/


Текст
PLUS: EXPERT AMIGURUMI TIPS & TRICKS
CHEEKY ROCK POOL
FRIENDS
INSPIRING PROJECTS
for Creative Crocheters
SUMMER
IN STYLE
JOIN THE SLOW FASHION
REVOLUTION!
insidecrocheTT .co.uk
insidecroche
QUICK
TO HOOK
SEASIDE FUN
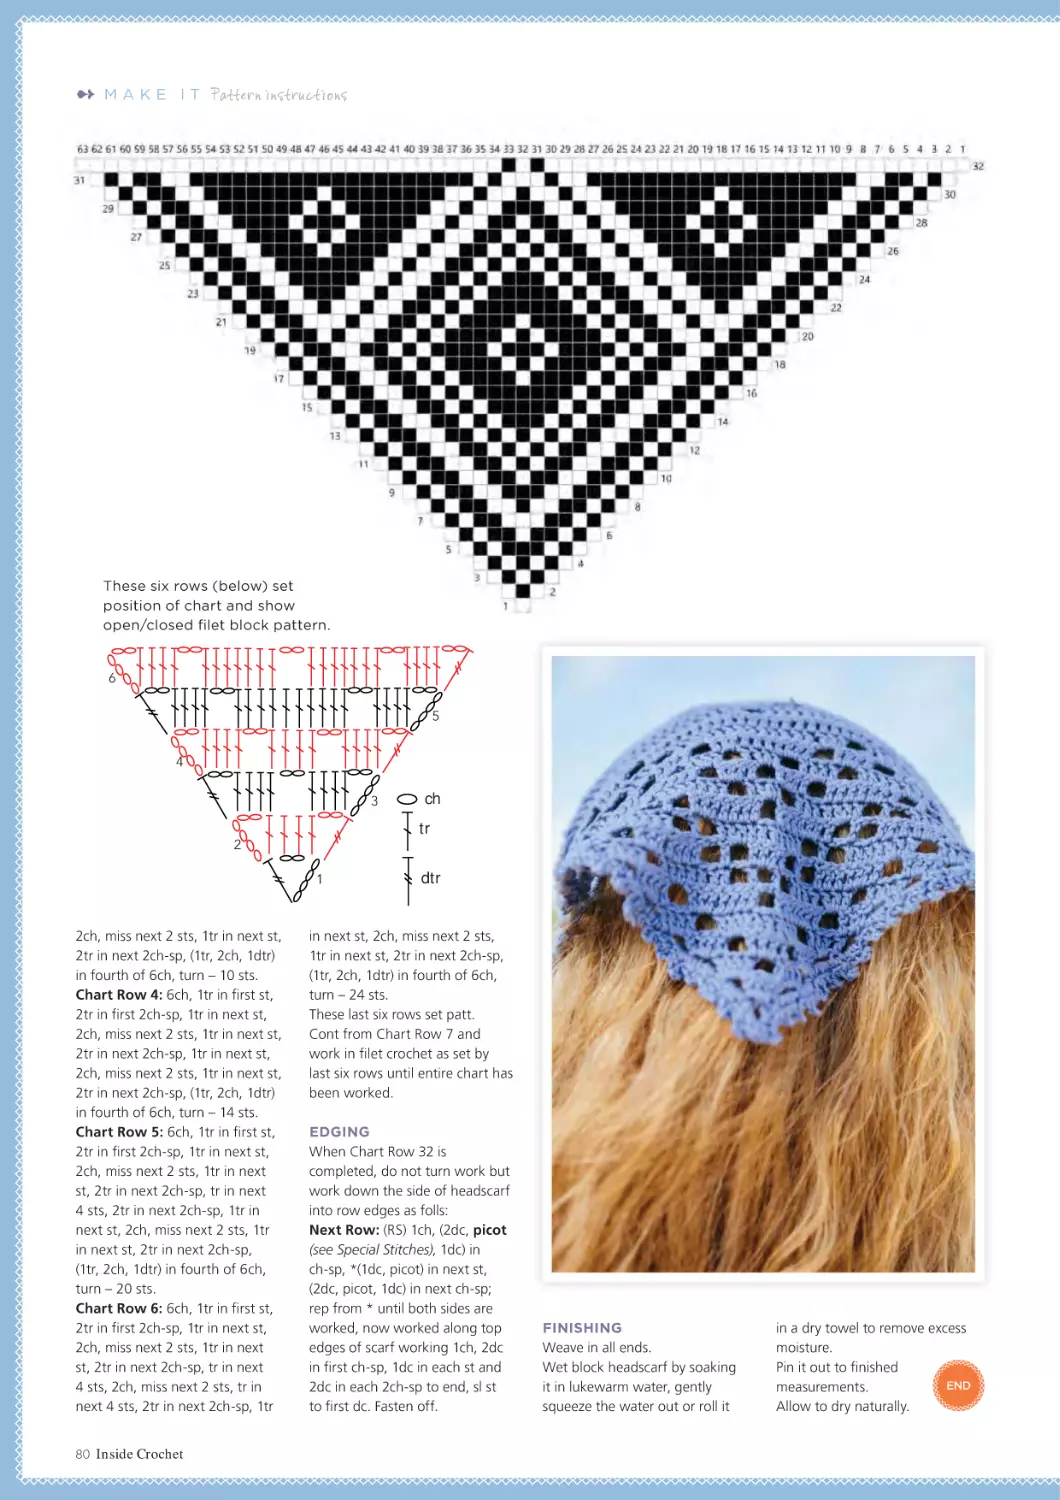
ELEGANT HEADSCARF
BRIGHT BEACH BLANKETS
Simple filet lace pattern
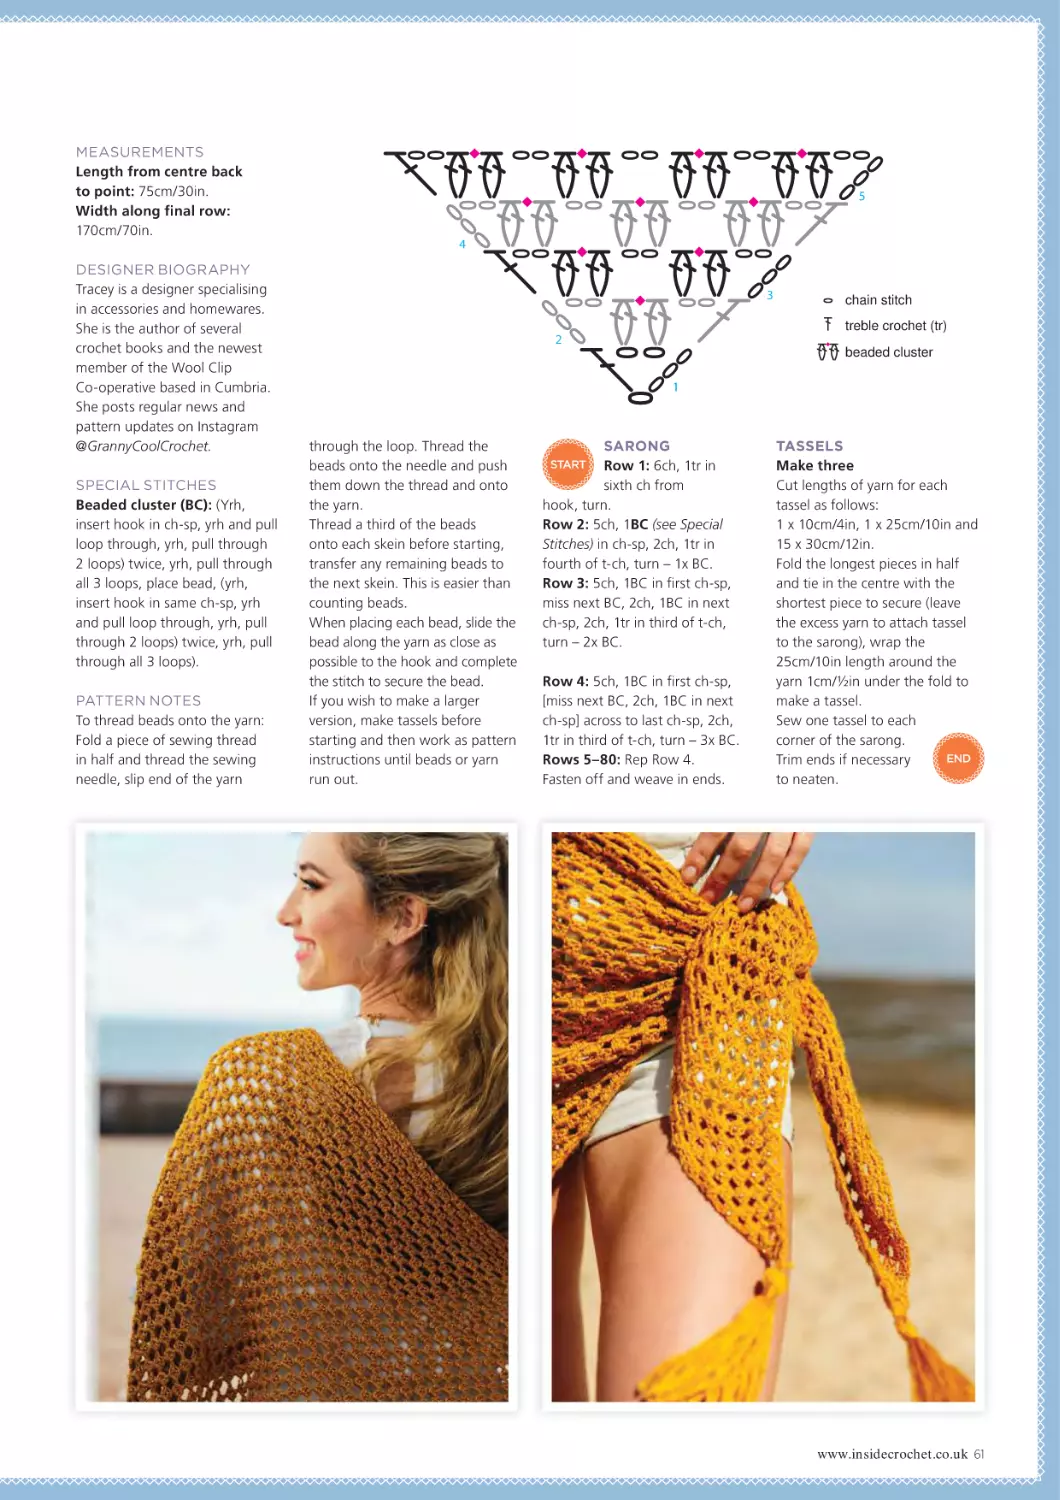
BEAUTIFUL BEADED SARONG
JUST ADD
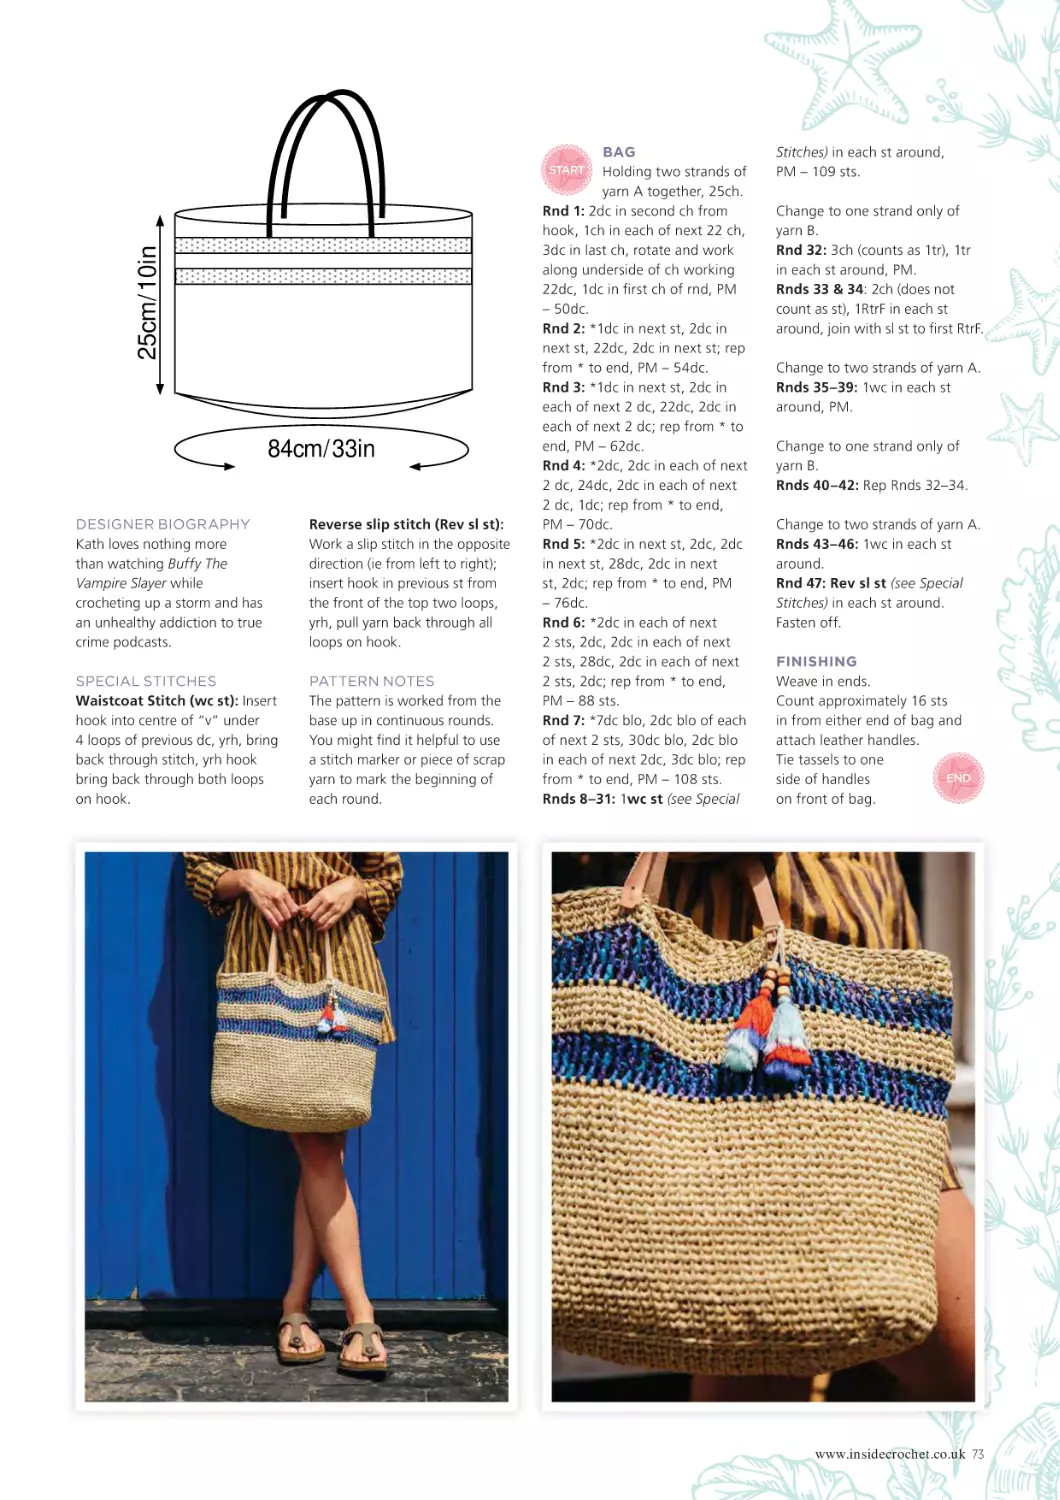
BAG
TASSELS!
FABULOUS FLIRTY SKIRT
LACY SURF-STYLE COVER-UP
SOFT ORGANIC
COTTON
CHIC RAFFIA TOTE BAG
Perfect for sunny days
GORGEOUS
GRANNY
SQUARES
SOFTEST
MERINO
YARN
DECKED OUT SHAWL
Soothing textured stripes
GREAT
DESK TIDY
TOO!
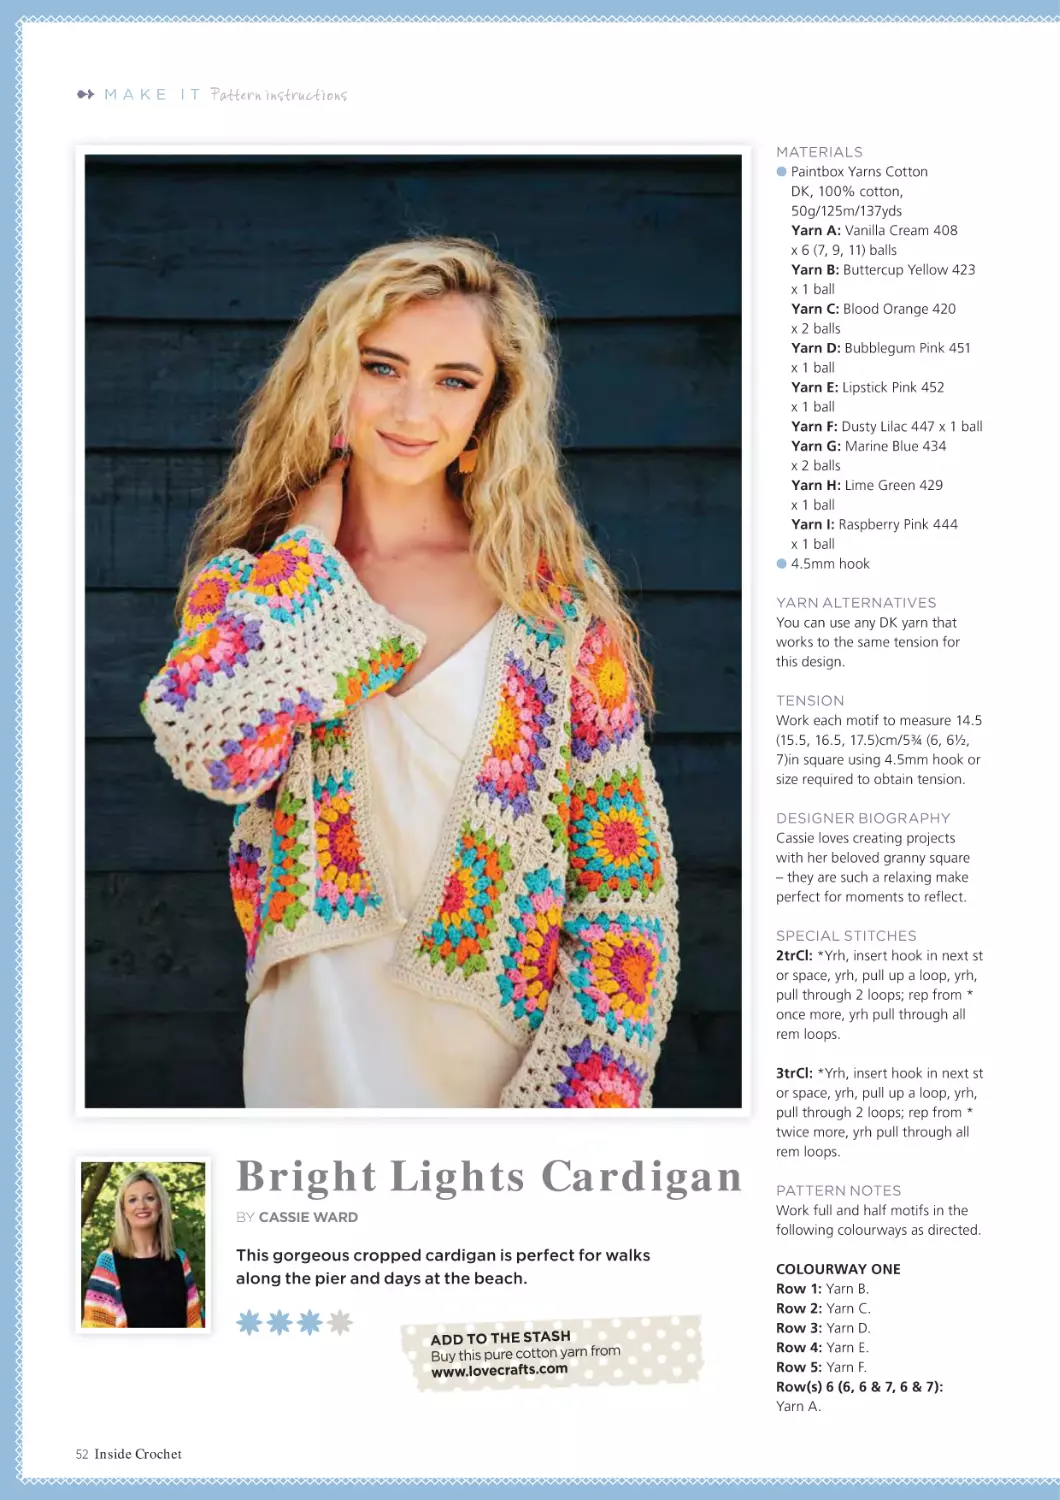
BRIGHT LIGHTS
FESTIVAL CARDIE
CUTE GARDEN GAMES
Summer holiday family fun
£6.99 ISSUE 138
LIGHT SLIPOVER ❤ HEXIE EARRINGS ❤ SOFT TOYS & MORE!
MIDSUMMER
Introducing
the MillaMia Collection.
6 exclusive patterns.
Bursting with folksy floral
embroidery and summer solstice
inspiration, the Midsummer
collection will whisk you away.
Eve Cardigan
Shop MillaMia patterns & yarns exclusively at lovecrafts.com
FREE delivery
on orders over £25
+ 15% OFF
with this code
LCHOOK
*terms & conditions apply
HOOK OUR COLOURFUL
SEASIDE DESIGNS
PO Box 6337, Bournemouth BH1 9EH
Subscription enquiries
t. +44 (0)1202 586848
chris@tailormadepublishing.co.uk
Me e t th e te am
Commissioning Editor
Sarah Moran
sarah@selectps.com
Styling & Photoshoot Editor
Claire Montgomerie
Deputy Editor & Pattern Editor
Rhian Drinkwater
News Editor
Lindsey Harrad
Technical Editors
Jane Czaja, Rachel Vowles
Art Editor
Stephanie Peat
steph@tailormadepublishing.co.uk
Sub Editor
Rhian Drinkwater
Contributors
Yessabett Bueno, Kwannie Cheng,
Jane Czaja, Rhian Drinkwater, Matt Farci,
Emma Friedlander-Collins, Lindsey Harrad,
Sarah-Jane Hicks, Erinna Lee, Loopsan,
Claire Montgomerie, Anna Nikipirowicz,
Rosina Northcott, Irina Palczynski,
Alessandra Poggiagliolmi, Sarah Shrimpton,
Tracey Todhunter, Cassie Ward, Kath Webber
Model
Ella Starbuck
Photography
Matt Farci, Leanne Jade,
Erinna Lee, Sarah Shrimpton
Stock art
Shutterstock
Hair and make-up
Julia Edwards
Ad Production
Leila Schmitz
Main cover image
Leanne Jade
Small cover images
Matt Farci, Leanne Jade
Publis h in g
Publisher
Tim Harris
Managing Editor
Sarah Moran
sarah@selectps.com
Partnerships Manager
Jennie Ayres
jennie@tailormadepublishing.co.uk
Advertising Manager
Cassie Ward
cassie@tailormadepublishing.co.uk
t. +44 (0)7734 952626
Circulation Manager
Tim Harris
Production Manager
John Beare
IT Manager
Vince Jones
Subscriptions Manager
Chris Wigg
(See page 66 for subscription details)
Published by
Tailor Made Publishing Ltd
PO Box 6337, Bournemouth BH1 9EH
t. +44 (0)1202 586848
Printed by
MRC Print Ltd
www.mrcprintltd.co.uk
t. +44 (0)1245 403330
Please support your local
yarn shops either by
popping in or online. Visit
www.ukhandknitting.com
to find a store near you.
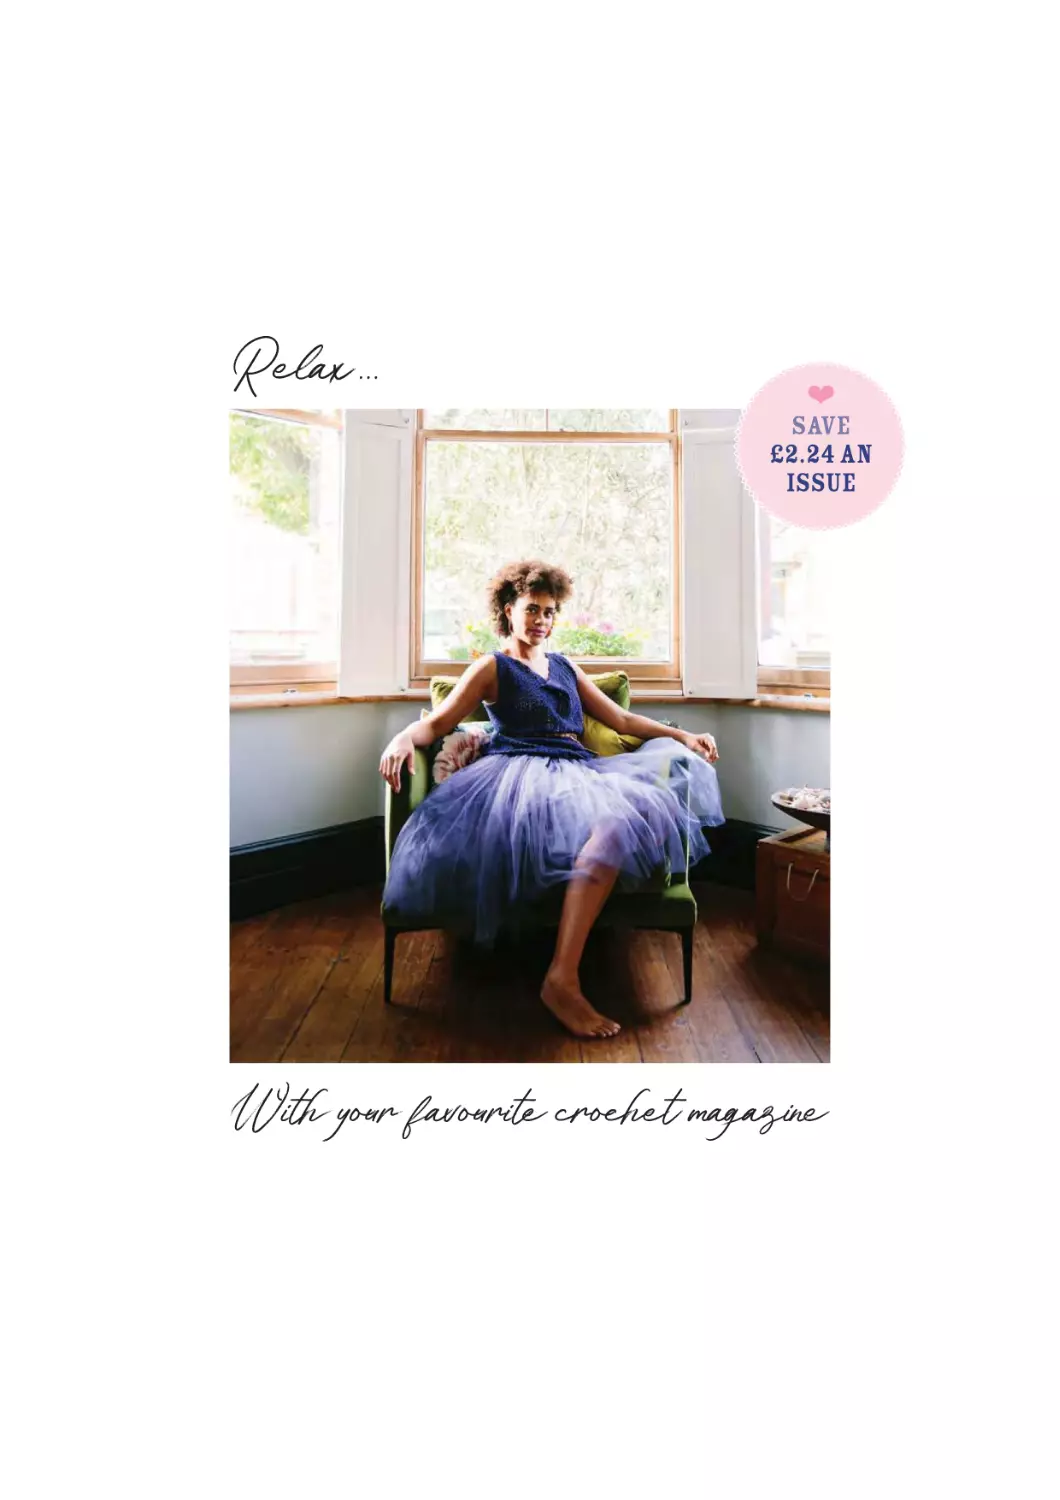
We lco m e
Yarn on the beach? Of course! Why not?! If you saw our crochet
on the high street feature last issue then you’ll know just how
on-trend us crocheters have become. From festival style boho
creations to raffia bags and hats and filet cover-ups…
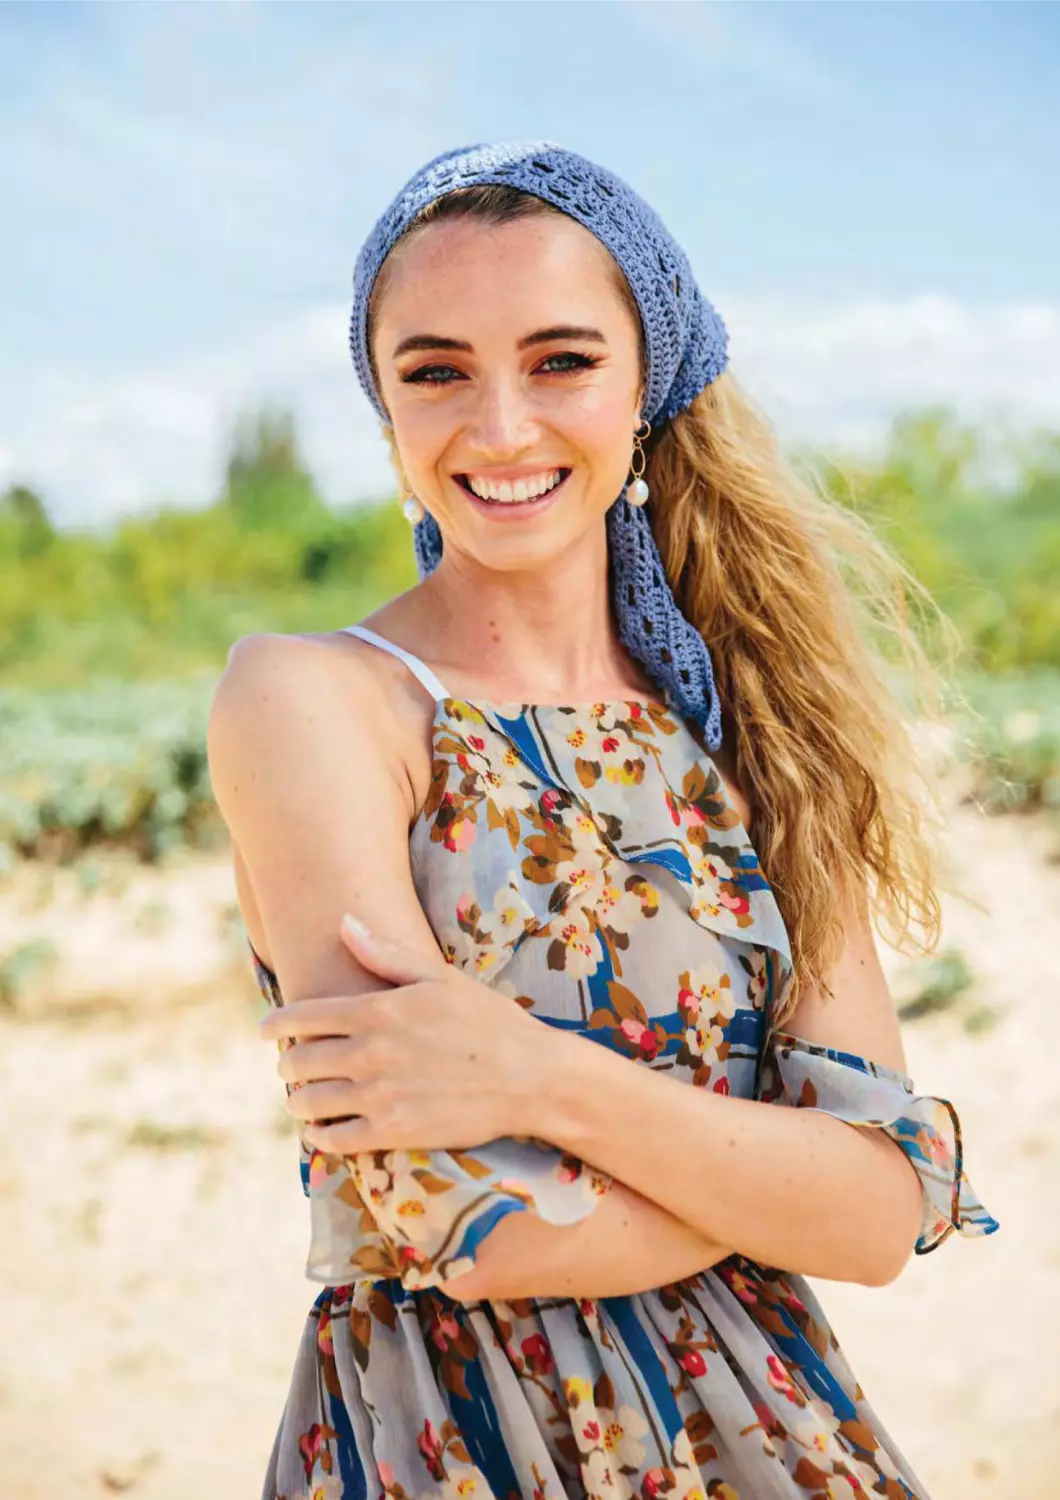
My first make this month will have to be Anna Nikipirowicz’s
pretty filet headscarf. It’s a one-ball project, quick to hook
and will be perfect for taming my hair on windy walks.
And then I’m spoilt for choice! The Nurturing Fibres organic cotton used in Rhian
Drinkwater’s lovely Pavilion Stripes Vest is a dream to work with, as is the beautiful
Fyberspates Scrumptious that Tracey Todhunter has transformed into the stunning
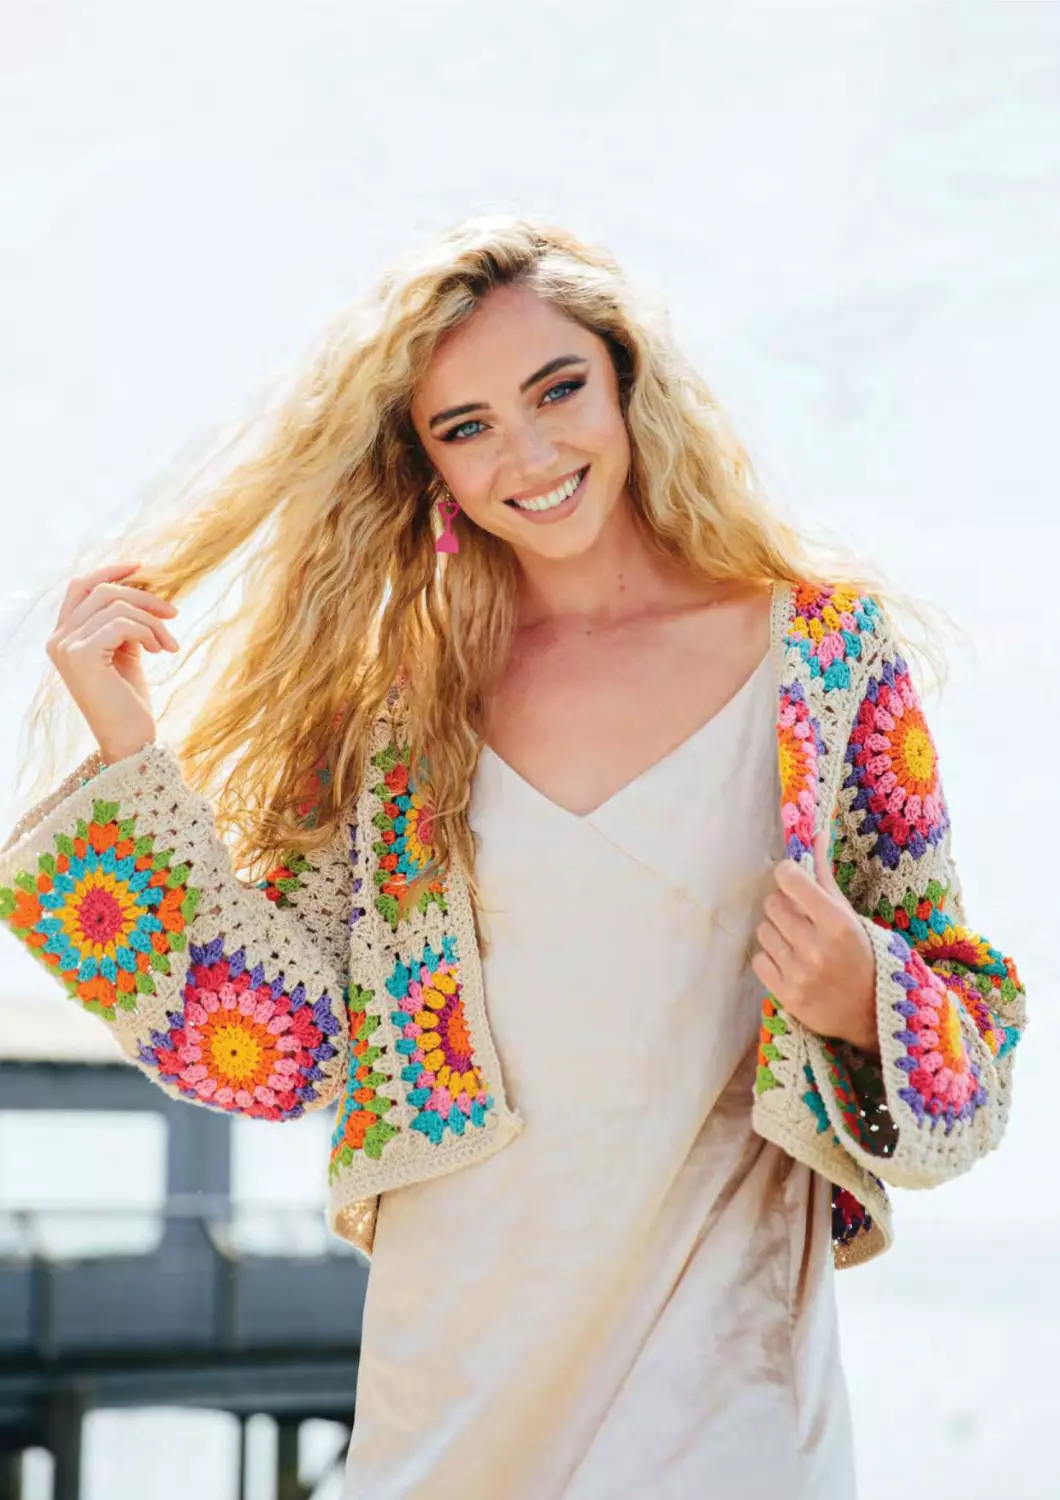
Selkie Sarong. My teenage daughter is also in love with Cassie Ward’s Bright Lights
Cardie, so I suspect that will be on my hook very soon.
We’ve got three fun characters for fans of am igur um i this issue. Sarah-Jane Hicks’
cheeky seagull joined our seafront photoshoot and managed not to steal our chips,
Matt Farci’s crab is definitely eyeing up a new adventure from his rock pool and
Erinna Lee’s crocodile gave us the toothiest grin ever! Matt also brings us part two
of his amigurumi masterclass with useful tips and tricks for a professional finish.
I hope you get to be beside the seaside somewhere this month. If not, then maybe
one of our gorgeous beach blan kets can bring the vibes to you.
Happy hooking,
S
x
JOIN OUR FRIENDLY
ONLINE COMMUNITY
OF MAKERS
©Tailor Made Publishing Ltd 2021
All rights reserved. No part of this magazine, or digital versions of the
magazine, may be used, reproduced, copied or resold without written
permission of the publisher. All information and prices, as far as we
are aware, are correct at the time of going to press but are subject to
change. Tailor Made Publishing Ltd cannot accept any responsibility
for errors or inaccuracies in such information. Unsolicited artwork,
manuscripts or designs are accepted on the understanding that
Tailor Made Publishing Ltd incur no liability for their storage or return.
Any free gifts are available only with print editions, not with digital
editions of the magazines. Tailor Made Publishing Ltd accepts no
liability for products and services offered by third parties.
www.instagram.com/
insidecrochet
www.facebook.com/insidecrochet
@insidecrochet
PS: Keep your eyes peeled over the next few issues as we’ll be launching our next big
crochet-along, designed by the amazing Jane Crowfoot, very soon!
www.insidecrochet.co.uk 03
16
8
ISSUE 138
COFFEE &
CROCHETING
WE CHAT TO
DESIGNER EMILIA
JOHANSSON
PAGE 114
52
MEET
ERINNA LEE
The amigurumi
creator and author
shares her
design journey
PAGE 8
NEWS & REVIEWS
GREAT READS
06 IN THE LOOP
14 CROCHET MASTERCLASS
Sustainable fashion, super-cute crochet
patterns, colourful summer tools and
accessories, classes, CALs and more. Plus,
we chat to amigurumi designer Erinna Lee.
Designer Matt Farci continues his
informative amigurumi masterclass, sharing
his expert tips and techniques for a
professional finish. Plus, his new design
for an adorable crocheted crab!
BESIDE
THE SEASIDE
HOOK THIS RAFFIA
TOTE BAG THAT’S
PERFECT FOR
THE BEACH!
PAGE 72
09 YARN REVIEWS
We hook up a selection of summery yarns
in natural shades, perfect for beachwear.
10 FOOD FOR THOUGHT
Inside Crochet designer and trained chef
Helda shares a delicious lentil salad, plus
a wonderful children’s book about
celebrating our differences.
13 BOOK REVIEWS
Adorable primate amigurumi, beautifully
textured garments and accessories, J apanese
stitch patterns and the magic of Harry Potter!
04 Inside Crochet
114 FINAL THOUGHT
Meet designer Emilia Johansson of Coffee
& Crocheting. We chat about architectural
inspiration, the importance of fine motor
skills in medicine and fitting her design work
around a demanding university degree.
7
14
Make it
62
79
Patterns
in this
issue
42 Pier Lattice
Top
49 Headland
Slipover
52 Bright Lights
Cardigan
56 Pavilion
Stripes Vest
59 Hexie
Earrings
60 Selkie
Sarong
62 Cloud Nine
Cover-up
68 Pacers Skirt
72 Estuary
Market Bag
74 Decked Out
Shawl
76 Rock
Necklace
79 Filet
Headscarf
85 Summer
Flip-flops
86 Funfair
Can Toss
88 Fairground
Star Pillow
90 Cheeky
Seagull
93 Sunny Beach
Blankets
102 Coco the
Crocodile
60
6
REGULARS
66 SUBSCRIPTIONS
Never miss an issue with an Inside
Crochet subscription.
83 NEXT ISSUE
Immerse yourself in a whimsical
wonderland with our new issue,
on sale 19 August.
101 BACK ISSUES
Complete your collection today!
SUBSCRIBE TODAY
Get every issue delivered
direct to your door, with
amazing savings to be had!
Turn to page 66 for details
106 YARN MARKET
Stock up on gorgeous yarns and
crochet accessories from our selection
of independent stores.
107 HOW TO CROCHET
Turn here for everything you need
to get started with our patterns.
www.insidecrochet.co.uk 05
News
etc
IN THE LOOP
BLOGS | BOOKS | REVIEWS | EVENTS | INTERVIEWS
A D U T Y TO D ON ATE
➻ Samantha Marshall of The Yarn Patch
has teamed up with Mary McCausland
and Little Woolly Sheep Fibre Art to
create these Line Of Duty character
dolls, which are to be raffled in aid of
the Northern Ireland Children’s Hospice
in Newtownabbey. Customers have
already donated generously and the
winner (to be chosen at random from
everyone that donates) will receive the
complete set of dolls. Patterns will also
be available to buy soon.
To donate and enter head to www.just
giving.com/fundraising/theyarnpatch
or The Yarn Patch Shop Facebook group
MOSAIC CAL
➻ If you’re a fan of mosaic crochet,
look out for the latest CAL from
Rosina Plane, aka Rosina Crochets.
Launching on 23 July, the seven-part
Letitia’s Garden CAL is sponsored by
Stylecraft and comes in four sizes.
Choose from the bright Cottage
Garden colourway in Special DK;
City Garden, a stylish muted version
in Special DK; and Country Garden,
in Highland Heathers and Life DK.
Buy the pattern at www.ravelry.
com/designers/rosina-plane and
join the CAL in the Mosaic Crochet
World Facebook group.
06 Inside Crochet
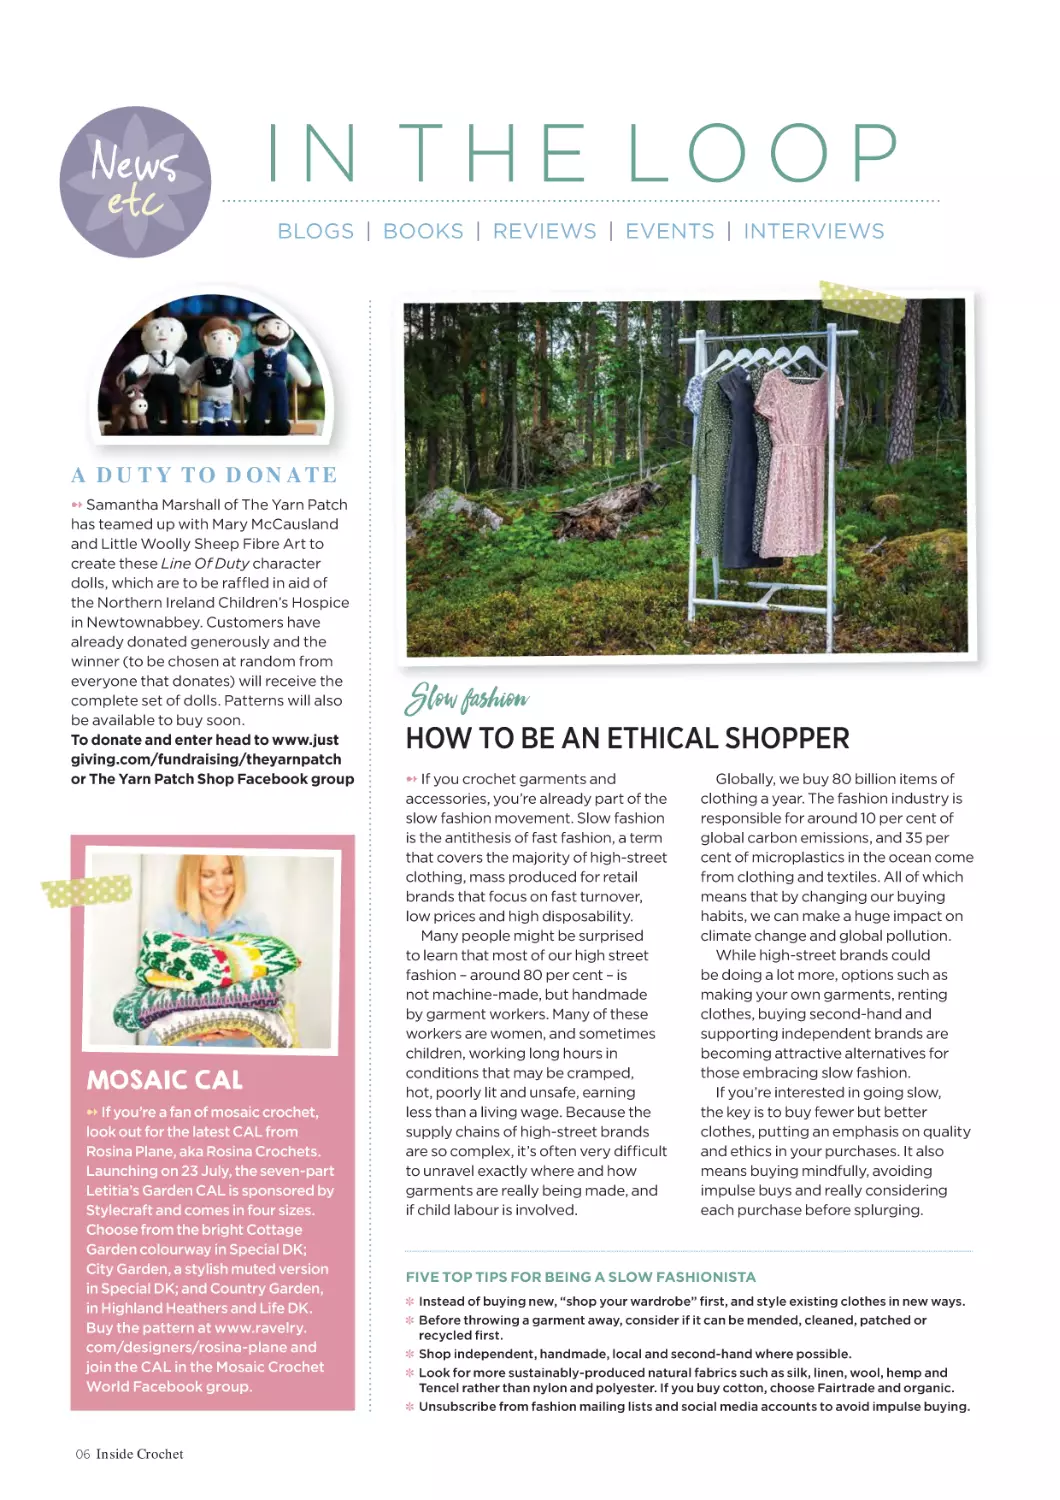
Slow fashion
HOW TO BE AN ETHICAL SHOPPER
➻ If you crochet garments and
accessories, you’re already part of the
slow fashion movement. Slow fashion
is the antithesis of fast fashion, a term
that covers the majority of high-street
clothing, mass produced for retail
brands that focus on fast turnover,
low prices and high disposability.
Many people might be surprised
to learn that most of our high street
fashion – around 80 per cent – is
not machine-made, but handmade
by garment workers. Many of these
workers are women, and sometimes
children, working long hours in
conditions that may be cramped,
hot, poorly lit and unsafe, earning
less than a living wage. Because the
supply chains of high-street brands
are so complex, it’s often very difficult
to unravel exactly where and how
garments are really being made, and
if child labour is involved.
Globally, we buy 80 billion items of
clothing a year. The fashion industry is
responsible for around 10 per cent of
global carbon emissions, and 35 per
cent of microplastics in the ocean come
from clothing and textiles. All of which
means that by changing our buying
habits, we can make a huge impact on
climate change and global pollution.
While high-street brands could
be doing a lot more, options such as
making your own garments, renting
clothes, buying second-hand and
supporting independent brands are
becoming attractive alternatives for
those embracing slow fashion.
If you’re interested in going slow,
the key is to buy fewer but better
clothes, putting an emphasis on quality
and ethics in your purchases. It also
means buying mindfully, avoiding
impulse buys and really considering
each purchase before splurging.
FIVE TOP TIPS FOR BEING A SLOW FASHIONISTA
✽ Instead of buying new, “shop your wardrobe” first, and style existing clothes in new ways.
✽ Before throwing a garment away, consider if it can be mended, cleaned, patched or
recycled first.
✽ Shop independent, handmade, local and second-hand where possible.
✽ Look for more sustainably-produced natural fabrics such as silk, linen, wool, hemp and
Tencel rather than nylon and polyester. If you buy cotton, choose Fairtrade and organic.
✽ Unsubscribe from fashion mailing lists and social media accounts to avoid impulse buying.
➻
IN THE LOOP
News etc
IN THE SPOTLIGHT
Colourful shades and pretty prints
are perfect for summer crafting
✽ TOTES TROPICAL
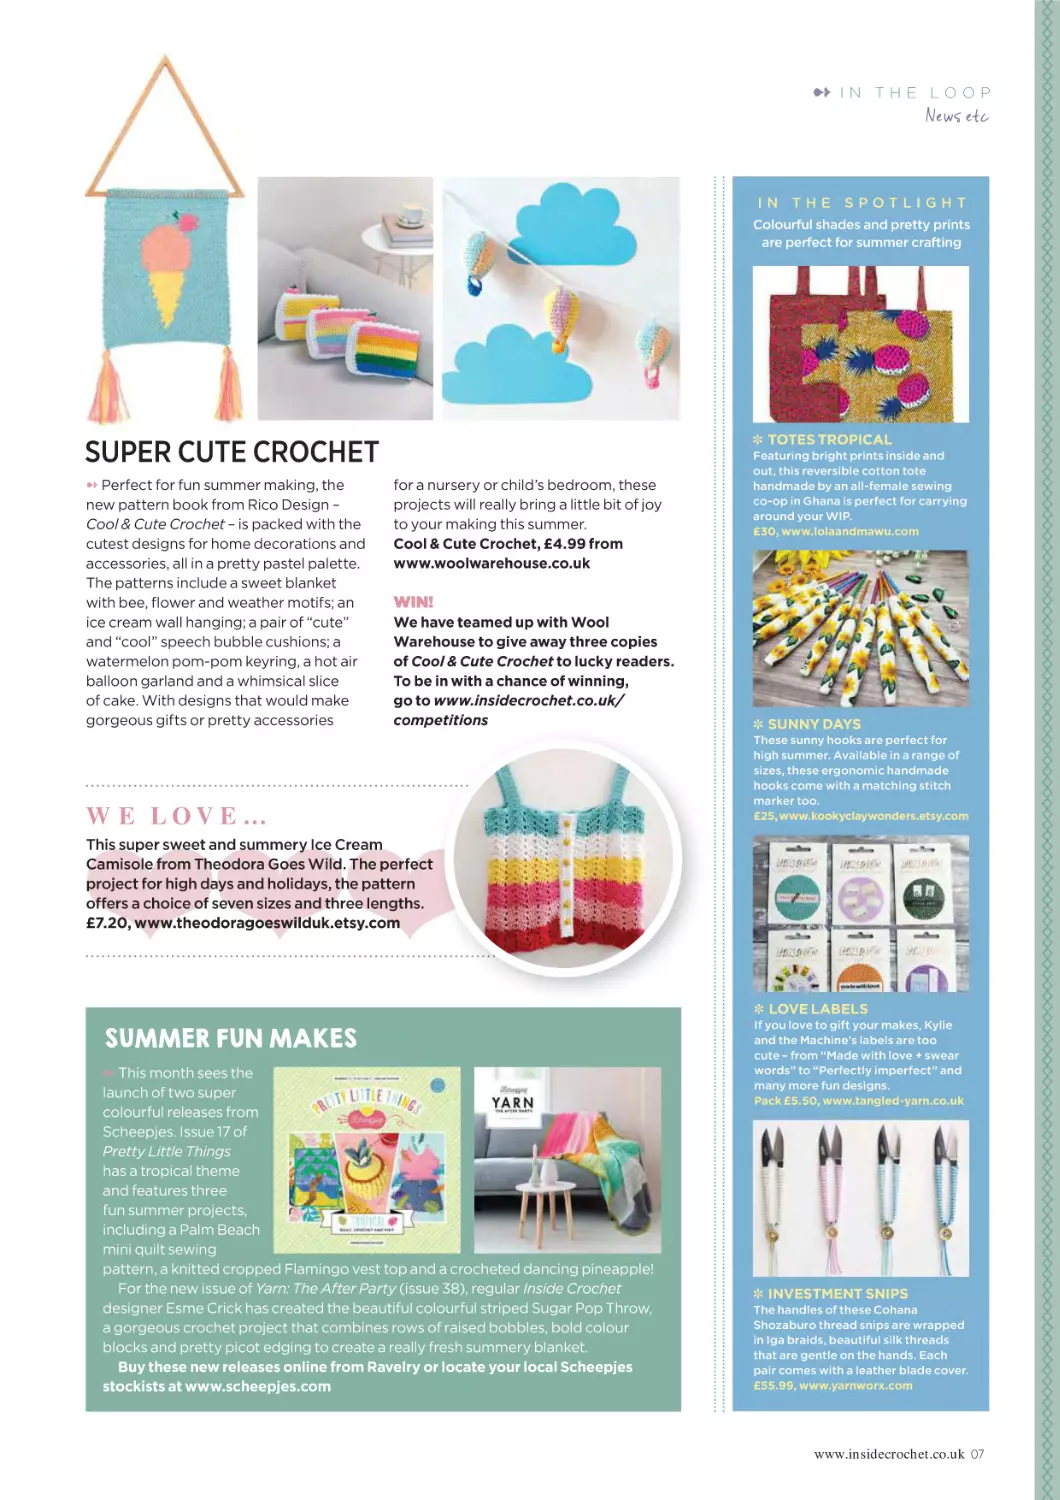
SUPER CUTE CROCHET
➻ Perfect for fun summer making, the
new pattern book from Rico Design –
Cool & Cute Crochet – is packed with the
cutest designs for home decorations and
accessories, all in a pretty pastel palette.
The patterns include a sweet blanket
with bee, flower and weather motifs; an
ice cream wall hanging; a pair of “cute”
and “cool” speech bubble cushions; a
watermelon pom-pom keyring, a hot air
balloon garland and a whimsical slice
of cake. With designs that would make
gorgeous gifts or pretty accessories
for a nursery or child’s bedroom, these
projects will really bring a little bit of joy
to your making this summer.
Cool & Cute Crochet, £4.99 from
www.woolwarehouse.co.uk
Featuring bright prints inside and
out, this reversible cotton tote
handmade by an all-female sewing
co-op in Ghana is perfect for carrying
around your WIP.
£30, www.lolaandmawu.com
WIN!
We have teamed up with Wool
Warehouse to give away three copies
of Cool & Cute Crochet to lucky readers.
To be in with a chance of winning,
go to www.insidecrochet.co.uk/
competitions
W E LOVE …
✽ SUNNY DAYS
These sunny hooks are perfect for
high summer. Available in a range of
sizes, these ergonomic handmade
hooks come with a matching stitch
marker too.
£25, www.kookyclaywonders.etsy.com
This super sweet and summery Ice Cream
Camisole from Theodora Goes Wild. The perfect
project for high days and holidays, the pattern
offers a choice of seven sizes and three lengths.
£7.20, www.theodoragoeswilduk.etsy.com
✽ LOVE LABELS
SUMMER FUN MAKES
➻ This month sees the
launch of two super
colourful releases from
Scheepjes. Issue 17 of
Pretty Little Things
has a tropical theme
and features three
fun summer projects,
including a Palm Beach
mini quilt sewing
pattern, a knitted cropped Flamingo vest top and a crocheted dancing pineapple!
For the new issue of Yarn: The After Party (issue 38), regular Inside Crochet
designer Esme Crick has created the beautiful colourful striped Sugar Pop Throw,
a gorgeous crochet project that combines rows of raised bobbles, bold colour
blocks and pretty picot edging to create a really fresh summery blanket.
Buy these new releases online from Ravelry or locate your local Scheepjes
stockists at www.scheepjes.com
If you love to gift your makes, Kylie
and the Machine’s labels are too
cute – from “Made with love + swear
words” to “Perfectly imperfect” and
many more fun designs.
Pack £5.50, www.tangled-yarn.co.uk
✽ INVESTMENT SNIPS
The handles of these Cohana
Shozaburo thread snips are wrapped
in Iga braids, beautiful silk threads
that are gentle on the hands. Each
pair comes with a leather blade cover.
£55.99, www.yarnworx.com
www.insidecrochet.co.uk 07
Designer
WE LOVE
C L A S S R E V I VA L
➻ Black Sheep Wools, based in Culcheth,
Warrington, has announced the
relaunch of its workshop programme in
the autumn, when guest tutors will be
sharing a range of skills. With courses on
crafts including weaving, embroidery
and hand dyeing, crocheters will be
particularly interested in Sophia Reed’s
Crochet Autumn Wreath workshop
(16 October), while newcomers will
enjoy Carol Meldrum’s Learn to Crochet
workshop (23 October). Equipment
and materials are provided, along with
lunch and refreshments. Bookings are
being taken now, and with only ten
places on each workshop, don’t leave it
too late to grab a place!
Book now at www.blacksheepwools.com
CLOSE AND
PERSONAL
➻ Stylecraft is celebrating the launch
of its new website, which is an exciting
mix of enhanced functionality and
project ideas, making it even easier
for you to find inspiration for your
next make. The fresh new look
includes lots more beautiful images
for each pattern, so you can see
each crocheted and knitted garment
and accessory close up and from a
range of angles. You’ll also find quick
links to new yarn launches, the
Blogstars and Stylecraft’s latest
social media updates.
Check out the gorgeous new look
at www.stylecraft-yarns.co.uk
08 Inside Crochet
www.instagram.com/littleaquagirl
ERINNA LEE
Tell us a bit
about yourself…
I was born in
Singapore.
After finishing
high school,
I moved to
London to
pursue my love for classical ballet at
the Central School of Ballet. After
a year, I relocated and attended
the Australian Ballet School where
I earned my qualification to teach
classical ballet. Prior to fulfilling
my childhood dream of opening a
dance school, I decided to complete
university first. It was at university
that I found a passion for biology
and this started me on a new path
that led to my current career as a
cancer treatment researcher.
Could you tell us a bit about what
you do?
I am a crochet amigurumi pattern
designer and love making supercute creations, mostly using a
pastel palette. For my day job,
I am a cancer researcher focused
on finding new drugs to combat
those cancers that remain
aggressive and incurable.
How did you first learn to crochet?
I first learned about amigurumi
on a golf course! A friend I was
playing golf with had the most
adorable club cover. I returned
home to research how the cover
was made and discovered the world
of amigurumi. In 2014, through
YouTube, online tutorials and books,
I taught myself the different stitches.
Co-ordinating the hook and yarn
was not the easiest, but thankfully,
I didn’t give up.
How did you get into design?
I started out using patterns created
by other talented designers, but
then I started creating my own little
universe of crochet characters.
My first break really came when I
entered my very first contest, held
by Amigurumi.com. I am not sure
how it happened, but my entry
finished in third place. This meant
it was featured in a publication and
I will always see that achievement
as the turning point – after that I
considered myself to be a designer.
What inspires your designs, and
how would you describe your style?
I draw inspiration from pretty
much anything around me –
nature, animals, cartoons, people,
my imagination! I love children’s
book illustrations and find a lot of
inspiration browsing platforms
such as Pinterest. I adore the kawaii
aesthetic and Japanese cartoon
characters and I believe that has
been the strongest influence on my
design style. I have also developed
a love for the Scandinavian and
Nordic design approach of using
light and neutral colours, where
simplicity meets style and elegance.
What is your favourite of your
designs?
A very difficult question to answer
and I can’t nominate just the one!
However, I am perhaps proudest
of the characters that I designed
for Amigurumi Treasures 2. I really
➻
IN THE LOOP
News etc
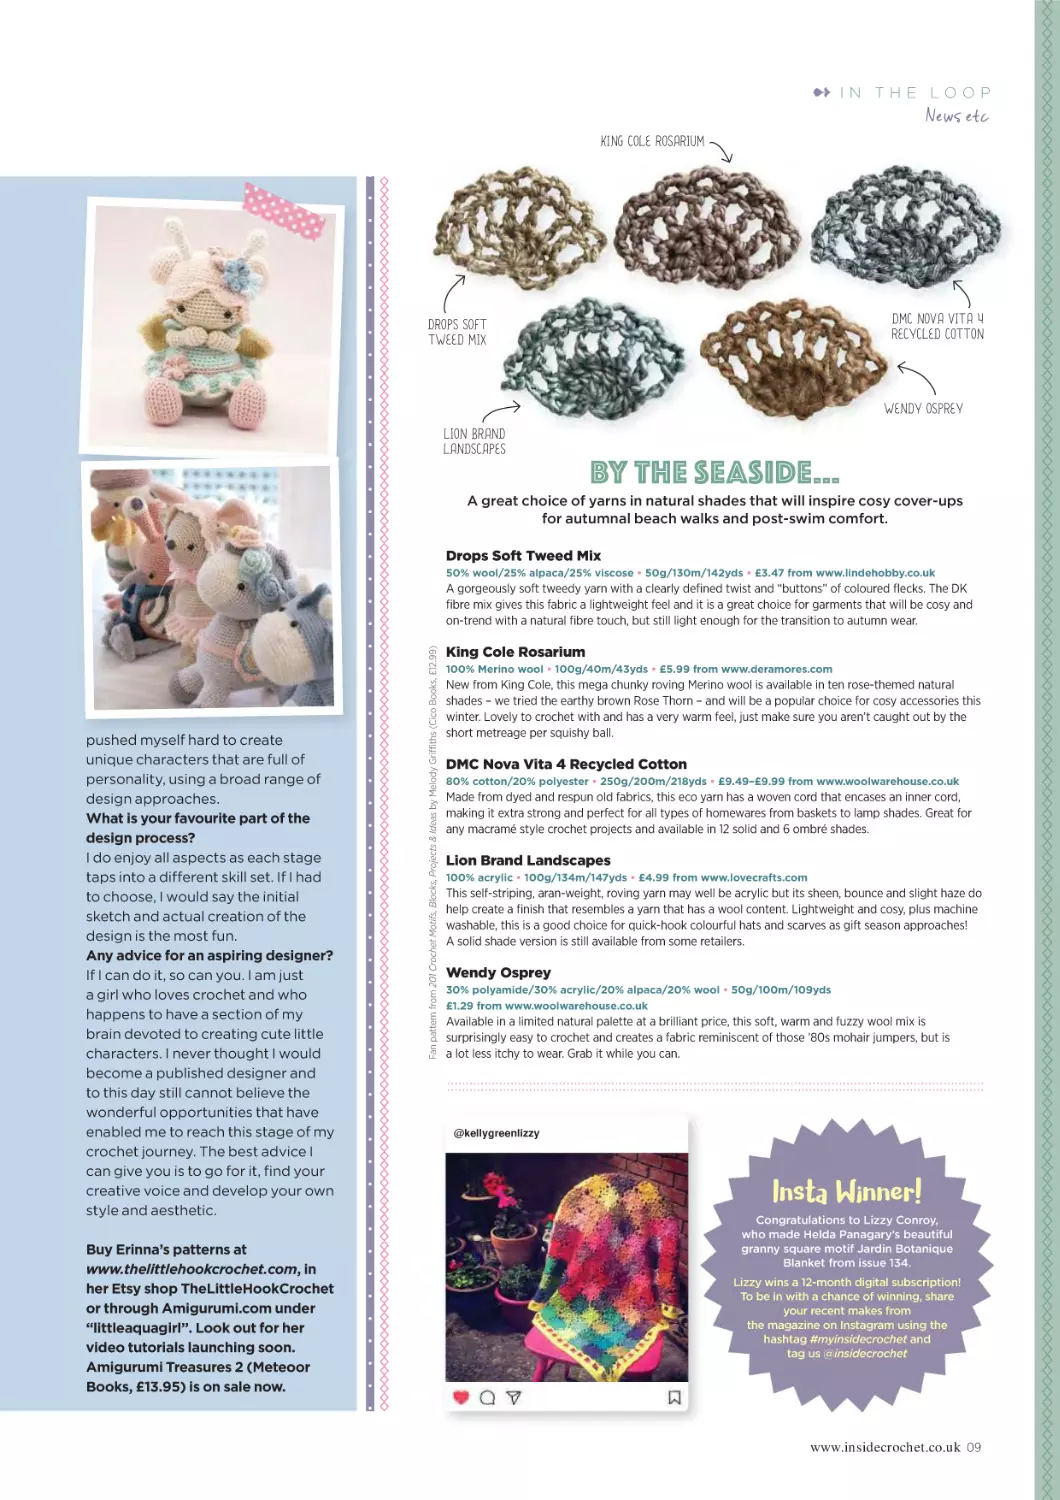
KING COLE ROSARIUM
DMC NOVA VITA 4
RECYCLED COTTON
DROPS SOFT
TWEED MIX
WENDY OSPREY
LION BRAND
LANDSCAPES
BY THE SEASIDE…
A great choice of yarns in natural shades that will inspire cosy cover-ups
for autumnal beach walks and post-swim comfort.
Drops Soft Tweed Mix
50% wool/25% alpaca/25% viscose • 50g/130m/142yds • £3.47 from www.lindehobby.co.uk
pushed myself hard to create
unique characters that are full of
personality, using a broad range of
design approaches.
What is your favourite part of the
design process?
I do enjoy all aspects as each stage
taps into a different skill set. If I had
to choose, I would say the initial
sketch and actual creation of the
design is the most fun.
Any advice for an aspiring designer?
If I can do it, so can you. I am just
a girl who loves crochet and who
happens to have a section of my
brain devoted to creating cute little
characters. I never thought I would
become a published designer and
to this day still cannot believe the
wonderful opportunities that have
enabled me to reach this stage of my
crochet journey. The best advice I
can give you is to go for it, find your
creative voice and develop your own
style and aesthetic.
Buy Erinna’s patterns at
www.thelittlehookcrochet.com, in
her Etsy shop TheLittleHookCrochet
or through Amigurumi.com under
“littleaquagirl”. Look out for her
video tutorials launching soon.
Amigurumi Treasures 2 (Meteoor
Books, £13.95) is on sale now.
Fan pattern from 201 Crochet Motifs, Blocks, Projectss & Ideas by Melody Griffiths (Cico Books, £12.99)
A gorgeously soft tweedy yarn with a clearly defined twist and “buttons” of coloured flecks. The DK
fibre mix gives this fabric a lightweight feel and it is a great choice for garments that will be cosy and
on-trend with a natural fibre touch, but still light enough for the transition to autumn wear.
King Cole Rosarium
100% Merino wool • 100g/40m/43yds • £5.99 from www.deramores.com
New from King Cole, this mega chunky roving Merino wool is available in ten rose-themed natural
shades – we tried the earthy brown Rose Thorn – and will be a popular choice for cosy accessories this
winter. Lovely to crochet with and has a very warm feel, just make sure you aren’t caught out by the
short metreage per squishy ball.
DMC Nova Vita 4 Recycled Cotton
80% cotton/20% polyester • 250g/200m/218yds • £9.49–£9.99 from www.woolwarehouse.co.uk
Made from dyed and respun old fabrics, this eco yarn has a woven cord that encases an inner cord,
making it extra strong and perfect for all types of homewares from baskets to lamp shades. Great for
any macramé style crochet projects and available in 12 solid and 6 ombré shades.
Lion Brand Landscapes
100% acrylic • 100g/134m/147yds • £4.99 from www.lovecrafts.com
This self-striping, aran-weight, roving yarn may well be acrylic but its sheen, bounce and slight haze do
help create a finish that resembles a yarn that has a wool content. Lightweight and cosy, plus machine
washable, this is a good choice for quick-hook colourful hats and scarves as gift season approaches!
A solid shade version is still available from some retailers.
Wendy Osprey
30% polyamide/30% acrylic/20% alpaca/20% wool • 50g/100m/109yds
£1.29 from www.woolwarehouse.co.uk
Available in a limited natural palette at a brilliant price, this soft, warm and fuzzy wool mix is
surprisingly easy to crochet and creates a fabric reminiscent of those ’80s mohair jumpers, but is
a lot less itchy to wear. Grab it while you can.
@kellygreenlizzy
Congratulations to Lizzy Conroy,
who made Helda Panagary’s beautiful
granny square motif Jardin Botanique
Blanket from issue 134.
Lizzy wins a 12-month digital subscription!
To be in with a chance of winning, share
your recent makes from
the magazine on Instagram using the
hashtag #myinsidecrochet and
tag us @insidecrochet
www.insidecrochet.co.uk 09
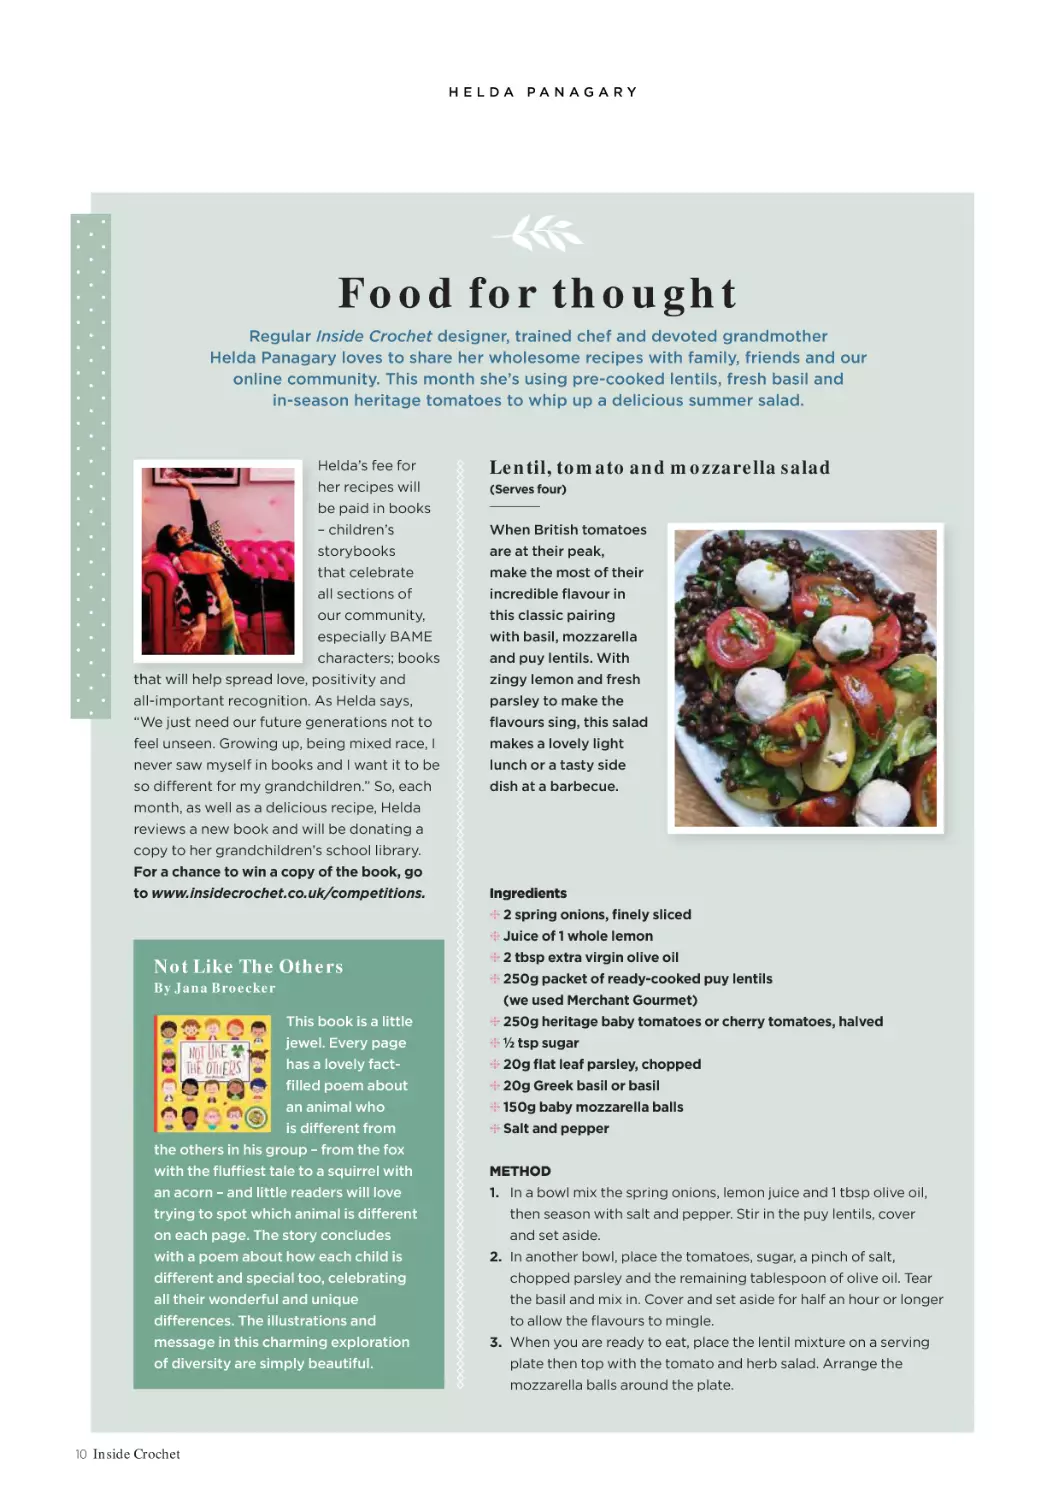
HELDA PANAGARY
Fo o d fo r th o u g h t
Regular Inside Crochet designer, trained chef and devoted grandmother
Helda Panagary loves to share her wholesome recipes with family, friends and our
online community. This month she’s using pre-cooked lentils, fresh basil and
in-season heritage tomatoes to whip up a delicious summer salad.
Helda’s fee for
her recipes will
be paid in books
– children’s
storybooks
that celebrate
all sections of
our community,
especially BAME
characters; books
that will help spread love, positivity and
all-important recognition. As Helda says,
“We just need our future generations not to
feel unseen. Growing up, being mixed race, I
never saw myself in books and I want it to be
so different for my grandchildren.” So, each
month, as well as a delicious recipe, Helda
reviews a new book and will be donating a
copy to her grandchildren’s school library.
For a chance to win a copy of the book, go
to www.insidecrochet.co.uk/competitions.
Le n til, to m ato an d m o zzare lla s alad
(Serves four)
When British tomatoes
are at their peak,
make the most of their
incredible flavour in
this classic pairing
with basil, mozzarella
and puy lentils. With
zingy lemon and fresh
parsley to make the
flavours sing, this salad
makes a lovely light
lunch or a tasty side
dish at a barbecue.
Ingredients
❈ 2 spring onions, finely sliced
❈ Juice of 1 whole lemon
N o t Like Th e Oth e rs
By Jan a Bro e cke r
This book is a little
jewel. Every page
has a lovely factfilled poem about
an animal who
is different from
the others in his group – from the fox
with the fluffiest tale to a squirrel with
an acorn – and little readers will love
trying to spot which animal is different
on each page. The story concludes
with a poem about how each child is
different and special too, celebrating
all their wonderful and unique
differences. The illustrations and
message in this charming exploration
of diversity are simply beautiful.
❈ 2 tbsp extra virgin olive oil
❈ 250g packet of ready-cooked puy lentils
(we used Merchant Gourmet)
❈ 250g heritage baby tomatoes or cherry tomatoes, halved
❈ ½ tsp sugar
❈ 20g flat leaf parsley, chopped
❈ 20g Greek basil or basil
❈ 150g baby mozzarella balls
❈ Salt and pepper
METHOD
1. In a bowl mix the spring onions, lemon juice and 1 tbsp olive oil,
then season with salt and pepper. Stir in the puy lentils, cover
and set aside.
2. In another bowl, place the tomatoes, sugar, a pinch of salt,
chopped parsley and the remaining tablespoon of olive oil. Tear
the basil and mix in. Cover and set aside for half an hour or longer
to allow the flavours to mingle.
3. When you are ready to eat, place the lentil mixture on a serving
plate then top with the tomato and herb salad. Arrange the
mozzarella balls around the plate.
10 Inside Crochet
SOFT AND COSY YARN | PERFECT FOR HOME DÉCOR PROJECTS
SUPER CHUNKY CHENILLE-STYLE YARN | BIG BALL SIZE FOR LARGE PROJECTS
MACHINE WASHABLE AND DRYABLE
NOW AVAILABLE FROM
WOOL WAREHOUSE | THE RANGE
READICUT | OH SEW CRAFTY
➻
IN THE LOOP
News etc
BOOKS
WE REVIEW NEW AND EXCITING RELEASES
W E ARE
A LS O R E A D I N G...
Harry Potter
Crochet Wizardry
Lee Sartori • Pavilion, £19.95
UK terminology
The designers featured
here have created a great
selection of Potter-themed
patterns, from an amigurumi
Sorting Hat and Fawkes the
phoenix, packed with detail,
to Hogwarts house scarves and replicas of
the children’s casual jumpers and hats, to
some stunning “inspired by” creations. We
love the cross-body bag modelled on the
envelope of a Hogwarts acceptance letter,
and the Hogwarts crest blanket, made in
intarsia crochet, is a must for any fan’s sofa!
Amazing Japanese
Crochet Stitches
Keiko Okamoto • Tuttle Publishing, £13.99
US terminology
➻ Stitch dictionaries are a
TOFT Primates
Kerry Lord • TOFT, £10 • UK terminology
➻ Beginning as an alpaca specialist before moving into
beautifully soft wools, Warwickshire-based TOFT
(www.toftuk.com) is particularly known by crocheters
worldwide for founder Kerry Lord’s adorable
amigurumi designs. Perfectly pitched to use TOFT’s
signature colours, collections have ranged from
menageries of animals and birds to adorable
personalised doll designs. There’s also now a quarterly
magazine, plus specials such as this gorgeous selection of primate patterns.
Showcasing 15 ape designs, some previously published and some new for this
collection, TOFT Primates is ideal for anyone with a love of the animal kingdom,
and the sweet primates in Kerry’s instantly recognisable long-armed style would be
adored by any child. Difficulty levels range from the super-simple bonobo, ideal for
beginners, to more complicated designs such as the Japanese macaque, covered
in loop stitch, via straightforward patterns such as the adorable sleepy-eyed slow
loris. And though designed for TOFT’s DK yarn, every pattern is easily upsized into
aran or chunky weights if you prefer even more cuddles!
great way to expand your
repertoire, and ones such as
this translated from different
cultures are particularly
good at introducing you to
techniques you might not have seen before.
Divided into chapters such as colourwork,
lace, motifs and more, this book contains
more than a hundred stitch patterns, giving
plenty of inspiration. Patterns are given
as charts only, and there are a selection of
projects to show off the stitch patterns.
Carefree Crochet
May Britt Bjella Zamori
Trafalgar Square, £18.95 • US terminology
➻ Packed with an amazing
50 garment and accessory
designs, Carefree Crochet is
a translation of a Norwegian
book, Hekling i tykt og tynt.
Some designs use knitted
sections as well, but all are made to show
off the wonderful textures and possibilities
of crochet. We adore the ethereal white
poncho in a fluffy mohair/silk yarn, and
a super-stylish lacy jacket shown in both
stripes and a solid tweedy blue – but we’re
tempted by almost everything in here!
www.insidecrochet.co.uk 13
MASTERCLASS:
AMIGURUMI
BY DESIGNER
M AT T FA R C I
Part two: Ti ps & Techniques
Matt enjoys adding playful touches to his
apartment by surrounding himself with
whimsical makes. Visit his new venture in
crochet at www.crojo.life and find him on
Instagram @crojolife.
Why not try out som e
of thes e tips on the cute
littl e crustacean I’ve
crea ted for you?
14 Inside Crochet
Throughout my time crocheting, I’ve dabbled
in many different crochet techniques, from
Tunisian crochet homewares to brioche
garments, corner-to-corner blan kets and
my fair share of glorious granny squares.
However, it’s in making am igurum i creations
that I really feel in my element. I get vast
amounts of joy from conjuring up the initial
concept of an amigurumi design, then seeing
it all the way through its development stages,
and finally getting to enjoy the finished
character and its personality in all of its
finessed ami glory.
It’s interesting to take note of the
development of a craft, to see how far you
have come and what has changed. When
I look back at some of my earlier amigurumi
projects, they were naturally very simple,
perfect designs for somebody that was new
to a craft. My earlier colour choices feel
somewhat garish now as my inclination
towards certain shades has shifted. I tend to
lean towards certain weights of yarn and am
somewhat stuck in my way when it comes to
my choice of hook (always Scheepjes Catona
with a 2.5mm hook).
When starting out crocheting I learned the
basics and the basics did the job, but as with
any craft you pick up hints and tricks along
the way, learning from other crafters and
finding new ways to more efficiently achieve
the desired outcome.
I thought today I’d share some of my
favourite tips with you all…
CHOOSE YOUR KIT WISELY
Having a well-rounded kit of supplies and
tools that feel good to use will make for a
much more enjoyable crafting experience.
In my crochet tool kit I like to have:
❈ My favourite hooks in a variety of sizes
❈ Yarn needle, for sewing in ends
❈ Stitch markers for indicating the start
of a new round
❈ Scissors
❈ Pins, to place your pieces before sewing
❈ A tape measure – handy to check tension
or to make sure pieces are the same
distance apart before sewing
❈ Safety eyes – I like to keep a small
collection of safety eyes in my crochet tool
kit, so I can quickly crochet an amigurumi
whilst on the go!
THE INVISIBLE JOIN
The invisible join has been an absolute game
changer for me when creating seamless joins
in my amigurumi work. Instead of joining
toy stuffing through? Use the handle end of
your crochet hook to easily push the stuffing
through the small opening. A chop stick also
works wonders!
work in the round with a slip stitch into the
first stitch of the round, which creates a tight
and uneven join, instead why not create the
illusion of a stitch with the help of your
trusty yarn needle?
Insert your hook through the front loops of
the two stitches you are decreasing.
TIE EMBROIDERED ENDS TOGETHER
Cut your yarn and fasten off before joining.
Thread the tail end onto the yarn needle and
insert under both loops of the second closest
stitch (if you join to the first stitch you will
add a stitch to the round).
Pull the yarn through.
Make sure embroidered details don’t come
undone by threading the two tail ends
through the same gap between two stitches.
Tie them in a knot and poke the knot back
through the stitches so that the knot is
hidden inside of your project.
Then insert the needle through the centre of
the last stitch made.
Complete like a regular double crochet.
Seamlessly joined in the round!
INVISIBLE DECREASE
The decrease stitch was one of the first
stitches I learned after the double crochet
and how to increase. Often a decrease is
created by inserting your hook into a
stitch, pulling the yarn through, inserting
into the next stitch and pulling the yarn
through, then yarn over and pull through
all loops on your hook. Whilst this works
perfectly to decrease, you end up with a
rather bulky stitch. The invisible decrease
creates a slim mer stitch which is much
harder to see.
PIN YOUR WORK
HOOK SIZE
When sewing pieces together, pin your work
to m ake sure it is in the correct position.
I used to always be too lazy to do this and
would eyeball my work. There’s is little more
annoying than sewing something together
to later decide it’s far too shoddy to pass.
Take the time to pin your work and play
around with the placement of the pieces
until you are happy with their final position.
When working your amigurumi projects,
lean towards the smaller hook size
recommended for your yarn. This will create
tighter, neater looking stitches for a clean
aesthetic. Not to mention this will mean no
holes between your stitches for toy stuffing
to appear through or potentially escape.
USE YOUR CROCHET HOOK TO
STUFF WORK
Have a small opening that you need to push
As you can see in the pictures both spheres
are made with the same yarn, the smaller
with a 2.5mm hook, creating tight neat and
uniform stitches, and the larger with a 3mm
hook. Can you spot the toy stuffing?
www.insidecrochet.co.uk 15
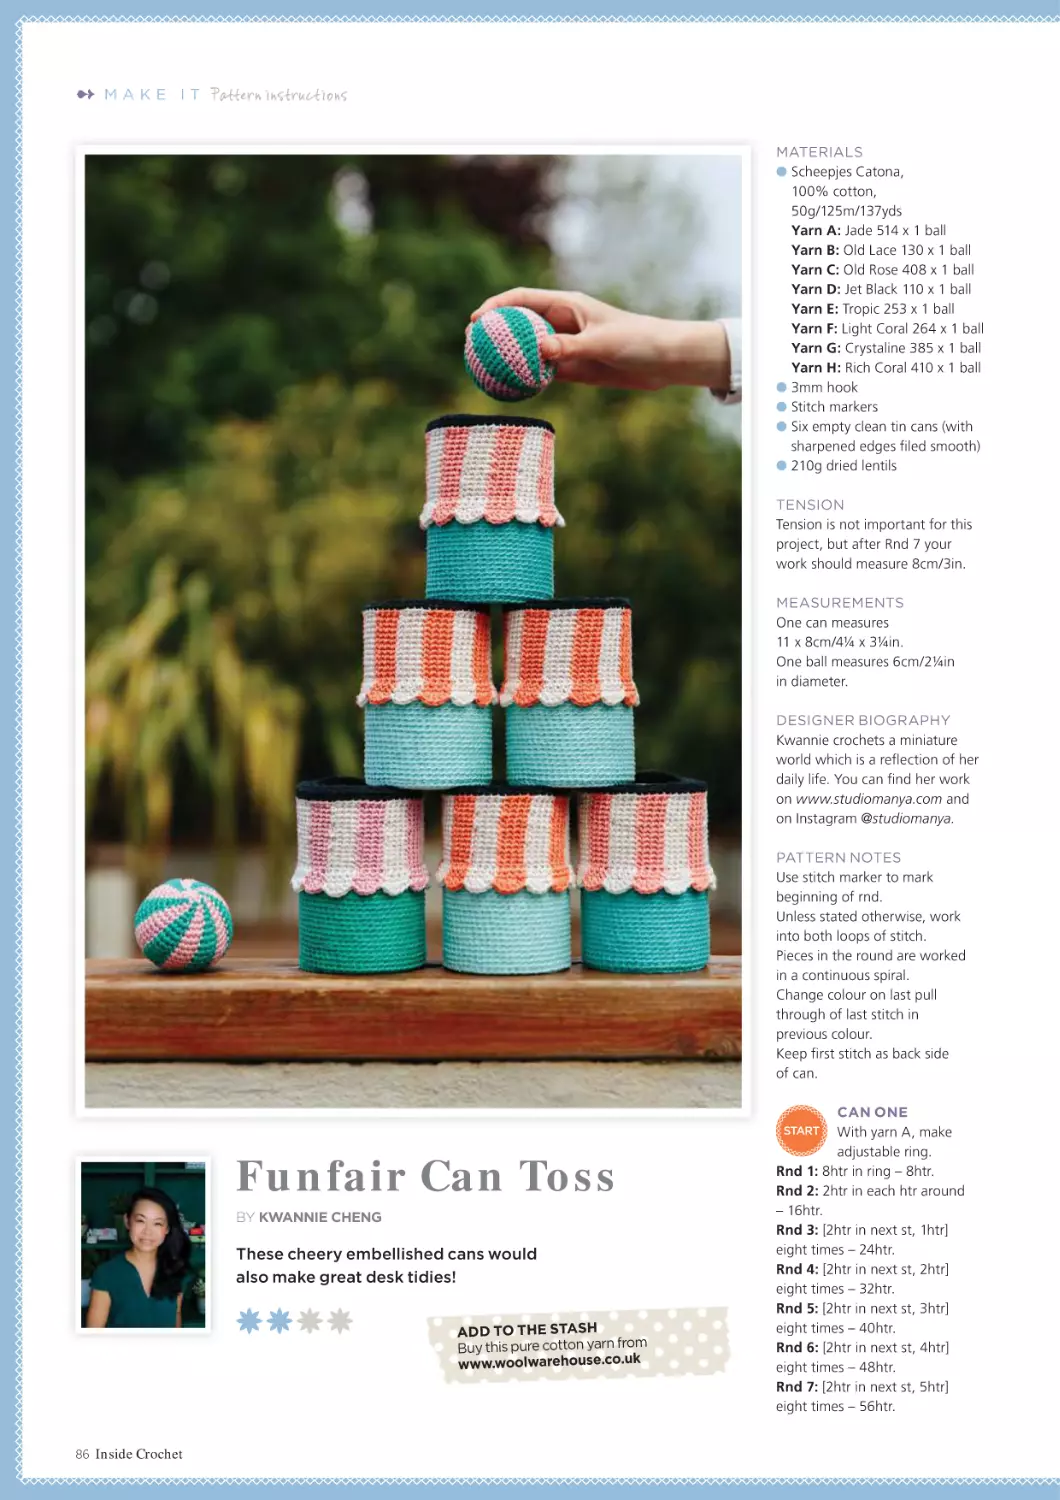
MATERIALS
● Scheepjes Catona, 100% cotton,
50g/125m/137yds
Yarn A: Tulip 222 x 3 balls
● Scheepjes Catona, 100% cotton,
10g/25m/27yds
Yarn B: Snow White 106 x 1 ball
Yarn C: Shocking Pink 114 x 1 ball
Yarn D: Fresia 519 x 1 ball
● 2.5mm hook
● Yarn needle
● Two safety eyes, 8mm/¼in
● Toy stuffing
TENSION
Tension is not important for this project.
MEASUREMENTS
Height: 10cm/4in including eyes.
Diameter: 30cm/12in including legs.
PATTERN NOTES
Pattern uses a combination of joining with
sl st at the end of each round and the
amigurumi method, working continuously
in the round.
1ch at start of joined rnds does not count
as a stitch.
CRAB BODY
With yarn A make an adjustable
ring. Work in continuous rnds
without joining using amigurumi method.
Stuff firmly as you go.
Rnd 1: 6dc in ring – 6dc.
Rnd 2: 2dc in each dc around – 12dc.
Rnd 3: [2dc in next dc, 1dc] around – 18dc.
Rnd 4: [2dc in next dc, 2dc] around – 24dc.
Rnd 5: [2dc in next dc, 3dc] around – 30dc.
Rnd 6: [2dc in next dc, 4dc] around – 36dc.
Rnd 7: [2dc in next dc, 5dc] around – 42dc.
Rnd 8: [2dc in next dc, 6dc] around – 48dc.
Rnd 9: [2dc in next dc, 7dc] around – 54dc.
Rnd 10: [2dc in next dc, 8dc] around – 60dc.
Rnd 11: [2dc in next dc, 9dc] around – 66dc.
Rnd 12: [2dc in next dc, 10dc] around – 72dc.
Rnd 13: [2dc in next dc, 11dc] around – 78dc.
Rnd 14: [2dc in next dc, 12dc] around – 84dc.
Rnd 15: [2dc in next dc, 13dc] around – 90dc.
Rnd 16: [2dc in next dc, 14dc] around – 96dc.
Rnd 17: [2dc in next dc, 15dc] around
– 102dc.
Rnd 18: [2dc in next dc, 16dc] around
– 108dc.
START
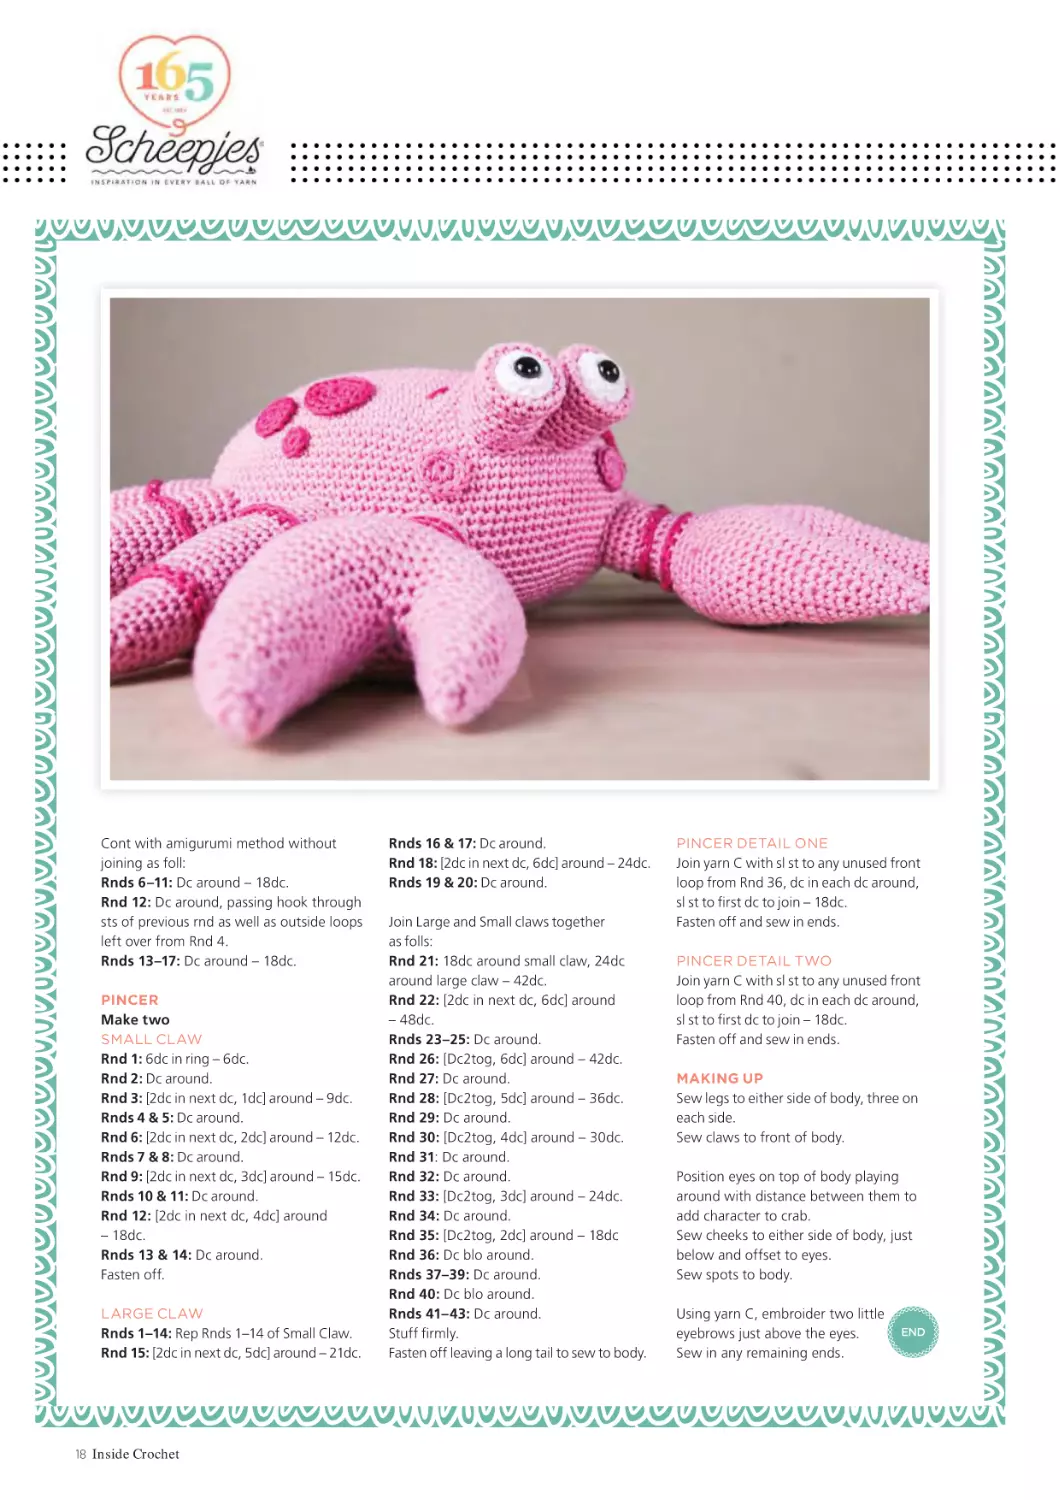
Mr Crab
BY MATT FARCI
Play with contrasting or complementary colours to create a quirky
crab that loves exploring the nooks and crannies of the sea bed.
16 Inside Crochet
Rnd 19: [2dc in next dc, 17dc] around
– 114dc.
Rnd 20: [2dc in next dc, 18dc] around
– 120dc.
Rnds 21–35: Dc around.
Rnd 36: [Dc2tog, 18dc] around – 114dc.
Rnd 37: [Dc2tog, 17dc] around – 108dc.
Rnd 38: [Dc2tog, 16dc] around – 102dc.
Rnd 39: [Dc2tog, 15dc] around – 96dc.
Rnd 40: [Dc2tog, 14dc] around – 90dc.
Rnd 41: [Dc2tog, 13dc] around – 84dc.
Rnd 42: [Dc2tog, 12dc] around – 78dc.
Rnd 43: [Dc2tog, 11dc] around – 72dc.
Rnd 44: [Dc2tog, 10dc] around – 66dc.
Rnd 45: [Dc2tog, 9dc] around – 60dc.
Rnd 46: [Dc2tog, 8dc] around – 54dc.
Rnd 47: [Dc2tog, 7dc] around – 48dc.
Rnd 48: [Dc2tog, 6dc] around – 42dc.
Rnd 49: [Dc2tog, 5dc] around – 36dc.
Rnd 50: [Dc2tog, 4dc] around – 30dc.
Rnd 51: [Dc2tog, 3dc] around – 24dc.
Rnd 52: [Dc2tog, 2dc] around – 18dc.
Rnd 53: [Dc2tog, 1dc] around – 12dc.
Rnd 54: [Dc2tog] around – 6dc.
Fasten off weaving tail end through final
6 sts, pulling tight to join.
LEGS
Make six
With yarn A, make an adjustable ring.
Work in continuous rnds using amigurumi
method.
Rnd 1: 6dc in ring – 6dc.
Rnd 2: Dc around.
Rnd 3: [2dc in next dc, 1dc] around – 9dc.
Rnds 4 & 5: Dc around.
Rnd 6: [2dc in next dc, 2dc] around – 12dc.
Rnds 7 & 8: Dc around.
Rnd 9: [2dc in next dc, 3dc] around – 15dc.
Rnds 10 & 11: Dc around.
Rnd 12: [2dc in next dc, 4dc] around – 18dc.
Rnd 13: Dc around.
Rnd 14: Dc blo around.
Rnd 15: [2dc in next dc, 5dc] around – 21dc.
Rnds 16–24: Dc around.
Rnd 25: Dc blo around.
Rnds 26–30: Dc around.
Fasten off leaving long tail to sew.
LEG DETAIL ONE
Join yarn C with sl st to any unused front loop
from Rnd 14.
Rnd 1: 1dc in each dc around, sl st to first st
to join – 18dc.
Fasten off and sew in ends.
LEG DETAIL TWO
Join yarn C with sl st to any unused front loop
from Rnd 25.
Rnd 1: 1dc in each dc around, sl st to first st
to join – 18dc.
Fasten off and sew in ends.
CHEEKS
Make two
With yarn D make an adjustable ring.
Rnd 1: 1ch (does not count as st), 6dc, sl st
to first dc to join – 6dc.
Rnd 2: 1ch, 2dc in each dc around, sl st to
first st to join – 12dc.
Fasten off leaving long tail to sew.
SMALL SPOTS
Make two
With yarn C make an adjustable ring.
Rnd 1: 1ch (does not count as a st), 6dc in
ring, invisible join to first dc to join – 6dc.
Fasten off leaving long tail to sew.
MEDIUM SPOTS
Make two
With yarn C make an adjustable ring.
Rnd 1: 1ch, 6dc, sl st to first st of round
to join – 6dc.
Rnd 2: 1ch, 2dc in each dc around,
invisible join to first st of round to join
– 12dc.
Fasten off leaving long tail to sew.
LARGE SPOTS
Make two
With yarn C make adjustable ring.
Rnd 1: 1ch, 6dc, sl st to first st of round to
join – 6dc.
Rnd 2: 1ch, 2dc in each dc around, invisible
join to first st of round to join – 12dc.
Rnd 3: 1ch, [2dc in next dc, 1dc] around,
invisible join to first dc to join – 18dc.
Fasten off leaving long tail to sew.
EYES
Make two
With yarn B make adjustable ring.
Rnd 1: 1ch, 6dc, sl st to first st of round to
join – 6dc.
Do not pull adjustable ring too tight yet.
Rnd 2: 1ch, 2dc in each dc around, invisible
join to first st of round to join – 12dc.
Rnd 3: 1ch, [2dc in next dc, 1dc] around,
invisible join to first dc to join – 18dc.
Rnd 4: 1ch, dc around, invisible join to first
dc to join.
Fasten off and sew in ends.
Insert safety eye into very centre of piece just
made, pull adjustable ring fully tight.
Rnd 5: Join yarn A with sl st to inside loops
of previous rnd. Working anticlockwise
around piece, working through inside loops
only work [2dc in next dc, 2dc] around
– 24dc in inside loops.
www.insidecrochet.co.uk 17
Cont with amigurumi method without
joining as foll:
Rnds 6–11: Dc around – 18dc.
Rnd 12: Dc around, passing hook through
sts of previous rnd as well as outside loops
left over from Rnd 4.
Rnds 13–17: Dc around – 18dc.
PINCER
Make two
SMALL CLAW
Rnd 1: 6dc in ring – 6dc.
Rnd 2: Dc around.
Rnd 3: [2dc in next dc, 1dc] around – 9dc.
Rnds 4 & 5: Dc around.
Rnd 6: [2dc in next dc, 2dc] around – 12dc.
Rnds 7 & 8: Dc around.
Rnd 9: [2dc in next dc, 3dc] around – 15dc.
Rnds 10 & 11: Dc around.
Rnd 12: [2dc in next dc, 4dc] around
– 18dc.
Rnds 13 & 14: Dc around.
Fasten off.
LARGE CLAW
Rnds 1–14: Rep Rnds 1–14 of Small Claw.
Rnd 15: [2dc in next dc, 5dc] around – 21dc.
18 Inside Crochet
Rnds 16 & 17: Dc around.
Rnd 18: [2dc in next dc, 6dc] around – 24dc.
Rnds 19 & 20: Dc around.
Join Large and Small claws together
as folls:
Rnd 21: 18dc around small claw, 24dc
around large claw – 42dc.
Rnd 22: [2dc in next dc, 6dc] around
– 48dc.
Rnds 23–25: Dc around.
Rnd 26: [Dc2tog, 6dc] around – 42dc.
Rnd 27: Dc around.
Rnd 28: [Dc2tog, 5dc] around – 36dc.
Rnd 29: Dc around.
Rnd 30: [Dc2tog, 4dc] around – 30dc.
Rnd 31: Dc around.
Rnd 32: Dc around.
Rnd 33: [Dc2tog, 3dc] around – 24dc.
Rnd 34: Dc around.
Rnd 35: [Dc2tog, 2dc] around – 18dc
Rnd 36: Dc blo around.
Rnds 37–39: Dc around.
Rnd 40: Dc blo around.
Rnds 41–43: Dc around.
Stuff firmly.
Fasten off leaving a long tail to sew to body.
PINCER DETAIL ONE
Join yarn C with sl st to any unused front
loop from Rnd 36, dc in each dc around,
sl st to first dc to join – 18dc.
Fasten off and sew in ends.
PINCER DETAIL TWO
Join yarn C with sl st to any unused front
loop from Rnd 40, dc in each dc around,
sl st to first dc to join – 18dc.
Fasten off and sew in ends.
MAKING UP
Sew legs to either side of body, three on
each side.
Sew claws to front of body.
Position eyes on top of body playing
around with distance between them to
add character to crab.
Sew cheeks to either side of body, just
below and offset to eyes.
Sew spots to body.
Using yarn C, embroider two little
eyebrows just above the eyes.
Sew in any remaining ends.
END
Owl Tree Crafts
Be Creative
Visit us @
24 Church Street, Sheringham, Norfolk, NR26 8QS
01263 822448
www.owltreecrafts.co.uk
Knitting Yarns, Needles & Accessories,
Ribbons, Buttons & Beads,
Crochet Hooks, Threads & Patterns,
Fabrics & Haberdashery, Books,
Cross-stitch Kits and sew much more!!!
King Cole, Rowan, Durable, Erika Knight, Katia,
Cygnet, Opal, DMC, Knit Pro, Pony & Clover,
Moda, Liberty & Makower
Plant Dyed Yarns
Hand Dyed British Wool Yarn & Fibre
Colours inspired by the landscape &
changing seasons of a Welsh mountain
www.nellieandeve.com
BABY SAFE
EN71-3
Beach party
Enjoy the long lazy days of sum m er with
our seaside-inspired designs.
PHOTOGRAPHS LEANNE JADE STYLING CLAIRE MONTGOMERIE
HAIR AND MAKE-UP JULIA EDWARDS
20 Inside Crochet
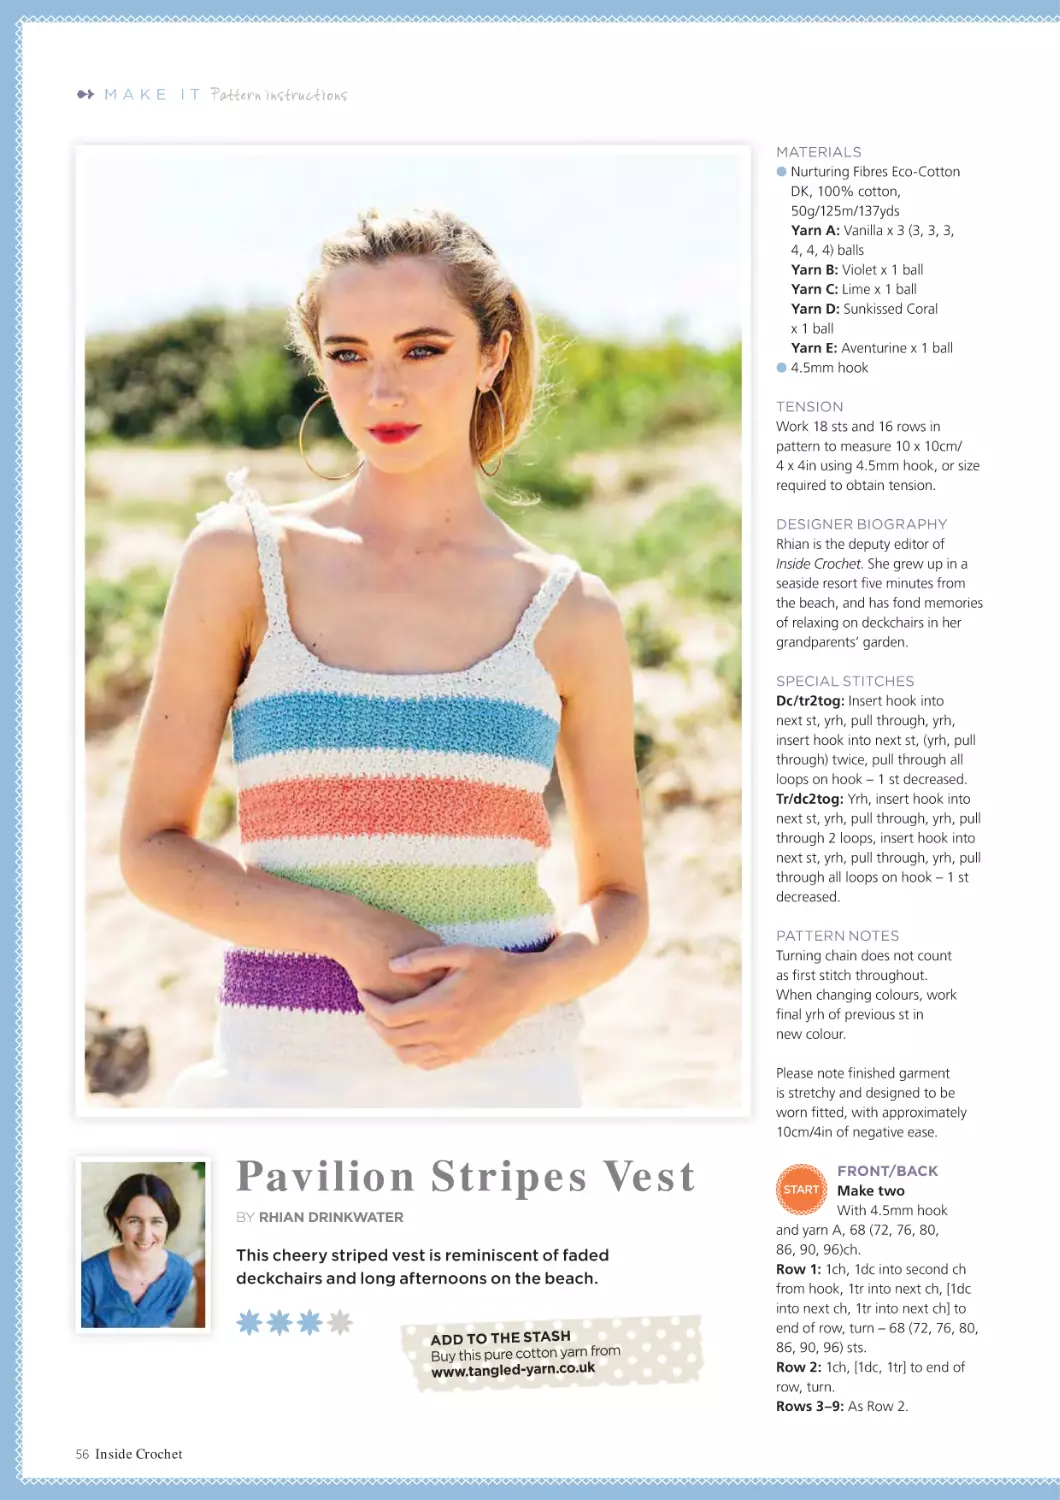
Pavilion Stripes Vest
by Rhian Drinkwater
Using Nurturing Fibres
Eco Cotton DK
Pattern page 56
www.insidecrochet.co.uk 21
BEACH PARTY
BELOW
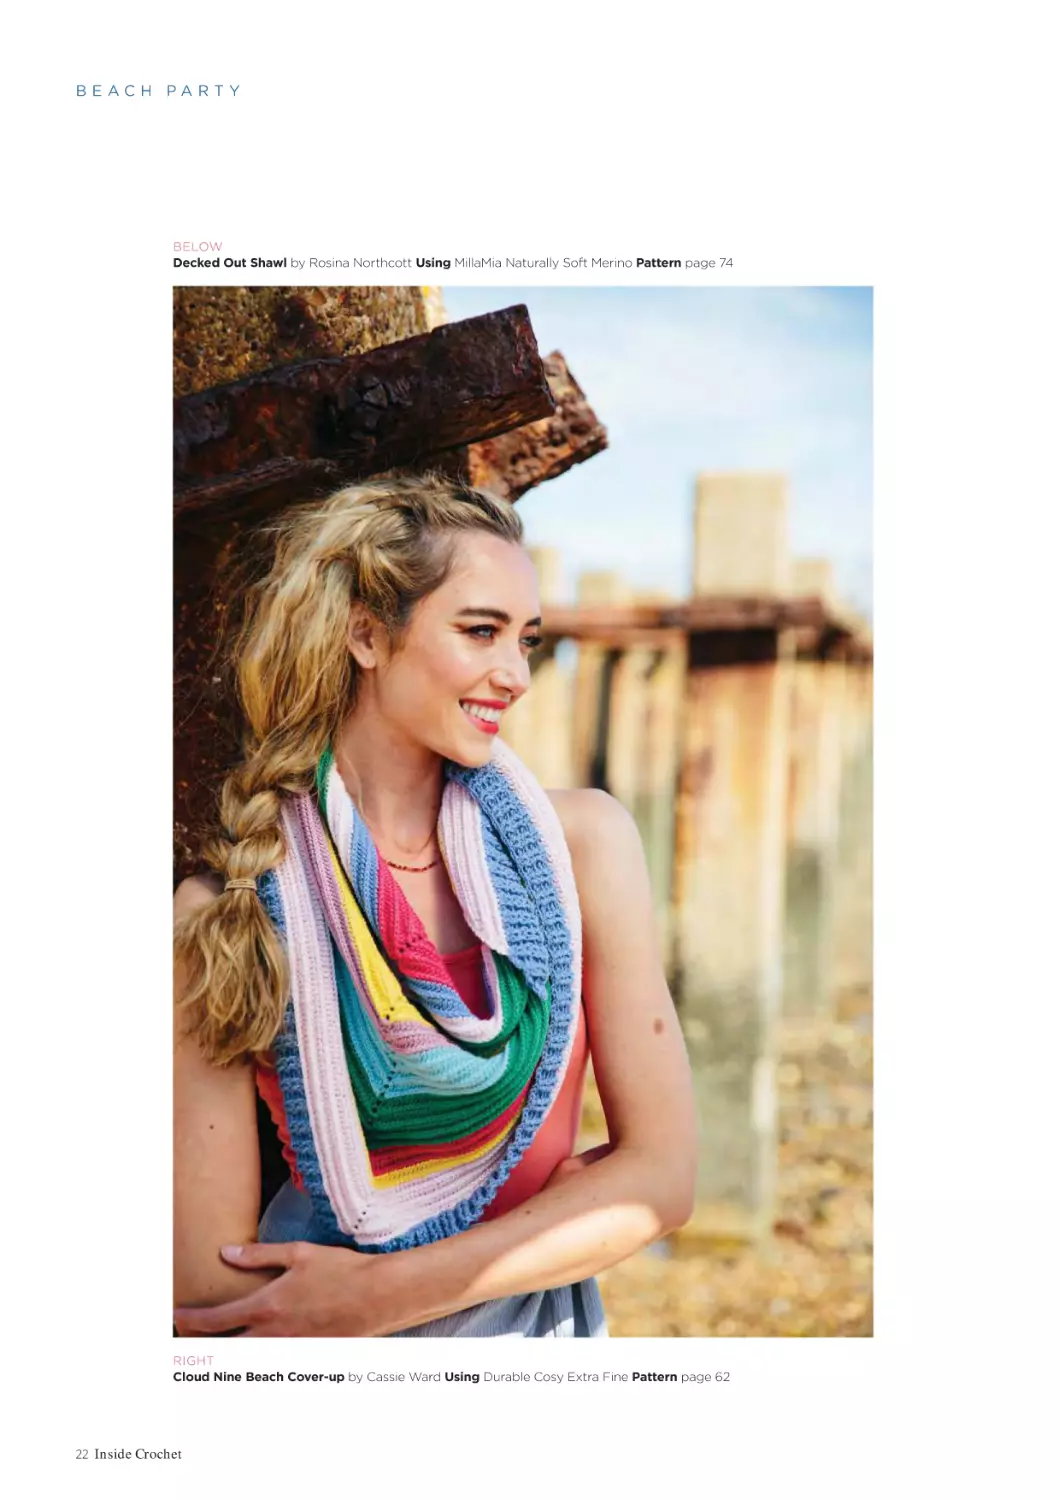
Decked Out Shawl by Rosina Northcott Using MillaMia Naturally Soft Merino Pattern page 74
RIGHT
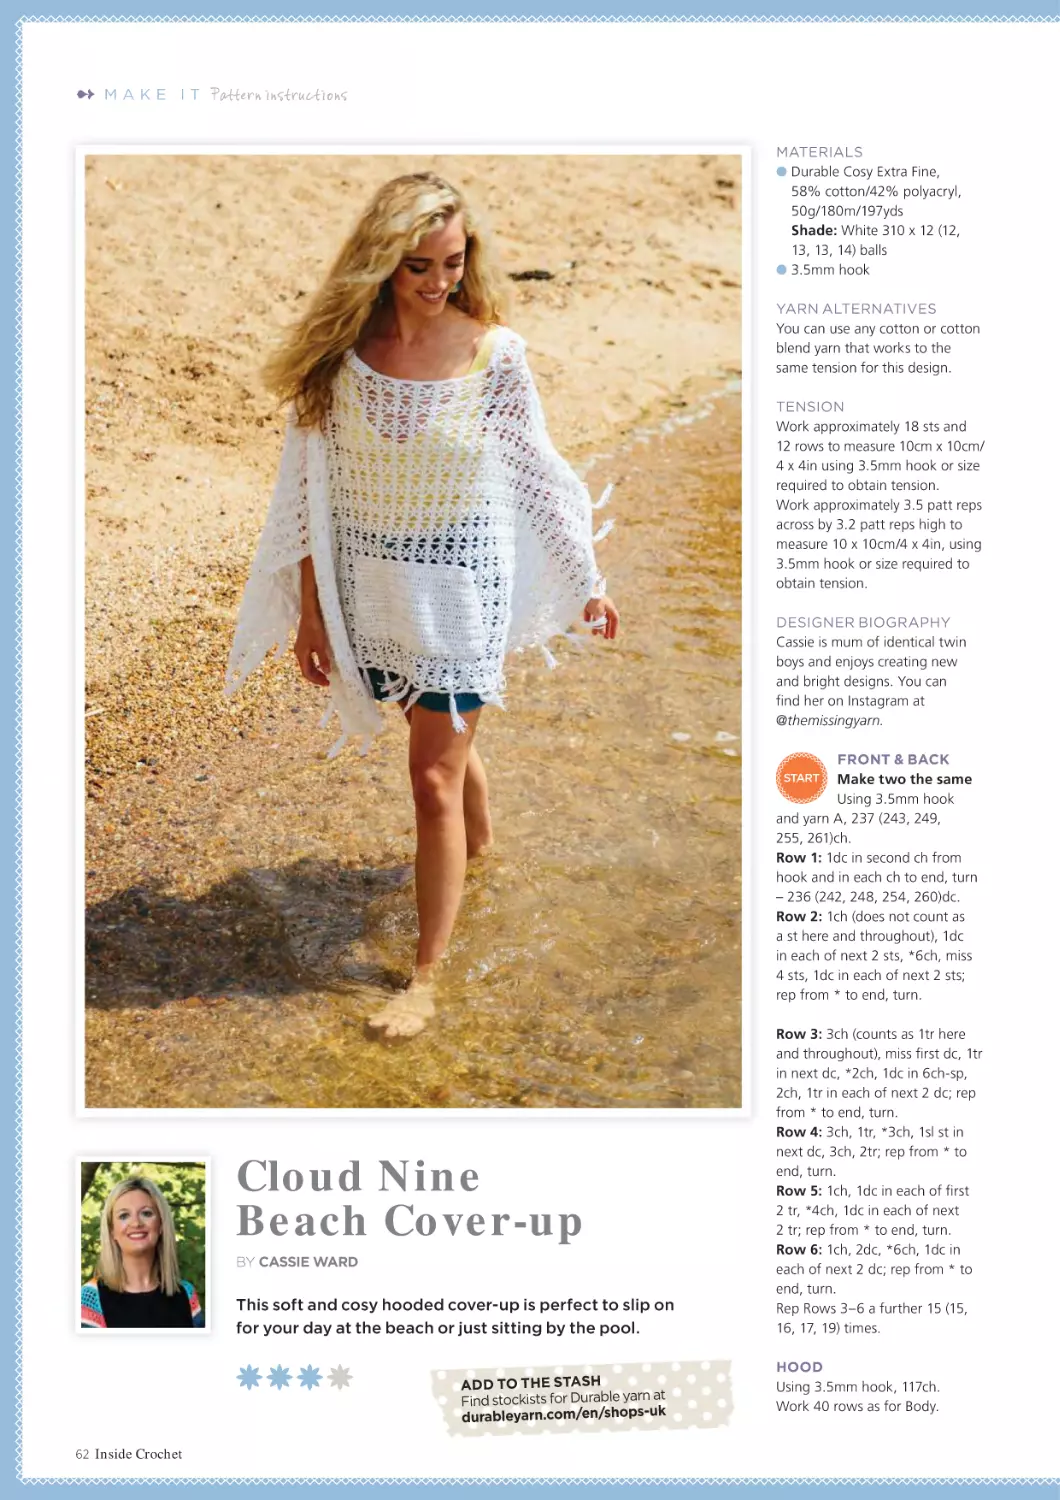
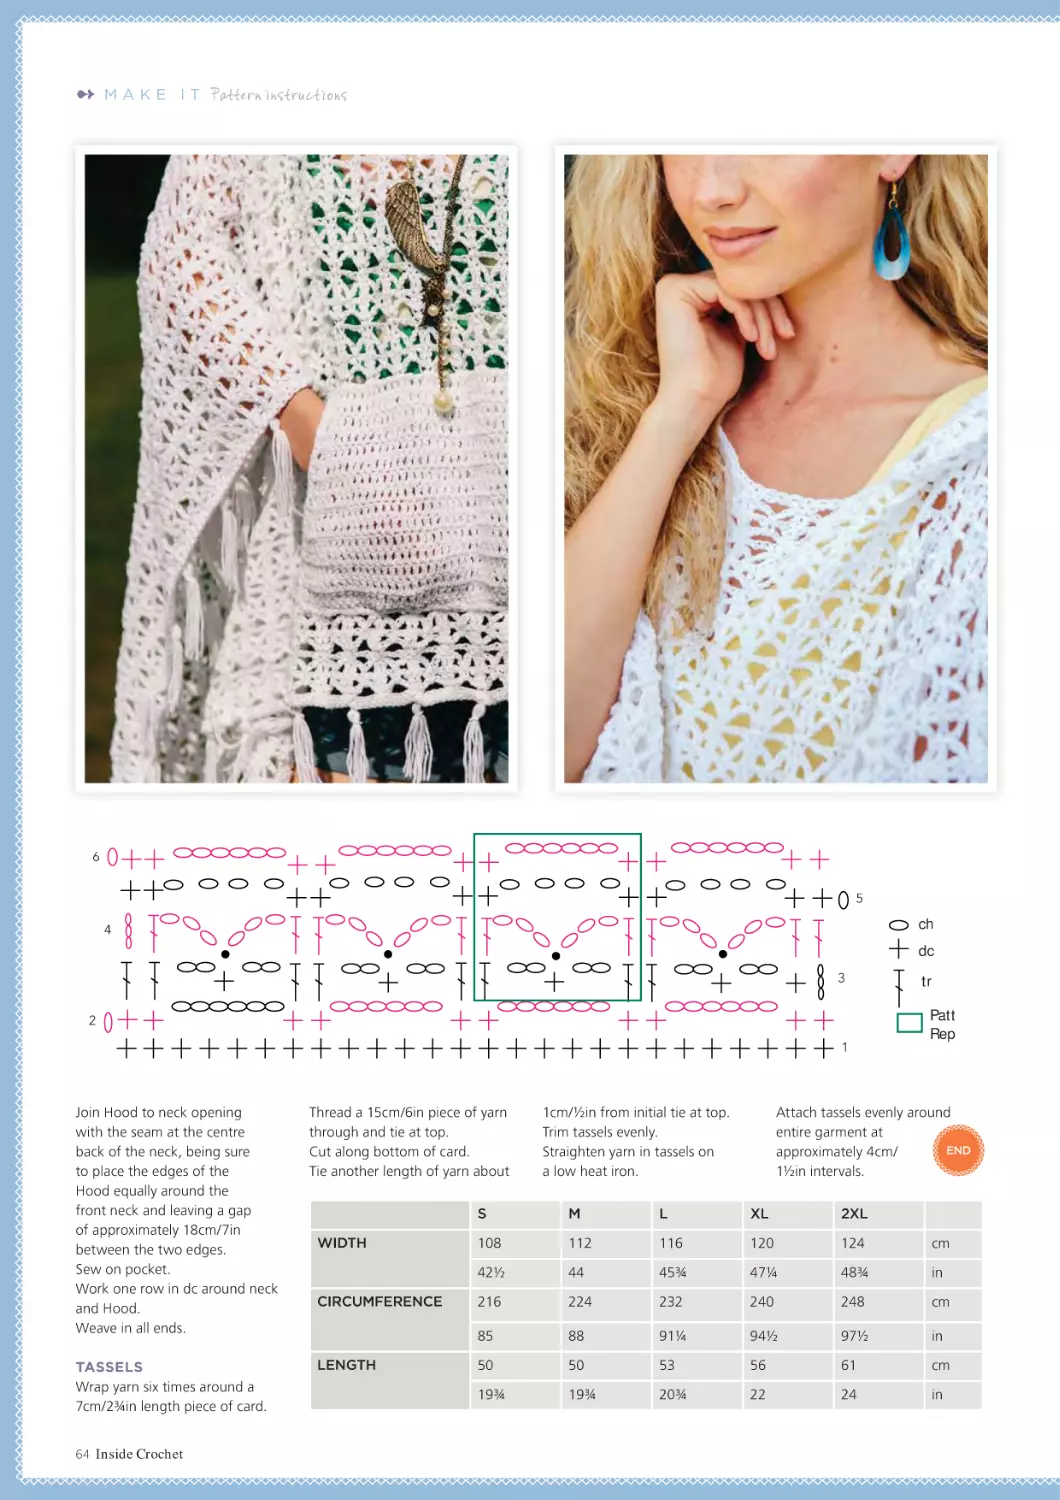
Cloud Nine Beach Cover-up by Cassie Ward Using Durable Cosy Extra Fine Pattern page 62
22 Inside Crochet
BEACH PARTY
BELOW
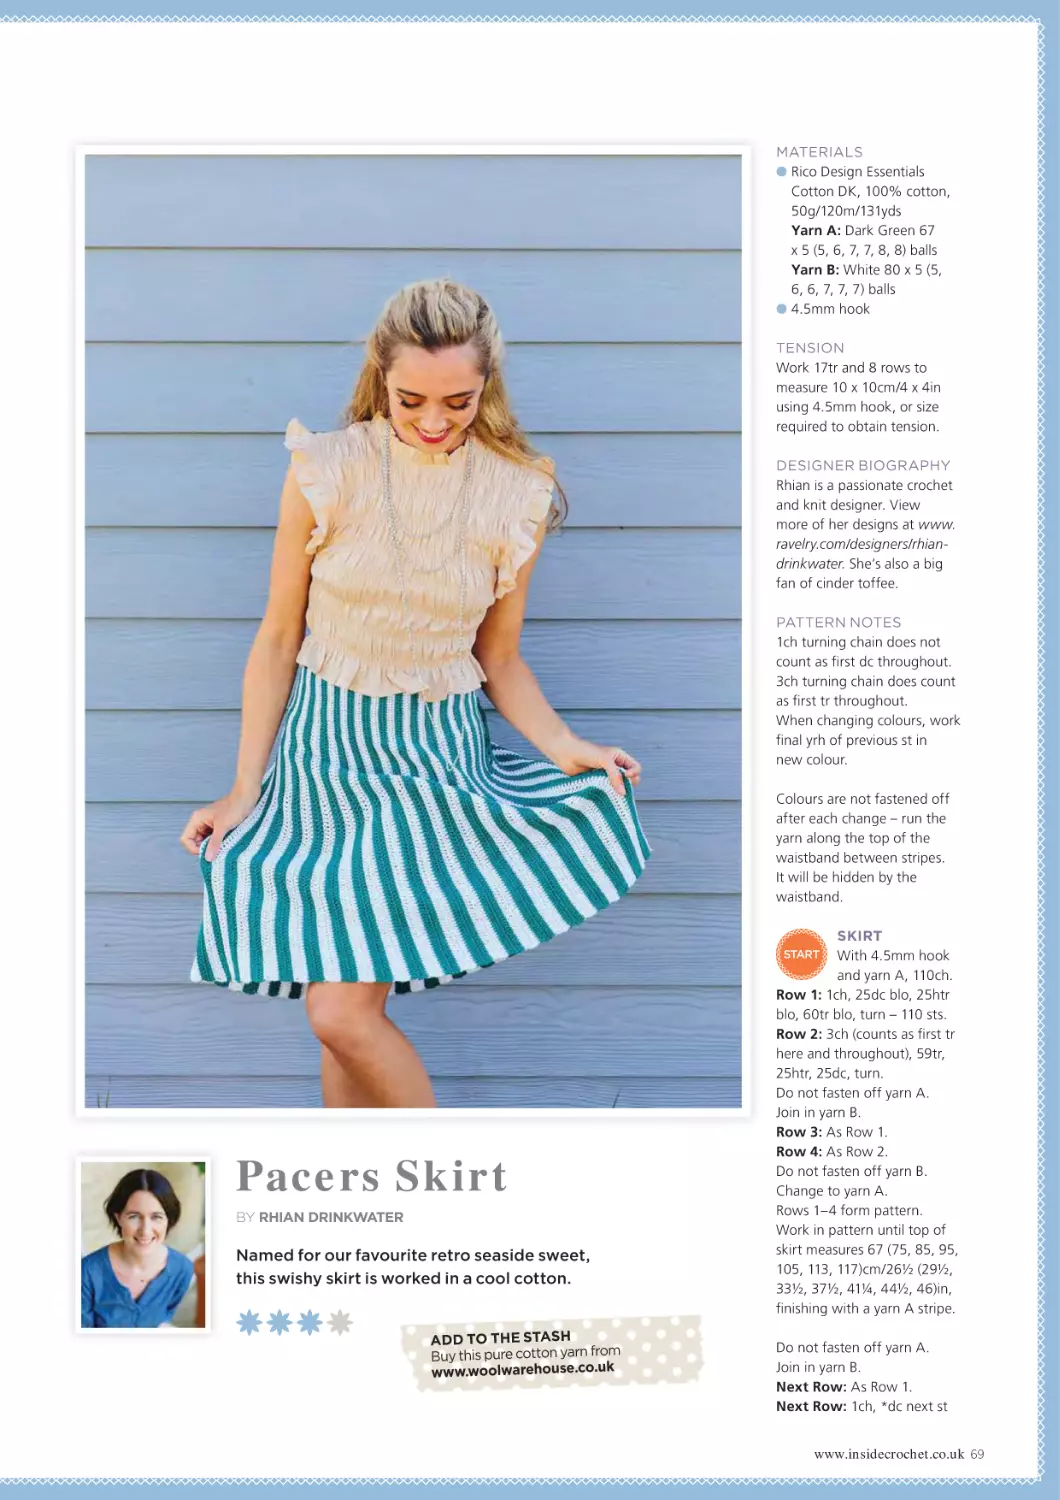
Pacers Skirt by Rhian Drinkwater Using Rico Design Essentials Cotton DK Pattern page 68
RIGHT
Selkie Sarong by Tracey Todhunter Using Fyberspates Scrumptious 4 ply Pattern page 60
24 Inside Crochet
www.insidecrochet.co.uk 25
BEACH PARTY
BELOW
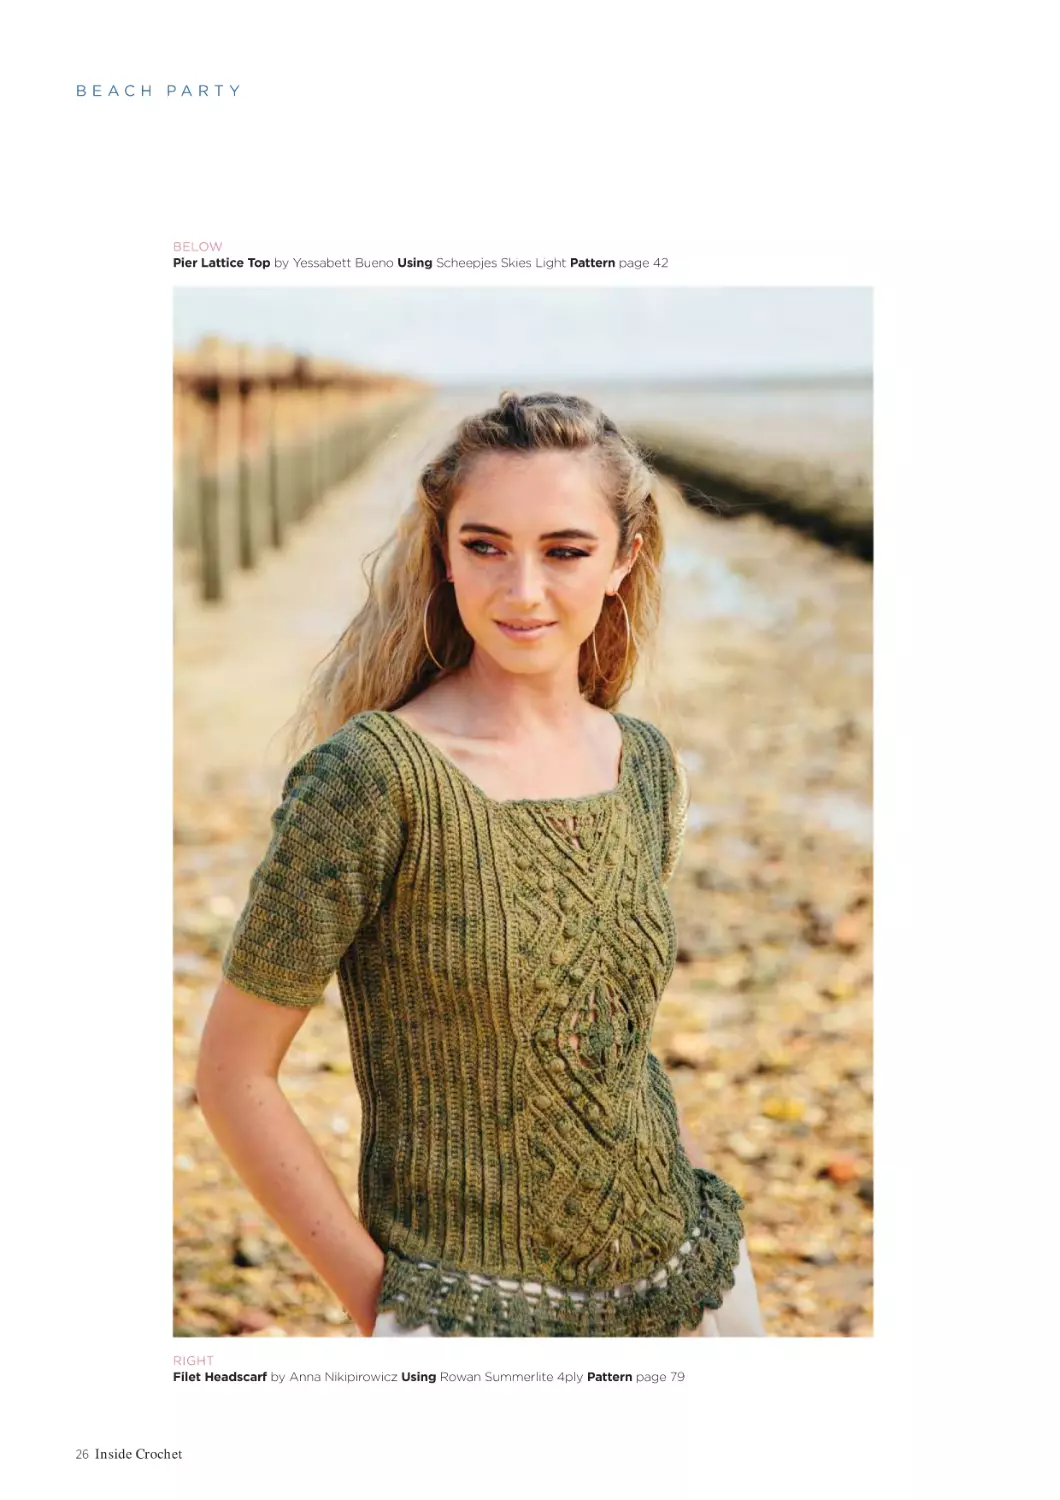
Pier Lattice Top by Yessabett Bueno Using Scheepjes Skies Light Pattern page 42
RIGHT
Filet Headscarf by Anna Nikipirowicz Using Rowan Summerlite 4ply Pattern page 79
26 Inside Crochet
BEACH PARTY
BELOW
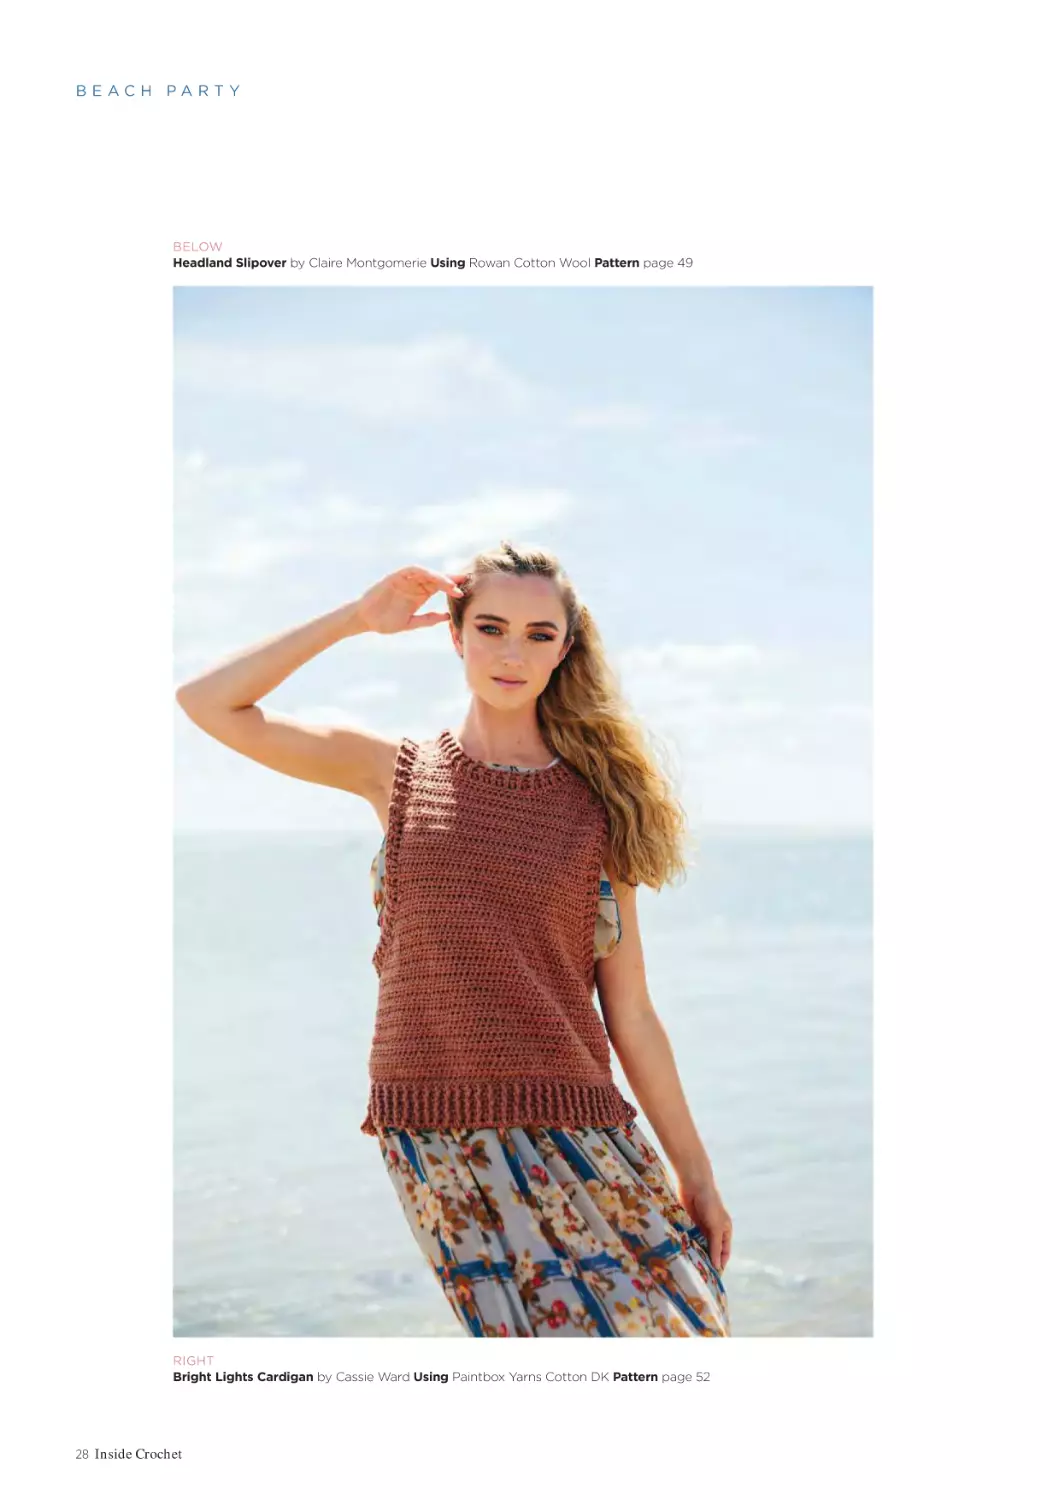
Headland Slipover by Claire Montgomerie Using Rowan Cotton Wool Pattern page 49
RIGHT
Bright Lights Cardigan by Cassie Ward Using Paintbox Yarns Cotton DK Pattern page 52
28 Inside Crochet
www.insidecrochet.co.uk 29
USE YARN5 FOR 5% OFF
@ammoniteyarns
Looking for inspiration?
We’ve done the hard work for you. Discover squishy magic
in our brilliant boxes and kits. For £5.00 off any of our boxes or kits,
use code SizzlingSummer.
7 Llantrisant Road, Pontyclun CF72 9DP
www.ammoniteyarns.co.uk 01443 520200
E: rufflescrochet@gmail.com
@crochetclareh
Hand Dyed Yarns - Assorted colours and sizes
Specialising in Mini Skeins, ideal for
Scrapghans and other projects.
FOR A 10%
DISCOUNT
USE CODE
INSIDE10
Suppliers of beautiful hand dyed yarns
from around the world.
Exclusive UK importers of
Emma’s Yarn.
UK stockist of Furls
crochet hooks.
01473 316936
WWW.YARNWORX.COM
On the horizon
Make the m ost of sun, sea and sand with these
fun accessories and hom ewares.
PHOTOGRAPHS LEANNE JADE, ERINNA LEE AND SARAH SHRIMPTON STYLING CLAIRE MONTGOMERIE
HAIR AND MAKE-UP JULIA EDWARDS
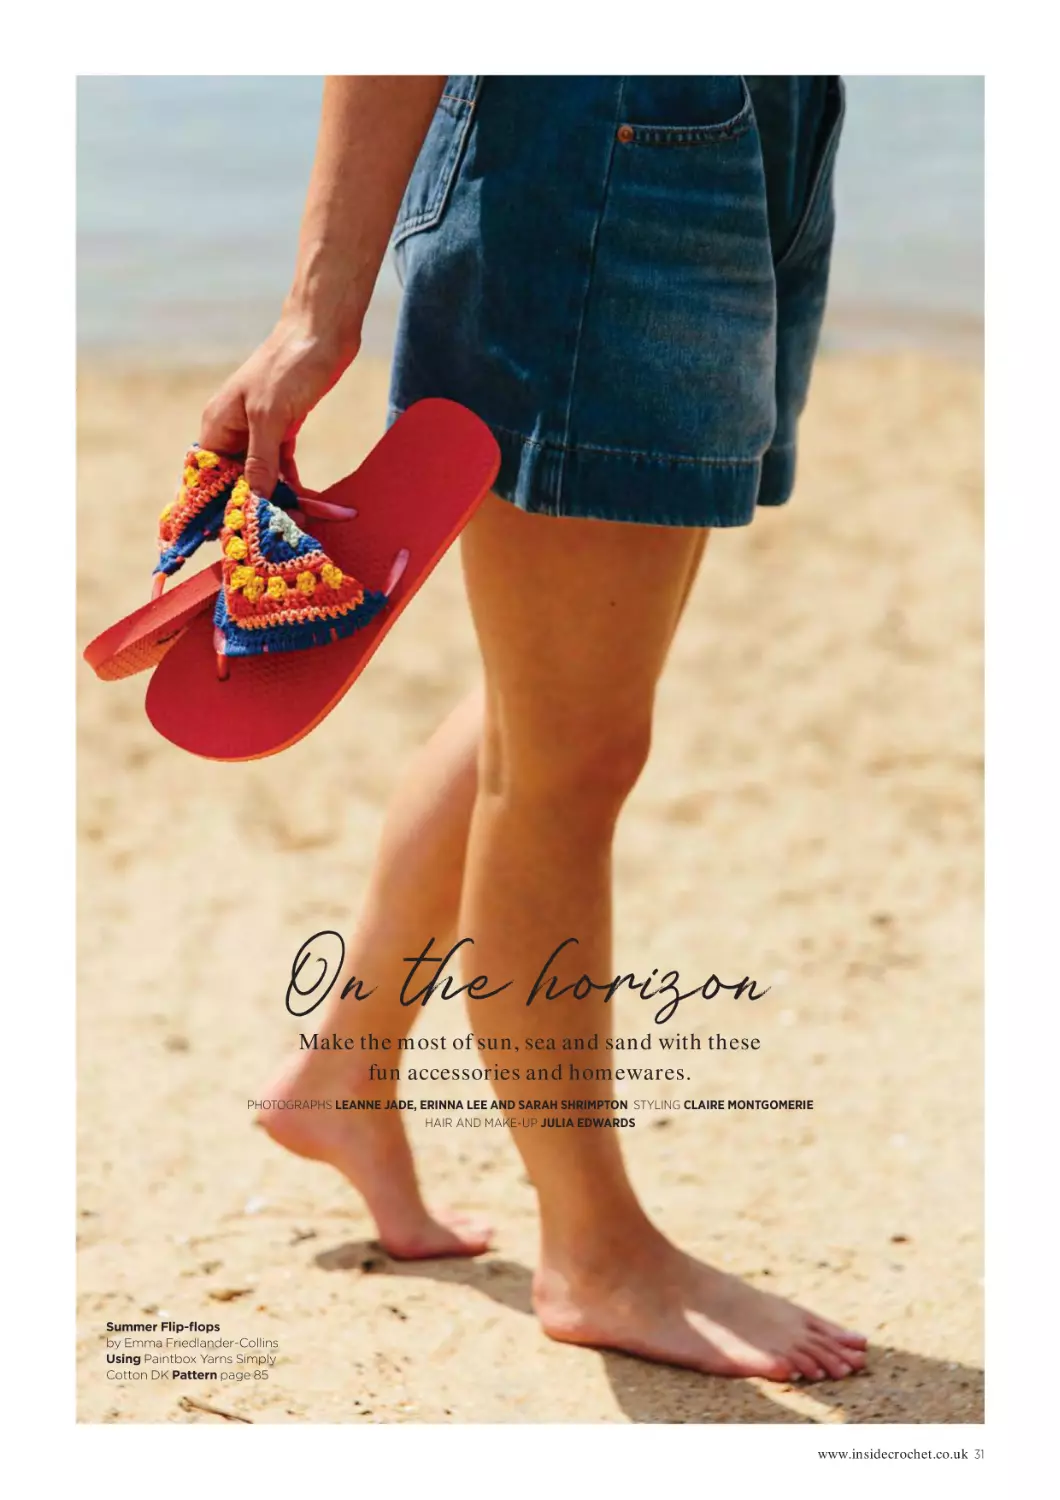
Summer Flip-flops
by Emma Friedlander-Collins
Using Paintbox Yarns Simply
Cotton DK Pattern page 85
www.insidecrochet.co.uk 31
ON THE HORIZON
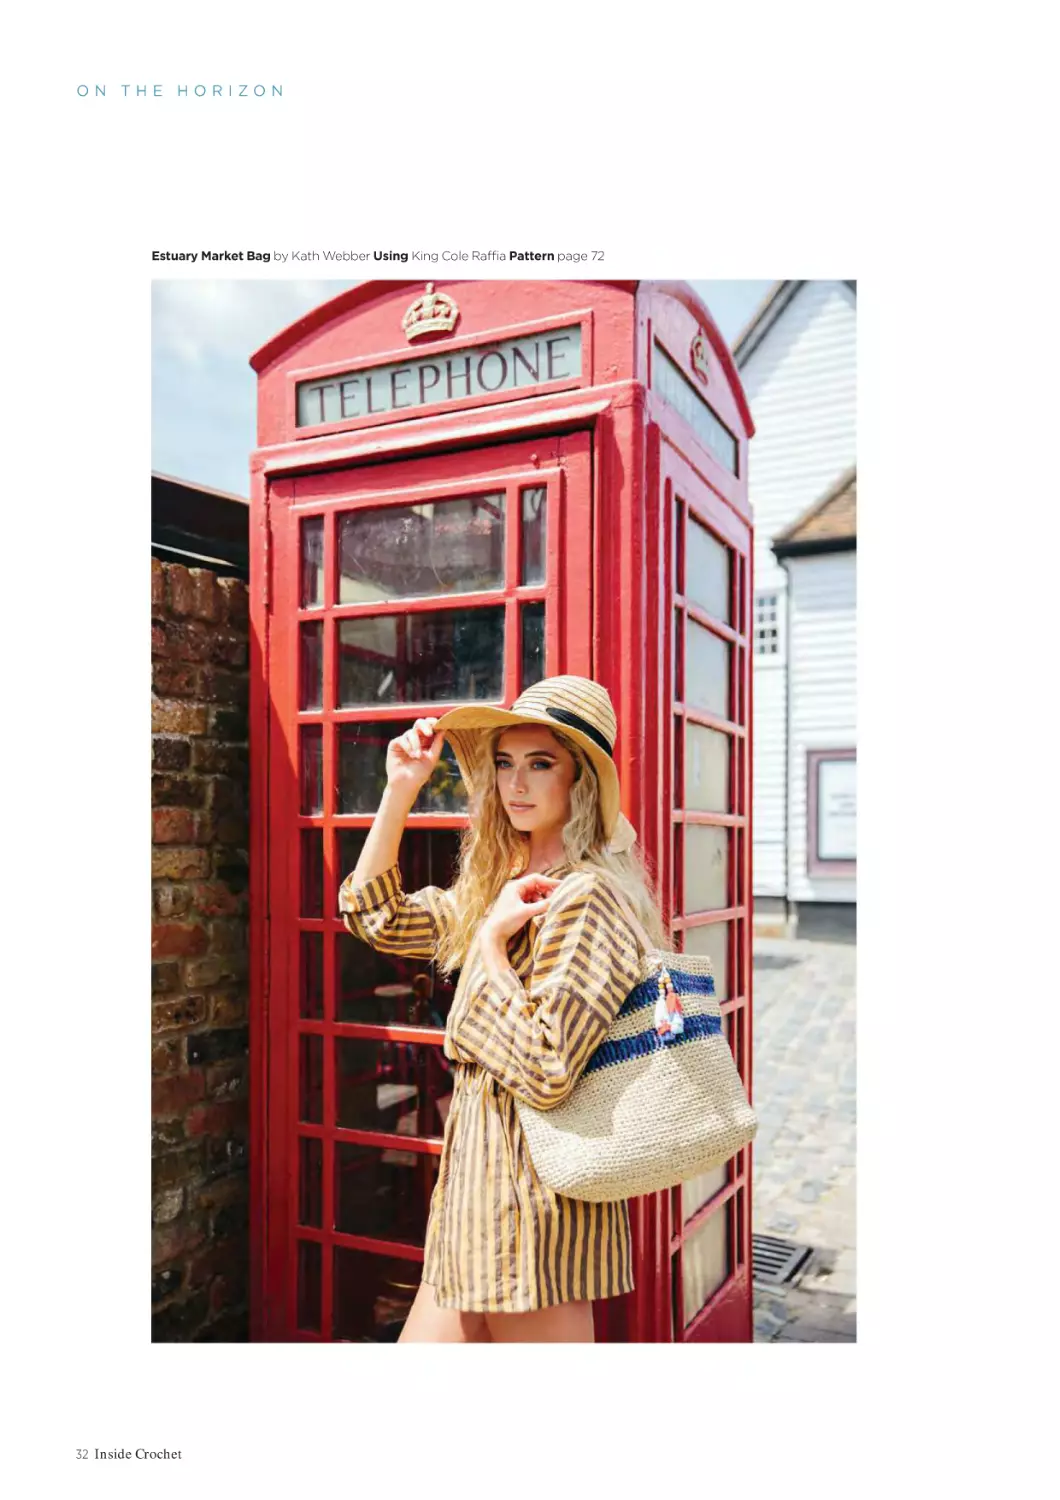
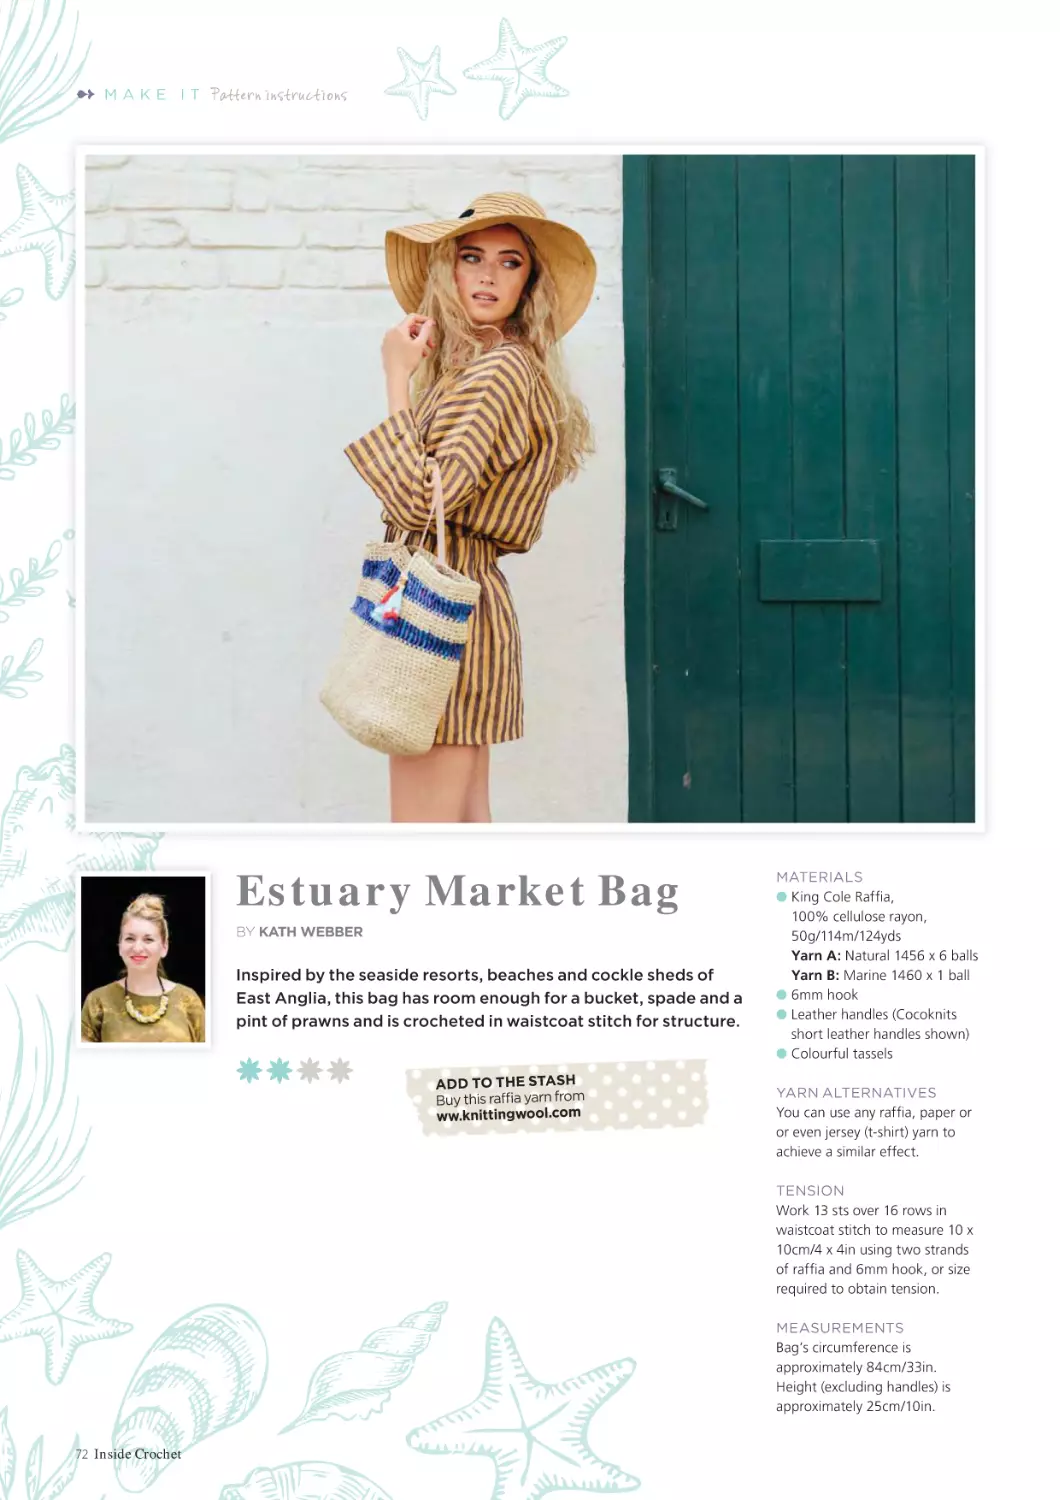
Estuary Market Bag by Kath Webber Using King Cole Raffia Pattern page 72
32 Inside Crochet
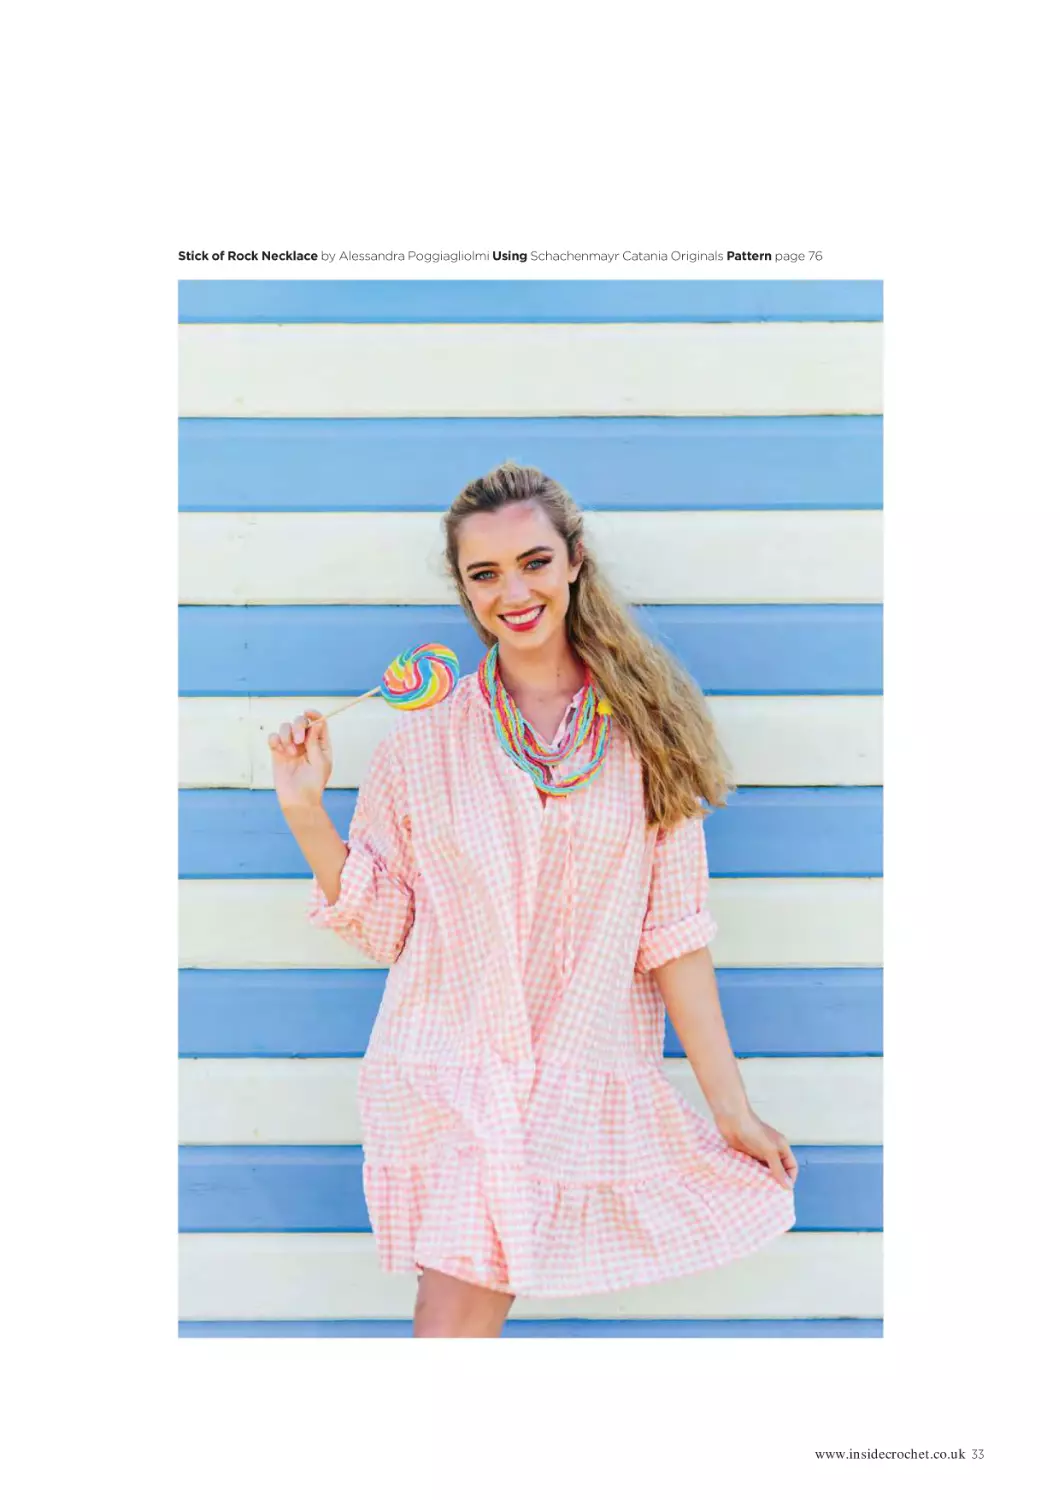
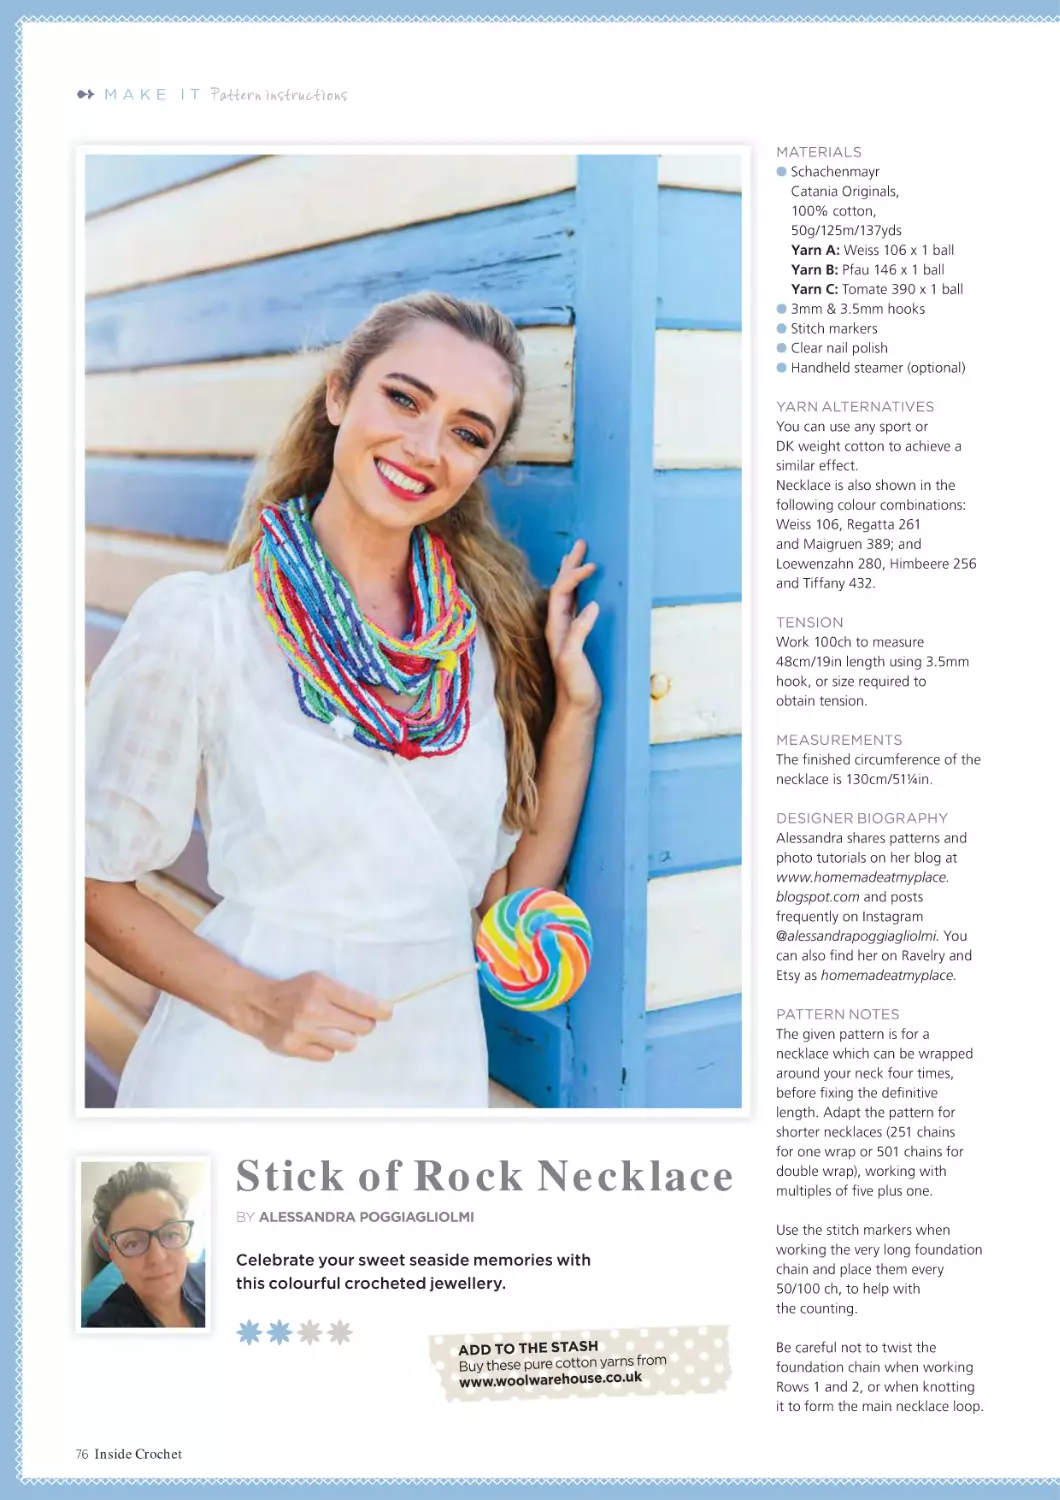
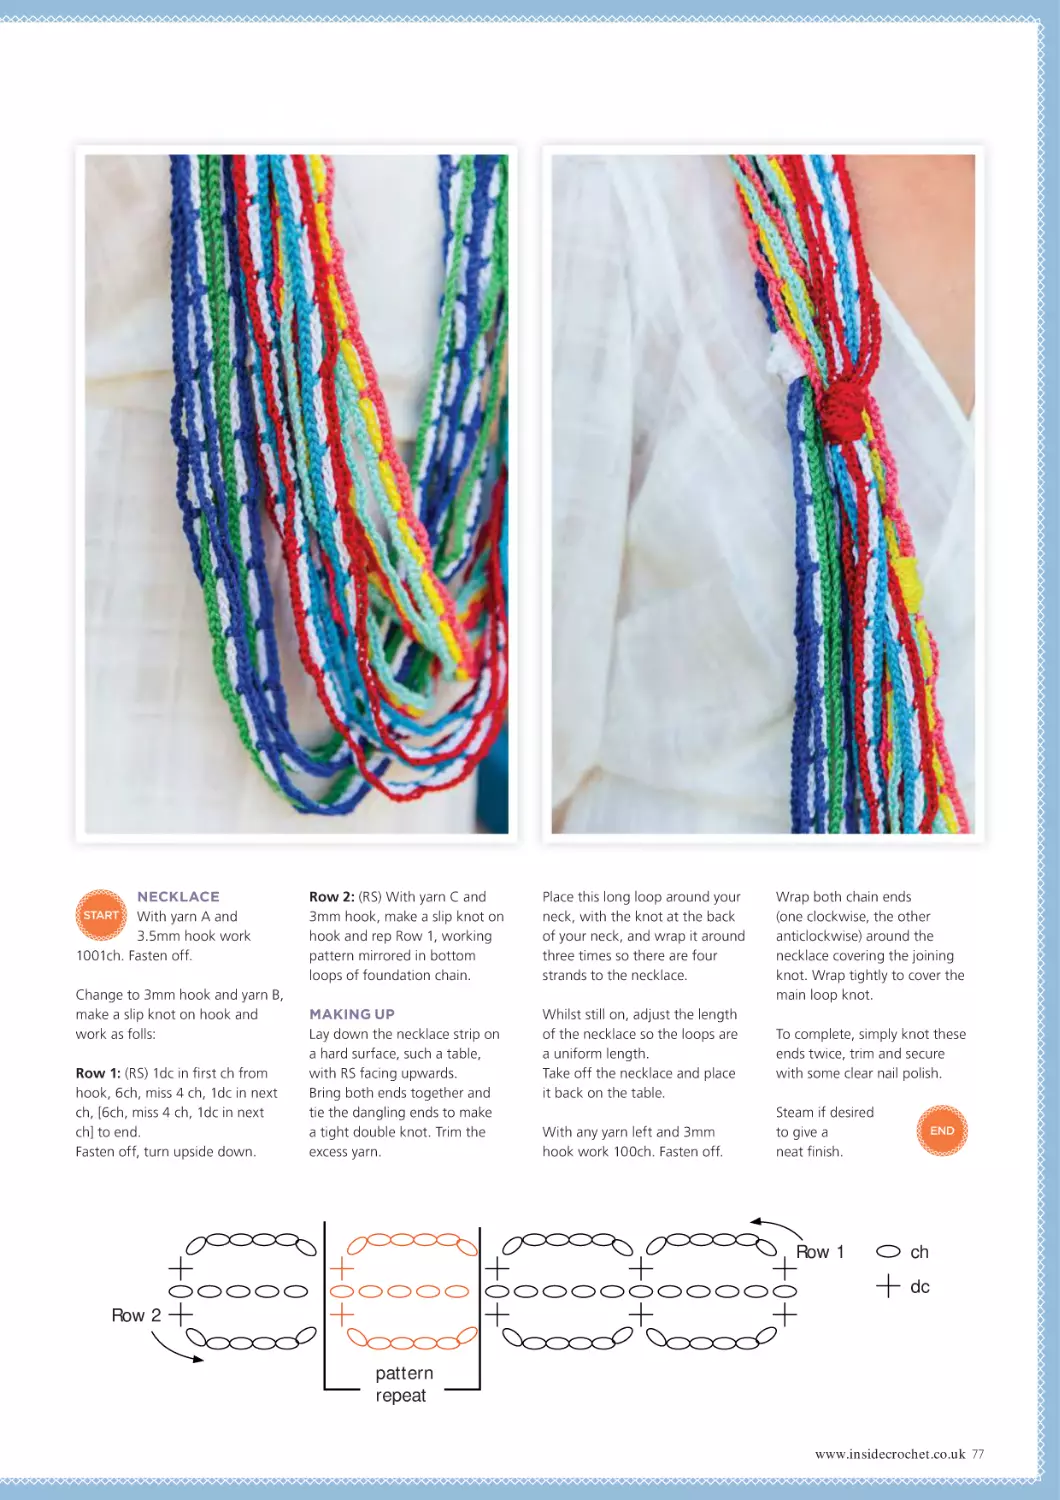
Stick of Rock Necklace by Alessandra Poggiagliolmi Using Schachenmayr Catania Originals Pattern page 76
www.insidecrochet.co.uk 33
ON THE HORIZON
BELOW
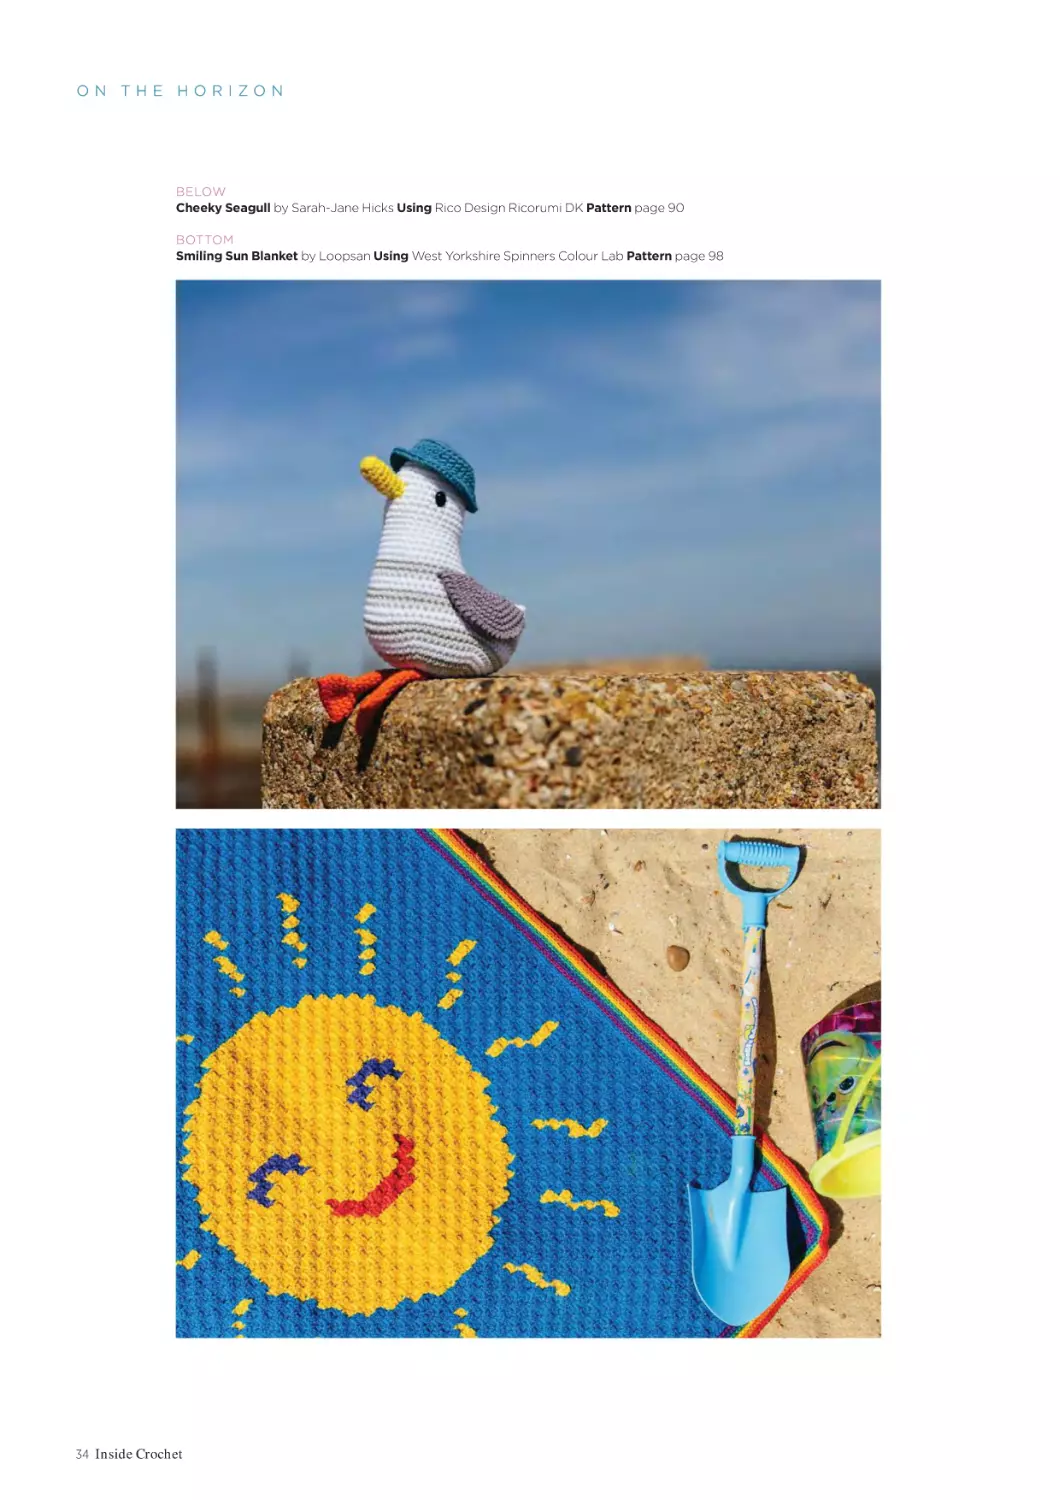
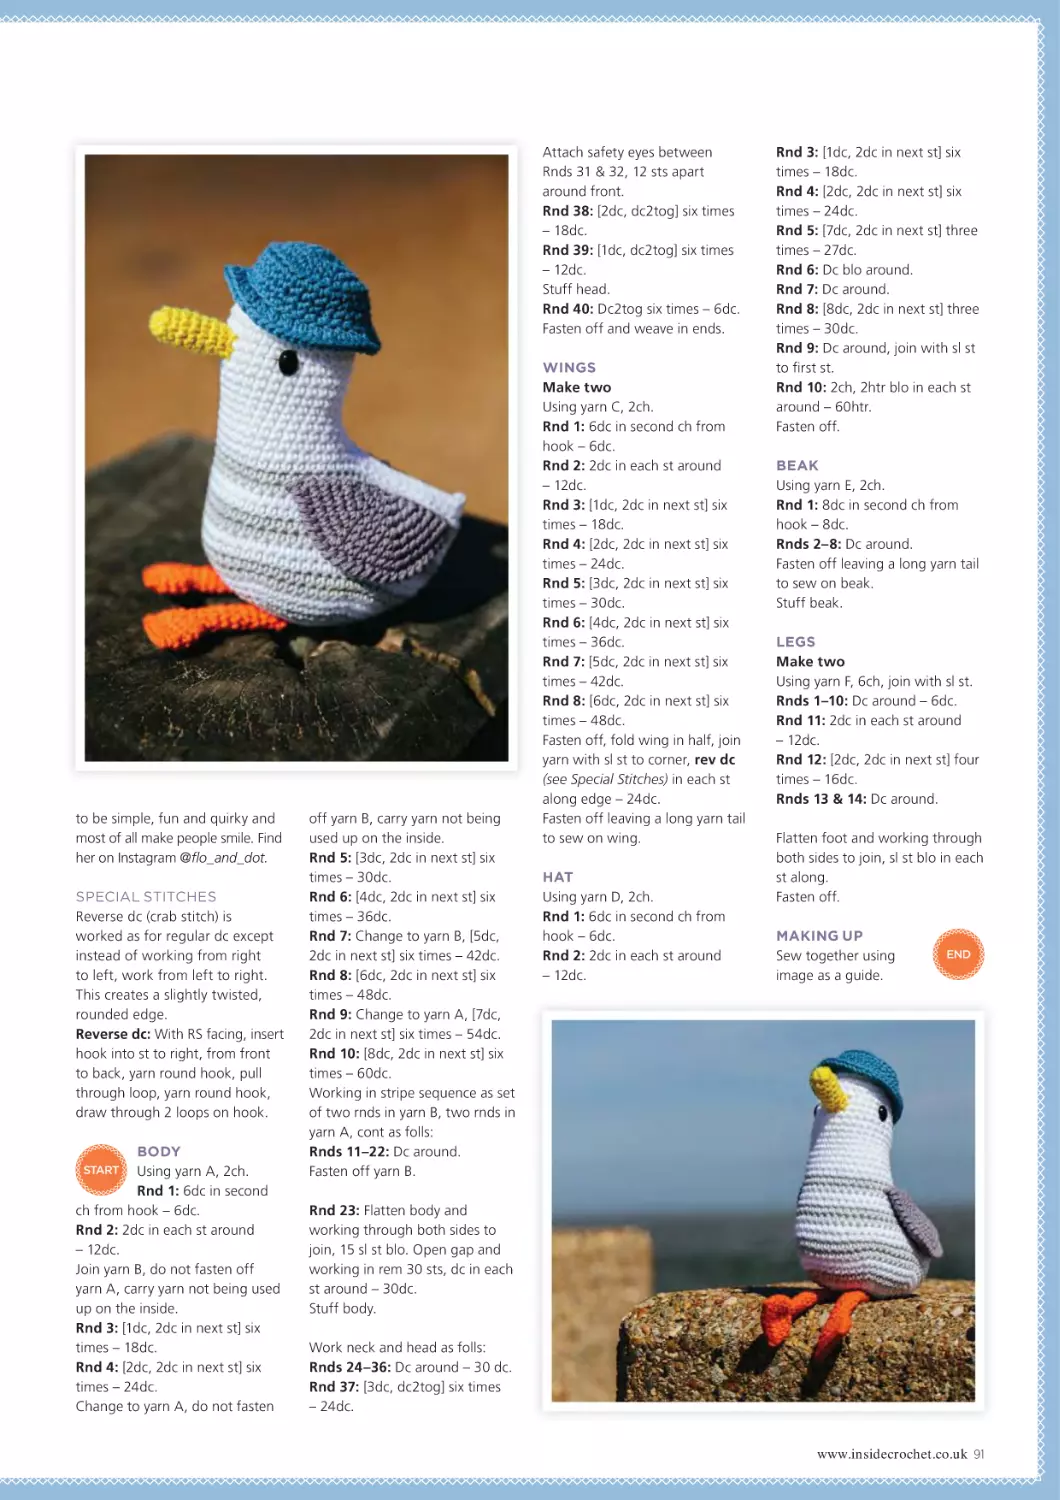
Cheeky Seagull by Sarah-Jane Hicks Using Rico Design Ricorumi DK Pattern page 90
BOTTOM
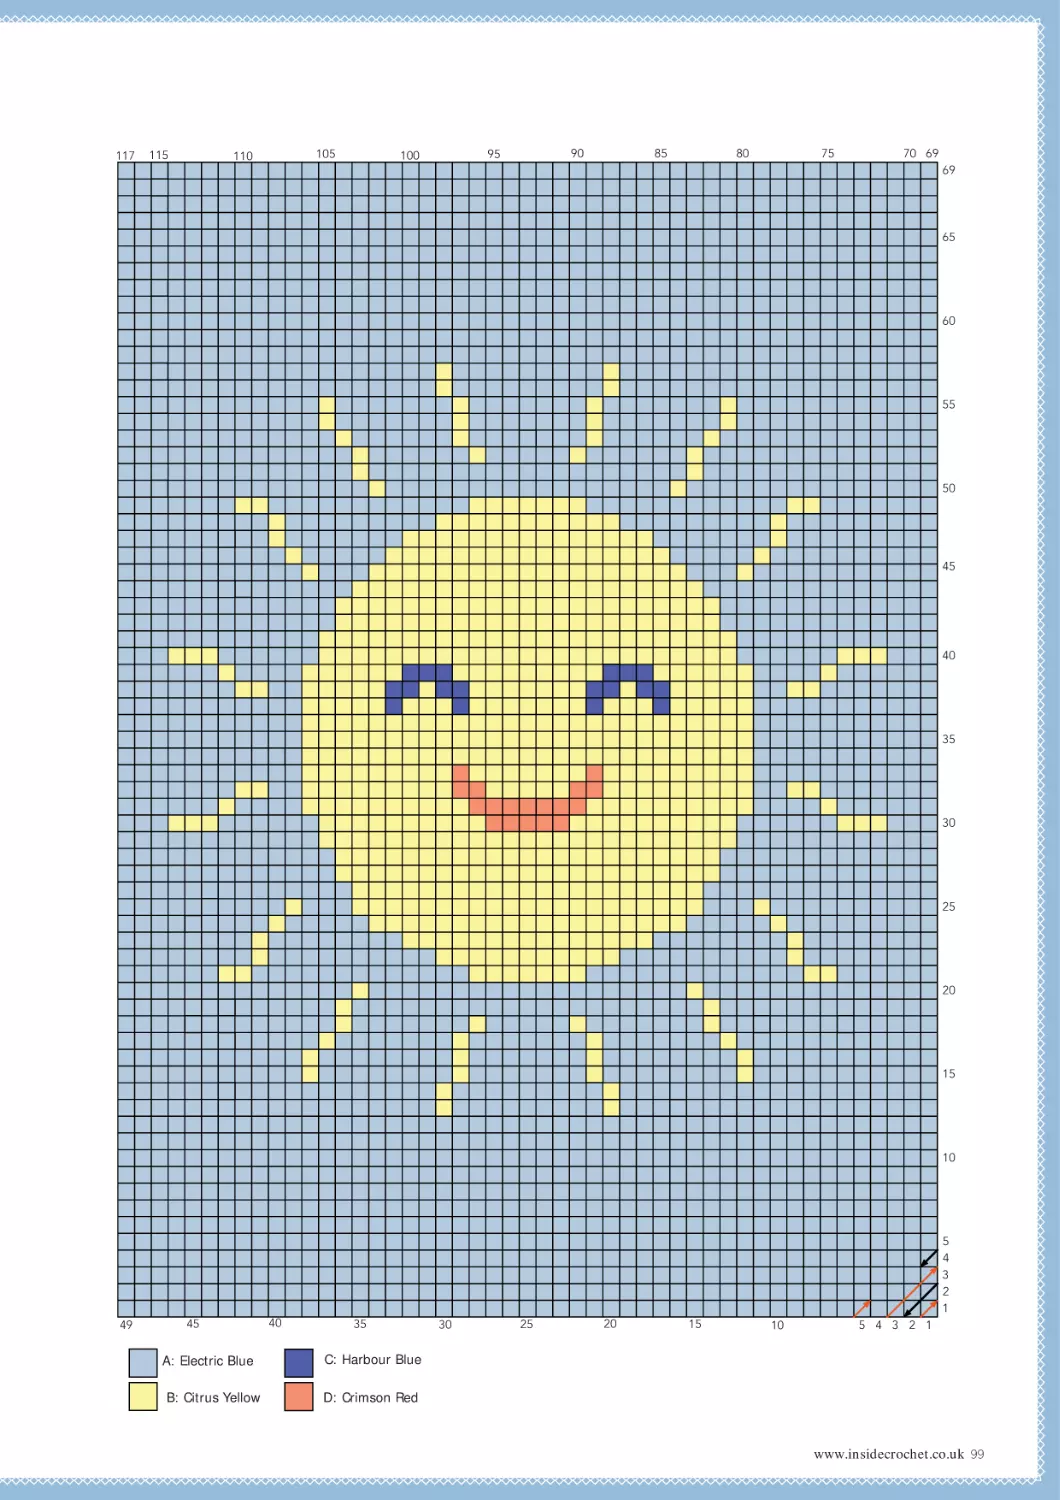
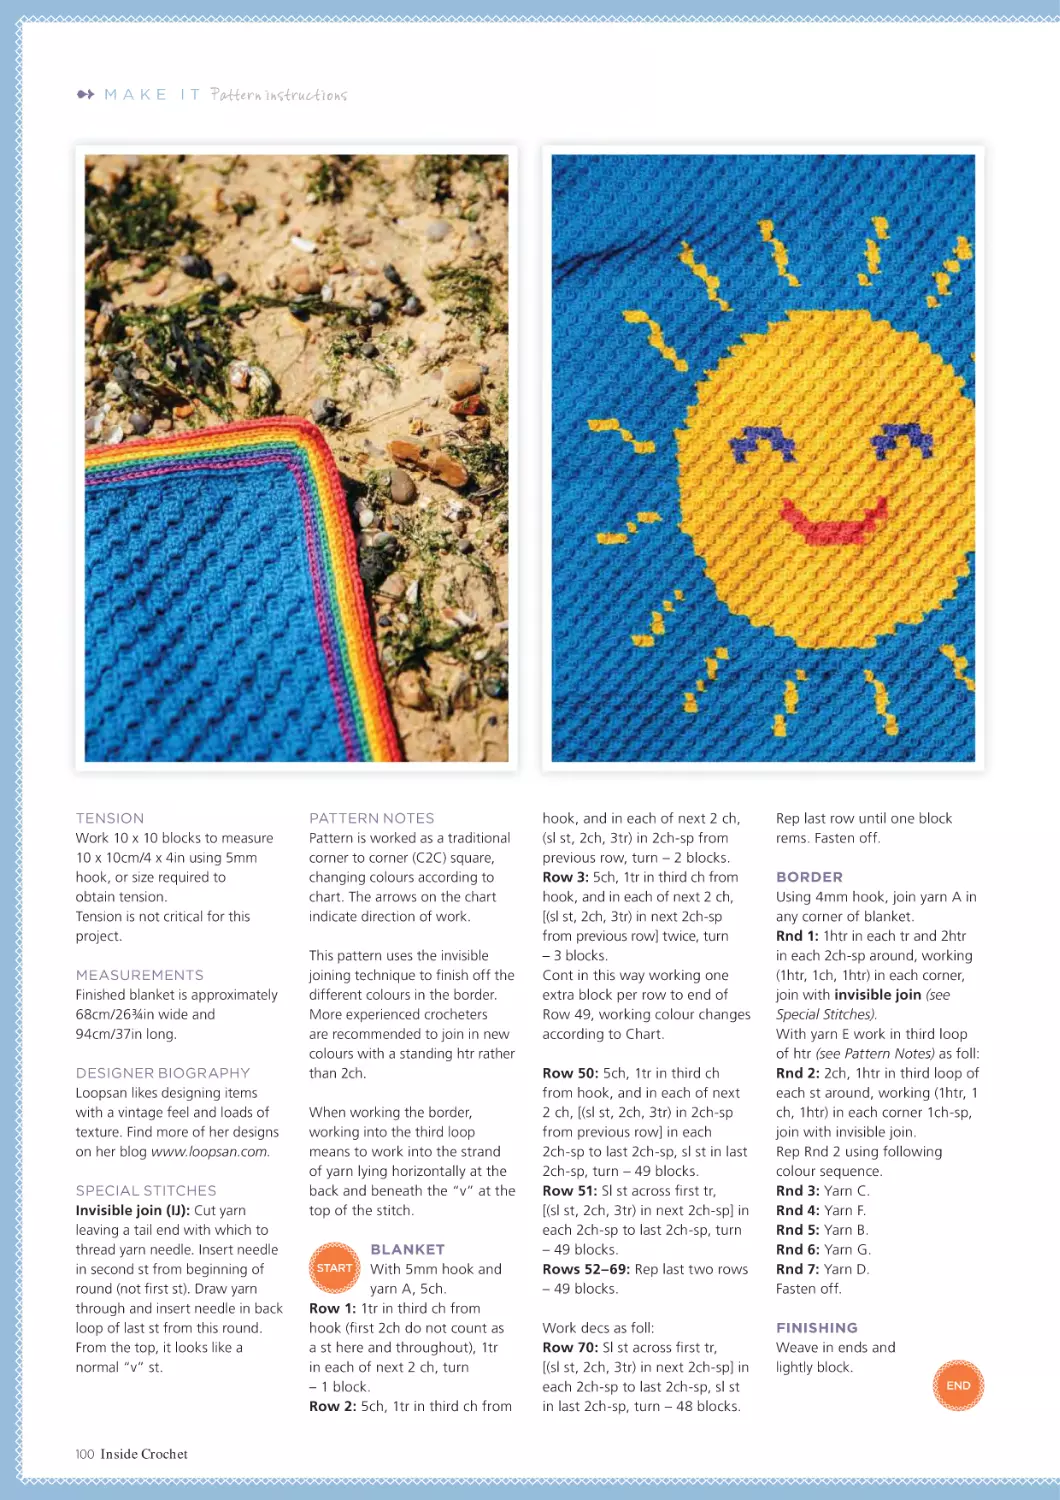
Smiling Sun Blanket by Loopsan Using West Yorkshire Spinners Colour Lab Pattern page 98
34 Inside Crochet
BELOW
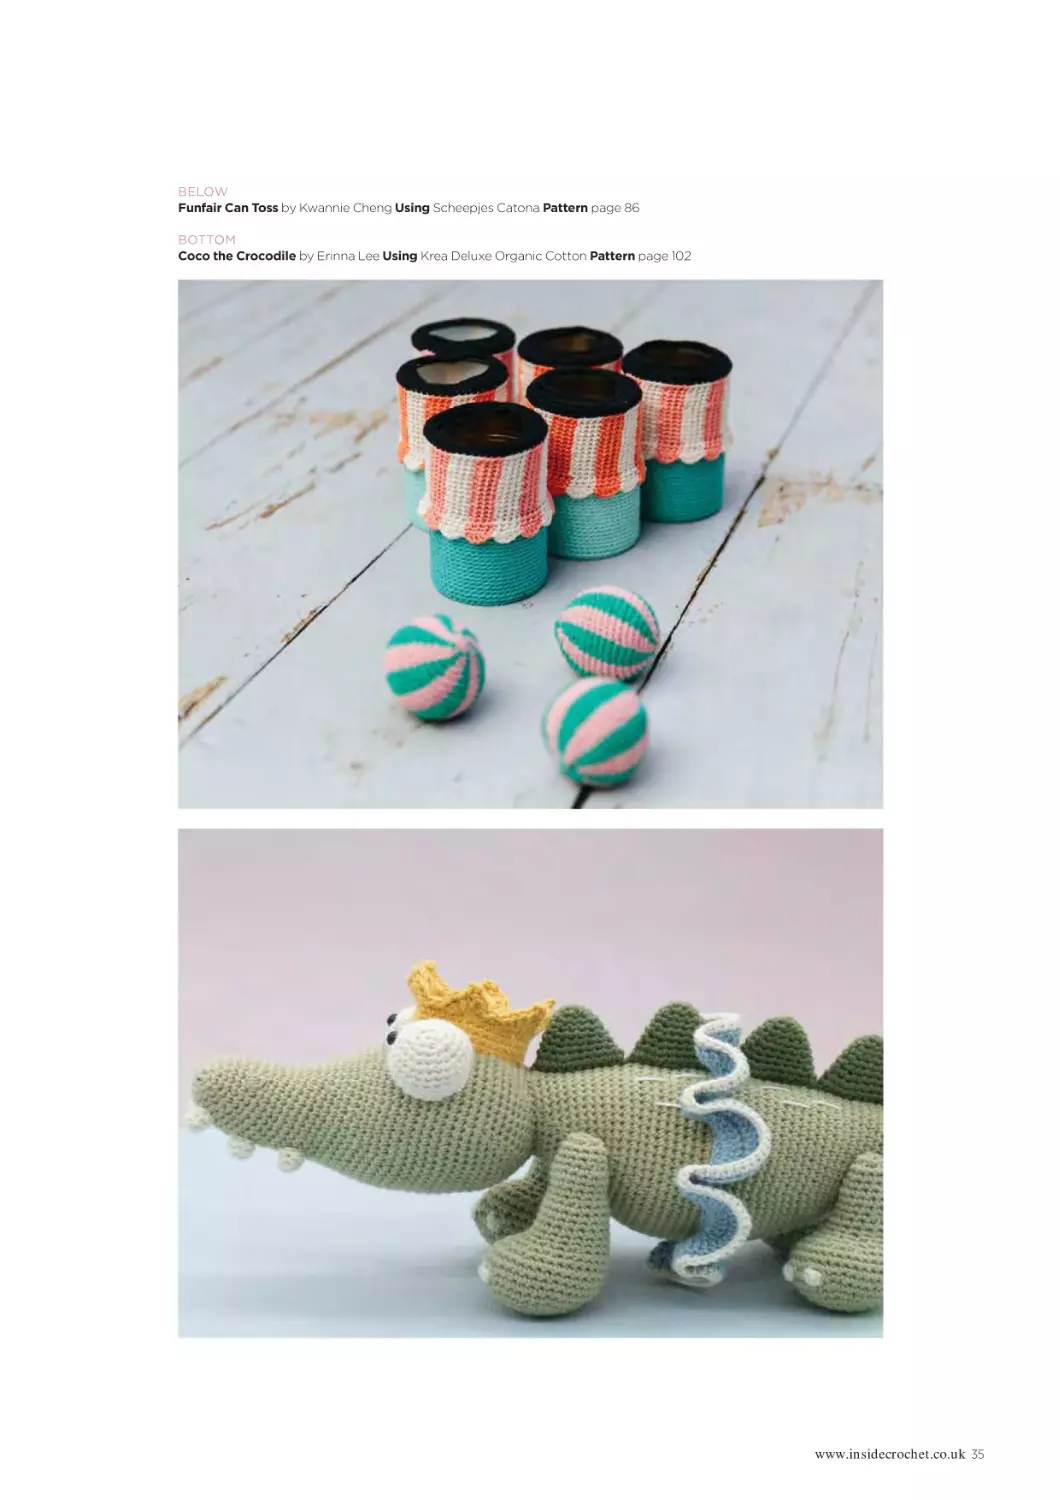
Funfair Can Toss by Kwannie Cheng Using Scheepjes Catona Pattern page 86
BOTTOM
Coco the Crocodile by Erinna Lee Using Krea Deluxe Organic Cotton Pattern page 102
www.insidecrochet.co.uk 35
ON THE HORIZON
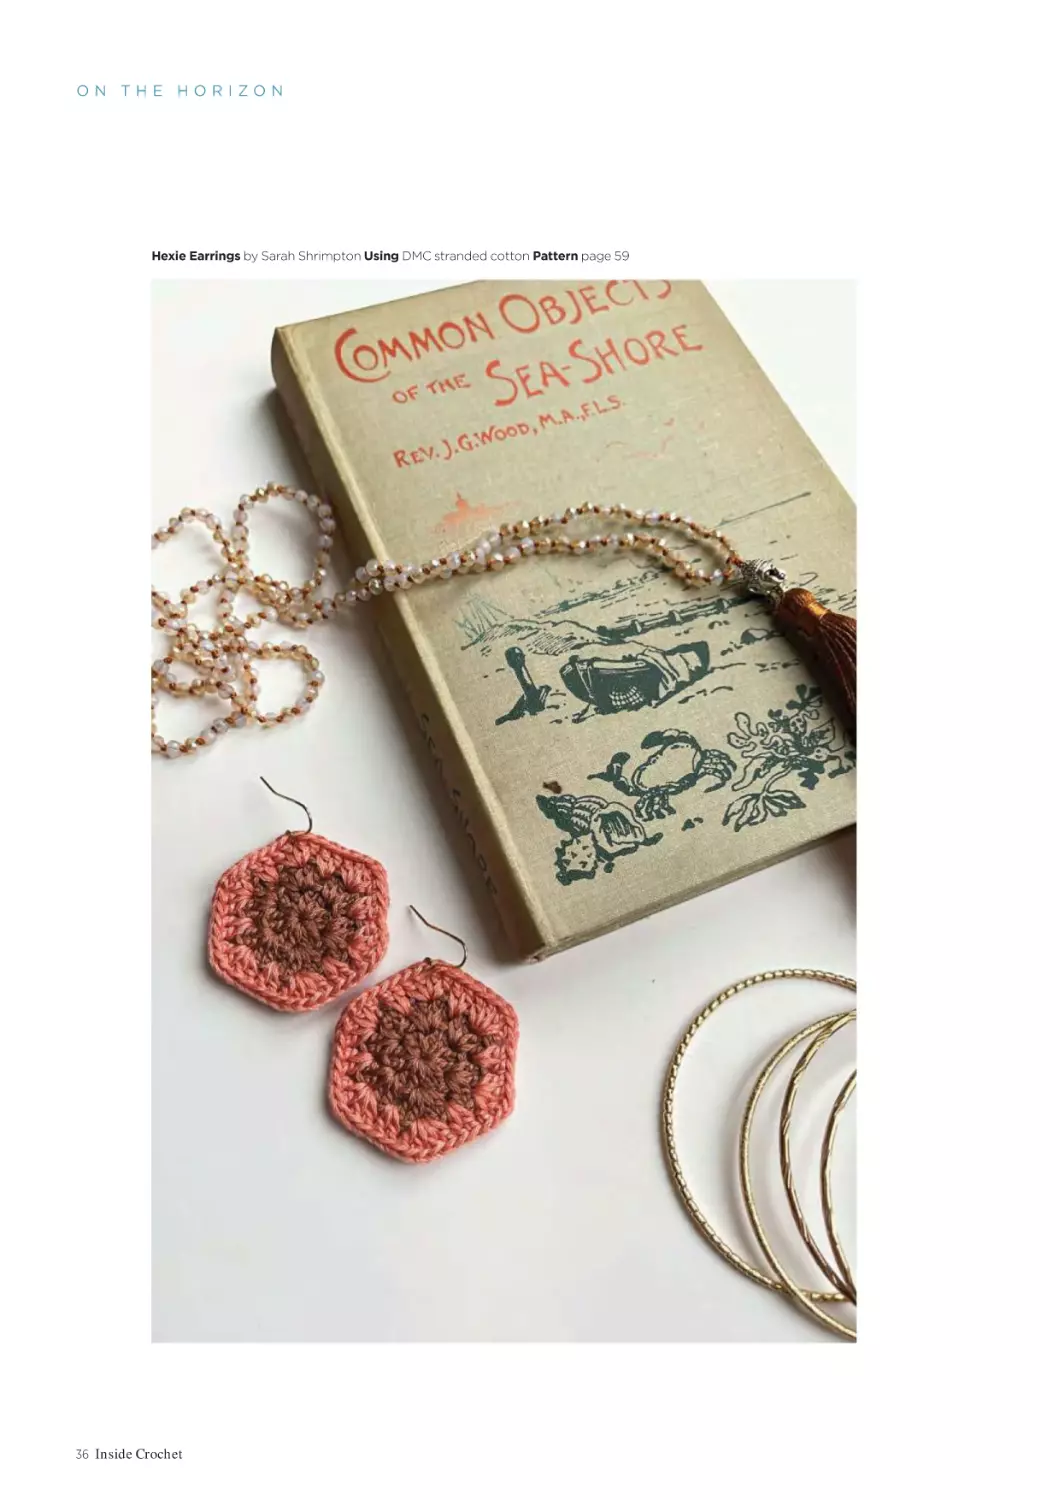
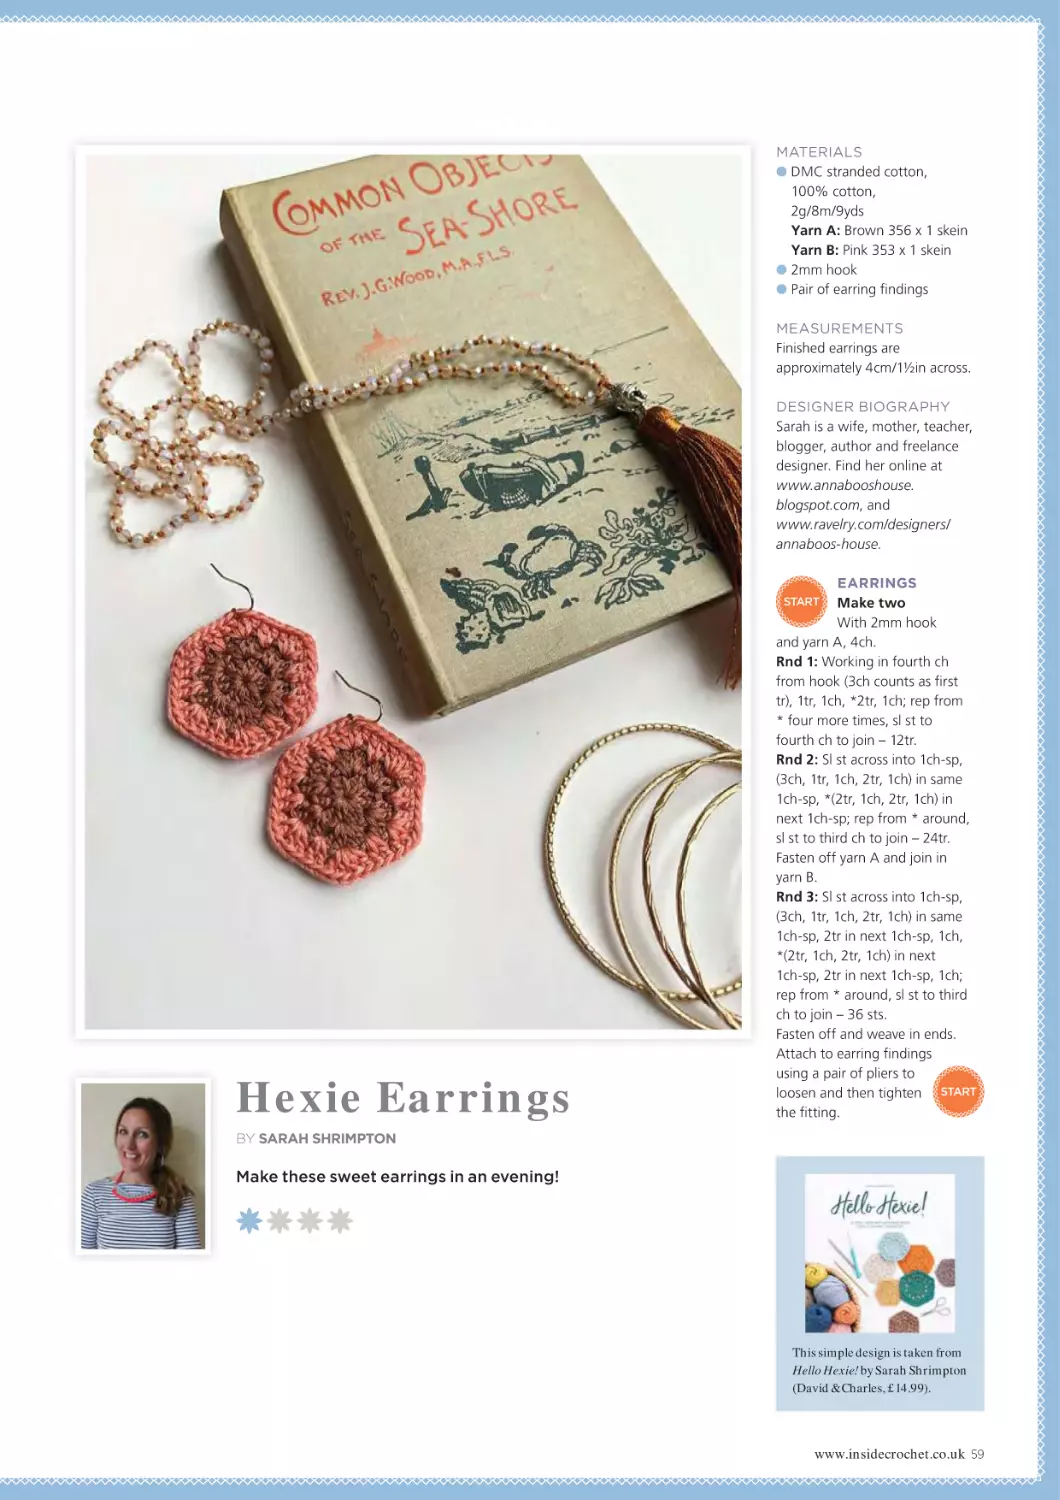
Hexie Earrings by Sarah Shrimpton Using DMC stranded cotton Pattern page 59
36 Inside Crochet
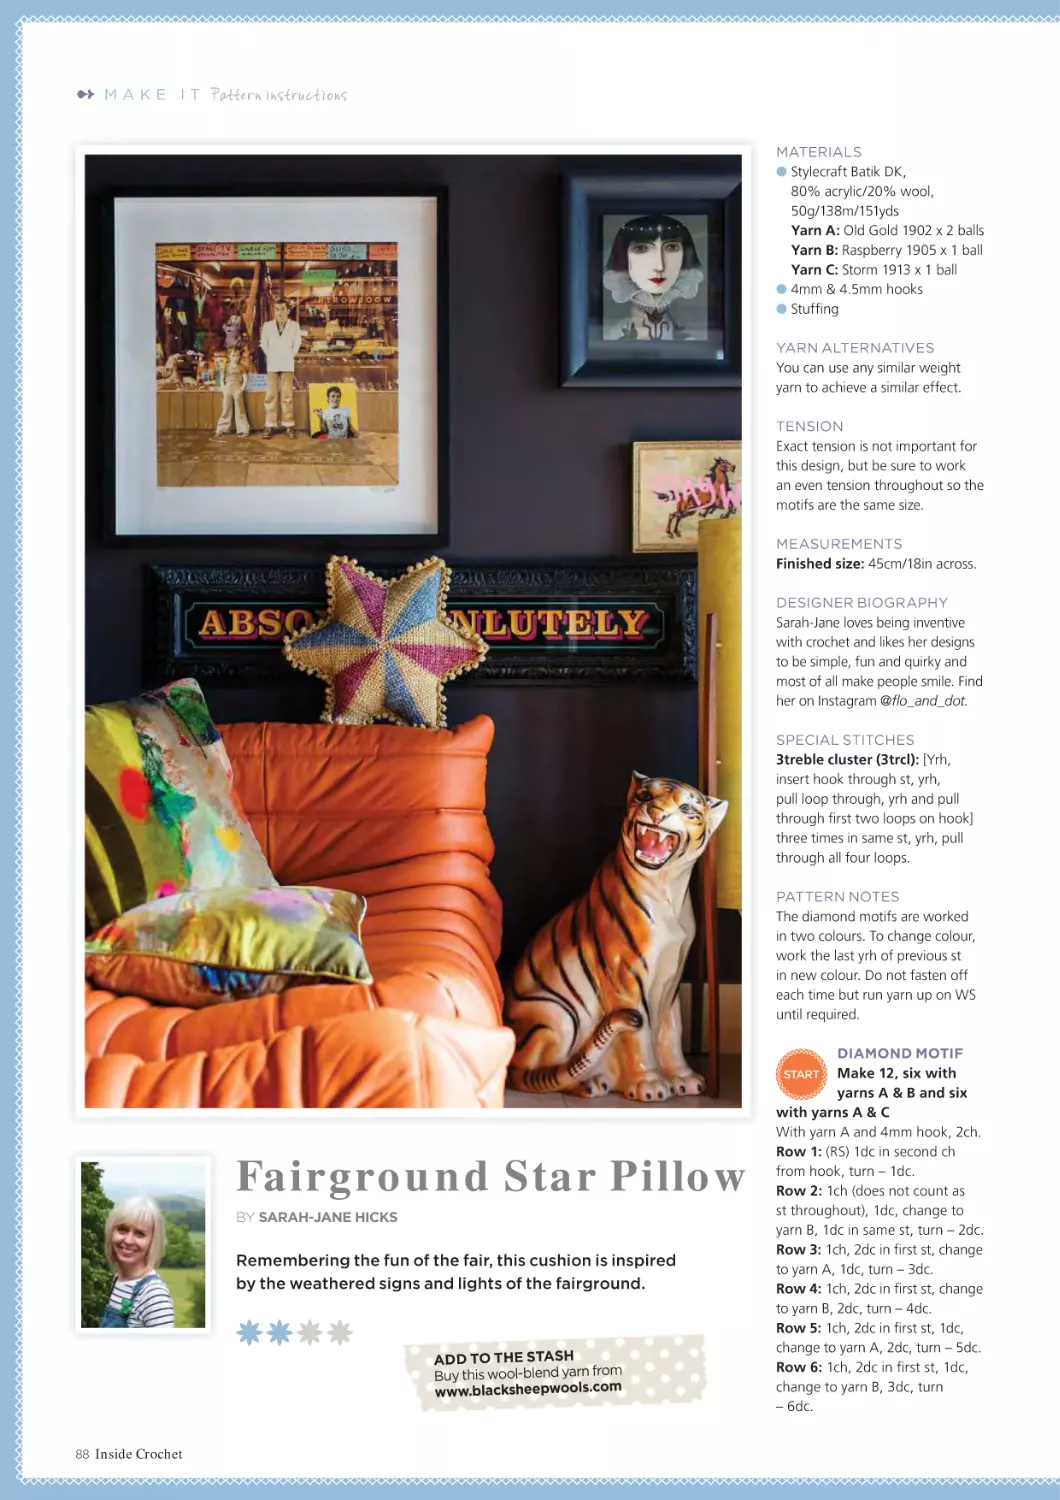
Fairground Star Pillow by Sarah-Jane Hicks Using Stylecraft Batik DK Pattern page 88
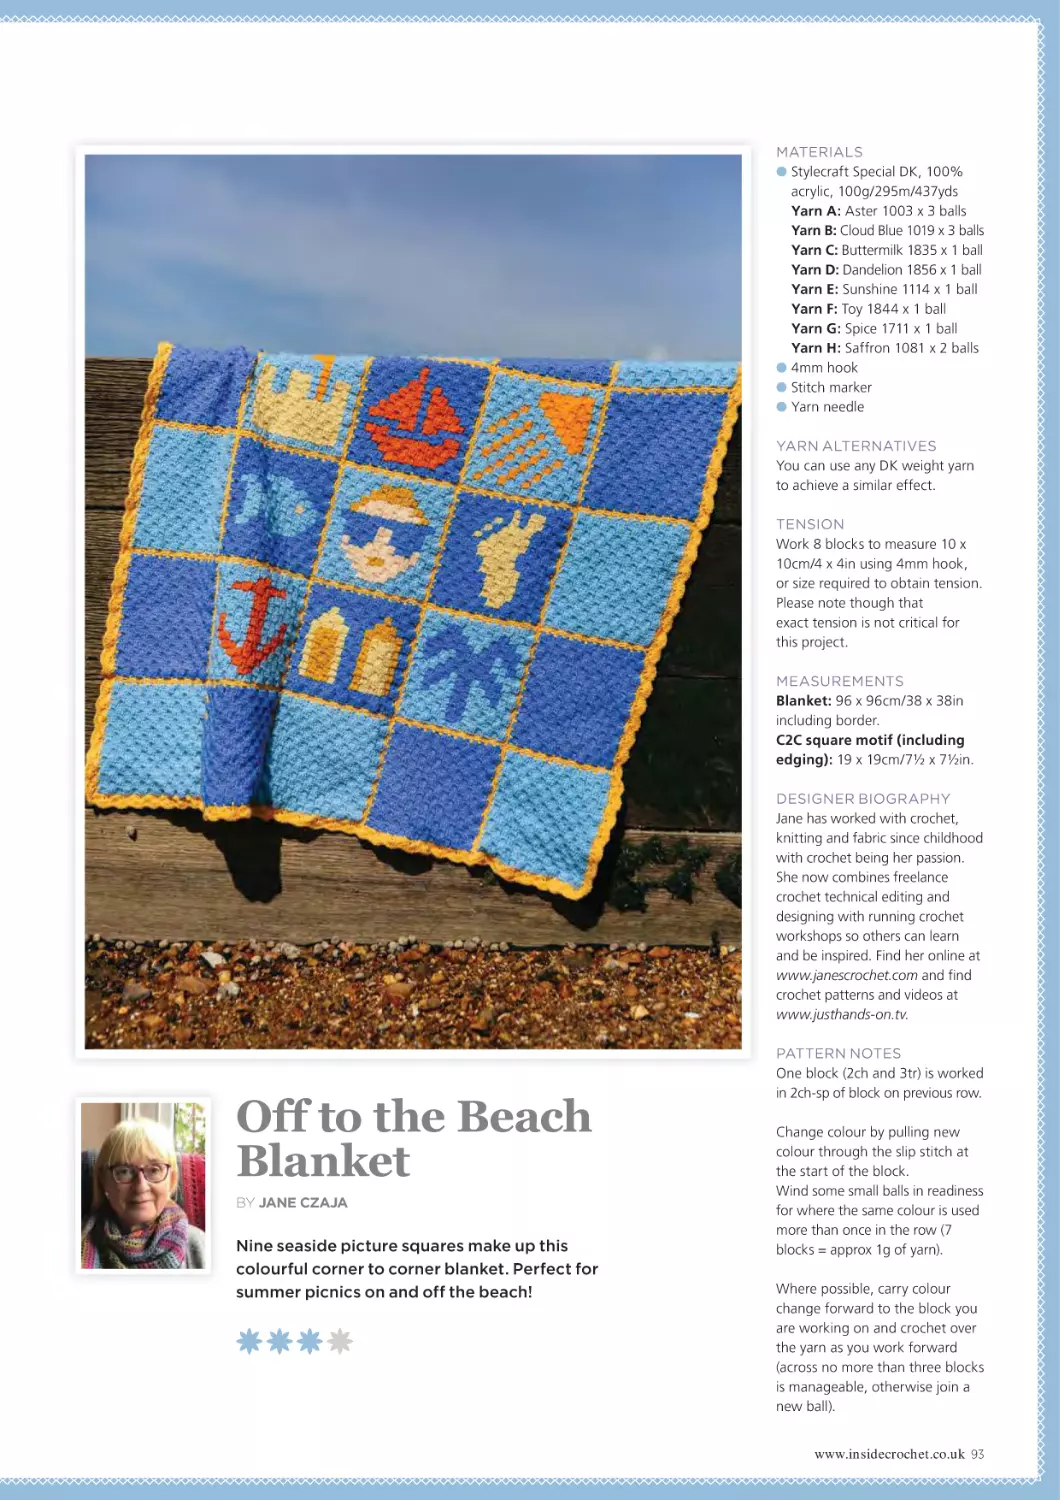
and Off To The Beach Blanket by Jane Czaja Using Stylecraft Special DK Pattern page 93
www.insidecrochet.co.uk 37
ya rn
£3.69
£2.99
pe r 100g ba ll
King Cole Baby
aby Str
Stripe DK
100% Acrylic
ll
pe r 50 g ba
Peter P,4an5%4 Aplcryylic
55% Nylon
£2.19
pe r 50g ba ll
£8.99
p a tte rns & b o o ks
ne e d le s & ho o ks
£4.59
pe r 100g ba ll
Stylecraft You & Me DK
80% Acrylic, 20% Polyamide
£5.99
pe r 50g ba ll
pe r 100 g ske in
Rico Essentialss Organnic CCotton Aran
100% Cotton
aash Wave
Cascade 2200%SupeWorw
ol
10
epjeess Downtown
cheeepj
Sch
75% Wool, 25% Nylon
£ 3.85
pe r 50g ba ll
£2.29
pe r 50g ba ll
Drops SoftpacTa,we25ed% Viscose
50% Wool, 25% Al
K
FREE URY
DELIVE
ers
on orrd£ 25
ove
Sttyylleeccrraafftt Naaturals Org
r an
a ic
Cotton DK| 100% Cotton
£9.79
pe r 50g ba ll
Rowan Cotton Wool DK
60% Cotton, 40% Wool
O rd e r o nline : www.wo o lwa re ho use .c o .uk
No minimum o rde r. £2.95 de live ry c ha rg e fo r UK o rde rs unde r £25.
knit & c ro c he t a c c e sso rie s
fa b ric
ha b e rd a she ry & a c c e sso rie s
b utto ns
rib b o ns
All the crochet supplies you’ll ever need...all under one roof!
Get
£11.49
pe r 190g ball
‘Look At What I Made’
y n packs Scheeppjejess yar
e!
make the Sophie’s Dream Blanket and mor
10 %
O FF EVER
YTHING ! *
Discount code:
IC138
Pe rfe c t for
mac ramé !
£1.05
pe r 50g ba ll
Rico Creeativ
ativee Cotton Cor
Co d Skinny
100% Cotton
£3.79
pe r 50g ball
Drropopss Paris Aran
100% Cotton
Rowanann Summerlit
Summerli e 4 Ply
100% Cotton
en
Co
m
tm
RO PS A
e D
sso
et
r
pl
t
w
Yarn packs to make your own
Attic24 projects, including
the Meadow Blanket!
m
w
w
.d
.c
ro p
sd e sig n
o
™
We’re proud to stock all these leading brands
Ca ll us: 01926 882818 o r 0800 505 3300 | Ema il us: he llo @ wo o lwa re ho use .c o .uk
* Disc o unt c o de no t va lid o n ya rn p a c ks, sa le ite ms, Sc he e p je s p ro duc ts a nd Lo p i p ro duc ts.
KNITTING
LE LANE
NEEDLE
LANE
Life’s too short not to buy
bright colourful yarn!
owse
Dip into the delights of KNL – browse
ock super
our online shop. We only stock
super
soft squishy yarn!
al,
Yarn Dye Workshops now running.
Head over to our website to book
your space!
.knittingneedlelane.co.uk
https://www.knittingneedlelane.co.uk
WE’RE OPEN - Appointments, Drop-In, One-to-One Tutoring
VISIT OUR SHOP IN STONEHAVEN,
ABERDEENSHIRE OR ON-LINE AT
WWW.BAAWOOL.CO.UK
01569 668298 hello@baawool.co.uk
43 Evan Street, Stonehaven AB39 2ET
Make it
YOUR PATTERN INSTRUCTIONS START HERE
BEGINNER
EASY
INTERMEDIATE
ADVANCED
Pier Lattice Top
Headland Slipover
Bright Lights Cardie
Pavilion Stripes Vest
Hexie Earrings
Yessabett Bueno
Page 42
Claire Montgomerie
Page 49
Cassie Ward
Page 52
Rhian Drinkwater
Page 56
Sarah Shrimpton
Page 59
Selkie Sarong
Cloud Nine Cover-up
Pacers Skirt
Estuary Market Bag
Decked Out Shawl
Tracey Todhunter
Page 60
Cassie Ward
Page 62
Rhian Drinkwater
Page 68
Kath Webber
Page 72
Rosina Northcott
Page 74
Rock Necklace
Filet Headscarf
Summer Flip-flops
Funfair Can Toss
Star Pillow
Alessandra Poggiagliolmi
Page 76
Anna Nikipirowicz
Page 79
Emma Friedlander-Collins
Page 85
Kwannie Cheng
Page 86
Sarah-Jane Hicks
Page 88
Ch e e ky Se agu ll
Off To The Beach Blanket
Smiling Sun Blanket
Coco the Crocodile
Sarah-Jane Hicks
Page 90
Jane Czaja
Page 93
Loopsan
Page 98
Erinna Lee
Page 102
www.insidecrochet.co.uk 41
➻
MAKE IT
Pattern instructions
MATERIALS
● Scheepjes Skies Light,
100% cotton,
100g/340m/372yds
Shade: Cumulonimbus 116
x 4 (4, 5, 5, 5, 6, 6) skeins
● 3mm hook
YARN ALTERNATIVES
You can use any 4ply weight
cotton to achieve a similar effect.
TENSION
Work 21 sts and 13 rows in one
row of treble and next row
in raised treble front to measure
10 x 10cm/4 x 4in using 3mm
hook, or size required to
obtain tension.
DESIGNER BIOGRAPHY
Yessabett loves crochet and
fibres. She is passionate about
crochet and is always searching
for new techniques! You can
see her work on Ravelry as
Yessabett-Bueno or on Instagram
@creaciones.ananda.
SPECIAL STITCHES
Popcorn st (PC): Yarn twice
round hook, insert hook in next
st, yrh, pull through st (4 loops
on hook), [yrh, pull through 2
loops on hook] twice, *yarn twice
round hook, insert hook in same
st, yrh, pull through st, [yrh, pull
through 2 loops on hook] twice;
rep from * three more times, yrh,
pull through all 6 loops on hook.
PATTERN NOTES
Piece 4 is for sizes XL to 4XL only.
Always work tr on RS and rtrf
on WS.
Pie r Lattice To p
BY YESSABETT BUENO
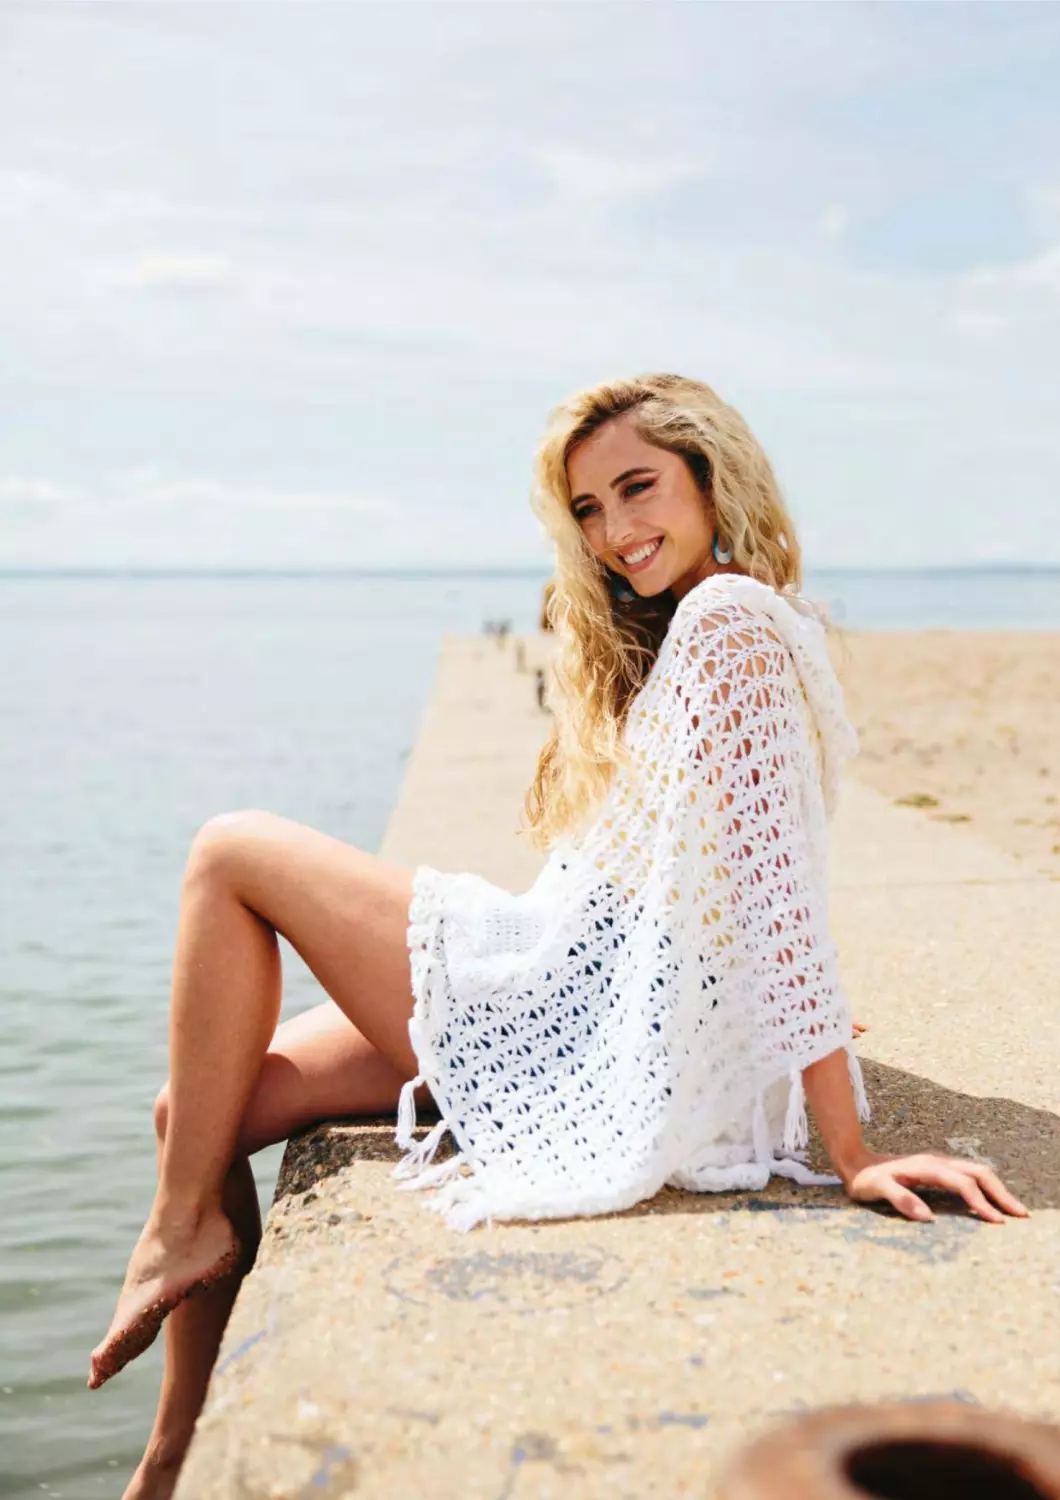
A soft, comfortable garment that takes you
down the memory lane of nostalgia.
ADD TO THE STASH
Buy this pure cotton yarn from
www.blacksheepwools.com
42 Inside Crochet
The front of the top is made
of one middle piece, then you
crochet out to the right and left
working vertically up and down
the garment. The back is worked
in one piece vertically as well
and then joined together before
working the sleeves.
CENTRE PANEL
PIECE ONE
Make one (one, one,
two, two, two, two)
Begin with adjustable ring.
Rnd 1: 2ch (counts as 1tr), 13tr
in ring, sl st in second ch to join
– 14tr.
Rnd 2: 2ch (counts as 1tr), 1tr in
START
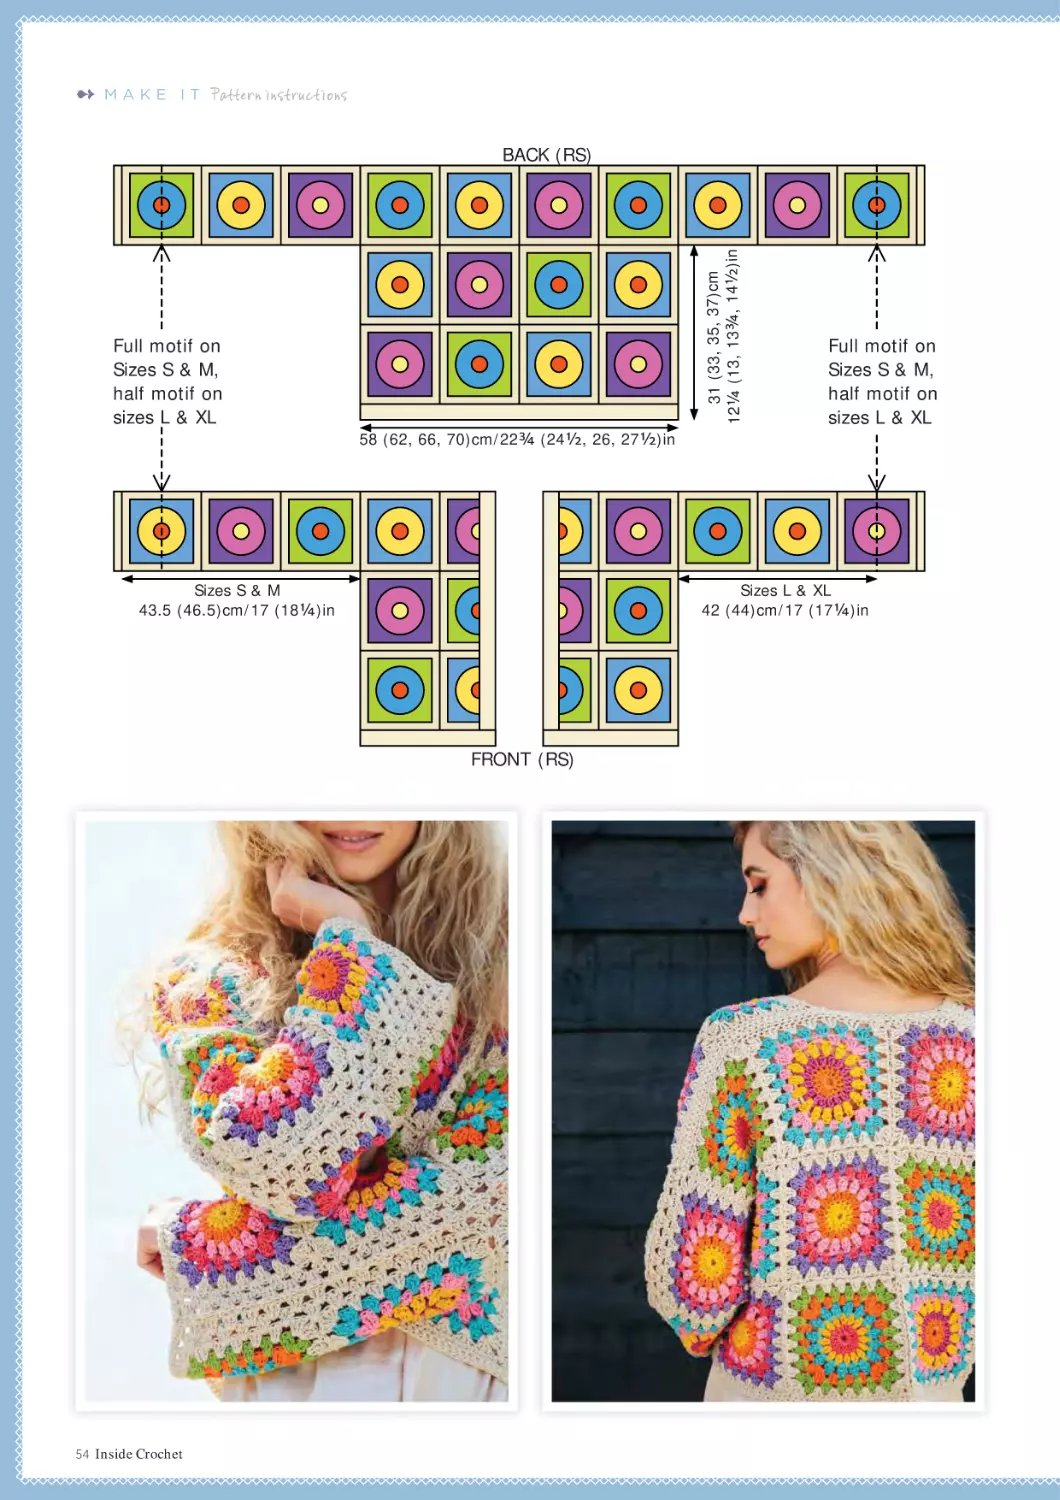
56 (58, 59, 71, 69, 70, 71)cm
22 (22¾, 23¾, 28, 27, 27½, 28)in
34 (36, 42, 45, 50.5, 53, 59.5)cm
13¼ (14, 16½, 17¾, 19¾, 20¾, 23¼)in
86 (98, 111, 120, 126, 138, 150)cm
33¾ (38½, 43¾, 47¼, 49½, 54¼, 59)in
same st, 1tr, 1ch, 1tr, 2tr in next
tr, 3ch, 1dtr, 2dtr in next tr, 1dtr,
3ch, 2tr in next tr, 1tr, 1ch, 1tr,
2tr in next tr, 3ch, 1dtr, 2dtr in
next tr, 1dtr, 3ch, sl st in second
ch to join.
Rnd 3: 2ch (counts as 1htr),
tr2tog (counts as tr3tog), 2ch,
1dc in 1ch-sp, 2ch, tr3tog, 4ch,
1dc in 3ch-sp, 4ch, dtr4tog, 4ch,
1dc in 3ch-sp, tr3tog, 2ch, 1dc
in 1ch-sp, 2ch, tr3tog, 4ch, 1dc
in 3ch-sp, 4ch, dtr4tog, 4ch, 1dc
in 3ch-sp, 4ch, sl st in second ch
to join.
Rnd 4: 1ch (does not count as
st), 1dc in first tr3tog, 5ch, 1dc
in next tr3tog, 5ch, 1tr in dc,
3ch, 1dc in 4ch-sp, 3ch, 1dc in
dtr4tog, 3ch, 1dc in 4ch-sp, 3ch,
1tr in dc, 5ch, 1dc in tr3tog, 5ch,
1dc in tr3tog, 5ch, 1tr in dc,
3ch, 1dc in 4ch-sp, 3ch, 1dc in
dtr4tog, 3ch, 1dc in 4ch-sp, 3ch,
1tr in dc, 5ch, sl st in ch to join.
Rnd 5: 2ch (counts as 1tr),
working in each ch and each st
work 19tr, (3tr, 1ch, 3tr) in next
dc (above dtr4tog), 1tr in each
ch and each st over next 33
sts, (3tr, 1ch, 3tr) in dc (above
dtr4tog), 1tr in each st to end,
sl st in second ch to join.
Rnd 6: 2ch (does not count as
st), 1rtrb in each tr to first ch-sp,
(3tr, 1ch, 3tr) in 1ch-sp, rtrb in
each tr until second ch-sp, (3tr,
1ch, 3tr) in 1ch-sp, 1rtrb in each
st to end, sl st in second ch
to join.
Rnd 7: 2ch (does not count as
st), [1PC (see Special Stitches),
5tr] four times, 2tr, (3tr, 1ch,
3tr) in 1ch-sp, 7tr, [1PC, 5tr] six
times, 2tr, (3tr, 1ch, 3tr) in 1chsp, 7tr, [1PC, 5tr] twice, sl st in
second ch to join.
Rnd 8: 2ch (counts as 1htr),
[5rtrb, 1htr] three times, 10rtrb,
PIECE ONE
www.insidecrochet.co.uk 43
➻
MAKE IT
Pattern instructions
1PC, 4tr, (3tr, 1dtr) in last st, turn.
Row 7: (WS) 3ch, 2tr in same
first st, 2rtrf, [5rtrf, 1htr] three
times, 3rtrf, 3rtrf in next tr, 3tr
[1htr, 5rtrf] three times, 2rtrf, (2tr,
1dtr) in last st.
Fasten off.
PIECE TWO
PIECE FOUR
Sizes XL, 2XL, 3XL & 4XL only
Make two
Begin with adjustable ring.
Row 1: (WS) 3ch (counts as 1dtr
here and throughout), (3tr, 1dtr)
in ring, turn – 5 sts.
Row 2: (RS) 3ch, 1tr in same first
st, 3tr, (3tr, 1dtr) in last st, turn.
Row 3: (WS) 3ch, 3tr in same first
st, 7rtrf, (1tr, 1dtr) in last st, turn.
Row 4: (RS) 3ch, 1tr in same first
st, 11tr, (3tr, 1dtr) in last st, turn.
Row 5: (WS) 3ch, 3tr in same
first st, 15rtrf, (1tr, 1dtr) in last
st, turn.
Row 6: (RS) 3ch, 1tr in same first
st, 2tr, [1PC, 5tr] twice, 1PC, 4tr,
(3tr, 1dtr) in last st, turn.
Row 7: (WS) 3ch, 2tr in same
first st, 2rtrf, [5rtrf, 1htr] three
times, 3rtrf, (1tr, 1dtr) in last st.
Fasten off.
PIECE THREE
RIGHT FRONT
Worked out from centre panel.
Following Diagram One for sizes
S, M & L only and Diagram Two
for sizes XL, 2XL, 3XL & 4XL only,
sew all pieces together.
(2tr, 1ch, 2tr) in 1ch-sp, 5rtrb,
[5rtrb, 1htr] six times, 10rtrb, (2tr,
1ch, 2tr) in 1ch-sp, 10rtrb, [1htr,
5rtrb] twice, sl st to join.
Fasten off.
PIECE TWO
Make two (two, two, one,
one, one, one)
Begin with adjustable ring.
Row 1: (RS) 2ch (counts as 1tr
here and throughout), 8tr in ring,
turn – 9tr.
Row 2: (WS) 2ch, 1tr, 2tr in next
tr, 3ch, 1dtr, 2dtr in next tr, 1dtr,
3ch, 2tr in next tr, 2tr, turn.
Row 3: (RS) 1ch (does not count
as st), 1dc, 2ch, tr3tog, 4ch, 1dc
in 3ch-sp, 4ch, dtr4tog, 4ch, 1dc
in 3ch-sp, 4ch, tr3tog, 2ch, 1dc in
top of 2ch, turn.
44 Inside Crochet
Row 4: (WS) 4ch (counts as 1tr,
2ch), 1dc in tr3tog, 5ch, 1tr in dc,
3ch, 1dc in 4ch-sp, 3ch, 1dc in
dtr4tog, 3ch, 1dc in 4ch-sp, 3ch,
1tr in dc, 5ch, 1dc in tr3tog, 2ch,
1tr in dc, turn.
Row 5: (RS) 2ch, 1tr in each st
and ch to dc above dtr4tog, (3tr,
1ch, 3tr) in 1ch-sp, 1tr in each st
and ch to end, turn.
Row 6: (WS) 2ch, 1rtrf in each st
to 1ch-sp, (3tr, 1ch, 3tr) in 1ch-sp,
1rtrf in each st to end, turn.
Row 7: (RS) 2ch, 2tr, [1PC, 5tr]
three times, 2tr, (3tr, 1ch, 3tr) in
1ch-sp, 2tr, [5tr, 1PC] three times,
3tr, turn.
Row 8: (WS) 2ch, 2rtrf, [1htr,
5rtrf] three times, 5rtrf, (2tr, 1ch,
2tr) in 1ch-sp, 5rtrf, [5rtrf, 1htr]
three times, 2rtrf, 1tr. Fasten off.
PIECE THREE
Make four
Begin with adjustable ring.
Row 1: (WS) 3ch (counts as 1dtr
here and throughout), 7tr, 1dtr in
ring, turn – 9 sts.
Row 2: (RS) 3ch, 3tr in same first
st, 3tr, 3tr in next tr, 3tr, (3tr,
1dtr) in last st, turn.
Row 3: (WS) 3ch, 3tr in same
first st, 7rtrf, 3rtrf in next tr, 7rtrf,
(3tr, 1dtr) in last st, turn.
Row 4: (RS) 3ch, 3tr in same first
st, 11tr, 3tr in next tr, 11tr, (3tr,
1dtr) in last st, turn.
Row 5: (WS) 3ch, 3tr in same
first st, 15rtrf, 3rtrf in next tr,
15rtrf, (3tr, 1dtr) in last st, turn.
Row 6: (RS) 3ch, 3tr in same first
st, 4tr, [1PC, 5tr] twice, 1PC, 2tr,
3tr in next tr, 2tr, [1PC, 5tr] twice,
Row 1: (RS) With RS facing,
starting in top left corner for
right front, work in tr down long
side of centre piece (working 3tr
in each st where the pieces join)
evenly space 89 (89, 89, 113, 113,
113, 113)tr along, turn – 89 (89,
89, 113, 113, 113, 113) sts.
Row 2: (WS) 2ch (counts as
1rtrf), rtrf across to last st, (2tr,
1dtr) in last st, turn – 91 (91, 91,
115, 115, 115, 115) sts.
Row 3: (RS) 3ch (counts as 1tr),
2tr in same st, tr to end, turn –
93 (93, 93, 117, 117, 117, 117) sts.
Rows 4–9 (11, 12, 13, 11, 12,
13): Rep Rows 2 & 3 – 105 (109,
111, 137, 133, 135, 137) sts.
Row 10 (12, 13, 14, 12, 13, 14):
2ch, rtrf (rtrf, tr, rtrf, rtrf, tr, rtrf)
to end, turn.
Row 11 (13, 14, 15, 13, 14, 15):
2ch, tr (tr, rtrf, tr, tr, rtrf, tr) to
end, turn.
Last two rows form patt and are
repeated.
Sizes S, M & L ONLY
Sizes XL, 2XL, 3XL & 4XL
Piece 2
Piece 3
Piece 3
Piece 3
Piece 1
Piece 3
Piece 1
Piece 3
Piece 3
Piece 3
Piece 3
Piece 2
Piece 2
Piece 1
Piece 4
Piece 4
Diagram One
Sizes S, M & L ONLY
Diagram Two
Sizes XL, 2XL, 3XL & 4XL ONLY
PIECE FOUR
Cont in patt for a further 5 (6, 8,
8, 9, 11, 15) rows.
SHAPE ARMHOLE
From the top of the fabric, (ie
where the rows of increases are),
miss 36 (38, 42, 44, 46, 48, 53)
sts, PM, and then count 69 (71,
69, 93, 87, 87, 84) sts to bottom.
Cont in patt as set working tr on
RS and rtrf on WS as folls:
Row 1: From the bottom, 2ch,
patt to end, turn – 69 (71, 69, 93,
87, 87, 84) sts.
Note: If you finish last row at the
top of the fabric on WS, fasten
off and start to work on RS from
top of armhole to bottom.
Rows 2–3 (4, 5, 6, 8, 9, 10):
Rep Row 1.
Fasten off.
LEFT FRONT
Worked out from centre panel.
Row 1: (RS) With RS facing,
starting in bottom right corner
for left front, work in tr up long
side of centre piece (working 3tr
in each st where the pieces join)
evenly space 89 (89, 89, 113, 113,
113, 113)tr along, turn – 89 (89,
89, 113, 113, 113, 113) sts.
Row 2: (WS) 3ch (count as 1rtrf),
2rtrf in same first st, rtrf across
row, turn – 91 (91, 91, 115, 115,
115, 115) sts.
Row 3: (RS) 2ch (count as 1tr), tr
in each st across row, (2tr, 1dtr) in
last st, turn – 93 (93, 93, 117, 117,
117, 117) sts.
Rows 4–9 (11, 12, 13, 11, 12,
13): Rep Rows 2 & 3 – 105 (109,
111, 137, 133, 135, 137) sts.
Row 10 (12, 13, 14, 12, 13, 14):
2ch, rtrf (rtrf, tr, rtrf, rtrf, tr, rtrf)
to end, turn.
Row 11 (13, 14, 15, 13, 14, 15):
2ch, tr (tr, rtrf, tr, tr, rtrf, tr) to
end, turn.
Last two rows form patt and are
repeated.
Cont in patt for a further 5 (6, 8,
8, 9, 11, 15) rows.
www.insidecrochet.co.uk 45
➻
MAKE IT
Pattern instructions
8
7
6
5
4
3
BACK
With 3mm hook, 71 (73, 71, 95,
89, 89, 86)ch.
Row 1: (RS) 1tr in fourth ch from
hook (first 3ch counts as a st) and
in each ch to end, turn – 69 (71,
69, 93, 87, 87, 84) sts.
Row 2: (WS) 2ch (counts as 1rtrf),
rtrf in each st across row, turn.
Row 3: (RS) 2ch (counts as 1tr), tr
in each st across row, turn.
These two rows form patt and
are repeated.
Work another 0 (1, 2, 3, 5, 6, 7)
row(s) in patt.
2
1
BOTTOM EDGE LACE PATTERN
SHAPE ARMHOLE
From the top of the fabric, (ie
where the rows of increases are),
miss 36 (38, 42, 44, 46, 48, 53)
sts, PM, and then count 69 (71,
69, 93, 87, 87, 84) sts to bottom.
Cont in patt as set working tr on
RS and rtrf on WS as folls:
46 Inside Crochet
Row 1: From the bottom, 2ch,
patt to end, turn – 69 (71, 69, 93,
87, 87, 84) sts.
Note: If you finish last row at the
top of the fabric on RS, you must
fasten off and start to work on
WS from armhole to bottom.
Rows 2–3 (4, 5, 6, 8, 9, 10):
Repeat Row 1. Fasten off.
Keeping two-row patt correct,
cont as folls:
Next Row: 38 (40, 44, 46, 48,
50, 55)ch, 1tr or rtrf in fourth
ch from hook, patt to end, turn
– 105 (109, 111, 137, 133, 135,
137) sts.
Rows 5–10 (6–12, 7–15, 8–17,
10–21, 11–24, 12–27): Patt to
end, turn.
Sizes S, M & 3XL only
Row 11 (13, -, -, -, 25, -): (RS)
3ch, tr2tog (counts as tr3tog),
tr across row, turn – 103 (107, -,
-, -, 133, -) sts.
Row 12 (14, -, -, -, 26, -): (WS)
2ch, rtrf across row until last 3
sts, tr3tog, turn – 101 (105, -, -,
-, 131, -) sts.
Sizes L, XL, 2XL & 4XL only
Row – (-, 16, 18, 22, -, 28): (WS)
2ch, rtrf across row until last
3 sts, tr3tog, turn – - (-, 109, 135,
131, -, 135) sts.
Row – (-, 17, 19, 23, -, 29): (RS)
3ch, tr2tog (counts as tr3tog), tr
across row, turn – - (-, 107, 133,
129, -, 133) sts.
All sizes
You should have 101 (105, 107,
133, 129, 131, 133) sts.
Rows 13–18 (15–22, 17–25,
19–28, 23–30, 27–35, 29–38):
Rep last two rows – 89 (89, 89,
113, 113, 113, 113) sts.
Rows 19–38 (23–42, 26–46,
29–49, 31–51, 36–55, 39–59):
Patt to end without shaping.
Sizes S, M & L only
Row 39 (43, 47, -, -, -, -): (RS)
3ch, 2tr in same first st, tr to end,
turn – 91 (91, 91, -, -, -, -) sts.
Row 40 (44, 48, -, -, -, -): (WS)
2ch, rtrf to last st, (2tr, 1dtr), turn
– 93 (93, 93, -, -, -, -) sts.
Sizes XL, 2XL, 3XL & 4XL only
Row – (-, -, 50, 52, 56, 60): (WS)
2ch, rtrf to last st, (2tr, 1dtr), turn
– - (-, -, 115, 115, 115, 115) sts.
Row – (-, -, 51, 53, 57, 61): (RS)
3ch, 2tr in same first st, tr to
end, turn – - (-, -, 117, 117, 117,
117) sts.
All sizes
You should have 93 (93, 93, 117,
117, 117, 117) sts.
Rows 41–46 (45–52, 49–57,
52–61, 54–61, 58–66, 62–71):
Rep last two rows – 105 (109,
111, 137, 133, 135, 137) sts.
Rows 47–53 (53–60, 58–67,
62–72, 62–74, 67–81, 72–88):
Patt to end without shaping.
SHAPE ARMHOLE
From the top of the fabric, (ie
where the rows of increases are),
miss 36 (38, 42, 44, 46, 48, 53)
sts, PM, and then count 69 (71,
69, 93, 87, 87, 84) sts to bottom.
Working on these 69 (71, 69, 93,
87, 87, 84) sts only and working
next row on WS or RS as set cont
as folls:
Next Row: 2ch (counts as first
st), patt to end, turn – 69 (71, 69,
93, 87, 87, 84) sts.
Note: If last row ends at top of
fabric on WS, you must fasten
off and start to work on RS from
armhole depth to bottom.
Rows 2–56 (64, 72, 78, 82, 90,
98): Repeat prev row – 69 (71,
69, 93, 87, 87, 84) sts.
Fasten off.
JOINING
Align both sections of work and
join shoulder and side seams.
BOTTOM EDGE LACE
PATTERN
Rejoin yarn to bottom edge at
side seam.
Rnd 1: 1ch (counts as 1dc), dc all
around being sure to have a final
number of sts that is a multiple of
four, plus one, sl st to join.
Rnd 2: 2ch (counts as 1tr), 4ch,
miss 3 dc, [1tr, 4ch, miss 3 dc] to
end, sl st in second ch to join.
Rnd 3: 2ch, 2tr in same st, 2ch,
[3tr in next tr, 2ch] to end, sl st in
second ch to join.
Rnd 4: 2ch, 1tr in same st, 1tr,
2tr in next tr, 1ch, [2tr in next tr,
1tr, 2tr in next tr, 1ch] to end, sl st
in second ch to join.
Rnd 5: 2ch, 4tr, 1ch, [5tr, 1ch] to
end, sl st in second ch to join.
Rnd 6: 2ch, 1tr, tr2tog, 1tr, 2ch,
[2tr, tr2tog, 1tr, 2ch] to end, sl st
in second ch to join.
Rnd 7: 1ch (does not count as st),
*1dc in first tr, 2ch, dtr2tog, 2ch,
1dc in last tr, 1ch, 1dc in 1ch-sp,
1ch; rep from * to end, sl st in
first ch to join.
Rnd 8: 1ch (does not count as st),
*2dc in 2ch-sp, 2dc in dtr2tog,
2dc in 2ch-sp, sl st in 1ch-sp, sl st
in next dc, sl st in next 1ch-sp,
rep from* to end, sl st in first ch
to join
Fasten off.
SLEEVES
Both alike
Rejoin yarn at top of seam
underarm and work around
armhole as folls:
Rnd 1: 13 (19, 25, 23, 27, 29,
31)dc, 10 (10, 10, 10, 12, 12,
14)htr, 40 (36, 36, 48, 48, 52,
58)tr, 10 (10, 10, 10, 12, 12,
14)htr, 13 (19, 25, 23, 27, 29,
31)dc, sl st in first st to join – 86
(94, 106, 114, 126, 134, 148) sts.
Rnd 2: 1ch (does not count as st
here and throughout), dc2tog,
11 (17, 23, 21, 25, 27, 29)dc,
40 (36, 36, 48, 48, 52, 58)tr,
10 (10, 10, 10, 12, 12, 14)htr,
11 (17, 23, 21, 25, 27, 29)dc,
dc2tog, sl st to join – 84 (92,
104, 112, 124, 132, 146) sts.
Rnd 3: 1ch, dc2tog, 9 (15, 21, 19,
23, 25, 27)dc, 40 (36, 36, 48, 48,
52, 58)tr, 10 (10, 10, 10, 12, 12,
14)htr, 12 (18, 24, 22, 26, 28, 30)
dc, sl st to join – 83 (91, 103, 111,
123, 131, 145) sts.
Rnds 4–10 (12, 12, 14, 14, 16,
TO FIT BUST
ACTUAL BUST
SLEEVE SEAM
LENGTH
16): Working dc over dc, htr over
htr and tr over tr around, rep
Rnds 1 & 2 – 77 (83, 95, 101,
113, 119, 133) sts.
Rnd 11 (13, 13, 15, 15, 17, 17):
2ch (counts as 1tr), tr2tog, 1tr
in each st until around, sl st in
second ch to join – 76 (82, 94,
100, 112, 118, 132) sts.
Rnd 12 (14, 14, 16, 16, 18, 18):
2ch, tr2tog, tr to last 2 sts, tr3tog,
sl st in second ch to join – 73 (79,
91, 97, 109, 115, 129) sts.
Rnds 13–21 (15–23, 15–28,
17–28, 17–29, 19–30, 19–34):
Rep last two rnds – 56 (63, 63,
73, 84, 91, 97) sts.
Work seven rnds in dc without
shaping.
Fasten off.
FINISHING
Weave in ends and
block to measurements.
END
S
M
L
XL
2XL
3XL
4XL
82
94
106
115
121
133
145
cm
32¼
37
41¾
45¼
47½
52¼
57
in
86
98
111
120
126
138
150
cm
33¾
38½
43¾
47¼
49½
54¼
59
in
34
36
42
45
50.5
53
59.5
cm
13¼
14
16½
17¾
19¾
20¾
23¼
in
56
58
59
71
69
70
71
cm
22
22¾
23¾
28
27
27½
28
in
www.insidecrochet.co.uk 47
Yarn, kits, patterns, gifts and more for
all yarn lovers out there
www.lilyk.co.uk
Opening times
Mon to Sat 9.30 til 4
Sundays & Bank Holidays Closed
16 Benedicts Court, Huntingdon PE29 3PN
01480 700890
contact@patcheshaberdashery.co.uk
www.patcheshaberdashery.co.uk
FABRICS
HANDMADE
ITEMS
YARNS
HABERDASHERY
SOCIAL
CRAFTING
GROUP
MATERIALS
● Rowan Cotton Wool,
60% cotton/40% wool,
50g/130m/142yds
Shade: Nutkin 209 x 4 (5, 6,
6, 7, 7, 8, 8, 9) balls
● 5.5mm hook
YARN ALTERNATIVES
Any DK to aran-weight yarn can
be substituted here.
TENSION
Check your tension carefully as
this vest is worked on a much
larger hook than the ball band
suggests to make use of its
plump airiness.
Work 13htr and 10 rows in
pattern to measure 10 x 10cm/
4 x 4in using 5.5mm hook, or size
required to obtain tension.
DESIGNER BIOGRAPHY
Claire is a textiles stylist, author,
editor, teacher and designer
specialising in knit and crochet.
Find out more on Instagram
@clairemontyknits.
SPECIAL STITCHES
Foundation treble (ftr): 3ch
(counts as 1ftr), yrh, insert in third
chain from hook and pull up a
loop, (3 loops on hook), yrh and
draw through first loop only to
create “1ch”, (3 loops on hook),
(yrh and pull through 2 loops)
twice. Foundation treble crochet
stitch completed (2ftr in total
including first 3ch). *Yrh, insert
hook in ‘1ch’ of last stitch and
pull up a loop, (3 loops on hook),
yrh and draw through first loop
only to create “1ch”, (3 loops
on hook), (yrh and pull through
2 loops) twice; rep from * until
desired number of stitches.
He ad lan d Slipo ve r
BY CLAIRE MONTGOMERIE
This simple, practical vest is the perfect contemporary layering
piece for cool summer evenings or blustery beach days.
ADD TO THE STASH
Buy this cotton-blend yarn from
www.englishyarns.co.uk
Raised Treble Front (rtrf): Yrh,
wrap hook around next stitch
from right to left, inserting hook
into the space to the right of the
stitch from front of fabric, around
the back and out to the front
again into the space to the left
of the stitch, yrh, draw a loop
around the back of the stitch
to the front, (3 loops on hook),
finish off treble as normal.
Raised Treble Back (rtrb): Yrh,
wrap hook around next stitch
from right to left, inserting hook
into the space to the right of the
www.insidecrochet.co.uk 49
stitch from back of fabric, around
the front of stitch and out to the
back again into the space to the
left of the stitch, yrh, draw a loop
around the front of the stitch
to the back, (3 loops on hook),
finish off treble as normal.
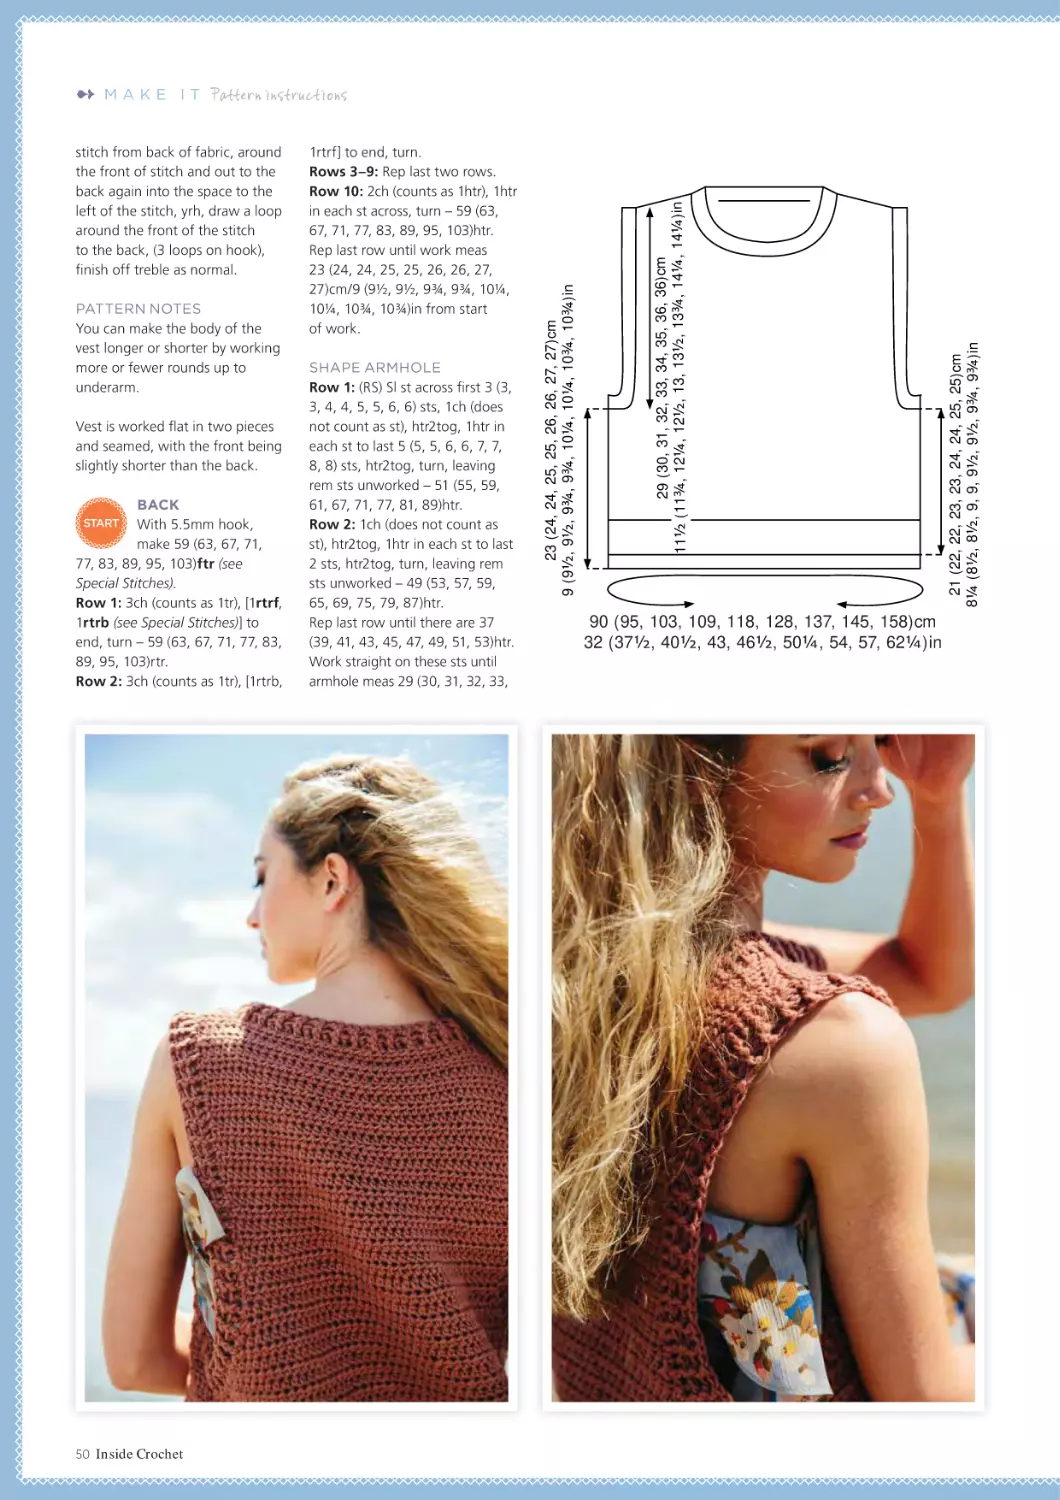
PATTERN NOTES
You can make the body of the
vest longer or shorter by working
more or fewer rounds up to
underarm.
Vest is worked flat in two pieces
and seamed, with the front being
slightly shorter than the back.
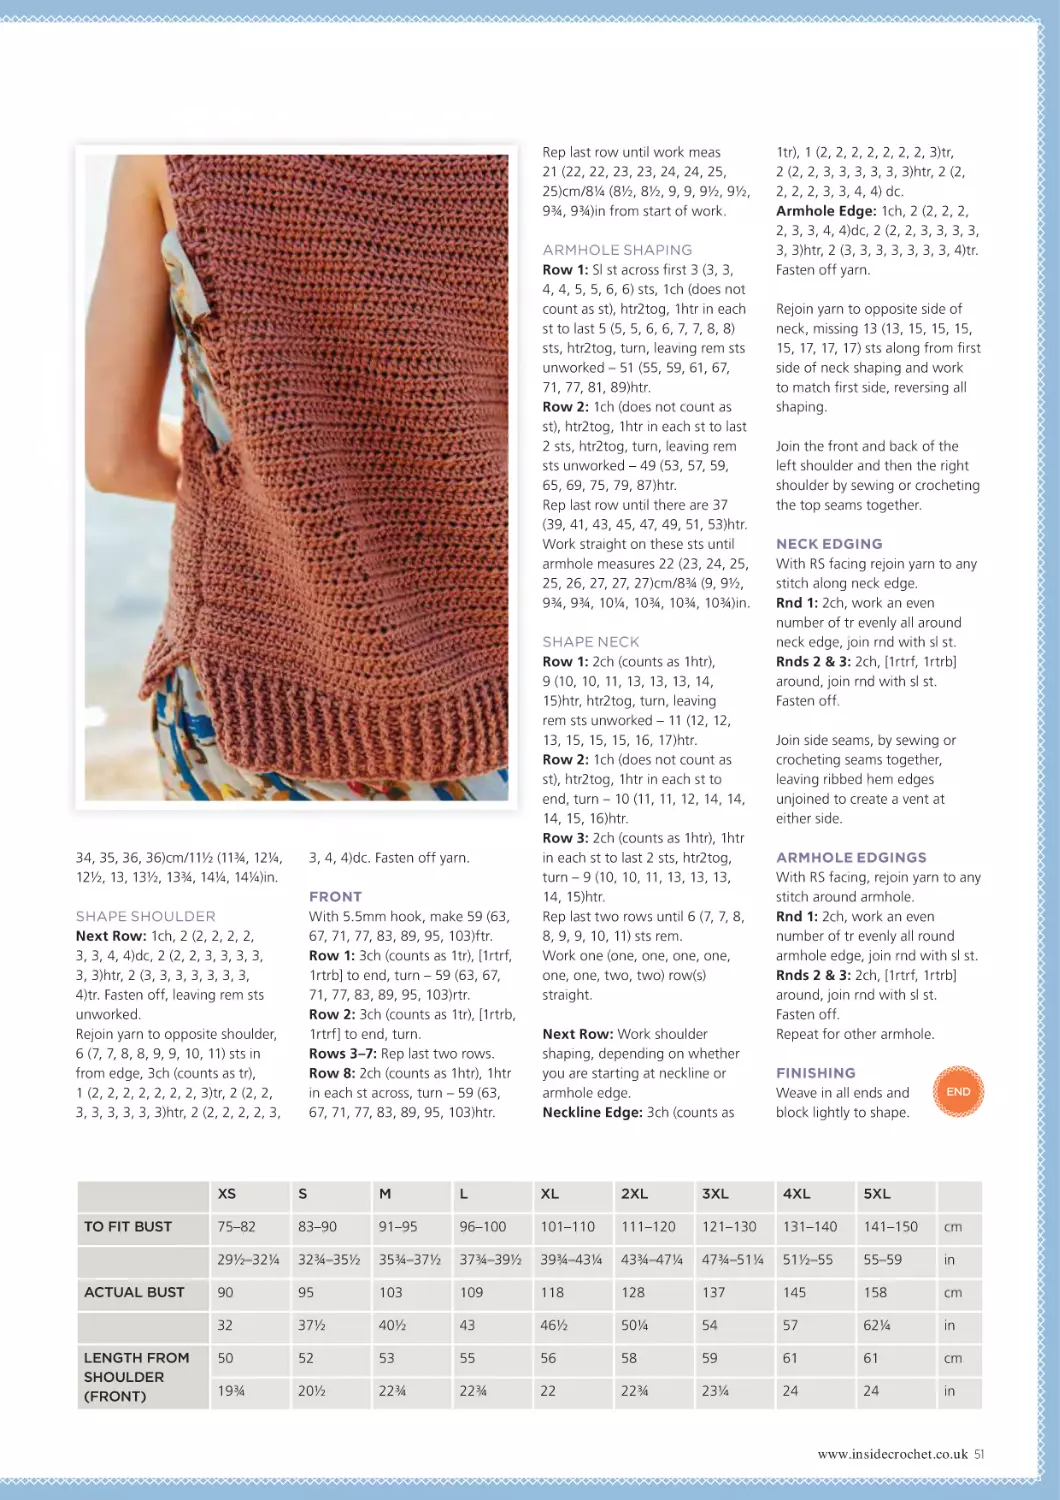
BACK
With 5.5mm hook,
make 59 (63, 67, 71,
77, 83, 89, 95, 103)ftr (see
Special Stitches).
Row 1: 3ch (counts as 1tr), [1rtrf,
1rtrb (see Special Stitches)] to
end, turn – 59 (63, 67, 71, 77, 83,
89, 95, 103)rtr.
Row 2: 3ch (counts as 1tr), [1rtrb,
START
50 Inside Crochet
1rtrf] to end, turn.
Rows 3–9: Rep last two rows.
Row 10: 2ch (counts as 1htr), 1htr
in each st across, turn – 59 (63,
67, 71, 77, 83, 89, 95, 103)htr.
Rep last row until work meas
23 (24, 24, 25, 25, 26, 26, 27,
27)cm/9 (9½, 9½, 9¾, 9¾, 10¼,
10¼, 10¾, 10¾)in from start
of work.
SHAPE ARMHOLE
Row 1: (RS) Sl st across first 3 (3,
3, 4, 4, 5, 5, 6, 6) sts, 1ch (does
not count as st), htr2tog, 1htr in
each st to last 5 (5, 5, 6, 6, 7, 7,
8, 8) sts, htr2tog, turn, leaving
rem sts unworked – 51 (55, 59,
61, 67, 71, 77, 81, 89)htr.
Row 2: 1ch (does not count as
st), htr2tog, 1htr in each st to last
2 sts, htr2tog, turn, leaving rem
sts unworked – 49 (53, 57, 59,
65, 69, 75, 79, 87)htr.
Rep last row until there are 37
(39, 41, 43, 45, 47, 49, 51, 53)htr.
Work straight on these sts until
armhole meas 29 (30, 31, 32, 33,
90 (95, 103, 109, 118, 128, 137, 145, 158)cm
32 (37½, 40½, 43, 46½, 50¼, 54, 57, 62¼)in
21 (22, 22, 23, 23, 24, 24, 25, 25)cm
8¼ (8½, 8½, 9, 9, 9½, 9½, 9¾, 9¾)in
Pattern instructions
29 (30, 31, 32, 33, 34, 35, 36, 36)cm
11½ (11¾, 12¼, 12½, 13, 13½, 13¾, 14¼, 14¼)in
MAKE IT
23 (24, 24, 25, 25, 26, 26, 27, 27)cm
9 (9½, 9½, 9¾, 9¾, 10¼, 10¼, 10¾, 10¾)in
➻
Rep last row until work meas
21 (22, 22, 23, 23, 24, 24, 25,
25)cm/8¼ (8½, 8½, 9, 9, 9½, 9½,
9¾, 9¾)in from start of work.
ARMHOLE SHAPING
Row 1: Sl st across first 3 (3, 3,
4, 4, 5, 5, 6, 6) sts, 1ch (does not
count as st), htr2tog, 1htr in each
st to last 5 (5, 5, 6, 6, 7, 7, 8, 8)
sts, htr2tog, turn, leaving rem sts
unworked – 51 (55, 59, 61, 67,
71, 77, 81, 89)htr.
Row 2: 1ch (does not count as
st), htr2tog, 1htr in each st to last
2 sts, htr2tog, turn, leaving rem
sts unworked – 49 (53, 57, 59,
65, 69, 75, 79, 87)htr.
Rep last row until there are 37
(39, 41, 43, 45, 47, 49, 51, 53)htr.
Work straight on these sts until
armhole measures 22 (23, 24, 25,
25, 26, 27, 27, 27)cm/8¾ (9, 9½,
9¾, 9¾, 10¼, 10¾, 10¾, 10¾)in.
34, 35, 36, 36)cm/11½ (11¾, 12¼,
12½, 13, 13½, 13¾, 14¼, 14¼)in.
3, 4, 4)dc. Fasten off yarn.
FRONT
With 5.5mm hook, make 59 (63,
67, 71, 77, 83, 89, 95, 103)ftr.
Row 1: 3ch (counts as 1tr), [1rtrf,
1rtrb] to end, turn – 59 (63, 67,
71, 77, 83, 89, 95, 103)rtr.
Row 2: 3ch (counts as 1tr), [1rtrb,
1rtrf] to end, turn.
Rows 3–7: Rep last two rows.
Row 8: 2ch (counts as 1htr), 1htr
in each st across, turn – 59 (63,
67, 71, 77, 83, 89, 95, 103)htr.
SHAPE SHOULDER
Next Row: 1ch, 2 (2, 2, 2, 2,
3, 3, 4, 4)dc, 2 (2, 2, 3, 3, 3, 3,
3, 3)htr, 2 (3, 3, 3, 3, 3, 3, 3,
4)tr. Fasten off, leaving rem sts
unworked.
Rejoin yarn to opposite shoulder,
6 (7, 7, 8, 8, 9, 9, 10, 11) sts in
from edge, 3ch (counts as tr),
1 (2, 2, 2, 2, 2, 2, 2, 3)tr, 2 (2, 2,
3, 3, 3, 3, 3, 3)htr, 2 (2, 2, 2, 2, 3,
TO FIT BUST
ACTUAL BUST
LENGTH FROM
SHOULDER
(FRONT)
SHAPE NECK
Row 1: 2ch (counts as 1htr),
9 (10, 10, 11, 13, 13, 13, 14,
15)htr, htr2tog, turn, leaving
rem sts unworked – 11 (12, 12,
13, 15, 15, 15, 16, 17)htr.
Row 2: 1ch (does not count as
st), htr2tog, 1htr in each st to
end, turn – 10 (11, 11, 12, 14, 14,
14, 15, 16)htr.
Row 3: 2ch (counts as 1htr), 1htr
in each st to last 2 sts, htr2tog,
turn – 9 (10, 10, 11, 13, 13, 13,
14, 15)htr.
Rep last two rows until 6 (7, 7, 8,
8, 9, 9, 10, 11) sts rem.
Work one (one, one, one, one,
one, one, two, two) row(s)
straight.
Next Row: Work shoulder
shaping, depending on whether
you are starting at neckline or
armhole edge.
Neckline Edge: 3ch (counts as
1tr), 1 (2, 2, 2, 2, 2, 2, 2, 3)tr,
2 (2, 2, 3, 3, 3, 3, 3, 3)htr, 2 (2,
2, 2, 2, 3, 3, 4, 4) dc.
Armhole Edge: 1ch, 2 (2, 2, 2,
2, 3, 3, 4, 4)dc, 2 (2, 2, 3, 3, 3, 3,
3, 3)htr, 2 (3, 3, 3, 3, 3, 3, 3, 4)tr.
Fasten off yarn.
Rejoin yarn to opposite side of
neck, missing 13 (13, 15, 15, 15,
15, 17, 17, 17) sts along from first
side of neck shaping and work
to match first side, reversing all
shaping.
Join the front and back of the
left shoulder and then the right
shoulder by sewing or crocheting
the top seams together.
NECK EDGING
With RS facing rejoin yarn to any
stitch along neck edge.
Rnd 1: 2ch, work an even
number of tr evenly all around
neck edge, join rnd with sl st.
Rnds 2 & 3: 2ch, [1rtrf, 1rtrb]
around, join rnd with sl st.
Fasten off.
Join side seams, by sewing or
crocheting seams together,
leaving ribbed hem edges
unjoined to create a vent at
either side.
ARMHOLE EDGINGS
With RS facing, rejoin yarn to any
stitch around armhole.
Rnd 1: 2ch, work an even
number of tr evenly all round
armhole edge, join rnd with sl st.
Rnds 2 & 3: 2ch, [1rtrf, 1rtrb]
around, join rnd with sl st.
Fasten off.
Repeat for other armhole.
FINISHING
Weave in all ends and
block lightly to shape.
END
XS
S
M
L
XL
2XL
3XL
4XL
5XL
75–82
83–90
91–95
96–100
101–110
111–120
121–130
131–140
141–150
cm
29½–32¼
32¾–35½
35¾–37½
37¾–39½
39¾–43¼
43¾–47¼
47¾–51¼
51½–55
55–59
in
90
95
103
109
118
128
137
145
158
cm
32
37½
40½
43
46½
50¼
54
57
62¼
in
50
52
53
55
56
58
59
61
61
cm
19¾
20½
22¾
22¾
22
22¾
23¼
24
24
in
www.insidecrochet.co.uk 51
➻
MAKE IT
Pattern instructions
MATERIALS
● Paintbox Yarns Cotton
DK, 100% cotton,
50g/125m/137yds
Yarn A: Vanilla Cream 408
x 6 (7, 9, 11) balls
Yarn B: Buttercup Yellow 423
x 1 ball
Yarn C: Blood Orange 420
x 2 balls
Yarn D: Bubblegum Pink 451
x 1 ball
Yarn E: Lipstick Pink 452
x 1 ball
Yarn F: Dusty Lilac 447 x 1 ball
Yarn G: Marine Blue 434
x 2 balls
Yarn H: Lime Green 429
x 1 ball
Yarn I: Raspberry Pink 444
x 1 ball
● 4.5mm hook
YARN ALTERNATIVES
You can use any DK yarn that
works to the same tension for
this design.
TENSION
Work each motif to measure 14.5
(15.5, 16.5, 17.5)cm/5¾ (6, 6½,
7)in square using 4.5mm hook or
size required to obtain tension.
DESIGNER BIOGRAPHY
Cassie loves creating projects
with her beloved granny square
– they are such a relaxing make
perfect for moments to reflect.
SPECIAL STITCHES
2trCl: *Yrh, insert hook in next st
or space, yrh, pull up a loop, yrh,
pull through 2 loops; rep from *
once more, yrh pull through all
rem loops.
3trCl: *Yrh, insert hook in next st
or space, yrh, pull up a loop, yrh,
pull through 2 loops; rep from *
twice more, yrh pull through all
rem loops.
Bright Lights Card igan
BY CASSIE WARD
This gorgeous cropped cardigan is perfect for walks
along the pier and days at the beach.
ADD TO THE STASH
Buy this pure cotton yarn from
www.lovecrafts.com
52 Inside Crochet
PATTERN NOTES
Work full and half motifs in the
following colourways as directed.
COLOURWAY ONE
Row 1: Yarn B.
Row 2: Yarn C.
Row 3: Yarn D.
Row 4: Yarn E.
Row 5: Yarn F.
Row(s) 6 (6, 6 & 7, 6 & 7):
Yarn A.
ch
htr
tr
4
5
3
2trCl
2
3trCl
sl st
1
Chart shows Rnds 1-5 only. For Rnds 6 (6, 6-7, 6-7) see written
instructions for your size.
4
2
1
3
5
Chart shows Rnds 1-5 only. For Rnds 6 (6, 6-7, 6-7) see written
instructions for your size.
COLOURWAY TWO
Row 1: Yarn C.
Row 2: Yarn I.
Row 3: Yarn B.
Row 4: Yarn D.
Row 5: Yarn G.
Row(s) 6 (6, 6 & 7, 6 & 7):
Yarn A.
COLOURWAY THREE
Row 1: Yarn E.
Row 2: Yarn B.
Row 3: Yarn G.
Row 4: Yarn C.
Row 5: Yarn H.
Row(s) 6 (6, 6 & 7, 6 & 7):
Yarn A.
FULL MOTIF
Sizes S & M only
Make 30 full Motifs,
ten in each colourway.
START
Sizes L & XL ONLY
Make 26 full Motifs – nine in
colourways one and two, eight
in colourway three.
Using suggested yarn and 4.5mm
hook, 4ch, sl st to form a ring.
Rnd 1: (RS) 3ch (counts as 1tr
here and throughout), 15tr in
ring, sl st to join, turn.
Fasten off.
Rnd 2: (WS) Join suggested yarn
with sl st before any tr, 3ch, 1tr in
same sp, 1ch (2trCl (see Special
Stitches), 1ch) in each sp between
tr around, sl st to join, turn.
Fasten off.
Rnd 3: (RS) Join suggested yarn
in any 1ch-sp, (3ch, 2trCl) in
same st, 2ch, (3trCl (see Special
Stitches), 2ch) in each ch-sp
around, sl st to join, turn.
Fasten off.
Rnd 4: (WS) Join suggested yarn
in any 2ch-sp, (3ch, 2tr, 2ch,
3tr) in 2ch-sp, 1ch, 3htr in next
2ch-sp, 1ch, 3dc in next 2ch-sp,
1ch, 3htr in next 2ch-sp, 1ch,
*(3tr, 2ch, 3tr) in 2ch-sp, 1ch,
3htr in next 2ch-sp, 1ch, 3dc in
next 2ch- sp, 1ch, 3htr in next
2ch-sp, 1ch; rep from * twice
more, sl st to join, turn.
Fasten off.
Rnd 5: (RS) Join suggested yarn
in any corner 2ch-sp, (3ch, 2tr,
2ch, 3tr) in corner 2ch-sp, 1ch,
(3tr, 1ch) in each ch-sp to corner
2ch-sp, *(3tr, 2ch, 3tr) in corner
2ch-sp, 1ch, (3tr, 1ch) in each
ch-sp to next corner 2ch-sp;
rep from * twice more, sl st to
join, turn.
Fasten off.
Sizes S & L only
Row 6: (WS) Join yarn A in any
corner 2ch-sp, (2ch, 2htr, 2ch,
3htr) in corner 2ch-sp, 1ch, (3htr,
1ch) in each ch-sp to next corner
2ch-sp, *(3htr, 2ch, 3htr) in
corner 2ch-sp, 1ch, (3htr, 1ch) in
each ch-sp to next corner 2ch-sp;
rep from * twice more, sl st to
join, turn.
Fasten off.
Size L only
Row 7: Join yarn A in any corner
2ch-sp, *(1dc, 2ch, 1dc ) in corner
2ch-sp, 1dc in each st to next
corner 2ch-sp; rep from * three
more, sl st to join.
Fasten off.
Sizes M & XL only
Row 6: Rep Row 5 using yarn A.
Size XL only
Row 7: Rep Row 5 using yarn A.
www.insidecrochet.co.uk 53
➻
MAKE IT
Pattern instructions
Full motif on
Sizes S & M,
half motif on
sizes L & XL
31 (33, 35, 37)cm
12 ¼ (13, 13 ¾, 14 ½)in
BACK (RS)
58 (62, 66, 70)cm/ 22 ¾ (24 ½, 26, 27 ½)in
Sizes S & M
43.5 (46.5)cm/ 17 (18 ¼)in
Sizes L & XL
42 (44)cm/ 17 (17 ¼)in
FRONT (RS)
54 Inside Crochet
Full motif on
Sizes S & M,
half motif on
sizes L & XL
HALF MOTIF
Sizes S & M only
Make six, two in each
colourway
Sizes L & XL only
Make ten, three in colourways
one and two, four in
colourway three.
Using suggested yarn and 4.5mm
hook, 4ch, sl st to form a ring.
Rnd 1: (RS) 3ch, 8tr in ring, turn
– 9tr.
Fasten off.
Rnd 2: (WS) Join suggested yarn,
join yarn in first st, 4ch counts as
(1tr, 1ch) (2trCl, 1ch) in each of
the next 7 sts, 1tr in last tr, turn.
Fasten off.
Rnd 3: (RS) Join yarn in first st,
4ch counts as (1tr, 1ch), (3trcl,
2ch) in each of next seven
1ch-sps, 3trCl in next sp, 1ch,
1tr in last tr, turn.
Fasten off.
Rnd 4: (WS) Join suggested yarn
with 1dc in top of first st, 2dc
in first ch-sp, 1ch, 3htr in next
2ch-sp, 1ch, (3tr, 2ch, 3tr) in
corner 2ch-sp, 1ch, 3htr in next
st, 1ch, 3dc in next st, 1ch, 3htr
in 2ch-sp, 1ch (3tr, 2ch, 3tr) in
next 2ch-sp, 3htr in next 2ch-sp,
2dc in 1ch-sp, 1dc in last st, turn.
Fasten off.
Rnd 5: (RS) Join suggested yarn
in first st, 3ch, (3tr, 1ch) in each
1ch-sp to next corner 2ch-sp,
(3tr, 2ch, 3tr) in corner 2ch-sp,
(3tr, 1ch) in each 1ch-sp to next
corner 2ch-sp, (3tr, 2ch, 3tr)
in corner 2ch-sp, (3tr, 1ch) in
each 1ch-sp to last st, 1tr in last
tr, turn. Fasten off.
Sizes S & L only
Rnd 6: (WS) Join yarn A in first
st, 2ch, (3htr, 1ch) in each 1ch-sp
to next corner 2ch-sp, (3htr, 2ch,
3htr) in corner 2ch-sp, (3htr,
1ch) in each 1ch-sp to next corner
2ch-sp, (3htr, 2ch, 3htr) in corner
ACTUAL BUST
SHOULDER TO SHOULDER
LENGTH TO UNDERARM
SLEEVE LENGTH
2ch-sp, (3htr, 1ch) in each 1ch-sp
to last st, 1htr in last st, turn.
Fasten off.
Size L only
Rnd 7: (RS) Using yarn A work
1dc in each st and ch-sp and (1dc,
2ch, 1dc) in each corner around.
Sizes M & XL only
Rnd 6: Rep Rnd 5 using yarn A.
Size XL only
Rnd 7: Rep Rnd 5 using yarn A.
FINISHING
Join motifs as shown on
schematic and sew fronts to back
seaming sleeves and shoulders
and underarm.
EDGINGS
Join yarn A in bottom corner of
lower edge.
Work two rows in dc along
bottom edge of garment.
Work two rows in dc around
front edges and neck.
Work one row in dc around
entire outside edge of garment.
Fasten off.
CUFFS
Work one row in dc around
cuff edge.
Fasten off.
END
FINISHING
Sew in ends.
S
M
L
XL
116
124
132
140
cm
45½
49
52
55
in
58
62
66
70
cm
22¾
24½
26
27½
in
31
33
35
37
cm
12¼
13
13¾
14½
in
43.5
46.5
42
44
cm
17
18¼
17
17¼
in
www.insidecrochet.co.uk 55
➻
MAKE IT
Pattern instructions
MATERIALS
● Nurturing Fibres Eco-Cotton
DK, 100% cotton,
50g/125m/137yds
Yarn A: Vanilla x 3 (3, 3, 3,
4, 4, 4) balls
Yarn B: Violet x 1 ball
Yarn C: Lime x 1 ball
Yarn D: Sunkissed Coral
x 1 ball
Yarn E: Aventurine x 1 ball
● 4.5mm hook
TENSION
Work 18 sts and 16 rows in
pattern to measure 10 x 10cm/
4 x 4in using 4.5mm hook, or size
required to obtain tension.
DESIGNER BIOGRAPHY
Rhian is the deputy editor of
Inside Crochet. She grew up in a
seaside resort five minutes from
the beach, and has fond memories
of relaxing on deckchairs in her
grandparents’ garden.
SPECIAL STITCHES
Dc/tr2tog: Insert hook into
next st, yrh, pull through, yrh,
insert hook into next st, (yrh, pull
through) twice, pull through all
loops on hook – 1 st decreased.
Tr/dc2tog: Yrh, insert hook into
next st, yrh, pull through, yrh, pull
through 2 loops, insert hook into
next st, yrh, pull through, yrh, pull
through all loops on hook – 1 st
decreased.
PATTERN NOTES
Turning chain does not count
as first stitch throughout.
When changing colours, work
final yrh of previous st in
new colour.
Please note finished garment
is stretchy and designed to be
worn fitted, with approximately
10cm/4in of negative ease.
Pavilio n Stripe s Ve s t
BY RHIAN DRINKWATER
This cheery striped vest is reminiscent of faded
deckchairs and long afternoons on the beach.
ADD TO THE STASH
Buy this pure cotton yarn from
www.tangled-yarn.co.uk
56 Inside Crochet
FRONT/BACK
Make two
With 4.5mm hook
and yarn A, 68 (72, 76, 80,
86, 90, 96)ch.
Row 1: 1ch, 1dc into second ch
from hook, 1tr into next ch, [1dc
into next ch, 1tr into next ch] to
end of row, turn – 68 (72, 76, 80,
86, 90, 96) sts.
Row 2: 1ch, [1dc, 1tr] to end of
row, turn.
Rows 3–9: As Row 2.
START
34 (34, 34, 34, 34, 34, 34)cm
13½ (13½, 13½, 13½, 13½, 13½, 13½)in
Fasten off yarn A.
Join in yarn B.
Rows 10–17: As Row 2.
Fasten off yarn B.
Join in yarn A.
Row 18: As Row 2.
Row 19: (Dec) 2ch, miss first st,
1tr into second st, [1dc, 1tr] to
2 sts from end, dc/tr2tog (see
Special Stitches), turn – 66 (70,
74, 78, 84, 88, 94) sts.
Row 20: 2ch, [1tr, 1dc] to end
of row, turn.
Row 21: As Row 20.
Fasten off yarn A.
Join in yarn C.
Rows 22–29: As Row 20.
Fasten off yarn C.
XS
TO FIT BUST
ACTUAL BUST
LENGTH FROM UNDERARM
S
M
71 (75.5, 80, 84.5, 91, 95.5, 102)cm
28 (29¾, 31½, 33¼, 35¾, 37½, 40¼)in
1tr, [1dc, 1tr] to 3 sts from end,
dc/tr2tog, turn.
Row 60: 1ch, miss one st, dc2tog,
[1tr, 1dc] to 2 sts from end,
dc2tog, turn.
Join in yarn A.
Row 30: As Row 20.
Row 31: (Dec) 1ch, miss first st,
1dc into second st, [1tr, 1dc] to
2 sts from end, tr/dc2tog (see
Special Stitches), turn – 64 (68,
72, 76, 82, 86, 92) sts.
Rows 32 & 33: As Row 2.
Fasten off yarn A.
Join in yarn D.
Rows 34–41: As Row 2.
Fasten off yarn D.
Join in yarn A.
Rows 42–45: As Row 2.
Fasten off yarn A.
Join in yarn E.
Rows 46–53: As Row 2.
Fasten off yarn E.
Join in yarn A.
Rows 54–57: As Row 2.
Continue as set until 4 sts remain.
Continue on these 4 sts in pattern
until length of strap from top of
shaping is 28cm/11in.
Fasten off.
Rejoin yarn to Row 57, leaving
16 sts from bottom of first strap.
Row 58: [1dc, 1tr] 8 (9, 10, 11, 12,
13, 14) times, dc/tr2tog, turn.
Continue to work as for first strap.
Fasten off.
MAKING UP
Weave in all ends.
With RS together, seam
sides of top.
Tie the straps together
over shoulders.
Row 58: 1ch, 6sl sts, [1dc, 1tr] 8
(9, 10, 11, 12, 13, 14, 15) times,
dc/tr2tog, turn.
Row 59: 1ch, miss one st, dc2tog,
L
XL
2XL
END
3XL
81
86
91
97
102
107
112
cm
32
34
36
38
40
42
44
in
71
75.5
80
84.5
91
95.5
102
cm
28
29¾
31½
33¼
35¾
37½
40¼
in
34
34
34
34
34
34
34
cm
13½
13½
13½
13½
13½
13½
13½
in
www.insidecrochet.co.uk 57
MEET OUR LATEST LOOKBOOK.
SIX UNIQUE DESIGNS WHICH GIVE YOU THE ULTIMATE SUMMER FEELING.
AVAILABLE ON WWW.YARNANDCOLORS.COM/LOOKBOOK-20 OR SCAN THE QR CODE.
MATERIALS
● DMC stranded cotton,
100% cotton,
2g/8m/9yds
Yarn A: Brown 356 x 1 skein
Yarn B: Pink 353 x 1 skein
● 2mm hook
● Pair of earring findings
MEASUREMENTS
Finished earrings are
approximately 4cm/1½in across.
DESIGNER BIOGRAPHY
Sarah is a wife, mother, teacher,
blogger, author and freelance
designer. Find her online at
www.annabooshouse.
blogspot.com, and
www.ravelry.com/designers/
annaboos-house.
EARRINGS
Make two
With 2mm hook
and yarn A, 4ch.
Rnd 1: Working in fourth ch
from hook (3ch counts as first
tr), 1tr, 1ch, *2tr, 1ch; rep from
* four more times, sl st to
fourth ch to join – 12tr.
Rnd 2: Sl st across into 1ch-sp,
(3ch, 1tr, 1ch, 2tr, 1ch) in same
1ch-sp, *(2tr, 1ch, 2tr, 1ch) in
next 1ch-sp; rep from * around,
sl st to third ch to join – 24tr.
Fasten off yarn A and join in
yarn B.
Rnd 3: Sl st across into 1ch-sp,
(3ch, 1tr, 1ch, 2tr, 1ch) in same
1ch-sp, 2tr in next 1ch-sp, 1ch,
*(2tr, 1ch, 2tr, 1ch) in next
1ch-sp, 2tr in next 1ch-sp, 1ch;
rep from * around, sl st to third
ch to join – 36 sts.
Fasten off and weave in ends.
Attach to earring findings
using a pair of pliers to
loosen and then tighten START
the fitting.
START
He xie Earrin gs
BY SARAH SHRIMPTON
Make these sweet earrings in an evening!
This simple design is taken from
Hello Hexie! by Sarah Shrimpton
(David & Charles, £14.99).
www.insidecrochet.co.uk 59
➻
MAKE IT
Pattern instructions
Se lkie Saro n g
BY TRACEY TODHUNTER
A silky sarong to wrap around your hips at the pool or drape
around your shoulders on summer evenings. The beads add
glamour as they catch the light and sparkle in the sunshine.
ADD TO THE STASH
Buy this luxurious yarn at
www.purlescence.co.uk
60 Inside Crochet
MATERIALS
● Fyberspates Scrumptious 4 ply,
55% Merino wool/45% silk,
100g/365m/399yds
Shade: Gold 302 x 3 skeins
● 3.5mm hook
● 3,000 gold beads, size 8
● Needle and cotton
YARN ALTERNATIVES
Any 4ply-weight wool/silk blend
will achieve a similar drape and
texture for this design.
TENSION
Work pattern (1 beaded cluster,
2ch) four times and 12 rows to
measure 10 x 10cm/4 x 4in using
3.5mm hook, or size required to
obtain tension.
MEASUREMENTS
Length from centre back
to point: 75cm/30in.
Width along final row:
170cm/70in.
5
4
DESIGNER BIOGRAPHY
Tracey is a designer specialising
in accessories and homewares.
She is the author of several
crochet books and the newest
member of the Wool Clip
Co-operative based in Cumbria.
She posts regular news and
pattern updates on Instagram
@GrannyCoolCrochet.
SPECIAL STITCHES
Beaded cluster (BC): (Yrh,
insert hook in ch-sp, yrh and pull
loop through, yrh, pull through
2 loops) twice, yrh, pull through
all 3 loops, place bead, (yrh,
insert hook in same ch-sp, yrh
and pull loop through, yrh, pull
through 2 loops) twice, yrh, pull
through all 3 loops).
PATTERN NOTES
To thread beads onto the yarn:
Fold a piece of sewing thread
in half and thread the sewing
needle, slip end of the yarn
3
chain stitch
treble crochet (tr)
2
beaded cluster
1
through the loop. Thread the
beads onto the needle and push
them down the thread and onto
the yarn.
Thread a third of the beads
onto each skein before starting,
transfer any remaining beads to
the next skein. This is easier than
counting beads.
When placing each bead, slide the
bead along the yarn as close as
possible to the hook and complete
the stitch to secure the bead.
If you wish to make a larger
version, make tassels before
starting and then work as pattern
instructions until beads or yarn
run out.
SARONG
Row 1: 6ch, 1tr in
sixth ch from
hook, turn.
Row 2: 5ch, 1BC (see Special
Stitches) in ch-sp, 2ch, 1tr in
fourth of t-ch, turn – 1x BC.
Row 3: 5ch, 1BC in first ch-sp,
miss next BC, 2ch, 1BC in next
ch-sp, 2ch, 1tr in third of t-ch,
turn – 2x BC.
START
Row 4: 5ch, 1BC in first ch-sp,
[miss next BC, 2ch, 1BC in next
ch-sp] across to last ch-sp, 2ch,
1tr in third of t-ch, turn – 3x BC.
Rows 5–80: Rep Row 4.
Fasten off and weave in ends.
TASSELS
Make three
Cut lengths of yarn for each
tassel as follows:
1 x 10cm/4in, 1 x 25cm/10in and
15 x 30cm/12in.
Fold the longest pieces in half
and tie in the centre with the
shortest piece to secure (leave
the excess yarn to attach tassel
to the sarong), wrap the
25cm/10in length around the
yarn 1cm/½in under the fold to
make a tassel.
Sew one tassel to each
corner of the sarong.
END
Trim ends if necessary
to neaten.
www.insidecrochet.co.uk 61
➻
MAKE IT
Pattern instructions
MATERIALS
● Durable Cosy Extra Fine,
58% cotton/42% polyacryl,
50g/180m/197yds
Shade: White 310 x 12 (12,
13, 13, 14) balls
● 3.5mm hook
YARN ALTERNATIVES
You can use any cotton or cotton
blend yarn that works to the
same tension for this design.
TENSION
Work approximately 18 sts and
12 rows to measure 10cm x 10cm/
4 x 4in using 3.5mm hook or size
required to obtain tension.
Work approximately 3.5 patt reps
across by 3.2 patt reps high to
measure 10 x 10cm/4 x 4in, using
3.5mm hook or size required to
obtain tension.
DESIGNER BIOGRAPHY
Cassie is mum of identical twin
boys and enjoys creating new
and bright designs. You can
find her on Instagram at
@themissingyarn.
FRONT & BACK
Make two the same
Using 3.5mm hook
and yarn A, 237 (243, 249,
255, 261)ch.
Row 1: 1dc in second ch from
hook and in each ch to end, turn
– 236 (242, 248, 254, 260)dc.
Row 2: 1ch (does not count as
a st here and throughout), 1dc
in each of next 2 sts, *6ch, miss
4 sts, 1dc in each of next 2 sts;
rep from * to end, turn.
START
Clo ud Nin e
Be ach Co ve r-up
BY CASSIE WARD
This soft and cosy hooded cover-up is perfect to slip on
for your day at the beach or just sitting by the pool.
ADD TO THE STASH
Find stockists for Durable yarn at
durableyarn.com/en/shops-uk
62 Inside Crochet
Row 3: 3ch (counts as 1tr here
and throughout), miss first dc, 1tr
in next dc, *2ch, 1dc in 6ch-sp,
2ch, 1tr in each of next 2 dc; rep
from * to end, turn.
Row 4: 3ch, 1tr, *3ch, 1sl st in
next dc, 3ch, 2tr; rep from * to
end, turn.
Row 5: 1ch, 1dc in each of first
2 tr, *4ch, 1dc in each of next
2 tr; rep from * to end, turn.
Row 6: 1ch, 2dc, *6ch, 1dc in
each of next 2 dc; rep from * to
end, turn.
Rep Rows 3–6 a further 15 (15,
16, 17, 19) times.
HOOD
Using 3.5mm hook, 117ch.
Work 40 rows as for Body.
A
Fasten off.
Fold in half matching A to B on
schematic and sew along Row 40
using a neat whip stitch.
Work two rows in dc around
front of hood.
Set aside.
FINISHING
Join Front to Back at shoulders
joining across 13.5 (14, 14.5, 15,
15.5) pattern repeats and leaving
centre 12 patt reps unworked on
sizes M and XL and centre 11 full
patt reps plus one half rep either
side on all other sizes.
Fold Line
HOOD
63cm/ 24¾n
50 (50, 53, 56, 61)cm
19¾ (19¾, 20¾, 22, 24)in
POCKET
Using 3.5mm hook, 57ch.
Row 1: 1tr in third ch from hook,
1tr in each ch to end, turn.
Rows 2–4: 3ch (counts as first
tr), tr to end, turn.
Row 5: 3ch, tr2tog, tr to last
3 sts, tr2tog, 1tr, turn.
Row 6: As Row 2.
Rows 7–16: Rep Rows 5 & 6.
Fasten off.
B
108 (112, 116, 120, 124)cm
42½ (44, 45¾, 47¼, 48¾)in
216 (224, 232, 240, 248)cm
85 (88, 91¼, 94½, 97½)in
www.insidecrochet.co.uk 63
➻
MAKE IT
Pattern instructions
6
5
ch
4
dc
3
tr
Patt
Rep
2
1
Join Hood to neck opening
with the seam at the centre
back of the neck, being sure
to place the edges of the
Hood equally around the
front neck and leaving a gap
of approximately 18cm/7in
between the two edges.
Sew on pocket.
Work one row in dc around neck
and Hood.
Weave in all ends.
TASSELS
Wrap yarn six times around a
7cm/2¾in length piece of card.
64 Inside Crochet
Thread a 15cm/6in piece of yarn
through and tie at top.
Cut along bottom of card.
Tie another length of yarn about
WIDTH
CIRCUMFERENCE
LENGTH
Attach tassels evenly around
entire garment at
END
approximately 4cm/
1½in intervals.
1cm/½in from initial tie at top.
Trim tassels evenly.
Straighten yarn in tassels on
a low heat iron.
S
M
L
XL
2XL
108
112
116
120
124
cm
42½
44
45¾
47¼
48¾
in
216
224
232
240
248
cm
85
88
91¼
94½
97½
in
50
50
53
56
61
cm
19¾
19¾
20¾
22
24
in
Durable yarn
www.durableyarn.com
Looking for
more inspiration?
www.durableyarn.com
durableyarn
durableyarns
Durable Cosy extra fine U.K. stockists :
Relax...
SAVE
£2.24 AN
ISSUE
With your favourite crochet magazine
subscribe today
HAVE 20* CONTEMPORARY CROCHET DESIGNS
BY LEADING INTERNATIONAL DESIGNERS DELIVERED
STRAIGHT TO YOUR HOME EVERY MONTH
Only £3.75 an issue!
**
CALL 01202 586848
OR
VISIT WWW.INSIDECROCHET.CO.UK/SUBSCRIBE
* We have an average of 20 patterns an issue ** UK 12-month subscriptions only
➻
MAKE IT
68 Inside Crochet
Pattern instructions
MATERIALS
● Rico Design Essentials
Cotton DK, 100% cotton,
50g/120m/131yds
Yarn A: Dark Green 67
x 5 (5, 6, 7, 7, 8, 8) balls
Yarn B: White 80 x 5 (5,
6, 6, 7, 7, 7) balls
● 4.5mm hook
TENSION
Work 17tr and 8 rows to
measure 10 x 10cm/4 x 4in
using 4.5mm hook, or size
required to obtain tension.
DESIGNER BIOGRAPHY
Rhian is a passionate crochet
and knit designer. View
more of her designs at www.
ravelry.com/designers/rhiandrinkwater. She’s also a big
fan of cinder toffee.
PATTERN NOTES
1ch turning chain does not
count as first dc throughout.
3ch turning chain does count
as first tr throughout.
When changing colours, work
final yrh of previous st in
new colour.
Colours are not fastened off
after each change – run the
yarn along the top of the
waistband between stripes.
It will be hidden by the
waistband.
SKIRT
With 4.5mm hook
and yarn A, 110ch.
Row 1: 1ch, 25dc blo, 25htr
blo, 60tr blo, turn – 110 sts.
Row 2: 3ch (counts as first tr
here and throughout), 59tr,
25htr, 25dc, turn.
Do not fasten off yarn A.
Join in yarn B.
Row 3: As Row 1.
Row 4: As Row 2.
Do not fasten off yarn B.
Change to yarn A.
Rows 1–4 form pattern.
Work in pattern until top of
skirt measures 67 (75, 85, 95,
105, 113, 117)cm/26½ (29½,
33½, 37½, 41¼, 44½, 46)in,
finishing with a yarn A stripe.
START
Pace rs Skirt
BY RHIAN DRINKWATER
Named for our favourite retro seaside sweet,
this swishy skirt is worked in a cool cotton.
ADD TO THE STASH
Buy this pure cotton yarn from
www.woolwarehouse.co.uk
Do not fasten off yarn A.
Join in yarn B.
Next Row: As Row 1.
Next Row: 1ch, *dc next st
www.insidecrochet.co.uk 69
MAKE IT
Pattern instructions
together with equivalent stitch
from Row 1; rep from * to end of
htr sts (25 sts from top of skirt),
work 25dc as normal (not joining
with Row 1).
Fasten off yarn B.
Note: Work the joining dc sts
with WS of skirt together. The
slight ridge created mimics
the blo sts in the other stripes
making the join almost invisible
when worn.
Use this to lace together
the gap at the top of
the skirt.
WAISTBAND
With yarn A, dc along top of
skirt working approximately
3dc into every two strips. Work
more or fewer sts if needed to
ensure waistband does not pull
in or ruffle.
Next Row: 1ch, dc to end, turn.
Work two more rows in dc as set,
then fasten off.
ACTUAL WAIST
FINISHING
Weave in all ends.
Wash and block skirt.
Crochet a chain in yarn A
approximately 80cm/31½in long.
70 Inside Crochet
68 (76, 86, 96, 106, 114, 118)cm
26¾ (30, 33¾, 37¾, 41¾, 44¾, 46½)in
END
58.5cm/ 23in
➻
LENGTH
S
M
L
XL
2XL
3XL
4XL
68
76
86
96
106
114
118
cm
26¾
30
33¾
37¾
41¾
44¾
46½
in
58.5
58.5
58.5
58.5
58.5
58.5
58.5
cm
23
23
23
23
23
23
23
in
01493 749120
We stock Scheepjes, Drops, Stylecraft, Rico, WYS, Adriafil,
Kremke and more. Plus books, kits, needles, hooks,
accessories and gorgeous skeins from local hand dyers.
We love colour!
33 South Street, Newtownards, Co Down BT23 4JT
Phone: 028 9122 9434
➻
MAKE IT
Pattern instructions
Es tu ary Marke t Bag
BY KATH WEBBER
Inspired by the seaside resorts, beaches and cockle sheds of
East Anglia, this bag has room enough for a bucket, spade and a
pint of prawns and is crocheted in waistcoat stitch for structure.
ADD TO THE STASH
Buy this raffia yarn from
ww.knittingwool.com
MATERIALS
● King Cole Raffia,
100% cellulose rayon,
50g/114m/124yds
Yarn A: Natural 1456 x 6 balls
Yarn B: Marine 1460 x 1 ball
● 6mm hook
● Leather handles (Cocoknits
short leather handles shown)
● Colourful tassels
YARN ALTERNATIVES
You can use any raffia, paper or
or even jersey (t-shirt) yarn to
achieve a similar effect.
TENSION
Work 13 sts over 16 rows in
waistcoat stitch to measure 10 x
10cm/4 x 4in using two strands
of raffia and 6mm hook, or size
required to obtain tension.
MEASUREMENTS
Bag’s circumference is
approximately 84cm/33in.
Height (excluding handles) is
approximately 25cm/10in.
72 Inside Crochet
BAG
Holding two strands of
yarn A together, 25ch.
Rnd 1: 2dc in second ch from
hook, 1ch in each of next 22 ch,
3dc in last ch, rotate and work
along underside of ch working
22dc, 1dc in first ch of rnd, PM
– 50dc.
Rnd 2: *1dc in next st, 2dc in
next st, 22dc, 2dc in next st; rep
from * to end, PM – 54dc.
Rnd 3: *1dc in next st, 2dc in
each of next 2 dc, 22dc, 2dc in
each of next 2 dc; rep from * to
end, PM – 62dc.
Rnd 4: *2dc, 2dc in each of next
2 dc, 24dc, 2dc in each of next
2 dc, 1dc; rep from * to end,
PM – 70dc.
Rnd 5: *2dc in next st, 2dc, 2dc
in next st, 28dc, 2dc in next
st, 2dc; rep from * to end, PM
– 76dc.
Rnd 6: *2dc in each of next
2 sts, 2dc, 2dc in each of next
2 sts, 28dc, 2dc in each of next
2 sts, 2dc; rep from * to end,
PM – 88 sts.
Rnd 7: *7dc blo, 2dc blo of each
of next 2 sts, 30dc blo, 2dc blo
in each of next 2dc, 3dc blo; rep
from * to end, PM – 108 sts.
Rnds 8–31: 1wc st (see Special
25cm/ 10in
START
84cm/ 33in
DESIGNER BIOGRAPHY
Kath loves nothing more
than watching Buffy The
Vampire Slayer while
crocheting up a storm and has
an unhealthy addiction to true
crime podcasts.
Reverse slip stitch (Rev sl st):
Work a slip stitch in the opposite
direction (ie from left to right);
insert hook in previous st from
the front of the top two loops,
yrh, pull yarn back through all
loops on hook.
SPECIAL STITCHES
Waistcoat Stitch (wc st): Insert
hook into centre of “v” under
4 loops of previous dc, yrh, bring
back through stitch, yrh hook
bring back through both loops
on hook.
PATTERN NOTES
The pattern is worked from the
base up in continuous rounds.
You might find it helpful to use
a stitch marker or piece of scrap
yarn to mark the beginning of
each round.
Stitches) in each st around,
PM – 109 sts.
Change to one strand only of
yarn B.
Rnd 32: 3ch (counts as 1tr), 1tr
in each st around, PM.
Rnds 33 & 34: 2ch (does not
count as st), 1RtrF in each st
around, join with sl st to first RtrF.
Change to two strands of yarn A.
Rnds 35–39: 1wc in each st
around, PM.
Change to one strand only of
yarn B.
Rnds 40–42: Rep Rnds 32–34.
Change to two strands of yarn A.
Rnds 43–46: 1wc in each st
around.
Rnd 47: Rev sl st (see Special
Stitches) in each st around.
Fasten off.
FINISHING
Weave in ends.
Count approximately 16 sts
in from either end of bag and
attach leather handles.
Tie tassels to one
END
side of handles
on front of bag.
www.insidecrochet.co.uk 73
➻
MAKE IT
Pattern instructions
MATERIALS
● MillaMia Naturally Soft
Merino, 100% Merino wool,
50g/125m/136yds
Yarn A: Fuchsia x 1 ball
Yarn B: Seaside x 2 balls
Yarn C: Petal x 2 balls
Yarn D: Grass Green x 2 balls
Yarn E: Yellow x 1 ball
Yarn F: Plum x 1 ball
Yarn G: Sea Green x 1 ball
● 3.5mm hook
YARN ALTERNATIVES
This design would also suit other
sportweight/4ply yarns.
TENSION
Exact tension is not essential for
this project.
MEASUREMENTS
Depth from top to tip:
54cm/21¼in.
Length: 147cm/57¾in.
DESIGNER BIOGRAPHY
Rosina is a Devon based crochet
designer who loves colour and
classic design. You can find her
on Instagram as @zeensandroger.
She frequently talks about how
brilliant crochet is on her blog and
YouTube podcasts.
PATTERN NOTES
The htr is made in the front third
loop of the stitch – this is the
horizontal loop that sits below
the “v” at the top of the stitch.
Stitch counts are per side and
do not include the two middle
chain.
D e cke d Out Sh aw l
BY ROSINA NORTHCOTT
Colourful stripes of half trebles represent traditional deckchair
fabrics. Picture long sandy beaches on hot summer days, with
windbreaks dotted along the water’s edge…
ADD TO THE STASH
Buy this pure wool yarn from
www.lovecrafts.com
74 Inside Crochet
Work in stripe sequence
as folls:
Rows 1–12: Yarn A.
Rows 13–16: Yarn B.
Rows 17–20: Yarn C.
Rows 21–24: Yarn D.
Rows 25–32: Yarn E.
Rows 33–36: Yarn F.
Rows 37–44: Yarn G.
Rows 45–52: Yarn D.
Rows 53–56: Yarn A.
Rows 57 & 58: Yarn E.
Rows 59–66: Yarn C.
Rows 67–71: Yarn B.
SHAWL
With yarn A, make
adjustable ring (or 4ch
and join with sl st).
Row 1: 1ch (does not count as
START
a st here and throughout), (1tr,
2htr, 2ch, 2htr, 1tr) all in ring,
turn – 3 sts per side.
Row 2: 1ch, (1tr, 2htr) in first tr,
htr in each st to centre 2ch-sp
(1htr, 2ch, 1htr) in 2ch-sp, htr in
each st to last st, (2htr, 1tr) in last
tr, turn – 6 sts per side.
Row 3: 1ch, (1tr, 2htr) in first tr,
htr in front third lp of each st to
centre 2ch-sp, (1htr, 2ch, 1htr)
in 2ch-sp, htr in front third lp of
each st to last st, (2htr, 1tr) in
last tr, turn – 9 sts per side.
Cont in patt as folls increasing
3 sts per side on each row as
set by Row 3 and working in
stripe pattern as detailed in
Pattern Notes.
Rows 4–67: Rep Row 3 – 201 sts
per side.
Row 68: 1ch, 3tr in first st,
[2rtrf, 2rtb] to centre 2ch-sp, (2tr,
2ch, 2tr) in 2ch-sp, [2rtb, 2rtf] to
last st, 3tr in last tr, turn – 205
sts (inc 4 sts per side).
Rows 69–71: Rep Row 68
– 217 sts per side.
Fasten off.
FINISHING
Sew in ends.
Block using preferred
method.
END
www.insidecrochet.co.uk 75
➻
MAKE IT
Pattern instructions
MATERIALS
● Schachenmayr
Catania Originals,
100% cotton,
50g/125m/137yds
Yarn A: Weiss 106 x 1 ball
Yarn B: Pfau 146 x 1 ball
Yarn C: Tomate 390 x 1 ball
● 3mm & 3.5mm hooks
● Stitch markers
● Clear nail polish
● Handheld steamer (optional)
YARN ALTERNATIVES
You can use any sport or
DK weight cotton to achieve a
similar effect.
Necklace is also shown in the
following colour combinations:
Weiss 106, Regatta 261
and Maigruen 389; and
Loewenzahn 280, Himbeere 256
and Tiffany 432.
TENSION
Work 100ch to measure
48cm/19in length using 3.5mm
hook, or size required to
obtain tension.
MEASUREMENTS
The finished circumference of the
necklace is 130cm/51¼in.
DESIGNER BIOGRAPHY
Alessandra shares patterns and
photo tutorials on her blog at
www.homemadeatmyplace.
blogspot.com and posts
frequently on Instagram
@alessandrapoggiagliolmi. You
can also find her on Ravelry and
Etsy as homemadeatmyplace.
Stick o f Ro ck Ne cklace
BY ALESSANDRA POGGIAGLIOLMI
Celebrate your sweet seaside memories with
this colourful crocheted jewellery.
ADD TO THE STASH
Buy these pure cotton yarns from
www.woolwarehouse.co.uk
76 Inside Crochet
PATTERN NOTES
The given pattern is for a
necklace which can be wrapped
around your neck four times,
before fixing the definitive
length. Adapt the pattern for
shorter necklaces (251 chains
for one wrap or 501 chains for
double wrap), working with
multiples of five plus one.
Use the stitch markers when
working the very long foundation
chain and place them every
50/100 ch, to help with
the counting.
Be careful not to twist the
foundation chain when working
Rows 1 and 2, or when knotting
it to form the main necklace loop.
NECKLACE
With yarn A and
3.5mm hook work
1001ch. Fasten off.
START
Change to 3mm hook and yarn B,
make a slip knot on hook and
work as folls:
Row 1: (RS) 1dc in first ch from
hook, 6ch, miss 4 ch, 1dc in next
ch, [6ch, miss 4 ch, 1dc in next
ch] to end.
Fasten off, turn upside down.
Row 2: (RS) With yarn C and
3mm hook, make a slip knot on
hook and rep Row 1, working
pattern mirrored in bottom
loops of foundation chain.
Place this long loop around your
neck, with the knot at the back
of your neck, and wrap it around
three times so there are four
strands to the necklace.
MAKING UP
Lay down the necklace strip on
a hard surface, such a table,
with RS facing upwards.
Bring both ends together and
tie the dangling ends to make
a tight double knot. Trim the
excess yarn.
Whilst still on, adjust the length
of the necklace so the loops are
a uniform length.
Take off the necklace and place
it back on the table.
With any yarn left and 3mm
hook work 100ch. Fasten off.
Wrap both chain ends
(one clockwise, the other
anticlockwise) around the
necklace covering the joining
knot. Wrap tightly to cover the
main loop knot.
To complete, simply knot these
ends twice, trim and secure
with some clear nail polish.
Steam if desired
to give a
neat finish.
Row 1
END
ch
dc
Row 2
pattern
repeat
www.insidecrochet.co.uk 77
Use code IC10 for 10% discount https://goodvibesyarn.co.uk
Beautifully unusual yarns from a small family
business to your doorstep - hand-dyed and major
brand yarns, and some you won’t find anywhere else!
Proud stockist of Lion Brand, Stylecraft, King Cole,
Papatya, Alize, YarnArt, Cygnet and more! Why not try one
of our Mystery Packs or a subscription box for a
yarny surprise?
https://goodvibesyarn.co.uk
/goodvibesyarn
Free delivery on all UK orders over £30
@goodvibesyarn
Est. 2011
TANGLED
YARN
Supplies of luxury yarns for
crochet & knitting
www.tangled-yarn.co.uk
0161 217 0858
MATERIALS
● Rowan Summerlite 4ply,
100% cotton,
50g/175m/191yds
Shade: Periwinkle 424 x 1 ball
● 3mm hook
YARN ALTERNATIVES
Any 4ply cotton yarn will work
well for this design.
TENSION
Work 9tr and 5 rows to measure
5 x 5cm/2 x 2in after blocking,
using 3mm hook or size required
to obtain tension.
MEASUREMENTS
Finished headscarf is 98cm/38½in
at the widest point and 32cm/
12½in deep, after blocking.
DESIGNER BIOGRAPHY
Anna has been crocheting and
knitting since childhood, and has
been designing for around ten
years, creating many gorgeous
accessory and homeware
designs. Visit her website at
www.moochka.co.uk.
SPECIAL STITCHES
Picot: 3ch, sl st to first ch.
PATTERN NOTES
The scarf is worked in filet crochet
from the chart. Filet crochet is
made up of a mesh of stitches
that form a squared grid. At each
side of each square there is a tr.
Each open (white) square has 2ch
between these trebles, creating a
square chain space (2ch-sp). For
solid (black) squares work 2tr into
these ch-sps.
The first square of each row is
worked as: 6ch (counts as 1dtr
and 2ch-sp).
The last square of each row is
worked as: 2ch, 1dtr in fourth of
6ch from beg of previous rnd.
File t He ad s carf
BY ANNA NIKIPIROWICZ
This elegant wrap will keep your head cool
and your hair neat in the summer breeze!
ADD TO THE STASH
Buy this pure cotton yarn from
www.blacksheepwools.com
The sample shown used entire
ball of yarn.
HEADSCARF
Chart Row 1: (WS)
6ch (counts as 1dtr and
2ch-sp here and throughout), 1dtr
in first ch, turn – 2 sts.
Chart Row 2: 6ch, 1tr in first st,
2tr in 2ch-sp, (1tr, 2ch, 1dtr) in
fourth of 6ch, turn – 6 sts.
Chart Row 3: 6ch, 1tr in first st,
2tr in first 2ch-sp, 1tr in next st,
START
www.insidecrochet.co.uk 79
➻
MAKE IT
Pattern instructions
These six rows (below) set
position of chart and show
open/closed filet block pattern.
filet block pattern.
6
5
4
3
ch
tr
2
1
2ch, miss next 2 sts, 1tr in next st,
2tr in next 2ch-sp, (1tr, 2ch, 1dtr)
in fourth of 6ch, turn – 10 sts.
Chart Row 4: 6ch, 1tr in first st,
2tr in first 2ch-sp, 1tr in next st,
2ch, miss next 2 sts, 1tr in next st,
2tr in next 2ch-sp, 1tr in next st,
2ch, miss next 2 sts, 1tr in next st,
2tr in next 2ch-sp, (1tr, 2ch, 1dtr)
in fourth of 6ch, turn – 14 sts.
Chart Row 5: 6ch, 1tr in first st,
2tr in first 2ch-sp, 1tr in next st,
2ch, miss next 2 sts, 1tr in next
st, 2tr in next 2ch-sp, tr in next
4 sts, 2tr in next 2ch-sp, 1tr in
next st, 2ch, miss next 2 sts, 1tr
in next st, 2tr in next 2ch-sp,
(1tr, 2ch, 1dtr) in fourth of 6ch,
turn – 20 sts.
Chart Row 6: 6ch, 1tr in first st,
2tr in first 2ch-sp, 1tr in next st,
2ch, miss next 2 sts, 1tr in next
st, 2tr in next 2ch-sp, tr in next
4 sts, 2ch, miss next 2 sts, tr in
next 4 sts, 2tr in next 2ch-sp, 1tr
80 Inside Crochet
dtr
in next st, 2ch, miss next 2 sts,
1tr in next st, 2tr in next 2ch-sp,
(1tr, 2ch, 1dtr) in fourth of 6ch,
turn – 24 sts.
These last six rows set patt.
Cont from Chart Row 7 and
work in filet crochet as set by
last six rows until entire chart has
been worked.
EDGING
When Chart Row 32 is
completed, do not turn work but
work down the side of headscarf
into row edges as folls:
Next Row: (RS) 1ch, (2dc, picot
(see Special Stitches), 1dc) in
ch-sp, *(1dc, picot) in next st,
(2dc, picot, 1dc) in next ch-sp;
rep from * until both sides are
worked, now worked along top
edges of scarf working 1ch, 2dc
in first ch-sp, 1dc in each st and
2dc in each 2ch-sp to end, sl st
to first dc. Fasten off.
FINISHING
Weave in all ends.
Wet block headscarf by soaking
it in lukewarm water, gently
squeeze the water out or roll it
in a dry towel to remove excess
moisture.
Pin it out to finished
END
measurements.
Allow to dry naturally.
Gorgeous knitting, crochet & embroidery supplies
LOOPKNITTING.COM
@LOOPLONDONLOVES
The best kept secret is out....
We stock: Stylecraft, Scheepjes, Durable, West Yorkshire Spinners, Yarn & Colours, Hoooked, Knitpro,
James C Brett, Cygnet, Schoppel Wolle, HiyaHiya and Cocoknits. Crochet & Knitting Accessories,
Felting & Macrame Supplies, General Haberdashery.
www.theyarnpatch.co.uk
Telephone Number: 02894 477 518
ISSUE 139
ON SALE
19 AUGUST 2021
next month
Whimsical wonderland
JOIN THE PARTY WITH JOYFUL FLORAL ACCESSORIES
FABULOUS FRILLS AND ETHEREAL FASHION
RAINBOW CAKE CUSHIONS AND CHILD’S PICNIC HAMPER
DIGITAL ISSUES
AVAILABLE FOR
JUST £2.92!
WWW.POCKET
MAGS.COM
& DON’T MISS
KWANNIE CHENG’S STUNNING TABLE CENTREPIECE
ONLY AVAILABLE IN INSIDE CROCHET MAGAZINE
SUBSCRIBE TODAY AND NEVER MISS AN ISSUE. SEE PAGE 66 FOR DETAILS
VISIT WWW.SELECTMAGAZINES.CO.UK
MATERIALS
● Paintbox Simply Cotton DK,
100% cotton, 50g/125m/137yds
Yarn A: Pistachio Green 425
x 1 ball
Yarn B: Kingfisher Blue 435
x 1 ball
Yarn C: Vintage Pink 456 x 1 ball
Yarn D: Rose Red 414 x 1 ball
Yarn E: Buttercup Yellow 423
x 1 ball
● 4mm hook
● Yarn needle
● Plain flip-flops
YARN ALTERNATIVES
Any DK weight cotton yarn can
be used to achieve a similar
effect. This would make an ideal
stashbusting project.
TENSION
Exact tension is not essential for
this project.
MEASUREMENTS
Work can be made to measure to
fit any adult size flip-flop. Sample
is a size 6.
Su m m e r
Flip-flops
BY EMMA FRIEDLANDER-COLLINS
Bring a smile to your face and feet
with these colourful flip-flops!
DESIGNER BIOGRAPHY
Emma has written numerous
books on crochet, craft and
upcycling and is a regular
contributor to UK craft mags and
websites. Emma is passionate
about sharing ways to transform
everyday materials with the
power of craft and can be found
on Instagram @steelandstitch.
PATTERN NOTES
Change colour on last pull
through of previous st.
TRIANGLE
Make two
Row 1: With yarn A,
3ch, (2tr, 2ch, 3tr) in third ch
START
from hook, change to yarn B (see
Pattern Notes), turn.
Row 2: 3ch (counts as st
throughout), 2tr in same st,
miss 2tr, (3tr, 2ch, 3tr) in 2ch-sp,
miss 2tr, 3tr in last st, change to
yarn C, turn.
Row 3: 2ch (counts as st
throughout), 1dc in each st
across to 2ch-sp, (1dc, 2ch, 1dc)
in 2ch-sp, 1dc in each st across
to end of row, change to yarn D,
turn – 16dc, 1x 2ch-sp.
Row 4: Rep Row 3, change to
yarn E, turn – 18dc, 1x 2ch-sp.
Row 5: 3ch, 2tr in same st, miss
2 sts, [3tr in next st, miss 2 sts]
twice, (3tr, 2ch, 3tr) in 2ch-sp,
[miss 2 sts, 3tr in next st] three
times, change to yarn D, turn.
Row 6: 3ch, 2tr in same st, [3tr in
sp between 3tr-grps] three times,
(3tr, 2ch, 3tr) in 2ch-sp, miss
2 sts, [3tr in sp between 3tr-grps]
across, working last 3tr on top of
3ch, change to yarn C, turn.
Row 7: 2ch,1dc in each st across
to 2ch-sp, (1dc, 2ch, 1dc) in
2ch-sp, 1dc in each st across,
change to yarn B, turn – 32dc,
1x 2ch-sp.
Row 8: Rep Row 7, without
changing yarn at end of row
– 34dc, 1x 2ch-sp.
(If you need the triangle to be
bigger, rep Rows 5–8 once
more).
Fasten off and weave in all ends.
FINISHING
Work one round of dc around the
thong of the flip-flop by passing
hook under thong, yrh, draw up
loop, yrh and pull through both
loops. Work approximately 20-25
dc sts around each side of thong.
Using yarn needle whip
END
stitch the triangle to the
dc sts around the thong.
ADD TO THE STASH
Buy this pure cotton yarn from
www.lovecrafts.co.uk
www.insidecrochet.co.uk 85
➻
MAKE IT
Pattern instructions
MATERIALS
● Scheepjes Catona,
100% cotton,
50g/125m/137yds
Yarn A: Jade 514 x 1 ball
Yarn B: Old Lace 130 x 1 ball
Yarn C: Old Rose 408 x 1 ball
Yarn D: Jet Black 110 x 1 ball
Yarn E: Tropic 253 x 1 ball
Yarn F: Light Coral 264 x 1 ball
Yarn G: Crystaline 385 x 1 ball
Yarn H: Rich Coral 410 x 1 ball
● 3mm hook
● Stitch markers
● Six empty clean tin cans (with
sharpened edges filed smooth)
● 210g dried lentils
TENSION
Tension is not important for this
project, but after Rnd 7 your
work should measure 8cm/3in.
MEASUREMENTS
One can measures
11 x 8cm/4¼ x 3¼in.
One ball measures 6cm/2¼in
in diameter.
DESIGNER BIOGRAPHY
Kwannie crochets a miniature
world which is a reflection of her
daily life. You can find her work
on www.studiomanya.com and
on Instagram @studiomanya.
PATTERN NOTES
Use stitch marker to mark
beginning of rnd.
Unless stated otherwise, work
into both loops of stitch.
Pieces in the round are worked
in a continuous spiral.
Change colour on last pull
through of last stitch in
previous colour.
Keep first stitch as back side
of can.
CAN ONE
With yarn A, make
adjustable ring.
Rnd 1: 8htr in ring – 8htr.
Rnd 2: 2htr in each htr around
– 16htr.
Rnd 3: [2htr in next st, 1htr]
eight times – 24htr.
Rnd 4: [2htr in next st, 2htr]
eight times – 32htr.
Rnd 5: [2htr in next st, 3htr]
eight times – 40htr.
Rnd 6: [2htr in next st, 4htr]
eight times – 48htr.
Rnd 7: [2htr in next st, 5htr]
eight times – 56htr.
START
Fu n fair Can To s s
BY KWANNIE CHENG
These cheery embellished cans would
also make great desk tidies!
ADD TO THE STASH
Buy this pure cotton yarn from
www.woolwarehouse.co.uk
86 Inside Crochet
Rnds 8–26: Dc blo around.
Insert empty can and work with
can from here to avoid change
in tension, taking care with the
sharp edge.
Change to yarn B.
Rnds 27 & 28: [4dc blo in yarn B,
4dc blo in yarn C] seven times.
PM in free loop of last st.
Rnds 29–41: [4dc flo in yarn B,
4dc flo in yarn C] seven times.
Twist rows clockwise to get
stripes straight.
Change to yarn D.
Rnds 42–45: Dc blo around.
Rnd 46: [5dc, dc2tog] eight times
– 48dc.
Fasten off and weave in end.
Fold Rnds 43–46 inside can.
Keep can upside down (bottom
up). Attach yarn C at marker with
sl st. Work next round in free
loop of Rnd 28.
Rnd 47: 1dc in same st in yarn
C, 3dc in yarn C, 4dc in yarn B,
[4dc in yarn C, 4dc in yarn B] six
times – 56dc.
Rnd 48: [4dc flo in yarn C, 4dc
flo in yarn B] seven times.
Rnd 49: [1sl st in yarn C, 2tr in
each of next 2 sts in yarn C, 1sl
st in yarn C, 1sl st in yarn B, 2tr in
each of next 2 sts in yarn B, 1sl st
in yarn B] seven times – 84 sts.
Fasten off and weave in ends.
CAN TWO
Make two
Work as for Can One, but
replacing yarn A with yarn E and
yarn C with yarn F.
Rnd 5: [2dc in next st in yarn C,
1dc in yarn C, 2dc in yarn A] six
times – 30dc.
Rnd 6: [3dc in yarn C, 1dc in
yarn A, 2dc in next st in yarn A]
six times – 36dc.
Rnd 7: [2dc in next st in yarn C,
2dc in yarn C, 3dc in yarn A] six
times – 42dc.
Rnd 8: [4dc in yarn C, 2dc in
yarn A, 2dc in next st in yarn A]
six times – 48dc.
Rnds 9–15: [4dc in yarn C, 4dc
in yarn A] six times.
Rnd 16: [4dc in yarn C, 2dc in
yarn A, dc2tog in yarn A] six
times – 42dc.
Rnd 17: [Dc2tog in yarn C, 2dc
in yarn C, 3dc in yarn A] six
times – 36dc.
Rnd 18: [3dc in yarn C, 1dc in
yarn A, dc2tog in yarn A] six
times – 30dc.
Rnd 19: [Dc2tog in yarn C, 1dc
in yarn C, 2dc in yarn A] six
times – 24dc.
Rnd 20: [2dc in yarn C, dc2tog
in yarn A] six times – 18dc.
Rnd 21: [Dc2tog in yarn C, 1dc
in yarn A] six times – 12dc.
Rnd 22: Dc2tog in yarn A
around – 6dc.
Fasten off and
END
weave in end.
Secure end tightly.
CAN THREE
Make three
Rnds 1–24: With yarn G work
as for Can One Rnds 1–24.
Change to yarn A.
Rnds 25 & 26: Dc blo around
– 56dc.
Rnds 27–49: Work as for
Can One Rnds 27–49 replacing
yarn C with H.
Fasten off and weave in ends.
BALLS
Make three
Stuff firmly with lentils while
you make.
With yarn C, make
adjustable ring.
Rnd 1: 6dc in ring – 6dc.
Rnd 2: [1dc in yarn C, 1dc in
same st in yarn A] six times
– 12dc.
Rnd 3: [2dc in next st in
yarn C, 1dc in yarn A] six times
– 18dc.
Rnd 4: [2dc in in yarn C, 2dc
in next st in yarn A] six times
– 24dc.
www.insidecrochet.co.uk 87
➻
MAKE IT
Pattern instructions
MATERIALS
● Stylecraft Batik DK,
80% acrylic/20% wool,
50g/138m/151yds
Yarn A: Old Gold 1902 x 2 balls
Yarn B: Raspberry 1905 x 1 ball
Yarn C: Storm 1913 x 1 ball
● 4mm & 4.5mm hooks
● Stuffing
YARN ALTERNATIVES
You can use any similar weight
yarn to achieve a similar effect.
TENSION
Exact tension is not important for
this design, but be sure to work
an even tension throughout so the
motifs are the same size.
MEASUREMENTS
Finished size: 45cm/18in across.
DESIGNER BIOGRAPHY
Sarah-Jane loves being inventive
with crochet and likes her designs
to be simple, fun and quirky and
most of all make people smile. Find
her on Instagram @flo_and_dot.
SPECIAL STITCHES
3treble cluster (3trcl): [Yrh,
insert hook through st, yrh,
pull loop through, yrh and pull
through first two loops on hook]
three times in same st, yrh, pull
through all four loops.
PATTERN NOTES
The diamond motifs are worked
in two colours. To change colour,
work the last yrh of previous st
in new colour. Do not fasten off
each time but run yarn up on WS
until required.
DIAMOND MOTIF
Make 12, six with
yarns A & B and six
with yarns A & C
With yarn A and 4mm hook, 2ch.
Row 1: (RS) 1dc in second ch
from hook, turn – 1dc.
Row 2: 1ch (does not count as
st throughout), 1dc, change to
yarn B, 1dc in same st, turn – 2dc.
Row 3: 1ch, 2dc in first st, change
to yarn A, 1dc, turn – 3dc.
Row 4: 1ch, 2dc in first st, change
to yarn B, 2dc, turn – 4dc.
Row 5: 1ch, 2dc in first st, 1dc,
change to yarn A, 2dc, turn – 5dc.
Row 6: 1ch, 2dc in first st, 1dc,
change to yarn B, 3dc, turn
– 6dc.
START
Fairgro u n d Star Pillo w
BY SARAH-JANE HICKS
Remembering the fun of the fair, this cushion is inspired
by the weathered signs and lights of the fairground.
ADD TO THE STASH
Buy this wool-blend yarn from
www.blacksheepwools.com
88 Inside Crochet
Row 7: 1ch, 2dc in first st, 2dc,
change to yarn A, 3dc, turn
– 7dc.
Row 8: 1ch, 2dc in first st, 2dc,
change to yarn B, 4dc, turn
– 8dc.
Row 9: 1ch, 2dc in first st, 3dc,
change to yarn A, 4dc, turn
– 9dc.
Row 10: 1ch, 2dc in first st,
3dc, change to yarn B, 5dc, turn
– 10dc.
Row 11: 1ch, 2dc in first st,
4dc, change to yarn A, 5dc, turn
– 11dc.
Row 12: 1ch, 2dc in first st,
4dc, change to yarn B, 6dc, turn
– 12dc
Row 13: 1ch, 2dc in first st,
5dc, change to yarn A, 6dc, turn
– 13dc.
Row 14: 1ch, 2dc in first st,
5dc, change to yarn B, 7dc, turn
– 14dc.
Row 15: 1ch, 2dc in first st,
6dc, change to yarn A, 7dc, turn
– 15dc.
Row 16: 1ch, 2dc in first st,
6dc, change to yarn B, 8dc, turn
– 16dc
Row 17: 1ch, 2dc in first st, 7dc,
change to yarn A, 8dc, turn.
– 17dc.
Row 18: 1ch, 2dc in first st,
7dc, change to yarn B, 9dc, turn
– 18dc.
Row 19: 1ch, 2dc in first st,
8dc, change to yarn A, 9dc, turn
– 19dc.
Row 20: 1ch, 2dc in first st, 8dc,
change to yarn B, 10dc, turn
– 20dc.
Row 21: 1ch, dc2tog, 8dc,
change to yarn A, 10dc, turn
– 19dc.
Row 22: 1ch, dc2tog, 8dc,
change to yarn B, 9dc, turn
– 18dc.
Row 23: 1ch, dc2tog, 7dc,
change to yarn A, 9dc, turn
– 17dc.
Row 24: 1ch, dc2tog, 7dc,
change to yarn B, 8dc, turn
– 16dc.
Row 25: 1ch, dc2tog, 6dc,
change to yarn A, 8dc, turn
– 15dc.
Row 26: 1ch, dc2tog, 6dc,
change to yarn B, 7dc, turn
– 14dc.
Row 27: 1ch, dc2tog, 5dc,
change to yarn A, 7dc, turn
– 13dc.
Row 28: 1ch, dc2tog, 5dc,
change to yarn B, 6dc, turn
– 12dc.
Row 29: 1ch, dc2tog, 4dc,
change to yarn A, 6dc, turn
– 11dc.
Row 30: 1ch, dc2tog, 4dc,
change to yarn B, 5dc, turn
– 10dc.
Row 31: 1ch, dc2tog, 3dc,
change to yarn A, 5dc, turn
– 9dc.
Row 32: 1ch, dc2tog, 3dc,
change to yarn B, 4dc, turn
– 8dc.
Row 33: 1ch, dc2tog, 2dc,
change to yarn A, 4dc, turn
– 7dc.
Row 34: 1ch, dc2tog, 2dc,
change to yarn B, 3dc, turn
– 6dc.
Row 35: 1ch, dc2tog, 1dc,
change to yarn A, 3dc, turn
– 5dc.
Row 36: 1ch, dc2tog, 1dc,
change to yarn B, 2dc, turn – 4dc.
Row 37: 1ch, dc2tog, change to
yarn A, 2dc, turn – 3dc.
Row 38: 1ch, dc2tog, change to
yarn B, 1dc, turn – 2dc.
Row 39: 1ch, dc2tog – 1dc.
Fasten off and weave in ends.
JOINING DIAMONDS
With yarn A and 4mm hook,
crochet (or sew) six diamonds
together to form front panel of
star as follows:
With diamonds RS together,
crochet from the bottom
point to halfway up, between
Rnds 20 & 21.
Rep with remaining six
diamonds to form back panel.
Fasten off and weave in ends.
BOBBLE EDGING
With yarn A and 4.5mm hook.
Rnd 1: Place front and back
panels with WS together, and
working through both panels,
join yarn with sl st to any st,
1ch, 1dc in each st around,
working 2dc at each point and
dc2tog between the points,
stuff before finishing, join with
sl st to first st, turn.
Rnd 2: [5ch, 3trcl (see Special
Stitches) in third ch from hook,
sl st in same st, 2ch, miss next 2
sts along edge, sl st in next st]
around, leaving one stitch gap
between some bobbles if sts do
not quite work out.
END
Fasten off and
weave in ends.
www.insidecrochet.co.uk 89
➻
MAKE IT
Pattern instructions
Che e ky Se agu ll
BY SARAH-JANE HICKS
This seagull loves nothing more than paddling
in the sea and eating chips.
ADD TO THE STASH
Buy this pure cotton yarn from
www.woolwarehouse.co.uk
MATERIALS
● Rico Design Ricorumi DK,
100% cotton,
25g/57.5m/63yds
Yarn A: White 001 x 1 ball
Yarn B: Silver Grey 058 x 1 ball
Yarn C: Mouse Grey 059
x 1 ball
Yarn D: Denim 034 x 1 ball
Yarn E: Yellow 006 x 1 ball
Yarn F: Orange 027 x 1 ball
● 3mm hook
● Two oval safety eyes,
12mm/½in
● Toy stuffing
YARN ALTERNATIVES
You can use any DK weight
cotton to achieve a similar effect.
TENSION
Tension is not critical for
this project.
MEASUREMENTS
Seagull measures 17cm/6½in
high when sitting.
DESIGNER BIOGRAPHY
Sarah-Jane loves being inventive
with crochet and likes her designs
90 Inside Crochet
Attach safety eyes between
Rnds 31 & 32, 12 sts apart
around front.
Rnd 38: [2dc, dc2tog] six times
– 18dc.
Rnd 39: [1dc, dc2tog] six times
– 12dc.
Stuff head.
Rnd 40: Dc2tog six times – 6dc.
Fasten off and weave in ends.
to be simple, fun and quirky and
most of all make people smile. Find
her on Instagram @flo_and_dot.
SPECIAL STITCHES
Reverse dc (crab stitch) is
worked as for regular dc except
instead of working from right
to left, work from left to right.
This creates a slightly twisted,
rounded edge.
Reverse dc: With RS facing, insert
hook into st to right, from front
to back, yarn round hook, pull
through loop, yarn round hook,
draw through 2 loops on hook.
BODY
Using yarn A, 2ch.
Rnd 1: 6dc in second
ch from hook – 6dc.
Rnd 2: 2dc in each st around
– 12dc.
Join yarn B, do not fasten off
yarn A, carry yarn not being used
up on the inside.
Rnd 3: [1dc, 2dc in next st] six
times – 18dc.
Rnd 4: [2dc, 2dc in next st] six
times – 24dc.
Change to yarn A, do not fasten
START
off yarn B, carry yarn not being
used up on the inside.
Rnd 5: [3dc, 2dc in next st] six
times – 30dc.
Rnd 6: [4dc, 2dc in next st] six
times – 36dc.
Rnd 7: Change to yarn B, [5dc,
2dc in next st] six times – 42dc.
Rnd 8: [6dc, 2dc in next st] six
times – 48dc.
Rnd 9: Change to yarn A, [7dc,
2dc in next st] six times – 54dc.
Rnd 10: [8dc, 2dc in next st] six
times – 60dc.
Working in stripe sequence as set
of two rnds in yarn B, two rnds in
yarn A, cont as folls:
Rnds 11–22: Dc around.
Fasten off yarn B.
WINGS
Make two
Using yarn C, 2ch.
Rnd 1: 6dc in second ch from
hook – 6dc.
Rnd 2: 2dc in each st around
– 12dc.
Rnd 3: [1dc, 2dc in next st] six
times – 18dc.
Rnd 4: [2dc, 2dc in next st] six
times – 24dc.
Rnd 5: [3dc, 2dc in next st] six
times – 30dc.
Rnd 6: [4dc, 2dc in next st] six
times – 36dc.
Rnd 7: [5dc, 2dc in next st] six
times – 42dc.
Rnd 8: [6dc, 2dc in next st] six
times – 48dc.
Fasten off, fold wing in half, join
yarn with sl st to corner, rev dc
(see Special Stitches) in each st
along edge – 24dc.
Fasten off leaving a long yarn tail
to sew on wing.
HAT
Using yarn D, 2ch.
Rnd 1: 6dc in second ch from
hook – 6dc.
Rnd 2: 2dc in each st around
– 12dc.
Rnd 3: [1dc, 2dc in next st] six
times – 18dc.
Rnd 4: [2dc, 2dc in next st] six
times – 24dc.
Rnd 5: [7dc, 2dc in next st] three
times – 27dc.
Rnd 6: Dc blo around.
Rnd 7: Dc around.
Rnd 8: [8dc, 2dc in next st] three
times – 30dc.
Rnd 9: Dc around, join with sl st
to first st.
Rnd 10: 2ch, 2htr blo in each st
around – 60htr.
Fasten off.
BEAK
Using yarn E, 2ch.
Rnd 1: 8dc in second ch from
hook – 8dc.
Rnds 2–8: Dc around.
Fasten off leaving a long yarn tail
to sew on beak.
Stuff beak.
LEGS
Make two
Using yarn F, 6ch, join with sl st.
Rnds 1–10: Dc around – 6dc.
Rnd 11: 2dc in each st around
– 12dc.
Rnd 12: [2dc, 2dc in next st] four
times – 16dc.
Rnds 13 & 14: Dc around.
Flatten foot and working through
both sides to join, sl st blo in each
st along.
Fasten off.
MAKING UP
Sew together using
image as a guide.
END
Rnd 23: Flatten body and
working through both sides to
join, 15 sl st blo. Open gap and
working in rem 30 sts, dc in each
st around – 30dc.
Stuff body.
Work neck and head as folls:
Rnds 24–36: Dc around – 30 dc.
Rnd 37: [3dc, dc2tog] six times
– 24dc.
www.insidecrochet.co.uk 91
Delicious hand crafted artisan yarns for harmonious colourwork.
Hand painted and hand dyed ethically sourced Merino yarns for
Crochet (and knitting).
Available in 100g multi colourways “Madrigals” and 50g semi solid “solos”.
DK, Aran and Sockweights available. Custom dyeing services offered also.
Visit www.madrigalyarns.com
Follow us on Instagram @madrigalyarns
Fabrics Plus Limited
The home of beautiful fabric and yarn.
19 Badminton Road
Downend
BS16 6BB
Tel No:- 0117 329 3857
www.fabrics-plus.co.uk
Facebook:- @FabricsPlusLimited
We stock a large range of yarn from Stylecraft, King Cole and West Yorkshire Spinners plus a great
range of knitting and crocheting accessories from Knit Pro.
We look forward to seeing you soon.
MATERIALS
● Stylecraft Special DK, 100%
acrylic, 100g/295m/437yds
Yarn A: Aster 1003 x 3 balls
Yarn B: Cloud Blue 1019 x 3 balls
Yarn C: Buttermilk 1835 x 1 ball
Yarn D: Dandelion 1856 x 1 ball
Yarn E: Sunshine 1114 x 1 ball
Yarn F: Toy 1844 x 1 ball
Yarn G: Spice 1711 x 1 ball
Yarn H: Saffron 1081 x 2 balls
● 4mm hook
● Stitch marker
● Yarn needle
YARN ALTERNATIVES
You can use any DK weight yarn
to achieve a similar effect.
TENSION
Work 8 blocks to measure 10 x
10cm/4 x 4in using 4mm hook,
or size required to obtain tension.
Please note though that
exact tension is not critical for
this project.
MEASUREMENTS
Blanket: 96 x 96cm/38 x 38in
including border.
C2C square motif (including
edging): 19 x 19cm/7½ x 7½in.
DESIGNER BIOGRAPHY
Jane has worked with crochet,
knitting and fabric since childhood
with crochet being her passion.
She now combines freelance
crochet technical editing and
designing with running crochet
workshops so others can learn
and be inspired. Find her online at
www.janescrochet.com and find
crochet patterns and videos at
www.justhands-on.tv.
Off to the Beach
Blanket
BY JANE CZAJA
Nine seaside picture squares make up this
colourful corner to corner blanket. Perfect for
summer picnics on and off the beach!
PATTERN NOTES
One block (2ch and 3tr) is worked
in 2ch-sp of block on previous row.
Change colour by pulling new
colour through the slip stitch at
the start of the block.
Wind some small balls in readiness
for where the same colour is used
more than once in the row (7
blocks = approx 1g of yarn).
Where possible, carry colour
change forward to the block you
are working on and crochet over
the yarn as you work forward
(across no more than three blocks
is manageable, otherwise join a
new ball).
www.insidecrochet.co.uk 93
➻
Pattern instructions
MAKE IT
BOAT: YARNS A AND G
SANDCASTLE: YARNS B, C AND E
Sandcastle: Yarns, C
B,an
C and E
27
26
25
24
23
22
21
21
20
20
19
Boat: Yarns A & G
18
17
16
15
14
27
26
25
24
23
22
21
20
19
18
17
16
15
14
14
27
14
27
13
26
13
26
12
25
12
25
11
24
11
24
10
23
10
23
9
22
9
22
8
21
8
21
7
20
7
20
6
19
6
19
5
18
5
18
4
17
4
17
3
16
3
16
2
15
2
15
1
14
1
14
14
13
12
11
10
9
8
7
6
5
4
3
2
14
1
25
24
23
22
11
10
9
8
7
6
5
4
3
2
1
Sunglasses:
glasses:
Yarns
glasses:
A,
glasses:
B, D & F
Fish: YarnsA,A,BB & C
26
12
SUNGLASSES: YARNS A, B, D AND F
FISH: YARNS A, B AND C
27
13
21
20
19
18
17
16
15
27
14
26
25
24
23
22
21
20
19
18
17
16
15
14
14
14
27
27
13
13
26
26
12
12
25
25
11
11
24
24
10
10
23
23
9
9
22
22
8
8
21
21
7
7
20
20
6
6
19
19
5
5
18
18
4
4
17
17
3
3
16
16
2
2
15
15
1
1
14
14
14
13
12
11
10
9
8
7
6
5
4
3
2
1
14
Anchor: Yarns B & G
26
25
24
23
22
12
11
10
9
8
7
6
5
4
3
2
1
BEACH HUTS: YARNS A, C AND D
ANCHOR: YARNS B AND G
27
13
Beach Huts: Yarns ,A,
CC& D
21
20
19
18
17
16
15
14
27
26
25
24
23
22
21
20
19
18
17
16
15
14
14
27
14
27
13
26
13
26
12
25
12
25
11
24
11
24
10
23
10
23
9
22
9
22
8
21
8
21
7
20
7
20
6
19
6
19
5
18
5
18
4
17
4
17
3
16
3
16
2
15
2
15
1
14
11
14
14
13
12
94 Inside Crochet
11
10
9
8
7
6
5
4
3
2
1
14
13
11
12
11
10
9
8
1
11
7
6
5
4
3
2
1
SUNSHINE:
Sunshine:YARNS
YarnsB AND
B & EE
27
26
25
24
23
22
21
20
19
18
17
16
15
14
14
27
13
26
12
25
11
24
10
23
9
22
8
21
7
20
6
19
5
18
4
17
3
16
2
15
1
14
14
13
12
11
10
9
8
7
6
5
4
3
2
1
FOOT PRINT: YARNS A AND C
Foot Print: Yarns A & C
27
26
25
24
23
22
21
20
19
18
17
16
15
14
14
27
13
26
12
25
11
24
10
23
9
22
8
21
7
20
6
19
5
18
14
17
27
26
25
24
23
22
21
20
19
18
17
16
15
96cm/ 38in
4
14
3
16
2
A: Aster
15
1
14
14
13
12
11
10
9
8
7
6
5
4
3
2
B: Cloud Blue
1
C: Buttermilk
PALM TREE: YARNS A AND B
Palm Tree: Yarns A & B
27
26
25
24
23
22
21
D: Dandelion
20
19
18
17
16
15
14
14
E: Sunshine
27
96cm/ 38in
15
13
F: Toy
26
12
25
11
G: Spice
24
10
23
9
22
8
21
7
20
6
19
5
18
4
17
3
16
2
15
1
14
14
13
12
11
10
9
8
7
6
5
4
3
2
1
Starting with Row 1 at bottom
right hand corner, work each
Chart taking care not to confuse
WS with RS. As a reminder, place
a marker on RS of square after
completing Row 2. Red arrow
denotes direction of odd (WS)
numbered rows. Black arrow
denotes direction of even (RS)
numbered rows.
PLAIN SQUARE
Make 16, eight in
each of yarns A and B
With 4mm hook and using yarn A
or yarn B, 5ch.
Row 1: (WS) 1tr in third ch from
hook, 1tr in each of next 2 ch,
turn – 1 block.
Row 2: (RS) 5ch, 1tr in third ch
from hook, 1tr in each of next
START
www.insidecrochet.co.uk 95
➻
MAKE IT
Pattern instructions
2 ch, (sl st, 2ch, 3tr) in 2ch-sp
of block of previous row, turn
– 2 blocks.
Row 3: 5ch, 1tr in third ch from
hook, 1tr in each of next 2 ch,
(sl st, 2ch, 3tr) in each 2ch-sp
across to end of row, turn
– 3 blocks.
Cont in this way to increase one
block on each row as folls:
Rows 4–14: Rep Row 3, turn
– 14 blocks.
Decrease one block on each
row as folls:
Row 15: Sl st in each of first
3 tr, (sl st, 2ch, 3tr) in each
2ch-sp across to last 2ch-sp,
sl st in last 2ch-sp, turn (without
making block in this last 2ch-sp)
– 13 blocks.
Rows 16–27: Rep Row 15, turn
– 1 block.
Finish with sl st in each of next
3 tr, sl st in corner 2ch-sp.
Fasten off.
PICTURE SQUARE
Make nine
With 4mm hook and using
96 Inside Crochet
yarn A or yarn B, according to
relevant chart, 5ch.
Row 1: (WS) 1tr in third ch from
hook, 1tr in each of next 2 ch,
turn – 1 block.
Row 2: (RS) 5ch, 1tr in third ch
from hook, 1tr in each of next
2 ch, (sl st, 2ch, 3tr) in 2ch-sp of
block of previous row, turn
– 2 blocks.
Row 3: 5ch, 1tr in third ch from
hook, 1tr in each of next 2 ch,
(sl st, 2ch, 3tr) in each 2ch-sp
across to end of row, turn
– 3 blocks.
in this last 2ch-sp) – 13 blocks.
Rows 16–27: Rep Row 15, turn
– 1 block.
Finish with sl st in each of next
3 tr, sl st in corner 2ch-sp.
Fasten off.
Cont in this way to increase
one block on each row working
colour changes according to
chart as folls:
Rows 4–14: Rep Row 3, turn
– 14 blocks.
FINISHING
Weave in all ends so that both
sides of square are neat.
Working colour changes
according to Chart, decrease one
Block on each row as folls:
Row 15: Sl st in each of first 3 tr,
(sl st, 2ch, 3tr) in each 2ch-sp
across to last 2ch-sp, sl st in last
2ch-sp, turn (without making block
SQUARE EDGING
Rnd 1: Join yarn H to any corner
st, 1dc in same corner st, [2ch,
1dc in next sp between blocks]
around, working last dc of each
side in corner st of square and
ending with sl st in first dc of
rnd. Fasten off.
JOINING SQUARES
Using photo as a guide, arrange
squares in five rows of five
squares each. Join as folls:
Step 1: First join two squares.
With right sides together and
working through corresponding
dc sts of both squares, join
yarn H to corner dc, 1dc in
same corner dc, [2ch, 1dc in
next dc] across, working last dc
in corner dc.
Step 2: Rep Step 1 to join
each of next three squares
to complete one row of five
squares.
Step 3: Rep Steps 1 & 2 with
remaining squares to complete
four more rows.
Step 4: Join rows together by
repeating method in Step 1.
BORDER
Rnd 1: With RS facing, join
yarn H to first dc after any
corner dc, 1dc in same dc, [5tr in
next dc, 1dc in next dc] around,
working 7tr in each corner dc,
join with sl st in first dc.
Rnd 2: 2ch, (counts as first tr),
4tr in same dc as sl st, [miss 2 tr,
1dc in next tr, miss 2 tr, 5tr in
next dc] around working 5dc in
fourth tr of each corner 7 tr, join
with sl st to top of 2ch at start.
Fasten off.
Weave in all ends so
that both sides of
blanket are neat.
END
-*-
CELEBRATING
DYED-BY-HAND THE ART OF
ARTISAN YARN
S
hand- dyed boutique
de
co 0
ith r1
w we
off flo
% ld
10 Wi
@wildfloweryarn
Buy Online on Etsy
Wildfloweryarn.Etsy.com
U S E YA R N 5 F O R 5 % O F F
Use code IC10 for 10% discount https://goodvibesyarn.co.uk
Suppliers of beautiful hand dyed
yarns from around the world.
Exclusive UK importers of Emma’s Yarn,
an incredible brand from Florida.
/goodvibesyarn
01473 316936
W W W.YA R N W O R X . C O M
@goodvibesyarn
Beautifully unusual hand dyed yarns from a small family business to your doorstep
Watercolours & Lace
Alpaca to Yak, Camel to Cashmere,
Mohair, Silk and fine Wools - we dye
over 50 yarn bases and more than 400
hand-painted colourways in weights
from cobweb to 4-ply. Join our Yarn Club
and be the first to sample the latest
recipes inspired by nature and the
landscape around our Norfolk home.
www.watercoloursandlace.co.uk
julie@watercoloursandlace.co.uk
Beautiful hand
dyed yarns
IN off Get
S w
at IDE ith 10%
ch CR co
ec OC de
ko H :
ut ET
!
Code:
INSIDECROCHET
for 10% off!
Hand dyed yarn from North East Scotland
www.fruitfulfusion.co.uk
www.atthisyarns.co.uk
➻
MAKE IT
Pattern instructions
Sm ilin g Su n Blan ke t
BY LOOPSAN
This fun and cheery blanket will provide at least a little bit of
sunshine on even the rainiest of days. Happy smiles all around!
ADD TO THE STASH
Buy this pure wool yarn from
www.wyspinners.com
MATERIALS
● West Yorkshire Spinners
Colour Lab, 100% wool,
100g/225m/245yds
Yarn A: Electric Blue x 4 balls
Yarn B: Citrus Yellow x 2 balls
Yarn C: Harbour Blue x 1 ball
Yarn D: Crimson Red x 1 ball
Yarn E: Perfectly Plum x 1 ball
Yarn F: Bottle Green x 1 ball
Yarn G: Zesty Orange x 1 ball
● 4mm & 5mm hooks
● Yarn needle
YARN ALTERNATIVES
You can use any DK yarn to
achieve a similar effect.
98 Inside Crochet
117
115
105
110
90
95
100
85
80
75
70 69
69
65
60
55
50
45
40
35
30
25
20
15
10
5
4
3
2
1
49
45
A: Electric Blue
B: Citrus Yellow
40
35
30
25
20
15
10
5 4 3 2 1
C: Harbour Blue
D: Crimson Red
www.insidecrochet.co.uk 99
➻
MAKE IT
Pattern instructions
TENSION
Work 10 x 10 blocks to measure
10 x 10cm/4 x 4in using 5mm
hook, or size required to
obtain tension.
Tension is not critical for this
project.
MEASUREMENTS
Finished blanket is approximately
68cm/26¾in wide and
94cm/37in long.
DESIGNER BIOGRAPHY
Loopsan likes designing items
with a vintage feel and loads of
texture. Find more of her designs
on her blog www.loopsan.com.
SPECIAL STITCHES
Invisible join (IJ): Cut yarn
leaving a tail end with which to
thread yarn needle. Insert needle
in second st from beginning of
round (not first st). Draw yarn
through and insert needle in back
loop of last st from this round.
From the top, it looks like a
normal “v” st.
100 Inside Crochet
PATTERN NOTES
Pattern is worked as a traditional
corner to corner (C2C) square,
changing colours according to
chart. The arrows on the chart
indicate direction of work.
This pattern uses the invisible
joining technique to finish off the
different colours in the border.
More experienced crocheters
are recommended to join in new
colours with a standing htr rather
than 2ch.
When working the border,
working into the third loop
means to work into the strand
of yarn lying horizontally at the
back and beneath the “v” at the
top of the stitch.
BLANKET
With 5mm hook and
yarn A, 5ch.
Row 1: 1tr in third ch from
hook (first 2ch do not count as
a st here and throughout), 1tr
in each of next 2 ch, turn
– 1 block.
Row 2: 5ch, 1tr in third ch from
START
hook, and in each of next 2 ch,
(sl st, 2ch, 3tr) in 2ch-sp from
previous row, turn – 2 blocks.
Row 3: 5ch, 1tr in third ch from
hook, and in each of next 2 ch,
[(sl st, 2ch, 3tr) in next 2ch-sp
from previous row] twice, turn
– 3 blocks.
Cont in this way working one
extra block per row to end of
Row 49, working colour changes
according to Chart.
Row 50: 5ch, 1tr in third ch
from hook, and in each of next
2 ch, [(sl st, 2ch, 3tr) in 2ch-sp
from previous row] in each
2ch-sp to last 2ch-sp, sl st in last
2ch-sp, turn – 49 blocks.
Row 51: Sl st across first tr,
[(sl st, 2ch, 3tr) in next 2ch-sp] in
each 2ch-sp to last 2ch-sp, turn
– 49 blocks.
Rows 52–69: Rep last two rows
– 49 blocks.
Work decs as foll:
Row 70: Sl st across first tr,
[(sl st, 2ch, 3tr) in next 2ch-sp] in
each 2ch-sp to last 2ch-sp, sl st
in last 2ch-sp, turn – 48 blocks.
Rep last row until one block
rems. Fasten off.
BORDER
Using 4mm hook, join yarn A in
any corner of blanket.
Rnd 1: 1htr in each tr and 2htr
in each 2ch-sp around, working
(1htr, 1ch, 1htr) in each corner,
join with invisible join (see
Special Stitches).
With yarn E work in third loop
of htr (see Pattern Notes) as foll:
Rnd 2: 2ch, 1htr in third loop of
each st around, working (1htr, 1
ch, 1htr) in each corner 1ch-sp,
join with invisible join.
Rep Rnd 2 using following
colour sequence.
Rnd 3: Yarn C.
Rnd 4: Yarn F.
Rnd 5: Yarn B.
Rnd 6: Yarn G.
Rnd 7: Yarn D.
Fasten off.
FINISHING
Weave in ends and
lightly block.
END
back issues
Issue
127
Plus
Cute mini
tassels & hook
LOOKING FOR THAT PERFECT PROJECT?
SEARCH WWW.INSIDECROCHET.CO.UK FOR ALL OUR PAST DESIGNS AND THEN
CALL 01202 586848 OR VISIT WWW.SELECTMAGAZINES.CO.UK TO BUY THE ISSUE!
Issue
133
Plus
Embroidery
hoop gift
Issue
134
Every issue is also
available as a digital
download for only £2.92!
That’s, on average, more
than 20 stunning patterns
for less than £3! Visit
www.pocketmags.com
to find out more
➻
MAKE IT
Pattern instructions
MATERIALS
● Krea Deluxe Organic
Cotton, 100% cotton,
50g/165m/180yds
Yarn A: Medium Green 39
x 2 balls
Yarn B: Dark Green 42 x 1 ball
Yarn C: Off-White 02 x 1 ball
Yarn D: Sky Blue 22 x 1 ball
Yarn E: Yellow 06 x 1 ball
● 2.5mm hook
● Pair of safety eyes, 6mm/¼in
● Yarn needle
● Stitch markers
● Stuffing
TENSION
Exact tension is not crucial for
this design, but ensure your
stitches are tight enough that the
stuffing does not show through.
MEASUREMENTS
Finished crocodile is 32cm/
12½in long.
DESIGNER BIOGRAPHY
Erinna is a scientist by day and
a crochet lover by night. She
loves soft colours and kawaii
characters. Find her on Instagram
@littleaquagirl.
Co co the Cro co d ile
BY ERINNA LEE
Despite the reputation that precedes her species, Coco in
fact loves to be cuddled. She’s also a vegetarian and makes
the tastiest hummus dip!
SPECIAL STITCHES
Inc: 2dc in next st.
Dec: Insert the hook in the
front loop of your first st, then
immediately insert your hook in
the front loop of the second st
(3 loops on hook). Yrh and pull
through first 2 loops, yrh and pull
through remaining loops.
3tr-bobble: *Yrh, insert hook
through next st, yrh, pull through
(3 loops on hook), yrh, pull
through 2 loops (2 loops on hook);
rep from * twice more (4 loops on
hook), yrh, pull through all loops.
3ch-picot: 3ch, insert hook in
first ch, yrh and pull through both
loops on hook.
HEAD
With yarn A, 8ch.
Stitches are worked
around both sides of the
foundation chain.
Rnd 1: Miss first ch on the hook,
dc in next 6 ch, 3dc in next ch.
Cont on other side of foundation
chain, dc in next 5 ch, inc (see
Special Stitches) in next ch – 16 sts.
Rnd 2: Inc in next st, 5dc, inc in
next 3 sts, 5dc, inc in next 2 sts
– 22 sts.
START
This adorable design is taken
from Am igurum i Treasures 2
by Erinna Lee
(Meteoor Books, £ 13.95).
102 Inside Crochet
Rnds 3 & 4: Dc around – 22 sts.
Rnd 5: Inc in next st, 9dc, inc in
next 2 sts, 9dc, inc in next st
– 26 sts.
Rnds 6 & 7: Dc around – 26 sts.
Rnd 8: 3dc, 3tr-bobble (see
Special Stitches) in next st, 6dc,
3tr-bobble in next st, 15dc – 26 sts.
Push each 3tr-bobble out to form
the nostrils.
Rnd 9: [Inc in next 2 sts, 11dc]
twice – 30 sts.
Rnd 10: 7dc, inc in next st, 2dc,
inc in next st, 10dc, dec (see
Special Stitches), 2dc, dec, 3dc
– 30 sts.
Rnd 11: Dc around – 30 sts.
Rnd 12: 8dc, inc in next st, 2dc,
inc in next st, 10dc, [dec, 2dc]
twice – 30 sts.
Rnd 13: 2dc, inc in next 2 sts,
15dc, inc in next 2 sts, 9dc – 34 sts.
Rnd 14: 11dc, inc in next st, 3dc,
inc in next st, 11dc, dec, 2dc, dec,
1dc – 34 sts.
Rnd 15: Dc around – 34 sts.
Rnd 16: 12dc, inc in next st,
5dc, inc in next st, 12dc, dec,
1dc – 35 sts.
Rnd 17: Dc around – 35 sts.
Rnd 18: 8dc, [inc in next st, 3dc]
five times, 5dc, dec – 39 sts.
Rnd 19: Dc around – 39 sts.
Rnd 20: 11dc, [inc in next st, 3dc]
five times, 8dc – 44 sts.
Rnd 21: Dc around – 44 sts.
Rnd 22: 9dc, [inc in next st, 4dc]
six times, 5dc – 50 sts.
Rnd 23: Dc around – 50 sts.
Rnd 24: 10dc, [inc in next st,
5dc] six times, 4dc – 56 sts.
Rnd 25: Dc around – 56 sts.
Rnd 26: 12dc, [inc in next st, 6dc]
six times, 2dc – 62 sts.
Rnds 27–34: Dc around – 62 sts.
Rnd 35: 19dc, dec, 32dc, dec,
7dc – 60 sts.
Rnd 36: [8dc, dec] six times
– 54 sts.
Rnd 37: [7dc, dec] six times
– 48 sts.
Rnd 38: [6dc, dec] six times
– 42 sts.
Rnd 39: [5dc, dec] six times
– 36 sts.
Stuff the head firmly and
continue stuffing as you go.
Rnd 40: [4dc, dec] six times
– 30 sts.
Rnd 41: [3dc, dec] six times
– 24 sts.
Rnd 42: Dc around – 24 sts.
Rnd 43: [2dc, dec] six times
– 18 sts.
Rnd 44: [1dc, dec] six times
– 12 sts.
Rnd 45: [Dec] six times – 6 sts.
Sl st in next st.
Fasten off, leaving a yarn tail.
Using your yarn needle, weave
the yarn tail through the front
loop of each remaining stitch and
pull it tight to close.
Weave in the yarn end.
TAIL & BODY
With yarn A, make an
adjustable ring.
Rnd 1: 6dc in ring – 6 sts.
Rnd 2: [1dc, inc in next st] three
times – 9 sts.
Rnd 3: [2dc, inc in next st] three
times – 12 sts.
Rnds 4 & 5: Dc around – 12 sts.
Rnd 6: 5dc, inc in next 2 sts, 5dc
– 14 sts.
Rnds 7 & 8: Dc around – 14 sts.
Rnd 9: 6dc, inc in next 2 sts, 6dc
– 16 sts.
Rnds 10 & 11: Dc around
– 16 sts.
Rnd 12: 7dc, inc in next st, 1dc,
inc in next st, 6dc – 18 sts.
Rnds 13 & 14: Dc around
– 18 sts.
Rnd 15: 8dc, inc in next st, 2dc,
inc in next st, 6dc – 20 sts.
Rnds 16 & 17: Dc around
– 20 sts.
Rnd 18: 9dc, inc in next st, 2dc,
inc in next st, 7dc – 22 sts.
Rnd 19: Dc around – 22 sts.
Rnd 20: 10dc, inc in next st, 3dc,
inc in next st, 7dc – 24 sts.
Rnd 21: Dc around – 24 sts.
Rnd 22: 11dc, [inc in next st, 3dc]
twice, 5dc – 26 sts.
Rnd 23: Dc around – 26 sts.
Rnd 24: 12dc, [inc in next st, 3dc]
twice, 6dc – 28 sts.
Rnd 25: Dc around – 28 sts.
Rnd 26: 12dc, [inc in next st, 5dc]
twice, 4dc – 30 sts.
Rnd 27: Dc around – 30 sts.
Rnd 28: 12dc, [inc in next st, 3dc]
three times, 6dc – 33 sts.
Rnd 29: Dc around – 33 sts.
Rnd 30: 14dc, [inc in next st,
3dc] three times, 7dc – 36 sts.
Rnd 31: Dc around – 36 sts.
Stuff the tail and body firmly and
continue stuffing as you go.
Rnd 32: 14dc, [inc in next st,
4dc] three times, 7dc – 39 sts.
Rnd 33: Dc around – 39 sts.
Rnd 34: 16dc, [inc in next st,
4dc] three times, 8dc – 42 sts.
Rnd 35: Dc around – 42 sts.
Rnd 36: 12dc, [inc in next st, 6dc]
four times, 2dc – 46 sts.
Rnd 37: Dc around – 46 sts.
Rnd 38: 17dc, inc in next st, 7dc,
inc in next st, 6dc, inc in next st,
7dc, inc in next st, 5dc – 50 sts.
Rnd 39: Dc around – 50 sts.
Rnd 40: 18dc, inc in next st, 7dc,
inc in next st, 8dc, inc in next st,
7dc, inc in next st, 6dc – 54 sts.
Rnd 41: Dc around – 54 sts.
Rnd 42: 19dc, [inc in next st,
8dc] three times, inc in next st,
7dc – 58 sts.
Rnd 43: Dc around – 58 sts.
Rnd 44: 20dc, [inc in next st,
9dc, inc in next st, 8dc] twice
– 62 sts.
Rnds 45–56: Dc around – 62 sts.
Rnd 57: 24dc, [dec, 8dc] three
times, dec, 6dc – 58 sts.
Rnd 58: Dc around – 58 sts.
Rnd 59: 23dc, dec, 7dc, dec,
8dc, dec, 7dc, dec, 5dc – 54 sts.
Rnd 60: Dc around – 54 sts.
Rnd 61: 21dc, dec, 7dc, dec, 8dc,
dec, 7dc, dec, 3dc – 50 sts.
Rnd 62: Dc around – 50 sts.
Rnd 63: 20dc, dec, 7dc, dec,
6dc, dec, 7dc, dec, 2dc – 46 sts.
Rnd 64: Dc around – 46 sts.
Rnd 65: 19dc, [dec, 6dc] three
times, dec, 1dc – 42 sts.
Rnd 66: 18dc, dec, 5dc, dec,
6dc, dec, 5dc, dec – 38 sts.
Rnd 67: Dec, 16dc, [dec, 8dc]
twice – 35 sts.
Rnd 68: 1dc, dec, 13dc, dec, 8dc,
dec, 7dc – 32 sts.
Rnd 69: Dec, 4dc, inc in next st,
2dc, inc in next st, 4dc, dec,
3dc, [dec, 2dc] twice, dec, 3dc
– 29 sts.
Mark the 6th and 7th, 10th and
11th stitches of Rnd 69. These
indicate the top centre of the
body.
Rnd 70: 1dc, dec, 3dc, inc in next
st, 2dc, inc in next st, [3dc, dec,
2dc, dec] twice, 1dc – 26 sts.
Sl st in next st. Fasten off, leaving
a long tail for sewing.
Finish stuffing the body firmly.
FRONT LEG
Make two
With yarn A, make an
adjustable ring.
Rnd 1: 6dc in ring – 6 sts.
Rnd 2: Inc in all 6 sts – 12 sts.
Rnd 3: [1dc, inc in next st] six
times – 18 sts.
Rnd 4: [2dc, inc in next st] six
times – 24 sts.
Rnd 5: [3dc, inc in next st] six
times – 30 sts.
Rnd 6: [4dc, inc in next st] six
times – 36 sts.
For Rnd 7, all 3tr-bobbles are
made in yarn C, whilst all
remaining stitches in the round
are made in yarn A.
Rnd 7: 13dc, [3tr-bobble in next
st, 3dc] three times, 11dc – 36 sts.
Push each 3tr-bobble out to form
the toes.
Rnds 8–10: Dc around – 36 sts.
Rnd 11: 9dc, [dec, dc in next st]
five times, dec, 10dc – 30 sts.
Rnd 12: 6dc, [dec, dc in next st]
five times, dec, 7dc – 24 sts.
Rnd 13: 3dc, [dec, dc in next st]
five times, dec, 4dc – 18 sts.
Rnds 14–18: Dc around – 18 sts.
Rnd 19: [4dc, dec] three times
– 15 sts.
Rnds 20–23: Dc around – 15 sts.
Rnd 24: [3dc, dec] three times
– 12 sts.
Rnds 25 & 26: Dc around – 12 sts.
Stuff the leg firmly.
Rnd 27: [Dec] six times – 6 sts.
Sl st in next st. Fasten off, leaving
a yarn tail.
Using your yarn needle, weave
the yarn tail through the front
loop of each remaining stitch and
pull it tight to close.
Bring out the yarn tail on the
inside of each front leg, between
Rnds 25 & 26 (Fig 1).
BACK LEG
Make two
Work Rnds 1–13 as for Front Leg.
Rnds 14 & 15: Dc around – 18 sts.
Rnd 16: [4dc, dec] three times
– 15 sts.
Rnds 17–19: Dc around – 15 sts.
Rnd 20: [3dc, dec] three times
– 12 sts.
Rnds 21 & 22: Dc around – 12 sts.
Stuff the leg firmly.
Rnd 23: Dec six times – 6 sts.
Sl st in next st. Fasten off, leaving
a yarn tail. Using your yarn needle,
weave the yarn tail through the
front loop of each remaining stitch
and pull it tight to close.
Bring out the yarn tail on the
inside of each leg, between
Rnds 22 & 23 (Fig 2).
EYE
Make two
With yarn C, make an
adjustable ring.
Rnd 1: 6dc in ring – 6 sts.
Rnd 2: Inc in all 6 sts – 12 sts.
Rnd 3: [1dc, inc in next st] six
times – 18 sts.
www.insidecrochet.co.uk 103
➻
MAKE IT
Pattern instructions
Rnd 25
Sl st into third
ch from hook
for 3ch-picot
Rnd 22
dc
INSIDE
INSIDE
miss
2 sts
Rnd 25
1
Rnd 22
FRONT LEG
2
BACK LEG
3
4
Rnd 31
Rnd 6
Rnd 25
Marked sts
from Rnd 69
indicate top
centre of
body
3 sts
11 sts
Rnd 11
Use nostrils
to centre
eyes
4 sts
Rnd 16
Rnd 43
Rnd 38
6 sts
5
Rnd 4: [2dc, inc in next st] six
times – 24 sts.
Rnds 5–8: Dc around – 24 sts.
Rnd 9: [4dc, dec] four times
– 20 sts.
Sl st in next st. Fasten off, leaving
a long tail for sewing.
Insert a safety eye between
Rnds 5 & 6. Stuff the eye firmly.
TOOTH
Make six
With yarn C, make an
adjustable ring.
Rnd 1: 4dc into ring – 4 sts.
Rnd 2: [1dc, inc in next st] twice
– 6 sts.
Rnd 3: Dc around – 6 sts.
Sl st in next st. Fasten off, leaving
a long tail for sewing.
Stuff the tooth firmly.
SPIKE
Make five
With yarn B, make an
adjustable ring.
Rnd 1: 6dc in ring – 6 sts.
Rnd 2: [1dc, inc in next st] three
times – 9 sts.
Rnd 3: [2dc, inc in next st] three
times – 12 sts.
Rnd 4: Dc around – 12 sts.
Rnd 5: [3dc, inc in next st] three
times – 15 sts.
Rnd 6: Dc around – 15 sts.
Rnd 7: [4dc, inc in next st] three
times – 18 sts.
Rnd 8: [5dc, inc in next st] three
104 Inside Crochet
6
times – 21 sts.
Don’t stuff the spike.
Flatten the spike and 10dc
through both layers to close the
opening.
Fasten off, leaving a long tail for
sewing.
SKIRT
With yarn D, and leaving long
starting yarn tail, 56ch. Join with
a dc to form a circle.
Rnd 1: Dc in next 55 ch – 56 sts.
Work Rnds 2 & 3 as joined
rounds.
Rnd 2: (1sl st, 2ch, 2tr) in first
st of Rnd 1, 2tr in each of next
7
55 sts, sl st in first st – 112 sts.
Rnd 3: 2ch, tr back in same st
in which you made the last sl st,
2tr in next st, [tr in next st, 2tr in
next st] 55 times – 168 sts.
Fasten off yarn D. Join in yarn C.
Rnd 4: Dc around – 168 sts.
Sl st in first st. Fasten off and
weave in ends.
TIARA
With yarn E, 36ch. Join with a dc
to form a circle.
Rnd 1: Dc in next 35 ch – 36 sts.
Rnds 2–4: Dc around – 36 sts.
Rnd 5: [1dc, miss next 2 sts,
(2htr, 2tr, 3ch-picot (see Special
8
Stitches), 2tr, 2htr) in next st, miss
next 2 sts] six times – 60 sts.
(Figs 3 & 4)
Slst in next st. Fasten off, leaving
a long tail for sewing. Weave in
the starting yarn tail.
ASSEMBLY
Sew the eyes over Rnds 25–31
of the head, centred above the
nostrils (Fig 5). The insides of
the eyes should be 11 sts apart
if you count between Rnds 24 &
25. Play with the direction of the
safety eyes to change up Coco’s
personality.
Sew the teeth to the underside
of the head, using the nostrils to
centre their positions. The front
row of teeth is sewn over Rnds 6
& 7, 3 sts apart. The middle row
of teeth is sewn over Rnds 11 &
12, 4 sts apart. The back row of
teeth is sewn over Rnds 16 & 17,
6 sts apart (Fig 6).
Sew the body to the back of the
head, using the marked stitches
on Rnd 69 to align the pieces.
The head is tilted upwards. The
top of the body should be sewn
between Rnds 38 & 39 on the
top side of the head (Fig 7), while
the bottom of the body should
be sewn between Rnds 43 & 44
on the bottom side of the head
(Fig 8).
Rnd 51
Rnd 21
10
9
Rnd 66
Rnd 31
Rnd 41
11
Rnd 61
11 sts
7 sts
Rnd 35
Leg paralle
l
to body
opening
Sew
around
12
Rnd 61
Sew the spikes on top of the
body. First mark the centre line
with pins (Fig 9). The first spike
is sewn over Rnds 61–70, the
second spike over Rnds 51–60
(Fig 10). Slip the skirt on as the
skirt will sit between the second
and third spikes. Sew the third
spike over Rnds 41–50, the fourth
spike over Rnds 31–40 and the
fifth spike over Rnds 21– 30
(Fig 11).
Rnd 31
Sew
around
Rnd 26
13
leg should be 7 sts from the base
of the fourth spike, counting
along between Rnds 31 & 32
(Fig 13). The top of the back leg
should fall over Rnds 31–35 of
the body. Aim for the back legs
to be parallel to the front legs.
Ensure that the back legs are
14
balanced. Sew along the inside of
the back leg as indicated by the
dotted line in Fig 13.
Only sew on the inside of the leg,
so that the stitches are not seen
on the outside.
Sew the tiara over Rnds 26–37
15
of the head, between the eyes
(Fig 14).
Use yarn C to sew random lines
along the top of the body, on
either side of the spikes.
END
Each line covers four
rounds (Fig 15).
Sew the front legs to the body
using the yarn tail that was
brought out between Rnds 25 &
26 (Fig 1). The top of each front
leg should be 11 sts from the
base of the first spike, counting
along between Rnds 61 & 62
(Fig 12). The top of the front leg
should fall over Rnds 62–66 of
the body. Aim for the front legs
to be parallel to where the body
joined the head. Before sewing,
pin them in place to ensure that
the front legs are balanced. Sew
along the inside of the front leg
as indicated by the dotted line in
Fig 12. Only sew on the inside of
the leg, so that the stitches are
not seen on the outside.
Sew the back legs to the body
using the yarn tail that was
brought out between Rnds 22 &
23 (Fig 2). The top of each back
www.insidecrochet.co.uk 105
Yarn Market
SARAH MORAN, COMMISSIONING EDITOR, WRITES:
“We are big fans of independent yarn shops – whether it’s the local yarn store in town
where you can, in normal times, pop in for a browse and some help with your latest
project, or an online shop with gorgeously curated wools and accessories, the care and
personal service you get is second-to-none. Our favourite independent yarn shops –
some local, some online - are all packed with a great choice of yarns, hooks and extras
perfect for your next project. Yarn shops are also great places to find fellow crocheters,
whether it’s a ‘Crochet and Chatter’ social group or workshops from local designers,
all brought to you by staff with a real passion for yarn and love for our craft. As we go
to press, the regulations for yarn and craft shops have just changed again and happily,
most bricks and mortar stores in the UK are able to reopen their doors and welcome
crafters once more. Please try to either visit in person or connect with your local yarn
shop and find out if they will be continuing to trade either online or by telephone
orders. It has been a tough year for all of us but our smaller retailers really do need
your support. We all know what a lifeline our crafting has been to us this past year!”
Friendly yarn shop near Evesham
Stockists of King Cole, Stylecraft and others
Workshops, accessories, lessons
Free Crochet & Chat twice a week
Free parking
Crochet Cottage, Cadbury Courtyard, Blackminster Business Park, WR11 7RE
07450 794505
www.yarnstyle.co.uk
Handmade by
Maryport
Situated on the edge of the Lake District we stock a wide range of
yarns including Stylecraft, Rico, King Cole, Sirdar and many more with
knitting and crochet accessories and patterns available too.
Quilting fabric, sewing machines,
wool and haberdashery
Email: handmadebymaryport@gmail.com Telephone: 07501 541961
/ HandmadeByMaryport
www.hookandeyeonline.com
HookandEyeOnline
hookandeye3
1 Biddicks Court, Saint Austell,
Cornwall PL25 5EW Tel: 01726 75385
Email: sewandfabric@yahoo.co.uk
A yarn lovers’ paradise
in the heart of Harrogate.
Come join our workshops and classes. Stockists: King Cole,
Stylecraft, Scheepjes, Grundl, Erika Knight Yarns and more!
17 Knaresborough Road, Harrogate H62 7SR
Tel: 01423 885565 Email: orders.yarnetc@gmail.com
www.yarnetc.co.uk
Sewing and Craft Shop in Cambridge
EVERYTHING YOU NEED TO KNIT OR CROCHET
YOUR OWN SLIPPERS.
www.tigerlilycrafts.co.uk
www.sewknitcraft.co.uk
01223 350691
➻
HOW TO CROCHET
Howto
Crochet
I have always believed
Hook Jacinta Bowie’s
stunning Lace Capelet
from issue 136, made
using beautiful
chain loops and perfect
for showing the elegance
and drape crochet is
capable of.
that anyone can learn to
crochet, so long as you
follow one simple rule:
don’t try to run before you
can chain! The chain is the
most simple of stitches
and therefore ideal for
practising the all-important hold, which helps create
the perfect tension for forming all the following
stitches. When my mother taught me to crochet,
she followed her grandmother’s lead and helped
me to hook metre upon metre of chain before I
was shown any further stitches. It was a fantastic
foundation for learning the more difficult
techniques. Once your chains are looking even
and feel comfortable to create, then progressing
on to the stitches becomes much easier.
If at any point you feel as if you have lost your
hold, simply go back to those comforting lengths
of chain until your confidence returns. My biggest
tip is to remember that this wonderful craft is well
known for being relaxing and fun, so find a comfy
chair, some free time and just enjoy it!
Happy crocheting…
TEACH
YOURSELF
How to hold the work,
chains, double
& treble crochet,
slip stitch
TURN THE PAGE FOR ALL
YOU NEED TO GET STARTED
www.insidecrochet.co.uk 107
GETTING STARTED
THE BASICS
To crochet smoothly and efficiently, you must hold the hook
and yarn in a relaxed, comfortable and consistent fashion. This
will also ensure that your tension is even and accurate. There
are two main ways of holding the hook and two main ways
to tension the yarn. You can choose whichever combination
feels more natural for you, or a variation on these.
SLIPKNOT
CHAIN
A slipknot creates the first
loop on the hook.
Most crochet projects begin
with a length of chain. This is
the perfect stitch to practise
your hold and tension with.
HOLDING THE HOOK
KNIFE GRIP
PENCIL GRIP
Hold the hook in your
dominant hand as you
would a knife.
Hold the hook in your
dominant hand as you
would a pencil.
1 Make a loop in the yarn
around 10–20cm/4–8in from
the end. Insert hook through
loop, catch the back strand
of yarn and pull it through to
the front.
HOLDING THE YARN
FOREFINGER
METHOD
MIDDLE-FINGER
METHOD
Wrap the ball end of the yarn
around the little finger of
your opposite hand, under
the next two fingers and over
the forefinger. Hold the work
steady with your middle
finger and thumb, then
raise your forefinger when
working to create tension.
Wrap the ball end of the
yarn around the little finger
of your opposite hand and
over the other fingers. Hold
the work steady with your
forefinger and thumb, then
raise your middle finger
while you are crocheting to
create tension.
To croch e t le ft-h and ed,
simply do the opp osit e to
.
the righ t-h and ed hol ds
Hold a mirror up to any
to
p ic ture in this gu ide
see how to wor k.
108 Inside Crochet
It doesn’t ma t te r
if your
sti tch es te nd tow
ar ds
be in g sli gh tly tig
ht or
ev en a lit tle loose;
you ar e
ai mi ng for an ev
en te nsion
th roughout to ac
hi ev e a
pr of ession al fin ish
.
1 Holding just the hook with
point up in your dominant
hand, and the yarn in the
other, grip the slipknot
with the yarn holding hand.
Work a yarn round hook
(yrh or yoh) by passing the
hook in front of the yarn,
under and around it.
2 Pull the ends of the yarn to
secure the knot around the
hook, but not too tightly or
it will be hard to pull the first
loop of chain through.
2 Roll the hook round in
your fingers towards you
to catch the yarn and pull
through loop on hook.
One chain made.
The action of working
stitches causes a
constan t rolling of the
hook in your fingers;
hold the hook pointin g
up when performing
the yrh, then roll it
round towards you
to point down when
pulling through the
loops so that you
don’t catch the hook
in the stitches.
3 Ensuring the stitches
are even – not too loose
or tight – repeat to make
a length of chain.
➻
HOW TO CROCHET
THE MAIN STITCHES
SLIP STITCH
(sl st)
A slip stitch is usually used to
join one stitch to another, or to
join a stitch to another point.
It is generally made by picking
up two strands of a stitch but
when used all over, you usually
only pick up the back loop.
Do uble cro chet stitches
are perfect fo r m akin g
am igurum i, w hile treble
cro chets are used to
create the classic gran n y
square design
This cheery
Floral Friends Vase by
Matt Farci (issue 127)
uses simple dc
stitches to create solid
blocks of adorable
colour!
DOUBLE CROCHET (dc)
The smallest stitch, creating a dense fabric perfect for amigurumi.
1 Insert hook into st or chain
required. Yarn over hook, as
when you make a chain. Pull
a loop through all stitches/
loops/work on hook to finish
slip stitch.
1 Insert hook into
chain or stitch, front to
back. Yarn over hook
and draw through
stitch to front, leaving
you with two loops
on the hook. Yarn
round hook.
2 Draw through both
loops to finish the
stitch. Double
crochet completed.
COUNTING
A CHAIN
The right side of your chain is
the one that looks like a little
plait of “v” shapes. Each “v” is
a stitch and must be counted.
When you are working the
chain, you do not count the
slipknot, but begin to count
your chain when you pull
through the first loop. To count
the chain afterwards you
count the slipknot as the first
stitch, but not the loop on the
hook, or “working” loop.
HALF TREBLE CROCHET (htr)
Slightly taller than a double crochet stitch, with a softer drape to the resulting fabric.
1 Yarn over hook, insert
hook into st from front
to back and draw loop
through stitch only.
This gives you three
loops on the hook.
Yarn round hook.
2 Draw yarn through
three remaining loops
on the hook together
to complete half treble.
www.insidecrochet.co.uk 109
Top crochet websites
TREBLE CROCHET
(tr)
The tallest of the basic
stitches, great for using within
more complex patterns.
www.cypresstextiles.net
➻ Inside Crochet designer Rachele Carmona
offers plenty of colourful inspiration on her
site, which includes stitch guides, techniques
and links to her wonderful patterns.
1 Yarn round hook, insert hook
into stitch from front to back
and draw loop through stitch
only. This gives you three loops
on the hook. Yarn round hook.
FASTEN OFF
Pull up final loop of last stitch to make it bigger
and cut the yarn, leaving enough of an end to
weave in. Pull end through loop, and pull up
tightly to secure.
COUNTING STITCHES
Count the post or “stem” of each stitch from the
side of your work. Each post counts as one stitch.
Double crochet
www.janiecrow.com
➻ Enjoy Jane Crowfoot’s inspirational blog,
plus browse her stunning designs. There’s
also a brilliant library of crochet techniques.
2 Pull loop through two loops.
Two loops on hook. Yarn
round hook.
Treble crochet
www.toftuk.com
➻ Kerry Lord of Toft is well known for her
stunning amigurumi, from dolls to animals
to birds to dinosaurs, and they sell wool too!
www.theloopystitch.com
➻ Packed with inspiration and shining with
a real love for inspiration, visit Emily’s site
for YouTube tutorials and a huge selection
of colourful homeware designs.
www.coastalcrochet.com
➻ Constantly inspired by her seaside home,
Eleonora shares a host of gorgeous designs,
the most popular of which are her stunning
blanket crochet-alongs.
110 Inside Crochet
3 Pull loop through the
remaining two loops to
complete treble, repeat to
end of row.
Try t o coun t your st it ches a t regu
lar
int erva ls, usua lly a t the end of
ever y,
or ever y othe r, row and esp ecia lly
a f t er an incr ea se or decr ea se row.
It is b est t o try t o ca t ch any mist
ake s
a s q uick ly a s p ossib le, a s this will
mak e them muc h ea sier t o rect i fy!
➻
HOW TO CROCHET
SHAPING, COLOURWORK & TENSION
Once you’ve learned simple shaping stitches, you can create almost any garment – and add
in different colours as you go with our simple technique. Make sure to check your tension first
though, or your finished piece could be completely the wrong size!
INCREASING
JOINING IN
A NEW COLOUR
TENSION/GAUGE
To join in a new colour (or a new ball
of the same colour), you can simply
fasten off the old yarn and then attach
the new colour with a slip stitch into the
top of the last stitch made. However,
for a neater join, you can also work the
colour change as follows:
To work an extra stitch, you simply
need to work into the same stitch more
than once. Work one stitch as normal.
Insert hook into same stitch you’ve just
worked and complete another stitch.
One stitch increased.
Work the last stitch in the colour you
are using first, up to the final step, so
that the stitch is unfinished. Pull the
new colour through the loops on your
hook, completing the stitch and joining
the new colour at the same time.
DECREASING
To decrease a stitch, you need to work
into two stitches without finishing
them, then work them together.
For a double crochet (above), insert hook
into next st, yarn over hook and draw a
loop through the stitch, but do not finish
the double crochet stitch as usual. Insert
hook into following st, yarn over hook and
draw a loop through the next st, so there
are three loops on the hook in total. Yarn
over hook and draw the loop through
all loops on hook, drawing two stitches
together. One stitch decreased.
For a treble crochet, work a treble into the
next stitch until the last step of the stitch,
two loops on hook. Do the same into the
following stitch, three loops on hook. Draw
through all three loops on hook to draw the
two trebles together. One stitch decreased.
Working a new colour over
double crochet
Working a new colour over
treble crochet
Once you have joined in the new yarn,
you can weave in the ends of both
yarns as you go, by holding them on
top of your stitches and working round
them as you work into the following
stitches. Do this for at least 5cm/2in
then cut the remaining ends.
A tension swatch is used to
ensure that you are working
at the tension called for in the
pattern. It is essential to check this,
otherwise your finished garment
is likely to be the wrong size!
Crochet a small square of just over
10 x 10cm/4 x 4in in the main yarn
and stitch used in the pattern, then
count and calculate the average
amount of stitches per cm.
Chain a few more stitches and
work more rows than the tension
in the pattern suggests you’ll
need for this size. Once you have
completed the swatch, use a
measuring tape or ruler, place
some pins at 0 and 10 and take
some average measurements
– count how many stitches and
rows to 10cm at different points
over the swatch.
If you find you have more stitches
per cm than indicated in the
pattern, then your tension is too
tight and you need to work more
loosely. The best way to do this
is to increase the size of hook
you’re using by a quarter or half
millimetre until the tension is as
close as you can get it. If there are
fewer stitches than required, then
you are crocheting too loosely,
and you need to decrease the size
of hook used in the same way.
TURN THE PAGE FOR MAGIC LOOPS, TIPS AND A FULL GLOSSARY
OF CROCHET ABBREVIATIONS, UK VS US TERMS AND HOOK SIZES
www.insidecrochet.co.uk 111
Beginner
books we
recommend
The
Learn to Crochet
Project
BY Joanne Scrace and Kat Goldin of
The Crochet Project
WORKING IN THE ROUND
When working in the round, instead of working backwards and forwards along the work,
turning at the end of each round, you simply work with the right side facing you at all times
and you do not turn. When working in the round, you generally begin one of three ways:
WORKING
AROUND A RING
WORKING INTO
A SHORT CHAIN
ADJUSTABLE
RING
This method of working in
the round creates a large
hole at the centre of your
work. Its size is dependent
on the length of chain used.
You can create a smaller
hole in the centre of your
work by working into a
chain as short as 2ch long.
This method is also referred
to as the magic loop or ring,
as it creates a round with
no hole at the centre. Here
it is demonstrated with
double crochet.
THE LEARN TO
CROCHET PROJECT
Joanne Scrace & Kat Goldin
(The Crochet Project, £12)
Joanne and Kat share their
knowledge and expertise in
a beginners’ guide brimming
with tips and techniques, plus
gorgeous wearable designs.
Make a length of chain as
required, then insert your
hook into the first chain stitch
you made. Yarn round hook.
For double crochets, as in this
example, work 2ch. For htr
you would work 3ch and for
trebles, 4ch.
Make a loop in your yarn, at
least 15cm/6in from the tail
end. Insert hook through the
loop from front to back.
Insert hook into the top loop
of the first chain as shown.
Yarn round hook.
CROCHETED HOME
Kate Eastwood
(CICO Books, £12.99)
Packed with beginnerfriendly patterns to fill your
home, from blankets to
cushions, chunky bathmats,
coasters, peg bags and more.
Work a slip stitch to join,
creating a ring, and then
work your turning chain
dependent on which stitch
you will be working into the
ring. Insert hook into the
centre of the ring and work
the first stitch into this ring.
Complete the first stitch in the
chain as shown (illustrations
show dc, but can be any stitch).
Work required number of
stitches into the centre of the
ring and join round with a slip
stitch. Do not turn, but continue
the next row around the last.
Now work the required amount
of stitches into the same chain.
The sheer amount of stitches
worked into one place will
cause them to fan out into a
round. Now join this round
with a slip stitch and continue
with the pattern.
YOU WILL BE ABLE TO
CROCHET BY THE END
OF THIS BOOK
Zoe Bateman
(Octopus, £14.99)
A contemporary crochet
textbook infused with a love
of our craft and packed with
inspiring photography.
112 Inside Crochet
Pull yarn though to front of
loop and complete the stitch
around the loop and the tail
end of yarn held double.
Work all the following stitches
into the ring in the same way,
over the two strands of yarn
in the loop. Once all stitches
have been worked, pull the
loose tail end of the yarn to
close the ring and join the
round with a slip stitch.
➻
HOW TO CROCHET
A note
on... Hook sizes
ABBREVIATIONS
Note: Inside Crochet uses UK terms throughout
alt · alternate
bef · before
beg · begin(s); beginning
bet · between
blo · back loop only
ch(s) · chain(s)
ch-sp(s) · chain space(s)
cl(s) · cluster(s)
cm · centimetre(s)
cont · continue(s);
continuing
dc · double crochet
dc2tog · work two dc
together
dec(s) · decrease(s);
decreasing; decreased
dtr · double treble crochet
dtr2tog · work two dtr
together
ea · each
ech · extended chain
edc · extended double
crochet
prev · previous
rem · remain(s); remaining
rep(s) · repeat(s)
rev dc · reverse double
crochet
rnd(s) · round(s)
RS · right side
rtrf · raised treble front
rtrb · raised treble back
sl · slip
sl st · slip stitch
sp(s) · space(es)
st(s) · stitch(es)
t-ch(s) · turning chain(s)
tog · together
tr · treble crochet
trtr · triple treble
tr2tog · work two trebles
together
WS · wrong side
yd(s) · yard(s)
yoh · yarn over hook
yrh · yarn round hook
etr · extended treble
est · established
fdc · foundation double
crochet
flo · front loop only
foll · follows; following
ftr · foundation treble
crochet
g · gram(s)
gp(s) · group(s)
hk · hook
htr · half treble crochet
htr2tog · work two htr
together
inc(s) · increase(s);
increasing; increased
in · inch(es)
lp(s) · loop(s)
m · stitch marker
mm · millimetre(s)
nc · not closed
patt · pattern
pm · place marker
BREAKING THE LANGUAGE BARRIER
UK and US terms have differing meanings which can create difficulty for the
crocheter. Here’s a handy reference guide to overcome any misunderstandings.
UK TERMS
US TERMS
Chain
Miss
Slip stitch
Double crochet
Half treble crochet
Treble crochet
Double treble crochet
Triple treble crochet
Raised treble back/front
Chain
Skip
Slip stitch
Single crochet
Half double crochet
Double crochet
Treble crochet
Double treble crochet
Back/front post dc
➻ Hook sizes and their designations vary
from country to country. When following
the recommendations in a pattern or on
a ball band, make sure to check which
size convention is being used.
CROCHET HOOK SIZES
Metric (mm)
UK
US
0.6
14
0.75
12
1
11
1.25
7
1.5
6
1.75
2
5
14
2.25
2.5
B/1
12
2.75
3
C/2
10
3.25
3.5
D/3
9
3.75
E/4
F/5
4
8
G/6
4.5
7
7
5
6
H/8
5.5
5
I/9
6
4
J/10
6.5
3
K-/101/2
7
2
8
0
L/11
9
00
M /13
10
000
N/15
11.5
O
12
P
15
Q
20
S
tr2tog
3-tr cl
tr3tog
popcorn
puff
linked tr
CHARTS KEY
adjustable ring
fl only
sl st
dc
ch
fdc
bl only
htr
tr
rtrf
dtr
rtrb
trtr
dc2tog
www.insidecrochet.co.uk 113
➻
FINAL THOUGHT
"I made an amigurumi squid as my
first project and a month later I'd
finished my first cardigan."
Emilia Johansson
COFFEE & CROCHET
WE CHAT TO DESIGNER EMILIA ABOUT COLOUR AND TEXTURE, KEEPING
YOUR OWN SCHEDULE AND THE BEAUTY OF MOHAIR YARNS…
Above: Designer Emilia wearing her
Sunday Coffee Cardigan.
Below: Emilia's Rose Dust Sweater,
Honey Waffle Cardigan and Lime
Berry Cardigan designs.
Tell us about your life…
I am Emilia, 31 years old and living with my
husband in Helsinki, Finland. I have a Masters
in Economics and used to work in finance before
I switched to med school, where I now have a bit
over one year left before I graduate.
How did you learn to crochet?
I taught myself how to crochet in the beginning of
med school. In case I one day decided to become a
surgeon, I thought the fine motor skills would
come in handy. Little did I know I’d find a second
passion. I made an amigurumi squid as my first
project and a month later I’d finished my first
cardigan. I haven’t put down my hook since!
How did you get into crochet design?
After making a few garments I bought a yarn that
I absolutely loved. I couldn’t find a pattern with
the look I was going for, so I decided to make it
myself. Fast forward two years and the Rose Dust
Sweater is to this day my most popular pattern.
How would you describe your design style?
Scandinavian and minimalist but with a great mix
of colour. I try to keep my designs simple but with
details that make them interesting. I do love
mixing stitches and textures, but tend to stick to
one or two per design.
What’s a typical day like for you?
I get up around 6– 7am and work with paperwork
for Coffee & Crocheting for around one hour while
drinking my large cup of morning coffee. Then I
am off to the hospital for work or for courses when
university semesters are ongoing. If we have
online lectures I am usually at home crocheting
while listening – I tend to focus better on the
lecture while doing something with my hands at
the same time. Evenings are then all about
crocheting and pattern writing and of course
support and paperwork that have been collected
during the day. It’s a busy schedule but I always
make sure to work out and get my eight hours of
sleep, that’s what keeps me going.
What are your favourite yarns or fibres?
I do love mohair. After making the Lime Berry
114 Inside Crochet
Cardigan I have always tried to get in a mohair
project now and then. Currently I have three
published designs all in mohair. They are so soft
and cosy! Alpaca is another favourite, probably
because it is as soft and cosy as mohair.
What is your favourite thing about being
a designer?
The best feeling of all is seeing when another person
has used my pattern to create a beautiful garment.
It is just the best! Love it!
Other than that, it is the freedom of planning
my own schedule. I do many collaborations with
deadlines, but the day-to-day I am free to plan. So
if I want an evening or weekend off I can have that.
What inspires you?
A lot of different things. That’s what is great about
designing. Designing lets me dream, grow and focus.
I get to use and capture my experiences from my
surroundings, travels, nature and everyday life and
combine them into something beautiful.
Sometimes the moment that I capture is when I
was looking at my tomato plants on the balcony and
saw the richness of life and colour. Or it could be a
memory of walking the streets of Helsinki and seeing
all of the beautiful architecture, the mix of locals and
tourists, the busy parks or the sea.
Which other designers do you admire?
So many! One of the first ones I made garments from
is Sandra from @littlegoldennook. Her bobble
designs are always so cute! Grace @forthefrills is
making so many nice minimalist patterns and she’s
doing so well with her business.
What are your plans for the future?
That’s a hard question! I am hoping to add kids’
versions of many of my patterns soon. Otherwise
I know I want it to involve a lot of crochet and
designing, combined with my future degree in
medicine. It would be great if I could expand my
business so I could try to be a crochet designer full
time for a while!
Find Emilia at www.coffeeandcrocheting.com,
and on Instagram @coffeeandcrocheting
TROPICAL SHORES
ALL NEW CROCHET ALONG
Available on our website, YouTube channel,
& from all good yarn retailers
Available from all good yarn retailers
kingcole.com
01756 703 670
enquiries@kingcole.com