/


Текст
• it
•.V.r.if.r.'.-.r.-.-.VAVrW
<‘ » I • ‘ < J < 1 I 4 , i < . 4 4 I 4 t J j . 4 |
* • { 11I i I । • * 4 11 4
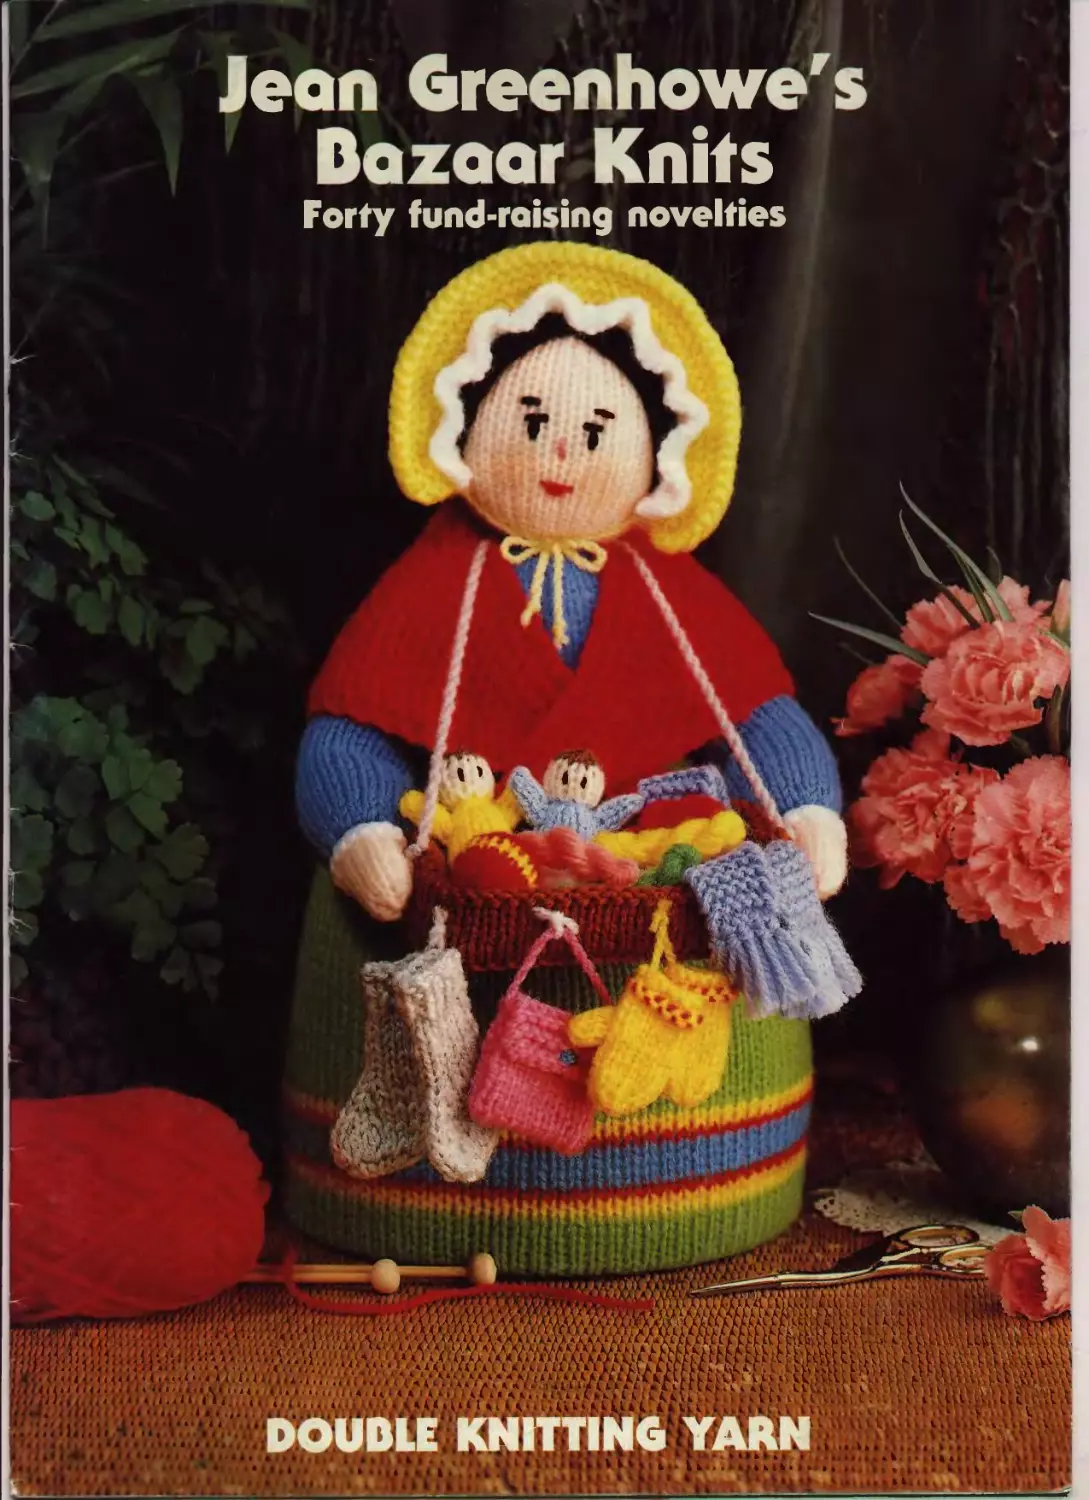
Bazaar Knits
Forty fund-raising novelties
Notes
If you en/oy knitting for charity, it can be quite a problem finding th ngs to make which are quick
easy inexpensive and yet attractive enough to sell like hot cakes! The designs in this booklet are a
pleasure to knit and excellent fund-raisers, as they require only small oddments of double knitting
yarn and take very little time to complete
The Pedlar doll from bygone days captures the theme of the bazaar. Inspired by antique Victorian
pedlar dolls, she would make an excellent raffle prize or a delightful ornament to treasure
Happy knitting1
^ccm
General materials required
Double knitting yarn [USA, knitting worsted
weight Australia, 8 ply] in colours stated in the
instructions, or colours of your choice Only
small oddments are required for all the des gns,
except for the Pedlar doll’s skirt, where you
need 28g [1oz] of the mam colour.
Good quality washable stuffing, small amounts
required or quantity will be quoted where
necessary
A red colouring pencil for shading cheeks
A pa r of tweezers [useful for turning small
knitted pieces right side out and also for
inserting small amounts of stuffing]
A pair of compasses for drawing circles
Cardboard, such as cuttings off washing
powder packets and breakfast cereal packets.
This type of cardboard is the correct thickness
to use when required
Glue, suitable for sticking cardboard and
paper.
Knitting needles required
A pair of 3mm [No 11, USA 2]
A pair of 4mm [No 8 USA 5]
Scented sachets
Knitted sachets can be loosely filled with dried
lavender flowers, but they must be closely
knitted in order to contain the lavender. If you
tend to knit loosely use one size smaller
knitting needles
Alternatively, the sachets can be filled with a
little stuffing which has been perfumed with a
drop of pot-pourri revitaliser oil. This oil is
usually available from shops which sell pot-
pourri and it comes in a variety of different
scents
Abbreviations
cm = centimetrefs]; dec = decrease [by
working 2 sts tog]; g-st = garter st tch [every
row K], g = gram[s]; inc = increase [by
working tw ce into same st]; in = inchfes]; К =
knit; m = metre[s], mm = millimetre[s]; oz =
ouncefs]; P = purl; st[s] = stitch[es]; st-st =
stocking stitch [K on the right side and P on the
wrong side]; tog = together; yd = yard[s].
Special abbreviations
В & T tightly — means break off yarn leaving a
long end. thread it through sts left on knitting
needle, pull up to gather tightly, then fasten off
В & T loosely — means same as above, but
thread yarn through sts loosely and leave until
later on.
US4 glossary
Cast off — bind off
Tension — gauge w
Instructions in round brackets
These are to be repeated the number of times
stated after the closing bracket.
Stars are used to mark a place in the
instructions which will be referred to later on.
Meanwhile follow the instructions in the usual
way
Tension
Using 3mm [No 11, USA 2] knitting needles and
a single strand of double knitting yarn: 26 sts =
10cm [4in] in width over st-st before stuffing.
Using 4mm [No 8, USA 5] knitting needles and
two strands of double knitting yarn together
20 sts = 10cm [4m] in width over st-st before
stuffing
Casting on
The thumb method is recommended
Casting off
Always cast off К wise unless otherwise stated
Working in st-st
Always begin with a К row unless otherwise
stated.
Working in stripes
When knitting different coloured stripes, carry
yarns loosely up side of work.
Making up
Join all seams having right sides of work
together and back-stitch one knitted stitch
within the edges unless oversewing is
stipulated. When sewing up the pieces which
are knitted in double yarn, use a single strand
of yarn
Colouring cheeks
Use the side of the red pencil lead and rub it
against the knitted stitches with a circular
motion
Twisted cords
To make a cord from a single length of yarn
[single twisted cord], cut a strand of yarn four
times as long as the measurement required
Knot one end round a door knob or hook and
knot a loop in the other end to fit round the
index finger of your right hand. Now keep ng
the yarn taut, twist your finger round and round
in a clockwise direction, steadying the yarn by
holding your left hand cupped around it close
to your right hand Keep twisting until when
relaxed, the strand of yarn begins to curl tightly
back on itself. Fold cord at centre, bringing
ends together Allow yarn to twist tightly, knot
ends and trim to length.
Use the same method when a double tw sted
cord is specified, but use a double length of
yarn four times as long as the measurement
required.
Working embroidered stitches
If the item has a hat sewn on [for example the
Pedlar doll], then the embroidered facia!
stitches can be worked in yarn starting and
fastening off the yarn ends at top of head,
where they will be hidden by the hat If these
starting and fastening off stitches can not be
hidden, then proceed as follows.
Thread a blunt-ended needle and knot end of
yarn. Take needle through the stuffed item
passing it between the knitted sts and bring it
out at the position required. Pull the yarn to
draw the knotted end right inside the stuffing
Tug the yarn to make sure the knot is caught in
the stuffing
Now work the required embroidered stitches.
Pass the needle back through the item to come
out at a position between the knitted sts Pass
needle back through item again between the
same knitted sts to come out at a different
position Repeat until yarn is securely fastened
off, then pull end of yarn and snip off close to
the item
Toy safety guidelines
A certain amount of common sense should
always be used regarding the safety factor in
children's toys. It is important to ensure that the
toy you are making s appropr ate for the age
group of the child for which it is intended. For
example, children under 3 years of age should
not be given toys which have separate tiny
parts, or any small attached pieces which
might be pulled off
The materials used for the few toys which
appear in this booklet are:- knitting yarn,
polyester stuffing, plastic drinking straws,
plastic plant pots and cardboard. Do not add
any other materials such as wire pipe cleaners,
buttons or beads.
Use only new, hygienic, washable stuffing
which conforms to current safety standards —
your craft materials supplier will advise.
When sewing up the toys always use large
glass-headed or plastic-headed pins. Ordinary
pins should not be used as they can pass into a
knitted toy between the knitted sts
Take care to sew all the added pieces securely
in place — for example arms, hats, etc. If a yarn
cord is tied in a bow on a toy sew through the
bow so that it can not be undone if pulled
2
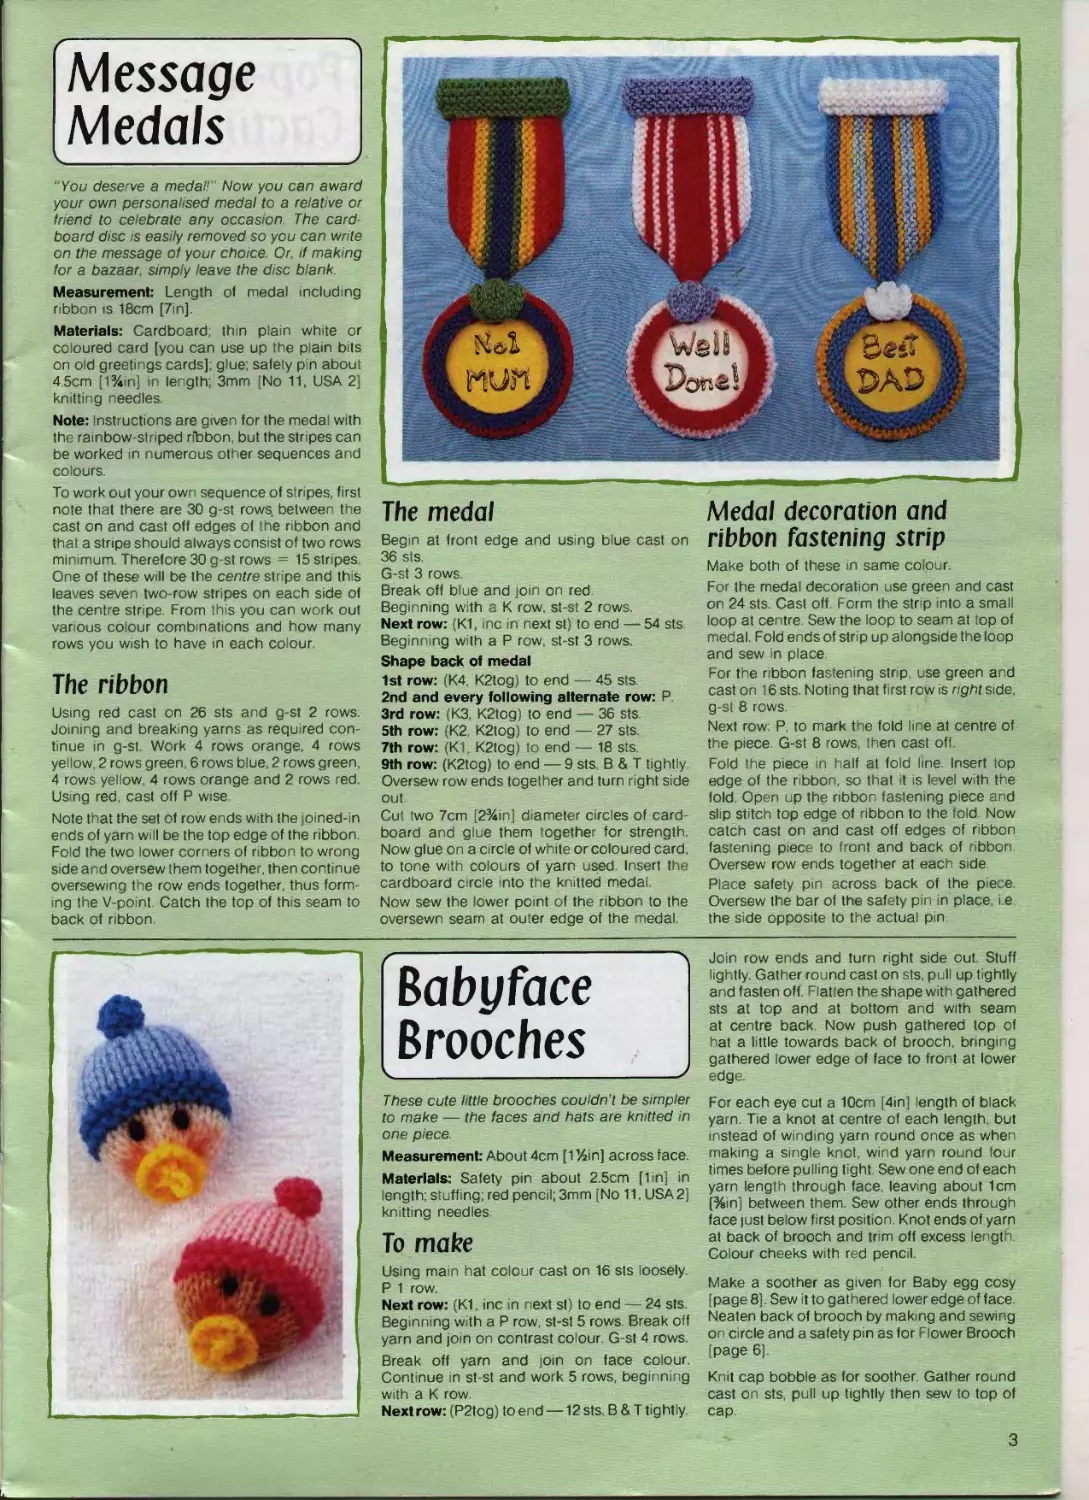
Message
ktedals
“You deserve a medal! Now you can award
your own personalised medal to a relative or
friend to celebrate any occasion The card-
board disc is easily removed so you can write
on the message of your choice Or, if making
for a bazaar, simply leave the disc blank.
Measurement: Length of medal including
ribbon is 18cm [7in].
Materials: Cardboard; thin plain white or
coloured card [you can use up the plain bits
on old greetings cards]; glue; safety pin about
4 5cm [1%in] in length 3mm [No 11, USA 2]
knitting needles.
Note: Instructions are g ven for the medal with
the rainbow-striped ribbon, but the stripes can
be worked in numerous other sequences and
colours.
To work out your own sequence of stripes, first
note that there are 30 g-st rows, between the
cast on and cast off edges of the ribbon and
that a stripe should always consist of two rows
minimum. Therefore 30 g-st rows = 15 stripes.
One of these will be the centre stripe and this
leaves seven two-row stripes on each side of
the centre stripe. From this you can work out
various colour combinations and how many
rows you wish to have in each colour.
The ribbon
Using red cast on 26 sts and g-st 2 rows.
Joining and breaking yarns as required con-
tinue in g-st. Work 4 rows orange, 4 rows
yellow, 2 rows green, 6 rows blue, 2 rows green,
4 rows yellow, 4 rows orange and 2 rows red.
Using red, cast off P wise
Note that the set of row ends with the joined-in
ends of yarn will be the top edge of the ribbon.
Fold the two lower corners of ribbon to wrong
s de and oversew them together, then continue
oversewing the row ends together, thus form-
ing the V-point Catch the top of this seam to
back of ribbon
The medal
Begin at front edge and using blue cast on
36 sts.
G-st 3 rows
Break off blue and join on red
Beginn ng with a К row, st-st 2 rows.
Next row: (K1, inc in next st) to end — 54 sts
Beg nning w th a P row, st-st 3 rows.
Shape back of medal
1st row: (K4 K2tog) to end — 45 sts
2nd and every following alternate row: P
3rd row: (КЗ, K2tog) to end — 36 sts.
5th row: (K2, K2tog) to end — 27 sts.
7th row: (K1, K2tog) to end — 18 sts.
9th row: (K2tog) to end — 9 sts. В & T tightly
Oversew row ends together and turn right side
out
Cut two 7cm [2%in] diameter circles of card-
board and glue them together for strength
Now glue on a circle of white or coloured card
to tone with colours of yarn used Insert the
cardboard c rcle into the knitted medal.
Now sew the lower point of the ribbon to the
oversewn seam at outer edge of the medal.
Medal decoration and
ribbon fastening strip
Make both of these in same colour.
For the medal decoration use green and cast
on 24 sts. Cast off Form the strip into a small
loop at centre Sew the loop to seam at top of
medal. Fold ends of strip up alongside the loop
and sew in place
For the ribbon fastening strip use green and
cast on 16 sts. Noting that first row is right side
g-st 8 rows
Next row: P, to mark the fold line at centre of
the piece. G-st 8 rows, then cast off.
Fold the piece in half at fold line. Insert top
edge of the ribbon, so that it is level with the
fold. Open up the ribbon fastening piece and
slip stitch top edge of ribbon to the fold Now
catch cast on and cast off edges of ribbon
fastening piece to front and back of ribbon
Oversew row ends together at each side.
Place safety pin across back of the piece
Oversew the bar of the safety pin in place, i e
the side opposite to the actual pin
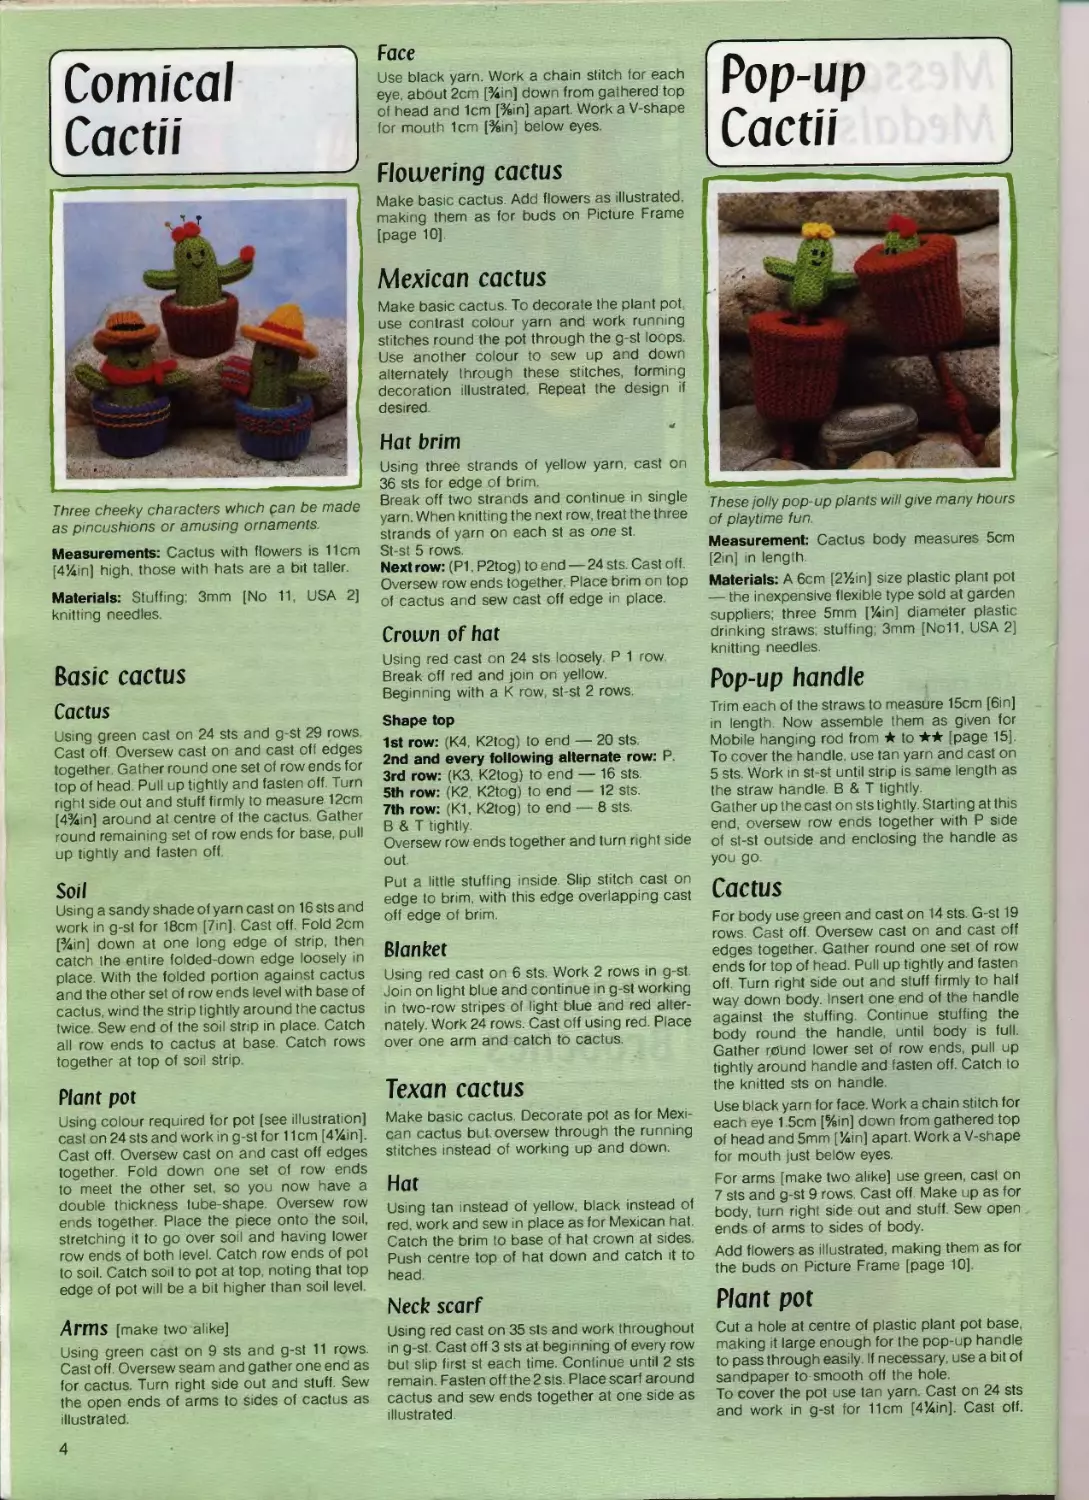
Baby face
Brooches
These cute little brooches couldn't be simpler
to make — the faces and hats are knitted in
one piece.
Measurement: About 4cm [1 %in] across face.
Materials: Safety pin about 2.5cm [1in] in
length; stuffing; red pencil; 3mm [No 11, USA 2]
knitting needles
To make
Using main hat colour cast on 16 sts loosely
P 1 row
Next row: (K1 inc in next st) to end — 24 sts
Beginning with a P row, st-st 5 rows Break off
yarn and join on contrast colour. G-st 4 rows.
Break off yarn and join on face colour.
Continue in st-st and work 5 rows, beginning
with a К row.
Next row: (P2tog) to end —12 sts. B&T tightly.
Join row ends and turn right side out. Stuff
lightly. Gather round cast on sts, pull up tightly
and fasten off. Flatten the shape with gathered
sts at top and at bottom and with seam
at centre back Now push gathered top of
hat a little towards back of brooch, bringing
gathered lower edge of face to front at lower
edge.
For each eye cut a 10cm [4m] length of black
yarn Tie a knot at centre of each length, but
instead of winding yarn round once as when
making a single knot, wind yarn round four
times before pulling tight. Sew one end of each
yarn length through face, leaving about 1cm
[%in] between them Sew other ends through
face just below first position. Knot ends of yarn
at back of brooch and trim off excess length.
Colour cheeks w th red pencil.
Make a soother as given for Baby egg cosy
[page 8]. Sew it to gathered lower edge of face
Neaten back of brooch by making and sewing
on circle and a safety pm as for Flower Brooch
[page 6].
Knit cap bobble as for soother. Gather round
cast on sts, pull up tightly then sew to top of
cap
3
Comical
Cacti i
Three cheeky characters which can be made
as pincushions or amusing ornaments.
Measurements: Cactus with flowers is 11cm
[4%in] high those w th hats are a bit taller.
Materials: Stuffing 3mm [No 11 USA 2]
knitting needles.
Basic cactus
Cactus
Using green cast on 24 sts and g-st 29 rows
Cast off Oversew cast on and cast oft edges
together. Gather round one set of row ends for
top of head Pull up tightly and fasten off Turn
right side out and stuff firmly to measure 12cm
[4%in] around at centre of the cactus Gather
round remaining set of row ends for base, pull
up tightly and fasten off
Soil
Using a sandy shade of yarn cast on 16 sts and
work in g-st for 18cm [7in] Cast off. Fold 2cm
[%in] down at one long edge of strip, then
catch the entire folded-down edge loosely in
place. With the folded portion against cactus
and the other set of row ends level with base of
cactus, wind the strip tightly around the cactus
twice Sew end of the soil strip in place Catch
all row ends to cactus at base. Catch rows
together at top of soil strip
Plant pot
Using colour required for pot [see illustration]
cast on 24 sts and work in g-st for 11 cm [4%in].
Cast off Oversew cast on and cast off edges
together Fold down one set of row ends
to meet the other set, so you now have a
double thickness tube-shape. Oversew row
ends together. Place the piece onto the soil,
stretching it to go over soil and having lower
row ends of both level. Catch row ends of pot
to soil. Catch soil to pot at top, noting that top
edge of pot will be a bit higher than soil level.
Arms [make two alike]
Using green cast on 9 sts and g-st 11 rows.
Cast off. Oversew seam and gather one end as
for cactus Turn right sde out and stuff Sew
the open ends of arms to sides of cactus as
illustrated.
Face
Use black yarn. Work a chain stitch for each
eye, about 2cm [%in] down from gathered top
of head and 1cm [%in] apart. Work a V-shape
for mouth 1cm [%in] below eyes
Flowering cactus
Make basic cactus. Add flowers as illustrated,
making them as for buds on Picture Frame
[page 10].
Mexican cactus
Make basic cactus. To decorate the plant pot
use contrast colour yarn and work running
stitches round the pot through the g-st loops.
Use another colour to sew up and down
alternately through these stitches, forming
decoration illustrated Repeat the design if
desired
Hat bnm
Using three strands of yellow yarn, cast on
36 sts for edge of br m.
Break off two strands and continue in single
yarn. When knitting the next row, treat the three
strands of yarn on each st as one st
St-st 5 rows
Next row: (P1 P2tog) to end — 24 sts. Cast off.
Oversew row ends together. Place brim on top
of cactus and sew cast off edge in place
Crown of hat
Using red cast on 24 sts loosely P 1 row
Break off red and join on yellow.
Beginning with a К row st-st 2 rows.
Shape top
1st row: (K4, K2tog) to end — 20 sts.
2nd and every following alternate row: P
3rd row: (КЗ K2tog) to end — 16 sts
5th row: (K2 K2tog) to end — 12 sts.
7th row: (K1, K2tog) to end — 8 sts.
В & T tightly.
Oversew row ends together and turn right side
out
Put a little stuffing inside. Slip stitch cast on
edge to brim with this edge overlapping cast
off edge of brim.
Blanket
Using red cast on 6 sts. Work 2 rows in g-st.
Join on light blue and continue in g-st working
in two-row stripes of light blue and red alter-
nately Work 24 rows. Cast off using red Place
over one arm and catch to cactus.
Texan cactus
Make basic cactus. Decorate pot as for Mexi-
can cactus but oversew through the running
stitches instead of working up and down.
Hat
Using tan instead of yellow, black instead of
red. work and sew in place as for Mexican hat.
Catch the brim to base of hat crown at sides.
Push centre top of hat down and catch it to
head.
Neck scarf
Using red cast on 35 sts and work throughout
n g-st Cast off 3 sts at beginning of every row
but slip first st each time. Continue until 2 sts
remain Fasten off the 2 sts. Place scarf around
cactus and sew ends together at one side as
illustrated
Pop-up
Cactii
These jolly pop-up plants will give many hours
of playtime fun.
Measurement: Cactus body measures 5cm
[2in] in length.
Materials: A 6cm [2%m] size plastic plant pot
— the inexpensive flexible type sold at garden
suppliers; three 5mm [%in] diameter plastic
drinking straws: stuffing 3mm [No11, USA 2]
knitting needles.
Pop-up handle
Trim each of the straws to measure 15cm [6in]
in length Now assemble them as given for
Mobile hanging rod from ★ to ★★ [page 15].
To cover the handle, use tan yarn and cast on
5 sts. Work in st-st until strip is same length as
the straw handle В & T tightly.
Gather up the cast on sts tightly. Starting at this
end, oversew row ends together with P side
of st-st outside and enclosing the handle as
you go.
Cactus
For body use green and cast on 14 sts. G-st 19
rows. Cast off. Oversew cast on and cast off
edges together. Gather round one set of row
ends for top of head. Pull up tightly and fasten
off Turn right side out and stuff firmly to half
way down body. Insert one end of the handle
against the stuffing Continue stuffing the
body round the handle, until body is full.
Gather round lower set of row ends, pull up
tightly around handle and fasten off. Catch to
the knitted sts on handle
Use black yarn for face. Work a chain stitch for
each eye 1.5cm [%in] down from gathered top
of head and 5mm [!4m] apart Work a V-shape
for mouth just below eyes.
For arms [make two alike] use green, cast on
7 sts and g-st 9 rows Cast off Make up as for
body, turn right side out and stuff. Sew open
ends of arms to sides of body.
Add flowers as illustrated, making them as for
the buds on Picture Frame [page 10]
Plant pot
Cut a hole at centre of plastic plant pot base,
making it large enough for the pop-up handle
to pass through easily. If necessary, use a bit of
sandpaper to smooth off the hole
To cover the pot use tan yarn. Cast on 24 sts
and work in g-st for 11cm [4%in]. Cast off.
4
Oversew cast on and cast off edges together
Turn right side out. Gather round one set of
row ends for base of pot. Pull up gathers,
leaving a finger-sized hole for the handle to
pass through Fasten off. Pull the knitted pot
on to the plastic plant pot. The top set of row
ends will extend about 2cm [Kin] above top
edge of plastic pot Gather round this set of
row ends and draw up gathers just enough to
make this section he flat across top of pot.
Fasten off.
Push end of handle through hole in pot base,
so that cactus Is inside the pot.
To keep the handle from coming out of the pot
when cactus is popped-up, make a retaining
strip as follows. Use tan, cast on 14 sts and g-st
3 rows. Cast off. Wind this strip tightly round
and round the handle 5cm [2in] away from the
end. Sew the wound strip to handle.
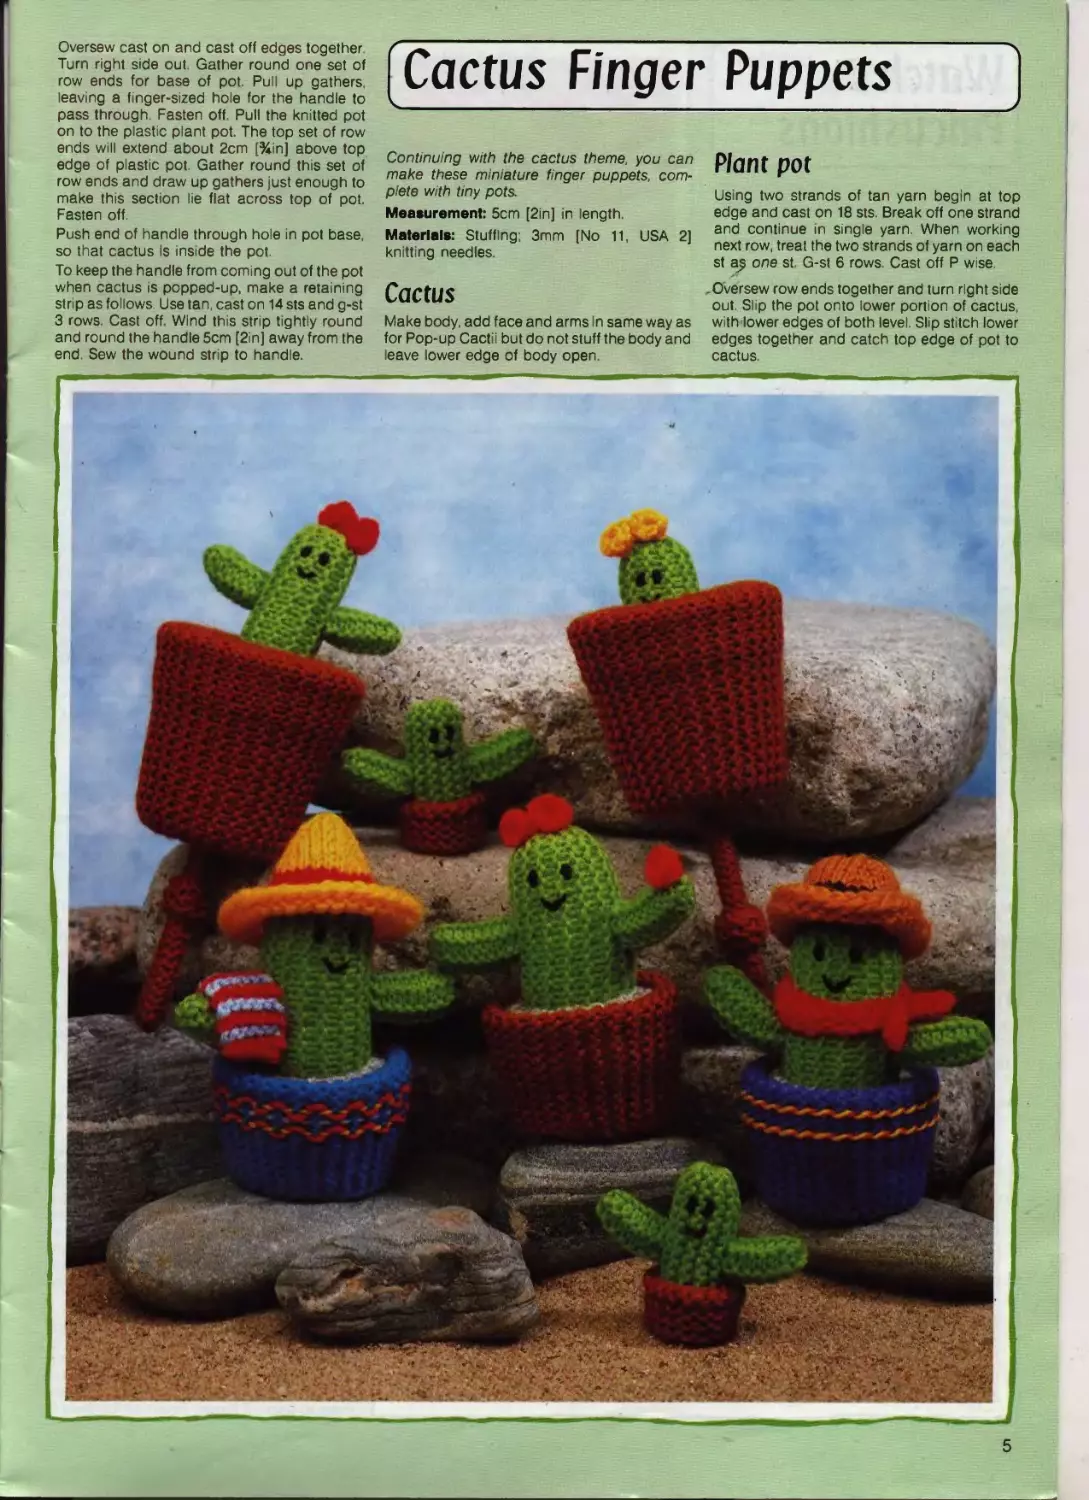
Cactus Finger Puppets
Continuing with the cactus theme, you can
make these miniature finger puppets, com-
plete with tiny pots.
Measurement: 5cm [2in] in length.
Materials: Stuffing; 3mm [No 11, USA 2]
knitting needles
Cactus
Make body, add face and arms In same way as
for Pop-up Cactii but do not stuff the body and
leave lower edge of body open.
Plant pot
Using two strands of tan yarn begin at top
edge and cast on 18 sts. Break off one strand
and continue in single yarn When working
next row, treat the two strands of yarn on each
st one st G-st 6 rows Cast off P wise.
Oversew row ends together and turn right side
out. Slip the pot onto lower portion of cactus,
with lower edges of both level. Slip stitch lower
edges together and catch top edge of pot to
cactus.
5
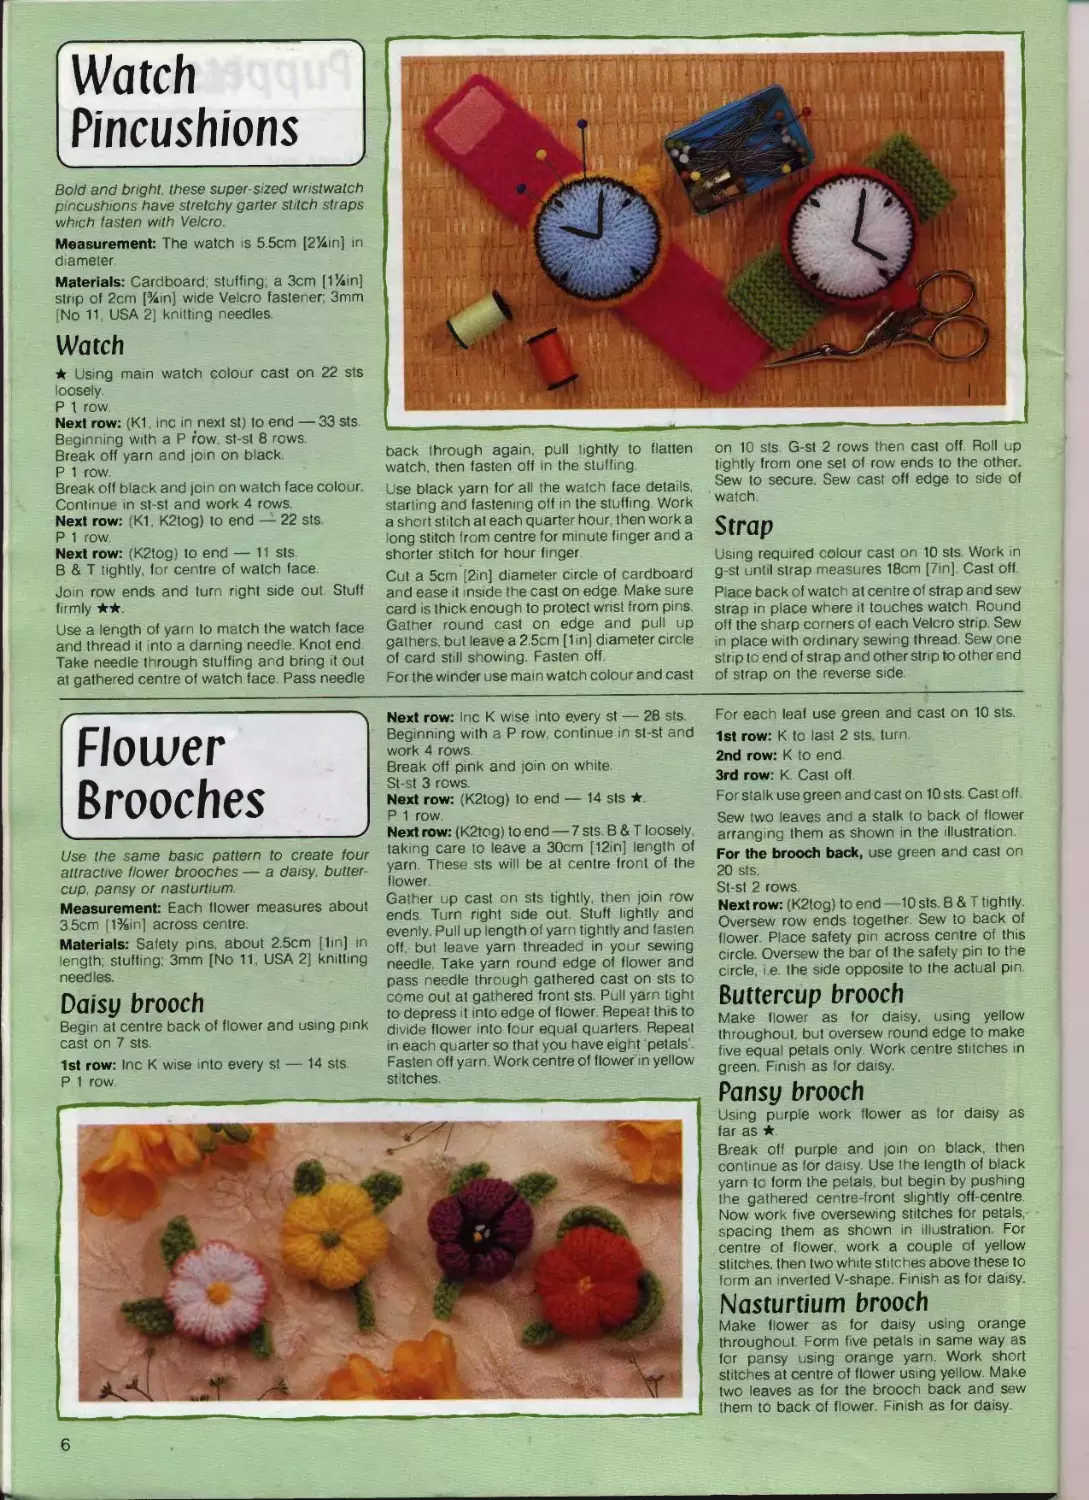
Watch
Pincushions
Bold and bright, these super-sized wristwatch
pincushions have stretchy garter stitch straps
which fasten with Velcro
Measurement: The watch is 5 5cm [2%m] in
diameter
Materials: Cardboard; stuffing a 3cm [1 %in]
strip of 2cm [%in] wide Velcro fastener; 3mm
[No 11 USA 2] knitting needles
Watch
★ Using mam watch colour cast on 22 sts
loosely
P 1 row
Next row: (K1 inc in next st) to end — 33 sts
Beginning with a P row, st-st 8 rows.
Break off yarn and jo n on black.
P 1 row
Break off black and join on watch face colour.
Continue m st-st and work 4 rows.
Next row: (K1 K2tog) to end — 22 sts
P 1 row.
Next row: (K2tog) to end — 11 sts
В & T tightly, for centre of watch face
Join row ends and turn right side out. Stuff
firmly ★★
Use a length of yarn to match the watch face
and thread it into a darning needle Knot end.
Take needle through stuffing and bring it out
at gathered centre of watch face Pass needle
back through again pull tightly to flatten
watch then fasten off in the stuffing
Use black yarn for all the watch face details,
starting and fastening off in the stuffing Work
a short stitch at each quarter hour, then work a
long stitch from centre for minute finger and a
shorter stitch for hour finger
Cut a 5cm [2in] diameter circle of cardboard
and ease it inside the cast on edge. Make sure
card is thick enough to protect wrist from pins.
Gather round cast on edge and pull up
gathers, but leave a 2.5cm [1 in] diameter circle
of card still showing. Fasten off
For the winder use main watch colour and cast
on 10 sts G-st 2 rows then cast off Roll up
tightly from one set of row ends to the other.
Sew to secure. Sew cast off edge to side of
watch
Strap
Using required colour cast on 10 sts. Work in
g-st until strap measures 18cm [7in], Cast off
Place back of watch at centre of strap and sew
strap in place where it touches watch Round
off the sharp corners of each Velcro strip Sew
in place with ordinary sewing thread. Sew one
strip to end of strap and other strip to other end
of strap on the reverse s de
Flower
Brooches
Use the same basic pattern to create four
attractive flower brooches — a daisy butter
cup, pansy or nasturtium.
Measurement: Each flower measures about
35cm [1%in] across centre
Materials: Safety pins about 2.5cm [1m] in
length; stuffing; 3mm [No 11, USA 2] knitting
needles.
Daisy brooch
Begin at centre back of flower and using pmk
cast on 7 sts
1st row: Inc К wise into every st — 14 sts
P 1 row
Next row: Inc К w se into every st — 28 sts
Beginning with a P row continue in st-st and
work 4 rows.
Break off pink and join on white
St-st 3 rows
Next row: (K2tog) to end — 14 sts ★.
P 1 row
Next row: (K2tog) to end — 7 sts. В & T loosely
taking care to leave a 30cm [12in] length of
yarn These sts will be at centre front of the
flower
Gather up cast on sts tightly, then join row
ends Turn right side out. Stuff lightly and
evenly. Pull up length of yarn tightly and fasten
off but leave yarn threaded in your sewing
needle. Take yarn round edge of flower and
pass needle through gathered cast on sts to
come out at gathered front sts Pull yarn tight
to depress it into edge of flower. Repeat this to
divide flower into four equal quarters Repeat
m each quarter so that you have eight ‘petals
Fasten off yarn. Work centre of flower in yellow
stitches
For each leaf use green and cast on 10 sts.
1st row: К to last 2 sts, turn
2nd row: К to end
3rd row: К Cast off
For stalk use green and cast on 10 sts. Cast off
Sew two leaves and a stalk to back of flower
arranging them as shown in the illustration.
For the brooch back, use green and cast on
20 sts.
St-st 2 rows
Next row: (K2tog) to end —10 sts. В & T tightly.
Oversew row ends together. Sew to back of
flower. Place safety pin across centre of this
circle. Oversew the bar of the safety pin to the
circle, i.e the side opposite to the actual pin.
Buttercup brooch
Make flower as for daisy, using yellow
throughout but oversew round edge to make
five equal petals only Work centre stitches in
green. Finish as for daisy.
Pansy brooch
Using purple work flower as for daisy as
far as ★
Break off purple and join on black then
continue as for daisy. Use the length of black
yarn to form the petals, but begin by pushing
the gathered centre-front slightly off-centre.
Now work five oversewing stitches for petals,
spacing them as shown in illustration For
centre of flower work a couple of yellow
stitches, then two white stitches above these to
form an inverted V-shape. Finish as for daisy.
Nasturtium brooch
Make flower as for daisy using orange
throughout Form five petals in same way as
for pansy using orange yarn. Work short
stitches at centre of flower using yellow Make
two leaves as for the brooch back and sew
them to back of flower. Finish as for daisy
6
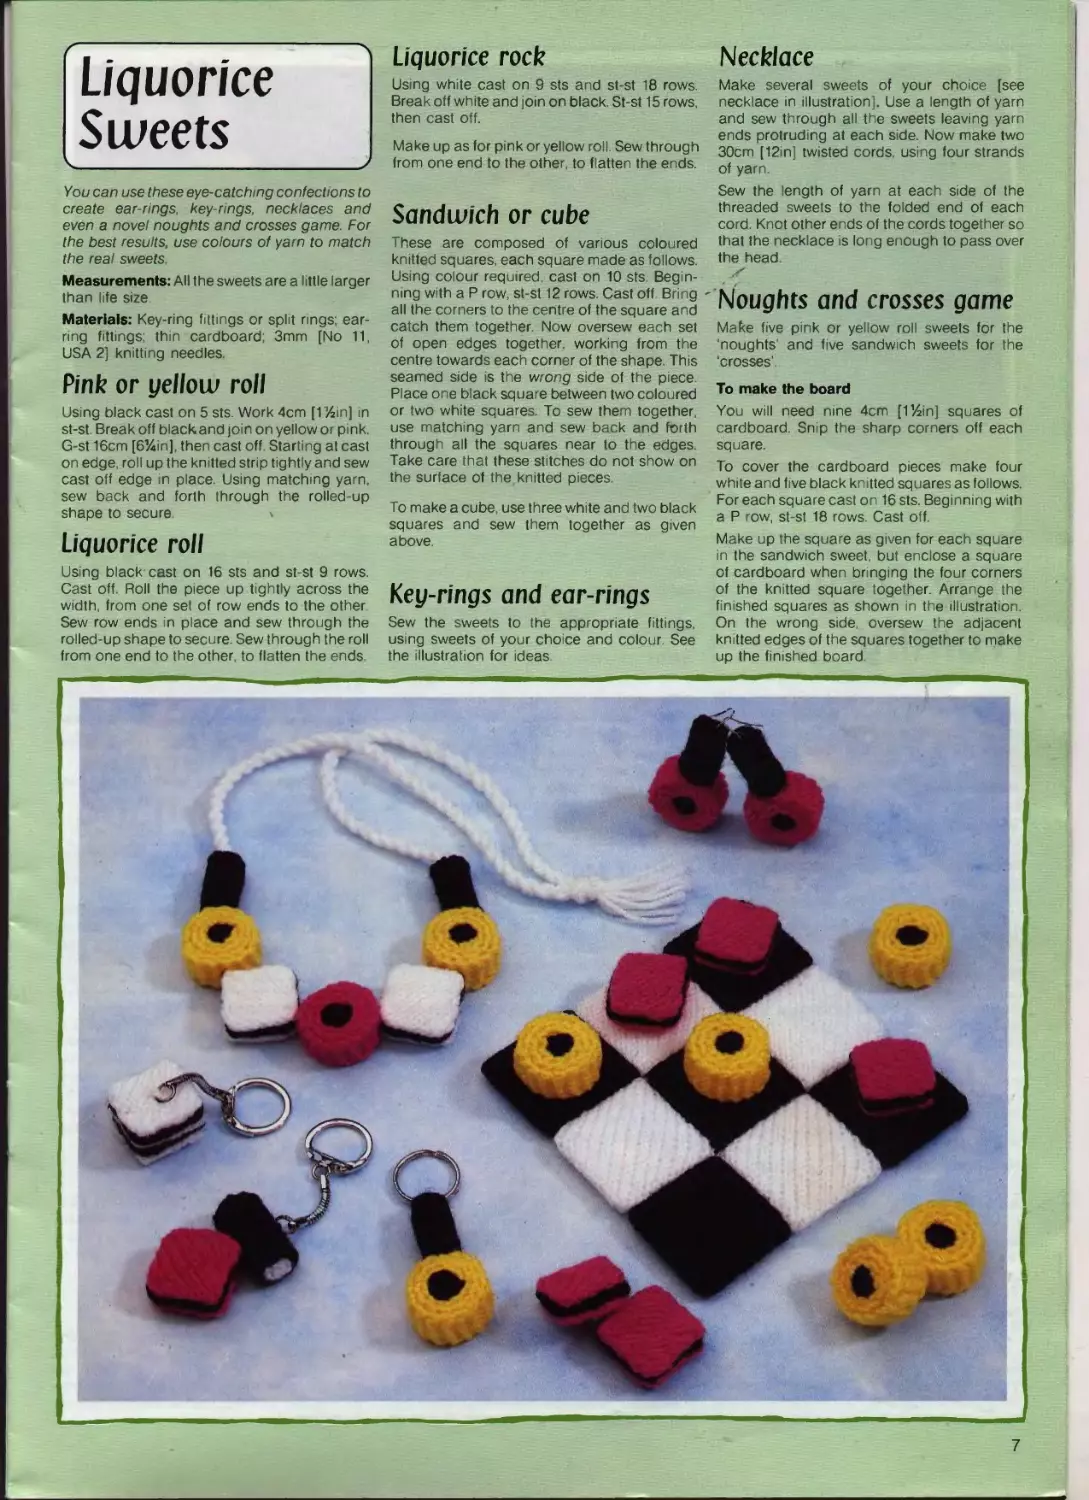
Liquorice
Streets
You can use these eye-catching confections to
create ear-rings, key-rings, necklaces and
even a novel noughts and crosses game. For
the best results, use colours of yarn to match
the real sweets.
Measurements: All the sweets are a little larger
than life size
Materials: Key-ring fittings or split rings; ear-
ring fittings; thin cardboard; 3mm [No 11,
USA 2] knitting needles.
Pink or yellow roll
Using black cast on 5 sts. Work 4cm [1 %m] in
st-st. Break off blackand join on yellow or pink.
G-st 16cm [6%in], then cast off. Starting al cast
on edge, roll up the knitted strip tightly and sew
cast off edge in place. Using matching yarn,
sew back and forth through the rolled-up
shape to secure. \
Liquorice roll
Using black cast on 16 sts and st-st 9 rows.
Cast off. Roll the piece up tightly across the
width, from one sei of row ends to the other.
Sew row ends in place and sew through the
rolled-up shape to secure. Sew through the roll
from one end to the other, to flatten the ends.
Liquorice rock
Us ng white cast on 9 sts and st-st 18 rows.
Break off white and join on black. St-st 15 rows,
then cast off.
Make up as for pink or yellow roll. Sew through
from one end to the other, to flatten the ends.
Sandwich or cube
These are composed of various coloured
knitted squares, each square made as follows.
Using colour required, cast on 10 sts. Beg n-
ning w th a P row, st-st 12 rows. Cast off Bring
all the corners to the centre of the square and
catch them together. Now oversew each set
of open edges together, working from the
centre towards each corner of the shape. This
seamed side is the wrong side of the piece.
Place one black square between two coloured
or two white squares. To sew them together,
use matching yarn and sew back and forth
through all the squares near to the edges.
Take care that these stitches do not show on
the surface of the knitted pieces.
To make a cube, use three white and two black
squares and sew them together as given
above.
Key-rings and ear-rings
Sew the sweets to the appropriate fittings,
using sweets of your choice and colour. See
the illustration for ideas
Necklace
Make several sweets of your choice [see
necklace in illustration]. Use a length of yarn
and sew through all the sweets leaving yarn
ends protruding at each side. Now make two
30cm [12in] twisted cords, using four strands
of yarn.
Sew the length of yarn at each side of the
threaded sweets to the folded end of each
cord. Knot other ends of the cords together so
that the necklace is long enough to pass over
the head.
Noughts and crosses game
Make five pink or yellow roll sweets for the
‘noughts' and five sandwich sweets for the
‘crosses'
To make the board
You will need nine 4cm [11Zin] squares of
cardboard. Snip the sharp corners off each
square.
To cover the cardboard pieces make four
white and five black knitted squares as follows.
For each square cast on 16 sts. Beginning with
a P row, st-st 18 rows. Cast off.
Make up the square as given for each square
in the sandwich sweet, but enclose a square
of cardboard when bringing the four corners
of the knitted square together. Arrange the
finished squares as shown in the illustration.
On the wrong side, oversew the adjacent
knitted edges of the squares together to make
up the finished board.
7
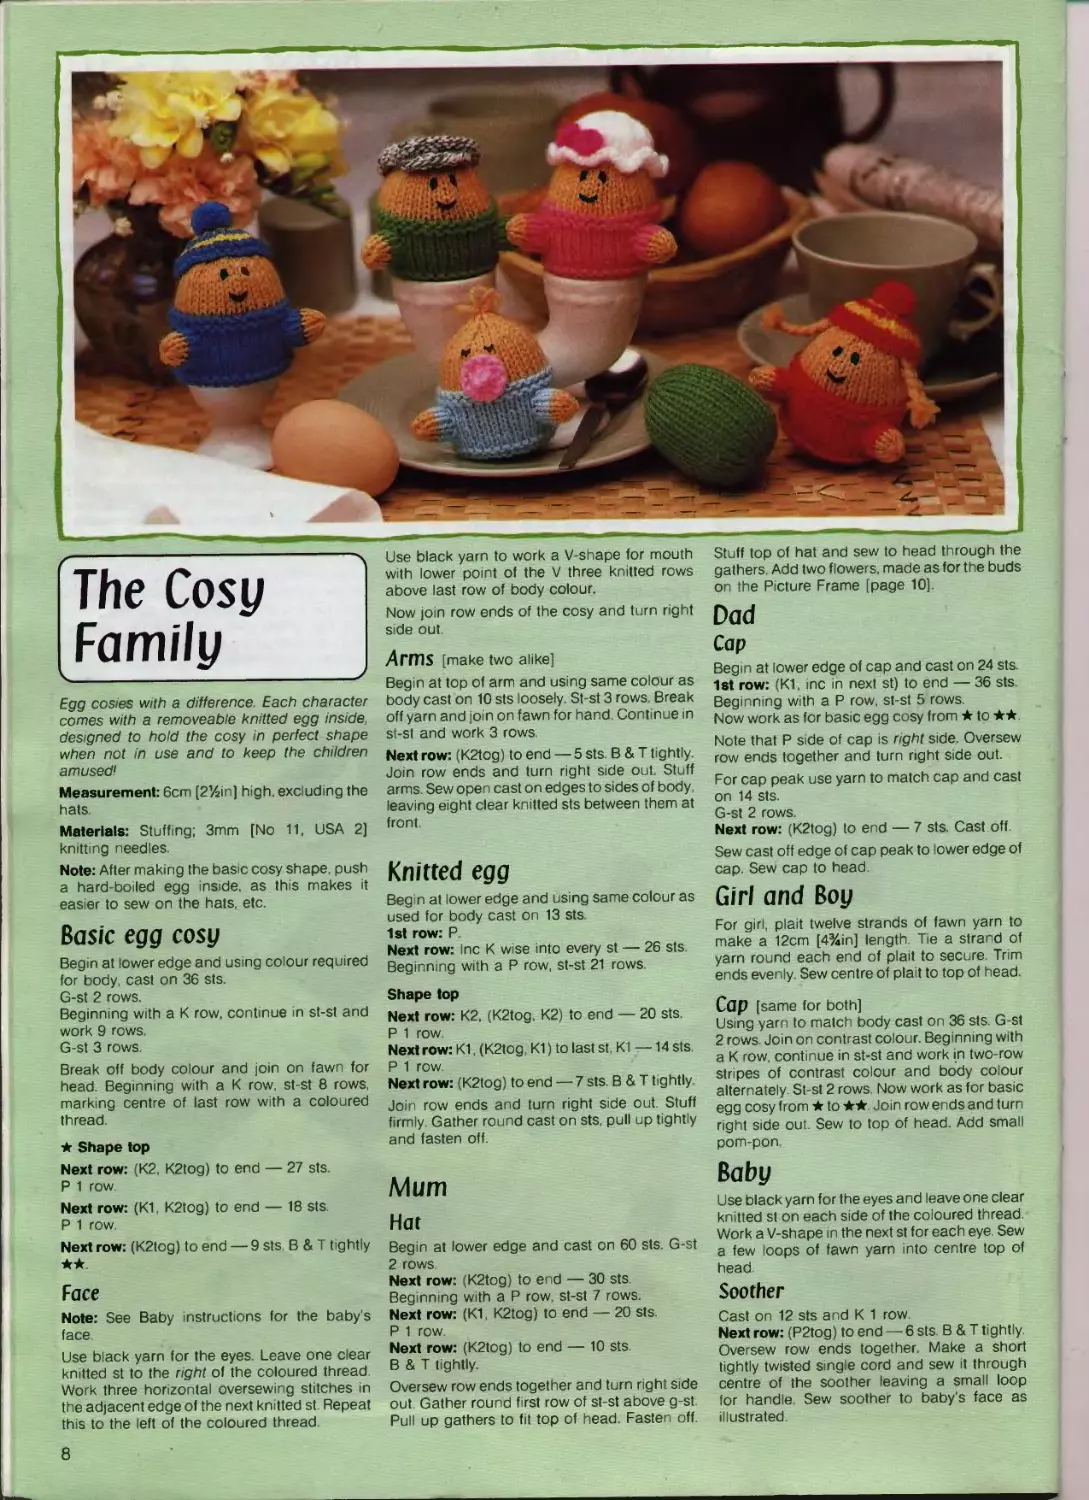
The Cosy
Family
Egg cosies with a difference Each character
comes with a removeable knitted egg inside,
designed to hold the cosy in perfect shape
when not in use and to keep the children
amused!
Measurement: 6cm [214in] high, exclud ng the
hats.
Materials: Stuff ng; 3mm [No 11. USA 2)
knitting needles.
Note: After making the basic cosy shape, push
a hard-boiled egg inside, as this makes it
easier to sew on the hats. etc.
Basic egg cosy
Begin at lower edge and using colour required
for body, cast on 36 sts.
G-st 2 rows.
Beginning with a К row, continue in st-st and
work 9 rows.
G-st 3 rows.
Break off body colour and join on fawn for
head. Beginning with a К row, st-st 8 rows,
marking centre of last row with a coloured
thread.
★ Shape top
Next row: (K2, K2tog) to end — 27 sts.
P 1 row.
Next row: (KI, K2tog) to end — 18 sts.
P 1 row.
Next row: (K2tog) to end — 9 sts. В & T tightly
★★
Face
Note: See Baby instructions for the babys
face
Use black yarn for the eyes Leave one clear
knitted st to the right of the coloured thread.
Work three horizontal oversewing stitches in
the adjacent edge of the next knitted st. Repeat
this to the left of the coloured thread.
Use black yarn to work a V-shape for mouth
with lower point of the V three knitted rows
above last row of body colour.
Now join row ends of the cosy and turn right
side out
Arms [make two alike]
Begin at top of arm and using same colour as
body cast on 10 sts loosely. St-st 3 rows. Break
off yarn and join on fawn for hand. Continue in
st-st and work 3 rows
Next row: (K2tog) to end — 5 sts. В & T tightly
Join row ends and turn right side out. Stuff
arms Sew open cast on edges to sides of body
leaving eight clear knitted sts between them at
front
Knitted egg
Beg n at lower edge and using same colour as
used for body cast on 13 sts.
1st row: P.
Next row: Inc К wise into every st — 26 sts
Beginning with a P row, st-st 21 rows.
Shape top
Next row: K2, (K2tog, K2) to end — 20 sts.
P 1 row
Next row: K1, (K2tog K1) to last st, K1 —14 sts.
P 1 row
Next row: (K2tog) to end — 7 sts. В & T tightly
Join row ends and turn right sde out Stuff
firmly. Gather round cast on sts, pull up tightly
and fasten off
Mum
Hat
Begin at lower edge and cast on 60 sts. G-st
2 rows
Next row: (K2tog) to end — 30 sts.
Beginning with a P row, st-st 7 rows.
Next row: (K1 K2tog) to end — 20 sts.
P 1 row.
Next row: (K2tog) to end — 10 sts.
В & T tightly.
Oversew row ends together and turn right side
out. Gather round first row of st-st above g-st.
Pull up gathers to fit top of head Fasten off
Stuff top of hat and sew to head through the
gathers. Add two flowers, made as for the buds
on the Picture Frame [page 10].
Dad
Cap
Begin at lower edge of cap and cast on 24 sts.
1st row: (K1, inc in next st) to end — 36 sts.
Beginning with a P row, st-st 5 rows
Now work as for basic egg cosy from ★ to ★★
Note that P side of cap is right side. Oversew
row ends together and turn right side out.
For cap peak use yarn to match cap and cast
on 14 sts.
G-st 2 rows.
Next row: (K2tog) to end — 7 sts. Cast off
Sew cast off edge of cap peak to lower edge of
cap Sew cap to head.
Girl and Boy
For girl, plait twelve strands of fawn yarn to
make a 12cm [4%in] length Tie a strand of
yarn round each end of plait to secure. Trim
ends evenly. Sew centre of plait to top of head.
Cap [same for both]
Using yarn to match body cast on 36 sts G-st
2 rows Join on contrast colour. Beginning with
a К row, continue in st-st and work in two-row
stripes of contrast colour and body colour
alternately St-st 2 rows. Now work as for basic
egg cosy from ★ to ★★ Join row ends and turn
right side out. Sew to top of head. Add small
pom-pon
Baby
Use black yarn for the eyes and leave one clear
knitted st on each side of the coloured thread.
Work a V-shape in the next st for each eye. Sew
a few loops of fawn yarn into centre top of
head
Soother
Cast on 12 sts and К 1 row.
Next row: (P2tog) to end — 6 sts. В & T tightly.
Oversew row ends together. Make a short
tightly twisted single cord and sew it through
centre of the soother leaving a small loop
for handle Sew soother to baby’s face as
illustrated
8
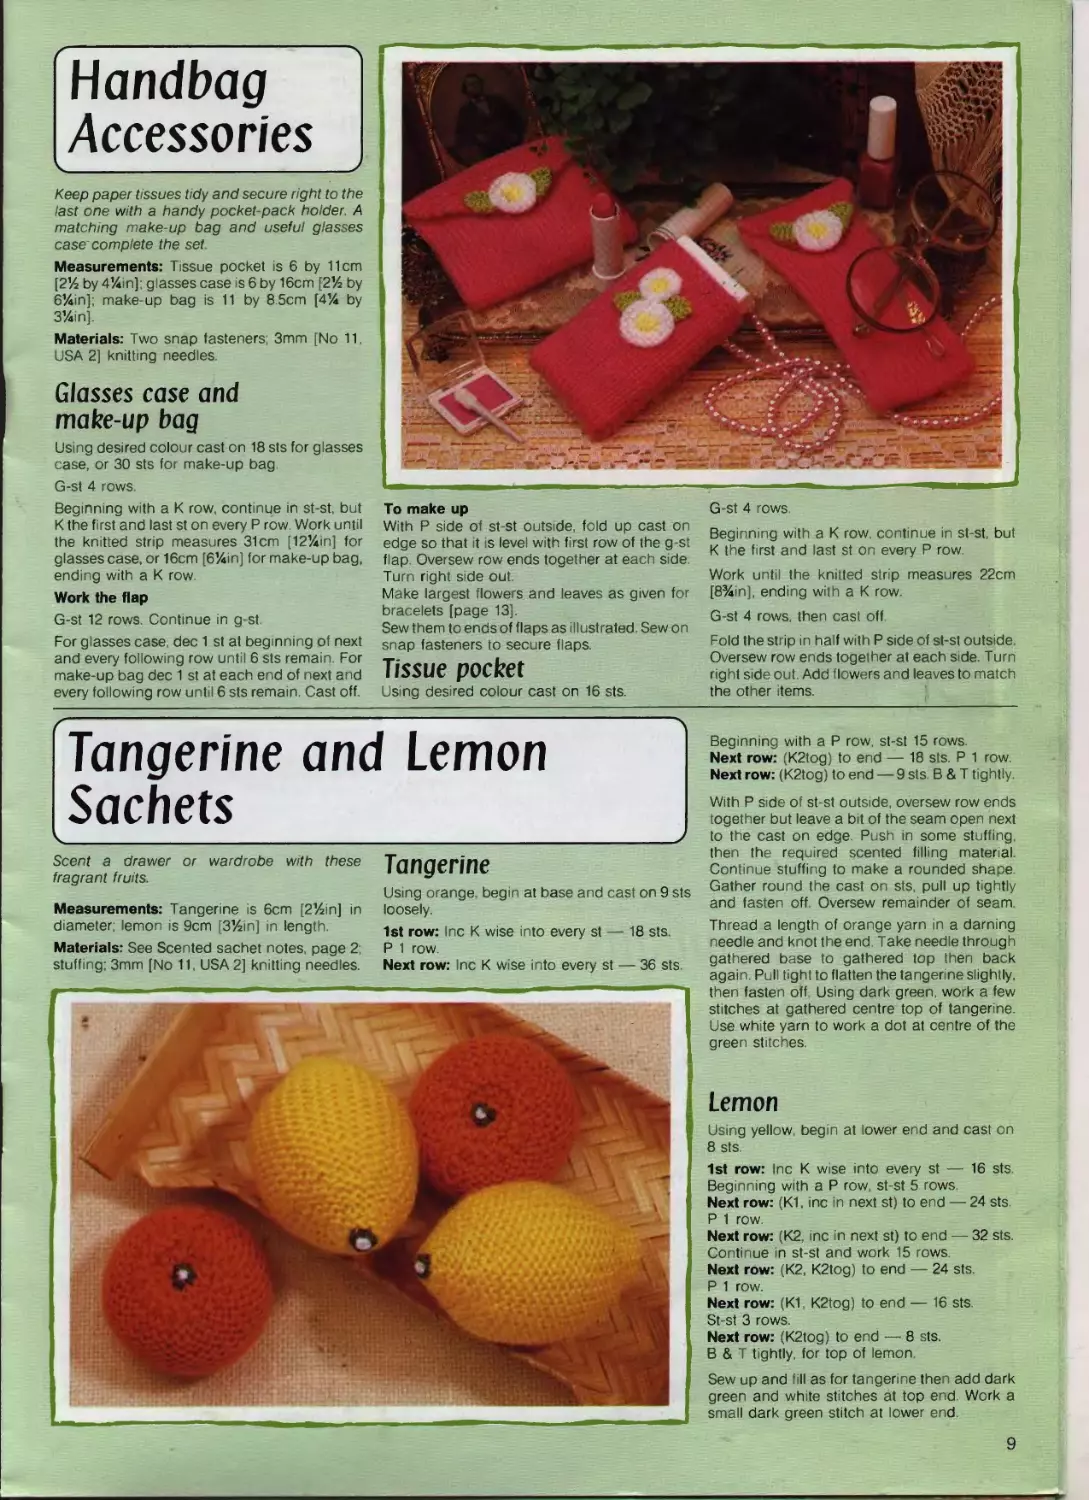
Handbag
Accessories
Keep paper tissues tidy and secure right to the
last one with a handy pocket-pack holder. A
matching make-up bag and useful glasses
case complete the set.
Measurements: Tissue pocket is 6 by 11cm
[2% by 4%in]; glasses case is 6 by 16cm [2% by
6%m]; make-up bag is 11 by 8.5cm [4'A by
3%in].
Materials: Two snap fasteners; 3mm [No 11,
USA 2] knitting needles.
Glasses case and
make-up bag
Using desired colour cast on 18 sts for glasses
case, or 30 sts for make-up bag.
G-st 4 rows.
Beginn ng with a К row, continue in st-st, but
К the first and last st on every P row. Work until
the knitted strip measures 31cm [12% n] for
glasses case, or 16cm [6%in] for make up bag,
ending with a К row.
Work the flap
G-st 12 rows. Continue in g-st.
For glasses case, dec 1 st at beginning of next
and every following row until 6 sts remain. For
make-up bag dec 1 st at each end of next and
every following row until 6 sts remain. Cast off.
To make up
With P side of st-st outside, fold up cast on
edge so that it is level with first row of the g-st
flap. Oversew row ends together at each side.
Turn right side out.
Make largest flowers and leaves as given for
bracelets [page 13].
Sew them to ends of flaps as illustrated. Sew on
snap fasteners to secure flaps.
Tissue pocket
Using desired colour cast on 16 sts.
G-st 4 rows.
Beginning with a К row. continue in st-st but
К the first and last st on every P row.
Work until the knitted strip measures 22cm
[8%in], ending with a К row.
G-st 4 rows, then cast off.
Fold the strip in half with P side of st-st outs de.
Oversew row ends together at each side. Turn
right side out. Add flowers and leaves to match
the other items.
Tangerine and Lemon
Sachets
Scent a drawer or wardrobe with these
fragrant fruits.
Measurements. Tangerine is 6cm [2%in] in
diameter; lemon is 9cm [3%in] in length.
Materials: See Scented sachet notes, page 2;
stuffing; 3mm [No 11, USA 2] knitting needles.
Tangerine
Using orange, begin at base and cast on 9 sts
loosely.
1st row: Inc К wise into every st — 18 sts.
P 1 row.
Next row: Inc К wise into every st — 36 sts.
Beginning with a P row, st-st 15 rows.
Next row: (K2tog) to end — 18 sts. P 1 row.
Next row: (K2tog) to end — 9 sts. В & T tightly.
With P side of st-st outside, oversew row ends
together but leave a bit of the seam open next
to the cast on edge. Push in some stuffing,
then the required scented filling material.
Continue stuffing to make a rounded shape.
Gather round the cast on sts, pull up tightly
and fasten off. Oversew remainder of seam.
Thread a length of orange yarn in a darning
needle and knot the end. Take needle through
gathered base to gathered top then back
again. Pull tight to flatten the tangerine slightly,
then fasten off Using dark green, work a few
stitches at gathered centre top of tangerine.
Use white yarn to work a dot at centre of the
green stitches.
Lemon
Using yellow, begin at lower end and cast on
8 sts.
1st row: Inc К wise into every st — 16 sts.
Beginning with a P row, st-st 5 rows.
Next row: (K1. inc in next st) to end — 24 sts.
P 1 row.
Next row: (K2, inc in next st) to end — 32 sts.
Continue in st-st and work 15 rows.
Next row: (K2, K2tog) to end — 24 sts.
P 1 row.
Next row: (K1, K2tog) to end — 16 sts.
St-st 3 rows.
Next row: (K2tog) to end — 8 sts.
В & T tightly, for top of lemon.
Sew up and fill as for tangerine then add dark
green and white stitches at top end. Work a
small dark green stitch at lower end.
9
4 It's easy to turn a piece of cardboard into a
Materials: Cardboard: stuffing; 3mm [No 11
USA 2] knitting needles.
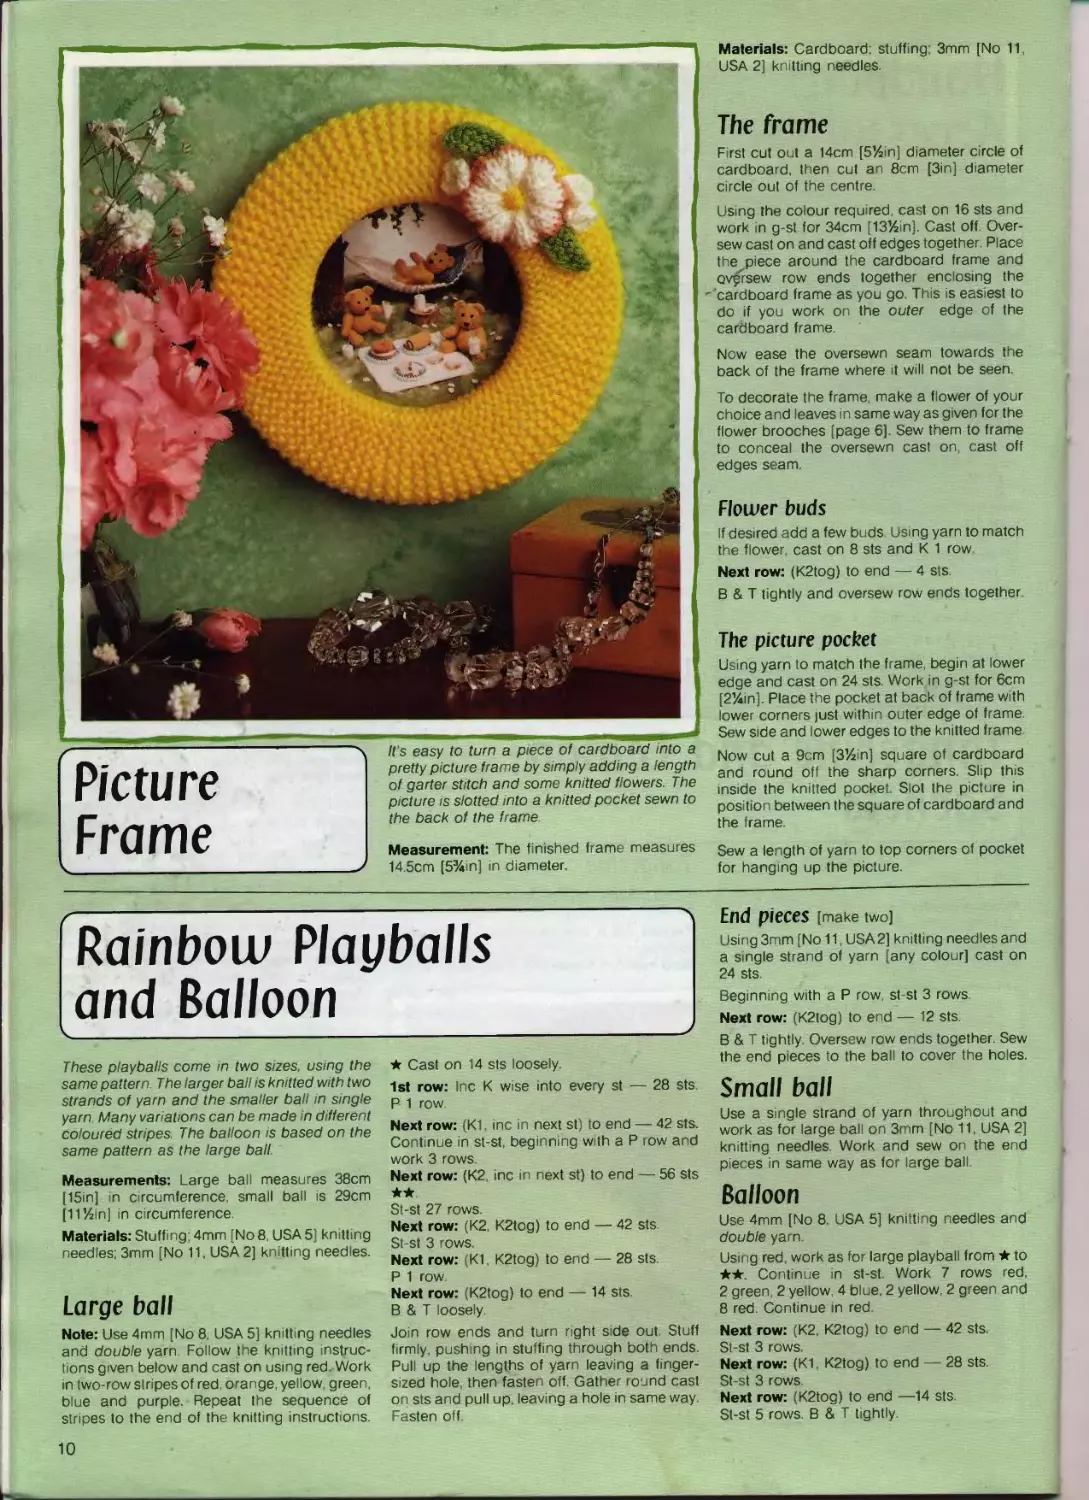
Picture
Frame
pretty picture frame by simply adding a length
of garter stitch and some knitted flowers The
picture is slotted into a knitted pocket sewn to
the back of the frame.
Measurement: The finished frame measures
У 14.5cm [5%in] in diameter.
The frame
First cut out a 14cm [5%in] diameter circle of
cardboard, then cut an 8cm [3in] diameter
circle out of the centre.
Using the colour required, cast on 16 sts and
work m g-st for 34cm [1334m]. Cast off. Over-
sew cast on and cast off edges together. Place
the piece around the cardboard frame and
oversew row ends together enclosing the
cardboard frame as you go This is easiest to
do if you work on the outer edge of the
cardboard frame.
Now ease the oversewn seam towards the
back of the frame where it will not be seen
To decorate the frame, make a flower of your
choice and leaves in same way as given for the
flower brooches [page 6] Sew them to frame
to conceal the oversewn cast on, cast off
edges seam.
Flower buds
If desired add a few buds Using yarn to match
the flower cast on 8 sts and К 1 row
Next row: (K2tog) to end — 4 sts
В & T tightly and oversew row ends together
The picture pocket
Using yarn to match the frame, begin at lower
edge and cast on 24 sts. Work in g-st for 6cm
[2%in]. Place the pocket at back of frame with
lower corners just w thin outer edge of frame
Sew side and lower edges to the knitted frame
Now cut a 9cm [334in] square of cardboard
and round off the sharp corners Slip this
inside the knitted pocket Slot the picture in
position between the square of cardboard and
the frame
Sew a length of yarn to top corners of pocket
for hanging up the picture.
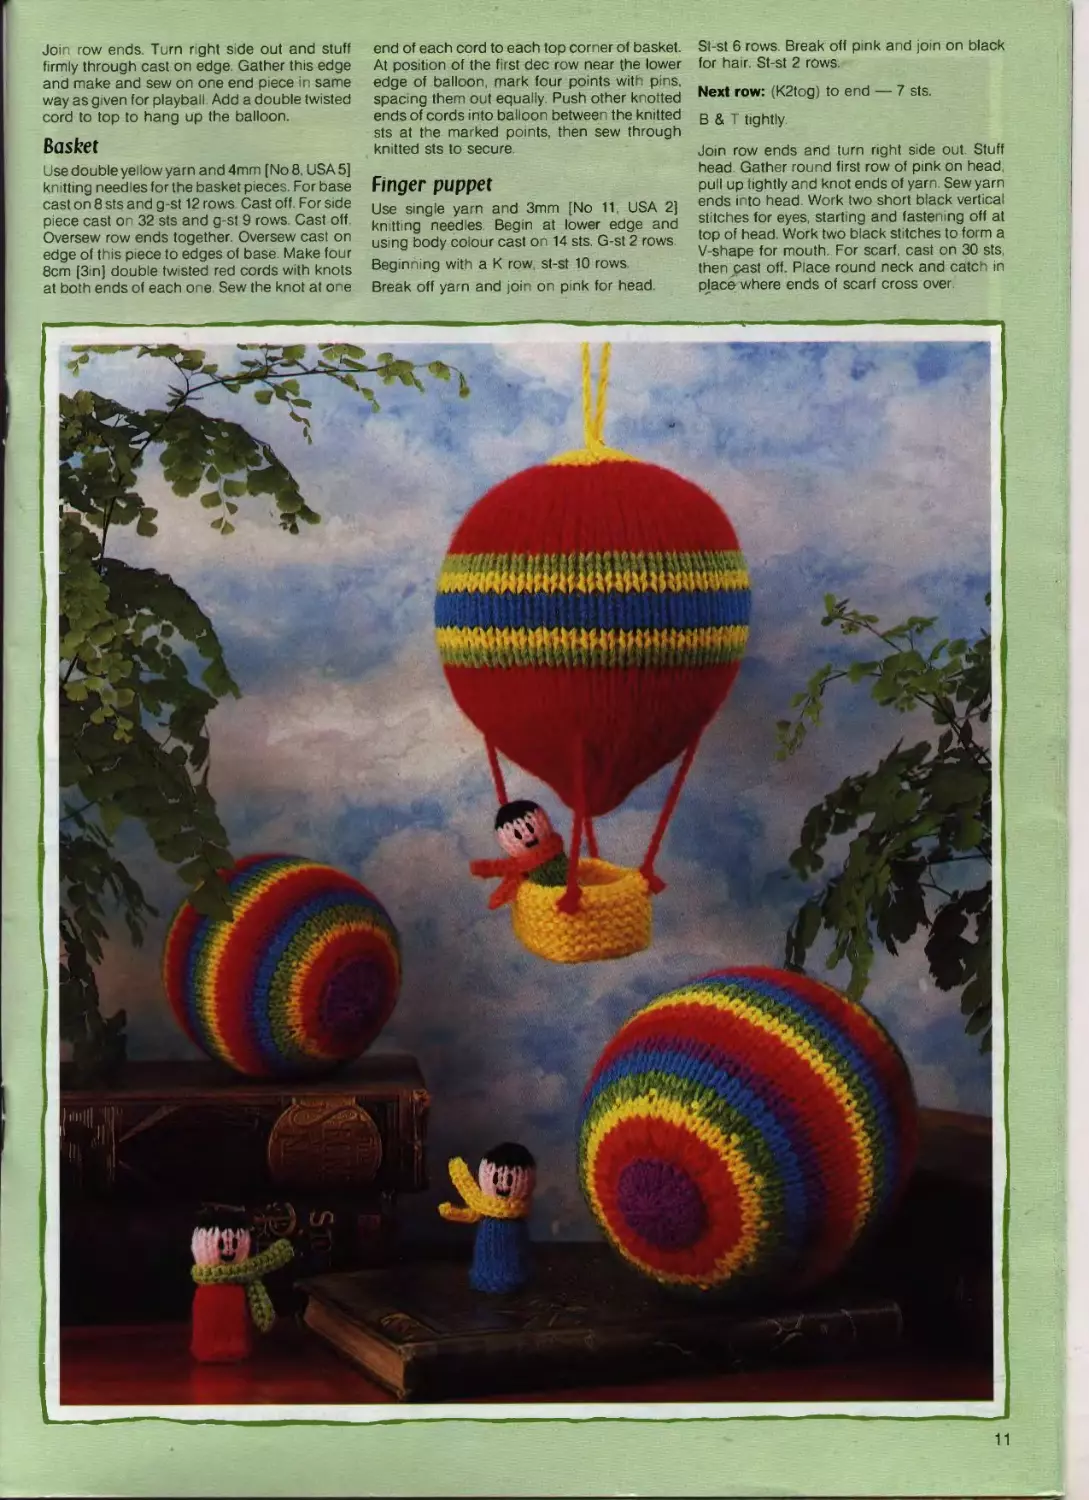
Rainbow Playballs
and Balloon________
These pl ay balls come in two sizes, using the
same pattern. The larger ball is knitted with two
strands of yarn and the smaller ball in single
yarn Many variations can be made in different
coloured stripes. The balloon is based on the
same pattern as the large ball
Measurements: Large ball measures 38cm
[15 n] n circumference, small ball is 29cm
[11 !4in] in circumference
Materials: Stuffing 4mm [No 8 USA 5] knitting
needles 3mm [No 11. USA 2] knitting needles
Large ball
Note: Use 4mm [No 8, USA 5] knitting needles
and double yarn. Follow the knitting instruc-
tions given below and cast on using red Work
in two-row stripes of red orange, yellow green,
blue and purple. Repeat the sequence of
stripes to the end of the knitting instructions.
★ Cast on 14 sts loosely
1st row: Inc К wise into every st — 28 sts.
P 1 row.
Next row: (K1. inc in next st) to end — 42 sts.
Continue in st-st, beginning with a P row and
work 3 rows.
Next row: (K2 inc in next st) to end — 56 sts
★★
St-st 27 rows
Next row: (K2, K2tog) to end — 42 sts
St-st 3 rows.
Next row: (K1 K2tog) to end — 28 sts.
P 1 row
Next row: (K2tog) to end — 14 sts
В & T loosely
Join row ends and turn right side out. Stuff
firmly, pushing in stuffing through both ends.
Pull up the lengths of yarn leaving a finger-
sized hole, then fasten off. Gather round cast
on sts and pull up, leaving a hole in same way.
Fasten off.
End pieces [make two]
Using 3mm [No 11, USA 2] knitting needles and
a single strand of yarn [any colour] cast on
24 sts.
Beginning with a P row st-st 3 rows
Next row: (K2tog) to end — 12 sts
В & T tightly. Oversew row ends together. Sew
the end pieces to the ball to cover the holes.
Small ball
Use a single strand of yarn throughout and
work as for large ball on 3mm [No 11, USA 2]
knitting needles Work and sew on the end
pieces in same way as for large ball.
Balloon
Use 4mm [No 8, USA 5] knitting needles and
double yarn
Using red, work as for large playball from ★ to
Continue in st-st. Work 7 rows red,
2 green, 2 yellow, 4 blue, 2 yellow, 2 green and
8 red. Continue in red
Next row: (K2, K2tog) to end — 42 sts.
St-st 3 rows.
Next row: (K1, K2tog) to end — 28 sts.
St-st 3 rows
Next row: (K2tog) to end —14 sts.
St-st 5 rows. В & T tightly
10
Join row ends Turn right side out and stuff
firmly through cast on edge, Gather this edge
and make and sew on one end piece in same
way as given for playball Add a double twisted
cord to top to hang up the balloon.
Basket
Use double yellow yarn and 4mm [No 8. USA 5]
knitting needles for the basket pieces For base
cast on 8 sts and g-st 12 rows Cast off For side
piece cast on 32 sts and g-st 9 rows Cast off
Oversew row ends together. Oversew cast on
edge of this piece to edges of base Make four
8cm [3m] double twisted red cords with knots
at both ends of each one Sew the knot at one
end of each cord to each top corner of basket.
At position of the first dec row near the lower
edge of balloon, mark four points with pins,
spacing them out equally. Push other knotted
ends of cords into balloon between the knitted
sts at the marked points, then sew through
knitted sts to secure
Finger puppet
Use single yarn and 3mm [No 11, USA 2]
knitting needles Begin at lower edge and
using body colour cast on 14 sts. G-st 2 rows
Beginning with a К row st-st 10 rows.
Break off yarn and join on pink for head
St-st 6 rows Break off pink and jo n on black
for hair. St-st 2 rows.
Next row: (K2tog) to end — 7 sts.
В & T tightly
Join row ends and turn right side out Stuff
head Gather round first row of p nk on head,
pull up tightly and knot ends of yarn Sew yarn
ends into head Work two short black vertical
stitches for eyes, starting and fastening off at
top of head. Work two black stitches to form a
V-shape for mouth. For scarf, cast on 30 sts
then cast off. Place round neck and catch in
place where ends of scarf cross over
11
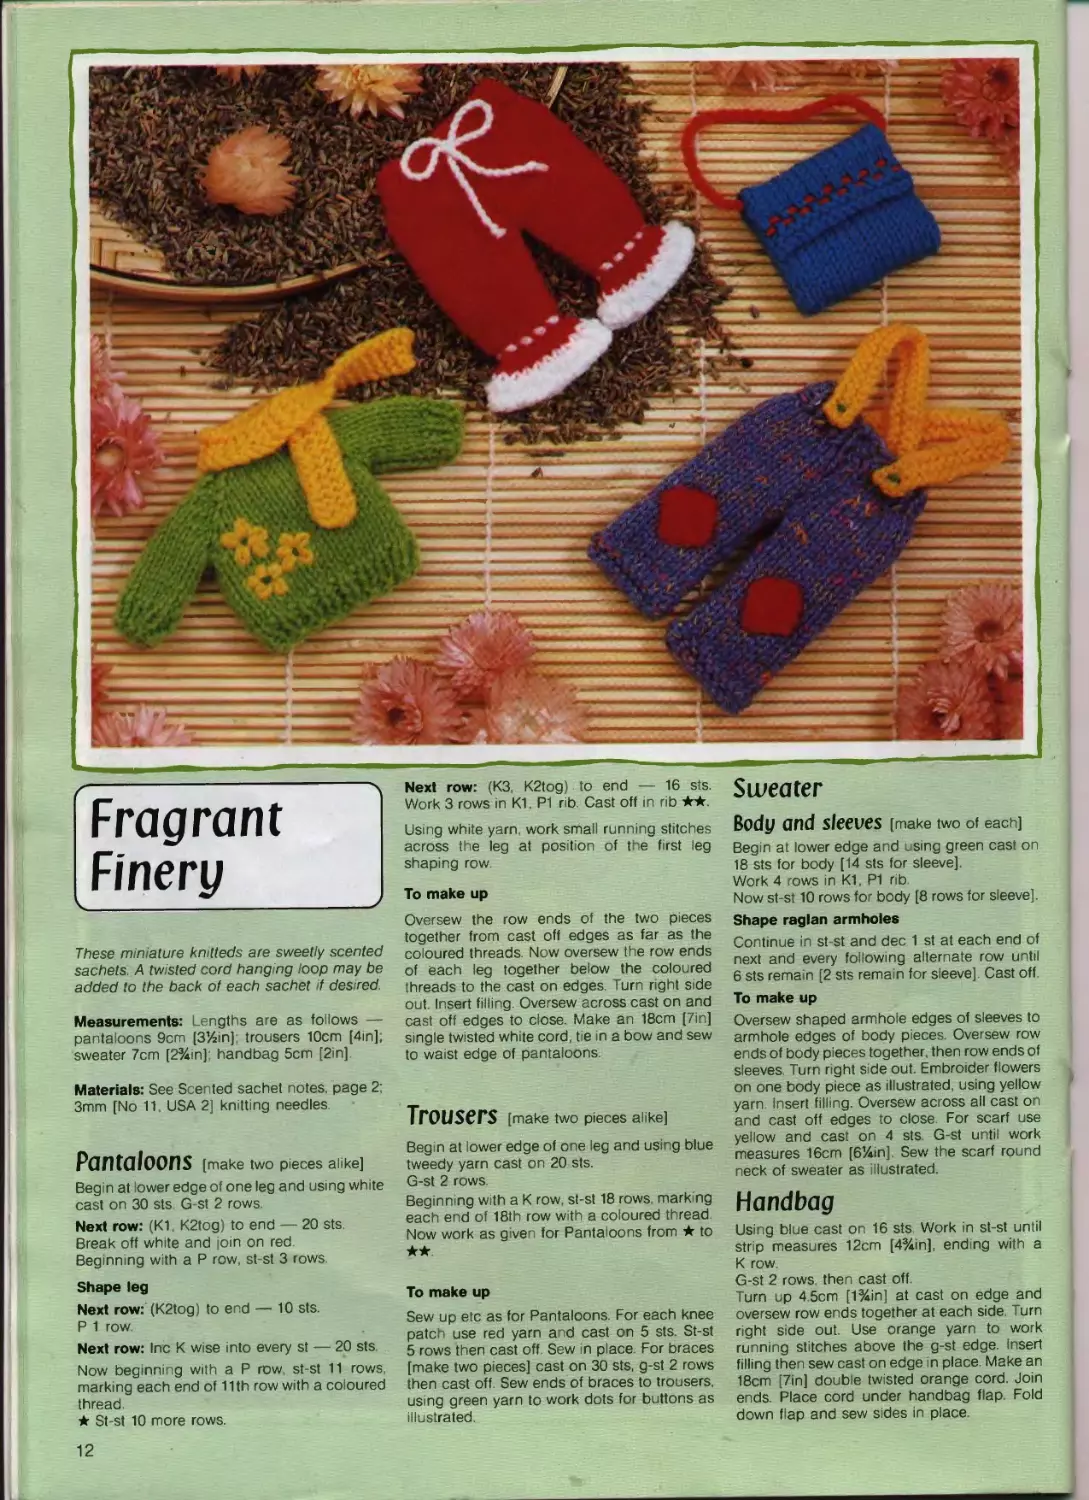
Fragrant
Finery
These miniature knitteds are sweetly scented
sachets A twisted cord hanging loop may be
added to the back of each sachet if desired.
Measurements: Lengths are as follows —
pantaloons 9cm [3%m] trousers 10cm [4m],
sweater 7cm [2%m]; handbag 5cm [2m]
Materials: See Scented sachet notes, page 2;
3mm [No 11 USA 2] knitting needles.
Pantaloons [make two pieces alike]
Begin at lower edge of one leg and using white
cast on 30 sts G-st 2 rows
Next row: (K1, K2tog) to end — 20 sts.
Break off white and |om on red
Beginning with a P row, st-st 3 rows.
Shape leg
Next row: (K2tog) to end — 10 sts.
P 1 row.
Next row: Inc К wise into every st — 20 sts.
Now beginning with a P row, st-st 11 rows,
marking each end of 11 th row with a coloured
thread.
★ St-st 10 more rows.
Next row: (КЗ, K2tog) to end — 16 sts.
Work 3 rows in K1 P1 nb. Cast off in rib ★★
Using white yarn, work small running stitches
across the leg at position of the first leg
shaping row
To make up
Oversew the row ends of the two pieces
together from cast off edges as far as the
coloured threads Now oversew the row ends
of each leg together below the coloured
threads to the cast on edges. Turn right side
out. Insert filling. Oversew across cast on and
cast off edges to close. Make an 18cm [7in]
single twisted white cord, tie in a bow and sew
to wa st edge of pantaloons
Trousers [make two pieces alike]
Begin at lower edge of one leg and using blue
tweedy yarn cast on 20 sts.
G-st 2 rows
Beginn ng with a К row, st-st 18 rows, marking
each end of 18th row with a coloured thread
Now work as given for Pantaloons from ★ to
To make up
Sew up etc as for Pantaloons. For each knee
patch use red yarn and cast on 5 sts. St-st
5 rows then cast off Sew n place For braces
[make two pieces] cast on 30 sts, g-st 2 rows
then cast off Sew ends of braces to trousers,
using green yarn to work dots for buttons as
illustrated
Sweater
Body and sleeves [make two of each]
Begin at lower edge and using green cast on
18 sts for body [14 sts for sleeve].
Work 4 rows in K1, P1 rib
Now st-st 10 rows for body [8 rows for sleeve].
Shape raglan armholes
Continue in st-st and dec 1 st at each end of
next and every following alternate row until
6 sts remain [2 sts remain for sleeve]. Cast off.
To make up
Oversew shaped armhole edges of sleeves to
armhole edges of body pieces. Oversew row
ends of body pieces together, then row ends of
sleeves Turn right side out. Embroider flowers
on one body piece as illustrated, using yellow
yarn Insert filling. Oversew across all cast on
and cast off edges to close For scarf use
yellow and cast on 4 sts. G-st until work
measures 16cm [61Am]. Sew the scarf round
neck of sweater as illustrated.
Handbag
Using blue cast on 16 sts Work in st-st until
strp measures 12cm [4%in], ending with a
К row
G-st 2 rows then cast off
Turn up 4 5cm [1%in] at cast on edge and
oversew row ends together at each side. Turn
right side out. Use orange yarn to work
running stitches above the g-st edge Insert
filling then sew cast on edge in place Make an
18cm [7in] double twisted orange cord. Join
ends. Place cord under handbag flap Fold
down flap and sew sides in place
12
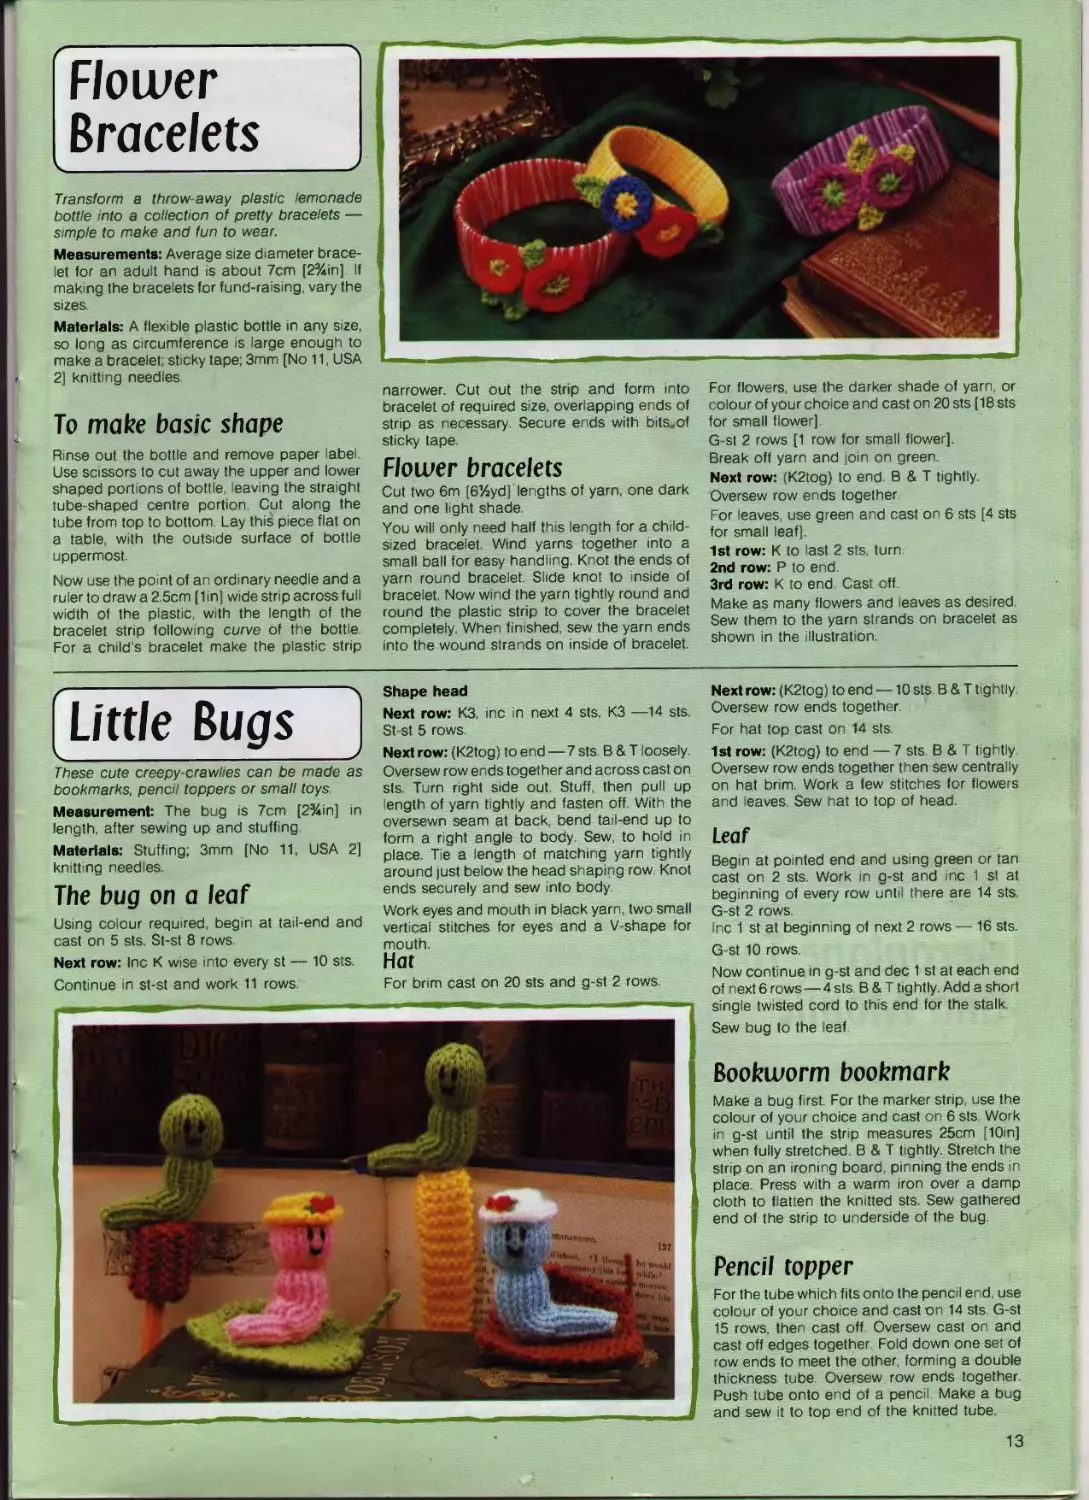
Floiver
Bracelets
Transform a throw-away plastic lemonade
bottle into a collection of pretty bracelets —
simple to make and fun to wear.
Measurements: Average size d ameter brace-
let for an adult hand is about 7cm [2%in] If
making the bracelets for fund-raising, vary the
sizes
Materials: A flexible plastic bottle in any size,
so long as circumference is large enough to
make a bracelet; sticky tape; 3mm [No 11, USA
v 2] knitting needles.
To make basic shape
Rinse out the bottle and remove paper label
Use scissors to cut away the upper and lower
shaped portions of bottle, leaving the straight
tube-shaped centre portion Cut along the
tube from top to bottom Lay this piece flat on
a table, with the outside surface of bottle
uppermost.
Now use the point of an ordinary needle and a
ruler to draw a 2 5cm [1m] wide strip across full
width of the plastic, with the length of the
bracelet strip following curve of the bottle
For a child s bracelet make the plastic strip
narrower. Cut out the strip and form into
bracelet of required size, overlapping ends of
strip as necessary. Secure ends with bits..of
sticky tape.
Floiver bracelets
Cut two 6m [6%yd] lengths of yarn, one dark
and one light shade
You will only need half this length for a child-
sized bracelet. Wind yarns together into a
small ball for easy handling. Knot the ends of
yarn round bracelet. Slide knot to inside of
bracelet. Now wind the yarn tightly round and
round the plastic strip to cover the bracelet
completely When finished, sew the yarn ends
into the wound strands on inside of bracelet
For flowers, use the darker shade of yarn, or
colour of your choice and cast on 20 sts [18 sts
for small flower],
G-st 2 rows [1 row for small flower]
Break off yarn and join on green
Next row: (K2tog) to end. В & T tightly.
Oversew row ends together
For leaves, use green and cast on 6 sts [4 sts
for small leaf].
1st row: К to last 2 sts, turn
2nd row: P to end
3rd row: К to end Cast off
Make as many flowers and leaves as desired
Sew them to the yarn strands on bracelet as
shown in the illustration
Little Bugs
These cute creepy-crawhes can be made as
bookmarks, pencil toppers or small toys
Measurement: The bug is 7cm [2%in] in
length, after sewing up and stuffing
Materials: Stuffing; 3mm [No 11, USA 2]
knitting needles.
The bug on a leaf
Using colour required, begin at ta l-end and
cast on 5 sts. St-st 8 rows
Next row: Inc К wise into every st — 10 sts.
Continue in st-st and work 11 rows
Shape head
Next row: КЗ nc n next 4 sts, КЗ —14 sts
St-st 5 rows
Next row: (K2tog) to end — 7 sts В & T loosely.
Oversew row ends together and across cast on
sts. Turn right side out. Stuff, then pull up
length of yarn tightly and fasten off. With the
oversewn seam at back, bend tail-end up to
form a right angle to body Sew to hold in
place Tie a length of matching yarn tightly
around just below the head shaping row Knot
ends securely and sew into body
Work eyes and mouth in black yarn, two small
vertical stitches for eyes and a V-shape for
mouth.
Hat
For brim cast on 20 sts and g-st 2 rows.
Next row: (K2tog) to end —10 sts. В & T tightly
Oversew row ends together.
For hat top cast on 14 sts
1st row: (K2tog) to end — 7 sts. В & T tightly.
Oversew row ends together then sew centrally
on hat brim Work a few stitches for flowers
and leaves. Sew hat to top of head.
Leaf
Begin at pointed end and using green or tan
cast on 2 sts. Work in g-st and inc 1 st at
beginning of every row until there are 14 sts
G-st 2 rows.
Inc 1 st at beginning of next 2 rows — 16 sts.
G-st 10 rows.
Now continue in g-st and dec 1 st at each end
of next 6 rows—4 sts. В & T tig htly Add a short
single twisted cord to this end for the stalk.
Sew bug to the leaf
Bookworm bookmark
Make a bug first For the marker strip use the
colour of your choice and cast on 6 sts. Work
in g-st until the strip measures 25cm [10in]
when fully stretched. В & T tightly. Stretch the
strip on an ironing board pinning the ends in
place Press with a warm iron over a damp
cloth to flatten the knitted sts. Sew gathered
end of the strip to underside of the bug.
Pencil topper
For the tube which fits onto the pencil end. use
colour of your choice and cast on 14 sts. G-st
15 rows, then cast off Oversew cast on and
cast off edges together. Fold down one set of
row ends to meet the other, forming a double
thickness tube. Oversew row ends together
Push tube onto end of a pencil Make a bug
and sew it to top end of the knitted tube.
13
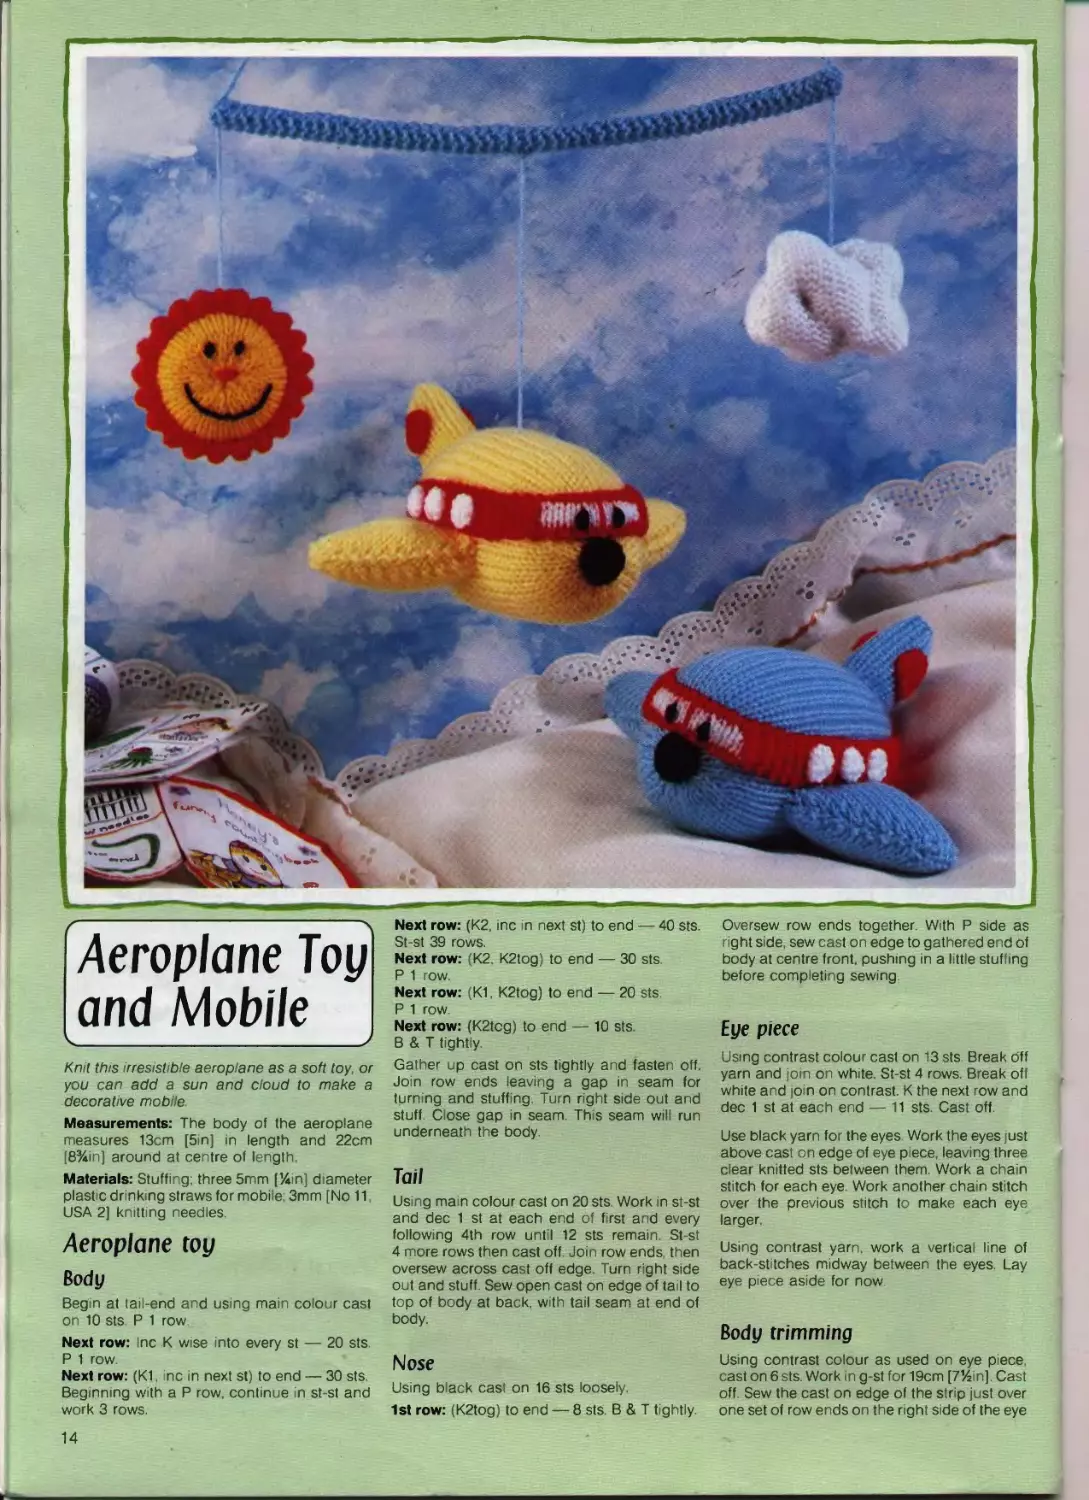
Aeroplane Toy
and Mobile
Knit this irresistible aeroplane as a soft toy, or
you can add a sun and cloud to make a
decorative mobile.
Measurements: The body of the aeroplane
measures 13cm [5in] in length and 22cm
[8%in] around at centre of length.
Materials: Stuffing; three 5mm [% n] diameter
plastic drinking straws for mobile; 3mm [No 11
USA 2] knitting needles.
Aeroplane toy
Body
Begin at tail-end and using main colour cast
on 10 sts. P 1 row
Next row: Inc К wise into every st — 20 sts.
P 1 row.
Next row: (K1, nc in next st) to end — 30 sts.
Beginning with a P row, continue in st-st and
work 3 rows.
Next row: (K2, inc in next st) to end — 40 sts.
St-st 39 rows.
Next row: (K2, K2tog) to end — 30 sts.
P 1 row.
Next row: (K1, K2tog) to end — 20 sts.
P 1 row.
Next row: (K2tcg) to end — 10 sts.
В & T tightly.
Gather up cast on sts tightly and fasten off.
Join row ends leaving a gap in seam for
turning and stuffing. Turn right side out and
stuff. Close gap in seam. This seam will run
underneath the body.
Tail
Using mam colour cast on 20 sts Work in st-st
and dec 1 st at each end of first and every
following 4th row until 12 sts remain. St-st
4 more rows then cast off. Join row ends, then
oversew across cast off edge. Turn right side
out and stuff. Sew open cast on edge of tail to
top of body at back, with tail seam at end of
body.
Nose
Using black cast on 16 sts loosely.
1st row: (K2tog) to end — 8 sts. В & T tightly.
Oversew row ends together. With P side as
right side, sew cast on edge to gathered end of
body at centre front, pushing in a little stuffing
before completing sewing.
Eye piece
Us ng contrast colour cast on 13 sts Break off
yarn and join on white. St-st 4 rows. Break off
white and join on contrast. К the next row and
dec 1 st at each end — 11 sts. Cast off.
Use black yarn for the eyes Work the eyes just
above cast on edge of eye piece, leaving three
clear knitted sts between them. Work a chain
stitch for each eye. Work another chain stitch
over the previous stitch to make each eye
larger.
Using contrast yarn, work a vertical line of
back-stitches midway between the eyes. Lay
eye piece aside for now
Body trimming
Using contrast colour as used on eye piece,
cast on 6 sts. Work in g-st for 19cm [7%in]. Cast
off Sew the cast on edge of the strip just over
one set of row ends on the right side of the eye
14
piece. Repeat with cast off edge at other set of
row ends on the eye piece. Place this complete
piece on the body, with eyes above nose and
the g-st strip passing under tail at back. Sew
long edges to body.
For each window [make six], use white and
cast on 10 sts В & T tightly. Oversew cast on
row ends together to form a circle. Sew three to
g-st strip at each side of body
W/ngs [make two alike]
Using mam colour cast on 28 sts St-st 2 rows.
Continue m st-st and dec 1 st at beginning of
next and every following row until 11 sts
remain. Cast off
Oversew row ends together, then oversew
across cast off edge Turn right side out and
stuff. Sew open cast on edges to s des of body
below the g-st band, with oversewn seams
facing towards front of body.
Tail motifs [make two]
Use contrast colour And work as for nose Sew
one to each side of tail with К side as r ght side.
Aeroplane mobile
Hanging rod
★ Cut two of the drinking straws open along
the length You will now be able to push one of
these straws inside the whole straw by over-
lapping the cut edges slightly. If the straws
have a ‘bendy’ section, make sure that this
comes at opposite end for second straw Now
push the remaining cut straw inside the other
two
To cover the hanging rod, use light blue yarn
and cast on 6 sts Work in g-st until strip is
same length as the rod when slightly stretched.
В & T tightly. Gather up cast on sts tightly.
Starting at this end, oversew row ends together
enclosing the rod as you go
Make aeroplane as for the toy and suspend it
with a 12cm [4%in] length of yarn at centre of
rod-.
Sun
Using yellow throughout, work as given for
Watch [page 6] from ★ to
Use black yarn for eyes and mouth, starting
and fastening off in the stuffing Work a chain
stitch for each eye, placing them about 1cm
[%in] above gathered centre and the same
distance apart.
Work a U-shape for mouth in back-stitches.
Work a few stitches in orange at centre for
nose. Gather round cast on edge, pull up
tightly and fasten off.
For the edging round the sun, use orange and
cast on 41 sts St-st 2 rows
Next row: K1, (pass yarn under and over tip of
right hand needle to make a st, K2tog) to end.
Beginning with a P row st-st 2 rows Cast off
Oversew row ends together Oversew cast on
and cast off edges together w th right side of
st-st outside Sew this edge around outer edge
of the sun as illustrated. Suspend the sun with
a 6cm [2%in] length of yarn from one end of
rod.
Cloud
x-Using white cast on 24 sts and work in st-st for
12cm [4%in]. Cast off. Bring cast on and cast
off edges together, with К side of st-st outside.
Work a line of back-stitches round all edges,
rounding off the corners, working in wavy lines
at outer edges and leaving a gap for turning.
Turn right side out and stuff. Close gap Use a
length of white yarn to sew back and forth
through the cloud, pulling tight to make
depressions here and there as shown in cloud
illustrated Suspend the cloud from other end
of rod as for sun
Attach ends of a 46cm [18m] single twisted
cord to ends of rod. Loop another cord of the
required length under this cord and use this to
suspend the mobile so that it can move freely.
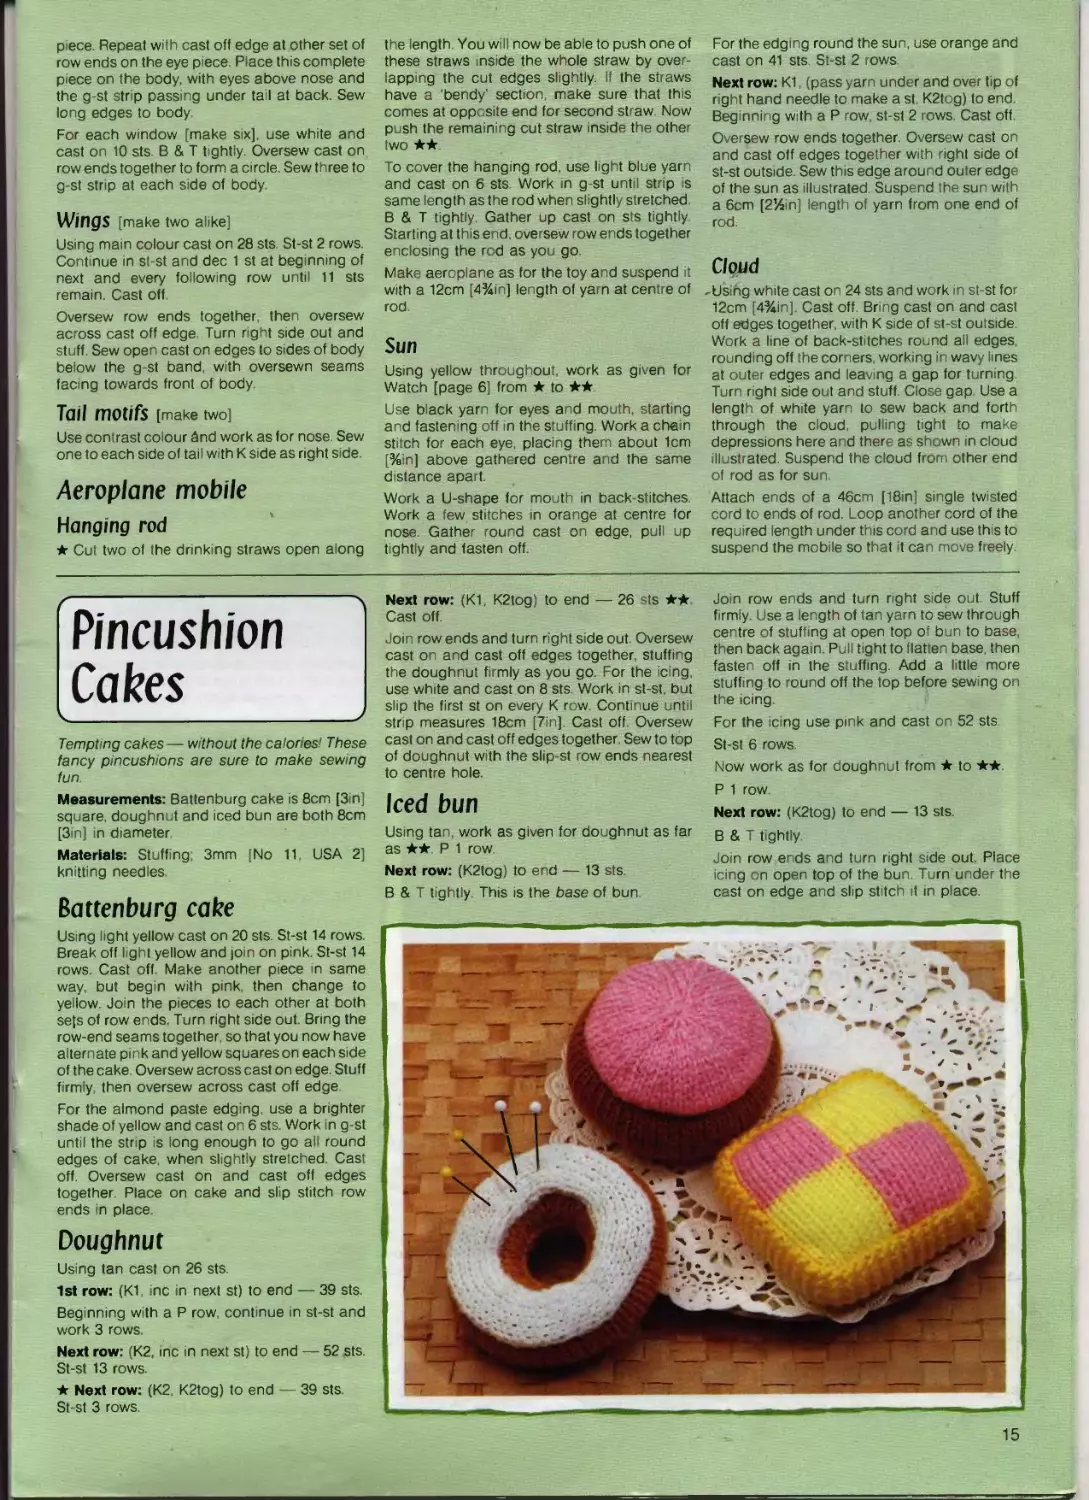
Pincushioni
Cakes___________________________
Tempting cakes— without the calores! These
fancy pincushions are sure to make sewing
fun.
Measurements: Battenburg cake is 8cm [3in]
square, doughnut and iced bun are both 8cm
[3in] in diameter
Materials: Stuffing 3mm [No 11 USA 2]
knitting needles
Battenburg cake
Using light yellow cast on 20 sts. St-st 14 rows.
Break off light yellow and join on pink St-st 14
rows. Cast off. Make another piece in same
way, but begin with pink, then change to
yellow. Join the pieces to each other at both
se]s of row ends Turn right side out Bring the
row-end seams together so that you now have
alternate pink and yellow squares on each side
of the cake Oversew across cast on edge Stuff
firmly, then oversew across cast off edge
For the almond paste edging, use a brighter
shade of yellow and cast on 6 sts. Work in g-st
until the strip is long enough to go all round
edges of cake when slightly stretched. Cast
off Oversew cast on and cast off edges
together. Place on cake and slip stitch row
ends in place
Doughnut
Using tan cast on 26 sts.
1st row: (K1 inc in next st) to end — 39 sts.
Beginning with a P row, continue in st-st and
work 3 rows
Next row: (K2 inc in next st) to end — 52 sts
St-st 13 rows
★ Next row: (K2. K2tog) to end — 39 sts.
St-st 3 rows.
Next row: (K1 K2tog) to end — 26 sts ★★
Cast off
Join row ends and turn right side out Oversew
cast on and cast off edges together, stuffing
the doughnut firmly as you go. For the icing,
use white and cast on 8 sts Work in st-st. but
slip the first st on every К row Continue until
strip measures 18cm [7in] Cast off Oversew
cast on and cast off edges together Sew to top
of doughnut w th the slip-st row ends nearest
to centre hole
Iced bun
Using tan, work as given for doughnut as far
as ★★ P 1 row
Next row: (K2tog) to end — 13 sts.
В & T tightly This is the base of bun
Join row ends and turn right side out. Stuff
firmly Use a length of tan yarn to sew through
centre of stuffing at open top of bun to base,
then back again. Pull tight to flatten base, then
fasten off in the stuffing. Add a little more
stuffing to round off the top before sewing on
the icing.
For the icing use pink and cast on 52 sts
St-st 6 rows
Now work as for doughnut from ★ to ★★
P 1 row.
Next row: (K2tog) to end — 13 sts.
В & T tightly.
Join row ends and turn right side out. Place
icing on open top of the bun. Turn under the
cast on edge and slip stitch it in place.
15
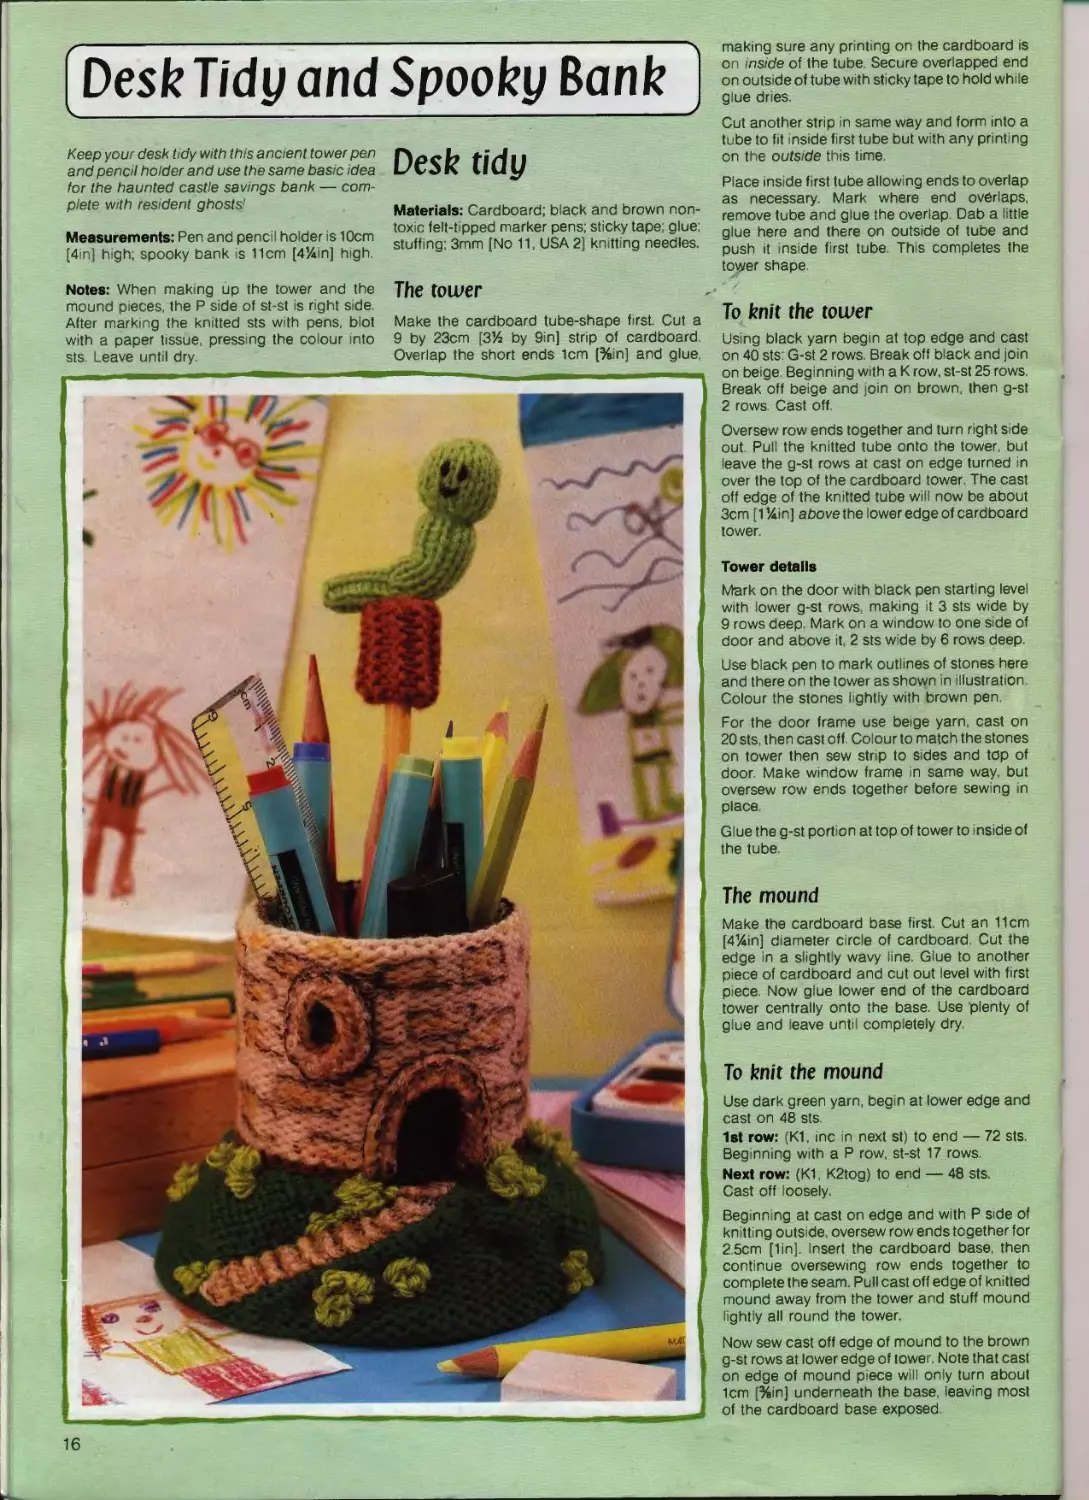
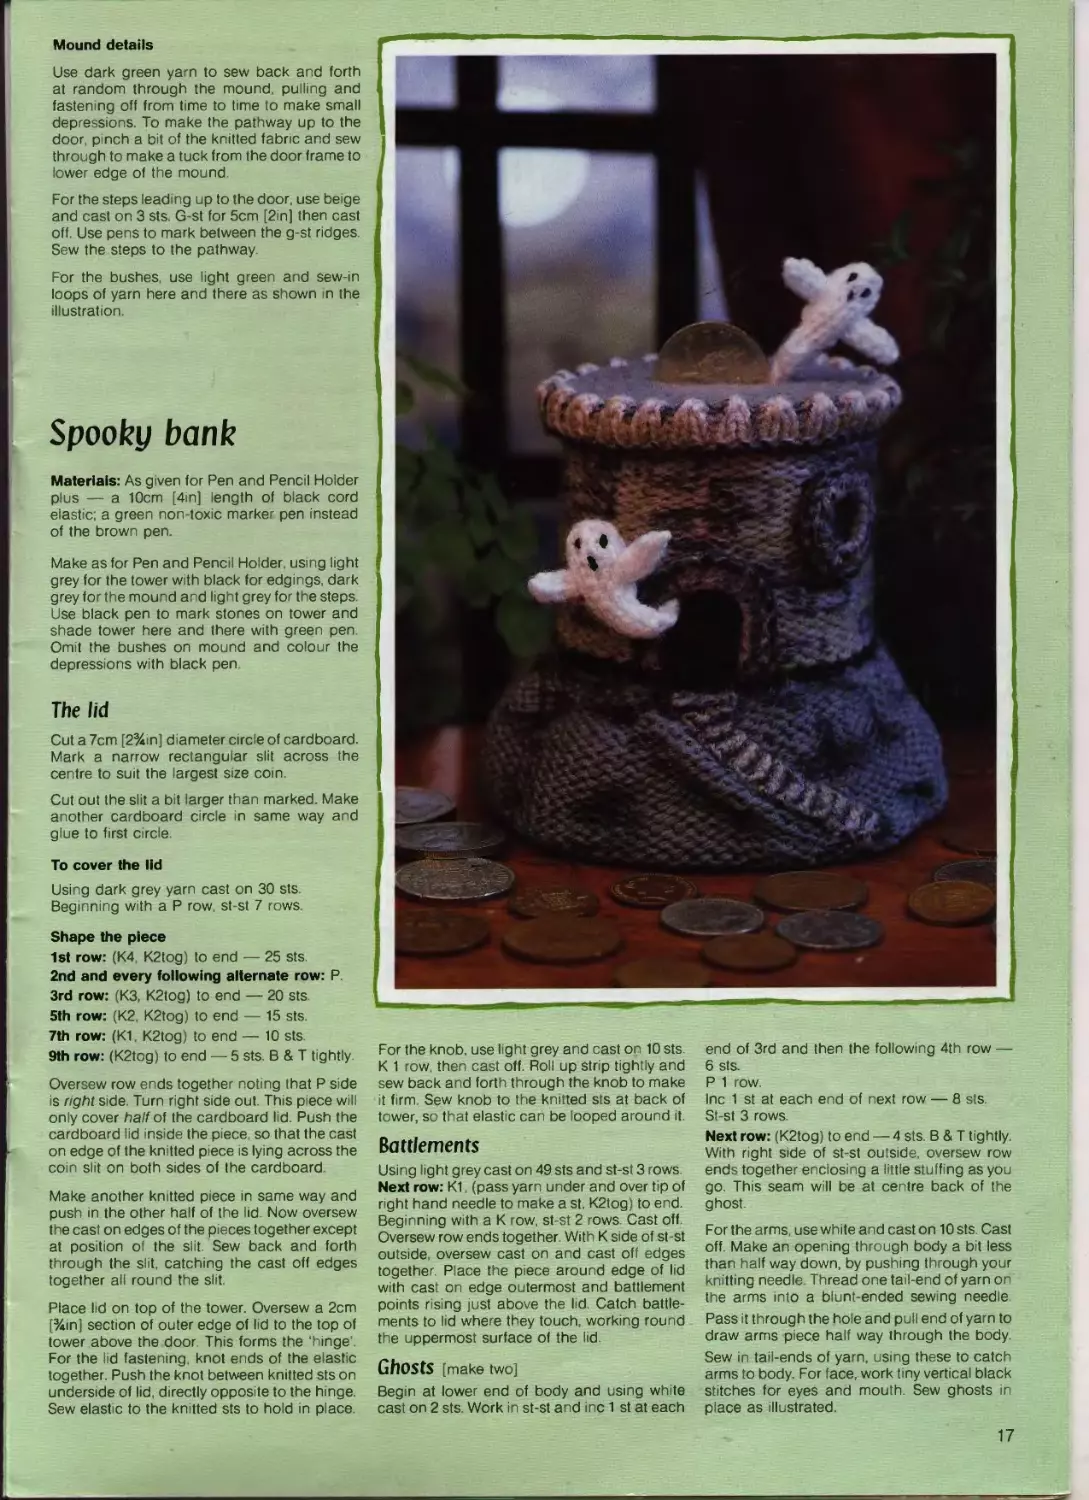
(Desk Tidy and Spooky Bank
Keep your desk tidy with this ancient tower pen
and pencil holder and use the same basic idea
for the haunted castle savings bank — com-
plete with resident ghosts!
Measurements: Pen and pencil holder is 10cm
[4inJ high, spooky bank is 11cm [4%in] high.
Notes: When making up the tower and the
mound pieces, the P side of st-st is rght side
After marking the kn tted sts with pens, blot
with a paper tissue, pressing the colour into
sts. Leave until dry.
Desk tidy
Materials: Cardboard; black and brown non-
toxic felt-tipped marker pens, sticky tape, glue,
stuffing; 3mm [No 11, USA 2] knitting needles.
The tower
Make the cardboard tube-shape first. Cut a
9 by 23cm [3% by 9in] strip of cardboard
Overlap the short ends 1cm [%in] and glue,
making sure any printing on the cardboard is
on inside of the tube. Secure overlapped end
on outside of tube with sticky tape to hold while
glue dries
Cut another strip m same way and form into a
tube to fit inside first tube but with any printing
on the outside this time.
Place inside first tube allowing ends to overlap
as necessary Mark where end overlaps,
remove tube and glue the overlap. Dab a little
glue here and there on outside of tube and
push it inside first tube. This completes the
tower shape
To knit the tower
Using black yarn begin at top edge and cast
on 40 sts. G-st 2 rows. Break off black and join
on beige Beginning with a К row, st-st 25 rows.
Break off beige and join on brown, then g-st
2 rows Cast off
Oversew row ends together and turn right side
out. Pull the knitted tube onto the tower, but
leave the g-st rows at cast on edge turned in
over the top of the cardboard tower The cast
off edge of the knitted tube will now be about
3cm [1 %in] above the lower edge of cardboard
tower.
Tower details
Mark on the door with black pen start ng level
with lower g-st rows, making it 3 sts w de by
9 rows deep Mark on a w ndow to one s de of
door and above it, 2 sts wide by 6 rows deep.
Use black pen to mark outlines of stones here
and there on the tower as shown in illustration.
Colour the stones lightly with brown pen
For the door frame use beige yarn, cast on
20 sts, then cast off Colour to match the stones
on tower then sew strip to sides and top of
door. Make window frame in same way, but
oversew row ends together before sew ng in
place
Glue the g-st portion at top of tower to inside of
the tube.
The mound
Make the cardboard base first. Cut an 11cm
[4%in] diameter circle of cardboard. Cut the
edge in a slightly wavy line. Glue to another
piece of cardboard and cut out level with first
piece. Now glue lower end of the cardboard
tower centrally onto the base. Use plenty of
glue and leave until completely dry.
To knit the mound
Use dark green yarn, begin at lower edge and
cast on 48 sts
1st row: (K1, inc in next st) to end — 72 sts.
Beginning with a P row, st-st 17 rows
Next row: (K1 K2tog) to end — 48 sts.
Cast off loosely.
Beginning at cast on edge and with P side of
knitting outside, oversew row ends together for
2.5cm [1in]. Insert the cardboard base, then
continue oversewing row ends together to
complete the seam. Pull cast off edge of knitted
mound away from the tower and stuff mound
lightly all round the tower.
Now sew cast off edge of mound to the brown
g-st rows at lower edge of tower. Note that cast
on edge of mound piece w II only turn about
1cm [%in] underneath the base, leaving most
of the cardboard base exposed.
16
Mound details
Use dark green yarn to sew back and forth
at random through the mound, pulling and
fastening off from time to time to make small
depressions. To make the pathway up to the
door, pinch a bit of the knitted fabric and sew
through to make a tuck from the door frame to
lower edge of the mound
For the steps leading up to the door, use be ge
and cast on 3 sts G-st for 5cm [2in] then cast
off. Use pens to mark between the g-st ridges.
Sew the steps to the pathway.
For the bushes, use light green and sew-in
loops of yarn here and there as shown in the
illustration.
Spooky bank
Materials: As given for Pen and Pencil Holder
plus — a 10cm [4m] length of black cord
elastic; a green non-toxic marker pen instead
of the brown pen.
Make as for Pen and Pencil Holder, using light
grey for the tower w th black for edgings dark
grey for the mound and light grey for the steps
Use black pen to mark stones on tower and
shade tower here and there with green pen.
Omit the bushes on mound and colour the
depressions with black pen
The lid
Cut a 7cm [2%m] diameter circle of cardboard.
Mark a narrow rectangular slit across the
centre to suit the largest size coin.
Cut out the slit a bit larger than marked Make
another cardboard circle in same way and
glue to first circle.
To cover the lid
Using dark grey yarn cast on 30 sts.
Beginning with a P row st-st 7 rows
Shape the piece
1st row: (K4 K2tog) to end — 25 sts
2nd and every following alternate row: P
3rd row: (КЗ, K2tog) to end — 20 sts
5th row: (K2, K2tog) to end — 15 sts
7th row: (K1, K2tog) to end — 10 sts
9th row: (K2tog) to end — 5 sts. В & T tightly.
Oversew row ends together noting that P side
is right side Turn right side out. This piece will
only cover half of the cardboard lid. Push the
cardboard lid inside the piece, so that the cast
on edge of the knitted piece is lying across the
coin slit on both sides of the cardboard
Make another knitted piece in same way and
push in the other half of the lid. Now oversew
the cast on edges of the pieces together except
at position of the slit. Sew back and forth
through the slit, catching the cast off edges
together all round the slit
Place lid on top of the tower. Oversew a 2cm
[%in] section of outer edge of lid to the top of
tower above the door. This forms the ‘hinge’.
For the lid fastening knot ends of the elastic
together. Push the knot between knitted sts on
underside of lid, directly opposite to the hinge.
Sew elastic to the knitted sts to hold in place.
For the knob, use light grey and cast on 10 sts.
К 1 row, then cast off. Roll up strip tightly and
sew back and forth through the knob to make
it firm Sew knob to the knitted sts at back of
tower, so that elastic can be looped around it
Battlements
Using light grey cast on 49 sts and st-st 3 rows.
Next row: K1 (pass yarn under and over tip of
right hand needle to make a st. K2tog) to end.
Beginning with a К row, st-st 2 rows. Cast off.
Oversew row ends together. With К side of st-st
outside, oversew cast on and cast off edges
together. Place the piece around edge of hd
with cast on edge outermost and battlement
points rising just above the hd. Catch battle-
ments to lid where they touch, working round
the uppermost surface of the I d
GhOStS [make two]
Begin at lower end of body and using white
cast on 2 sts Work in st-st and inc 1 st at each
end of 3rd and then the following 4th row —
6 sts.
P 1 row
Inc 1 st at each end of next row — 8 sts
St-st 3 rows
Next row: (K2tog) to end — 4 sts. В & T tightly.
With right side of st-st outside, oversew row
ends together enclosing a little stuff ng as you
go. This seam will be at centre back of the
ghost.
For the arms, use white and cast on 10 sts Cast
off. Make an opening through body a bit less
than half way down, by pushing through your
knitting needle. Thread one tail-end of yarn on
the arms into a blunt-ended sew ng needle
Pass it through the hole and pull end of yarn to
draw arms piece half way through the body.
Sew in tail-ends of yarn, using these to catch
arms to body. For face, work tiny vertical black
stitches for eyes and mouth. Sew ghosts in
place as illustrated.
17
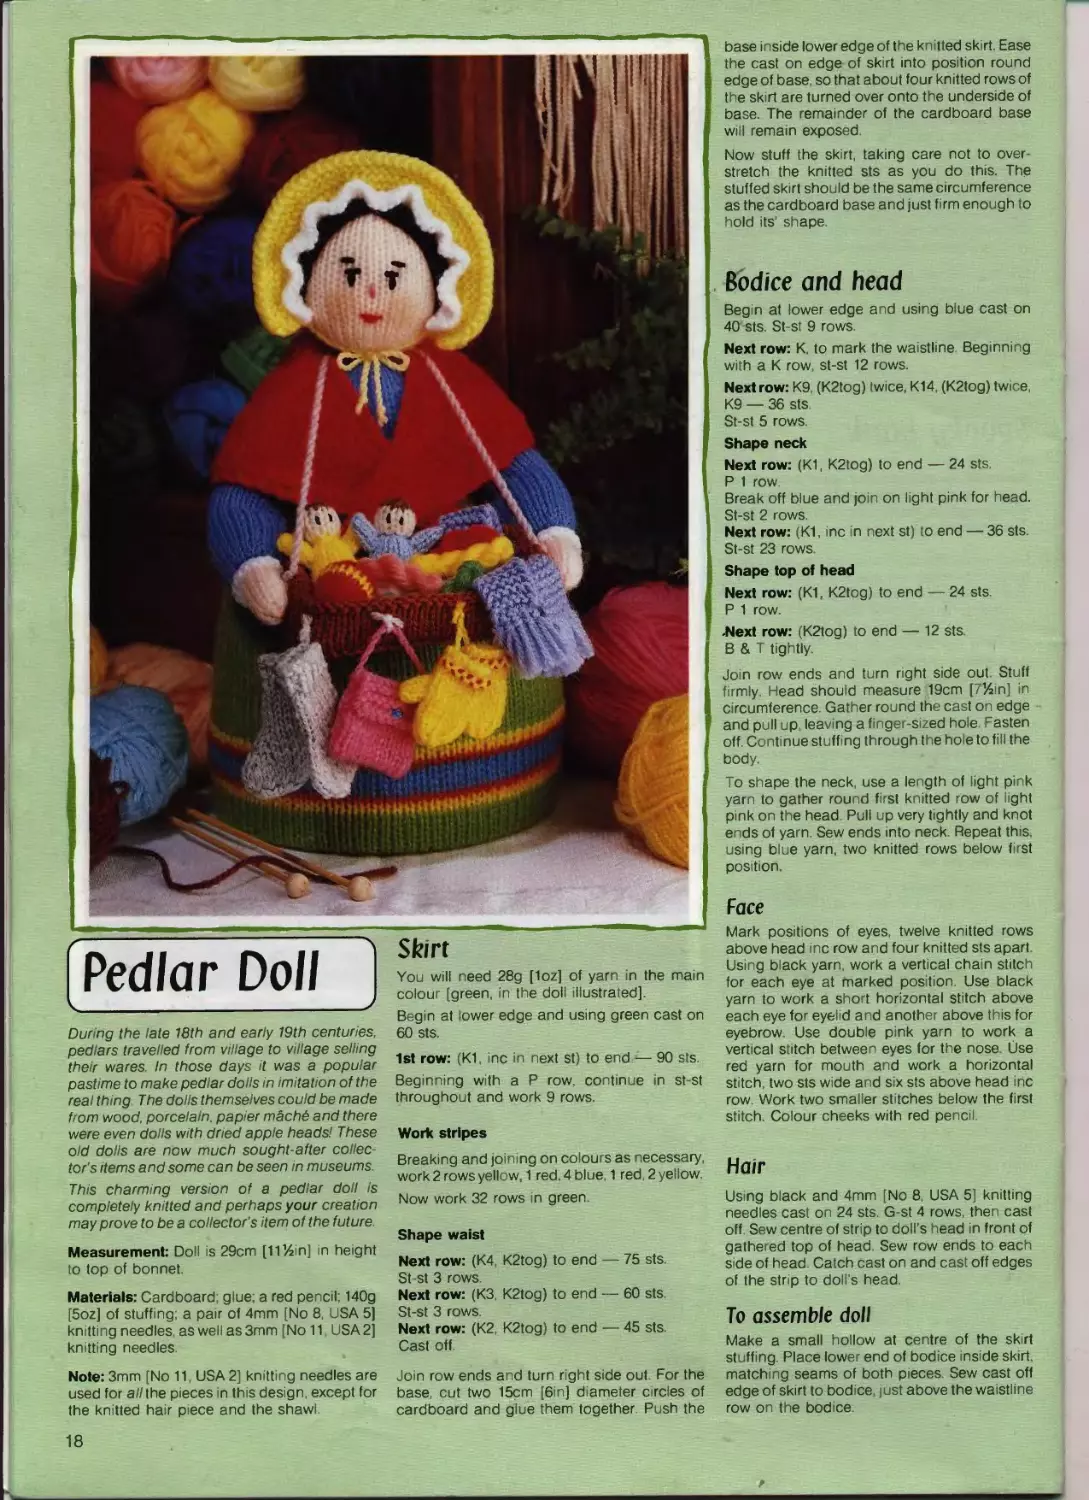
Pedlar Doll
Dur ng the late 18th and early 19th centuries,
pedlars travelled from village to village selling
their wares In those days it was a popular
pastime to make pedlar dolls in imitation of the
real thing The dolls themselves could be made
from wood, porcelain papier machd and there
were even dolls with dred apple heads1 These
old dolls are now much sought-after collec-
tor's items and some can be seen in museums.
This charming version of a pedlar doll is
completely knitted and perhaps your creation
may prove to be a collector's item of the future.
Measurement: Doll is 29cm [1114m] in height
to top of bonnet.
Materials: Cardboard glue; a red pencil; 140g
[5oz] of stuffing; a pair of 4mm [No 8, USA 5]
knitting needles, as well as 3mm [No 11 USA 2]
knitting needles.
Note: 3mm [No 11, USA 2] knitting needles are
used for all the pieces in this design, except for
the knitted hair piece and the shawl
Skirt
You will need 28g [1oz] of yarn in the main
colour [green, in the doll illustrated].
Begin at lower edge and using green cast on
60 sts.
1st row: (K1 inc in next st) to end — 90 sts.
Beginning with a P row. continue in st-st
throughout and work 9 rows.
Work stripes
Breaking and joining on colours as necessary,
work 2 rows yellow, 1 red. 4 blue, 1 red, 2 yellow.
Now work 32 rows in green
Shape waist
Next row: (K4 K2tog) to end — 75 sts
St-st 3 rows.
Next row: (КЗ, K2tog) to end — 60 sts
St-st 3 rows
Next row: (K2 K2tog) to end — 45 sts.
Cast off.
Join row ends and turn right side out. For the
base cut two 15cm [6in] diameter circles of
cardboard and glue them together Push the
base inside lower edge of the knitted skirt. Ease
the cast on edge of sk rt into position round
edge of base, so that about four knitted rows of
the skirt are turned over onto the underside of
base. The remainder of the cardboard base
will remain exposed.
Now stuff the skirt, taking care not to over-
stretch the knitted sts as you do this. The
stuffed skirt should be the same circumference
as the cardboard base and just firm enough to
hold its' shape
Bodice and head
Begin at lower edge and using blue cast on
40 sts. St-st 9 rows.
Next row: К to mark the waistline Beginning
with a К row, st-st 12 rows.
Next row: K9 (K2tog) twice, K14, (K2tog) twice,
K9 — 36 sts
St-st 5 rows.
Shape neck
Next row: (K1, K2tog) to end — 24 sts.
P 1 row
Break off blue and join on light pink for head.
St-st 2 rows.
Next row: (K1, inc in next st) to end — 36 sts.
St-st 23 rows
Shape top of head
Next row: (K1, K2tog) to end — 24 sts.
P 1 row.
.Next row: (K2tog) to end — 12 sts
В & T tightly
Join row ends and turn right side out Stuff
firmly. Head should measure 19cm [7%in] in
circumference Gather round the cast on edge
and pull up, leaving a finger-sized hole. Fasten
off. Continue stuffing through the hole to fill the
body.
To shape the neck, use a length of light pink
yarn to gather round first knitted row of light
pink on the head Pull up very tightly and knot
ends of yarn Sew ends into neck Repeat this,
using blue yarn, two knitted rows below first
position.
Face
Mark positions of eyes, twelve knitted rows
above head inc row and four knitted sts apart
Using black yarn work a vertical chain stitch
for each eye at marked position. Use black
yarn to work a short horizontal stitch above
each eye for eyelid and another above this for
eyebrow Use double pink yarn to work a
vertical stitch between eyes for the nose Use
red yarn for mouth and work a horizontal
stitch, two sts wide and six sts above head inc
row Work two smaller stitches below the first
stitch Colour cheeks with red pencil.
Hair
Using black and 4mm [No 8, USA 5] knitting
needles cast on 24 sts G-st 4 rows, then cast
off Sew centre of strip to doll’s head in front of
gathered top of head Sew row ends to each
side of head. Catch cast on and cast off edges
of the strip to doll's head.
To assemble doll
Make a small hollow at centre of the skirt
stuffing. Place lower end of bodice inside skirt,
matching seams of both pieces. Sew cast off
edge of skirt to bodice just above the waistline
row on the bodice.
18
Sleeves and hands
Make two sleeves alike.
Begin at wrist edge and using blue cast on
11 sts loosely. P 1 row.
Next row: Inc К wise into every st — 22 sts
Beginning with a P row st-st 31 rows
Shape armhole
Continue in st-st and dec 1 st at each end of
next and every following alternate row until
12 sts remain.
Next row: (P2tog) to end — 6 sts
Cast off
Join row ends as far as armhole shaping. Turn
right side out
Make two hands alike.
Beg n at wrist edge and using light pink cast
on 12 sts G-st 2 rows.
Beginning with a К row, st-st 10 rows.
Next row: (K2tog) to end — 6 sts
В & T tightly. Join row ends and turn right s de
out.
Stuff hands Oversew cast on edges to close,
with seams at centre. Push the g-st rows on
hands inside cast on edges of sleeves match-
ing the seams on both Sew cast on edges of
sleeves to hands
Stuff sleeves lightly.
For the wrist trimming [make two alike], use
white and cast on 16 sts. Cast off. Oversew row
ends together, then sew cast off edges round
wrists
Sew the open armhole edges of sleeves to
sides of doll, with cast off edges just below
neck
Bonnet
Using double light yellow yarn cast on 54 sts
for brim Break off one strand of yarn and
continue in single yarn. When working next
row treat the two strands of yarn on each st as
one st G-st 6 rows.
Next row: (K1, K2tog) to end — 36 sts.
Cast off loosely
Using light yellow, p ck up and К the 36 cast off
sts on the brim. P 1 row.
Next row: (K2. inc in next st) to end — 48 sts
Beginning with a P row, st-st 13 rows.
Shape back
Next row: K8. (K2tog) to last 8 sts. K8—32 sts.
G-st 3 rows.
Next row: K8 (K2 tog) to last 8 sts, K8 — 24 sts.
Cast off.
Fold cast off edge in half and oversew for
centre back seam of bonnet Turn right side
out
Bonnet frill
Using white cast on 72 sts and g-st 2 rows
Next row: (K2tog) to end — 36 sts
Cast off
Oversew cast off edge of frill to cast off edge of
the brim Make two 14cm [5%in] light yellow
single twisted cords Sew to bonnet brim at
ends of cast off edge. Place bonnet on doll's
head and tie the cords in a bow under chin.
Sew bow to neck
Shawl
Using red and 4mm [No 8 USA 5] knitting
needles cast on 2 sts. Work in g-st and inc 1 st
at beginning of every row until there are 66 sts.
Cast off
Place shawl around doll, crossing over the
pointed ends at front. Catch these ends to skirt
to hold shawl in place
Basket and contents
Basket
Base
Cut two 4 5 by 9.5cm [1% by 3%in] peces of
cardboard and glue them together
To cover the base use brown, cast on 10 sts
and work in g-st for 15cm [6in]. Cast off.
Oversew cast on and cast off edges together.
Place the cardboard base inside the knitted
piece. Oversew row ends together at one long
edge of the cardboard Stretch the knitted
piece across the width of the cardboard and
oversew the other set of row ends together
The knitted piece should fit the cardboard
base very tightly
Side piece
Using brown cast on 64 sts and st-st 7 rows.
Next row: К Next row: P
Beginning w th a P row, st-st 6 rows. Cast off.
Oversew row ends together and turn right side
out. Oversew cast on edge to cast off edge.
Oversew this edge round the edges of the
base.
For the neck strap make a 30cm [12in] double
twisted grey cord. Sew the ends to centre of
short sides of the basket Do not place basket
on doll until you have sewn in the contents
Socks [make two alike]
Using grey begin at sole and cast on 10 sts.
P 1 row.
Next row: Inc К wise into every st — 20 sts
Beginning with a P row continue in st-st and
work 3 rows
Next row: K6 (K2tog) 4 times, K6 — 16 sts.
P 1 row
Next row: K6, (K2tog) twice, K6 — 14 sts.
P 1 row.
Next row: K5. (K2tog) twice K5 — 12 sts St-st
7 rows. Work 3 rows in K1, P1 rib.
Cast off
Oversew row ends together and across cast on
sts. Turn right side out. Attach socks to side of
the basket with a short length of yarn as
illustrated
Mittens [make two alike]
Using yellow, knit in same way as for the doll's
hands. Oversew row ends together leaving a
gap at centre of seam for inserting the thumb
Turn right sde out.
For the thumb use yellow and cast on 5 sts.
St-st 4 rows. В & T tightly. Oversew row ends
together with right side of st-st outside Push
cast on edge of thumb inside gap in mitten
seam, so that thumb sticks out at correct
angle Sew thumb in place
Using red yarn work running stitches in and
out of the g-st loops on mittens to decorate
Attach mittens to basket as for socks.
Scarf
Using lilac cast on 6 sts and work in g-st for
18cm [7in]. Cast off Attach fringe of yarn to
each end. Sew scarf to basket
Doll [make two]
Beg n at lower edge and using colour required
Tor body cast on 12 sts.
St-st 8 rows. Break off yarn and join on cream
for head.
Next row: K4 (K2tog) twice K4 — 10 sts
Continue in st-st and work 3 rows. Break off
cream and join on brown for hair. К 1 row
Next row: (P2tog) to end —5 sts. В & T tightly.
Join rc.. ends for centre back seam, then turn
right side out. Stuff lightly. Tea strand of
matching yarn tightly around last row of body
colour. Oversew cast on edge to close Using
black yarn, work two small stitches for eyes as
illustrated.
Make arms as for the mitten thumbs Sew to
s des of body Sew dolls in basket
Ball
Using red cast on 6 sts.
1st row: Inc К wise into every st — 12 sts.
Beginning with a P row cont nue n st-st and
work 3 rows. Join on yellow and work 2 rows.
Break off yellow and continue in red and work
4 rows.
Next row: (K2tog) to end — 6 sts В & T loosely
Oversew row ends together. Gather up cast on
sts tightly and fasten off. Turn right side out
and stuff to ball shape Pull up length of yarn
tightly and fasten off. Sew ball in basket.
Handbag
Using pink cast on 10 sts and st-st 21 rows
G-st 10 rows Cast off.
Fold up cast on edge to meet first row of g-st
Oversew row ends together at each side. Turn
right side out Make a 14cm [5%in] single
twisted pink cord for handle and knot ends
together Place across bag, then fold down
g-st flap and catch it in place. Work a small
blue dot at centre of flap for the fastening
Attach handle to basket as for socks.
Hanks of yarn
Using colours of your choice wind yarn five
times around a 14cm [5%in] piece of card-
board Knot ends of yarn together, then slip the
hank off the cardboard Holding the ends taut,
twist one end round and round as when
making a twisted cord. Fold hank in half and
tuck one set of loops inside the other. Sew
hanks in the basket
To place basket on the doll
Place the neck strap over doll’s head. Bend
doll's arms at the elbows and sew hands to
short sides of basket.
© 1990 Jean Greenhowe Designs. Designed and published by Jean Greenhowe Designs, PO Box 295, Aberdeen AB9 8NW, Scotland. U K.
Printed by Gilcomston Litho (Aberdeen) Ltd. Photography by Studio Morgan, Aberdeen.
© WARNING — COPYRIGHT. This publication is protected by the law of copyr ght and reproduction in any form or by any means (including photocopying) is
strictly forbidden The items in this publication are copyright and may not be reproduced n whole or in part for commercial or industrial purposes.
Ref. No. JGD 04
19
ISBN 1-873193-04-1
Jeon Greenhowe's knitting booklets —
for irresistible dolls and toys!
All the designs are easy to make from
oddments of double knitting yarn.
Available from most knitting yarn stockists, or in case of
difficulty, write to Jean Greenhowe Designs for further details:
PO Box 295, Aberdeen AB9 8NW, Scotland, U.K.
Printed In Scotland
by Gllcomston Litho (Aberdeen) Ltd.