/


Текст
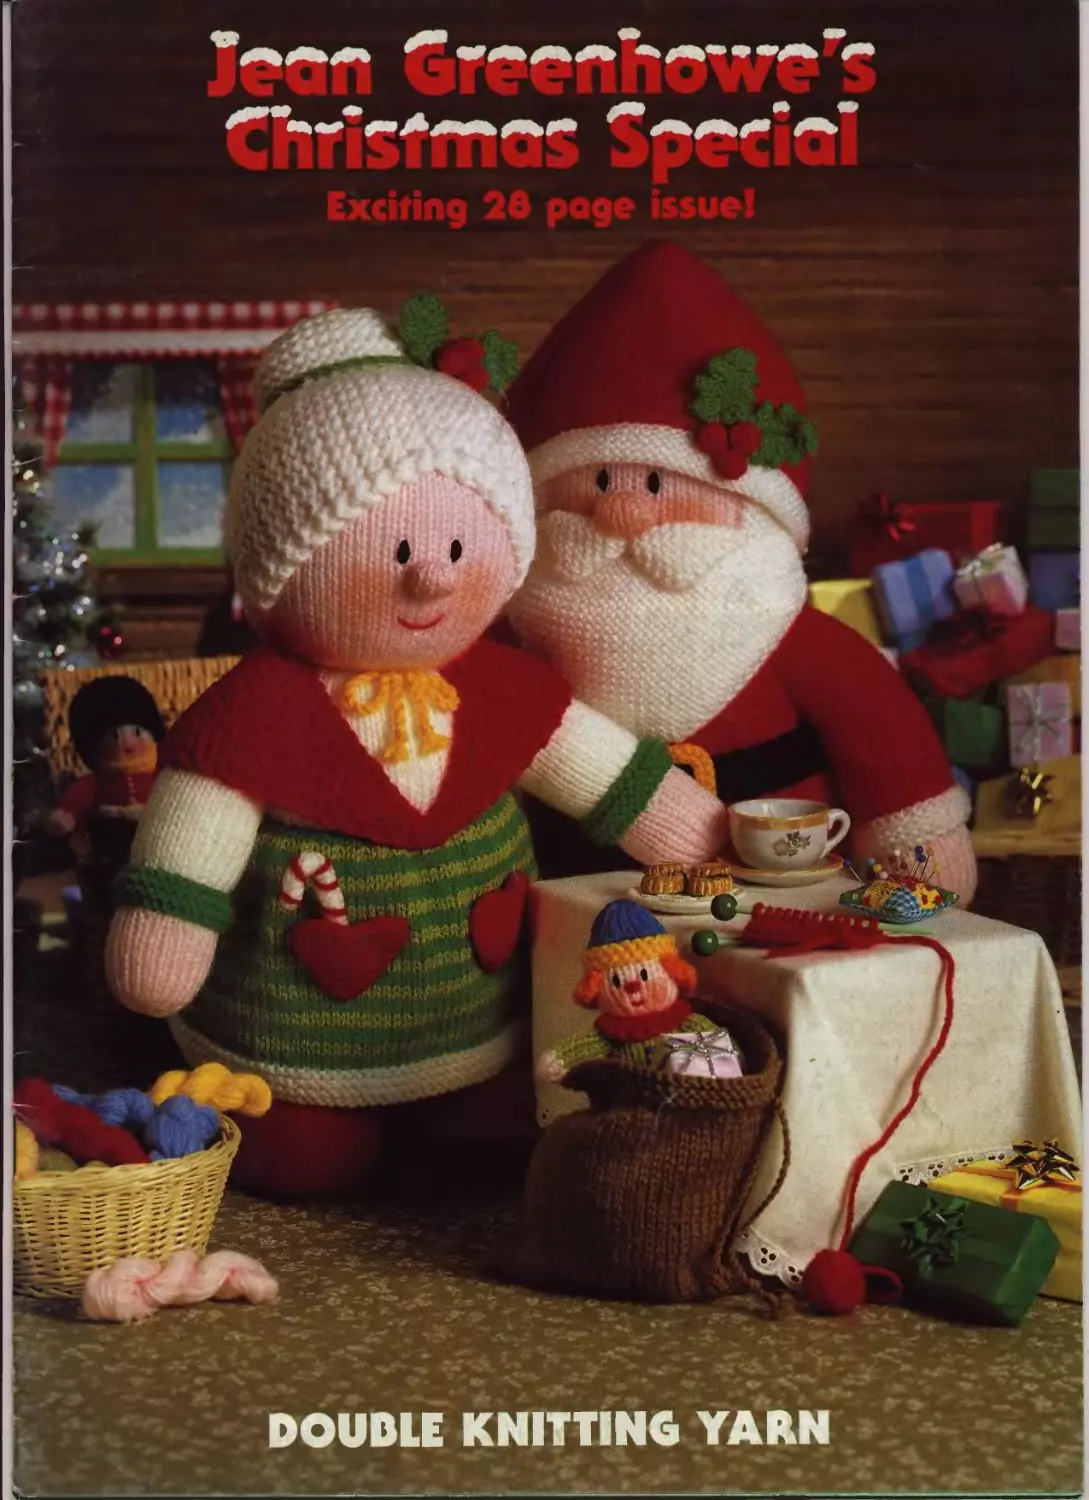
DOUBLE KNITTING YARN
Notes
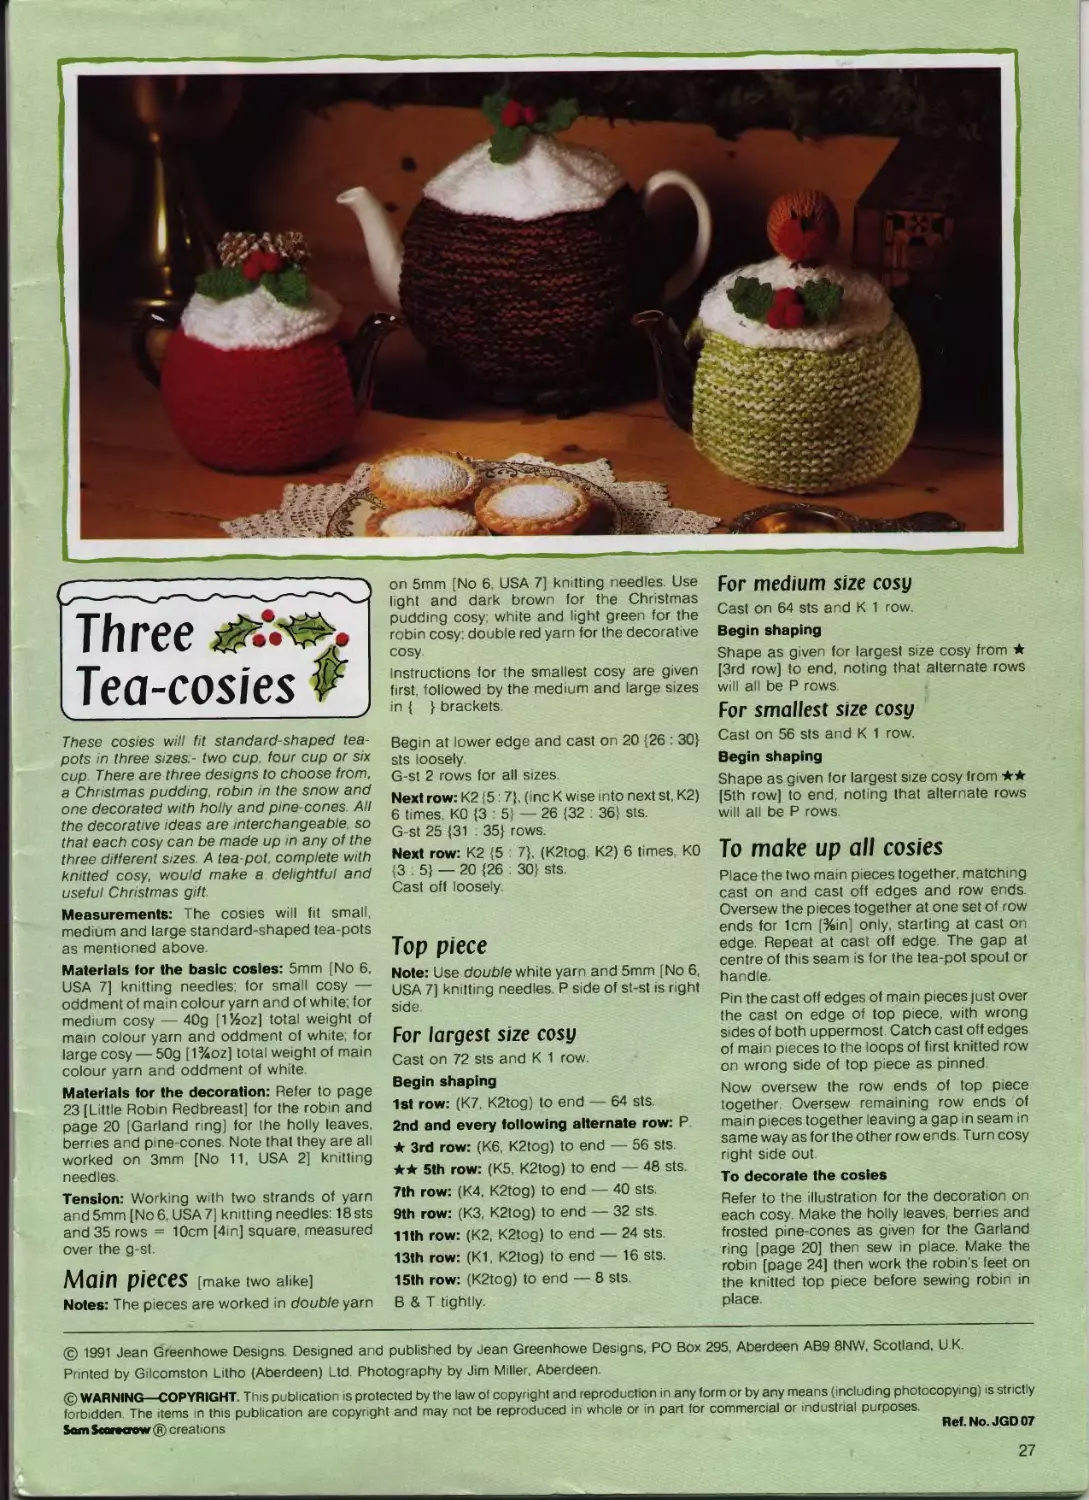
It's never too early to start knitting for Christmas and here is an exciting array of designs
guaranteed to set your needles clicking!
For this special issue we have extended the content to 28 pages, to make a super collection of
gifts toys and decorations for the festive season
Happy knitting!
Aean
General materials required
Double knitting yarn [USA, knitting worsted
weight Australia, 8 ply] in colours stated in
the instructions or colours of your choice
When oddments’ of yarn are quoted in a
materials list, it can be assumed that any part
of the design worked in one colour can be
completed with less than 25g [1oz] of that
particular colour When specific amounts of
yarn are quoted the weights have been
rounded up to the nearest 10g or %oz
Good quality washable stuffing [amounts
required are quoted in the individual
instructions]
A pair of tweezers [useful for turn ng small
knitted pieces right side out and also for
inserting small amounts of stuffing]
A red colouring pencil for shading cheeks
A pair of compasses for drawing circles
Cardboard, such as cuttings off washing
powder packets and breakfast cereal
packets This type of cardboard is the correct
thickness to use when required
Glue suitable for sticking cardboard
Knitting needles required
A pair of 3mm [No 11, USA 2]
A pair of 5mm [No 6, USA 7]
Abbreviations
cm = centimetre[s] dec = decrease [by
working 2 sts tog]; g-st = garter stitch [every
row K]; g = gram[s]; me = increase [by
working twice into same st]; in = inch[es];
К = knit; mm = millimetre[s]; oz = ouncefs];
P = purl; st[s] = stitch[es]; st-st = stocking
stitch [K on the right side and P on the wrong
side] tog = together
Special abbreviations
В & T tightly - means break off yarn leaving a
long end, thread it through sts left on knitting
needle, pull to gather tightly then fasten off
В & T loosely - means same as above, but
thread yarn through sts loosely and leave
until later on
ml = make 1 stitch, by picking up the
horizontal strand of yarn lying between the
stitch you have just knitted and the next st on
left hand needle Place the strand on left hand
needle and knit into the back of it
yrn = yarn round needle as follows. Take
strand of yarn under and over tip of r ght
hand needle, then continue as given in
instructions
USA glossary
Cast off - bind off
Tension - gauge
Instructions in round brackets
These are to be repeated the number of times
stated after the closing bracket.
★ ★★ ★★★
Stars are used to mark a place in the
instructions which will be referred to later on.
Meanwhile, follow the instructions in the
usual way
Tension
Using 3mm [No 11, USA 2] knitting needles
and a single strand of double knitting yarn;
26 sts = 10cm [4in] in width over st-st, before
stuffing
Where 5mm [No 6, USA 7] knitting needles are
used the tension is given in the individual
instructions if necessary
Casting on
The thumb method is recommended.
Casting off
Always cast off К wise unless otherwise
stated
Working in st-st
Always begin with a К row unless otherwise
stated
Working in stripes
When knitting different coloured stripes carry
yarns loosely up side of work.
Making up
Join all seams with right sides of work
together and back-stitch one knitted stitch
within the edges unless oversewing is
stipulated. When attaching the various small
pieces to the dolls and toys, you can use
ordinary matching sewing threads for a neat
finish
Colouring cheeks
Use the side of the red pencil lead and rub it
against the knitted sts with a circular motion.
Working embroidered stitches
Tо work any embroidered stitches on a toy it is
sometimes necessary to start and fasten off
the yarn ends invisibly If this is required,
proceed as follows.
Thread a blunt-ended needle with yarn
required and knot end of yarn. Take needle
through the stuffed toy passing it between
the knitted sts and bring it out at the position
required Pull the yarn to draw the knotted
end right inside the stuffing. Tug the yarn to
make sure the knot is caught in the stuffing.
Now work the required embroidered stitches
Pass the needle back through the toy to come
out at a position between the knitted sts Pass
needle back through toy again between the
same knitted sts to come out at a different
-position. Repeat until yarn is securely
fastened off then pull end of yarn and snip off
close to the knitted sts
A.
Tiv/sted cords
To make a cord from a single length of yarn
[single twisted cord] cut a strand of yarn four
times as long as the measurement required
Knot one end round a door knob or hook and
knot a loop in the other end to fit round the
index finger of your right hand Now keeping
the yarn taut, twist your finger round and
round in a clockw se direction steadying the
yarn by holding your left hand cupped
around it close to your right hand. Keep
twisting until when relaxed the strand of yarn
begins to curl tightly back on itself. Fold cord
at centre, bringing ends together. Allow yarn
to twist tightly knot ends and trim to length
Use the same method when a double twisted
cord is specified but use a double length of
yarn four times as long as the measurement
required
Occasional rows worked
in double yarn
There are occasions in the instructions where
one or more rows are worked using double
yarn changing back to a single strand of yarn
for subsequent rows When changing from
double to single yarn, treat the two loops on
each st on the previous row as one st when
working the next row
Toy safety guidelines
A certain amount of common sense should
always be used regarding the safety factor in
children's toys.
It is important to ensure that the toy you are
making is appropriate for the age group of
the child for which t is ntended. For example,
children under 3 years of age should not be
given toys which have separate tiny parts or
any small attached pieces which might be
pulled off
The materials used for the dolls and toys
which appear in this booklet are. knitting
yarn, polyester stuffing, plastic drinking
straws and cardboard. Do not add any other
materials such as wire, pipe cleaners, buttons
or beads.
Use only new, hygienic, washable stuffing
which conforms to current safety standards -
your craft mater als supplier will advise.
When sewing up the toys always use large
glass-headed or plastic-headed pins
Ordinary pins should not be used as they can
pass into a knitted toy between the knitted sts.
Take care to sew all the added pieces
securely in place - for example arms, hats etc.
If a yarn cord is tied in a bow on a toy, sew
through the bow so that it can not be undone
if pulled
2
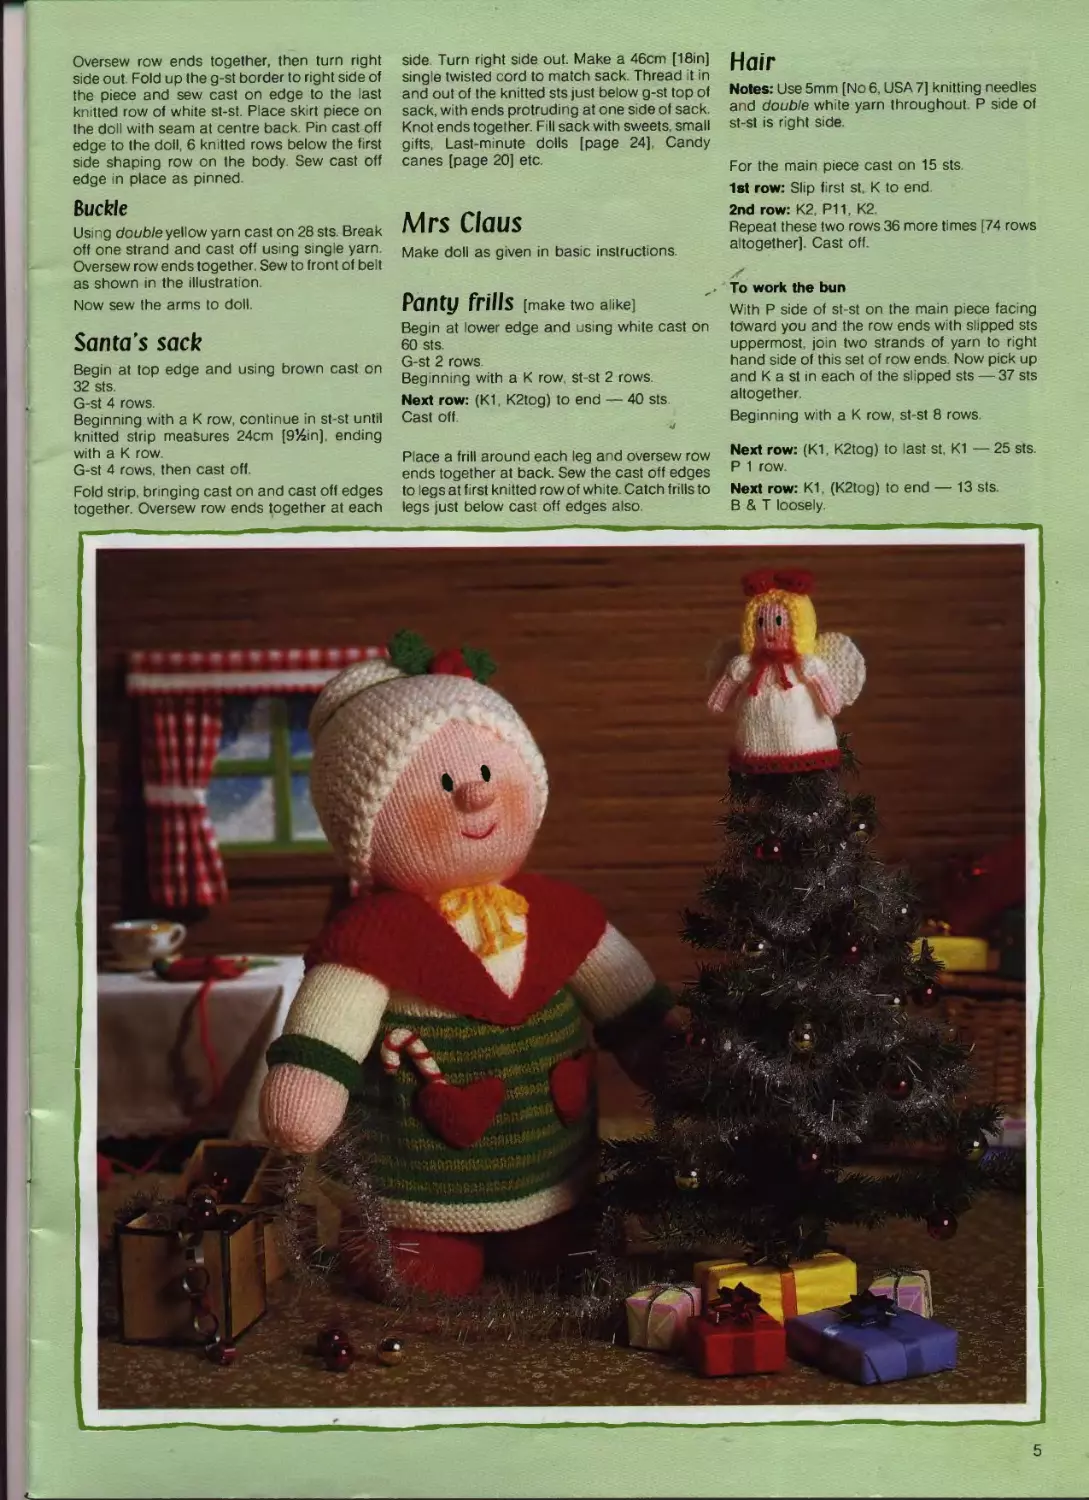
Santa and^
Mrs Claus &
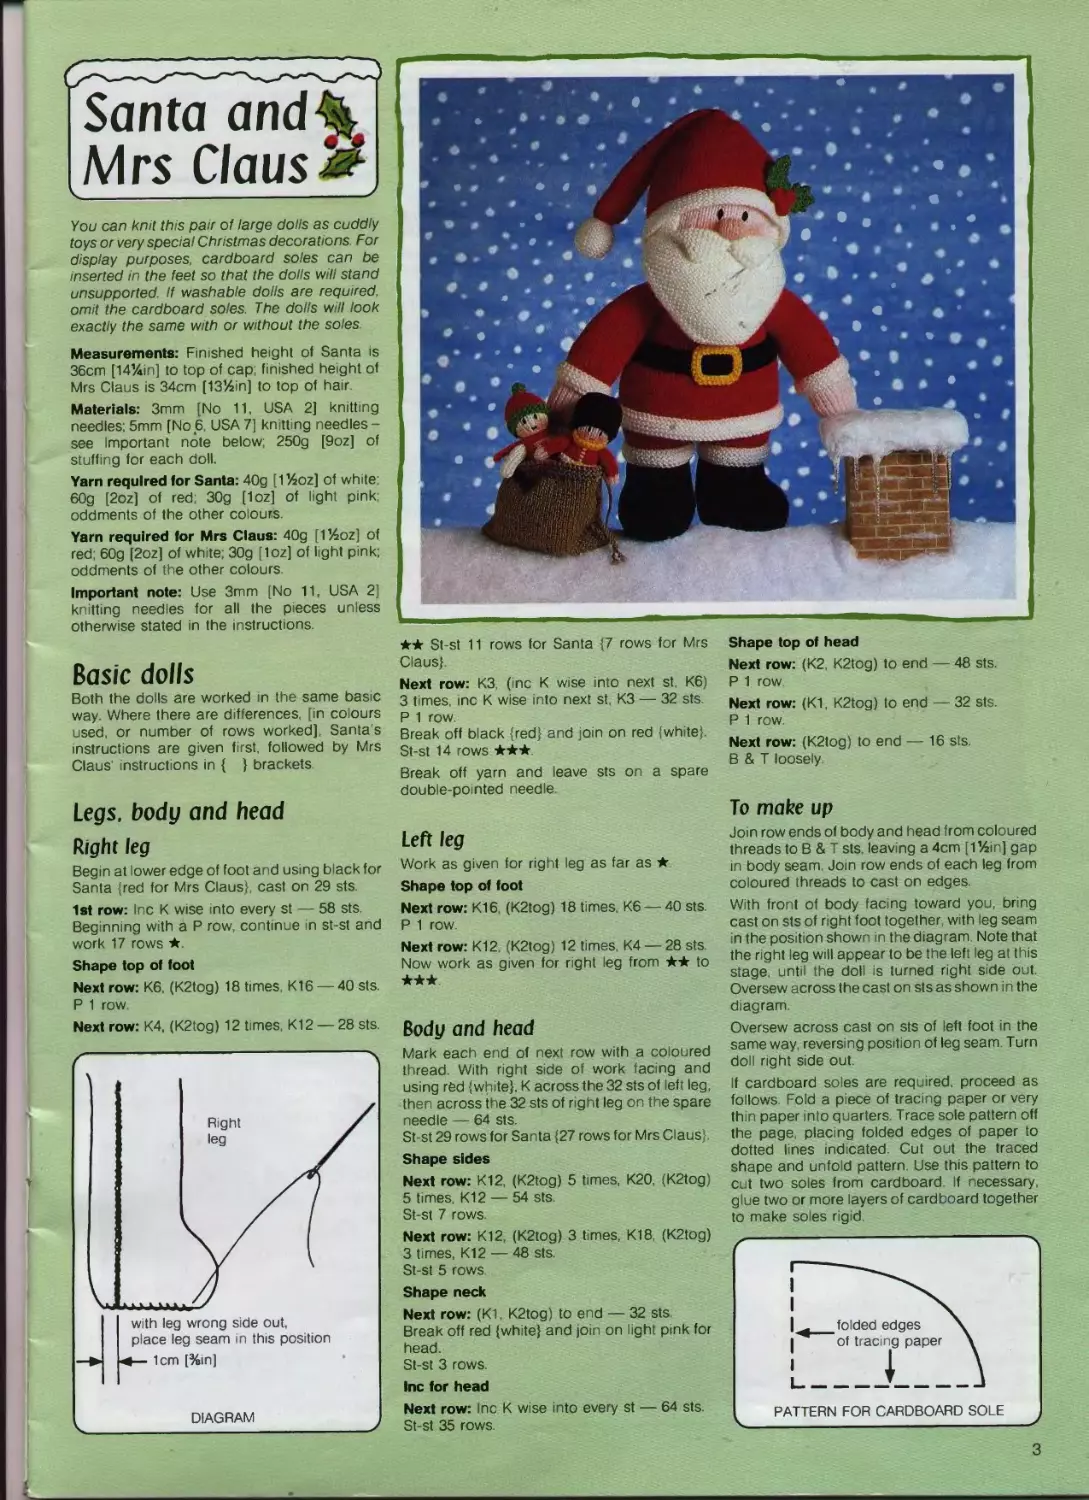
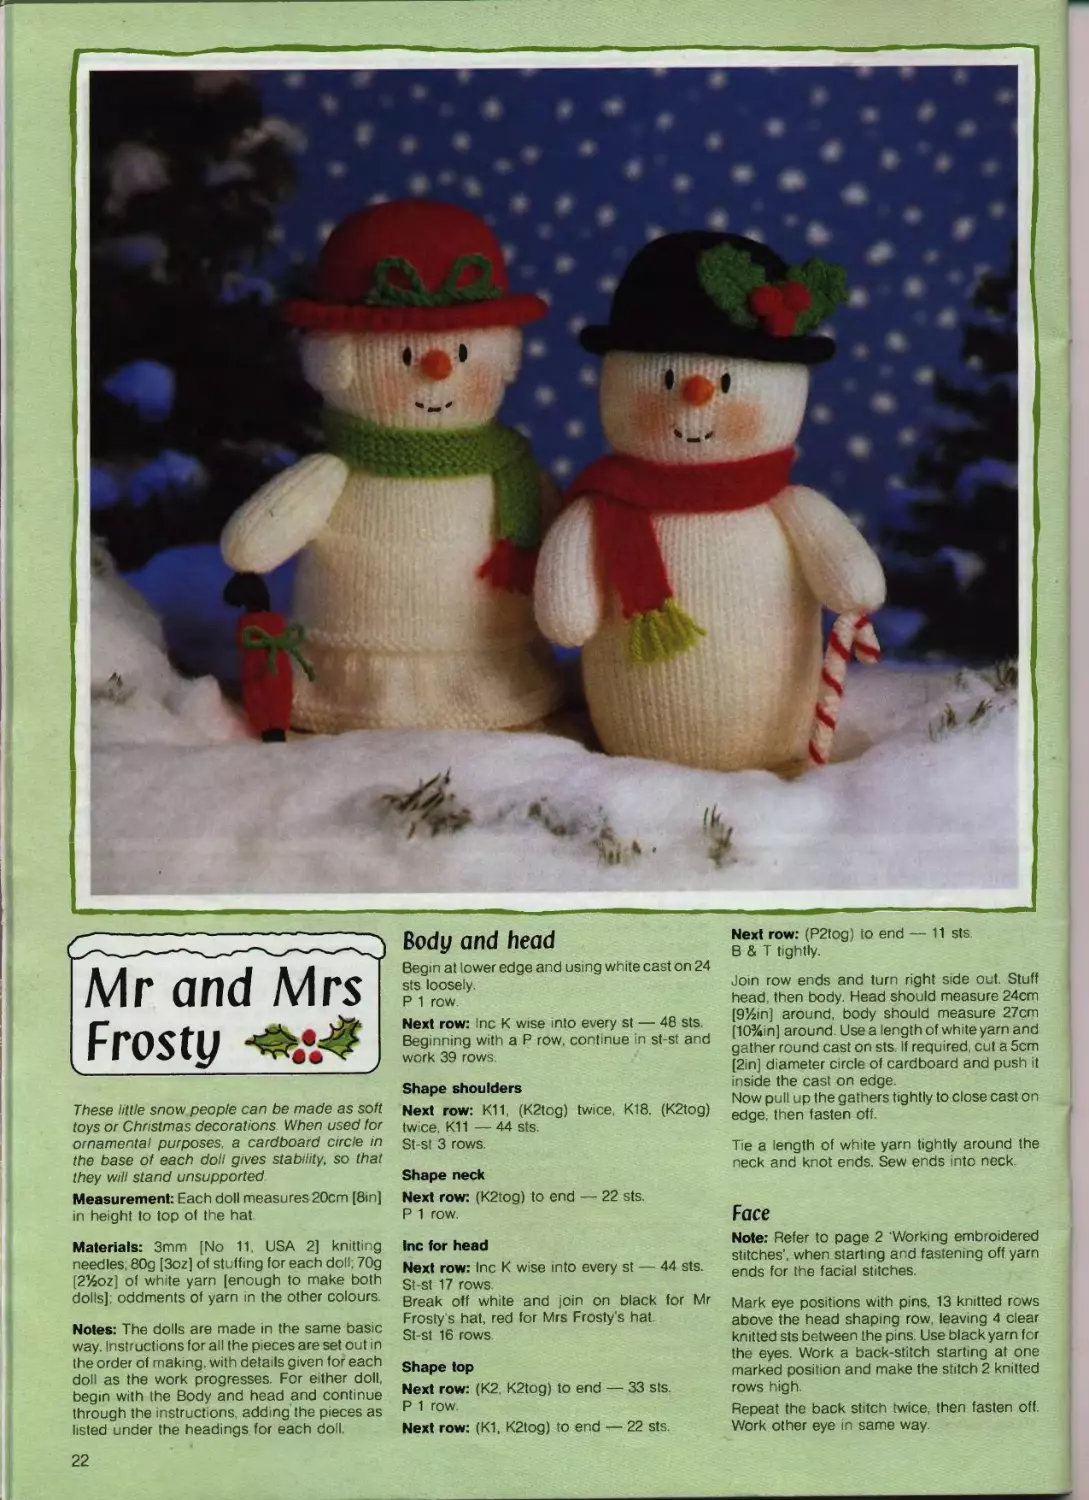
You can knit this pair of large dolls as cuddly
toys or very special Christmas decorations For
display purposes, cardboard soles can be
inserted in the feet so that the dolls will stand
unsupported. If washable dolls are required
omit the cardboard soles The dolls will look
exactly the same with or without the soles.
Measurements: Finished height of Santa is
36cm [14%.in] to top of cap, finished height of
Mrs Claus is 34cm [13%in] to top of hair.
Materials: 3mm [No 11, USA 2] knitting
needles 5mm [No 6 USA 7] knitt ng needles-
see Important note below; 250g [9oz] of
stuffing for each doll.
Yarn required for Santa: 40g [1 %oz] of wh te
60g [2oz] of red; 30g [1oz] of light pink
oddments of the other colours.
Yarn required tor Mrs Claus: 40g [114oz] of
red; 60g [2oz] of white; 30g [1oz] of light pink;
oddments of the other colours.
Important note: Use 3mm [No 11, USA 2]
knitting needles for all the pieces unless
otherwise stated in the instructions.
Basic doffs
Both the dolls are worked in the same basic
way. Where there are differences [in colours
used, or number of rows worked], Santa s
instructions are given first, followed by Mrs
Claus' instructions in { } brackets
Legs, body and head
Right leg
Begin at lower edge of foot and using black for
Santa {red for Mrs Claus}, cast on 29 sts
1st row: Inc К wise into every st — 58 sts
Beginning with a P row, continue in st-st and
work 17 rows ★
Shape top of foot
Next row: K6, (K2tog) 18 times, K16 — 40 sts.
P 1 row
Next row: K4, (K2tog) 12 t mes K12 — 28 sts
★★ St-st 11 rows for Santa {7 rows for Mrs
Claus}
Next row: КЗ, (inc К wise into next st, K6)
3 times, inc К wise into next st, КЗ — 32 sts.
P 1 row.
Break off black {red} and join on red {white}.
St-st 14 rows ★★★
Break off yarn and leave sts on a spare
double-pointed needle
Left leg
Work as given for right leg as far as ★.
Shape top of foot
Next row: K16 (K2tog) 18 times K6 — 40 sts.
P 1 row.
Next row: K12t (K2tog) 12 times K4 — 28 sts.
Now work as given for right leg from ★★ to
★★★
Body and head
Mark each end of next row with a coloured
thread. With right side of work facing and
using red {white}, К across the 32 sts of left leg,
then across the 32 sts of right leg on the spare
needle — 64 sts.
St-st 29 rows for Santa {27 rows for Mrs Claus}.
Shape sides
Next row: K12, (K2tog) 5 times, K20, (K2tog)
5 times, K12 — 54 sts
St-st 7 rows
Next row: K12, (K2tog) 3 times, K18, (K2tog)
3 times, K12 — 48 sts
St-st 5 rows
Shape neck
Next row: (K1, K2tog) to end — 32 sts
Break off red {white} and join on light pink for
head.
St-st 3 rows.
Inc for head
Next row: Inc К wise into every st — 64 sts.
St-st 35 rows
Shape top of head
Next row: (K2, K2tog) to end — 48 sts.
P 1 row
Next row: (K1, K2tog) to end — 32 sts.
P 1 row
Next row: (K2tog) to end — 16 sts.
В & T loosely.
To make up
Join row ends of body and head from coloured
threads to В & T sts leaving a 4cm [ 1 %in] gap
in body seam. Join row ends of each leg from
coloured threads to cast on edges.
With front of body facing toward you, bring
cast on sts of right foot together, with leg seam
in the position shown in the diagram Note that
the right leg will appear to be the left leg at this
stage, until the doll is turned right side out
Oversew across the cast on sts as shown in the
diagram
Oversew across cast on sts of left foot in the
same way, reversing position of leg seam. Turn
doll right side out.
If cardboard soles are required, proceed as
follows Fold a piece of tracing paper or very
thin paper into quarters. Trace sole pattern off
the page placing folded edges of paper to
dotted lines indicated. Cut out the traced
shape and unfold pattern. Use this pattern to
cut two soles from cardboard. If necessary,
glue two or more layers of cardboard together
to make soles rigid
3
Insert a sole into each foot, through gap in
body seam Stuff feet, taking care that the long
centres of soles are in line with oversewn
seams of feet Stuff feet in the normal way if
soles are not required
Stuff legs, body and lower portion of head. The
body should measure 33cm [13in] around at
centre. Close gap in body seam.
To shape neck
Use a double length of red {white} yarn and
gather round the last knitted row of red {white}
on body. Pull up gathers very tightly and knot
ends of yarn. Sew ends into neck. Now
continue stuffing head through opening at
top. Head should measure 33cm [13in] around
at centre. Pull up length of yarn t ghtly at top of
head and fasten off
Epes
The eyes are worked in back-stitch as
described below'Mark the eye positions with
pins, placing them 20 knitted rows above the
head me row and leaving 4 clear knitted sts
between the pins
★ Use a length of black yarn to work the back-
stitches starting and fastening off yarn ends
invisibly as described on page 2 ‘Working
embroidered stitches
Bring needle out at one eye pos tion, pass it
through face 2 knitted rows directly below first
position. Bring it out at first position and pull
yarn through. This completes one back-stitch.
Repeat four more times. Fasten off yarn. Work
other eye in same way *★
Mouth [for Mrs Claus only]
Start and fasten off yarn as for eyes Mark
centre of mouth with a pin, 8 knitted rows
above the head inc row. Use red yarn to work a
small V-shape. with centre of the V at marked
position.
Nose
Using light pink cast on 5 sts for Santa {4 sts for
Mrs Claus}.
P 1 row
Next row: Inc К wise into every st — 10 sts {8
sts}.
Beginning with a P row st-st 7 rows {5 rows}.
Next row: (K2tog) to end — 5 sts {4 sts}
В & T loosely
Colour the knitted piece by rubbing right side
of st-st lightly with red pencil. Using the В & T
length of yarn, gather all round edges of
knitted piece. Stuff nose, then pull up gathers
tightly and fasten off Sew nose to centre of
face below the eyes. Colour cheeks with red
pencil.
4rms [make two alike]
Begin at end of hand and using light pink cast
on 12 sts
P 1 row
Next row: Inc К wise into every st — 24 sts.
Beginning with a P row continue n st-st and
work 11 rows.
Next row: K7, (inc К wise into next st K2)
4 times, K5 — 28 sts
Break off light pink and join on red {white} for
sleeve.
St-st 25 rows for Santa {21 rows for Mrs Claus}.
Shape top
Dec 1 st at beginning of next and every
following row until 14 sts remain
Next row: (K2tog) to end — 7 sts. Cast off.
Join row ends from cast on edge as far as the
top shaping. Oversew across cast on sts. Turn
right side out and stuff Lay arms aside until
you have sewn on Santa’s jacket skirt {Mrs
Claus’ skirt}, then sew the open edges of arms
to sides of doll, with cast off edges of arms 1cm
[%in] below neck.
Sleeve cuffs [make two alike]
Using white {green} cast on 30 sts. G-st 7 rows
for Santa {5 rows for Mrs Claus}. Cast off
Oversew row ends of each cuff together Turn
right side out Sew cuffs round lower edges of
sleeves
Santa Claus
Make doll as given in basic instructions.
Beard
Lining piece
Begin at lower edge and using wh te cast on
12 sts Work throughout in g-st and note that
first row is right side.
Inc 1 st at beginning of first and every following
row until there are 42 sts
G-st 13 rows ★
Cast off
Main piece
Work as given for lining piece as far as ★ Mark
each end of last row with a coloured thread.
G-st 2 more rows.
Work opening for face
Next row: K8. turn
G-st 13 rows on these 8 sts then cast off the
8 sts.
Rejoin white yarn to the remaining 34 sts on the
knitting needle
Next row: Cast off 26 sts, К to end — 8 sts
remain
G-st 13 rows on the remaining 8 sts, then cast
off
To make up
Place lining and main pieces together with
right sides outside and matching cast on
edges and row ends at each side. Make sure
that cast off edge of lining is level with the row
marked with coloured threads on the main
piece. Oversew row ends and cast on edges
together. Stuff very lightly. Now catch cast off
edge of lining to the main piece, level with the
knitted row marked with coloured threads.
Pin beard to face with the 26 cast off sts of
main piece just below the nose. Sew this edge
to face Sew the pieces worked on the 8 sts at
each side of beard to the face also.
Moustache [make two pieces al ke]
Using white cast on 6 sts. Work in g-st
throughout. Inc 1 st at beginning of first and
every following row until there are 16 sts. Dec
1 st at end of next and every following row until
2 sts remain. Fasten off the 2 sts
Oversew row ends of each piece together
Oversew the pieces together at the cast on
edges Sew this centre seam to face under the
nose. Catch pointed ends of moustache to
beard at sides of face. Sew other edges of
moustache to face and beard.
Cap
Using white begin at lower edge and cast on
82 sts
G-st 8 rows.
Beginning with a P row, continue in st-st and
work 7 rows
Break off white and join on red.
St-st 24 rows.
Shape top
1st row: K1, (K2tog, K14) to last st, K1 —77 sts.
2nd and every following alternate row: P.
3rd row: K1 (K2tog, K13) to last st, K1 — 72 sts.
5th row: K1. (K2tog, K12) to last st, K1 —67 sts.
7th row: K1, (K2tog K11) to last st, K1 —62 sts.
^pth row: K1, (K2tog, K10) to last st. K1 —57 sts
11th row: K1, (K2tog, K9) to last st, K1 —52 sts.
13th row: K1, (K2tog, K8) to last st. K1 —47 sts.
15th row: K1, (K2tog, K7) to last st, K1 —42 sts.
St-st 3 rows.
Next row: K1, (K2tog, K6) to last st K1 — 37 sts.
St-st 3 rows.
Next row: K1, (K2tog, K5) to last st, K1 —32 sts.
St-st 5 rows
Next row: K1 (K2tog, K4) to last st, K1 —27 sts.
St-st 5 rows.
Next row: K1, (K2tog. КЗ) to last st K1 —22 Sts.
St-st 30 rows.
Next row: (P2tog) to end — 11 sts.
Break off red and join on white for cap bobble.
Next row: Inc К wise into every st — 22 sts
Beginning with a К row, st-st 12 rows
Next row: (K2tog) to end — 11 sts
В & T tightly.
Oversew row ends of the g-st together at lower
edge. Join all other row ends. Turn right side
out Stuff bobble Using red yarn, gather round
last knitted row of red below bobble Pull up
tightly and fasten off. Stuff the narrow section
at top of cap very lightly Fold the g-st border
up onto right side of cap
Place cap on head with seam at centre back
just above neck. Centre front of cap should be
just above the eyes. Fold down the g-st border.
Sew cap to head through the last knitted row of
white st-st. Fold g-st border back up again and
catch cast on edge to the last knitted row of
white st-st. Fold down narrow portion at top of
cap and catch to one side of the head as
illustrated
Make holly leaves and berries as given for the
Garland ring [page 20].
Sew to cap as illustrated.
Boot top pieces [make two alike]
Using white cast on 40 sts G-st 7 rows then
cast off
Place one round top of each boot and oversew
row ends together at back. Sew cast on and
cast off edges to boots.
Jacket skirt piece
Begin at lower edge and using white cast on
96 sts.
G-st 8 rows.
Beginning with a P row, continue in st-st and
work 6 rows
Break off white and join on red then st-st
15 rows.
Dec for waist
Next row: (K2, K2tog) to end — 72 sts.
Break off red and oin on black for belt.
P next 2 rows.
Beginning with a P row, st-st 6 rows
Cast off.
4
Oversew row ends together, then turn right
side out Fold up the g-st border to right side of
the piece and sew cast on edge to the last
knitted row of white st-st Place skirt piece on
the doll with seam at centre back. Pin cast off
edge to the doll, 6 knitted rows below the first
side shaping row on the body. Sew cast off
edge in place as pinned
Buckle
Using double yellow yarn cast on 28 sts Break
off one strand and cast off using single yarn
Oversew row ends together. Sew to front of belt
as shown in the illustration.
Now sew the arms to doll.
Santa’s sack
Begin at top edge and using brown cast on
32 sts.
G-st 4 rows.
Beginning with a К row, continue in st-st until
knitted strip measures 24cm [9%in], ending
with a К row.
G-st 4 rows, then cast off
Fold strip, bringing cast on and cast off edges
together. Oversew row ends together at each
side. Turn right side out. Make a 46cm [18in]
single twisted cord to match sack Thread it in
and out of the knitted sts just below g-st top of
sack, with ends protruding at one side of sack
Knot ends together. Fill sack with sweets, small
gifts, Last-minute dolls [page 24], Candy
canes [page 20] etc.
Mrs Claus
Make doll as given in basic instructions.
Panty frills [make two alike]
Begin at lower edge and us ng white cast on
60 sts.
G-st 2 rows
Beginning with a К row, st-st 2 rows.
Next row: (K1, K2tog) to end — 40 sts.
Cast off
Place a frill around each leg and oversew row
ends together at back. Sew the cast off edges
to legs at first knitted row of white Catch frills to
legs just below cast off edges also.
Hair
Notes: Use 5mm [No 6, USA 7] knitting needles
and double white yarn throughout P side of
st-st is right side
For the main piece cast on 15 sts.
1st row: Slip first st К to end
2nd row: K2, P11, K2
Repeat these two rows 36 more times [74 rows
altogether). Cast off.
To work the bun
With P side of st-st on the main piece facing
toward you and the row ends with slipped sts
uppermost, join two strands of yarn to right
hand side of this set of row ends. Now pick up
and К a st in each of the slipped sts — 37 sts
altogether.
Beginning with a К row, st-st 8 rows
Next row: (K1, K2tog) to last st, K1 — 25 sts.
P 1 row.
Next row: K1, (K2tog) to end — 13 sts.
В & T loosely.
5
Oversew cast on and cast off edges of main
hair piece together, then row ends of bun. Turn
right side out. Place hair on doll’s head with
seam at centre back just above neck and with
centre front above the eyes. To give the illusion
of a centre parting use a pin to pull up the row
ends on forehead. 9 knitted rows above the
eyes. Sew row ends to head. Sew base of the
bun to head Stuff bun then pull up lengths of
yarn tightly and fasten off
Make a 40cm [16m] double twisted green cord
Tie it around base of bun. in a bow at centre
back. Sew through bow to secure
Make holly leaves and berries as given for the
Garland ring [page 20]. Sew to bun as
illustrated
Skirt
Begin at lower edge and using white cast on
108 sts
G-sl 6 rows. ,
Break off white and join on two different
shades of green.
Beginning with a К row st-st 32 rows, in
alternate two-row stripes of each shade of
green. <
Keeping stripes correct, shape waist
Next row: (K1, K2tog) to end — 72 sts.
Cast off
Pockets [make four pieces alike]
Using red, begin at lower point of the heart-
shape and cast on 2 sts Work in st-st and inc
1 st К wise at beginning of first and every
following row until there are 14 sts
К 1 row
Next row: P5, (P2tog) twice. P5 — 12 sts
★ Next row: (K2tog) 3 times — 3 sts, В & T
these 3 sts tightly. Rejoin yarn to remaining sts
on knitting needle, with right side of work
facing Repeat from ★.
Place two of the pieces together with right side
of st-st outside. Oversew all round edges.
Repeat with other two pieces. Pin pockets to
front of skirt, half way down and 3cm [1 %m]
apart Sew the V-shaped edges of pockets to
skirt, leaving upper edges free
Join row ends of skirt for centre back seam.
Turn right side out Pin cast off edge to the doll
6 knitted rows below the first side shaping row
on the body. Sew cast off edge in place as
pinned
Now sew the arms to doll.
Shawl
Note: Use 5mm [No 6, USA 7] knitting needles
and a single strand of red yarn.
Begin at back edge and cast on 2 sts
Work in g-st and inc 1 st at beginning of first
and every following row until there are 56 sts.
Next row: Inc in f rst st K11, (K2tog) 5 times
K12, (K2tog) 5 times, K12 — 47 sts.
Cast off
Place shawl around doll's shoulders and
catch points together at top of skirt.
Make a 22cm [8%in] double twisted gold cord.
Tie in a bow and sew to centre front under
chin.
Candy cane
You will need an ordinary plastic drinking
straw about 3mm [%in] in diameter
'Using white cast on 22 sts Beginning with a
P row, st-st 4 rows.
Cast off.
Cut an 8cm [3m] length off the straw With right
side of st-st outside oversew cast on and cast
off edges of the knitted strip together,
enclosing the 8cm [3m] length of straw as you
go Gather row ends up at each end ★
For the red stripe use double red yarn and
secure it at one end Wind yarn round and
round the straw to form the spiral stripe, then
secure at other end. Bend over 2cm [%in] at
one end of the candy cane and sew through
straw at the bend to hold in place. Sew the
cane into Mrs Claus' pocket.
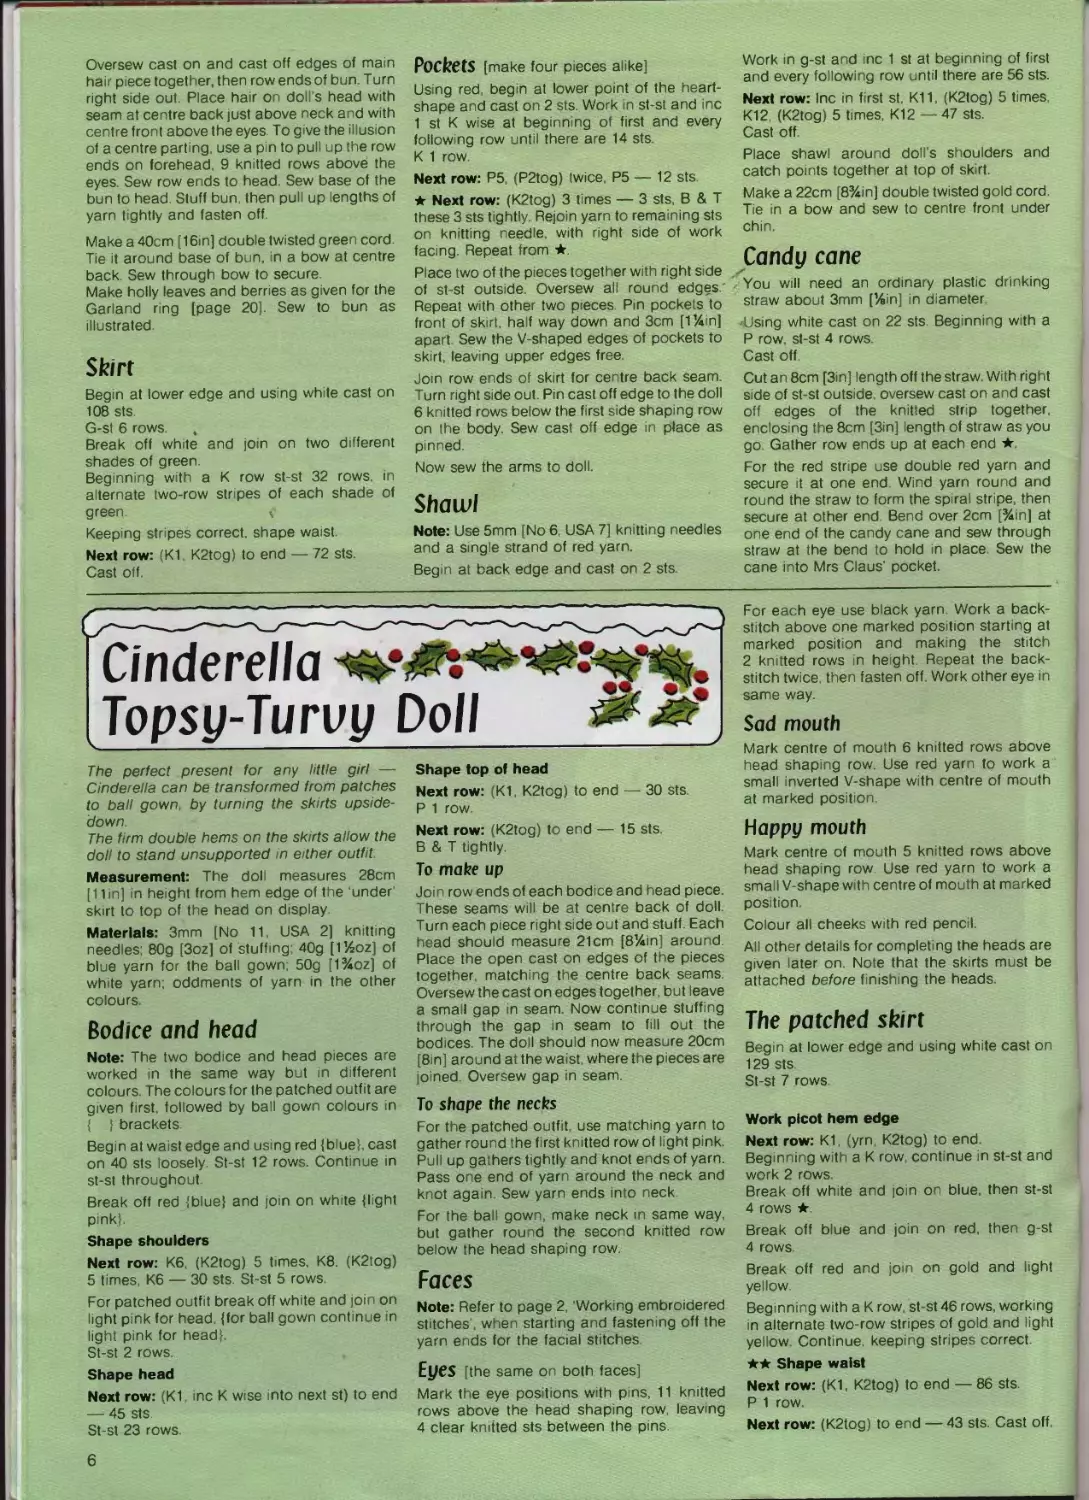
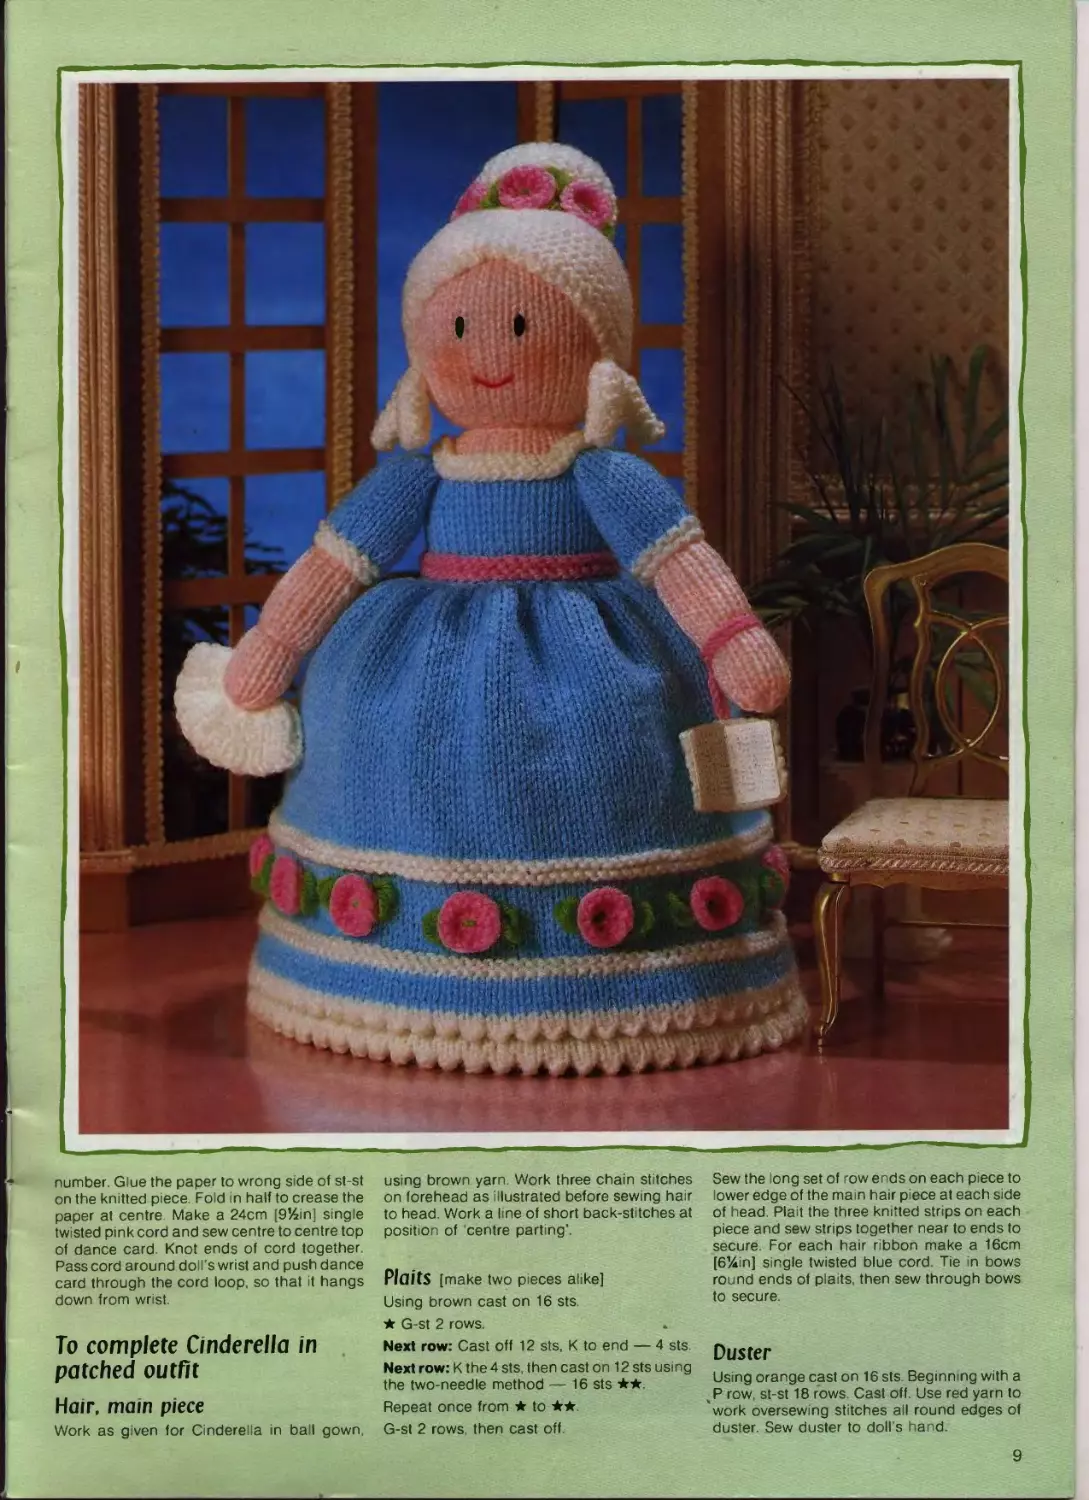
Cinderella
Topsy-Turuy Doll
The perfect present for any little girl —
Cinderella can be transformed from patches
to ball gown, by turning the skirts upside-
down
The firm double hems on the skirts allow the
doll to stand unsupported in either outfit
Measurement: The doll measures 28cm
[11 in] in height from hem edge of the ‘under’
skirt to top of the head on display
Materials: 3mm [No 11, USA 2] knitting
needles: 80g [3oz] of stuffing; 40g [1%oz] of
blue yarn for the ball gown; 50g [1%oz] of
white yarn; oddments of yarn in the other
colours.
Bodice and head
Note: The two bodice and head pieces are
worked in the same way but in different
colours. The colours for the patched outfit are
given first, followed by ball gown colours in
{ } brackets.
Begin at waist edge and using red {blue}, cast
on 40 sts loosely St-st 12 rows. Continue in
st-st throughout.
Break off red {blue} and join on wh te {light
pink}.
Shape shoulders
Next row: K6, (K2tog) 5 times, K8. (K2tog)
5 times, K6 — 30 sts. St-st 5 rows.
For patched outfit break off white and join on
light pink for head, {for ball gown continue in
light pink for head}.
St-st 2 rows
Shape head
Next row: (K1 me К w se into next st) to end
— 45 sts
St-st 23 rows.
Shape top of head
Next row: (K1, K2tog) to end — 30 sts.
P 1 row
Next row: (K2tog) to end — 15 sts.
В & T tightly.
To make up
Join row ends of each bodice and head piece.
These seams will be at centre back of doll.
Turn each p ece right side out and stuff Each
head should measure 21cm [8%in] around.
Place the open cast on edges of the pieces
together, matching the centre back seams.
Oversew the cast on edges together, but leave
a small gap in seam Now continue stuffing
through the gap in seam to fill out the
bodices. The doll should now measure 20cm
[8m] around at the waist where the pieces are
joined. Oversew gap in seam.
To shape the necks
For the patched outfit, use matching yarn to
gather round the first knitted row of light pink.
Pull up gathers tightly and knot ends of yarn.
Pass one end of yarn around the neck and
knot again Sew yarn ends into neck
For the ball gown, make neck in same way,
but gather round the second knitted row
below the head shaping row.
Faces
Note: Refer to page 2, Working embroidered
stitches', when starting and fastening off the
yarn ends for the facial stitches.
Eyes [the same on both faces]
Mark the eye positions with pins, 11 knitted
rows above the head shaping row leaving
4 clear knitted sts between the pins.
For each eye use black yarn Work a back-
stitch above one marked position starting at
marked position and making the stitch
2 knitted rows in height. Repeat the back-
stitch twice, then fasten off Work other eye in
same way.
Sad mouth
Mark centre of mouth 6 knitted rows above
head shaping row Use red yarn to work a
small inverted V-shape with centre of mouth
at marked position.
Happy mouth
Mark centre of mouth 5 knitted rows above
head shaping row Use red yarn to work a
small V-shape with centre of mouth at marked
position
Colour all cheeks w th red pencil
All other details for completing the heads are
given later on Note that the skirts must be
attached before finishing the heads
The patched skirt
Begin at lower edge and using white cast on
129 sts
St-st 7 rows.
Work picot hem edge
Next row: K1, (yrn, K2tog) to end.
Beginning with a К row continue n st-st and
work 2 rows.
Break off white and join on blue, then st-st
4 rows ★
Break off blue and join on red, then g-st
4 rows
Break off red and join on gold and light
yellow.
Beginning with a К row st-st 46 rows, working
in alternate two-row stripes of gold and light
yellow. Continue, keeping stripes correct.
★★ Shape waist
Next row: (K1, K2tog) to end — 86 sts.
P 1 row
Next row: (K2tog) to end — 43 sts. Cast off.
6
Join row ends for centre back seam. With
wrong side of skirt outside, fold up hem at
picot edge. Catch cast on edge to the wrong
side of the g-st. Turn skirt right side out ★★★
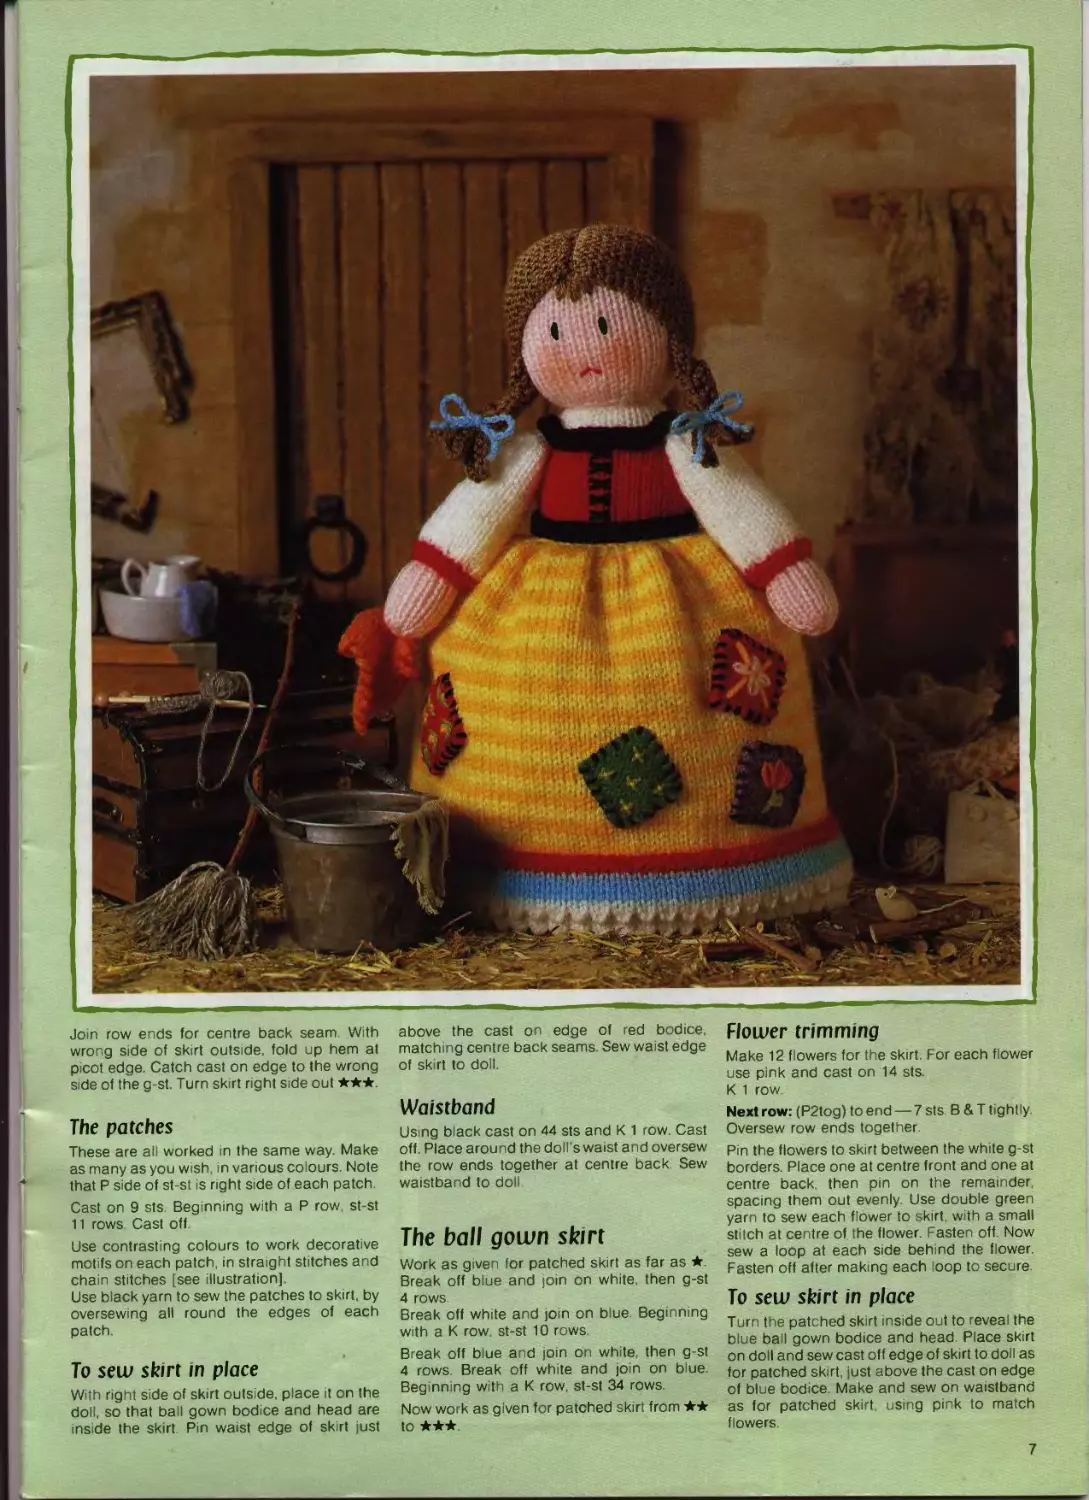
The patches
These are all worked in the same way. Make
as many as you wish, in various colours. Note
that P side of st-st is right side of each patch
Cast on 9 sts Beginning with a P row st-st
11 rows Cast off
Use contrasting colours to work decorative
motifs on each patch, in straight stitches and
chain stitches [see illustration]
Use black yarn to sew the patches to skirt, by
oversewing all round the edges of each
patch
To sew skirt in place
With right side of skirt outside, place it on the
doll, so that ball gown bodice and head are
inside the skirt Pin waist edge of skirt just
above the cast on edge of red bodice,
matching centre back seams Sew waist edge
of sk rt to doll.
Waistband
Using black cast on 44 sts and К 1 row Cast
off. Place around the doll's waist and oversew
the row ends together at centre back. Sew
waistband to doll.
The ball gown skirt
Work as given for patched skirt as far as ★
Break off blue and join on white, then g-st
4 rows
Break off white and join on blue Beginning
with a К row st-st 10 rows
Break off blue and join on white, then g-st
4 rows Break off white and jo n on blue
Beginning with a К row st-st 34 rows
Now work as given for patched skirt from ★★
to ★★★
Flower trimming
Make 12 flowers for the skirt For each flower
use pink and cast on 14 sts.
К 1 row.
Next row: (P2tog) to end — 7 sts В & T tightly
Oversew row ends together
Pin the flowers to skirt between the white g-st
borders. Place one at centre front and one at
centre back then pm on the remainder
spacing them out evenly Use double green
yarn to sew each flower to skirt, with a small
stitch at centre of the flower. Fasten off. Now
sew a loop at each side behind the flower
Fasten off after making each loop to secure
To sew skirt in place
Turn the patched skirt inside out to reveal the
blue ball gown bodice and head Place skirt
on doll and sew cast off edge of skirt to doll as
for patched skirt, just above the cast on edge
of blue bodice. Make and sew on waistband
as for patched skirt, using pink to match
flowers
7
4rms. hands, sleeves
Ball gotvn arms [make two alike]
Begin at top edge and using light pink cast on
14 sts
St-st 24 rows.
Next row: (K2tog) to end — 7 sts. В & T tightly
Join row ends of each arm. Turn right side out
and stuff With seam at one side of each arm
oversew across cast on sts To shape wr sts
tie a length of matching yarn around each
arm 10 knitted rows away from the В & T sts.
Sew yarn ends into arms Lay arms aside for
now.
Patched outfit hands [make two alike]
Work as given for ball gown arms, but st-st
14 rows only, instead of 24 rows. Make up in
same way also, but ignore reference to wrist
shaping
Sleeves [make two alike for each outfit]
Note: The sleeves for patched outfit and ball
gown are worked in the same way Where
there are differences in colour and number of
knitted rows, instructions for patched outfit
are given first, followed by ball gown in { }
brackets
Begin at top of sleeve and using white {blue}
cast on 12 sts
P 1 row
Next row: Inc К wise into every st — 24 sts
Beginning with a P row, st-st 23 rows {13
rows}
Break off white {blue} and join on red {white}
Next row: (K1, K2tog) to end — 16 sts.
G-st 2 rows, then cast off
Join row ends of each sleeve for underarm
seam. Turn right side out. Bring underarm
seam to centre of cast on edge, then oversew
across cast on sts Stuff sleeves very lightly
To assemble the pieces for
patched outfit
Push the cast on edges of hands inside cast
off edges of sleeves, so that 4 knitted rows of
each hand are inside each sleeve and hand
and sleeve seams are together Sew sleeves to
hands
Now sew top edges of sleeves to sides of the
doll's body just above the last knitted row of
red
To assemble the pieces for
ball gown
Work in same way as for patched outfit,
pushing cast on edges of arms inside sleeves.
Sew top edges of sleeves to sides of doll's
body just above the last knitted row of blue.
Neck edging strip
This is the same for both outfits. Use black for
the patched outfit and white for the ball gown.
Cast on 50 sts and К 1 row. Cast off
Place the appropriate strip around each
doll’s neck and oversew row ends together at
centre back Now p n the strips over
shoulders above tops of sleeves and also to
top edge of red bodice or blue bodice. Sew
each strip in place as pinned
On the red bodice work black cross-stitches
at centre front as shown in the illustration.
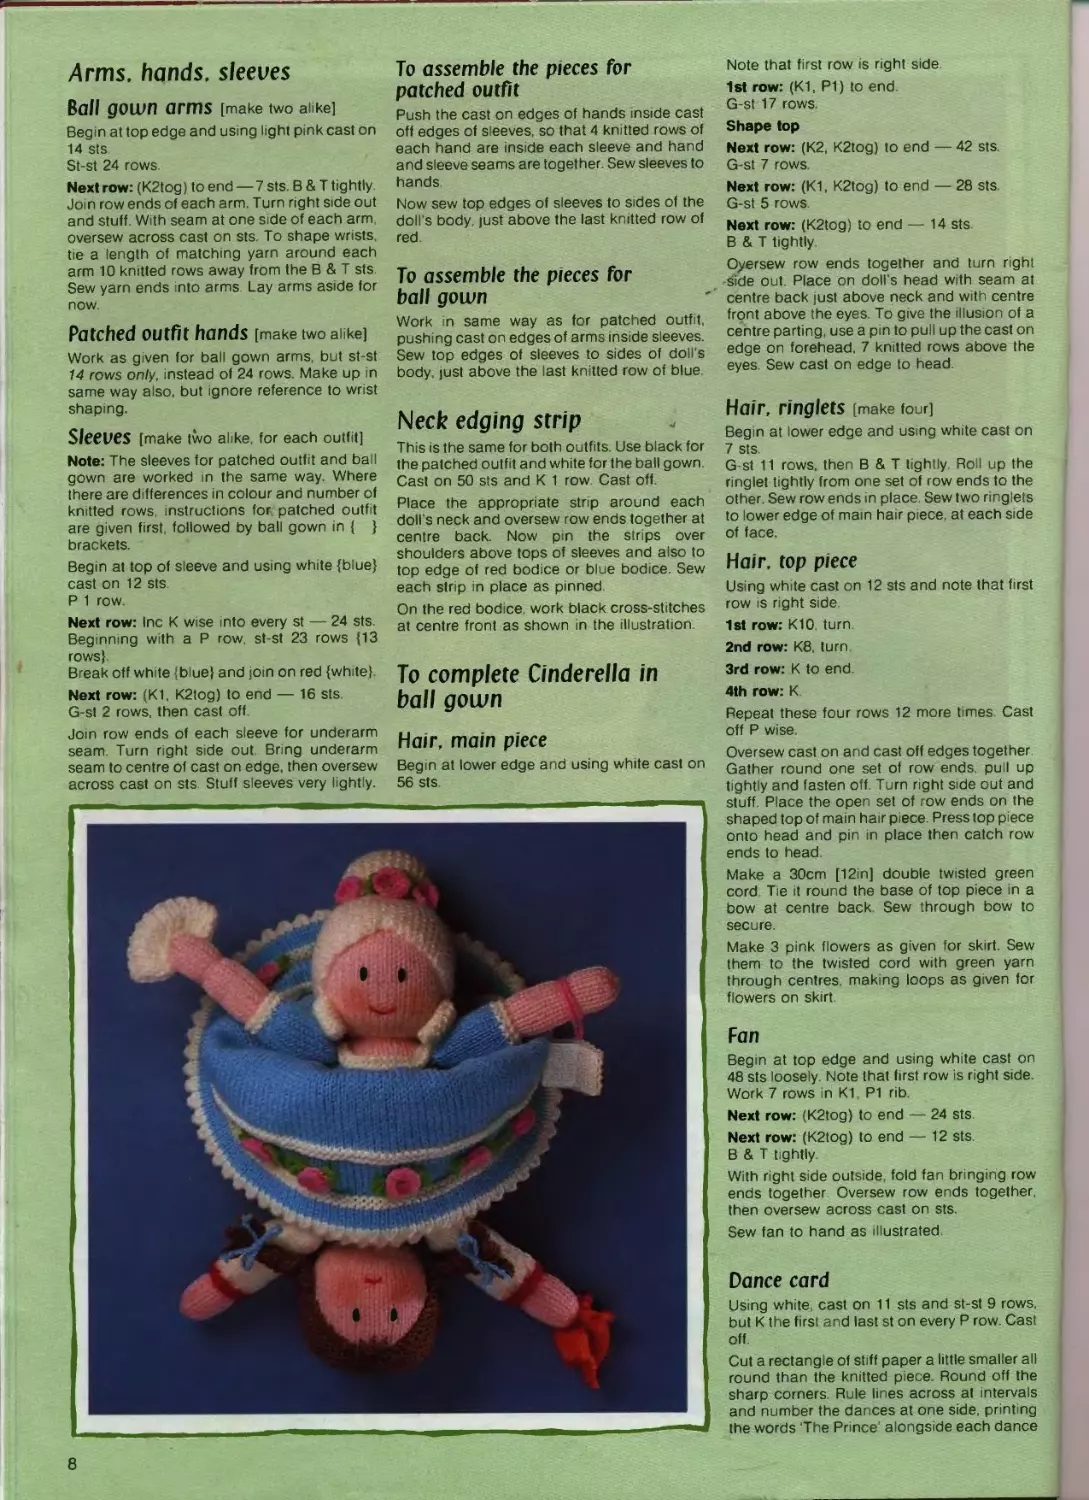
To complete Cinderella in
ball gotvn
Hair, main piece
Begin at lower edge and using white cast on
56 sts
Note that first row is right side.
1st row: (KI, P1) to end.
G-st 17 rows.
Shape top
Next row: (K2, K2tog) to end — 42 sts.
G-st 7 rows
Next row: (K1, K2tog) to end — 28 sts.
G-st 5 rows
Next row: (K2tog) to end — 14 sts
В & T tightly.
Oyersew row ends together and turn right
side out. Place on doll’s head with seam at
centre back just above neck and w th centre
front above the eyes. To give the illusion of a
centre parting, use a pin to pull up the cast on
edge on forehead 7 knitted rows above the
eyes Sew cast on edge to head
Hair, ringlets [make four]
Begin at lower edge and us ng white cast on
7 sts.
G st 11 rows, then В & T tightly Roll up the
ringlet tightly from one set of row ends to the
other Sew row ends in place. Sew two ringlets
to lower edge of mam hair piece, at each side
of face.
Hair, top piece
Using white cast on 12 sts and note that first
row is right side
1st row: K10 turn.
2nd row: K8. turn
3rd row: К to end
4th row: K.
Repeat these four rows 12 more times. Cast
off P wise.
Oversew cast on and cast off edges together
Gather round one set of row ends pull up
tightly and fasten off Turn right side out and
stuff. Place the open set of row ends on the
shaped top of main hair piece. Press top piece
onto head and pm in place then catch row
ends to head
Make a 30cm [12in] double twisted green
cord Tie it round the base of top piece in a
bow at centre back Sew through bow to
secure.
Make 3 pink flowers as given for skirt. Sew
them to the twisted cord with green yarn
through centres making loops as given for
flowers on skirt
Fan
Begin at top edge and using white cast on
48 sts loosely. Note that first row is right side.
Work 7 rows in K1 P1 rib
Next row: (K2tog) to end — 24 sts.
Next row: (K2tog) to end — 12 sts
В & T tightly
With right side outside, fold fan bringing row
ends together Oversew row ends together
then oversew across cast on sts.
Sew fan to hand as illustrated
Dance card
Using white, cast on 11 sts and st-st 9 rows,
but К the first and last st on every P row. Cast
off
Cut a rectangle of stiff paper a little smaller all
round than the knitted p ece. Round off the
sharp corners. Rule lines across at intervals
and number the dances at one side, printing
the words ‘The Prince' alongside each dance
8
number Glue the paper to wrong s de of st-st
on the knitted piece. Fold in half to crease the
paper at centre Make a 24cm [9!4m] single
twisted pink cord and sew centre to centre top
of dance card. Knot ends of cord together.
Pass cord around doll's wrist and push dance
card through the cord loop, so that it hangs
down from wrist
To complete Cinderella in
patched outfit
Hair, mam piece
Work as given for Cinderella in ball gown,
using brown yarn. Work three chain stitches
on forehead as illustrated before sew ng hair
to head Work a line of short back-stitches at
position of 'centre parting’.
Plaits [make two pieces alike]
Using brown cast on 16 sts
★ G-st 2 rows
Next row: Cast off 12 sts, К to end — 4 sts
Next row: К the 4 sts, then cast on 12 sts using
the two-needle method — 16 sts
Repeat once from ★ to
G-st 2 rows, then cast off.
Sew the long set of row ends on each p ece to
lower edge of the main hair piece at each side
of head Plait the three knitted strips on each
piece and sew strips together near to ends to
secure. For each hair ribbon make a 16cm
[6%in] single twisted blue cord. Tie in bows
round ends of plaits, then sew through bows
to secure
Duster
Using orange cast on 16 sts. Beginning with a
чР row, st-st 18 rows. Cast off. Use red yarn to
work oversewing stitches all round edges of
duster. Sew duster to doll’s hand.
9
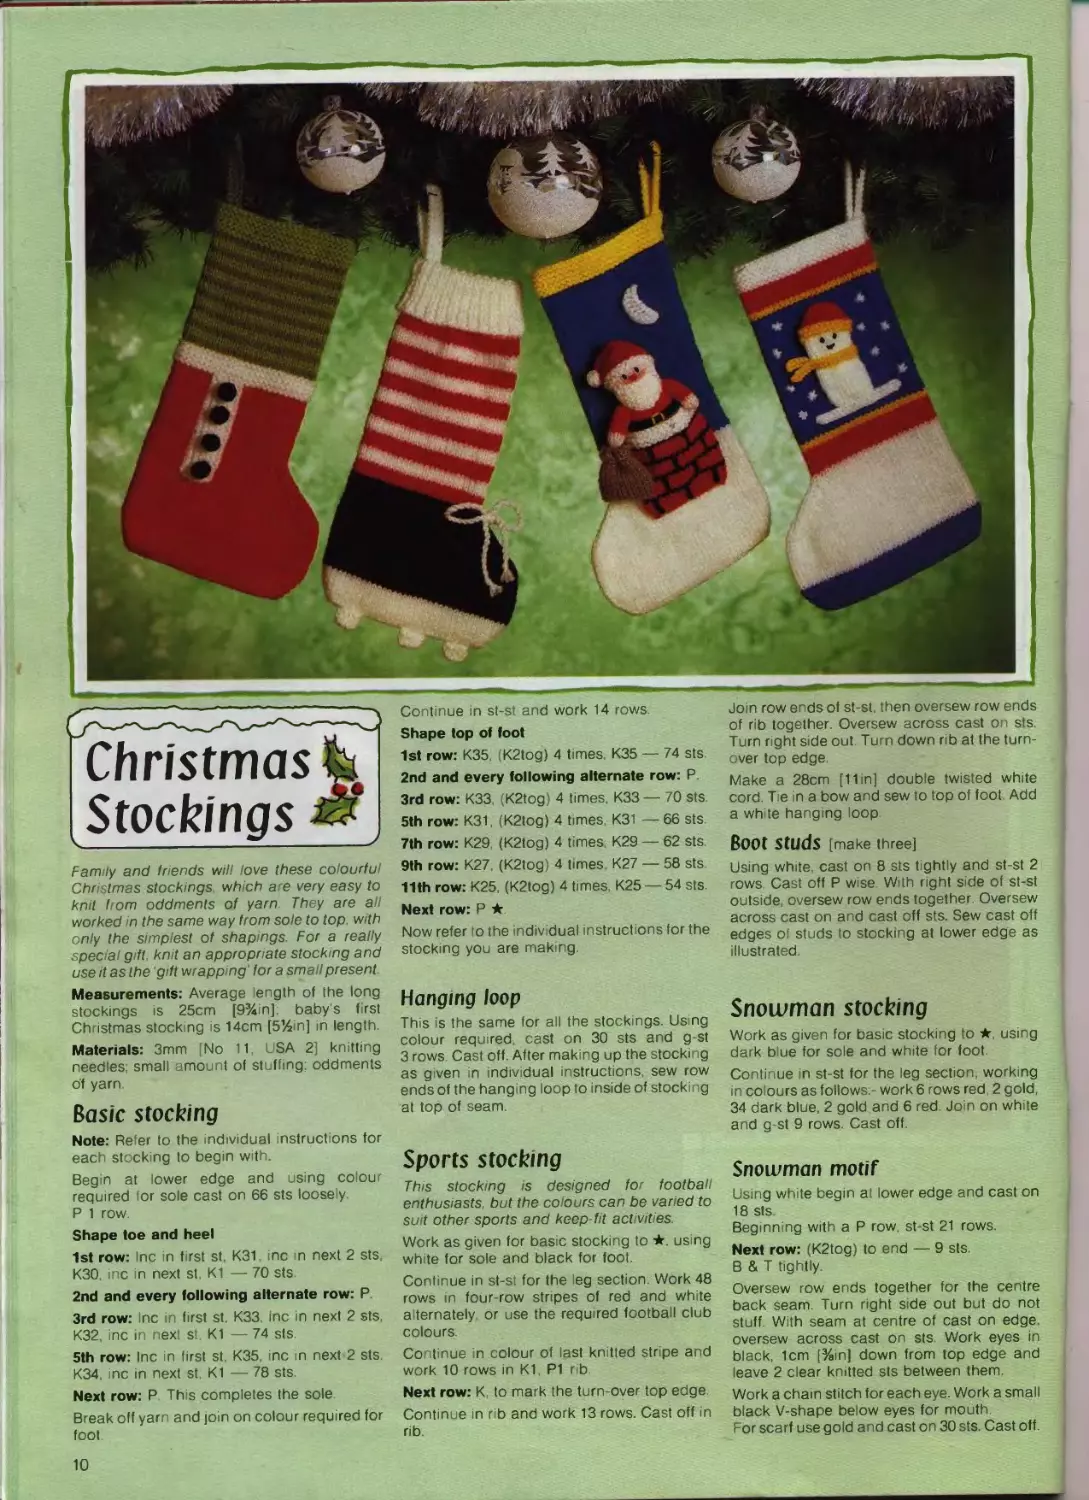
Christmas
Stockings
Family and friends will love these colourful
Christmas stockings which are very easy to
knit from oddments of yarn They are all
worked in the same way from sole to top with
only the simplest of shapings For a really
special gift knit an appropriate stock ng and
use it as the gift wrapping for a small present
Measurements: Average length of the long
stockings is 25cm [9%in] babys f rst
Christmas stocking is 14cm [534in] in length.
Materials: 3mm [No 11 USA 2] knitting
needles; small amount of stuffing; oddments
of yarn
Basic stocking
Note: Refer to the individual instructions tor
each stocking to begin with.
Begin at lower edge and using colour
required for sole cast on 66 sts loosely
P 1 row
Shape toe and heel
1st row: Inc in first st K31 inc n next 2 sts
K30, inc in next st, K1 — 70 sts.
2nd and every following alternate row: P
3rd row: Inc in first st. K33, inc in next 2 sts,
K32, inc in next st, K1 — 74 sts
5th row: Inc in first st, K35, inc in next 2 sts,
K34 inc in next st. K1 — 78 sts
Next row: P, This completes the sole
Break off yarn and jo n on colour required for
foot.
Continue in st-st and work 14 rows
Shape top of foot
1st row: K35. (K2tog) 4 times K35 — 74 sts
2nd and every following alternate row: P.
3rd row: K33 (K2tog) 4 times, K33 — 70 sts
5th row: K31, (K2tog) 4 times K31 — 66 sts
7th row: K29 (K2tog) 4 times K29 — 62 sts
9th row: K27 (K2tog) 4 times K27 — 58 sts
11th row: K25, (K2tog) 4 times, K25 — 54 sts
Next row: P ★
Now refer to the individual instructions for the
stocking you are making
Hanging loop
This is the same for all the stockings. Using
colour required cast on 30 sts and g-st
3 rows Cast off. After making up the stocking
as given in individual instructions, sew row
ends of the hanging loop to inside of stocking
at top of seam.
Sports stocking
This stocking is designed for football
enthusiasts but the colours can be varied to
suit other sports and keep-fit activities
Work as given for basic stocking to ★ using
white for sole and black for foot.
Continue in st-st for the leg section Work 48
rows in four row stripes of red and white
alternately or use the required football club
colours
Continue in colour of last knitted stripe and
work 10 rows in K1 P1 r b
Next row: К to mark the turn-over top edge
Continue n rib and work 13 rows Cast off in
rib
Join row ends of st-st then oversew row ends
of rib together. Oversew across cast on sts.
Turn right side out Turn down rib at the turn-
over top edge
Make a 28cm [11m] double twisted white
cord. Tie in a bow and sew to top of foot Add
a white hanging loop
Boot studs [make three]
Using white, cast on 8 sts tightly and st-st 2
rows Cast off P wise With right side of st-st
outside, oversew row ends together Oversew
across cast on and cast off sts. Sew cast off
edges of studs to stocking at lower edge as
illustrated
Snowman stocking
Work as given for basic stocking to ★ using
dark blue for sole and white for foot
Continue in st-st for the leg section working
m colours as follows:- work 6 rows red 2 gold,
34 dark blue, 2 gold and 6 red Join on white
and g-st 9 rows. Cast off
Snoiumon motif
Using white begin at lower edge and cast on
18 sts.
Beginning with a P row, st-st 21 rows.
Next row: (K2tog) to end — 9 sts.
В & T tightly
Oversew row ends together for the centre
back seam. Turn right side out but do not
stuff. With seam at centre of cast on edge,
oversew across cast on sts Work eyes in
black, 1cm [%in] down from top edge and
leave 2 clear knitted sts between them
Work a chain stitch for each eye. Work a small
black V-shape below eyes for mouth.
For scarf use gold and cast on 30 sts. Cast off.
10
Place round snowman below mouth as illus-
trated Sew in place
Make hat as tor Clown [Last-minute dolls,
page 25], using gold for g-st and red for
remainder. Place hat on head and sew to
snowman as illustrated
Fold the stocking with right side outside
bringing row ends together. Pm snowman to
the dark blue portion of stocking as illus-
trated Forthelineof snow on the ground use
white and cast on 20 sts then cast off Pin this
strip in place at base of snowman. Now unfold
the stocking and sew all the pieces in place as
pinned
For each snowflake, work four short stitches
in wh te crossing over each other at centre in
positions illustrated
Now join row ends of stocking then oversew
across cast on sts
Turn right side out Add a white hanging loop.
Buttoned boot stocking
Work as given for basic stocking to ★ using
red throughout for sole and foot Continue in
red for leg section
St-st 16 rows ,
Break off red and join on white, then g-st 8
rows
Break off white and join on dark and light
green.
St-st 30 rows m two-row stripes of dark and
light green alternately.
Using light green g-st 9 rows then cast off
Button strip
Using white cast on 20 sts and g-st 9 rows
Cast off
Using black, make 4 buttons as for holly
berries [page 20]
Fold the stocking with right side outside,
bring ng row ends together. Pin the white g-st
strip to the red boot portion of stocking as
shown in the illustration Unfold the stocking
and sew strip in place Now sew the black
buttons to the strip, spacing them out evenly.
Join row ends of stocking then oversew
across cast on sts Turn right side out Add a
dark green hanging loop
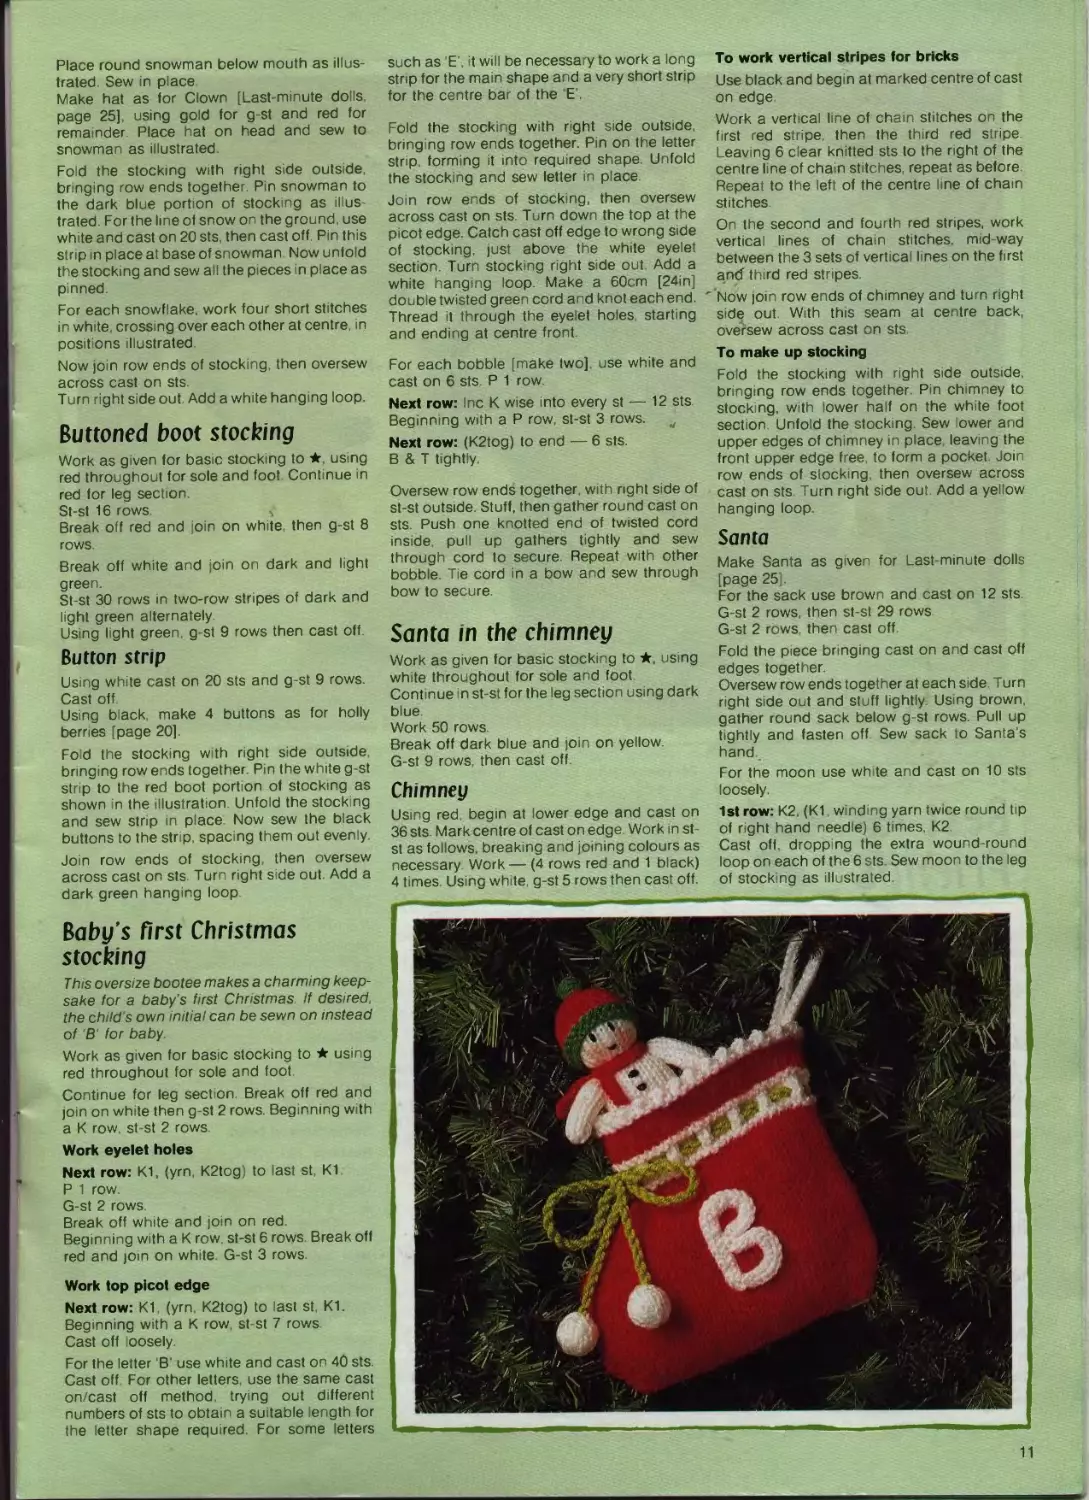
Baby’s first Christmas
stocking
This oversize bootee makes a charming keep-
sake for a baby's first Christmas If desired,
the child s own initial can be sewn on instead
of 'B' for baby
Work as given for basic stocking to ★ using
red throughout for sole and foot.
Continue for leg section. Break off red and
join on white then g-st 2 rows. Beginning with
a К row st-st 2 rows.
Work eyelet holes
Next row: K1, (yrn K2tog) to last st K1
P 1 row
G-st 2 rows
Break off white and join on red
Beginning with a К row st-st 6 rows Break off
red and join on white G-st 3 rows
Work top picot edge
Next row: K1 (yrn K2tog) to last st K1.
Beginning with a К row, st-st 7 rows
Cast off loosely
For the letter ‘B’ use white and cast on 40 sts
Cast off. For other letters, use the same cast
on/cast off method, trying out different
numbers of sts to obtain a suitable length for
the letter shape required. For some letters
such as E , it will be necessary to work a long
strip for the main shape and a very short strip
for the centre bar of the E'
Fold the stocking with right side outside,
bringing row ends together. Pin on the letter
strip, forming it into required shape Unfold
the stocking and sew letter in place
Join row ends of stocking, then oversew
across cast on sts. Turn down the top at the
picot edge. Catch cast off edge to wrong side
of stocking, just above the white eyelet
section. Turn stocking right side out Add a
white hanging loop Make a 60cm [24m]
double twisted green cord and knot each end.
Thread it through the eyelet holes starting
and ending at centre front.
For each bobble [make two] use white and
cast on 6 sts. P 1 row.
Next row: Inc К wise into every st — 12 sts
Beginning with a P row, st-st 3 rows.
Next row: (K2tog) to end — 6 sts.
В & T tightly
Oversew row ends together with right side of
st-st outside. Stuff, then gather round cast on
sts. Push one knotted end of twisted cord
inside pull up gathers tightly and sew
through cord to secure Repeat with other
bobble. Tie cord in a bow and sew through
bow to secure.
Santa in the chimney
Work as given for basic stocking to ★, using
wh te throughout for sole and foot
Continue in st-st for the leg section using dark
blue
Work 50 rows
Break off dark blue and join on yellow.
G-st 9 rows, then cast off.
Chimney
Using red begin at lower edge and cast on
36 sts Mark centre of cast on edge. Work in st
st as follows, breaking and joining colours as
necessary Work — (4 rows red and 1 black)
4 times. Using white, g-st 5 rows then cast off.
To work vertical stripes for bricks
Use black and begin at marked centre of cast
on edge
Work a vertical line of chain stitches on the
first red stripe then the third red stripe.
Leaving 6 clear knitted sts to the right of the
centre line of chain stitches, repeat as before.
Repeat to the left of the centre I ne of chain
stitches
On the second and fourth red stripes, work
vertical lines of chain stitches, mid-way
between the 3 sets of vertical lines on the first
and third red stripes
' Now join row ends of chimney and turn right
side out With this seam at centre back,
oversew across cast on sts
To make up stocking
Fold the stocking with right side outside,
bringing row ends together. Pin chimney to
stock ng with lower half on the white foot
section Unfold the stocking. Sew lower and
upper edges of chimney in place, leaving the
front upper edge free, to form a pocket. Join
row ends of slocking, then oversew across
cast on sts. Turn right side out. Add a yellow
hanging loop
Santa
Make Santa as given for Last-minute dolls
[page 25].
For the sack use brown and cast on 12 sts.
G-st 2 rows, then st-st 29 rows.
G-st 2 rows, then cast off
Fold the piece bringing cast on and cast off
edges together
Oversew row ends together at each side Turn
right side out and stuff lightly. Using brown,
gather round sack below g st rows. Pull up
tightly and fasten off Sew sack to Santa’s
hand.
For the moon use white and cast on 10 sts
loosely
1st row: K2. (K1 winding yarn twice round tip
of right hand needle) 6 times, K2
Cast off. dropping the extra wound-round
loop on each of the 6 sts. Sew moon to the leg
of stocking as illustrated
11
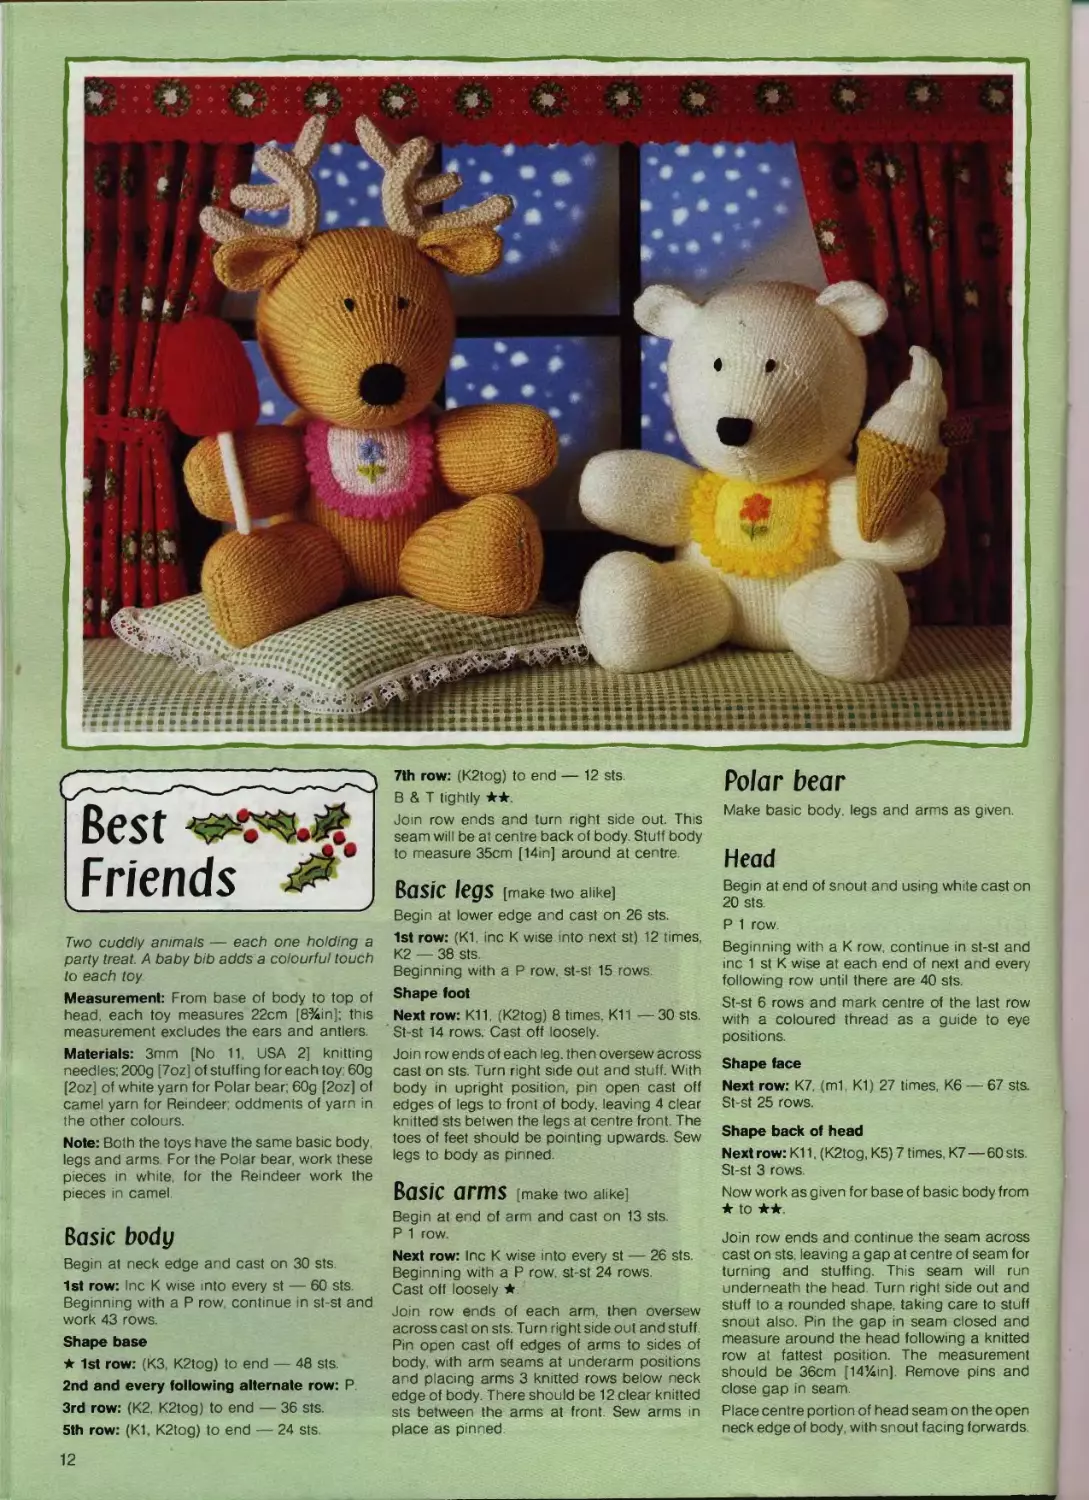
Best
Friends $
Two cuddly animals — each one hold ng a
party treat A baby bib adds a colourful touch
to each toy
Measurement: From base of body to top of
head, each toy measures 22cm [8%in]; this
measurement excludes the ears and antlers.
Materials: 3mm [No 11, USA 2] knitting
needles: 200g [7oz] of stuffing for each toy 60g
[2oz] of white yarn for Polar bear; 60g [2oz] of
camel yarn for Reindeer oddments of yarn in
the other colours.
Note: Both the toys have the same basic body,
legs and arms For the Polar bear, work these
pieces in white, for the Reindeer work the
pieces in camel.
Basic body
Begin at neck edge and cast on 30 sts
1st row: Inc К wise into every st — 60 sts
Beginning with a P row, continue in st-st and
work 43 rows
Shape base
★ 1st row: (КЗ K2tog) to end — 48 sts
2nd and every following alternate row: P.
3rd row: (K2, K2tog) to end — 36 sts.
5th row: (K1, K2tog) to end — 24 sts
7th row: (K2tog) to end — 12 sts.
В & T tightly ★★
Join row ends and turn right side out. This
seam will be at centre back of body. Stuff body
to measure 35cm [Min] around at centre.
Basic legs [make two alike]
Begin at lower edge and cast on 26 sts.
1st row: (K1, inc К wise nto next st) 12 times
K2 — 38 sts.
Beginning with a P row st-st 15 rows.
Shape foot
Next row: K11, (K2tog) 8 times, K11 — 30 sts.
St-st 14 rows. Cast off loosely.
Join row ends of each leg. then oversew across
cast on sts. Turn right side out and stuff. With
body in upright position, pm open cast off
edges of legs to front of body, leaving 4 clear
knitted sts betwen the legs at centre front. The
toes of feet should be pointing upwards. Sew
legs to body as pinned.
Basic arms [make two alike]
Begin at end of arm and cast on 13 sts.
P 1 row.
Next row: Inc К wise into every st — 26 sts.
Beginning with a P row st-st 24 rows.
Cast off loosely ★
Join row ends of each arm, then oversew
across cast on sts. Turn right side out and stuff
Pm open cast off edges of arms to sides of
body with arm seams at underarm positions
and placing arms 3 knitted rows below neck
edge of body. There should be 12 clear knitted
sts between the arms at front. Sew arms in
place as pinned.
Polar bear
Make basic body, legs and arms as given
Head
Begin at end of snout and using white cast on
20 sts.
P 1 row
Beg nnmg with a К row continue m st-st and
inc 1 st К wise at each end of next and every
following row until there are 40 sts.
St-st 6 rows and mark centre of the last row
with a coloured thread as a guide to eye
positions.
Shape face
Next row: K7 (ml K1) 27 times K6 — 67 sts.
St st 25 rows.
Shape back of head
Next row: K11. (K2tog, K5) 7 times K7—60 sts.
St-st 3 rows.
Now work as given for base of basic body from
★ to ★★
Join row ends and continue the seam across
cast on sts, leaving a gap at centre of seam for
turning and stuffing. This seam will run
underneath the head. Turn right side out and
stuff to a rounded shape, taking care to stuff
snout also. Pin the gap in seam closed and
measure around the head following a knitted
row at fattest position The measurement
should be 36cm [14%in]. Remove pins and
close gap in seam.
Place centre portion of head seam on the open
neck edge of body, with snout facing forwards.
12
Sew neck edge of body to head where it
touches the head.
Eyes
Mark eye positions with pins, leaving 2 clear
knitted sts to the right and left of the coloured
thread. The eyes are worked in back-stitch.
Refer to page 4 [Santa and Mrs Claus basic
doll-Eyes], working as given from ★ to
Nose
Begin at lower edge and using black cast on
3 sts.
1st row: Inc К wise into first 2 sts, K1 — 5 sts.
Beginning with a P row, st-st 3 rows.
Cast off
With P side of st-st outside sew nose to end of
snout as illustrated
Ears [make two alike]
Each ear is knitted in one piece.
Begin at top edge and using white cast on
10 sts '
P 1 row
Next row: Inc К wise into every st — 20 sts.
Beginning with a P row, st-st 7 rows ★
Next row: K2tog K6. (K2tog) twice K6 K2tog
— 16 sts. Cast off.
Fold each ear piece in half and oversew row
ends together, then oversew across cast on
sts.
Turn rght side out. With the oversewn row
ends at one si de of ear, oversew across cast off
sts. Sew these edges of ears to top of head,
leaving 12 clear knitted sts between them.
Bib
Main piece
Begin at lower edge and using light yellow for
Polar bear [light pink for Reindeer], cast on
10 sts.
Work in st-st and inc 1 st at beginning of first
4 rows — 14 sts
St-st 14 rows
Next row: K2, (K2tog. K2) to end — 11 sts.
Cast off for neck edge
Picot edging
Using yellow for Polar bear [pink for Reindeer]
cast on 44 sts St-st 3 rows
Next row: K2tog (yrn K2tog) to end — 43 sts
Beginning with a К row, st-st 2 rows.
Cast off
To make up
With P side of st-st on main piece and edging
piece uppermost, oversew the cast off edge of
picot edging to the side and lower edges of bib
Fold the picot edge piece to right side of the bib
and catch cast on edge to the b b just within
the edges of bib Using orange for Polar bear
[lilac for Reindeer] work a flower at centre of
bib in chain stitches. Work a straight stitch in
green for stem and two chain stitches for
leaves. Work a green stitch at centre of flower
For the neck ribbon, make a 48cm [19in]
twisted cord from three lengths of yarn to
match the bib Oversew top edge of bib to
centre of cord Tie cord around the neck in a
bow at back. Sew through bow to secure.
Catch bib to tummy.
Ice-cream cone
Begin at top of ice-cream and using white cast
on 3 sts
St -st 2 rows.
Next row: Inc К wise into every st — 6 sts
Beginning with a P row continue in st-st and
inc 1 st at each end of next 2 rows — 10 sts.
St-st 5 rows.
Next row: Inc К wise into every st — 20 sts.
St-st 5 rows.
Next row: (K1, inc К w se nto next st) to end —
30 sts
St-st 5 rows.
Break off white and join on two strands of
camel to begin the cone
G-st 4 rows.
Break off one strand and continue in single
yarn
Beginning with a К row, st-st 2 rows.
Shape cone
Next row: (K4, K2tog) to end — 25 sts.
St-st 3 rows.
Next row: (КЗ, K2tog) to end — 20 sts.
St-st 3 rows.
Next row: (K2, K2tog) to end — 15 sts.
St st 3 rows.
Next row: (K1 K2tog) to end — 10 sts
St-st 3 rows.
Next row: (K2tog) to end — 5 sts.
В & T tightly.
Oversew row ends together leaving a gap in
the cone section of the seam. Turn right side
out and stuff. Close gap in seam. Run a
gathering thread around the ice-cream at the
inc row above the cone Pull up slightly and
fasten off. Repeat at the inc row above.
For the chocolate flake use brown and cast on
6 sts.
G-st 30 rows. Cast off
Starting at cast off edge, roll up the strip t ghtly
then sew cast on edge n place. Sew one end of
flake to the ice-cream. Sew cone to end of
Polar bear’s arm.
Reindeer
Make basic body, legs and arms as given
Head
Begin at end of snout and using camel cast on
10 sts.
1st row: Inc К wise into every st — 20 sts.
P 1 row.
Next row: Inc К wise into every st — 40 sts
Beginning with a P row, continue in st-st
Work 15 rows and mark centre of last row w th
a coloured thread as a guide to eye positions
Shape face
Next row: K10, (ml, KI) 20 times, K10—60 sts.
St-st 33 rows
Now work as given for base of basic body from
★ to ★★
Gather cast on sts up t ghtly and fasten off
Now make up exactly as given for Polar bear,
noting that the measurement around head
should be 35cm [14in], Attach head to body as
for Polar bear.
Eyes
Work as given for Polar bear.
Nose
Using black cast on 14 sts.
1st row: K1, (inc К wise into next st. K1) 6 times,
K1 — 20 sts.
P 1 row
Next row: (K2tog) to end — 10 sts.
Next row: (P2tog) to end — 5 sts
В & T tightly
Oversew row ends together turn right side out
and stuff lightly. Sew open cast on edge to end
of snout, with nose seam underneath nose.
Aritlers
' Use fawn for all the pieces and note that first
row is right side on all the pieces
Main piece [make one for each antler]
Cast on 30 sts.
1st row: K13, inc К wise into next 4 sts, K13 —
34 sts.
G-st 9 rows
Next row: K13 (K2tog) 4 times, K13 — 30 sts.
Cast off
With right side outside oversew cast on and
cast off edges of each piece together. Stuff
firmly, pushing in stuffing at each set of row
ends The piece will now be V-shaped Gather
round each set of row ends, pull up tightly and
fasten off Pin the base of each V-shaped
antler to top of head leaving a 4cm [1%m]
space between them The V-shaped antlers
should bend away from each other as shown
in the illustration. Sew securely to head as
pinned.
Small pieces [make two for each antler]
Cast on 9 sts and g-st 9 rows. Cast off. With
right side outside, oversew cast on and cast off
edges of each piece together. Gather round
one set of row ends, pull up tightly and fasten
off. Stuff each piece. Sew the open sets of row
ends to antlers [two on each antler] at
positions shown in the illustration
Ears [make two alike]
Using camel, work as given for Polar bear's ear
as far as ★.
St-st 6 more rows.
Next row: (K2tog) to end — 10 sts.
Cast off
Fold each ear in half and oversew row ends
together then oversew across cast on sts Turn
right side out With the oversewn row ends at
one side of ear, oversew across cast off sts.
Fold this edge in half and oversew again. Pin
these edges of ears to head just in front of
position where antlers are sewn to head
The ears should he flat as shown in the
illustration. Sew in place as pinned
Bib
Refer to instructions for Polar bear’s bib.
Ice-lolly
Make lolly stick as given for Candy cane [Mrs
Claus, page 6], working as far as ★.
Using red work lolly as given for Basic arm
[page 12] as far as ★. Join row ends. With this
seam at one side, close cast off edge with a
back-stitch seam, but leave a gap at centre for
inserting the lolly stick Turn right side out and
stuff, keeping the shape fairly flat. Oversew
across cast on sts
Use a large knitting needle to open up a hole in
stuffing for lolly stick Push stick into lolly, then
catch lolly to stick. Sew stick to end of
Reindeer’s arm.
13
Christmas
Crib
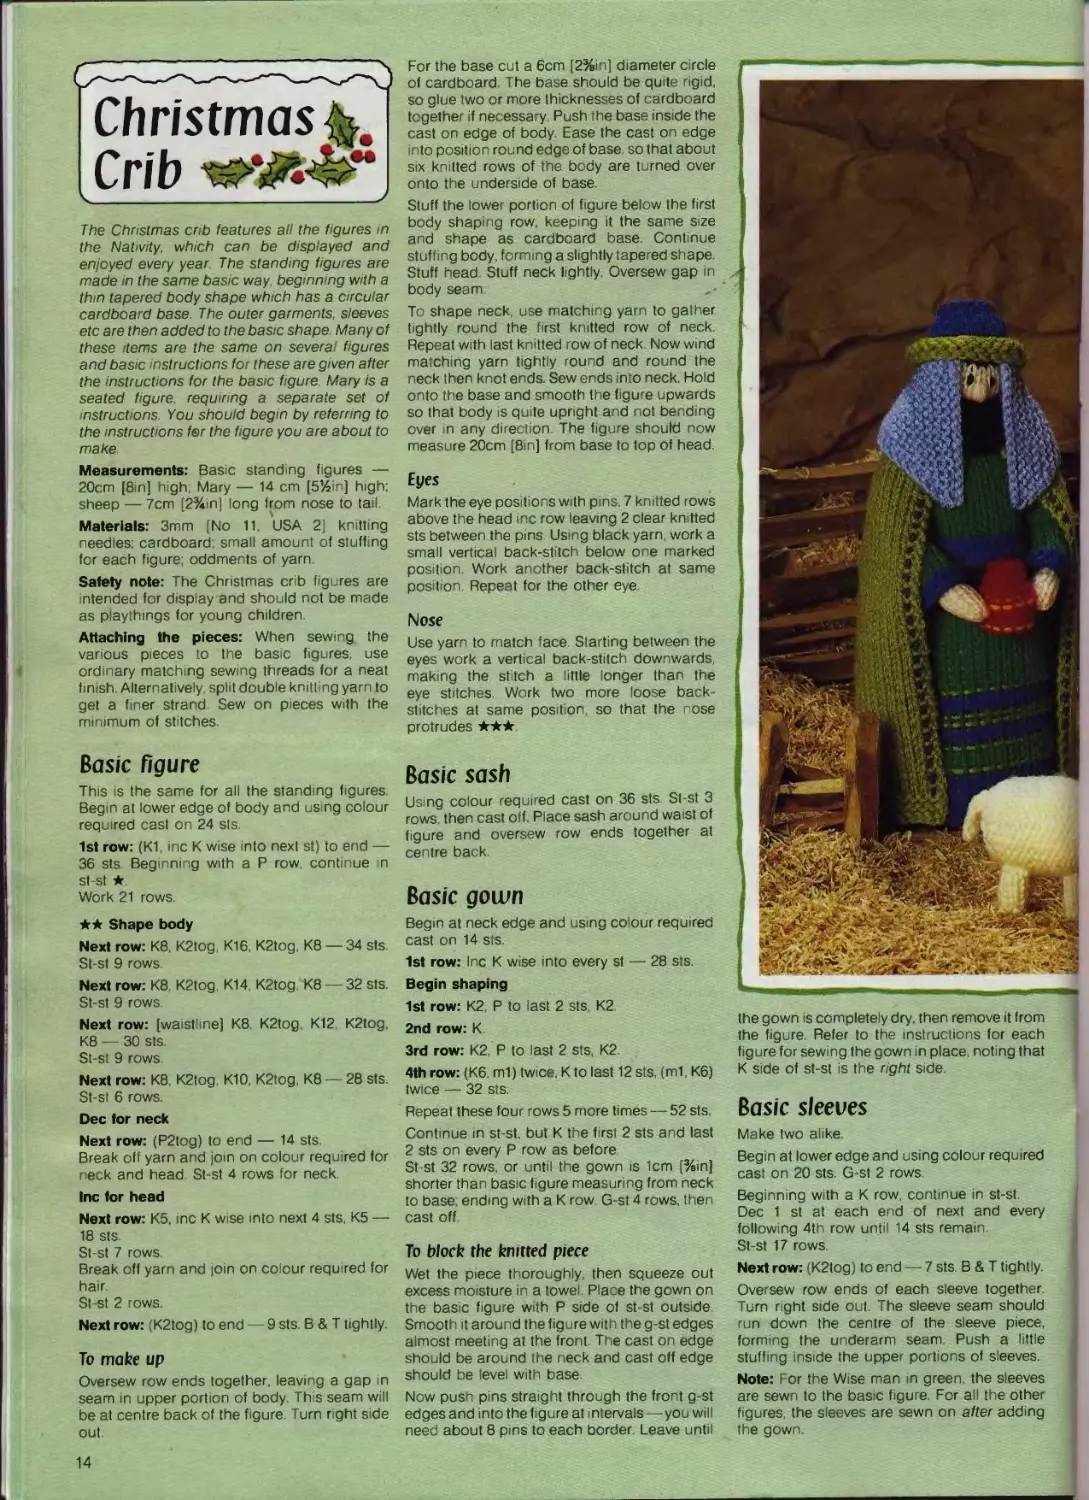
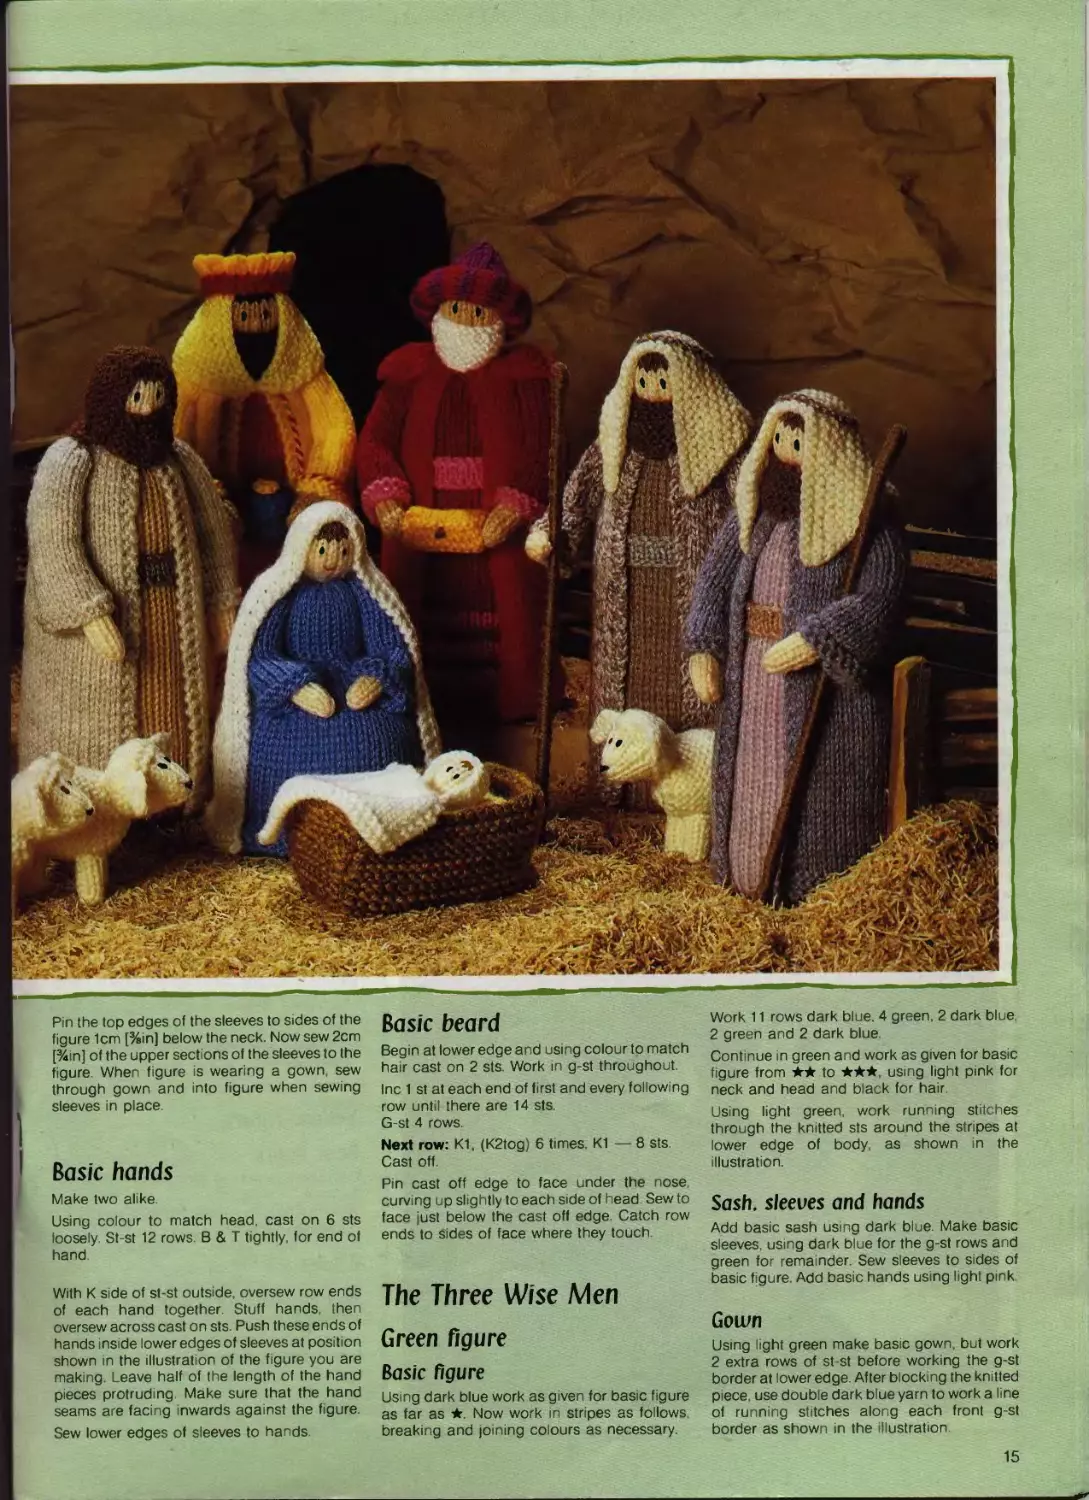
The Christmas crib features all the figures in
the Nativity, which can be displayed and
enjoyed every year. The standing figures are
made in the same basic way. beginning with a
thin tapered body shape which has a circular
cardboard base. The outer garments, sleeves
etc are then added to the basic shape. Many of
these items are the same on several figures
and basic instructions for these are given after
the instructions for the basic figure Mary is a
seated figure requiring a separate set of
instructions. You should begin by referring to
the instructions f&r the figure you are about to
make
Measurements: Basic standing figures —
20cm [8in] high; Mary — 14 cm [5%in] high;
sheep — 7cm [2%m] long from nose to tail.
Materials: 3mm [No 11 USA 2] knitting
needles, cardboard small amount of stuffing
for each figure; oddments of yarn
Safety note: The Christmas crib figures are
intended for display and should not be made
as playthings for young children
Attaching the pieces: When sew ng the
various pieces to the basic fgures use
ordinary matching sewing threads for a neat
finish. Alternatively, split double knitting yarn to
get a finer strand. Sew on pieces with the
minimum of stitches
Basic figure
This is the same for all the standing figures.
Begin at lower edge of body and using colour
required cast on 24 sts.
1st row: (K1 inc К wise into next st) to end —
36 sts Beginning wth a P row continue in
st-st ★
Work 21 rows.
1k* Shape body
Next row: K8. K2tog K16, K2tog K8 —34 sts.
St-st 9 rows.
Next row: K8 K2tog K14 K2tog K8 — 32 sts.
St-st 9 rows.
Next row: (waistline] K8. K2tog, K12, K2tog,
K8 — 30 sts.
St-st 9 rows
Next row: K8 K2tog K10, K2tog K8 — 28 sts.
St-st 6 rows.
Dec for neck
Next row: (P2tog) to end — 14 sts.
Break off yarn and join on colour required for
neck and head St-st 4 rows for neck
Inc for head
Next row: K5, inc К wise into next 4 sts, K5 —
18 sts.
St-st 7 rows.
Break off yarn and join on colour required for
hair
St-st 2 rows.
Next row: (K2tog) to end — 9 sts. В & T tightly.
To make up
Oversew row ends together, leaving a gap in
seam n upper port on of body. This seam will
be at centre back of the figure Turn right side
out
For the base cut a 6cm [2%in] diameter circle
of cardboard. The base should be quite rigid,
so glue two or more thicknesses of cardboard
together if necessary Push the base inside the
cast on edge of body Ease the cast on edge
into position round edge of base, so that about
six knitted rows of the body are turned over
onto the underside of base.
Stuff the lower portion of figure below the first
body shaping row. keeping it the same size
and shape as cardboard base. Continue
stuffing body, forming a slightly tapered shape
Stuff head Stuff neck lightly. Oversew gap in
body seam
To shape neck use matching yarn to gather
tightly round the frst knitted row of neck.
Repeat with last knitted row of neck. Now wind
matching yarn tightly round and round the
neck then knot ends. Sew ends into neck Hold
onto the base and smooth the figure upwards
so that body is quite upright and not bending
over in any direction. The figure should now
measure 20cm [8in] from base to top of head
Eyes
Mark the eye positions with pins, 7 knitted rows
above the head inc row leaving 2 clear knitted
sts between the pins Using black yarn work a
small vertical back-stitch below one marked
position. Work another back-stitch at same
position. Repeat for the other eye
Nose
Use yarn to match face Starting between the
eyes work a vertical back-stitch downwards,
making the stitch a little longer than the
eye stitches. Work two more loose back-
stitches at same position so that the nose
protrudes ★★★
Basic sash
Using colour required cast on 36 sts. St-st 3
rows then cast off. Place sash around waist of
figure and oversew row ends together at
centre back
Basic grown
Begin at neck edge and using colour required
cast on 14 sts.
1st row: Inc К wise nto every st — 28 sts.
Begin shaping
1st row: K2 P to last 2 sts K2
2nd row: К
3rd row: K2, P to last 2 sts, K2.
4th row: (K6, ml) tw се, К to last 12 sts, (ml, K6)
twice — 32 sts.
Repeat these four rows 5 more times — 52 sts.
Continue in st-st, but К the first 2 sts and last
2 sts on every P row as before
St-st 32 rows, or until the gown is 1cm [%in]
shorter than basic f gure measuring from neck
to base ending with a К row. G-st 4 rows, then
cast off
To block the knitted piece
Wet the piece thoroughly then squeeze out
excess moisture in a towel. Place the gown on
the basic figure with P side of st-st outside.
Smooth it around the figure with the g-st edges
almost meeting at the front. The cast on edge
should be around the neck and cast off edge
should be level with base
Now push pins straight through the front g-st
edges and into the f gure at intervals—you will
need about 8 pins to each border. Leave until
the gown is completely dry. then remove it from
the figure. Refer to the instructions for each
figure for sewing the gown in place noting that
К side of st-st is the right side.
Basic sleeves
Make two alike.
Begin at lower edge and using colour required
cast on 20 sts. G-st 2 rows
Beginning with a К row, continue in st-st.
Dec 1 st at each end of next and every
following 4th row until 14 sts remain.
St-st 17 rows.
Next row: (K2tog) to end — 7 sts В & T tightly.
Oversew row ends of each sleeve together.
Turn right side out The sleeve seam should
run down the centre of the sleeve piece,
forming the underarm seam. Push a little
stuffing inside the upper portions of sleeves.
Note: For the Wise man in green the sleeves
are sewn to the basic figure. For all the other
figures the sleeves are sewn on after adding
the gown.
14
Pm the top edges of the sleeves to sides of the
figure 1cm [%m] below the neck. Now sew 2cm
[%in] of the upper sections of the sleeves to the
figure. When figure is wearing a gown, sew
through gown and into figure when sewing
sleeves in place
Basic hands
Make two al ke
Using colour to match head, cast on 6 sts
loosely St-st 12 rows. В & T tightly, for end of
hand
With К side of st-st outside, oversew row ends
of each hand together. Stuff hands, then
oversew across cast on sts. Push these ends of
hands inside lower edges of sleeves at position
shown in the illustration of the figure you are
making Leave half of the length of the hand
pieces protruding Make sure that the hand
seams are facing inwards against the figure.
Sew lower edges of sleeves to hands.
Basic beard
Begin at lower edge and using colour to match
hair cast on 2 sts. Work in g-st throughout.
Inc 1 st at each end of first and every following
row until there are 14 sts
G st 4 rows
Next row: K1, (K2tog) 6 times. K1 — 8 sts.
Cast off
Pm cast off edge to face under the nose
curving up slightly to each side of head Sew to
face just below the cast off edge. Catch row
ends to sides of face where they touch.
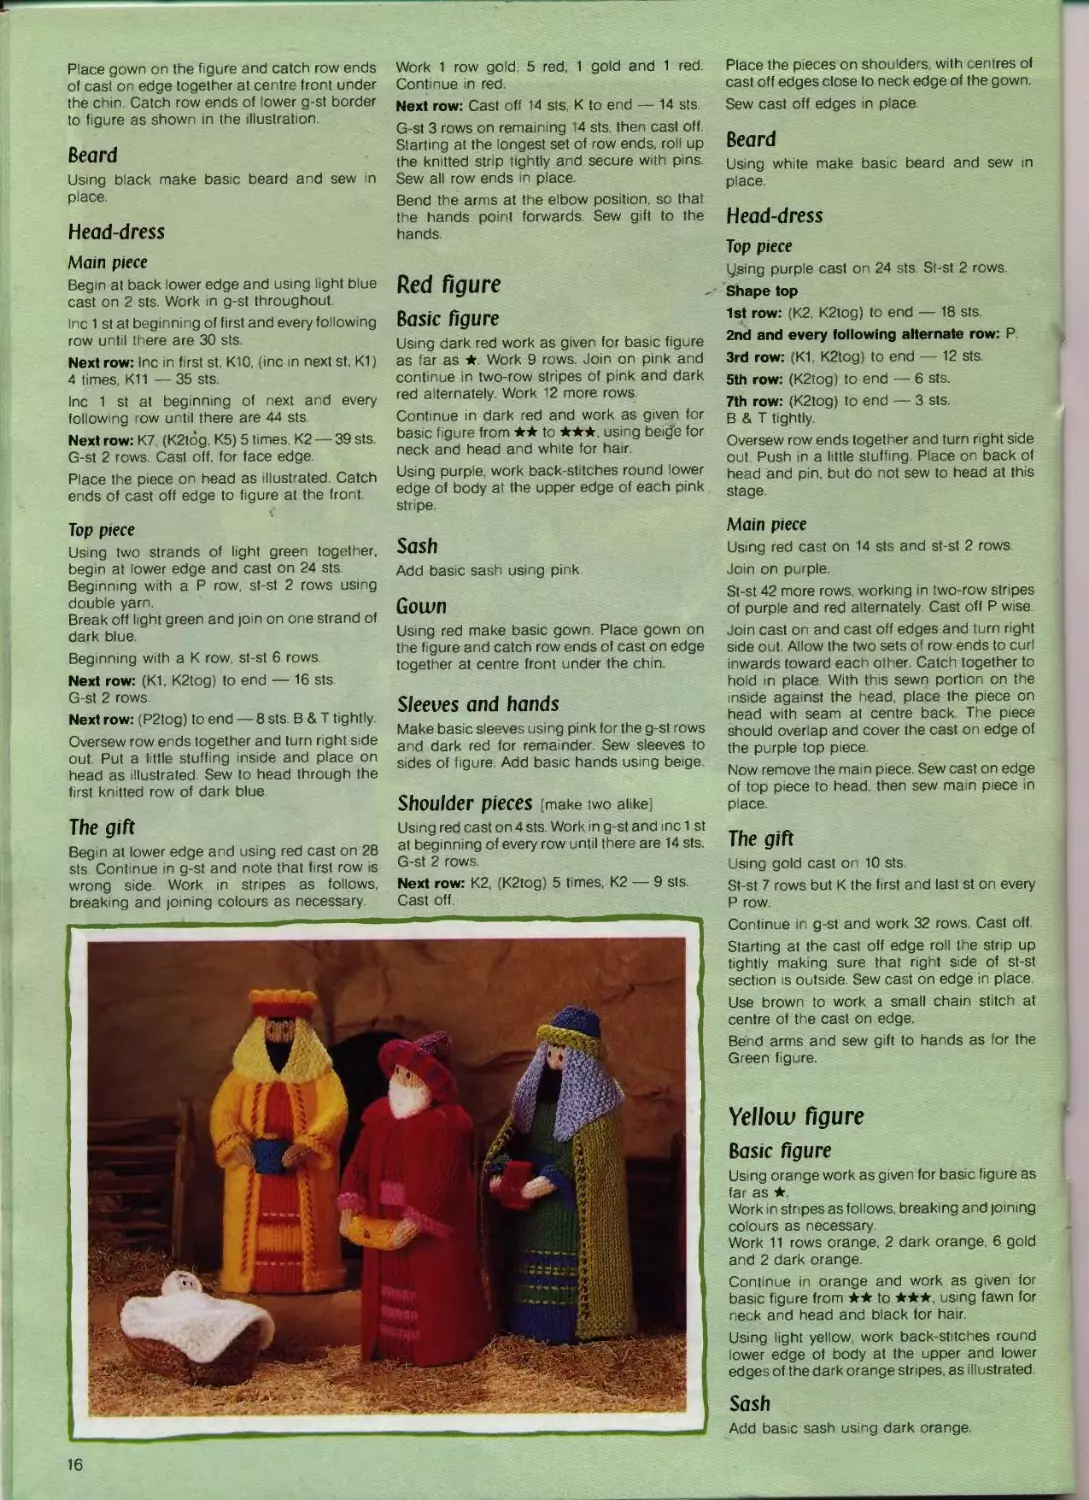
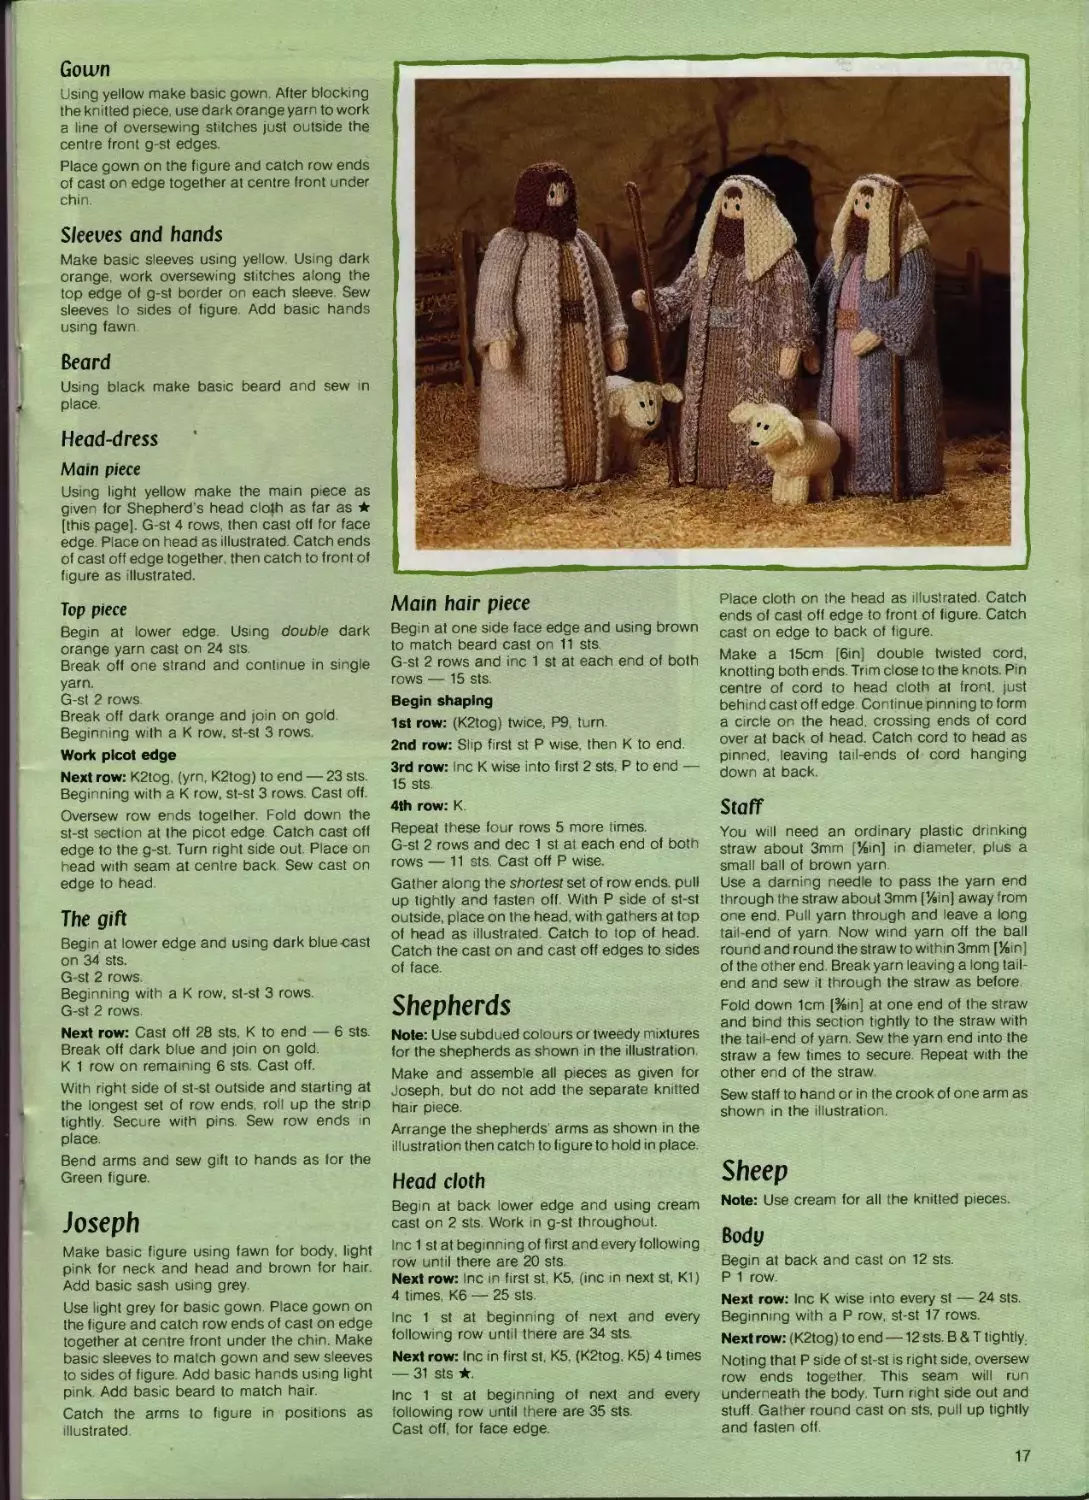
The Three Wise Men
Green figure
Basic figure
Using dark blue work as given for basic figure
as far as ★ Now work in stripes as follows
breaking and joining colours as necessary.
Work 11 rows dark blue 4 green, 2 dark blue
2 green and 2 dark blue
Continue in green and work as given for basic
figure from ★★ to ★★★, using light pink for
neck and head and black for hair
Using light green, work running stitches
through the knitted sts around the stripes at
lower edge of body, as shown in the
illustration.
Sash, sleeves and hands
Add basic sash using dark blue. Make basic
sleeves, using dark blue for the g-st rows and
green for remainder Sew sleeves to sides of
basic figure Add basic hands using light pink
Goivn
Using light green make basic gown, but work
2 extra rows of st-st before working the g-st
border at lower edge. After blocking the knitted
piece, use double dark blue yarn to work a line
of running stitches along each front g-st
border as shown in the (lustration
15
Place gown on the figure and catch row ends
of cast on edge together at centre front under
the chin. Catch row ends of lower g-st border
to figure as shown in the illustration
Beard
Using black make basic beard and sew in
place
Head-dress
Main piece
Begin at back lower edge and using light blue
cast on 2 sts. Work in g-st throughout.
Inc 1 st at beginning of first and every following
row until there are 30 sts
Next row: Inc in first st. K10, (inc in next st, K1)
4 times K11 — 35 sts.
Inc 1 st at beginning of next and every
following row until there are 44 sts
Next row: K7 (K2tog K5) 5 times, K2 — 39 sts.
G-st 2 rows. Cast off, for face edge
Place the piece on head as illustrated Catch
ends of cast off edge to figure at the front.
Top piece
Using two strands of light green together,
begin at lower edge and cast on 24 sts.
Begmn ng with a P row, st-st 2 rows using
double yarn.
Break off light green and join on one strand of
dark blue
Beginning with a К row st-st 6 rows.
Next row: (K1, K2tog) to end — 16 sts.
G-st 2 rows.
Next row: (P2tog) to end — 8 sts В & T tightly
Oversew row ends together and turn right side
out Put a little stuffing inside and place on
head as illustrated Sew to head through the
first knitted row of dark blue
The gift
Begin at lower edge and using red cast on 28
sts Continue in g-st and note that first row is
wrong side. Work in stripes as follows,
breaking and joining colours as necessary
Work 1 row gold 5 red, 1 gold and 1 red
Continue in red
Next row: Cast off 14 sts, К to end — 14 sts.
G-st 3 rows on remaining 14 sts. then cast off
Starting at the longest set of row ends roll up
the knitted strip tightly and secure with pins.
Sew all row ends in place
Bend the arms at the elbow position, so that
the hands point forwards Sew gift to the
hands.
Red figure
Basic figure
Using dark red work as given for basic figure
as far as ★. Work 9 rows. Join on pink and
continue in two-row stripes of pink and dark
red alternately Work 12 more rows
Continue in dark red and work as given for
basic figure from ★★ to ★★★ using beigfe for
neck and head and white for hair.
Using purple, work back-stitches round lower
edge of body at the upper edge of each pink
stripe
Sash
Add basic sash using pink
Gown
Using red make basic gown Place gown on
the figure and catch row ends of cast on edge
together at centre front under the chin
Sleeves and hands
Make basic sleeves using pink for the g-st rows
and dark red for remainder. Sew sleeves to
sides of figure. Add basic hands using beige
Shoulder pieces [make two alike]
Using red cast on 4 sts. Work in g-st and inc 1 st
at begmn ng of every row until there are 14 sts
G-st 2 rows.
Next row: K2, (K2tog) 5 times, K2 — 9 sts.
Cast off
Place the pieces on shoulders, with centres of
cast off edges close to neck edge of the gown
Sew cast off edges in place.
Beard
Using white make basic beard and sew in
place
Head-dress
Top piece
losing purple cast on 24 sts St-st 2 rows.
Shape top
1st row: (K2, K2tog) to end — 18 sts
2nd and every following alternate row: P
3rd row: (KI, K2tog) to end — 12 sts.
5th row: (K2tog) to end — 6 sts.
7th row: (K2tog) to end — 3 sts.
В & T tightly.
Oversew row ends together and turn right side
out. Push in a little stuffing Place on back of
head and pin, but do not sew to head at this
stage.
Main piece
Using red cast on 14 sts and st-st 2 rows
Join on purple.
St-st 42 more rows, working in two-row str pes
of purple and red alternately Cast off P wise
Join cast on and cast off edges and turn right
side out. Allow the two sets of row ends to curl
inwards toward each other Catch together to
hold in place With this sewn portion on the
inside against the head, place the piece on
head with seam at centre back The piece
should overlap and cover the cast on edge of
the purple top piece.
Now remove the main piece Sew cast on edge
of top piece to head, then sew main piece in
place.
The gift
Using gold cast on 10 sts.
St-st 7 rows but К the first and last st on every
P row
Continue in g-st and work 32 rows Cast off
Starting at the cast off edge roll the strip up
tightly making sure that right side of st-st
section is outside. Sew cast on edge in place
Use brown to work a small chain stitch at
centre of the cast on edge.
Bend arms and sew gift to hands as for the
Green figure.
Yellow figure
Basic figure
Using orange work as given for bas c figure as
far as ★
Work in stripes as follows, breaking and joining
colours as necessary.
Work 11 rows orange, 2 dark orange 6 gold
and 2 dark orange.
Continue in orange and work as given for
basic f gure from ★★ to ★★★, us ng fawn for
neck and head and black for hair.
Using light yellow work back-stitches round
lower edge of body at the upper and lower
edges of the dark orange stripes, as illustrated
Sash
Add basic sash using dark orange.
16
Gown
Using yellow make basic gown. After blocking
the knitted piece, use dark orange yarn to work
a line of oversewing stitches just outside the
centre front g-st edges.
Place gown on the figure and catch row ends
of cast on edge together at centre front under
chin.
Sleeves and hands
Make basic sleeves using yellow. Using dark
orange, work oversewing stitches along the
top edge of g-st border on each sleeve Sew
sleeves to sides of figure Add basic hands
using fawn
Beard
Using black make basic beard and sew in
place
Head-dress
Main piece
Using light yellow make the main piece as
given for Shepherd’s head cloth as far as ★
[this page] G-st 4 rows then cast off for face
edge Place on head as llustrated Catch ends
of cast off edge together, then catch to front of
figure as illustrated.
Top piece
Begin at lower edge Using double dark
orange yarn cast on 24 sts
Break off one strand and continue in single
yarn.
G-st 2 rows.
Break off dark orange and join on gold
Beginning with a К row, st-st 3 rows
Work plcot edge
Next row: K2tog (yrn, K2tog) to end — 23 sts.
Beginning with a К row, st-st 3 rows. Cast off
Oversew row ends together. Fold down the
st-st section at the picot edge Catch cast off
edge to the g-st Turn r ght side out Place on
head with seam at centre back Sew cast on
edge to head
The gift
Begin at lower edge and using dark blue-cast
on 34 sts.
G-st 2 rows.
Beginning with a К row. st-st 3 rows.
G-st 2 rows.
Next row: Cast off 28 sts, К to end — 6 sts.
Break off dark blue and join on gold.
К 1 row on remaining 6 sts Cast off
With right side of st-st outside and starting at
the longest set of row ends, roll up the strip
tightly. Secure with pins. Sew row ends in
place.
Bend arms and sew g fl to hands as for the
Green figure
Joseph
Make basic figure using fawn for body, light
pink for neck and head and brown for hair.
Add basic sash using grey
Use light grey for basic gown Place gown on
the figure and catch row ends of cast on edge
together at centre front under the chin. Make
basic sleeves to match gown and sew sleeves
to sides of figure. Add basic hands using light
pink Add basic beard to match hair
Catch the arms to fgure in postons as
illustrated
Main hair piece
Begin at one side face edge and using brown
to match beard cast on 11 sts.
G-st 2 rows and inc 1 st at each end of both
rows — 15 sts.
Begin shaping
1st row: (K2tog) twice, P9 turn
2nd row: Slip first st P wise, then К to end
3rd row: Inc К wise into first 2 sts, P to end —
15 sts
4th row: K.
Repeat these four rows 5 more times.
G-st 2 rows and dec 1 st at each end of both
rows — 11 sts. Cast off P wise.
Gather along the shortest set of row ends, pull
up tightly and fasten off. With P side of st-st
outside, place on the head, with gathers at top
of head as illustrated. Catch to top of head.
Catch the cast on and cast off edges to s des
of face.
Shepherds
Note: Use subdued colours or tweedy mixtures
for the shepherds as shown in the illustration
Make and assemble all pieces as given for
Joseph, but do not add the separate knitted
hair piece.
Arrange the shepherds' arms as shown in the
illustration then catch to figure to hold in place.
Head cloth
Begin at back lower edge and using cream
cast on 2 sts. Work in g-st throughout.
Inc 1 st at beginning of first and every following
row until there are 20 sts
Next row: Inc in first st K5, (inc in next st, K1)
4 times, K6 — 25 sts.
Inc 1 st at beginning of next and every
following row until there are 34 sts.
Next row: Inc in first st, K5, (K2tog, K5) 4 times
— 31 sts ★
Inc 1 st at beginning of next and every
following row until there are 35 sts
Cast off, for face edge
Place cloth on the head as illustrated. Catch
ends of cast off edge to front of figure. Catch
cast on edge to back of figure.
Make a 15cm [6in] double twisted cord,
knotting both ends Trim close to the knots Pin
centre of cord to head cloth at front, just
behind cast off edge. Continue pinning to form
a circle on the head, crossing ends of cord
over at back of head Catch cord to head as
pinned, leaving tail-ends of cord hanging
down at back.
Staff
You will need an ordinary plastic drinking
straw about 3mm [% n] in diameter, plus a
small ball of brown yarn
Use a darning needle to pass the yarn end
through the straw about 3mm [%in] away from
one end. Pull yarn through and leave a long
tail-end of yarn Now wind yarn off the ball
round and round the straw to within 3mm [%in]
of the other end. Break yarn leaving a long tail-
end and sew it through the straw as before.
Fold down 1cm [%in] at one end of the straw
and bind this section tightly to the straw with
the tail-end of yarn. Sew the yarn end into the
straw a few times to secure Repeat with the
other end of the straw.
Sew staff to hand or in the crook of one arm as
shown in the illustration.
Sheep
Note: Use cream for all the knitted pieces.
Body
Begin at back and cast on 12 sts.
P 1 row
Next row: Inc К wise into every st — 24 sts.
Beginning with a P row, st-st 17 rows
Next row: (K2tog) to end —12 sts. В & T tightly.
Noting that P side of st-st is right side, oversew
row ends together. This seam will run
underneath the body Turn right side out and
stuff Gather round cast on sts, pull up tightly
and fasten off.
17
Legs [make two pieces alike]
The following knitted strip makes one pair of
legs.
Begin at top edge and cast on 19 sts.
1st row: K9, P1, K9.
2nd row: P9. K1, P9.
Repeat these two rows once, then first row
once.
Cast off.
Starting at one set of row ends and with К side
of st-st outside, roll up the strip very tightly as
far as the centre line of sts. Catch rolled-up
section to centre sts. Roll up and sew the other
set of row ends in same way. Sew one pair of
legs under body at front and the other pair
under body at back.
Head
Begin at top edge and cast on 14 sts. P 1 row.
Next row: K4, inc К wise into next 6 sts, K4 —
20 sts
Join on another strand of cream yarn. Using
double yarn and beginning with a P row, st st
3 rows.
Break off one strand and continue in single
yarn.
К 1 row.
Dec for face
Next row: K2, (K2tog) 8 times, K2 — 12 sts.
Beginning with a P row, st-st 3 rows and dec
1 st at each end of 3rd row — 10 sts.
St-st 2 more rows.
Next row: (K2tog) to end — 5 sts.
В & T tightly.
Noting that К side of st-st on face is right side,
oversew row ends together. Turn right side out
and stuff. Leave cast on edge open. Note that
the oversewn seam will run underneath the
head.
Eyes and nose
Work the stitches in black, starting and
fastening off in stuffing at open cast on edge.
For one eye work a small back-stitch, 2 knitted
rows down the st-st face section. Work again
over the first back-stitch. For other eye repeat
in the adjacent st. At end of face work a small
V shape for nose.
Push a little more stuffing ins de head to cover
black yarn ends. Gather round cast on sts, pull
up tightly and fasten off. Pin the seam [at
section of head which was worked in double
yarn], to front of body above the В & T sts. Sew
head to body as pinned.
Ears [make two alike]
Cast on 5 sts.
1st row: КЗ, turn.
2nd row: Slip first st К wise, P to end.
Cast off P w se.
Gather up longest set of row ends. Pin these
edges to section of head worked in double
yarn, at sides of head. Make sure that К side of
st-st faces forwards. Sew ears in place as
pinned.
Tail
Work tail as for ears. Sew to back of body
above the gathered cast on sts, with P side of
st-st outside.
Mary
Skirt
Begin at lower edge and using blue cast on
32 sts.
1st row: (K1, inc К wise into next st) to end —
48 sts.
Beginning with a P row, continue in st-st and
work 25 rows.
Shape knee section of skirt
1st row: K13. (K2tog) 4 times, K6, (K2tog) 4
times, K13 — 40 sts.
2nd and every following alternate row: P.
3rd row: K11, (K2tog) 3 times, K6, (K2tog)
3 times, K11 — 34 sts.
5th row: КЮ. (K2tog) twice. K6, (K2tog) twice,
K10 — 30 sts.
7th row: K9, (K2tog) 6 times, K9 — 24 sts.
9th row: K9, (K2tog) 3 times, K9 — 21 sts.
Cast off, for waist edge.
Oversew row ends together and turn right side
out. For the base cut an 8cm [3in] diameter
circle of cardboard, making sure it is rigid as
for the standing figures. Push it inside the cast
on edge of skirt in same way as for basic
standing figure. Stuff skirt through the waist
edge, keeping it the same size as base as far as
the knee shaping. Continue stuffing but keep
the knee shaping section as flat as possible.
Skirt hem
Begin at lower edge and using blue to match
skirt cast on 60 sts.
G-st 3 rows. Cast off. Oversew row ends
together Place round lower edge of skirt with
seam at back. Sew cast off edge to skirt.
Bodice and head
Begin at waist edge and using blue to match
skirt cast on 26 sts. St-st 6 tows.
Next row: K6, K2tog, K10, K2tog, K6 —24 sts.
St-st 3 rows.
Dec for neck
Next row: (K2tog) to end — 12 sts.
Break off blue and join on light pink.
St-st 3 rows for neck.
Inc for head
Next row: K4, inc К wise into next 4 sts, K4 —
16 sts.
St-st 7 rows.
Break off light pink and join on brown for hair.
St-st 2 rows.
Next row: (K2tog) to end — 8 sts.
В & T tightly.
Oversew row ends together and turn right side
out. Stuff head, then stuff neck lightly. Stuff
bodice. Pin cast on edge of bodice to skirt, with
bodice edge just overlapping waist edge of
skirt. Make sure also that the oversewn skirt
and bodice seams are in line. Sew bodice in
place as pinned.
Shape the neck in same way as for the other
figures.
18
Face
Mark the eye positions and work one back-
stitch for each eye, as for the other figures.
Mark centre of mouth with a pin, 4 knitted rows
above the head inc row. Using two strands of
red sewing thread, work a small V-shape for
mouth with lower point of the V at marked
position Work once again over the first mouth
stitches.
Sleeves [make two alike]
Begin at lower edge and using blue to match
bodice cast on 16 sts.
G-st 2 rows
Beginning w th a К row continue in st-st and
work 2 rows
Dec 1 st at each end of next and every
following alternate row until 10 sts remain.
St-st 15 rows.
Next row: (K2tog) to end — 5 sts. В & T tightly
Make up and sew sleeves to bodice as given
for the other figures. Using light pink add
hands as for the other f gures also, but push
them a little further inside the sleeves Bend
arms at the elbow position and catch hands to
skirt as shown in the illustration.
Head-dress
Begin at top edge and using white cast on
8 sts.
1st row: K2, inc К wise into next 4 sts. K2 —
12 sts
Begin shaping
1st row — K2, P to last 2 sts, K2
2nd row — КЗ ml, К to last 3 sts. ml КЗ —
14 sts
Repeat these two rows until there are 50 sts
St-st 14 more rows, but К the first 2 sts and last
2 sts on every P row as before
G-st 4 rows, then cast off
To block the knitted piece
Wet the piece thoroughly, then squeeze out
excess moisture in a towel. Fold the piece,
bringing front g-st edges together. Pin these
edges to an ironing board covered with a
towel, stretching the inc shaping rows slightly.
Leave to dry. Place on the figure as illustrated.
Catch to head and sides of face Catch ends of
cast off edge to skirt hem
Next row: K1, K2tog, К to last 3 sts, K2tog K1 —
10 sts
Repeat from ★ — 8 sts.
G-st 6 more rows, then cast off.
To make up
Oversew the cast off edges of end pieces to
row ends of the st-st base as shown in the
diagram. Now bring the adjacent row ends of
long side pieces and end pieces together as
shown by the arrows in the diagram Oversew
them together on the outs de
Straiv piece
Using light yellow cast on 30 sts and st-st 30
rows
Cast off.
With P side of st-st outside oversew row ends
together leaving a gap at centre of seam With
this seam at centre of cast on and cast off
edges oversew across these edges ktuff
lightly but leave a hollow depression at centre
of the stuffed shape Oversew gap in seam.
Place in manger with seam against base
Baby
Body
Using white begin at lower edge and cast on
8 sts loosely
1st row: Inc К wise into every st — 16 sts
Beginning with a P row, st-st 13 rows
Next row: (K2tog) to end — 8 sts.
В & T loosely.
With К side of st-st outside, oversew row ends
together for centre back seam
Push a little stuffing nside With seam at centre
of cast on edge, oversew across cast on sts
Head
Using light pink cast on 5 sts and st-st 6 rows
for neck.
Next row: Inc К wise into every st — 10 sts.
Beginning with a P row st-st 5 rows for head.
В & T loosely
With К side of st-st outside, oversew row ends
together Stuff head, then pull up length of yarn
tightly at top of head and fasten off.
Push the neck r ght inside В & T sts of the body,
matching seams on both pieces Pull up length
of yarn tightly and fasten off.
Mark eye positions with pins 3 knitted rows
above inc row, placing pins at centres of
adjacent sts. Split a length of black yarn to get
a finer strand then work a tiny vertical back-
stitch at each eye position For hair, use brown
and work three small stitches on forehead
starting at gathered top of head.
Head covering
Begin at face edge and using white cast on
22 sts
1st row: K10, inc К wise into next 2 sts, K10 —
24 sts
Beginning with a P row st-st 4 rows and dec 1 st
at each end of every row — 16 sts.
Next row: P4 (P2tog) 4 times, P4 — 12 sts
Cast off.
Fold cast off edge in half and oversew across
cast off sts.
Turn right side out Place on baby s head and
catch ends of cast on edge to body at front.
Place baby in the hollow on straw piece
Blanket
Using white cast on 24 sts and g-st 2 rows.
Beginning with a К row, st-st 12 rows, but К the
first 2 sts and last 2 sts on every P row.
Commence shaping
Continue in st-st, keeping the two К sts correct
at beginning of all P rows only.
Dec 1 st at beginning of every К row and end of
every P row until 9 sts rema n.
G-st 2 rows, then cast off
Note that the shaped edge is the top edge of
blanket.
Place blanket over manger as illustrated
Catch to the straw piece and to sides and end
of manger
Manger
Long sides and base
[knitted in one piece]
Use double yarn in two different shades of
brown Begin at top of one long side piece and
cast on 18 sts.
G-st 18 rows. This completes one side piece
Commence base
Beginning with a К row st st 13 rows
This completes the base
Commence other side piece
G-st 18 rows, then cast off
End pieces [make two alike]
Use double yarn as before Begin at top edge
and cast on 12 sts.
★ G-st 4 rows
19
Christmas
Tree Trims'!
These pretty decorations are all very quick to
knit from oddments of yarn Foran inexpensive
little gift, the apple can also be made as a
novelty pincushion The measurements are
given in the instructions for each design
Materials: 3mm [No 11, USA 2] knitting
needles; small amount of stuffing, plastic
drinking straws about 5mm [%in] in diameter
with a 'bendy' section, for the candy canes,
oddments of yarn.
Twisted cords: Make single or double twisted
cords of required length for suspending the
tree trims. For an unobtrusive cord use brown
yarn and attach the cord as a loop For a more
decorative effect use coloured yarn and tie the
ends of the cord in a bow
Safety note: In normal circumstances the
electric lights which are used to decorate
Christmas trees should not present a fire risk.
However, it is safest to place all decorations on
the tree in positions where they do not come
into direct ^pntact with any of the lights
Garland ring
Measurement: 8cm [3in]. across the ring.
Using white cast on 16 sts and К 1 row
Begin shaping
1st row: K14, turn
2nd row: K12, turn.
3rd row: К to end
4th row: К to end
Repeat these four rows 19 more times
К 1 row, then cast off.
Oversew row ends together. Stuff the piece.
Bring cast off and cast on edges together and
oversew to join into a ring.
Holly leaves [make two]
Using green cast on 16 sts
1st row: P7, inc К wise into next 2 sts. P7 —
18 sts.
К 1 row. This completes the upper surface of
leaf
Work picot edge of leaf
Next row: KI, (yrn, K2tog) 8 times, K1
Beginning with a К row, st-st 2 rows.
Next row: K7, (K2tog) twice, K7 — 16 sts
Cast off.
Fold leaf at picot edge with right side of st-st
outside Oversew cast on and cast off edges
together Fold this edge in half and oversew
across cast off sts on underside of leaf Gather
up the row ends tightly and fasten off
Holly berries [make three]
Using red, cast on 12 sts lightly
Beginning with a P row, st-st 2 rows
Cast off tightly
Roll up the strip tightly starting at one set of row
ends and with right side of st-st outside
Oversew row ends in place. Now gather round
the outer edge at one end of the rolled-up
shape, pull up tightly and fasten off. Repeat at
other end.
Pine-cones [make two]
Using light brown cast on 48 sts.
1st row: K8, turn.
2nd and every following alternate row:
P to end.
3rd row: K16, turn.
5th row: K24, turn
7th row: K36, turn
9th row: K48
Work picot edge
For a plain pine-cone continue in light brown.
For a frosted pine-cone work next row in white
Next row: K1 (yrn. K2tog) to last st. K1
Continue in light brown and К 1 row. Cast off.
With right side of st-st outside, fold the strip
along the picot edge and catch cast off edge in
place. Starting at the longest set of row ends
and with right side of st-st outside, roll up the
strip, keeping the cast on edge sts leveCat the
base of the cone The picot points will spiral
downwards as you do this forming the points
of the pine-cone Now sew the short set of row
ends in place. Sew up through centre of the
cone and back again pull tightly and fasten
off. Oversew round cast on sts to secure, at
base of cone.
To assemble the pieces
Arrange holly etc on the garland ring, as
shown in illustration. Sew in place. Sew a
twisted cord to top of the garland behind the
decoration.
Christmas stocking
Measurement: 10cm [4'n] long.
Begin at lower edge and using red [main
colour] or colour of your choice, cast on 30 sts.
P 1 row.
Next row: K2, (inc К wise into next st, K1) to end
— 44 sts.
Beginning with a P row continue in st-st and
work 9 rows.
Shape top of foot
1st row: K18, (K2tog) 4 times, K18 — 40 sts
2nd and every following alternate row: P.
3rd row: K16 (K2tog) 4 times K16 — 36 sts
5th row: K14, (K2tog) 4 times K14 — 32 sts.
7th row: K12, (K2tog) 4 times, K12 — 28 sts.
Next row: P. Break off main colour.
There are 16 rows of st-st for the leg section of
the stocking. These can be worked in any
combination of colours and stripes. For the
stocking illustrated, work 4 rows in orange
4 yellow, 4 green and 4 blue.
After the 16 rows, join on main colour and g-st
5 rows.
Cast off.
Join row ends then oversew across cast on
sts. Turn right side out. Stuff very lightly, then
oversew across cast off sts
Sew a twisted cord to top of stocking at the
seam.
Bell
Measurement: 8cm [3m] high excluding holly
and the bell clapper.
Begin at lower edge and using double white
yarn cast on 45 sts. Break off one strand and
continue in single yarn.
G-st 4 rows.
Break off white and join on gold
Beginning with a К row, continue in st-st and
work 6 rows.
Next row: (K1, K2tog) to end — 30 sts.
St-st 15 rows.
Next row: (K1, K2tog) to end — 20 sts.
P 1 row.
Next row: (K2tog) to end — 10 sts.
В & T tightly
Join row ends and turn right side out Place
this seam at centre back of bell. Stuff lightly
Oversew across cast on sts. Sew a twisted cord
to top of bell. Trim with holly leaves and berries,
as given for the Garland ring. Make the bell
clapper as given for bobble on Baby's first
Christmas stocking [page 11] Sew it to centre
lower edge of bell
Christmas tree
Measurement: 8.5cm [3%in] high, excluding
the tub.
For the tree use two different shades of green,
one a little lighter than the other
Begin at lower edge and using two strands of
the darker green cast on 44 sts.
Break off one strand and continue in single
yarn
St-st 2 rows Join on the lighter shade of green
and continue throughout in two-row stripes of
light and dark green alternately. St-st 6 rows.
Next row: (K2, K2tog) to end — 33 sts.
St-st 7 rows.
Next row: (K1, K2tog) to end — 22 sts.
St-st 7 rows.
Next row: (K2tog) to end — 11 sts.
St-st 5 rows. Continue in dark green
Next row: K1, (K2tog) to end — 6 sts
В & T tightly.
Make up the tree and add twisted cord as
given for Bell
For the tub use tan and cast on 12 sts tightly
St-st 5 rows, then cast off loosely
Oversew row ends together and turn right side
out. With seam at centre back, oversew across
cast on sts, then cast off sts.
Sew cast off edge to base of tree at centre.
Make 9 baubles in same way as for holly
berries on the Garland ring, using colours
desired Sew the baubles to tree as illustrated
Candy cane
Measurement: 15cm [6in] long.
Using white cast on 50 sts. Note that first row is
the right side G-st 2 rows. Join on red and g-st
4 rows. Break off red and continue in white
G-st 2 rows, then cast off.
The knitted strip will be sewn up around the
drinking straw. First trim 1.5cm [%in] off the
end of the straw which is nearest to the bendy
section Stretch out the bendy section. The
straw should now measure 19cm [7%in] in
length. Gather up the row ends at one end of
the knitted strip Starting at this end, oversew
the cast on and cast off edges together with
right side outside enclosing the straw as you
go. Gather up the other set of row ends and
fasten off.
Now twist the knitted strip around the straw so
that the red stripe spirals along the length Sew
through each end of the knitted strip, catching
it to the straw. Bend over the straw at the bendy
section. To hold in bent position, sew through
both sections of the straw just underneath the
bend. Pull tightly and fasten off. For the bow
use green or yellow and cast on 60 sts. К 1 row,
then cast off. Tie in a bow around the cane
Sew a twisted cord to top of cane.
20
Holly-trimmed bauble
Measurement. 8cm [3in] long.
Begin at lower edge and using red cast on
12 sts.
P 1 row.
Next row: Inc К wise into every st — 24 sts.
P 1 row.
Next row: (K1 inc К wise into next st) to end —
36 sts ★
Beginning with a P row st-st 3 rows.
Break off red and join on white then g-st
14 rows.
Break off white and join on red Beginning with
a К row, continue in st-st and work 2 rows
Next row: (K2, K2tog) to end — 27 sts.
St-st 3 rows
Next row: (K1, K2tog) to end — 18 sts
St-st 3 rows
Next row: (K2tog) to end — 9 sts.
St-st 7 rows. В & T tightly.
Join row ends, turn right side out and stuff
Gather round cast on sts, pull up tightly and
fasten off
Sew a twisted cord to top of bauble. Trim with
holly leaves and berr es as given for Garland
ring
Apples
Measurement: 6cm [2%m) in diameter.
Work as given for Holly-trmmed bauble as far
as ★ using red or green yarn.
Beginning with a P row, continue in st-st and
work 15 rows.
Next row: (K2 K2tog) to end — 27 sts
P 1 row.
Next row: (K1 K2tog) to end — 18 sts
P 1 row
Next row: (K2tog) to end — 9 sts В & T tightly.
Join row ends, turn right side out and stuff
firmly Gather round cast on sts pull up lightly
and fasten off, but do not break length of yarn
as this will be used to sew on the stalk.
Use brown for stalk and cast on 6 sts. St-st 2
rows then cast off With P side outside,
oversew cast on and cast off edges together,
then wind yarn tightly round and round stalk
from one end to the other Sew yarn end into
stalk
Using the length of yarn on apple pass needle
up through apple to В & T sts. Sew through
one end of stalk, then pass needle back
through apple. Pull tightly to depress stalk into
apple, then fasten off
Use green for the leaf and cast on 8 sts
1st row: K6, turn
2nd row: К to end.
К 1 row, then cast off. Gather up the longest set
of row ends and sew to the stalk. Sew a twisted
cord to the stalk.
Using white work a few back-stitches at top of
apple as illustrated to resemble the 'shine
Lantern
Measurement: 9cm [3%in] long
Begin at lower edge and using red cast on 36
sts Mark centre of cast on edge G-st 2 rows
Continue working as follows, breaking and
joining colours as necessary and beginning
the gold st-st portions with a К row
St-st 8 rows gold then g-st 2 rows red.
St-st 8 rows gold
Continue in red and g-st 4 rows
Beginning with a К row, continue in st-st and
work 2 rows
Next row: (K2 K2tog) to end — 27 sts.
St-st 3 rows
Next row: (K1 K2tog) to end — 18 sts.
St-st 3 rows
Next row: (K2tog) to end — 9 sts
P 1 row, then В & T tightly.
Using red and starting at first knitted row of
gold above marked centre of cast on edge,
work a vertical line of chain stitches ending at
last knitted row of gold Leaving 6 clear knitted
sts to the right of first line of chain stitches,
work another line of chain stitches in same
way Repeat to the left of first line of chain
stitches.
Make up the lantern and add twisted cord as
given for Bell
21
Mr and Mrs
Frosty
These little snow people can be made as soft
toys or Christmas decorations When used for
ornamental purposes, a cardboard circle in
the base of each doll gives stability, so that
they will stand unsupported
Measurement: Each doll measures 20cm [8in]
in height to top of the hat
Materials: 3mm [No 11 USA 2] kn tting
needles, 80g [3oz] of stuffing for each doll; 70g
[2%oz] of white yarn [enough to make both
dolls] oddments of yarn in the other colours
Notes: The dolls are made in the same basic
way. Instructions for all the pieces are set out in
the order of making, with details given for each
doll as the work progresses. For either doll,
begin with the Body and head and continue
through the instructions, adding the pieces as
listed under the headings for each doll.
Body and head
Begin at lower edge and using white cast on 24
sts loosely.
P 1 row
Next row: Inc К wise into every st — 48 sts
Beginning with a P row. continue in st-st and
work 39 rows.
Shape shoulders
Next row: K11, (K2tog) twice, K18. (K2tog)
twice, K11 — 44 sts.
St-st 3 rows.
Shape neck
Next row: (K2tog) to end — 22 sts.
P 1 row.
Inc for head
Next row: Inc К wise into every st — 44 sts.
St-st 17 rows
Break off white and join on black for Mr
Frosty’s hat, red for Mrs Frosty’s hat
St-st 16 rows
Shape top
Next row: (K2 K2tog) to end — 33 sts
P 1 row
Next row: (K1. K2tog) to end — 22 sts.
Next row: (P2tog) to end — 11 sts.
В & T tightly.
Join row ends and turn right side out. Stuff
head, then body Head should measure 24cm
[9%in] around, body should measure 27cm
[10%in] around. Use a length of white yarn and
gather round cast on sts. If required, cut a 5cm
[2in] diameter circle of cardboard and push it
inside the cast on edge
Now pull up the gathers tightly to close cast on
edge, then fasten off.
Tie a length of white yarn tightly around the
neck and knot ends. Sew ends into neck
Face
Note: Refer to page 2 Work ng embro dered
stitches’, when starting and fastening off yarn
ends for the facial stitches.
Mark eye positions with p ns, 13 knitted rows
above the head shaping row leaving 4 clear
knitted sis between the pins Use black yarn for
the eyes. Work a back-stitch starting at one
marked position and make the stitch 2 knitted
rows high.
Repeat the back stitch twice, then fasten off.
Work other eye in same way.
22
Mark centre of mouth 6 knitted rows above the
head shaping row Use black yarn and work 3
small stitches to form a shallow U-shape as
shown in the illustration.
For nose use orange and cast on 6 sts
St-st 2 rows.
Next row: (K2tog) to end — 3 sts В & T tightly
Oversew row ends together w th right side of
st-st outside
Tuck tail-end of yarn inside nose instead of
stuffing. Sew cast on edge to face as
illustrated. Colour cheeks with red pencil.
Mrs Frosty’s hair
Begin at lower edge and using white cast on 44
sts. G-st 11 rows, then cast off Sew the piece to
head with row ends at sides of face and cast
off edge just below the first knitted row of the
hat
Mr Frosty’s hat brim
Using black cast on 53 sts and P 1 row
Next row: K1 (inc К wise into next st, K1) to end
— 79 sts ★
Beginning with a P row, st-st Screws
★★ Next row: K1 (K2tog, K1) to end — 53 sts
Cast off.
Oversew row ends together W th right side of
st-st outside, oversew cast on and cast off
edges together. Sew this oversewn seam to doll
at first knitted row of the hat colour ★★★
Make holly leaves and berries as for the
Garland ring [page 20] and sew them to hat
Mrs Frosty’s hat brim
Using red, work as given for Mr Frosty s hat
brim as far as ★ Beginning w th a P row st-st
3 rows.
Work picot edge
Next row: K1 (yrn, K2tog) to end
Beginning with a P row, st-st 3 rows
Now work as given for Mr Frosty's hat brim
from ★★ to ★★★
Make a 40cm [ 16in] double twisted green cord
for hat band. Tie it around hat in a bow at front.
Catch to hat
Mrs Frosty’s skirt
Begin at lower edge and using white cast on
96 sts
G-st 4 rows.
Beginning with a К row, st-st 8 rows.
Next row: (K1 K2tog) to end — 64 sts
P the next 2 rows.
Next row: К
Beginning with a К row, st-st 15 rows.
Cast off, for waist edge.
Join row ends and turn right side out Pull the
skirt onto the doll, with seam at centre back
and lower edge level with lower edge of body
Sew waist edge to doll.
Arms [make two alike for each doll]
Begin at top edge and using white cast on
18 sts
Beginning with a P row, st-st 25 rows.
Next row: (K2tog) to end — 9 sts.
В & T tightly
Join row ends of each arm, turn right s de out
and stuff lightly. Bring seam to centre of cast
on edge then oversew across cast on sts. Pin
these edges to sides of body just below neck
with arm seams against body. Make sure that
top edges of arms slope away from neck so
that arms point forwards Sew tops of arms in
place Catch one of the arms to body. Catch
other arm to body leaving the lower portion
free to hold the walking stick or umbrella
Scarf
Use red for Mr Frosty, green for Mrs Frosty.
Cast on 80 sts and g-st 7 rows. Cast off Attach
fringe to each set of row ends — green for Mr
Frosty red for Mrs Frosty. Place scarf around
neck and catch in place at overlap
Mr Frosty’s walking stick
Make as given for Candy cane [Mrs Claus,
page 6]
Sew to end of arm
Mrs Frosty’s umbrella
For umbrella handle use black and make
Candy cane as given for Mrs Claus [page 6].
Do not add the red spiral stripe.
For umbrella top piece use red and cast on 12
sts First row is right side.
1st row: K10, turn.
2nd row: К to end
3rd and 4th rows: К
Repeat these four rows 4 more times.
Cast off P wise
With right side outside, oversew cast on and
cast off edges together
Push umbrella handle inside so that end of
handle just protrudes through the shortest set
of row ends Sew these row ends to handle.
Make a 15cm [6in] single twisted green cord.
Tie it tightly in a bow around umbrella. 1cm
[%m] away from other set of row ends. Sew
through bow to secure. Sew umbrella handle
to end of arm
Little Robin д,
Redbreast
You only need small amounts of yarn, a little
time and a packet of seeds to create ths
unusual Christmas gift for gardening
enthusiasts. Since the base is a knitted
pocket which contains the seed packet, it will
hold any other kind of flat object, envelope or
sachet and here are some alternative
suggestions. Dried lavender bath salts or
shampoo, a few notelets herbal tea bags
family photographs, a letter, a small note pad,
a calendar or diary, a children’s book. If you
wish to make the scene for display only, insert
a piece of cardboard and sew up the open
end of the base
Measurement: The base is 12 by 15cm [4% by
6m]; robin is 4cm [1 %in) high.
Materials: 3mm [No 11 USA 2] knitting
needles; 5mm [No 6, USA 7] knitting needles
— see Important notes below; small amount
of stuffing; 30g [1oz] of wh te yarn for the
base; oddments of yarn in the other colours.
Important notes: Use 3mm [No 11 USA 2]
knitting needles for all the pieces unless
otherwise stated in the instructions. Make all
the pieces before assembling
The log
Note: Use 5mm [No 6. USA 7] knitting needles
and double yarn throughout.
Using two different shades of brown yarn cast
on 16 sts.
Beginning with a P row, st-st 11 rows. Note
that К side of this section of st-st is right side
of the log.
Break off brown and join on two strands of
white.
К 1 row
Beginning with a К row, st-st 6 rows. Cast off.
23
Oversew cast on and cast off edges together.
Gather round one set of row ends, pull up
tightly and fasten off. Turn right side out and
stuff Gather round remaining set of row ends,
pull up tightly and fasten off but do not break
yarn. Pass needle through log to other set of
row ends then back aga n Pull tightly to
depress row ends into log slightly, then fasten
off
Robin
Begin at tail-end of body and using tan yarn
cast on 6 sts
P 1 row.
Next row: Inc К wise into every st — 12 sts
P 1 row
Next row: Inc К wise into every st — 24 sts
Beginning with a P row, st-st 5 rows
Inc for head
Next row: K9, inc К wise into next 6 sts, K9 —
30 sts.
Continue in st-st and work 5 rows.
Dec for breast
Next row: K9, (K2tog) 6 times, K9 — 24 sts.
P 1 row and mark centre of row with a
coloured thread.
Break off tan, join on red for breast and st-st
2 rows.
Next row: (K2tog) to end — 12 sts
P 1 row.
Next row: (K2tog) to end — 6 sts. В & T tightly.
Join row ends, leaving a small gap at centre of
seam. Gather round cast on sts, pull up tightly
and fasten off.
Turn right side out and stuff, but do not close
gap in seam. Use black yarn for the eyes and
beak, starting and fastening off yarn in
stuffing at gap in seam.
Mark eye positions with pins on either side of
the coloured thread, leaving 2 clear knitted sts
between the pins. Work a short vertical back-
stitch for each eye, then repeat at same
positions Work beak in same way below eyes^
but leave yarn loops protruding. Oversew
through the loops several times to make beak
firm Now add a little more stuffing if
necessary, before closing gap in seam
For the robin’s tail use tan and cast on 4 sts.
Work in st-st and inc 1 st at beginning of first
and every following row until there are'8 sts.
St-st 8 rows
Dec 1 st at beginning of next and every
following row until 4 sts remain Cast off.
With right side of st-st outside oversew cast on
and cast off edges together then oversew row
ends together at each side.
Sew cast on, cast off edge of tail to back of
robin just below the gathered cast on sts of
body
Holly and pine-cones
Refer to the Garland ring [page 20] and make
four holly leaves, six berries and three frosted
pine-cones
The pocket base
[make two pieces alike]
Notes: Use 5mm [No 6, USA 7] knitting
needles and double white yarn. P side of st-st
is right side
Cast on 20 sts and st-st 36 rows, but К the first
2 sts and last 2 sts on every P row Cast off.
To assemble the pieces
With right side of one base piece uppermost,
sew on the log, holly and pine-cones, arrang-
ing them as shown in the illustration On the
white portion of the log, use brown yarn to
work robin's feet. Work three stitches for each
foot, fanning out from a centre point and
placing feet side by side. Sew robin to log so
that feet are visible at front
Place the other base piece underneath the
first piece, matching cast on and cast off
edges and with right sides outside Oversew
cast on edges together and row ends at each
side leaving cast off edges open for inserting
the gift or piece of cardboard
If desired, add a small gift tag with an
appropriate greeting.
Last-minute
Dolls 4|»W
These sweet little characters are ideal for last-
minute stocking fillers, as they can be knitted
up so quickly. They are all worked from the
same basic pattern, with extra accessories for
each of the dolls. You should begin by
referring to the instructions for the doll you
are about to make If twisted cords are
attached to the top. the dolls can be used as
Christmas tree decorations.
Measurement: Height of basic doll is 8 5cm
[3%in],
Materials: 3mm [No 11, USA 2] knitting
needles; small amount of stuffing; oddments
of yarn
Basic doll
Legs, body and head
Begin at lower edge and using colour
required for legs cast on 10 sts loosely. Mark
centre of the cast on edge with a coloured
thread.
1st row: Inc К wise into every st — 20 sts.
Beginning with a P row continue in st-st and
work 7 rows Mark centre of the last row with a
coloured thread
St-st 4 more rows.
Break off yarn and join on colour required for
upper body
St-st 6 rows.
Shape shoulders
Next row: K4, (K2tog) twice, K4, (K2tog) twice,
K4 — 16 sts.
P 1 row
Break off yarn and join on colour required for
head
St-st 2 rows.
Shape head
Next row: K6, inc К wise into next 4 sts. K6 —
20 sts. St-st 9 rows.
Next row: (K2tog) to end — 10 sts.
В & T loosely.
Join row ends for centre back seam Bring
marked centre of cast on edge to the seam,
then oversew across cast on sts Turn right
side out. To divide the legs, use matching yarn
and begin at the marked row. Sew through
doll to back seam, then back again. Continue
sewing back and forth through the doll until
you reach cast on edge. Fasten off.
Stuff legs, then body and head. Use a length
of matching yarn to gather round first knitted
row of the head. Pull up gathers very tightly
and knot ends Wind yarn once round neck
and knot ends again Sew ends into neck.
Finish stuffing head, then pull up length of
yarn tightly and fasten off
Use black yarn for the eyes Mark eye
positions with pins, 6 knitted rows above head
shaping row, leaving 2 clear knitted sts
between the pins. For one eye, work a tiny
back-stitch downwards from the marked
position Work another back-stitch at same
position, then fasten off. Repeat for the other
eye
For mouth work a small horizontal red stitch
[black for Snowman], 2 knitted rows above
head shaping row. Colour cheeks w th red
pencil.
BCISIC OTITIS [make two alike]
Begin at end of hand and using colour to
match head cast on 7 sts.
Beginning with a P row, continue n st-st and
work 2 rows
Break off yarn and join on colour required for
sleeve
St-st 9 rows В & T tightly.
Oversew row ends together, with right side of
st-st outside. Stuff, then gather round cast on
sts, pull up tightly and fasten off.
Sew tops of arms to sides of doll, about 5mm
[%in] below neck.
Toy soldier
Make basic doll, using black for legs, red for
upper body and light pink for head. Add basic
arms, using red for sleeves Work small white
stitches on upper body for buttons. For belt
use white and cast on 22 sts Cast off Place
round waist and catch row ends together at
back. Sew belt to doll. Use gold to work four
stitches for the buckle
Hot
For chin strap use gold Cast on 14 sts, then
cast off Sew under chin and up sides of face.
For hat use black, begin at lower edge and
cast on 24 sts
G-st 17 rows.
Next row: (K2tog) to end — 12 sts. В & T
tightly. Oversew row ends together and turn
right side out. Stuff top of hat, place on head
as illustrated, then sew cast on edge to head
Snowman
Make basic doll and arms, using white
throughout Work small black stitches on
front of body as illustrated.
Cap
Using green begin at lower edge and cast on
24 sts.
G-st 2 rows.
Break off green and join on red
Beginning with a К row, st-st 8 rows.
24
Next row: (K1. K2tog) to end — 16 sts ★.
P 1 row.
Next row: (K2tog) to end — 8 sts. В & T tightly
★★ Oversew row ends together and turn right
side out Sew cap to head as illustrated Using
green make a bobble as for holly berry
[Garland ring page 20] Sew to top of cap
★★★.
For scarf, use red and cast on 40 sts. Cast off.
Place round neck. Cross over ends at one
side and catch in place
Santa
Make basic doll using red for legs and upper
body and light pink for head. Add basic arms
using red for sleeves. Using black, add belt as
for Toy soldier Using white, make beard as
given for Christmas crib figure [Basic beard,
page 15] Sew beard to face, then work nose in
red stitches above beard
Work cap as for Snowman's cap to ★, using
white instead of green for the g-st rows
Continue in st-st and work 3 rows.
Next row: (K2tog) to end — 8 sts
St-st 3 rows.
Next row: (K2tog) to end —4 sts В & T tightly.
Make up as given for Snowman’s cap from
★★ to ★★★, using white for the bobble. Fold
down top of cap and catch to head.
Clown
Make basic doll, using black for legs, green
for upper body and light pink for head. Work
nose as for Santa. Add basic arms using
green for sleeves. Use dark blue to work
stitches for buttons on upper body
Pants
Begin at lower edge and using red cast on
18 sts
Mark centre of cast on edge with a coloured
thread
1st row: Inc К wise into every st — 36 sts
Join on gold. Beginning with a P row st-st 8
rows, working in two-row stripes of gold and
red alternately. Continue in gold.
Next row: (P1 P2tog) to end — 24 sts.
Cast off P wise, for waist edge.
Join row ends for centre back seam. Turn
right side out. Put pants on doll. Sew wa st
edge to doll, just above last knitted row of
black Sew through doll’s legs, catching
marked centre of cast on edge of pants to
back seam of pants.
Hat and hair
Begin at lower edge of hat and using gold
cast on 24 sts.
G-st 2 rows Break off gold and join on dark
blue. Beginning with a К row continue in st-st
and work 2 rows
Next row: (K2tog, K1) to end — 16 sts.
St-st 4 rows.
Next row: (P2tog) to end — 8 sts.
В & T tightly.
Oversew row ends together and turn rght
side out. Stuff top lightly, then sew cast on
edge to head as illustrated.
For hair use orange and cast on 18 sts.
1st row: [wrong side] KI, (K1 winding yarn
twice round tip of right hand needle) 16 times,
К 1
2nd row: K1, (K1. letting the extra wound-
round loop drop) 16 times, K1 — 18 sts
Cast off.
Sew cast off edge round head, level with lower
edge of hat as illustrated.
Collar
Using red make as for hair Oversew row
ends together at back of neck
Christmas elf
Make basic doll, using dark green for legs,
green for upper body and light pink for head
Add basic arms using green for sleeves Add
red belt, light yellow buckle and buttons, as
for Toy soldier.
Make cap as for Santa using dark green for
g-st rows and red for remainder Omit the
bobble and sew cap to head as illustrated.
Make collar as for Clown’s hair using red
Oversew row ends of collar together at back
of neck.
Christmas fairy
Make basic doll, using white for legs and
upper body and light pink for head.
Arms [make two alike]
Begin at end of hand and using colour to
match head cast on 6 sts.
Beginning with a P row, continue in st-st and
work 7 rows.
Break off yarn and join on white.
К 1 row.
Next row: Inc К wise nto every st — 12 sts.
Beginning with a К row, st-st 2 rows
Next row: (K2tog) to end — 6 sts
В & T tightly.
Make up and sew to doll as for basic arms.
25
Hair and bow
Using light yellow for hair, begin at lower edge
and cast on 20 sts.
G-st 2 rows.
Beginning with a К row, st-st 10 rows, but К
the first and last st on every P row
Next row: K2, (K2tog) 8 times, K2 — 12 sts
Cast off.
Fold cast off edge in half and oversew across
the sts for centre parting of hair Turn right
side out Place on doll's head as illustrated
Sew row ends in place. Catch hair to head just
above the g-st border
Use red for the hair bow and cast on 22 sts
К 1 row, then cast off. Oversew row ends
together and turn right side out. Work green
running stitches through the К row Tie red
yarn tightly round the centre of the piece to
form the bow-shape Sew to top of head
Skirt
Begin at lower edge and using red cast on
36 sts G-st 2 rows. Break off red and jo n on
white. Beginning with a К row, st-st 12 rows.
Dec for waist
Next row: (K1, K2tog) to end — 24 sts. Cast
off.
Join row ends and turn right side out. Work
green running stitches round centre of g-st at
lower edge. Place skirt on the doll so that cast
on edge is level with doll's feet. Sew cast off
edge to doll.
Wings [make two pieces alike]
Using white cast on 5 sts. Work in g-st
throughout.
Inc 1 st at beginning of first and every
following row until there are 10 sts
G-st 10 rows
Dec 1 st at end of next and every following row
unt I 4 sts remain
Cast off *
Oversew cast off edges of wings together
Sew this seam to back of doll at upper body.
Bow
Make a 10cm [4in] single twisted red cord. Tie
in a bow and sew under chin
Mrs Claus
Make basic doll using red for legs and upper
body and light pink for head. Add basic arms
using red for sleeves
Make skirt as for Fairy, but join on white after
the red g-st rows and st-st 12 rows in two-row
stapes of white and red alternately. Work the
dec and cast off rows in white. Make up and
sew in place as for Fairy.
Bonnet
Knit and make up as for Fairy’s hair, using
white for g-st rows and red for remainder
Place on head with the g-st rows around the
face Catch ends of cast on edge together
under chin with a length of white yarn Add
bow under chin as for Fairy, using wh te. Sew
row ends of bonnet to back of head above
neck.
To keep little hands warm, make a cosy muff in
the shape of a snow-covered log, then add a
knitted robin and some holly for decoration
The muff has circular end-pieces for the hands
to pass through, which provide extra warmth
and protection
Measurement: The muff is 20cm [8in] in
length
Materials for the muff: 5mm [No 6 USA 7]
knitting needles, three different shades of
brown yarn, total weight 60g [2oz] 40g [1 !4oz]
of white yarn
Materials for the robin and holly trimming:
Refer to page 23 [Little Robin Redbreast] for
the robin and page 20 [Garland ring] for the
holly leaves and berries. Note that they are all
worked on 3mm [No 11, USA 2] knitting
needles.
Tension for the muff: Working with three
strands of yarn and 5mm [No 6, USA 7] knitting
needles: 17 sts and 32 rows = 10cm [4m]
square, measured over the g-st.
The muff
Using three strands of brown yarn together,
cast on 34 sts.
Note that first row is right side. G-st 56 rows.
Break off brown and join on three strands of
white for the snow.
G-st 29 rows then cast off loosely
Oversew cast on and cast off edges together
and leave wrong side out. For the neck strap
make a 1 metre [1% yard] twisted cord us ng
six strands of white yarn Lay centre of cord
across centre of the snow and catch cord in
place. Turn muff right side out. Knot ends of
cord together, adjusting length to suit the
child. Trim off yarn ends evenly
End pieC€S [make two alike]
Using three strands of brown yarn as for muff,
cast on 27 sts loosely
1st row: K1, (inc К wise into next st, K1) to end
— 40 sts. G-st 3 rows Cast off loosely
Oversew row ends of each piece together
Place one piece inside one end of muff and
sew cast off edge in place just inside row ends
of muff Repeat at other end
Make the robin [page 24], holly leaves and
berries [page 20]
Work robin's feet on the snow before sewing
robin and holly in place as illustrated
26
Three
Tea-cosies v
These cosies will fit standard-shaped tea-
pots in three sizes:- two cup. four cup or six
cup There are three designs to choose from,
a Christmas pudding, robin in the snow and
one decorated with holly and pine-cones All
the decorative ideas are interchangeable so
that each cosy can be made up in any of the
three different sizes A tea pot complete with
knitted cosy, would make a delightful and
useful Christmas gift
Measurements: The cosies will fit small,
medium and large standard-shaped tea-pots
as mentioned above
Materials for the basic cosies: 5mm [No 6.
USA 7] knitting needles; for small cosy —
oddment of main colour yarn and of white; for
medium cosy — 40g [1%oz] total weght of
main colour yarn and oddment of white for
large cosy — 50g [1 %oz] total weight of main
colour yarn and oddment of white
Materials for the decoration: Refer to page
23 [Little Robin Redbreast] for the robin and
page 20 [Garland ring] for the holly leaves,
berries and pine-cones Note that they are all
worked on 3mm [No 11, USA 2] knitting
needles.
Tension: Working wth two strands of yarn
and 5mm [No 6, USA 7] knitting needles: 18 sts
and 35 rows = 10cm [4m] square, measured
over the g-st.
Mam pieces [make two alike]
Notes: The pieces are worked in double yarn
on 5mm [No 6, USA 7] knitting needles. Use
light and dark brown for the Christmas
pudding cosy white and light green for the
robin cosy, double red yarn for the decorative
cosy
Instructions for the smallest cosy are given
first, followed by the medium and large s zes
in { } brackets
Begin at lower edge and cast on 20 {26 : 30}
sts loosely
G-st 2 rows for all sizes
Next row: K2 {5:7}, (inc К wise into next st, K2)
6 times, K0 {3 5} — 26 {32 36} sts
G-st 25 {31 35} rows.
Next row: K2 {5 7}, (K2tog K2) 6 times K0
{3 : 5} — 20 {26.30} sts.
Cast off loosely
Top piece
Note: Use double white yarn and 5mm [No 6,
USA 7] knitting needles P side of st-st is r ght
side.
For largest size cosy
Cast on 72 sts and К 1 row
Begin shaping
1st row: (K7, K2tog) to end — 64 sts.
2nd and every following alternate row: P
★ 3rd row: (K6 K2tog) to end — 56 sts
★★ 5th row: (K5, K2tog) to end — 48 sts.
7th row: (K4, K2tog) to end — 40 sts.
9th row: (КЗ, K2tog) to end — 32 sts.
11th row: (K2, K2tog) to end — 24 sts
13th row: (K1, K2tog) to end — 16 sts.
15th row: (K2tog) to end — 8 sts
В & T tightly.
For medium size cosy
Cast on 64 sts and К 1 row.
Begin shaping
Shape as given for largest size cosy from ★
[3rd row] to end, noting that alternate rows
will all be P rows
For smallest size cosy
Cast on 56 sts and К 1 row.
Begin shaping
Shape as given for largest size cosy from ★★
[5th row] to end, noting that alternate rows
w II all be P rows
To make up all cosies
Place the two main pieces together, matching
cast on and cast off edges and row ends
Oversew the pieces together at one set of row
ends for 1cm [%in] only, starting at cast on
edge Repeat at cast off edge The gap at
centre of this seam is for the tea-pot spout or
handle
Pin the cast off edges of mam pieces just over
the cast on edge of top piece, with wrong
sides of both uppermost Catch cast off edges
of main pieces to the loops of first knitted row
on wrong side of top p ece as pinned
Now oversew the row ends of top piece
together. Oversew remaining row ends of
main pieces together leaving a gap in seam in
same way as for the other row ends. Turn cosy
right side out
To decorate the cosies
Refer to the illustration for the decoration on
each cosy. Make the holly leaves, berries and
frosted pine-cones as given for the Garland
ring [page 20] then sew in place. Make the
robin [page 24] then work the robin’s feet on
the knitted top piece before sewing robin in
place.
© 1991 Jean Greenhowe Designs Designed and published by Jean Greenhowe Designs, PO Box 295, Aberdeen AB9 8NW, Scotland, U.K.
Printed by Gilcomston Litho (Aberdeen) Ltd Photography by Jim Miller, Aberdeen
© WARNING—COPYRIGHT. This publication is protected by the law of copyright and reproduction in any form or by any means (including photocopying) is strictly
forbidden The items in this publication are copyright and may not be reproduced in whole or in part for commercial or industrial purposes.
Sam Scarecrow ® creations Ref- No. JGD 07
27
Printed In Scotland
by Gilcomston Litho (Aberdeen) Lid.
Have you seen Jean Greenhowe's other knitting booklets?
Available from most knitting yarn stockists.