/


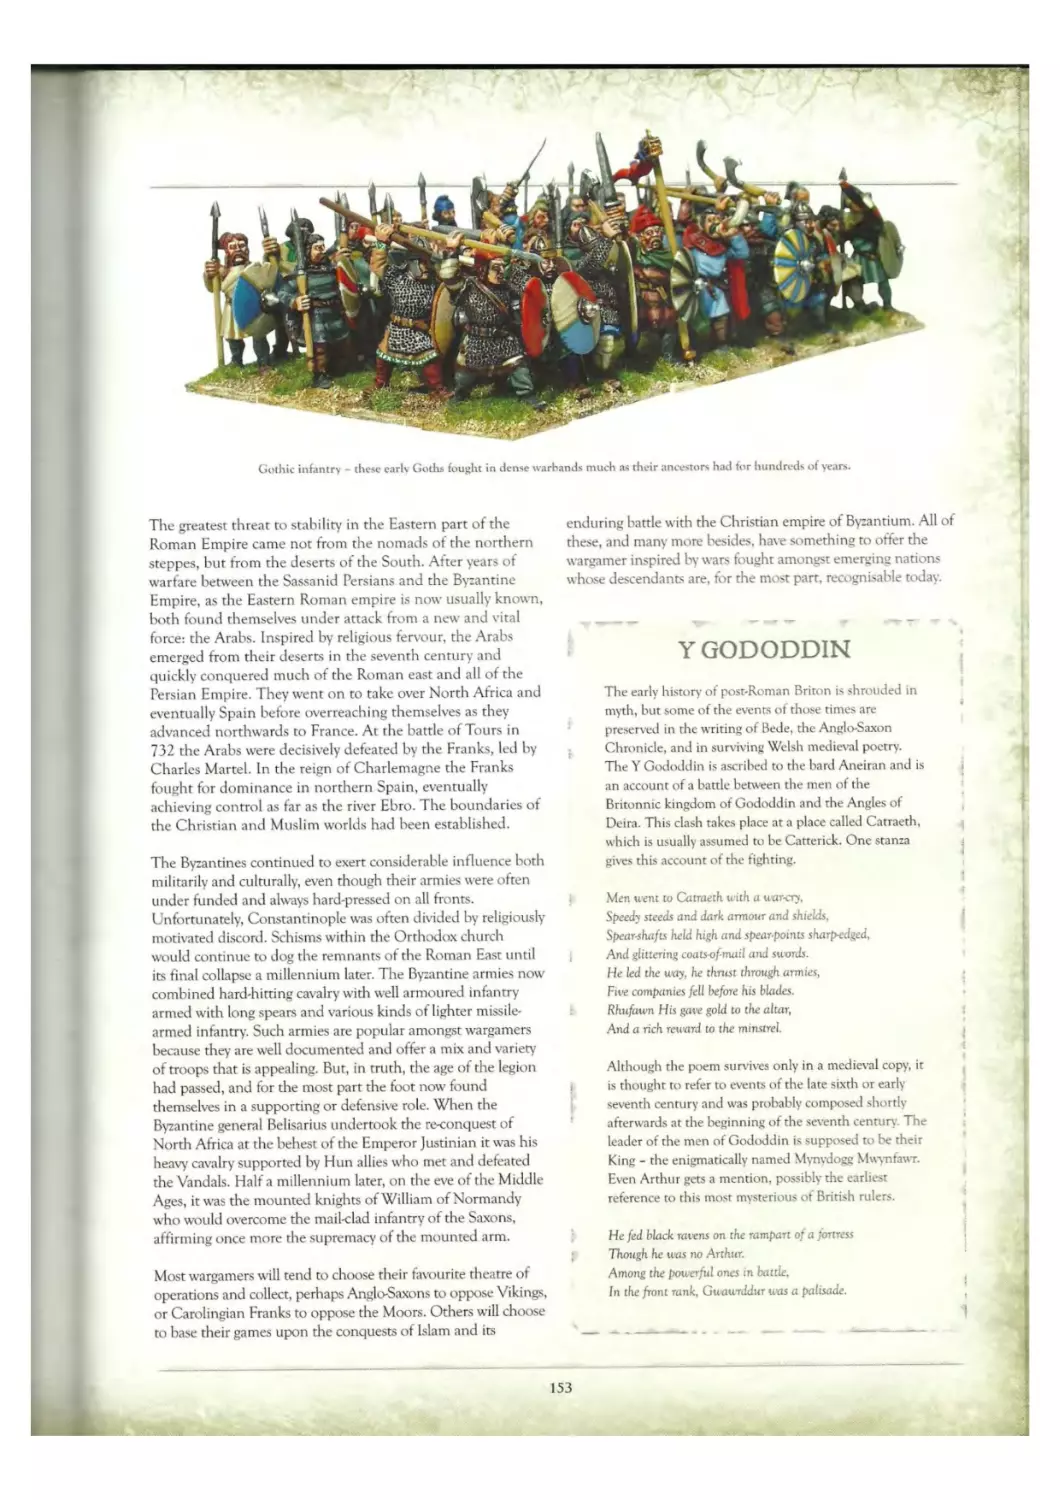


Текст
BOADICEA
Alfred the Great
Alexander the Great
—Сйлдгггв—
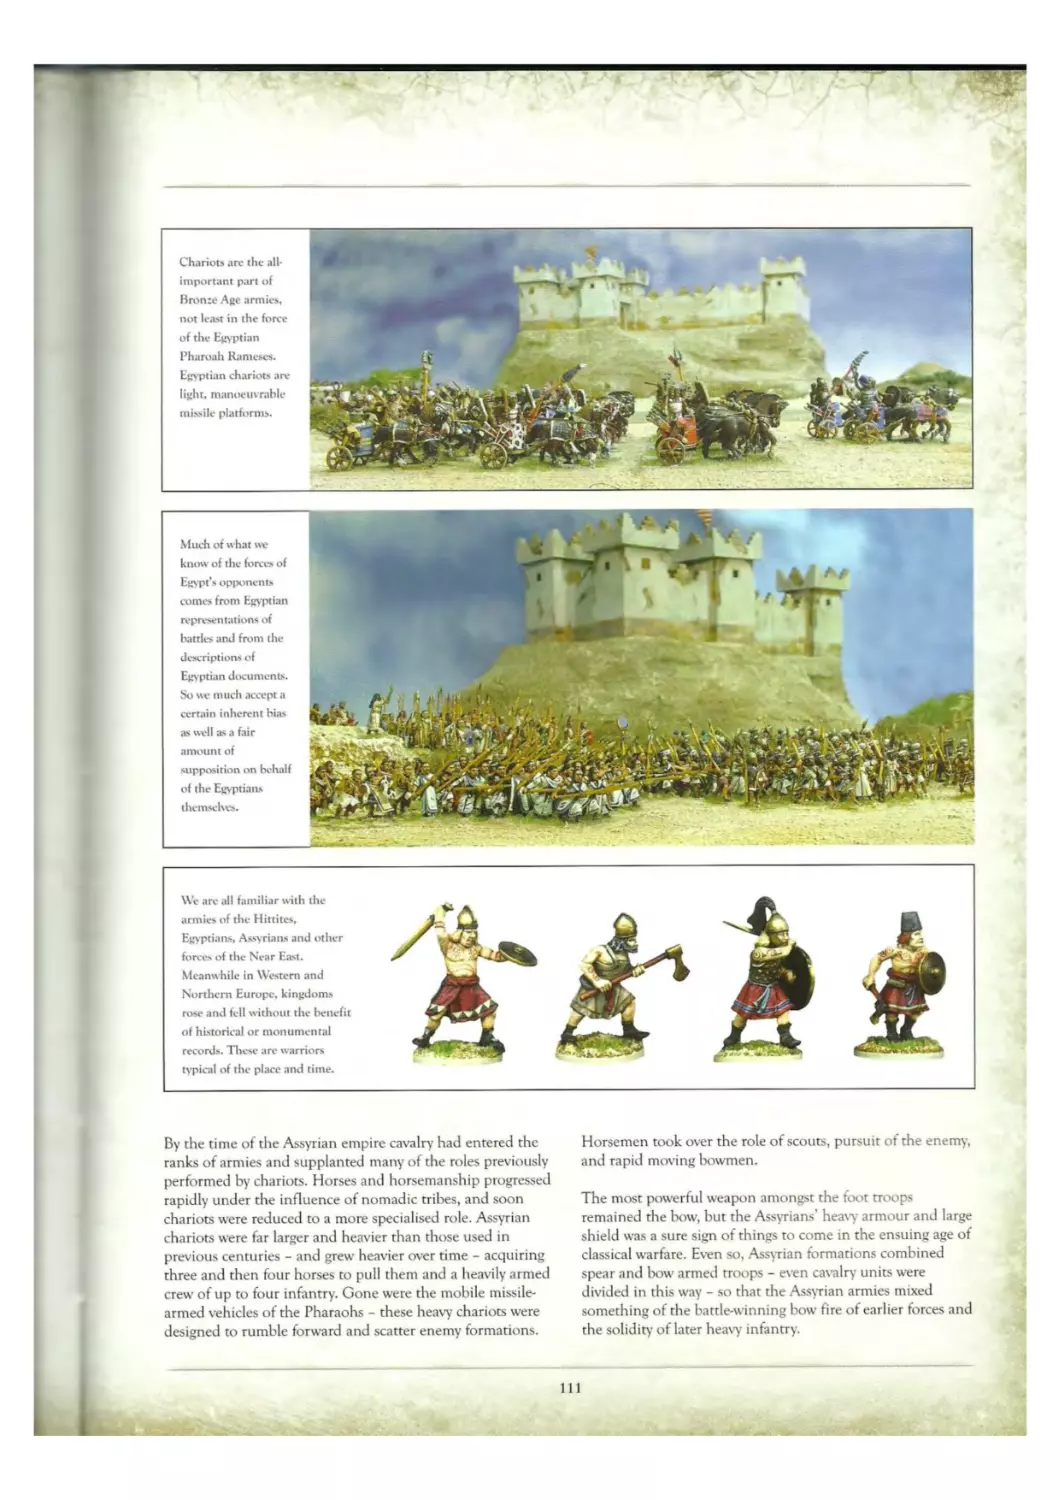
Pharaoh Rameses
WlLUA* TT€ CONQCBCR
•HAIL CAESAR-
f| Game Design and Written By:
Rick Priestley
Photography:
Per^^Michael Perry, Dr Phil Hendry
Kevin Dallimore, Duncan MacFarlane,
Eric Hagen and Wargames Illustrated
Cover Artwork:
Peter Dennis
Design and Layout:
Paul Sawyer and Tim Vincent
Editing:
Steve Yates and
Duncan MacFarlane
With Special Thanks To:
Drew Will, Alessio Cavatore,
Sean Turtle, Mark Sims and
Great Escape Games
ISBN: 978-0-956358L1-0
© Copyright Warlord Games Ltd 2011
Warlord Games, the Warlord Games logo,
Hail Caesar and the Hail Caesar logo are trademarks
of Warlord Games Ltd. All rights reserved.
All rights resenvd. No pan of this publication may lx
reproduced, stored in a retrieval system, or transmitted, in
any form or by any means without the prior written
permission of rhe publisher, nor be otherwise circulated in
any form of binding or cover other than that in which it is
published and without a similar condition being imposed
upon the subsequent purchaser.
www.warlordgames.co.uk
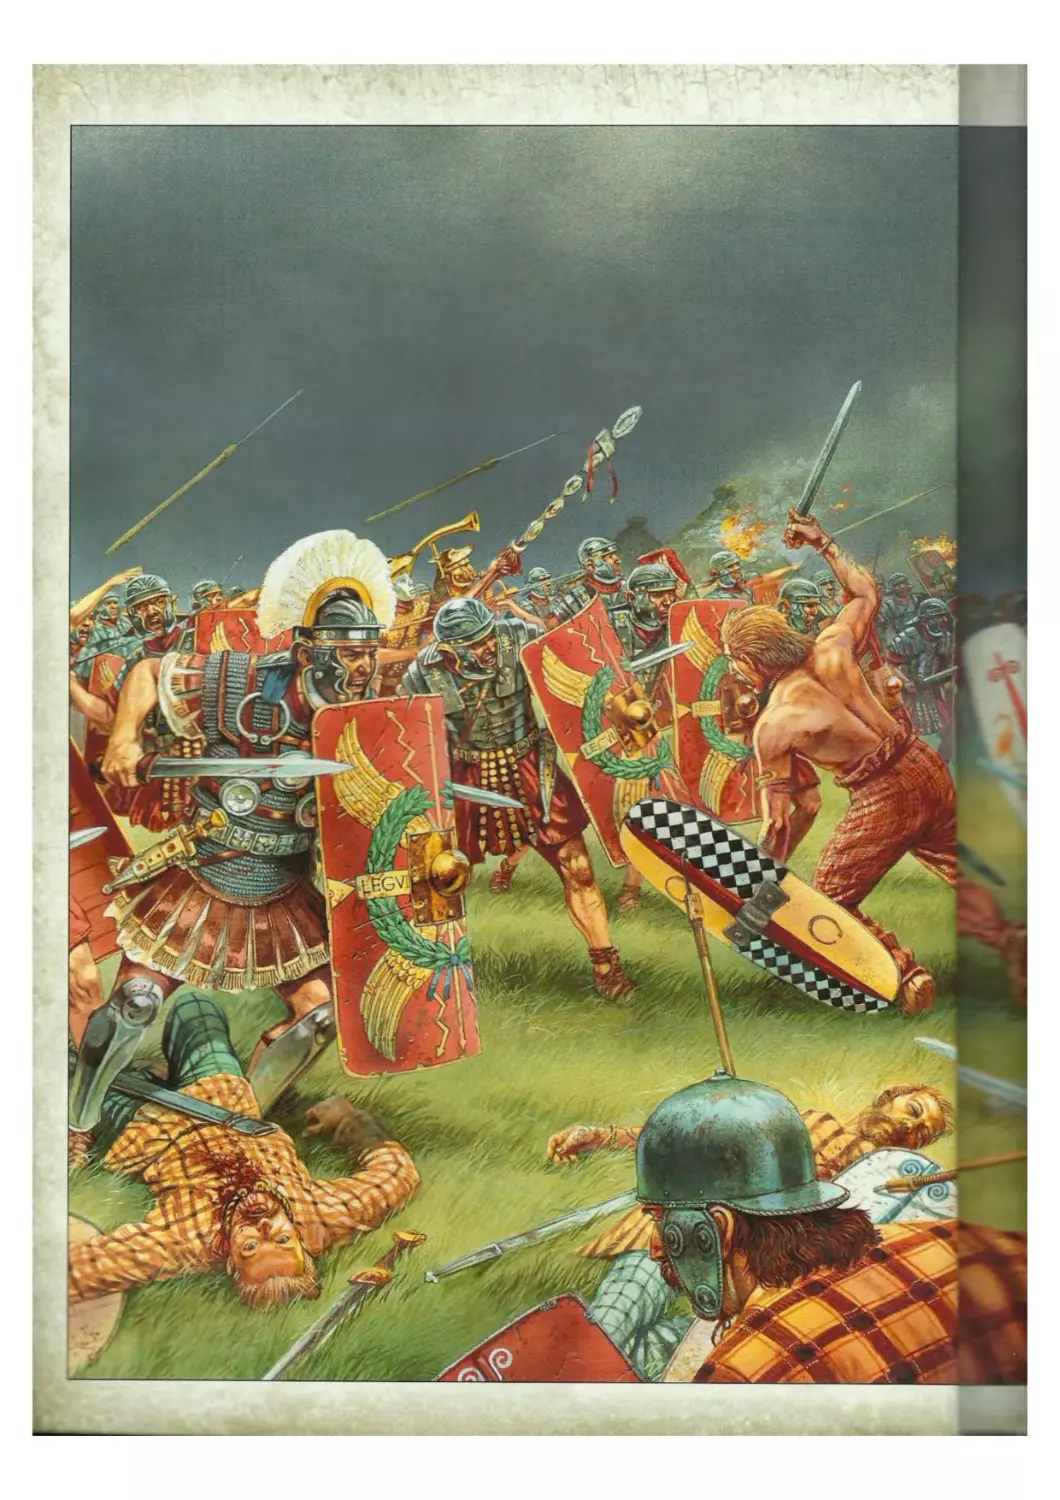
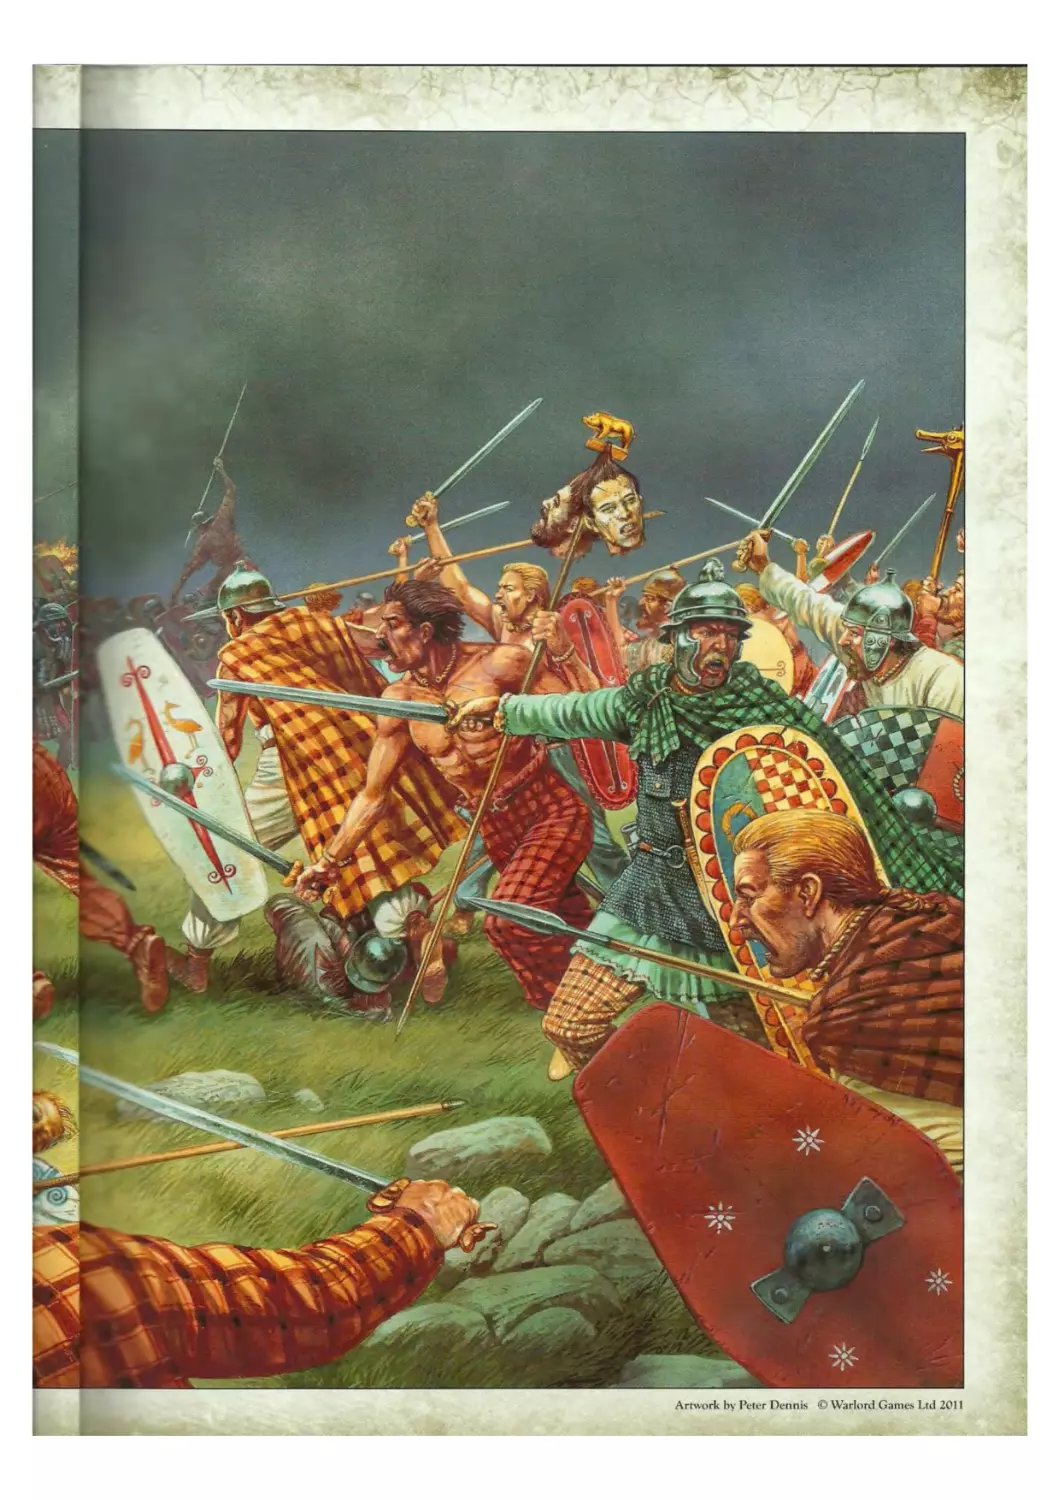
Artwork by Peter Dennis © Warlord Games Ltd 2011
CONTENTS
Foreword 5 Linear Obstacles Rivers
Hail Caesar 6 Buildings .
The Army 8 Impassable Terrain
Models 8 Embellishing the Tabletop
Organising rhe Models 9
The Unit 10 Ranged Attacks
Divisions and Commanders 10 Short and Long Ranged Attacks
Troop Types 11 Who Can Make Ranged Arracks?
Fighting Qualities 12 Range
The Unit’s Leader 13 Measure Distance
Bases for the Models 14 Nominate Target
Bases for Commanders 15 Choice of Targets
Size of Units 16 Arrack
Casualty Markers 17 Morale Saves
Leadership Ratings 17 Casualties Shaken Units
Formations 18 Shattered Units
Basic Formations 18 1 Msotder
Changing Formation 22 Ranged Attacks and Open Order
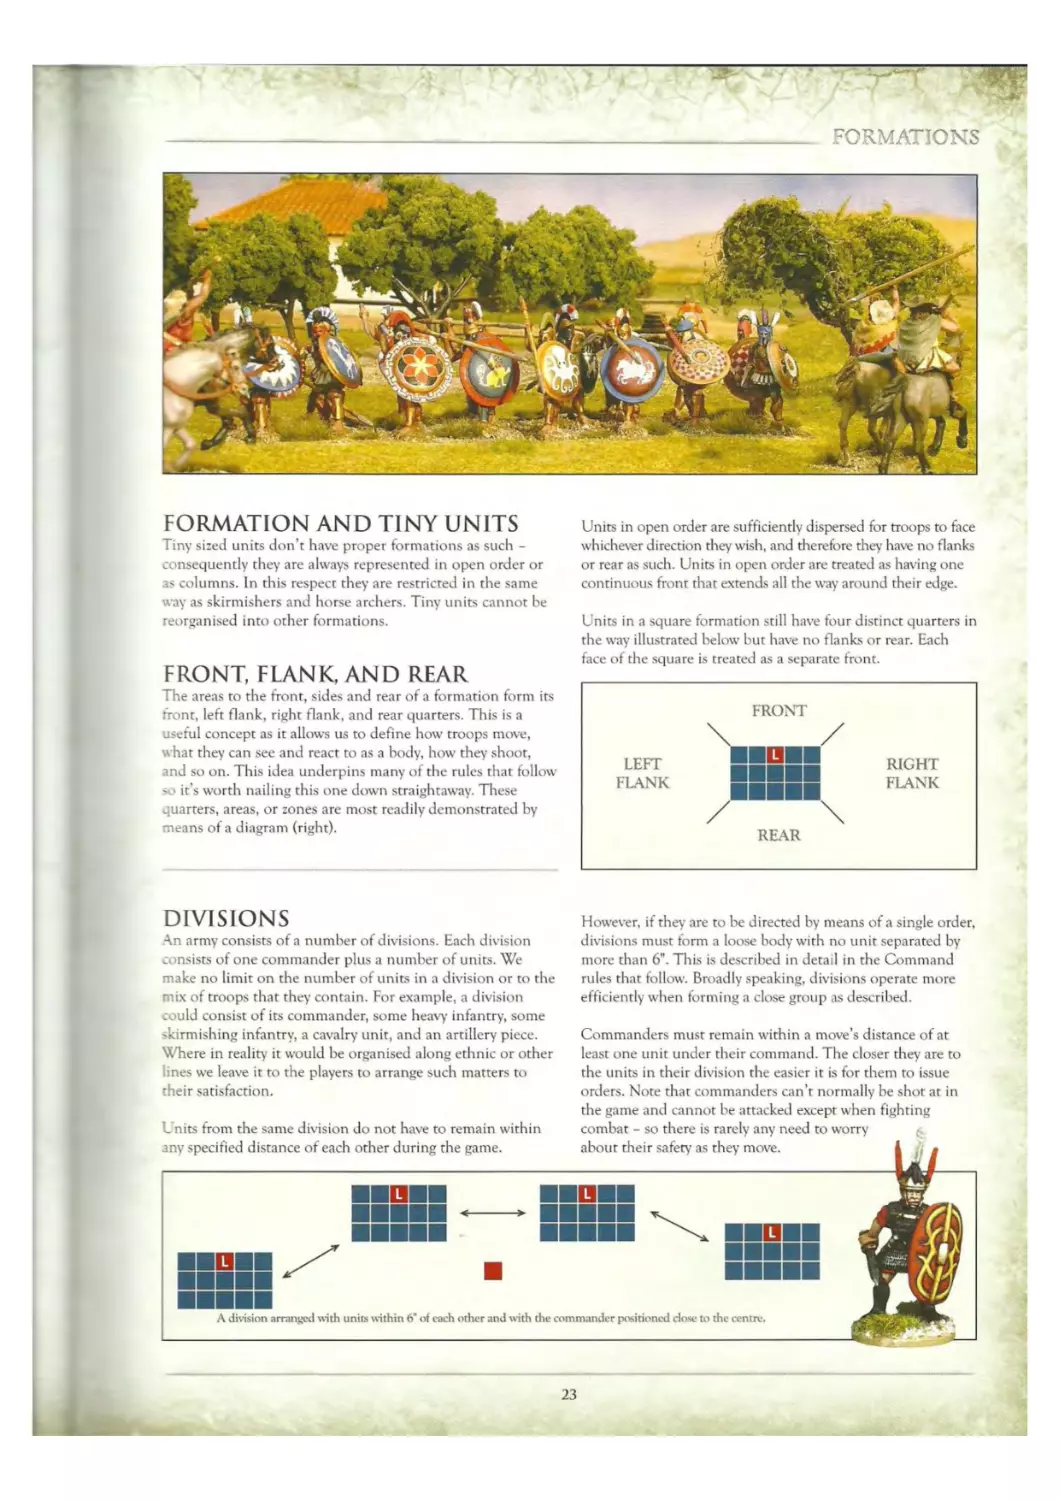
Formation and Tiny Units 23 Columns
Front, Flank and Rear 23 Closing Shors
Divisions 23 Traversing Shots
Game Rules 24 Artillery Shooting Overhead with Artillery
Preparing to Play 24
Sequence of Phy 24 Hand-to-Hand Combat
Measuring Distances
Visibility
Learning rhe Game Rules
An Important Principle
25
Command
Orders
Test for Success
Commanders, Units and Orders
Charge Orders
Division Orders
Distance Modifiers
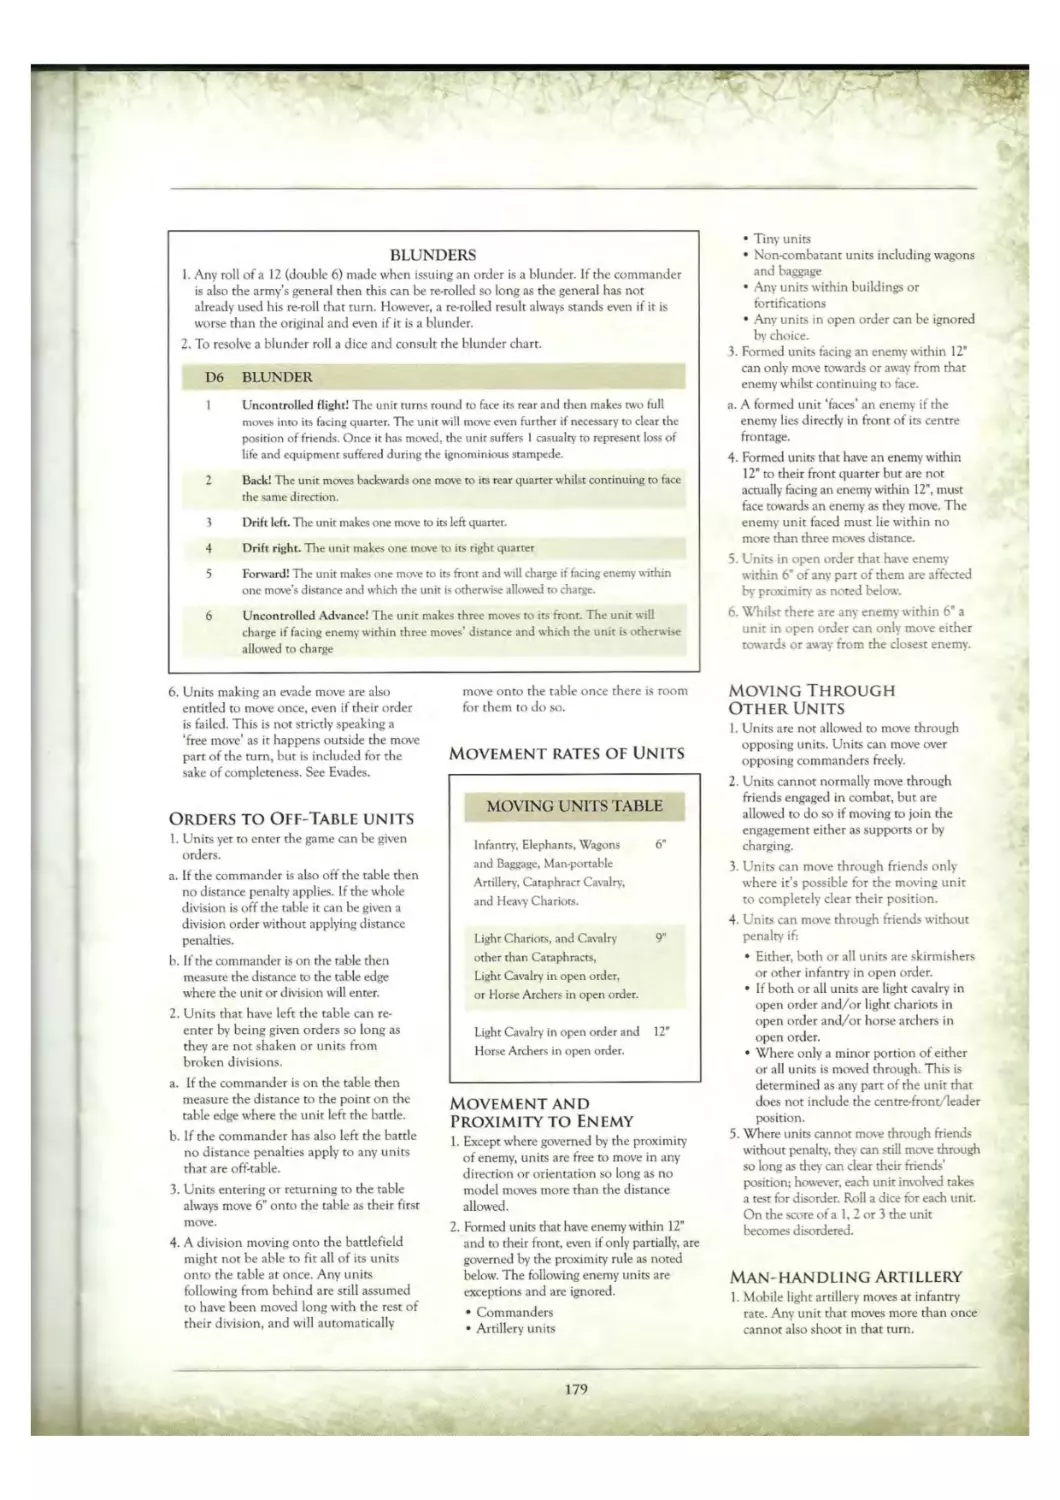
Blunders
Initiative Moves
Free Moves
Orders to Units in Combat
Orders to Off-Table Units
Disordered Units and Orders
Moving Units
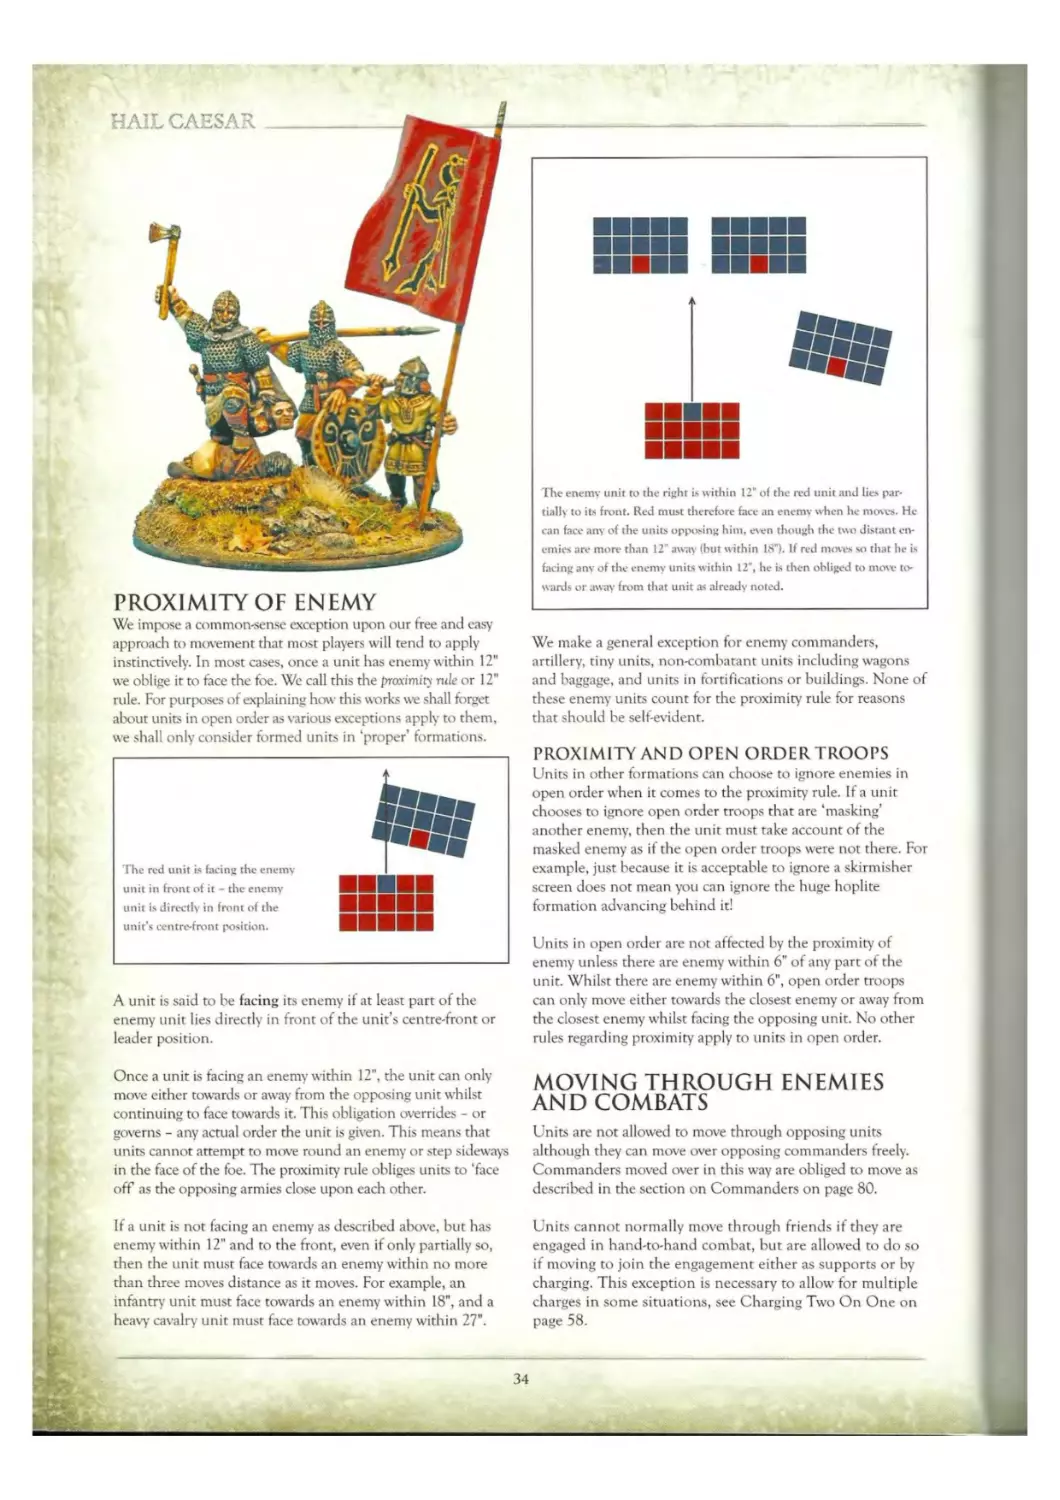
Proximity of Enemy
Moving Through Enemies and Combats
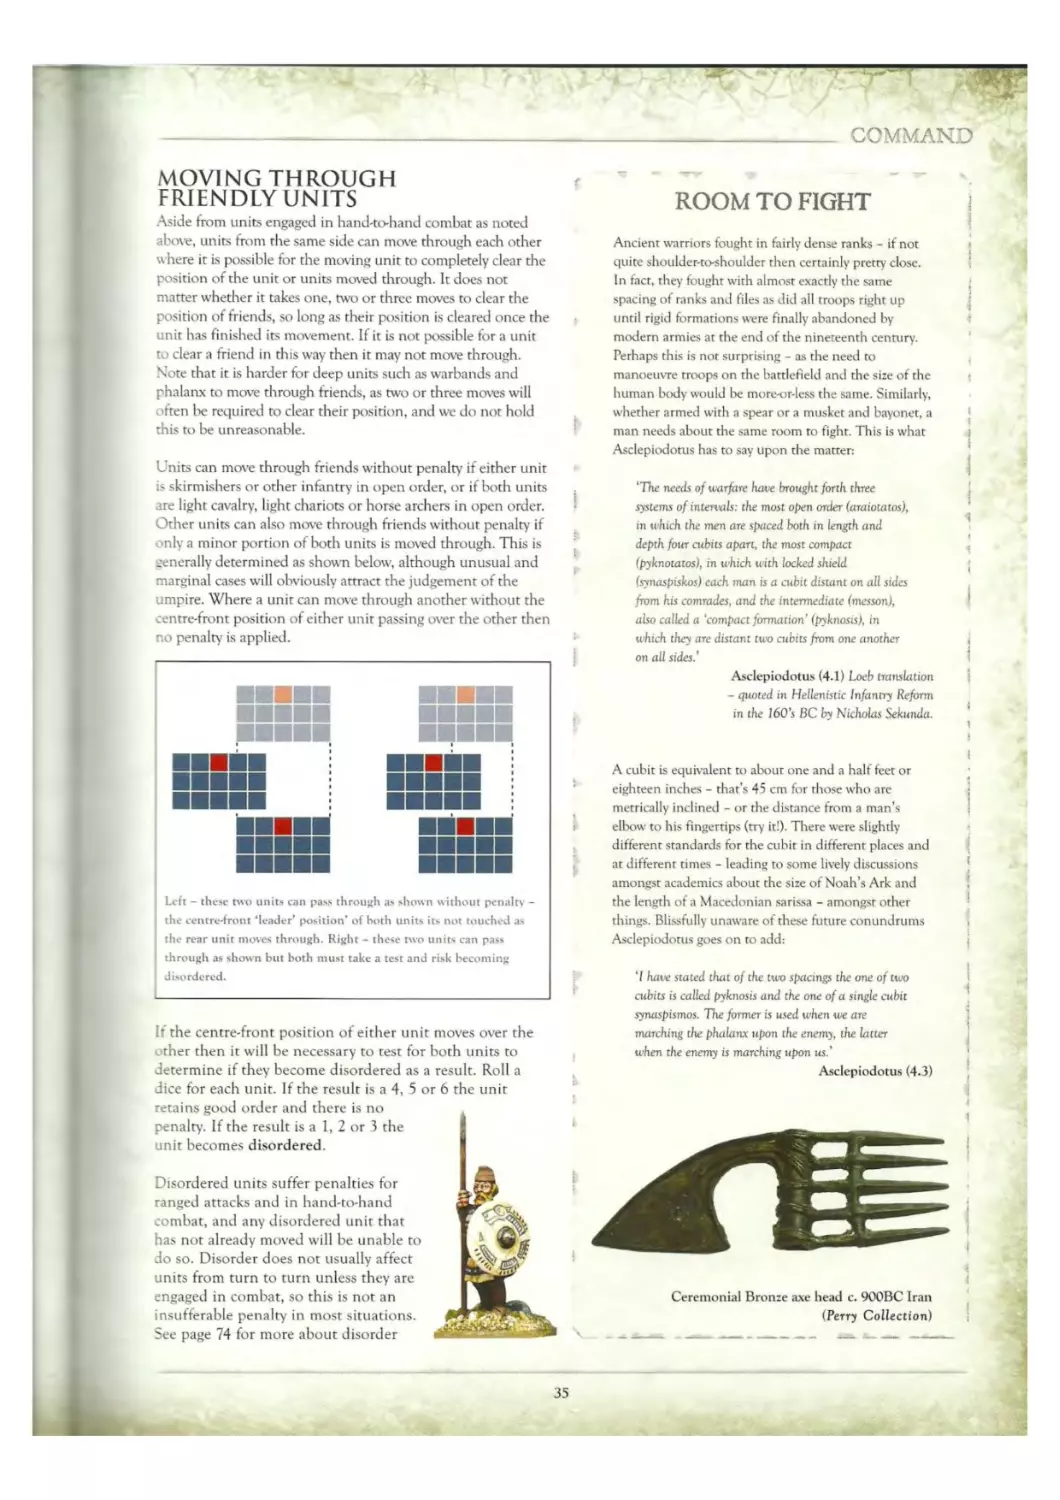
Moving Through Friendly Units
Manhandling Artillery
Formation Changes
Squares
Units Leaving rhe Table
Commanders
Moving Commanders
26
26
26
27
27
28
29
30
31
31
31
32
32
33
34
34
35
36
36
36
36
36
36
Terrain
Woods
Rough Ground
38
38
38
How Combat Works
What is an Engagement?
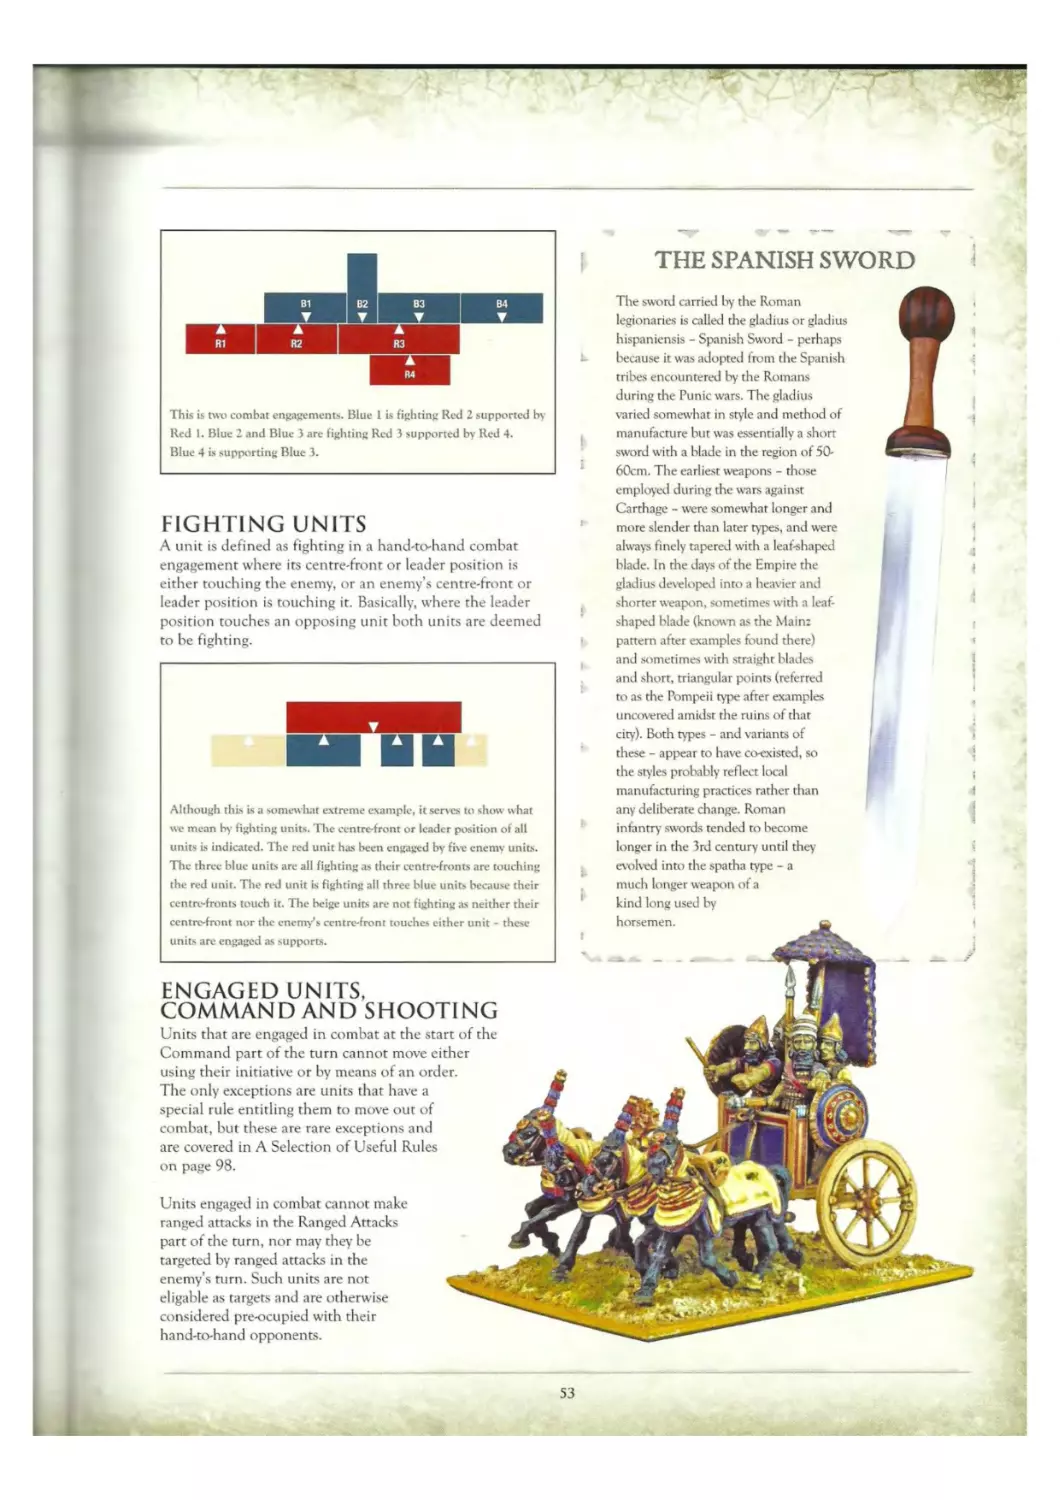
Fighting Units
Engaged Units. Command &. Shooting
Charge Moves
State your Intention to Charge
Units not Allowed to Charge
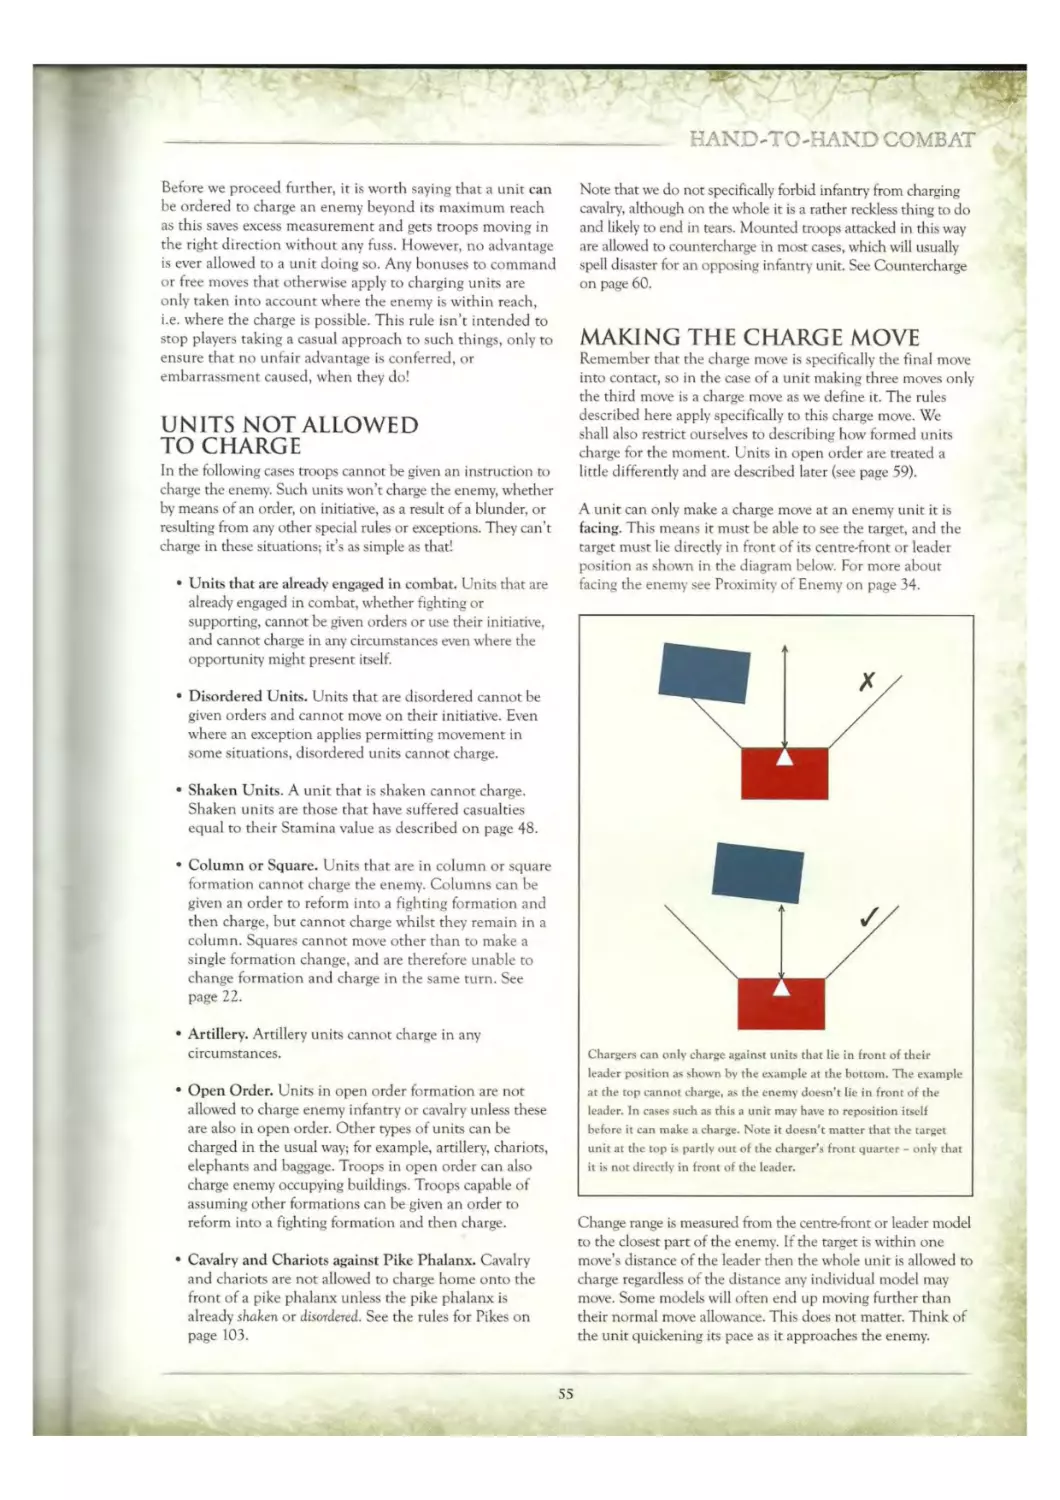
Making the Charge Move
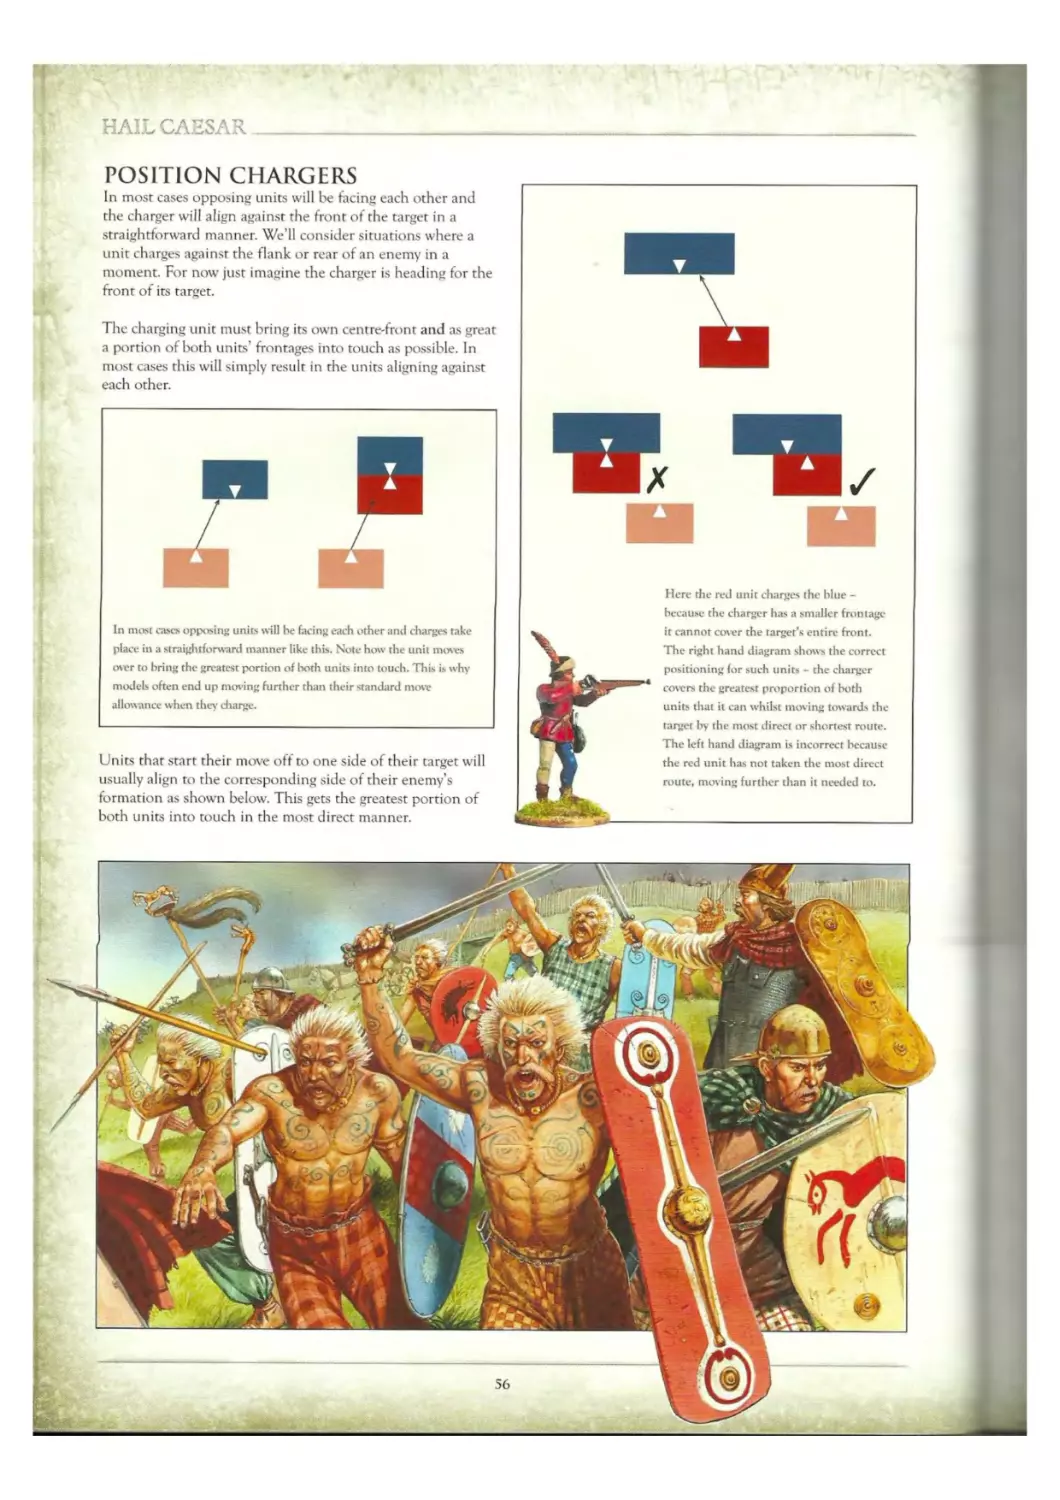
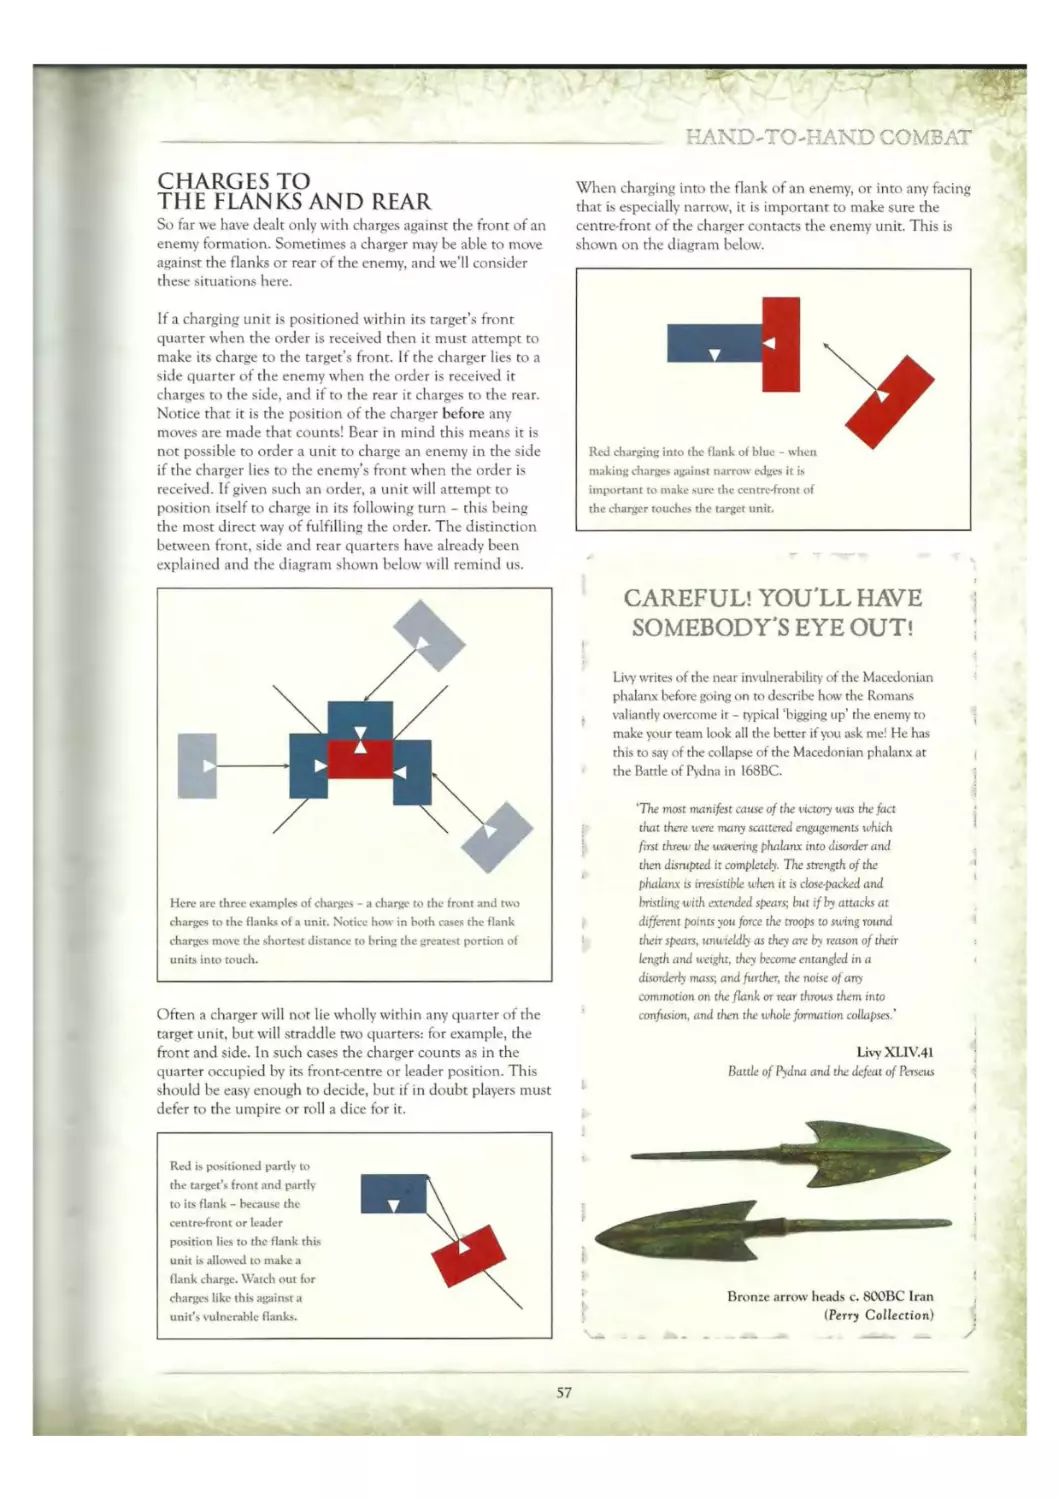
Position Chargers
Charges to the Flank and Rear
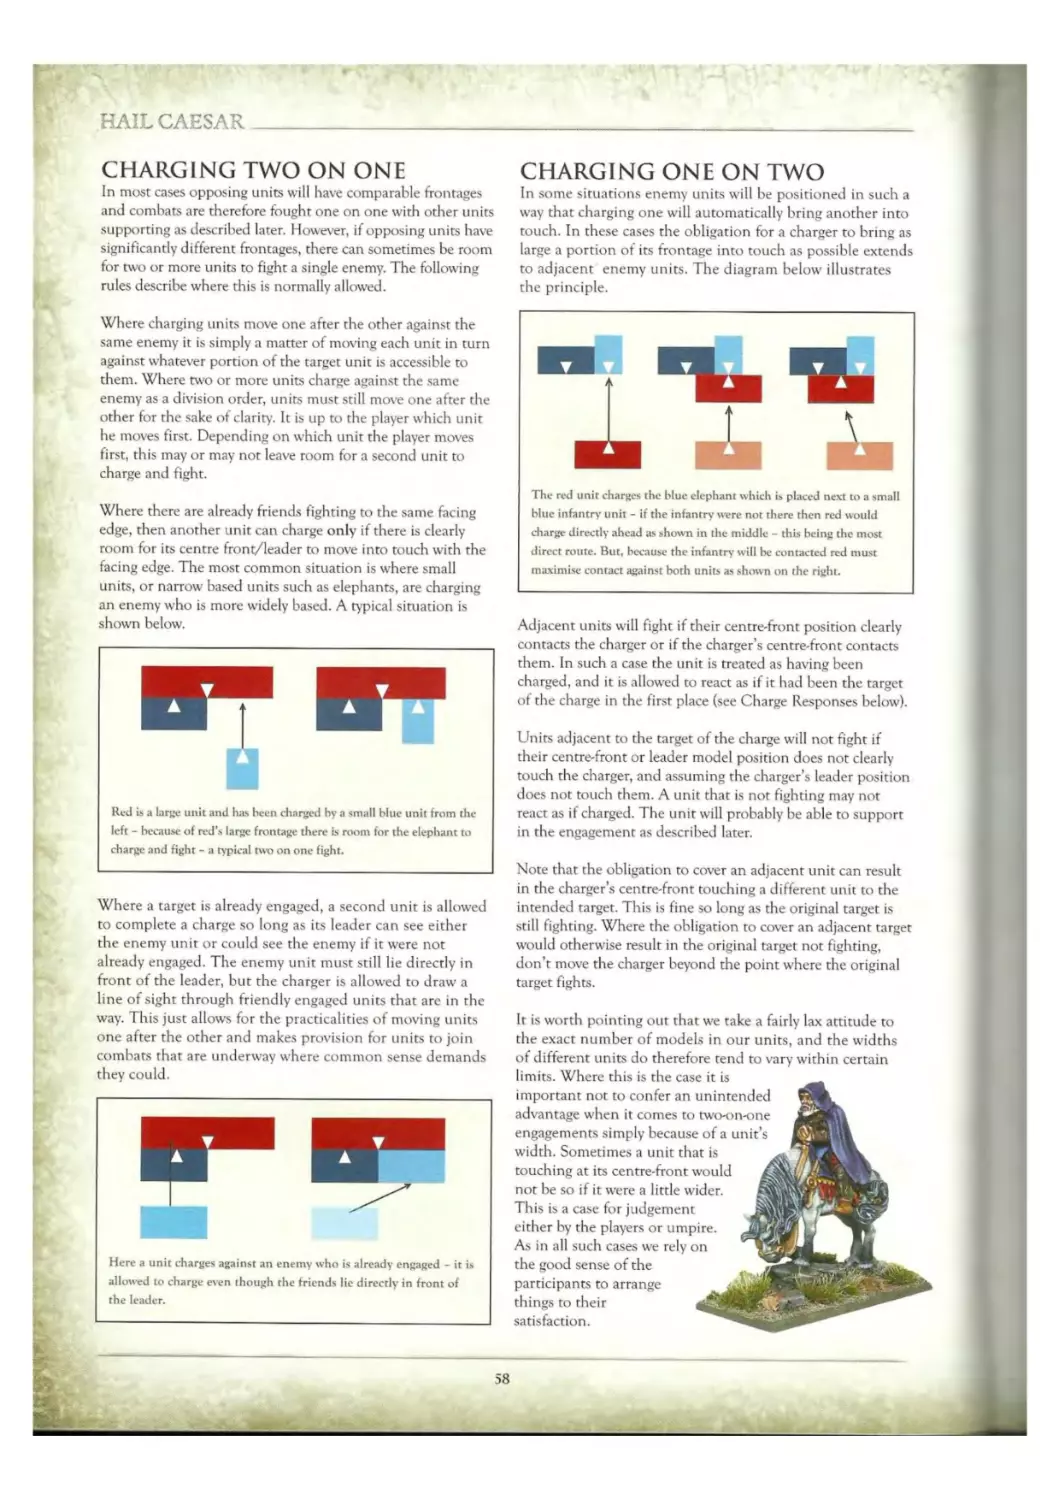
Charging Two on One.........
Charging One on Two
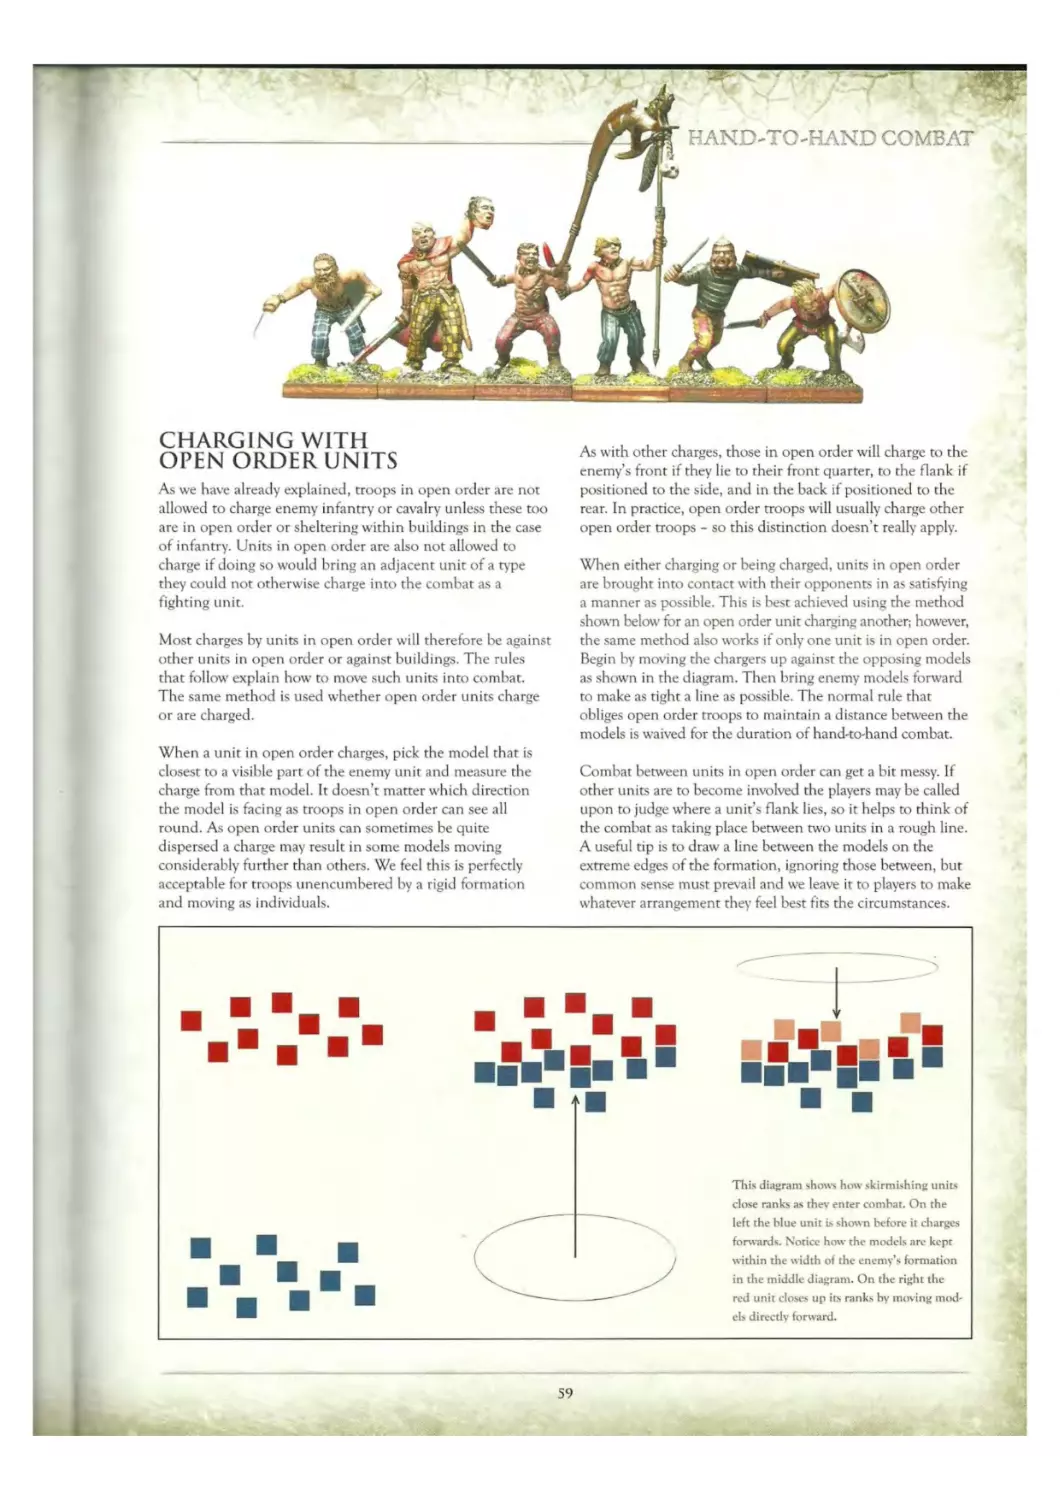
Charging with Open Order Units
Charge Responses
Evade
Countercharge .......
Turn ro Face
Fighting
.Attacks
Morale Saves
Casualties
Close Ranks
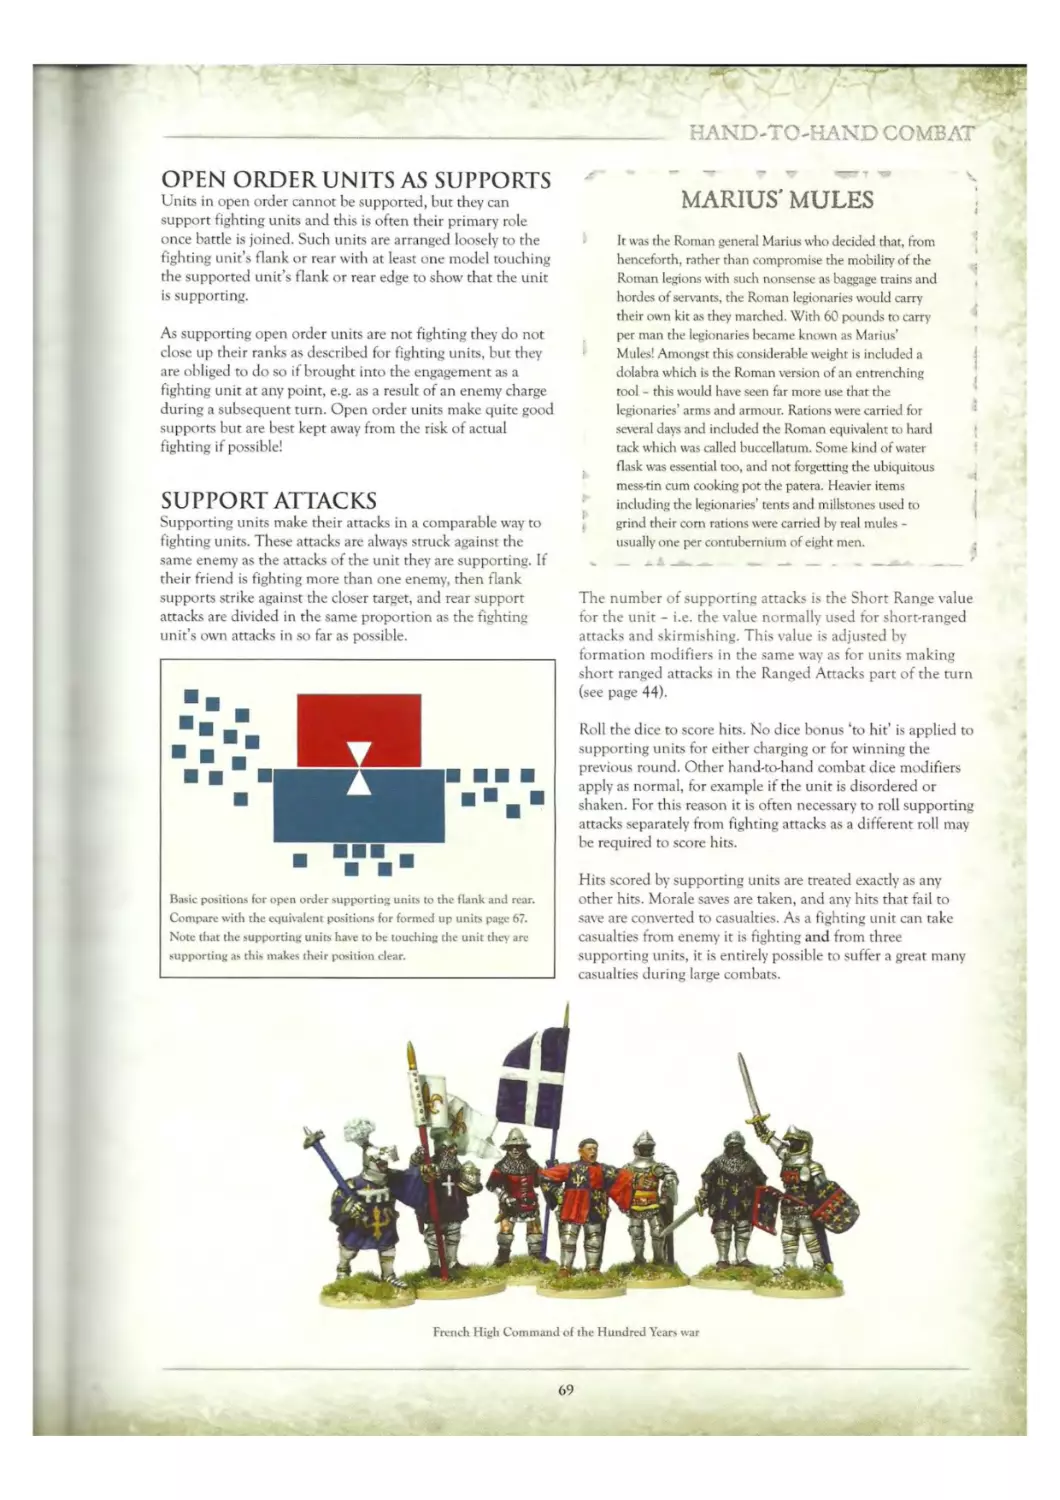
Supports
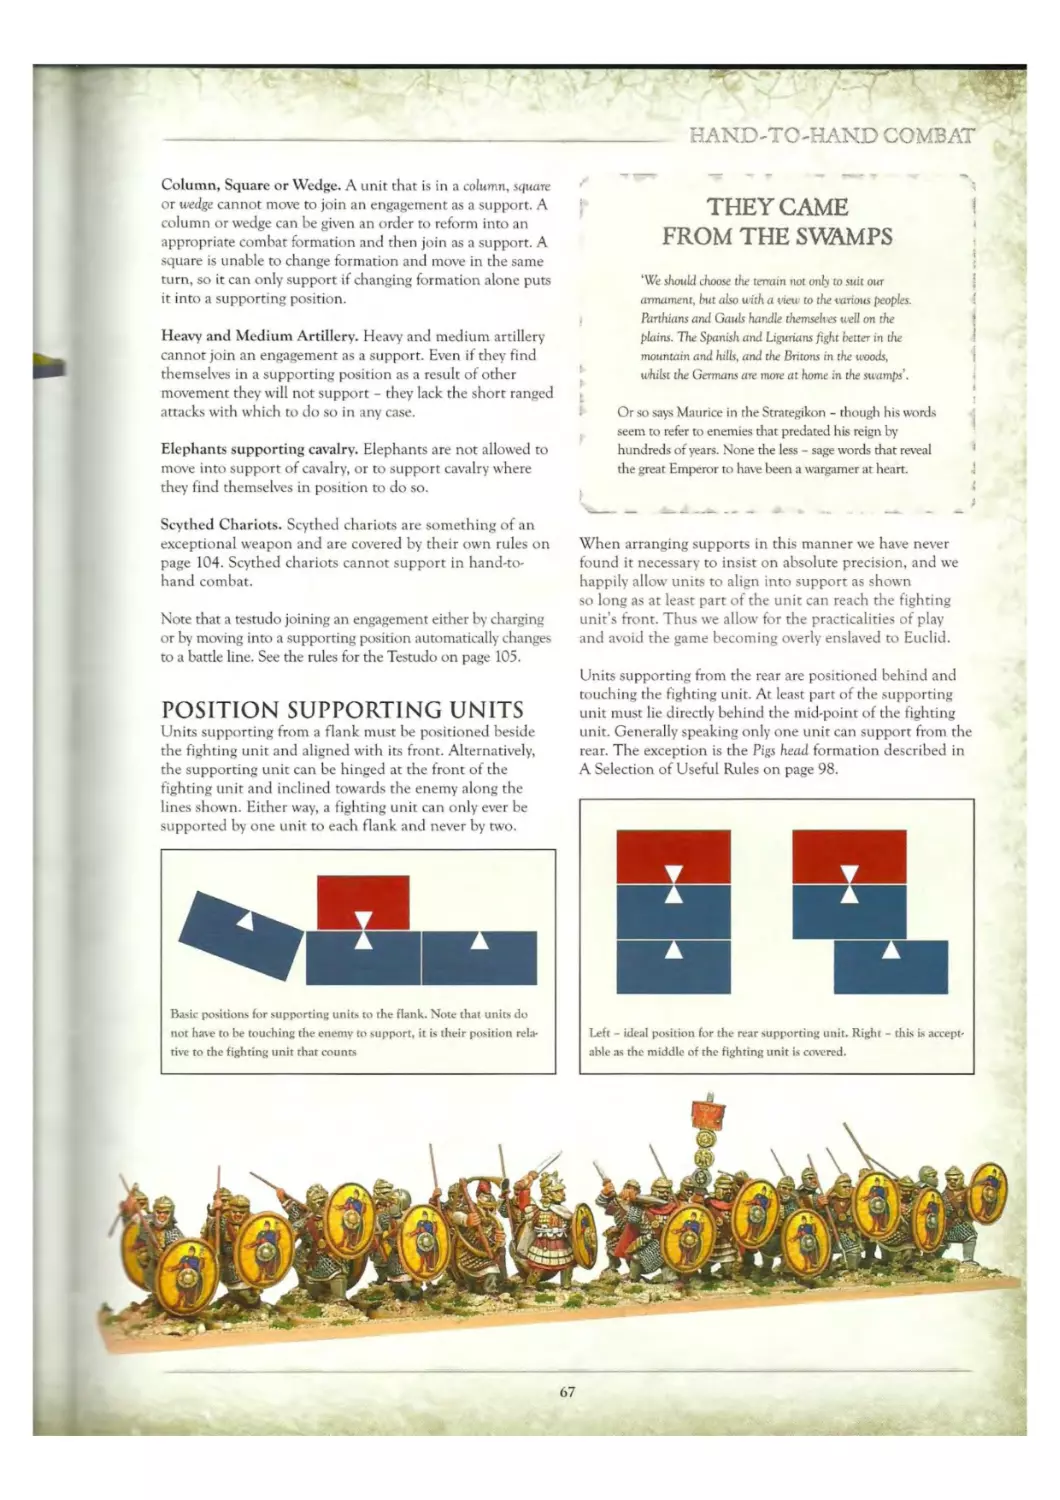
Position Supporting Units
Open Order Units as Supports
Support .Attacks
Incidental Contacts
Combat Results
Reallocating Casualties
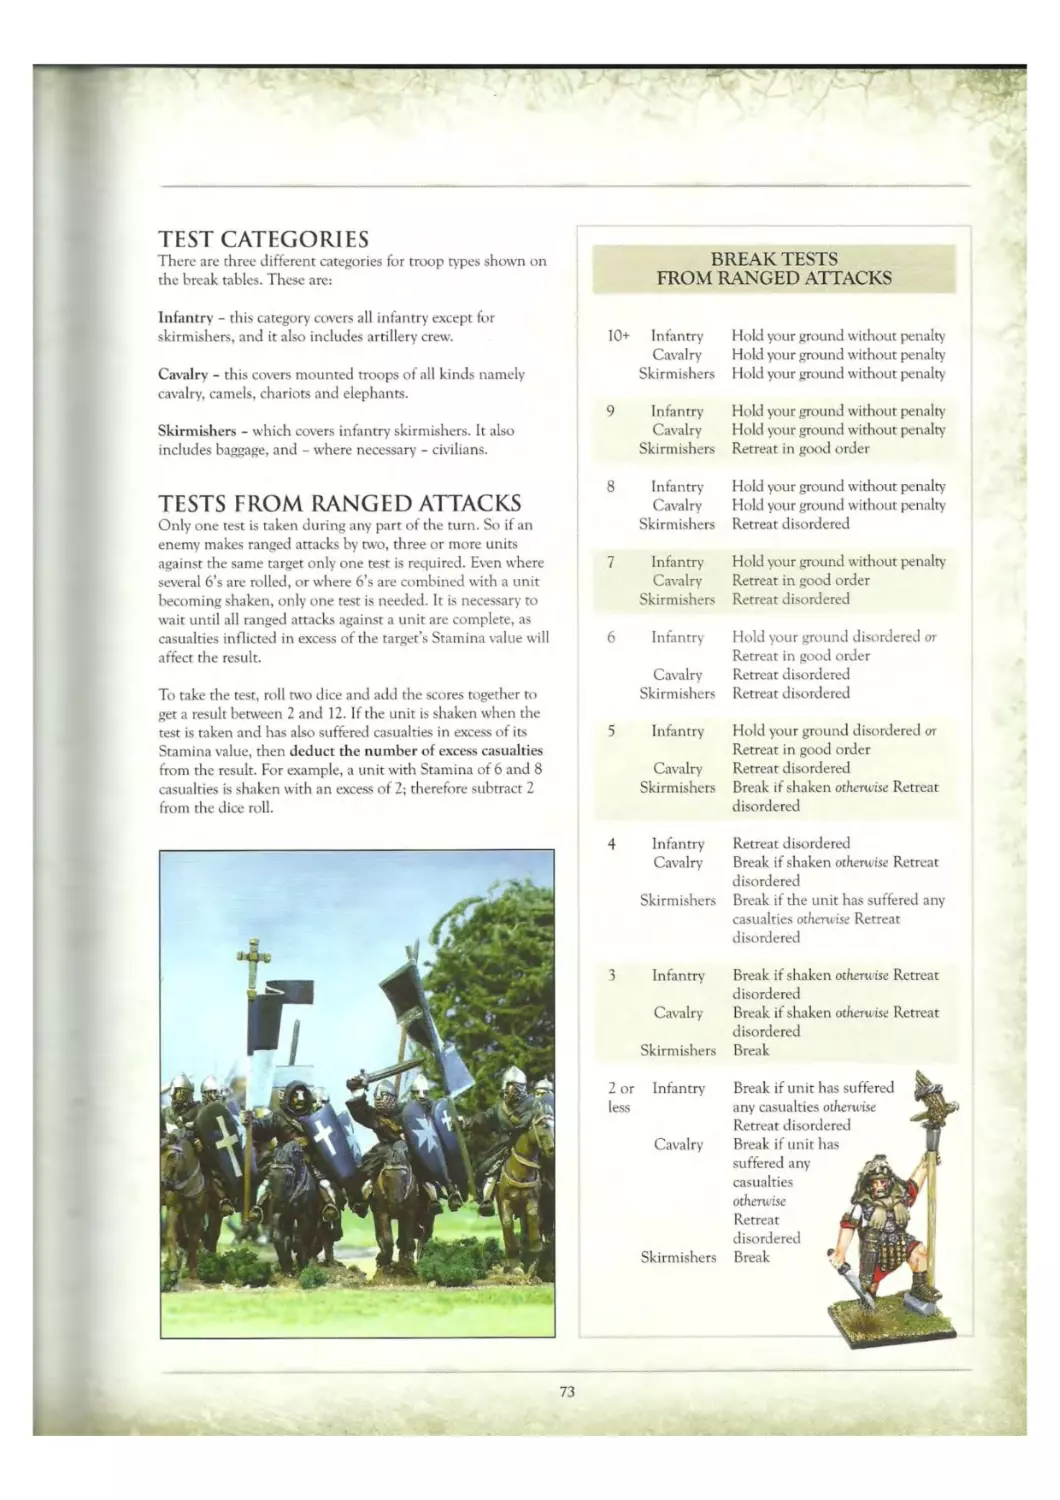
Break Tests
End of Combat
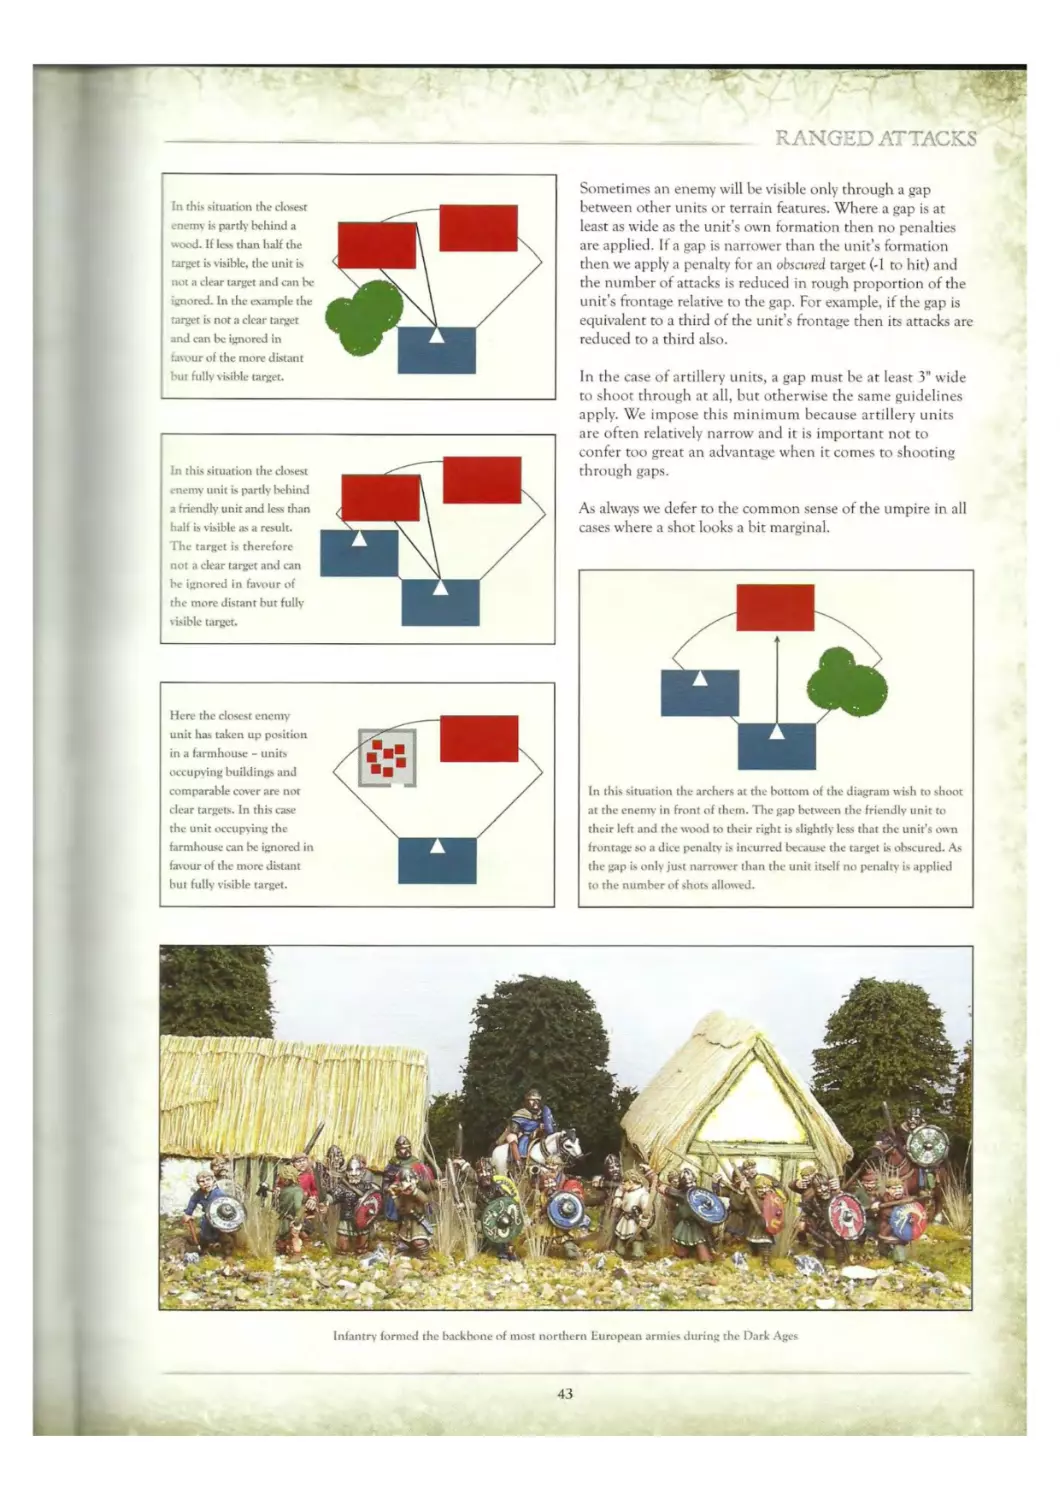
38 Break Tests 72
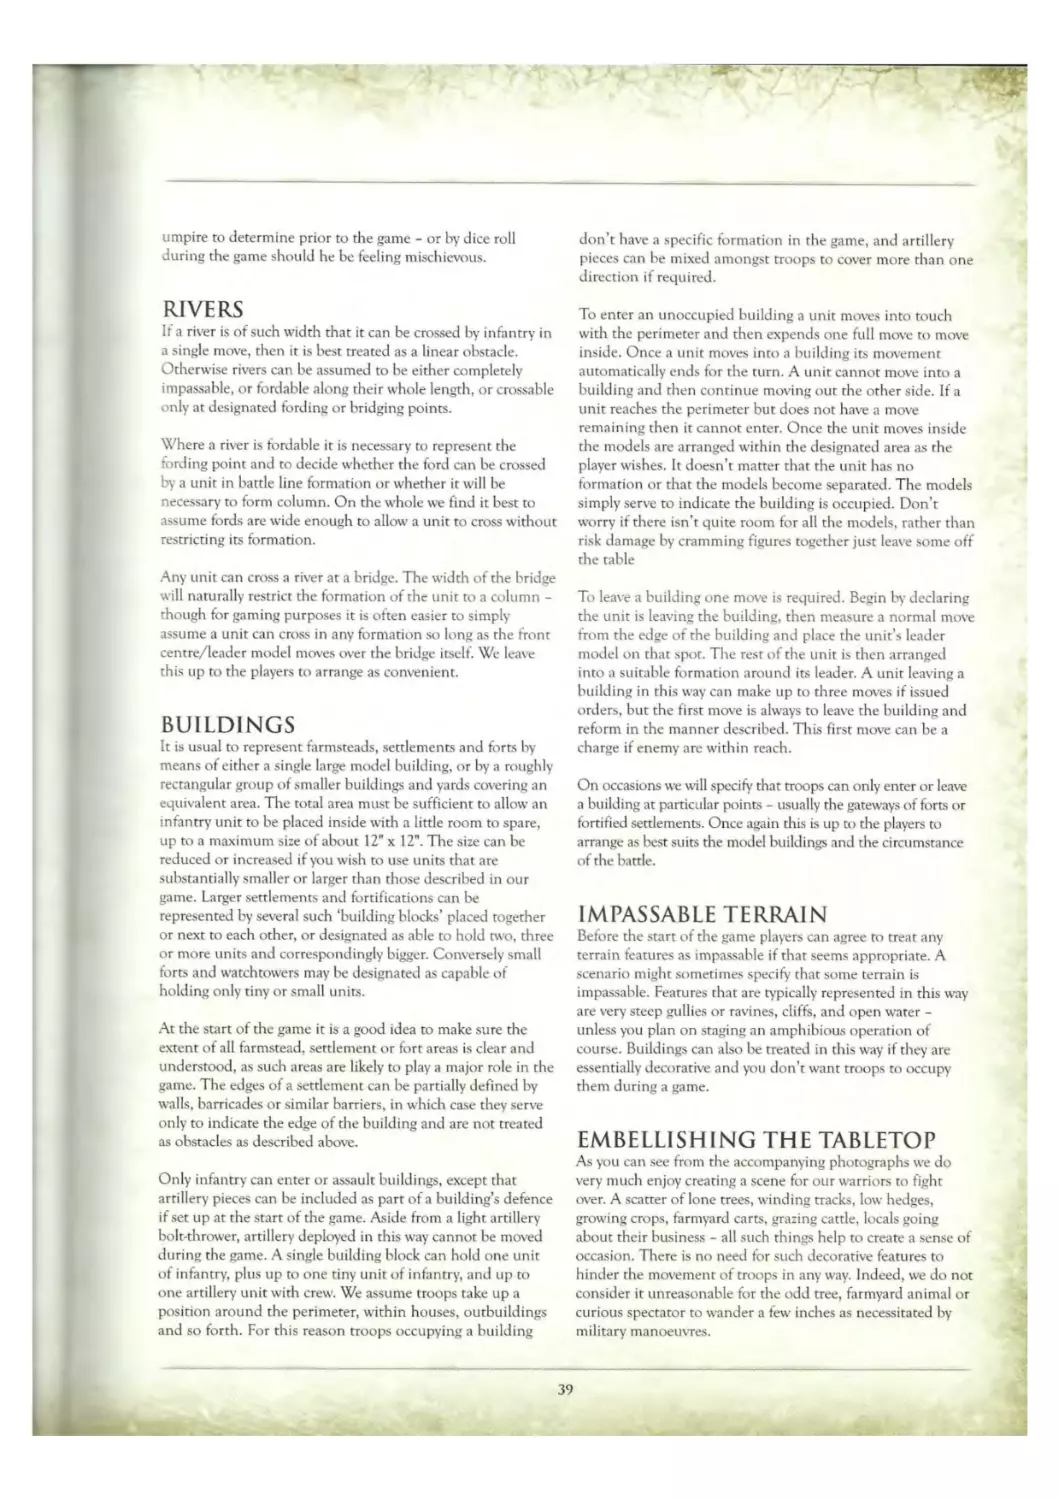
39 io Tests from Ranged Attacks 73
39 Ranged Attacks Test Results 74
39 Retreats 75
Tests from Hand-to-Hand Combat 75
40 Hand-to-Hand Combat Test Results 76
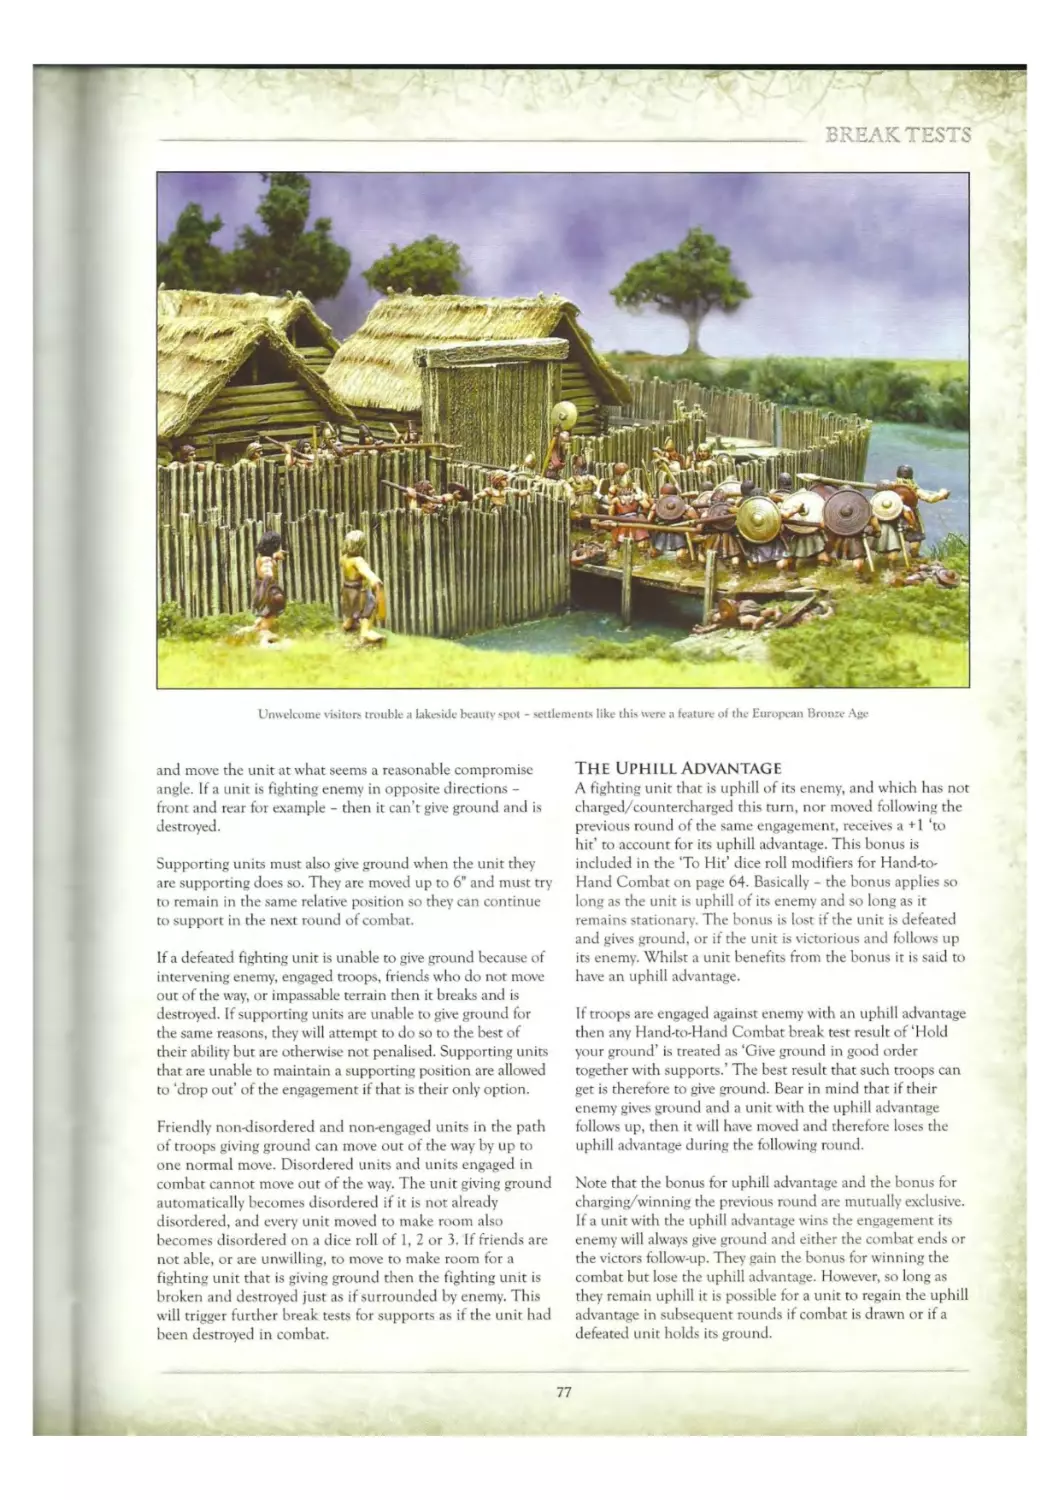
40 Give Ground 76
40 Supporting Units 78
40 Moves by Victorious Units . 78
40 Combat Results &. Incidental Contacts .79
41 Units in Open Order 79
42 Squares 79
44 Units in Buildings 79
46 Occupying Buildings 79
48
48 Commanders 80
48
48 Commander Models 80
48 Reserve Commanders 80
48 The General 80
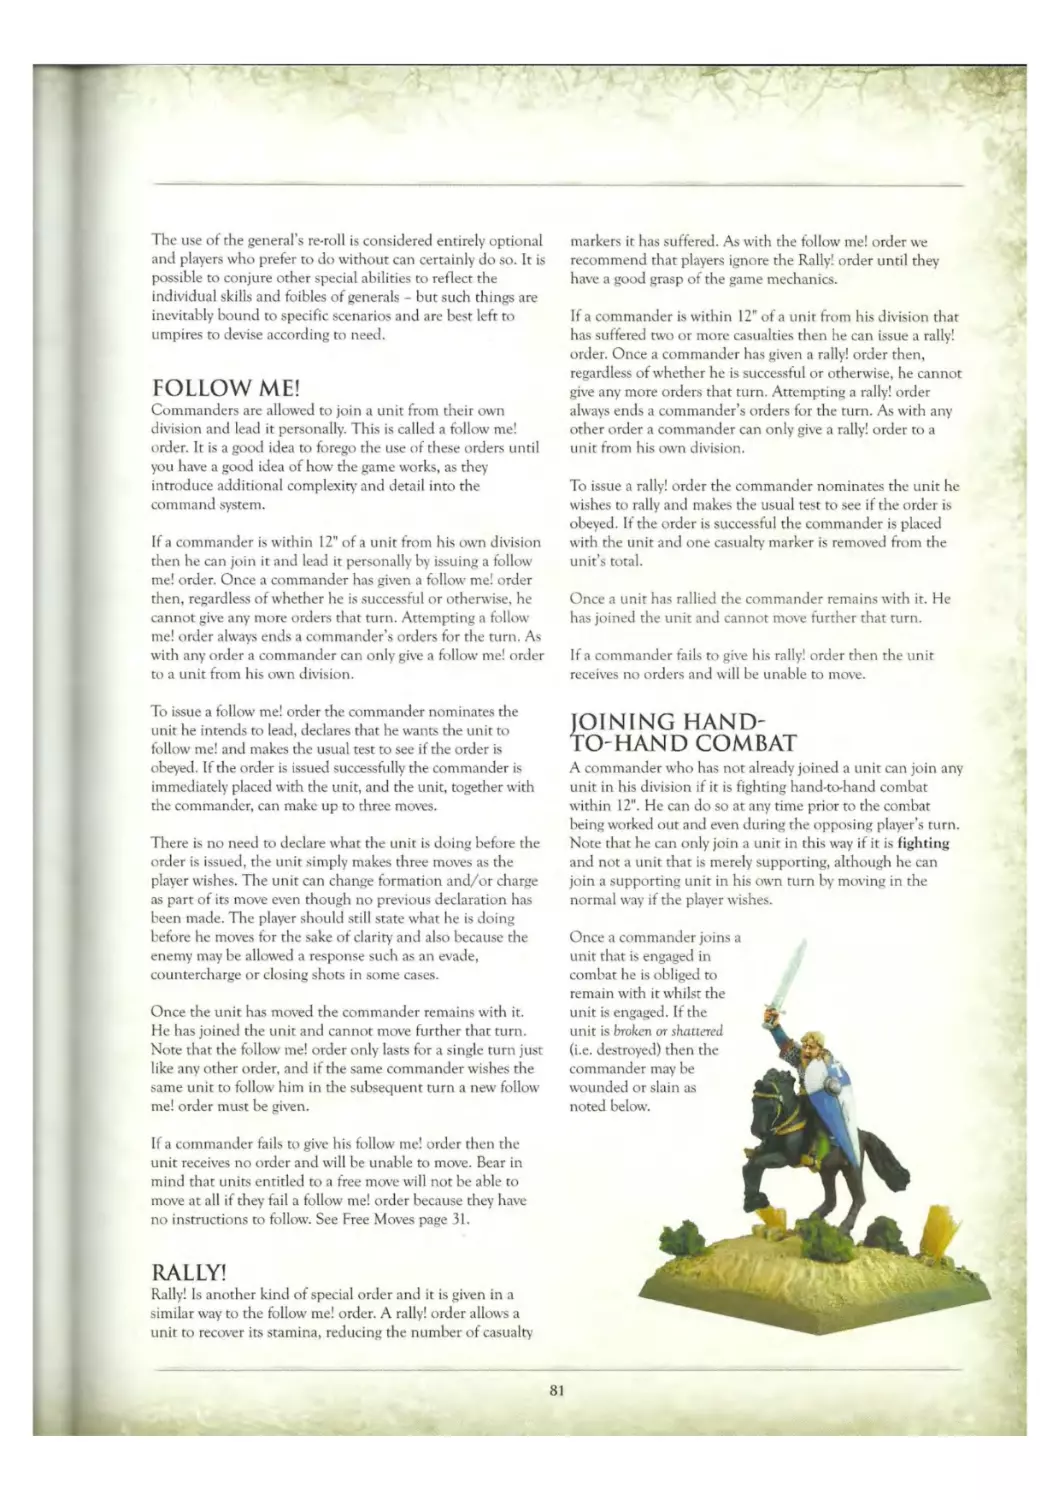
48 Follow Me! 81
50 Rally! 81
51 Joining Hand-to-Hand Combat 81
51 Risk to Commanders 82
52 Risk from Ranged Attacks 82
Risk from Hand-to-Hand Combat 83
52
52 Fighting Values of Commanders 83
53 Wounded Commanders 83
53
54 Victory and Defeat 84
54 Defeat 84
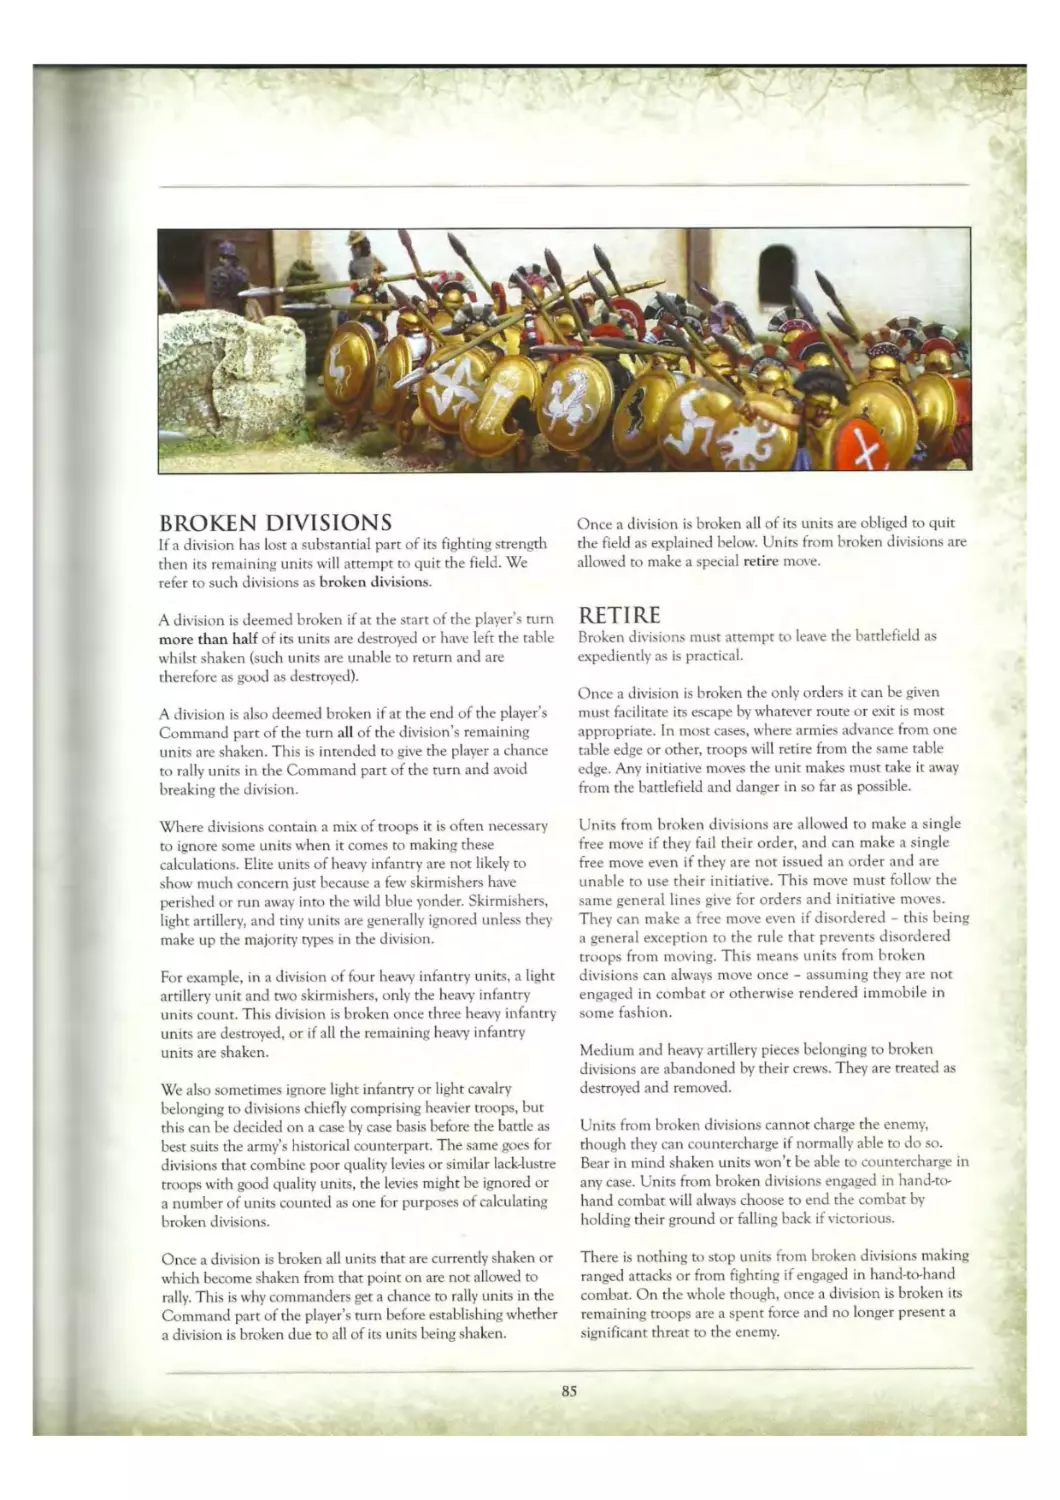
55 Broken Divisions 85
55 Retire 85
56
56 58 Troop Types 86
58
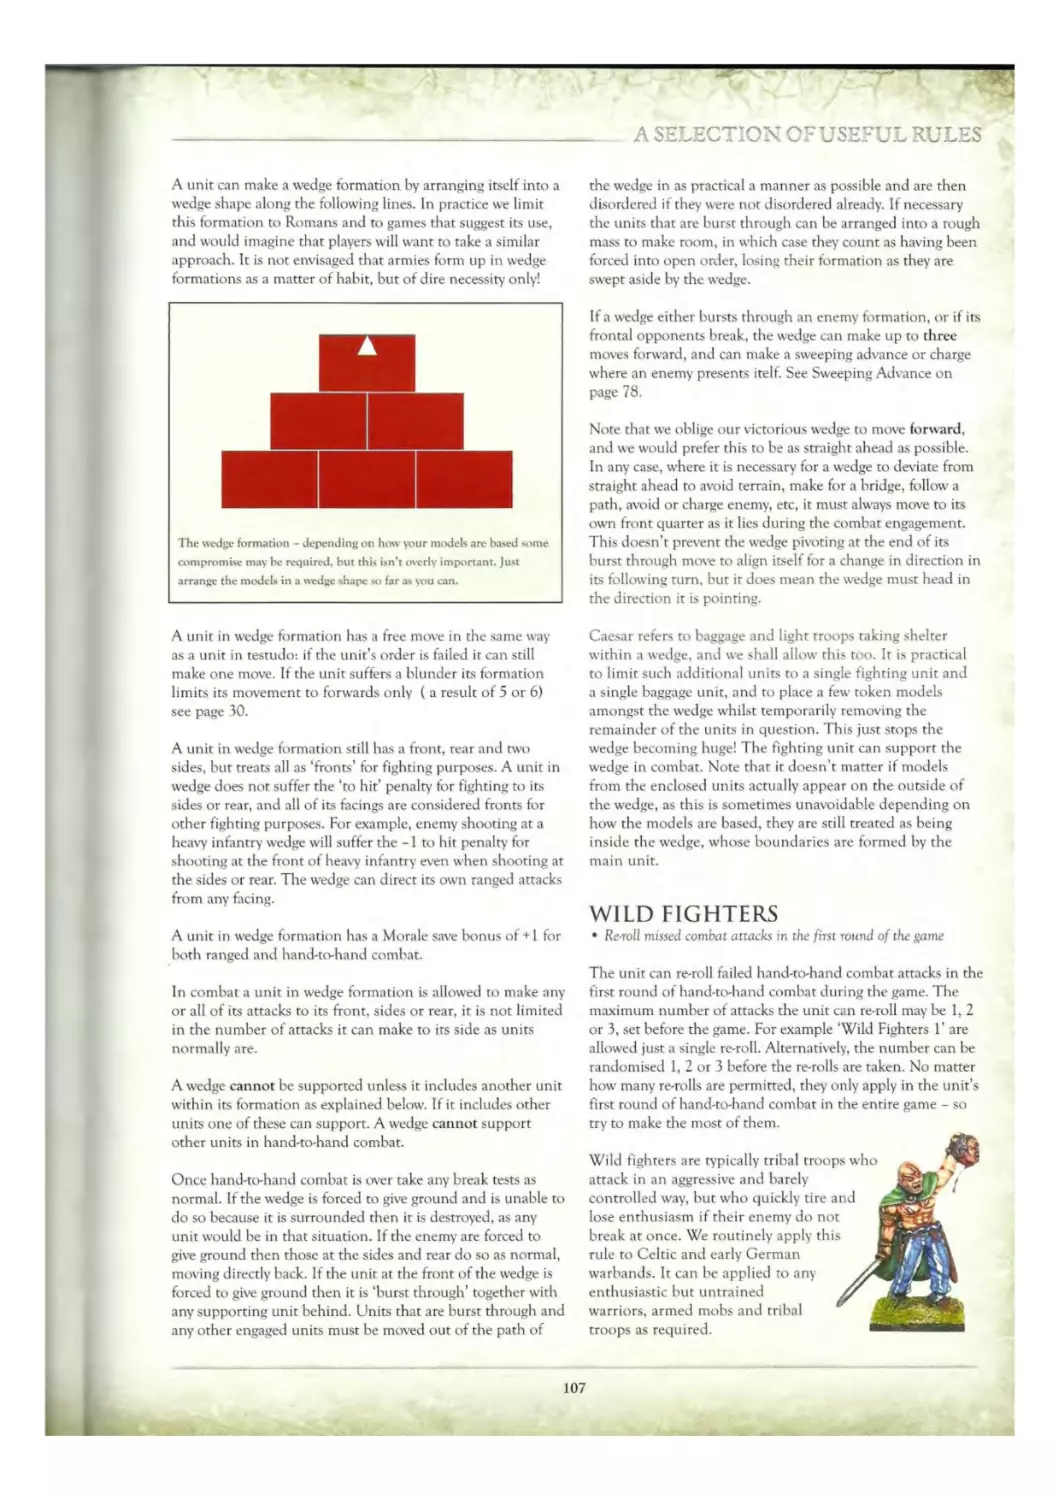
59 A Selection of Useful Rules 98
60
60 Battle Reports 110
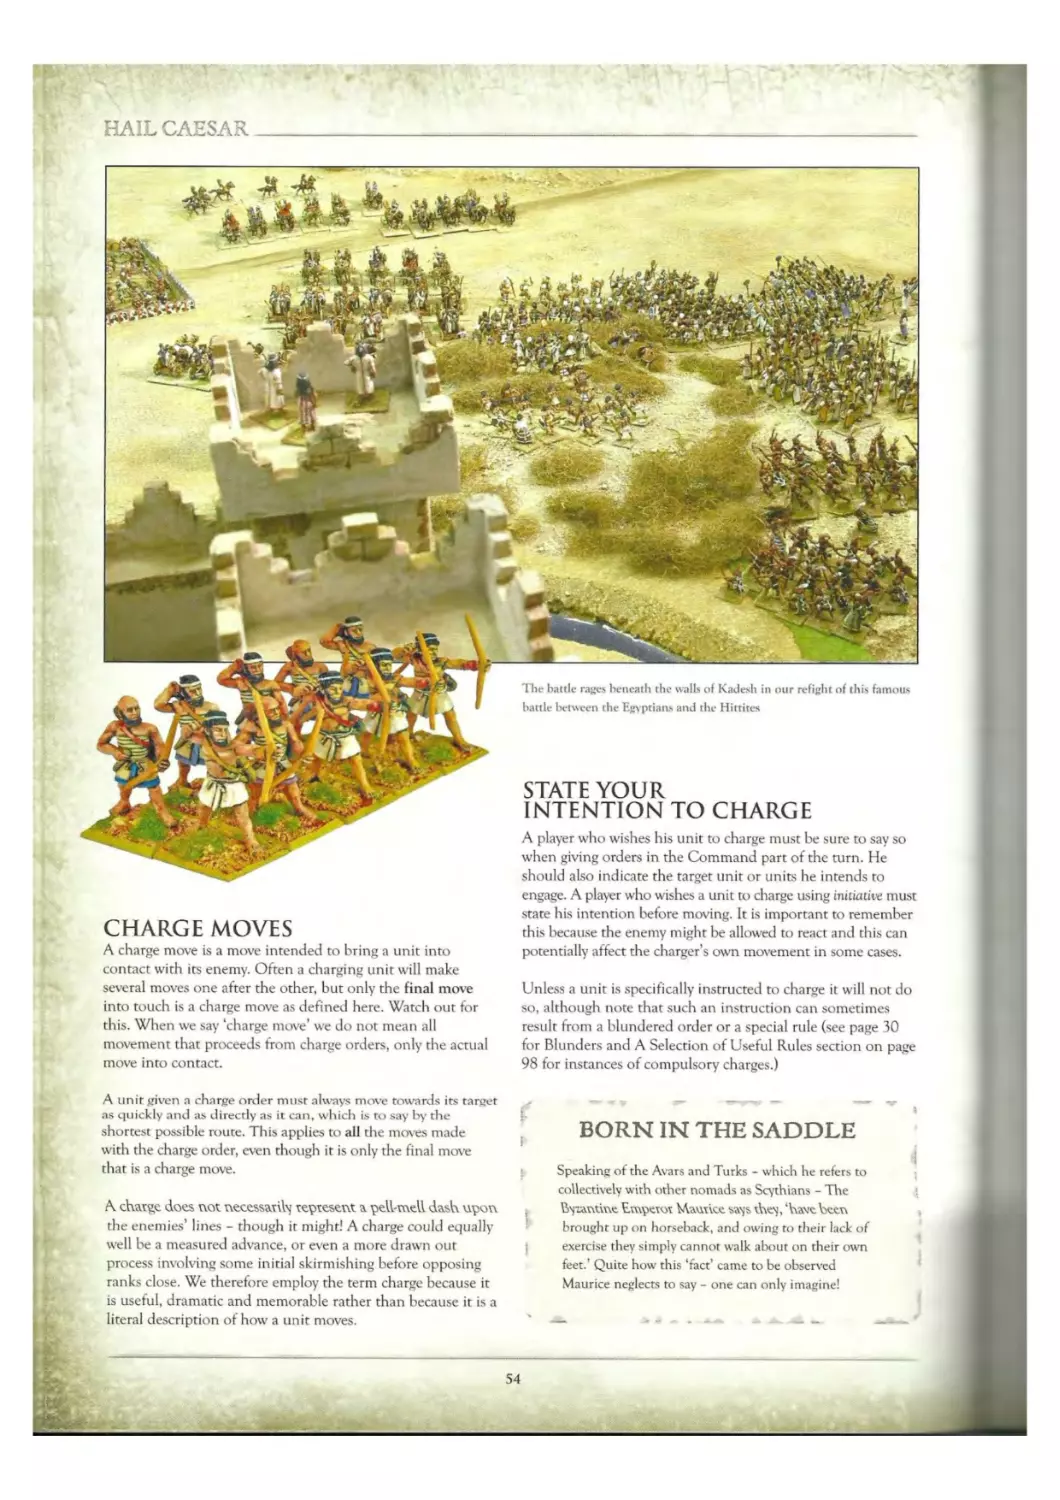
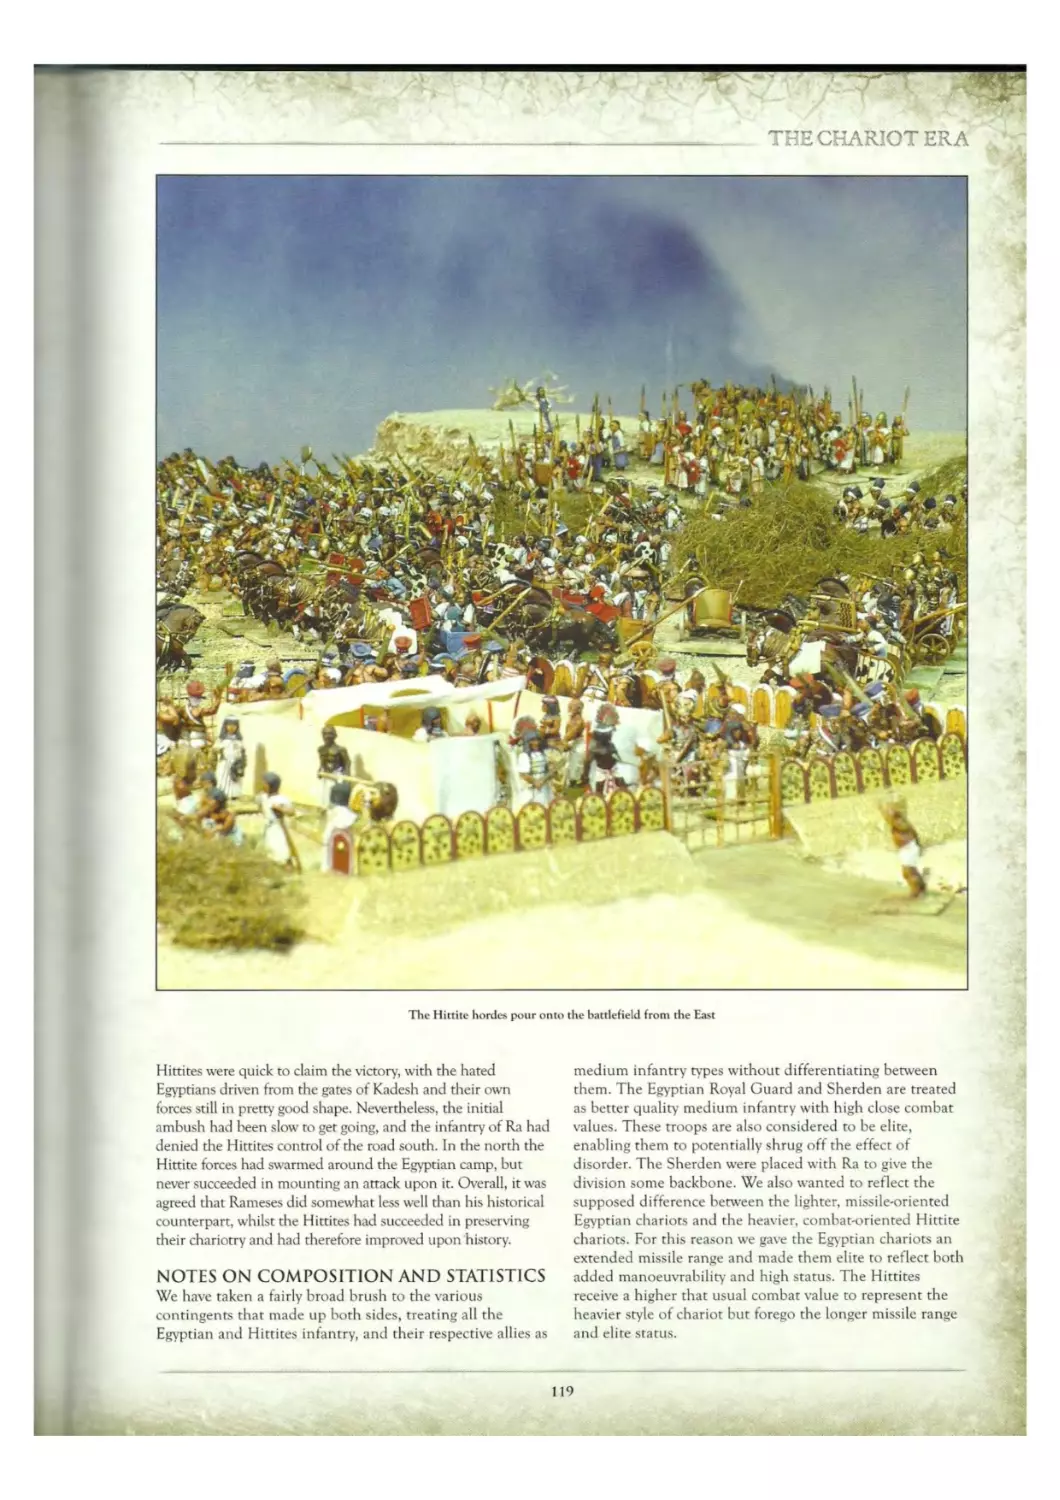
61 The Battle of Kadesh: 1274BC 112
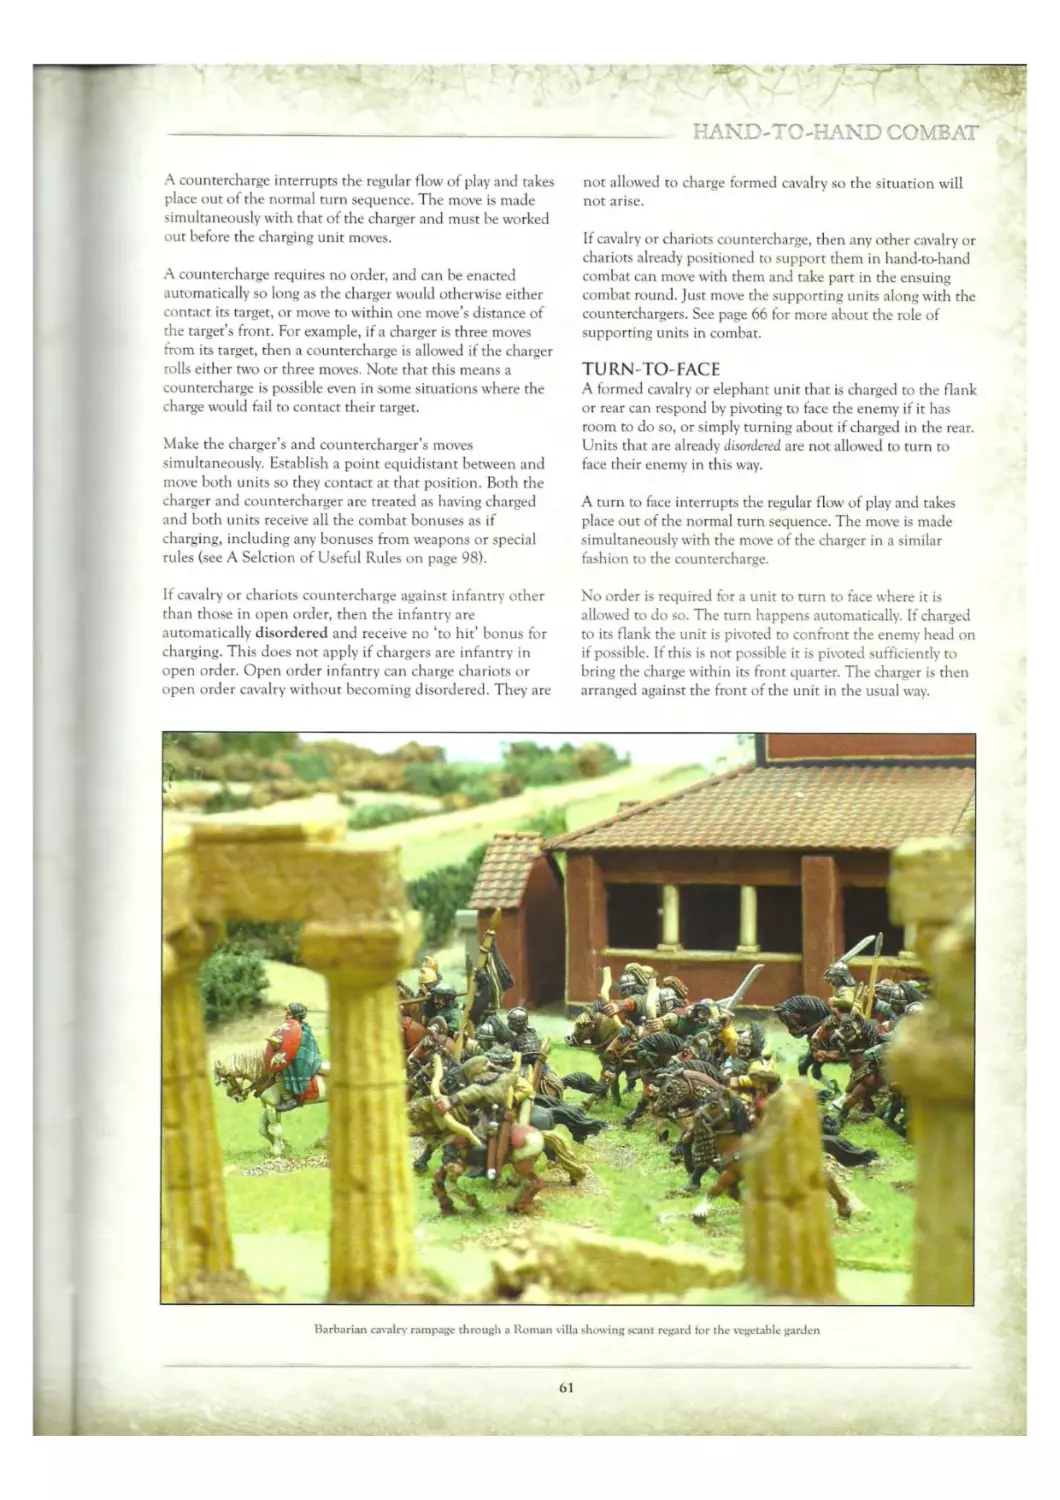
61
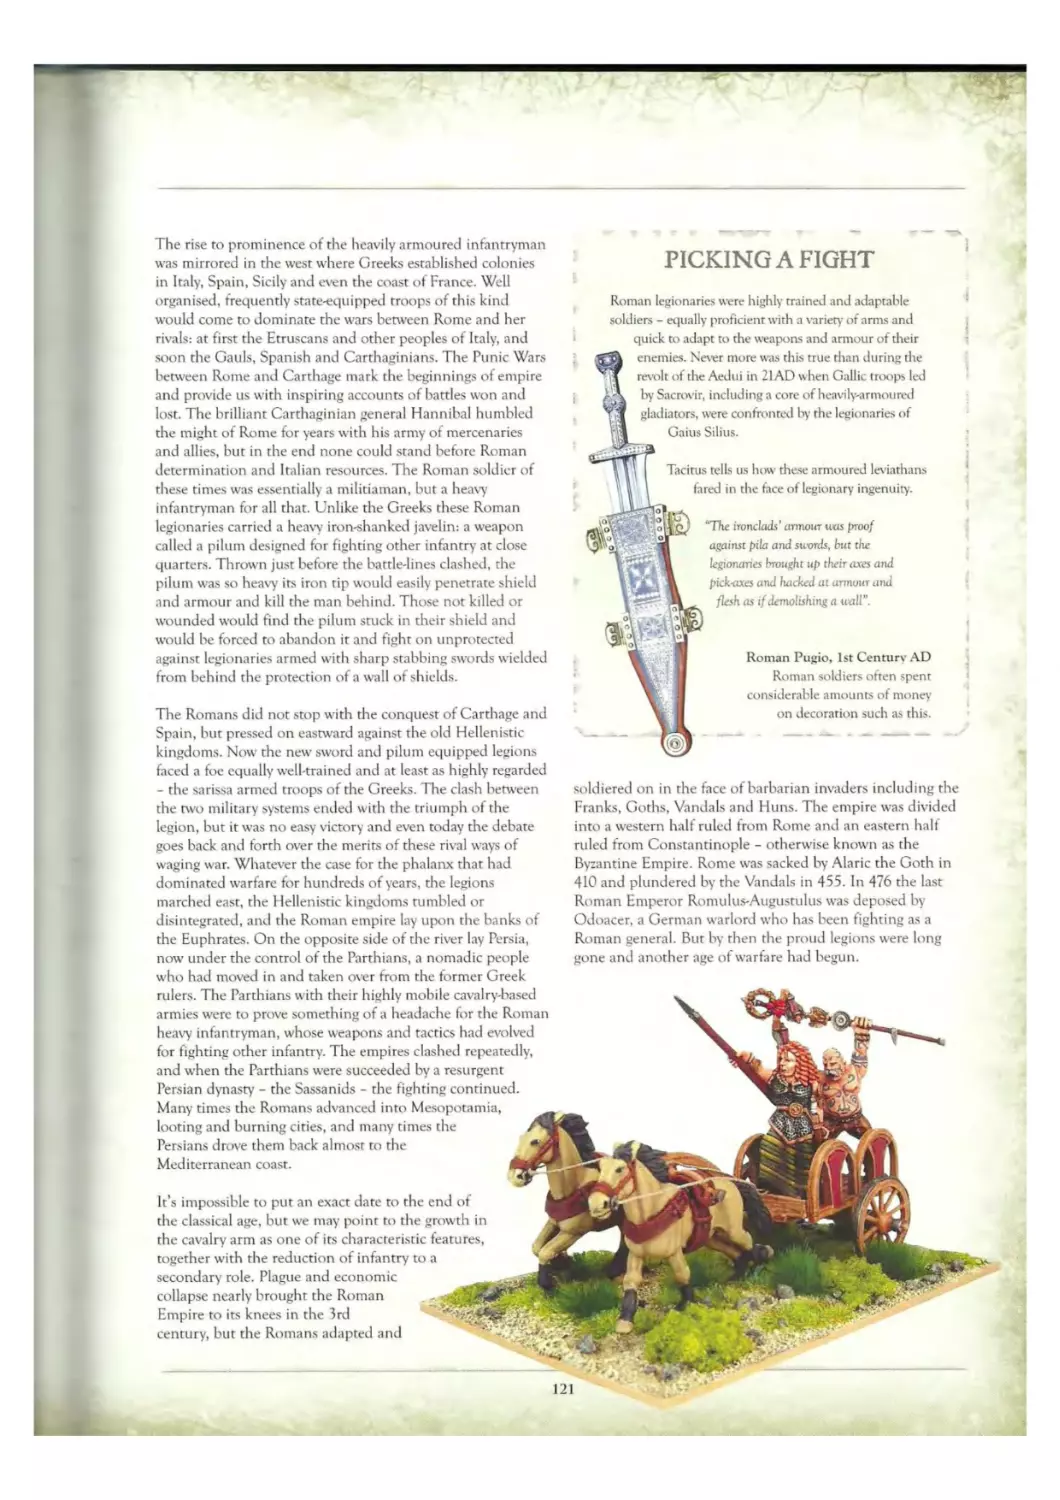
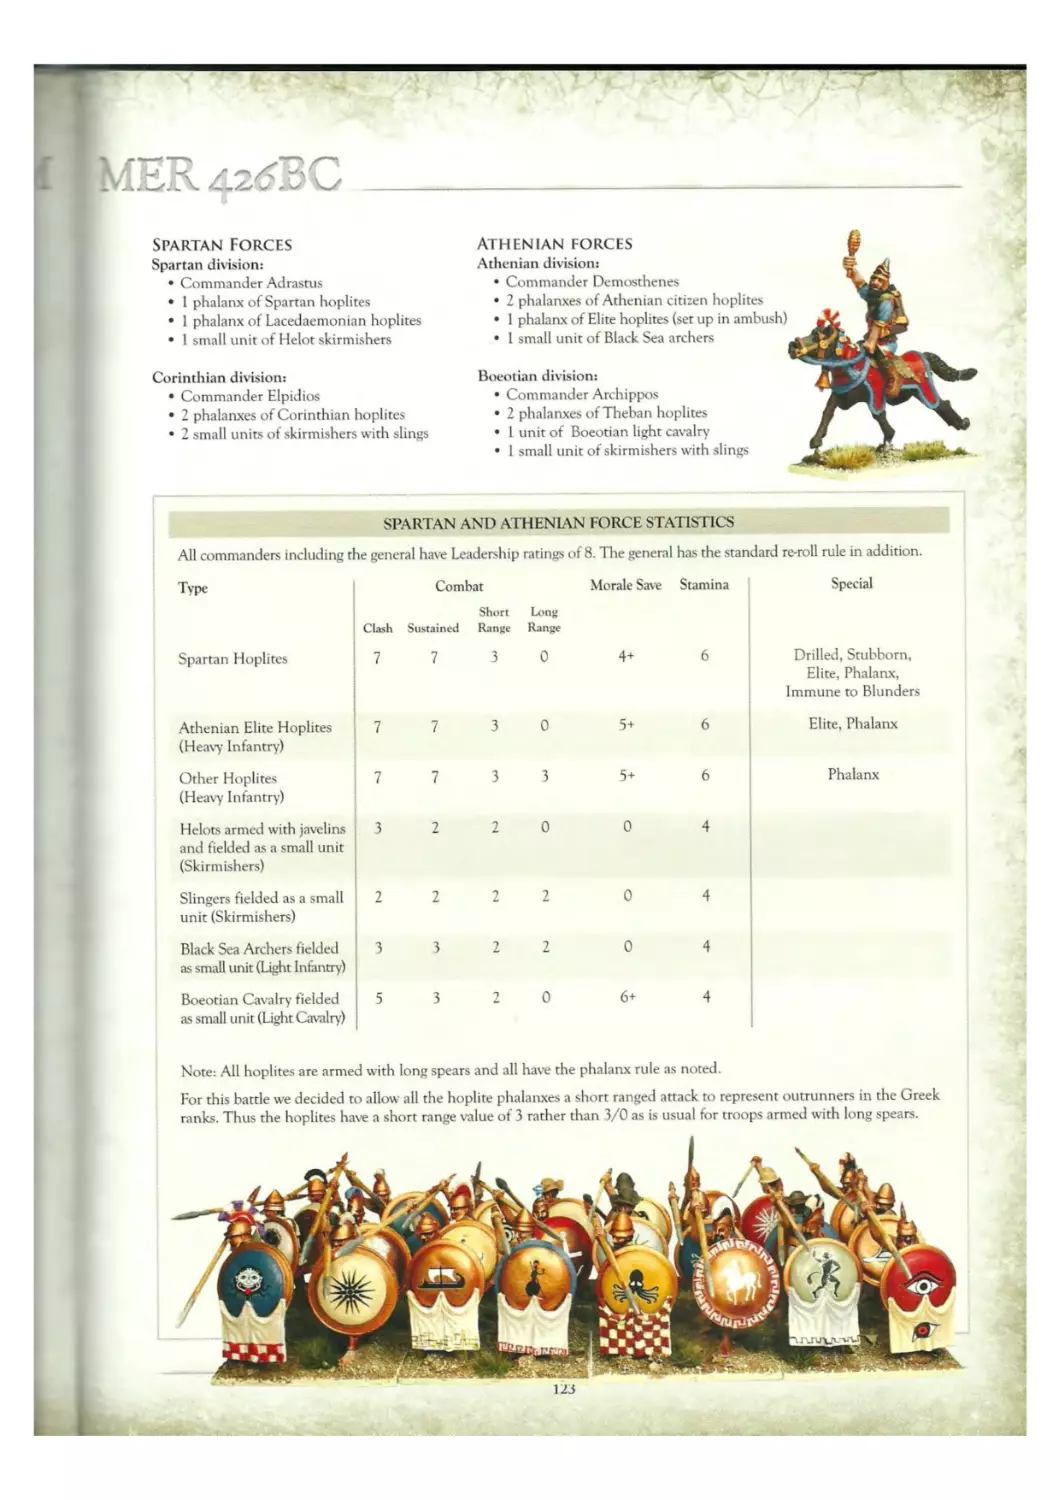
62 With Your Shield or On It: Summer 426BC : 122
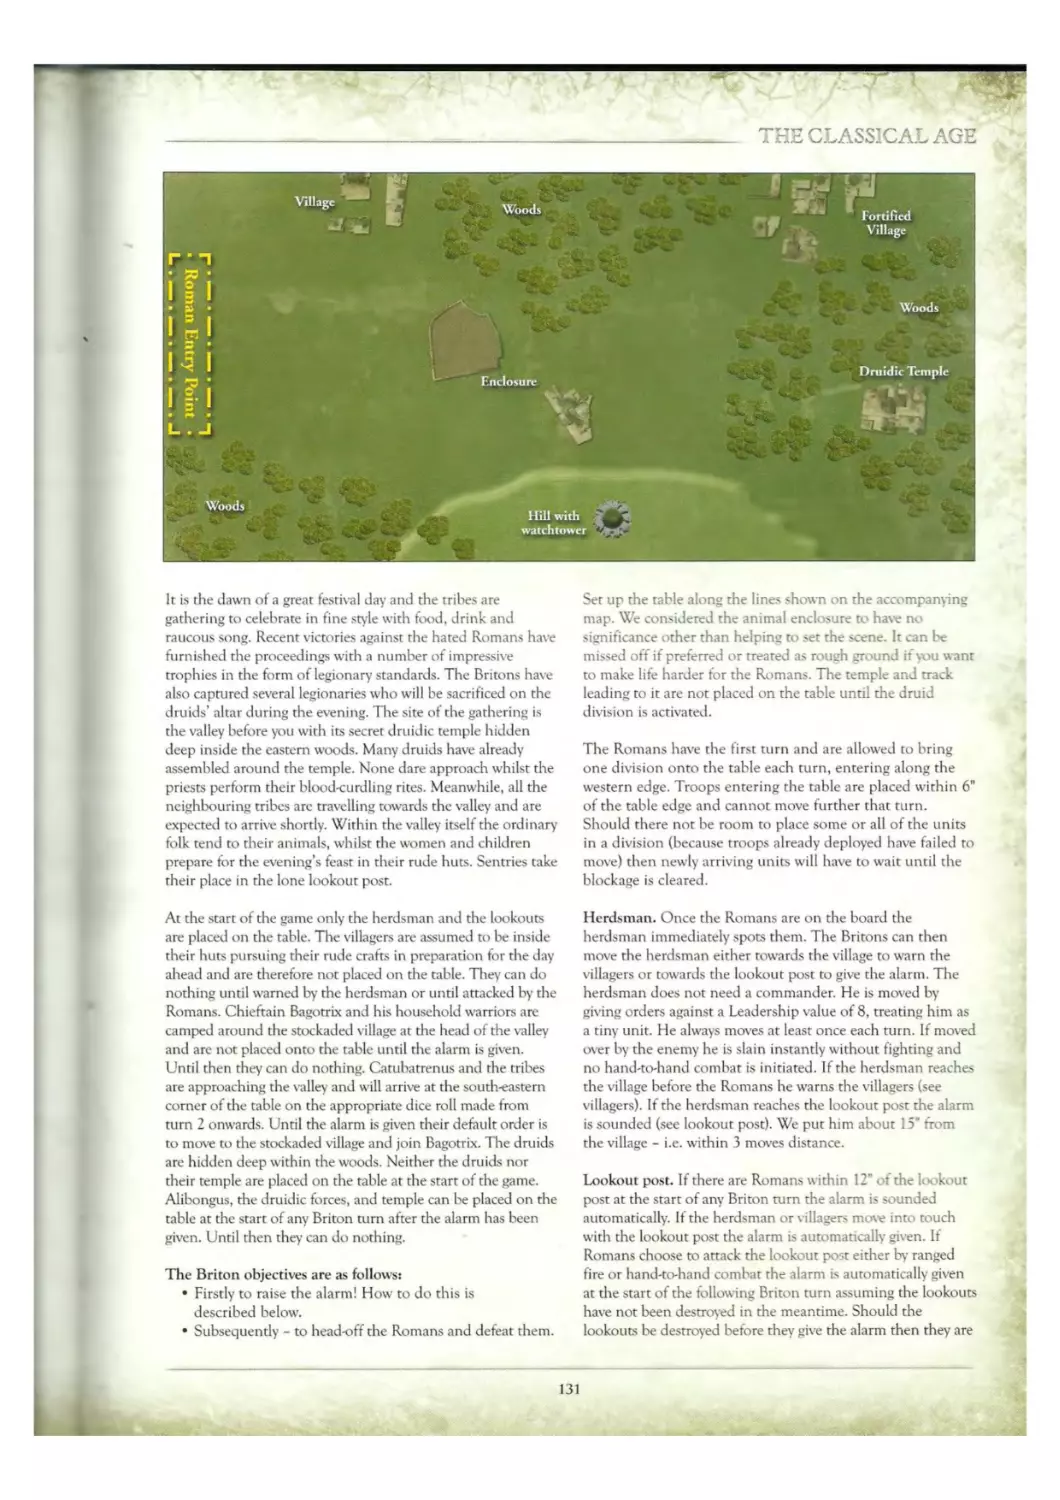
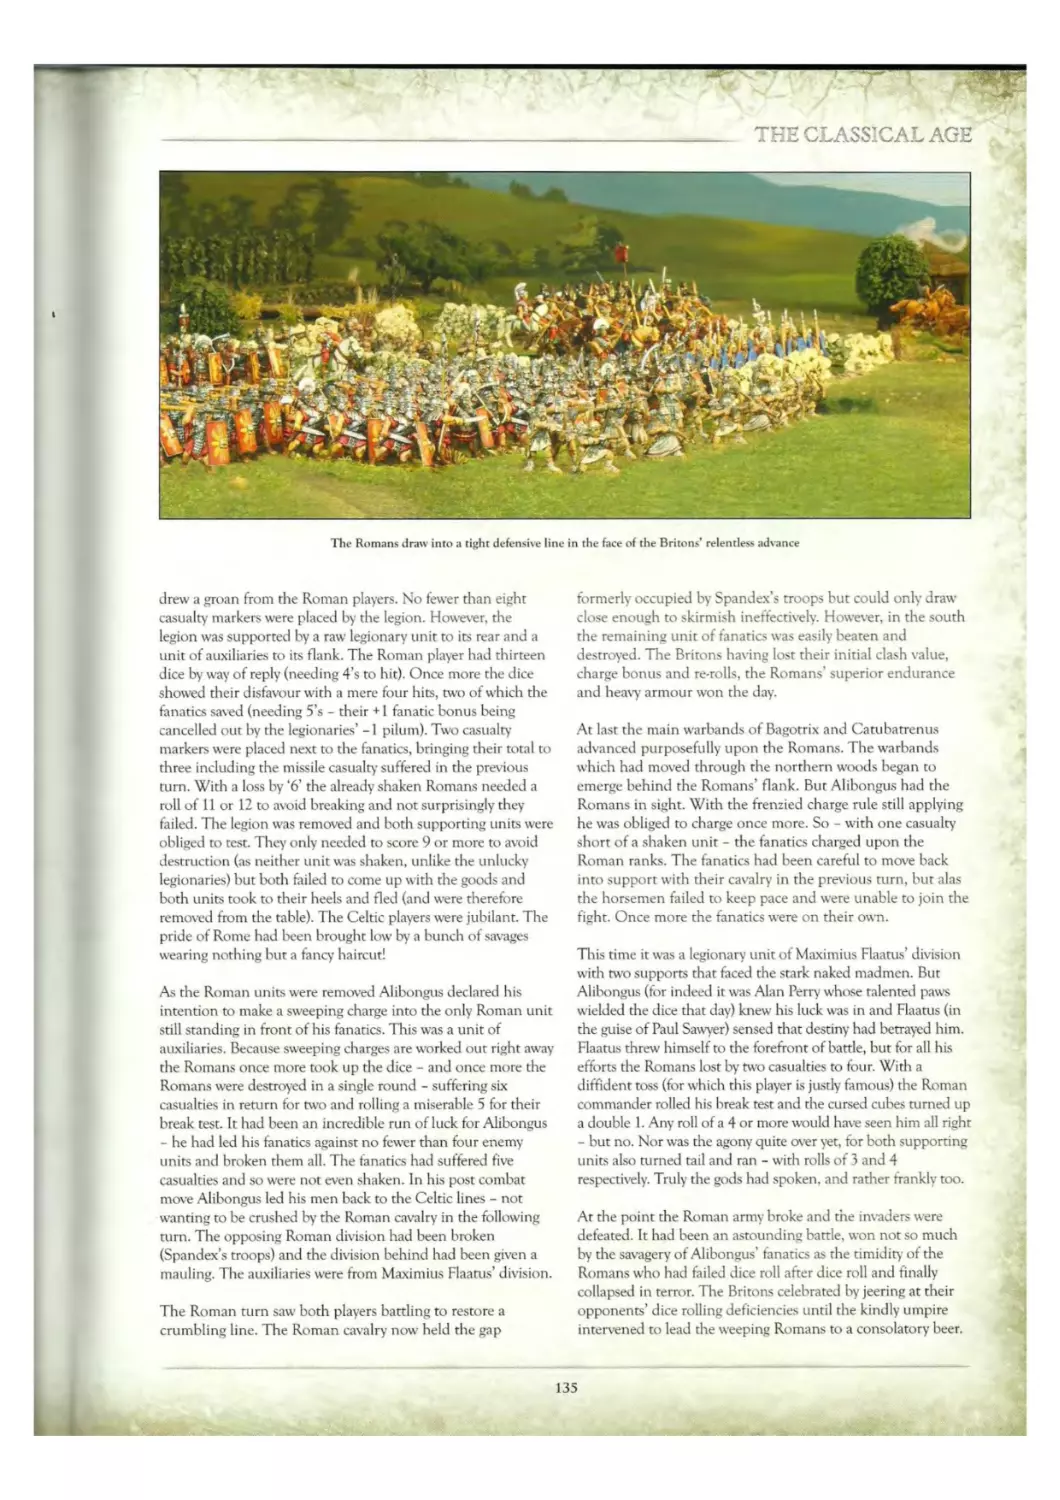
62 A Border Raid: AD52 128
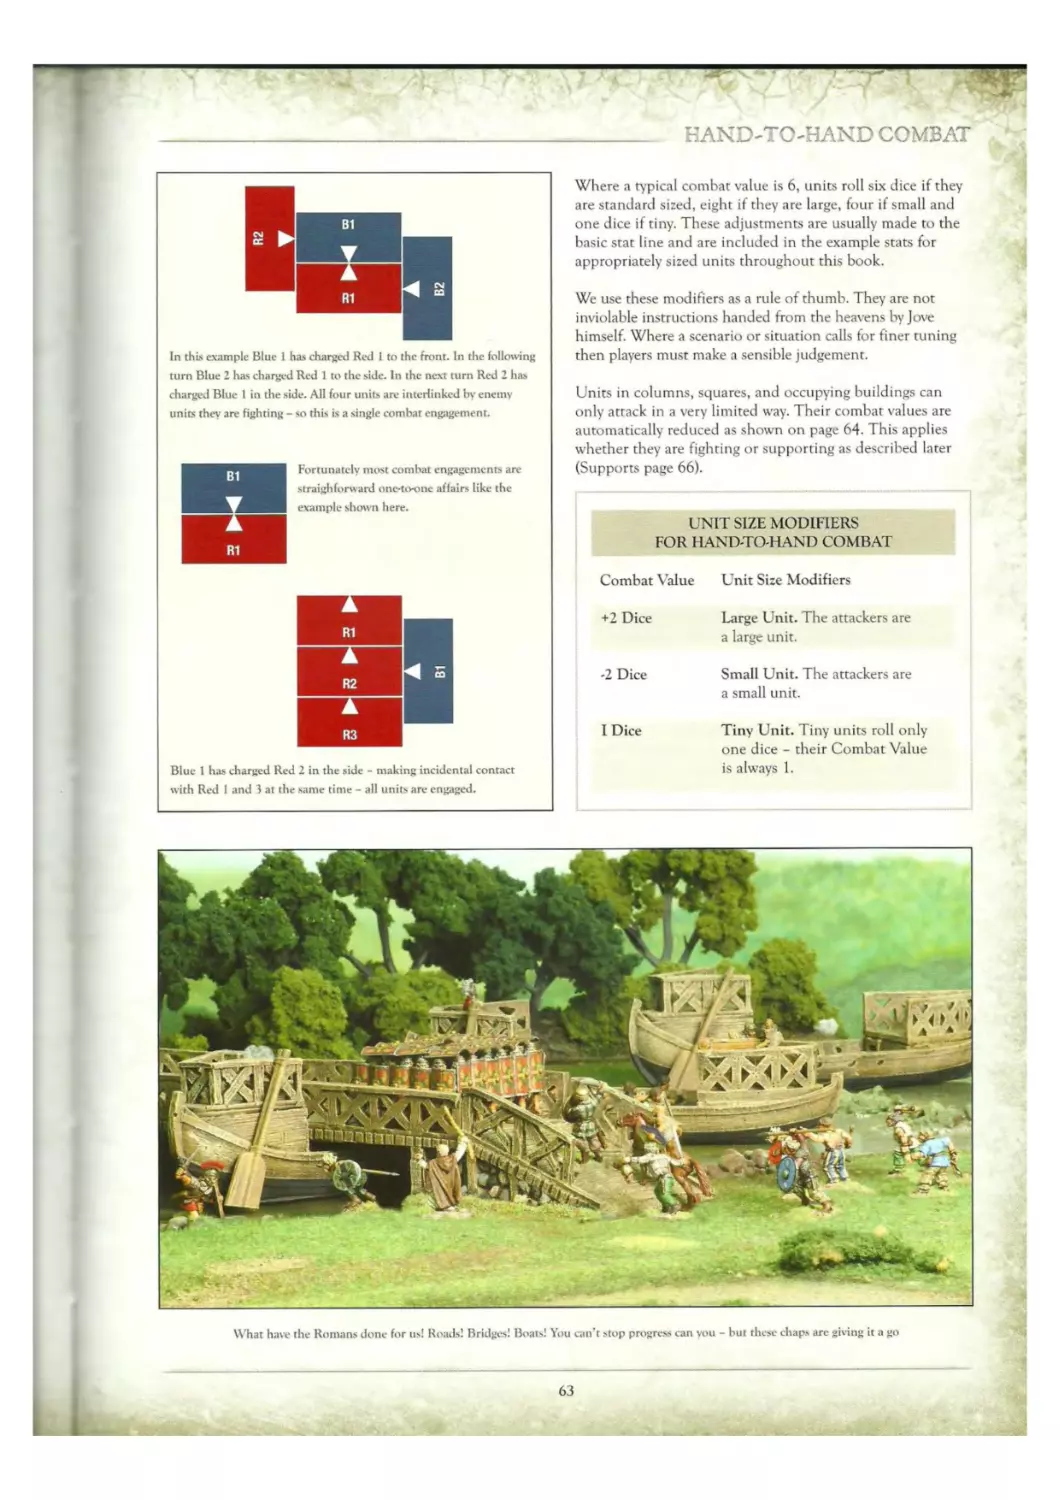
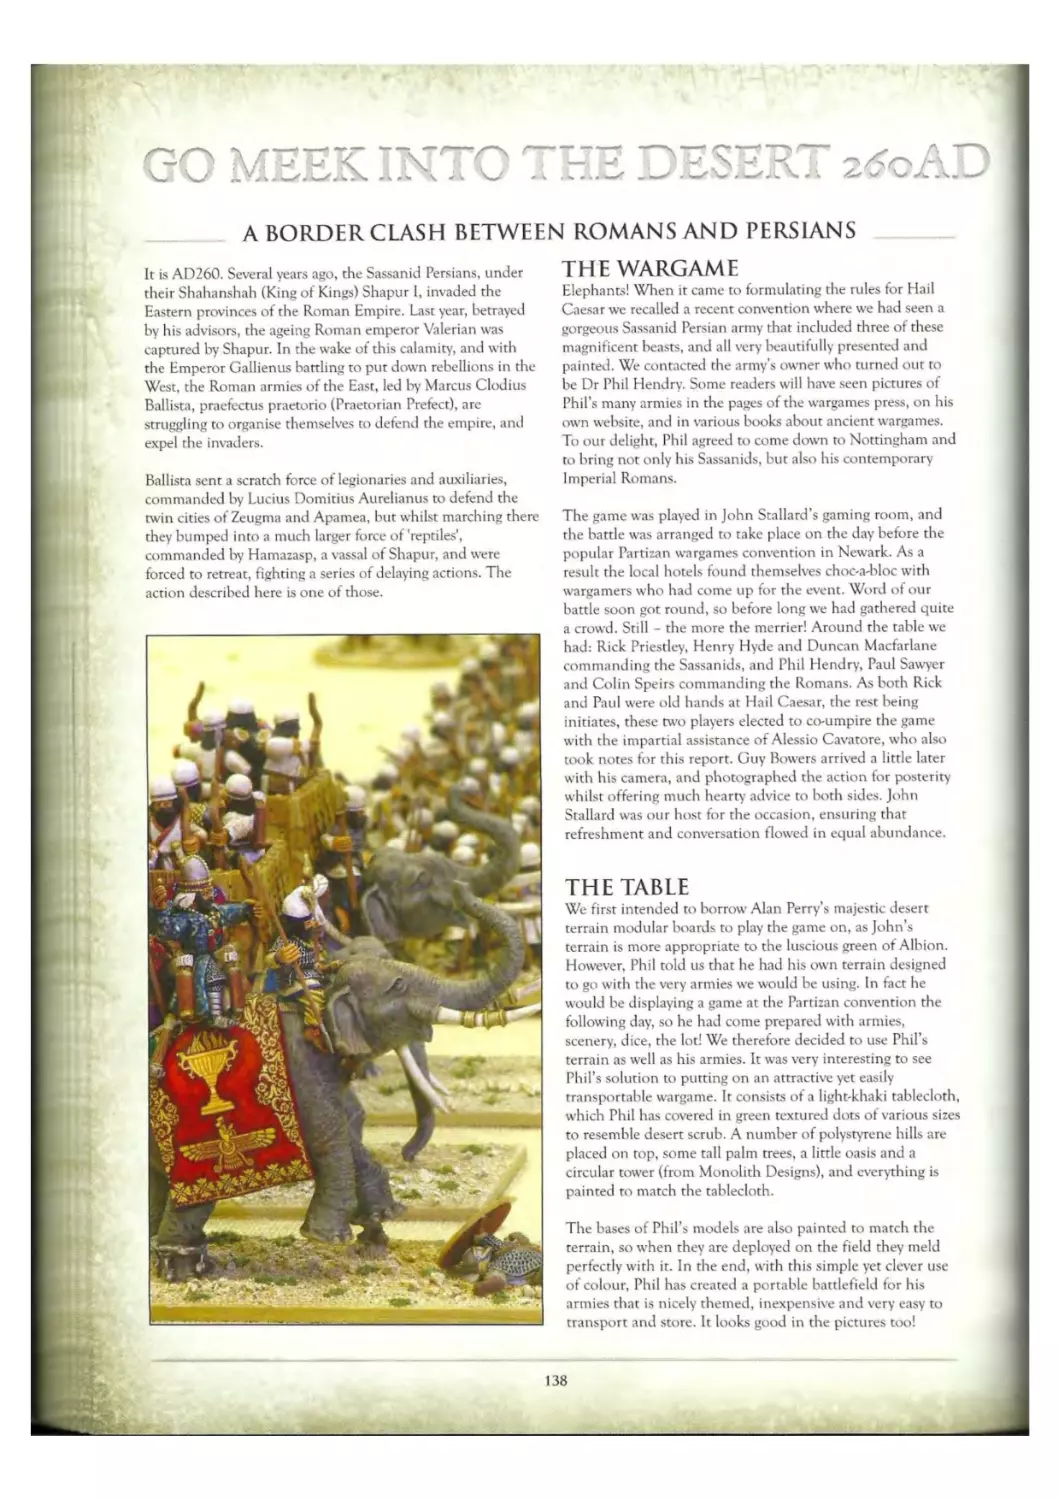
65 Go Meek into the Desert: 260AD 138
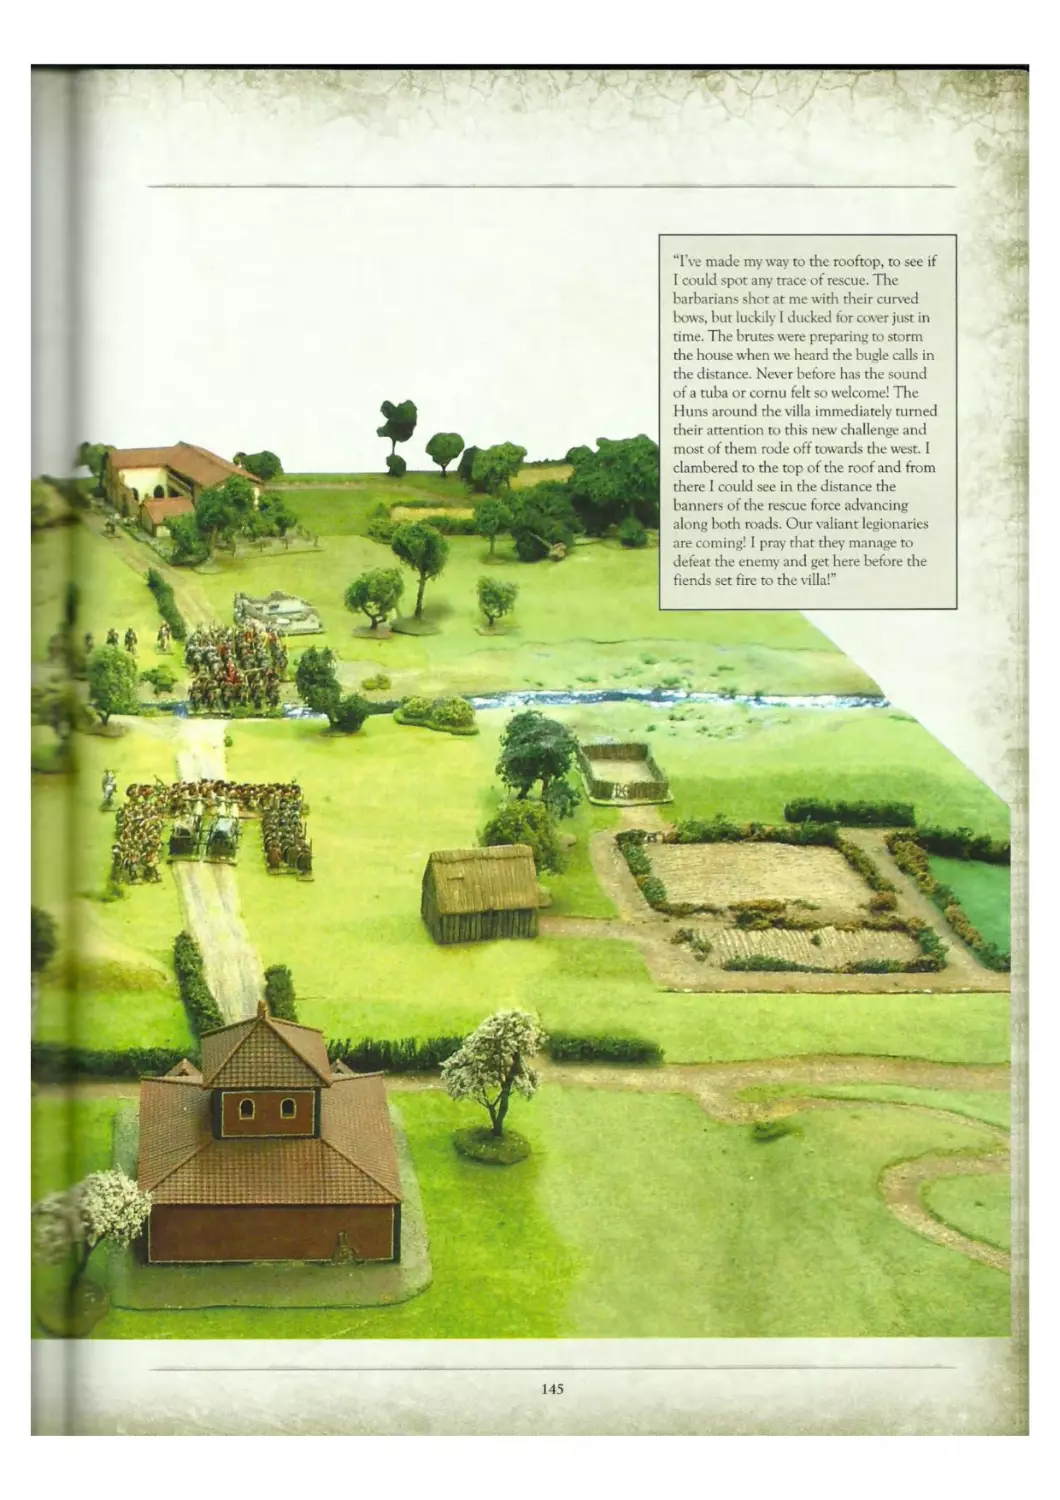
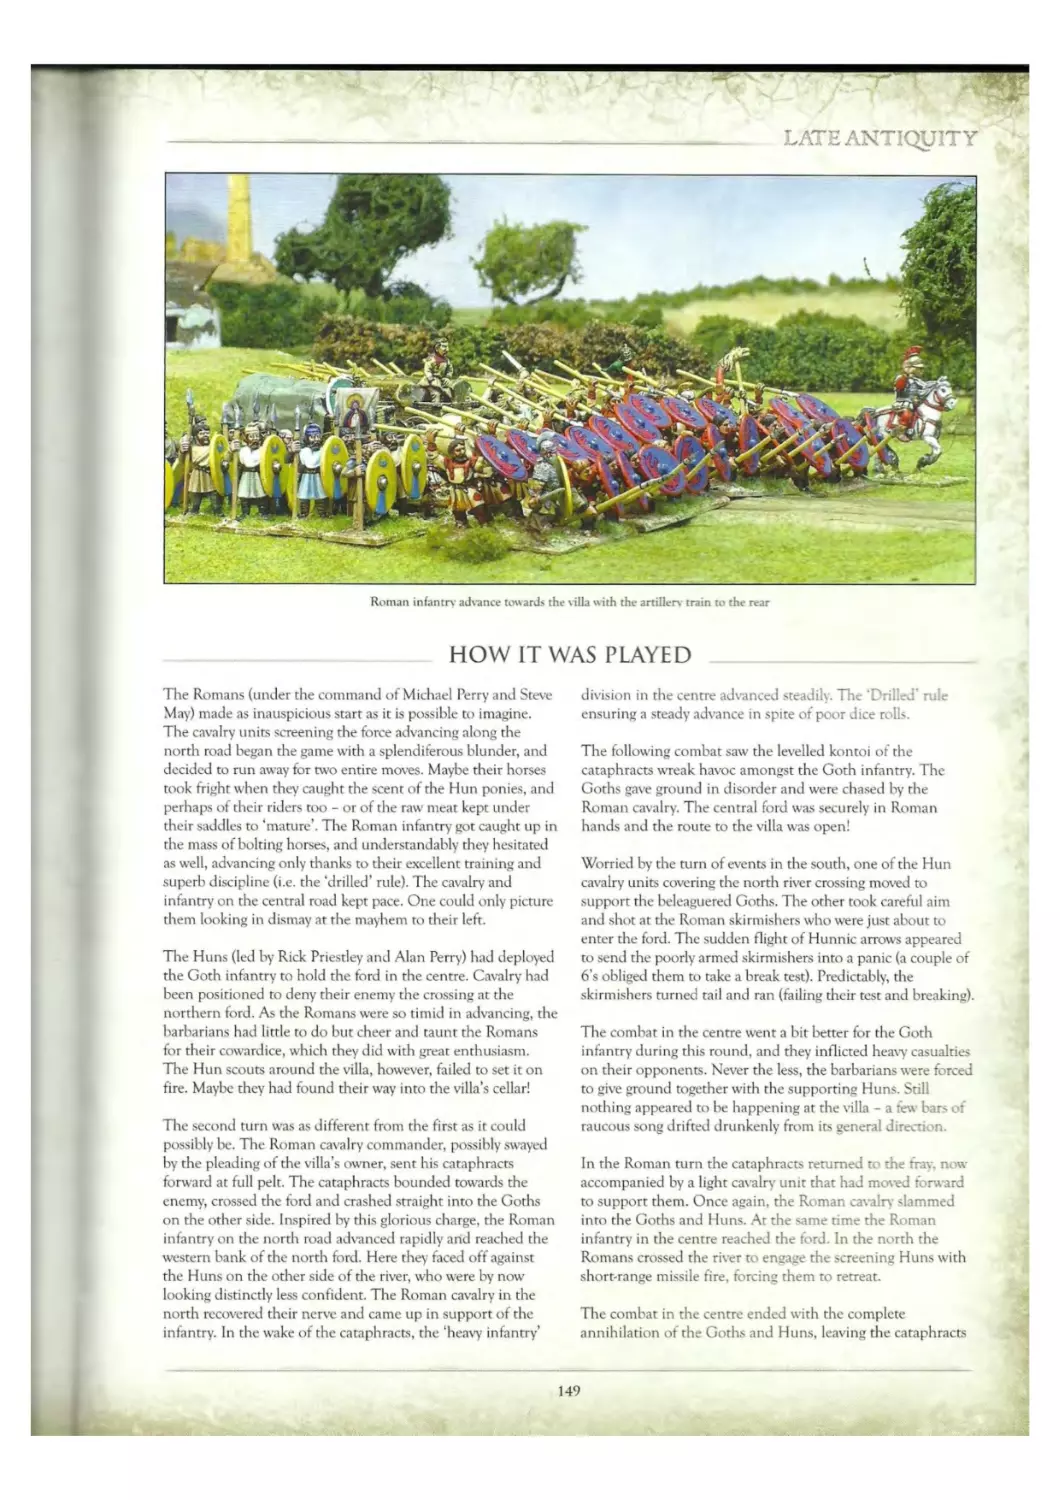
65 Barbarians at tire Gates: 500 AD 144
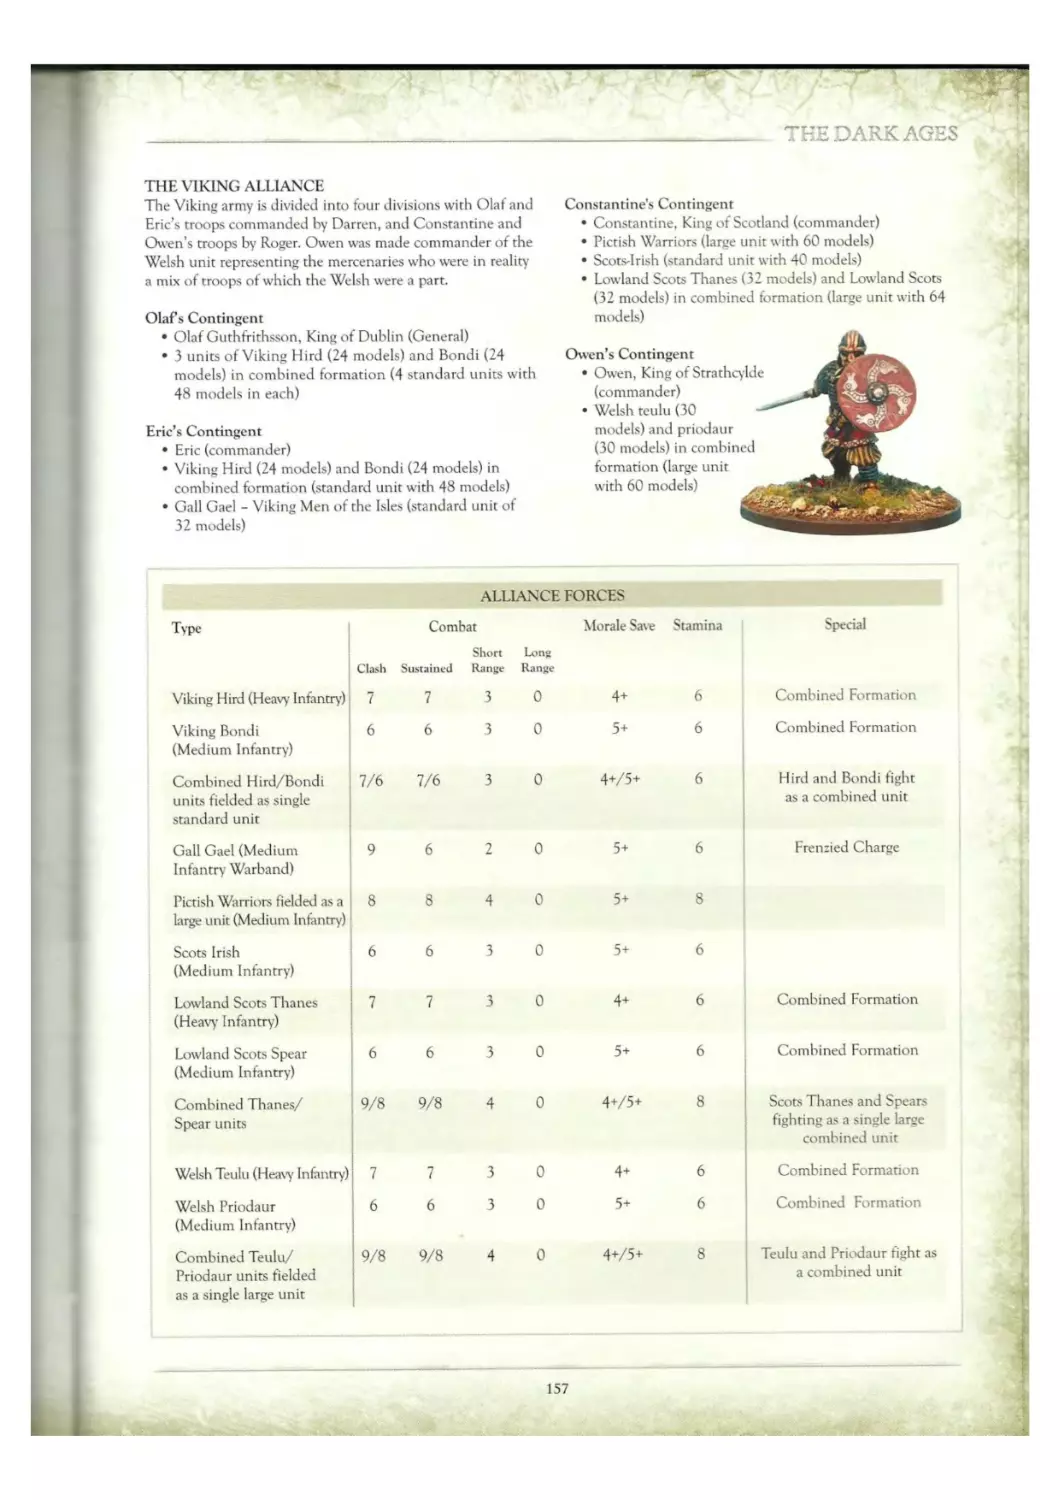
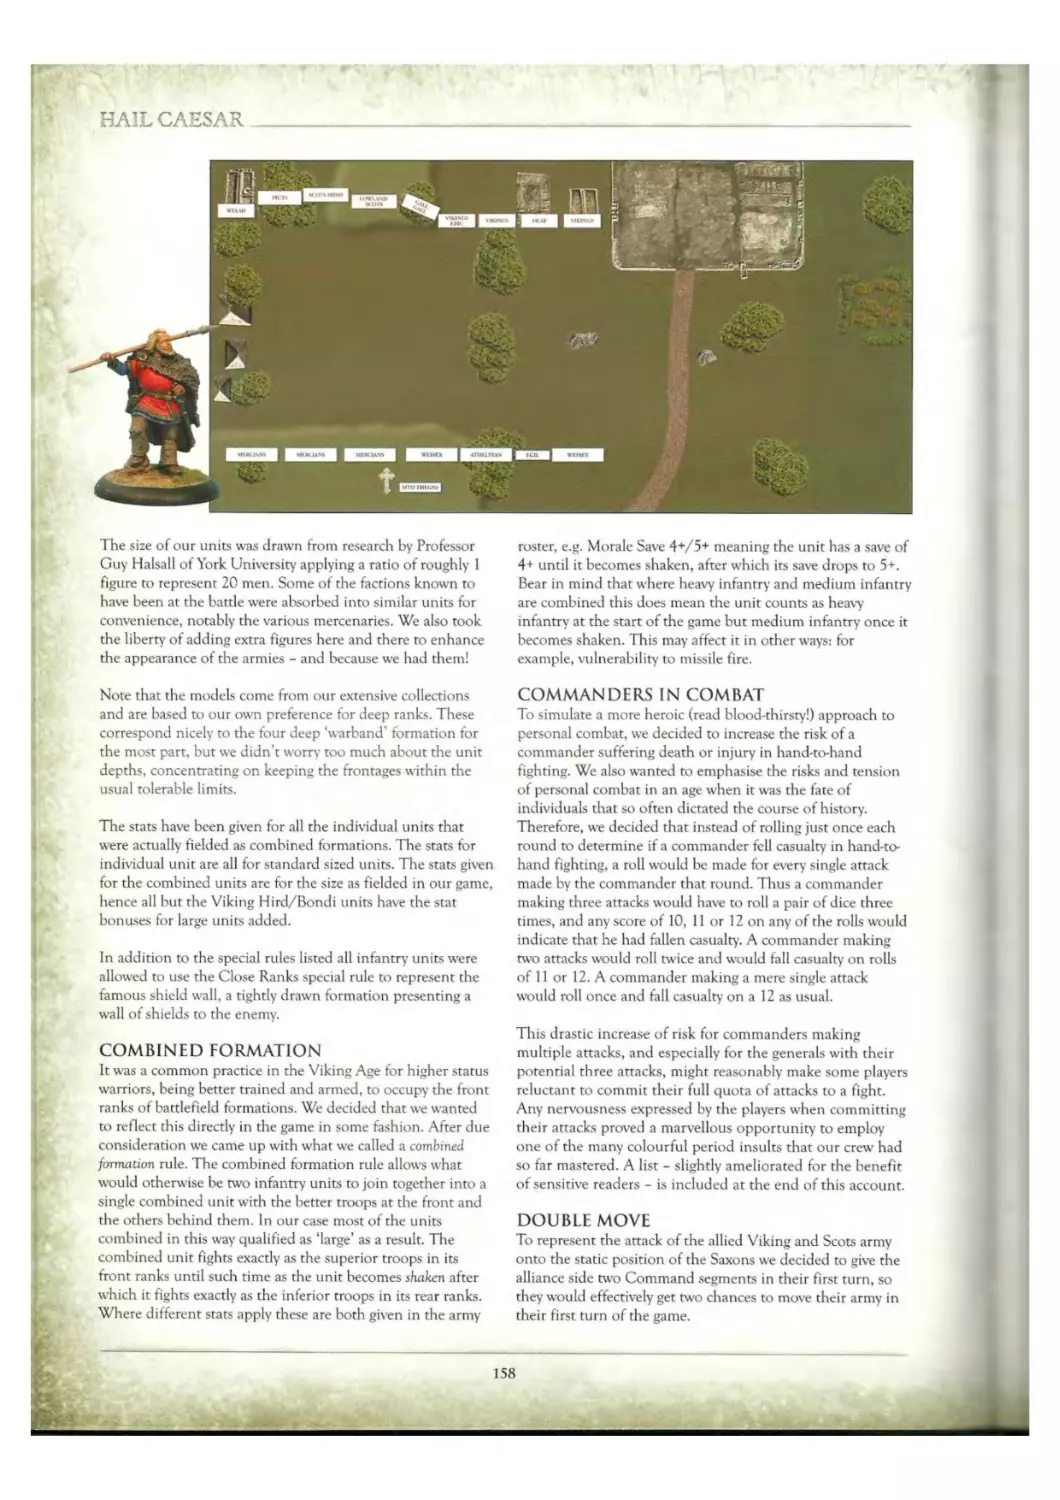
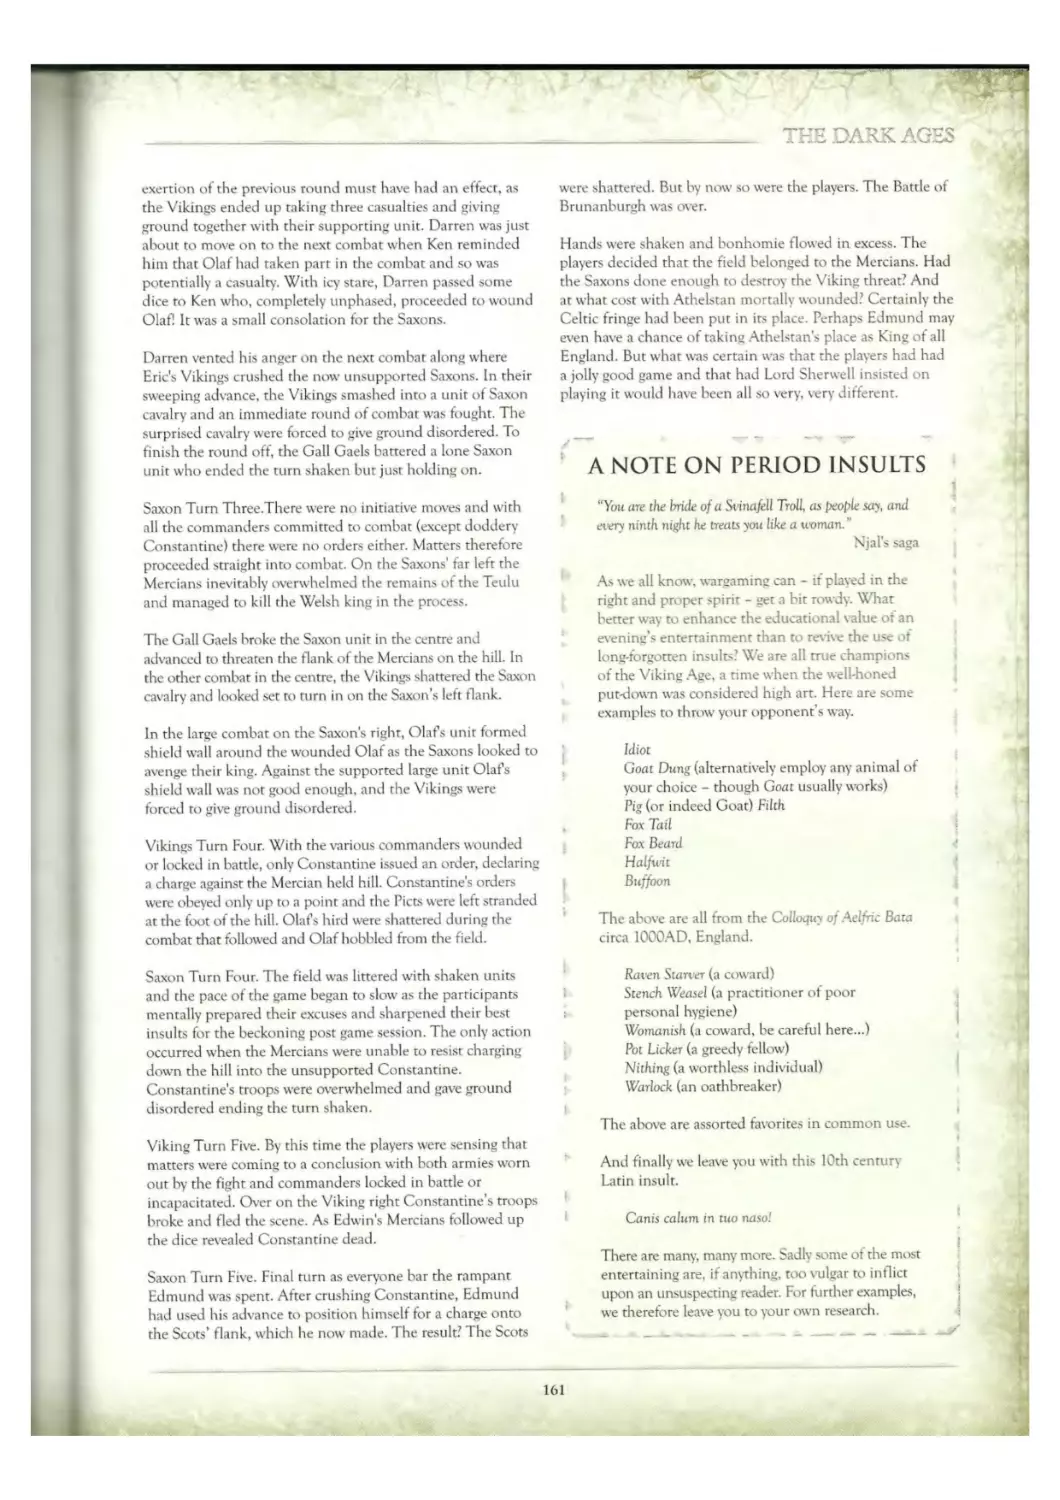
66 The Battle of Brunanburgh: 937AD 154
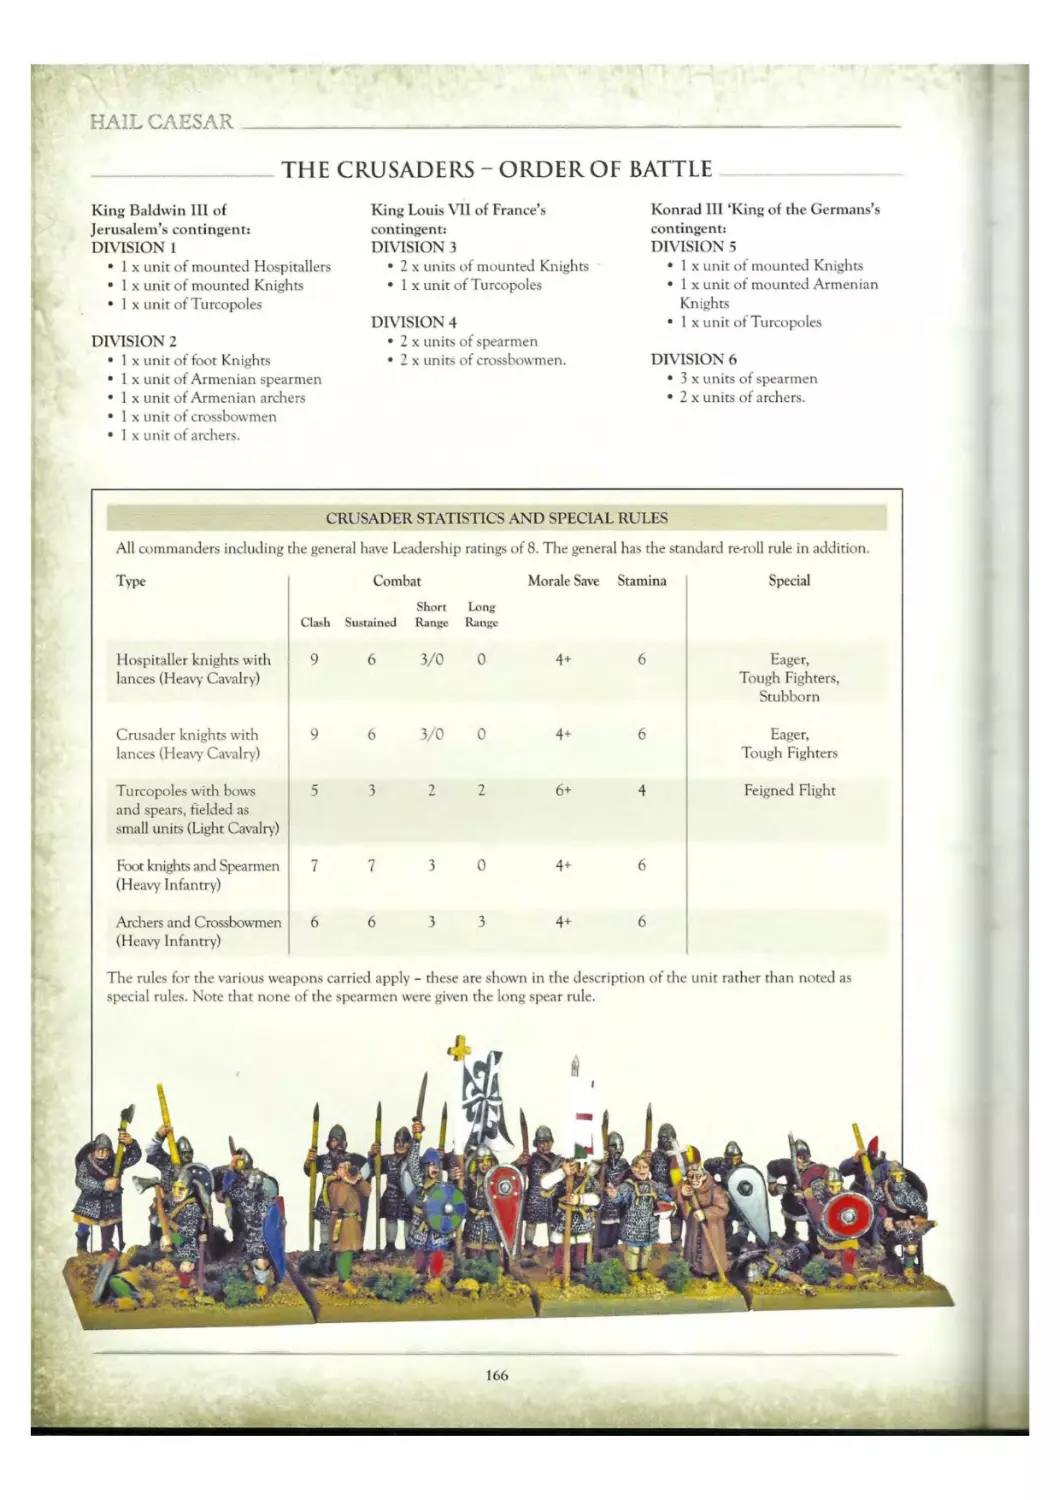
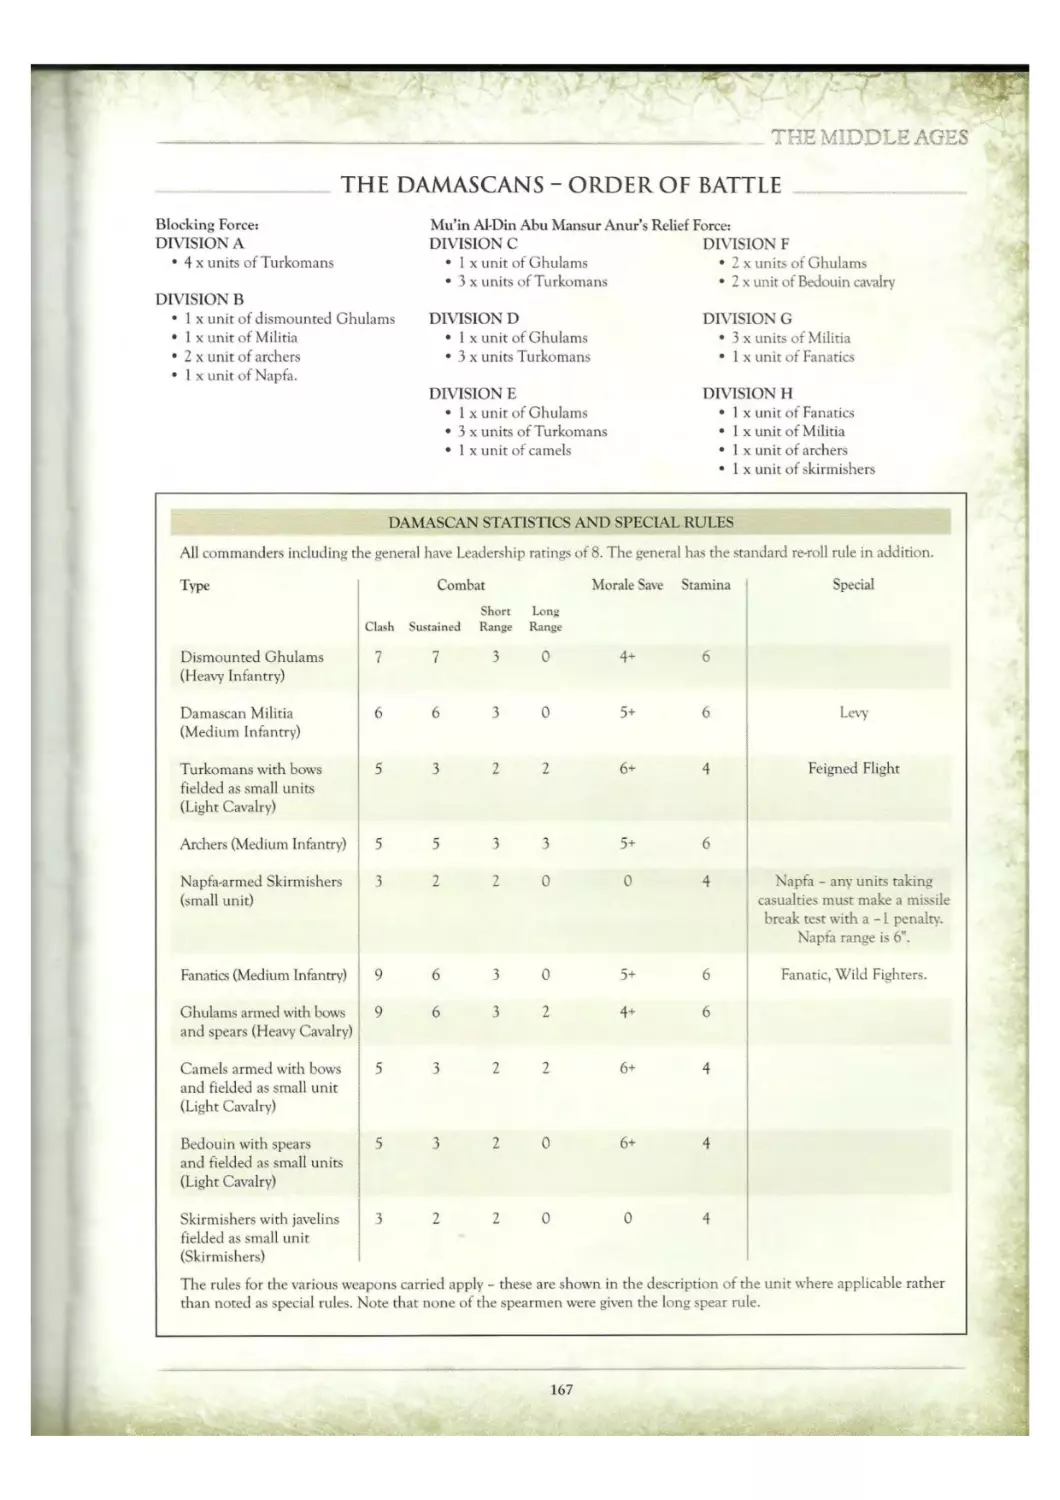
66 The Road to Damascus: 1148AD 164
67
69 69 Appendices 172
70 1. Designer’s Notes 172
70 2. Using Smaller Models 174
70 3. A Brief Guide to Army Lists 175
71 4. Rules Summary 178
71 5. Resources 187
4
—
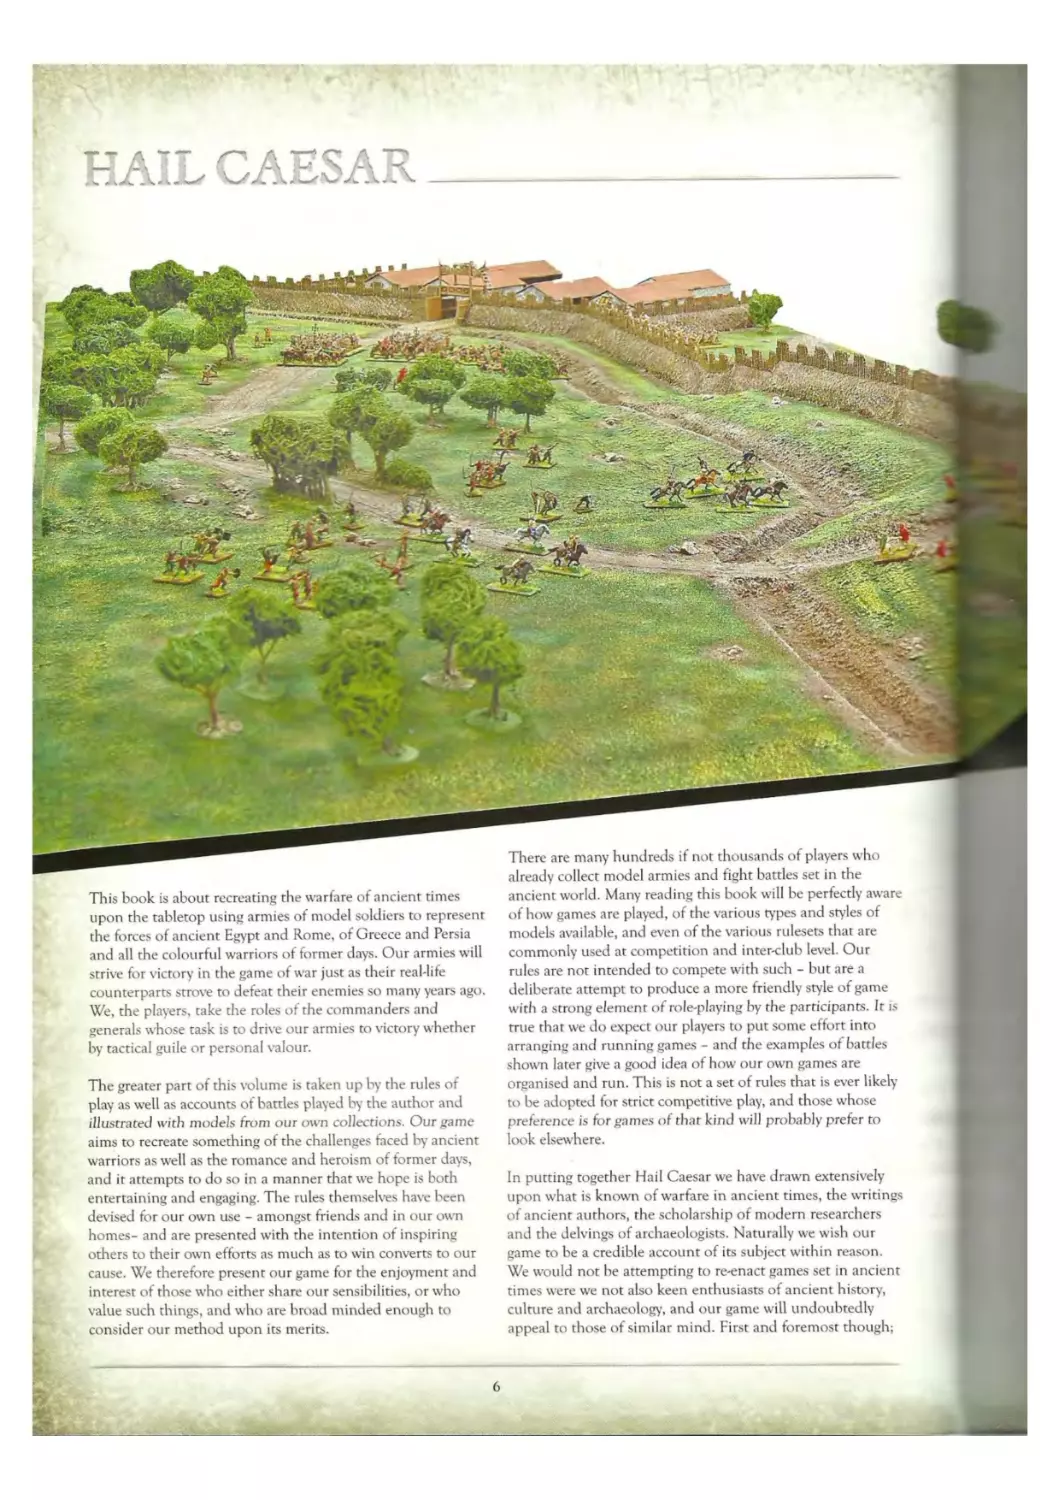
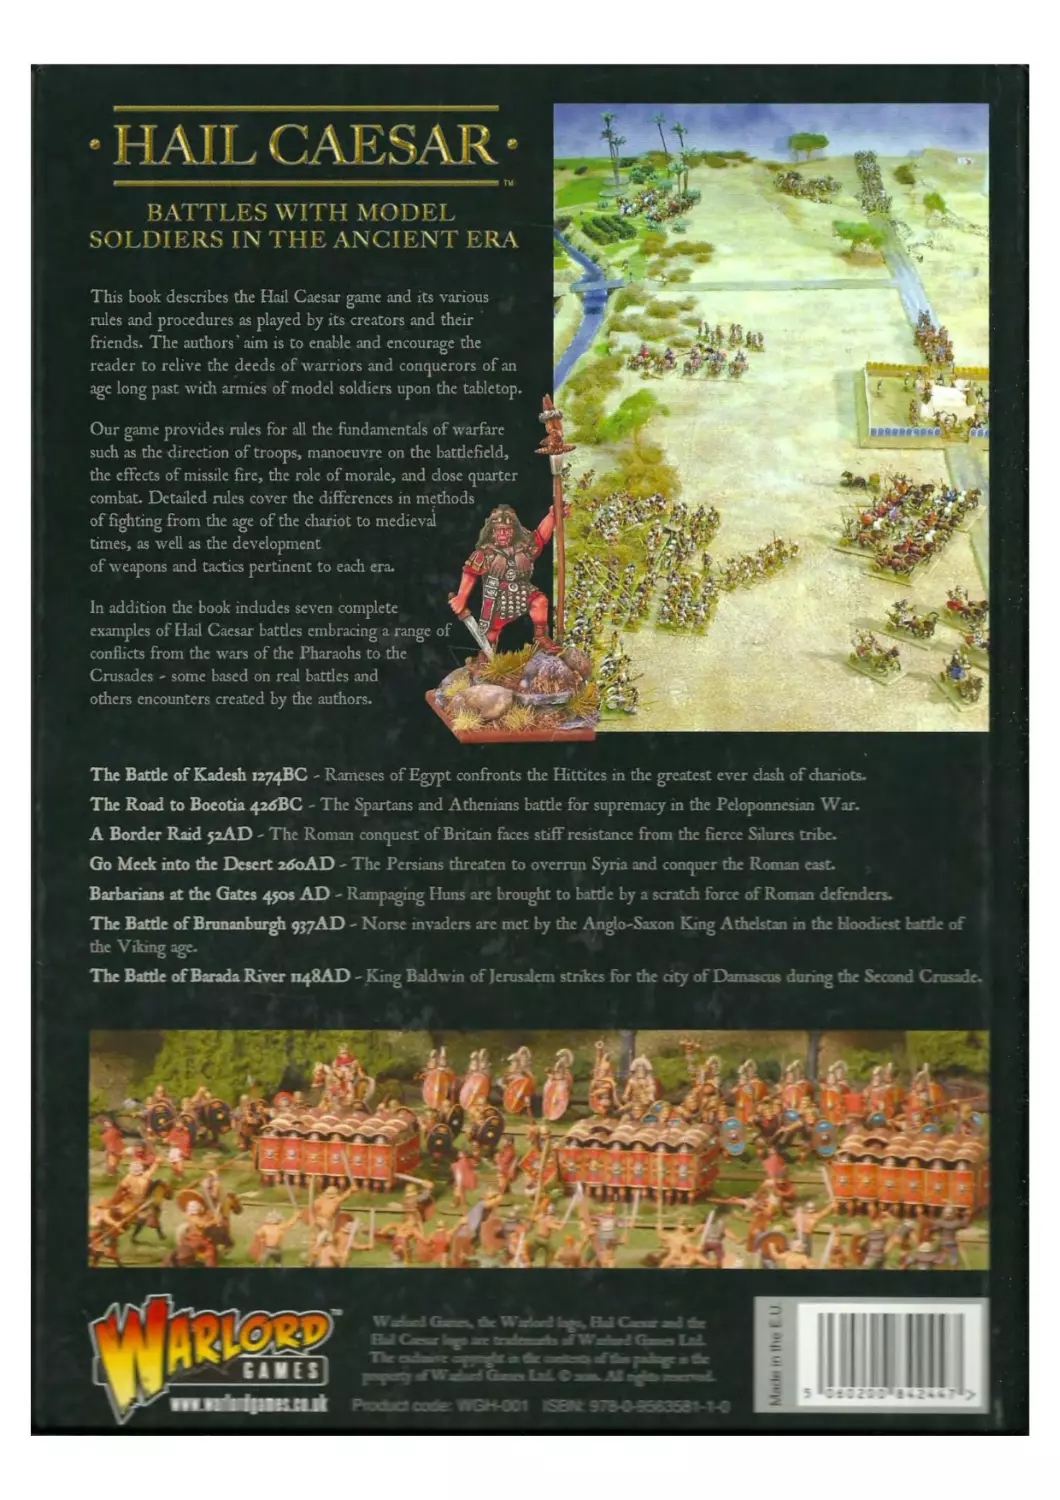
This book is about recreating the warfare of ancient times
upon the tabletop using armies of model soldiers to represent
the forces of ancient Egypt and Rome, of Greece and Persia
and all the colourful warriors of former days. Our armies will
strive for victory in the game of war just as their real-life
counterparts strove to defeat their enemies so many years ago.
We, the players, take the roles of the commanders and
generals whose task is to drive our armies to victory whether
by tactical guile or personal valour.
The greater part of this volume is taken up by the rules of
play as well as accounts of battles played by the author and
illustrated with models from our own collections. Our game
aims to recreate something of the challenges faced by ancient
warriors as well as the romance and heroism of former days,
and it attempts to do so in a manner that we hope is both
entertaining and engaging. The rules themselves have been
devised for our own use - amongst friends and in our own
homes- and are presented with the intention of inspiring
others to their own efforts as much as to win converts to our
cause. We therefore present our game for the enjoyment and
interest of those who either share our sensibilities, or who
value such things, and who are broad minded enough to
consider our method upon its merits.
There are many hundreds if not thousands of players who
already collect model armies and fight battles set in the
ancient world. Many reading this book will be perfectly aware
of how games are played, of the various types and styles of
models available, and even of the various rulesets that are
commonly used at competition and inter-club level. Our
rules are not intended to compete with such - but are a
deliberate attempt to produce a more friendly style of game
with a strong element of role-playing by the participants. It is
true that we do expect our players to put some effort into
arranging and running games - and the examples of battles
shown later give a good idea of how our own games are
organised and run. This is not a set of rules that is ever likely
to be adopted for strict competitive play, and those whose
preference is for games of that kind will probably prefer to
look elsewhere.
In putting together Hail Caesar we have drawn extensively
upon what is known of warfare in ancient times, the writings
of ancient authors, the scholarship of modern researchers
and the delvings of archaeologists. Naturally we wish our
game to be a credible account of its subject within reason.
We would not be attempting to re-enact games set in ancient
times were we not also keen enthusiasts of ancient history,
culture and archaeology, and our game will undoubtedly
appeal to those of similar mind. First and foremost though;
6
Romans, remember that you shall rule by
your authority, for this is to be your
skill, to make peace the custom, to spare
the rules of play have been developed so that our own group
of players can spend an evening - or occasionally a long
weekend - fighting battles with model soldiers amongst
kindred spirits. As such the rules aim to convey a sense of
drama to the action, to present the players with nerve-
racking decisions, and to reward and punish risk taking in
equal measure.
Finally, for those who are interested in the ideas and aims
behind the rule set and its development we have added a
section of Designer’s Notes at the end of the book.
HOW THE RULES
ARE CONSTRUCTED
The rules of our game can be readily adjusted to suit
different sized battles, different numbers of players, and
differing levels of complexity. This reflects the fact that
the game has evolved amongst a core of players, but also
has to accommodate friends and occasional visitors w'ho
may not be familiar with the course of play. As it happens
this is a useful basis for a broadly based set of ancient rules,
as it also allows us to easily adapt the game to represent
the specific considerations of warfare throughout
the ancient era.
and
otherwise help out to
With this in mind it will help to think of the game as a core set
of rules tor command, movement and combat. The basic values
and ratings assigned to the armies facilitate these core
mechanics: they define how troops move, how effectively they
fight in different situations, and how they react to casualties
suffered. In addition, the specific qualities of troops,
technologies and cultural traditions are represented by means
of additional or special rules that we apply according to our
tastes and the type of game being played. These special rules
have been largely improvised through play, and they can be
readily extended or changed as the occasion demands. Often
they were devised as part of a specific scenario and not
necessarily used regularly. We leave it up to the players
themselves to decide how much of this kind of representational
detail to apply. Our aim is to provide an adaptable framework,
plus a suggested ‘kit’ of additional rules that can be altered or
expanded at will. To illustrate how this works we have included
seven examples of quite different games that demonstrate the
rules as applied to specific battles and eras.
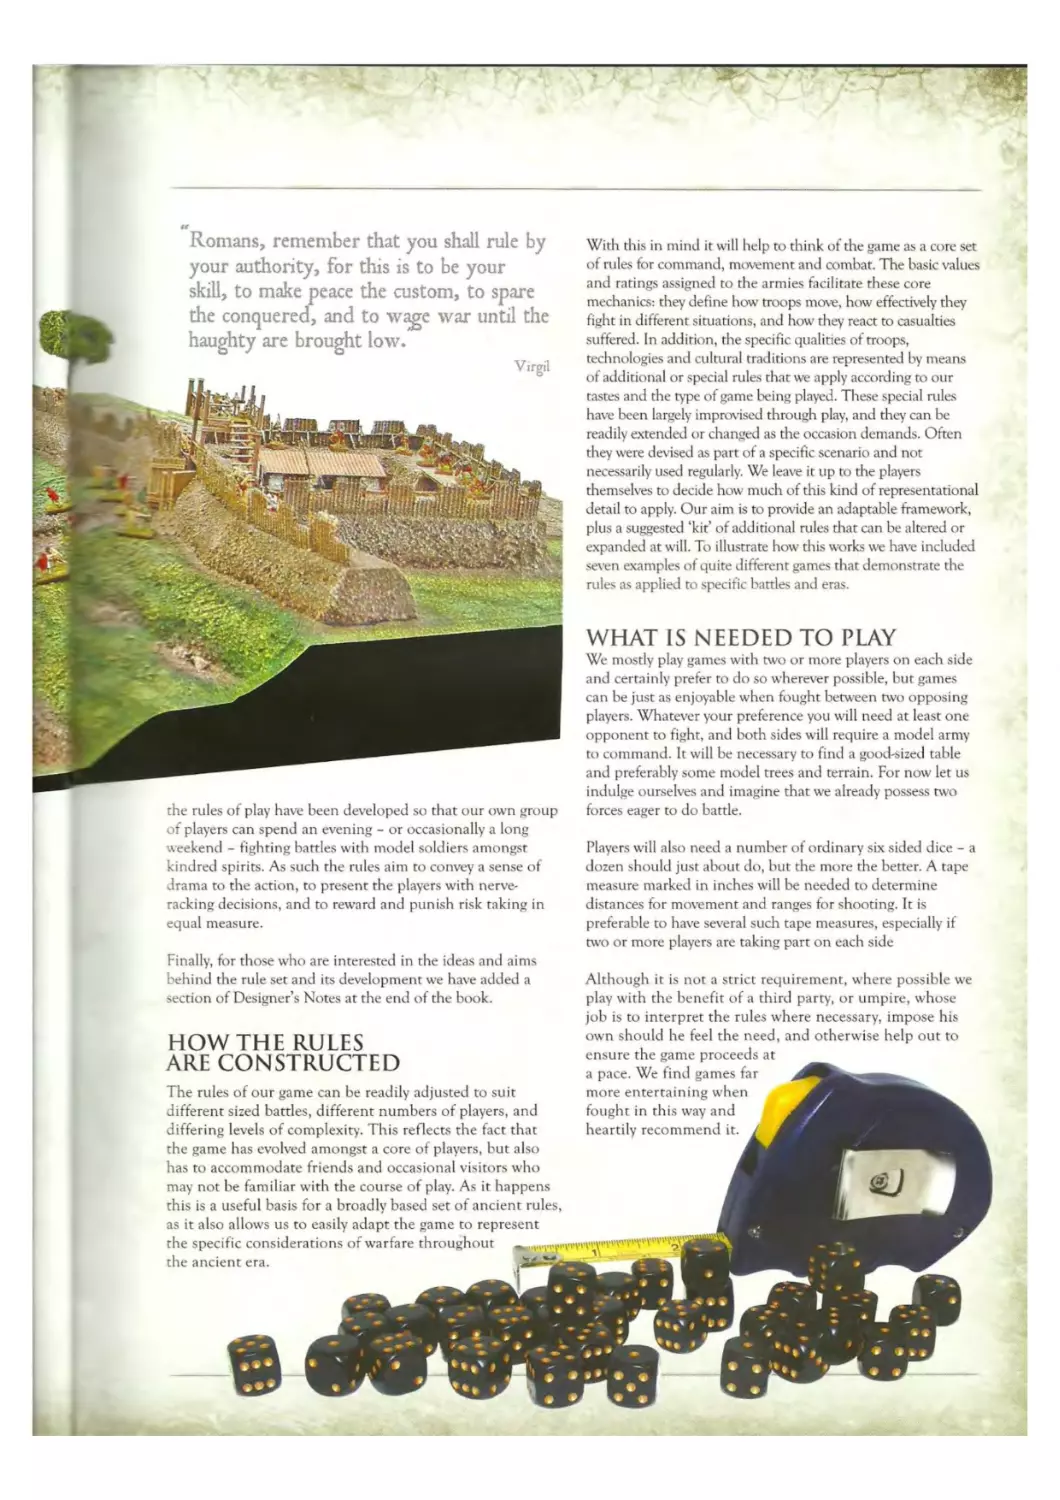
WHAT IS NEEDED TO PLAY
We mostly play games with two or more players on each side
and certainly prefer to do so wherever possible, but games
can be just as enjoyable when fought between two opposing
players. Whatever your preference you will need at least one
opponent to fight, and both sides will require a model army
to command. It will be necessary to find a good-sized table
and preferably some model trees and terrain. For now let us
indulge ourselves and imagine that we already possess two
forces eager to do battle.
Players will also need a number of ordinary six sided dice - a
dozen should just about do, but the more the better. A tape
measure marked in inches will be needed to determine
distances for movement and ranges for shooting. It is
preferable to have several such tape measures, especially if
two or more players are taking part on each side
Although it is not a strict requirement, wdiere possible we
play with the benefit of a third party, or umpire, w'hose
job is to interpret the rules where necessary, impose his
own should he feel the need,
ensure the game proceeds at
a pace. We find games far
more entertaining w'hen
fought in this way and
heartily recommend it.
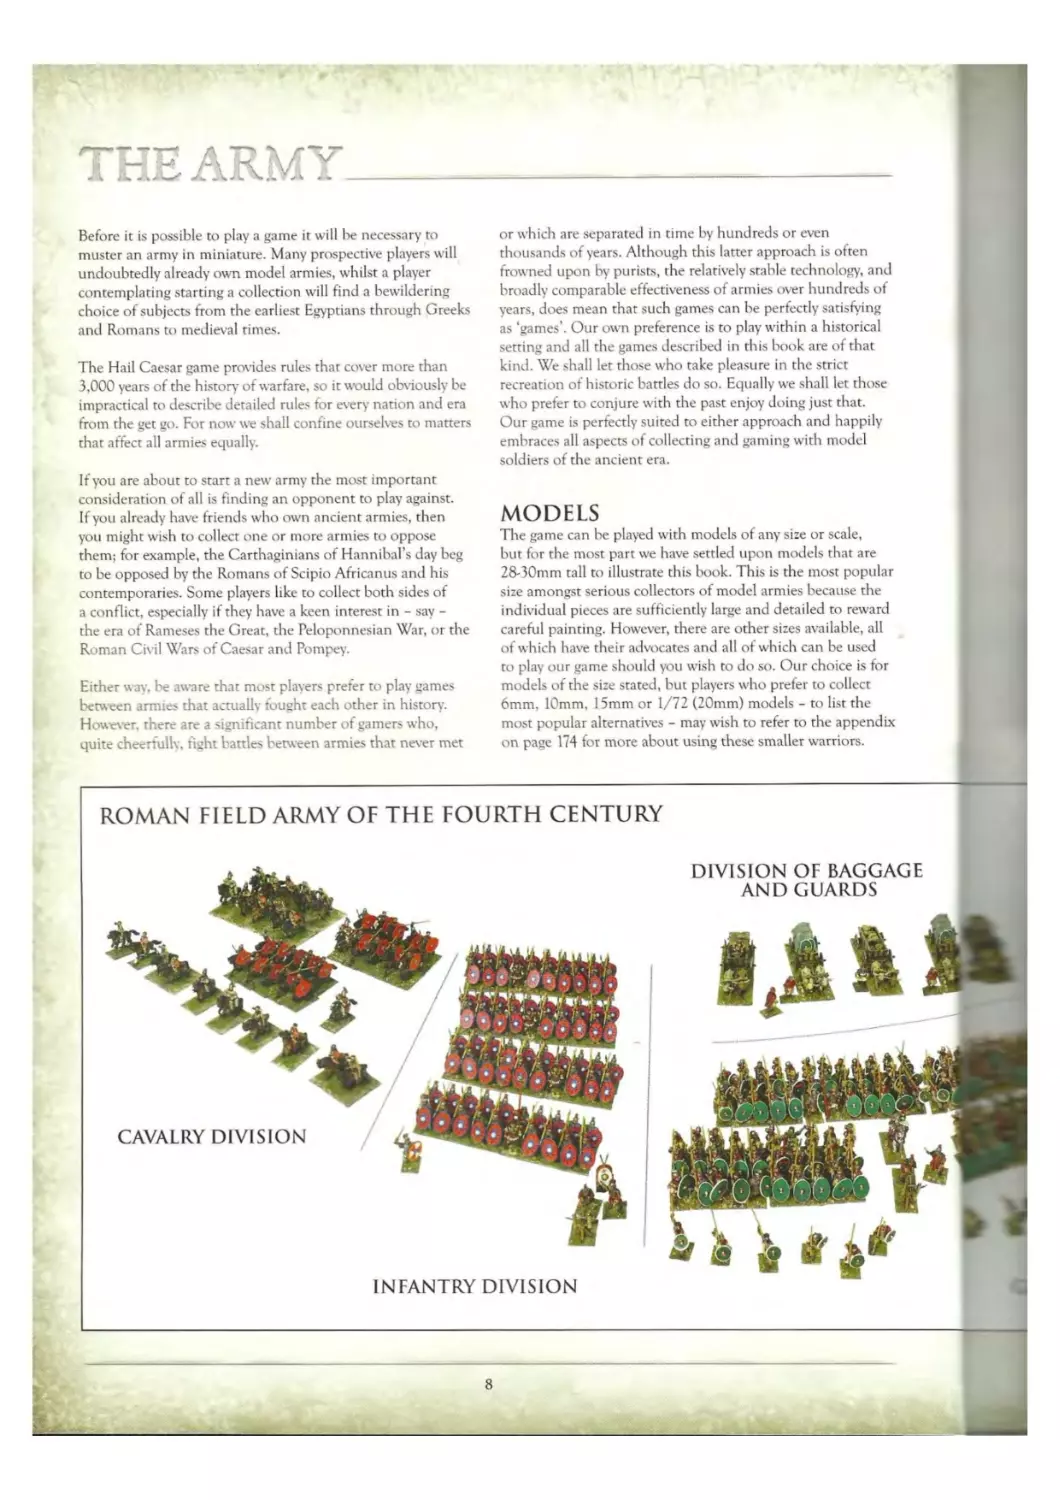
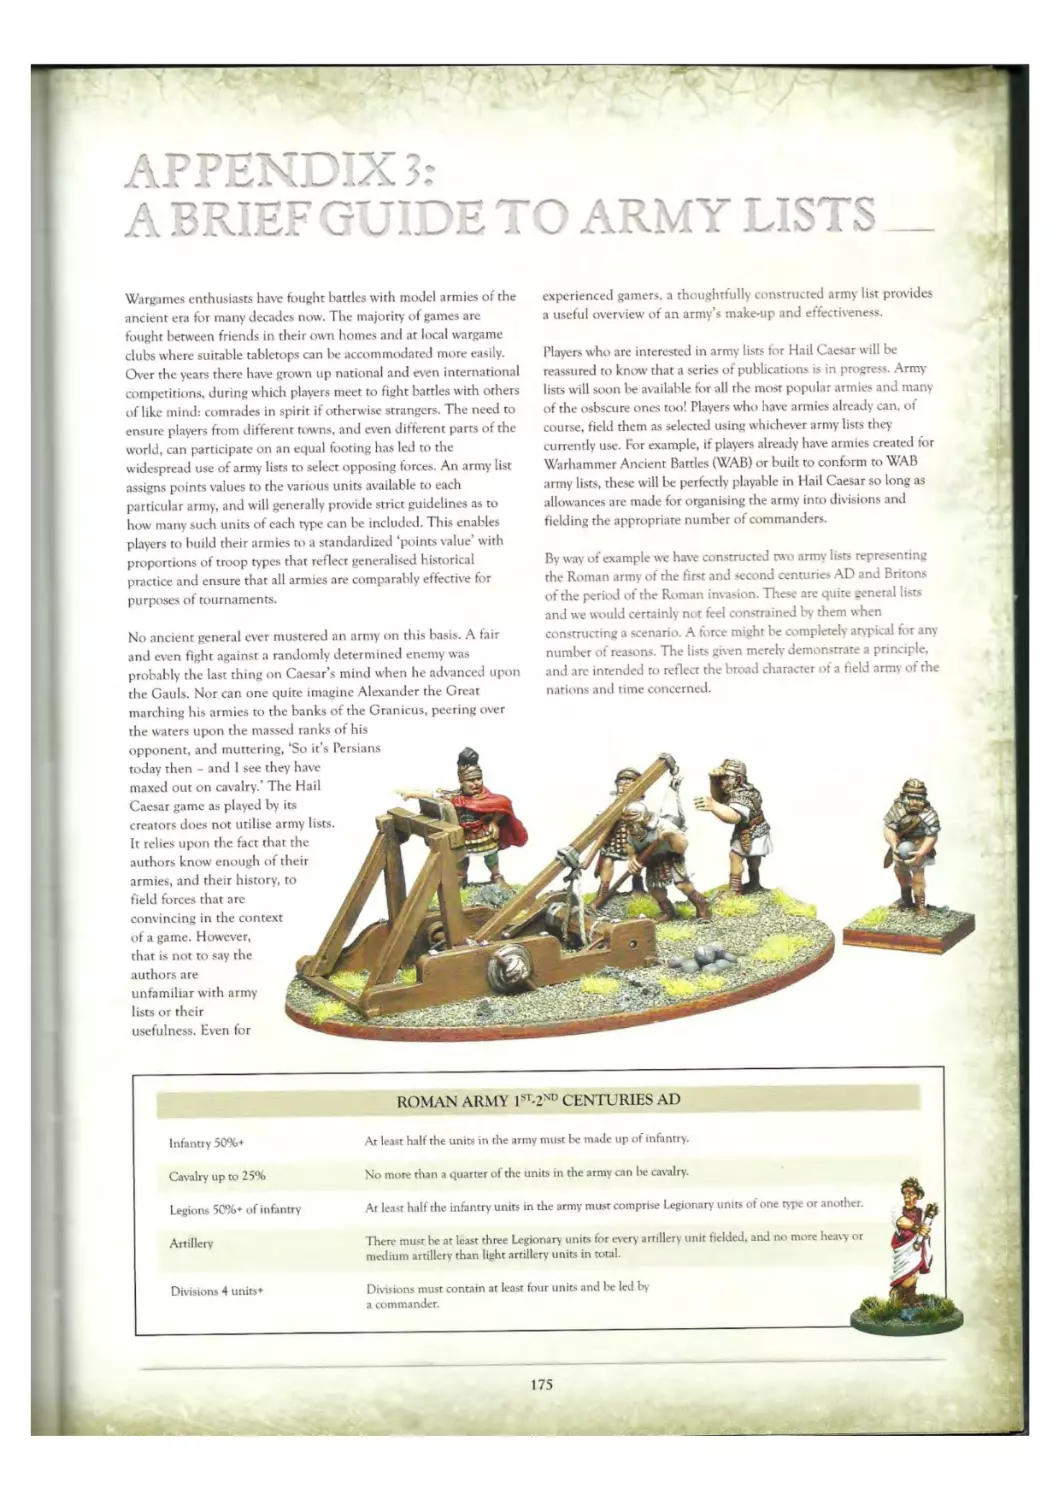
ROMAN FIELD ARMY OF THE FOURTH CENTURY
Either way, be aware that most players prefer to play games
between armies that actually fought each other in history.
However, there are a significant number of gamers who,
quite cheerfully, fight battles between armies that never met
The Hail Caesar game provides rules that cover more than
3,000 years of the history of warfare, so it would obviously be
impractical to describe detailed rules for every nation and era
from the get go. For now we shall confine ourselves to matters
that affect all armies equally.
CAVALRY D V S ON
Before it is possible to play a game it will be necessary to
muster an army in miniature. Many prospective players will
undoubtedly already own model armies, whilst a player
contemplating starting a collection will find a bewildering
choice of subjects from the earliest Egyptians through Greeks
and Romans to medieval times.
If you are about to start a new army the most important
consideration of all is finding an opponent to play against.
If you already have friends who own ancient armies, then
you might wish to collect one or more armies to oppose
them; for example, the Carthaginians of Hannibal’s day beg
to be opposed by the Romans of Scipio Africanus and his
contemporaries. Some players like to collect both sides of
a conflict, especially if they have a keen interest in - say -
rhe era of Rameses the Great, the Peloponnesian War, or the
Roman Civil Wars of Caesar and Pompey.
or which are separated in time by hundreds or even
thousands of years. Although this latter approach is often
frowned upon by purists, the relatively stable technology, and
broadly comparable effectiveness of armies over hundreds of
years, does mean that such games can be perfectly satisfying
as ‘games’. Our own preference is to play within a historical
setting and all the games described in this book are of that
kind. We shall let those who take pleasure in the strict
recreation of historic battles do so. Equally we shall let those
who prefer to conjure with the past enjoy doing just that.
Our game is perfectly suited to either approach and happily
embraces all aspects of collecting and gaming with model
soldiers of the ancient era.
MODELS
The game can be played with models of any size or scale,
but for the most part we have settled upon models that are
28-30mm tall to illustrate this book. This is the most popular
size amongst serious collectors of model armies because the
individual pieces are sufficiently large and detailed to reward
careful painting. However, there are other sizes available, all
of which have their advocates and all of which can be used
to play our game should you wish to do so. Our choice is for
models of the size stated, but players who prefer to collect
6mm, 10mm, 15mm or 1/72 (20mm) models - to list the
most popular alternatives - may wish to refer to the appendix
on page 174 for more about using these smaller warriors.
DIVISION OF BAGGAGE
AND GUARDS
INFANTRY DIVISION
The majority of collectors purchase models as metal castings
or plastic kits, which they proceed to assemble and paint
before mounting the finished pieces onto bases for ease of
handling. For those that do not wish to go to all this effort, it
is possible to buy models that have already been painted.
Some will gladly pay a professional artist to paint their
collections for them; though they will need deep pockets, for
such skills are not purchased cheaply. Models painted to the
highest artistic standards are always in demand amongst
serious collectors of whom there are a growing number. At
the other end of the scale there are some gamers to whom
building the army takes second place to the game itself, and
they are happy to make use of unpainted models, being
content to let their imagination alone colour the spectacle
before them. It must be said that the majority of players
prefer to build collections of models they have painted
themselves, and most enjoy doing so. There is undeniably
something satisfying about completing each new band of
warriors and adding it to the growing army.
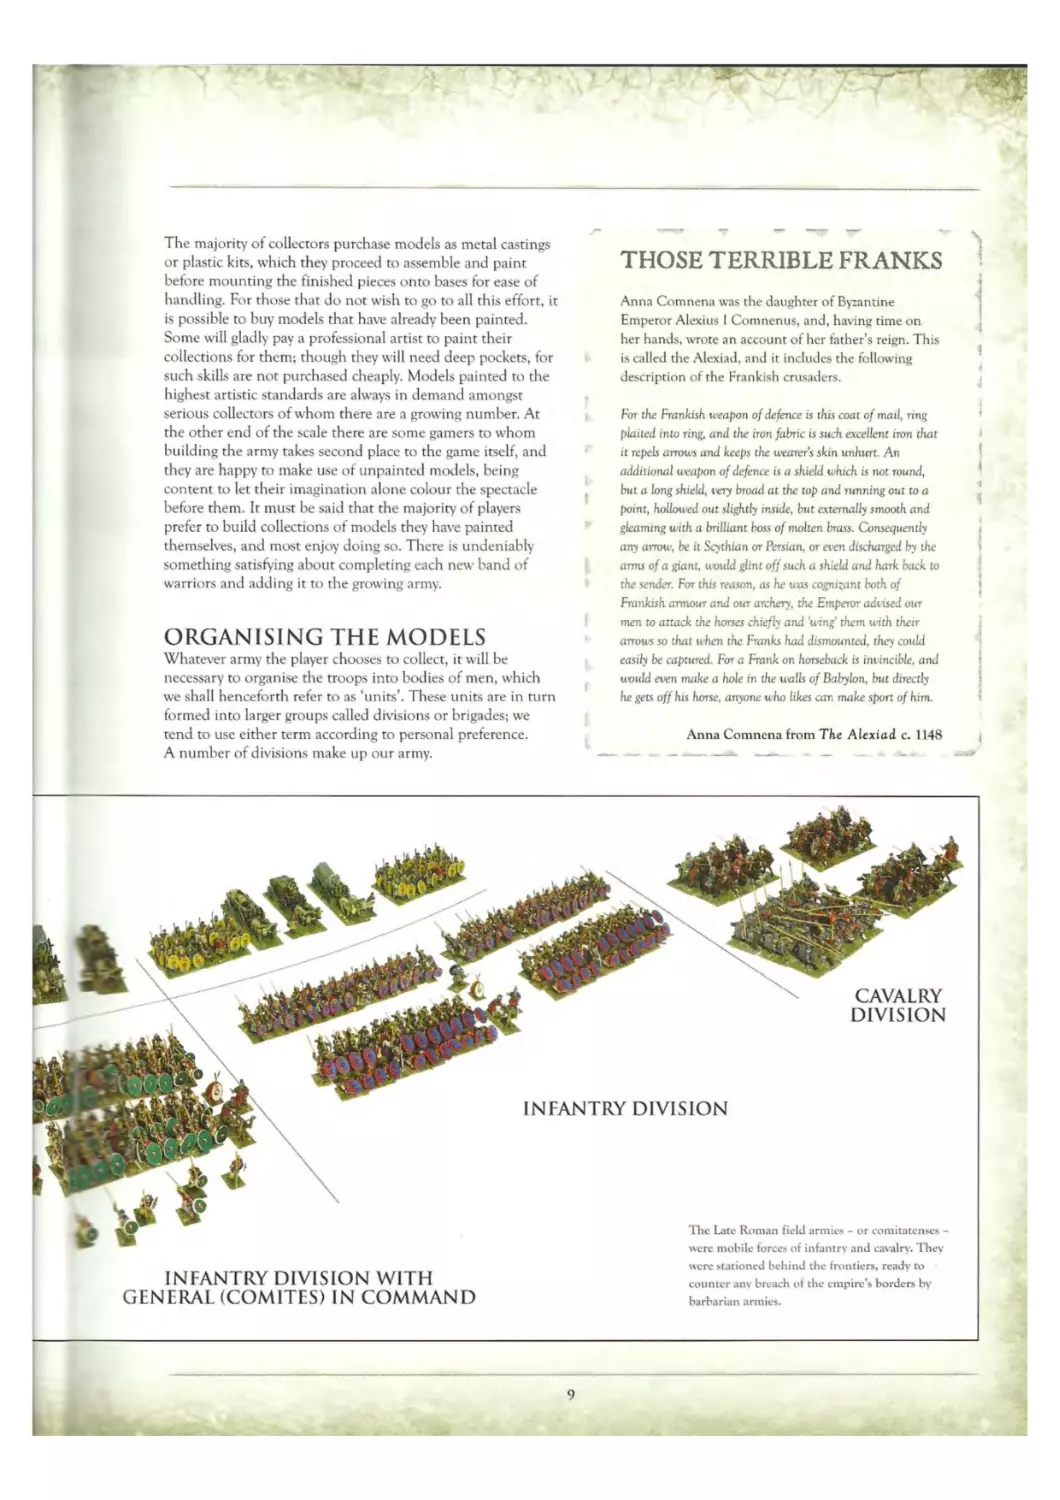
ORGANISING THE MODELS
Whatever army the player chooses to collect, it will be
necessary to organise the troops into bodies of men, which
we shall henceforth refer to as ‘units’. These units are in turn
formed into larger groups called divisions or brigades; we
tend to use either term according to personal preference.
A number of divisions make up our army.
— - * \
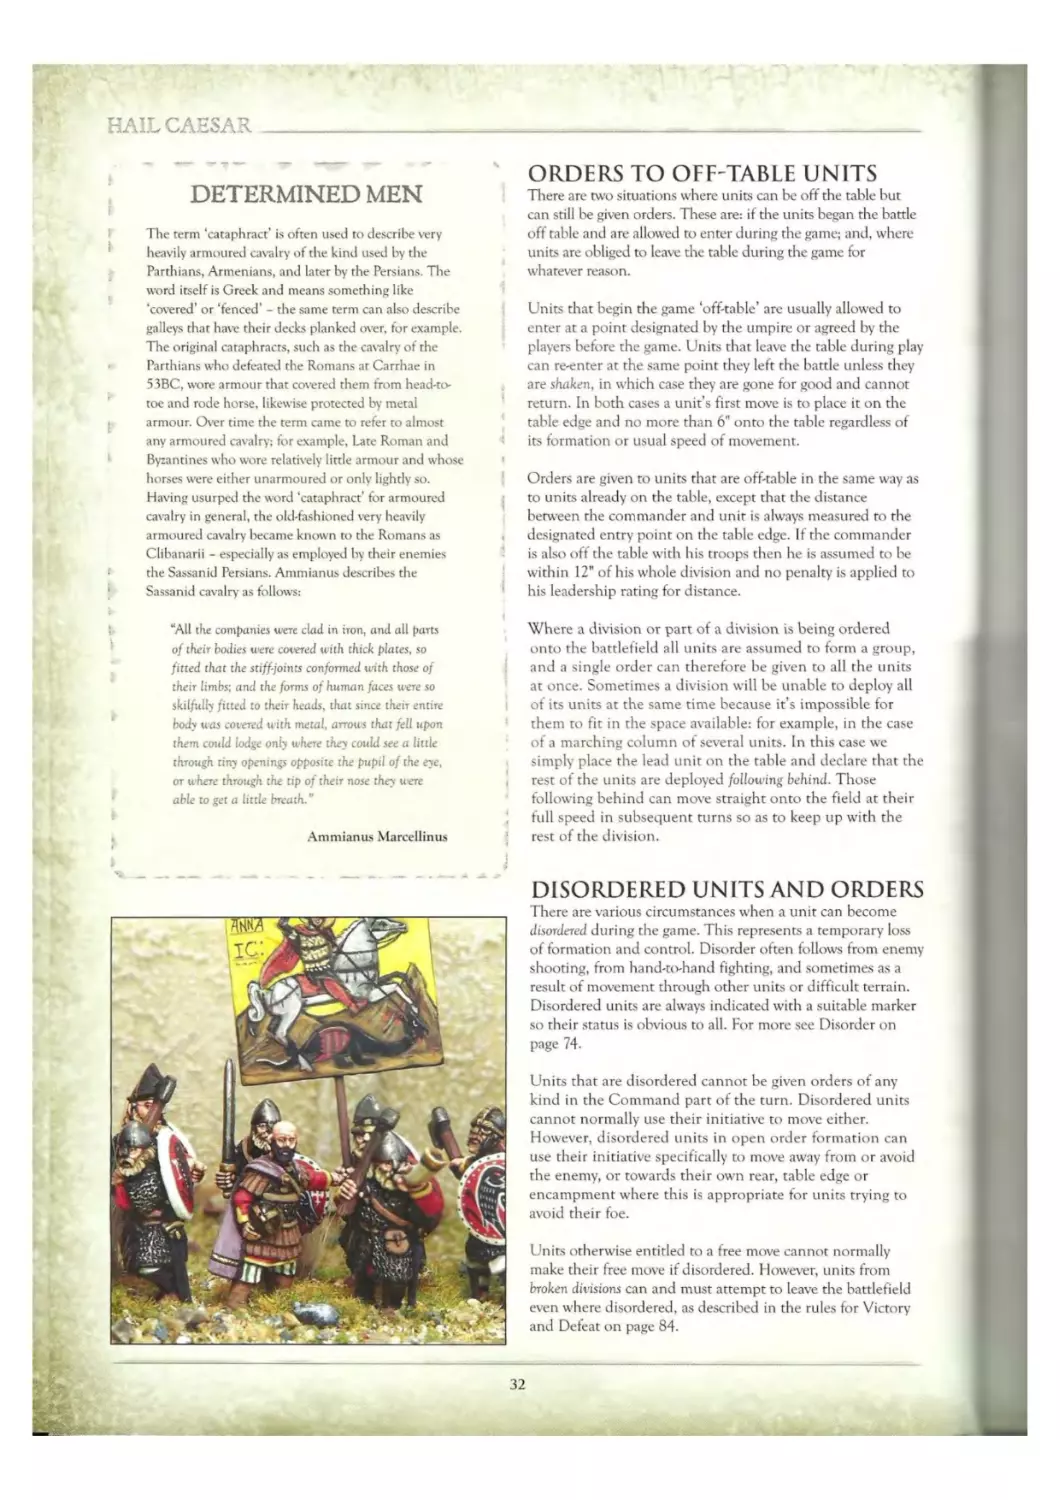
THOSE TERRIBLE FRANKS
Anna Comnena was the daughter of Byzantine
Emperor Alexius 1 Comnenus, and, having time on
her hands, wrote an account of her father’s reign. This
is called the Alexiad, and it includes the following
description of rhe Frankish crusaders.
For the Frankish weapon of defence is this coat of mail, ring
plaited into Ting, and the iron fabric is such excellent iron that
it repels arrows and keeps the wearer's skin unhurt. An
additional weapon of defence is a shield which is not round,
but a long shield, very broad at the top and running out to a
point, hollowed out slightly inside, but externally smooth and
gleaming with a brilliant boss of molten brass. Consequently
any arrow, be it Scythian or Persian, or even discharged by the
arms of a giant, would glint off such a shield and hark back to
the sender. For this reason, as he was cognisant both of
Frankish armour and our archery, the Emperor advised our
men to attack the horses chiefly and 'wing' them with their
arrows so that when the Franks had dismounted, they could
easily be captured. For a Frank on horseback is invincible, and
would even make a hole in the walls of Babylon, but directly
he gets off his horse, anyone who likes can make sport of him.
Anna Comnena from The Alexiad c. 1148
were .stationed behind the frontiers, ready to
counter anv breach of the empire’s borders by
barbarian armies.
INFANTRY DIVISION WITH
GENERAL (COMITES) IN COMMAND
HAIL CAESAR___________________________
THE UNIT
Each unit of model soldiers represents a typical fighting
formation of its day, for example a cohort of Romans or taxis
of Greek Hoplites. The term ‘unit’ is admittedly a rather
bleak piece of jargon; however, it has the advantage that it
allows us to devise rules in an even-handed manner without
distinguishing between the varied military terms used in
different armies. Of course, the language - let alone the
military terminology - of many ancient peoples is now lost to
us; so it is convenient to resort to a generic cover-all term for
purposes of describing the game.
Naturally, we are mindful that a real formation of warriors
would typically number some hundreds of fighting men, but
the need to accommodate our battles on a tabletop means
our units must be scaled down to something like a few
dozen models. None-the-less, our band of model soldiers
shall stand for a whole formation complete with its officers,
troopers, standards, horn players and supernumeraries
where appropriate.
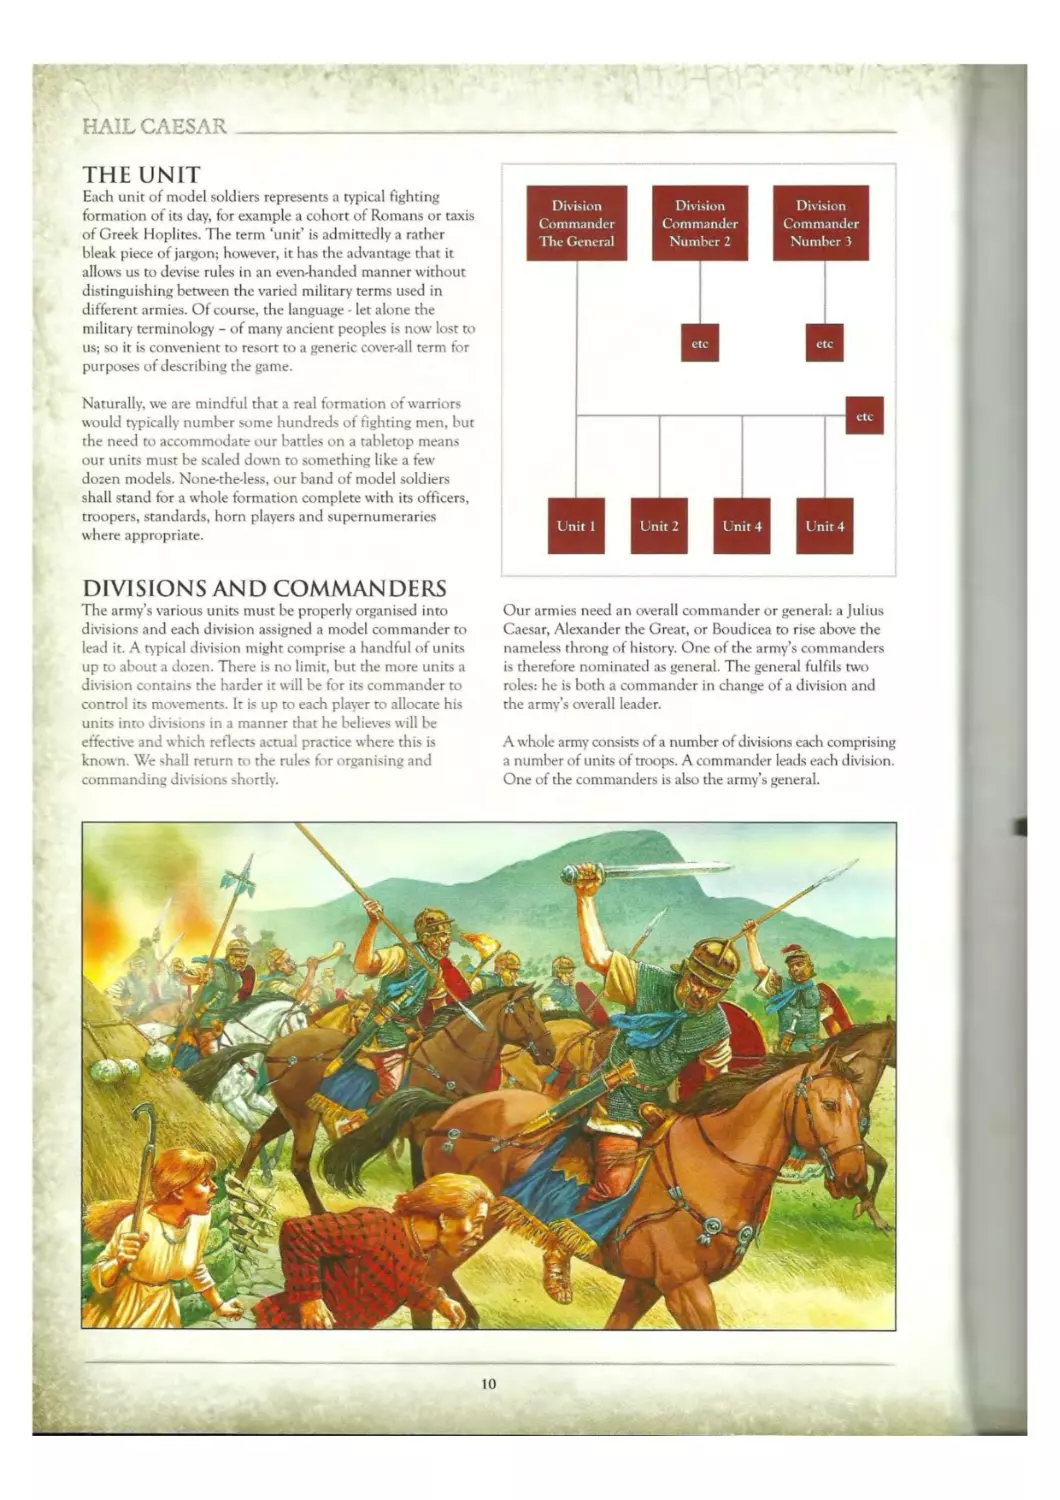
DIVISIONS AND COMMANDERS
The army’s various units must be properly organised into
divisions and each division assigned a model commander to
lead it. A typical division might comprise a handful of units
up to about a dozen. There is no limit, but the more units a
division contains the harder it will be for its commander to
control its movements. It is up to each player to allocate his
units into divisions in a manner that he believes will be
effective and which reflects actual practice where this is
known. We shall return to the rules for organising and
commanding divisions shortly.
Our armies need an overall commander or general: a Julius
Caesar, Alexander the Great, or Boudicea to rise above the
nameless throng of history. One of the army’s commanders
is therefore nominated as general. The general fulfils two
roles: he is both a commander in change of a division and
the army’s overall leader.
A whole army consists of a number of divisions each comprising
a number of units of troops. A commander leads each division.
One of the commanders is also the army’s general.
10
_____________________ THEARMY
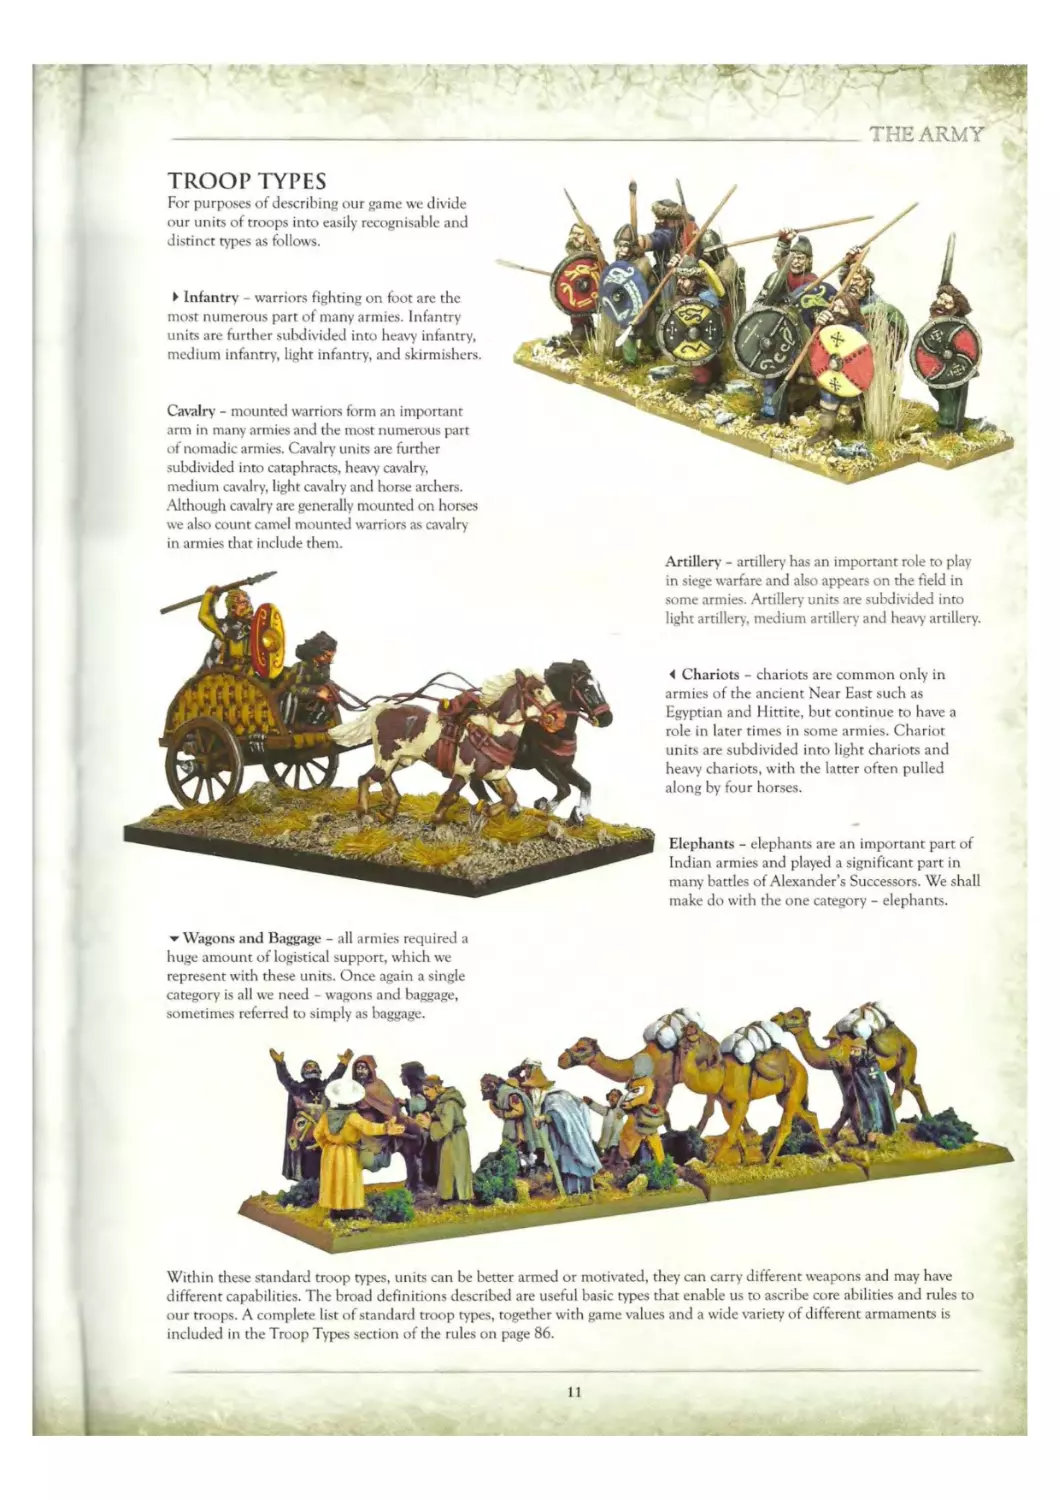
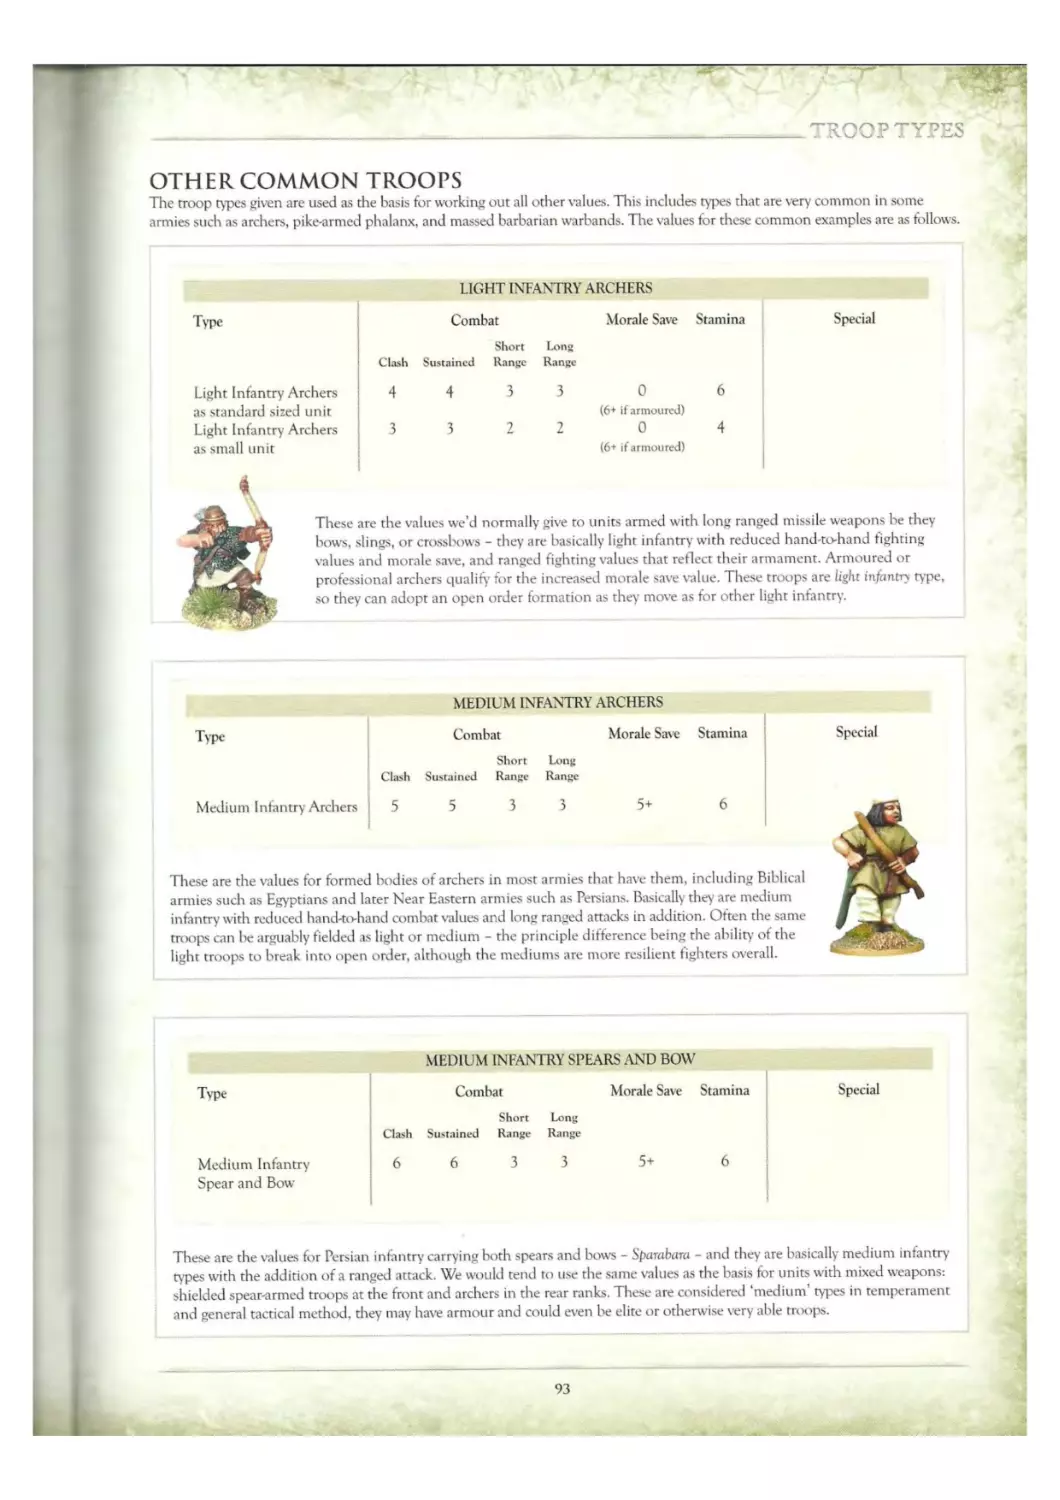
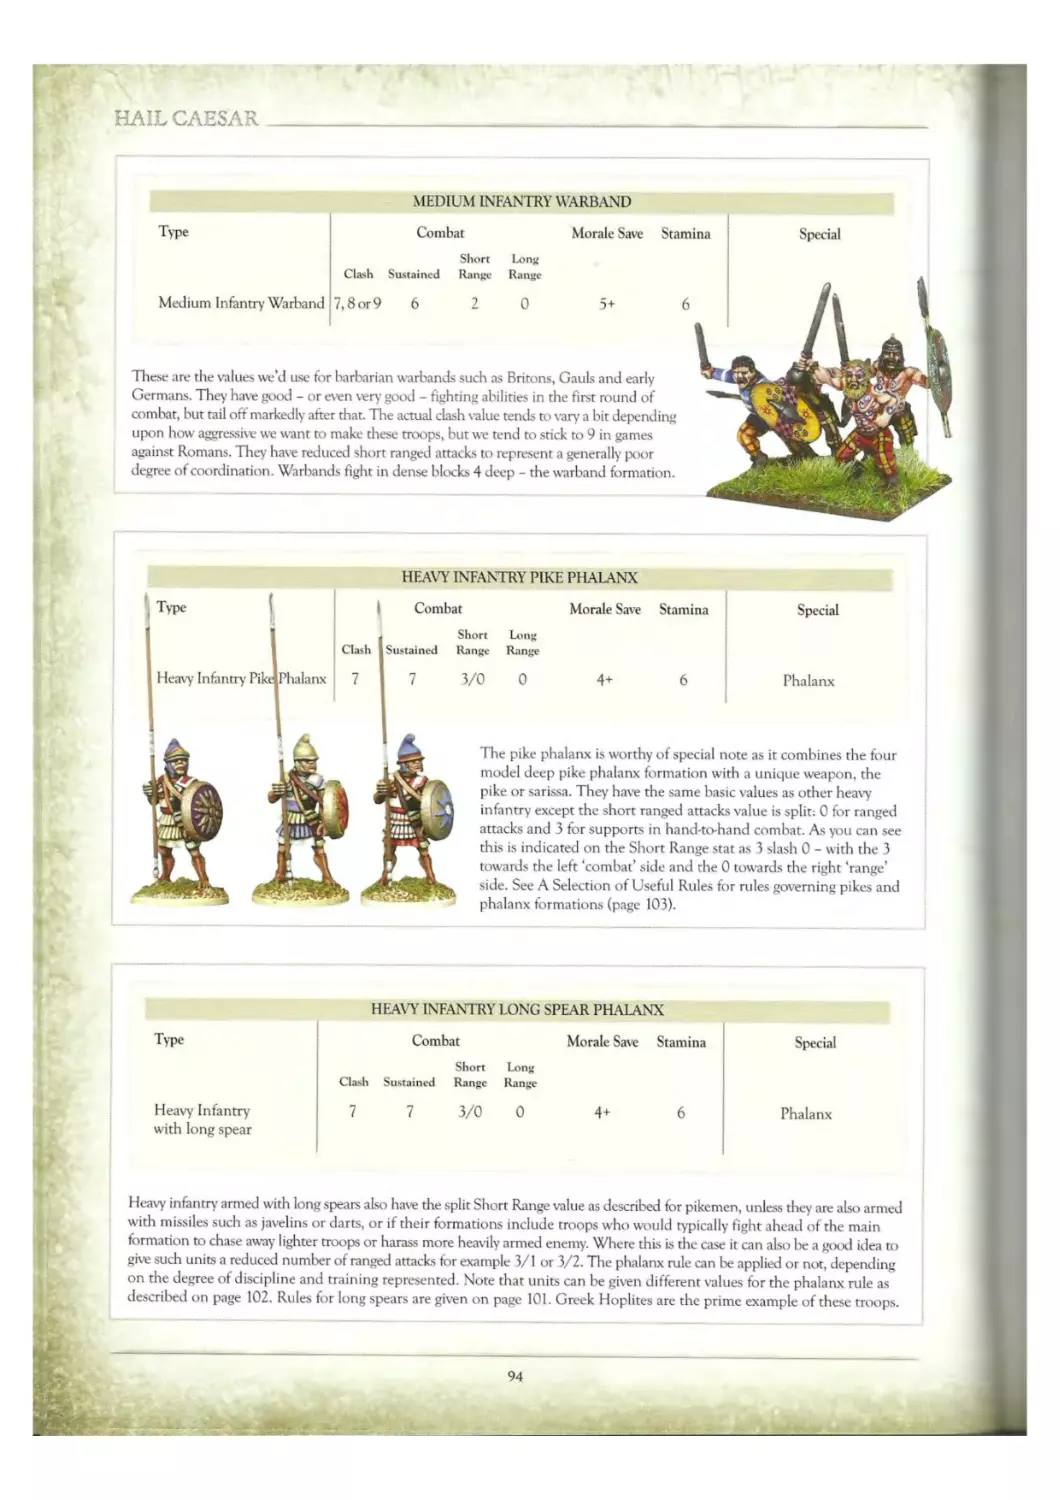
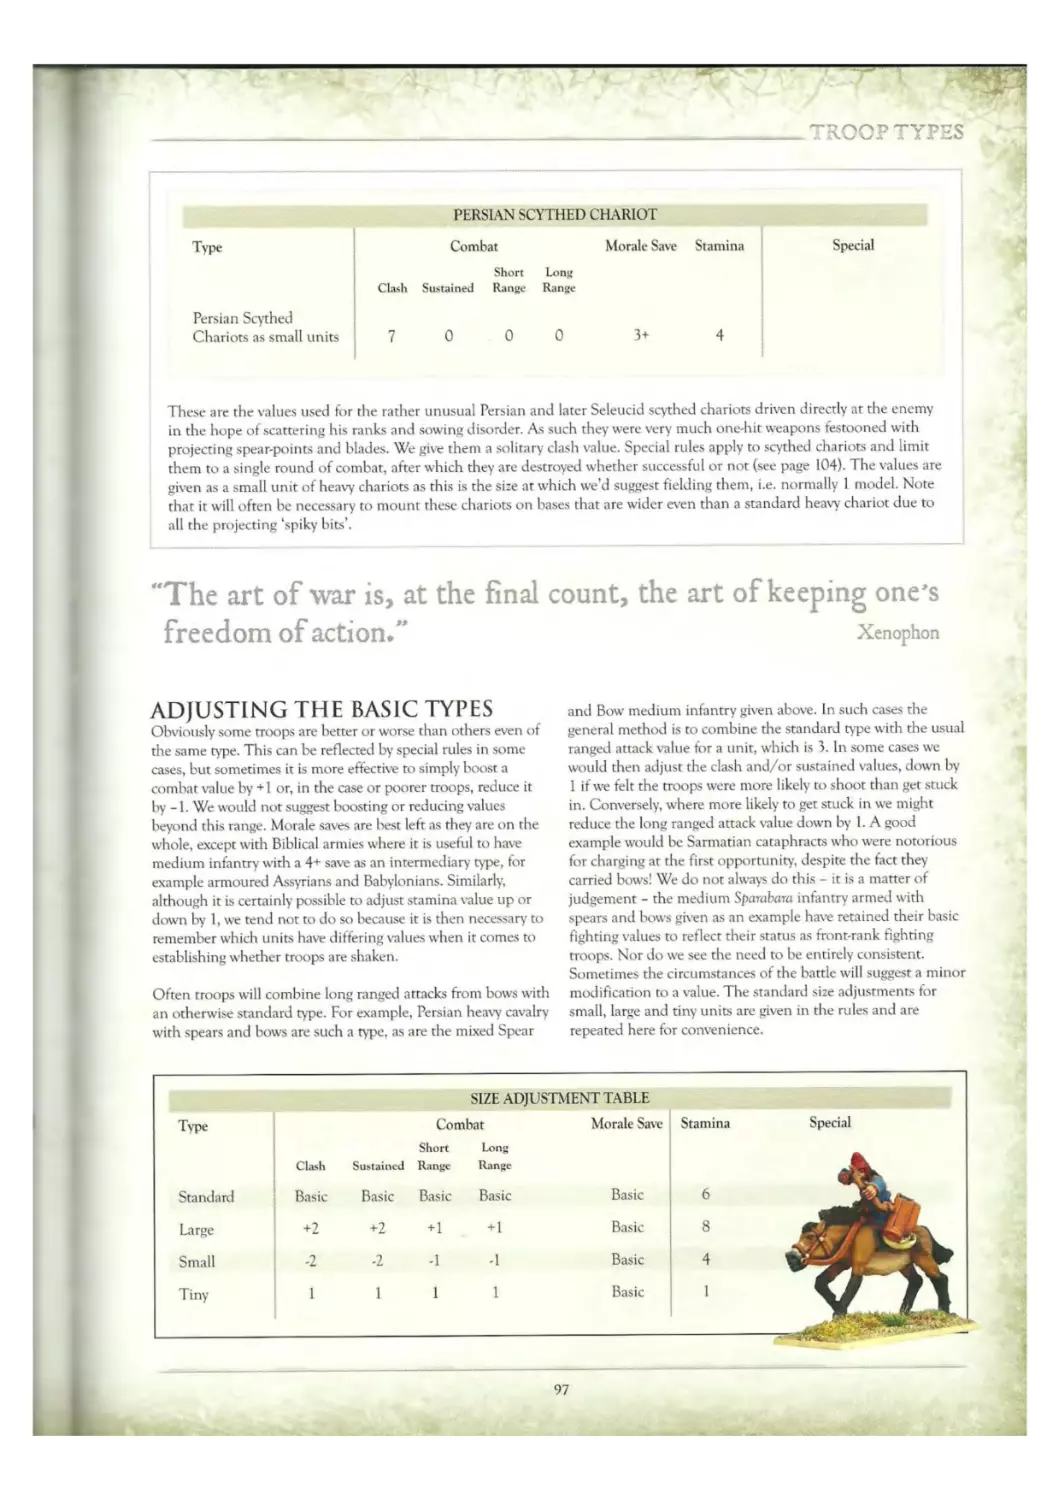
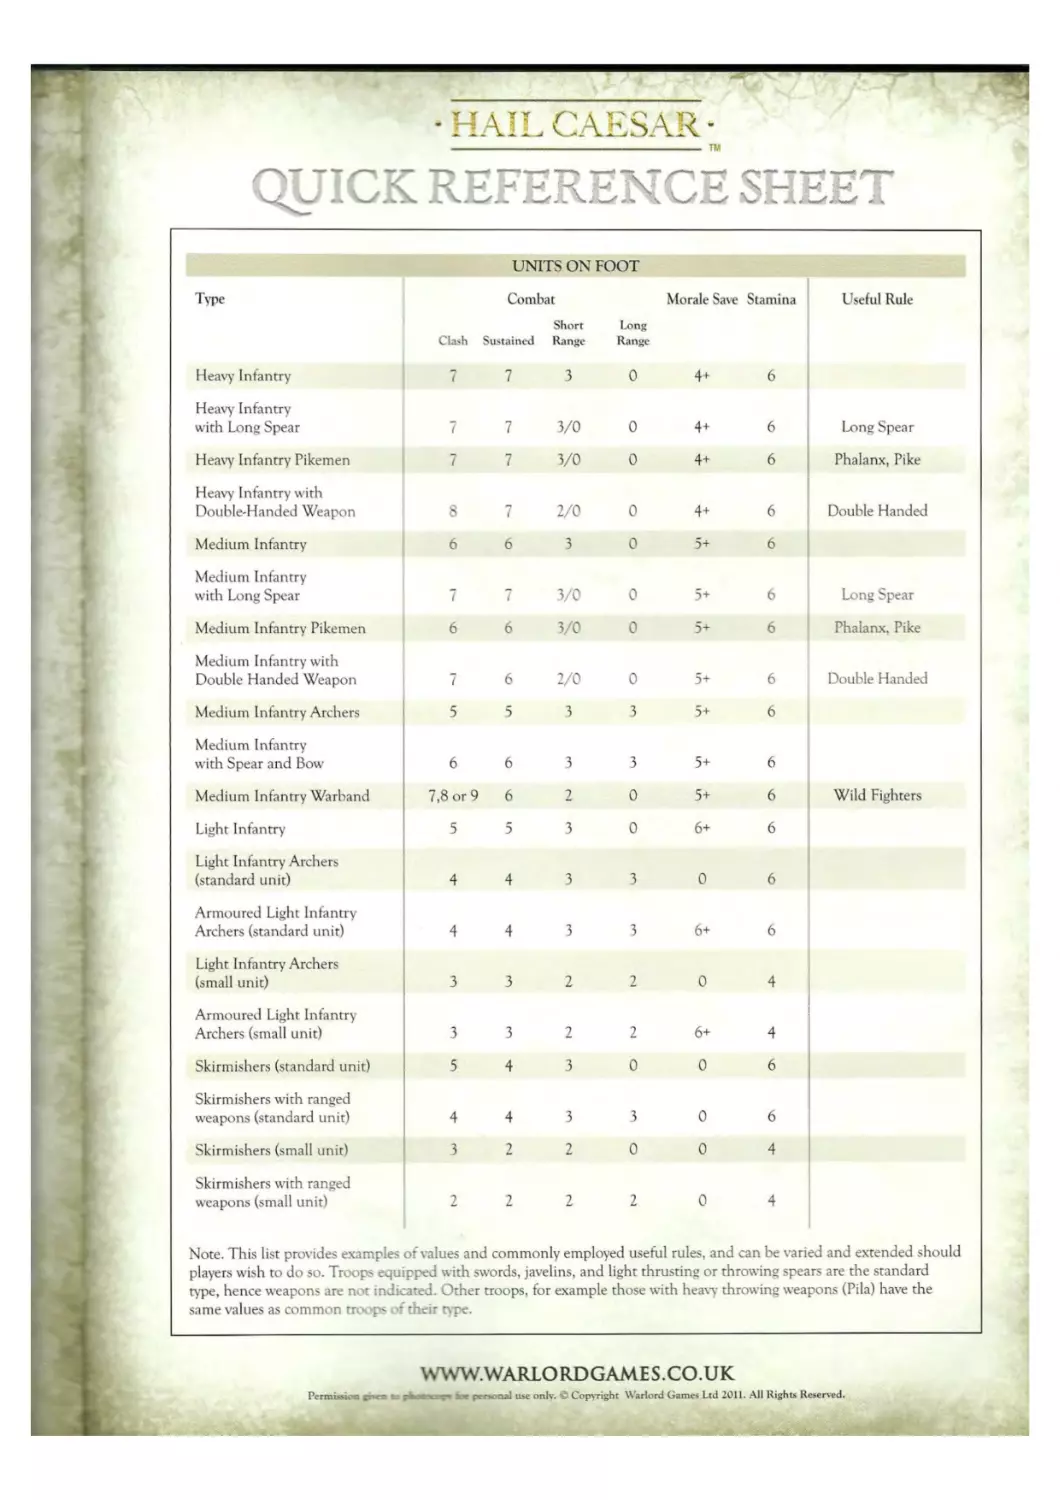
TROOP TYPES
For purposes of describing our game we divide
our units of troops into easily recognisable and
distinct types as follows.
► Infantry - warriors fighting on foot are the
most numerous part of many armies. Infantry
units are further subdivided into heavy infantry,
medium infantry, light infantry, and skirmishers.
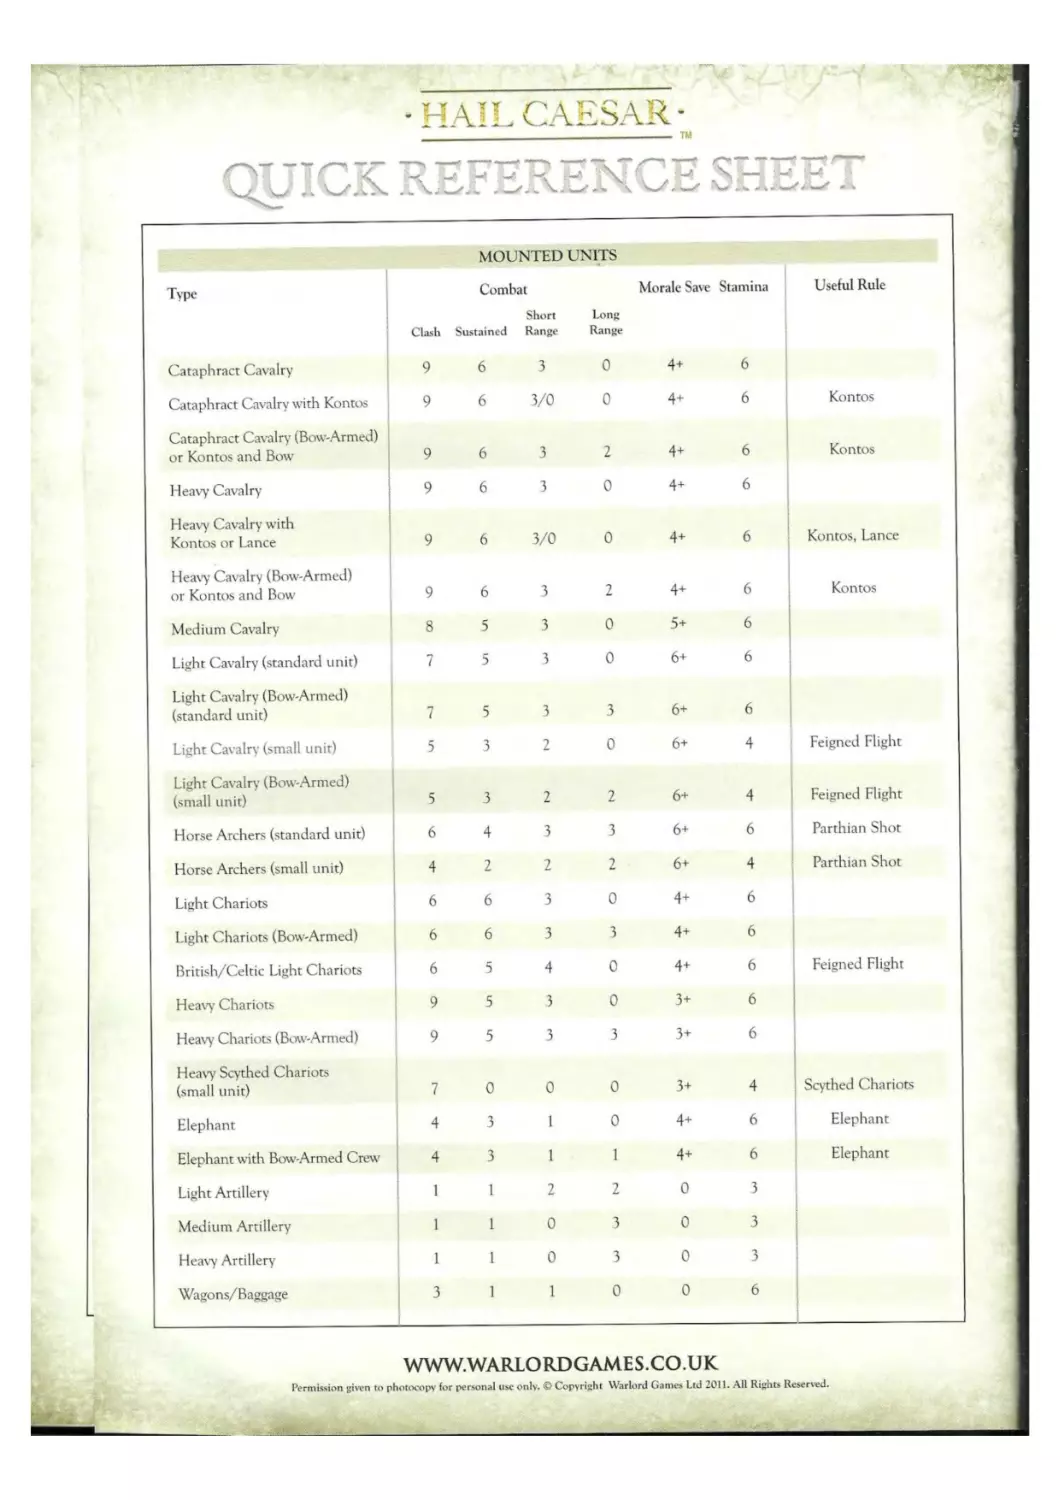
Cavalry - mounted warriors form an important
arm in many armies and the most numerous part
of nomadic armies. Cavalry units are further
subdivided into cataphracts, heavy cavalry,
medium cavalry, light cavalry and horse archers.
Although cavalry’ are generally mounted on horses
we also count camel mounted warriors as cavalry’
in armies that include them.
Artillery’ - artillery has an important role to play
in siege warfare and also appears on the field in
some armies. Artillery units are subdivided into
light artillery, medium artillery* and heavy artillery.
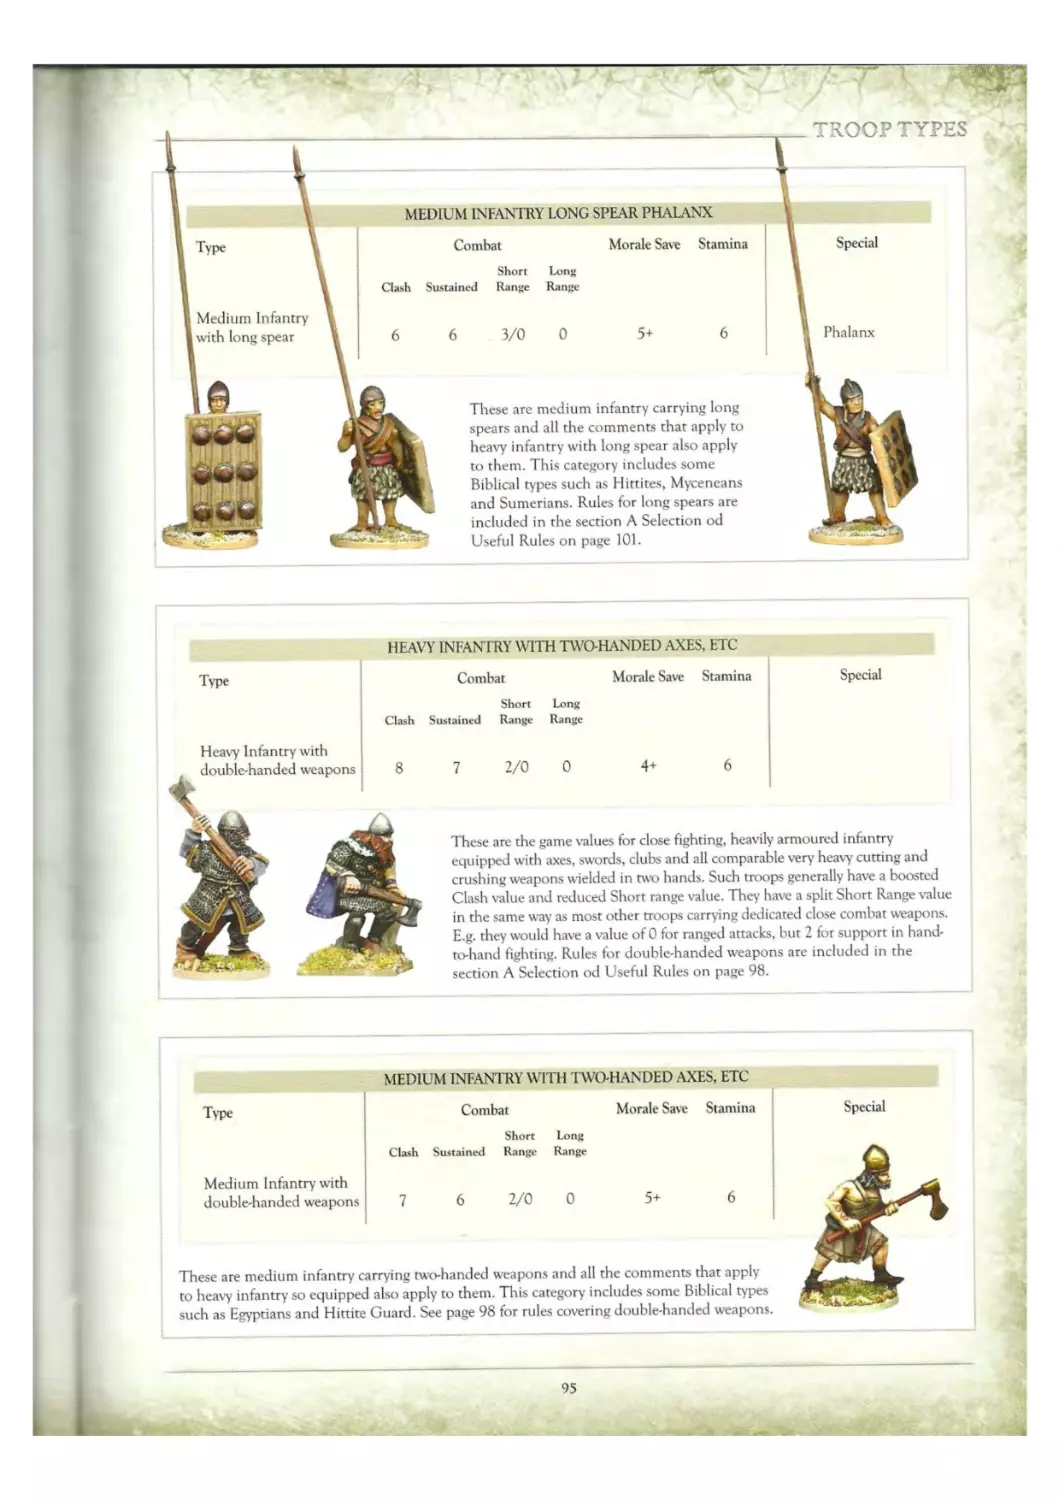
◄ Chariots - chariots are common only in
armies of the ancient Near East such as
Egyptian and Hittite, but continue to have a
role in later times in some armies. Chariot
units are subdivided into light chariots and
heavy chariots, with the latter often pulled
along by four horses.
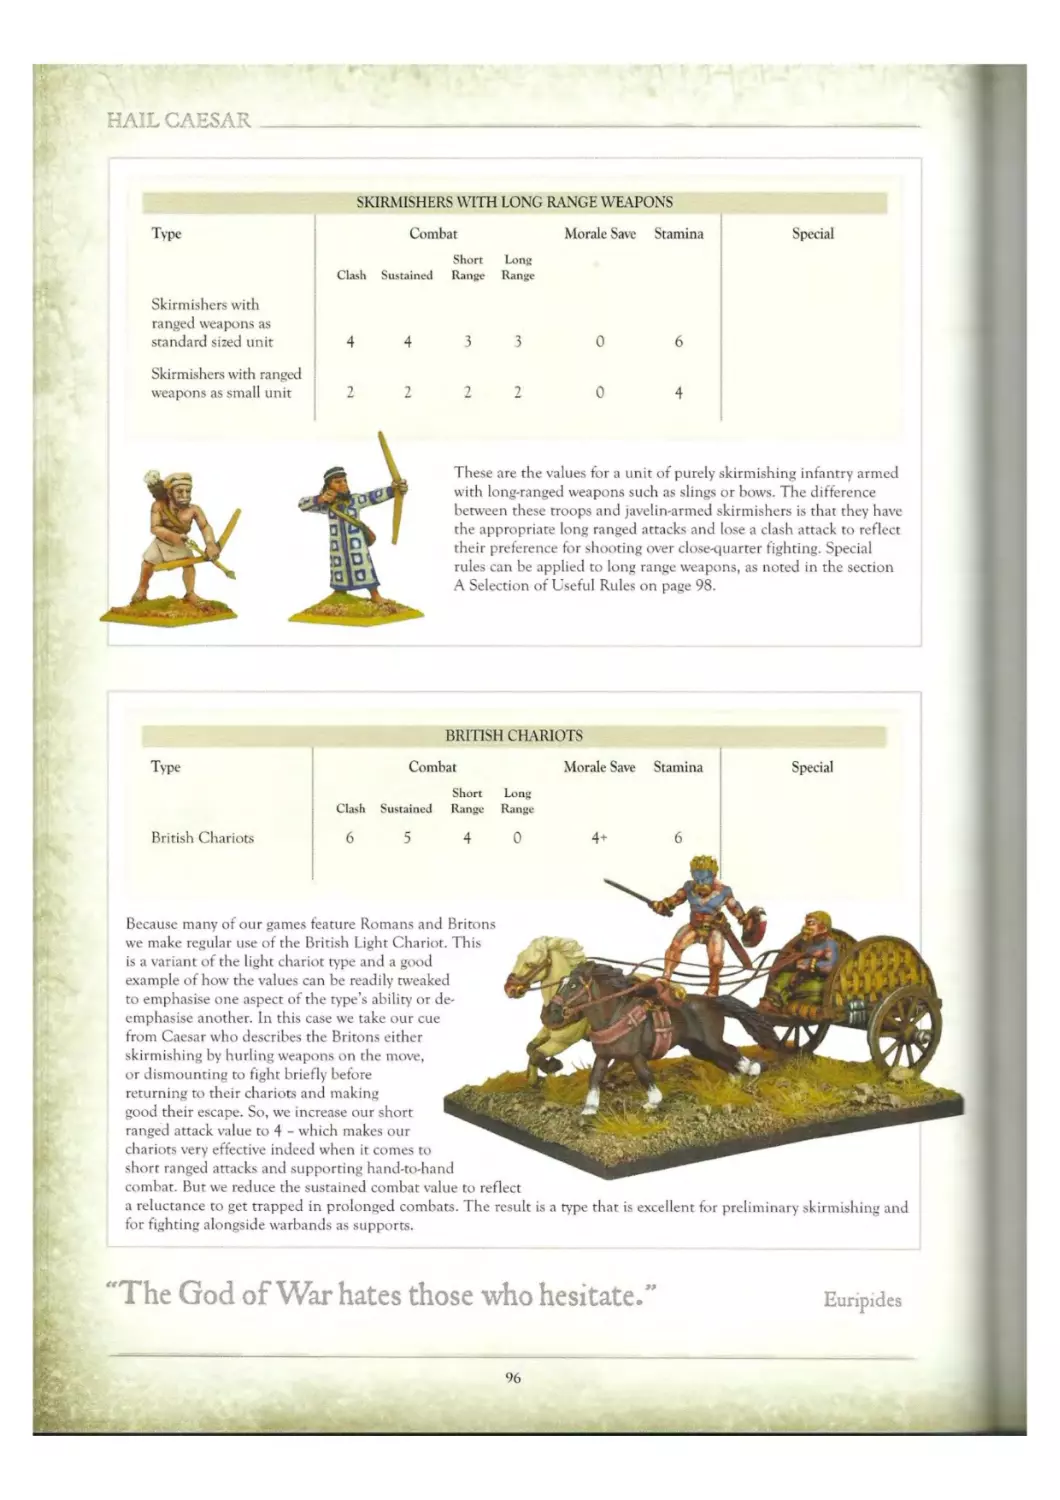
Elephants - elephants are an important part of
Indian armies and played a significant part in
many battles of Alexander’s Successors. We shall
make do with the one category - elephants.
▼ Wagons and Baggage - all armies required a
huge amount of logistical support, which we
represent with these units. Once again a single
category is all we need - wagons and baggage,
sometimes referred to simply as baggage.
Within these standard troop types, units can be better armed or motivated, they can carry different weapons and may have
different capabilities. The broad definitions described are useful basic types that enable us to ascribe core abilities and rules to
our troops. A complete list of standard troop types, together with game values and a wide variety of different armaments is
included in the Troop Types section of the rules on page 86.
11
HAIL CAESAR
FIGHTING QUALITIES
Unit Combat Morale Save Stamina Special
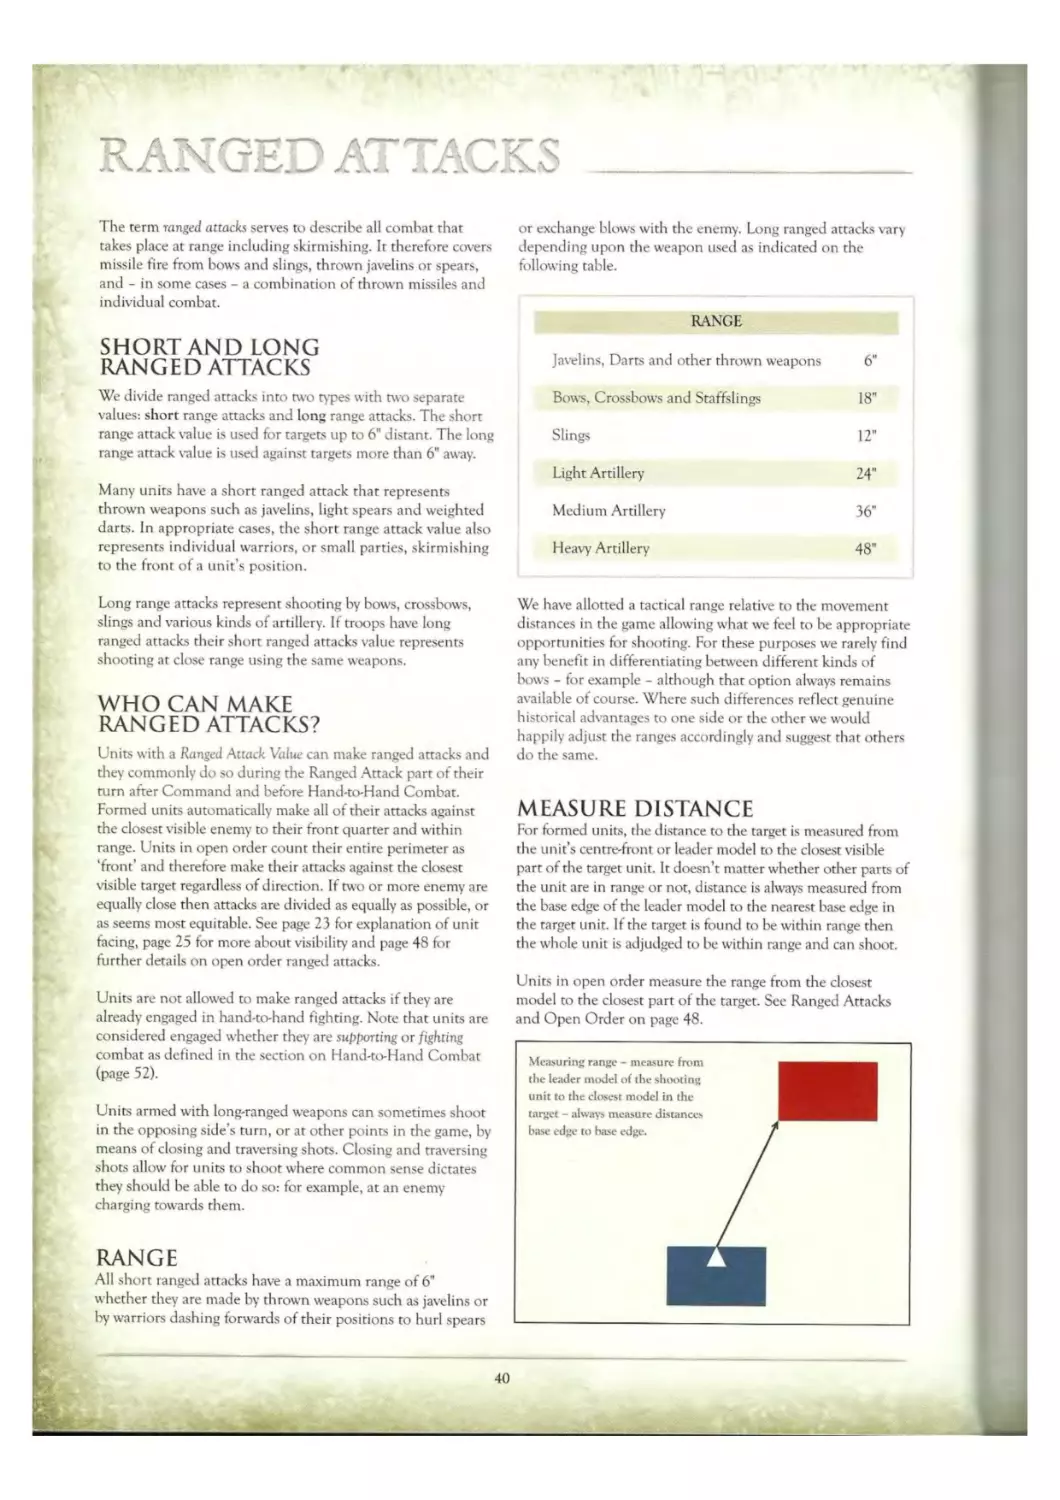
Clash Short Sustained Range Long Range
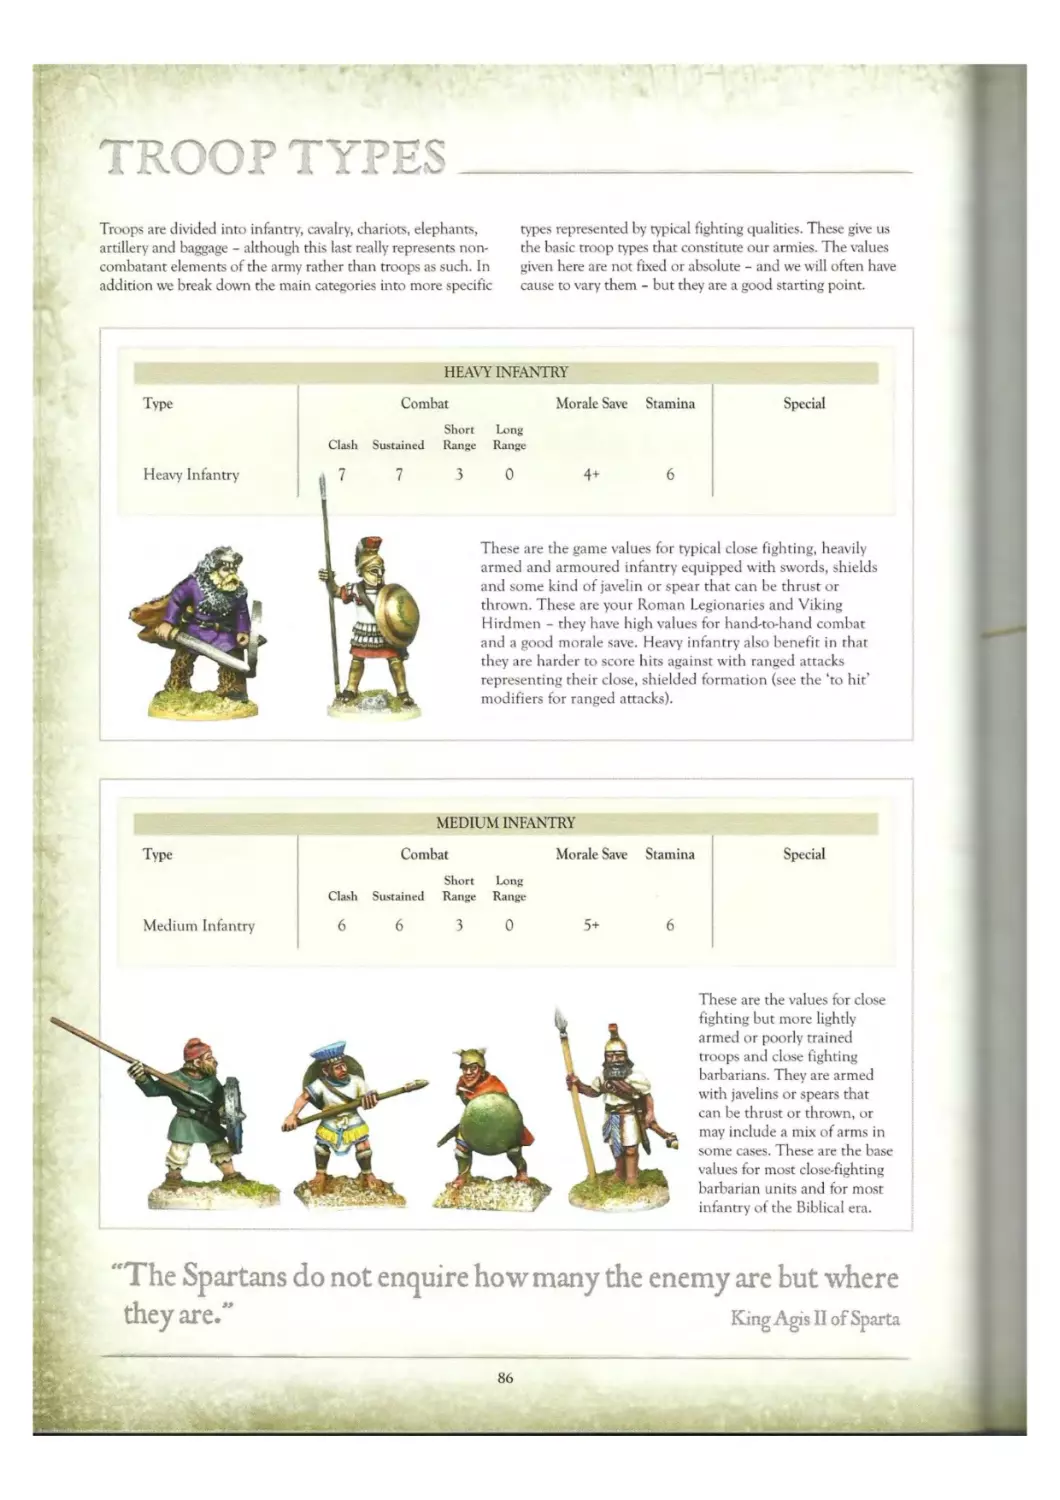
Legionary Heavy Infantry armed with pilum 7 7 3 0 4+ 6 Testudo, Drilled
We attribute appropriate fighting qualities to each of our units by allocating game values that best reflect their abilities.
These values determine how effectively each unit fights in different combat situations. By way of example, the values
for a unit of Roman Legionaries of Trajan’s Dacian Wars are shown above.
Unit
The name of the unit and its type and armament where
appropriate - in this case Legionary troops who are heavy
infantry' armed with pilum.
Combat
Four different values are used for combat depending upon
the situation and range. The first two values are clash and
sustained - used for fighting hand-to-hand combat. The
clash value is used in the first round of a combat
engagement and the sustained value is used in subsequent
rounds. The second wo values are short ranged and long
ranged. Long ranged attacks are used for shooting at
distances of greater than 6". Short ranged attacks are used
for skirmishing at short range, and also for supporting other
units in hand-to-hand combat.
Morale Save
A unit’s morale save indicates its ability to shrug off the
debilitating effects of combat. This value is expressed as the
minimum dice score required to withstand enemy attacks. A
value of 3+ is therefore excellent, as a roll of 3, 4, 5 or 6 will
succeed. A value of 4+ is good, 5+ average, 6+ poor, and a
value of 0 indicates the unit is very fragile and no dice roll is
permitted. This is explained at length under the rules for
ranged and hand-to-hand fighting.
Stamina
A unit’s Stamina value shows how many casualties it
can take before it is ‘shaken’ at which point it becomes
vulnerable to destruction or collapse. Casualty markers
are used to represent reduction of stamina. Most units can
suffer 6 casualties before they are ‘shaken’. Once again,
this is explained under the rules for ranged and hand-to-
hand fighting
Special
Any special rules that apply to the unit will be listed here.
Such rules may reflect tactical doctrine, weaponry, cultural
inclination or special skills of one kind or other. This need
not concern us for the moment - various special rules will
be discussed in due course.
12
THE ARMY
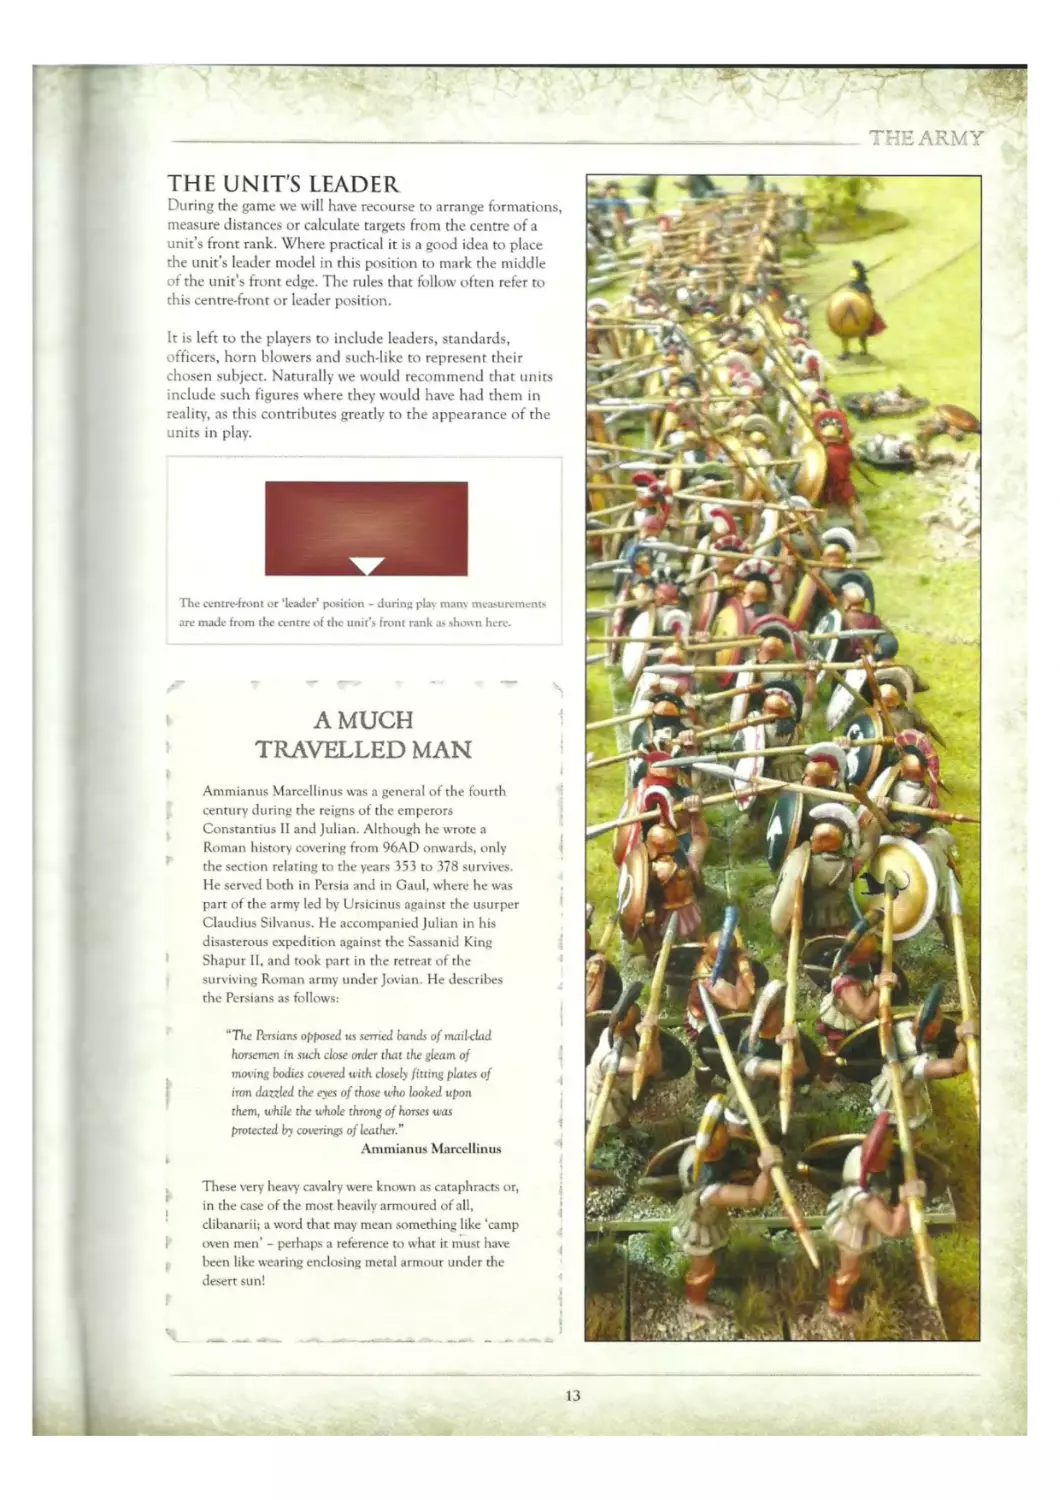
THE UNITS LEADER
During the game we will have recourse to arrange formations,
measure distances or calculate targets from the centre of a
unit’s front rank. Where practical it is a good idea to place
the unit’s leader model in this position to mark rhe middle
of the unit’s front edge. The rules that follow often refer to
this centre-front or leader position.
It is left to the players to include leaders, standards,
officers, horn blowers and such-like to represent their
chosen subject. Naturally we would recommend that units
include such figures where they would have had them in
reality, as this contributes greatly to the appearance of the
units in play.
The centre-front or ‘leader’ position - during play mans measurements
are made from the centre of the unit’s front rank as shown here.
A MUCH
TRAVELLED MAN
I I
Ammianus Marcellinus was a general of the fourth
century during the reigns of the emperors
Constantius II and Julian. Although he wrote a
Roman history covering from 96AD onwards, only
the section relating to the years 353 to 378 survives.
He served both in Persia and in Gaul, where he was
part of the army led by Ursicinus against the usurper
Claudius Silvanus. He accompanied Julian in his
disasterous expedition against the Sassanid King
Shapur 11, and took part in rhe retreat of rhe
surviving Roman army under Jovian. He describes
rhe Persians as follows:
“The Persians opposed us serried bands of mail-clad
horsemen in such close order that the gleam of
moving bodies covered with closed fitting plates of
iron dazzled the eyes of those who looked upon
them, while the whole throng of horses was
protected by coverings of leather.”
Ammianus Marcellinus
These very heavy cavalry were known as cataphracts or,
in rhe case of the most heavily armoured of all,
clibanarii; a word that may mean something like ‘camp
oven men’ - perhaps a reference to what it must have
been like wearing enclosing metal armour under the
desert sun!
HAIL CAESAR________________________________-____________
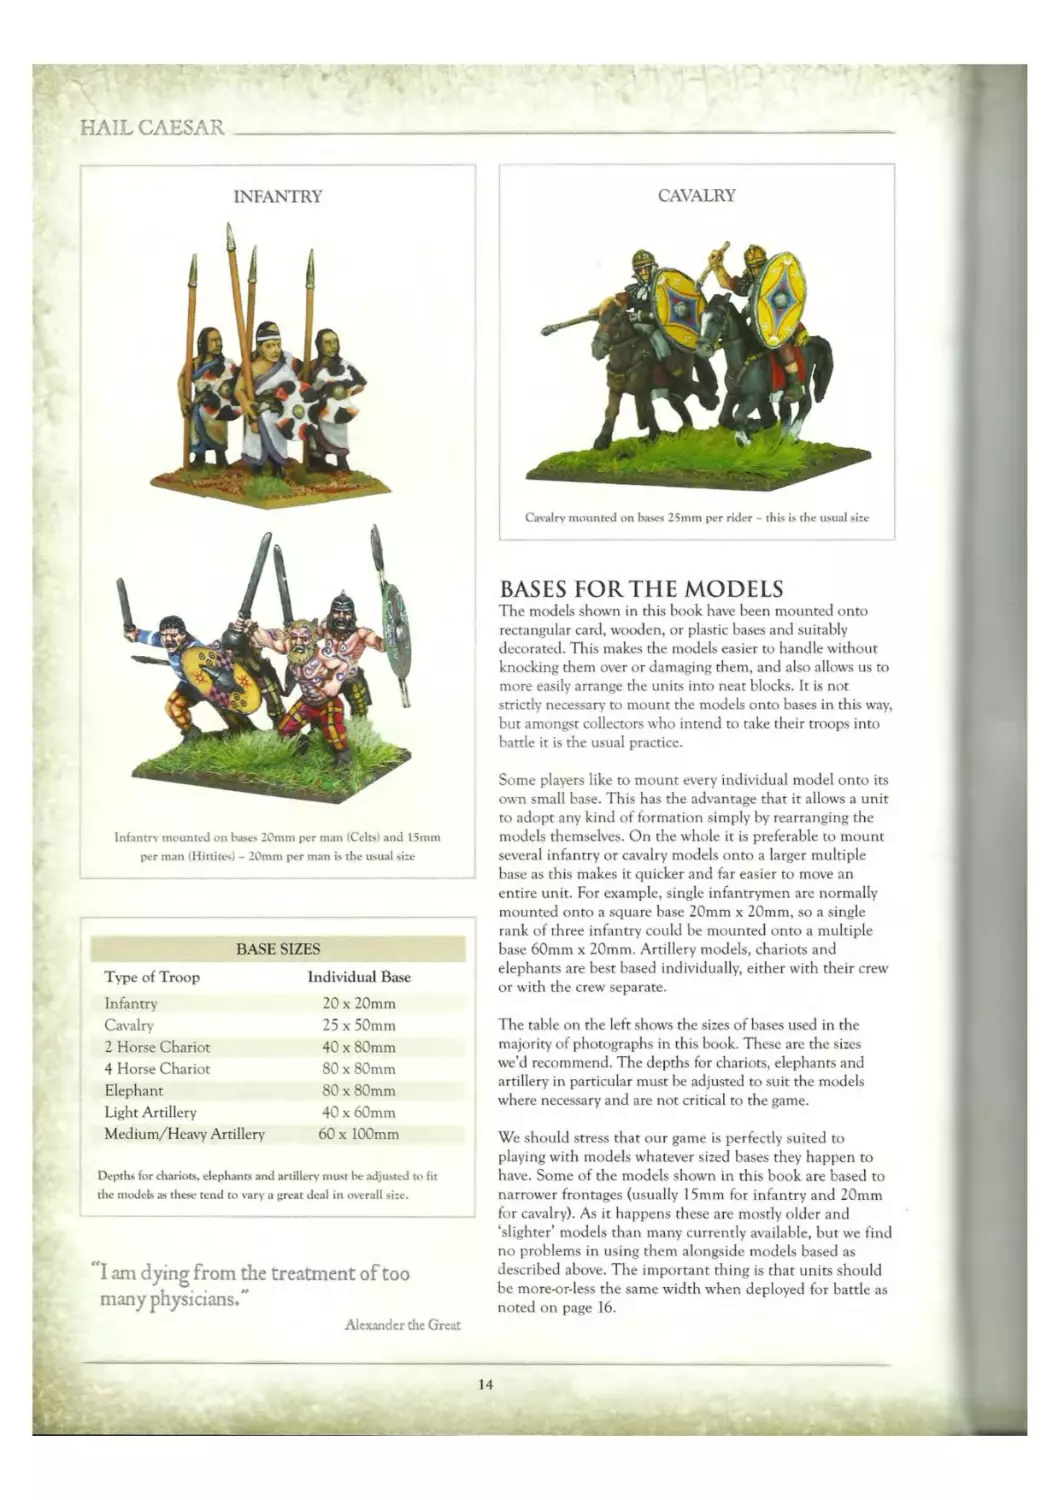
INFANTRY
CAVALRY
Infantry mounted on bases 20mm per man (Celts) and 15mm
per man (Hittites) - 20mm per man is the usual size
BASE SIZES
Type of Troop Individual Base
Infantry 20 x 20mm
Cavalry 25 x 50mm
2 Horse Chariot 40 x 80mm
4 Horse Chariot 80 x 80mm
Elephant 80 x 80mm
Light Artillery 40 x 60mm
Medium/Heavy Artillery 60 x 100mm
Depths for chariots, elephants and artillery* must be adjusted to fit
the models as these tend to vary a great deal in overall size.
“I am dying from the treatment of too
many physicians."
Alexander the Great
Cavalry* mounted on bases 25mm per rider - this is the usual size
BASES FORTHE MODELS
The models shown in this hook have been mounted onto
rectangular card, wooden, or plastic bases and suitably
decorated. This makes the models easier to handle without
knocking them over or damaging them, and also allows us to
more easily arrange the units into near blocks. It is not
strictly necessary to mount the models onto bases in this way,
bur amongst collectors who intend to take their troops into
battle it is the usual practice.
Some players like to mount every individual model onto its
own small base. This has the advantage that it allows a unit
to adopt any kind of formation simply by rearranging the
models themselves. On the whole it is preferable to mount
several infantry or cavalry models onto a larger multiple
base as this makes it quicker and far easier to move an
entire unit. For example, single infantrymen are normally
mounted onto a square base 20mm x 20mm, so a single
rank of three infantry could be mounted onto a multiple
base 60mm x 20mm. Artillery models, chariots and
elephants are best based individually, either with their crew
or with the crew separate.
The table on the left shows the sizes of bases used in the
majority of photographs in this book. These are the sizes
we’d recommend. The depths for chariots, elephants and
artillery in particular must be adjusted to suit the models
where necessary and are not critical to the game.
We should stress that our game is perfectly suited to
playing with models whatever sized bases they happen to
have. Some of the models shown in this book are based to
narrower frontages (usually 15mm for infantry and 20mm
for cavalry). As it happens these are mostly older and
‘slighter’ models than many currently available, but we find
no problems in using them alongside models based as
described above. The important thing is chat units should
be more-or-less the same width when deployed for battle as
noted on page 16.
________-________________________________THE ARMY
CHARIOTS
COMMANDERS
A chariot mounted on a 40mm wide base
- 50mm is also common - both work just fine
Commanders can be based to suit - many players like to put their
commanders on round bases to distinguish them from ordinary troops
BASES FOR COMMANDERS
Our commanders are represented by either individual models
or small groups mounted onto a single base. Ideally, these
pieces should be readily distinguishable from the troops they
command. We do not feel the need to specify base
dimensions for these models - players can adopt a size and
shape they find serviceable - numerous examples are shown
throughout the book.
Just as our units of a few dozen models are understood to
represent formations of hundreds of men, so a commander is
taken to represent not just the great man himself but his
bodyguard, runners, soothsayers, secretaries and such
personal servants as the exercise of command plainly
demands. A commander can be mounted onto a larger base
and include such individuals if you please. This can be
fashioned to look suitably imposing!
HAIL CAESAR
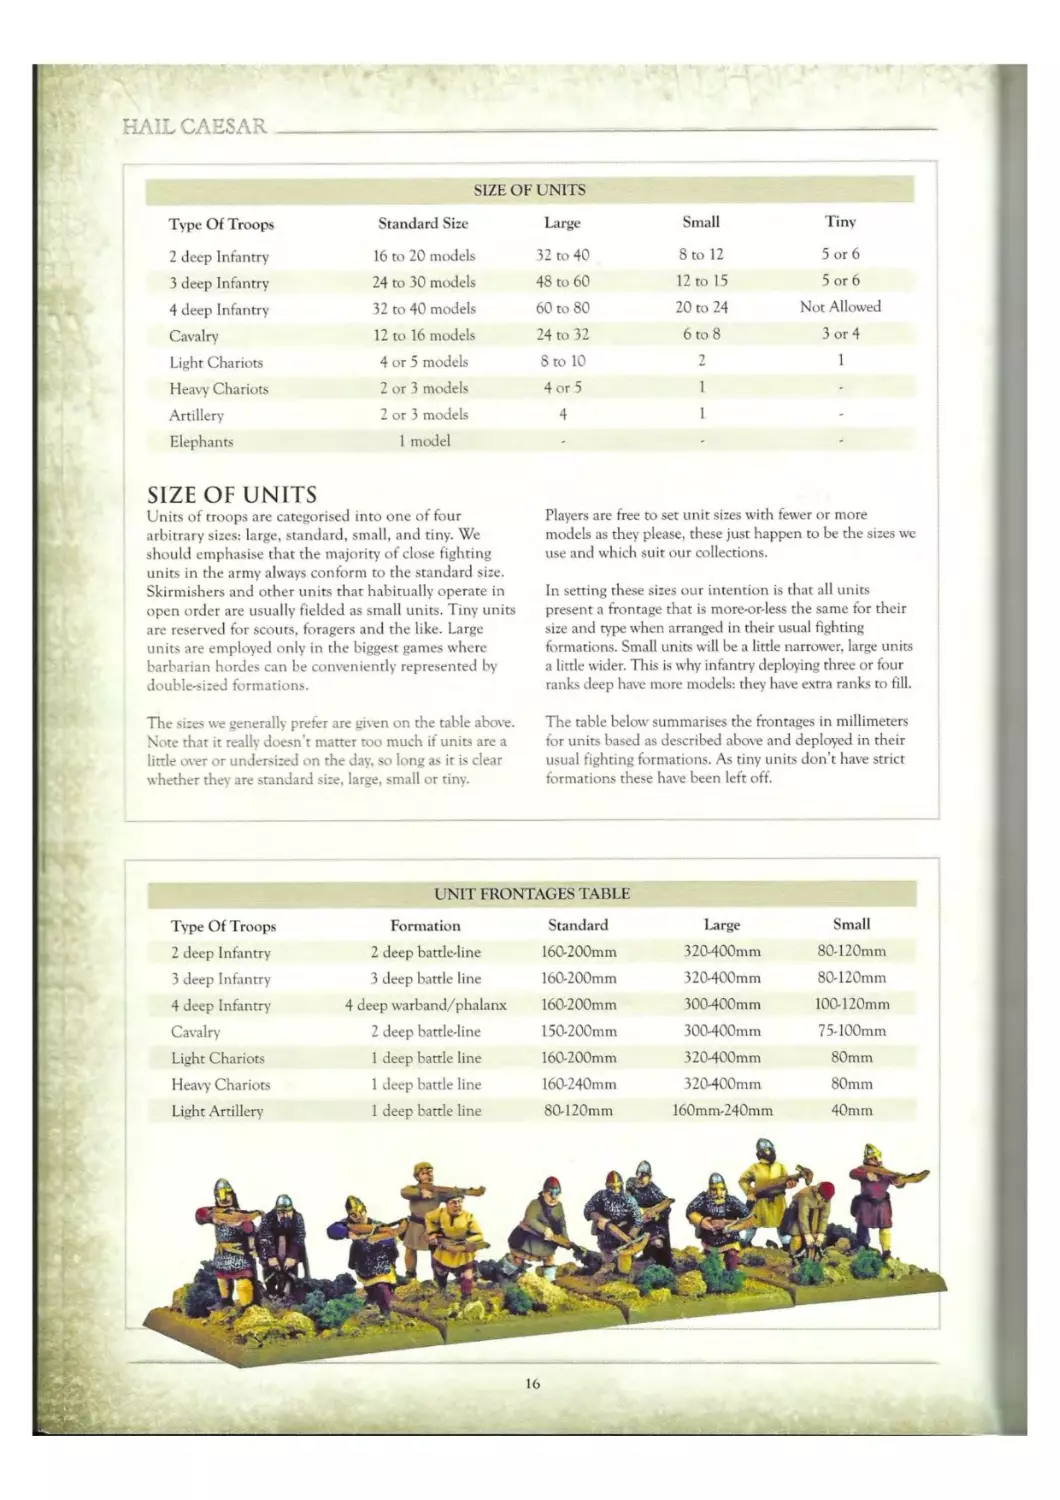
SIZE OF UNITS
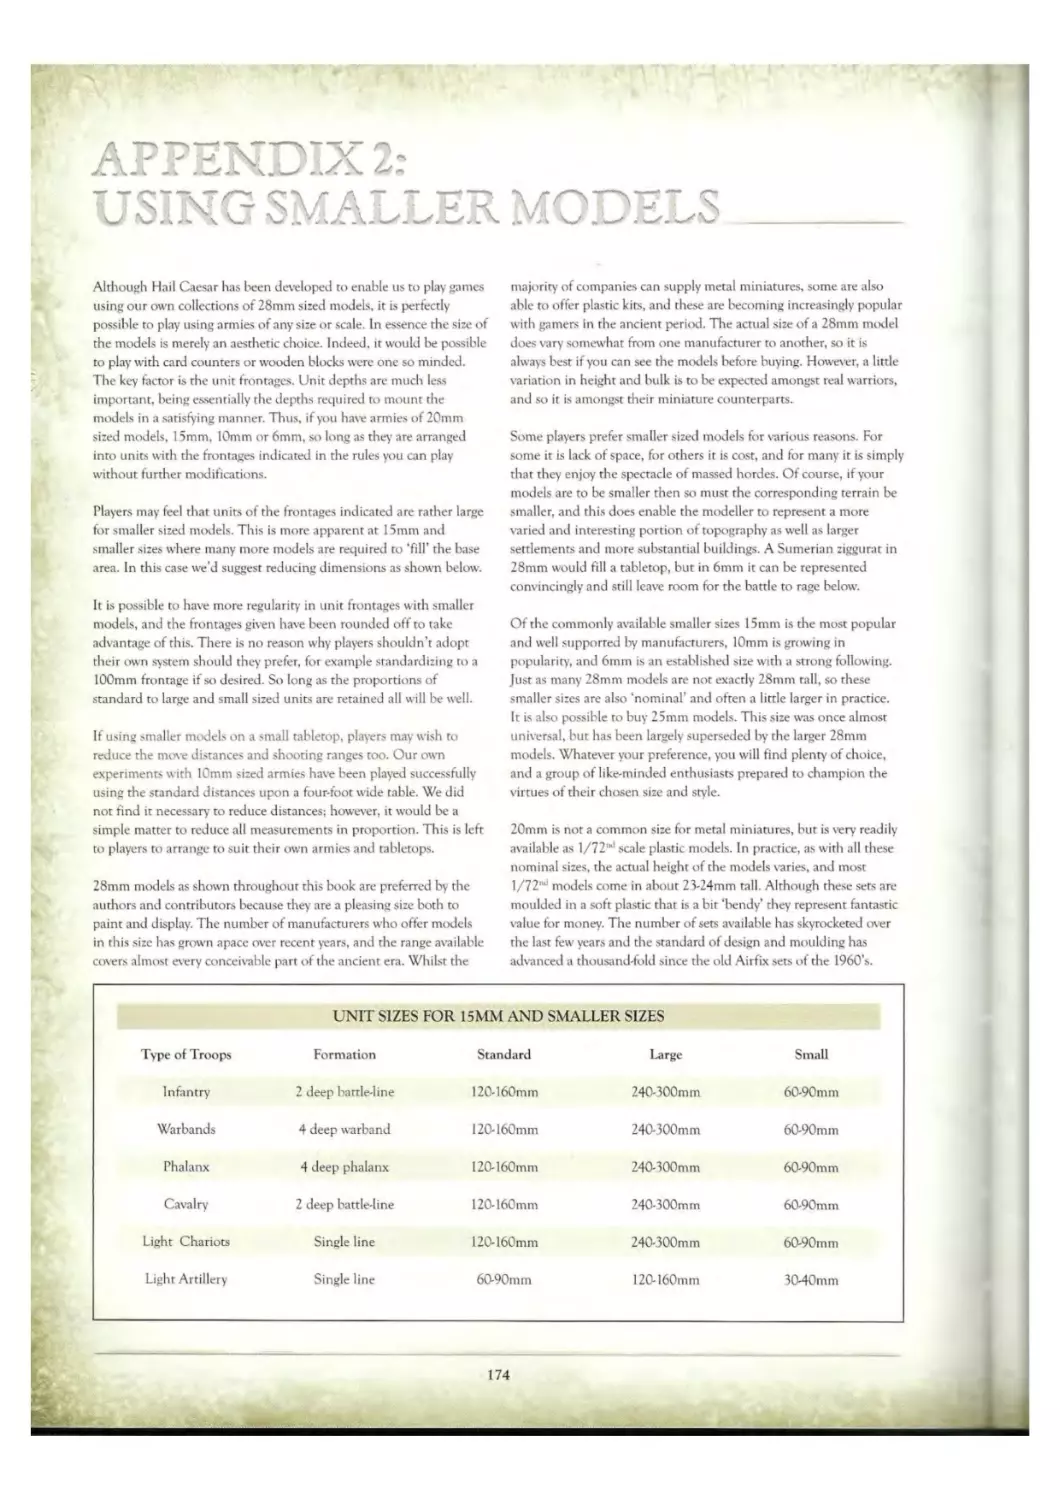
Type Of Troops Standard Size Large Small Tiny
2 deep Infantry 16 to 20 models 32 to 40 8 to 12 5 or 6
3 deep Infantry 24 to 30 models 48 to 60 12 to 15 5 or 6
4 deep Infantry 32 to 40 models 60 to 80 20 to 24 Not Allowed
Cavalry 12 to 16 models 24 to 32 6 to 8 3 or 4
Light Chariots 4 or 5 models 8 to 10 2 1
Heavy Chariots 2 or 3 models 4 or 5 1 -
Artillery 2 or 3 models 4 1 *
Elephants 1 model - - -
SIZE OF UNITS
Units of troops are categorised into one of four
arbitrary sizes: large, standard, small, and tiny. We
should emphasise that the majority of close fighting
units in the army always conform to the standard size.
Skirmishers and other units that habitually operate in
open order are usually fielded as small units. Tiny units
are reserved for scouts, foragers and the like. Large
units are employed only in the biggest games where
barbarian hordes can be conveniently represented by
double-sized formations.
The sizes we generally prefer are given on the table above.
Note that it really doesn’t matter too much if units are a
little over or undersized on the day, so long as it is clear
whether they are standard size, large, small or tiny.
Players are free to set unit sizes with fewer or more
models as they please, these just happen to be the sizes we
use and which suit our collections.
In setting these sizes our intention is that all units
present a frontage that is more-or-less the same for their
size and type when arranged in their usual fighting
formations. Small units will be a little narrower, large units
a little wider. This is why infantry deploying three or four
ranks deep have more models: they have extra ranks to fill.
The table below summarises the frontages in millimeters
tor units based as described above and deployed in their
usual fighting formations. As tiny units don’t have strict
formations these have been left off.
UNIT FRONTAGES TABLE
Type Of Troops Formation Standard
2 deep Infantry 2 deep battle-line I60-200mm
3 deep Infantry 3 deep battle line 160-200mm
4 deep Infantry 4 deep warband/phalanx 160-200mm
Cavalry- 2 deep battle-line 15O-2OOmm
Light Chariots 1 deep battle line 160-200mm
Heavy Chariots 1 deep battle line 160-240mm
Light Artillery 1 deep battle line 80-120mm
Large Small
320-400mm 80-120mm
320-400mm 80-120mm
300-400mm 100-120mm
300-400mm 75-100mm
320-400mm 80mm
320-400mm 80mm
160mm-240mm 40mm
16
_________________________________________THE ARMY
As you can see from the Unit Frontages table, our units have
a comparable frontage when arranged into a typical fighting
formation. Artillery units are significantly shorter, but as
these are not close fighting troops we don’t worry about it
too much.
Incidentally, we enjoy the mass spectacle of our armies and
so arrange our battle lines two or more ranks deep. Some
players may prefer to reduce the number of ranks simply to
lessen the number of models required for each unit and this
is entirely up to the players. It is the width of the unit that
plays a major part in the game, the depth is far less
important and can be adjusted to suit. For example, on
occasions we would deploy cavalry units one deep either
because we want to field more units, or because a player has
built his collection round units with fewer models; this
makes no difference, and units of one or two depth can both
be used alongside each other.
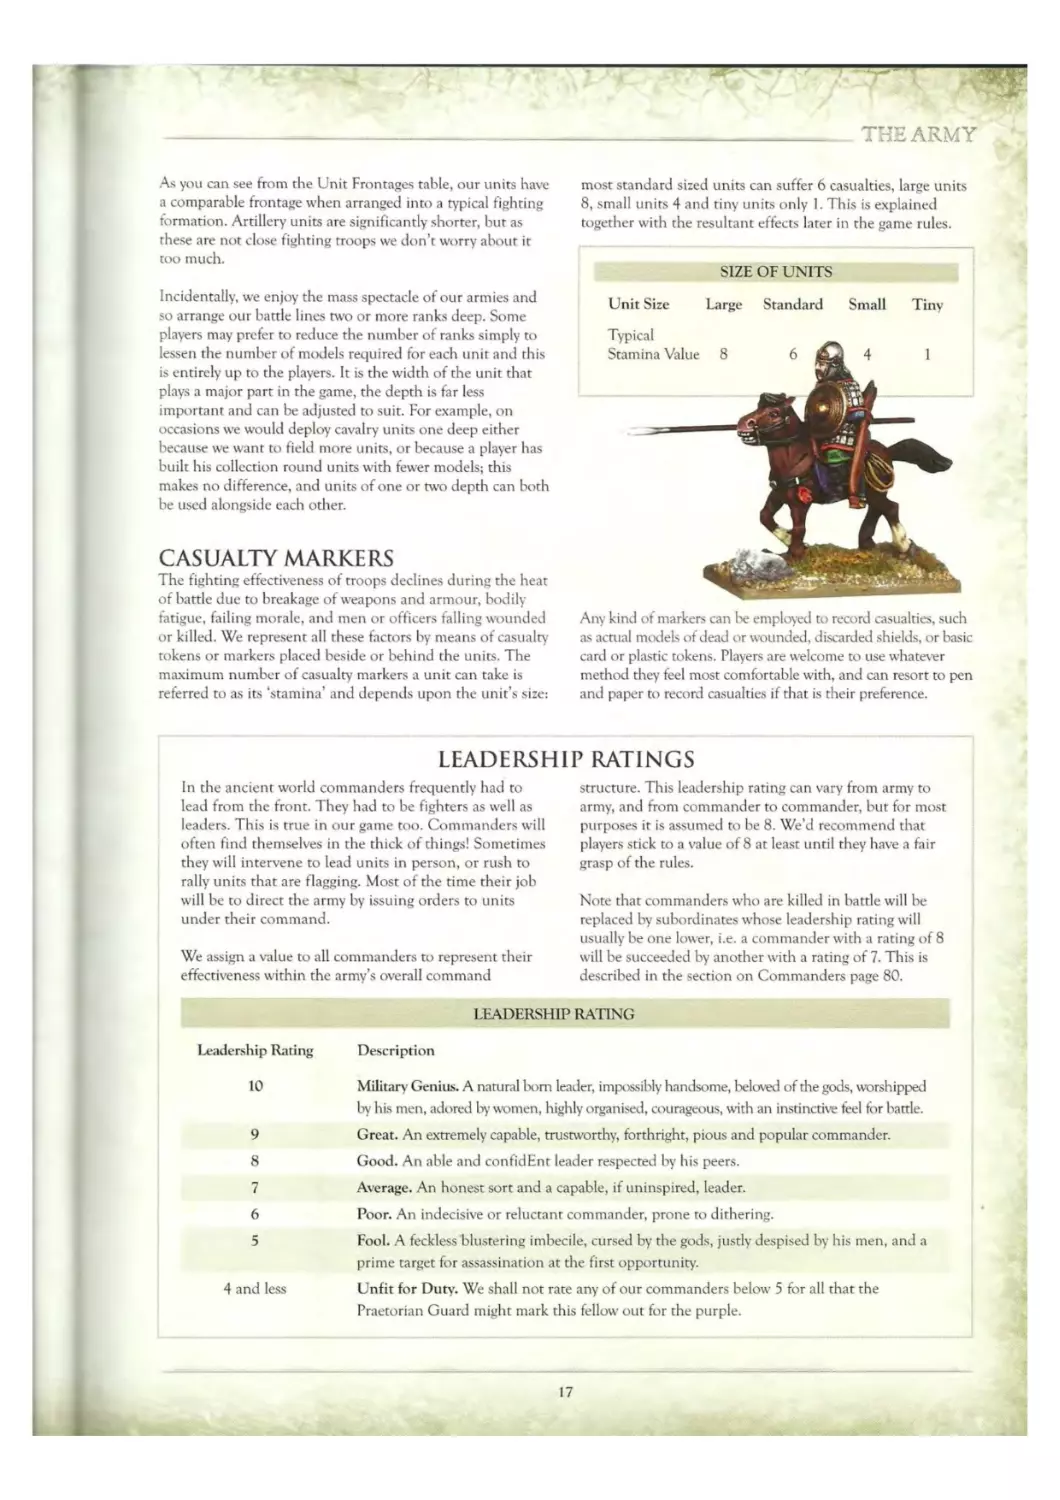
CASUALTY MARKERS
The fighting effectiveness of troops declines during the heat
of battle due to breakage of weapons and armour, bodily
fatigue, failing morale, and men or officers falling wounded
or killed. We represent all these factors by means of casualty
tokens or markers placed beside or behind the units. The
maximum number of casualty markers a unit can take is
referred to as its ‘stamina’ and depends upon the unit’s size:
most standard sized units can suffer 6 casualties, large units
8, small units 4 and tiny units only 1. This is explained
together with the resultant effects later in the game rules.
SIZE OF UNITS
Unit Size Large Standard Small Tiny
Any kind of markers can be employed to record casualties, such
as actual models of dead or wounded, discarded shields, or basic
card or plastic tokens. Players are welcome to use whatever
method they feel most comfortable with, and can resort to pen
and paper to record casualties if that is their preference.
LEADERSHIP RATINGS
In the ancient world commanders frequently had to
lead from the front. They had to be fighters as well as
leaders. This is true in our game too. Commanders will
often find themselves in the thick of things! Sometimes
they will intervene to lead units in person, or rush to
rally units that are flagging. Most of the time their job
will be to direct the army by issuing orders to units
under their command.
We assign a value to all commanders to represent their
effectiveness within the army’s overall command
structure. This leadership rating can vary from army to
army, and from commander to commander, but for most
purposes it is assumed to be 8. We’d recommend that
players stick to a value of 8 at least until they have a fair
grasp of the rules.
Note that commanders who are killed in battle will be
replaced by subordinates whose leadership rating will
usually be one lower, i.e. a commander with a rating of 8
will be succeeded by another with a rating of 7. This is
described in the section on Commanders page 80.
LEADERSHIP RATING
Leadership Rating
Description
10 Military Genius. A natural bom leader, impossibly handsome, beloved of the gods, worshipped
by his men, adored by women, highly organised, courageous, with an instinctive feel for battle.
9 Great. An extremely capable, trustworthy, forthright, pious and popular commander.
8 Good. An able and confidEnt leader respected by his peers.
7 Average. An honest sort and a capable, if uninspired, leader.
6 Poor. An indecisive or reluctant commander, prone to dithering.
5 Fool. A feckless blustering imbecile, cursed by the gods, justly despised by his men, and a
prime target for assassination at the first opportunity.
4 and less Unfit for Duty. We shall not rate any of our commanders below 5 for all that the
Praetorian Guard might mark this fellow out for the purple.
17
FORMATIONS
Before our troops are ready to take part in a battle we must
decide how to arrange them into fighting formations. For
the most part, ancient warriors fought in simple linear
formations and, although hints of how this worked in
practice can be gleaned from surviving commentaries, it is
far from certain how troops fought in any detail.
Despite the necessary uncertainties imposed upon us by rhe
passage of time, the general similarity in weapons and the
universal constant of the human body make it reasonable to
assume warriors fought in comparable ways in comparable
circumstances. This is a broad assumption of course, but for
the purposes of playing battles with model soldiers it seems a
not unreasonable one.
BASIC FORMATIONS
The following are all formations that are either used by all
armies or often employed by specific but relatively common
troop types. For example, the pike phalanx formation won’t
interest those whose inspiration is drawn from the legions of
Rome or the chariotry of Egypt, but it is basic to all the
Hellenistic armies of Alexander the Great and his Successors,
so it is worth consideration from the onset. Some very
specific and unusual formations are dealt with separately, for
example the Roman Testudo and enigmatically named Pigs
Head (see page 103).
We sometimes refer to formed bodies of troops, by which we
mean troops arranged in any formation aside from ‘open
order’, where models are spaced apart with gaps between as
explained below. This is a useful distinction to make because
some rules apply only to formed units and other rules apply
only to units in open order.
BATTLE LINE
This is the basic fighting formation for most units whether
they are infantry, cavalry, chariots, artillery or even
elephants. A battle line is a straight line of troops deployed
as shown.
A standard battle line of infantry and cavalry is represented
in rhe game by a unit arranged into two ranks of troops. This
represents a real unit arranged something like four to six men
deep in the case of infantry and perhaps two to four deep in
the case of cavalry.
We arrange some of our close fighting infantry battle lines
into three ranks, representing a real life formation in the
order of eight to ten men deep. We do this mostly for the
look of the thing and also because our units happen to be
fairly sizeable. It makes no difference in play. In reality deeper
formations tended to be distinct of specific armies and troop
types, and we provide the option for players whose
collections reflect this.
A battle line of chariots and artillery is arranged one deep as
this looks more convincing and provides a more playable depth
given the size of the models. Elephants are fielded as a battle
line of a single model and cannot adopt other formations.
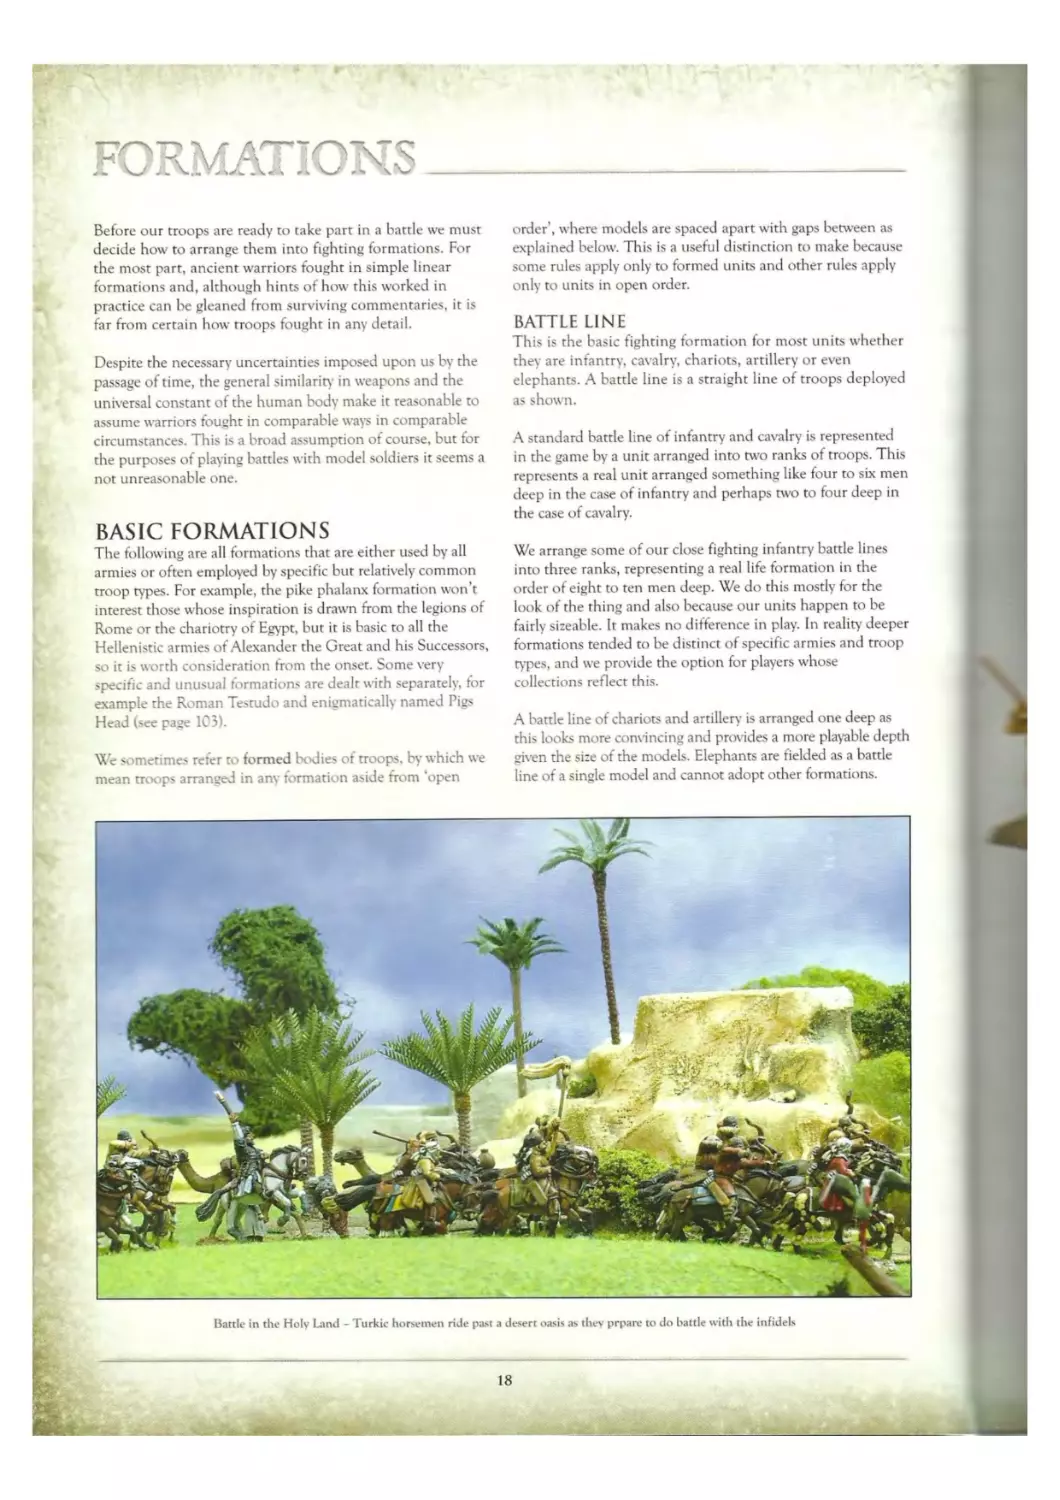
Battle in the Holy Land - Turkic horsemen ride past a desert oasis as they prparc to do battle with the infidels
18
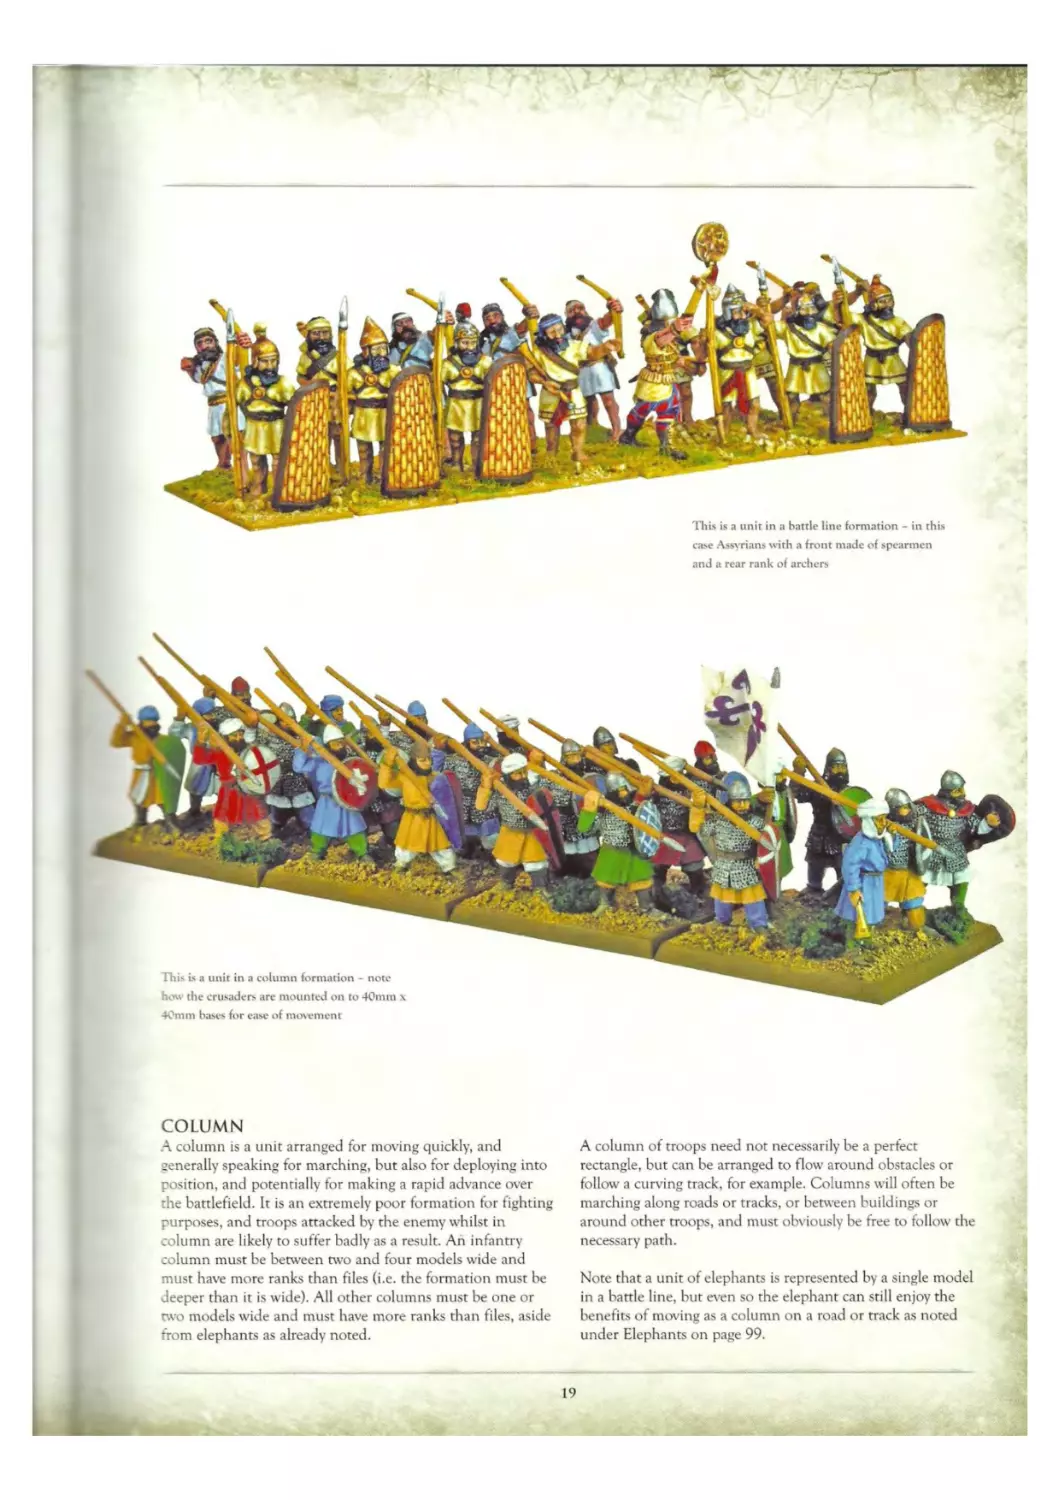
case Assyrians with a front made of spearmen
and a rear rank of archers
COLUMN
A column is a unit arranged for moving quickly, and
generally speaking for marching, but also for deploying into
position, and potentially for making a rapid advance over
the battlefield. It is an extremely poor formation for fighting
purposes, and troops attacked by the enemy whilst in
column are likely to suffer badly as a result. An infantry
column must be between two and four models wide and
must have more ranks than files (i.e. the formation must be
deeper than it is wide). All other columns must be one or
two models wide and must have more ranks than files, aside
from elephants as already noted.
A column of troops need not necessarily be a perfect
rectangle, but can be arranged to flow around obstacles or
follow a curving track, for example. Columns will often be
marching along roads or tracks, or between buildings or
around other troops, and must obviously be free to follow the
necessary path.
Note that a unit of elephants is represented by a single model
in a battle line, but even so the elephant can still enjoy the
benefits of moving as a column on a road or track as noted
under Elephants on page 99.
19
HAIL CAESAR
OPEN ORDER
Open order formation is a dispersed fighting formation
where individual models or their bases are spaced apart.
Units in open order are often distinguished from ‘formed’
units for rules purposes, as will become apparent.
Skirmishers, horse archers and all tiny units are restricted
to open order or column formations and cannot adopt
other formations.
formation as soon as possible once they are out of the
woods, rough ground, etc.
Other units - heavy chariots, artillery, elephants and
baggage - cannot adopt open order at all. This will restrict
their ability to move through some kinds of terrain such as
woods and rough ground.
Light infantry, light cavalry and light chariots can adopt
When a unit adopts open order the models’ bases are
open order as an option during the battle. These troops can
operate in column, battle line or in open order as the
occasion demands.
Other infantry and cavalry can only adopt open order
when moving in situations where they could not
otherwise move at all, or where they could not move
without incurring some penalty. This usually
happens when operating in wooded land, moving
over rough ground, and crossing rivers or other
kinds of obstacles (see Terrain page 38). Such units
must revert to a battle line or other
spaced up to Iй apart so they form a chain or loose mass.
Pikemen deployed 4 models
deep in ‘pike phalanx’
formation. The*e models have
been fielded to a slightly smaller
size than we’d normally use. but
such things are easily
accomodated within the game
PIKE PHALANX
This formation is unique to troops armed with the long pike or
sarissa. This is a spear-like weapon somewhere between sixteen
and twenty-four feet long with a long spearhead at one end and
a counterweighted butt-spike at the other. These troops fought
in very deep formations and so we arrange our model pikemen
to fight in a pike phalanx four models deep. This represents
sixteen ranks of real warriors. The phalanx is the usual
formation for such troops when deployed for battle. It is the
equivalent of a battle line, and we do not allow pikemen to
form into battle lines three or two deep.
Not surprisingly, the pike phalanx was an unwieldy
formation that demanded a very high degree of training
and discipline to operate effectively. Consequently we will
require special rules to deal with pikemen as well as a
distinct formation - see page 102.
20
________________________________________________
------:----------------------------------
-••Ж
________________________ FORMATIONS
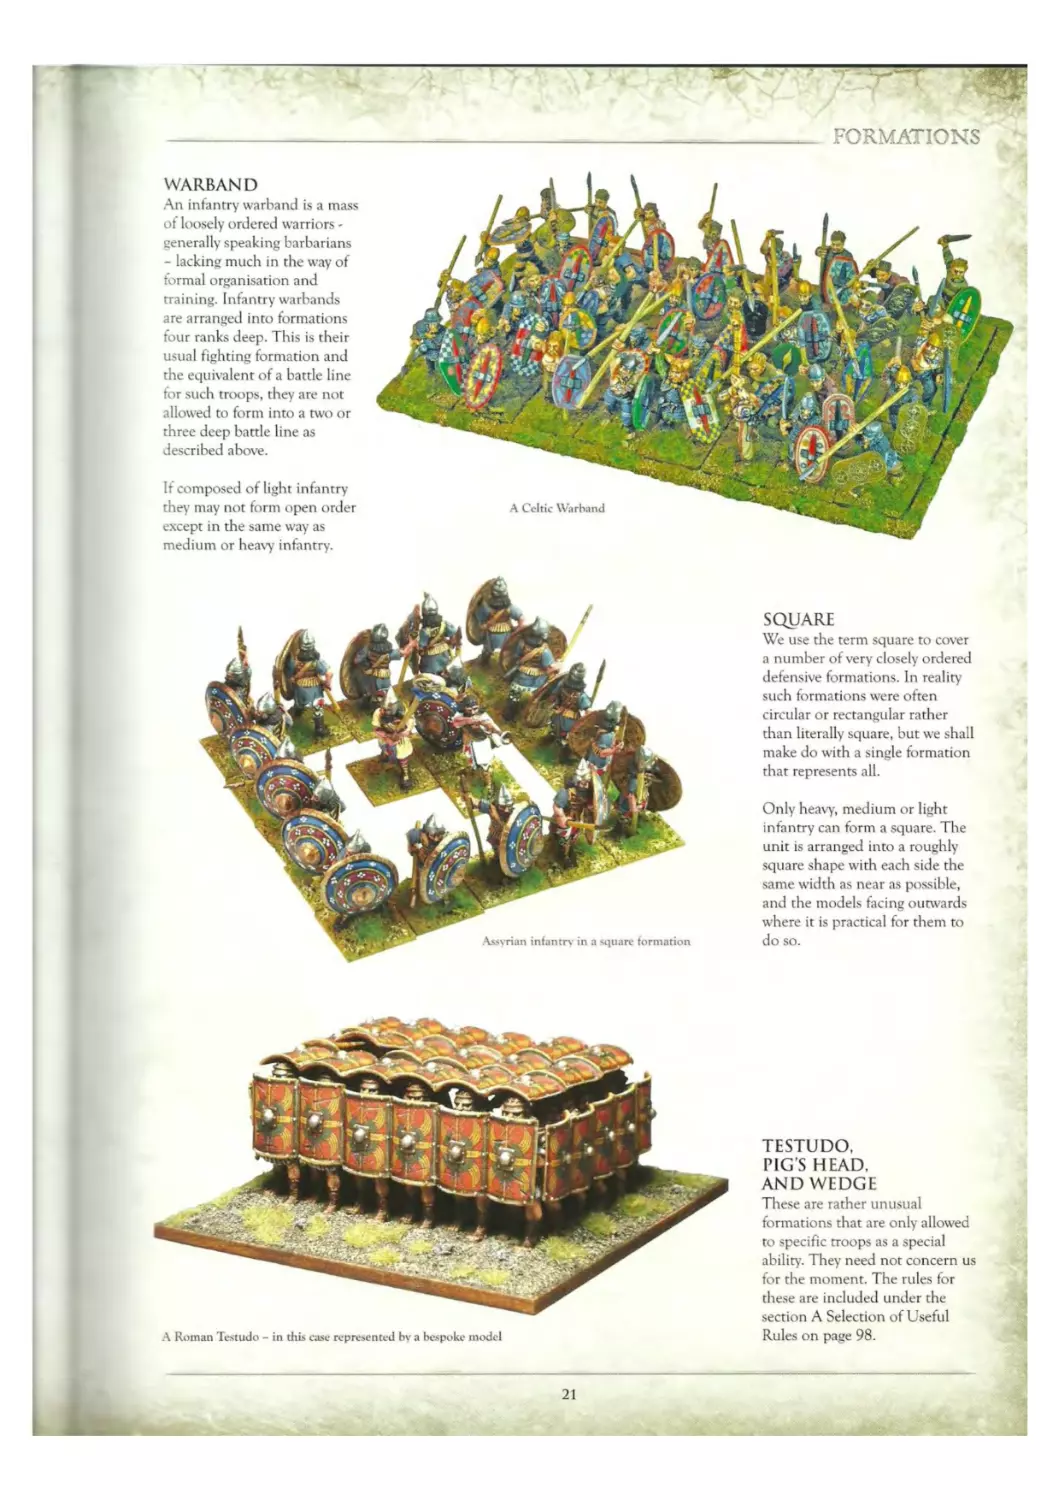
WARBAND
An infantry warband is a mass
of loosely ordered warriors -
generally speaking barbarians
- lacking much in the way of
formal organisation and
training. Infantry warbands
are arranged into formations
four ranks deep. This is their
usual fighting formation and
the equivalent of a battle line
for such troops, they are not
allowed to form into a two or
three deep battle line as
described above.
If composed of light infantry
they may not form open order
except in the same way as
medium or heavy infantry.
SQUARE
We use the term square to cover
a number of very closely ordered
defensive formations. In reality
such formations were often
circular or rectangular rather
than literally square, but we shall
make do with a single formation
that represents all.
Only heavy, medium or light
infantry can form a square. The
unit is arranged into a roughly
square shape with each side the
same width as near as possible,
and the models facing outwards
where it is practical for them to
do so.
A Roman Testudo - in this case represented bv a bespoke model
TESTUDO,
PIG’S HEAD.
AND WEDGE
These are rather unusual
formations that are only allowed
to specific troops as a special
ability. They need not concern us
for the moment. The rules for
these are included under the
section A Selection of Useful
Rules on page 98.
21
HAIL CAESAR____________________________________
TUCK IN -
PLENTY FOR ALL!
No wargame is complete without suitable refreshments
and what could be more appropriate than a quick delve
into the Roman cookbook of Apicius.
CHANGING FORMATION
Generally speaking, changing from one formation to
another requires a specific instruction when orders are
given. We shall address the rules for giving orders and
resultant moves in the following rules section. For now’ we
shall simply establish the procedures for changing from one
formation to another.
Milk-fed Snails
(adapted somewhat) from Apicius' De Re Coqumaria
Ingredients
4-5 snczils per person
A quantity of milk
Olive oil
1 clove of garlic per person
1 tablespoon of red wine per person
Garum - fish sauce
First catch your snails - make sure these are nice big
ones that haven’t been anywhere near anything nasty
such as ivy or other poisonous plants, pesticides, or
practically anything else you might typically find in
your garden. Starve for two days to cleanse
thoroughly. Pur snails in closed container and cover
with milk. Leave for two or three days - but be
mindful to remove the snail excrement every hour
and change the milk completely twice a day.
After two or three days take the fattened snails and
remove them from their shells. Heat rhe olive oil in a
frying pan and add the garlic, finely chopped. Add
snails and fry for about five minutes. Add wine and
heat until the whole thing is reduced by about half.
Serve with garum, which - as we all know - is a kind
of salty sauce based on rotted fish.
Sadly garum is no longer available - probably due
to some namby-pamby food hygiene regulation -
a strong soy sauce or similar will have to do.
♦ < #
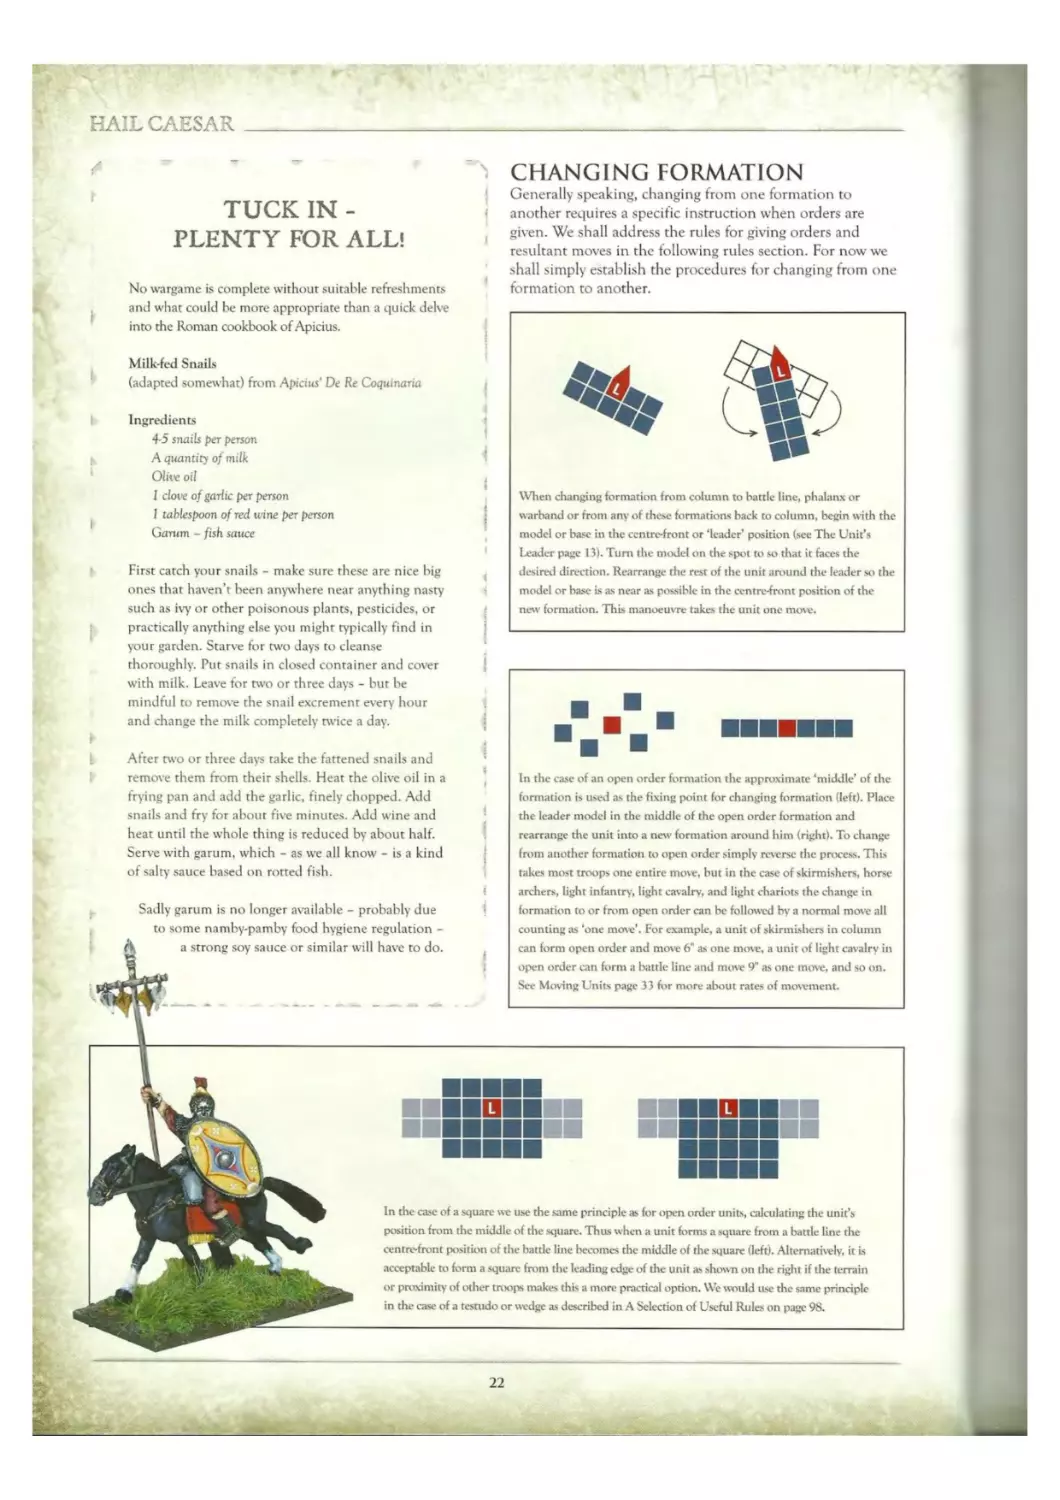
When changing formation from column to battle line, phalanx or
warband or from any of these formations back to column, begin with the
model or base in the centre-front or ‘leader’ position (sec The Unit’s
Leader page 13). Turn the model on the spot to so that it faces the
desired direction. Rearrange the rest of the unit around the leader so the
model or base is as near as possible in the centre-front position of the
new formation. This manoeuvre takes the unit one move.
In the case of an open order formation the approximate ‘middle’ of the
formation is used as the fixing point for changing formation (left). Place
the leader model in the middle of the open order formation and
rearrange the unit into a new formation around him (right). To change
from another formation to open order simply reverse the process. This
takes most troops one entire move, but in the case of skirmishers, horse
archers, light infantry, light cavalry, and light chariots the change in
formation to or from open order can be followed by a normal move all
counting as ‘one mow'. For example, a unit of skirmishers in column
can form open order and move 6" as one move, a unit of light cavalry in
open order can form a battle line and move 9" as one move, and so on.
See Moving Units page 33 for more about rates of movement.
In the case of a xjuarc we use the same principle as for open order units, calculating the unit’s
position from the middle of the square. Thus when a unit forms a square from a battle line the
centre-front position of the battle line becomes the middle of the square (left). Alternatively, it is
acceptable to form a square from the leading edge of die unit as shown on the right if the terrain
or proximity of other tniops makes this a more practical option. We would use the same principle
in the case of a testudo or wedge as described in A Selection of Useful Rules on page 98.
FORMATION AND TINY UNITS
Tiny sized units don’t have proper formations as such -
consequently they are always represented in open order or
as columns. In this respect they are restricted in the same
way as skirmishers and horse archers. Tiny units cannot be
reorganised into other formations.
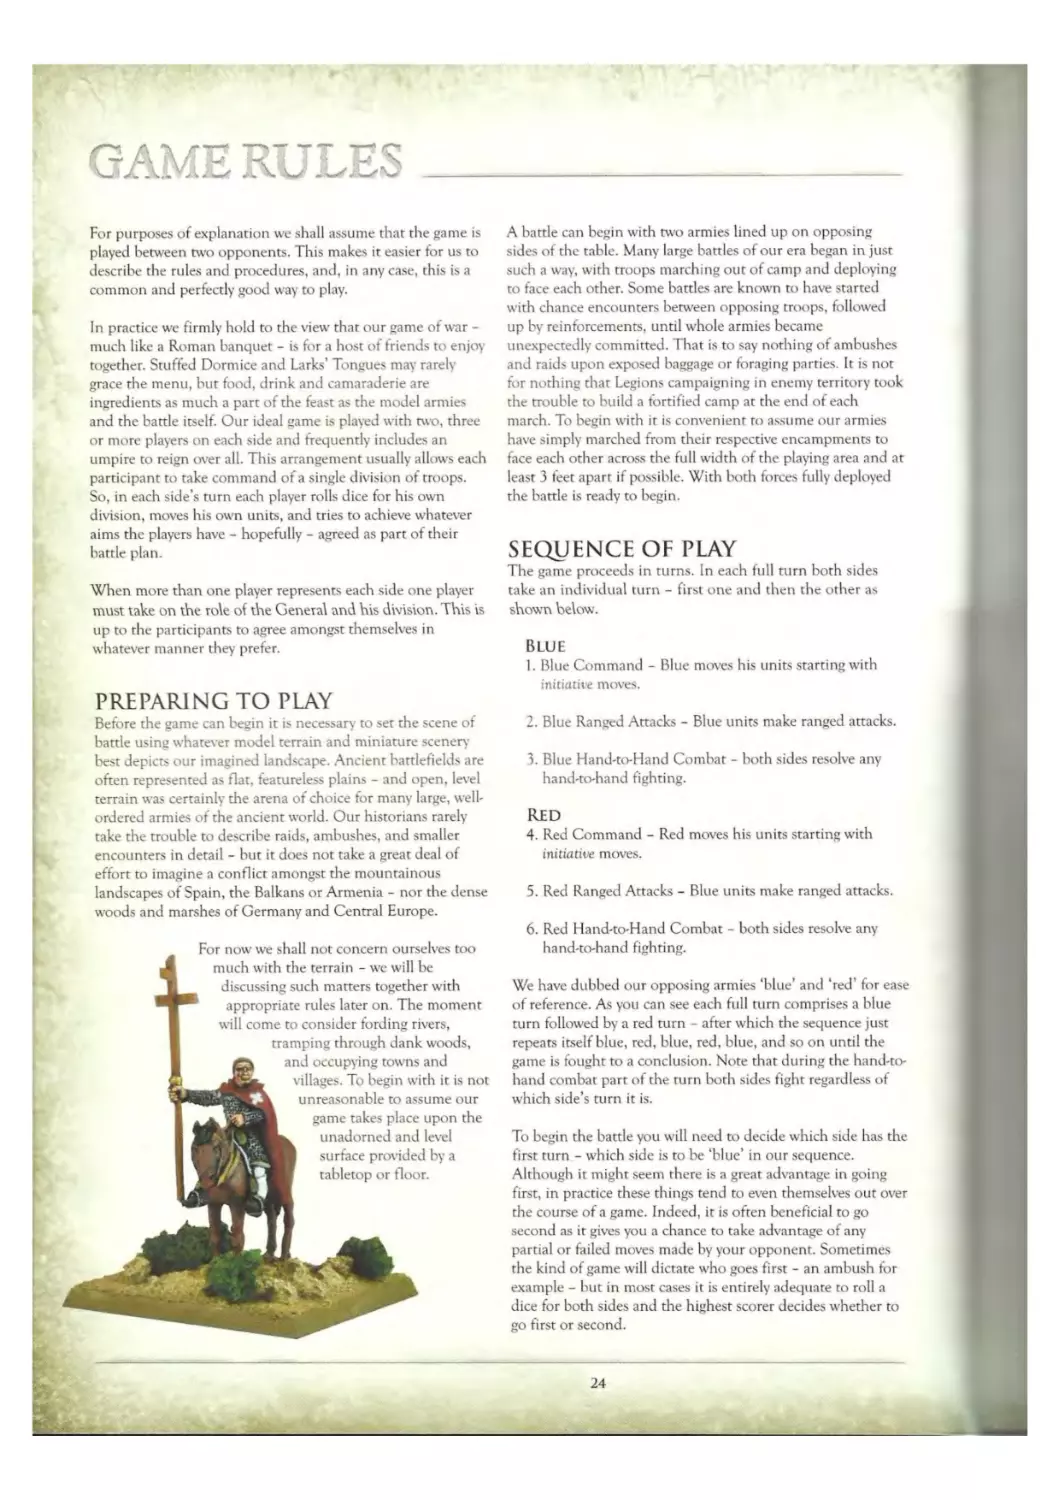
FRONT, FLANK, AND REAR
The areas to the front, sides and rear of a formation form its
front, left flank, right flank, and rear quarters. This is a
useful concept as it allows us to define how troops move,
what they can see and react to as a body, how they shoot,
and so on. This idea underpins many of the rules that follow
so it’s worth nailing this one down straightaway. These
quarters, areas, or zones are most readily demonstrated by
means of a diagram (right).
Units in open order are sufficiently dispersed for troops to face
whichever direction they wish, and therefore they have no flanks
or rear as such. Units in open order are treated as having one
continuous front that extends all the way around their edge.
Units in a square formation still have four distinct quarters in
the way illustrated below but have no flanks or rear. Each
face of the square is treated as a separate front.
DIVISIONS
An army consists of a number of divisions. Each division
consists of one commander plus a number of units. We
make no limit on the number of units in a division or to the
mix of troops that they contain. For example, a division
could consist of its commander, some heavy’ infantry, some
skirmishing infantry, a cavalry unit, and an artillery piece.
Where in reality it would be organised along ethnic or other
lines we leave it to the players to arrange such matters to
their satisfaction.
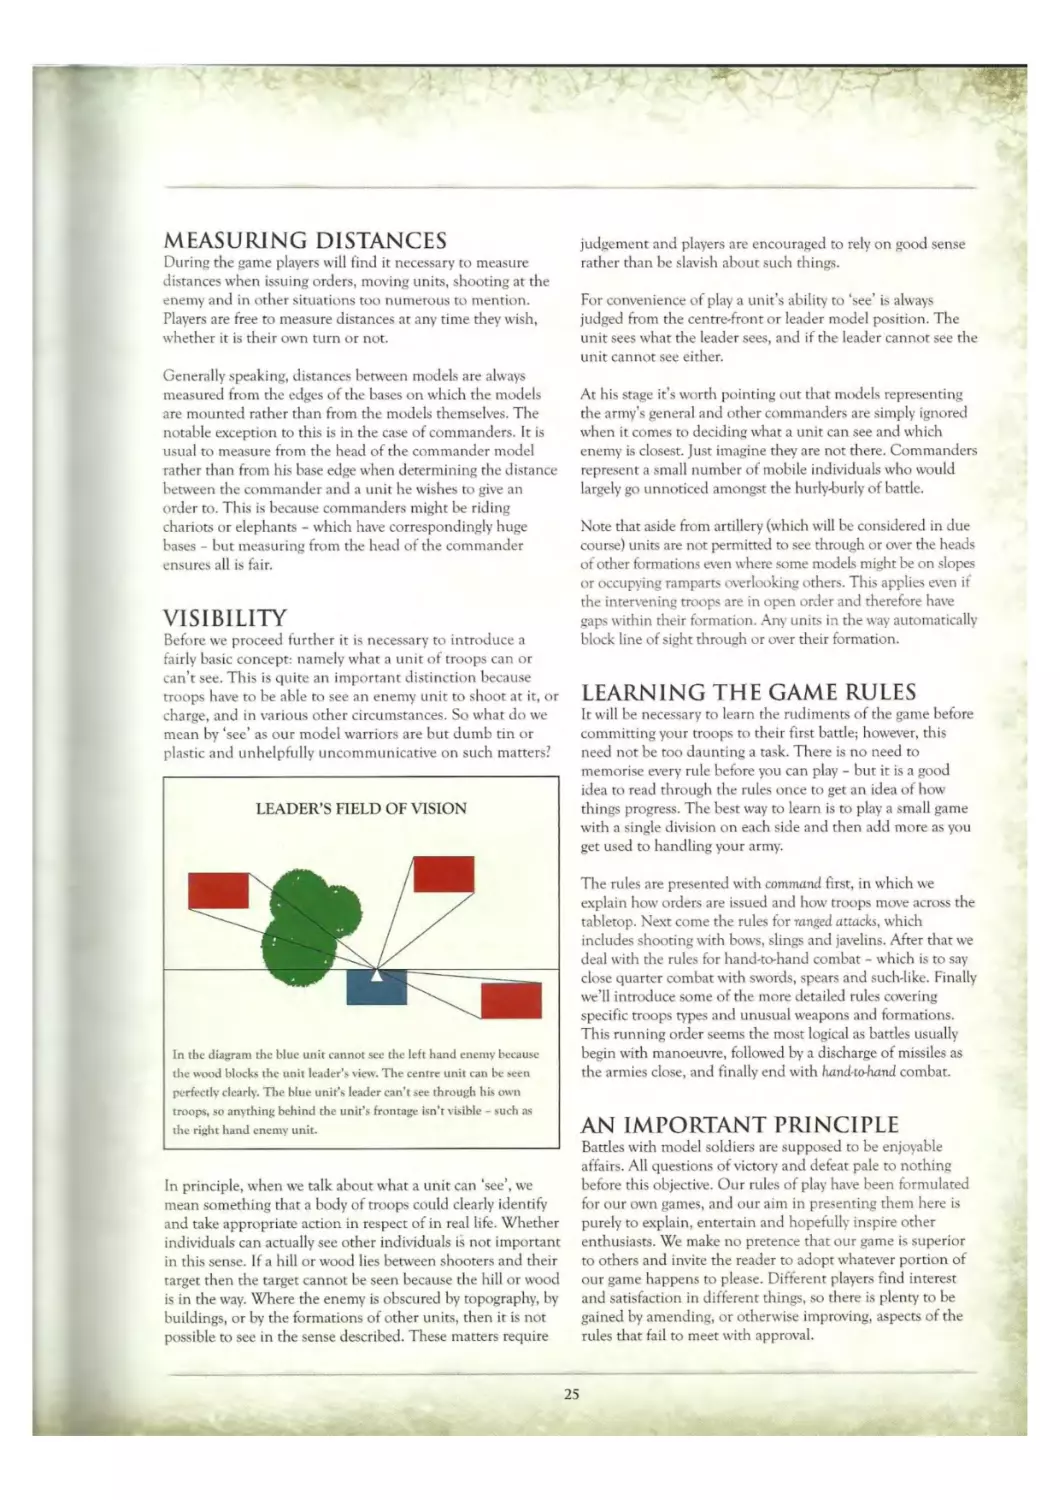
However, if they are to be directed by means of a single order,
divisions must form a loose body with no unit separated by
more than 6”. This is described in detail in the Command
rules that follow. Broadly speaking, divisions operate more
efficiently when forming a close group as described.
Commanders must remain within a move’s distance of at
least one unit under their command. The closer they are to
the units in their division the easier it is for them to issue
orders. Note that commanders can’t normally be shot at in
the game and cannot be attacked except when fighting
Units from the same division do not have to remain within
combat - so there is rarely any need to worry
23
Ithii t
GAME RULES
For purposes of explanation we shall assume that the game is
played between two opponents. This makes it easier for us to
describe the rules and procedures, and, in any case, this is a
common and perfectly good way to play.
In practice we firmly hold to the view that our game of war -
much like a Roman banquet - is for a host of friends to enjoy
together. Stuffed Dormice and Larks’ Tongues may rarely
grace rhe menu, but food, drink and camaraderie are
ingredients as much a part of the feast as the model armies
and the battle itself. Our ideal game is played with two, three
or more players on each side and frequently includes an
umpire to reign over all. This arrangement usually allows each
participant to take command of a single division of troops.
So, in each side’s turn each player rolls dice for his own
division, moves his own units, and tries to achieve whatever
aims the players have - hopefully - agreed as part of their
battle plan.
When more than one player represents each side one player
must take on the role of the General and his division. This is
up to the participants to agree amongst themselves in
whatever manner they prefer.
PREPARING TO PLAY
Before the game can begin it is necessary to set the scene of
battle using whatever model terrain and miniature scenery
best depicts our imagined landscape. Ancient battlefields are
often represented as flat, featureless plains - and open, level
terrain was certainly the arena of choice for many large, well-
ordered armies of the ancient world. Our historians rarely
take the trouble to describe raids, ambushes, and smaller
encounters in detail - but it does not take a great deal of
effort to imagine a conflict amongst the mountainous
landscapes of Spain, the Balkans or Armenia - nor the dense
woods and marshes of Germany and Central Europe.
For now we shall not concern ourselves too
much with rhe terrain - we will be
discussing such matters together with
appropriate rules later on. The moment
will come to consider fording rivers,
tramping through dank woods,
and occupying towns and
villages. To begin with it is not
unreasonable to assume our
game takes place upon the
unadorned and level
surface provided by a
tabletop or floor.
A battle can begin with two armies lined up on opposing
sides of the table. Many large battles of our era began in just
such a way, with troops marching out ofcamp and deploying
to face each other. Some battles are known to have started
with chance encounters between opposing troops, followed
up by reinforcements, until whole armies became
unexpectedly committed. That is to say nothing of ambushes
and raids upon exposed baggage or foraging parties. It is not
for nothing that Legions campaigning in enemy territory took
the trouble to build a fortified camp at the end of each
march. To begin with it is convenient to assume our armies
have simply marched from their respective encampments to
face each other across the full width of the playing area and at
least 3 feet apart if possible. With both forces fully deployed
the battle is ready to begin.
SEQUENCE OF PLAY
The game proceeds in turns. In each full turn both sides
take an individual turn - first one and then the other as
shown below.
BLUE
1. Blue Command - Blue moves his units starting with
initiative moves.
2. Blue Ranged Attacks - Blue units make ranged attacks.
3. Blue Hand-to-Hand Combat - both sides resolve any
hand-to-hand fighting.
RED
4. Red Command - Red moves his units starting with
initiative moves.
5. Red Ranged Attacks - Blue units make ranged attacks.
6. Red Hand-to-Hand Combat - both sides resolve any
hand-to-hand fighting.
We have dubbed our opposing armies ‘blue’ and ‘red’ for ease
of reference. As you can see each full turn comprises a blue
turn followed by a red turn - after which the sequence just
repeats itself blue, red, blue, red, blue, and so on until the
game is fought to a conclusion. Note that during the hand-to-
hand combat part of the turn both sides fight regardless of
which side’s turn it is.
To begin the battle you will need to decide which side has the
first turn - which side is to be ‘blue’ in our sequence.
Although it might seem there is a great advantage in going
first, in practice these things tend to even themselves out over
the course of a game. Indeed, it is often beneficial to go
second as it gives you a chance to take advantage of any
partial or failed moves made by your opponent. Sometimes
the kind of game will dictate who goes first - an ambush for
example - but in most cases it is entirely adequate to roll a
dice for both sides and the highest scorer decides whether to
go first or second.
MEASURING DISTANCES
During the game players will find it necessary to measure
distances when issuing orders, moving units, shooting at the
enemy and in other situations too numerous to mention.
Players are free to measure distances at any time they wish,
whether it is their own turn or not.
Generally speaking, distances between models are always
measured from the edges of the bases on which the models
are mounted rather than from the models themselves. The
notable exception to this is in the case of commanders. It is
usual to measure from the head of the commander model
rather than from his base edge when determining the distance
between the commander and a unit he wishes to give an
order to. This is because commanders might be riding
chariots or elephants - which have correspondingly huge
bases - but measuring from the head of the commander
ensures all is fair.
VISIBILITY
Before we proceed further it is necessary to introduce a
fairly basic concept: namely what a unit of troops can or
can’t see. This is quite an important distinction because
troops have to be able to see an enemy unit to shoot at it, or
charge, and in various other circumstances. So what do we
mean by ‘see’ as our model warriors are but dumb tin or
plastic and unhelpfully uncommunicative on such matters?
In principle, when we talk about what a unit can ‘see’, we
mean something that a body of troops could clearly identify
and take appropriate action in respect of in real life. Whether
individuals can actually see other individuals is not important
in this sense. If a hill or wood lies between shooters and their
target then the target cannot be seen because the hill or wood
is in the way. Where the enemy is obscured by topography, by
buildings, or by the formations of other units, then it is not
possible to see in the sense described. These matters require
judgement and players are encouraged to rely on good sense
rather than be slavish about such things.
For convenience of play a unit’s ability to ‘see’ is always
judged from the centre-front or leader model position. The
unit sees what the leader sees, and if the leader cannot see the
unit cannot see either.
At his stage it’s worth pointing out that models representing
the army’s general and other commanders are simply ignored
when it comes to deciding what a unit can see and which
enemy is closest. Just imagine they are not there. Commanders
represent a small number of mobile individuals who would
largely go unnoticed amongst the hurly-burly of battle.
Note that aside from artillery (which will be considered in due
course) units are not permitted to see through or over the heads
of other formations even where some models might be on slopes
or occupying ramparts overlooking others. This applies even if
the intervening troops are in open order and therefore have
gaps within their formation. Any units in the way automatically
block line of sight through or over their formation.
LEARNING THE GAME RULES
It will be necessary to learn the rudiments of the game before
committing your troops to their first battle; however, this
need not be too daunting a task. There is no need to
memorise every rule before you can play - but it is a good
idea to read through the rules once to get an idea of how
things progress. The best way to learn is to play a small game
with a single division on each side and then add more as you
get used to handling your army.
The rules are presented with command first, in which we
explain how orders are issued and how troops move across the
tabletop. Next come the rules for ranged attacks, which
includes shooting with bows, slings and javelins. After that we
deal with the rules for hand-to-hand combat - which is to say
close quarter combat with swords, spears and such-like. Finally
we’ll introduce some of the more detailed rules covering
specific troops types and unusual weapons and formations.
This running order seems the most logical as battles usually
begin w’ith manoeuvre, followed by a discharge of missiles as
the armies close, and finally end with hand^ahand combat.
AN IMPORTANT PRINCIPLE
Battles with model soldiers are supposed to be enjoyable
affairs. All questions of victory and defeat pale to nothing
before this objective. Our rules of play have been formulated
for our own games, and our aim in presenting them here is
purely to explain, entertain and hopefully inspire other
enthusiasts. We make no pretence that our game is superior
to others and invite the reader to adopt whatever portion of
our game happens to please. Different players find interest
and satisfaction in different things, so there is plenty to be
gained by amending, or otherwise improving, aspects of the
rules that fail to meet with approval.
25
In the command part of his turn the player gets a chance to
move his army. Sometimes troops are allowed to move
automatically, but in most situations they must be issued
orders to do so. Orders are issued on behalf of the army’s
commanders to the units in their divisions. Broadly speaking,
to give an order the player first nominates a commander to
issue the order, then he indicates which unit he wishes to
move, and finally the player describes what he wants the unit
to do before rolling dice to determine if he is successful or
not. This is the basic method by which troops are moved in
the Hail Caesar game.
ORDERS
Giving orders is one of the most important parts of the game
and also one of the most entertaining aspects of play. When
framing orders participants are encouraged to imagine
themselves as proud consuls, brave warlords or merciless
despots according to their inclination.
Players should endeavour to state orders aloud, in good time,
and in a straightforward, robust fashion without conditions
or vagaries. Orders must always be stated before making the
requisite test for success. Failure to state an order before
rolling the dice is considered an affront to the gods resulting
in a blunder as described later. A generous opponent may
choose to forgive such a fundamental error - though it is
questionable whether it is worth a player so indebting himself
to his adversary!
Units don’t need orders to make ranged attacks or to fight
when they find themselves in hand-to-hand combat - they do
these things automatically. In most situations units do need
orders to move in the Command part of the turn, although
there are some situations where units are able to move
without orders, as we shall see. There are also situations
where units can or must move during other parts of the turn:
for example, following hand-to-hand combat when defeated
units are often obliged to give ground and victorious units
have the opportunity to press forward or fall back.
The order must explain where a unit is to move to and by
which route in cases where there is room for doubt. A unit
must also be given a specific order if the player wishes it to
change formation: for example, to rearrange its ranks into a
column or disperse into open order. Finally - and importantly
- if you want a unit to move into hand-to-hand combat with
an enemy then you must specifically state that you want the
unit to charge, and you must indicate which enemy unit or
units you intend the chargers to contact. If you want a unit to
charge then you must say so when giving the order.
Units will always attempt to obey their orders in so far as
they are able and in the most direct and straightforward way
they can. If a unit’s move proves inadequate to fulfil an
order in its entirety, then the unit will follow its instructions
to the best of its ability in so far as it can. For example, if a
unit is ordered to charge an enemy but has insufficient
movement to do so, then it will move as far as it can towards
the intended target.
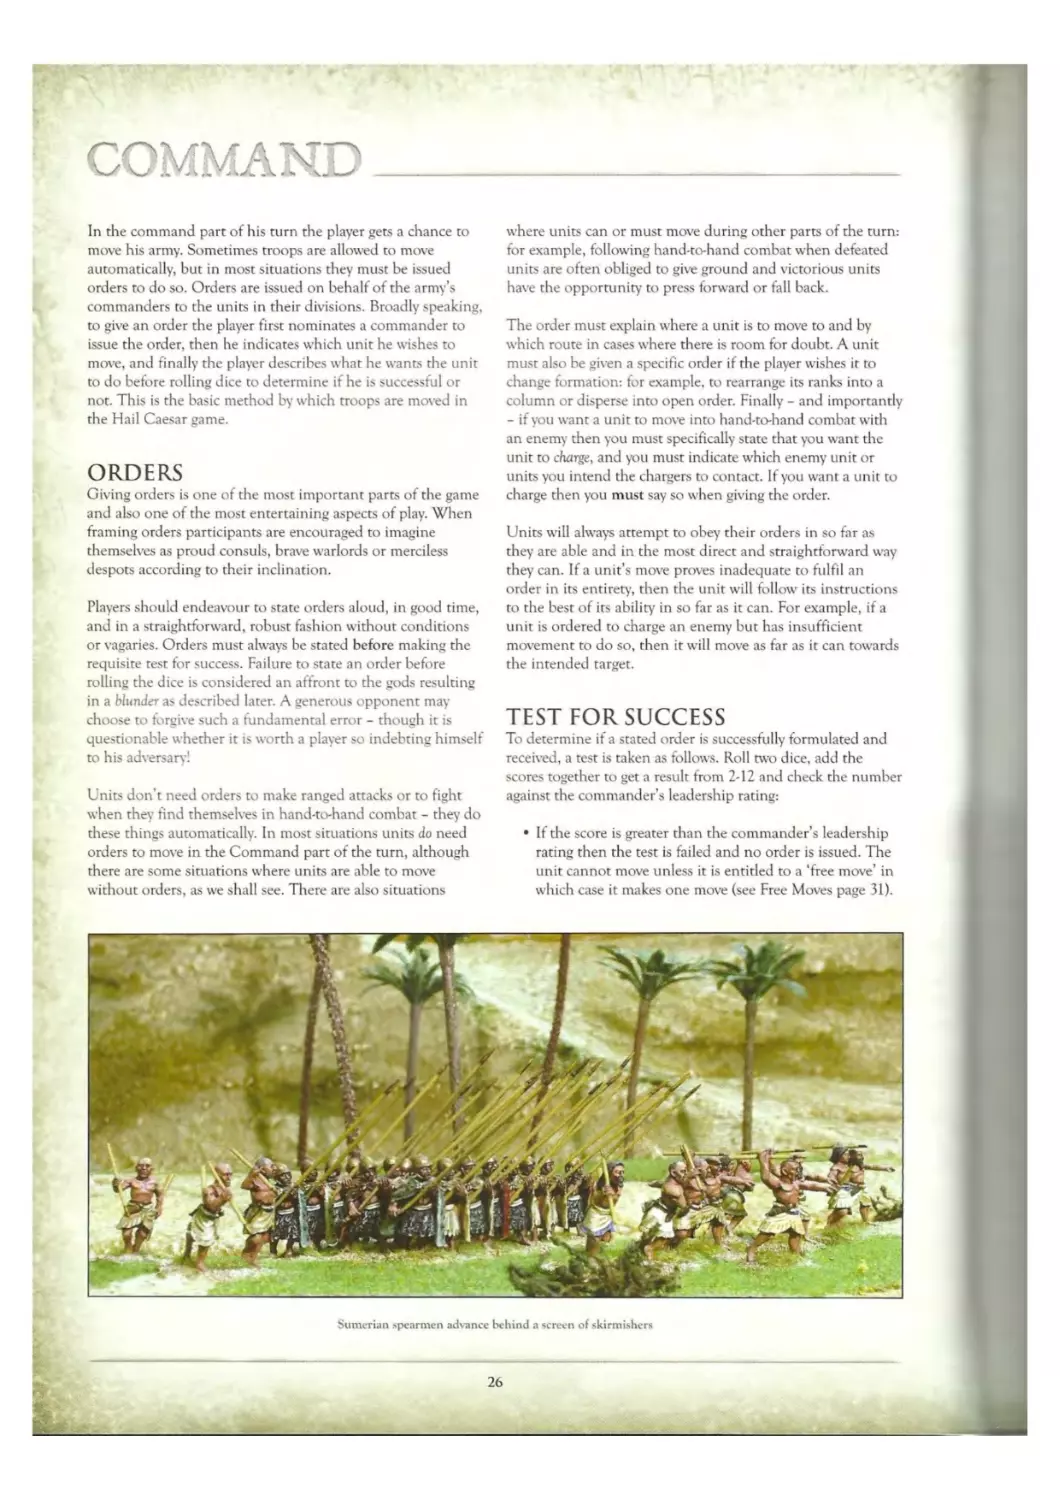
TEST FOR SUCCESS
To determine if a stated order is successfully formulated and
received, a test is taken as follows. Roll two dice, add the
scores together to get a result from 2-12 and check the number
against the commander’s leadership rating:
• If the score is greater than the commander’s leadership
rating then the test is failed and no order is issued. The
unit cannot move unless it is entitled to a ‘free move’ in
which case it makes one move (see Free Moves page 31).
Sumerian spearmen advance behind a screen of skirmishers
26
__________________________________________________________
• It the score is equal to the commander’s leadership
rating or 1 less, the order is issued and acted upon in
due course - the unit can make one move.
• If the score is 2 less than the commander’s leadership
rating, the order is speedily issued and acted upon
immediately - the unit can make two moves.
• If the score is 3 less than the commander’s leadership
rating or lower the order is issued in anticipation of events
and hurriedly obeyed - the unit can make three moves.
For example: rolling against the standard leadership rating of
8: a score of 9 or more is a failure, a score of 7 or 8 gives 1
move, a score of 6 gives 2 moves and a score of 5 or less gives
3 moves. Statisticians will note that the chances of rolling 1, 2
or 3 moves varies depending on the leadership rating and is
not a linear progression. Often a result of 3 moves will be
more likely than a result of 2 or even 1. Before anyone writes
to us about this we’d just like to say - we know. This is one of
the reasons why it is often worth going tor a long move, as
the odds often favour aggressive and ambitious play. On the
other hand, this has to be balanced against the chances of
not moving or of moving only once or twice.
.As you can see a unit might not move at all or may have one,
two or three moves to complete its order. Often a single move
will enable only part of an order to be fulfilled. Sometimes it
will be possible to complete an order in a single move even
where more moves would otherwise be available. Such things
are matters to consider when formulating orders. Remember
also that orders must be unconditional and cannot therefore
be dependent on the results of the dice or the number of
moves available.
For example, Ludicrus Sextus gives an order to a Legionary’
Cohort to move to the crest of a hill - the dice roll is 1 and 2
= 3 which gives 3 moves compared to Ludicrus’ leadership
rating of 8. The Legionaries make one move as instructed and
reach their destination - the remaining two moves are wasted
in this case. Next Ludicrus orders his cavalry to make a
sweeping move around the enemy’s flanks - keeping a good
distance from the enemy to avoid being caught up in combat.
Once more the dice are rolled this time scoring 5 and 4 = 9 a
failure! The cavalry stay put, having failed their order.
Ludicrus’ orders are now complete, although he still has a
unit of archers and some skirmishers who have not received
orders at all and which are therefore unable to move this turn.
COMMANDERS, UNITS
AND ORDERS
A unit can only be issued one order each turn. If its order is
passed then the unit obeys the order in so far as it can, but
cannot then be issued any further orders. If its order is failed
then the unit cannot be issued another order. In some cases
units are allowed to make a single move even if they fail their
order - this is generally referred to as a free mwe see Free
Moves (page 31).
A commander can only give orders to units belonging to his
own designated division. Refer back to the section on The
Army for a description of divisions (page 10).
If a commander issues an order successfully then he can
continue to issue further orders to other units in his
division. He can issue any number of orders so long as he
continues to do so successfully, and so long as his division
has units able to receive them. If a commander fails to issue
an order then he cannot give any more orders that turn.
This can sometimes result in some units moving and others
staying where they are, or even for entire divisions to not
move at all in some cases.
Each commander must finish giving all of his orders before
another commander can begin to do so. It is not permitted
for one commander to give an order, then a second
commander, and then the first commander again. Where
several players are playing on one side, it is usual for them all
to issue orders and make moves at the same time as this is
only sensible, but each player must finish giving orders from
each of his own commanders one at a time.
CHARGE ORDERS
It is necessary to give a specific order if you want troops to
move into hand-to-hand combat against an enemy. This is
the charge order. It is not necessary that the intended
opponent be in sight of the charger when the order is given.
Nor do we worry whether it is possible for a unit to mount
its charge successfully at this point. The important thing is
that the unit has been given a clear order to engage the
enemy - charge!
Charge orders can be framed in as specific or general a
manner as rhe players deem appropriate. For example,
‘charge the elephant!’ and ‘advance to the ridge and charge
any enemy that appear!* and ‘charge the enemy to your
front!* would all be perfectly good orders. In the last two
examples given, the player might also indicate which units
he expected his troops to discover if only for the sake of
clarity. Players should not give orders that are unclear or
ambiguous, and where the umpire considers this to be the
case he is encouraged to interpret such orders in as devious
and disastrous a manner as possible. Units will always try
and fulfil their orders in the most direct and straightforward
way they can, so a unit simply instructed to ‘Charge the
enemy!’ would naturally take the shortest route towards the
closest enemy within sight.
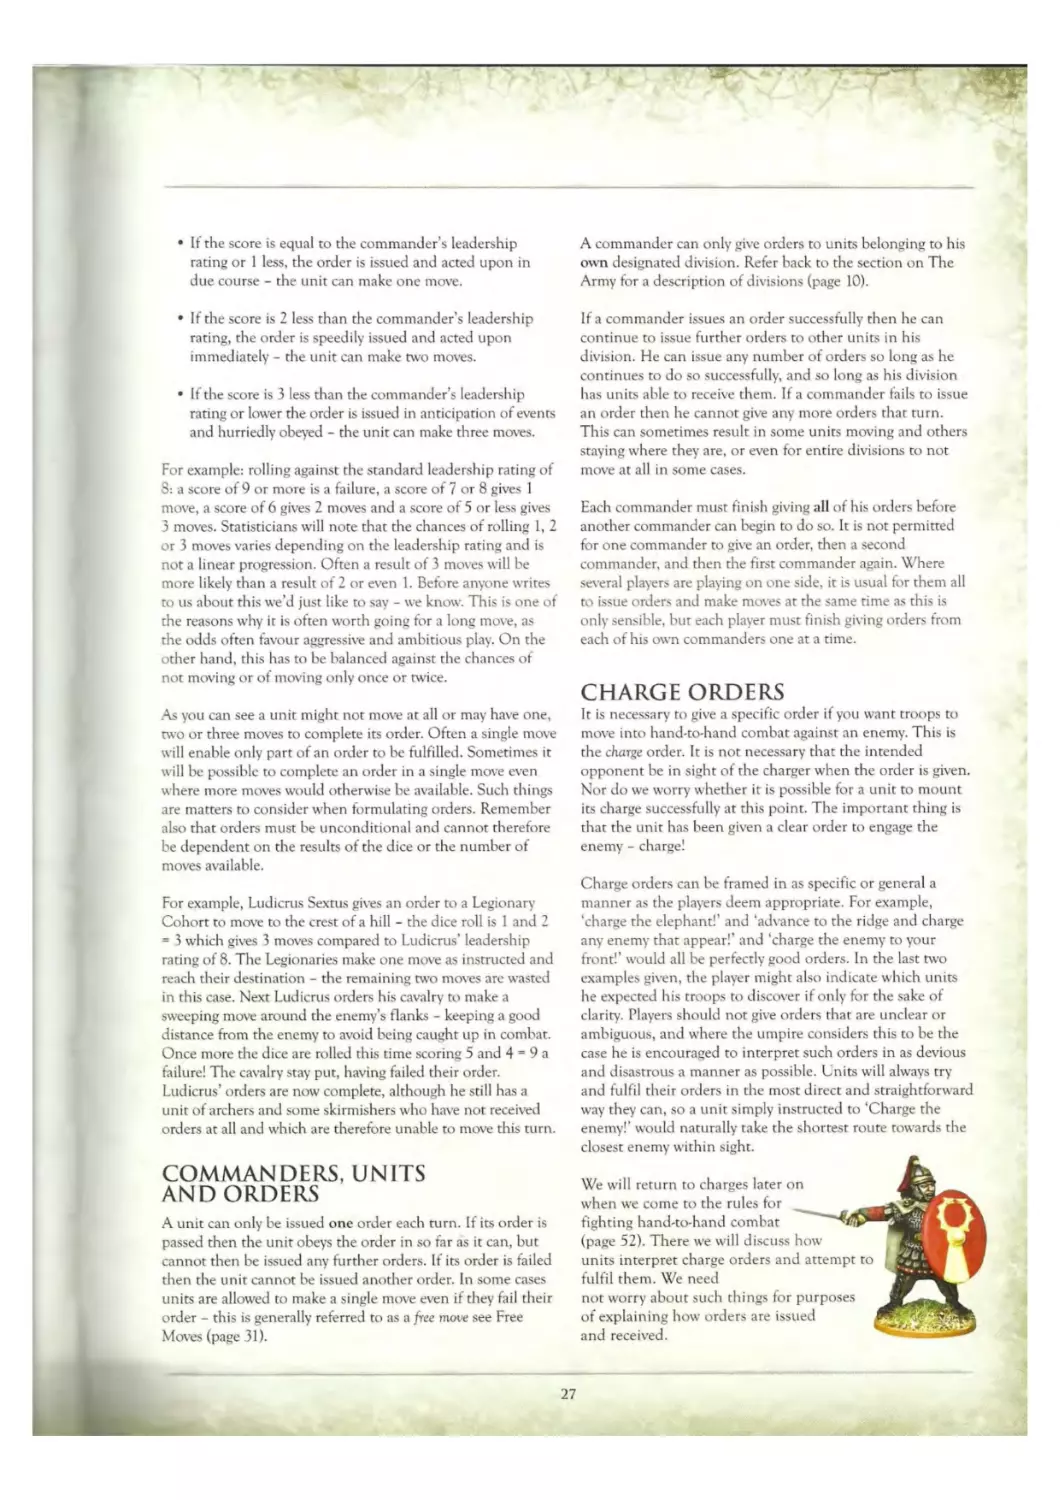
We will return to charges later on
when we come to the rules for
fighting hand-to-hand combat ' I V
(page 52). There we will discuss how Ah
units interpret charge orders and attempt to ,
fulfil them. We need jribh
not worry about such things for purposes
of explaining how orders are issued
and received.
27
HAIL CAESAR ____________________________________________
DIVISION ORDERS
So far we have assumed that an order is given to a single unit.
This is a perfectly good and often useful way of issuing orders
as it allows a commander to exercise precise control over the
unit concerned. However, it is often more practical to issue
the same order to a group of units at the same time. This is
called a division order.
A commander can issue the same order to any or all of rhe
units in his division so long as all the units form a group and
so long as none of the units in the group have already moved
that turn. To qualify as a group none of the units must be
separated by more than 6" from other units in the group
when the order is given. Similarly, once the units have moved
none can be more than 6” from other units in the same
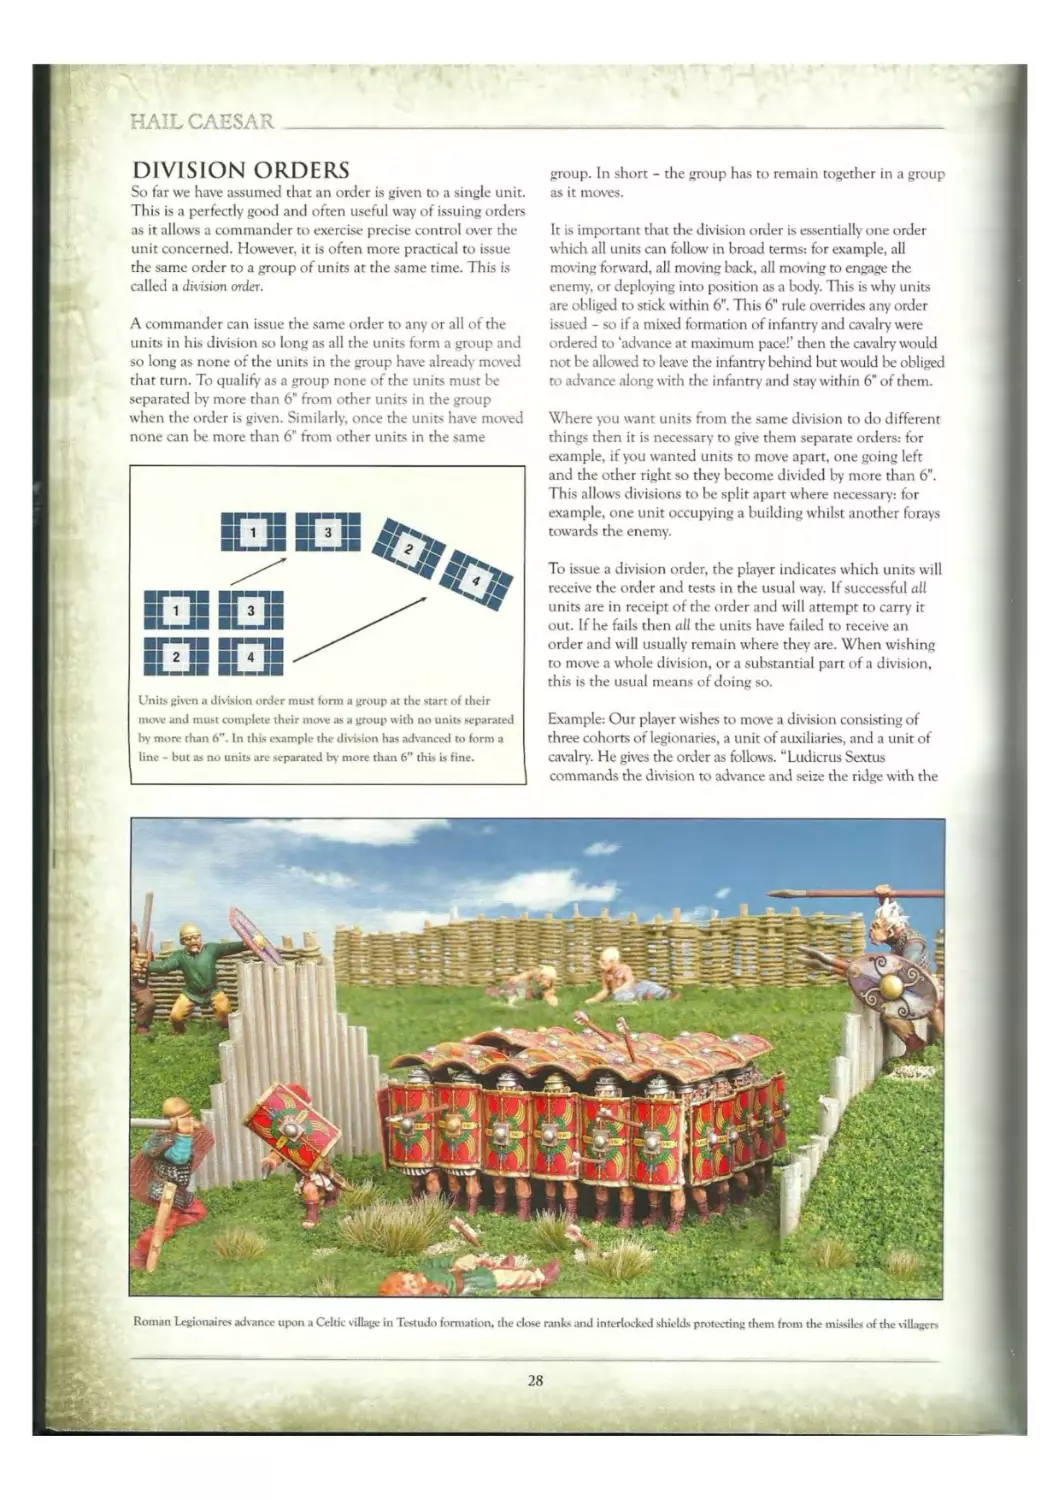
Units given a division order must form a group at the start of their
mow and must complete their move as a group with no units separated
by more than 6”. In this example the division has advanced to form a
line - but as no units are separated by more than 6” this is fine.
group. In short - the group has to remain together in a group
as it moves.
It is important that the division order is essentially one order
which all units can follow in broad terms: for example, all
moving forward, all moving back, all moving to engage the
enemy, or deploying into position as a body. This is why units
are obliged to stick within 6”. This 6" rule overrides any order
issued - so if a mixed formation of infantry and cavalry’ were
ordered to ‘advance at maximum pace!’ then the cavalry would
not be allowed to leave the infantry' behind but would be obliged
to advance along with the infantry and stay within 6” of them.
Where you want units from the same division to do different
things then it is necessary to give them separate orders: for
example, if you wanted units to move apart, one going left
and the other right so they become divided by more than 6".
This allows divisions to be split apart where necessary: for
example, one unit occupying a building whilst another forays
towards the enemy.
To issue a division order, the player indicates which units will
receive the order and tests in the usual way. If successful all
units are in receipt of the order and will attempt to carry it
out. If he fails then all the units have failed to receive an
order and will usually remain where they are. When wishing
to move a whole division, or a substantial part of a division,
this is the usual means of doing so.
Example: Our player wishes to move a division consisting of
three cohorts of legionaries, a unit of auxiliaries, and a unit of
cavalry. He gives the order as follows. “Ludicrus Sextus
commands the division to advance and seize the ridge with the
Roman Legionaires advance upon a Celtic village in Testlido formation, the close ranks and interlocked shields protecting them from the missiles of the villagers
28
_______—_______________________________ COMMAND
legions taking the centre, the cavalry the right flank, and the
auxiliaries breaking into open order formation to occupy rhe
wood on the left Hank”. Our player banishes any lurking
doubts as to his intentions by carefully indicating where he
imagines his troops will deploy. This is a perfectly reasonable
order. The player rolls two dice to test his success. Ludicrus
Sextus has a leadership rating of 8 and roils 4+1 =5. With a
result of‘3 under’ the division has 3 moves to complete its
orders. The auxiliaries leading the advance have to expend a
move to change formation but manage to take up the indicated
position with their third move. The two cohorts immediately
behind also manage to reach the positions indicated without
any trouble, leaving the third cohort just short of its desired
position but well placed for the following turn. “Пае cavalry with
their longer move also manage to get close to where they are
needed despite starting at the rear of the formation. Overall it is
a pretty successful manoeuvre - the ridgeline is firmly defended
and the position affords a good view of the approaching enemy.
DISTANCE MODIFIERS
We assume orders are relayed by messengers who form part of
every commander’s staff or bodyguard, although there is no
need for these individuals to be represented on the tabletop.
It can readily be imagined that messengers might be killed or
captured, delayed, or distracted in some fashion. To represent
this we apply a penalty to the commander’s leadership rating
if he is a long way from troops he is trying to give an order to.
Note that skirmishers, light cavalry and horse archers in open
order are exempt from these penalties as explained below.
Measure from the commander model to the closest point on rhe
unit being ordered. If a commander wishes to give a division
order to several units at once, measure to the unit that is farthest
away. If the distance is more than 12” then deduct -1 from the
commander’s leadership rating for every full 12". For example: at
19" deduct 1, at 38" deduct 3, at 48" deduct 4, and so on.
Measurements are normally made from the commander’s head,
as this frees us to mount our models on bases of any size, thereby
facilitating models riding chariots or elephants and the use of
scenic dioramas to represent individual commanders.
Regardless of any modifiers that may apply, including
bonuses afforded by special rule of one kind or other, no
commander ever has a leadership rating of better than 10 or
worse than 5. 10 is the best possible value and 5 is the worst.
No distance modifiers apply when orders are
issued to skirmishers in open order, light cavalry
in open order or horse archers in open order.
However, in the case of a division order,
distance modifiers apply if they would
normally apply to any other units
included in the order. For example,
a division order to a unit of
skirmishers and a unit of horse
archers both in open order
would attract no distance
penalties; however, a division
order given to a unit of
skirmishers in open
order and a unit of
heavy infantry in
battle line formation
attracts the penalty
for heavy infantry.
THE BATTLE OF EMESA
The following graphic account of a battle between a Roman
army and that of rhe rebel Palmyrenes comes form Zosimus’
New History’. It was written in the early sixth century in the
time of the Byzantine Emperor Anastasius I, bur refers to
events of the mid-third century and is regarded as a
compilation of earlier writings. It is interesting to us
wargamers because it describes a cavalry action in some
detail, and also the subsequent attack of Roman auxiliaries
armed with ‘staves’ that they wield to notable effect against
the exhausted Palmyrene cataphracts.
J.
‘Finding the Palmyrene army drawn up before Emesa, amounting to
seventy thousand men, consisting of Palmyrenes and their allies, he
opposed to them the Dalmatian cavalry, the Moesians and
Pannonians, and the Celtic legions of Noncum and Rhaetia, and
besides these live choicest of the imperial regiment selected man by
man, the Mauritanian horse, the Tyaneans, the Mesopotamians, the
Syrians, the Phoenicians, and the Palestinians, all men of
acknowledged valour, the Palestinians besides other arms wielding
clubs and staves.
At the commencement of the engagement, the Roman cavalry
receded, lest the Palmyrenes, who exceeded them in number, and
were better horsemen, should by some stratagem surround the
Roman army. But the Palmyrene cavalry pursued them so fiercely,
though their ranks were broken, that the event was quite contrary
to the expectation of the Roman cavalry. For they were pursued by
an enemy much their superior in strength, and therefore most of
them fell. The foot had to bear the brunt of the action. Observing
that the Palmyrenes had broken their ranks when the horse
commenced their pursuit, they wheeled about, and attacked them
while they were scattered and out of order. Upon which many were
killed, because the one side fought with the usual weapons, while
those of Palestine brought clubs and staves against coats of mail
made of iron and brass. The Palmyrenes therefore ran away with
the utmost precipitation, and in their flight trod each other to
pieces, as if the enemy did not make sufficient slaughter; the field
was filled with dead men and horses, whilst the few that could
escape took refuge in the city.'
Zosimus - The New History
29
HAIL CAESAR
BLUNDERS
We would suggest that anyone reading or playing for the first
time ignores the rules for blunders until they have a good
idea of how rhe game works. Indeed, players who abhor the
lack of control that often results from blundered orders are
entirely at liberty to ignore the following rule - no harm will
be done!
If a commander rolls a double 6 when giving an order this
signifies that the unit has gone out of control in some
fashion. We call this a blunder. Either an order has been
misunderstood or perhaps warriors are overcome by
exceptional eagerness or timidity. The consequences are
determined by making a test. Roll a dice and consult the
blunder table below. The result is the unit’s order for that
turn and the affected unit must endeavour to obey as best it
can. If a division has blundered the same result applies to all
the units given the original order. A unit in open order has
no defined front, so for these purposes assume its front is
the part of the unit closest to the enemy or the opposing
player’s table edge as seems most appropriate.
As you can see a blunder cannot override the rules that forbid
some units from charging others: for example, skirmishers are
not allowed to charge infantry in battle line formation. A
blunder can sometimes contradict a rule that otherwise obliges
troops to face their enemy. Similarly terrain, enemies, or the
position of friends may make it impossible to act as instructed.
In all these cases the unit will try and obey the instruction it
has been given in so far as it can, in the most direct and
straightforward manner, and to the umpire’s satisfaction.
Non-combatant units such as messengers, scouts, civilians
and baggage are not normally subject to blunders, but
umpires should feel free to improvise in such cases. There is
certainly no harm in rolling a few dice, contemplating the
score sagely, and remarking what awfully thirsty work all this
adjudication business is.
BLUNDER TABLE
1 Uncontrolled flight! The unit turns round to face its rear and then makes two full moves into its facing
quarter. The unit will move even further if necessary to clear the position of friends. Once it has moved, the
unit suffers 1 casualty to represent loss of life and equipment suffered during the ignominious stampede.
2 Back! The unit moves backwards one move to its rear quarter whilst continuing to face the same direction.
3 Drift left. The unit makes one move to its left quarter.
4 Drift right. The unit makes one move to its right quarter.
5 Forward! The unit makes one move to its front and will charge if facing enemy within one move’s distance
and which the unit is otherwise allowed to charge.
6 Uncontrolled Advance! The unit makes three moves to its front. The unit will charge if facing enemy
within three move’s distance and which the unit is otherwise allowed to charge.
Bronze Age warriors attack a lake-side settlement, somewhere in Northern Europe
30
----------:--------
COMMAND
INITIATIVE MOVES
Units that are within 12" of the enemy at the start of the
Command part of their turn are allowed to use their initiative
to move instead of receiving orders. This represents the
leaders of these units taking matters into their own hands or
acting according to some prearranged plan or signal. The
important thing to remember is units that move using their
initiative cannot also be given orders that turn - the two are
mutually exclusive.
All units wishing to move using their initiative must do so
before any orders are issued. Thus, during the Command
part of his turn, a player always moves units using initiative
first and then issues any orders for remaining troops as
required. In practice there is no need to be rigid about
applying this rule should a player prove forgetful, or where
the field is a large one and the action widely scattered.
However, in situations where the outcome of a move would
otherwise be affected it is important to stick to the proper
sequence and make all initiative moves before issuing orders:
for example, it would affect the normal course of game play if
an ordered move created a space that another unit was
subsequently able to move through on initiative.
We do not concern ourselves whether a unit can see the
enemy entitling it to an initiative move. For our purposes it is
enough that there is an enemy within 12" for the unit to use
its initiative. The umpire may override this principle in cases
that merit it; for example during ambushes where enemy are
lying ‘hidden’. All enemy units count for this purpose
including artillery, baggage and civilians, but enemy
commander models do not count. Commanders represent
individuals or small groups whose presence otherwise goes
unnoticed, and they are therefore ignored for purposes of
triggering initiative.
All units using initiative are considered to be automatically in
receipt of an order and can make one move. The player states
the order in the usual way before making the move.
Note that units are not obliged to use initiative just because
they are within 12" of the enemy. Units can always be issued
orders instead. Whether it is better to take the certainty of an
initiative move or go tor an order with its attendant risk of
failure is a matter of judgement tor our players. Much will
depend upon circumstances.
FREE MOVES
In some situations units are entitled to make one move even
though their order has failed as noted below, and assuming
they have not blundered. In some unusual situations units
may be entitled to a free move even where no order is issued.
• A unit in column formation moves once if it faits its order.
• All tiny units representing scouts, working parties, civilians
and such will move once if they fail their order.
• All baggage, carriages, wagons and such like will move once
if they fail their order so long as they are on a road or
track. In this instance wagons moving along a road are
treated as if they are columns.
• Some units have a special rule that entitles them to move
once when an order is failed. See the section A Selection
of Useful Rules on page 98 for more about these.
• Units from broken divisions can move once if they fail an
order or if no order is attempted. However, such units are
obliged to attempt to leave the battle where possible as
described in the section on Victory and Defeat (page 84).
A division order might encompass some units that are entitled
to a free mox’e and others that are not. In such a case those units
entitled to a free move can move as described whilst other units
cannot. For example, if a division consisted of a mix of units in
column and units in battle line then only the units in column
would get the free move. Bear in mind that if a division order
has been issued units must still remain within 6" as a group,
even where some units have a free move whilst others do not.
ORDERS TO UNITS IN COMBAT
Units that are engaged in combat, whether fighting or
supporting as described in the Hand'to-Hand Combat rules,
cannot be given orders and cannot use their initiative. They
must stay where they are whilst the combat continues. See
the Hand-to-Hand Combat rules on page 52.
Note that an exception is made to this rule as a special ability’ -
allowing some fast, highly mobile troops to move out of combat,
either feigning flight or taking advantage of their speed to
escape their enemy. See A Selection of Useful Rules on page 98.
31
HAIL CAESAR
DETERMINED MEN
The rerm ‘cataphract’ is often used to describe very
heavily armoured cavalry of the kind used by die
Parthians, Armenians, and later by the Persians. The
word itself is Greek and means something like
‘covered’ or ‘fenced’ - the same term can also describe
galleys that have their decks planked over, for example.
The original caraphracrs, such as rhe cavalry of rhe
Parthians who defeated the Romans at Carrhae in
53BC, wore armour that covered them from head-to-
toe and rode horse, likewise protected by metal
armour. Over time the term came to refer to almost
any armoured cavalry; for example, Late Roman and
Byzantines who wore relatively little armour and whose
horses were either unarmoured or only lightly so.
Having usurped the word ‘cataphract’ for armoured
cavalry in general, rhe old-fashioned very heavily
armoured cavalry became known to the Romans as
Clibanarii - especially as employed by their enemies
the Sassanid Persians. Ammianus describes the
Sassanid cavalry as follows:
“All the companies were clad in iron, and all parts
of their bodies were covered with thick plates, so
fitted that the stiff'joints conformed with those of
their limbs; and the forms of human faces were so
skilfully fitted to their heads, that since their entire
bod> uas covered with metal, arrows that fell upon
them could lodge only where they could see a little
through tiny openings opposite the pupil of the eye,
or where through the tip of their nose they were
able to get a little breath.”
4
J
Ammianus Marcellinus
ORDERS TO OFF-TABLE UNITS
There are two situations where units can be off the table hut
can still be given orders. These are: if the units began the battle
off table and are allowed to enter during the game; and, where
units are obliged to leave the tabic during the game for
whatever reason.
Units that begin the game ‘off-table’ are usually allowed to
enter at a point designated by the umpire or agreed by the
players before the game. Units that leave the table during play
can re-enter at the same point they left the battle unless they
are shaken, in which case they are gone for good and cannot
return. In both cases a unit’s first move is to place it on the
table edge and no more than 6" onto the table regardless of
its formation or usual speed of movement.
Orders are given to units that are off-table in the same way as
to units already on the table, except that the distance
between rhe commander and unit is always measured to the
designated entry point on the table edge. If the commander
is also off the table with his troops then he is assumed to be
within 12” of his whole division and no penalty is applied to
his leadership rating for distance.
Where a division or part of a division is being ordered
onto the battlefield all units are assumed to form a group,
and a single order can therefore be given to all the units
at once. Sometimes a division will be unable to deploy all
of its units at the same time because it’s impossible for
them to fit in the space available: for example, in the case
of a marching column of several units. In this case we
simply place the lead unit on the table and declare that the
rest of the units are deployed following behind. Those
following behind can move straight onto the field at their
full speed in subsequent turns so as to keep up with the
rest of the division.
DISORDERED UNITS AND ORDERS
There are various circumstances when a unit can become
disordered during the game. This represents a temporary loss
of formation and control. Disorder often follows from enemy
shooting, from hand-to-hand fighting, and sometimes as a
result of movement through other units or difficult terrain.
Disordered units are always indicated with a suitable marker
so their status is obvious to all. For more see Disorder on
page 74.
Units that are disordered cannot be given orders of any
kind in the Command part of the turn. Disordered units
cannot normally use their initiative to move either.
However, disordered units in open order formation can
use their initiative specifically to move away from or avoid
the enemy, or towards their own rear, table edge or
encampment where this is appropriate for units trying to
avoid their foe.
Units otherwise entitled to a free move cannot normally
make their free move if disordered. However, units from
broken divisions can and must attempt to leave the battlefield
even where disordered, as described in the rules for Victory
and Defeat on page 84.
32
MOVING UNITS
A unit in receipt of orders can potentially move up to three
rimes in a single turn depending upon the result of the test
when issuing orders. The total distance a unit moves during
the Command part of the turn therefore varies: for example,
an infantry unit could potentially move 18", a heavy cavalry
unit 27", and a light cavalry unit in open order 36".
Strictly speaking, if a unit is entitled to move three times
then it makes three separate and distinct moves - hut plainly
MOVING UNITS TABLE
Infantry, Elephants, Wagons and Baggage,
Man-portable Artillery, Cataphract Cavalry,
and Heavy Chariots. 6"
Light Chariots
and other formed Cavalry.
Light Cavalry in open
order and Horse Archers
12"
it would be rather tedious to demand that players move their
models three times where it is perfectly simply and sensible to
make all three moves at once. So, for most purposes an
infantry unit with three moves can be moved 18". However,
there will be situations where it is necessary to break moves
down, in which case it is usually sufficient for a player to
move a token base and then to reassemble the whole unit in
its final position.
The table to the left shows the standard move distances for
units in inches. This is generally very straightforward: less
mobile troops such as infantry, elephants, and baggage move
6" at a time, faster troops such as cavalry and light chariots
move 9", whilst light cavalry and horse archers in open order
are allowed a move of 12".
When a unit moves the individual models or bases are free
to move in any direction or orientation so long as the unit
retains the same formation as a whole and no model moves
further than the distance allowed (except where specifically
permitted in the rules, e.g. during a charge). This enables a
unit to swing about, to reverse its facing, move to its right or
left, move at an angle, go forwards or backwards, or make
any comparable manoeuvre the player might wish. This
rather free and easy method of moving is quite different to
many sets of gaming rules and can take some getting used to
- it is a ‘no nonsense’ method that gets the game moving at
a good lick!
33
PROXIMITY OF ENEMY
We impose a common-sense exception upon our free and easy
approach to movement that most players will tend to apply
instinctively. In most cases, once a unit has enemy within 12"
we oblige it to face the foe. We call this the proximity rule or 12"
rule. For purposes of explaining how this works we shall forget
about units in open order as various exceptions apply to them,
we shall only consider formed units in ‘proper’ formations.
The red unit is facing the enemv
unit in front of it - the enemy
unit is directly in front of the
unit’s centre-front position.
A unit is said to be facing its enemy if at least part of the
enemy unit lies directly in front of the unit’s centre-front or
leader position.
Once a unit is facing an enemy within 12", the unit can only
move either towards or away from the opposing unit whilst
continuing to face towards it. This obligation overrides - or
governs - any actual order the unit is given. This means that
units cannot attempt to move round an enemy or step sideways
in the face of the foe. The proximity rule obliges units to ‘face
off as the opposing armies close upon each other.
If a unit is not facing an enemy as described above, but has
enemy within 12" and to the front, even if only partially so,
then the unit must face towards an enemy within no more
than three moves distance as it moves. For example, an
infantry unit must face towards an enemy within 18", and a
heavy cavalry unit must face towards an enemy within 27".
daily to its front. Red must therefore face an enemv when he moves. He
can face any of the units opposing him, even though the two distant en-
emies are more than 12” away (but within 18"). If red moves so that he is
facing any of the enemy units within 12", he is then obliged to mow to-
wards or away from that unit as already noted.
We make a general exception for enemy commanders,
artillery, tiny units, non-combatant units including wagons
and baggage, and units in fortifications or buildings. None of
these enemy units count for the proximity rule for reasons
that should be self-evident.
PROXIMITY AND OPEN ORDER TROOPS
Units in other formations can choose to ignore enemies in
open order when it comes to the proximity rule. If a unit
chooses to ignore open order troops that are ‘masking’
another enemy, then the unit must take account of the
masked enemy as if the open order troops were not there. For
example, just because it is acceptable to ignore a skirmisher
screen does not mean you can ignore the huge hoplite
formation advancing behind it!
Units in open order are not affected by the proximity of
enemy unless there are enemy within 6" of any part of the
unit. Whilst there are enemy within 6", open order troops
can only move either towards the closest enemy or away from
the closest enemy whilst facing the opposing unit. No other
rules regarding proximity apply to units in open order.
MOVING THROUGH ENEMIES
AND COMBATS
Units are not allowed to move through opposing units
although they can move over opposing commanders freely.
Commanders moved over in this way are obliged to move as
described in the section on Commanders on page 80.
Units cannot normally move through friends if they are
engaged in hand-to-hand combat, but are allowed to do so
if moving to join the engagement either as supports or by
charging. This exception is necessary to allow for multiple
charges in some situations, see Charging Two On One on
page 58.
34
COMMAND
MOVING THROUGH
FRIENDLY UNITS
.Aside from units engaged in hand-to-hand combat as noted
above, units from rhe same side can move through each other
w here it is possible for the moving unit to completely clear the
position of the unit or units moved through. It does not
matter whether it takes one, two or three moves to clear the
position of friends, so long as their position is cleared once the
unit has finished its movement. If it is not possible for a unit
to clear a friend in this way then it may not move through.
Note that it is harder for deep units such as warbands and
phalanx to move through friends, as two or three moves will
often be required to clear their position, and we do not hold
this to be unreasonable.
ROOM TO FIGHT
Ancient warriors fought in fairly dense ranks - if not
quite shoulder-to-shoulder then certainly pretty close.
In fact, they fought with almost exactly the same
spacing of ranks and files as did all troops right up
until rigid formations were finally abandoned by
modern armies at the end of the nineteenth century.
Perhaps this is not surprising - as the need to
manoeuvre troops on rhe battlefield and the size of the
human body would be more-or-less the same. Similarly,
whether armed with a spear or a musket and bayonet, a
man needs about the same room to fight. This is what
Asclepiodotus has to say upon the matter:
4
Units can move through friends without penalty if either unit
is skirmishers or other infantry in open order, or if both units
are light cavalry, light chariots or horse archers in open order.
Other units can also move through friends without penalty if
•nly a minor portion of both units is moved through. This is
generally determined as shown below, although unusual and
marginal cases will obviously attract the judgement of the
umpire. Where a unit can move through another without the
centre-front position of either unit passing over the other then
no penalty is applied.
.•
i
Left - these two units can pass through as shown without penalty -
the centre-front ‘leader* position’ of both units its not touched as
the rear unit moves through. Right - these two units can pass
through as shown but both must take a test and risk becoming
disordered.
If the centre-front position of either unit moves over the
other then it will be necessary to test for both units to
determine if they become disordered as a result. Roll a
dice for each unit. If the result is a 4, 5 or 6 the unit
retains good order and there is no
penalty. If the result is a 1, 2 or 3 the
unit becomes disordered.
Disordered units suffer penalties for
ranged attacks and in hand-to-hand
combat, and any disordered unit that
has not already moved will be unable to
do so. Disorder does not usually affect
units from turn to turn unless they are
engaged in combat, so this is not an
insufferable penalty in most situations.
See page 74 for more about disorder
'The needs of warfare have brought forth three
systems of intervals: the most open order (araiotatos),
in which the men are spaced both in length and
depth four cubits apart, the most compact
(pyknotatos), in which with locked shield
(synaspiskos) each man is a cubit distant on all sides
from his comrades, and the intermediate (messon),
also called a 'compact formation' (pyknosis), in
which they are distant two cubits from one another
on all sides.’
Asclepiodotus (4.1) Loeb translation
- quoted in Hellenistic Infantry Reform
in the 160's BC by Nicholas Sekunda.
A cubit is equivalent to about one and a half feet or
eighteen inches - that’s 45 cm for those who are
metrically inclined - or the distance from a man’s
elbow to his fingertips (try it!). There were slightly
different standards for the cubit in different places and
at different rimes - leading to some lively discussions
amongst academics about the size of Noah’s Ark and
the length of a Macedonian sarissa - amongst other
things. Blissfully unaware of these future conundrums
Asclepiodotus goes on to add:
‘I have stated that of the two spacings the one of two
cubits is called pyknosis and the one of a single cubit
synaspismos. The former is used when we are
marching the phalanx upon the enemy, the latter
when the enemy is marching upon us.’
Asclepiodotus (4.3)
1
I
1
Ceremonial Bronze axe head с. 900BC Iran
(Perry Collection)
35
HAIL CAESAR
MANHANDLING ARTILLERY
Artillery can range in size from the smallest man-portable
bolt-throwing machines to huge static siege engines. Here
we are concerned only with mobile field artillery of
different kinds.
The lightest types of man-portable machines move at infantry
rates - i.e. at 6м per move. A machine of this kind can move
once in the Command part of the turn and still shoot in the
Ranged Arracks part of the turn. If a machine moves more
than once it cannot also shoot that turn.
Heavier types of field machine can still be carried by their
crew and, in some cases, have wheels to enable them to move
more easily. Such machines can only move once in any
Command part of the rum and cannot move and shoot in
the same turn.
FORMATION CHANGES
Formation changes must be stated when giving orders and it
is necessary to do so even where a formation change would
be obligatory to fulfil an order. For example, a heavy infantry
unit would have to form into open order to enter a wood.
A formation change takes an entire move except in the case
of skirmishers, light infantry, light cavalry, horse archers and
light chariots. In these cases a unit can change formation to
or from open order and then move counting this as a single
move in all. However, these units are not allowed to change
formation in this way and charge as a single move, their move
must be a non-charge move. See Charge Moves page 54 for
more about charge moves.
A unit can only make one formation change in each
Command part of the turn. No matter how many moves a
unit has, it can only make one formation change. For
example, a heavy infantry unit with three moves could not
adopt open order, move through a wood, and form a battle
line all in the same turn.
SQUARES
Squares are essentially static defensive formations. A square
cannot move and the only order it can be given is to change
formation. A square cannot change to another formation and
move further that turn. Regardless of the number of moves a
square is allowed it can only change formation.
UNITS LEAVING THE TABLE
Units can leave the table in several circumstances, most
commonly following a blunder or as a result of a break test.
A unit is adjudged to have left the table once any models pass
the boundaries of the tabletop or playing area, or if a model
would otherwise ‘fall off the edge’ having completed its
move. Such units are removed at once, but can potentially
return to the battle as already described (see page 32)
Note that a unit cannot return to the battlefield if it is
shaken or if it belongs to a broken division. Units become
shaken once they have casualty* markers equal to their
stamina value as described later. Such units always retire from
the battlefield for good once they leave the table. Divisions
become broken once a proportion of their units are
destroyed or deemed lost as described under Victory and
Defeat (page 84).
COMMANDERS
Commander models are treated a little differently from
units of troops. Commanders are ignored for purposes of
determining initiative, proximity of enemy, when calculating
targets for ranged attacks, and in other circumstances as
described throughout the rules. Commanders can move
through units from their own side freely unless they are
engaged in combat, and similarly units can move through
their own side’s commanders as they wish. If a unit ends its
move on top of a friendly commander then the commander
model is moved sufficiently far to allow the unit to take up
its position.
A commander who is moved into by an enemy unit must
immediately join a friendly unit within a move’s distance -
otherwise he is deemed to have been captured, and is
removed as a casualty. Note that commanders cannot force
enemy commanders to move in this fashion - only units can
do so. See page 82 Risk to Commanders.
MOVING COMMANDERS
Each commander is allowed to make one move as soon as he
has completed issuing any orders that turn, or once all orders
have been issued if he has not moved already. There is no
need to be strict about this rule - it is included to help
players remember to move their commanders rather that to
penalise those who forget! Commanders do not require
orders to move - they move automatically.
All commanders move 24" regardless of whether or how
they are mounted. We assume that commanders riding
horses, chariots or elephants have the sense to dismount
where necessary and so impose no restriction upon them in
respect to terrain and their mounts (see Terrain page 38).
Players may wish to provide both foot and mounted models
to represent their commanders to avoid the insensitive
spectacle of chariots plunging through woodlands, elephants
standing upon ramparts, and other incongruous situations
of that kind.
A commander can join a unit in his division by moving
into touch with it. The player should also declare that the
commander has joined the unit for clarity’s sake and
position him in the unit’s formation if this is practical.
Once a commander has joined a unit he becomes a
constituent part of and moves along with it until the start
of his following turn.
Commanders are also allowed to join friendly units that arc
fighting in hand-to-hand combat within 12”. It does not
matter which side’s turn it is, but commanders must join the
combat before any troops fight - they are not allowed to join
half-way through. For this and more about commanders see
the separate section Commanders on page 80.
36
TERRAIf
To complete our rules for movement we shall deal with
battlefield terrain of various kinds.
We usually agree upon the rules for different kinds of terrain
before the battle, or the umpire or player who has devised the
scenario will work out the rules for terrain at the same time.
So, we quite commonly improvise the rules as suits our
purposes and expect others will wish to do the same.
Summaries of the rules we have found most useful and
practical are given here.
WOODS
By woods we mean areas designated as being reasonable
dense woodland or forest and covering an area that justifies
representation on the tabletop. The boundaries of our
miniature wood need to be delineated in some fashion: for
example, by a row of tree models or by a scenic base covering
the entire wooded area. Individual model trees can be
positioned within this area to stand in for the mass of trees
and tangled undergrowth that practicality dictates must
otherwise lx? left to our imagination.
It is usual to assume that woodland can’t be seen through or
into by our troops, apart from those positioned along the edges
who can see out and who can likewise be seen. We often allow
for troops to lie in hiding at the edge of woods, in which case
they remain unseen until they move or until the enemy
approach within a specified distance, but such matters are up to
the players or umpire to determine as part of the game scenario.
Infantry in open order, cavalry in open order, commanders or
other models representing individuals can move through
w’oods. Other troops cannot move through woods at all. The
movement of cavalry in woods is reduced to infantry speed -
i.e. 6" per move - for each move that begins within the wood.
Players are at liberty to run roads or tracks through w'oods if
they wish - in w’hich case movement via road is treated as
completely accessible if preferred. Make sure this is clear at
the start of the game.
ROUGH GROUND
This covers all manner of broken or difficult ground
including scrub, marshes, soft sand, steep or rocky slopes,
areas of ruinous or tumbled down building, and heavily
irrigated or flooded fields. Such areas need to be designated
in some fashion: for example, by arranging appropriate scenic
features to mark a boundary.
Apart from infantry in open order, cavalry in open order, and
commanders and other individuals, units moving over rough
ground are restricted to a maximum of one move. A unit
moving into rough ground completes its move and moves no
tw, w\\\\st \h\\v \t\ тсл.\у\\ yjouvuX
limited to a maximum of one move. Open order infantry and
open order cavalry can make up to three moves as usual.
As with woods, players are at liberty’ to run roads or tracks
through rough ground if desired, in which case movement will
be via road or treated as completely accessible if preferred.
LINEAR OBSTACLES
A battlefield might include any number of fences, ditches,
boundary walls, streams, narrow’ rivers and such-like, and on the
w hole we simply treat these as decorative or use them to
delineate rhe boundaries of rough ground, settlements or
fortifications. On occasions we w’ill want to attach some
significance to a dried up stream or riverbed, wall, or some such
feature, in w hich case w’e have found the following rules useful.
Infantry in open order, cavalry in open order, and commanders
or other individuals can cross linear obstacles without penalty to
their movement. All other units can cross an obstacle giving up
one entire move. So, with one move a unit can move up to the
obstacle without crossing, in the second turn the unit
surrenders a move and moves whatever distance is required to
cross the obstacle, in the third turn the unit continues moving.
Alternatively, where they are substantial, obstacles can be
judged to be impassable to chariots, wagons and w'heeled
vehicles of all kinds except by gates or gaps. This is up to the
38
____________________________________________________________
—. ..............
umpire to determine prior to the game - or by dice roll
during the game should he be feeling mischievous.
RIVERS
It a river is of such width that it can be crossed by infantry in
a single move, then it is best treated as a linear obstacle.
Otherwise rivers can be assumed to be either completely
impassable, or fordable along their whole length, or crossable
only at designated fording or bridging points.
Where a river is fordable it is necessary to represent the
fording point and to decide whether the ford can be crossed
by a unit in battle line formation or whether it will be
necessary to form column. On the whole we find it best to
assume fords are wide enough to allow a unit to cross without
restricting its formation.
Any unit can cross a river at a bridge. The width of the bridge
will naturally restrict the formation of the unit to a column -
though for gaming purposes it is often easier to simply
assume a unit can cross in any formation so long as the front
centre/leader model moves over the bridge itself. We leave
this up to the players to arrange as convenient.
BUILDINGS
It is usual to represent farmsteads, settlements and forts by
means of either a single large model building, or by a roughly
rectangular group of smaller buildings and yards covering an
equivalent area. The total area must be sufficient to allow an
infantry unit to be placed inside with a little room to spare,
up to a maximum size of about 12” x 12". The size can be
reduced or increased if you wish to use units that are
substantially smaller or larger than those described in our
game. Larger settlements and fortifications can be
represented by several such ‘building blocks’ placed together
or next to each other, or designated as able to hold two, three
or more units and correspondingly bigger. Conversely small
forts and watchtowers may be designated as capable of
holding only tiny or small units.
At the start of the game it is a good idea to make sure the
extent of all farmstead, settlement or fort areas is clear and
understood, as such areas are likely to play a major role in the
game. The edges of a settlement can be partially defined by
walls, barricades or similar barriers, in which case they serve
only to indicate the edge of the building and are not treated
as obstacles as described above.
Only infantry can enter or assault buildings, except that
artillery pieces can be included as part of a building’s defence
if set up at the start of the game. Aside from a light artillery
bolt-thrower, artillery deployed in this way cannot be moved
during the game. A single building block can hold one unit
of infantry, plus up to one tiny unit of infantry, and up to
one artillery unit with crew. We assume troops take up a
position around the perimeter, within houses, outbuildings
and so forth. For this reason troops occupying a building
don’t have a specific formation in the game, and artillery
pieces can be mixed amongst troops to cover more than one
direction if required.
To enter an unoccupied building a unit moves into touch
with the perimeter and then expends one full move to move
inside. Once a unit moves into a building its movement
automatically ends for the turn. A unit cannot move into a
building and then continue moving out the other side. If a
unit reaches the perimeter but does not have a move
remaining then it cannot enter. Once the unit moves inside
the models are arranged within the designated area as rhe
player wishes. It doesn’t matter that the unit has no
formation or that the models become separated. The models
simply serve to indicate the building is occupied. Don’t
worry if there isn’t quite room for all the models, rather than
risk damage by cramming figures together just leave some off
the table
To leave a building one move is required. Begin by declaring
the unit is leaving the building, then measure a normal move
from the edge of the building and place the unit’s leader
model on that spot. The rest of the unit is then arranged
into a suitable formation around its leader. A unit leaving a
building in this way can make up to three moves if issued
orders, but the first move is always to leave the building and
reform in the manner described. This first move can be a
charge if enemy are within reach.
On occasions we will specify that troops can only enter or leave
a building at particular points - usually rhe gateways of forts or
fortified settlements. Once again this is up to the players to
arrange as best suits the model buildings and the circumstance
of the battle.
IMPASSABLE TERRAIN
Before the start of the game players can agree to treat any
terrain features as impassable if that seems appropriate. A
scenario might sometimes specify that some terrain is
impassable. Features that are typically represented in this way
are very steep gullies or ravines, cliffs, and open water -
unless you plan on staging an amphibious operation of
course. Buildings can also be treated in this way if they are
essentially decorative and you don’t want troops to occupy
them during a game.
EMBELLISHING THE TABLETOP
As you can see from the accompanying photographs we do
very much enjoy creating a scene for our warriors to fight
over. A scatter of lone trees, winding tracks, low hedges,
growing crops, farmyard carts, grazing cattle, locals going
about their business - all such things help to create a sense of
occasion. There is no need for such decorative features to
hinder the movement of troops in any way. Indeed, we do not
consider it unreasonable for the odd tree, farmyard animal or
curious spectator to wander a few inches as necessitated by
military manoeuvres.
39
RANGED ATTACKS
The term ranged attacks serves to describe all combat that
takes place at range including skirmishing. It therefore covers
missile fire from bows and slings, thrown javelins or spears,
and - in some cases - a combination of thrown missiles and
individual combat.
SHORT AND LONG
RANGED ATTACKS
We divide ranged attacks into two types with two separate
values: short range attacks and long range attacks. The short
range attack value is used for targets up to 6” distant. The long
range attack value is used against targets more than 6" away.
Many units have a short ranged attack that represents
thrown weapons such as javelins, light spears and weighted
darts. In appropriate cases, the short range attack value also
represents individual warriors, or small parties, skirmishing
to the front of a unit’s position.
Long range attacks represent shooting by bows, crossbows,
slings and various kinds of artillery. If troops have long
ranged attacks their short ranged attacks value represents
shooting at close range using the same weapons.
WHO CAN MAKE
RANGED ATTACKS?
Units with a Ranged Attack Value can make ranged attacks and
they commonly do so during the Ranged Attack part of their
rum after Command and before Hand-to-Hand Combat.
Formed units automatically make all of their attacks against
the closest visible enemy to their front quarter and within
range. Units in open order count their entire perimeter as
‘front’ and therefore make their attacks against the closest
visible target regardless of direction. If two or more enemy are
equally close then attacks are divided as equally as possible, or
as seems most equitable. See page 23 for explanation of unit
facing, page 25 for more about visibility and page 48 for
further details on open order ranged attacks.
Units are not allowed to make ranged attacks if they are
already engaged in hand-to-hand fighting. Note that units are
considered engaged whether they are supporting or fighting
combat as defined in the section on Hand-to-Hand Combat
(page 52).
Units armed with long-ranged weapons can sometimes shoot
in the opposing side’s turn, or at other points in rhe game, by
means of closing and traversing shots. Closing and traversing
shots allow' for units to shoot where common sense dictates
they should be able to do so: for example, at an enemy
charging towards them.
RANGE
All short ranged attacks have a maximum range of 6”
w hether they are made by thrown weapons such as javelins or
by warriors dashing forwards of their positions to hurl spears
or exchange blows with the enemy. Long ranged attacks vary
depending upon the weapon used as indicated on the
following table.
RANGE
Javelins, Darts and other thrown weapons 6”
Bow’s, Crossbows and Staffslings 18”
Slings 12"
Light Artillery 24"
Medium Artillery 36"
Heavy Artillery 48"
We have allotted a tactical range relative to the movement
distances in the game allowing what we feel to be appropriate
opportunities for shooting. For these purposes we rarely find
any benefit in differentiating between different kinds of
bows - for example - although that option always remains
available of course. Where such differences reflect genuine
historical advantages to one side or the other we would
happily adjust the ranges accordingly and suggest that others
do the same.
MEASURE DISTANCE
For formed units, the distance to the target is measured from
the unit’s centre-front or leader model to the closest visible
part of the target unit. It doesn’t matter w'hether other parts of
rhe unit are in range or nor, distance is always measured from
the base edge of the leader model to the nearest base edge in
the target unit. If the target is found to be within range then
the w'hole unit is adjudged to be within range and can shoot.
Units in open order measure the range from the closest
model to the closest part of the target. See Ranged Attacks
and Open Order on page 48.
40
THE BATTLE OF CANNAE
By rhe time the Carthaginians faced rhe Roman legions at the
Battle of Cannae they had met and defeated the Romans
twice already. After their victory at Trasimene, the vast
quantity of arms and armour taken as spoils had been
sufficient to re-equip Hannibal’s army. Livy reports the
Carthaginians’ appearance so:
To look at them, one might have thought the Africans
were Roman soldiers - their arms were mostly Roman,
having been part of the spoils at Trasimene, and some,
too, at the Trehia.
The battle itself is often described as Hannibal’s masterpiece,
serving as a model of warfare that has been copied by other
commanders right up until today. Recognising the strength of
rhe Roman legions Hannibal deployed with his weaker troops
- Gauls and Spaniards - in the centre of his army. These were
arranged in a crescent shape bulging outwards in the middle.
At rhe tips of the crescent Hannibal placed his strongest
African infantry and beyond those his cavalry. Although the
Roman army had the greater numbers overall, the
1
j
Carthaginians had the most and strongest cavalry. As the
Romans came on they met the Gauls and Spaniards, and soon
pushed into their ranks so that the Carthaginian centre was
first flattened into line with the w’ings and then pushed
beyond them. Hannibal encouraged his centre to give ground
until the Romans had passed the Africans, at which point the
trap was sprung and the Africans fell upon the Romans’ flank
and rear. Livy describes the attack upon the Roman centre:
Recklessly ike Romans charged straight into it, and the
A unit can engage an enemy to its front quarter and within range.
NOMINATE TARGET
Formed units are obliged to direct their ranged attacks
against the closest enemy unit to their front quarter
measuring from the centre-front or leader model position.
Units in open order direct their ranged attacks against the
closest enemy regardless of direction as noted later (page 48).
Players are not usually in a position to ‘pick’ a target as such,
but there are situations where players are allowed to divide
their attacks as described below.
Units in hand-to-hand combat are not eligible as targets
whether they are fighting or supporting. Such units are
ignored when it comes to working out ranged attacks,
excepting that they can in some cases block line-of-sight to
other targets.
A formed unit makes ranged attacks to its front quarter as
shown on the diagram below. Note that as range is
measured from the centre-front of the unit, the area covered
by a unit’s ranged attacks will have a shape something like
that shown here, with a greater projection towards the
centre of the unit.
In most cases a unit must direct its ranged attacks to a closer
enemy in preference to a more distant one. Occasionally a
number of enemy may be equally close - or as near as the
players feel makes no difference - in which case it is usual to
divide the number of attacks between the two as near
equally as possible.
41
HAIL CAESAR _
HANNIBAL'S
DEPARTURE FROM
ITALY
After the battle of Cannae the people of Rome awaited
the appearance of Hannibal and his army - for surely
nothing now could prevent the Carthaginian general
from advancing upon the capital. Yer he did nor. For
whatever reason he chose to rest his troops - and rhe
moment was lost. Livy puts these words into the mouth
of Hannibal’s cavalry commander Maherbal.
Assuredly, no one man has been blessed with all
God’s gifts. You know, Hannibal, how to conquer,
but you do not know how to use your victory.
Ah - if only! Whether or not Hannibal really had
much choice in the matter is a moot question. His
army had taken a bartering and was in no position to
undertake a siege of Rome whilst much of the
surrounding land still lay in Roman hands. The
Romans, meanwhile, had learned a thing or two and
never gave him another chance to flaunt his
generalship on Roman territory. Soon Hannibal was
leaving Italy to defend Carthage in Africa where he
. would meet defeat at Zama. This is how Livy describes
his departure.
Seldom, we are told, has any exile left his
native land with so heavy a heart as that of
Hannibal when he left the country of his
enemies. Again and again he looked back at
the shores of Italy, accusing gods and men
and calling down curses upon his own head
for not having led his armies straight to Rome
when they were still bloody from the
victorious field of Cannae.
CHOICE OF TARGETS
There are some situations where we allow a choice of targets,
and these are mostly common-sense situations where to do
otherwise seems pedantic or petty. In all these cases we
maintain that the closest enemy is either partly obscured or
otherwise not a clear target of attack. Attacks against such
units are made with a penally’ to the dice roll, so it might be
better to choose a more distant but clear target instead.
If a unit is partly obscured or otherwise not a clear target
then it can be ignored in favour of the closest unit that
presents a clear target of attack. The following are all units
that are not considered clear targets.
• Units in open order formation.
• Artillery units.
• Wagons, carts, baggage and such like.
• Units that are only partly within the attacker’s front arc
as shown below.
• Units that are only partly in the attacker’s sight as shown
below*.
• Units occupying buildings or cover.
• Units that can only be seen through narrow gaps as
shown below.
Here the closest enemy is a unit in open order, which can therefore be
ignored in favour of the more distant unit beyond. Remember that
line of sight is calculated from the attacking unit’s centre-front posi-
tion so the new target must be clearly visible as in the situation here.
Here the closest enemy is partly outside the unit’s front quarter. If less
than half the enemy unit lies within the attacker’s front quarter then
it can be ignored in favour of the more distant unit beyond. The fact
\ that the distant unit \ies part\y out oi range doesn t matter - range is
always measured from the centre-front of the attacker to the closest
part of the target.
42
RANGED ATTACKS
In this situation the closest
enemy is partly behind a
wood. If less than half the
target is visible, the unit is
not a clear target and can be
ignored. In the example the
target is not a clear target
and can be ignored in
favour of the more distant
but fully visible target.
In this situation the closest
enemy unit is partly behind
a friendly unit and less than
half is visible as a result.
The target is therefore
not a clear target and can
be ignored in favour of
rhe more distant but fully
visible target.
Sometimes an enemy will be visible only through a gap
between other units or terrain features. Where a gap is at
least as wide as the unit’s own formation then no penalties
are applied. If a gap is narrower than the unit’s formation
then we apply a penalty for an obscured target (-1 to hit) and
the number of attacks is reduced in rough proportion of the
unit’s frontage relative to the gap. For example, if the gap is
equivalent to a third of the unit’s frontage then its attacks are
reduced to a third also.
In the case of artillery units, a gap must be at least 3” wide
to shoot through at all, but otherwise the same guidelines
apply. We impose this minimum because artillery units
are often relatively narrow and it is important not to
confer too great an advantage when it comes to shooting
through gaps.
As always we defer to the common sense of the umpire in all
cases where a shot looks a bit marginal.
Here the closest enemy-
unit has taken up position
in a farmhouse - units
occupying buildings and
comparable cover are not
clear targets. In this case
the unit occupying the
farmhouse can be ignored in
favour of the more distant
but fully visible target.
In this situation the archers at the bottom of the diagram wish to shoot
at the enemy in front of them. The gap between the friendly unit to
their left and the wood to their right is slightly less that the unit’s own
frontage so a dice penalty' is incurred because the target is obscured. As
the gap is only just narrower than the unit itself no penalty is applied
to the number of shots allowed.
Infantry formed the backbone of most northern European armies during the Dark Ages
43
HAIL CAESAR_____________________________________
ATTACK
As many ranged attacks and all long ranged attacks are due
to shooting we’ll sometimes refer to such attacks as ‘shots’
and attackers as ‘shooters’, but bear in mind that short range
attacks are not always down to shooting but can include
skirmishing in a broad sense.
Dice are rolled to work out the effects of a unit’s ranged
attacks. The number of dice rolled equals the unit’s Short
Ranged Attacks value ar up to 6" and the unit’s Long Ranged
Attacks value at ranges of greater than 6”.
Roll the appropriate number of dice. Any dice scoring 4, 5 or
6 indicate that the attackers have inflicted a hit on their
target. For example, three dice scoring 1, 5 and 6=2 hits; 4,
5 and 5 = 3 hits; and 2, 3 and 3 = 0 hits.
In addition - except as noted below - if any of the dice
rolled score a 6, then the target must take a break test once
any casualties have been calculated. The rules for conducting
this test are given on page 72. If the score required to hit is 6
then a break test is only required if two or more 6s are
rolled. These 6s can be from the same or different units.
UNIT SIZE MODIFIERS FOR RANGED ATTACKS
Ranged Attack Value Unit Size Modifiers
+1 Dice Large Unit. The
attackers are a large unit.
-1 Dice Small Unit. The
attackers are a small unit.
I Dice Tiny Unit. Tiny units
roll only one dice -
their Range Attack
Value is always 1.
If the unit is a tiny, small or large unit by the standards
already discussed, then the indicated adjustments are made
to the unit’s fighting qualities. These adjustments are
generally made when calculating the unit’s fighting qualities
in the first place, and are already included in the statistics for
example units as given elsewhere in this book.
Units in column, testudo or square formations, or occupying
buildings can only make ranged attacks in a very limited way.
In these cases ranged attack values are automatically reduced
as shown below. Such formations are not ideal for shooting
or skirmishing, but sometimes troops are obliged to do the
best they can.
FORMATION MODIFIERS FOR RANGED ATTACKS
Ranged Attack Value Formation Modifiers
None Column or Testudo.
Units in column or
testudo cannot make
ranged attacks.
1 Dice Square. Attacks in square
are limited to a maximum
of one dice only.
2/face Buildings. Units
occupying buildings are
limited to a maximum
of two dice from any face
up to their ranged attacks
value in total - see the
rules for buildings.
In some situations it becomes easier or harder to score a hit.
This is represented by adding or subtracting to the dice rolls as
noted. For example, if shooters are disordered they suffer a
penalty of -1 and therefore require scores of 5 or 6 to score a
hit rather than 4, 5 or 6. Regardless of these modifiers, a roll
of 6 always scores a hit, whilst a roll of 1 always misses. There
is no such thing as an automatic hit or miss.
QUALITY AND QUANTITY
The highest principle of the Byzantine art of war, as
the Strategikon makes clear, was economy of force.
i
$
“A ship cannot cross the sea without a helmsman,
nor can one defeat an enemy without tactics and
strategy. With these and the aid of God it is possible
to overcome not only an enemy force of equal strength
but even one greatly superior in numbers. For it is not
true, as some inexperienced people believe, that wars
are decided by courage and numbers of troops, but...
by tactics and generalship and our concern should be
with these rather than [with] wasting our time
mobilizing large numbers of troops.”
Bronze sheild decoration. Middle East с. 1200BC Iran
(Perry Collection)
44
RANGED ATTACKS
‘TO HIT' MODIFIERS FOR RANGED ATTACKS
Dice Score Situation
- 1 Attackers are shaken and/or disordered. This applies if the attacking unit is either shaken, disordered,
or both. These states are explained in due course and affect units in various deleterious ways.
- 1 The target is partly obscured, in open order, artillery’ or baggage. This applies if the target is partly
obscured as already explained, or in open order, or artillery or wagons and other baggage. Note that
these are the same conditions for ignoring the closest target as described on page 42.
- 1 The target is formed heavy infantry being attacked by enemy to their front quarter, or formed
cataphract cavalry regardless of the direction of attack. This applies to heavily armoured targets
and, in the case of heavy infantry, applies only when attacked from the front due to their shields and
tight formation. Note that some unusual formations count as front all round in which case the penalty
applies all round too, for example the testudo as described on page 105.
- 1 Closing Shots. This applies to units shooting at enemies as they charge home as described for
Closing Shots page 48.
- 1 Traversing Shots. This applies to units shooting at enemies as they traverse their front as described
for Traversing Shots page 50.
- 1 Long Range Shots. This applies to all shots ar ranges of over 12".
45
HAIL CAESAR___________________________________-_______._
Auxiliaries lead the assault as legionary cohorts pour from their encampment to join the battle
MORALE SAVES
Every unit has a Morale value as part of its fighting qualities.
This value is a measure of a unit’s ability to stand firm in the
face of ranged attacks or hand-to-hand fighting. It is both a
measure of our troops’ resolve as well as their physical
protection. Morale therefore reflects how heavily armoured
the unit is as well as how determined. The two factors often
go together for obvious reasons: troops lacking armour are
both more likely to suffer casualties and less inclined to
stand up to their enemy. As the value is a composite of
factors, there may be troops who are well-armoured but still
have relatively poor morale, or troops that are less well-
armoured but whose morale is extraordinarily good for
other reasons.
Morale values vary from one ty’pe of troops to another, and a
list of standard types can be found under Troop Types on
page 86. Standard values vary from 4+ (good), to 5+ (average),
6+ (poor) and 0 (heaven help us!).
To test morale, a player rolls one dice for each hit inflicted
on his unit. So, if a unit has suffered three hits the player
rolls three dice, and so on. If a dice scores equal to or better
than the unit’s morale value then that hit is disregarded or
‘saved*. Dice scoring less than the unit’s morale value
indicate that the hit is not saved and a casualty is inflicted.
For this reason we commonly refer to morale checks as
‘morale saves’ or just as ‘saves’, i.e. the test is made to see if
you can save your unit from taking casualties.
Casualties inflicted on a unit must be recorded, usually by
means of a marker placed beside or behind the unit itself.
See Casualties on page 48.
If a unit is attacked by two or more enemies, it is often
convenient to roll all the attacks in one go and then roll all the
saves at once. However, bear in mind that different modifiers
can apply in which case it will be necessary to either roll
separate batches of dice or use different coloured dice to
differentiate between these attacks. Where there is any room
for confusion it is always clearer to roll tor each attacking unit
separately.
For example: a unit has a morale save of 5+ and suffers
three hits from enemy bow fire. Three dice are rolled
scoring 4, 5 and 6. The roll of a 4 is a fail and the rolls of 5
and 6 are both successes - so two hits are saved and one
casualty inflicted.
46
• ...
_____________________________________________________RANGED ATTACKS
There are some situations where we allow a modifier to the
_nit’s morale save as noted on the table below. These
~ difiers allow for a greater chance of saving for units that
-ave adopted defensive positions or formations, but reduce
rhe chance of saving for units that are in column and
unprepared for combat. Modifiers are applied to the dice
score rolled, but note that no penalty can reduce a save to
worse than 6 if it starred out as 6 or better, and no bonus can
improve a save to better than 2+. In other words, a roll of 1 is
a failed save regardless, and troops that start off with a save
always save on at least a 6. Troops that have no morale save
still benefit from positive modifiers: for example, with a +1
bonus a morale value of 0 becomes 6, with a +2 it becomes
5+, and so on.
If a unit is only partly within cover, then consider what
proportion of the target appears to be within cover from the
attackers perspective, and allow the bonus to the same
proportion of dice throws in so far as possible. For example,
if about half the unit is behind cover then allow the bonus to
about half the dice throws. We normally err on the side of
the player throwing the dice when it comes to making these
calls, but players can adopt whatever convention they prefer
when deciding such things.
MORALE SAVE MODIFIERS
Dice Score Situation
+1 Square or Wedge. Troops in square or wedge formation derive extra protection from their
overlapping shields, whilst their close mass makes it practically impossible for individuals to shy
from the fight. Add +1 to the morale value of such troops.
+ 1 Cover. The unit is within woodland, behind hedgerows or low walls, or in other situations where
it is felt it should rightly benefit from the physical protection and reassurance of cover. Add +1 to
the morale value of such troops.
+2 Testudo. Troops in testudo formation derive extra protection from their overlapping shields and
the rigidity’ of their ranks prevents flight. Add +2 to the morale value of such troops.
+2 Buildings. If a unit is occupying a substantial building it benefits further from cover. Add +2 to the
morale value of such troops.
+3 Fortification. If a unit is sheltering behind even more considerable fortifications it will be protected
from missile fire. Add +3 to the morale value of such troops.
- 1 Hit by Light Artillery. If a unit is hit by light artillery then deduct -1 from its morale value to
represent both the penetrating power and demoralising effect of artillery fire.
- 2 Hit by Medium or Heavy Artillery. If a unit is hit by medium or heavy artillery’ then deduct -2 from
its morale value to represent both the penetrating power and demoralising effect of artillery fire.
• 2 Column. If a unit is attacked whilst in column formation it is unprepared for combat and will
quickly fall into disarray. To represent this deduct -2 from the morale value of such troops.
Ancient Briton armies included a fair number of slingers. Piles of sling stones were found, ready to use, by archeologists
excavating the remains of Maiden Castle, Dorset
HAIL CAESAR
CASUALTIES
Casualties represent men killed or wounded as well as other
factors that affect a unit’s ability to fight, such as exhaustion
and loss of nerve. Casualties can be recorded in any fashion
the players wish, but our preferred method is to use markers.
For each casualty taken place a casualty marker besides or
behind the unit. Models of dead or dying combatants make
the most pleasing markers. We sometimes resort to using
shields as more practical where many casualties have been
suffered. Card or plastic chits or similar tokens will do at a
push, although our own preference is to avoid anything so
mechanical. The advantage of using markers, rather than
simply noting down how many casualties a unit has taken, is
that its status is visually obvious to both players - which we
consider to be an important element of play!
SHAKEN UNITS
Once a unit has taken casualties equal to its Stamina value it
is described as shaken. This value varies from unit to unit but
is usually 6 for close-quarter fighting infantry, meaning that
once the unit has taken 6 casualties it is deemed shaken. A
unit can suffer more casualties than its Stamina value up to a
maximum of double (i.e. usually 12) but casualties in excess
of the Stamina value are only recorded for purposes of taking
break tests as described later. Once any such tests have been
taken all excess casualties are removed - for example if a
unit’s Stamina is 6 and it has suffered eight casualties then
the excess two are removed after tests are taken leaving six
markers in place.
Units shaken by ranged attacks must take a break test and
can be forced to retire or may even rout and flee from the
battle altogether. Units that are already shaken must take a
break test if they suffer further casualties. Shaken units also
suffer additional penalties as indicated throughout the book
and summarised together with the rules for Break Tests on
page 72.
SHATTERED UNITS
Units that accumulate casualties to a total of double their
Stamina value are automatically broken. The unit has been
shattered by missile fire. It is considered to have been
destroyed and its warriors slain or irretrievably scattered. The
whole unit is removed from the game immediately. No dice
are rolled for the break test that would otherwise be required;
the unit is simply removed.
DISORDER
Disorder often results from a break test, or a test for moving
through friendly units. Disorder represents a unit losing its
cohesion either because of panic or more likely due to its ranks
becoming disorganised or thrown into disarray. A disordered
unit suffers various penalties the most signif icant of which is
that it is not allowed to receive orders or use its initiative in the
Command part of the turn.
The rules relating to disordered units are indicated
throughout the book and summarised together with the rules
for Break Tests on page 73.
RANGED ATTACKS
AND OPEN ORDER
Units in open order can direct their ranged attacks in any
direction. Unlike formed units, which shoot to their front,
open order units can see and shoot all round. Range is
therefore measured from the closest model in the unit to the
closest part of the target.
Units in open order are obliged to target the nearest enemy
they can see in a comparable way to other units. However,
an open order unit will often be spread out in such a way
that a proportion of its models are closer to different
enemies. Indeed, sometimes a large portion of the open
order unit may be ‘out of range’ of the nearest enemy
entirely. In such cases we deem it appropriate to divide the
unit’s ranged attacks against all of its potential targets in
what seems the most proportionate manner.
This unit of skirmishers is about 4" from the left red unit and 5" from
the right unit - the left hand unit is therefore the closest target.
However, a large proportion of the skirmishers are out of range of the
closest target (6") although many are within range of the other enemy
unit on the right. The player has three attacks to make and recognises
that both enemy arc practically as close - so he takes one attack
against each and rolls a dice to decide where to allocate the second
attack - a very fair thing to do! Some are happy to leave rhe choice to
the player, and either convention works just as well in practice.
COLUMNS
Units arranged into a column are not permitted to make
ranged attacks. A column represents a unit prepared to move
and manoeuvre rather than fight, so we do not permit such
units to use ranged attacks. On the whole, columns are
vulnerable formations and must be used with care; infantry
in particular will suffer very badly if caught whilst unprepared
to fight. Cavalry can be luckier, as they are allowed a broader
range of response moves when charged as described in the
rules for Charge Responses (page 60).
CLOSING SHOTS
When a formed infantry, cavalry, elephant, chariot or light
artillery unit that is armed with long ranged weapons is
charged to its front it is allowed to shoot at its enemy as they
close. Units in open order armed with long ranged weapons
can make closing shots against a charge from any direction.
These are called closing shots. These shots are worked out
immediately after the chargers move into contact and before
making any more moves with other units. As such, closing
RANGED ATTACKS
<hots are worked out in the opposing player’s turn or
whenever a charge is made. Note that units that have short-
ringed attacks, and which don’t also have long ranged
Ticks, cannot shoot in his way: any throwing of missiles at
'e range is subsumed into the Clash Combat value for
r* th sides.
Medium and Heavy artillery units are nor allowed to shoot
-. 'ing shots at their enemy as their rate of fire is assumed to
be too slow to do so effectively. Light artillery units can shoot
closing shots as described.
Shooting in this way is described as a charge response and a
nit making closing shots cannot make another charge
response as well: for example, a counter charge or evade. The
rules for charge responses are covered as part of the Hand-to-
Hand Combat rules on page 52. Note that troops with the
special rule Parthian Shot are an exception in that they can
both shoot and evade. See Parthian Shot (page 102).
Calculate the effect of closing shots as follows. Roll a dice for
each long ranged attack. Apply the -1 penalty for closing
shots to represent the limited time available for the shooters
to employ their weapons. Calculate casualties as described for
other shooting and make any break tests required if 6’s are
thrown or if the chargers become shaken. Note that the long
ranged attack value is always used when working out closing
shots even though the enemy are in contact when the test is
made. Shots are assumed to take place as the units close,
even though it is convenient to work out the results once the
charge move is complete.
If a missile break test is required this is taken immediately and
can potentially result in the chargers becoming disordered, or
even forcing them to retreat. If forced to retreat they are
driven off before fighting hand-to-hand combat, so in such a
case no hand-to-hand fighting takes place. Assuming chargers
are not driven off, any casualties inflicted are recorded onto
the unit as usual, and any excess casualties are removed once
the break test has been taken. Casualties inflicted by closing
shots do not count as having been struck in combat when it
comes to working out which side has won the fight.
A unit can potentially fire closing shots more than once
during the turn if it succeeds in driving away or destroying
one enemy and is then charged by another.
If a unit attempts to charge more than one enemy at the
same time, then it is possible it will take closing shots from
two or more units. In such cases work out the closing shots
from all the units charged, calculate casualties, and take any
missile breaks test required.
49
HAIL CAESAR_______________
Dig faster Marcus! Roman Legionaries entrench at the end of a long day’s march, under the supervision of Centurion Cedo Alteram
TRAVERSING SHOTS
Sometimes you will get a situation where an enemy unit
moves across the front of one of your missile armed units
thus presenting a target as it passes. This is similar in concept
to closing shots, except that it occurs as the enemy moves past
your unit’s front rather than into hand-to-hand combat with
the shooter.
Shooting at a traversing target is a response to an enemy
move and therefore usually takes place in the Command
part of the opposing side’s turn. It can also take place
following combat during a sweeping advance as described
on page 78.
As with closing shots, only infantry, cavalry, elephant,
chariots or light artillery armed with long ranged weapons
can make traversing shots. Units with short ranged attacks
and which don’t also have long ranged attacks cannot make
traversing shots. Medium and heavy artillery’ units are
considered insufficiently mobile to make traversing shots.
A unit can shoot ar an enemy traversing its front that crosses
half or more of the shooter’s frontage and which comes
within 12" range as it does so or within the unit’s maximum
range for its weapons if this is less than 12”. Range is
measured from the centre-front or leader position in the
usual way. This is shown in the diagrams below.
The red cavalry’ charge the blue
cavalry' - this is a perfectly good
move, but it takes the charging
unit straight past the blue
infantry. Because the red
cavalry move across at least half
the frontage of their unit, the
infantry’ are allowed to shoot at
them as they charge.
The red cavalry unit moves across
the infantry unit’s front and out
of its front quarter. This diagram
shows the position where the
cavalry move across exactly half of
the infantry' unit’s front - if the
cavalry had started further to the
left, it could have moved without
attracting the infantry unit’s fire.
50
RANGED ATTACKS
Make the shots once the enemy unit has completed its move.
Roll a dice for each long ranged attack, applying the -1
penalty for traversing shots to represent the limited time
available for the shooters to employ their weapons. Work out
casualties and take any break test required if 6s are thrown or
the target is shaken. Note that, as with closing shots, units
making traversing shots always use the long ranged attack
value even if the enemy approach to within 6”.
Traversing shots quite often occur where a bow or other missile
armed unit has taken up a position in a building, as such a
unit is able to shoot at enemy moving past their position. Note
that the number of shots in such cases will be limited to the
number normally allowed from buildings (see page 44).
ARTILLERY
Artillery includes all team operated long ranged stone and
bolt throwing engines. In antiquity such weapons were
invariably torsion powered, and engines of similar design
were often employed to throw stones, bolts or darts. We
distinguished between light, medium and heavy types. ‘Light’
typically describes a man-portable scorpion, ‘medium’ an
onager, and ‘heavy’ a stationary weapon requiring assembly
on-site and therefore restricted to assaults upon, and defence
of, fortifications.
Artillery units have the same arc of fire to their front as other
missile armed units. Unlike other missile armed units
artillery are allowed a free choice of target if no targets
present themselves within half maximum range. This enables
artillery units to pick a target where enemy remain distant,
and this is a useful ability in siege and assault situations.
Where one or more targets presents itself within half range,
the artillery unit is obliged to shoot at the closest in the same
way as for other shooters.
Light artillery can move once and shoot, but cannot move
further and shoot in the same turn. Other artillery cannot
move and shoot in the same turn. This has already been
covered in the rules for Manhandling Artillery (page 36) but
is worth repeating whilst we consider the effect of artillery
shooting.
Unlike other shooters, medium and heavy' artillery units
have no short ranged attacks and therefore cannot bring
their weapons to bear at ranges of 6" or less. Where the
closest enemy to their front are within 6” they cannot shoot
at all. Note that this also means they are unable to act as
supports in hand-to-hand combat, as a short ranged attack
value is required to do so (see Supports page 66). This
doesn’t apply to light artillery units, which have a short
range attack values being assumed to shoot with a flat
trajectory much as a crossbow.
Note that artillery hits impose a -1 or -2 modifier to the
target’s morale save and are therefore especially to be feared
by heavily armoured troops and those placing their faith
in fortifications.
SHOOTING OVERHEAD
WITH ARTILLERY
Artillery units can shoot over the heads of other units or
terrain if the artillery is positioned on high ground or
elevated on fortifications, and where it is possible to draw a
line of sight to the target. The only way to determine if this is
so is to get down over the table for a model’s eye view. The
unit must be able to draw line of sight to the target from the
centre-front of the unit just as for any other shooter.
As well as being able to see rhe target as described, an
artillery unit can only shoot over the heads of intervening
units or blocking terrain that is both further than 6" from the
artillery piece and further than 6” from the target. This 6"
represents ‘dead ground’ - too close to either the artillery or
the target to afford a shot.
The ballista is positioned on a hill facing
the (red) enemy unit on the right. A
friendly (blue) unit lies between, but the
artillery crew can see overhead thanks to
their higher position (a good squint from
the ballista confirms that this is so!). The
unit that is being shot over is not within 6"
or either shooter or target - so the shot is
allowed.
51
HAND-TO-HAND COMBAT
Close quarter fighting is what ancient battles are all about.
This is where it comes to determining victors and
vanquished. When we speak of combat we also tend to use
the terms ‘hand-to-hand’ combat, ‘close’ combat and
occasionally ‘melee’ combat to describe exactly the same
thing. Whatever term falls to hand, it represents decisive
man-to-man fighting with spears, swords, and such-like
weaponry, and the exchange of missile fire at very short
ranges and especially during the moments before contact.
HOW COMBAT WORKS
Units begin hand-to-hand fighting by charging their enemy
in the Command part of the turn as described below. Once
opposing units have moved into touch they exchange blows
as described in rhe rules that follow.
Once both sides have struck blows and casualties have been
determined, the side that has inflicted the most casualties is
deemed to have won. The units on the losing side must
then take a break test to determine if they hold, give ground
or break altogether, in which case they are destroyed. The
resolution of break tests and resulting moves are covered in
the separate section Break Tests page 72.
WHAT IS AN ENGAGEMENT?
A combat engagement consists of opposing units that are
fighting each other plus all those adjoining units judged to
be supporting. The role of supporting units is described in
depth later. For now the important thing to remember is
that both fighting and supporting units form part of the
same combat engagement as shown in the example below.
All the units shown here constitute a single engagement - Red 2 and
Blue I are fighting (they arc aligned face to face) and all the other
units are supporting as described later.
In situations where more than one unit is fighting on each
side, all units that are mutually fighting form part of the same
engagement together with any associated supporting units.
52
This is two combat engagements. Blue 1 is fighting Red 2 supported by
Red I. Blue 2 and Blue 3 are fighting Red 3 supported by Red 4.
Blue 4 is supporting Blue 3.
FIGHTING UNITS
A unit is defined as fighting in a hand-to-hand combat
engagement where its centre-front or leader position is
either touching the enemy, or an enemy’s centre-front or
leader position is touching it. Basically, where the leader
position touches an opposing unit both units are deemed
to be fighting.
HH
Although this is a somewhat extreme example, it serves to show what
we mean by fighting units. The centre-front or leader position of all
units is indicated. The red unit has been engaged by five enemy units.
The three blue units are all fighting as their centre-fronts are touching
the red unit. The red unit is fighting all three blue units because their
centre-fronts touch it. The beige units are not fighting as neither their
centre-front nor the enemy's centre-front touches either unit - these
units are engaged as supports.
ENGAGED UNITS.
COMMAND AND SHOOTING
Units that are engaged in combat at the start of the
Command part of the turn cannot move either
using their initiative or by means of an order.
The only exceptions are units that have a
special rule entitling them to move out of
combat, but these are rare exceptions and
are covered in A Selection of Usefill Rules
on page 98.
Units engaged in combat cannot make
ranged attacks in the Ranged Attacks
part of the turn, nor may they be
targeted by ranged attacks in the
enemy’s turn. Such units are not
eligable as targets and are otherwise
considered pre-ocupied with their
hand-to-hand opponents.
THE SPANISH SWORD
The sword carried by the Roman
legionaries is called the gladius or gladius
hispaniensis - Spanish Sword - perhaps
because it was adopted from the Spanish
tribes encountered by the Romans
during the Punic wars. The gladius
varied somewhat in style and method of
manufacnire bur was essentially a short
sword with a blade in the region of 50-
60cm. The earliest weapons - those
employed during the wars against
Carthage - were somewhat longer and
more slender than later types, and were
always finely tapered with a leaf-shaped
blade. In rhe days of rhe Empire the
gladius developed into a heavier and
shorter weapon, sometimes with a leaf-
shaped blade (known as the Mainz
pattern after examples found there)
I
J
4
I
t
and sometimes with straight blades
and short, triangular points (referred
to as the Pompeii type after examples
uncovered amidst the ruins of that
city). Both types - and variants of
these - appear to have co-existed, so
the styles probably reflect local
manufacturing practices rather than
any deliberate change. Roman
infantry swords tended to become
longer in the 3rd century until they
evolved into the spatha type - a
much longer weapon of a
kind long used by
horsemen.
53
HAIL CAESAR
The battle rages beneath the walls of Kadesh in our refight of this famous
battle between the Egyptians and the Hittites
CHARGE MOVES
A charge move is a move intended to bring a unit into
contact with its enemy. Often a charging unit will make
several moves one after the other, but only the final move
into touch is a charge move as defined here. Watch out for
this. When we say ‘charge move’ we do not mean all
movement that proceeds from charge orders, only the actual
move into contact.
A unit given a charge order must always move towards its target
as quickly and as directly as it can, which is to say by the
shortest possible route. This applies to all the moves made
with the charge order, even though it is only the final move
that is a charge move.
A charge does not necessarily represent a pell-mell dash, upon
the enemies’ lines - though it might! A charge could equally
well be a measured advance, or even a more drawn out
process involving some initial skirmishing before opposing
ranks close. We therefore employ the term charge because it
is useful, dramatic and memorable rather than because it is a
literal description of how a unit moves.
STATE YOUR
INTENTION TO CHARGE
A player who wishes his unit to charge must be sure to say so
w’hen giving orders in the Command part of the turn. He
should also indicate the target unit or units he intends to
engage. A player who wishes a unit to charge using initiative must
state his intention before moving. It is important to remember
this because the enemy might be allowed to react and this can
potentially affect the charger’s own movement in some cases.
Unless a unit is specifically instructed to charge it will not do
so, although note that such an instruction can sometimes
result from a blundered order or a special rule (see page 30
for Blunders and A Selection of Useful Rules section on page
98 for instances of compulsory charges.)
BORN IN THE SADDLE
Speaking of the Avars and Turks - which he refers to
collectively with other nomads as Scythians - The
Byzantme Emperor Maurice says they, ‘have heer\
brought up on horseback, and owing to their lack of
exercise they simply cannot walk about on their own
feet.’ Quite how this ‘fact’ came to be observed
Maurice neglects to say - one can only imagine!
HAND-TO-HAND COMBAT
55
A unit can only make a charge move at an enemy unit it is
facing. This means it must be able to see the target, and the
target must lie directly in front of its centre-front or leader
position as shown in the diagram below. For more about
facing the enemy see Proximity of Enemy on page 34.
Artillery. Artillery units cannot charge in any
circumstances.
Before we proceed further, it is worth saying that a unit can
be ordered to charge an enemy beyond its maximum reach
as this saves excess measurement and gets troops moving in
the right direction without any fuss. However, no advantage
is ever allowed to a unit doing so. Any bonuses to command
or free moves that otherwise apply to charging units are
only taken into account where the enemy is within reach,
i.e. where the charge is possible. This rule isn’t intended to
stop players taking a casual approach to such things, only to
ensure that no unfair advantage is conferred, or
embarrassment caused, when they do!
UNITS NOTALLOWED
TO CHARGE
In the following cases troops cannot be given an instruction to
charge the enemy. Such units won’t charge the enemy, whether
by means of an order, on initiative, as a result of a blunder, or
resulting from any other special rules or exceptions. They can’t
charge in these situations; it’s as simple as that!
Units that are already engaged in combat. Units that are
already engaged in combat, whether fighting or
supporting, cannot be given orders or use their initiative,
and cannot charge in any circumstances even where the
opportunity might present itself.
Disordered Units. Units that are disordered cannot be
given orders and cannot move on their initiative. Even
where an exception applies permitting movement in
some situations, disordered units cannot charge.
Shaken Units. A unit that is shaken cannot charge.
Shaken units are those that have suffered casualties
equal to their Stamina value as described on page 48.
Column or Square. Units that are in column or square
formation cannot charge the enemy. Columns can be
given an order to reform into a fighting formation and
then charge, but cannot charge whilst they remain in a
column. Squares cannot move other than to make a
single formation change, and are therefore unable to
change formation and charge in the same turn. See
page 22.
Open Order. Units in open order formation are not
allowed to charge enemy infantry or cavalry unless these
are also in open order. Other types of units can be
charged in the usual way; for example, artillery7, chariots,
elephants and baggage. Troops in open order can also
charge enemy occupying buildings. Troops capable of
assuming other formations can be given an order to
reform into a fighting formation and then charge.
Cavalry and Chariots against Pike Phalanx. Cavalry
and chariots are not allowed to charge home onto the
front of a pike phalanx unless the pike phalanx is
already shaken or disordered. See the rules for Pikes on
page 103.
Note that we do not specifically forbid infantry7 from charging
cavalry, although on the whole it is a rather reckless thing to do
and likely to end in tears. Mounted troops attacked in this way
are allowed to countercharge in most cases, which will usually
spell disaster for an opposing infantry unit. See Countercharge
on page 60.
MAKING THE CHARGE MOVE
Remember that the charge move is specifically the final move
into contact, so in the case of a unit making three moves only
the third move is a charge move as we define it. The rules
described here apply specifically to this charge move. We
shall also restrict ourselves to describing how formed units
charge for the moment. Units in open order are treated a
little differently and are described later (see page 59).
Change range is measured from the centre-front or leader model
to the closest part of the enemy. If the target is within one
move’s distance of the leader then the whole unit is allowed to
charge regardless of the distance any individual model may
move. Some models will often end up moving further than
their normal move allowance. This does not matter. Think of
the unit quickening its pace as it approaches the enemy.
HAIL CAESAR
POSITION CHARGERS
In most cases opposing units will be facing each other and
the charger will align against the front of the target in a
straightforward manner. We’ll consider situations where a
unit charges against the flank or rear of an enemy in a
moment. For now just imagine the charger is heading for the
front of its target.
The charging unit must bring its own centre-front and as great
a portion of both units’ frontages into touch as possible. In
most cases this will simply result in rhe units aligning against
each other.
In most cases opposing units will be facing each other and charges take
place in a straightforward manner like this. Note how the unit moves
over to bring the greatest portion of both units into touch. This is why
models often end up moving further than their standard move
allowance when they charge.
Units that start their move off to one side of their target will
usually align to the corresponding side of their enemy’s
formation as shown below. This gets the greatest portion of
both units into touch in the most direct manner.
Here rhe red unit charges the blue -
because the charger has a smaller frontage
it cannot ewer the target’s entire front.
The right hand diagram shows the correct
positioning for such units - the charger
covers the greatest proportion of both
units that it can whilst moving towards the
target by the most direct or shortest route.
The left hand diagram Ls incorrect because
the red unit has not taken the most direct
route, moving further than it needed to.
__ HAND-TO-HAND COMSAT
Vi
CHARGES TO
THE FLANKS AND REAR
So far we have dealt only with charges against the front of an
enemy formation. Sometimes a charger may be able to move
against the flanks or rear of the enemy, and we’ll consider
these situations here.
When charging into the Hank of an enemy, or into any facing
that is especially narrow, it is important to make sure the
centre-front of the charger contacts the enemy unit. This is
shown on the diagram below.
If a charging unit is positioned within its target’s front
quarter when the order is received then it must attempt to
make its charge to the target’s front. If the charger lies to a
side quarter of the enemy when the order is received it
charges to the side, and if to the rear it charges to the rear.
Notice that it is the position of the charger before any
moves are made that counts' Bear in mind this means it is
not possible to order a unit to charge an enemy in the side
if the charger lies to the enemy’s front when the order is
received. If given such an order, a unit will attempt to
position itself to charge in its following turn - this being
the most direct way of fulfilling the order. The distinction
between front, side and rear quarters have already been
explained and the diagram shown below will remind us.
making charges against narrow edges it is
important to make sure the centre-front of
the charger touches the target unit.
Here are three examples of charges - a charge to the front and two
charges to the flanks of a unit. Notice how in both cases the flank
charges move the shortest distance to bring the greatest portion of
units into touch.
CAREFUL’ YOU'LL HAVE
SOMEBODY’S EYE OUT’
Livy writes of the near invulnerability of the Macedonian
phalanx before going on to describe how the Romans
valiantly overcome ir - typical ‘bigging up’ the enemy to
make your team look all the better if you ask me! He has
rhis to say of the collapse of the Macedonian phalanx at
rhe Battle of Pydna in 168BC.
Often a charger will not lie wholly within any quarter of the
target unit, but will straddle two quarters: for example, the
front and side. In such cases the charger counts as in the
quarter occupied by its front-centre or leader position. Tbiis
should be easy enough to decide, but if in doubt players must
defer to the umpire or roll a dice for it.
"The most manifest cause of the victory uas the fact
that there uere many scattered engagements which
first threw the wavering phalanx into disorder and
then disrupted it completely. The strength of the
phalanx is irresistible when it is close-packed and
bristling with extended spears; but if by attacks at
different points you force the troops to suing round
their spears, unwieldly as they are by reason of then-
length and weight, they become entangled in a
disorderly mass; and further, the noise of any
commotion on the flank or rear throws them into
confusion, and then the whole formation collapses.’
Red is positioned partly to
the target’s front and partly
to its flank - because the
centre-front or leader
position lies to the flank this
unit is allowed to make a
flank charge. Watch out for
charges like this against a
unit’s vulnerable flanks.
LivyXLIV.41
Battle of Pydna and the defeat of Perseus
Bronze arrow heads с. 800BC Iran
(Perry Collection)
I
I
4
I
I
I
i
?
I
HAIL CAESAR
CHARGING TWO ON ONE
In most cases opposing units will have comparable frontages
and combats are therefore fought one on one with other units
supporting as described later. However, if opposing units have
significantly different frontages, there can sometimes be room
for two or more units to fight a single enemy. The following
rules describe where this is normally allowed.
Where charging units move one after the other against the
same enemy it is simply a matter of moving each unit in turn
against whatever portion of the target unit is accessible to
them. Where two or more units charge against the same
enemy as a division order, units must still move one after the
other for the sake of clarity. It is up to the player which unit
he moves first. Depending on which unit the player moves
first, this may or may not leave room for a second unit to
charge and fight.
Where there are already friends fighting to the same facing
edge, then another unit can charge only if there is clearly
room for its centre front/leader to move into touch with the
facing edge. The most common situation is where small
units, or narrow based units such as elephants, are charging
an enemy who is more widely based. A typical situation is
shown below.
Red is a large unit and has been charged by a small blue unit from the
left - because of red’s large frontage there Ls room for the elephant to
charge and fight - a typical two on one fight.
Where a target is already engaged, a second unit is allowed
to complete a charge so long as its leader can see either
the enemy unit or could see the enemy if it were not
already engaged. The enemy unit must still lie directly in
front of the leader, but the charger is allowed to draw a
line of sight through friendly engaged units that are in the
way. This just allows for the practicalities of moving units
one after the other and makes provision for units to join
combats that are underway where common sense demands
they could.
CHARGING ONE ON TWO
In some situations enemy units will be positioned in such a
way that charging one will automatically bring another into
touch. In these cases the obligation for a charger to bring as
large a portion of its frontage into touch as possible extends
to adjacent enemy units. The diagram below illustrates
the principle.
The red unit charges the blue elephant which ii» placed next to a small
blue infantry unit - if the infantry were not there then red would
charge directly ahead as shown in the middle - this being the most
direct route. But, because the infantry will be contacted red must
maximise contact against both units as shown on the right.
Adjacent units will fight if their centre-front position clearly
contacts the charger or if the charger’s centre-front contacts
them. In such a case the unit is treated as having been
charged, and it is allowed to react as if it had been the target
of the charge in the first place (see Charge Responses below).
Units adjacent to the target of the charge will not fight if
their centre-front or leader model position does not clearly
touch the charger, and assuming the charger’s leader position
does not touch them. A unit that is not fighting may not
react as if charged. The unit will probably be able to support
in the engagement as described later.
Note that the obligation to cover an adjacent unit can result
in the charger’s centre-front touching a different unit to the
intended target. This is fine so long as the original target is
still fighting. Where the obligation to cover an adjacent target
would otherwise result in the original target not fighting,
don’t move the charger beyond the point where the original
target fights.
It is worth pointing out that we take a fairly lax attitude to
the exact number of models in our units, and the widths
of different units do therefore tend to vary within certain
limits. Where this is the case it is
important not to confer an unintended
advantage when it comes to two-on-one
engagements simply because of a unit’s
width. Sometimes a unit that is
touching at its centre-front would
not be so if it were a little wider.
This is a case for judgement
either by the players or umpire.
As in all such cases we rely on
the good sense of the
participants to arrange
things to their
satisfaction.
58
CHARGING WITH
OPEN ORDER UNITS
As we have already explained, troops in open order are not
allowed to charge enemy infantry or cavalry unless these too
are in open order or sheltering within buildings in the case
of infantry. Units in open order are also not allowed to
charge if doing so would bring an adjacent unit of a type
they could not otherwise charge into the combat as a
fighting unit.
Most charges by units in open order will therefore be against
other units in open order or against buildings. The rules
that follow explain how to move such units into combat.
The same method is used whether open order units charge
or are charged.
When a unit in open order charges, pick the model that is
closest to a visible part of the enemy unit and measure the
charge from that model. It doesn’t matter which direction
the model is facing as troops in open order can see all
round. As open order units can sometimes be quite
dispersed a charge may result in some models moving
considerably further than others. We feel this is perfectly
acceptable for troops unencumbered by a rigid formation
and moving as individuals.
As with other charges, those in open order will charge to the
enemy’s front if they lie to their front quarter, to the flank if
positioned to the side, and in the back if positioned to the
rear. In practice, open order troops will usually charge other
open order troops - so this distinction doesn’t really apply.
When either charging or being charged, units in open order
are brought into contact with their opponents in as satisfying
a manner as possible. This is best achieved using the method
shown below for an open order unit charging another; however,
the same method also works if only one unit is in open order.
Begin by moving the chargers up against the opposing models
as shown in the diagram. Then bring enemy models forward
to make as tight a line as possible. The normal rule that
obliges open order troops to maintain a distance between the
models is waived for the duration of hand-to-hand combat.
Combat between units in open order can get a bit messy. If
other units are to become involved the players may be called
upon to judge where a unit’s flank lies, so it helps to think of
the combat as taking place between паю units in a rough line.
A useful tip is to draw a line between the models on the
extreme edges of the formation, ignoring those between, but
common sense must prevail and we leave it to players to make
whatever arrangement they feel best fits the circumstances.
TIiis diagram shows how skirmishing units
close ranks as thev enter combat. On the
left the blue unit is shown before it charges
forwards. Notice how the models are kept
within the width of the enemy’s formation
in the middle diagram. On the right the
red unit closes up its ranks by moving mod-
els directly forward.
kL.
HAIL CAESAR _____________________________________________
CHARGE RESPONSES
Depending upon the situation, a unit that has been charged
can opt to make one of the responses listed below. Only units
that are not already engaged can respond in this way. Units that
are already engaged will always ‘stand’. The player whose unit
has been charged must declare its response before his opponent
makes his charge move. We assume units that would normally
advance to meet their enemy do so, even though their response
in the game is to stand and the models themselves are not
moved. This is why we give all units a unique value for the first
turn of hand-to-hand fighting (the Clash value).
• Stand. This is rhe default response and often the only
option available. The unit remains where it is. In the
case of a unit in open order it will close up its ranks as
already described.
• Closing Shots. Troops with long range attacks can
respond to a charge by shooting as described in the
Ranged Attacks section page 40. Work out rhe result of
closing shots once the chargers have moved into touch
and before doing anything else. Units that elect to shoot at
their enemy in this way are otherwise treated as standing.
• Evade. Only units in open order can attempt to evade a
charge. Evading troops try to avoid combat by turning
and running off - hopefully to regroup and return to
the fight later. See Evade below.
• Countercharge. A cavalry or chariot unit that has
been charged to its front can elect to countercharge
assuming it would otherwise be allowed to charge the
enemy concerned. This is explained under
Countercharge below.
• Turn to Face. A cavalry or elephant unit that is
charged to the flank or rear can respond by pivoting to
face the enemy. This is explained under Turn to Face
on page 61.
• Parthian Shot. Only a unit with the special Parthian
Shot rule can choose this option, combining an evade
move and closing shots into one manoeuvre. As this is
an exception that applies only to specific troops it is
covered in A Selection of Useful Rules on page 98.
EVADE
Only units in open order are allowed to try and evade from
a charge. Units in open order have no formal facing, and
will therefore always attempt to move directly away from rhe
unit charging them. Units that are already disordered are not
allowed to evade.
An evade interrupts the regular flow of play and takes place
out of the normal turn sequence. The attempt is made once
it has been established the charger can charge into contact,
but before moving the charging unit.
A unit that evades successfully cannot evade again if charged
by another enemy unit that turn. If charged a second time
the unit is obliged to stand without making closing shots or
any other response.
The evade move takes place exactly like a move given in the
Command phase and requires an order in the usual way. In
this case the order is ‘evade’ and, if the order is issued
successfully, the unit is moved as far as possible one, two, or
three moves into the quarter opposite the chargers. In the
case of an evade order, if the test is failed rhe evaders can still
move once, so evaders will always move one, two, or three
moves depending upon their roll. If the evade order is given
by the army’s general the result can be re-rolled in the usual
way (see page 80).
Once the evaders have moved, the chargers complete their
move. Depending on how many moves the chargers have, they
may be able to catch the evaders, or they may find the evaders
have moved beyond range. In either case, the chargers must
attempt to complete their order in the usual manner. If
evaders have moved through other enemy to their rear, then
rhe chargers can potentially charge these troops if their order
has been framed in a suitable manner.
For example, if the order is simply ‘charge rhe skirmishers’
then the unit is obliged to do just that, and, if unable to
complete their order because their target has evaded, the
unit will not charge other enemies who happen to lie
within reach. On the other hand, if the order is ‘charge
enemy to your front’, or even ‘charge the skirmishers, drive
them away and charge the cavalry behind’ the unit has a
clear order to follow and will be able to charge a further
target if evaders escape. For this reason it is important to
frame orders carefully when charging troops who are likely
to evade.
Evaders are automatically destroyed if their enemy catch them.
The unit is removed from the table. The chargers are treated as
having beaten their enemy in hand-to-hand fighting, and have
the same options as described tor victorious units. See Break
Tests page 72.
If evaders are not caught, and assuming chargers do not
redirect their charge to another unit indicated by their
orders, then chargers are left high-and-dry and the normal
sequence of play resumes. The evading unit is not otherwise
penalised and can continue to move normally in the player’s
following turn.
It can happen that a unit attempting an evade rolls a blunder
(double six) in which case we would suggest the unit rolls its
blunder and acts accordingly. Even with a blunder there is a
good chance of a unit moving away from the charger and out
of reach.
COUNTERCHARGE
A cavalry or chariot unit that is charged to its front by
another unit of any kind can respond with a countercharge.
Units charged to the flank or rear cannot countercharge.
Counterchargers must be of a type and status normally
allowed to charge the enemy bearing down upon them. For
example, units that are already disordered or shaken are not
allowed to countercharge, and units in open order cannot
countercharge formed units. Open order units can
countercharge other open order units assuming they are
otherwise able to do so.
60
________________________________ HAND-TO-HAND COMBAT
A countercharge interrupts the regular flow of play and takes
place out of the normal turn sequence. The move is made
simultaneously with that of the charger and must be worked
out before the charging unit moves.
A countercharge requires no order, and can be enacted
automatically so long as the charger would otherwise either
contact its target, or move to within one move’s distance of
the target’s front. For example, if a charger is three moves
from its target, then a countercharge is allowed if the charger
rolls either two or three moves. Note that this means a
countercharge is possible even in some situations where the
charge would fail to contact their target.
Make the charger’s and countercharger’s moves
simultaneously. Establish a point equidistant between and
move both units so they contact at that position. Both the
charger and countercharger arc treated as having charged
and both units receive all the combat bonuses as if
charging, including any bonuses from weapons or special
rules (see A Selction of Useful Rules on page 98).
If cavalry or chariots countercharge against infantry other
than those in open order, then the infantry are
automatically disordered and receive no ‘to hit’ bonus for
charging. This does not apply if chargers are infantry in
open order. Open order infantry can charge chariots or
open order cavalry without becoming disordered. They are
not allowed to charge formed cavalry so the situation will
not arise.
If cavalry or chariots countercharge, then any other cavalry or
chariots already positioned to support them in hand-to-hand
combat can move with them and take part in the ensuing
combat round. Just move the supporting units along with the
counterchargers. See page 66 for more about the role of
supporting units in combat.
TURNTO^FACE
A formed cavalry or elephant unit that is charged to the flank
or rear can respond by pivoting to face the enemy if it has
room to do so, or simply turning about if charged in the rear.
Units that are already disordered are not allowed to turn to
face their enemy in this way.
A turn to face interrupts the regular flow of play and takes
place out of the normal turn sequence. The move is made
simultaneously with the move of the charger in a similar
fashion to the countercharge.
No order is required for a unit to turn to face where it is
allowed to do so. The turn happens automatically. If charged
to its flank the unit is pivoted to confront the enemy head on
if possible. If this is not possible it is pivoted sufficiently to
bring the charge within its front quarter. The charger is then
arranged against the front of the unit in the usual way.
Barbarian cavalry rampage through a Roman villa showing scant regard tor the vegetable garden
61
HAIL CAESAR
FIGHTING
Regardless of which side’s turn it is, every unit engaged in
combat takes part every turn. All units that are fighting fight,
and all units that are supporting contribute as supports.
Because combat happens every turn, we often refer to combat
in terms of‘rounds’. So, in Blue’s turn fight a round of
combat, in Red’s turn fight a round of combat, then in
Blue’s turn another round of combat, and so on until the
engagement is over.
During each round it is usual to work out one engagement in
its entirety, then another, and so on until all engagements on
the tabletop have been fought. So, if opposing cavalry are
fighting each other on the western side of the table whilst
two groups of skirmishers are engaged on the eastern side, it
would be usual to pick one engagement (say the cavalry) and
work that out completely, including any results and break
tests, before turning to the skirmisher battle and resolving
that in the same way. The player whose turn it is can decide
the order in which to tackle engagements. Note that this can
be quite an advantage as units victorious in one engagement
can potentially move into or influence another.
ATTACKS
In reality units in hand-to-hand combat obviously strike at the
same time; however, for the sake of our game it is convenient to
work out all the attacks from one side, including any supporting
attacks (see below), and then all the attacks from the other side.
It doesn’t strictly matter which side strikes first as all units fight
with the status they had at the start of the combat round. We
usually allow the player who charged or who is winning the
fight to strike first, but this is by no means essential.
Hand-to-hand attacks are worked out in the same way
described for ranged attacks. So, roll a dice for each attack
and establish the number of hits inflicted on the enemy, the
enemy makes morale saves if he has them, and any hits that
are not saved are turned into casualties and recorded against
the unit’s Stamina value.
Two different combat attack values are used when fighting
hand-to-hand combat: a unit’s Clash value is used during its
first round of each engagement, and a unit’s Sustained value
is used for subsequent rounds of the same engagement. In
both cases the value indicates the number of dice rolled in
the same way as for ranged attacks. Depending on the
situation, we tend to refer to either of these values as the
unit’s combat value. Combat values for troops whose primary
role is to fight hand-to-hand typically lie within the range of 6
to 9 for standard sized units.
If the unit is a tiny, small or large unit by the standards
already discussed, then the indicated modifiers apply.
62
________________________________ HAND-TO-HAND COMBAT
In this example Blue 1 has charged Red 1 to the front. In the following
turn Blue 2 has charged Red 1 to the side. In the next turn Red 2 has
charged Blue 1 in the side. AU four unib arc interlinked by enemy
units they are fighting - so this is a single combat engagement.
Fortunately most combat engagements are
straighforward one-to-one affairs like the
example shown here.
Blue 1 has charged Red 2 in the side - making incidental contact
with Red 1 and 5 at the same time - all units are engaged.
Where a typical combat value is 6, units roll six dice if they
are standard sized, eight if they are large, four if small and
one dice if tiny. These adjustments are usually made to the
basic stat line and are included in the example stats for
appropriately sized units throughout this book.
We use these modifiers as a rule of thumb. They are not
inviolable instructions handed from the heavens by Jove
himself. Where a scenario or situation calls for finer tuning
then players must make a sensible judgement.
Units in columns, squares, and occupying buildings can
only attack in a very limited way. Their combat values are
automatically reduced as shown on page 64. This applies
whether they are fighting or supporting as described later
(Supports page 66).
UNIT SIZE MODIFIERS
FOR HAND-TO-HAND COMBAT
Combat Value Unit Size Modifiers
+2 Dice Large Unit. The attackers are
a large unit.
-2 Dice Small Unit. The attackers are
a small unit.
I Dice Tiny Unit. Tiny units roll only
one dice - their Combat Value
is always 1.
VVhat have the Romans done for us! Roads! Bridges! Boats! You can’t stop progress can you - but these chaps are giving it a go
HALL CAESAR
FORMATION MODIFIERS
FOR HAND-TO-HAND COMBAT
Combat Value Formation Modifiers
1 Dice Column. Units in column have a combat value of one dice regardless of their size.
2 Dice per Face Square. Units in square are limited to a maximum of two dice for any face up to their full combat value in total.
2 Dice per Face Buildings. Units occupying buildings are limited to a maximum of two dice from any face up to their combat value in total - see the rules for buildings page 39.
At least halt of a unit’s attacks must always be allocated to its
front if it is engaged to the front. If engaged to the front by
more than one unit then attacks must be divided as equally
as possible amongst them. Whatever the situation, a unit
cannot allocate more than half of its attacks against either
flank. A unit can fight to the rear with all of its attacks
assuming it is not also fighting to the front, and if fighting to
the front and rear must allocate attacks as near as equally
between them bearing in mind it cannot make fewer than
half its attacks to the front.
TO HIT DICE ROLL MODIFIERS
FOR HAND-TO-HAND COMBAT
Dice Score Situation
+1 Charging. If the unit has charged or
countercharged into combat the
bonus applies in the first round of
fighting. Charging units will therefore
usually hit their enemy on the roll of
a 3+ rather than a roll of 4+.
To make your attacks roll the appropriate number of dice.
Any dice scoring 4, 5 or 6 indicate that the attackers have
inflicted a hit on their target. For example, six dice scoring 1,
3, 3, 4, 5 and 6 = 3 hits. In some situations it becomes easier
or harder to score a hit. These situations are taken into
account by adding or subtracting from the dice rolls as noted
below. For example, if a unit is charging it is considered more
effective and so +1 is added to the chance of scoring a hit -
so dice rolls of 3, 4, 5 or 6 will hit.
Regardless of these modifiers a dice roll of a 1 is always a
miss and a dice roll of a 6 is always a hit. There is no such
thing as an automatic hit or miss. A unit normally fights to
its front, but if attacked in the side or rear, or where it is
attacked from several directions at once, then its own attacks
are distributed as noted below. Where the player has a
choice, it is necessary to declare where all the attacks will be
made before rolling any dice - otherwise confusion will
surely reign!
Winning. If the unit fought and won
the previous round of the same
combat engagement then this bonus
applies during the following round of
fighting. As with chargers these units
will usually score hits on a roll of 3+.
Uphill. If the unit is uphill of its
opponent and has neither
charged/countercharged this turn nor
moved following the previous round
of the same engagement, then this
bonus applies in the current round.
If a unit moves following combat
results the bonus is lost in the
following round regardless of whether
the unit won or lost the fight.
Shaken and/or disordered. This
applies if the attacking unit is either
shaken, disordered, or both. These states
are explained elsewhere and affect
units in various deleterious ways.
Open Order. This applies if the
attacking unit is in open order
formation. Such units prefer to
skirmish rather than get stuck in and
will generally require a 5+ to score hits
rather than the usual 4+.
Flank/Rear. This applies to all of a
unit’s attacks if it is engaged to either
flank or to the rear, including to any
attacks made to its front.
For example, a unit has 7 attacks and is attacked to the front
and a flank. It could make 3 attacks against the flank as this
is the most it can allocate to a flank, whilst it is obliged to
make at least 4 attacks to its front as any fewer will be less
than half.
MORALE SAVES
We have already discussed Morale saves at some length in
the section on Ranged Attacks. Morale saves in hand-to-
hand fighting are the same in all respects and you might
wish to refer back to remind yourself how this works. See
page 46. Modifiers to the Morale save are also the same as
for ranged attacks, although there are also some additional
modifiers, w hich take account of specific weaponry and
strategies. These are covered as part of A Selection of Useful
Rules on page 98.
In hand-to-hand combat the +1 bonus for cover, the +2 for
buildings, and +3 for fortifications apply to any stationary unit
that has been charged. These bonuses continue to apply from
round to round until the unit loses a round of combat. Once
the unit loses a round of combat, the enemy is assumed to
have broken through any intervening cover, and the Morale
save bonus is lost during further rounds.
For the avoidance of doubt, a unit that charges an enemy
behind cover does not benefit from the cover itself even
where a barrier physically separates both units. Only units
that take up a position within cover receive the bonus. This
should be obvious enough, but let us be clear and dispel any
lurking confusion at this stage.
CASUALTIES
Once Morale saves have been taken, any hits that have not
been saved are recorded as casualties on the unit. As with
ranged combat, casualties inflicted in hand-to-hand-fighting
represent men killed or wounded as well as other factors that
we might expect to affect a unit’s ability to fight such as
exhaustion and loss of nerve. Casualties are recorded onto
the unit using markers as already discussed in the section on
Ranged Attacks page 40.
During a combat round it is important to keep a separate tally
of the casualties inflicted on a unit in the current round. This
can most easily be done by carefully keeping any fresh markers
separate from casualties inflicted previously, or by means of a
dice placed face up to indicate the number of casualties
suffered that round. Players can use these or any other
method to keep track of the casualties in the current round.
Once rhe combat has been worked out, the result
established and break tests taken, all casualties suffered in
excess of a unit’s Stamina value are removed. These excess
casualties are either redistributed amongst supporting units
as described later, or discarded altogether. Once a unit is
shaken - i.e. casualties have reached its Stamina value -
casualties must still be recorded for purposes of determining
winners, establishing if units are shattered and for taking
break tests as described later.
ONE HUMP OR TWO?
•
Our ancestors were always open to all manner of
unorthodox tricks and ruses that might give them an
advantage in a fight. One famous example took place
during rhe Bartie ofThymbra between rhe Persians and
Lydians in 547BC. The Lydians under their King
Croesus ruled a powerfill empire in western Anatolia,
and they were especially famous for the quality and
ferocity of their cavalry. To counter this threat the
Persians arranged their camels - probably baggage
animals - in front of their troops, reasoning that the
unfamiliar smell of these strange creatures would spook
the Lydian horses. In the battle this is exactly what
happened and Croesus was defeated and his capital
Sardis captured.
"In war, events of importance are the result
of trivial causes.”
Julius Caesar
65
HAIL CAESAR
CLOSE RANKS
Shield-carrying heavy infantry units fighting in a battle line
formation are allowed to close their ranks during any round
of hand-to-hand combat, except for rhe initial round if the
unit has either charged or countercharged. This represents
the unit drawing into the kind of dense ‘synaspismos’
formation associated with Hoplite warfare and with the
‘shieldwall’ of Dark Age infantry. Only heavy infantry units
equipped with shields are allowed to do this, and it is a
useful way of reducing the number of casualties likely to be
inflicted by both sides that round.
If a player wishes a unit to close ranks he must say so before
either side strikes blows. Once a unit has closed ranks it
fights with a -1 ‘to hit’ penalty when making its own attacks,
but adds a +1 bonus when making its morale saves. So, a
unit that would normally hit on 4+ and save on 4+ will
instead hit on 5+ and save on 3+.
Closing ranks only takes effect for a single round - so if a player
wishes his troops to close ranks throughout the combat he
must announce that he is doing so at the start of each round.
SUPPORTS
Supports arc units positioned either alongside or behind
fighting units in such a way that they can be imagined
contributing to the combat either with missiles, by relieving
fighting troops, or by striking blows themselves.
Units in open order, artillery and baggage units fighting in
hand-to-hand combat cannot be supported by other units of
any kind. In these cases the fighting units are either too
dispersed or represent too few combatants to benefit from
supporting friends. Units fighting from buildings cannot
normally be supported either, aldaough they can be supported
by other units in the same building where the building is large
enough to hold them. Units in square or testudo formation
also cannot be supported by other troops because of their
closed and, in the case of the square, multi-directional
formations. Units in wedge formation can only be supported
by friends enclosed within the wedge. Units that cannot be
supported in hand-to-hand combat are listed below.
• Units in open order
• Artillery
• Wagons and baggage
• Cavalry cannot be supported by elephants
• Units in buildings except from troops within the same
building
• Units in squares
• Units in testudo
• Units in wedge, except by enclosed friends
• Scythed chariots
Practically all units are allowed to support apart from baggage
units, which are understandably reluctant to get involved in
combat at all if they can help it. Heavy and medium artillery
is unable to support only because it lacks the necessary short
ranged combat value with which to do so. Note that light
artillery is allowed to support and has the requisite short
range value needed. In addition elephants are not allowed to
support cavalry - see Elephants page 99.
Except as noted below, a unit can be moved into support
during normal movement in the Command part of the
turn. In cases where a group of units is ordered to charge
the same enemy, units unable to complete their charge will
always try and support where they can. Such units are trying
to fulfil their orders in the best way possible. Supporting
units are considered to be engaged in combat, and may find
themselves fighting in subsequent rounds if more enemy
pile into the engagement.
In the following situations units cannot deliberately join an
engagement to support a fighting unit whether by means of
an order, initiative move, free move or whatever. Such units
can sometimes find themselves in a position to support as a
result of other units’ movement, for example an enemy
charge against a neighbouring unit, and they are allowed to
support in these situations.
Disordered Units. Disordered units are not allowed to move
in the Command part of the turn in most cases, and where
allowed to do so are generally obliged to retreat. In any case,
even where allowed a move, disordered units cannot use it to
join an engagement as a support.
Engaged Units. Units that are already engaged in combat are
already fighting or supporting and can’t move other than as
dictated by the results of combat.
Shaken Units. A unit that is already shaken cannot move to
join an engagement as a support. Shaken units are those that
have suffered casualties equal to their Stamina value as
described on pages 48.
—
HAND-TO-HAND COMBAT
Column, Square or Wedge. A unit that is in a column, square
or wedge cannot move to join an engagement as a support. A
column or wedge can be given an order to reform into an
appropriate combat formation and then join as a support. A
square is unable to change formation and move in the same
turn, so it can only support if changing formation alone puts
it into a supporting position.
Heavy and Medium Artillery. Heavy' and medium artillery
cannot join an engagement as a support. Even if they find
themselves in a supporting position as a result of other
movement they will not support - they lack the short ranged
attacks with which to do so in any case.
Elephants supporting cavalry. Elephants are not allowed to
move into support of cavalry, or to support cavalry where
they find themselves in position to do so.
Scythed Chariots. Scythed chariots are something of an
exceptional weapon and are covered by their own rules on
page 104. Scythed chariots cannot support in hand-to-
hand combat.
Note that a testudo joining an engagement either by charging
or by moving into a supporting position automatically changes
to a battle line. See the rules for the Testudo on page 105.
POSITION SUPPORTING UNITS
Units supporting from a flank must be positioned beside
the fighting unit and aligned with its front. Alternatively,
the supporting unit can be hinged at the front of the
fighting unit and inclined towards the enemy along the
lines shown. Either way, a fighting unit can only ever be
supported by one unit to each flank and never by two.
THEY CAME
FROM THE SWAMPS
lWe should choose the terrain not onto to suit our
armament, but also with a view to the turious peoples.
Parthians and Gauls handle themselves well on the
plains. The Spanish and Ligurians fight better in the
mountain and hills, and the Britons in the woods,
whilst the Germans are more at home in the swamps1.
Or so say’s Maurice in rhe Strategikon - though his words
seem to refer to enemies that predated his reign by
hundreds of years. None the less - sage words that reveal
the great Emperor to have been a wargamer at heart.
When arranging supports in this manner we have never
found it necessary to insist on absolute precision, and we
happily allow units to align into support as shown
so long as at least part of the unit can reach the fighting
unit’s front. Thus we allow for the practicalities of play
and avoid the game becoming overly enslaved to Euclid.
Units supporting from the rear are positioned behind and
touching the fighting unit. At least part of the supporting
unit must lie directly behind the mid-point of the fighting
unit. Generally speaking only one unit can support from the
rear. The exception is the Pigs head formation described in
A Selection of Useful Rules on page 98.
Basic positions for supporting units to the flank. Note that units do
not haw to be touching the enemy to support, it is their position rela-
tive to the fighting unit that counts
Left - ideal position for the rear supporting unit. Right - this is accept-
able as the middle of the fighting unit is covered.
HAIL CAESAR
In many situations a unit moving into support will touch the
enemy as shown below. The unit is still supporting so long as
its centre-front does not touch the enemy unit, and the
enemy’s centre-front does not touch it.
All three blue units have charged. The units either side cannot fight be-
cause their centre-front is not engaged. In both cases they move into
support. We show them moving to the flanks, assuming they have the
movement to reach
If a unit moves into an engagement as a support and its
centre-front or leader position touches the enemy, or the
leader position of the enemy touches it, then the unit
joins the engagement as a fighting unit and not as a
support. This does sometimes allow a unit to join a
combat as a fighting unit where it could not otherwise
charge, but note that the unit is not ‘charging’ and doesn’t
get ‘To Hit’ bonuses or any bonuses due to special rules
when charging.
This unit cannot charge the enemy because the target does not lie in
front of its leader, but it can move into support. As it does so its centre-
front comes into touch with the enemy, so instead of supporting the
unit will fight instead. This tends to happen more commonly with
units that have very narrow frontages such as elephants.
Hittite and Canaanite chariots prepare to spring their ambush from the
wooded banks of the Orontes river
It is conceivable to have a situation where a supporting unit
can potentially support two fighting friends. In such cases
divide the unit’s attacks between both units in proportion
to the degree of contact - in so far as is reasonable.
In this engagement the middle blue unit is supporting both friends. In
this case it would be appropriate to simply divide the unit’s support as
equally as possible.
For avoidance of doubt, only one unit is allowed to support
from each flank and the maximum number of units that can
support a single fighting unit is three (one from each flank
and one from the rear). In the rare position where two or
more units are positioned so that they could both support
the same flank, the one that is most directly facing the enemy
will do so.
68
__ HAND-TO-HAND COMBAT
OPEN ORDER UNITS AS SUPPORTS
Units in open order cannot be supported, but they can
support fighting units and this is often their primary role
once battle is joined. Such units are arranged loosely to the
fighting unit’s flank or rear with at least one model touching
the supported unit’s flank or rear edge to show that the unit
is supporting.
As supporting open order units are not fighting they do not
close up their ranks as described for fighting units, but they
are obliged to do so if brought into the engagement as a
fighting unit at any point, e.g. as a result of an enemy charge
during a subsequent turn. Open order units make quite good
supports but are best kept away from the risk of actual
fighting if possible!
SUPPORT ATTACKS
Supporting units make their attacks in a comparable way to
fighting units. These attacks are always struck against the
same enemy as the attacks of the unit they are supporting. If
their friend is fighting more than one enemy, then flank
supports strike against the closer target, and rear support
attacks are divided in the same proportion as the fighting
unit’s own attacks in so far as possible.
Basic positions for open order supporting units to the flank and rear.
Compare with the equivalent positions for formed up units page 67.
Note that the supporting units have to be touching the unit they are
supporting as this makes their position clear.
w — — V ~ 4
MARIUS' MULES
It was rhe Roman general Marius who decided that, from
henceforth, rather than compromise the mobility of the
Roman legions with such nonsense as baggage trains and
hordes of servants, rhe Roman legionaries would carry
their own kit as they marched. With 60 pounds to carry
per man the legionaries became known as Marius’
Mules’ Amongst this considerable weight is included a
dolabra which is the Roman version of an entrenching
tool - this would have seen far more use that rhe
legionaries’ arms and armour. Rations were carried for
several days and included the Roman equivalent to hard
tack which was called buccellatum. Some kind of water
flask was essential too, and not forgetting the ubiquitous
mess-tin cum cooking pot the patera. Heavner items
including the legionaries’ tents and millstones used to
grind their com rations were carried by real mules -
usually one per conrubernium of eight men.
The number of supporting attacks is the Short Range value
for the unit - i.e. the value normally used for short-ranged
attacks and skirmishing. This value is adjusted by
formation modifiers in the same way as for units making
short ranged attacks in the Ranged Attacks part of the turn
(see page 44).
Roll the dice to score hits. No dice bonus ‘to hit’ is applied to
supporting units for either charging or for winning the
previous round. Other hand-to-hand combat dice modifiers
apply as normal, for example if the unit is disordered or
shaken. For this reason it is often necessary to roll supporting
attacks separately from fighting attacks as a different roll may
be required to score hits.
Hits scored by supporting units are treated exactly as any
other hits. Morale saves are taken, and any hits that fail to
save are converted to casualties. As a fighting unit can rake
casualties from enemy it is fighting and from three
supporting units, it is entirely possible to suffer a great many
casualties during large combats.
French High Command of the Hundred Years war
69
HAIL CAESAR
INCIDENTAL CONTACTS
It can happen that a unit which cannot be supported
(artillery or skirmishers for example) has friends arranged
alongside in what would otherwise be a supporting position.
As shown here.
There will be occasions when, because of the constraints of
other units or terrain, it will not be possible to bring these
flanking units into the combat engagement. In these cases a
unit may find it is touching an enemy but not engaged in
combat. Units that are touching but neither fighting nor
supporting do not take part in the engagement, but they still
have a useful role to play in holding back enemy who might
otherwise advance forward after combat. The example below
shows such a situation.
The artillery unit in the centre is flanked by infantry units on either
side. Even though they are positioned to offer support these infantry
are unable to do so as artillery cannot be supported.
A charge made against the artillery will inevitably touch both
flanking units. Where possible the charger must move in such
a way as to bring one or other of the flanking units into
combat, for example as shown below.
Now the artillery unit ha.s been defeated and destroyed - leaving the
charger in contact with the flanking unit even though they are not
engaged in combat. The units are left ‘hanging*.
In this case the charger has chosen to ‘maximise frontage* against the
unit on the right allowing it to fight in the combat. Note that the
artillery unit is still fighting - as its own centre-front leader position is
touching the enemy.
LUCKY GENERALS
‘Give me lucky generals* Napoleon said - but he wasn’t the
first to put his faith in the fortunate rather than the
courageous for his words are pretty much taken from the
Strategikon where the Byzantine Emperor Maurice say’s,
'The state benefits more from a lucky general than
from a brave one. The first achieves his results with
little effort, whereas the other does so at some risk.’ .
This is something wargamers will certainly sympathise
with - for amidst all the cunning and guile we can
muster, nothing beats an opportune roll of the dice.
Bronze horse bit с. 900BC Iran
(Perry Collection)
See Combat Results and Incidental Contacts page 79 for rules
about how to resolve these situations following combat.
COMBAT RESULTS
Combat results are worked out for each engagement as soon
as all units taking part have fought, including any supports.
To work out which side wins, add up the number of casualties
inflicted by each side during that round. Do not include any
casualties inflicted by closing or traversing shots prior to the
round of combat itself. The side that has inflicted the most
casualties is victorious and the other side has been defeated. If
both sides suffer the same number of casualties then there is
no clear winner or loser and the result is a draw.
The fighting unit that has been defeated may be destroyed
outright. Such units are described as shattered. Otherwise it is
obliged to take a break test to determine whether it breaks and is
destroyed, if it gives ground, or if it holds its ground undaunted.
REALLOCATING CASUALTIES
As soon as you have worked out which side has won make a
note of the difference in the number of casualties scored by
each side that round. For example, if one side scores 4
casualties on the enemy who scores 7 casualties in return,
then the enemy have won the combat by 3. This value affects
the result of the subsequent break test so it is important to
establish this first before doing anything else.
Once you have worked out which side has won and by how
much, identify any fighting units that are shattered and
remove them immediately. Shattered units are those that
have lost the combat and sustained a total of at least double
their Stamina value number of casualties. Such units are
destroyed without recourse to a break test. Note that only
fighting units that are defeated can be shattered, not units
that win or draw' a combat.
________________________________ HAND-TO-HAND COMBAT
Once you have removed shattered units, take any excess
casualties inflicted on fighting units from both sides and
redistribute them amongst their supporting units. Don’t
forget to redistribute excess casualties from shattered units;
these casualties must still be redistributed amongst the
shattered unit’s supports. Excess casualties are those in excess
of the unit’s Stamina value, so a unit with a Stamina of 6 and
which has a total of 8 casualties has 2 excess. Excess casualties
are distributed amongst each fighting unit’s supports as
equally as possible, starting with supporting units that are
touching the enemy; otherwise the owning player can choose
which units will suffer odd casualties. If a defeated unit has
no supports any excess casualties are simply removed. Where
a supporting unit already has its maximum number of
casualties, any additional casualties accrued to it are also
removed. Supporting units cannot be shattered as a result of
this redistribution of casualties. The most number of
casualties a unit can have once reallocation is complete is its
Stamina value.
BREAK TESTS
Once an engagement has been fought, results worked out
and any casualties reallocated to supports as necessary, the
side that has been defeated must take a break test for each
surviving unit that is fighting the enemy. This won’t be
necessary if a unit has been .shattered, as shattered units are
destroyed automatically as already explained. The rules for
break tests are given in the following section on page 72.
Note that a separate break test is taken for each fighting unit in
the engagement, so it is possible for one unit to hold its ground
whilst another breaks, for example. Only fighting units test
initially. Supporting units don’t automatically need to take a
break test when their side loses a combat. Supports only have to
test if the unit they are supporting is shattered or if the unit they
are supporting breaks as a result of its own break test
In the case of a draw, fighting units from either side must
take a break test if they are already shaken. This can result in
opposing units both giving ground or even breaking and
being destroyed in some cases. Supporting units are not
required to test in a drawn combat, even if they are shaken,
bur will have to test subsequently if the unit they were
supporting breaks in the same way as for defeated units.
END OF COMBAT
Once a fight has been resolved units are often left in place
facing each other, in which case the combat engagement
continues into the following turn. Few engagements will be
resolved in one round of fighting, especially between equally
matched close fighting infantry.
Sometimes the losing side will give ground, moving away
from the enemy, in which case the victors have a choice of
whether to follow them up and continue the engagement.
This is covered in the section on Break Tests, along with the
rules for moves resulting from combat.
71
A break test is taken to determine how a unit reacts in
perilous circumstances. Most commonly, tests are required
when defeated in hand-to-hand fighting. Troops will also be
called upon to take a break test if they are shaken by ranged
attacks, and in other situations as noted below. A unit that
fails a break test by a sufficient margin is removed from the
game; its warriors turn tail and flee, dispersing beyond recall
or falling beneath the blades of their enemies. This is often
how units are defeated and destroyed in our game, so it is an
important part of play as can readily be imagined. Break tests
don’t always result in a unit’s destruction. Sometimes units
will be obliged to retreat, they might become disordered, or
they could simply hold their ground.
A test is also required on account of ranged attacks in other
parts of the turn
• If a unit is shaken by closing and/or traversing shots.
• On the roll of a 6 ‘to hit’ against units where closing
shots/traversing shots require better than 6 to hit.
• On two rolls of 6 ‘to hit’ against units where closing
shots/traversing shots require 6 to hit.
Test in the Hand-to-Hand Combat part of the turn
• If a fighting unit is defeated in hand-to-hand combat.
• If a fighting unit that is shaken draws a hand-to-hand
combat.
• If a unit is supporting a fighting unit that breaks or
is shattered.
There are two different break test tables. One is used for
ranged combat and the other for hand-to-hand combat. Tests
are required in the following situations as described in the
relevant sections of the rules.
Test in the Ranged Attacks part of the turn
• if a unit is shaken by ranged attacks.
• If a unit that is already shaken suffers casualties from
ranged attacks.
• On the roll of a 6 ‘to hit’ by ranged attacks requiring
better than 6 to hit.
• On two rolls of 6 ‘to hit’ by ranged attacks requiring
6 to hit.
Tests can also be taken on either table
at the discretion of the umpire or the
agreement of the players as seems
reasonable at the time. Thus we can
take account of otherwise
extraordinary events should we wish,
such as the proximity* of stampeding
elephants, the occurrence of
earthquakes, the occasional solar
eclipse and so on. Think of this as
divine intervention on the part of
the umpire.
72
TEST CATEGORIES
There are three different categories for troop types shown on
the break tables. These are:
Infantry - this category covers all infantry except for
skirmishers, and it also includes artillery crew.
Cavalry - this covers mounted troops of all kinds namely
cavalry, camels, chariots and elephants.
Skirmishers - which covers infantry skirmishers. It also
includes baggage, and - where necessary - civilians.
TESTS FROM RANGED ATTACKS
Only one test is taken during any part of the turn. So if an
enemy makes ranged attacks by two, three or more units
against the same target only one test is required. Even where
several 6’s are rolled, or where 6’s are combined with a unit
becoming shaken, only one rest is needed. It is necessary to
wait until all ranged attacks against a unit are complete, as
casualties inflicted in excess of the target’s Stamina value will
affect the result.
To take the test, roll two dice and add the scores together to
get a result between 2 and 12. If the unit is shaken when the
test is taken and has also suffered casualties in excess of its
Stamina value, then deduct the number of excess casualties
from the result. For example, a unit with Stamina of 6 and 8
casualties is shaken with an excess of 2; therefore subtract 2
from the dice roll.
BREAK TESTS
FROM RANGED ATTACKS
10+ Infantry
Cavalry
Skirmishers
9 Infantry
Cavalry
Skirmishers
8 Infantry
Cavalry
Skirmishers
7 Infantry
Cavalry
Skirmishers
6 Infantry’
Cavalry
Skirmishers
5 Infantry
Cavalry
Skirmishers
4 Infantry
Cavalry
Skirmishers
Hold your ground without penalty
Hold your ground without penalty
Hold your ground without penalty
Hold your ground without penalty
Hold your ground without penalty
Retreat in good order
Hold your ground without penalty
Hold your ground without penalty
Retreat disordered
Hold your ground without penalty’
Retreat in good order
Retreat disordered
3 Infantry
Cavalry
Skirmishers
2 or Infantry
less
Cavalry
Hold your ground disordered or
Retreat in good order
Retreat disordered
Retreat disordered
Hold your ground disordered or
Retreat in good order
Retreat disordered
Break if shaken otherwise Retreat
disordered
Retreat disordered
Break if shaken otherwise Retreat
disordered
Break if the unit has suffered any
casualties otherwise Retreat
disordered
Break if shaken otherwise Retreat
disordered
Break if shaken otherwise Retreat
disordered
Break
Break if unit has suffered
any casualties otherwise
Retreat disordered
Break if unit has
suffered any
casualties
otherwise
Retreat
disordered
Break
Skirmishers
73
HAIL CAESAR_____________________________________________
RANGED ATTACK TEST RESULTS
Hold your ground without penalty. The unit has passed
the test, remains where it is, and suffers no penalties. If the
unit is testing on account of closing or traversing shots
during a charge, then this result does not stop it charging
home successfully.
Retreat in good order. The unit makes one move in so far as
it can away from the enemy. Move the unit into the quarter
opposite the enemy: for example, if attackers lie to the front
the unit moves to its rear quarter, whilst continuing to face
its opponents. If the unit is unable to comply because there
are friends, enemies, combat engagements or terrain that
prevent it doing so, then the unit complies as far as it can
and becomes disordered. If the unit is testing on account of
closing or traversing shots, then it retreats away from the
engagement without fighting.
Retreat disordered. This is the same result as Retreat in good
order except that the unit becomes disordered at the end of its
move regardless of circumstances.
Hold your ground disordered. The unit stays where it is and
becomes disordered. If the unit is testing on account of
closing or traversing shots during a charge, then the unit
charges home successfully and fights close combat disordered.
Break if shaken. If the unit is shaken it breaks and is
removed from the table as destroyed.
Break if the unit has suffered any casualties. If the unit has
already suffered any casualties it breaks and is removed from
the table as destroyed.
Break. Break! The unit is removed from the table as destroyed.
DISORDER
Disorder often results from a break test, or from a test for
moving through or out of the way of other units.
Disorder also occurs automatically in some situations,
notably where formed infantry arc countercharged by
cavalry or chariots, and where the movement of retreating
units is blocked or compromised as noted under Retreats
on page 75.
Disorder represents a unit losing its cohesion either due to
panic or, more likely, to its ranks becoming disorganised or
thrown into disarray. A disordered unit suffers various
penalties, the most significant of which is that it is not
allowed to receive orders or use its initiative in the
Command part of the turn. See Disordered Units and
Orders on page 32.
Note that disordered units can still move during the
Ranged Attacks and Hand-to-Hand Combat parts of the
turn, and are often obliged to do so due to break test
results.
Units cannot recover from disorder whilst they remain
engaged in combat, whether they are fighting or supports.
Otherwise, units usually recover from disorder at the end
of their own turn. Once the player’s turn is otherwise
finished he removes all outstanding disorder markers from
units not engaged in combat and his turn is then complete.
Some special rules do affect a unit’s ability to recover from
disorder for better or worse. See A Selection of Useful
Rules page 98.
Disorder can also result from special rules in some cases.
For example, cavalry charging the front of infantry armed
with long spears risk becoming disordered (see page 101).
As these rules are both optional and mutable there is little
point in listing them all, so refer to A Selection of Useful
Rules for more details.
Players should bear in mind that where a game is run by
an umpire it is entirely feasible to allow for discretionary
tests for disorder where he feels it appropriate to do so.
Like the thunderbolts of Jove such proclamations should
fall upon the players as judgements from heaven! We
leave such matters to the participants to
arrange to their liking, and as seems the most
appropriate for the game played.
74
—
BREAK TESTS
RETREATS
It is worth saying a little more about how retreats work as units
are often obliged to retreat in rhe face of enemy shooting.
Wherever possible, a retreating unit makes a single move away
from the closest enemy that attacked it. However, if the players
or umpire agree that the balance of threat lies in another
direction, the unit retreats away from that instead. The
retreating unit makes one move into the quarter opposite to rhe
closest attacker/greatest threat, in the same way as a move made
in the Command part of the rum. If the retreating unit is
already facing an enemy unit within 12” then it must continue
to face rhe same enemy (see the Proximity’ rule page 34).
If a unit cannot move exactly into the quarter opposite the
closest attacker/greatest threat, then it must attempt to do so
in so far as it can. If a friendly unit blocks its path it will move
through it, and will make two or three moves where necessary
to clear the position of other unit/s. If presented with terrain
it cannot enter, enemy units, units from either side engaged in
combat, or other insoluble impediments to movement, the
retreating unit will move as far as it can. A retreating unit that
is obliged to make additional moves to clear the position of
friends is automatically disordered once it has done so. Units
moved through risk becoming disordered in the usual way (see
page 35). A retreating unit that cannot make its full move
because of impenetrable terrain or enemy units is also
disordered once it has moved as far as it can.
TESTS FROM
HAND-TO-HAND COMBAT
Tests for hand-to-hand combat are a little more complex than
those for ranged attacks comprising tests for units that are
fighting following defeat or a draw, and tests for units
supporting friends who break or become shattered.
Fighting units must test if they are defeated in combat. Such
units will have been beaten by a difference of one, two, three
or more casualties as described in the section on hand-to-hand
combat results (page 70). This difference is deducted from the
unit’s test score, so the greater the difference in casualties the
worse the outcome. Note that there is no additional penalty
for shaken units that have taken excess casualties as there is
for ranged attacks. In break tests tor hand-to-hand fighting it is
only the difference in casualties that matters.
Test for the unit by rolling two dice and adding the scores to
get a result between 2 and 12. Then deduct the difference in
casualties inflicted by both sides during the combat. For
example, if the winning side inflicts 5 casualties and the loser
inflicts 2 the difference is 3, so deduct 3 from the dice total.
Refer to the chart below for the result.
Units that are fighting must also test if the combat is a draw
and the unit is shaken. As it is possible for both sides to be
shaken it is also possible that both will have to test. It doesn’t
matter which side tests first in such a case.
If a unit breaks or is shattered, then all units supporting it
must take a break test. Only one test is required for a unit
during any turn, even where it is supporting two friends who
break - the unit’s first test result will stand for both. Deduct
BREAK TESTS FROM
HAND-TO-HAND FIGHTING
10 or Infantry Hold your ground without penalty
more Cavalry Hold your ground without penalty
Skirmishers Hold your ground without penalty
9 Infantry Hold your ground without penalty
Cavalry Give ground in good order, together with supports
Skirmishers Give ground disordered
8 Infantry Hold your ground without penalty
Cavalry Give ground in good order together with supports
Skirmishers Break if shaken otherwise Give ground disordered
7 Infantry Give ground in good order, together with supports
Cavalry Give ground disordered, together with supports
Skirmishers Break
6 Infantry Give ground in good order, together with supports
Cavalry Give ground disordered, together with supports
Skirmishers Break
5 Infantry Give ground disordered, together with supports
Cavalry Break if shaken otherwise Give ground, together with supports - all disordered
Skirmishers Break
4 Infantry Break if shaken otherwise Give
ground, together with supports - all disordered
Cavalry Break if shaken otherwise Give
ground, together with supports - all disordered
Skirmishers Break
3 Infantry Break if shaken otherwise Give ground, together with supports - all disordered
Cavalry Break
Skirmishers Break
2 or Infantry Break
less Cavalry* Break
Skirmishers Break
75
HAIL CAESAR
THE MURDEROUS
GLADIUS!
The gladius was a proficient weapon in the hands of a
determined warrior whether used to stab or cut at the
enemy. The Romans placed great store in training
soldiers to use these swords to deadly effect, with
emphasis on the stabbing blow-. This is what Vegetius has
to say on the matter - he was writing in rhe 4th century
AD but referring to traditional Roman fighting methods.
‘A stroke with the edges, though made with ever so
much force, seldom kills,On the contrary, a stab,
though it penetrates but two inches, is generally fatal
...the body is covered while a thrust is given, and the
adversary receives the point before he sees the sword.
This was the method of fighting principalh used by
the Romans...’
Vegetius De Re Militari
When the Romans expanded eastwards they came
into conflict with rhe Macedonians, w’hose troops
were equipped as phalangites with long pikes and
light sw’ords. Livy describes how the Greeks were
horrified by the ghastly wounds inflicted by the heavy-
bladed Roman gladius.
'Accordingly, those who, being always accustomed to
fight with Greeks and Illyrians, had only seen
wounds made with javelins and arrows, seldom even
by lances, came to behold bodies dismembered by the
Spanish sword, some with their arms lopped off,
with the shoulder or the neck entirely cut through,
heads severed from the trunk, and the bowels laid
open, with other frightful exhibitions of wounds:
they therefore perceived, with horror, against what
weapons and what men they were to fight. Even the
king himself was seized with apprehensions, having
never yet engaged the Romans in a regular battle.’
Livy XXXI 34
the difference in casualties suffered during the combat from
the dice roll as before. Refer to the table on page 75 and read
off the result for the troop type under test.
HAND-TO-HAND
COMBAT TEST RESULTS
Hold your ground without penalty'. The unit has passed the
test, remains where it is, and suffers no penalties. Thank
Jove! However, note the exception for fighting against troops
who enjoy an uphill advantage.
Give ground in good order, together with supports. The
unit moves 6” directly away from the enemy it is fighting. Any
supporting units also move back up to 6” whilst remaining in
; supporting positions in so far as they can. See Give Ground
below for more about these moves.
Give ground disordered, together with supports. This is the
same as described above for ‘Give ground in good order, together
with supports’ except that the unit also becomes disordered.
Note that only the fighting unit is disordered, supporting units
retain good order assuming they had it to start with.
Give ground, together with supports - all disordered. This
is the same as described above for ‘Give ground in good
order, together with supports’ except that the unit and all of
its supports are disordered.
Break if shaken. If the unit is shaken it breaks and is
removed from the table as destroyed. Supporting units must
then each take a separate break test.
Break. Break! The unit is removed from the table as destroyed.
Supporting units must then each take a separate break test.
GIVE GROUND
A unit giving ground is mined 6” directly aw’ay from the
enemy unit it is fighting. In most cases this will be directly
backwards. It doesn’t matter how fast the unit normally
moves, all units give ground 6". The exceptions are artillery
and baggage units, which do not give ground but are
destroyed instead (see below).
If a unit is fighting to its own flank or rear it gives ground
in rhe opposite direction. Just slide the unit along in
whatever direction is required without altering the unit’s
formation or facing. If fighting to the front and a flank at the
same t\me, then consider the weight of attacks from each foe
—
BREAK TESTS
Unwelcome visitors trouble a lakeside beauty spot - settlements like this were a feature of the European Bronze Age
and move the unit at what seems a reasonable compromise
angle. If a unit is fighting enemy in opposite directions -
front and rear for example - then it can’t give ground and is
destroyed.
Supporting units must also give ground when the unit they
are supporting does so. They are moved up to 6" and must try
to remain in the same relative position so they can continue
to support in the next round of combat.
If a defeated fighting unit is unable to give ground because of
intervening enemy, engaged troops, friends who do not move
out of the way, or impassable terrain then it breaks and is
destroyed. If supporting units are unable to give ground for
the same reasons, they will attempt to do so to the best of
their ability but are otherwise not penalised. Supporting units
that are unable to maintain a supporting position are allowed
to ‘drop out’ of the engagement if that is their only option.
Friendly non-disordered and non-engaged units in the path
of troops giving ground can move out of the way by up to
one normal move. Disordered units and units engaged in
combat cannot move out of the way. The unit giving ground
automatically becomes disordered if it is not already
disordered, and every unit moved to make room also
becomes disordered on a dice roll of 1, 2 or 3. If friends are
not able, or are unwilling, to move to make room for a
fighting unit that is giving ground then the fighting unit is
broken and destroyed just as if surrounded by enemy. This
will trigger further break tests for supports as if the unit had
been destroyed in combat.
The Uphill Advantage
A fighting unit that is uphill of its enemy, and which has not
charged/countercharged this turn, nor moved following the
previous round of the same engagement, receives a +1 ‘to
hit’ to account for its uphill advantage. This bonus is
included in the ‘To Hit’ dice roll modifiers for Hand-to-
Hand Combat on page 64. Basically - the bonus applies so
long as the unit is uphill of its enemy and so long as it
remains stationary. The bonus is lost if rhe unit is defeated
and gives ground, or if the unit is victorious and follows up
its enemy. Whilst a unit benefits from the bonus it is said to
have an uphill advantage.
If troops are engaged against enemy with an uphill advantage
then any Hand-to-Hand Combat break test result of ‘Hold
your ground’ is treated as ‘Give ground in good order
together with supports.’ The best result that such troops can
get is therefore to give ground. Bear in mind that if their
enemy gives ground and a unit with the uphill advantage
follows up, then it will have moved and therefore loses the
uphill advantage during the following round.
Note that the bonus for uphill advantage and the bonus for
charging/winning rhe previous round are mutually exclusive.
If a unit with the uphill advantage wins the engagement its
enemy will always give ground and either the combat ends or
the victors follow-up. They gain the bonus for winning the
combat but lose the uphill advantage. However, so long as
they remain uphill it is possible for a unit to regain the uphill
advantage in subsequent rounds if combat is drawn or if a
defeated unit holds its ground.
77
HAIL CAESAR
ARTILLERY AND BAGGAGE GIVING GROUND
Artillery and baggage units that are obliged to give ground in
combat are destroyed instead. This applies to units that are
fighting and to supporting units that arc obliged to give
ground together with fighting units. This takes into account
the immobility of such units and avoids the unwelcome sight
of siege engines pushing to-and- fro in combat. We humanely
assume crews abandon their machines to the enemy and flee
for their lives.
SUPPORTING UNITS
Following combat, supporting units will do whatever the unit
they are supporting does in principle. So, if a fighting unit
gives ground, supports must also give ground whilst
continuing to support where possible. If a victorious fighting
unit moves forward to maintain contact with retreating
enemy, then supports must also press forward and continue to
support where they can. Victorious supports will always
attempt to continue to support where they can, and if doing
so brings them into a fighting position then this is allowed. If
a fighting unit breaks then its supporting units do not
automatically break as well, each must take a break test and
abide by the result.
Where a unit is dividing support between fighting units to
either flank, then it follows the first unit tested and ignores the
second unit. On the whole this is considered the most practical
way of dealing with such a situation. The umpire or players may
consider it appropriate to follow one unit rather than another
in some circumstances; this is up to those concerned.
MOVES BY VICTORIOUS UNITS
If neither side moves or breaks following combat, units
remain in place and continue to fight in the following round.
It is quite likely that other units may join the engagement
over the following turn, and this can happen over several
turns causing a fight to swing one way and then the other.
If all of the enemy in contact with a victorious fighting unit
give ground or are destroyed then rhe victors are allowed to
make a move. They do not have to do so. They can remain
where they are if preferred. If they do move then the victors
are bound by the proximity rule assuming there are enemy
within 12” to their front. See page 34.
A move can take a unit forward to maintain contact with the
enemy who has given ground, thereby continuing the combat
into the following round. When following up in this way move
4 the victors so they contact w ith as much
, frontage as possible in the same fashion as a
charge - see Position Chargers on page 56.
Units that press forward to maintain contact
with their enemy count the +1 ‘to hit’ bonus
for winning the combat in the next round of
fighting. Note that a victorious unit can do
this even if disordered, as disorder does not
affect moves resulting from break tests or
hand-to-hand fighting (see Disorder
page 74).
A victorious unit can move in any other way normally
allowed, but note that if facing their enemy during the
combat rhe proximity rule will dictate they remain facing
the same enemy as they move. This allows a unit to
reposition itself to some extent whilst withdrawing from
hand-to-hand combat, and it permits the unit to fall back
if desired.
SWEEPING ADVANCE
If all the enemy fighting a victorious unit are destroyed, and
no other enemies remain in contact to their front, the
victors may be allowed to make a sweeping advance as an
alternative to a single ordinary move as explained above. A
unit can only make a sweeping advance if it is neither
shaken nor disordered. However, a unit making a sweeping
advance must roll a dice once it has done so, and becomes
disordered on a roll of 4, 5 or 6.
When making a sweeping advance the proximity rule is
likely to apply. This will constrain the move somewhat. A
sweeping advance is up to two normal moves into the unit’s
front quarter. If a suitable target presents itself a sweeping
advance can be used to charge against another enemy, in
which case it is a sweeping charge. Declare the charge before
moving the unit as you would for a charge order in the
Command part of the turn. Often a target will be a unit
previously offering rear or side support to a destroyed
fighting unit.
A sweeping charge can result in a unit rejoining the same
engagement, in which case the combat continues in the
following round and the unit making the sweeping
advance counts as charging in that round. This is the most
common situation, where a victorious unit plunges
straight into an enemy previously supporting the unit that
has been destroyed.
A sweeping charge can also potentially enable a unit to
charge into a previously unengaged unit, for example a fresh
enemy positioned a little distance behind the enemy that has
been destroyed. In this case the charge initiates a new’
engagement and this is worked out immediately. This means
that the unit making the sweeping advance w’ill fight twice
during the round. Resolve the combat right away before
dealing with any other fighting. If the victorious charging
unit is fortunate enough to destroy this second enemy then it
may not make a further sweeping advance. Only one
sweeping advance is allowed in any round.
A sweeping charge can also potentially enable a unit to charge
into another engagement that either has or hasn’t already been
fought. If the engagement has already been fought then the
charger joins the engagement and fights in the following round
and counts as charging in that round. If the engagement has
not already been fought then the charger joins the engagement
and fights this round, and counts as charging.
Because a sweeping charge is a charge, enemy units are
allowed to make a response in the same way as when
charged in the Command part of the turn. Similarly, units
with a long ranged attack may be entitled to make closing
shots, whilst adjacent units are allowed to make traversing
78
shots where they can. Note that these shots can potentially
lead to a break test.
The sweeping charge can be a decisive moment in a combat,
as it allows a victorious unit to fold into the flank of a long
battle line and potentially ’roll up' several units one after the
other. This tactic can be countered by a second line of
troops - or careful placement of reserves - so watch out for
it and try not to be caught out.
COMBAT RESULTS
AND INCIDENTAL CONTACTS
It can happen that a unit is positioned alongside a fighting
unit and touching the enemy, but is unable to support
because the fighting unit is of a type that cannot be
supported (such as skirmishers). Such units are described as
incidental contacts.
Units positioned as incidental contacts will block further
moves by enemy after combat is complete. For example, a
victorious enemy will be unable to follow up a unit giving
ground because it cannot move through the incidental contact.
In situations such as that shown below, where the combat
engagement ends but units are left in incidental contact,
then units that were engaged must move 6” back just like
units giving ground. They have to do this even if they won or
drew the combat.
This skirmisher unit has lost the combat and given ground - leaving the
enemy in contact with the flanking unit even though it is not engaged in
combat. The victorious unit cannot follow up back into touch with the
skirmishers because the flanking unit is blocking its move.
There will be occasions when units are blocked to a trivial
degree, or where a block results purely from inconsequential
differences in frontage, and in such cases we would defer to
the umpire’s judgement rather than be pernickety about
things. The idea behind blocks is simply to stop players
taking advantage of small, weak and vulnerable units to break
through an otherwise solid battle line.
Note that is also possible for comparable situations to occur
because units have been placed in supporting positions that
are of a type not actually allowed to support: notably
baggage and medium or heavy artillery units. It seems
wrong that incidental contacts of these kinds should block
an enemy’s follow-up, so we usually consider such units to
be destroyed if they would otherwise stop a victorious
enemy making a follow-up or sweeping advance. A scenario,
circumstance or umpire may suggest otherwise - but as a
general rule it is best to remove such units as casualties.
UNITS IN OPEN ORDER
If a unit in open order has closed up its ranks to fight in
combat, then it automatically disperses into open order again
if it is no longer fighting once the engagement is complete.
This prevents open order units being left in a ‘closed up’
fighting position once they are no longer engaged. The player
rearranges the models into open order around the centre of
the unit as best as can be managed.
SQUARES
Units in square formation ignore all break test results of
‘Retreat or give ground’. They treat all such results as
‘Hold your ground’ instead. This does not affect results of
Disorder, so a unit that rolls a result of ‘Gives ground
disordered’ will ‘Hold your ground disordered’ instead.
This makes squares especially resilient as a result of Break
is needed to destroy them.
UNITS IN BUILDINGS
Units in buildings are treated the same way as units in squares
and ignore all break test results of‘Retreat’ or ‘Gives ground’.
They treat all such results as ‘Hold your ground’ instead. As
with squares this does not affect results of Disorder, so a unit
that rolls a result of‘Give ground disordered’ will ‘Hold your
ground disordered’ instead.
OCCUPYING BUILDINGS
Where a combat takes place for possession of a fortified
position, building or something along those lines, the victors
can always move into the position and occupy it once the
enemy have been broken and destroyed. This is just the
equivalent to taking a move after combat. The unit moves into
the building and is positioned within it. If a victor does this
then supporting units are under no obligation to maintain
support and can make a single move forward or back instead.
79
In ancient rimes men with aspirations to rule were obliged to
lead from the front - and all too frequently they died there
too! Politics was a serious business in those days. This wasn’t
just true of the chieftains and officers in charge of individual
bands of warriors - even the highest in the land were looked
upon to do their part. The loyalty of the army was often
intensely personal, and the death of the overall commander
could result in troops abandoning the battle or suing for
peace. Naturally, we shall demand that our leaders live up to
the expectations of their troops and peers - be quite sure that
our model commanders and generals will be seeing their fair
share of action.
COMMANDER MODELS
As discussed already each commander is represented by a
suitably sized base bearing the great man plus supernumeraries
and/or scenic elements as deemed appropriate. We do not feel
the need to specify dimensions for bases when it comes to
commanders: we only require that they be a convenient size
and shape for purposes of play. Measurements are always taken
from the commander’s head - or centre of the base if preferred
- so rhe size of the base isn’t critical to the game.
Commanders can be on foot or mounted - as deemed most
realistic for the force they lead - and they can ride elephants
or chariots if their actual counterparts did so. Elephants and
chariots were a mark of status in some armies, and we would
obviously ask our commanders to come up to scratch as
regards their personal transport. We will consider suitable
rules for individuals so mounted later; for now we shall
simply say that it makes no difference how a commander is
mounted when it comes to issuing orders. Commanders can
issue orders just as well w hether on foot, astride a horse,
stood in a chariot, atop an elephant, riding a donkey or
taking a bath.
Players will need a commander model to lead each separate
division in the army. Ideally, players should have a few reserve
commanders ready and waiting to take their place should the
originals be killed. Where commanders ride chariots or
elephants it is a good idea to have a few7 reserve commander
models on foot or riding horses.
RESERVE COMMANDERS
Commanders often get killed in action, and when this
happens we assume the most senior of the deceased’s
subordinates immediately takes over. The slain commander
model is removed and a reserve commander is placed
within 12" of any unit in the same division. He can be
placed with a unit if you wish, even a unit that is already
fighting a combat. We assume the reserve commander was
previously one of the commander’s close companions and
subsumed within his base; or perhaps he was one of a
network of subordinates not otherwise represented in the
game. Either way, the dead commander is removed as a
casualty and the reserve commander takes his place at the
head of his division.
Reserve commanders have a leadership rating one less
than their predecessor. So, if the original commander has
the average rating of 8, then his replacement has a rating
of 7.
If a reserve commander is slain then the next in line takes
over in the same w7ay, and so on. Fear not - there is no
shortage of budding officer material amongst our armies.
The only problem is that each replacement has a leadership
rating one less than his predecessor, to a minimum value of
5. We sometimes find it convenient to set the minimum
value higher than this - at 6 or even 7 - especially where an
army might reasonably be assumed to have a number of
capable officers and an organised structure. This is up to the
participants.
If a commander rides an elephant or chariot then w'e require
that his replacement should be on foot or mounted on a
horse. This isn’t an absolute necessity’ by any means; but we
find the sight of elephants and chariots popping onto the
battlefield a little too discomposing for our tastes!
THE GENERAL
The player must nominate one of his commanders to be
the general. The general is the overall leader of the army,
but otherwise takes rhe role of an ordinary commander
and leads one of the divisions. The general usually has the
same leadership rating as his fellows - although we
sometimes favour him with a value one higher where
merited. To start with we’d recommend a leadership rating
of 8 throughout until players have a good grasp of how the
rules work.
The general is also entitled to a special re-roll bonus. This
allows the player to re-roll any order rest result rolled by the
general. It does not matter whether the result is passed or
failed or even if a blunder is scored, the player is allowed to
re-roll the general’s dice once in rhe Command part of each
of his turns. When the dice are re-rolled in this way the re-
rolled score stands even if the result is worse than the original
score or if it is a blunder. Should the general fall casualty
then his re-roll is lost as well, his successor lacking the great
man’s talents.
80
The use of the general’s re-roll is considered entirely optional
and players who prefer to do without can certainly do so. It is
possible to conjure other special abilities to reflect the
individual skills and foibles of generals - but such things are
inevitably bound to specific scenarios and are best left to
umpires to devise according to need.
FOLLOW ME!
Commanders are allowed to join a unit from their own
division and lead it personally. This is called a follow me!
order. It is a good idea to forego the use of these orders until
you have a good idea of how the game works, as they
introduce additional complexity and detail into the
command system.
If a commander is within 12” of a unit from his own division
then he can join it and lead it personally by issuing a follow
me! order. Once a commander has given a follow me! order
then, regardless of whether he is successful or otherwise, he
cannot give any more orders that turn. Attempting a follow
me! order always ends a commander’s orders for rhe turn. As
with any order a commander can only give a follow me! order
to a unit from his own division.
To issue a follow me! order the commander nominates the
unit he intends to lead, declares that he wants the unit to
follow me! and makes the usual test to see if the order is
obeyed. If the order is issued successfully the commander is
immediately placed with the unit, and the unit, together with
the commander, can make up to three moves.
There is no need to declare what the unit is doing before the
order is issued, the unit simply makes three moves as the
player wishes. The unit can change formation and/or charge
as part of its move even though no previous declaration has
been made. The player should still state what he is doing
before he moves for the sake of clarity and also because the
enemy may be allowed a response such as an evade,
countercharge or closing shots in some cases.
Once the unit has moved the commander remains with it.
He has joined the unit and cannot move further that turn.
Note that the follow me! order only lasts for a single turn just
like any other order, and if the same commander wishes the
same unit to follow him in the subsequent turn a new follow
me! order must be given.
If a commander fails to give his follow me! order then the
unit receives no order and will be unable to move. Bear in
mind that units entitled to a free move will not be able to
move at all if they fail a follow me! order because they have
no instructions to follow. See Free Moves page 31.
RALLY!
Rally! Is another kind of special order and it is given in a
similar way to the follow me! order. A rally! order allows a
unit to recover its stamina, reducing the number of casualty
markers it has suffered. As with the follow me! order we
recommend that players ignore the Rally! order until they
have a good grasp of the game mechanics.
If a commander is within 12" of a unit from his division that
has suffered two or more casualties then he can issue a rally!
order. Once a commander has given a rally! order then,
regardless of whether he is successful or otherwise, he cannot
give any more orders that turn. Attempting a rally! order
always ends a commander’s orders for the turn. As with any
other order a commander can only give a rally! order to a
unit from his own division.
To issue a rally! order the commander nominates the unit he
wishes to rally and makes the usual test to see if the order is
obeyed. If the order is successful the commander is placed
with the unit and one casualty marker is removed from the
unit’s total.
Once a unit has rallied the commander remains with it. He
has joined the unit and cannot move further that turn.
If a commander fails to give his rally! order then the unit
receives no orders and will be unable to move.
JOINING HAND-
TO-HAND COMBAT
A commander who has not already joined a unit can join any
unit in his division if it is fighting hand-to-hand combat
within 12". He can do so at any time prior to the combat
being worked out and even during the opposing player’s turn.
Note that he can only join a unit in this way if it is fighting
and not a unit that is merely supporting, although he can
join a supporting unit in his own turn by moving in the
normal way if the player wishes.
Once a commander joins a
unit that is engaged in
combat he is obliged to
remain with it whilst the
unit is engaged. If the
unit is broken or shattered
(i.e. destroyed) then the
commander may be
wounded or slain as
noted below.
81
RISK TO COMMANDERS
If a commander is moved over by an enemy unit, then he
must immediately join a friendly unit within one move’s
distance. If he is unable to do so he is captured and removed
from the battle, counting as a casualty. Note that only units
of troops can capture an enemy commander by moving over
him and not enemy commanders. Opposing commanders
can move over or through each other without penalty. As
commanders can move up to 24” at a time this isn’t likely to
happen too often.
If a commander has joined a unit that is broken or shattered
then roll a dice to determine his fate. On a score of 1 or 2 the
Commander is slain outright, on a roll of a 4 or 5 he is
wounded as described below, on a roll of 5 or 6 he is
unharmed. Whether wounded or unharmed he can make an
immediate move to join a unit from his division, and if unable
to do so is captured by the enemy and considered a casualty.
Commanders also risk being slain or wounded if they fight
hand-to-hand combat or if they are with units that are shaken
by ranged attack as described below.
RISK FROM RANGED ATTACKS
If a commander has joined a unit he risks being wounded
or killed if that unit is shaken by ranged attacks, or if it is
already shaken and suffers further casualties from
ranged attacks. Where this is the case, the opposing
player rolls two dice once all ranged attacks have been
worked out and the commander is hit on a roll of 12.
To determine his fate roll a dice, on a score of 1, 2 or 3
the Commander is slain outright, on a roll of a 4, 5 or 6
he is wounded as described on page 83.
COMMANDERS
RiSKFROM
HAND-TO-HAND COMBAT
If a commander is with a fighting unit then he risks being
wounded or slain regardless of whether the unit wins or loses
the combat. The chance of the commander being slain
depends upon how ferociously he throws himself forward at
the head of his troops. We represent this by the number of
attacks he adds to the unit as described under Fighting
Values of Commanders below.
Once both sides have fought and before taking a break test
for the loser, the opposing player rolls two dice to determine
if he has hit his opponent’s commander. On the roll of 12
the commander is hit. The opposing side adds +1 to his
unit’s result score in combat just as if he had inflicted an
extra casualty.
If the commander has added more than one attack to his
unit in the combat round then the chance of being hit is
increased. Add +1 to the risk dice roll for each extra attack
used. So, if a commander fights with two attacks he is hit on
a roll of 11 or 12, if he fights with three attacks he is hit on a
roll of 10, 11 or 12 and so on.
Once a commander is hit roll a dice to see what has happened
to him, on a score of 1, 2 or 3 the commander is slain
outright, on a roll of a 4, 5 or 6 he is wounded as described
below. Note that he still counts +1 to the other side’s combat
result regardless of whether he is killed or wounded.
FIGHTING VALUES
OF COMMANDERS
Commanders have a number of attacks reflecting their personal
valour and their ability to inspire the efforts of their men.
Generals usually have three attacks and other commanders
two. Any or all of a commander’s attacks can be added to the
total number of attacks made by a fighting unit he has joined
and are treated as struck by the unit with any associated
bonuses or penalties to the dice rolls. The commander’s
attacks simply boost those of the unit he has joined.
Reserve commanders have a maximum fighting value of 1,
thus the loss of a division’s commander will reduce its
fighting power as well as its leadership. Indeed, any
commanders can be set a lower or higher maximum value if
it is felt appropriate to do so. The likes of Alexander the
Great might justly scoff at a mere 3 attacks. If he isn’t worth
4, 5 or even 6 I don’t know who is! Of course, the greater
the number of attacks used in a fight the greater the risk of
the commander being wounded or slain.
Regardless of what fighting value you care to assign to a
commander, he is never allowed to enhance a unit’s attacks by
more than double. So, a unit with only one attack can only
benefit by one further attack from a commander, for example.
A commander can only join a unit from his own division, so
in normal situations it is only possible for a single commander
to join a unit. However, just to be doubly sure, we should
emphasise that only one commander can fight with a unit at
any time.
THE GENERAL AS
COMMANDER-IN-CHIEF
An alternative way of fielding generals is to have a
commander for each division and a separate general
model as a commander-in-chief. This can be a useful way
of representing the general’s role, especially in very large
games where it allows the general to sit back and leave
the work to his subordinates.
The commander-in-chief can only give orders to troops
by moving into touch with another commander and
taking over his division. This allows the commander-in-
chief to move from one division to another, spreading
his special talents where needed. He can only join with
one commander at once, so he will only be
able to take over a single division in any
turn. The commander he has joined is
unable to issue orders whilst accompanied
by the commander-in-chief.
A commander-in-chief can only join a
unit in company with the commander
he has joined, in which case the
player can use the higher of the two’s
fighting value. Where commanders
risk being slain or wounded in this
situation, then randomise between
them to find out which is affected.
WOUNDED COMMANDERS
Once a commander is wounded then he can no longer fight
in hand-to-hand combat. If he is with a unit that is already
fighting hand-to-hand combat he must remain with it, but
can no longer make his attacks. He can still issue orders,
move and otherwise act as normal.
83
This section of the rules is about how to recognise the
moment when the battle is done and one army has
defeated the other. Generally speaking, our preferred
approach is for the umpire to set objectives for each side
before the game. This will vary according to the nature of
the game being played: escape an ambush by breaking
through a blocking force and reaching the opposing table
edge, assault and capture a fortress, attack and burn a
settlement and drive away cattle... these kinds of scenarios
require the players to set objectives before the game begins.
Often we will agree targets for outright victory and degrees
of success, depending upon the number of objectives taken
from, or denied to, the foe. The examples of battles
included in this book will give a good idea of the sort of
thing intended.
In many battles the opposing armies will have no special
objective other than to defeat their enemy. The following
rules have been devised to provide a tangible objective based
on destroying enemy units. We use these rules for games
which otherwise have no specific objectives, and we also use
them in other games as a way of ending a battle whether
objectives have been met or not. The rules are offered as
guidelines and are not meant to be immutable by any means,
but form a useful starting point and can easily be adapted to
suit particular circumstances as required.
DEFEAT
An army is deemed defeated once more than half of its
divisions are broken as defined below. At this point all the
army’s remaining divisions are also judged to have been
broken. Often this is the signal for the battle to end - the
losing army is assumed to quit the fight, leaving the field to
the victor. If a scenario suggests it is worth fighting on then
players can always agree to do so, and this is left to the
participants to decide at the time.
This simple rule does assume the army has at least three
divisions. Should you be playing a small game where this is
not the case you might agree to call a halt once one division
is broken. We’d recommend that armies have ar least three
divisions though. If playing a very large game you might want
to set the point of defeat at half the number of divisions
rather than more than half, if only to make the game playable
over a shorter period.
84
BROKEN DIVISIONS
If a division has lost a substantial part of its fighting strength
then its remaining units will attempt to quit the field. We
refer to such divisions as broken divisions.
A division is deemed broken if at the start of the player’s turn
more than half of its units are destroyed or have left the table
whilst shaken (such units are unable to return and are
therefore as good as destroyed).
A division is also deemed broken if at the end of the player’s
Command part of the turn all of the division’s remaining
units are shaken. This is intended to give the player a chance
to rally units in the Command part of the turn and avoid
breaking the division.
Where divisions contain a mix of troops it is often necessary
to ignore some units when it comes to making these
calculations. Elite units of heavy infantry are not likely to
show much concern just because a few skirmishers have
perished or run away into the wild blue yonder. Skirmishers,
light artillery, and tiny units are generally ignored unless they
make up the majority types in the division.
For example, in a division of four heavy infantry units, a light
artillery unit and two skirmishers, only the heavy infantry
units count. This division is broken once three heavy infantry
units are destroyed, or if all the remaining heavy infantry
units are shaken.
We also sometimes ignore light infantry’ or light cavalry
belonging to divisions chiefly comprising heavier troops, but
this can be decided on a case by case basis before the battle as
best suits the army’s historical counterpart. The same goes for
divisions that combine poor quality levies or similar lack-lustre
troops with good quality units, the levies might be ignored or
a number of units counted as one for purposes of calculating
broken divisions.
Once a division is broken all units that are currently shaken or
which become shaken from that point on are not allowed to
rally. This is why commanders get a chance to rally units in the
Command part of the player’s turn before establishing whether
a division is broken due to all of its units being shaken.
Once a division is broken all of its units are obliged to quit
the field as explained below. Units from broken divisions are
allowed to make a special retire move.
RETIRE
Broken divisions must attempt to leave the battlefield as
expediently as is practical.
Once a division is broken the only orders it can be given
must facilitate its escape by whatever route or exit is most
appropriate. In most cases, where armies advance from one
table edge or other, troops will retire from the same table
edge. Any initiative moves the unit makes must take it away
from the battlefield and danger in so far as possible.
Units from broken divisions are allowed to make a single
free move if they fail their order, and can make a single
free move even if they are not issued an order and are
unable to use their initiative. This move must follow the
same general lines give for orders and initiative moves.
They can make a free move even if disordered - this being
a general exception to the rule that prevents disordered
troops from moving. This means units from broken
divisions can always move once - assuming they are not
engaged in combat or otherwise rendered immobile in
some fashion.
Medium and heavy artillery pieces belonging to broken
divisions are abandoned by their crews. They are treated as
destroyed and removed.
Units from broken divisions cannot charge the enemy,
though they can countercharge if normally able to do so.
Bear in mind shaken units won’t be able to countercharge in
any case. Units from broken divisions engaged in hand-to-
hand combat will always choose to end the combat by
holding their ground or falling back if victorious.
There is nothing to stop units from broken divisions making
ranged attacks or from fighting if engaged in hand-to-hand
combat. On the whole though, once a division is broken its
remaining troops are a spent force and no longer present a
significant threat to the enemy.
85
TROOP TYPES
Troops are divided into infantry, cavalry, chariots, elephants,
artillery and baggage - although this last really represents non-
combatant elements of the army rather than troops as such. In
addition we break down the main categories into more specific
types represented by typical fighting qualities. These give us
the basic troop types that constitute our armies. The values
given here are not fixed or absolute - and we will often have
cause to vary them - but they are a good starting point.
HEAVY INFANTRY
Type
Combat
Morale Save Stamina
Special
Heavy Infantry
Clash Sustained
Short Long
Range Range
3 0 4+
These are the game values for typical close fighting, heavily
armed and armoured infantry equipped with swords, shields
and some kind of javelin or spear that can be thrust or
thrown. These are your Roman Legionaries and Viking
Hirdmen - they have high values for hand-to-hand combat
and a good morale save. Heavy infantry also benefit in that
they are harder to score hits against with ranged attacks
representing their close, shielded formation (see the ‘to hit’
modifiers for ranged attacks).
MEDIUM INFANTRY
Type Combat Morale Save Stamina Special
Clash Short Sustained Range Long Range
Medium Infantry 6 6 3 0 5+ 6
These are the values for close
fighting but more lightly
armed or poorly trained
troops and close fighting
barbarians. They are armed
with javelins or spears that
can be thrust or thrown, or
may include a mix of arms in
some cases. These are the base
values for most close-fighting
barbarian units and for most
infantry of the Biblical era.
"The Spartans do not enquire how many the enemy are but where
they are." King Agis II of Sparta
86
"In peace sons bury fathers, but war violates the order of nature,
and fathers bury sons.” Herodotus
LIGHT INFANTRY
Type
Combat Morale Save Stamina
Special
Light Infantry
Short Long
Clash Sustained Range Range
5 5 3 0 6+
These are the values for troops who would typically
fight in a looser order than the ‘heavies’, but who
are still expected to fight hand-to-hand when the
occasion demands. They typically carry javelins and
light shields, but wear little if any armour beyond a
helmet. Peltasts are the classic example of this troop
type. Unlike heavier kinds of infantry, light infantry
can form into open order without restriction and
can combine a formation change to or from open
order with a single move.
SKIRMISHERS
Type Combat Morale Save Stamina Special
Clash Sustained Short Range Long Range
Skirmishers as standard sized unit 5 4 3 0 0 6
Skirmishers as small unit 3 2 2 0 0 4
These are the values for a unit of purely skirmishing infantry
typically armed with javelins. Skirmishers are limited to open order
and column. They cannot form a battle line or other formations.
They are highly mobile troops and can combine a formation change
between column and open order with a single move. In addition, no
distance penalties are applied to skirmishers when issuing orders.
Skirmishers wear no armour and might carry a small shield or none
as reflected in their lack of Morale save. They would not usually
expect to engage in close combat except, perhaps, with others of
their kind. They are usually fielded as small units and so we have
shown the values for both standard and small units for convenience.
87
HAIL CAESAR
Type Cataphract Cavalry Clash 9 CATAPHRACT CAVALRY Combat Morale Save Short Long Sustained Range Range 6 3/0 0 4+ Stamina 6 Special
These are the most heavily armoured of all cavalry comprising riders often clad from head to
toe in iron or bronze armour and horses wearing armour that protects their
front quarters and often their entire bodies. Parthian and Sassanid Persian
Cataphracts are the most well known cavalry of this kind. They are typically
armed with long lances or a very long spear held in both hands (the kontos). Cataphracts
fought in much closer formations than other cavalry sacrificing mobility’ for protection. Our
units move more slowly than other cavalry to reflect this. In addition they have a short range
value of 3 when supporting in combat, but 0 attacks for ranged combat - lacking weapons
they can throw and being insufficiently mobile to skirmish ahead of their main formation.
However, thanks to their exceptionally heavy’ armour, enemies making ranged attacks suffer a
-1 to hit penalty against Cataphracts (see the ‘to hit’ modifiers for shooting attacks).
HEAVY CAVALRY
Type
Combat
Morale Save Stamina
Special
Clash Sustained
Short
Range
Long
Range
9
6
3
0
6
4+
Heavy Cavalry
These are heavy armoured cavalry riding big and occasionally partially armoured horses. They are
typically armed with spears, lances, or the two handed kontos and often carry’ missile weapons in
addition. They are supremely dangerous upon contact with a high clash value and they have a hefty
morale save. Generally speaking we give them a Short Range value of 3 regardless of armament to
reflect their mobility - i.e. sending individual squadrons ahead to chase off light troops or harass
dense formations. However, this can be reduced for ranged attacks in the same way as Cataphracts
where it is felt appropriate - most specifically in the case of cavalry armed with lances or kontos.
Note that cataphracts and heavy cavalry have the same values, but cataphracts have the advantage
of being much more resistant to missile fire to reflect the effect of their near-complete armour.
MEDIUM CAVALRY
Type Combat Morale Save Stamina Special
Short Clash Sustained Range Long Range
Medium Cavalry 8 5 3 0 5+ 6
These are close fighting cavalry and likely to be armoured and heavily armed, making up all cavalry types not otherwise
classified as cataphract, heavy or light. Probably armed with spears, but could carry javelins instead or in addition.
88
TROOP TYPES
LIGHT CAVALRY
Type
Combat
Morale Save Stamina
Special
Clash Sustained
Short
Range
Long
Range
Light Cavalry
as standard sized unit
0(3*)
6+
Light Cavalry
as small unit
5 3 2 0 (2*) 6+ 4
7
5
3
6
*if bow armed
These are lightly armed, fast moving cavalry mounted on
nimble ponies or small horses. They rely heavily upon
missile fire and most carry javelins or both bows and
javelins. They are highly mobile troops and when in
open order they move at rhe fastest rate of all cavalry
(12”). In open order they incur no distance
modifiers when given orders. Unlike heavier kinds of
cavalry, light cavalry can form into open order without
restriction and can combine a formation change to or
from open order with a single move. They are usually
fielded as small units, so we have shown the values
for both standard sized and small units.
HORSE ARCHERS
Type Combat Morale Save Stamina Special
Clash Sustained Short Range Long Range
Horse Archers as standard sized unit 6 4 3 3 6+ 6
Horse Archers as small unit 4 2 2 2 6+ 4
These are the values for a unit of horse archers. These are
the lightest kind of cavalry, carrying no weapons aside from
a bow and possible a light side arm. Like infantry
skirmishers they are only permitted to form open order and
column formations. Like light cavalry they can combine a
formation change to or from open order with a single
move. Not all cavalry who carry bows are categorized as
horse archers. The type more accurately describes Scythian
and Parthian cavalry whose role is to shoot and run,
avoiding contact with the enemy where possible.
“I am not afraid of an army of lions led by a sheep: I am afraid of
an army of sheep led by a lion.” Alexander the Great
89
HAIL CAESAR
LIGHT CHARIOTS
Type Combat Morale Save Stamina Special
Clash Short Sustained Range Long Range
Light Chariots 6 6 3 0(3*) 4+ 6 *if bow armed
These are the values for chariots of the Egyptian and
Hittite type pulled by two horses. They make good
supporting units and have sufficient hitting power in
hand-to-hand fighting to disperse contemporary
infantry. Light chariots can combine a formation
change to or from open order with a single move,
which makes them very manoeuvrable in the same
way as light cavalry. This is the usual kind of chariot
to be found in late Bronze Age armies of the Near
East from Mitanni through to Egypt. The riders are
armed with bows, javelins and light spears. Primarily
spear-armed, or more heavily built chariots can be
given higher Clash value - typically 8 - to reflect this.
A further type of chariot is drawn by four horses bur
still fights in a highly mobile way unlike heavy
chariots described below. Examples of these can be
found in the early armies of the Carthaginians, as
well as in the forces of their Berber neighbours the
Libyans. Indian armies also included a variety of
chariot types of different sizes, with different numbers
of crewmen, and with more or fewer draught animals.
The distinction between light chariots and heavy
chariots is the way they fight, as heavy chariots are
slow, retain a solid formation at all times, and rely
upon the shock of impact to scatter their enemies.
They are like small fortresses, creaking forward and
crammed with spearmen and archers. Light chariots,
on the other hand, are far more mobile regardless of
the number of horse or crew, although for obvious
reasons they will tend to have fewer crewmen and be
more lightly built than heavy chariots.
We usually give these four-horse chariot types a better
clash value than the standard type - typically 8 - but
otherwise treat them as the same as two-horse
chariots. Because of the width of the models it is
necessary to reduce the number of chariots in a unit
in the same way as for heavy chariots.
HEAVY CHARIOTS
Type
Heavy Chariots
Clash
Combat
Sustained
Short
Range
Long
Range
0(3*)
Morale Save Stamina
These are the values for heavy chariots of the later Assyrian and Persian type
pulled by four horses. They move at infantry speed and are well protected with
armoured crew bearing shields and rhe chariots themselves are sturdy and high-
sided. They can be used offensively, but will be quickly overwhelmed if they do
not dispose of their enemy in the first round of combat. For this reason we give
them a reduced sustained value compared to a standard light chariot.
Special
*if bow armed
90
ELEPHANT
Combat
Clash Sustained
0(1*)
Short
Range
Long
Range
Type
Elephant
Morale Save Stamina
*if bow armed
Type
Light Artillery
_ TROOP TYPES
Special
Elephant
Our values for elephants may look a little on the low side -
but remember a unit of elephants is one model - so it is
quite possible for a unit to end up fighting two or
potentially three elephants all at once. Such an elephant
might have a howdah and crew armed with javelins or bows
- although howdahs were not always used and some
elephants may have had no crew at all!
"Si vis pacem, para bellum
(If you seek peace,
prepare for warQ.”
Vegetius
LIGHT ARTILLERY
Combat
Short Long
Clash Sustained Range Range
1 1 2
This defines a small bolt throwing engine along the
lines of a Roman scorpion. These weapons have a
range of 24” and enemies struck by their missiles suffer
a -1 morale save penalty.
"There is nothing impossible to
him who will try."
Morale Save Stamina
Special
Alexander the Great
91
HAIL CAESAR
MEDIUM ARTILLERY
Type
Combat
Morale Save Stamina
Special
Short Long
Clash Sustained Range Range
This defines a medium sized
piece of field artillery,
whether a bolt or stone
thrower. A typical example
would be a Roman onager.
These weapons have a range
of 36” but are incapable of
targeting enemy within 6”;
hence they have no short
ranged attack value.
HEAVY ARTILLERY
Combat Morale Save Stamina
Short Long
Clash Sustained Range Range
1 1 0 3 0 3
Type
Special
Heavy Artillery
Heavy artillery represents larger stone throwing engines that would be used during sieges or assaults upon fortifications -
they are not field weapons as such, but we feel no need to confine ourselves to battles of that kind. Heavy artillery has the
same combat values as medium artillery, but a longer range at 48”.
।--------------------------------------------------------
WAGONS AND BAGGAGE
Type
Combat
Morale Save
Stamina
Special
Wagons and Baggage
Short Long
Clash Sustained Range Range
3 10/10
These are the kind of values we’d give baggage units, although it is rare for them
to get anywhere near the fighting in most situations. They have some capacity to
put up a fight - but will quickly despair in a prolonged combat. We give them
some ability to make short ranged attacks, but note that they cannot support in
combat, so their short ranged attack is restricted to shooting.
92
TROOP TYPES
OTHER COMMON TROOPS
The troop types given are used as the basis for working out all other values. This includes types that are very common in some
armies such as archers, pike-armed phalanx, and massed barbarian warbands. The values for these common examples are as follows.
Type
Light Infantry Archers
as standard sized unit
Light Infantry Archers
as small unit
LIGHT INFANTRY ARCHERS
Combat Morale Save Stamina
Short Long
Clash Sustained Range Range
4 4 3 3 0 6
(6+ if armoured)
3 3 2 2 0 4
(6+ if armoured)
Special
These are the values we’d normally give to units armed with long ranged missile weapons be they
bows, slings, or crossbows - they are basically light infantry with reduced hand-to-hand fighting
values and morale save, and ranged fighting values that reflect their armament. Armoured or
professional archers qualify for the increased morale save value. These troops are light infantry type,
so they can adopt an open order formation as they move as for other light infantry.
MEDIUM INFANTRY ARCHERS
Type Combat Morale Save Stamina
Short Long
Clash Sustained Range Range
Medium Infantry Archers 5 5 3 3 5+ 6
Special
These are the values for formed bodies of archers in most armies that have them, including Biblical
armies such as Egyptians and later Near Eastern armies such as Persians. Basically they are medium
infantry with reduced hand-to-hand combat values and long ranged attacks in addition. Often the same
troops can be arguably fielded as light or medium - rhe principle difference being rhe ability of rhe
light troops to break into open order, although the mediums are more resilient fighters overall.
MEDIUM INFANTRY SPEARS AND BOW
Type Combat Morale Save Stamina Special
Clash Short Sustained Range Long Range
Medium Infantry Spear and Bow 6 6 3 3 5+ 6
These are the values for Persian infantry carrying both spears and bows - Sparabara - and they are basically medium infantry
types wirh the addition of a ranged attack. We would tend to use the same values as the basis for units with mixed weapons:
shielded spear-armed troops at the front and archers in the rear ranks. These are considered ‘medium’ types in temperament
and general tactical method, they may have armour and could even be elite or otherwise very able troops.
93
HAIL CAESAR
MEDIUM INFANTRY WARBAND
Type
Combat
Morale Save Stamina Special
Short Long
Clash Sustained Range Range
Medium Infantry Warband 7,8 or 9 6 2 0
These are the values we’d use for barbarian warbands such as Britons, Gauls and early
Germans. They have good - or even very good - fighting abilities in rhe first round of
combat, but tail off markedly after that. The actual clash value tends to x-ary a bit depending
upon how aggressive we want to make these troops, but we tend to stick to 9 in games
against Romans. They have reduced short ranged attacks to represent a generally poor
degree of coordination. Warbands fight in dense blocks 4 deep - the warband formation.
HEAVY INFANTRY PIKE PHALANX
, Type
Heavy Infantry Pike
Phalanx
Clash
Combat
Sustained
Short
Range
Long
Range
Morale Save
Stamina
Special
Phalanx
The pike phalanx is worthy of special note as it combines the four
model deep pike phalanx formation with a unique weapon, the
pike or sarissa. They have the same basic values as other heavy-
infantry except the short ranged attacks value is split: 0 for ranged
attacks and 3 for supports in hand-to-hand combat. As you can see
this is indicated on the Short Range stat as 3 slash 0 - with the 3
towards the left ‘combat’ side and the 0 towards the right ‘range*
side. See A Selection of Useful Rules for rules governing pikes and
phalanx formations (page 103).
HEAVY INFANTRY LONG SPEAR PHALANX
Type Combat Morale Save Stamina Special
Short Clash Sustained Range Long Range
Heavy Infantry with long spear 7 7 3/0 0 4+ 6 Phalanx
Heavy infantry armed with long spears also have the split Short Range value as described for pikemen, unless they are also armed
with missiles such as javelins or darts, or if their formations include troops who would typically fight ahead of the main
formation to chase away lighter troops or harass more heavily armed enemy. Where this is the case it can also be a good idea to
give such units a reduced number of ranged attacks tor example 3/1 or 3/2. The phalanx rule can be applied or not, depending
on the degree of discipline and training represented. Note that units can be given different values for the phalanx rule as
described on page 102. Rules for long spears are given on page 101. Greek Hoplites are the prime example of these troops.
94
MEDIUM INFANTRY LONG SPEAR PHALANX
Combat
Clash Sustained
Short
Range
Long
Range
Morale Save Stamina
These are medium infantry carrying long
spears and all the comments that apply to
heavy infantry with long spear also apply
to them. This category includes some
Biblical types such as Hittites, Myceneans
and Sumerians. Rules for long spears are
included in the section A Selection od
Useful Rules on page 101.
Type
HEAVY INFANTRY WITH TWO-HANDED AXES, ETC
Combat Morale Save Stamina
Short Clash Sustained Range Long Range
7 2/0 0 4+
6
Special
Heavy Infantry with
double-handed weapons
These are the game values for close fighting, heavily armoured infantry
equipped with axes, swords, clubs and all comparable very heavy cutting and
crushing weapons wielded in two hands. Such troops generally have a boosted
Clash value and reduced Short range value. They have a split Short Range value
in the same way as most other troops carrying dedicated close combat weapons.
E.g. they would have a value of 0 for ranged attacks, but 2 for support in hand-
to-hand fighting. Rules for double-handed weapons are included in the
section A Selection od Useful Rules on page 98.
MEDIUM INFANTRY WITH TWO-HANDED AXES, ETC
Type Combat Morale Save Stamina
Short Clash Sustained Range Long Range
Medium Infantry with double-handed weapons 7 6 2/0 0 5+ 6
These are medium infantry carrying two-handed weapons and all the comments that apply
to heavy infantry so equipped also apply to them. This category includes some Biblical types
such as Egyptians and Hittite Guard. See page 98 for rules covering double-handed weapons.
Special
95
HAIL CAESAR
SKIRMISHERS WITH LONG RANGE WEAPONS
Type Clash Combat Long Range Morale Save Stamina Special
Sustained Short Range
Skirmishers with ranged weapons as standard sized unit 4 4 3 3 0 6
Skirmishers with ranged weapons as small unit 2 2 2 2 0 4
These are the values for a unit of purely skirmishing infantry armed
with long-ranged weapons such as slings or bows. The difference
between these troops and javelin-armed skirmishers is that they have
the appropriate long ranged attacks and lose a clash attack to reflect
their preference for shooting over close-quarter fighting. Special
rules can be applied to long range weapons, as noted in the section
A Selection of Useful Rules on page 98.
BRITISH CHARIOTS
Combat
Morale Save Stamina
Special
British Chariots
Short Long
Clash Sustained Range Range
6 5 4 0 4+
Because many of our games feature Romans and Britons
we make regular use of the British Light Chariot. This
is a variant of the light chariot type and a good
example of how the values can be readily tweaked
to emphasise one aspect of the type’s ability or de-
emphasise another. In this case we take our cue
from Caesar who describes the Britons either
skirmishing by hurling weapons on the move,
or dismounting to fight briefly before
returning to their chariots and making
good their escape. So, we increase our short
ranged attack value to 4 - which makes our
chariots very effective indeed when it comes to
short ranged attacks and supporting hand-to-hand
combat. Bur we reduce the sustained combat value to reflect
a reluctance to get trapped in prolonged combats. The result is a type that is excellent for preliminary skirmishing and
for fighting alongside warbands as supports.
"The God of War hates those who hesitate.”
Euripides
96
TROOP TYPES
Type
Persian Scythed
Chariots as small units
PERSIAN SCYTHED CHARIOT
Combat Morale Save Stamina
Short Long
Clash Sustained Range Range
7 0 0 0 3+ 4
Special
These are the values used for rhe rather unusual Persian and later Seleucid scythed chariots driven directly at the enemy
in the hope of scattering his ranks and sowing disorder. As such they were very much one-hit weapons festooned with
projecting spear-points and blades. We give them a solitary clash value. Special rules apply to scythed chariots and limit
them to a single round of combat, after which they are destroyed whether successful or not (see page 104). The values are
given as a small unit of heavy chariots as this is the size ar which we’d suggest fielding them, i.e. normally 1 model. Note
that it will often be necessary to mount these chariots on bases that are wider even than a standard heavy chariot due to
all the projecting ‘spiky bits’.
“The art of war is, at the final count, the art of keeping one’s
freedom of action.” Xenophon
ADJUSTING THE BASIC TYPES
Obviously some troops are better or worse than others even of
the same type. This can be reflected by special rules in some
cases, but sometimes it is more effective to simply boost a
combat value by +1 or, in the case or poorer troops, reduce it
by -1. We would not suggest boosting or reducing values
beyond this range. Morale saves are best left as they are on the
whole, except with Biblical armies where it is useful to have
medium infantry with a 4+ save as an intermediary type, for
example armoured Assyrians and Babylonians. Similarly,
although it is certainly possible to adjust stamina value up or
down by 1, we tend not to do so because it is then necessary to
remember which units have differing values when it comes to
establishing whether troops are shaken.
Often troops will combine long ranged attacks from bows with
an otherwise standard type. For example, Persian heavy cavalry
with spears and bows are such a type, as are the mixed Spear
and Bow’ medium infantry given above. In such cases the
general method is to combine the standard type w ith the usual
ranged attack value for a unit, which is 3. In some cases we
would then adjust the clash and/or sustained values, down by
1 if we felt the troops were more likely to shoot than get stuck
in. Conversely, where more likely to get stuck in we might
reduce the long ranged attack value down by 1. A good
example would be Sarmatian cataphracts who were notorious
for charging at the first opportunity’, despite the fact they
carried bows! We do not always do this - it is a matter of
judgement - the medium Sparabara infantry armed with
spears and bows given as an example have retained their basic
fighting values to reflect their status as front-rank fighting
troops. Nor do w'e see the need to be entirely consistent.
Sometimes the circumstances of the battle will suggest a minor
modification to a value. The standard size adjustments for
small, large and tiny units are given in the rules and are
repeated here for convenience.
SIZE ADJUSTMENT TABLE
Type Combat Morale Save Stamina Special
Clash Sustained Short Range Long Range
Standard Basic Basic Basic Basic Basic 6
Large +2 +2 +1 + 1 Basic 8
Small -2 -2 -1 -1 Basic 4
Tiny 1 1 1 1 Basic 1
97
Up to this point we have discussed the basic rules for the
conduct of battle. In this section of the book we shall consider
some of the occasional and alternative rules employed to give
our warriors particular and differing qualities. These rules
might reflect our troops’ training or discipline, their
armament or tactical skills, and their cultural or personal
inclinations. We have also given rules to represent specific
weapons, including the pilum, sarissa, lance, long spear and
kontos, as these are all cases that beg for unique treatment for
one reason or another. Some of our rules are more involved
and cover unusual troop types or formations that otherwise
have no place amongst the preceding sections: for example,
elephants, scythed chariots, and the wedge formation.
All of the rules presented here are intended as examples,
being modifications and additions that we have developed
during and for our own games. They are not a definitive
‘tool set’ and can be changed, added to, and developed as
players wish. We freely confess that the emphasis has been
on our own armies as shown throughout this book and
featured in the battle reports. Players who have collected a
particular army will doubtless acquire a fair amount of
expert knowledge of the forces, battles and tactics of their
chosen subject, and must therefore feel free to create rules
to reflect such qualities as they feel appropriate. Indeed, we
rather assume that players will want to do so, as a great
deal of the enjoyment of wargaming comes from
developing one’s own rules of play to reflect personal
research and preferences.
All of these modifications are intended to allow us to better
represent particular troops or circumstances, either in general
or in particular battles. Our objective is to endow our model
warriors with something of the character associated with
their historical counterparts. We see no need to be consistent
in the way these rules are applied. What is suitable for one
battle may not be suitable for another, even where the same
troops are involved.
BRAVE
• Shaken units rally without an order
If the unit is shaken (i.e. it has taken its full quota of
casualties) it can attempt to rally at the end of the Command
part of the turn if it is more than 12" from any enemy. It does
not matter if the unit has moved or not that turn, either
because it has been given an order or if it has used its
initiative.
Roll a dice. On the score of 4, 5 or 6 the unit recovers 1
casualty -remove 1 casualty from the unit.
This rule is too fiddly for larger games as it allows units to
‘come back’ to the fight, potentially prolonging the battle
unduly. It is very useful in smaller actions where a few brave
warriors are ambushed or surrounded by hordes of enemy.
The dice score required to rally successfully could be varied,
but seems to work nicely enough as a 50/50 roll.
CROSSBOWS
• Enemy Morale capped at 5+
• No closing/traversing shots
In most circumstances there is no need to differentiate
between ordinary bows and crossbows, as the crossbow used
by such early peoples as the Romans and Picts was a relatively
weak affair offering no significant advantages over other
bows. More powerful crossbows are represented by the
following minor modifications.
Enemy Morale saves are capped at 5+ when hit by crossbows.
This means the roll 'to save' can never be better than 5+.
Crossbows are not allowed to make closing shots or traversing
shots. This is because, although powerful, crossbows are slow
to load compared to ordinary bows.
DOUBLE-HANDED
INFANTRY ARMS
• Enemy Morale capped at 5+
Infantry with double handed weapons of all kinds, be they
clubs, swords or axes such as the Danish axe carried by the
English, huscarls at Hastings, are generally given their own
stats as described in the section on Troop Types (page 95).
Such weapons required considerable expertise to use
effectively. Their weight gave them great hitting power,
especially against armoured troops who were otherwise safe
from the blows of ordinary weapons. Balanced against this
they are heavy and cumbersome to fight with, limiting the
role of troops so equipped.
Enemy Morale saves are capped at 5+ when fighting against
troops equipped with double-handed weapons. This means
the roll ‘to save’ can never be better than 5+.
This is a rule that makes double-handed weapons worth
having in battles against heavily armoured opponents. Against
more lightly equipped enemy their lack of ranged ability is a
disadvantage - see Troop Types for stats for troops carrying
double-handed weapons.
DRILLED
• Free move on a failed order
• Move through or out of the way of friends without risk of disorder
In this case we have combined two abilities into a single rule -
although there is no reason why one can’t be applied without
the other should you so wish. We found it convenient to
consider the two together as it seemed a better representation
of professional, drilled troops, and also easier to remember.
Drilled units make one free move if they fail their order, unless a
blunder is rolled in which case this takes precedence. If a
division order encompasses units that are drilled and units that
are not, then only the drilled units are entitled to this free move.
98
I ‘rilled units do not risk becoming disordered when moving
тЬ г ugh other drilled units where both are in a battle line
* —larion. Drilled units do not risk disorder when moving out
ле way of other drilled units that are giving ground in hand-
-hand combat and where both are in battle line formation.
‘drilled’ rule is used to represent the most disciplined
ind professional troops such as Roman legionaries, Greek
~ ercenaries and Macedonian phalangites (although note that
г г ..-langites in a 4-deep pike phalanx won’t benefit from the
for moving through or out of the way of friends as they
"c not in a battle line). Whether you choose to categorise
~ >ps as drilled is up to you. It is not obligatory to do so. It’s
i useful rule for emphasising the cool-headedness of
.- - ressional units, especially compared to barbarians,
- irriedly mobilised militia or weary garrison troops.
EAGER
• Free move on charge order
n its given an order to charge an enemy within charge range
i ways make one move even if they fail their order, assuming
rriey don’t blunder. If a blunder is rolled the result is always
* ken as 6 on the blunder result table - Uncontrolled
Advance! If a division order encompasses units that are eager
J units that are not, then only the eager units are entitled
* • the free move.
- > rule is used to represent troops who are headstrong, rash
7 impetuous - eager for battle and difficult to hold back once
T;c enemy are close by. Barbarian warbands are usually given
-- is rule - though it could equally apply to religiously or
dcalistically motivated troops, vengeful mobs, or any troops
h ase eagerness to get to grips makes them difficult to restrain.
ELEPHANTS
• Defeated enemy re-roll 1 dice for Break Tests
• Open order opponents +1 to hit
• Elephants giving ground stampede on D6 roll of 1.
• Free move along road от as part of marching column
• Elephants cannot support cavalry.
• Cavalry charging elephants lose charge bonus and risk disorder.
• a unit is fighting against an enemy elephant in hand-to-
hand combat and is obliged to take a break test, the opposing
' de can ask the unit to re-roll whichever of its two break test
dice scores highest. For example, if the player rolls 3 and 4
- >r a total of 7 his opponent can ask him to re-roll the 4. The
re-rolled score stands regardless of the result, even if a better
. re is rolled the second time around. Note that this rule
nly applies where the elephant is fighting and not where it is
merely supporting.
if infantry in open order are fighting an elephant in hand-to-
- and combat they do not suffer the usual -1 ‘to hit’ for being
n open order, and instead they receive a +1 to hit the
elephant Elephants were especially vulnerable to troops
fighting in open order, who were able to avoid the creature’s
attacks and work their way around and beneath them. Note
that this rule only applies to units that are fighting elephants
and not to units that are merely supporting.
Elephants are not permited to support cavalry in combat, or to
move into support of cavalry who are fighting. The presence of
pachydermic perils being far too disconcerting for the horses.
A cavalry unit charging against elephants loses its charge
bonus as follows. Roll a dice once the cavalry has charged.
On the roll of a 1, 2 or 3 the cavalry are disordered.
If an elephant gives ground in hand-to-hand fighting, roll a
dice once it has moved. This applies whether it is fighting or
supporting. On the score of 1 the elephant has panicked
and immediately turns to face its rear and stampedes out of
the fight a distance equal to the total of 3 dice (i.e. 3D6
inches). It will stampede straight through any units in the
way, diverting only to avoid terrain or buildings it cannot
move through. If an elephant would otherwise end its move
on top of a unit it moves whatever additional distance is
required to move all the way through. Any units stampeded
through must take a break test as if struck by shooting.
Once an elephant has stampeded it is removed from the
table as a casualty'.
Because elephants are fielded as units of one model it feels
odd to talk in terms of ‘formations’. None the less, for the
sake of our game elephants are treated as being in a battle
line and cannot adopt other formations, not even to move
through terrain that is otherwise impassable. However, if
positioned along a track or taking their place as part of a
marching column, they are allowed to count as if in
column and receive a free move. This is just so that they
can keep up with other marching troops. Note that this is
purely a concession to practicality and the elephant retains
its battle line formation and is not otherwise treated as
being in column.
ELITE
• Recover from disorder on roll of 4+
At the start of the Command parr of the turn, before any
units are moved or orders given, the player rolls a dice for
each elite unit that is currently disordered and which is not
already engaged in hand-to-hand combat. If the dice scores 4,
5 or 6 the unit reorders its ranks and the disorder marker is
removed immediately. If successful, the unit can then be given
an order or it can use its initiative to move in the normal way.
This is a very useful rule and one we trot out quite often to
represent the most cool-headed and disciplined troops,
especially when outnumbered or facing barbarian hordes. On
occasions we extend the rule to lesser units by allowing them
to recover from disorder on the roll of 5 or 6, or sometimes
6. Such differences can be noted as Elite 4+, Elite 5+ and
Elite 6+ as required.
99
HAIL CAESAR
FANATIC
• Morale save +1 until shaken
Fanatic troops have a Morale value bonus of +1 regardless
of type - they are so intoxicated by drugs or fervour that
they ignore all but the most fatal wounds and fight with
utter disregard for their own safety. This effect lasts until
the unit is shaken. Once the unit is shaken it loses its
special Morale save bonus and reverts to whatever Morale
value it would normally have for its type. The bonus is set
at +1 as we found +2 simply too effective, but it remains an
option should the occasion demand the appearance of
virtual demi-gods.
Fanatic troops are often given other wild and dangerous
qualities such as tough or wild fighters, frenzied charge and
eager. Norse Berserkers and Celtic Fanatics spring to mind
when considering troops of this kind.
FEIGNED FLIGHT
• Can move out of combat
A unit with the feigned flight ability can be given orders to
move, or can use its initiative to move, when it is engaged in
combat. This enables the unit to move out of combat during
the command part of its turn.
This ability allows a unit to break contact with an enemy.
It is usually given to light infantry or light cavalry units
and used as part of a deliberate ploy to draw enemy out
of position.
FRESHLY RAISED
• Check Unit in First Round of Combat
The unit’s capabilities are uncertain and its behaviour in
battle cannot be entirely predicted. This is taken into account
in the first round of hand-to-hand fighting. Roll a dice at the
start of the combat.
FRESHLY RAISED TABLE
1 Terror The unit is momentarily overcome
with terror - for this round only
all attacks need 6s to hit and the
unit becomes disordered if it is not
already so.
2-3 Panic The unit is momentarily overcome
by panic - for this round only all
attacks need 6s to hit.
4-5 Determined The troops do their duty - no effect.
6 Inspired! The unit fights with unexpected
fervour - the unit gets an extra
bonus attack this round.
The result applies only for the first round fought during the
game - thereafter the unit fights normally. This is an
entertaining rule that introduces a little uncertainty into the
performance of troops as yet untested by combat.
FRENZIED CHARGE
• Mitst charge with 3 Moves Allowed
If there are visible enemy within charge reach and which
the unit can potentially charge, then the unit must be
given a charge order. The player has no choice in the
matter. If issued a successful charge order the unit always
moves up to three moves regardless of the result. If the
order to charge is failed the unit still makes one free move.
In addition, the unit must use its initiative to charge where
it can do so, and can make up to three moves to reach the
enemy when it does. Note that shaken or disordered units
are not allowed to charge and so are not affected. Units
have to be able to charge to be affected by the Frenzied
Charge rule.
This rule is usually
reserved for fanatical, out
of control, or frenzied
troops who just can’t
hold back! There can be
circumstances where the
obligation to charge
doesn’t quite work - for
example assaulting
fortifications - so
exceptions must be made
as the situation demands.
KONTOS
• Counteracts enemy charge bonus.
• Counteracts long spear armed infantry disorder test
The kontos is a very’ long spear held in both hands by mounted
troops, typically by cataphract cavalry. The long reach afforded
by the kontos enables a rider to jab away at an enemy whilst
keeping a safe distance, and also enables him to get the first
strike during any initial clash. These very long spears were
carried by such foes of the Romans as the Parthians and
Sarmatians, and later on by the Romans themselves.
If a unit of charging or countercharing cavalry is armed with
the kontos, then any enemy charging or countercharging
them to their front lose their +1 ‘to hit’ bonus for charging
unless they are also cavalry armed with kontos or infantry
pikemen. This represents the longer reached weapons
striking ahead of their opponent.
If a unit of kontos armed cavalry charges the front of an
infantry unit armed with long spears, then the cavalry are
exempt from the usual test for disorder when cavalry charge
long spears. The cavalry will still lose their own charge
bonus for ‘charging long spears’ as explained in the long
spear rule.
Kontos armed cavalry usually lose their short range attack
unless they also carry missile weapons.
100
A SELECTION OF USEFUL RULES
The kontos rule is enough to make a difference compared to
spear armed cavalry who will typically lose their charge bonus
when they go head-uvhead with kontos-armed opponents.
Although pikemen are also judged exempt from this penalty,
their own weapons being longer than the kontos, the
opportunities for pike-armed infantry to charge stationary
cavalry to the front will be rare, if countercharged they lose
their charge bonus in any case. However it can happen!
LANCE
• 1 Morale on charge/countercharge
The couched lance is associated with mounted medieval
knights equipped with stirrups and is a characteristic weapon
of the Middle Ages.
When a lance armed cavalry unit charges or countercharges,
the enemy suffer a - I penalty to their morale save in the first
round of combat. Where two lance-armed cavalry units
charge and countercharge this penalty will apply to both.
We apply this rule to lance armed medieval cavalry giving
them a natural advantage on the charge. It might arguably be
used for any cavalry armed with long spears, but we generally
reserve it for medieval knights.
LEVY
• Must roll 4+ to recoter disorder at end of turn
Units that are designated as levy do not automatically recover
from disorder at the end of their turn. They must roll a dice
and only recover successfully on the roll of a 4, 5 or 6.
The levy rule is a way of representing ill-disciplined or poorly
trained troops. It is a severe penalty, as such troops may be
unable to move from one turn to the next. The score
required can be changed to make levy recover more or less
easily should we wish; for example levy 2+ recover on a score
of 2 or more, levy 5+ on the score of 5 or 6. We sometimes
combine a levy 2+ with the freshly raised or militia rules to
represent poorly trained or disaffected troops.
LONG SPEARS
• Charging cavalry/chariots disordered on roll of 1, 2 or 3
(except kontos)
• Chargers lose charge bonus (except other long spears and pikes)
The long spear was the characteristic weapon of Greek hoplites
and a fairly common armament for many warriors of the ancient
world. In the hands of closely ordered troops it could be used
to form a wall of spear points with the weapons of warriors in
the second and third ranks projecting forward of the front of
the formation. Such a barrier presents a formidable obstacle to
less densely packed troops and especially to cavalry whose horses
would be unwilling to move against a mass of spear points.
Cavalry and chariots charging or counter-charging onto the
front of an infantry battle line armed with long spears must test
for disorder once they have done so. Roll a D6. On a score of 1,
2 or 3 the chargers are disordered. Kontos armed cavalry are
exempt from this rule due to the length of their own weapons
as explained above under kontos.
All enemy who are not themselves infantry armed with long
spear or pikes lose their ‘to hit’ bonus for charging or counter-
charging against the front of an infantry battle line armed
with long spears.
Note that the long spear rule only comes into play when the
troops are deployed into a battle line. Units deployed in open
order or column formation get no benefit, for example, as
these formations don’t allow the warriors to wield their
weapons as a dense ‘hedge’ of spears.
We apply this rule to heavy infantry units armed with long
spears - but not necessarily to medium or light infantry on
the basis that they lack either the training, closeness of
formation or determination to maintain an unbroken wall of
spear points. It makes infantry so armed quite solid, though
not invulnerable, in the face of cavalry. It would be possible
to change the chance of disordering cavalry either up or
down, but we have always stuck to a 50/50 roll and rather
enjoy the resulting sense of trepidation.
MARAUDERS
• Ignore distance penalty for command
Marauders ignore the distance penalty that is normally
applied when giving orders to units more than 12” from their
commander. Note that units in open order formation are
already exempt from this penalty anyway. The rule is properly
applied only where units wouldn’t otherwise benefit.
This rule just extends the exemption for distance modifiers that
normally apply to units in open order. We often give it to light
cavalry to give them a roving role regardless of their formation.
MARKSMEN
• Re-roll one missed shot
The unit can re-roll a single failed ranged attack each time it
‘shoots’ in the ranged combat part of the turn, or from
closing or traversing shots.
This rule is used to single out the abilities of expert missile
men be they archers, slingers, artillerymen or whatever.
MILITIA
• No move on equal command roll
Units that are designated militia will fail a command on a dice
roll equal to the score required to give the order. For example,
if the roll normally required is 8 then a roll of 5 is three moves
as normal, a roll of 6 is two moves as normal, a roll of 7 is one
move as normal, and a roll of 8 is fail where normally it would
be one move. Where a division consists of militia and other
units, then only the militia will fail their order on an equal
dice roll - other units move once as normal.
101
HAIL CAESAR
Greek chaps about to get up close and personal - hoplites earn, long spears and can have the phalanx rule
The militia rule is a useful way of representing ill-disciplined or
poorly trained troops, citizen militias, and perhaps levies of not
overly enthusiastic subject peoples. It is a fairly simple rule and easy
to apply without imposing too harsh a handicap on a player.
named. The Parthians were famed for their ability to shoot
behind as they rode away from their enemy. Note that only
troops in open order can evade and this rule is not intended
to override that.
PARTHIAN SHOT
• Can evade and make closing shots.
The unit can both evade from an enemy charge and make
closing shots as it does so. Parthian shots are worked out
slightly differently from normal closing shots as units
normally evade before the enemy make their charge move
whilst normal closing shots are worked out after the enemy
has charged.
Work out the Parthian shot as follows. If the chargers are
already within a single move of their target then work out
closing shots immediately. If the chargers are further away,
then they make the necessary one or two moves to put them
within a single charge move of their target before working out
closing shots. In either case, the closing shots are worked out
with the enemy within a single charge move of their target.
Work out the closing shots in the usual way, mark any
casualties, and apply any break tests that result. The usual -1
‘to hit’ penalty for closing shots applies.
Once the unit has shot it evades in the standard way, and
does so even if the chargers are unable to complete their
charge because they are forced to hold their ground or retreat
following a break test. Where a break test is required chargers
will always fail to complete their charge. The best result they
can get is to hold their ground.
This ability is usually given to nomadic or eastern horse
archers such as the Scythians and Parthians after whom it is
PHALANX
• Hand-to-hand combat defeats by up to 2 are treated as a draw.
The term phalanx properly describes a formation of Greek
hoplites or pike-armed phalangites. In antiquity it was
sometimes used to indicate any body of close fighting
infantry. We created the following rule specifically to better
represent the push, shove and sudden collapse of hoplite
warfare, but it could be applied to any body of troops that
you wanted to make especially resilient in the first rounds of
hand-to-hand fighting.
Troops designated as phalanx treat any hand-to-hand combat
defeat by up to a predetermined number of casualties as a
draw’. We generally set this level as 2, though there is no
reason not to allocate different levels to represent troops who
are more or less resistant. Units can even be assigned
different values in the same battle if you wish - so long as
you can remember w hich is which of course! We recommend
sticking to 2, at least to begin with. So, a unit losing a combat
by 5 casualties to 3, for example, would treat the result as a
draw' and would not have to take a break test. The same unit
losing by 5 casualties to 2 would be defeated by 3 and would
therefore have to take a break test with a minus 3 penalty to
the result. Note that once a unit is shaken (i.e. once it has
suffered casualties equal to its Stamina value - usually 6) it
will be obliged to take a break test following a draw’ in any
case. Where a phalanx unit is obliged to test on a draw
because it is shaken the full difference in casualties counts:
for example, a phalanx unit losing a combat by 6 to 4 must
take a test deducting 2.
102
________________________________ A SELECTION OF USEFUL RULES
PIG’S HEAD FORMATION
• Fighting unit supported by two from rear
It is no easy matter to reconstruct what the late Roman writer
Vegetius meant by the enigmatically named Pig’s Head
formation or what exactly its role was when it came down to
fighting. It might also be referred to as a ‘wedge’, but seems
to have been a different kind of thing to rhe wedges referred
to by Caesar in his Gallic Wars. We take the view that the
Pig’s Head describes a body of troops supported from behind
by a great mass who contribute to the fighting by throwing
missiles over the heads of those in front. Thus it is a way of
concentrating fighting power across the width of a unit.
Perhaps it is a style of fighting that entered the Roman army
along with the Germans who increasingly filled its ranks in
the later Empire. Whatever rhe case, this is how we choose to
interpret the Pig’s Head in our game.
The Pig’s Head was probably a common formation of later
Roman and Germanic units, and of warriors such as Saxons
and Danes during the centuries following the fall of Rome.
However, it may have been more widespread and is perhaps a
natural formation for relatively small armies of infantry with
no obvious need to extend their lines.
The Pig’s Head consists of three separate units of infantry
arranged with one unit in front and two behind as shown here.
When arranged in his fashion in hand-to-hand combat the
unit ar the front cannot be supported from either flank, but
both rhe units behind count as supporting.
A Pig’s Head formation. The yellow unit forms the front
of the Pig’s Head and the units behind form the rear.
The Pig’s Head is a useful formation for
later Roman and Dark Age armies and that is
where we would employ it. It does have the
advantage that the two supporting units are
able to move out to the flanks without risk of
disorder in most cases, and as such it is a
flexible formation whose reduced width
makes it possible to manoeuvre more easily
across a crowded field. It is also a good
formation for forces that have a mix of
well-armoured first-class troops (at the
front) and poorer fighters you would
prefer to keep out of the front line (at
the back).
PIKES
• Cavalry/Chariots cannot charge pikes unless disordered or
scathed chariot
• Cavalry/Chariots charging disordered pike must test for disorder
• Chargers lose charge bonus (except Pikes)
• Phalanx
Pikes - properly rhe Macedonian sarissa - are hefty spears in
the region of fourteen to twenty feet in length. They are the
characteristic weapons of the armies of Alexander the Great
and his Successors. Troops so armed made up the dominant
military arm until the rise of the Roman legions. Pikemen
fight in a very close, deep formation - the pike phalanx - and
for this reason are generally known as phalangites. The array
of multiple spear points projecting beyond the unit’s front is
almost impossible for cavalry to approach
Cavalry and chariots are not allowed to charge or
countercharge the front of a unit of pike-armed infantry in
phalanx or square formation unless the pike-armed unit is
already shaken or disordered. The exception to this is the scythed
chariot, which is allowed to charge/countercharge, and may be
obliged to do so, as explained in the rules for scythed chariots.
Cavalry and chariots that do charge home onto the front of a
pike-armed infantry unit must test for disorder as they do so,
in the same way as described for long spears. Note that cavalry
armed with the kontos are not an exception in this case; they
must test just like other troops, as the pike is longer even than
the kontos.
All enemy that charge or countercharge to the front of a
pike-armed infantry phalanx or square, apart from another
pike phalanx, lose their +1 ‘to hit’ charge bonus. This
applies regardless of whether the phalanx is disordered, or
shaken, or otherwise.
Pike-armed troops always have rhe Phalanx rule in addition.
If fielded together with long-spear phalanxes, pike phalanxes
always have a level at least one greater, because they represent
deeper formations with longer weapons.
PILUM
• Enemy -1 Morale save in first round
The pilum is associated with Roman infantry. It is a heavy
javelin with a long, thin iron shank, a small tip, and usually
an additional lead weight to boost its penetrating power.
Although the pilum was probably the most sophisticated
weapon of this kind it was not necessarily the first or only
one. A heavy javelin made of iron called a soliferrum was
used by the Spanish and Celtiberians in their w’ars against
the Romans (and one imagines with each other). From the
third century the Romans themselves continued to employ
cruder weighted javelins and darts. These w^ent by various
names including the spiculum and plumbata. Once again,
similar weapons were used by contemporary barbarians, all
characterised by a relatively long, thin shank, small head,
and being carried in sufficient number to facilitate
throwing. Examples include the German angon and the
bebra cited by Vegetius.
HAILCASSAR
If a unit is armed with pila or the equivalent, then any enemy
the unit is fighting to its front suffers a -1 Morale save
penalty against hits inflicted by rhe unit in the first round of
each and every hand-to-hand engagement. This penalty
applies regardless of whether the unit charges or is charged,
and note that it applies in the first round of every combat
engagement and not just the first combat engagement of the
battle. We assume the legionaries are carrying sufficient pila
to remain effective throughout the battle. Also, remember
the penalty to the enemy’s Morale only applies where the
pilum armed unit is fighting to its front and not where it is
merely supporting the combat or fighting to its sides or rear.
For example, a Roman cohort charges a Gallic warband and
attacks with 7 dice scoring 4 hits - the Gauls have a Morale
Save of 5+ but this is reduced to 6+ because they are fighting
pila in the first round. Four dice are rolled scoring 1, 4, 5
and 6 equals 1 save.
SCYTHED CHARIOTS
• Frenzied charge - must charge with 3 moves allowed
• Drilled heavy infantry can open ranks on roll of 4, 5 or 6
• Defeated enemy become disordered
• Scythed chariots are removed after one round
• Cannot support/be supported
By scythed chariots we do not intend ordinary chariots
romantically kitted-out with sharpened wheel-spinners in the
fashion of Ben Hur, bur heavy armoured chariots armed with
projecting spears and scythes used to deliberately break арап
enemy formations. Chariots of this kind had a single
crew'man whose only hope lay in bailing out at the last
moment, his rather unenviable mission being to drive the
chariot at full pelt directly towards the enemy lines. To
achieve this it would probably have been necessary to work
the team up into a state of blind terror, as no horse would
willingly throw itself upon a body of formed men. As such
these are one-shot weapons. Disciplined troops w’ould
typically respond by opening gaps in their lines w'hich the
terrified horses would naturally bolt through.
Scythed chariots are heavy chariots and also have the frenzied
charge rule that obliges them to charge where they can.
If scythed chariots charge unengaged drilled heavy infantry to
the front, then the enemy w ill automatically try and open up
his ranks to channel the chariots harmlessly to their rear.
Once the chariots have charged roll a dice, on the score of 4,
5 or 6 the infantry have succeeded in diverting most of the
chariots through their lines - the chariots are removed
immediately and inflicts no damage. On the roll of a 1, 2 or 3
most of the chariots crash into the infantry and combat is
worked out in the usual way.
Scythed chariots only ever fight one round of hand-to-hand
combat after which they are removed as destroyed. Work out
the combat in the usual way. If the enemy are defeated they
automatically become disordered prior to taking their break
test. Whether defeated or victorious the scythed chariots are
removed once the result of the combat is established without
making any further moves.
Scythed chariots are the only chariots that are allowed to
charge a pike phalanx. They still lose the usual ‘to hit’ bonus
for charging though.
Scythed chariots cannot support other friendly units in
combat and cannot be supported either.
SLINGS
• Enemy Morale -1 at short range
Slingshots w'ere impossible to see in flight and dealt
horrendous wounds, often battering through arms or shields.
To represent this we reduce the enemy’s Morale save at ranges
of 6” or less (short ranged attacks).
Enemy Morale saves are reduced by 1 from hits at short range
(6" or less). Where a significant proportion of shooters are at
a different range, it may be necessary to roll two batches of
dice - with only those attacks made at short range incurring
the Morale save penalty.
STEADY
• Ignore first ‘6’ for break tests each turn
Steady units ignore the first ‘6’ rolled against them for
purposes of taking break tests from ranged attacks each turn.
The ‘6’ is still resolved as a hit and wall cause a casualty if not
saved. The rule applies during the ranged attacks part of each
enemy turn, and also when shot at from closing and/or
traversing shots.
This represent units that are 'steady underfire’ in part because of
training or experience, and in part due to armour and large shields. It
is a useful bonus for games where close fighting troops are advancing
upon hordes of bowmen; for example, the Greek hoplites at Marathon.
Out feeling is that such chaps are not likely to be put off by the first
flurry of arrows. It is usually applied to heavy infantry units, although
it could be extended to any troops where appropriate.
STUBBORN
• Re-roll failed Morale save
A unit that is stubborn is allowed to re-roll a single failed
Morale save each time the unit suffers casualties - but only
once during any part of the turn. This means they can re-roll
one failed save when they are shot at by the enemy in his turn,
and they can re-roll one failed save during any hand-to-hand
combat round - including against casualties suffered by closing
or traversing shots as they charge. If the re-roll is successful the
casualty is not inflicted, the unit’s stubbornness has won out.
We sometimes place a further limit on stubborn troops,
permining a re-roll only so long as the unit has suffered 0, 1, 2
or 3 casualties maximum, depending upon how ‘stubborn’ we
want our units to be. Stubborn noops can be very frustrating
because - with luck - they can hang on practically forever! As
such the full rule is best reserved for games featuring the few
against the many, perhaps where a small force must hold out
whilst reinforcements arrive. In larger games it is more
104
A SELECTION OF USEFUL RULES
"Remember upon the conduct of each depends the fate of all.”
Alexander the Great
practical to field stubborn troops with a casualty limit, for
example ‘Stubborn 3’ where the rule ceases to apply once the
unit has 4 or more casualties. ‘Stubborn O’, where the rule
applies so long as the unit has no casualties already, should
not be dismissed lightly. For well armoured troops it is almost
comparable to an extra half point of stamina.
SUB-UNIT
• Unit and sub-unit must remain within 1 move’s distance.
The unit has an attached body of troops of a different type,
or differently armed, forming a sub-unit. For example a
Republican Roman century consists of heavy or medium
infantry with a sub-unit of light infantry.
The sub-unit must remain within 1 move’s distance of its
unit where possible, and where this is no longer the case the
sub-unit must endeavour to come within a move where
possible. This will override any orders it is given.
The sub-unit rule is imposed upon troops that fought in these
mixed formations of which the Republican Roman Legions are the
most well known, but some Spanish and German armies reputedly
fought with cavalry supported by infantry, and light infantry were
reportedly trained to operate alongside cavalry in the
Peloponnesian War. Such matters might best be left to the players
to arrange for themselves where historical precedent suggests it -
hut we have included the rule, as it is a straightforward way of
representing such formations without too much fuss.
TESTUDO FORMATION
• Free move
• +2 Morale saves from ranged attacks
• Counts ‘front' all round to ranged attacks
• Make no ranged attacks
• Adopt battle line if engaged.
The Roman testudo - tortoise - is a close order formation of
interlocked shields designed to protect legionaries as they
advance under missile fire. Because we play a lot of games with
Romans we have developed our testudo rules to serve, and
present them here as part of our selection of special, unusual
and useful rules. We have also incorporated the various
penalties and bonuses into the main body of the rules, as that
seemed the easiest and most convenient thing to do.
To form a testudo the unit is arranged in so far as possible
into a square shape with all the models facing forward. If you
have a specific model to represent the testudo then remove
the unit and replace it with the testudo model. The model
should have a total frontage of about half that of a standard
battle line, something as shown below.
A unit in testudo formation has a free move and therefore
always moves at least once when given an order, unless a blunder
is rolled. If the unit suffers a blunder its formation limits its
movement to forwards only (i.e. a result of a 5 or 6) see page 30.
A unit in testudo formation has a Morale save bonus of +2
from ranged attacks (see page 46). In addition all faces of the
formation count as the unit’s front to enemies making ranged
attacks against it, and will therefore suffer the -1 ‘to hit’
penalty for shooting at the front of a heavy infantry formation.
A unit in testudo formation makes no attacks in the ranged
attacks part of the turn. The testudo is essentially a formation
for movement, an armoured column, and not prepared for
missile combat.
A testudo that becomes engaged in combat automatically
changes to a battle line as it does so, troops spreading out into
a fighting formation. So, if a testudo charges into combat it
automatically changes to a battle line formation at the same
time. If a testudo moves into an engagement as a support it
also changes into battle line. Similarly, if rhe testudo is
Roman players will find it
useful to have a Testudo
model to substitute for
their units when the
Testudo formation is used
in battle.
105
HAIL CAESAR
charged it automatically responds by changing into a battle
line formation facing the enemy as soon as it becomes
engaged. This formation change happens automatically in
both cases and no account is made of it as a move.
Note that because troops in testudo formation spread out on
contact with the enemy it is necessary to leave sufficient
space to enable them to do so. Where there is insufficient
room for the unit to deploy in this way it still counts as a
battle line and fights as such. In this case the unit must be
rearranged into a battle line at the first opportunity, even
where giving ground or making a move following combat.
This rather flexible ruling is intended to allow a testudo to
make assaults along narrow roads or ramps and into
breaches, as are common in many siege situations. In cases
where a testudo is unable to form a satisfactory battle line
because of restricted width, we would tend to reduce the
combat value of the unit in proportion to the frontage
achieved, deferring to the merciful umpire’s good sense as in
all such matters.
TOUGH FIGHTERS
• Re-roll one missed combat attack
The unit can re-roll a single failed hand-to-hand combat
attack each round of hand-to-hand fighting.
This rule is a good way of representing especially competent
fighters, veterans and professional mercenary troops. It is a
considerable bonus and not one to be spread too widely - save it
for the best troops where some predictability might be expected.
VALIANT
• Break test re-roll once per battle
The unit can re-roll its first break test result of ‘break’ during
the game. This only applies once during the whole game.
This is a very useful bonus that can keep a unit in the game for at
least another turn. We usually apply it to professional and highly
disciplined troops - the best of the Hellenistic phalangites, Greek
mercenaries and Roman legions.
WAVERING
• Take a break test when you take a casualty
The unit must take a break test whenever it takes a casualty.
If the unit takes one or more casualties from shooting it must
take a break test even where no 6s are scored. If the unit
suffers one or more casualties in hand-to-hand combat it
must take a break test, regardless of whether it wins or loses
the combat.
This is a harsh penalty to apply to any unit. We have only used it
for angry mobs and rioting drunkards! It could also be applied to
scratch units of any kind, but remember such units will not last
long, unless they are very lucky indeed.
WEDGE FORMATION
• Free move
• Counts ‘/ront’ all round to attacks
• Counts ‘front' all round for own ranged attacks
• +1 Morale saves against all attacks
• Cannot support/be supported except by enclosed friend
• Can make own attacks all round
• Enemy giving ground to front are burst through
• Wedge can make three moves when enemy break or are burst
through
When different ancient authors refer to the ‘wedge’
formation they may not always mean the same thing and
probably don’t! A shallow ‘V’ shape is a natural formation for
advancing cavalry, for example, as it allows the riders to see
and follow their standards and leaders, but it is likely that a
‘wedge’ so formed would level up as battle lines clashed.
However, when Caesar describes surrounded legionaries
forming a wedge and cutting their way through a Gallic army
he is undoubtedly describing a formation of densely packed
troops in what we might typically think of as a wedge or
arrowhead shape. Modern re-enactors have re-created this
formation for public display, and the result is quite
convincing even if comprising only a few dozen legionaries
rather than hundreds. In any case, we have taken this
interpretation as the model for our ‘wedge’. It is a formation
designed for breaking through and moving beyond enemy
lines - a ‘breakout and escape’ formation.
106
A SELECTION OF USEFUL RULES
A unit can make a wedge formation by arranging itself into a
wedge shape along the following lines. In practice we limit
this formation to Romans and to games that suggest its use,
and would imagine that players will want to take a similar
approach. It is not envisaged that armies form up in wedge
formations as a matter of habit, but of dire necessity only!
The wedge formation - depending on how your models are based some
compromise may be required, but this isn’t overly important. Just
arrange the models in a wedge shape so far as you can.
A unit in wedge formation has a free move in the same way
as a unit in testudo: if the unit’s order is failed it can still
make one move. If the unit suffers a blunder its formation
limits its movement to forwards only ( a result of 5 or 6)
see page 30.
A unit in wedge formation still has a front, rear and two
sides, but treats all as ‘fronts’ for fighting purposes. A unit in
wedge does not suffer the ‘to hit’ penalty for fighting to its
sides or rear, and all of its facings are considered fronts for
other fighting purposes. For example, enemy shooting at a
heavy infantry wedge will suffer the -1 to hit penalty’ for
shooting at the front of heavy infantry even when shooting at
the sides or rear. The wedge can direct its own ranged attacks
from any facing.
A unit in wedge formation has a Morale save bonus of+ 1 for
both ranged and hand-to-hand combat.
In combat a unit in wedge formation is allowed to make any
or all of its attacks to its front, sides or rear, it is not limited
in the number of attacks it can make to its side as units
normally are.
A wedge cannot be supported unless it includes another unit
within its formation as explained below’. If it includes other
units one of these can support. A wedge cannot support
other units in hand-to-hand combat.
Once hand-to-hand combat is over take any break tests as
normal. If the w edge is forced to give ground and is unable to
do so because it is surrounded then it is destroyed, as any
unit would be in that situation. If the enemy are forced to
give ground then those at the sides and rear do so as normal,
moving directly back. If the unit at the front of the w'edge is
forced to give ground then it is ‘burst through’ together with
any supporting unit behind. Units that are burst through and
any other engaged units must be moved out of the path of
the w’edge in as practical a manner as possible and are then
disordered if they were not disordered already. If necessary
the units that are burst through can be arranged into a rough
mass to make room, in w’hich case they count as having been
forced into open order, losing their formation as they are
swept aside by the wedge.
If a wedge either bursts through an enemy formation, or if its
frontal opponents break, the wedge can make up to three
moves forward, and can make a sweeping advance or charge
where an enemy presents itelf. See Sweeping Advance on
page 78.
Note that we oblige our victorious wedge to move forward,
and we would prefer this to be as straight ahead as possible.
In any case, w'here it is necessary for a wedge to deviate from
straight ahead to avoid terrain, make for a bridge, follow’ a
path, avoid or charge enemy, etc, it must always move to its
own front quarter as it lies during the combat engagement.
This doesn’t prevent the wedge pivoting at the end of its
burst through move to align itself for a change in direction in
its following turn, but it does mean the w’edge must head in
the direction it is pointing.
Caesar refers to baggage and light troops taking shelter
within a wedge, and we shall allow’ this too. It is practical
to limit such additional units to a single fighting unit and
a single baggage unit, and to place a few’ token models
amongst the wedge whilst temporarily removing the
remainder of the units in question. This just stops the
w’edge becoming huge! The fighting unit can support the
w’edge in combat. Note that it doesn’t matter if models
from the enclosed units actually appear on the outside of
the wedge, as this is sometimes unavoidable depending on
how the models are based, they are still treated as being
inside the w’edge, whose boundaries are formed by the
main unit.
WILD FIGHTERS
• Re-roll missed combat attacks in the first round of the game
The unit can re-roll failed hand-to-hand combat attacks in the
first round of hand-to-hand combat during the game. The
maximum number of attacks the unit can re-roll may be 1, 2
or 3, set before the game. For example ‘Wild Fighters Г are
allowed just a single re-roll. Alternatively, the number can be
randomised 1, 2 or 3 before the re-rolls are taken. No matter
how many re-rolls are permitted, they only apply in the unit’s
first round of hand-to-hand combat in the entire game - so
try to make the most of them.
Wild fighters are typically tribal troops w’ho
attack in an aggressive and barely
controlled way, but who quickly tire and
lose enthusiasm if their enemy do not
break at once. We routinely apply this
rule to Celtic and early German
w’arbands. It can be applied to any
enthusiastic but untrained
warriors, armed mobs and tribal
troops as required.
107
HAIL CAESAR
SUMMARY OF USEFUL RULES
Brave
Crossbows
Double-handed
Infantry arms
Drilled
Shaken units rally without an order.
Enemy Morale capped ar 5+.
No closing/traversing shots.
Enemy Morale capped at 5+.
Free move on failed order.
Move through friends without risk
of disorder.
Pikes Cavalry/Chariots cannot charge Pikes
unless disordered or Scythed Chariot.
Cavalry/Chariots charging disordered
Pikes must test for disorder.
Chargers lose charge bonus
(except Pikes).
Phalanx.
Eager
Elephant
Elite 4+
Fanatic
Feigned Flight
Frenzied Charge
Freshly Raised
Kontos
Lance
Levy
Long Spears
Marauders
Marksmen
Parthian Shot
Phalanx
Pig’s Head
Formation
Free move on charge order.
Defeated enemy re-roll 1 dice for
break tests.
Open order opponents +1 to hit.
Elephants giving ground Stampede
on D6 roll of a 1.
Free move along road or as part of
marching column.
Elephants cannot support cavalry.
Cavalry charging elephants lose charge
bonus and risk becoming disordered.
Recover from disorder on roll of 4+
Morale save +1 until Shaken.
Can move out of combat.
Must charge with 3 moves allowed.
Check unit in first round of combat.
Counteracts enemy charge bonus.
Counteracts Long Spear armed
infantry disorder test.
-I morale on charge/countercharge.
Must roll 4+ to recover disorder at end
of turn.
Charging Cavalry/Chariots disordered
on roll of 1, 2 or 3.
All chargers lose charge bonus
(except other Long Spears and Pikes).
Ignore distance penalty for command.
Re-roll one missed shot.
Can evade and make closing shots.
Hand-to-hand combat defeats by up
to 2 are treated as a draw.
Fighting unit supported by two
from rear.
Pilum Enemy -1 Morale save in first round.
Scythed Chariots Frenzied Charge - must charge with 3 moves allowed. Drilled Heavy Infantry can open ranks on roll of 4, 5 or 6. Defeated enemy become disordered. Scythed Chariots are removed after one round. Cannot support/be supported.
Sling Enemy -1 Morale at short range
Steady Ignore first ‘6’ for break tests each turn.
Stubborn Re-roll failed Morale save.
Sub-Unit Unit and sub-unit must remain with I move’s distance.
Testudo Formation Free move.
+2 Morale saves from Ranged
Attacks.
Counts ‘front’ all round to
Ranged Attacks.
Make no Ranged Attacks.
Adopt battle line if engaged.
Tough Fighters Re-roll one missed combat attack.
Valiant Break test re-roll once per battle.
Wavering Take a break rest when you take a casualty.
Wedge Formation Free move.
Counts ‘front* all round
to all attacks.
Counts ‘front’ all round for
own ranged attacks.
+1 Morale saves against all attacks.
Cannot support/be supported
except by enclosed friend.
Can make own attacks all round.
Enemy giving ground to front are
burst through.
Wedge can make three moves
after enemy break/burst through.
Wild Fighters Re-roll missed combat attacks in
the first round of the game.
A SELECTION OF USEFUL RULES
Pillaging Goths threaten to set fire to the homes of these proud citizens of the Roman Empire
Look smart there Marcus! Roman troops prepare to move from their encampment
109
The glittering civilisation of’ the Nile continues to fascinate
people today just as it did during the age of great discoveries
in the nineteenth century. Few could fail to recognise such
images as the golden funerary mask of Tutankhamun, the
temples of Karnak and - of course - the Pyramids of Egypt
themselves. Many of the wars of the Pharaohs were fought for
control of Palestine, Lebanon and Syria (an area often referred
to as the Levant), and so enter into Biblical history. Indeed,
those who choose to wargame the battles of this era often
refer to it as the Biblical Period unless they prefer the more
sober and rather academic sounding title of the Late Bronze
Age. It is a period that corresponds with the Egyptian New
Kingdom - the 18th, 19th and 20th dynasties. Needless to say,
none of this would have made much sense to Thutmosis III or
Rameses 11 - two of Egypt’s greatest warrior Pharaohs.
Although organised warfare did not begin with rhe chariot, it
is with the introduction of the chariot and the development of
powerful bows that we will make a start. Both reflect a growth
in technology - for, although we tend to think of chariots as
primitive weapons of war, their construction and maintenance
was a complicated and expensive business. The manufacture of
spoked wheels, of shaped wooden components, and the
specialist bronze fixings that go into making a chariot were all
cutting-edge sniff in the second millennium BC. Both chariots
and the war-winning composite bow were introduced into
Egypt by conquerors - the Hyksos - whose exact identity
remains something of a mystery (though it is worth pointing
out a number of their rulers have Canaanite names). Following
the expulsion of the Hyksos, Egypt emerged as a politically
centralised and ambitious nation under a new dynasty of
warrior Pharaohs - the age of the New Kingdom had begun.
The Egyptian New Kingdom spans the years from rhe 155O’s
to 1O77BC and includes the many campaigns of Thuthmosis
III (1479Л425). Thuthmosis led Egyptian armies through the
Levant over the Euphrates and against Miranni. During his
reign the Egyptians defeated the Canaanites at the Bartie of
Megiddo (1457) the first ever battle recorded in any detail.
Following a period of internal and religious dissention under
the monotheistic Pharaoh Akhenaten, the eighteenth dynasty
died out and was replaced by rulers who were bent on
restoring an empire that had been eroded by years of internal
strife at home and peace with neighbours. Amongst these
Pharaohs we will recognise Seti I, who set about recapturing
rhe cities of Kadesh and Amurru, and his more famous son
Rameses II (1279-1213). Rameses fought rhe Hittites at rhe
Battle of Kadesh (1275) possibly the largest chariot battle of
all time. Rameses claimed the victory, but wars against the
Hittites continued for twenty* years and were concluded with
the first recorded peace treaty (1258). The twentieth dynasty
offers only Rameses 111 (1186-1155) as a candidate for
greatness - his battles against the Sea Peoples are recorded
upon the walls of his mortuary temple and show the Pharaoh
defeating his enemies in a series of land and sea battles
(1178). Rameses preserved Egypt from invasion at a time
when most of the eastern Mediterranean was falling to wild
and foreign armies. Sadly, his successors were unable to
maintain control and Egypt gradually slid into anarchy. The
New Kingdom came to an end with Egypt divided into
numerous factions with a new dynasty ruling much of Lower
Egypt from Tanis and the High Priests of Amun ruling Upper
Egypt from Thebes.
Warfare in Mesopotamia has a history at least as old as in
Egypt, but by far the most popular subject for wargames are the
wars of the Assyrians, specifically of the empire of the early
Iron Age, approximately from the 8th to 7th centuries BC,
when Assyria was at its height. During these few hundred years
the Assyrians developed a centrally organised state and a well
provisioned and disciplined army, which was feared throughout
the Near East. Many of the Assyrians’ battles were sieges -
which sometimes lasted for years. Sargon II conquered the
Kingdom of Israel and carried off its population into captivity
before turning his attentions northwards, against Armenia and
Syria, and eastwards, against the Medes. He also suppressed one
of many revolts by the Babylonians and their Elamite allies.
Sargon died fighting the Cimmerians, a tribe of horse-nomads
who lived between the Black and Caspian Seas.
Under Esarhaddon and his son Ashurbanipal the Assyrians
extended their empire as far as Egypt - but theirs was never a
realm at peace. As well as constant wars against the Medes,
Armenians and Cimmerians the Assyrians were faced with
periodic rebellions by their Egyptian and Babylonian vassels.
It was all too much, and within a generation after
Ashurbanipal’s death the empire was toppled by its many
enemies. Medes, Cimmerians and Scythians overran much of
rhe Near East - joining forces with Assyria’s old enemy the
Babylonians to attack and destroy Nineveh in 612BC.
Much of what we
know of the forces of
Egypt’s opponent»
comes from Egyptian
representations of
battles and from the
descriptions of
Egyptian documents.
So we much accept a
certain inherent bias
as well as a fair
amount of
supposition on behalf
of the Egyptians
themselves.
We are all familiar with the
armies of the Hittites,
Egyptians, Assyrians and other
forces of the Near East.
Meanwhile in Western and
Northern Europe, kingdoms
rose and fell without the benefit
of historical or monumental
records. These are warriors
typical of the place and time.
By the time of the Assyrian empire cavalry had entered the
ranks of armies and supplanted many of the roles previously
performed by chariots. Horses and horsemanship progressed
rapidly under the influence of nomadic tribes, and soon
chariots were reduced to a more specialised role. Assyrian
chariots were far larger and heavier than those used in
previous centuries - and grew’ heavier over time - acquiring
three and then four horses to pull them and a heavily armed
crew of up to four infantry. Gone were the mobile missile-
armed vehicles of the Pharaohs - these heavy chariots were
designed to rumble forward and scatter enemy formations.
Horsemen took over the role of scouts, pursuit of the enemy,
and rapid moving bowmen.
The most powerful weapon amongst the foot troops
remained the bow, but the Assyrians’ heavy armour and large
shield was a sure sign of things to come in the ensuing age of
classical warfare. Even so, Assyrian formations combined
spear and bow armed troops - even cavalry’ units were
divided in this way - so that the Assyrian armies mixed
something of the battle-winning bow fire of earlier forces and
the solidity’ of later heavy infantry.
The Battle of Kadesh is one of the great conflicts of the age of
chariot warfare and also one of the first battles to be described
and recorded for posterity. Because Kadesh is so well known -
or rather because it is one of the few Bronze Age battles of
which anything is known at all - it has long been a popular
subject for wargames re-enactment. Michael and Alan Perry
were sufficiently inspired by this tale of Rameses’ campaign in
Syria that they not only designed an entire range of Egyptian
and Hittite models to represent the rival armies, they also
hand-built the scene of the battle in miniature, complete with
the walls of Kadesh and the banks of the Orontes. Needless to
say, the battle of Kadesh, and variants thereof, have raged
across this tabletop numerous times over the years, with
honours pretty much divided between the Egyptians and
Hittites. The participants in our game were therefore looking
forward to seeing how the Hail Caesar rules dealt with the
peculiarities and challenges of this familiar battle.
Kadesh was the key battle during the early part of Rameses
campaign against the Hittites. Over the preceding years the
Hittites had extended their rule over lands previously subicc:
to Egyptian control. Kadesh was a large, powerful fortified
city and also the main Hittite fortress along the border. The
pharaoh was determined to re-establish Egyptian domink r
in Syria, and the city’ of Kadesh was to be his target. Ramv-r-
led his army northwards through the Orontes valley. His
forces probably amounted to about 20,000 troops in all
including 2,000 chariots. The Egyptian army was formed :
four divisions called Amun, Ra, Ptah, and Seth. The ph - -
himself led the Amun division at the front, followed by R
Ptah and Seth at the end of the column.
As the Egyptian army marched, it first crossed the Otoe'c- -
a ford, and then headed through a wooded part of the \ : L
before crossing a tributary that flowed past Kadesh itsek ? s
112
Rameses and Amun make camp beneath the walls of Kadesh. The Roval Guard deploy to protect the pharaoh
likely that the Egyptians had
no idea the Hittite army was
nearby. This explains why
Rameses allowed his four
divisions to become strung out
over twelve miles or so of road.
As Amun was making camp
within sight of the walls of
Kadesh, Ra was still marching
to join them, whilst Ptah was
traversing the woodland some
miles behind. Seth was yet to
cross the Orontes twelve miles
to the south.
As the Amun division was making camp, with its chariot
horses unharnessed and picketed, the entire Hittite army
suddenly appeared from behind Kadesh where it had been
hiding. The Hittite chariots crossed the Orontes at a ford
just south of the city, and smashed into the flank of Ra
division whilst it was still on the march. Ra was scattered
and at a stroke the Hittites had successfully divided the
remaining Egyptian forces in two. The Pharaoh and
Amun were isolated in their camp to the north, and Ptah
was still struggling through the wooded valley. Seth was
still many miles distance and was to take no part in the
ensuing battle.
The Hittite chariotry pursued the fleeing remnants of Ra
into the camp causing untold confusion and mayhem.
Rameses bravely gathered his troops and fought his way out
of the camp. The Egyptians began to rally for a counter-
attack. Fortunately for the Pharaoh, the Hittite attack was
starting to falter. Many of their chariots had been lost in the
fighting. Worse still from the point of view of Muwatallis the
Hittite king, rather than following up the attack on Amun
his troops stopped to loot the Egyptian camp. This gave
Rameses the chance he needed to re-organise his scattered
army. Rameses counter-attacked, forcing Muwatallis to
commit more chariots to the fight. However, the Egyptians
had the best of it, driving the Hittites back towards Kadesh
and the river.
It was at this moment that Ptah division appeared on the
scene, advancing upon the Hittite chariotry in a two-pronged
attack together with the elite Na’arun chariotry. Now the
Hittites found themselves caught by surprise. Their chariots
turned in disarray and headed back over the river. Many
crews supposedly abandoned their chariots before attempting
to swim the Orontes. Upon the far bank of the river the
remaining Hittite infantry stood immobile and
uncommitted. Some of the charioteers were slain by
Egyptian arrows as they crowded about the ford, others were
drowned in the river itself.
Both sides were brazen enough to claim the victory.
Casualties had certainly been high amongst both armies.
Afterwards, Rameses soon abandoned his attempt upon
Kadesh and withdrew. The Hittite king had lost many of his
chariots. The two empires were to fight on for years to come,
without either side ever decisively overcoming the other.
Fifteen years following the battle of Kadesh, the Egy ptians
and the Hittites signed a peace treaty recognising their
respective spheres of influence. The text of this treaty survives
both in Egyptian and Hittite versions and it is the earliest
such treaty ever recorded.
113
HAIL CAESAR_____________________________________________
THE SIDES
The Hittite Command is organised into five divisions. Every
division commander had a Leadership rating of 8.
Muwatallis commands number five ‘Chariot’ division and
has the general’s re-roll ability.
ONE - AMBUSHERS
• 4 units of Hittite Chariots
TWO - HITTITE INFANTRY
• 4 units of Hittite Spearmen
• 1 small unit of Skirmishers with javelins
THREE-ALLIED INFANTRY
• 4 units of Spearmen
• 1 small unit of Skirmishers with bows
FOUR-ALLIED INFANTRY
• 2 units of Spearmen
• 2 units of Archers
• 1 small unit of Skirmishers with javelins
FIVE-CHARIOTS
• 3 units of Hittite/Allied Chariots
The Egyptian command was organised in four divisions:
Amun, Ra, Ptah South, and Ptah West. Every division
commander had a Leadership rating of 8. Rameses commands
Amun and has the general’s re-roll ability.
AMUN
• 3 units of Egyptian Chariots
• 1 unit of Royal Guard Infantry
• 1 tiny unit of Cavalry Scouts
RA
• 2 units of Egyptian Spearmen
• 1 unit of Sherden
• 1 small unit of bow-armed Skirmishers
PTAH SOUTH
• 3 units of Egyptian Spearmen
• 1 unit of Egyptian Archers
PTAH WEST(NA’ARUN)
• 3 units of Egyptian Chariots
THE CHARIOT ERA
FORCE STATISTICS
Type Clash Combat Long Range Morale Save Stamina
Sustained Short Range
Egyptian Spearmen (Medium Infantry) 6 6 3 0 5+ 6
Egyptian Guard Infantry (Medium Infantry) 7 7 3 0 5+ 6
Egyptian Bowmen (Medium Infantry’ Archers) 5 5 3 3 5+ 6
Sherden Infantry (Medium Infantry) 7 7 3 0 5+ 6
Sherden bow-armed Skirmishers (small) 2 2 2 2 0 4
Egyptian Chariot (Light Chariot) 6 6 3 3 4+ 6
Hittite/Allied Spearmen (Medium Infantry) 6 6 3 0 5+ 6
Hittite/Allied Skirmishers with javelins (small) 3 2 2 0 0 4
Allied Bowmen (Medium Infantry Archers) 5 5 3 3 5+ 6
Bow-armed Skirmishers (small) 2 2 2 2 0 4
Hittite/Allied Chariots 7 7 3 0 4+ 6
Special
Elite
Elite
Elite
HOW IT WAS FOUGHT
The table was arranged as shown on the map with the walls
of Kadesh and Egyptian camp at one end of the table and Ra
division in column of march at the other. Rameses and
Amun division were arranged within and around the camp.
Our umpire explained to the Egyptian players that the
infantry of Ptah would be allowed to enter the table behind
Ra on a dice roll from turn two onwards, a roll of 6 being
required at the start of turn two, a 5 on turn three, and a 4
on subsequent turns. At the same time the chariotry of Ptah
would arrive in the west opposite the Egyptian camp.
Unknown to the Egyptians, the umpire had allowed the
Hittites to arrange their forces on either side of Kadesh,
rather than all on the southern side as the historical battle.
This would certainly give Rameses something to think about!
None of the Hittite forces were deployed on the table at the
start of the game. The chariots that would mount the
ambush in the south were hidden amongst the low scrub by
the banks of the river. The remaining Hittites prepared to
march onto the table at the signal of the Hittite commander.
The game began with the Hittite chariots emerging from the
river bank and speeding rapidly towards Ra. The Hittites
were allowed a minimum one move measured from the river
on the first turn. Fortunately for the troops of Ra division,
one move wras all the Hittite commander could manage,
leaving his chariots careering across the intervening
scrubland towards the Egyptians’ flank. In their turn the
Egyptians were informed that, because they had been caught
by surprise, their usual automatic move for troops moving in
column would be suspended and their Leadership rating
reduced to a pitiful 6 for the first turn (as opposed to 8).
Wails and lamentations from the Egyptian commanders were
followed by a dice roll of 5 allowing Ra to successfully reorder
its ranks into a fighting formation facing the Hittite chariots.
At the other end of the table Rameses troops w ere judged to
be busy encamping requiring an order to regroup ready to
fight from the following turn. With divine aid the brave
pharaoh roused his warriors with a successful dice roll.
Perhaps it was the sight of mighty Ra that caused the
Hittite chariotry to hesitate. Maybe some of those Hittite
allies were less enthusiastic than their commander might
have liked. Either way the dice dictated that the Hittite
ambush would falter. The Hittite chariots failed to move.
115
HAIL CAESAR
Hittite chariots lie in wait whilst hapless Egyptians march towards Kadesh
Ra in trouble! The Egyptians put up a stiff fight
The Egyptians rearranged Ra into a better fighting line
with the support of some skirmishing archers. Seeing the
danger, and ever eager to give his foes a good smiting,
Rameses gathered the forces of Amun and advanced to the
aid of Ra.
With Rameses still a good way off and no sign of Ptah, the
Hittite chariots attempted to mount their charge upon the
troops of Ra. The chariots rolled forward to within short
missile range but failed to contact. The next turn would do it
though, and the Egyptians responded by hurling missiles and
shooting arrows at the Hittites, sending their ranks into
disarray. Thanks to a round of excellent dice rolling and poor
missile break tests from the Hittites, the chariot division was
forced out of formation with one unit disordered. To make
matters worse Rameses with three chariot units was now
approaching from rhe North.
Seizing their moment, the three Hittite chariot units that
were still in good order fell upon the troops of Ra using
their initiative moves to do so. One of the chariots had
positioned itself for a flanking attack and things looked
pretty bad for Ra. So it was to prove, with the flanked unit
broken and destroyed in a single turn and the remaining
units badly mauled. The wily Hittite commander was not
going to take unnecessary risks though, so he withdrew the
flanking chariot unit from the fight and prepared to face the
wrath of Rameses.
116
THE CHARIOT ERA
As the battle between the Hittite chariots and Ra division
raged in the southern part of the table the Hittite commanders
launched their second surprise: advancing onto the table from
the north of Kadesh. This caught Rameses on the hop as he
had already pretty much abandoned his camp to lead his
chariots to the rescue of Ra. Only a unit of infantry remained
behind to protect the camp. Now, with the Egyptian chariots
drawn away, it looked as if the camp would be overrun.
Leaving the fate of his camp in the hands of the gods (and
the Royal Guard), Rameses ordered his chariots to the attack.
Three Egyptian chariot units thundered into the lone Hittite
chariot unit that stood in their path. The Hittites responded
with a determined countercharge and the two forces met
beneath rhe walls of Kadesh itself. It would be the first
chariot clash of the game and the Egyptians were feeling
pretty’ confident. So, confident in fact, that Rameses,
observing from a nearby rise, saw little need to commit his
divine person to the fray.
Rameses confidence appeared to be justified. Things
certainly seemed to be going the Egyptians’ way. The first
infantry unit of Ptah marched onto the southern edge of the
board, and three units of chariots did likewise in the west. In
the ensuring hand-to-hand fighting the remaining troops of
Ra managed to defeat rhe Hittite chariots arrayed against
them, driving the enemy back in disorder. It was a gallant
and some might say lucky bit of fighting by Ra, and largely
down to the grim determination (and successful saving
throws) of the elite Sherden. With the Hittite ambush
convincingly rebuffed, Rameses turned confidently to his
chariots. Now at this stage it is worth pointing out that we
allowed for the supposedly ‘lighter’ Egyptian chariots to have
better shooting ability than the Hittites, whilst the Hittites
were given a slightly more favourable hand-to-hand combat
value to represent their heavier chariot. None-the-less the
Egyptians had the advantage of two supporting units giving
them the upper hand. Rameses confidence quickly ebbed as
fortune suddenly deserted him. What w'as a clear advantage
quickly turned to abject defeat. How he wished he’d been
there amongst his troops, calling down the wrath of the gods
and adding his own three dice to the fight. Alas it was not to
be. Not only were the Egyptian chariots soundly defeated, but
they failed their break test and were destroyed. As a result the
supporting units also had to test, and one also broke and was
removed immediately, whilst the single remaining unit
retreated back towards the Egyptian camp. It was a
spectacularly poor show from Rameses* troops. How much
better it would have been to have brought the chariotry of
Egypt to within bow range of the Hittites and peppered the
foe with arrows, rather than entering into a close combat
where the Hittites had the advantage.
In their turn the Hittites advanced from the north of
Kadesh. Their forces divided into two groups: one heading
towards the fighting with Ra and the other heading towards
the Egyptian camp and chariots of Ptah. The camp was still
held by infantry from Amun division bur things were
looking distinctly shaky for the Egyptians. In the centre the
victorious Hittite chariot unit retreated back towards
Kadesh. Having suffered five casualties, the Hittite player
was keen to get the badly mauled unit out of missile range
of Ra’s remaining bow-armed skirmishers, in the south the
Hittite chariots found themselves pressed by the remnants of
Where did thev come from! The Hittites engage the chariots of the Na’arun (Ptah West division)
117
HAIL CAESAR
Ra’s infantry as well as the infantry of Ptah who were now
making their way onto the battlefield.
In the following turn the Hittites and Egyptians converged to
the north of Kadesh. The Egyptians tried to take advantage
of their long ranged missile fire to disrupt the Hittites.
Infantry defending the camp took every opportunity to pelt
the Hittites with missiles as they swept past. The Egyptian
plan seemed to be working, with several of the Hittite
chariots and infantry forced into a disordered retreat.
Meanwhile in the south, the Hittite chariots had once again
clashed with the remnants of Ra. The Egyptians were pushed
back onto high ground where Ra and Ptah arranged their
troops into a defensive line. A unit of Ra was broken, which
also broke the division. The remaining units of Ra were
shaken whilst their enemies were either shaken or almost so.
Neither side felt able to press the attack and the Hittites
retreated back towards the scrub adjoining the riverbank.
With the game reaching its tenth turn and two of the
Egyptian divisions broken, both sides agreed to call it a day.
The Egyptians had lost Amun division - the survivors of
which were huddled in their camp. Ra was also broken with
the remnants of Ra’s infantry clustered around the high
ground west of the road to Kadesh. On the plus side the
chariots of Ptah had successfully stayed the Hittite advance
upon the camp. Ra had held out against the odds and pretty
much put the opposing Hittite division out of action. The
umpire decreed that the road was open for the surviving
Egyptians to withdraw, leaving Rameses to escape and return
to Egypt. He would have plenty' of time to come up with a
suitably glorious account of his ‘victory’ on the way.
All the players agreed it had been an edge-of-the seat game that
could easily have gone either way. The Hittite players decision
to put the bulk of their forces north of Kadesh obviously made
a big difference compared to the actual events. This left the
ambushing force to the south not really big enough to flatten
Ra in one fell swoop. There was some discussion whether the
Hittites should have been allowed to spring their ambush
closer to Ra, but in end all agreed that both sides had had their
chance. Rameses admitted that launching Amun’s chariots
straight into the lone Hittite chariot unit had been a huge
tactical mistake that stemmed from overconfidence. Charging
the enemy had simply allowed the Hittites a chance they would
never have had if the Egyptians had stood off and shot. Even if
the Hittites had subsequently charged, the Egyptian chariots
could have inflicted devastating damage with closing shots or
counterchanged themselves. After the defeat of Amun’s
chariots the Egyptians were forced into a holding action. It was
to rhe Egyptian players’ credit that they managed this with
reasonable success. On the other side of the Orontes the
The encampment surrounded by swirling chariotry’ - in the background Egyptian bowmen give chase
118
THE CHARIOT ERA
The Hittite hordes pour onto the battlefield from the East
Hittites were quick to claim the victory, with the hated
Egyptians driven from the gates of Kadesh and their own
forces still in pretty good shape. Nevertheless, the initial
ambush had been slow to get going, and the infantry of Ra had
denied the Hittites control of rhe road south. In the north the
Hittite forces had swarmed around the Egyptian camp, but
never succeeded in mounting an attack upon it. Overall, it was
agreed that Rameses did somewhat less well than his historical
counterpart, whilst the Hittites had succeeded in preserving
their chariotry and had therefore improved upon history.
NOTES ON COMPOSITION AND STATISTICS
We have taken a fairly broad brush to the various
contingents that made up both sides, treating all the
Egyptian and Hittites infantry, and their respective allies as
medium infantry types without differentiating between
them. The Egyptian Royal Guard and Sherden are treated
as better quality’ medium infantry with high close combat
values. These troops are also considered to be elite,
enabling them to potentially shrug off the effect of
disorder. The Sherden were placed with Ra to give the
division some backbone. We also wanted to reflect the
supposed difference between the lighter, missile-oriented
Egyptian chariots and the heavier, combat-oriented Hittite
chariots. For this reason we gave the Egyptian chariots an
extended missile range and made them elite to reflect both
added manoeuvrability and high status. The Hittites
receive a higher that usual combat value to represent the
heavier style of chariot but forego the longer missile range
and elite status.
119
A
Roman Testudos prepare to sweep aside the onrushing barbarians. The Testudo was used when assaulting fortifications and other
heavily defended positions to allow the legionaries to advance in the face of enemy missile fire
Classical warfare brings us to the battles of the Greeks and
Romans - the cultures thought of as the wellspring of western
civilisation: of philosophy and science, and of the arts such as
we understand them today. Because the Greeks and Romans
wrote histories of their exploits we know a great deal more
about them than we do about their contemporaries, and most
of what we do know of the wider world is pictured through
the eyes of Greek and Roman historians. This is just as well,
as it enables us to recreate the appearance and tactics of
armies with reasonable confidence. We also have descriptions
of actual battles, offering our first ever glimpse of how battles
were planned and conducted.
The age of classical warfare begins with the wars between the
Greeks and Persians starting with the revolt of the Greek
cities of Ionia in the years following 500BC. The war that
followed saw the triumph of the closely ordered and heavily
armoured Greek infantry over the mixed bow and spear-
armed armies of Persia. The Greek hoplite with his round,
bronze-faced shield, body armour and long spear soon became
the most feared and sought-after mercenary warrior in the
ancient world. After the defeat of the Persians, Greek hoplites
fought in the armies of the Persians themselves and ruled the
battlefields of the eastern Mediterranean for the following two
hundred years. During the Peloponnesian Wars the Greeks
turned upon each other, in a struggle won by the Spartans.
The ultimate triumph of Hellenism came at the hands of a
Macedonian rather than a Greek: Alexander the Great.
Alexander’s soldiers fought in a dense phalanx like those of
the Greeks - but now they were armed with an even longer
spear: the eighteen foot long sarissa, held in two hands. Such
a cumbersome weapon required highly skilled warriors to
wield it, and the Macedonians were certainly that. After
crushing opposition in Greece, Alexander turned his mighty
phalanx eastward against the Persians, defeating one army
after another until all of the Persian empire lay in his grasp.
Not content with conquering one of the largest empires of
antiquity, Alexander pressed on to India, bringing a touch of
Hellenic civilisation to the sub-continent. Following
Alexander’s death his vast empire broke apart into rival
factions, but remained a world ruled by Greeks. For the next
two hundred or more years Hellenic culture and language
predominated throughout the lands once fought over by the
Egyptians and Assyrians.
CIn war, events of importance
are the result of trivial causes.
Julius Caesar
120
The rise to prominence of the heavily armoured infantryman
was mirrored in the west where Greeks established colonies
in Italy, Spain, Sicily and even the coast of France. Well
organised, frequently state-equipped troops of this kind
would come to dominate the wars between Rome and her
rivals: at first the Etruscans and other peoples of Italy, and
soon the Gauls, Spanish and Carthaginians. The Punic Wars
between Rome and Carthage mark the beginnings of empire
and provide us with inspiring accounts of battles won and
lost. The brilliant Carthaginian general Hannibal humbled
the might of Rome for years with his army of mercenaries
and allies, but in rhe end none could stand before Roman
determination and Italian resources. The Roman soldier of
these times was essentially a militiaman, but a heavy
infantryman for all that. Unlike the Greeks these Roman
legionaries carried a heavy iron-shanked javelin: a weapon
called a pilum designed for fighting other infantry at close
quarters. Thrown just before the battle-lines clashed, rhe
pilum was so heavy its iron rip would easily penetrate shield
and armour and kill the man behind. Those not killed or
wounded would find the pilum stuck in their shield and
would be forced to abandon it and fight on unprotected
against legionaries armed with sharp stabbing swords wielded
from behind the protection of a wall of shields.
The Romans did not stop with the conquest of Carthage and
Spain, but pressed on eastward against the old Hellenistic
kingdoms. Now rhe new sword and pilum equipped legions
faced a foe equally well-trained and at least as highly regarded
- the sarissa armed troops of the Greeks. The clash between
rhe two military systems ended with the triumph of the
legion, but it was no easy victory and even today the debate
goes back and forth over rhe merits of these rival ways of
waging war. Whatever the case for the phalanx that had
dominated warfare for hundreds of years, the legions
marched east, the Hellenistic kingdoms tumbled or
disintegrated, and the Roman empire lay upon the banks of
the Euphrates. On the opposite side of the river lay Persia,
now under the control of the Parthians, a nomadic people
who had moved in and taken over from the former Greek
PICKING A FIGHT
Roman legionaries were highly trained and adaptable
soldiers - equally proficient with a variety of arms and
quick to adapt to the weapons and armour of their
enemies. Never more was this true than during die
revolt of the Aedtii in 21AD when Gallic troops led
by Sacrovir, including a core of heavily-armoured
gladiators, were confronted by rhe legionaries of
Gaius Silius.
Tacitus tells us how these armoured leviathans
fared in the face of legionary ingenuity.
“The ironclads’ armour was proof
against pila and swords, but the
legionaries brought up their axes and
pick-axes and hacked at armour and
flesh as if demolishing a wall’’.
Roman Pugio, 1st Century AD
Roman soldiers often spent
considerable amounts of money
on decoration such as this.
soldiered on in the face of barbarian invaders including the
Franks, Goths, Vandals and Huns. The empire was divided
into a western half ruled from Rome and an eastern halt
ruled from Constantinople - otherwise known as the
Byzantine Empire. Rome was sacked by Alaric the Goth in
410 and plundered by the Vandals in 455. In 476 the last
Roman Emperor Romulus-Augustulus was deposed by
Odoacer, a German warlord who has been fighting as a
Roman general. But by then the proud legions were long
gone and another age of warfare had begun.
rulers. The Parthians with their highly mobile cavalry-based
armies were to prove something of a headache for the Roman
heavy infantryman, whose weapons and tactics had evolved
for fighting other infantry. The empires clashed repeatedly,
and when the Parthians were succeeded by a resurgent
Persian dynasty - the Sassanids - rhe fighting continued.
Many times the Romans advanced into Mesopotamia,
looting and burning cities, and many times the
Persians drove them back almost to the
Mediterranean coast.
It’s impossible to put an exact date to the end of
the classical age, but we may point to the growth in
the cavalry arm as one of its characteristic features,
together with the reduction of infantry to a
secondary role. Plague and economic
collapse nearly brought the Roman
Empire to its knees in the 3rd
century, but the Romans adapted and
Early in the Peloponnesian War the Spartan army, supported
by its allies, advanced out of the Peloponnese and into
Boeotia and rhe surrounding countryside. Its intention was
clear: to send a message to Athens and her supporters that
Sparta was the true master of Greece. As the Spartans
progressed, contingents split from the army to hold strategic
positions along the route, gather supplies, and take control of
roads to and from the main cities. Some went unopposed,
but others met resistance.
A small force consisting of Athenians and their allies was
reported to be blocking the road to Boeotia. Although
nominally allied to Athens, the Boeotians’ loyalties were
known to be suspect, and the Athenians wanted to
demonstrate in full view of the enemy that it would be
foolish to switch sides and oppose them.
Relying on their unshakable belief that they were by far
superior to the Athenians in battle, the Spartans sent an
equally small force to brush the opposition aside. The
Spartan general Adrastus took command of a mixed force
comprising hoplites together with some lightly armed men.
The hoplites included a Spartan phalanx as well as some of
the most trusted of the allies.
THE SET UP
We know’ of the major battles of the Greek world, but many
smaller conflicts are only mentioned in passing, and many
more are likely to have gone unrecorded. Our game is an
attempt to re-create just such a battle, and also to show’ that
the Hail Caesar rules are not only about big games w’ith
hundreds of models!
As the Spartan army came into sight, and knowing they would
be without cavalry, the Athenians formed a battle line of
hoplites along the edge of a road with open ground to their
front. This would allow their own cavalry to operate freely and
give their missile-armed men a clear shot at the enemy as they
approached. Part of the road was sunken and lined with trees
in full leaf; this was used to full benefit by the Athenian
commander during in the conflict, as we shall see.
122
Spartan Forces
Spartan division:
• Commander Adrastus
• 1 phalanx of Spartan hoplites
• 1 phalanx of Lacedaemonian hoplites
• 1 small unit of Helot skirmishers
Corinthian division:
• Commander Elpidios
• 2 phalanxes of Corinthian hoplites
• 2 small units of skirmishers with slings
ATHENIAN FORCES
Athenian division:
• Commander Demosthenes
• 2 phalanxes of Athenian citizen hoplites
• 1 phalanx of Elite hoplites (set up in ambush)
• 1 small unit of Black Sea archers
Boeotian division:
• Commander Archippos
• 2 phalanxes of Theban hoplites
• 1 unit of Boeotian light cavalry
• 1 small unit of skirmishers with slings
SPARTAN AND ATHENLAN FORCE STATISTICS
All commanders including the general have Leadership ratings of 8. The general has the standard re-roll rule in addition.
Type Clash Combat Long Range Morale Save Stamina Special
Sustained Short Range
Spartan Hoplites 7 7 3 0 4+ 6 Drilled, Stubborn, Elite, Phalanx, Immune to Blunders
Athenian Elite Hoplites (Heavy Infantry) 7 7 3 0 5+ 6 Elite, Phalanx
Other Hoplites (Heavy Infantry) 7 7 3 3 5+ 6 Phalanx
Helots armed with javelins and fielded as a small unit (Skirmishers) 3 2 2 0 0 4
Slingers fielded as a small unit (Skirmishers) 2 2 2 2 0 4
Black Sea Archers fielded as small unit (Light Infantry) 3 3 2 2 0 4
Boeotian Cavalry fielded as small unit (Light Cavalry) 5 3 2 0 6+ 4
Note: All hoplites are armed with long spears and all have the phalanx rule as noted.
For this battle we decided to allow all the hoplite phalanxes a short ranged attack to represent outrunners in the Greek
ranks. Thus the hoplites have a short range value of 3 rather than 3/0 as is usual for troops armed with long spears.
123
HOW IT WAS PLAYED
Seeing the Athenians’ position clearly, their shields gleaming in
the midday sun, the Spartans began to draw into a line, flanked
by their lightly armed skirmishers. But as they approached rhe
Athenians they moved their entire line quickly to the right
where they perceived their enemy to be weakest. This kind of
manoeuvre took other Greeks much longer to perform, but
demonstrating their superior training and famous discipline,
the Spartans’ phalanx moved effortlessly as if of one mind and
advanced towards the foe, eager tor battle to be joined.
Reacting quickly to this sudden shift of the Spartan line, and
in an effort to take advantage of the lingering of the
Spartans’ allies, the Athenians advanced quickly forwards.
Meanwhile, the Boeotian allied cavalry on the Athenian right
flank moved into the olive groves in front of them.
The other Greeks in the Spartan army noticed the Spartan
phalanx ahead of them, and wanting to prove their worth,
caught up with them at a quick pace. However, terrified by
glimpses of enemy horsemen expertly navigating the olive
groves ahead and coming right for them, the slingers on the
Spartan left flank froze. Their want of training, experience -
and some might say courage - betrayed them.
Letting loose a single poorly aimed volley of sling shot
towards the cavalry, the skirmishers had already started to
run as the enemy horsemen came within javelin range. No
resistance was offered and no mercy was shown as the
slingers were pursued and destroyed.
Meanwhile, unnerved by the Spartans’ quick advance and
the noise struck up by them as they sang, the main Athenian
line became disorganised as some hoplites showed their
bravery whilst others shamed themselves and froze in terror.
Now, the general Adrastus of the Spartans was obliged to
hold back his men to allow his allies to catch up properly,
seeing that ar the pace they were going the Spartans would
otherwise be in danger of becoming surrounded. This
allowed the other Lacedaemonian Greeks to come forward
besides the Spartans and the helots to cover the phalanx’s
exposed flank.
As all students know the area around Sparta was called
Lacedaemonia, and for this reason the Spartans bore the
Greek letter equivalent to L (lambda) - an inverted V - as
a device emblazoned upon their bronze-clad shields.
Witnessing the destruction of their slingers and seeing that
the enemy cavalry were distracted as a result of their pursuit,
one of the Corinthian phalanxes performed a masterful
manoeuvre: wheeling to face the horsemen and advancing
quickly towards them. Lightly armed out-runners broke
ranks to engage rhe cavalry in the rear. This caused the
Boeotian horsemen much consternation and soon forced
them to break and flee from the battlefield altogether. For
this brave act, rhe Corinthian hoplites were later honoured
in Sparta.
The Athenian line now found its courage and formed a
solid wall of men to oppose the Spartans. The archers they
had recruited from the Black Sea coast moved to the front
and trained their bows on the Spartans. By the luck of the
gods not even they could find their mark. A small band of
slingers saw the Corinthian phalanx’s formation was in
disarray and took the opportunity to try and strike at the
hoplites’ unprotected side. They only caused minimal
injuries however.
Once again the contrast between the highly trained Spartans
and the rest of rhe army showed itself. The Spartans
advanced heroically towards rhe Athenians, but beside them
their allies stumbled in the face of the enemy and were
obliged to momentarily halt their ranks.
Now the Athenian trap was sprung! General Demosthenes,
showing a remarkable tactical insight and no little cunning,
had hidden some of the finest hoplites in Athens in rhe
sunken lane. Ducked down low and hidden behind the
trees, the Spartans were completely unaware of their
presence. The Athenians sprang from their ambush and
charged straight into the Spartans and their general. They
were followed by a Theban phalanx, spears at the ready.
A very bloody combat was fought, with the Spartan
commander in the thick of it. In the midst of the clash a
brave Athenian named Miltiades struck Adrastus in the
neck with his spear, inflicting a mortal wound upon him.
The close-fought struggle took a heavy toll of both sides,
with the Spartans fighting for the body of their fallen
general and the noble Athenians refusing to give ground.
Seeing that battle had been joined, one Corinthian phalanx ran
to the aid of the Spartans and charged into the Thebans who
were pressing upon them. The other Corinthian phalanx again
showed their bravery by charging at the Theban flank, taking the
enemy by surprise and quickly breaking them. As their enemy
fled, the Corinthians crashed through into the Athenian citizens
____________ _ THE CLASSICAL AGE
behind, causing utter mayhem in their ranks and sending them
in flight after their allies. Amidst the confusion rhe Athenian
commander was badly wounded and dragged to safety.
Both sides now joined in earnest. Although the Athenian line
was almost destroyed the elite phalanx refused to flee and
continued to exchange deadly blows with the Spartans. The
Black Sea archers showed their ferocity, drawing their axes and
charging the Spartans. But, alas, the Athenians and their allies
could not prevail against the Spartans and were soon broken
and in flight. Skirmishers continued to pelt the Spartan line
with missiles from a safe distance, but only caused a few
casualties before they too melted away from the battlefield.
Only the brave noblemen of Athens fought on. They were
abandoned to their fate and surrounded, valiantly fighting
until the last man.
So the battled ended with the mighty Spartans triumphant
and the Athenian dead and wounded strewn upon the field.
The way to Boeotia was now open, but an omen was foretold
at this moment of victory - an omen that the Spartan’s heard
in grim silence: ‘The war for Greece will not be won as easily
as the road to Boeotia’.
125
HAIL CAESAR
SPECIAL RULES AND SCENARIO
Wc decided to make the Spartan phalanx drilled, stubborn
and elite (4+). We also decided to make the Spartans
immune to blunders - treating the result as a standard ‘fail’
instead (which did happen during the game). It just seemed
wrong to have a Spartan unit misunderstand orders or
otherwise move unpredictably!
All hoplite phalanxes were treated as heavy infantry armed
with long spears The Athenian elite unit was given the elite
(4+) special rule the same as the Spartans, allowing it to
potentially recover from disorder at rhe start of their turn.
The umpire secretly arranged for the Athenians to hide a
single unit in the sunken road before the game. This unit
could be placed on the board at the start of any Athenian
turn, or would be placed automatically as soon as the
enemy came within 6”.
On this occasion Mike Perry and Alessio Cavatore donned
loincloths to play the Spartans, whilst Alan Perry and Rick
Priestley sauntered from the Agora to represent the Athenians.
Steve May devised the scenario, provided both armies,
recorded the game for posterity and took the photographs.
Cavalry chase the opposing skirmishers from the rough ground in the opening moves of the battle
At the moment of impact warriors in the front rank stab furiously
over the tops of their bronze-faced shields
Hoplites close up shoulder-to-shoulder forming a hedge of spearpoints
126
THE CLASSICAL AGE
PHALANX
Hand-to-hand combat defeats by up to 2 are treated as a draw.
The term phalanx properly describes a formation of Greek
hoplites or pike-armed phalangites. In antiquity it was
sometimes used to indicate any body of close fighting infantry.
We created the following rule specifically to better represent the
push, shove and sudden collapse of hoplite warfare, but it could
be applied to any body of troops that you wanted to make
especially resilient in the first rounds of hand-to-hand fighting.
Troops designated as phalanx treat any hand-to-hand combat
defeat by up to a predetermined number of casualties as a
draw. We generally set this level as 2, though there is no
reason not to allocate different levels to represent troops who
are more or less resistant. Units can even be assigned
different values in the same battle if you wish - so long as
you can remember which is which of course! We recommend
sticking to 2, at least to begin with. So, a unit losing a combat
by 5 casualties to 3, for example, would treat the result as a
draw and would not have to take a break test. The same unit
losing by 5 casualties to 2 would be defeated by 3 and would
therefore have to take a break test with a minus 3 penalty to
the result. Note that once a unit is shaken (i.e. once it has
suffered casualties equal to its Stamina value - usually 6) it
will be obliged to take a break test following a draw in any
case. Where a phalanx unit is obliged to test on a draw
because it is shaken, the full difference in casualties counts:
for example, a phalanx unit losing a combat by 6 to 4 must
take a test deducting 2.
Another view of the Greek cavalry» These light cavalry are armed with
javelins and prefer to fight in open order.
Hoplite battles were decided by a clash of solid lines of armoured infantry. The Greeks had few cavalry or light troops, although the importance of these
supporting units grew over time. Never the less the hoplite remained the most important part of all Greek armies until the time of Alexander
127
A
AN ENCOUNTER DURING THE ROMAN CONQUEST OF BRITAIN
Our battle takes place shortly after the death of the Roman
governor Ostorius Scapula in 52AD. Taking advantage of the
temporary lack of leadership, the Silures tribe have attacked
and destroyed part of a legion engaged in building
fortifications in their territory. (The Silures lived in what is
now south Wales and rhe borders - the troops described by
Tacitus were probably from Legio XX then based near
Gloucester). Now the Silures are rampaging far and wide,
ambushing Roman foraging parties and keeping the invaders
pinned in their fortresses. The new governor Aulus Didius
hurries to Britain at Caesar’s command, but when he arrives
his attentions are drawn northwards where Rome’s ally
Queen Cartimandua is fighting a civil war for control of the
Brigantes. In the west the Silures will remain a troublesome
thorn in the side of Rome for another twenty years.
Unrecorded by the pen of Tacitus, as Aulus Didius leads
his legions northwards to the rescue of the beautiful but
treacherous queen of the Brigantes, a mixed vexillation of
legionaries and auxiliary troops embarks upon a punitive raid
against a native settlement deep inside Silures country. This is
a land of densely wooded valleys and treacherous bogs, of
darkness, damp and druids. As the Romans march step-by-
step, the wind stirs rhe shadows in rhe woods, the crows caw
ominously overhead, and the sky is tinged the colour of blood.
OF MEN AND GODS
This game was devised as a multi-player scenario with the
scene set and the game run by an umpire. Two avowedly
depilated players took the role of the Roman commanders,
whilst the three players sporting the most luxuriant
moustaches - a necessary furnishing for any self-respecting
Briton - represented the natives. The tabletop was set up to
represent a narrow steep-sided valley lined with woodland as
shown on the map. The table itself was nine feet by six with
the Romans beginning at the western entrance to the valley
edge as indicated. No Britons were placed on the table at
the start of play, on the principle that their forces would
remain hidden until discovered by the Romans or until they
moved. Thus, at the start of the game, the Romans are
unaware what dangers lurk before them. By the same token
the Druidic temple is not placed on the table, being
secluded deep within the woods at the head of the valley,
and must either be discovered by the Romans or revealed by
the Britons during the course of the game.
Each group of players was briefed separately by the umpire
prior to the battle along the lines given below. The Britons
elected to forego the option of conducting the game naked
save for a daubing of woad, for which consideration the
Romans were manifestly grateful.
Battle followed battle. They were mostly
guerrilla fights, in woods and bogs. Some were
accidental - the results of chance encounters.
Others were planned and calculated bravery’.
Tacitus Annals xii ;
128
THE ROMAN BRIEF
The Roman army consists of four divisions as follows:
General - Marcus Spandex, Praefectus castrorum
• 1 unit of legionaries
• 1 unit of raw legionaries
• 1 unit of auxiliaries
• 1 small unit of auxiliary archers
Cenicus Dodius - in charge of the cavalry
• 2 units of auxiliary cavalry
• 1 small unit of Numidian light cavalry
Maximius Flaatus
• 1 unit of legionaries
• 1 unit of raw legionaries
• 1 unit of auxiliaries
• 1 small unit of auxiliary archers
Dipso Maniacus Vino
• 1 unit of legionaries
• 1 unit of raw legionaries
• 1 unit of auxiliaries
• 1 small unit of auxiliary archers
All Roman commanders apart from Dipso Maniacus Vino
have a Leadership rating of 8. Marcus Spandex has the
General’s re-roll rule and is therefore entitled to re-roll a
single command test each round. Dipso Maniacus Vino
turns up scandalously drunk. His Leadership value is
therefore determined randomly at the start of the Command
part of each turn. Roll a dice: a roll of 1=7, 2-5=8 and 6= 9.
The Roman force is engaged in a punitive raid. The Silures have
committed sundry outrages against the majesty of Rome.
Standards of Legio XX were lost to the enemy during a recent
attack. It is your duty to avenge this disgrace and restore the
Legion’s pride. Scouts have located a tribal centre in a steep-
sided valley. The table represents this valley. It is dawn. As you
enter the valley the sight of grazing animals confirms the
enemy have been caught napping. Progress up the valley,
looting, taking captives and finding and recovering the lost
standards. Your objectives are, in order of priority:
• Crush any opposition!
• Recover the lost standards of Legio XX.
• Loot and destroy native settlements.
• Capture woman and children, and drive away livestock.
THE ROMAN ARMY
All commanders including the general have Leadership ratings of 8 apart from Dipso Maniacus Vino who has a
randomised Leadership rating as already noted. The general has the standard re-roll rule in addition.
Type Clash Combat Long Range Morale Save Stamina Special
Sustained Short Range
Roman Legionaries armed with pila and swords (Heavy Infantry) 7 7 3 0 4+ 6 Drilled, Elite (4+), Testudo
Raw Roman Legionaries armed as above (Heavy Infantry) 6 6 3 0 4+ 6
Auxiliaries with spears (Medium Infantry) 6 6 3 0 5+ 6
Auxiliary Archers fielded as small unit (Light Infantry Archers) 3 3 2 2 6+ 4
Cavalry Auxiliaries with spears/javelins (Medium Cavalry) 8 5 3 0 5+ 6
Numidian Cavalry* fielded as small unit (Light Cavalry) 5 3 2 0 6+ 4 Feigned Flight
Roman legionaries are armed with pila and archers with bows. No special rules apply to spear/javelin armed troops and
spears are not considered long spears.
129
HAIL CAESAR
THE BRITONS’ BRIEF
This force is divided into three commands: a division of
infantry, cavalry and chariots representing the local chiefs
household troops, a large division of infantry, cavalry and
chariots representing local tribes, and a smaller division of
druidic warriors. The local chieftain controls the villagers,
hunters and lookouts as explained below.
General - Bagotrix, Chieftain of the Valley
• 4 Warbands
• 1 unit of Skirmishers with slings
• 1 unit of Chariots
• 1 unit of Cavalry
Catubatrenus
• 4 Warbands
• 1 unit of Skirmishers with slings
• 2 units of Chariots
• 1 unit of Cavalry
Alibongus - the Druid
• 2 units of Druidic Fanatics
• 1 unit of Skirmishers with javelins
Celtic Villagers
• 1 group of Villagers
• 1 group of Hunters
• 1 group of Sentries
• 1 Herdsman
All Briton Commanders have a
Leadership value of 8 and Bagotrix
has the general’s re-roll rule allowing
him to re-roll one command result
each turn. Alibongus the Druid is a
commander but also has up to 3
attacks (as opposed to the more
usual 2).
THE BRITONS
All commanders including the general have Leadership ratings of 8. The general has the standard re-roll rule in addition.
Type Combat Morale Save Stamina Special
Clash Sustained Short Range Long Range
Warband armed with swords and javelins (medium infantry) 9 6 2 0 5+ 6 Wild Fighters (3 re-rolls)
Druid Fanatic Warband (medium infantry) 9 6 2 0 5+ 6 Wild Fighters (3 re-rolls), Fanatic, Frenzied Charge
Skirmishers with javelins fielded as a small unit. 3 2 2 0 0 4
Skirmishers with slings
fielded as a small unit
Cavalry armed with
javelins (light cavalry)
British Light Chariots
Celtic sentries with
bows (tiny)
Celtic villagers (tiny)
Hunters armed with
javelins and fielded as
small unit (skirmishers)
Britons are armed with swords and javelins throughout, apart from the sling-armed Skirmishers.
The Celtic sentries occupy the lookout post, which is treated as a building, adding +2 to their
Morale save. The villagers are armed with whatever comes to hand. The herdsman has no stats
and is simply slain if caught, if he reaches the villagers he is absorbed into their unit.
130
It is rhe dawn of a great festival day and the tribes are
gathering to celebrate in fine style with food, drink and
raucous song. Recent victories against the hated Romans have
furnished the proceedings with a number of impressive
trophies in the form of legionary standards. The Britons have
also captured several legionaries who will be sacrificed on the
druids’ altar during the evening. The site of the gathering is
the valley before you with its secret druidic temple hidden
deep inside the eastern woods. Many druids have already
assembled around the temple. None dare approach whilst the
priests perform their bloodcurdling rites. Meanwhile, all the
neighbouring tribes are travelling towards the valley and are
expected to arrive shortly. Within the valley itself the ordinary
folk tend to their animals, whilst the women and children
prepare for the evening’s feast in their rude huts. Sentries take
their place in the lone lookout post.
At the start of the game only the herdsman and the lookouts
are placed on the table. The villagers are assumed to be inside
their huts pursuing their rude crafts in preparation for the day
ahead and are therefore not placed on the table. They can do
nothing until warned by the herdsman or until attacked by the
Romans. Chieftain Bagotrix and his household warriors are
camped around the stockaded village at the head of the valley
and are not placed onto the table until the alarm is given.
Until then they can do nothing. Catubatrenus and the tribes
are approaching the valley and will arrive at the south-eastern
corner of the table on the appropriate dice roll made from
turn 2 onwards. Until the alarm is given their default order is
to move to the stockaded village and join Bagotrix. The druids
are hidden deep within the woods. Neither the druids nor
their temple are placed on the table at the start of the game.
Alibongus, the druidic forces, and temple can be placed on the
table at the start of any Briton turn after the alarm has been
given. Until then they can do nothing.
The Briton objectives are as follows:
• Firstly to raise the alarm! How to do this is
described below.
• Subsequently - to head-off the Romans and defeat them.
Set up rhe table along the lines shown on the accompanying
map. We considered the animal enclosure to have no
significance other than helping to set the scene. It can be
missed off if preferred or treated as rough ground if you want
to make life harder for the Romans. The temple and track
leading to it are not placed on the table until the druid
division is activated.
The Romans have the first turn and are allowed to bring
one division onto the table each turn, entering along the
western edge. Troops entering the table are placed within 6"
of the table edge and cannot move further that turn.
Should there not be room to place some or all of the units
in a division (because troops already deployed have failed to
move) then newly arriving units will have to wait until the
blockage is cleared.
Herdsman. Once the Romans are on the board the
herdsman immediately spots them. The Britons can then
move the herdsman either towards the village to warn the
villagers or towards the lookout post to give the alarm. The
herdsman does not need a commander. He is moved by
giving orders against a Leadership value of 8, treating him as
a tiny unit. He always moves at least once each turn. If moved
over by the enemy he is slain instantly without fighting and
no hand-to-hand combat is initiated. If the herdsman reaches
the village before the Romans he warns the villagers (see
villagers). If the herdsman reaches the lookout post the alarm
is sounded (see lookout post). We put him about 15* from
the village - i.e. within 3 moves distance.
Lookout post. If there are Romans within 12" of the lookout
post at the start of any Briton turn the alarm is sounded
automatically. If the herdsman or villagers move into touch
with the lookout post the alarm is automatically given. If
Romans choose to attack the lookout post either by ranged
fire or hand-to-hand combat the alarm is automatically given
at the start of the following Briton turn assuming the lookouts
have not been destroyed in the meantime. Should the
lookouts be destroyed before they give the alarm then they are
131
HAIL CAESAR ____________________________________
Roman legionaries and auxiliaries in the thick of the fighting
unable to do so. Otherwise, if there are Romans within 24" of
the lookout post at the start of any Briton turn roll a dice, on
the score of 4, 5 or 6 the alarm is sounded. Finally, if any
Roman unit progresses further east than the line between the
lookout post and the animal enclosure the alarm is
automatically given at the start of the following Briton turn
regardless of whether the lookouts have been destroyed or not
- this is as far as the Romans can possibly get without being
spotted.
Villagers. If the herdsman reaches the village before the
Romans the villagers deploy as a tiny unit and can be placed
within 6" of the village. Subsequently they can be given
orders with a Leadership value of 8 and always make one
move. Should rhe villagers reach either rhe stockaded village
or the watchtower the alarm is given automatically. If the
village is attacked before its inhabitants are warned, then the
villagers deploy automatically as a unit that has been charged
in combat - they are caught by surprise and cannot evade or
make closing shots.
Hunters. Some villagers are off hunting in the northern
woods. They will deploy at the edge of the northern wood
next to the village ar the start of a Briton turn once the
village is attacked. They do not need a commander and are
ordered with a Leadership value of 8.
Stockaded village. Bagotrix and his division can deploy into
the open area to the east of the village as soon as the alarm is
given. If the alarm is given at the start of a Briton turn they
can be given orders as normal. The village itself can be
occupied and defended by a single unit of infantry if desired
- it is lightly defensible with a Morale bonus of +1. The
stockaded village is where the Roman standards are displayed
- surrounded by a great pile of captured arms and armour.
Druidic Temple. The Britons can place the temple and rhe
druidic division in the clearing in the woods at the start of
any turn once the alarm has been sounded. They must be
deployed if the Romans move into the surrounding woods
and if they have not already done so. At the druidic temple
will be found Roman captives awaiting sacrifice.
Neighbouring tribes. Catubatrenus’s division of neighbouring
tribes will arrive on the table on the dice roll of a 4, 5 or 6
made at the start of each Briton turn. If they have not arrived
by the time the alarm is given they automatically arrive the
following turn. They are deployed into the south-eastern
corner of the table between the eastern woods and hill and
move from the board edge with orders as usual. They get one
free move on the turn they deploy - sufficient to place them
on the table regardless of their Leadership roll. If the alarm
has yet to be given the division’s orders must be to move to
the stockaded village and camp next to Bagotrix’s division.
Herd. The herd of cattle is placed on the table at the start
of the game and automatically moves 6" per Briton turn
down the valley, away from the Romans, until captured.
The herd does not need orders to move - it always moves
once per turn. The herd cannot be moved through by
troops from either side. Don’t make the herd too big or it
will hinder progress- it needs to have about the same
footprint as a unit of troops. The Romans can capture the
herd by any Roman unit moving into touch, at which point
the herd will start to move back towards the Roman starting
edge (it being assumed some troops have been detailed to
drive the cattle away). The herd can be recaptured in the
same way. Once the herd has left the table it has been
successfully driven off.
Plundering. The Romans can plunder or attempt to destroy
either village, the watchtower, or temple if they have a unit
in touch at the end of any Roman turn and no enemy
within 12". If they plunder they will automatically find
legionary standards and Roman prisoners, and are assumed
to take any civilians present captive along the w’ay. If they
choose to destroy a location they are assumed to have set the
buildings on fire and these become uninhabitable from that
point on.
The game ends once one side is broken, or by the end of the
evening at the umpire’s discretion in which case he must pass
judgement on the players* efforts. If the Britons are broken
then the Romans are free to fulfil any outstanding objectives.
If the Romans are broken then any objectives already fulfilled
count in their favour, whilst any remaining troops will be
forced to withdraw. Overall, this is a tough one for the
Romans who must coordinate their forces both to explore
the valley and take on any enemy that appear. Roman success
must therefore by judged in light of the fact that their raid
was unlucky to take place on the same day as a great festival
and gathering of tribes.
132
THE CLASSICAL AGE
HOW IT WAS PLAYED-OR ALIBONGUS REVEALS ALL!
Our Roman players surveyed the narrow tree-hemmed valley
with evident trepidation before deploying their cavalry
division along the northern portion of the western board
edge facing the village. The only option remaining to the
Britons was to move the herdsman - who was evidently
feeling the effects of the damp upon his arthritic limbs that
morning as he only managed a single move, placing him
firmly in danger of being trampled by the advancing Roman
cavalry. The cattle, meanwhile stumbled down the valley, no
doubt catching the scent of horses or possibly the garlicky’
whiff of their riders.
The Romans deployed their main infantry division next,
under the command of Spandex, positioning the battlelines
further south, with the division’s flank resting upon the
adjoining woodland. Fearing the sudden appearance of
Britons the Romans very sensibly took the precaution of
deploying some light troops into open order along the edge
of the woods. The Roman cavalry meanwhile appeared to
lose their way in the morning mist (rolling a 10 for their
move) and so held their ground. Spandex’s legions marched
resolutely forward a single move.
The Briton player began his second turn by rolling for the
arrival of the neighbouring tribes without success. The
herdsman wheezed forward another move leaving him mere
inches short of the village and some 20" or so from the
Roman cavalry. In their turn the Romans deployed their
second infantry division under the inebriated command of
Dipso Maniacus Vino, whilst Spandex formed a defensive line
to the south of the village.
A band of Roman archers found themselves within bowshot
of the Britons’ look-out post and cast a few arrows in its
direction without any effect other than to arouse the notice of
the sentries. The Roman cavalry finally sprang into action,
rolling three moves and trampling over the gasping herdsman
as they launched themselves upon the village. The villagers
deployed into a defensive line, but were quickly massacred,
leaving the Romans in possession of the village, no enemies
nearby, and therefore one objective achieved. A search of the
buildings revealed them to be empty and the Romans led the
women and children off into captivity.
The alarm was raised at the start of the Britons* following
turn (because the Romans had shot at the look outs) and the
neighbouring tribe also decided to show up with an
auspicious dice roll of a 6. The chieftain’s own household
division deployed around the stockaded village. The Hunters
deployed on the edge of the wood and, spying the Romans
pillaging their village, proceeded to attack the opposing
cavalry with their javelins.
By this time the Romans were starting to get an idea of how
many enemy they were facing and decided to draw their
troops together into a tighter defensive line. The final Roman
infantry division moved onto the table edge behind
Spandex’s troops, whilst the unpredictable Vino (Leadership
9 this turn) merrily led his men forward in a futile attempt to
capture the Britons’ cattle. Meanwhile the Numidian cavalry
skirmished with the Hunters around the village, though with
little consequence. Whilst the Hunters remained within 12"
the Romans were unable to set fire to the village, so the
Britons were satisfied to keep things bogged down.
The Britons moved forward rapidly in their turn, with the
foremost warbands, cavalry, and chariots crowding into the
narrow open space along the valley floor. Catubatrenus’s
division showed remarkably enthusiasm (three moves) and
spilled into the area between the watchtower and eastern
woods. Meanwhile Bagotrix dispatched a portion of his
command through the northern woods. This allowed him to
make room in the centre and gave him a chance to get
behind the flanks of any potential Roman advance. As the
woods were only passable to troops in open order the
warbands were obliged to open their formation to enter.
The Romans responded by advancing to the edge of the
animal enclosure in an attempt to form a solid defensive line
between the northern and southern woods. Spandex’s
Briton chariots seen against a background of the Welsh hills. Chariot ponies were small, hardy beasts not unlike modem day Welsh hill ponies
133
HAIL CAESAR
division took up a convincing position to the north. Sadly
Vino chose this moment to blunder, and the intended
advance of his division resolved itself as a two move retreat to
his rear! This left a yawning gap in the Roman line which the
cavalry successfully plugged with a double move. Meanwhile,
the rearmost Roman infantry division failed to move at all.
At this point is was all looking a bit of a shambles for the
Romans, although Spandex’s troops continued to maintain a
tenable position around the general.
The Britons were determined to mount a head-on assault
towards the Roman lines, but managed only a steady shamble
forwards (one move) in the north, whilst in the south the
advance stalled altogether. The Romans responded by
drawing their line back into a tight formation with infantry
in good mutually supporting positions. A unit of Roman
archers found itself within range of the enemy skirmish
screen and had the satisfaction of seeing the Britons turn and
run before a volley of arrows (a 6 ‘to hit’ resulting in a break
test that the skirmishers failed).
The Britons saw that matters would be settled in the centre
and decided to reveal their secret weapon - the dreaded
druidic warriors and their fearsome leader Alibongus. The
sudden appearance of the Celtic temple and its fanatical
devotees did little for the fighting spirit of the Romans whose
confidence had visibly plummeted as each enemy division
took its place on the field. To have called these latest foes
half-naked savages would have been a distinct exaggeration;
for they were proudly skyclad to a man, not least the raving
madman at their head: the druid Alibongus. The druids ran
forward as bereft of fear as of trouser, elbowing their way past
friendly units in the front of the Briton army. The cavalry
moved up to support them. The Britons had now formed a
credible line between the northern woods and the southern
hill. The opposing infantry forces had drawn into charge
reach - though only just.
Somewhat unnerved by the appearance of the fanatical
warriors the Romans pushed the Numidian cavalry forward
and proceeded to pepper the naked Celts with javelins.
Roman archers, who had deployed into open order ahead of
the legions, added their own missiles to the barrage. Both
druid units suffered a casualty each as a consequence, but the
Roman archery failed to halt their advance (failing to score
the 6’s needed to initiate a break test). On the positive side
the Romans had managed to move their remaining infantry
back into formation, and now stood in a solid battleline that
would be tough for the Britons to breach.
In the Britons’ turn Alibongus declared his charge, and
with the ‘frenzied charge’ rule giving them three moves on a
successful order both units of druids hurled themselves upon
the opposing Romans. The archers in front of the first unit
of fanatics evaded back through the legions to their rear, and
the chargers flew onwards into the massed ranks of heavy
infantry. It had been a long charge though - almost 18" in
fact - and the rest of the Celtic army predictably failed to
keep pace. The fanatics were on their own. Against a
battleline of well-supported legionaries they would be lucky
to survive. To make matters worse Catubatrenus’ tribesmen
hung back altogether (Catubatrenus failed his first order,
leaving the whole division standing). Suspicions were cast
upon the loyalty of Catubatrenus and his warriors - had they
been bought off with Roman gold.7 The Roman players were
certainly happy to claim as much!
Each unit of fanatics found itself in a separate combat. In
the south the dice showed little favour to either side. The
fanatics with nine attacks and benefiting from their charge
bonus and re-rolls landed eight hits, but the Romans
managed to save six. They needed 4’s to save so this was
better than average. Two casualties were marked on the
Romans. In reply the Romans and their supports managed
to hit with five of their attacks. Average again as the legion
was supported by a single auxiliary unit. The fanatics
enhanced save (+1 Morale save until shaken) was cancelled
out by the legionaries’ pilum bonus (-1 Morale save in the
first round). However, the gods were with the fanatics that
day and they saved three hits. They needed rolls of 5 or 6.
Two more casualties were marked on the fanatics bringing
their total to three including the casualty suffered in the
previous turn from bowfire. Result - two casualties scored
each - a draw! The Roman line had held.
In the north the other unit of fanatics was joined by
Alibongus, bringing their total number of attacks to twelve of
which ten landed hits on the Romans. A fistful of l’s and 2’s
134
'< " - -\2 л< ''l'<
______________________________________________________ THE CLASSICAL AGE '
The Romans draw into a tight defensive line in the face of the Britons’ relentless advance
drew a groan from the Roman players. No fewer than eight
casualty markers were placed by the legion. However, the
legion was supported by a raw legionary unit to its rear and a
unit of auxiliaries to its flank. The Roman player had thirteen
dice by way of reply (needing 4’s to hit). Once more the dice
showed their disfavour with a mere four hits, two of which the
fanatics saved (needing 5’s - their +1 fanatic bonus being
cancelled out by the legionaries’ -1 pilum). Two casualty
markers were placed next to the fanatics, bringing their total to
three including the missile casualty suffered in the previous
turn. With a loss by ‘6’ the already shaken Romans needed a
roll of 11 or 12 to avoid breaking and not surprisingly they
failed. The legion was removed and both supporting units were
obliged to test. They only needed to score 9 or more to avoid
destruction (as neither unit was shaken, unlike the unlucky
legionaries) but both failed to come up with the goods and
both units took to their heels and fled (and were therefore
removed from the table). The Celtic players were jubilant. The
pride of Rome had been brought low by a bunch of savages
wearing nothing but a fancy haircut!
As the Roman units were removed Alibongus declared his
intention to make a sweeping charge into the only Roman unit
still standing in front of his fanatics. This was a unit of
auxiliaries. Because sweeping charges are worked out right away
the Romans once more took up the dice - and once more the
Romans were destroyed in a single round - suffering six
casualties in return for two and rolling a miserable 5 for their
break test. It had been an incredible run of luck for Alibongus
- he had led his fanatics against no fewer than four enemy-
units and broken them all. The fanatics had suffered five
casualties and so were not even shaken. In his post combat
move Alibongus led his men back to the Celtic lines - not
wanting to be crushed by the Roman cavalry in the following
turn. The opposing Roman division had been broken
(Spandex’s troops) and the division behind had been given a
mauling. The auxiliaries were from Maximins Flaatus’ division.
The Roman turn saw both players battling to restore a
crumbling line. The Roman cavalry now held the gap
formerly occupied by Spandex’s troops but could only draw
close enough to skirmish ineffectively. However, in the south
the remaining unit of fanatics was easily beaten and
destroyed. The Britons having lost their initial clash value,
charge bonus and re-rolls, the Romans’ superior endurance
and heavy armour won the day.
At last the main warbands of Bagotrix and Catubatrenus
advanced purposefully upon the Romans. The warbands
which had moved through the northern woods began to
emerge behind the Romans* flank. Bur Alibongus had the
Romans in sight. With the frenzied charge rule still applying
he was obliged to charge once more. So - with one casualty
short of a shaken unit - the fanatics charged upon the
Roman ranks. The fanatics had been careful to move back
into support with their cavalry in the previous turn, but alas
the horsemen failed to keep pace and were unable to join the
fight. Once more the fanatics were on their own.
This time it was a legionary unit of Maximius Flaatus’ division
with two supports that faced the stark naked madmen. But
Alibongus (for indeed it was Alan Perry whose talented paws
wielded the dice that day) knew his luck was in and Flaatus (in
the guise of Paul Sawyer) sensed that destiny had betrayed him.
Flaatus threw' himself to the forefront of battle, but for all his
efforts the Romans lost by two casualties to four. With a
diffident toss (for which this player is justly famous) the Roman
commander rolled his break test and the cursed cubes turned up
a double 1. Any roll of a 4 or more would have seen him all right
- but no. Nor was the agony quite over yet, for both supporting
units also turned tail and ran - with rolls of 3 and 4
respectively. Truly the gods had spoken, and rather frankly too.
Ar the point the Roman army broke and the invaders were
defeated. It had been an astounding battle, won not so much
by the savagery of Alibongus’ fanatics as the timidity of the
Romans w'ho had failed dice roll after dice roll and finally
collapsed in terror. The Britons celebrated by jeering at their
opponents’ dice rolling deficiencies until the kindly umpire
intervened to lead the weeping Romans to a consolatory beer.
135
AN
Late Roman infantry deploy in the face of barbarian cavalry. Following the collapse of the empire in the 3rd century, the old-fashioned
Roman legions disappear to be replaced by infantry armed with spears and flat, oval shields much like their barbarian opponents
The Roman Empire suffered a long period of disintegration
and civil wars during the middle and late third century,
resulting in a complete breakdown in the old system of closed
borders protected by modest legionary forces. The causes of
this disaster stem from the pressures exerted by powerful and
numerous invaders all along Rome’s northern and eastern
frontiers. The old military system proved unable to respond
effectively, at least not until hordes of barbarians had rampaged
through Roman provinces, plundering and sowing
devastation in their wake. In the west these invaders were
chiefly German tribes such as the Franks, Saxons, and
Alamanni. Along the Danube there were the Sarmatians and
Goths. In the east there was the additional threat posed by a
resurgent Persian empire under the newly founded Sassanid
dynasty. The Sassanids were far more ambitious, and much
better organised, than the Parthians they supplanted. Sassanid
Kings saw’ themselves as the heirs of Xerxes and rhe
Achaemenids of old, destined to restore the Persian empire to
its former glory.
As a result of these repeated invasions and almost continuous
warfare, Emperors were forced into an increasingly military
roll as the leaders of armies. Successful generals found
themselves elevated to the purple by their troops - not always
willingly if their biographers are to be believed! Rival
Emperors - in reality rival armies - split the old Roman
Empire apart. Gaul and Britain became independent as the
Gallic Empire. In the east the Palmyrans took over a
substantial part of the old Hellenised Near East. At first they
did so nominally on behalf of Rome, later as rivals. Amidst
this anarchy the old military systems soon broke down as
forces w'ere hastily mustered to meet new’ threats. New, larger
and more mobile armies were to emerge, but the cost far
exceeded anything the Roman state had ever endured before.
In order to pay for these vast armies, civic society, the
economy and imperial government w^ere all reorganised from
the top down. A huge bureaucracy of tax gatherers and civil
servants was created, and a new caste of Emperors - half-
educated, pragmatic military men from Illyria - was ushered
to the fore.
For the ordinary people these were tough times. In the third
century they had been burdened by repeated invasions. If
they lived near the fighting zones they would have suffered
from the wholesale requisition of supplies to meet the
rapacious needs of the army. From the fourth century
onw’ards citizens became legally bound to their lands or
trades, and they were taxed even more heavily than ever
136
_____________________________________
before. Agricultural workers, artisans and tradesmen became
little more than serfs in service to a militarised and
increasingly centralised state. In the west, cities declined in
importance as people fled to the relative safety of the
countryside. Banditry became rife as farmers abandoned
their lands - unable to endure both rising taxes and periodic
pillaging. Everywhere populations declined - a situation not
helped by a plague that took hold after 251 and recurred
periodically over the next 20 years, carrying off rhe Emperor
Claudius Gothicus amongst its victims. The resulting
manpower shortages were made up to some extent by the
large-scale settlement of alien - mostly German - tribes on
otherwise abandoned land. The prosperity and relative
freedom of the days of high empire were ended forever.
By the time rhe Romans had regained control of all the lands
from Britain in the west to the Euphrates in the east, their
armies had changed completely. These changes had begun as
a response to the invasions of the previous decades, when it
was necessary for forces to become increasingly mobile in
order to meet and defeat barbarian hordes that had already
penetrated the frontiers. The old fashioned, heavily armed
legionaries disappear during these upheavals. They were
replaced by a mix of border guards spread thinly across the
frontiers and field armies, which were held in reserve to deal
with invaders. The border forces were called limitanei and
their role was to garrison the new fortifications and hold out
whilst the field armies - the comitatenses - turned up to
offer battle. In time the limitanei became bound to the area
they were expected to defend - a kind of hereditary
militiamen/farmers rather than professional warriors.
The field armies included the remnants of the old legions.
These retained little of their predecessor’s qualities aside
from their names, and were reduced in size to about 1,000
men apiece compared to about 5,000 in a traditional legion.
Gone were the familiar segmented armour and oblong
scutum of the legionary, replaced by mail armour and oval
shaped shields. Infantry now carried spears: weapons more
suited for use against horsemen than the old Roman pilum,
and easier to manufacture in the many new armouries
established to supply the burgeoning armies. Where
required, a cheaper and easier to produce replacement for the
pilum was created called the ‘martiobarbulus’ - dart of Mars.
This was a short, lead-weighted javelin that could be thrown
prior to contact. Several of these darts could be carried in
addition to an infantryman’s spear. However, the real
strength of the Roman army no longer lay with its infantry,
but with heavily armoured horsemen. Often these troops
were Germans - and frequently they were men born outside
the Empire who had been recruited en masse to serve in the
new armies. Throughout all ranks, Roman armies
increasingly consisted of barbarians who were, in many cases,
barely distinguishable from their enemies.
During this period the main foes of the Romans were the
German tribes that, in the west, included Saxons, Franks and
Alemanni. These were not necessary new peoples, but more
likely new names for confederacies that had fought against
the Romans for centuries. Along the Danube frontier a new
enemy emerged in the shape of the Goths - a large and
powerful Germanic nation that had moved eastwards into
the lands north of the Black Sea. In time the Goths came
under pressure from the Huns, forcing them south and
westwards into conflict with the Roman Empire. This
enforced migration was to lead to the great military disaster
at the Battle of Adianople in 378 when the Emperor Valens
and an army of over 40,000 men was destroyed by Gothic
cavalry. Further east still, Rome’s principle opponent
remained the Sassanid Persians. Here the Romans enjoyed
periodic success as well as suffering their fair share of
setbacks. The Emperor Julian the Apostate succeeded in
defeating the Persians at the very gates of their capital
Ctcsiphon in 363, but was subsequently killed during the
retreat to Roman controlled Mesopotamia. His successor was
forced to buy off the Persians - a tactic that was to become
habitual during the fifth century and beyond into the days of
the Byzantine Empire.
By the fifth century the Huns had subdued the Goths and
together they invaded the Roman east, causing widespread
devastation and panic. Hun armies captured Armenia and
rampaged through Syria. West of the Black Sea they rode
though Thrace and into Italy and Gaul. By rhe mid fifth
century Attila the Hun was so feared that the Romans and
Visigoths put aside their differences to fight against him and
his mostly Ostrogothic allies. The result was the Battle of
Chalons of 451 where the power of the eastern invaders was
dealt a mortal blow. Gibbon refers to this as the ‘last victory-
achieved in the name of the Western Roman Empire.’
The adoption of Christianity by Constantine ended an
ambiguous position where the genii of Roman Emperors
were effectively worshipped as state gods. Ar the end of the
third century this had led to the bloody persecution of
Christians who refused to make the appropriate - and legally
enforceable - sacrifices both to the traditional Roman gods
and to the genius of the Emperor. From the time of
Constantine’s triumph at the Milvian Bridge in 312 Roman
armies would adopt the Christian Chi-Rho symbol, and
battle standards would increasingly
become icons bearing images of
Christ and the saints. Henceforth
Rome would become the
embodiment of the church, rather
than its antithesis.
Cavalry* became an increasingly
important part of Roman armies
from die mid-third century.
Bv the reign of Constantine the
cavalry were placed under their own
commander in each of the Empire’s
provinces • the Magister Equitum.
137
A BORDER CLASH BETWEEN ROMANSAND PERSIANS
It is AD260. Several years ago, the Sassanid Persians, under
their Shahanshah (King of Kings) Shapur 1, invaded the
Eastern provinces of the Roman Empire. Last year, betrayed
by his advisors, the ageing Roman emperor Valerian was
captured by Shapur. In the wake of this calamity, and with
the Emperor Gallienus battling to put down rebellions in the
West, the Roman armies of the East, led by Marcus Clodius
Ballista, praefectus praetorio (Praetorian Prefect), are
struggling to organise themselves to defend the empire, and
expel rhe invaders.
Ballista sent a scratch force of legionaries and auxiliaries,
commanded by Lucius Domitius Aurelianus to defend the
twin cities of Zeugma and Apamea, but whilst marching there
they bumped into a much larger force of'reptiles',
commanded by Hamazasp, a vassal of Shapur, and were
forced to retreat, fighting a series of delaying actions. The
action described here is one of those.
THE WARGAME
Elephants! When it came to formulating the rules for Hail
Caesar we recalled a recent convention where we had seen a
gorgeous Sassanid Persian army that included three of these
magnificent beasts, and all very beautifully presented and
painted. We contacted the army’s owner who turned out to
be Dr Phil Hendry. Some readers will have seen pictures of
Phil’s many armies in the pages of the wargames press, on his
own website, and in various books about ancient wargames.
To our delight, Phil agreed to come down to Nottingham and
to bring not only his Sassanids, but also his contemporary
Imperial Romans.
The game was played in John Stallard’s gaming room, and
the battle was arranged to take place on the day before the
popular Partizan wargames convention in Newark. As a
result the local hotels found themselves choc-a-bloc with
wargamers who had come up for the event. Word of our
battle soon got round, so before long we had gathered quite
a crowd. Still - the more the merrier! Around the table we
had: Rick Priestley, Henry Hyde and Duncan Macfarlane
commanding the Sassanids, and Phil Hendry, Paul Sawyer
and Colin Speirs commanding the Romans. As both Rick
and Paul were old hands at Hail Caesar, the rest being
initiates, these two players elected to coumpire the game
with the impartial assistance of Alessio Cavatore, who also
took notes for this report. Guy Bowers arrived a little later
with his camera, and photographed the action for posterity
whilst offering much hearty advice to both sides. John
Stallard was our host for the occasion, ensuring that
refreshment and conversation flowed in equal abundance.
THE TABLE
We first intended to borrow Alan Perry’s majestic desert
terrain modular boards to play the game on, as John’s
terrain is more appropriate to the luscious green of Albion.
However, Phil told us that he had his own terrain designed
to go with the very armies we would be using. In fact he
would be displaying a game at the Partizan convention the
following day, so he had come prepared with armies,
scenery, dice, the lot! We therefore decided to use Phil’s
terrain as well as his armies. It was very interesting to see
Phil’s solution to putting on an attractive yet easily
transportable wargame. It consists of a light-khaki tablecloth,
which Phil has covered in green textured dots of various sizes
to resemble desert scrub. A number of polystyrene hills are
placed on top, some tall palm trees, a little oasis and a
circular tower (from Monolith Designs), and everything is
painted to match the tablecloth.
The bases of Phil’s models are also painted to match the
terrain, so when they are deployed on the field they meld
perfectly with it. In the end, with this simple yet clever use
of colour, Phil has created a portable battlef ield for his
armies that is nicely themed, inexpensive and very easy to
transport and store. It looks good in the pictures too!
138
—
THE ARMIES - ORDERS OF BATTLE
The Sassanids
1st Division - cavalry:
• Division Commander - Army General Hamazasp
• 3 units of Savaran Cataphract (two units have kontos,
all three units have bows as well).
• 1 unit of Sassanid light cavalry
2nd Division - horse archers:
• Division Commander
• 2 units of horse archers (one Parthian one Arab)
4th Division - infantry:
• Division Commander
• 4 units of mixed spearmen/archers
• 2 units of skirmishers
3rd Division - war elephants:
• Division Commander
• 3 Elephants
SASSANID STATISTICS AND SPECIAL RULES
All commanders including the general have Leadership ratings of 8. The general has the standard re-roll rule in addition.
Type Clash Combat Morale Save Stamina Special
Sustained Short Range Long Range
Elephant with howdah and crew 4 3 1 1 4+ 6 Elephant
Savaran Cataphracts with kontos and bow (Cataphracts) 9 6 3 2 4+ 6
Savaran Cataphracts with bow (Cataphracts) 9 6 3 2 4+ 6
Sassanid light cavalry with javelins (Light Cavalry) 7 5 3 0 6+ 6 Feigned Flight
Parthian/Arab Horse Archer (Horse Archers) 6 3 3 3 6* 6 Feigned Flight, Parthian Shot
Sassanid infantry (Medium Infantry with spear and bow) 6 6 3 3 5+ 6
Skirmishers with javelins and fielded as small units (Skirmishers) 3 2 2 0 0 4
Sassanid infantry (Medium Infantry) 6 6 3 0 5+ 6
The rules for the various weapons carried apply - these are shown in the description of the unit rather than noted as
special rules. Note that the mixed spearmen and archer units are not given the long spear rule.
HAIL CAESAR_________________
THE ROMANS
1st Division - infantry left:
• Division Commander -
Army General Lucius Domitius Aurelianus
• 2 cohorts of auxiliary infantry
• 1 cohort of auxiliary archers
• 1 scorpio unit (light artillery)
• 1 unit of auxiliary 'expedita' (skirmishers)
2nd Division - infantry right:
• Division Commander
• 2 cohorts of legionaries from Legio II Traiana Fortis
• 1 cohort of auxiliary archers
• 1 scorpio unit (light artillery)
3rd Division - infantry reserve:
• Division Commander
• 2 cohorts of legionaries (one from Legio II Traiana
Fortis and one from Legio XII Fretensis)
• 1 cohort of auxiliary infantry
4th Division - cavalry:
• Division Commander
• 2 alae of heavy cavalry
• 1 ala of light cavalry (Moors)
• 1 ala of light cavalry (camels)
DISPOSITIONS
All of the Roman infantry was deployed around the
watchtower, having already taken position to defend the
oasis from the approaching Sassanid army.
The Roman cavalry division started the game off the table.
We assumed they were looking for more water for their
mounts, as the little oasis near the tower had barely
enough water for the men. As the dust of the approaching
Sassanids was spotted a messenger had been sent out to
summon the cavalry with all haste. This division would
therefore enter the table on the roll of a 4+ in Turn 2, 3+
on turn 3, 2+ on turn 4 or automatically on turn 5. It
would appear in the gap between the two hills on the
Roman left flank.
The entire Sassanid army was assumed to be just outside the
opposite table edge and needed to be ordered onto the table
starting on turn 1. They were going to go first.
Objectives
The two armies were fighting for control of the oasis outpost.
The first side to break would be driven from the field.
Otherwise, the side deemed by the umpiral committee to
have the most decisive presence around the oasis at the close
of play would be declared the winner.
ROMAN STATISTICS AND SPECIAL RULES
All commanders including the general have Leadership ratings of 8. The general has the standard re-roll rule in addition.
Type Clash Combat Long Range Morale Save Stamina Special
Sustained Short Range
Auxiliary Infantry with spears and javelins (Heavy Infantry) 7 7 3 0 4+ 6
Auxiliary Archers (Medium Infantry Archers) 5 5 3 3 5+ 6
Scorpio (Light Artillery) 1 1 2 2 0 3
Expedita with javelins fielded as small unit (Skirmishers) 3 2 2 0 0 4
Legionaries with spears and javelins (Heavy Infantry) 7 7 3 3 4+ 6 Drilled
Heavy Cavalry Ala (Heavy Cavalry) 9 6 3 0 4+ 6
Moorish Cavalry Ala (Light Cavalry) 7 5 3 0 6+ 6 Feigned Flight
Camel Ala (Light Cavalry) 7 5 3 0 6+ 6
The rules for the various weapons carried apply - these are shown in the description of the unit rather than noted as
special rules. Note that none of the spearmen were given the long spear rule.
140
LATE ANTIQyiT Y
HOW IT WAS PLAYED
The Sassanid army appeared on the horizon - infantry
division to the extreme left, elephants in the centre and
horse archers on the right scouting ahead of the mighty
Savaran division led by the Persian general Hamazasp,
otherwise known as Shah Henry. However, it seemed that the
cataphracts, true to their reputation of not being the most
nimble of troops, were delayed and therefore failed to appear
on the Persian right. This was due to Shah Henry failing a
command roll, re-rolling it because of his general special
ability and failing once again. Plainly it was not to be.
Taking advantage of the fact that the enemy’s strongest
division had failed to arrive, the Romans made a very brave
decision that would shape the entire game. The Roman
general ordered his infantry to advance as fast as possible
against the enemy, with the idea of smashing them apart with
his legionaries before the slow-moving Savaran could join the
fray. The first and second division advanced boldly towards
the Sassanids and a missile exchange erupted between the
skirmishers at the fore of 1st division and the horse archers
facing them. The Romans jubilantly managed to force the
opposing Arab cavalry to retire under a barrage of javelins!
The second turn saw the Sassanid Savaran cavalry division
once again fail to reach the battlefield. At this point Henry
was considering a quick trip to The Gushnasp Fire-temple at
Shiz to get his dice blessed in the holy flame of Zarathushtra.
The horse archers and elephants, nervously aware of both the
big gap on their flank and rhe rapidly advancing Roman
infantry, decided to hold their ground. They proceeded to
pepper the skirmishers with bow fire, successfully driving
away their lightly armed opponents. Meanwhile, the massed
ranks of Sassanid infantry on the Persian left seized the
moment and charged down at the oncoming legionaries in
an altogether unexpected show of bravery. Predictably, they
bounced right off the solid ranks of legionaries, but only
after a few hurried prayers to Mithras and some fortunate
dice rolling by the Romans.
In the Romans’ turn, Paul’s efforts to bring his cavalry
division onto the field proved no more successful than
Henry’s, leaving the Roman left flank and Persian right
very empty indeed (as befits a desert after all). The Roman
infantry continued with their relentless advance in the
centre, driving away the horse archers who used their
Parthian Shot special rule to retire past the elephants and
reform beside their Arab counterparts. On the Roman
right, the legionaries pressed on against rhe Sassanid
infantry, and even the auxiliary archers joined the fray
with credible results. Advancing steadily behind, the
Romans’ reserve division also began to slowly close the
distance with the enemy.
Finally, in the Persians’ turn the Sassanid general arrived
onto the field to the resounding cheers of his underlings,
the braying of trumpets, and calls for celebration. He
inspected his army and saw that the elephants and Parthians
were busily destroying the remaining Roman skirmishers
with a volley of well-aimed arrows. A little beyond them, his
infantry were engaged with a numerically inferior enemy
division that was never the less cutting the Sassanid
spearmen to pieces with typical Roman efficiency, bringing
the fighting to a bloody stalemate.
It was now the Romans’ turn, and at last Paul’s cavalry also
arrived, and just in time to protect the legionaries’ now
dangerously exposed left flank. The gallant horsemen
immediately started to ride towards the enemy cataphracts,
plainly unimpressed by tales of the Savarans’ much-vaunted
superiority. The Roman infantry in the centre pushed on
and, after sending the Parthians scampering for the hills
with a shower of javelins, closed in against the elephants.
Surely now these exotic monsters would charge and scatter
their foes.
The Romans on the right flank finished off a couple of units
of Persian spearmen, but emerged from the confrontation
HAIL CAESAR_____________________________
shaken. They therefore stopped to lick their wounds and
allow the reserves to catch up. Sadly, the reserve division also
halted its advance when called upon to move. Perhaps they
imagined that the enemy infantry had been adequately dealt
with. Their commander, Colin, seemed to have caught the
highly contagious ‘dice plague’ that had earlier wrought such
havoc amongst the Paul and Henry’s divisions.
And then the moment of decision was upon us, as the
Sassanid cataphracts spied the approaching Roman cavalry
and spurred their steeds into a thunderous charge, kontoi at
the ready. The two units of Roman heavies decided to meet
them head-on and countercharged. We could almost feel
the earth shaking under the hooves of the horses and their
armoured riders.
The elephants chose to withdraw rather than charge the
enemy infantry, possibly waiting to see the outcome of the
cavalry clash. The remaining Persian infantry units also
followed their example. All eyes turned to the right, to the
cloud of dust rising from the big cavalry melee on the
flank.
Alas, once that dust had settled there was nothing left of the
Roman equites, who were taught the harsh lesson of what
happens when you charge with two units against three units of
superior troops well supported by friends. Paul Sawyer’s dice
had obviously studied the odds in advance and decided that
resistance was pointless, turning what was always going to be a
tough fight into a total and immediate collapse. This was a
disaster for the Romans as the Sassanid cavalry were now poised
to wipe out their whole leftwing and advance upon the Romans
in the centre from both front and flank at the same time.
Sensing that time was of the essence, the Roman infantry
closed the distance with the retreating elephants and
spearmen, ensuring that the Persians had nowhere to retreat
to in the following turn other than by abandoning the
battlefield. This was a calculated risk. The Romans would
try and break the enemy army by annihilating the elephants
and what was left of the infantry division. If they managed
to do that, they would have won the game without having to
fight the deadly cataphracts again. This was a brave and risky
move, because it left the entire Roman line with its left flank
exposed to the enemy cavalry.
At last the Persian cavalry arrive and quickly find themselves engaged with their Roman counterparts
Roman infantry defend the oasis. Nice shields’. Despite repeated attempts
to move them, the division remained unengaged at the end of the game
Well, there’s certainly a lot of them! The Persian infantry come under
attack from their Roman opponents
142
________________________________________ LATE ANTIQUITY
Tile final moments of the Roman cavalry division as the Persian cataphracts prepare to sweep all before them
In order to buy time for the infantry to finish the job, what
was left of the Roman mounted troops, the two units of light
cavalry, declared a charge against the exposed flank of the
lead cataphract unit. What these hot-heads (and the players
commanding them) had forgotten is that the cataphracts,
even though they are as slow as infantry, are still a cavalry
unit, and were therefore able to respond by turning to face
the charging lights. Let us draw a piteous veil over the
carnage that ensued. Following this bloodbath the unit of
cataphracts, still practically untouched, pursued the fleeing
Moorish cavalry right into the flank of the unit of Roman
auxiliaries who were facing the elephants. The next turn did
not look too promising for the Romans.
And indeed the rest of the Savaran turned left and rolled up
the flank of the Roman first division, even charging some
units in the rear. In an attempt to charge the already engaged
auxiliaries, the elephants finally issue their trumpeting
challenge only to fail to make contact with the beleaguered
infantry by a few inches. That would teach them to be so
cautious. The Sassanid infantry still held back as they had
suffered many casualties already, and to lose a unit at this
stage would break a division and potentially bring defeat
upon the Persians even at the moment of victory.
As it turned out the elephants would have made no
difference, as the auxilliaries were trampled into the ground
by the all-conquering cataphracts. The Roman general was
crushed underfoot as he tried to lead his men in a desperate
last stand.
It has to be said that many armies would have lost heart at
this stage, but the Romans were determined to carry on
whilst their army remained unbroken. If the second
division could turn and charge the exposed elephants and
destroy them, while at the same time the reserve division
could finally move off the blocks and reach the remaining
Sassanid infantry, victory could still be theirs. Just.
The legionaries had a great start, managing to charge the
elephants, but then the goddess Fate decided the outcome
of the battle, as she so often does. The hurried closing
shots by the few archers in the elephants’ howdahs
managed to find their mark and caused the charging
legionaries to take a break test. Colin rolled a spectacular
double 1, at which point not only the nerve of the
Romans, but also that of the players, broke without any
chance for recovery. The Roman army abandoned the field
in defeat - Romanes eunt domus!
143
4 . KY •
“I write these few lines in the family journal
lest we are all murdered by these accursed
barbarians. Maximus Effluvium, the
magister of the house left many hours since,
riding with great speed under the cover of
darkness, taking with him only Dacius and
Tervix. With the help of the Lord, they will
be able to reach the fort, and the garrison
commander will send help.
The enemy’s scouts have continued to
haunt the fields through the night. We
fought them off for a while, but we are no
warriors, and Lucius was killed defending
the young magister who has also been
wounded. At the first light of dawn, a
troop of cavalrymen joined the foe,
perhaps the vanguard of a larger raiding
force to come. They have sacked the
outbuildings and slaughtered all those
who tried to resist. Now the few of us that
are left: Lady Apollonia, her sons and
daughters, and a handful of us slaves, have
taken shelter on the second floor and
pulled up the ladders.
I can hear them smashing everything apart
downstairs. The lady has barely managed
to bring the Lares and Penates with her, so
the heathens have by now stolen all of our
remaining valuables. It is only a matter of
time before they burn us out or demolish
the house. May the Lord protect us.”
“I’ve made my way to the rooftop, to see if
I could spot any trace of rescue. The
barbarians shot at me with their curved
bows, but luckily I ducked for cover just in
time. The brutes were preparing to storm
the house when we heard the bugle calk in
the distance. Never before has the sound
of a tuba or cornu felt so welcome! The
Huns around rhe villa immediately turned
their attention to this new challenge and
most of them rode off towards the west. I
clambered to the top of the roof and from
there I could see in the distance the
banners of the rescue force advancing
along both roads. Our valiant legionaries
are coming! I pray that they manage to
defeat the enemy and get here before the
fiends set fire to the villa!”
HAIL CAESAR
THE WARGAME
Our game represented one of the many unrecorded raids against Roman outposts and colonial settlements west of the
Danube during the fifth century AD. The game itself was played in Alan Perry’s legendary wargame room, using Alan and
Michael’s extensive collection of late Romans and assorted barbarians (in this case Huns and Goths).
THE TABLE
For this battle we settled for a 10 foot x 6 foot table, with the scenery arranged as shown on the following maps. The key
features were the Roman villa and the fords along the river
THE ARMIES - ORDERS OF BATTLE
The Huns
1st Division - holding force, deploys on table:
• Division Commander
• 1 unit of Goth infantry (heavy infantry, pilum)
• 2 small units of Hun cavalry (light cavalry with bows
and javelins)
• 1 tiny unit of Hun scouts, ransacking the villa
(skirmishers armed with bow's)
2nd Division - Hun main force, arrives Turn 3 on 4+, Turn 4
automatically, from East or South road):
• Division Commander (General)
• 1 unit of Hun Noble cavalry (cataphracts, kontos
and bows)
• 2 small units of Hun cavalry (light cavalry with bows
and javelins)
3rd Division - Hun main force, arrives Turn 3 on 4+, Turn 4
automatically, from East or South road):
• Division Commander
• 3 small units of Hun cavalry (light cavalry with bows
and javelins)
4th Division - Goth main force, arrives Turn 3 on 4+, Turn
4 automatically, from East or South road):
• Division Commander
• 1 unit of Goth infantry (heavy* infantry, pilum)
• 2 units of Goth cavalry units (cataphracts)
5th Division - Hun flanking force, arrives Turn 4 on 4+,
Turn 5 automatically, from West road):
• Division Commander
• 3 small units of Hun cavalry units (light cavalry with
bows and javelins)
HUN STATISTICS AND SPECIAL RULES
All commanders including the general have Leadership ratings of 8. The general has the standard re-roll rule in addition.
Type
Combat
Morale Save Stamina
Special
Hun scouts with mix
of bows and javelins
(tiny unit of Skirmishers)
Hun Nobles armed
with kontos and bow*s
(Cataphracts)
Hun cavalry armed wath
with javelins and bows
(Light Cavalry fielded as
small units)
Goth Infantry w'ith heavy
throwing spears (Heavy
\niantry witYi pAum)
Goth cavalry (Cataphracts)
Clash Sustained
0
1
1
1
1
Long
Range
Short
Range
Must remain in the villa
and attempt to set
fire to it
The rules for the various weapons carried apply - these are shown in the description
of the unit rather than noted as special rules.
146
-
LATE ANTIQJJIT Y
The Romans
1st Division - infantry centre/right:
• Division Commander
(General)
• 1 unit of elite legionaries
(heavy infantry, drilled,
elite 4+, long spears)
• 1 unit of legionaries (heavy infantry,
drilled, long spears)
• 1 unit of legionaries (heavy infantry,
drilled, long spears), with 1 small
sub-unit of Skirmishers (javelin-armed
skirmishers)
• 2 units of Scorpios (light artillery)
2nd Division - infantry left:
• Division Commander
• 1 unit of legionaries (heavy infantry, drilled, long spears)
• 1 unit of legionaries (heavy infantry, drilled, long spears),
with 1 small sub-unit of Skirmishers (javelin armed
skirmishers)
• 1 small unit of Infantry Archers unit
3rd Division - cavalry:
• Division Commander
• 1 unit of Cataphract cavalry (cataphracts, drilled, kontos)
• 1 unit of Heavy’cavalry’(heavy cavalry)
• 1 small unit of Light cavalry (light cavalry)
• 1 small unit of Horse Archers (horse archers)
ROMAN STATISTICS AND SPECIAL RULES
All commanders including the general have Leadership ratings of 8. The general has the standard re-roll rule in addition.
Type Combat Morale Save Stamina Special
Short Long
Clash Sustained Range Range
Elite Legionaries with long 7 7 3/0 0 4+ 6 Drilled,
spears (Heavy Infantry) Elite 4+
Legionaries with long 7 7 3/0 0 4+ 6 Drilled
spears (Heavy Infantry)
Sub-unit of Skirmishers 3 2 2 0 0 4 Sub-unit
armed with javelins
(small unit)
Archers (small unit 3 3 2 2 6+ 4
of Light Infantry)
Scorpio - bolt-throwing 1 1 2 2 0 3
engines (Light Artillery)
Roman Cataphracts with 9 6 3/0 0 4+ 6 Drilled
kontos (Cataphracts)
Roman Heavy Cavalry 9 6 3 0 4+ 6
(Heavy Cavalry)
Roman Light Cavalry 5 3 2 0 6+ 4
with javelins (small unit
of Light Cavalry)
Roman Horse Archers 4 2 2 2 6+ 4
(small unit of Horse Archers)
The rules for the various weapons carried apply - these are shown in the description of the unit rather than noted as
special rules.
“How great are the dangers I face to win a good name in Athens.”
Alexander the Great
147
HAIL CAESAR_____________________________________________
Dispositions
The entire Roman force started the game on the table and
was allowed to deploy anywhere within a foot of the
western edge.
After the Romans had deployed, the Huns were permitted to
position the holding force (1st division) anywhere east of the
river. The scouts were placed within the villa where they were
busily engaged in looting. They would remain here until the
villa was fired or recaptured.
The remaining Huns were formed into two separate groups:
the main force and the flanking force. These were kept off
the table at the start of the game.
western table edge (right behind the Romans!) on a 4+ on
turn 4. Failing that, the flanking force would arrive
automatically on turn 5.
The map shows the initial deployment, with the Goths
blocking the ford in the middle of the table and the Hun
cavalry ready to harry any unit attempting to cross at the
northern ford. The Romans* strongest infantry division
deployed in column on the central road; their lighter infantry
division in column on the northern road, and the cavalry
spread out in front of both infantry columns. Clearly the
Romans intended to send the cavalry to capture the crossing
points before more Huns could turn up to defend them.
The three divisions composing the main force were
approaching from the south-east and therefore would be
allowed to arrive at any point on the eastern table edge or
along the south-east road. The players declared where each of
their divisions would enter the table. In order to determine
Objectives
The battle began w ith some roguish barbarians busy razing,
burning and pillaging in the fields around the Roman villa.
At rhe end of every Hun turn, these sinister
types would attempt to set the main villa on
fire by rolling two dice. On turn 1, they w’ill
when they would arrive, it was agreed that
at the beginning of the Hun turn 3 the
players would roll a dice for each of their
divisions. On a roll of 4+ that division
could be ordered onto the table that
turn. On a result of 1-3 the division
was delayed and would instead
arrive at the beginning of the
following turn (turn 4).
succeed only on the roll of a double six.
On turn 2 they’ll need a double five or
double six. On turn 3 a double four, five
or six, and so on until they will need any
roll of a double from turn 6
onwards.
The flanking force, which we
imagined to be engaged in a wide
encircling manoeuvre, would
arrive at any point on the
In order to prevent this, the
Romans must enter the villa with
an infantry unit and then hold it
for an entire Hun turn. If
successful, this w’ould make the
villa secure and the Romans
would win the game.
----------- ------------------------------- LATE ANTIQJJIT Y
Roman infantrv adx'ance towards the villa with the artillerv train to the rear
HOW IT WAS PLAYED
The Romans (under the command of Michael Perry and Steve
May) made as inauspicious start as it is possible to imagine.
The cavalry units screening the force advancing along the
north road began the game with a splendiferous blunder, and
decided to run away for two entire moves. Maybe their horses
took fright when they caught the scent of the Hun ponies, and
perhaps of their riders too - or of the raw' meat kept under
their saddles to ‘mature’. The Roman infantry got caught up in
the mass of bolting horses, and understandably they hesitated
as well, advancing only thanks to their excellent training and
superb discipline (i.e. the ‘drilled’ rule). The cavalry and
infantry on the central road kept pace. One could only picture
them looking in dismay at the mayhem to their left.
The Huns (led by Rick Priestley and Alan Perry) had deployed
the Goth infantry to hold the ford in the centre. Cavalry had
been positioned to deny their enemy the crossing at the
northern ford. As the Romans were so timid in advancing, the
barbarians had little to do but cheer and taunt the Romans
for their cowardice, which they did with great enthusiasm.
The Hun scouts around the villa, however, failed to set it on
fire. Maybe they had found their way into the villa’s cellar!
The second turn was as different from the first as it could
possibly be. The Roman cavalry commander, possibly swayed
by the pleading of the villa’s owner, sent his cataphracts
forward at full pelt. The cataphracts bounded towards the
enemy, crossed the ford and crashed straight into the Goths
on the other side. Inspired by this glorious charge, the Roman
infantry on the north road advanced rapidly and reached the
western bank of the north ford. Here they faced off against
the Huns on the other side of the river, who were by now'
looking distinctly less confident. The Roman cavalry in the
north recovered their nerve and came up in support of the
infantry. In the w’ake of the cataphracts, the ‘heavy infantry’
division in the centre advanced steadily. The ‘Drilled’ rule
ensuring a steady advance in spite of poor dice rolls.
The following combat saw the levelled kontoi of the
cataphracts wreak havoc amongst the Goth infantry. The
Goths gave ground in disorder and were chased by the
Roman cavalry. The central ford was securely in Roman
hands and the route to the villa was open!
Worried by the turn of events in the south, one of the Hun
cavalry units covering the north river crossing moved to
support the beleaguered Goths. The other took careful aim
and shot at the Roman skirmishers who were just about to
enter the ford. The sudden flight of Hunnic arrows appeared
to send the poorly armed skirmishers into a panic (a couple of
6’s obliged them to take a break test). Predictably, the
skirmishers turned tail and ran (failing their test and breaking).
The combat in the centre went a bit better for the Goth
infantry during this round, and they inflicted heavy casualties
on their opponents. Never the less, the barbarians were forced
to give ground together with the supporting Huns. Still
nothing appeared to be happening at the villa - a few bars or
raucous song drifted drunkenly from its general direction.
In the Roman turn the cataphracts returned to the fray, now
accompanied by a light cavalry unit that had moved forw ard
to support them. Once again, the Roman cavalry slammed
into the Goths and Huns. At the same time the Roman
infantry in the centre reached the ford. In the north the
Romans crossed the river to engage the screening Huns with
short-range missile fire, forcing them to retreat.
The combat in the centre ended with the complete
annihilation of the Goths and Huns, leaving the cataphracts
149
HAIL CAESAR
Roman cataphracts storm across the river and charge the Goths on the other side
exhausted and badly mauled. They took a sixth casualty and
were therefore shaken. The Romans were now in control of
the field. This was a perfect turn for the Romans, and if the
Hun main force failed to turn up at the first opportunity’ the
game could have been very short indeed.
Luckily tor the barbarians, the second and fourth divisions
arrived from the south-east. The second division (Huns), led by
the general, advanced steadily to meet the bloodied
cataphracts. The fourth division (Goths) decided that perhaps
they had forgotten something in the baggage train. Another
blunder! They therefore remained off the table. At this stage
the last unit of the Hun holding force was obliged to retire (as
their division had now lost two units out of three and was
therefore broken). This seemed the sensible thing to do in any
case, and they proceeded to fall back, taking a few shots at the
advancing Legionaries as they did so. And no, of course, there
was still no sign of flame or smoke at the villa. Things did not
seem to be going well for the barbarians.
The Roman cataphracts and their supporting light cavalrymen
wisely decided to fall back and wait for the Roman infantry to
cross the river and join them. In the north, the infantry
division and the rest of rhe Roman cavalry continued to
advance while exchanging arrows with the retreating Huns.
Thankful for this moment of respite, the Hun general
consolidated his position northwards of the villa. The third
(Hun) division arrived on to the table from the south and took
up a position opposing the Romans. Bizarrely, the Goths once
again failed to turn up on the table... perhaps some Roman
gold had found its way into the hands of their chieftains? We
imagined the Hun general sending a few messengers back with
very clear instructions to his Goth allies. To compound this,
there was no trace of the Hun flanking force, and - needless to
say - no fire was set in the villa.
In their turn the Roman infantry advanced slowly. The
Roman cavalry commander rode to the tired and wounded
cataphracts to deliver a powerful speech, reminding them
that the civilians in the villa were just the same as their loved
ones waiting for them at home, or perhaps hinting at the vast
amounts of Italian wine that was being wasted on uncouth
palates. With such words, and a tolerable roll of the dice, he
managed to rally them so that they were once again ready to
fight. Seeing this formidable unit recover, the Hun players
muttered grim oaths to their dark gods, but the pious
Romans were not to be daunted by pagan threats.
In their own turn the Huns were greatly relieved by the
timely arrival of both the flanking force on the western edge
and of the Goth division in the east. Plainly, the Goths had
been ‘convinced’ by their master’s messengers that it was in
their interest, and in those of their home villages, that they
join the action promptly.
Suddenly the situation looked less rosy for the Romans, with
three fresh enemy divisions lining up around the villa, and
the dust of the flanking force rising behind them. The
Roman artillery, bringing up the rear of the advance, was at
this very moment in the middle of the ford and looking
distinctly vulnerable.
During the following turn the two battle lines around the
villa straightened up for the unavoidable clash. Aside from
the inevitable exchange of missiles and insults, little serious
damage was done whilst the rival forces manoeuvred in
preparation for the deciding conflict. The Roman artillery
scrambled across the ford and successfully unlimbered,
pointing their machines backwards to cover their rear against
the Huns’ flanking force. Then, during the following two
turns all hell broke loose, bringing the game to an abrupt and
spectacular end.
150
LATE ANTIQUITY
The main Roman line pushed on towards the beleaguered
villa. Their horse archers rode ahead with the intent of
tempting some of the impetuous Huns and Goths into an
uncoordinated charge, thus breaking up their line. The ruse
was somehow successful. A unit of Hun heavy cavalry
charged the horse archers. The horse archers proved too slow
to flee away and were caught and massacred. The blood-mad
Goths chased them and crashed into the Roman line behind.
Unfortunately the accompanying Huns hesitated and didn’t
charge in with the Goths. This delay proved the undoing of
the barbarians. The long spears of the Roman infantry took
the edge off the Gothic charge, and the supporting Roman
troops annihilated their enemies with ruthless efficiency.
Next it was the turn of the Roman heavy cavalry, together with
the now much refreshed cataphracts, to charge the remaining
Huns. The ensuing cavalry battle lasted long enough for the
Roman infantry to catch up and add their weight to the fight.
There was nothing the Huns could do, caught flat-footed by
the legionaries and pinned by Roman cavalry’. Many of the
Hun units were destroyed or routed, and the Romans advanced
upon the villa. The few barbarians who were still harassing the
household proved too drunk to resist, much less to set
anything on fire, and were quickly put to the sword. The lady
of the house and her family and entourage were saved! The
Romans had won rhe day.
THOUGHTS AND CONCLUSION
Before the game we decided to give all Roman legionaries the
long spear rule. It seemed reasonable that troops would have
chosen that weapon, knowing they were going to face an army
of cavalry. How’ever in game terms it was felt that applying the
rule to all the legionaries had made them too effective against
the Hunnic cavalry. In hindsight, we thought it would
probably be better to give some of the heavy infantry plain
spears or throwing spears instead of long spears. However, the
accompanying force lists give the legionaries long spears as that
is how our troops were equipped for the battle.
The Hunnic attempt to burn the villa - w hilst affording much
hilarity on the part of the Roman players - was probably not
the way to do it. A binary random roll is always dangerously
fickle w hen it comes to setting a time limit on a game. A
better routine w'ould have been to roll a dice each turn and
accumulate the score towards a total - say 25 - which w'ould
have given a more predictable time limit for the Romans to
mount their rescue. However, as it was, things turned out
reasonably well, at least from the Roman point of view.
It had been an entertaining game with plenty' of highs and
lows on both sides, even if most of the low’s ended up in the
Huns’ camp. In fact, we fought this battle twice, the game
described being the second of the encounters. The Huns won
the first battle so quickly and so convincingly, destroying the
Roman cataphracts as they crossed the ford, and holding rhe
river against all-comers, that we decided to play it again. The
Romans’ success in the final game may be partly put down to
experience, as the players did a much better job of capturing
the bridges and securing them the second time round. The
Huns, on the other hand, were perhaps a little over confident
after their initial victory, and therefore too willing to confront
the Romans with the holding force alone rather than falling
back and awaiting reinforcements.
The charge of the Goth heavy cavalry! Roman infantry stand firm, making good use of their long spears against the enemy horsemen
151
THE DARK AGES
The disintegration of the Roman Empire during the fifth
and sixth centuries heralded the beginnings of the Dark Ages
in Western Europe. Where the Romans had once held sway
now there were any number of barbarian tribes fighting over
the spoils. These movements of peoples from one end of
Europe to the next give us that other term for the first phase
of these turbulent years: the migration period. Britain was
abandoned by the legions and was soon to become a
battleground between the native Britons, Saxons, Angles and
Jutes. The Vandals moved southwards from Germany
through France and into Spain where they set up a kingdom
together with the Alans. Elsewhere Franks moved into
France, the Lombards into Italy, and Goths into Italy and
eventually Spain. The Vandals moved on to North Africa,
capturing Carthage and establishing an empire that
dominated the western Mediterranean.
Popular culture dubs these violent times the Dark Ages,
reflecting a lack of reliable historical record, generally low
literacy levels and widespread cultural poverty. However, despite
this paucity of ready information, as wargamers we are at liberty
to colour the bare facts and raise savage armies of shaggy mail
clad barbarians to carve out new kingdoms amongst the
remnants of the Roman West. Nor are we are entirely ignorant
of what warriors of the day looked like or how they fought.
Wherever they came into contact with the remnants of
civilisation that still persisted under the auspices of the
Christian Church and the Byzantine Empire these barbarians
never failed to make their mark. The Vandals certainly made a
name for themselves when they sacked Rome in 455, whilst
the Norse became so well-established in the armies of the
Eastern Emperors they gave their name to the ‘Varangian’
Guard - Varangians being Rus warriors of Nordic descent.
Elsewhere, barbarian troops were recruited into the service of
Rome, even rising to command armies against other barbarians.
General trends in warfare had already started to emphasise
the mounted arm in late antiquity, and this came fully to the
fore with the collapse of Roman authority. Many of the
invading barbarian armies had at their core heavily armed
cavalry riding sturdy horses, now commonly shod with iron
for the first time, and carrying men who rode with the aid of
stirrups. Both of these developments helped to improve the
effectiveness of the mounted arm. Where the preceding age
had seen the rise of the heavy infantrymen, the Dark Ages
saw the eclipse of infantry by mobile, heavily armed cavalry.
Not all of these rampaging barbarians were horsemen by any
means, especially in the West and North where Saxons and
Franks, and later Danes and Norse, continued to fight largely on
foot in massed ranks much as their ancestors had. But where
they found themselves opposed to cavalry, such peoples soon
adapted to mounted warfare: the Franks evolving into the
knights of Charlemagne for example. In the East the principal
invaders were themselves horse-riding nomads such as the Huns,
Bulgars, Avars, Pechenegs, and other steppe peoples. Soon they
too settled into lands that had once formed part of the Roman
Empire as well as parts of the Near East and Eastern Europe.
Vikings are a popular wargames army - the term is usually applied to Danish raiders, but could equally refer to warriors
of the many Scandinavian kingdoms of the Dark Ages.
152
Gothic infantry - these early Goths fought in dense warbands much as their ancestors had for hundreds of years.
The greatest threat to stability in the Eastern part of the
Roman Empire came not from the nomads of the northern
steppes, but from the deserts of the South. After years of
warfare between the Sassanid Persians and the Byzantine
Empire, as the Eastern Roman empire is now usually known,
both found themselves under attack from a new and vital
force: the Arabs. Inspired by religious fervour, the Arabs
emerged from their deserts in the seventh century and
quickly conquered much of the Roman east and all of the
Persian Empire. They went on to take over North Africa and
eventually Spain before overreaching themselves as they
advanced northwards to France. At the battle of Tours in
732 the Arabs were decisively defeated by the Franks, led by
Charles Martel. In the reign of Charlemagne the Franks
fought for dominance in northern Spain, eventually
achieving control as far as the river Ebro. The boundaries of
the Christian and Muslim worlds had been established.
The Byzantines continued to exert considerable influence both
militarily and culturally, even though their armies were often
under funded and always hard-pressed on all fronts.
Unfortunately, Constantinople was often divided by religiously
motivated discord. Schisms within the Orthodox church
would continue to dog the remnants of the Roman East until
its final collapse a millennium later. The Byzantine armies now
combined hard-hitting cavalry with well armoured infantry
armed with long spears and various kinds of lighter missile-
armed infantry. Such armies are popular amongst wargamers
because they are well documented and offer a mix and variety
of troops that is appealing. But, in truth, the age of the legion
had passed, and for the most part the foot now found
themselves in a supporting or defensive role. When the
Byzantine general Belisarius undertook the re-conquest of
North Africa at the behest of the Emperor Justinian it was his
heavy cavalry supported by Hun allies who met and defeated
the Vandals. Half a millennium later, on the eve of the Middle
Ages, it was the mounted knights of William of Normandy
who would overcome the mail-clad infantry of the Saxons,
affirming once more the supremacy of the mounted arm.
Most wargamers will tend to choose their favourite theatre of
operations and collect, perhaps Anglo-Saxons to oppose Vikings,
or Carolingian Franks to oppose the Moors. Others will choose
to base their games upon the conquests of Islam and its
enduring battle with the Christian empire of Byzantium. All of
these, and many more besides, have something to offer the
wargamer inspired by wars fought amongst emerging nations
whose descendants are, for the most part, recognisable today.
Y GODODDIN
The early history' of post-Roman Briton is shrouded in
myth, but some of the events of those times are
preserved in rhe writing of Bede, the Anglo-Saxon
Chronicle, and in surviving Welsh medieval poetry.
The Y Gododd in is ascribed to the bard Aneiran and is
an account of a battle between the men of the
Britonnic kingdom of Gododdin and the Angles of
Deira. This clash takes place at a place called Catraeth,
which is usually assumed to be Catterick. One stanza
gives this account of the fighting.
Men went to Catraeth with a uar-cni,
Speedy steeds and dark armour and shields.
Spearshafts held high and s pear-joints shar^edged,
And glittering coatsof-mail and suords.
He led the way, he thrust through armies,
Five companies fell before his blades.
Rhufawn His gave gold to the altar, ‘
And a rich reward to the minstrel.
Although the poem survives only in a medieval copy, it
is thought to refer to events of the late sixth or early
seventh century and was probably composed shortly
afterwards at the beginning of the seventh century. The
leader of the men of Gododdin is supposed to be their
King - the enigmatically named Mynvdogg Mwynfawr.
Even Arthur gets a mention, possibly the earliest
reference to this most mysterious of British rulers.
He fed black ravens on the rampart of a fortress
; Though he was no Arthur.
Among the powerful ones in battle.
In the front rank, Gwawrddur was a palisade.
1
153
Here, King Athelstan, leader of warriors,
ring-giver of men, and also his brother,
the aetheling Edmund, struck life-long
glory in strife around Brunanburh...
'The Song Of Brunanburgh',
The ^Anglo-Saxon Qhronicle
One of the largest battles of the Viking Age, the Battle of
Brunanburgh, saw Athelstan the King of England and
Edmund, his younger brother, defeat Olaf Guthfrithsson,
King of Dublin, Constantine II King of Scots, and Owen 1,
the King of Strathclyde. Olaf, Constantine and Owen’s
alliance was also supported by numbers of Irish, Cornish
and Welsh mercenaries.
Athelstan was an astute politician who had already unified
most of England and Wales under his sway, including the
much-disputed territory of Northumbria. To the Scots and
the kingdom of Strathclyde he was an ever-growing threat.
Constantine had already run foul of Athelstan's authority’
twice before, but in 937 he allied himself with his neighbour,
Owen of Strathclyde, and Olaf the Viking King of Dublin.
Together these forces invaded Athelstan's territory.
The combined armies converged at a site the exact location
of which is still the subject of much debate. The stage was set
for one of the bloodiest battles of its time. The alliance's
forces numbered perhaps 10,000 men of which almost half
were Vikings. The Saxons mustered somewhere in the region
of 8,500 men. For the time these were large armies indeed.
The opposing armies advance into shouting range and exchange obscenities. The air turns blue with bloodthirsty oaths.
154
The Song of Brunanburgh makes great play of the number of
different contingents at the battle, referring to it as “the
conflict of banners.”
As for the battle itself, it started with a dawn attack by the
alliance against a defensive position adopted by the smaller
English army. The fighting raged all day. The Song of
Brunanburgh describes the battle thus:
“The field grew dark with the blood of men from the time
when the sun moved over the earth in the hours of the
morning until that noble creation sank at its setting.”
According to Egil's Saga the battle was close and hard fought
with many casualties on both sides, including a great
proportion of the nobility and their retainers. For rhe
alliance, the Song of Brunanburgh accounts five young Kings
and seven of Olafs earls slain, plus a host of seamen
(Vikings) and Scots. On the Saxon side, Althelstan’s two
cousins, two prominent bishops, two senior eoldermen plus a
multitude of'lesser’ men were lost. Amidst the slaughter, the
Scots and Welsh were eventually broken and the Saxons
closed in on the Vikings’ flank, finally routing them.
Constantine fled north across the border and Olaf escaped
back to his ship with a small group of his bird. The remnant
of the alliance’s army was cut to pieces and England was
saved from another large scale Viking invasion.
Postscript -Brunanburgh was not as decisive as it at first
appears considering it was such a large and bloodthirsty
battle. Athelstan reigned for two more relatively peaceful
years and enjoyed his position as arguably the most
powerful man in Europe. Edmund succeeded him only to
face Olafs return a year after Athelstan's death. Olaf re-
established the Viking Kingdom of York and, although he
was killed a year later, it took 14 more years of hard
fighting to finally secure Northumberland as part of
England forever.
155
HAIL CAESAR
BRUNANBURGH
THE WARGAME
The arrival of Hail Caesar ar Beast
Towers, the home of Gripping Beast
Miniatures, caused much excitement.
Here was the perfect excuse to refight
one of the largest battles of the Viking
Age in Britain: the Battle of
Brunanburgh. Furthermore, the alliance
of forces at Brunanburgh presented the
perfect set-up for a four-player game: the
Saxons of Wessex and Mercians on one
side, and the Vikings and assorted
Celtic types on the other.
We set up the table and laid out the
armies before deciding who would take
command of the forces. All expected
that Gripping Beast owner and
undisputed Beastmaster Andy ‘Lord’
Sherwell would take the part of
Athelstan as an exalted position and
fine moustache entitled him. In fact,
much to everyone's relief, Lord Sherwell
gallantly gave up his command to gestir
Ken Pearce and volunteered to umpire
instead. It has to be said that things do
generally go better when Lord Sherwell
isn't actually playing. Darren Harding
would naturally lead the Vikings as Olaf
Guthfrithsson and Martin Gibbins
opted for the Mercians of Edmund.
This left Roger Jenkins to manage the
Celtic hotchpotch that was Constantine
and Owen's forces.
ORDERS OF BATTLE
THE SAXONS
The Saxons are divided into four separate divisions for purposes of
command. With two players taking the role of rhe Saxon army, Athelstan
and Egil came under the control of Ken as overall commander, and the
Mercians and Eorl fell to Martin.
Athelstan's Contingent (Wessex)
• Athelstan, King of England (General)
• 3 units of Saxon Thegns (28 models) and Ceorls (28 models) in
combined formation (3 large units with 56 models in each).
EgiPs Viking Contingent
• Egil Skallagrimsson - Icelandic adventurer, warrior and
poet (commander)
• Egil’s Vikings - Vikings (small unit of 24 models).
Edmund’s Contingent (Mercia)
• Edmund, brother of Athelstan (commander)
• 3 units of Saxon Thegns (32 models) and Ceorls (32 models) in
combined formation (3 large units with 64 models in each)
Mounted Contingent
• Eorl (commander)
• 2 units Mounted Saxon Thegns (standard units with
12 models in each).
SAXON FORCES
Type Combat Morale Save Stamina Special
Clash Sustained Short Range Long Range
Saxon Thegn (Heavy Infantry) 7 7 3 0 4+ 6 Combined Formation
Saxon Ceorl (Medium Infantry) 6 6 3 0 5+ 6 Combined Formation
Combined Thegn/Ceorl units fielded as single large unit 9/8 9/8 4 0 4+/5+ 8 Thegns and Ceorls fight as a combined unit
Mounted Saxon Thegns (Medium Cavalry) 8 5 3 0 5+ 6
Egil’s Vikings fielded as small unit (Heavy Infantry) 5 5 2 0 4+ 4 Tough Fighters
156
THE DARK AGES
THE VIKING ALLIANCE
The Viking army is divided into four divisions with Olaf and
Eric’s troops commanded by Darren, and Constantine and
Owen’s troops by Roger. Owen was made commander of the
Welsh unit representing the mercenaries who w-ere in reality
a mix of troops of which the Welsh were a part.
Olaf s Contingent
• Olaf Guthfrithsson, King of Dublin (General)
• 3 units of Viking Hird (24 models) and Bondi (24
models) in combined formation (4 standard units with
48 models in each)
Eric’s Contingent
• Eric (commander)
• Viking Hird (24 models) and Bondi (24 models) in
combined formation (standard unit with 48 models)
• Gall Gael - Viking Men of the Isles (standard unit of
32 models)
Constantine's Contingent
• Constantine, King of Scotland (commander)
• Pictish Warriors (large unit with 60 models)
• Scots-Irish (standard unit with 40 models)
• Lowland Scots Thanes (32 models) and Lowland Scots
(32 models) in combined formation (large unit with 64
models)
Owen’s Contingent
• Owen, King of Strathcylde
(commander)
• Welsh teulu (30
models) and priodaur
(30 models) in combined
formation (large unit
with 60 models)
ALLIANCE FORCES
Type Combat Morale Save Stamina Special
Clash Sustained Short Range Long Range
Viking Hird (Heavy- Infantry) 7 7 3 0 4+ 6 Combined Formation
Viking Bondi (Medium Infantry) 6 6 3 0 5+ 6 Combined Formation
Combined Hird/Bondi units fielded as single standard unit 7/6 7/6 3 0 4+/5+ 6 Hird and Bondi fight as a combined unit
Gall Gael (Medium Infantry Warband) 9 6 2 0 5+ 6 Frenzied Charge
Pictish Warriors fielded as a large unit (Medium Infantry) 8 8 4 0 5+ 8
Scots Irish (Medium Infantry) 6 6 3 0 5+ 6
Lowland Scots Thanes (Heavy Infantry) 7 7 3 0 4+ 6 Combined Formation
Lowland Scots Spear (Medium Infantry) 6 6 3 0 5+ 6 Combined Formation
Combined Thanes/ Spear units 9/8 9/8 4 0 4+/5+ 8 Scots Thanes and Spears fighting as a single large combined unit
Welsh Teulu (Heavy Infantry-) 7 7 3 0 4+ 6 Combined Formation
Welsh Priodaur (Medium Infantry) 6 6 3 0 5+ 6 Combined Formation
Combined Teulu/ Priodaur units fielded as a single large unit 9/8 9/8 4 0 4+/5+ 8 Teulu and Priodaur fight as a combined unit
157
L...
HAIL CAESAR_____________________________________________
иг
The size of our units was drawn from research by Professor
Guy Halsall of York University applying a ratio of roughly 1
figure to represent 20 men. Some of the factions known to
have been at the battle were absorbed into similar units for
convenience, notably the various mercenaries. We also took
the liberty of adding extra figures here and there to enhance
the appearance of the armies - and because we had them!
Note that the models come from our extensive collections
and are based to our own preference for deep ranks. These
correspond nicely to the four deep ‘warband’ formation for
the most part, but we didn’t worry too much about the unit
depths, concentrating on keeping the frontages within the
usual tolerable limits.
The stats have been given for all the individual units that
were actually fielded as combined formations. The stats for
individual unit are all for standard sized units. The stats given
for the combined units are for the size as fielded in our game,
hence all but the Viking Hird/Bondi units have the stat
bonuses for large units added.
In addition to the special rules listed all infantry’ units were
allowed to use the Close Ranks special rule to represent the
famous shield wall, a tightly drawn formation presenting a
wall of shields to the enemy.
COMBINED FORMATION
It was a common practice in the Viking Age for higher status
warriors, being better trained and armed, to occupy the front
ranks of battlefield formations. We decided that we wanted
to reflect this directly in the game in some fashion. After due
consideration we came up with what we called a combined
formation rule. The combined formation rule allows what
would otherwise be two infantry units to join together into a
single combined unit wnth the better troops at the front and
the others behind them. In our case most of the units
combined in this way qualified as ‘large’ as a result. The
combined unit fights exactly as the superior troops in its
front ranks until such time as the unit becomes shaken after
u’hich it fights exactly as the inferior troops in its rear ranks.
Where different stats apply these are both given in the army
roster, e.g. Morale Save 4+/5+ meaning the unit has a save of
4+ until it becomes shaken, after which its save drops to 5+.
Bear in mind that where heavy infantry and medium infantry
are combined this does mean the unit counts as heavy
infantry at the start of the game but medium infantry once it
becomes shaken. This may affect it in other ways: for
example, vulnerability to missile fire.
COMMANDERS IN COMBAT
To simulate a more heroic (read blood-thirsty!) approach to
personal combat, we decided to increase the risk of a
commander suffering death or injury in hand-to-hand
fighting. We also wanted to emphasise the risks and tension
of personal combat in an age when it w’as the fate of
individuals that so often dictated the course of history.
Therefore, we decided that instead of rolling just once each
round to determine if a commander fell casualty in hand-to-
hand fighting, a roll would be made for every single attack
made by the commander that round. Thus a commander
making three attacks w’ould have to roll a pair of dice three
times, and any score of 10, 11 or 12 on any of the rolls would
indicate that he had fallen casualty. A commander making
two attacks would roll twice and would fall casualty on rolls
of 11 or 12. A commander making a mere single attack
w’ould roll once and fall casualty on a 12 as usual.
This drastic increase of risk for commanders making
multiple attacks, and especially for the generals with their
potential three attacks, might reasonably make some players
reluctant to commit their full quota of attacks to a fight.
Any nervousness expressed by the players when committing
their attacks proved a marvellous opportunity to employ
one of the many colourful period insults that our crew had
so far mastered. A list - slightly ameliorated for the benefit
of sensitive readers - is included at the end of this account.
DOUBLE MOVE
To represent the attack of the allied Viking and Scots army
onto the static position of the Saxons we decided to give the
alliance side two Command segments in their first turn, so
they would effectively get two chances to move their army in
their first turn of the game.
158
THE DARK AGES
The action in full swing on the Saxons’ left flank
HOW IT WAS PLAYED
Newly self-appointed umpire Lord Sherwell ran through the
scenario tweeks and extra special rules that we would be
using. A brief pause to stock up on the infamous Beast
strength, coffee (no tea here) and we were off.
Viking and Scots Double First Turn. As per the scenario, the
Vikings and Cekic types took advantage of their bonus move
and, knowing that it would immediately be their move again,
Olaf and Constantine signaled an all out advance into the
teeth of the enemy. One paltry stumbling move later and the
two commanders were ready to try again. This time they
needed to proceed with some caution. In theory they could
just about make a successful charge if their order rolls were
good enough, but should something go wrong they could
end up with a very raggedy battle line - universally
acknowledged to be ‘A Bad Thing’.
Faced with the awesome might of Athelstan and his
bodyguard, Olaf opted to advance cautiously maintaining
his line. On the right flank Constantine decided that the
Mercians were not going to leave the hill come-what-may, so
he reasoned that the Scots and Welsh might as well go and
get them. Some decidedly average dice rolling later and the
Vikings managed to advance slowly, but kept their line.
Over on Constantine's flank, Roger's erratic rolling enabled
the Scots to press on despite the complete lack of support
from their Welsh allies who resolutely refused to budge.
A few rounds of Viking Age insults later and it was over to
the Saxons.
Saxon Turn One. Athelstan decided to meet the oncoming
Vikings but wasn't quite ready to engage. He advanced his
main units to form an imposing battle line while sending
Egil's 'friendly' Vikings out towards the right flank. As he
advanced, Athelstan tried to order his mounted reserve onto
rhe table as he could see a potential hanging flank by
Constantine's contingent. Unfortunately, the distance was just
too far and Ken failed the modified roll. Edmund did the
sensible thing by holding steady on the ridgeline, choosing to
spend his time practicing for the next round of insults.
Althelstan issued his orders and moved his troops to within
javelin range of the Vikings arrayed to their front. Ken rolled
a number of 6's prompting a test by the centre Viking unit
which fell back in good order. It was not exactly devastating,
but if Olaf could not repair his line the Saxons might be able
to launch a supported charge on their next turn.
Viking Turn Two. Despite the minor setback, Olaf was all
Viking enthusiasm as he sounded the charge. Apart from the
unit that had been hurled back by the previous turn's rain of
Saxon javelins, the Vikings didn't need to be issued an order as
they all used their initiative. With a clash of shield and sword,
the Viking charges all hit home. However, on the other flank
Constantine found himsek plagued once more by truculent
supporters (and Roger's dice). His instruction to charge
towards the hill resulted in a stumble one move forward, with
units coming to rest mere yards from the Saxons. Maybe the
insults were getting to the Celts. Even their javelins missed.
159
HAIL CAESAR
The Saxons cling to their ridge line where they enjoy an uphill adeantage. In the foreground, the Mercians charge at the shambling Celts
Olaf, Eric and Athelstan all hurried to join the combats. The
Saxons elected to close ranks to form a shield wall. This was a
sensible decision seeing as the Vikings were fronted by Hird
and supported on the left, whereas Egil’s troops hadn't quite
extended the Saxon line. Add to that Olafs three attacks and
you have a formidably offensive unit. Even with their shield
wall reducing casualties thanks to the improved Morale save
the Saxons were driven back disordered.
Saxon Turn Two, On the Saxon army's left flank, rhe
disorganised Celtic advance was too tempting a target for
the Mercians. Martin used his troops’ initiative to charge
down from the commanding position on the hill into the
vulnerable unsupported Scots and Welsh.
In the centre, the cavalry reserve attempted to move on from
behind the hill and attack the Gall Gael. This they did
successfully. Heedless of the Gall Gael’s fearsome reputation
the cavalry charged forward. As the units clashed the cavalry’s
commander joined in the fight. Good man!
With the majority of the units committed this round of
combat was shaping up to be the pivotal moment in the
battle. Which is why at this point we had another swift round
of Viking Age insults! See useful list following this account.
With oaths, exhortations and defamatory remarks complete, the
Saxons on the left flank punished the Teulu for advancing
without sufficient support: inflicting eight unsaved casualties
and leaving the Welshmen shaken. At the other end of the battle
line, and in complete contrast, Egil's Vikings took five casualties.
This caused them to become shaken as they were a small unit,
yet they managed to merely give ground in good order.
In the centre the Saxons just couldn't make any headway
against the Gaels, and after a flurry of dice rolling were giving
ground disordered. This was not a good omen for the main
event: the continued combat between Olaf and his Hird, and
Athelstan and his Hearthguard. As you would expect from
two great units with maximum support, the combat
generated quite a few dice rolls, and thanks to some good
rolling by Olaf the Saxons finished the round shaken. And
then it all went horribly wrong. A confident Ken rolled for
his break test and got a ‘three’. Olaf roared as the Saxon king
fled the scene surrounded by his humiliated retainers. And
then it got worse. As Athelstan had thrown his full weight
into the combat, the Vikings, using our modified rules for
risks to commanders in combat (see notes) had a good
chance to kill or wound the Saxon King. This they did and
left the King not only fleeing the table, but also severely
wounded into the bargain. Cue the Viking horns.
Following up this victory, the Vikings moved up into support
for the final combat of the turn. A small measure of calm was
restored as the Saxon shield wall managed to save nine of the
ten Viking hits and the combat ended in a draw.
A slightly longer than normal round of insults preceded turn
three, and it has to be said that most were directed at Ken for
losing Athelstan, and that the most cruelly cutting came from
the umpire! Lord Sherwell was not at all amused by the
Saxons’ performance.
Viking Turn Three. The hapless Constantine got things off
to a flying start by blundering his first order, following which
the Scots retreated. With very little other movement it was
straight on to combat.
On the far left the Vikings hammered Egil's smaller unit. No
doubt inspired by the great man’s poetry (and infamous bad
temper) Egil's boys merely gave ground in good order once
again. They ended the combat still fighting, but shaken. In
the next combat along, Olaf, his blood now well and truly
up, battered the Saxon shieldwall, but to no avail. The
160
TEE DARK AGES
exertion of the previous round must have had an effect, as
the Vikings ended up taking three casualties and giving
ground together with their supporting unit. Darren was just
about to move on to the next combat when Ken reminded
him that Olaf had taken part in the combat and so was
potentially a casualty. With icy stare, Darren passed some
dice to Ken who, completely unphased, proceeded to wound
Olaf. It was a small consolation for the Saxons.
Darren vented his anger on the next combat along where
Eric's Vikings crushed the now unsupported Saxons. In their
sweeping advance, the Vikings smashed into a unit of Saxon
cavalry and an immediate round of combat was fought. The
surprised cavalry were forced to give ground disordered. To
finish the round off, the Gall Gaels battered a lone Saxon
unit who ended the turn shaken but just holding on.
Saxon Turn Three.There were no initiative moves and with
all the commanders committed to combat (except doddery
Constantine) there were no orders either. Matters therefore
proceeded straight into combat. On the Saxons' far left the
Mercians inevitably overwhelmed the remains of the Teulu
and managed to kill the Welsh king in the process.
The Gall Gaels broke the Saxon unit in the centre and
advanced to threaten the flank of the Mercians on the hill. In
the other combat in the centre, the Vikings shattered the Saxon
cavalry and looked set to turn in on the Saxon’s left flank.
In the large combat on the Saxon's right, Olafs unit formed
shield wall around the wounded Olaf as the Saxons looked to
avenge their king. Against the supported large unit Olafs
shield wall was not good enough, and the Vikings were
forced to give ground disordered.
Vikings Turn Four. With the various commanders wounded
or locked in battle, only Constantine issued an order, declaring
a charge against the Mercian held hill. Constantine's orders
were obeyed only up to a point and rhe Picts were left stranded
at the foot of the hill. Olafs bird were shattered during the
combat that followed and Olaf hobbled from the field.
Saxon Turn Four. The field was littered with shaken units
and the pace of the game began to slow as the participants
mentally prepared their excuses and sharpened their best
insults for the beckoning post game session. The only action
occurred when the Mercians were unable to resist charging
down the hill into the unsupported Constantine.
Constantine's troops were overwhelmed and gave ground
disordered ending the tum shaken.
Viking Turn Five. By this time the players were sensing that
matters were coming to a conclusion with both armies worn
out by the fight and commanders locked in battle or
incapacitated. Over on the Viking right Constantine’s troops
broke and fled the scene. As Edwin's Mercians followed up
the dice revealed Constantine dead.
Saxon Turn Five. Final turn as everyone bar the rampant
Edmund was spent. After crushing Constantine, Edmund
had used his advance to position himself for a charge onto
the Scots’ flank, which he now made. The result? The Scots
were shattered. But by now so were the players. The Battle of
Brunanburgh was over.
Hands were shaken and bonhomie flowed in excess. The
players decided that the field belonged to the Mercians. Had
the Saxons done enough to destroy the Viking threat? And
at what cost with Athelstan mortally wounded? Certainly the
Celtic fringe had been put in its place. Perhaps Edmund may
even have a chance of taking Athelstan’s place as King of all
England. But what was certain was that the players had had
a jolly good game and that had Lord Sherwell insisted on
playing it would have been all so very, very different.
A NOTE ON PERIOD INSULTS
. J
“You are the bride of a Svinafell Troll, as people say, and
even1 ninth, night he treats you like a woman. ”
Njal's saga
As we all know , wargaming can - if plaved in the
right and proper spirit - ger a bit rowdy. What
better way to enhance the educational value of an
evening's entertainment than to revive the use of
long-forgotten insults? We are all true champions
of the Viking Age, a time when the well-honed
put-down was considered high art. Here are some
examples to throw your opponent’s way.
Idiot
Goat Dung (alternatively employ any animal of
your choice - though Goat usually w'orks)
Pig (or indeed Goat) Filth
, Fox Tail
Fox Beard
Halfwit
Buffoon
The above are all from the Colloquy of Aelfric Bata
circa 1000AD, England.
Raven Starver (a coward)
Stench Weasel (a practitioner of poor
personal hygiene)
Womanish (a coward, be careful here...)
Pot Licker (a greedy fellow)
Niching (a worthless individual)
Warlock (an oathbreaker)
i- i
The above are assorted favorites in common use.
And finally we leave you with this 10th century
Latin insult.
Cam's calum in tuo naso!
There are many, many more. Sadly some of the most
entertaining are, if anything, too vulgar to inflict
upon an unsuspecting reader. For further examples,
we therefore leave you to your own research.
161
The Hundred Years War was a long running conflict between the English and French crowns to establish authority over large parts of what is today
France. The battles of this period established the supremacy of the largely infantry based armies of the English over the feudal knights of France - but
even so - it was an age when the mounted knight was surely at his most flamboyant!
The Middle Ages will forever be associated with knights in
armour and their retainers wielding bows and pole arms.
Here are the warriors who fought on behalf on the kings
and nobles of feudal Europe, the recognisable predecessors
of the peoples and nations of modern times. Once we
consider the wars of the medieval period we enter an
historical realm that is increasing well recorded and
understood, where the names and stories of many of the
warriors of the day are known to us, and where battles are
often described and discussed by contemporary writers. It is
still a world unlike our own in many ways, though visible
remnants of it endure in the ecclesiastic architecture of
churches and monasteries as well as in the castles and
fortresses of overlords and monarchs.
The age of medieval warfare may be said to begin with the
Norman Conquest of Saxon England, and with the
annexation of Byzantine Anatolia by the Turks. These events
followed on from decisive battles, both were fought at rhe
extreme boundaries of Christendom, and both were to shape
the future development of world history. They took place
about the same time too: rhe Battle of Hastings in 1066 in the
West and the Battle of Manzikert in 1071 in the East. Of
course, these are arbitrary dates really, and they do not in
themselves signify any great or immediate change in the
evolving story of warfare. None the less, it is convenient for us
to mark the eleventh century as the beginning of our chosen
era. As for its end, we shall settle upon the development of
effective gunpowder weapons during the final years of the
Norman Knights such as these did not only subjugate the Saxon kingdom
of England, they carved out a substantial empire that included the south of
Italy and Sicily. The Normans also fought as mercenaries in Byzantine and
Armenian service. The Norman adventurer Bohemond, Prince of Taranto
was one of the leaders of the First Crusade and the Prince of Antioch. He
campaigned in Greece and the Levant against the Byzantines and Muslims.
The Wars of the Roses were civil wars fought for control of the English
crown between two rival branches of the Plantagenets, the Houses of York
and Lancaster. The battle of Tewkesbury in 1471 was a decisive victory for
the Yorkist King Edward. The war lasted until 1485 w'hen the last of the
Plantagenets, Richard Ill, was slain at the battle of Bosworth and crown
passed to the House of Tudor.
162
fifteenth century. In England the death of the last of the
Plantagenet kings, Richard Ill, at Bosworth Field in 1485
marks the transition to early modern times with the accession
of the Tudors. It was the final victory upon British soil gained
by the charge of heavily armoured knights.
If the preceding era had witnessed the triumph of the
armoured horsemen then the Middle Ages were to see the
almost universal triumph of the mounted knight and the rapid
evolution of armaments and tactics by way of response. As the
centuries progressed the armour of the knight advanced from
the mail coat of former years to a mixture of mail and plate,
and eventually to the sophisticated and beautiful articulated
harness of the fifteenth century. But the knights and heavily
armoured men-at-arms were not to have it all their own way.
Infantry soon found ways to counter the supremacy of the
mounted arm. In their wars against the English the Scots
spearmen adopted the dense schiltron formation bristling with
spears. Elsewhere the refinement of the crossbow placed a
weapon capable of defeating the thickest armour into the
hands of the common man. In Europe the crossbowman was
to become a mercenary for hire, rhe universal soldier ready for
battle and siege alike. The English appreciated the value of
missile power more than their contemporaries. In the hands of
the English archer the long bow - or war bow to give it its
proper name - was to become a battle-winning weapon.
The armies of Western Europe evolved around knights and
their retainers, the archetypical warriors of a feudal society. To
the east the Arab world retained its own traditions, based in
part around mobile, lightly armed cavalry and missile-armed
infantry. The two cultures clashed in the long series of wars
known as the Crusades, thereby providing wargamers with
one of the most colourful themes of the Middle Ages. Here
we introduce the armies of the Saracens with their flowing
robes and armies of swift horsemen, worthy opponents to
pitch against the mail-clad knights of Christian kings.
Although the Crusades in the East are the best known, the
Knights of the Teutonic Order also campaigned in the North
against the pagan Prussians and Livonians of the Baltic coasts.
In Eastern Europe there were other foes to fight including
fierce Mongol hordes and the increasingly powerful Ottoman
Turks who displaced the Seljuk Sultanate of Rum from the
fourteenth century onwards. The Mongols devastated
Hungary and only withdrew following the death of the Khan
and subsequent in-fighting between rival Mongol factions.
All these make fascinating subjects for wargames armies,
whether your interest is in the early part of the period with its
predominance of mail-clad knights, or the later years and more
sophisticated armies that combined different types of foot and
mounted troops together. Gunpowder weapons first make an
appearance in Western European armies of the fourteenth
century in the form of simple bombards. At first they are siege
weapons and play little part in field battles, but soon artillery’
pieces begin to make their mark, with mobile, wheeled
carriages introduced around the turn of the fifteenth century.
It was to take another half century or so tor improvements in
technology to furnish the humble infantryman with a practical
handgun, and not until the end of the century that such weapons
began to rival the traditional bows and crossbows in effectiveness.
But by then the medieval era - the age of feudal lords, kings and
the church of Rome - was drawing to a close. New' forces were
at work in the world. Protestantism would champion the many
over the few: the common man over the nobles and established
clergy'. The printing press would bring knowdedge and literacy
to a w'hole new class of Europeans, and wealth and power
w'ould devolve dowm from the old feudal masters. It was a time
of change, the first dawn of a new’ age that would be dominated
by science and reason. It was an age in which the knight in
armour w’as starting to look an anachronous figure indeed.
Gunpowder weapons first appeared upon the battlefields of Europe during the Middle Ages in the form of simple bombards. These weapons made their
presence felt during sieges and would soon make their appearance upon the battlefield.
163
THE BATTLE OF THE BARADA RIVER 24TH JULY 1148
The County of Edessa in the Holy Land was the first
Crusader state to be founded and its fall in 1144 triggered the
Second Crusade. Initially the idea of the crusade was simply
to recapture Edessa itself. King Louis VII of France and
Konrad HI of Germany set out separately, travelling across
Europe to the Holy Land. After reaching Constantinople the
armies joined forces at Lopardium and then campaigned
both together and separately eastwards.
Konrad, King Baldwin III of Jerusalem and Patriarch Fulcher of
the Templars met at Jerusalem where they were later joined by
Louis. There it was decided that Edessa, having been lost and
re-taken twice already, wasn’t in any condition to be conquered
again. Instead, the Crusaders decided to launch their attack
upon Damascus. This was surprising considering that
Damascus had hitherto been an ally of the Crusader states, but
none the less the allied army prepared to advance upon the city.
The combined Crusader forces marched north east towards
Damascus. On reaching the fertile and irrigated suburbs they
turned north to cross the Barada River, thereby
circumnavigating the city’s substantial walls in order to
approach at the weakest point in the defences. A force of
militia and local Turkoman tribesmen tried to stop the
Crusaders amongst the walled orchards, narrow lanes and
irrigation canals that lay beside the river. This worked for a
while and the attackers were held at bay, but eventually the
bloody confrontation went in favour of the Christians. This
is the action that our game attempts to recreate.
The setup
The exact sizes and make up of the forces involved are not
known. We do know’ that the three Crusader armies
approached the Barada River with Baldwin’s troops in front,
Louis in the centre and Konrad bringing up the rear, so that
is how we arranged the allied forces. We substituted
Hospitallers for Templars as these are what we had to hand.
This force started the game at the hilltop village of Mizzah
(see map) and its objective was to reach the opposite side of
the board between the river and the Quanawat canal with at
least three quarters of its units intact.
The approach of the Frankish army causes some consternation
in downtown Damascus
The small Muslim blocking force is there mainly to hold
up the invaders until the relief force from the city
under Mu’in al-Din Abu Mansur Anur arrives on
the Christians’ right flank. The Muslim players
were allowed to arrange the blocking force up ./
to half way across the table using any
terrain features for defence. Anur began t
the game wdth one of his divisions [
marching down the road from the 4Я
city in column. He would roll
randomly thereafter for g
reinforcements, two
divisions at a time, Л|
arriving on any roll of
a 4+. i 14*
164
—
- V «-1
HAIL CAESAR__________________________________________
THE CRUSADERS - ORDER OF BATTLE
King Baldwin 111 of
Jerusalem’s contingent:
DIVISION 1
• 1 x unit of mounted Hospitallers
• 1 x unit of mounted Knights
• 1 x unit of Turcopoles
DIVISION 2
• 1 x unit of foot Knights
• 1 x unit of Armenian spearmen
• 1 x unit of Armenian archers
• 1 x unit of crossbowmen
• 1 x unit of archers.
King Louis VII of France’s
contingent:
DIVISION 3
• 2 x units of mounted Knights
• 1 x unit of Turcopoles
DIVISION 4
• 2 x units of spearmen
• 2 x units of crossbowmen.
Konrad Ill ‘King of the Germans’s
contingent:
DIVISION 5
• 1 x unit of mounted Knights
• 1 x unit of mounted Armenian
Knights
• 1 x unit of Turcopoles
DIVISION 6
• 3 x units of spearmen
• 2 x units of archers.
CRUSADER STATISTICS AND SPECIAL RULES
All commanders including the general have Leadership ratings of 8. The general has the standard re-roll rule in addition.
Type Clash Combat Morale Save Stamina Special
Sustained Short Range Long Range
Hospitaller knights with lances (Heavy Cavalry) 9 6 3/0 0 4+ 6 Eager, Tough Fighters, Stubborn
Crusader knights with lances (Heavy Cavalry) 9 6 3/0 0 4+ 6 Eager, Tough Fighters
Turcopoles with bows and spears, fielded as small units (Light Cavalry) 5 3 2 2 6+ 4 Feigned Flight
Foot knights and Spearmen (Heavy Infantry) 7 7 3 0 4+ 6
Archers and Crossbowmen (Heavy Infantry) 6 6 3 3 4+ 6
The rules for the various weapons carried apply - these are shown in the description of the unit rather than noted as
special rules. Note that none of the spearmen were given the long spear rule.
166
Blocking Force: DIVISION A Mu’in Al-Din Abu Mansur Anur’s Relief Force:
DIVISION C DIVISION F
• 4 x units of Turkomans • 1 x unit of Ghulams • 2 x units of Ghulams
• 3 x units of Turkomans • 2 x unit of Bedouin cavalry
DIVISION В
• 1 x unit of dismounted Ghulams DIVISION D DIVISION G
• 1 x unit of Militia • 1 x unit of Ghulams • 3 x units of Militia
• 2 x unit of archers • 1 x unit of Napfa. • 3 x units Turkomans • 1 x unit of Fanatics
DIVISION E DIVISION H
• 1 x unit of Ghulams • 1 x unit of Fanatics
• 3 x units of Turkomans • 1 x unit of Militia
• 1 x unit of camels • 1 x unit of archers • 1 x unit of skirmishers
DAMASCAN STATISTICS AND SPECIAL RULES
All commanders including the general have Leadership ratings of 8. The general has the standard re-roll rule in addition.
Type Combat Morale Save Stamina Short Long Clash Sustained Range Range Special
Dismounted Ghulams (Heavy Infantry) 7 7 3 0 4+ 6
Damascan Militia (Medium Infantry) 6 6 3 0 5+ 6 Levy
Turkomans with bows fielded as small units (Light Cavalry) 5 3 2 2 6+ 4 Feigned Flight
Archers (Medium Infantry) 5 5 3 3 5+ 6
Napfa-armed Skirmishers (small unit) 3 2 2 0 0 4 Napfa - any units taking casualties must make a missile break test with a -1 penalty’. Napfa range is 6".
Fanatics (Medium Infantry) 9 6 3 0 5+ 6 Fanatic, Wild Fighters.
Ghulams armed with bows and spears (Heavy Cavalry) 9 6 3 2 4+ 6
Camels armed with bows and fielded as small unit (Light Cavalry) 5 3 2 2 6+ 4
Bedouin with spears and fielded as small units (Light Cavalry) 5 3 2 0 6+ 4
Skirmishers with javelins fielded as small unit (Skirmishers) 3 2 2 0 0 4
The rules for the various weapons carried apply - these are shown in the description of the unit where applicable rather
than noted as special rules. Note that none of the spearmen were given the long spear rule.
167
HAIL CAESAR
HOW IT WAS PLAYED
It all looked very pleasing and easy for the Crusaders as they
surveyed the sparse opposition behind the crumbling walls of
the suburbs below their own positions at Mizzah. Indeed, rhe
Hospitallers, knights and Turcopoles of Baldwin raced off -
almost uncontrollably - in pursuit of a unit of Turkoman
light cavalry that dared to approach their lines. Baldwin’s
infantry proved to be much slower on the uptake. In their
turn the blocking force stood firm while Anur’s
reinforcements dragged their feet (and hooves) on the road.
The Hospitallers made short work of one unit of
Turkomans, but ended up trapped and shot at by a second
unit. This forced them to retire to the Northwest, far away
from their comrades arrayed on the slopes below Mizzah.
Meanwhile, Baldwin’s knights and Turcopoles advanced
across the plain and tried to engage the enemy infantry
behind their walls. Shots were exchanged to little effect.
Louis’ force now arrived very slowly behind the main
advance, advancing on to the battlefield with a single move.
The first two divisions of Anur were now all on the table,
but were also making slow progress.
There then followed a catastrophe for the blocking force.
Baldwin’s knights charged headlong into the elite unit of
dismounted Ghulams who were straddling the main road
between two orchards. In the ensuing combat rhe
Crusaders inflicted heavy casualties. The Ghulams routed,
taking with them their two supporting units of archers.
The Crusaders pressed forward, hitting the Muslim militia
in the flank with a sweeping charge and destroying them in
a single round of fighting. This left only three units of
Turkomans and a tiny unit of Napfa between the entire
Crusader horde and its objective on the far side of the
table. As the knights’ pursuit of the enemy militia had
carried them into the middle of all these units, they
received a heavy pounding from flame and arrows in the
Anur’s infantry march onto the table to confront the rampaging Crusaders
168
THE MIDDLE AGES
The Crusaders begin to advance from their initial position on the hilts behind Mizzah
following turn. The Germans now arrived up the hill
heading towards Mizzah, while the rest of the infantry
struggled to make their way off the high ground and onto
the plain. More of Anur’s reinforcements arrived and their
commander diverted them off the road to sweep towards
the Crusaders’ vulnerable looking flank.
Baldwin’s cavalry withdrew from the village under a hail of
missiles that came from every direction. The Hospitallers
finally returned from their pursuit of the enemy and rejoined
their friends. Their early and over enthusiastic charge had
taken them out of the battle for several turns. Konrad’s
German infantry formed column and pushed their way past
their sluggish allies still struggling to descend the hill, with
the German/Armenian cavalry thundering down into the
plain to protect the army’s right flank. At last the first of
Anur’s divisions arrived at a point where they could do some
damage, and quickly formed line opposite Konrad’s cavalry.
A unit of Turkomans who w’ere somewhat ahead of the rest
of their division were shaken during a preliminary encounter,
but in return they did some damage to Baldwin’s Turkopoles,
who had taken up a position upon his right flank.
Frankish crossbowmen prepare to see off the heathen
HAIL CAESAR
Sustained casualties and a lucky shot from the village sent
Baldwin’s knights recoiling into the column of German
infantry behind. Meanwhile, the French infantry shook
themselves into line to face the threat upon the army’s right
flank. It was well that they did, for a single arrow hit from a
Ghulam unit the other side of the irrigation canal sent the
Armenians knights in full flight never to be seen again,
leaving the German knights and the whole flank very
exposed (a break test was forced from a roll of 6 which also
inflicted a casualty, and the poor Armenians rolled snake
eyes - double 1!). The Crusaders were momentarily dismayed
by this unexpected loss. They needn’t have worried, for in the
combat that followed between the German knights in
company with French infantry and Ghulams together with a
Turkoman unit it was the Crusaders who came up trumps,
killing the enemy commander and routing half the division.
Baldwin’s infantry eventually got their act together and
pushed down into the plain to attack the last enemy infantry
still defending the suburbs and the road to their objective.
The three original Turkoman units, like mosquitoes, kept
plugging away at the Hospitallers, successfully holding them
at bay. By now more of Anur’s troops were arriving, but even
a rapid advance was going to find it difficult to stop the
Christians’ reaching the opposite table edge, which was their
ultimate aim.
Seizing their moment, Baldwin’s knights struck out for the
objective, forcing back the blocking Turkoman units to the
very edge of the table. But the Turkomans hung on and
successfully recoiled the Hospitallers with missile fire in their
turn. There was heavy pressure now on the Crusaders’ right
flank with many of Anur’s troops joining the fray against the
German horse and French foot. But the blocking force had
gone and there was next to nothing stopping Baldwin, Louis
and Konrad’s forces from gaining their goal. So it was
determined to be a Crusader victory, as was the real battle.
The Christians might have won that battle, but the
subsequent siege and campaign proved a complete disaster -
bur for now it was victory indeed!
COMMENTS ON
THE SPECIAL RULES
The Crusader knights were rated as eager - which means
they would automatically move at least once when given
a charge order against an enemy within range. They were
also given the tough fighters rule, allowing them to re-roll
one missed combat attack each round. This was to give
the knights an edge over their Ghulam opponents in
addition to that afforded by their lances (-1 morale save
when charging/countercharging). The Hospitallers were
also made stubborn, allowing them to re-roll a failed
morale save when taking casualties.
Both the Turcopoles and their adversaries the
Turkoman light cavalry were given feigned flight, allowing
them to move out of combat and therefore avoid getting
pinned down by rhe heavier cavalry.
The Damascan militia were rated as levy, obliging them
to roll a 4+ to shake off the effect of disorder. The napfa
armed unit was treated as a small unit of skirmishers
armed with short ranged missile weapons - but it was
decreed than any unit suffering casualties from napfa
would be obliged to take a break test with a -1 modifier.
The Fanatics were given the fanatic rule, boosting their
morale save by +1 until shaken, and the wild fighters rule,
allowing them to re-roll up to three failed hits in their
first round of combat only. As it was this unit failed to
reach combat.
Another valiant Crusader falls victim to the accursed Saracens, or possibly the temptations of the Communion wine...
170
THE MIDDLE AGES
A hail of arrows falls upon these daring horsemen in an attempt to drive the Turkomans back to their lines
What a scorcher! Napfa-armed skirmishers rain fire and destruction upon the Frankish knights...
Ghulams advance apace with Turkoman horse in close support
171
The Hail Caesar rules are a development of Warlord Games' Black
Powder wargame that covers warfare of rhe eighteenth and nineteenth
centuries. Hail Caesar is a broad set of rules covering the earliest
warfare through to battles of medieval times. Many of the underlying
procedures and mechanisms have therefore changed in order to more
properly represent wars of the ancient and medieval world. As a
result, even though the structure of the Hail Caesar game is the same
as Black Powder, players of Black Powder will find many differences of
detail and emphasis. Thus, regardless of whether players are familiar
with Black Powder or not, it is best to consider Hail Caesar as an
altogether new set of rules. These notes are intended to give an idea of
the design aims and process of development of Hail Caesar.
Our over-riding concern was to create a game that looked and felt
like a conflict of ancient times. Black Powder emphasises the sweep
of battle, the predominance of musketry as the main arm, and the
sudden and decisive consequences of moving to close quarters to
deliver the coup de grdee. None of this seemed quite right for battles
of the ancient world, where manoeuvre often amounted to ‘keeping
in line’, where missile fire was usually secondary to close quarter
fighting, and where hand-to-hand combat could be a protracted
affair. To address this change of emphasis the basic move rates were
reduced to roughly half those of Black Powder, and the stamina
value of units (rhe number of casualties units can take before being
shaken) was doubled (from three to six for standard sized units).
The affect of shorter moves is to keep the army more closely
together as a body, reducing the potential for broad sweeping
manoeuvres and emphasising cohesion. The effect of increased
stamina is that it introduces more granularity into the system tor
inflicting and recording casualties, allowing for overall less effective
shooting as well as prolonged hand-to-hand fighting. In short, these
changes make ancient battles more of a ‘grind’ tor the opposing
armies, though hopefully no less nail biting for the players.
.As the rules for Hail Caesar started to take shape it soon became
necessary to define various types of troops. The ancient and
medieval worlds were far more diverse in this respect than the era of
rhe musket. In Black Powder, unusual weaponry and native types are
mostly treated as exceptions and special cases. The proliferation of
differently armed and equipped warriors of ancient times forces
Hail Caesar to address armaments and fighting styles as part of the
core rules. This has been tackled by creating a variety of different
functional types of troops from the get go: for example, heavy,
medium and light cavalry. These types have standard game values
and, in some cases, specific armaments and formations rules. The
same principle applies to infantry, artillery’ and chariots. The overall
effect is that rules that would be treated as ‘special’ or exceptional in
Black Powder, and consequently covered in a separate section away
from the main text, are integrated into the body of the rules. This
does tend to make the rules themselves a little longer, but this is
perhaps to be expected from a game where these essential qualities
in troop types are often key to an army’s fighting style.
The core command system is common to Black Powder and Hail
Caesar, and forms the backbone of game play. Units, or groups of
units, are given orders and a test is made to see whether they act upon
their instructions. If this is successful, units will act as ordered within
the number of moves allowed to them. Units can potentially move
not at all, once, twice or three times depending on the result of their
dice roll. This system replaces the predictable fixed movement of most
wargames. Variable move distances reflect the decisiveness of
commanders, the determination of troops, and the limited ability of
troops on the ground to understand what is happening around them.
Moves are not calculated from the number of metres a man could
theoretically move over some pre-determined fixed time. Troops may
sometimes be rooted to rhe spot from turn to turn whilst others
bound across the battlefield with relative ease. This idea is based upon
a view taken about behaviour of armies in battle, rather than
theoretical drill manoeuvre rates on a parade ground. Thus, a
determined commander seeing an opportunity, leading troops who
are eager, and communicating an order successfully through his
command structure, can mount a cavalry charge that takes his forces
straight into the heart of the enemy. Conversely a timid commander
who is unsure what to do, leading troops who are poorly motivated,
whose instructions may be lost, delayed or misinterpreted, might do
nothing at all while the enemy close upon him.
Players of Black Powder will notice that the role of free moves has
been extended in Hail Caesar. Modifiers to rhe command rolls have
also been reduced to that for distance only. These changes draw the
emphasis away from the use of marching columns along roads to
facilitate the movement of troops, artillery, baggage and supplies.
Taken together with the reduced move rates, the overall result is to
encourage a steady advance and more cohesive battle plan. This
might feel odd to players who have grown used to the sudden re-
deployments of Black Powder. However, it better represents the
measured movement to contact characteristic of many larger ancient
battles. This does not affect the potential for relatively rapid
manoeuvres with mounted troops, especially in smaller scenario-
driven games. This is further emphasised by the introduction of a
faster pace for light cavalry and horse archers in open order. A side
benefit of the reduced moves and more compacted battle formations
is that it becomes possible to play on tables four feet wide using rhe
measurements given. In Black Powder it is generally necessary to
reduce the standard moves to do so.
Shortening move distances changes the way the initiative and
proximity rules work within the game. In the case of initiative this is
because units entitled to move on their initiative (i.e. within 12" of rhe
enemy) are now much less likely to be within ‘charge’ range of a target
(a single charge move is now 9" for cavalry and 6" for infantry, rather
than 18" and 12" as in Black Powder). The drive to combat is therefore
slowed down, and will often involve a turn of preliminary’ contact at
short range before the opposing sides clash. This results in a game that
feels more like a fight between ancient armies, where the combatants
are dense blocks of heavy infantry arrayed facing each other. A second
important consequence of the reduced move is the way it interacts
with the proximity’ rule. Because the proximity’ rule affects a unit’s
movement within 12" of the enemy it does not normally come into
play in Black Powder except where units are within charge range or
critical distance for musketry. However, in Hail Caesar this affects
movement as opposing armies approach each other, forcing units to
‘face up’ to the enemy in front of them. To reflect its new found
importance rhe proximity rule is defined more tightly, and the overall
affect is to guide units into mutual combats, or to ensure that units
avoiding combat move away from their enemy rather than attempting
to slip around their formations or through gaps in their lines.
172
Although move distances have been reduced overall, shooting ranges
have been kept about the same with bow fire set at 18". This distance
is not based on a ground scale as such. If one assumes a typical
standard sized unit to be equivalent to a Roman cohort, it is
theoretically possible to retro-calculate an approximate ground scale
based on the number of men occupying rhe unit’s frontage.
However, as far as we are concerned a single model could equally
easily represent almost any number of actual combatants from
perhaps as many as a hundred to just one. This presumed ratio is not
necessarily constant, and may vary from one game to another. With
that in mind, the ranges for long-ranged missile shooting are set
relative to rhe movement distances and the size of tabletop we would
expect a game to be played over. In fact, we did start out with shorter
ranges, but found the results unsatisfying. Although more realistic on
a representational level, this approach proved less convincing in
terms of results, so missile ranges were promptly increased to a degree
that gives credible results and looks and feels right.
Rather than dealing with shooting as such, the rules cover ‘ranged’
fighting; which is judged to include conventional bow fire; similar
shooting with long ranged weaponry such as crossbows, slings, staff
slings and artillery; and a closer exchange that can include
skirmishing with hand-to-hand weapons as well as thrown weapons
such as spears, javelins, throwing axes, darts, stones and so forth.
These two distinct styles of ranged fighting are allocated separate
values. Almost all troops have been given some short ranged attack
ability (up to 6") representing both thrown weapons and troops
skirmishing ahead or out of the main body where historical
precedent suggests it. This allows for the representation of troops
whose fighting methods are essentially ‘non-contact’, especially light
cavalry, horse archers and skirmishers.
Players familiar with Black Powder will know that disorder results
from a volley of musket fire on any roll of a 6 to hit. This is fine
for musketry and cannon fire, which one naturally expects to be
decisive and dramatic. However, it didn’t feel at all right when it
came to the exchange of the hand-hurled missiles, arrows and
sling stones typical of pre-gunpowder warfare. This gave us reason
to reconsider how to utilise disorder in the game. Hence, disorder
in Hail Caesar has been incorporated into rhe break test results
for both ranged attacks and hand-to-hand combat. Missiles can
still disorder troops, but this is far less likely than in Black
Powder. On the other hand, with prolonged combats more
common in Hail Caesar, disorder often results from a hand-to-
hand combat break test.
The rules for hand-to-hand fighting did need to be refined to allow
for longer fights and for the participation of adjoining units in a way
that reflected their fighting qualities. To make this more workable
additional guidance on unit frontages is given compared to Black
Powder. However, we were keen to keep the same sense of flexibiliry
that so strongly characterises the original game. The changes ensure
that combats are resolved one on one where appropriate, together
with supporting units if present. In Hail Caesar the supporting units
contribute to the fighting with their own attacks, unlike in Black
Powder where they simply add a modifier to rhe result. Furthermore,
troops are given a separate supporting value based on their close
ranged fighting ability, enabling us to create troops that are more or
less effective as supports.
At last we satisfied ourselves that our framework was solid. Many
enjoyable games were played. New ideas and robust observation
flowed forth. At this stage we had to decide whether to restrict our
game to a limited time period, or produce a more broad based set of
ancient rules that would allow us to fight all kinds of engagements
from the Bronze Age to the medieval period. We felt it would be
unrealistic to try and cover every aspect of every army of the ancient
and medieval world in derail. To attempt such a thing would be very
much against the spirit of the original Black Powder game, where
players are encouraged to freely adapt rules to suit individual wars,
campaigns and encounters. Our own games had concentrated
heavily on Roman armies of the first century AD, and in particular
the conquest of Britain. This stemmed from our personal interests
and collections as much as anything. Although many other games
were fought using armies as diverse as New Kingdom Egyptians and
medieval Crusaders, we felt it would be foolish to try’ and reduce rhe
whole of three thousand of years of history into a rigid formula.
Rather, Hail Caesar gives a good selection of rules that we have
used, and leaves players to adapt the game as they wish to reflect the
capabilities and distinctions between specific opposing forces.
Having said that, the selection of rules given is reasonabk
comprehensive in the generalised way intended.
In keeping with Black Powder we abandoned any attempt at
assembling our opposing armies by means of army lists or points
values, preferring to match our forces to rhe scenario and players.
This does not preclude the use of army lists and points values of
the kinds commonly used by some game rules should players wish
to do so. Some suggestions about how to adapt the copious army
lists produced for other games are included in a separate appendix
together with a couple of army lists by way of example.
173
Although Hail Caesar has been developed to enable us to play games
using our own collections of 28mm sized models, it is perfectly
possible to play using armies of any size or scale. In essence the size of
rhe models is merely an aesthetic choice. Indeed, it would be possible
to play with card counters or wooden blocks were one so minded.
The key factor is rhe unit frontages. Unit depths are much less
important, being essentially the depths required to mount the
models in a satisfying manner. Thus, if you have armies of 20mm
sized models, 15mm, 10mm or 6mm, so long as they are arranged
into units with the frontages indicated in the rules you can play
without further modifications.
Players may feel that units of the frontages indicated are rather large
for smaller sized models. This is more apparent at 15mm and
smaller sizes where many more models are required to ‘fill’ the base
area. In this case we’d suggest reducing dimensions as shown below'.
It is possible to have more regularity in unit frontages with smaller
models, and the frontages given have been rounded off to take
advantage of this. There is no reason w'hy players shouldn’t adopt
their own system should they prefer, for example standardizing to a
100mm frontage if so desired. So long as the proportions of
standard to large and small sized units are retained all will be well.
If using smaller models on a small tabletop, players may wish to
reduce the move distances and shooting ranges too. Our own
experiments with 10mm sized armies have been played successfully
using the standard distances upon a four-foot w ide table. We did
not find it necessary to reduce distances; however, it would be a
simple matter to reduce all measurements in proportion. This is left
to players to arrange to suit their own armies and tabletops.
28mm models as shown throughout this book are preferred by the
authors and contributors because they are a pleasing size both to
paint and display. The number of manufacturers who offer models
in this size has growm apace over recent years, and rhe range available
covers almost every conceivable part of the ancient era. Whilst the
majority of companies can supply metal miniatures, some are also
able to offer plastic kits, and these are becoming increasingly popular
writh gamers in rhe ancient period. The actual size of a 28mm model
does vary somewhat from one manufacturer to another, so it is
always best if you can see the models before buying. However, a little
variation in height and bulk is to be expected amongst real warriors,
and so it is amongst their miniature counterparts.
Some players prefer smaller sized models for various reasons. For
some it is lack of space, for others it is cost, and for many it is simply
that they enjoy the spectacle of massed hordes. Of course, if your
models are to be smaller then so must the corresponding terrain be
smaller, and this does enable the modeller to represent a more
varied and interesting portion of topography as well as larger
settlements and more substantial buildings. A Sumerian ziggurat in
28mm would fill a tabletop, but in 6mm it can be represented
convincingly and still leave room for the battle to rage below\
Of the commonly available smaller sizes 15mm is the most popular
and well supported by manufacturers, 10mm is growing in
popularity, and 6mm is an established size with a strong follow ing.
Just as many 28mm models are not exactly 28mm tall, so these
smaller sizes are also ‘nominal’ and often a little larger in practice.
It is also possible to buy 25mm models. This size was once almost
universal, but has been largely superseded by the larger 28mm
models. Whatever your preference, you will find plenty of choice,
and a group of like-minded enthusiasts prepared to champion the
virtues of their chosen size and style.
20mm is not a common size for metal miniatures, but is very readily
available as 1/7 2 nd scale plastic models. In practice, as with all these
nominal sizes, the actual height of the models varies, and most
1 /72nd models come in about 23-24mm tall. Although these sets are
moulded in a soft plastic that is a bit ‘bendy’ they represent fantastic
value for money. The number of sets available has skyrocketed over
rhe last few years and the standard of design and moulding has
advanced a thousand-fold since the old Airfix sets of the 1960’s.
UNIT SIZES FOR 15MM AND SMALLER SIZES
Type of Troops Formation Standard Large Small
Infantry 2 deep battle-line 120-160mm 24O-3OOmm 60-90mm
Warbands 4 deep w'arband 120-160mm 240-300mm 60-90mm
Phalanx 4 deep phalanx 120-160mm 24O-3OOmm 60-90mm
Cavalry 2 deep battle-line 120-160mm 240-300mm 60-90mm
Light Chariots Single line 120-160mm 240-300mm 60-90mm
Light Artillery Single line 60-90mm 120-160mm 30-40mm
174
Wargames enthusiasts have fought battles with model armies of rhe
ancient era for many decades now. The majority of games are
fought between friends in their own homes and at local wargame
clubs where suitable tabletops can be accommodated more easily.
Over the years there have grown up national and even international
competitions, during which players meet to fight battles with others
of like mind: comrades in spirit if otherwise strangers. The need to
ensure players from different towns, and even different parrs of rhe
world, can participate on an equal footing has led to the
widespread use of army lists to select opposing forces. An army list
assigns points values to rhe various units available to each
particular army, and will generally provide strict guidelines as to
how many such units of each type can be included. This enables
players to build their armies to a standardized ‘points value’ with
proportions of troop types that reflect generalised historical
practice and ensure that all armies are comparably effective for
purposes of tournaments.
No ancient general ever mustered an army on this basis. A fair
and even fight against a randomly determined enemy was
probably the last thing on Caesar’s mind when he advanced upon
rhe Gauls. Nor can one quite imagine Alexander the Great
marching his armies to rhe banks of the Granicus, peering over
the waters upon the massed ranks of his
opponent, and muttering, ‘So it’s Persians
today then - and 1 see they have
maxed out on cavalry.’ The Hail
Caesar game as played by its
creators does not utilise army lists.
It relies upon the fact that the
authors know enough of their
armies, and their history, to
field forces that are
convincing in the context
of a game. However,
that is not to say the
authors are
unfamiliar w’irh army
lists or their
usefulness. Even for
experienced gamers, a thoughtfully constructed army list provides
a useful overview of an army’s make-up and effectiveness.
Players who are interested in army lists tor Hail Caesar will be
reassured to know’ that a series of publications is in progress. Army
lists w ill soon be available for all rhe most popular armies and many
of the osbscure ones too! Players who have armies already can, of
course, field them as selected using whichever army lists they’
currently use. For example, if players already have armies created for
Warhammer Ancient Battles (WAB) or built to conform to WAB
army lists, these will be perfectly playable in Hail Caesar so long as
allowances are made for organising rhe army into divisions and
fielding the appropriate number of commanders.
By way of example we have constructed two army lists representing
rhe Roman army of rhe first and second centuries AD and Britons
of the period of the Roman invasion. These are quire general lists
and we would certainly not feel constrained by them when
constructing a scenario. A force might be completely atypical tor any
number of reasons. The lists given merely demonstrate a principle,
and arc intended to reflect rhe broad character of a field armv of the
nations and rime concerned.
ROMAN ARMY 1^2ND CENTURIES AD
Infantry 50%+
Cavalry up to 25%
Legions 5C%+ of infantry
Artillery
Divisions 4 units*
Ar least half the units in rhe army must be made up of infantry.
No more than a quarter of the units in the army can be cavalry.
At least half the infantry units in the army must comprise Legionary units of one type or another.
There must be ar least three Legionary units for every artillery unit fielded, and no more heavy or
medium artillery than light artillery units in total.
Divisions must contain at least four units and be led by
a commander.
HAIL CAESAR
Give me a safe commander - not a rash one!"
Augustus Caesar according to Suetonius
EARLY IMPERIAL ROMAN - TROOP VALUES
All commanders including the general have Leadership ratings of 8. The general has the standard re-roll rule in addition.
Unit Combat Morale Stamina Special Points
Clash Sust Short Long Save Value
Heavy Infantry Legionaries armed 7 7 3 0 4+ 6 Drilled,
with pila and swords. Tesnido. 32 points per unit.
Extra to upgrade Legionaries to veteran 7 7 3 0 4+ 6 Drilled, +3 per unit
no more than half in total Elite 4+, Testudo.
Reduction to downgrade Legionaries to raw recruits - no more than half in total. 6 6 3 0 4+ 6 -5 per unit
Medium Infantry Auxiliaries with spears. 6 6 3 0 5+ 6 23 points per unit
Light Infantry (LI) Auxiliaries with spears/javelins. 5 5 3 0 6* 6 20 points per unit
Medium Infantry Auxiliary Archers 5 5 3 3 5+ 6 24 points per unit
Light Infantry Auxiliary Archers. 4 4 3 3 6+ 6 21 points per unit
Reduction to field LI Archers as small unit. 3 3 2 2 6+ 4 -6 per unit
Infantry Skirmishers armed with javelins and fielded as small unit. 3 2 2 0 0 4 11 points per unit
Infantry Skirmishers armed with slings or bows and fielded as small unit. 2 2 2 2 0 4 12 points per unit
Medium Cavalry (MC) Auxiliaries spears/javelins. 8 5 3 0 5+ 6 27 points per unit
Extra to give MC kontos instead of spears/ javelins - 1 unit only 8 5 3 0 5+ 6 Kontos +3 per unit
Light Cavalry (LC) Auxiliaries armed with javelins and fielded as a small unit. 5 3 2 0 6+ 4 17 points per unit
Extra to upgrade LC Auxiliaries to Numidians 5 3 2 0 6+ 4 Feigned +2 per unit
- 1 unit only. Flight
Light Cavalry Auxiliaries armed with bow’s 5 3 2 2 6+ 4 Feigned 21 points per unit
and fielded as a small unit. Flight
Light Artillery Scorpion bolt thrower. 1 1 2 2 0 3 Drilled 18 points per unit
Medium Artillery Onager 1 1 0 3 0 3 20 points per unit
Heavy Artillery Ballista 1 1 0 3 0 3 23 points per unit
Commanders 1 Commander must be provided per division. All commanders Free
including general hav e Leadership 8.
Extra to upgrade general to Leadership 9. The general can have Leadership 9 at the following extra cost. +25 points
Notes: One unit of light cavalry can be fielded as camel mounted troops if desired - such troops were known only in the east. As eastern legionaries
were notoriously soft ar least 1 unit of Legionaries must be fielded as raw recruits if camels are included.
A BRIEF GUIDE TO ARMY LISTS
ANCIENT BRITON ARMY 1st CENTURY BC - 1st CENTURY AD
Infantry 50%+ At least half the units in the army must be made up of infantry.
Cavalry and/or Chariots up to 50% Up to half of the units in the army can be cavalry and/or chariots.
Warbands 50%+ of infantry Ar least half rhe infantry units in the army must comprise medium infantry Warbands.
Divisions 4* units. Divisions must contain at least 4 units and be led by a commander.
‘He learned that Alexander, having completed nearly all his conquests by
the time he was thirty-two years old, was at an utter loss to know what
he should do during the rest of his life, whereat Augustus expressed his
surprise that Alexander did not regard it as a greater task to set in order
the empire which he had won than to win it.’
Augustus Caesar according to Plutarch
ANCIENT BRITON ARMY - TROOP VALUES
All commanders including the general have Leadership ratings of 8. The general has the standard re-roll rule in addition.
Unit Combat Morale Save Stamina Special Points Value
Clash Sust Short Long
Medium Infantry (Ml) Warband armed with swords and javelins 9 6 2 0 5+ 6 Wild Fighters (3 re-rolls) 28 points per unit
Extra to field Ml Warband as large unit. 11 8 3 0 5* 8 Wild Fighters (3 re-rolls) ♦7 per unit
Extra to field one standard-sized MI Warband as Fanatic 9 6 2 0 5* 6 Wild Fighters (3 re-rolls), Fanatic ♦ 1 per unit
Skirmishers with javelins fielded as a small unit 3 2 2 0 0 4 11 points per unit
Skirmishers with slings fielded as a small unit 2 2 2 2 0 4 12 points per unit
Skirmishers with bows fielded as a small unit - 1 unit only. 2 2 2 2 0 4 12 points per unit
Medium Cavalry armed with spears/ javelins - I unit only. 8 5 3 0 5+ 6 27 points per unit
Light Cavalry armed with javelins 7 5 3 0 6* 6 25 points per unit
Light Cavalry armed with javelins and fielded as a small unit 5 3 2 0 6+ 4 17 points per unit
British Light Chariots 6 5 4 0 4+ 6 27 points per unit
Commanders 1 Commander must be provided per division. All commanders Free
including general have Leadership 8
177
APPENDIX 4:
.л „ ._...L> О U
Sequence of play
1. Play alternates between the opposing
sides, first one player (blue) and then rhe
other (red) and so forth: blue, red, blue,
red, etc until rhe battle is over.
2. The scenario will likely dictate which side
goes first. Otherwise, rhe players can agree
which side is to take the first turn, or roll
a dice to decide randomly.
BLUE TURN
1. Blue Command: movement is executed by
initiative and/or orders.
2. Blue Ranged Attacks: ranged attacks are
worked out against enemy within range.
3. Hand-to-Hand combats are resolved:
both sides take part in any engagements.
RED TURN
1. Red Command: movement is executed by
initiative and/or orders.
2. Red Ranged Attacks: ranged attacks are
worked our against enemy within range.
3. Hand-to-Hand combats are resolved:
both sides take part in any engagements.
MEASURING
1. Players are free to measure at all times.
2. Distances are usually measured base-edge to
base-edge except tor issuing orders.
3. When issuing orders the distance from
commanders is measured from the head of
the commander model to the nearest base
edge of the unit receiving the order.
Command - Giving Orders
AND MOVING BY INITIATIVE
1. All initiative moves must be made before
orders are given. Individual initiative
moves can be resolved in any convenient
sequence, but each unit must complete its
move before another is allowed to do so.
2. Orders are issued by one commander at a
time. Each commander must finish giving
orders before another begins. Moves are
enacted in their entirety' as soon as orders
are issued. Where orders are given to
multiple units, units can move in any
sequence, but each unit must complete its
move before another is allowed to do so.
3. Commanders can only issue orders to
units in their own division, and similarly
units can only receive orders from the
commander of their division.
4. Units making moves on initiative cannot
also be given orders. Units can move
either by initiative or by orders - not both.
5. Units engaged in combat, whether fighting
or supporting, cannot be given orders and
cannot move using initiative.
6. Units that are disordered cannot be given
orders and cannot move using initiative.
However, note they are still entitled to a
free ‘retire’ move if they belong to a
broken division.
7. Units from broken divisions are allowed a
free ‘retire’ move if they fail their order or
where no order is issued. They are allowed
this move even where disordered and
therefore unable to receive an order or use
initiative. Such units can be moved at any
convenient time after all initiative moves arc
complete, and must be moved if they have
not already done so by the time their
commander has finished issuing orders.
FRAMING OF ORDERS
1. Orders must be framed in good rime
without conditions or vagaries.
2. A unit can only be issued one order in
any turn
3. If a unit is to charge then the order must
specify ‘charge’ and must indicate the
target or targets.
4. If a unit is to change formation then the
order must specify rhe formation change.
5. Units will always try to obey their orders
in so far as they can and in the most
direct and straightforward way possible.
Test against Leadership
1. To determine if an order is successful, roll
two dice and add the scores together to
ger a result of between 2 and 12.
2. If rhe result is equal ro rhe commander’s
Leadership rating, or 1 less, then the
unit is permitted one move as per its
instructions.
3. If the result is 2 less than the
commander’s Leadership rating, then the
unit is permitted two moves as per its
instructions.
4. If the result is 3 less than the
commander’s Leadership rating, then
the unit is permitted three moves as per
its instructions.
5. If the result is greater than the
commander’s Leadership raring then the
order is failed. The unit does not move
unless it has a free move. The commander
cannot issue further orders unless he is
also the army’s general in which case he is
entitled to a single re-roll each turn.
6. The army’s general is allowed to re-roll a
rest to issue an order once in the
Command part of each of his side's
turns. Should he do so then the second
result stands, even if it is worse than the
first or a blunder.
7. If a result of 12 is rolled when testing to
issue an order, then the order is failed
and the result is a blunder. If rhe general
blunders rhe dice can be re-rolled if he
has not re-rolled already that turn.
DIVISION ORDERS
1. Units from the same division can be given
a single order so long as they form an
interlinked group with no units separated
by more than 6".
2. When giving a division order, all units
must be given essentially the same order.
This does not prevent individual units
being instructed to change formation if
that is consistent with the broad intent of
the order; for example to allow light
troops to form a skirmish screen, or for
units to pass through terrain they could
not otherwise enter.
3. Where a division is ordered to charge an
enemy, then units unable to charge will
attempt to support fighting units where
possible. This is judged to be following
their orders as best they can.
4. Units moving as a division must still form
an interlinked group with no units
separated by more than 6" after they have
moved. I.e. the division has to stay
together and cannot move off in two
separate directions. Note that this
restriction overrides any order given.
REDUCTION IN
Leadership for Distance
1. If the distance from the commander to
the unit he wishes to give an order is 12”
or greater, then his Leadership rating is
reduced by 1 for every full 12" distance
between them. Exceptions to this rule are
noted below.
2. No modifiers for distance are applied to
the following units unless they form part
of a division as noted below:
• Skirmishers in open order
• Light cavalry in open order
• Horse archers in open order
3. When issuing orders to a division, the
distance penalty is applied in respect of
the unit that is the greatest distance from
rhe commander and to which a penalty is
normally applied (i.e. not an exception as
noted above). However, any penalty
applies to all the units in the division
including those that are normally exempt.
This means all units test against the same
value when acting as a body.
Free Moves
1. A unit in column formation moves once if
it has failed its order.
2. A tiny unit will move once if it has failed
its order.
3. A baggage, carriage, wagon or comparable
unit will move once if it has failed its
order and is also on a road or track.
4. Some units have a special rule entitling
them to a free move if they fail their order
- specifically drilled and eager units.
5. Units from broken divisions can move
once if they fail an order or if no order is
attempted, even where disordered. They
must use this free ‘retire’ move to attempt
to leave the battlefield.
178
BLUNDERS
1. Any roll of a 12 (double 6) made when issuing an order is a blunder. If the commander
is also the army’s general then this can be re-rolled so long as the general has nor
already used his re-roll that turn. However, a re-rolled result always stands even if it is
worse than the original and even if it is a blunder.
2. To resolve a blunder roll a dice and consult the blunder chart.
D6 BLUNDER
1 Uncontrolled flight! The unit turns round to face its rear and then makes two full
moves into its facing quarter. The unit will move even further if necessary to clear the
position of friends. Once it has moved, the unit suffers I casualty to represent loss of
life and equipment suffered during the ignominious stampede.
2 Back! The unit moves backwards one move to its rear quarter whilst continuing to face
rhe same direction.
3 Drift left. The unit makes one move to its left quarter.
4 Drift right. The unit makes one move to its right quarter
5 Forward! The unit makes one mo\t to its front and will charge if facing enemy within
one move’s distance and which the unit is otherwise allowed to charge.
6 Uncontrolled Advance! The unit makes three moves to its front. The unit will
charge if facing enemy within three moves’ distance and which the unit is otherw ise
allowed to charge
6. Units making an evade move are also
entitled to move once, even if their order
is failed. This is not strictly speaking a
‘free move’ as it happens outside the move
part of the turn, but is included for the
sake of completeness. See Evades.
Orders то Off-Table units
1. Units yer ro enter the game can be given
orders.
a. If the commander is also off the table then
no distance penalty applies. If the whole
division is off the table it can be given a
division order without applying distance
penalties.
b. If the commander is on the table then
measure the distance to the table edge
where the unit or division will enter.
2. Units that have left the table can re-
enter by being given orders so long as
they are not shaken or units from
broken divisions.
a. If the commander is on the table then
measure the distance to the point on the
table edge where the unit left the battle.
b. If the commander has also left the battle
no distance penalties apply to any units
that are off-table.
3. Units entering or returning to the table
always move 6" onto the table as their first
move.
4. A division moving onto the battlefield
might not be able to fit all of its units
onto the table at once. Any units
following from behind are still assumed
to have been moved long with the rest of
their division, and will automatically
move onto rhe table once there is room
for them to do so.
MOVEMENT RATES OF UNITS
MOVING UNITS TABLE
Infantry, Elephants, Wagons 6”
and Baggage, Man-portable
Artillery, Cataphract Cavalry,
and Heavy Chariots.
Light Chariots, and Cavalry 9”
other than Cataphracts,
Light Cavalry in open order,
or Horse Archers in open order.
Light Cavalry in open order and 12"
Horse Archers in open order.
MOVEMENT AND
Proximity то Enemy
1. Except where governed by the proximity
of enemy, units are free to move in any
direction or orientation so long as no
model moves more than the distance
allowed.
2. Formed units that have enemy within 12"
and to their front, even if only partially, are
governed by the proximity rule as noted
below. The following enemy units are
exceptions and are ignored.
• Commanders
• Artillery units
• Tiny units
• Non-combatant units including wagons
and baggage
• Any units w ithin buildings or
fortifications
• Any units in open order can be ignored
by choice.
3. Formed units facing an enemy within 12"
can only move towards or away from that
enemy whilst continuing to face.
a. A formed unit ‘faces’ an enemy if the
enemy lies directly in front of its centre
frontage.
4. Formed units that have an enemy within
12" to their front quarter but are nor
actually facing an enemy within 12", must
face towards an enemy as they move. The
enemy unit faced must lie within no
more than three moves distance.
5. Units in open order that have enemy
within 6" of any part of them are affected
by proximity as noted below’.
6. Whilst there are any enemy within 6" a
unit in open order can only move either
tow ards or away from the closest enemy.
MOVING THROUGH
Other Units
1. Units are nor allowed to move through
opposing units. Units can move over
opposing commanders freely.
2. Units cannot normally move through
friends engaged in combat, but are
allowed to do so if moving to join the
engagement either as supports or by
charging.
3. Units can move through friends only
w'here it’s possible for the moving unit
to completely clear their position.
4. Units can move through friends without
penalty if:
• Either, both or all units are skirmishers
or other infantry in open order.
• If both or all units are light cavalry’ in
open order and/or light chariots in
open order and/or horse archers in
open order.
• Where only a minor portion of either
or all units is moved through. This is
determined as any part of the unit that
does not include the centre-front/leader
position.
5. Where units cannot move through friends
without penalty’, they can still move through
so long as they can clear their friends’
position; however, each unit involved takes
a test for disorder. Roll a dice for each unit.
On the score of a 1, 2 or 3 the unit
becomes disordered.
MAN-HANDLING ARTILLERY
1. Mobile light artillery moves at infantry
rate. Any unit that moves more than once
cannot also shoot in that turn.
179
HAIL CAESAR_____________________________________________
2. Mobile forms of medium or heavy
artillery can only move a maximum of
once per turn, and cannot move and
shoot in rhe same turn.
Formation Changes
1. All changes to formation must be
indicated when giving orders or stated
aloud when using initiative.
2. Changes to formation take up one entire
move except as noted below. Those units
noted below can change to or from open
order and then make one non-charging
move, the whole counting as a single
move.
• Skirmishers
• Light infantry
• Light cavalry
• Horse archers
• Light chariots
3. A unit can only make one formation
change in the Command part of any
turn.
4. Skirmishers, horse archers and tiny units
are restricted to open order or column.
Light infantry, light cavalry and light
chariots can adopt open order if they wish.
Other infantry and cavalry can only adopt
open order where they could not otherwise
move without penalty. Other units cannot
adopt open order.
Squares
1. A square cannot move and the only order
it may be given is to change formation. It
may not change formation and then move
further in the same turn.
MOVEMENT OF COMMANDERS
1. Commanders move 24” per turn
regardless of how they are mounted, and
suffer no movement penalties in respect of
their mounts, it being assumed they are
capable of dismounting where
appropriate.
2. Commanders can join a unit that is
fighting hand-to-hand combat within 12”
in any turn, including opposing turns, up
until rhe point that hand-to-hand attacks
are struck.
3. Commanders arc ignored tor purposes of
determining initiative, proximity of enemy,
calculating targets for shooting, and in most
other circumstances as described in the
body of the rules.
4. Commanders can move freely through
units from their own side, and can be
moved through freely by troops from their
own side. If a friendly unit moves on top of
a commander the commander model is
moved sufficiently far to allow the unit to
take up its position.
5. Commanders cannot move through
enemy units, although they can move
through other commanders from cither
side freely.
6. A commander who is moved into by an
enemy unit must join a friendly unit
within one move’s distance, otherwise he
becomes a casualty and is removed as dead
or captured.
TERRAIN
1. Terrain rules are regarded as part of rhe
scenario and can be freely adapted to suit.
The following rules reflect our usual
practice, but are often varied as the
occasion demands.
2. Woods. Infantry in open order, cavalry in
open order and commanders can move
through woods. Tire movement of open
order cavalry is reduced to infantry speed.
Other troops cannot move through woods
except by means of roads or tracks.
3. Rough Ground. Infantry in open order,
cavalry in open order and commanders
can move through rough ground without
hindrance. Other troops are restricted to a
maximum of one move. A unit moving
into rough ground completes that move
and moves no further. A unit already in
rough ground ar the start of movement
makes one move only.
4. Linear obstacles. Hedges, walls and ditches
are often considered decorative elements or
used to mark boundaries of other feauires
such as woods. rough ground, or buildings.
However, they can also be treated as
obstacles in their own right. Where so
treated, infantry in open order, cavalry in
open order and commanders can move
over linear obstacles without hindrance.
Other units must surrender one entire
move to cross a linear obstacle. Where
substantial obstacles are treated as
impassable to wheeled vehicles - this is up
to the players/umpire to determine.
5. Rivers. Small rivers can be treated as
linear obstacles. Larger rivers can only be
crossed at a ford or bridge.
6. Buildings. Buildings are arranged into
blocks sufficient to allow entry to a
standard sized unit plus a tiny unit, or as
the players prefer. Only infantry can enter
or assault a building, although light
artillery can be deployed in or on
buildings at the start of the game if
desired. An artillery piece deployed in this
manner is regarded as immobile. To enter
an unoccupied building a unit must move
into touch with the perimeter and then
expend one move to move inside. The
unit is then arranged within the building
or built-up area as required. To leave a
building measure from a point on the
perimeter.
SHOOTING AND
Skirmishing ata Distance
1. Units with a ranged attack value can make
attacks during the ranged attacks part of
the turn. This represents both skirmishing
and shooting. Two separate values are
indicated: short range and long range.
WEAPON RANGE
Javelins, darts and other
thrown weapons 6"
Slings 12"
Bows, crossbows and staff slings 18"
Light artillery 24"
Medium artillery 36’
Heavy artillery 48"
2. Short ranged attacks are made at ranges of
up to 6". Long ranged attacks are made at
ranges of greater than 6" up to rhe
distance shown for the weapon carried.
3. Formed units automatically make their
attacks against the closest target they can
see within their own front quarter
measuring from the unit’s centre-front
position. Where several enemy units
present themselves as potential ‘closest’
visible targets, attacks can be divided as
the players see fit. Artillery is an exception
to this rule as noted below.
4. Units in open order must direct their
attacks against the closest visible enemy.
Where portions of the open order unit lie
closest to different enemies then attacks
arc divided between them as rhe players
see fit.
5. Artillery units must shoot at the closest
enemy target if such a target presents itself
within half rhe weapon’s maximum range.
However, if no enemy target presents itself
within half maximum range, the artillery
unit can shoot at any enemy target within
its frontal arc. Light artillery can make up to
one move and shoot in the same turn.
Medium and heavy artillery cannot move
and shoot in the same nirn.
6. Artillery units are also allowed to shoot
overhead at targets they’ can see, so long as
there is 6" of clear ground in front of both
shooter and target. Other units are not
permitted to shoot overhead.
7. Units already engaged in hand-to-hand
combat, whether as fighting units or
supports, cannot make ranged attacks.
8. Units with long ranged attacks are also
allowed to shoot during other parts of the
turn, or during the opposing side's turn,
by means of closing shots or traversing
shots as noted separately.
9. The following targets can be ignored in
favour of a more distant target if the
player wishes:
• Targets in open order formation.
• Artillery targets.
• Wagons, carts, baggage and such like
targets.
• Targets that are only partially to rhe
front quarter of the attacker.
• Targets that are only partially within
sight of the attacker.
180
_ RULES SUMMARY
• Targets occupying buildings or within
cover.
• Targets visible through narrow gaps
(narrower than rhe unit’s own
formation and minimum 3" in the case
of artillery).
WORKING OUT
Ranged Attacks
1. Roll the number of dice equivalent to the
unit’s ranged attack value. Any dice
scoring 4, 5 or 6 once any modifiers have
been taken into account are ‘hits’. Dice
failing to score hits are ‘misses’.
2. Regardless of any modifiers that apply,
dice rolls of 1 are always misses and dice
rolls of 6 are always hits.
3. If the dice roll required to score a hit after
modifiers have been taken into account is
5 or less, then a missile break test is
initiated if any dice rolls a 6.
4. If the dice roll required to score a hit after
modifiers have been taken into account is
6, then a missile break rest is initiated if
two or more dice roll 6s.
5. The following modifiers apply to the dice
scores rolled.
Closing Shots
1. If a formed unit of a kind indicated below
is charged to its front, it is allowed to shoot
at the charger with any weapons that have a
long range attack value. A unit in open
order can shoot in this way at chargers
coming from any direction, so long as it has
a long range arrack value.
• Infantry
• Cavalry
• Elephant
• Chariot
• Light artillery
FORMATION MODIFIERS
FOR RANGED ATTACKS
Ranged Attack Value Formation Modifiers
None Column or Testudo. Units in column or testudo cannot make ranged attacks.
1 Dice Square. Attacks in square are limited to one dice only.
2/facc Buildings. Units occupying buildings are limited to a maximum of two dice from any face up to their ranged attacks value in total - see the rules for buildings.
‘TO HIT MODIFIERS FOR RANGED ATTACKS
Dice Score Situation
- 1 Attackers are shaken and/or disordered. This applies if the attacking unit
is either shaken, disordered, or both.
- 1 The target is partly obscured, in open order, artillery or baggage. This
applies if rhe target is partly obscured, or in open order, or artillery or
wagons and other baggage.
- 1 The target is formed heavy infantry being attacked bv enemy to their
front quarter, or formed cataphract cavalry regardless of the direction
of attack. Note that some unusual formations count as front all round
in which case rhe penalty' applies all round too, for example rhe testudo
as described on page 105.
- 1 Closing Shots. This applies ro units shooting at enemies as they charge
home.
- 1 Traversing Shots. This applies to units shooting ar enemies as they traverse
their front.
- 1 Long Range Shots. This applies at all shots at ranges of over 12".
2. A unit making closing shots cannot react
to the enemy charge by either
countercharging or evading, except in rhe
case of units that have rhe special Parthian
Shot rule, which are allowed to both shoot
and evade.
3. Work out attacks once the chargers have
moved, using the shooter’s long ranged
attack value. Apply any casualties and rake
any break tests required as a result of
shooting.
TRAVERSING SHOTS
1. A unit is allowed ro shoot ar an enemy
target that crosses its front within 12".
This can occur either during the
opposing players turn or, more rarely,
during a sweeping advance following
hand-to-hand combat in any turn.
2. Only units armed with long ranged
weapons can make traversing shots.
morale Saves
1. Units hit by ranged or hand-to-hand
combat attacks must test their morale to
determine if hits are converted to
casualties.
2. Roll a dice for each hit suffered. If the
score of any dice is equal to or more than
the unit’s Morale Save value that hit is
negated or ‘saved’ and has no effect. If the
dice score less than the unit’s Morale Save
value rhe hit is converted to a casualty
upon the unit.
3. Casualties must be recorded on each unit
in some appropriate manner, as the players
prefer.
4. Morale Save values are modified in some
situations as indicated on the table below.
These will increase the save value in some
circumstances (positive modifiers) or
decrease them in others (negative
modifiers). In either case, a dice roll of 6
always succeeds assuming the unit had a
value of ar least 6 to start with, and a roll
of 1 always fails and results in a casualty’.
Shaken Units
1. Once a unit has suffered casualties equal
to its Stamina value it is shaken. This
value is usually 6 for standard sized units
and 4 for small units.
2. A unit can suffer more casualties than its
Stamina value, up to a maximum of
double, bur these ‘excess’ casualties are
only recorded for purposes of taking break
rests. Once any required break tests have
been taken, excess casualties are either
removed or redistributed to supporting
friends in the case of units engaged in
hand-to-hand combat.
3. Units that accumulate casualties equal to
double their Stamina value are
automatically shattered. These units are
deemed to be broken and are removed as
destroyed without the need for a break
test. This applies both in respect to
casualties from ranged attacks and hand-
to-hand fighting.
Hand-to-Hand Fighting
1. A combat engagement is initiated w hen
one unit charges another, usually in the
Command pan of the turn as a result of
an initiative mwe or order. Charges can
also occur following combat as part of a
sweeping ad\-ance as noted later.
2. A combat engagement consists of
mutually fighting units plus their
respective supports. In most cases an
engagement will therefore consist of one
fighting unit on each side plus a number
of suppons. It is possible to have multiple
181
HAIL CAESAR_________________
combats where one side has units with
significantly shorter frontages (e.g.
elephants).
3. All fighting and supporting units are
engaged in combat and are therefore
unable to move during the Command
part of the turn or make ranged attacks
during rhe Ranged Attacks part of the
turn. Special rules may include
exceptions, specifically Feigned Flight
which allows units to move out of a
combat engagement.
Charge Moves in General
1. A charge move is a move intended to bring a
unit into contact with the enemy. Often a
unit will move several times during the turn
as a result of an order, but only the final
move into contact is a charge move.
2. A unit given a charge order must move
towards the intended target as quickly
and directly as possible. This applies to
all the moves made that turn and not
just rhe charge move itself.
3. Where a unit intends to charge the enemy
by means of an order the player must state
his intention to charge and must indicate
the target or targets of the charge. Where
a charge is executed on initiative it is still
necessary to declare this before moving.
4- A charge intention can result from a
blundered order regardless of the wishes
of the player.
MORALE SAVE MODIFIERS
Dice Score Situation
+1 Square or Wedge. Troops in square or wedge formation derive extra
protection from their overlapping shields, whilst their close mass makes it
practically impossible for individuals to shy from the fighr. Add +1 ro the
morale value of such troops.
+ 1 Cover. The unit is within woodland, behind hedgerows or low walls, or in
other situations where it is felt it should rightly benefit from the physical
protection and reassurance of cover. Add +1 to the morale value of such troops.
+2 Testudo. Troops in testudo formation derive extra protection from their
overlapping shields and the rigidity of their ranks prevents flight. Add +2
to the morale value of such troops.
+2 Buildings. If a unit is occupying a substantial building it benefits further from
their cover. Add *2 to the morale value of such troops.
+3 Fortification. If a unit is sheltering behind even more considerable
fortifications it will be protected from missile fire. Add +3 to the morale
value of such troops.
- 1 Hit by Light Artillery» If a unit is hit by light artillery then deduct -1 from its
morale value to represent both the penetrating power and demoralising effect
of artillery fire.
- 2 Hit by Medium or Heavy Artillery. If a unit is hit by medium or heavy
artillery then deduct -2 from its morale value to represent both the
penetrating power and demoralising effect of artillery fire.
- 2 Column. If a unit is attacked whilst in column formation it is
unprepared for combat and will quickly fall into disarray. To represent
this deduct -2 from the morale value of such troops.
5. The following units are unable to charge
and may be unable to receive orders or
move at all in some cases.
• Units that are already engaged in
combat.
• Disordered units.
• Shaken units (i.e. units that have
suffered casualties equal to their
Stamina value).
• Units in column or square formation.
Note that units in column can be
ordered to change formation and then
charge. Units in square are limited to
one move and so are unable to do so.
• Artillery units.
• Units in open order are not allowed
to charge formed units of infantry or
cavalry. Units capable of doing so can
change formation and charge. Open
order units can charge enemy in
buildings or fortifications.
• Cavalry and chariots are not allowed to
charge home onto the front of a pike
phalanx unless the phalanx is shaken
and/or disordered, except in the case of a
scythed chariot where special rules apply.
Making a Charge
with formed Units
1. A formed unit can only make a charge
move against an enemy it can see, which is
within charge range, and which lies
directly in front of the unit’s centre-front
or leader position.
2. The charge range of a formed unit is
measured from the centre-front position
to the closest part of the enemy. If
within range the unit can charge
regardless of the distance moved by
individual models.
3. If the chargers lie ro rhe front quarter of
the target they will charge to the front, if
to the side they charge to the flank, and if
behind they’ charge to the rear. However,
note that a unit given a charge order will
always move towards the enemy in the
most direct manner, it is not permitted to
move from rhe front of an enemy unit and
charge its flank or rear even where two or
three moves are available.
4. Move the charging unit so that it brings
its own centre-front position and as great
a portion of the frontages of both units
into contact as possible. Where a charge
is mounted to the enemy’s flank or rear
then the charger must contact as great a
portion of the appropriate unit facing.
Tlie charger always moves the least
distance required to accomplish this in
the most direct manner.
5. Two (or more) on one combats are
allowed where rhe centre-front positions
of several units can successfully charge
and contact the same enemy unit one
after the other.
6. Where units are already engaged, a second
(or subsequent) charger is allowed to draw
line-of-sight through friendly engaged
troops onto the target.
7. Where two enemy units are positioned
next to each other, such that charging one
will bring the adjacent unit into touch,
then rhe obligation for rhe charger ro
maximise frontal contact extends to the
adjacent unit. If the result is to bring the
adjacent unit into the engagement as a
fighting unit, then it may react as if
charged
Making a Charge with
Open Order units
1. Units in open order are not allowed to
charge formed infantry or cavalry. They
are unable to charge other units if doing
so would bring formed enemy infantry or
cavalry into the engagement as fighting
units.
2. The charge range of an open order unit
is measured from the closest part of the
charger to the closest part of the target
that it can see. If within range the whole
unit can charge regardless of the distance
moved by individual models.
3. When an open order unit charges its
models are brought forward to form an
approximate line in as satisfying a manner
as possible.
4. As with other units, those in open order
will charge to the front if positioned to the
enemy’s front quarter, to the flank if
positioned to the side, and to the rear if
positioned behind.
182
Charge responses
1. Units that are charged must declare their
responses as soon as it is established a charge
has been made and before moving the
chargers, or as soon as practical where
adjacent units are brought into an
engagement as fighting units.
2. The following charge responses are
permitted where appropriate.
• Stand. The default response. Units in
open order will form an approximate
line as already noted.
• Closing shots. Enemy armed with long
ranged weapons make closing shots upon
the charger. Work this out once the
chargers are in contact.
• Evade. Open order units that are not
disordered can attempt to evade from a
charge as noted below.
• Countercharge. A cavalry or chariot
unit charged to its front can
countercharge assuming it would
otherwise be allowed to charge.
• Turn to face. A cavalry or elephant
unit charged to rhe flank or rear can
pivot to face a charging enemy as noted
below.
3. Evades. Units in open order are allowed to
evade from chargers, and do so by moving
directly away by one, two or three moves
after giving an order in the usual way. This
is worked out before the chargers make
their moves once it is established they
would otherwise charge home successfully.
Evading units always move at least once,
even if their order is failed - i.e. they get a
free move. Evaders are automatically
destroyed if they fail to outpace their
chargers.
4. Countercharge. Where a countercharge is
permitted both chargers and
counterchargers move simultaneously and
meet at a point equidistant between them.
Both units are treated as having charged,
and both receive the appropriate combat
bonuses and any special rules pertinent to
charging. If cavalry or chariots
countercharge against formed infantry
units, then the infantry automatically
become disordered and receive no ‘to hit’
bonus for charging. Where units
countercharge, then any other cavalry or
chariot units already positioned such as
they could support them can be included
in the countercharge and can join the
ensuing engagement as supports.
5. Turn to face. An unengaged, non-
disordered, formed cavalry or elephant
unit that is charged to the flank or rear
can respond by' pivoting to face the
chargers assuming there is room for it to
do so. This move is made at the same time
as the charge and is automatic.
FIGHTING - WORKING OUT
COMBAT ENGAGEMENTS
1. Regardless of which side’s turn it is both
sides take part in hand-to-hand fighting. All
units that are fighting will fight, and all
units that are supporting will contribute to
the engagement as supports. As both side’s
fight, each rum of hand-to-hand fighting is
referred to as a round: a round is fought in
red’s turn, a round is fought in blue's rum,
then red’s turn again, and so on.
2. During each round it is usual to work
out all the current engagements one at a
time, completing each engagement and
taking any break tests required before
moving on to another. The player whose
turn ir is can decide the sequence in
which the engagements are resolved.
HAND-TO-HAND COMBAT
FORMATION MODIFIERS
Combat
Value
1 Dice
2 Dice/Face
2 Dice/Face
Formation
Modifiers
Column. Units in
column have a
combat value of one
dice regardless of
their size.
Square. Units in
square are limited to
a maximum of two
dice for any face up
to their full combat
value in total.
Buildings. Units
occupying buildings
are limited to a
maximum of two dice
from any face up to
rheir combat value
in total.
HAND-TO-HAND COMBAT
Attacks
1. All attacks are assumed to be
simultaneous, bur for rhe sake of simplicity
it is usual for one side to make all of its
attacks and then the other. Units fight as
they are ar the start of the round, so it
makes no difference which side goes first.
2. In hand-to-hand combat, units that are
fighting use their clash combat attack
value in the initial round of any
engagement, and rheir sustained combat
value in any subsequent round of any
engagement. Units that are supporting
use their short ranged attack value. The
term combat value refers to all of these
values, including supporting attacks made
in hand-to-hand combat. In all cases these
values indicate the number of dice rolled.
WORKING OUT HAND-TO-
HAND Combat Attacks
1. Roll the number of dice equivalent to tire
attacking unit’s combat value. Any dice
scoring 4, 5 or 6 once any modifiers have
been taken into account are ‘hits’. Dice
failing to score hits are ‘misses’.
RULES SUMMARY
2. Regardless of any modifiers that apply,
dice rolls of 1 are always misses and dice
rolls of 6 are always hits.
3. If a unit is engaged in more than one
direction then its attacks are distributed as
follow’s. If fighting to the front at least half
of its attacks must be made against the
enemy to its front, dividing such attacks
equally where two or more enemies are
fighting to rhe front. No more than half a
unit's attacks can be allocated to each
flank. If not engaged to the front all of a
unit's attacks can be allocated to its rear: if
fighting to the front then any attacks not
made to the front can be made to the rear
if desired.
4. Supporting units make their attacks
against rhe same rarger as the unit they are
supporting. A unit can potentially
support two fighting units, in which case
ir divides its attacks between them.
5. The following modifiers apply to the
dice scores rolled. Note that Charging
and Winning modifiers apply only to
fighting units as indicated, i.e. they do
not apply to supporting units. This may
mean ir is necessary to roll supporting
attacks separately as they may require a
different score to hit.
morale Saves in
Hand-to-Hand Combat
1. Morale saves for hits inflicted in hand-
to-hand combat are worked out in the
same way as those inflicted by ranged
attacks.
SUPPORTS
1. Units positioned alongside or behind
fighting units support by making their
short ranged number of attacks.
2. Units that cannot be supported in
hand-to-hand combat are listed below.
• Units in open order
• Artillery
• Wagons and baggage
• Units in buildings except from
troops within the same building
• Units in squares
• Units in testudo
• Units in wedge except by enclosed
friends
• Cavalry cannot be supported
by elephants
• Scythed chariots
Close Ranks
1. Shield-armed heavy infantry can close
ranks at the start of any combat round with -
1 ‘to hit’ and ♦ 1 ‘to save’.
183
I
HAIL CAESAR_______________—____________________________—
Combat results
1. Combat results are worked out tor each
engagement as soon as all units taking part
have fought including any supports and any
commanders where they are present.
2. Add up the total number of casualties
inflicted by’ each side that round. Do not
including casualties inflicted by closing or
traversing shots prior to rhe combat.
Include commanders if they are killed or
wounded during the round.
3. The side that has inflicted the most
casualties has won and the other side is
defeated. Where both sides score rhe same
the result is a draw.
4. If a fighting unit has suffered a total
number of casualties equal to double its
stamina value that unit is shattered and is
removed immediately and treated as
broken. No break test is required for such
units.
5. Aside from shattered units, defeated
fighting units must take a break test. The
break rest result is modified by the
difference in casualties inflicted by each
side during rhe round, so make a note of
this before reallocating casualties.
6. All excess casualties inflicted on fighting
units are reallocated to supporting units.
Excess casualties are reallocated as equally
as possible between the fighting unit’s
supports, starting with supports that are
touching the enemy. Any casualties
remaining in excess of a unit’s Stamina
v’alue once casualties are reallocated are
discarded.
7. Break tests are taken by defeated f ighting
units. This can result in fighting units
breaking, in which case they are removed,
and each supporting units must then take a
separate break test. Otherwise, both
fighting and supporting units must act as
indicated by the break test result.
8. Fighting units that are shaken must also
take a break test if the result of the
combat is a draw. This can mean both
sides have to rest and both can potentially
be broken.
9. Units that remain engaged once hand-to-
hand fighting is complete will remain
where they are. Combat will resume in the
next hand-to-hand combat round.
Break Tests
1. A break test is required in the Ranged
Attacks part of the turn as follows:
• If a unit is shaken by ranged attacks.
• If a unit that is already shaken suffers
further casualties form ranged attacks.
• On the roll of a 6 ‘to hit’ by ranged
attacks requiring better than 6.
• On two rolls of a 6 ‘to hit’ by ranged
attacks requiring 6’s.
2. A break test is required following ranged
attacks in other parts of the turn as
follows:
• If a unit is shaken by closing or
traversing shots.
• On the roll of a 6 ‘to hit’ by
closing/traversing shots requiring better
than 6.
• On the roll of two 6’s ‘to hit’ by
closing/traversing shots requiring 6’s.
3. A break test is required in hand-to-hand
combat as follows:
• If a fighting unit is defeated in hand-to-
hand combat.
• If a fighting unit that is already shaken
draws hand-to-hand combat.
• If a unit is supporting a fighting unit
that breaks or is shattered.
4. Break tests are taken by rolling two dice
and adding the scores to get a result
between 2 and 12. The following
modifiers apply.
• For break tests from ranged attacks
deduct any excess casualties scored on
rhe unit.
• For break tests from hand-to-hand
fighting deduct the difference in
casualties scored from the loser’s dice
roll. This applies both to fighting units
and to supports if they have to rest
following a fighting unit breaking.
5. Units retreating as a result of ranged
attacks move one move away from rhe
closest enemy attackers. Note that the
proximity rule will oblige them ro
continue to face their enemy if within
12". Units unable to clear the position of
friends with a single move will move as
far as required to do so, and then
become disordered. Units unable to
make their move because of impenetrable
terrain or engaged units move as far as
they can and become disordered.
6. Units giving ground in hand-to-hand
combat move 6" directly away from their
enemy. Artillery and baggage units obliged
ro give ground are automatically
destroyed. A defeated fighting unit that is
unable to give ground because of terrain,
the presence of opposing units, friends
who do not move out of the way, or
engaged troops is destroyed. A supporting
unit unable to give ground in the same
situation will move as far as it can, but is
not otherwise penalised.
7. Friendly non-engaged and non-disordered
troops in rhe path of units giving ground
can move out of the way by up to one
move in order to make a path for them. If
they do this, the unit giving ground is
automatically disordered and the moving
unit is disordered on the dice roll of a 1, 2
or 3. If friends are unable or unwilling ro
move out of the way the unit giving
ground is destroyed.
8. Uphill advantage. A unit defeated by an
enemy with uphill advantage treats any
result of ‘Hold your ground’ as ‘Rerrear in
good order’.
9. Artillery units that give ground are
automatically destroyed whether fighting
or supporting.
Disorder
l. Disorder can result from:
• A break test from ranged attacks.
• A break test from hand-to-hand combat.
• A test for moving through or out of the
way of other units
• Units forcing friends to move out of the
way when giving ground.
• Formed infantry units countercharged by
cavalry or chariots.
• Retreating units obliged to retreat two or
‘TO HIT MODIFIERS FOR HAND-TO-HAND COMBAT
Dice Score Situation
+ 1 Charging. If a fighting unit has charged or countercharged into combat the bonus applies in the first round of fighting.
♦ 1 Winning. If a fighting unit fought and won the previous round of the same combat engagement then this bonus
applies during the following round of fighting.
+ 1 Uphill. If the unit is uphill of its opponent and has neither charged/countercharged this turn, nor moved following rhe
previous round of rhe same engagement, then this bonus applies in the current round. If a unit moves following combat
results the bonus is lost in rhe next round regardless of whether the unit won or lost the fight.
- 1 Shaken and/or disordered. This applies if rhe attacking unit is either shaken, disordered, or both.
- 1 Open Order. This applies if rhe attacking unit is in open order formation.
- 1 Flank/Rear. This applies to all of a unit’s attacks if it is engaged to either flank or to the rear, including to any attacks
made to its front.
184
______________________ RULES SUMMARY
three moves to clear friends, or unable to
retreat due to impassable terrain, enemy,
combatants, etc.
• As defined by special rules: specifically
units defeated by scythed chariots, and
chariot^/cavalry tailing a test versus long
spears or disordered pikes.
2. Disordered units cannot move in the
Command part of the turn either by
initiative or by orders except as noted below.
• Open order units can use initiative to
move away from enemy/rowards own
table edge.
• Units from broken divisions receive a free
move to ‘retire’ even where no order is
issued.
MOVEMENT OF VICTORIOUS
Units Following Combat
l. If all of the enemy in contact with a
victorious fighting unit give ground or are
destroyed, then the victors can make one
move if they wish. They can do this even if
disordered.
2. A move can take a unit forward to
maintain contact with an enemy who has
given ground. Combat continues in the
following round and rhe victors count rhe +1
bonus for winning the previous round.
3. Otherwise, a fighting unit can move as it
wishes within the constraints of the
proximity rule, which will usually oblige it
to continue to face the enemy.
4. Supporting units do whatever rhe unit
they are supporting does in so far as they
can, and will continue to support where
possible. This can potentially bring a
supporting unit into a fighting position -
this is allowed.
5. If all the enemies fighting a victorious
unit are destroyed, and no other enemies
remain in contact, victors who are neither
shaken nor disordered are allowed to
make a sweeping advance. A sweeping
advance is up to two normal moves into
the unit’s front quarter. This can be a
charge against another enemy in which
case the move is termed a sweeping
charge.
6. Where a sweeping charge enables a unit
to rejoin the same engagement (by
charging a unit that was previously
supporting, for example) the combat
continues in the following round and rhe
victorious unit counts as charging in that
round.
7. Where a sweeping advance initiates a new
engagement against a previously
unengaged enemy, then a new combat is
worked out immediately. The victorious
unit counts as charging. Should this
engagement also result in the destruction
of rhe enemy note that no second
sweeping advance is permitted: only one
sweeping advance is allowed in a round.
8. Where a sweeping charge carries a
victorious unit into another as yet
unfought engagement, the victorious unit
joins the engagement and fights again this
round, counting as charging.
9. Where a sweeping charge carries a
victorious unit into another already
fought engagement, the victorious unit
joins rhe engagement and fights from the
following round counting as charging in
that round.
10. A sweeping charge is a charge, and
targets are allowed the usual charge
response where appropriate. This may
result in closing shots from a charged
unit or traversing shots from units
nearby.
11. The movement of victorious units may
be blocked by incidental contact to the
unit’s front. In this case units must give
ground. Note that artillery units cannot
block and are therefore destroyed.
RULES FOR BREAK TESTS AND
Hand-to-Hand Combat
l. Open order units that have closed their
ranks to fight hand-to-hand combat
automatically disperse into regular open
order if they are no longer engaged once
hand-to-hand combat is слег.
2. Squares. Units in square formation
ignore break test results of Retreat and
Give Ground and treat all such results as
Hold Your Ground.
3. Buildings. Units in buildings ignore
break test results of Retreat and Give
Ground and treat all such results as Hold
Your Ground.
4. Units fighting against troops in buildings
can occupy the buildings if rhe enemy are
destroyed. Supporting troops can make
one move in any fashion.
COMMANDERS
1. The army’s general is allowed to re-roll the
dice when making a rest to issue an order,
and can do so whatever rhe result
including a blunder. The re-rolled score
stands even if it is a worse result that the
initial roll. The general is allowed one re-
roll in each turn.
2. Commanders who fall casualty are
replaced with a ‘reserve’. Reserve
commanders have a Leadership rating of 1
lower down to a minimum value of 5. The
reserve commander is placed within 12" of
any unit in his division.
3. If a commander is within 12" of a unit
from his own division he can issue it a
Follow' Me! order. Whether successful or
not, a Follow Me! instruction always ends
orders from that commander for that turn.
If successfully issued, the commander
moves to join the unit and can then make
three moves as the player wishes within the
usual constraints of the rules.
4. If a commander is w’ithin 12" of a unit
from his division that has suffered two or
more casualties, he can issue it a Rally!
order. Whether successful or not a Rally!
instruction always ends orders from that
commander for that turn. If successfully
issued, the commander moves to join the
unit and the unit removes one casualty.
5. A commander who has nor already joined
a unit can join any unit w ithin his division
w’ithin 12" that is fighting hand-to-hand
combat. He can do this at any point prior
to hand-to-hand combat being worked out.
and can do so even during rhe opposing
side’s turn.
6. A commander who is joined with a unit
that is engaged in combat must remain
with it until it is no longer engaged or
until he is wounded or slain.
7. A commander model moved over by an
enemy unit must immediately join a
friendly unit w’ithin one move’s distance.
If unable to do so he is captured and
removed as a casualty.
8. If a commander has joined a unit that is
subsequently shattered or broken roll a
dice. 1-2 - slain (removed as casualty), 3-4
• wounded (see below), 5-6 • unharmed.
Wounded and unharmed commanders
must make an immediate move to join a
friendly unit and if unable ro do so are
captured.
9. If a commander has joined a unit that is
shaken by ranged arracks, or sutlers
further ranged casualties if already
shaken, the opposing player rolls two dice.
The commander is deemed ro have been
hit on the score of a 12. Roll a f urther
dice to determine what happens to him. 1-
3 - slain (removed as casualty), 4-6 =
wounded (see below).
10. If a commander is with a fighting unit in
hand-to-hand combat then he risks being
slain or wounded regardless of whether
rhe combat is w*on or lost. Once other
attacks have been resolved the opposing
player rolls two dice to determine if the
commander is hit. He adds +1 ro the
total for each attack the commander has
made above 1 (i.e. 1 attack add nothing,
2 attacks add *1 and three arracks add
*2). On a total of 12 or more the
commander is hit. This scores an extra
casualty against that side’s combat result
regardless of whether the commander is
slain or wounded. Roll a dice. 1-3 • slain
(remove as casualty) and 4-6 - w’ounded
(see below).
11. A commander who has been wounded
can no longer make any attacks in hand-
to-hand fighting and cannot join a unit
that is fighting hand-to-hand combat. If
he is already with a unit that is fighting
hand-to-hand combat he must remain
with it until it is no longer engaged.
Wounded commanders can otherwise
move and issue orders as normal.
VICTORY AND DEFEAT
1. .An army is defeated once more than half
of its divisions are broken.
2. A division is broken once more than half
185
I
HAIL CAESAR_____________________________________________
BREAK TESTS
Dice Score Unit RANGED ATTACKS HAND-TO-HAND
10 or more Infantry Hold your ground without penalty Hold your ground without penalty
Cavalry Hold your ground without penalty Hold your ground without penalty
Skirmishers Hold your ground without penalty Hold your ground without penalty
9 Infantry Hold your ground without penalty Hold your ground without penalty
Cavalry Hold your ground without penalty Give ground in good order together with supports
Skirmishers Retreat in good order Give ground disordered
8 Infantry Hold your ground without penalty Hold your ground w ithout penalty
Cavalry Hold your ground without penalty Give ground in good order together with supports
Skirmishers Retreat disordered Break if shaken, otherwise Give ground disordered
7 Infantry Hold your ground without penalty Give ground in good order together with supports
Cavalry Retreat in good order Give ground disordered, together with supports
Skirmishers Retreat disordered Break
6 Infantry Hold your ground disordered or Retreat in good order Give ground in good order together with supports
Cavalry Retreat disordered Give ground disordered, together with supports
Skirmishers Retreat disordered Break
5 Infantry Hold your ground disordered or Retreat in good order Give ground disordered, together with supports
Cavalry Retreat disordered Break if shaken, otherwise Give ground together with supports - all disordered
Skirmishers Break if shaken, otherwise Retreat disordered Break
4 Infantry Retreat disordered Break if shaken, otherwise Give ground together with supports - all disordered
Cavalry Break if shaken, otherwise Retreat disordered Break if shaken, otherwise Give ground together with supports - all disordered
Skirmishers Break if the unit has suffered any casualties, otherwise Retreat disordered Break
3 Infantry Break if shaken, otherwise Retreat disordered Break if shaken, otherwise Give ground together with supports - all disordered
Cavalry Break if shaken, otherwise Retreat disordered Break
Skirmishers Break Break
2 or less Infantry Break if unit has suffered any casualties, otherwise Retreat disordered Break
Cavalry Break if unit has suffered any casualties, otherwise Retreat disordered Break
Skirmishers Break Break
of its units are either destroyed or have
left the table whilst shaken. A division is
also broken if all of its remaining units are
shaken at the end of its side’s Command
part of the turn. The following units do
not count when making this calculation
unless such units make up the majority
type in the division.
• Skirmishers
• Light artillery’
• Tiny units
• Light infantry/light cavalry and others
where agreed prior to the game
3. Once a division is broken no units that
are shaken, or which subsequently
become shaken, are allowed to rally. They
remain shaken from thereon.
4. Broken divisions must attempt to quit the
field as expediently as practical.
Unengaged units from broken divisions
will ‘retire’ moving once even where no
order is issued and even where a unit is
disordered. Units failing an order also
move once (free move).
5. Units from broken divisions are not
allowed to charge the enemy, though they
can countercharge if otherwise allowed to
do so.
186
AERENDaX R RESOURCES
Publishing this book would not have been possible
without a host of enthusiastic, talented individuals:
Miniatures and terrain courtesy of the collections of: Alan Perry, Michael Perry, Rick Priestley, John Stallard,
Paul Sawyer, Kevin Dallimore, Bennett Blalock-Doane, Dave Bodley, Sascha Herm, Mark Bedford, Paul Cubbin,
Dale Yates, Great Escape Games, Mark Sims, Dr Phil Hendry, Steve May, Paul Darnell, Warwick Kmrade
Playtesting: Alan Perry, Michael Perry, Paul Sawyer, John Stallard, Alessio Cavatore, Steve Morgan, Andy Bartlett,
Duncan McFarlane, Peter Brown, Dr Phil Hendry, Nigel Stillman, Jervis Johnson, Steve May
Miniatures painted by: Rick Priestley, Paul Sawyer, Dr Phil Hendry, Mark Bedford, Dale Yates, Darren Linington,
Darren Harding, Andrew Chesney, Sascha Herm, Alan Ретту, Michael Ретту, Steve May, Bruno Allanson,
Colin and Duncan Patten, Mystic Spirals, Darrell Hindley, Mike Collington
We hope you’ve enjoyed the photographs of our collections of painted armies. The models featured in Hail
Caesar come from a number of manufacturers and suppliers including the following:
Warlord Games
www.warlordgames.co.uk
Unit U-15, Lenton Business Centre, Lenton Boulevard, Nottingham NG7 2BY, UK.
Email: info@warlordgames.co.uk
Perry Miniatures
www.perry-miniatures.com
PO Box 6512, Nottingham, NG7 1UJ, UK. Email: perryminiatures@aol.com
Immortal Miniatures
www.immortalminiatures.com
PO Box 9713, Nottingham NG8 9GR, UK. Email: info@immortalminiatures.com
Grand Manner
www.grandmanner.co.uk
Unit B, Harolds Court, Saxon Business Park, Hanbury Road, Bromsgrove, Worcestershire, B60 4FL, UK.
Email: grandmanner@live.co.uk
Gripping Beast
www.grippingbeast.com
Unit 8, Briar Close Business Park, Evesham, Worcestershire WR11 4JT, UK.
Email: grippingbeast@btconnect.com
Wargames Foundry
www.wargamesfoundry.com
24-34 St. Marks Street, Nottingham NG3 IDE, UK.
Email: sales@wargamesfoundry.com
Attackers are shaken and/or disordered
-1
Closing Shots
Traversing Shots
HAND-TO-HAND ‘TO HIT MODIFIERS
Winning - fighting units only
Uphill
Shaken and/or disordered
Open Order
Engaged to the Flank/Rear
The target is formed and either
cataphracts or the front of heavy infantry
The target is partly obscured, in open
order, artillery or baggage
Long Range Shots - this applies to all
shots at ranges over 12"
Charging/Countercharging - fighting
units only
4
-1
-1
4
+ 1
+ 1
+ 1
4
Column
6’
Testudo
Square
9’
12”
Buildings
24’
Light Cavalry in open
order and Horse Archers
Light Chariots
and other formed Cavalry7
Infantry, Elephants, Wagons
and Baggage, Man-portable
Artillery, Cataphract Cavalry,
and Heavy Chariots
’ > a
RANGED ATTACKS ‘TO HIT’ MODIFIERS
Dice Score Situation
Square or Wedge
+ 1
Dice Score Situation
MORALE SAVE MODIFIERS
+ 1
+2
+2
-1
-2
Cover
Testudo
Buildings
Fortification
Hit by Light Artillery
Hit by Medium or Heavy Artillerv
Column
BLUNDER TABLE
Dice Score Situation
4
4
MOVEMENT
Commanders
1
2
3
4
6
FORMATION
MODIFIERS
Uncontrolled flight! Face to rear and make 2
moves. Take 1 casualty.
Back! Make 1 move backwards whilst continuing
to face.
Drift left. The unit makes 1 move to its left.
Drift right. The unit makes 1 move to its right.
Forward! The unit makes 1 move to its front and
charges if possible.
Uncontrolled Advance! The unit makes 3 moves
to its front and charges if possible.
RANGED ATTACK
DISTANCES
Ranged Attacks 0,
Hand-to-Hand
Attacks 1
Ranged Attacks 0
Ranged Attacks 1,
Hand-to-Hand
Attacks 2 per face
Ranged Attacks 2 per
face, Hand-to-Hand
Attacks 2 per face
Javelins, Darts and
other thrown weapons 6"
Bows, Crossbows and Staffslings 18"
Slings 12"
Light Artillerv 24"
Medium Artillery 36"
Heavy Artillery 48"
www.warlordgames.co.uk
Permission given to photocopy for personal use only. © Copyright Warlord Games Ltd 2011. All Rights Reserved.
HAIL CAESAR
BREAK TESTS
TEST WHEN:
’ A unit is shaken by ranged attacks including by closing/traversing shots.
’ A shaken unit takes further casualties from ranged attacks.
’ On the roll of a 6 ‘to hit’ by ranged attacks requiring better than 6 to hit.
’ On two rolls of 6 ‘to hit’ by ranged attacks requiring 6 to hit.
’ If a fighting unit is defeated in hand-to-hand combat.
’ If a fighting unit that is already shaken draws a hand-to-hand combat.
’ If a unit is supporting a fighting unit that breaks or is shattered.
BREAK TEST MODIFIERS (2D6):
’ For Break tests due to ranged attacks deduct excess casualties
suffered by the unit from the dice score.
’ For Break tests due to hand-to-hand combat deduct the difference
in casualties suffered from the dice score.
DICE SCORE UNIT RANGED ATTACKS HAND-TO-HAND
10 or more Infantry Hold your ground without penalty Hold your ground without penalty’
Cavalry Hold your ground without penalty Hold your ground without penalty’
Skirmishers Hold your ground without penalty Hold your ground without penalty
9 Infantry Hold your ground without penalty Hold your ground without penalty
Cavalry Hold your ground without penalty Give ground in good order together with supports
Skirmishers Retreat in good order Give ground disordered
8 Infantry Hold your ground without penalty Hold your ground without penalty
Cavalry Hold your ground without penalty Give ground in good order together with supports
Skirmishers Retreat disordered Break if shaken, otherwise Give ground disordered
7 Infantry Hold your ground without penalty Give ground in good order together with supports
Cavalry Retreat in good order Give ground disordered, together with supports
Skirmishers Retreat disordered Break
6 Infantry Hold your ground disordered or Retreat in good order Give ground in good order together with supports
Cavalry Retreat disordered Give ground disordered, together with supports
Skirmishers Retreat disordered Break
5 Infantry Hold your ground disordered or Retreat in good order Give ground disordered, together with supports
Cavalry Retreat disordered Break if shaken, otherwise Give ground together with supports - all disordered
Skirmishers Break if shaken, otherwise Retreat disordered Break
4 Infantry Retreat disordered Break if shaken, otherwise Give ground together with supports - all disordered
Cavalry Break if shaken, otherwise Retreat disordered Break if shaken, otherwise Give ground together with supports - all disordered
Skirmishers Break if the unit has suffered any casualties, otherwise Retreat disordered Break
3 Infantry Break if shaken, otherwise Retreat disordered Break if shaken, otherwise Give ground together with supports - all disordered
Cavalry Break if shaken, otherwise Retreat disordered Break
Skirmishers Break Break
2 or less Infantry Break if unit has suffered any casualties, otherwise Retreat disordered Break
Cavalry Break if unit has suffered any casualties, otherwise Retreat disordered Break
Skirmishers Break Break
www.warlordgames.co.uk
Permission given to photocopy for personal use only. © Copyright Warlord Games Ltd 2011. Ail Rights Reserved.
QUICK REFERENCE SHEE1
UNITS ON FOOT
Type Combat Short Clash Sustained Range Long Range Morale Save Stamina Useful Rule
Heavy Infantry 7 7 3 0 4+ 6
Heavy Infantry
with Long Spear 7 7 3/0 0 4+ 6 Long Spear
Heavy Infantry Pikemen 7 7 3/0 0 4+ 6 Phalanx, Pike
Heavy Infantry with
Double-Handed Weapon 8 7 2/0 0 4+ 6 Double Handed
Medium Infantry 6 6 3 0 5+ 6
Medium Infantry
with Long Spear 7 7 3/0 0 5+ 6 Long Spear
Medium Infantry Pikemen 6 6 3/0 0 5+ 6 Phalanx, Pike
Medium Infantry with
Double Handed Weapon 7 6 2/0 0 5+ 6 Double Handed
Medium Infantry Archers 5 5 3 3 5+ 6
Medium Infantry
with Spear and Bow 6 6 3 3 5+ 6
Medium Infantry Warband 7,8 or 9 6 2 0 5+ 6 Wild Fighters
Light Infantry 5 5 3 0 6+ 6
Light Infantry Archers
(standard unit) 4 4 3 3 0 6
Armoured Light Infantry
Archers (standard unit) 4 4 3 3 6+ 6
Light Infantry Archers
(small unit) 3 3 2 2 0 4
Armoured Light Infantry
Archers (small unit) 3 3 2 2 6+ 4
Skirmishers (standard unit) 5 4 3 0 0 6
Skirmishers with ranged
weapons (standard unit) 4 4 3 3 0 6
Skirmishers (small unit) 3 2 2 0 0 4
Skirmishers with ranged
weapons (small unit) 2 2 2 2 0 4
Note. This list provides examples of values and commonly employed useful rules, and can be varied and extended should
players wish to do so. Troops equipped with swords, javelins, and light thrusting or throwing spears are the standard
type, hence weapons are not indicated. Other troops, for example those with heavy throwing weapons (Pila) have the same values as common troops f their type.
www.warlordgames.co.uk
PermLxsicn ₽vce rtcc c- lor personal use onlv. Э Copyright Warlord Games Ltd 2011. All Rights Reserved.
MOUNTED UNITS
Type Combat Morale Save Stamina Useful Rule
Clash Sustained Short Range Long Range
Cataphract Cavalry 9 6 3 0 4+ 6
Cataphract Cavalry with Kontos 9 6 3/0 0 4+ 6 Kontos
Cataphract Cavalry (Bow-Armed) or Kontos and Bow 9 6 3 2 4+ 6 Kontos
Heavy Cavalry 9 6 3 0 4+ 6
Heavy Cavalry with Kontos or Lance 9 6 3/0 0 4+ 6 Kontos, Lance
Heavy Cavalry (Bow-Armed) or Kontos and Bow 9 6 3 2 4+ 6 Kontos
Medium Cavalry 8 5 3 0 5+ 6
Light Cavalry (standard unit) 7 5 3 0 6+ 6
Light Cavalry (Bow-Armed) (standard unit) 7 5 3 3 6+ 6
Light Cavalry’ (small unit) 5 3 2 0 6+ 4 Feigned Flight
Light Cavalry (Bow-Armed) (small unit) 5 3 2 2 6+ 4 Feigned Flight
Horse Archers (standard unit) 6 4 3 3 6+ 6 Parthian Shot
Horse Archers (small unit) 4 2 2 2 6+ 4 Parthian Shot
Light Chariots 6 6 3 0 4+ 6
Light Chariots (Bow-Armed) 6 6 3 3 4+ 6
British/Celtic Light Chariots 6 5 4 0 4+ 6 Feigned Flight
Heavy Chariots 9 5 3 0 3+ 6
Heavy Chariots (Bow-Armed) 9 5 3 3 3+ 6
Heavy Scythed Chariots (small unit) 7 0 0 0 3+ 4 Scythed Chariots
Elephant 4 3 1 0 4+ 6 Elephant
Elephant with Bow-Armed Crew 4 3 1 1 4+ 6 Elephant
Light Artillery 1 1 2 2 0 3
Medium Artillery 1 1 0 3 0 3
Heavy Artillery 1 1 0 3 0 3
Wagons/Baggage 3 1 1 0 0 6
www.warlordgames.co.uk
• HAIL CAESAR -
BATTLES WITH MODEL
SOLDIERS IN THE ANCIENT ERA
This book describes the Hail Caesar game and its various
rules and procedures as played by its creators and their
friends. The authors' aim is to enable and encourage the
reader to relive the deeds of warriors and conquerors of an
age long past with armies of model soldiers upon the tabletop.
Our game provides rules for all the fundamentals of warfare
such as the direction of troops, manoeuvre on the battlefield,
the effects of missile fire, the role of morale, and close quarter
combat. Detailed rules cover the differences in methods
of fighting from the age of the chariot to medieval ,
times, as well as the development
of weapons and tactics pertinent to each era.
In addition the book includes seven complete i
examples of Hail Caesar battles embracing a range of
conflicts from the wars of the Pharaohs to the
Crusades * some based on real battles and
others encounters created by the authors.
The Battle of Kadesh 1274BC * Rameses of Egypt confronts the Hittites in the greatest ever dash of chariots.
The Road to Boeotia 42dBC - The Spartans and Athenians battle for supremacy in the Peloponnesian War.
A Border Raid 52AD - The Roman conquest of Britain faces stiff resistance from the fierce Silures tnbe.
Go Meek into the Desert 260AD * The Persians threaten to overrun Syria and conquer the Roman east.
Barbarians at the Gates 450s AD * Rampaging Huns are brought to battle by a scratch force of Roman defenders.
The Battle of Brunanburgh 937AD * Norse invaders are met by the Anglo-Saxon King Athelstan in the bloodiest battle of
the Viking age.
The Battle of Barada River 1148AD - King Baldwin of Jerusalem strikes for the city of Damascus during the Second Crusade.