/


Автор: Greenoff J.
Теги: embroidery do it yourself cross stitch handicrafts
ISBN: 0-7153-1830-6
Год: 2005


Текст
ftW'Am
cine
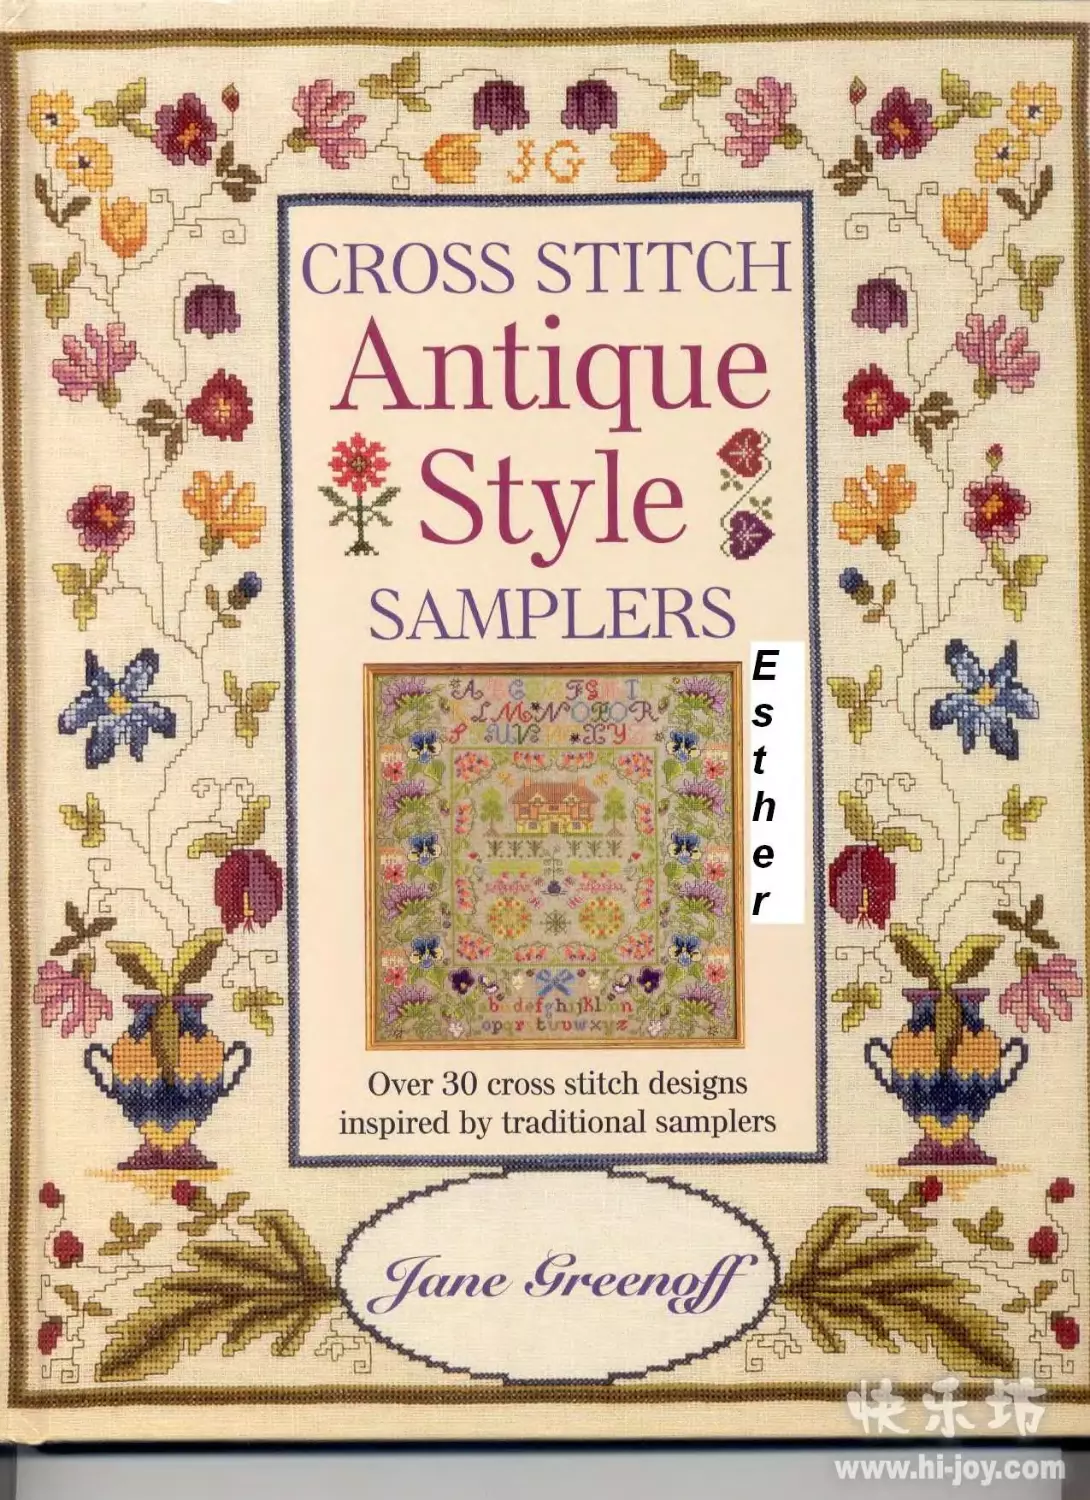
Over 30 cross stitch designs
inspired by traditional samplers
$5-b defghjXl
. r tbvwx
CROSS STITCH
Antique
$ Style $
SAMPLERS
fflivvvivivjnxxsin
№
ЬМЯОРМй
omaswrwxrz^BCDErc
„.«as3sw&s;s‘K33£XaMs^03>a
iWft-
ex .’L.h < Г-»
CROSS STITCH
Antique
Style
SAMPLERS
fane Mree/ioi
David and Charles
A DAVID G Cl 1ARLES BOOK
David G Charles is a subsidiary of F+W (UK) Ltd.,
an F+W Publications Inc. company
First published in the UK in 2005
Reprinted 2006
Text and designs Copyright © Jane Greenoff 2005
Photography and layout Copyright © David G Charles 2005
Distributed in North America
by F+W Publications, Inc.
4700 East Galbraith Road
Cincinnati, OH 45236
1-800-289-0063
Jane Greenoff has asserted her right to be identified as author of this work
in accordance with the Copyright, Designs and Patents Act. 1988.
All rights reserved. No part of this publication may be reproduced, stored in a retrieval system, or transmitted,
in any form or by any means, electronic or mechanical, by photocopying, recording or otherwise,
without prior peimission in writing from the publisher.
A catalogue record for this book is available from the British Library.
ISBN 0 7153 1830 6
Executive commissioning editor Cheryl Brown
Desk editor Ame Verso
Executive art. editor .Mi Myer
Art editor Prudence Rogers
Project editor Lin Clements
Photography Simon Whitmore, Karl Adamson and Pete Canning (antique samplers)
Printed in Singapore by KHL Printing Co Pte Ltd
for David G Charles
Brunel House Newton Abbot Devon
Visit our website at www.davidandcharles.co.uk
David G Charles books are available from all good bookshops; alternatively you can contact our Orderline
on (0) 1626 334555 or write to us at FREEPOST EX21 It), David G Charles Direct. Newton AbbotTQ12 4ZZ, UK
(no stamp required UK mainland).
The Cross Stitch Guild
The Cross Stitch Guild was formed in March 1996 and quickly became a worldwide organization with a committed
and enthusiastic body of members - over 2,000 in the first six months of operation. As word spreads it is clear- that
many cross stitch and counted thread addicts around the world are delighted to have a Guild of their own.'I'he CSG
has received an extraordinary level of support from designers, retailers, manufacturers and stitchers. Guild members
receive a full-colour bi-monthly magazine, Stitch That with Jane Greenoff. with cross stitch designs, counted thread
patterns, new products and news and information. The CSG also supplies cross stitch kits, gold-plated needles,
stitchers' gifts and Jane Greenoff’s classes. There is now a comprehensive website for members and non-members.
with the stitchers' market open to all:
wwAv.tliecrossstitchguild.com
For more information and a catalogue contact: CSG HQ, Yells Yard,
Cirencester Road, Fairford, Gloucestershire, GL7 4BS, UK.
Tel: from the UK 0800 328 9750; from overseas +44 1285 713799.
< (Frontispiece, previous page): The picture shows two red samplers - an antique sampler by Catherine Archer and
my Bristol Orphanage Sampler (seepage 54). I was lucky enough to find the little sampler book, complete with the
contents, stitched by a girl called Alice Flower. She had drawn each project or technique beautifully in fine ink and
then worked the technique on the opposite page. The book included a small marking sampler, a baby’s bonnet, a liny
nightdress and any number of patches and darns - a real treasure!
/О t ,
(эогг1е/гб&
Index
Introduction 4
A Brie! History of Samplers 6
Back to Basics 10
House Samplers 14
Alphabet Samplers 22
Map Samplers 30
Darning Samplers 38
Spot Motif Samplers 46
Red Samplers 54
Berlin Woolwork Samplers 62
Victorian Sentiments 70
Band Samplers 78
Stitch Library 88
Additional Charts 98
Finishing 6 Making Up 100
Caring for Antique Samplers 102
Further Reading 103
Acknowledgments 103
Suppliers 104
105
This is a book I have always wanted to write! From tire beginning of my love
affair with embroidery, and particularly with the counted thread variety,
1 have had a passion for samplers. I say passion advisedly because I have been
known to have real physical pain when walking around
an exhibition of antique samplers where they are either not for
sale or have such high value as to be completely out of the
reach of us ordinary mortals!
Since 1985 1 have been collecting antique embroidery,
particularly samplers, and continue to search for more of
these treasures. And treasure is what they are - a child stitched one of my
map samplers in 1815 - the year that Wellington won the Battle
of Waterloo! 1 still find it difficult to imagine children as young
as eight, working away at some fine embroidery for hours at
a time. When you consider poor nutrition, no electricity, rough
needles and complete lack of equipment it is even more incredible
X that these beautiful pieces of stitching were completed at all! During
the 20 years 1 have been designing and stitching, I still love to work
traditional samplers on unbleached linen, attempting to emulate the
standard and excellence of school-age children.
I have used my collection of antique samplers as inspiration for
this book but have not reproduced them in chart form. Instead
I have designed and stitched a variety of samplers to echo the
feel and atmosphere of these old embroideries, often using
pastel shades to create that wonderful faded and aged appearance, although the
original samplers were not stitched with pastel colours of course but have faded
over the passage of time.
I hope that you enjoy stitching the samplers and the other smaller projects in
this book and in the process create some beautiful heirlooms of your own.
4 • INTRODUCTION
4
On cloud» of Glory
Алл fippe»
fbWwl
AE>r«*r
X ы V -x «V ./> -r1 Л» Л»
aza.-e^-a^'a-"'- "ez®»e.-3ee
Oreal Gon whai do л aec and hen»
A J can remember the day n?? bought this sampler as if it were yesterday. It it-as our very Hist antique purchase, bought forme
by my husband. Bill, instead of an eteniit, i ring! Unfortunately it had been washed and not by an expert and there ate some
colour runs that iw? could not remove. Ann Tipper worked the sampler on verF fine linen mid included the words for
Luther’s hymn. The stitches are tiny and 11 orked и?л7 • neatly indeed.
INTRODUCTION • 5
A This colourful motif paper sampler was purchased at a stitching show in London. It is very unusual
to see motifs stitched on paper: these were worked in cross stitch and satin stitch in a pretty range
of colours. The sampler, dated 1893. is awaiting restoration.
The term ‘sampler’
comes from the Latin
exemplum, meaning an
example to be followed,
a pattern or model. It is
believed that although the
earliest dated samplers and
references to them come
from the 16th century,
they were stitched long
before this time - simple
embroideries on linen have
been found in the tombs of
the Pharaohs.
Some of the earliest
samplers from the 16th
century, typically band
samplers, included a huge
variety of stitches. They
were made from long, thin
strips of linen and were not
intended to be decorative
but to act as a reference
to stitchers, and were kept
rolled up in a drawer to
be referred to as necessary.
These now very valuable
treasures demonstrate the
skill, diligence and patience
of the embroiderers and
leave us in awe of their
talent. We also have to
remember that the fabric
had to be woven and the
threads dyed before the
stitching began in earnest.
The first known dated
English sampler was made
by Jane Bostocke in 1598
to celebrate the birth of her
daughter Alice Lee, and
6 • A BRIEF I nSTORY OF SAMPLERS
you can see this exquisite
embroidery at the Victoria
and Albert Museum
in London. This work,
although 16th century, is
not a band sampler but
more a spot motif sampler,
covered with random motif's
in a variety of stitches and
shades, and including metal
threads, pearls and beads.
Later in the 17th century
(lie style changed to spot
samplers, which included
random motifs worked in
coloured threads. These
could be used on costumes,
bed hangings or other
furnishings. During this
period printed pattern
books became available, so
samplers lost some of their
use as reference works. It is
probably true that this was
the golden era for sampler
making as the. use of motifs
and quality of stitching has
never been bettered.
From the mid - 18th
century onwards, it. became
more common for young
girls to work samplers as
pari of their education.
Alphabet samplers, pictorial
designs including houses
and animals, decorative
borders, poems and prayers
became common and today
represent the popular image
of the sampler. Marking
samplers included various
< 77rZs .Ifarr-Fowler sampler was
bought from a friend, partly
because Fowler was my maiden
name and also because it is
such an unusual and tine early
example stitched in 1725. As part
of its restoration it uas stitched
on to washed linen and then
mounted on acid-five card.
V This sampler by Christina Wood
of Nottingham was worked on
linen with a striking castle, lovely
spot motifs and a strawberry
border. Christina did not date
her sampler but she was horn in
November 1816.
A BRIEF 11ISTORY OF SAMPLERS • 7
A [often wonder who the people in this Victorian picture were.
Absent But Not Forgotten teas- worked on stitching paper mid
was spotted, examined and paid for in the ten minutes that
my husband was in a shop in Truro!
AW те /®жэ «ж
ABCDEFGHIJ
KLMNOPQR r,
STUVX¥Z 4 >•
10bljTUVTYX
A / bought this red French sampler at a Talent for Textiles sale near
Bath, England. Stitched for a mother, it was worked on double canvas
with die background left unstitched. This red sampler is not dated
but must have been stitched idler 1860as that is when double
canvas was first available.
This тир of England and Wales, >
stitched on silk in 1793by
Eliza Long, is in urgent need of
restoration. The counties are all
marked and the map has the
addition of a decorative compass
and a lovely rosebud border.
k, 8 • A BRIEF HISTORY OF SAMPLERS
alphabets in reversible stitches, crowns and coronets,
which could be used to mark the household linens of the
aristocracy. Some samplers contained pious verses or
religious symbols and others taught geography in the form
of embroidered maps, or mathematics as almanacs or
multiplication tables.
During Victorian Limes samplers became more pictorial
and metamorphosed into decorative articles to be hung
on the parlour walls by proud parents, or in Lire case of
the sampler shown above, by rather dour Victorians! These
would generally be worked in cross stitch or tent stitch and
often included the child's
name and age. With the
high child mortality at. the
time. the. death of a sibling
or other family member was
commonplace and so a very
Victorian theme became
more common, that of the
mourning sampler, possibly
worked in large amounts
of blade and occasionally
including stitching done with
the hair of the deceased!
Throughout the centuries
Die creation of samplers has
given much pleasure, not
only to the stitchers but to
those admiring the work,
and for some it becomes a
totally absorbing pastime.
Below is an extract from a
poem written around 1865
when Berlin woolwork was
at its height and yet 1 am
sure many stitchers (mid
certainly Uieir partners)
would recognize lire
sentiment today.
(м,fat/j/vra'ffm> ///rybrz///
ff zfab w///zy<wcr/ azcz/yb
r/p/z/r/z///
/fa//гr<w fa
ayfaz fa-g/fa farfa//fa
or/fa fa fa/
(fa faz/far ////zw/. /w/'
fafa Z/faztS/fa /W/' fa/ZIt' z.'r
/// farrz/fa/t
. ///tWare/ZZ^fafa //fa’
fat/zfa&Z /zz t’/zzfazzzfa/-. '
(Anon.)
A This lovely sampler was worked by Marianne Lusty in ISIS). I bought it because I loved the наг
she had incorporated the words ‘come buy my sweet Howers 'in the middle of the sampler.
It is worked mainly in blues and antique golds and I love it.
A BRIEF IHSTORY OF SAMPLERS • 9
(Вас/ to /Bastes
This section describes the basic materials and equipment needed, how to use charts, prepare
fabric and start stitching. Il also describes the basic techniques for counted embroidery, with
some useful cross stitching tips. See the Stitch Library pages 88-97 for working all other stitches.
Materials and
Equipment
Fabrics
The fabrics used for counted cross
stitch are. woven with the same number
of threads or blocks to 2.5cm (1 in) in
both directions. The warp and weft are
woven evenly so when a stitch is formed
it appeal's as a square or part of a square. When choosing
fabrics for counted cross stitch, the thread count differentiates
between the varieties available - the higher the count, Hie more
threads or stitches to 2.5cm (tin) and tire finer the fabric.
Evenweaves, including linens, are woven singly, which means
single threads can be withdrawn, making them suitable for
withdrawn and pulled thread work.They are made from various
fibres and mixtures and in different colours, counts and bands.
Aida fabric is designed for cross stitch and is woven in
blocks rather than singly. It is available in 8, 11, 14, 16, 18 and
20 blocks to 2.5cm (1 in) and in many colours. Aida is now
available made from linen thread.
Th reads
The most commonly used thread for counted embroidery is
stranded cotton (floss) but there are many other types now
available. I have used stranded cotton (floss) with the addition
of metallic threads for some projects.
Needles
Use blunt tapestry needles for counted cross stitch.The
commonest sizes used are 24 and 26 but this depends on the
project and personal preference. 1 always use a gold-plated needle,
finding the nickel variety less satisfactory. Avoid leaving a needle
in the fabric unless it is gold plated or it may cause marks.
Scissors
Use dressmaker’s shears for cutting fabric, and a small, sharp
pair of pointed scissors for cutting embroidery threads. 1 keep
mine on a ribbon around my neck, which means 1 always know
where they are!
Frames and 1 loops
These are not essential but if you do use one,
choose one large enough to hold the complete
design, to avoid marking the fabric and flattening
your stitches. All tire designs in this book, with the
exception of the darning sampler, were stitched
without a frame or hoop.
/Z)7//y (7/ts (Boo/
Throughout this book, 1 have used Zweigart linens,
which 1 think are the best needlework fabrics. When
you are going to spend many hours working on your
sampler, it is worthwhile using the best available.
Linen is the most appropriate fabric for the creation
of samplers, although I have indicated where you
could substitute Aida fabric if preferred.
I have used colour charts with symbols so you
can visualize the designs more easily. You could
photocopy and enlarge the charts for your own use.
iZ All the designs have been stitched in DMC stranded
embroidery cotton (floss) unless stated otherwise.
Anchor colour equivalents have been given where
possible (in brackets).
|Z Measurements are given in metric with imperial
conversions in brackets - work with one or the other.
|Z Most of the designs use just cross stitch and
backstitch but the band samplers are more
adventurous so refer to the Stitch Library, starting on
page 88, for how to work the stitches used.
|Z Each chapter has a large sampler project, with
full instructions and chart, followed by one or two
smaller, quick-to-work projects that use parts of the
large chart or have their own chart on pages 98-99.
10 • BACK TO BASICS
Techniques
Preparing Fabric
Press the fabric before you begin stitching and trim the
selvage or any rough edges. When working with linen or linen
mixtures, sew a narrow hem around all raw edges to preserve
them for hemstitching when the project is completed. Avoid
using masking tape as the adhesive creeps and attracts grime.
Work from the middle of the fabric and middle of the chart
where possible to ensure your design is centred on the fabric.
Find the middle of the fabric by folding it in four and pressing
lightly. Work lines of tacking (basting) stitches following
a fabric thread to mark the folds. When working a band
sampler it is also a good idea to tack (baste) a line down each
side of tlie outermost stitches on the first completed band, to
When calculating design sizes for evenweave fabrics, divide
the fabric count by 2 before you start, because evenweave is
worked over two threads not one block as with Aida fabric.
Always add a generous margin when calculating fabric
requirements, to allow for finishing and making up. 1 add
13cm (5m) to both dimensions when stitching a sampler.
Starting and Finishing Stitching
Unless indicated otherwise in the project instructions, begin
stitching in the middle of the fabric and the centre of the chart
to ensure adequate margins for making up. Start and finish
neatly, avoiding knots that cause lumps. Two starting methods
are described here.
Knolless loop .start This neat start can be used with an even
number of strands i.e., 2,4 or 6. To stitch with two strands.
indicate where the bands should start and stop.
begin with one strand twice the length you’d normally need -
Working from Charts
The designs in this book are
worked from charts
anti are counted
designs. The charts
are in colour with a black
or white symbol to aid
colour identification and
allow you to photocopy for your
own use. Each square, both occupied
and unoccupied, represents two threads of linen or one block
of Aida unless stated otherwise. Each occupied square equals
one stitch. 1 have avoided using fractional stitches as much as
possible as traditional sampler makers did not use them.
When looking al a chart, try to plan your stitching direction.
H you count across the shortest distances of empty fabric each
time you will avoid counting mistakes. To prevent serious
counting errors, rule a line on the chart to match the centre
using a coloured pen. You can turn your work and the chart
upside-down if you prefer to work towards you, but never turn
halfway - your stitches will end up facing the wrong way!
1 make a copy of a chart so that I can lightly colour it in as
I proceed, to avoid looking at the wrong section.
Calculating Design Size
Being able to calculate the eventual size of a design means
that you will be able to decide how much fabric you need for
a particular project or whether a design wifi lit a specific card
aperture or picture frame.
Calculate design size as follows: count the number of stitches
in each direction on the chart and then divide these numbers
by the stitch count of your fabric.
For example:
A design on 14-count Aida of 140 stitches x 140 stitches -e- 14
= a design size of 10 x Win (25 x 25cm).
about 80cm (30in). Double the thread and thread the needle
with the two ends. Put the needle up through the fabric from
the wrong sitle. where you intend to begin stitching, leaving
the loop at tire back (Fig 1). Form a half cross stitch, put the
needle back through the fabric and through the waiting
loop. The stitch is now anchored and you may begin.
Fig I Knotless loop start
Away waste, knot start Start this way if using an odd number
of strands. Thread your needle with tlie number of strands
required and knot the end. Insert the needle into the right side
of the fabric about 2.5cm (1 in) away from where you wish to
begin stitching (Fig 2). Work your stitching towards tlie knot
and cut it off when the threads are anchored. The alternative is
to snip off the knot, thread a needle and work the thread under
a few stitches to anchor it.
Fig2. hf»r waste knot start
BACK TO BASICS • 1 1
Finishing Stitching
At the back of the work, pass the needle and thread under
several stitches of the same or similar colour, and then snip off
the loose end close to the stitching.You can begin a now colour
in a similar way.
Fig 3 Finishing stitching
Cross Stitching on Evenweave
An evenweave fabric may have thick and thin fibres and quite
dramatic slubs in the material. To even out any oddities in the
weave, cross stitch is usually worked over two threads of the
fabric in each direction. An evenweave can be worked over one
thread, for miniature work or when line detail is required. It is
also possible to stitch poems or other text over one thread
within a small sampler. If working over one tlrread, each cross
stitch must be completed rather than worked in two journeys
because part of the stitch will tend to slip under the fabric
threads. When working on evenweave over two fabric threads,
start the first cross stitch to the left of a vertical thread (Fig 4).
Tills makes it easier to spot counting mistakes because each
stitch will start in the same position relevant to adjacent
threads of the fabric.
Fig 1 Starting to the left of
a vertical thread
Fig 5 Single cross stitch on
et vn 11 ea ve fabric
Cross stitches on evenweave can be formed individually (Fig 5)
or in a sewing movement in two journeys, working half cross
stitches along a row and completing the crosses on the return
journey (Fig 6).This quicker method forms neat single vertical
Cross Stitching on Aida
When stitching on Aida, one block on the fabric corresponds to
one square on a chart and cross stitch is usually worked over
one block. To work a single cross stitch, bring the needle up
from the wrong side of the fabric at the bottom left of a block.
Cross one block diagonally and insert the needle into the top
right cornei- (Fig 7). Come up at the bottom right corner and
cross to the top left to complete the stitch.To work an adjacent
stitch, bring the needle up at the bottom right corner of the
first stitch. Cross stitches on Aida can be worked singly or in
Iwo journeys - work half cross stitches along a row and then
complete the cross stitches on the return journey (shown in
Fig 6 for evenweave). Whichever way you choose, for a neat
effect, make sure the top stitches all face in the same direction.
Fig 7 Single cross stitch on Aida fabric
Three-Quarter Cross Stitel
Three-quarter cross stitch is a
fractional stitch that produces
the illusion of curves. The stitch
can be formed on zXida or
even weave but is more successful
on evenweave, as the formation
of the stitch leaves a hole for
the quarter stitch.
Work the first half of the cross stitch as usual, sloping the
stitch in the direction shown on the chart you are using (see
examples in the comers of the diagram below). Always work
the second ‘quarter’ stitch over the top and down into the
central hole to anchor the first half of the stitch. If using Aida,
push the needle through the centre of a block of the fabric.
Where two three-quarter stitches lie back to back in the space
of a full cross stitch, work both of the respective ‘quarter’
stitches into the central hole.
Fig S Three-quarter cross stitch on evenweave
12 • BACK TO BASICS
These tried and tested tips have been developed over 20 years of enthusiastic cross stitching
and seem to cover most eventualities. I hope you find them helpful.
Organize your threads before you start a project, as this
will help to avoid problems later. Always include the
manufacturer’s name and shade number.
Separate tlie strands on a skein of stranded cotton
(floss) then take the number you need and realign them
before threading your needle.
✓ Start with tlie loop method when using two, four or six
strands. This method avoids the muddle often found on
tlie wrong side of a piece of embroidery:
у/ Plan your route around the chart, counting over short
distances to avoid mistakes.
|Z Work your cross stitch in two directions in a sewing
movement - half cross stitch in one direction and then
cover those original stitches with the second row. This
forms single vertical lines on the back that are very'
neat and give somewhere to finish raw ends.
Remember that for neatest work the top stitches should
all face tlie same direction.
4/ Avoid coming up through occupied holes from the
back (where a stitch has already been formed). Instead,
insert the needle from the front, as this will prevent
existing stitches being spoilt.
К As you stitch you may find that the threads start to
corkscrew slightly and spoil the appearance of the
stitches. Either turn the work upside-down and allow
the needle to spin, or each time you take tlie needle out
of the fabric give it a half turn before you re-insert it
and the stitches will then lie flat.
4/ During cross stitch embroidery, remember to count
fabric threads rather than the holes and you will be less
likely to make counting errors.
4/ If you are adding a backstitch outline, always add it
after the cross stitch has been completed to prevent
tlie solid line of the backstitch being broken. Work the
stitches over each block, resisting the temptation to use
longer stitches as this will show!
BACK TO BASICS • 13
A little girl called Aim Passmore worked the house sampler shown above using wools on canvas,
dating and signing her work.The traditional image of a sampler with alphabets, featuring a house
with trees, signed and dated by the child is the most familiar image evoked by the word ‘sampler’.
During the late 18th to early 19th century, the tradition of sampler making was commonly seen in
schools, orphanages and latterly in the workhouses of Victorian Britain. Generally the elements included
an upper and lower case, alphabet, a house and stylized tree motifs and a counted border pattern.
Examples of school samplers can sometimes be identified by how the building was stitched, by the use
of certain motifs and so on. I’ve created my own unique sampler design, opposite, combining hedgerow
flowers with a colourful alphabet. Most importantly, the house and garden are the central feature.
Wild Hedgerow House Sampler
1 wanted to create a sampler that had a historic feel to it but using modern materials so 1 have
used unbleached 25-count linen and stranded cottons (floss) rather than canvas and wools.
You could also work the design on a 14-count Aida. Most of the design is worked in pure cross
stitch with no fractional stitches, although I have introduced a few additional counted stitches to
I he garden area in the foreground. When designing the border for my house sampler I wanted to
move away from the. formal symmetrical border and create something fuller and wilder
and, frankly, more firn to stitch.
Wild Hedgerow House Sampler
Stitch count 198 x 182
Design size 38.5 x 35.5cm (1514 x 14in)
Illllllflllllllllllllllllllllllllllllinilllllllllllllllllllt-
You will need
49 x 46cm (19 x 18in) 25-count
unbleached Zweigart Dublin linen
Stranded cotton (floss)
as listed in the chart key
I
!
Tapestry needle size 24
IFokl the fabric in four mid mark
the folds with tacking (basting)
stitches. Oversew or hem the raw edges
of the fabric to prevent fraying. Starting
at the centre of the chart and fabric and
using a loop start (page 11), follow the
chart on pages 18-21. Refer to the Stitch
Library for working the stitches.
away waste knot start (page 11) with one
strand of each colour in the needle to
work the tweeded stitches on the roofs of
the houses.
3To work the queen stitches and
Algerian eyes, stitch over four fabric
threads with two strands of stranded
cotton (floss). Work half Rhodes stitch
over six threads with two strands. Use
two strands for the satin stitch, eyelets
and French knots, following the positions
and colours on the chart .
4When stitching is complete, check for
missed stitches, remove tacking
(basting) and mount and frame as
preferred (see page 100). Wadding
(batting) has been used to give the work
an attractive padded look.
SAMPLER HOUSE
It’s easy to personalize the house on tills
sampler. Draw a box on graph paper
using the same number of squares as in
the main sampler. Experiment sketching
roof shapes and window sizes. When
drawing houses for traditional samplers,
keep the outline simple, showing a
front view of the house, drawn in a
rather childlike fashion. Details can be
added as you stiteh.
If you have charting software this
is a chance to use it. When you have
sketched the outline of the house,
transfer this in backstitch on to the
screen. Now try different window and
door shapes, using the copy and paste
facility to repeat as required. Use Lire
colour palette to add the shades to the
outline. If charting your own house,
take a shade card outside and look
at the walls - you might be surprised
at the colours you find. When adding
colour to the body of tire house,
try darker shades (one shade apart
perhaps) under the windows, just under
the roof and near- the ground to add
a sense of perspective.
2Work the full and three-quarter cross
stitch first over two linen threads (or
one Aida block) using two strands of
stranded cotton (floss) and keeping lire
top stitches facing in the same direction.
Use one strand for Lire backstitch in the
shades indicated on the chart. Use an
Stitching detail showing queen stitch (fartop left), satin stitch (centre)
and two half Rhodes stitches (bottom).
ZZi vzy . (й/а • /'a/>rfc
If stitching this sampler on 14-count
Aida, use a sharp needle when
working the half Rhodes stitches, to
pierce the fabric blocks more easily.
16 • HOUSE SAMPLERS
УЫдегоа) $(са/7 с !ac/e/
Stitch Ulis charming heart-shaped sachet lor a weekend project.
It uses some of the lovely motifs in the main sampler, recombined
to create a pleasingly symmetrical design and charted on page 98.
You could fill the sachet with scented pot-pourri when making up.
Stitch count 73 x 85 Design size 13.25 x 15.5cm (5'Zt x Gin)
You will need 31 x 25cm (12 x Win) buttermilk 28-count Zweigart
Cashel linen (or 14-counl Aida) • 31 x 25cm (12 x lOin) silk moire
I'abric • polyester stuffing • narrow ribbon for a hanging loop
Fold the fabric in four and mark the folds
with lacking (basting) stitches. Start
stitching from the centre of the chart and
the centre of the fabric, using a loop start
(page II ) and working over two linen
threads (or one Aida block). Work cross
stitch using two strands of stranded cotton
(floss) and backstitch with one strand.
Remove lacking when stitching is complete.
To make up the heart, copy the heart
shape given on page 103 on to paper. Use
this template to cut a piece of silk moire.
Trim your embroidered fabric to this shape,
making sure the stitching is centred in
the heart shape. With right sides facing.
gap at the top for turning. Turn
right side out and press on the
back. Stuff the shape quite firmly
with polyester stuffing and pot-
pourri if you wish. Tuck a doubled
piece of narrow ribbon for a hanging
loop into the gap and slipstitch closed.
r Aze/rZ r J7ia/>e
Make a sachet of any shape by
choosing motifs and borders from
the main sampler and creating
your own design to fit.
machine the two pieces together leaving a
{Rut/er/fy r/Touse damfl/w
This delightful little sampler makes a feature of the tiny
butterflies that flit throughout the main sampler. Simple-
to-work eyelet stitches provide additional interest.This
mini sampler is worked on linen Aida (see page 10) and
is charted on page 99.
Stitch count 78 x 96 Design size 14 x 17.5cm (5И> x 6Min)
You will need 30.5 x 25cm (12 x lOin) 14-count linen Aida
Fold the fabric in four and mark the folds with tacking (basting)
stitches. Start stitching from the centre of the chart and the centre of
the I'abric. using a loop start (page 11) and working over one block.
Work cross stitches and eyelet stitches using two strands of stranded
cotton (floss) and backstitch with one strand.
When stitching is complete, check for missed stitches, remove
tacking (basting) and mount and frame as preferred (see page 100).
HOUSE SAMPLERS • 17
TOP LEFT
DMC (ANCHOR)
Cross stitch
S<J 316 (1017)
:: 35i (10)
" 352 (9)
oS 353 (8)
M 402 (1047)
В 470 (267)
В 471 (265)
tt 472 (253)
s 552 (100)
в 554 (90)
Y Y 676 (891)
Л A 677 (886)
is 721 (324)
ЙЙ 722 (323)
s s s s 725 (298)
;; 729 (890)
BB 823 (127)
840 (903)
В 920 (1004)
В 931 (1034)
932 (920)
BB 937 (268)
:: зо42 (870)
В 3350 (63)
2Й 3740 (872) ®
:: 3772 (379) *
blane (2) 9
t; 407 * 840 ®
(914 + 903)
tweeded together
Additional backstitch
colours needed:
650 (101)
317 (400)
French knots
729 (890)
(903)
(1034)
840
931
407 + 840
(914 + 903)
tweeded together
Special stitches
Algerian eye in 351 (10)
Queen stitch in 3350 (63)
ntfiffltoiini Satin stitch in 471 (265)
3K Half Rhodes in 351 (10)
•5
61 • sMndwvsacsnoH
3
2
а.
о
р
fc
с
-J
DMC (ANCHOR)
Cross stitch
French knots
Special stitches
316 (1017)
И 351 (10)
ее e e 352 (9)
Г6Т0. •O'io 353 (8)
TT 402 (1047)
470 (267)
в 471 (265)
(ПГ •Lt 472 (253)
v v
s s
s s
552
554
676
677
721
722
725
729
(100)
(90)
(891)
(886)
(324)
(323)
(298)
(890)
ffi 823 (127)
В 840 (903)
920 (1004)
931 (1034)
itf®; 932 (920)
80 937 (268)
:: 3042 (870)
3350 (63)
| 3740 (872)
3772 (379)
J ' blanc (2)
Ц 407 + 840
(914 + 903)
tweeded together
Additional backstitch
colours needed:
550 (101)
317 (400)
® 729 (890)
9 840 (903)
9 931 (1034)
® 407 + 840
(914 + 903)
tweeded together
Algerian eye in 351 (10)
<^> Queen stitch in 3350 (63)
Half Rhodes in 351 (10)
Eyelet in 729 (890)
BOTTOM RIGHT
ph fo h/e
In English schools during the
Victorian period, it was quite common
for 60 children as young as eight years of age to
be working on their samplers at any one time,
possibly sharing the same school pattern. Now
highly collectable, these house samplers are a
charming illustration of times gone by,
and a reminder of the patience and
endeavour of Victorian children.
HOUSE SAMPLERS • 21
With the exception of house samplers, alphabet samplers are one of the most well-known styles of
sampler. They were often a first attempt at counted cross stitch because the lettering is generally
simple and could be personalized. Alphabets were stitched on school samplers as well as when training gills
for household sendee, as such skills were needed when marking laundry and caring for household linens.
I have collected a number of alphabet samplers, some plain, others very decorative. I bought the Baird
sampler (above) as one of a trio stitched by the same family around 1800. One. sampler in the trio is
incomplete and I often wonder what happened to the third girl. The Baird sampler combines the use
of decorative lettering with a less formal but elegant border, an idea 1 have used in my own design. In
creating my own alphabet sampler, my aim was to include many different styles of alphabet but also to
get a flavour of the Baird sampler by working a lush decorative border.
Fanciful Flowers Alphabet Sampler
For my sampler, 1 was partly inspired by the flowers in my sampler collection and by work seen
at exhibitions. 1 realized that earlier samplers, particularly from the 18th century, did not always
have repeating borders and had seen a number with flowers ‘growing’ up the fabric, so I tried to
capture that idea.The vase and flowers are from my imagination but they do echo the feel of the
samplers I had in mind. I could have added lots of little insects but in the end decided it was busy
enough! The alphabets were a selection of types and styles that felt right in the context. I worked
my sampler on 28-count linen for authenticity but it could also be worked on 14-count Aida.
Fanciful Flowers Alphabet Sampler
Stitch count 229 x 200
Design size 41.5 x 36.3cm (16’Zi x 14Vtin)
Illltlllltllllllilllllllllllltllllllllllllllltllllltllllinll
You will need
56 x 48cm (22 x 19in) ivory
28-count. linen (Zweigart shade 224)
Stranded cotton (floss)
as listed in the chart key
Tapestry needle size 24
-riiiiiiiiiiiiiniiiiiiii..
J/"'"' 0^
ALPHABET SAMPLERS
Alphabet samplers are great fun to
compile, particularly if you have
charting design software as the letters
of the alphabet are easy to combine in a
variety of shapes, styles and Colom's.
You can mix italic letters and block
capitals if you wish, adding some
decorative elements if you are left with
some awkward spaces to fill. Why
not try working some of the letters in
Algerian eye stitch or double cross stitch
to create a different effect? In order
to work out what size your finished
sampler will be and choose the correct
amount of fabric to work on, see
calculating design size on page 11.
IFold the fabric in
four and mark
the folds with
tacking (basting)
stitches. Oversew or
hem the raw edges of
the fabric to prevent fraying.
Beginning at the centre of the chart and
fabric and using a loop start (page 11).
follow the chart on pages 26-29.
2 Work over two linen threads (or one
Aida block) using two strands of
stranded cotton (floss) for full and three-
quarter cross stitches, keeping the top
stitch facing the same direction. Use two
strands for French knots in the quotation
and one strand for the backstitch, using
the shades given on the chart.
31 have added some simple words
in the garland at tire bottom of the
toe/w. \cec//e L/o/c/
border but feel free to add
your own words, or date
and sign the sampler
in this space - see
page 98 for a charted
backstitch alphabet.
When stitching is complete,
check for missed stitches,
remove tacking (basting) and mount
and frame as preferred (see page 100).
Wadding (batting) has been used to give
the sampler an attractive padded look.
If adding names and dates to
samplers or stitching your own
messages, it is best to plan the
lettering out on graph paper first,
to ensure it fits the space available.
Illll llllllllll llllllllllllllllllllllllllllIIIIHII1IIIIHIIIIIIIIIII
Using part of the border motif from
the chart on page 29,1 have created a
pretty needle fold, which has a folded
hem and is lined with blue felt. I have
added some needle types in backstitch,
which helps to keep my gold-plated
needles in order (see picture top of
opposite page). This project needs to be
worked on linen if you intend to work
the folded hem.
Stitch count 71 x 46 flower vase motif
Design size 12.5 x 8.25cm (5 x 3'Ziin)
You will need 35.5 x 18cm (14 x 7in)
light stone 25-count Dublin linen
(Zweigart shade 52) • dark blue felt •
a small button for fastening
24 • ALPHABET SAMPLERS
Work the needle fold design in the centre
of the fabric, using two strands of stranded
cotton (floss) for cross stitch and one strand
for backstitch.
Count four fabric threads from the lop
and bottom of the stitching and work a
row of four-sided stitch over four
fabric threads, using two
strands ofcream. Steam
press the embroidery with
some spray starch prior to
working the hemstitch.
Work the hemstitch
by first measuring 7cm
(2 Um) from the four-sided
stitch towards the raw edge and
removing one fabric thread. Do the same
al the other end of the stitching. On each
long side, count four threads outwards from
the stitching and remove one
fabric thread. Work a folded
hem around the whole design
(see page 93 for stitching a
folded hem), checking that
when the flaps are folded to
the back they meet in the
middle. If desired, add
the backstitch writing
to the needle fold as
shown in the picture
below - see page
98 for a charted
backstitch alphabet.
Lay the hemmed
stitching right side down and cut
a piece of felt as a lining. Using a sharp
needle, hemstitch the felt inside the project,
re-using the holes made when the hemstitch
was first worked. On the right side, using
dark blue thread, work one row' of counted
chain stitch using the hemstitch holes. To
fasten the needle fold, add a pretty button
and a button loop (see page 89).
' s„ I ccessaire
1 have used the lovely vase and flower motif on the front of this simple sewing
roll formerly known as a necessaire or httssif, which is a case with pockets for
small tools and certainly useful for keeping pins, scissors and a few needles.
The design can be worked on linen or Aida.
Stitch count 120 x 46 Design size 21 x 8.25cm (8'/а x З'/ат)
You will need 30.5 x 15cm (12 x 6in) beige 28-count Perleinen (Zweigart shade
53) • beige 32-count Belfast linen (shade 345) for pockets • polyester wadding
(batting) • dark blue luring fabric • bias binding (bought or homemade)
Work the design in the centre
of the fabric, using two
strands of stranded cotton
(floss) for cross stitch and
one forbackstitch. You could
also add some flower motifs
to the pockets faces prior to
making up. as shown here.
To make up the necessaire,
cut a curve to the top of the
stitching - a small plate will
help achieve this rounded
shape. Using the embroidery
as a template cut lining fabric and polyester
wadding (batting) to match.
To make the tw-o pockets, cut two pieces
of linen 15 x 9cm (6 x 3!Ain) and bind one
straight edge on each pocket (see making
bias binding page 101). Lay the pocket
sections on the lining, right sides together.
Stitch the pocket to the lining
with one straight seam each,
so that once pressed you can
turn the pocket upwards and
tack (baste) in position, thus
hiding the straight seam.
Now' sandwich the cross
stitch, wadding (batting) and
linen lining together, right
sides out and pin carefully.
Ideally, zigzag around the
edge of the whole project
and trim away excess fabric.
Bind the short straight edge with bias
binding. Attaching bias binding around the
rest of the necessaire will ncaten the edges
and also complete the pockets. To attach
binding, either machine first on the wrong
side and then top stitch down on the right
side, or vice versa.
ALPHABET SAMPLERS • 25
TOP LEFT
DMC (ANCHOR)
Cross stitch
₽₽ 223 (10) L L L L 172 (293) HiH H'H 738 (880)
:: 224 (.1021) Y Y Y Y 676 (301) s 930 (1036)
it 316 (76) 712 (2) 931 (978)
137 (891) 729 (306) ECU Lft3 3011 (277)
French knots
3012 (365) gg 3740 (972) • 3011 (277)
7, 3013 (278) :c 3752 (1037)
gg 3041 (1027) £ 3777 (20)
Ц 3721 (29)
(}ц/м /о f/te
Wondering about the stories that samplers eould tell us
about people of past eras is one of the fascinating aspects of studying
antique samplers. I can still remember a visit in the early 1990s to an exhibition at the
Metropolitan Museum in Los Angeles. USA, where the antique alphabet samplers were so
beautifully stitched that I did not pick up a needle for weeks! One of the samplers, worked
by a twelve-year-old girl, had been stitched by moonlight
and I often imagine what her life was like.
ALPHABET SAMPLERS • 27
DMC (ANCHOR)
Cross stitch
£₽ 223 (10)
t+ 224 (1021)
11 310 (76)
vv 437 (891)
tt 172 (293)
Y-? 070 (301)
t: 712 (2)
11 729 (306)
Srt 738 (880)
ffi 930 (1036)
£3 931 (978)
Й0 3011 (277)
•• 3012 (365)
3013 (278)
И ЗОН (1027)
|g 3721 (29)
ffi 3740 (972)
:: 3752 (1037)
ffi 3777 (20)
French knots
• 3011 (277)
BOTTOM RIGHT
ALPHABET SAMPLERS • 29
Map samplers were commonly worked in educational establishments, Eke. charity schools, orphanages
and in more affluent schools as a method of teaching geography, spelling and diligence. As well as
country maps, children worked county maps, village plans and designs based on a local farm or estate.
The map of Europe above is one of the finest samplers in my collection and another antique-fair
find.The dealer wasn’t really interested in textiles and didn’t push the price too high. 1 was thrilled to
find that all the names, longitude and latitude and the border were worked in tiny stitches on linen.
IL was, however, worked on a pre-printed fabric rather than being a counted example. Another charming
element of map samplers are the ships, sea monsters and mythical creatures that often fill the oceans
- always an inspiration to a stitcher and an idea I have used in my map sampler, opposite.
Map of England Sampler
This sampler started life some years ago when my husband kept nagging me to design a sampler
based on the old ‘real’ comities of England. In the end I suggested that he went away and design it
himself! The map part of tins sampler is Ins creation and I have added the very decorative border
to echo the map samplers in my collection. I have a number of maps, all in various stages of
disrepair, all with different borders and decorative motifs. 1 love the little boats and sea monsters
that are often seen in antique maps both stitched and as old prints. My sampler was worked on
28-count linen but it could also be worked on 14-count Aida.
North
(cotlcml
Dwha1
[wnber.
yorkshire
•hrthii
Norfolk
Wfoit
pre
;o«te
•omerset.
Die tn jlish Channel
•Lincoln
shire
shire
Jfchire
'Vlales^Shi, Ji
Д Oewon
ornl f*
11ог’ЬЙи^Щ2Кг~.
shireJF Sussex
Map of England Sampler
Stitch count 219 x 196
Design size 40 x 35.5cm (15Й x 14m)
.Ulllllllllllllllllllllllliuilllllllllilllllllilllllllllllllllllillllllllilllililb
You Mil need
53 x 48cm (21 x 19in) ivory
28-count Cashel linen
(Zweigart shade 224)
=
Stranded cotton (floss)
as listed in chart key
iiiiiiiiiiiilifiiiiiiiiiiiiiiiiiininiiiiliiiiiiiniiiiiiiiF
Tapestry needle size 24
MAP SAMPLER
Maps are a fascinating source of
material for stitchers and non-stitchers
alike. 1 know from personal experience
that even non-stitching men like to
mess with maps. Using tracing paper,
pencil and eraser, my husband charted
my first cross stitch map kit over 20
yearn ago.You need to start with a good
outline of the area you intend to chart
and remember to keep the chart simple
- details can be added as you stitch.
I have charted and stitched a map of the
United States of America (shown right)
using the same border and ship motifs
as the English map.There isn’t enough
room to include the chart here but it can
be obtained from The Cross Stitch Guild
(see Suppliers page 104).
IFold the fabric in four and mark the
folds with Lacking (basting) stitches.
Oversew or hem the raw edges of the
fabric to prevent fraying.
Beginning at the
centre of the chart
and fabric and
using a loop
start (page 11),
follow the chart
on pages 34-37.
2 Work over two linen
threads (or one Aida block) using
two strands of stranded cotton (floss) for
full and three-quarter cross stitches, and
keeping the top stitch facing the same
direction. In order to keep your place
Map of the l'S. \ sampler - chart available from The Cross Stitch Guild (seepage 104).
on the chart you may find it helpful
to backstitch the county names as you
complete each one. Use one strand only
for the backstitch in the
counties using the shade
given on the chart.
I1 Use two strands for
the backstitch for
Scotland, Wales and
the sea names.
3When the stitching
is complete, check
for missed stitches, remove tacking
(basting) and mount and frame as
preferred (seepage 100). Wadding
(batting) was used to give the sampler a
nice padded look.
32 • MAP SAMPLERS
. T/oater //СеаП Ga/G
This pretty motif has been adapted from the main chart
(see chart below).The stitching has been frayed and
applied to the card as a patch trimmed with pink ribbon.
The design could be worked on linen or Aida.
Stitch count 30 x 43 Design size 5.5 x 8cm (2'/t x 3in)
You will need 12.5 x 15.25cm (5 x Gin) candy pink
28-count Cashel linen (Zweigart shade 443)
• single-fold card • decorative paper • craft glue
• double-sided adhesive tape • ribbon to trim
Using a loop stall (page 11), work from the centre of the chart and
fabric over two linen threads (or one Aida block) using two strands
ofstranded cotton (floss) for cross stitch and one for backstitch.
Using craft glue, cover the front of the card with decorative
paper. Trim the fabric to within 2.5cm (I in) of the embroidery all
round, fray the edges and (ix the patch to the card with double-
sided tape. Trim with pretty ribbon as desired.
D.MC (ANCHOR)
Cross stitch
3i5 <65) :: 676 (3oi) z: 3727 (юз)
S® 316 (7(5) '»37 (269)
470 (256) И 3363 (239)
G/raoe//er\ G/a/es Gan/
For this attractive card I have used a ship from the map
sampler, repeating and adapting it and adding some text (see
chart below). The card is made using decorative paper and
plain card. The design could also be worked on Aida.
Stitch count 19x 41 Design size 3.5 x 7.5cm (114 x 3in)
You will need 12.5 x 15.25cm (5 x Gin) tea-dyed 28-count
Cashel Vintage linen (Zweigart shade 3009) • single-fold card
• decorative paper • craft glue • double-sided adhesive tape
Using a loop stan (page 11), work from the centre of the chart and
fabric. Work over two linen threads (or one block of Aida) using
two strands of stranded cotton (floss) for full and three-quarter
cross stitch and one strand for backstitch.
Using craft glue, cover the front of the card with decorative paper.
Trim the fabric to within 2.5cm (lin) of the embroidery all round,
fray the edges and fix the patch to the card with double-sided tape.
MAP SAMPLERS • 33
Sandwvsdvw
(OS) LLl£ II
tali) ssz,c it
(eoi) zzlc z:
(gcs) race И
(69S) лее gg
(6st) see "
(sz.6) ice
(9£0l) oeo ffi
(9ИН) It’S
(M’6) OPS
<c) cu :t
doc) 949 ::
(9SS) О4Г
(t-6) дге И
(848) Z.IC ffi
(94) эк ;;
(99) SIC
(cot') OlC 08
tpips ssoiq
(mohonv) :л\(1
TOP LEE!
ГОР RIGHT
I have a lew map samplers, all slightly different -
some counted, some on pre-printed fabrics. The counted ones
arc particularly charming, with the child's home town and
nearby villages marked but major cities like London leii out
altogether. One can imagine that, when the world was a
smaller place, if you lived in the York area, you
would know of local towns but have little knowledge
of the rest of the country.
MAP SAMPLERS • 35
BOTTOM LEFT
DMC (ANCHOR)
Cross stitch
ffi 310 (403)
H 315 (65)
316 (76)
ffi 317 (878)
327 (94)
170 (256)
676 (301)
❖ ❖ 712 (2)
840 (911)
H 841 (1046)
ffi 930 (1036)
H 931 (978)
932 (129)
ЙЙ 937 (269)
3363 (239)
Z_ 3727 (103)
J ’ 3752 (1037)
3777 (20)
36 • MAP SAMPLERS
BOTTOM RIGHT
—
1
The very idea of darning, particularly darning socks, leaves me cold but pattern darning for fun is so
satisfying. Over Hie past years. 1 have Гош id two darning samplers to add to my collection. Surviving
examples are generally dated 1770-1820 and are found in the UK, Germany, Holland and Denmark.
The Adam and Eve darning sampler (above) was stitched in Germany, probably in an orphanage by
the children. Each darning pattern was stitched by a different group of children using the most delicate
and tiny stitches imaginable and then signed with their initials. It is worked on very fine linen and in
some cases worked over one thread of the I'abric. 1 bought the sampler from an avid textile collector
whilst visiting a trade fair in Germany. I was quite unable to resist the charming Adam and Eve motif in
the centre and all the gorgeous patterns, some of which feature in ray own darning sampler.
Gardenia Darning Sampler
Darning samplers vary enormously in their character and decorative elements, so my version
(shown right) is really a combination of designs I have seen and patterns from my own collection. I
have used a Hower outline that could be used as a cross stitch or blackwork pattern (see the baud
sampler on page, 80 for ideas) or filled with darning patterns. You can follow my version or work
the backstitch outline of the Hower and fill the petals with your own patterns. During stitching I
found that once a lew rows of the pattern were in place 1 no longer needed the. chart because you
can see where you are supposed to be. The sampler can really only be worked on linen as some of
the patterns are worked over one fabric thread.
Gardenia Darning Sampler
Stitch count 162 x 155
Design size 30 x 28cm (111/> x 11 in)
.Uilllllllllllllllililllllllllillllillillllllllllllllllllllllllllllllllllllliillllb
You will need
^iiinillliiillllllllllllllllllllllllllllllllllllllllllllllll
40.5 x 40.5cm (16 x 1 Gin) ivory
28-count Cashel linen
(Zweigart shade 224)
Stranded cotton (floss)
as listed in the chart key
Tapestry needle size 24
DARNING PATTERNS
As you can see from the small projects
on the opposite page, pattern dams are
very attractive in their own right and
make excellent decorations for small
items.You could experiment with a few
of the patterns supplied in the main
chart on pages 42-45 using different
colourways. If you want to create a
more complex project, why not select an
outline of a flower or an abstract pattern
of a little house shape and fill this with
different darning patterns? It is a good
idea to start the pattern hi the centre
of a designated area and then allow tire
pattern to fill the space.
To create your own darning patterns
treat yourself to some large-squared
graph paper so you can draw lines using
coloured crayons. The large squares
will enable you to draw lines on tire
lines and also in Lire spaces. If you are
using computer charting software you
can really let yourself go by using any
existing cross stitch patterns and, after
deleting the cross stitch, filling in the
voids with your own choice of coloured
pattern darning.
I Fold the fabric in four and mark Ute
folds with tacking (basting) stitches.
Oversew or hem the raw edges of
the fabric to prevent fraying.You
may find using an embroidery frame
helpful as the stitches are worked over
different numbers of fabric threads.
2Using a loop staid (page 11) and
following the chart on pages
42-45, work over two Linen
threads, beginning with the
gardenia outline in backstitch
(or Holbein stitch) using two strands
of stranded cotton (Hoss). To check your
position as you stitch, work each petal
outline completely, making sure you are
returning to the correct place every time.
Add the cross stitch stem to the flower.
using two strands and working over two
linen threads.
3Using one strand, start to work the
darning patterns in the Hower, a petal
at a time, working in straight rows of
running stitch (not backstitch). Once the
Hower is finished, work the rest of the
darning patterns in a similar way,
working over the fabric threads indicated
on the chart.
4Finally, work the border using two
strands for full and three-quarter
cross stitch and one for backstitch.
5When the stitching is complete,
remove tacking (basting) and mount
and frame as preferred (see page 100).
Alternatively, create a hemstitched edge
as described on page 93.
/(>/'
Darning patterns are perfect for
decorating cards, especially if you
like to create your own cards as I do.
Since the growth in paper crafts and
rubber stamping you can buy the
most beautiful handmade papers and
cards so have a go al creating your
own. 1 keep a box of useful ribbons,
decorative papers and even buttons
handy just in case. Once stitched, the
darning patterns can be mounted in
an aperture card or fixed as a patch
to the front of a car’d (see page 101).
40 • DARNING SAMPLERS
[Aecorcrhoe G)a/w Gftoo//n(i/7?
Stitch count 13 x 30 Design size 2.5 x 7cm (1 x 2%in)
You will need 5 x 18cm (2 x 7in) antique white 25-count Dublin linen
(Zweigart shade 101) • plain card • two decorative buttons
• double-sided adhesive tape • twisted cord
using double-sided tape. Sew some thread
through the button holes and stick them to
the bookmark, adding twisted cord.
This bookmark uses a darning pattern from the main sampler, which was then
hemstitched and stuck to plain card. For a finishing touch add two decorative
buttons and a twisted cord (sec page 101). The design can only be worked on linen.
Using one strand of stranded cotton (floss),
work the darning patterns in straight rows
of running stitch using the chart on page 44
and extending the pattern by two zigzags.
When complete, press on the wrong side
using spray starch and hemstitch the edge.
Cut card slightly larger than the embroidery
and trim the embroidery to the hemstitched
line (see diagram) and stick it to the card
Weco/wtwe &<?/// Goa&ter
This pretty coaster features one of the darning patterns
from the main sampler. The embroidery was trimmed and
the edges frayed up to a simple interlaced border. The
design needs to be worked on linen.
Stitch count 41 x 42 Design size 8.25 x 8.25cm (314 x 3'Ziin)
You will need 15 x 15cm (6 x 6in) antique white 25-count
Dublin linen (Zweigart shade 101)
Using one strand of stranded cotton (floss), start to work the
darning patterns in straight rows of running stitch, changing
colours as shown on the chart on page 44.
When complete, press on the wrong side using spray starch.
Create the interlaced border by counting four fabric threads from
the stitching and removing two threads. Repeat on all sides. Using
a large needle and all six strands of blue stranded cotton (floss),
weave the thread under and over three fabric threads, overlapping
at the corners as shown. Work a row of white backstitch invisibly
outside this blue border to prevent further fraying, then trim the
edge and fray to within four threads of the blue border.
DARNING SAMPLERS • 41
3721
729
fw
10с“Шио1
•|И“«
S.oBS»ii«Siel
TOP LEFT
DMC (ANCHOR)
Cross stitch Running stitch (backstitch for border)
470 (978) — 223 (10) = 729 (1018) — 3041 (65)
± 729 (1018) — 315 (256) — 930 (1036) — 3721 (306)
№ 930 (1036) — 470 (978) — 931 (29) — 3830 (39)
931 (29)
42 • DARNING SAW>1£RS
DARNING SAMPLERS • 43
J.H01H dOl
BOTTOM I.EFT
DMC (ANCHOR)
Cross stitch Running stitch (backstitch for border)
:: 470 (978) — 223 (10) — 729 (1018) — 3041 (65)
ZZ 729 (1018) — 315 (256) — 930 (1036) — 3721 (306)
S 930 (1036) — 470 (978) — 931 (29) — 3830 (39)
И 931 (29)
44 • DARNING SAMPLERS
BOTTOM RIGHT
Our clothes today are much
more durable than in earlier limes thanks to
modem textiles, so darning is not considered a necessary
skill. In past times, this skill was valued highly and
sampler makers demonstrated this with wonderful pieces
of work. I have seen a darning sampler from this period in
a gallery priced at £36,000! Having said that, 1 have seen
some remarkable modem darning done by a tailor in the
Cotswolds, England, an expert in real pattern
darning involving the recreation of tweed.
DARNING SAMPLERS • 45
< \/)о/ .
Spot motif samplers were stitched during the 17th century in Britain as a record of stitches and
patterns and also for applique for garments and furnishings. Many individual designs were stitched
on. one piece of fabric and rolled and stored in a drawer until more stitching was added.
I’m not lucky enough to own a 17th century motif sampler but do have some antique samplers covered in
random patterns. Sarah Hubbard’s pretty sampler (above) has all sorts of motifs including birds, animals,
trees and Howers. 1 bought it unframed and with many moth holes, which are now barely visible after some
attention. What isn’t obvious at first glance is that the design is worked, in just reds and greens, proving you
do not have to use dozens of colours to create a lovely effect. When Sarah stitched this sampler she hadn’t
quite mastered the counting and occasionally runs out of fabric: this just adds to the charm and increases
my affection for the piece. 1 have tried to bring this sense of naive charm to my Own spot sampler design.
Garden of Eden Motif Sampler
Inspired by Sarah’s intermingling of motifs, I have taken an Adam and Eve motif from one of
my antique darning samplers (see picture on page 38) and then added lots of my favourite cross
stitch and counted patterns in the same way that a stitcher might have done in the 17th century,
although I have worked most of the design in pure cross stitch rather than using many different
stitches. I have included a small hemstitch square in the main design and a few additional stitches
that must be worked on evenweave rather than Aida. If .you prefer you could replace the hemstitch
square with a cross stitch motif, perhaps of your own design.
Garden of Eden Motif Sampler
Stitch count 170 x 280
Design size 31 x 51cm (12 x 20in)
.uiiiiiiiiiiiiiiiiiiiiiiiiiiiiiiiiiiuiiiiiiiiiiiiiniiiiiiiiiiiiiiiiiiiiiiiiiiiiib
You will need
43 x 64cm (17 x 25in) light beige |
28-count Cashel linen
(Zwcigart shade 345)
Stranded cotton (floss)
as listed in the chart key
Tapestry needle size 24
E
itiiiiiiiiiiiniiiiiiiiiiniiilllliiitllillllllillllllliiiiiiilliiiiiiiiiniiF
iiiiiiiiiiiitntiiiiiiitiiiiiiiiiiiiiiiiiiiiiiiiHiiiniiiiiF
SPOT SAMPLER
For the modern embroiderer, spot
samplers are the perfect answer: just
collect together all your favourite
motifs and then work them all over
the fabric with no attention to subject,
scale or symmetry - pure indulgence!
These types of samplers are the perfect
medium if you want to experiment with
designing for yourself because anything
goes. This process is even easier if
you have cross stitch design software,
because you can cut and paste motifs
to your heart’s content; flip them, rotate
them, repeat them - whatever looks
pleasing. You can then choose which
colours work best when you are happy
with tlae overall shape and balance of
the design.
IFold the fabric in four and mark the
folds with tacking (basting) stitches.
Oversew or hem the raw edges of the
fabric to prevent fraying. Beginning al
the centre of the chart and fabric and
using a loop start (page 11), follow the
chart on pages 50-53. Refer to the Stitch
Library for working the stitches.
2 Work over two linen threads using
two strands of stranded cotton (floss)
for full and three-quarter cross stitches.
Work queen stitches and French knots
using two strands. Add the backstitch
in one strand, in the colours given on
the chart. 11' you are not working the
hemstitch square, move on to step 6.
3Working a hemstitch square: using
two strands of cream, work a square
of hemstitch as shown on the chart,
counting each side carefully. As you turn
a corner, count the last stitch on one row
as the first on the next to avoid working
a rectangle! Finish off waste thread.
4You can now cut the fabric threads.
To ensure that you cut the correct
ones you may find it helpful to run a line
of tacking (basting) threads through the
square as shown in the diagram. Count
to the centre of the hemmed area and
snip alternate pairs. Carefully unravel
the cut threads from the middle to the
hemstitched edge, leaving a two-thread
border at the sides. On the back of the
work, loosely lack (baste) these threads
out of the way - to be dealt with later.
Above: working the hemstitch square;
below: position of the satin stitch border.
5To decorate the remaining threads,
wap each pair with one strand of
cream, adding dove’s eye stitches as you
wrap. To complete the square, use two
strands of cream to work one row of
satin stitch around the square. Remove
the tacking and snip off fabric threads.
6If you are not working the hem-
stitched square, fill the space with
another motif. The space is about 20 x 20
stitches so try one of the rosebuds from
the Berlin Swallows sampler chart page
66 or a star from the Bristol Orphanage
sampler chart on page 58, changing the
colour as you please. Alternatively, design
your own motif to fit the space.
7 When stitching is complete, remove
tacking (basting) and mount and
frame.Wadding (batting) gives the
sampler a nice padded look.
/ii/)/)о /г &а/7а/гс7 \ссс//с ffto//
The cross stitch motif on this pretty needle roll has been taken directly from
the main chart on page 50 and is easily made up. The design needs to be
Improving verses and moral
stitched on evenweave if you intend to work the hemstitching.
quotations have featured on many samplers
Stitch count 32 x 41
Design size 5.8 x 7.5cm (214 x 3in)
You will need 20 x 12.5cm (8 x 5in)
pale, peach 28-count Cashel linen
(ZweigarL shade 448) • polyester
wadding (batting) • ribbon
Using a loop start (page 11). work from the
centre of the charted motif and fabric. Work
over two linen threads using two strands of
stranded cotton (floss) for cross stitch.
To make up the roll, work a row of
hemstitch along the short side using two
strands of matching stranded cotton (floss).
Trim to the stitching (see diagram on page
41). Fold the long sides together, folding
over the centuries. Sarah Hubbard's advice al
the lop ot her sampler is a good example.
Have communion with few.
Be familiar with one,
Deal Justly with all.
Speak evil of none.
in the raw edges, and
slipstitch together to form
a tube. Fill the tube with polyester
wadding (batting) until fairly firm. Halfway
between the cross stitch and the hemstitch,
run a line of gathering stitches around the
tube, pull tightly to gather and finish off.
Tie ribbon around the gathers and trim
neatly. Repeat for the other end of the tube.
Many spot motif designs were
stitched during the 17th century and surviving
examples of this genre are very collectable and fetch
enormous prices al auction. Spot or random motif
samplers could include a wide range of subjects
including birds, animals, mythical beasts, fish, trees,
plants and flower designs. These were all worked as
individual motifs bearing little or no relationship
to each other - an insect could appear larger
than a rabbit all adding to the
. Hower (!T&ctare
Tliis sweet little picture has a pure
cross stitch motif taken from the
main chart on page 51, which
has then been framed
diagonally. The design
could also be worked
on 14-count Aida
if you prefer.
Stitch count
49x41
Design size
9 x 7.5cm (3’4 x 3in)
You will need
18 x 20cm (7 x 8in) candy
pink 28-count Cashel linen
(Zweigart shade 443)
Using a loop start (page 11), w'ork from the centre of the
charted motif and fabric. Cross stitch over two linen
threads (or one Aida block) using two strands of
stranded cotton (floss).
Check for missed stitches and then mount
and frame as preferred (see page 100).
charm of the work.
SPOT MOTIF SAMPLERS • 49
SPOT MOTIF SAMPLERS
TOP LEFT
BOTTOM LEFT
SPOT MOTIF SAMPLERS • 51
DMC (ANCHOR)
Cross stitch
223 (10) @| 351 (33) SI 470 (256) 743
:: 224 (1021) 2* 353 (1020) tt 471 (279) X X 744
iS 327 (94) SS 367 (245) ffi 632 (20) SI cC 758
349 (335) Ц 136 (363) 7, 712 (2) 840
U 350 (333) St- 137 (891) 729 (306) 926
(289) ffi 930 (1036) Si 3012 (365) h![ 3364 (265)
(292) la 931 (978) j!j 3041 (1018) 3721 (29)
(36) 932 (129) :: 3042 (390) Si 3772 (1049)
(944) 937 (269) Я 3053 (264) Bl 3777 (1005)
(208) : : 95i (926) 3363 (239)
French knots
« 729 (306)
• 840 (944)
• 930 (1036)
® 3042 (390)
52 • SPOT MOTIF SAMPLERS
TOP RIGHT
BOTTOM RIGHT
SPOT MOTIF SAMPLERS • 53
D.MC (ANCHOR)
Cross stitch French knots
В 223 (10) +t 351 (33) H 470 (256) ♦ | 743 (289) EB 930 (1036) 3012 (365) H 3364 (265) 729 (306)
e e e б 224 (1021) * » 353 (1020) В 471 (279) x> 744 (292) Ц 931 (978) 3041 (1018) 3721 (29) 9 840 (944)
327 (94) 367 (245) ffl 632 (20) В 758 (36) $ 932 (129) • • 3042 (390) Ц 3772 (1049) 9 930 (1036)
349 (335) 436 (363) " 712 (2) ZJ 840 (944) ffi 937 (269) 3053 (264) 3777 (1005) 3042 (390)
350 (333) 0 4 437 (891) 729 (306) 926 (208) Й 951 (926) R 3363 (239)
The idea of working a sampler in one colour, particularly red, isn’t new as they have been popular in
France and Germany for years. You can see a line example of a French sampler worked in red on
canvas on page 8 and if you look in needlework shops in Europe, they are still as popular today.
11 was when I found this red sampler worked by Catherine Archer (above) that I lirst heard of the
George Muller Foundation and realized that Catherine’s sampler had been stitched while she was living
at Ashley Down Orphanage, one of the Muller orphanages in Bristol. England (see Links to the Past,
page 61). Red samplers are popular in Europe but if you prefer another colour choose one that works
with your furnishings and have tire background fabric to hand to see how this affects the finished piece.
Inspired by Catherine’s work, I have charted sections of her sampler for my Bristol Orphanage sampler.
Bristol Orphanage Sampler and Italic Alphabet Cushion
For my alphabet sampler I used one of Catherine’s upper case alphabets, one lower case and some,
repeating border patterns. Catherine worked her design on fabric 40 threads to 2.5cm (lin) and
over one thread! My sampler is cross stitched over two threads of 32-counl linen - easier on the eye!
The italic alphabet cushion was inspired by the ornate alphabet Iran the French sampler on page 8.
The original was stitched on canvas but I have used traditional unbleached linen.The italic
alphabet design would make a great framed picture but for variety I’ve shown it made up as an
inset cushion, with a bright cotton lace trim. Both designs can be worked on linen or Aida fabric.
_, ^s0'S4-,
iSrs 3ra ^=
*"®^ * SZJH* *r4*7 *K?Wr IXf чСлгр pP.t 'KJHr 11?
_к?Х1 т?
^£%й£Д*И«HJbCjL*мДУТ... JWL Ай Ку| h .< к 4
'.'2
Bristol Orphanage Sampler
Stitch count 159 X 136
Design size 25.5 x 21.5cm (10 x 8!4>in)
jjllllilllllllllllllllllllllllllllllillllllllllllllliilllllllllilllillllliililllllb
You will need
38 x 33cm (15 x 13in) cream |
32-count Belfast linen
(Zweigart shade 223)
Stranded cotton (floss)
as listed in the chart key
Tapestry needle size 26
liiiiiiiiiiiiiiiiiiiiiiiiiiiiiiiiiiiiiiiiiiiiiiiiiiiiiiiiiiii
IFold the fabric in four and mark the
folds with tacking (basting) stitches.
Using a loop start (page 11), work from
the chart overleaf starting at. the cent re
of the chart and fabric.
2 Work all the cross stitch over two
linen threads (or one Aida block)
using two strands of stranded cotton
(floss) for the cross stitch and keeping
the top stitch facing the same direction.
3When the stitching is complete,
check for missed stitches, remove
lacking (basting) and mount and frame
as preferred (see page 100). Wadding
(batting) was used to give the picture an
attractive padded look.
COLOUR SCHEME
Il is easy and fun to stitch an alphabet
sampler in a different colour, perhaps to
match the furnishings or colour scheme
of a particular room. For example, see
the little red sampler on the opposite
page which has been worked in an
attractive blue shade. You will find it
useful have the embroidery fabric you
plan to use as the background in order
to see how this affects the finished piece
- for instance, a creamy fabric colour
may work better than a bright white if
you prefer subtlety over drama.
56 • RED SAMPLERS
fffauo y(A)/a6et Cvm'/zo/?
This design is very simple to stitch on either linen or
Aida fabric. It has been given extra impact by being
made tip as a cushion with a striking cotton lace
trim but see page 100 if you prefer it as a picture.
Stitch count 90 x 109
Design size 17.5 x 33cm (7 x 13in)
You will need 30.5 x 46cm (12 x 18in)
unbleached 26-count Dublin linen (Zweigart
shade 11)» checked fabric and lace trim if
making up as a cushion
Fold the fabric in four and mark the folds with
tacking (basting) stitches. Using a loop start
(page II), work the cross stitch from the chart
on page 60, starting at the centre of the chart and fabric. Work over two
linen threads (or one Aida block) using two strands of stranded cotton (floss).
When complete, make up as a cushion as described on page 101.
!( У
Fold the fabric in four and mark the folds with tacking (basting)
stitches. Using a loop start (page 11), work the cross stitch from the
chart on page 61 starting at the centre of the chart and fabric. Work
This simple little alphabet is worked on unbleached linen
and has an attractive drawn thread border, which means
it needs to be worked on linen. I have also worked another
version using a blue thread on ivory' linen. If you prefer
to work on Aida, by one of the Zw eigart Vintage Aida
fabrics for an antique feel. You w ill need to omit the zigzag
hemstitch border but the design will still look charming.
Stitch count 53 x 81 excluding hemstitch border
Design size 10 x 16cm (4 x 6% in)
You will need 30 x 36cm (12 x 14in) unbleached
26-count Dublin linen (Zweigart shade 11)
over two linen threads using two strands of stranded cotton (floss).
When complete, add the optional zigzag hemstitch border.
Working a zigzag hemstitch border: From the middle of one
of the long sides, count four fabric threads from the edge of the
stitching and using sharp, pointed scissors, cut six horizontal fabric
threads. Carefully unpick the threads, working in pairs, to the edge,
matching at the corners. Remove one fabric thread completely,
creating a ladder in the fabric. Using a size 22 needle, re-weave the
neighbouring thread into the edge of this ladder. Do not attempt
to remove more than one thread at a time as the reweaving will be
much less effective. Repeat on all corners. Work zigzag hemstitch
(page 97) around the edge using two strands of stranded cotton
(floss) that match the fabric colour. When the design is complete,
stretch and mount it as a picture (see page 100).
REDSAMPLERS • 57
58 • RED SAMPLERS
Bristol Orphanage Sampler
DMC (ANCHOR)
Cross stitch
В 321 (9046)
smnawvs (1?ш
HI£D SAMPLERS
„В1Ш1
^ПВЯВШВЯВ!
иа.а1
Italic Alphabet Cushion
DMC (ANCHOR)
Cross stitch
| 347 (9046)
Six threads removed lor zigzag hemstitch border
__1— 1_____________________________I _L_L_l__L_
LiLtle Red Alphabet Picture
DMC (ANCHOR)
Cross stitch
| 304 (47)
gt £/* ЛК/,*J
£g h A$T
jAl®aij|gT5t«
George Miiller was born in 1805 in Prussia
(now Germany). By his own admission he was a liar
and a thief who stole from his family and friends and spent time in
prison. However, in November 1825 he was converted to the Christian faith ?'
and his life took a completely new track. In 1829 Miiller travelled to England ИЙИ
to work as a missionary and it was in England that he started his extraordinary
work amongst die orphaned children of Bristol. In 1836, Miiller opened his first
house for 30 girls and over the next 35 years, he opened five orphanages on
Ashley Down. Bristol, housing more than 2,000 children altogether. All Miiller
children were smartly dressed, well fed and educated. Boys stayed
in the orphanages until they were 14. girls until they were 17. When
they left the orphanage all children were found employment
and given clothing and a bible.
RED SAMPLERS • 61
I have a number of samplers worked in Berlin wool, till on canvas with unstitched backgrounds. The
brightly coloured woolwork sampler by Anne Jones (above) was purchased on eBay, the auction website.
Beautiful hand-painted woolwork charts first came into Britain in about 1810, with a range of Berlin
woollen threads, known as such because they were produced in Berlin, an important centre for dyeing in the
early 10th century'.These charts are now very collectable and sought after by dealers and embroiderers.
Ann Jones’ sampler is stitched on double canvas and although it is quite naive and not particularly
well stitched, it demonstrates the qualities of Berlin wools very clearly. Although stitched in 1875, it. is
still vivid and colourful. The unlikely flowers, animals, birds and brightly coloured baskets of fruit are
delightful and I wanted to capture the lively, colourful quality of this work in my own design.
Berlin Swallows Sampler
1 wanted to create a design that had the freshness, simplicity and bright colouring of Anne Jones’
work, and having collected original Berlin patterns for some years it seemed an excellent idea
to use some of these to compose the colourful swallows sampler shown opposite. I worked die
sampler using stranded cottons (floss) rather than wools (yams) as this is my personal preference,
but you could use tapestry wools if you prefer. You will notice that the project is completely free
of backstitch outline except on the swallows’ breasts, as a lack of backstitch is a feature of the
original Berlin patterns.The design could be stitched on evenweave or Aida fabric.
Berlin Swallows Sampler
Stitch count 177 x 247
Design size 32 x 45cm (12W x 17 Win)
DIIIIIIIIIIIIIIIIIIIIIIIIIIIIIIIIIIIIIIIIIIIIIIIIIIIIIIIIIIIIIIIIUIIIIIIIIIHIIIb
Illi llllll I tllltllllll llllllll III 111 Uli I llllllll Hilllll III I
You will need
43 x 56cm (17 x 22in) oatmeal
27-count Perleinen
(Zweigart shade 53)
Stranded cotton (floss)
as listed in the chart key
Tapestry needle size 24
1
£
I
=
E
i
nitiiiimtiinitiintiniiTiitmini
iiiiiitiiiiiiiniiitinniHiiiiiiiiiiiinnr
IFold the fabric in four and
mark the folds with
tacking (basting) stitches.
Using a loop start (page 11),
work from the chart on pages
66-69, starting at the centre of
the chart and fabric.
2 Work over two fabric threads (or
one Aida block) using two strands
of stranded cotton (floss) for the cross
stitches. Remember to keep the top stitch
lacing the same direction.
Add the backstitch to the
birds’ breasts in one strand
of DMC 824 (Anchor 134).
3When the stitching
is complete, check
for missed stitches, remove
tacking (basting) and mount
and frame as preferred (see page 100).
Wadding (batting) was used to give the
picture an attractive padded look.
BERLIN PATTERNS
I think the secret of Berlin patterns is
tlie choice of striking colours and tlie
complete lack of backstitch. When
planning your own stylized piece,
remember to use lots of shading in
leaves and petals and no backstitch!
You will need a stranded cotton (floss)
shade card so that you can shade
successfully - these are available at craft
stores or from thread manufacturers. For
instance, when shading a leaf you would
use four or five complementary greens
to create, a realistic effect .
о/Q6e/7///
I have selected four posies from the main chart to produce these exquisite little
pictures. They arc stitched in the same way, so there is one set of instructions,
with individual stitch counts and design sizes. The designs can he worked on
linen or Aida fabric and can face in any direction, so would be perfect for table
linen. I worked each flower on different fabric but have used the same frame to
link the group together.You could work the flowers on one piece of fabric.
We/
Stitch count 31 x 29
Design size 5.5cm (2!Ziin) square
You will need candy pink 28-count
Cashel linen (Zweigart shade 443)
Stitch count 30 x 30
Design size 5.5cm (2’Ziin) square
You will need oatmeal 28-count
Perlleinen (Zweigart shade 53)
Stitch count 30 x 29
Design size 5.5cm (2 Win) square
You will need mushroom 28-count
Cashel linen (Zweigart shade 345)
fft’/tt/iur
Stitch count 29 x 30
Design size 5.5cm (2’/iin) square
You will need beige 14-count
Zweigart linen Aida
Fold the fabric in four and mark the folds
by pressing firmly. Using a loop start (page
11). work the cross stitch posy motif from
the main chart on pages 66-69 starting at
the centre of the charted motif and in the
middle of the piece of fabric.
Once all the stitching is complete,
frame as desired (see page 100). Wadding
(batting) was used behind the embroideries
before framing to give the pictures a nice
padded look.
64 • BERLIN WOOLWORK SAMPLERS
W*
to
The creation of embroidery charts in Berlin from
1835 was big business thousands were produced. The early charts
are the best, created by skilled artists who understood eanvaswork embroidery.
The designs were etched on copper plates and printed on quality paper, often beige or
grey blue. The charts were then hand coloured. When the trade was at its height, thousands
of girls were employed to do the skilful hand colouring. Originally watercolours or slightly
thicker gouache-type paints were used, and the paint was applied using a special brush
with a square end. the width of the squares on the paper.
The wool used for Berlin embroidery came from Saxony Merino sheep, which was soft and
ideal for embroidery. Change came after the invention of aniline dyes by Sir William Perkins
in England in 1856. These produced much brighter colours than had previously been
possible with natural dyes, so England soon overtook Berlin in the production of
wools. With invention of double canvas in about I860 and die development
of the new dyes, Berlin wool work was in its heyday.
BERLIN WOOLWORK SAMPLERS • 65
BERLIN WOOLWORK SAMPLERS
TOP LEKI
DMC (ANCHOR)
Cross stitch
К 221 (1006)
223 (10)
о о о о 225 (271)
Eg 327 (94)
НН 367 (245)
368 (213)
434 (351)
- 436 (363)
437 (891)
470 (256)
❖ 4 ❖ ❖ 471 (279)
Я 550 (102)
552 (88)
> й 676 (301)
ll 677 (386)
z * z * 712 (2)
0 0; oo 738 (880)
S 793 (136)
gg 824 (134)
я 931 (978)
p p p p 932 (129)
я 937 (269)
ffi 939 (152)
H 3347 (239)
s 3721 (29)
c c cnc 3752 (1037)
= - blane (1)
BOTTOM LEFT
BERLIN WOOLWORK SAMPLERS • 67
BERLIN WOOLWORK SAMPLERS
TOP RIGHT
DMC (ANCHOR)
Cross stitch
221 (1006)
1? 223 (10)
o * 225 (271)
gg 327 (94)
367 (245)
368 (213)
434 (351)
Jz 436 (363)
7, Ж (891)
й'й 470 (256)
S 471 (279)
ffi 550 (102)
Ц 552 (88)
5* 676 (301)
tt 677 (386)
:: 712 (2)
о ° 738 (880)
II 793 (136)
ffi 824 (134)
931 (978)
?? 932 (129)
937 (269)
ffi 939 (152)
| 3347 (239)
3721 (29)
c c 3752 (1037)
,-S blanc (1)
BOTTOM RIGHT
BERLIN WOOLWORK SAMPLERS • 69
ЯН7о//'//// tSendments
Upstanding Victorians loved quoting spirit-enhancing Bible texts, snippets from the Common
Prayer Book and from the works of William Shakespeare. Children would be admonished using the
Ten Commandments and Psalms, and phrases such as, ‘Children should be seen and not heard’.
I have two examples of this type of stitching. One, shown above, illustrates the poem ‘Home Sweet
Home’, the words of which (see below) were used as the lyrics of a song, first performed in 1822 in the
opera Clan, the Maid of Milan. The other sentiment, ‘Absent but not forgotten’ (see page 8), includes a
photograph of two rather dour-looking Victorians. My Victorian pieces are worked on stitching paper
(perforated paper), formerly called Bristol Board, and are stitched in stranded cottons (floss). My own
interpretation of such samplers, shown opposite, would make a cheerful and inspirational addition to
any stitcher’s home.
(fie//feast/гел еше/рег/гсея i/ioay/t a>e mere/ roam.
Qoe ii eaer -\o /eem//e, i/еге 'л' e/e> /j/aev /i/е /roene.
John 1 toward Payne (1792-1852)
Wise Words Samplers
The saying ‘Home Sweet Home’ has become a bit of a cliche and it is certainly included in cross
stitch kits more often them any other, but I still love it. My design has the addition of lovely roses,
created with French knots and bullion knots.The second design was inspired by the old proverb
‘A stitch in time saves nine’. We stitchers know this to be true but tend not to sew unless it is our
embroidery stitching buttons are not replaced, hems are not repaired but cross stitch continues!
Both designs are straightforward to stitch and can be worked on 28-count linen as shown here,
or on 14-count Aida. Refer to the Stitch Library starting on page 88 for working the stitches.
Home Sweet Home
Stitch count 57 x 222
Design size 10.5 x 40cm (4 x 16in)
lllilllllllllllllllilll|lllllllllllllllllllillllllllllllllllllllllllllllllllllllllb
You will need
25 x 53cm (10 x 21m) buttermilk |
28-count Zweigart Cashel
linen (or 14-count Aida)
=
Stranded cotton (floss)
as listed in the chart key
Tapestry needle size 24
Illllllllllllllllllllllllllltllllllllllllllllllllllllllllllllllll1
. \са/ \Аа(7мМ(/й/у
Try to resist the temptation to leap
across more than two threads when
backstilching: the finished effect will
not look as good as trailing threads
will show through on Hie front.
IFold the fabric in four and
mark the folds with tacking
(basting) stitches. Oversew
or hem the raw edges
of the fabric to prevent
fraying. Beginning at the
centre of the chart, and
fabric and using a loop
start (page 11), follow the
chart on pages 74-75. Refei'
to the Stitch Library (starting on page
88) for working the stitches.
2 Work the cross stitch over two fabric
threads (or one Aida block) using
two strands of stranded cotton (floss),
keeping the Lop stitch facing in the
same direction. Use one strand for the
backstitch following the shades given on
the chart. Use two strands for the French
knots in the centres of the large flowers.
3Use a gold-plated
needle to create
the rose motifs on the
capital letters, working
two or three French
knots in pale yellow
DMC 677 (Anchor
386) in the positions
marked on the chart, with
curly bullion knots around
them in pink and dark pink (see detail
above). Alter the roses have been
formed, add the leaves in counted chain
stitch by eye in two strands of green
DMC 470 (Anchor 256).
4When stitching is complete, check
for missed stitches, remove tacking
(basting) and mount and frame as
preferred (seepage 100), using wadding
(batting) to create a nice padded look.
You can work this simple but decorative coaster using the
corner motif from the main chart on page 74. The pretty
pulled-thread edging is created with fom-sided stitch. If you
stitch a set of four coasters they can be arranged on
the table facing in any direction.
Fold the fabric in four and mark the folds with lines of tacking
(basting) stitches. Start with a loop start (page 11) and stitching
over two fabric threads, work the motif in the comer of the fabric,
approximately 2.5cm (I in) from the fabric edges, using two strands
of stranded cotton (tloss) for cross stitch and one for backstitch.
Stitch count 45 x 67
Design size 8.2 x 12cm
(3’Zi x 4%in) excluding
pulled-thread border
You will need
20 x 23cm (8 x 9in)
ivory 28-count
Zweigart linen
To edge the coaster, count four threads from the outermost
stitch on each side and work a border of four-sided stitch over two
threads (see page 91) using two strands of DMC ecru (Anchor 387)
stranded cotton (floss). Count fourteen threads from the outside of
the four-sided stitch and withdraw the fifteenth fabric thread.
Cut along the withdrawn thread with sharp shears and
then press firmly on the wrong side with a hot iron
• and using spray starch to slightly stiffen the
g. ’ coaster. To finish, fray the raw edge all
round to within four threads of the
square-stitched edge. Remove the
lacking (basting).
A Stitch in Time
Stitch count 54 x 202
Design size 10 x 37cm (4 x 14!£in)
Jllllllllllllllllllllllllllllllllllllllllllllllllllllllllllllllllllllllllllllllllb
I
You will need
25x51 cm (10 x 20in)
28-count Zweigart Perlleinen (shade |
53) (or 14-count Aida)
Stranded cottons (floss)
as listed in tire chart key
Tapestry needle size 21
lllllliiililUilllHIillUitHlllllllilililillllllllllHIIIIIIIilil
IFold the fabric in four and. mark the
folds witli tacking (basting) stitches.
Beginning at the centre of the chart and
fabric and using a loop start (page 11),
follow the chart on pages 76-77. Refer to
the Stitch Library for working tire stitches.
2 Work the full and three-quarter cross
stitch first, over two fabric threads (or
one Aida block) using two strands
of stranded cotton (floss) and
keeping the top stitches facing
in the same direction. Use
one strand for the backstitch
using the shades given on
tire chart.
3To add the little skein of thread by
the thimble motif, use a dressmaker’s
pin and pick up five fabric threads.
Using two strands of thread on your
needle, wind orange DMC 740 (Anchor
925) around the pin in a figure-of-eight
movement several times and before
moving the pin, anchor the
bundle, in position with
contrasting thread.
4When the. stitching is
complete, check for
missed stitches, remove tacking
(basting) and mount and frame (see
page 100) using wadding (batting).
VICTORIAN TEXT
If you have a favourite saying, text
or perhaps a family motto, you could
recreate a Victorian feel by working
the design on parchment-coloured
stitching paper.You could even chart
some of the amusing stitchers’ laments
if you prefer something more modern.
If using charting software, you can
type in your words, select a font and
г /Л?/'/
This pretty case will hold a pair of spectacles or pens and pencils with ease.
It has been adapted from the mani design but has its own chart on page 99.
The design is only suitable for working on linen if you want to work the
attractive folded hem.
it will chart it for you. As you can see
from the photograph on page 70. tire
Stitch count 31 x 90 Design size 5.6 x 16.5cm (2!4 x 6!^in) front flap only
You will need 25 x 25cm (10 x lOin) 28-count Zweigart Perlleinen (shade 53)
antique text is worked on stitching
paper in cross stitch and long stitch.
When working on paper, avoid, using
fractional stitches.
Fold the fabric in three
equal parts and mark
the folds with
tacking (basting)
stitches. Start
stitching from
the centre of the
chart and the centre of the
top part of the fabric (this
will be the front of the
case). Use a loop start (page
11) and working over two
fabric threads, work cross stitch using two
strands of stranded cotton (floss) and
backstitch with one strand. When all the
stitching is complete, check for missed
stitches, remove tacking (basting) and press
firmly on the wrong side using spray starch
to slightly stiffen the fabric.
To create the folded hem, refer to page
93 for detailed instructions. To make up the
stork case, fold the bottom flap up and
slipstitch the side edges to the middle part
of the fabric with matching thread.
VICTORIAN SENTIMENTS • 73
74 • VICTORIAN SENTIMENTS
VICTORIAN SENTIMENTS • 75
76 • VICTORIAN SENTIMENTS
This section looks at one of my favourite sampler groups, band samplers, one of the most fascinating
areas of early embroidery. The antique band sampler (above) has been kindly lent by a friend and
is simply exquisite. Worked in 1649 on linen, it is extremely valuable and I wish it were mine! I love the
little ‘boxer’ figures with the wonderful top knots and the dogs at their feet.
Band samplers, long strips of linen, were not intended to be decorative but to be a stitcher’s aide-
memoire. Patterns were copied and stitches practised and when not in use, the strip was rolled up
and put in a draw for safekeeping.The ‘bands’ could include dozens of different stitches. Antique band
samplers are very collectable and can cost a fortune at auction and so are out of reach of most stitching
enthusiasts. This is an opportunity to work your own antique-style sampler for a fraction of the cost!
Band Sampler Collection
Inspired by the many bands and stitches on the antique sampler, I have chosen to work lour small
band samplers rather than a large one but you could combine the motifs and bands on to one fabric
piece. One sampler focuses on blackwork patterns and motifs and uses some gold metallic thread,
while the delicately coloured strawberries and cream sampler has various bands of drawn and pulled
thread work giving it a lovely lacy feel. The other two samplers are collections of my favourite motifs
and bands and include some additional counted stitches to add texture and an antique feel.Two of
the samplers have folded hem borders worked before framing and all four need to be worked on
evenweave fabric. Refer to the Stitch Library for working all the stitches used.
Blackwork Band Sampler
Stitch count 150 x 36
Design size 27 x 6.5cm (10% x 2 kun)
Jlllllllllllllllllllllllllllllllllllllllillllllllllilllllllllllllllllilllllllllillb
You will need
40 x 20cm (16 x Sin) light stone. =
28-count Cashel linen
(Zweigart. shade 223)
Stranded cotton (floss)
as listed in the chart key
IIIIIIIIIIIIIIIIIIIIIIIIIIIIIIIIIIIIIIIIIIIIIIIIIIIIIIIIIIIIIHIIIIIIIIIIIIIIIIIF
Madeira gold metallic thread
No. 15 shade 22
Tapestry needle size 26
IFold the fabric in four and mark
the folds with tacking (basting)
stitches. Using a loop start (page 11),
work the row of herringbone stitches
just below the centre. Work a line of
tacking (basting) stitches, under and
over two linen threads at either end of
this completed band: these will indicate
the edges of the sampler and should be
removed when all work is finished.
2 Using one strand of stranded cotton
(floss), work all the blackwork
patterns in Holbein stitch or double
running stitch in black or metallic gold,
according to the chart. Use tine gold
For this band sampler I have used the
traditional blackwork combination
of black and gold but do experiment
with other colours. Many different
effects can be achieved by varying
the thickness of the threads used and
careful selection of patterns with dark,
medium and light tones. Refer to
the Stitch Libraiy (pages 88-97) for
working all the stitches used.
metallic thread in short lengths to avoid
excessive wear on the thread.
3Using two strands of thread, work
the eyelets, Algerian eyes, double
cross stitch, Rhodes stitch, French knots,
bullion knots and herringbone stitch.
4When the stitching is complete,
check for missed stitches, remove
tacking (basting) and mount and frame
as preferred. Wadding (batting) was used
to give the sampler an attractive padded
look. If you wish to create a hemstitched
edge, as shown on the Carnation and
Butterfly sampler on page 82, follow the
instructions on page 93.
R В П Ш
DRDR'S TU
twwyvwwvwwwy-
fink* to (/lC
Blackwork is an embroidery technique
of geometric patterns built up using Holbein stitch
(also called double running stitch) and was traditionally worked in
black thread against a contrasting (usually white) background with
gold metallic highlights added for extra impact. During Elizabethan
times, it was used to decorate clothing to imitate the appearance of
lace although the name is a little misleading as this type of counted
embroidery can be stitched in any colour. Holbein stitch (named
after the painter) produces a smooth effect, so the back of
your work will look almost as good as the front,
making it useful for table linen.
UUXV2
St w’iiiTSJIZ’
80 • BAND SAMPLERS
Strawberries and Cream
Band Sampler
Stitch count 150 x 35
Design size. 29 x 6.8cm (11% x 23/iin)
iHHiHiiiiiniHfitiiiiiitHiiiiiHniiHiiimHHiinnuiiuiimniiiitiiiiF
Jllllllllllllllllllllllllllllllllllllllllllllllllllllllllllllllllllllllllllllllllb
I
You will need
40.x 20cm (16 X 8in) pale
unbleached 26-count Dublin linen |
(Zweigart shade 52)
Stranded cotton (floss)
as listed in the chart key
Madeira gold metallic thread i
No. 15 shade 22
Tapestry needle size 26
imiiiiiiiiiiiiiiniiiiiiininiiiiiiiiiintiiiiiiiiiiiiiiuiiiiiiiniiiiiiiF
This delicate pulled and drawn thread
sampler is simpler to stitch than it seems
if you lake it in short stages. The chart
and instructions are divided into
banded areas to help you work through.
IFokl the fabric in four and mark folds
with tacking (basting) stitches. Work
the top band at least 5cm (2m) from the
top of the fabric to allow for making up.
2Using a loop start (page 11), begin
working the bands over two linen
threads, unless stated otherwise.
Band 1: work the cross stitch, tipsy stitch
and half Rhodes stitch using two strands
of stranded cotton (floss). Work a line of
tacking (basting) stitches, under and over
two linen threads at either end of this
completed band: these indicate the edges
of Hie sampler and will be removed later.
Band 2: work the hemstitch square
following the instructions on page 48.1
added my initials in dove’s eye stitches
but you could work any pattern you like.
Work the lines of couched gold above
and below the hemstitched square.
Band 3: work zigzag hemstitch, ladder
hemstitch then zigzag again, as follows.
Working from the centre of the band,
snip the horizontal linen tlireads down
the centre line once and, using a needle,
un-pick the threads back to the band
edge (see chart for how many threads are
removed). Working in pairs, remove one
thread completely and reweave the oilier
into the gap (see diagram, bottom page
92), continuing until all threads are
removed or re-woven. Following the
chart, hemstitch the remaining fabric
threads using two strands of stranded
cotton (floss).
Band 4: work tire slightly smaller
hemstitch square in the same way as
band 2, adding dove’s eyes in the pattern
shown (or one of your choice). Work the
four-sided stitch over two threads.
Band 5: work the bands of hemstitch
(ladder, zigzag then ladder again) as in
band 3, then the diamond hemstitch.
Add rows of counted chain stitch and
herringbone stitch using two strands of
thread in die colours given.
Band 6: work the strawberry using two
strands for cross stitch and one for back-
stitch. Use two strands for the queen stitch
and four-sided stitch over four threads.
Band 7: cross stitch the heart, outlines
in two strands, then add the pulled satin
stitch in the centres (one vertically and
the other horizontally), working across
two threads, one thread apart and
pulling the stitches very firmly. Work
a row of hemstitch after four threads
removed. Work the cross stitch motifs
using two strands, backstitch with one
and detached buttonhole stitch, bullion
knots and French knots with two strands.
Work vertical herringbone patterns in
two strands in the colours given.
3When stitching is complete, remove
tacking (basting) and mount and
frame, using wadding (batting) for a
padded look and silk moire behind the
embroidery to emphasize the pulled
thread work. To create a hemstitched
edge, as in the Carnation and Butterfly
sampler overleaf, see page 93.
BAND SAMPLERS • 81
Carnation and Butterfly Band Sampler
Stitch count 143 x 38
Design size 23 x 6cm (9 x 2'/2in)
iiiliiiiillliilliiiiiniliiiiiiiitiiiiiiiiiiiiiiimiiniiniiiinF
You will need
40 x 20cm (16 x 8in)
medium stone 32-count
Belfast linen (Zweigart shade 345)
Stranded cotton (floss)
as listed in the chart key
Tapestry needle size 26
This colourful and fine sampler is
very satisfying to work and includes
a butterfly worked over one thread of
the linen where you may need your
magnifier! Refer to the Stitch Library
(pages 88-97) for working all the
stitches used.
IFold the fabric in four and mark the
folds with tacking (basting) stitches.
The top band needs to be worked at
least 5cm (2in) from the top of the fabric
to allow for malting up.
2Using a loop start (page 11), begin
working the bands over two linen
threads, unless stated otherwise.
Band 1: work the cross stitch and French
knots using two strands of stranded cotton
(floss), adding the backstitch in one
strand in the colour's given on the chart.
Band 3: work the cross stitch with two
strands and backstitch with one. Work
the zigzags of tipsy stitch with two
strands, followed by the vertical threaded
backstitch using two strands for the
backstitch and one for the weaving.
Band 4: work the hemstitch as in band 2.
Go on to work the cross stitch with two
strands and backstitch with one. Work the
satin stitch squares using two strands,
following the stitcliing directions on the
chart. Complete each section of satin
stitch before moving on. Work the queen
stitches with two strands, followed by
tlu'eaded backstitch, using one strand for
the, backstitch and two for the weaving.
Band 2: work the hemstitch by removing
four threads and working the top row.
Work the backstitch motifs with one
strand and then the butterfly (charted
separately) in one strand and over only
сие thread. Work the bullion rose and
the French knots in the centre with two
strands. Work the needlelace leaves with
the French knots in the centre in two
strands. Repeat the hemstitching and
withdrawn threads to finish this band.
3When stitching is complete, check
for missed stitches, remove tacking
(basting) and mount and frame.
.Alternatively, create a hemstitched edge
following the instructions on page 93.
82 • BAND SAMPLERS
Violets and Berries Band Sampler
Stitch count 147 x 38
Design size 26.5 x 7cm (lOfo x 23/iin)
JJIIllllllllllllllllIllIIIIIIIIUIIIIIIIllllllllUIIIIIIIIIIIIIIIIIIIIIIIIIIIIIKIb
iiiuiiiimiiuiiiiMUiiiuiHimiiiiitHiiitiiiiHUiiiiiiiiHiiiitiiniiiiiti
You will need
40 x 20cm (16x 8in) cream
28-count Vintage Cashel linen
(Zweigart shade 1019)
Stranded cotton (floss)
as listed in the chart key
Madeira gold metallic thread
No. 15 shade 22
Tapestry needle size 26
-
I
IFold the fabric in four and mark folds
with tacking (basting) stitches. Work
the top band at least 5cm (2in) from the
lop of the fabric to allow for making up.
2Using a loop start (page 11), begin
working the bands over two linen
threads, unless stated otherwise.
Band 1: work the Vandyke stitch over
four threads using two strands of
stranded cotton (floss). Use two strands
[or the half eyelets, then work the
backstitch patterns with one strand.
Band 2: work the cross stitch, queen
stitch and French knots with two
strands and the backstitch with one.
Work tire diamond hemstitch, removing
four threads, leaving four threads
and removing four. Work the ladder
hemstitch with four threads removed.
Band 3: work cross stitch and backstitch
as before, then tire threaded backstitch
with one strand for the backstitch and
two strands for the weaving. Work
.Montenegrin stitch with two strands.
Band 4: work cross stitch, queen stitch
and backsti tch as before. Work Pekinese
stitch with two strands of each colour.
Band 5: work the gold metallic couching,
then cross stitch and backstitch as before.
Work the hemstitched rectangles,
removing the threads indicated on the
I have used a special Zweigart fabric
for this pretty little sampler to give it
an antique feel. Knowing that many
stitchers enjoy creating antique-style
samplers, Zweigart have invented a
technique to give the fabric an aged
appearance. There are a number of
these Vintage fabrics available both
in evenweave and Aida.
chart and working the hemstitch as
shown (see diagrams page 87). Decorate
remaining threads with needleweaving -
I worked a triangular pattern in each
half of the hemstitched square but you
could work a different pattern.
Band 6: work the cross stitch, queen
stitch and tipsy stitch using two strands,
adding backstitches in one strand.
Band 7: work the form-sided stitch
and quarter eyelets in two strands and
the Vandyke stitches over six threads
using two strands. Work the diamond
hemstitch as in band 2 but leave lire
upper row as ladder hemstitch.
3When Stitching is complete, remove
tacking (basting) and mount and
frame, using wadding (batting) for a
padded look and silk moire behind the
embroidery to emphasize the pulled
thread work. To create a hemstitched
edge, as shown, see page 93.
w i 1 i- .H-ll u i.j Щ U
BAND SAMPLERS • 83
Blackwork Band Sampler
DMC (ANCHOR)
Cross stitch
BS 310 (403)
* x Madeira metallic gold
н i j xim л
ив
г
/ / / > ✓
L i fc L u
Г~хГй|
v х х
•/ X
-ж-
IQIpK»
Гхх x’v
х х :: ?
|Х X V V
X X V V
nixx v
IX x X у v v v|
pVx X/V vf *
v x.X ОГ J
backstitch in 3052
bullion knots in 3363
fill with detached buttonhole stitch in 356
— gold thread couched in 3778
—zigzag hemstitch over 4 threads
— ladder hemstitch over 2 threads
— zigzag hemstitch over 4 threads
ladder hemstitch over 4 threads
queen stitch in 3778
diamond hemstitch over 4 threads
in 3778 with optional French knots in 712
—tipsy stitch in 712
—half Rhodes stitch in 712
—gold thread couched in 3778
— four-sided stitch over 2 threads in 712
—hemstitch square with dove’s eyes
—four-sided stitch over 2 threads in 712
Strawberries and
Cream Band Sampler
DMC (ANCHOR)
Cross stitch
Ц 356 (11)
Ц 712 (2)
К 3052 (265)
H 3053 (264)
3363 (2311)
3778 (329)
= Madeira metallic gold
® French knots in
colours as labelled
— hemstitch square with dove’s eyes
—zigzag hemstitch over 4 threads
— counted chain stitch in 3778
— ladder hemstitch over I threads
—herringbone stitch in 3778
-— four-sided stitch over 4 threads
in 2 strands of 712
=-1 row of hemstitch after 4 threads removed
—fill heart shape with vertical pulled satin stitch
over 2 threads in 712
—bullion knots in 712 with French knots in 676
-fill heart shape with horizontal pulled satin stitch
over 2 threads in 712
- herringbone stitch in 712, then 356
BAND SAMPLERS • 85
French knots in 680
Carnation and Butterfly
Band Sampler
DMC (ANCHOR)
3777
— 367
hemstitch
4 threads withdrawn
3777
937
bullion rose in 315 and 316
with French knots in 729
butterfly worked over 1 thread
(see separate chart, right)
needlelace leaves in 937
with French knots in 316
Cross Stitch
315 (65) Я 926 (208)
:: 3i6 (76) BB 937 (269)
356 (U) 3051 (268)
434 (351) 3346 (245)
470 (256) 3768 (877)
680 (307) 3777 (20)
7, 712 (2) 3830 (29)
729 (306)
П 738 (880) ® French knots
as labelled
0 0 778 (103)
4 threads withdrawn
hemstitch
~—729
926
----937
----315
tipsy stitch in 3830
- — threaded backstitch
in 729 and 680
’—3768
— 3777
Butterfly motif (cross stitched over
1 thread, i.e., 1 square equals 1 thread)
-937
-3.15
—926
-----937
Sos
hemstitch
—4 threads withdrawn
— 3830
—queen stitch in 3830
—937
— 315
—926
—satin stitch in 926
-------queen stitch in 926
3830
926
threaded backstitch in 729 and 926
926
—Vandyke stitch over 4 threads in 3041
-729
—half eyelet in 926
—backstitch in 926
-327
— 729
—backstitch in 930
-diamond hemstitch
—backstitch in 930
— queen stitch in 930
—French knots in 3041
— ladder hemstitch after 4 threads withdrawn
—French knots in 3041
3041
522
— 3777
-threaded backstitch in 930 and 3830
-^Montenegrin stitch in 926
—backstitch in 327
— queen stitch in 327
— queen stitch in 3041
-— Pekinese stitch in 930 and 729
— 3041
— 522
Violets and Berries
Band Sampler
DMC (ANCHOR)
Cross stitch
327 (94)
522 (261)
Ф 712 (2)
729 (306)
926 (208)
88 930 (1036)
3041 (1018)
3740 (972)
Eg 3777 (20)
3830 (29)
Madeira metallic gold
® French knots
as labelled
queen stitch in 3830
— queen stitch in 3777
—gold metallic couched with 3830
withdrawn threads for hemstitch
rectangle with needleweaving in 712
hemstitch
522
gold metallic couched with 3830
522
queen stitch in 3830
-327
3830
queen stitch in 3777
3041
. Ibove: working the hemstitch rectangle:
below: needleweming remaining threads.
3041
queen stitch in 3740
tipsy stitch in 3830
327
_522
__four-sided stitch
over 4 threads in 712
—quarter eyelets in 3041
—backstitch in 930
— hemstitch
diamond hemstitch
— backstitch in 930
quarter eyelets in 3041
Vandyke stitch
over 6 threads in 729
BAND SAMPLERS • 87
The stiLcfa.es used in this book are described here alphabetically. In many cases the stitches may be
worked on Aida, evenweave or canvas unless stated otherwise, although I would not recommend
working pulled stitches on Aida. 1 find it useful to have a scrap of 20-count fabric at hand to practise
new stitches on before working them on a project. Some of the diagrams show the stitch worked over
two or four fabric threads. Many diagrams give a numbered stitching sequence. Remember, when
working a stitch, the construction stays the same but the size and number of fabric threads used may
alter, so refer to the project and chart for the correct number of threads involved. When constructing a
stitch, remember which way you worked and keep all the stitches the same, clockwise or anticlockwise.
Algerian Eye
This pretty star-shaped stitch is a pulled stitch, which means
that when it is formed correctly holes are pulled in the fabric.
It can be worked over two or four threads of evenweave anti is
more successful worked on evenweave than Aida.
1 Start to the left of a
vertical thread and
work from left to right
around each stitch in an
an I iclockwise direction
(or vice versa but keeping
each stitch the same).
2Always work the stitch
by passing the needle
down through the central
hole, pulling quite firmly so
that a small hole is formed
in the centre.Take care that
trailing threads do not cover
this hole as you progress to
the next stitch.
Backstitch
Backstitch is used for outlining a design or part of a design,
to add detail or emphasis, or for lettering. It is usually
indicated on a chart by solid lines with the shade code
indicated on the chart or key. Backstitch is added alter the
cross stitch has been completed, to prevent the backstitch
line being broken by the cross stitches. See page 97 for
working threaded backstitch.
To work backstitch, follow
the number sequence in the
diagram, working over one
block of Aida or two threads
of evenweave, unless stated
otherwise on the chart. Avoid
long, loose stitches unless for
Hower stamens and so on.
Bullion Stitch - bars and roses
This is a very versatile stitch that can be formed in straight
bars or in curves to form roses, as seen in Home. Sweet
1 lome on page 72.1 don’t attempt these stitches unless
using a gold-plated needle.
Straight Bullion Bar
IThe stitch is begun by
working an incomplete
backstitch, leaving the
needle in the fabric. It is
vital that the point of the
needle exits from the hole
where it. started.
2 With the needle still
in the fabric, wind
the thread around the
needle as many times as
necessary to make the coil
I he length of the. incomplete
backstitch. Hold the needle i
uid coil of thread firmly against
the fabric, then gently pull the needle, through the coil and
fabric. Using a gold-plated needle makes this exercise much
smoother. To finish the bullion bar turn the coil back on
itself and push the needle through the fabric at the rear of
the backstitch.
88 • STITCH LIBRARY
Bullion Rose
1 First work a couple
of French knots as
described on page 91. Now
work a Ini Ilion bar, adding
extra winds to the needle to
force the bar to bend.
2 Begin
build up
the rose, adding
more tightly curved bullions
around the first curved bar.
3The completed bullion
rose above has six
curved bullions, with the
colour changed to a deeper
shade on the final two but
you can change their shape
and colour as desired.
Buttonhole Stitch
This very old stitch is simple
to work and extremely
versatile. It is used as the
basis for detached buttonhole
stitch (below right).
Start with an away waste
knot (page 11) and follow
the numbered sequence in
the diagram here. Buttonhole
stitches are usually worked
closely together but may be
spaced more widely according
to the pattern you are working.
Button Loop
To create a button loop, useful for
fastening the needle fold on page 24,
work four straight stitches hi and
out of the same hole and then bring
Lhe needle to the surface al one end.
Working on top of the fabric and
just under the straight stitches, work
buttonhole stitches all along the bar,
closely together.
Couching
This is not a counted stitch as such but can be very effective,
particularly on a band sampler (see page 80). It is often
worked with a metallic thread laid on the fabric, held down
by small vertical stitches. Start by bringing the laid thread up
through the fabric and laying it across the fabric. Using the
couching thread, work small vertical stitches, as shown.
Counted Chain Stitch
This stitch is very versatile as it may be used on evenweave
or Aida, as part of a pattern, as an outline, in close, rows to
fill a pattern or to join sections of stitching together.
1Tb work chain stitch
on evenweave, start to
Hie left of a vertical thread,
bringing the needle up
through lhe fabric and down
through lhe same hole,
forming a loop on the surface.
Pass the point of the needle
under two threads and up to
the surface forming another
loop. Each new stitch thus
anchors the previous stitch.
2 If chain stitch is worked
as a border, then lhe last
stitch will anchor the first.
If not, the last stitch may be
anchored over one thread, as
Shown here.
Cross Stitch
Refer to page 12 of Back to Basics for working cross stitch
and three-quarter cross stitch on Aida and evenweave.
Detached Buttonhole Stitch
Tills stitch can be used to fill shapes, such as lhe
strawberries in the band sampler on page 81. The
stitches should lie closely together but are. shown more
widely spaced on the right side of lhe second diagram overleaf
to explain the stitch more easily. The rows are worked to and
fro, with the first and last, stitches of each row worked into Hie
fabric, to anchor all the buttonhole stitches.
STITCI1 LIBRARY • 89
1 Begin by outlining the
motif in backstitch,
then work two long stitches
across the width of the
shape. Work the first row of
buttonhole over this satin
stitch line.
2 When you come to the
end of the row, reverse
direction and work Hie
next row into the previous
row, With the stitches close
together. Continue working
to and fro, reducing the
length of the rows to follow
the shape being filled.
Diamond Hemstitch
This is an attractive hemstitch variation (see hemstitch,
page 92). Withdraw threads either side of a solid fabric area
(see withdrawing and reweaving threads, page 92) and then
work the hemstitch in two journeys. The stitches will form
diamond shapes on the front of the work and if pulled firmly
will create small holes in the solid fabric area. The trick to
remember with this stitch is that it is formed on the front of
the fabric, so if you find yourself with the needle on the back
you know something is wrong!
Double Cross Stitch
Double cross stitch can be
worked over two or four
threads of an evenweave
fabric or over one or two
blocks of Aida, to create
a series of bold crosses or
stars. Tiny double cross
stitches may be formed over
two threads of evenweave
but they are difficult to work on one block of Aida. To
keep all double cross stitches uniform make sure that the
direction of the stitches within them is tlie same.
To work, start to the left of a vertical thread and following
the numbered sequence in the diagram, work a diagonal
cross stitch and then add a vertical cross on top. The second
vertical cross may be worked in a different colour to add
interest, in which case work the stitch in two stages - all
lower crosses first, followed by the top crosses.
Dove’s Eye Stitch
This is a traditional I lardanger stitch usually constructed
whilst needleweaving or wrapping. It is used in the band
sampler on page 81. The diagrams here show Kloster blocks
worked but these aren’t required for this book.
1 Whilst working the
last side of a square,
needleweave to the centre
of tlie bar, bringing the
needle out through a void
area, as shown.
90 • STITCH LIBRARY
2 Pierce the neighbouring
needlewoven bar or
wrapped thread halfway
along its length, bringing the
needle up through the void
and through the loop formed
by tlie thread.
1 Begin to the left of a
vertical thread and work
a horizontal straight stitch
across four threads (or
number on the chart),
passing the needle diagonally
across four threads at the
back of the work.
3 Continue round the
square following the
diagram sequence but before
resuming needleweaving,
loop the needle under the
first stitch to form the final
twist in the dove’s eye.
2 Bring the needle up and
form a vertical straight
stitch, again passing the
needle diagonally across
four threads at the back of
the work.
Eyelets
These can be stitched in
various shapes, as shown
here and the rules are the
same for all eyelets: as
with Algerian eye you need
to pass the needle down
the central hole, working
the stitch in the correct
sequence (numbered on
the diagrams) and in one
direction to ensure that the
hole is round and uniform.
Take care that trailing
threads do not cover the
hole as you progress to the
next stitch.
Four-Sided Stitch
’Illis is traditionally worked as a pulled stitch to create a
lacy effect without the removal of fabric threads. It can
also be used as a hemstitch when threads are to be cut or
removed.The secret of creating a perfect four-sided stitch is
to make sure that your needle travels in the correct direction
on the. back of the stitch. The stitches on the front should
be vertical or horizontal but diagonal on the back. It is this
tension that forms the small holes as the stitch is worked.
The stitch is not recommended for Aida fabric.
3 Bring the needle up and
form another vertical
straight stitch, again passing
the needle diagonally across
four threads at the back.
but this time pass the needle
across diagonally to begin
the next stitch.
4Work a horizontal
straight stitch to form
the last side of the square
French Knol
French knots are small but important stitches though they
can cause distress as they are apt to disappear to the back of
the work or end up as a row of tiny knots on the tliread in
the needle! Follow the steps below for perfect knots.
1 Bring the needle through
to the front of the fabric
and wind the thread around
the needle twice. Begin to
'post’ the needle partly
through to the back, one
thread or part of a block
away from the entry point
(to stop the stitch being
pulled to the wrong side).
STITCH LIBRARY • 91
2Gently pull the thread
you have wound so that
it sits snugly al the point
where the needle enters
the, fabric. Pull Lhe needle
through to the back and you
should have a perfect knot in
position. If you want bigger
knots, add more thread to
the needle as this gives a
better result than winding
more times round the needle.
Hall’ Rhodes Stitch with Bar
This is an adaptation of Rhodes stitch (page 96), producing
a decorative stitch shaped rather like a sheaf of corn, with
a straight bar across lhe centre to tie the threads together.
Buttonhole stitching could be added to lhe bar.
IWork over squares of
two, four, six or eight
threads of evenweave fabric
(or according to the chart)
in a slanting, anticlockwise
direction.
2Complete Lhe half Rhodes
stitch by following the
numbered sequence on the
diagrams, and maintain lite
same sequence for every stitch
to achieve a uniform effect.
3To finish lhe Rhodes
stitch, add a single
straight stitch across the
centre, holding all the
threads firmly.
I lemstitch
Hemstitch is wonderfully versatile, allowing you to hem raw
edges, form folded hems (see right) or remove horizontal
threads and decorate the verticals in various ways. When
working hemstitches for the first lime, it is simple, to work
them without removing threads first, eliminating lhe anxiety
of cutting too many, although traditionally the threads are
removed before the hemstitelling. When you have perfected
the stitch you can experiment with thread removal - see
withdrawing and reweaving threads, below.
A hemstitch is made up of parks - two straight stitches and
one. diagonal on the back. It is this combination that forms
Lhe safe barrier i f threads are to be cut or removed. If you are
intending to cut to the edge, you may prefer to use double
hemstitch where each stage of the stitch is worked twice.
Hemstitch can look very effective worked in rows without
any threads removed. The stitch is not suitable for Aida.
IThis shows hemstitching
over two threads in each
direction. Begin by working
a straight, stitch across two
threads, turning the needle
to face horizontally.
2 Make a straight stitch
across two threads, at
right angles to the first stitch,
then pass the needle down
diagonally under two threads.
3Repeat the straight
stitches along the row,
counting carefully.
Withdrawing and
Reweaving Th reads
To remove horizontal
threads prior to
hemstitching, count
carefully to the centre of
the band and cut horizontal
threads down the centre
line (refer to the chart for how many threads to cut). Using
a needle, un pick the linen threads back to the edge of the
band. Working in pairs, remove one thread completely and
then reweave the other into the gap (see ladder hemstitch,
page 93). Continue until all the tlireads are removed or
rewoven. Following Lhe instructions on the chart, hemstitch
the remaining fabric threads using two strands of stranded
cotton (floss).
92 • STITCH LIBRARY
Stitching a Folded Hem
Many projects are beautifully finished off by a folded and
stitched hem - such as tlie hand samplers on page 82 and
83. This method is also used for the needle fold on page 24
and could be used for table linen.
IFrom the middle of the long side (of a sampler) count
five threads out from the edge of the sti telling and cut
the sixth thread. Carefully unravel this thread back to the
comer and reweave it into the margin. Repeat on all four
sides. Now lay the fabric wrong side up on a hard surface
and count out from the missing thread to tlie ninth and
tenth threads. Place the point of a tapestry needle between
these threads and pull the fabric (not the needle) to score a
line that will form a crease - this will form the fold al the
edge of the work. Repeat on all four sides.
Cut edge
Score line I
Score line 2
Cut thread
Stitching
2Score the fabric again,
nine threads further out
(line 2 on the diagram, left).
Score another line seven
threads out and cut the
fabric carefully following
this line of threads.
3Fold the fabric piece at
tlie comers and cut as
shown in the diagram, left
Now fold in all the edges,
mitring the comers.
Herringbone Stitch
This simple and decorative stitch is often used on band
samplers, making a fine companion to cross stitch. It looks
particularly pretty when combined with stitches like long-
legged cross stitch. It can also be whipped with a second
colour. It is shown here worked over four evenweave threads
diagonally and under two horizontally. Il can be worked
over two and under one to make it smaller, or over and
under more threads to make it larger.
Work the stitch by starting to the left of a vertical thread,
across the number of threads indicated on the chart,
following the numbered sequence in the diagram.
Holbein Stitch
This stitch, also called double running stitch, is the stitch
used for blackwork, which looks the same on the back and
front. Backstitch creates a rather padded and untidy reverse.
Holbein stitch can be worked in two colours by changing
colour before completing the gaps on the return journey.
Work a row of running stitch in one direction, counting
to ensure, that you work under and over two threads of
evenweave or one Aida block, and then back over the row
in the opposite direction, filling in the gaps.
4Hemstitch the folded
edge in place as shown
in the diagram below. At the
corners, stitch the mitres
with invisible, stitching up
lire seam.
Ladder Hemstitch
This is the simplest
decorative hemstitch. Cut
the horizontal threads (see
withdrawing and reweaving
threads, page 92) and
reweave them, as shown.
Work two rows of hemstitch
as described on page 92 - the
vertical threads that remain
form a ladder pattern.
STITCH LIBRARY • 93
Long-Legged Cross Stitch
This stitch, also known as long-armed Slav stitch and
Portuguese stitch, looks wonderful when worked in rows
because it forms a plaited effect ideal for borders, or for the
outside edges of pieces to be made up as a pincushion or
a scissor keeper. II can also be worked on Aida across two
blocks anil upwards over one.The stitch can also be used to
join sections.
2 Insert the needle two
threads backwards
diagonally to make the short
leg at 4. Bring the needle
back up at 5 and down at 6
to form the final vertical leg.
ITo work long-legged
cross stitch on
evenweave, begin to the
left of a vertical thread.
Following die numbered
sequence, insert the needle
four threads forwards and
two threads upwards in a
long diagonal ‘leg’.
2Insert the needle two
threads upwards and
two threads backwards
diagonally to make the
Short leg.
3 Repeat Montenegri n
stitch in a row to form
Lhe pattern shown.
Needlelace
1 have used needlelace to create leaves on the band sampler
on page 82 but needlelace is not a modern idea - some
17th-century samplers included pretty flower petals created
this way.The technique isn’t difficult but practising on spare
fabric helps. The instructions that follow show petals being
worked but the principle is the same for leaves.
3To work a row
of long-legged
cross stitch, follow
the sequence in
this diagram.
1 Begin by positioning a
glass-headed pin in lhe
material as shown in Fig 1.
Il’ using stranded cotton
(floss), anchor a pair of
threads using the loop start
method. II' using one strand
of perle cotton, use an away
waste, knot.
Montenegrin Stitch
This unusual stitch looks similar to long-legged cross stitch
but is constructed differently and includes an extra vertical
leg, which gives it a fuller appearance. It forms an embossed
braid on the front of the stitching and makes a raised edge
for folding. 11 is shown worked on evenweave but can also be
worked on Aida by moving two blocks forward and one up.
1 Start to the left of an
evenweave thread, and
following the numbered
sequence in die diagram,
work a long diagonal leg
by moving four threads
forwards and two threads
up. Bring the needle two
threads back and two
threads down to emerge at 3.
2 Wind the thread around
the pin as shown here.
94 • STITCH LIBRARY
3Wind the thread around
the pin again and stop
winding when you are at the
head of the pin.
4Using the needle, weave
in and out of the threads.
It takes a little practice to
get an even finish but it is
very effective. When a petal
or leaf is complete, pass the
needle to the wrong side and
remove the pin. Repeat the
process to make as many
petals or leaves as you need.
When the flower or leaf
spray is complete, add
some French knots to the
centre, or as indicated on
the chart.
Needleweaving
Needleweaving is used to decorate the loose threads that
remain either when threads are cut as in Hardanger
embroidery or when fabrid areas have had threads removed.
The needleweaving creates covered bar's and these, can be
decorated with stitches like picots, while the spaces between
bars can be filled with decorative stitches such as dove’s
eyes and spider’s webs. The diagrams show Kloster blocks
worked but these aren’t required for this book - see the
band sampler on page 87 (band 5).
1 Start by anchoring tire
thread under adjacent
cross stitch or hemstitch on
the back of the work.
Pekinese Stitch
This looped stitch is worked over a line of backstitch and
may use two different types of thread and two colours. To
explain the stitch more clearly, the loops are shown loosely
worked in the diagram below but can be pulled tighter to
achieve different effects.
Work a line of backstitch the width of the area to be
stitched. Take the interlaced thread from left to right, passing
it beneath the second backstitch, then looping to pass
beneath tine third and so on, but not piercing the fabric.
Pulled Satin Stitch
Pulled satin stitch is worked in the same way as normal satin
stitch (page 96) but the threads are pulled as you stitch,
which forms holes in the fabric, and creates a lacy effect.
STITCH LIBRARY • 95
Queen Stitch
This stitch is made of four parts and forms little dimples
in the embroidery by pulling small holes in tlie fabric. It is
gorgeous when worked as a group.The stitch is traditionally
worked from right to left, but if you find tins difficult to count,
work the two middle parts first followed by the outer ones.
IWork one long stitch
over four threads of the
fabric, which is then moved
two threads to the right by
the needle coming up at 3
and a small stitch worked
across one thread.
Rhodes Stitch
Rhodes stitch produces a solid, slightly raised, three-
dimensional effect, almost like a series of studs on die fabric.
The diagrams that follow illustrate one version but the size
of the stitch can be altered - check the chart to see how
many threads are in each stitch.This stitch doesn’t work
well on Aida fabric.
1 Begin to the left of a
vertical evenweave
thread, working each stitch
over squares of two, four or
more threads.
2Repeat the long stitch
from the same position
as in Fig 1, but this time
bending the stitch over one
thread only.
3Repeat the long stitch
from tlie same position
as in Fig I, but this time tlie
long stitch is bent to die left
and the needle re-enters the
fabric in the centre position.
2Following the numbered
sequence, build up
die stitch, working in an
anticlockwise direction
around the square.
ЗА correctly formed
Rhodes stitch should
have a raised central area.
Maintain the same sequence
for every stitch to produce a
uniform effect.
4The last stage of the
stitch is completed
forming a lantern shape on
the fabric. Note how the top
and bottom hole is shared
by each stage of die stitch
so forming the holes or little
dimples that make this stitch
so distinctive.
Satin Stitch
This long, smooth stitch is often used to fill in shapes and
can also look very effective when worked in blocks lacing in
different directions. It can be worked diagonally, horizontally
or vertically.
To work satin stitch, start with an away waste knot (page
11). Beginning to die left of a vertical thread, follow the
numbered sequence in the diagram, laying flat stitches
side by side. Always come up the same side and down die
other so the back of the fabric is covered and the stitches lie
closely and neatly beside each oilier.Take care not to pull
loo tight (unless working pulled satin stitch - see page 95).
96 • STITCII LIBRARY
Threaded Backstitch
Sometimes called embellished backstitch, this pretty
addition to backstitch is very simple to work. Work
backstitch as shown on page 88 and then take the second
tliread colour and weave it in and out of each backstitch,
creating smooth S-shaped loops. The pattern lines can be
straight, as shown below, or in any pattern you choose.
Zigzag Hemstitch
This is formed in almost lhe same way as ladder hemstitch
(page 93). Cui the horizontal threads (see withdrawing and
reweaving threads, page 92) and reweave them, as shown.
Work one row of hemstitch as for ladder hemstitch and then
work the second row but offset the stitches by one fabric
thread to create a zigzag effect.
Tipsy Stitch
This is my variation on
Rhodes stitch, which is very
simple to work and produces
an interesting 'tipsy' slant to
your stitching.
Work the stitch over two,
four, six or eight threads of
evenweave fabric, according
to the chart. Simply follow
lhe numbered sequence in
the diagram.
Vandyke Stitch
lliis stitch is quite straightforward but don't pull lhe stitches
too tightly or you will lose the effect of Lhe central plait. Il
can be worked over two, four or six fabric threads.
Bring lhe thread through at 1, make a small horizontal
stitch at 2 and put the needle back through at 3.Now bring
the thread through at 4 and without piercing the fabric, pass
the needle under the crossed threads at 2 and insert at 5.
Wrapped Bars
Like needleweaving, wrapped bars may be worked alone
to decorate lhe threads that remain after cutting or with-
drawing and as part of other decorative stitches.The number
of wraps depend on Lhe project - you may only need two
wraps per section as in hemstitch squares or to completely
cover the bar as in Hardanger embroidery. The diagrams
show Kloster blocks worked but these aren’t required for
this book.
1 Start by anchoring lire
thread under adjacent
hemstitches and then begin
wrapping the fabric threads,
working horizontally across
the fabric. Tn the. spot
sampler on page 53,1 only
wrapped the threads twice.
2 Wind the thread
around and around the
remaining fabric threads,
then travel to the next group
of threads and repeat. As
you wrap each bar, hold the
threads you are wrapping
quite firmly to prevent them
unravelling as you work.
3Continue wrapping the
bars, noting how many
times each set is wrapped
and keeping the stitches as
consistent as possible.
STITCH LIBRARY • 97
Hedgerow Heart Sachet (page 17)
D.MC (ANCHOR)
Cross Stitch
:H 316 (76)
351 (33)
Ц1 352 (1094)
§ o 353 (1020)
П 402 (311)
470 (890)
Я 471 (256)
H 472 (279)
П 676 (293)
677 (301)
721 (386)
SP 722 (333)
И 725 (330)
Щ 823 (297)
931 (127)
932 (978)
3740 (129)
' ' Blanc (2)
ogg 407 + 840
+ + (914+ 1084)
French knots
® 840 (1084)
Fanciful Flowers Alphabet (page 24)
AE?CpEFGI IIJKLПИРРV2
MS I^LrpOP®R5TU0imr
тфф cP /JWB ......
I ; I
1 । 11 1—LLL!—J 1——I 1—_L_—। 1--L—— 1 L
2i2
D.MC (ANCHOR)
Backstitch
— 3011 (277)
(or colour of your choice)
French knots
® 3011 (277)
(or colour of your choice)
98 • ADDITIONAL CHARTS
Butterfly House Sampler (page 17)
Afe. AM Ab,
TgS2 HSgr
3740
<400h
vvv
840’
wiv
v^vVv
mw
VVVVV vvwy
V V V v VVV
] v УдаГУ
rFffir.yL-.i
French knots
in 840
French knots
in 729
-840
eyelets in 3740
3740
840
470
DMC (ANCHOR)
Cross Stitch
316 (76)
o ? 353 (1020)
It 402 (311)
470 (890)
И 471 (256)
J J 676 (293)
721 (386)
729 (306)
Щ 840 (903)
920 (1004) 3350 (63)
931 (978) 3740 (129)
ffi 937 (268) : 2| 3772 (379)
407 + 840 (tweeded)
(914 + 903)
® French knots as labelled
DMC (ANCHOR)
Cross Stitch
470 (256)
471 (279)
603 (55)
t+ 676 (301)
:: 677 (386)
;; 729 (зоб)
£3 740 (925) $$ 800 (1092) 932 (129)
J J 743 (289) о» 931 (978)
How your embroidery is finished and made up makes a great deal of difference to the look
of the piece. This section describes some of the finishing techniques used in this book.
Stretching and Mounting
Your embroidery will look its best if stretched and mounted.
When mounting small cards or novelty items you can use
double-sided adhesive tape, but it is worth taking more time
and effort on larger projects.
All the framed embroidery in this book has been mounted
using polyester wadding (batting) to create a padded finish.
The advantage of this is that any slightly lumpy bits on the
back of your work will be pushed into the padding rather than
appear as raised areas on the front. The padding also raises lhe
embroidery, which displays it to better effect.
The two band samplers on pages 81 and 83 have been
mounted with the addition of silk moire. A fabric stretched
under the embroidery in this way creates a colour and texture
contrast which displays hemstitching to better effect and also
emphasizes other areas of pulled and drawn thread work.
There are three methods of attaching your embroidery to
board before framing:
• Pin the work to a fabric-covered board and then stitch it
into position.
• Pin the work to tire edge of the board and stick in place
with double-sided adhesive tape.
• Pin the work to tire board and lace across the back both
ways with strong linen thread.
To stretch and mount an embroidery on a fabric-covered
board you will need either acid-free mounting board or
lightweight foam board or foamcore.
1 Using a sharp craft knife, cut a piece of foamcore board to
fit your frame - an easy way to do this is to cut round the
glass that fils lhe frame.
2Trim the wadding (batting) to the same size as the
foamcore and attach it to lhe foamcore using double-sided
tape. Position your embroidery on top of the wadding and
centre it carefully in relation to the board. Fix the embroidery-
in position by pinning through the fabric into the board edges.
Start in tire middle of each side and pin towards the comers,
making sure your pins follow a line of Aida holes or a linen
tliread so that edges will be really straight. If necessary, adjust
the fabric’s position until it is centred and straight.
3Turn lhe work over and, leaving pins in place, trim excess
fabric to 5cm (2in) all round.
Framing
You will see from some of the wonderful photographs in
this book, that the way in which a design is framed can
greatly affect Lhe end appearance. Mounting and framing
by a professional can be expensive, particularly if you want
something a little different, but most of the finishing techniques
suggested in this book can be tackled at home.
When choosing a frame for a particular project, select the
best moulding you can afford. Generally embroidery looks
better framed without glass but if you prefer glass use crystal
glass, which although more expensive will minimize reflections
and distortions. You must also ensure that the embroidery
does not get squashed by the underside of the glass. Either
use a spacer (narrow strips of board), gold slip, or a mount
(mat) between the glass and the mounted embroidery to hold
them apart. Adding a single mount or double mount can add
dimension to even the simplest project. Framers have a large
selection of mounts in all sizes and colours or will cut one to
fit. Ask the framer to make up the frame and a coloured or
gold slip for you, but buy lhe frame, glass and so on in kit form
(most framers do not mind!) and then put it together yourself.
100 • FINISHING & MAKING UP
To frame your stitching, stretch and mount as described
above and set aside. Place the frame lace down on a covered
surface and after cleaning both sides of the glass, place the
glass in the frame rebate and insert tlie gold slip, mount or
spacer followed by the stitching. Before fixing in the backboard
and sealing the frame, line the inside with aluminium foil,
which will discomage thunder flies from finding their way in!
Making Bias Binding
The Stitcher’s Necessaire on
page 25 is completed using bias
binding, which can be purchased or
homemade. To make bias binding,
cut strips of fabric 4cm (1 'lui) wide
across the grain of the fabric and
machine sew them together to make
tlie length needed.
To attach bias binding by hand or
machine, first cut tlie binding to the
correct length. Pin the binding to the
wrong side of the project, matching
raw edges and machine or hand
stitch. Now fold the binding to the
right side and top stitch in position.
Press lightly.
Making an Inset Cushion
An inset front to a cushion gives it a professional touch and
really sets off the embroidery as you can see in the I talic
Alphabet Cusliion. I have used some antique checked linen
and matching lace to great effect.
1 Measure tlie embroidery and decide on the size of tlie
finished cushion. Allowing 1.25cm (Fain) seam allowances,
cut tlie embroidery to the required size plus two seam
allowances. Press the embroidery face down on soft towels.
2 Measure the short side of the trimmed embroidery and cut
two strips of fabric to match. Find the mid-point of each
edge by folding and marking with a pin. Fold the border pieces
in half to find the centre point and mark with a pin. With
right sides together, pin the border panels to the embroidery,
matching the centre points. Machine stitch these seams
and press seams open.
3 Measure the long side of tlie embroidery and cut two strips
of fabric to match. With right sides together, pin the border
panels to the embroidery, matching centre points. Machine
stitch these seams arid press open.
4Cut backing fabric to fit your cushion front. Place tlie
front and back right sides together and sew a seam round
all edges, leaving a gap for turning. Him through to tlie right
side, insert a cushion pad and slipstitch tlie gap. In the version
illustrated I added the lace trim by hand after tlie border pieces
were completed.
Making Cards
There are many card blanks
available from needlecraft
shops and mail-order
companies or you can
make your own using
pretty papers, card and
ribbon, as I have for the
Flower I leant card and
the Traveller’s Tales card
on page 33.
In all cases, cut the
finished embroidery
to the required size (allowing for
fraying the edges if appropriate) and then select a
coloured card that complements your threads. Create a single-
fold card and embellish it with decorative paper. Attach the
embroidery to tlie card with double-sided adhesive tape and
add trims or other embellishments as desired.
Making a Twisted Cord
A twisted cord is perfect for embellishing projects - see the
bookmark on page 41. Choose a colour or group of colours in
stranded cottons (floss) to match your embroidery. Cut a
minimum of four lengths at least four times the finished length
required and fold in half. Ask a friend to hold the two ends
while you slip a pencil through the loop at the other end.Twist
the pencil and continue twisting until kinks appear. Walk towards
your partner and the cord will twist. Smooth out the kinks
from the looped end and secure wi th a knot at the other end.
Making a length
of twisted cord
from embroidery'
threads.
FINISHING & MAKING UP
101
I
I have been collecting antique embroidery for over 20 years and still love every piece in my collection.
Antique embroideries, particularly samplers have become very collectable and therefore more valuable.
As a reSult, it is even more important that we care for any that we find and that we preserve embroidery using
current knowledge and expertise. With antique textiles there are a lew golden rules. 1 have included some
examples from my collection to illustrate some of these do’s and don’ts.
The large red sampler (see frontispiece
picture) had been framed very badly, with die
inadequate mount actually obscuring some
details of Lhe embroidery in the bottom right
of the sampler.
Sarah Hubbard’s sampler (see page 46) had
a number of moth holes but these were disguised
by stitching the sampler on to unbleached linen
and mounting it sympathetically.
During its restoration the very early Mary
Fowler sampler (see page 7) was stitched on
to well-washed unbleached linen and the linen
mounted over card. The frame has spacers to keep
the crystal glass away from Lhe stitching.
The Ann Tipper sampler (see page 5) had,
unfortunately, been washed, which was such a
shame as some of the colours ran and these are
difficult if not. impossible to remove.
.1 lap samplers are becoming i eri • collectable and therefore more
expensive to buy. I «да те/т lucky to see my first map of England in
an antique shop in a parlous state Ibra bargain price. It needed
considerable conservation and lo ving care and I still love it!
Do use acid-free card when mounting embroideries.
✓ Do use crystal glass where possible Lo avoid
distortion.
l/ Do consider having damaged embroidery mounted
on to unbleached linen to minimize faults.
Do use spacers or mounts (mats) to keep the glass
from pressing on the stitching.
Do add aluminium foil Lo the back before making
up the frame, to discourage insects.
X Don’t attempt to wash any old embroideries -
the threads were originally dyed using natural dyes
and may disin Legrate when the fabric comes in
contact with water. This is a specialist job!
De-ionized water is used by experts.
X Don’t expose embroideries to sunlight.
X Don’t fold embroideries - the fabric may tear on
the folds. Leave flat or roll instead.
X Don’t allow the embroidery to remain in contact
with glass when the piece is framed as the glass
could permanently damage tire stitching.
102 • CARING FOB ANTIQUE SAMPLERS
Further Reading
The New Anchor Embroidery Series (David fl Charles, 2005)
BISHOP, E. A Collection of Beautiful Stitches (Cross ‘N’ Patch. 2002)
DILKMONT.Therese DMC Library: The Encyclopaedia of Needlework (Bracken, reprinted 1987)
The Embroiderer’s Guild Making Samplers (David fl Charles, 1993)
GREENOFF, Jane The Cross Stitcher's Bible (David fl Charles, 2000)
MeNEILL, Moyra Pulled Thread Embroidery (Dover Publications, 1999)
O'STEEN, D. The Proper Stitch (Symbol of Excellence Publishers Inc, 1994 )
SNOOK, Barbara Embroidery Stitches (Balsford, 1972)
Acknowledgments
As always, there are many people involved with the production of a book like this one, but 1 would Like to mention a tew people
to whom I am most grateful. Without the support of my family, particularly my husband Bill, it would be simply impossible to
continue writing cross stitch books. I lis patience in the face of more late meals, a tired and ratty wife and too many late nights is
never ending. To my parents, Eric and Pat Fowler who continue to search out my books and magazines and make sure they are on
Lhe front of the book stand wherever they are!
My heartfelt thanks to the following: to Sue Hawkins whose continues to support me in her work as Technical Director of the Cross
Stitch Guild and for her friendship, which even survives working together! To my right-hand woman, I lelen Beecroft, who supports
and protects me when I’m scribbling and Daphne, who keeps the business going in my absence.'lb John and Lucy Evans for the
loan of the lovely, extremely valuable band sampler on page 78.
Many thanks to my marvellous team of stitchers and pattern testers - Hanne Fentiman, Lesley Clegg. Jill Vaughan, Margaret
Cornish, Margaret Pallanl, Susan Bridgens, Deborah Buglass, Liz Burford, Jacqueline Davies, Doreen Ely, Elizabeth Edwards, Jean
Fox, Joyce Halliday, Joan Hastewell, Janet Jarvis, Margaret Locke, Sue Smith, Suzanne Spencer, Joan Barnes, Sue Heeley, Jane
King and Joan Winwood. Jemma McMinn at Artistuff for the framing.
Thanks to all the generous suppliers of the materials and equipment required for this book, particularly Rainer Steiman of Zweigart
for lovely fabrics, DMC Creative World and Coats Crafts UK for stranded cottons and metallic threads and Ian Lawson Smith for
my wonderful cross stitch design programme.
Thanks to Cheryl Brown at David fl Charles for continuing to have faith in me, Ame Verso who works on my books and allows me
to talk about her remarkable mother, so sadly missed. Linda Clements for her attention to detail and tireless work checking yet
another manuscript! A special thank you to Ethan Danielson for his patience, good humour and the excellent stitch diagrams and
beautiful charts that make this book so special. Last but not least, my business advisor and guru, Neal Dennis - a special man.
FURT1IER READING AND ACKNOWLEDGMENTS • 103
Suppliers
UK
If ringing from outside the UK use +44 and no (0)
Artist ulT Framing I jmited
40-41 Fleet Street, Swindon, Wiltshire SN1 I RE
Tel: +44 (0) 1793 522152
For all the stunning picture frames used in this book
Burford Needlecraft
117 High St, Burford, Oxfordshire OX 18 4RG
'lei: +44 (0) 1993 822136
For general needlework supplies, including Caron threads
(also mail order)
Coals Crafts UK
PO Box 22, Lingfield Estate, McMullen Road, Darlington,
County Durham, DL1 1YQ
Tel: +44 (0) 1325 365457 (for a list of stockists)
Fax:+44 (0) 1325 338822
For a wide range of needlework supplies, including
Anchor threads
The Cross Stitch Guild
Yells Yard, Cirencester Road, Fairford, Gloucestershire
GL7 4BS
Tel:+44 (0) 1285 713799
www.thecrossstitc.hguild.com
Fora wide range of needlework supplies, including Zweigart
fabrics, threads, handcrafted buttons, cross stitch design
software (Cross Stitch Designer Gold), gold-plated needles
and the USA map sampler chart (see also page 2)
DMC Creative World Ltd
Pullman Road, Wigston, Leicestershire LE18 2DY
Tel:+44 (0) 116 281 1040
Fax: +44 (0) 116 281 3592
www.dmc.com
Fora wide range of needlework supplies, including
DMC threads
Lakeland Ltd
Alexandra Buildings, Windermere, Cumbria LA23 1BQ
Tel: +44 (0) 15394 88100
www. lake! and! united .co. uk
For decorative papers
The Paper Shed
Tollerton,York YO6I 1QQ
Tel:+44 (0) 1347 838253
www.papershed. co. uk
For decorative papers
US
Charles Craft Inc
PO Box 1049, Laurenburg, NC 28353
Tel: 910 844 3521
Email: ccraft@carolina.net
wvw.chaiiescraft.com
For cross stitch fabrics and many pre-finished items
Kreinik Manufacturing Co Inc
3106Timanus Lane, Suite 101, Baltimore, Maryland 21244
Tel: 1 800 537 2166 or 1 110 281 0040
Fax: 1 410 281 0987
www.krienik.com
For Kreinik metallic threads and blending filaments
MCG Textiles
13845 Magnolia Avenue, Chino, CA 91710
Tel: 909 591 6351
www. megtexti 1 es .com
For cross stitch fabrics and many pre-finished items
M G .1 Buttons
1000 Sixth Avenue, New York, NY 10018
Tel: 212 391 6200
www.mjtrim.com
For beads, buttons, ribbons and trimmings
Yarn Tree Designs
PO Box 724, Ames, Iowa 500100724
Tel: 1 800 247 3952
www.yamtree.com
For cross stitch supplies and card mounts
Zweigart/Joan Toggit Ltd
262 Old Brunswick Road, Suite E, Piscataway,
N.J 08854-3756
Tel: 732 562 8888
www. zwe i ga rt.. com
For cross stitch fabrics mid linens
104 • SUPPLIERS
Index
Bold indicates technique references
Adam and Eve 13,38,46-53
Aida 10, 11, 12, 16,72,73,88
Algerian eye stitch 16,80,88
alphabet samplers 22-9,
54 61
A Stitch in Time 71.73, 76-7
backstitch 72.88
outlines 13
threaded 82,83.97
band samplers 78-87
bars 88, 97
Berlin woolwork 62-9
bias binding 25, 101
birds, swallows 62-9
blackwork band sampler
79-80,84
bookmark, darned 41
border, interlaced 41
Bristol Orphanage sampler
54-6, 58-9,61
bullion knots 72,80,81
bullion stitch 82. 88-9
butterflies 17-21,79,82,86,
99
buttonhole stitch 89
detached 81.89-90
button loop 25,89
cards 33,40,101
caring for samplers 102
carnation and butterfly band
sampler 79,82,86
case, stork 73,99
chain stitch, counted 81,89
charts
Berlin woolwork 65
personalizing 16, 24
working from 10, 11, 13,
88
coasters 41,72
colour
shading 64
single 54-61
cord, twisted 41, 101
couching 81.83.89
cross stitch 12, 13
double 80,90
long-legged 94
three quarter 12
Cross Stitch Guild 2, 32, 104
cushions 54-5,57,60, 101
darning samplers 38-45
design
personalizing 16,24,40,
48,73,76
size 11
dove’s eye stitch 48,81,90-1
edges
frayed 33,41,72,92
hemstitched 81,82,93
equipment 10, 104
evenweave 10, 11, 12
eyelets 16,91
half 83,92
quarter 83
fabrics
choice 10,83
preparation 11
finishing work 12, 100-1
flowers
alphabet sampler 22-9
band samplers 78-87
Berlin pictures 64-5
Berlin swallows sampler
62-9
carnation and butterfly
band sampler 79,82,86
floral spray coaster 72
garden of Eden motif
sampler 46-53
gardenia darning sampler
38-15
heart card 33
hedgerow heart sachet 17,
98,103
needle fold 24-5,98
stitcher’s necessaire 25,
101
vase picture 19
violets and berries band
sampler 79,83,87
wild hedgerow house
sampler 14-21
four-sided stitch 81,83,91
frames, embroidery 10
framing work 100-1, 102
French knot 16,27, 51,72,
80,81,82,91-2
gardenia darning sampler
38-45
hearts 17,33,81,98,103
hemstitch 41,48,81,82,87,
92-3
diamond 81,83,90
ladder 81,83,93
zigzag 57, 81,97
herringbone stitch 80.81.93
history of samplers 4,6-9
links to the past 21,27,
35,49,61,80
Holbein stitch 80,93
Home Sweet Home 71-2,
74-5
hoops 10
house samplers 14-21,99
linen 10
map samplers 8,30-7, 102
materials 10, 104
measurements 10
miniature samplers 57
Montenegrin stitch 83,94
moth damage 102
motif samplers 6-7,46-53
mounting work 100, 102
needle fold 2 1 -5,98
needlelace 82,94-5
needle roll 49
needles 10
needle.weaving 83,87, 90, 95
outlines, backstitch 13
paper samplers 6,8,70
Pekinese stitch 83,95
personalizing designs 16, 24,
40,48,73,76
pictures 49,57,61,64-5
pulled and drawn thread
designs 48,81,82,83,87,92,
95, 97
queen stitch 16,81,82,83,
96
red samplers 2,8,54-61
restoration 7, 102
reweaving threads 92
Rhodes stitch 80.96
half 16,81,92
ribbon garland needle roll 49
rose, bullion 89
sachet, heart 17, 98, 103
satin stitch 16,48,82,96
pulled 95
scissors 10
shading 64
ships 33-7
spot motif samplers 6-7,
46-53
starting work 11,13,88
stitcher’s necessaire 25, 101
stitch library 88-97
storing samplers 102
stork case 73,99
strawberries and cream band
sampler 79,81,85
stretching work 100
suppliers 104
techniques 11-13
threads 4,9, 10,13,62,65
tipsy stitch 81,82,97
Vandyke stitch 83,97
Victorian sentiments 70-7
violets and berries band
sampler 79,83,87
washing 102
wise words samplers 8, 49,
70-7
working methods 13,88
CROSS STITCH
Over 30 cross stitch
। designs inspired
by traditional samplers
Best-selling author Jane Greenoff uses her own
historical sampler collection as the inspiration
Гог this exquiste collection of designs, so that
you can begin a collection of your very own!
Cross Stitch Antique Style Samplers offers
everything you need to make your own family
heirlooms of the future, and features all the
most popular sampler styles, as well as smaller
quick-to-stitch projects inspired by the main
sampler designs.
Combining cross stitch with a selection of
other counted thread stitches, this book will
help you to extend your stitching repertoire,
and give you all the inspiration and practical
advice you need to create beautiful and
traditional samplers of your very own.
,с/(оиие r J'u/ufi/e/w •« ty/uifiet t iu/n/.)/e/vi • <. t iani/j/em
,(/ie/7//i-t !{i//e f fa/iifl/e/vr
‘Picforian t fe/i/i/ne/tAv • ,Q>ci/ic/«• f'a/ii/)/e/w
06488 41797
8
ж « I HI » ж ж
&CKOSS&
S I I rein.It's
Ф BibleS
Also in print
O.lVIll CIlAtll'.
UK £ 18.99
US $24 99
(C.r.SU^i
41797 9 780715 318300