/


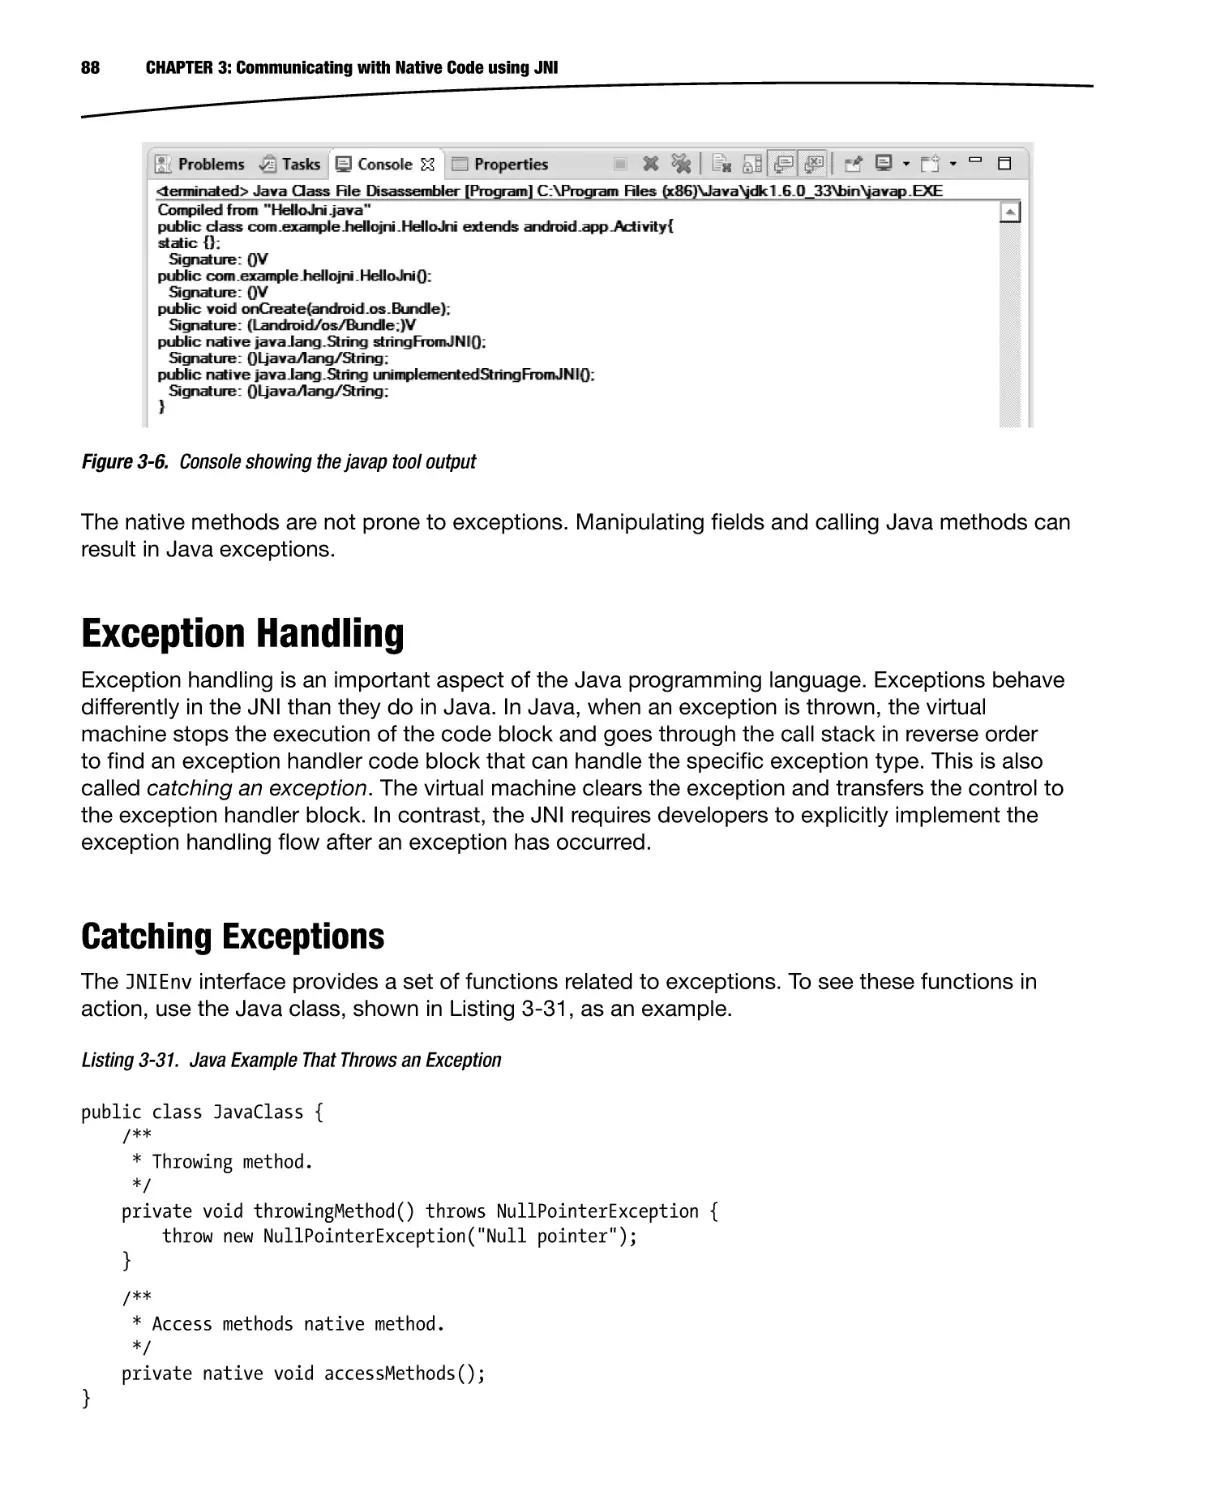

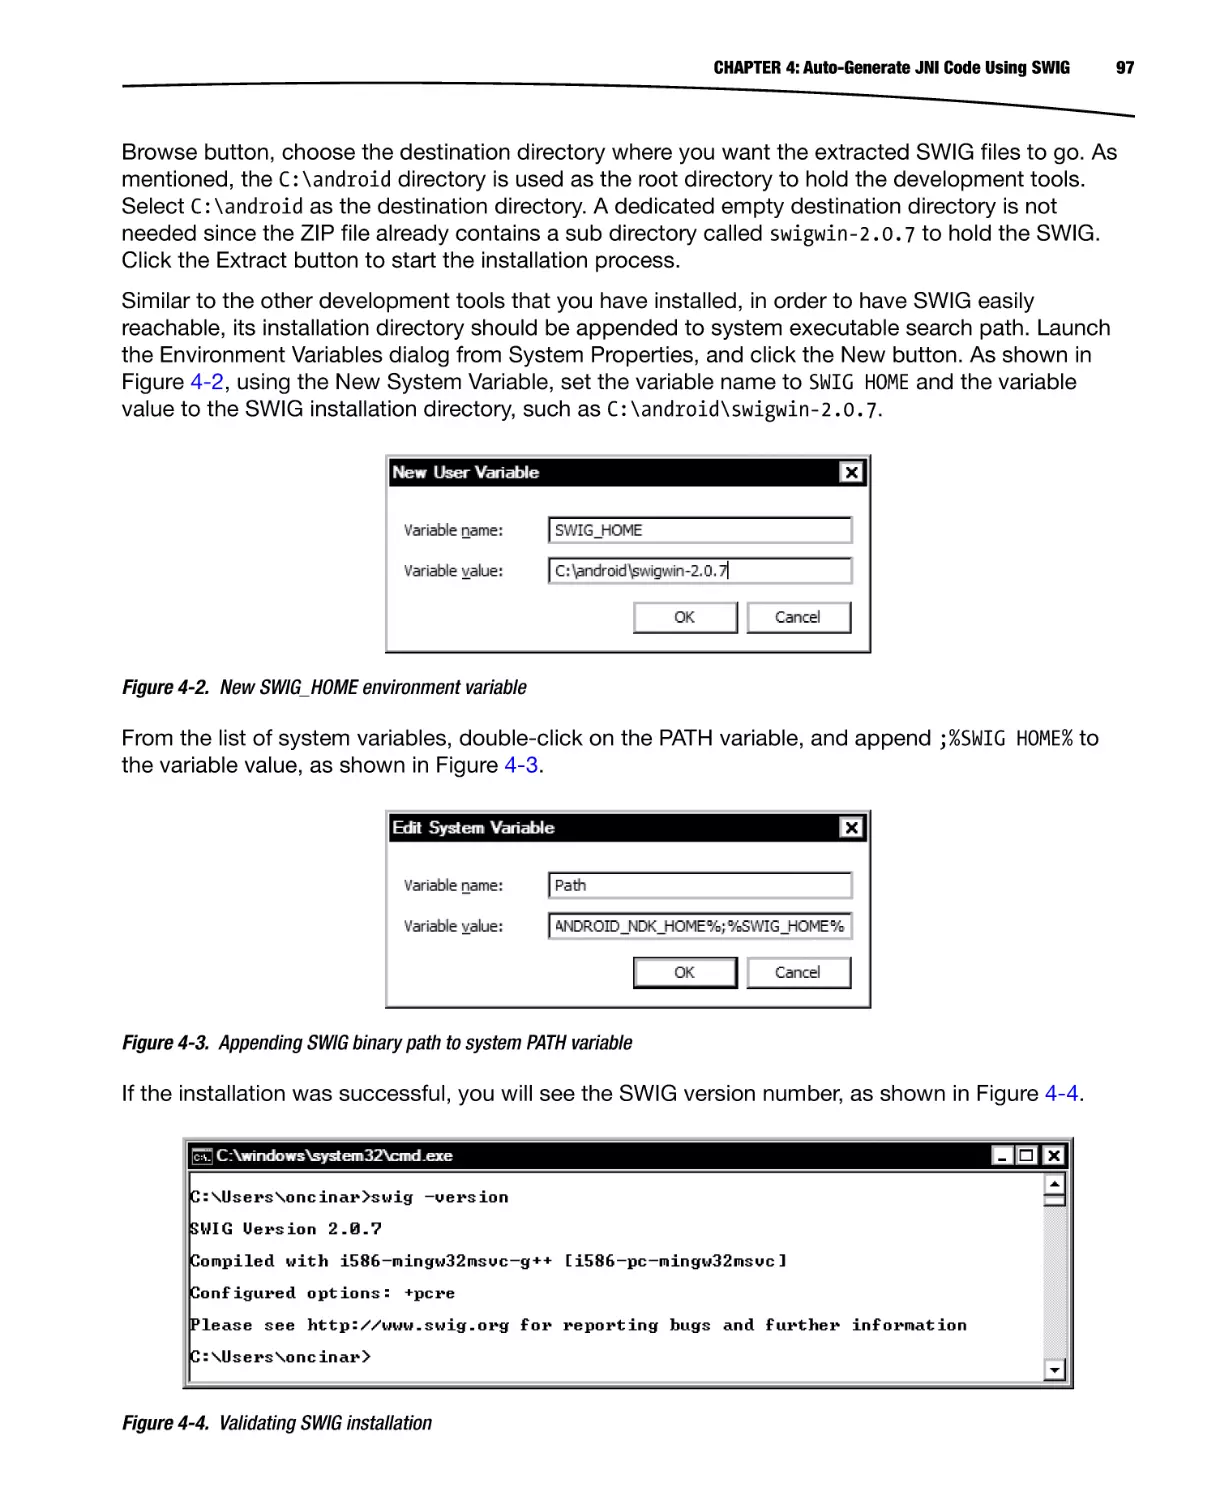
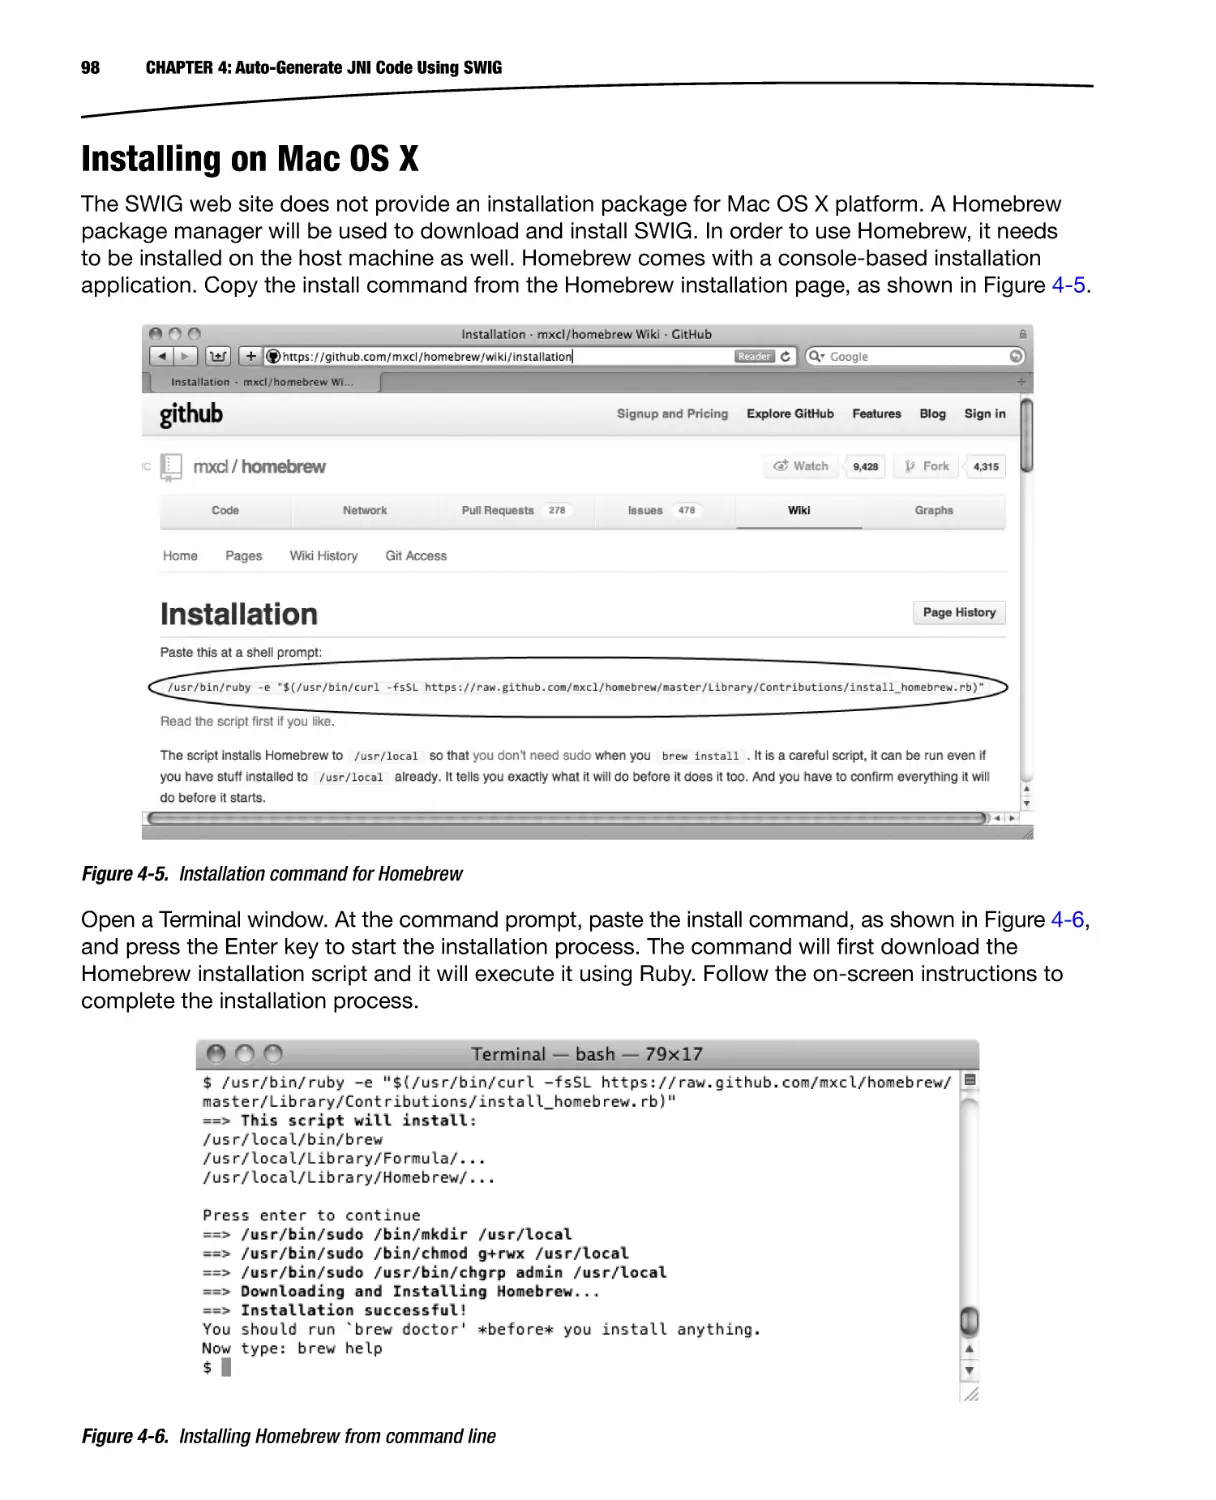
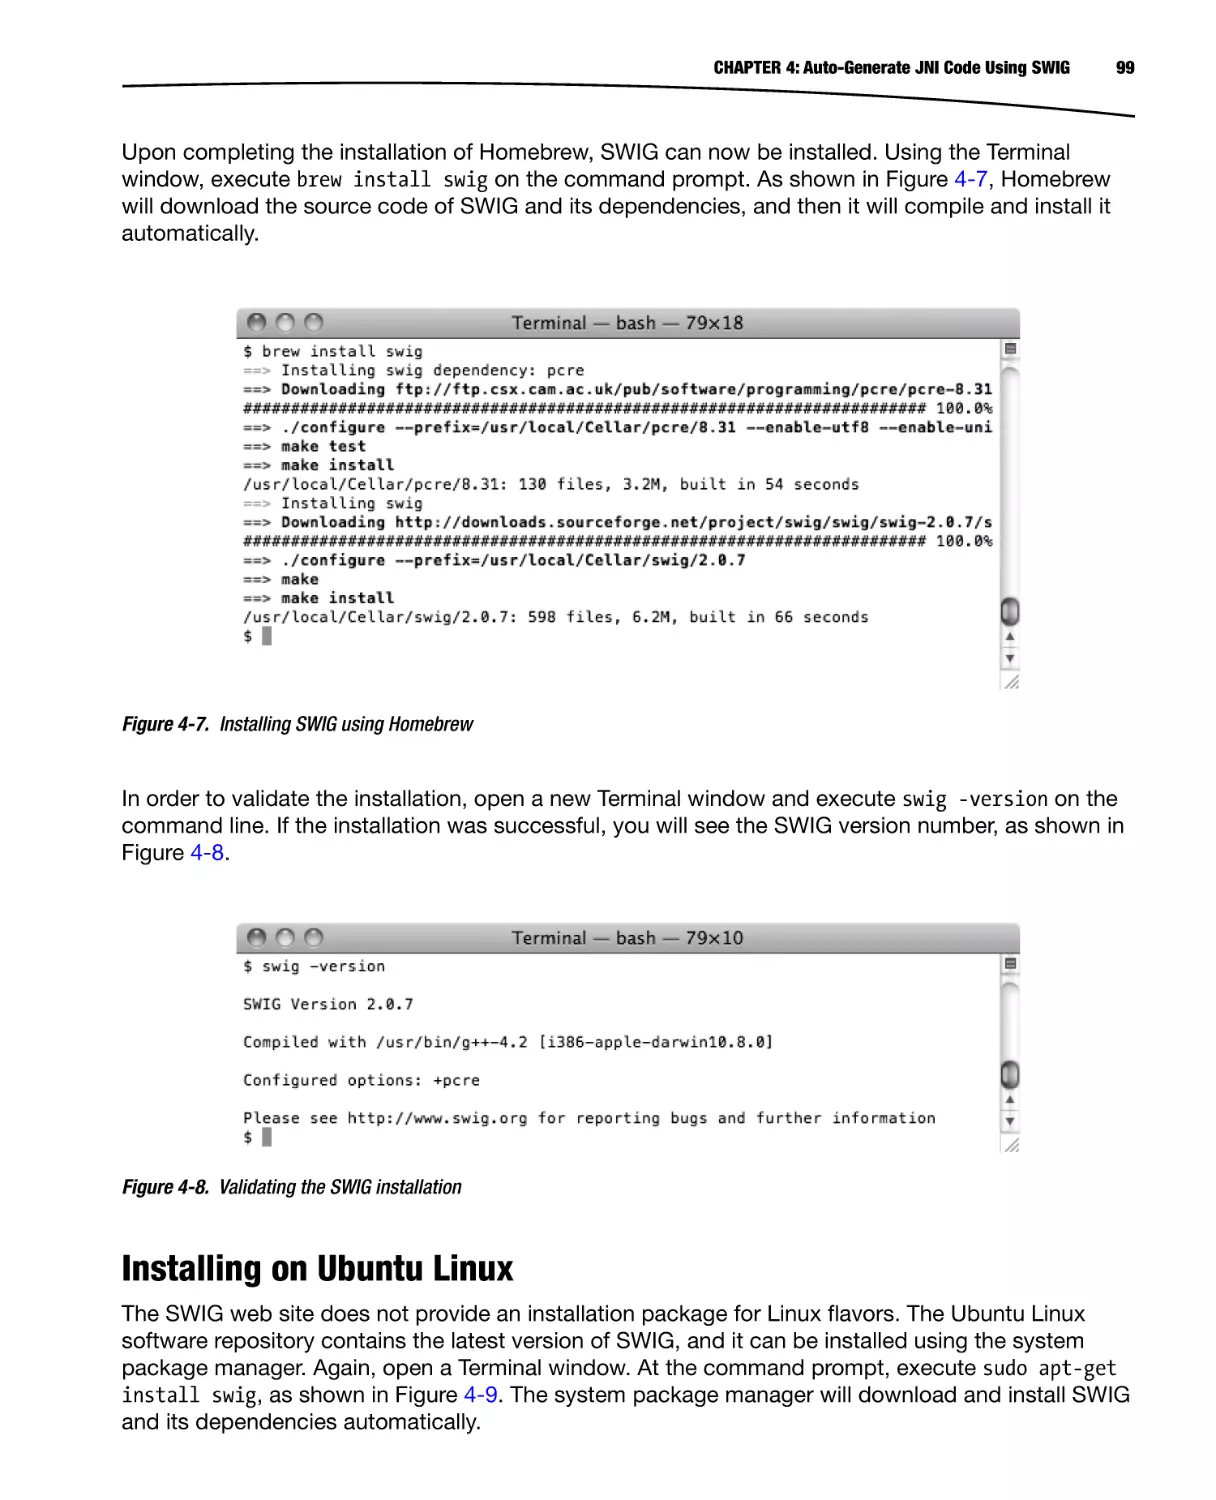
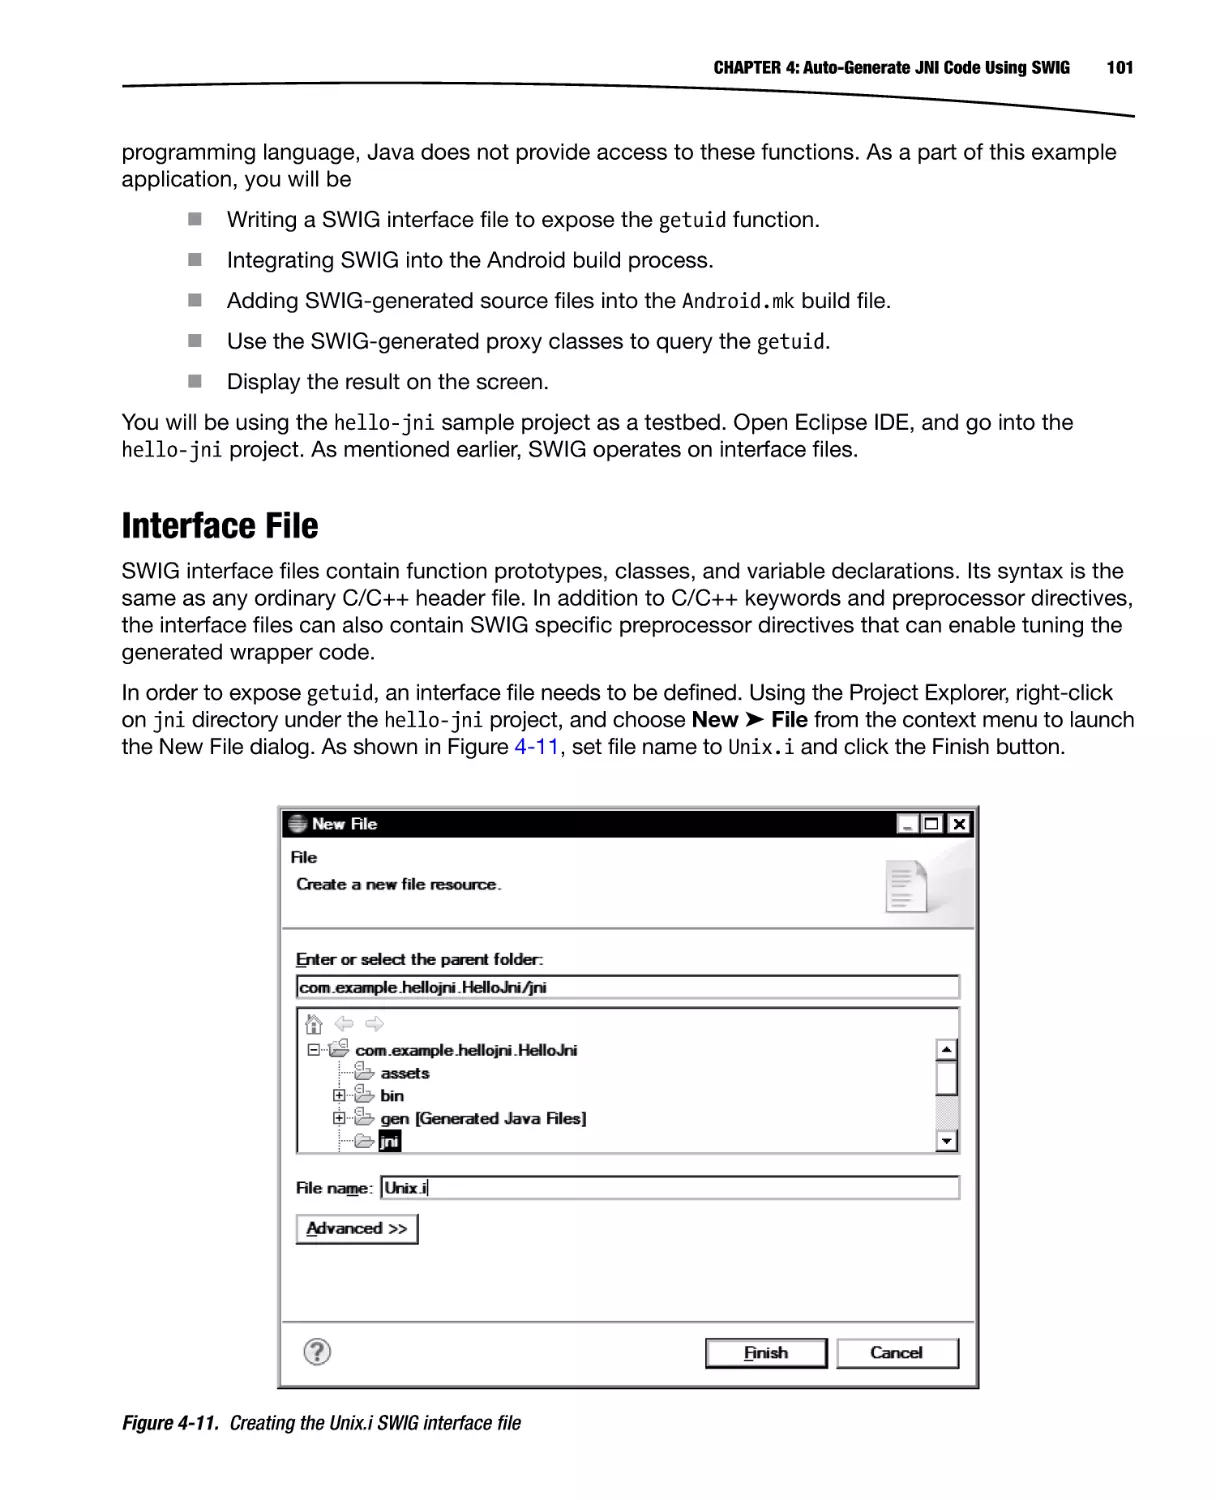
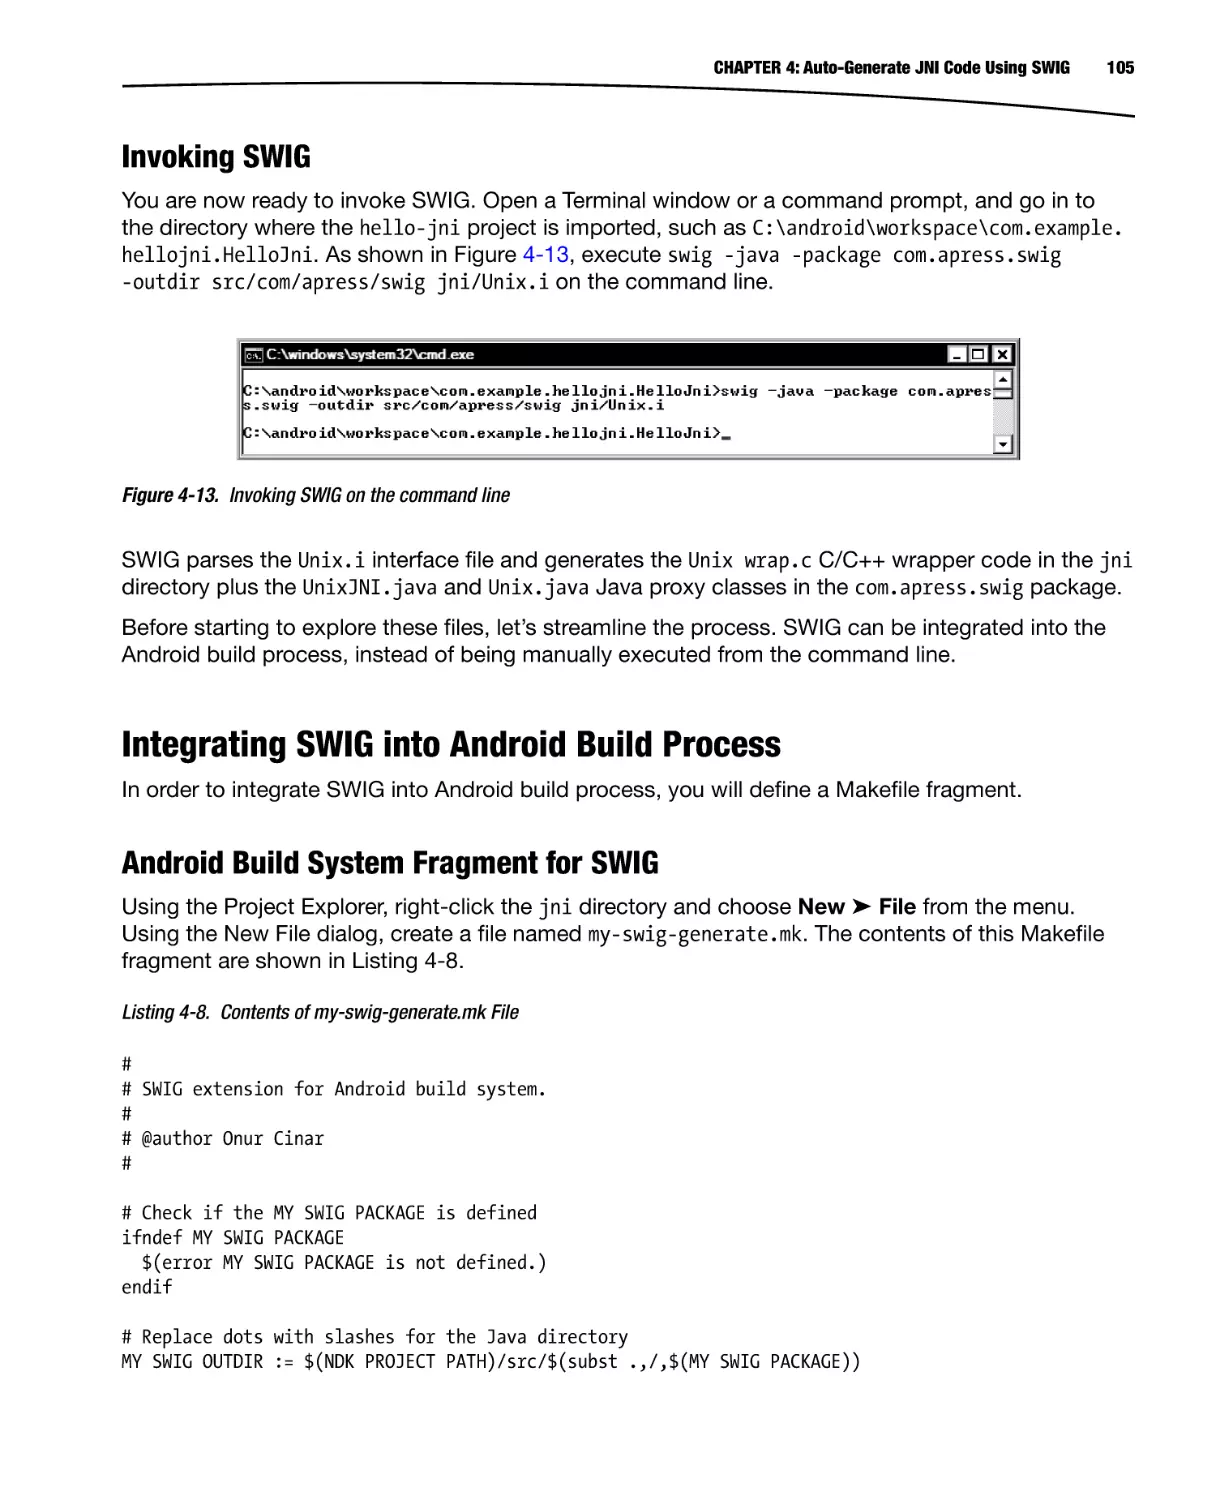

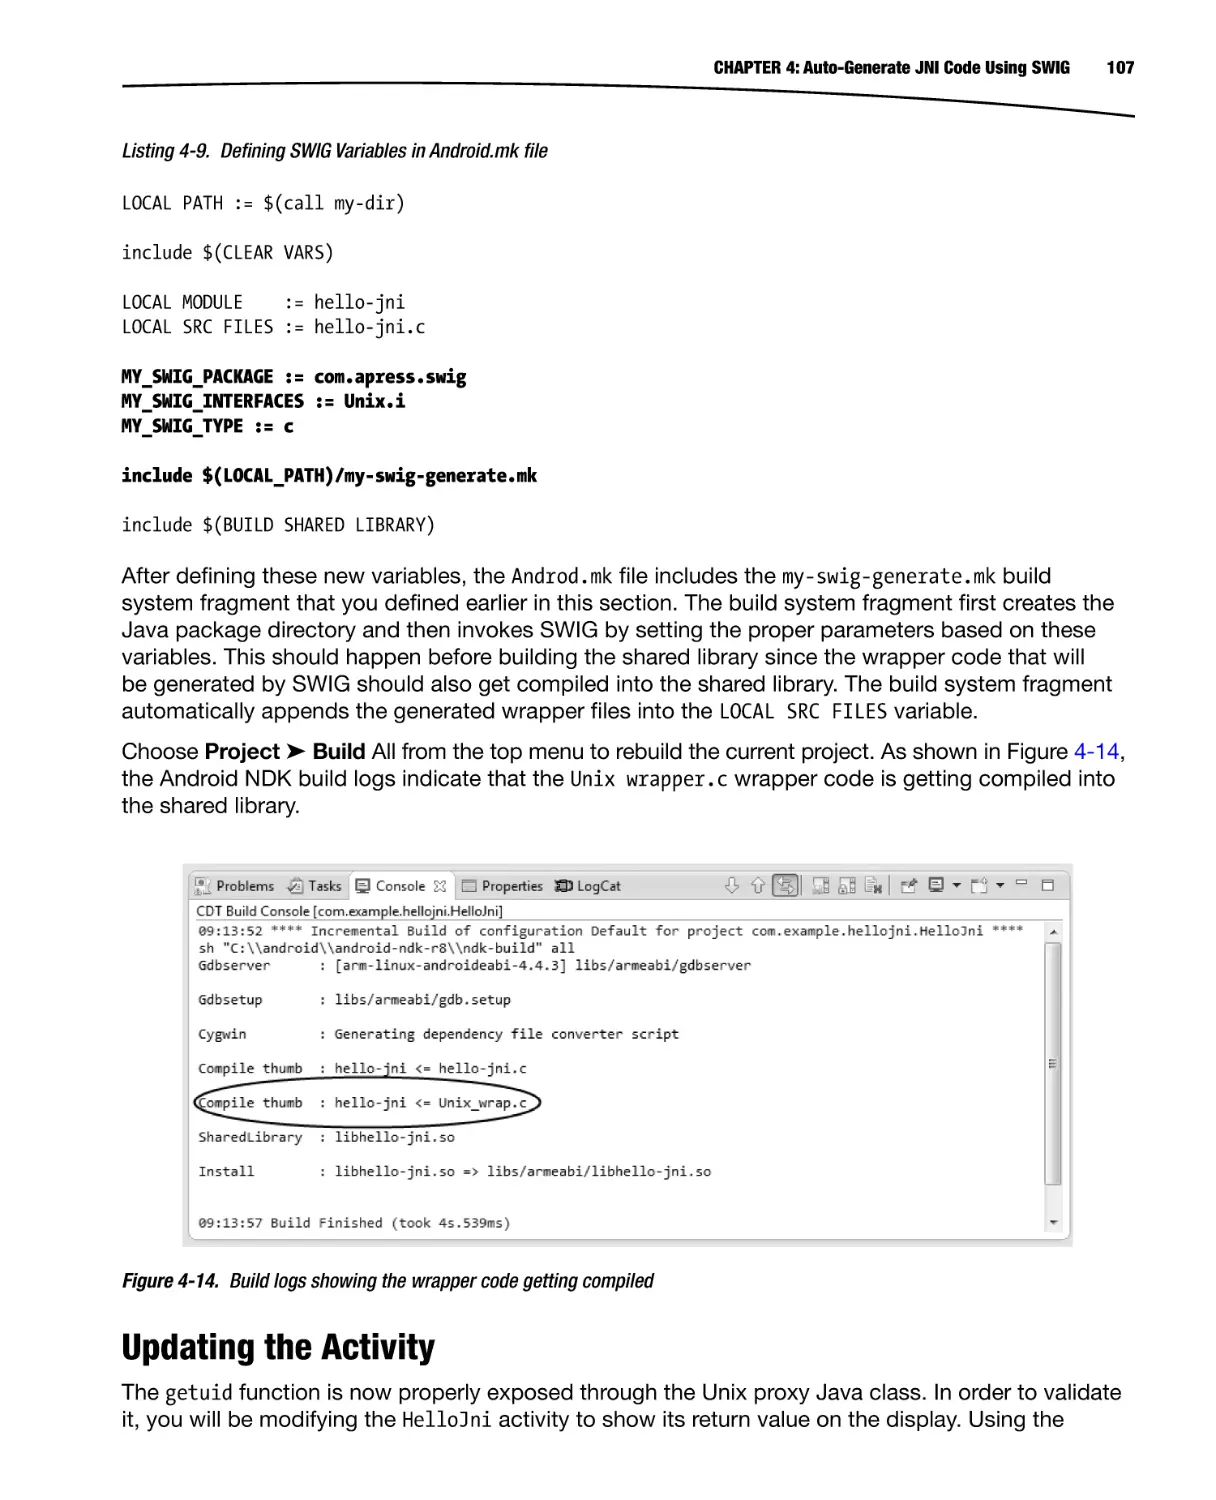
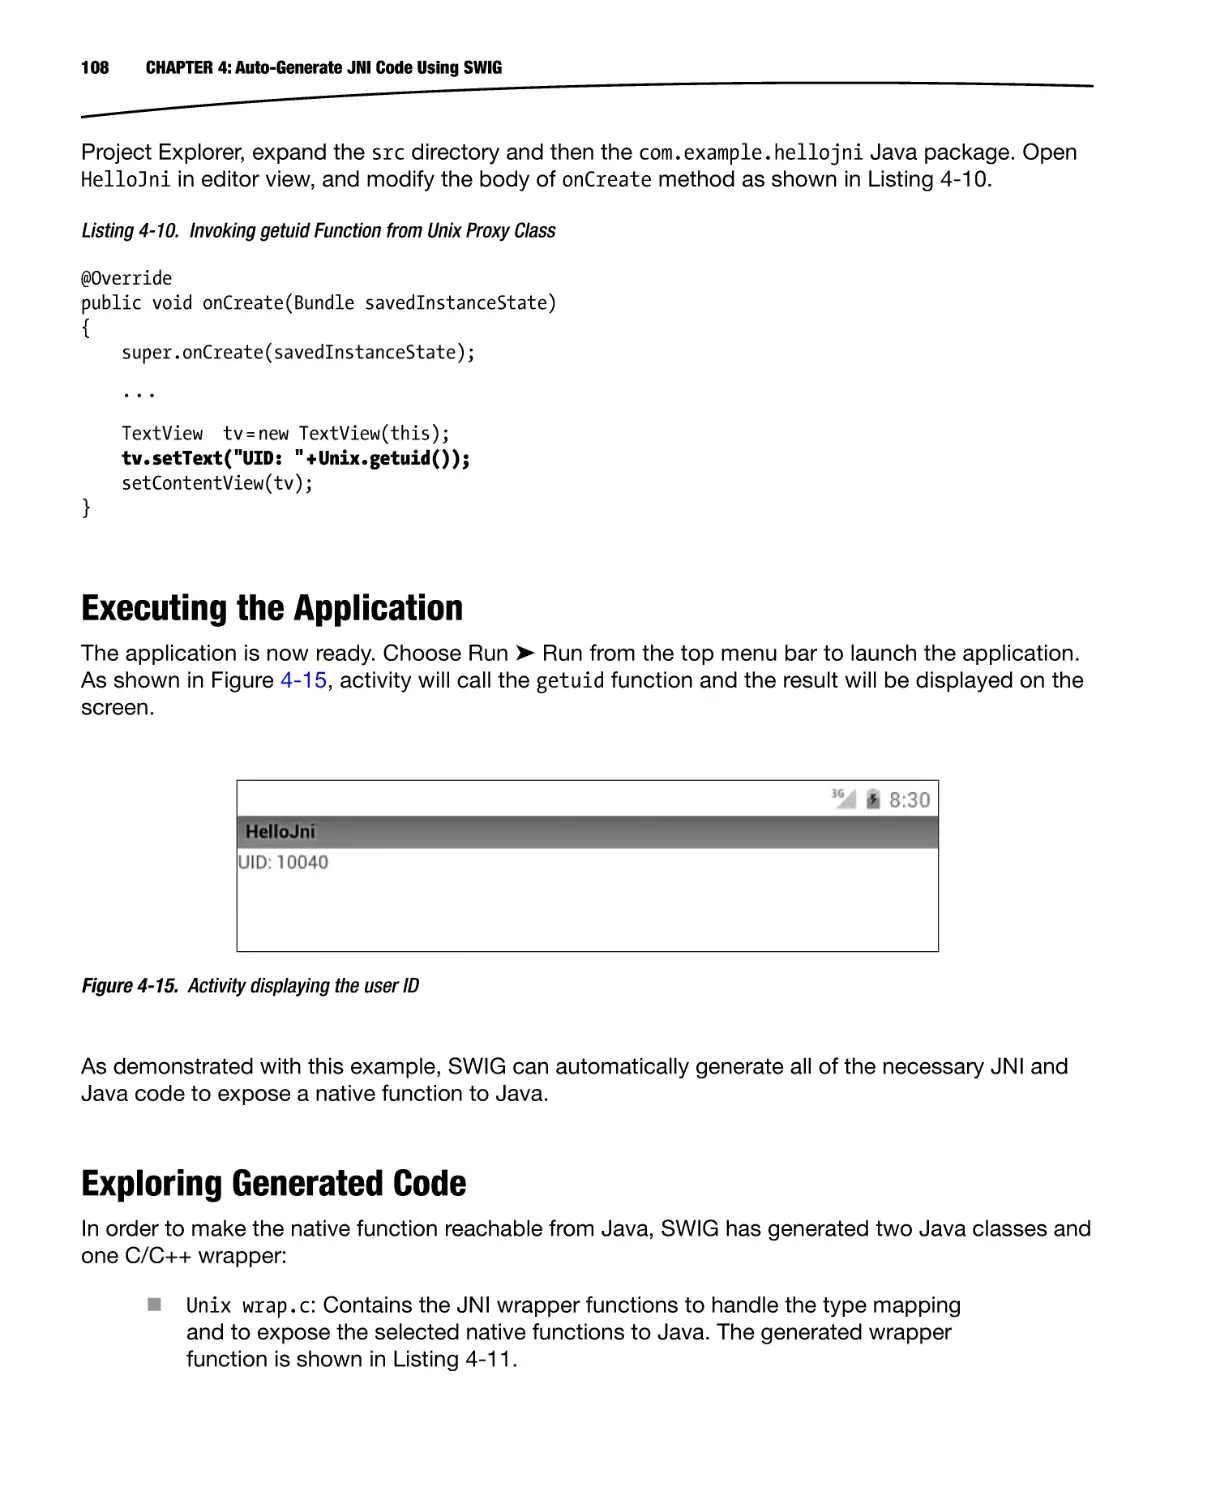

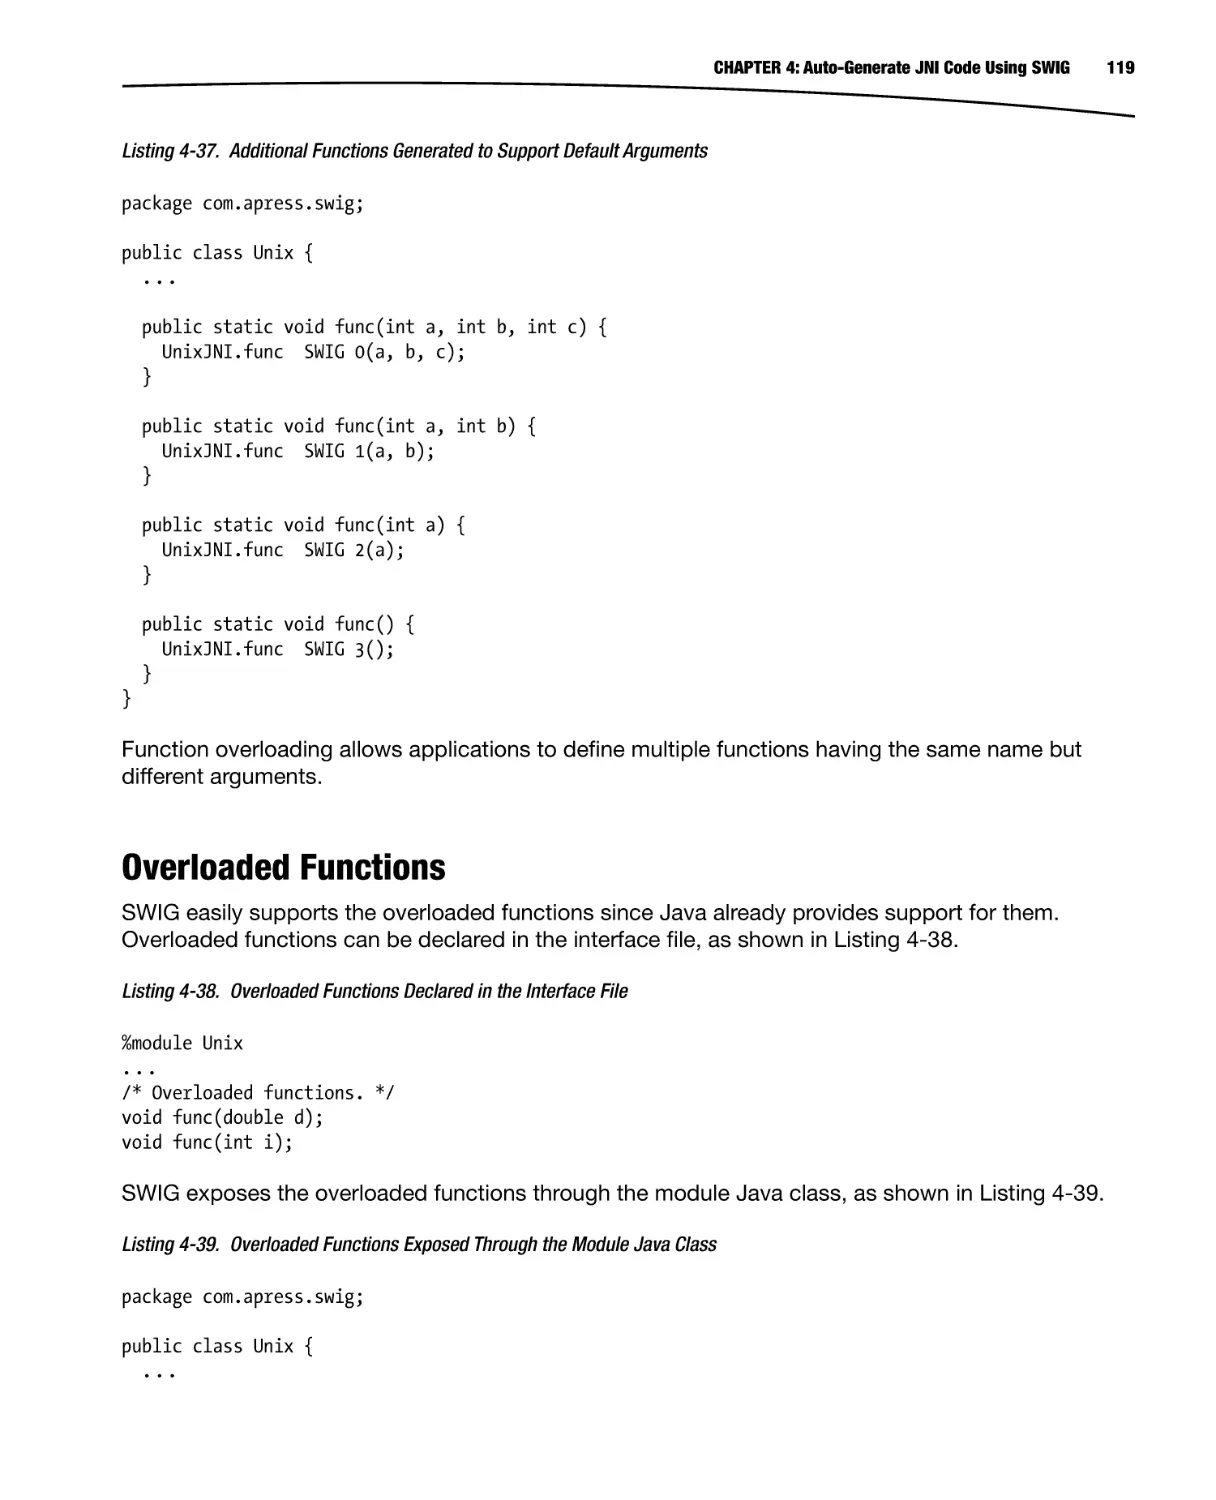
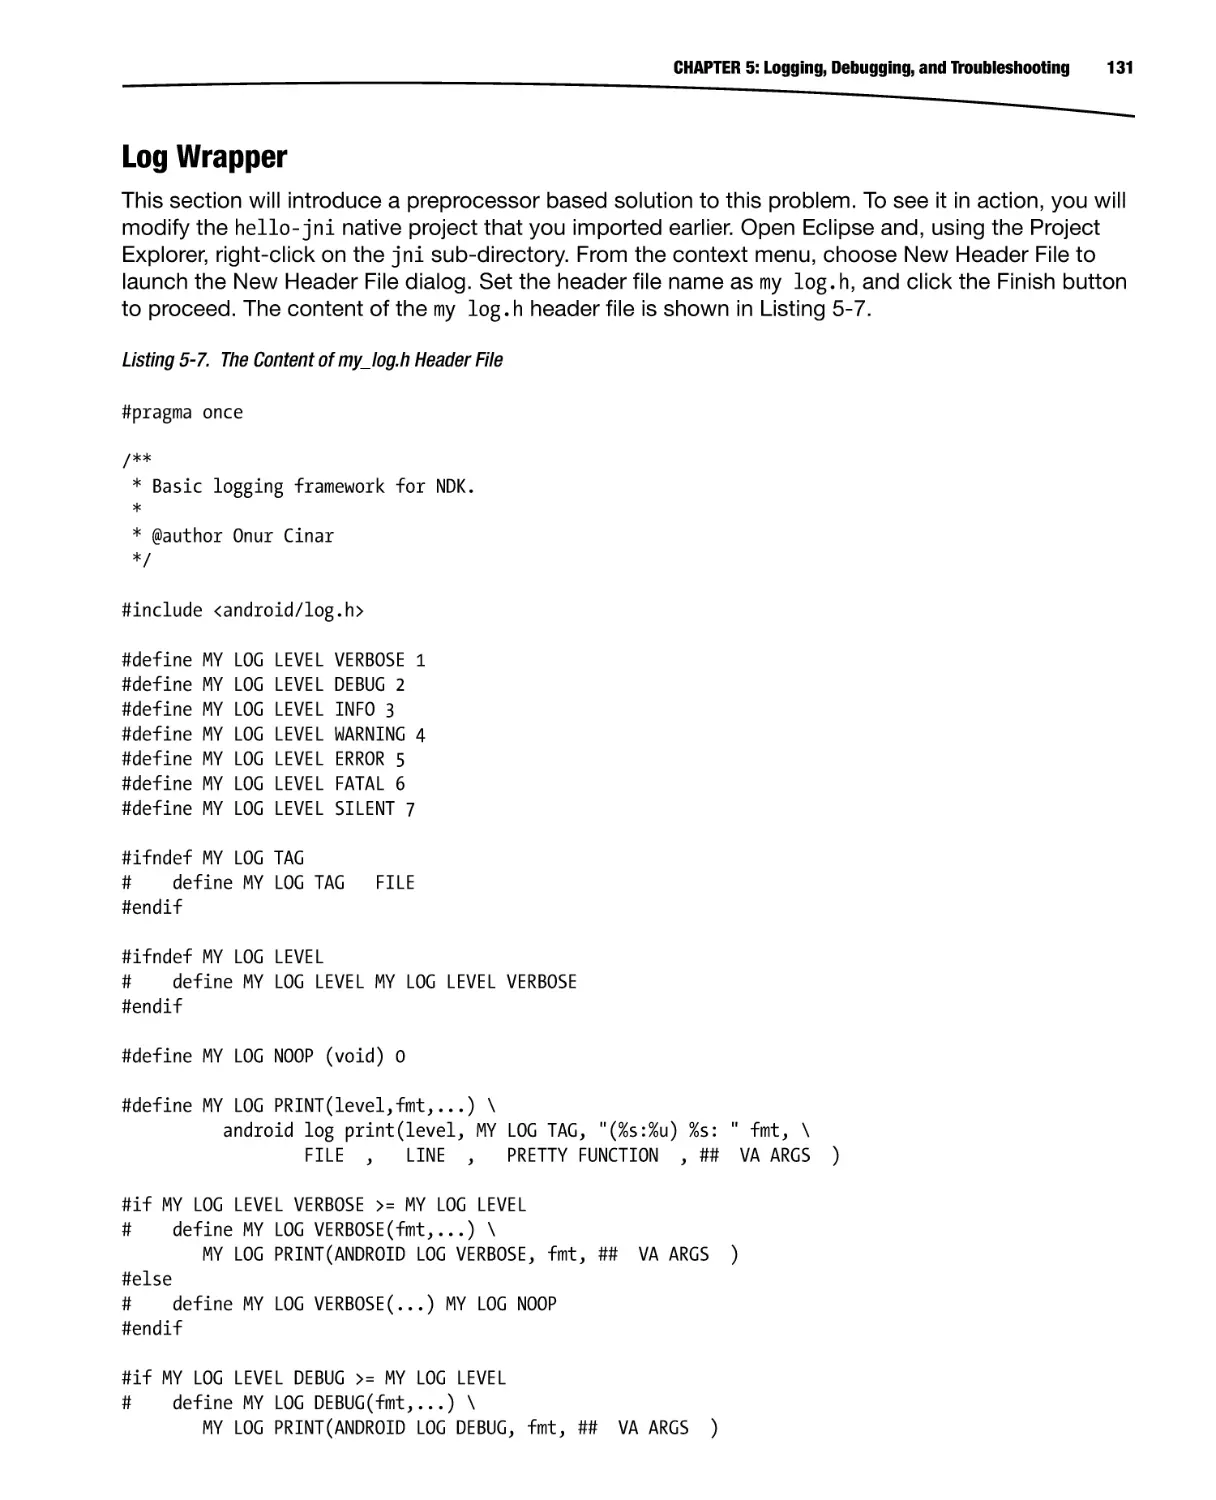
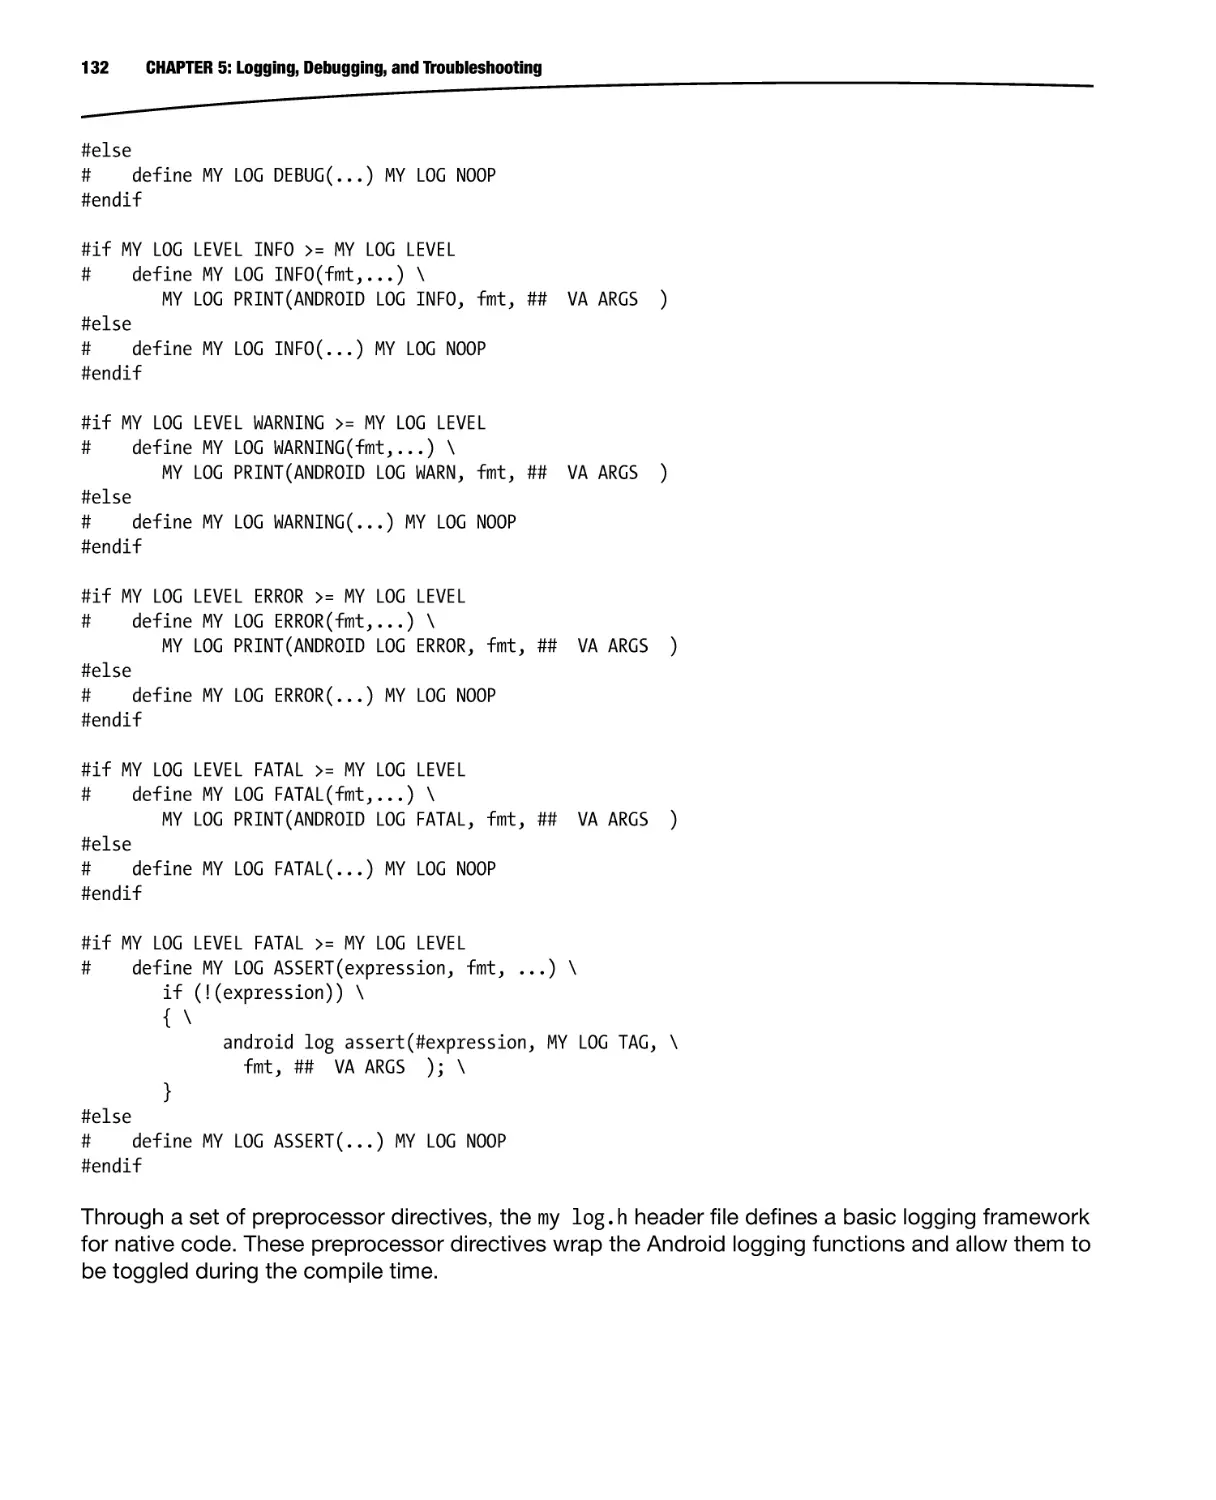
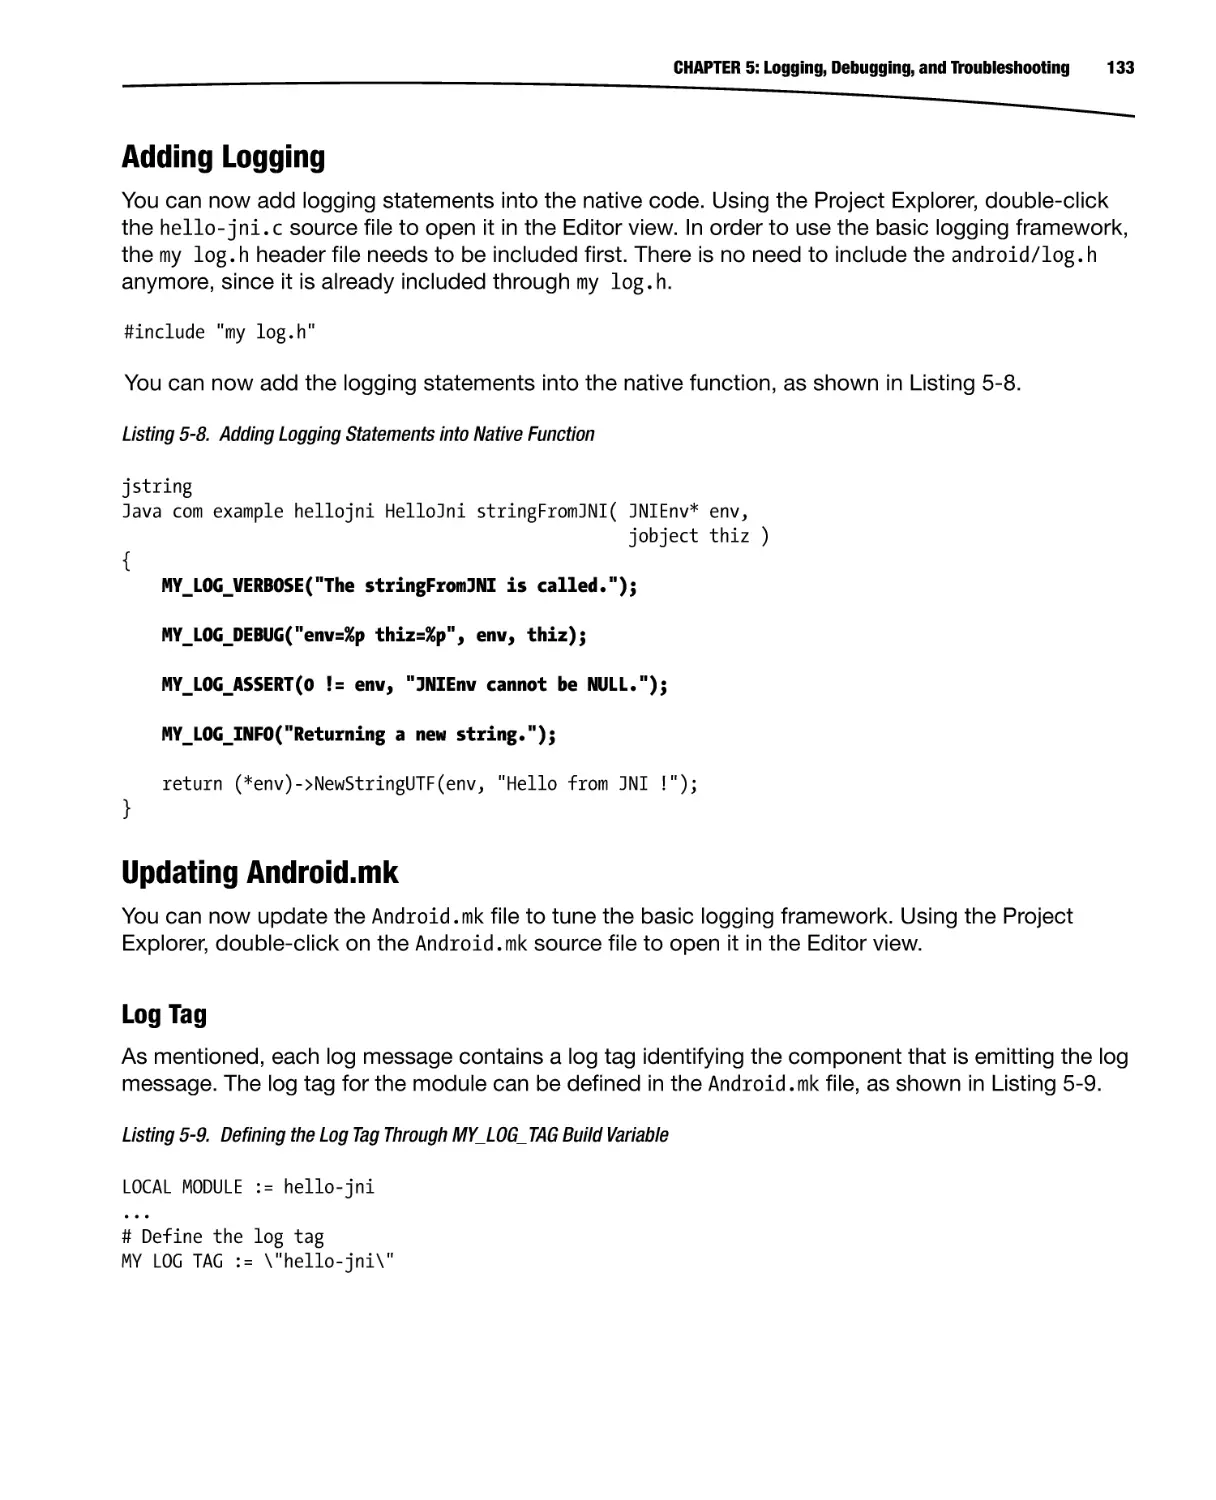
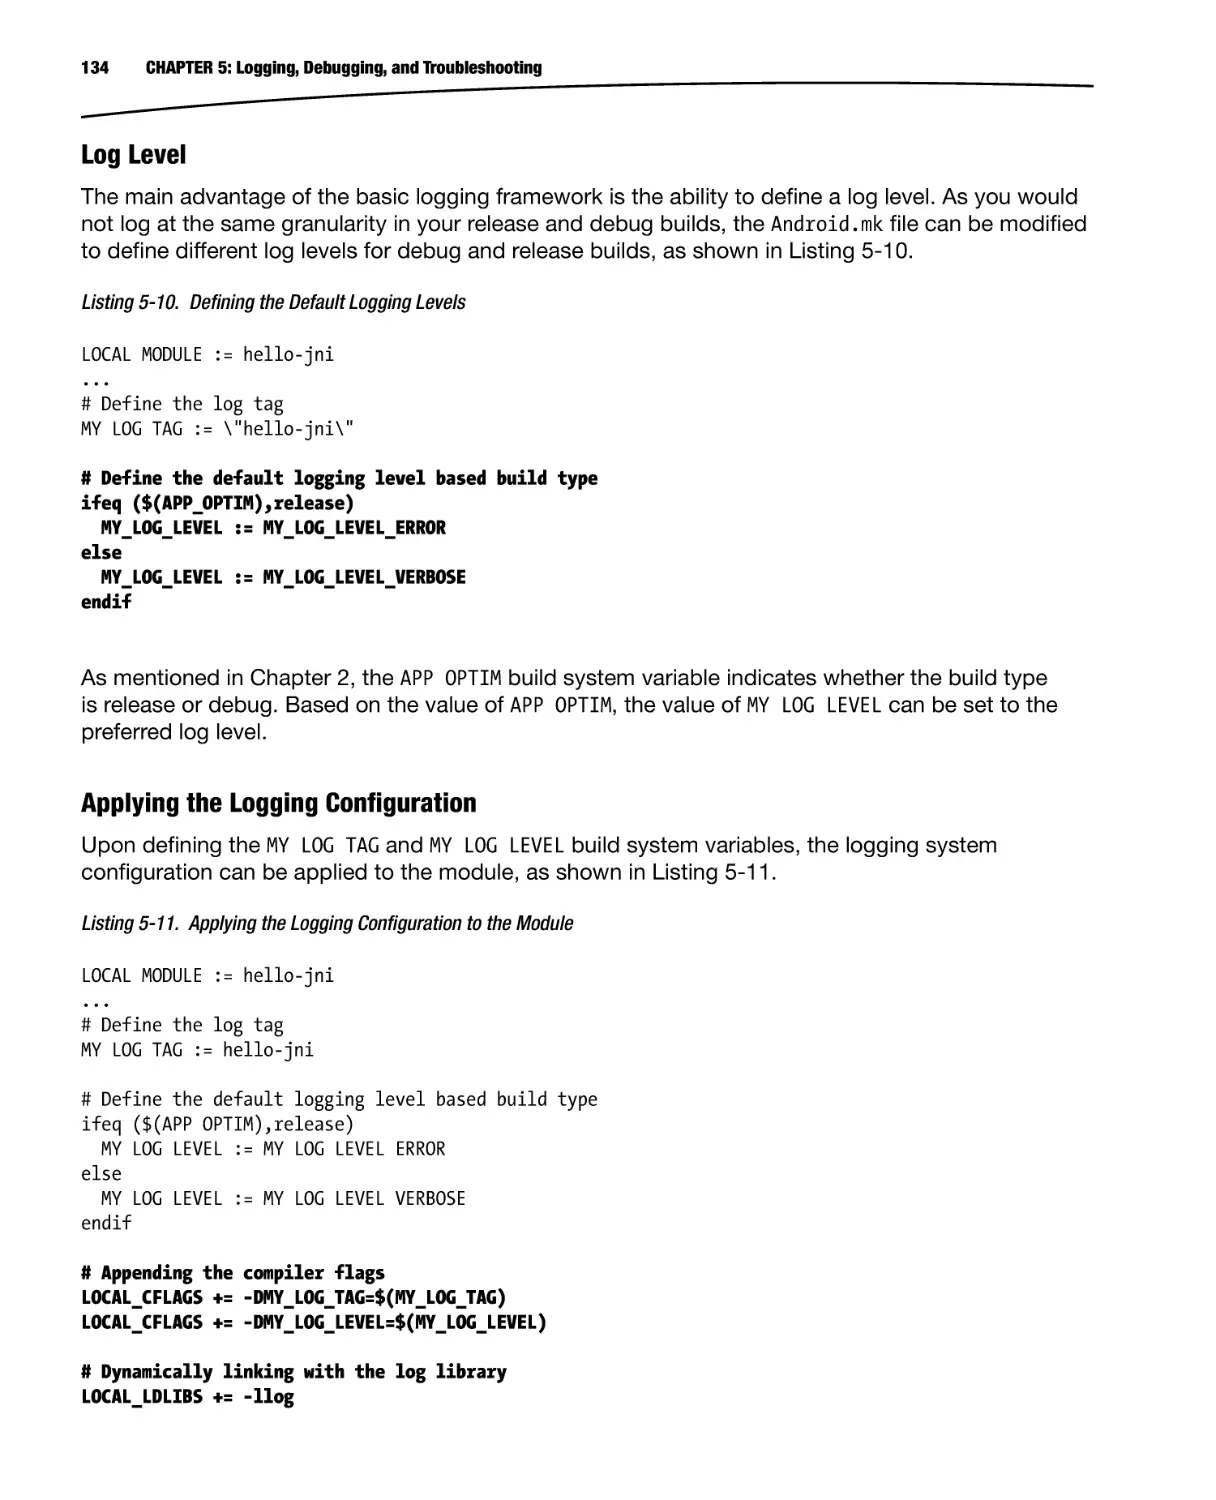


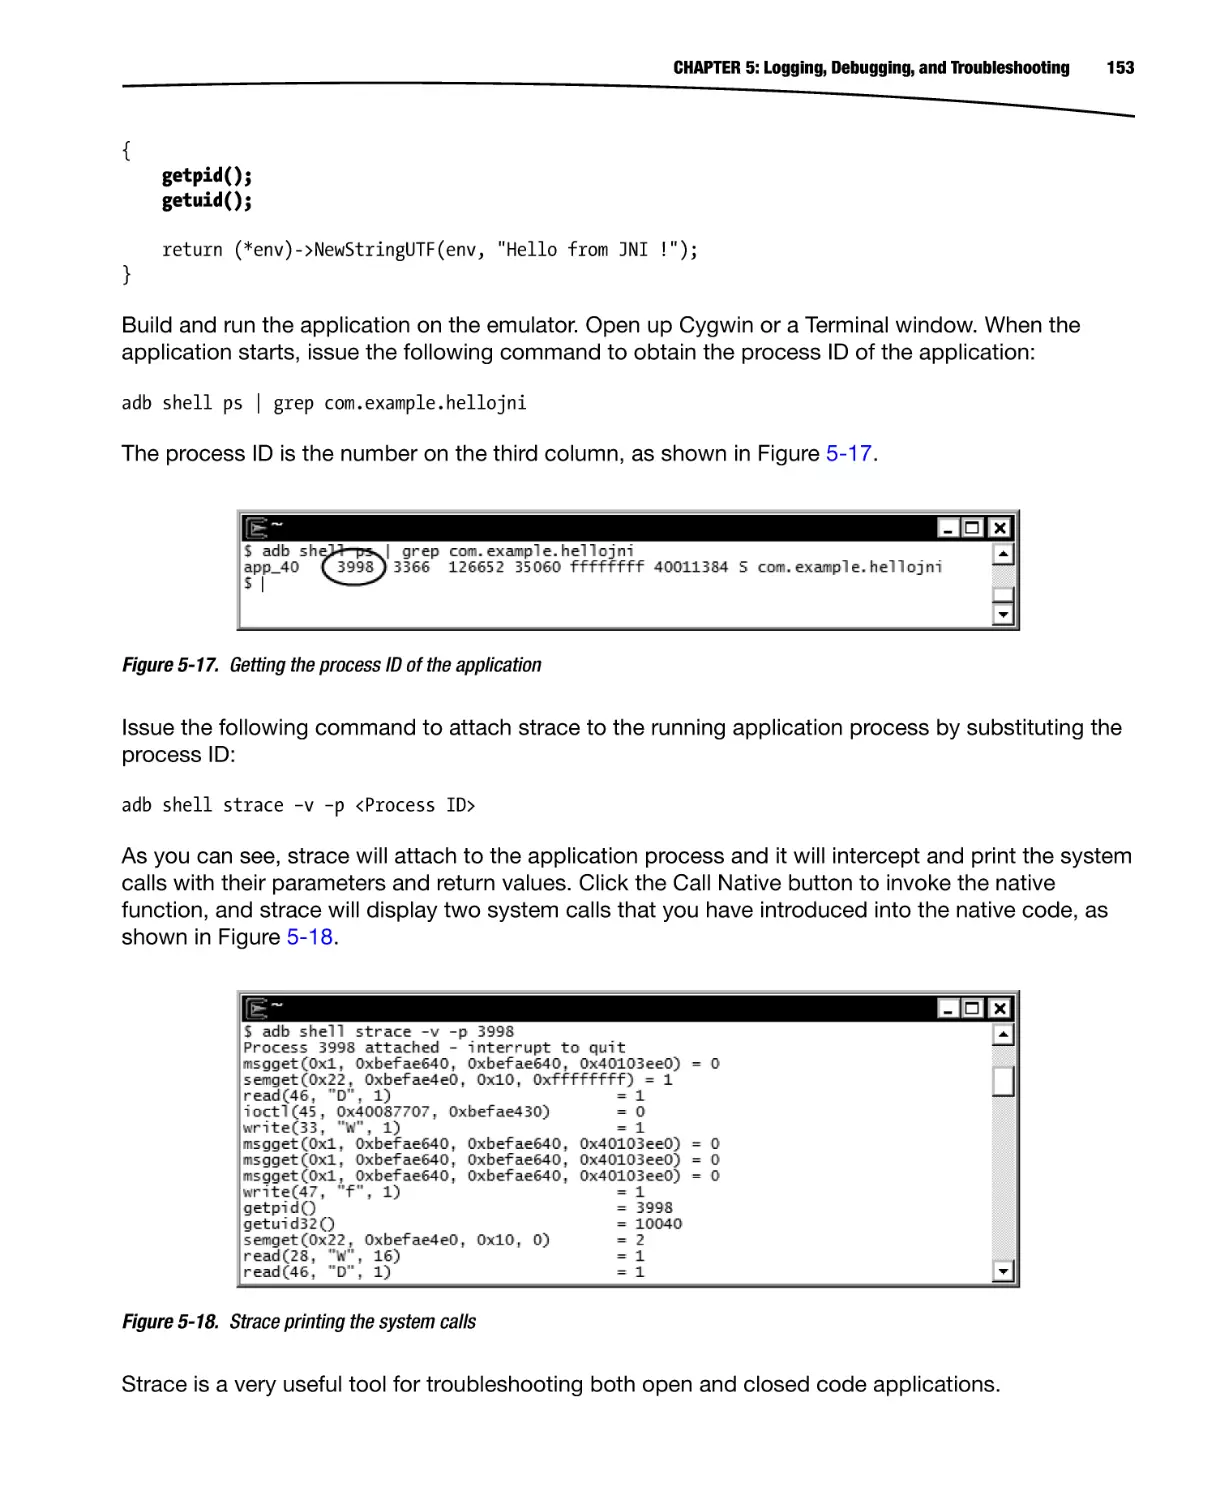


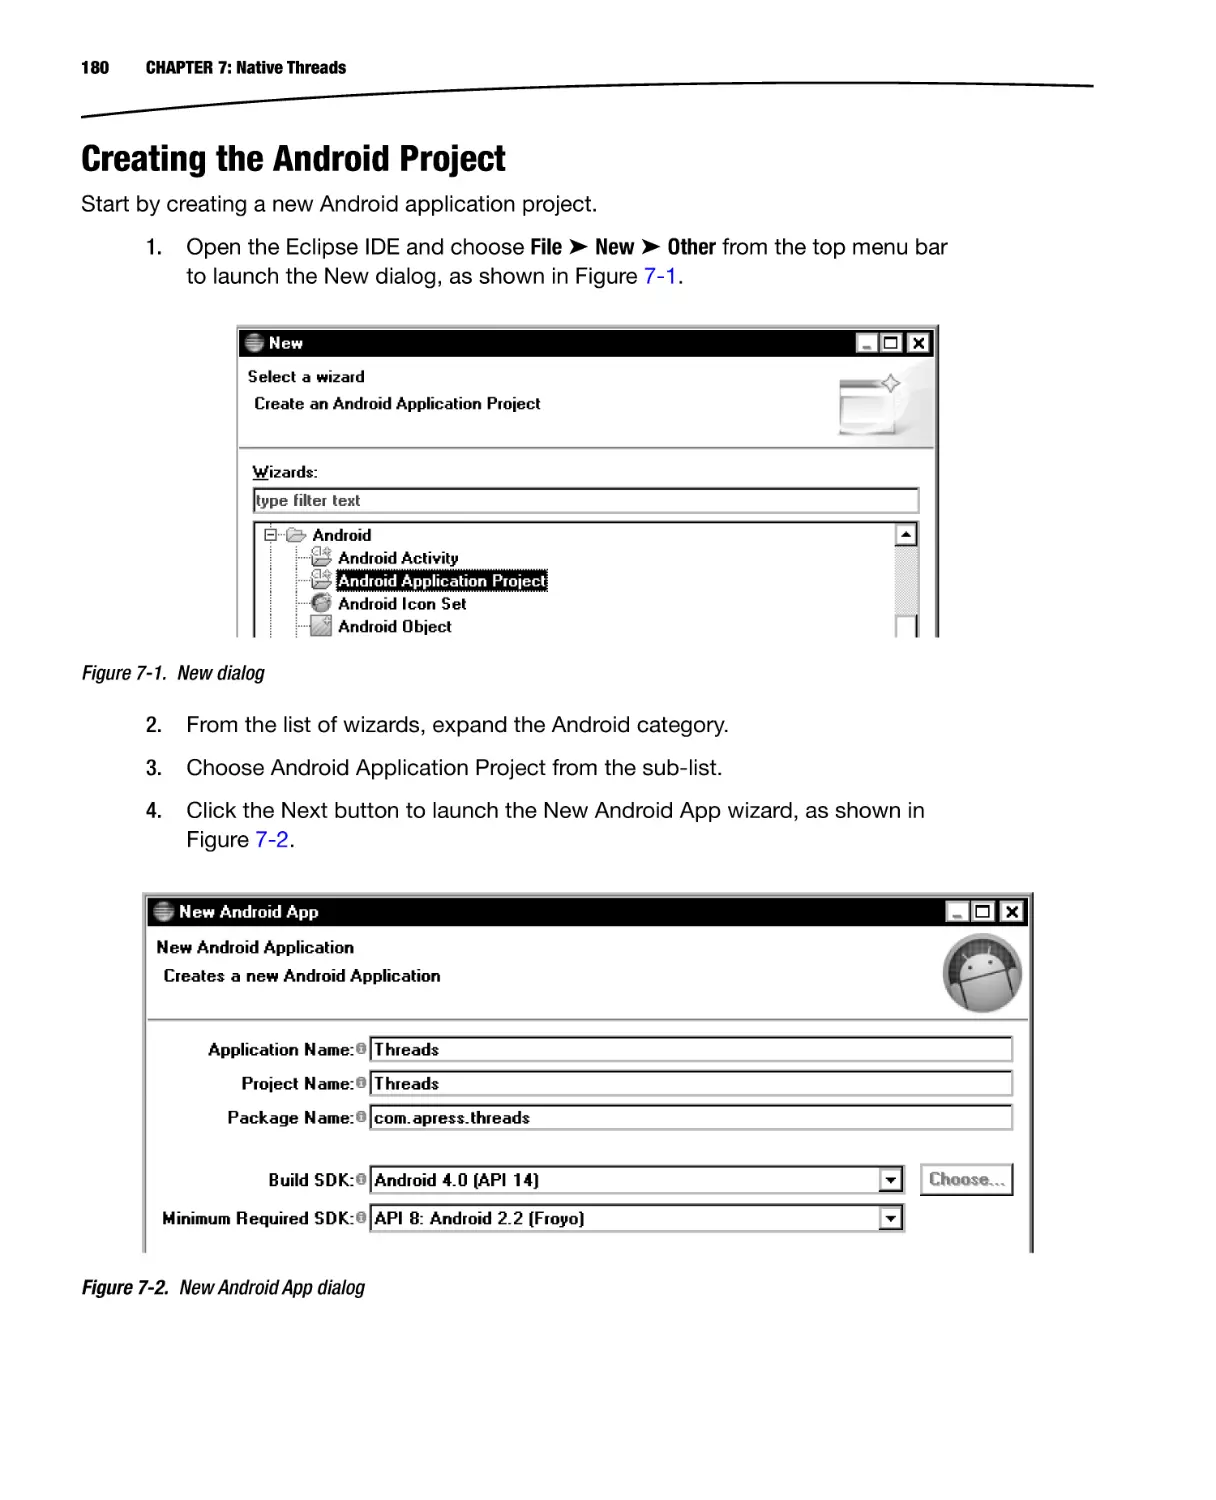
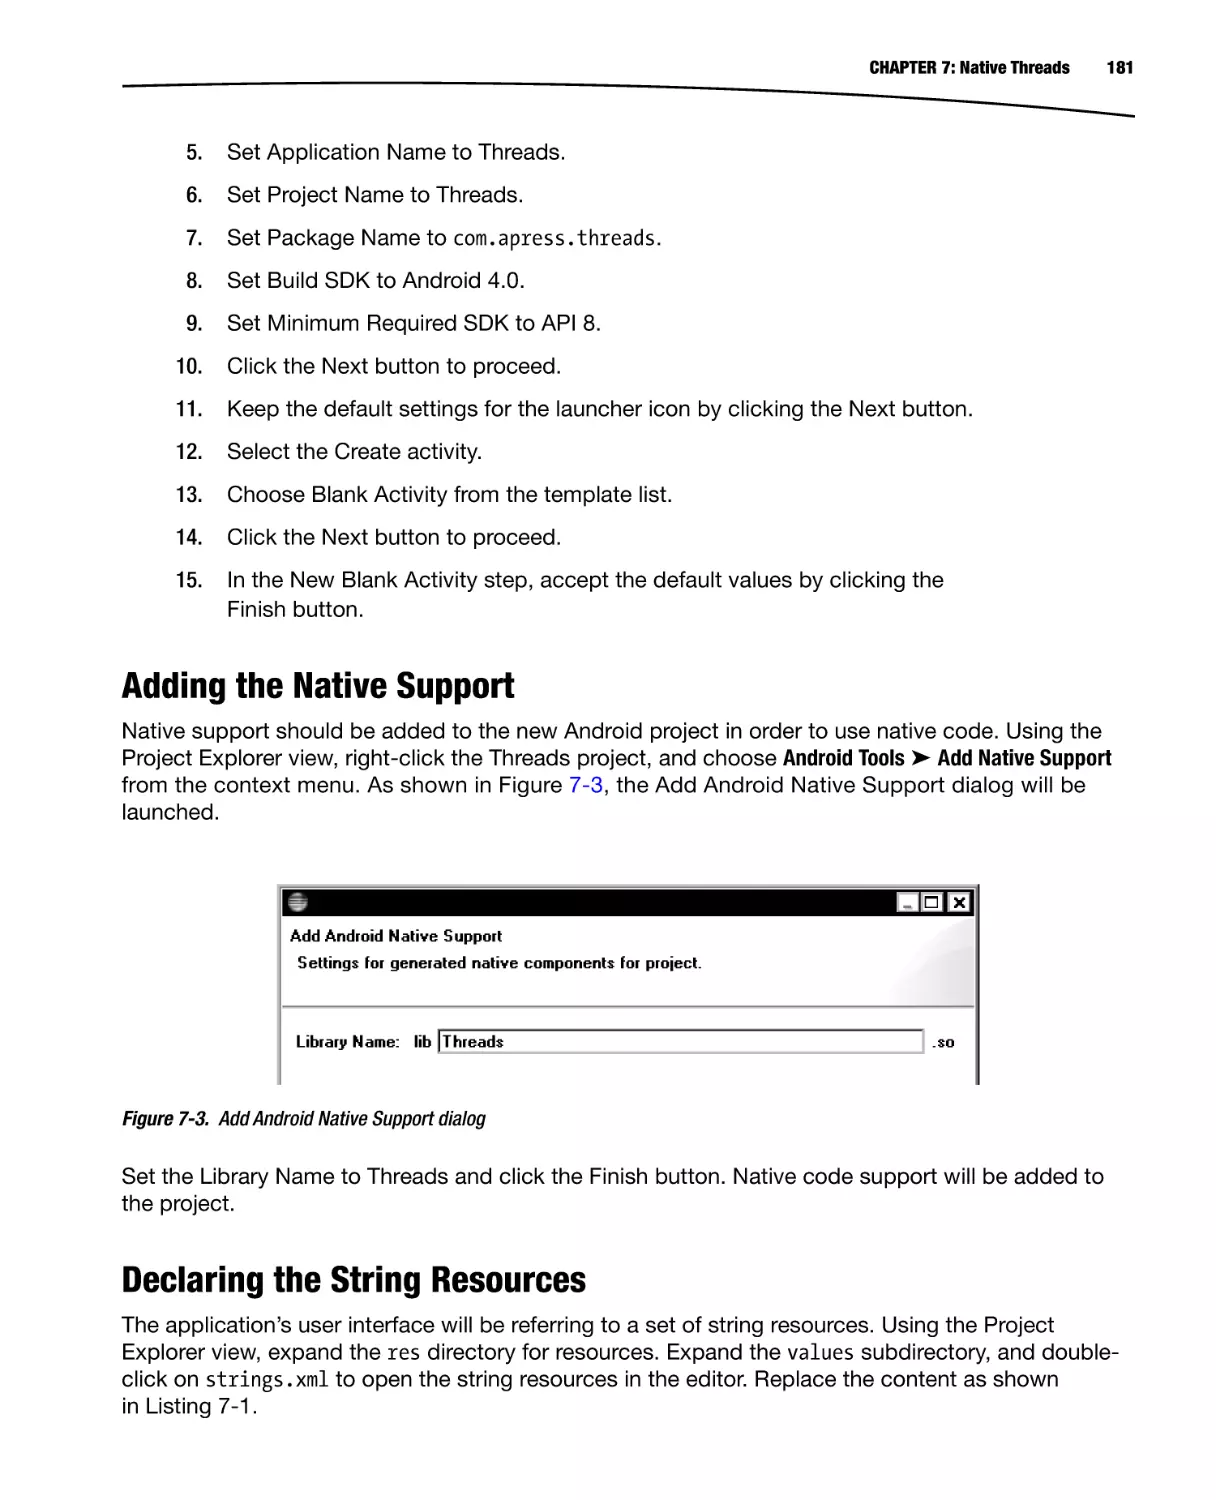
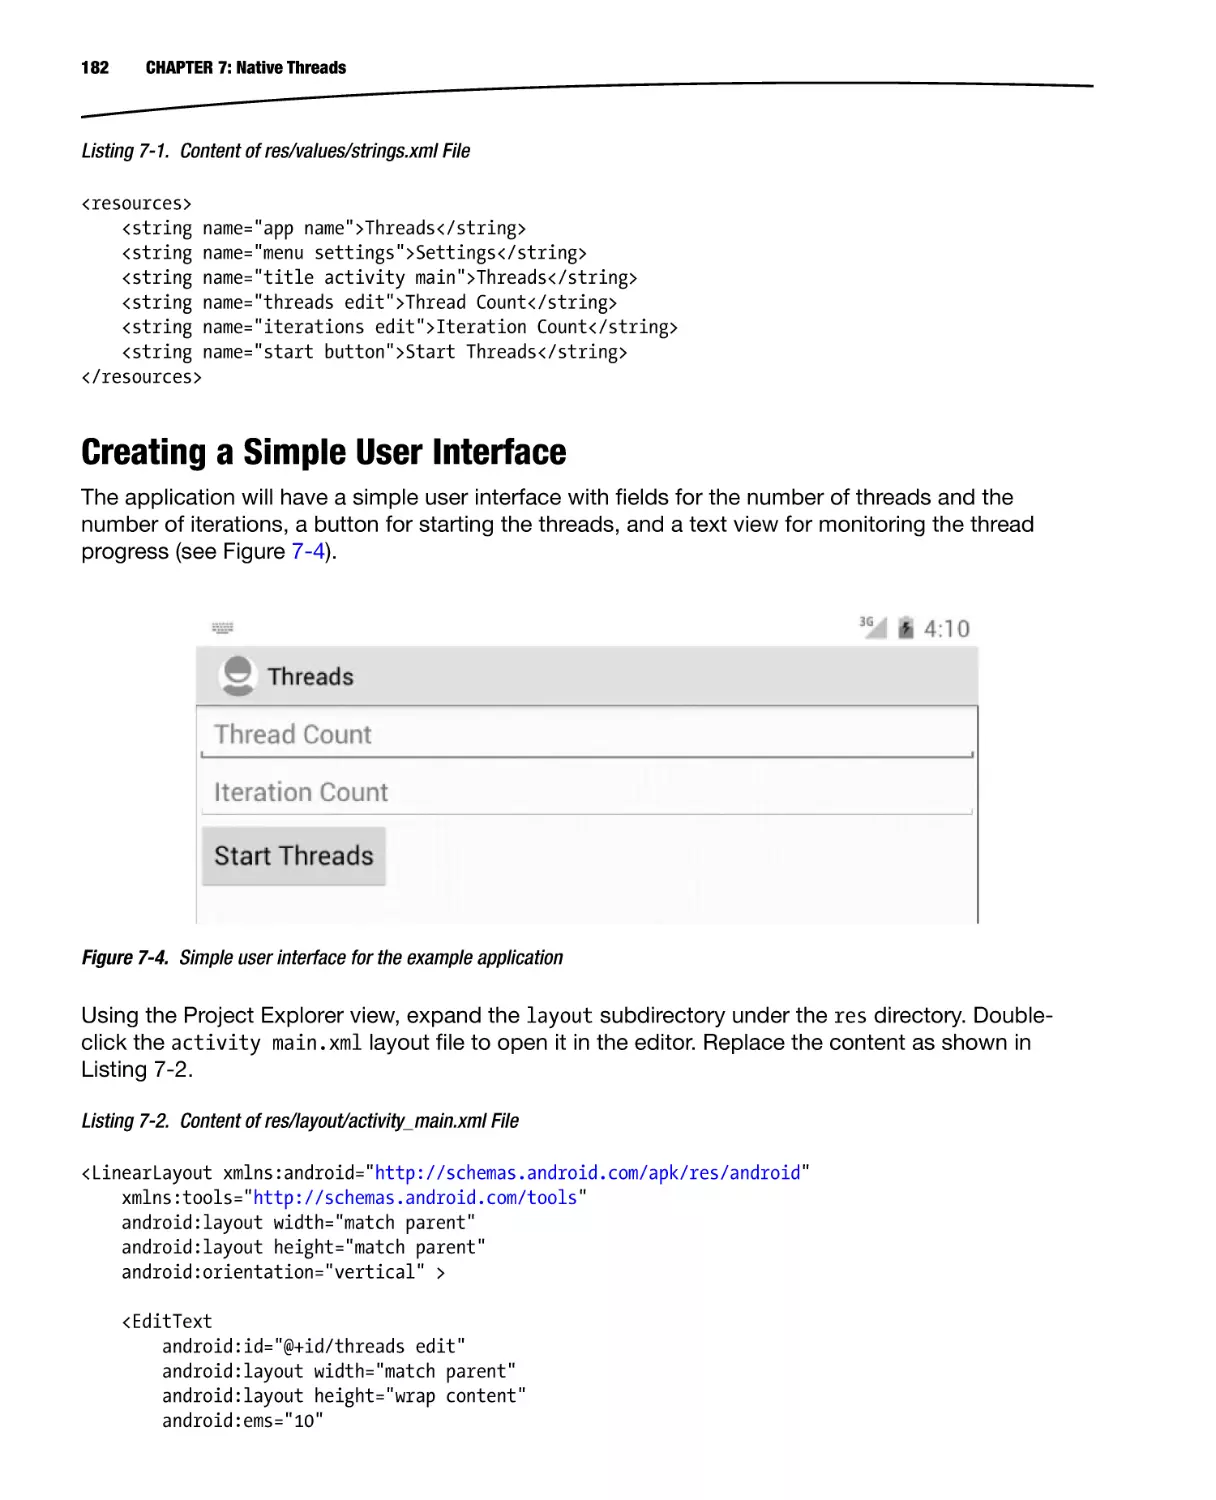
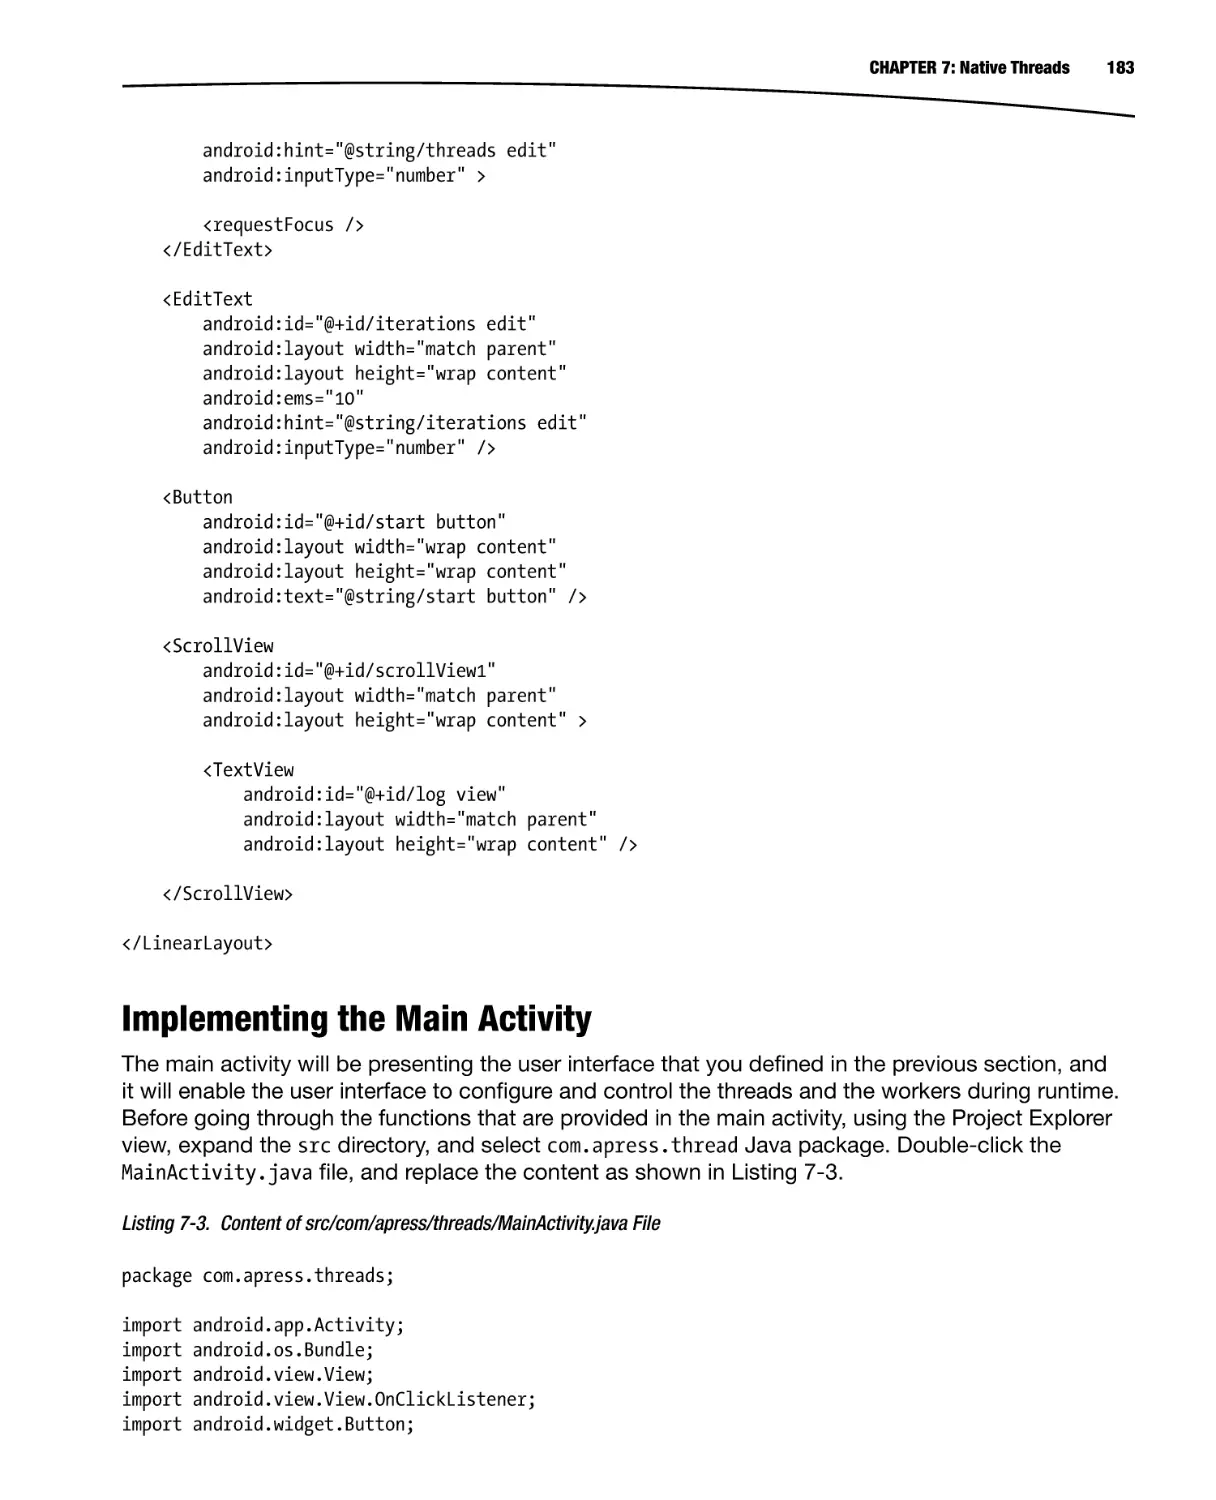
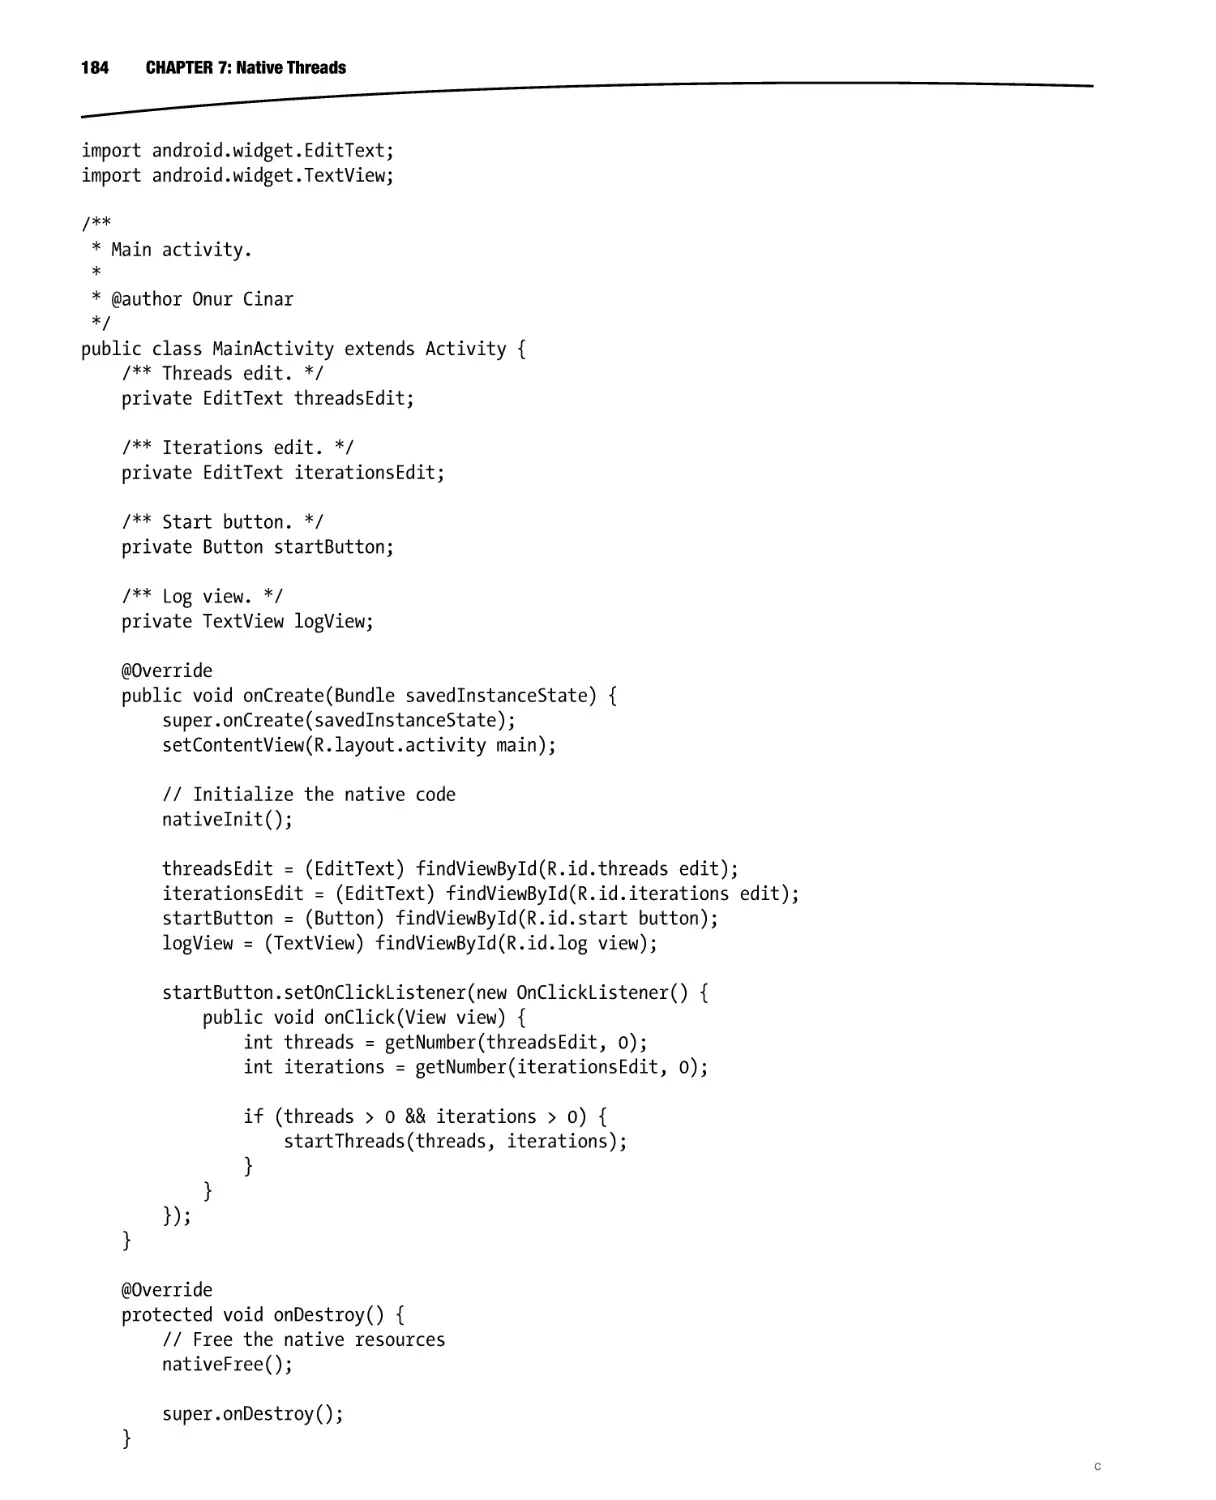
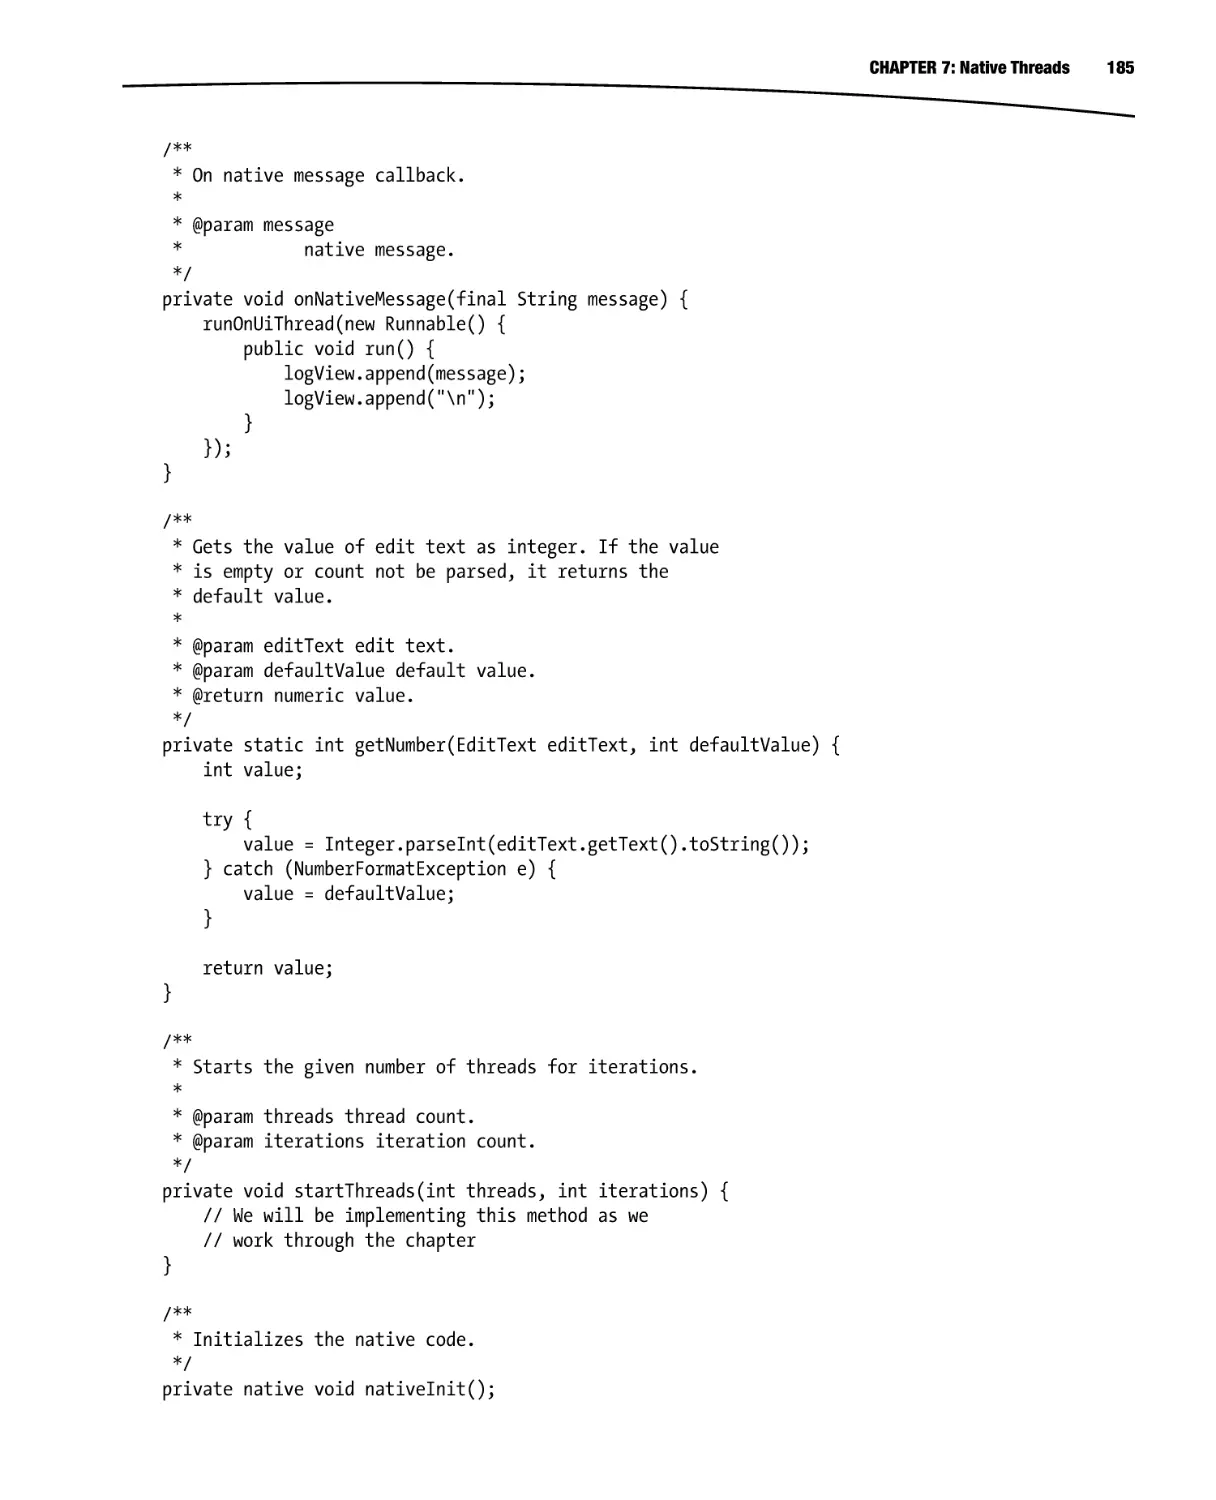
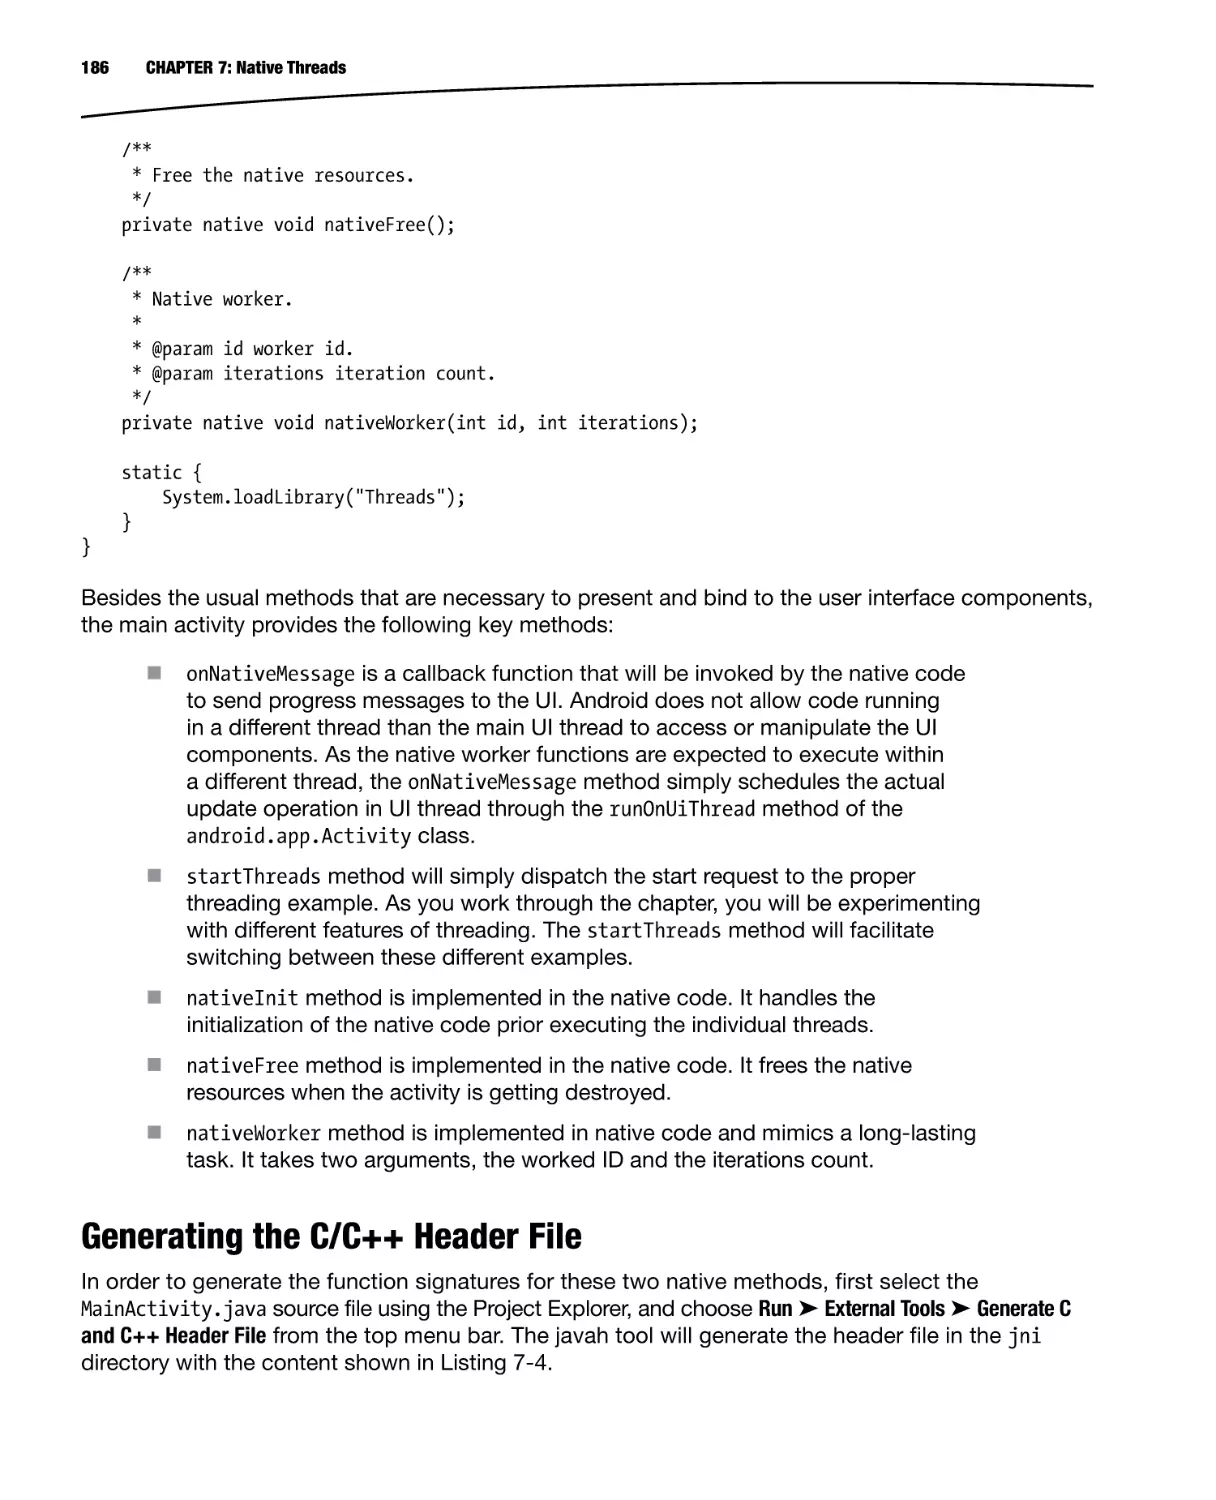
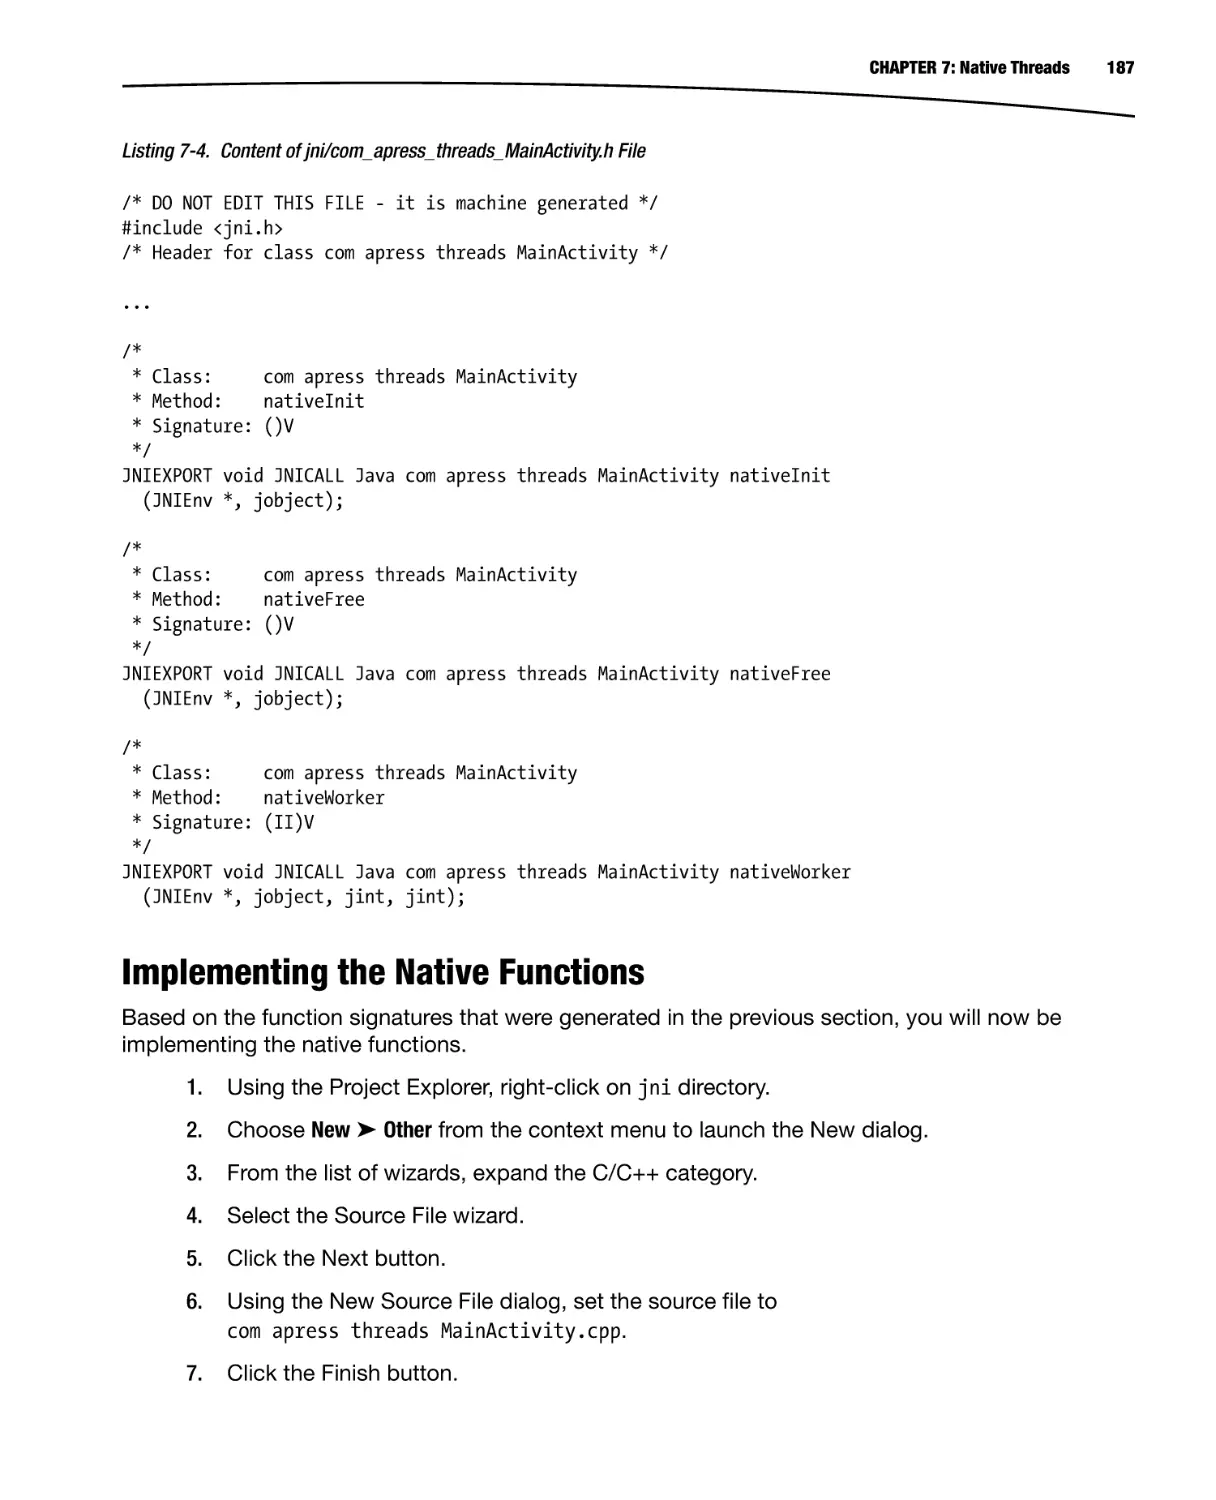
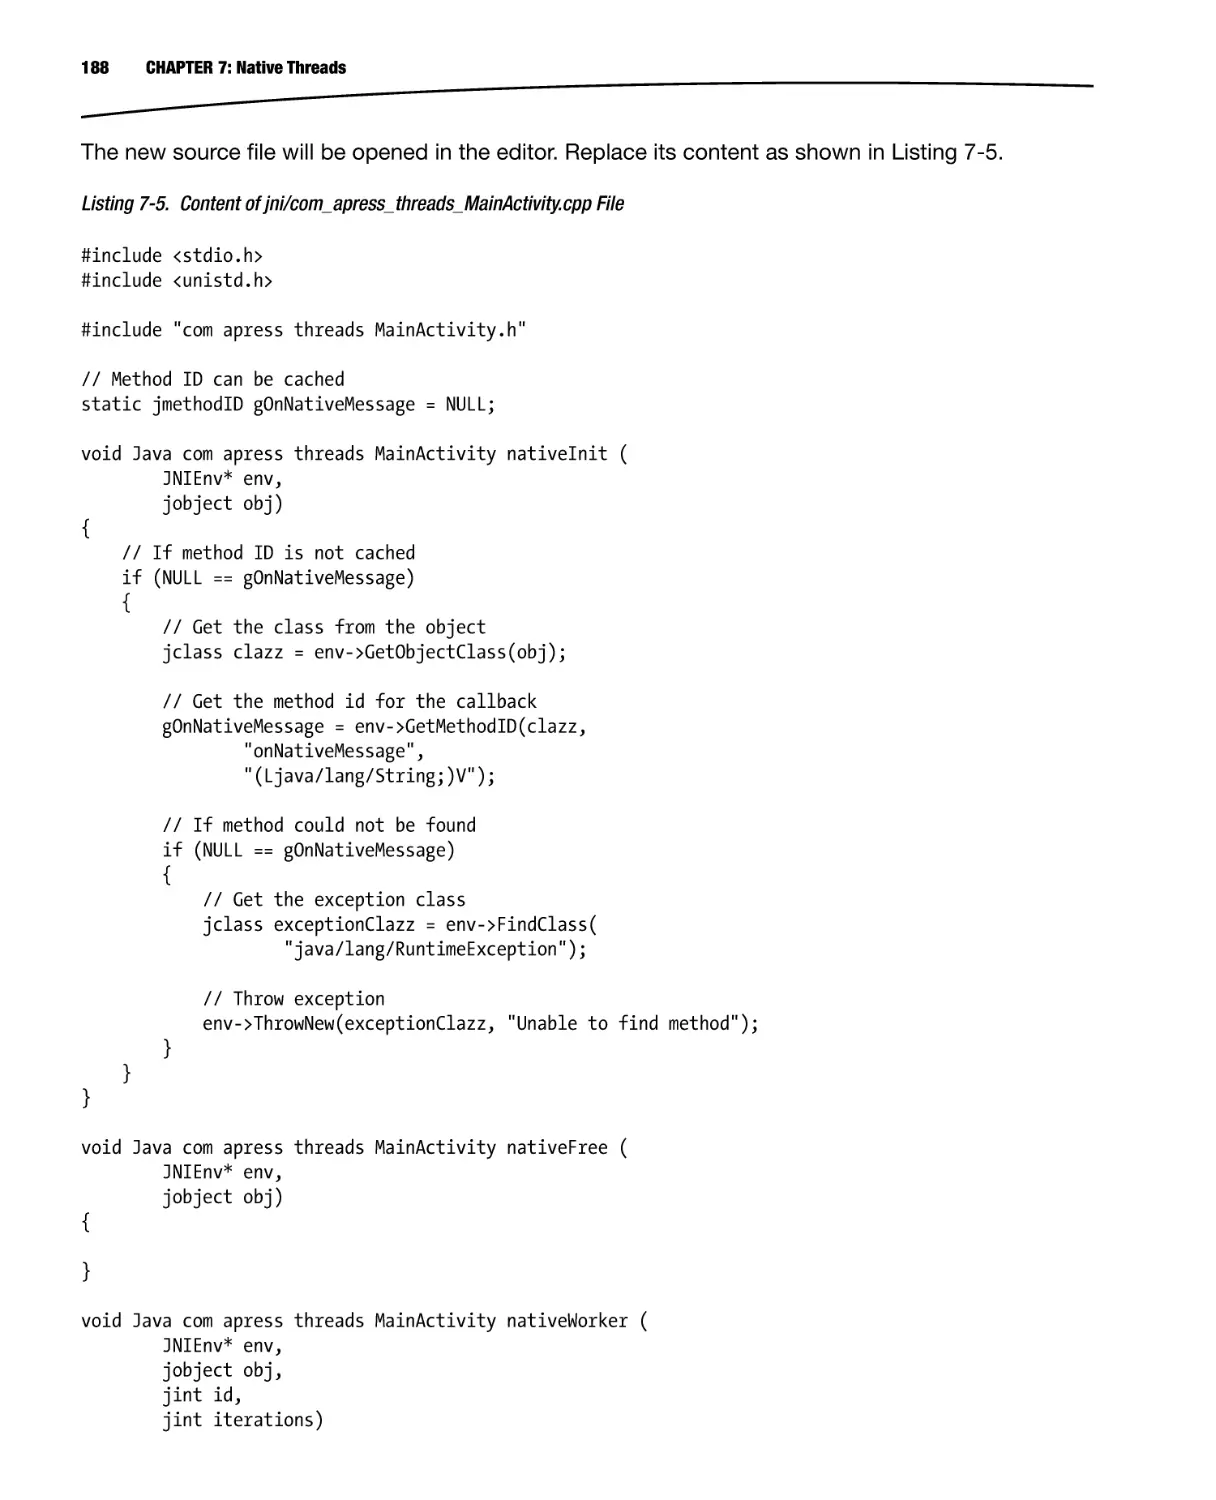

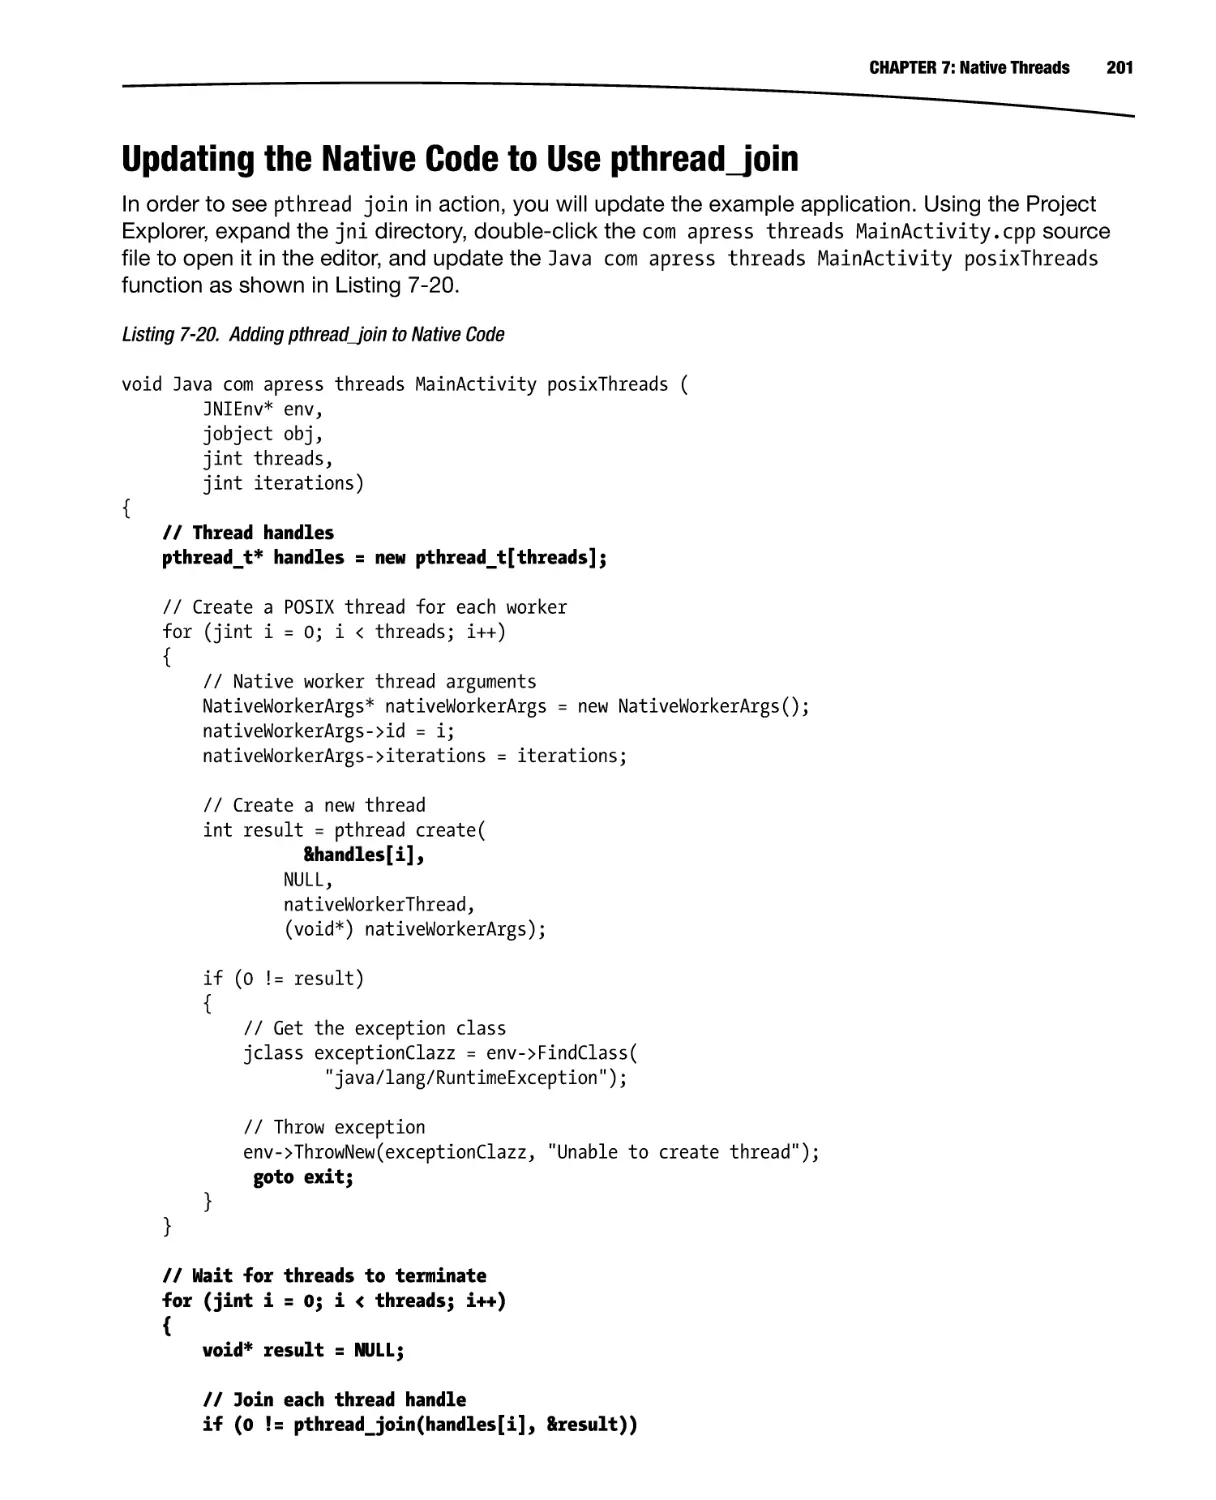


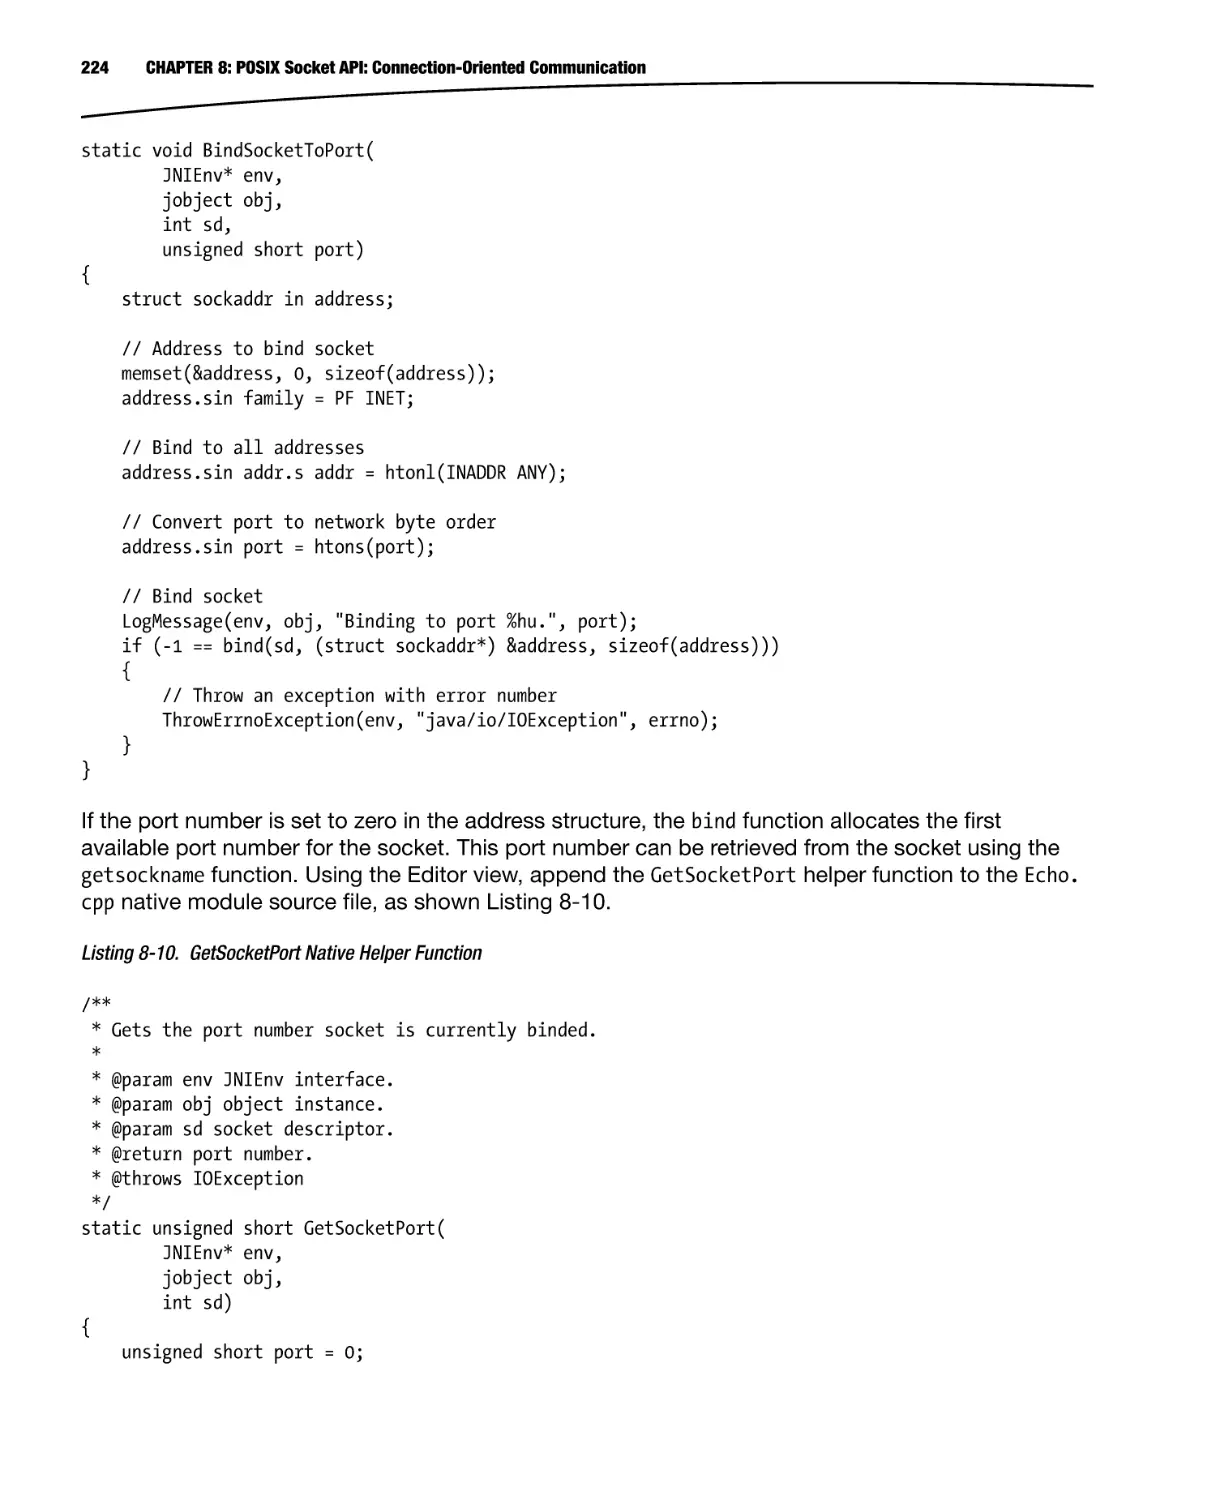


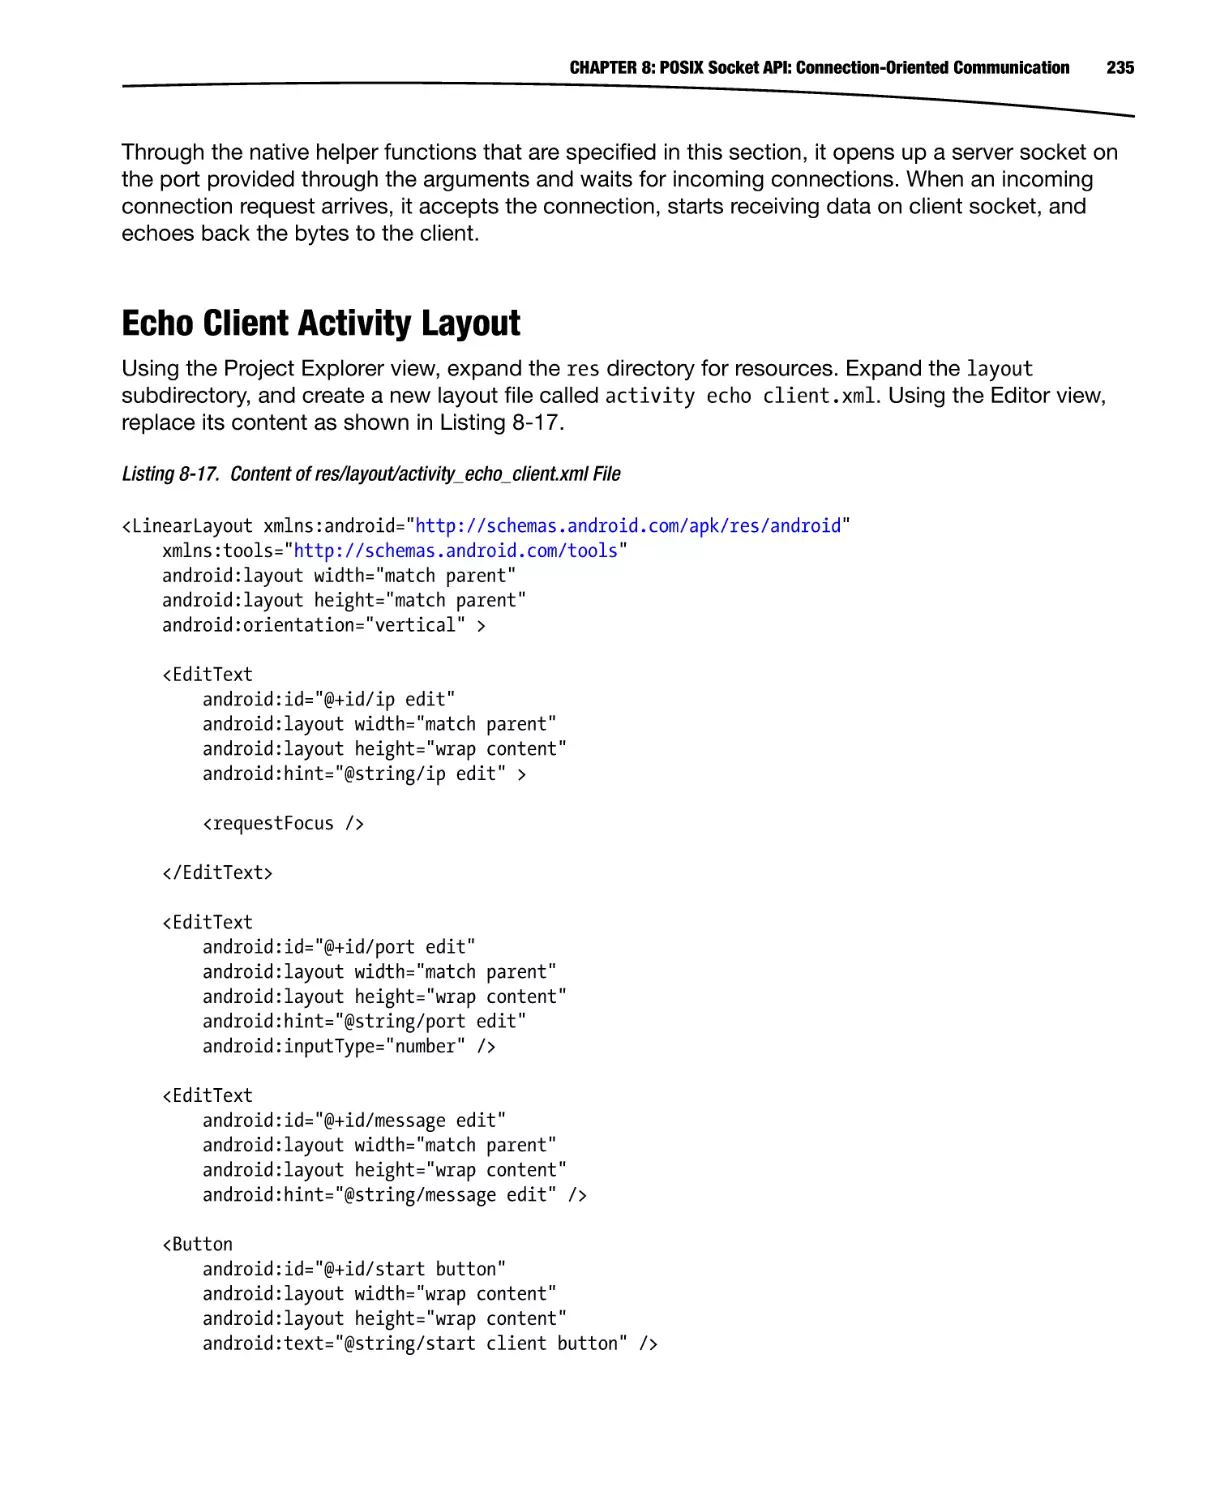

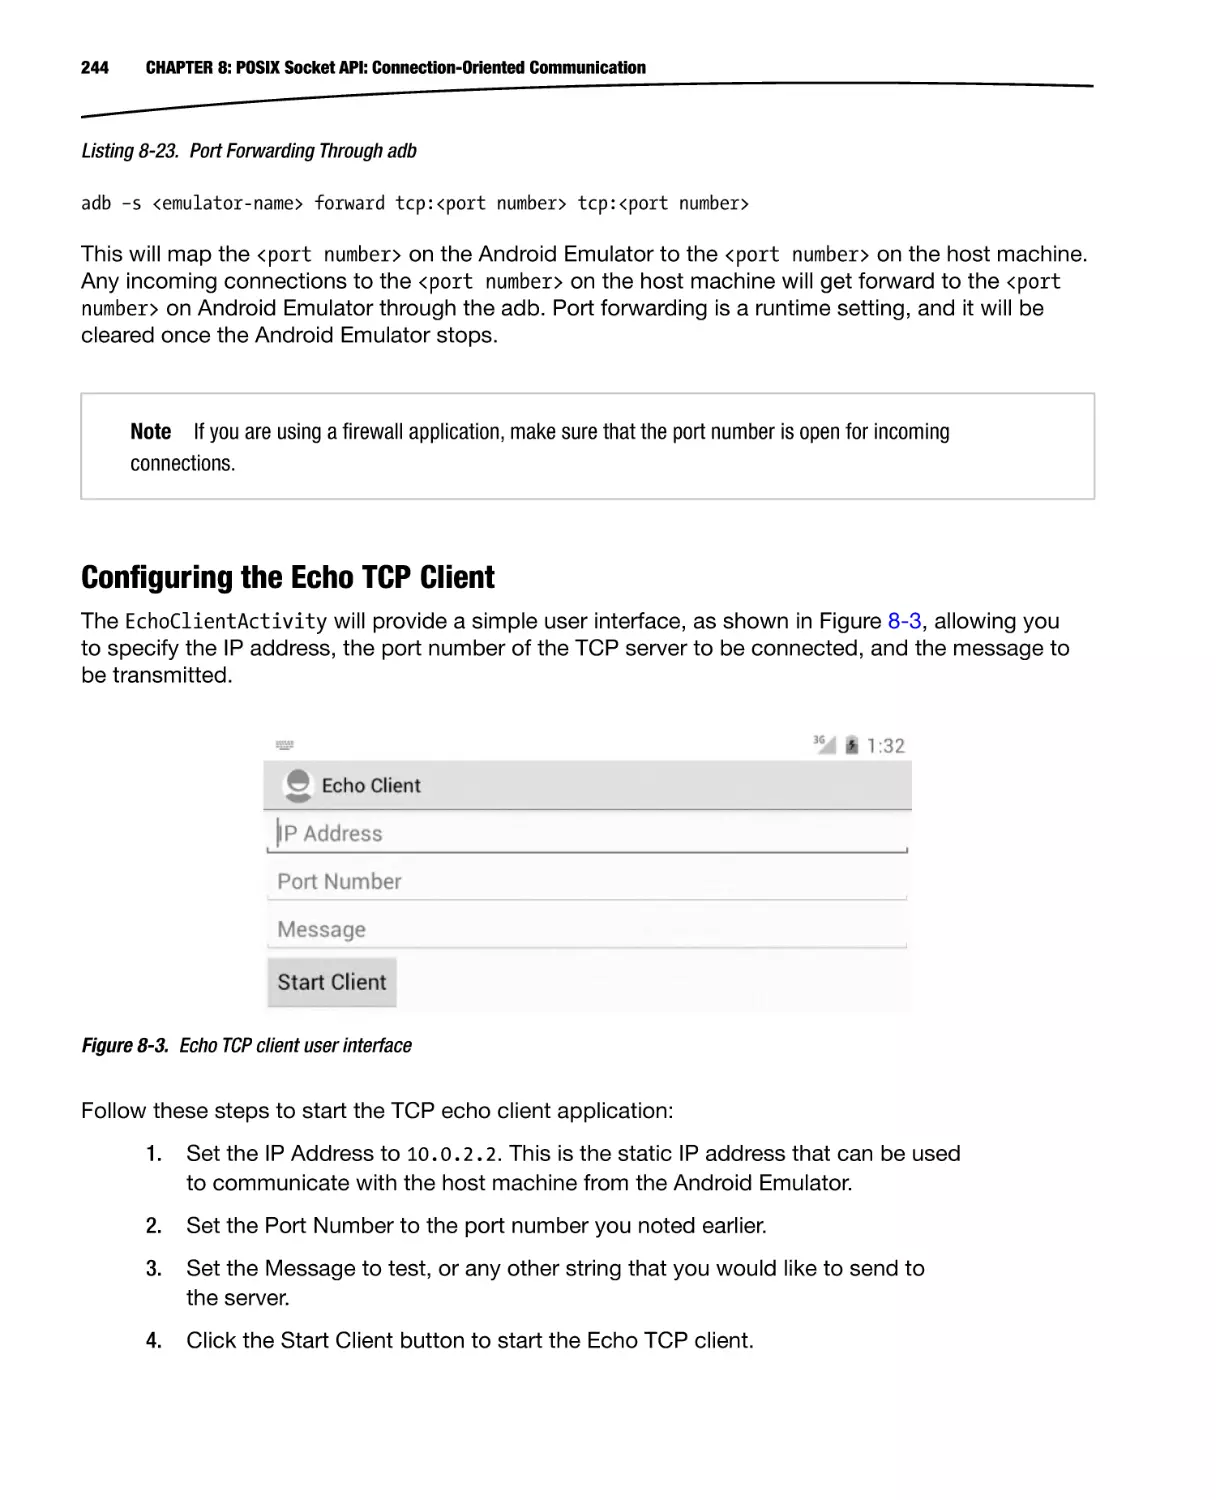

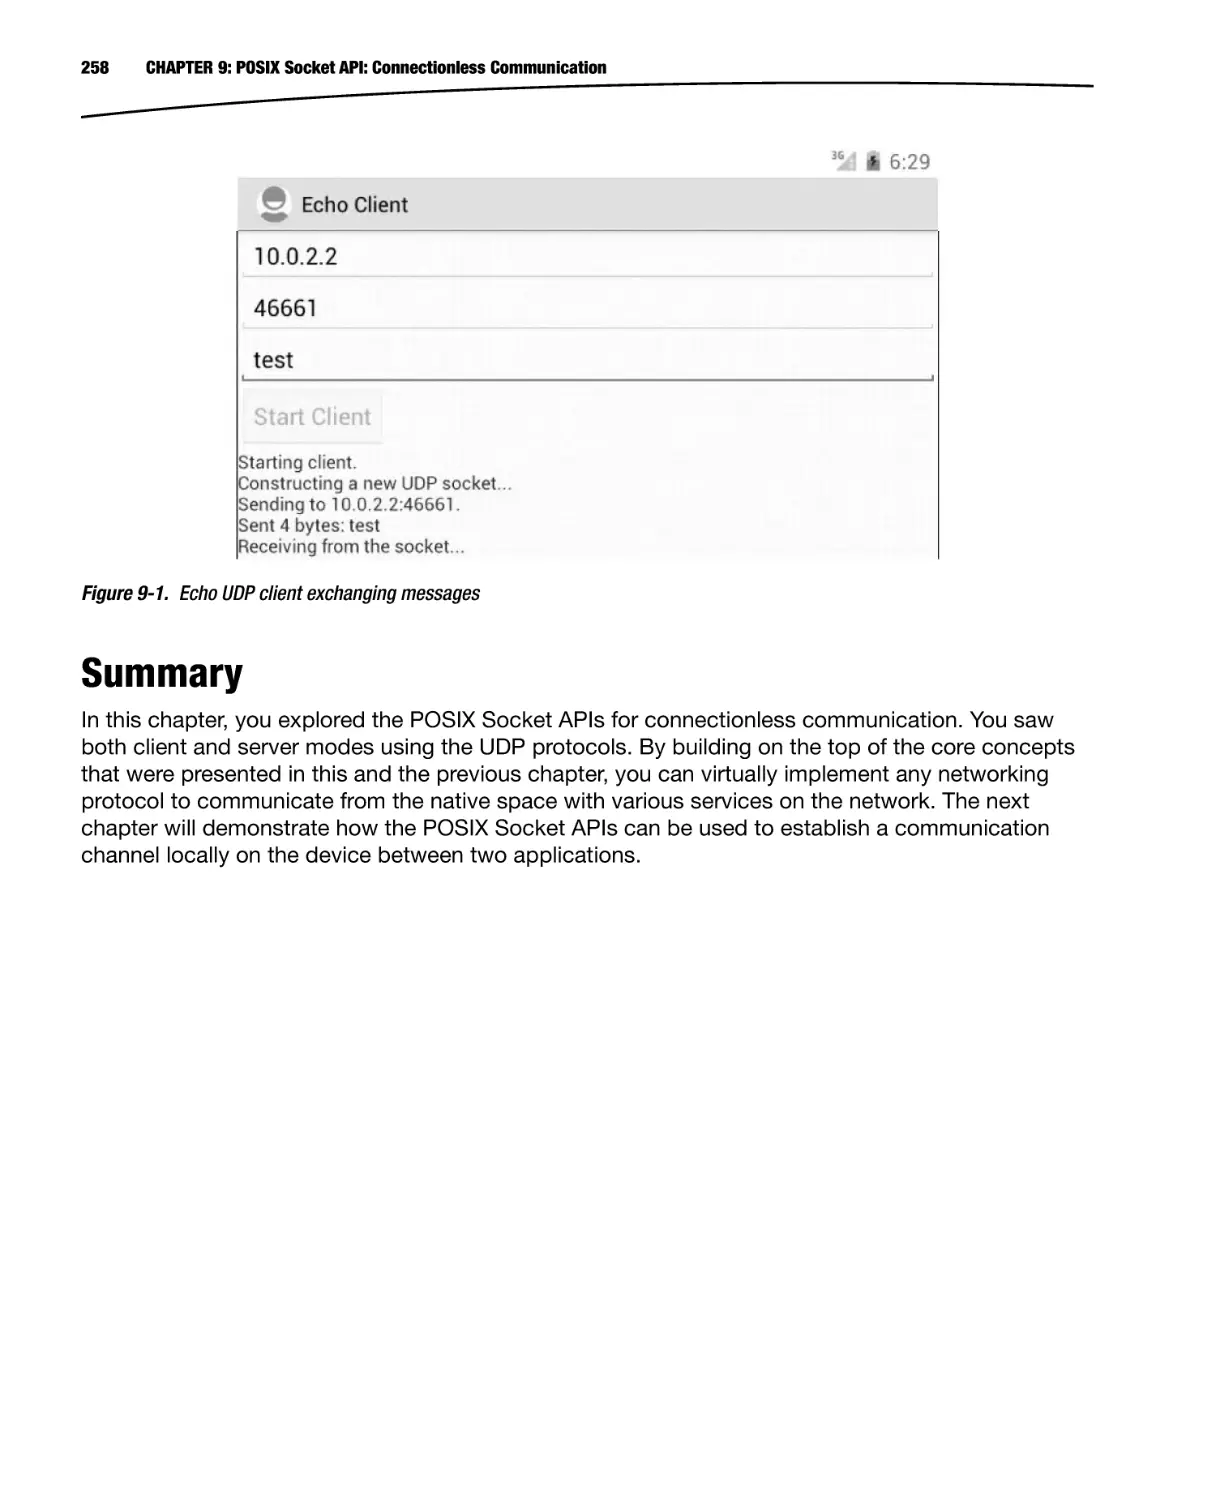


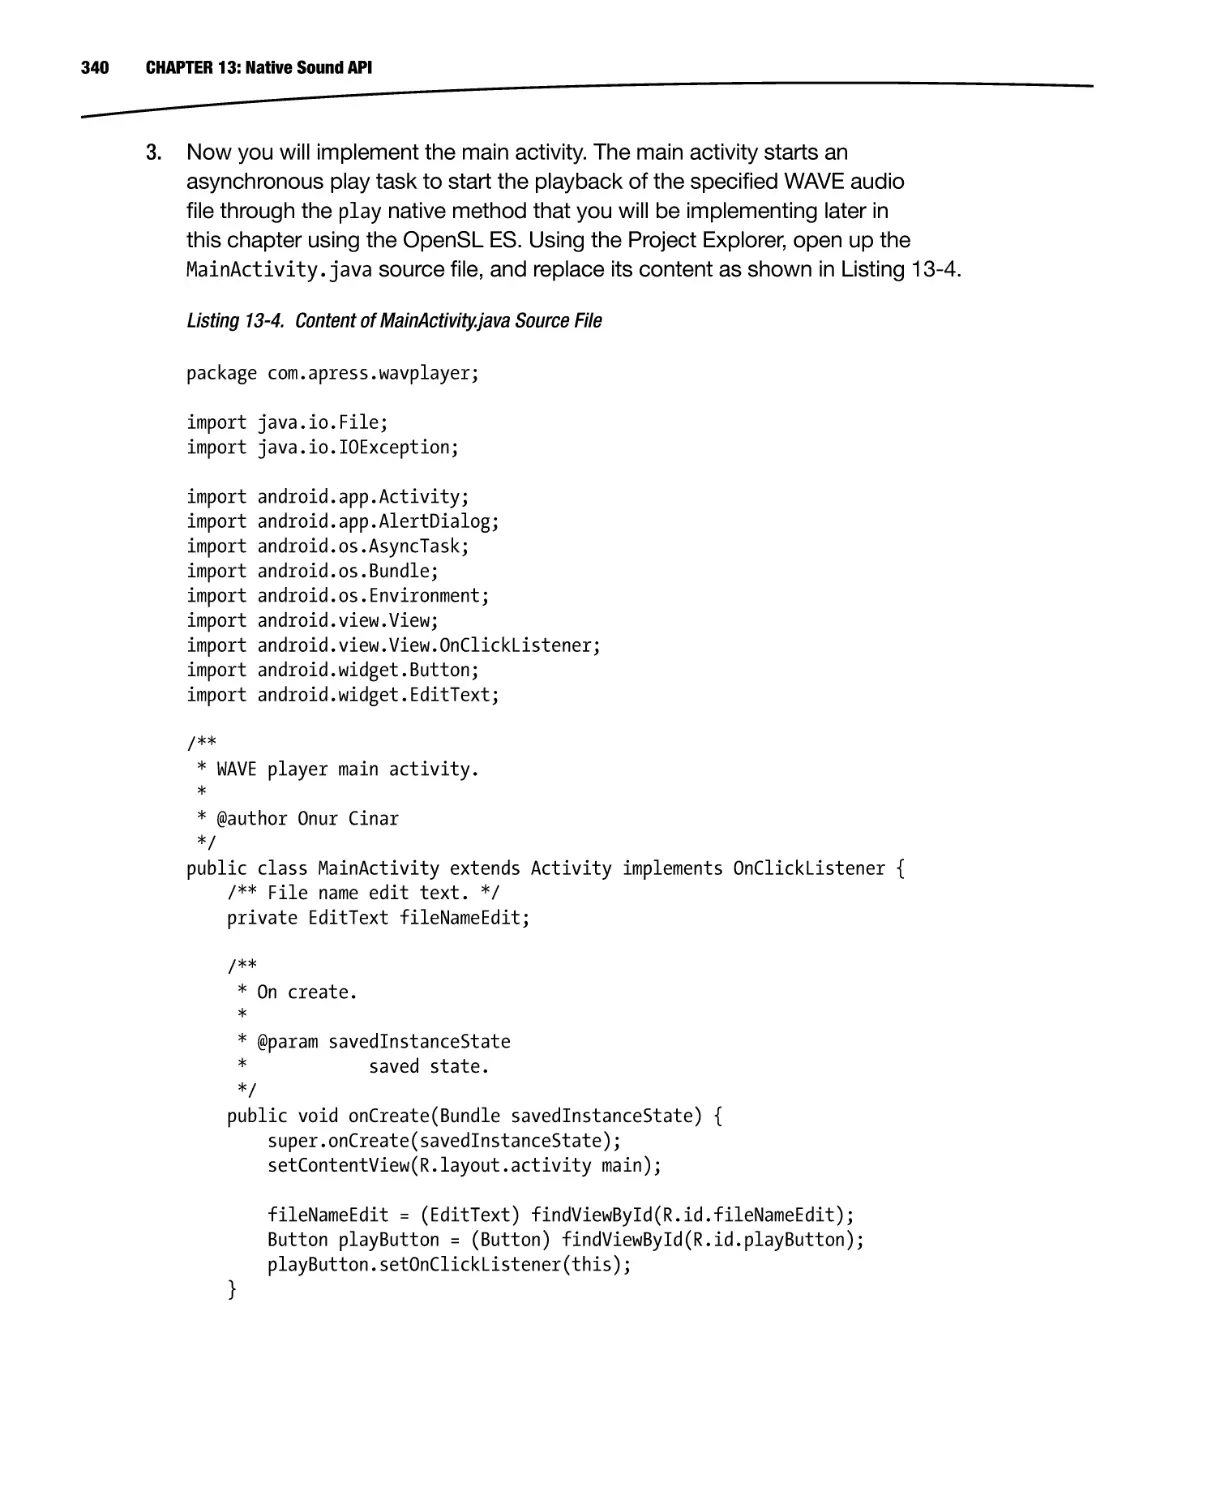


Текст
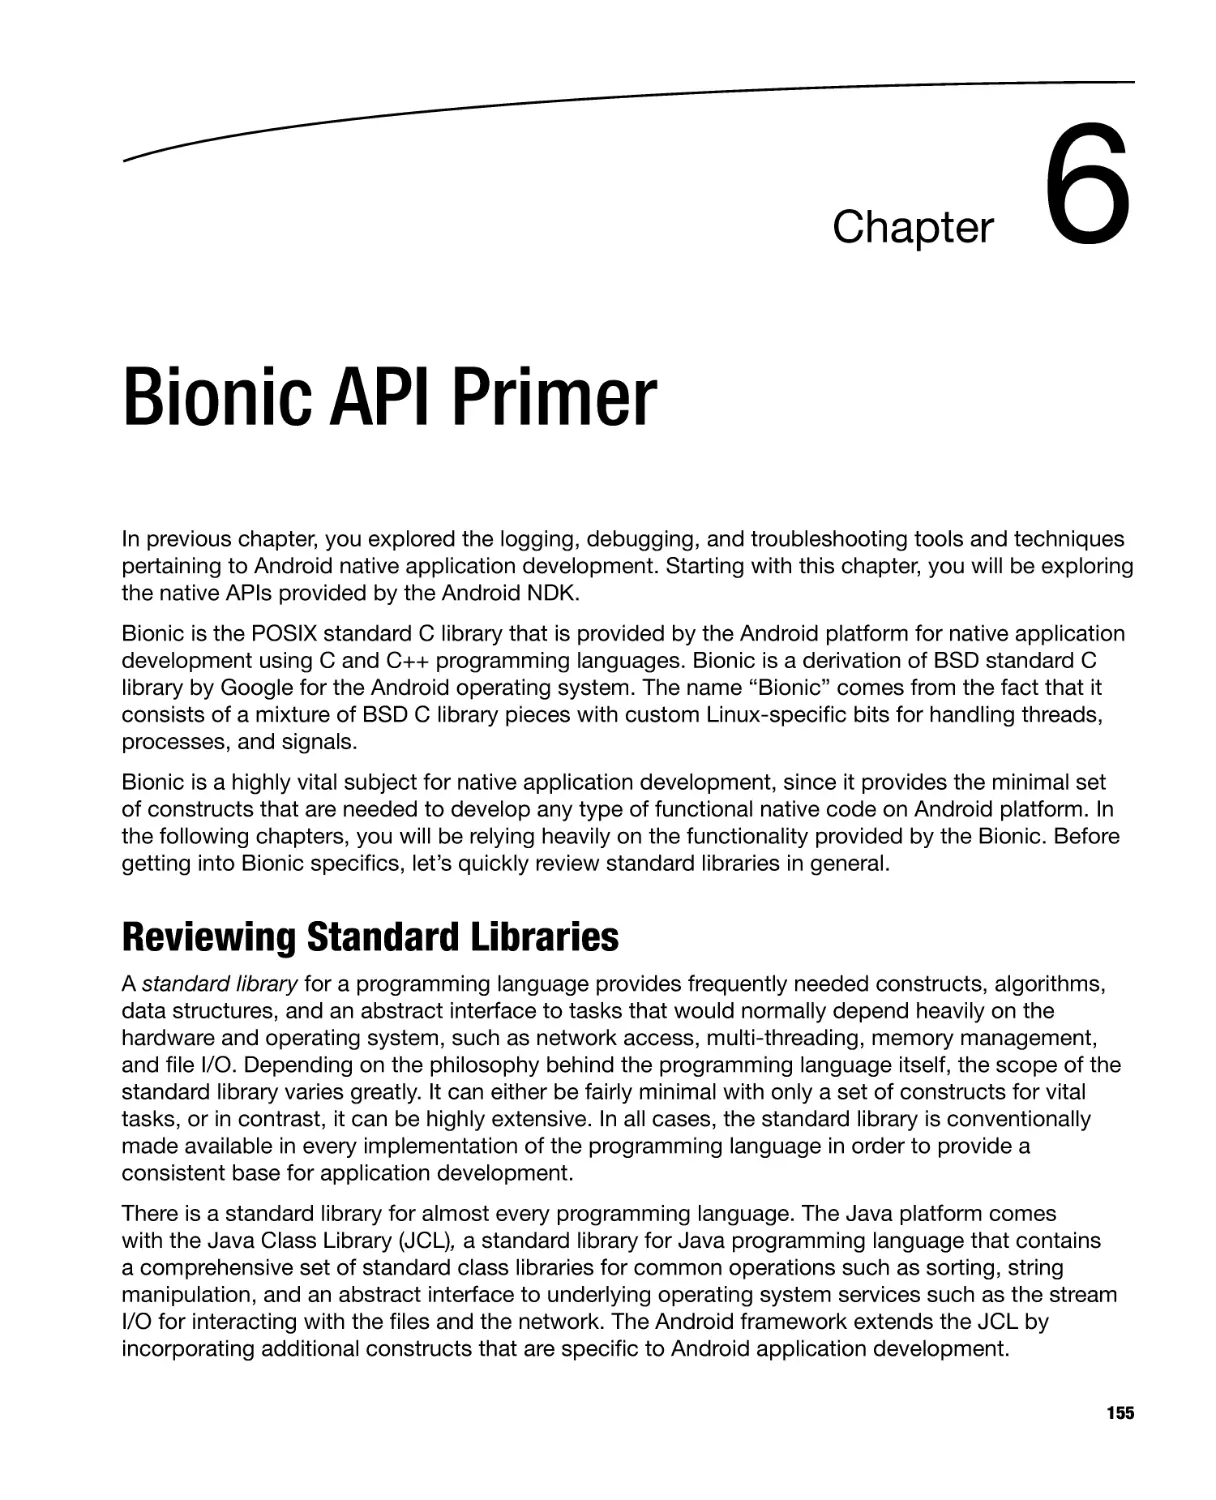
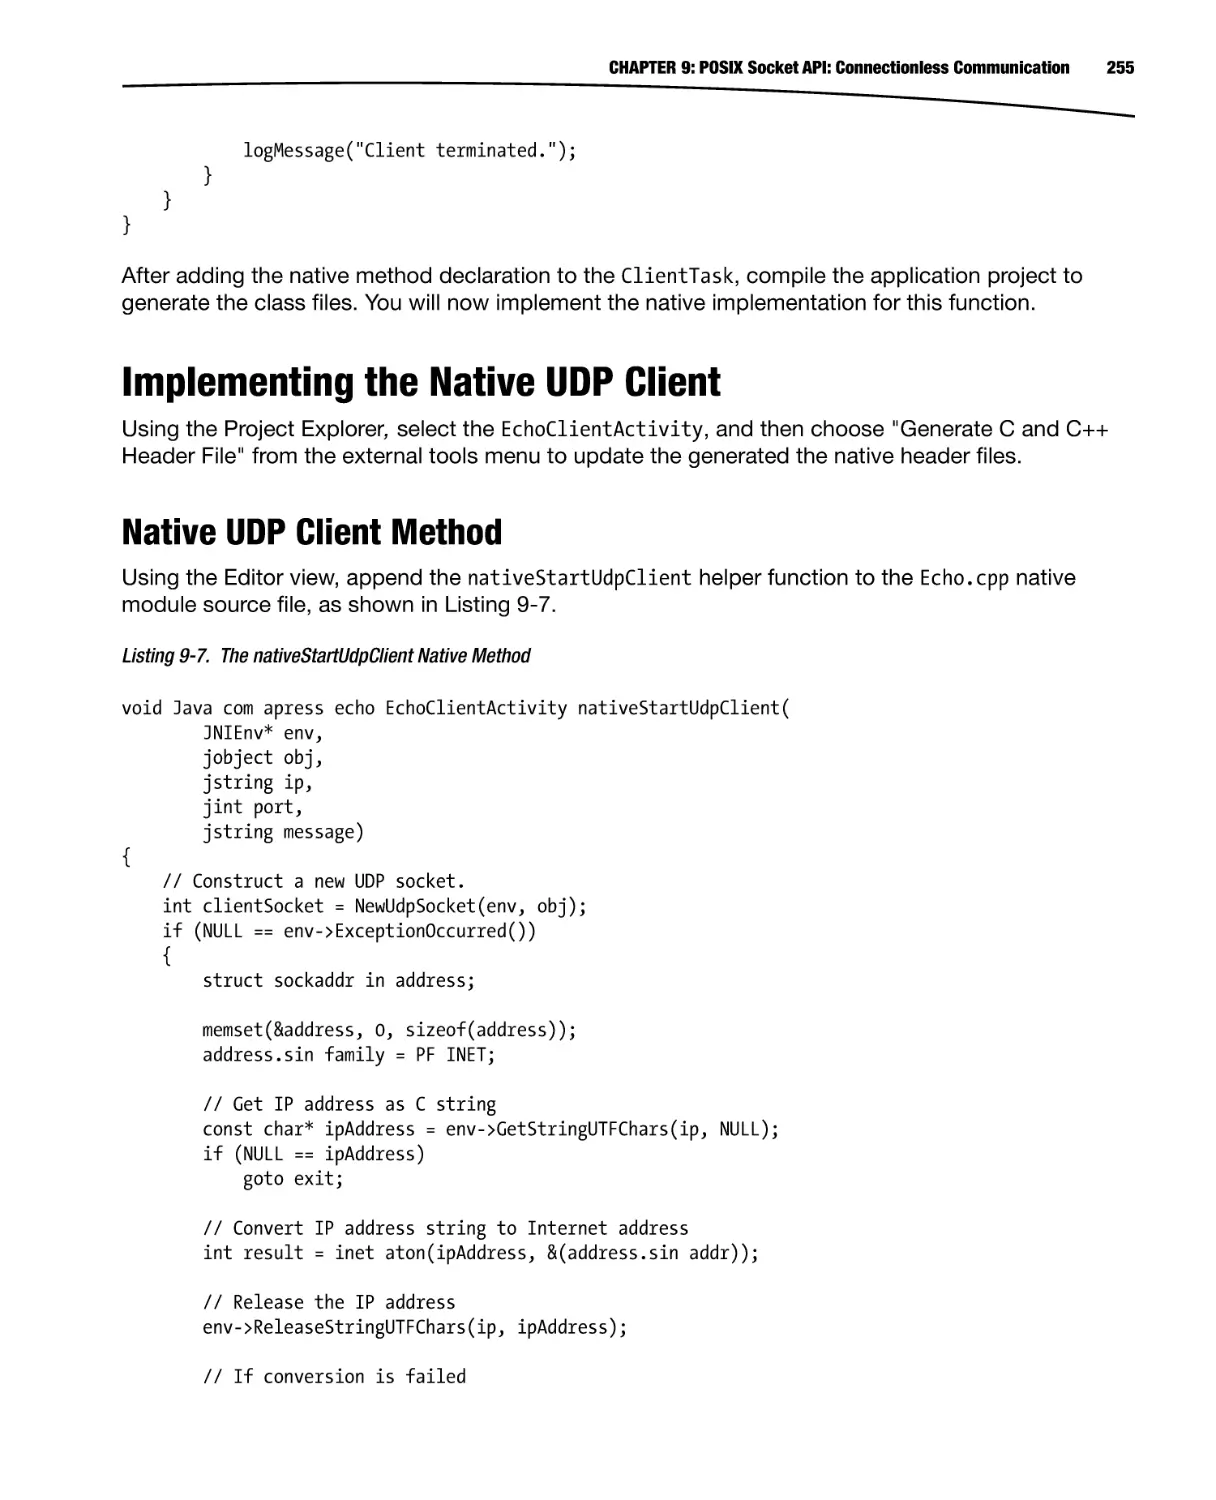
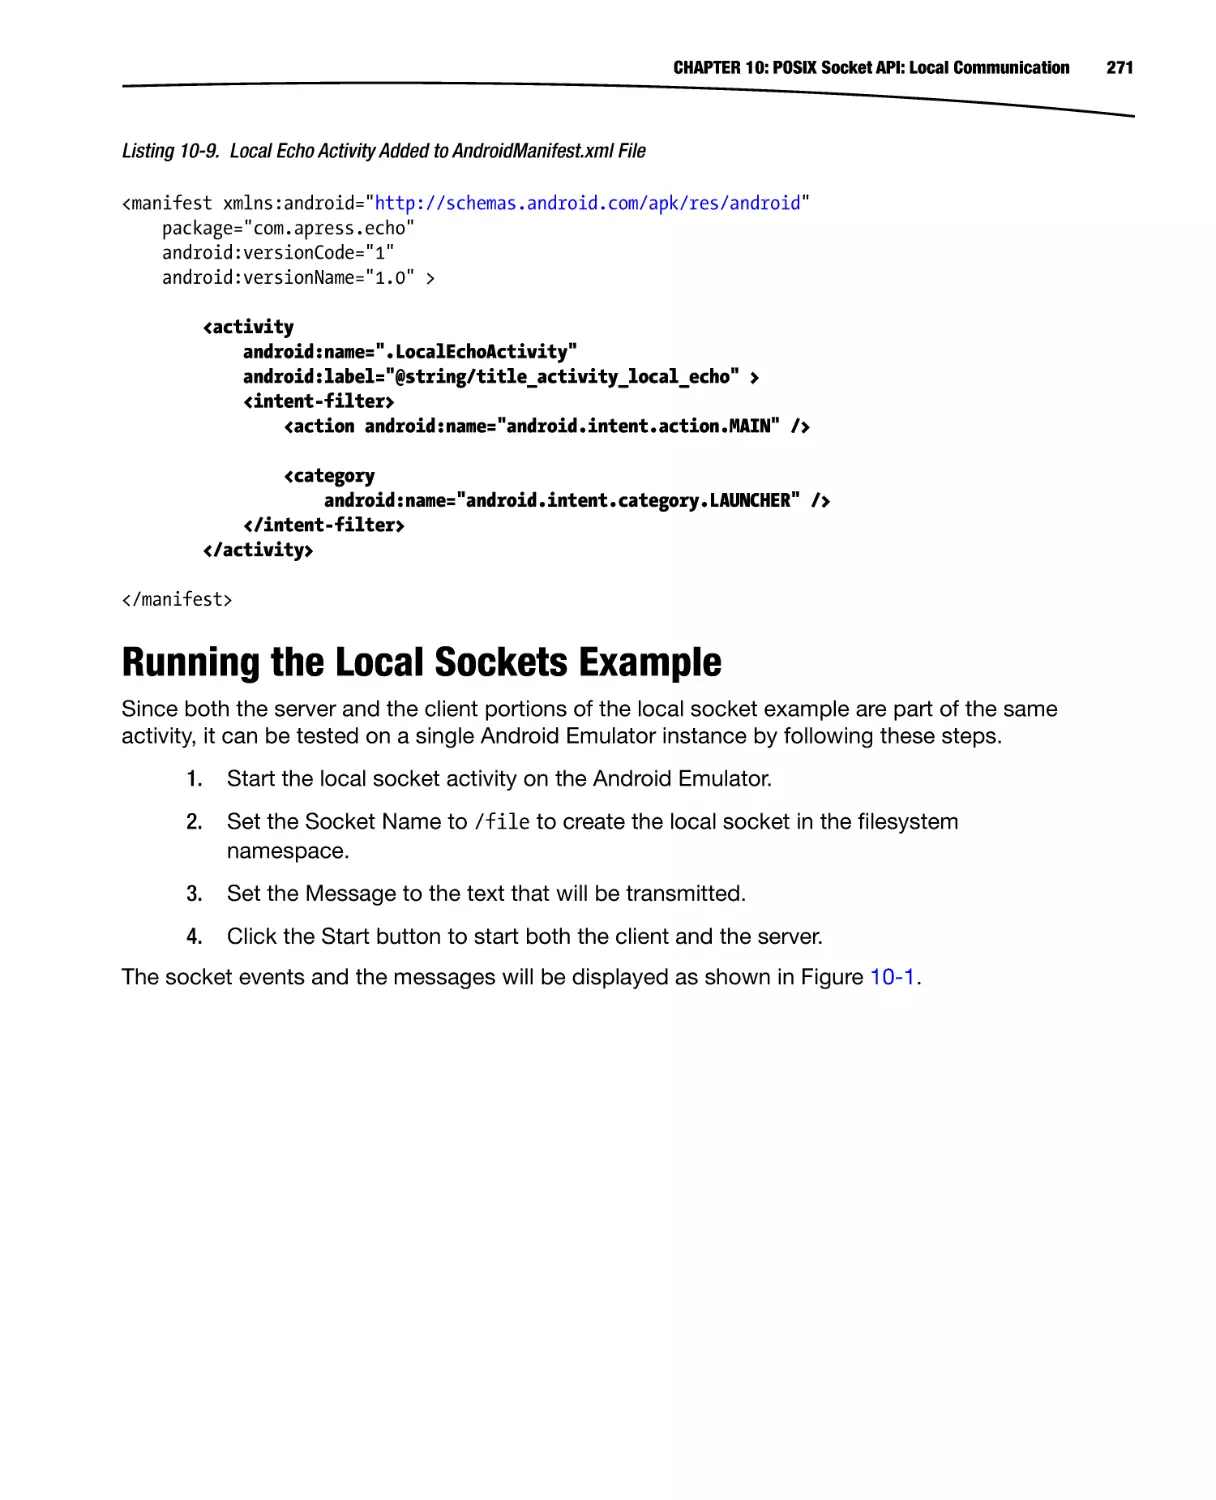
Building graphic-rich and better performing
native applications
Pro
Android C++
with the NDK
Onur Cinar
For your convenience Apress has placed some of the front
matter material after the index. Please use the Bookmarks
and Contents at a Glance links to access them.
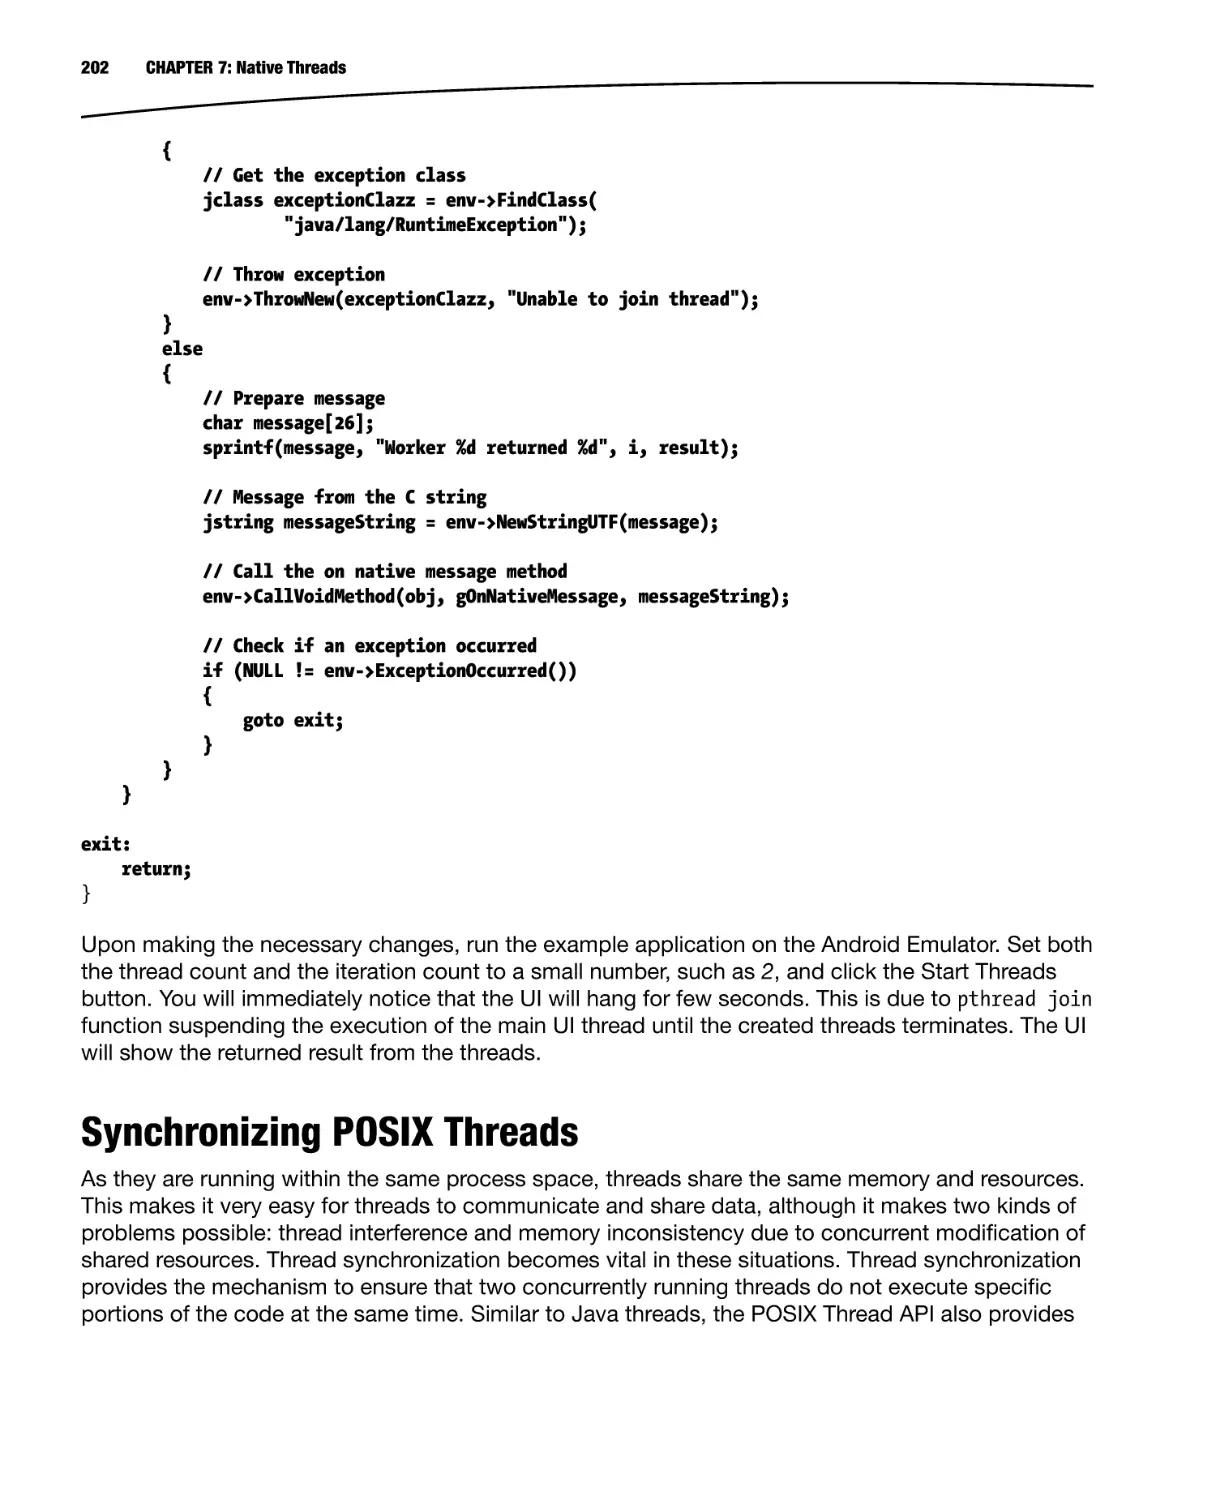
Contents at a Glance
About the Author��������������������������������������������������������������������������������������������������������������� xix
About the Technical Reviewer������������������������������������������������������������������������������������������� xxi
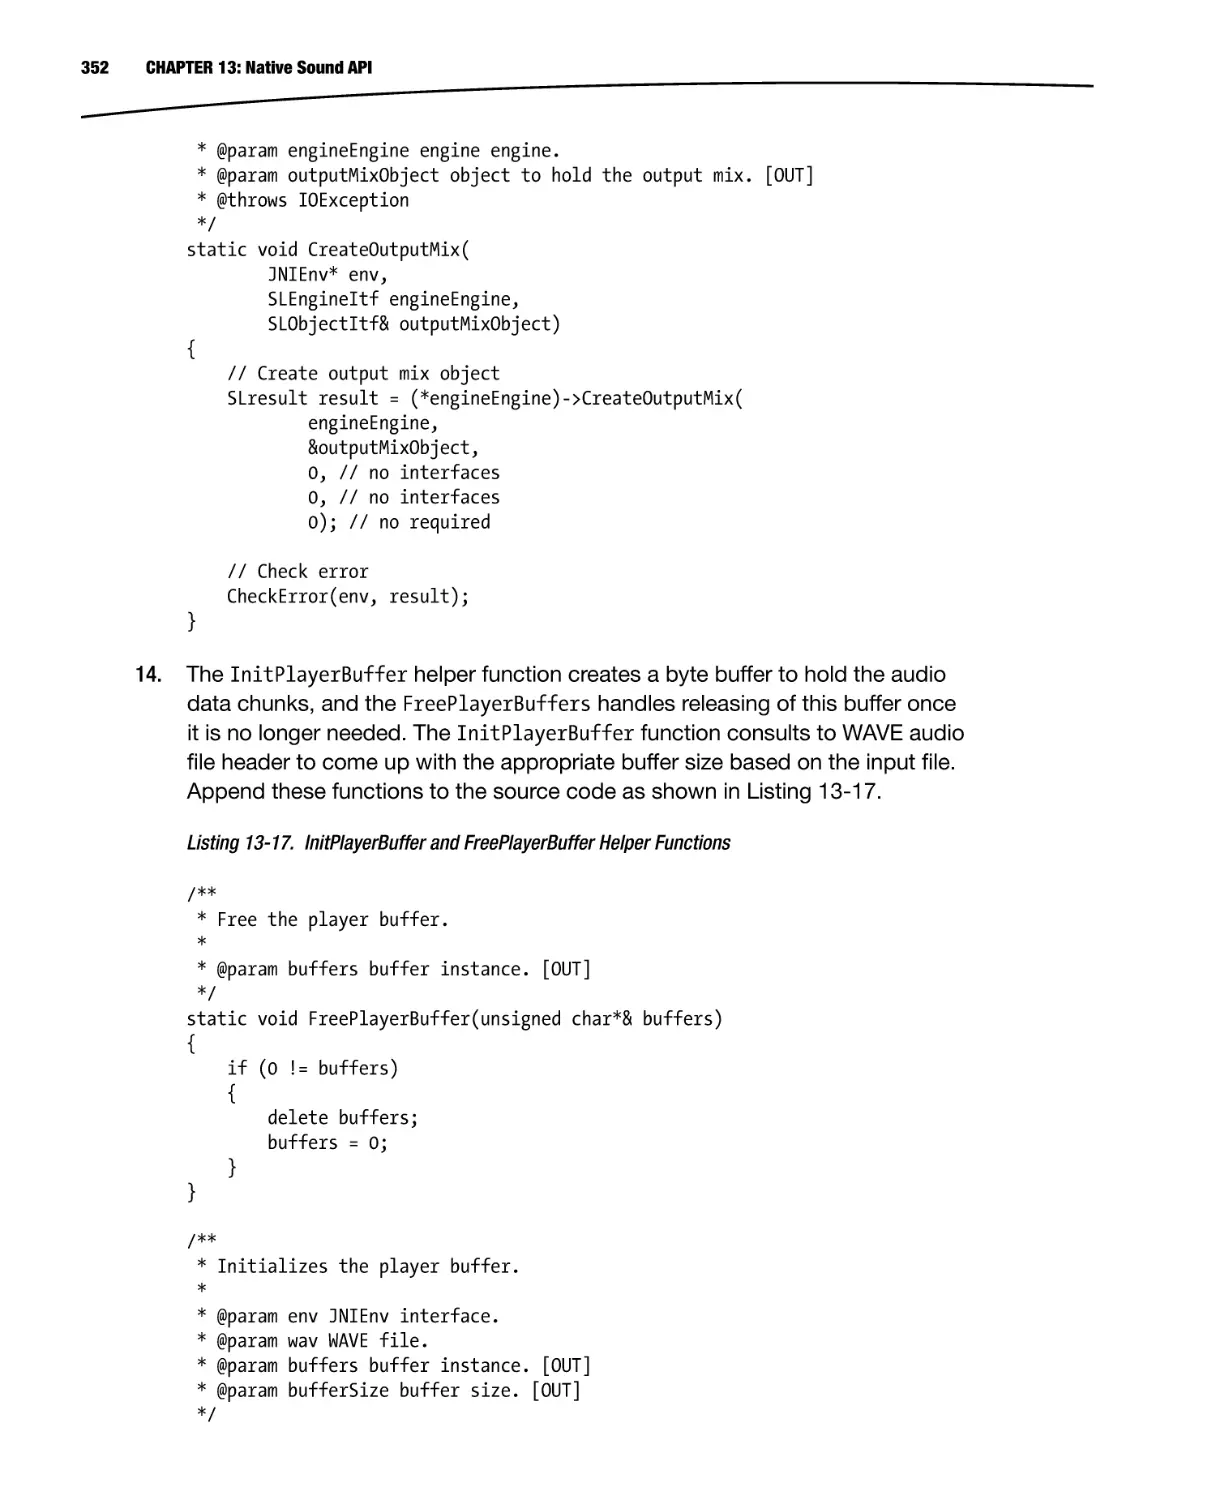
Preface���������������������������������������������������������������������������������������������������������������������������� xxiii
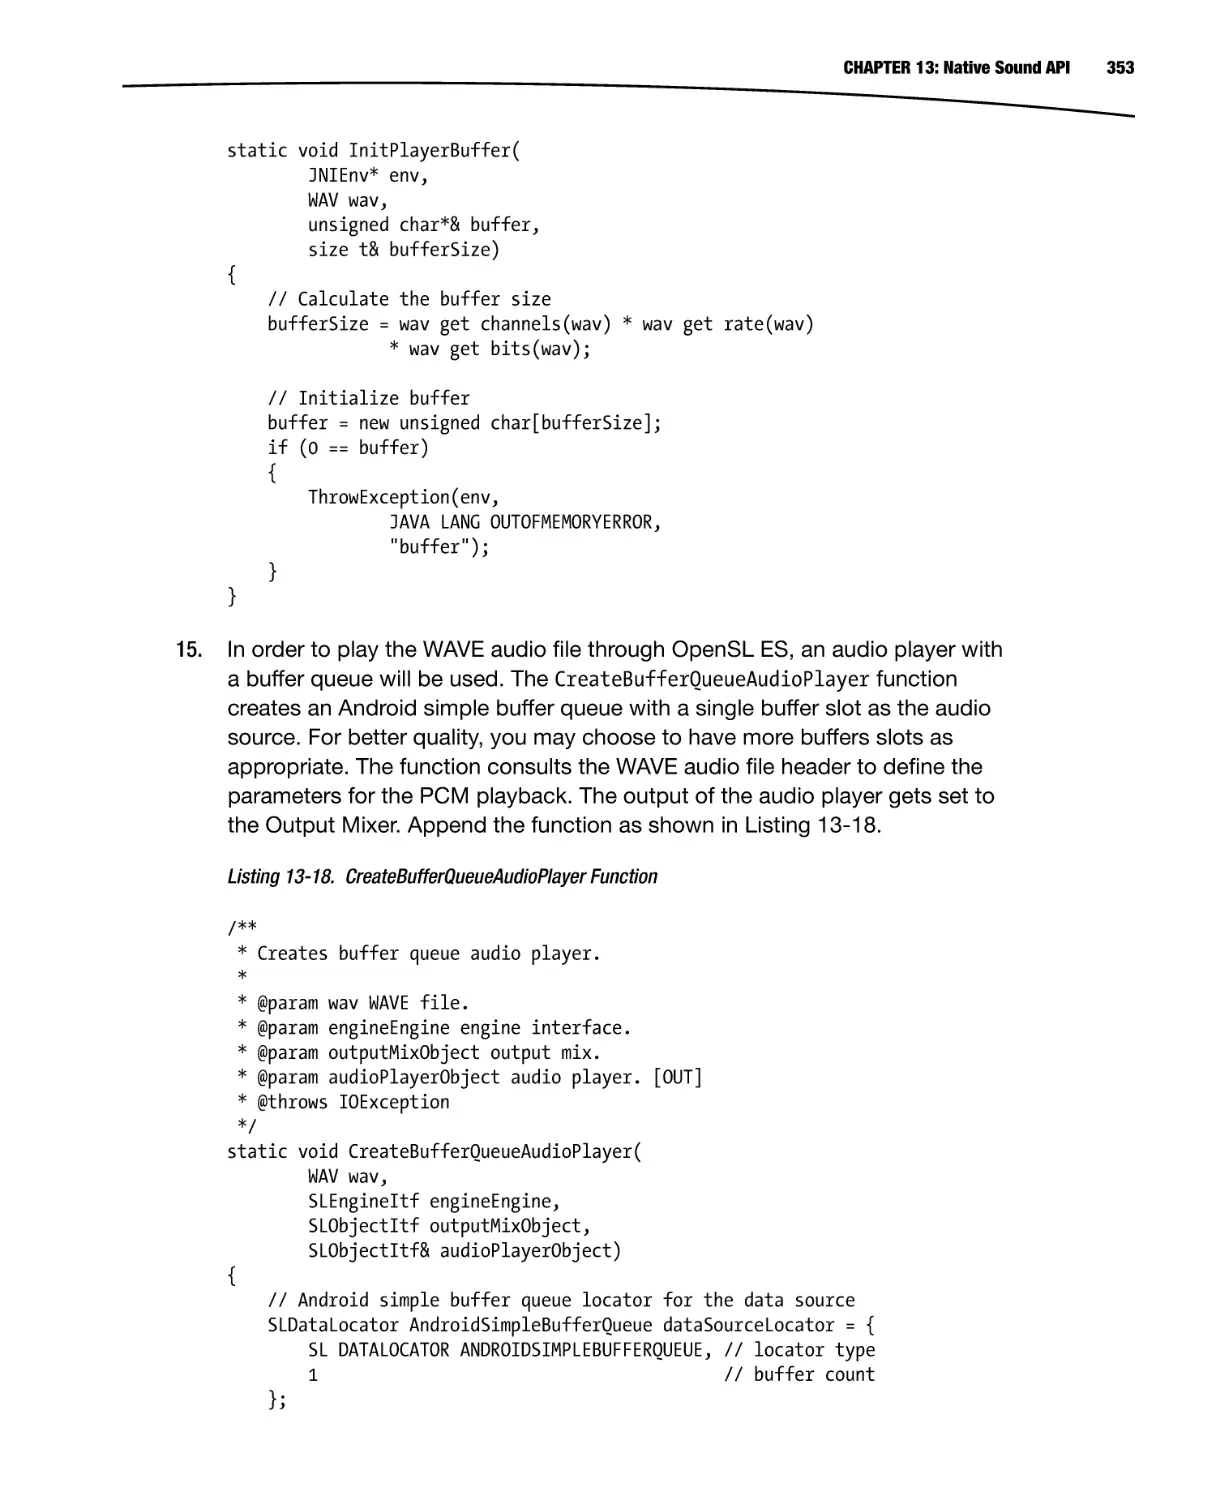
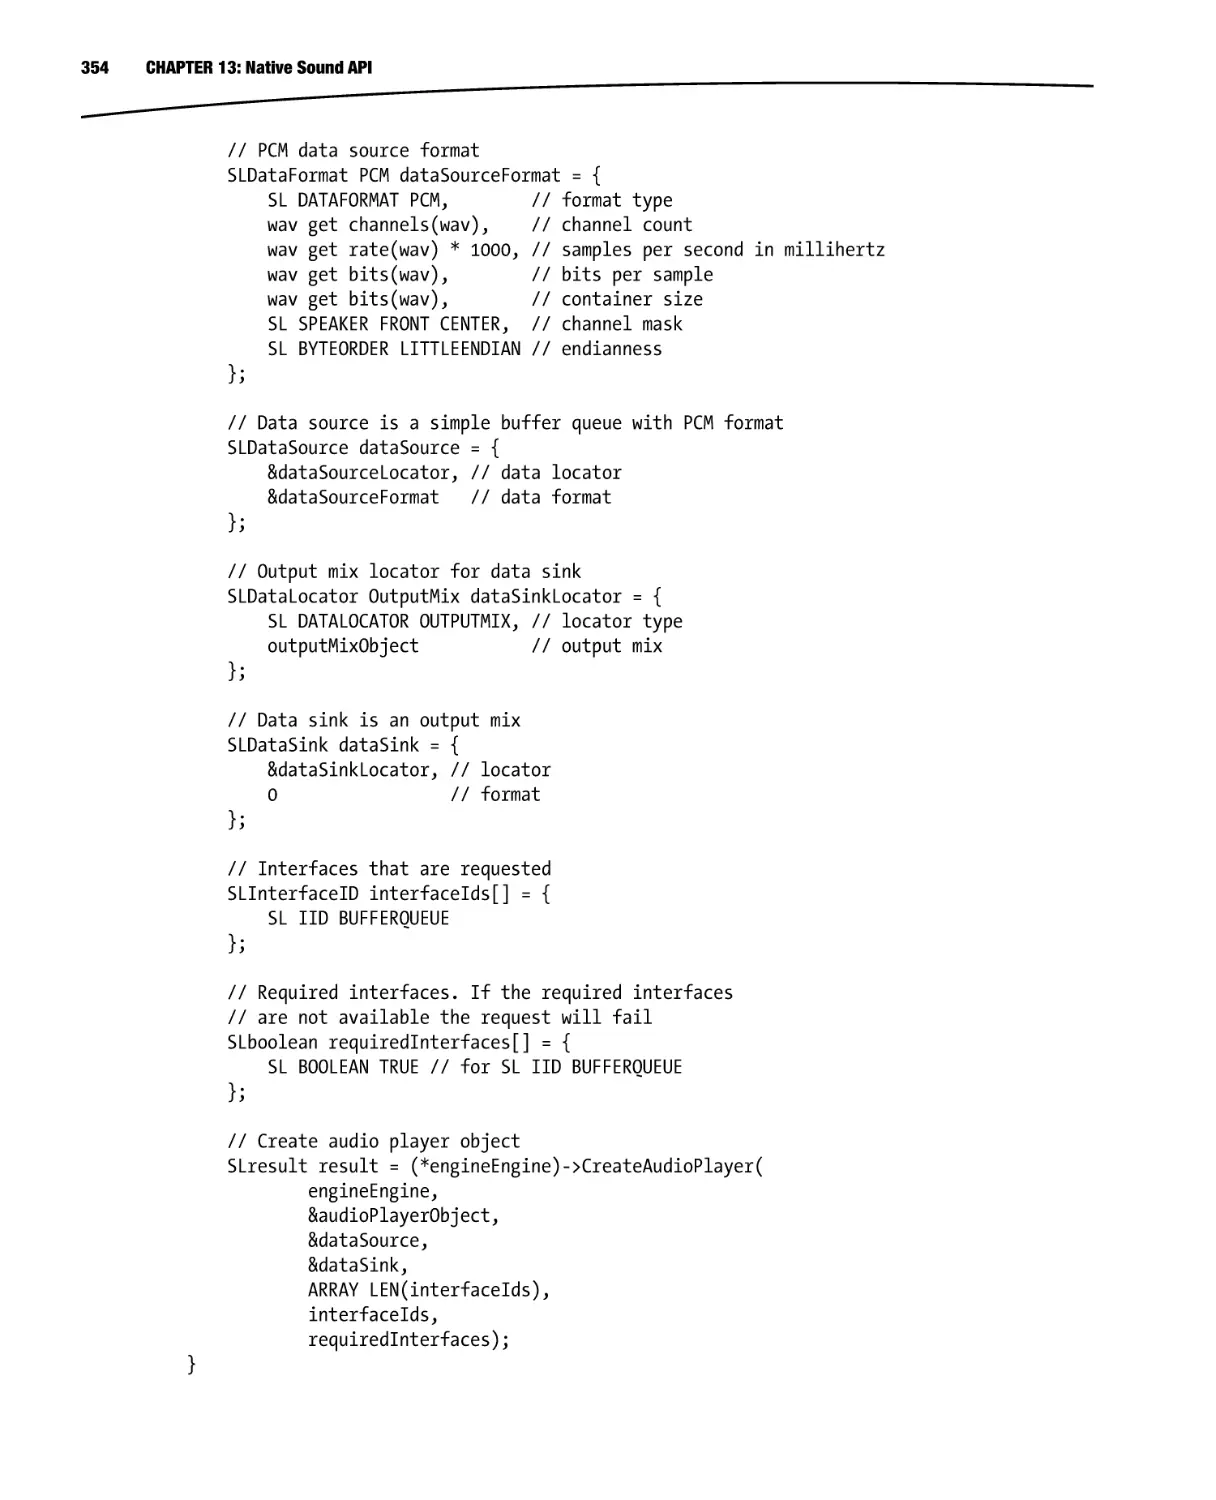
■■Chapter 1: Getting Started with C++ on Android���������������������������������������������������������������1
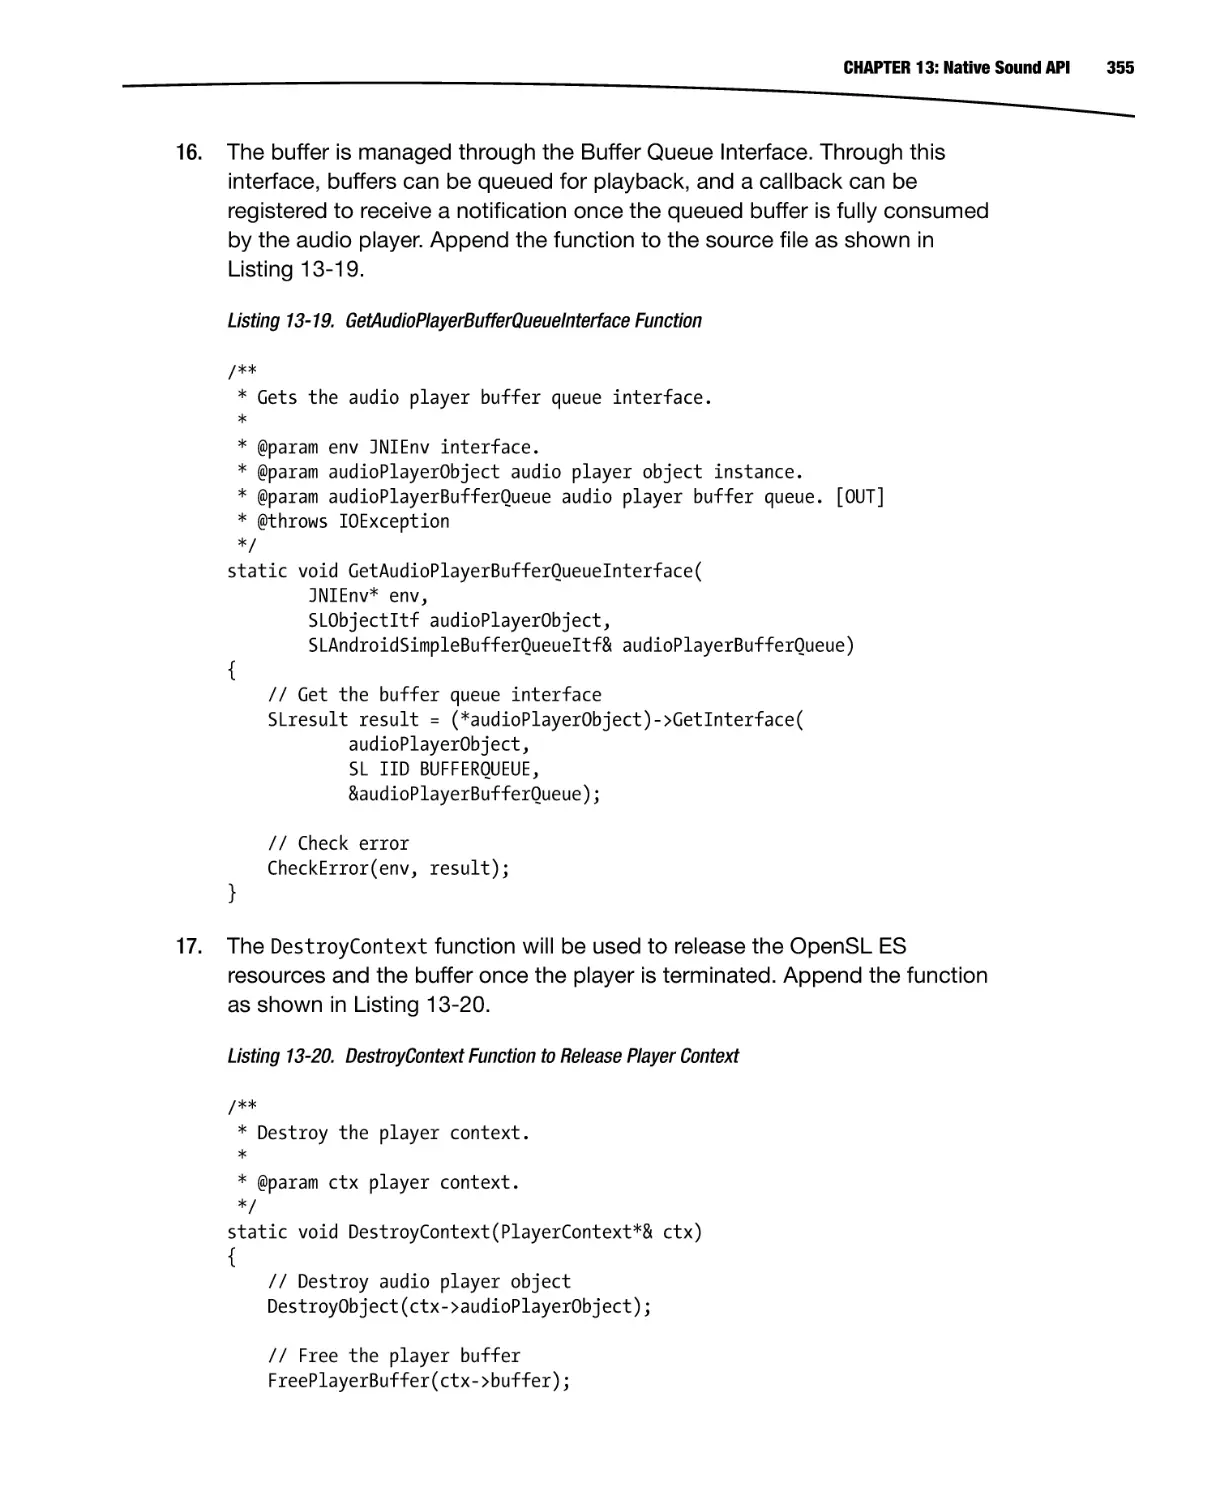
■■Chapter 2: Exploring the Android NDK�����������������������������������������������������������������������������41
■■Chapter 3: Communicating with Native Code using JNI��������������������������������������������������67
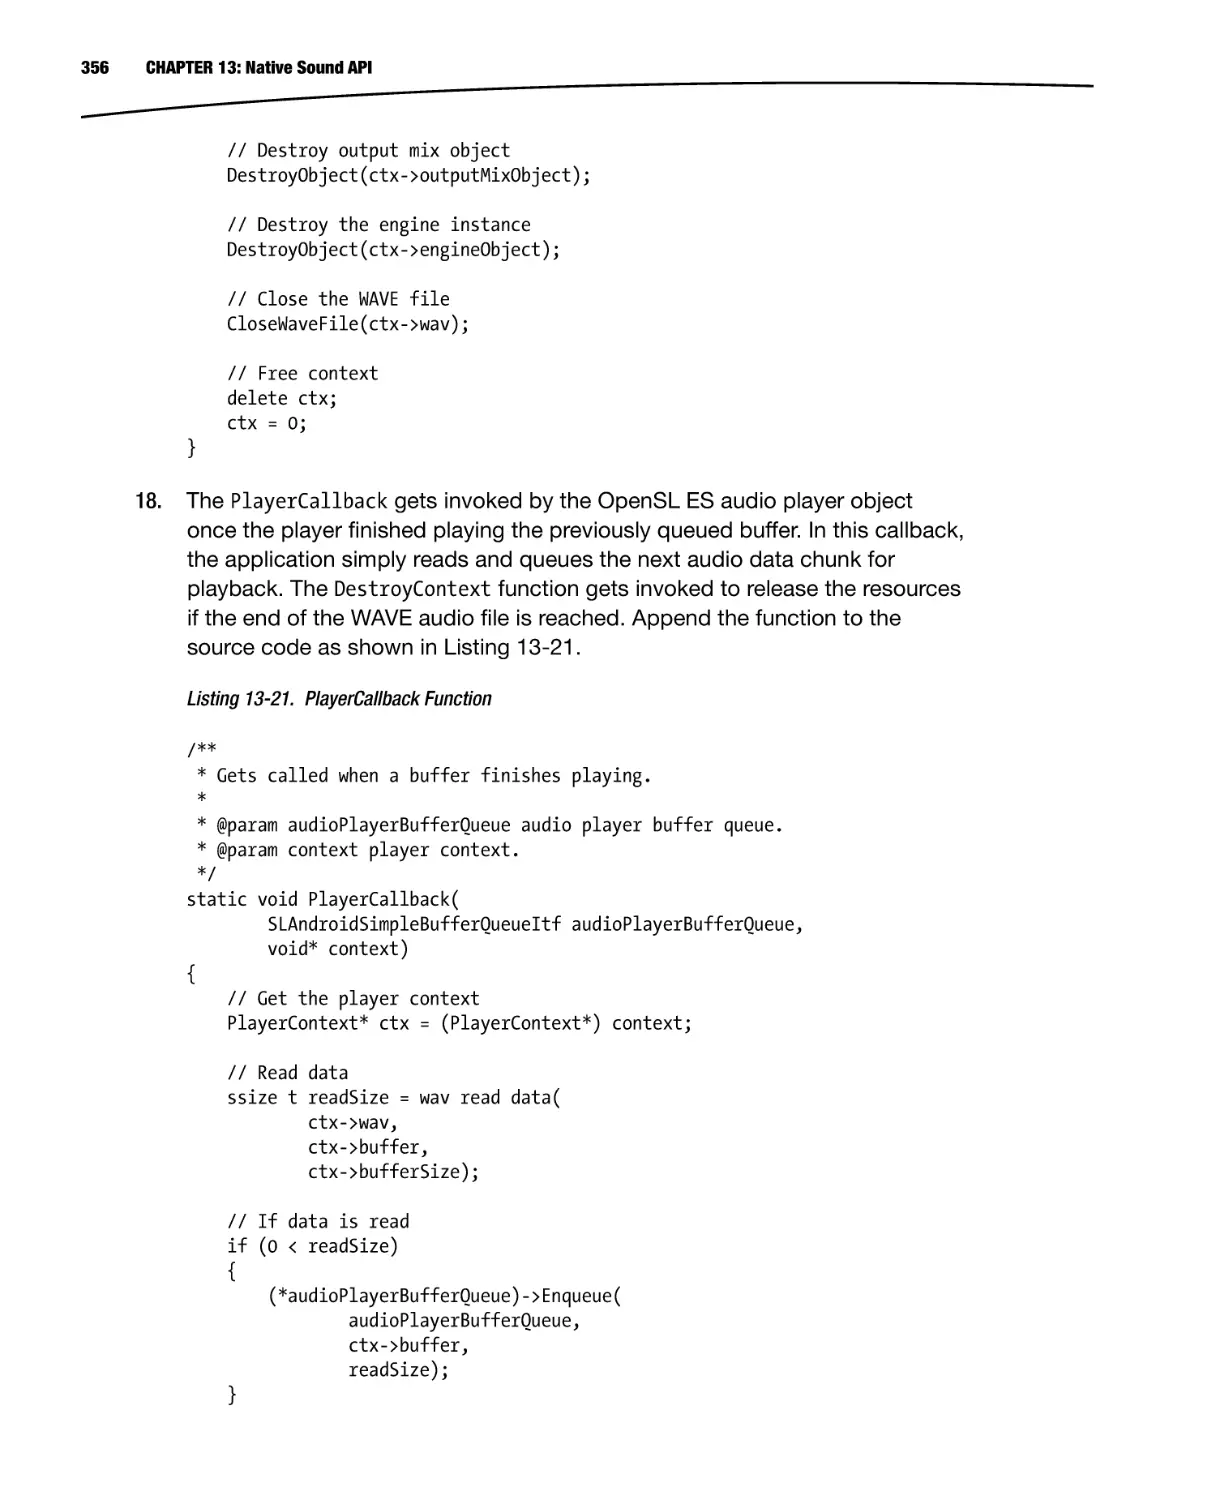
■■Chapter 4: Auto-Generate JNI Code Using SWIG��������������������������������������������������������������95
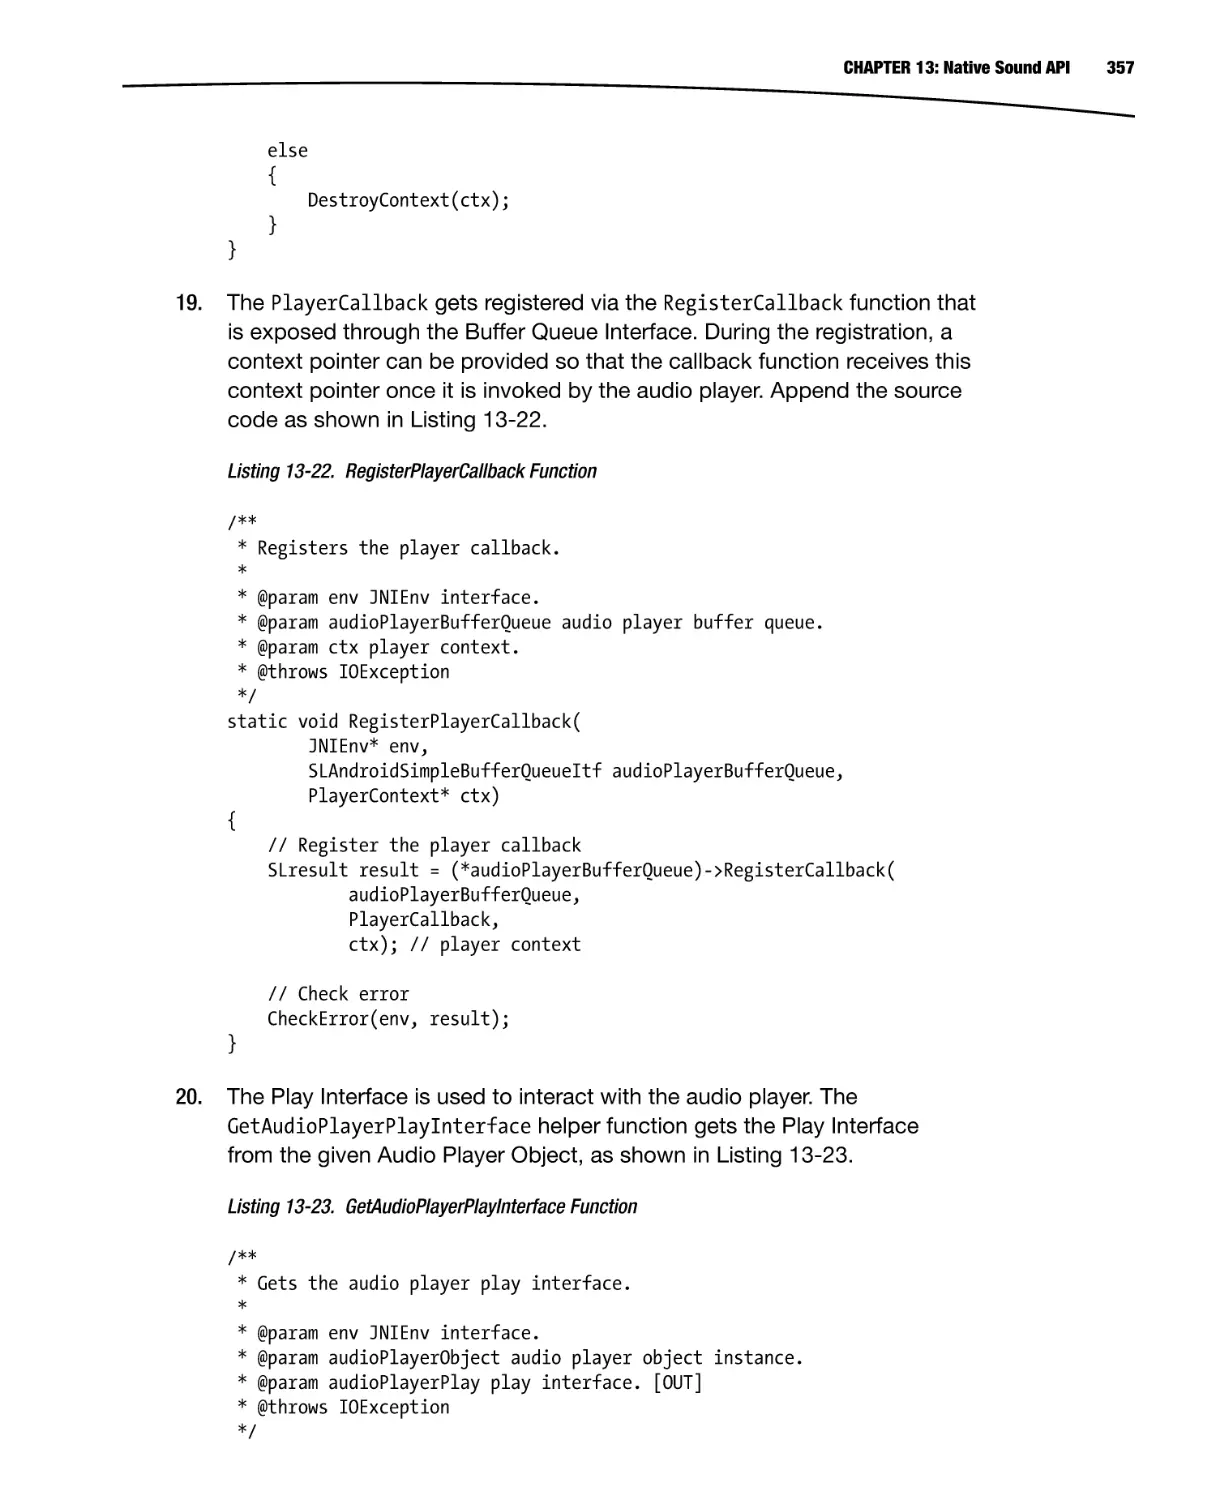
■■Chapter 5: Logging, Debugging, and Troubleshooting���������������������������������������������������127
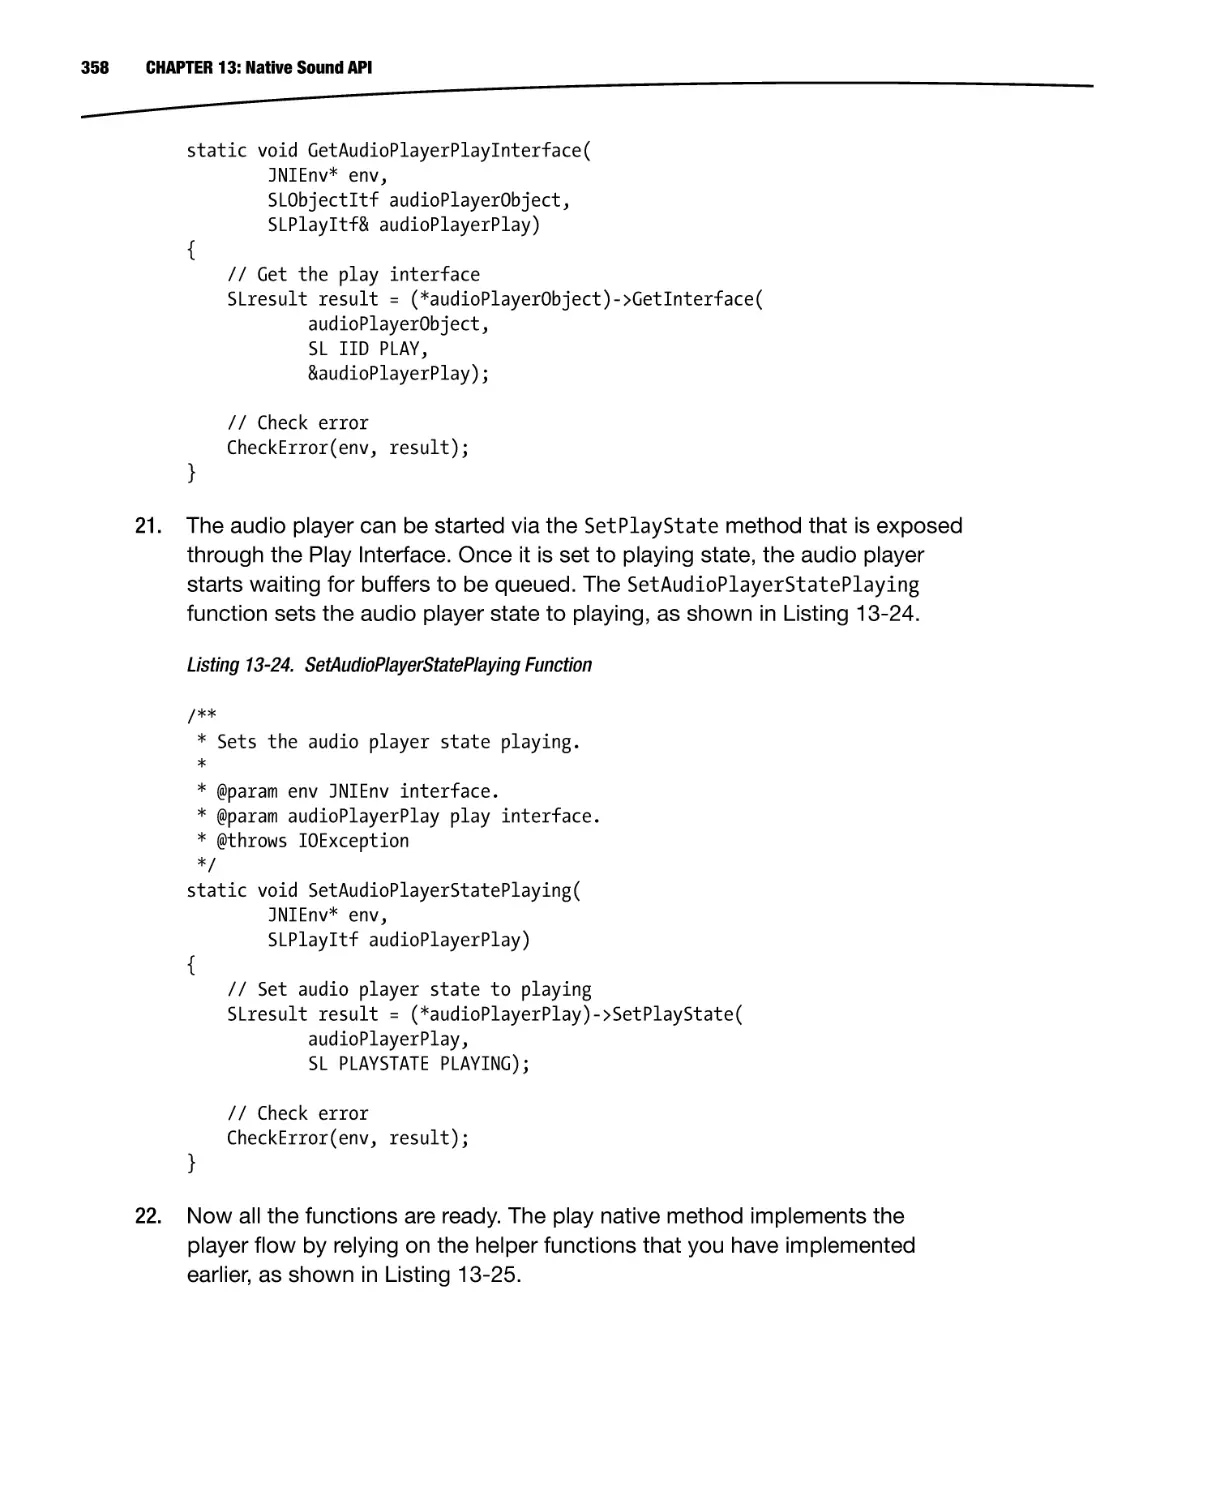
■■Chapter 6: Bionic API Primer�����������������������������������������������������������������������������������������155
■■Chapter 7: Native Threads���������������������������������������������������������������������������������������������179
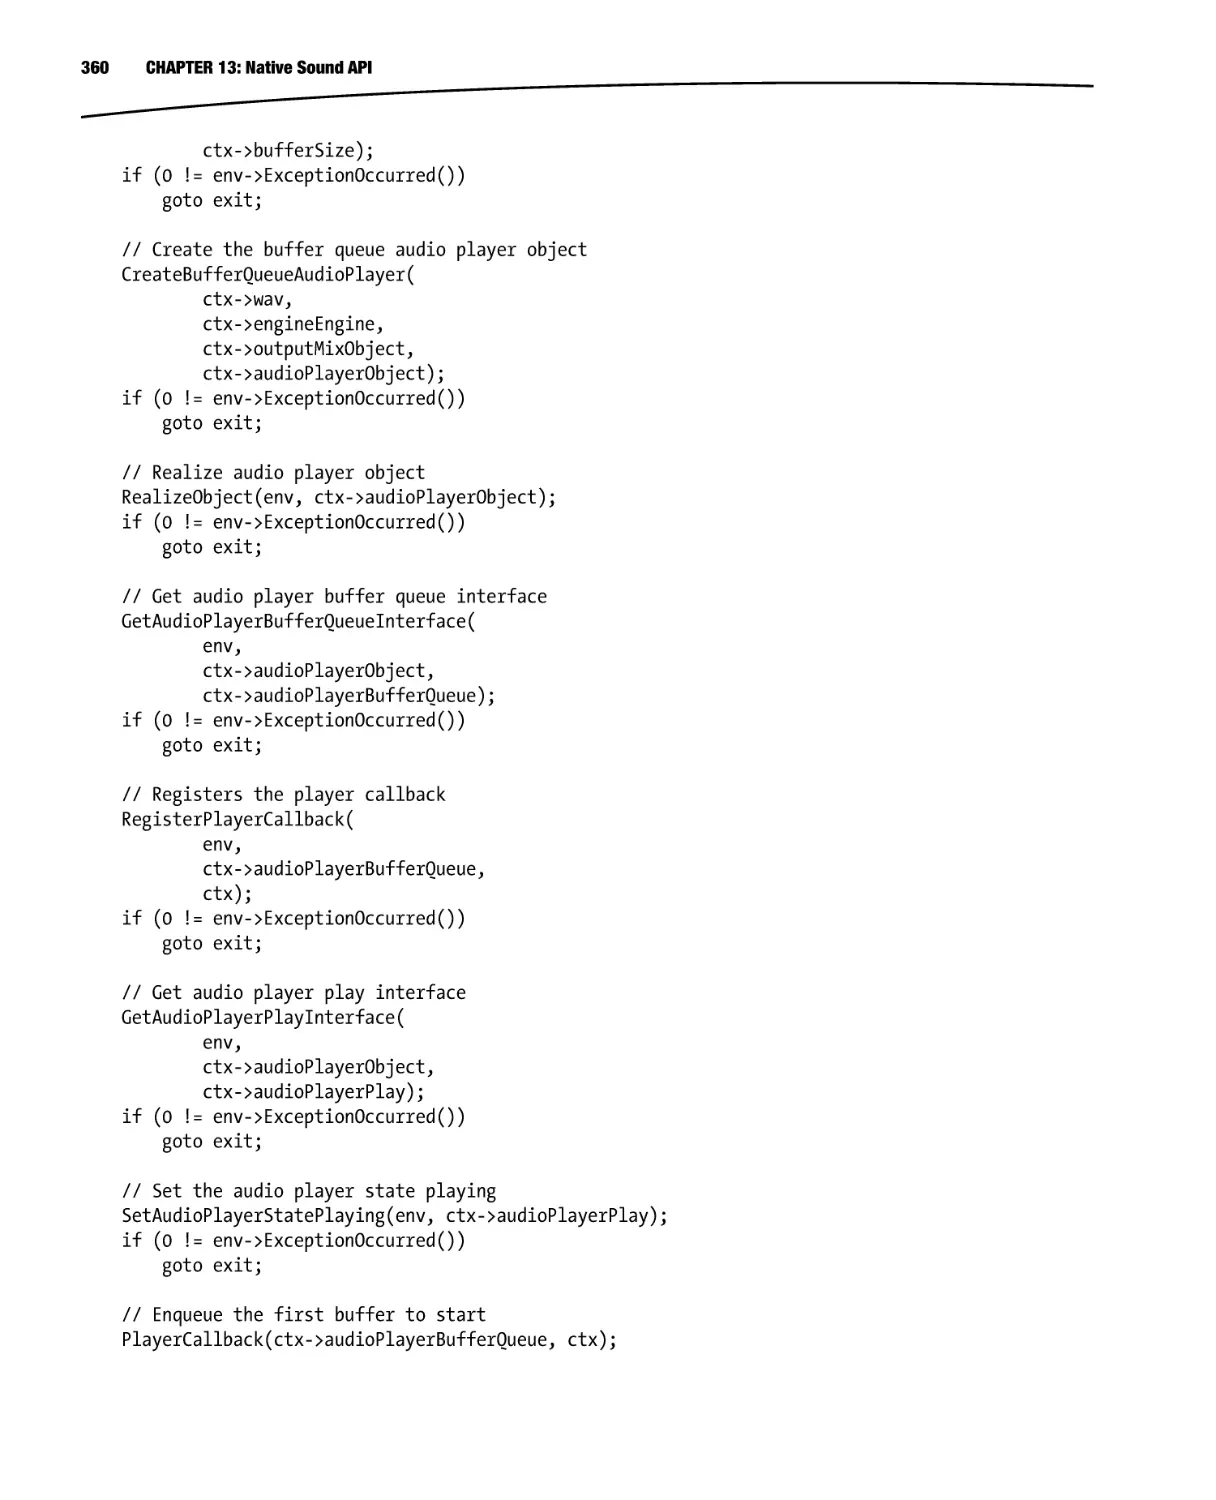
■■Chapter 8: POSIX Socket API: Connection-Oriented Communication����������������������������209
■■Chapter 9: POSIX Socket API: Connectionless Communication�������������������������������������247
■■Chapter 10: POSIX Socket API: Local Communication���������������������������������������������������259
■■Chapter 11: C++ Support�����������������������������������������������������������������������������������������������275
v
vi
Contents at a Glance
■■Chapter 12: Native Graphics API�����������������������������������������������������������������������������������285
■■Chapter 13: Native Sound API���������������������������������������������������������������������������������������335
■■Chapter 14: Profiling and NEON Optimization���������������������������������������������������������������363
Index���������������������������������������������������������������������������������������������������������������������������������381
Chapter
1
Getting Started with C++
on Android
Needless to say, exploring and practicing are the best methods for learning. Having a fully functional
development environment ready at the very beginning of this book will enable you to explore and
experiment with the material while working through the chapters. The Android C++ development
environment is mainly formed by the following components:
Android Software Development Kit (SDK)
Android Native Development Kit (NDK)
Android Development Tools (ADT) Plug-In for Eclipse
Java Development Kit (JDK)
Apache ANT Build System
GNU Make Build System
Eclipse IDE
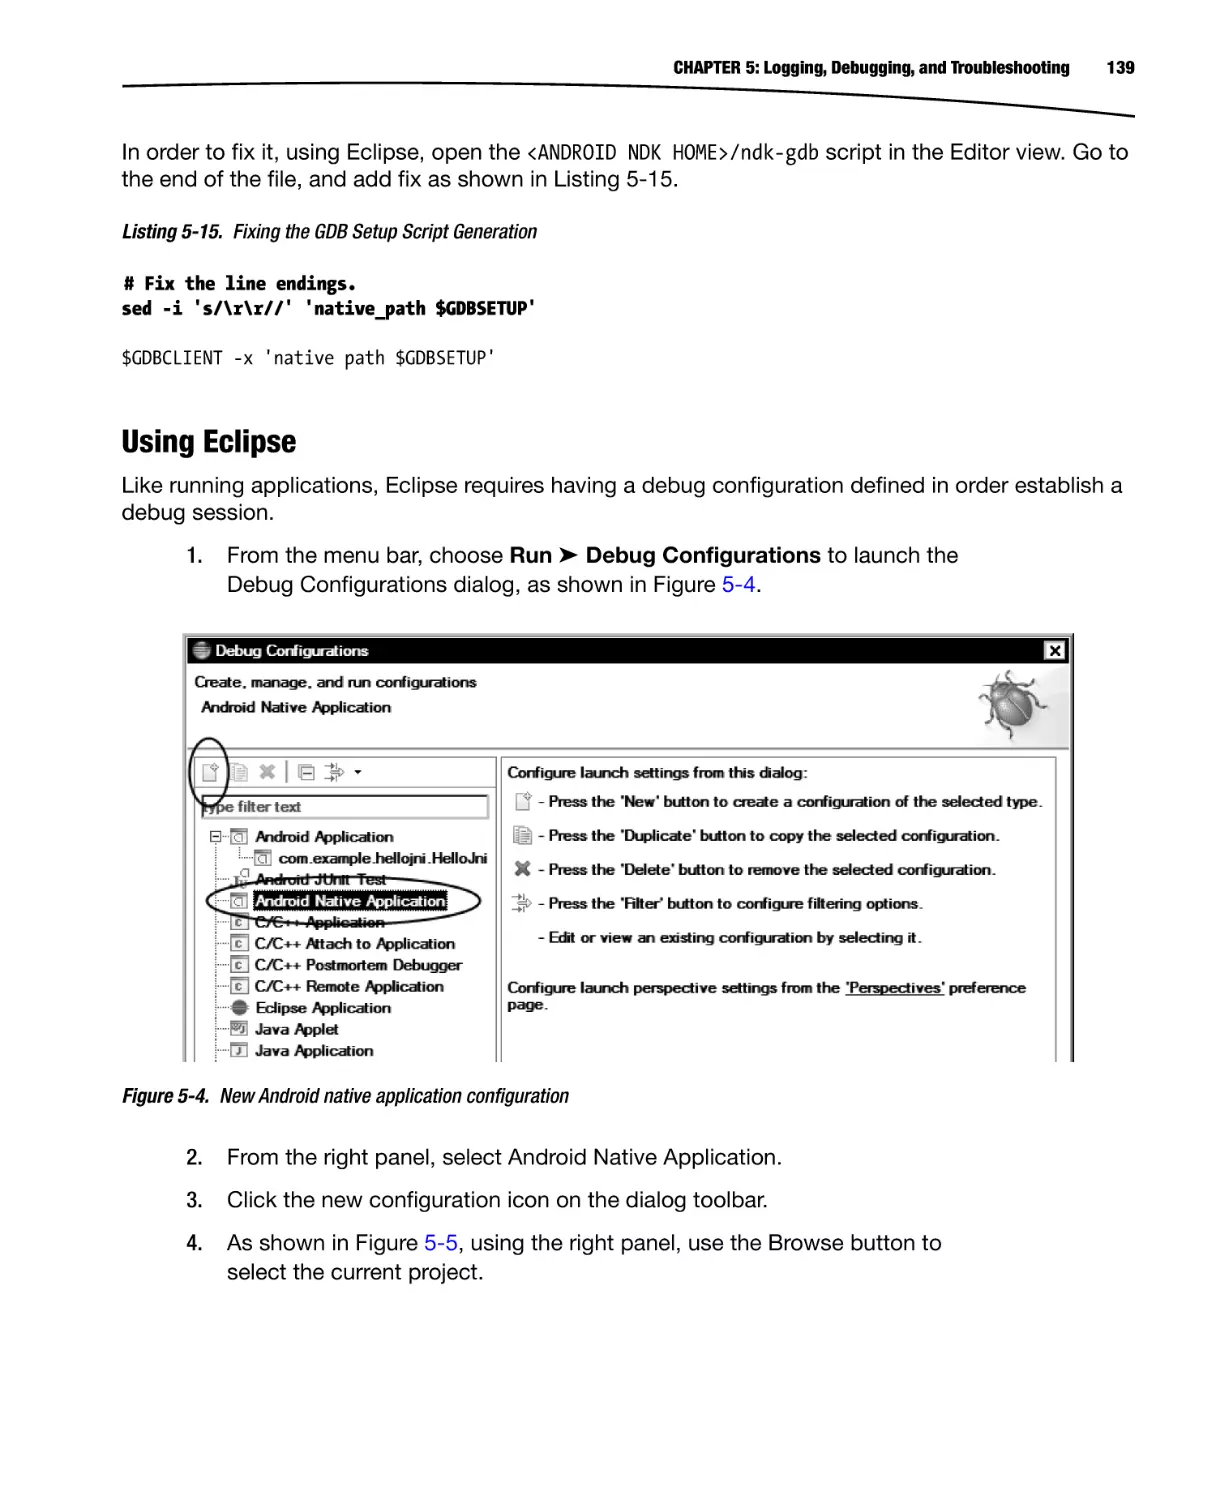
This chapter will provide step-by-step instructions for setting up the proper Android C++ development
environment. Android development tools are provided for the major operating systems:
Microsoft Windows
Apple Mac OS X
Linux
Since the requirements and the installation procedure vary depending on the operating system,
the following sections will walk you through the steps for setting up the Android C++ development
environment based on the operating system. You can skip over the ones that don’t apply to you.
1
2
CHAPTER 1: Getting Started with C++ on Android
Microsoft Windows
Android development tools require Windows XP (32-bit only), Vista, or Windows 7. In this section,
you will be downloading and installing the following components:
Java JDK 6
Apache ANT Build System
Android SDK
Cygwin
Android NDK
Eclipse IDE
Downloading and Installing the Java Development Kit on Windows
Android development tools require Java Development Kit (JDK) version 6 in order to run. Java
Runtime Edition (JRE) itself is not sufficient. Java JDK 6 needs to be installed prior installing the
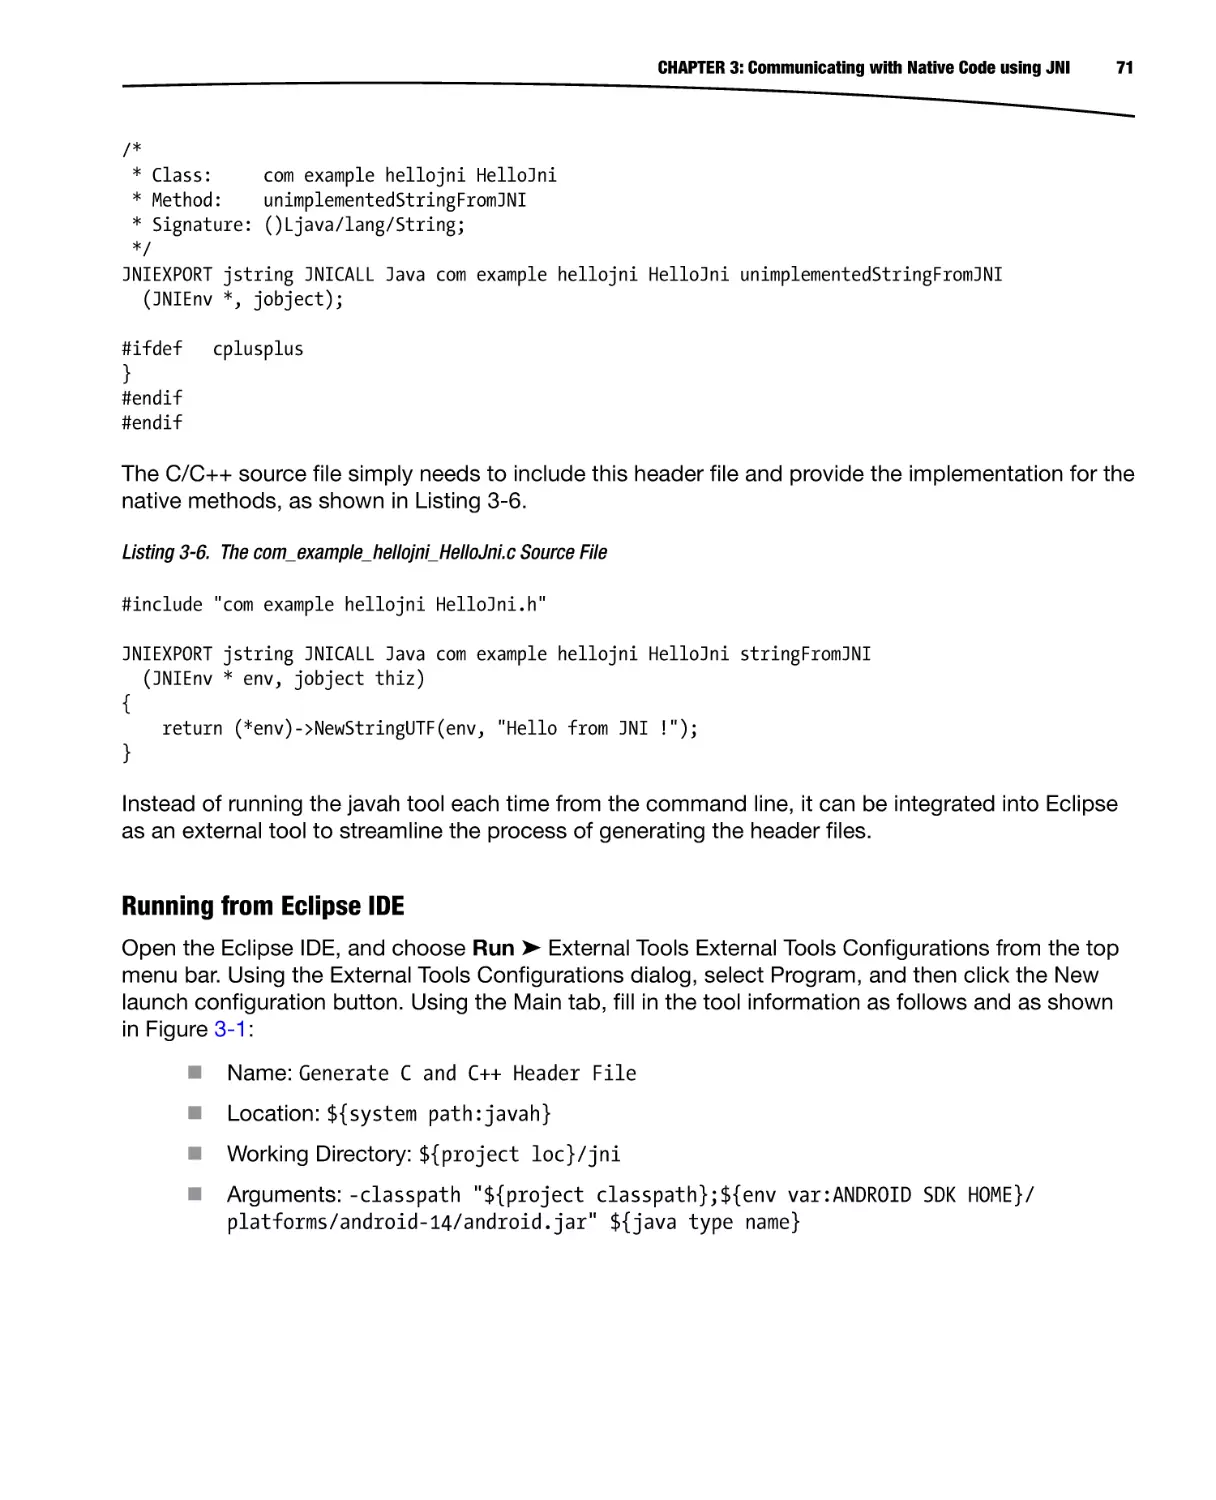
Android development tools.
Note Android development tools only support Java compiler compliance level 5 or 6. Although the
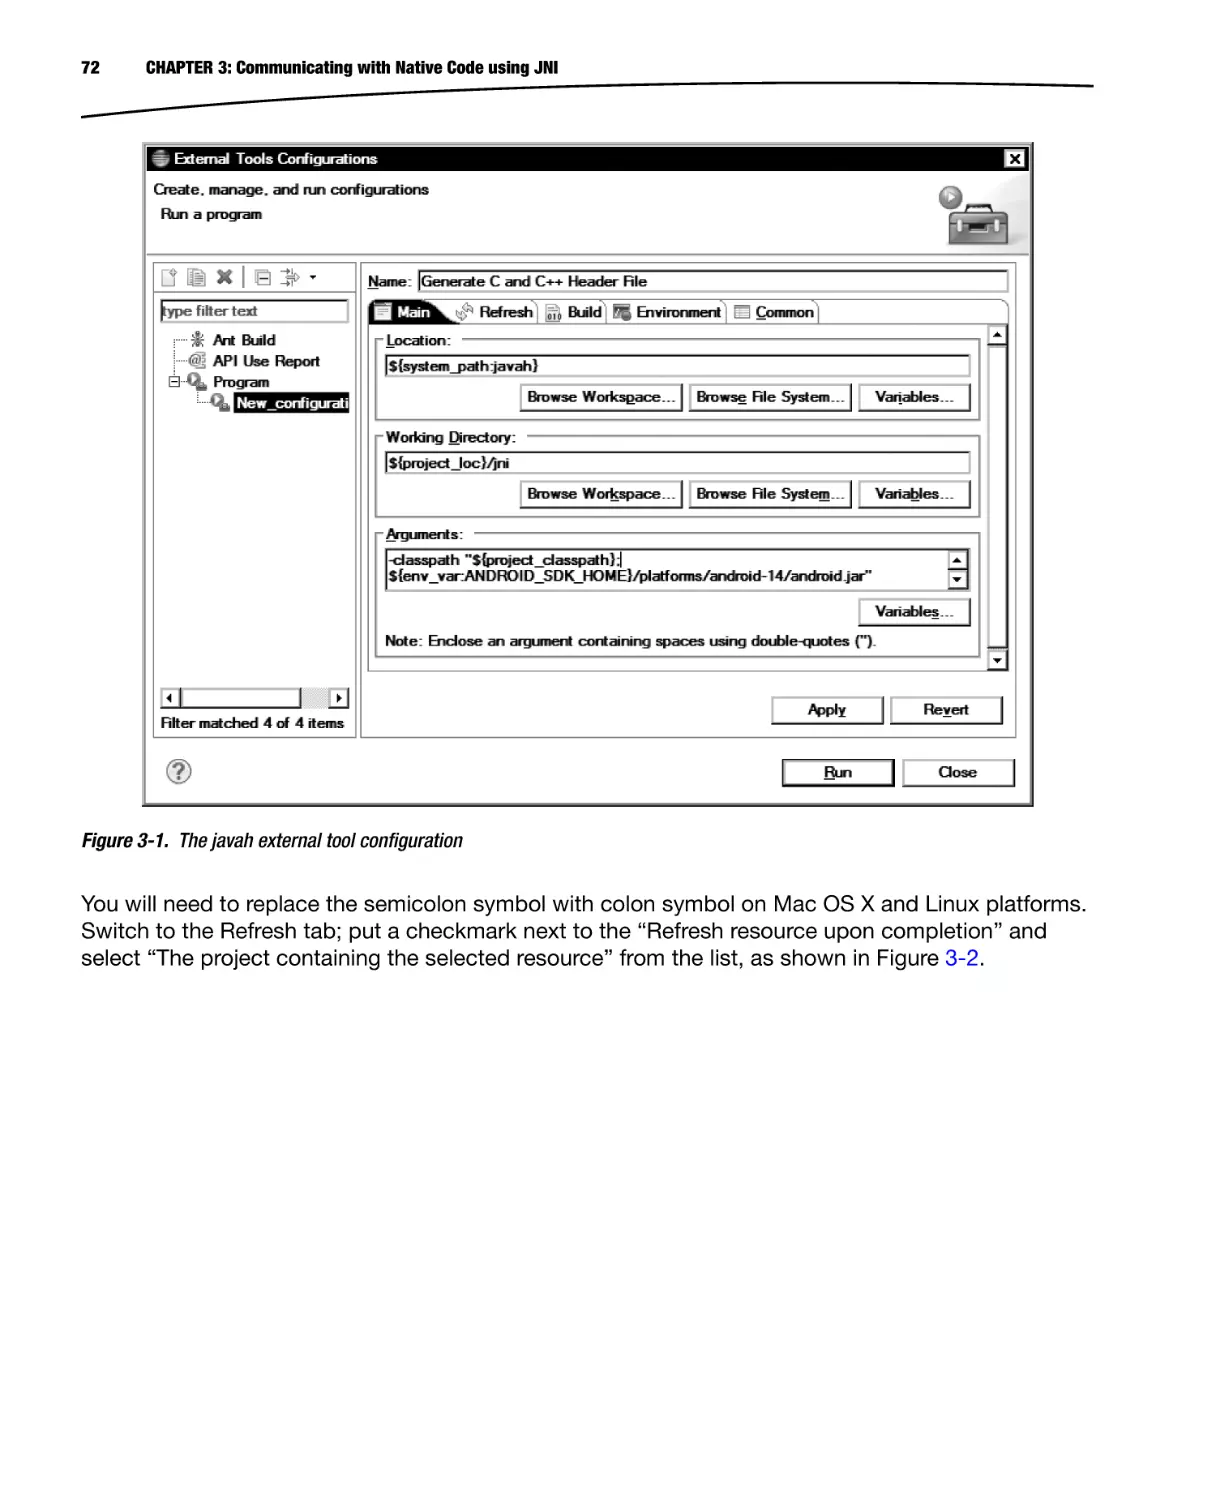
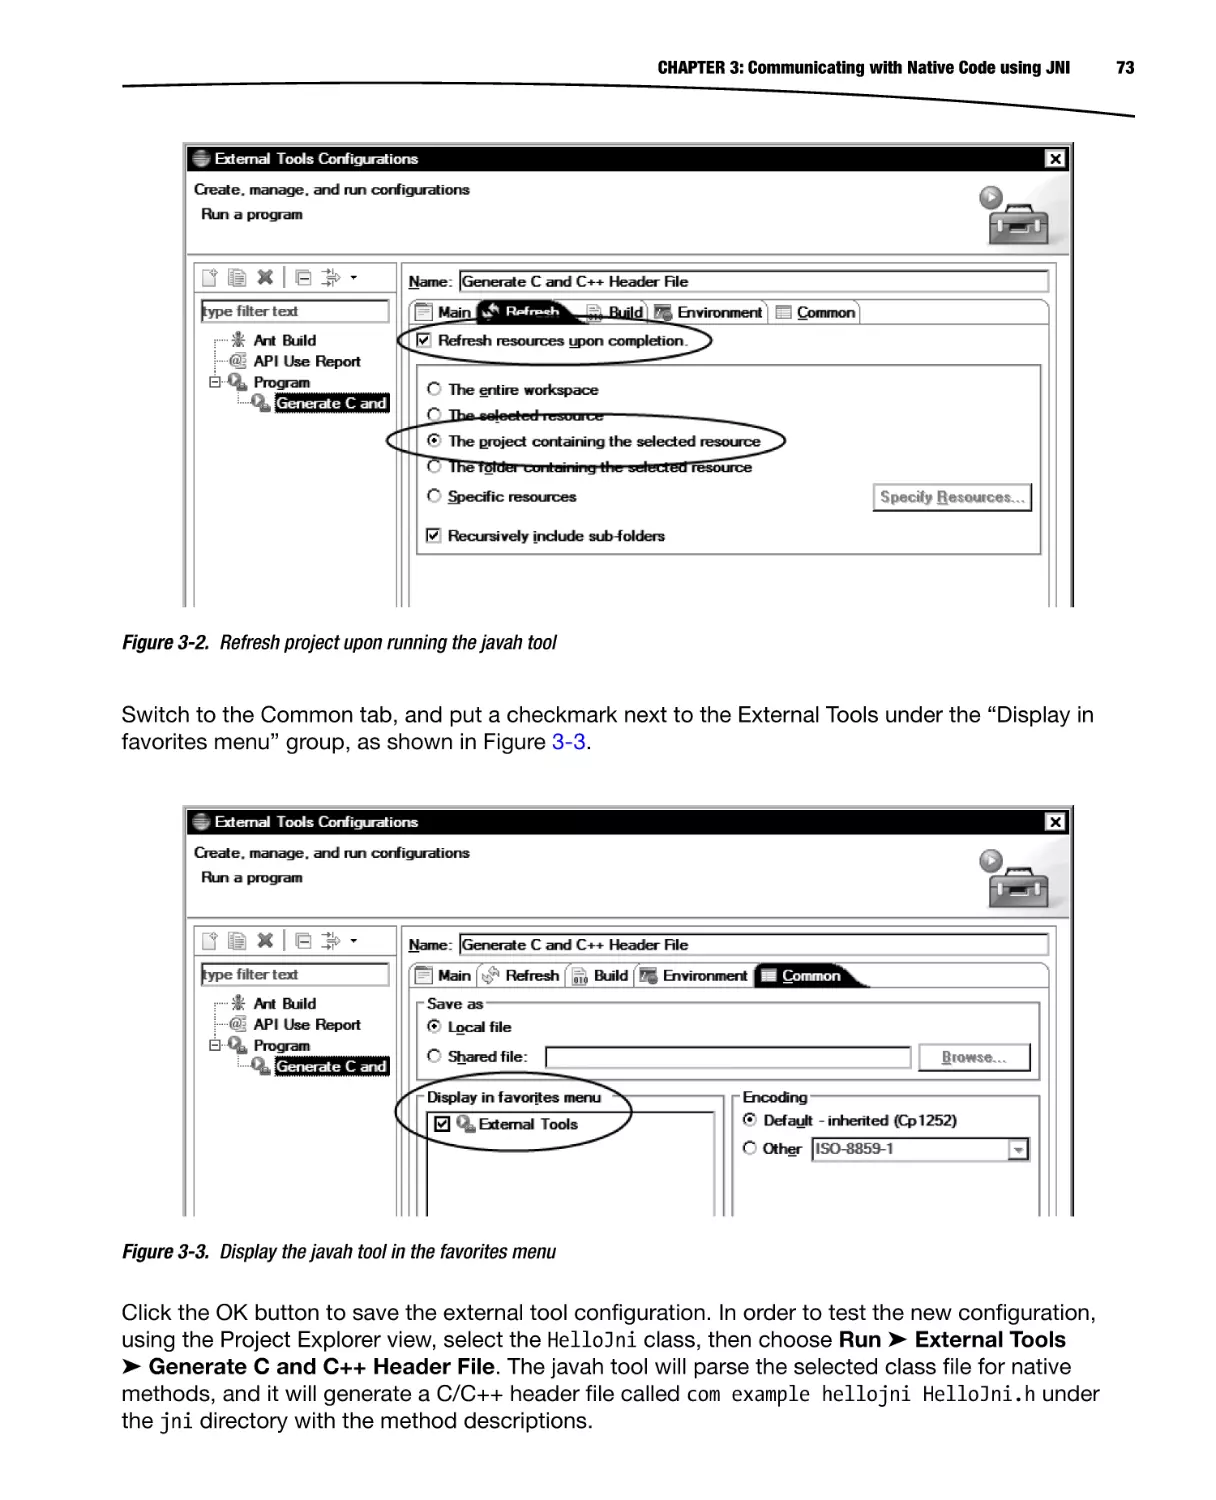
later versions of JDK can be configured to comply with those levels, using JDK 6 is much simpler and
less prone to errors.
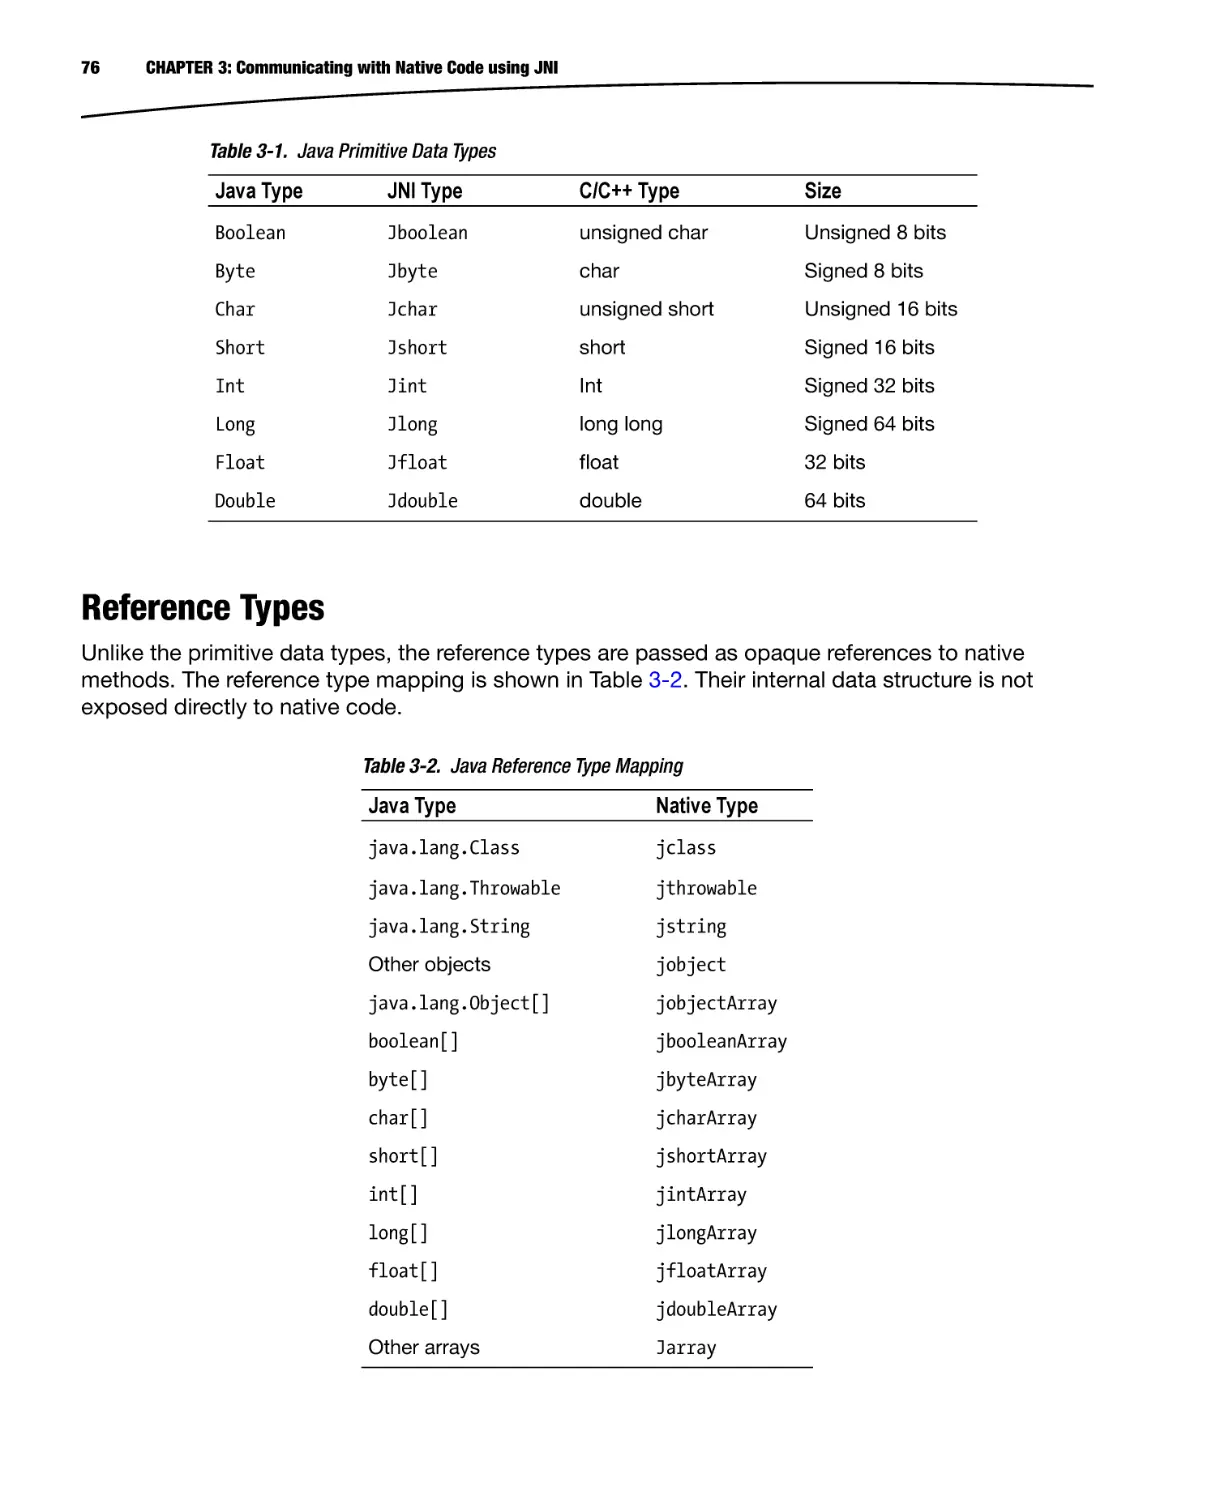
Multiple JDK flavors are supported by Android development tools, such as IBM JDK, Open JDK, and
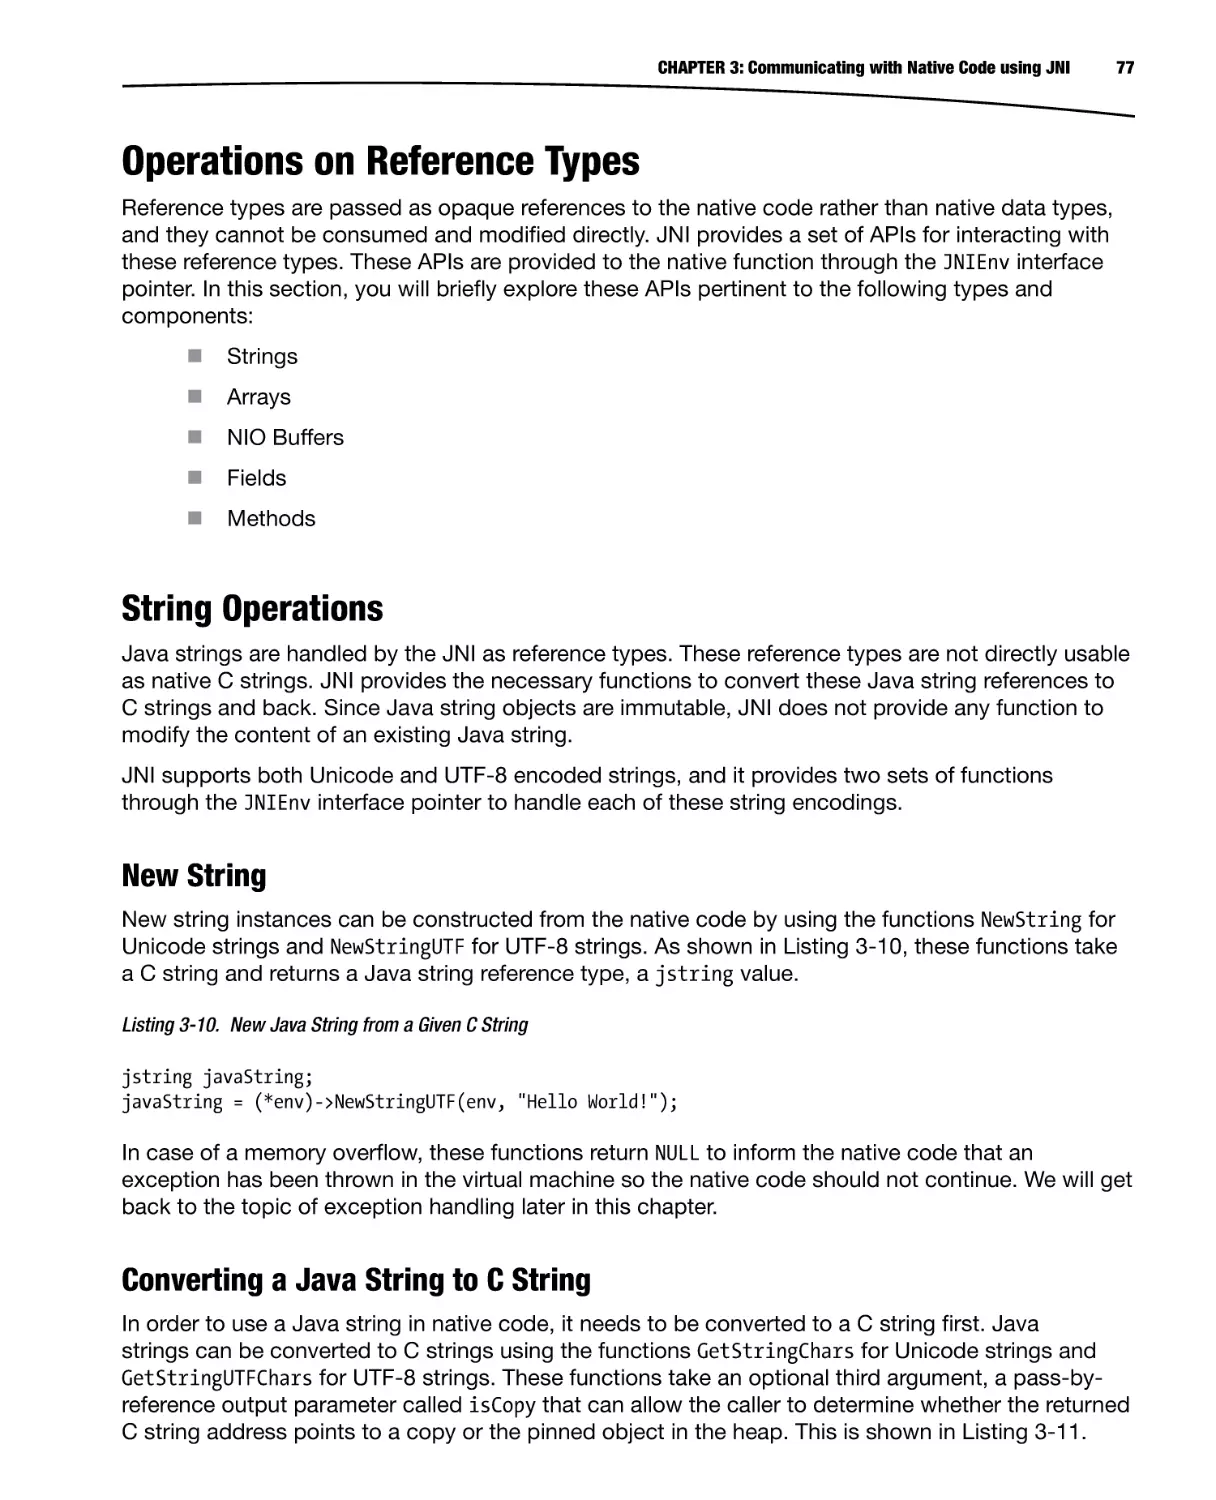
Oracle JDK (formerly known as Sun JDK). In this book, it is assumed that Oracle JDK will be used
since it supports a broader range of platforms.
In order to download Oracle JDK, navigate to
www.oracle.com/technetwork/java/javase/downloads/index.html and follow these steps:
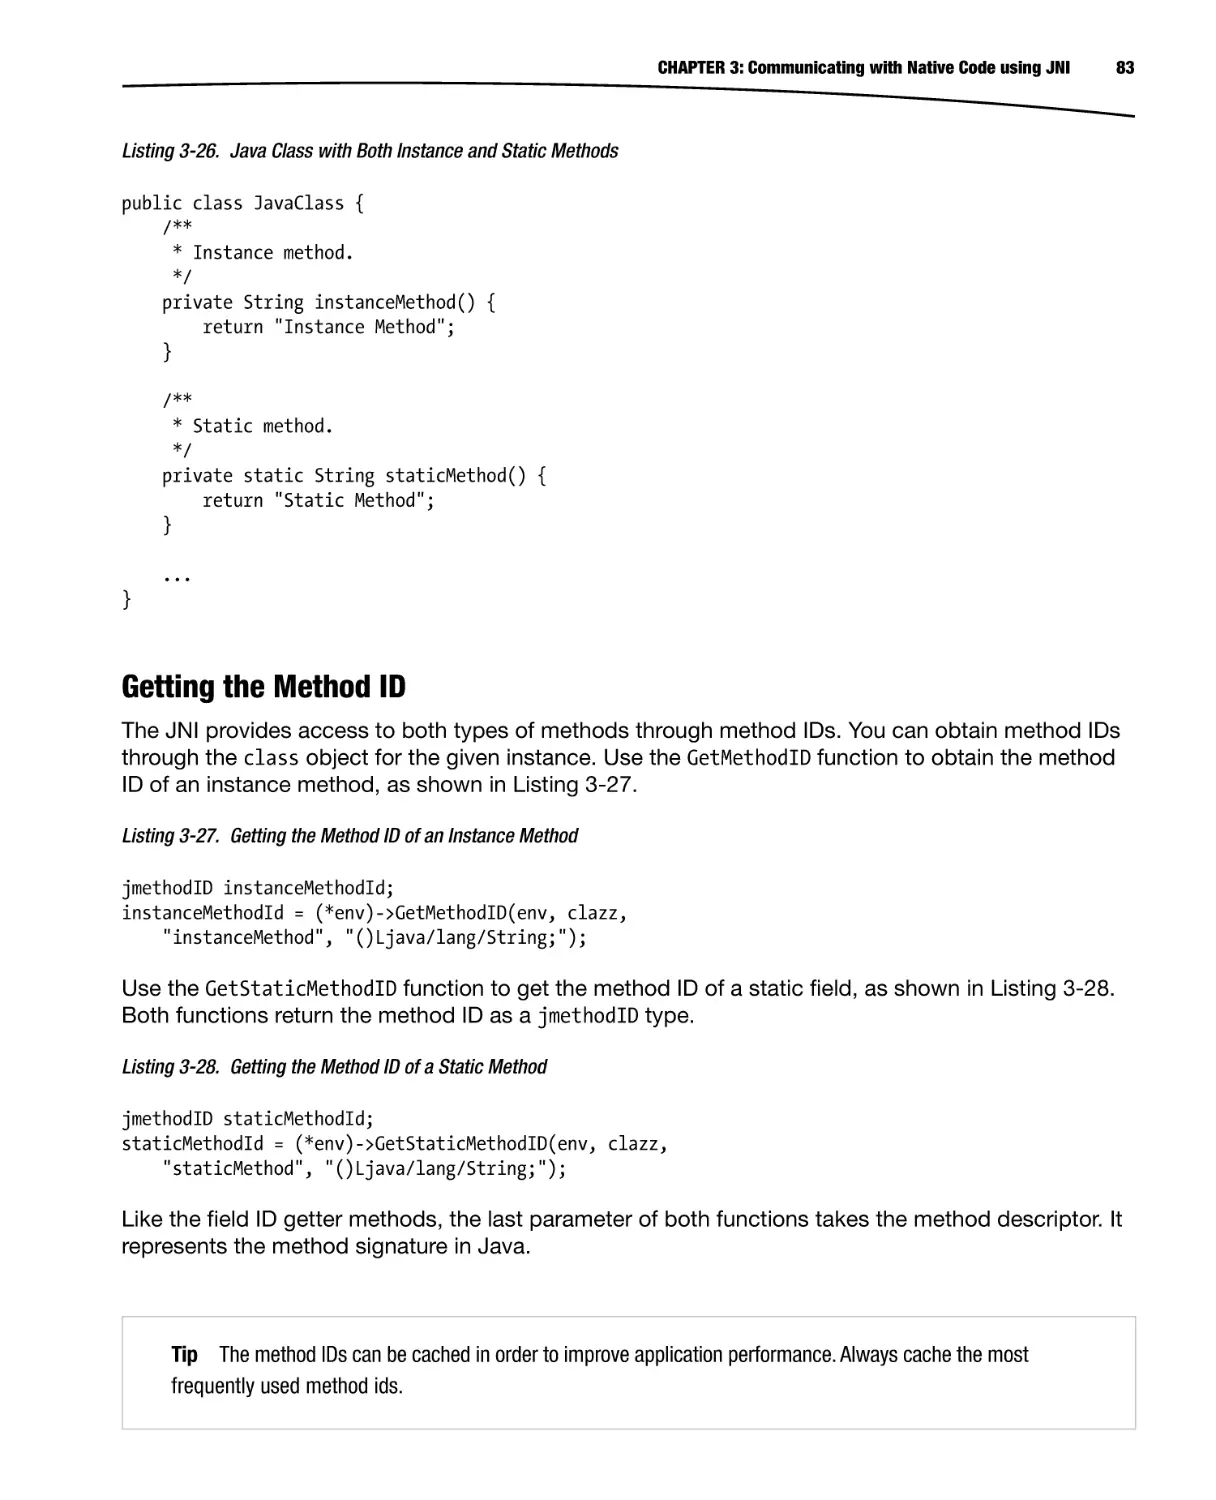
1.
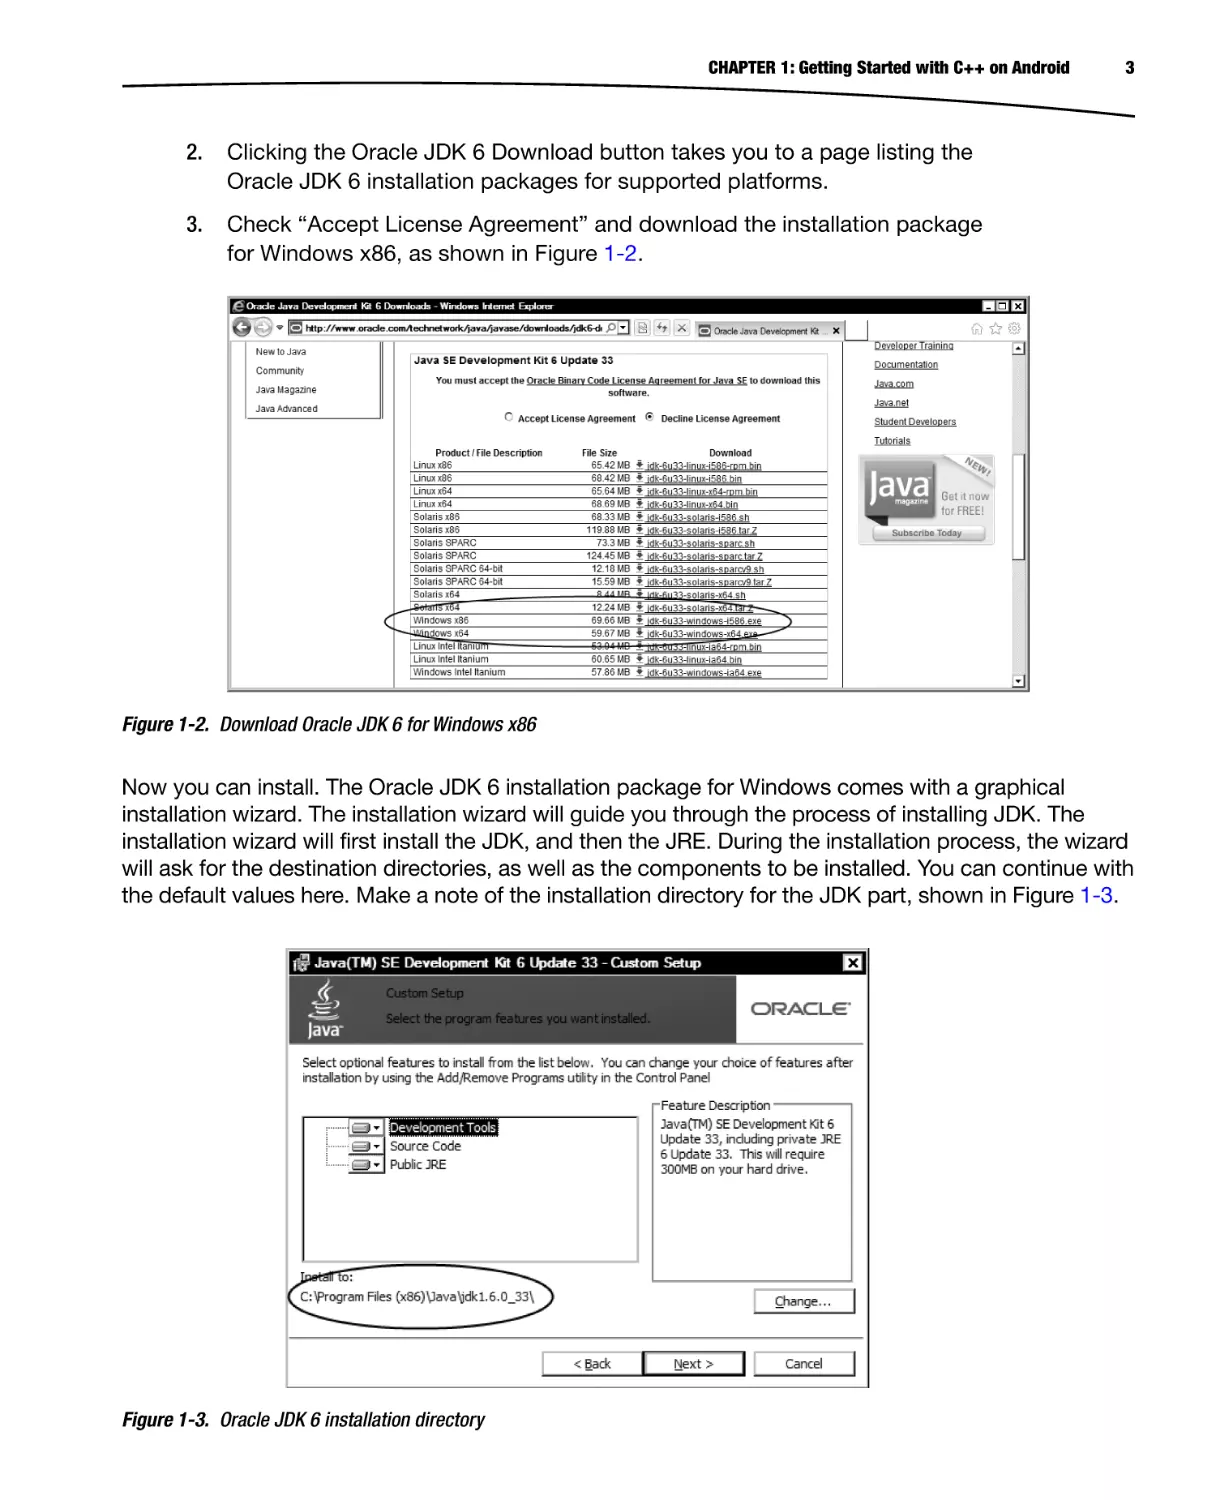
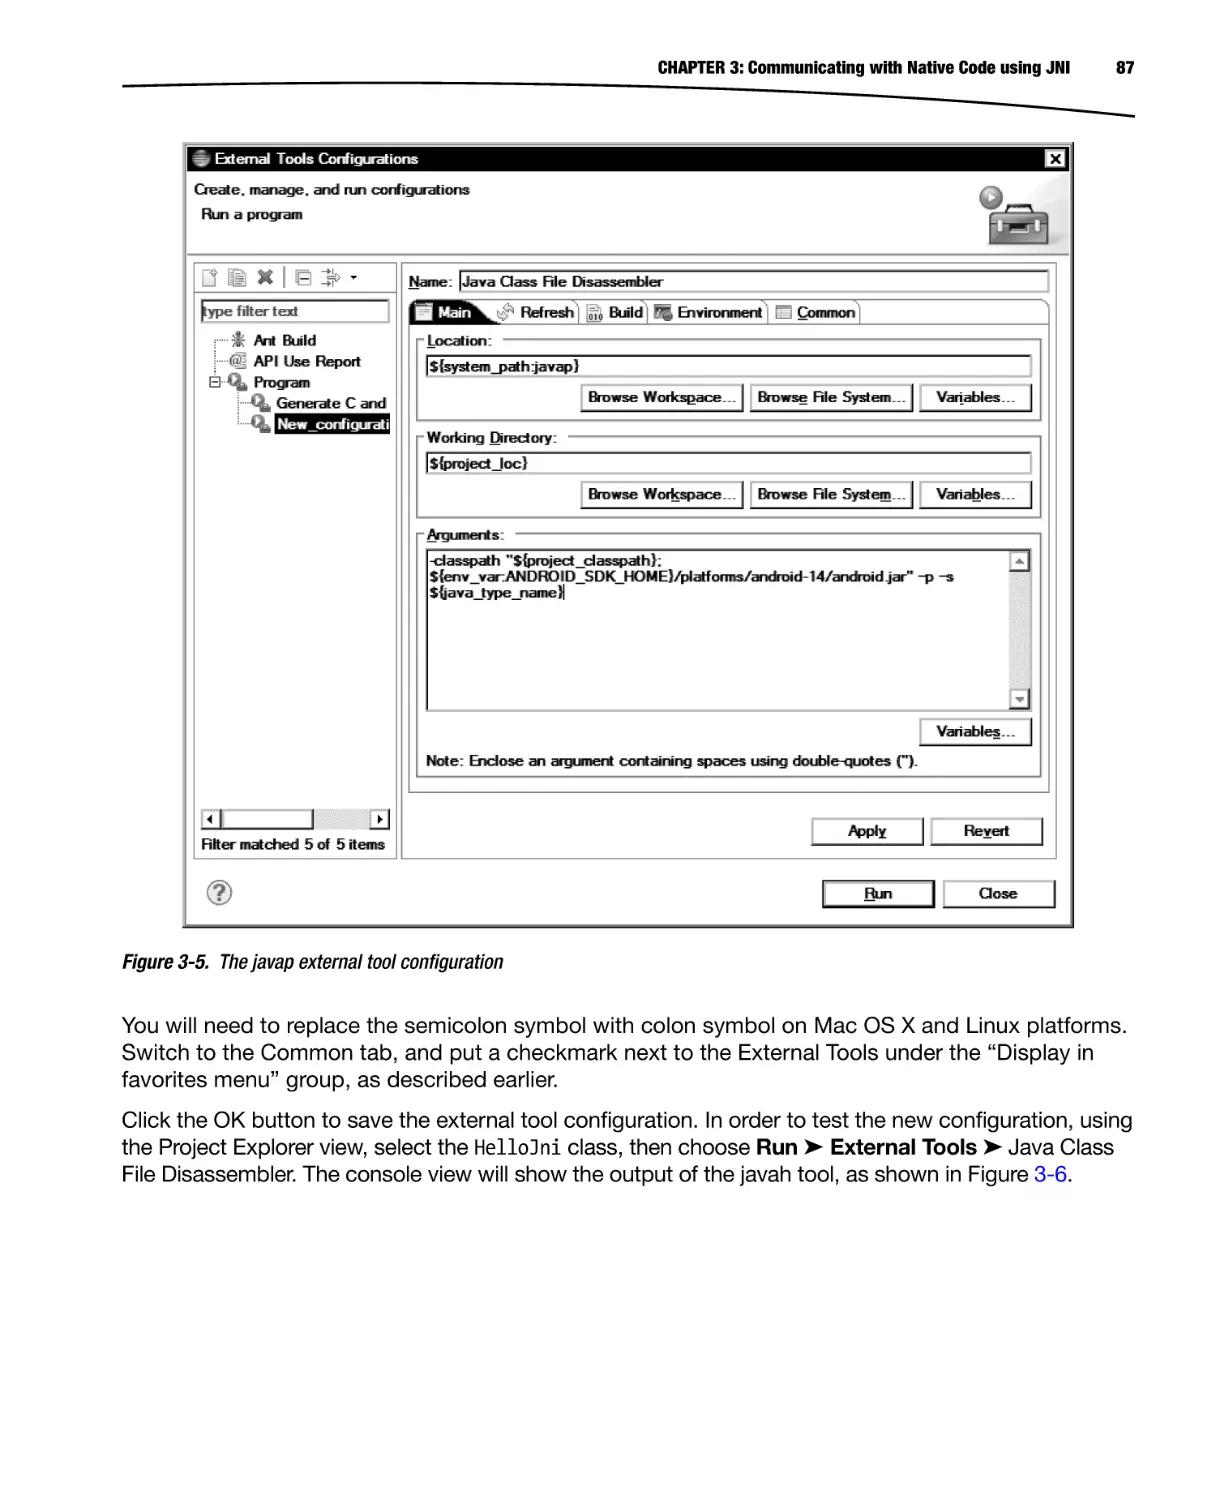
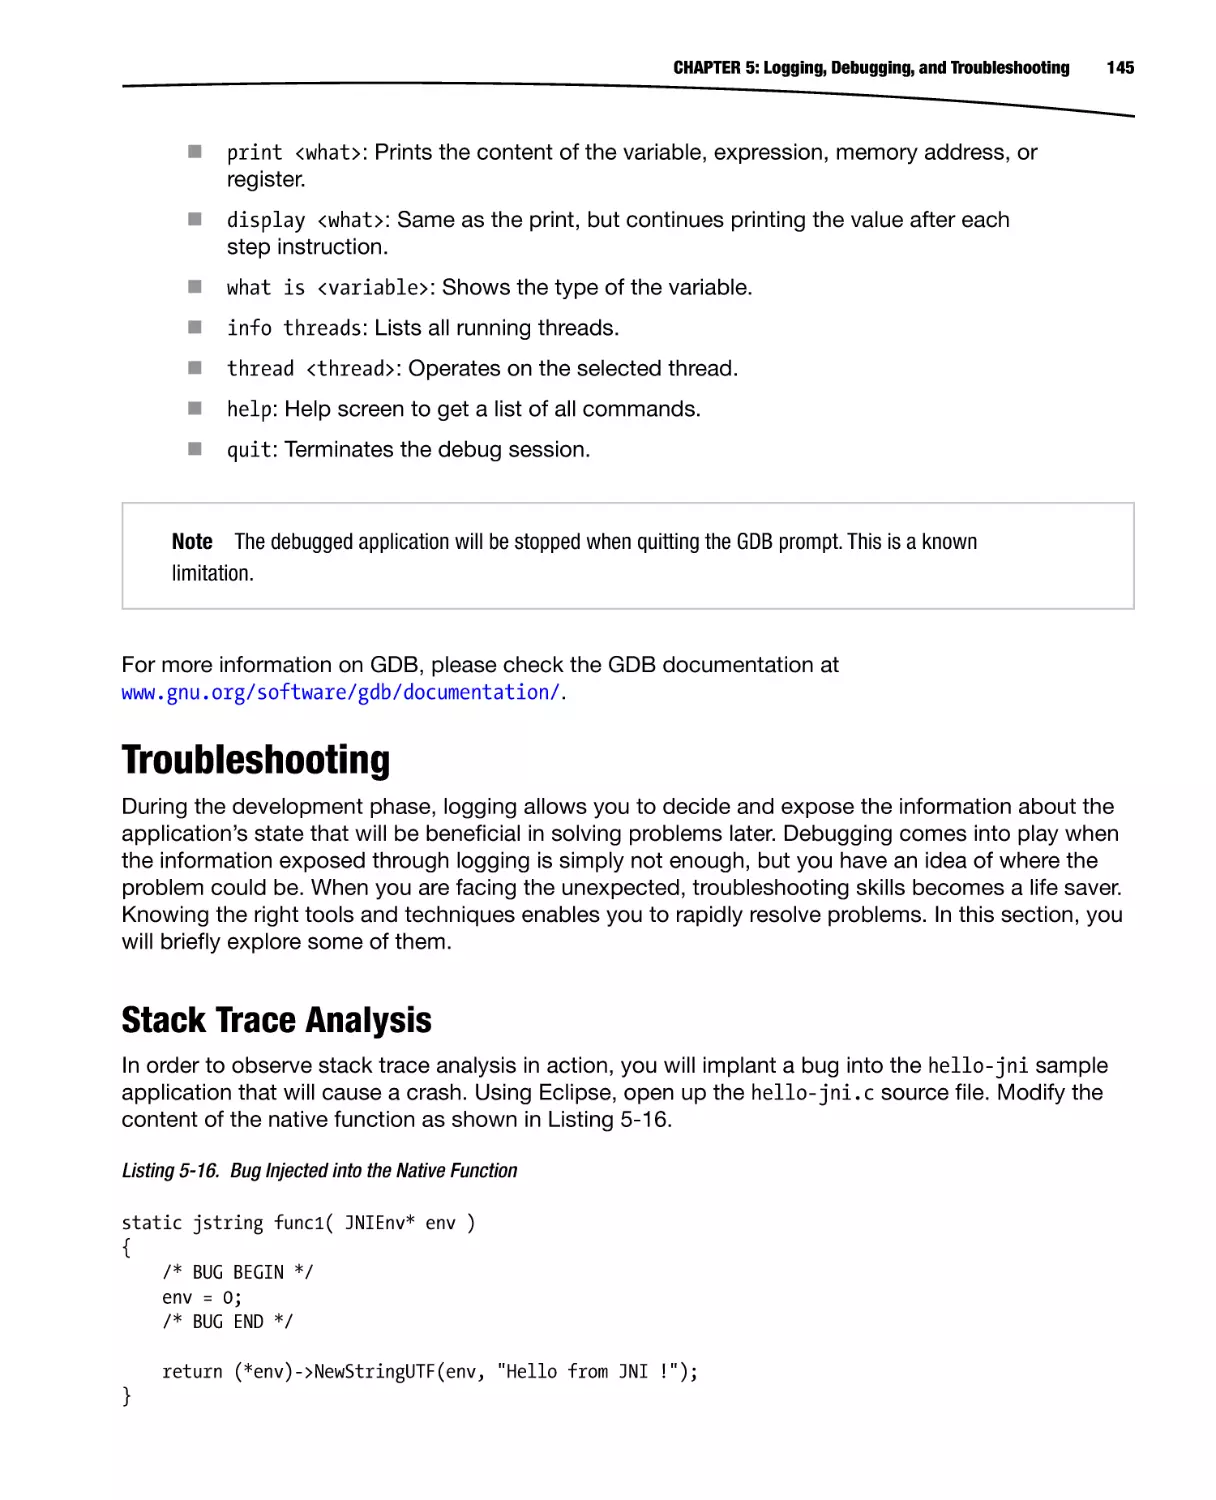
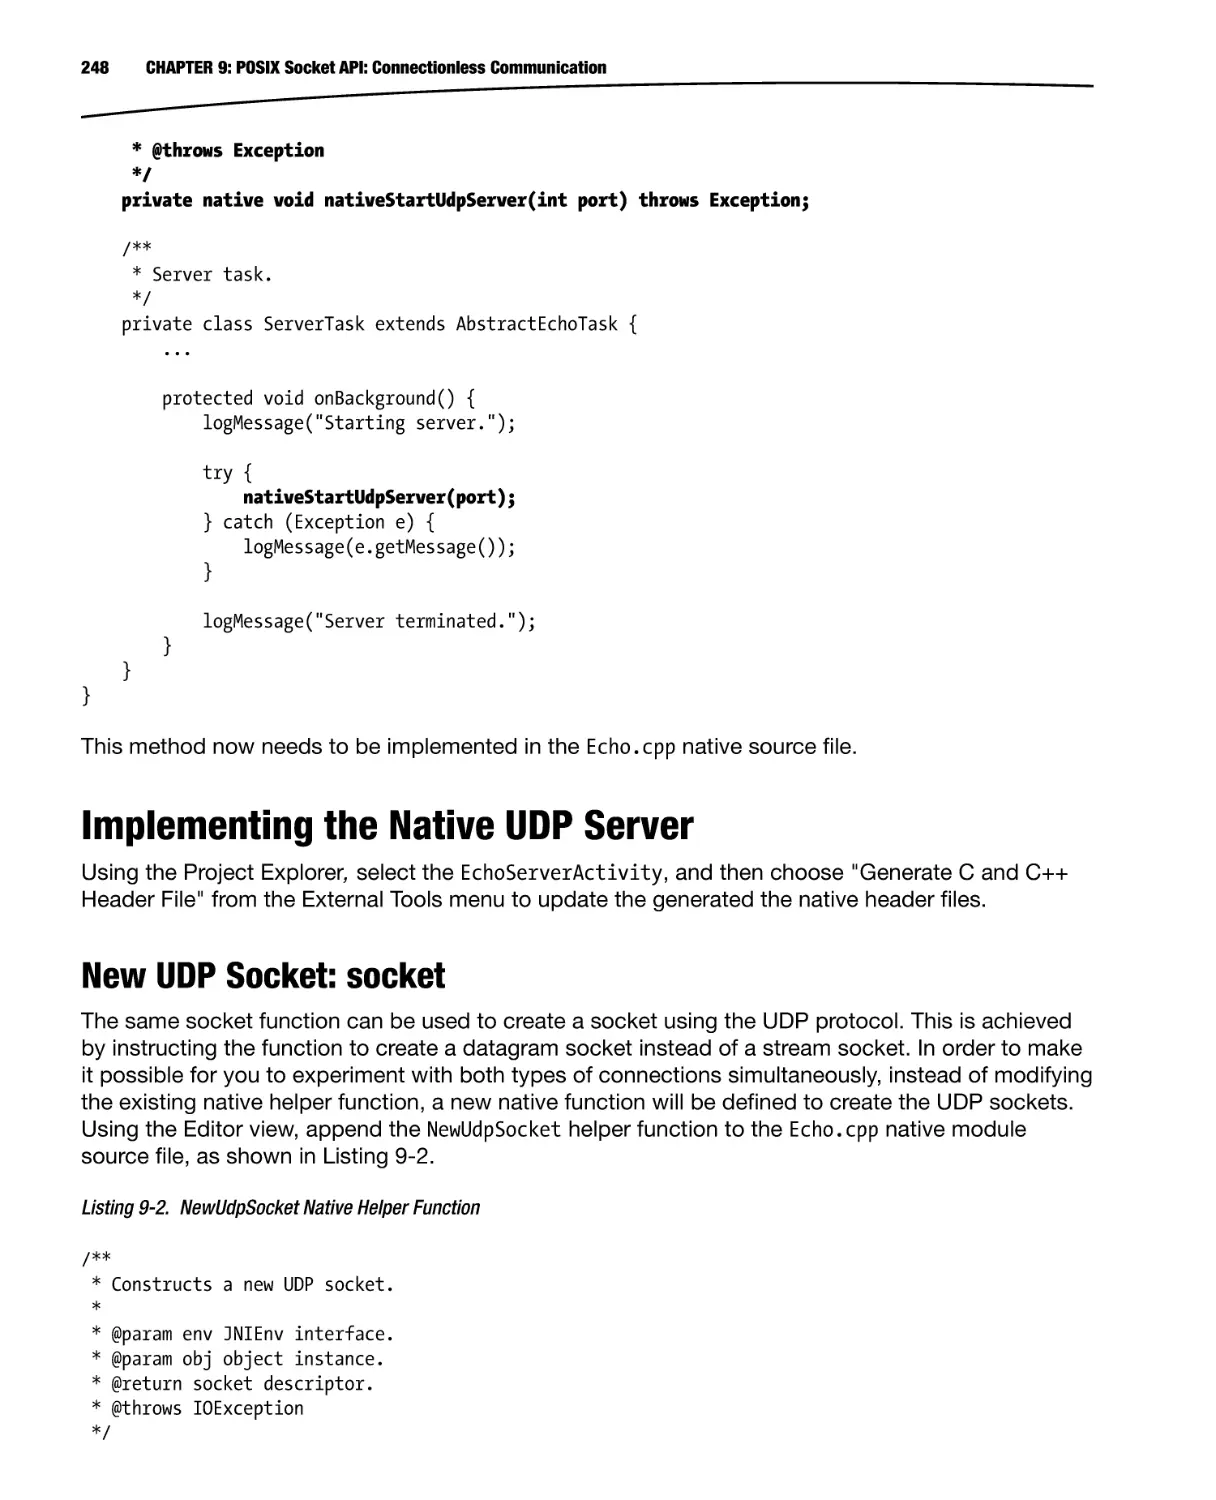
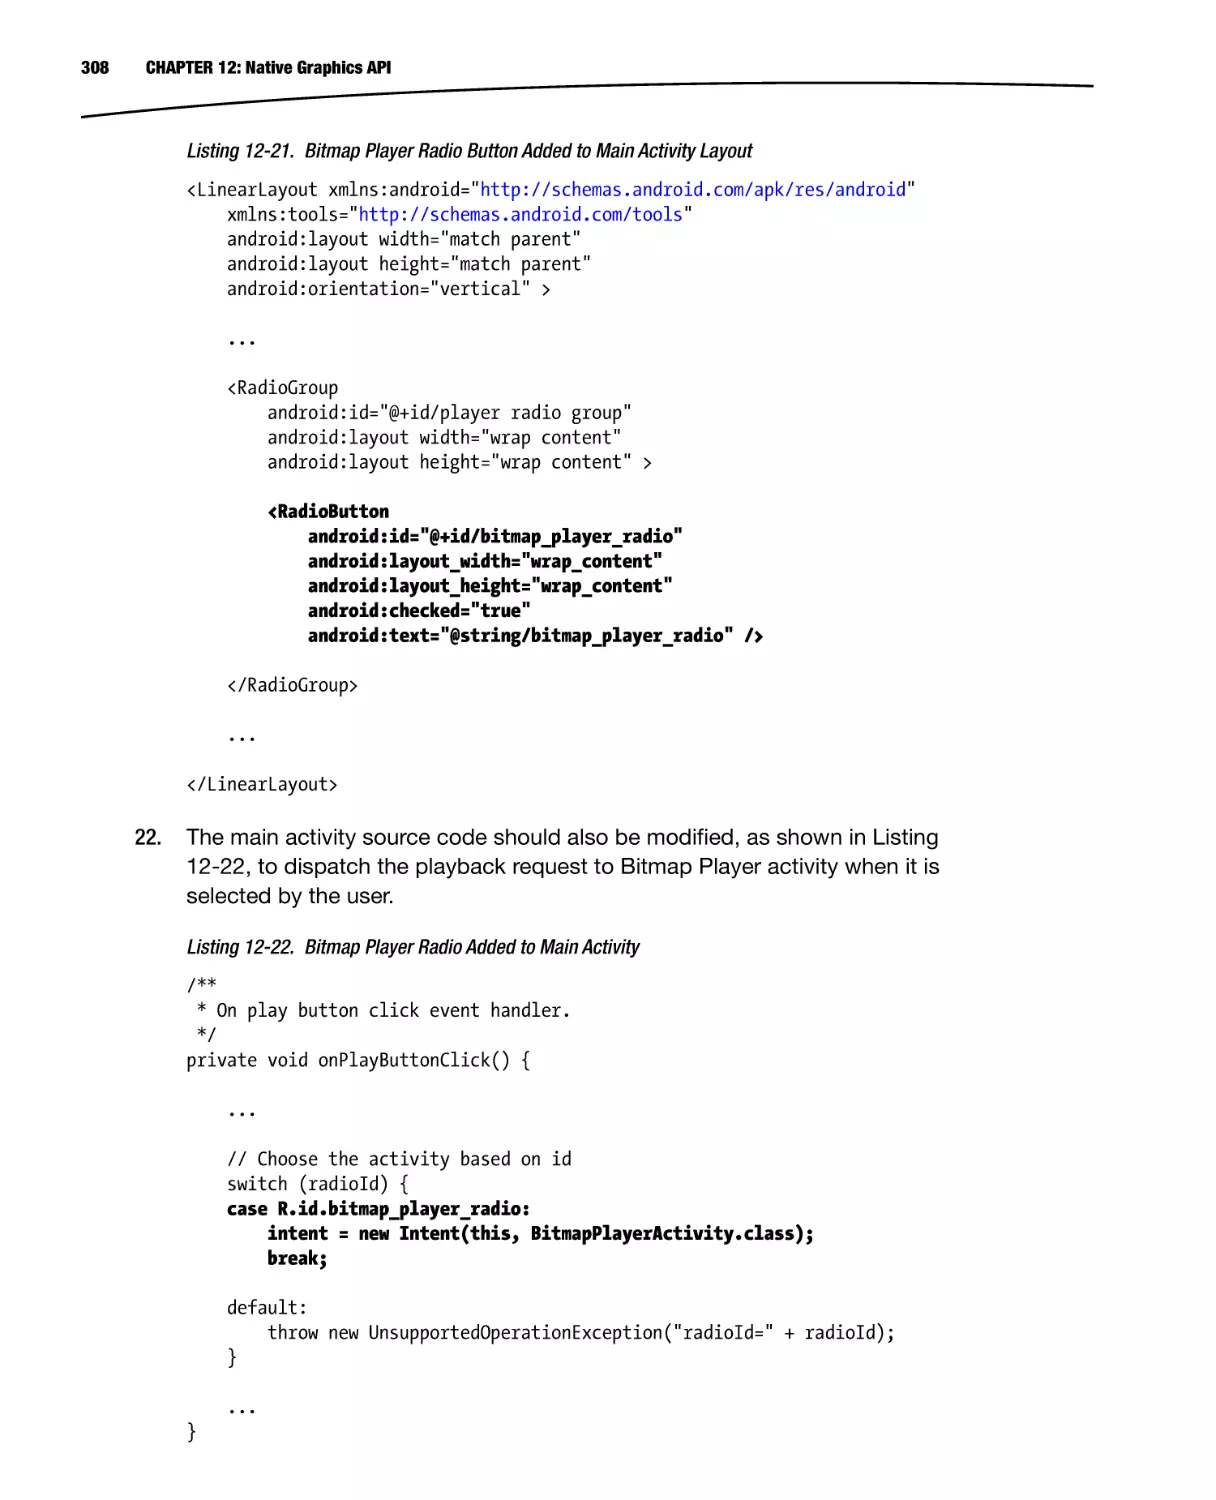
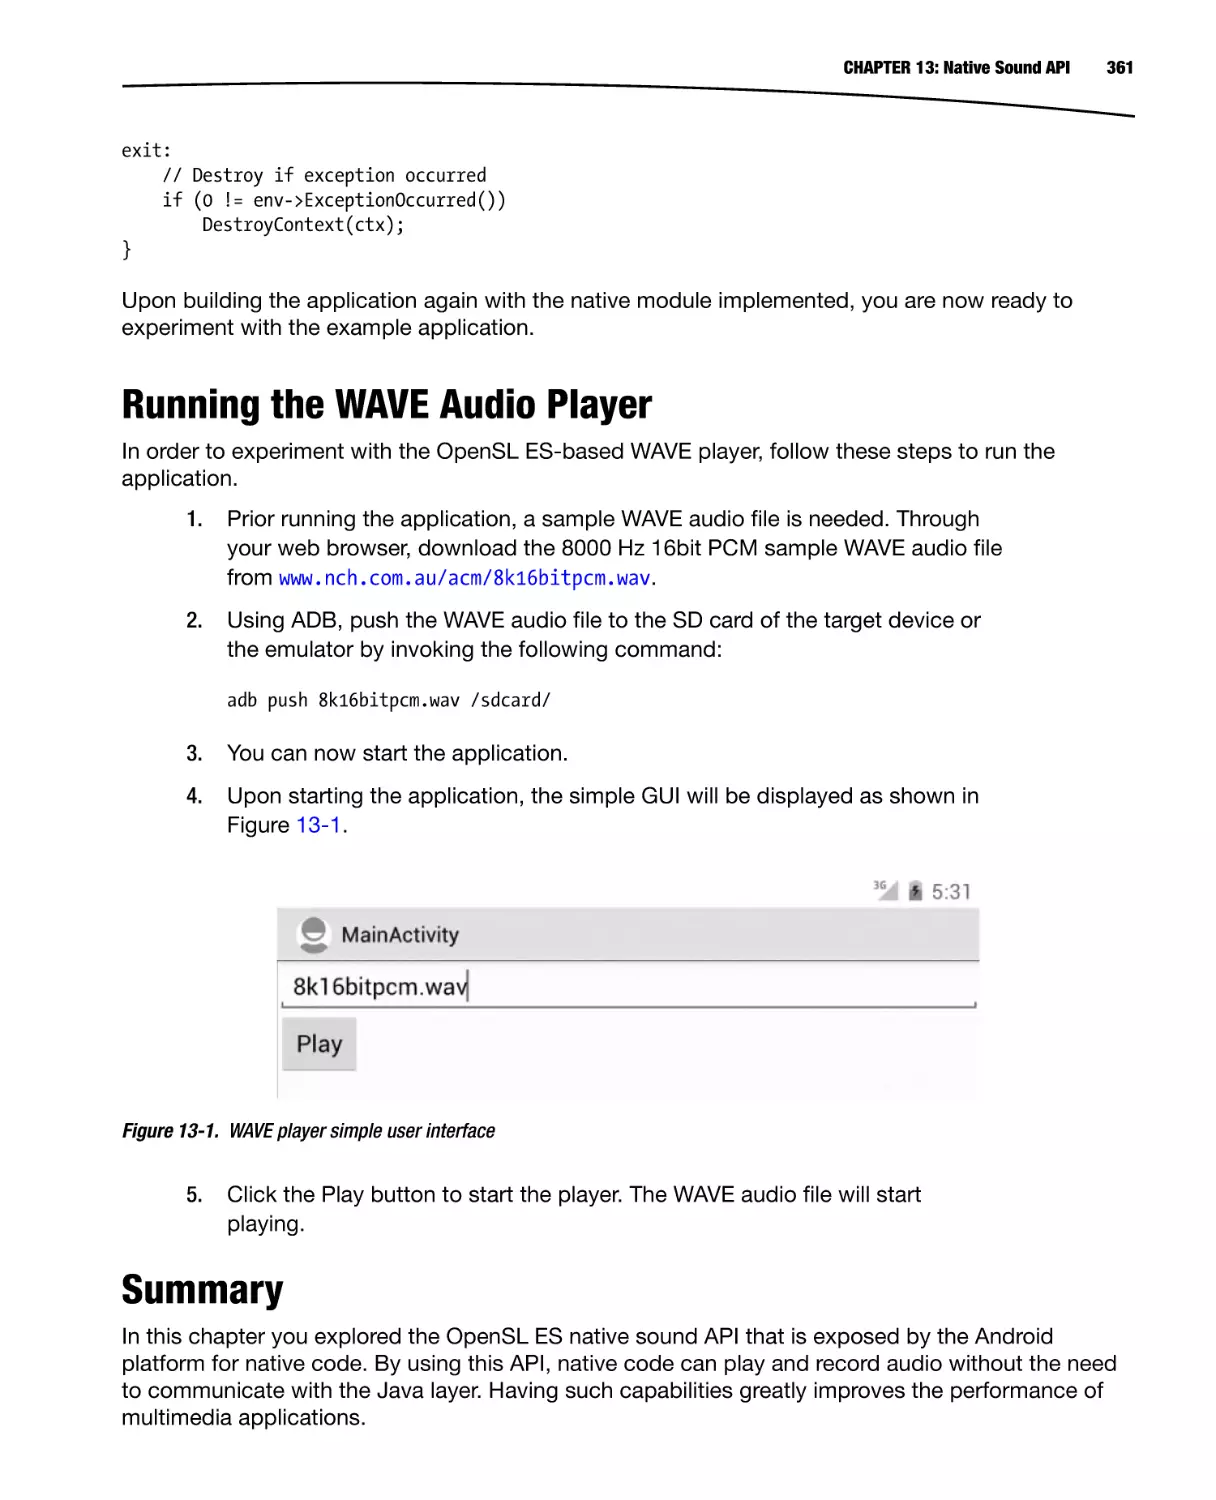
Click the JDK 6 download button, as shown in Figure 1-1. At the time of this
writing the latest version of Oracle JDK 6 is Update 33.
Figure 1-1. Oracle JDK 6 Download button
CHAPTER 1: Getting Started with C++ on Android
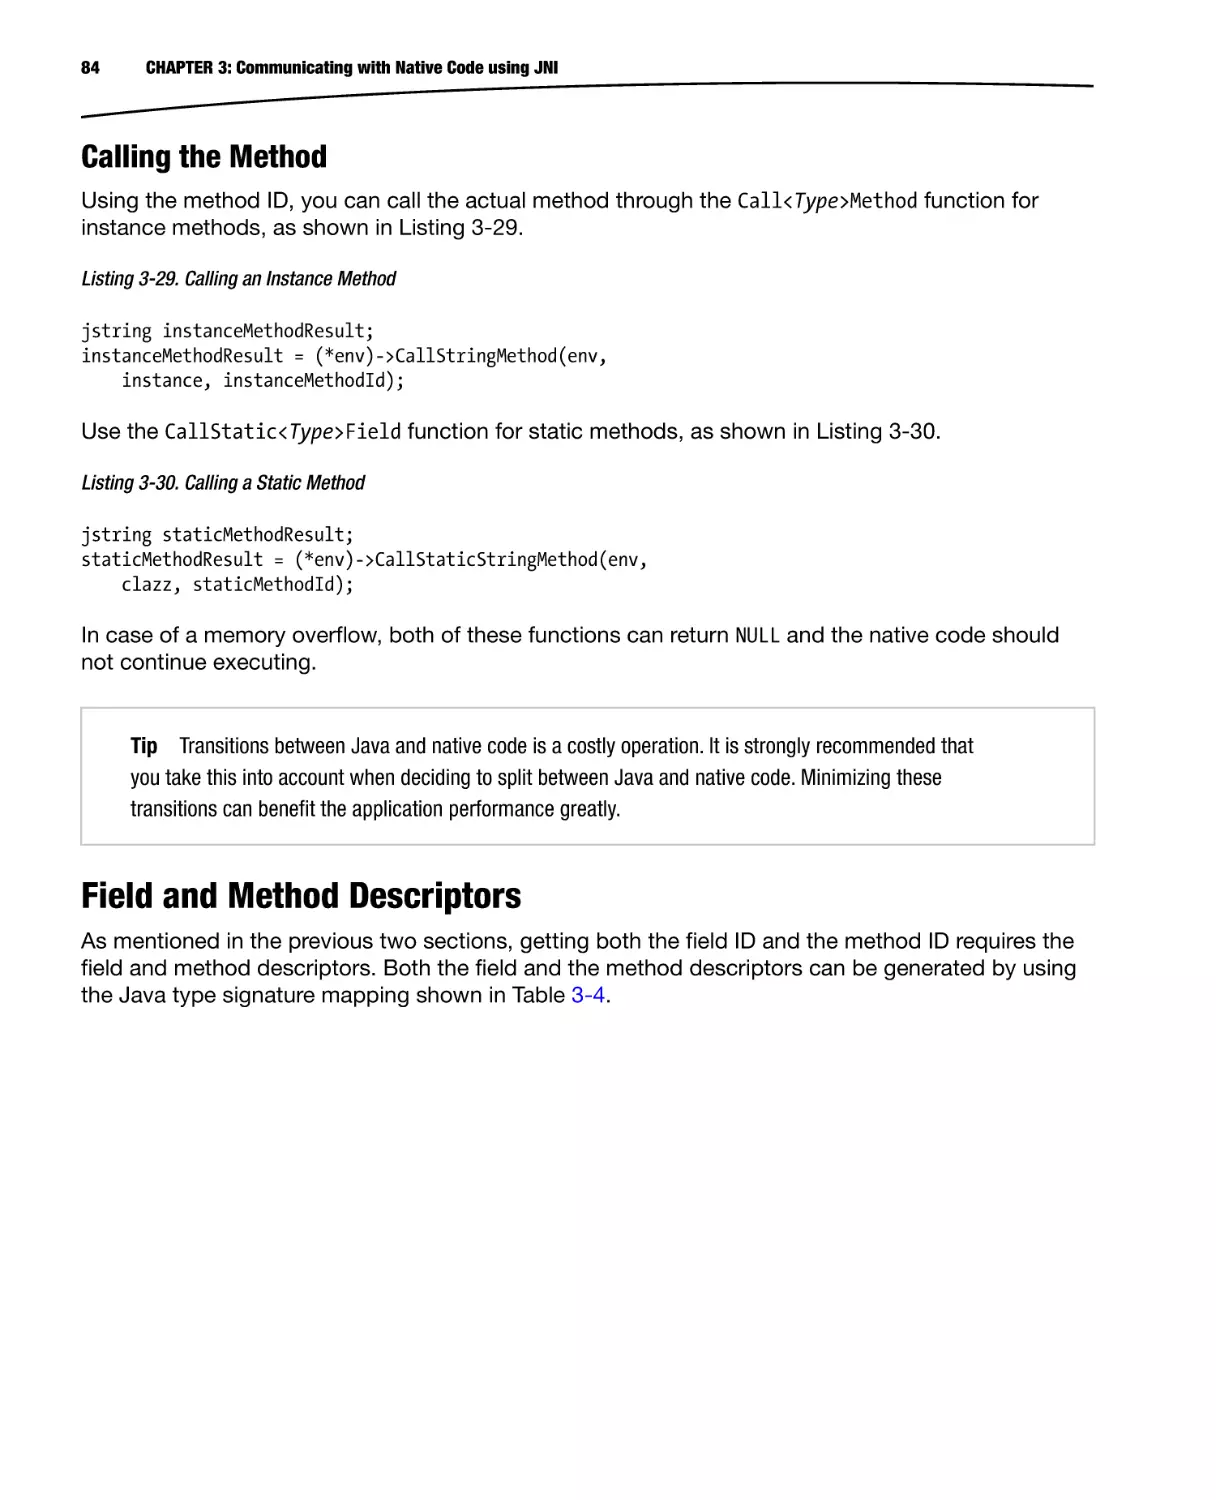
2.
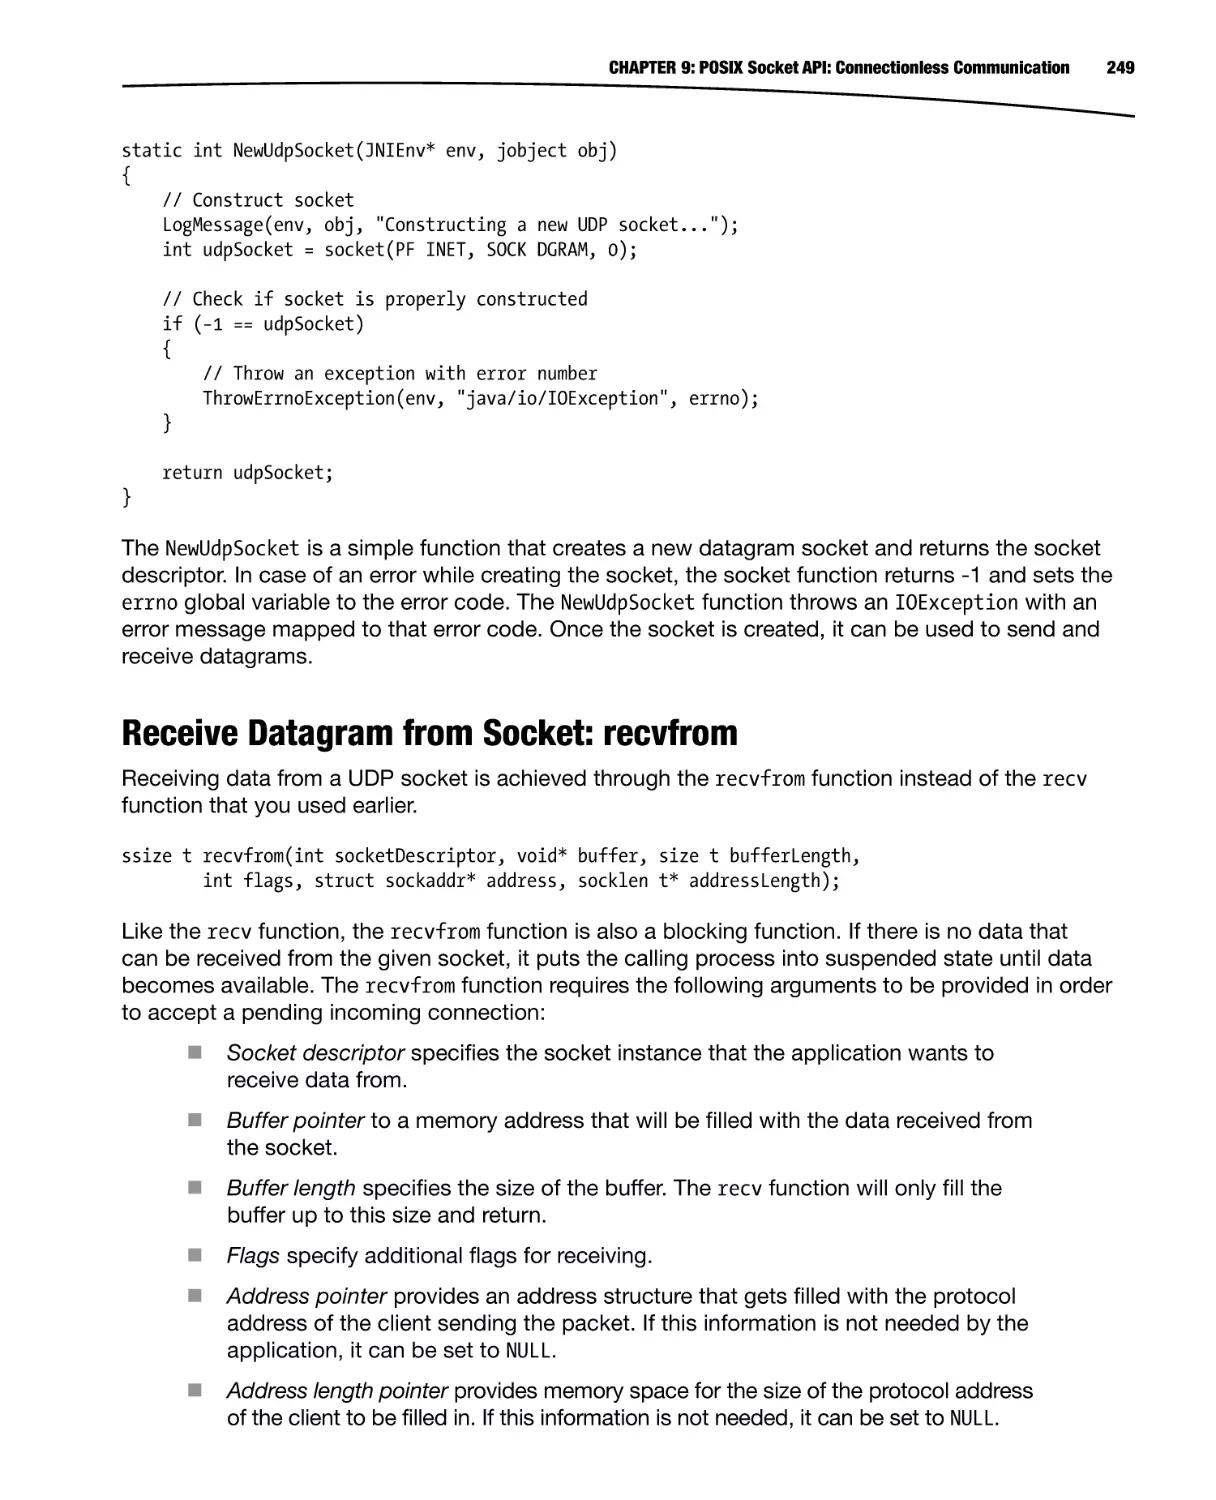
Clicking the Oracle JDK 6 Download button takes you to a page listing the
Oracle JDK 6 installation packages for supported platforms.
3.
Check “Accept License Agreement” and download the installation package
for Windows x86, as shown in Figure 1-2.
3
Figure 1-2. Download Oracle JDK 6 for Windows x86
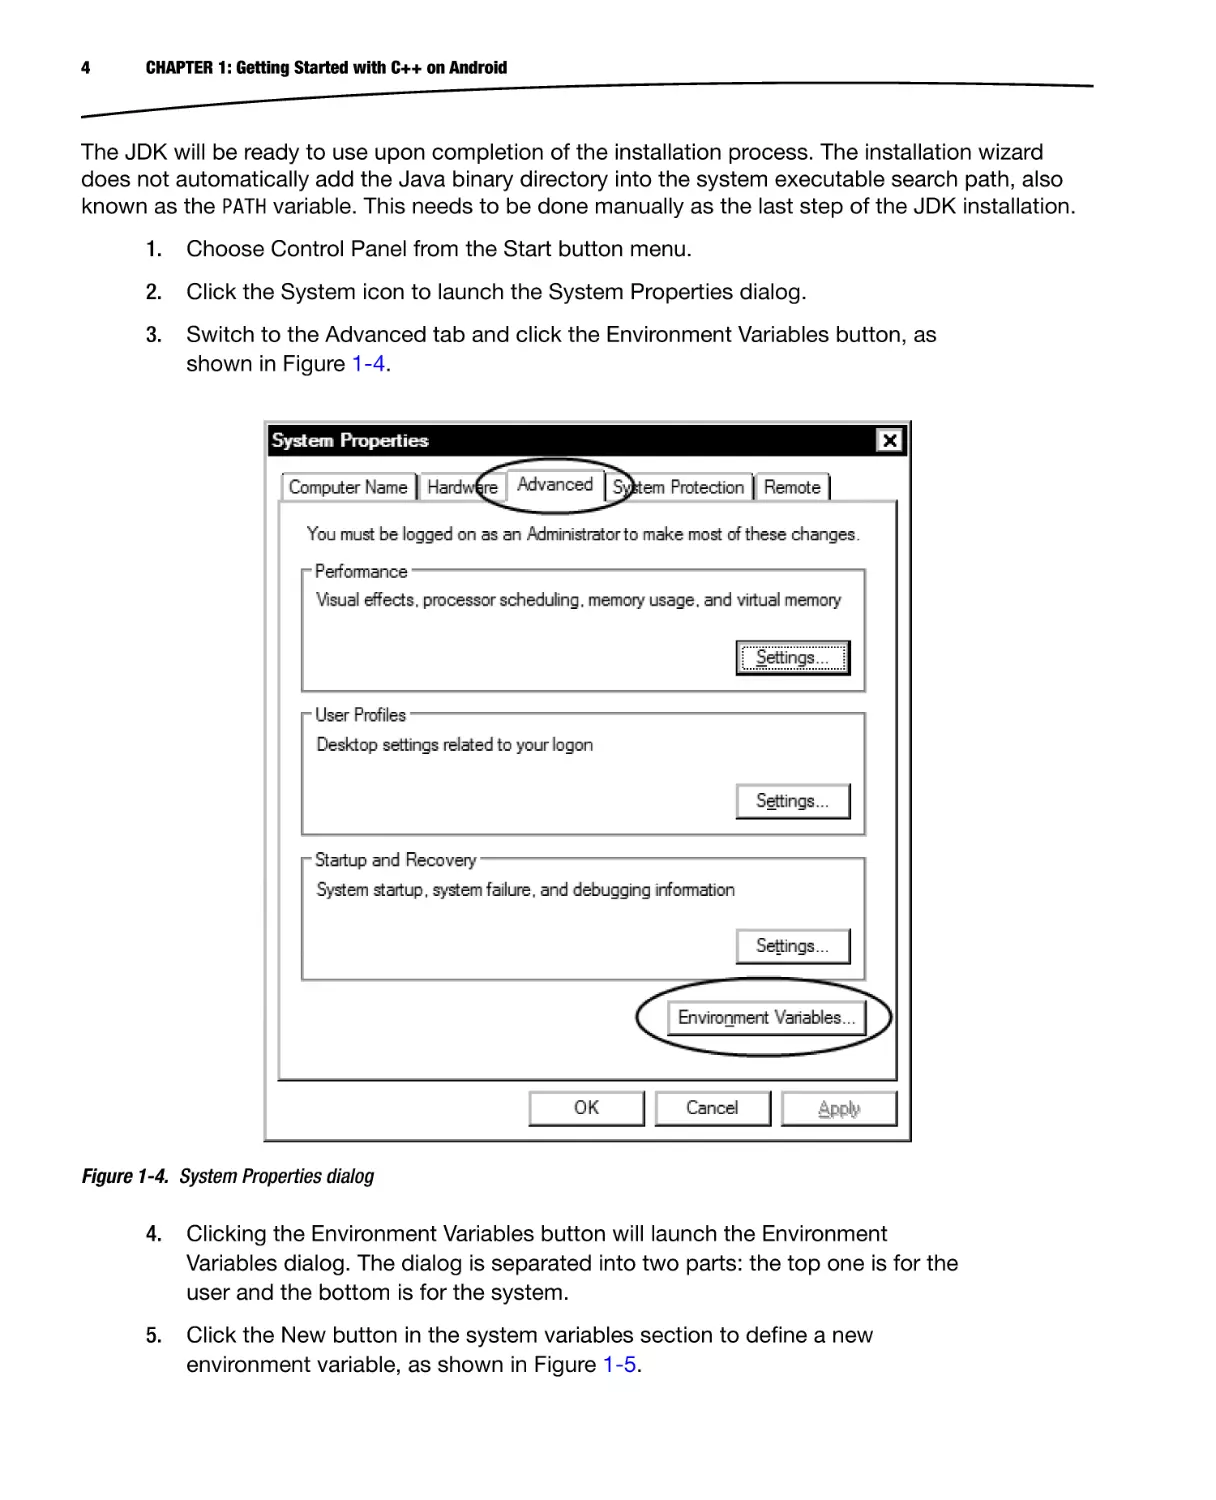
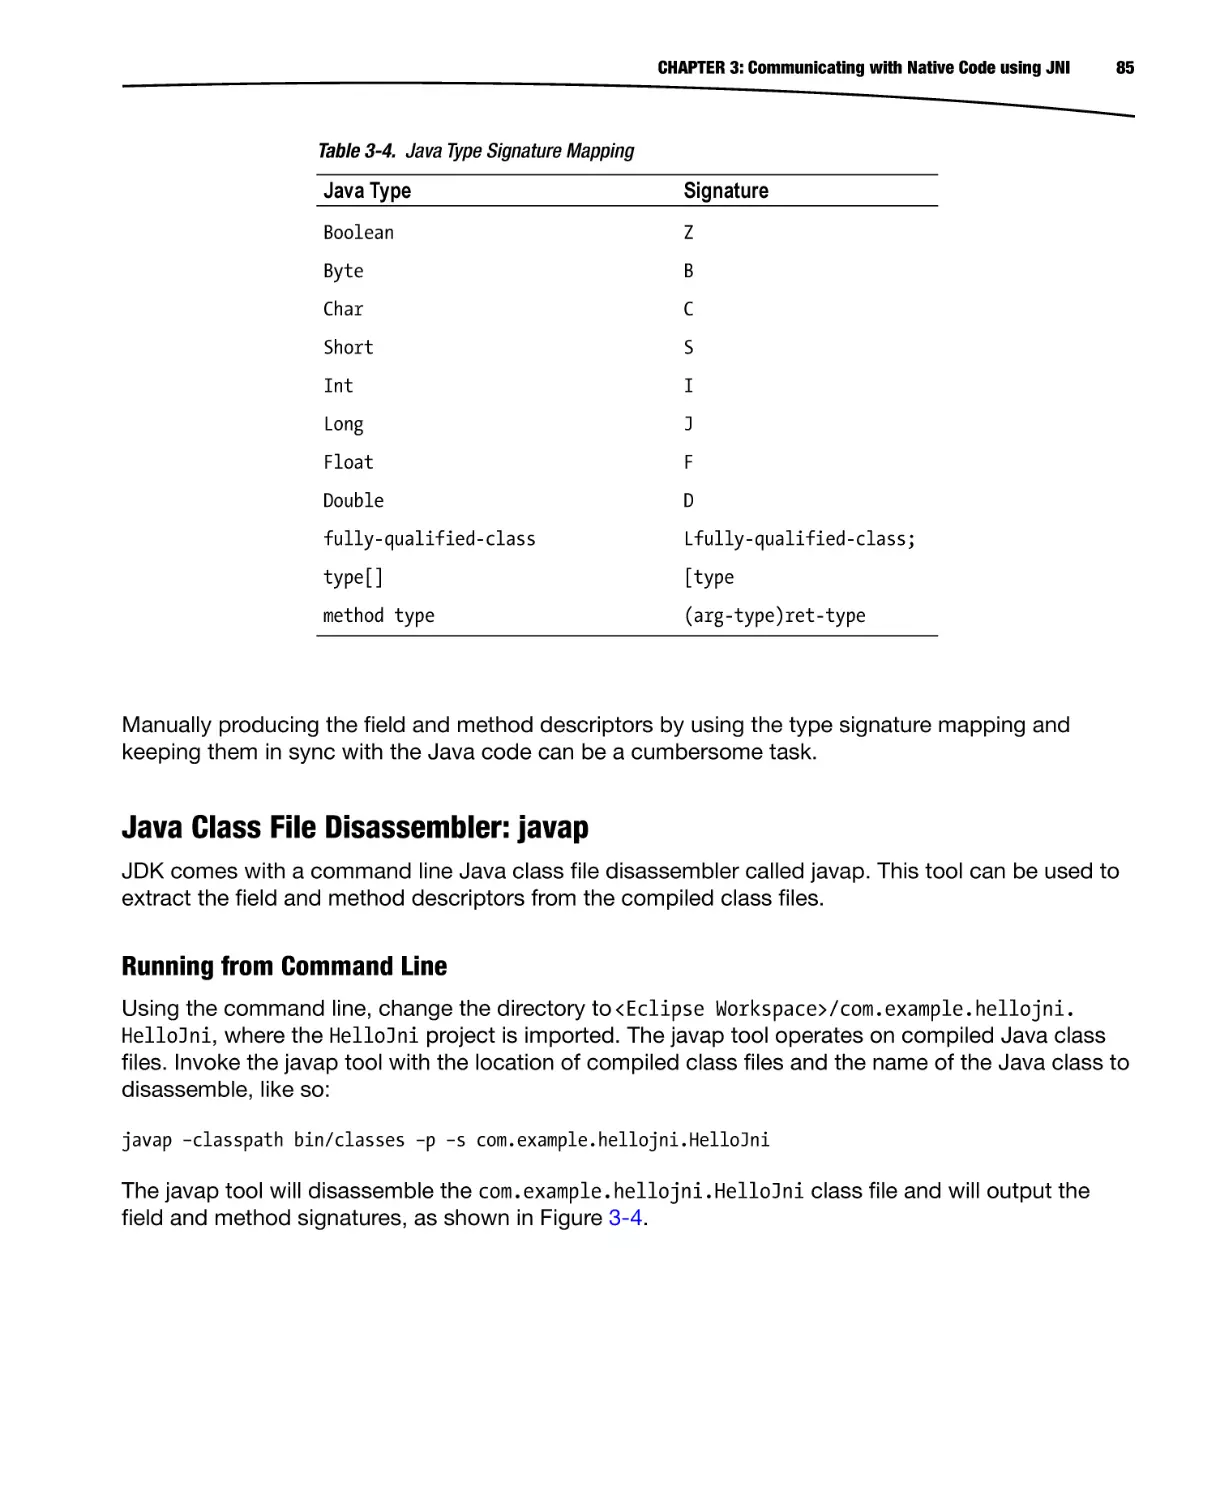
Now you can install. The Oracle JDK 6 installation package for Windows comes with a graphical
installation wizard. The installation wizard will guide you through the process of installing JDK. The
installation wizard will first install the JDK, and then the JRE. During the installation process, the wizard
will ask for the destination directories, as well as the components to be installed. You can continue with
the default values here. Make a note of the installation directory for the JDK part, shown in Figure 1-3.
Figure 1-3. Oracle JDK 6 installation directory
4
CHAPTER 1: Getting Started with C++ on Android
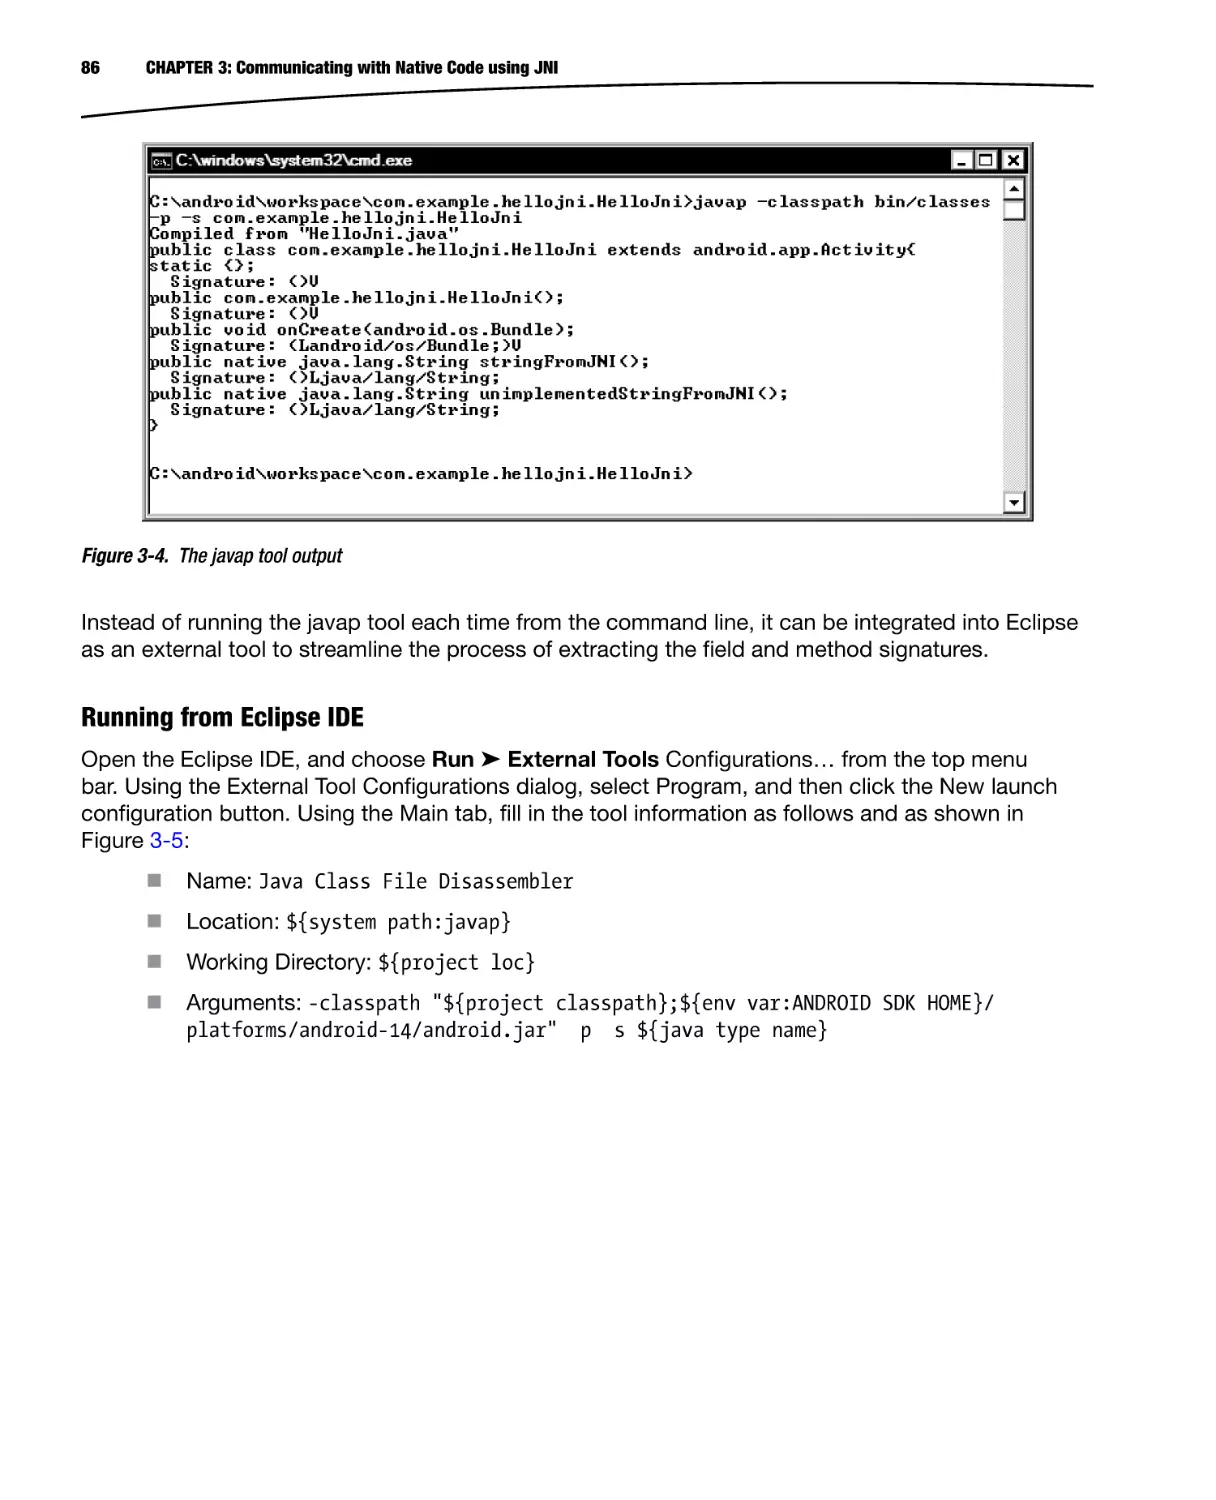
The JDK will be ready to use upon completion of the installation process. The installation wizard
does not automatically add the Java binary directory into the system executable search path, also
known as the PATH variable. This needs to be done manually as the last step of the JDK installation.
1.
Choose Control Panel from the Start button menu.
2.
Click the System icon to launch the System Properties dialog.
3.
Switch to the Advanced tab and click the Environment Variables button, as
shown in Figure 1-4.
Figure 1-4. System Properties dialog
4.
Clicking the Environment Variables button will launch the Environment
Variables dialog. The dialog is separated into two parts: the top one is for the
user and the bottom is for the system.
5.
Click the New button in the system variables section to define a new
environment variable, as shown in Figure 1-5.
CHAPTER 1: Getting Started with C++ on Android
Figure 1-5. Environment Variables dialog
6.
Set the variable name to JAVA HOME and the variable value to the Oracle JDK
installation directory that you noted during the Oracle JDK installation, as
shown in Figure 1-6.
Figure 1-6. New JAVA_HOME environment variable
7.
Click OK button to save the environment variable.
5
6
CHAPTER 1: Getting Started with C++ on Android
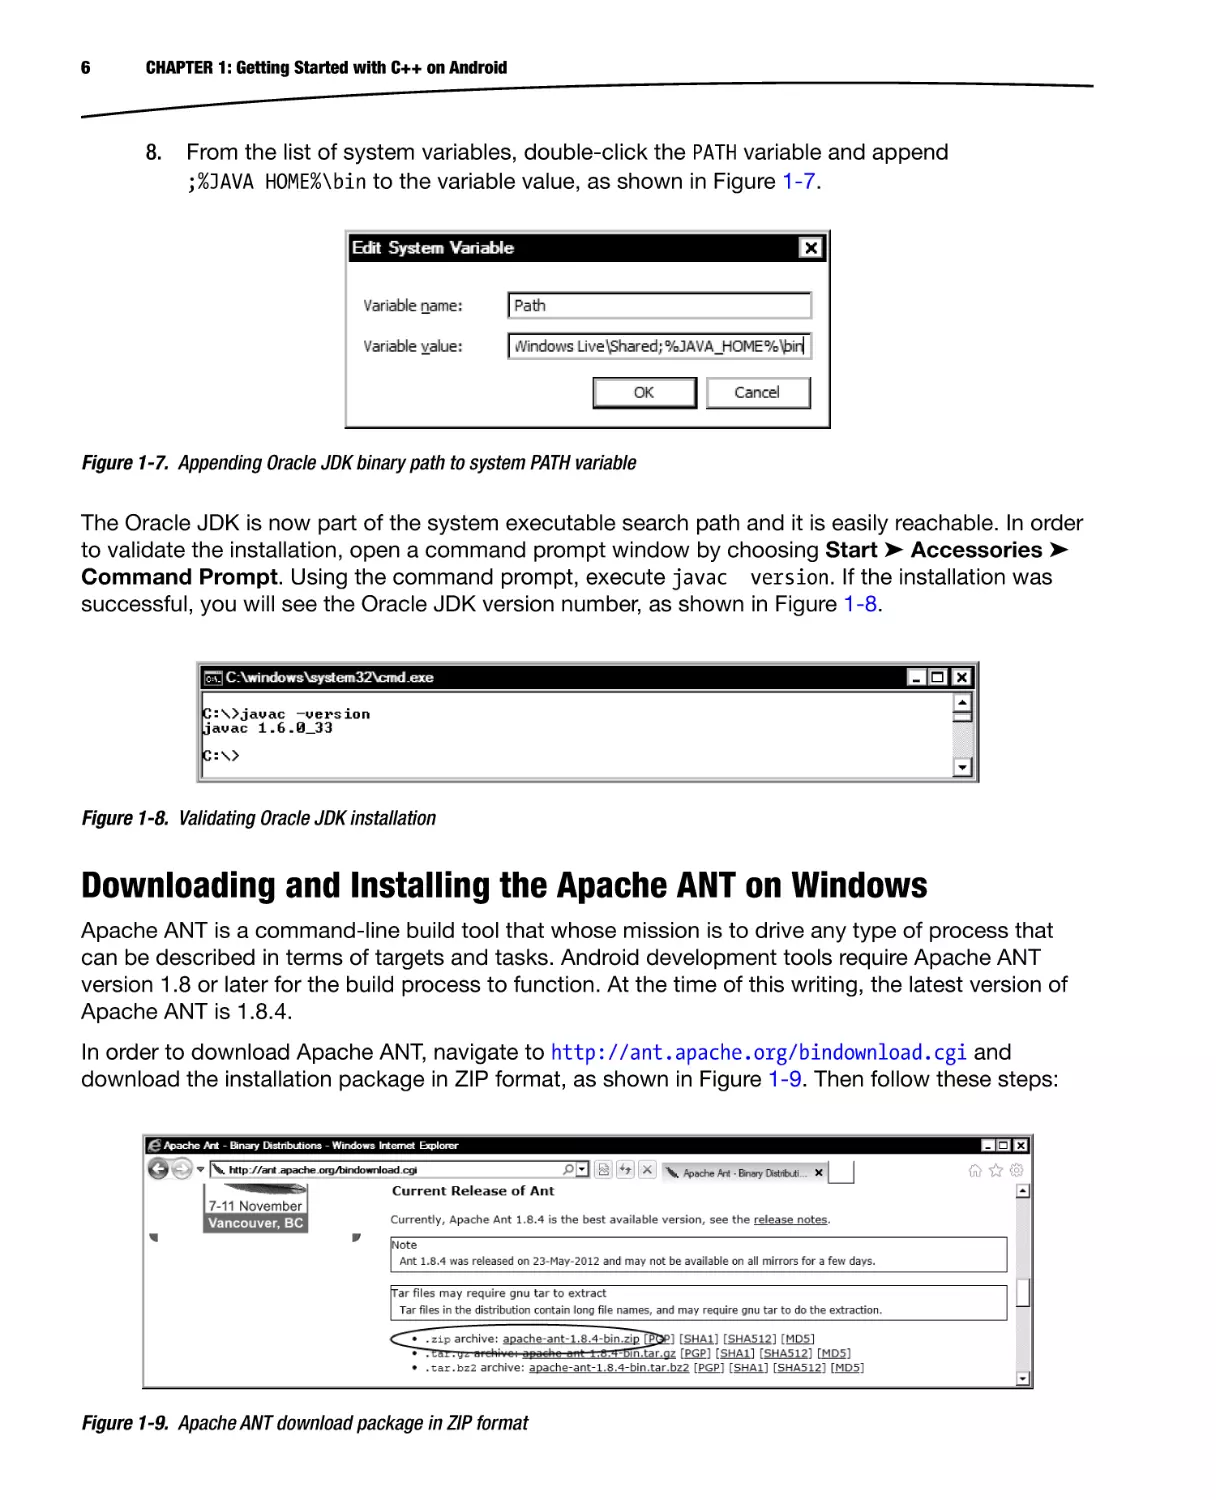
8.
From the list of system variables, double-click the PATH variable and append
;%JAVA HOME%\bin to the variable value, as shown in Figure 1-7.
Figure 1-7. Appending Oracle JDK binary path to system PATH variable
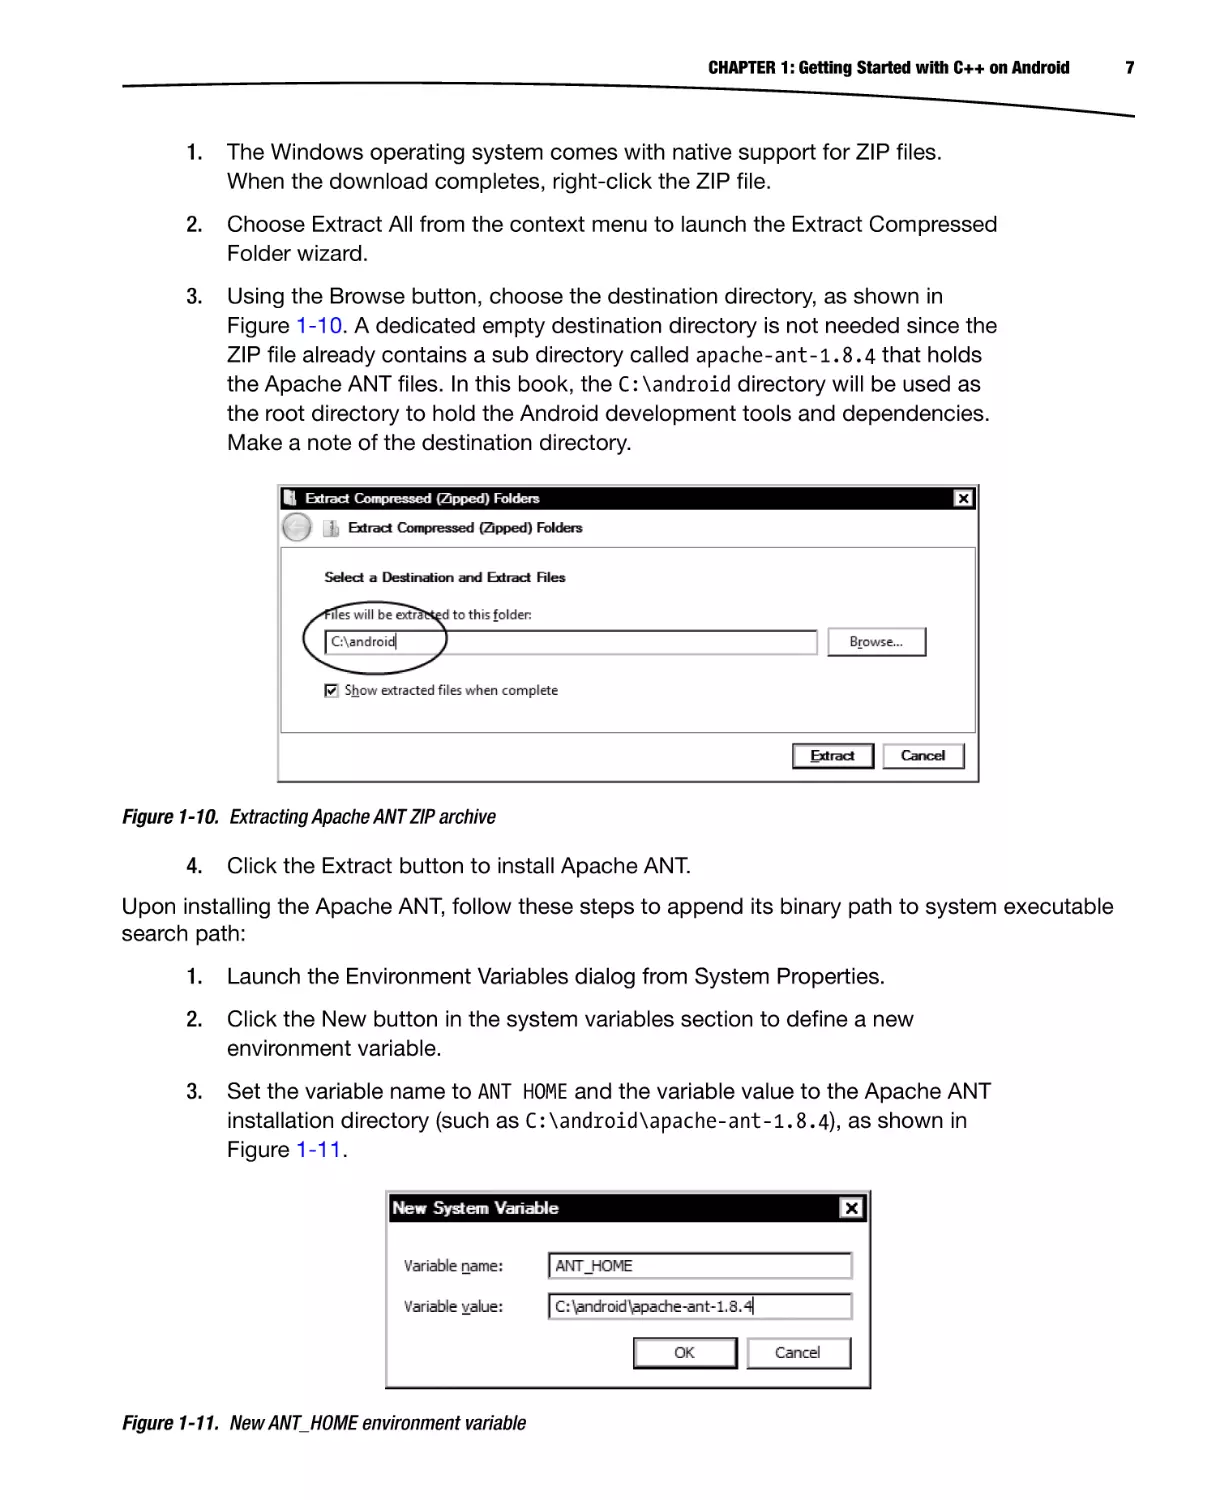
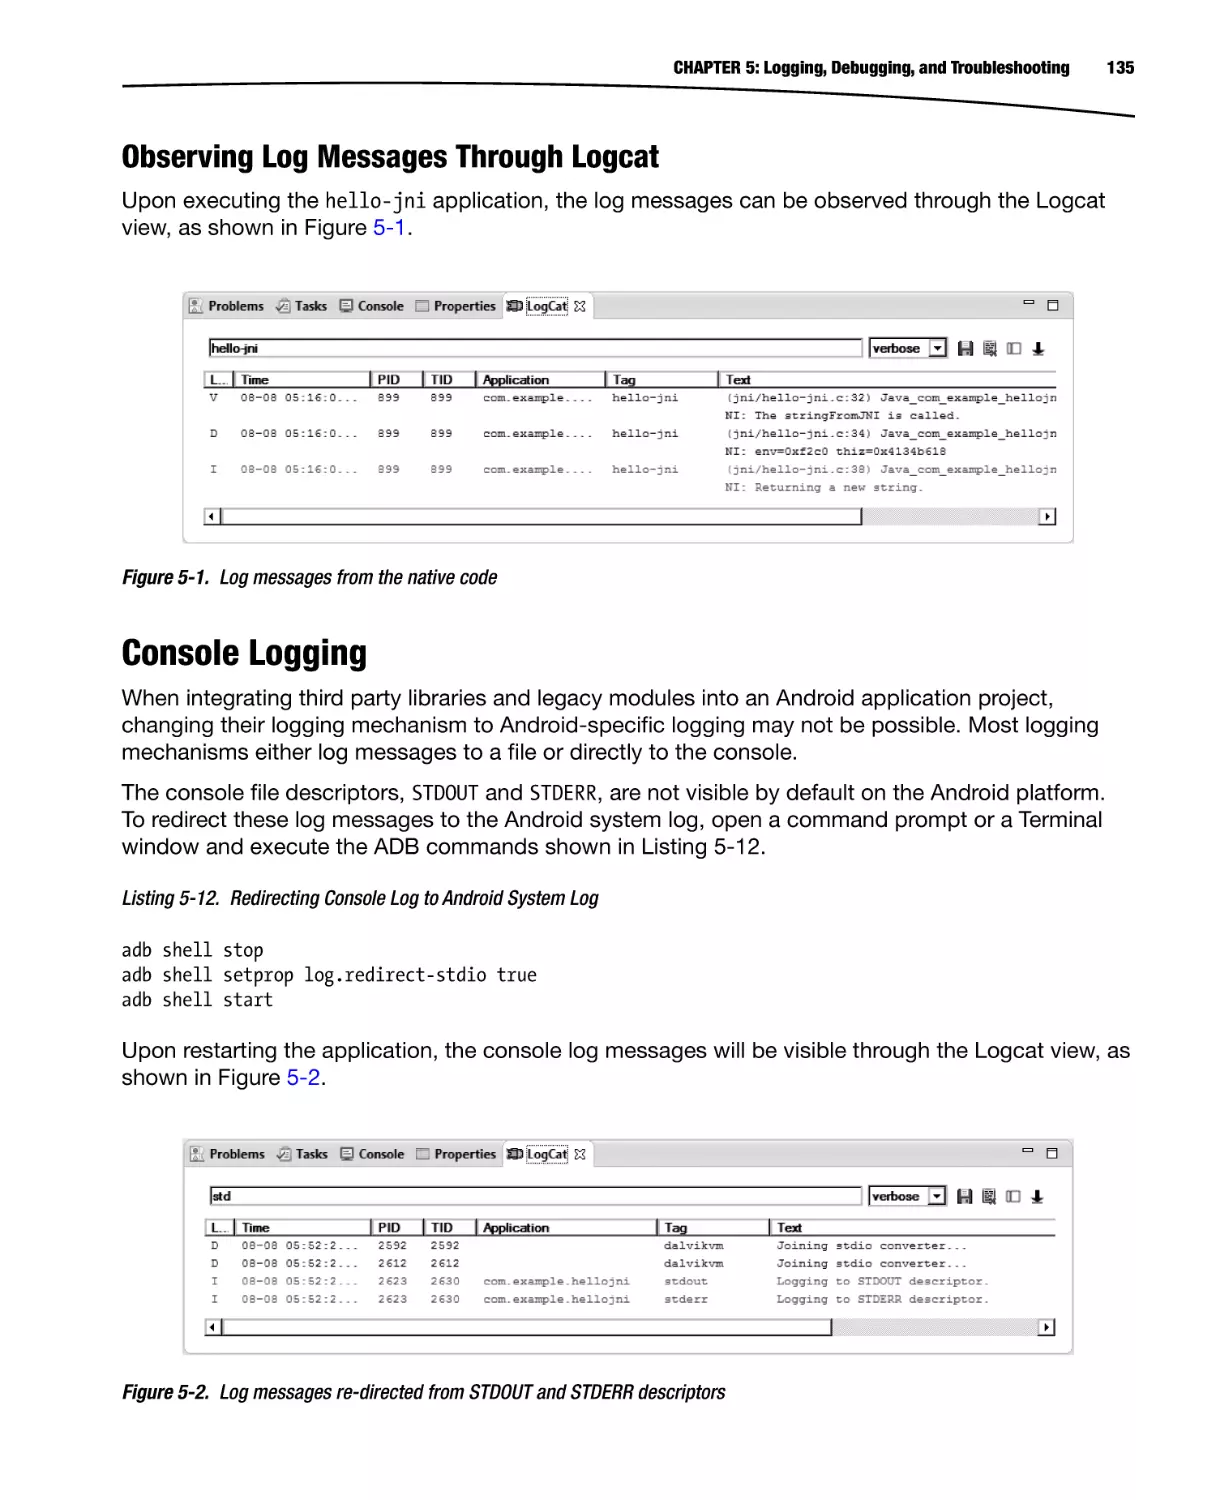
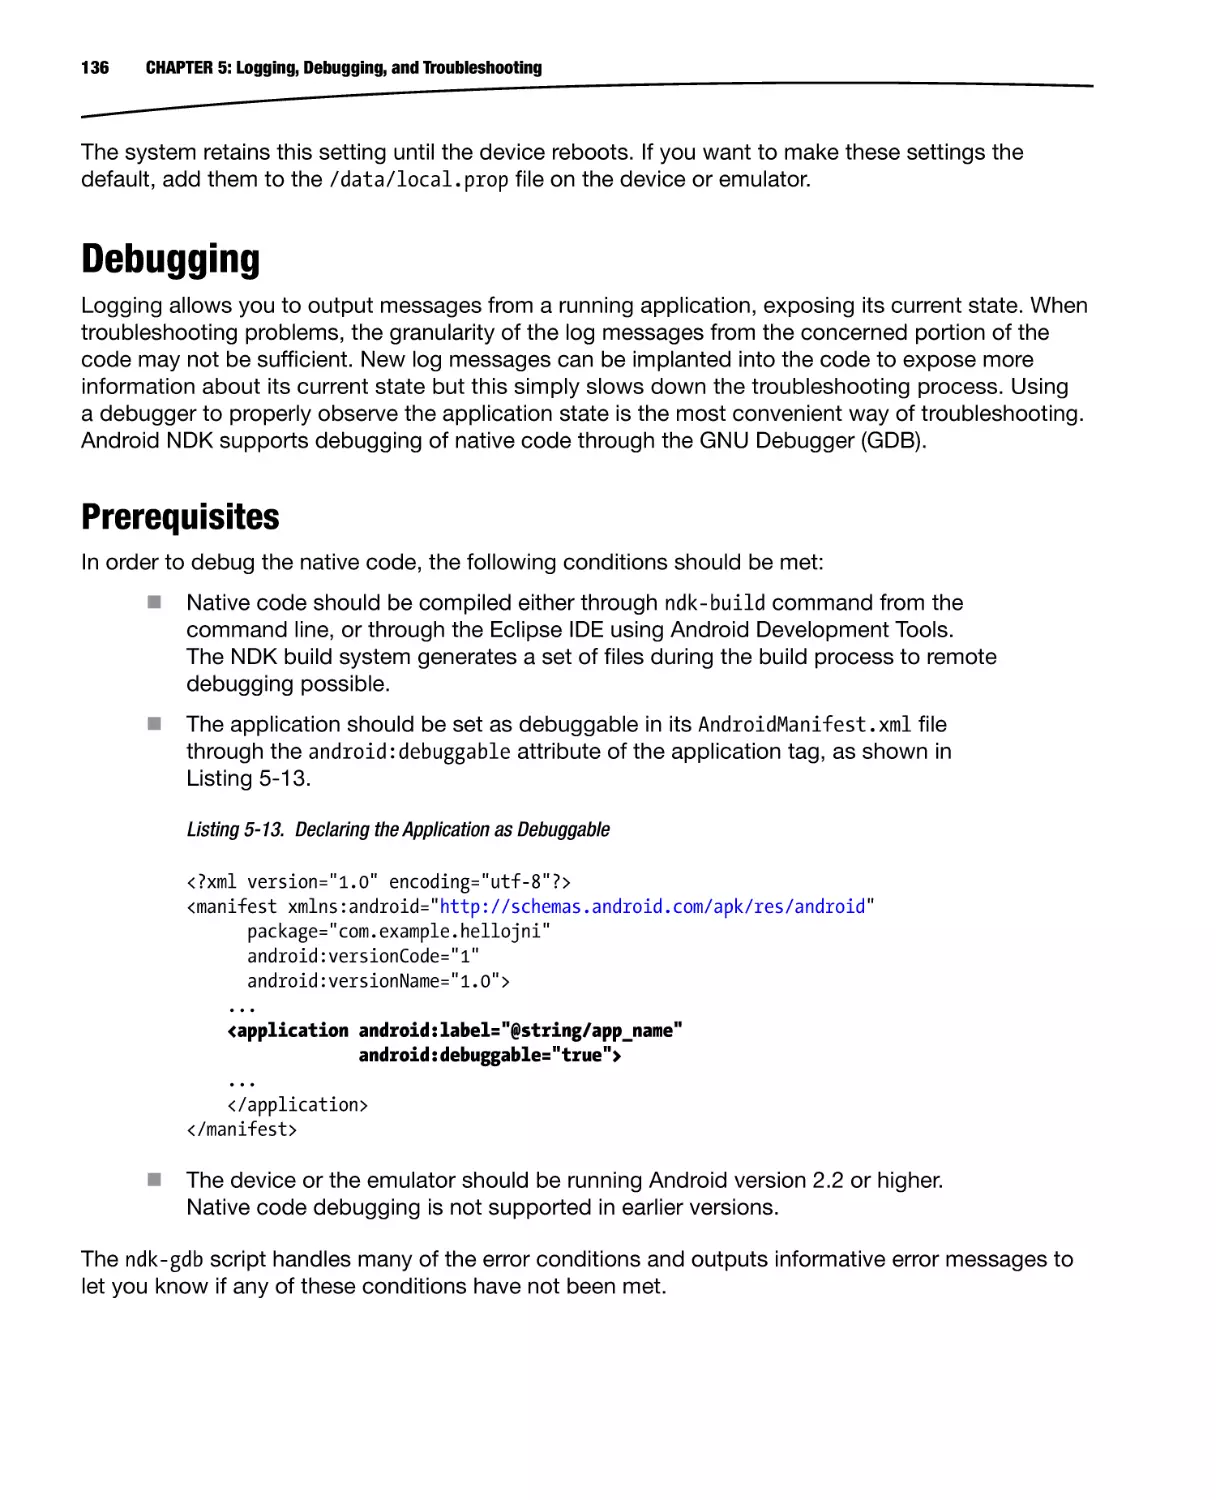
The Oracle JDK is now part of the system executable search path and it is easily reachable. In order
to validate the installation, open a command prompt window by choosing Start ➤ Accessories ➤
Command Prompt. Using the command prompt, execute javac version. If the installation was
successful, you will see the Oracle JDK version number, as shown in Figure 1-8.
Figure 1-8. Validating Oracle JDK installation
Downloading and Installing the Apache ANT on Windows
Apache ANT is a command-line build tool that whose mission is to drive any type of process that
can be described in terms of targets and tasks. Android development tools require Apache ANT
version 1.8 or later for the build process to function. At the time of this writing, the latest version of
Apache ANT is 1.8.4.
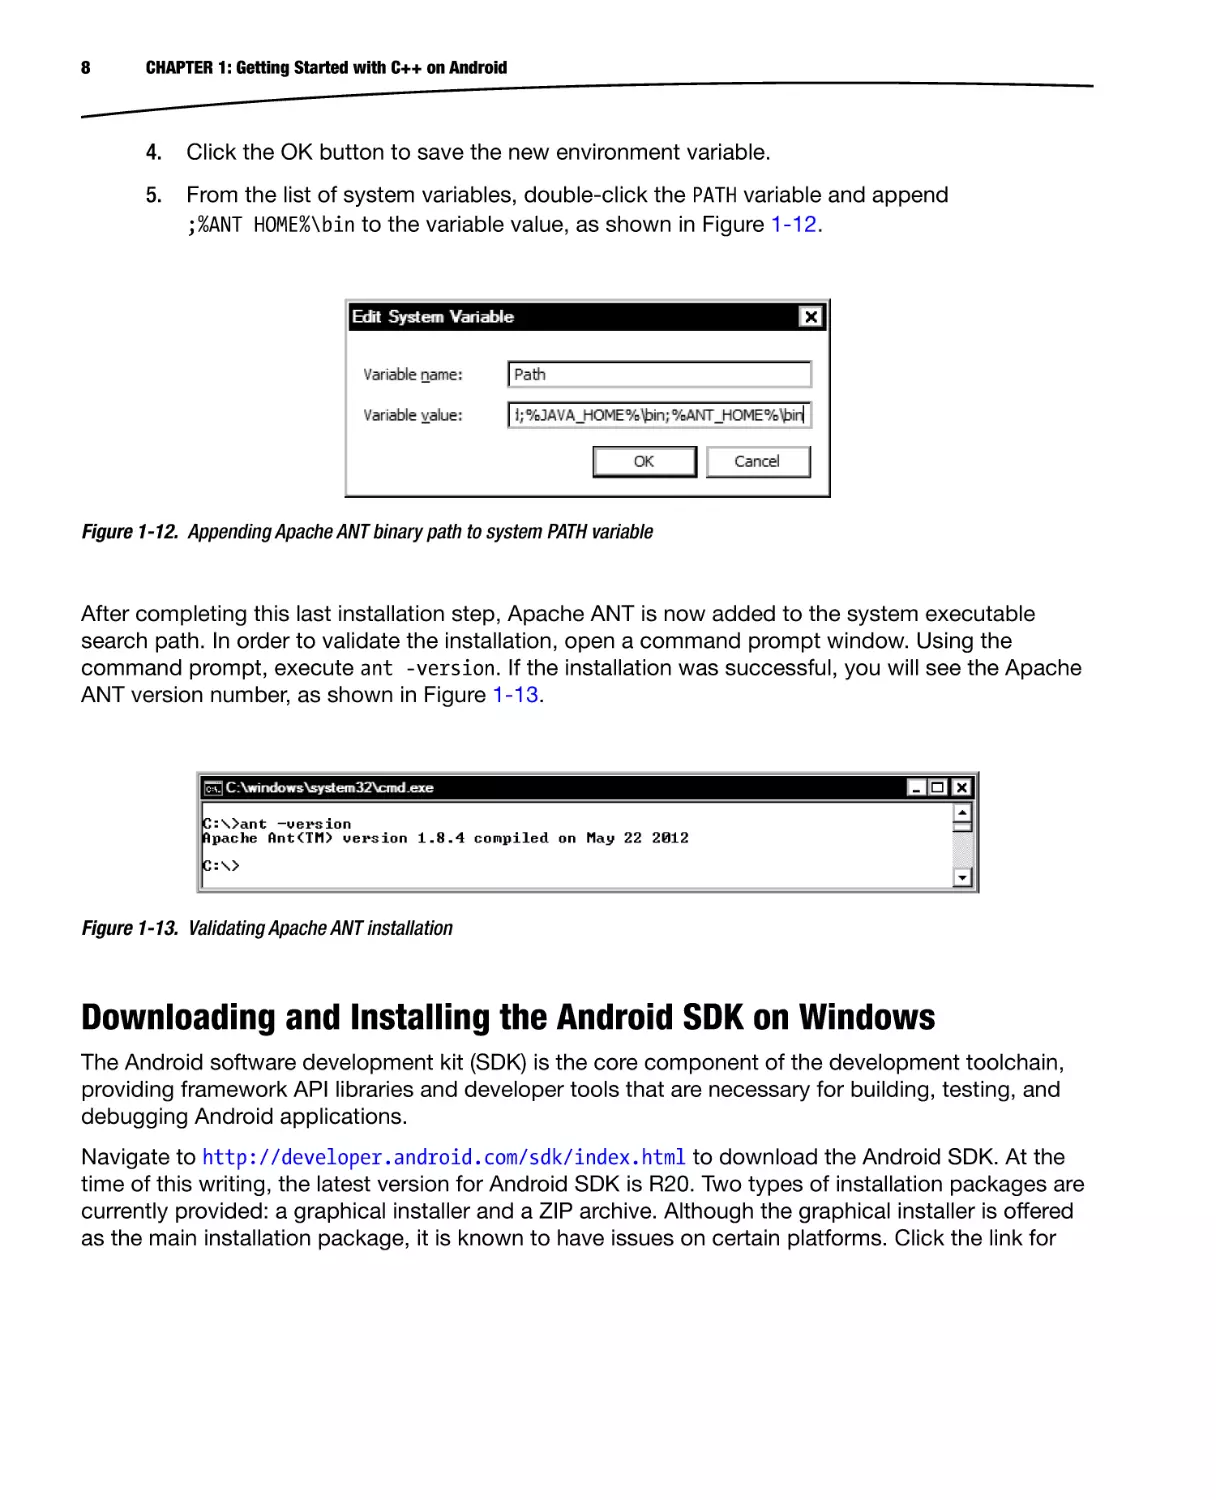
In order to download Apache ANT, navigate to http://ant.apache.org/bindownload.cgi and
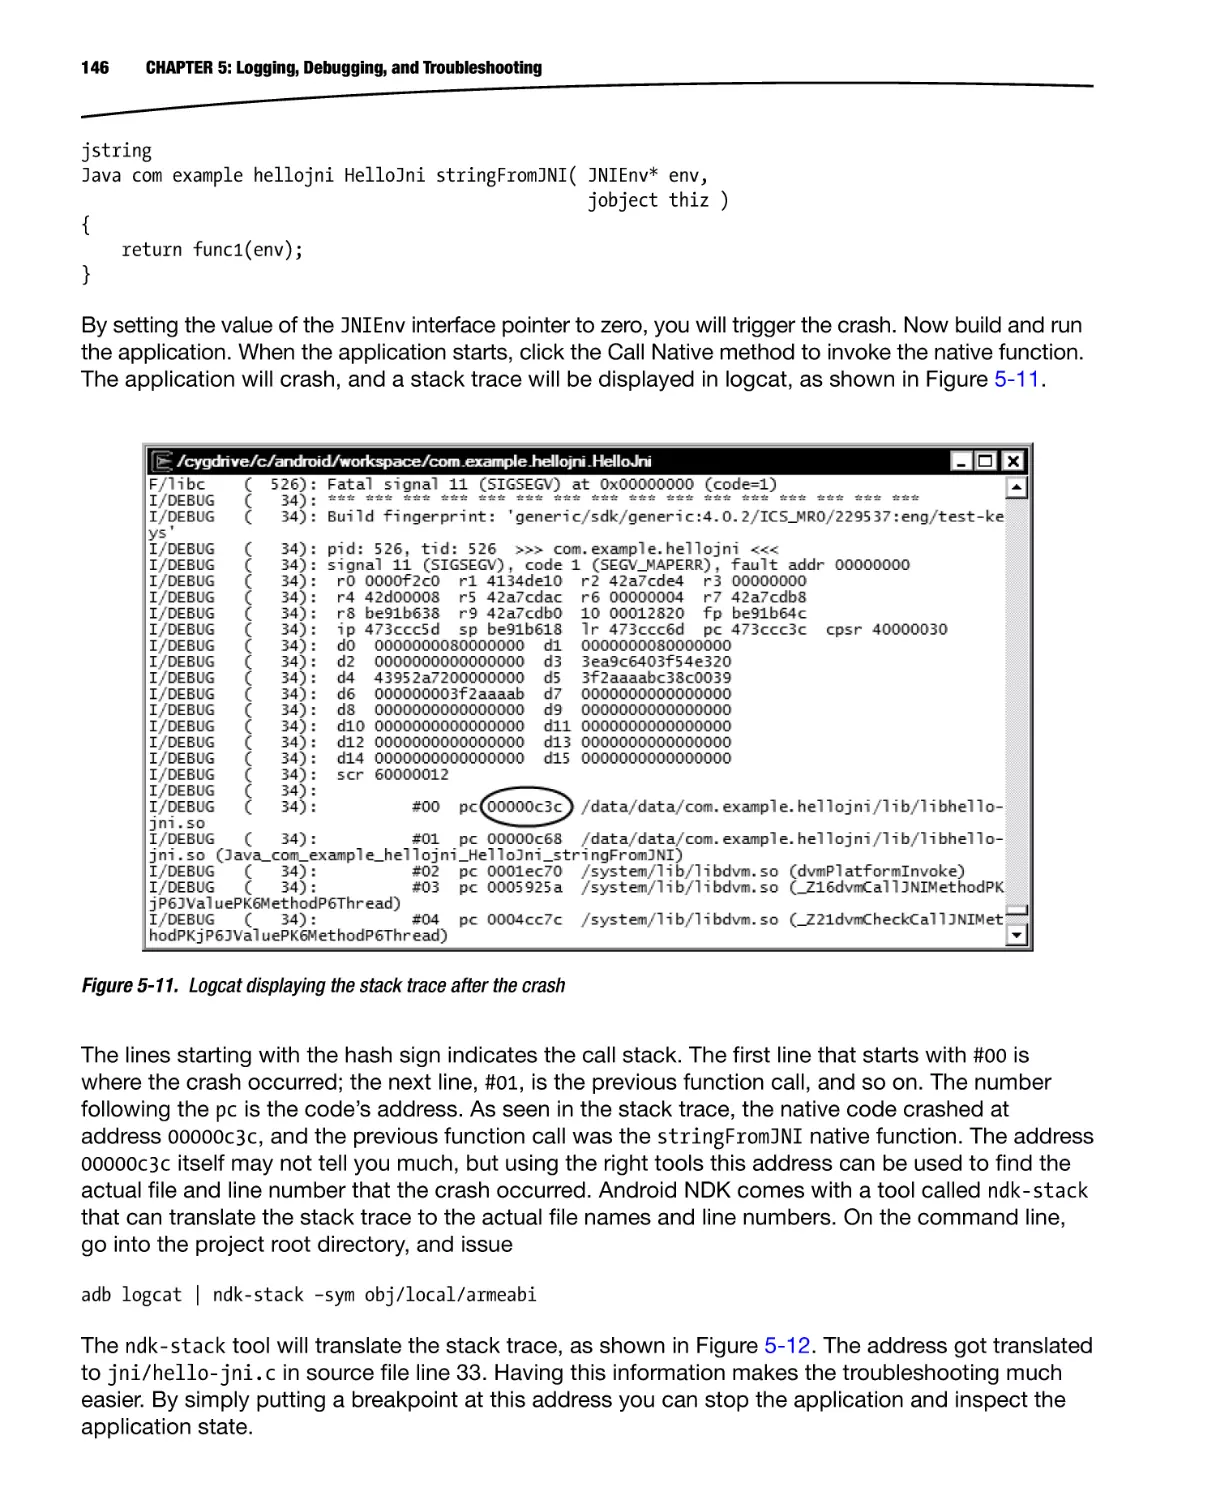
download the installation package in ZIP format, as shown in Figure 1-9. Then follow these steps:
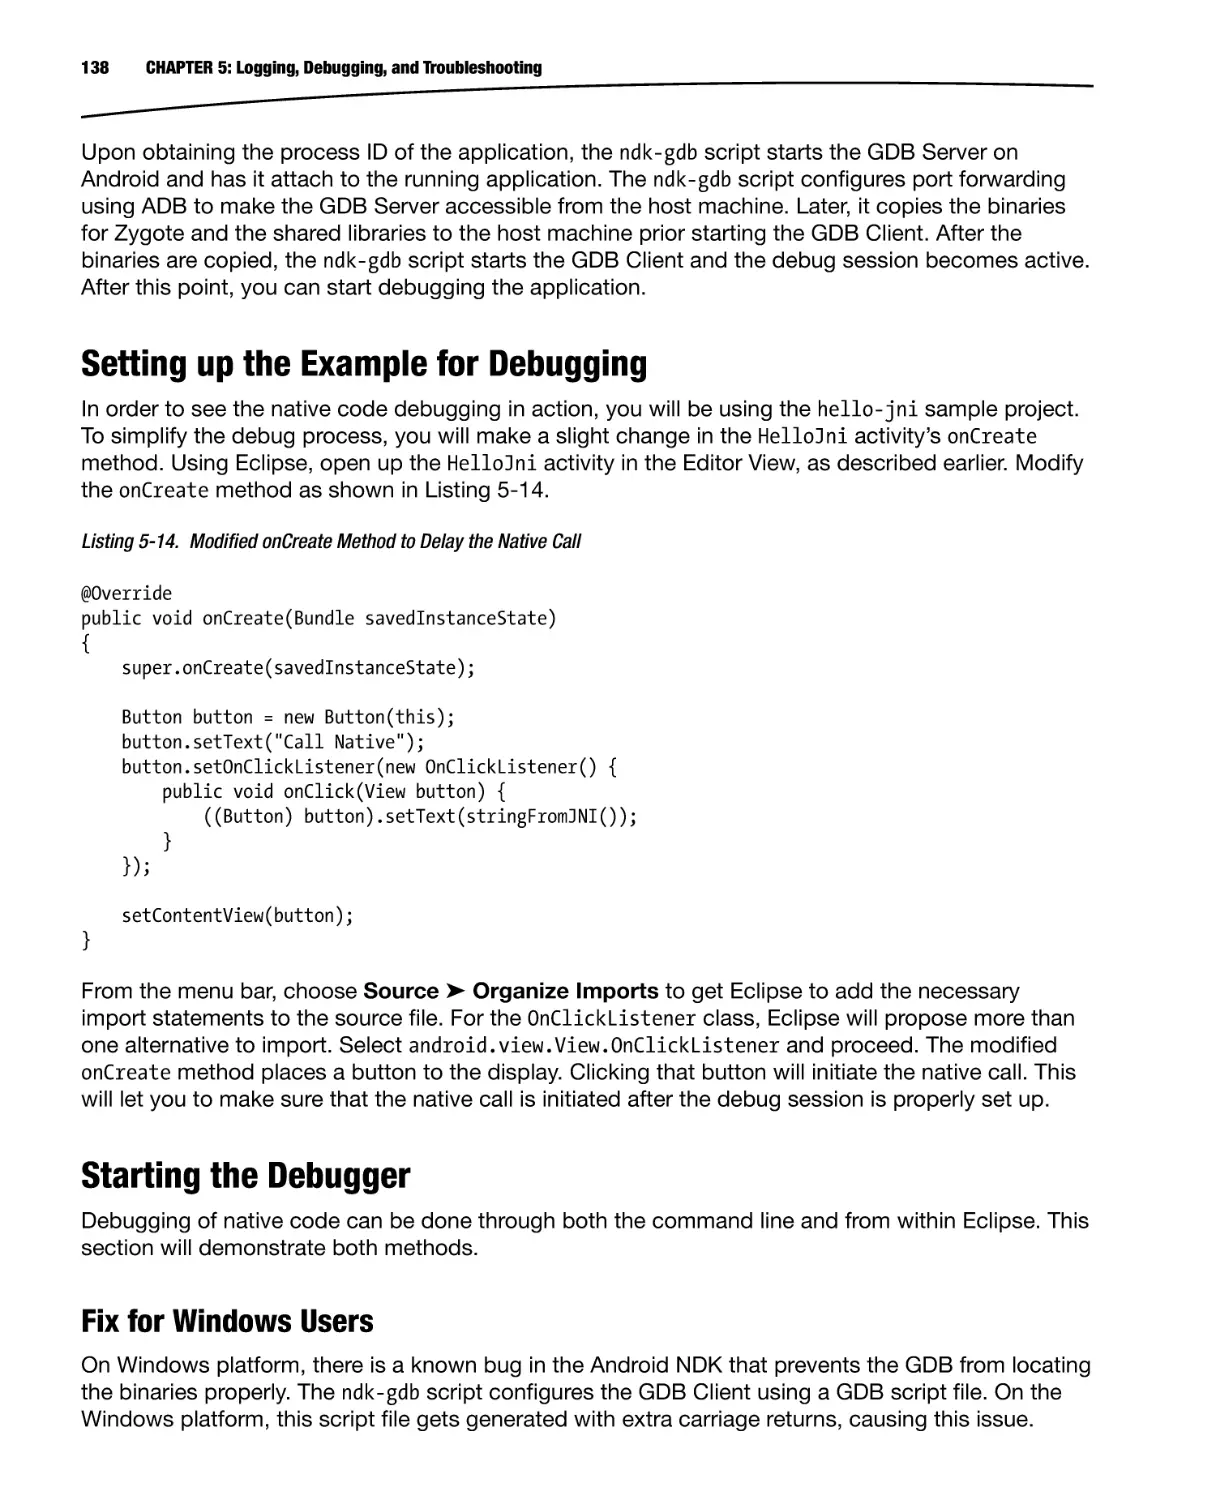
Figure 1-9. Apache ANT download package in ZIP format
CHAPTER 1: Getting Started with C++ on Android
1.
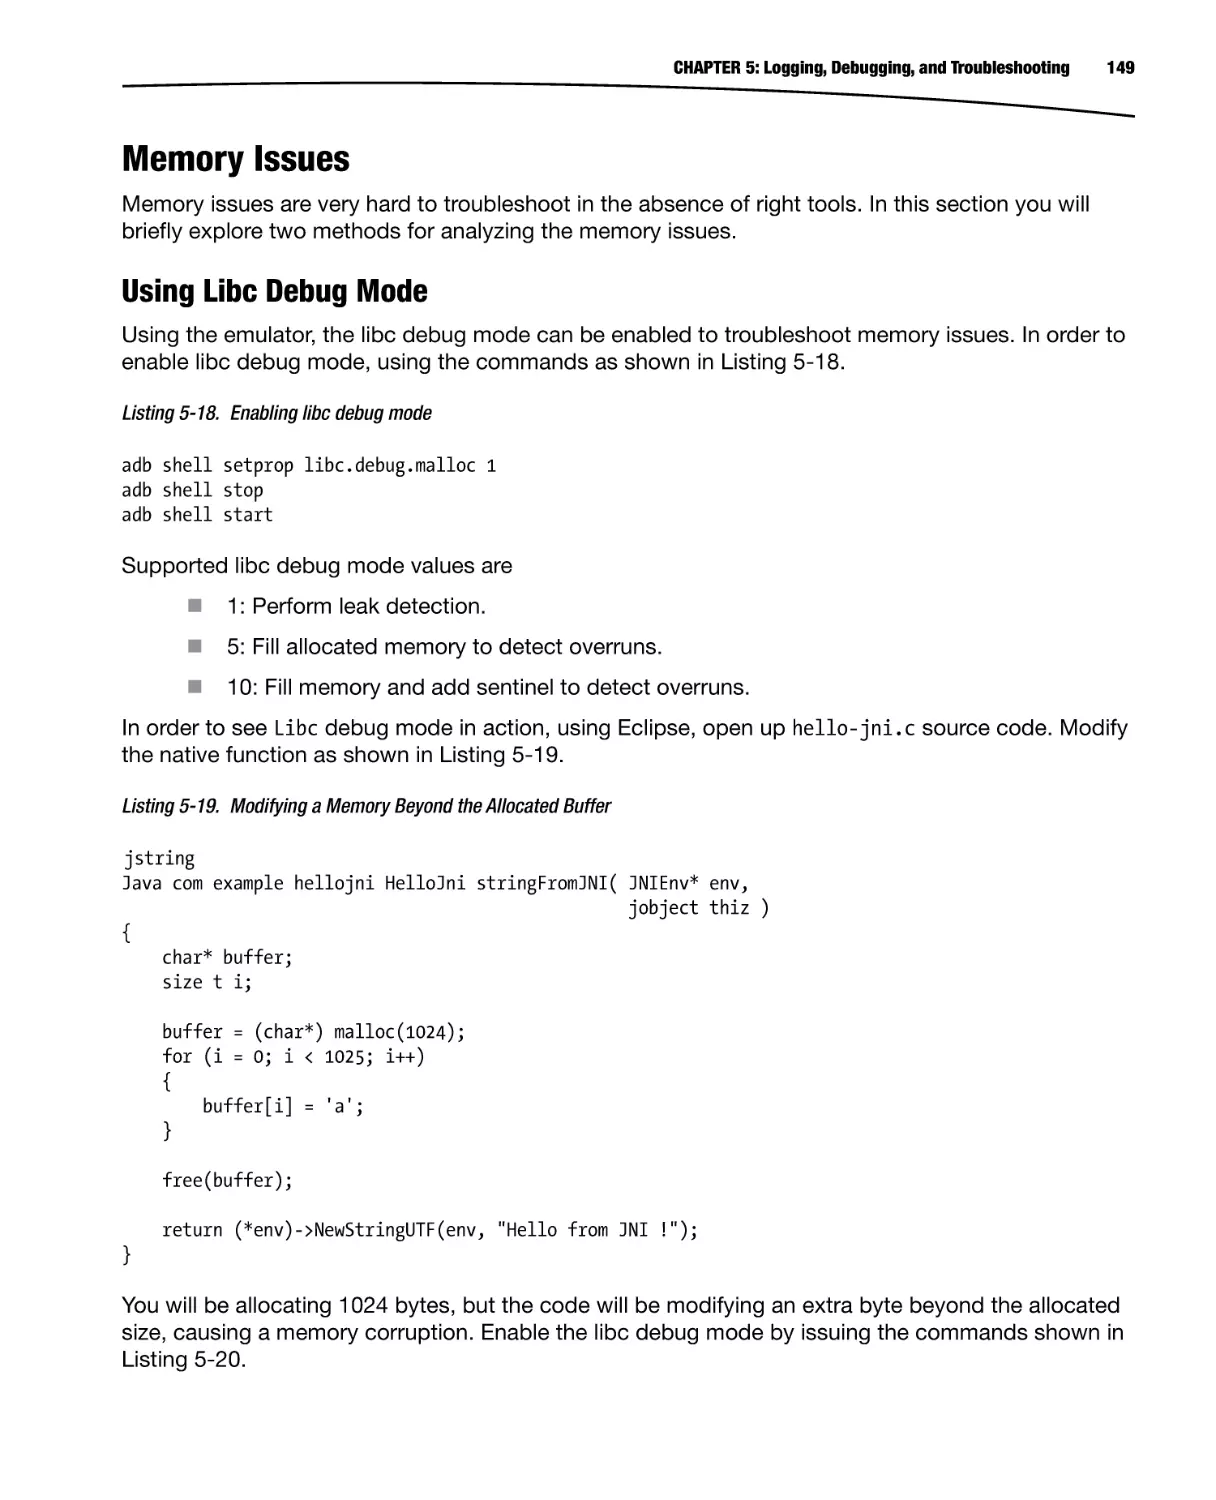
The Windows operating system comes with native support for ZIP files.
When the download completes, right-click the ZIP file.
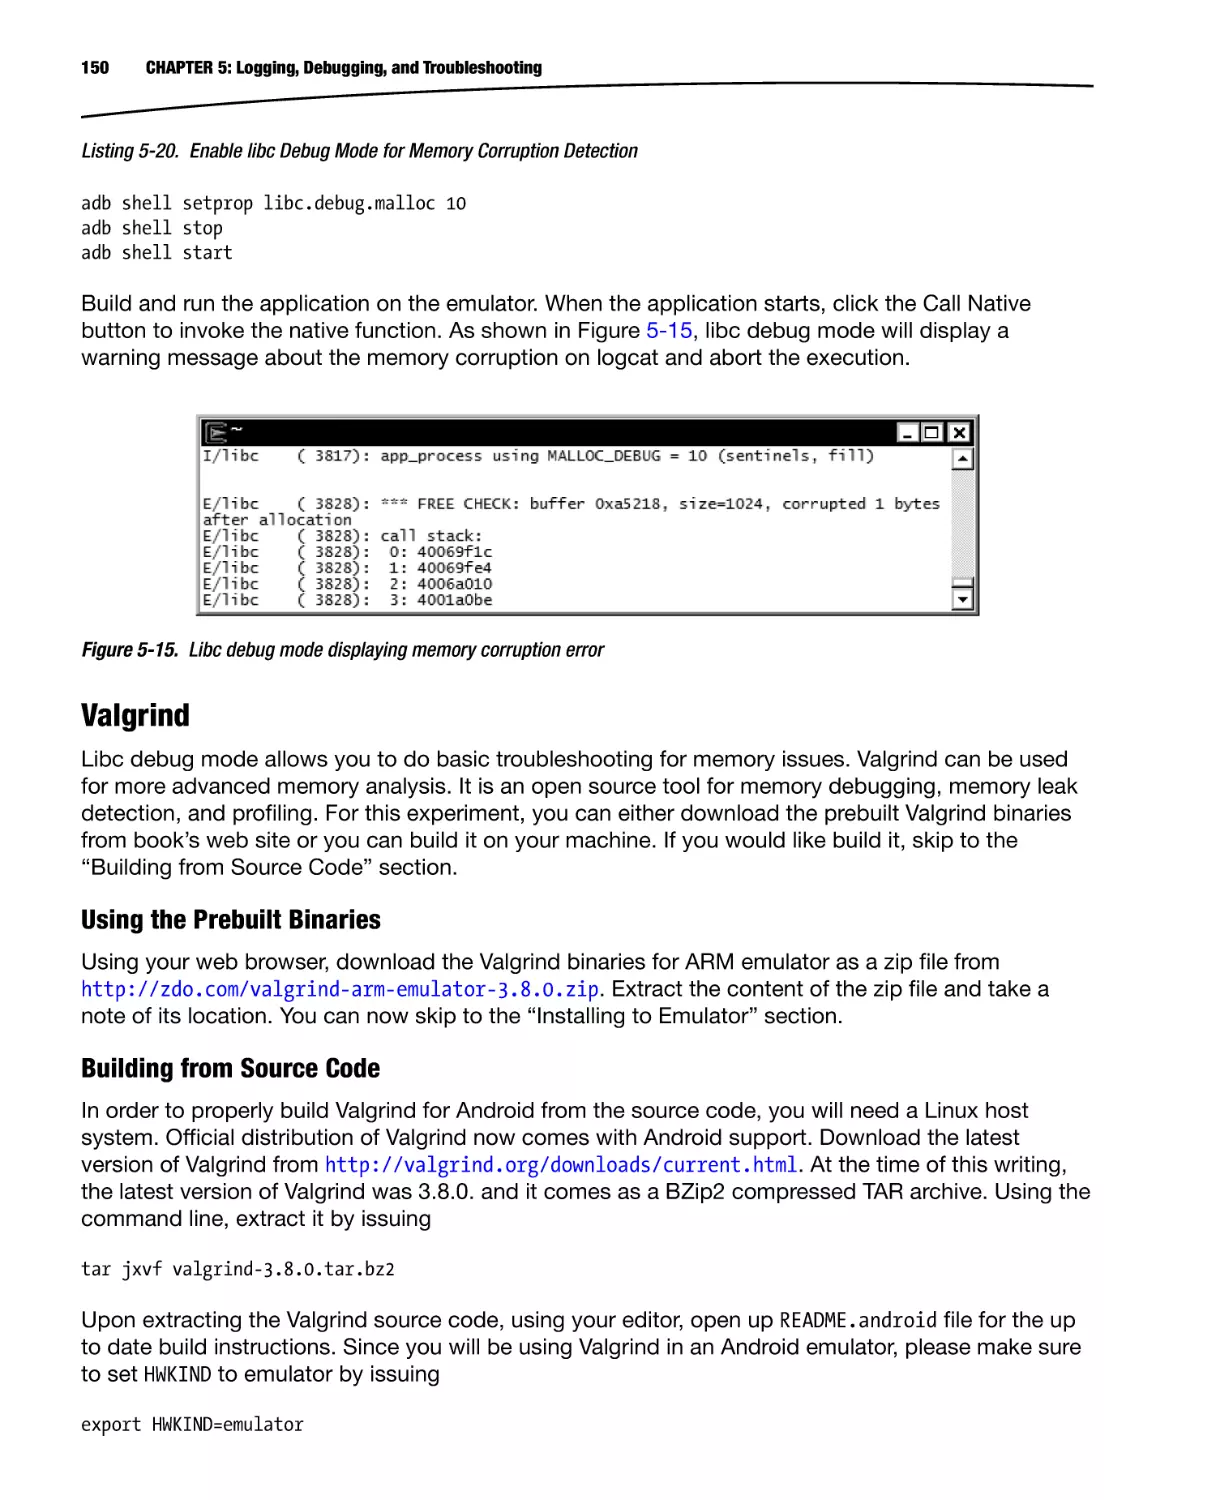
2.
Choose Extract All from the context menu to launch the Extract Compressed
Folder wizard.
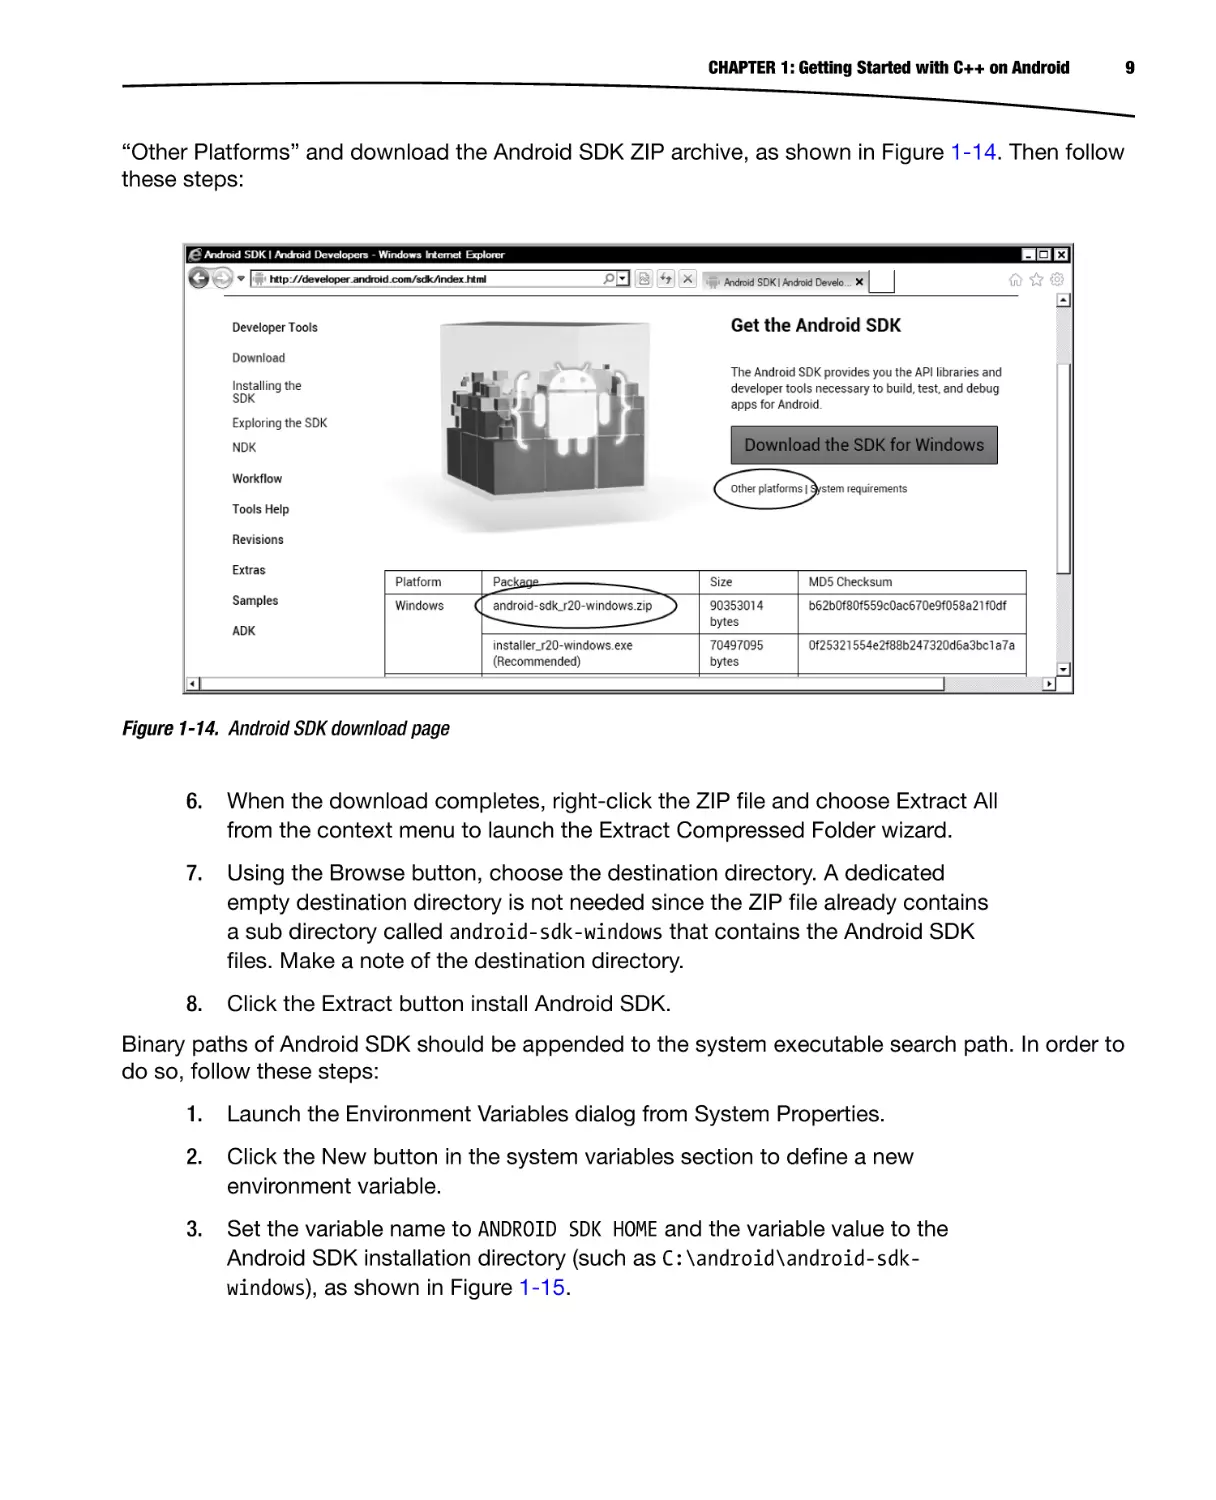
3.
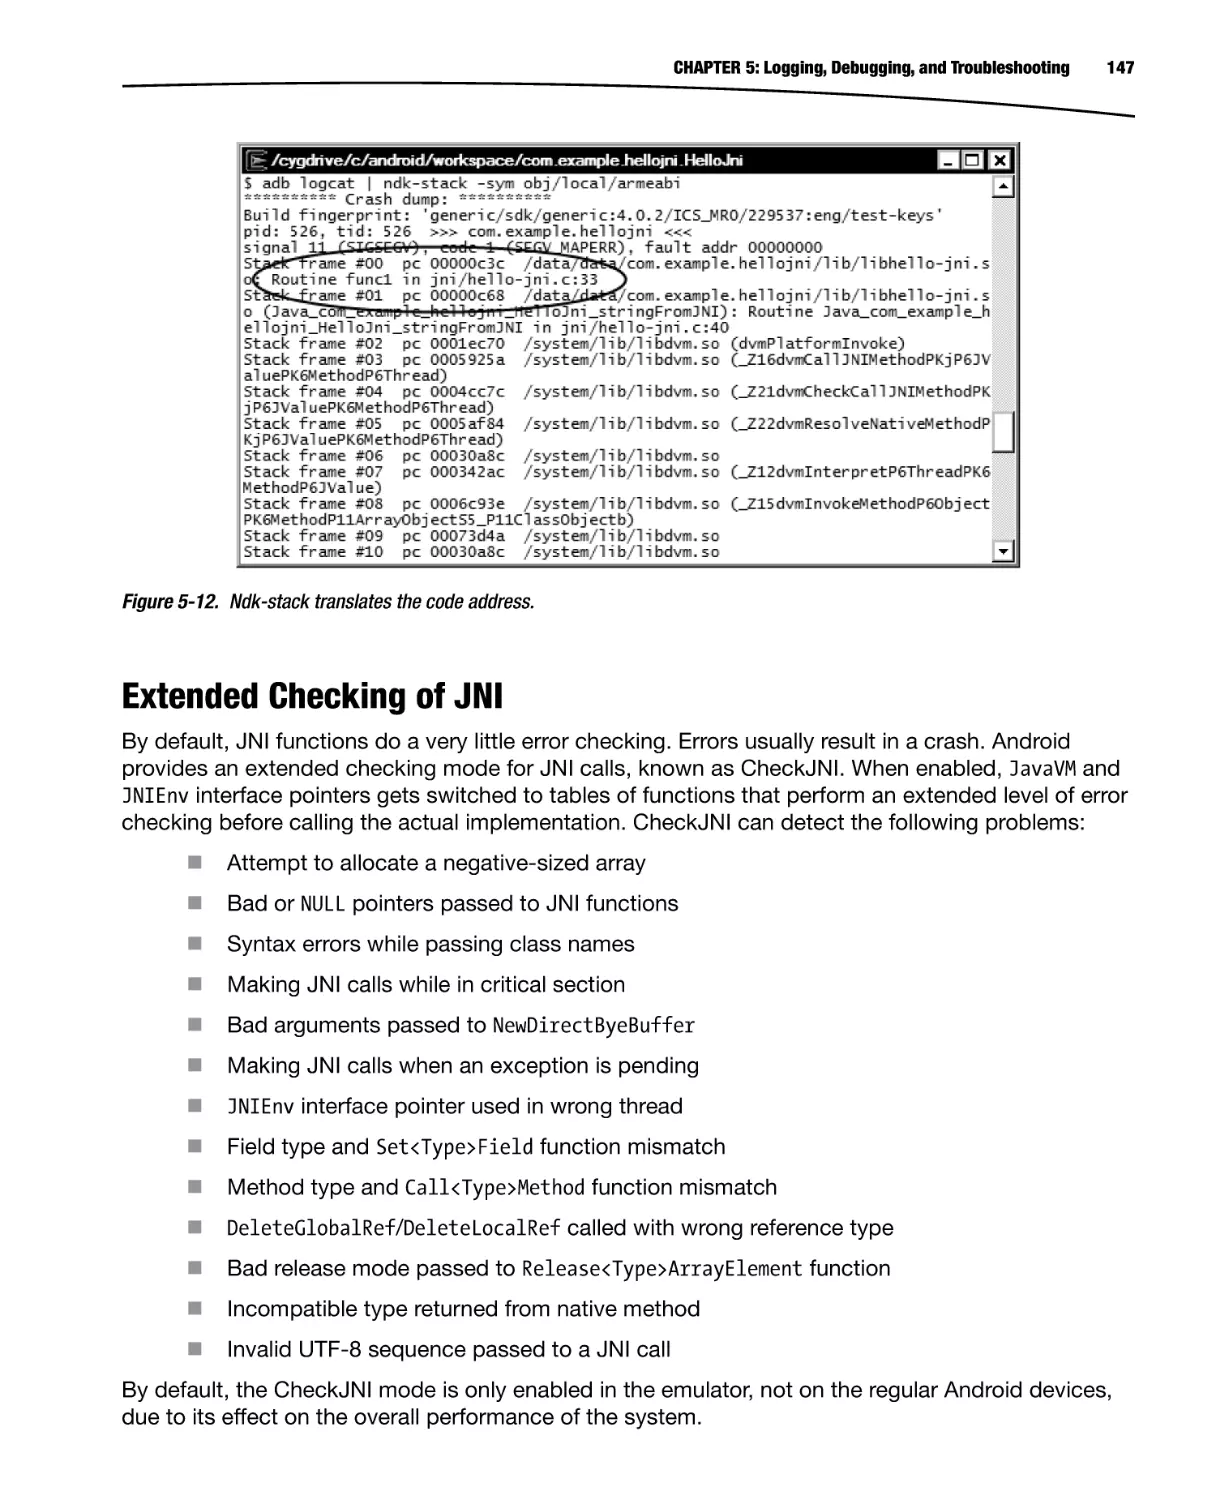
Using the Browse button, choose the destination directory, as shown in
Figure 1-10. A dedicated empty destination directory is not needed since the
ZIP file already contains a sub directory called apache-ant-1.8.4 that holds
the Apache ANT files. In this book, the C:\android directory will be used as
the root directory to hold the Android development tools and dependencies.
Make a note of the destination directory.
Figure 1-10. Extracting Apache ANT ZIP archive
4.
Click the Extract button to install Apache ANT.
Upon installing the Apache ANT, follow these steps to append its binary path to system executable
search path:
1.
Launch the Environment Variables dialog from System Properties.
2.
Click the New button in the system variables section to define a new
environment variable.
3.
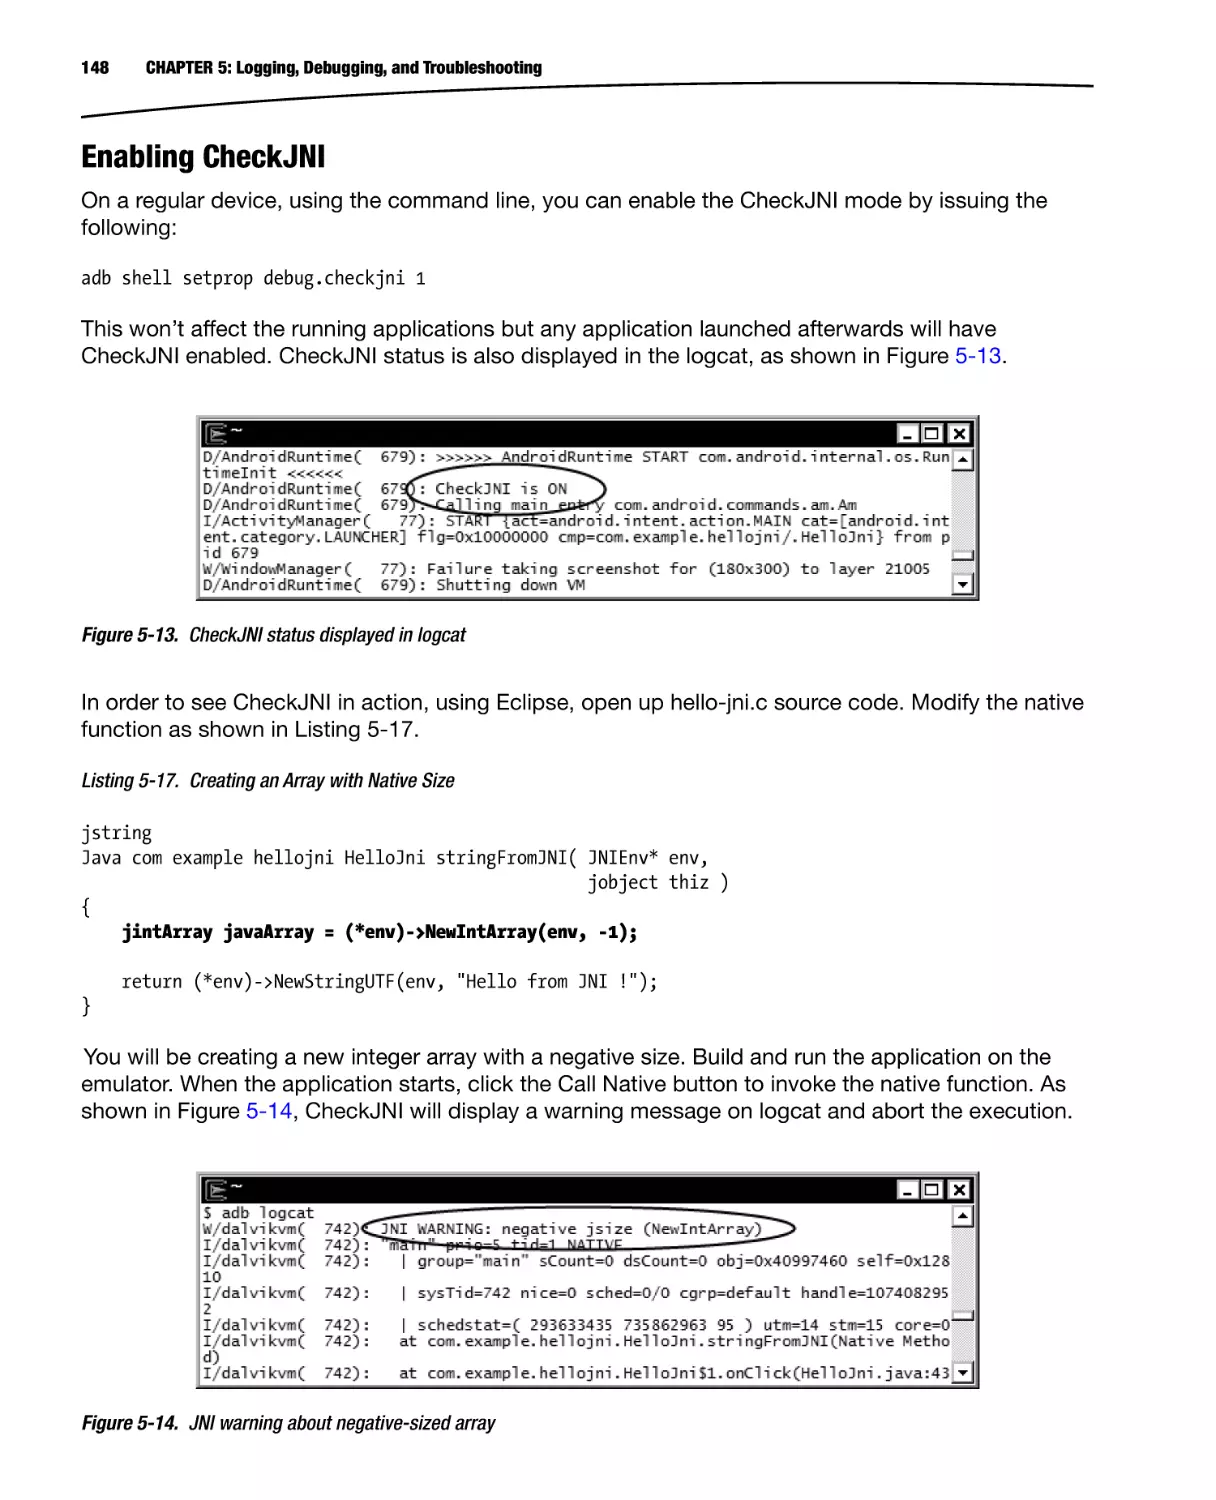
Set the variable name to ANT HOME and the variable value to the Apache ANT
installation directory (such as C:\android\apache-ant-1.8.4), as shown in
Figure 1-11.
Figure 1-11. New ANT_HOME environment variable
7
8
CHAPTER 1: Getting Started with C++ on Android
4.
Click the OK button to save the new environment variable.
5.
From the list of system variables, double-click the PATH variable and append
;%ANT HOME%\bin to the variable value, as shown in Figure 1-12.
Figure 1-12. Appending Apache ANT binary path to system PATH variable
After completing this last installation step, Apache ANT is now added to the system executable
search path. In order to validate the installation, open a command prompt window. Using the
command prompt, execute ant -version. If the installation was successful, you will see the Apache
ANT version number, as shown in Figure 1-13.
Figure 1-13. Validating Apache ANT installation
Downloading and Installing the Android SDK on Windows
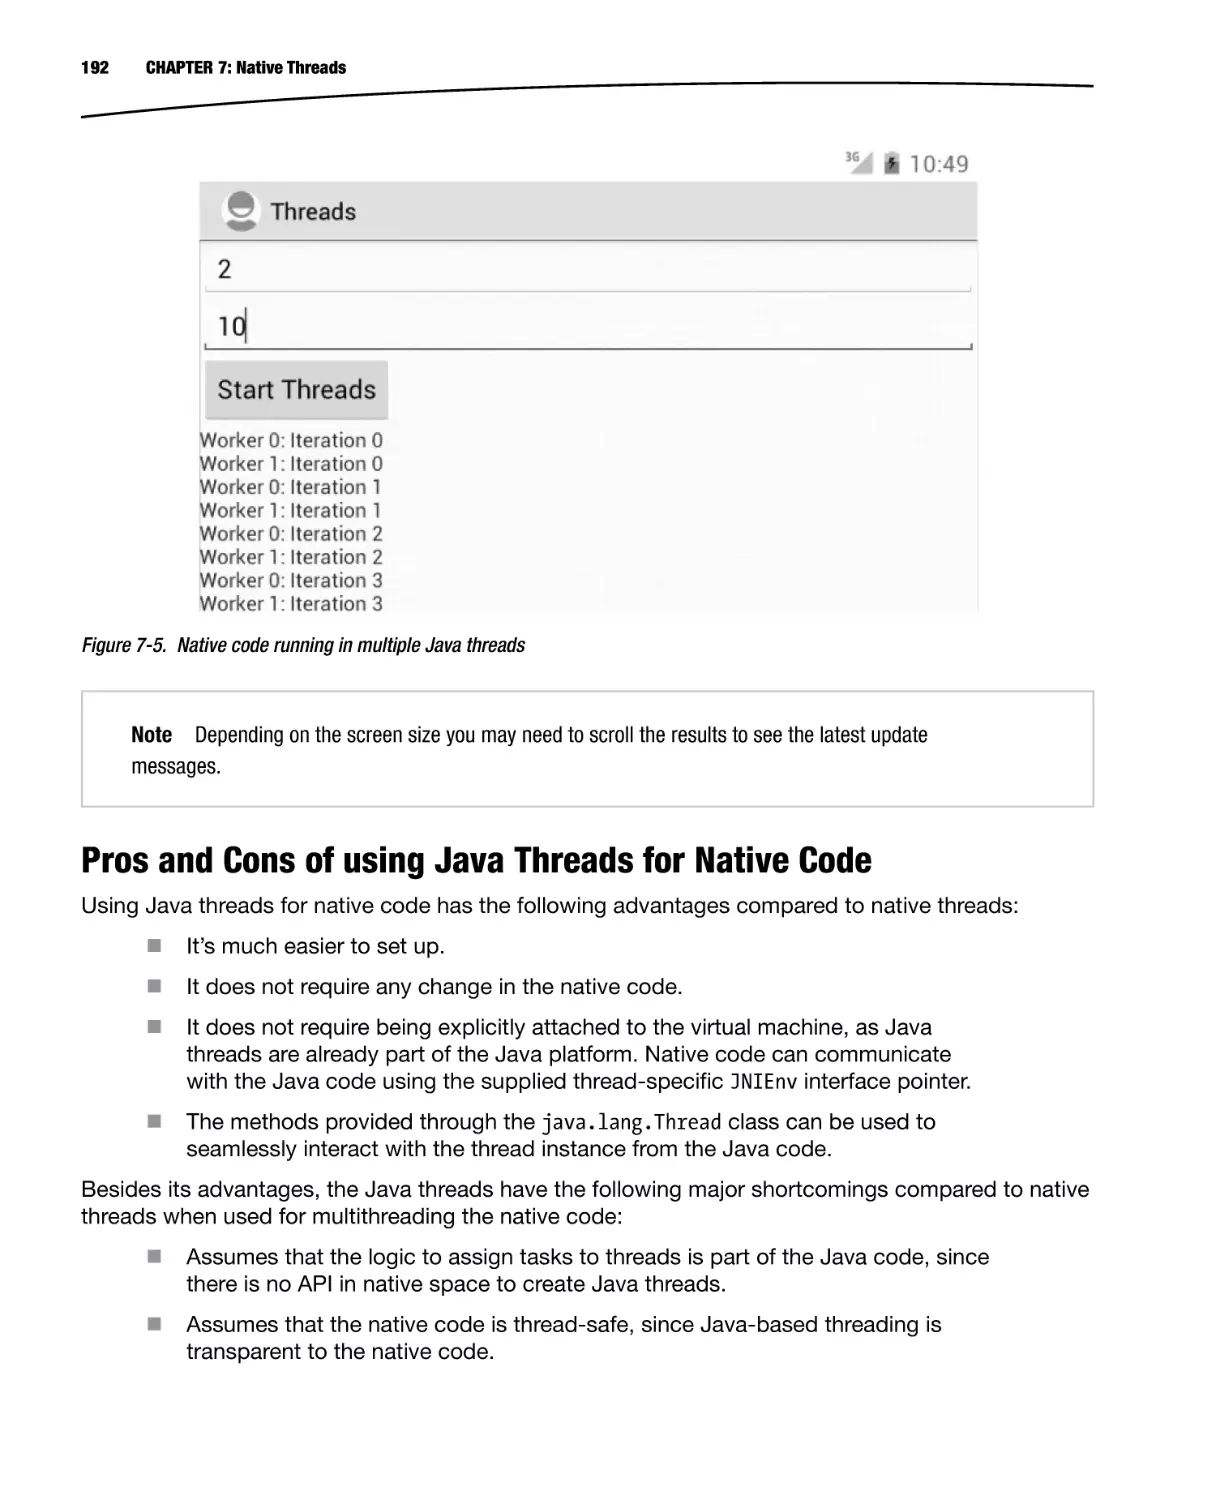
The Android software development kit (SDK) is the core component of the development toolchain,
providing framework API libraries and developer tools that are necessary for building, testing, and
debugging Android applications.
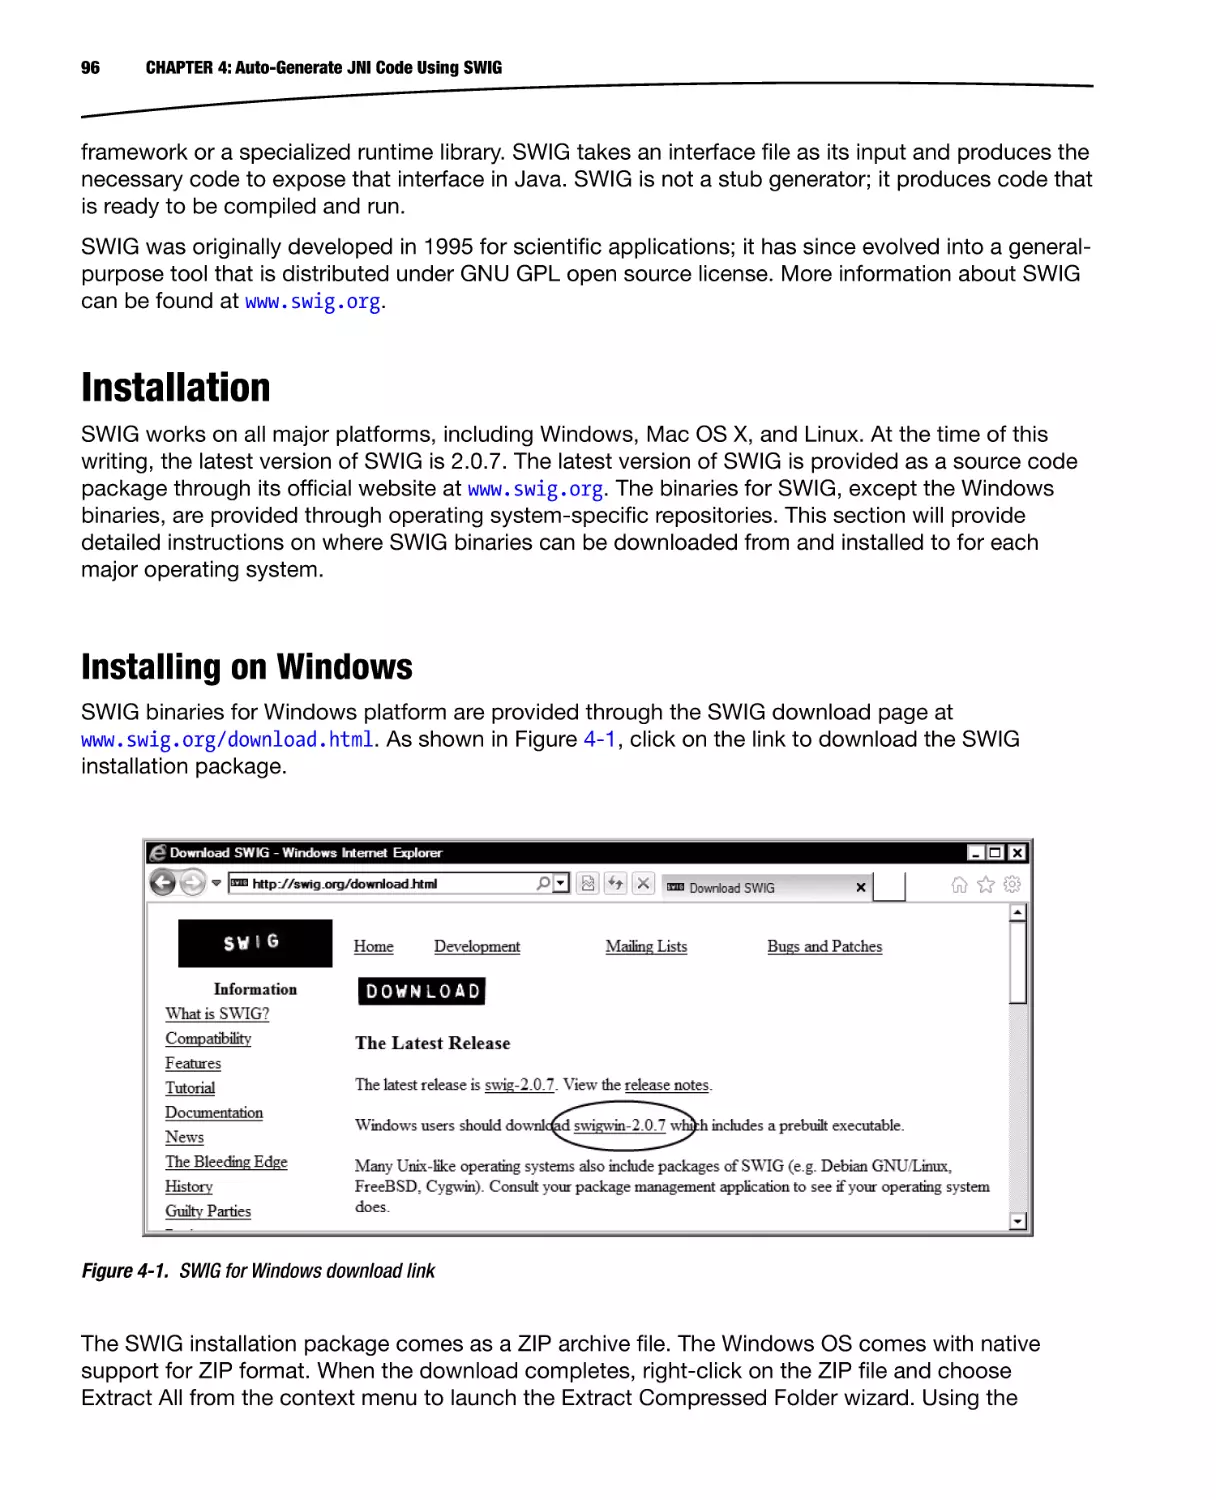
Navigate to http://developer.android.com/sdk/index.html to download the Android SDK. At the
time of this writing, the latest version for Android SDK is R20. Two types of installation packages are
currently provided: a graphical installer and a ZIP archive. Although the graphical installer is offered
as the main installation package, it is known to have issues on certain platforms. Click the link for
CHAPTER 1: Getting Started with C++ on Android
“Other Platforms” and download the Android SDK ZIP archive, as shown in Figure 1-14. Then follow
these steps:
Figure 1-14. Android SDK download page
6.
When the download completes, right-click the ZIP file and choose Extract All
from the context menu to launch the Extract Compressed Folder wizard.
7.
Using the Browse button, choose the destination directory. A dedicated
empty destination directory is not needed since the ZIP file already contains
a sub directory called android-sdk-windows that contains the Android SDK
files. Make a note of the destination directory.
8.
Click the Extract button install Android SDK.
Binary paths of Android SDK should be appended to the system executable search path. In order to
do so, follow these steps:
1.
Launch the Environment Variables dialog from System Properties.
2.
Click the New button in the system variables section to define a new
environment variable.
3.
Set the variable name to ANDROID SDK HOME and the variable value to the
Android SDK installation directory (such as C:\android\android-sdkwindows), as shown in Figure 1-15.
9
10
CHAPTER 1: Getting Started with C++ on Android
Figure 1-15. ANDROID_SDK_HOME environment variable
4.
Click the OK button to save the new environment variable.
5.
There are three important directories that need to be added to the system
executable search path: the SDK root directory, the tools directory holding
the Android platform-independent SDK Tools, and the platform-tools
directory holding the Android platform tools. Ignore the fact that platformtools directory does not exist yet. From the list of system variables on the
Environment Variables dialog, double-click the PATH variable and append
;%ANDROID SDK HOME%;%ANDROID SDK HOME%\tools;%ANDROID SDK HOME%\
platform-tools to the variable value, as shown in Figure 1-16.
Figure 1-16. Appending Android SDK binary paths to system PATH variable
In order to validate the installation, open a command prompt window. Using the command prompt,
execute 'SDK Manager' including the quotes. If the installation was successful, you will see the
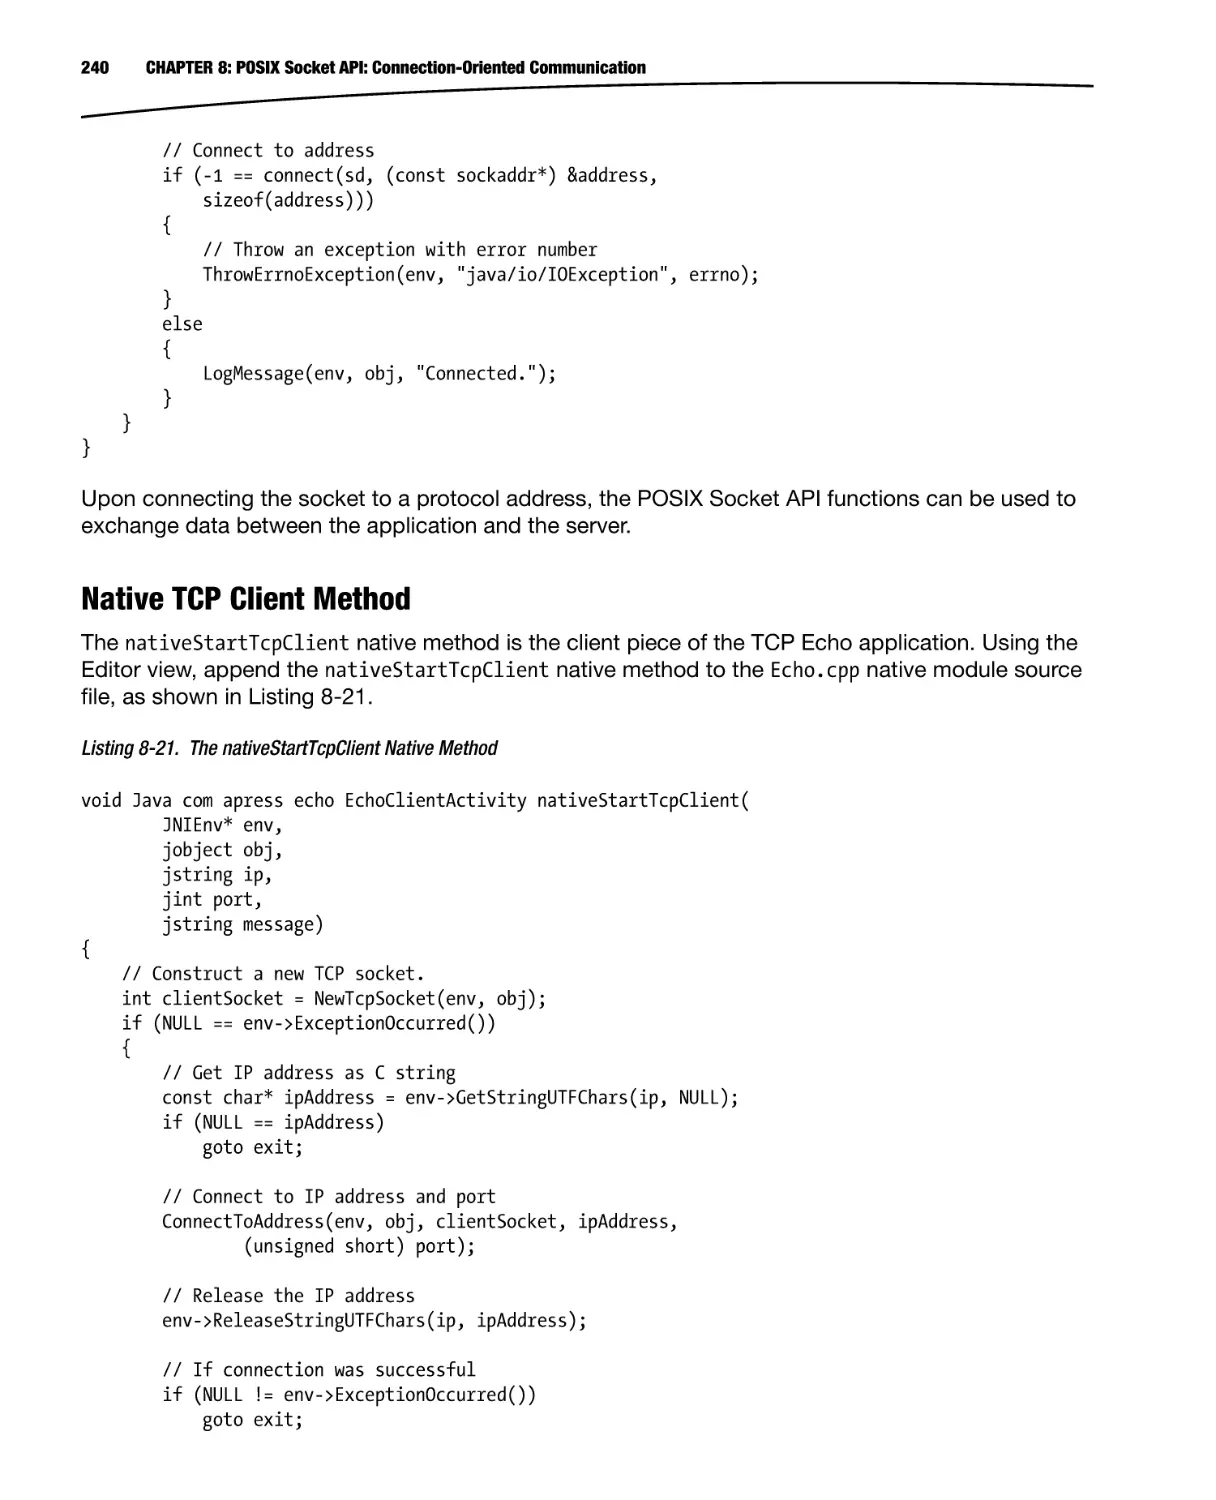
Android SDK Manager, as shown in Figure 1-17.
Figure 1-17. Android SDK Manager application
CHAPTER 1: Getting Started with C++ on Android
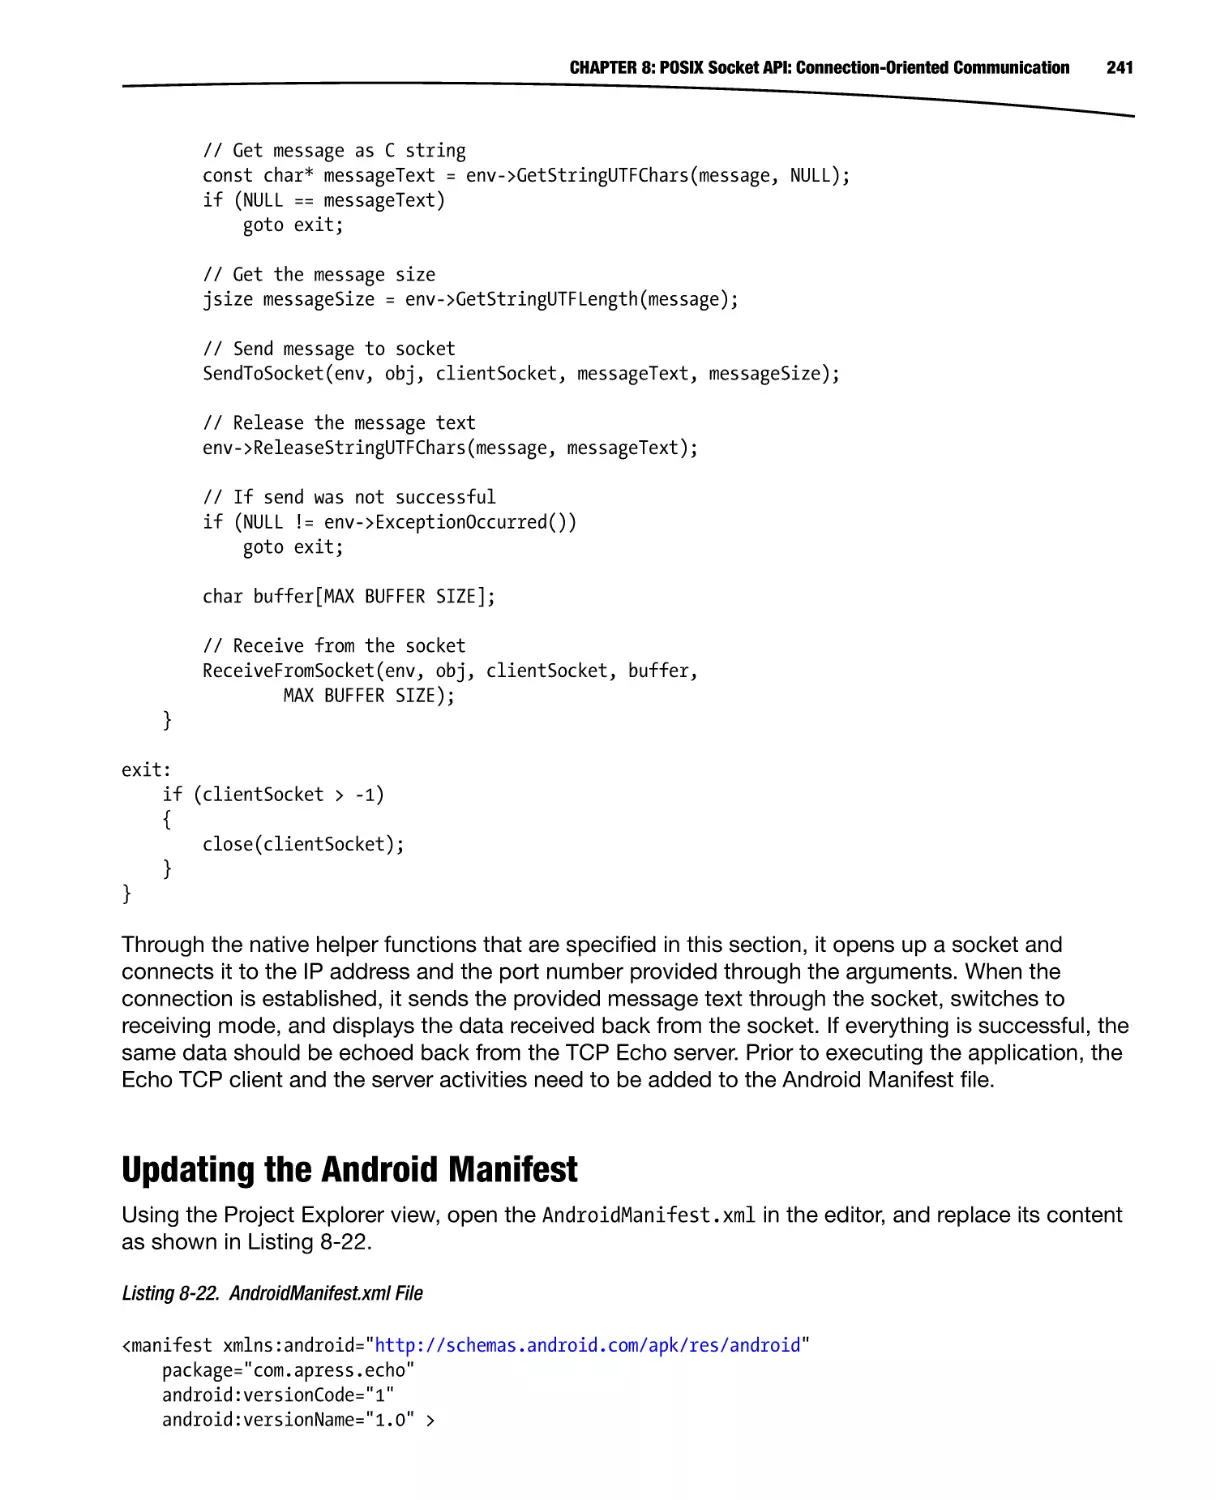
11
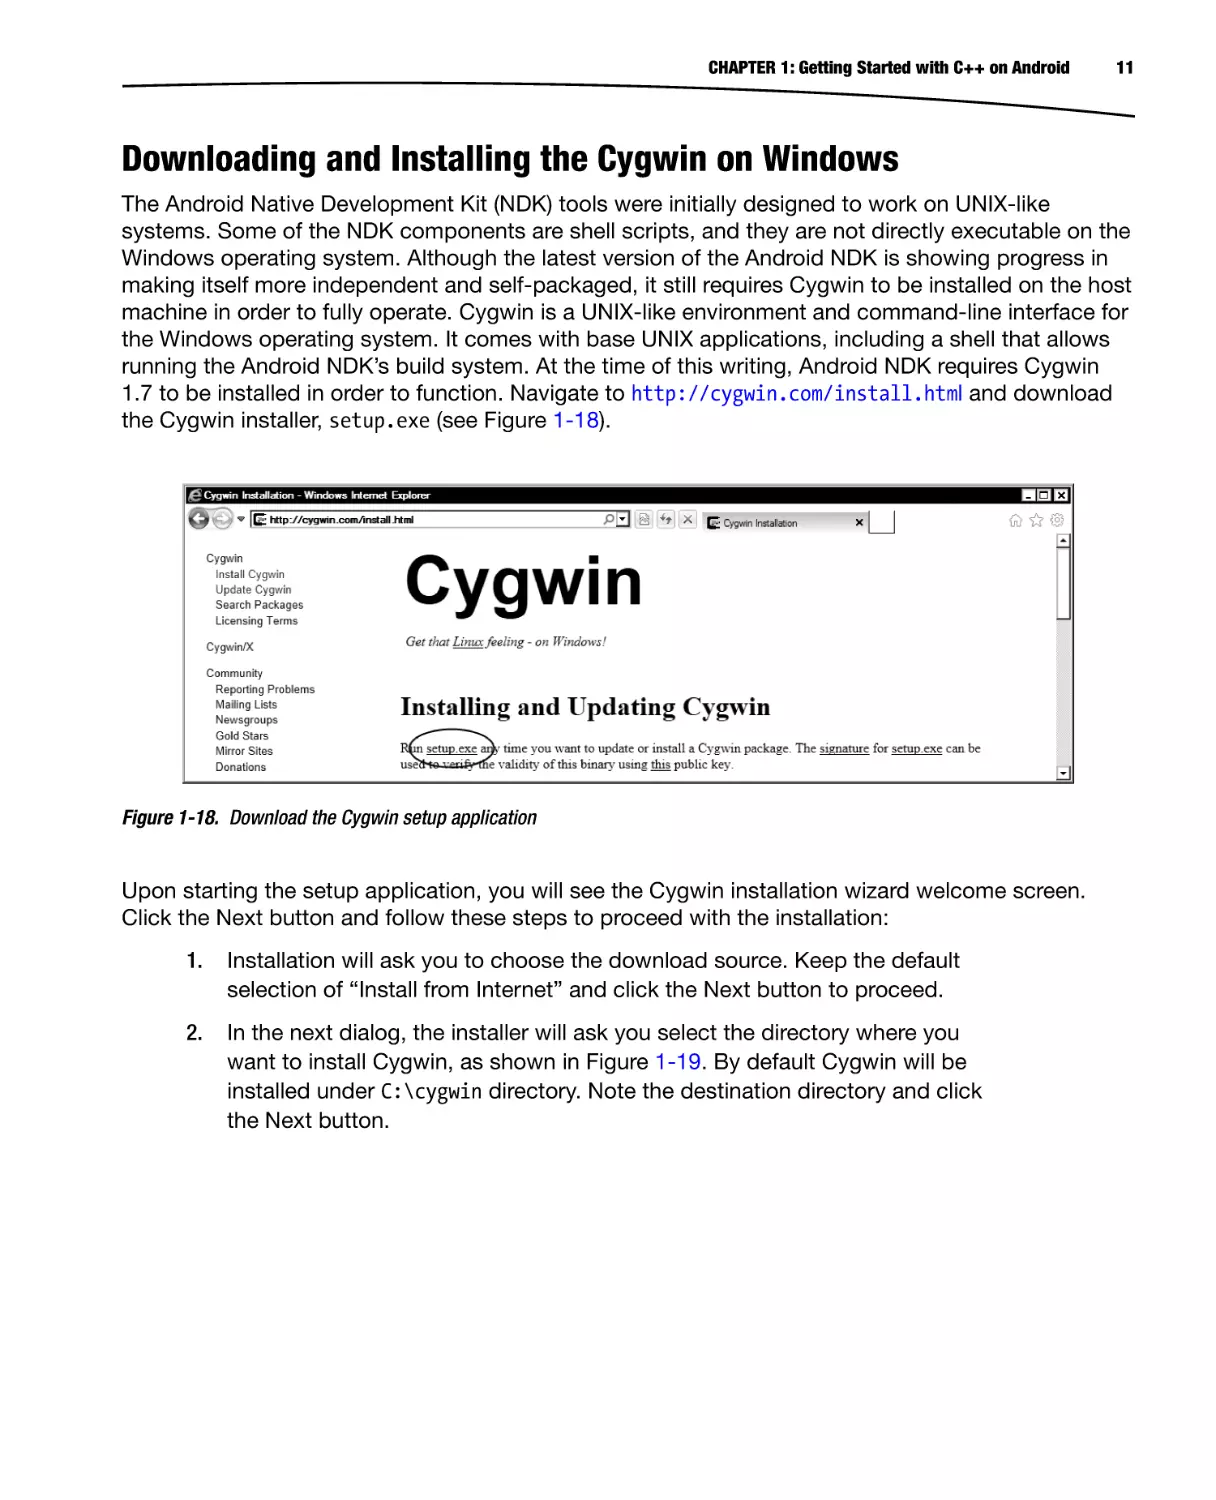
Downloading and Installing the Cygwin on Windows
The Android Native Development Kit (NDK) tools were initially designed to work on UNIX-like
systems. Some of the NDK components are shell scripts, and they are not directly executable on the
Windows operating system. Although the latest version of the Android NDK is showing progress in
making itself more independent and self-packaged, it still requires Cygwin to be installed on the host
machine in order to fully operate. Cygwin is a UNIX-like environment and command-line interface for
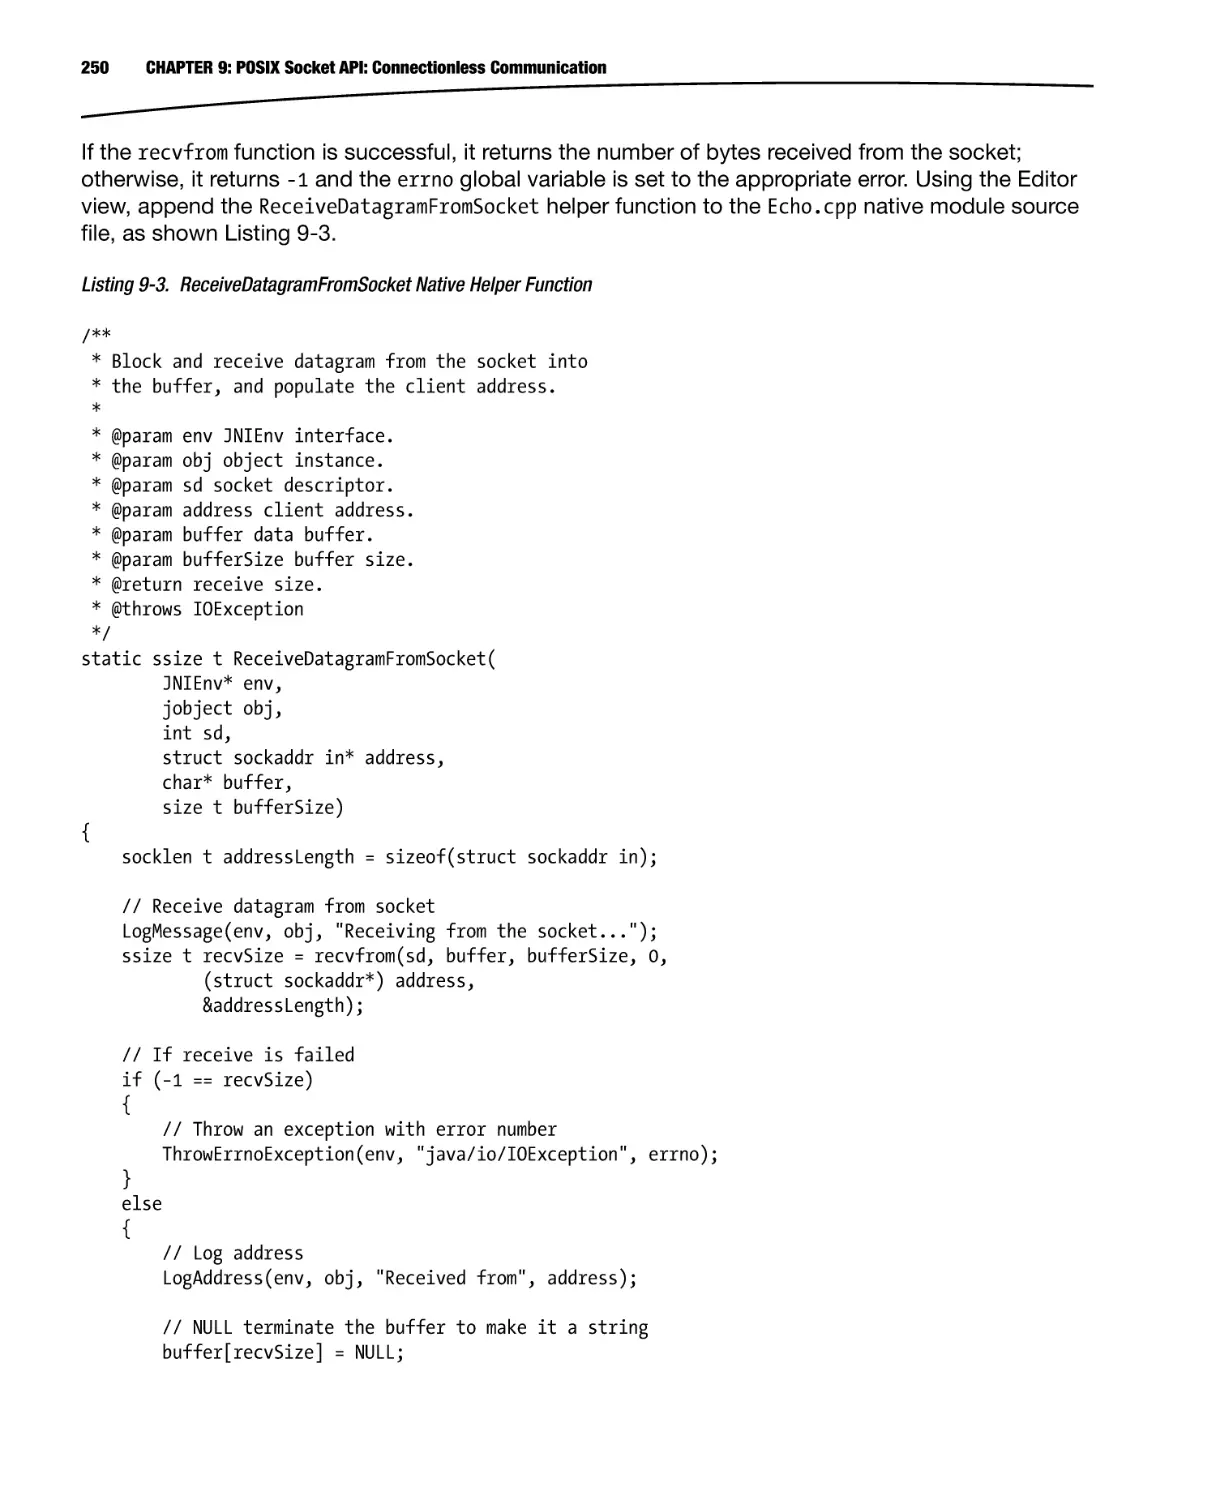
the Windows operating system. It comes with base UNIX applications, including a shell that allows
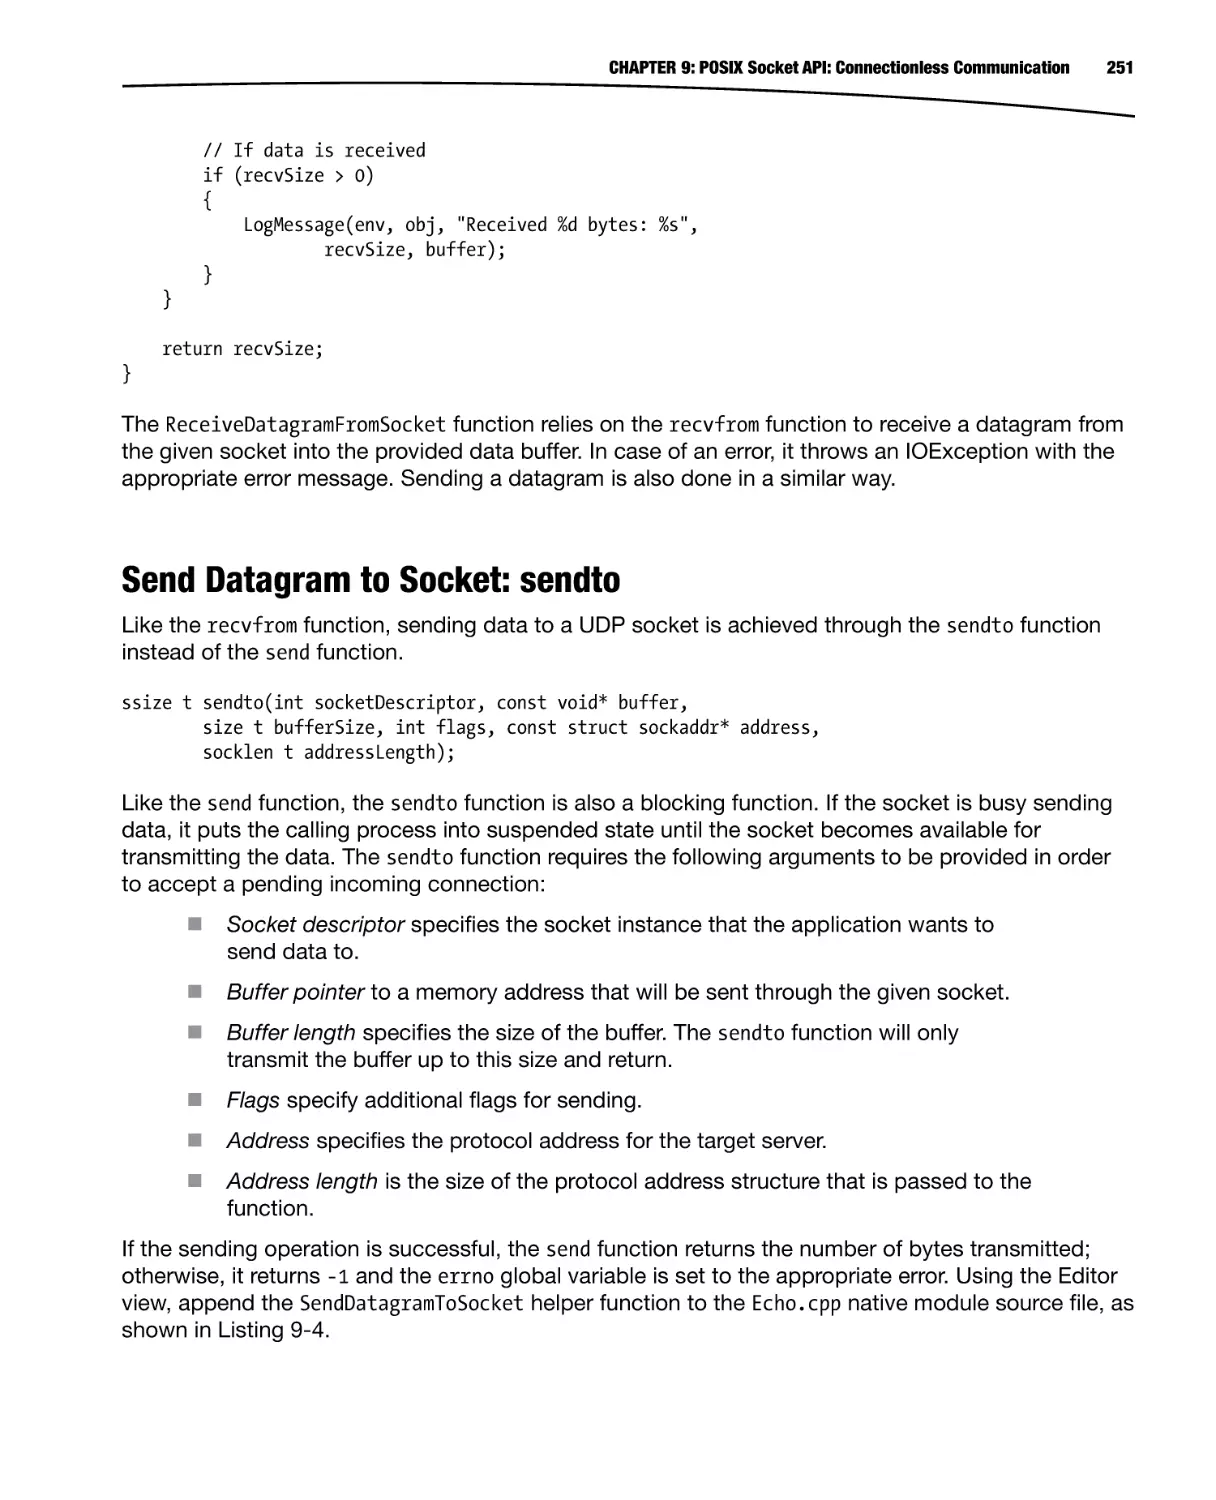
running the Android NDK’s build system. At the time of this writing, Android NDK requires Cygwin
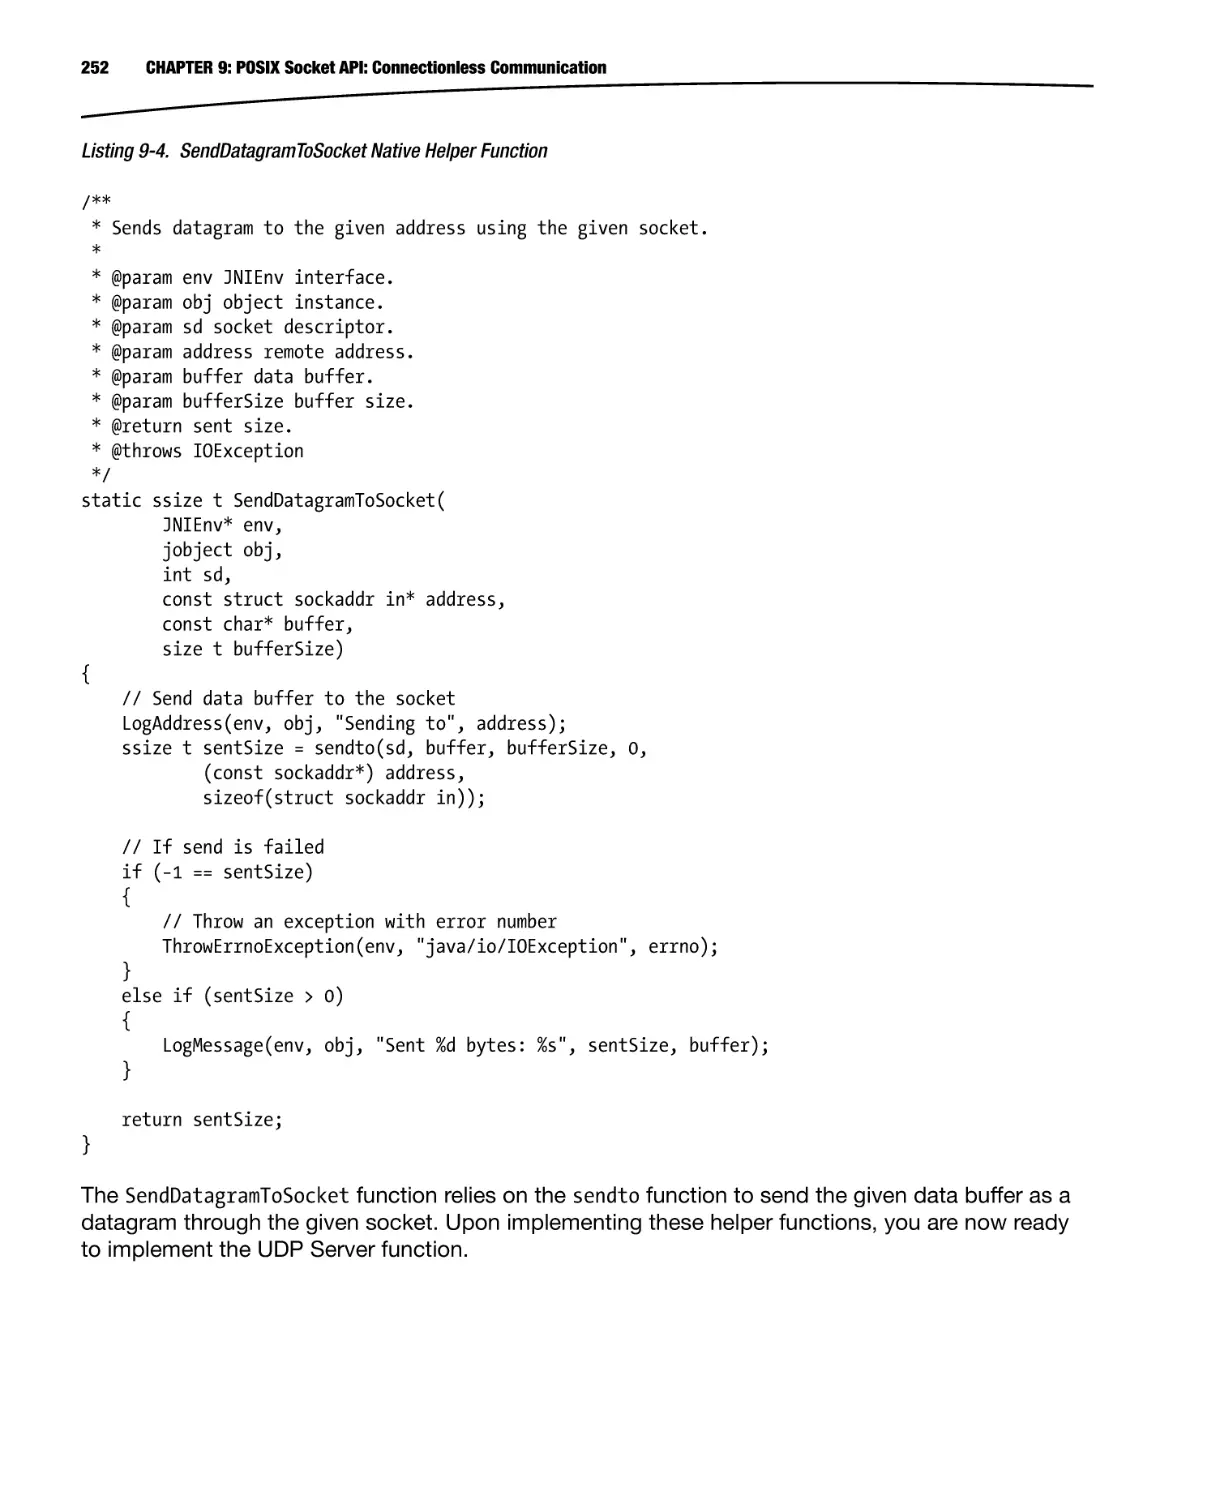
1.7 to be installed in order to function. Navigate to http://cygwin.com/install.html and download
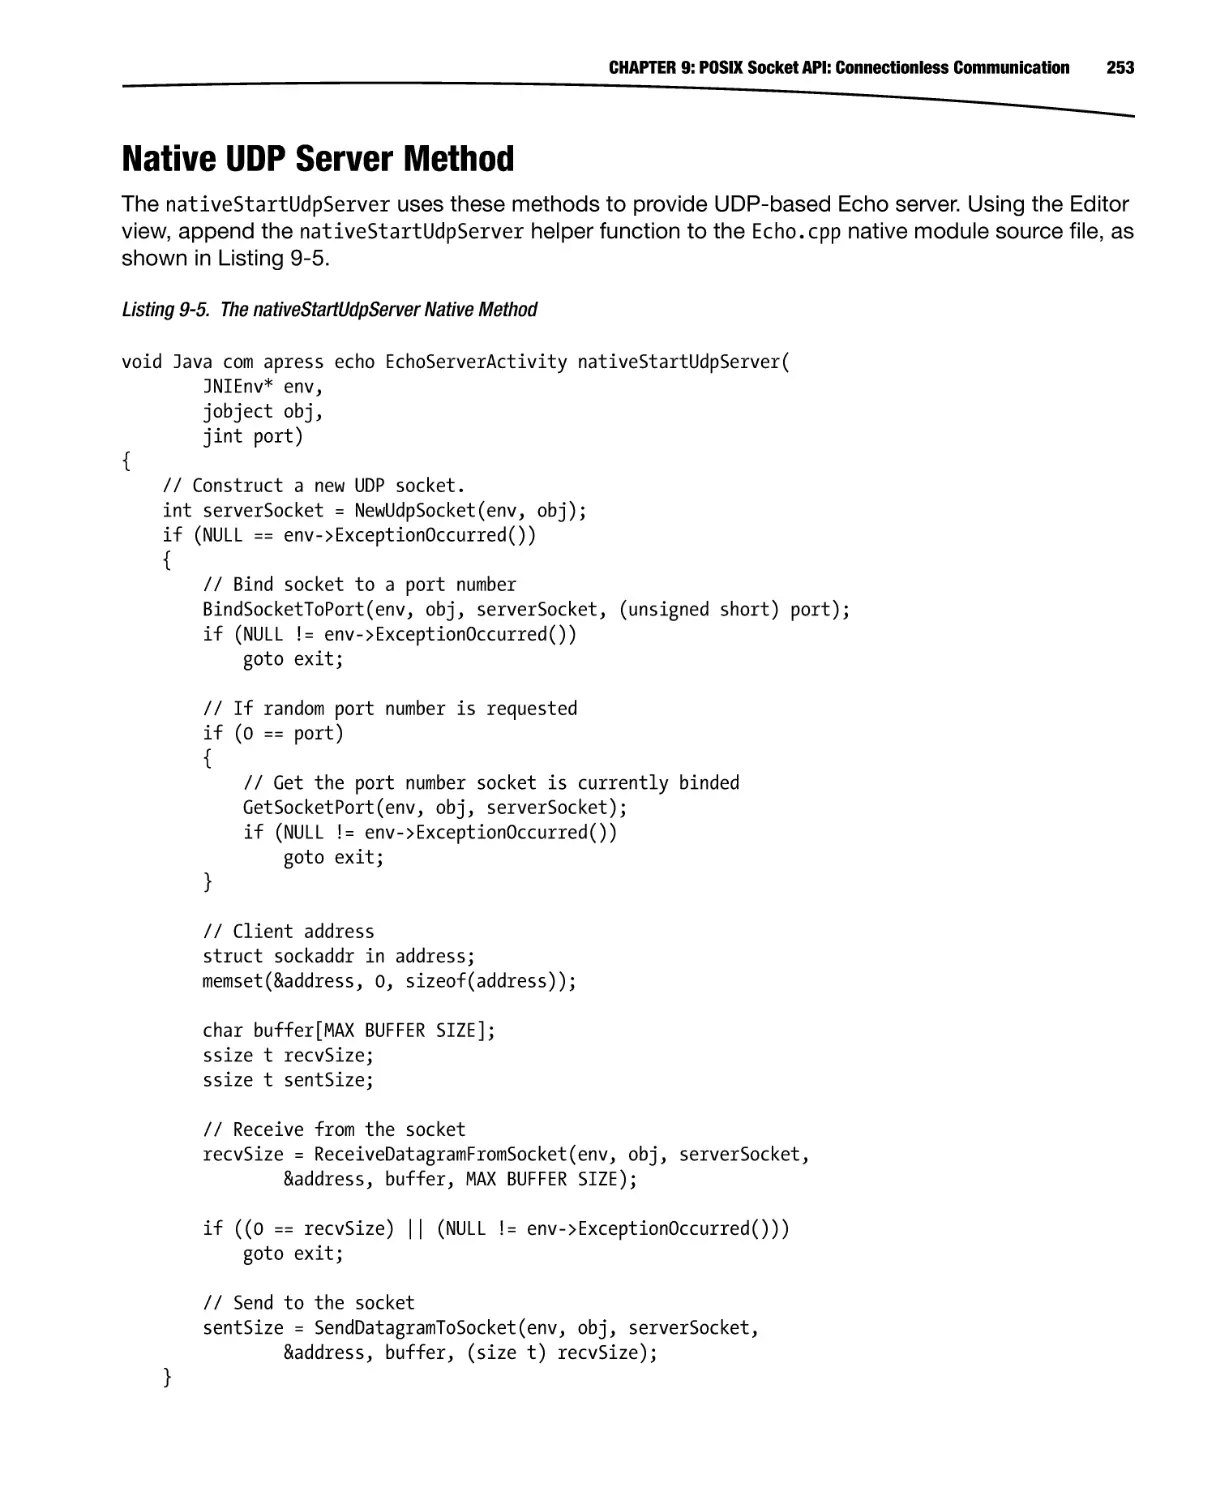
the Cygwin installer, setup.exe (see Figure 1-18).
Figure 1-18. Download the Cygwin setup application
Upon starting the setup application, you will see the Cygwin installation wizard welcome screen.
Click the Next button and follow these steps to proceed with the installation:
1.
Installation will ask you to choose the download source. Keep the default
selection of “Install from Internet” and click the Next button to proceed.
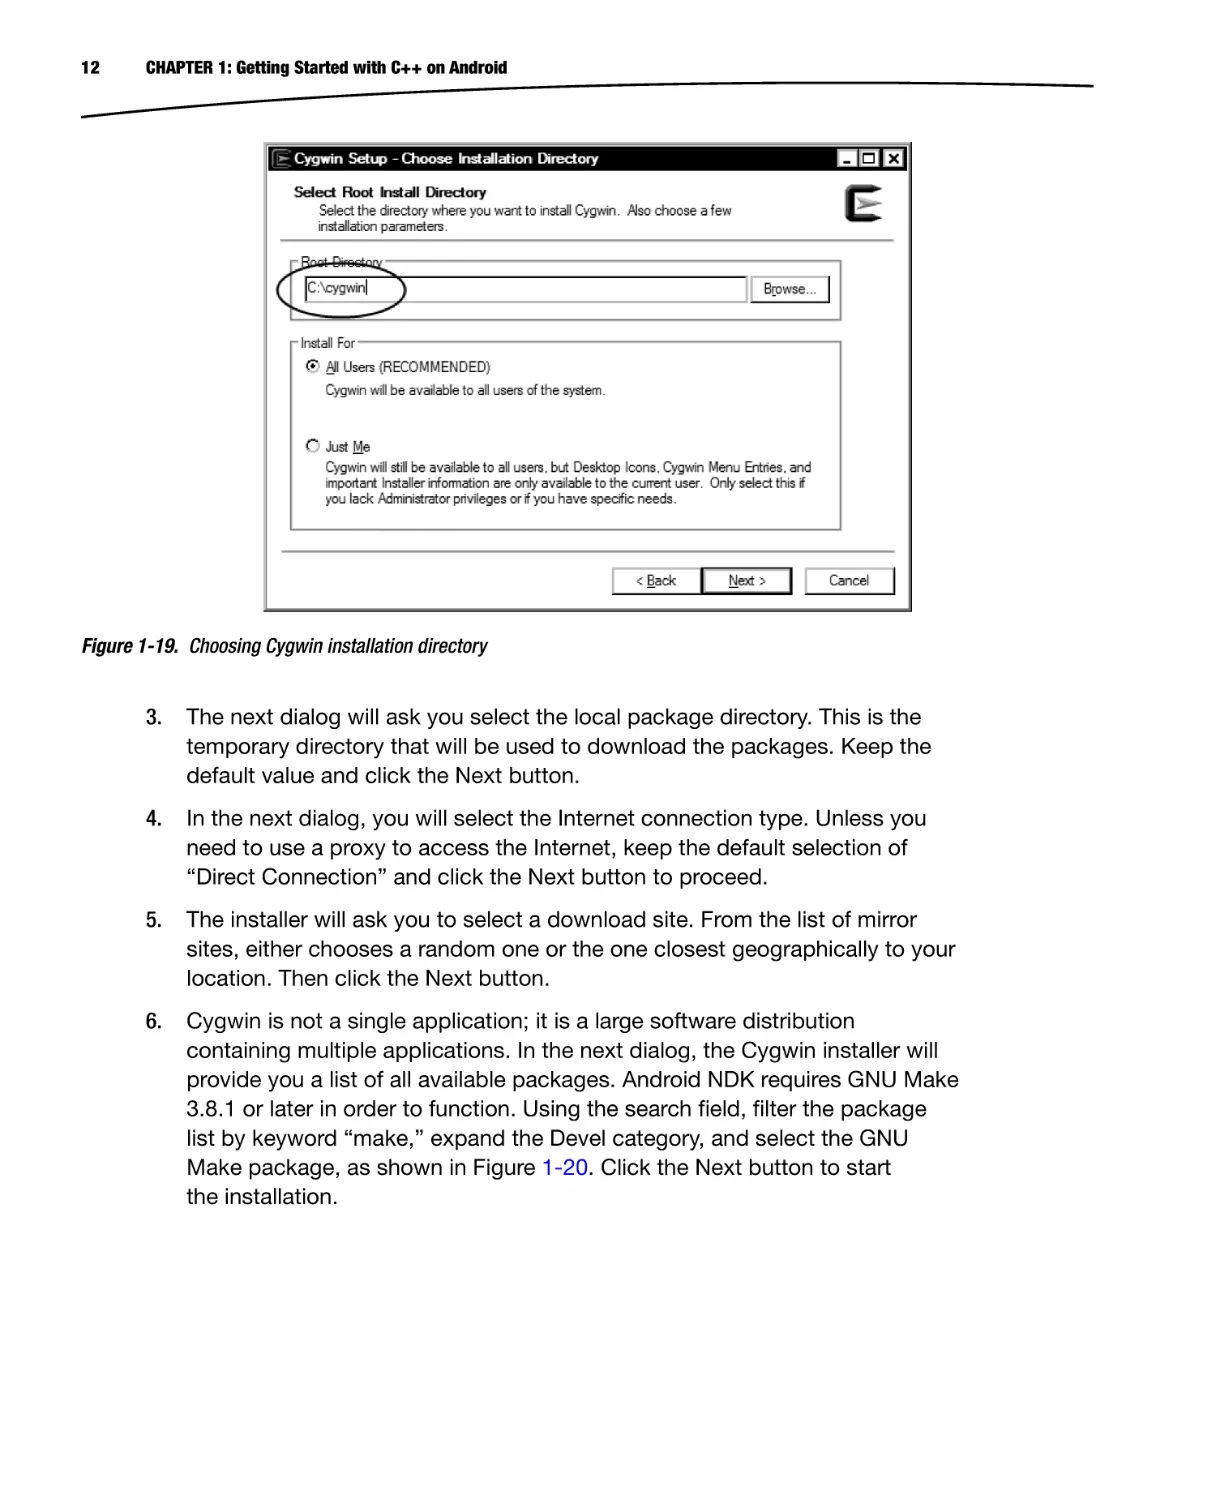
2.
In the next dialog, the installer will ask you select the directory where you
want to install Cygwin, as shown in Figure 1-19. By default Cygwin will be
installed under C:\cygwin directory. Note the destination directory and click
the Next button.
12
CHAPTER 1: Getting Started with C++ on Android
Figure 1-19. Choosing Cygwin installation directory
3.
The next dialog will ask you select the local package directory. This is the
temporary directory that will be used to download the packages. Keep the
default value and click the Next button.
4.
In the next dialog, you will select the Internet connection type. Unless you
need to use a proxy to access the Internet, keep the default selection of
“Direct Connection” and click the Next button to proceed.
5.
The installer will ask you to select a download site. From the list of mirror
sites, either chooses a random one or the one closest geographically to your
location. Then click the Next button.
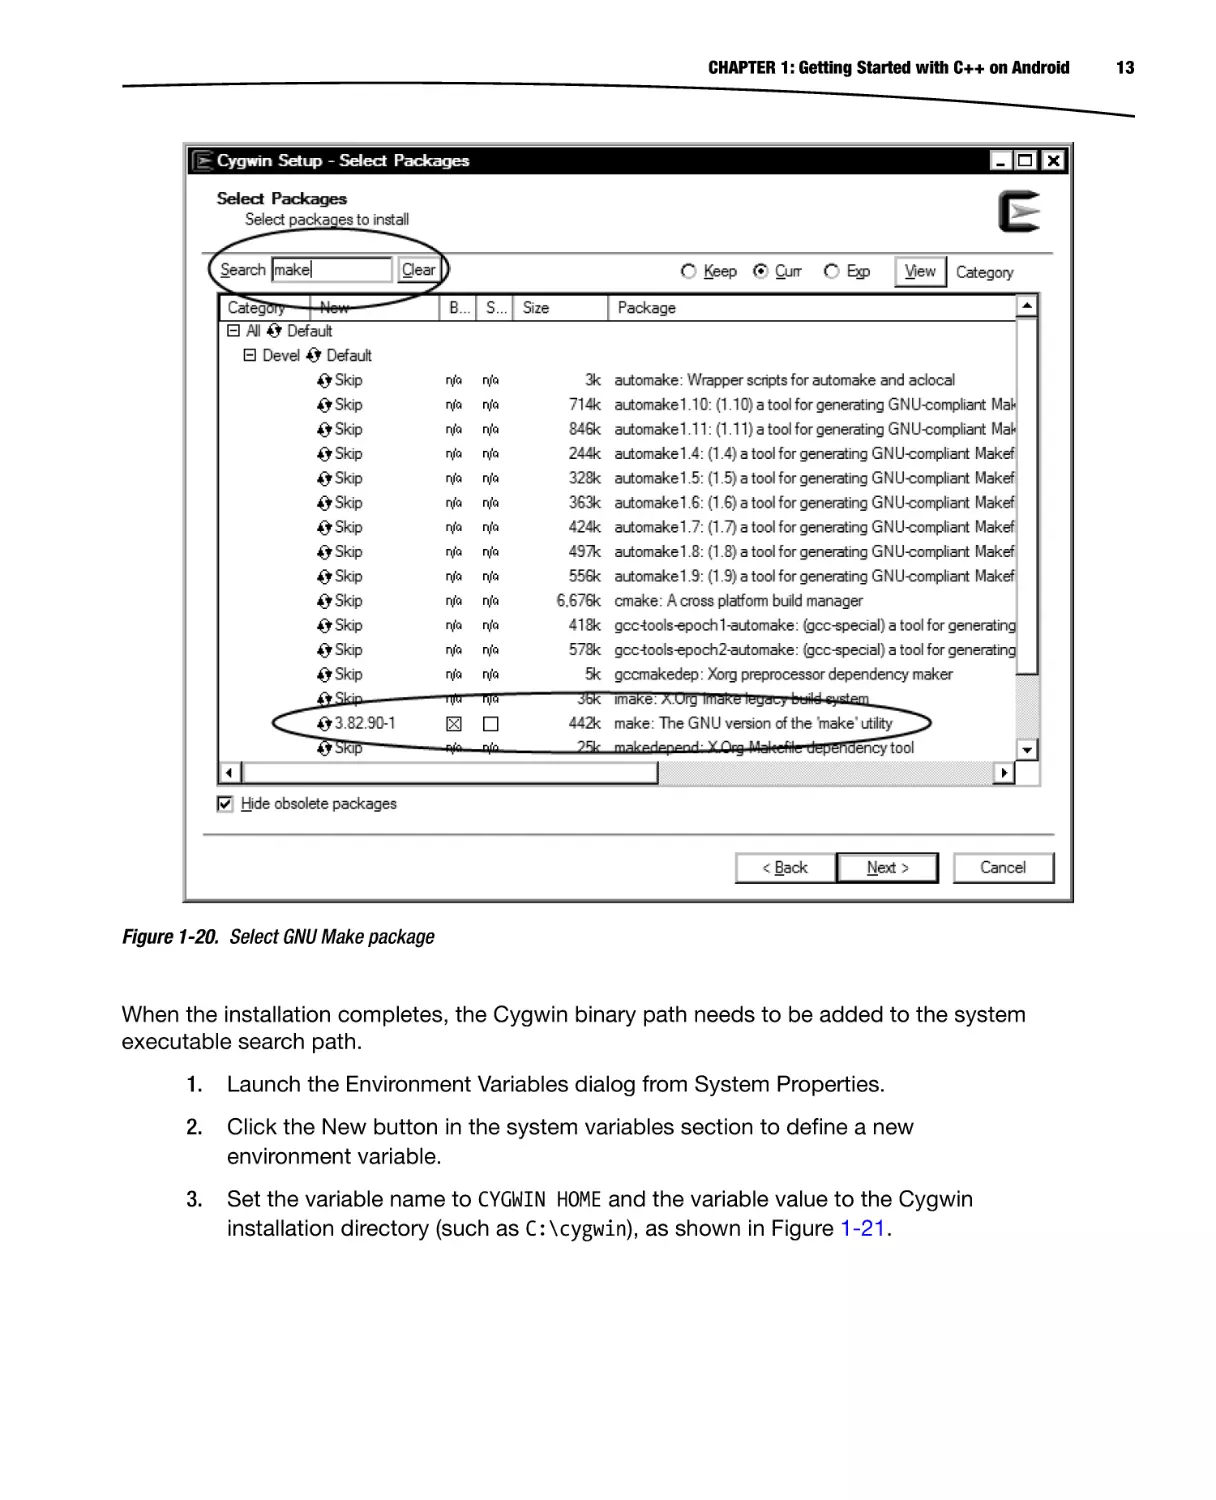
6.
Cygwin is not a single application; it is a large software distribution
containing multiple applications. In the next dialog, the Cygwin installer will
provide you a list of all available packages. Android NDK requires GNU Make
3.8.1 or later in order to function. Using the search field, filter the package
list by keyword “make,” expand the Devel category, and select the GNU
Make package, as shown in Figure 1-20. Click the Next button to start
the installation.
CHAPTER 1: Getting Started with C++ on Android
Figure 1-20. Select GNU Make package
When the installation completes, the Cygwin binary path needs to be added to the system
executable search path.
1.
Launch the Environment Variables dialog from System Properties.
2.
Click the New button in the system variables section to define a new
environment variable.
3.
Set the variable name to CYGWIN HOME and the variable value to the Cygwin
installation directory (such as C:\cygwin), as shown in Figure 1-21.
13
14
CHAPTER 1: Getting Started with C++ on Android
Figure 1-21. CYGWIN_HOME environment variable
4.
From the list of system variables in the Environment Variables dialog, double-click
the PATH variable and append ;%CYGWIN HOME%\bin to the variable value, as shown
in Figure 1-22.
Figure 1-22. Appending Cygwin binary path to system PATH variable
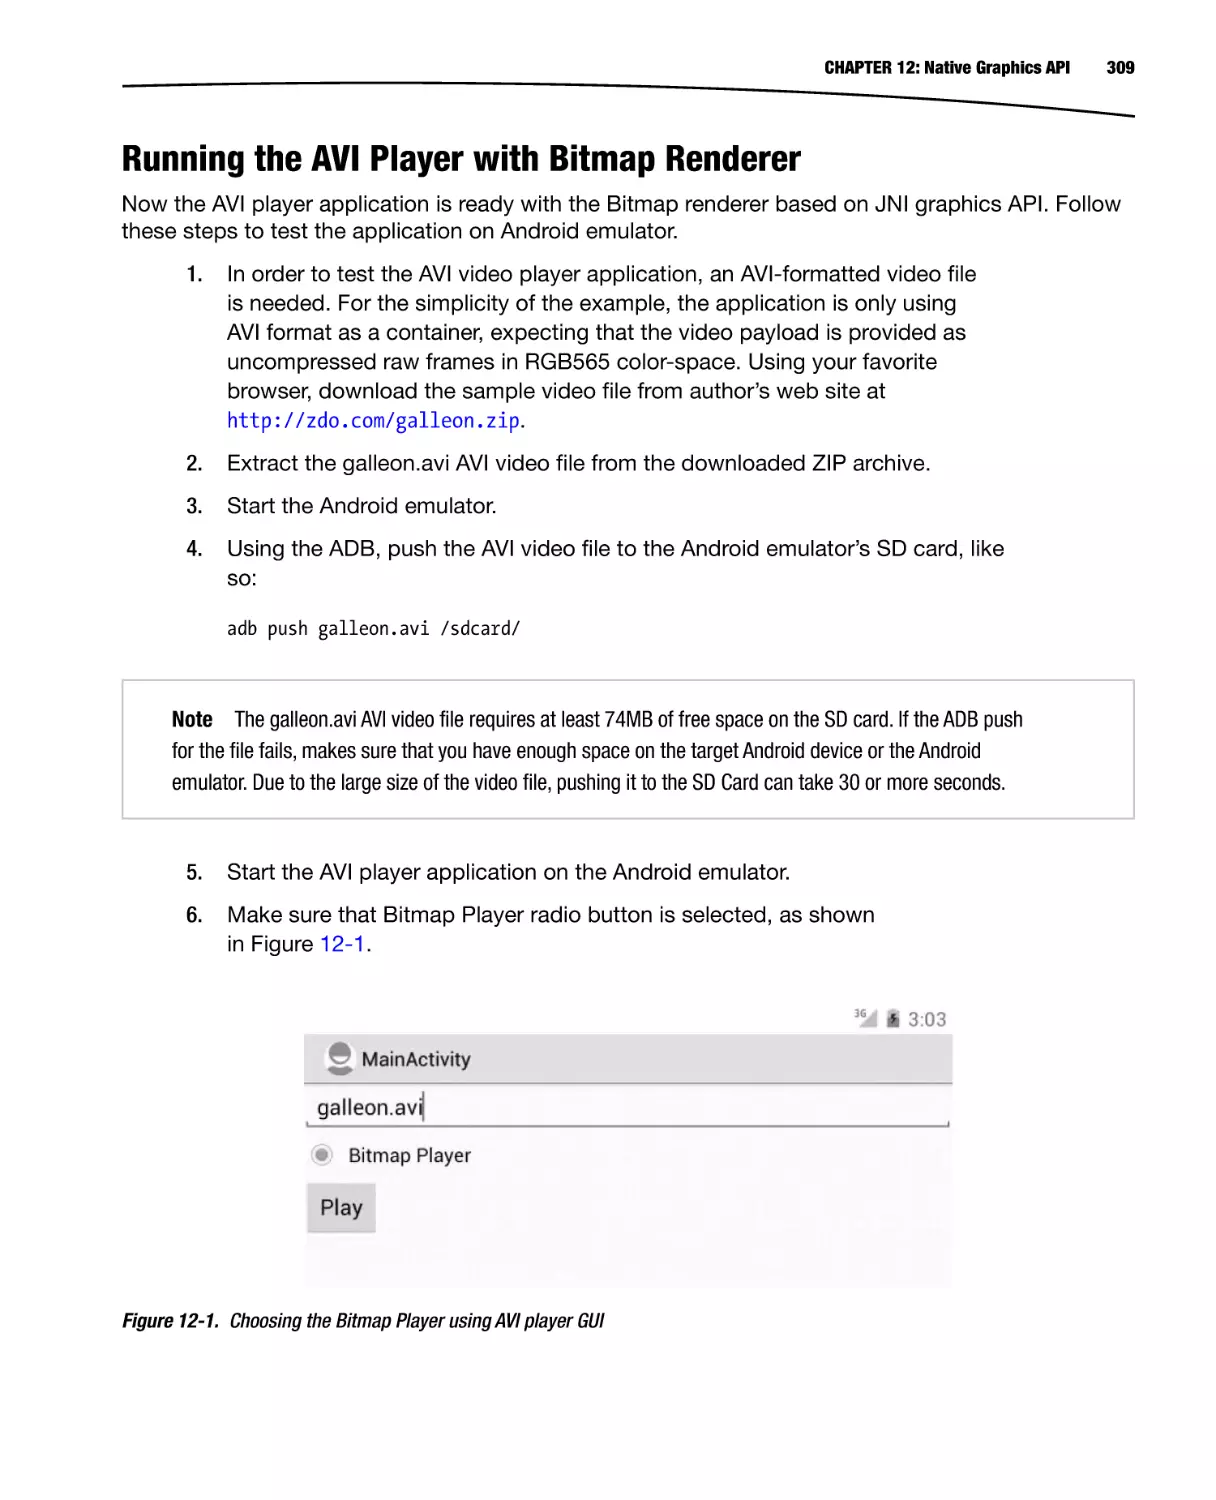
After completing this last installation step, Cygwin tools are now part of the system executable
search path. In order to validate the installation, open a command prompt window. Using the
command prompt, execute make -version. If the installation was successful, you will see the GNU
Make version number, as shown in Figure 1-23.
Figure 1-23. Validating Cygwin installation
Downloading and Installing the Android NDK on Windows
The Android Native Development Kit (NDK) is a companion tool to Android SDK that lets you develop
Android applications using native programming languages such as C++. Android NDK provide
header files, libraries, and cross-compiler toolchains. At the time of this writing, the latest version for
CHAPTER 1: Getting Started with C++ on Android
15
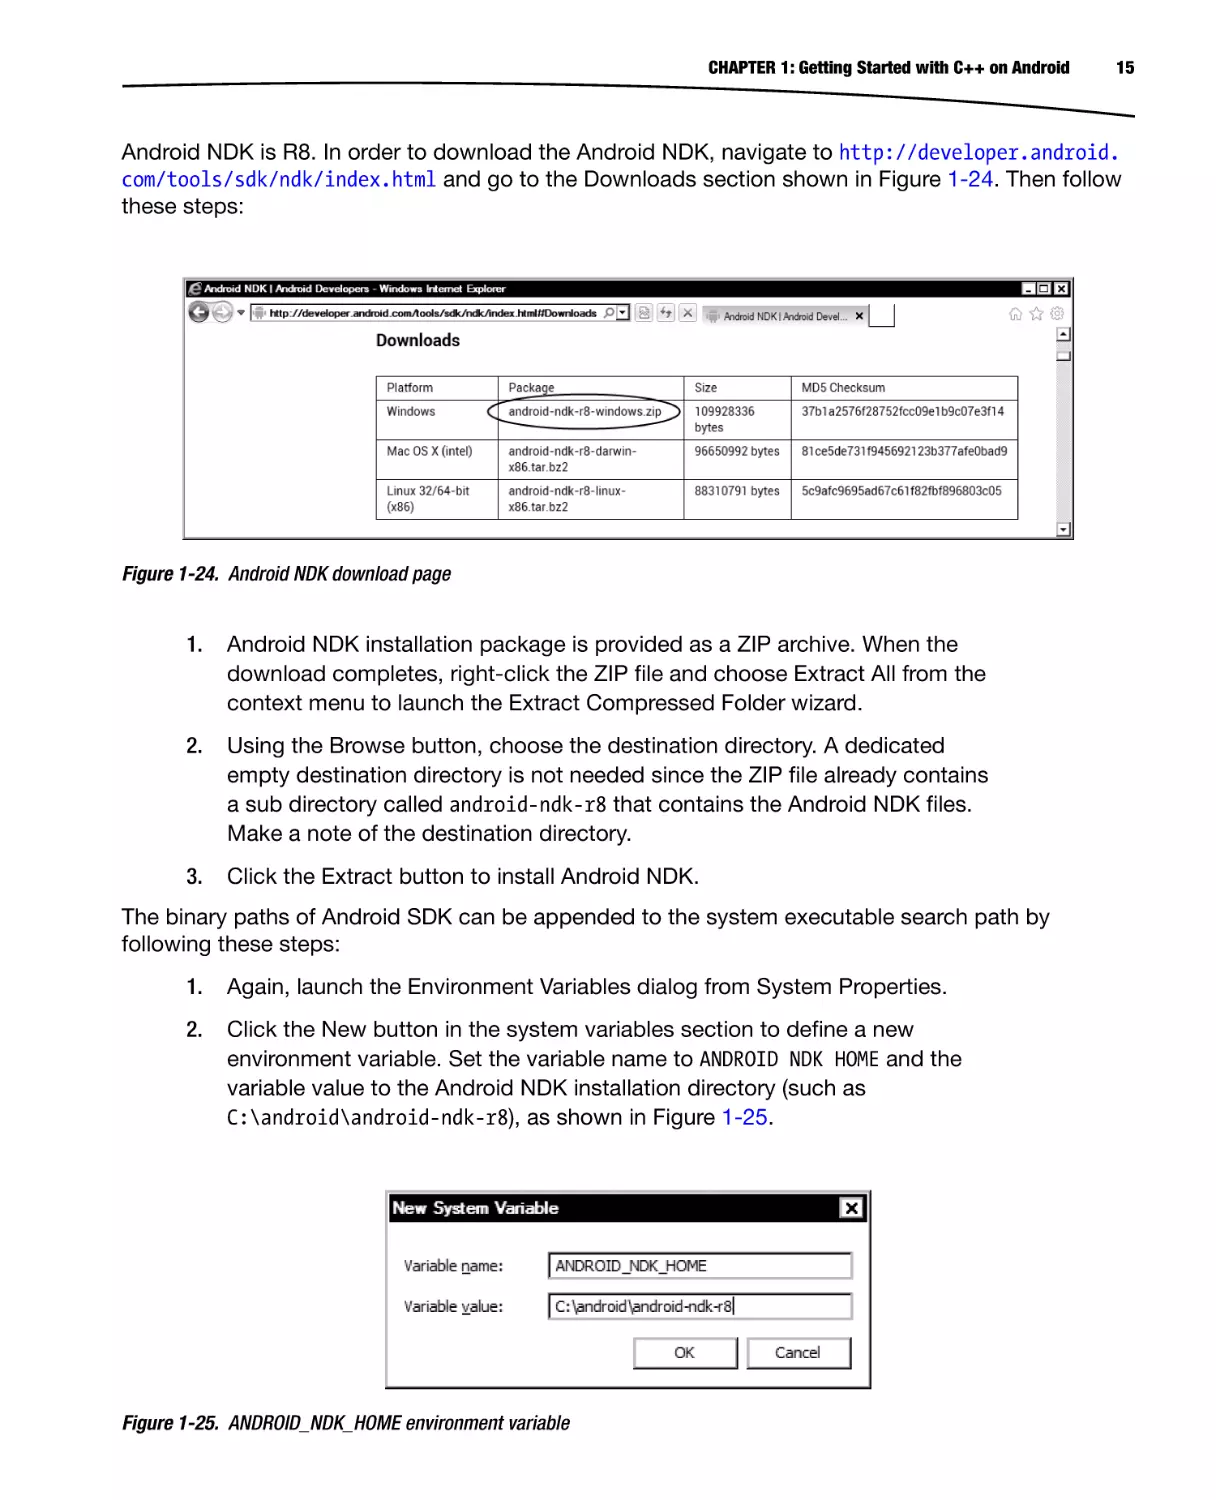
Android NDK is R8. In order to download the Android NDK, navigate to http://developer.android.
com/tools/sdk/ndk/index.html and go to the Downloads section shown in Figure 1-24. Then follow
these steps:
Figure 1-24. Android NDK download page
1.
Android NDK installation package is provided as a ZIP archive. When the
download completes, right-click the ZIP file and choose Extract All from the
context menu to launch the Extract Compressed Folder wizard.
2.
Using the Browse button, choose the destination directory. A dedicated
empty destination directory is not needed since the ZIP file already contains
a sub directory called android-ndk-r8 that contains the Android NDK files.
Make a note of the destination directory.
3.
Click the Extract button to install Android NDK.
The binary paths of Android SDK can be appended to the system executable search path by
following these steps:
1.
Again, launch the Environment Variables dialog from System Properties.
2.
Click the New button in the system variables section to define a new
environment variable. Set the variable name to ANDROID NDK HOME and the
variable value to the Android NDK installation directory (such as
C:\android\android-ndk-r8), as shown in Figure 1-25.
Figure 1-25. ANDROID_NDK_HOME environment variable
16
CHAPTER 1: Getting Started with C++ on Android
3.
Click the OK button to save the new environment variable.
4.
From the list of system variables in the Environment Variables dialog, double-click
the PATH variable and append ;%ANDROID NDK HOME% to the variable value, as
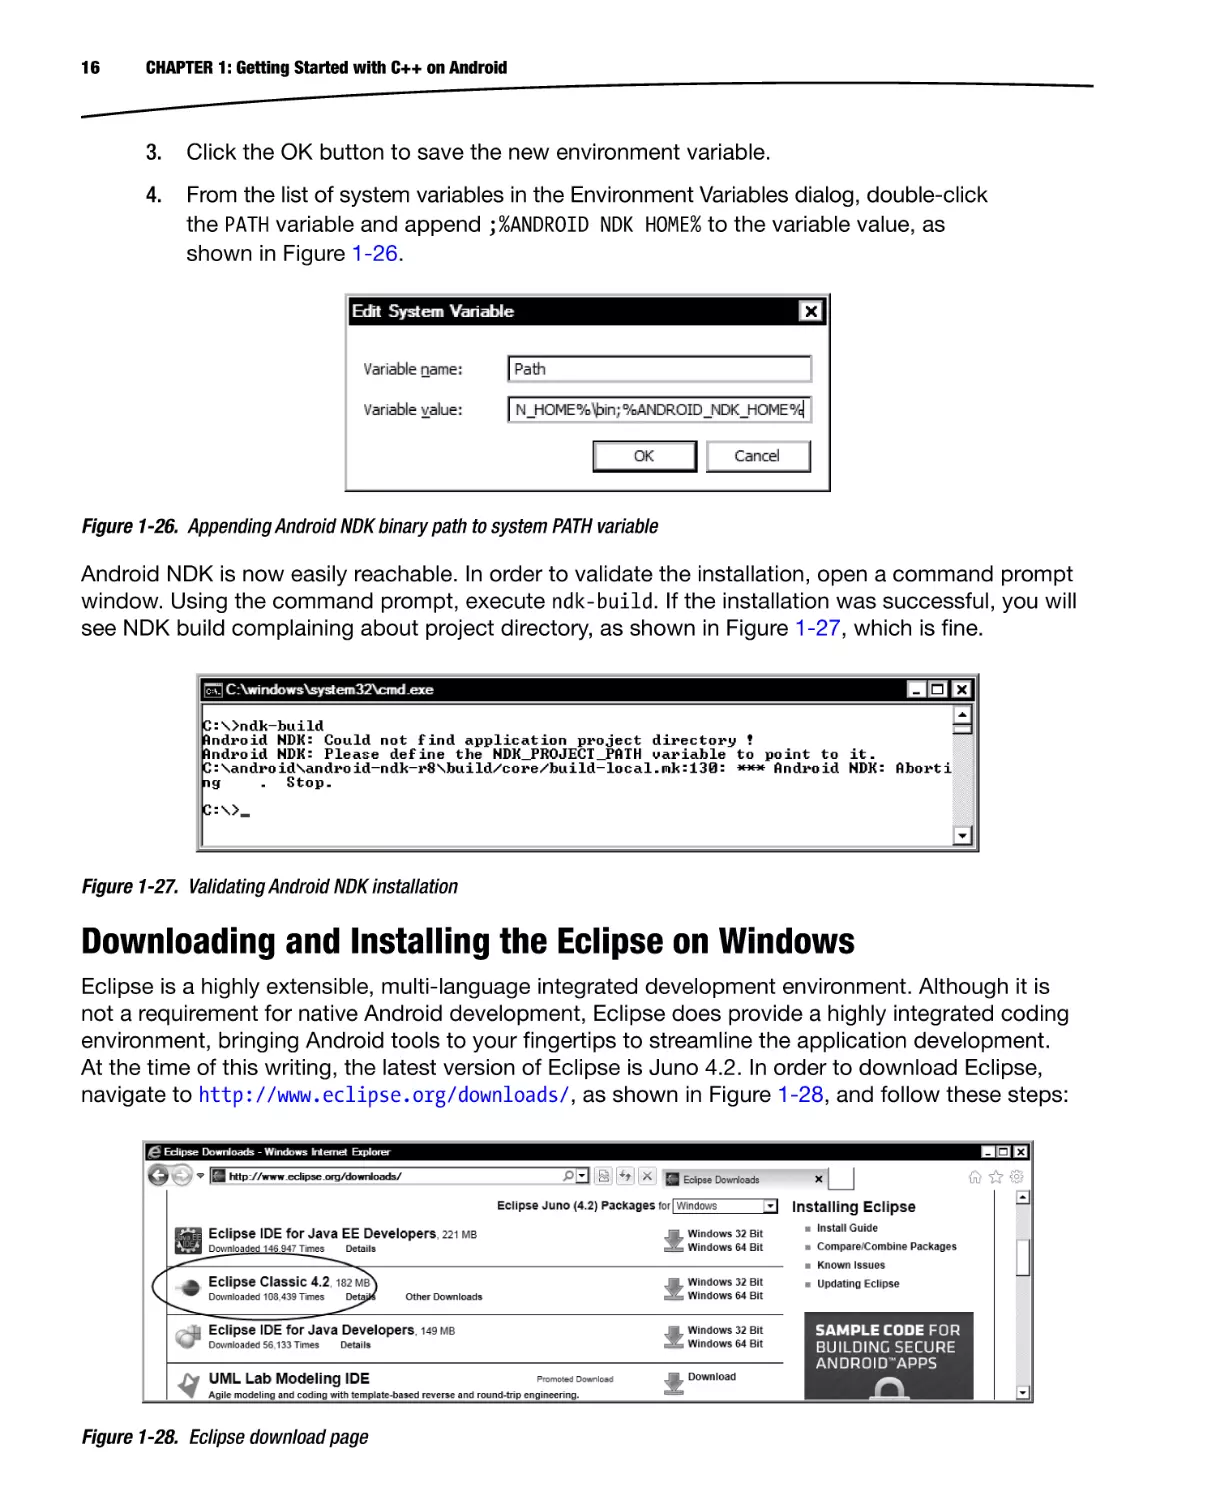
shown in Figure 1-26.
Figure 1-26. Appending Android NDK binary path to system PATH variable
Android NDK is now easily reachable. In order to validate the installation, open a command prompt
window. Using the command prompt, execute ndk-build. If the installation was successful, you will
see NDK build complaining about project directory, as shown in Figure 1-27, which is fine.
Figure 1-27. Validating Android NDK installation
Downloading and Installing the Eclipse on Windows
Eclipse is a highly extensible, multi-language integrated development environment. Although it is
not a requirement for native Android development, Eclipse does provide a highly integrated coding
environment, bringing Android tools to your fingertips to streamline the application development.
At the time of this writing, the latest version of Eclipse is Juno 4.2. In order to download Eclipse,
navigate to http://www.eclipse.org/downloads/, as shown in Figure 1-28, and follow these steps:
Figure 1-28. Eclipse download page
CHAPTER 1: Getting Started with C++ on Android
1.
Download the Eclipse Classic for Windows 32 Bit from the list. The Eclipse
installation package is provided as a ZIP archive.
2.
When the download completes, right-click the ZIP file and choose Extract All
from the context menu to launch the Extract Compressed Folder wizard.
3.
Using the Browse button, choose the destination directory. A dedicated
empty destination directory is not needed since the ZIP file already contains
a sub directory called eclipse that holds the Eclipse files.
4.
Click the Extract button to install Eclipse.
5.
In order to make Eclipse easily accessible, go to the Eclipse installation
directory.
6.
Right-click the Eclipse binary and choose Send ➤ Desktop to make a
shortcut to Eclipse on your Windows desktop.
To validate the Eclipse installation, double-click the Eclipse icon. If the installation was successful,
you will see the Eclipse Workspace Launcher dialog shown in Figure 1-29.
Figure 1-29. Validating Eclipse installation
Apple Mac OS X
Android development tools require Mac OS X 10.5.8 or later and an x86 system. Since Android
development tools were initially designed to work on UNIX-like systems, most of its dependencies
are already available on the platform either through OS X directly or through the Xcode developer
tools. In this section, you will be downloading and installing the following components:
Xcode
Java JDK 6
Apache ANT Build System
GNU Make
17
18
CHAPTER 1: Getting Started with C++ on Android
Android SDK
Android NDK
Eclipse IDE
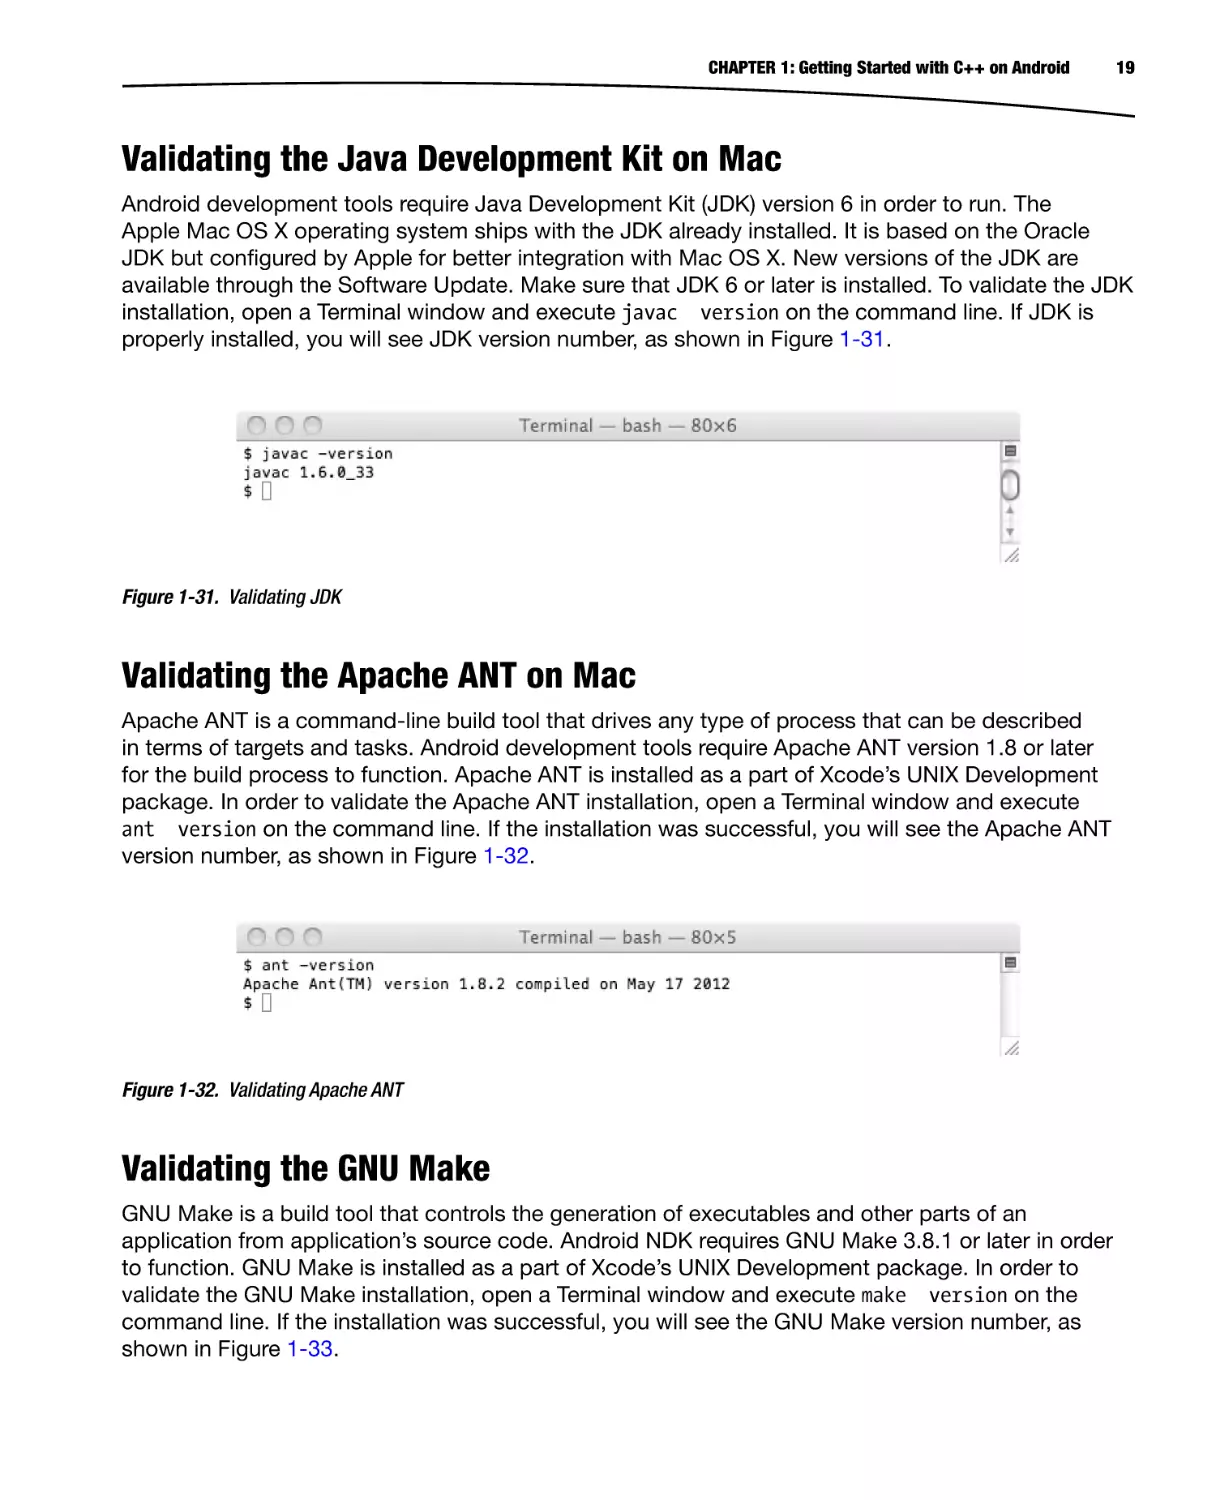
Installing Xcode on Mac
Xcode provides developer tools for application development on the OS X platform. Xcode can be
found at Mac OS X installation media or through the Mac App Store free of charge. Navigate to
https://developer.apple.com/xcode/ for more information. Starting the Xcode installer will take you
to the Xcode installation wizard, which will guide you through the installation process.
1.
Approve the licenses.
2.
Select the destination directory.
3.
The Install wizard will show the list of Xcode components that can be
installed. From this list, select the UNIX Development package shown in
Figure 1-30.
Figure 1-30. Xcode custom installation dialog
4.
Click the Continue button to start the installation.
CHAPTER 1: Getting Started with C++ on Android
19
Validating the Java Development Kit on Mac
Android development tools require Java Development Kit (JDK) version 6 in order to run. The
Apple Mac OS X operating system ships with the JDK already installed. It is based on the Oracle
JDK but configured by Apple for better integration with Mac OS X. New versions of the JDK are
available through the Software Update. Make sure that JDK 6 or later is installed. To validate the JDK
installation, open a Terminal window and execute javac version on the command line. If JDK is
properly installed, you will see JDK version number, as shown in Figure 1-31.
Figure 1-31. Validating JDK
Validating the Apache ANT on Mac
Apache ANT is a command-line build tool that drives any type of process that can be described
in terms of targets and tasks. Android development tools require Apache ANT version 1.8 or later
for the build process to function. Apache ANT is installed as a part of Xcode’s UNIX Development
package. In order to validate the Apache ANT installation, open a Terminal window and execute
ant version on the command line. If the installation was successful, you will see the Apache ANT
version number, as shown in Figure 1-32.
Figure 1-32. Validating Apache ANT
Validating the GNU Make
GNU Make is a build tool that controls the generation of executables and other parts of an
application from application’s source code. Android NDK requires GNU Make 3.8.1 or later in order
to function. GNU Make is installed as a part of Xcode’s UNIX Development package. In order to
validate the GNU Make installation, open a Terminal window and execute make version on the
command line. If the installation was successful, you will see the GNU Make version number, as
shown in Figure 1-33.
20
CHAPTER 1: Getting Started with C++ on Android
Figure 1-33. Validating GNU Make
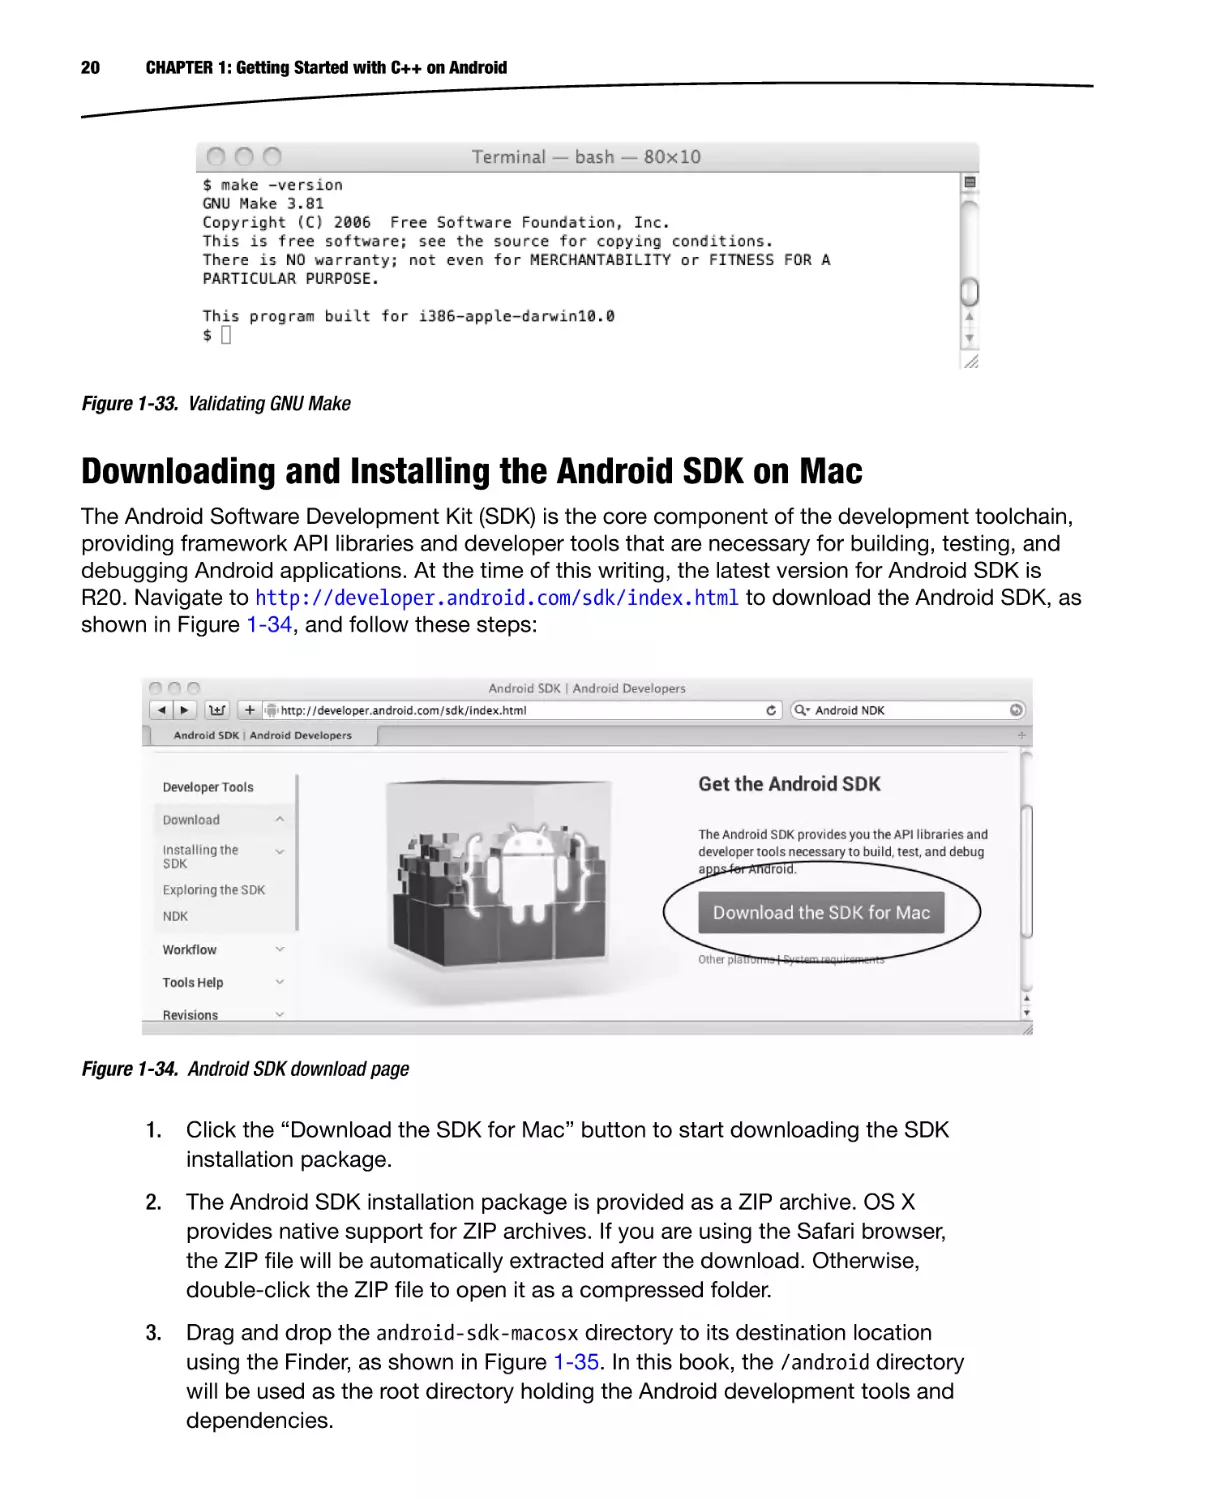
Downloading and Installing the Android SDK on Mac
The Android Software Development Kit (SDK) is the core component of the development toolchain,
providing framework API libraries and developer tools that are necessary for building, testing, and
debugging Android applications. At the time of this writing, the latest version for Android SDK is
R20. Navigate to http://developer.android.com/sdk/index.html to download the Android SDK, as
shown in Figure 1-34, and follow these steps:
Figure 1-34. Android SDK download page
1.
Click the “Download the SDK for Mac” button to start downloading the SDK
installation package.
2.
The Android SDK installation package is provided as a ZIP archive. OS X
provides native support for ZIP archives. If you are using the Safari browser,
the ZIP file will be automatically extracted after the download. Otherwise,
double-click the ZIP file to open it as a compressed folder.
3.
Drag and drop the android-sdk-macosx directory to its destination location
using the Finder, as shown in Figure 1-35. In this book, the /android directory
will be used as the root directory holding the Android development tools and
dependencies.
CHAPTER 1: Getting Started with C++ on Android
21
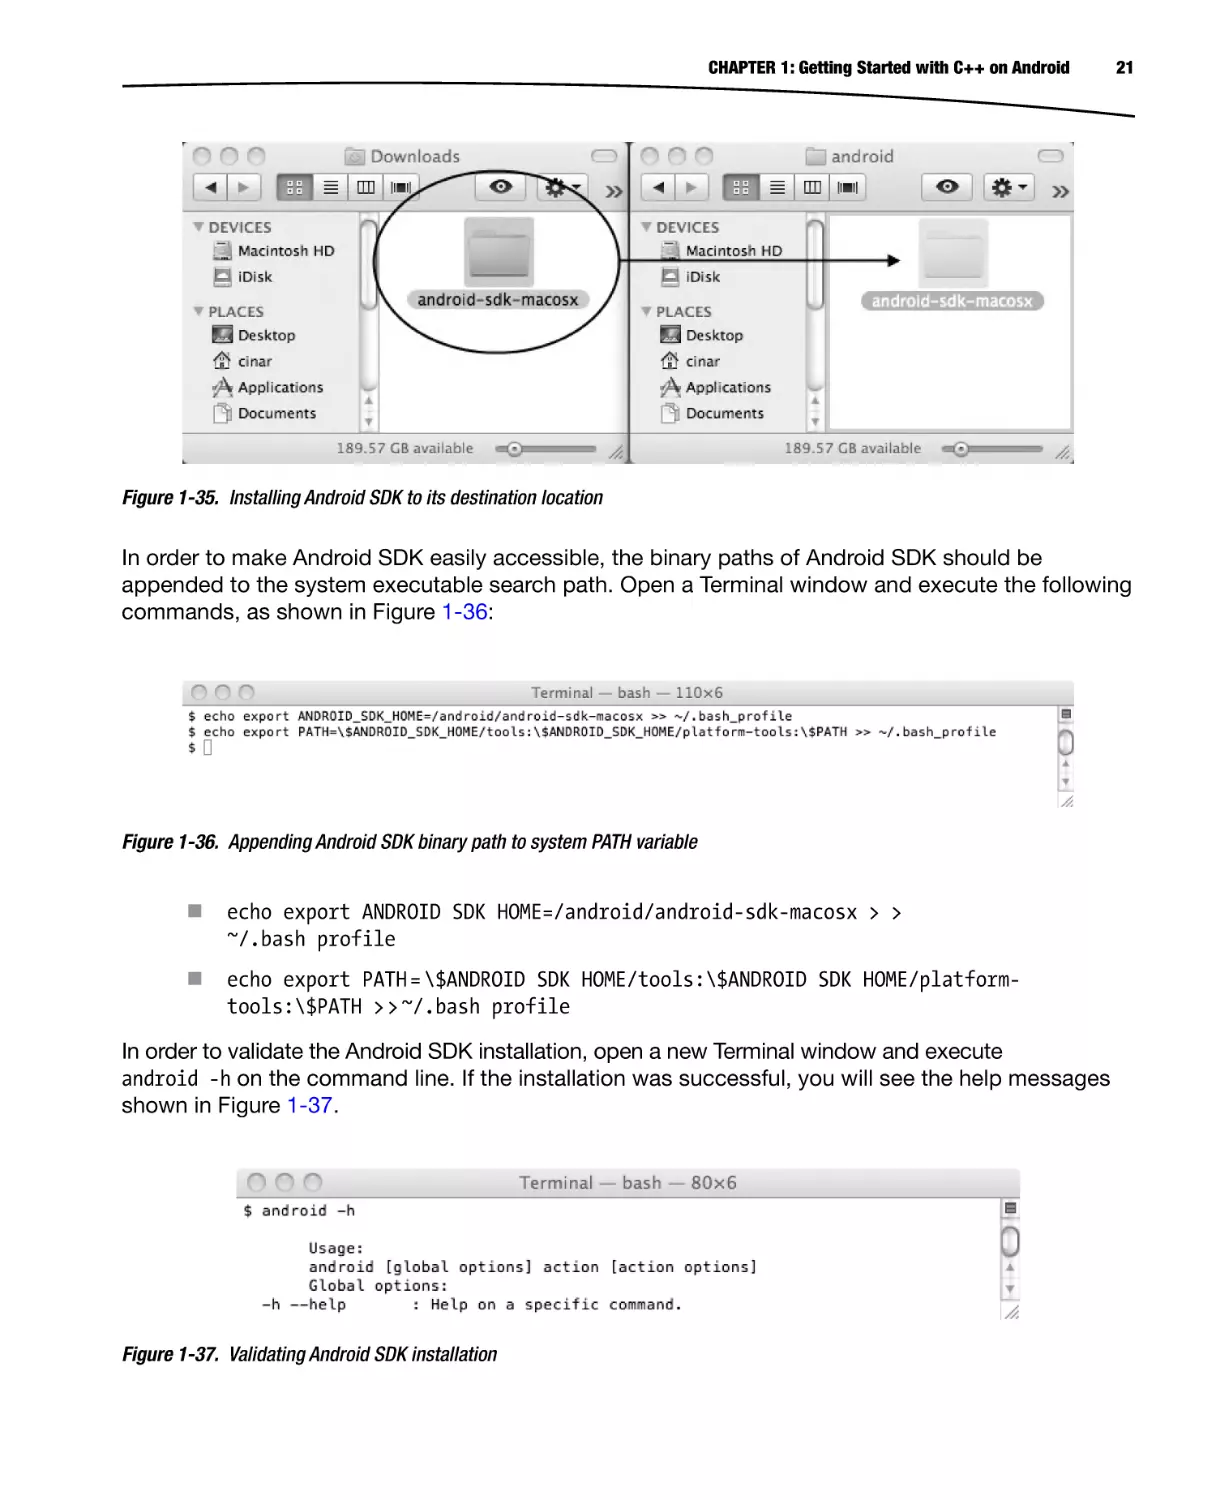
Figure 1-35. Installing Android SDK to its destination location
In order to make Android SDK easily accessible, the binary paths of Android SDK should be
appended to the system executable search path. Open a Terminal window and execute the following
commands, as shown in Figure 1-36:
Figure 1-36. Appending Android SDK binary path to system PATH variable
echo export ANDROID SDK HOME=/android/android-sdk-macosx > >
~/.bash profile
echo export PATH = \$ANDROID SDK HOME/tools:\$ANDROID SDK HOME/platformtools:\$PATH > > ~/.bash profile
In order to validate the Android SDK installation, open a new Terminal window and execute
android -h on the command line. If the installation was successful, you will see the help messages
shown in Figure 1-37.
Figure 1-37. Validating Android SDK installation
22
CHAPTER 1: Getting Started with C++ on Android
Downloading and Installing the Android NDK on Mac
Android Native Development Kit (NDK) is a companion tool to Android SDK that lets you develop
Android applications using native programming languages such as C++. The Android NDK provides
header files, libraries, and cross-compiler toolchains. At the time of this writing, the latest version for
Android NDK is R8. In order to download the Android NDK, navigate to http://developer.android.
com/tools/sdk/ndk/index.html and go to the Downloads section, as shown in Figure 1-38. Then
follow these steps:
Figure 1-38. Android NDK download page
1.
Click to download the installation package. The Android NDK installation
package is provided as a BZIP’ed TAR archive. OS X does not automatically
extract this type of archive files.
2.
In order to manually extract the archive file, open a Terminal window.
3.
Go into the destination directory /android.
4.
Execute tar jxvf ~/Downloads/android-ndk-r8-darwin-x86.tar.bz2, as
shown in Figure 1-39.
Figure 1-39. Installing Android NDK
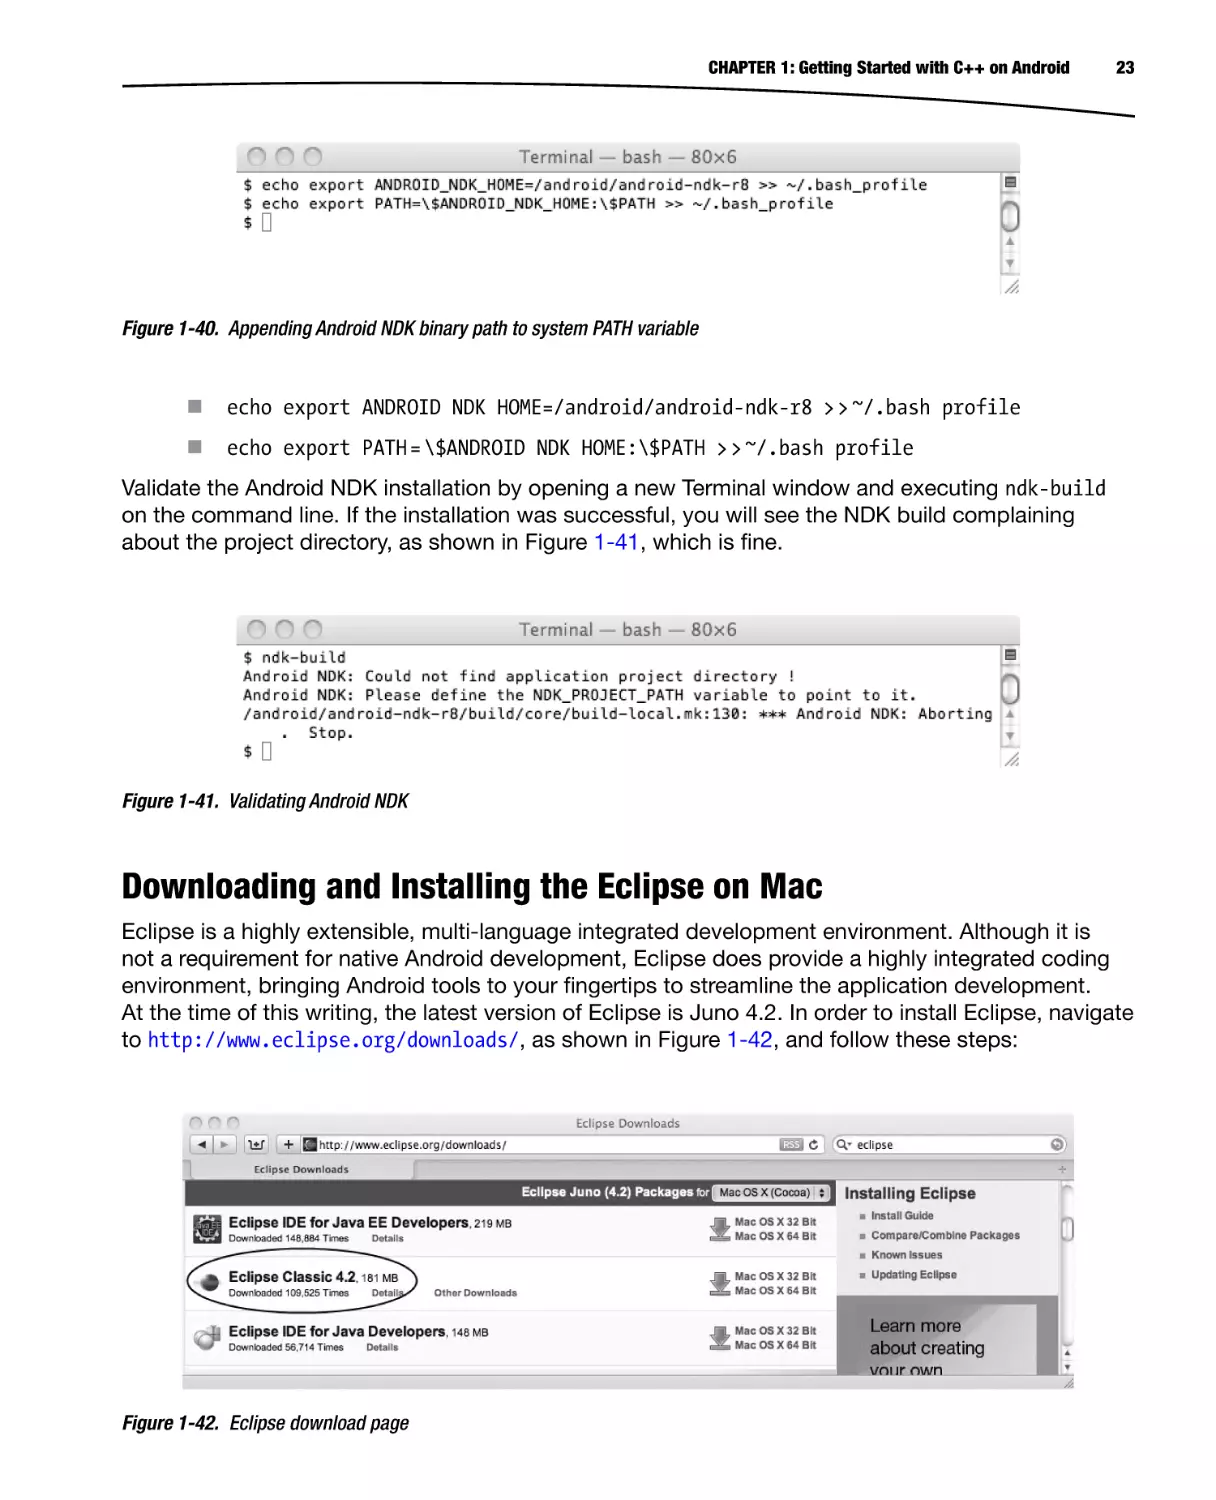
The binary paths of Android NDK should be appended to system-executable search path to make it
easily accessible. Open a Terminal window and execute the following commands (see Figure 1-40).
CHAPTER 1: Getting Started with C++ on Android
23
Figure 1-40. Appending Android NDK binary path to system PATH variable
echo export ANDROID NDK HOME=/android/android-ndk-r8 > > ~/.bash profile
echo export PATH = \$ANDROID NDK HOME:\$PATH > > ~/.bash profile
Validate the Android NDK installation by opening a new Terminal window and executing ndk-build
on the command line. If the installation was successful, you will see the NDK build complaining
about the project directory, as shown in Figure 1-41, which is fine.
Figure 1-41. Validating Android NDK
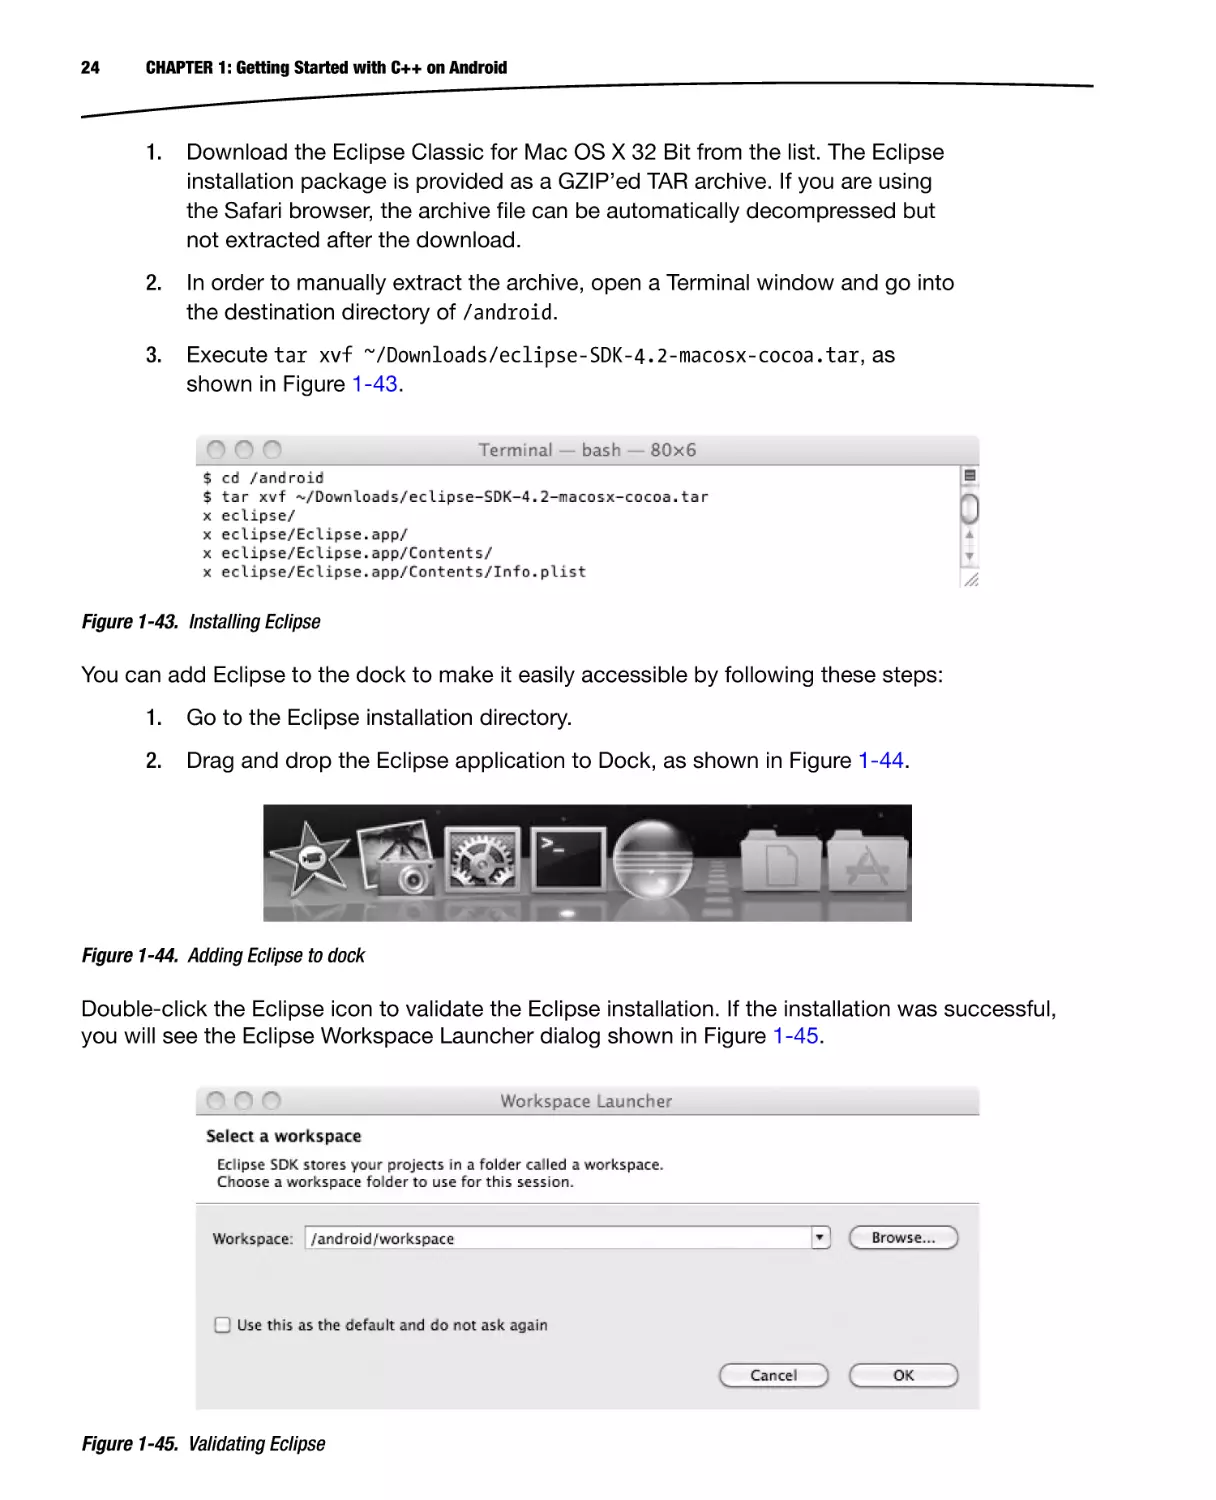
Downloading and Installing the Eclipse on Mac
Eclipse is a highly extensible, multi-language integrated development environment. Although it is
not a requirement for native Android development, Eclipse does provide a highly integrated coding
environment, bringing Android tools to your fingertips to streamline the application development.
At the time of this writing, the latest version of Eclipse is Juno 4.2. In order to install Eclipse, navigate
to http://www.eclipse.org/downloads/, as shown in Figure 1-42, and follow these steps:
Figure 1-42. Eclipse download page
24
CHAPTER 1: Getting Started with C++ on Android
1.
Download the Eclipse Classic for Mac OS X 32 Bit from the list. The Eclipse
installation package is provided as a GZIP’ed TAR archive. If you are using
the Safari browser, the archive file can be automatically decompressed but
not extracted after the download.
2.
In order to manually extract the archive, open a Terminal window and go into
the destination directory of /android.
3.
Execute tar xvf ~/Downloads/eclipse-SDK-4.2-macosx-cocoa.tar, as
shown in Figure 1-43.
Figure 1-43. Installing Eclipse
You can add Eclipse to the dock to make it easily accessible by following these steps:
1.
Go to the Eclipse installation directory.
2.
Drag and drop the Eclipse application to Dock, as shown in Figure 1-44.
Figure 1-44. Adding Eclipse to dock
Double-click the Eclipse icon to validate the Eclipse installation. If the installation was successful,
you will see the Eclipse Workspace Launcher dialog shown in Figure 1-45.
Figure 1-45. Validating Eclipse
CHAPTER 1: Getting Started with C++ on Android
25
Ubuntu Linux
Android development tools require Ubuntu Linux version 8.04 32-bit or later or any other Linux flavor
with GNU C Library (glibc) 2.7 or later. In this section, you will be downloading and installing the
following components:
Java JDK 6
Apache ANT Build System
GNU Make
Android SDK
Android NDK
Eclipse IDE
Checking the GNU C Library Version
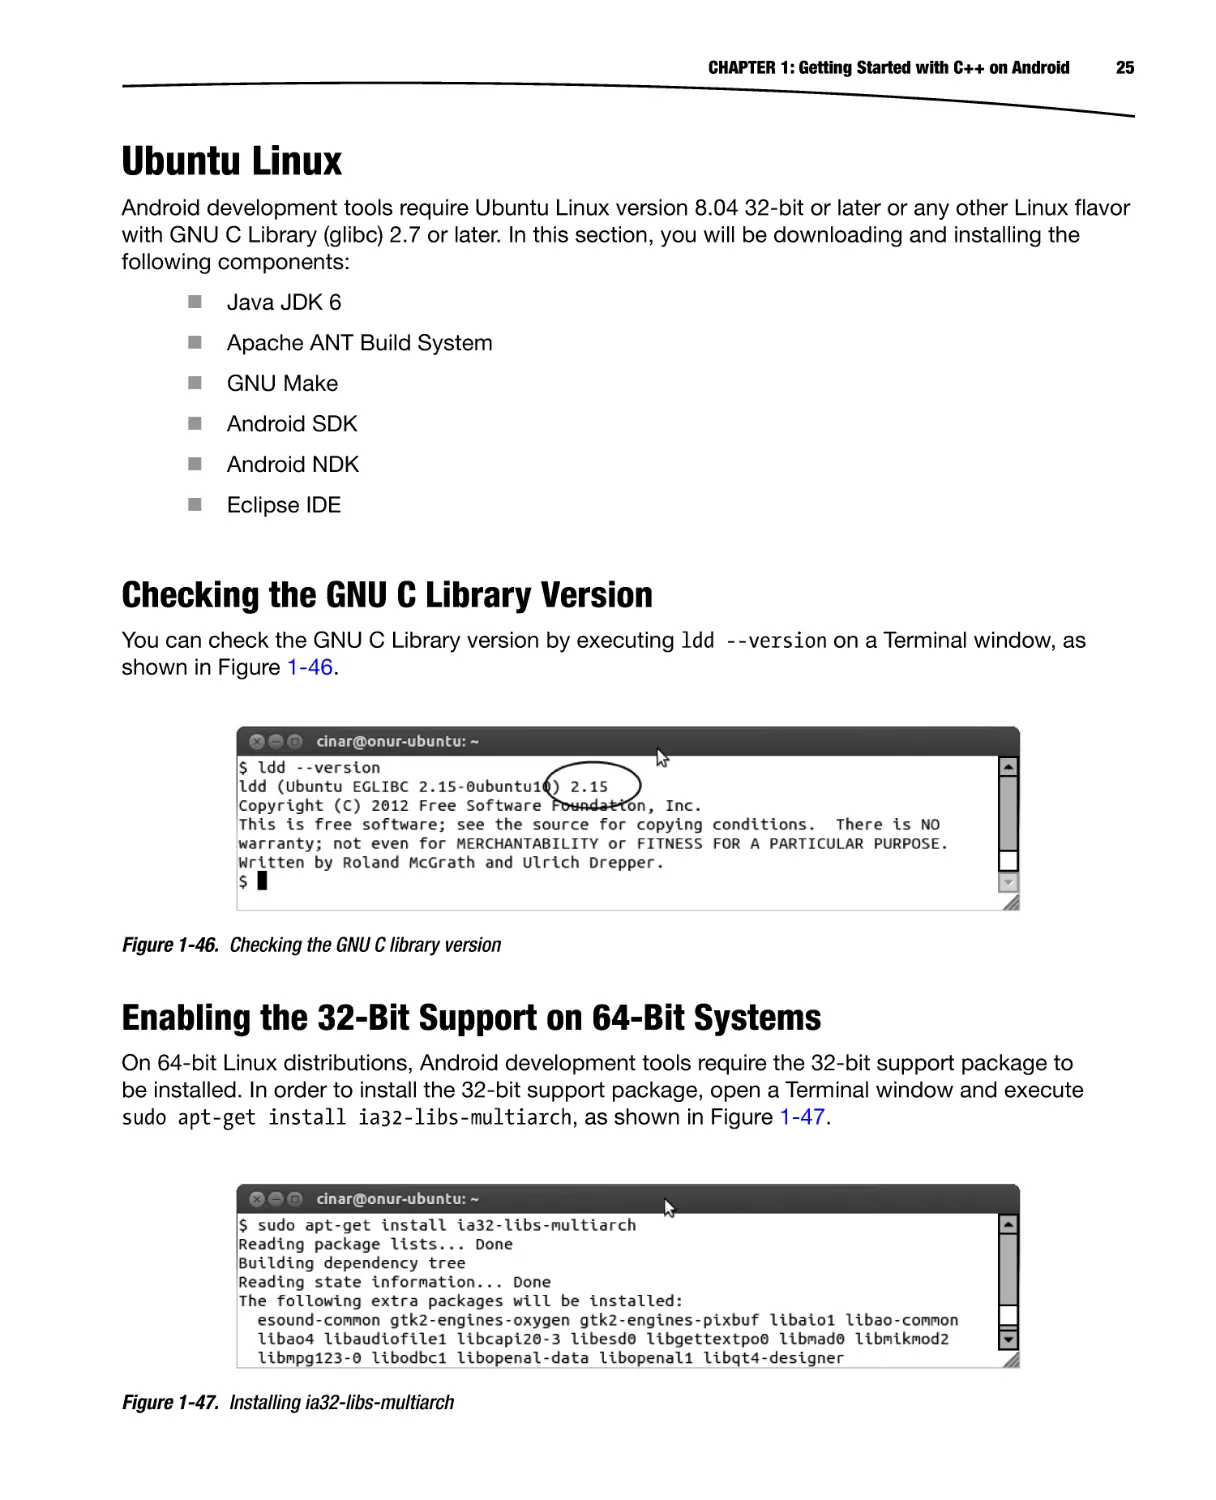
You can check the GNU C Library version by executing ldd --version on a Terminal window, as
shown in Figure 1-46.
Figure 1-46. Checking the GNU C library version
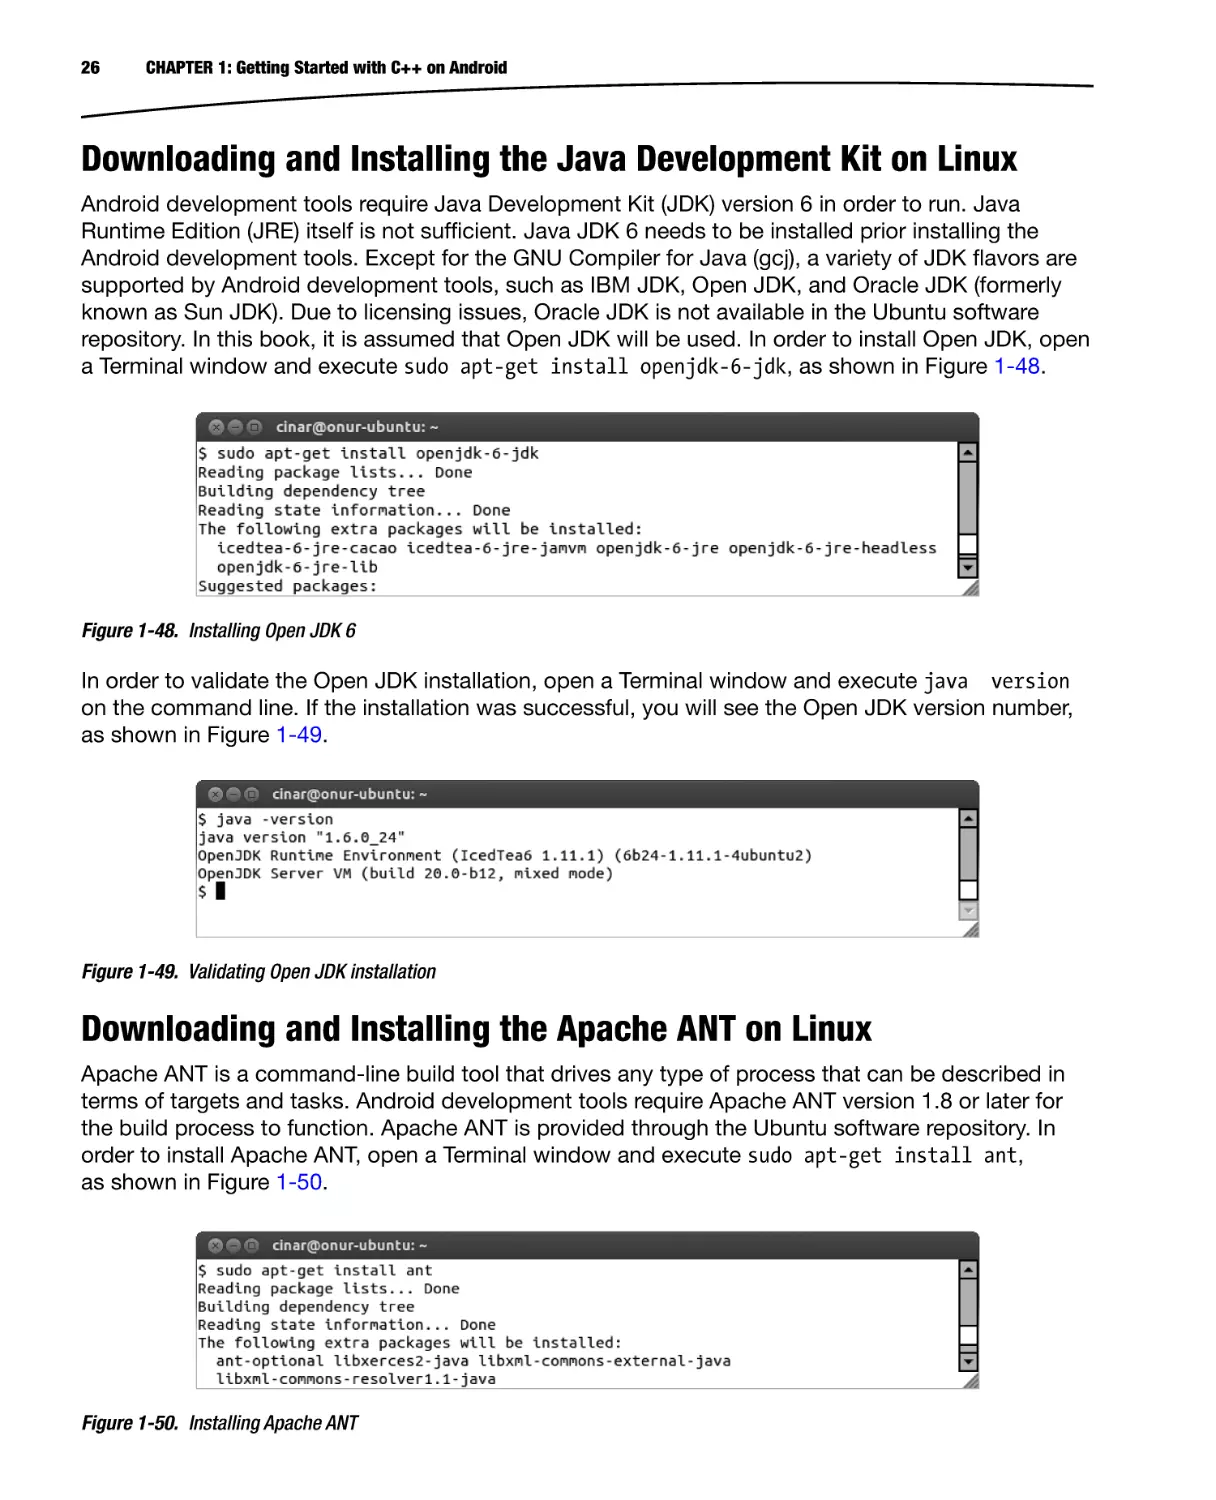
Enabling the 32-Bit Support on 64-Bit Systems
On 64-bit Linux distributions, Android development tools require the 32-bit support package to
be installed. In order to install the 32-bit support package, open a Terminal window and execute
sudo apt-get install ia32-libs-multiarch, as shown in Figure 1-47.
Figure 1-47. Installing ia32-libs-multiarch
26
CHAPTER 1: Getting Started with C++ on Android
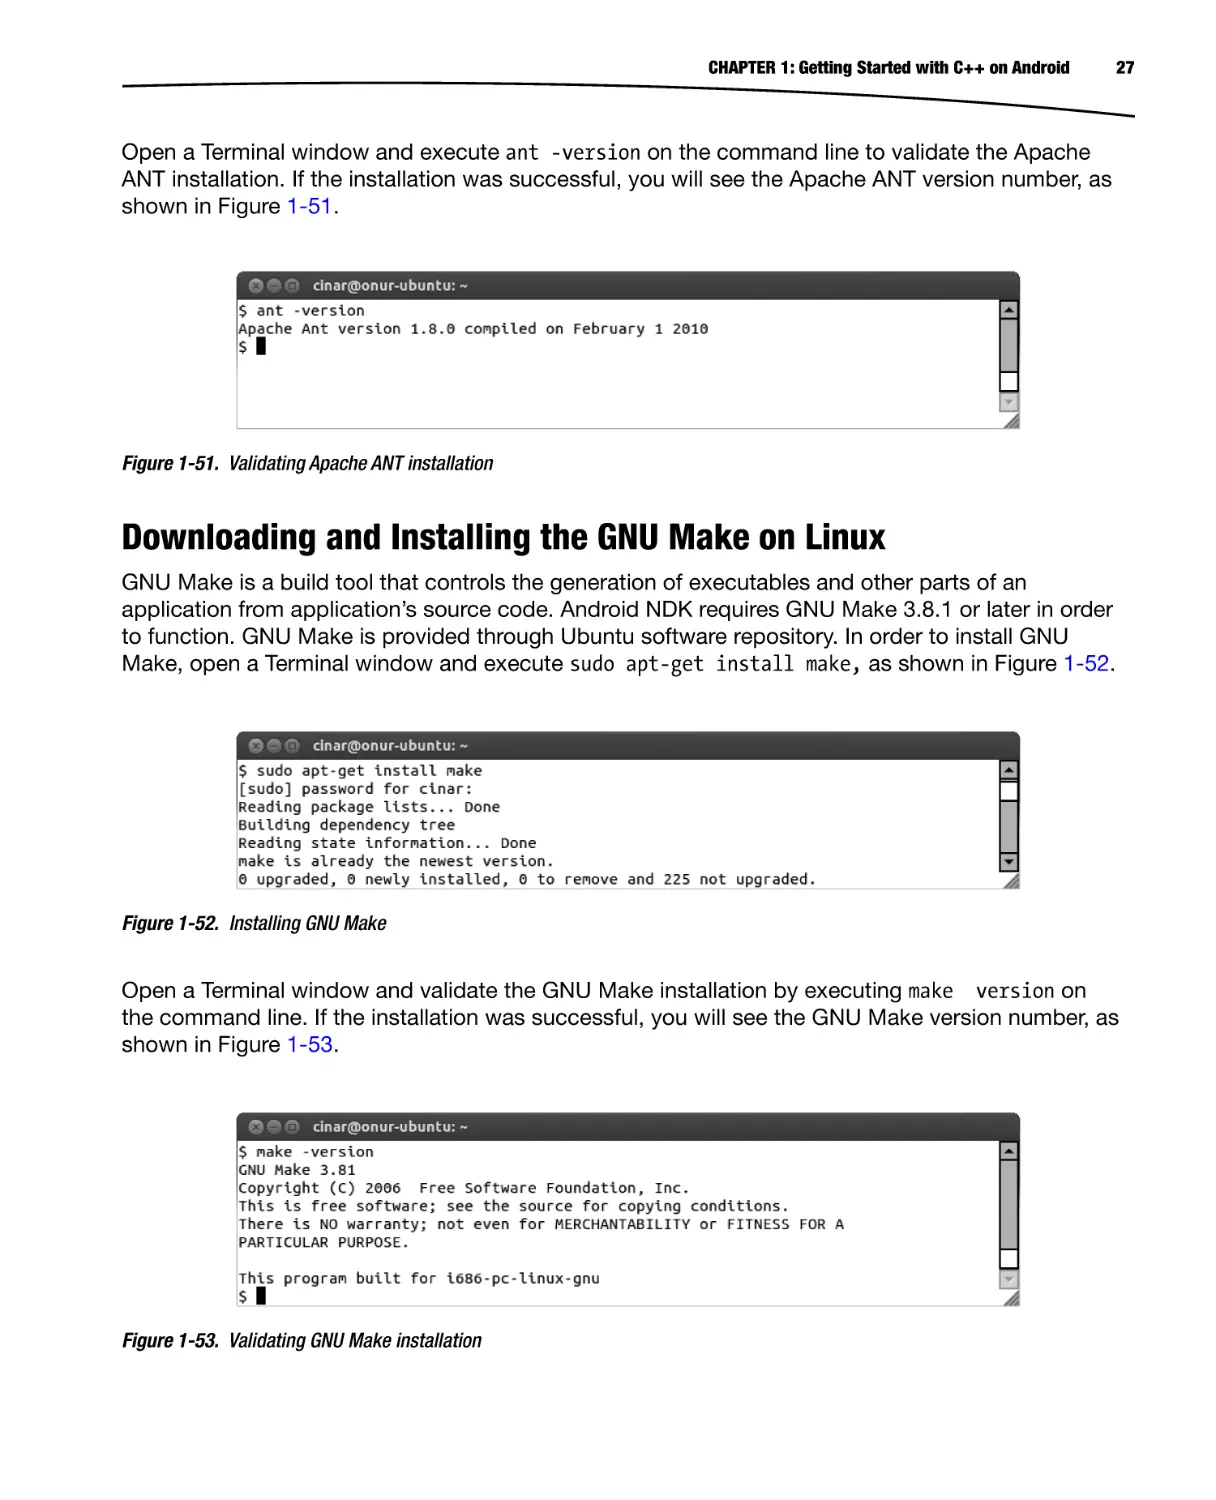
Downloading and Installing the Java Development Kit on Linux
Android development tools require Java Development Kit (JDK) version 6 in order to run. Java
Runtime Edition (JRE) itself is not sufficient. Java JDK 6 needs to be installed prior installing the
Android development tools. Except for the GNU Compiler for Java (gcj), a variety of JDK flavors are
supported by Android development tools, such as IBM JDK, Open JDK, and Oracle JDK (formerly
known as Sun JDK). Due to licensing issues, Oracle JDK is not available in the Ubuntu software
repository. In this book, it is assumed that Open JDK will be used. In order to install Open JDK, open
a Terminal window and execute sudo apt-get install openjdk-6-jdk, as shown in Figure 1-48.
Figure 1-48. Installing Open JDK 6
In order to validate the Open JDK installation, open a Terminal window and execute java version
on the command line. If the installation was successful, you will see the Open JDK version number,
as shown in Figure 1-49.
Figure 1-49. Validating Open JDK installation
Downloading and Installing the Apache ANT on Linux
Apache ANT is a command-line build tool that drives any type of process that can be described in
terms of targets and tasks. Android development tools require Apache ANT version 1.8 or later for
the build process to function. Apache ANT is provided through the Ubuntu software repository. In
order to install Apache ANT, open a Terminal window and execute sudo apt-get install ant,
as shown in Figure 1-50.
Figure 1-50. Installing Apache ANT
CHAPTER 1: Getting Started with C++ on Android
27
Open a Terminal window and execute ant -version on the command line to validate the Apache
ANT installation. If the installation was successful, you will see the Apache ANT version number, as
shown in Figure 1-51.
Figure 1-51. Validating Apache ANT installation
Downloading and Installing the GNU Make on Linux
GNU Make is a build tool that controls the generation of executables and other parts of an
application from application’s source code. Android NDK requires GNU Make 3.8.1 or later in order
to function. GNU Make is provided through Ubuntu software repository. In order to install GNU
Make, open a Terminal window and execute sudo apt-get install make, as shown in Figure 1-52.
Figure 1-52. Installing GNU Make
Open a Terminal window and validate the GNU Make installation by executing make version on
the command line. If the installation was successful, you will see the GNU Make version number, as
shown in Figure 1-53.
Figure 1-53. Validating GNU Make installation
28
CHAPTER 1: Getting Started with C++ on Android
Downloading and Installing the Android SDK on Linux
The Android Software Development Kit (SDK) is the core component of the development toolchain,
providing framework API libraries and developer tools that are necessary for building, testing, and
debugging Android applications. At the time of this writing, the latest version for Android SDK is
R20. Navigate to http://developer.android.com/sdk/index.html to download the Android SDK, as
shown in Figure 1-54. Then follow these steps to install it:
Figure 1-54. Android SDK download page
1.
The Android SDK installation package is provided as a GZIP’ed TAR archive.
Open a Terminal window and go to the destination directory. In this book, ~/
android directory will be used as the root directory for holding the Android
development tools and dependencies.
2.
Extract the Android SDK by executing tar zxvf ~/Downloads/android-sdk
r20-linux.tgz on the command line, as shown in Figure 1-55.
Figure 1-55. Installing Android SDK
In order to make Android SDK easily accessible, binary paths of Android SDK should be appended
to the system executable search path. Assuming that you are using the BASH shell, open a Terminal
window and execute the following commands (shown in Figure 1-56):
CHAPTER 1: Getting Started with C++ on Android
29
Figure 1-56. Appending Android SDK binary path to system PATH variable
echo export ANDROID SDK HOME = ~/android/android-sdk-linux > > ~/.bashrc
echo export PATH = \$ANDROID SDK HOME/tools:\$ANDROID SDK HOME/platformtools:\$PATH > > ~/.bashrc
In order to validate the Android SDK installation, open new a Terminal window and execute android h
on the command line. If the installation was successful, you will see the help messages shown in
Figure 1-57.
Figure 1-57. Validating Android SDK installation
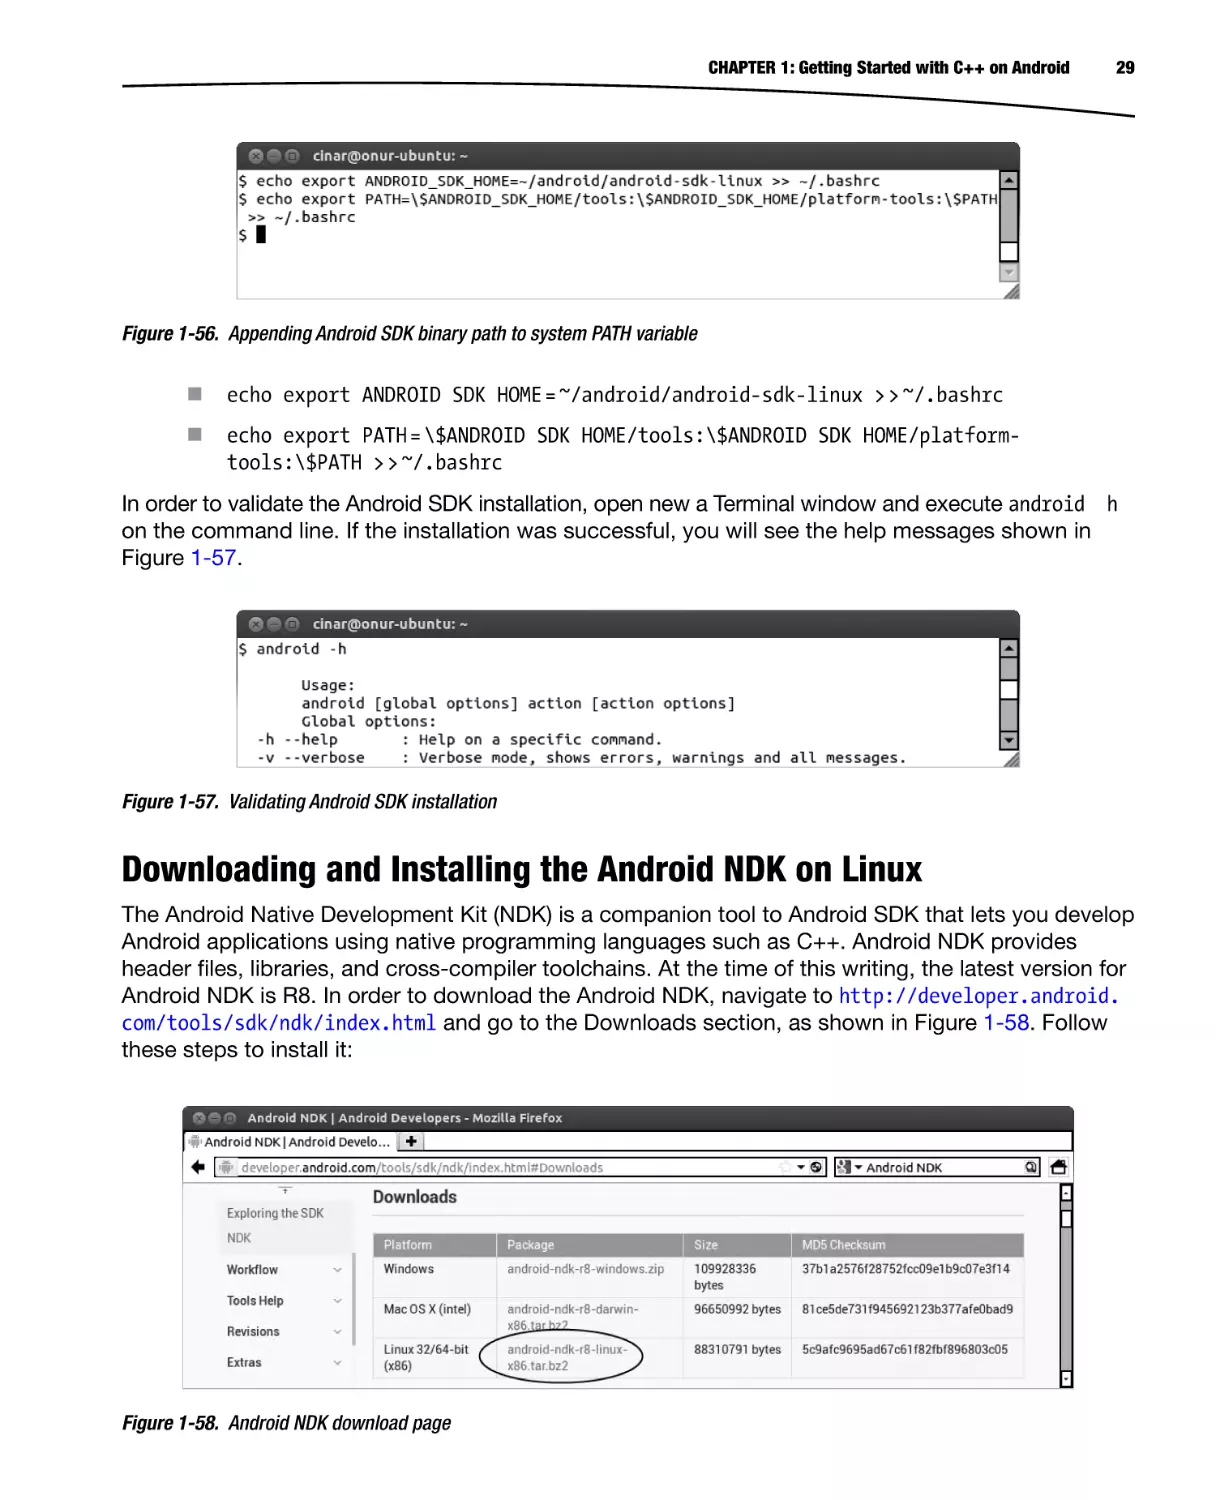
Downloading and Installing the Android NDK on Linux
The Android Native Development Kit (NDK) is a companion tool to Android SDK that lets you develop
Android applications using native programming languages such as C++. Android NDK provides
header files, libraries, and cross-compiler toolchains. At the time of this writing, the latest version for
Android NDK is R8. In order to download the Android NDK, navigate to http://developer.android.
com/tools/sdk/ndk/index.html and go to the Downloads section, as shown in Figure 1-58. Follow
these steps to install it:
Figure 1-58. Android NDK download page
30
CHAPTER 1: Getting Started with C++ on Android
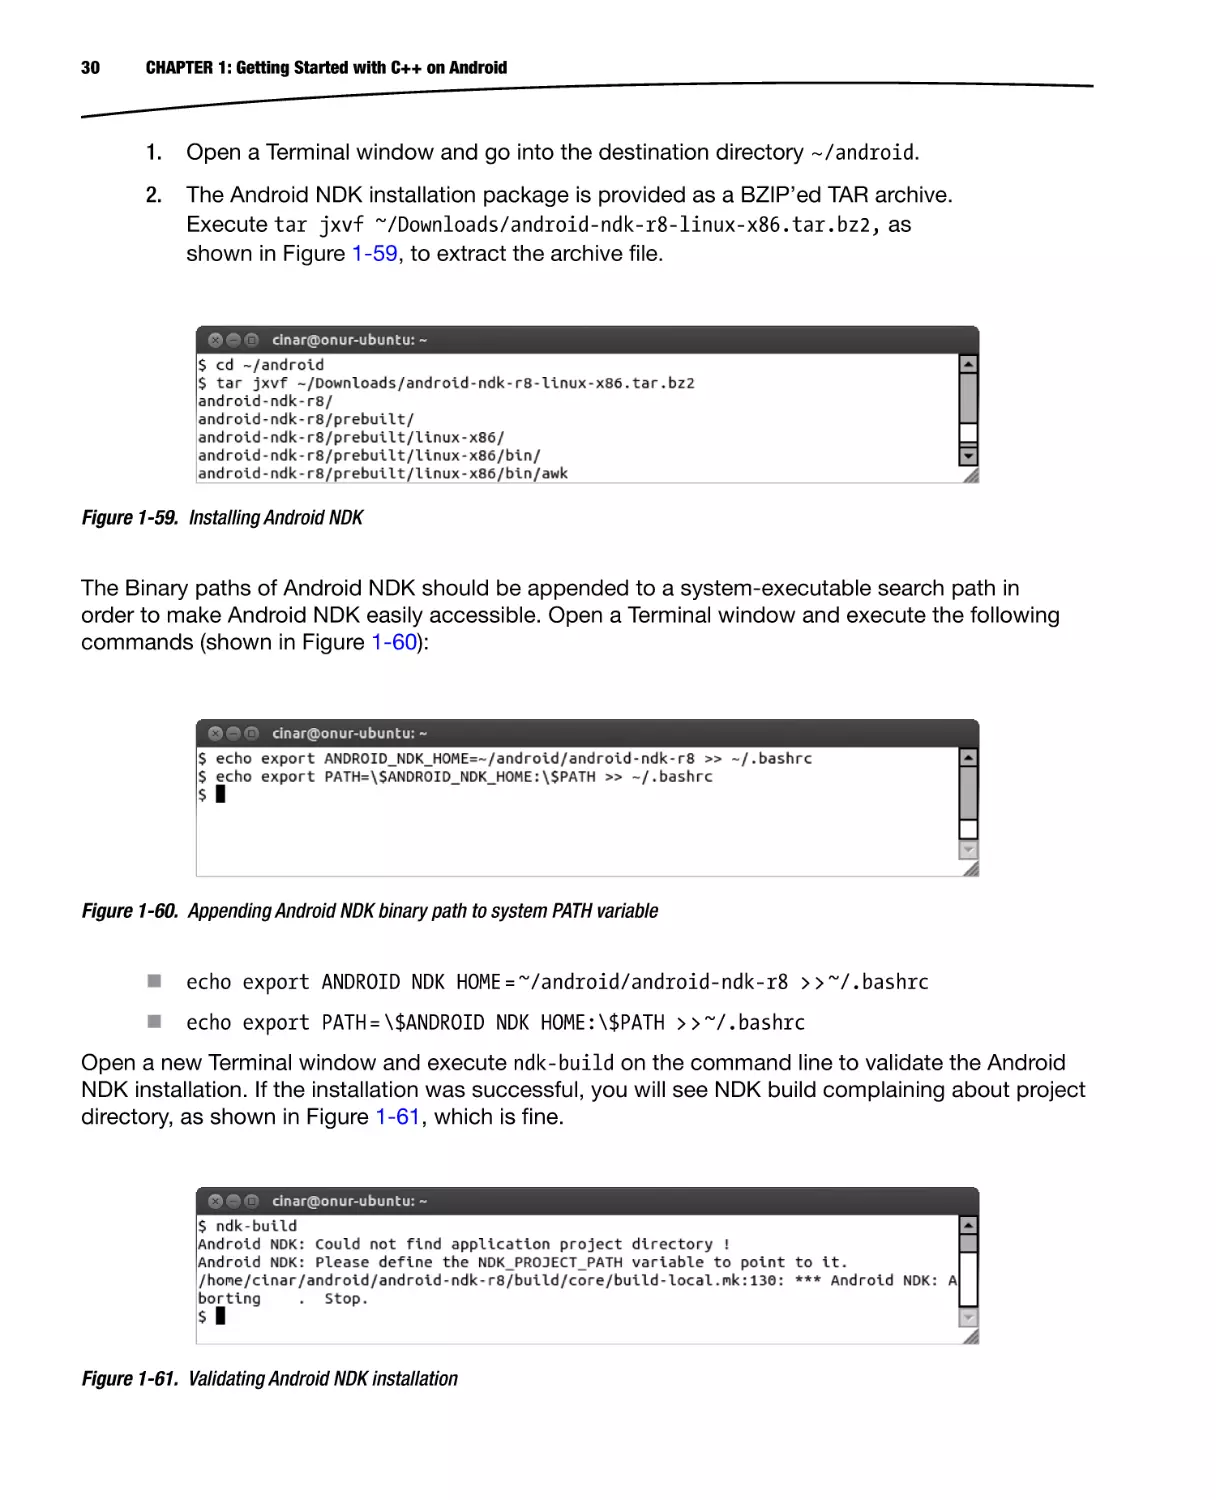
1.
Open a Terminal window and go into the destination directory ~/android.
2.
The Android NDK installation package is provided as a BZIP’ed TAR archive.
Execute tar jxvf ~/Downloads/android-ndk-r8-linux-x86.tar.bz2, as
shown in Figure 1-59, to extract the archive file.
Figure 1-59. Installing Android NDK
The Binary paths of Android NDK should be appended to a system-executable search path in
order to make Android NDK easily accessible. Open a Terminal window and execute the following
commands (shown in Figure 1-60):
Figure 1-60. Appending Android NDK binary path to system PATH variable
echo export ANDROID NDK HOME = ~/android/android-ndk-r8 > > ~/.bashrc
echo export PATH = \$ANDROID NDK HOME:\$PATH > > ~/.bashrc
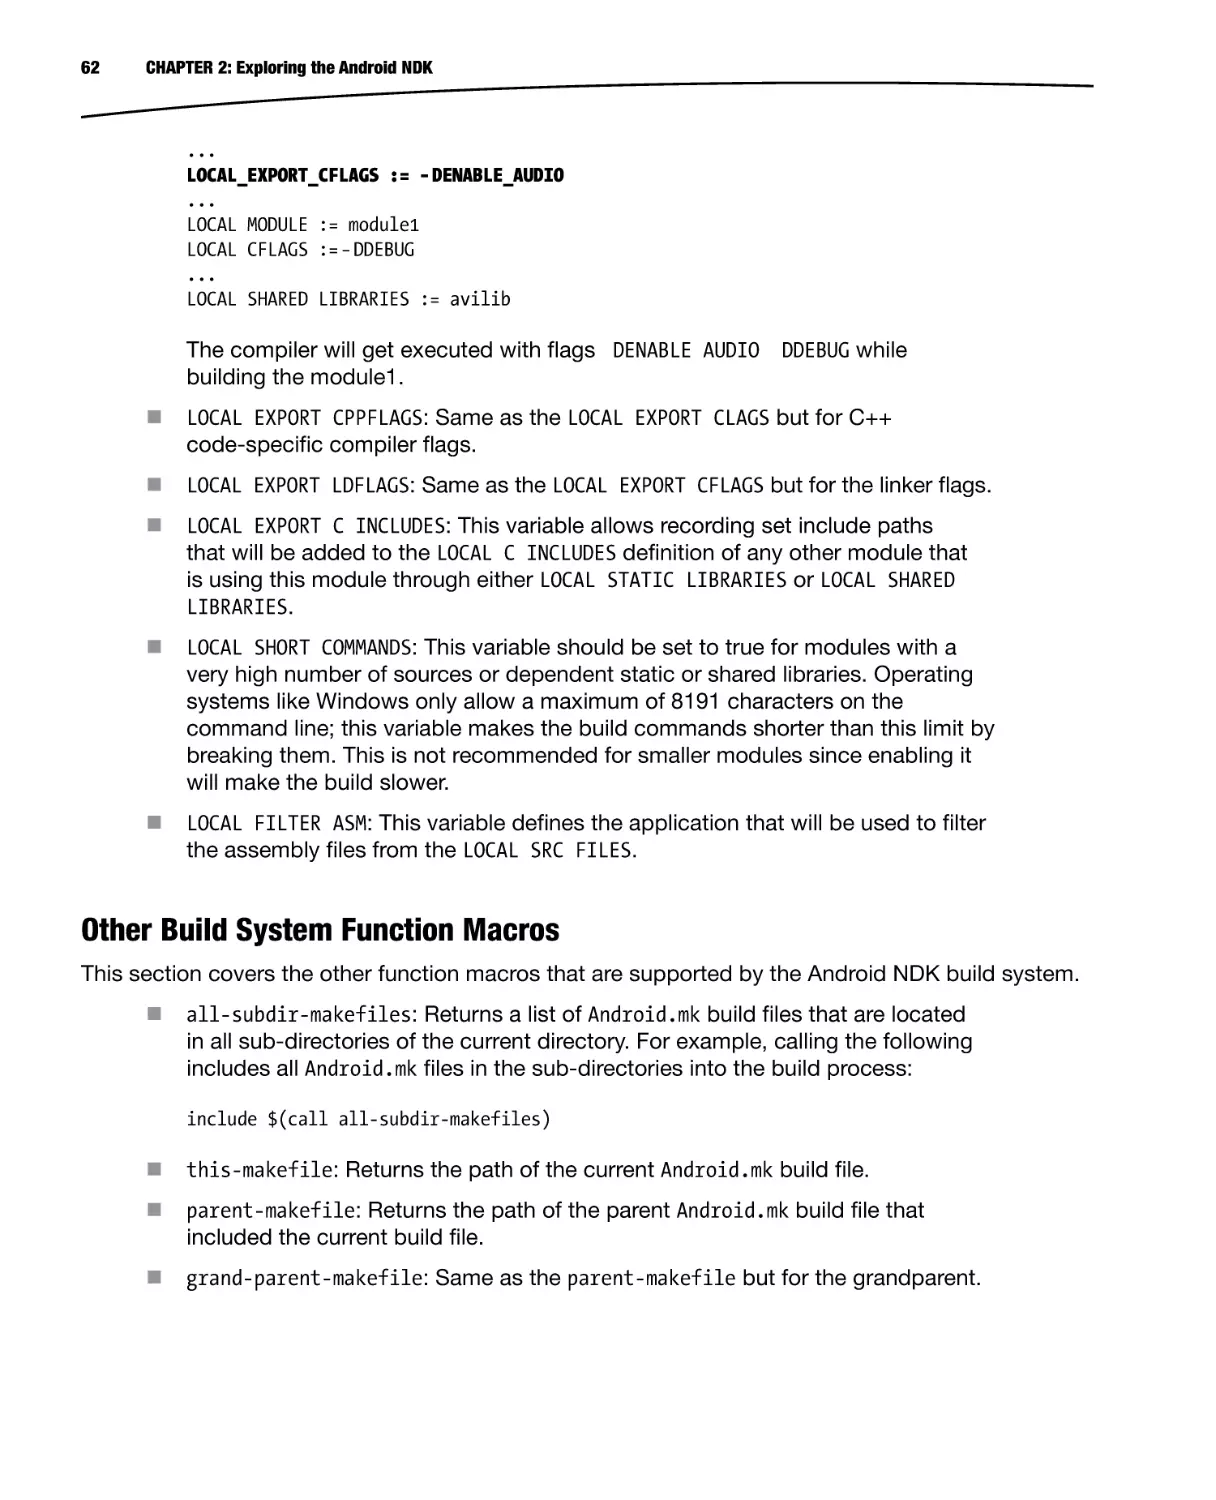
Open a new Terminal window and execute ndk-build on the command line to validate the Android
NDK installation. If the installation was successful, you will see NDK build complaining about project
directory, as shown in Figure 1-61, which is fine.
Figure 1-61. Validating Android NDK installation
CHAPTER 1: Getting Started with C++ on Android
31
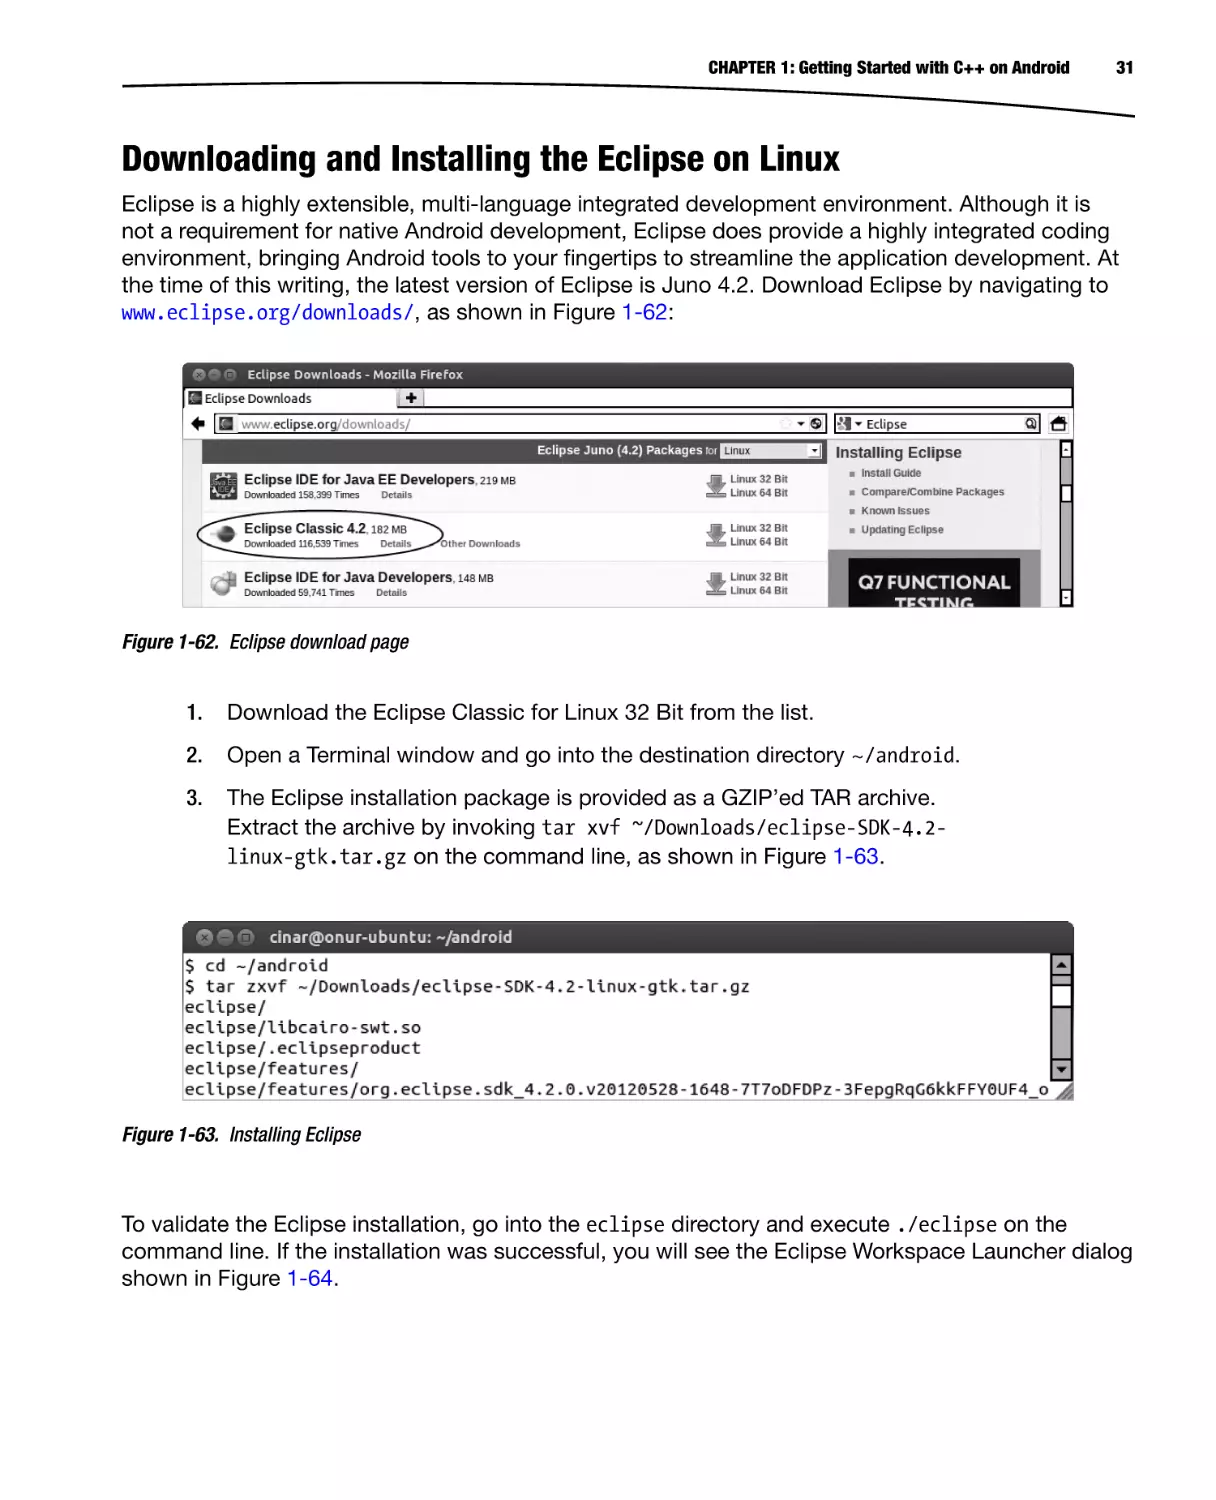
Downloading and Installing the Eclipse on Linux
Eclipse is a highly extensible, multi-language integrated development environment. Although it is
not a requirement for native Android development, Eclipse does provide a highly integrated coding
environment, bringing Android tools to your fingertips to streamline the application development. At
the time of this writing, the latest version of Eclipse is Juno 4.2. Download Eclipse by navigating to
www.eclipse.org/downloads/, as shown in Figure 1-62:
Figure 1-62. Eclipse download page
1.
Download the Eclipse Classic for Linux 32 Bit from the list.
2.
Open a Terminal window and go into the destination directory ~/android.
3.
The Eclipse installation package is provided as a GZIP’ed TAR archive.
Extract the archive by invoking tar xvf ~/Downloads/eclipse-SDK-4.2linux-gtk.tar.gz on the command line, as shown in Figure 1-63.
Figure 1-63. Installing Eclipse
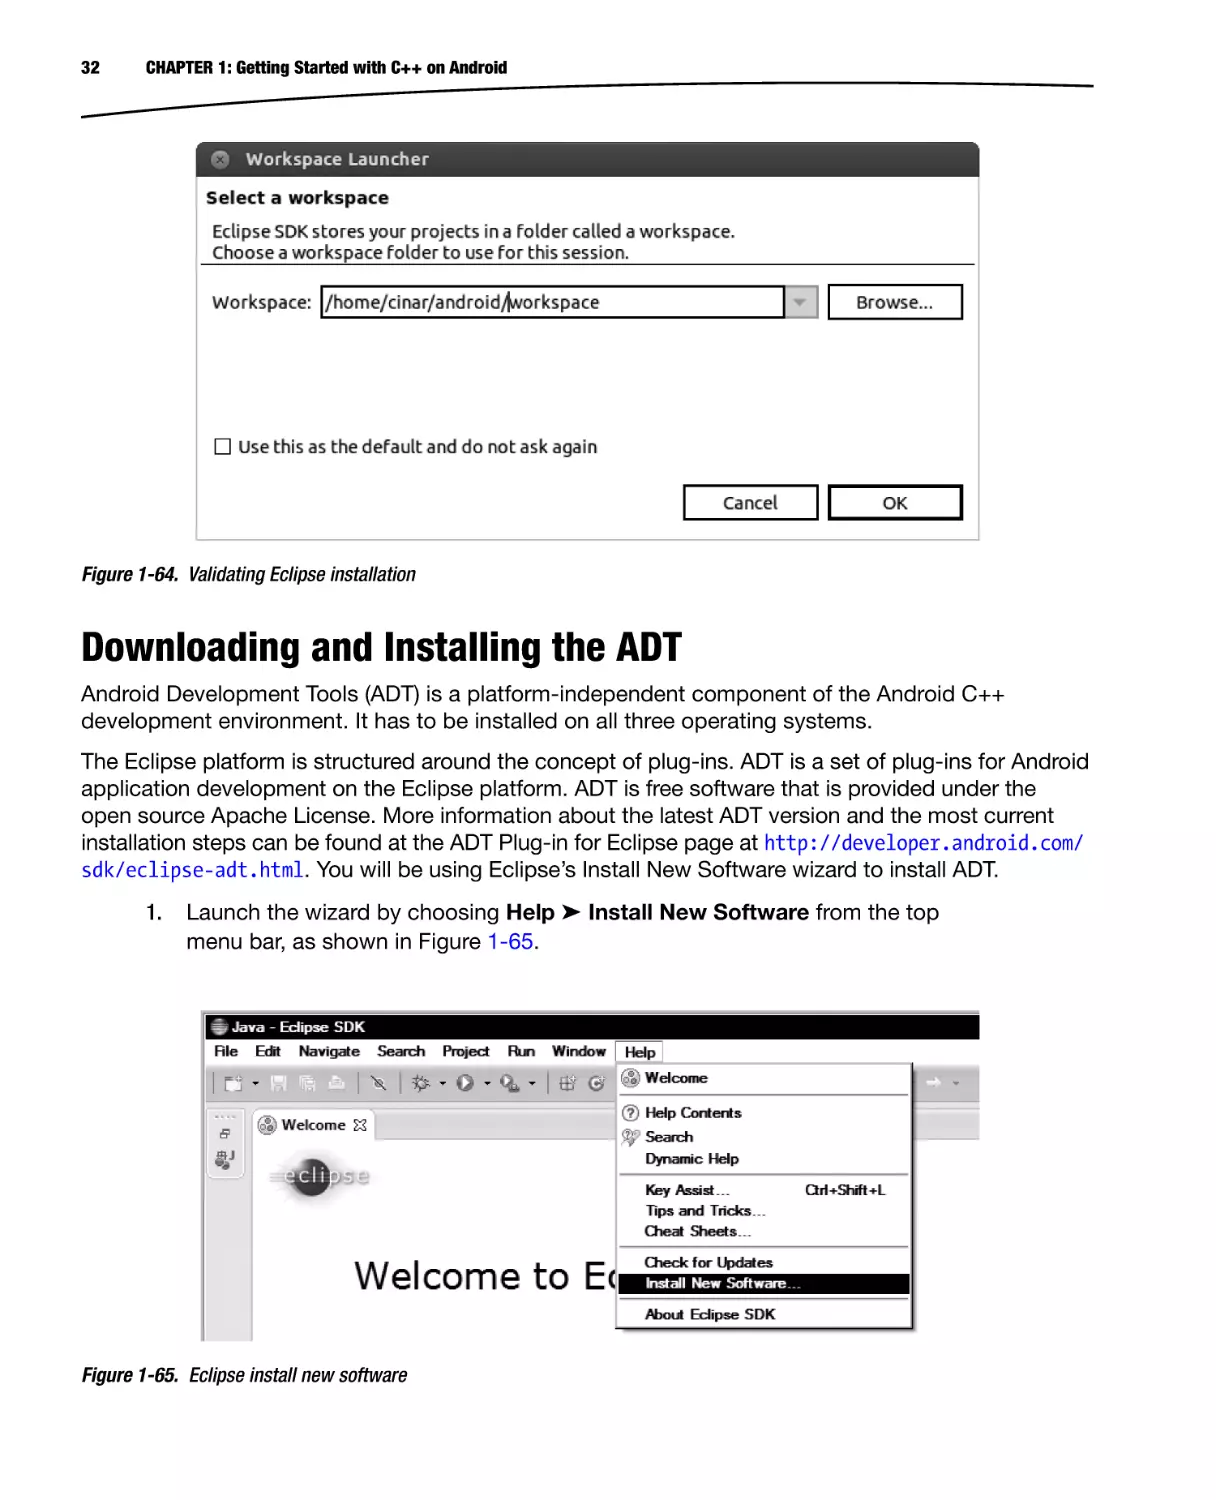
To validate the Eclipse installation, go into the eclipse directory and execute ./eclipse on the
command line. If the installation was successful, you will see the Eclipse Workspace Launcher dialog
shown in Figure 1-64.
32
CHAPTER 1: Getting Started with C++ on Android
Figure 1-64. Validating Eclipse installation
Downloading and Installing the ADT
Android Development Tools (ADT) is a platform-independent component of the Android C++
development environment. It has to be installed on all three operating systems.
The Eclipse platform is structured around the concept of plug-ins. ADT is a set of plug-ins for Android
application development on the Eclipse platform. ADT is free software that is provided under the
open source Apache License. More information about the latest ADT version and the most current
installation steps can be found at the ADT Plug-in for Eclipse page at http://developer.android.com/
sdk/eclipse-adt.html. You will be using Eclipse’s Install New Software wizard to install ADT.
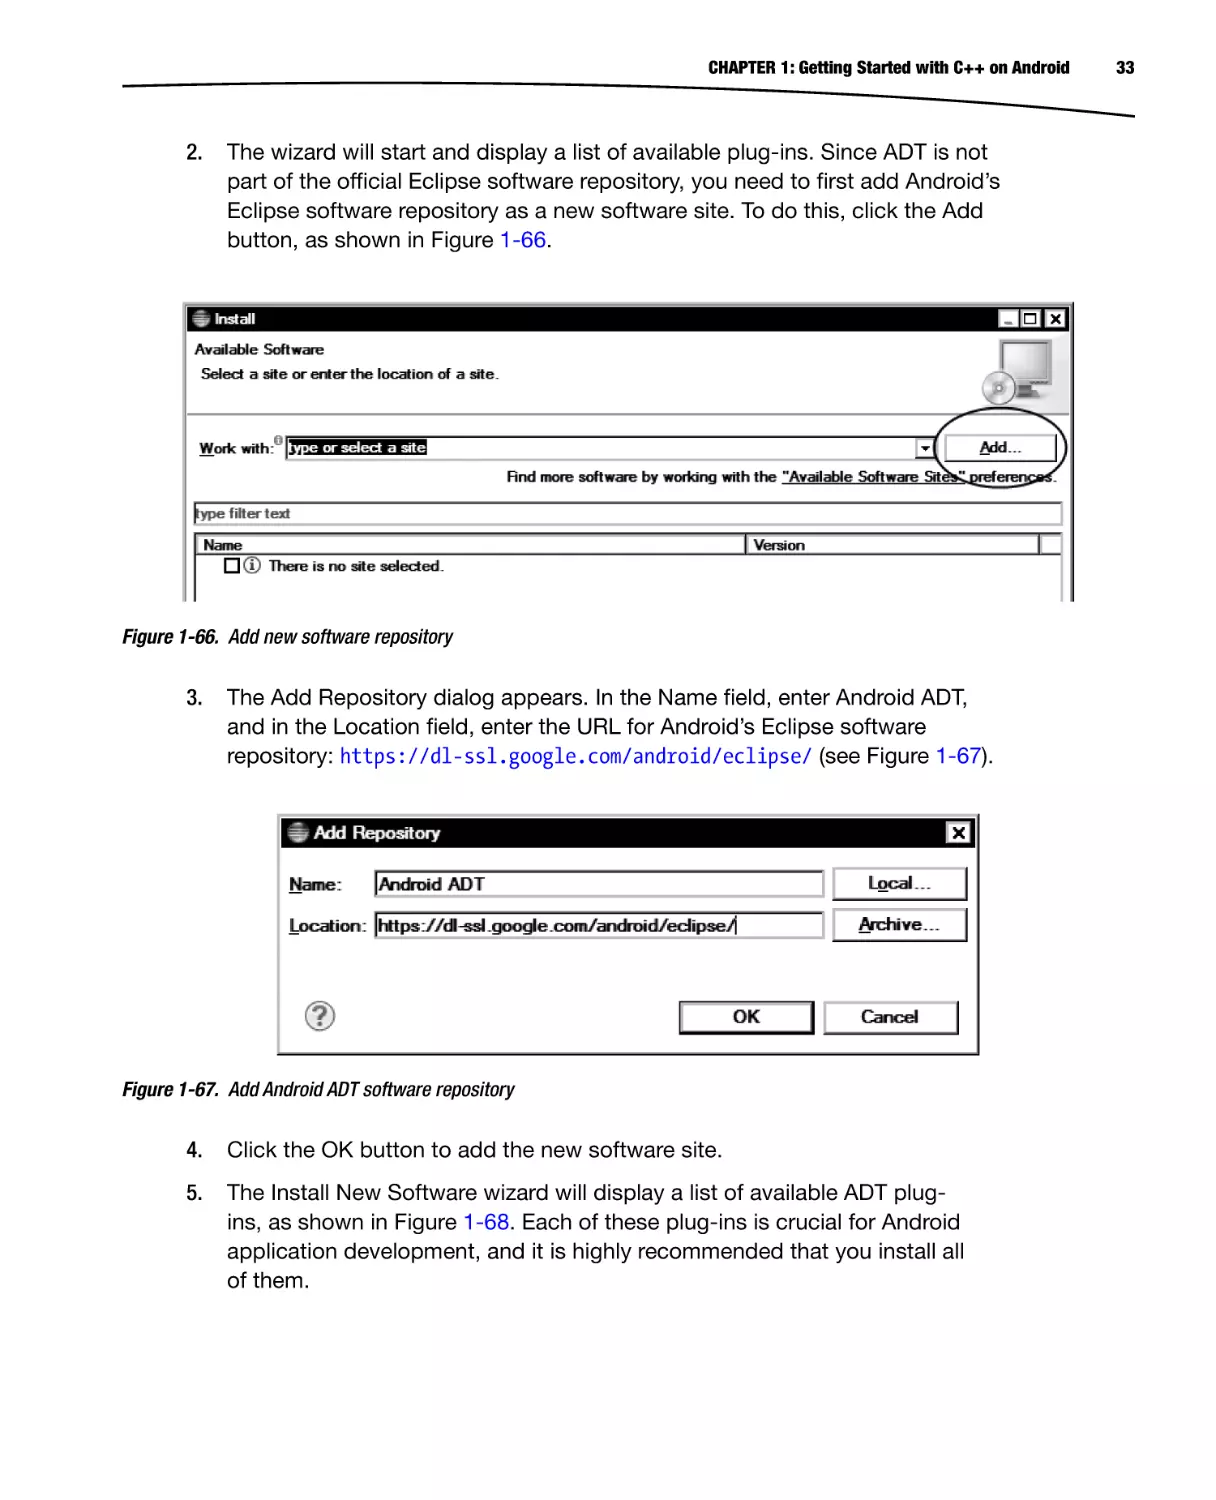
1.
Launch the wizard by choosing Help ➤ Install New Software from the top
menu bar, as shown in Figure 1-65.
Figure 1-65. Eclipse install new software
CHAPTER 1: Getting Started with C++ on Android
2.
The wizard will start and display a list of available plug-ins. Since ADT is not
part of the official Eclipse software repository, you need to first add Android’s
Eclipse software repository as a new software site. To do this, click the Add
button, as shown in Figure 1-66.
Figure 1-66. Add new software repository
3.
The Add Repository dialog appears. In the Name field, enter Android ADT,
and in the Location field, enter the URL for Android’s Eclipse software
repository: https://dl-ssl.google.com/android/eclipse/ (see Figure 1-67).
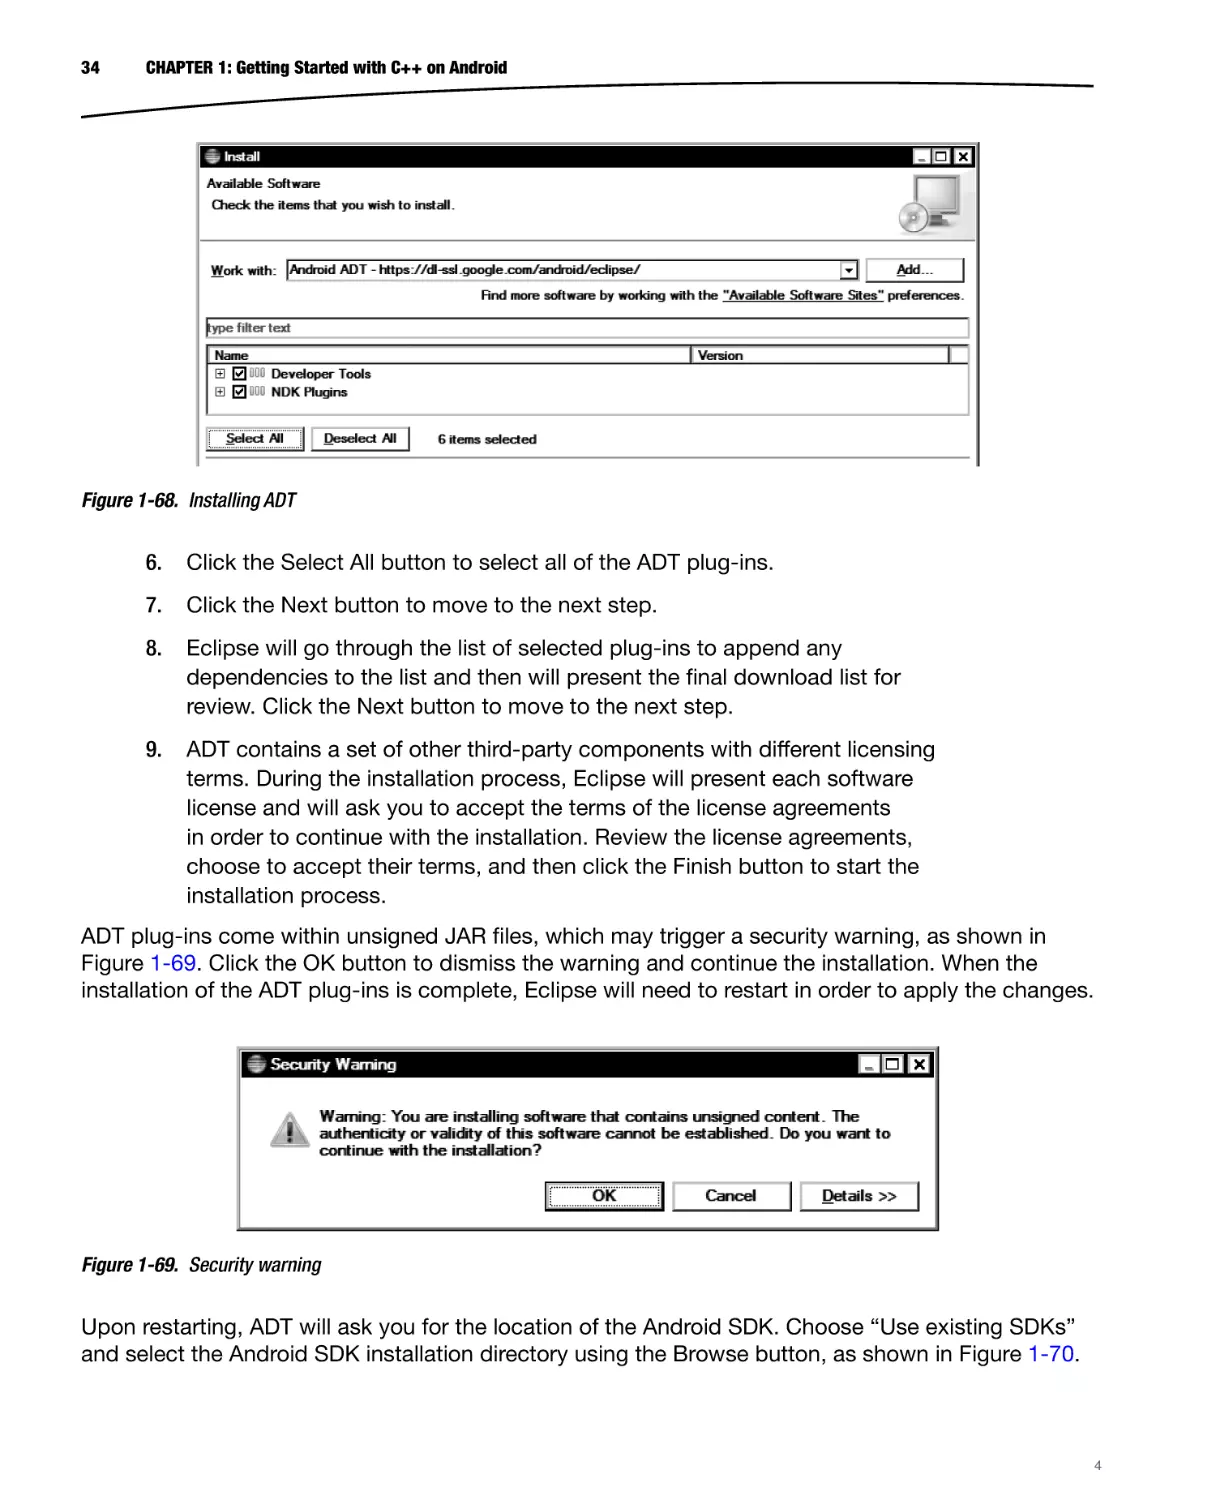
Figure 1-67. Add Android ADT software repository
4.
Click the OK button to add the new software site.
5.
The Install New Software wizard will display a list of available ADT plugins, as shown in Figure 1-68. Each of these plug-ins is crucial for Android
application development, and it is highly recommended that you install all
of them.
33
34
CHAPTER 1: Getting Started with C++ on Android
Figure 1-68. Installing ADT
6.
Click the Select All button to select all of the ADT plug-ins.
7.
Click the Next button to move to the next step.
8.
Eclipse will go through the list of selected plug-ins to append any
dependencies to the list and then will present the final download list for
review. Click the Next button to move to the next step.
9.
ADT contains a set of other third-party components with different licensing
terms. During the installation process, Eclipse will present each software
license and will ask you to accept the terms of the license agreements
in order to continue with the installation. Review the license agreements,
choose to accept their terms, and then click the Finish button to start the
installation process.
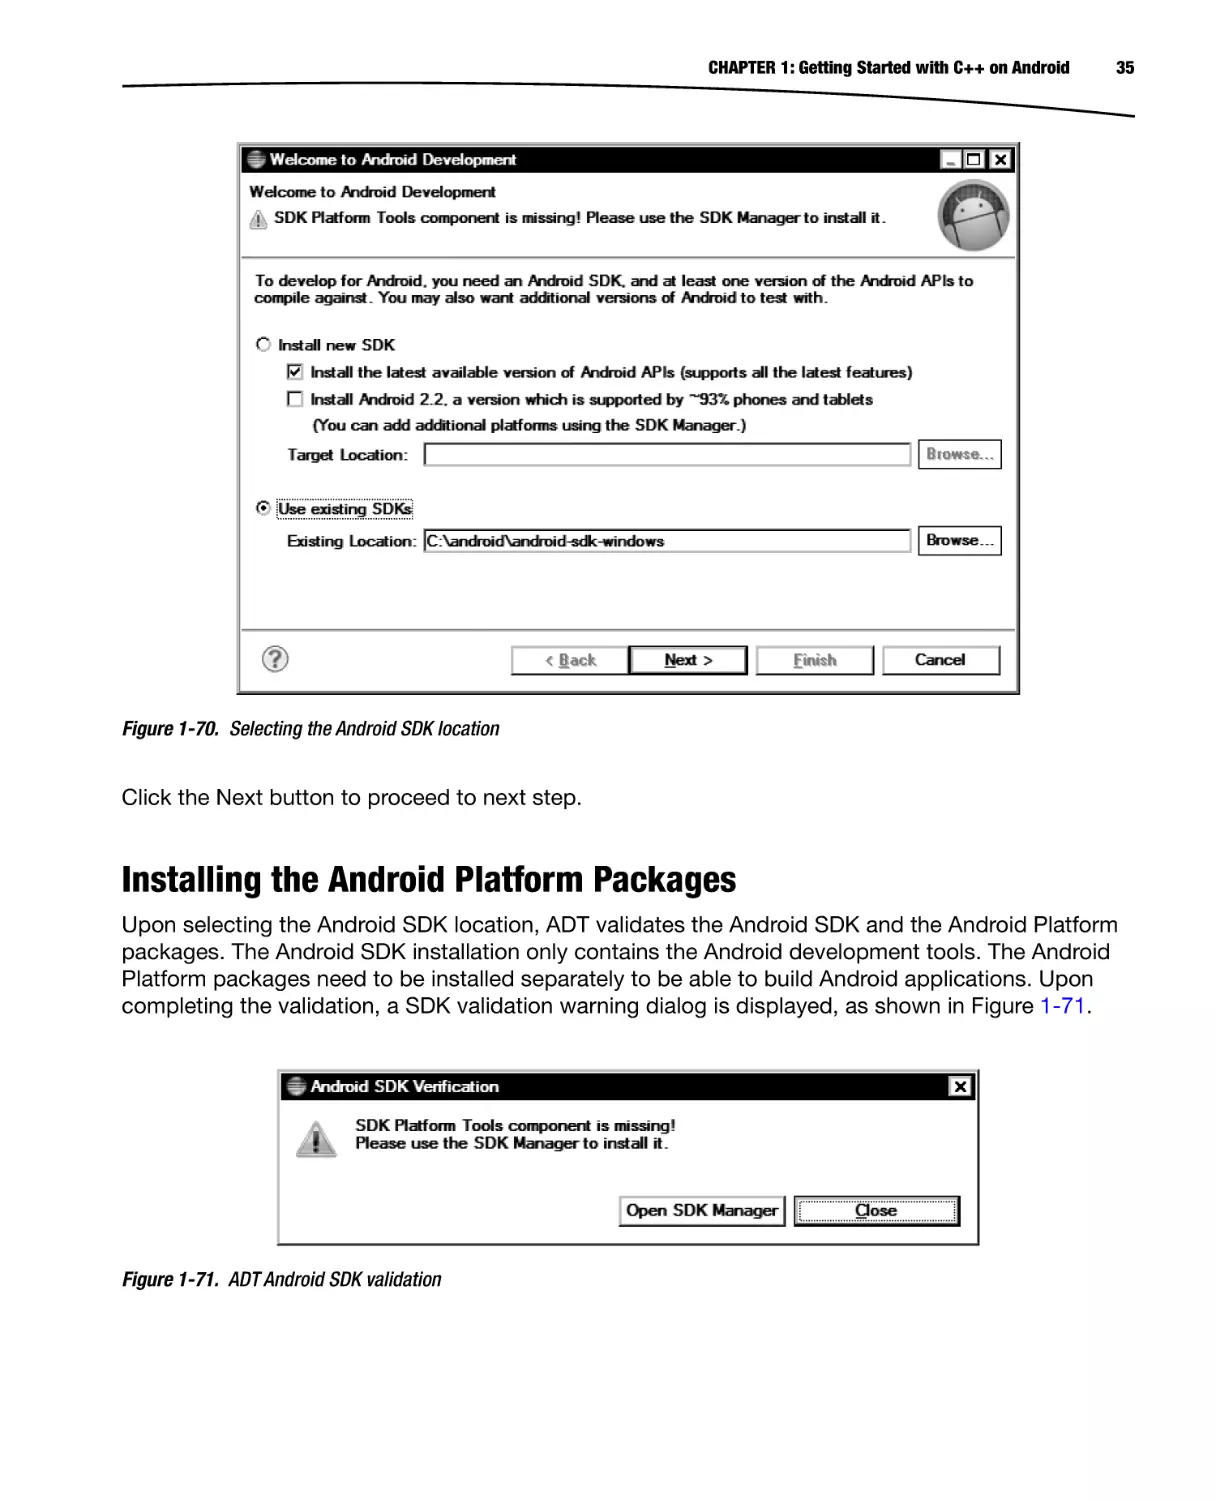
ADT plug-ins come within unsigned JAR files, which may trigger a security warning, as shown in
Figure 1-69. Click the OK button to dismiss the warning and continue the installation. When the
installation of the ADT plug-ins is complete, Eclipse will need to restart in order to apply the changes.
Figure 1-69. Security warning
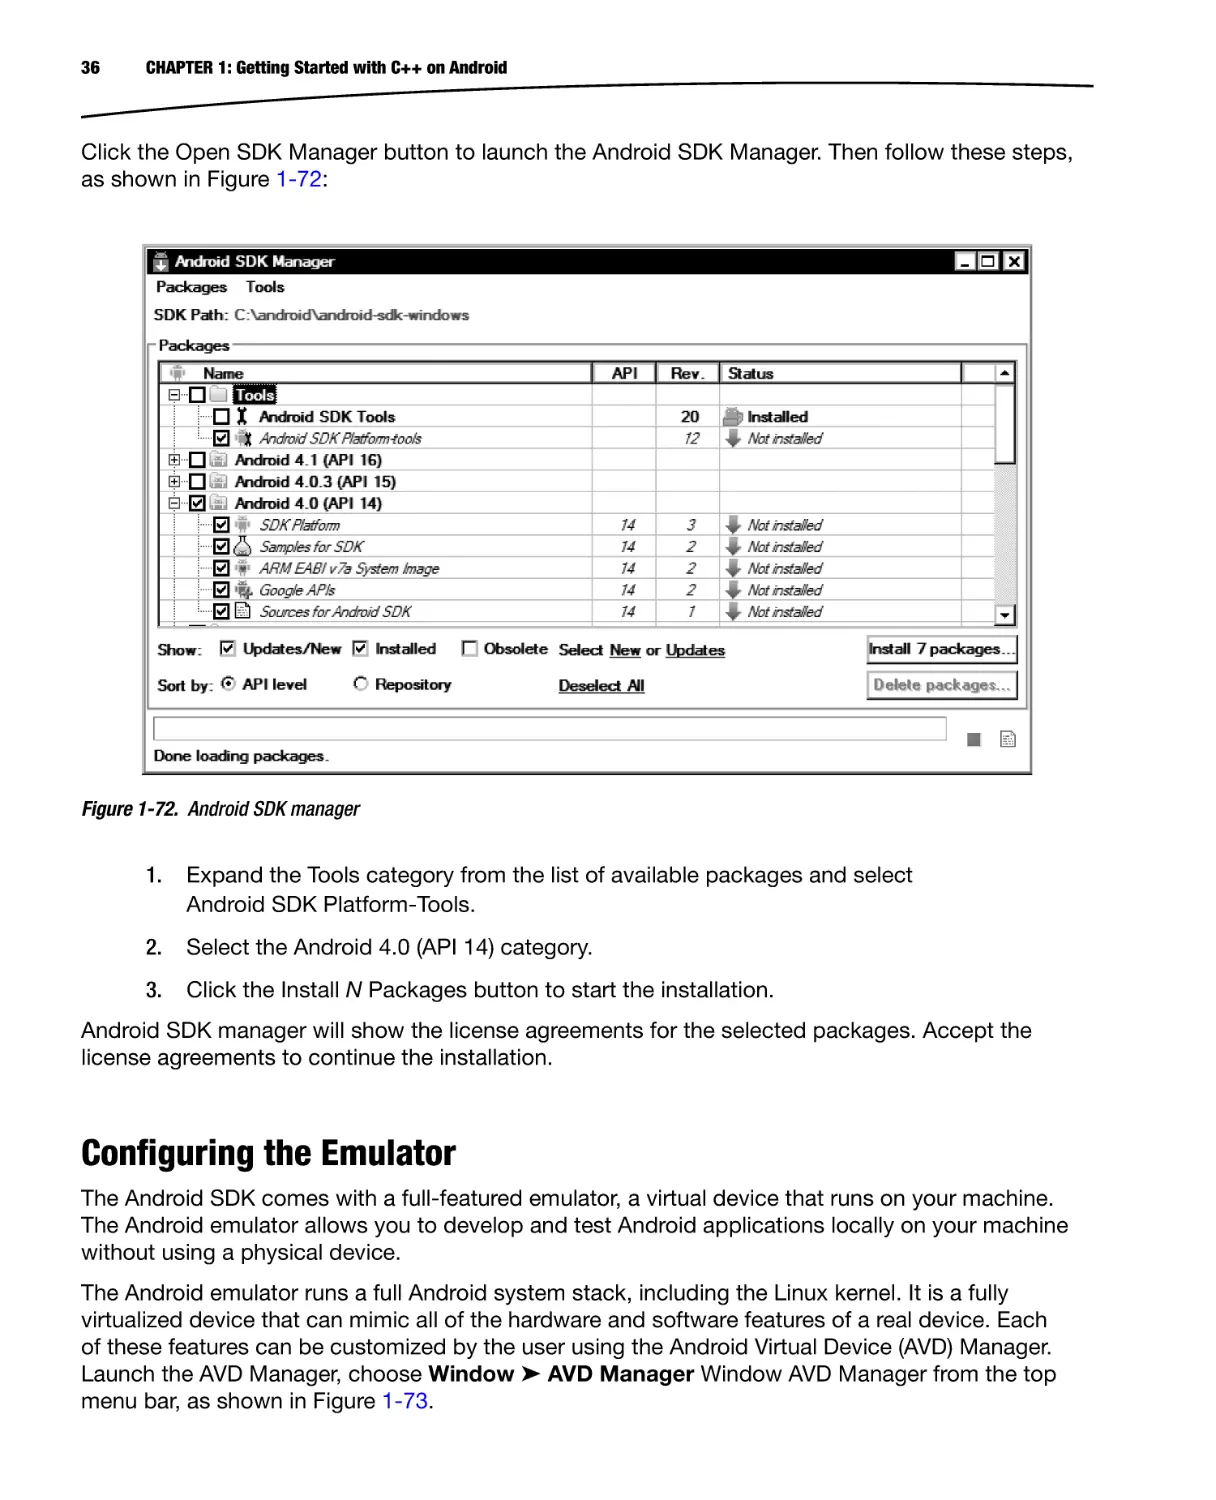
Upon restarting, ADT will ask you for the location of the Android SDK. Choose “Use existing SDKs”
and select the Android SDK installation directory using the Browse button, as shown in Figure 1-70.
4
CHAPTER 1: Getting Started with C++ on Android
35
Figure 1-70. Selecting the Android SDK location
Click the Next button to proceed to next step.
Installing the Android Platform Packages
Upon selecting the Android SDK location, ADT validates the Android SDK and the Android Platform
packages. The Android SDK installation only contains the Android development tools. The Android
Platform packages need to be installed separately to be able to build Android applications. Upon
completing the validation, a SDK validation warning dialog is displayed, as shown in Figure 1-71.
Figure 1-71. ADT Android SDK validation
36
CHAPTER 1: Getting Started with C++ on Android
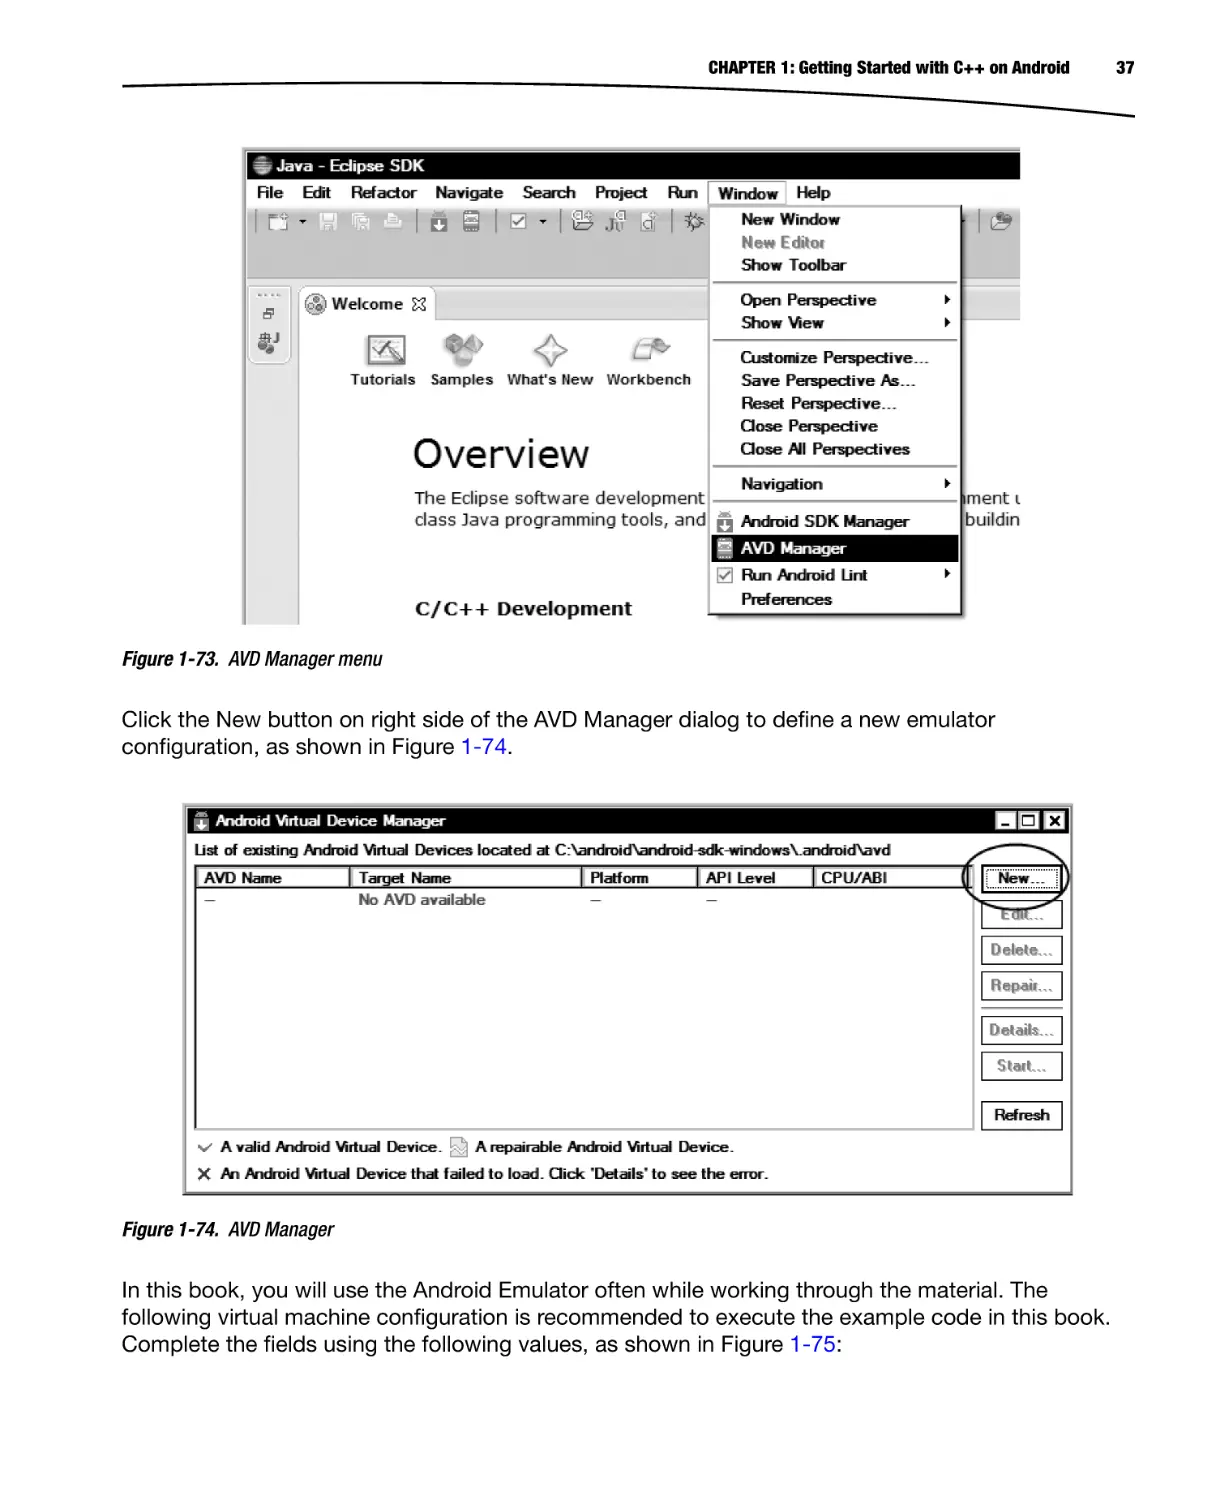
Click the Open SDK Manager button to launch the Android SDK Manager. Then follow these steps,
as shown in Figure 1-72:
Figure 1-72. Android SDK manager
1.
Expand the Tools category from the list of available packages and select
Android SDK Platform-Tools.
2.
Select the Android 4.0 (API 14) category.
3.
Click the Install N Packages button to start the installation.
Android SDK manager will show the license agreements for the selected packages. Accept the
license agreements to continue the installation.
Configuring the Emulator
The Android SDK comes with a full-featured emulator, a virtual device that runs on your machine.
The Android emulator allows you to develop and test Android applications locally on your machine
without using a physical device.
The Android emulator runs a full Android system stack, including the Linux kernel. It is a fully
virtualized device that can mimic all of the hardware and software features of a real device. Each
of these features can be customized by the user using the Android Virtual Device (AVD) Manager.
Launch the AVD Manager, choose Window ➤ AVD Manager Window AVD Manager from the top
menu bar, as shown in Figure 1-73.
CHAPTER 1: Getting Started with C++ on Android
Figure 1-73. AVD Manager menu
Click the New button on right side of the AVD Manager dialog to define a new emulator
configuration, as shown in Figure 1-74.
Figure 1-74. AVD Manager
In this book, you will use the Android Emulator often while working through the material. The
following virtual machine configuration is recommended to execute the example code in this book.
Complete the fields using the following values, as shown in Figure 1-75:
37
38
CHAPTER 1: Getting Started with C++ on Android
Figure 1-75. New emulator configuration
The Name parameter should be set to Android_14.
The Target parameter should be set to Android 4.0 – API Level 14.
The SD Card size should be set to at least 128 MB.
The other settings can be left as is.
In order to validate the newly defined emulator configuration, open up the AVD Manager, select the
name of the emulator configuration from the list, and click the Start button to launch the emulator
instance. If the configuration was successful, the emulator will come up (see Figure 1-76).
CHAPTER 1: Getting Started with C++ on Android
39
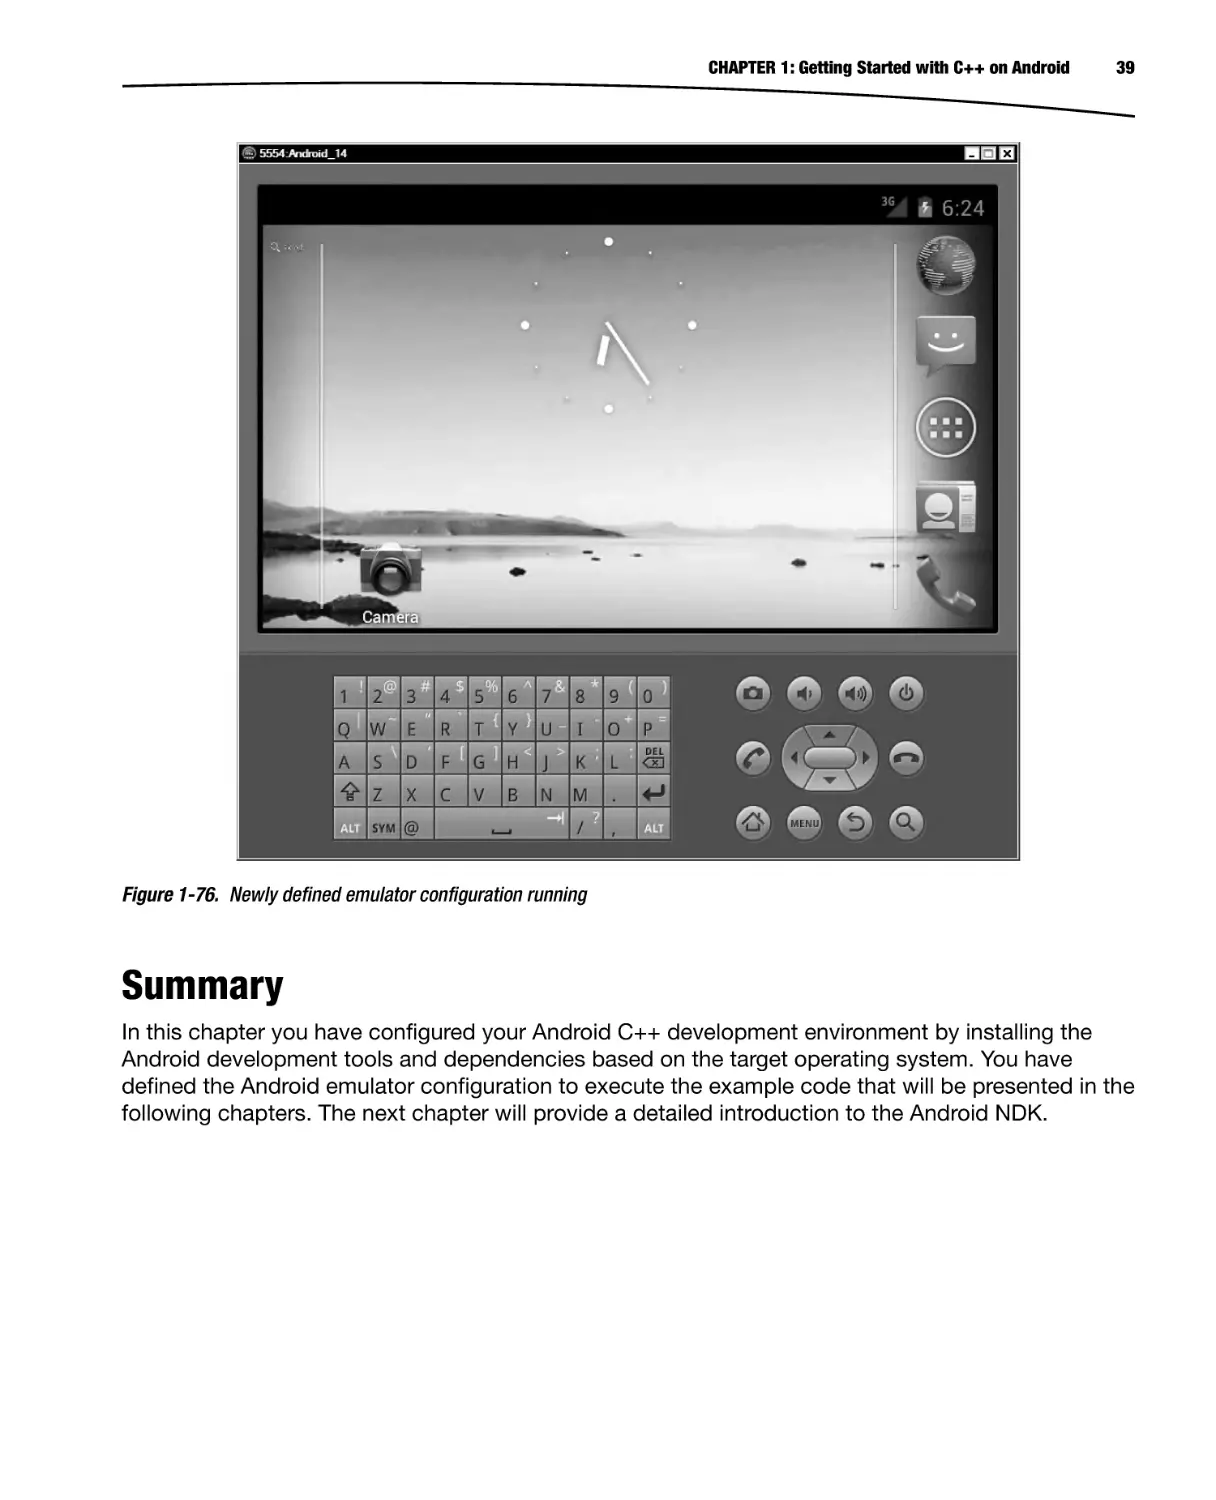
Figure 1-76. Newly defined emulator configuration running
Summary
In this chapter you have configured your Android C++ development environment by installing the
Android development tools and dependencies based on the target operating system. You have
defined the Android emulator configuration to execute the example code that will be presented in the
following chapters. The next chapter will provide a detailed introduction to the Android NDK.
Chapter
2
Exploring the Android NDK
In the previous chapter, you configured your development environment by installing Android
development tools and dependencies. Among these tools, the Android Native Development Kit
(NDK) is the tool you will be using for C++ development on Android platform. The Android NDK
is a companion toolset for the Android Software Development Kit (SDK), designed to augment the
Android SDK to allow developers to implement and embed performance-critical portions of their
applications using machine code-generating programming languages like C, C++, and Assembly.
In this chapter, you will start exploring the Android NDK. You will be taking the hello-jni sample
application that comes with the Android NDK and manipulating it to demonstrate the Android NDK
build system.
Components Provided with the Android NDK
The Android NDK is not a single tool; it is a comprehensive set of APIs, cross-compilers, linkers,
debuggers, build tools, documentation, and sample applications. The following are some of the key
components of Android NDK:
ARM, x86, and MIPS cross-compilers
Build system
Java Native Interface headers
C library
Math library
POSIX threads
Minimal C++ library
ZLib compression library
Dynamic linker library
Android logging library
41
42
CHAPTER 2: Exploring the Android NDK
Android pixel buffer library
Android native application APIs
OpenGL ES 3D graphics library
OpenSL ES native audio library
OpenMAX AL minimal support
Structure of the Android NDK
During the installation process, all of the Android NDK components are installed under the target
directory. The following are some of the important files and subdirectories:
ndk-build: This shell script is the starting point of the Android NDK build
system. This chapter will cover ndk-build in detail while exploring the Android
NDK build system.
ndk-gdb: This shell script allows debugging native components using the GNU
Debugger. Chapter 5 will cover ndk-gdb in detail while discussing the debugging
of native components.
ndk-stack: This shell script helps facilitate analyzing the stack traces that are
produced when native components crash. Chapter 5 will cover ndk-stack in
detail while discussing the troubleshooting and crash dump analysis of native
components.
build: This directory contains the modules of the entire Android NDK build
system. This chapter will cover the Android NDK build system in detail.
platforms: This directory contains header files and libraries for each supported
Android target version. These files are used automatically by the Android NDK
build system based on the specified target version.
samples: This directory contains sample applications to demonstrate the
capabilities provided by the Android NDK. These sample projects are very useful
for learning how to use the features provided by the Android NDK.
sources: This directory contains shared modules that developers can import into
their existing Android NDK projects.
toolchains: This directory contains cross-compilers for different target machine
architectures that the Android NDK currently supports. Android NDK currently
supports ARM, x86, and MIPS machine architectures. The Android NDK build
system uses the cross-compiler based on the selected machine architecture.
The most important component of the Android NDK is its build system, which brings all other
components together. To better understand how the build system works, you will be starting with a
working example.
CHAPTER 2: Exploring the Android NDK
43
Starting with an Example
You will start with the hello-jni sample application that comes with the Android NDK. Later, you
will modify it to demonstrate the different functionalities provided by the Android NDK build system,
such as
Building a shared library
Building multiple shared libraries
Building static libraries
Sharing common modules using shared libraries
Sharing modules between multiple NDK projects
Using prebuilt libraries
Building standalone executables
Other build system variables and macros
Defining new variables and conditional operations
Open the Eclipse IDE that you installed in the previous chapter. Although the Android NDK does not
require the use of an IDE, using one will help to visually inspect the project structure and the build flow.
During the startup, Eclipse will ask you to choose the workspace; you can continue with the default.
Specifying the Android NDK Location
Since this is the first time the workspace will be used for Android NDK development, the location of
the Android NDK needs to be specified.
1.
On Windows and Linux platforms, choose the Preferences menu item from the
top menu bar. On Mac OS X platform, use the application menu in Eclipse
and choose the Preferences menu item.
2.
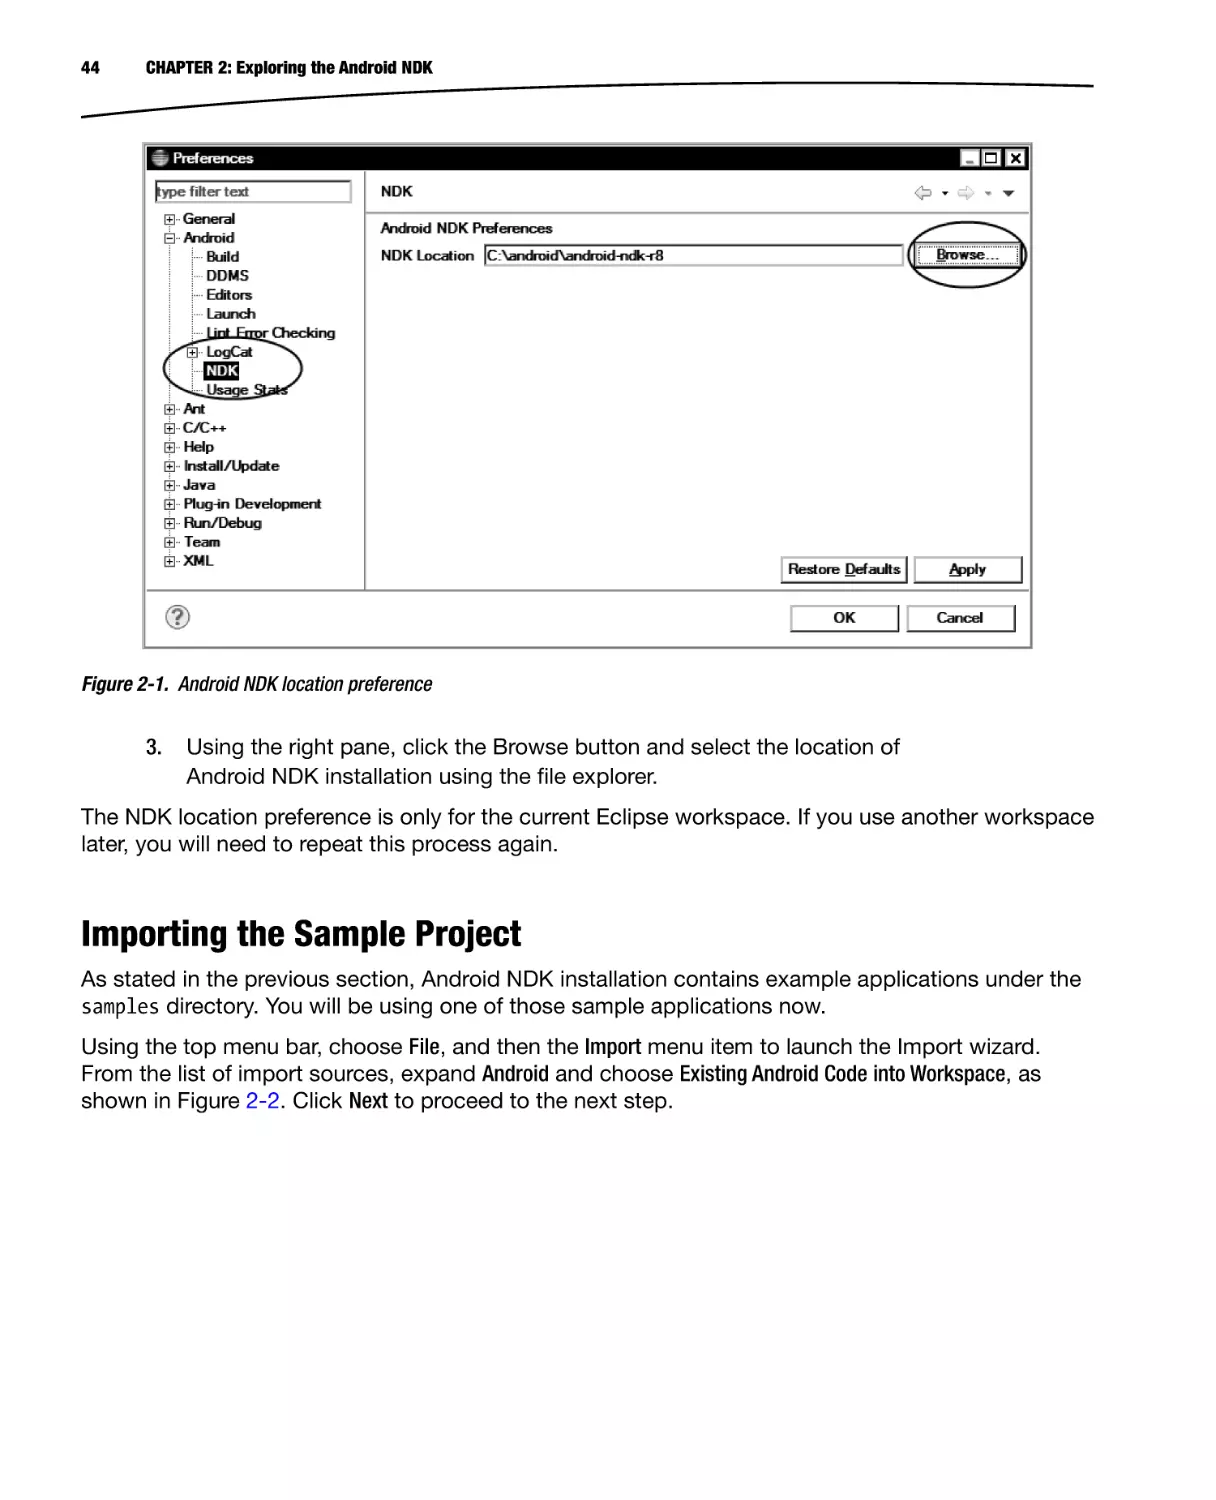
As shown in Figure 2-1, the left pane of the Preferences dialog contains the
list of preferences categories in a tree format. Expand Android and then
choose NDK from the tree.
44
CHAPTER 2: Exploring the Android NDK
Figure 2-1. Android NDK location preference
3.
Using the right pane, click the Browse button and select the location of
Android NDK installation using the file explorer.
The NDK location preference is only for the current Eclipse workspace. If you use another workspace
later, you will need to repeat this process again.
Importing the Sample Project
As stated in the previous section, Android NDK installation contains example applications under the
samples directory. You will be using one of those sample applications now.
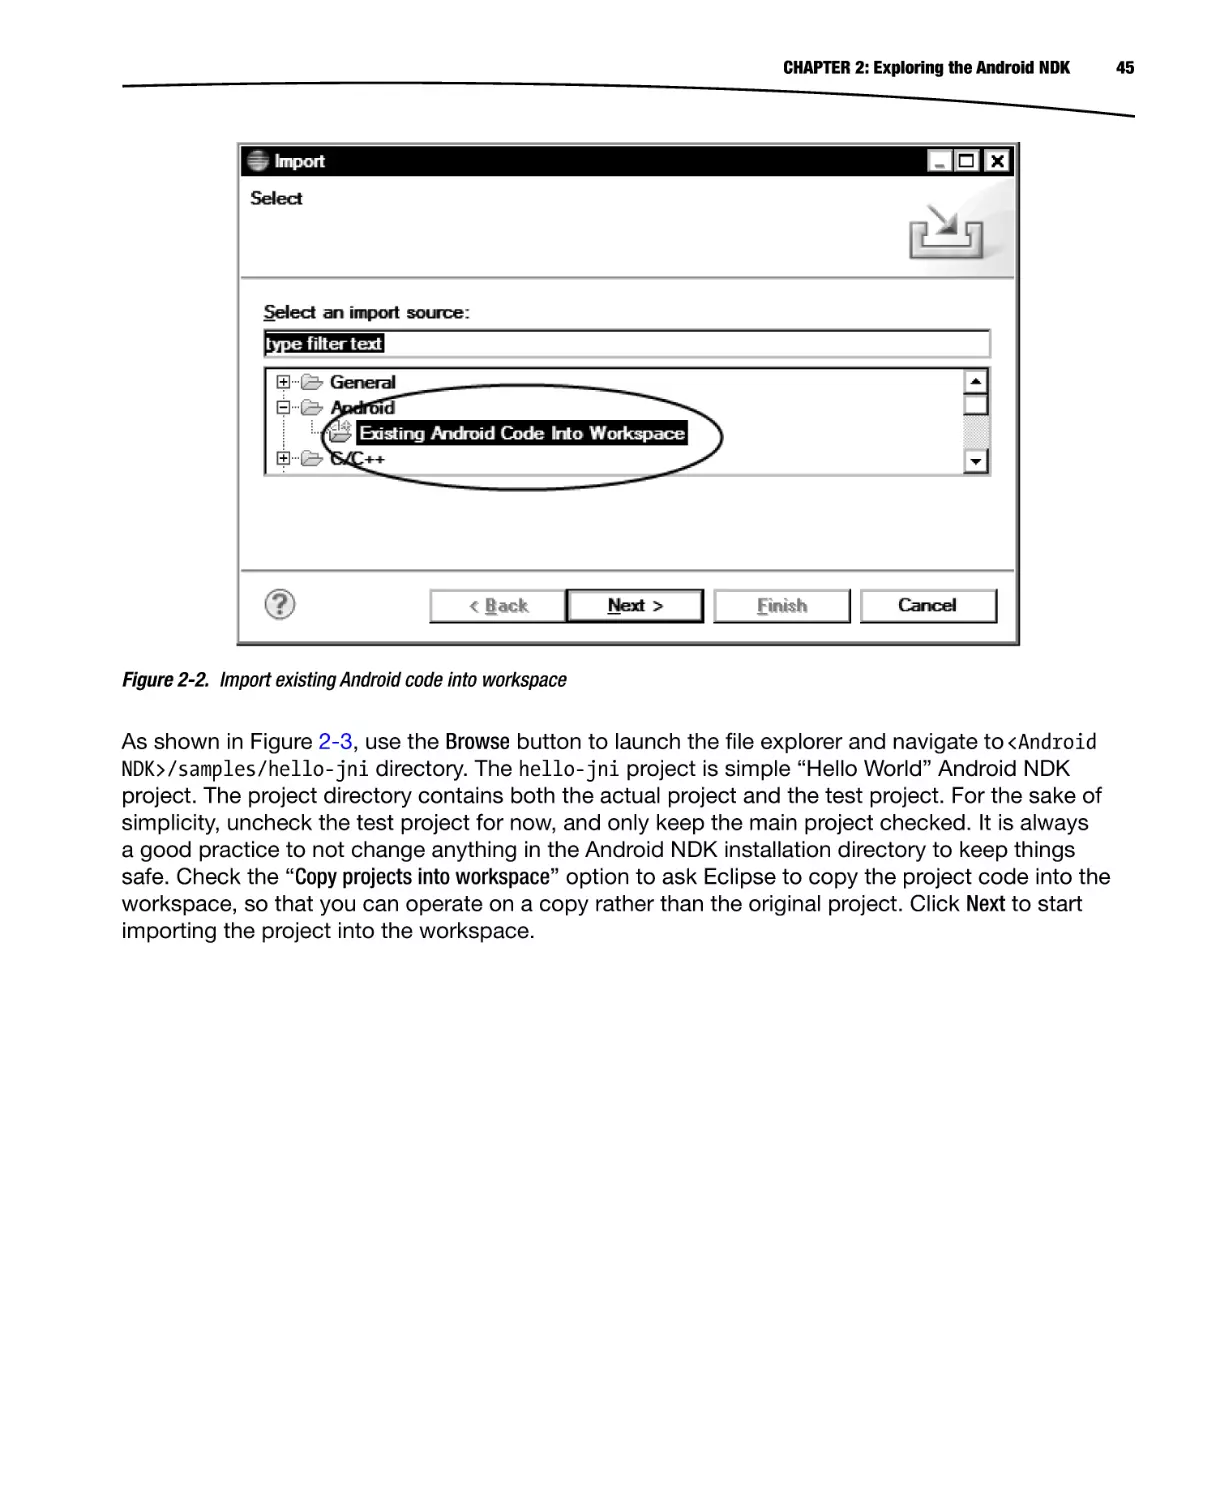
Using the top menu bar, choose File, and then the Import menu item to launch the Import wizard.
From the list of import sources, expand Android and choose Existing Android Code into Workspace, as
shown in Figure 2-2. Click Next to proceed to the next step.
CHAPTER 2: Exploring the Android NDK
Figure 2-2. Import existing Android code into workspace
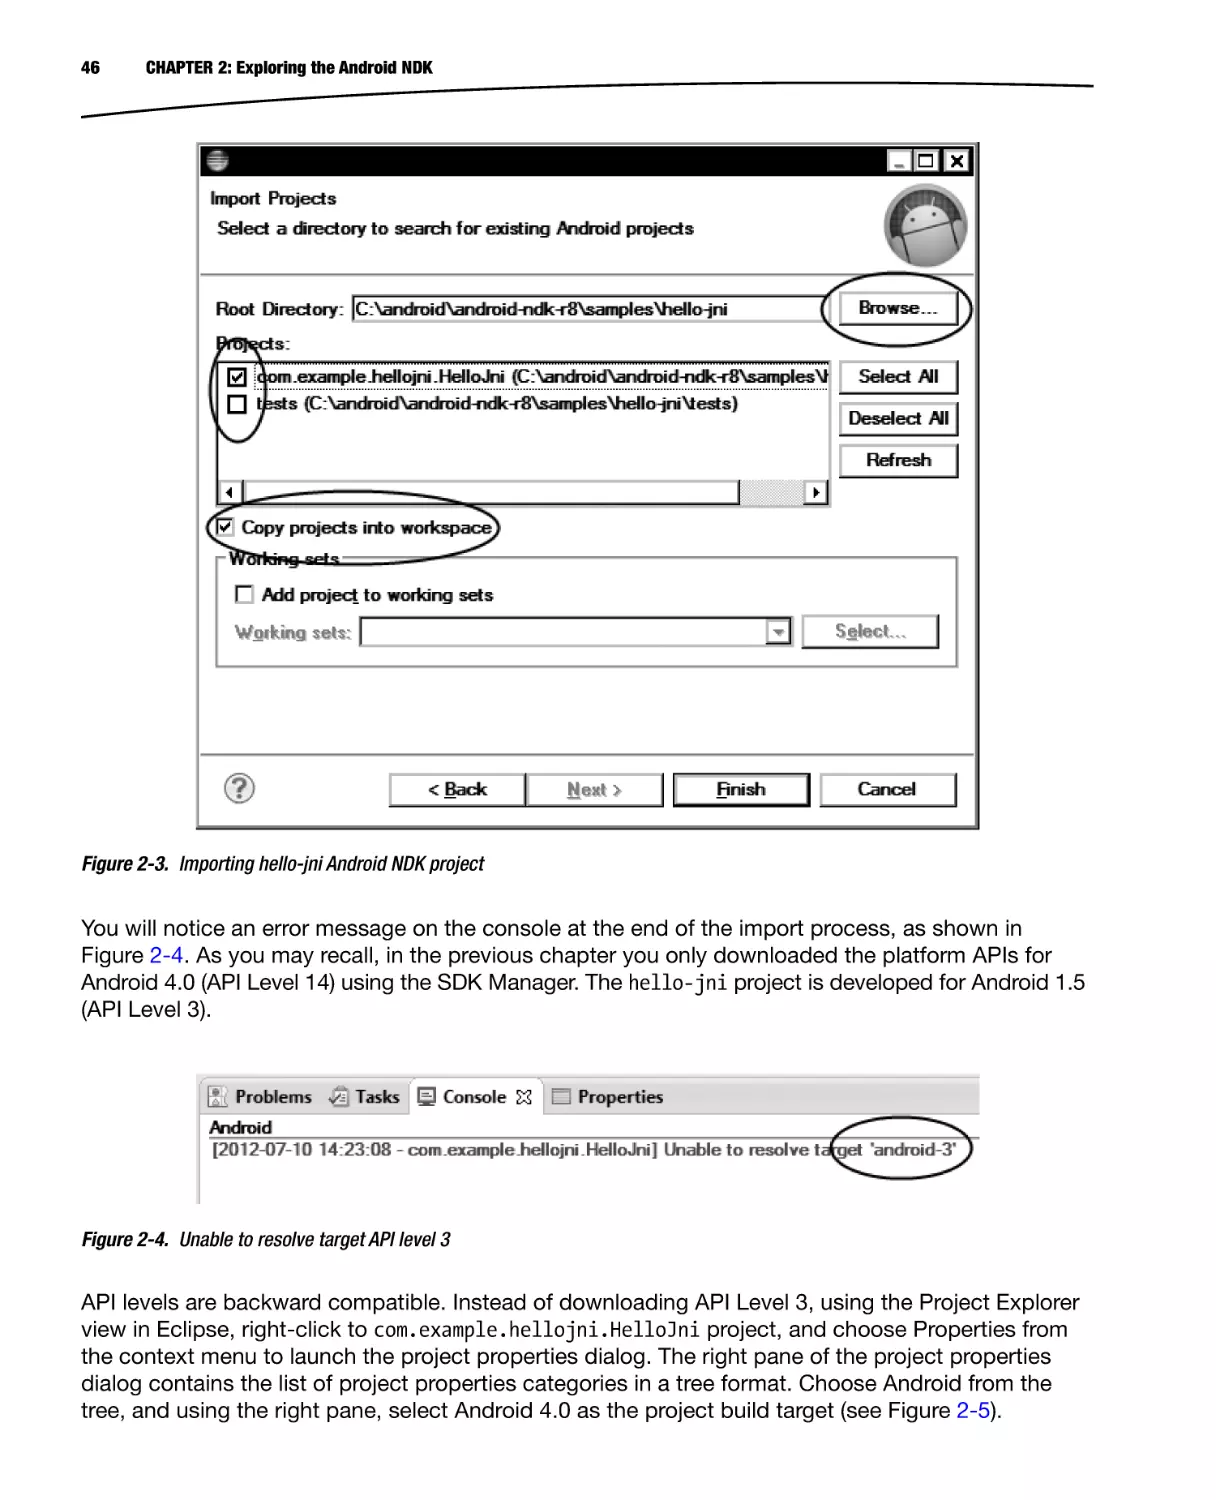
As shown in Figure 2-3, use the Browse button to launch the file explorer and navigate to <Android
NDK>/samples/hello-jni directory. The hello-jni project is simple “Hello World” Android NDK
project. The project directory contains both the actual project and the test project. For the sake of
simplicity, uncheck the test project for now, and only keep the main project checked. It is always
a good practice to not change anything in the Android NDK installation directory to keep things
safe. Check the “Copy projects into workspace” option to ask Eclipse to copy the project code into the
workspace, so that you can operate on a copy rather than the original project. Click Next to start
importing the project into the workspace.
45
46
CHAPTER 2: Exploring the Android NDK
Figure 2-3. Importing hello-jni Android NDK project
You will notice an error message on the console at the end of the import process, as shown in
Figure 2-4. As you may recall, in the previous chapter you only downloaded the platform APIs for
Android 4.0 (API Level 14) using the SDK Manager. The hello-jni project is developed for Android 1.5
(API Level 3).
Figure 2-4. Unable to resolve target API level 3
API levels are backward compatible. Instead of downloading API Level 3, using the Project Explorer
view in Eclipse, right-click to com.example.hellojni.HelloJni project, and choose Properties from
the context menu to launch the project properties dialog. The right pane of the project properties
dialog contains the list of project properties categories in a tree format. Choose Android from the
tree, and using the right pane, select Android 4.0 as the project build target (see Figure 2-5).
CHAPTER 2: Exploring the Android NDK
47
Figure 2-5. Choose Android 4.0 as the project build target
Click the OK button to apply the changes. Eclipse will rebuild the project using the selected project
build target.
Adding Native Support to Project
The Import Android Project wizard only imports projects as Android Java projects. The native
support needs to be added manually in order to include the native components into the build flow.
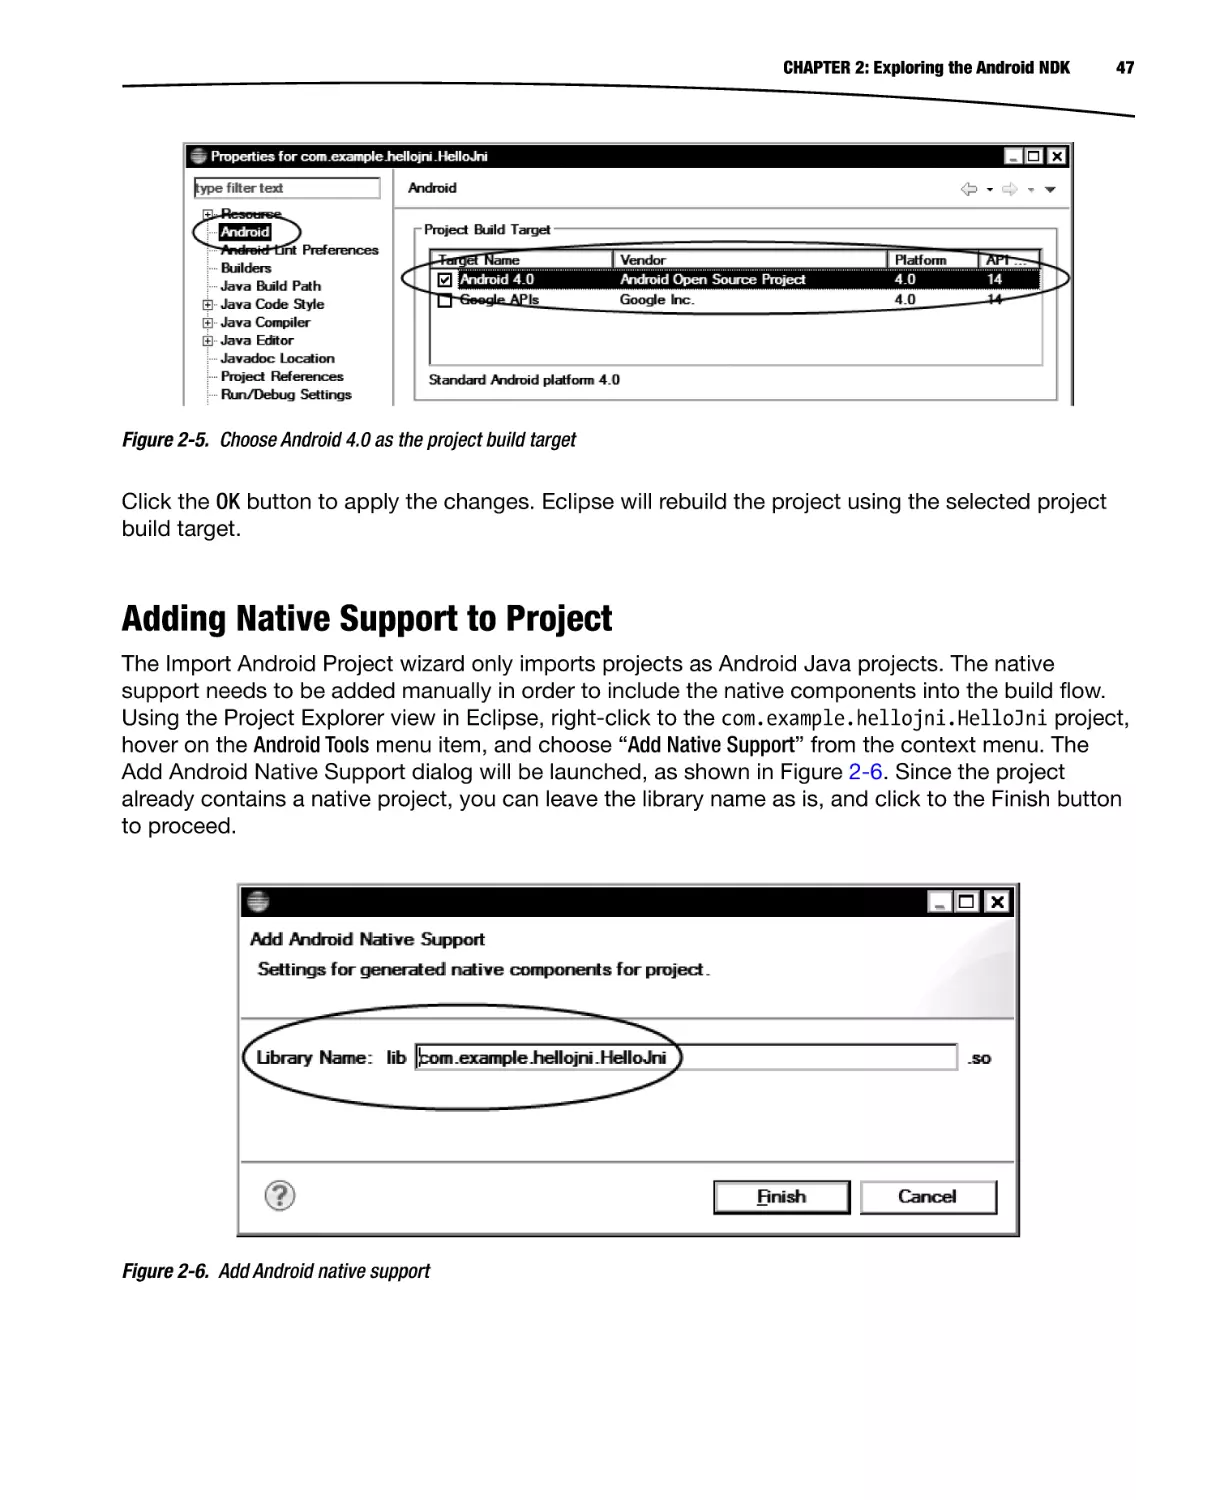
Using the Project Explorer view in Eclipse, right-click to the com.example.hellojni.HelloJni project,
hover on the Android Tools menu item, and choose “Add Native Support” from the context menu. The
Add Android Native Support dialog will be launched, as shown in Figure 2-6. Since the project
already contains a native project, you can leave the library name as is, and click to the Finish button
to proceed.
Figure 2-6. Add Android native support
48
CHAPTER 2: Exploring the Android NDK
If this is the first time you are adding native support to a Java-only project, you can specify the
preferred name of the shared library in this dialog and it will be used while auto-generating the build
files as a part of the process.
Running the Project
Now that the project is ready, you can run it on the Android emulator. Choose Run from the top menu,
and select Run from the submenu. Since this is the first time you are running this project, Eclipse will
ask you to select how you would like to run the project through the Run As dialog. Choose Android
Application from the list and click OK button to proceed. Android Emulator will be launched; the project
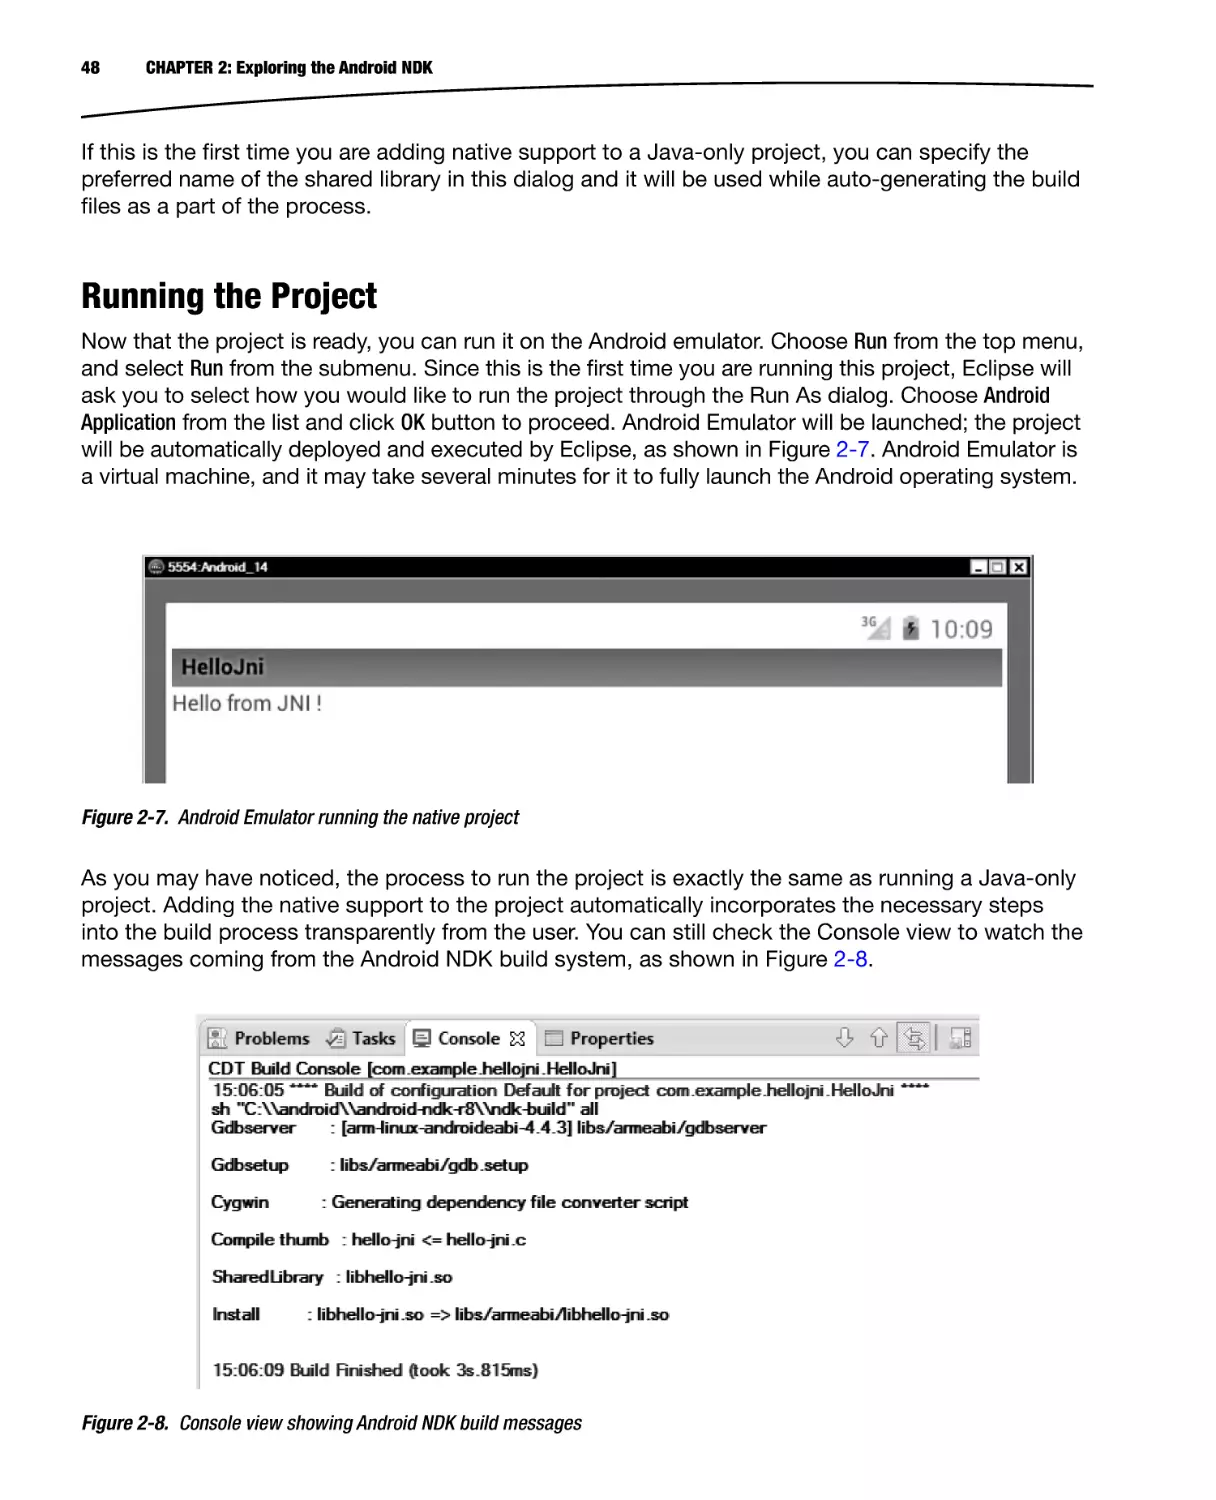
will be automatically deployed and executed by Eclipse, as shown in Figure 2-7. Android Emulator is
a virtual machine, and it may take several minutes for it to fully launch the Android operating system.
Figure 2-7. Android Emulator running the native project
As you may have noticed, the process to run the project is exactly the same as running a Java-only
project. Adding the native support to the project automatically incorporates the necessary steps
into the build process transparently from the user. You can still check the Console view to watch the
messages coming from the Android NDK build system, as shown in Figure 2-8.
Figure 2-8. Console view showing Android NDK build messages
CHAPTER 2: Exploring the Android NDK
49
Although Eclipse did a great job streamlining the entire build and deployment process for us, as
stated earlier in this chapter, Eclipse is not a requirement to build Android NDK projects. The entire
build process can be executed from the command line as well.
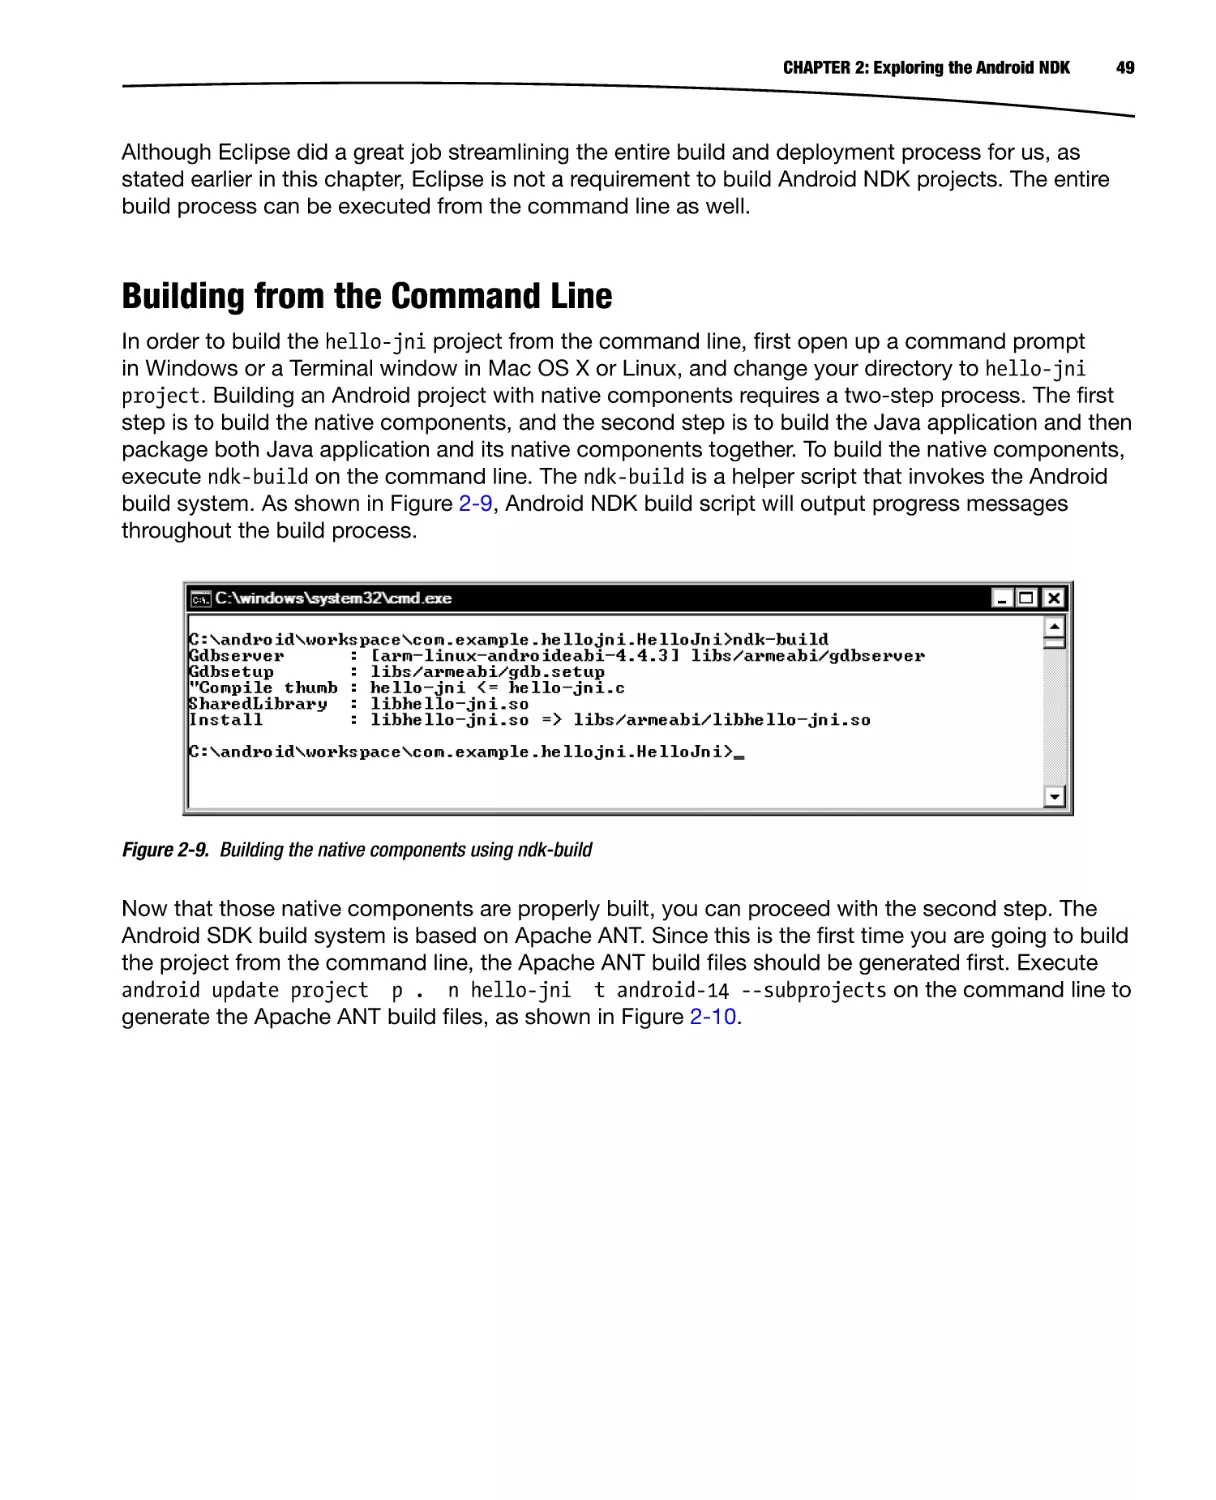
Building from the Command Line
In order to build the hello-jni project from the command line, first open up a command prompt
in Windows or a Terminal window in Mac OS X or Linux, and change your directory to hello-jni
project. Building an Android project with native components requires a two-step process. The first
step is to build the native components, and the second step is to build the Java application and then
package both Java application and its native components together. To build the native components,
execute ndk-build on the command line. The ndk-build is a helper script that invokes the Android
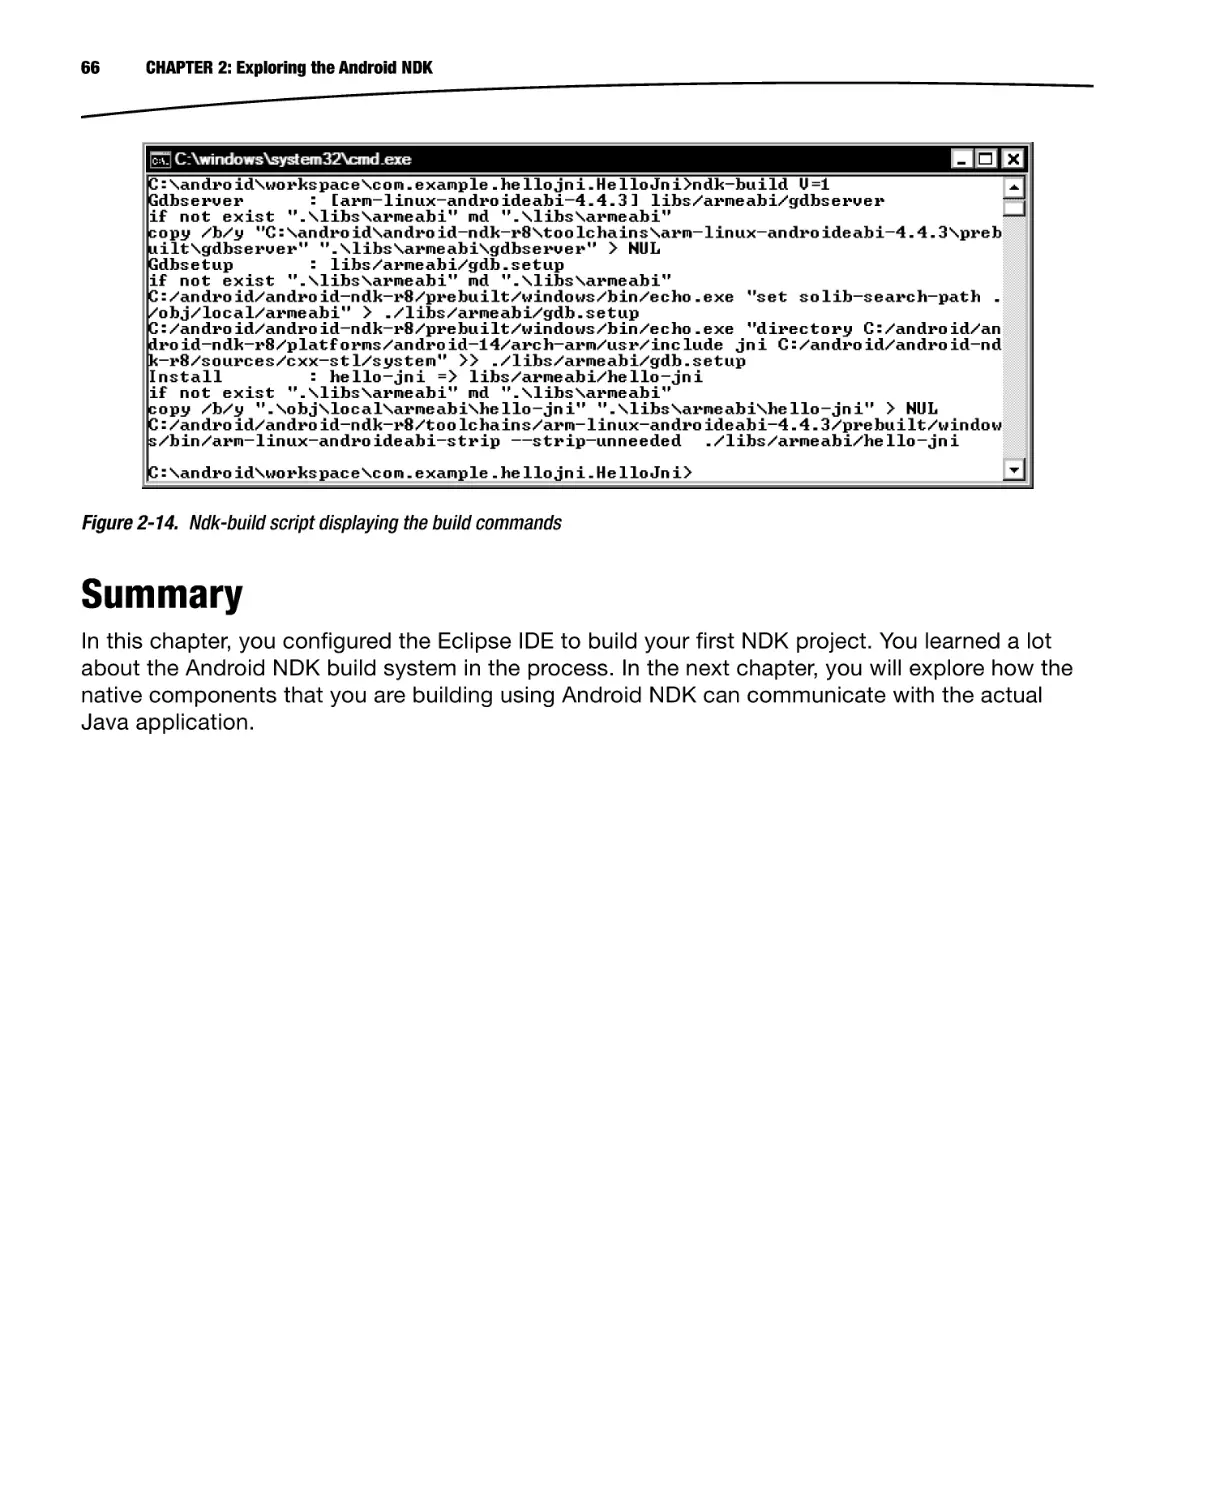
build system. As shown in Figure 2-9, Android NDK build script will output progress messages
throughout the build process.
Figure 2-9. Building the native components using ndk-build
Now that those native components are properly built, you can proceed with the second step. The
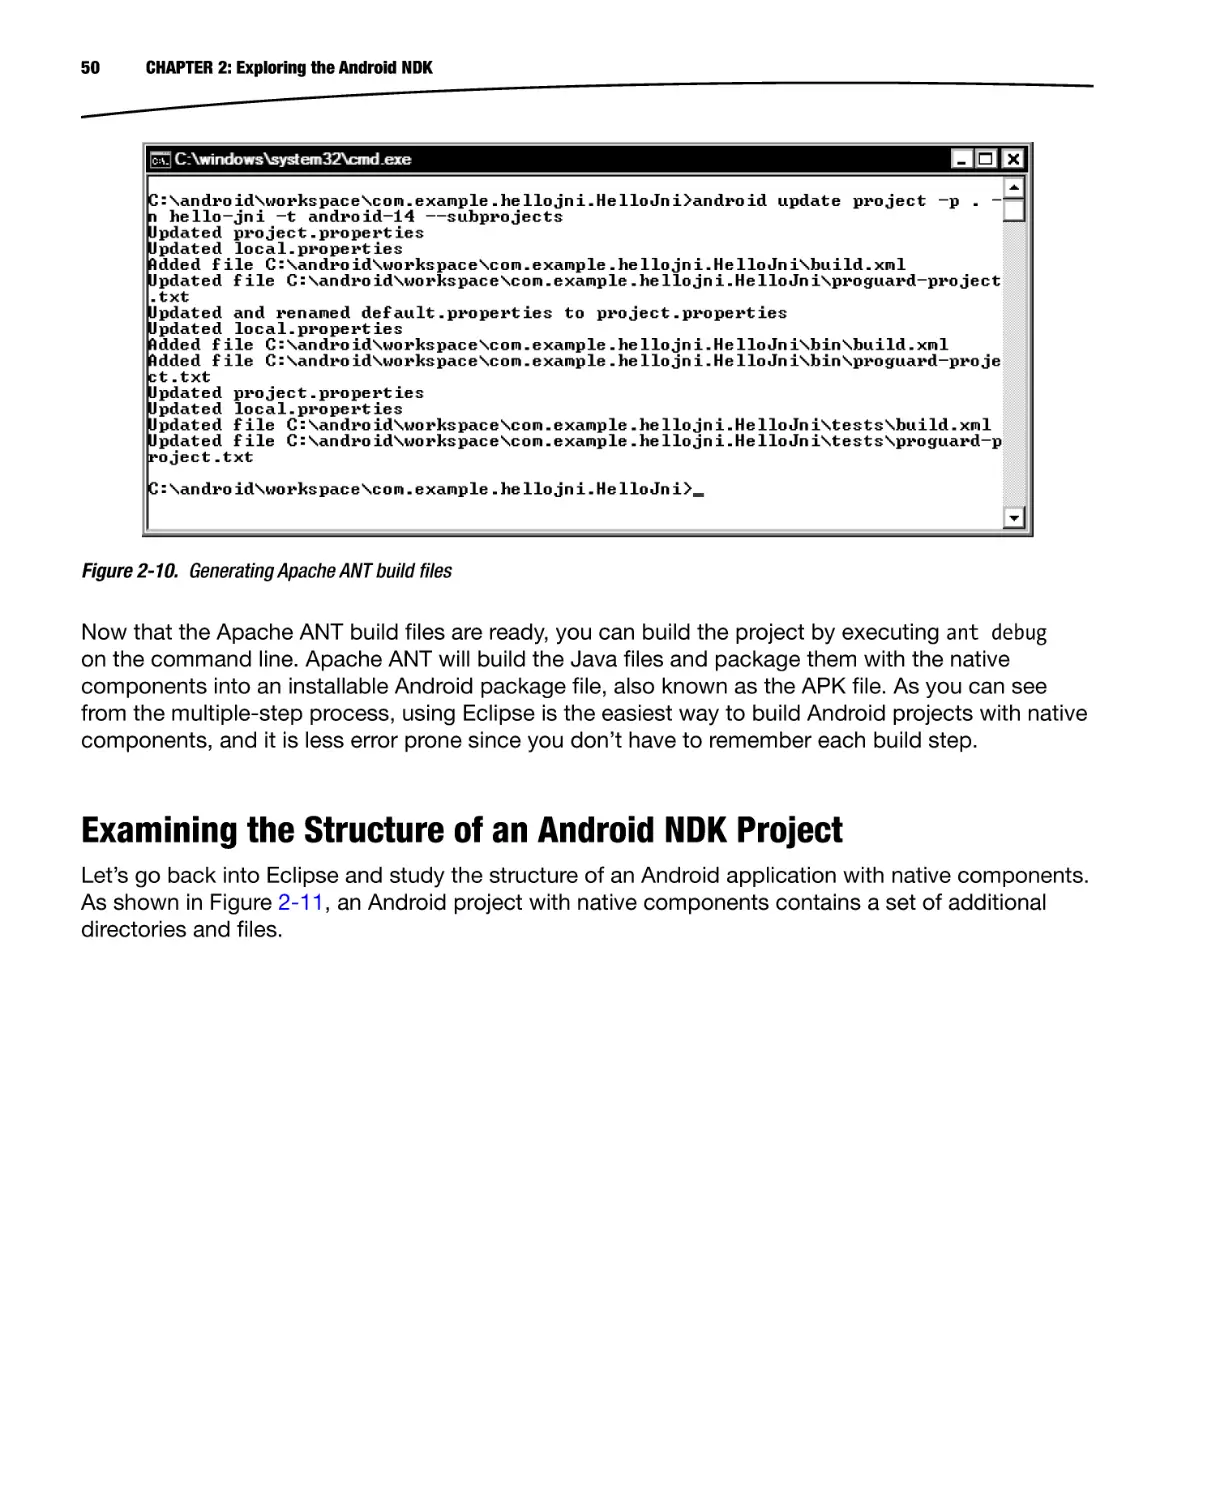
Android SDK build system is based on Apache ANT. Since this is the first time you are going to build
the project from the command line, the Apache ANT build files should be generated first. Execute
android update project p . n hello-jni t android-14 --subprojects on the command line to
generate the Apache ANT build files, as shown in Figure 2-10.
50
CHAPTER 2: Exploring the Android NDK
Figure 2-10. Generating Apache ANT build files
Now that the Apache ANT build files are ready, you can build the project by executing ant debug
on the command line. Apache ANT will build the Java files and package them with the native
components into an installable Android package file, also known as the APK file. As you can see
from the multiple-step process, using Eclipse is the easiest way to build Android projects with native
components, and it is less error prone since you don’t have to remember each build step.
Examining the Structure of an Android NDK Project
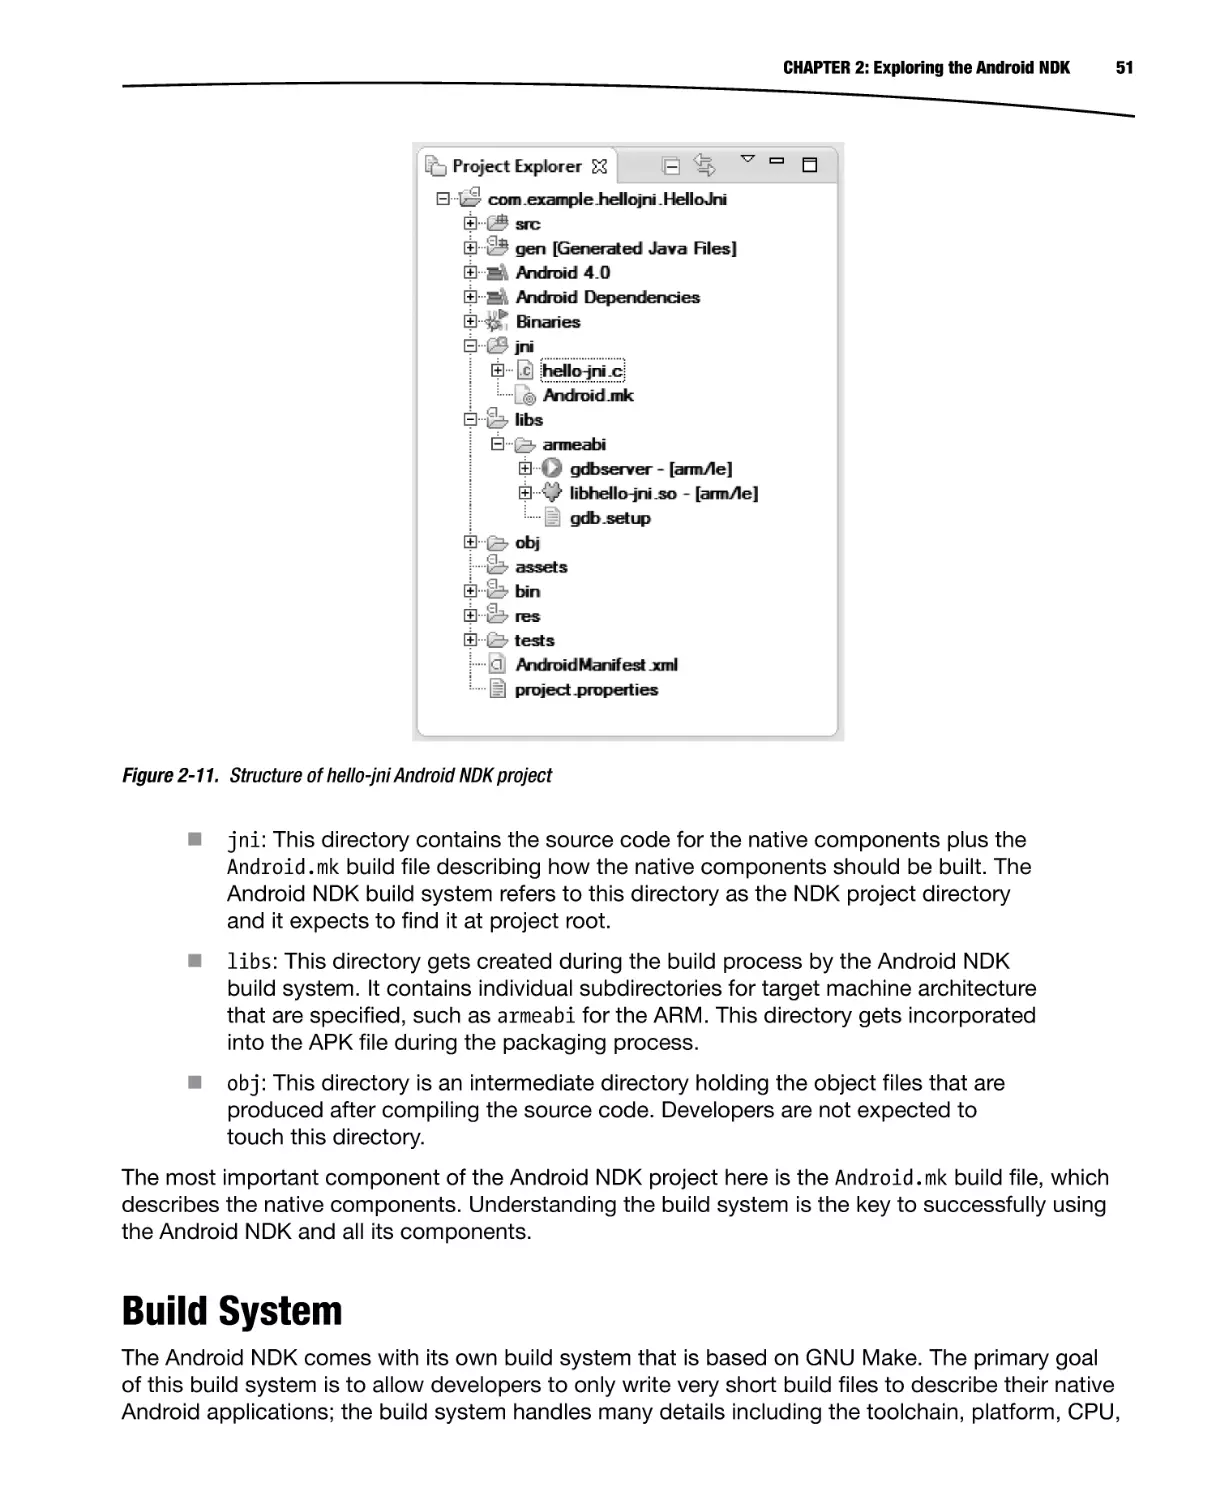
Let’s go back into Eclipse and study the structure of an Android application with native components.
As shown in Figure 2-11, an Android project with native components contains a set of additional
directories and files.
CHAPTER 2: Exploring the Android NDK
51
Figure 2-11. Structure of hello-jni Android NDK project
jni: This directory contains the source code for the native components plus the
Android.mk build file describing how the native components should be built. The
Android NDK build system refers to this directory as the NDK project directory
and it expects to find it at project root.
libs: This directory gets created during the build process by the Android NDK
build system. It contains individual subdirectories for target machine architecture
that are specified, such as armeabi for the ARM. This directory gets incorporated
into the APK file during the packaging process.
obj: This directory is an intermediate directory holding the object files that are
produced after compiling the source code. Developers are not expected to
touch this directory.
The most important component of the Android NDK project here is the Android.mk build file, which
describes the native components. Understanding the build system is the key to successfully using
the Android NDK and all its components.
Build System
The Android NDK comes with its own build system that is based on GNU Make. The primary goal
of this build system is to allow developers to only write very short build files to describe their native
Android applications; the build system handles many details including the toolchain, platform, CPU,
52
CHAPTER 2: Exploring the Android NDK
and ABI specifics on behalf of the developer. Having the build process encapsulated allows the later
updates of the Android NDK to add support for more toolchains, platforms, and system interfaces
without requiring changes in the build files.
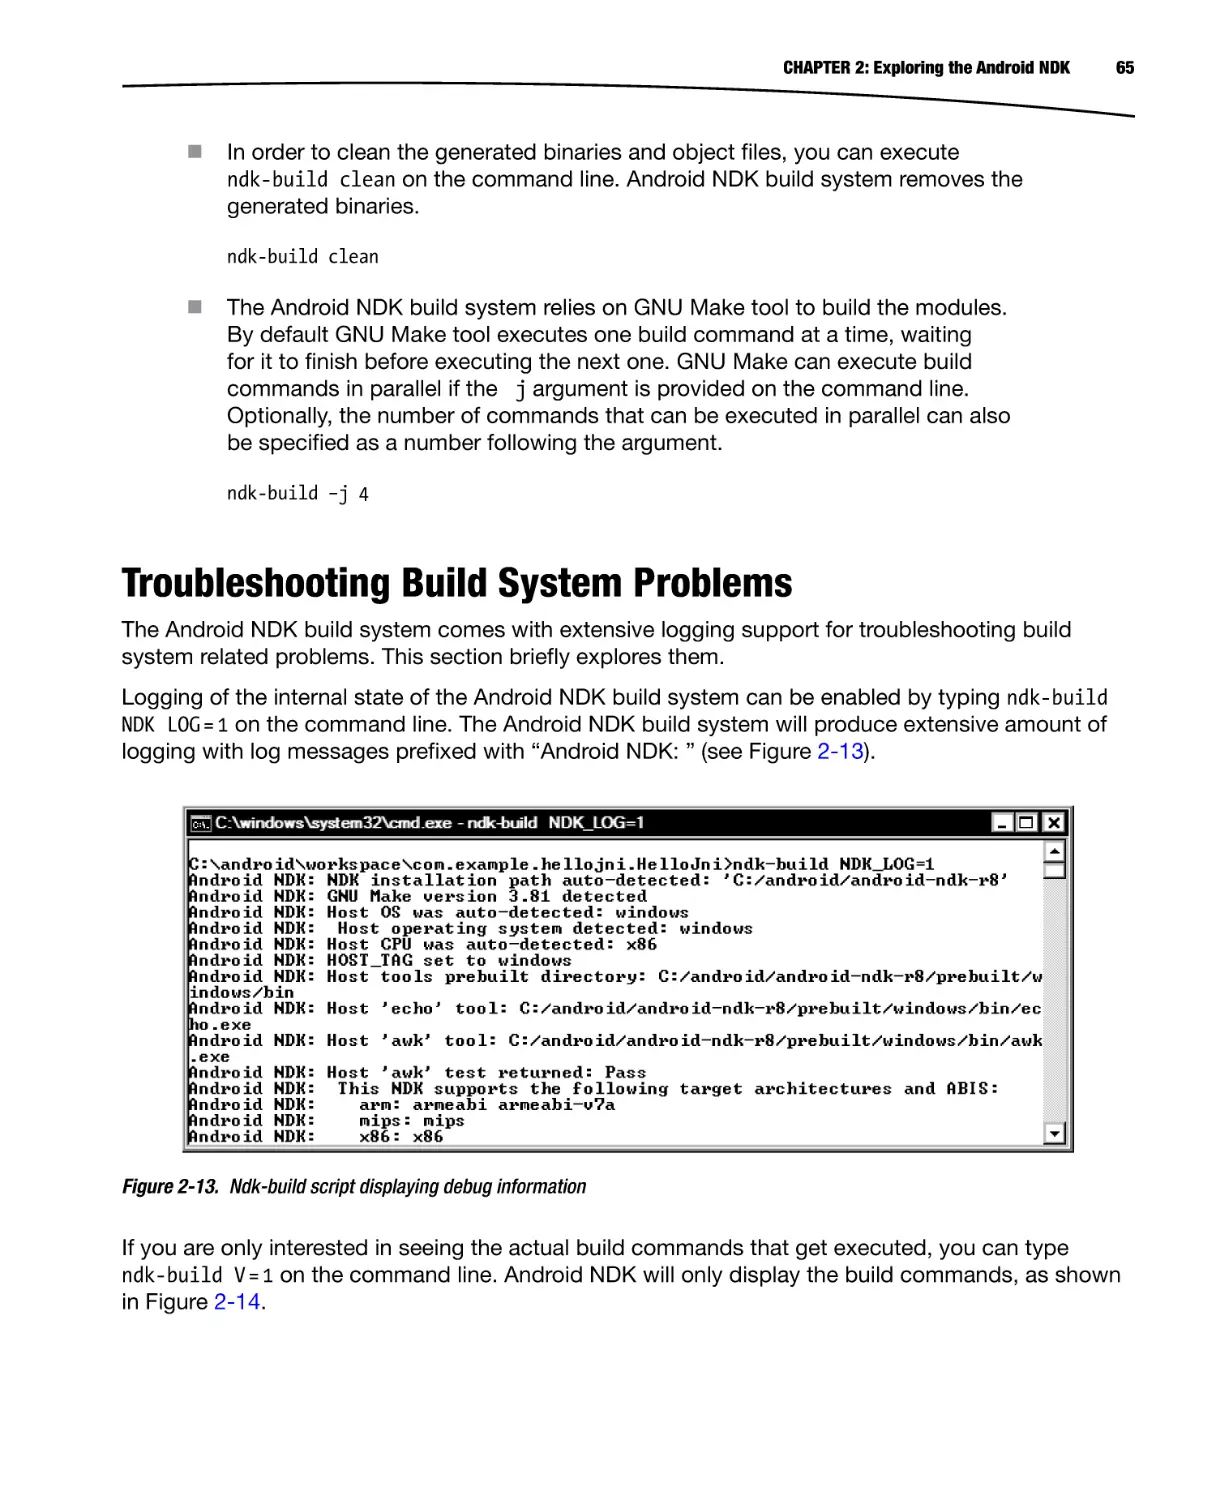
The Android NDK build system is formed by multiple GNU Makefile fragments. The build system
includes the necessary fragments based on type of the NDK project needed to render the build
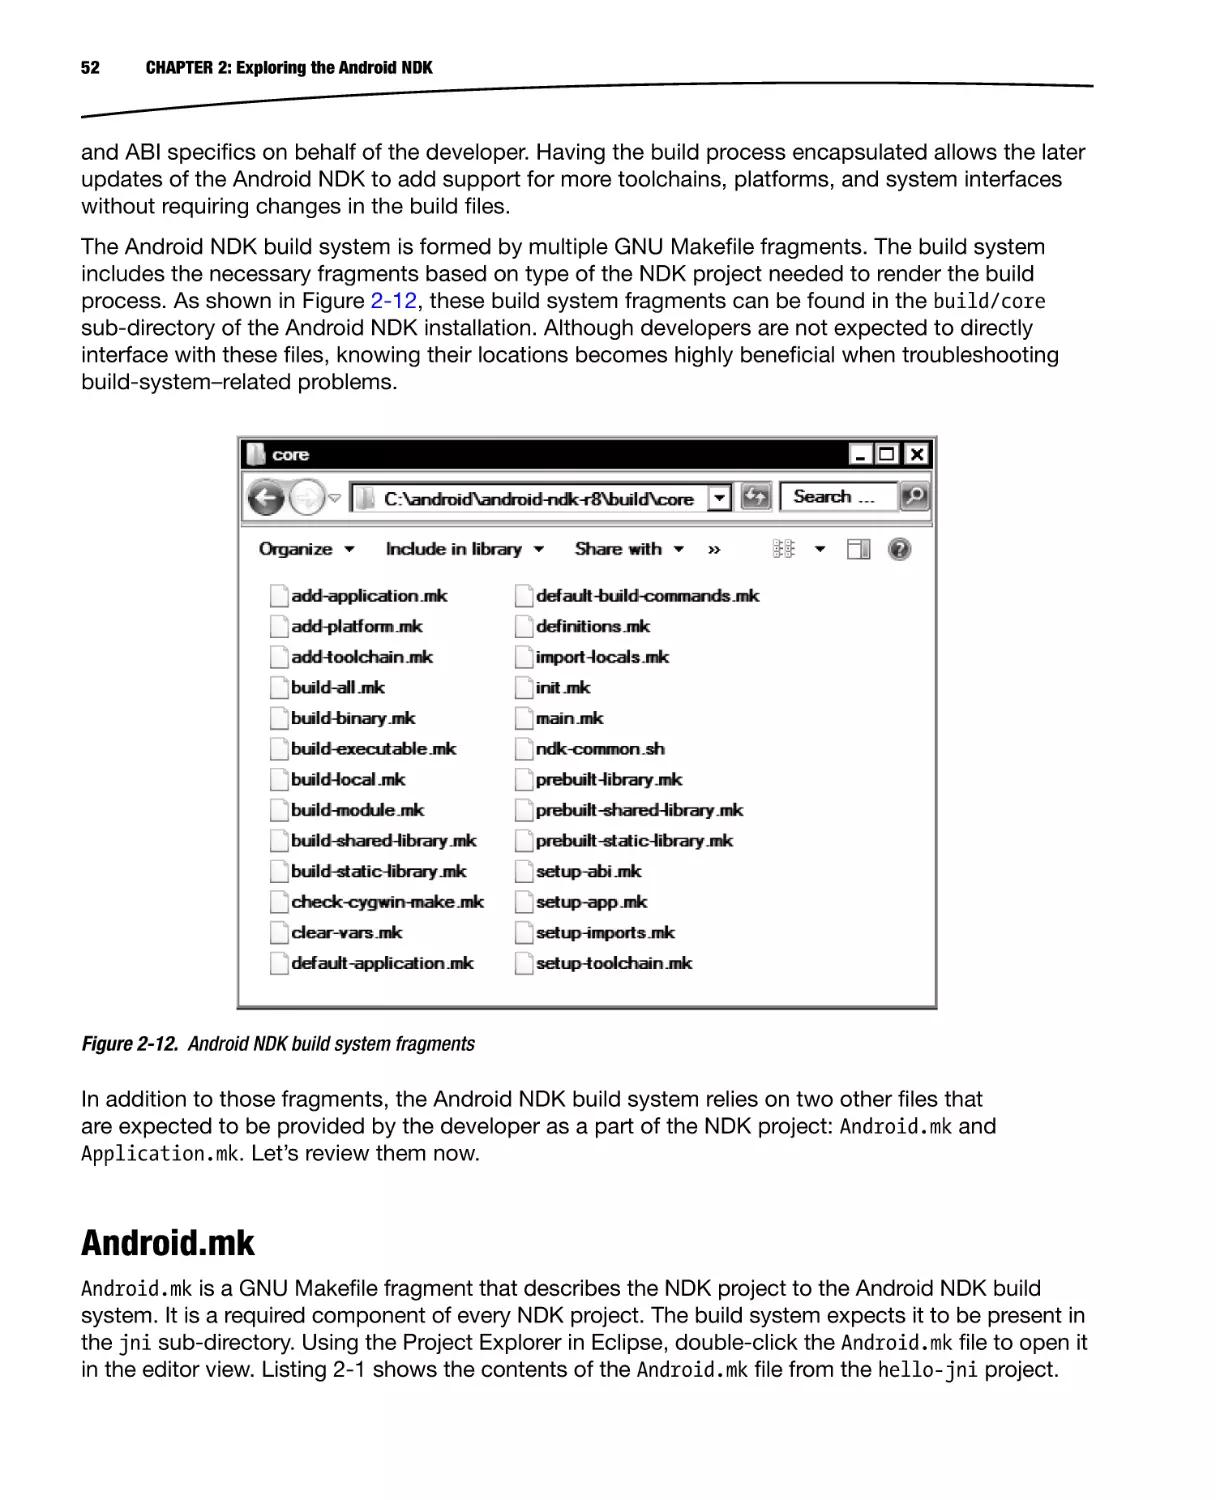
process. As shown in Figure 2-12, these build system fragments can be found in the build/core
sub-directory of the Android NDK installation. Although developers are not expected to directly
interface with these files, knowing their locations becomes highly beneficial when troubleshooting
build-system–related problems.
Figure 2-12. Android NDK build system fragments
In addition to those fragments, the Android NDK build system relies on two other files that
are expected to be provided by the developer as a part of the NDK project: Android.mk and
Application.mk. Let’s review them now.
Android.mk
Android.mk is a GNU Makefile fragment that describes the NDK project to the Android NDK build
system. It is a required component of every NDK project. The build system expects it to be present in
the jni sub-directory. Using the Project Explorer in Eclipse, double-click the Android.mk file to open it
in the editor view. Listing 2-1 shows the contents of the Android.mk file from the hello-jni project.
CHAPTER 2: Exploring the Android NDK
53
Listing 2-1. Contents of Android.mk File from hello-jni Project
# Copyright (C) 2009 The Alndroid Open Source Project
#
# Licensed under the Apache License, Version 2.0 (the "License");
# you may not use this file except in compliance with the License.
# You may obtain a copy of the License at
#
#
http://www.apache.org/licenses/LICENSE-2.0
#
# Unless required by applicable law or agreed to in writing, software
# distributed under the License is distributed on an "AS IS" BASIS,
# WITHOUT WARRANTIES OR CONDITIONS OF ANY KIND, either express or implied.
# See the License for the specific language governing permissions and
# limitations under the License.
#
LOCAL PATH := $(call my-dir)
include $(CLEAR VARS)
LOCAL MODULE
:= hello-jni
LOCAL SRC FILES := hello-jni.c
include $(BUILD SHARED LIBRARY)
Let’s go through this file line by line to better understand its syntax. Since this is a GNU Makefile
fragment, its syntax is exactly the same as any other Makefile. Each line contains a single
instruction. The lines starting with a hash (#) sign indicate a comment and they are not processed by
the GNU Make tool. By the naming convention, the variable names are upper-case.
The first instruction after the comments block is the definition of the LOCAL PATH variable. As a
requirement of the Android build system, the Android.mk file should always begin with the definition
of LOCAL PATH variable.
LOCAL PATH := $(call my-dir)
The LOCAL PATH is used by the Android build system to locate the source files. Since setting this
variable to a hard-coded value is not appropriate, the Android build system provides a macro
function called my-dir. By setting the variable to the return of the my-dir macro function, it gets set
to the current directory.
The CLEAR VARS variable gets set by the Android build system to the location of clear-vars.mk
fragment. Including this Makefile fragment clears the LOCAL <name> variables such as LOCAL MODULE,
LOCAL SRC FILES, etc., with the exception of LOCAL PATH.
include $(CLEAR VARS)
This is needed because multiple build files and module definitions are parsed by the Android build
system in a single execution, and the LOCAL <name> variables are global. Clearing them prevent
conflicts. Each native component is referred to as a module.
54
CHAPTER 2: Exploring the Android NDK
The LOCAL MODULE variable is used to name these modules with a unique name. This line sets the
name of the module to hello-jni
LOCAL MODULE
:= hello-jni
since the module name is also used to name the generated file as a result of the build process. The
build system adds the proper prefix and the suffix to the file. In this example, the hello-jni module
will generate a shared library file, and it will be named as libhello-jni.so by the build system.
The list of source files that will be built and assembled to produce the module is defined using the
LOCAL SRC FILES variable.
LOCAL SRC FILES := hello-jni.c
The hello-jni module is produced by only one source file, but LOCAL SRC FILES variable can contain
more than one source file separated by spaces.
Until this point, the build system variables that are defined in the Android.mk file simply described
the native project. For the build system to compile and generate the actual module, the appropriate
build system fragment needs to be included, depending on the type of the preferred module.
Building a Shared Library
In order to have a consumable module by the main application, it has to become a shared library.
The BUILD SHARED LIBRARY variable is set by the Android NDK build system to the location of
build-shared-library.mk file. This Makefile fragment contains the necessary build procedure to
build and assemble the source files as a shared library:
include $(BUILD SHARED LIBRARY)
The hello-jni is a simple module; however, unless your module requires any special treatment, your
Android.mk file will contain the exact same flow and instructions.
Building Multiple Shared Libraries
Depending on your application’s architecture, multiple shared library modules can also be produced
from a single Android.mk file. In order to do so, multiple modules need to be defined in the Android.mk
file, as shown in Listing 2-2.
Listing 2-2. Android.mk Build File with Multiple Shared Library Modules
LOCAL PATH := $(call my-dir)
#
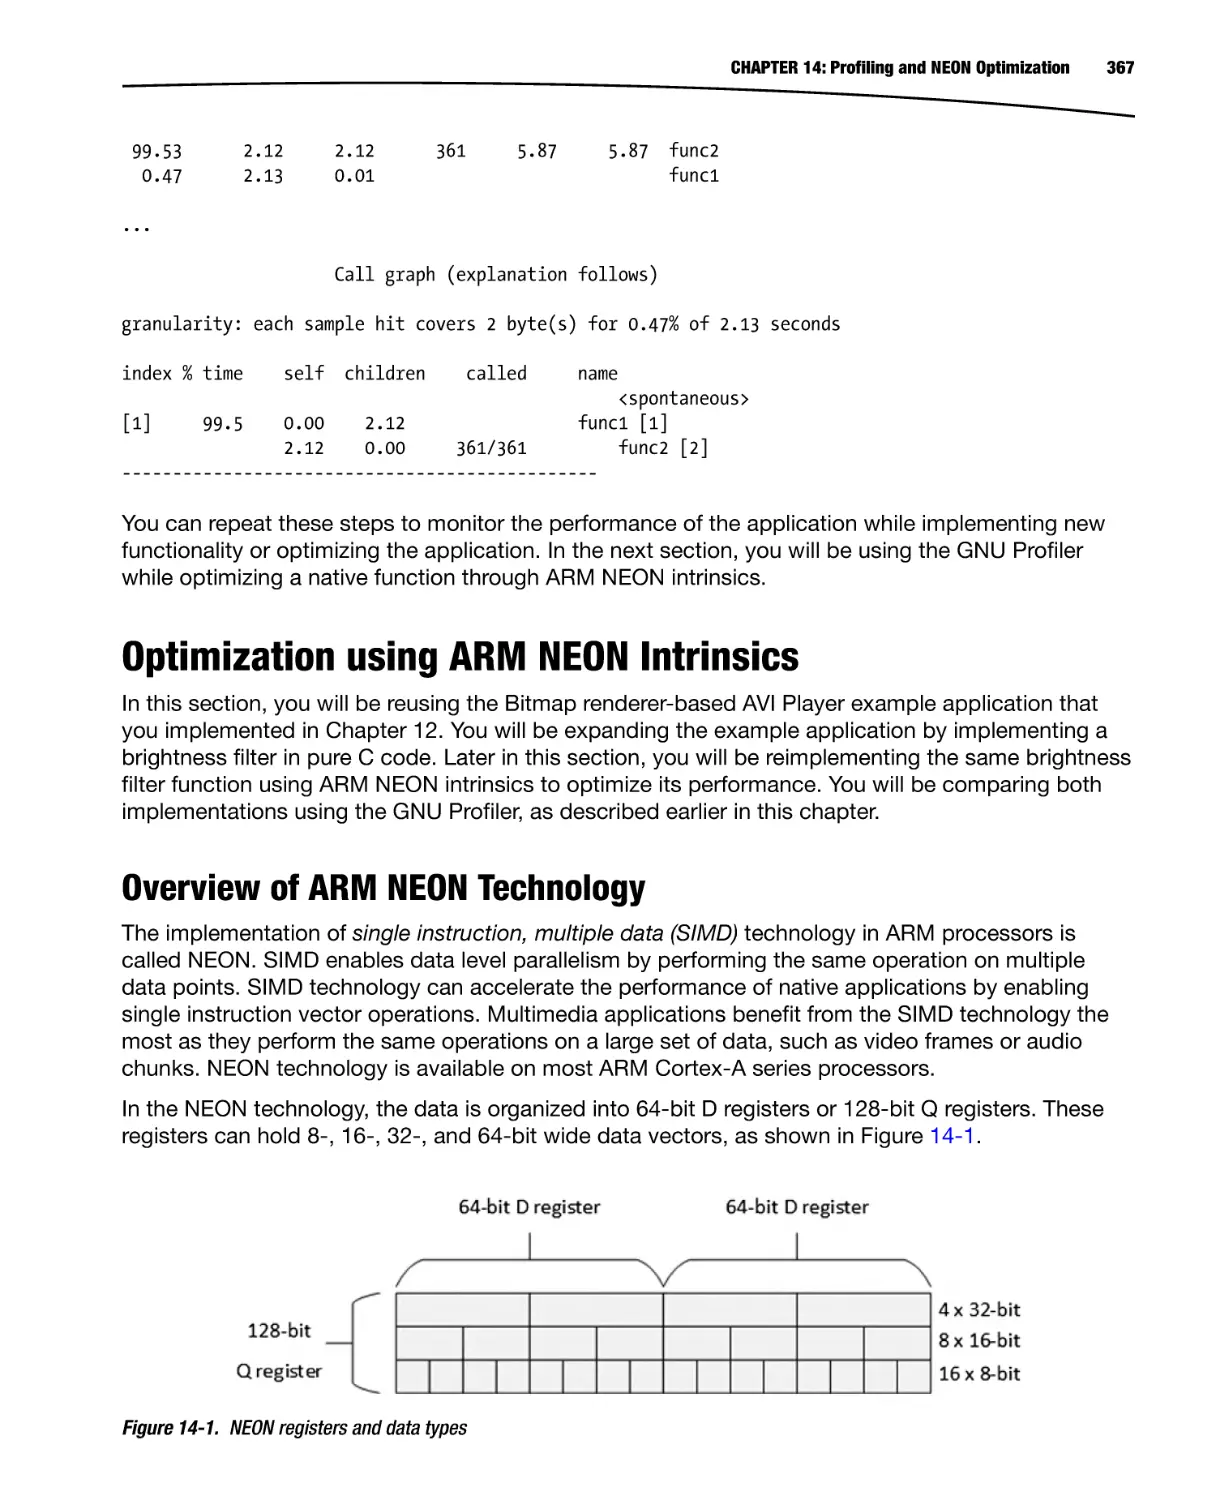
# Module 1
#
include $(CLEAR VARS)
LOCAL MODULE
:= module1
LOCAL SRC FILES := module1.c
CHAPTER 2: Exploring the Android NDK
55
include $(BUILD SHARED LIBRARY)
#
# Module 2
#
include $(CLEAR VARS)
LOCAL MODULE
:= module2
LOCAL SRC FILES := module2.c
include $(BUILD SHARED LIBRARY)
The Android NDK build system will produce libmodule1.so and libmodule2.so shared libraries after
processing this Android.mk build file.
Building Static Libraries
Static libraries are also supported by the Android NDK build system. Static libraries are not directly
consumable by the actual Android application, and they don’t get included into the application
package. Static libraries can be used to build shared libraries. For example, when integrating third
party code into an existing native project, instead of including the source code directly, the third
party code can be compiled as a static library and then combined into the shared library, as shown
in Listing 2-3.
Listing 2-3. Android.mk File Showing the Use of Static Library
LOCAL PATH := $(call my-dir)
#
# 3rd party AVI library
#
include $(CLEAR VARS)
LOCAL MODULE
:= avilib
LOCAL SRC FILES := avilib.c platform posix.c
include $(BUILD_STATIC_LIBRARY)
#
# Native module
#
include $(CLEAR VARS)
LOCAL MODULE
:= module
LOCAL SRC FILES := module.c
LOCAL_STATIC_LIBRARIES := avilib
include $(BUILD SHARED LIBRARY)
56
CHAPTER 2: Exploring the Android NDK
Upon building the module as a static library, it can get consumed by the shared libraries by including
its module name into the LOCAL STATIC LIBRARIES variable.
Sharing Common Modules using Shared Libraries
Static libraries allow you to keep your source code modular; however, when the static library gets
linked into a shared library, it becomes part of that shared library. In the case of multiple shared
libraries, linking with the same static library simply increases the application size due to multiple
copies of the common module. In such cases, instead of building a static library, the common
module can be built as a shared library, and the dependent modules then dynamically link to it to
eliminate the duplicate copies (see Listing 2-4).
Listing 2-4. Android.mk File Showing Code Sharing Between Shared Libraries
LOCAL PATH := $(call my-dir)
#
# 3rd party AVI library
#
include $(CLEAR VARS)
LOCAL MODULE
:= avilib
LOCAL SRC FILES := avilib.c platform posix.c
include $(BUILD_SHARED_LIBRARY)
#
# Native module 1
#
include $(CLEAR VARS)
LOCAL MODULE
:= module1
LOCAL SRC FILES := module1.c
LOCAL_SHARED_LIBRARIES := avilib
include $(BUILD SHARED LIBRARY)
#
# Native module 2
#
include $(CLEAR VARS)
LOCAL MODULE
:= module2
LOCAL SRC FILES := module2.c
LOCAL_SHARED_LIBRARIES := avilib
include $(BUILD SHARED LIBRARY)
CHAPTER 2: Exploring the Android NDK
57
Sharing Modules between Multiple NDK Projects
Using both the static and shared libraries, the common modules can be shared between modules.
However, the caveat here is that all these modules should be part of the same NDK project. Starting
from version R5, Android NDK also allows sharing and reusing modules between NDK projects.
Considering the previous example, the avilib module can be shared between multiple NDK projects
by doing the following:
First, move the avilib source code to a location outside the NDK project, such
as C:\android\shared-modules\avilib. In order to prevent name conflicts, the
directory structure can also include the module provider’s name, such as
C:\android\shared-modules\transcode\avilib.
Caution The Android NDK build system does not accept the space character in shared module path.
As a shared module, avilib requires its own Android.mk file, as shown in
Listing 2-5.
Listing 2-5. Android.mk File of the Shared avilib Module
LOCAL PATH := $(call my-dir)
#
# 3rd party AVI library
#
include $(CLEAR VARS)
LOCAL MODULE
:= avilib
LOCAL SRC FILES := avilib.c platform posix.c
include $(BUILD SHARED LIBRARY)
Now the avilib module can be removed from the Android.mk file of the NDK
project. A call to function macro import-module with parameter transcode/
avilib should be added to the end of the build file, as shown in Listing 2-6,
to use this shared module. The import-module function macro call should be
placed at the end of the Android.mk file to prevent any build system conflicts.
Listing 2-6. NDK Project Using the Shared Module
#
# Native module
#
include $(CLEAR VARS)
LOCAL MODULE
:= module
LOCAL SRC FILES := module.c
58
CHAPTER 2: Exploring the Android NDK
LOCAL SHARED LIBRARIES := avilib
include $(BUILD SHARED LIBRARY)
$(call import-module,transcode/avilib)
The import-module function macro needs to first locate the shared module
and then import it into the NDK project. By default, only the < Android NDK>/
sources directory is searched by the import-module function macro. In order to
include the c:\android\shared-modules directory into the search, define a new
environment variable called NDK MODULE PATH and set it to the root directory of
shared modules, such as c:\android\shared-modules.
Using Prebuilt Libraries
Using the shared modules requires you to have the source code of the shared modules. The Android
NDK build system simply includes these source files in the NDK project and builds them each time.
Android NDK, since version R5, also provides support for prebuilt libraries. Prebuilt libraries are very
useful in the following situations:
You want to distribute your modules to other parties without distributing your
source code.
You want to use prebuilt version of your shared modules to speed up the builds.
Although they are already compiled, prebuild modules still required an Android.mk build file, as
shown in Listing 2-7.
Listing 2-7. Android.mk File for Prebuilt Shared Module
LOCAL PATH := $(call my-dir)
#
# 3rd party prebuilt AVI library
#
include $(CLEAR VARS)
LOCAL MODULE
:= avilib
LOCAL_SRC_FILES := libavilib.so
include $(PREBUILT_SHARED_LIBRARY)
The LOCAL SRC FILES variable, instead of pointing to the source files, points to the location of the
actual prebuilt library relative to the LOCAL PATH.
Caution The Prebuilt library definition does not carry any information about the actual machine
architecture that the prebuilt library is built for. Developers need to ensure that the prebuilt library is
built for the same machine architecture as the NDK project.
CHAPTER 2: Exploring the Android NDK
59
The PREBUILT SHARED LIBRARY variable points to the prebuilt-shared-library.mk Makefile fragment.
It does not build anything, but it copies the prebuilt library to the NDK project’s libs directory. By
using PREBUILT STATIC LIBRARY variable, static libraries can also be used as prebuilt libraries the
same way as the shared libraries. NDK project can use the prebuilt library the same way as the
ordinary shared libraries.
...
LOCAL SHARED LIBRARIES := avilib
...
Building Standalone Executable
The recommended and supported way of using native components on Android platform is through
packaging them as shared libraries. However, in order to facilitate testing and quick prototyping,
Android NDK also provides support for building a standalone executable. The standalone
executables are regular Linux applications that can be copied to the Android device without being
packaged into an APK file, and they can get executed directly without being loaded through a Java
application. Standalone executables can be produced by importing the BUILD EXECUTABLE variable in
the Android.mk build file instead of BUILD SHARED LIBRARY, as shown in Listing 2-8.
Listing 2-8. Android.mk File for Standalone Executable Module
#
# Native module standlone executable
#
include $(CLEAR VARS)
LOCAL MODULE
:= module
LOCAL SRC FILES := module.c
LOCAL STATIC LIBRARIES := avilib
include $(BUILD_EXECUTABLE)
The BUILD EXECUTABLE variable points to the build-executable.mk Makefile fragment that contains
the necessary build steps to produce a standalone executable on Android platform. The standalone
executable gets placed into libs/<machine architecture> directory with the same name as the
module. Although it is placed into this directory, it does not get included into the APK file during the
packaging phase.
Other Build System Variables
Besides the variables covered in the previous sections, there are other variables that are supported
by the Android NDK build system. This section will briefly mention them.
The variables that are defined by the build system are
TARGET ARCH: Name of the target CPU architecture, such as arm.
TARGET PLATFORM: Name of the target Android platform, such as android-3.
60
CHAPTER 2: Exploring the Android NDK
TARGET ARCH ABI: Name of the target CPU architecture and the ABI, such as
armeabi-v7a.
TARGET ABI: Concatenation of target platform and ABI, such as android-3armeabi-v7a.
The variables that can be defined as a part of the module description are
LOCAL MODULE FILENAME: Optional variable to redefine the name of the generated
output file. By default the build system uses the value of LOCAL MODULE as the
name of the generated output file, but it can be overridden using this variable.
LOCAL CPP EXTENSION: The default extension of C++ source files is .cpp.
This variable can be used to specify one or more file extensions for the C++
source code.
...
LOCAL CPP EXTENSION := .cpp .cxx
...
LOCAL CPP FEATURES: Optional variable to indicate that the module relies on
specific C++ features such as RTTI, exceptions, etc.
...
LOCAL CPP FEATURES := rtti
...
LOCAL C INCLUDES: Optional list of paths, relative to NDK installation directory, to
search for header files.
...
LOCAL C INCLUDES := sources/shared-module
LOCAL C INCLUDES := $(LOCAL PATH)/include
...
LOCAL CFLAGS: Optional set of compiler flags that will be passed to the compiler
while compiling the C and C++ source files.
...
LOCAL CFLAGS := − DNDEBUG –DPORT = 1234
...
LOCAL CPP FLAGS: Optional set of compiled flags that will be passed to the
compiler while compiling the C++ source files only.
LOCAL WHOLE STATIC LIBRARIES: A variant of LOCAL STATIC LIBRARIES that
indicates that the whole content of the static library should be included in the
generated shared library.
CHAPTER 2: Exploring the Android NDK
Tip LOCAL WHOLE STATIC LIBRARIES is very useful when there are circular dependencies
between several static libraries.
LOCAL LDLIBS: Optional list of linker flags that will be passed to the linker while
linking the object files to generate the output file. It is primarily used to pass
the list of system libraries to dynamically link with. For example, to link with the
Android NDK logging library, use this code:
LOCAL LDFLAGS := − llog
LOCAL ALLOW UNDEFINED SYMBOLS: Optionally disables the checking for missing
symbols in the generated file. When not defined, the linker will produce error
messages indicating the missing symbols.
LOCAL ARM MODE: Optional and ARM machine architecture-specific variable
indicating the type of ARM binary to be generated. By default, the build system
generates in thumb mode with 16-bit instructions, but this variable can be set to
arm to indicate that the 32-bit instructions should be used.
LOCAL ARM MODE := arm
This variable changes the build system behavior for the entire module; the
.arm extension can also be used to only build specific files in arm mode.
LOCAL SRC FILES := file1.c file2.c.arm
LOCAL ARM NEON: Optional and ARM machine architecture-specific variable
indicating that ARM Advanced Single Instruction Multiple Date (SIMD)
(a.k.a. NEON) intrinsics should be enabled in the source files.
LOCAL ARM NEON := true
This variable changes the build system behavior for the entire module; the
.neon extension can also be used to only build specific files with NEON intrinsics.
LOCAL SRC FILES := file1.c file2.c.neon
LOCAL DISABLE NO EXECUTE: Optional variable to disable the NX Bit security
feature. NX Bit, which stands for Never Execute, is a technology used in CPUs
to segregate areas of memory for use by either code or storage. This prevents
malicious software from taking control of the application by inserting its code
into the application’s storage memory area.
LOCAL DISABLE NO EXECUTE := true
LOCAL EXPORT CFLAGS: This variable allows recording a set of compiler flags that
will be added to the LOCAL CFLAGS definition of any other module that is using
this module through either LOCAL STATIC LIBRARIES or LOCAL SHARED LIBRARIES.
LOCAL MODULE := avilib
61
62
CHAPTER 2: Exploring the Android NDK
...
LOCAL_EXPORT_CFLAGS := − DENABLE_AUDIO
...
LOCAL MODULE := module1
LOCAL CFLAGS := − DDEBUG
...
LOCAL SHARED LIBRARIES := avilib
The compiler will get executed with flags DENABLE AUDIO
building the module1.
DDEBUG while
LOCAL EXPORT CPPFLAGS: Same as the LOCAL EXPORT CLAGS but for C++
code-specific compiler flags.
LOCAL EXPORT LDFLAGS: Same as the LOCAL EXPORT CFLAGS but for the linker flags.
LOCAL EXPORT C INCLUDES: This variable allows recording set include paths
that will be added to the LOCAL C INCLUDES definition of any other module that
is using this module through either LOCAL STATIC LIBRARIES or LOCAL SHARED
LIBRARIES.
LOCAL SHORT COMMANDS: This variable should be set to true for modules with a
very high number of sources or dependent static or shared libraries. Operating
systems like Windows only allow a maximum of 8191 characters on the
command line; this variable makes the build commands shorter than this limit by
breaking them. This is not recommended for smaller modules since enabling it
will make the build slower.
LOCAL FILTER ASM: This variable defines the application that will be used to filter
the assembly files from the LOCAL SRC FILES.
Other Build System Function Macros
This section covers the other function macros that are supported by the Android NDK build system.
all-subdir-makefiles: Returns a list of Android.mk build files that are located
in all sub-directories of the current directory. For example, calling the following
includes all Android.mk files in the sub-directories into the build process:
include $(call all-subdir-makefiles)
this-makefile: Returns the path of the current Android.mk build file.
parent-makefile: Returns the path of the parent Android.mk build file that
included the current build file.
grand-parent-makefile: Same as the parent-makefile but for the grandparent.
CHAPTER 2: Exploring the Android NDK
63
Defining New Variables
Developers can define other variables to simplify their build files. The names beginning with LOCAL
and NDK prefixes are reserved for use by the Android NDK build system. It is recommended to use
MY prefix for variables that are defined by the developers, as shown in Listing 2-9.
Listing 2-9. Android.mk File Showing the Use of Developer-Defined Intermediate Variables
...
MY_SRC_FILES := avilib.c platform_posix.c
LOCAL SRC FILES := $(addprefix avilib/, $(MY_SRC_FILES))
...
Conditional Operations
The Android.mk build file can also contain conditional operations on these variables, for example, to
include a different set of source files per architecture, as shown in Listing 2-10.
Listing 2-10. Android.mk Build File with Conditional Operation
...
ifeq ($(TARGET_ARCH),arm)
LOCAL SRC FILES + = armonly.c
else
LOCAL SRC FILES + = generic.c
endif
...
Application.mk
The Application.mk is an optional build file that is used by the Android NDK build system. Same as the
Android.mk file, it is also placed in the jni directory. Application.mk is also a GNU Makefile fragment.
Its purpose is to describe which modules are needed by the application; it also defines the variables that
are common for all modules. The following variables are supported in the Application.mk build file:
APP MODULES: By default the Android NDK build system builds all modules that
are declared by the Android.mk file. This variable can override this behavior and
provide a space-separated list of modules that need to be built.
APP OPTIM: This variable can be set to either release or debug to alter the
optimization level of the generated binaries. By default the release mode is
used and the generated binaries are highly optimized. This variable can be set to
debug mode to generate un-optimized binaries that are easier to debug.
APP CLAGS: This variable lists the compiler flags that will be passed to the
compiler while compiling C and C++ source files for any of the modules.
APP CPPFLAGS: This variable lists the compilers flags that will be passed to the
compiler while compiling the C++ source files for any of the modules.
64
CHAPTER 2: Exploring the Android NDK
APP BUILD SCRIPT: By default the Android NDK build system looks for the
Android.mk build file under the jni sub-directory of the project. This behavior
can be altered by using this variable, and a different build file can be used.
APP ABI: By default Android NDK build system generates binaries for armeabi
ABI. This variable can be used to alter this behavior and generate binaries for a
different ABI, like so:
APP ABI := mips
Additionally, more than one ABI can be set
APP ABI := armeabi mips
in order to generate binaries for all supported ABIs
APP ABI := all
APP STL: By default the Android NDK build system uses the minimal STL runtime
library, also known as the system library. This variable can be used to select a
different STL implementation.
APP STL := stlport shared
APP GNUSTL FORCE CPP FEATURES: Similar to LOCAL CPP EXTENSIONS variable, this
variable indicates that all modules rely on specific C++ features such as RTTI,
exceptions, etc.
APP SHORT COMMANDS: Similar to the LOCAL SHORT COMMANDS variable, this variable
makes the build system use shorter commands on projects with high amount of
source files.
Using the NDK-Build Script
As stated earlier in this chapter, the Android NDK build system is started by executing the
ndk-build script. The script can take a set of arguments to allow you to easily maintain and control
the build process.
By default the ndk-build script expects to be executed within the main project
directory. The C argument can be used to specify the location the NDK project
on the command line so that the ndk-build script can be started from an
arbitrary location.
ndk-build –C /path/to/the/project
The Android NDK build system does not rebuild objects if their source file is not
being modified. You can execute the ndk-build script using the B argument to
force rebuilding all source code.
ndk-build -B
CHAPTER 2: Exploring the Android NDK
65
In order to clean the generated binaries and object files, you can execute
ndk-build clean on the command line. Android NDK build system removes the
generated binaries.
ndk-build clean
The Android NDK build system relies on GNU Make tool to build the modules.
By default GNU Make tool executes one build command at a time, waiting
for it to finish before executing the next one. GNU Make can execute build
commands in parallel if the j argument is provided on the command line.
Optionally, the number of commands that can be executed in parallel can also
be specified as a number following the argument.
ndk-build –j 4
Troubleshooting Build System Problems
The Android NDK build system comes with extensive logging support for troubleshooting build
system related problems. This section briefly explores them.
Logging of the internal state of the Android NDK build system can be enabled by typing ndk-build
NDK LOG = 1 on the command line. The Android NDK build system will produce extensive amount of
logging with log messages prefixed with “Android NDK: ” (see Figure 2-13).
Figure 2-13. Ndk-build script displaying debug information
If you are only interested in seeing the actual build commands that get executed, you can type
ndk-build V = 1 on the command line. Android NDK will only display the build commands, as shown
in Figure 2-14.
66
CHAPTER 2: Exploring the Android NDK
Figure 2-14. Ndk-build script displaying the build commands
Summary
In this chapter, you configured the Eclipse IDE to build your first NDK project. You learned a lot
about the Android NDK build system in the process. In the next chapter, you will explore how the
native components that you are building using Android NDK can communicate with the actual
Java application.
Chapter
3
Communicating with Native
Code using JNI
In the previous chapter, you started exploring the Android NDK by going through its components, its
structure, and its build system. Using this information you can now build and package any kind of
native code with your Android applications. In this chapter, you will focus on the integration part by
using the Java Native Interface (JNI) technology to enable the Java application and the native code
to communicate with each other.
What is JNI?
The JNI is a powerful feature of the Java programming language. It allows certain methods of Java
classes to be implemented natively while letting them be called and used as ordinary Java methods.
These native methods can still use Java objects in the same way that the Java code uses them.
Native methods can create new Java objects or use objects created by the Java application, which
can inspect, modify, and invoke methods on these objects to perform tasks.
Starting with an Example
Before going into the details of JNI technology, let’s walk through an example application. This will
provide you with the foundation necessary to experiment with the APIs and concepts as you work
through the chapter. By going through the example application, you will learn the following key
concepts:
How the native methods are called from Java code
Declaration of native methods
Loading the native modules from shared libraries
Implementing the native methods in C/C++
67
68
CHAPTER 3: Communicating with Native Code using JNI
To begin, open the Eclipse IDE and go into the hello-jni sample project that you imported in the
previous chapter. The hello-jni application is a single activity Android application. Using the Project
Explorer view, expand the src directory, and then expand the com.example.hellojni package. Open
the HelloJni activity in the editor view by double-clicking the HelloJni.java source file.
The HelloJni activity has a very simple user interface that is formed by a single
android.widget.TextView widget. In the body of activity’s onCreate method, the string value of the
TextView widget is set to the return value of stringFromJNI method, as shown in Listing 3-1.
Listing 3-1. HelloJni Activity onCreate Method
/** Called when the activity is first created. */
@Override
public void onCreate(Bundle savedInstanceState)
{
super.onCreate(savedInstanceState);
/* Create a TextView and set its content.
* the text is retrieved by calling a native
* function.
*/
TextView tv = new TextView(this);
tv.setText( stringFromJNI() );
setContentView(tv);
}
There is nothing new here. You will find the stringFromJNI method just below the onCreate method.
Declaration of Native Methods
As shown in Listing 3-2, the method declaration of stringFromJNI contains the native keyword to
inform the Java compiler that the implementation of this method is provided in another language.
The method declaration is terminated with a semicolon, the statement terminator symbol, because
the native methods do not have a body.
Listing 3-2. Method Declaration of Native stringFromJNI Method
/* A native method that is implemented by the
* 'hello-jni' native library, which is packaged
* with this application.
*/
public native String stringFromJNI();
Although the virtual machine now knows that the method is implemented natively, it still does not
know where to find the implementation.
CHAPTER 3: Communicating with Native Code using JNI
69
Loading the Shared Libraries
As mentioned in the previous chapter, native methods are compiled into a shared library. This shared
library needs to be loaded first for the virtual machine to find the native method implementations. The
java.lang.System class provides two static methods, load and loadLibrary, for loading shared libraries
during runtime. As shown in Listing 3-3, the HelloJni activity loads the shared library hello-jni.
Listing 3-3. HelloJni Activity Loading the hello-jni Shared Library
/* this is used to load the 'hello-jni' library on application
* startup. The library has already been unpacked into
* /data/data/com.example.HelloJni/lib/libhello-jni.so at
* installation time by the package manager.
*/
static {
System.loadLibrary("hello-jni");
}
The loadLibrary method is called within the static context because you want the native code
implementations to be loaded as the class is loaded and initialized for the first time.
Bear in mind that Java technology is designed with the goal of being platform independent. As a part
of the Java framework API, the design of loadLibrary is not any different. Although the actual shared
library produced by Android NDK is named libhello-jni.so, the loadLibrary method only takes
the library name, hello-jni, and adds the necessary prefix and suffix as required by the operating
system in use. The library name is same as the module name that is defined in Android.mk using the
LOCAL MODULE build system variable.
The argument to loadLibrary does not include the location of the shared library either. The Java
library path, system property java.library.path, holds the list of directories that the loadLibrary
method will search for in the shared libraries. The Java library path on Android contains /vendor/lib
and /system/lib.
The caveat here is that loadLibrary will load the shared library as soon as it finds a library with the
same name while going through the Java library path. Since the first set of directories in the Java
library path is the Android system directories, Android developers are strongly encouraged to pick
unique names for the shared libraries in order to prevent any name clashes with the system libraries.
Now let’s look into the native code to see how the native method is declared and implemented.
Implementing the Native Methods
Using the Project Explorer view, expand the jni directory and double-click the hello-jni.c source
file to open it in the editor view. The C source code starts by including the jni.h header file, as
shown in Listing 3-4. This header file contains definitions of JNI data types and functions.
Listing 3-4. Native Implementation of stringFromJNI Method
#include <string.h>
#include <jni.h>
70
CHAPTER 3: Communicating with Native Code using JNI
...
jstring
Java com example hellojni HelloJni stringFromJNI( JNIEnv* env,
jobject thiz )
{
return (*env)->NewStringUTF(env, "Hello from JNI !");
}
The stringFromJNI native method is also declared with a fully qualified function named
Java com example hellojni HelloJni stringFromJNI. This explicit function naming allows the
virtual machine to automatically find native functions in loaded shared libraries.
C/C++ Header Generator: javah
Keeping the native function names and list of arguments aligned to their original declaration in Java
class files can be a cumbersome and redundant task. The JDK comes with a command line tool,
known as javah, to automate this task. The javah tool parses a Java class file for native methods
and generates a header file consisting of native method declarations.
Running from Command Line
Using the command line, change the directory to < Eclipse Workspace>/com.example.hellojni.
HelloJni, where the HelloJni project is imported. The javah tool operates on compiled Java class
files. Invoke the javah tool with the location of compiled class files and the name of the Java class to
parse, like so:
javah –classpath bin/classes com.example.hellojni.HelloJni
The javah tool will parse the com.example.hellojni.HelloJni class file, and it will generate the
C/C++ header file as com example hellojni HelloJni.h, as shown in Listing 3-5.
Listing 3-5. The com_example_hellojni_HelloJni.h Header File
/* DO NOT EDIT THIS FILE - it is machine generated */
#include < jni.h>
/* Header for class com example hellojni HelloJni */
#ifndef Included com example hellojni HelloJni
#define Included com example hellojni HelloJni
#ifdef
cplusplus
extern "C" {
#endif
/*
* Class:
com example hellojni HelloJni
* Method:
stringFromJNI
* Signature: ()Ljava/lang/String;
*/
JNIEXPORT jstring JNICALL Java com example hellojni HelloJni stringFromJNI
(JNIEnv *, jobject);
CHAPTER 3: Communicating with Native Code using JNI
71
/*
* Class:
com example hellojni HelloJni
* Method:
unimplementedStringFromJNI
* Signature: ()Ljava/lang/String;
*/
JNIEXPORT jstring JNICALL Java com example hellojni HelloJni unimplementedStringFromJNI
(JNIEnv *, jobject);
#ifdef
}
#endif
#endif
cplusplus
The C/C++ source file simply needs to include this header file and provide the implementation for the
native methods, as shown in Listing 3-6.
Listing 3-6. The com_example_hellojni_HelloJni.c Source File
#include "com example hellojni HelloJni.h"
JNIEXPORT jstring JNICALL Java com example hellojni HelloJni stringFromJNI
(JNIEnv * env, jobject thiz)
{
return (*env)->NewStringUTF(env, "Hello from JNI !");
}
Instead of running the javah tool each time from the command line, it can be integrated into Eclipse
as an external tool to streamline the process of generating the header files.
Running from Eclipse IDE
Open the Eclipse IDE, and choose Run ➤ External Tools External Tools Configurations from the top
menu bar. Using the External Tools Configurations dialog, select Program, and then click the New
launch configuration button. Using the Main tab, fill in the tool information as follows and as shown
in Figure 3-1:
Name: Generate C and C++ Header File
Location: ${system path:javah}
Working Directory: ${project loc}/jni
Arguments: -classpath "${project classpath};${env var:ANDROID SDK HOME}/
platforms/android-14/android.jar" ${java type name}
72
CHAPTER 3: Communicating with Native Code using JNI
Figure 3-1. The javah external tool configuration
You will need to replace the semicolon symbol with colon symbol on Mac OS X and Linux platforms.
Switch to the Refresh tab; put a checkmark next to the “Refresh resource upon completion” and
select “The project containing the selected resource” from the list, as shown in Figure 3-2.
CHAPTER 3: Communicating with Native Code using JNI
Figure 3-2. Refresh project upon running the javah tool
Switch to the Common tab, and put a checkmark next to the External Tools under the “Display in
favorites menu” group, as shown in Figure 3-3.
Figure 3-3. Display the javah tool in the favorites menu
Click the OK button to save the external tool configuration. In order to test the new configuration,
using the Project Explorer view, select the HelloJni class, then choose Run ➤ External Tools
➤ Generate C and C++ Header File. The javah tool will parse the selected class file for native
methods, and it will generate a C/C++ header file called com example hellojni HelloJni.h under
the jni directory with the method descriptions.
73
74
CHAPTER 3: Communicating with Native Code using JNI
Now that you have automated the way to generate the native method declarations, let’s look into the
generated method declarations more in detail.
Method Declarations
Although the Java method stringFromJNI does not take any parameters, the native function takes
two parameters, as shown in Listing 3-7.
Listing 3-7. Mandatory Parameters of Native Methods
JNIEXPORT jstring JNICALL Java com example hellojni HelloJni stringFromJNI
(JNIEnv *, jobject);
The first parameter, JNIEnv, is an interface pointer that points to a function table of available JNI
functions. The second parameter, jobject, is a Java object reference to the HelloJni class instance.
JNIEnv Interface Pointer
Native code accesses the virtual machine functionality through the various functions exposed by the
JNIEnv interface pointer. JNIEnv is a pointer to thread-local data, which in turn contains a pointer to
a function table. Functions that implement a native method take the JNIEnv interface pointer as their
first argument.
Caution The JNIEnv interface pointer that is passed into each native method call is also valid in the
thread associated with the method call. It cannot be cached and used by other threads.
Depending on whether the native code is a C or C++ source file, the syntax for calling JNI functions
differs. In C code, JNIEnv is a pointer to JNINativeInterface structure. This pointer needs to be
dereferenced first in order to access any JNI function. Since the JNI functions in C code do not know
the current JNI environment, the JNIEnv instance should be passed as the first argument to each JNI
function call, like so:
return (*env)->NewStringUTF(env, "Hello from JNI !");
In C++ code, JNIEnv is actually a C++ class instance. JNI functions are exposed as member
functions. Since JNI methods have access to the current JNI environment, the JNI method calls do
not require the JNIEnv instance as an argument. In C++, the same code looks like
return env->NewStringUTF("Hello from JNI !");
Instance vs. Static Methods
The Java programming language has two types of methods: instance methods and static methods.
Instance methods are associated with a class instance, and they can only be called on a class
instance. Static methods are not associated with a class instance, and they can be called directly
CHAPTER 3: Communicating with Native Code using JNI
75
from a static context. Both instance and static methods can be declared as native, and their
implementations can be provided as native code through the JNI technology. Native instance
methods get the instance reference as their second parameter as a jobject value, as shown in
Listing 3-8.
Listing 3-8. Native Instance Method Definition
JNIEXPORT jstring JNICALL Java com example hellojni HelloJni stringFromJNI
(JNIEnv * env, jobject thiz);
Since static methods are not tied to an instance, they get the class reference instead as their second
parameter as a jclass value, shown in Listing 3-9.
Listing 3-9. Native Static Method Definition
JNIEXPORT jstring JNICALL Java com example hellojni HelloJni stringFromJNI
(JNIEnv * env, jclass clazz);
As you may have noticed in the method definitions that JNI provides its own data types to expose
Java types to native code.
Data Types
There are two kinds of data types in Java:
Primitive types: boolean, byte, char, short, int, long, float, and double
Reference types: String, arrays, and other classes
Let’s take a closer look at each of these data types.
Primitive Types
Primitive types are directly mapped to C/C++ equivalents, as shown in Table 3-1. The JNI uses type
definitions to make this mapping transparent to developers.
76
CHAPTER 3: Communicating with Native Code using JNI
Table 3-1. Java Primitive Data Types
Java Type
JNI Type
C/C++ Type
Size
Boolean
Jboolean
unsigned char
Unsigned 8 bits
Byte
Jbyte
char
Signed 8 bits
Char
Jchar
unsigned short
Unsigned 16 bits
Short
Jshort
short
Signed 16 bits
Int
Jint
Int
Signed 32 bits
Long
Jlong
long long
Signed 64 bits
Float
Jfloat
float
32 bits
Double
Jdouble
double
64 bits
Reference Types
Unlike the primitive data types, the reference types are passed as opaque references to native
methods. The reference type mapping is shown in Table 3-2. Their internal data structure is not
exposed directly to native code.
Table 3-2. Java Reference Type Mapping
Java Type
Native Type
java.lang.Class
jclass
java.lang.Throwable
jthrowable
java.lang.String
jstring
Other objects
jobject
java.lang.Object[]
jobjectArray
boolean[]
jbooleanArray
byte[]
jbyteArray
char[]
jcharArray
short[]
jshortArray
int[]
jintArray
long[]
jlongArray
float[]
jfloatArray
double[]
jdoubleArray
Other arrays
Jarray
CHAPTER 3: Communicating with Native Code using JNI
77
Operations on Reference Types
Reference types are passed as opaque references to the native code rather than native data types,
and they cannot be consumed and modified directly. JNI provides a set of APIs for interacting with
these reference types. These APIs are provided to the native function through the JNIEnv interface
pointer. In this section, you will briefly explore these APIs pertinent to the following types and
components:
Strings
Arrays
NIO Buffers
Fields
Methods
String Operations
Java strings are handled by the JNI as reference types. These reference types are not directly usable
as native C strings. JNI provides the necessary functions to convert these Java string references to
C strings and back. Since Java string objects are immutable, JNI does not provide any function to
modify the content of an existing Java string.
JNI supports both Unicode and UTF-8 encoded strings, and it provides two sets of functions
through the JNIEnv interface pointer to handle each of these string encodings.
New String
New string instances can be constructed from the native code by using the functions NewString for
Unicode strings and NewStringUTF for UTF-8 strings. As shown in Listing 3-10, these functions take
a C string and returns a Java string reference type, a jstring value.
Listing 3-10. New Java String from a Given C String
jstring javaString;
javaString = (*env)->NewStringUTF(env, "Hello World!");
In case of a memory overflow, these functions return NULL to inform the native code that an
exception has been thrown in the virtual machine so the native code should not continue. We will get
back to the topic of exception handling later in this chapter.
Converting a Java String to C String
In order to use a Java string in native code, it needs to be converted to a C string first. Java
strings can be converted to C strings using the functions GetStringChars for Unicode strings and
GetStringUTFChars for UTF-8 strings. These functions take an optional third argument, a pass-byreference output parameter called isCopy that can allow the caller to determine whether the returned
C string address points to a copy or the pinned object in the heap. This is shown in Listing 3-11.
78
CHAPTER 3: Communicating with Native Code using JNI
Listing 3-11. Converting a Java String to C String
const jbyte* str;
jboolean isCopy;
str = (*env)->GetStringUTFChars(env, javaString, &isCopy);
if (0 != str) {
printf("Java string: %s", str);
if (JNI TRUE == isCopy) {
printf("C string is a copy of the Java string.");
} else {
printf("C string points to actual string.");
}
}
Releasing Strings
C strings obtained though the JNI GetStringChars and GetStringUTFChars functions need to be
properly released after the native code is finished using them, or memory leaks will occur. As shown
in Listing 3-12, JNI provides ReleaseStringChars for Unicode strings and ReleaseStringUTFChars for
UTF-8 encoded strings.
Listing 3-12. Releasing the C Strings Returned by JNI Functions
(*env)->ReleaseStringUTFChars(env, javaString, str);
Array Operations
Java arrays are handled by the JNI as reference types. The JNI provides the necessary functions to
access and manipulate Java arrays.
New Array
New array instances can be constructed from the native code using the New<Type>Array function,
with the <Type> being Int, Char, Boolean, etc. such as NewIntArray. As shown in Listing 3-13, the size
of the array should be provided as a parameter when invoking these functions.
Listing 3-13. New Java Array from Native Code
jintArray javaArray;
javaArray = (*env)->NewIntArray(env, 10);
if (0 != javaArray) {
/* You can now use the array. */
}
Same as the NewString function, in case of a memory overflow, the New<Type>Array function will
return NULL to inform the native code that an exception has been thrown in the virtual machine and
that the native code should not continue.
CHAPTER 3: Communicating with Native Code using JNI
79
Accessing the Array Elements
JNI provides two types of access to Java array elements. Code can either get a copy of the array as
a C array, or it can ask JNI to get a direct pointer to the array elements.
Operating on a Copy
The Get<Type>ArrayRegion function copies the given primitive Java array to the given C array, as
shown in Listing 3-14.
Listing 3-14. Getting a Copy of Java Array Region as a C Array
jint nativeArray[10];
(*env)->GetIntArrayRegion(env, javaArray, 0, 10, nativeArray);
The native code can then use and modify the array elements as an ordinary C array. When the native
code wants to commit its changes back to the Java array, the Set<Type>ArrayRegion function can be
used to copy the C array back to Java array, as shown in Listing 3-15.
Listing 3-15. Committing Back the Changes from C Array to Java Array
(*env)->SetIntArrayRegion(env, javaArray, 0, 10, nativeArray);
When the array sizes are big, copying the array in order to operate on them causes performance
problems. In such cases, the native code should either only get or set the region of the array
elements instead of getting the entire array, if possible. Otherwise, JNI provides a different set of
functions to obtain a direct pointer to the array elements instead of their copies.
Operating on Direct Pointer
The Get <Type>ArrayElements function allows the native code to get a direct pointer to array
elements, when possible. As shown in Listing 3-16, the function takes a third optional parameter, a
pass-by-reference output parameter called isCopy that can allow the caller to determine whether the
returned C array points to a copy or the pinned array in the heap.
Listing 3-16. Getting a Direct Pointer to Java Array Elements
jint* nativeDirectArray;
jboolean isCopy;
nativeDirectArray = (*env)->GetIntArrayElements(env, javaArray, &isCopy);
JNI does not provide a set method, since the array elements can be accessed and manipulated as
an ordinary C array. JNI requires the native code to release these pointers when it finishes; otherwise
memory leaks happen. JNI provides the Release<Type>ArrayElemens functions to enable native code
to release the C arrays that are returned by Get<Type>ArrayElements function calls, as shown in
Listing 3-17.
80
CHAPTER 3: Communicating with Native Code using JNI
Listing 3-17. Releasing the Direct Pointer to Java Array Elements
(*env)->ReleaseIntArrayElements(env, javaArray, nativeDirectArray, 0);
This function takes a fourth parameter, the release mode. Table 3-3 contains a list of supported
release modes.
Table 3-3. Supported Release Modes
Release Mode
Action
0
Copy back the content and free the native array.
JNI COMMIT
Copy back the content but do not free the native array.
This can be used for periodically updating a Java array.
JNI ABORT
Free the native array without copying its content.
NIO Operations
Native I/O (NIO) provides improved performance in the areas of buffer management, scalable network
and file I/O, and character-set support. JNI provides functions to use the NIO buffers from native
code. Compared to array operations, NIO buffers deliver much better performance, and they are
highly suitable for delivering vast amount of data between the native code and the Java application.
New Direct Byte Buffer
Native code can create a direct byte buffer that will be used by the Java application by providing a
native C byte array as the basis. The NewDirectByteBuffer is used in Listing 3-18.
Listing 3-18. New Byte Buffer Based on the Given C Byte Array
unsigned char* buffer = (unsigned char*) malloc(1024);
...
jobject directBuffer;
directBuffer = (*env)->NewDirectByteBuffer(env, buffer, 1024);
Note The memory allocated in native methods is out of the scope and control of the virtual machine’s
garbage collector. Native functions should manage their memory properly by freeing the unused
allocations to prevent memory leaks.
Getting the Direct Byte Buffer
The direct byte buffer can also be created in the Java application. Native code can use the
GetDirectBufferAddress function call to obtain the memory address of the native byte array, as
shown in Listing 3-19.
CHAPTER 3: Communicating with Native Code using JNI
81
Listing 3-19. Getting the Native Byte Array from the Java Byte Buffer
unsigned char* buffer;
buffer = (unsigned char*) (*env)->GetDirectBufferAddress(env,
directBuffer);
Accessing Fields
Java has two types of fields: instance fields and static fields. Each instance of a class owns its copy
of the instance fields, whereas all instances of a class share the same static fields.
The JNI provides functions to access both field types. Listing 3-20 shows an example of a Java
class with one static and one instance field.
Listing 3-20. Java Class with Both Static and Instance Fields
public class JavaClass {
/** Instance field */
private String instanceField = "Instance Field";
/** Static field */
private static String staticField = "Static Field";
...
}
Getting the Field ID
The JNI provides access to both types of fields through field IDs. You can obtain field IDs through
the class object for the given instance. The class object is obtained through the GetObjectClass
function, as shown in Listing 3-21.
Listing 3-21. Getting the Class from an Object Reference
jclass clazz;
clazz = (*env)->GetObjectClass(env, instance);
Depending on the field type, there are two functions to obtain the field ID from the class. The
GetFieldId function is for instance fields, as shown in Listing 3-22.
Listing 3-22. Getting the Field ID of an Instance Field
jfieldID instanceFieldId;
instanceFieldId = (*env)->GetFieldID(env, clazz,
"instanceField", "Ljava/lang/String;");
The GetStaticFieldId is for static fields, as shown in Listing 3-23. Both functions return the field ID as
a jfieldID type.
82
CHAPTER 3: Communicating with Native Code using JNI
Listing 3-23. Getting the Field ID of a Static Field
jfieldID staticFieldId;
staticFieldId = (*env)->GetStaticFieldID(env, clazz,
"staticField", "Ljava/lang/String;");
The last parameter of both functions takes the field descriptor that represents the field type in Java.
In the example code, "Ljava/lang/String" indicates that the field type is a String. We will get back
to this later in this chapter.
Tip The field IDs can be cached in order to improve application performance. Always cache the most
frequently used field ids.
Getting the Field
After you obtain the field ID, you can get the actual field through the Get<Type>Field function
for instance fields, as shown in Listing 3-24.
Listing 3-24. Getting an Instance Field
jstring instanceField;
instanceField = (*env)->GetObjectField(env, instance, instanceFieldId);
Use the GetStatic<Type>Field function for static fields, as shown in Listing 3-25.
Listing 3-25. Getting a Static Field
jstring staticField;
staticField = (*env)->GetStaticObjectField(env, clazz, staticFieldId);
In case of a memory overflow, both of these functions can return NULL, and the native code should
not continue to execute.
Tip Getting the value of a single field takes two or three JNI function calls. Native code reaching back
to Java to obtain values of each individual field adds extra overhead to the application and leads to
poorer performance. It is strongly recommended to pass all needed parameters to native method calls
instead of having the native code reach back to Java.
Calling Methods
As with fields, there are two types of methods in Java: instance methods and static methods. The
JNI provides functions to access both types. Listing 3-26 shows a Java class that contains one
static method and one instance method.
CHAPTER 3: Communicating with Native Code using JNI
83
Listing 3-26. Java Class with Both Instance and Static Methods
public class JavaClass {
/**
* Instance method.
*/
private String instanceMethod() {
return "Instance Method";
}
/**
* Static method.
*/
private static String staticMethod() {
return "Static Method";
}
...
}
Getting the Method ID
The JNI provides access to both types of methods through method IDs. You can obtain method IDs
through the class object for the given instance. Use the GetMethodID function to obtain the method
ID of an instance method, as shown in Listing 3-27.
Listing 3-27. Getting the Method ID of an Instance Method
jmethodID instanceMethodId;
instanceMethodId = (*env)->GetMethodID(env, clazz,
"instanceMethod", "()Ljava/lang/String;");
Use the GetStaticMethodID function to get the method ID of a static field, as shown in Listing 3-28.
Both functions return the method ID as a jmethodID type.
Listing 3-28. Getting the Method ID of a Static Method
jmethodID staticMethodId;
staticMethodId = (*env)->GetStaticMethodID(env, clazz,
"staticMethod", "()Ljava/lang/String;");
Like the field ID getter methods, the last parameter of both functions takes the method descriptor. It
represents the method signature in Java.
Tip The method IDs can be cached in order to improve application performance. Always cache the most
frequently used method ids.
84
CHAPTER 3: Communicating with Native Code using JNI
Calling the Method
Using the method ID, you can call the actual method through the Call<Type>Method function for
instance methods, as shown in Listing 3-29.
Listing 3-29. Calling an Instance Method
jstring instanceMethodResult;
instanceMethodResult = (*env)->CallStringMethod(env,
instance, instanceMethodId);
Use the CallStatic<Type>Field function for static methods, as shown in Listing 3-30.
Listing 3-30. Calling a Static Method
jstring staticMethodResult;
staticMethodResult = (*env)->CallStaticStringMethod(env,
clazz, staticMethodId);
In case of a memory overflow, both of these functions can return NULL and the native code should
not continue executing.
Tip Transitions between Java and native code is a costly operation. It is strongly recommended that
you take this into account when deciding to split between Java and native code. Minimizing these
transitions can benefit the application performance greatly.
Field and Method Descriptors
As mentioned in the previous two sections, getting both the field ID and the method ID requires the
field and method descriptors. Both the field and the method descriptors can be generated by using
the Java type signature mapping shown in Table 3-4.
CHAPTER 3: Communicating with Native Code using JNI
85
Table 3-4. Java Type Signature Mapping
Java Type
Signature
Boolean
Z
Byte
B
Char
C
Short
S
Int
I
Long
J
Float
F
Double
D
fully-qualified-class
Lfully-qualified-class;
type[]
[type
method type
(arg-type)ret-type
Manually producing the field and method descriptors by using the type signature mapping and
keeping them in sync with the Java code can be a cumbersome task.
Java Class File Disassembler: javap
JDK comes with a command line Java class file disassembler called javap. This tool can be used to
extract the field and method descriptors from the compiled class files.
Running from Command Line
Using the command line, change the directory to <Eclipse Workspace>/com.example.hellojni.
HelloJni, where the HelloJni project is imported. The javap tool operates on compiled Java class
files. Invoke the javap tool with the location of compiled class files and the name of the Java class to
disassemble, like so:
javap –classpath bin/classes –p –s com.example.hellojni.HelloJni
The javap tool will disassemble the com.example.hellojni.HelloJni class file and will output the
field and method signatures, as shown in Figure 3-4.
86
CHAPTER 3: Communicating with Native Code using JNI
Figure 3-4. The javap tool output
Instead of running the javap tool each time from the command line, it can be integrated into Eclipse
as an external tool to streamline the process of extracting the field and method signatures.
Running from Eclipse IDE
Open the Eclipse IDE, and choose Run ➤ External Tools Configurations… from the top menu
bar. Using the External Tool Configurations dialog, select Program, and then click the New launch
configuration button. Using the Main tab, fill in the tool information as follows and as shown in
Figure 3-5:
Name: Java Class File Disassembler
Location: ${system path:javap}
Working Directory: ${project loc}
Arguments: -classpath "${project classpath};${env var:ANDROID SDK HOME}/
platforms/android-14/android.jar" p s ${java type name}
CHAPTER 3: Communicating with Native Code using JNI
87
Figure 3-5. The javap external tool configuration
You will need to replace the semicolon symbol with colon symbol on Mac OS X and Linux platforms.
Switch to the Common tab, and put a checkmark next to the External Tools under the “Display in
favorites menu” group, as described earlier.
Click the OK button to save the external tool configuration. In order to test the new configuration, using
the Project Explorer view, select the HelloJni class, then choose Run ➤ External Tools ➤ Java Class
File Disassembler. The console view will show the output of the javah tool, as shown in Figure 3-6.
88
CHAPTER 3: Communicating with Native Code using JNI
Figure 3-6. Console showing the javap tool output
The native methods are not prone to exceptions. Manipulating fields and calling Java methods can
result in Java exceptions.
Exception Handling
Exception handling is an important aspect of the Java programming language. Exceptions behave
differently in the JNI than they do in Java. In Java, when an exception is thrown, the virtual
machine stops the execution of the code block and goes through the call stack in reverse order
to find an exception handler code block that can handle the specific exception type. This is also
called catching an exception. The virtual machine clears the exception and transfers the control to
the exception handler block. In contrast, the JNI requires developers to explicitly implement the
exception handling flow after an exception has occurred.
Catching Exceptions
The JNIEnv interface provides a set of functions related to exceptions. To see these functions in
action, use the Java class, shown in Listing 3-31, as an example.
Listing 3-31. Java Example That Throws an Exception
public class JavaClass {
/**
* Throwing method.
*/
private void throwingMethod() throws NullPointerException {
throw new NullPointerException("Null pointer");
}
/**
* Access methods native method.
*/
private native void accessMethods();
}
CHAPTER 3: Communicating with Native Code using JNI
89
The accessMethods native method needs to explicitly do the exception handling while calling the
throwingMethod method. The JNI provides the ExceptionOccurred function to query the virtual
machine if there is a pending exception. The exception handler needs to explicitly clear the
exception using the ExceptionClear function after it finishes with it, as shown in Listing 3-32.
Listing 3-32. Exception Handling in Native Code
jthrowable ex;
...
(*env)->CallVoidMethod(env, instance, throwingMethodId);
ex = (*env)->ExceptionOccurred(env);
if (0 != ex) {
(*env)->ExceptionClear(env);
/* Exception handler. */
}
Throwing Exceptions
The JNI allows the native code to throw exceptions as well. Since exceptions are Java classes, the
exception class should be obtained first using the FindClass function. The ThrowNew function can be
used to initiate and throw the new exception, as shown in Listing 3-33.
Listing 3-33. Throwing an Exception from Native Code
jclass clazz;
...
clazz = (*env)->FindClass(env, "java/lang/NullPointerException");
if (0 ! = clazz) {
(*env)->ThrowNew(env, clazz, "Exception message.");
}
As the code execution of native functions are not under the control of the virtual machine, throwing
an exception does not stop the execution of the native function and transfer control to the exception
handler. Upon throwing an exception, the native function should free any allocated native resources,
such as the memory, and properly return. The references obtained through the JNIEnv interface
are local references and they get freed automatically by the virtual machine as soon as the native
function returns.
Local and Global References
References play an important role in Java programming. The virtual machine manages the lifetime
of class instances by tracking their references and garbage-collecting the ones that are no longer
referenced. Since native code is not a managed environment, the JNI provides a set of functions to
allow native code to explicitly manage the object references and lifetimes. The JNI supports three
type kinds of references: local references, global references, and weak global references,
as described in the following sections.
90
CHAPTER 3: Communicating with Native Code using JNI
Local References
Most JNI functions return local references. Local references cannot be cached and reused in
subsequent invocations since their lifetime is limited to the native method. Local references are freed
once the native function returns. For example, the FindClass function returns a local reference; it is
freed automatically when the native method returns. Native code can also be freed explicitly through
the DeleteLocalRef function, as shown in Listing 3-34.
Listing 3-34. Deleting a Local Reference
jclass clazz;
clazz = (*env)->FindClass(env, "java/lang/String");
...
(*env)->DeleteLocalRef(env, clazz);
Based on the JNI specification, the virtual machine should allow minimum of 16 local references
to be created for the native code. Best practice is to delete unused local references while doing
multiple memory-intensive operations within a single method invocation. If that is not possible, the
native code can use the EnsureLocalCapacity method to request more local reference slots from the
virtual machine prior using them.
Global References
Global references remain valid across subsequent invocations of the native methods until they are
explicitly freed by the native code.
New Global Reference
Global references can be initiated from local references through the NewGlobalRef function, as shown
in Listing 3-35.
Listing 3-35. New Global Reference from a Given Local Reference
jclass localClazz;
jclass globalClazz;
...
localClazz = (*env)->FindClass(env, "java/lang/String");
globalClazz = (*env)->NewGlobalRef(env, localClazz);
...
(*env)->DeleteLocalRef(env, localClazz);
Deleting a Global Reference
When a global reference is no longer needed by the native code, you can free it at any time through
the DeleteGlobalRef function, as shown in Listing 3-36.
CHAPTER 3: Communicating with Native Code using JNI
91
Listing 3-36. Deleting a Global Reference
(*env)->DeleteGlobalRef(env, globalClazz);
Weak Global References
Another flavor of global reference is the weak global reference. Like global references, weak global
references remain valid across subsequent invocations of the native methods. Unlike global references,
weak global references do not prevent the underlying object from being garbage-collected.
New Weak Global Reference
Weak global references can be initiated using the NewWeakGlobalRef function, as shown in Listing 3-37.
Listing 3-37. New Weak Global Reference from a Given Local Reference
jclass weakGlobalClazz;
weakGlobalClazz = (*env)->NewWeakGlobalRef(env, localClazz);
Validating a Weak Global Reference
To determine if the weak global reference is still pointing to a live class instance, you can use the
IsSameObject function, as shown in Listing 3-38.
Listing 3-38. Checking if Weak Global Reference is Still Valid
if (JNI FALSE == (*env)->IsSameObject(env, weakGlobalClazz, NULL)) {
/* Object is still live and can be used. */
} else {
/* Object is garbage collected and cannot be used. */
}
Deleting a Weak Global Reference
Weak global references can be freed at any time using the DeleteWeakGlobalRef function, as shown
in Listing 3-39.
Listing 3-39. Deleting a Weak Global Reference
(*env)->DeleteWeakGlobalRef(env, weakGlobalClazz);
Until they get explicitly freed, the global references remains valid, and they can be used by other
native function calls as well as the native threads.
92
CHAPTER 3: Communicating with Native Code using JNI
Threading
The virtual machine supports running native code as a part of the multithreaded environment. There
are certain constraints of JNI technology to keep in mind while developing native components:
Local references are valid only during the execution of the native method and in
the thread context that is executing the native method. Local references cannot
be shared among multiple threads. Only global references can be shared by
multiple threads.
The JNIEnv interface pointer that is passed into each native method call is also
valid in the thread associated with the method call. It cannot be cached and
used by other threads.
Synchronization
Synchronization is an important aspect of multithreaded programming. Similar to Java’s
synchronized blocks, JNI’s monitors allow the native code to synchronize using Java objects. The
virtual machine guarantees that the thread that acquired the monitor executes safely, while the
other threads wait until the monitored object becomes available. The synchronized block in a Java
application is shown in Listing 3-40.
Listing 3-40. Java Synchronized Code Block
synchronized(obj) {
/* Synchronized thread-safe code block. */
}
In the native code, the same level of synchronization can be achieved using the JNI’s monitor
methods, as shown in Listing 3-41.
Listing 3-41. Native Equivalent of Java Synchronized Code Block
if (JNI OK == (*env)->MonitorEnter(env, obj)) {
/* Error handling. */
}
/* Synchronized thread-safe code block. */
if (JNI OK == (*env)->MonitorExit(env, obj)) {
/* Error handling. */
}
Caution The call to the MonitorEnter function should be matched with a call to MonitorExit in
order to prevent deadlocks in the code.
CHAPTER 3: Communicating with Native Code using JNI
93
Native Threads
These native components may use native threads in order to execute certain tasks in parallel. Since
the native threads are not known to the virtual machine, they cannot directly communicate with the
Java components. Native threads should be attached to the virtual machine first in order to interact
with the remaining portion of the application.
The JNI provides the AttachCurrentThread function, through the JavaVM interface pointer, to allow
native code to attach native threads to the virtual machine, as shown in Listing 3-42. The JavaVM
interface pointer should be cached earlier since it cannot be obtained otherwise.
Listing 3-42. Attaching and Detaching the Current Thread to the Virtual Machine
JavaVM* cachedJvm;
...
JNIEnv* env;
...
/* Attach the current thread to virtual machine. */
(*cachedJvm)->AttachCurrentThread(cachedJvm, &env, NULL);
/* Thread can communicate with the Java application
using the JNIEnv interface. */
/* Detach the current thread from virtual machine. */
(*cachedJvm)->DetachCurrentThread(cachedJvm);
The call to the AttachCurrentThread function allows the application to obtain a JNIEnv interface
pointer that is valid for the current thread. There is no side effect of attaching an already attached
native thread. When the native thread completes, it can be detached from the virtual machine by
using the DetachCurrentThread function.
Summary
In this chapter, you learned how to communicate between the Java application and the native code
using the JNI technology. More information on the JNI technology and available JNI APIs can be
found in Oracle’s JNI documentation at http://docs.oracle.com/javase/1.5.0/docs/guide/jni/
spec/jniTOC.html.
As you may have noticed, doing any operation in JNI takes two or three function calls. Implementing
a large number of native methods and keeping them in sync with the Java classes can easily
become a cumbersome task. In the next chapter, you will evaluate some open source solutions that
can automatically generate the JNI code for you based on the existing native code interfaces.
Chapter
4
Auto-Generate JNI Code
Using SWIG
In the previous chapter you explored JNI technology and you learned how to connect native code
to a Java application. As noted, implementing JNI wrapper code and handling the translation of
data types is a cumbersome and time-consuming development task. This chapter will introduce
the Simplified Wrapper and Interface Generator (SWIG), a development tool that can simplify this
process by automatically generating the necessary JNI wrapper code.
SWIG is not an Android- and Java-only tool. It is a highly extensive tool that can generate code
in many other programming languages. As SWIG is rather large, this chapter will only cover the
following key SWIG concepts and APIs that will get you started:
Defining a SWIG interface for native code.
Generating JNI code based on the interface.
Integrating SWIG into the Android Build process.
Wrapping C and C++ code.
Exception handling.
Using memory management.
Calling Java from native code.
As SWIG simplifies the development of JNI code, you will be using SWIG often in the next chapters.
What is SWIG?
SWIG is a compile-time software development tool that can produce the code necessary to connect
native modules written in C/C++ with other programming languages, including Java. SWIG is an
interface compiler, merely a code generator; it does not define a new protocol nor is it a component
95
96
CHAPTER 4: Auto-Generate JNI Code Using SWIG
framework or a specialized runtime library. SWIG takes an interface file as its input and produces the
necessary code to expose that interface in Java. SWIG is not a stub generator; it produces code that
is ready to be compiled and run.
SWIG was originally developed in 1995 for scientific applications; it has since evolved into a generalpurpose tool that is distributed under GNU GPL open source license. More information about SWIG
can be found at www.swig.org.
Installation
SWIG works on all major platforms, including Windows, Mac OS X, and Linux. At the time of this
writing, the latest version of SWIG is 2.0.7. The latest version of SWIG is provided as a source code
package through its official website at www.swig.org. The binaries for SWIG, except the Windows
binaries, are provided through operating system-specific repositories. This section will provide
detailed instructions on where SWIG binaries can be downloaded from and installed to for each
major operating system.
Installing on Windows
SWIG binaries for Windows platform are provided through the SWIG download page at
www.swig.org/download.html. As shown in Figure 4-1, click on the link to download the SWIG
installation package.
Figure 4-1. SWIG for Windows download link
The SWIG installation package comes as a ZIP archive file. The Windows OS comes with native
support for ZIP format. When the download completes, right-click on the ZIP file and choose
Extract All from the context menu to launch the Extract Compressed Folder wizard. Using the
CHAPTER 4: Auto-Generate JNI Code Using SWIG
97
Browse button, choose the destination directory where you want the extracted SWIG files to go. As
mentioned, the C:\android directory is used as the root directory to hold the development tools.
Select C:\android as the destination directory. A dedicated empty destination directory is not
needed since the ZIP file already contains a sub directory called swigwin-2.0.7 to hold the SWIG.
Click the Extract button to start the installation process.
Similar to the other development tools that you have installed, in order to have SWIG easily
reachable, its installation directory should be appended to system executable search path. Launch
the Environment Variables dialog from System Properties, and click the New button. As shown in
Figure 4-2, using the New System Variable, set the variable name to SWIG HOME and the variable
value to the SWIG installation directory, such as C:\android\swigwin-2.0.7.
Figure 4-2. New SWIG_HOME environment variable
From the list of system variables, double-click on the PATH variable, and append ;%SWIG HOME% to
the variable value, as shown in Figure 4-3.
Figure 4-3. Appending SWIG binary path to system PATH variable
If the installation was successful, you will see the SWIG version number, as shown in Figure 4-4.
Figure 4-4. Validating SWIG installation
98
CHAPTER 4: Auto-Generate JNI Code Using SWIG
Installing on Mac OS X
The SWIG web site does not provide an installation package for Mac OS X platform. A Homebrew
package manager will be used to download and install SWIG. In order to use Homebrew, it needs
to be installed on the host machine as well. Homebrew comes with a console-based installation
application. Copy the install command from the Homebrew installation page, as shown in Figure 4-5.
Figure 4-5. Installation command for Homebrew
Open a Terminal window. At the command prompt, paste the install command, as shown in Figure 4-6,
and press the Enter key to start the installation process. The command will first download the
Homebrew installation script and it will execute it using Ruby. Follow the on-screen instructions to
complete the installation process.
Figure 4-6. Installing Homebrew from command line
CHAPTER 4: Auto-Generate JNI Code Using SWIG
99
Upon completing the installation of Homebrew, SWIG can now be installed. Using the Terminal
window, execute brew install swig on the command prompt. As shown in Figure 4-7, Homebrew
will download the source code of SWIG and its dependencies, and then it will compile and install it
automatically.
Figure 4-7. Installing SWIG using Homebrew
In order to validate the installation, open a new Terminal window and execute swig -version on the
command line. If the installation was successful, you will see the SWIG version number, as shown in
Figure 4-8.
Figure 4-8. Validating the SWIG installation
Installing on Ubuntu Linux
The SWIG web site does not provide an installation package for Linux flavors. The Ubuntu Linux
software repository contains the latest version of SWIG, and it can be installed using the system
package manager. Again, open a Terminal window. At the command prompt, execute sudo apt-get
install swig, as shown in Figure 4-9. The system package manager will download and install SWIG
and its dependencies automatically.
100
CHAPTER 4: Auto-Generate JNI Code Using SWIG
Figure 4-9. Installing SWIG from command line
In order to validate the installation, open a new Terminal window. Using the Terminal window,
execute swig -version on the command line. If the installation was successful, you will see the
SWIG version number, as shown in Figure 4-10.
Figure 4-10. Validating SWIG installation
Experimenting with SWIG Through an Example
Before learning the details of SWIG, you will walk through an example application to better
understand how SWIG works. The Android platform is built on top of the Linux OS, a multiuser
platform. It runs the applications within a virtual machine sandbox and treats them as different users
on the system to keep the platform secure. On Linux, each user gets assigned a user ID, and this
user ID can be queried by using the POSIX OS API getuid function. As a platform-independent
CHAPTER 4: Auto-Generate JNI Code Using SWIG
101
programming language, Java does not provide access to these functions. As a part of this example
application, you will be
Writing a SWIG interface file to expose the getuid function.
Integrating SWIG into the Android build process.
Adding SWIG-generated source files into the Android.mk build file.
Use the SWIG-generated proxy classes to query the getuid.
Display the result on the screen.
You will be using the hello-jni sample project as a testbed. Open Eclipse IDE, and go into the
hello-jni project. As mentioned earlier, SWIG operates on interface files.
Interface File
SWIG interface files contain function prototypes, classes, and variable declarations. Its syntax is the
same as any ordinary C/C++ header file. In addition to C/C++ keywords and preprocessor directives,
the interface files can also contain SWIG specific preprocessor directives that can enable tuning the
generated wrapper code.
In order to expose getuid, an interface file needs to be defined. Using the Project Explorer, right-click
on jni directory under the hello-jni project, and choose New ➤ File from the context menu to launch
the New File dialog. As shown in Figure 4-11, set file name to Unix.i and click the Finish button.
Figure 4-11. Creating the Unix.i SWIG interface file
102
CHAPTER 4: Auto-Generate JNI Code Using SWIG
Using the Editor view, populate the content of Unix.i, as shown in Listing 4-1.
Listing 4-1. Unix.i Interface File Content
/* Module name is Unix. */
%module Unix
%{
/* Include the POSIX operating system APIs. */
#include < unistd.h>
%}
/* Tell SWIG about uid t. */
typedef unsigned int uid t;
/* Ask SWIG to wrap getuid function. */
extern uid t getuid(void);
Before moving to the next step (invoking SWIG), let’s briefly go through the interface file.
Comments
The Unix.i interface file starts with a C style comment line starting with /* and ending with */
characters, as shown in Listing 4-2. Like the compilers, SWIG does not process comment lines.
They are merely for annotating the interface files for developers.
Listing 4-2. Unix.i Starting with a Comment
/* Module name is Unix. */
...
Module Name
Each invocation of SWIG requires a module name to be specified. The module name is used to name
the resulting wrapper files. The module name is specified using the SWIG specific preprocessor
directive %module, and it should appear at the beginning of every interface file. Complying with this
rule, the Unix.i interface file also starts by defining its module name as Unix, as shown in Listing 4-3.
Listing 4-3. Unix.i Defining Its Module Name
%module Unix
User-Defined Code
SWIG only uses the interface file while generating the wrapper code; its content does not go beyond
this point. It is often necessary to include user-defined code in the generated files, such as any
header file that is required to compile the generated code. When SWIG generates a wrapper code,
it is broken up to into five sections. SWIG provides preprocessor directives to enable developers to
CHAPTER 4: Auto-Generate JNI Code Using SWIG
103
specify the code snippets that should be included in any of these five sections. The syntax for SWIG
preprocessor directive is shown in Listing 4-4.
Listing 4-4. Syntax for SWIG insert preprocessor directive
% < section > %{
...
This code block will be included into generated code as is.
...
%}
...
The <section> portion can take following values:
begin: Places the code block at the beginning of the generated wrapper file. It is
mostly used for defining preprocessor macros that are used in the later part of
the file.
runtime: Places the code block next to SWIG’s internal type-checking and other
support functions.
header: Places the code block into the header section next to header files and
other helper functions. This is the default place to inject code into the generated
files. The %{ . . . %} can also be used the short form.
wrapper: Places the code block next to generated wrapper functions.
init: Places the code block into to function that will initialize the module upon
loading.
As shown in Listing 4-5, the Unix.i interface file injects a header file into the generated wrapper
code using the short form of insert header preprocessor directive.
Listing 4-5. Unix.i Inserting a Header into Generated Wrapper Code
%{
/* Include the POSIX operating system APIs. */
#include < unistd.h>
%}
Type Definitions
SWIG can understand all C/C++ data types but treats anything else as objects and wraps them as
pointers. The declaration of the getuid function suggests that its return type is uid t, which is not
a standard C/C++ data type. As is, SWIG will treat it as an object, and it will wrap it as a pointer.
This is not the preferred behavior since uid t is nothing more than a simple typedef-name based on
unsigned integer, not an object. As shown in Listing 4-6, the Unix.i interface file uses a typedef to
inform SWIG about the actual return type of getuid function.
104
CHAPTER 4: Auto-Generate JNI Code Using SWIG
Listing 4-6. Type Definition for uid_t
/* Tell SWIG about uid t. */
typedef unsigned int uid t;
Function Prototypes
The Unix.i interface file ends with the function prototype for the getuid function as shown in Listing 4-7.
Listing 4-7. Function Prototype for getuid
/* Ask SWIG to wrap getuid function. */
extern uid t getuid(void);
This was a brief explanation of how SWIG gets instructed to generate wrapper code to expose
native functions to Java.
Invoking SWIG from Command Line
Now that the interface file is ready, SWIG can be invoked to generate the necessary wrapper code to
expose getuid function to Java. SWIG will generate two sets of files: wrapper C/C++ code to expose
the native function and Java proxy classes to provide access to the exposed function.
Java Package for Proxy Classes
The Java package directory should be created in advance of invoking SWIG. Using the Project
Explorer, right-click on the src directory and select New ➤ Package to launch the New Java
Package dialog. As shown in Figure 4-12, set the package name to com.apress.swig and click the
Finish button.
Figure 4-12. Java package for SWIG files
CHAPTER 4: Auto-Generate JNI Code Using SWIG
105
Invoking SWIG
You are now ready to invoke SWIG. Open a Terminal window or a command prompt, and go in to
the directory where the hello-jni project is imported, such as C:\android\workspace\com.example.
hellojni.HelloJni. As shown in Figure 4-13, execute swig -java -package com.apress.swig
-outdir src/com/apress/swig jni/Unix.i on the command line.
Figure 4-13. Invoking SWIG on the command line
SWIG parses the Unix.i interface file and generates the Unix wrap.c C/C++ wrapper code in the jni
directory plus the UnixJNI.java and Unix.java Java proxy classes in the com.apress.swig package.
Before starting to explore these files, let’s streamline the process. SWIG can be integrated into the
Android build process, instead of being manually executed from the command line.
Integrating SWIG into Android Build Process
In order to integrate SWIG into Android build process, you will define a Makefile fragment.
Android Build System Fragment for SWIG
Using the Project Explorer, right-click the jni directory and choose New ➤ File from the menu.
Using the New File dialog, create a file named my-swig-generate.mk. The contents of this Makefile
fragment are shown in Listing 4-8.
Listing 4-8. Contents of my-swig-generate.mk File
#
# SWIG extension for Android build system.
#
# @author Onur Cinar
#
# Check if the MY SWIG PACKAGE is defined
ifndef MY SWIG PACKAGE
$(error MY SWIG PACKAGE is not defined.)
endif
# Replace dots with slashes for the Java directory
MY SWIG OUTDIR := $(NDK PROJECT PATH)/src/$(subst .,/,$(MY SWIG PACKAGE))
106
CHAPTER 4: Auto-Generate JNI Code Using SWIG
# Default SWIG type is C
ifndef MY SWIG TYPE
MY SWIG TYPE := c
endif
# Set SWIG mode
ifeq ($(MY SWIG TYPE),cxx)
MY SWIG MODE := − c++
else
MY SWIG MODE :=
endif
# Append SWIG wrapper source files
LOCAL SRC FILES + = $(foreach MY SWIG INTERFACE,\
$(MY SWIG INTERFACES),\
$(basename $(MY SWIG INTERFACE)) wrap.$(MY SWIG TYPE))
# Add .cxx as a C++ extension
LOCAL CPP EXTENSION + = .cxx
# Generate SWIG wrapper code (indention should be tabs for this block)
% wrap.$(MY SWIG TYPE) : %.i
$(call host-mkdir,$(MY SWIG OUTDIR))
swig -java \
$(MY SWIG MODE) \
-package $(MY SWIG PACKAGE) \
-outdir $(MY SWIG OUTDIR) \
$<
Integrating SWIG into Android.mk
In order to use this build system fragment, the existing Android.mk file needs to be modified. The
build system fragment requires three new variables to be defined in Android.mk file in order to
operate:
MY SWIG PACKAGE: Defines the Java package where SWIG will generate the proxy
classes. In your example, this will be the com.apress.swig package.
MY SWIG INTERFACES: Lists the SWIG interface file that should be processed. In
your example, this will be the Unix.i file.
MY SWIG MODE: Instructs SWIG to generate the wrapper code in either C or C++.
In your example, this will be C code.
Using the Project Explorer, expand the jni directory under the project root, and open Android.mk in
editor view. Let’s now define these new variables for the project. The additions to the Android.mk file
are shown in Listing 4-9 as bold.
CHAPTER 4: Auto-Generate JNI Code Using SWIG
107
Listing 4-9. Defining SWIG Variables in Android.mk file
LOCAL PATH := $(call my-dir)
include $(CLEAR VARS)
LOCAL MODULE
:= hello-jni
LOCAL SRC FILES := hello-jni.c
MY_SWIG_PACKAGE := com.apress.swig
MY_SWIG_INTERFACES := Unix.i
MY_SWIG_TYPE := c
include $(LOCAL_PATH)/my-swig-generate.mk
include $(BUILD SHARED LIBRARY)
After defining these new variables, the Androd.mk file includes the my-swig-generate.mk build
system fragment that you defined earlier in this section. The build system fragment first creates the
Java package directory and then invokes SWIG by setting the proper parameters based on these
variables. This should happen before building the shared library since the wrapper code that will
be generated by SWIG should also get compiled into the shared library. The build system fragment
automatically appends the generated wrapper files into the LOCAL SRC FILES variable.
Choose Project ➤ Build All from the top menu to rebuild the current project. As shown in Figure 4-14,
the Android NDK build logs indicate that the Unix wrapper.c wrapper code is getting compiled into
the shared library.
Figure 4-14. Build logs showing the wrapper code getting compiled
Updating the Activity
The getuid function is now properly exposed through the Unix proxy Java class. In order to validate
it, you will be modifying the HelloJni activity to show its return value on the display. Using the
108
CHAPTER 4: Auto-Generate JNI Code Using SWIG
Project Explorer, expand the src directory and then the com.example.hellojni Java package. Open
HelloJni in editor view, and modify the body of onCreate method as shown in Listing 4-10.
Listing 4-10. Invoking getuid Function from Unix Proxy Class
@Override
public void onCreate(Bundle savedInstanceState)
{
super.onCreate(savedInstanceState);
...
TextView tv = new TextView(this);
tv.setText("UID: " + Unix.getuid());
setContentView(tv);
}
Executing the Application
The application is now ready. Choose Run ➤ Run from the top menu bar to launch the application.
As shown in Figure 4-15, activity will call the getuid function and the result will be displayed on the
screen.
Figure 4-15. Activity displaying the user ID
As demonstrated with this example, SWIG can automatically generate all of the necessary JNI and
Java code to expose a native function to Java.
Exploring Generated Code
In order to make the native function reachable from Java, SWIG has generated two Java classes and
one C/C++ wrapper:
Unix wrap.c: Contains the JNI wrapper functions to handle the type mapping
and to expose the selected native functions to Java. The generated wrapper
function is shown in Listing 4-11.
CHAPTER 4: Auto-Generate JNI Code Using SWIG
109
Listing 4-11. Generated Wrapper Function for getuid
SWIGEXPORT jlong JNICALL Java com apress swig UnixJNI getuid(JNIEnv *jenv, jclass jcls)
{
jlong jresult = 0 ;
uid t result;
(void)jenv;
(void)jcls;
result = (uid t)getuid();
jresult = (jlong)result;
return jresult;
}
UnixJNI.java: Intermediary JNI class containing the Java native function
declaration for all functions that are exposed by the wrapper. It is generated
in the com.apress.swig Java package as specified in Android.mk file. The
generated intermediary JNI class is shown in Listing 4-12.
Listing 4-12. Generated Intermediary JNI Class
package com.apress.swig;
public class UnixJNI {
public final static native long getuid();
}
Unix.java: Module class containing all methods and global variable getter
and setters. It wraps the calls in the intermediary JNI class to implement static
type checking. You will revisit this subject when you start exploring how SWIG
handles the objects. It is generated in com.apress.swig Java package as well.
The generated module class is shown in Listing 4-13.
Listing 4-13. Generated Module Class
package com.apress.swig;
public class Unix {
public static long getuid() {
return UnixJNI.getuid();
}
}
Wrapping C Code
In the previous example, you learned how the functions get exposed through SWIG. In this section,
you will explore how other components get wrapped by SWIG. Note that the components that are
defined in the interface file are merely for SWIG to expose them to Java; they do not get included
into the generated files unless they are also declared in insert preprocessor declaration. SWIG
assumes that all exposed components are defined elsewhere in the code. If the component is not
defined, the build will simply fail during compile-time.
110
CHAPTER 4: Auto-Generate JNI Code Using SWIG
Global Variables
Although there is no such thing as a Java global variable, SWIG does support global variables.
SWIG generates getter and setter methods in the module class to provide access to native global
variables. In order to expose a global variable to Java, simply add it to the interface file as shown in
Listing 4-14.
Listing 4-14. Interface File Exposing the Counter Global Variable
%module Unix
...
/* Global counter. */
extern int counter;
Upon processing the interface file, SWIG will generate the corresponding getter and setter methods
to provide access to the global variable from the Java application, as shown in Listing 4-15.
Listing 4-15. Getter and Setter Methods for Counter Global Variable
package com.apress.swig;
public class Unix {
...
public static void setCounter(int value) {
UnixJNI.counter set(value);
}
public static int getCounter() {
return UnixJNI.counter get();
}
}
Besides the variables, SWIG also provides support for those constants that are associated with a
value that cannot be altered during runtime.
Constants
Constants can be defined in the interface file either through #define or %constant preprocessor
directives, as shown in Listing 4-16.
Listing 4-16. Interface File Defining Two Constants
%module Unix
...
/* Constant using define directive. */
#define MAX WIDTH 640
CHAPTER 4: Auto-Generate JNI Code Using SWIG
111
/* Constant using %constant directive. */
%constant int MAX HEIGHT = 320;
SWIG generates a Java interface called <Module>Constant, and the constants are exposed as static
final variables on that interface, as shown in Listing 4-17.
Listing 4-17. UnixConstants Interface Exposing Two Constants
package com.apress.swig;
public interface UnixConstants {
public final static int MAX WIDTH = UnixJNI.MAX WIDTH get();
public final static int MAX HEIGHT = UnixJNI.MAX HEIGHT get();
}
By default SWIG generates runtime constants. The values of the constants are initialized by making
JNI function calls to the native code at runtime. This can be changed by using the %javaconst
preprocessor directive in interface file, as shown in Listing 4-18.
Listing 4-18. Instructions to Generate Compile-time Constant for MAX_WIDTH
%module Unix
...
/* Constant using define directive. */
%javaconst(1);
#define MAX WIDTH 640
/* Constant using %constant directive. */
%javaconst(0);
%constant int MAX HEIGHT = 320;
This preprocessor directive instructs SWIG to generate a compile-time constant for MAX_WIDTH
and a run-time constant for MAX_HEIGHT. The Java constants interface now looks like Listing 4-19.
Listing 4-19. UnixConstants Interface Exposing the Compile-time Constant
package com.apress.swig;
public interface UnixConstants {
public final static int MAX WIDTH = 640;
public final static int MAX HEIGHT = UnixJNI.MAX HEIGHT get();
}
In certain situation you may want to limit the write access on a variable and expose it as read-only
to Java.
Read-Only Variables
SWIG provides the %immutable preprocessor directive to mark a variable as read-only, as shown in
Listing 4-20.
112
CHAPTER 4: Auto-Generate JNI Code Using SWIG
Listing 4-20. Enabling and Disabling Read-only Mode in the Interface File
%module Unix
...
/* Enable the read-only mode. */
%immutable;
/* Read-only variable. */
extern int readOnly;
/* Disable the read-only mode. */
%mutable;
/* Read-write variable. */
extern int readWrite;
The setter method will not be generated for the read-only variable, as shown in Listing 4-21.
Listing 4-21. Setter Method Is Not Generated for the Read-only Variable
package com.apress.swig;
public class Unix implements UnixConstants {
...
public static int getReadOnly() {
return UnixJNI.readOnly get();
}
public static void setReadWrite(int value) {
UnixJNI.readWrite set(value);
}
public static int getReadWrite() {
return UnixJNI.readWrite get();
}
}
Besides the constants and read-only variables, enumerations are also frequently used in
applications. Enumerations are set of named constant values.
Enumerations
SWIG can handle both named and anonymous enumerations. Depending on the developer’s choice
or the target Java version, it can generate enumerations in four different ways.
CHAPTER 4: Auto-Generate JNI Code Using SWIG
113
Anonymous
Anonymous enumerations can be declared in the interface file, as shown in Listing 4-22.
Listing 4-22. Anonymous Enumeration
%module Unix
...
/* Anonymous enumeration. */
enum { ONE = 1, TWO = 2, THREE, FOUR };
SWIG generates the final static variables in the <Module>Constants Java interface for each
enumeration, as shown in Listing 4-23. Like the constants, the enumerations are also generated as
run-time enumerations. The %javaconst preprocessor directive can be used to generate compiletime enumeration.
Listing 4-23. Anonymous Enumeration Exposed Through Constants Interface
package com.apress.swig;
public interface UnixConstants {
...
public final static int ONE = UnixJNI.ONE get();
public final static int TWO = UnixJNI.TWO get();
public final static int THREE = UnixJNI.THREE get();
public final static int FOUR = UnixJNI.FOUR get();
}
Type-Safe
Named enumerations can be declared in interface file, as shown in Listing 4-24. Unlike the
anonymous enumerations, they get exposed to Java as type-safe enumerations.
Listing 4-24. Named Enumeration
%module Unix
...
/* Named enumeration. */
enum Numbers { ONE = 1, TWO = 2, THREE, FOUR };
SWIG defines a separate class with the enumeration’s name, and the enumeration values are
exposed as final static member fields, as shown in Listing 4-25.
Listing 4-25. Named Enumeration Exposed as a Java Class
package com.apress.swig;
public final class Numbers {
public final static Numbers ONE = new Numbers(
"ONE", UnixJNI.ONE get());
114
CHAPTER 4: Auto-Generate JNI Code Using SWIG
public final static Numbers TWO = new Numbers(
"TWO", UnixJNI.TWO get());
public final static Numbers THREE = new Numbers("THREE");
public final static Numbers FOUR = new Numbers("FOUR");
...
/* Helper methods. */
...
}
This type of enumeration allows type checking and it is much safer than the constants based
approach, although it cannot be used in switch statements.
Type-Unsafe
The third approach is a combination of previous two approaches. Enumeration gets wrapped into its
on class but the enumeration values are exposed as static final variables. A named enumeration can
be marked as type-unsafe exposure by including the enumtypeunsafe.swg extension, as shown in
Listing 4-26.
Listing 4-26. Named Enumeration Exposed as Type Unsafe
%module Unix
...
/* Type Unsafe */
%include "enumtypeunsafe.swg"
/* Named enumeration. */
enum Numbers { ONE = 1, TWO = 2, THREE, FOUR };
The generated Java class for the enumeration is shown in Listing 4-27. This type of enumerations
can be used in switch statements since they are constants-based.
Listing 4-27. Type Unsafe Enumeration Exposed as a Java Class
package com.apress.swig;
public final class Numbers {
public final static int ONE = UnixJNI.ONE get();
public final static int TWO = UnixJNI.TWO get();
public final static int THREE = UnixJNI.THREE get();
public final static int FOUR = UnixJNI.FOUR get();
}
Java Enumerations
Named enumerations can also be exposed to Java as proper Java enumerations. This type
of enumerations is type checked, and they can also be used in switch statements. Named
enumerations can be marked as Java enumeration exposure by including the enums.swg extension,
as shown in Listing 4-28.
CHAPTER 4: Auto-Generate JNI Code Using SWIG
Listing 4-28. Java Enumeration
%module Unix
...
/* Java enumeration. */
%include "enums.swg"
/* Named enumeration. */
enum Numbers { ONE = 1, TWO = 2, THREE, FOUR };
The generated Java class is shown in Listing 4-29.
Listing 4-29. Generated Java Enumeration Class
package com.apress.swig;
public enum Numbers {
ONE(UnixJNI.ONE get()),
TWO(UnixJNI.TWO get()),
THREE,
FOUR;
...
/* Helper methods. */
...
}
Structures are widely used in C/C++ applications. They aggregate a set of named variables into a
single data type.
Structures
Structures are also supported by SWIG, and they can be declared in the interface file, as shown in
Listing 4-30.
Listing 4-30. Point Structure That Is Declared in the Interface File
%module Unix
...
/* Point structure. */
struct Point {
int x;
int y;
};
They get wrapped as Java classes with getters and setters for the member variables, as shown in
Listing 4-31.
115
116
CHAPTER 4: Auto-Generate JNI Code Using SWIG
Listing 4-31. Generated Point Java Class
package com.apress.swig;
public class Point {
private long swigCPtr;
protected boolean swigCMemOwn;
protected Point(long cPtr, boolean cMemoryOwn) {
swigCMemOwn = cMemoryOwn;
swigCPtr = cPtr;
}
protected static long getCPtr(Point obj) {
return (obj == null) ? 0 : obj.swigCPtr;
}
protected void finalize() {
delete();
}
public synchronized void delete() {
if (swigCPtr ! = 0) {
if (swigCMemOwn) {
swigCMemOwn = false;
UnixJNI.delete Point(swigCPtr);
}
swigCPtr = 0;
}
}
public void setX(int value) {
UnixJNI.Point x set(swigCPtr, this, value);
}
public int getX() {
return UnixJNI.Point x get(swigCPtr, this);
}
public void setY(int value) {
UnixJNI.Point y set(swigCPtr, this, value);
}
public int getY() {
return UnixJNI.Point y get(swigCPtr, this);
}
public Point() {
this(UnixJNI.new Point(), true);
}
}
CHAPTER 4: Auto-Generate JNI Code Using SWIG
117
Another widely used C/C++ data type is pointers, a memory address whose value refers directly to
value elsewhere in the memory.
Pointers
SWIG also provides support for pointers. As seen in the previous example, SWIG stores the C
pointer of the actual C structure instance in the Java class. SWIG stores the pointers using the long
data type. It manages the life cycle of the C components aligned with the life cycle of the associated
Java class through the use of the finalize method.
Wrapping C++ Code
In the previous section you explored the basics of wrapping C components. Now you will focus on
wrapping the C++ code. First, you need to modify the Android.mk file to instruct SWIG to generate
C++ code. In order to do so, open the Android.mk file in the editor view and set MY SWIG TYPE
variable to cxx, as shown in Listing 4-32.
Listing 4-32. Android.mk Instructing SWIG to Generate C + Code
MY SWIG PACKAGE := com.apress.swig
MY SWIG INTERFACES := Unix.i
MY_SWIG_TYPE := cxx
SWIG will now generate the wrapper in C++ instead of C code. You have already learned the function
generation, so you’ll now focus on the type of arguments that can be passed to these functions.
Pointers, References, and Values
In C/C++, function can take arguments in many different ways, such as through pointers, references,
or by simply value (see Listing 4-33).
Listing 4-33. Functions with Different Argument Types
/* By pointer. */
void drawByPointer(struct Point* p);
/* By reference */
void drawByReference(struct Point& p);
/* By value. */
void drawByValue(struct Point p);
In Java there are no such types. SWIG unifies these types together in the wrapper code as object
instance reference, as shown in Listing 4-34.
118
CHAPTER 4: Auto-Generate JNI Code Using SWIG
Listing 4-34. Unified Methods in Generated Java Class
package com.apress.swig;
public class Unix implements UnixConstants {
...
public static void drawByPointer(Point p) {
UnixJNI.drawByPointer(Point.getCPtr(p), p);
}
public static void drawByReference(Point p) {
UnixJNI.drawByReference(Point.getCPtr(p), p);
}
public static void drawByValue(Point p) {
UnixJNI.drawByValue(Point.getCPtr(p), p);
}
}
Although the declaration in C code is different, all of the calls shown in Listing 4-35 are correct
based on the generated code.
Listing 4-35. Unified Methods Getting Called with the Same Argument Type
Point p;
...
Unix.drawByPointer(p);
Unix.drawByReference(p);
Unix.drawByValue(p);
The C/C++ programming language allows functions to specify default values for some of their
arguments. When these functions are called by omitting these arguments, the default values are used.
Default Arguments
Although default arguments are not supported by Java, SWIG provides support for functions with
default arguments by generating additional functions for each argument that is defaulted. Functions
with default arguments can be decelerated in the interface file, as shown in Listing 4-36.
Listing 4-36. Function with Default Arguments in the Interface File
%module Unix
...
/* Function with default arguments. */
void func(int a = 1, int b = 2, int c = 3);
Generated additional functions will be exposed through the module Java class, as shown
in Listing 4-37.
CHAPTER 4: Auto-Generate JNI Code Using SWIG
Listing 4-37. Additional Functions Generated to Support Default Arguments
package com.apress.swig;
public class Unix {
...
public static void func(int a, int b, int c) {
UnixJNI.func SWIG 0(a, b, c);
}
public static void func(int a, int b) {
UnixJNI.func SWIG 1(a, b);
}
public static void func(int a) {
UnixJNI.func SWIG 2(a);
}
public static void func() {
UnixJNI.func SWIG 3();
}
}
Function overloading allows applications to define multiple functions having the same name but
different arguments.
Overloaded Functions
SWIG easily supports the overloaded functions since Java already provides support for them.
Overloaded functions can be declared in the interface file, as shown in Listing 4-38.
Listing 4-38. Overloaded Functions Declared in the Interface File
%module Unix
...
/* Overloaded functions. */
void func(double d);
void func(int i);
SWIG exposes the overloaded functions through the module Java class, as shown in Listing 4-39.
Listing 4-39. Overloaded Functions Exposed Through the Module Java Class
package com.apress.swig;
public class Unix {
...
119
120
CHAPTER 4: Auto-Generate JNI Code Using SWIG
public static void func(double d) {
UnixJNI.func SWIG 0(d);
}
public static void func(int i) {
UnixJNI.func SWIG 1(i);
}
}
SWIG resolves overloaded functions using a disambiguation scheme that ranks and sorts
declarations according to a set of type-precedence rules. Besides the functions and primitive data
types, SWIG can also translate C++ classes.
Classes
Similar to structures, classes are also wrapped as Java classes. SWIG generates the necessary
getter and setter methods for all public class variables. Classes can be declared in the interface file,
as shown in Listing 4-40.
Listing 4-40. Class Declaration in the Interface File
%module Unix
...
/* Class A. */
class A {
public:
A();
A(int value);
~A();
void print();
int value;
private:
void reset();
};
SWIG generates the corresponding Java class, as shown in Listing 4-41. The value member
variable is public, and the corresponding getter and setter methods are automatically generated by
SWIG. The reset method does not get exposed to Java since it is declared in private in the class
declaration.
Listing 4-41. C/C++ Exposed to Java
package com.apress.swig;
public class A {
private long swigCPtr;
protected boolean swigCMemOwn;
CHAPTER 4: Auto-Generate JNI Code Using SWIG
121
protected A(long cPtr, boolean cMemoryOwn) {
swigCMemOwn = cMemoryOwn;
swigCPtr = cPtr;
}
protected static long getCPtr(A obj) {
return (obj == null) ? 0 : obj.swigCPtr;
}
protected void finalize() {
delete();
}
public synchronized void delete() {
if (swigCPtr ! = 0) {
if (swigCMemOwn) {
swigCMemOwn = false;
UnixJNI.delete A(swigCPtr);
}
swigCPtr = 0;
}
}
public A() {
this(UnixJNI.new A
}
SWIG 0(), true);
public A(int value) {
this(UnixJNI.new A SWIG 1(value), true);
}
public void print() {
UnixJNI.A print(swigCPtr, this);
}
public void setValue(int value) {
UnixJNI.A value set(swigCPtr, this, value);
}
public int getValue() {
return UnixJNI.A value get(swigCPtr, this);
}
}
SWIG provides support for inheritance as well. Those classes are wrapped into a hierarchy of
Java classes reflecting the same inheritance relationship. Since Java does not support multiple
inheritance, any C++ class with multiple inheritance will trigger an error during the code generation
phase.
122
CHAPTER 4: Auto-Generate JNI Code Using SWIG
Exception Handling
In native code, C/C++ functions can throw exceptions or return error codes. SWIG allows developers
to inject exception handling code into the generated wrapper code by using the %exception
preprocessor directive to translate the C/C++ exceptions and error codes into Java exceptions.
Exception handling code can be defined in the interface file, as shown in Listing 4-42. The exception
handling code should be defined before the actual function declaration.
Listing 4-42. Exception Handling Code for getuid Function
/* Exception handling for getuid. */
%exception getuid {
$action
if (!result) {
jclass clazz = jenv->FindClass("java/lang/OutOfMemoryError");
jenv->ThrowNew(clazz, "Out of Memory");
return $null;
}
}
/* Ask SWIG to wrap getuid function. */
extern uid t getuid(void);
Compared to Listing 4-11, the generated wrapper code for getuid function now looks like
Listing 4-43.
Listing 4-43. Wrapper Code with Exception Handling
SWIGEXPORT jlong JNICALL Java com apress swig UnixJNI getuid(JNIEnv *jenv, jclass jcls) {
jlong jresult = 0 ;
uid t result;
(void)jenv;
(void)jcls;
{
result = (uid t)getuid();
if (!result) {
jclass clazz = jenv->FindClass("java/lang/OutOfMemoryError");
jenv- > ThrowNew(clazz, "Out of Memory");
return 0;
}
}
jresult = (jlong)result;
return jresult;
}
The generated Java code did not change since the code is throwing a run-time exception. If a
checked exception is thrown, SWIG can be instructed through the %javaexception preprocessor
directive to reflect that accordingly to the generated Java methods, as shown in Listing 4-44.
CHAPTER 4: Auto-Generate JNI Code Using SWIG
123
Listing 4-44. Instructing SWIG That a Checked Exception May Be Thrown
/* Exception handling for getuid. */
%javaexception("java.lang.IllegalAccessException") getuid {
$action
if (!result) {
jclass clazz = jenv->FindClass("java/lang/IllegalAccessException");
jenv->ThrowNew(clazz, "Illegal Access");
return $null;
}
}
The generated Java method signature now reflects the checked exception that may be thrown, as
shown in Listing 4-45.
Listing 4-45. Java Class Reflecting the Thrown Exception
package com.apress.swig;
public class Unix {
public static long getuid() throws java.lang.IllegalAccessException {
return UnixJNI.getuid();
}
}
Memory Management
Each proxy class that is generated by SWIG contains an ownership flag called swigCMemOwn. This
flag specifies who is responsible for cleaning up the underlying C/C++ component. If the proxy
class owns the underlying component, the memory will get freed by the finalize method of the Java
class when it gets garbage collected. Memory can be freed without waiting for the garbage collector
by simply invoking the delete method of the Java class. During runtime the Java class can be
instructed to release or take ownership of the underlying C/C++ component’s memory through the
swigReleaseOwnership and swigTakeOwnership methods.
Calling Java from Native Code
Until this point you have always called from Java to C/C++ code. In certain cases, you may need
to call from C/C++ code back to Java code as well, such as for callbacks. SWIG does also provide
support calling from C/C++ code to Java by the use of virtual methods.
Asynchronous Communication
In order to demonstrate the flow, you will convert the getuid function call to an asynchronous mode
by wrapping it in a C/C++ class and returning its result through a callback. For this experiment, you
can place the class declaration and definition into the SWIG interface file, as shown in Listing 4-46.
124
CHAPTER 4: Auto-Generate JNI Code Using SWIG
Listing 4-46. Declaration and Definition of AsyncUidProvider Class
%module Unix
...
%{
/* Asynchornous user ID provider. */
class AsyncUidProvider {
public:
AsyncUidProvider() {
}
virtual ~ AsyncUidProvider() {
}
void get() {
onUid(getuid());
}
virtual void onUid(uid t uid) {
}
};
%}
/* Asynchornous user ID provider. */
class AsyncUidProvider {
public:
AsyncUidProvider();
virtual ~ AsyncUidProvider();
void get();
virtual void onUid(uid t uid);
};
Enabling Directors
SWIG provides support for cross language polymorphism using directors feature. The directors
feature is disabled by default. In order to enable it, the %module preprocessor directive should be
modified to include the directors flag. After enabling the directors extension, the feature should be
applied to AsyncUidProvider class using the %feature preprocessor directive. Both changes are
shown in Listing 4-47.
Listing 4-47. Enabling Directors Extension and Applying the Feature
/* Module name is Unix. */
%module(directors = 1) Unix
/* Enable directors for AsyncUidProvider. */
%feature("director") AsyncUidProvider;
In order to bridge calls from C/C++ code to Java, the directors extension relies on Run-Time Type
Information (RTTI) feature of the compiler.
CHAPTER 4: Auto-Generate JNI Code Using SWIG
125
Enabling RTTI
By default, RTTI is turned off on Android NDK build system. In order to enable it, modify the
Android.mk file as shown in Listing 4-48.
Listing 4-48. Enabling RTTI in Android.mk File
# Enable RTTI
LOCAL CPP FEATURES + = rtti
The native code portion is now ready. Choose Project ➤ Build All from the top menu to rebuild the
current project.
Overriding the Callback Method
On the Java side, you need to extend the exposed AsyncUidProvider class and override the onUid
method to receive the result of the getuid function call, as shown in Listing 4-49.
Listing 4-49. Extending the AsyncUidProvider in Java
package com.example.hellojni;
import android.widget.TextView;
import com.apress.swig.AsyncUidProvider;
public class UidHandler extends AsyncUidProvider {
private final TextView textView;
UidHandler(TextView textView) {
this.textView = textView;
}
@Override
public void onUid(long uid) {
textView.setText("UID: " + uid);
}
}
Updating the HelloJni Activity
As the last step, the HelloJni activity needs to be modified to use the UidHandler class. The
modified content of onCreate method is shown in Listing 4-50.
126
CHAPTER 4: Auto-Generate JNI Code Using SWIG
Listing 4-50. Modified onCreate Method Using the New UidHandler
@Override
public void onCreate(Bundle savedInstanceState)
{
...
TextView tv = new TextView(this);
setContentView(tv);
UidHandler uidHandler = new UidHandler(tv);
uidHandler.get();
}
Now you can choose New ➤ File from the top menu to launch the application. Upon invoking the
get method of the AsnycUidProvider, the C/C++ code will call back to Java with the result of the
getuid function call and it will get displayed.
Summary
As you can see, SWIG simplifies the process of connecting native code to the Java layer by
automatically producing all necessary JNI wrapper code. Although the process is highly transparent
to the developers, SWIG still provides the necessary functionality to enable developers to expand
the generated code to match their unique requirements. More information about SWIG features can
be found in SWIG Documentation at http://swig.org/Doc2.0/index.html. You will be using SWIG
often in the next chapters, and you will continue exploring the other unique features offered.
Chapter
5
Logging, Debugging,
and Troubleshooting
In previous chapters, you explored the Android NDK build system and how to connect the native code
to the Java application using the JNI technology. Needless to say, learning application development
on a new platform involves much experimentation; it takes time to get things right. It is vital to gain the
troubleshooting skills pertaining to Android platform before starting to experiment with the native APIs
offered, as it can catalyze the learning phase greatly by helping you to spot problems quickly. Your
existing troubleshooting skills may not directly apply since the development and execution of Android
applications happens on two different machines. In this chapter you will explore logging, debugging,
and troubleshooting tools and techniques including:
An introduction to Android Logging framework
Debugging native code through Eclipse and command line
Analyzing stack traces from crashes
Using CheckJNI mode to spot problems earlier
Troubleshooting memory issues using libc and Valgrind
Using strace to monitor native code execution
Logging
Logging is the most important part of troubleshooting, but it is tricky to achieve, especially on mobile
platforms where the development and the execution of the application happen on two different
machines. Android has an extensive logging framework that promotes system-wide centralized
logging of information from both the Android system itself and the applications. A set of user-level
applications is also provided to view and filter these logs, such as the logcat and Dalvik Debug
Monitor Server (DDMS) tools.
127
128
CHAPTER 5: Logging, Debugging, and Troubleshooting
Framework
The Android logging framework is implemented as a kernel module known as the logger. The
amount of information being logged on the platform at any given time makes the viewing and
analysis of these log messages very difficult. In order to simplify this procedure, the Android logging
framework groups the log messages into four separate log buffers:
Main: Main application log messages
Events: System events
Radio: Radio-related log messages
System: Low-level system debug messages for debugging
These four buffers are kept as pseudo-devices under the /dev/log system directory. Since input
and output (I/O) operations on mobile platforms are very costly, the log messages are not saved in
persistent storage; instead, they are kept in memory. In order to keep the memory utilization of the
log messages under control, the logger module puts them in fixed-sized buffers. Main, radio, and
system logs are kept as free-form text messages in 64KB log buffers. The event log messages carry
additional information in binary format, so they are kept in a 256KB log buffer.
Native Logging APIs
Developers are not expected to directly interact with the logger kernel module. The Android runtime
provides a set of API calls to allow both Java and the native code to easily send log messages to
the logger kernel module. The logging API for the native code is exposed through the android/log.h
header file. In order to use the logging functions, native code should include this header file first.
#include <android/log.h>
In addition to including the proper header file, the Android.mk file needs to be modified dynamically
to link the native module with the log library. This is achieved through the use LOCAL LDLIBS build
system variable, as shown in Listing 5-1. This build system variable must be placed before the
include statement for the shared library build fragment; otherwise, it will not have any affect.
Listing 5-1. Dynamically Linking the Native Module with Log Library
LOCAL MODULE := hello-jni
...
LOCAL_LDLIBS += −llog
...
include $(BUILD SHARED LIBRARY)
CHAPTER 5: Logging, Debugging, and Troubleshooting
Log Message
Each log entry that is dispatched to the logger module through the logging APIs has the following
fields:
Priority: Can be verbose, debug, info, warning, error, or fatal to indicate the
severity of the log message. Supported log priority levels are declared in the
android/log.h header file, as shown in Listing 5-2.
Listing 5-2. Supported Log Priority Levels
typedef enum android LogPriority {
...
ANDROID LOG VERBOSE,
ANDROID LOG DEBUG,
ANDROID LOG INFO,
ANDROID LOG WARN,
ANDROID LOG ERROR,
ANDROID LOG FATAL,
...
} android LogPriority;
Tag: Identifies the component that emits the log message. The logcat and
DDMS tools can filter the log messages based on this tag value. The tag value is
expected to be reasonably small.
Message: Text payload carrying the actual log message. The newline character
gets automatically appended to each log message. Since the circular log buffers
are pretty small, it is strongly recommended that the applications keep the size
of log message at a reasonable level.
Logging Functions
The android/log.h header file also declares a set of functions for the native code to emit log
messages.
android log write: Can be used to emit a simple string as a log message. It
takes log priority, log tag, and a log message, as shown in Listing 5-3.
Listing 5-3. Logging a Simple Message
android log write(ANDROID LOG WARN, "hello-jni", "Warning log.");
android log print: Can be used to emit a formatted string as a log message.
It takes log priority, log tag, string format, and variable numbers of other
parameters as specified in the format, as shown in Listing 5-4. For the syntax of
the format string, please refer to ANSI C printf documentation.
129
130
CHAPTER 5: Logging, Debugging, and Troubleshooting
Listing 5-4. Logging a Formatted Message
android log print(ANDROID LOG ERROR, "hello-jni",
"Failed with errno %d", errno);
android log vprint: It behaves exactly as the android log print
function except the additional parameters are passed as a va list instead of
a succession of parameters. This is very useful if you are planning to call the
logging function with variable number of parameters that are passed to the
current function, as shown in Listing 5-5.
Listing 5-5. Logging a Message by Using the Variable Number of Parameters That Are Passed In
void log verbose(const char* format, ...)
{
va list args;
va start(args, format);
__android_log_vprint(ANDROID_LOG_VERBOSE, "hello-jni", format, args);
va end(args);
}
...
void example()
{
log verbose("Errno is now %d", errno);
}
android log assert: Can be used to log assertion failures. Compared to other
logging functions, it does not take a log priority and always emits logs as fatal,
as shown in Listing 5-6. If a debugger is attached, it also SIGTRAP’s the current
process to enable further inspection through the debugger.
Listing 5-6. Logging an Assertion Failure
if (0 != errno)
{
android log assert("0 != errno", "hello-jni",
"There is an error.");
}
Controlled Logging
Like their Java counterparts, the native logging APIs only let you emit log messages to the logger
kernel module. In real life, you would neither use asserts nor log at the same granularity in your
release and debug builds. Unfortunately, the Android logging API does not provide any capability to
suppress log messages based on their priorities. It is not as advanced as other logging frameworks
such as Log4J or Log4CXX. The Android logging framework assumes that you will somehow take
out the unnecessary logging calls from your release builds. Although this can very easily be done in
Java applications by relying on Proguard, there is no easy recipe for the native code.
CHAPTER 5: Logging, Debugging, and Troubleshooting
131
Log Wrapper
This section will introduce a preprocessor based solution to this problem. To see it in action, you will
modify the hello-jni native project that you imported earlier. Open Eclipse and, using the Project
Explorer, right-click on the jni sub-directory. From the context menu, choose New Header File to
launch the New Header File dialog. Set the header file name as my log.h, and click the Finish button
to proceed. The content of the my log.h header file is shown in Listing 5-7.
Listing 5-7. The Content of my_log.h Header File
#pragma once
/**
* Basic logging framework for NDK.
*
* @author Onur Cinar
*/
#include <android/log.h>
#define
#define
#define
#define
#define
#define
#define
MY
MY
MY
MY
MY
MY
MY
LOG
LOG
LOG
LOG
LOG
LOG
LOG
LEVEL
LEVEL
LEVEL
LEVEL
LEVEL
LEVEL
LEVEL
VERBOSE 1
DEBUG 2
INFO 3
WARNING 4
ERROR 5
FATAL 6
SILENT 7
#ifndef MY LOG TAG
#
define MY LOG TAG
#endif
FILE
#ifndef MY LOG LEVEL
#
define MY LOG LEVEL MY LOG LEVEL VERBOSE
#endif
#define MY LOG NOOP (void) 0
#define MY LOG PRINT(level,fmt,...) \
android log print(level, MY LOG TAG, "(%s:%u) %s: " fmt, \
FILE ,
LINE ,
PRETTY FUNCTION , ## VA ARGS
#if MY LOG LEVEL VERBOSE >= MY LOG LEVEL
#
define MY LOG VERBOSE(fmt,...) \
MY LOG PRINT(ANDROID LOG VERBOSE, fmt, ##
#else
#
define MY LOG VERBOSE(...) MY LOG NOOP
#endif
#if MY LOG LEVEL DEBUG >= MY LOG LEVEL
#
define MY LOG DEBUG(fmt,...) \
MY LOG PRINT(ANDROID LOG DEBUG, fmt, ##
VA ARGS
VA ARGS
)
)
)
132
CHAPTER 5: Logging, Debugging, and Troubleshooting
#else
#
define MY LOG DEBUG(...) MY LOG NOOP
#endif
#if MY LOG LEVEL INFO >= MY LOG LEVEL
#
define MY LOG INFO(fmt,...) \
MY LOG PRINT(ANDROID LOG INFO, fmt, ##
#else
#
define MY LOG INFO(...) MY LOG NOOP
#endif
#if MY LOG LEVEL WARNING >= MY LOG LEVEL
#
define MY LOG WARNING(fmt,...) \
MY LOG PRINT(ANDROID LOG WARN, fmt, ##
#else
#
define MY LOG WARNING(...) MY LOG NOOP
#endif
#if MY LOG LEVEL ERROR >= MY LOG LEVEL
#
define MY LOG ERROR(fmt,...) \
MY LOG PRINT(ANDROID LOG ERROR, fmt, ##
#else
#
define MY LOG ERROR(...) MY LOG NOOP
#endif
#if MY LOG LEVEL FATAL >= MY LOG LEVEL
#
define MY LOG FATAL(fmt,...) \
MY LOG PRINT(ANDROID LOG FATAL, fmt, ##
#else
#
define MY LOG FATAL(...) MY LOG NOOP
#endif
VA ARGS
)
VA ARGS
)
VA ARGS
)
VA ARGS
)
#if MY LOG LEVEL FATAL >= MY LOG LEVEL
#
define MY LOG ASSERT(expression, fmt, ...) \
if (!(expression)) \
{ \
android log assert(#expression, MY LOG TAG, \
fmt, ## VA ARGS ); \
}
#else
#
define MY LOG ASSERT(...) MY LOG NOOP
#endif
Through a set of preprocessor directives, the my log.h header file defines a basic logging framework
for native code. These preprocessor directives wrap the Android logging functions and allow them to
be toggled during the compile time.
CHAPTER 5: Logging, Debugging, and Troubleshooting
133
Adding Logging
You can now add logging statements into the native code. Using the Project Explorer, double-click
the hello-jni.c source file to open it in the Editor view. In order to use the basic logging framework,
the my log.h header file needs to be included first. There is no need to include the android/log.h
anymore, since it is already included through my log.h.
#include "my log.h"
You can now add the logging statements into the native function, as shown in Listing 5-8.
Listing 5-8. Adding Logging Statements into Native Function
jstring
Java com example hellojni HelloJni stringFromJNI( JNIEnv* env,
jobject thiz )
{
MY_LOG_VERBOSE("The stringFromJNI is called.");
MY_LOG_DEBUG("env=%p thiz=%p", env, thiz);
MY_LOG_ASSERT(0 != env, "JNIEnv cannot be NULL.");
MY_LOG_INFO("Returning a new string.");
return (*env)->NewStringUTF(env, "Hello from JNI !");
}
Updating Android.mk
You can now update the Android.mk file to tune the basic logging framework. Using the Project
Explorer, double-click on the Android.mk source file to open it in the Editor view.
Log Tag
As mentioned, each log message contains a log tag identifying the component that is emitting the log
message. The log tag for the module can be defined in the Android.mk file, as shown in Listing 5-9.
Listing 5-9. Defining the Log Tag Through MY_LOG_TAG Build Variable
LOCAL MODULE := hello-jni
...
# Define the log tag
MY LOG TAG := \"hello-jni\"
134
CHAPTER 5: Logging, Debugging, and Troubleshooting
Log Level
The main advantage of the basic logging framework is the ability to define a log level. As you would
not log at the same granularity in your release and debug builds, the Android.mk file can be modified
to define different log levels for debug and release builds, as shown in Listing 5-10.
Listing 5-10. Defining the Default Logging Levels
LOCAL MODULE := hello-jni
...
# Define the log tag
MY LOG TAG := \"hello-jni\"
# Define the default logging level based build type
ifeq ($(APP_OPTIM),release)
MY_LOG_LEVEL := MY_LOG_LEVEL_ERROR
else
MY_LOG_LEVEL := MY_LOG_LEVEL_VERBOSE
endif
As mentioned in Chapter 2, the APP OPTIM build system variable indicates whether the build type
is release or debug. Based on the value of APP OPTIM, the value of MY LOG LEVEL can be set to the
preferred log level.
Applying the Logging Configuration
Upon defining the MY LOG TAG and MY LOG LEVEL build system variables, the logging system
configuration can be applied to the module, as shown in Listing 5-11.
Listing 5-11. Applying the Logging Configuration to the Module
LOCAL MODULE := hello-jni
...
# Define the log tag
MY LOG TAG := hello-jni
# Define the default logging level based build type
ifeq ($(APP OPTIM),release)
MY LOG LEVEL := MY LOG LEVEL ERROR
else
MY LOG LEVEL := MY LOG LEVEL VERBOSE
endif
# Appending the compiler flags
LOCAL_CFLAGS += −DMY_LOG_TAG=$(MY_LOG_TAG)
LOCAL_CFLAGS += −DMY_LOG_LEVEL=$(MY_LOG_LEVEL)
# Dynamically linking with the log library
LOCAL_LDLIBS += −llog
CHAPTER 5: Logging, Debugging, and Troubleshooting
135
Observing Log Messages Through Logcat
Upon executing the hello-jni application, the log messages can be observed through the Logcat
view, as shown in Figure 5-1.
Figure 5-1. Log messages from the native code
Console Logging
When integrating third party libraries and legacy modules into an Android application project,
changing their logging mechanism to Android-specific logging may not be possible. Most logging
mechanisms either log messages to a file or directly to the console.
The console file descriptors, STDOUT and STDERR, are not visible by default on the Android platform.
To redirect these log messages to the Android system log, open a command prompt or a Terminal
window and execute the ADB commands shown in Listing 5-12.
Listing 5-12. Redirecting Console Log to Android System Log
adb shell stop
adb shell setprop log.redirect-stdio true
adb shell start
Upon restarting the application, the console log messages will be visible through the Logcat view, as
shown in Figure 5-2.
Figure 5-2. Log messages re-directed from STDOUT and STDERR descriptors
136
CHAPTER 5: Logging, Debugging, and Troubleshooting
The system retains this setting until the device reboots. If you want to make these settings the
default, add them to the /data/local.prop file on the device or emulator.
Debugging
Logging allows you to output messages from a running application, exposing its current state. When
troubleshooting problems, the granularity of the log messages from the concerned portion of the
code may not be sufficient. New log messages can be implanted into the code to expose more
information about its current state but this simply slows down the troubleshooting process. Using
a debugger to properly observe the application state is the most convenient way of troubleshooting.
Android NDK supports debugging of native code through the GNU Debugger (GDB).
Prerequisites
In order to debug the native code, the following conditions should be met:
Native code should be compiled either through ndk-build command from the
command line, or through the Eclipse IDE using Android Development Tools.
The NDK build system generates a set of files during the build process to remote
debugging possible.
The application should be set as debuggable in its AndroidManifest.xml file
through the android:debuggable attribute of the application tag, as shown in
Listing 5-13.
Listing 5-13. Declaring the Application as Debuggable
<?xml version="1.0" encoding="utf-8"?>
<manifest xmlns:android="http://schemas.android.com/apk/res/android"
package="com.example.hellojni"
android:versionCode="1"
android:versionName="1.0">
...
<application android:label="@string/app_name"
android:debuggable="true">
...
</application>
</manifest>
The device or the emulator should be running Android version 2.2 or higher.
Native code debugging is not supported in earlier versions.
The ndk-gdb script handles many of the error conditions and outputs informative error messages to
let you know if any of these conditions have not been met.
CHAPTER 5: Logging, Debugging, and Troubleshooting
137
Debug Session Setup
The ndk-gdb script that takes care of setting up the debug session on behalf of the developer but
knows the sequence of events happening during the debug session setup, which is very beneficial to
understanding the caveats of debugging native code on Android. The complete sequence of events
during the debug session setup is shown in Figure 5-3.
Figure 5-3. Debug session setup sequence diagram
The ndk-gdb script launches the target application by using the application manager through ADB.
The application manager simply relays the request to Zygote process.
Zygote, also known as the “app process,” is one of the core processes started when the Android system
boots. Its role within the Android platform is to start the Dalvik virtual machine and initialize all core
Android services. As a mobile operating system, Android needs to keep the startup time of applications
as small as possible in order to provide a highly responsive user experience. In order to achieve that,
instead of starting a new process from scratch for the applications, Zygote simply relies on forking. In
computing, forking is the operation to clone an existing process. The new process has an exact copy of
all memory segments of the parent process, although both processes execute independently.
At this point in time, the application is started and is executing code. As you may have noticed, the
debug session is not established yet at this point.
Note Due to the way Zygote works, the GDB cannot start the application, but it can simply attach to
an already running application process. If you want to prevent your application from executing code
prior to when GDB attaches, you need to use the Java Debugger to set a breakpoint at a proper position
in the code.
138
CHAPTER 5: Logging, Debugging, and Troubleshooting
Upon obtaining the process ID of the application, the ndk-gdb script starts the GDB Server on
Android and has it attach to the running application. The ndk-gdb script configures port forwarding
using ADB to make the GDB Server accessible from the host machine. Later, it copies the binaries
for Zygote and the shared libraries to the host machine prior starting the GDB Client. After the
binaries are copied, the ndk-gdb script starts the GDB Client and the debug session becomes active.
After this point, you can start debugging the application.
Setting up the Example for Debugging
In order to see the native code debugging in action, you will be using the hello-jni sample project.
To simplify the debug process, you will make a slight change in the HelloJni activity’s onCreate
method. Using Eclipse, open up the HelloJni activity in the Editor View, as described earlier. Modify
the onCreate method as shown in Listing 5-14.
Listing 5-14. Modified onCreate Method to Delay the Native Call
@Override
public void onCreate(Bundle savedInstanceState)
{
super.onCreate(savedInstanceState);
Button button = new Button(this);
button.setText("Call Native");
button.setOnClickListener(new OnClickListener() {
public void onClick(View button) {
((Button) button).setText(stringFromJNI());
}
});
setContentView(button);
}
From the menu bar, choose Source ➤ Organize Imports to get Eclipse to add the necessary
import statements to the source file. For the OnClickListener class, Eclipse will propose more than
one alternative to import. Select android.view.View.OnClickListener and proceed. The modified
onCreate method places a button to the display. Clicking that button will initiate the native call. This
will let you to make sure that the native call is initiated after the debug session is properly set up.
Starting the Debugger
Debugging of native code can be done through both the command line and from within Eclipse. This
section will demonstrate both methods.
Fix for Windows Users
On Windows platform, there is a known bug in the Android NDK that prevents the GDB from locating
the binaries properly. The ndk-gdb script configures the GDB Client using a GDB script file. On the
Windows platform, this script file gets generated with extra carriage returns, causing this issue.
CHAPTER 5: Logging, Debugging, and Troubleshooting
139
In order to fix it, using Eclipse, open the <ANDROID NDK HOME>/ndk-gdb script in the Editor view. Go to
the end of the file, and add fix as shown in Listing 5-15.
Listing 5-15. Fixing the GDB Setup Script Generation
# Fix the line endings.
sed -i 's/\r\r//' 'native_path $GDBSETUP'
$GDBCLIENT -x 'native path $GDBSETUP'
Using Eclipse
Like running applications, Eclipse requires having a debug configuration defined in order establish a
debug session.
1.
From the menu bar, choose Run ➤ Debug Configurations to launch the
Debug Configurations dialog, as shown in Figure 5-4.
Figure 5-4. New Android native application configuration
2.
From the right panel, select Android Native Application.
3.
Click the new configuration icon on the dialog toolbar.
4.
As shown in Figure 5-5, using the right panel, use the Browse button to
select the current project.
140
CHAPTER 5: Logging, Debugging, and Troubleshooting
Figure 5-5. Defining the native debug configuration
5.
Click the Apply button to store the debug configuration.
6.
Close the debug configurations dialog and go back to Eclipse workbench.
You will now place a breakpoint into the native code to stop the process in the debugger. In order to
do so, follow these steps:
1.
Open up the hello-jni.c source file in Editor view, as described earlier.
2.
Go into the native function, and right-click on the marker area, the left border
of the Editor view.
3.
As shown in Figure 5-6, choose from the context menu to place a breakpoint.
A blue point will be placed on the marker bar indicating the breakpoint.
Figure 5-6. Toggle breakpoint
n
CHAPTER 5: Logging, Debugging, and Troubleshooting
141
Tip Using the same context menu, you can also place a conditional breakpoint as well as enable and
disable existing breakpoints.
4.
Now that the breakpoint is placed, using the top menu bar, choose Run ➤
Debug Configurations to launch the Debug Configurations dialog.
5.
Select the debug configuration that you defined earlier.
6.
Click the Debug button.
7.
Eclipse supports different perspectives, workbench layouts, for different tasks.
Upon clicking the Debug button, Eclipse will ask you if you would like to switch
to the Debug perspective, as shown in Figure 5-7. Click Yes to proceed.
Figure 5-7. Switching to the debug perspective
8.
Using the Android device or the emulator, click the Call Native button to
invoke the native function.
As soon as the native code hits the breakpoint, the application will stop and give the control to the
debugger, as shown in Figure 5-8.
142
CHAPTER 5: Logging, Debugging, and Troubleshooting
Figure 5-8. Eclipse debug perspective in action
The debug perspective gives you a full snapshot of the native code’s current state. On the top left,
the Debug view shows the list of running threads and the function that they are currently running.
On the top right corner, the Variables view gives you access to the native variables and lets you to
inspect their current values. In the center area, the native source code is shown in the Editor view,
and an arrow is shown on the marker bar next to the line that will be executed next. As shown in
Figure 5-9, using the debug toolbar, you can control the execution of the application.
Figure 5-9. Debug toolbar
The following actions are provided through the debug toolbar:
Skip All Breakpoints: Allows you to disable all breakpoints.
Resume: Resumes the execution of the native code until the next breakpoint.
CHAPTER 5: Logging, Debugging, and Troubleshooting
Suspend: Suspends the execution of native code by sending the SIGINT
interrupt signal to the process, which allows you to investigate the current state
of the native code.
Step Into: Follows the next native call by going into it.
Step Over: Executes the next native call and then stops.
Step Return: Executes until the native function returns.
Terminate: Terminates the debug session.
143
Debugging of native applications is not only possible through Eclipse. The same level of debugging
functionality can also be achieved through the command line as well.
The Command Line
Native code can be debugged using the ndk-gdb script from the command line. Currently the
ndk-gdb script requires a UNIX shell to run. On the Windows platform, you will use Cygwin instead
of the command prompt for debugging. First, open Cygwin or the Terminal window, based on your
platform. You will use the hello-jni sample project for this experiment.
1.
Make sure that Eclipse is no longer running in order to prevent any conflicts.
2.
Change the current directory to the hello-jni project directory.
3.
Delete any leftover files from the Eclipse by issuing rm
4.
Compile the native module by issuing ndk-build on the command line.
5.
In order to compile and package the application from command line, make
sure that the ANT build script build.xml file exists in project directory. If this
is the first time you are building this project from the command line, issue
android update project p to generate the necessary build files. If you are
using Cygwin, use android.bat instead of android.
6.
Compile and package the project in debug mode by issuing ant debug on the
command line.
7.
Deploy the application to the device or the emulator by issuing ant installd
on the command line.
8.
By default, the ndk-gdb script searches for an already running application
process; however, you can use the -start or -launch=<activity>
arguments to automatically start the application before the debugging
session. Start the debugging session by issuing ndk-gdb --start from the
command. When GDB successfully attaches to the hello-jni application,
it will show the GDB prompt.
9.
Add a breakpoint to the hello-jni.c souce file at line 30 by issuing b
hello-jni.c:30 on the GDB prompt.
rf bin obj libs.
144
CHAPTER 5: Logging, Debugging, and Troubleshooting
10.
Now that the breakpoint is defined, issue c on the GDB prompt to continue
the execution of the native application.
11.
Using the Android device or emulator, click the Native Call button to invoke
the native function.
Note It is normal to see a long list of error messages saying that GDB cannot be able locate various
system library files. You can safely ignore these messages since symbol/debug versions of these
libraries are not available.
When the native function hits the breakpoint, the application will stop and you can inspect the
current state of the native code using GDB, as shown in Figure 5-10.
Figure 5-10. Command line debug session
Useful GDB Commands
Here is a list of useful GDB commands that you can use through the GDB prompt to debug the
native code:
break <where>: Places a breakpoint to the location specified. The location can
be a function name, or a file name and a line number such as file.c:10.
enable/disable/delete <#>: Enables, disables, or deletes the breakpoint with
the given number.
clear: Clears all breakpoints.
next: Goes to the next instruction.
continue: Continues execution of the native code.
backtrace: Shows the call stack.
backtrace full: Shows the call stack including the local variables in each frame.
CHAPTER 5: Logging, Debugging, and Troubleshooting
print <what>: Prints the content of the variable, expression, memory address, or
register.
display <what>: Same as the print, but continues printing the value after each
step instruction.
what is <variable>: Shows the type of the variable.
info threads: Lists all running threads.
thread <thread>: Operates on the selected thread.
help: Help screen to get a list of all commands.
quit: Terminates the debug session.
145
Note The debugged application will be stopped when quitting the GDB prompt. This is a known
limitation.
For more information on GDB, please check the GDB documentation at
www.gnu.org/software/gdb/documentation/.
Troubleshooting
During the development phase, logging allows you to decide and expose the information about the
application’s state that will be beneficial in solving problems later. Debugging comes into play when
the information exposed through logging is simply not enough, but you have an idea of where the
problem could be. When you are facing the unexpected, troubleshooting skills becomes a life saver.
Knowing the right tools and techniques enables you to rapidly resolve problems. In this section, you
will briefly explore some of them.
Stack Trace Analysis
In order to observe stack trace analysis in action, you will implant a bug into the hello-jni sample
application that will cause a crash. Using Eclipse, open up the hello-jni.c source file. Modify the
content of the native function as shown in Listing 5-16.
Listing 5-16. Bug Injected into the Native Function
static jstring func1( JNIEnv* env )
{
/* BUG BEGIN */
env = 0;
/* BUG END */
return (*env)->NewStringUTF(env, "Hello from JNI !");
}
146
CHAPTER 5: Logging, Debugging, and Troubleshooting
jstring
Java com example hellojni HelloJni stringFromJNI( JNIEnv* env,
jobject thiz )
{
return func1(env);
}
By setting the value of the JNIEnv interface pointer to zero, you will trigger the crash. Now build and run
the application. When the application starts, click the Call Native method to invoke the native function.
The application will crash, and a stack trace will be displayed in logcat, as shown in Figure 5-11.
Figure 5-11. Logcat displaying the stack trace after the crash
The lines starting with the hash sign indicates the call stack. The first line that starts with #00 is
where the crash occurred; the next line, #01, is the previous function call, and so on. The number
following the pc is the code’s address. As seen in the stack trace, the native code crashed at
address 00000c3c, and the previous function call was the stringFromJNI native function. The address
00000c3c itself may not tell you much, but using the right tools this address can be used to find the
actual file and line number that the crash occurred. Android NDK comes with a tool called ndk-stack
that can translate the stack trace to the actual file names and line numbers. On the command line,
go into the project root directory, and issue
adb logcat | ndk-stack –sym obj/local/armeabi
The ndk-stack tool will translate the stack trace, as shown in Figure 5-12. The address got translated
to jni/hello-jni.c in source file line 33. Having this information makes the troubleshooting much
easier. By simply putting a breakpoint at this address you can stop the application and inspect the
application state.
CHAPTER 5: Logging, Debugging, and Troubleshooting
147
Figure 5-12. Ndk-stack translates the code address.
Extended Checking of JNI
By default, JNI functions do a very little error checking. Errors usually result in a crash. Android
provides an extended checking mode for JNI calls, known as CheckJNI. When enabled, JavaVM and
JNIEnv interface pointers gets switched to tables of functions that perform an extended level of error
checking before calling the actual implementation. CheckJNI can detect the following problems:
Attempt to allocate a negative-sized array
Bad or NULL pointers passed to JNI functions
Syntax errors while passing class names
Making JNI calls while in critical section
Bad arguments passed to NewDirectByeBuffer
Making JNI calls when an exception is pending
JNIEnv interface pointer used in wrong thread
Field type and Set<Type>Field function mismatch
Method type and Call<Type>Method function mismatch
DeleteGlobalRef/DeleteLocalRef called with wrong reference type
Bad release mode passed to Release<Type>ArrayElement function
Incompatible type returned from native method
Invalid UTF-8 sequence passed to a JNI call
By default, the CheckJNI mode is only enabled in the emulator, not on the regular Android devices,
due to its effect on the overall performance of the system.
148
CHAPTER 5: Logging, Debugging, and Troubleshooting
Enabling CheckJNI
On a regular device, using the command line, you can enable the CheckJNI mode by issuing the
following:
adb shell setprop debug.checkjni 1
This won’t affect the running applications but any application launched afterwards will have
CheckJNI enabled. CheckJNI status is also displayed in the logcat, as shown in Figure 5-13.
Figure 5-13. CheckJNI status displayed in logcat
In order to see CheckJNI in action, using Eclipse, open up hello-jni.c source code. Modify the native
function as shown in Listing 5-17.
Listing 5-17. Creating an Array with Native Size
jstring
Java com example hellojni HelloJni stringFromJNI( JNIEnv* env,
jobject thiz )
{
jintArray javaArray = (*env)->NewIntArray(env, -1);
return (*env)->NewStringUTF(env, "Hello from JNI !");
}
You will be creating a new integer array with a negative size. Build and run the application on the
emulator. When the application starts, click the Call Native button to invoke the native function. As
shown in Figure 5-14, CheckJNI will display a warning message on logcat and abort the execution.
Figure 5-14. JNI warning about negative-sized array
CHAPTER 5: Logging, Debugging, and Troubleshooting
149
Memory Issues
Memory issues are very hard to troubleshoot in the absence of right tools. In this section you will
briefly explore two methods for analyzing the memory issues.
Using Libc Debug Mode
Using the emulator, the libc debug mode can be enabled to troubleshoot memory issues. In order to
enable libc debug mode, using the commands as shown in Listing 5-18.
Listing 5-18. Enabling libc debug mode
adb shell setprop libc.debug.malloc 1
adb shell stop
adb shell start
Supported libc debug mode values are
1: Perform leak detection.
5: Fill allocated memory to detect overruns.
10: Fill memory and add sentinel to detect overruns.
In order to see Libc debug mode in action, using Eclipse, open up hello-jni.c source code. Modify
the native function as shown in Listing 5-19.
Listing 5-19. Modifying a Memory Beyond the Allocated Buffer
jstring
Java com example hellojni HelloJni stringFromJNI( JNIEnv* env,
jobject thiz )
{
char* buffer;
size t i;
buffer = (char*) malloc(1024);
for (i = 0; i < 1025; i++)
{
buffer[i] = 'a';
}
free(buffer);
return (*env)->NewStringUTF(env, "Hello from JNI !");
}
You will be allocating 1024 bytes, but the code will be modifying an extra byte beyond the allocated
size, causing a memory corruption. Enable the libc debug mode by issuing the commands shown in
Listing 5-20.
150
CHAPTER 5: Logging, Debugging, and Troubleshooting
Listing 5-20. Enable libc Debug Mode for Memory Corruption Detection
adb shell setprop libc.debug.malloc 10
adb shell stop
adb shell start
Build and run the application on the emulator. When the application starts, click the Call Native
button to invoke the native function. As shown in Figure 5-15, libc debug mode will display a
warning message about the memory corruption on logcat and abort the execution.
Figure 5-15. Libc debug mode displaying memory corruption error
Valgrind
Libc debug mode allows you to do basic troubleshooting for memory issues. Valgrind can be used
for more advanced memory analysis. It is an open source tool for memory debugging, memory leak
detection, and profiling. For this experiment, you can either download the prebuilt Valgrind binaries
from book’s web site or you can build it on your machine. If you would like build it, skip to the
“Building from Source Code” section.
Using the Prebuilt Binaries
Using your web browser, download the Valgrind binaries for ARM emulator as a zip file from
http://zdo.com/valgrind-arm-emulator-3.8.0.zip. Extract the content of the zip file and take a
note of its location. You can now skip to the “Installing to Emulator” section.
Building from Source Code
In order to properly build Valgrind for Android from the source code, you will need a Linux host
system. Official distribution of Valgrind now comes with Android support. Download the latest
version of Valgrind from http://valgrind.org/downloads/current.html. At the time of this writing,
the latest version of Valgrind was 3.8.0. and it comes as a BZip2 compressed TAR archive. Using the
command line, extract it by issuing
tar jxvf valgrind-3.8.0.tar.bz2
Upon extracting the Valgrind source code, using your editor, open up README.android file for the up
to date build instructions. Since you will be using Valgrind in an Android emulator, please make sure
to set HWKIND to emulator by issuing
export HWKIND=emulator
CHAPTER 5: Logging, Debugging, and Troubleshooting
151
Upon properly building Valgrind, the binaries and the other necessary components will be placed in
Inst sub-directory.
Deploying Valgrind to Emulator
Valgrind needs to be deployed into the emulator first before it can be used. In order to do so, open
up Cygwin or a Terminal window, and go in to the root directory where you have extracted the zip file
if you are using the prebuilt binaries or to the root directory of Valgrind source code, and issue the
following on the command line:
adb push Inst /
This will deploy the Valgrind files to /data/local/Inst directory on the emulator. Upon deploying
the files to the device, the execution bits should be fixed. In order to do so, issue the following
command:
adb shell chmod 755 \
$(find Inst -type f -exec file {} \; | \
grep executable | \
sed -n -e 's/^Inst\([^:]*\).*$/\1/gp' | \
xargs)
Valgrind Wrapper
In addition to Valgrind binaries, a helper script is also needed. Using Eclipse or your favorite editor,
create new file called valgrind wrapper.sh with the content shown in Listing 5-21.
Listing 5-21. Valgrind Wrapper Shell Script
#!/system/bin/sh
export TMPDIR=/sdcard
exec /data/local/Inst/bin/valgrind --error-limit=no $*
Fix the wrapper script’s line ending, deploy it to the Emulator, and grant executable permission by
issuing the commands shown in Listing 5-22.
Listing 5-22. Deploying the Valgrind Wrapper Script
dos2unix.exe valgrind wrapper.sh
adb push valgrind wrapper.sh /data/local/Inst/bin
adb shell chmod 755 /data/local/Inst/bin/valgrind wrapper.sh
Running Valgrind
In order to run the application under Valgrind, inject the wrapper script into the startup sequence by
issuing the command shown in Listing 5-23.
152
CHAPTER 5: Logging, Debugging, and Troubleshooting
Listing 5-23. Injecting Valgrind Wrapper into Startup Sequence
adb shell setprop wrap.com.example.hellojni \
"logwrapper /data/local/Inst/bin/valgrind wrapper.sh"
The format for the property key is wrap.<package name>. To run your other applications under
Valgrind, simply substitute the package name with the proper value. Stop and restart the application.
Valgrind messages will be displayed on logcat, as shown in Figure 5-16.
Figure 5-16. Logcat displaying Valgrind messages
Note Running application under Valgrind will slow down the application at a very high rate. Android may
complain about process not responding. Please click Wait button to give Valgrind more time in such cases.
Strace
In certain cases you may want to monitor every activity of your application without attaching a
debugger or adding numerous log messages. The strace tool can be used to easily achieve that. It
is a useful diagnostic tool because it intercepts and records the system calls that are called by the
application and the signals that are received. The name of each system call, its arguments, and its
return value are printed. Note that strace comes with the Android emulator.
In order to see strace in action, using Eclipse, open the hello-jni.c source code. Modify the source
file as shown in Listing 5-24.
Listing 5-24. Native Source Code with Two System Calls Added
#include <unistd.h>
...
jstring
Java com example hellojni HelloJni stringFromJNI( JNIEnv* env,
jobject thiz )
CHAPTER 5: Logging, Debugging, and Troubleshooting
153
{
getpid();
getuid();
return (*env)->NewStringUTF(env, "Hello from JNI !");
}
Build and run the application on the emulator. Open up Cygwin or a Terminal window. When the
application starts, issue the following command to obtain the process ID of the application:
adb shell ps | grep com.example.hellojni
The process ID is the number on the third column, as shown in Figure 5-17.
Figure 5-17. Getting the process ID of the application
Issue the following command to attach strace to the running application process by substituting the
process ID:
adb shell strace –v –p <Process ID>
As you can see, strace will attach to the application process and it will intercept and print the system
calls with their parameters and return values. Click the Call Native button to invoke the native
function, and strace will display two system calls that you have introduced into the native code, as
shown in Figure 5-18.
Figure 5-18. Strace printing the system calls
Strace is a very useful tool for troubleshooting both open and closed code applications.
154
CHAPTER 5: Logging, Debugging, and Troubleshooting
Summary
In this chapter, you explored the tools and the techniques for effective logging, debugging, and
troubleshooting on Android platform. The concepts presented in this chapter will be highly beneficial
when experimenting with the native APIs offered by the Android platform, as you will see in the
following chapters.
Chapter
6
Bionic API Primer
In previous chapter, you explored the logging, debugging, and troubleshooting tools and techniques
pertaining to Android native application development. Starting with this chapter, you will be exploring
the native APIs provided by the Android NDK.
Bionic is the POSIX standard C library that is provided by the Android platform for native application
development using C and C++ programming languages. Bionic is a derivation of BSD standard C
library by Google for the Android operating system. The name “Bionic” comes from the fact that it
consists of a mixture of BSD C library pieces with custom Linux-specific bits for handling threads,
processes, and signals.
Bionic is a highly vital subject for native application development, since it provides the minimal set
of constructs that are needed to develop any type of functional native code on Android platform. In
the following chapters, you will be relying heavily on the functionality provided by the Bionic. Before
getting into Bionic specifics, let’s quickly review standard libraries in general.
Reviewing Standard Libraries
A standard library for a programming language provides frequently needed constructs, algorithms,
data structures, and an abstract interface to tasks that would normally depend heavily on the
hardware and operating system, such as network access, multi-threading, memory management,
and file I/O. Depending on the philosophy behind the programming language itself, the scope of the
standard library varies greatly. It can either be fairly minimal with only a set of constructs for vital
tasks, or in contrast, it can be highly extensive. In all cases, the standard library is conventionally
made available in every implementation of the programming language in order to provide a
consistent base for application development.
There is a standard library for almost every programming language. The Java platform comes
with the Java Class Library (JCL), a standard library for Java programming language that contains
a comprehensive set of standard class libraries for common operations such as sorting, string
manipulation, and an abstract interface to underlying operating system services such as the stream
I/O for interacting with the files and the network. The Android framework extends the JCL by
incorporating additional constructs that are specific to Android application development.
155
156
CHAPTER 6: Bionic API Primer
For the C programming language, the ANSI C standard defines the scope of the standard library.
This standard library is known as C standard library, or simply as libc. Implementations of the C
programming language also accompanied with an implementation of the C standard library. On
top of the standard C library specification, the POSIX C library specification declares the additional
constructs that should be included in such standard library on POSIX compliant systems.
Yet Another C Library?
Google’s motivation behind creating a new C library instead of reusing the existing GNU C Library
(glibc) or the C Library for Embedded Linux (uClibc) can be summarized under the three main goals
behind its design:
License: Both the glibc and uClibc are available under GNU Lesser General
Public License (LGPL), thus restricting the way they can be used by proprietary
applications. Instead, Bionic is published under the BSD license, a highly
permissive license that does not set any restriction on the use of the library.
Speed: Bionic is specifically crafted for mobile computing. It is tailored to work
efficiently despite the limited CPU cycles and memory available on the mobile
devices.
Size: Bionic is designed with the core philosophy of keeping it simple. It provides
lightweight wrappers around kernel facilities and a lesser set of APIs, making it
smaller compared to other alternatives. This chapter will cover these APIs.
Binary Compatibility
Even though it is a C standard library, Bionic is not in any way binary-compatible with other C
libraries. Object files and static libraries that are produced against other C libraries should not be
dynamically linked with Bionic. Doing so will usually result in the inability to link or execute your
native applications properly.
Besides that, any application that is generated by statically linking with other C libraries and not
mixed with Bionic can run on the Android platform without any issues, unless it is dynamically
loading any other system library during runtime.
What is Provided?
Bionic provides C standard library macros, type definitions, functions, and small number of Androidspecific features that can be itemized under these functionality domains:
Memory Management
File Input and Output
String Manipulation
Mathematics
CHAPTER 6: Bionic API Primer
Date and Time
Process Control
Signal Handling
Socket Networking
Multithreading
Users and Groups
System Configuration
Name Service Switch
157
What is Missing?
As mentioned, Bionic is specifically designed for Android platform and tuned for mobile computing.
Not every function in the standard C library is supported by Bionic. Android NDK documentation
does provide a full list of missing functionality; however, such information is available within the
actual header files itself. Bionic header files can be located platforms/android- <api-level>/
arch- <architecture>/usr/include under the ANDROID NDK HOME directory.
Each header file in this directory contains a section clearly marking the list of missing functions. As
an example, the section listing the missing functions in stdio.h header file is shown in Listing 6-1.
Listing 6-1. Missing Functions in Bionic Implementation
#if 0 /* MISSING FROM BIONIC */
char
*ctermid(char *);
char
*cuserid(char *);
#endif /* MISSING */
The pre-processor if statement is used to disable these lines in the header file, and the associated
comment indicates that the section contains the list of missing functions. In addition to this list,
the Android NDK documentation also cites the functions that are exposed through Bionic but
implemented as a stub only, without any or minimal functionality.
Memory Management
Memory is the most basic resource available to a process. For Java applications, the memory is
managed by the virtual machine. Memory gets allocated as new objects are created, and through
the garbage collector, the unused memory automatically gets returned to the system. However,
in the native space, the applications are expected to manage their own memory explicitly. Managing
the memory properly is vital in native application development since failure to do so will result in
exhausting available system memory and will deeply impact the stability of the application as well as
the system in general.
158
CHAPTER 6: Bionic API Primer
Memory Allocation
There are three types of memory allocation that are supported by the C/C++ programming language:
Static allocation: For each static and global variable that is defined in the code,
static allocation happens automatically when the application starts.
Automatic allocation: For each function argument and local variable, automatic
allocation happens when the compound statement containing the declaration is
entered; it’s freed automatically when compound statement is exited.
Dynamic allocation: Both static and automatic allocation assumes that the
required memory size and its scope are fixed and defined during the compiletime. Dynamic allocation comes into play when the size and the scope of
memory allocation depends on runtime factors that are not known in advance.
This section will focus on the dynamic memory management for both C and C++ based applications.
Dynamic Memory Management for C
The C programming language does not provide built-in support for dynamic memory management.
The Bionic C library provides a set of functions to enable the use of dynamic memory in C code.
Allocating Dynamic Memory in C
In the C programming language, dynamic memory can be allocated during runtime using the
standard C library function malloc.
void* malloc(size t size);
In order to use this function, the stdlib.h standard C library header file should be included first. As
shown in Listing 6-2, malloc takes a single argument, the size of memory to be allocated as number
of bytes, and returns a pointer to the newly allocated memory.
Listing 6-2. Dynamic Memory Allocation in C Code Using malloc
/* Include standard C library header. */
#include < stdlib.h>
...
/* Allocate an integer array of 16 elements. */
int* dynamicIntArray = (int*) malloc(sizeof(int) * 16);
if (NULL == dynamicIntArray) {
/* Unable to allocate enough memory. */
...
} else {
/* Use the memory through the integer pointer. */
*dynamicIntArray
= 0;
dynamicIntArray[8] = 8;
...
CHAPTER 6: Bionic API Primer
159
/* Free the memory allocation. */
free(dynamicIntArray);
dynamicIntArray = NULL;
}
Tip Since malloc takes the size of memory as number of bytes, the C keyword sizeof can be used
to extract the size of a data types.
If the requested memory size is not achievable, malloc returns NULL to indicate that. Applications
should check the value returned from malloc prior using it. Once allocated, the dynamic memory can
be used by ordinary C code through the pointers, until it gets freed.
Freeing Dynamic Memory in C
Dynamic memory should be explicitly freed by the application when it is no longer needed. The
standard C library function free is used to release the dynamic memory.
void free(void* memory);
The free function takes a pointer the previously allocated dynamic memory and releases it, as
shown in Listing 6-3.
Listing 6-3. Releasing the Dynamic Memory in C Code Using free
int* dynamicIntArray = (int*) malloc(sizeof(int) * 16);
...
/* Use the allocated memory. */
...
free(dynamicIntArray);
dynamicIntArray = NULL;
Note that the pointer’s value does not change after this function call even though the memory that it
is pointing to got released. Any attempt to use this invalid pointer results in segmentation violation. It
is a good practice to set the pointer to NULL immediately after freeing it in order to prevent accidental
use of the invalid pointers.
Changing Dynamic Memory Allocation in C
Once the memory is allocated, its size can be changed through the realloc function that is provided
by the standard C library.
void* realloc(void* memory, size t size);
The size of dynamic memory allocation gets either expanded or reduced based on its new size. The
realloc function takes the original dynamic memory allocation as its first argument and the new size
as the second argument, as shown in Listing 6-4.
160
CHAPTER 6: Bionic API Primer
Listing 6-4. Reallocating Dynamic Memory Allocation Using realloc
int* newDynamicIntArray = (int*) realloc(
dynamicIntArray, sizeof(int) * 32);
if (NULL == newDynamicIntArray) {
/* Unable to reallocate enough memory. */
...
} else {
/* Update the memory pointer. */
dynamicIntArray = newDynamicIntArray;
...
}
The realloc function returns the pointer to reallocated dynamic memory. The function may move the
memory to a new location by preserving its content, in which case the new location is returned. If the
function fails, it keeps the original dynamic memory allocation unchanged and returns NULL.
Dynamic Memory Management for C++
The C++ programming language does provide built-in support for dynamic memory management.
The C++ new and delete keywords can be used to manage dynamic memory allocation instead of
standard C library memory functions.
When dealing with C++ objects, it is highly recommended to use these C++ keywords instead of the
functions provided through the standard C library. Unlike the standard C library functions, the C++
dynamic memory management keywords are type-aware, and they support C++ object lifecycle.
In addition to allocating memory, the new keyword also invokes the class’ constructor; likewise, the
delete keyword invokes the class’ destructor prior releasing the memory.
Allocating Dynamic Memory in C++
Memory is allocated using the new keyword followed by the data type, as shown in Listing 6-5.
Listing 6-5. Dynamic Memory Allocation for Single Element in C++ Code
int* dynamicInt = new int;
if (NULL == dynamicInt) {
/* Unable to allocate enough memory. */
...
} else {
/* Use the allocated memory. */
*dynamicInt = 0;
...
}
If an array of elements needs to be allocated, the number of elements is specified using the
brackets, as shown in Listing 6-6.
CHAPTER 6: Bionic API Primer
161
Listing 6-6. Dynamic Memory Allocation for Multiple Elements in C++ Code
int* dynamicIntArray = new int[16];
if (NULL == dynamicIntArray) {
/* Unable to allocate enough memory. */
...
} else {
/* Use the allocated memory. */
dynamicIntArray[8] = 8;
...
}
Freeing Dynamic Memory in C++
Dynamic memory should be explicitly freed using the C++ delete keyword by the application when it
is no longer needed, as shown in Listing 6-7.
Listing 6-7. Freeing Single Element Dynamic Memory Using the delete Keyword
delete dynamicInt;
dynamicInt = 0;
If an array of elements needs to be freed, the C++ delete[] keyword should be used instead, as
shown in Listing 6-8.
Listing 6-8. Freeing Array Dynamic Memory Using delete[ ]
delete[] dynamicIntArray;
dynamicIntArray = 0;
Take care to use the proper delete keyword; failure to do so will result in memory leaks in the native
application.
Changing Dynamic Memory Allocation in C++
The C++ programming language does not have built-in support for reallocating dynamic memory.
The memory allocation is done based on the size of the data type and the number of elements. If the
application logic requires increasing or decreasing the number of elements during runtime, it is highly
recommended to use the suitable Standard Template Library (STL) container classes.
Mixing the Memory Functions and the Keywords
Developers must use the proper function and keyword pairs when dealing with dynamic memory.
Memory blocks that are allocated through malloc must be released through the free keyword;
likewise, memory blocks that are allocated through new keyword must be released with the delete
keyword accordingly. Failure to do so will result in unknown application behavior.
162
CHAPTER 6: Bionic API Primer
Standard File I/O
Native applications can interact with the file system through the Standard File I/O (stdio) functions
that are provided by the standard C library. Two flavors of file I/O are provided through the standard
C library:
Low-level I/O: Primitive I/O functions with finer grade of control over the data
source.
Stream I/O: Higher-level, buffered I/O functions more suitable for dealing with
data streams.
The stream based I/O is more flexible and convenient when dealing with regular files. This section
will focus on the stream I/O functions. Low-level I/O functions will be partially covered in the socket
communication section of this chapter.
Standard Streams
Through the stream I/O, there are three predefined streams available to the native code immediately.
These represent the standard input and output channels for the native application. They are defined
in the standard I/O header file as the following variables:
stdin: Standard input stream for the application
stdout: Standard output stream for the application
stderr: Standard error stream for the application
As the native application on Android runs as a module behind the graphical user interface (GUI),
these streams are not very useful. While integrating legacy code, you should make sure that any
use of these standard streams is properly handled through the GUI. As explained in the “Console
Logging” section in Chapter 5, the stdout and stderr streams can be directed to Android system log
by setting the log.redirect-stdio system property prior starting the application.
Using the Stream I/O
Stream I/O constructs and functions are defined in the stdio.h standard C library header file. In
order to use stream I/O in native applications, this header file should be included in advance, as
shown in Listing 6-9.
Listing 6-9. Including Standard I/O Header File to Use the Stream I/O
#include <stdio.h>
For historical reasons, the type of data structure representing a stream is called FILE, not a stream,
in the standard C library. A FILE object holds all of the internal state information for the stream
I/O connection. The FILE object is created and maintained by the stream I/O functions and is not
expected to be directly manipulated by the application code.
CHAPTER 6: Bionic API Primer
163
Opening Streams
A new stream to a new or an existing file can be opened through the stream I/O fopen function. The
fopen function takes the name of the file, and the open type as arguments, and returns a pointer to
the stream.
FILE* fopen(const char* filename, const char* opentype);
The second argument to fopen function, the opentype, is a string that controls how the file is opened.
It should begin with one of the following open types:
r: Opens an existing file as read-only.
w: Opens the file as write-only. If the file already exists, it gets truncated to zero
length.
a: Opens the file in append mode. File content is preserved, and the new output
gets appended to the end of the file. If the file does not exist, a new file is
opened.
r+: Opens the file in read-write mode.
w+: Opens the file in read-write mode. If the file already exists, it gets truncated
to zero length.
a+: Opens the file for reading and appending. The initial file position is set to the
beginning for reading and to the end of the file for appending.
Note The buffers should be flushed using the fflush function prior to switching between reading
and writing if the file is opened in dual-mode with either r+, w+, or a + .
If the file could not be opened with the requested mode, the fopen function returns a NULL pointer. In
case of success, a stream pointer, a FILE pointer, is returned for communicating with the stream, as
shown in Listing 6-10.
Listing 6-10. Opening a Stream in Write-Only Mode
#include <stdio.h>
...
FILE* stream = fopen("/data/data/com.example.hellojni/test.txt", "w");
if (NULL == stream)
{
/* File could not be opened for writing. */
}
else
{
/* Use the stream. */
/* Close the stream. */
}
Once the stream is opened, it can be used for reading and writing until it gets closed.
164
CHAPTER 6: Bionic API Primer
Writing to Streams
Stream I/O provides four functions for writing to a stream. This section will briefly explore these
functions.
Writing Block of Data to Streams
The fwrite function can be used for writing blocks of data to the streams.
size t fwrite(const void* data, size t size, size t count, FILE* stream);
As shown in Listing 6-11, the fwrite function writes count number of elements of size size from the
buffer data to given stream stream.
Listing 6-11. Writing Block of Data to Stream Using fwrite
char data[] = { 'h', 'e', 'l', 'l', 'o', '\n' };
size t count = sizeof(data) / sizeof(data[0]);
/* Write data to stream. */
if (count ! = fwrite(data, sizeof(char), count, stream))
{
/* Error occured while writing to stream. */
}
It returns the number of elements actually written to the stream. In case of success, the returned
value should be equal to the value given as the count; otherwise, it indicates an error in writing.
Writing Character Sequences to Streams
Sequence of null-terminated characters can be written to a stream using the fputs function.
int fputs(const char* data, FILE* stream);
As shown in Listing 6-12, the fputs function writes the given character sequence data to the given
stream, named stream.
Listing 6-12. Writing Character Sequence to the Stream Using fputs
/* Writing character sequence to stream. */
if (EOF == fputs("hello\n", stream))
{
/* Error occured while writing to the stream. */
}
If the character sequence cannot be written to the stream, fputs function returns EOF.
CHAPTER 6: Bionic API Primer
165
Writing a Single Character to Streams
A single character or byte can be written to a stream using the fputc function.
int fputc(int c, FILE* stream);
As shown in Listing 6-13, the fputc function takes the single character c as an integer and converts
it to a unsigned char prior writing to the given stream, named stream.
Listing 6-13. Writing a Single Character to Stream Using fputc
char c = 'c';
/* Writing a single character to stream. */
if (c ! = fputc(c, stream))
{
/* Error occured while writing character to string.
}
If the character cannot be written to the stream, fputc function returns EOF; otherwise it returns the
character itself.
Writing Formatted Data to Streams
The fprintf function can be used to format and output variable number of arguments to the given
stream.
int fprintf(FILE* stream, const char* format, ...);
It takes a pointer to the stream, the format string, and variable number of arguments that are
referenced in the format. The format string consists of a mix of ordinary characters and format
specifiers. Ordinary characters in the format string are passed unchanged into the stream. Format
specifiers cause the fprintf function to format and write the given arguments to the stream
accordingly. The most frequently used specifiers are
%d, %i: Formats the integer argument as signed decimal.
%u: Formats the unsigned integer as unsigned decimal.
%o: Formats the unsigned integer argument as octal.
%x: Formats the unsigned integer argument as hexadecimal.
%c: Formats the integer argument as a single character.
%f: Formats the double precision argument as floating point number.
%e: Formats the double precision argument in fixed format.
%s: Prints the given NULL-terminated character array.
%p: Print the given pointer as memory address.
%%: Writes a % character.
166
CHAPTER 6: Bionic API Primer
As shown in Listing 6-14, the order and the type of the provided arguments to fprintf function
should match the specifiers in the format string.
Listing 6-14. Writing Formatted Data to the Stream
/* Writes the formatted data. */
if (0 > fprintf(stream, "The %s is %d.", "number", 2))
{
/* Error occurred while writing formatted data. */
}
The fprintf function returns the number of characters written to the stream. In case of an error, it
returns a negative value. More information on the format string, including the full list of specifiers
and other modifiers, can be found in fprintf manual page at
http://pubs.opengroup.org/onlinepubs/009695399/functions/fprintf.html.
Flushing the Buffer
Stream I/O accumulates the written data and asynchronously transmits it to the underlying file
instead of writing it immediately. Similarly, stream I/O reads from files in blocks instead of
character-by-character basis. This is known as buffering.
Flushing the buffer means transmitting all accumulated data to the underlying file. Flushing happens
automatically in certain cases:
Normal termination of the application.
When a newline is written in case of line buffering.
When the buffer is full.
When the stream is closed.
Stream I/O also provides the fflush function to enable applications to manually flush the buffer as
needed.
int fflush(FILE* stream);
As shown in Listing 6-15, the fflush function takes the stream pointer and flushes the output buffer.
Listing 6-15. Flushing the Buffer Using fflush Function
char data[] = { 'h', 'e', 'l', 'l', 'o', '\n' };
size t count = sizeof(data) / sizeof(data[0]);
/* Write data to stream. */
fwrite(data, sizeof(char), count, stream);
/* Flush the output buffer. */
if (EOF == fflush(stream))
{
/* Error occured while flushing the buffer. */
}
CHAPTER 6: Bionic API Primer
167
If the buffer cannot be written to the actual file, fflush function returns EOF; otherwise, it returns zero.
Reading from Streams
Similar to writing, stream I/O provides four functions for reading from a stream.
Reading Block of Data from Streams
The fread function can be used for reading blocks of data from the stream.
size t fread(void* data, size t size, size t count, FILE* stream);
As shown in Listing 6-16, the fread function reads count number of elements of size (size) into the
buffer data from the given stream, named stream. It returns the number of elements actually read.
Listing 6-16. Reading Block Data of Four Characters from the Stream
char buffer[5];
size t count = 4;
/* Read 4 characters from the stream. */
if (count ! = fread(buffer, sizeof(char), count, stream))
{
/* Error occured while reading from the stream. */
}
else
{
/* Null terminate. */
buffer[4] = NULL;
/* Output buffer. */
MY LOG INFO("read: %s", buffer);
}
In the case of success, the returned number of elements should be equal to the value passed as
count.
Reading Character Sequences from Streams
The fgets function can be used to read a newline-terminated character sequence from the given
stream.
char* fgets(char* buffer, int count, FILE* stream);
As shown in Listing 6-17, the fgets function reads at most count-1 characters up to and including
the newline character into the character array buffer from the given stream, named stream.
168
CHAPTER 6: Bionic API Primer
Listing 6-17. Reading a Newline-Terminated Character Sequence
char buffer[1024];
/* Read newline terminated character sequence from the stream. */
if (NULL == fgets(buffer, 1024, stream))
{
/* Error occured while reading the stream. */
}
else
{
MY LOG INFO("read: %s", buffer);
}
In the case of success, it returns the buffer pointer; otherwise, it returns the NULL pointer.
Reading a Single Character from Streams
The fgetc function can be used to read a single unsigned char from the streams.
int fgetc(FILE* stream);
As shown in Listing 6-18, the fgetc functions reads a single character from the stream and returns it
as an integer.
Listing 6-18. Reading a Single Character from the Stream
unsigned char ch;
int result;
/* Read a single character from the stream. */
result = fgetc(stream);
if (EOF == result)
{
/* Error occured while reading from the stream. */
}
else
{
/* Get the actual character. */
ch = (unsigned char) result;
}
If end-of-file indicator for the stream is set, it returns EOF.
Reading Formatted Data from Streams
The fscanf function can be used to read formatted data from the streams. It works in a way similar
to the fprintf function, except that it reads the data based on the given format into the provided
arguments.
CHAPTER 6: Bionic API Primer
int fscanf(FILE* stream, const char* format, ...);
It takes a pointer to the stream, the format string, and variable number of arguments that are
referenced in the format. The format string consists of a mix of ordinary characters and format
specifiers. Ordinary characters in the format string are used to specify characters that must be
present in the input. Format specifiers cause the fscanf function to read and place the data into
the given arguments. The most frequently used specifiers are
%d, %i: Reads a signed decimal.
%u: Reads an unsigned decimal.
%o: Reads an octal number as unsigned integer.
%x: Reads a hexadecimal number as unsigned integer.
%c: Reads a single character.
%f: Reads a floating point number.
%e: Reads a fixed format floating point number.
%s: Scans a string.
%%: Escapes the % character.
As shown in Listing 6-19, the order and the type of the provided arguments to fscanf function
should match the specifiers in the format string.
Listing 6-19. Reading Formatted Data from the Stream
char s[5];
int i;
/* Stream has "The number is 2" */
/* Reads the formatted data. */
if (2 ! = fscanf(stream, "The %s is %d", s, &i))
{
/* Error occured while reading formatted data. */
}
On success, the fscanf function returns the number of items read. In case of an error,
EOF is returned. More information on the format string, including the full list of specifiers
and other modifiers, can be found in fscanf manual page at
http://pubs.opengroup.org/onlinepubs/009695399/functions/fscanf.html.
Checking for End of File
When reading from a stream, the feof function can be used to check if the end-of-file indicator for
the stream is set.
int feof(FILE* stream);
169
170
CHAPTER 6: Bionic API Primer
As shown in Listing 6-20, the feof function takes the stream pointer as an argument and returns a
non-zero value if the end of file is reached; otherwise, it returns zero if more data can be read from
the stream.
Listing 6-20. Reading Strings from stream Until the End of the File
char buffer[1024];
/* Until the end of the file. */
while (0 == feof(stream))
{
/* Read and output string. */
fgets(buffer, 1024, stream);
MY LOG INFO("read: %s", buffer);
}
Seeking Position
The position within the stream can also be changed through the fseek function.
int fseek(FILE* stream, long offset, int whence);
The fseek function uses the stream pointer, the relative offset, and the whence as the reference point
for the offset. The whence can take following values:
SEEK SET: Offset is relative to the beginning of stream.
SEEK CUR: Offset is relative to current position.
SEEK END: Offset is relative to the end of the stream.
The example code, shown in Listing 6-21, writes four characters, rewinds back the stream 4 bytes,
and overwrites them with a different set of characters.
Listing 6-21. Rewinding the Stream for 4 Bytes
/* Write to the stream. */
fputs("abcd", stream);
/* Rewind for 4 bytes. */
fseek(stream, -4, SEEK_CUR);
/* Overwrite abcd with efgh. */
fputs("efgh", stream);
Error checking is omitted in the example code. The fseek function returns zero if the operation is
successful; otherwise a non-zero value indicates the failure.
CHAPTER 6: Bionic API Primer
171
Checking Errors
Most stream I/O functions returns EOF to indicate both the errors as well as to report end-of-file.
The ferror function can be used to check if an error has occurred on a previous operation.
int ferror(FILE* stream);
As shown in Listing 6-22, the ferror function returns a non-zero value if the error flag is set for the
given stream.
Listing 6-22. Checking for the Errors
/* Check for the errors. */
if (0 ! = ferror(stream))
{
/* Error occured on the previous request. */
}
Closing Streams
Streams can be closed using the fclose function. Any buffered output gets written to the stream,
and any buffered input is discarded.
int fclose(FILE* stream);
The fclose function takes the stream pointer as argument. It returns zero in case of success and EOF
if an error is occurred while closing the stream, as shown in Listing 6-23.
Listing 6-23. Closing a Stream Using fclose Function
if (0 ! = fclose(stream))
{
/* Error occured while closing the stream. */
}
The error may indicate that the buffered output could not be written to the stream due to insufficient
space on the disk. It is always a good practice to check the return value of the fclose function.
Interacting with Processes
Bionic enables native applications to start and interact with other native processes. Native code can
execute shell commands; it can execute a process in the background and communicate to it. This
section will briefly mention some of the key functions.
172
CHAPTER 6: Bionic API Primer
Executing a Shell Command
The system function can be used to pass a command to the shell. In order to use this function, the
stdlib.h header file should be included first.
#include <stdlib.h>
As shown in Listing 6-24, the function blocks the native code until the command finishes executing.
Listing 6-24. Executing a Shell Command Using the System Function
int result;
/* Execute the shell command. */
result = system("mkdir /data/data/com.example.hellojni/temp");
if (−1 == result || 127 == result)
{
/* Execution of the shell failed. */
}
Communicating with the Child Process
The system command does not provide a communication channel for the native application to either
receive the output of the process or to send commands to the running process. The native code
waits until the command finishes executing. In certain cases, having a communication channel
between the native code and the executed process is needed.
The popen function can be used to open a bidirectional pipe between the parent process and the
child process. In order o use this function, the stdio.h standard header file should be included first.
FILE *popen(const char* command, const char* type);
The popen function takes the command to be executed and the type of the requested
communication channel as arguments and returns a stream pointer. In case of an error, it returns
NULL. As shown in Listing 6-25, the stream I/O functions that you explorer earlier in this chapter can
be used to communicate with the child process as interacting with a file.
Listing 6-25. Opening a Channel to ls Command and Printing the Output
#include <stdio.h>
...
FILE* stream;
/* Opening a read-only channel to ls command. */
stream = popen("ls", "r");
if (NULL == stream)
{
MY LOG ERROR("Unable to execute the command.");
}
CHAPTER 6: Bionic API Primer
173
else
{
char buffer[1024];
int status;
/* Read each line from command output. */
while (NULL ! = fgets(buffer, 1024, stream))
{
MY LOG INFO("read: %s", buffer);
}
/* Close the channel and get the status. */
status = pclose(stream);
MY LOG INFO("process exited with status %d", status);
}
Note The popen streams are fully buffered by default. You will need to use fflush function to flush
the buffer as needed.
When the child process finishes executing, the stream should be closed using the pclose function.
int pclose(FILE* stream);
It takes the stream pointer as the argument and waits for the child process to terminate and returns
the exit status.
System Configuration
The Android platform holds the system properties as a simple key-value pair. Bionic provides a
set of functions to enable native applications to query the system properties. In order to use these
functions, the system properties header file should be included first.
#include <sys/system properties.h>
The system properties header file declares the necessary structures and functions. Each system
property consists of a maximum of PROP NAME MAX character long name for the property and a
maximum of PROP VALUE MAX characters long value.
Getting a System Property Value by Name
The
system property get function can be used to look up a system property by name.
int
system property get(const char* name, char* value);
174
CHAPTER 6: Bionic API Primer
As shown in Listing 6-26, it copies the null-terminated property value to the provided value pointer
and returns the size of the value. The total bytes copied will not be greater than PROP VALUE MAX.
Listing 6-26. Getting a System Property Value by Name
char value[PROP VALUE MAX];
/* Gets the product model system property. */
if (0 == __system_property_get("ro.product.model", value))
{
/* System property is not found or it has an empty value. */
}
else
{
MY LOG INFO("product model: %s", value);
}
If a property is not defined, a value with size zero is returned.
Getting a System Property by Name
The
system property find function can be used to get a direct pointer to the system property.
const prop info*
system property find(const char* name);
It searches the system property by name and returns a pointer to it if it is found; otherwise it returns
NULL. The returned pointer remains valid for the lifetime of the system, and it can be cached to avoid
future lookups. As shown in Listing 6-27, the system property read function can be used to
obtain the property value from this pointer.
Listing 6-27. Getting a System Property by Name
const prop info* property;
/* Gets the product model system property. */
property = __system_property_find("ro.product.model");
if (NULL == property)
{
/* System property is not found. */
}
else
{
char name[PROP NAME MAX];
char value[PROP VALUE MAX];
/* Get the system property name and value. */
if (0 == __system_property_read(property, name, value))
CHAPTER 6: Bionic API Primer
175
{
MY LOG INFO("%s is empty.");
}
else
{
MY LOG INFO("%s: %s", name, value);
}
}
The system property read function takes pointers to the system property and two other character
array pointers to return the system property name and value.
int
system property read(const prop info* pi, char* name, char* value);
It copies the null-terminated property value to the provided value pointer, and returns the size of
the value. The total characters copied will not be greater than PROP VALUE MAX. The name argument
is optional; if a character array is supplied, it copies the system property name to the given value
pointer. The total characters copied will not be greater than PROP NAME MAX.
Users and Groups
The Linux kernel is designed for multiuser platforms. Although Android is meant to be used by a
single handset user, it still takes advantage of the user-based permission model.
Android runs the applications within a virtual machine sandbox and treats them
as different users on the system. By simply relying on the user-based permission
model, Android easily secures the system by preventing the applications from
accessing other applications’ data and memory.
Services and hardware resources are also protected through the user-based
permission model. Each of these resources has its own protection group. During
application deployment, the application requests access to those resources.
The application won’t be allowed to access any additional resources if it is not a
member of the proper resource group.
Bionic provides basic support for the user and group information functions, and most of these
functions are only stubs with minimal or no functionality. This section covers the key ones. In order
to use these functions, the unistd.h standard header file needs to be included first.
#include <unistd.h>
Getting the Application User and Group IDs
Each installed application gets its own user and group ID starting from 10000. The lower IDs are
used for system services. The user ID for the current application can be obtained using the getuid
function, as shown in Listing 6-28.
176
CHAPTER 6: Bionic API Primer
Listing 6-28. Getting the Application User ID Using the getuid Function
uid t uid;
/* Get the application user ID. */
uid = getuid();
MY LOG INFO("Application User ID is %u", uid);
Similar to the user ID, the group ID for the current application can be obtained through the getgid
function, as shown in Listing 6-29.
Listing 6-29. Getting the Application Group ID Using the getgid Function
gid t gid;
/* Get the application group ID. */
gid = getgid();
MY LOG INFO("Application Group ID is %u", gid);
Getting the Application User Name
Each installed application gets assigned a user name prefixed with “app_” followed by the
application number. For example, the user name for application with user ID 10040 will be
app_40. The user name be obtained through the getlogin function, as shown in Listing 6-30.
Listing 6-30. Getting the Application User Name Using the getlogin Function
char* username;
/* Get the application user name. */
username = getlogin();
MY LOG INFO("Application user name is %s", username);
Inter-Process Communication
Bionic does not provide support for System V inter-process communication (IPC), in order to avoid
denial-of-service attacks and kernel resource leakage. Although System V IPC is not supported, the
Android platform architecture makes heavy use of IPC using its own flavor known as Binder. Android
applications communicate with the system, services, and each other through the Binder interface.
At the time of this writing, Bionic does not provide any official APIs to enable native applications
to interact with the Binder interface. Currently, the Binder interface is only accessible through the
Android Java APIs.
CHAPTER 6: Bionic API Primer
177
Summary
In this chapter, you started exploring Bionic, a derivation of the BSD standard C library by Google
for the Android operating system. You studied the standard C library functions that are exposed to
the native applications through Bionic, such as memory management, standard I/O, process control,
system configuration, plus user and group management functions. Beside the APIs mentioned,
Bionic also provides multi-threading and networking APIs for the native applications. You will explore
these APIs separately in individual chapters.
Chapter
7
Native Threads
A thread is a mechanism enabling a single process to perform multiple tasks concurrently. Threads are
lightweight processes sharing the same memory and resources of the same parent process. A single
process can contain multiple threads executing in parallel. As part of the same process, threads can
communicate with each other and share data. Android supports threads in both Java and the native
code. In this chapter, you will be exploring different strategies and APIs that can be used for concurrent
programming pertaining to native code. The following key topics are covered in this chapter:
Java vs. POSIX Threads
Thread synchronization
Controlling the thread lifecycle
Thread priorities and scheduling strategies
Interacting with Java from within native threads
Creating the Threads Example Project
Before going into the details of having multithreading in native code, you will create a simple
example application that will act as a testbed. The example application will provide the following:
An Android application project with native code support.
A simple GUI to define the number of threads, the number of iterations per
worker, a button to start threads, and a text view showing the progress
messages from the native workers during runtime.
A native worker function mimicking a long-lasting task.
While working through the chapter, you will expand this example application to demonstrate different
techniques and APIs pertaining to multithreading in native code.
179
180
CHAPTER 7: Native Threads
Creating the Android Project
Start by creating a new Android application project.
1.
Open the Eclipse IDE and choose File ➤ New ➤ Other from the top menu bar
to launch the New dialog, as shown in Figure 7-1.
Figure 7-1. New dialog
2.
From the list of wizards, expand the Android category.
3.
Choose Android Application Project from the sub-list.
4.
Click the Next button to launch the New Android App wizard, as shown in
Figure 7-2.
Figure 7-2. New Android App dialog
CHAPTER 7: Native Threads
5.
Set Application Name to Threads.
6.
Set Project Name to Threads.
7.
Set Package Name to com.apress.threads.
8.
Set Build SDK to Android 4.0.
9.
Set Minimum Required SDK to API 8.
10.
Click the Next button to proceed.
11.
Keep the default settings for the launcher icon by clicking the Next button.
12.
Select the Create activity.
13.
Choose Blank Activity from the template list.
14.
Click the Next button to proceed.
15.
In the New Blank Activity step, accept the default values by clicking the
Finish button.
181
Adding the Native Support
Native support should be added to the new Android project in order to use native code. Using the
Project Explorer view, right-click the Threads project, and choose Android Tools ➤ Add Native Support
from the context menu. As shown in Figure 7-3, the Add Android Native Support dialog will be
launched.
Figure 7-3. Add Android Native Support dialog
Set the Library Name to Threads and click the Finish button. Native code support will be added to
the project.
Declaring the String Resources
The application’s user interface will be referring to a set of string resources. Using the Project
Explorer view, expand the res directory for resources. Expand the values subdirectory, and doubleclick on strings.xml to open the string resources in the editor. Replace the content as shown
in Listing 7-1.
182
CHAPTER 7: Native Threads
Listing 7-1. Content of res/values/strings.xml File
<resources>
<string name="app name">Threads</string>
<string name="menu settings">Settings</string>
<string name="title activity main">Threads</string>
<string name="threads edit">Thread Count</string>
<string name="iterations edit">Iteration Count</string>
<string name="start button">Start Threads</string>
</resources>
Creating a Simple User Interface
The application will have a simple user interface with fields for the number of threads and the
number of iterations, a button for starting the threads, and a text view for monitoring the thread
progress (see Figure 7-4).
Figure 7-4. Simple user interface for the example application
Using the Project Explorer view, expand the layout subdirectory under the res directory. Doubleclick the activity main.xml layout file to open it in the editor. Replace the content as shown in
Listing 7-2.
Listing 7-2. Content of res/layout/activity_main.xml File
<LinearLayout xmlns:android="http://schemas.android.com/apk/res/android"
xmlns:tools="http://schemas.android.com/tools"
android:layout width="match parent"
android:layout height="match parent"
android:orientation="vertical" >
<EditText
android:id="@+id/threads edit"
android:layout width="match parent"
android:layout height="wrap content"
android:ems="10"
CHAPTER 7: Native Threads
183
android:hint="@string/threads edit"
android:inputType="number" >
<requestFocus />
</EditText>
<EditText
android:id="@+id/iterations edit"
android:layout width="match parent"
android:layout height="wrap content"
android:ems="10"
android:hint="@string/iterations edit"
android:inputType="number" />
<Button
android:id="@+id/start button"
android:layout width="wrap content"
android:layout height="wrap content"
android:text="@string/start button" />
<ScrollView
android:id="@+id/scrollView1"
android:layout width="match parent"
android:layout height="wrap content" >
<TextView
android:id="@+id/log view"
android:layout width="match parent"
android:layout height="wrap content" />
</ScrollView>
</LinearLayout>
Implementing the Main Activity
The main activity will be presenting the user interface that you defined in the previous section, and
it will enable the user interface to configure and control the threads and the workers during runtime.
Before going through the functions that are provided in the main activity, using the Project Explorer
view, expand the src directory, and select com.apress.thread Java package. Double-click the
MainActivity.java file, and replace the content as shown in Listing 7-3.
Listing 7-3. Content of src/com/apress/threads/MainActivity.java File
package com.apress.threads;
import
import
import
import
import
android.app.Activity;
android.os.Bundle;
android.view.View;
android.view.View.OnClickListener;
android.widget.Button;
184
CHAPTER 7: Native Threads
import android.widget.EditText;
import android.widget.TextView;
/**
* Main activity.
*
* @author Onur Cinar
*/
public class MainActivity extends Activity {
/** Threads edit. */
private EditText threadsEdit;
/** Iterations edit. */
private EditText iterationsEdit;
/** Start button. */
private Button startButton;
/** Log view. */
private TextView logView;
@Override
public void onCreate(Bundle savedInstanceState) {
super.onCreate(savedInstanceState);
setContentView(R.layout.activity main);
// Initialize the native code
nativeInit();
threadsEdit = (EditText) findViewById(R.id.threads edit);
iterationsEdit = (EditText) findViewById(R.id.iterations edit);
startButton = (Button) findViewById(R.id.start button);
logView = (TextView) findViewById(R.id.log view);
startButton.setOnClickListener(new OnClickListener() {
public void onClick(View view) {
int threads = getNumber(threadsEdit, 0);
int iterations = getNumber(iterationsEdit, 0);
if (threads > 0 && iterations > 0) {
startThreads(threads, iterations);
}
}
});
}
@Override
protected void onDestroy() {
// Free the native resources
nativeFree();
super.onDestroy();
}
c
CHAPTER 7: Native Threads
/**
* On native message callback.
*
* @param message
*
native message.
*/
private void onNativeMessage(final String message) {
runOnUiThread(new Runnable() {
public void run() {
logView.append(message);
logView.append("\n");
}
});
}
/**
* Gets the value of edit text as integer. If the value
* is empty or count not be parsed, it returns the
* default value.
*
* @param editText edit text.
* @param defaultValue default value.
* @return numeric value.
*/
private static int getNumber(EditText editText, int defaultValue) {
int value;
try {
value = Integer.parseInt(editText.getText().toString());
} catch (NumberFormatException e) {
value = defaultValue;
}
return value;
}
/**
* Starts the given number of threads for iterations.
*
* @param threads thread count.
* @param iterations iteration count.
*/
private void startThreads(int threads, int iterations) {
// We will be implementing this method as we
// work through the chapter
}
/**
* Initializes the native code.
*/
private native void nativeInit();
185
186
CHAPTER 7: Native Threads
/**
* Free the native resources.
*/
private native void nativeFree();
/**
* Native worker.
*
* @param id worker id.
* @param iterations iteration count.
*/
private native void nativeWorker(int id, int iterations);
static {
System.loadLibrary("Threads");
}
}
Besides the usual methods that are necessary to present and bind to the user interface components,
the main activity provides the following key methods:
onNativeMessage is a callback function that will be invoked by the native code
to send progress messages to the UI. Android does not allow code running
in a different thread than the main UI thread to access or manipulate the UI
components. As the native worker functions are expected to execute within
a different thread, the onNativeMessage method simply schedules the actual
update operation in UI thread through the runOnUiThread method of the
android.app.Activity class.
startThreads method will simply dispatch the start request to the proper
threading example. As you work through the chapter, you will be experimenting
with different features of threading. The startThreads method will facilitate
switching between these different examples.
nativeInit method is implemented in the native code. It handles the
initialization of the native code prior executing the individual threads.
nativeFree method is implemented in the native code. It frees the native
resources when the activity is getting destroyed.
nativeWorker method is implemented in native code and mimics a long-lasting
task. It takes two arguments, the worked ID and the iterations count.
Generating the C/C++ Header File
In order to generate the function signatures for these two native methods, first select the
MainActivity.java source file using the Project Explorer, and choose Run ➤ External Tools ➤ Generate C
and C++ Header File from the top menu bar. The javah tool will generate the header file in the jni
directory with the content shown in Listing 7-4.
CHAPTER 7: Native Threads
Listing 7-4. Content of jni/com_apress_threads_MainActivity.h File
/* DO NOT EDIT THIS FILE - it is machine generated */
#include <jni.h>
/* Header for class com apress threads MainActivity */
...
/*
* Class:
com apress threads MainActivity
* Method:
nativeInit
* Signature: ()V
*/
JNIEXPORT void JNICALL Java com apress threads MainActivity nativeInit
(JNIEnv *, jobject);
/*
* Class:
com apress threads MainActivity
* Method:
nativeFree
* Signature: ()V
*/
JNIEXPORT void JNICALL Java com apress threads MainActivity nativeFree
(JNIEnv *, jobject);
/*
* Class:
com apress threads MainActivity
* Method:
nativeWorker
* Signature: (II)V
*/
JNIEXPORT void JNICALL Java com apress threads MainActivity nativeWorker
(JNIEnv *, jobject, jint, jint);
Implementing the Native Functions
Based on the function signatures that were generated in the previous section, you will now be
implementing the native functions.
1.
Using the Project Explorer, right-click on jni directory.
2.
Choose New ➤ Other from the context menu to launch the New dialog.
3.
From the list of wizards, expand the C/C++ category.
4.
Select the Source File wizard.
5.
Click the Next button.
6.
Using the New Source File dialog, set the source file to
com apress threads MainActivity.cpp.
7.
Click the Finish button.
187
188
CHAPTER 7: Native Threads
The new source file will be opened in the editor. Replace its content as shown in Listing 7-5.
Listing 7-5. Content of jni/com_apress_threads_MainActivity.cpp File
#include <stdio.h>
#include <unistd.h>
#include "com apress threads MainActivity.h"
// Method ID can be cached
static jmethodID gOnNativeMessage = NULL;
void Java com apress threads MainActivity nativeInit (
JNIEnv* env,
jobject obj)
{
// If method ID is not cached
if (NULL == gOnNativeMessage)
{
// Get the class from the object
jclass clazz = env->GetObjectClass(obj);
// Get the method id for the callback
gOnNativeMessage = env->GetMethodID(clazz,
"onNativeMessage",
"(Ljava/lang/String;)V");
// If method could not be found
if (NULL == gOnNativeMessage)
{
// Get the exception class
jclass exceptionClazz = env->FindClass(
"java/lang/RuntimeException");
// Throw exception
env->ThrowNew(exceptionClazz, "Unable to find method");
}
}
}
void Java com apress threads MainActivity nativeFree (
JNIEnv* env,
jobject obj)
{
}
void Java com apress threads MainActivity nativeWorker (
JNIEnv* env,
jobject obj,
jint id,
jint iterations)
CHAPTER 7: Native Threads
189
{
// Loop for given number of iterations
for (jint i = 0; i < iterations; i++)
{
// Prepare message
char message[26];
sprintf(message, "Worker %d: Iteration %d", id, i);
// Message from the C string
jstring messageString = env->NewStringUTF(message);
// Call the on native message method
env->CallVoidMethod(obj, gOnNativeMessage, messageString);
// Check if an exception occurred
if (NULL != env->ExceptionOccurred())
break;
// Sleep for a second
sleep(1);
}
}
The native source file contains three native functions:
Java com apress threads MainActivity nativeInit function initializes the
native code by locating the method ID for the onNativeMessage callback function
and caching it in the gOnNativeMessage global variable.
Java com apress threads MainActivity nativeFree function is a placeholder
for releasing the native resources. You will implement this function as you work
through the chapter.
Java com apress threads MainActivity nativeWorker function mimics a
long-lasting task through a for loop. It loops based on the specified number of
iterations and sleeps a second between iterations. It communicates the iteration
status to the UI by invoking the onNativeMessage callback method.
Updating the Android.mk Build Script
The new source file should be added to the Android.mk build script for the Android build system
to compile it as part of the shared library. Using the Project Explorer, expand the jni directory, and
double-click the Android.mk file to open it in the editor. Replace the content as shown in Listing 7-6.
Listing 7-6. Content of jni/Android.mk File
LOCAL PATH := $(call my-dir)
include $(CLEAR VARS)
190
CHAPTER 7: Native Threads
LOCAL MODULE
:= Threads
LOCAL SRC FILES := com apress threads MainActivity.cpp
include $(BUILD SHARED LIBRARY)
The example application is now ready. You can validate the example project by running it in the
Android Emulator. Since the startThreads method is not implemented yet, the application will
not function, although the UI will be displayed. In the next section, you will add multithreading
functionality to the example application.
Java Threads
The easiest way to benefit from multithreading in native code is by simply using the Java threads.
A java.lang.Thread instance can be created in Java space using pure Java code, and it can invoke
the native method within its context. The main advantage of this approach is that it does not require
any change in the native code.
Updating the Example Application to use Java Threads
Using the Project Explorer, open the MainActivity.java source file in the editor. Add the
javaThreads method into the MainActivity class as shown in Listing 7-7.
Listing 7-7. Adding the javaThreads Method to MainActivity Class
public class MainActivity extends Activity {
...
/**
* Using Java based threads.
*
* @param threads thread count.
* @param iterations iteration count.
*/
private void javaThreads(int threads, final int iterations) {
// Create a Java based thread for each worker
for (int i = 0; i < threads; i++) {
final int id = i;
Thread thread = new Thread() {
public void run() {
nativeWorker(id, iterations);
}
};
thread.start();
}
}
...
}
CHAPTER 7: Native Threads
191
The javaThreads method takes two arguments, number of threads and the number of iterations for
each worker, and it does the following:
Creates the requested number of java.lang.Thread objects.
Overrides the run method of java.lang.Thread class to invoke the nativeWorker
method in the thread context.
Starts each thread instance.
In order to use the javaThreads method, you need to modify the startThreads method to point to it.
As you work through this chapter, you will be repeating the same procedure for other examples so
that you can easily switch between examples. Update the startThreads method as shown in
Listing 7-8.
Listing 7-8. Modified startThreads Method Invoking javaThreads Method
public class MainActivity extends Activity {
...
/**
* Starts the given number of threads for iterations.
*
* @param threads thread count.
* @param iterations iteration count.
*/
private void startThreads(int threads, int iterations) {
javaThreads(threads, iterations);
}
...
}
Executing the Java Threads Example
Run the example application on the Android Emulator, and follow these steps:
1.
Set the Thread Count to 2 to have two threads run concurrently.
2.
Set the Iteration Count to 10 to have each thread worker iterate through
ten steps.
Click the Start Threads button to start the Java threads.
3.
The javaThreads method will create two threads, and each of these threads will run the nativeWorker
function with ten iterations. The threads will run for ten seconds. The nativeWorker function, while
starting each iteration step, will inform the UI by sending an update message, as shown in Figure 7-5.
192
CHAPTER 7: Native Threads
Figure 7-5. Native code running in multiple Java threads
Note Depending on the screen size you may need to scroll the results to see the latest update
messages.
Pros and Cons of using Java Threads for Native Code
Using Java threads for native code has the following advantages compared to native threads:
It’s much easier to set up.
It does not require any change in the native code.
It does not require being explicitly attached to the virtual machine, as Java
threads are already part of the Java platform. Native code can communicate
with the Java code using the supplied thread-specific JNIEnv interface pointer.
The methods provided through the java.lang.Thread class can be used to
seamlessly interact with the thread instance from the Java code.
Besides its advantages, the Java threads have the following major shortcomings compared to native
threads when used for multithreading the native code:
Assumes that the logic to assign tasks to threads is part of the Java code, since
there is no API in native space to create Java threads.
Assumes that the native code is thread-safe, since Java-based threading is
transparent to the native code.
CHAPTER 7: Native Threads
Native code cannot benefit from other concurrent programming concepts and
components, such as semaphores, since no APIs for Java threads are available
in native space.
Native code running in separate threads cannot communicate or share
resources directly.
193
Note Although some of these shortcomings of Java threads can be resolved by using JNI to invoke
the necessary Java APIs, this approach is not preferable since passing through the JNI boundary is a
relatively expensive operation.
In the next section, you will start exploring the native threads.
POSIX Threads
POSIX Threads, also known as simply Pthreads, is a POSIX standard for threads. Prior to 1995,
several different threading APIs existed. The POSIX.1c, Threading Extensions, standard was
published in 1995 and defined a common API for creating and manipulating threads. Many of
the major operating systems, including Microsoft Windows, Mac OS X, BSD, and Linux provide
multithreading support conforming to the POSIX Threads standard. As it is based on the Linux
operating system, Android also provides non-compliant implementation of POSIX Threads for native
code. As POSIX Threads standard is rather large, this section will only cover the APIs that are fully
supported by Android platform.
Using POSIX Threads in Native Code
The POSIX Thread API is declared through the pthread.h header file. In order to use POSIX Threads
in native code, this header file needs to be included first.
#include <pthread.h>
The Android implementation of POSIX Threads is part of the Bionic standard C standard library.
Unlike other platforms, it does not require linking of any additional library during compile-time.
Creating Threads using pthread_create
The POSIX Threads are created through the pthread create function.
int pthread create(pthread t* thread,
pthread attr t const* attr,
void* (*start routine)(void*),
void* arg);
194
CHAPTER 7: Native Threads
The function takes the following arguments:
Pointer to a thread t type variable that will be used by the function to return the
handle for the new thread.
Attributes for the new thread in the form of a pointer to a pthread attr t
structure. Stack base, stack size, guard size, scheduling policy, and scheduling
priority for the new thread can be specified through the attributes. You will learn
about some of these attributes later in the chapter. It can be NULL if the default
attributes are going to be used.
A function pointer to the start routine for the thread. The start routine function
signature should look like the following:
void* start rountine (void* args)
The start routine takes the thread arguments as a void pointer, and it returns a result as a
void pointer.
Any arguments should be passed to the start routine when the thread gets
executed in the form of a void pointer. It can be NULL if not arguments needs to
be passed.
In case of success, the pthread create function returns zero; otherwise it returns an error code.
Updating the Example Application to use POSIX Threads
You can now expand the example application to use POSIX Threads in order to experiment with the
pthread create function.
Updating the Main Activity
Using the Project Explorer, open the MainActivity.java source file in the editor. Add the native
posixThreads method into the MainActivity class as shown in Listing 7-9.
Listing 7-9. Adding the Native posixThreads Method to MainActivity Class
public class MainActivity extends Activity {
...
/**
* Using the POSIX threads.
*
* @param threads thread count.
* @param iterations iteration count.
*/
private native void posixThreads(int threads, int iterations);
...
}
CHAPTER 7: Native Threads
195
Similar to the javaThreads method, the posixThreads method also takes two arguments, number of
threads and the number of iterations for each worker. In order to use the posixThreads method, you
need to modify the startThreads method to point to it instead of the javaThreads method. Update
the startThreads method as shown in Listing 7-10.
Listing 7-10. Modified startThreads Method Invoking posixThreads Method
public class MainActivity extends Activity {
...
/**
* Starts the given number of threads for iterations.
*
* @param threads thread count.
* @param iterations iteration count.
*/
private void startThreads(int threads, int iterations) {
posixThreads(threads, iterations);
}
...
}
Regenerating the C/C++ Header File for posixThreads Method
As you will be using the POSIX Threads, the implementation of the posixThreads method will
happen in native code instead of Java. Upon making these changes on the MainActivity class, the
com apress threads MainActivity.h header file should be updated. Select the MainActivity.java
source file using the Project Explorer, and then choose Run ➤ External Tools ➤ Generate C and C++
Header File from the top menu bar. The updated header file will contain the function declaration the
posixThreads native method, as shown in Listing 7-11.
Listing 7-11. Generated Function Signature for posixThreads
/*
* Class:
com apress threads MainActivity
* Method:
posixThreads
* Signature: (II)V
*/
JNIEXPORT void JNICALL Java com apress threads MainActivity posixThreads
(JNIEnv *, jobject, jint, jint);
Updating the Native Code
You will now update the native code for POSIX Threads. As the POSIX Threads are not part of the
Java platform, multiple changes will be needed in the native code in order to provide the same
functionality. Using the Project Explorer, expand the jni directory, and double-click on the
com apress threads MainActivity.cpp source file to open it. Then follow these steps:
1.
Include the pthread.h in the source file in order to utilize the POSIX Thread
APIs in the native code, as shown in Listing 7-12.
196
CHAPTER 7: Native Threads
Listing 7-12. Including the pthread.h header File for POSIX Threads
#include <stdio.h>
#include <unistd.h>
#include <pthread.h>
#include "com apress threads MainActivity.h"
...
2.
As mentioned earlier, the pthread create function can pass a single void
pointer argument to the start routine when running a new thread. The
com apress threads nativeWorker function requires two task specific
arguments, the worker ID and the iteration count to be supplied. In order to
pass more than one argument to the start routine, a new structure is needed
to wrap these multiple arguments. Add the definition of NativeWorkerArgs
structure, as shown in Listing 7-13.
Listing 7-13. Defining the NativeWorkerArgs Structure
#include "com apress threads MainActivity.h"
// Native worker thread arguments
struct NativeWorkerArgs
{
jint id;
jint iterations;
};
// Method ID can be cached
static jmethodID gOnNativeMessage = NULL;
3.
As the POSIX Threads are not part of the Java platform, they are not known
to the virtual machine. The POSIX Threads should first attach themselves
to the virtual machine in order to interact with the Java space. The Java
VM interface pointer should be available to the POSIX Threads in order to
properly attach them. Once they are attached, the worker code running in
the POSIX Threads needs to invoke the onNativeMessage callback method
to inform the UI. This requires having a reference to the MainActivity class
instance. The object reference that is provided with the JNI method call
cannot be cached here since it is a local reference. A global reference should
be created and stored for the threads to use. Add the two global variables in
Listing 7-14 to the native code.
CHAPTER 7: Native Threads
Listing 7-14. Global Variables to Hold Java VM Interface Pointer and Global Reference to Object Instance
// Method ID can be cached
static jmethodID gOnNativeMessage = NULL;
// Java VM interface pointer
static JavaVM* gVm = NULL;
// Global reference to object
static jobject gObj = NULL;
void Java com apress threads MainActivity nativeInit (
JNIEnv* env,
jobject obj)
4.
There are multiple ways to get the Java VM interface pointer in native code.
The easiest and most proper way of doing it is through the JNI OnLoad
function. This function gets invoked automatically by the virtual machine
when the shared library gets loaded. The function takes the Java VM
interface pointer as one of its arguments. As shown in Listing 7-15, add the
JNI OnLoad function to the native code in order to store the Java VM interface
pointer in the gVm global variable that was defined in the previous step.
Listing 7-15. JNI OnLoad Function to Store Java VM Interface Pointer
jint JNI OnLoad (JavaVM* vm, void* reserved)
{
// Cache the JavaVM interface pointer
gVm = vm;
return JNI VERSION 1 4;
}
5.
The object reference to MainActivity class instance is needed in order to
invoke the onNativeMessage callback method to deliver updates to the UI
from the native code. As shown in Listing 7-16, update the Java com apress
threads MainActivity nativeInit method to create a global reference that
can be used by the threads.
Listing 7-16. Creating a Global Reference for the Object Instance
void Java com apress threads MainActivity nativeInit (
JNIEnv* env,
jobject obj)
{
// If object global reference is not set
if (NULL == gObj)
{
197
198
CHAPTER 7: Native Threads
// Create a new global reference for the object
gObj = env->NewGlobalRef(obj);
if (NULL == gObj)
{
goto exit;
}
}
// If method ID is not cached
if (NULL == gOnNativeMessage)
...
exit:
return;
}
6.
Global references should be properly deleted when they are no longer
needed; otherwise memory leaks will occur. Update the
Java com apress threads MainActivity nativeFree function to delete the
global reference once the activity has stopped, as shown in Listing 7-17.
Listing 7-17. Updated nativeFree Method Deleting the Global Reference
void Java com apress threads MainActivity nativeFree (
JNIEnv* env,
jobject obj)
{
// If object global reference is set
if (NULL != gObj)
{
// Delete the global reference
env->DeleteGlobalRef(gObj);
gObj = NULL;
}
}
...
7.
In order to run the Java com apress threads MainActivity nativeWorker
function within the POSIX Thread, an intermediate start routine is required to
properly attach the POSIX Thread to the Java virtual machine, obtain a valid
JNIEnv interface pointer, and execute the native worker with the proper set of
arguments. As shown in Listing 7-18, add the nativeWorkerThread start routine.
Listing 7-18. Adding the Start Routine for Native Worker Threads
static void* nativeWorkerThread (void* args)
{
JNIEnv* env = NULL;
CHAPTER 7: Native Threads
// Attach current thread to Java virtual machine
// and obrain JNIEnv interface pointer
if (0 == gVm->AttachCurrentThread(&env, NULL))
{
// Get the native worker thread arguments
NativeWorkerArgs* nativeWorkerArgs = (NativeWorkerArgs*) args;
// Run the native worker in thread context
Java com apress threads MainActivity nativeWorker(env,
gObj,
nativeWorkerArgs->id,
nativeWorkerArgs->iterations);
// Free the native worker thread arguments
delete nativeWorkerArgs;
// Detach current thread from Java virtual machine
gVm->DetachCurrentThread();
}
return (void*) 1;
}
8.
As all the prerequisites have been satisfied, the Java com apress threads
MainActivity posixThreads function can be implemented in the native code.
The function creates new threads using the pthread create function and
supplies the worker arguments wrapped in a NativeWorkerArgs structure
that was defined earlier. In case of an error, the function throws a
java.lang.RuntimeException and terminates. As shown in Listing 7-19, add
the function to the native code.
Listing 7-19. The posixThreads Native Method Implementation
void Java com apress threads MainActivity posixThreads (
JNIEnv* env,
jobject obj,
jint threads,
jint iterations)
{
// Create a POSIX thread for each worker
for (jint i = 0; i < threads; i++)
{
// Native worker thread arguments
NativeWorkerArgs* nativeWorkerArgs = new NativeWorkerArgs();
nativeWorkerArgs->id = i;
nativeWorkerArgs->iterations = iterations;
// Thread handle
pthread t thread;
199
200
CHAPTER 7: Native Threads
// Create a new thread
int result = pthread create(
&thread,
NULL,
nativeWorkerThread,
(void*) nativeWorkerArgs);
if (0 != result)
{
// Get the exception class
jclass exceptionClazz = env->FindClass(
"java/lang/RuntimeException");
// Throw exception
env->ThrowNew(exceptionClazz, "Unable to create thread");
}
}
}
The POSIX Threads are now integrated into the native code.
Executing the POSIX Threads Example
Run the example application on the Android Emulator, and follow the same steps that were provided
for the Java threads to test the application using POSIX Threads. The application should execute
identically, although the underlying threading mechanism is different.
Return Result from POSIX Threads
Threads can return a result back when they are terminating. This is achieved through the void pointer
that is returned from the thread start routine. In the previous example, the Java com apress threads
MainActivity posixThreads function is designed to return immediately after executing the threads.
The function can be modified to wait for threads to finish their work and return. A function can wait
for a thread to terminate by using the pthread join function.
int pthread join(pthread t thread, void** ret val);
The pthread join function takes the following arguments:
Thread handle that is returned from the pthread create function for the target
thread.
Pointer to a void pointer for obtaining the returned result from the start routine.
It suspends the execution of the calling thread until the target thread terminates. If the ret val is not
NULL, the function will set the value of ret val pointer to the result returned from the start routine. In
case of success, pthread join function returns zero; otherwise it returns the error code.
CHAPTER 7: Native Threads
201
Updating the Native Code to Use pthread_join
In order to see pthread join in action, you will update the example application. Using the Project
Explorer, expand the jni directory, double-click the com apress threads MainActivity.cpp source
file to open it in the editor, and update the Java com apress threads MainActivity posixThreads
function as shown in Listing 7-20.
Listing 7-20. Adding pthread_join to Native Code
void Java com apress threads MainActivity posixThreads (
JNIEnv* env,
jobject obj,
jint threads,
jint iterations)
{
// Thread handles
pthread_t* handles = new pthread_t[threads];
// Create a POSIX thread for each worker
for (jint i = 0; i < threads; i++)
{
// Native worker thread arguments
NativeWorkerArgs* nativeWorkerArgs = new NativeWorkerArgs();
nativeWorkerArgs->id = i;
nativeWorkerArgs->iterations = iterations;
// Create a new thread
int result = pthread create(
&handles[i],
NULL,
nativeWorkerThread,
(void*) nativeWorkerArgs);
if (0 != result)
{
// Get the exception class
jclass exceptionClazz = env->FindClass(
"java/lang/RuntimeException");
// Throw exception
env->ThrowNew(exceptionClazz, "Unable to create thread");
goto exit;
}
}
// Wait for threads to terminate
for (jint i = 0; i < threads; i++)
{
void* result = NULL;
// Join each thread handle
if (0 != pthread_join(handles[i], &result))
202
CHAPTER 7: Native Threads
{
// Get the exception class
jclass exceptionClazz = env->FindClass(
"java/lang/RuntimeException");
// Throw exception
env->ThrowNew(exceptionClazz, "Unable to join thread");
}
else
{
// Prepare message
char message[26];
sprintf(message, "Worker %d returned %d", i, result);
// Message from the C string
jstring messageString = env->NewStringUTF(message);
// Call the on native message method
env->CallVoidMethod(obj, gOnNativeMessage, messageString);
// Check if an exception occurred
if (NULL != env->ExceptionOccurred())
{
goto exit;
}
}
}
exit:
return;
}
Upon making the necessary changes, run the example application on the Android Emulator. Set both
the thread count and the iteration count to a small number, such as 2, and click the Start Threads
button. You will immediately notice that the UI will hang for few seconds. This is due to pthread join
function suspending the execution of the main UI thread until the created threads terminates. The UI
will show the returned result from the threads.
Synchronizing POSIX Threads
As they are running within the same process space, threads share the same memory and resources.
This makes it very easy for threads to communicate and share data, although it makes two kinds of
problems possible: thread interference and memory inconsistency due to concurrent modification of
shared resources. Thread synchronization becomes vital in these situations. Thread synchronization
provides the mechanism to ensure that two concurrently running threads do not execute specific
portions of the code at the same time. Similar to Java threads, the POSIX Thread API also provides
CHAPTER 7: Native Threads
203
synchronization functionality. In this chapter, you will mainly focus on the two most frequently used
synchronization mechanisms offered by the POSIX Threads:
Mutexes allow mutual exclusion in the code where specific portions of the code
do not execute at the same time.
Semaphores control access to a resource based on a defined number of
available resources. If no resource is available, the calling thread simply waits on
the semaphore until a resource becomes available.
Synchronizing POSIX Threads using Mutexes
POSIX Thread API exposes mutexes to the native code through the pthread mutex t data type.
The POSIX Thread API provides a set of functions for interacting with mutexes from the native code.
Prior to being used, the mutex variables should be initialized first.
Initializing Mutexes
The POSIX Thread API provides two ways of initializing the mutexes: pthread mutex init function
and the PTHREAD MUTEX INITIALIZER macro. The pthread mutex init function can be used to
initialize the mutexes.
int pthread mutex init(pthread mutex t* mutex,
const pthread mutexattr t* attr);
The pthread mutex init function takes two arguments, a pointer to the mutex variable to initialize
and a pointer to the pthread mutextattr t structure defining the attributes for the mutex. If the
second argument is set to NULL, the default attributes gets used. If the default attributes are enough,
instead of the pthread mutex init function, the PTHREAD MUTEX INITIALIZER macro is more
appropriate.
pthread mutex t mutex = PTHREAD MUTEX INITIALIZER;
Upon successful initialization, the state of the mutex becomes initialized and unlocked, and the
function returns zero; otherwise it returns the error code.
Locking Mutexes
The pthread mutex lock function can be used to gain mutual exclusion by locking an already
initialized mutex.
int pthread mutex lock(pthread mutex t* mutex);
The function takes a pointer to the mutex variable. If the mutex is already being locked, the calling
thread gets suspended until the mutex becomes available. In case of success, the function returns
zero; otherwise it returns the error code.
204
CHAPTER 7: Native Threads
Unlocking Mutexes
Upon completing executing the critical code section, the mutex can be unlocked using the
pthread mutex unlock function.
int pthread mutex unlock(pthread mutex t* mutex);
The function takes a pointer to the mutex variable and unlocks it. The scheduling policy decides
which thread waiting on the mutex gets executed next. In case of success, the function returns zero;
otherwise it returns the error code.
Destroying Mutexes
Once the mutex is no longer needed, it can be destroyed through the pthread mutex destroy
function. The function takes a pointer to the mutex variable and destroys it. Attempting to destroy a
locked mutex may result in undefined behavior.
int pthread mutex destroy(pthread mutex t* mutex);
Updating the Example Application to Use a Mutex
Now you’ll update the native code to experiment with the mutexes. Using the Project Explorer,
expand the jni directory, double-click the com apress threads MainActivity.cpp source file to open
it, and follow these steps.
1.
Add the mutex variable to the native code as shown in Listing 7-21.
Listing 7-21. Adding the Mutex Variable to the Native Code
// Global reference to object
static jobject gObj = NULL;
// Mutex instance
static pthread_mutex_t mutex;
jint JNI OnLoad (JavaVM* vm, void* reserved)
2.
The mutex variable should be initialized prior being used. As shown in
Listing 7-22, update the Java com paress threads MainActivity nativeInit
function to initialize the mutex.
Listing 7-22. Initializing the Mutex Variable
void Java com apress threads MainActivity nativeInit (
JNIEnv* env,
jobject obj)
{
// Initialize mutex
if (0 != pthread_mutex_init(&mutex, NULL))
CHAPTER 7: Native Threads
{
// Get the exception class
jclass exceptionClazz = env->FindClass(
"java/lang/RuntimeException");
// Throw exception
env->ThrowNew(exceptionClazz, "Unable to initialize mutex");
goto exit;
}
...
}
3.
Once the mutex is no longer needed, it should be destroyed. Update the
Java com apress threads MainActivity nativeFree function as shown in
Listing 7-23.
Listing 7-23. Destroying the Mutex Variable
void Java com apress threads MainActivity nativeFree (
JNIEnv* env,
jobject obj)
{
...
// Destory mutex
if (0 != pthread_mutex_destroy(&mutex))
{
// Get the exception class
jclass exceptionClazz = env->FindClass(
"java/lang/RuntimeException");
// Throw exception
env->ThrowNew(exceptionClazz, "Unable to destroy mutex");
}
}
4.
The thread worker can now lock the mutex at the beginning of the code
section and then unlock it when the code section terminates. Update the
Java com apress threads MainActivity nativeWorker function as shown in
Listing 7-24.
Listing 7-24. Locking and Unlocking the Mutex Variable
void Java com apress threads MainActivity nativeWorker (
JNIEnv* env,
jobject obj,
jint id,
jint iterations)
{
// Lock mutex
if (0 != pthread_mutex_lock(&mutex))
205
206
CHAPTER 7: Native Threads
{
// Get the exception class
jclass exceptionClazz = env->FindClass(
"java/lang/RuntimeException");
// Throw exception
env->ThrowNew(exceptionClazz, "Unable to lock mutex");
goto exit;
}
...
// Unlock mutex
if (0 != pthread_mutex_unlock(&mutex))
{
// Get the exception class
jclass exceptionClazz = env->FindClass(
"java/lang/RuntimeException");
// Throw exception
env->ThrowNew(exceptionClazz, "Unable to unlock mutex");
}
exit:
return;
}
You can now run the example application on the Android Emulator. As the native code is now using
the mutex, threads will no longer execute concurrently. Only the thread with the mutex lock will
execute and send update messages to UI; the other threads will be suspended, waiting for the
mutex to become available.
Synchronizing POSIX Threads Using Semaphores
Unlike the other POSIX functions, the POSIX semaphores are declared in a different header file, the
semaphore.h.
#include <semaphore.h>
The POSIX semaphores are exposed to native code through the sem t data type. The POSIX
Semaphore API provides a set of functions for interacting with the semaphores from the native code.
Prior being used, the semaphore variables should be initialized first.
CHAPTER 7: Native Threads
207
Initializing Semaphores
The POSIX Semaphore API provides the sem init function to initialize the semaphore variables.
extern int sem init(sem t* sem, int pshared, unsigned int value);
It takes three arguments: a pointer to the semaphore variable that will be initialized, the share flag,
and its initial value. On success, the function returns zero; otherwise −1 is returned.
Locking Semaphores
Once the semaphore is properly initialized, threads can use the sem wait function to decrease the
number of the semaphore.
extern int sem wait(sem t* sem);
The function takes a pointer to the semaphore variable. If semaphore’s value is greater than zero,
the locking succeeds and the value of the semaphore gets decremented accordingly. If the value
of the semaphore is zero, then the calling thread gets suspended until the semaphore value gets
incremented by another thread through unlocking it. On success, the function returns zero;
otherwise −1 is returned.
Unlocking Semaphores
Upon finishing executing the critical code section, the thread can unlock the semaphore using the
sem post function.
extern int sem post(sem t* sem);
When the semaphore gets unlocked by the sem post function, its value gets incremented by one.
Scheduling policy decides which thread waiting on the semaphore gets executed next. On success,
the function returns zero; otherwise −1 is returned.
Destroying Semaphores
Once the semaphore is no longer needed, it can be destroyed through the sem destory function.
extern int sem destroy(sem t* sem);
The function takes a pointer to the semaphore variables that will be destroyed. Destroying a
semaphore that another thread is currently blocked on may result in undefined behavior. On success,
the function returns zero; otherwise −1 is returned.
Priority and Scheduling Strategy for POSIX Threads
Scheduling policies, with the thread priorities, orders the list of threads in a certain execution order.
This section will briefly explore these scheduling strategies and the thread priorities.
208
CHAPTER 7: Native Threads
POSIX Thread Scheduling Strategy
The POSIX Thread specification requires a set of scheduling strategies to be implemented. The most
frequently used scheduling policies are the following:
SCHED_FIFO: The first in, first out scheduling policy orders the list of threads
based on the time the thread has been on the list. Based on its priority, the
thread can also move within the thread list.
SCHED_RR: the round-robin scheduling policy is identical to the SCHED_FIFO
scheduling policy with the addition of limiting the duration of the thread
execution to prevent any thread monopolizing the available CPU cycles.
These scheduling policy constants are defined in the sched.h header file. The scheduling strategy
can either be defined using the sched policy field of the thread attributes structure pthread attr t
while creating a new thread using the pthread create function, or during runtime through the
pthread setschedparam function.
int pthread setschedparam(pthread t thid,
int poilcy,
struct sched param const* param);
The function takes a pointer to the target thread handle, the scheduling policy, and the parameters
for the scheduling policy.
POSIX Thread Priority
The POSIX Thread API also provides functions to adjust the priority of the threads based on the
scheduling policy. The thread priority can either be defined using the sched priority field of the
thread attributes structure pthread attr t while creating a new thread using the pthread create
function, or during runtime through the pthread setschedparam function and proving the thread
priority in sched param structure. The minimum and maximum priority value differs based on the
scheduling policy in use. The application can query for these number by using the
sched get priority max and sched get priority min function.
Summary
In this chapter, you explored the possible multithreading mechanisms that are provided through
Java threads and POSIX Threads in the native space. The chapter provided a comparison of these
threading mechanisms. Then the chapter focused on POSIX Threads to provide a quick overview of
the threading APIs provided in the native space, such as synchronization, priority, and scheduling
pertaining to POSIX Threads.
Chapter
8
POSIX Socket API:
Connection-Oriented
Communication
As they get executed in an isolated environment distant from the user, native code applications
require a medium of communication either with their parent applications or the external world
in order to provide any services. In Chapter 3, you explored the JNI technology enabling the
native code to communicate with its parent Java application. Starting with this chapter, you will
start exploring the POSIX Socket APIs available through Bionic that enable the native code to
communicate with the external world directly without calling into the Java layer.
A socket is a connection end-point that can be named and addressed in order to transmit data
between applications that are running either on the same machine or another machine on the
network. The POSIX Socket API, previously known as the Berkeley Socket API, is designed in a
highly generic fashion, enabling the applications to communicate over various protocol families
through the same set of API functions.
This chapter will give a brief overview of the POSIX Socket APIs for connection-oriented
communication with emphasis on the following key topics pertaining to Android platform:
Overview of POSIX sockets
Socket families
Connection-oriented sockets
Prior to going into the details of the POSIX Socket APIs for connection-oriented communication, you
will create a simple example application called Echo. This example application will act as a testbed
enabling you to better understand the different aspects of socket programming as you work through
the material presented in this chapter and the next two chapters of the book.
209
210
CHAPTER 8: POSIX Socket API: Connection-Oriented Communication
Echo Socket Example Application
The example application will provide the following:
A simple user interface for defining the parameters necessary to configure the
sockets.
Service logic for a simple echo service repeating the received bytes back to the
sender.
Boilerplate native code snippets to facilitate socket programming for Android in
native layer.
A connection-oriented socket communication example.
A connectionless socket communication example.
A local socket communication example.
Echo Android Application Project
Open the Eclipse IDE, and follow these steps in order to create the Echo application.
1.
Launch the Android Application Project dialog.
2.
Set Application Name to Echo.
3.
Set Project Name to Echo.
4.
Set Package Name to com.apress.echo.
5.
Set Build SDK to Android 4.1.
6.
Set Minimum Required SDK to API 8.
7.
Click the Next button to accept the default values for all other settings.
8.
Click the Next button to accept the default launcher icon.
9.
Uncheck the Create activity, and click the Finish button to create the empty
project.
10.
From the Project Explorer view, launch the Android Native Support wizard
through the Android Tools context menu item.
11.
Set Library Name to Echo.
12.
Follow the wizard to add native support to the project.
CHAPTER 8: POSIX Socket API: Connection-Oriented Communication
211
Abstract Echo Activity
In order to facilitate the reuse of common functionality, you will create an abstract activity class prior
defining the actual activities. Using the Project Explorer view, expand the src directory, right-click on
the com.apress.echo package, and choose New ➤ Class from the context menu. Set the Name to
AbstractEchoActivity and click the Finish button. Using the Editor view, populate the content of the
new class file as shown in Listing 8-1.
Listing 8-1. Content of AbstractEchoActivity.java Class File
package com.apress.echo;
import
import
import
import
import
import
import
import
import
android.app.Activity;
android.os.Bundle;
android.os.Handler;
android.view.View;
android.view.View.OnClickListener;
android.widget.Button;
android.widget.EditText;
android.widget.ScrollView;
android.widget.TextView;
/**
* Abstract echo activity object.
*
* @author Onur Cinar
*/
public abstract class AbstractEchoActivity extends Activity implements
OnClickListener {
/** Port number. */
protected EditText portEdit;
/** Server button. */
protected Button startButton;
/** Log scroll. */
protected ScrollView logScroll;
/** Log view. */
protected TextView logView;
/** Layout ID. */
private final int layoutID;
/**
* Constructor.
*
* @param layoutID
212
CHAPTER 8: POSIX Socket API: Connection-Oriented Communication
*
layout ID.
*/
public AbstractEchoActivity(int layoutID) {
this.layoutID = layoutID;
}
public void onCreate(Bundle savedInstanceState) {
super.onCreate(savedInstanceState);
setContentView(layoutID);
portEdit = (EditText) findViewById(R.id.port edit);
startButton = (Button) findViewById(R.id.start button);
logScroll = (ScrollView) findViewById(R.id.log scroll);
logView = (TextView) findViewById(R.id.log view);
startButton.setOnClickListener(this);
}
public void onClick(View view) {
if (view == startButton) {
onStartButtonClicked();
}
}
/**
* On start button clicked.
*/
protected abstract void onStartButtonClicked();
/**
* Gets the port number as an integer.
*
* @return port number or null.
*/
protected Integer getPort() {
Integer port;
try {
port = Integer.valueOf(portEdit.getText().toString());
} catch (NumberFormatException e) {
port = null;
}
return port;
}
/**
* Logs the given message.
*
* @param message
*
log message.
*/
CHAPTER 8: POSIX Socket API: Connection-Oriented Communication
protected void logMessage(final String message) {
runOnUiThread(new Runnable() {
public void run() {
logMessageDirect(message);
}
});
}
/**
* Logs given message directly.
*
* @param message
*
log message.
*/
protected void logMessageDirect(final String message) {
logView.append(message);
logView.append("\n");
logScroll.fullScroll(View.FOCUS DOWN);
}
/**
* Abstract async echo task.
*/
protected abstract class AbstractEchoTask extends Thread {
/** Handler object. */
private final Handler handler;
/**
* Constructor.
*/
public AbstractEchoTask() {
handler = new Handler();
}
/**
* On pre execute callback in calling thread.
*/
protected void onPreExecute() {
startButton.setEnabled(false);
logView.setText("");
}
public synchronized void start() {
onPreExecute();
super.start();
}
public void run() {
onBackground();
213
214
CHAPTER 8: POSIX Socket API: Connection-Oriented Communication
handler.post(new Runnable() {
public void run() {
onPostExecute();
}
});
}
/**
* On background callback in new thread.
*/
protected abstract void onBackground();
/**
* On post execute callback in calling thread.
*/
protected void onPostExecute() {
startButton.setEnabled(true);
}
}
static {
System.loadLibrary("Echo");
}
}
The AbstractEchoActivity, besides handling the housekeeping tasks such as binding the user
interface components, provides a simple thread implementation enabling the application to execute
the network operations in a separate thread than the UI thread.
Echo Application String Resources
Using the Project Explorer view, expand the res directory for resources. Expand the values
subdirectory, and double-click strings.xml to open the string resources in the Editor view. Replace
the content as shown in Listing 8-2.
Listing 8-2. Content of res/values/strings.xml Resource File
<resources>
<string
<string
<string
<string
<string
<string
<string
<string
name="app name">Echo</string>
name="title activity echo server">Echo Server</string>
name="port edit">Port Number</string>
name="start server button">Start Server</string>
name="title activity echo client">Echo Client</string>
name="ip edit">IP Address</string>
name="start client button">Start Client</string>
name="send button">Send</string>
CHAPTER 8: POSIX Socket API: Connection-Oriented Communication
215
<string name="message edit">Message</string>
<string name="title activity local echo">Local Echo</string>
<string name="local port edit">Port Name</string>
</resources>
The application’s user interface layouts will be referring to these common string resources.
Native Echo Module
The native echo module will provide the implementations of native socket methods to the Java
application. Using the Project Explorer view, expand the jni directory for native source files, and
double-click the Echo.cpp C++ source file. Replace its content as shown in Listing 8-3 with a set of
helper functions that will facilitate the implementation of the socket communication examples.
Listing 8-3. Content of jni/Echo.cpp File
// JNI
#include <jni.h>
// NULL
#include <stdio.h>
// va list, vsnprintf
#include <stdarg.h>
// errno
#include <errno.h>
// strerror r, memset
#include <string.h>
// socket, bind, getsockname, listen, accept, recv, send, connect
#include <sys/types.h>
#include <sys/socket.h>
// sockaddr un
#include <sys/un.h>
// htons, sockaddr in
#include <netinet/in.h>
// inet ntop
#include <arpa/inet.h>
// close, unlink
#include <unistd.h>
216
CHAPTER 8: POSIX Socket API: Connection-Oriented Communication
// offsetof
#include <stddef.h>
// Max log message length
#define MAX LOG MESSAGE LENGTH 256
// Max data buffer size
#define MAX BUFFER SIZE 80
/**
* Logs the given message to the application.
*
* @param env JNIEnv interface.
* @param obj object instance.
* @param format message format and arguments.
*/
static void LogMessage(
JNIEnv* env,
jobject obj,
const char* format,
...)
{
// Cached log method ID
static jmethodID methodID = NULL;
// If method ID is not cached
if (NULL == methodID)
{
// Get class from object
jclass clazz = env->GetObjectClass(obj);
// Get the method ID for the given method
methodID = env->GetMethodID(clazz, "logMessage",
"(Ljava/lang/String;)V");
// Release the class reference
env->DeleteLocalRef(clazz);
}
// If method is found
if (NULL != methodID)
{
// Format the log message
char buffer[MAX LOG MESSAGE LENGTH];
va list ap;
va start(ap, format);
vsnprintf(buffer, MAX LOG MESSAGE LENGTH, format, ap);
va end(ap);
CHAPTER 8: POSIX Socket API: Connection-Oriented Communication
// Convert the buffer to a Java string
jstring message = env->NewStringUTF(buffer);
// If string is properly constructed
if (NULL != message)
{
// Log message
env->CallVoidMethod(obj, methodID, message);
// Release the message reference
env->DeleteLocalRef(message);
}
}
}
/**
* Throws a new exception using the given exception class
* and exception message.
*
* @param env JNIEnv interface.
* @param className class name.
* @param message exception message.
*/
static void ThrowException(
JNIEnv* env,
const char* className,
const char* message)
{
// Get the exception class
jclass clazz = env->FindClass(className);
// If exception class is found
if (NULL != clazz)
{
// Throw exception
env->ThrowNew(clazz, message);
// Release local class reference
env->DeleteLocalRef(clazz);
}
}
/**
* Throws a new exception using the given exception class
* and error message based on the error number.
*
* @param env JNIEnv interface.
* @param className class name.
* @param errnum error number.
*/
217
218
CHAPTER 8: POSIX Socket API: Connection-Oriented Communication
static void ThrowErrnoException(
JNIEnv* env,
const char* className,
int errnum)
{
char buffer[MAX LOG MESSAGE LENGTH];
// Get message for the error number
if (-1 == strerror r(errnum, buffer, MAX LOG MESSAGE LENGTH))
{
strerror r(errno, buffer, MAX LOG MESSAGE LENGTH);
}
// Throw exception
ThrowException(env, className, buffer);
}
You will be heavily modifying this source file as you work through this chapter by adding the
implementations of various socket functions.
Connection-Oriented Communication through TCP Sockets
Connection-oriented communication through TCP sockets provides a robust, error-free
communication medium for the applications. This type of connection maintains an open connection
throughout the lifetime of the communication, and handles the ordering and error checking of the
packets transparently from the application. You will modify the example Echo application to include
both TCP server and client activities in order to demonstrate the connection establishment and
message exchange using the sockets.
Echo Server Activity Layout
Using the Project Explorer view, expand the res directory for resources. Expand the layout
subdirectory, and create a new layout file called activity echo server.xml. Using the Editor view,
replace its content as shown in Listing 8-4.
Listing 8-4. Content of res/layout/activty_echo_server.xml File
<LinearLayout xmlns:android="http://schemas.android.com/apk/res/android"
xmlns:tools="http://schemas.android.com/tools"
android:layout width="match parent"
android:layout height="match parent"
android:orientation="vertical" >
<LinearLayout
android:layout width="match parent"
android:layout height="wrap content" >
CHAPTER 8: POSIX Socket API: Connection-Oriented Communication
<EditText
android:id="@+id/port edit"
android:layout width="wrap content"
android:layout height="wrap content"
android:layout weight="1"
android:hint="@string/port edit"
android:inputType="number" >
<requestFocus />
</EditText>
<Button
android:id="@+id/start button"
android:layout width="wrap content"
android:layout height="wrap content"
android:layout weight="1"
android:text="@string/start server button" />
</LinearLayout>
<ScrollView
android:id="@+id/log scroll"
android:layout width="match parent"
android:layout height="match parent" >
<TextView
android:id="@+id/log view"
android:layout width="match parent"
android:layout height="wrap content" />
</ScrollView>
</LinearLayout>
The Echo Server provides a simple user interface to obtain the port number to bind the server and
also to present the status updates from the native TCP server while it is running.
Echo Server Activity
Using the Project Explorer view, create a new class file called EchoServerActivity.java under the
src directory. Using the Editor view, populate its content as shown in Listing 8-5.
Listing 8-5. Content of EchoServerActivity.java File
package com.apress.echo;
/**
* Echo server.
*
* @author Onur Cinar
*/
219
220
CHAPTER 8: POSIX Socket API: Connection-Oriented Communication
public class EchoServerActivity extends AbstractEchoActivity {
/**
* Constructor.
*/
public EchoServerActivity() {
super(R.layout.activity echo server);
}
protected void onStartButtonClicked() {
Integer port = getPort();
if (port != null) {
ServerTask serverTask = new ServerTask(port);
serverTask.start();
}
}
/**
* Starts the TCP server on the given port.
*
* @param port
*
port number.
* @throws Exception
*/
private native void nativeStartTcpServer(int port) throws Exception;
/**
* Starts the UDP server on the given port.
*
* @param port
*
port number.
* @throws Exception
*/
private native void nativeStartUdpServer(int port) throws Exception;
/**
* Server task.
*/
private class ServerTask extends AbstractEchoTask {
/** Port number. */
private final int port;
/**
* Constructor.
*
* @param port
*
port number.
*/
public ServerTask(int port) {
this.port = port;
}
CHAPTER 8: POSIX Socket API: Connection-Oriented Communication
221
protected void onBackground() {
logMessage("Starting server.");
try {
nativeStartTcpServer(port);
} catch (Exception e) {
logMessage(e.getMessage());
}
logMessage("Server terminated.");
}
}
}
The EchoServerActivity acquires the necessary parameters from the user and starts the
nativeStartTcpServer function, native TCP client implementation, within a separate thread.
Implementing the Native TCP Server
Using the Project Explorer, select the EchoServerActivity, and then choose “Generate C and C++
Header File” from the External Tools menu to generate the native header files. Using the Project
Explorer, expand the jni sub-directory, and open the Echo.cpp source file in the editor. Go the top
of the source file, and insert the include statement shown in Listing 8-6 in order to include the native
method declarations.
Listing 8-6. Including the EchoServerActivity Header File
#include "com apress echo EchoServerActivity.h"
Creating a Socket: socket
A socket is represented through an integer called the socket descriptor. Socket API functions, other
than the one creating the socket itself, require a valid socket descriptor in order to function. A socket
can be created using the socket function.
int socket(int domain, int type, int protocol);
The socket function requires the following arguments to be provided in order to create a new socket:
Domain specifies the socket domain where the communication will take place
and selects the protocol family that will be used. At the time of this writing, the
following protocol families are supported on Android platform:
PF_LOCAL: Host-internal communication protocol family. This protocol family enables
applications that are running physically on the same device to use the Socket APIs to
communicate with each other.
PF_INET: Internet version 4 protocol family. This protocol family enables applications
to communicate with applications that are running elsewhere on the network.
222
CHAPTER 8: POSIX Socket API: Connection-Oriented Communication
Type specifies the semantics of the communication. The following major socket
types are supported:
SOCK_STREAM: Stream socket type provides connection-oriented communication
using the TCP protocol.
SOCK_DGRAM: Datagram socket type provides connectionless communication using
the UDP protocol.
Protocol specifies the protocol that will be used. For most protocol families and
types, there is only one possible protocol that can be used. In order to pick the
default protocol, this argument can be set to zero.
If the socket is properly created, the socket function returns the associated socket descriptor;
otherwise, it returns -1 and the errno global variable is set to the appropriate error.
Using the Editor view, append the NewTcpSocket helper function to the Echo.cpp native module
source file, as shown in Listing 8-7.
Listing 8-7. NewTcpSocket Native Helper Function
/**
* Constructs a new TCP socket.
*
* @param env JNIEnv interface.
* @param obj object instance.
* @return socket descriptor.
* @throws IOException
*/
static int NewTcpSocket(JNIEnv* env, jobject obj)
{
// Construct socket
LogMessage(env, obj, "Constructing a new TCP socket...");
int tcpSocket = socket(PF INET, SOCK STREAM, 0);
// Check if socket is properly constructed
if (-1 == tcpSocket)
{
// Throw an exception with error number
ThrowErrnoException(env, "java/io/IOException", errno);
}
return tcpSocket;
}
This helper function creates a new TCP socket and throws a java.lang.IOException in case
of a failure.
CHAPTER 8: POSIX Socket API: Connection-Oriented Communication
223
Binding the Socket to an Address: bind
When a socket is created through the socket function, it exists in a socket family space without
having a protocol address assigned to it. For clients to be able to locate and connect to this
socket, it needs to be bound to an address first. A socket can be bound to an address using the
bind function.
int bind(int socketDescriptor, const struct sockaddr* address,
socklen t addressLength);
The bind function requires the following arguments in order to bind the socket to an address:
The socket descriptor specifies the socket instance that will be bound to the
given address.
The address specifies the protocol address where the socket will be bound.
The address length specifies the size of the protocol address structure that is
passed to the function.
Depending on the protocol family, a different flavor of protocol address gets used. For PF_INET
protocol family, the sockaddr_in structure is used to specify the protocol address. The definition of
sockaddr_in structure is shown in Listing 8-8.
Listing 8-8. The sockaddr_in address Structure
struct sockaddr in {
sa family t sin family;
unsigned short int sin port;
struct in addr sin addr;
}
If the socket is properly bound, the bind function returns zero; otherwise, it returns -1 and the errno
global variable is set to the appropriate error.
Using the Editor view, append the BindSocketToPort helper function to the Echo.cpp native module
source file, as shown in Listing 8-9.
Listing 8-9. BindSocketToPort Native Helper Function
/**
* Binds socket to a port number.
*
* @param env JNIEnv interface.
* @param obj object instance.
* @param sd socket descriptor.
* @param port port number or zero for random port.
* @throws IOException
*/
224
CHAPTER 8: POSIX Socket API: Connection-Oriented Communication
static void BindSocketToPort(
JNIEnv* env,
jobject obj,
int sd,
unsigned short port)
{
struct sockaddr in address;
// Address to bind socket
memset(&address, 0, sizeof(address));
address.sin family = PF INET;
// Bind to all addresses
address.sin addr.s addr = htonl(INADDR ANY);
// Convert port to network byte order
address.sin port = htons(port);
// Bind socket
LogMessage(env, obj, "Binding to port %hu.", port);
if (-1 == bind(sd, (struct sockaddr*) &address, sizeof(address)))
{
// Throw an exception with error number
ThrowErrnoException(env, "java/io/IOException", errno);
}
}
If the port number is set to zero in the address structure, the bind function allocates the first
available port number for the socket. This port number can be retrieved from the socket using the
getsockname function. Using the Editor view, append the GetSocketPort helper function to the Echo.
cpp native module source file, as shown Listing 8-10.
Listing 8-10. GetSocketPort Native Helper Function
/**
* Gets the port number socket is currently binded.
*
* @param env JNIEnv interface.
* @param obj object instance.
* @param sd socket descriptor.
* @return port number.
* @throws IOException
*/
static unsigned short GetSocketPort(
JNIEnv* env,
jobject obj,
int sd)
{
unsigned short port = 0;
CHAPTER 8: POSIX Socket API: Connection-Oriented Communication
225
struct sockaddr in address;
socklen t addressLength = sizeof(address);
// Get the socket address
if (-1 == getsockname(sd,
(struct sockaddr*) &address,
&addressLength))
{
// Throw an exception with error number
ThrowErrnoException(env, "java/io/IOException", errno);
}
else
{
// Convert port to host byte order
port = ntohs(address.sin port);
LogMessage(env, obj, "Binded to random port %hu.", port);
}
return port;
}
As you may have noticed, the port number does not get passed directly into the sockaddr in
structure. Instead, the htons function is used to make a conversion first. This is due to the difference
between the host and the network byte ordering.
Network Byte Ordering
Different machine architectures use different conventions for ordering and representing data at the
hardware level. This is known as the machine byte ordering, or endianness. For example:
Big-endian byte ordering stores the most significant byte first.
Little-endian byte ordering stores the least significant byte first.
Machines with different byte ordering conventions cannot directly exchange data. In order to enable
machines with different byte order conventions to communicate over the network, the Internet
Protocol declares big-endian byte ordering as the official network byte ordering convention for data
transmission.
As a Java virtual machine already uses big-endian byte ordering, this could be the first time you are
hearing about the endianness of data. Java applications do not have to do any conversions on the
data while communicating over the network. In contrast, as native components are not executed by
the Java virtual machine, they use the machine byte ordering.
ARM and x86 machine architectures use little-endian byte ordering.
MIPS machine architecture uses big-endian byte ordering.
When communicating over the network, the native code should do the necessary conversion
between the machine byte ordering and network byte ordering.
226
CHAPTER 8: POSIX Socket API: Connection-Oriented Communication
The socket library provides a set of convenience functions to enable native applications to
transparently handle the byte ordering conversions. These functions are declared through the
sys/endian.h header file.
#include <sys/endian.h>
The following convenience functions are provided through this header file:
htons function converts an unsigned short from host machine byte ordering to
network byte ordering.
ntohs function does the reverse of htons by converting an unsigned short from
network byte ordering to host machine byte ordering.
htonl function converts an unsigned integer from host machine byte ordering to
network byte ordering.
ntohl function does the reverse of htonl by converting an unsigned integer from
network byte ordering to host machine byte ordering.
Using these convenience methods is highly beneficial as their implementations get defined during
compile-time based on the target machine architecture. If the machine byte ordering is different
from the network byte ordering, these functions get mapped to the proper conversion functions;
otherwise, they don’t perform any operation on the data. Throughout this chapter, you will be
frequently using these convenience functions.
Having the port bound to an address is not enough to have client connect to it. The application
should explicitly start listening on the socket for incoming connections.
Listen for Incoming Connections: listen
Listening on a socket is achieved through the listen function.
int listen(int socketDescriptor, int backlog);
The listen function requires the following arguments to be provided in order to start listening for
incoming connections on the given socket:
The socket descriptor specifies the socket instance that the application wants to
start listening for incoming connections.
The backlog specifies the size of the queue to hold the pending incoming
connections. If the application is busy serving a client, other incoming
connections get queued up to the number of pending connections specified
by the backlog. When the backlog limit is reached, other incoming connections
get refused.
CHAPTER 8: POSIX Socket API: Connection-Oriented Communication
227
If the function is successful, it returns zero; otherwise, it returns -1 and the errno global variable is
set to the appropriate error. Using the Editor view, append the ListenOnSocket helper function to the
Echo.cpp native module source file, as shown in Listing 8-11.
Listing 8-11. ListenOnSocket Native Helper Function
/**
* Listens on given socket with the given backlog for
* pending connections. When the backlog is full, the
* new connections will be rejected.
*
* @param env JNIEnv interface.
* @param obj object instance.
* @param sd socket descriptor.
* @param backlog backlog size.
* @throws IOException
*/
static void ListenOnSocket(
JNIEnv* env,
jobject obj,
int sd,
int backlog)
{
// Listen on socket with the given backlog
LogMessage(env, obj,
"Listening on socket with a backlog of %d pending connections.",
backlog);
if (-1 == listen(sd, backlog))
{
// Throw an exception with error number
ThrowErrnoException(env, "java/io/IOException", errno);
}
}
Listening for incoming connections through the listen function simply puts the incoming
connections into a queue and waits for the application to explicitly accept them.
Accepting Incoming Connections: accept
The accept function is used to explicitly pull an incoming connection from the listen queue and to
accept it.
int accept(int socketDescriptor, struct sockaddr* address, socklen t* addressLength);
228
CHAPTER 8: POSIX Socket API: Connection-Oriented Communication
The accept function is a blocking function. If there is no pending incoming connection request in
the listen queue, it puts the calling process into a suspended state until a new incoming connection
arrives. The accept function requires the following arguments to be provided in order to accept a
pending incoming connection:
The socket descriptor specifies the socket instance that the application wants to
accept a pending incoming connection on.
The address pointer provides an address structure that gets filled with the
protocol address of the connecting client. If this information is not needed by the
application, it can be set to NULL.
The address length pointer provides memory space for the size of the protocol
address of the connecting client to be filled in. If this information is not needed,
it can be set to NULL.
If the accept request is successful, the function returns the client socket descriptor that will be used
to interact with this connection instance; otherwise, it returns -1 and the errno global variable is set
to the appropriate error.
In the example application you will obtain the information about the connecting client and display
that information on the activity. Using the Editor view, append the LogAddress helper function to the
Echo.cpp native module source file, as shown in Listing 8-12, that will be used to extract and display
the necessary information.
Listing 8-12. LogAddress Native Helper Function
/**
* Logs the IP address and the port number from the
* given address.
*
* @param env JNIEnv interface.
* @param obj object instance.
* @param message message text.
* @param address adress instance.
* @throws IOException
*/
static void LogAddress(
JNIEnv* env,
jobject obj,
const char* message,
const struct sockaddr in* address)
{
char ip[INET ADDRSTRLEN];
// Convert the IP address to string
if (NULL == inet ntop(PF INET,
&(address->sin addr),
ip,
INET ADDRSTRLEN))
CHAPTER 8: POSIX Socket API: Connection-Oriented Communication
229
{
// Throw an exception with error number
ThrowErrnoException(env, "java/io/IOException", errno);
}
else
{
// Convert port to host byte order
unsigned short port = ntohs(address->sin port);
// Log address
LogMessage(env, obj, "%s %s:%hu.", message, ip, port);
}
}
Using the Editor view, append the AcceptOnSocket helper function to the Echo.cpp native module
source file, as shown in Listing 8-13. This function will be used by the application to accept pending
incoming connections, as mentioned earlier.
Listing 8-13. AcceptOnSocket Native Helper Function
/**
* Blocks and waits for incoming client connections on the
* given socket.
*
* @param env JNIEnv interface.
* @param obj object instance.
* @param sd socket descriptor.
* @return client socket.
* @throws IOException
*/
static int AcceptOnSocket(
JNIEnv* env,
jobject obj,
int sd)
{
struct sockaddr in address;
socklen t addressLength = sizeof(address);
// Blocks and waits for an incoming client connection
// and accepts it
LogMessage(env, obj, "Waiting for a client connection...");
int clientSocket = accept(sd,
(struct sockaddr*) &address,
&addressLength);
// If client socket is not valid
if (-1 == clientSocket)
230
CHAPTER 8: POSIX Socket API: Connection-Oriented Communication
{
// Throw an exception with error number
ThrowErrnoException(env, "java/io/IOException", errno);
}
else
{
// Log address
LogAddress(env, obj, "Client connection from ", &address);
}
return clientSocket;
}
Upon accepting a pending connection, the new socket descriptor that is returned by the accept
function can be used to exchange data with the client.
Receiving Data from the Socket: recv
Receiving data from a socket is achieved through the recv function.
ssize t recv(int socketDescriptor, void* buffer, size t bufferLength,
int flags);
The recv function is also a blocking function. If there is no data that can be received from the given
socket, it puts the calling process into suspended state until data becomes available. The recv
function requires the following arguments to be provided in order to accept a pending incoming
connection:
The socket descriptor specifies the socket instance that the application wants to
receive data from.
The buffer pointer to a memory address that will be filled with the data received
from the socket.
The buffer length specifies the size of the buffer. The recv function will only fill
the buffer up to this size and return.
Flags specify additional flags for receiving.
If the recv function is successful, it returns the number of bytes received from the socket; otherwise,
it returns -1 and the errno global variable is set to the appropriate error. If the function returns zero,
it indicates that the socket is disconnected. Using the Editor view, append the ReceiveFromSocket
helper function to the Echo.cpp native module source file, as shown in Listing 8-14.
Listing 8-14. ReceiveFromSocket Native Helper Function
/**
* Block and receive data from the socket into the buffer.
*
* @param env JNIEnv interface.
* @param obj object instance.
* @param sd socket descriptor.
CHAPTER 8: POSIX Socket API: Connection-Oriented Communication
231
* @param buffer data buffer.
* @param bufferSize buffer size.
* @return receive size.
* @throws IOException
*/
static ssize t ReceiveFromSocket(
JNIEnv* env,
jobject obj,
int sd,
char* buffer,
size t bufferSize)
{
// Block and receive data from the socket into the buffer
LogMessage(env, obj, "Receiving from the socket...");
ssize t recvSize = recv(sd, buffer, bufferSize - 1, 0);
// If receive is failed
if (-1 == recvSize)
{
// Throw an exception with error number
ThrowErrnoException(env, "java/io/IOException", errno);
}
else
{
// NULL terminate the buffer to make it a string
buffer[recvSize] = NULL;
// If data is received
if (recvSize > 0)
{
LogMessage(env, obj, "Received %d bytes: %s",
recvSize, buffer);
}
else
{
LogMessage(env, obj, "Client disconnected.");
}
}
return recvSize;
}
The ReceiveFromSocket function uses the recv function to receive data from the given socket into the
given buffer. In case of an error, it throws an IOException. Sending data through a socket is done in a
similar way.
232
CHAPTER 8: POSIX Socket API: Connection-Oriented Communication
Sending Data to the Socket: send
Sending data to the socket is achieved through the send function.
ssize t send(int socketDescriptor, void* buffer, size t bufferLength,
int flags);
Like the recv function, the send function is also a blocking function. If the socket is busy sending
data, it puts the calling process into a suspended state until the socket becomes available to
transmit the data. The send function requires the following arguments to be provided in order to
accept a pending incoming connection:
The socket descriptor specifies the socket instance that the application wants to
send data to.
The buffer pointer to a memory address that will be sent through the given
socket.
The buffer length specifies the size of the buffer. The send function will only
transmit the buffer up to this size and return.
Flags specify additional flags for sending.
If the sending operation is successful, the send function returns the number of bytes transmitted;
otherwise, it returns -1 and the errno global variable is set to the appropriate error. Like the recv
function, if the function returns zero, it indicates that the socket is disconnected. Using the Editor
view, append the SendToSocket helper function to the Echo.cpp native module source file, as shown
in Listing 8-15.
Listing 8-15. SendToSocket Native Helper Function
/**
* Send data buffer to the socket.
*
* @param env JNIEnv interface.
* @param obj object instance.
* @param sd socket descriptor.
* @param buffer data buffer.
* @param bufferSize buffer size.
* @return sent size.
* @throws IOException
*/
static ssize t SendToSocket(
JNIEnv* env,
jobject obj,
int sd,
const char* buffer,
size t bufferSize)
{
// Send data buffer to the socket
LogMessage(env, obj, "Sending to the socket...");
ssize t sentSize = send(sd, buffer, bufferSize, 0);
CHAPTER 8: POSIX Socket API: Connection-Oriented Communication
233
// If send is failed
if (-1 == sentSize)
{
// Throw an exception with error number
ThrowErrnoException(env, "java/io/IOException", errno);
}
else
{
if (sentSize > 0)
{
LogMessage(env, obj, "Sent %d bytes: %s", sentSize, buffer);
}
else
{
LogMessage(env, obj, "Client disconnected.");
}
}
return sentSize;
}
The SendToSocket function uses the send function to send data from the given buffer to the given
socket. In case of an error while sending the data, it throws an IOException. Now all necessary
helper functions are ready to implement the TCP server flow.
Native TCP Server Method
The nativeStartTcpServer native method is the core of the TCP Echo application. Using the Editor
view, append the nativeStartTcpServer native method to the Echo.cpp native module source file, as
shown in Listing 8-16.
Listing 8-16. The nativeStartTcpServer Native Method
void Java com apress echo EchoServerActivity nativeStartTcpServer(
JNIEnv* env,
jobject obj,
jint port)
{
// Construct a new TCP socket.
int serverSocket = NewTcpSocket(env, obj);
if (NULL == env->ExceptionOccurred())
{
// Bind socket to a port number
BindSocketToPort(env, obj, serverSocket, (unsigned short) port);
if (NULL != env->ExceptionOccurred())
goto exit;
234
CHAPTER 8: POSIX Socket API: Connection-Oriented Communication
// If random port number is requested
if (0 == port)
{
// Get the port number socket is currently binded
GetSocketPort(env, obj, serverSocket);
if (NULL != env->ExceptionOccurred())
goto exit;
}
// Listen on socket with a backlog of 4 pending connections
ListenOnSocket(env, obj, serverSocket, 4);
if (NULL != env->ExceptionOccurred())
goto exit;
// Accept a client connection on socket
int clientSocket = AcceptOnSocket(env, obj, serverSocket);
if (NULL != env->ExceptionOccurred())
goto exit;
char buffer[MAX BUFFER SIZE];
ssize t recvSize;
ssize t sentSize;
// Receive and send back the data
while (1)
{
// Receive from the socket
recvSize = ReceiveFromSocket(env, obj, clientSocket,
buffer, MAX BUFFER SIZE);
if ((0 == recvSize) || (NULL != env->ExceptionOccurred()))
break;
// Send to the socket
sentSize = SendToSocket(env, obj, clientSocket,
buffer, (size t) recvSize);
if ((0 == sentSize) || (NULL != env->ExceptionOccurred()))
break;
}
// Close the client socket
close(clientSocket);
}
exit:
if (serverSocket > 0)
{
close(serverSocket);
}
}
CHAPTER 8: POSIX Socket API: Connection-Oriented Communication
235
Through the native helper functions that are specified in this section, it opens up a server socket on
the port provided through the arguments and waits for incoming connections. When an incoming
connection request arrives, it accepts the connection, starts receiving data on client socket, and
echoes back the bytes to the client.
Echo Client Activity Layout
Using the Project Explorer view, expand the res directory for resources. Expand the layout
subdirectory, and create a new layout file called activity echo client.xml. Using the Editor view,
replace its content as shown in Listing 8-17.
Listing 8-17. Content of res/layout/activity_echo_client.xml File
<LinearLayout xmlns:android="http://schemas.android.com/apk/res/android"
xmlns:tools="http://schemas.android.com/tools"
android:layout width="match parent"
android:layout height="match parent"
android:orientation="vertical" >
<EditText
android:id="@+id/ip edit"
android:layout width="match parent"
android:layout height="wrap content"
android:hint="@string/ip edit" >
<requestFocus />
</EditText>
<EditText
android:id="@+id/port edit"
android:layout width="match parent"
android:layout height="wrap content"
android:hint="@string/port edit"
android:inputType="number" />
<EditText
android:id="@+id/message edit"
android:layout width="match parent"
android:layout height="wrap content"
android:hint="@string/message edit" />
<Button
android:id="@+id/start button"
android:layout width="wrap content"
android:layout height="wrap content"
android:text="@string/start client button" />
236
CHAPTER 8: POSIX Socket API: Connection-Oriented Communication
<ScrollView
android:id="@+id/log scroll"
android:layout width="match parent"
android:layout height="0dip"
android:layout weight="1.0" >
<TextView
android:id="@+id/log view"
android:layout width="match parent"
android:layout height="wrap content" />
</ScrollView>
</LinearLayout>
The Echo client provides a simple user interface to obtain the remote IP address, port number, and
the message payload from the user, and also to present the status updates from the native TCP
client while it is running.
Echo Client Activity
Using the Project Explorer view, create a new class file called EchoClientActivity.java under the
src directory. Using the Editor view, populate its content as shown in Listing 8-18.
Listing 8-18. Content of EchoClientActivity.java File
package com.apress.echo;
import android.os.Bundle;
import android.widget.EditText;
/**
* Echo client.
*
* @author Onur Cinar
*/
public class EchoClientActivity extends AbstractEchoActivity {
/** IP address. */
private EditText ipEdit;
/** Message edit. */
private EditText messageEdit;
/**
* Constructor.
*/
public EchoClientActivity() {
super(R.layout.activity echo client);
}
CHAPTER 8: POSIX Socket API: Connection-Oriented Communication
public void onCreate(Bundle savedInstanceState) {
super.onCreate(savedInstanceState);
ipEdit = (EditText) findViewById(R.id.ip edit);
messageEdit = (EditText) findViewById(R.id.message edit);
}
protected void onStartButtonClicked() {
String ip = ipEdit.getText().toString();
Integer port = getPort();
String message = messageEdit.getText().toString();
if ((0 != ip.length()) && (port != null)
&& (0 != message.length())) {
ClientTask clientTask = new ClientTask(ip, port, message);
clientTask.start();
}
}
/**
* Starts the TCP client with the given server IP address and
* port number, and sends the given message.
*
* @param ip
*
IP address.
* @param port
*
port number.
* @param message
*
message text.
* @throws Exception
*/
private native void nativeStartTcpClient(String ip, int port,
String message) throws Exception;
/**
* Client task.
*/
private class ClientTask extends AbstractEchoTask {
/** IP address to connect. */
private final String ip;
/** Port number. */
private final int port;
/** Message text to send. */
private final String message;
/**
* Constructor.
*
* @param ip
*
IP address to connect.
237
238
CHAPTER 8: POSIX Socket API: Connection-Oriented Communication
* @param port
*
port number to connect.
* @param message
*
message text to send.
*/
public ClientTask(String ip, int port, String message) {
this.ip = ip;
this.port = port;
this.message = message;
}
protected void onBackground() {
logMessage("Starting client.");
try {
nativeStartTcpClient(ip, port, message);
} catch (Throwable e) {
logMessage(e.getMessage());
}
logMessage("Client terminated.");
}
}
}
The EchoClientActivity acquires the necessary parameters from the user and starts the
nativeStartTcpClient function, native TCP client implementation, within a separate thread.
Implementing the Native TCP Client
Using the Project Explorer, select the EchoClientActivity, and then choose “Generate C and C++
Header File” from the External Tools menu to generate the native header files. Using the Project
Explorer, open the Echo.cpp source file in the editor. Go the top of the source file, and insert the
include statement shown in Listing 8-19.
Listing 8-19. Including the EchoClientActivity Header File
#include "com apress echo EchoClientActivity.h"
The header file contains the function declaration of the nativeStartTcpClient function. Prior to
implementing this function, a helper function for the connecting to an address needs to be defined.
Connect to Address: connect
Connecting a socket to a server socket by providing the protocol address is achieved through the
connect function.
int connect(int socketDescriptor, const struct sockaddr *address,
socklen t addressLength);
CHAPTER 8: POSIX Socket API: Connection-Oriented Communication
239
The connect function requires the following arguments to be provided in order to accept a pending
incoming connection:
The socket descriptor specifies the socket instance that the application wants to
connect to a protocol address.
The address specifies the protocol address that the socket will connect.
The address length specifies the length of the address structure provided.
If the connection attempt is successful, the connect function returns zero; otherwise, it returns
-1 and the errno global variable is set to the appropriate error. Using the Editor view, append the
ConnectToAddress helper function to the Echo.cpp native module source file, as shown in Listing 8-20.
Listing 8-20. ConnectToAddress Native Helper Function
/**
* Connects to given IP address and given port.
*
* @param env JNIEnv interface.
* @param obj object instance.
* @param sd socket descriptor.
* @param ip IP address.
* @param port port number.
* @throws IOException
*/
static void ConnectToAddress(
JNIEnv* env,
jobject obj,
int sd,
const char* ip,
unsigned short port)
{
// Connecting to given IP address and given port
LogMessage(env, obj, "Connecting to %s:%uh...", ip, port);
struct sockaddr in address;
memset(&address, 0, sizeof(address));
address.sin family = PF INET;
// Convert IP address string to Internet address
if (0 == inet aton(ip, &(address.sin addr)))
{
// Throw an exception with error number
ThrowErrnoException(env, "java/io/IOException", errno);
}
else
{
// Convert port to network byte order
address.sin port = htons(port);
240
CHAPTER 8: POSIX Socket API: Connection-Oriented Communication
// Connect to address
if (-1 == connect(sd, (const sockaddr*) &address,
sizeof(address)))
{
// Throw an exception with error number
ThrowErrnoException(env, "java/io/IOException", errno);
}
else
{
LogMessage(env, obj, "Connected.");
}
}
}
Upon connecting the socket to a protocol address, the POSIX Socket API functions can be used to
exchange data between the application and the server.
Native TCP Client Method
The nativeStartTcpClient native method is the client piece of the TCP Echo application. Using the
Editor view, append the nativeStartTcpClient native method to the Echo.cpp native module source
file, as shown in Listing 8-21.
Listing 8-21. The nativeStartTcpClient Native Method
void Java com apress echo EchoClientActivity nativeStartTcpClient(
JNIEnv* env,
jobject obj,
jstring ip,
jint port,
jstring message)
{
// Construct a new TCP socket.
int clientSocket = NewTcpSocket(env, obj);
if (NULL == env->ExceptionOccurred())
{
// Get IP address as C string
const char* ipAddress = env->GetStringUTFChars(ip, NULL);
if (NULL == ipAddress)
goto exit;
// Connect to IP address and port
ConnectToAddress(env, obj, clientSocket, ipAddress,
(unsigned short) port);
// Release the IP address
env->ReleaseStringUTFChars(ip, ipAddress);
// If connection was successful
if (NULL != env->ExceptionOccurred())
goto exit;
CHAPTER 8: POSIX Socket API: Connection-Oriented Communication
241
// Get message as C string
const char* messageText = env->GetStringUTFChars(message, NULL);
if (NULL == messageText)
goto exit;
// Get the message size
jsize messageSize = env->GetStringUTFLength(message);
// Send message to socket
SendToSocket(env, obj, clientSocket, messageText, messageSize);
// Release the message text
env->ReleaseStringUTFChars(message, messageText);
// If send was not successful
if (NULL != env->ExceptionOccurred())
goto exit;
char buffer[MAX BUFFER SIZE];
// Receive from the socket
ReceiveFromSocket(env, obj, clientSocket, buffer,
MAX BUFFER SIZE);
}
exit:
if (clientSocket > -1)
{
close(clientSocket);
}
}
Through the native helper functions that are specified in this section, it opens up a socket and
connects it to the IP address and the port number provided through the arguments. When the
connection is established, it sends the provided message text through the socket, switches to
receiving mode, and displays the data received back from the socket. If everything is successful, the
same data should be echoed back from the TCP Echo server. Prior to executing the application, the
Echo TCP client and the server activities need to be added to the Android Manifest file.
Updating the Android Manifest
Using the Project Explorer view, open the AndroidManifest.xml in the editor, and replace its content
as shown in Listing 8-22.
Listing 8-22. AndroidManifest.xml File
<manifest xmlns:android="http://schemas.android.com/apk/res/android"
package="com.apress.echo"
android:versionCode="1"
android:versionName="1.0" >
242
CHAPTER 8: POSIX Socket API: Connection-Oriented Communication
<uses-sdk
android:minSdkVersion="8"
android:targetSdkVersion="15" />
<uses-permission android:name="android.permission.INTERNET" />
<application
android:icon="@drawable/ic launcher"
android:label="@string/app name"
android:theme="@style/AppTheme" >
<activity
android:name=".EchoServerActivity"
android:label="@string/title activity echo server"
android:launchMode="singleTop" >
<intent-filter>
<action android:name="android.intent.action.MAIN" />
<category
android:name="android.intent.category.LAUNCHER" />
</intent-filter>
</activity>
<activity
android:name=".EchoClientActivity"
android:label="@string/title activity echo client"
android:launchMode="singleTop" >
<intent-filter>
<action android:name="android.intent.action.MAIN" />
<category
android:name="android.intent.category.LAUNCHER" />
</intent-filter>
</activity>
</application>
</manifest>
Rebuild the Android project to reflect the changes. The example application is now ready to
be tested.
Running the TCP Sockets Example
In order to test the TCP Echo application, you will need two Android Emulator instances. As
described in Chapter XX, create a new Android Emulator instance with the exact same settings. Start
the EchoClientActivity and the EchoServerActivity on two separate Android Emulator instances
using the Eclipse IDE.
Configuring the Echo TCP Server
The EchoServerActivity will provide a simple user interface, as shown in Figure 8-1, allowing you to
specify the port number that the TCP server will be accepting connections on.
z
CHAPTER 8: POSIX Socket API: Connection-Oriented Communication
243
Figure 8-1. Echo TCP server user interface
Set the Port Number to 0. This will request a random port assignment from the
bind function.
Click the Start Server button to start the Echo TCP server.
Upon starting the TCP server, the bind function will assign the first available port number to the
server socket, and this port number will be reported on the screen, as shown in Figure 8-2.
Figure 8-2. Echo TCP server binded to a random port number
Take a note of this port number because you will need it in order to have the Echo TCP Client to
connect to the TCP Server.
Interconnecting Emulators for TCP
As both the Echo TCP Client and the TCP Server are running on two separate Android Emulator
instances, they cannot directly establish a connection among them. Android Emulators run in a
sandboxed environment as a virtual device on a virtual network. Applications running on the Android
Emulator can only communicate with the machine hosting the Android Emulator process. The TCP
port number should be bridged through the host machine in order to enable the TCP Client and the
TCP Server to communicate. This can be achieved through the port forwarding functionality that is
provided by the Android Debug Bridge (adb).
Open a command prompt or a Terminal window based on your operating system, as shown in
Listing 8-23, and issue the following command by substituting the <port number> with the port
number that you have noted earlier, and the <emulator name> with the device name of the Android
Emulator instance.
244
CHAPTER 8: POSIX Socket API: Connection-Oriented Communication
Listing 8-23. Port Forwarding Through adb
adb –s <emulator-name> forward tcp:<port number> tcp:<port number>
This will map the <port number> on the Android Emulator to the <port number> on the host machine.
Any incoming connections to the <port number> on the host machine will get forward to the <port
number> on Android Emulator through the adb. Port forwarding is a runtime setting, and it will be
cleared once the Android Emulator stops.
Note If you are using a firewall application, make sure that the port number is open for incoming
connections.
Configuring the Echo TCP Client
The EchoClientActivity will provide a simple user interface, as shown in Figure 8-3, allowing you
to specify the IP address, the port number of the TCP server to be connected, and the message to
be transmitted.
Figure 8-3. Echo TCP client user interface
Follow these steps to start the TCP echo client application:
1.
Set the IP Address to 10.0.2.2. This is the static IP address that can be used
to communicate with the host machine from the Android Emulator.
2.
Set the Port Number to the port number you noted earlier.
3.
Set the Message to test, or any other string that you would like to send to
the server.
4.
Click the Start Client button to start the Echo TCP client.
CHAPTER 8: POSIX Socket API: Connection-Oriented Communication
245
Upon clicking the Start Client button, the Echo TCP client will connect to the Echo TCP server that
is running on the other Android Emulator instance, and it will send the message payload. Both the
client and the server activities will display the socket events and the message transmitted, as shown
in Figure 8-4.
Figure 8-4. Echo TCP client exchanging messages
Connection-oriented protocols like TCP provides an error-free communication channel to the
applications requiring a reliable medium of communication in order to properly function. This is
achieved at the expense of maintaining an open connection. Certain applications can still perform
without having to maintain a connection channel, such as the media applications. The POSIX Socket
API also provides support for connectionless communication in the native layer.
Summary
In this chapter, you explored the POSIX Socket APIs that are provided through the Bionic library for
connection-oriented communication. You learned about both client and server modes using the TCP
protocol. The next two chapters of the book continue the discussion of POSIX Socket APIs. The next
chapter will start exploring the POSIX Socket APIs for connectionless communication.
Chapter
9
POSIX Socket API:
Connectionless Communication
In the previous chapter, you started exploring the POSIX Socket APIs by going through an example
of a connection-oriented communication application using the TCP protocol. In this chapter, you
will learn how to establish a connectionless communication between the Android application and
a remote end-point. Connectionless communication through UDP sockets provides a lightweight
communication medium tailed for real-time applications that can work with unordered and lost
data packets. This type of connection does not maintain an open connection. Packets get sent
to the target protocol address as needed. Since there is no connection in place, packets may get
lost or get out of order during transition. The protocol does not provide any service to handle such
situations. Throughout this chapter you will continue to modify the example Echo application to
include both UDP server and client native implementations.
Adding Native UDP Server Method to Echo Server Activity
In order to experiment with the UDP-based Echo server, the EchoServerActivity needs to be
modified to include a new native method, as shown in Listing 9-1.
Listing 9-1. The nativeStartUdpServer Method Added
public class EchoServerActivity extends AbstractEchoActivity {
...
/**
* Starts the UDP server on the given port.
*
* @param port
*
port number.
247
248
CHAPTER 9: POSIX Socket API: Connectionless Communication
* @throws Exception
*/
private native void nativeStartUdpServer(int port) throws Exception;
/**
* Server task.
*/
private class ServerTask extends AbstractEchoTask {
...
protected void onBackground() {
logMessage("Starting server.");
try {
nativeStartUdpServer(port);
} catch (Exception e) {
logMessage(e.getMessage());
}
logMessage("Server terminated.");
}
}
}
This method now needs to be implemented in the Echo.cpp native source file.
Implementing the Native UDP Server
Using the Project Explorer, select the EchoServerActivity, and then choose "Generate C and C++
Header File" from the External Tools menu to update the generated the native header files.
New UDP Socket: socket
The same socket function can be used to create a socket using the UDP protocol. This is achieved
by instructing the function to create a datagram socket instead of a stream socket. In order to make
it possible for you to experiment with both types of connections simultaneously, instead of modifying
the existing native helper function, a new native function will be defined to create the UDP sockets.
Using the Editor view, append the NewUdpSocket helper function to the Echo.cpp native module
source file, as shown in Listing 9-2.
Listing 9-2. NewUdpSocket Native Helper Function
/**
* Constructs a new UDP socket.
*
* @param env JNIEnv interface.
* @param obj object instance.
* @return socket descriptor.
* @throws IOException
*/
CHAPTER 9: POSIX Socket API: Connectionless Communication
249
static int NewUdpSocket(JNIEnv* env, jobject obj)
{
// Construct socket
LogMessage(env, obj, "Constructing a new UDP socket...");
int udpSocket = socket(PF INET, SOCK DGRAM, 0);
// Check if socket is properly constructed
if (−1 == udpSocket)
{
// Throw an exception with error number
ThrowErrnoException(env, "java/io/IOException", errno);
}
return udpSocket;
}
The NewUdpSocket is a simple function that creates a new datagram socket and returns the socket
descriptor. In case of an error while creating the socket, the socket function returns -1 and sets the
errno global variable to the error code. The NewUdpSocket function throws an IOException with an
error message mapped to that error code. Once the socket is created, it can be used to send and
receive datagrams.
Receive Datagram from Socket: recvfrom
Receiving data from a UDP socket is achieved through the recvfrom function instead of the recv
function that you used earlier.
ssize t recvfrom(int socketDescriptor, void* buffer, size t bufferLength,
int flags, struct sockaddr* address, socklen t* addressLength);
Like the recv function, the recvfrom function is also a blocking function. If there is no data that
can be received from the given socket, it puts the calling process into suspended state until data
becomes available. The recvfrom function requires the following arguments to be provided in order
to accept a pending incoming connection:
Socket descriptor specifies the socket instance that the application wants to
receive data from.
Buffer pointer to a memory address that will be filled with the data received from
the socket.
Buffer length specifies the size of the buffer. The recv function will only fill the
buffer up to this size and return.
Flags specify additional flags for receiving.
Address pointer provides an address structure that gets filled with the protocol
address of the client sending the packet. If this information is not needed by the
application, it can be set to NULL.
Address length pointer provides memory space for the size of the protocol address
of the client to be filled in. If this information is not needed, it can be set to NULL.
250
CHAPTER 9: POSIX Socket API: Connectionless Communication
If the recvfrom function is successful, it returns the number of bytes received from the socket;
otherwise, it returns -1 and the errno global variable is set to the appropriate error. Using the Editor
view, append the ReceiveDatagramFromSocket helper function to the Echo.cpp native module source
file, as shown Listing 9-3.
Listing 9-3. ReceiveDatagramFromSocket Native Helper Function
/**
* Block and receive datagram from the socket into
* the buffer, and populate the client address.
*
* @param env JNIEnv interface.
* @param obj object instance.
* @param sd socket descriptor.
* @param address client address.
* @param buffer data buffer.
* @param bufferSize buffer size.
* @return receive size.
* @throws IOException
*/
static ssize t ReceiveDatagramFromSocket(
JNIEnv* env,
jobject obj,
int sd,
struct sockaddr in* address,
char* buffer,
size t bufferSize)
{
socklen t addressLength = sizeof(struct sockaddr in);
// Receive datagram from socket
LogMessage(env, obj, "Receiving from the socket...");
ssize t recvSize = recvfrom(sd, buffer, bufferSize, 0,
(struct sockaddr*) address,
&addressLength);
// If receive is failed
if (−1 == recvSize)
{
// Throw an exception with error number
ThrowErrnoException(env, "java/io/IOException", errno);
}
else
{
// Log address
LogAddress(env, obj, "Received from", address);
// NULL terminate the buffer to make it a string
buffer[recvSize] = NULL;
CHAPTER 9: POSIX Socket API: Connectionless Communication
251
// If data is received
if (recvSize > 0)
{
LogMessage(env, obj, "Received %d bytes: %s",
recvSize, buffer);
}
}
return recvSize;
}
The ReceiveDatagramFromSocket function relies on the recvfrom function to receive a datagram from
the given socket into the provided data buffer. In case of an error, it throws an IOException with the
appropriate error message. Sending a datagram is also done in a similar way.
Send Datagram to Socket: sendto
Like the recvfrom function, sending data to a UDP socket is achieved through the sendto function
instead of the send function.
ssize t sendto(int socketDescriptor, const void* buffer,
size t bufferSize, int flags, const struct sockaddr* address,
socklen t addressLength);
Like the send function, the sendto function is also a blocking function. If the socket is busy sending
data, it puts the calling process into suspended state until the socket becomes available for
transmitting the data. The sendto function requires the following arguments to be provided in order
to accept a pending incoming connection:
Socket descriptor specifies the socket instance that the application wants to
send data to.
Buffer pointer to a memory address that will be sent through the given socket.
Buffer length specifies the size of the buffer. The sendto function will only
transmit the buffer up to this size and return.
Flags specify additional flags for sending.
Address specifies the protocol address for the target server.
Address length is the size of the protocol address structure that is passed to the
function.
If the sending operation is successful, the send function returns the number of bytes transmitted;
otherwise, it returns -1 and the errno global variable is set to the appropriate error. Using the Editor
view, append the SendDatagramToSocket helper function to the Echo.cpp native module source file, as
shown in Listing 9-4.
252
CHAPTER 9: POSIX Socket API: Connectionless Communication
Listing 9-4. SendDatagramToSocket Native Helper Function
/**
* Sends datagram to the given address using the given socket.
*
* @param env JNIEnv interface.
* @param obj object instance.
* @param sd socket descriptor.
* @param address remote address.
* @param buffer data buffer.
* @param bufferSize buffer size.
* @return sent size.
* @throws IOException
*/
static ssize t SendDatagramToSocket(
JNIEnv* env,
jobject obj,
int sd,
const struct sockaddr in* address,
const char* buffer,
size t bufferSize)
{
// Send data buffer to the socket
LogAddress(env, obj, "Sending to", address);
ssize t sentSize = sendto(sd, buffer, bufferSize, 0,
(const sockaddr*) address,
sizeof(struct sockaddr in));
// If send is failed
if (−1 == sentSize)
{
// Throw an exception with error number
ThrowErrnoException(env, "java/io/IOException", errno);
}
else if (sentSize > 0)
{
LogMessage(env, obj, "Sent %d bytes: %s", sentSize, buffer);
}
return sentSize;
}
The SendDatagramToSocket function relies on the sendto function to send the given data buffer as a
datagram through the given socket. Upon implementing these helper functions, you are now ready
to implement the UDP Server function.
CHAPTER 9: POSIX Socket API: Connectionless Communication
253
Native UDP Server Method
The nativeStartUdpServer uses these methods to provide UDP-based Echo server. Using the Editor
view, append the nativeStartUdpServer helper function to the Echo.cpp native module source file, as
shown in Listing 9-5.
Listing 9-5. The nativeStartUdpServer Native Method
void Java com apress echo EchoServerActivity nativeStartUdpServer(
JNIEnv* env,
jobject obj,
jint port)
{
// Construct a new UDP socket.
int serverSocket = NewUdpSocket(env, obj);
if (NULL == env->ExceptionOccurred())
{
// Bind socket to a port number
BindSocketToPort(env, obj, serverSocket, (unsigned short) port);
if (NULL != env->ExceptionOccurred())
goto exit;
// If random port number is requested
if (0 == port)
{
// Get the port number socket is currently binded
GetSocketPort(env, obj, serverSocket);
if (NULL != env->ExceptionOccurred())
goto exit;
}
// Client address
struct sockaddr in address;
memset(&address, 0, sizeof(address));
char buffer[MAX BUFFER SIZE];
ssize t recvSize;
ssize t sentSize;
// Receive from the socket
recvSize = ReceiveDatagramFromSocket(env, obj, serverSocket,
&address, buffer, MAX BUFFER SIZE);
if ((0 == recvSize) || (NULL != env->ExceptionOccurred()))
goto exit;
// Send to the socket
sentSize = SendDatagramToSocket(env, obj, serverSocket,
&address, buffer, (size t) recvSize);
}
254
CHAPTER 9: POSIX Socket API: Connectionless Communication
exit:
if (serverSocket > 0)
{
close(serverSocket);
}
}
As the UDP-based server is connectionless, it does not use neither of listen or accept functions.
Adding Native UDP Client Method to Echo Client Activity
In order to experiment with the UDP-based Echo client, the EchoClientActivity needs to be
modified to include a new native method, as shown in Listing 9-6.
Listing 9-6. The nativeStartUdpClient Method Added
public class EchoClientActivity extends AbstractEchoActivity {
...
/**
* Starts the UDP client with the given server IP address
* and port number.
*
* @param ip
*
IP address.
* @param port
*
port number.
* @param message
*
message text.
* @throws Exception
*/
private native void nativeStartUdpClient(String ip, int port,
String message)
throws Exception;
/**
* Client task.
*/
private class ClientTask extends AbstractEchoTask {
...
protected void onBackground() {
logMessage("Starting client.");
try {
nativeStartUdpClient(ip, port, message);
} catch (Throwable e) {
logMessage(e.getMessage());
}
CHAPTER 9: POSIX Socket API: Connectionless Communication
255
logMessage("Client terminated.");
}
}
}
After adding the native method declaration to the ClientTask, compile the application project to
generate the class files. You will now implement the native implementation for this function.
Implementing the Native UDP Client
Using the Project Explorer, select the EchoClientActivity, and then choose "Generate C and C++
Header File" from the external tools menu to update the generated the native header files.
Native UDP Client Method
Using the Editor view, append the nativeStartUdpClient helper function to the Echo.cpp native
module source file, as shown in Listing 9-7.
Listing 9-7. The nativeStartUdpClient Native Method
void Java com apress echo EchoClientActivity nativeStartUdpClient(
JNIEnv* env,
jobject obj,
jstring ip,
jint port,
jstring message)
{
// Construct a new UDP socket.
int clientSocket = NewUdpSocket(env, obj);
if (NULL == env->ExceptionOccurred())
{
struct sockaddr in address;
memset(&address, 0, sizeof(address));
address.sin family = PF INET;
// Get IP address as C string
const char* ipAddress = env->GetStringUTFChars(ip, NULL);
if (NULL == ipAddress)
goto exit;
// Convert IP address string to Internet address
int result = inet aton(ipAddress, &(address.sin addr));
// Release the IP address
env->ReleaseStringUTFChars(ip, ipAddress);
// If conversion is failed
256
CHAPTER 9: POSIX Socket API: Connectionless Communication
if (0 == result)
{
// Throw an exception with error number
ThrowErrnoException(env, "java/io/IOException", errno);
goto exit;
}
// Convert port to network byte order
address.sin port = htons(port);
// Get message as C string
const char* messageText = env->GetStringUTFChars(message, NULL);
if (NULL == messageText)
goto exit;
// Get the message size
jsize messageSize = env->GetStringUTFLength(message);
// Send message to socket
SendDatagramToSocket(env, obj, clientSocket, &address,
messageText, messageSize);
// Release the message text
env->ReleaseStringUTFChars(message, messageText);
// If send was not successful
if (NULL != env->ExceptionOccurred())
goto exit;
char buffer[MAX BUFFER SIZE];
// Clear address
memset(&address, 0, sizeof(address));
// Receive from the socket
ReceiveDatagramFromSocket(env, obj, clientSocket, &address,
buffer, MAX BUFFER SIZE);
}
exit:
if (clientSocket > 0)
{
close(clientSocket);
}
}
The nativeStartUdpServer function starts by creating a new UDP socket. Later it sends the given
message text as a datagram to the given IP address and the port number. Upon sending the
datagram, it starts waiting for receiving the response datagram.
CHAPTER 9: POSIX Socket API: Connectionless Communication
257
Running the UDP Sockets Example
The Echo UDP server and the client can be tested using the same way as the Echo TCP server and
client. Run both the server and the client on two different Android Emulator instances. Start the Echo
UDP server with port number set to zero. Once the UDP server is started, note the assigned port number.
Interconnecting the Emulators for UDP
In order set up port forwarding for UDP ports, you need to use the Android Emulator console.
1.
First find out the console port number for the Android Emulator instance by
looking at its window title; note the four digit number displayed on its title
bar, such as 5556.
2.
Using your favorite telnet client, connect to localhost and the port number
that you noted in the previous step.
3.
Issuing the following command on the Android Emulator console by
substituting the <port number> with the port number that the Echo UDP
Server to setup UDP port redirection:
redir add udp:<port number>:<port number>
Note If you are using a firewall application, make sure that the port number is opened through the
firewall in order to receive the incoming packets.
This will map the UDP port <port number> on the Android Emulator to the UDP port <port number>
on the host machine. Any incoming connections to the <port number> on the host machine will get
forward to the <port number> on Android Emulator. Port forwarding is a runtime setting, and it will be
cleared once the Android Emulator stops.
Starting the Echo UDP Client
Configure the Echo UDP client with the same set of parameters that are provided for the Echo TCP
client, and click the Start Client button. Upon clicking the Start Client button, the Echo TCP client
will send the message payload. Both the client and the server activities will display the socket events
and the message transmitted, as shown in Figure 9-1.
258
CHAPTER 9: POSIX Socket API: Connectionless Communication
Figure 9-1. Echo UDP client exchanging messages
Summary
In this chapter, you explored the POSIX Socket APIs for connectionless communication. You saw
both client and server modes using the UDP protocols. By building on the top of the core concepts
that were presented in this and the previous chapter, you can virtually implement any networking
protocol to communicate from the native space with various services on the network. The next
chapter will demonstrate how the POSIX Socket APIs can be used to establish a communication
channel locally on the device between two applications.
Chapter
10
POSIX Socket API:
Local Communication
In the previous two chapters, you explored the POSIX Socket API as it pertains to communication
with remote parties. The POSIX Socket API can also be used to establish a communication channel
locally on the device between two applications, or between the native and Java layers. In this chapter,
you will continue to build on top of the Echo example application. The local socket communication
example will demonstrate the following:
Local socket server implementation in the native layer.
Local client implementation in the Java layer.
Establishing a local socket communication between two applications.
Echo Local Activity Layout
Using the Project Explorer view, expand the res directory for resources. Expand the layout
subdirectory, and create a new layout file called activity echo local.xml. Using the Editor view,
replace its content as shown in Listing 10-1.
Listing 10-1. Content of res/layout/activity_echo_local.xml File
<LinearLayout xmlns:android="http://schemas.android.com/apk/res/android"
xmlns:tools="http://schemas.android.com/tools"
android:layout width="match parent"
android:layout height="match parent"
android:orientation="vertical" >
259
260
CHAPTER 10: POSIX Socket API: Local Communication
<EditText
android:id="@+id/port edit"
android:layout width="match parent"
android:layout height="wrap content"
android:hint="@string/local port edit" >
<requestFocus />
</EditText>
<EditText
android:id="@+id/message edit"
android:layout width="match parent"
android:layout height="wrap content"
android:hint="@string/message edit" />
<Button
android:id="@+id/start button"
android:layout width="wrap content"
android:layout height="wrap content"
android:text="@string/start client button" />
<ScrollView
android:id="@+id/log scroll"
android:layout width="match parent"
android:layout height="0dip"
android:layout weight="1.0" >
<TextView
android:id="@+id/log view"
android:layout width="match parent"
android:layout height="wrap content" />
</ScrollView>
</LinearLayout>
The Echo Local provides a simple user interface to obtain the port name to bind the local socket, the
message to send, and also to present the status updates from the native local socket server and the
client while they are running.
Echo Local Activity
As described earlier, using the Project Explorer view, create a new class file called
LocalSocketActivity.java under the src directory. Using the Editor view, populate its content as
shown in Listing 10-2.
CHAPTER 10: POSIX Socket API: Local Communication
Listing 10-2. LocalSocketActivity.java File
package com.apress.echo;
import
import
import
import
java.io.File;
java.io.InputStream;
java.io.OutputStream;
java.nio.charset.Charset;
import
import
import
import
android.net.LocalSocket;
android.net.LocalSocketAddress;
android.os.Bundle;
android.widget.EditText;
/**
* Echo local socket server and client.
*
* @author Onur Cinar
*/
public class LocalEchoActivity extends AbstractEchoActivity {
/** Message edit. */
private EditText messageEdit;
/**
* Constructor.
*/
public LocalEchoActivity() {
super(R.layout.activity local echo);
}
public void onCreate(Bundle savedInstanceState) {
super.onCreate(savedInstanceState);
messageEdit = (EditText) findViewById(R.id.message edit);
}
protected void onStartButtonClicked() {
String name = portEdit.getText().toString();
String message = messageEdit.getText().toString();
if ((name.length() > 0) && (message.length() > 0)) {
String socketName;
// If it is a filesystem socket, prepend the
// application files directory
if (isFilesystemSocket(name)) {
File file = new File(getFilesDir(), name);
socketName = file.getAbsolutePath();
} else {
socketName = name;
}
261
262
CHAPTER 10: POSIX Socket API: Local Communication
ServerTask serverTask = new ServerTask(socketName);
serverTask.start();
ClientTask clientTask = new ClientTask(socketName, message);
clientTask.start();
}
}
/**
* Check if name is a filesystem socket.
*
* @param name
*
socket name.
* @return filesystem socket.
*/
private boolean isFilesystemSocket(String name) {
return name.startsWith("/");
}
/**
* Starts the Local UNIX socket server binded to given name.
*
* @param name
*
socket name.
* @throws Exception
*/
private native void nativeStartLocalServer(String name)
throws Exception;
/**
* Starts the local UNIX socket client.
*
* @param port
*
port number.
* @param message
*
message text.
* @throws Exception
*/
private void startLocalClient(String name, String message)
throws Exception {
// Construct a local socket
LocalSocket clientSocket = new LocalSocket();
try {
// Set the socket namespace
LocalSocketAddress.Namespace namespace;
if (isFilesystemSocket(name)) {
namespace = LocalSocketAddress.Namespace.FILESYSTEM;
} else {
namespace = LocalSocketAddress.Namespace.ABSTRACT;
}
CHAPTER 10: POSIX Socket API: Local Communication
// Construct local socket address
LocalSocketAddress address = new LocalSocketAddress(
name, namespace);
// Connect to local socket
logMessage("Connecting to " + name);
clientSocket.connect(address);
logMessage("Connected.");
// Get message as bytes
byte[] messageBytes = message.getBytes();
// Send message bytes to the socket
logMessage("Sending to the socket...");
OutputStream outputStream = clientSocket.getOutputStream();
outputStream.write(messageBytes);
logMessage(String.format("Sent %d bytes: %s",
messageBytes.length, message));
// Receive the message back from the socket
logMessage("Receiving from the socket...");
InputStream inputStream = clientSocket.getInputStream();
int readSize = inputStream.read(messageBytes);
String receivedMessage = new String(messageBytes,
0, readSize);
logMessage(String.format("Received %d bytes: %s",
readSize, receivedMessage));
// Close streams
outputStream.close();
inputStream.close();
} finally {
// Close the local socket
clientSocket.close();
}
}
/**
* Server task.
*/
private class ServerTask extends AbstractEchoTask {
/** Socket name. */
private final String name;
/**
* Constructor.
*
* @param name
*
socket name.
263
264
CHAPTER 10: POSIX Socket API: Local Communication
*/
public ServerTask(String name) {
this.name = name;
}
protected void onBackground() {
logMessage("Starting server.");
try {
nativeStartLocalServer(name);
} catch (Exception e) {
logMessage(e.getMessage());
}
logMessage("Server terminated.");
}
}
/**
* Client task.
*/
private class ClientTask extends Thread {
/** Socket name. */
private final String name;
/** Message text to send. */
private final String message;
/**
* Constructor.
*
* @parma name socket name.
* @param message
*
message text to send.
*/
public ClientTask(String name, String message) {
this.name = name;
this.message = message;
}
public void run() {
logMessage("Starting client.");
try {
startLocalClient(name, message);
} catch (Exception e) {
logMessage(e.getMessage());
}
logMessage("Client terminated.");
}
}
}
CHAPTER 10: POSIX Socket API: Local Communication
265
The LocalEchoActivity activity the local socket port, and the test message from the UI, and creates
two background tasks. The first task runs the native nativeStartLocalServer method which creates
a local server socket and waits for connections. The second task runs the startLocalClient Java
method which creates a local socket client using the Java based socket API to communicate with
the local socket server. As with the other examples, upon connecting to the server socket, the client
sends the test message and waits for the server to echo the test message back.
Implementing the Native Local Socket Server
Using the Project Explorer, select the LocalSocketActivty, and then choose “Generate C and C++
Header File” from the External Tools menu to generate the native header files. Using the Project
Explorer, expand the jni subdirectory, and open the Echo.cpp source file in the editor. Go the top of
the source file, and insert the include statement shown in Listing 10-3.
Listing 10-3. Including the LocalSocketActivity Header File
#include "com apress echo LocalEchoActivity.h"
The header file contains the nativeStartLocalServer native method declaration. Set of helper
functions needs to be implemented first, in order to facilitate the implementation of this native
method.
New Local Socket: socket
The same socket function can be used to create a local socket. This is achieved by instructing the
function to create the socket in the PF LOCAL protocol family. In order to make it possible for you to
experiment with all types of connections simultaneously, instead of modifying the existing native
helper function, a new native function will be defined to create the local sockets. Using the Editor
view, append the NewLocalSocket helper function to the Echo.cpp native module source file as shown
in Listing 10-4.
Listing 10-4. NewLocalSocket Native Helper Function
/**
* Constructs a new Local UNIX socket.
*
* @param env JNIEnv interface.
* @param obj object instance.
* @return socket descriptor.
* @throws IOException
*/
static int NewLocalSocket(JNIEnv* env, jobject obj)
{
// Construct socket
LogMessage(env, obj, "Constructing a new Local UNIX socket...");
int localSocket = socket(PF LOCAL, SOCK STREAM, 0);
266
CHAPTER 10: POSIX Socket API: Local Communication
// Check if socket is properly constructed
if (−1 == localSocket)
{
// Throw an exception with error number
ThrowErrnoException(env, "java/io/IOException", errno);
}
return localSocket;
}
The local socket family supports both stream- and datagram-based socket protocols. For this
example, you will be using the stream-based protocol.
Bind Local Socket to Name: bind
Same as the TCP and UDP sockets, once they are created, the local socket exists in a socket family
space without having a protocol address assigned to it. The same bind function can be used to bind
the local socket to a name that can be used by the clients to connect. The protocol address for the
local sockets is specified through the sockaddr un structure, as shown in Listing 10-5.
Listing 10-5. The sockaddr_un Address Structure
struct sockaddr un {
sa family t sun family;
char sun path[UNIX PATH MAX];
};
The local socket protocol addresses consists of only a name. It does not have an IP address or a
port number. Local socket names can be created under two different namespaces:
Abstract namespace is maintained within the local socket communication
protocol module. The socket name gets prefixed by a NULL character for binding
the socket name.
Filesystem namespace is maintained through the file system as a special socket
file. The socket name gets directly passed to the sockaddr un structure for
binding the socket name to the socket.
Using the Editor view, append the BindLocalSocketToName helper function to the Echo.cpp native
module source file, as shown in Listing 10-6.
Listing 10-6. BindLocalSocketToName Native Helper Function
/**
* Binds a local UNIX socket to a name.
*
* @param env JNIEnv interface.
* @param obj object instance.
* @param sd socket descriptor.
* @param name socket name.
* @throws IOException
*/
CHAPTER 10: POSIX Socket API: Local Communication
static void BindLocalSocketToName(
JNIEnv* env,
jobject obj,
int sd,
const char* name)
{
struct sockaddr un address;
// Name length
const size t nameLength = strlen(name);
// Path length is initiall equal to name length
size t pathLength = nameLength;
// If name is not starting with a slash it is
// in the abstract namespace
bool abstractNamespace = ('/' != name[0]);
//
//
//
if
{
Abstract namespace requires having the first
byte of the path to be the zero byte, update
the path length to include the zero byte
(abstractNamespace)
pathLength++;
}
// Check the path length
if (pathLength > sizeof(address.sun path))
{
// Throw an exception with error number
ThrowException(env, "java/io/IOException", "Name is too big.");
}
else
{
// Clear the address bytes
memset(&address, 0, sizeof(address));
address.sun family = PF LOCAL;
// Socket path
char* sunPath = address.sun path;
// First byte must be zero to use the abstract namespace
if (abstractNamespace)
{
*sunPath++ = NULL;
}
// Append the local name
strcpy(sunPath, name);
// Address length
socklen t addressLength =
267
268
CHAPTER 10: POSIX Socket API: Local Communication
(offsetof(struct sockaddr un, sun path))
+ pathLength;
// Unlink if the socket name is already binded
unlink(address.sun path);
// Bind socket
LogMessage(env, obj, "Binding to local name %s%s.",
(abstractNamespace) ? "(null)" : "",
name);
if (−1 == bind(sd, (struct sockaddr*) &address, addressLength))
{
// Throw an exception with error number
ThrowErrnoException(env, "java/io/IOException", errno);
}
}
}
The BindLocalSocketToName native function binds the given local socket to the given local socket
name. It checks if local socket name starts with a slash character to identify whether the abstract
or file system namespace to be used. Once the local socket is binded to a local socket name, the
application can start waiting and accepting incoming local connections.
Accept on Local Socket: accept
The same accept function is also used to accept incoming connections to the local socket, the
only difference being the client protocol address that is returned by the accept function will be a
socketaddr un type. Using the Editor view, append the AcceptOnLocalSocket helper function to the
Echo.cpp native module source file, as shown in Listing 10-7.
Listing 10-7. AcceptOnLocalSocket Native Helper Function
/**
* Blocks and waits for incoming client connections on the
* given socket.
*
* @param env JNIEnv interface.
* @param obj object instance.
* @param sd socket descriptor.
* @return client socket.
* @throws IOException
*/
static int AcceptOnLocalSocket(
JNIEnv* env,
jobject obj,
int sd)
{
// Blocks and waits for an incoming client connection
// and accepts it
CHAPTER 10: POSIX Socket API: Local Communication
LogMessage(env, obj, "Waiting for a client connection...");
int clientSocket = accept(sd, NULL, NULL);
// If client socket is not valid
if (−1 == clientSocket)
{
// Throw an exception with error number
ThrowErrnoException(env, "java/io/IOException", errno);
}
return clientSocket;
}
Native Local Socket Server
The nativeStartLocalServer native method is very similar to the nativeStartTcpServer native
method, the only difference being that it is using a local socket instead of a TCP socket. Using the
Editor view, append the nativeStartLocalServer helper function to the Echo.cpp native module
source file, as shown in Listing 10-8.
Listing 10-8. The nativeStartLocalServer Native Method
void Java com apress echo LocalEchoActivity nativeStartLocalServer(
JNIEnv* env,
jobject obj,
jstring name)
{
// Construct a new local UNIX socket.
int serverSocket = NewLocalSocket(env, obj);
if (NULL == env->ExceptionOccurred())
{
// Get name as C string
const char* nameText = env->GetStringUTFChars(name, NULL);
if (NULL == nameText)
goto exit;
// Bind socket to a port number
BindLocalSocketToName(env, obj, serverSocket, nameText);
// Release the name text
env->ReleaseStringUTFChars(name, nameText);
// If bind is failed
if (NULL != env->ExceptionOccurred())
goto exit;
// Listen on socket with a backlog of 4 pending connections
ListenOnSocket(env, obj, serverSocket, 4);
if (NULL != env->ExceptionOccurred())
goto exit;
269
270
CHAPTER 10: POSIX Socket API: Local Communication
// Accept a client connection on socket
int clientSocket = AcceptOnLocalSocket(env, obj, serverSocket);
if (NULL != env->ExceptionOccurred())
goto exit;
char buffer[MAX BUFFER SIZE];
ssize t recvSize;
ssize t sentSize;
// Receive and send back the data
while (1)
{
// Receive from the socket
recvSize = ReceiveFromSocket(env, obj, clientSocket,
buffer, MAX BUFFER SIZE);
if ((0 == recvSize) || (NULL != env->ExceptionOccurred()))
break;
// Send to the socket
sentSize = SendToSocket(env, obj, clientSocket,
buffer, (size t) recvSize);
if ((0 == sentSize) || (NULL != env->ExceptionOccurred()))
break;
}
// Close the client socket
close(clientSocket);
}
exit:
if (serverSocket > 0)
{
close(serverSocket);
}
}
The nativeStartLocalServer native method relies on the helper functions that you have defined
earlier. It create a local socket and binds it to the given name. It starts waiting for local connections
and simply echoes back the received bytes. Both the server and client parts of the local socket
communication application is now implemented.
Adding Local Echo Activity to Manifest
The Echo local activity needs to be added to the Android Manifest file in order to be used. Using the
Project Explorer view, open up the AndroidManifest.xml in editor, and modify its content as shown
in Listing 10-9.
CHAPTER 10: POSIX Socket API: Local Communication
Listing 10-9. Local Echo Activity Added to AndroidManifest.xml File
<manifest xmlns:android="http://schemas.android.com/apk/res/android"
package="com.apress.echo"
android:versionCode="1"
android:versionName="1.0" >
<activity
android:name=".LocalEchoActivity"
android:label="@string/title_activity_local_echo" >
<intent-filter>
<action android:name="android.intent.action.MAIN" />
<category
android:name="android.intent.category.LAUNCHER" />
</intent-filter>
</activity>
</manifest>
Running the Local Sockets Example
Since both the server and the client portions of the local socket example are part of the same
activity, it can be tested on a single Android Emulator instance by following these steps.
1.
Start the local socket activity on the Android Emulator.
2.
Set the Socket Name to /file to create the local socket in the filesystem
namespace.
3.
Set the Message to the text that will be transmitted.
4.
Click the Start button to start both the client and the server.
The socket events and the messages will be displayed as shown in Figure 10-1.
271
272
CHAPTER 10: POSIX Socket API: Local Communication
Figure 10-1. Local echo client and server exchanging messages
Asynchronous I/O
As mentioned, most of the socket APIs are blocking function calls. These functions suspend the calling
process until a certain condition is met, such as data becoming available on the socket for the read
operation. The asynchronous I/O support for the sockets is provided through the select function.
Unlike the other socket APIs that can operate on only one socket descriptor at any given time, the
select function can take more than one socket descriptor and monitor their states simultaneously.
The function blocks until either a monitored event occurs or the specified timeout is reached.
To use the select function, the sys/select.h header file should be included first.
#include <sys/select.h>
The select function requires the following arguments to be provided:
int select(int nfds, fd set* readfds, fd set* writefds,
fd set* exceptfds, struct timeval* timeout);
The nfds specifies the highest numbered descriptor plus one. The select
function will monitor descriptors including to this number.
The readfds set lists the descriptors that will be monitored for readability.
The writefs set lists the descriptors that will be monitored for writability.
The exceptfds set lists the descriptors that will be monitored for any type of
error.
The timeout specifies the maximum interval to block the current process for the
selection to complete. If this is not necessary, it can be set to NULL.
CHAPTER 10: POSIX Socket API: Local Communication
273
If the selection is successful, the select function returns the number of ready descriptors; otherwise
-1 is returned and the errno is set to the error.
The lists of descriptors are provided to the select function through the fd set structure.
struct fd set readfds;
In order to manipulate the list of descriptors, the following set of macros are provided:
FD_ZERO macro takes a pointer to the fd set structure and clears it.
FD_SET macro takes a pointer to the fd set structure and adds a descriptor to
the set.
FD_CLR macro takes a pointer to the fd set structure and removes a descriptor
from the set.
FD_ISSET macro can be used after the selection completes to check if a
descriptor is part of the set that the select function returned.
Summary
In this chapter, you explored the POSIX Socket APIs pertaining to local socket communication on the
same device. This chapter briefly introduced the asynchronous I/O capabilities for the POSIX Socket
API. Throughout the last three chapters (including this one), you learned the fundamental concepts
and the APIs that are offered by Bionic to develop networking applications in the native layer. With
this information, any networking protocol can easily be implemented on the native layer.
Chapter
11
C++ Support
In the previous chapters you explored the functionality that is offered by the Bionic C standard library.
Bionic provides frequently needed basic constructs and a common abstract interface to interact with
the functionality provided through the operating system and the hardware. Compared to the Java
framework, the extent of generic constructs that are offered by Bionic is fairly minimal. In addition
to the standard C library, the C++ ISO standard specifies an additional standard library for the C++
programming language, known as the C++ standard library. This library provides several generic
containers, strings, streams, and everyday utility functions. Through the building bricks that it provides,
the C++ standard library simplifies the native development by allowing the developers to focus on the
actual application logic rather than developing the constructs that are necessary to implement the
logic. This takes C++ development to a higher level of productivity and promotes code reuse.
In this chapter you will start exploring the C++ runtime support that is provided through the Android
platform and the Android NDK. This chapter will emphasize the following key topics:
Different available C++ runtimes
Availability of exception and RTTI support
Overview of C++ standard library concepts
Thread safety of C++ runtime
C++ runtime debug mode
Supported C++ Runtimes
The Android platform comes with a very minimal C++ runtime support library, called the system
runtime. This runtime does not provide any of the following features:
C++ standard library
Exceptions support
RTTI support
275
276
CHAPTER 11: C++ Support
Android NDK provides additional C++ runtime libraries to compliment the system runtime in order to
compensate a subset of these missing features. Comparison between the available C++ runtimes is
shown in Table 11-1.
Table 11-1. Comparison of Supported C++ Runtimes
C++ Runtime
C++ Exceptions Support
C++ RTTI Support
C++ Standard Library
System
No
No
No
GAbi++
No
Yes
No
STLport
No
Yes
Yes
GNU STL
Yes
Yes
Yes
GAbi++ C++ Runtime
The GAbi++ C++ runtime is an experimental, minimalistic runtime that provides RTTI support on
the top of the same set of features provided by the system runtime. It is available as both static and
shared libraries.
STLport C++ Runtime
STLport is an open-source, multiplatform C++ standard library implementation. It provides a
complete set of C++ standard library headers and support for RTTI. At the time of this writing,
STLport C++ runtime support in Android NDK is based on STLport version 5.2.0. STLport is
available as both static and shared libraries. It is provided under a royalty-free license for use in both
commercial and open-source projects.
GNU STL C++ Runtime
The GNU Standard C++ Library, also known as libstdc++-v3, is the most complete standard C++
runtime available through Android NDK. It is an ongoing open-source project to implement ISO
standard C++ library.
Both the C++ exceptions and C++ RTTI are supported through the GNU standard C++ runtime. If the
native code does require any of these features, it should be explicitly mentioned through the build
system variables as described in the C++ exceptions and C++ RTTI sections in this chapter.
The GNU Standard C++ Library is available as both static and shared libraries through the Android
NDK. Different from the other components of the Android NDK components, it is distributed under
the GNU General Public License version 3, with the addition of the GCC Runtime Library Exception.
CHAPTER 11: C++ Support
277
Specifying the C++ Runtime
The Android NDK build system variable APP STL can be used to specify which C++ runtime library
should be used by the native Android project. The APP STL variable is an application-scope variable
that can be only defined in the Application.mk build file in the jni sub-directory, as shown in
Listing 11-1.
Listing 11-1. Content of jni/Application.mk File Selecting the C++ Runtime
APP ABI := armeabi armeabi-v7a
...
APP_STL := system
The APP STL variable can take a single value, the name of the C++ runtime to use. At the time of this
writing, the following values are supported by the APP STL variable:
system: Default minimal system C++ runtime. If APP STL is not set, the system
runtime gets used by default.
gabi++ static: GAbi++ runtime as a static library.
gabi++ shared: GAbi++ runtime as a shared library.
stlport static: STLport runtime as static library.
stlport shared: STLport runtime as shared library.
gnustl static: GNU STL runtime as static library.
gnustl shared: GNU STL runtime as shared library.
Static vs. Shared Runtimes
For all supported C++ runtimes except the system runtime, both static and shared libraries are
provided. Application developers can choose to either statically or dynamically link the preferred
C++ runtime with their native modules.
Static library is only supported if the project contains a single native module.
Shared library is recommended if the project contains more than one native
module.
When the C++ runtime is used in shared library form, the application should explicitly load the
necessary shared library before loading any native module that depends on it. As shown in
Listing 11-2, you should load the libraries in reverse dependency order.
Listing 11-2. Explicitly Loading C++ Runtime Shared Library
static {
System.loadLibrary("strport_shared");
System.loadLibrary("module1");
System.loadLibrary("module2");
}
278
CHAPTER 11: C++ Support
This will load the stlport_shared shared library before loading the native modules, so that the C++
runtime is available while loading the modules that are linked to it. Otherwise, the loading of native
modules will fail.
C++ Exception Support
An exception is a mechanism to transfer control to a specific function, called an exception handler,
when an exceptional circumstance, such as an error, occurs in a wrapped block of code. Android
NDK provides support for C++ exceptions through the GNU STL C++ runtime. In order to use C++
exception with your native module, you need to first specify GNU STL in Application.mk, like so:
APP STL := gnustl shared
For compatibility and performance reasons, C++ exception support is disabled by default. The C++
exception support can be enabled for a single native module using the LOCAL CPP FEATURES build
system variable in the Android.mk build file, as shown in Listing 11-3.
Listing 11-3. Content of Android.mk Build File Enabling C++ Exceptions
LOCAL MODULE := module
...
LOCAL_CPP_FEATURES += exceptions
...
include $(BUILD SHARED LIBRARY)
The C++ exception support can be enabled for all native modules through the APP CPPFLAGS build
system variable in the Application.mk build file, as shown in Listing 11-4.
Listing 11-4. Content of Application.mk Build File Enabling C++ Exceptions
APP STL := gnustl shared
APP_CPPFLAGS += −fexceptions
This enables C++ exception support on all native modules that are part of the application. C++ RTTI
support can also be enabled in a similar way.
C++ RTTI Support
Run-Time Type Information (RTTI) is a mechanism that exposes object type information during
runtime. It is primarily used for performing safe typecasts. The dynamic cast and typeid operators
and the type info class are part of the RTTI. Android NDK provides support for RTTI through
GAbi++, STLport, or GNU STL C++ runtimes. In order to use RTTI with your native module, you need
to first specify the proper C++ runtime in Application.mk, like so:
APP STL := gnustl shared
For compatibility and performance reasons, C++ exception support is disabled by default. The C++
exception support can be enabled for a single native module using the LOCAL CPP FEATURES build
system variable in the Android.mk build file, as shown in Listing 11-5.
CHAPTER 11: C++ Support
279
Listing 11-5. Content of Android.mk Build File Enabling RTTI Support
LOCAL MODULE := module
...
LOCAL_CPP_FEATURES += rtti
...
include $(BUILD SHARED LIBRARY)
The C++ exception support can be enabled for all native modules through the APP CPPFLAGS build
system variable in the Application.mk build file, as shown Listing 11-6.
Listing 11-6. Content of Application.mk Build File Enabling RTTI Support
APP STL := gnustl shared
APP_CPPFLAGS += −frtti
This enables C++ RTTI support for all native modules that are part of the application.
C++ Standard Library Primer
As the C++ standard library specification is rather large, this section will only provide a brief overview
of the functionality that is provided. More information can be found at the respective C++ runtime
documentation:
STLport documentation at www.stlport.org/doc/
GNU STL documentation at http://gcc.gnu.org/onlinedocs/libstdc++/
Containers
A container is an object that stores other objects and provides methods for accessing and
manipulating its elements. Containers own the elements within, and the lifetime of an element
cannot exceed the lifetime of the container.
Sequence
A sequence is a variable-sized container whose elements are in a linear order. The following
sequence containers are supported by the C++ standard library:
vector supports random access to its elements. It provides constant time
insertion and removal of elements at the end, and linear time insertion and
removal of elements at other positions.
deque is similar to a vector, with the addition of constant time insertion of
removal of elements at the beginning of the sequence. This makes deque the
candidate as the base of queue implementations.
list is a doubly linked list. It supports both forward and backward traversal of
the sequence.
slist is a singly linked list. It supports only forward traversal of the sequence.
280
CHAPTER 11: C++ Support
Associative Container
An associative container is a variable-sized container that supports efficient retrieval of elements
through keys. Each element in an associative container must have a key. There are two main types of
associative containers: sorted associative container and hashed associative container.
Sorted Associative Container
A sorted associative container stores the keys in a case-insensitive ascending order. It guarantees
that the complexity of most operations is never worse than logarithmic. The following sorted
associative containers are supported by the C++ standard library:
set is a sorted simple associative container. All of its elements are sorted, and
no two elements are the same.
map is a sorted unique associative container. It associates elements with keys.
No two elements are the same.
multiset is a sorted, simple, and multiple associative container. All of its
elements are sorted, and duplicate elements are supported.
multimap is a sorted, multiple container. It associated elements with keys. There
is no limit on the number elements with the same key.
Hashed Associative Container
A hashed associative container is implemented based on a hash table. It does not store the elements
in any meaningful order. A hashed associative container is much faster than a sorted associative
container. It guarantees that the worst case complexity of most operations is linear in the size of the
container, average case complexity being constant time. This makes the hashed associative container
a perfect match when quick lookup of elements are needed. In contrast to sorted associative
containers, hashed associative containers do not store the elements and the keys in any meaningful
order. The following hashed associative containers are supported by the standard C++ library:
hashed set is a hashed simple associative container. It does not allow duplicate
elements. It is the best match when you would like to quickly check if an
element is in a set.
hash map is a hashed pair associative container. It associates elements with keys
and provides quick lookup of elements through these keys. Neither the elements
nor the keys are sorted in any meaningful order.
hash multiset is a hashed, simple, and multiple associative container.
It allows duplicate elements to be present in the container. As with other
hashed associative containers, it provides a fast lookup of elements through the
provided keys.
hash multimap is a hashed, pair, and multiple associative container. It associates
elements with keys and provides quick lookup. It allows duplicate elements with
the same key to be present in the container.
CHAPTER 11: C++ Support
281
Adaptors
Container adaptors are used to provide specialized container types based on the existing generic
containers. They achieve this by restricting the set of container functionality for the specialized type.
The following containers are provided through the adaptors:
stack is a last in, first out (LIFO) data structure. It is implemented on top of a
deque container by restricting its functionality through the adaptors.
queue is a first in, first out (FIFO) data structure. It is also implemented on top of
deque container by restricting its functionality through adaptors.
String
String is also a container type. It is represented as a sequence of characters. Besides the usual
methods that are available to a sequence, the string class also provides additional methods for
standard string operations, such as concatenation and search. Through the provided methods,
the string values can be converted to and from ordinary C strings.
Iterators
Iterators allow iterating over a range of objects or a container. They are the generalization of pointers,
but they are implemented as regular classes. It is a key component of C++ standard library, since
iterators are the interface between containers and the algorithms. Five base iterators are provided by the
C++ standard library based on the level of access and the type of the operation that will be performed:
Input iterator is used to refer to an element for reading its value.
Output iterator is used to modify the value of the object at the current location.
Forward iterator can be used in multiple algorithms as it corresponds to the
usual notion of a linear sequence of values, and it does not dictate either input
or output operation.
Bidirectional iterator can be used to traverse the given range of elements both in
forward and backward directions.
Random access iterator provides all of the operations of ordinary C pointer
arithmetic. It provides constant-time methods for traversing the elements in
arbitrary-sized steps.
Derivatives of these iterators are also provided through the adaptors, such as the reverse iterator and
the front insert iterator.
Algorithms
The C++ standard library also provides an extensive set of everyday functions to operate on a range
of elements, such as collections. Algorithms provide functions for searching, replacing, copying,
and extracting boundaries of elements in a given range of elements. They rely on iterators as the
interface to traverse through the containers.
282
CHAPTER 11: C++ Support
Thread Safety of C++ Runtime
All C++ runtime implementations are thread safe in the sense that simultaneous read access to
shared containers is safe; however, the application is responsible for ensuring mutual exclusion if
threads are both reading from and writing to shared containers.
C++ Runtime Debug Mode
The C++ runtimes are optimized for performance, so they perform little or no error checking. GNU
STL and STLport C++ runtimes provide a debug mode to make it easier to detect incorrect use
of the C++ standard library and obscure bugs in application code. The debug mode replaces the
unsafe standard containers and iterators with semantically equivalent but safe containers and
iterators. The following debugging facilities are provided:
Safe iterators track the container to which the iterator is attached. They perform
runtime checking of the iterator’s validity and ownership. Errors such as
dereferencing an iterator that points to a container that has been destructed are
detected immediately in debug mode.
Algorithm preconditions attempt to validate the input parameters to detect
errors immediately. Preconditions are validated using any additional information
that is available at runtime, such as the position of an iterator within a container.
GNU STL Debug Mode
GNU STL C++ runtime allows the debug mode to be enabled either for a specific portion of the code
or for the entire application.
Using Individual GNU STL Debugging Containers
In order to only enable debug mode for a specific portion of the code, GNU STL provides debug
mode-enabled counterparts for most containers in the gnu debug namespace instead of the std
namespace. These debugging containers can be included by prefixing the header file name with the
debug sub-directory, as shown in Listing 11-7.
Listing 11-7. Enabling GNU STL Debug Mode in a Portion of the Code
// Including debugging vector container
#include <debug/vector>
...
gnu debug::vector v;
Using the individual GNU STL debugging containers requires code modification, which is not
preferable in most cases. GNU STL debug mode can also be enabled during compile-time without
modifying the source code.
CHAPTER 11: C++ Support
283
Enabling GNU STL Debug Mode
The debug mode is controlled through the GLIBCXX DEBUG preprocessor symbol. This symbol can
be defined either through APP CFLAGS build system variable for all native modules in the project or
through LOCAL CFLAGS build system variable for a specific native module, as shown in Listing 11-8.
Listing 11-8. Enabling GNU STL Debug Mode for the Module
LOCAL MODULE := module
...
LOCAL_CFLAGS += −D_GLIBCXX_DEBUG
...
include $(BUILD SHARED LIBRARY)
The native module needs to be recompiled upon enabling or disabling the debug mode.
STLport Debug Mode
The debug mode is controlled through the STLP DEBUG preprocessor symbol. This symbol can be
defined either through the APP CFLAGS build system variable for all native modules in the project, or
through LOCAL CFLAGS build system variable for a specific native module, as shown in Listing 11-9.
Listing 11-9. Enabling STLport Debug Mode for Module
LOCAL MODULE := module
...
LOCAL_CFLAGS += −D_STLP_DEBUG
...
include $(BUILD SHARED LIBRARY)
The native module needs to be recompiled upon enabling or disabling the debug mode.
Redirecting Debug Mode Messages to Android Logs
By default, the error messages get displayed on the standard error output. STLport allows you to
override the default behavior by redirecting the error messages to a user-defined function. In order to
do so, follow these steps.
1.
Modify the Android.mk build file to define the STLP DEBUG MESSAGE
preprocessor macro, as shown in Listing 11-10.
Listing 11-10. Enabling User-Defined Debug Message Output Function
LOCAL MODULE :=
...
LOCAL CFLAGS +=
LOCAL_CFLAGS +=
LOCAL_LDLIBS +=
...
include $(BUILD
module
−D STLP DEBUG
−D_STLP_DEBUG_MESSAGE
−llog
SHARED LIBRARY)
284
CHAPTER 11: C++ Support
2.
Implement the stl debug message global function to redirect the error
messages to Android logs, as shown in Listing 11-11.
Listing 11-11. Implementation of __stl_debug_message Function
#include <stdarg.h>
#include <android/log.h>
...
void
stl debug message(const char* format str, ...)
{
va list ap;
va start(ap, format str);
android log vprint(ANDROID LOG FATAL, "STLport", format str, ap);
va end(ap);
}
Upon making this change, any STL debug message will get directed to the Android logs
with the tag STLport and the log level FATAL, and can be monitored through the logcat.
Summary
In this chapter you started exploring the C++ runtime support that is provided through the Android
platform and the Android NDK. Different C++ runtimes that are supported by the Android NDK were
compared in terms of the functionality that they offer, such C++ exception support and C++ RTTI
support. As the C++ standard library is rather large and complex, the thread safety and the debug
mode of C++ runtime was presented in this chapter to facilitate the troubleshooting pertaining to
invalid use of C++ components in native applications. In the following chapters, you will be seeing
examples of the C++ standard library functions in action.
Chapter
12
Native Graphics API
Needless to say, games and multimedia applications benefit from the Android NDK the most. These
applications rely on native code for performance-critical operations. Having the capability to render
graphics directly to the display from within the native layer is a highly crucial for such applications.
This chapter will explore the following set of native graphics APIs that are provided through the
Android NDK:
JNI Graphics API (aka Bitmap API)
OpenGL ES 1.x and 2.0
Native Window API
Throughout this chapter, you will be building an AVI video player application that will be used as a
test bed to demonstrate rendering of video frames through the various native graphics APIs that are
available.
Availability of Native Graphics API
Not all native graphics API are available for all versions of the Android operating system. These
APIs are introduced over time, and they are applicable to only a subset of Android versions. The
availability of native graphics API is shown in Table 12-1.
Table 12-1. Availability of Native Graphics API
Native Graphics API
Android Version
API Level
JNI Graphics API
2.2 and later
8 and later
OpenGL ES 1.x
1.6 and later
4 and later
OpenGL ES 2.0
2.0 and later
5 and later
Native Window
2.3 and later
9 and later
285
286
CHAPTER 12: Native Graphics API
Before going into the details of displaying graphics in native code, you will be creating a simple AVI
video player application.
Creating an AVI Video Player
The AVI video player application will act as a test bed. Throughout this chapter you will be expanding
this test application to experiment with the different native graphics APIs that are available in native
space. The example application will provide the following:
An Android application project with native code support.
A Statically linked AVI library, with basic functions exposed to the Java layer and
tied with activity lifecycle.
A simple GUI to specify the name of the AVI video file and the type of native
graphics API to use for playing.
Playing AVI video files requires parsing of AVI files. Although the AVI container format is not too
complicated, for the sake of simplicity, a third party AVI library called AVILib will be used to handle
the AVI files.
Make AVILib a NDK Import Module
The AVILib library comes as part of a larger open source project called Transcode. Follow these
steps to make AVILib available as a NDK import module.
1.
Using your favorite browser, navigate to http://tcforge.berlios.de/.
2.
At the time of this writing, the latest version of Transcode is 1.1.5. Follow the
Download link for transcode-1.1.5.tar.bz2 source archive file.
3.
Open up a Terminal window if you are using Mac OS or Linux, or Cygwin if
you are using Windows.
4.
Change the current directory to Android NDK import modules directory by
issuing the following on the command line:
cd $ANDROID NDK HOME/sources
5.
The transcode source archive file comes as a BZip2 compressed TAR
archive. By replacing <Download Location> with the actual directory name
that you have downloaded transcode-1.1.5.tar.bz2 into, issue the following
command to extract the compressed archive file:
tar jxvf <Download Location>/transcode-1.1.5.tar.bz2
6.
Change the current directory to the avilib subdirectory of Transcode by
issuing the following:
cd transcode-1.1.5/avilib
CHAPTER 12: Native Graphics API
7.
Open the platform.h header file in Eclipse. As shown in Listing 12-1, add the
bold lines around the include statement for the config.h header file.
Listing 12-1. Modified Content of AVILib platform.h Header File
#ifndef PLATFORM H
#define PLATFORM H
#ifdef HAVE_CONFIG_H
#include "config.h"
#endif
#ifdef OS DARWIN
#include <sys/uio.h>
#endif
You are making this change because the AVILib will be compiled through the
Android NDK build system, not with the Makefile that came with Transcode
project.
8.
The Android NDK build system requires the import module described in its
own Android.mk file. Using Eclipse, create a new Android.mk in the current
directory, with the content shown in Listing 12-2.
Listing 12-2. Android.mk Build File for AVILib Import Module
LOCAL PATH := $(call my-dir)
#
# Transcode AVILib
#
# Source files
MY AVILIB SRC FILES := avilib.c platform posix.c
# Include path to export
MY AVILIB C INCLUDES := $(LOCAL PATH)
#
# AVILib static
#
include $(CLEAR VARS)
# Module name
LOCAL MODULE := avilib static
# Source files
LOCAL SRC FILES := $(MY AVILIB SRC FILES)
# Include path to export
LOCAL EXPORT C INCLUDES := $(MY AVILIB C INCLUDES)
287
288
CHAPTER 12: Native Graphics API
# Build a static library
include $(BUILD STATIC LIBRARY)
#
# AVILib shared
#
include $(CLEAR VARS)
# Module name
LOCAL MODULE := avilib shared
# Source files
LOCAL SRC FILES := $(MY AVILIB SRC FILES)
# Include path to export
LOCAL EXPORT C INCLUDES := $(MY AVILIB C INCLUDES)
# Build a shared library
include $(BUILD SHARED LIBRARY)
This build script defines both a static and shared import module for the
AVILib library.
The AVILib library is now ready. In the next section, you will start implementing the AVI Player
example project that will use the AVILib library to play AVI-formatted video files.
Create the AVI Player Android Application
As described earlier in the book, launch the New Android Application Project dialog in Eclipse, and
follow these steps.
1.
Set Application Name to AVI Player.
2.
Set Project Name to AVI Player.
3.
Set Package Name to com.apress.aviplayer.
4.
Click the Next button to accept the default values for all other settings.
5.
Click the Next button to accept the default launcher icon.
6.
Uncheck the Create Activity and click the Finish button to create the empty
AVI Player project.
7.
In order to add native support, using the Project Explorer, launch the Add
Android Native Support wizard through the Android Tools context menu.
8.
Set Library Name to AVIPlayer.
9.
Click the Finish button to add native support to the AVI Player project.
CHAPTER 12: Native Graphics API
289
Create the AVI Player Main Activity
The main activity will provide a simple GUI to enable you to specify the name of the AVI video file
and the type of native graphics API to use for rendering. Using Eclipse, choose New ➤ Other from
the top menu bar, expand Android, select the Android Activity, and click Next to launch the New
Android Activity dialog. Then follow these steps.
1.
Select the Blank Activity template.
2.
Click the Next button to proceed.
3.
Set Activity Name to MainActivity.
4.
Click the Finish button to accept the default settings and to create the new
activity.
5.
Using the Project Explorer, open the AndroidManifest.xml manifest file, and
replace its content with code in the Listing 12-3.
Listing 12-3. Content of AndroidManifest.xml File
<manifest xmlns:android="http://schemas.android.com/apk/res/android"
package="com.apress.aviplayer"
android:versionCode="1"
android:versionName="1.0" >
<uses-sdk
android:minSdkVersion="8"
android:targetSdkVersion="15" />
<application
android:icon="@drawable/ic launcher"
android:label="@string/app name"
android:theme="@style/AppTheme" >
<activity
android:name=".MainActivity"
android:label="@string/main activity title" >
<intent-filter>
<action android:name="android.intent.action.MAIN" />
<category
android:name="android.intent.category.LAUNCHER" />
</intent-filter>
</activity>
</application>
</manifest>
6.
Using the Project Explorer, expand the res directory for resources. From the
values subdirectory, open the strings.xml string resources file. Replace its
content with the code in Listing 12-4.
290
CHAPTER 12: Native Graphics API
Listing 12-4. Content of res/values/strings.xml Resource File
<resources>
<string name="app name">AVI Player</string>
<string name="main activity title">MainActivity</string>
<string name="file name hint">AVI Video File Name</string>
<string name="file name text">galleon.avi</string>
<string name="play button">Play</string>
<string name="hello world">Hello world!</string>
<string name="menu settings">Settings</string>
<string name="error alert title">Error Occurred</string>
</resources>
7.
The main activity provides a very simple GUI, with a text field for specifying the
AVI file and a radio group to choose the native graphics API to use. Using the
Project Explorer, expand the layout subdirectory under the res directory. Open
the activity main.xml layout file and replace its content with Listing 12-5.
Listing 12-5. Content of res/layout/activity_main.xml Layout File
<LinearLayout xmlns:android="http://schemas.android.com/apk/res/android"
xmlns:tools="http://schemas.android.com/tools"
android:layout width="match parent"
android:layout height="match parent"
android:orientation="vertical" >
<EditText
android:id="@+id/file name edit"
android:layout width="match parent"
android:layout height="wrap content"
android:ems="10"
android:hint="@string/file name hint"
android:text="@string/file name text" >
<requestFocus />
</EditText>
<RadioGroup
android:id="@+id/player radio group"
android:layout width="wrap content"
android:layout height="wrap content" >
</RadioGroup>
<Button
android:id="@+id/play button"
android:layout width="wrap content"
android:layout height="wrap content"
android:text="@string/play button" />
</LinearLayout>
CHAPTER 12: Native Graphics API
8.
And lastly, you need to implement the activity itself. Using the Project
Explorer, open the MainActivity.java source file and replace its content with
the code in Listing 12-6.
Listing 12-6. Content of MainActivity.java Source File
package com.apress.aviplayer;
import java.io.File;
import
import
import
import
import
import
import
import
import
android.app.Activity;
android.content.Intent;
android.os.Bundle;
android.os.Environment;
android.view.View;
android.view.View.OnClickListener;
android.widget.Button;
android.widget.EditText;
android.widget.RadioGroup;
/**
* Main activity.
*
* @author Onur Cinar
*/
public class MainActivity extends Activity implements OnClickListener {
/** AVI file name edit. */
private EditText fileNameEdit;
/** Player type radio group. */
private RadioGroup playerRadioGroup;
/** Play button. */
private Button playButton;
/**
* On create.
*
* @param savedInstanceState saved state.
*/
public void onCreate(Bundle savedInstanceState) {
super.onCreate(savedInstanceState);
setContentView(R.layout.activity main);
fileNameEdit = (EditText) findViewById(R.id.file name edit);
playerRadioGroup = (RadioGroup) findViewById(
R.id.player radio group);
playButton = (Button) findViewById(R.id.play button);
playButton.setOnClickListener(this);
}
291
292
CHAPTER 12: Native Graphics API
/**
* On click event handler.
*
* @param view view instance.
*/
public void onClick(View view) {
switch (view.getId()) {
case R.id.play button:
onPlayButtonClick();
break;
}
}
/**
* On play button click event handler.
*/
private void onPlayButtonClick() {
Intent intent;
// Get the checked radio button id
int radioId = playerRadioGroup.getCheckedRadioButtonId();
// Choose the activity based on id
switch (radioId) {
// You will be adding cases here later in this chapter
default:
throw new UnsupportedOperationException(
"radioId=" + radioId);
}
// Under the external storage
File file = new File(Environment.getExternalStorageDirectory(),
fileNameEdit.getText().toString());
// Put AVI file name as extra
intent.putExtra(AbstractPlayerActivity.EXTRA FILE NAME,
file.getAbsolutePath());
// Start the player activity
startActivity(intent);
}
}
Creating the Abstract Player Activity
While experimenting with different native graphics APIs, a large percentage of the AVI player code will
be the same across all these implementations, such as opening and closing the AVI file. The abstract
player activity will provide the common code, leaving only the rendering piece to the actual player
implementations that are extending it. Follow these steps to implement the abstract player activity.
CHAPTER 12: Native Graphics API
1.
Using the Project Explorer, expand the src directory.
2.
Right-click on the com.apress.aviplayer package.
3.
Choose New ➤ Class from the context menu to launch the New Java
Class dialog.
4.
Set Name to AbstractPlayerActivity.
5.
Click the Finish button to create the new class.
6.
Replace the content of AbstractPlayerActivity.java source file with the
Listing 12-7.
Listing 12-7. Content of AbstractPlayerActivity.java Source File
package com.apress.aviplayer;
import java.io.IOException;
import android.app.Activity;
import android.app.AlertDialog;
/**
* Player activity.
*
* @author Onur Cinar
*/
public abstract class AbstractPlayerActivity extends Activity {
/** AVI file name extra. */
public static final String EXTRA FILE NAME =
"com.apress.aviplayer.EXTRA FILE NAME";
/** AVI video file descriptor. */
protected long avi = 0;
/**
* On start.
*/
protected void onStart() {
super.onStart();
// Open
try {
avi
} catch
new
}
}
the AVI file
= open(getFileName());
(IOException e) {
AlertDialog.Builder(this)
.setTitle(R.string.error alert title)
.setMessage(e.getMessage())
.show();
293
294
CHAPTER 12: Native Graphics API
/**
* On stop.
*/
protected void onStop() {
super.onStop();
// If the AVI video is open
if (0 != avi) {
// Close the file descriptor
close(avi);
avi = 0;
}
}
/**
* Gets the AVI video file name.
*
* @return file name.
*/
protected String getFileName() {
return getIntent().getExtras().getString(EXTRA FILE NAME);
}
/**
* Opens the given AVI file and returns a file descriptor.
*
* @param fileName file name.
* @return file descriptor.
* @throws IOException
*/
protected native static long open(String fileName)
throws IOException;
/**
* Get the video width.
*
* @param avi file descriptor.
* @return video width.
*/
protected native static int getWidth(long avi);
/**
* Get the video height.
*
* @param avi file descriptor.
* @return video height.
*/
protected native static int getHeight(long avi);
/**
* Gets the frame rate.
*
CHAPTER 12: Native Graphics API
* @param avi file descriptor.
* @return frame rate.
*/
protected native static double getFrameRate(long avi);
/**
* Closes the given AVI file based on given file descriptor.
*
* @param avi file descriptor.
*/
protected native static void close(long avi);
static {
System.loadLibrary("AVIPlayer");
}
}
The AbstractPlayerActivity also contains a set of native methods to process
AVI video files. These methods need to be implemented in the native space.
7.
Choose Project ➤ Build Project from the top menu bar to compile the
Java source code. This will allow you to use the javah tool to generate
the necessary header files for implementing the native portion of
AbstractPlayerActivity.
8.
Using the Project Explorer, select the AbstractPlayerActivity.
9.
Choose Run ➤ External Tools ➤ Generate C and C++ Header File from the
top menu bar to invoke the javah tool for AbstractPlayerActivity class.
10.
Under the jni subdirectory of the project, the com apress aviplayer
AbstractPlayerActivity.h header file will be generated by the javah tool,
with the content shown in Listing 12-8.
Listing 12-8. Content of com_apress_aviplayer_AbstractPlayerActivity.h
/* DO NOT EDIT THIS FILE - it is machine generated */
#include <jni.h>
/* Header for class com apress aviplayer AbstractPlayerActivity */
#ifndef Included com apress aviplayer AbstractPlayerActivity
#define Included com apress aviplayer AbstractPlayerActivity
#ifdef
cplusplus
extern "C" {
#endif
...
/*
* Class:
* Method:
com apress aviplayer AbstractPlayerActivity
open
295
296
CHAPTER 12: Native Graphics API
* Signature: (Ljava/lang/String;)J
*/
JNIEXPORT jlong JNICALL Java com apress aviplayer AbstractPlayerActivity open
(JNIEnv *, jclass, jstring);
/*
* Class:
com apress aviplayer AbstractPlayerActivity
* Method:
getWidth
* Signature: (J)I
*/
JNIEXPORT jint JNICALL Java com apress aviplayer AbstractPlayerActivity
getWidth
(JNIEnv *, jclass, jlong);
/*
* Class:
com apress aviplayer AbstractPlayerActivity
* Method:
getHeight
* Signature: (J)I
*/
JNIEXPORT jint JNICALL Java com apress aviplayer AbstractPlayerActivity
getHeight
(JNIEnv *, jclass, jlong);
/*
* Class:
com apress aviplayer AbstractPlayerActivity
* Method:
getFrameRate
* Signature: (J)D
*/
JNIEXPORT jdouble JNICALL Java com apress aviplayer AbstractPlayerActivity
getFrameRate
(JNIEnv *, jclass, jlong);
/*
* Class:
com apress aviplayer AbstractPlayerActivity
* Method:
close
* Signature: (J)V
*/
JNIEXPORT void JNICALL Java com apress aviplayer AbstractPlayerActivity
close
(JNIEnv *, jclass, jlong);
#ifdef
}
#endif
#endif
cplusplus
11.
In order to implement these native functions, a new C++ source file is
needed. Right-click on the jni directory, and choose New ➤ Source File
from the context menu.
12.
Set the Source File to com apress aviplayer AbstractPlayerActivity.cpp.
CHAPTER 12: Native Graphics API
13.
Click the Finish button to create a new C++ source file.
14.
The native portion of abstract player activity provides functions to parse
the given AVI video file by using the API provided through AVILib third party
library. Using the Eclipse, replace the content of com apress aviplayer
AbstractPlayerActivity.cpp source file with Listing 12-9.
Listing 12-9. Content of com_apress_aviplayer_AbstractPlayerActivity.cpp
extern "C" {
#include <avilib.h>
}
#include "Common.h"
#include "com apress aviplayer AbstractPlayerActivity.h"
jlong Java com apress aviplayer AbstractPlayerActivity open(
JNIEnv* env,
jclass clazz,
jstring fileName)
{
avi t* avi = 0;
// Get the file name as a C string
const char* cFileName = env->GetStringUTFChars(fileName, 0);
if (0 == cFileName)
{
goto exit;
}
// Open the AVI file
avi = AVI open input file(cFileName, 1);
// Release the file name
env->ReleaseStringUTFChars(fileName, cFileName);
// If AVI file cannot be opened throw an exception
if (0 == avi)
{
ThrowException(env, "java/io/IOException", AVI strerror());
}
exit:
return (jlong) avi;
}
jint Java com apress aviplayer AbstractPlayerActivity getWidth(
JNIEnv* env,
jclass clazz,
jlong avi)
297
298
CHAPTER 12: Native Graphics API
{
return AVI video width((avi t*) avi);
}
jint Java com apress aviplayer AbstractPlayerActivity getHeight(
JNIEnv* env,
jclass clazz,
jlong avi)
{
return AVI video height((avi t*) avi);
}
jdouble Java com apress aviplayer AbstractPlayerActivity getFrameRate(
JNIEnv* env,
jclass clazz,
jlong avi)
{
return AVI frame rate((avi t*) avi);
}
void Java com apress aviplayer AbstractPlayerActivity close(
JNIEnv* env,
jclass clazz,
jlong avi)
{
AVI close((avi t*) avi);
}
15.
The native portion of abstract player activity will share some common code
between the player implementations. This common code will be provided
through the Common.h and Common.cpp source files. Right-click on jni
directory, and choose New ➤ Header File from the context menu.
16.
Set the Header File to Common.h.
17.
Click the Finish button to create the new header file.
18.
Replace the content of new header file with Listing 12-10.
Listing 12-10. Content of the Common.h header File
#pragma once
#include <jni.h>
/**
* Throws a new exception using the given exception class
* and exception message.
*
* @param env JNIEnv interface.
* @param className class name.
* @param message exception message.
*/
CHAPTER 12: Native Graphics API
void ThrowException(
JNIEnv* env,
const char* className,
const char* message);
19.
Right-click the jni directory, and choose New ➤ Source File from the
context menu.
20.
Set the Source File to Common.cpp.
21.
Click the Finish button to create the new C++ source file.
22.
Replace the content of the new source file with the code in Listing 12-11.
Listing 12-11. Content the of Common.cpp Source File
#include "Common.h"
void ThrowException(
JNIEnv* env,
const char* className,
const char* message)
{
// Get the exception class
jclass clazz = env->FindClass(className);
// If exception class is found
if (0 != clazz)
{
// Throw exception
env->ThrowNew(clazz, message);
// Release local class reference
env->DeleteLocalRef(clazz);
}
}
23.
The build file for the native project should now be updated to include the new
source files, as well as to statically linking with the AVILib third party module.
Open the Android.mk file from the jni subdirectory and replace its content
with the code in Listing 12-12.
Listing 12-12. Content of the Android.mk Build File
LOCAL PATH := $(call my-dir)
include $(CLEAR VARS)
LOCAL MODULE
:= AVIPlayer
LOCAL SRC FILES := \
Common.cpp \
com apress aviplayer AbstractPlayerActivity.cpp
299
300
CHAPTER 12: Native Graphics API
# Use AVILib static library
LOCAL STATIC LIBRARIES += avilib static
include $(BUILD SHARED LIBRARY)
# Import AVILib library module
$(call import-module, transcode-1.1.5/avilib)
24.
Although you have not yet implemented the rendering functionality for AVI
video playback, build and run the example application on the emulator to
make sure that it is properly implemented before going to the next step.
Rendering using JNI Graphics API
The Android framework provides the android.graphics.Bitmap class for manipulating and using
bitmap pixel buffers from the Java code. Starting from Android 2.2 (API Level 8), Android provides
the JNI Graphics API, enabling the native code to access and manipulate the pixel buffers of
Bitmap objects.
Enabling the JNI Graphics API
Follow these steps to use the JNI Graphics API in your native application.
1.
Include the android/bitmap.h header file.
#include <android/bitmap.h>
2.
Update the Android.mk build file to dynamically link with jnigraphics library.
LOCAL LDLIBS += −ljnigraphics
Upon making these changes, the JNI Graphics API is now available to your native application.
Using the JNI Graphics API
The JNI Graphics API provides four native functions for accessing and manipulating the Bitmap
objects.
Retrieving Information about a Bitmap Object
The AndroidBitmap getInfo function allows native code to retrieve information about a Bitmap
object in terms of its dimensions, as well as its pixel format.
int AndroidBitmap getInfo(JNIEnv* env,
jobject bitmap,
AndroidBitmapInfo* info);
CHAPTER 12: Native Graphics API
301
The function takes JNI interface pointer, the Bitmap object reference, and a pointer to a
AndroidBitmapInfo structure that will be used to return the information about the given bitmap, as
shown in Listing 12-13.
Listing 12-13. The AndroidBitmapInfo Structure Deceleration
typedef struct {
uint32 t
width;
uint32 t
height;
uint32 t
stride;
int32 t
format;
uint32 t
flags;
} AndroidBitmapInfo;
The format field contains information about the pixel format, as shown in Listing 12-14.
Listing 12-14. The AndroidBitmapFormat Enumeration Deceleration
enum AndroidBitmapFormat {
ANDROID BITMAP FORMAT NONE
ANDROID BITMAP FORMAT RGBA 8888
ANDROID BITMAP FORMAT RGB 565
ANDROID BITMAP FORMAT RGBA 4444
ANDROID BITMAP FORMAT A 8
};
=
=
=
=
=
0,
1,
4,
7,
8,
In case of success, the AndroidBitmap getInfo function returns zero; otherwise, it returns a negative
value. The full list of error codes can be found in the android/bitmap.h header file.
Accessing the Native Pixel Buffer
The AndroidBitmap lockPixels function locks the pixel buffer to ensure that the memory for the
pixels will not move. It returns a native pointer to the pixel buffer for the native application access the
pixel data and to manipulate it.
int AndroidBitmap lockPixels(JNIEnv* env,
jobject jbitmap,
void** addrPtr);
It takes a JNIEnv interface pointer, the Bitmap object reference, and a pointer to a void pointer
to return the address for the native pixel buffer. In case of success, it returns zero; otherwise, it
returns a negative value. As with the AndroidBitmap getInfo, the full list of error codes for the
AndroidBitmap lockPixels function can be found in the android/bitmap.h header file.
Releasing the Native Pixel Buffer
Each call to AndroidBitmap lockPixels should be balanced by a call to AndroidBitmap unlockPixels to
release the native pixel buffer. The native application should release the native pixel buffer upon finishing
the reading or writing to it. Once it is released, the Bitmap object can be used at the Java layer.
302
CHAPTER 12: Native Graphics API
int AndroidBitmap unlockPixels(JNIEnv* env,
jobject jbitmap);
The AndroidBitmap unlockPixels function takes a JNIEnv interface pointer and the Bitmap object
reference. In case of success, it returns zero; otherwise, it returns a negative value.
Updating AVI Player with Bitmap Renderer
To update the AVI player, follow these steps.
1.
Using Project Explorer, open the AndroidManifest.xml manifest file and
declare the new activity as shown in Listing 12-15.
Listing 12-15. New Bitmap Player Activity Declared in the Manifest File
<manifest xmlns:android="http://schemas.android.com/apk/res/android"
package="com.apress.aviplayer"
android:versionCode="1"
android:versionName="1.0" >
...
<application
android:icon="@drawable/ic launcher"
android:label="@string/app name"
android:theme="@style/AppTheme" >
...
<activity
android:name=".BitmapPlayerActivity"
android:label="@string/title_activity_bitmap_player" >
</activity>
</application>
</manifest>
2.
The title of the new Bitmap Player activity, as well as the label for the Bitmap
Player radio button, should be added to the string resources. Open the
strings.xml string resources file, and add the new string resources as shown
in Listing 12-16.
Listing 12-16. Bitmap Player Activity String Resources Appended
<resources>
...
<string name="bitmap_player_radio">Bitmap Player</string>
<string name="title_activity_bitmap_player">Bitmap Player</string>
</resources>
CHAPTER 12: Native Graphics API
3.
The Bitmap Player activity requires a single SurfaceView widget in order to
function. Using the Project Explorer, expand the res directory.
4.
Right-click the layout subdirectory, and choose New ➤ File from the context
menu.
5.
Set File Name to activity bitmap player.xml.
6.
Replace the content of the new layout with the code in Listing 12-17.
Listing 12-17. Content of the activity_bitmap_player.xml Layout File
<LinearLayout xmlns:android="http://schemas.android.com/apk/res/android"
xmlns:tools="http://schemas.android.com/tools"
android:layout width="match parent"
android:layout height="match parent" >
<SurfaceView
android:layout width="match parent"
android:layout height="match parent"
android:id="@+id/surface view" />
</LinearLayout>
7.
Using the Project Explorer, expand the src directory.
8.
Right-click on the com.apress.aviplayer package, and choose New ➤ Class
from the context menu.
9.
Set Name to BitmapPlayerActivity.
10.
Click the Finish button to create the new class.
11.
Replace its content with the code in Listing 12-18.
Listing 12-18. Content of the BitmapPlayerActivity.java Source File
package com.apress.aviplayer;
import java.util.concurrent.atomic.AtomicBoolean;
import
import
import
import
import
import
android.graphics.Bitmap;
android.graphics.Canvas;
android.os.Bundle;
android.view.SurfaceHolder;
android.view.SurfaceHolder.Callback;
android.view.SurfaceView;
/**
* AVI player through bitmaps.
*
* @author Onur Cinar
*/
303
304
CHAPTER 12: Native Graphics API
public class BitmapPlayerActivity extends AbstractPlayerActivity {
/** Is playing. */
private final AtomicBoolean isPlaying = new AtomicBoolean();
/** Surface holder. */
private SurfaceHolder surfaceHolder;
/**
* On create.
*
* @param savedInstanceState saved state.
*/
public void onCreate(Bundle savedInstanceState) {
super.onCreate(savedInstanceState);
setContentView(R.layout.activity bitmap player);
SurfaceView surfaceView = (SurfaceView)
findViewById(R.id.surface view);
surfaceHolder = surfaceView.getHolder();
surfaceHolder.addCallback(surfaceHolderCallback);
}
/**
* Surface holder callback listens for surface events.
*/
private final Callback surfaceHolderCallback = new Callback() {
public void surfaceChanged(SurfaceHolder holder, int format,
int width, int height) {
}
public void surfaceCreated(SurfaceHolder holder) {
// Start playing since surface is ready
isPlaying.set(true);
// Start renderer on a separate thread
new Thread(renderer).start();
}
public void surfaceDestroyed(SurfaceHolder holder) {
// Stop playing since surface is destroyed
isPlaying.set(false);
}
};
/**
* Renderer runnable renders the video frames from the
* AVI file to the surface through a bitmap.
*/
private final Runnable renderer = new Runnable() {
public void run() {
// Create a new bitmap to hold the frames
CHAPTER 12: Native Graphics API
Bitmap bitmap = Bitmap.createBitmap(
getWidth(avi),
getHeight(avi),
Bitmap.Config.RGB 565);
// Calculate the delay using the frame rate
long frameDelay = (long) (1000 / getFrameRate(avi));
// Start rendering while playing
while (isPlaying.get()) {
// Render the frame to the bitmap
render(avi, bitmap);
// Lock canvas
Canvas canvas = surfaceHolder.lockCanvas();
// Draw the bitmap to the canvas
canvas.drawBitmap(bitmap, 0, 0, null);
// Post the canvas for displaying
surfaceHolder.unlockCanvasAndPost(canvas);
// Wait for the next frame
try {
Thread.sleep(frameDelay);
} catch (InterruptedException e) {
break;
}
}
}
};
/**
* Renders the frame from given AVI file descriptor to
* the given Bitmap.
*
* @param avi file descriptor.
* @param bitmap bitmap instance.
* @return true if there are more frames, false otherwise.
*/
private native static boolean render(long avi, Bitmap bitmap);
}
The BitmapPlayerActivity handles the rendering of the video frames through
a native method called as render.
12.
Choose Project ➤ Build Project from the top menu bar to compile the Java
source code.
13.
Using the Project Explorer, select the BitmapPlayerActivity.
305
306
CHAPTER 12: Native Graphics API
14.
Choose Run ➤ External Tools ➤ Generate C and C++ Header File from
the top menu bar to invoke the javah tool for BitmapPlayerActivity class.
15.
Under the jni subdirectory of the project, the com apress aviplayer
BitmapPlayerActivity.h header file will be generated by the javah tool.
16.
Right-click the jni directory, and choose New ➤ Source File from the
context menu.
17.
Set Source File to com apress aviplayer BitmapPlayerActivity.cpp.
18.
Click the Finish button to create a new C++ source file.
19.
Using the Eclipse, replace the content of the new source file with the code in
Listing 12-19.
Listing 12-19. Content of com_apress_aviplayer_BitmapPlayerActivity.cpp
extern "C" {
#include <avilib.h>
}
#include <android/bitmap.h>
#include "Common.h"
#include "com apress aviplayer BitmapPlayerActivity.h"
jboolean Java com apress aviplayer BitmapPlayerActivity render(
JNIEnv* env,
jclass clazz,
jlong avi,
jobject bitmap)
{
jboolean isFrameRead = JNI FALSE;
char* frameBuffer = 0;
long frameSize = 0;
int keyFrame = 0;
// Lock bitmap and get the raw bytes
if (0 > AndroidBitmap lockPixels(env, bitmap, (void**) &frameBuffer))
{
ThrowException(env, "java/io/IOException",
"Unable to lock pixels.");
goto exit;
}
// Read AVI frame bytes to bitmap
frameSize = AVI read frame((avi t*) avi, frameBuffer, &keyFrame);
CHAPTER 12: Native Graphics API
// Unlock bitmap
if (0 > AndroidBitmap unlockPixels(env, bitmap))
{
ThrowException(env, "java/io/IOException",
"Unable to unlock pixels.");
goto exit;
}
// Check if frame is successfully read
if (0 < frameSize)
{
isFrameRead = JNI TRUE;
}
exit:
return isFrameRead;
}
20.
The build file Android.mk needs to be modified, as shown in Listing
12-20, to compile the new source file, as well as to dynamically link with the
jnigraphics shared library in order to use the JNI Graphics Bitmap API.
Listing 12-20. Build File Modified for Bitmap Player
LOCAL PATH := $(call my-dir)
include $(CLEAR VARS)
LOCAL MODULE
:= AVIPlayer
LOCAL SRC FILES := \
Common.cpp \
com apress aviplayer AbstractPlayerActivity.cpp \
com_apress_aviplayer_BitmapPlayerActivity.cpp
# Use AVILib static library
LOCAL STATIC LIBRARIES += avilib static
# Link with JNI graphics
LOCAL_LDLIBS += −ljnigraphics
include $(BUILD SHARED LIBRARY)
# Import AVILib library module
$(call import-module, transcode-1.1.5/avilib)
21.
The bitmap player activity is now ready. In order to be able to use it, it needs
to be added as a radio button to the activity main.xml layout file, as shown
in Listing 12-21.
307
308
CHAPTER 12: Native Graphics API
Listing 12-21. Bitmap Player Radio Button Added to Main Activity Layout
<LinearLayout xmlns:android="http://schemas.android.com/apk/res/android"
xmlns:tools="http://schemas.android.com/tools"
android:layout width="match parent"
android:layout height="match parent"
android:orientation="vertical" >
...
<RadioGroup
android:id="@+id/player radio group"
android:layout width="wrap content"
android:layout height="wrap content" >
<RadioButton
android:id="@+id/bitmap_player_radio"
android:layout_width="wrap_content"
android:layout_height="wrap_content"
android:checked="true"
android:text="@string/bitmap_player_radio" />
</RadioGroup>
...
</LinearLayout>
22.
The main activity source code should also be modified, as shown in Listing
12-22, to dispatch the playback request to Bitmap Player activity when it is
selected by the user.
Listing 12-22. Bitmap Player Radio Added to Main Activity
/**
* On play button click event handler.
*/
private void onPlayButtonClick() {
...
// Choose the activity based on id
switch (radioId) {
case R.id.bitmap_player_radio:
intent = new Intent(this, BitmapPlayerActivity.class);
break;
default:
throw new UnsupportedOperationException("radioId=" + radioId);
}
...
}
CHAPTER 12: Native Graphics API
309
Running the AVI Player with Bitmap Renderer
Now the AVI player application is ready with the Bitmap renderer based on JNI graphics API. Follow
these steps to test the application on Android emulator.
1.
In order to test the AVI video player application, an AVI-formatted video file
is needed. For the simplicity of the example, the application is only using
AVI format as a container, expecting that the video payload is provided as
uncompressed raw frames in RGB565 color-space. Using your favorite
browser, download the sample video file from author’s web site at
http://zdo.com/galleon.zip.
2.
Extract the galleon.avi AVI video file from the downloaded ZIP archive.
3.
Start the Android emulator.
4.
Using the ADB, push the AVI video file to the Android emulator’s SD card, like
so:
adb push galleon.avi /sdcard/
Note The galleon.avi AVI video file requires at least 74MB of free space on the SD card. If the ADB push
for the file fails, makes sure that you have enough space on the target Android device or the Android
emulator. Due to the large size of the video file, pushing it to the SD Card can take 30 or more seconds.
5.
Start the AVI player application on the Android emulator.
6.
Make sure that Bitmap Player radio button is selected, as shown
in Figure 12-1.
Figure 12-1. Choosing the Bitmap Player using AVI player GUI
310
CHAPTER 12: Native Graphics API
7.
Click the Play button to start the playback. The Bitmap Player activity will
be invoked, and the AVI video file will be rendered through the JNI Graphics
API, as shown in Figure 12-2. You should see the waving white flag on
the galleon.
Figure 12-2. The AVI video file is getting rendered through the Bitmap renderer
Rendering Using OpenGL ES
The Android NDK provides OpenGL ES both version 1.x and 2.0 graphics API to the native code. As
indicated earlier in this chapter,
OpenGL ES 1.0 is supported from Android 1.6 and later.
OpenGL ES 1.1 is supported only on specific devices that have the
corresponding GPU.
OpenGL ES 2.0 is supported on Android 2.0 and later.
Applications should use the <uses-feature> tag in the Android manifest file to indicate the preferred
version of OpenGL ES version to use.
Using the OpenGL ES API
In order to use the OpenGL ES API, you need to have a android.opengl.GLSurfaceView instance on
the Java code. The native application can then call the OpenGL ES API functions to render graphics
to the GLSurfaceView. More information on available OpenGL ES API can be found at the Khronos
Groups web site at www.khronos.org/opengles/.
At the time of this writing, the Android emulator does not support OpenGL ES 2.0 hardware
emulation. In order to allow you to experiment with the OpenGL ES-based graphics API, the example
application will be using the OpenGL ES 1.x.
CHAPTER 12: Native Graphics API
Enabling OpenGL ES 1.x API
Follow these steps to use the OpenGL ES 1.x in your native application.
1.
Include the OpenGL ES 1.x header files.
#include <GLES/gl.h>
#include <GLES/glext.h>
2.
Update the Android.mk build file to dynamically link with GLESv1 CM library.
LOCAL LDLIBS += −lGLESv1 CM
Upon making these changes, the OpenGL ES 1.x API will now be available to your
native application.
Enabling OpenGL ES 2.0 API
Follow these steps to use the OpenGL ES 2.0 in your native application.
1.
Include the OpenGL ES 2.0 header files.
#include <GLES2/gl2.h>
#include <GLES2/gl2ext.h>
2.
Update the Android.mk build file to dynamically link with GLESv2 library.
LOCAL LDLIBS += −lGLESv2
Upon making these changes, the OpenGL ES 2.0 API will now be available to your
native application.
Updating AVI Player with OpenGL ES Renderer
Follow these steps.
1.
Using Project Explorer, open the AndroidManifest.xml manifest file and
declare the new activity, as shown in Listing 12-23.
Listing 12-23. New OpenGL Player Activity Declared in Manifest File
<manifest xmlns:android="http://schemas.android.com/apk/res/android"
package="com.apress.aviplayer"
android:versionCode="1"
android:versionName="1.0" >
...
311
312
CHAPTER 12: Native Graphics API
<application
android:icon="@drawable/ic launcher"
android:label="@string/app name"
android:theme="@style/AppTheme" >
...
<activity
android:name=".OpenGLPlayerActivity"
android:label="@string/title_activity_open_gl_player" >
</activity>
</application>
</manifest>
2.
The title of the new OpenGL player activity, as well as the label for the
OpenGL player radio button, should be added to the string resources. Open
the strings.xml string resources file and add the new string resources, as
shown in Listing 12-24.
Listing 12-24. OpenGL Player Activity String Resources Appended
<resources>
...
<string name="title_activity_open_gl_player">OpenGL Player</string>
<string name="open_gl_player_radio">OpenGL Player</string>
</resources>
3.
The Bitmap Player activity requires a single GLSurfaceView widget in order to
function. Using the Project Explorer, expand the res directory.
4.
Right-click on the layout subdirectory, and choose New ➤ File from the
context menu.
5.
Set File Name to activity open gl player.xml.
6.
Replace the content of new layout with the code in Listing 12-25.
Listing 12-25. Content of the activity_open_gl_player.xml Layout File
<LinearLayout xmlns:android="http://schemas.android.com/apk/res/android"
xmlns:tools="http://schemas.android.com/tools"
android:layout width="match parent"
android:layout height="match parent" >
<android.opengl.GLSurfaceView
android:layout width="match parent"
android:layout height="match parent"
android:id="@+id/gl surface view" />
</LinearLayout>
CHAPTER 12: Native Graphics API
7.
Using the Project Explorer, expand the src directory.
8.
Right-click the com.apress.aviplayer package, and choose New ➤ Class
from the context menu.
9.
Set Name to OpenGLPlayerActivity.
10.
Click the Finish button to create the new class.
11.
Replace its content with the code in Listing 12-26.
Listing 12-26. Content of the OpenGLPlayerActivity.java Source File
package com.apress.aviplayer;
import java.util.concurrent.atomic.AtomicBoolean;
import javax.microedition.khronos.egl.EGLConfig;
import javax.microedition.khronos.opengles.GL10;
import android.opengl.GLSurfaceView;
import android.opengl.GLSurfaceView.Renderer;
import android.os.Bundle;
/**
* AVI player through OpenGL.
*
* @author Onur Cinar
*/
public class OpenGLPlayerActivity extends AbstractPlayerActivity {
/** Is playing. */
private final AtomicBoolean isPlaying = new AtomicBoolean();
/** Native renderer. */
private long instance;
/** GL surface view instance. */
private GLSurfaceView glSurfaceView;
/**
* On create.
*
* @param savedInstanceState saved state.
*/
public void onCreate(Bundle savedInstanceState) {
super.onCreate(savedInstanceState);
setContentView(R.layout.activity open gl player);
glSurfaceView = (GLSurfaceView)
findViewById(R.id.gl surface view);
// Set renderer
glSurfaceView.setRenderer(renderer);
313
314
CHAPTER 12: Native Graphics API
// Render frame when requested
glSurfaceView.setRenderMode(GLSurfaceView.RENDERMODE WHEN DIRTY);
}
/**
* On start.
*/
protected void onStart() {
super.onStart();
// Initializes the native renderer
instance = init(avi);
}
/**
* On resume.
*/
protected void onResume() {
super.onResume();
// GL surface view must be notified when activity is resumed
glSurfaceView.onResume();
}
/**
* On pause.
*/
protected void onPause() {
super.onPause();
// GL surface view must be notified when activity is paused.
glSurfaceView.onPause();
}
/**
* On stop.
*/
protected void onStop() {
super.onStop();
// Free the native renderer
free(instance);
instance = 0;
}
/**
* Request rendering based on the frame rate.
*/
private final Runnable player = new Runnable() {
public void run() {
// Calculate the delay using the frame rate
long frameDelay = (long) (1000 / getFrameRate(avi));
CHAPTER 12: Native Graphics API
// Start rendering while playing
while (isPlaying.get()) {
// Request rendering
glSurfaceView.requestRender();
// Wait for the next frame
try {
Thread.sleep(frameDelay);
} catch (InterruptedException e) {
break;
}
}
}
};
/**
* OpenGL renderer.
*/
private final Renderer renderer = new Renderer() {
public void onDrawFrame(GL10 gl) {
// Render the next frame
if (!render(instance, avi))
{
isPlaying.set(false);
}
}
public void onSurfaceChanged(GL10 gl, int width, int height) {
}
public void onSurfaceCreated(GL10 gl, EGLConfig config) {
// Initialize the OpenGL surface
initSurface(instance, avi);
// Start playing since surface is ready
isPlaying.set(true);
// Start player
new Thread(player).start();
}
};
/**
* Initializes the native renderer.
*
* @param avi file descriptor.
* @return native instance.
*/
private native static long init(long avi);
315
316
CHAPTER 12: Native Graphics API
/**
* Initializes the OpenGL surface.
*
* @param instance native instance.
*/
private native static void initSurface(long instance, long avi);
/**
* Renders the frame from given AVI file descriptor.
*
* @param instance native instance.
* @param avi file descriptor.
* @return true if there are more frames, false otherwise.
*/
private native static boolean render(long instance, long avi);
/**
* Free the native renderer.
*
* @param instance native instance.
*/
private native static void free(long instance);
}
12.
Choose Project ➤ Build Project from the top menu bar to compile the Java
source code.
13.
Using the Project Explorer, select the OpenGLPlayerActivity.
14.
Choose Run ➤ External Tools ➤ Generate C and C++ Header File from
the top menu bar to invoke the javah tool for OpenGLPlayerActivity class.
15.
Under the jni subdirectory of the project, the com apress aviplayer
OpenGLPlayerActivity.h header file will be generated by the javah tool.
16.
Right-click the jni directory, and choose New ➤ Source File from the
context menu.
17.
Set Source File to com apress aviplayer OpenGLPlayerActivity.cpp.
18.
Click the Finish button to create a new C++ source file.
19.
Using the Eclipse, replace the content of the new source file with the code in
Listing 12-27.
Listing 12-27. Content of com_apress_aviplayer_OpenGLPlayerActivity.cpp
extern "C" {
#include <avilib.h>
}
#include <GLES/gl.h>
#include <GLES/glext.h>
CHAPTER 12: Native Graphics API
#include <malloc.h>
#include "Common.h"
#include "com apress aviplayer OpenGLPlayerActivity.h"
struct Instance
{
char* buffer;
GLuint texture;
Instance():
buffer(0),
texture(0)
{
}
};
jlong Java com apress aviplayer OpenGLPlayerActivity init(
JNIEnv* env,
jclass clazz,
jlong avi)
{
Instance* instance = 0;
long frameSize = AVI frame size((avi t*) avi, 0);
if (0 >= frameSize)
{
ThrowException(env, "java/io/RuntimeException",
"Unable to get the frame size.");
goto exit;
}
instance = new Instance();
if (0 == instance)
{
ThrowException(env, "java/io/RuntimeException",
"Unable to allocate instance.");
goto exit;
}
instance->buffer = (char*) malloc(frameSize);
if (0 == instance->buffer)
{
ThrowException(env, "java/io/RuntimeException",
"Unable to allocate buffer.");
delete instance;
instance = 0;
}
317
318
CHAPTER 12: Native Graphics API
exit:
return (jlong) instance;
}
void Java com apress aviplayer OpenGLPlayerActivity initSurface(
JNIEnv* env,
jclass clazz,
jlong inst,
jlong avi)
{
Instance* instance = (Instance*) inst;
// Enable textures
glEnable(GL TEXTURE 2D);
// Generate one texture object
glGenTextures(1, &instance->texture);
// Bind to generated texture
glBindTexture(GL TEXTURE 2D, instance->texture);
int frameWidth = AVI video width((avi t*) avi);
int frameHeight = AVI video height((avi t*) avi);
// Crop the texture rectangle
GLint rect[] = {0, frameHeight, frameWidth, -frameHeight};
glTexParameteriv(GL TEXTURE 2D, GL TEXTURE CROP RECT OES, rect);
// Full color
glColor4f(1.0, 1.0, 1.0, 1.0);
// Generate an empty texture
glTexImage2D(GL TEXTURE 2D,
0,
GL RGB,
frameWidth,
frameHeight,
0,
GL RGB,
GL UNSIGNED SHORT 5 6 5,
0);
}
jboolean Java com apress aviplayer OpenGLPlayerActivity render(
JNIEnv* env,
jclass clazz,
jlong inst,
jlong avi)
{
Instance* instance = (Instance*) inst;
CHAPTER 12: Native Graphics API
jboolean isFrameRead = JNI FALSE;
int keyFrame = 0;
// Read AVI frame bytes to bitmap
long frameSize = AVI read frame((avi t*) avi,
instance->buffer,
&keyFrame);
// Check if frame read
if (0 >= frameSize)
{
goto exit;
}
// Frame read
isFrameRead = JNI TRUE;
// Update the texture with the new frame
glTexSubImage2D(GL TEXTURE 2D,
0,
0,
0,
AVI video width((avi t*) avi),
AVI video height((avi t*) avi),
GL RGB,
GL UNSIGNED SHORT 5 6 5,
instance->buffer);
// Draw texture
glDrawTexiOES(0, 0, 0,
AVI video width((avi t*) avi),
AVI video height((avi t*) avi));
exit:
return isFrameRead;
}
void Java com apress aviplayer OpenGLPlayerActivity free(
JNIEnv* env,
jclass clazz,
jlong inst)
{
Instance* instance = (Instance*) inst;
if (0 != instance)
{
free(instance->buffer);
delete instance;
}
}
319
320
CHAPTER 12: Native Graphics API
20.
The build file Android.mk needs to be modified, as shown in Listing 12-28, to
compile the new source file, as well as to dynamically link with the GLESv1 CM
shared library in order to use the OpenGL ES API from native space.
Listing 12-28. Build File Modified for OpenGL Player
LOCAL PATH := $(call my-dir)
include $(CLEAR VARS)
LOCAL MODULE
:= AVIPlayer
LOCAL SRC FILES := \
Common.cpp \
com apress aviplayer AbstractPlayerActivity.cpp \
com apress aviplayer BitmapPlayerActivity.cpp \
com_apress_aviplayer_OpenGLPlayerActivity.cpp
# Use AVILib static library
LOCAL STATIC LIBRARIES += avilib static
...
# Enable GL ext prototypes
LOCAL_CFLAGS += −DGL_GLEXT_PROTOTYPES
# Link with OpenGL ES
LOCAL_LDLIBS += −lGLESv1_CM
include $(BUILD SHARED LIBRARY)
...
21.
The Bitmap Player activity is now ready. In order to be able to use it, it needs
to be added as a radio button to the activity main.xml layout file, as shown
in Listing 12-29.
Listing 12-29. OpenGL Player Radio Button Added to the Main Layout
<LinearLayout xmlns:android="http://schemas.android.com/apk/res/android"
xmlns:tools="http://schemas.android.com/tools"
android:layout width="match parent"
android:layout height="match parent"
android:orientation="vertical" >
...
<RadioGroup
android:id="@+id/player radio group"
android:layout width="wrap content"
android:layout height="wrap content" >
CHAPTER 12: Native Graphics API
<RadioButton
android:id="@+id/bitmap player radio"
android:layout width="wrap content"
android:layout height="wrap content"
android:checked="true"
android:text="@string/bitmap player radio" />
<RadioButton
android:id="@+id/open_gl_player_radio"
android:layout_width="wrap_content"
android:layout_height="wrap_content"
android:text="@string/open_gl_player_radio" />
</RadioGroup>
...
</LinearLayout>
22.
The main activity source code should also be modified, as shown in Listing
12-30, to dispatch the playback request to the Bitmap Player activity when it
is selected by the user.
Listing 12-30. OpenGL Player Radio Button Added to Main Activity
/**
* On play button click event handler.
*/
private void onPlayButtonClick() {
...
// Choose the activity based on id
switch (radioId) {
case R.id.bitmap player radio:
intent = new Intent(this, BitmapPlayerActivity.class);
break;
case R.id.open_gl_player_radio:
intent = new Intent(this, OpenGLPlayerActivity.class);
break;
default:
throw new UnsupportedOperationException("radioId=" + radioId);
}
...
}
321
322
CHAPTER 12: Native Graphics API
23.
The AVI player application is now ready with the OpenGL ES renderer.
Follow the same steps in JNI Graphics API section of this chapter to run the
example application on the Android emulator.
Rendering Using Native Window API
Starting from Android API level 9, the Android NDK provides an API to enable the native code to
directly access and manipulate the pixel buffer of the native window. This API is known as the native
windows API. In this section, you will learn how to use this API to do rendering from the native code
directly without involving any Java based API.
Enabling the Native Window API
Follow these steps to use the Native Window API in your native application.
1.
Include the native window header files.
#include <android/native window.h>
#include <android/native window jni.h>
2.
Update the Android.mk build file to dynamically link with android library.
LOCAL LDLIBS += −landroid
Upon making these changes, the native window API will now be available to your native application.
Using the Native Window API
The native window API provides four native functions for accessing and manipulating the
Bitmap objects.
Retrieving Native Window from a Surface Object
The ANativeWindow fromSurface function retrieves the native window from the given Surface object.
ANativeWindow* ANativeWindow fromSurface(JNIEnv* env,
jobject surface);
It takes a JNIEnv interface pointer and a Surface object reference and returns a pointer to the native
window instance. The ANativeWindow fromSurface function also acquires a reference on the returned
native window instance, and it needs to be released through the ANativeWindow release function to
prevent memory leaks.
CHAPTER 12: Native Graphics API
323
Acquiring a Reference on a Native Window Instance
In order to prevent the native window instance from being deleted, the native code can acquire a
reference to it using the ANativeWindow acquire function.
void ANativeWindow acquire(ANativeWindow* window);
Every call to ANativeWindow acquire function should be balanced by a call to ANativeWindow
release function.
Releasing the Native Window Reference
As mentioned earlier, to prevent memory leaks, each native window reference should be released
using the ANativeWindow release function.
void ANativeWindow release(ANativeWindow* window);
The ANativeWindow release function takes a pointer to the native window instance.
Retrieving Native Window Information
The native window API provides a set of functions for the native code to obtain information regarding
the native window such as the dimensions and the pixel format.
The ANativeWindow getWidth function can be used to obtain the width of the
native window.
The ANativeWindow getHeight function can be used to obtain the height of the
native window.
The ANativeWindow getFormat function can be used to obtain the pixel format of
the native window.
Setting the Native Window Buffer Geometry
The dimensions and the pixel format of the native window should match the image data that will
be rendered. If the image data dimensions or the pixel format is different, the ANativeWindow
setBuffersGeometry function can be used to reconfigure the native window buffer. The buffer will
then get automatically scaled to match the native window.
int32 t ANativeWindow setBuffersGeometry(ANativeWindow* window,
int32 t width,
int32 t height,
int32 t format);
The function takes a pointer to the previously acquired native window instance, the new width, the
new height, and the new pixel format for the native window buffer. In case of success, it returns zero.
For all parameters, if zero is supplied, then the parameter value will be reverted to the native window
buffer’s base.
324
CHAPTER 12: Native Graphics API
Accessing the Native Window Buffer
The ANativeWindow lock function is used to lock the native window buffer and to obtain a pointer to
the raw pixel buffer. Native code can then use this pointer to access and manipulate the pixel buffer.
int32 t ANativeWindow lock(ANativeWindow* window,
ANativeWindow Buffer* outBuffer,
ARect* inOutDirtyBounds);
The function takes a pointer to the previously acquired native window instance, a pointer to a
ANativeWindow Buffer structure, and an optional pointer to a ARect structure. As shown in Listing 12-31,
the ANativeWindow Buffer structure, in addition to the information about the native window, provides
access to native pixel buffer through the bits fields.
Listing 12-31. The ANativeWindow_Buffer Structure Declaration
typedef struct ANativeWindow Buffer {
// The number of pixels that are show horizontally.
int32 t width;
// The number of pixels that are shown vertically.
int32 t height;
// The number of *pixels* that a line in the buffer takes in
// memory. This may be >= width.
int32 t stride;
// The format of the buffer.
int32 t format;
One of WINDOW FORMAT *
// The actual bits.
void* bits;
// Do not touch.
uint32 t reserved[6];
} ANativeWindow Buffer;
In case of success the ANativeWindow lock function returns zero.
Releasing the Native Window Buffer
Once the native code is done, it should unlock and post the native window buffer back using the
ANativeWindow unlockAndPost function.
int32 t ANativeWindow unlockAndPost(ANativeWindow* window);
The function takes a pointer to the native window instance that is locked. In case of success, it
returns zero. You will now update the AVI Player test application with the native window renderer to
experiment with these functions.
CHAPTER 12: Native Graphics API
Updating AVI Player with Native Window Renderer
Follow these steps.
1.
Using Project Explorer, open AndroidManifest.xml manifest file and declare
the new activity as shown on Listing 12-32.
Listing 12-32. New Native Window Player Declared in Manifest File
<manifest xmlns:android="http://schemas.android.com/apk/res/android"
package="com.apress.aviplayer"
android:versionCode="1"
android:versionName="1.0" >
...
<application
android:icon="@drawable/ic launcher"
android:label="@string/app name"
android:theme="@style/AppTheme" >
...
<activity
android:name=".OpenGLPlayerActivity"
android:label="@string/title activity open gl player" >
</activity>
<activity
android:name=".NativeWindowPlayerActivity"
android:label="@string/title_activity_native_window_player" >
</activity>
</application>
</manifest>
2.
The title of the new Bitmap Player activity, as well as the label for the Bitmap
Player radio button should be added to the string resources. Open the
strings.xml string resources file and add the new string resources, as shown
in Listing 12-33.
Listing 12-33. Native Window Player Activity String Resources Appended
<resources>
...
<string name="title_activity_native_window_player"
>Native Window Player</string>
<string name="native_window_player_radio"
>Native Window Player</string>
</resources>
325
326
CHAPTER 12: Native Graphics API
3.
The Bitmap Player activity requires a single SurfaceView widget in order to
function. Using the Project Explorer, expand the res directory.
4.
Right-click the layout subdirectory, and choose New ➤ File from the context
menu.
5.
Set File Name to activity native window player.xml.
6.
Replace the content of new layout with the code in Listing 12-34.
Listing 12-34. Content of activity_native_window_player.xml Layout File
<LinearLayout xmlns:android="http://schemas.android.com/apk/res/android"
xmlns:tools="http://schemas.android.com/tools"
android:layout width="match parent"
android:layout height="match parent" >
<SurfaceView
android:layout width="match parent"
android:layout height="match parent"
android:id="@+id/surface view" />
</LinearLayout>
7.
Using the Project Explorer, expand the src directory.
8.
Right-click the com.apress.aviplayer package, and choose New ➤ Class
from the context menu.
9.
Set Name to NativeWindowPlayerActivity.
10.
Click the Finish button to create the new class.
11.
Replace its content with the code in Listing 12-35.
Listing 12-35. Content of NativeWindowPlayerActivity.java Source File
package com.apress.aviplayer;
import java.util.concurrent.atomic.AtomicBoolean;
import
import
import
import
import
android.os.Bundle;
android.view.Surface;
android.view.SurfaceHolder;
android.view.SurfaceHolder.Callback;
android.view.SurfaceView;
/**
* AVI player through native window.
*
* @author Onur Cinar
*/
CHAPTER 12: Native Graphics API
public class NativeWindowPlayerActivity extends AbstractPlayerActivity {
/** Is playing. */
private final AtomicBoolean isPlaying = new AtomicBoolean();
/** Surface holder. */
private SurfaceHolder surfaceHolder;
/**
* On create.
*
* @param savedInstanceState saved state.
*/
public void onCreate(Bundle savedInstanceState) {
super.onCreate(savedInstanceState);
setContentView(R.layout.activity bitmap player);
SurfaceView surfaceView = (SurfaceView)
findViewById(R.id.surface view);
surfaceHolder = surfaceView.getHolder();
surfaceHolder.addCallback(surfaceHolderCallback);
}
/**
* Surface holder callback listens for surface events.
*/
private final Callback surfaceHolderCallback = new Callback() {
public void surfaceChanged(SurfaceHolder holder, int format,
int width,
int height) {
}
public void surfaceCreated(SurfaceHolder holder) {
// Start playing since surface is ready
isPlaying.set(true);
// Start renderer on a separate thread
new Thread(renderer).start();
}
public void surfaceDestroyed(SurfaceHolder holder) {
// Stop playing since surface is destroyed
isPlaying.set(false);
}
};
/**
* Renderer runnable renders the video frames from the
* AVI file to the surface through a bitmap.
*/
327
328
CHAPTER 12: Native Graphics API
private final Runnable renderer = new Runnable() {
public void run() {
// Get the surface instance
Surface surface = surfaceHolder.getSurface();
// Initialize the native window
init(avi, surface);
// Calculate the delay using the frame rate
long frameDelay = (long) (1000 / getFrameRate(avi));
// Start rendering while playing
while (isPlaying.get()) {
// Render the frame to the surface
render(avi, surface);
// Wait for the next frame
try {
Thread.sleep(frameDelay);
} catch (InterruptedException e) {
break;
}
}
}
};
/**
* Initializes the native window.
*
* @param avi file descriptor.
* @param surface surface instance.
*/
private native static void init(long avi, Surface surface);
/**
* Renders the frame from given AVI file descriptor to
* the given Surface.
*
* @param avi file descriptor.
* @param surface surface instance.
* @return true if there are more frames, false otherwise.
*/
private native static boolean render(long avi, Surface surface);
}
12.
Choose Project ➤ Build Project from the top menu bar to compile the Java
source code.
13.
Using the Project Explorer, select the NativeWindowPlayerActivity.
14.
Choose Run ➤ External Tools ➤ Generate C and C++ Header File from the
top menu bar to invoke the javah tool for NativeWindowPlayerActivity class.
CHAPTER 12: Native Graphics API
15.
Under the jni subdirectory of the project, the com apress aviplayer
NativeWindowPlayerActivity.h header file will be generated by the javah tool.
16.
Right-click on jni directory, and choose New ➤ Source File from the
context menu.
17.
Set Source File to com apress aviplayer NativeWindowPlayerActivity.cpp.
18.
Click the Finish button to create a new C++ source file.
19.
Using the Eclipse, replace the content of the new source file with the code in
Listing 12-36.
Listing 12-36. Content of com_apress_aviplayer_NativeWindowPlayerActivity.cpp
extern "C" {
#include <avilib.h>
}
#include <android/native window jni.h>
#include <android/native window.h>
#include "Common.h"
#include "com apress aviplayer NativeWindowPlayerActivity.h"
void Java com apress aviplayer NativeWindowPlayerActivity init(
JNIEnv* env,
jclass clazz,
jlong avi,
jobject surface)
{
// Get the native window from the surface
ANativeWindow* nativeWindow = ANativeWindow fromSurface(
env, surface);
if (0 == nativeWindow)
{
ThrowException(env, "java/io/RuntimeException",
"Unable to get native window from surface.");
goto exit;
}
//
//
//
if
Set the buffers geometry to AVI movie frame dimensions
If these are different than the window's physical size
then the buffer will be scaled to match that size.
(0 > ANativeWindow setBuffersGeometry(nativeWindow,
AVI video width((avi t*) avi),
AVI video height((avi t*) avi),
WINDOW FORMAT RGB 565))
{
ThrowException(env, "java/io/RuntimeException",
"Unable to set buffers geometry.");
}
329
330
CHAPTER 12: Native Graphics API
// Release the native window
ANativeWindow release(nativeWindow);
nativeWindow = 0;
exit:
return;
}
jboolean Java com apress aviplayer NativeWindowPlayerActivity render(
JNIEnv* env,
jclass clazz,
jlong avi,
jobject surface)
{
jboolean isFrameRead = JNI FALSE;
long frameSize = 0;
int keyFrame = 0;
// Get the native window from the surface
ANativeWindow* nativeWindow = ANativeWindow fromSurface(
env, surface);
if (0 == nativeWindow)
{
ThrowException(env, "java/io/RuntimeException",
"Unable to get native window from surface.");
goto exit;
}
// Lock the native window and get access to raw buffer
ANativeWindow Buffer windowBuffer;
if (0 > ANativeWindow lock(nativeWindow, &windowBuffer, 0))
{
ThrowException(env, "java/io/RuntimeException",
"Unable to lock native window.");
goto release;
}
// Read AVI frame bytes to raw buffer
frameSize = AVI read frame((avi t*) avi,
(char*) windowBuffer.bits,
&keyFrame);
// Check if frame is successfully read
if (0 < frameSize)
{
isFrameRead = JNI TRUE;
}
CHAPTER 12: Native Graphics API
// Unlock and post the buffer for displaying
if (0 > ANativeWindow unlockAndPost(nativeWindow))
{
ThrowException(env, "java/io/RuntimeException",
"Unable to unlock and post to native window.");
goto release;
}
release:
// Release the native window
ANativeWindow release(nativeWindow);
nativeWindow = 0;
exit:
return isFrameRead;
}
20.
The build file Android.mk needs to be modified, as shown in Listing 12-37, to
compile the new source file, as well as to dynamically link with the android
shared library in order to use the native window API.
Listing 12-37. Build File Modified for Native Window Player
LOCAL PATH := $(call my-dir)
include $(CLEAR VARS)
LOCAL MODULE
:= AVIPlayer
LOCAL SRC FILES := \
Common.cpp \
com apress aviplayer AbstractPlayerActivity.cpp \
com apress aviplayer BitmapPlayerActivity.cpp \
com apress aviplayer OpenGLPlayerActivity.cpp \
com_apress_aviplayer_NativeWindowPlayerActivity.cpp
...
# Link with Android library
LOCAL_LDLIBS += −landroid
include $(BUILD SHARED LIBRARY)
...
21.
The Bitmap Player activity is now ready. In order to be able to use it, it needs
to be added as a radio button to the activity main.xml layout file, as shown
in Listing 12-38.
331
332
CHAPTER 12: Native Graphics API
Listing 12-38. Native Window Player Radio Button Added to the Main Layout
<LinearLayout xmlns:android="http://schemas.android.com/apk/res/android"
xmlns:tools="http://schemas.android.com/tools"
android:layout width="match parent"
android:layout height="match parent"
android:orientation="vertical" >
...
<RadioGroup
android:id="@+id/player radio group"
android:layout width="wrap content"
android:layout height="wrap content" >
...
<RadioButton
android:id="@+id/open gl player radio"
android:layout width="wrap content"
android:layout height="wrap content"
android:text="@string/open gl player radio" />
<RadioButton
android:id="@+id/native_window_player_radio"
android:layout_width="wrap_content"
android:layout_height="wrap_content"
android:text="@string/native_window_player_radio" />
</RadioGroup>
...
</LinearLayout>
22.
The main activity source code should also be modified, as shown in Listing
12-39, to dispatch the playback request to Bitmap Player activity when it is
selected by the user.
Listing 12-39. Native Window Player Radio Button Added to Main Activity
/**
* On play button click event handler.
*/
private void onPlayButtonClick() {
...
// Choose the activity based on id
switch (radioId) {
CHAPTER 12: Native Graphics API
333
case R.id.bitmap player radio:
intent = new Intent(this, BitmapPlayerActivity.class);
break;
case R.id.open gl player radio:
intent = new Intent(this, OpenGLPlayerActivity.class);
break;
case R.id.native_window_player_radio:
intent = new Intent(this, NativeWindowPlayerActivity.class);
break;
default:
throw new UnsupportedOperationException("radioId=" + radioId);
}
...
}
23.
The AVI player application is now ready with the native window renderer.
Follow the same steps given in “JNI Graphics API” section of this chapter to
run the example application on the Android emulator.
EGL Graphics Library
Starting from API Level 9, the Android NDK also comes with support from EGL graphics library,
enabling the native applications to manage OpenGL ES surfaces. More information on EGL can be
found at Khronos Group’s web site at www.khronos.org/egl.
In order to enable EGL graphics library, follow these steps.
1.
Include the EGL header files.
#include <EGL/egl.h>
#include <EGL/eglext.h>
2.
Update the Android.mk build file to dynamically link with EGL library.
LOCAL LDLIBS += −lEGL
Upon making these changes, the EGL graphics library will now be available to your native
application. You can use the EGL graphics library API functions to list supported EGL configurations,
allocate and release OpenGL ES surfaces, and swap/flip surfaces for display.
Summary
This chapter explored the different native graphics APIs that are available to native applications. In
order to help you better understand these graphics native APIs, an AVI video player application was
built throughout this chapter.
Chapter
13
Native Sound API
In the previous chapter, you explored the multiple flavors of the native graphics APIs that are
provided by the Android platform. Starting from Android OS version 2.3, API Level 9, the Android
platform also provides a native sound API, enabling the native code to play and record audio
without invoking any method at Java layer. Android native sound support is based on the OpenSL
ES 1.0.1 standard from Khronos Group. OpenSL ES is the short form of the Open Sound Library
for Embedded Systems. This chapter will briefly demonstrate the OpenSL ES native sound API
pertaining to Android platform.
Using the OpenSL ES API
As the OpenSL ES specification is large, this chapter will only cover the pieces that pertain
to the Android platform. More information on OpenSL ES can be found at
$ANDROID NDK HOME/docs/opensles/OpenSL ES Specification 1.0.1.pdf.
1.
The OpenSL ES API is exposed through a set of header files. The main
header file that needs to be included is the SLES/OpenSLES.h.
#include <SLES/OpenSLES.h>
2.
In order to use the Android extensions, the SLES/OpenSLES Android.h header
file should also be included in the source file.
#include <SLES/OpenSLES Android.h>
3.
The OpenSL ES native sound API also requires having a library linked
dynamically with the native module. This is achieved by adding the following
line to the Android.mk build script:
LOCAL LDLIBS += −lOpenSLES
335
336
CHAPTER 13: Native Sound API
The Android platform is committed to binary compatibility for applications that are using OpenSL ES.
By simply linking with this shared library, the same application is expected to work seamlessly on the
feature versions of the platform.
Compatibility with the OpenSL ES Standard
Although it is based on the OpenSL ES 1.0.1 specification, the Android native sound API is not
a conforming implementation of any OpenSL ES profile. The Android-specific portions of this
implementation are exposed through the Android Extensions API. More information about the
Android Extensions can be found in Android NDK documentation at $ANDROID NDK HOME/docs/
opensles/index.html.
Audio Permissions
In terms of permissions, using the native sound API is not any different from using the Java-based
sound API. The application is expected to request the proper permissions, through the usespermission tag, in its manifest file.
android.permission.RECORD AUDIO is needed to create an audio recorder.
android.permission.MODIFY AUDIO SETTINGS is needed to change audio settings
and also to use effects.
Creating the WAVE Audio Player
The WAVE audio player application will act as a test bed to demonstrate the OpenSL ES-based
native audio playback on the Android platform. The example application will provide the following:
The Android application project with native code support.
A statically linked WAVE library to parse WAVE audio files in native code.
OpenSL ES-based WAVE audio file playback support.
A simple GUI to specify the WAVE file from the SD card for playback.
Playing WAVE audio files requires parsing of WAVE files. Although WAVE format is not very complex,
for the sake of simplicity, a third party WAVE library will be used to handle the WAVE files.
Note Full source code of this example application can be downloaded from the publisher’s web site at
www.apress.com.
CHAPTER 13: Native Sound API
337
Make WAVELib a NDK Import Module
The AVILib library that you used in Chapter 10 also comes with WAVE audio file support through the
WAVELib. Follow these steps to make WAVELib available as a NDK import module.
1.
Open up a Terminal window if you are using Mac OS or Linux; otherwise
Cygwin if you are using Windows.
2.
Change the current directory to Android NDK import module directory for
AVILib (that you installed in Chapter 10) by issuing the following command:
cd $ANDROID NDK HOME/sources/transcode-1.1.5/avilib
3.
Open up the Android.mk build script in Eclipse. Append the import module
description for both static and shared WAVELib library as shown in
Listing 13-1.
Listing 13-1. Android.mk Build File with WAVELib Import Module Changes
LOCAL PATH := $(call my-dir)
...
#
# Transcode WAVLib
#
# Source files
MY_WAVLIB_SRC_FILES := wavlib.c platform_posix.c
# Include path to export
MY_WAVLIB_C_INCLUDES := $(LOCAL_PATH)
#
# WAVLib static
#
include $(CLEAR_VARS)
# Module name
LOCAL_MODULE := wavlib_static
# Source files
LOCAL_SRC_FILES := $(MY_WAVLIB_SRC_FILES)
# Include path to export
LOCAL_EXPORT_C_INCLUDES := $(MY_WAVLIB_C_INCLUDES)
# Build a static library
include $(BUILD_STATIC_LIBRARY)
338
CHAPTER 13: Native Sound API
#
# WAVLib shared
#
include $(CLEAR_VARS)
# Module name
LOCAL_MODULE := wavlib_shared
# Source files
LOCAL_SRC_FILES := $(MY_WAVLIB_SRC_FILES)
# Include path to export
LOCAL_EXPORT_C_INCLUDES := $(MY_WAVLIB_C_INCLUDES)
# Build a shared library
include $(BUILD_SHARED_LIBRARY)
Upon making these changes, WAVELib is now available as both a static and a shared library for
native modules. The WAVELib is now ready to be used in the example WAVE player application.
Create the WAVE Player Android Application
In order to create the WAVE player application, launch the New Android Application Project dialog
and follow these steps.
1.
Set Application Name to WAV Player.
2.
Set Project Name to WAV Player.
3.
Set Package Name to com.apress.wavplayer.
4.
Click the Next button to accept the default values on the current and
following wizard pages.
5.
Once the Android application project is created, using the Project Explorer,
launch the Add Android Native Support wizard through the Android Tools
context menu.
6.
Set Library Name to WAVPlayer.
7.
Click the Finish button to add native support to the new project.
Creating the WAVE Player Main Activity
The main activity will provide a simple GUI to specify the WAVE audio file to play from the SD card.
Follow these steps to implement the main activity.
1.
Using the Project Explorer, expand the res directory for the resources.
Populate the string resources by opening the string.xml file from the values
sub-directory, and replace its content as shown in Listing 13-2.
CHAPTER 13: Native Sound API
Listing 13-2. Content of res/values/string.xml String Resources File
<resources>
<string name="app name">WAV Player</string>
<string name="menu settings">Settings</string>
<string name="title activity main">MainActivity</string>
<string name="file name hint">WAV file</string>
<string name="play button">Play</string>
<string name="error alert title">Error Occurred</string>
<string name="file name">8k16bitpcm.wav</string>
</resources>
2.
The main activity provides a simple GUI with a text field to specify the WAVE
audio file name, and a Play button to start the playback using OpenSL ES
with native code. Using the Project Explorer, expand the layout sub-directory
from res resource directory. Open the activity main.xml layout file, and
replace its content as shown in Listing 13-3.
Listing 13-3. Content of res/layout/activity_main.xml Layout File
<LinearLayout xmlns:android="http://schemas.android.com/apk/res/android"
xmlns:tools="http://schemas.android.com/tools"
android:id="@+id/LinearLayout1"
android:layout width="match parent"
android:layout height="match parent"
android:orientation="vertical" >
<EditText
android:id="@+id/fileNameEdit"
android:layout width="match parent"
android:layout height="wrap content"
android:ems="10"
android:hint="@string/file name hint"
android:text="@string/file name" >
<requestFocus />
</EditText>
<Button
android:id="@+id/playButton"
android:layout width="wrap content"
android:layout height="wrap content"
android:text="@string/play button" />
</LinearLayout>
339
340
CHAPTER 13: Native Sound API
3.
Now you will implement the main activity. The main activity starts an
asynchronous play task to start the playback of the specified WAVE audio
file through the play native method that you will be implementing later in
this chapter using the OpenSL ES. Using the Project Explorer, open up the
MainActivity.java source file, and replace its content as shown in Listing 13-4.
Listing 13-4. Content of MainActivity.java Source File
package com.apress.wavplayer;
import java.io.File;
import java.io.IOException;
import
import
import
import
import
import
import
import
import
android.app.Activity;
android.app.AlertDialog;
android.os.AsyncTask;
android.os.Bundle;
android.os.Environment;
android.view.View;
android.view.View.OnClickListener;
android.widget.Button;
android.widget.EditText;
/**
* WAVE player main activity.
*
* @author Onur Cinar
*/
public class MainActivity extends Activity implements OnClickListener {
/** File name edit text. */
private EditText fileNameEdit;
/**
* On create.
*
* @param savedInstanceState
*
saved state.
*/
public void onCreate(Bundle savedInstanceState) {
super.onCreate(savedInstanceState);
setContentView(R.layout.activity main);
fileNameEdit = (EditText) findViewById(R.id.fileNameEdit);
Button playButton = (Button) findViewById(R.id.playButton);
playButton.setOnClickListener(this);
}
CHAPTER 13: Native Sound API
/**
* On click.
*
* @param view
*
view instance.
*/
public void onClick(View view) {
switch (view.getId()) {
case R.id.playButton:
onPlayButtonClick();
}
}
/**
* On play button click.
*/
private void onPlayButtonClick() {
// Under the external storage
File file = new File(Environment.getExternalStorageDirectory(),
fileNameEdit.getText().toString());
// Start player
PlayTask playTask = new PlayTask();
playTask.execute(file.getAbsolutePath());
}
/**
* Play task.
*/
private class PlayTask extends AsyncTask<String, Void, Exception> {
/**
* Background task.
*
* @param file
*
WAVE file.
*/
protected Exception doInBackground(String... file) {
Exception result = null;
try {
// Play the WAVE file
play(file[0]);
} catch (IOException ex) {
result = ex;
}
return result;
}
341
342
CHAPTER 13: Native Sound API
/**
* Post execute.
*
* @param ex
*
exception instance.
*/
protected void onPostExecute(Exception ex) {
// Show error message if playing failed
if (ex != null) {
new AlertDialog.Builder(MainActivity.this)
.setTitle(R.string.error alert title)
.setMessage(ex.getMessage()).show();
}
}
}
/**
* Plays the given WAVE file using native sound API.
*
* @param fileName
*
file name.
* @throws IOException
*/
private native void play(String fileName) throws IOException;
static {
System.loadLibrary("WAVPlayer");
}
}
The Java portion of the WAVE player application is now ready. You will now start implementing the
native Play button to play the specified WAVE audio file using the OpenSL ES library.
Implementing WAVE Audio Playback
Prior starting to implement the native portion of the WAVE audio player application, build the Java
portion of the application and make sure that it compiles. Follow these steps to implement the
playback functionality.
1.
Using the Project Explorer, select the MainActivity.java source file and
Choose Run ➤ External Tools ➤ Generate C and C++ header file from the
top menu bar to generate the com apress wavplayer MainActivity.h header
file declaring the native method.
2.
The Android.mk build script for the project needs to be modified to statically
link with the wavelib static library for WAVE file format support and
dynamically link with the OpenSLES library to use OpenSL ES native sound
API. Open up the build script in Eclipse, and replace its content as shown in
Listing 13-5.
CHAPTER 13: Native Sound API
Listing 13-5. Content of jni/Android.mk Build Script
LOCAL PATH := $(call my-dir)
include $(CLEAR VARS)
LOCAL MODULE
:= WAVPlayer
LOCAL SRC FILES := WAVPlayer.cpp
# Use WAVLib static library
LOCAL STATIC LIBRARIES += wavlib static
# Link with OpenSL ES
LOCAL LDLIBS += −lOpenSLES
include $(BUILD SHARED LIBRARY)
# Import WAVLib library module
$(call import-module, transcode-1.1.5/avilib)
3.
Open up the WAVPlayer.cpp native source file in Eclipse. Start by including
the necessary header files to use both OpenSL ES API and also the WAVLib
API, as shown in Listing 13-6.
Listing 13-6. Headers Files Included in jni/WAVPlayer.cpp Source File
#include "com apress wavplayer MainActivity.h"
#include <SLES/OpenSLES.h>
#include <SLES/OpenSLES Android.h>
extern "C" {
#include <wavlib.h>
}
static const char* JAVA LANG IOEXCEPTION = "java/lang/IOException";
static const char* JAVA LANG OUTOFMEMORYERROR =
"java/lang/OutOfMemoryError";
#define ARRAY LEN(a) (sizeof(a) / sizeof(a[0]))
4.
The OpenSL ES native sound API is designed to operate in asynchronous
way. Throughout the playback, a specified callback function will get invoked
by the OpenSL ES engine to provide the audio data. This function will
need access to the player context in order to render its functionality. The
PlayerContext structure will be used to feed the player context into that
callback function when it gets registered. The PlayerContext structure holds
OpenSL ES and WAVLib constructs, and also the audio buffer. Append the
PlayerContext to WAVPlayer.cpp source file as shown in Listing 13-7.
343
344
CHAPTER 13: Native Sound API
Listing 13-7. PlayerContext Structure to Hold the Native Context
/**
* Player context.
*/
struct PlayerContext
{
SLObjectItf engineObject;
SLEngineItf engineEngine;
SLObjectItf outputMixObject;
SLObjectItf audioPlayerObject;
SLAndroidSimpleBufferQueueItf audioPlayerBufferQueue;
SLPlayItf audioPlayerPlay;
WAV wav;
unsigned char* buffer;
size t bufferSize;
PlayerContext()
: engineObject(0)
, engineEngine(0)
, outputMixObject(0)
, audioPlayerBufferQueue(0)
, audioPlayerPlay(0)
, wav(0)
, bufferSize(0)
{}
};
5.
The ThrowException is a helper function to easily throw exceptions to Java
layer when an error occurs in the native code. Append this function to the
source file as shown in Listing 13-8.
Listing 13-8. ThrowException Helper Function
/**
* Throw exception with given class and message.
*
* @param env JNIEnv interface.
* @param className class name.
* @param message exception message.
*/
static void ThrowException(
JNIEnv* env,
const char* className,
const char* message)
{
// Get the exception class
jclass clazz = env->FindClass(className);
CHAPTER 13: Native Sound API
// If exception class is found
if (0 != clazz)
{
// Throw exception
env->ThrowNew(clazz, message);
// Release local class reference
env->DeleteLocalRef(clazz);
}
}
6.
The OpenWaveFile function opens the given WAVE audio file, and
CloseWaveFile releases the file once it is no longer needed. If an error occurs,
both of these functions throws an IOException to inform the Java application,
and the error gets displayed in an alert dialog to inform the user. Append
these functions to the source file as shown in Listing 13-9.
Listing 13-9. The WAVLib Helper Functions to Open and Close WAVE Files
/**
* Open the given WAVE file.
*
* @param env JNIEnv interface.
* @param fileName file name.
* @return WAV file.
* @throws IOException
*/
static WAV OpenWaveFile(
JNIEnv* env,
jstring fileName)
{
WAVError error = WAV SUCCESS;
WAV wav = 0;
// Get the file name as a C string
const char* cFileName = env->GetStringUTFChars(fileName, 0);
if (0 == cFileName)
goto exit;
// Open the WAVE file
wav = wav open(cFileName, WAV READ, &error);
// Release the file name
env->ReleaseStringUTFChars(fileName, cFileName);
// Check error
if (0 == wav)
345
346
CHAPTER 13: Native Sound API
{
ThrowException(env,
JAVA LANG IOEXCEPTION,
wav strerror(error));
}
exit:
return wav;
}
/**
* Close the given WAVE file.
*
* @param wav WAV file.
* @throws IOException
*/
static void CloseWaveFile(
WAV wav)
{
if (0 != wav)
{
wav close(wav);
}
}
7.
The OpenSL ES function calls can fail due to many different issues. Each
OpenSL ES function call returns a result code in SLresult type. OpenSL
ES does not provide any function to translate these result codes to human
readable messages. The ResultToString helper function fills this gap. It takes
a result code and returns the corresponding error message. Append the
ResultToString function as shown in Listing 13-10.
Listing 13-10. ResultToString Helper Function to Translate Result Code
/**
* Convert OpenSL ES result to string.
*
* @param result result code.
* @return result string.
*/
static const char* ResultToString(SLresult result)
{
const char* str = 0;
switch (result)
{
case SL RESULT SUCCESS:
str = "Success";
break;
CHAPTER 13: Native Sound API
case SL RESULT PRECONDITIONS VIOLATED:
str = "Preconditions violated";
break;
case SL RESULT PARAMETER INVALID:
str = "Parameter invalid";
break;
case SL RESULT MEMORY FAILURE:
str = "Memory failure";
break;
case SL RESULT RESOURCE ERROR:
str = "Resource error";
break;
case SL RESULT RESOURCE LOST:
str = "Resource lost";
break;
case SL RESULT IO ERROR:
str = "IO error";
break;
case SL RESULT BUFFER INSUFFICIENT:
str = "Buffer insufficient";
break;
case SL RESULT CONTENT CORRUPTED:
str = "Success";
break;
case SL RESULT CONTENT UNSUPPORTED:
str = "Content unsupported";
break;
case SL RESULT CONTENT NOT FOUND:
str = "Content not found";
break;
case SL RESULT PERMISSION DENIED:
str = "Permission denied";
break;
case SL RESULT FEATURE UNSUPPORTED:
str = "Feature unsupported";
break;
case SL RESULT INTERNAL ERROR:
str = "Internal error";
break;
347
348
CHAPTER 13: Native Sound API
case SL RESULT UNKNOWN ERROR:
str = "Unknown error";
break;
case SL RESULT OPERATION ABORTED:
str = "Operation aborted";
break;
case SL RESULT CONTROL LOST:
str = "Control lost";
break;
default:
str = "Unknown code";
}
return str;
}
8.
The CheckError helper function throws an IOException if the result code
indicates an error. It relies on ResultToString function to translate the result
code to a message. Append the CheckError function as shown in Listing 13-11.
Listing 13-11. CheckError Function to Throw an Exception in Case of Error
/**
* Checks if the result is an error, and throws
* and IOException with the error message.
*
* @param env JNIEnv interface.
* @param result result code.
* @return error occurred.
* @throws IOException
*/
static bool CheckError(
JNIEnv* env,
SLresult result)
{
bool isError = false;
// If an error occurred
if (SL RESULT SUCCESS != result)
{
// Throw IOException
ThrowException(env,
JAVA LANG IOEXCEPTION,
ResultToString(result));
CHAPTER 13: Native Sound API
isError = true;
}
return isError;
}
9.
Although the OpenSL ES API is C based, it adopts an object-oriented
approach. Every construct of OpenSL ES is built on the top of two main
constructs: object and interface. An object is an abstract set of resources
assigned for well-defined tasks. An interface is an abstract set of related
features that an object can provide. An object may expose one or more
interfaces. Objects can be created through either the engine object or
through the object interface. Every OpenSL ES application starts by first
creating an engine object in order to access the rest of the API. The engine
is created through the slCreateEngine API. The CreateEngine helper function
relies on that function to create an engine object and throws an IOException
if it fails. Append the CreateEngine function to the source code as shown in
Listing 13-12.
Listing 13-12. CreateEngine Function to Create the Engine Object
/**
* Creates an OpenGL ES engine.
*
* @param env JNIEnv interface.
* @param engineObject object to hold engine. [OUT]
* @throws IOException
*/
static void CreateEngine(
JNIEnv* env,
SLObjectItf& engineObject)
{
// OpenSL ES for Android is designed to be thread-safe,
// so this option request will be ignored, but it will
// make the source code portable to other platforms.
SLEngineOption engineOptions[] = {
{ (SLuint32) SL ENGINEOPTION THREADSAFE,
(SLuint32) SL BOOLEAN TRUE }
};
// Create the OpenSL ES engine object
SLresult result = slCreateEngine(
&engineObject,
ARRAY LEN(engineOptions),
engineOptions,
0, // no interfaces
0, // no interfaces
0); // no required
349
350
CHAPTER 13: Native Sound API
// Check error
CheckError(env, result);
}
10.
Once the object is created, it is in unrealized state where the object is alive
but has not allocated any resources. It needs to be realized first to become
usable. This is achieved through the Realize method that is exposed by the
Object Interface. The RealizeObject helper function realizes the objects and
throws an IOException if it fails. Append the function to the source file as
shown in Listing 13-13.
Listing 13-13. RealizeObject Function to Realize Object Instances
/**
* Realize the given object. Objects needs to be
* realized before using them.
*
* @param env JNIEnv interface.
* @param object object instance.
* @throws IOException
*/
static void RealizeObject(
JNIEnv* env,
SLObjectItf object)
{
// Realize the engine object
SLresult result = (*object)->Realize(
object,
SL BOOLEAN FALSE); // No async, blocking call
// Check error
CheckError(env, result);
}
11.
Once the object is no longer needed, it needs to be destroyed in order to
release the allocated resources. This is achieved through the Destroy method
that is exposed by the Object Interface. Append the DestroyObject function
to the source code as shown in Listing 13-14.
Listing 13-14. DestroyObject Function to Destroy Unused Objects
/**
* Destroys the given object instance.
*
* @param object object instance. [IN/OUT]
*/
CHAPTER 13: Native Sound API
static void DestroyObject(SLObjectItf& object)
{
if (0 != object)
(*object)->Destroy(object);
object = 0;
}
12.
Each object can expose one or more interfaces. These interfaces can be
obtained through the GetInterface method that is exposed by the Object
Interface. The GetEngineInterface helper function gets the Engine Interface
from the given Engine Object. Append the function to the source file as
shown in Listing 13-15.
Listing 13-15. GetEngineInterface Function to Obtain Engine Interface
/**
* Gets the engine interface from the given engine object
* in order to create other objects from the engine.
*
* @param env JNIEnv interface.
* @param engineObject engine object.
* @param engineEngine engine interface. [OUT]
* @throws IOException
*/
static void GetEngineInterface(
JNIEnv* env,
SLObjectItf& engineObject,
SLEngineItf& engineEngine)
{
// Get the engine interface
SLresult result = (*engineObject)->GetInterface(
engineObject,
SL IID ENGINE,
&engineEngine);
// Check error
CheckError(env, result);
}
13.
The CreateOutputMix function creates an Output Mixer object by invoking the
CreateOutputMix method of the Engine Interface with a set of parameters.
Append the CreateOutputMix function to the source file as shown in Listing 13-16.
Listing 13-16. CreateOutputMix Function to Create an Output Mixer
/**
* Creates and output mix object.
*
* @param env JNIEnv interface.
351
352
CHAPTER 13: Native Sound API
* @param engineEngine engine engine.
* @param outputMixObject object to hold the output mix. [OUT]
* @throws IOException
*/
static void CreateOutputMix(
JNIEnv* env,
SLEngineItf engineEngine,
SLObjectItf& outputMixObject)
{
// Create output mix object
SLresult result = (*engineEngine)->CreateOutputMix(
engineEngine,
&outputMixObject,
0, // no interfaces
0, // no interfaces
0); // no required
// Check error
CheckError(env, result);
}
14.
The InitPlayerBuffer helper function creates a byte buffer to hold the audio
data chunks, and the FreePlayerBuffers handles releasing of this buffer once
it is no longer needed. The InitPlayerBuffer function consults to WAVE audio
file header to come up with the appropriate buffer size based on the input file.
Append these functions to the source code as shown in Listing 13-17.
Listing 13-17. InitPlayerBuffer and FreePlayerBuffer Helper Functions
/**
* Free the player buffer.
*
* @param buffers buffer instance. [OUT]
*/
static void FreePlayerBuffer(unsigned char*& buffers)
{
if (0 != buffers)
{
delete buffers;
buffers = 0;
}
}
/**
* Initializes the player buffer.
*
* @param env JNIEnv interface.
* @param wav WAVE file.
* @param buffers buffer instance. [OUT]
* @param bufferSize buffer size. [OUT]
*/
CHAPTER 13: Native Sound API
static void InitPlayerBuffer(
JNIEnv* env,
WAV wav,
unsigned char*& buffer,
size t& bufferSize)
{
// Calculate the buffer size
bufferSize = wav get channels(wav) * wav get rate(wav)
* wav get bits(wav);
// Initialize buffer
buffer = new unsigned char[bufferSize];
if (0 == buffer)
{
ThrowException(env,
JAVA LANG OUTOFMEMORYERROR,
"buffer");
}
}
15.
In order to play the WAVE audio file through OpenSL ES, an audio player with
a buffer queue will be used. The CreateBufferQueueAudioPlayer function
creates an Android simple buffer queue with a single buffer slot as the audio
source. For better quality, you may choose to have more buffers slots as
appropriate. The function consults the WAVE audio file header to define the
parameters for the PCM playback. The output of the audio player gets set to
the Output Mixer. Append the function as shown in Listing 13-18.
Listing 13-18. CreateBufferQueueAudioPlayer Function
/**
* Creates buffer queue audio player.
*
* @param wav WAVE file.
* @param engineEngine engine interface.
* @param outputMixObject output mix.
* @param audioPlayerObject audio player. [OUT]
* @throws IOException
*/
static void CreateBufferQueueAudioPlayer(
WAV wav,
SLEngineItf engineEngine,
SLObjectItf outputMixObject,
SLObjectItf& audioPlayerObject)
{
// Android simple buffer queue locator for the data source
SLDataLocator AndroidSimpleBufferQueue dataSourceLocator = {
SL DATALOCATOR ANDROIDSIMPLEBUFFERQUEUE, // locator type
1
// buffer count
};
353
354
CHAPTER 13: Native Sound API
// PCM data source format
SLDataFormat PCM dataSourceFormat = {
SL DATAFORMAT PCM,
// format type
wav get channels(wav),
// channel count
wav get rate(wav) * 1000, // samples per second in millihertz
wav get bits(wav),
// bits per sample
wav get bits(wav),
// container size
SL SPEAKER FRONT CENTER, // channel mask
SL BYTEORDER LITTLEENDIAN // endianness
};
// Data source is a simple buffer queue with PCM format
SLDataSource dataSource = {
&dataSourceLocator, // data locator
&dataSourceFormat
// data format
};
// Output mix locator for data sink
SLDataLocator OutputMix dataSinkLocator = {
SL DATALOCATOR OUTPUTMIX, // locator type
outputMixObject
// output mix
};
// Data sink is an output mix
SLDataSink dataSink = {
&dataSinkLocator, // locator
0
// format
};
// Interfaces that are requested
SLInterfaceID interfaceIds[] = {
SL IID BUFFERQUEUE
};
// Required interfaces. If the required interfaces
// are not available the request will fail
SLboolean requiredInterfaces[] = {
SL BOOLEAN TRUE // for SL IID BUFFERQUEUE
};
// Create audio player object
SLresult result = (*engineEngine)->CreateAudioPlayer(
engineEngine,
&audioPlayerObject,
&dataSource,
&dataSink,
ARRAY LEN(interfaceIds),
interfaceIds,
requiredInterfaces);
}
CHAPTER 13: Native Sound API
16.
The buffer is managed through the Buffer Queue Interface. Through this
interface, buffers can be queued for playback, and a callback can be
registered to receive a notification once the queued buffer is fully consumed
by the audio player. Append the function to the source file as shown in
Listing 13-19.
Listing 13-19. GetAudioPlayerBufferQueueInterface Function
/**
* Gets the audio player buffer queue interface.
*
* @param env JNIEnv interface.
* @param audioPlayerObject audio player object instance.
* @param audioPlayerBufferQueue audio player buffer queue. [OUT]
* @throws IOException
*/
static void GetAudioPlayerBufferQueueInterface(
JNIEnv* env,
SLObjectItf audioPlayerObject,
SLAndroidSimpleBufferQueueItf& audioPlayerBufferQueue)
{
// Get the buffer queue interface
SLresult result = (*audioPlayerObject)->GetInterface(
audioPlayerObject,
SL IID BUFFERQUEUE,
&audioPlayerBufferQueue);
// Check error
CheckError(env, result);
}
17.
The DestroyContext function will be used to release the OpenSL ES
resources and the buffer once the player is terminated. Append the function
as shown in Listing 13-20.
Listing 13-20. DestroyContext Function to Release Player Context
/**
* Destroy the player context.
*
* @param ctx player context.
*/
static void DestroyContext(PlayerContext*& ctx)
{
// Destroy audio player object
DestroyObject(ctx->audioPlayerObject);
// Free the player buffer
FreePlayerBuffer(ctx->buffer);
355
356
CHAPTER 13: Native Sound API
// Destroy output mix object
DestroyObject(ctx->outputMixObject);
// Destroy the engine instance
DestroyObject(ctx->engineObject);
// Close the WAVE file
CloseWaveFile(ctx->wav);
// Free context
delete ctx;
ctx = 0;
}
18.
The PlayerCallback gets invoked by the OpenSL ES audio player object
once the player finished playing the previously queued buffer. In this callback,
the application simply reads and queues the next audio data chunk for
playback. The DestroyContext function gets invoked to release the resources
if the end of the WAVE audio file is reached. Append the function to the
source code as shown in Listing 13-21.
Listing 13-21. PlayerCallback Function
/**
* Gets called when a buffer finishes playing.
*
* @param audioPlayerBufferQueue audio player buffer queue.
* @param context player context.
*/
static void PlayerCallback(
SLAndroidSimpleBufferQueueItf audioPlayerBufferQueue,
void* context)
{
// Get the player context
PlayerContext* ctx = (PlayerContext*) context;
// Read data
ssize t readSize = wav read data(
ctx->wav,
ctx->buffer,
ctx->bufferSize);
// If data is read
if (0 < readSize)
{
(*audioPlayerBufferQueue)->Enqueue(
audioPlayerBufferQueue,
ctx->buffer,
readSize);
}
CHAPTER 13: Native Sound API
else
{
DestroyContext(ctx);
}
}
19.
The PlayerCallback gets registered via the RegisterCallback function that
is exposed through the Buffer Queue Interface. During the registration, a
context pointer can be provided so that the callback function receives this
context pointer once it is invoked by the audio player. Append the source
code as shown in Listing 13-22.
Listing 13-22. RegisterPlayerCallback Function
/**
* Registers the player callback.
*
* @param env JNIEnv interface.
* @param audioPlayerBufferQueue audio player buffer queue.
* @param ctx player context.
* @throws IOException
*/
static void RegisterPlayerCallback(
JNIEnv* env,
SLAndroidSimpleBufferQueueItf audioPlayerBufferQueue,
PlayerContext* ctx)
{
// Register the player callback
SLresult result = (*audioPlayerBufferQueue)->RegisterCallback(
audioPlayerBufferQueue,
PlayerCallback,
ctx); // player context
// Check error
CheckError(env, result);
}
20.
The Play Interface is used to interact with the audio player. The
GetAudioPlayerPlayInterface helper function gets the Play Interface
from the given Audio Player Object, as shown in Listing 13-23.
Listing 13-23. GetAudioPlayerPlayInterface Function
/**
* Gets the audio player play interface.
*
* @param env JNIEnv interface.
* @param audioPlayerObject audio player object instance.
* @param audioPlayerPlay play interface. [OUT]
* @throws IOException
*/
357
358
CHAPTER 13: Native Sound API
static void GetAudioPlayerPlayInterface(
JNIEnv* env,
SLObjectItf audioPlayerObject,
SLPlayItf& audioPlayerPlay)
{
// Get the play interface
SLresult result = (*audioPlayerObject)->GetInterface(
audioPlayerObject,
SL IID PLAY,
&audioPlayerPlay);
// Check error
CheckError(env, result);
}
21.
The audio player can be started via the SetPlayState method that is exposed
through the Play Interface. Once it is set to playing state, the audio player
starts waiting for buffers to be queued. The SetAudioPlayerStatePlaying
function sets the audio player state to playing, as shown in Listing 13-24.
Listing 13-24. SetAudioPlayerStatePlaying Function
/**
* Sets the audio player state playing.
*
* @param env JNIEnv interface.
* @param audioPlayerPlay play interface.
* @throws IOException
*/
static void SetAudioPlayerStatePlaying(
JNIEnv* env,
SLPlayItf audioPlayerPlay)
{
// Set audio player state to playing
SLresult result = (*audioPlayerPlay)->SetPlayState(
audioPlayerPlay,
SL PLAYSTATE PLAYING);
// Check error
CheckError(env, result);
}
22.
Now all the functions are ready. The play native method implements the
player flow by relying on the helper functions that you have implemented
earlier, as shown in Listing 13-25.
CHAPTER 13: Native Sound API
Listing 13-25. Play Native Method Implementing the Player Logic
void Java com apress wavplayer MainActivity play(
JNIEnv* env,
jobject obj,
jstring fileName)
{
PlayerContext* ctx = new PlayerContext();
// Open the WAVE file
ctx->wav = OpenWaveFile(env, fileName);
if (0 != env->ExceptionOccurred())
goto exit;
// Create OpenSL ES engine
CreateEngine(env, ctx->engineObject);
if (0 != env->ExceptionOccurred())
goto exit;
// Realize the engine object
RealizeObject(env, ctx->engineObject);
if (0 != env->ExceptionOccurred())
goto exit;
// Get the engine interface
GetEngineInterface(
env,
ctx->engineObject,
ctx->engineEngine);
if (0 != env->ExceptionOccurred())
goto exit;
// Create output mix object
CreateOutputMix(
env,
ctx->engineEngine,
ctx->outputMixObject);
if (0 != env->ExceptionOccurred())
goto exit;
// Realize output mix object
RealizeObject(env, ctx->outputMixObject);
if (0 != env->ExceptionOccurred())
goto exit;
// Initialize buffer
InitPlayerBuffer(
env,
ctx->wav,
ctx->buffer,
359
360
CHAPTER 13: Native Sound API
ctx->bufferSize);
if (0 != env->ExceptionOccurred())
goto exit;
// Create the buffer queue audio player object
CreateBufferQueueAudioPlayer(
ctx->wav,
ctx->engineEngine,
ctx->outputMixObject,
ctx->audioPlayerObject);
if (0 != env->ExceptionOccurred())
goto exit;
// Realize audio player object
RealizeObject(env, ctx->audioPlayerObject);
if (0 != env->ExceptionOccurred())
goto exit;
// Get audio player buffer queue interface
GetAudioPlayerBufferQueueInterface(
env,
ctx->audioPlayerObject,
ctx->audioPlayerBufferQueue);
if (0 != env->ExceptionOccurred())
goto exit;
// Registers the player callback
RegisterPlayerCallback(
env,
ctx->audioPlayerBufferQueue,
ctx);
if (0 != env->ExceptionOccurred())
goto exit;
// Get audio player play interface
GetAudioPlayerPlayInterface(
env,
ctx->audioPlayerObject,
ctx->audioPlayerPlay);
if (0 != env->ExceptionOccurred())
goto exit;
// Set the audio player state playing
SetAudioPlayerStatePlaying(env, ctx->audioPlayerPlay);
if (0 != env->ExceptionOccurred())
goto exit;
// Enqueue the first buffer to start
PlayerCallback(ctx->audioPlayerBufferQueue, ctx);
CHAPTER 13: Native Sound API
361
exit:
// Destroy if exception occurred
if (0 != env->ExceptionOccurred())
DestroyContext(ctx);
}
Upon building the application again with the native module implemented, you are now ready to
experiment with the example application.
Running the WAVE Audio Player
In order to experiment with the OpenSL ES-based WAVE player, follow these steps to run the
application.
1.
Prior running the application, a sample WAVE audio file is needed. Through
your web browser, download the 8000 Hz 16bit PCM sample WAVE audio file
from www.nch.com.au/acm/8k16bitpcm.wav.
2.
Using ADB, push the WAVE audio file to the SD card of the target device or
the emulator by invoking the following command:
adb push 8k16bitpcm.wav /sdcard/
3.
You can now start the application.
4.
Upon starting the application, the simple GUI will be displayed as shown in
Figure 13-1.
Figure 13-1. WAVE player simple user interface
5.
Click the Play button to start the player. The WAVE audio file will start
playing.
Summary
In this chapter you explored the OpenSL ES native sound API that is exposed by the Android
platform for native code. By using this API, native code can play and record audio without the need
to communicate with the Java layer. Having such capabilities greatly improves the performance of
multimedia applications.
Chapter
14
Profiling and NEON Optimization
In the previous chapters, you learned how to develop native applications on the Android platform.
You explored the native APIs that are provided by both the Android platform and the Linux operating
system. The following key topics will be covered on this last chapter:
Profiling the native Android applications to identify performance bottlenecks
using the GNU Profiler.
Optimizing native applications using ARM NEON technology through compiler
intrinsics.
Enabling automatic vectorization support in the compiler to seamlessly boost
the performance of native applications without changing the source code.
GNU Profiler for Measuring Performance
The GNU Profiler, also known as the gprof application, is a UNIX-based profiling tool. Through
instrumentation and sampling, gprof can gather and report the absolute execution time spent in
each function. The instrumentation is done through the GNU C/C++ compiler when the pg option
is supplied during compile time. Upon executing the application, the sampling data is automatically
stored in the gmon.out data file, which can be processed later with the gprof tool to produce the
profiling reports. Android NDK does come with the gprof tool; however, the GNU C/++ compiler
toolchain that comes with the Android NDK lacks the implementation of gnu mcount nc function
that is necessary for timing the functions. In order to use the gprof tool with the Android NDK native
projects, you will be using an open source project called Android NDK Profiler. More information
about the Android NDK Profiler open source project can be found on its official site at
http://code.google.com/p/android-ndk-profiler/.
363
364
CHAPTER 14: Profiling and NEON Optimization
Installing the Android NDK Profiler
Follow these steps to install the Android NDK Profiler native module.
1.
Via your browser, go to https://github.com/cinar/android-ndk-profiler/zipball/
master to download the Android NDK Profiler native module as a ZIP
archive file.
2.
Extract the content of the ZIP archive into the NDK native modules
subdirectory ANDROID NDK HOME/sources directory. Rename the extracted
directory cinar-android-ndk-profiler-9cdf13 to android-ndk-profiler.
The Android NDK Profiler is now ready as a native module that can be used by any Android NDK
native project. You will now learn how to enable the Android NDK Profiler for the native projects.
Enabling the Android NDK Profiler
The Android NDK Profiler should be enabled during compile time to collect profiling data. In order to
enable the Android NDK Profiler for a native Android project, follow these steps.
1.
The Android.mk build script needs to be updated to statically link with the
andprof library that you installed earlier. Update your Android.mk file as
shown in Listing 14-1.
Listing 14-1. Enabling Android NDK Profiler in Android.mk Build Script
LOCAL PATH := $(call my-dir)
include $(CLEAR VARS)
LOCAL MODULE := module
...
# Android NDK Profiler enabled
MY_ANDROID_NDK_PROFILER_ENABLED := true
# If Android NDK Profiler is enabled
ifeq ($(MY_ANDROID_NDK_PROFILER_ENABLED),true)
# Show message
$(info GNU Profiler is enabled)
# Enable the monitor functions
LOCAL_CFLAGS += −DMY_ANDROID_NDK_PROFILER_ENABLED
# Use Android NDK Profiler static library
LOCAL_STATIC_LIBRARIES += andprof
endif
CHAPTER 14: Profiling and NEON Optimization
...
include $(BUILD SHARED LIBRARY)
...
# If Android NDK Profiler is enabled
ifeq ($(MY_ANDROID_NDK_PROFILER_ENABLED),true)
# Import Android NDK Profiler library module
$(call import-module, android-ndk-profiler/jni)
endif
2.
Upon making these changes, you can enable and disable profiling by setting
the MY_ANDROID_NDK_PROFILER_ENABLED build system variable to true
or false.
3.
As the native code runs within a shared library, the profiling lifecycle should
be manually managed. The Android NDK Profiler provides functions to start
and stop collecting profiling data. These functions are declared in the prof.h
header file, which should be included first to use these functions, as shown
in Listing 14-2.
Listing 14-2. Including the Android NDK Profiler Header File
#ifdef MY ANDROID NDK PROFILER ENABLED
#include <prof.h>
#endif
4.
In order to start collecting profiling data, the monstartup function should be
invoked. The monstartup function takes the name of the shared library and
starts collecting profiling data. Depending on your application’s lifecycle, as
shown in Listing 14-3, invoke the monstartup function at the point you want
to start collecting profiling data.
Listing 14-3. Invoking the monstartup Function to Start Collecting Data
#ifdef MY ANDROID NDK PROFILER ENABLED
// Start collecting the samples
monstartup("libModule.so");
#endif
5.
You can stop collecting profiling data by invoking the moncleanup function,
as shown in Listing 14-4. Upon invoking this function, the collected profiling
data gets saved to the SD card under the file name gmon.out.
365
366
CHAPTER 14: Profiling and NEON Optimization
Listing 14-4. Invoking the moncleanup Function to Stop Collecting Data
#ifdef MY ANDROID NDK PROFILER ENABLED
// Store the collected data
moncleanup();
#endif
Note Make sure that your application has the proper permission to write to the SD card prior profiling
your application.
Analyzing gmon.out using GNU Profiler
The gmon.out profiling data file that is generated through the Android NDK Profiler can be processed
through the GNU Profiler gprof tool. The tool generates a human-readable report based on provided
profiling data file. Follow these steps to process the gmon.out file.
1.
Pull the gmon.out profiling data file from the SD card using adb.
adb pull /sdcard/gmon.out
2.
The GNU Profiler requires the debug symbols as well as the profiling data
file in order to generate a report. Invoke the arm-linux-androideabi-gprof.
exe application with the debug version of the shared library and the gmon.out
profiling data file.
%ANDROID NDK HOME%\toolchains\arm-linux-androideabi-4.4.3\prebuilt\windows\bin\armlinux-androideabi-gprof.exe obj\local\armeabi-v7a\libModule.so gmon.out
3.
Substitute the application path with the proper location of the arm-linuxandroideabi-gprof application based on your host platform. Substitute the
armeabi-v7a with the proper architecture that you are profiling on.
4.
The GNU Profiler will analyze the profiling data file and produce a report, as
shown in Listing 14-5. The generated report has two sections, a flat profile
and a call graph. Both sections contain a tabulated representation of the
profiling data; a description of each measurement is also provided in the
report.
Listing 14-5. GNU Profiler Report File
Flat profile:
Each sample counts as 0.01 seconds.
%
cumulative
self
self
time
seconds
seconds
calls ms/call
total
ms/call
name
CHAPTER 14: Profiling and NEON Optimization
99.53
0.47
2.12
2.13
2.12
0.01
361
5.87
5.87
367
func2
func1
...
Call graph (explanation follows)
granularity: each sample hit covers 2 byte(s) for 0.47% of 2.13 seconds
index % time
self
children
called
name
<spontaneous>
0.00
2.12
func1 [1]
2.12
0.00
361/361
func2 [2]
----------------------------------------------[1]
99.5
You can repeat these steps to monitor the performance of the application while implementing new
functionality or optimizing the application. In the next section, you will be using the GNU Profiler
while optimizing a native function through ARM NEON intrinsics.
Optimization using ARM NEON Intrinsics
In this section, you will be reusing the Bitmap renderer-based AVI Player example application that
you implemented in Chapter 12. You will be expanding the example application by implementing a
brightness filter in pure C code. Later in this section, you will be reimplementing the same brightness
filter function using ARM NEON intrinsics to optimize its performance. You will be comparing both
implementations using the GNU Profiler, as described earlier in this chapter.
Overview of ARM NEON Technology
The implementation of single instruction, multiple data (SIMD) technology in ARM processors is
called NEON. SIMD enables data level parallelism by performing the same operation on multiple
data points. SIMD technology can accelerate the performance of native applications by enabling
single instruction vector operations. Multimedia applications benefit from the SIMD technology the
most as they perform the same operations on a large set of data, such as video frames or audio
chunks. NEON technology is available on most ARM Cortex-A series processors.
In the NEON technology, the data is organized into 64-bit D registers or 128-bit Q registers. These
registers can hold 8-, 16-, 32-, and 64-bit wide data vectors, as shown in Figure 14-1.
Figure 14-1. NEON registers and data types
368
CHAPTER 14: Profiling and NEON Optimization
NEON technology also provides a set of instructions to perform operations on these data vectors.
More information on NEON technology as well as the supported instructions can be found in ARM’s
“Introducing NEON Development Article” at http://infocenter.arm.com/help/index.jsp?topic=/
com.arm.doc.dht0002a/ch01s04s03.html.
Adding a Brightness Filter to AVI Player
Follow these steps to add the brightness filter.
1.
Using the Project Explorer, create a new C/C++ header file under the jni
subdirectory.
2.
Name the C/C++ header file as BrightnessFilter.h and update its content
with the code in Listing 14-6.
Listing 14-6. Content of BrightnessFilter.h Header File
#pragma once
/**
* Extract the interleaved components. RGB565 color
* space has a total of 16-bits with 5-bits red,
* 6-bits green, and 5-bits blue.
*/
void brightnessFilter(
unsigned short* pixels,
long count,
unsigned char brightness);
3.
Create a new C/C++ source file with the name BrightnessFilter.cpp and
update its content as shown in Listing 14-7. The brightnessFilter function
simply dispatches the call to genericBrightnessFilter function, which is
your plain C brightness filter implementation. It takes an array of 16-bit pixels
formatted using RGB656 color space. It decomposes the color components
into three 8-bit values and increments them based on the given brightness
value. It adjusts each value based on its range and combines them together
into a 16-bit pixel in RGB565 color-space.
Listing 14-7. Content of BrightnessFilter.cpp Source File
#include "BrightnessFilter.h"
static void genericBrightnessFilter(
unsigned short* pixels,
long count,
unsigned char brightness)
{
const unsigned char MAX RB = 0xF8;
const unsigned char MAX G = 0xFC;
CHAPTER 14: Profiling and NEON Optimization
369
unsigned short r, g, b;
for (long i = 0; i < count; i++)
{
// Decompose colors
r = (pixels[i] >> 8) & MAX RB;
g = (pixels[i] >> 3) & MAX G;
b = (pixels[i] << 3) & MAX RB;
// Brightness increment
r += brightness;
g += brightness;
b += brightness;
// Make sure
r = (r > MAX
g = (g > MAX
b = (b > MAX
that components are in range
RB) ? MAX RB : r;
G) ? MAX G : g;
RB) ? MAX RB : b;
// Set pixel
pixels[i] = (r << 8);
pixels[i] |= (g << 3);
pixels[i] |= (b >> 3);
}
}
void brightnessFilter(
unsigned short* pixels,
long count,
unsigned char brightness)
{
genericBrightnessFilter(pixels, count, brightness);
}
4.
The Brightness Filter needs to be invoked for each AVI video frame
prior to rendering. In order to do so, open the com apress aviplayer
BitmapPlayerActivity.cpp source file.
5.
Add the BrightnessFilter.h header file to the list of includes, as shown in
Listing 14-8.
Listing 14-8. Adding the BrightnessFilter.h Header File to BitmapRenderer
extern "C" {
#include <avilib.h>
}
#include <android/bitmap.h>
2
370
CHAPTER 14: Profiling and NEON Optimization
#include "BrightnessFilter.h"
#include "Common.h"
#include "com apress aviplayer BitmapPlayerActivity.h"
...
6.
Update the renderer function to invoke the brightnessFilter function for
every frame, as shown in Listing 14-9.
Listing 14-9. Invoking brightnessFilter Function for Each Frame
jboolean Java com apress aviplayer BitmapPlayerActivity render(
JNIEnv* env,
jclass clazz,
jlong avi,
jobject bitmap)
{
...
// Read AVI frame bytes to bitmap
frameSize = AVI read frame((avi t*) avi, frameBuffer, &keyFrame);
// Apply the brigthness filter
brightnessFilter((unsigned short*) frameBuffer, frameSize/2, 1);
...
}
7.
Add the BrightnessFilter.cpp source file the Android.mk build script, as
shown in Listing 14-10.
Listing 14-10. Adding BrightnessFilter.cpp Source File to Android.mk
LOCAL PATH := $(call my-dir)
include $(CLEAR VARS)
LOCAL MODULE
:= AVIPlayer
LOCAL SRC FILES := \
Common.cpp \
com apress aviplayer AbstractPlayerActivity.cpp \
com apress aviplayer BitmapPlayerActivity.cpp
LOCAL_SRC_FILES += BrightnessFilter.cpp
# Use AVILib static library
LOCAL STATIC LIBRARIES += avilib static
8.
Now the Brightness Filter is integrated into the AVI Player application. Prior
starting the application, you will need to enable the GNU Profiler.
CHAPTER 14: Profiling and NEON Optimization
371
Enabling the Android NDK Profiler for AVI Player
As explained earlier in this chapter, the GNU Profiler needs to be enabled during compile time in
order to collect profiling data. Follow these steps to enable the GNU Profiler for the Bitmap renderer
AVI Player.
1.
Update the Android.mk build script to enable the GNU Profiler.
2.
Using the Project Explorer, expand the jni subdirectory, and open the
com apress aviplayer AbstractPlayerActivity.cpp source file.
3.
Update the code to invoke the Android NDK Profiler functions, as shown in
Listing 14-11. The profiling will start as soon as the AVI open gets called and
finalizes when the AVI file gets closed. This provides the profiling data during
the AVI processing.
Listing 14-11. Invoking Profiler Functions from AbstractPlayerActivity
extern "C" {
#include <avilib.h>
}
#ifdef MY_ANDROID_NDK_PROFILER_ENABLED
#include <prof.h>
#endif
...
jlong Java com apress aviplayer AbstractPlayerActivity open(
JNIEnv* env,
jclass clazz,
jstring fileName)
{
avi t* avi = 0;
#ifdef MY_ANDROID_NDK_PROFILER_ENABLED
// Start collecting the samples
monstartup("libAVIPlayer.so");
#endif
...
}
...
void Java com apress aviplayer AbstractPlayerActivity close(
JNIEnv* env,
jclass clazz,
jlong avi)
{
AVI close((avi t*) avi);
372
CHAPTER 14: Profiling and NEON Optimization
#ifdef MY_ANDROID_NDK_PROFILER_ENABLED
// Store the collected data
moncleanup();
#endif
}
4.
For the Android NDK Profiler to store the profiling data file on the SD card,
the proper permission needs to be added to the manifest file. Using Project
Explorer, open up the AndroidManifest.xml and modify it as shown in
Listing 14-12.
Listing 14-12. Adding Writing Permission to External Storage
<manifest xmlns:android="http://schemas.android.com/apk/res/android"
package="com.apress.aviplayer"
android:versionCode="1"
android:versionName="1.0" >
...
<uses-permission
android:name="android.permission.WRITE_EXTERNAL_STORAGE"/>
...
</manifest>
The GNU Profiler is now enabled for the AVI Player project. You can now start the application to
collect profiling data.
Profiling the AVI Player
Follow these steps to profile the Bitmap renderer AVI Player application.
1.
Start the application an actual Android device.
2.
Start AVI file playback using the Bitmap renderer.
3.
Wait until the AVI playback ends.
4.
Click the hard back key on the device.
5.
As explained earlier in this chapter, pull the gmon.out profiling data from the
device.
6.
Using the gprof tool, generate a report, as shown in Listing 14-13.
CHAPTER 14: Profiling and NEON Optimization
373
Listing 14-13. Profiling Report for Generic Brightness Filter
Flat profile:
Each sample counts as 0.01 seconds.
%
cumulative
self
self
time
seconds
seconds
calls ms/call
100.00
2.62
2.62
361
7.26
long, unsigned char)
total
ms/call
7.26
name
brightnessFilter(unsigned short*,
Based on this report, the brightnessFilter function, which is using the genericBrightnessFilter
function, took 7.26 millisecond to process each frame and took 2.62 seconds overall to process all
frames.
Optimizing the Brightness Filter using NEON Intrinsics
You will now optimize the genericBirghtnessFilter function using the ARM NEON intrinsics.
1.
Using the Project Explorer, go to the jni subdirectory.
2.
Open up the BrightnessFilter.cpp source file and add the NEON-optimized
neonBrightnessFilter function, as shown in Listing 14-14. Compared to the
generic brightness filter implementation, the ARM NEON-optimized brightness
filter operates on 8 pixels at a time, instead of only processing 1 pixel.
Listing 14-14. Content of Updated BrightnessFilter.cpp Source File
#include "BrightnessFilter.h"
#ifdef __ARM_NEON__
#include <cpu-features.h>
#include <arm_neon.h>
static void neonBrightnessFilter(
unsigned short* pixels,
long count,
unsigned char brightness)
{
const unsigned char MAX_RB = 0xF8;
const unsigned char MAX_G = 0xFC;
uint8x8_t maxRb = vmov_n_u8(MAX_RB);
uint8x8_t maxG = vmov_n_u8(MAX_G);
uint8x8_t increment = vmov_n_u8(brightness);
for (long i = 0; i < count; i += 8)
{
// Load 8 16-bit pixels
uint16x8_t rgb = vld1q_u16(&pixels[i]);
374
CHAPTER 14: Profiling and NEON Optimization
// r = (pixels[i] >> 8) & MAX_RB;
uint8x8_t r = vshrn_n_u16(rgb, 8);
r = vand_u8(r, maxRb);
// g = (pixels[i] >> 3) & MAX_G;
uint8x8_t g = vshrn_n_u16(rgb, 3);
g = vand_u8(g, maxG);
// b = (pixels[i] << 3) & MAX_RB;
uint8x8_t b = vmovn_u16(rgb);
b = vshl_n_u8(b, 3);
b = vand_u8(b, maxRb);
// r += brightness;
r = vadd_u8(r, increment);
// g += brightness;
g = vadd_u8(g, increment);
// b += brightness;
b = vadd_u8(b, increment);
// r = (r > MAX_RB) ? MAX_RB : r;
r = vmin_u8(r, maxRb);
// g = (g > MAX_G) ? MAX_G : g;
g = vmin_u8(g, maxG);
// b = (b > MAX_RB) ? MAX_RB : b;
b = vmin_u8(b, maxRb);
// pixels[i] = (r << 8);
rgb = vshll_n_u8(r, 8);
// pixels[i] |= (g << 3);
uint16x8_t g16 = vshll_n_u8(g, 8);
rgb = vsriq_n_u16(rgb, g16, 5);
// pixels[i] |= (b >> 3);
uint16x8_t b16 = vshll_n_u8(b, 8);
rgb = vsriq_n_u16(rgb, b16, 11);
// Store 8 16-bit pixels
vst1q_u16(&pixels[i], rgb);
}
}
#endif
CHAPTER 14: Profiling and NEON Optimization
static void genericBrightnessFilter(
unsigned short* pixels,
long count,
unsigned char brightness)
3.
The brightnessFilter function needs to be updated as well in order to
invoke the NEON-optimized function when applicable. ARM NEON support is
only available when targeting armeabi-v7a ABI. However, note that not every
ARM-v7 based device supports NEON instructions. The native applications
are expected to detect NEON support during runtime on ARM-v7 based
devices. In order to address this issue, the Android NDK comes with the
CPU Features native import module. This module allows detection of CPU
type as well as the features supported by the CPU at runtime. Update the
brightnessFilter function as shown in Listing 14-15.
Note Not every ARM-v7 based device supports ARM NEON instructions. You should always use the CPU
Features import module to detect the NEON support during runtime prior calling any NEON optimized function.
Listing 14-15. Updated brightnessFilter Function Calling NEON Optimized Function
void brightnessFilter(
unsigned short* pixels,
long count,
unsigned char brightness)
{
#ifdef __ARM_NEON__
// Get the CPU family
AndroidCpuFamily cpuFamily = android_getCpuFamily();
// Get the CPU features
uint64_t cpuFeatures = android_getCpuFeatures();
// Use NEON optimized function only on ARM CPUs with NEON support
if ((ANDROID_CPU_FAMILY_ARM == cpuFamily)
&& ((ANDROID_CPU_ARM_FEATURE_NEON & cpuFeatures) != 0))
{
// Invoke the NEON optimized brightness filter
neonBrightnessFilter(pixels, count, brightness);
}
else
375
376
CHAPTER 14: Profiling and NEON Optimization
{
#endif
// Invoke the generic brightness filter
genericBrightnessFilter(pixels, count, brightness);
#ifdef __ARM_NEON__
}
#endif
}
4.
Open the Android.mk build script and update it as shown in Listing 14-16.
This allows compiling the proper flavor of the brightnessFilter function
during compile time. For the ARMv7a target platform, the NEON-enhanced
version of brightnessFilter will be used. For all other platforms, the generic
implementation of the brightnessFilter will be used.
Listing 14-16. The NEON Version of brightnessFilter Added to Android.mk
LOCAL PATH := $(call my-dir)
include $(CLEAR VARS)
LOCAL MODULE
:= AVIPlayer
LOCAL SRC FILES := \
Common.cpp \
com apress aviplayer AbstractPlayerActivity.cpp \
com apress aviplayer BitmapPlayerActivity.cpp
# Add NEON optimized version on armeabi-v7a
ifeq ($(TARGET_ARCH_ABI),armeabi-v7a)
LOCAL_SRC_FILES += BrightnessFilter.cpp.neon
LOCAL_STATIC_LIBRARIES += cpufeatures
else
LOCAL_SRC_FILES += BrightnessFilter.cpp
endif
# Use AVILib static library
LOCAL STATIC LIBRARIES += avilib static
# Android NDK Profiler enabled
MY ANDROID NDK PROFILER ENABLED := true
# If Android NDK Profiler is enabled
ifeq ($(MY ANDROID NDK PROFILER ENABLED),true)
# Show message
$(info GNU Profiler is enabled)
# Enable the monitor functions
LOCAL CFLAGS += −DMY ANDROID NDK PROFILER ENABLED
CHAPTER 14: Profiling and NEON Optimization
377
# Use Android NDK Profiler static library
LOCAL STATIC LIBRARIES += andprof
endif
# Link with JNI graphics
LOCAL LDLIBS += −ljnigraphics
include $(BUILD SHARED LIBRARY)
# Import AVILib library module
$(call import-module, transcode-1.1.5/avilib)
# If Android NDK Profiler is enabled
ifdef MY ANDROID NDK PROFILER ENABLED
# Import Android NDK Profiler library module
$(call import-module, android-ndk-profiler/jni)
endif
# Add CPU features on armeabi-v7a
ifeq ($(TARGET_ARCH_ABI),armeabi-v7a)
# Import Android CPU features
$(call import-module, android/cpufeatures)
endif
Note You may have already noticed the .neon suffix that is appended to the BrightnessFilter.cpp
source file. This suffix tells the Android NDK build system that this source file needs to be compiled with ARM
NEON support.
5.
Create a new file with the name of Application.mk and include the following
content:
APP ABI := armeabi-v7a
6.
As you will be profiling the NEON-enhanced brightnessFilter, having
armeabi-v7a ABI as the single target platform is better.
7.
Repeat the same profiling steps. The report generated by the GNU Profiler
will be similar to Listing 14-17.
Listing 14-17. Profiling Report for NEON-optimized Brightness Filter
Flat profile:
Each sample counts as 0.01 seconds.
%
cumulative
self
self
time
seconds
seconds
calls ms/call
100.00
0.50
0.50
361
1.39
long, unsigned char)
total
ms/call
1.39
name
brightnessFilter(unsigned short*,
378
CHAPTER 14: Profiling and NEON Optimization
Based on this report, the brightnessFilter function, which is using the neonBrightnessFilter
function, took 1.39 millisecond to process each frame and took 0.50 seconds overall to process all
frames. Compared to the generic implementation, the NEON-optimized function is 5 times faster.
Automatic Vectorization
As you saw in the previous section, using the ARM NEON support can have a great impact on
application performance; however, it requires fluency in either the ARM assembly language or NEON
intrinsics constructs. NEON is an ARM-specific flavor of SIMD; to support platforms other than ARM,
such as Intel or MIPS, you will need to also provide implementations of your optimized functions for
other SIMD flavors such as Intel SSE or MIPS MDMX.
Assembly language or intrinsics are not the only ways of benefitting from SIMD support. In most
cases, the GNU C/C++ compiler can also automatically optimize your application to benefit from the
available SIMD engine without having you write a single line of assembly code or using intrinsics.
This process is known as automatic vectorization.
Enabling Automatic Vectorization
In order to enable automatic vectorization, follow these steps:
1.
Open the Application.mk build script, and make sure that APP ABI contains
armeabi-v7a.
APP ABI := armeabi armeabi-v7a
2.
Open the Android.mk build script, and add the ftree-vectorize argument to
LOCAL CFLAGS build system variable, as shown in Listing 14-18.
Listing 14-18. Enabling GNU C/C++ Compiler Automatic Vectorization
LOCAL PATH := $(call my-dir)
include $(CLEAR VARS)
LOCAL MODULE := module
...
LOCAL_CFLAGS += −ftree-vectorize
...
include $(BUILD SHARED LIBRARY)
3.
Make sure that the source files are getting compiled with ARM NEON
support, as shown in Listing 14-19.
CHAPTER 14: Profiling and NEON Optimization
379
Listing 14-19. Enabling ARM NEON Support for All Source Files
LOCAL PATH := $(call my-dir)
include $(CLEAR VARS)
...
# Add ARM NEON support to all source files
ifeq ($(TARGET_ARCH_ABI),armeabi-v7a)
LOCAL_ARM_NEON := true
endif
...
include $(BUILD SHARED LIBRARY)
Upon making these changes, the GNU C/C++ compiler will try to automatically vectorize the native
application to benefit from the ARM NEON support.
The C/C++ language does not provide any mechanism to specify parallelizing behavior. You may have
to give GNU C/C++ compiler additional hints about where it is safe to have the code automatically
vectorized. For a list of automatically vectorizable loops, please consult the “Auto-vectorization in
GCC” documentation at http://gcc.gnu.org/projects/tree-ssa/vectorization.html.
Troubleshooting Automatic Vectorization
When troubleshooting automatic vectorization issues, you can request more verbose output from the
GNU C/C++ compiler by adding the ftree-vectorizer-verbose=2 argument to the LOCAL CFLAGS
build system variable.
LOCAL CFLAGS += −ftree-vectorizer-verbose=2
Once this argument is specified, the GNU C/C++ compiler will produce a verbose output, as shown
in Listing 14-20, to give you hints on how the compiler is treating each loop in your application.
Listing 14-20. Verbose Output on Automatic Vectorization
Cygwin
Compile thumb
: Generating dependency file converter script
: Vectorization <= Vectorization.c
jni/Vectorization.c:9: note: not vectorized: complicated access pattern.
jni/Vectorization.c:4: note: vectorized 0 loops in function.
jni/Vectorization.c:28: note: LOOP VECTORIZED.
jni/Vectorization.c:22: note: LOOP VECTORIZED.
jni/Vectorization.c:18: note: vectorized 2 loops in function.
Executable
: Vectorization
Install
: Vectorization => libs/armeabi-v7a/Vectorization
380
CHAPTER 14: Profiling and NEON Optimization
Based on the verbose output from the compiler, you can tune the source code to provide proper
hints to the compiler about each loop in your application.
Summary
In this chapter, you learned how to profile your native Android applications using the Android NDK
Profiler library and the GNU Profiler application. You also explored how to optimize the performance
of your native application using the ARM NEON technology.
Index
■A
Android C++ development environment
Apple Mac OS X, 17–20, 22–23
Apache ANT, 19
components, 17
eclipse, 23–24
GNU validation, 19
Java Development Kit, 19
Native Development Kit, 22–23
Software Development Kit, 20–21
Xcode, 18
components, 1
Microsoft Windows, 2, 6, 8, 11, 14, 16
Apache ANT, 6–8
components, 2
Cygwin, 11–14
eclipse, 16–17
Java Development Kit, 2–6
Native Development Kit, 14
software Development kit, 8–10
operating systems, 1
Ubuntu Linux, 25–29, 31
Apache ANT, 26–27
32-bit on 64-bit system, 25
components, 25
eclipse, 31–32
GNU C Library version, 25
GNU Make, 27
Java Development Kit, 26
Native Development Kit, 29–30
Software Development Kit, 28–29
Android Development Tools (ADT)
add repositories, 33
emulator, 36–38
AVD Manager, 37
configuration, 38
menu bar, 36
running configuration, 38
installation, 34
platform packages, 35–36
security warning, 34
selection, 34
Software wizard, 32
validation warning, 35
Android.mk
build system variables, 59–62
CLEAR_VARS variable, 53
conditional operations, 63
function macros, 62
hello-jni project, 52
LOCAL_PATH variable, 53
LOCAL_SRC_FILES
variable, 54
modules, 57–58
multiple shared library, 54
prebuilt libraries, 58–59
shared library, 54
source code modular, 56
standalone executable, 59
static libraries, 55
variables, 63
Android Native Development Kit
(NDK), 41
Android Virtual Device (AVD), 36
Apache ANT build system
Apple Mac OS X, 19
download, 6
environment variable, 8
extraction, 7
installation step, 8
PATH variable, 8
Microsoft Windows, 6–8
Ubuntu Linux, 26
381
382
Index
Apple Mac OS X
Apache ANT, 19
binary paths, 21–22
installation, 23
destination location, 20
installation, 21
components, 17
eclipse, 23
GNU validation, 19
Java Development Kit, 19
Native Development Kit, 22–23
download page, 22
installation, 22
Software Development Kit, 20–21
download page, 20
Xcode, 18
Application.mk, 63
Automatic vectorization
enable, 378
intrinsics, 378
troubleshooting, 379
■B
Bionic API primer, 155, 157. See Memory
management
C libraries, 156–157
binary-compatible, 156
design, 156
functional domains, 156
missing functions, 157
inter-process communication, 176
process interaction, 172
child process, 172
shell command, 172
Standard File I/O, 162–171
buffer flushing, 166
characters sequences, 164
close-fclose function, 171
constructs and functions, 162
error checking-ferror function, 171
feof function, 169
fgetc function-single character, 168
fgets function-character sequence, 167
fopen function, 163
format string-fprintf function, 165
formatting data-fscanf function, 168
fseek function, 170
reading data blocks-fread function, 167
single character, 165
standard stream, 162
stdio functions, 162
writing data blocks, 164
standard libraries, 155
system configuration, 173–174
name-system properties, 174
value-name properties, 173
user-based permission model, 175–176
advantage, 175
application gets, 175
user name, 176
Build system, 52. See Android.mk
Application.mk, 63–64
ndk-build script, 64
troubleshooting, 65–66
■C
C++
containers, 279–281
adaptors, 281
hashed associative, 280
sequence, 279
sorted associative, 280
string, 281
debugging facilities, 282–283
enable, 283
GNU STL, 282
steps, 282
exception handler, 278
implementation-native UDP client
method, 255
key points, 275
runtimes, 275–277
APP_STL variable, 277
comparison, 276
features, 275
GAbi++, 276
GNU Standard, 276
static vs. shared, 277
STLport, 276
standard library primer, 279, 281
algorithms, 281
containers, 279
documentation, 279
iterators, 281
Index
STLport debug mode, 283
error messages, 283
system variable, 283
thread safe, 282
Connectionless communication, 247
native UDP server, 248–249,
251, 253
nativeStartUdpServer method,
253–254
recvfrom, 249–251
sendto, 251–252
socket function, 248–249
UDP Sockets, 257
Android Emulator console, 257
Echo UDP client, 257
UDP-based Echo client, 254–255
UDP-based Echo server, 247–248
Connection-oriented communication, 218.
See TCP sockets
Android platform, 209
Echo Socket example application,
210–211, 214–215
abstract activity class, 211
Android Application project, 210
native module, 215
steps, 210
string resources, 214
Cygwin
download page, 11
environment variable, 14
GNU Make package, 13
installation directory, 12
installation step, 14
PATH variable, 14
■D
Debugging
command line, 143
eclipse, 139–142
breakpoint, 140
configuration, 139
native code, 141
native debug configuration, 140
perspective, 141
toolbar, 142
GDB commands, 144
prerequisites, 136
session setup, 137
set up, 138
Windows platform, 138
■ E, F
Eclipse
Apple Mac OS X, 23
Microsoft Windows, 17
Ubuntu Linux, 31
■ G, H
GNU Debugger (GDB), 136
GNU Make, 27
gprof application, 363
GUI Profiler
Android NDK Profiler, 364
gmon.out profiling data file, 366
gprof tool, 363
installation, 364
■I
Instance vs. static methods, 74
Inter-process communication
(IPC), 176
■ J, K
Java Class Library (JCL), 155
Java Development Kit (JDK)
Apple Mac OS X, 19
directories, 3
download button, 2
environment variable, 4
installation, 6
installation package, 3
PATH variable, 6
system properties dialog, 4
Microsoft Windows, 2–4, 6
Ubuntu Linux, 26
Java Native Interface (JNI), 67
array operations, 78–79
copies, 79
direct pointer, 79
elements, 79
New array, 78
383
384
Index
Java Native Interface (JNI) (cont.)
calling method, 82–84
CallStatic <Type> Field function, 84
Call <Type> Method function, 84
method IDs, 83
static and instance method, 82
transitions, 84
convertion, Java-C, 77
New string, 77
reference types, 77
release, 78
data types, 75–76
kinds, 75
primitive types, 75
reference types, 76
exception handling, 88–89
catching an exception, 88
catching exceptions, 88
throw exceptions, 89
fields, 81–82
GetStatic <Type> Field
function, 82
Get <Type> Field function, 82
IDs, 81
instance and static fields, 81
global reference, 90
DeleteGlobalRef function, 90
NewGlobalRef function, 90
hello-jni application, 68–69
method declaration, 68
native implementation, 69
shared libraries, 69
stringFromJNI method, 68
javah, 70–71, 73
command line, 70
Eclipse IDE, 71, 86
favorites menu, 73
refresh project, 73
javap, 85–87
command line, 70
console view, 87
Eclipse IDE, 71, 86
key concepts, 67
local references, 90
meaning, 67
method declarations, 74
instance vs. static methods, 74
JNIEnv interface pointer, 74
parameters, 74
method description, 84–85
Java type-signature mapping, 84
javap, 85–87
Native I/O (NIO), 80
direct byte buffer, 80
GetDirectBufferAddress function, 80
reference types, 77
string operations, 77–78
threading, 92–93
components, 92
native threads, 93
synchronization, 92
weak global reference, 91
DeleteWeakGlobalRef function, 91
IsSameObject function, 91
NewWeakGlobalRef function, 91
Java Runtime Edition (JRE), 2, 26
Java threads
execution, 191
MainActivity class, 190
pros and cons, 192
advantages, 192
multithreads, 192
startThreads method, 191
JNI Graphics API
access-native pixel buffer, 301
Bitmap object, 300
enable, 300
release-native pixel buffer, 301
run-AVI player-Bitmap renderer, 309
update-AVI player, 302
■L
Linux, 25
Local socket communication, 259
Android Manifest file, 270
asynchronous I/O, 272–273
Emulator instance, 271
layout subdirectory, 259–260
LocalSocketActivity.java, 260–265
LocalSocketActivty, 265
native server, 265–266, 268
accept function, 268–269
bind, 266–268
Index
namespaces, 266
socket function, 265–266
nativeStartLocalServer native method, 269
Logging, 127
controlled logging, 131, 133–135
adding logging, 133
Android.mk file, 133
console file, 135
log levels, 134
log tag, 133
log wrapper, 131
system configuration, 134
android/log.h header file, 128
functions, 129
log message, 129
framework, 128
native APIs, 128–129
■M
Mac OS X, 17, 98
Memory management
allocation, 158
C dynamic memory, 158–159
allocation, 159–160
change, 159
free function, 159
C++ dynamic memory, 160–161
change, 161
freeing array, 161
memory function, 161
single and multiple
elements, 160
Microsoft Windows
Apache ANT, 6
components, 2
Cygwin, 11–14
download page, 11
environment variable, 14
GNU Make package, 13
installation directory, 12
installation step, 14
PATH variable, 14
eclipse, 16
Microsoft Windows, 2
Native Development Kit, 15
Software Development Kit, 8, 10
download page, 8
environment variable, 10
installation, 10
PATH variable, 10
Mutexes, POSIX threads
destroy, 204
initialization, 203
pthread_mutex_lock function, 203
unlock, 204
updates, 204
■N
Native Development Kit (NDK)
build system, 52, 63–65
Android.mk, 52
Application.mk, 63
fragments, 52
ndk-build script, 64
troubleshooting, 65
Apple Mac OS X, 22–23
download page, 22
installation, 22
binary path, 22
installation, 23
components, 41
files and subdirectories, 42
hello-jni application, 43–44, 47–50
Apache ANT build files, 49
build process, 49–50
build system, 43
console view, 48
emulator running, 48
import menu item, 44–47
location, 43–44
native project, 47–48
project build target, 47
structure, 50
Microsoft Windows, 15
Native Development Kit (NDK), 41
Ubuntu Linux, 29
Native graphics API, 285, 300
abstract player activity, 292, 293, 295,
297–299
AbstractPlayerActivity.java, 293
activity dialog, 289
Android Application Project, 288
385
386
Index
Native graphics API (cont.)
AVILib-NDK import module, 286
com_apress_aviplayer_
AbstractPlayerActivity.cpp, 297
com_apress_aviplayer_
AbstractPlayerActivity.h, 295
example application, 286
steps, 292
Android NDK, 285
availability, 285
AVI video player, 286, 288–289, 292
Common.cpp source file, 299
Common.h header file, 298
native window API, 322–325, 333
ANativeWindow_lock
function, 324
ANativeWindow_unlockAndPost
function, 324
buffer geometry, 323
EGL graphics library, 333
information, 323
references, 323
release, 323
steps, 322
Surface object, 322
update AVI player, 325
OpenGL ES API, 310–311
OpenGL ES 1.x, 311
OpenGL ES 2.0, 311
update AVI player, 311–322
use of, 310
version, 310
Native sound API, 335–336. See WAVE
audio players
OpenSL ES
Android platform, 335
audio permissions, 336
compatibilities, 336
NEON optimization, 363, 378. See Automatic
vectorization
Android NDK Profiler, 371
AVI Player application, 372
brightness filter, 368, 373
intrinsics, 367
technologies overview, 367
■O
OpenGL ES API
OpenGL ES 1.x, 311
OpenGL ES 2.0, 311
update AVI player, 311–313, 316
AndroidManifest.xml, 311
com_apress_aviplayer_
OpenGLPlayerActivity.h, 316
layout file, 312
OpenGLPlayerActivity.java, 313
string resources, 312
version, 310
OpenSL ES
Android platform, 335
audio permissions, 336
compatibilities, 336
■ P, Q, R
POSIX, 155
POSIX Socket APIs
connectionless communication, 247
connection-oriented
communication, 209
local socket communication, 259
POSIX threads
application updates, 194–195
main activity, 194
native code, 195
posixThreads method, 195
execution, 200
native code, 193, 196–199, 201
global reference, 197
global variables, 196
JNI OnLoad function, 197
nativeFree method, 198
NativeWorkerArgs structure, 196
nativeWorkerThread, 198
pthread.h header file, 195
posixThreads, 199
pthread_join function, 200
priorities, 208
pthread_create function, 193
Pthreads, 193
Index
result returns, 200–201
native code, 196–198
pthread_join function, 200
scheduling strategies, 208
synchronization, 203, 206
features, 203
mutexes, 203
semaphores, 206
posixThreads method, 195
■S
Semaphores, POSIX threads
destroy, 207
header file, 206
initialization, 207
lock, 207
unlock, 207
Simplified Wrapper and Interface
Generator (SWIG), 95
activity updation, 108
Android build process, 105–106
Android.mk file, 106, 117
Makefile fragment, 105
code generation, 108
command line, 104–105
definition, 95
executing application, 108
files, 104
invoke SWIG, 105
Java package directory, 104
getuid function, 100
interface file, 101–104
comments, 102
content, 102
function prototype, 104
module name, 102
type definitions, 103
Unix.i, 101
user-defined code, 102
Java-native code, 123–125
asynchronous, 123
callback method, 125
enable directors, 124
HelloJni activity, 125
RTTI, 125
installation, 96, 98–99
Mac OS X, 98–99
387
Ubuntu Linux, 99–100
Windows, 96–97
memory management, 123
wrapping C code, 110–111, 113–115, 117
anonymous enumerations, 113
constants, 110
global variables, 110
Java enumerations, 114–115
pointers, 117
read-only variables, 111–112
structures, 115–116
type-safe, 113
type-unsafe, 114
wrapping C++ code, 117–120
Android.mk file, 106, 117
classes, 120
default arguments, 118–119
overloaded functions, 119–120
pointers, references and
values, 117–118
Software Development Kit (SDK)
Apple Mac OS X, 20–21
download page, 20
binary paths, 21
destination location, 20
installation, 21
download page, 9
environment variable, 10
installation, 10
PATH variable, 10
Microsoft Windows, 9–10
Ubuntu Linux, 28
Standard Template Library (STL), 161
■T
TCP sockets
android manifest, 241–242
client activity layout, 235–236
configuration, 243
random port number, 243
server user interface, 243
Echo Tcp Client, 244–245
EchoClientActivity.java file, 236
EchoServerActivity.java, 219
emulator interconnection, 243
native implementation, 221, 223, 225–227,
230, 232–233
388
Index
TCP sockets (cont.)
accept function, 227–230
bind function, 223–225
byte ordering/endianness, 225–226
connect, 238
EchoClientActivity, 238
EchoServerActivity, 221
listen function, 226–227
nativeStartTcpServer native
method, 233, 240
recv function, 230
send function, 232
socket, 221
server activity layout, 218
Threads, 179, 193
example project creation, 179–183,
186–187, 189
Android application project, 180–181
Android.mk build script, 189–190
application, 179
C/C++ header file, 186–187
key methods, 186
main activity, 183
native function, 187–189
Native Support dialog, 181
simple user interface, 182
string resources, 181
Java, 190–192
execution, 191–192
MainActivity class, 190
pros and cons, 192–193
startThreads method, 191
key topics, 179
Troubleshooting
check JNI, 147–148
enable, 148
problems, 147
memory issues, 149–150
libc debug mode, 149–150
Valgrind, 150
stack trace analysis, 145–147
strace tool, 152–153
■U
Ubuntu Linux, 100
Apache ANT, 26
32-bit on 64-bit system, 25
components, 25
eclipse, 31
GNU C Library version, 25
GNU Make, 27
Java Development Kit, 26
Native Development Kit, 29
Software Development Kit, 28
■V
Valgrind binaries
emulator, 151
Prebuilt, 150
program running, 151–152
source code, 150
Wrapper, 151
■ W, X, Y, Z
WAVE audio player
Android platform, 336
main activity, 338
playback implementation, 343, 345–346,
348, 361
application running, 361
CheckError function, 348
CreateBufferQueueAudioPlayer
function, 353–354
CreateEngine function, 349
CreateOutputMix function,
351–352
DestroyContext function, 355–356
DestroyObject function, 350–351
GetAudioPlayerBufferQueueInterface
function, 355
GetAudioPlayerPlayInterface, 357–358
InitPlayerBuffer and FreePlayerBuffer
functions, 352–355
jni/Android.mk build script, 343
play native method, 340–342
PlayerCallback function, 356–357
PlayerContext-WAVPlayer.cpp, 343
RealizeObject, 350
RegisterPlayerCallback, 357
ResultToString helper function, 346
ThrowException, 344
WAVLib helper functions, 345
WAVPlayer.cpp, 343
Index
steps-Android application, 338
WAVELib-NDK import module, 337
Wrapping code
C, 110–111, 113–115, 117
anonymous enumerations, 113
constants, 110–111
global variables, 110
Java enumerations, 114–115
pointers, 117–118
read-only variables, 111–112
structures, 115–117
type-safe, 113
type-unsafe, 114
C++, 117–120
Android.mk file, 117
classes, 120
default arguments, 118–119
overloaded functions, 119–120
pointers, references and
values, 117–118
389
Pro Android C++
with the NDK
Onur Cinar
Pro Android C++ with the NDK
Copyright © 2012 by Onur Cinar
This work is subject to copyright. All rights are reserved by the Publisher, whether the whole or part of the material
is concerned, specifically the rights of translation, reprinting, reuse of illustrations, recitation, broadcasting,
reproduction on microfilms or in any other physical way, and transmission or information storage and retrieval,
electronic adaptation, computer software, or by similar or dissimilar methodology now known or hereafter developed.
Exempted from this legal reservation are brief excerpts in connection with reviews or scholarly analysis or material
supplied specifically for the purpose of being entered and executed on a computer system, for exclusive use by the
purchaser of the work. Duplication of this publication or parts thereof is permitted only under the provisions of the
Copyright Law of the Publisher's location, in its current version, and permission for use must always be obtained from
Springer. Permissions for use may be obtained through RightsLink at the Copyright Clearance Center. Violations are
liable to prosecution under the respective Copyright Law.
ISBN-13 (pbk): 978-1-4302-4827-9
ISBN-13 (electronic): 978-1-4302-4828-6
Trademarked names, logos, and images may appear in this book. Rather than use a trademark symbol with every
occurrence of a trademarked name, logo, or image we use the names, logos, and images only in an editorial fashion
and to the benefit of the trademark owner, with no intention of infringement of the trademark.
The use in this publication of trade names, trademarks, service marks, and similar terms, even if they are not identified
as such, is not to be taken as an expression of opinion as to whether or not they are subject to proprietary rights.
The images of the Android Robot (01 / Android Robot) are reproduced from work created and shared by Google and
used according to terms described in the Creative Commons 3.0 Attribution License. Android and all Android and
Google-based marks are trademarks or registered trademarks of Google, Inc., in the U.S. and other countries. Apress
Media, L.L.C. is not affiliated with Google, Inc., and this book was written without endorsement from Google, Inc.
While the advice and information in this book are believed to be true and accurate at the date of publication, neither
the authors nor the editors nor the publisher can accept any legal responsibility for any errors or omissions that may
be made. The publisher makes no warranty, express or implied, with respect to the material contained herein.
President and Publisher: Paul Manning
Lead Editor: Steve Anglin
Technical Reviewer: Grant Allen
Editorial Board: Steve Anglin, Mark Beckner, Ewan Buckingham, Gary Cornell, Louise Corrigan, Morgan Ertel,
Jonathan Gennick, Jonathan Hassell, Robert Hutchinson, Michelle Lowman, James Markham, Matthew
Moodie, Jeff Olson, Jeffrey Pepper, Douglas Pundick, Ben Renow-Clarke, Dominic Shakeshaft, Gwenan
Spearing, Matt Wade, Tom Welsh
Coordinating Editor: Brigid Duffy
Copy Editor: Mary Behr
Compositor: SPi Global
Indexer: SPi Global
Artist: SPi Global
Cover Designer: Anna Ishchenko
Distributed to the book trade worldwide by Springer Science+Business Media New York, 233 Spring Street,
6th Floor, New York, NY 10013. Phone 1-800-SPRINGER, fax (201) 348-4505, e-mail orders-ny@springer-sbm.com,
or visit www.springeronline.com. Apress Media, LLC is a California LLC and the sole member (owner) is Springer
Science + Business Media Finance Inc (SSBM Finance Inc). SSBM Finance Inc is a Delaware corporation.
For information on translations, please e-mail rights@apress.com, or visit www.apress.com.
Apress and friends of ED books may be purchased in bulk for academic, corporate, or promotional use. eBook
versions and licenses are also available for most titles. For more information, reference our Special Bulk Sales–eBook
Licensing web page at www.apress.com/bulk-sales.
Any source code or other supplementary materials referenced by the author in this text is available to readers at
www.apress.com. For detailed information about how to locate your book’s source code, go to
www.apress.com/source-code/.
Dedicated to my son Deren, my wife Sema, and my parents, Zekiye and Dogan, for their love,
continuous support, and always encouraging me to pursue my dreams.
I could not have done this without all of you.
—Onur Cinar
Contents
About the Author��������������������������������������������������������������������������������������������������������������� xix
About the Technical Reviewer������������������������������������������������������������������������������������������� xxi
Preface���������������������������������������������������������������������������������������������������������������������������� xxiii
■■Chapter 1: Getting Started with C++ on Android���������������������������������������������������������������1
Microsoft Windows������������������������������������������������������������������������������������������������������������������������2
Downloading and Installing the Java Development Kit on Windows��������������������������������������������������������������������� 2
Downloading and Installing the Apache ANT on Windows������������������������������������������������������������������������������������� 6
Downloading and Installing the Android SDK on Windows������������������������������������������������������������������������������������ 8
Downloading and Installing the Cygwin on Windows������������������������������������������������������������������������������������������ 11
Downloading and Installing the Android NDK on Windows���������������������������������������������������������������������������������� 14
Downloading and Installing the Eclipse on Windows������������������������������������������������������������������������������������������ 16
Apple Mac OS X���������������������������������������������������������������������������������������������������������������������������17
Installing Xcode on Mac�������������������������������������������������������������������������������������������������������������������������������������� 18
Validating the Java Development Kit on Mac������������������������������������������������������������������������������������������������������ 19
Validating the Apache ANT on Mac���������������������������������������������������������������������������������������������������������������������� 19
Validating the GNU Make������������������������������������������������������������������������������������������������������������������������������������� 19
Downloading and Installing the Android SDK on Mac������������������������������������������������������������������������������������������ 20
Downloading and Installing the Android NDK on Mac����������������������������������������������������������������������������������������� 22
Downloading and Installing the Eclipse on Mac�������������������������������������������������������������������������������������������������� 23
vii
viii
Contents
Ubuntu Linux�������������������������������������������������������������������������������������������������������������������������������25
Checking the GNU C Library Version�������������������������������������������������������������������������������������������������������������������� 25
Enabling the 32-Bit Support on 64-Bit Systems�������������������������������������������������������������������������������������������������� 25
Downloading and Installing the Java Development Kit on Linux������������������������������������������������������������������������� 26
Downloading and Installing the Apache ANT on Linux����������������������������������������������������������������������������������������� 26
Downloading and Installing the GNU Make on Linux������������������������������������������������������������������������������������������� 27
Downloading and Installing the Android SDK on Linux���������������������������������������������������������������������������������������� 28
Downloading and Installing the Android NDK on Linux���������������������������������������������������������������������������������������� 29
Downloading and Installing the Eclipse on Linux������������������������������������������������������������������������������������������������ 31
Downloading and Installing the ADT��������������������������������������������������������������������������������������������32
Installing the Android Platform Packages������������������������������������������������������������������������������������������������������������ 35
Configuring the Emulator������������������������������������������������������������������������������������������������������������������������������������� 36
Summary�������������������������������������������������������������������������������������������������������������������������������������39
■■Chapter 2: Exploring the Android NDK�����������������������������������������������������������������������������41
Components Provided with the Android NDK������������������������������������������������������������������������������41
Structure of the Android NDK������������������������������������������������������������������������������������������������������42
Starting with an Example������������������������������������������������������������������������������������������������������������43
Specifying the Android NDK Location������������������������������������������������������������������������������������������������������������������ 43
Importing the Sample Project������������������������������������������������������������������������������������������������������������������������������ 44
Adding Native Support to Project������������������������������������������������������������������������������������������������������������������������ 47
Running the Project��������������������������������������������������������������������������������������������������������������������������������������������� 48
Building from the Command Line������������������������������������������������������������������������������������������������������������������������ 49
Examining the Structure of an Android NDK Project�������������������������������������������������������������������������������������������� 50
Build System�������������������������������������������������������������������������������������������������������������������������������51
Android.mk���������������������������������������������������������������������������������������������������������������������������������������������������������� 52
Application.mk����������������������������������������������������������������������������������������������������������������������������������������������������� 63
Using the NDK-Build Script���������������������������������������������������������������������������������������������������������64
Troubleshooting Build System Problems�������������������������������������������������������������������������������������65
Summary�������������������������������������������������������������������������������������������������������������������������������������66
Contents
ix
■Chapter 3: Communicating with Native Code using JNI �............................67 What is JNI? �
....................................................................................................................................................67
Starting with an Example �...........................................................................................................67
Declaration of Native Methods � ...........................................................................................................................68
Loading the Shared Libraries� ..............................................................................................................................69
Implementing the Native Methods� ......................................................................................................................69
Data Types �..................................................................................................................................75
Primitive Types � ...................................................................................................................................................75
Reference Types � .................................................................................................................................................76
Operations on Reference Types �..................................................................................................77
String Operations � ................................................................................................................................................77
Array Operations � .................................................................................................................................................78
NIO Operations� ....................................................................................................................................................80
Accessing Fields � .................................................................................................................................................81
Calling Methods � ..................................................................................................................................................82
Field and Method Descriptors� .............................................................................................................................84
Exception Handling�.....................................................................................................................88
Catching Exceptions � ...........................................................................................................................................88
Throwing Exceptions � ..........................................................................................................................................89
Local and Global References �......................................................................................................89
Local References � ................................................................................................................................................90
Global References� ...............................................................................................................................................90
Weak Global References � .....................................................................................................................................91
Threading �...................................................................................................................................92
Synchronization � ..................................................................................................................................................92
Native Threads � ....................................................................................................................................................93
Summary �....................................................................................................................................93
■Chapter 4: Auto-Generate JNI Code Using SWIG �......................................95What is SWIG? �
....................................................................................................................................................95
Installation�..................................................................................................................................96
x
Contents
Installing on Windows������������������������������������������������������������������������������������������������������������������������������������������ 96
Installing on Mac OS X����������������������������������������������������������������������������������������������������������������������������������������� 98
Installing on Ubuntu Linux����������������������������������������������������������������������������������������������������������������������������������� 99
Experimenting with SWIG Through an Example������������������������������������������������������������������������100
Interface File������������������������������������������������������������������������������������������������������������������������������������������������������ 101
Invoking SWIG from Command Line������������������������������������������������������������������������������������������������������������������ 104
Integrating SWIG into Android Build Process����������������������������������������������������������������������������������������������������� 105
Updating the Activity������������������������������������������������������������������������������������������������������������������������������������������ 107
Executing the Application���������������������������������������������������������������������������������������������������������������������������������� 108
Exploring Generated Code��������������������������������������������������������������������������������������������������������������������������������� 108
Wrapping C Code�����������������������������������������������������������������������������������������������������������������������109
Global Variables������������������������������������������������������������������������������������������������������������������������������������������������� 110
Constants����������������������������������������������������������������������������������������������������������������������������������������������������������� 110
Read-Only Variables������������������������������������������������������������������������������������������������������������������������������������������ 111
Enumerations���������������������������������������������������������������������������������������������������������������������������������������������������� 112
Structures���������������������������������������������������������������������������������������������������������������������������������������������������������� 115
Pointers������������������������������������������������������������������������������������������������������������������������������������������������������������� 117
Wrapping C++ Code������������������������������������������������������������������������������������������������������������������117
Pointers, References, and Values���������������������������������������������������������������������������������������������������������������������� 117
Default Arguments��������������������������������������������������������������������������������������������������������������������������������������������� 118
Overloaded Functions���������������������������������������������������������������������������������������������������������������������������������������� 119
Classes�������������������������������������������������������������������������������������������������������������������������������������������������������������� 120
Exception Handling��������������������������������������������������������������������������������������������������������������������122
Memory Management���������������������������������������������������������������������������������������������������������������123
Calling Java from Native Code��������������������������������������������������������������������������������������������������123
Asynchronous Communication�������������������������������������������������������������������������������������������������������������������������� 123
Enabling Directors��������������������������������������������������������������������������������������������������������������������������������������������� 124
Enabling RTTI����������������������������������������������������������������������������������������������������������������������������������������������������� 125
Overriding the Callback Method������������������������������������������������������������������������������������������������������������������������ 125
Updating the HelloJni Activity���������������������������������������������������������������������������������������������������������������������������� 125
Summary�����������������������������������������������������������������������������������������������������������������������������������126
Contents
xi
■■Chapter 5: Logging, Debugging, and Troubleshooting���������������������������������������������������127
Logging�������������������������������������������������������������������������������������������������������������������������������������127
Framework�������������������������������������������������������������������������������������������������������������������������������������������������������� 128
Native Logging APIs������������������������������������������������������������������������������������������������������������������������������������������� 128
Controlled Logging�������������������������������������������������������������������������������������������������������������������������������������������� 130
Console Logging������������������������������������������������������������������������������������������������������������������������������������������������ 135
Debugging���������������������������������������������������������������������������������������������������������������������������������136
Prerequisites����������������������������������������������������������������������������������������������������������������������������������������������������� 136
Debug Session Setup���������������������������������������������������������������������������������������������������������������������������������������� 137
Setting up the Example for Debugging�������������������������������������������������������������������������������������������������������������� 138
Starting the Debugger��������������������������������������������������������������������������������������������������������������������������������������� 138
Troubleshooting�������������������������������������������������������������������������������������������������������������������������145
Stack Trace Analysis������������������������������������������������������������������������������������������������������������������������������������������ 145
Extended Checking of JNI���������������������������������������������������������������������������������������������������������������������������������� 147
Memory Issues�������������������������������������������������������������������������������������������������������������������������������������������������� 149
Strace���������������������������������������������������������������������������������������������������������������������������������������������������������������� 152
Summary�����������������������������������������������������������������������������������������������������������������������������������154
■■Chapter 6: Bionic API Primer�����������������������������������������������������������������������������������������155
Reviewing Standard Libraries���������������������������������������������������������������������������������������������������155
Yet Another C Library?���������������������������������������������������������������������������������������������������������������156
Binary Compatibility������������������������������������������������������������������������������������������������������������������������������������������ 156
What is Provided?���������������������������������������������������������������������������������������������������������������������������������������������� 156
What is Missing?����������������������������������������������������������������������������������������������������������������������������������������������� 157
Memory Management���������������������������������������������������������������������������������������������������������������157
Memory Allocation��������������������������������������������������������������������������������������������������������������������������������������������� 158
Dynamic Memory Management for C���������������������������������������������������������������������������������������������������������������� 158
Dynamic Memory Management for C++����������������������������������������������������������������������������������������������������������� 160
Standard File I/O������������������������������������������������������������������������������������������������������������������������162
Standard Streams���������������������������������������������������������������������������������������������������������������������������������������������� 162
Using the Stream I/O����������������������������������������������������������������������������������������������������������������������������������������� 162
Opening Streams����������������������������������������������������������������������������������������������������������������������������������������������� 163
xii
Contents
Writing to Streams��������������������������������������������������������������������������������������������������������������������������������������������� 164
Reading from Streams��������������������������������������������������������������������������������������������������������������������������������������� 167
Seeking Position������������������������������������������������������������������������������������������������������������������������������������������������ 170
Checking Errors������������������������������������������������������������������������������������������������������������������������������������������������� 171
Closing Streams������������������������������������������������������������������������������������������������������������������������������������������������ 171
Interacting with Processes��������������������������������������������������������������������������������������������������������171
Executing a Shell Command������������������������������������������������������������������������������������������������������������������������������ 172
Communicating with the Child Process������������������������������������������������������������������������������������������������������������� 172
System Configuration����������������������������������������������������������������������������������������������������������������173
Getting a System Property Value by Name�������������������������������������������������������������������������������������������������������� 173
Getting a System Property by Name������������������������������������������������������������������������������������������������������������������ 174
Users and Groups����������������������������������������������������������������������������������������������������������������������175
Getting the Application User and Group IDs������������������������������������������������������������������������������������������������������� 175
Getting the Application User Name�������������������������������������������������������������������������������������������������������������������� 176
Inter-Process Communication���������������������������������������������������������������������������������������������������176
Summary�����������������������������������������������������������������������������������������������������������������������������������177
■■Chapter 7: Native Threads���������������������������������������������������������������������������������������������179
Creating the Threads Example Project��������������������������������������������������������������������������������������179
Creating the Android Project������������������������������������������������������������������������������������������������������������������������������ 180
Adding the Native Support��������������������������������������������������������������������������������������������������������������������������������� 181
Declaring the String Resources������������������������������������������������������������������������������������������������������������������������� 181
Creating a Simple User Interface����������������������������������������������������������������������������������������������������������������������� 182
Implementing the Main Activity������������������������������������������������������������������������������������������������������������������������� 183
Generating the C/C++ Header File�������������������������������������������������������������������������������������������������������������������� 186
Implementing the Native Functions������������������������������������������������������������������������������������������������������������������� 187
Updating the Android.mk Build Script��������������������������������������������������������������������������������������������������������������� 189
Java Threads�����������������������������������������������������������������������������������������������������������������������������190
Updating the Example Application to use Java Threads������������������������������������������������������������������������������������ 190
Executing the Java Threads Example���������������������������������������������������������������������������������������������������������������� 191
Pros and Cons of using Java Threads for Native Code�������������������������������������������������������������������������������������� 192
Contents
xiii
POSIX Threads���������������������������������������������������������������������������������������������������������������������������193
Using POSIX Threads in Native Code����������������������������������������������������������������������������������������������������������������� 193
Creating Threads using pthread_create������������������������������������������������������������������������������������������������������������ 193
Updating the Example Application to use POSIX Threads���������������������������������������������������������������������������������� 194
Executing the POSIX Threads Example�������������������������������������������������������������������������������������������������������������� 200
Return Result from POSIX Threads��������������������������������������������������������������������������������������������200
Updating the Native Code to Use pthread_join�������������������������������������������������������������������������������������������������� 201
Synchronizing POSIX Threads���������������������������������������������������������������������������������������������������202
Synchronizing POSIX Threads using Mutexes��������������������������������������������������������������������������������������������������� 203
Synchronizing POSIX Threads Using Semaphores��������������������������������������������������������������������������������������������� 206
Priority and Scheduling Strategy for POSIX Threads�����������������������������������������������������������������207
POSIX Thread Scheduling Strategy�������������������������������������������������������������������������������������������������������������������� 208
POSIX Thread Priority����������������������������������������������������������������������������������������������������������������������������������������� 208
Summary�����������������������������������������������������������������������������������������������������������������������������������208
■■Chapter 8: POSIX Socket API: Connection-Oriented Communication����������������������������209
Echo Socket Example Application���������������������������������������������������������������������������������������������210
Echo Android Application Project����������������������������������������������������������������������������������������������������������������������� 210
Abstract Echo Activity���������������������������������������������������������������������������������������������������������������������������������������� 211
Echo Application String Resources�������������������������������������������������������������������������������������������������������������������� 214
Native Echo Module������������������������������������������������������������������������������������������������������������������������������������������� 215
Connection-Oriented Communication through TCP Sockets�����������������������������������������������������218
Echo Server Activity Layout������������������������������������������������������������������������������������������������������������������������������� 218
Echo Server Activity������������������������������������������������������������������������������������������������������������������������������������������� 219
Implementing the Native TCP Server����������������������������������������������������������������������������������������������������������������� 221
Echo Client Activity Layout�������������������������������������������������������������������������������������������������������������������������������� 235
Echo Client Activity�������������������������������������������������������������������������������������������������������������������������������������������� 236
Implementing the Native TCP Client������������������������������������������������������������������������������������������������������������������ 238
Updating the Android Manifest�������������������������������������������������������������������������������������������������������������������������� 241
Running the TCP Sockets Example�������������������������������������������������������������������������������������������������������������������� 242
Summary�����������������������������������������������������������������������������������������������������������������������������������245
xiv
Contents
■■Chapter 9: POSIX Socket API: Connectionless Communication�������������������������������������247
Adding Native UDP Server Method to Echo Server Activity�������������������������������������������������������247
Implementing the Native UDP Server����������������������������������������������������������������������������������������248
New UDP Socket: socket����������������������������������������������������������������������������������������������������������������������������������� 248
Receive Datagram from Socket: recvfrom��������������������������������������������������������������������������������������������������������� 249
Send Datagram to Socket: sendto��������������������������������������������������������������������������������������������������������������������� 251
Native UDP Server Method�������������������������������������������������������������������������������������������������������������������������������� 253
Adding Native UDP Client Method to Echo Client Activity����������������������������������������������������������254
Implementing the Native UDP Client�����������������������������������������������������������������������������������������255
Native UDP Client Method���������������������������������������������������������������������������������������������������������������������������������� 255
Running the UDP Sockets Example�������������������������������������������������������������������������������������������257
Interconnecting the Emulators for UDP������������������������������������������������������������������������������������������������������������� 257
Starting the Echo UDP Client����������������������������������������������������������������������������������������������������������������������������� 257
Summary�����������������������������������������������������������������������������������������������������������������������������������258
■■Chapter 10: POSIX Socket API: Local Communication���������������������������������������������������259
Echo Local Activity Layout���������������������������������������������������������������������������������������������������������259
Echo Local Activity��������������������������������������������������������������������������������������������������������������������260
Implementing the Native Local Socket Server��������������������������������������������������������������������������265
New Local Socket: socket���������������������������������������������������������������������������������������������������������������������������������� 265
Bind Local Socket to Name: bind����������������������������������������������������������������������������������������������������������������������� 266
Accept on Local Socket: accept������������������������������������������������������������������������������������������������������������������������� 268
Native Local Socket Server�������������������������������������������������������������������������������������������������������������������������������� 269
Adding Local Echo Activity to Manifest�������������������������������������������������������������������������������������270
Running the Local Sockets Example�����������������������������������������������������������������������������������������271
Asynchronous I/O����������������������������������������������������������������������������������������������������������������������272
Summary�����������������������������������������������������������������������������������������������������������������������������������273
Contents
xv
■■Chapter 11: C++ Support�����������������������������������������������������������������������������������������������275
Supported C++ Runtimes���������������������������������������������������������������������������������������������������������275
GAbi++ C++ Runtime���������������������������������������������������������������������������������������������������������������������������������������� 276
STLport C++ Runtime���������������������������������������������������������������������������������������������������������������������������������������� 276
GNU STL C++ Runtime�������������������������������������������������������������������������������������������������������������������������������������� 276
Specifying the C++ Runtime�����������������������������������������������������������������������������������������������������277
Static vs. Shared Runtimes�������������������������������������������������������������������������������������������������������277
C++ Exception Support�������������������������������������������������������������������������������������������������������������278
C++ RTTI Support����������������������������������������������������������������������������������������������������������������������278
C++ Standard Library Primer����������������������������������������������������������������������������������������������������279
Containers��������������������������������������������������������������������������������������������������������������������������������������������������������� 279
Iterators������������������������������������������������������������������������������������������������������������������������������������������������������������� 281
Algorithms��������������������������������������������������������������������������������������������������������������������������������������������������������� 281
Thread Safety of C++ Runtime�������������������������������������������������������������������������������������������������282
C++ Runtime Debug Mode��������������������������������������������������������������������������������������������������������282
GNU STL Debug Mode���������������������������������������������������������������������������������������������������������������������������������������� 282
STLport Debug Mode����������������������������������������������������������������������������������������������������������������������������������������� 283
Summary�����������������������������������������������������������������������������������������������������������������������������������284
■■Chapter 12: Native Graphics API�����������������������������������������������������������������������������������285
Availability of Native Graphics API���������������������������������������������������������������������������������������������285
Creating an AVI Video Player�����������������������������������������������������������������������������������������������������286
Make AVILib a NDK Import Module�������������������������������������������������������������������������������������������������������������������� 286
Create the AVI Player Android Application��������������������������������������������������������������������������������������������������������� 288
Create the AVI Player Main Activity�������������������������������������������������������������������������������������������������������������������� 289
Creating the Abstract Player Activity����������������������������������������������������������������������������������������������������������������� 292
Rendering using JNI Graphics API���������������������������������������������������������������������������������������������300
Enabling the JNI Graphics API��������������������������������������������������������������������������������������������������������������������������� 300
Using the JNI Graphics API�������������������������������������������������������������������������������������������������������������������������������� 300
Updating AVI Player with Bitmap Renderer�������������������������������������������������������������������������������������������������������� 302
Running the AVI Player with Bitmap Renderer��������������������������������������������������������������������������������������������������� 309
xvi
Contents
Rendering Using OpenGL ES�����������������������������������������������������������������������������������������������������310
Using the OpenGL ES API����������������������������������������������������������������������������������������������������������������������������������� 310
Enabling OpenGL ES 1.x API������������������������������������������������������������������������������������������������������������������������������ 311
Enabling OpenGL ES 2.0 API������������������������������������������������������������������������������������������������������������������������������ 311
Updating AVI Player with OpenGL ES Renderer������������������������������������������������������������������������������������������������� 311
Rendering Using Native Window API�����������������������������������������������������������������������������������������322
Enabling the Native Window API������������������������������������������������������������������������������������������������������������������������ 322
Using the Native Window API����������������������������������������������������������������������������������������������������������������������������� 322
Updating AVI Player with Native Window Renderer������������������������������������������������������������������������������������������� 325
EGL Graphics Library����������������������������������������������������������������������������������������������������������������������������������������� 333
Summary�����������������������������������������������������������������������������������������������������������������������������������333
■■Chapter 13: Native Sound API���������������������������������������������������������������������������������������335
Using the OpenSL ES API�����������������������������������������������������������������������������������������������������������335
Compatibility with the OpenSL ES Standard������������������������������������������������������������������������������������������������������ 336
Audio Permissions��������������������������������������������������������������������������������������������������������������������������������������������� 336
Creating the WAVE Audio Player������������������������������������������������������������������������������������������������336
Make WAVELib a NDK Import Module���������������������������������������������������������������������������������������������������������������� 337
Create the WAVE Player Android Application����������������������������������������������������������������������������������������������������� 338
Creating the WAVE Player Main Activity������������������������������������������������������������������������������������������������������������� 338
Implementing WAVE Audio Playback����������������������������������������������������������������������������������������������������������������� 342
Running the WAVE Audio Player������������������������������������������������������������������������������������������������361
Summary�����������������������������������������������������������������������������������������������������������������������������������361
■■Chapter 14: Profiling and NEON Optimization���������������������������������������������������������������363
GNU Profiler for Measuring Performance����������������������������������������������������������������������������������363
Installing the Android NDK Profiler�������������������������������������������������������������������������������������������������������������������� 364
Enabling the Android NDK Profiler��������������������������������������������������������������������������������������������������������������������� 364
Analyzing gmon.out using GNU Profiler������������������������������������������������������������������������������������������������������������� 366
Contents
xvii
Optimization using ARM NEON Intrinsics����������������������������������������������������������������������������������367
Overview of ARM NEON Technology������������������������������������������������������������������������������������������������������������������ 367
Adding a Brightness Filter to AVI Player������������������������������������������������������������������������������������������������������������ 368
Enabling the Android NDK Profiler for AVI Player����������������������������������������������������������������������������������������������� 371
Profiling the AVI Player�������������������������������������������������������������������������������������������������������������������������������������� 372
Optimizing the Brightness Filter using NEON Intrinsics������������������������������������������������������������������������������������� 373
Automatic Vectorization������������������������������������������������������������������������������������������������������������378
Enabling Automatic Vectorization���������������������������������������������������������������������������������������������������������������������� 378
Troubleshooting Automatic Vectorization���������������������������������������������������������������������������������������������������������� 379
Summary�����������������������������������������������������������������������������������������������������������������������������������380
Index���������������������������������������������������������������������������������������������������������������������������������381
About the Author
Onur Cinar has over 17 years of experience in design, development,
and management of large scale complex software projects, primarily
in mobile and telecommunication space. His expertise spans VoIP,
video communication, mobile applications, grid computing, and
networking technologies on diverse platforms. He has been actively
working with Android platform since its beginning. He is the author of
the book Android Apps with Eclipse from Apress. He has a Bachelor
of Science degree in Computer Science from Drexel University in
Philadelphia, PA, United States. He is currently working at Skype
division of Microsoft as the Sr. Product Engineering Manager for
the Skype client on Android platform.
xix
About the Technical
Reviewer
Grant Allen has worked in the IT field for over 20 years as a CTO,
enterprise architect, and database architect. Grant’s roles have
covered private enterprise, academia, and the government sector
around the world, specializing in globalscale systems design,
development, and performance. He is a frequent speaker at industry
and academic conferences, on topics ranging from data mining to
compliance, and technologies such as databases (DB2, Oracle, SQL
Server, and MySQL), content management, collaboration, disruptive
innovation, and mobile ecosystems like Android.
His first Android application was a task list to remind him to finish all his
other unfinished Android projects.
Grant works for Google, and in his spare time is completing a PhD on
building innovative high-technology environments.
Grant is the author of Beginning DB2: From Novice to Professional
(Apress, 2008), and lead author of Oracle SQL Recipes: A Problem-Solution Approach (Apress, 2010)
and The Definitive Guide to SQLite, 2nd Edition (Apress, 2010).
xxi
Preface
Android is one of the major players in mobile phone market, and continuously growing its market
share. It is the first complete, open, and free mobile platform that is enabling endless opportunities
for mobile application developers.
Althrough the official programming language for the Android platform is Java, the application
developers are not limited to using only the Java techonology.
Android allows application developers to implement parts of their application using native-code
languages such as C and C++ through the Android Native Development Kit (NDK). In this book, you
will learn how to use the Android NDK to implement performance-critical portions of your Android
applications using native-code languages.
Android C++ with the NDK provides a detailed overview of native application development, available
native APIs, the troubleshooting techniques, including the step by step instructions and screenshots
to help Android developers to quickly get up to speed on developing native application.
What You Will Learn
This book includes the following:
n
Installing the Android native development environment on major operating
systems.
n
Using the Eclipse IDE to develop native code.
n
Connecting native code to Java world using Java Native Interface (JNI).
n
Auto-generating the JNI code using SWIG.
n
Developing multithreaded native apps using the POSIX and Java threads.
n
Developing networking native apps using POSIX sockets.
n
Debug native code through logging, GDB, and Eclipse Debugger.
xxiii
xxiv
Preface
n
Analyzing memory issues through Valgrind.
n
Measuring application performance through GProf.
n
Optimizing native code through SIMD/NEON.
Downloading the Code
The source code for this book is available to readers at www.apress.com.
Contacting the Author
Readers can contact the author through author’s Android C++ with the NDK site at
http://www.zdo.com/android-c++-with-the-ndk to ask questions.