/


Текст
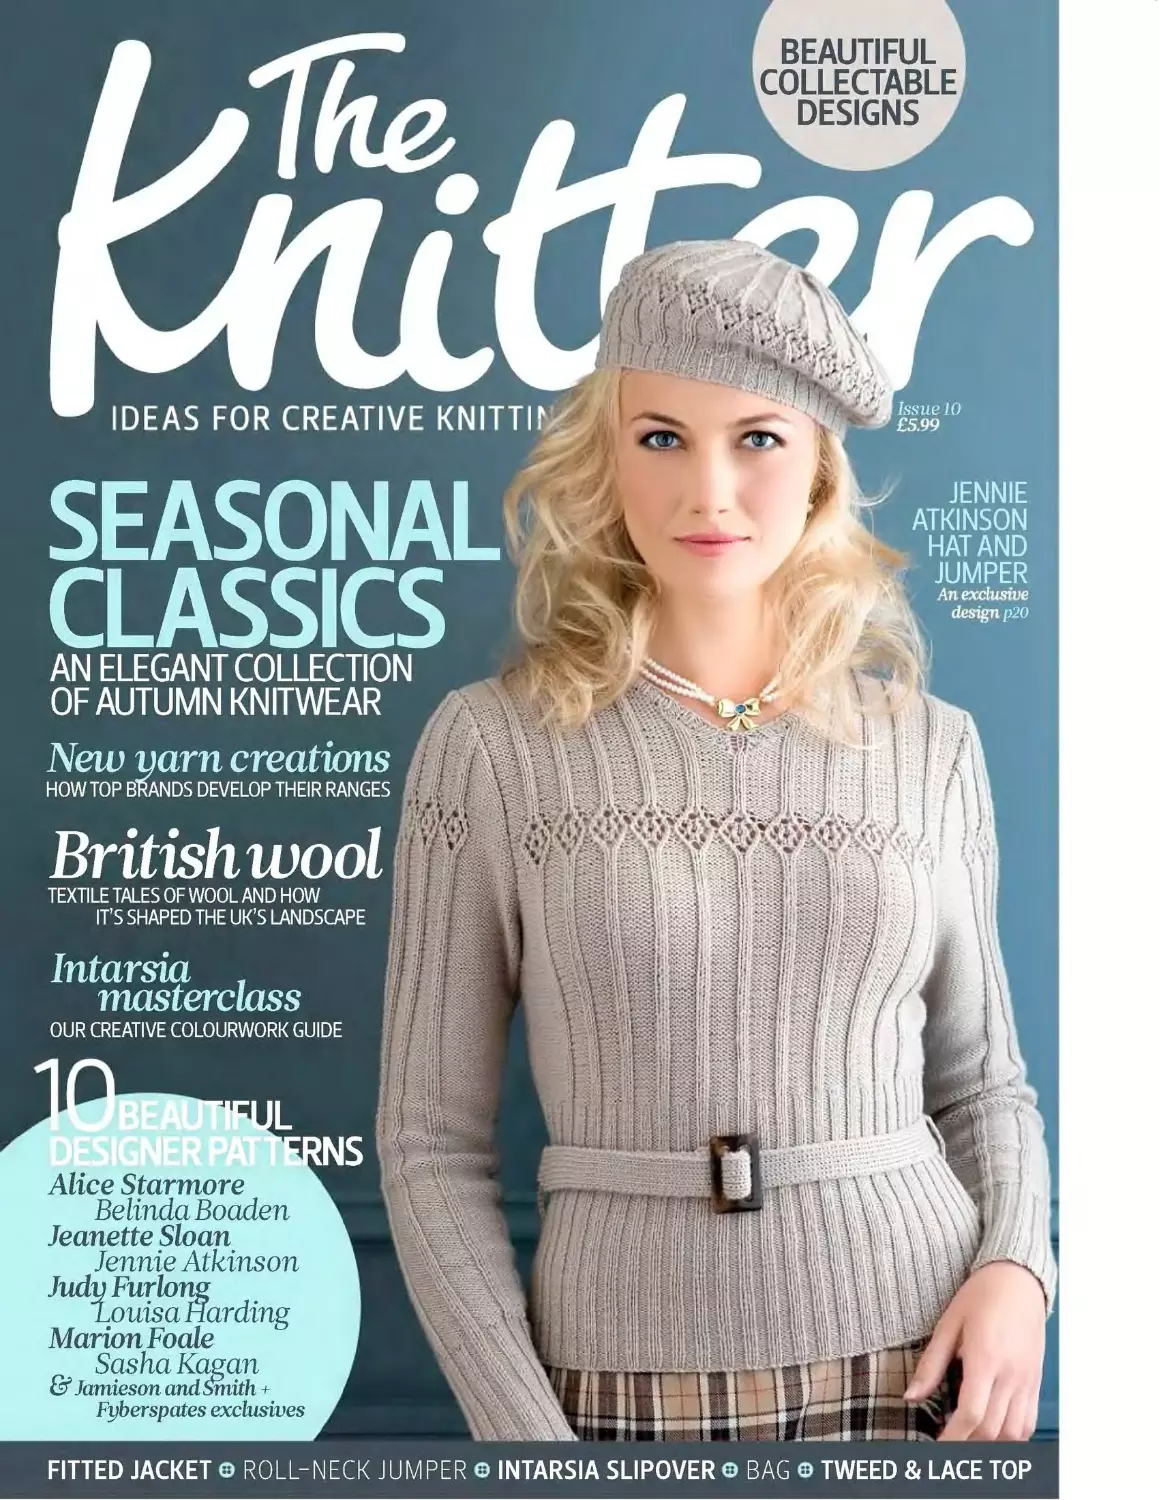
                    BEAUTIFUL
COLLECTABLE
DESIGNS
IDEAS FOR CREATIVE KNITTIT
SEASONAL
CLASSICS
AN ELEGANT COLLECTION
OF AUTUMN KNITWEAR
New yarn creations
HOW TOP BRANDS DEVELOP THEIR RANGES
Issue 10
£5.99
JENNIE
ATKINSON
HAT AND
JUMPER
An exclusive
design p20
British wool
TEXTILE TALES OF WOOL AND HOW
IT’S SHAPED THE UK’S LANDSCAPE
Intarsia ,
masterclass
OUR CREATIVE COLOURWORK GUIDE
Alice Starmore
Belinda Boaden
Jeanette Sloan
Jennie Atkinson
Judy Furlong
Marion Foale
Sasha Kagan
& Jamieson and Smith +
Fyberspates exclusives
FITTED JACKET © ROLL-NECK JUMPER © INTARSIA SLIPOVER © BAG © TWEED & LACE TOP
SEASONAL CLASSICS
What is it about September that immediately conjurs up misty mornings, leaves
being touched by gold and red, country pursuits and the quintessential Britishness
of tweed? Every autumn I have a deep and abiding love affair with flecked and
multi-hued yarns because of the way that they evoke the changing seasons.
A traditional tweed yarn is a blend of many colours - a recipe pulled together by
true craftsmen designed to reflect the colours and textures of nature.
This issue, we have uncovered classic, wearable shapes to bring the country look
home. Colours are redolent of the changing tones in our environment. Patterning,
style and detail have all been carefully balanced in designs that are just perfect for
the classic country weekend taking you from daywear to evening.
Welcome to Autumn!
Editor
The Knitter ф Issue Ten
letter
IDEAS FOR CREATIVE KNITTING
10 Collectable Patterns
12 Jared Flood’s Comfort Square
Get involved in our Macmillan
blanket appeal with this latest design
20 Virginia
Feminine ribbed sweater and beret
with diamond patterning
26 Orla
Stylish jumper with Fair Isle yoke
and cabling to interest
31 Wavy cardigan
Pretty shaped cardigan with a moss
stitch patterning and rib accents
40 Gosford
Knit this gorgeous tailored jacket,
inspired by ladies’ riding jackets
50 Miss Marple
Elegant tweedy jumper with lacy
edge and ribbed border
56 Argyll Leaf
Intarsia leaves framed by a diamond
network in this men’s slipover
65 Hairst
Richly-coloured Fair Isle hat for a
wonderful autumnal flavour
68 Graceful
Luxurious jumper features an
intricate cabled lace pattern
74 Gladstone bag
Felted and embellished bag with
eye-catching geometric motifs
79 Elizabeth I
Enjoy beautiful shaping in this
superb jumper, with lace panel
The Knitter (J) Issue Ten
SUBSCRIBE TODAY AND JOIN OUR
EXCLUSIVE CUSHION CLUB BY DEBBIE ABRAHAMS YOU’LL ALSO
SAVE £1.62 PER ISSUE ON THE SHOP PRICE SEE PAGE 38 FOR FURTHER DETAILS
The Knitter ф Issue Ten
Contents
Textile tales: how
wool has shaped the
landscape
Enter our stash
bag competition to win
these treats
Belnspired
8 The Knitter Loves...
What’s new and exciting in the
worlds of knitting, books and fashion
14 Yarns
We bring you our favourite products
with our selection of tweed yarns
35 Behind the scenes...
In the first of a new series, we find
out what goes on for spinners and
producers creating new yams
56 Mason-Dixon Knitting Notebook
Our columnists compare hand-dyed
versus machine-produced yams
60 Written in the landscape
Join us as we enjoy the view and see
how wool and the textile industry
has shaped the UK’s landscape
84 Masterclass
Knitting expert Jane Crowfoot offers
her advice on keeping your intarsia
colourwork tidy and tangle-free
Our readers
share their proudest
creations with us
Regulars
16 Readers’ letters
Your news, views and opinions
88 Gallery
Check out other readers’ creations
90 Information page
Stockist details, pattern corrections
and essential knitting abbreviations
98 Goody bag
Win our stash bag worth £220!
The Knitter ф Issue Ten
letter
Future Publishing Ltd, 30 Monmouth Street, Bath BAI 2BW
Phone 01225 442244 EmainheKnitter@futurenet.com
Website www.theknitter.co.uk
UK subscriptions hotline 0844 848 2852
Editor Juliet Bernard
juliet. bernard@futurenet.com
Judy’s love of mixing up
traditional and
contemporary styles in
her designs is perfectly
illustrated with her
Gosford design for this
month’s issue. The
stunning fitted jacket is
the epitome of chic
seasonal style that will
take you from work to
play with ease. Find the
exclusive pattern
JENNIE ATKINSON
A great fan of
incorporating historical
and vintage influences in
her bespoke hand knits
and fashion garments,
it’s easy to see how
Jennie has enjoyed
creating her latest
designs for us. The
stunning Virginia belted
jumper and coordinating
beret, reminiscent of
1940s femme fatales,
are on page 20
Acting Operations Editor Ruth Southorn Technical Editor Jen Amall-Culliford
ruth.southorn@futurenet.com	jen.amall-culliford@futurenet.com
Art Editor Jude Curie	Group Senior Editor Julie Tolley
jude.curle@futurenet.com
Ami Penfold, Karen Reed, Kimberley Watson
Photography Future Photo Studio Models Irena and lara Rorich at MOT Models. Niamh Traynor, Joe Branston
Creative Director Robin Abbott	Editorial Director Jim Douglas
-Advertising
Advertising Director Paula EUwood
psula.ellwood@luturenet.com
amanda.haughey@futurenet.com
Account Manager Sasha Dodimead
nfox@futurenet.com
UK Sales Director Clare Dove
Central Agency Sales Director Jude Daniels
020 7042 4105
Central Agency Sales Manager Kerry Nortcliffe
0207042 4153
^Marketing
Marketing Campaign Manager Charlotte Pratten Promotions Executive Madeleine Umpleby
Production Manager Rose Griffiths
Senior Image Mai
Trint &Troduction
Production Co-ordinator Stephanie Smith
Prepress Manager Brian Hook
Head of Production Richard Mason
Circulation
Trade Marketing Manager
Philippa Gordon
philippa.gordon@futurenet.com
International Account Manager
John Lawton
jolinJawtcri@futurenet.com
Licensing
International Licensing Director
Tim Hudson
tim.hudson@futurenet.com
Тек» 44 (0)1225 442244
Fax: >44 (0)1225 732275
knitter
Future Tublisbing Limited
Group Publisher Kerry Lawrence
Chief Operating Officer, Future UK Simon Wear " '	’
Chief Executive, Future UK Robert Price
Subscriptions
Phone our UK hotline on 0844 848 2852
or subscribe online at
Overseas subscriptions *441858 438794
‘Distributed 6y
Seymour Distribution Ltd,
2 East Poultry Avenue,
London ECLA 9PT
Tel: 020 7429 4000
Want to work for Future >
Visit www.futurenet.com/jobs
Wednesday 14 October
Future produces carefully targeted special-interest magazines, websites and events
JENI BROWN
Jeni is the force behind
yarn company
Fyberspates. Spending
plenty of her time
specialising in hand-dyed
yarns, Jeni is ideally
placed to create a
luxurious knit exclusively
for The Knitter with one
of her yarns. Look for her
Graceful sweater, an
elegant combination of
intricate cables and lace
on page 68
and 100 international editions of our titles are published across the world.
quoted on the London Stock
Exchange(symbol: FUTR).
Chief Executive Stevie Spring
Non executive Chairman Roger Parry
Belinda’s whole family
have worked in the
knitwear industry and she
herself learnt to knit at
the age of four. Simply
said, it is in the family
blood. A great fan of
textural knits, London-
based Belinda has created
a number of popular
designs for The Knitter,
and her latest Fair Isle and
cabled jumper is sure to
add to these. Find her
autumnal Orla design
on
Tel -44 (0)20 7042 4000 (London)
Tel *44 (0)1225 442244 (Bath)
recycle
The Knitter Q Issue Ten
Trends Accessories Websites Events Embellishments Music More...
ALL SEWN UP
We don’t know about you, but here at
The Knitter HQ we find that we all
have no end of tapestry needles, but
when we actually need one... can we
lay our hands on one? No, of course
not. So make the most of this nifty
‘Chibi’ needle case set from Clover
with three curved-end needles, all
safely stashed in a screw-topped
case. Smooth steel needles, two in
size 12 and one slightly smaller size 15
will come in handy with their curved
tips for easily hooking threads.
Clover products are distributed in
the UK by EQS. Visit wunv.eqsuk.
com or call 0116 271 0033for
stockists’ details.
Be inspired by the new range of fabrics and sewing patterns, from Anna Maria Homer.
With her finger firmly on the contemporary pulse of fashionable patterns, shapes and
colour combinations, Anna Maria surely falls neatly into the category of one of
America’s hot textile designers of the moment.
We think her Multi-Tasker Tote pattern would make for a fabulous roomy stash bag,
great to take to knitting groups with plenty of pockets, good-sized shoulder strap and
gathered details that allow for easy access. Her Ruthie clutch is a cute handbag project
too and there are a couple of trendy fashion makes, namely the Socialite Dress and
perfectly-pleated Study Hall Skirt. Patterns cost from £7.50. And don’t miss Anna
Maria’s vibrant fabric ranges: Garden Party, and Good Folks.
‘Kpitwear by $as6a ^Kpgan
Stunning photography and colourful projects make Sasha's
latest book a reference must-have. Knitwear is a collection
of 22 hand knits, featuring Sasha’s signature love of
colourwork and also including lace and cabling. Fashionable
floral, nautical and abstract patterns
in this collection are sure to inspire.
To order at 20% off the usual
price of £19.99, call GMC on
01273 488005 and quote “R1932”
to pay £14.99plus £2.95 P+P,
before 30 November 2009.
Thirst for design
Since 1908 Swiss company SIGG have been
making drinking bottles, and its smartly-
designed bottles are sure to catch the eye even
today. Created to minimise the huge
environmental impact that disposable bottles
have, SIGG’s innovative bottles with leak-
proof lid system and unique aesthetic style
means they stand out from the crowd. Fill
one for when you're knitting out and about!
SIGG 600ml bottles cost around £12.99.
Find local stockists at www.sigg.com.
The Knitter ф Issue Ten
The Knitter loves...
DEBBIE BLISS NEW COLLECTIONS
Out now are Debbie Bliss’ latest three pattern books, and they
delight with plenty of playful patterns, interesting shapes and
detailing that we have come to expect from Debbie.
For a fun collection of kid’s patterns, 9 to 5 is a super choice.
There are 18 lovely patterns of jumpers, jackets, accessories and
more, all for tweens - described as between five and ten years.
A wide variety of yams from Rialto and Cashmerino, to Fez and
Alpaca Silk are used so there are plenty of options available.
Fez has 16 womenswear projects, all using Debbie’s Fez yarn
which is a camel hair/ merino mix that has great stitch
definition. She says, “The collection celebrates this in cables
and texture, Fair Isle and intarsia. ”
Look out also for The Big Easy, featuring 13 patterns for
jackets, coats and more, ripe for snuggling up in on a chilly
weekend. There are ideas for Debbie Bliss’ new Donegal Luxury
Tweed Chunky yarn, as well as her Donegal Luxury Tweed
Aran, the luscious cashmere-and-merino blend Como and
Alpaca Silk Aran.
Visit www.designeryarns.uk.com or call 01535 664222
for stockist details of Debbie Bliss pattern books and yarns.
National treasure
Celebrate the season with an outing to one of Britain’s
beautiful country estates this month. The National
Trust's diverse wealth of properties includes many
where you can get away from it all for the day, often
enjoying stunning parklands and gardens - with those
rich, autumn colours - and of course country houses.
Hardwick Hall near Chesterfield, Derbyshire, is a
must-visit with its inspiring collection of intricately-
worked tapestries and hangings. This Tudor home was
built for ‘Bess of Hardwick’, at the time Britain’s
second wealthiest woman, and it is now filled with
treasures. Hardwick Hall is celebrating 50 years in
National Trust ownership this year.
Hardwick Hall is open to visitors Wed- Sun until 1
November, and weekends only until 20 December.
Call for further information 01246 850430, and see
www.nationaltrust.org.uk for complete details of
National Trust properties, events and membership.
MAKE A NOTE...
For a gift to remember, this gorgeous, one-off knitting journal is
one to drool over, bound by Machelle at ChoppedTomatoes. Ours,
Seafoam, has a powder blue suede cover held
closed with vintage buttons and wrap-
around strap. 200 plain pages and 32 graph
pages leave ample room for notes,
sketching, storing swatches and more,
and there are full needle and yarn
conversion charts. The attention to
detail is beautiful; we love it!
Journal measures approx 4‘/г x 6
xlViin, priced $40 (approx £24.)
on her etsy site. See www.
chopped- tomatoes. com.
Rgaify. steady. block!
Made from sturdy tortoiseshell-effect
plastic, these sock blockers from KnitPro
are just the thing for your footwear. They
do not absorb moisture nor will they
warp, so for perfectly blocked socks give
these a try. Each pair is available in three
sizes to account for different foot
lengths, and is priced as follows: small
(8XA in, £18), medium (9x/s in, £19) and
large (lOVs in, £20).
Visit www.knitpro.eu for details.
The Knitter ф Issue Ten
The Knitter loves...
DYLON AUTUMN
COLOUR TRENDS
Here at The Knitter, we love
drooling over the new colour
palette for autumn/winter
yarns, and so inspired are we
that we have been looking for
other ways to brighten up our
lives. With the new season’s
shades for machine-wash dyes
from DYLON out now, we’re all
set to update our interiors.
The gorgeous new colours,
autumn plum, petrol blue and
stone grey, add to the existing
range which includes warming
shades with names to spur the
imagination, like rosewood red
and woodland brown.
With dyeing in a washing
machine so quick, easy and
economical, why not treat your
home to a makeover that’s right
on trend?
DYLON fabric dyes are
available in high street stores
including John Lewis. For more
details, see www.dylon.co.uk.
3 of tbe best \eedle gauges
BEST FOR	BEST FOR	BEST FOR
Multi-purpose	Simple practicality	Elegance
О KnitPro’s View Sizer is
not only a knitting needle
gauge; it has the bonus
addition of a magnifier
strip and a 15cm and 6in
ruler for help with reading
patterns and measuring
knits. For needle sizing,
there are measuring holes
from 2mm to 12mm, with
associated US sizes (but not
UK sizes). Made from a
semi-translucent plastic,
it’s a handy addition to any
knitting bag. The View
Sizer costs around £2.40.
0 This gauge from Pony
has a certain simplicity -
“it does what it says on the
tin”. A central line of holes
is labelled by the metric
measurements to one side
from 2mm to 10mm, and a
12cm ruler, whilst the other
side has a length of imperial
lables (size 14 to 000) and a
5in ruler. Handily the clear
red print has been added to
both faces of this cream
plastic gauge, and there is a
slot at the top - ideal for
adding a ribbon tie, so it
will be within easy reach. It
costs just £1.30.
0 For a pretty choice, this
neat little gauge by Debra’s
Garden is ideal, and a super
gift option. Made from
lightweight metal, there
are various colour choices
- shown here is lavender.
You can measure needles
from 2mm to 12mm, and
the markings have been
permanently lasered into
the surface. The ammonite
-style spiral has a metal
loop for attaching to a
keyring or bag zip. Also
available is a smaller sizes
gauge, (great for lace and
socks); it measures 0.75mm
to 4mm. Both are £12.95.
Cosy creations
It's not hard to appreciate the
stunning hand-embroidered
cushions and blankets from textile
designer, Shirley McLauchlan. She
specialises in unique designs,
handsewn onto vintage Ayrshire
wool blankets or linen, each one personally made for
her clients, who include the rich and famous - Nicole
Kidman and Zoe Ball. “My philosophy is to create something
that can be passed down the generations,” Shirley told us.
Visit www.skmclauchlan.co.uk for more info.
SYew yarn at the yard
The Yarn Yard is releasing a new base yarn to be proud of,
and one unlike those offered elsewhere... Clan is a 100%
superwash merino and (unusually for a sockweight yarn) is
wonderfully evenly spun from no less than 8 plies, resulting
in a very even diameter. Because of this, it takes colour very
well with rich saturation, leading to a yarn that knits with
amazing stitch definition. Available in 65g/210m skeins, in a
full range of standard colours, these smaller skeins allow for
more scope with colourwork. Clan costs £6.99 per skein.
Visit www.theyarnyard.co.uk to view the full range of
hand-dyed yarns and fibres.
The Knitter ф Issue Ten
The Knitter loves...
CHARITY
KNITTING
O Why not hold a
Macmillan Big Coffee
Morning? 0 Some of
the blanket squares
knitted by the Knitting
Goddesses Ravelry
group © Reader Sue
McBride’s knitting
groups have also been
getting involved
0 Register for a coffee
morning online
© Amanda Leggat showed us
her beaded Sunburst square,
designed by Jennie Atkinson
Q + O Rowan’s Marie Wallin has
created this colourful square
pattern, available to download
Get involved and knit for a good
cause (but we’re sure that you
don’t really need an excuse...)
WHETHER A BIG nationwide charity or a
local fund-raising event, there’s nothing
like putting your needles and yarn stash to
good use, and doing your bit for a worthy
cause! Small causes can often benefit -
maybe a local hospital or pet re-homing
centre is looking for knitted blankets? Is
your local scout group raising funds for its
meeting hall? Ask around in your area how
you can do your bit with your knits.
When it comes to larger charities, many
appreciate money raised from actual sales
of hand knits, or often there are alternative
ways to support them.
Closest to The Knitter’s hearts right now
is our Macmillan Cancer Support comfort
blanket campaign, backed by Rowan. We
are encouraging knitters (and crocheters!)
to make squares that can be sewn up into
blankets, raising awareness for Macmillan’s
Fuel for Poverty campaign. So far the
reactions we’ve been receiving to this
campaign have been amazing.
We have heard from plenty of knitters
who have already been throwing
themselves into knitting squares. Sue
McBride, in Washington says, “I belong to
four knitting group© who are donating
squares, and we are joining in the World’s
Biggest Coffee Morning too. ”
Sam Philips at Macmillan says, “Last year
we had over 45,000 people registering
coffee mornings, and this year we hope for
even more so we can raise more than
£8million for people affected by cancer. It’s
not all about coffee - you could try
smoothies or even herbal tea. It’s easy to
get involved, bake cakes and sell slices, to
nibble on while you knit or sew up squares!
Get creative with where you have your
coffee morning too, to encourage lots of
people to come along. ” О
The Knitter ф Issue Ten
The Knitter Campaign
Comfort
Square
With subtle tweed
yarn and a beautiful
colourwork pattern,
this Comfort Blanket
square created by
Jared Flood has
knitting rhythm
SIZE
20cm x 20cm (8in x 8in)
Rowan Scottish Tweed DK (100% pure new
wool; 50g/113m balls)
A Grey Mist (01) 1 x 50g ball
В Herring (08) lx 50g ball
NEEDLES
1 pair 4mm (size 8/US 6) knitting needles
TENSION
25 sts and 25 rows to 10 cm over colourwork
using 4mm needles
NOTES
Stitches are slipped from one needle to the
other at the start and end of this square to
avoid having to break off and join in colours
unnecessarily.
SQUARE
Cast on 51 sts using yam A and 4mm
needles.
Row 1 (RS): Knit first row using yarn A as
Chart row 1.
Slip all stitches back onto empty needle.
Row 2 (also RS): Join in yarn В and work
row 2, slip first and last stitch and knit all
other sts, as shown on chart.
Work rows 3 to 49 from chart. Odd
numbered rows will be WS rows and even
numbered rows are RS. Use the Fair Isle
technique to carry unused yarn across the
back of the work. Take care not to carry
unused yarn too tightly as this will cause
the knitted fabric to pucker.
Row 50 (WS): Slip all stitches back to
This abstract colourwork
pattern from Jared would
work well alongside plain
or cabled squares
empty needle. Pick up yarn A and purl
across row.
Cast off all stitches knitwise.
Weave in ends and block gently to
measurements, following any instructions
on ball band. ©
CHART
KEY
Yarn A; К on RS, P on WS
Yarn A; S11 on RS holding
yarn in back, S11 on WS,
holding yarn in front
Yarn В; К on RS, P on WS
iBSlilllSBBBIilBliSI
I i:i 11! iS in iS Si Si Si ii!!!! EEE!
т.т.Г.-И^Л’Лтл-.т.т.т

The Knitter ф Issue Ten
The Knitter loves...
YweedYarns
A round of new tweed, and tweed effect yarns
available online and in your local yarn shop
T)e66ie "Bfiss
Luxury Tweed Chunky
Shade pictured 07
Skein weight/iength 100g/100m
Needle size 6.5mm (size 3/US IO1/?)
Tension 12 sts and 19 rows to 10cm
Fibre content 85% merino wool, 15% angora
Care Hand wash only
Contact 01535 664222
Qedifra
Riana Big Color
Shade pictured 5945
Ball weight/iength 50g/30m
Needle size 10mm (size OOO/US15)
Tension 10 sts and 14 rows to 10cm
Fibre content 50% new wool, 45% acrylic, 5% viscose
Care Hand wash only
Contact 01325 394237
www. coatscrafts. co. uk
This new range provides a chunky version of Debbie Bliss’s
popular Luxury Tweed yarn. It makes a beautiful knitted
fabric that is both sturdy and surprisingly soft for a
traditional-looking tweed yarn. Being chunky weight, the
fabric knitted up very quickly and gave wonderful texture
in the moss stitch used for our samples. The flecks present
in the yarn are in contrasting shades; dark green, bright
pink, purple and brown in the bright red yarn pictured
above. 16 shades are available, and patterns can be found in
Debbie Bliss’s new collection, The Big Easy.
This new super chunky yarn from Gedifra has much to
offer. When knitted, it gives a subtle self-striping effect,
adding interest to the flecked, single ply yarn. It is bouncy
and stretchy, having a hazy finish when knitted into fabric.
Riana Big Color is available in five shades that compliment
the 17 solid colours of the Riana Big range. The new yarn
range is supported with patterns in Gedifra’s winter
magazine, Gedifra Highlights 092, a collection of 32
patterns showcasing their new yarn collections.
The Knitter ф Issue Ten
The Knitter loves...
-R^tiuin
Felted Tweed Aran
Shade pictured Ivy (727)
Ball weight/length 50g/87m
Needle size 5mm (size 6/US 8)
Tension 16 sts and 23 rows to 10cm
Fibre content 50% merino, 25% alpaca, 25% viscose
Care Machine wash at 40C
Contact 01484 681881
www.knitrowan.com
T/je Yarn Yard
Croft
Shade pictured Scots Pine
Skein weight/length 100g/420m
Needle size 2.25mm (size 13/US 1)
Tension 28 sts and 32 rows to 10cm
Fibre content 75% wool, 25% nylon
Care Hand wash only
Contact natalie(5>theyarnyard.co.uk
www.theyarnyard.co.uk
Rowan have introduced two new qualities of the highly -
popular Felted Tweed yarn; aran and chunky. The yarn is
subtly flecked and is constructed from 4 plies twisted
together. The surface of the fabric has a gentle haze of long
fibres that add to the pleasingly rustic look, with the
resultant knitted cloth keeping a soft, slightly felted feel.
Ten stunning heathered shades are available in the aran
weight, with a further ten in the chunky, and both yarns
have the added advantage of being machine washable.
This new sock yarn range from The Yarn Yard is a total
delight. It forms a light and yet firm fabric, with beautifully
saturated colour. There is some gentle variation in the
intensity on the skein, but it balances and gives an even
overall effect when knitted. Our sample had an almost
vintage feel with the flecks of the wrapping strands giving a
tweed appearance to the swatch. As with all hand-dyed
products, it is important to purchase enough yarn to
complete your project in one go.
Louisa Th
Willow Tweed
Shade pictured Ash (4)
Skein weight/length 50g/116m
Needle size 4mm (size S/US 6)
Tension 22 sts and 30 rows to 10cm
Fibre content 40% alpaca, 40% merino wool, 20% silk
Care Hand wash only
Contact 01535 664222
www.designeryarns.uk.com
$lyfecraft
Chunky Signature
Shade pictured 23S7
Skein weight/length 50g/60m
Needle size 6mm (size 4/US10)
Tension 14 sts and 20 rows to 10cm
Fibre content 50% wool, 50% acrylic
Care Hand wash only
Contact 01535 609798
www.stylecraft-yarns.co.uk
Louisa Harding’s new Willow Tweed line is a
contemporary take on a traditional tweed. Made from a
soft blend of alpaca, merino and silk, the yarn has a crisp,
firm handle. With excellent stitch definition and a strong
slub, the knitted fabric has an interesting, dimensional
quality. In 12 bright pastel shades, this yarn has a fresh
look. Louisa’s new pattern collection, Little Cake, contains
lots of beautiful projects using Willow Tweed.
Chunky Signature is a new line of heavier weight yam
from Stylecraft. The sample was a real pleasure to knit.
It has a fantastic, soft feel with a beautiful haze to the
knitted fabric. The stitches lie really evenly, which is not
always the case with moss stitch, giving a smooth, regular
fabric. The yarn is constructed from different coloured
fibres that are then spun into an airy single ply. When
knitted up, the fabric has a flecked appearance. Eight
beautifully-rich autumn shades are available.
The Knitter ф Issue Ten
CONTACT US
The Knitter Magazine, Future Publishing,
30 Monmouth Street, Bath BA1 2BW
TheKnitter@futurenet.com
Letters
Want to comment on
what you’ve seen in
The Knitter? Discovered
new patterns or designers
you’d like to share with
other readers? Then get
in touch - we’d love to
hear from you...
STAR LETTER
Rich inspiration
I would like to share a moment of
extreme pleasure. Yesterday I arrived
home to find The Knitter Issue Nine
waiting on my doormat. I carefully
unwrapped the latest treasured
edition. With coffee made, I settled
down to enjoy your latest creation.
Turning the pages slowly so as to make
the experience last as long as possible,
I drank in the patterns so beautifully
illustrated; the articles so varied and
interesting; the advice so informative.
Eventually, I reached the back cover
replete and stimulated to try all sorts
of new ideas. Thank you for this
stylish, glamorous addition to my life.
May I make one little plea? Please
could you occasionally provide larger
sizes or perhaps something in a loose,
flowing design that would be kind to a
more generous figure? If that is not
possible, then I can still use my
imagination, can’t I?
Katrina McDonald, Surrey
THE KNITTER SAYS: To answer your sizing
query... this is something we are looking
into. The largest size we currently list is a
22, though of course we encourage
readers to study the actual garment
measurements provided. For example, in
Issue Nine, the Carinthia coat pattern was
generously-sized, so offers more options
for those with larger figures. We hope that
you saw our Perfect Fit masterclass in
Issues Eight and Nine too, with guidance
on increasing by one size. Meanwhile, we
hope you enjoy our wonderful patterns for
shawls, socks and other accessories, and
of course ideas for the home!
Our Star Letter
wins a pattern, four
skeins of
Hummingbird
Alpaca yarn and
Brittany birch
needles, courtesy
of Artesano (www.
artesanoyarns.
co.uk).
In-flight pins
I read the letter from Marion Vint
about having needles confiscated at
airports, in Issue Eight. I have found
that if you use KnitPro needles with
interchangeable ends and cables, you
could pack most of your knitting in
luggage to go into the hold, but have a
spare pair of ends which you could use
in the departure lounge until it is
almost time to board.
Before going through security put
stops on the cable ends to keep your
knitting safe and post the spare pair of
ends back to yourself in an SAE you
have taken with you. I assume there
are still postal facilities in departure
lounges, it is a long time since I have
had to travel by air.
Sue Gent
via email
Fair Isle fan
I thought I’d show you this cardigan
that I knitted for my friend Vai. I have
been doing Fair Isles since 1994 and
use original knitting in the round
techniques, with either a circular
needle or double-pointed needles and
working steeks.
This particular design is one of my
own and uses a chart from Sheila
McGregor’s book, The Complete Book
of Traditional Fair Isle Knitting. It
fitted perfectly with the stitch pattern
I needed of 30 stitches to 30 rows. Vai
herself chose the colours - three dark,
The Knitter 0 Issue Ten
Letters
Elisabeth designed this Fair Isle cardigan
herself, using a Sheila McGregor chart
three light and a contrast - and the
yarn is from Jamieson & Smith.
I have always used their yarns for
my Fair Isle knitting, and there was a
time when I knew all the ladies there
by their first names. I even visited
Shetland a couple of times and had tea
with them.
Elisabeth Townsend
Northampton
Knitting on credit
Having read with interest your Issue
Five on Ecological and Ethical yams, I
was very taken with the Curve of
Pursuit blanket pattern. However
having noted the amount of yarn
required and its recommended price, I
put it to the back of my mind. Later
that week, I found myself in a charity
shop in Coventry and fell upon some
100g balls of DK for £1.19 each. I then
proceeded to knit the blanket on my
old bamboo needles, adapting the
bands of colours, and have ended up
with a marvellously warm blanket for
This stunning throw, Curve of Pursuit, using
short row shaping, appeared in Issue Five
the ‘Economical’ price of £9.60!
Also, I read in your recent issue
about using cosmetic bags for small
projects. I have taken to using a
cosmetic bag for my sock projects, the
latest of which is Lucy Neatby’s
Mermaid Socks from Issue Four that
I’m knitting with 50p worth of yarn
from the church fete.
My biggest outgoing at the moment
is The Knitter, so I have taken out a
subscription, and it is worth every
penny. There are lots of projects for
which I am holding out for more
bargain buys.
Angie Fox
Norwich
THE KNITTER SAYS: Glad to hear you are
doing your bit to put those yarns to good
use! And our savings on a subscription to
The Knitter are too good to miss, as Angie
has found. Take advantage on page 38...
Antipodean knits
It is such a joy to read a magazine
aimed at the more experienced
knitter. The variety, challenges and
use of finer yarns is refreshing. Many
of the recommended yarns are not
available here in New Zealand, but so
far I have made two items using
substitutes. Also the masterclass on
moebius knitting in Issue Three was
very timely and meant I was able to
make a cowl scarf to match some
fingerless gloves that I’d just made.
Maureen van den Beld
Wellington, New Zealand
The Knitter online
Earlier this year I came across your
magazine in my local bookstore -
what gorgeous patterns! - but since
then I have unfortunately had trouble
finding a copy. Until just recently that
is, when I finally found a link online to
subscribe digitally. So I’m now
looking forward to all issues, and at a
good price! I just wanted to say thanks
so much again.
Louisa Batton
Boston, USA
THE KNITTER SAYS: Good to hear you’ve
managed to ensure your regular fix of The
Knitter, Louisa. Digital subscriptions are
now available online at: www.
myfavouritemagazines.co.uk/zinio and
cost just £70.00 for a year's subscription
- that's for 13 issues. This ensures a good
saving on the usual newsstand price for
readers in the USA.
Lucinda Guy created these pretty Magda
socks exclusively for The Knitter, Issue Five
For love of socks
As a Vogue Knitting subscriber for 27
years (and now to you too!), you have
achieved what I didn’t think possible
- a British version, and even better, as
you are monthly. Superb!
Thank you for the sock patterns
(though sadly I missed the Mermaid
socks in Issue Four). I do have a tip for
other ‘sockers’ which maybe of
interest. As I grew bored of finishing
one sock, only to have to start the
second, so I have two sets of needles
on the go. I work the top of the first,
then the top of the second, one heel
then the second... and so on. Once the
first is finished, I know it’s only a case
of finishing off the second!
Joanna Jacobs
Oxford
THE KNITTER SAYS: Thank you for the
compliments Joanna. For your’sand other
reader’s information, back issues of The
Knitter may be purchased (subject to
availability) by calling 0844 848 1602 or
visiting www.myfavouritemagazines.co.
uk. UK pricing per issue is £7.99, £8.99
for European destinations, and £9.99 to
the rest of the world.
GET IN TOUCH
We’d love to hear from you. Write to us at
The Knitter, Future Publishing,
30 Monmouth Street, Bath BAI 2BW
or email TheKnitter@futurenet.com.
Unless otherwise specified, we will assume that
you are happy for us to publish your emails. We
reserve the right to edit all letters submitted.
The Knitter ф Issue Ten
№
Exclusive
ienuie Atkinson
Virginia
Vintage-inspired sweater and matching beret
make a contemporary, feminine pairing
с

THIS EXQUISITE FITTED sweater is a
flattering knit created by Jennie Atkinson,
reminiscent of vintage designs,
reminiscent of the shapes and stitches that
have become so popular. Jennie says, “ My
belted sweater design was inspired by a
vintage pattern, from the 1940s I think,
which used a diamond patterning across
the chest. I thought it was a beautifully
simple idea, but more interesting than a
plain rib.”
As for the shape, Jennie has updated it for
a more contemporary line, with the
ribbing and also designing the belt as the
perfect addition to emphasise the waist.
She says: “I imagined it being worn with a
slim, below-the-knee skirt, an image
which just seemed to conjure a femme
fatale of the 40s, and so I thought it
demanded a beret! ”
The Sublime Extra Fine Merino Wool 4ply
that Jennie has chosen for Virginia is nice
and springy. It gives excellent stitch
definition, making the most of the texture
of both the diamond pattern and the rib,
and also allowing a good fit. The yarn is
made from the finest quality merino fibres
and is available in 10 beautiful shades.
THE BELTED SWEATER WAS INSPIRED BY A VINTAGE
PATTERN WITH DIAMOND PATTERNING FOR INTEREST, AND
A MATCHING BERET KNITTED IN THE ROUND
r Vi
'«Mwr
iwweat-

'Jennie eAtHinson
Virginia
SIZE
8	10	12	14	16	18	20	22
TO FIT	81	86	91	96	101	107	112	117	cm
BUST
32	34	36	38	40	42	44	46	in
ACTUAL	84	89	94	99	104	109	114	119	cm
BUST	33	35	37	39	41	43	45	47	jn
ACTUAL	61	61	63	63	65	65	67	67	cm
LENGTH	24	24	25	25	25‘Л	25<; 26‘Л 261..	in
SLEEVE	51	51	51	51	51	51	51	51	cm
SEAM	20	20	20	20	20	20	20	20	in
YARN
Sublime Extra fine merino wool 4 ply
(100% extra fine merino wool: 50g/175m
balls)
BI(SjIT 8 8 9 9 10 10 11 11 ««
BERET SIZE & YARN
One size to fit average adult head.
Sublime Extra fine merino wool 4 ply (100%
extra fine merino wool; 50g/175m balls)
Biscuit (06) 2 x 50g balls
NEEDLES & ACCESSORIES
1 pair 2.75mm (size 12/US 2) knitting needles
1 circular 2.75mm (size 12/US 2) knitting
needle (short length for Beret)
1 pair 3.25mm (size 10/US 3) knitting needles
1 circular 3.25mm (size 10/US 3) needle (short
length for Beret)
Set of double pointed 3.25mm (size 10/US 3)
knitting needles for Beret
Belt buckle
TENSION
28 sts by 36 rows to 10cm using 3.25mm
knitting needles over st st
BACK
Using 2.75mm needles cast on 114
(122:126:134:142:146:154:162) Sts.
Row 1 (RS): K2, *P2, K2; rep from * to end.
Row 2: P2, *K2, P2; rep from * to end.
Keeping rib patt correct, dec 1 st both ends
of 11th row and foil 10th row twice then
every foil 8th row 3 times.
102 (110:114:122:130:134:142:150) Sts.
Cont straight in rib patt for 19 rows.
Keeping patt correct inc 1 st both ends of
next row and foil 8th row twice.
108 (116:120:128:136:140:148:156) Sts.
Work 1 row ending RS facing for next row.
Change to 3.25mm needles.
Next row (RS): P13 (17:19:23:27:21:25:29),
K2, ”P6, K2; rep from * to last 13 (17:19:23:
27:21:25:29) Sts, P13 (17:19:23:27:21:25:29).
Next row: K13 (17:19:23:27:21:25:29), P2,
*K6, P2; rep from ‘ to last 13
(17:19:23:27:21:25:29) StS, K13
(17:19:23:27:21:25:29).
Cont in rib patt as set, taking all inc sts into
rev st st, inc 1 st both ends of 5th and every
foil 8th row 4 (4:5:4:4:5:5:4) times. 118
(126:132:138:146:152:160:166).
Work 11 (11:7:15:9:9:21:21) rows straight
ending with RS facing for next row.
SHAPE ARMHOLES
Next row (RS): Castoff 6 (7:8:8:9:9:10:10)
sts patt to end.
Next row: Cast off 6 (7:8:8:9:9:10:10) StS
patt to end.
106 (] 12:116:122:128:134:140:146) StS.
Keeping patt correct cast off 2
(3:3:4:4:5:5:6) Sts at beg of next 2 rows.
102 (106:110:114:120:124:130:134) Sts.
Dec 1 st both ends of next 3 rows then next
2 (2:3:4:4:4:5:5) alt rows.
92 (96:98:100:106:110:114:118) Sts.
Work one row straight ending with RS
facing for next row.
DIAMOND PATTERN
Row 1 (RS): P4 (6:7:8:11:5:7:9), *K2tOg,yo,
SSK, P4; rep from * to last 0 (2:3:4:7:1:3:5)
StS, P0(2:3:4:7:l:3:5).
Row 2: K4 (6:7:8:11:5:7:9), 'Pl, KFB, Pl,
K4: rep from • to last 0 (2:3:4:7:1:3:5) StS,
KO (2:3:4:7:1:3:5).
Row3:P3 (5:6:7:10:4:6:8), *K2tOg,yO, K2,
yo, SSK, P2; rep from ’ to last 1
(3:4:5:8:2:4:6) StS, Pl (3:4:5:8:2:4:б).
Row4: КЗ (5:6:7:10:4:6:8), *P6, K2; rep
from * to last 1 (3:4:5:8:2:4:6) StS, KI
(3:4:5:8:2:4:6).
Row 5: P2 (4:5:6:9:3:5:7), ’(K2tog, yo)
twice, SSK, yo, SSK: rep from * to last 2
(4:5:6:9:3:5:7) Sts, P2 (4:5:6:9:3:5:7).
ROW6: K2 (4:5:6:9:3:5:7), *P3, KFB, P3; rep
from * to last 2 (4:5:6:9:3:5:7) StS, K2
(4:5:6:9:3:5:7).
ROW7: P2 (4:5:6:9:3:5:7), *(yo, SSK) twice,
K2tog, yo, K2tog; rep from * to last 2
(4:5:6:9:3:5:7)sto,yo,P2 (4:5:6:9:3:5:7).
ROW 8: K2 (4:5:6:9:3:5:7), KI tbl, P6, ’KFB,
P6; rep from • to last 3 (5:6:7:10:4:6:8) Sts,
KI tbl, K2 (4:5:6:9:3:5:7).
ROW9:P3 (5:6:7:10:4:6:8), *yo, Sil, K2tog,
psso, yo, K3tog, yo, P2; rep from * to last
1 (3:4:5:8:2:4:6) Sts, Pl (3:4:5:8:2:4:б).
Row 10: КЗ (5:6:7:10:4:6:8), *K1 tbl, Pl,
KFB, Pl, KI tbl, K2; rep from * to last
1 (3:4:5:8:2:4:6) Sts, KI (3:4:5:8:2:4:6) Sts.
Row 11: P4 (6:7:8:11:5:7:9), 'yo, SSK,
K2tog, yo, P4; rep from * to last 0
(2:3:4:7:1:3:5) Sts, PO (2:3:4:7:1:3:5).
Row 12: K4 (6:7:8:11:5:7:9), *K1 tbl, P2, KI
tbl, K4; rep from ’ to last 0 (2:3:4:7:l:3s5)
StS,K0(2:3:4:7:l:3:5).
Rowl3:P5 (7:8:9:12:6:8:10), K2,'P6,K2;
rep from • to last 5 (7:8:9:12:6:8:10) StS, P5
(7:8:9:12:6:8:10).
Row 14: K5 (7:8:9:12:6:8:10), P2, *K6, P2;
rep from* to last 5 (7:8:9:12:6:8:10), P5
(7:8:9:12:6:8:10).
•••Rep last 2 rows 23 (23:24:23:25:25:25:25;
more times.
SHOULDERS AND BACK NECK
Next row (RS): Patt 31
(33:34:35:36:38:40:42) StS. Turn. (Sliprem
sts on to stitch holder).
Next row: Work 2tog, patt to end.
Next row: Cast off 10 (10:11:11 =11=12=13=13)
Sts.
Next row: Work 2tog, patt to end.
Next row: Cast off 9 (10:10:11 =11:12:12:13)
Sts.
Next row: Work 2tog, patt to end.
Next row: Cast off rem 9
(10:10:10:11:11:12:13) StS.
With RS facing return to sts on holder.
Keep centre 30 (30:30:30:34:34:34:34) Sts
on holder and rejoin yarn to rem 31
(33:34:35:36:38:40:42) Sts and
The Knitter ф Issue Ten
reversing shapings complete to match first
side.
FRONT
As Back to ”•
Rep last 2 rows 7 (7:7:7:5:5:5:5) more times
ending with RS facing for next row.
SHAPE NECK
Next row (RS): Patt 45
(47:48:49:52:54:56:58) Sts. Turn. (Slip rem
sts to holder)
Next row: Patt to end.
Keep patt correct, dec 1 st at neck edge of
next and every foil alt row until 29
(31:32:33:34:36:38:40) Sts.
Work one row straight.
Next row (RS): Cast off 10
(10:11:11:11:12:13:13) Sts, patt to end.
Next row: Work 2tog, patt to end.
Next row: Cast Off 9 (10:10:11:11:12:12:13)
sts, patt to end.
Next row: Patt 9 (10:10:10:11:11:12=13) Sts.
Next row: Cast off rem 9
(10=10:10:11:11=12=13) Sts.
With RS facing return to rem sts on holder,
leave next (centre) 2 sts on holder, rejoin
yam to rem 45 (47:48=49:52:54:56=58) Sts.
Work to match first side of neck, reversing
shapings.
SLEEVES
Using 2.75mm needles cast on 50
(50:54=54:58=58:62:62) Sts.
Row 1 (RS): K2, *P2, K2; rep from ’ to end.
Row 2: P2, *K2, P2; rep from ’ to end. and
Keeping rib patt correct, inc 1 st at both
ends of 11th row and every foil 10th row
until60 (60:64:64:68=68:72:72) Sts.
Change to 3.25mm needles.
Row 1 (RS): P5(5:7:7:9:9:11:11), K2, ’P6,
K2; rep from’to last 5 (5:7:7:9:9:11:11) Sts,
P5 (5:7:7:9:9:11:11).
Row2: K5 (5:7:7:9:9:11:11), P2, ’Кб, P2: rep
from ’ to last 5 (5:7:7:9:9:11:11) Sts, K5
(5:7:7:9:9:11:11).
Cont in rib patt as set, working all inc sts in
rev st st, inc 1 st at both ends of 3rd row and
every foil 8th row to 82 (82:86:86:90:90:
94:94) sts, then every foil 4th row to 108
(108:112:112:116:116:120:120) Sts.
Cont until sleeve meas 51cm ending with
RS facing for next row.
SLEEVEHEAD
Next row (RS): Castoff 6 (7:8:8:9:9:10:10)
sts, patt to end.
Next row: Cast off 6 (7:8:8:9:9:10:10) StS,
patt to end.
Cast off 2 (3:3:4:4:5:5:6) Sts at beg next 2
rows. 92 (88:90:88:90:88:90:88) Sts.
Size 8 only
Dec 1 st at both ends of next row and foil 2
alt rows. 86sts.
Work 1 row.
Sizes 10-22 only
Dec 1 st at both ends of next row and foil
4throw. - (84:86:84:86:84:86:84) Sts.
Work 3 rows straight.
All sizes
Cont in Diamond Pattern whilst shaping
sleevehead thus:
Rowl: P2tOg, P15 (14:15:14:15:14:15:14),
'K2tog, yo, SSK, P4; rep from ’ to last 13
(12:13:12:13:12:13:12) Sts, Pll
(10:11:10:11:10:11:10), P2tOg.
77 (75:77:75:77:75:77:75) Sts.
ROW 2: K16 (15:16:15:16:15:16:15), ’Pl, KFB,
Pl, K4; rep from ’ to last 12
(11:12:11:12:11:12:11) Sts, K12
(11:12:11:12:11:12:11). 84
(82:84:82:84:82:84:82) Sts.
Row3:P15 (14:15:14:15:14:15:14), *K2tOg,
уо, K2, yo, SSK, P2; rep from ’ to last 13
(12:13:12:13:12:13:12) Sts, P13
(12:13:12:13:12:13:12).
Row 4: K15 (14:15:14:15:14:15:14), ’P6, K2;
rep from * to last 13 (12:13:12:13:12:13:12)
Sts, P13 (12:13:12:13:12:13:12).
Row5:P2tOg, P12 (11:12:11:12:11:12:11)
*(K2tog, yo) twice, SSK, yo, SSK; rep from
’ to last 14 (13:14:13:14:13:14:13) StS, P12
(11:12:11:12:11:12:11), P2tOg.
75 (73:75:73:75:73:75:73) Sts.
ROW6: K13 (12:13:12:13:12:13:12), *P3, KFB,
P3; rep from * to last 13 (12:13:12:13:12:13:
12) sts, K13 (12:13:12:13:12:13:12).
82 (80:82:80:82:80:82:80) Sts.
ROW7: P13 (12:13:12:13:12:13:12), ’(yo, SSK)
twice, K2tog, yo, K2tog; rep from' to last
13 (12:13:12:13:12:13:12) StS, yo, P13
(12:13:12:13:12:13:12). 76
(74:76:74:76:74:76:74) Sts.
ROW8: K13 (12:13:12:13:12:13:12), KI tbl,
P6, ’ KFB, P6; rep from * to last 14
(13:14:13:14:13:14:13) Sts, KI tbl, K13
The Knitter ф Issue Ten
Virginia
(12:13:12:13:12:13:12).
82 (80:82:80:82:80:82:80) St©.
ROW 9: P2tOg, P12 (11:12:11:12:11 =12:11), 'yo,
Sil, K2tog, psso, yo, K3tog, yo, P2; rep
from • to last 12 (11:12:11:12:11:12:11) Sts, PIO
(9:10:9:10:9:10:9), P2tOg.
73 (71:73:71:73:71:73:71) Sts.
Row 10: K13 (12:13:12:13:12:13:12), 'Kltbl,
Pl, KFB, Pl, KI tbl, K2; rep from * to last 11
(10:11:10:11:10:11:10) Sts, KU (10:11:10:11:
10:11:10). 80 (78:80:78:80:78:80:78) Sts.
Row 11: P14 (13:14:13:14:13:14:13), ’yo, SSK,
K2tog, yo, P4; rep from * to last 10
(9:10:9:10:9:10:9) Sts, PIO
(9:10:9:10:9:10:9).
Row 12: K14 (13:14:13:14:13:14:13), *K1 tbl,
P2, KI tbl, K4; rep from * to last 10
(9:10:9:10:9:10:9) Sts, K10
(9:10:9:10:9:10:9).
Row 13: P2tog, P13 (12:13:12:13:12:13:12),
K2, 'P6, K2; rep from * to last 15
(14:15:14:15:14:15:14) Sts, P13
(12:13:12:13:12:13:12), P2tOg.
78 (76:78:76:78:76:78:76) St©.
Row 14: K14 (13:14:13:14:13:14:13), P2, *K6,
P2; rep from * to last 14 (13:14:13:14:13:14:
13) StS, K14 (13:14:13:14:13:14:13).
Keep rib as set by last 2 rows, dec 1 st at each
end Of next and 4 (6:11:10:14:13:14:13) foil
alt rows, then dec 1 st each end of every
row 10 (7:3:3:0:0:0:0) times. 48 Sts.
Next row: Cast off 4 ©ts at beg next 2 rows.
Next row: Cast off 8 sts at beg next 2 rows.
Next row: Cast off rem 24 sts.
NECK TRIM
Join shoulder seams.
With RS ofworkfacing, using3.25mm
circular needle, starting at left shoulder
seam pick up and K36 (.36:40:40:44:44:48:
48) sts down left front neck, K2tog at
centre front from holder, pick up and K36
(36:40:40:44:44:48:48) Sts up right front
neck, 4 sts from right back neck, patt
across 30 (30:30:30:34:34:34:34) stsfrom
back neck st holder, and 4 sts from left
back neck. 111(111:119:119:131:131:139:139)
sts. Work in the round as foil;
Round 1: P2, (K2, P2) 8 (8:9:9:10:10:11:11)
times, K2tog tbl, К centre st, K2tog, 'P2,
K2; rep from * to end.
Round 2: Rib to within 2 sts of centre st,
K2tog tbl, К centre st, K2tog, rib to end.
Rep last round 2 more times.
Using 5mm needle cast off in rib.
BELT
Using 2.75mm needles cast on 15 sts. Work
in KI, Pl, rib until belt measures desired
length. Dec at both ends on every row until
3 sts rem, K3tog and pull yarn through st.
MAKING UP
Sew side seams, sew sleeve seams, sew
sleeves into garment. Make belt loops in
side seams.

Jennie -1 tfcinson
Virginia Beret
BERET
Using 2.75mm circular needle cast on 146
sts. Taking care not to twist sts, join to
work in the round. Mark beg of round.
Round 1: K2, *P2, K2; rep from* to end.
Rep last round 7 more times.
Next round: Rib lOsts, Ml,' rib 6, Ml; rep
from ’ to last 10 sts, rib to end. 168 sts.
Change to 3.25mm circular needle.
Round 1:' P2, K2, P2; rep from * to end.
Rep this round4 times more.
Round 6: 'Pl, inc in next st purlwise, K2,
P2; rep from ’ to end. 196 sts.
Round 7: *P3, K2, P2; rep from * to end.
Rep last round 3 times more.
Round 11: 'РЗ, K2, Pl, inc in next st purl
wise; rep from * to end. 224 sts.
Round 12: 'P3, K2, P3; rep from' to end.
Roundl3: (Diamondpattern) “P2,K2tog,
yo, SSK, P2; rep from *, to end. 196 sts.
Round 14: *P2, KI, KFB, KI, P2; rep from *
to end. 224 ste.
Round 15: 'Pl, K2tog, yo, K2, yo, SSK, Pl;
rep from * to end.
Round 16: 'Pl, K6, Pl; rep from' to end.
Round 17: *(K2tog, yo) twice, SSK, yo, SSK;
rep from ' to end. 196 sts.
Round 18: 'КЗ, KFB, КЗ; rep from' to end.
Round 19: '(yo, SSK) twice, K2tog,yo,
K2tog; rep from * to end. 196 ste.
Round 20: 'KFB, K6; rep from' to end. 224
sts.
Round 21: 'Pl, yo, SI 1, K2tog, psso, yo,
K3tog, yo, Pl; rep from' to end. 196 sts.
Round 22: 'P2, KI, KFB, KI, P2; rep from'
to end. 224 sts.
Round23: *P2, yo, SSK, K2tog, yo, P2; rep
from * to end.
Round 24: 'P3, K2, P3; rep from * to end.
Rep last round 4 times more.
Round 29: "P3, SI 1, KI, psso, P3; rep from *
to end. 196 sts.
Round 30: 'P3, KI, P3; rep from' to end.
Rep this last round 7 times more.
Round38: P3, KI, 'P2tog, P2, P2tog, KI,
P6, KI; rep from' to last 10 sts, P2tog, P2,
P2tog, KI, P3.168 sts.
Round 39: P3, KI, 'P4, KI, P6, KI; rep from
'to last 8 sts, P4, KI, P3.
Rep last round 7 times more.
Round 47: P3, KI, '(P2tog) twice, KI, P6,
KI; rep from * to last 8 sts, (P2tog) twice,
KI, P3.140 sts.
Round 48: P3, KI, 'P2, KI, P6, KI; rep from
'to last 6 sts, P2, KI, P3.
Rep last round 5 times more.
Round 54: P3, KI, *P2tog, KI, P6, KI; rep
from' to last 6 sts, P2tog, KI, P3.126 sts.
Round 55: P3, KI, 'Pl, KI, P6, KI; rep from
'to last 5 sts, Pl, KI, P3.
Rep last round 5 times more.
Round61: P3, 'Sil, K2tog, psso, P6; rep
from' to last 6 sts, Sil, K2tog, psso, P3.98
sts.
Round 62: P3, 'KI, P6; rep from * to last 4
sts, KI, P3. Rep last round once more.
Round64: 'Pl, P2tog, KI, P2tog, Pl; rep
from' to end. 70 sts.
Round 65: 'P2, KI, P2; rep from ' to end.
Round 66: *P2tog, KI, P2tog; rep from ’ to
end. 42 ©ts.
Round 67: 'Pl, KI, Pl; rep from * to end.
Round 68: Pl, 'KI, P2tog; rep from' to end,
using first st to make last P2tog. 28 sts.
Round 69; *P2tog; rep from' to end. 14 sts.
Break yarn and thread through rem sts,
pull tight and fasten off securely. Ф
The Knitter ф Issue Ten
'elinda
A DELIGHT FOR THE NEW SEASON, ORLA IS
NEATLY SHAPED AND USES RICH CABLING AND ON-TREND
SHADES FOR THE FAIR ISLE YOKE
Stay warm in this easy-wear jumper with
Fair Isle yoke and cabling to interest
Belinda has incorporated around the yoke,
which is knitted in the round, are all
traditional Fair Isle or Scandinavian
inspired, with the twist that the motifs are
perhaps not usually used on yokes.
For the cables Belinda reveals that she
has used ones that ar e “quite ribby, so
there’s a nice bit of stretch in the
garment. L didn’t want a cable that was
just straight ‘up and - down ropes’. ’’
Instead Belinda originally found this
slimline cable on a 1940s sports sweater,
and she has used this as her inspiration
for the cabling in Or1a.
BELINDA BOADEN 'S SWEATER is a delight
for the new season, with rich cabling and
using on trend shadesforthe Fair Isle
yoke. When creating her Orla jumper,
Belinda was thinking particularly of the fit:
“Rather thanworking to a Nordic style
which tends to be looser, 1 really wanted
something with a neater shape,’’ she says.
By using Debbie Bliss Rialto 4Ply which
is 100 % merino wool, Belinda was able to
take advantage of its “lovely, springy”
quality, as well as the range of shades for
the colourwork there are 22 colours in the
collection. The colourwork patterning that

6	8	10-12	14	16-18	20	22
TOFIT	76	81	86-91	97	102-107	112	117	cm
BLJST	30	32	34-36	38	40-42	44	46	in
ACTUAL	79	85	93	102	109	115	125	Cm
BUST	31	33V2	36V2	40	43	45V2	49	in
ACTUAL	65	65	67	6 9	70	73	74	cm
LENGTH	251/2	251/2	261/2	27	271/2	281/2	29	,n
SLEEVE	45	45	45	46	46	47	47	Cm
SEAM	17V2	171/2	171/2	18	18	1gl/2	1gl/2	,n
Debbie Bliss Rialto 4ply (100% extra fine merino wool;
50g/180m balls)
MSSHADE
04
ASHADE
12
В SHADE
07
CSHADE
18
DSHADE
17
9	10	11	12	12 Ж
x50g
BALLS
x50g
BALLS
x50g
BALLS
NEEDLES &
ACCESSORIES
2 x 3mm (size 11/US 3) circular
needles, 40cm and 100cm long
2 x 3.25mm (size 10/US 3)
circular needles, 40cm and
100cm, or set of double-pointed
needles (DPNs)
Stitch markers and stitch holders
TENSION
36 sts and 40 rows to 10cm over
cable pattern.
33 sts and 35 rows to 10cm over
stocking stitch Fair Isle pattern.
SPECIAL
ABBREVIATIONS
M1P: Make 1 stitch purlwise. Lift
strand between last and next st
and purl into the back of the
loop.
For stockists and abbreviations, see p90
BODY
Using circular 100cm long 3mm needle,
cast on 280 (308:336:364:392:420:448)sts
with MS.
Join for working in the round, being
careful not to twist sts and marking the
join.
Round 1: KI, *P2, K2; rep from to last 3 sts,
P2,K1.
Rep this round until work meas 8cm.
Change to 3.25mm circular needle, work
sts 28 to 35 from chart and then rep 28 st
motif as shown on chart to last 20 sts, then
work sts 8 to 27. Cont to foil cable pattern
from chart as set until work meas 39
(39:40:40:41:41:42) cm from cast-on edge.
All chart rows are read from right to left.
SPLIT FOR YOKE
Patt next 20 (20:20:24:24:28:28) StS, slip
these sts onto a holder for right underarm,
patt 140 (154:168:182:196:210:224) StS, slip
20(20:20:24:24:28:28) sts just worked to a
stitch holder for left underarm, patt to
end.
Leave rem 240 (264:296:316:344:364:392)
sts on a stitch holder.
SLEEVES
Using 3mm DPNs or 40cm circular needle
caston 68 (68:68:72:72:76:76) Sts.
Work in rib as for Body for 6cm.
Change to 3.25mm needles and cont in
cable patt as foil:
Work st 4 on chart, pm, work to st 7, rep
Sts 8 to 35 to last 8 (8:8:12:12:16:16) Sts,
then WOrksts8tO 14 (14:14:18:18:22:22),
pm, WOrkstl5 (15:15:19:19:23:23), knitting
instead of final cable in sizes 20 & 22.
Cont to work from chart, increasing every
following 6th (6th:6th:6th:6th:4th:4th)
round until there are 116 (116:116:124:124:
144:144) sts working increases as foils:
Work 1st, slm, M1P, patt to marker, M1P,
slm, work last st.
Take inc sts into patt when possible.
Cont straight until sleeve meas 45
(45:45:46:46:47:47)cm from cast-ОП edge,
ending final round 10 stitches after last
marker.
Slip 20 (20:20:24:24:28:28) StS just worked,
to a holder for underarm.
Leave rem 96 (96:96:100:100:116:116) sts
on a holder.
YOKE
With RS of work facing arrange pieces on
3.25mm circular needle as foils:
96 (96:96:100:100:116:116) Sts from one
sleeve, prn, 120 (132:148:158:172:182:196)
sts from front half of body, pm, 96
(96:96:100:100:116:116) sts from second
sleeve, pm, 120 (132:148:158:172:182:196)
sts from back half of body, pm for beg of
round. 432 (456:488:516:544:596:624) Sts.
1st Dec md: Rejoin MS, *K2tog, [Kll
(11:11:11:11:14:14), K2tOg] 3 times, K12
(12:12:16:16:14:14), K2tOg, [Kll
(11:11:11:11:14:14), K2tog] 3 times, [K2tOg]
twice, [K8 (9:11:12:13:14:15), K2tOg] 5
times, K14 (16:12:12:16:16:20), K2tog, [K8
(9:11:12:13:14:15), K2tog] 5 times, K2tog,
The Knitter ф Issue Ten
Orla sweater
rep from * once more, slipping markers as
you reach them.
388 (412:444:472:500:552:580) Sts.
Knit 1 round straight.
2nd Dec rnd: K2tog, *K to within 2 sts of
next marker, K2tog, slm, K2tog, repeat
from * twice more, knit to within
2 sts of final marker, K2tog.
380 (404:436:464:492:544:572) Sts.
Rep last 2 rounds 1 (1:2:1:3:5:4) more times.
372 (396:420:456:468:504:540) Sts.
Change to yarn A and knit 1 round straight.
Remove all markers, except beg of the
round marker.
Joining in colours as necessary, work in
Fair Isle patt from chart for 32 rows, rep 12
st motif across rounds and reading all rows
of chart from right to left.
Round33 (dec): ’K2 (2:2:4:2:4:2), (K2,
K2tog) 15 (16:17:18:19:20:22) times; rep
from * 5 more times.
282 (300:318:348:354:384:408) Sts.
Work rounds 34 to 53 from chart, repeating
6 st motifs across rounds as nec.
Round 57 (dec): ’KI, K2tog; rep from * to
end. 188 (200:212:232:236:256:272) Sts.
Body and sleeves are worked in the round and then
joined at the yoke, making this a seamless sweater
Sizes 6,8 and 10-12 only
Round68 (dec): ’(KI, K2tog, K2tog) 8
(9:10) times, K7(5:3) rep from' 3 more
times. 124 (128:132) sts.
Sizes 14,16-18,20 and 22 only
Round68 (dec): K(0:3:0:0),’Kl, (K2tOg)
(2:2:3:4) times; rep from * to last (2:3:4:2)
sts, K(2:3:4:2). (140:144:148:152) StS.
All sizes: Work final 2 rounds ofchart.
Cont straight using yarn A only for 0
(0:0:8:6:12:13) rnds.
NECKTRIM
Change to 3mm needle, and cont in yarn A.
Round 1: K2, P2; rep from * to end.
Rep last round until work meas 10cm.
Cast off loosely.
MAKING UP
Press gently following instructions on ball
band.
Fold neckband to wrong side of sweater
and slip stitch into place, making sure to
do this loosely so that you do not
tighten the neck too much.
Graft underarm sts together using
Kitchener stitch.
Sew in all ends.
The Knitter ф Issue Ten
г
□ к
. р
SI next 2 sts to cn and hold at front, P2, K2; K2 from cn
SI next 2 sts to cn and hold at back, K2; P2 from cn
SI next 2 sts to cn and hold at front, P2; K2 from cn
51 next 2 sts to cn and hold at back, K2; K2 from cn
SI next 2 sts to cn and hold at front, K2; K2 from cn
The Knitter ф Issue Ten

Wayy
Cardigan
SIZE
8	10	12	14	16	18	20	22
TO FIT	81	86	91	97	102	107	112	117	cm
BUST
32	34	36	38	40	42	44	46	in
ACTUAL	89	94	99	104	109	114	119	124	Cm
BUST	35	37	39	41	43	45	47	49	In
ACTUAL	65	65	66	66	69	69	70	70	™
LENCTH	25%	25%	26	2g	2?	2?	271/j	27>л	,n
SLEEVE	44	44	44	44	45	45	45	45	°"
SCAM	17%	17V,	171д	17i,;	ls	18	18	18	in
YARN
Marion Foale 3 Ply Wool (100% wool; 50g/220m balls)
BLOOM 9	10 10 11	11	12 13 14 Ж
NEEDLES &
ACCESSORIES
1 pair 2.75mm (size 12/US 2) knitting
needles
1 pair each 2.25mm (size 13/US l)
straight and circular knitting needles
1 pair 2mm (size 14/US 0) knitting
needles
Stitch holders
5 Buttons (18mm)
TENSION
34 sts and 47 rows to 10cm over
stocking st using 2.75mm needles
MARION FOALE HAS created this
elegant cardigan, Wavy, as a design
exclusive, using her 3Ply Wool yarn.
A colour range of about 10 shades is
available at any one time, for example
cream, beige, rich dark red, olive or
citrus. The cardigan itself is a classic,
gently fitted shape with a deep collar
for a feminine neckline, but it is the
textural moss stitch patterning that
really enhances this design.
BACK AND FRONTS
Using 2.25mm circular needle cast on
343 (359:375:393:409:429:447:463)stS
and working in rows, not rounds, cont
in rib thus:
Row 1(RS): KI tbl, *K1 tbl, Pl; rep from * to
last 2 sts, K2 tbl.
Row 2: KI tbl, •Pl, KI tbl; rep from * to end.
These 2 rows form Twisted Rib, rep 3
more times.
Next row (RS): Work first 19 sts in twisted
rib and leave on a stitch holder, change to
2.75mm needles andK305
(321:337:355:371:391:409:425) Sts and
turn, leaving rem 19 sts on a stitch
holder.
Starting with a purl row work 5 rows in
stocking st.
Now place Zig Zag patt from Chart 1.
Next row (RS): K8 (4:0:9:5:3:0;8), work
from Chart 1, rep sts 1 to 24 across row 12
(13:14:14:15:16:17:17) times and end with st
25,K8(4:0:9:5:3:0:8).
Cont in patt from Chart as set until row
24 has been worked.
LEFT FRONT
Next row (RS): K73 (77:81:85:89:95:99:103)
and leave on a stitch holder for Right Front,
K159 (167:175:185:193:201:211:219) and
leave on a stitch holder for Back, K73
(77:81:85:89:95:99:103).
Next row: P73 (77:81:85:89:95:99:103) turn
and cont on these sts for Left Front.
Cont in stocking st for 6 more rows.
Next row (RS): K15 (17:19:21:23:26:28:30)
K2tog tbl, KI, K2tog, K26, K2tog tbl, KI,
K2tOg, K22 (24:26:28:30:33:35:37).
69 (73:77:81:85:91:95:99) Ste.
Work 11 rows straight in st st.
Next row (RS): K14 (16:18:20:22:25:27:29)
K2tog tbl, KI, K2tog, K24, K2tog tbl, KI,
K2tOg, K21 (23:25:27:29:32:34:36).
65 (69:73:77:81:87:91:95) Sts.
Cont to dec this way every foil 12th row 3
more times. 53(57:61:65:69:75:79:83)sts.
Purl 1 row.
Wavy pattern in
moss stitch, gjves.the'
cardigan its name
WAIST RIB
Sizes 8,14 and 22 only
Next row (RS): Pl, *K3, Pl, KI, Pl; rep from
•to last 4 sts, КЗ, Pl.
Next row: P5, ’KI, P5; rep from ’ to end.
Sizes 10,16 and 18 only
Next row (RS): КЗ, ’Pl, KI, Pl, КЗ; rep
from * to end.
Next row: P4, ‘KI, P5; rep from' to last 5
sts, KI, P4.
Sizes 12 and 20 only
Next row (RS): KI, *P1, КЗ, Pl, KI; rep from
’ to end.
Next row: Pl, 'P5, KI; rep from * to end.
All sizes
These 2 rows set Moss rib, rep 16 more
times.
Next row (RS): Knit.
Next row: Purl.
Wavy Cardigan
65 (65:66:66:69:69:70:70) cm
For stockists and abbreviations, see p90
Next row: K27 (29:31:33:35:39:41:43), (inc
into next st) twice, K9, (inc into next st)
twice, K13 (15:17:19:21:23:25:27).
57 (61:65:69:73:79:83:87) Sts.
Work 11 rows straight in st st.
Next row (RS): K28 (30:32:34:36:40:42:44),
(inc into next st) twice, Kll, (inc into next
St) twice, K14 (16:18:20:22:24:26:28).
61 (65:69:73:77:83:87:91) Sts.
Cont to inc on 12th row this way 2 more
times. 69 (73:77:81:85:91:95:99) Sts.
Work straight in st st for 47
(47:47:47:55:55:55:55) TOWS ending with
RS facing for next row.
If tension is correct work should meas 46
(46:46:46:48:48:48:48) cm.
SHAPE ARMHOLE
Castoff 8 (8:9:9:10:10:11:11) Sts, К to end. 61
(65:68:72:75:81:84:88) Sts.
Work 1 row.
Next row (RS): КЗ, K2togtbl, К to end.
Cont to dec 1 st at armhole edge every alt
row as set to 50 (52:54:55:57:62:64:66) Sts.
Work 21 (17:23:17:13:11:7:3) TOWS Straight
ending with RS facing for next row.
SHAPE NECK
Next row (RS): К to last 9 sts, turn and leave
9 sts on a stitch holder.
41(43:45:46:48:53:55:57) Sts.
Work 1 row.
Next row (RS): К to last 5 sts, K2tog, КЗ.
Cont to dec at neck edge every alt row until
30 (32:34:35:37:40:42:44) stsrem.
Cont straight in st st until armhole meas
cm ending with RS facing for next row.
SHAPE SHOULDER
Cast off 8 (8:9:9:10:10:11:11) sts at beg of
next row. 22 (24:25:26:27:30:31:33) Sts.
Work 1 row in st st.
Cast off 8 (8:9:9:9:10:11:11) Sts at begofnext
row. 14 (16:16:17:18:20:20:22) Sts.
Work 1 row.
Cast off 7 (8:8:9:9:10:10:11) Sts at beg of
next row. 7 (8:8:8:9:10:10:11) Sts.
Work 1 row.
Cast Off rem 7 (8:8:8:9:10:10:11) Sts.
BACK
Rejoin yarn with WS facing using 2.75mm
needles, and purl across 159
(167:175:185:193:201:211:219) Sts from
stitch holder.
Next row (RS): Kll (15:16:18:19:20:22:23),
•K2togtbl, KI, K2tog, K17
(17:18:19:20:21:22:23); rep from * 6 times,
K2tog tbl, KI, K2tog, Kll
(15:16:18:19:20:22:23).
145 (153:161:171:179:187:197:205) Sts.
Work 17 rows straight in st st.
Next row (RS): K10 (14:15:17:18:19:21:22),
*K2togtbl, KI, K2tog, K15
(15:16:17:18:19:20:21); rep from * 6 times,
K2tog tbl, KI, K2tog, K10
(14:15:17:18:19:21:22).
131 (139:147:157:165:173:183:191) Sts.
Cont to dec this way on the foil 18th row
twice. 103 (lll:119:129:137:145:155:163)etS.
Work 1 row.
Back should now meas same as Left
Front to beg of Moss Rib Waist.
WAIST RIB
Sizes 8,18 and 22 only
Next row (RS): KI, ’Pl, КЗ, Pl, KI; rep from
’ to end.
Next row: Pl, ’P5, KI; rep from ’ to end.
Sizes 10 and 14 only
Next row (RS): КЗ, ’Pl, KI, Pl, КЗ; rep from
’ to end.
Next row: P4, ‘KI, P5; rep from * to last 5
sts,Kl,P4.
Sizes 12,16 and 20 only
Next row (RS): Pl, ’КЗ, Pl, KI, Pl; rep from
’to last 4 sts, КЗ, Pl.
Next row: P5, 'KI, P5; rep from* to end.
The Knitter @ Issue Ten
Wavy Cardigan
Collar in moss rib is perfect for cooler autumn days
All sizes
These 2 rows set Moss rib, rep 16 more
times ending with RS facing for next
row.
Beg with a К row work 12 rows in st st.
Next row (RS): K22 (24:26:28:30:32:35:36),
*(lnc into next st) twice, K9
(11:13:15:17:19:21:23), (incintO next St)
twice,•* K33 (33:33:35:35:35:35:37) rep
from ’ to ", K22 (24:26:28:30:32:35:36).
Ill (119:127:137:145:153:163:171) Sts.
Work 13 rows straight.
Next row (RS): K23 (25:27:29:31:33:36:37),
*(Inc into next st) twice, Kll
(13:15:17:19:21:23:25), (inc into next St)
twice,**K35 (35:35:37:37:37:37:39) rep
from * to ", K23 (25:27:29:31:33:36:37).
119 (127:135:145:153:161:171:179) Sts.
Cont to inc this way, on 14th row, 4 more
times.
151 (159:167:177:185:193:203:211) Sts.
Work 3 rows straight. Back should now
meas same as Left Front to beg of
armhole shaping.
SHAPE ARMHOLES
Cast0ff8 (8:9:9:10:10:11:11) Sts at beg Of
next 2 rows and every foil alt row thus;
Next row (RS): КЗ, K2tog tbl, К to last 5 sts,
K2tog, КЗ.
Cont to dec every alt row to 113
(117:121:125:129:135:141:145)sts.
Work 1 row.
Work from Chart 2, repeating sts 1 to 16 as
necessary across the row, starting on st 1
(15:13:11:1:14:11:1).
When Chart is complete, work straight
in st st until work meas same as Left
Front to beg of shoulder shaping.
SHAPE SHOULDERS
Castoff8 (8:9:9:10:10:11:11) Stsatbegof
next 2 rows.
97 (101 =103:107:109:115:119:123) St*.
Castoff8 (8:9:9:9:10:11:11) sts at beg of next
2 rows.
81 (85:85:89:91:95:97:101)stS.
Castoff 7 (8:8:9:9:10:10:11) sts atbegof
next 2 rows.
67 (69:69:71:73:75:77:79) Sts.
Castoff 7 (8:8:8:9:10:10:11) stsatbegof
next 2 rows.
53 (53:53:55:55:55:57:57) Sts.
Work 1 row.
Castoff rem 53 (53:53:55:55:55:57:57) Sts.
RIGHT FRONT
With WS facing, rejoin yarn to
remaining sts on stitch holder and work
as for Left Front, reversing all shapings.
COLLAR
With RS facing, using 2mm needles and
starting at Right Front, К across 9 sts from
stitch holder, pick up and K32
(32:35:35:37:37:40:40) Sts up neck edge,
53 (53:53:53:55:55:55:55) Sts across back
neck, 32 (32:35:35:37:37:40:40) stsdown
Left neck and 9 sts from stitch holder.
135(135:141:141:147:147:153:153)sts.
Next row (RS): КЗ, *P1, KI, Pl, КЗ; rep from
• to end.
Next row: P4, 'KI, P5; rep from * to last 5
sts, KI, P4.
Rep last 2 rows until 51 rows have been
worked.
Next row (WS): PO (0:0:0:l:l:0:0), *P4, inc
purlwise into next st; rep from ’ to last 5
(511:1:6:6:3:3) Sts, P5 (5:1:1:6:6:3:3).
161 (161:169:169:175:175:183:183) Sts.
Next row (RS): KI tbl, 'Pl, KI tbl; rep from *
to end.
Next row: KI tbl, 'KI tbl, Pl; rep from' to
last 2 sts, K2 tbl.
Rep last 2 rows 4 more times.
Cast off in Rib.
FRONTBANDS
LEFT BAND
With RS facing using 2mm needles К across
19 sts from Left Front stitch holder and
cont in Twisted Rib as set until band meas
5cm less than Front to beg of Neck Shaping.
Mark this row then cont in twisted rib
until Band fits up Front and to cast-off
edge of Collar.
Cast off in Rib.
Place buttons on Button Band so that the
first button is 20cm up from cast-on edge
and the last button to be placed 21 rows
down from cast-off edge of Collar.
Place 3 more buttons evenly between
the first and last button.
BUTTONHOLE BAND
Work as for Button Band but include 5
buttonholes to correspond with placed
buttons.
Work buttonholes thus:
RS row: Rib 8 sts, cast off 3 sts, rib to end.
Next row: Rib to last 8 sts, yo twice, rib to
end.
Next row: Rib 8 sts, (KI, Pl, Kl), into yo
from previous row, rib to end.
SLEEVES
Using 2.25mm needles cast on 68
(68:74:74:80:80:86:86) Sts.
Next row (RS): 'Kltbl, Pl; rep from'to
end.
Next row: *K1 tbl, Pl; rep from * to end.
Rep last 2 rows 3 more times.
Next row (RS): Kl, Pl, 'КЗ, Pl, Kl, Pl; rep
from' to end.
Next row: Pl, 'Kl, P5; rep from' to last st,
Kl.
Rep last 2 rows 16 more times increasing 1
st on last row.
69 (69:75:75:81:81:87:87) Sts.
Change to 2.75mm needles and cont in
st Gt for 6 rows.
Next row (RS): K2, inc into next st, К to last
3 sts, inc into next st, K2.
Cont to inc this way on every foil 8th row to
107 (107:113:113:119:119:125:125) StS.
Cont straight until sleeve meas 44
(44:44:44:45:45:45:45)cm ending with RS
facing for next row.
Castoffs (8:9:9:10:10:11:11) StSatbegof
next 2 rows.
91 (91:95:95:99:99:103:103) StS.
Dec 1 st each end of 3rd and every foil 3rd
row to 83 (83:83:83:87:87:87:87) Sts.
Cont to dec 1 st each end of every alt
row to 45 sts then every row until 21 sts
rem.
Cast off.
MAKING UP
Press carefully following instructions on
ball band.
Set in sleeves and join side seams and
underarm seams.
Sew Buttonband and Buttonhole Band
to Fronts. G
The Knitter ф Issue Ten
Secrets revealed: Part 1
^Rebind
tie Scenes
(Cbal it takes to
create a yarn'
In the first part of our revealing series,
Perri Lewis investigates what goes on behind
closed doors for the top brand spinners and
artisan producers, when putting together the
yarns we’ll all be loving next season
The Knitter ф Issue Ten
Secrets revealed: Part 1
re you torn between the turquoise and the teal
cashmere? What about the apricot silky tweed and the terracotta
baby alpaca? Do you go for the solid, or for the variegated merino
silk, or a something cream in 4ply or chunky? Alas, making
decisions in a yarn shop is nigh impossible for most of us when
faced with shelf upon shelf of beautiful skeins and sumptuous
balls. But if you think we have it bad, spare a thought for the
people behind the yams who face these choices every day.
For the major mainstream companies such as Rowan, Coats,
Sirdar and Debbie Bliss work starts well over a year before yarn
hits the shops. Designers scan the trends that are emerging all
over the world, from what’s on the catwalk to social trends and
even movies. Just think of The Matrix and you can picture the long
sinuous lines of black tailoring that were all over the High Street
that year and we will continue to see the impact the film Australia
is having right into next summer. Organisations such as the
International Colour Authority have been predicting which
colours we will be wearing since 1966 and international trend
forecasters, like Li Edelkoort, interpret emerging trends so that
designers can understand them. With a huge amount of
information to be digested by the handknit design community,
it’s no wonder they need to work
so far in advance. “We have quite a
long lead tune for our main Rowan
magazine,” says Kate Buller, senior
Rowan brand manager. “We start at
least 18 months before the actual
launch because the designers need
time to work on the collections.”
Companies like Rowan will work
with a specialist spinner to produce
the yarn for them. This is a very
creative partnership as Kate
•• (Citi) such a huge amount
of information, it s no
wonder the bandknit design
community need to work
so far in advance ••
explains: “We have our preferred suppliers and we work with
their development teams. We talk about where we think the
fashions are going, what fibres might be coming up - it’s a joint
process. Then they go away and develop yams for us.”
There are quite a few trade shows that are important to the
yarns, but the most famous is probably Pitti Filati where spinners
and manufacturers showcase their wares: “It’s a real gem,” says
knitwear designer Erika Knight. “Each spinner has a stall and
there is a trend area too, which is always very inspirational with
yarns, colour and fabric in the most amazing displays - one year
there were tables of yam made into cakes and food. ”
Yarn selections and test-driving
Pitti takes place twice a year - once in January (showing spring/
summer) and once in July (showing autumn/winter). This
summer's show was dedicated to the autumn/winter 2010
collection. “You are always hunting for winter yams in blistering
heat, and summer yarns in 6ft of snow,” Erika explains.
No matter how gorgeous a yarn is or how luscious the colour, it
must be attractive to knitters and help inspire the patterns that'll
support it. Yarn developers, sales teams and pattern designers all
have their input as the yarn gets
closer to the LYS and to your
eager needles. But high fashion
isn’t everything, explains Sue
Batley-Kyle, brand manager for
Sirdar. “We go to the trade shows,
we look at trend forecasting, but
we don’t slavishly go with them.
We have people who want more
traditional things, so we have to
decide what is appropriate for
us.” Spinners are very mindful of
The Knitter ф Issue Ten
Secrets revealed: Part 1
O + © Laughing
Yaffle's energy- and
labour-intensive
hand-painting of yarn
is a process much
valued by their
customers
who will be knitting the final yarn and translating the trends to
suit the handknitters that they produce yarn for.
Another thing to consider when launching new yarns, or
adding new colours to existing collections, is what Kate Buller
calls ‘architecture’; having a good range of products. “We are
aware of all the different skill levels - have we got something
that’s right for the entry-level knitter? Have we got something for
the knitter that wants to knit Fair Isle or intarsia?”
With these choices made, yarns are then rigorously tested. “We
wash them, tumble dry them, see if they stretch, if they'll shrink,
if they are flammable, ” says Sue at Sirdar. If all those things are
OK, then we give it to our knitters. But they may say that they are
horrible to knit with - it may rub your fingers or you might get
split stitches - so we have to go back and do some more
tweaking. ” It’s only after all this that the yarn gets into the shops.
Heads up on hand-dyeing
Recently we have seen the rise of the artisan spinner or dyer. You
may recognise intriguing names like Old Maiden Aunt, Knitting
Goddess or Laughing Yaffle. How do they develop their specialist
yarns? Over at the Natural Dye Studio Amanda Perkins does it her
way. She doesn’t go to trade shows or look at trends; instead,
everything is much more customer-led. “I have a close
relationship with my knitters thanks to internet groups and
Ravelry - they tell me what they want,” explains Amanda.
“I used to dye up more variegated yarns, but when I talked to
my customers, I found that they were doing lots of lace and cable
designs which call for semi-solid colours, so I changed my yarns
to suit the projects they were wanting to knit.”
Amanda doesn’t work to seasons either, or worry too much
about offering a massive range of products. She brings out a
couple of new yarns every year in response to what her customers
want. It’s the same for Jeni Brown at Fyberspates, another UK
artisan company. “If I find something new and exciting, I’ll try to
get it out as quickly as possible because I know how much my
knitters like to try a new product,” she says. “Although I am
starting to move towards seasonal yams as well.”
Both ladies head up their small companies. There are no
designers or research teams to satisfy in the development process
- they have complete creative control. Of her colour choices, Jeni
says: “I have to be honest, I go for what I like and what I know will
sell. ” Amanda works this way too: “I introduce colours that I like
and if they don’t sell, then they have to be discontinued. ”
Having sole responsibility of their companies may bring creative
freedom, but it also means hard graft. After developing ranges of
white yarn with their suppliers (Amanda works with just one,
Jennifer with two), both women hand dye the majority of it
themselves in UK studios. They do have some help, but the
operation remains small-scale: Amanda works with her husband
(“he does all the boring stuff like VAT”) and has a lady to do the
winding for her. Jennifer, meanwhile, takes on extra hands when
there is too much for her to dye on her own, and has just launched
a line of commercially-dyed yarn so she can get products to her
wholesale clients more quickly.
On the face of it, it seems like a far cry from the Rowans and
Sirdars of the yarn world. But while all four companies might have
different ways of going about it, it all comes down to wanting to
develop the very best yam they can. Which, of course, is brilliant
news for us knitters. It just doesn’t make those decisions about
which yam to choose any easier.
For more information on the yarn producers featured see:
Rowan www.knitrowan.com, Sirdar www.sirdar.co.uk, Old
Maiden Aunt www.oldmaidenaunt.com, Knitting Goddess www.
theknittinggoddess.co.uk, Laughing Yaffle www.laughingyaffle,
com, The Natural Dye Studio www.thenaturaldyestudio.com,
Fyberspates www.fyberspates.co.uk G
The Knitter @ Issue Ten
c1tidtiTuridng
:OMBINING THE SMARTNESS OF A TAILORED JACKET
Create this stunning fitted riding jacket with
contrast lapels and pockets for a smart finish
THIS GLORIOUS FIT TED jacket, inspired
by ladies’ hacking jackets, is the perfect
addition to our autumnal issue, celebrating
all things country. Combining the
smartness of a tailored jacket and the
comfort of a knitted piece, its designer
Judy Furlong has created a garment of
which you can be proud.
Judy says, “It features slits at the back
and at the sleeves and even has neat little
pockets handy for a couple of sugar
lumps for the horse! I wanted to come up
with a design that was a bit different,
not so much in terms of the knitting
techniques, as other than the short row
shaping there’s nothing that’s too
challenging.” She goes on, “It’s the
making up of my Gosford jacket that
offers more of a challenge, with classical
tailoring techniques. ”
Judy chose yarn from Rennie
I landknits, using their 100% lambswool
Chunky for the main shade. She has
included a contrast yarn for the curving
lapels, collar and pocket - Castle which
is a 58% lambswool and 42% silk mix.
“They are very well priced and in
wonderful colours,” recommends Judv.
Exclusive ~
AND THE COMFORT OF A KNITTED PIECE, THIS GARMENT IS
INSPIRED BY LADIES’ HACKING JACKETS


SIZE
8	10	12	14
TORT	81	86	91	96
BUST
32	34	36	38
ACTUAL	91	96	101	107
BUST	36	38	40	42
ACTUAL	501/2	501/2	5 2	52
LENGTH	20	20	20Vj	2O‘A
SLEEVE	431/2	431/2	431/2	431/2
SEAM	17	17	17	17
YARN
Rennie Handknits Chunky (100% lambswool;
50g/95m balls)
A(1Z) 10 10 11 12 12 13 14 м ж
Rennie Handknits Castle (58% lambswool, 42% silk;
50g/154m balls)
GLENBUCHAT 22222222
16	18	20	22
101	107	112	117	cm
40	42	44	46	in
111	117	122	126	cm
44	46	48	50	in
53	54	54V?	55’/?	cm
21	21’/?	2РЛ	22	in
43’/? 43’ ’? 43’/? 43V? cm
17	17	17	17	in
NEEDLES &
ACCESSORIES
1 pair 5mm (size 6/ US 8) knitting
needles
1 pair 3.25mm (size 10/ US 3)
knitting needles
Stitch markers
Stitch holder
4 x 23mm Gosford buttons
8 x 18 mm Gosford buttons both
from Duttons for Buttons
TENSION
18 sts and 24 rows to 10cm using
5mm needles and Rennie
Handknits Chunky over st st, after
light pressing or steaming.
24 sts and 32 rows to 10cm using
3.25mm needles and Rennie
Handknits Castle over st st, after
light pressing or steaming.
BACK
LEFT FLAP
Using 5mm needles and yarn A, cast on 28
(29:30:32:33:35:37:38) Sts.
Beg with a knit row, work in st st for 14
rows.
Next row: KI, skpo, knit to last 3 sts,
K2tog, KI.
Work in st st for 13 rows.
26 (27:28:30:31:33:35:36) sts. Break off
yarn and transfer sts to a stitch holder.
CENTRE FLAP
Using 5mm needles and yarn A, cast on 30
(32:34:36:38:40:40:42) Sts.
Work 28 rows as for Left Side.
28 (30:32:34:36:38:38:40) Sts. Break off
yarn and transfer sts to a stitch holder.
RIGHT FLAP
Using 5mm needles and yarn A, cast on 28
(29:30:32:33:35:37:38) StS.
Work 28 rows as for Left Side but do not
break off yarn.
26(27:28:30:31:33:35:36) StS.
JOIN BACK FLAPS
Next row: KI, skpo, knit to last 2 sts of
Right Flap, pm, Kl, slip final st onto RH
needle.
Transfer the 26 (27:28:30:31:33:35:36) Left
Flap sts, then the Centre 28
(30:32:34:36:38:38:40) Sts back onto the
LH needle. Slip the last st of Right Flap
back onto LH needle. K3tog (this joins
Centre to Right Side). Knit to last 2 sts of
Centre, pm, Sil, K2tog, pass slipped st
over, knit to last 3 sts of Left Side, K2tog,
Kl. 74(78:82:88:92:98:102:106) StS.
Work in st st for 13 rows.
SHAPE BACK
In following instructions all row numbers
not given are to be worked straight in st st.
Row 1: Kl, skpo, knit to first marker, slm,
Sil, K2tog, psso, knit to second marker,
slm, K3tog, knit to last 3 sts, K2tog, Kl.
68 (72:76:82:86:92:96:100) StS.
Row 11: Kl, Ml, knit to last st, Ml, Kl.
Row 13: Knit to first marker, slm, Ml, knit
to second marker, Ml,slm, knit to end.
Row 21: As Row 11.
Row 25: As Row 13.
Row 31: As Row 11.
Row 37: As Row 13.
Row 41: As Row 11.
82 (86:90:96:100:106:110:114) Sts.
Work in st st for 7 rows without further
shaping.
SHAPE ARMHOLE
Cast off 4 (4:4:5:6:6:7:7) Sts at beg of next
two TOWS. 74(78:82:86:88:94:96:100) Sts.
Dec 1 st at both ends of every row 2
(2:2:2:2:4:4:4) times.
Dec 1 st at both ends of this and the foil
2(2:3:4:4:3:3:4) RS TOWS ending with WS
facing. 64 (68:70:72:74:78:80:82) StS.
Wbrkl9 (19:21:19:21:23:25:25) TOWS
without further shaping.
Next row: Kl, Ml, knit to last st, Ml. Kl.
Work in st st for 5 rows.
Rep the last 6 rows twice more.
70 (74:76:78:80:84:86:88) Sts.
SHAPE SHOULDERS
Next row: Castoff 4 (5:5:5:5:5:5:5) Sts, K19
(19:19:20:20:21:21:22) (including St left ОП
RH needle after cast off), K2tog, turn.
P2tog, purl to end. Cont on these 19
(19:19:20:20:21:21:22) Sts only.
Next row: Cast off4(4:4:5:5:5:5:5) Sts, knit
to last 2 sts, K2tog, turn. Purl to end.
Next row: Cast off 4 (4:4:4:4:5:5;5) Sts, knit
to last 2 sts, K2tog, turn. Purl to end.
Next row: Cast off 4 (4:4:4:4:4:4:5) Sts, knit
to last 2 sts, K2tog, turn. Purl to end.
Next row: Cast off rem 4 sts.
With RS facing, slip centre 20
(22:24:24:26:28:30:30) StS onto a Stitch
holder. Rejoin yam, K2tog tbl, knit to end.
Next row: Cast off 4 (5:5:5:5:5:5:5) Sts
purlwise, purl to last 2 sts, P2tog tbl.
Next row: K2tog tbl, knit to end.
The Knitter ф Issue Ten
Gosford
PATTERN NOTES
Where not otherwise stated, the pattern is
worked in stocking stitch. Row numbers are
given for shaping rows, all other rows will be
worked straight in st st.
BLOCKING DIAGRAM
Next row: Cast off 4 (4:4:5:5:5:5:5) Sts
purlwise, purl to end.
Next row: K2tog tbl, knit to end.
Next row: Castoff 4 (4:4:4:4:5:5:5) Sts
purlwise, purl to end.
Next row: K2tog, tbl, knit to end.
Next row: Cast off 4 (4:4:4:4:4:4:5)
purlwise, purl to end.
Next row: Knit to end.
Next row: Cast off rem 4 sts purlwise.
LEFT FRONT
In following instructions all row numbers
not given are to be worked straight in st st.
SHAPE LOWER SECTION
Using 5mm needles and yarn A, cast on 47
(49:51:54:56:59:61:63) Sts.
Beg with a knit row and work in st st.
Row 15: KI, skpo, K23
(24:25:27:28:30:32:33), K2tOg, pm, skpO,
K17 (18:19:20:21:22:22:23).
44(46:48:51:53:56:58:60) Sts.
Row29: KI, skpo, K21
(22:23:25:26:28:30:31), K2tOg, slm, skpo,
K16 (17:18:19:20:21:21:22).
41 (43:45:48:50:53:55:57) Sts.
PLACE POCKET
ROW41: K9 (10:11:13:14:16:18:19), castoff
14, KI, slm, knit to end.
ROW42: P18 (19:20:21:22:23:23:24), turn,
cast on 14, turn, purl to end.
SPECIAL ABBREVIATIONS
slm: slip marker
SR: short row
wrpl: wrap 1 st -Bring yarn fwd under
needle, si 1st, yarn back, return slipped st to
left hand needle, turn work. When the
wrapped st is eventually worked, put the tip
of the right hand needle through the wrap
and the st and knit (or purl as appropriate)
For stockists and abbreviations, see p9O
SHAPE BODICE FRONT
Row 1: KI, skpo,K19
(20:21:23:24:26:28:29), K2tOg, slm, skpo,
knit to last 4 sts, mark this point (for first
button placement), K4.
38 (40:42:45:47:50:52:54) Sts.
Row 11: KI, Ml, knit to end.
Row 15: Knit to marker, slm, Ml, knit to
end.
Rows 21 to 40: Rep the last 10 rows (Rows 11
to 20) twice more, removing markers on
the last row.
44 (46:48:51:53:56:58:60) Sts.
SHAPE BUST
Row 41: KI, Ml, to end.
45 (47:49:52:54:57:59:61) Sts.
SR 1 & 2: P37 (38:40:44:45:47:49:51), wrpl,
turn, knit to end.
SR3& 4: P29 (.30:31:34:35:36:37:39), wrpl,
turn, knit to end.
SR 5 & 6: P21 (22:23:24:25:25:26:27), wrpl,
turn, knit to end.
SR7& 8: P25 (26:27:29:30:31:32:33), wrpl,
turn, knit to end.
SR 9 & 10: P33 (34:36:39:40:42:43:45),
wrpl, turn, knit to end.
Rows 42 to 44: Work in st st for 3 rows
without further shaping.
SHAPE LAPEL
The foil lapelincreases formthe fold line.
Mark them with spare yarn. This will help
to alignFront andLining later.
Row 45: Knit to last 4 sts, pm, Ml, K4.
46 (48:50:53:55:58:60:62) St*.
Rows 46 to 48: Work in st st for 3 rows.
SHAPE ARMHOLE AND LAPEL
Lapel is shaped at the same time as
armhole. Read right through instructions
for Front before starting this section.
Row 1: Cast off 4 (4:4:5:6:6:7:7) Sts, knit to 1
st before marker, place second marker on
needle, Ml, KI, remove original marker,
work to end.
Row 2: Purl to end.
Work in st st for 2 rows without further
shaping at lapel edge (remember to
continue with armhole edge shaping at the
same time).
Next row: Knit to 1 st before marker, pm,
Ml, KI, remove old marker, work to end.
Work in st *t for 3 rows without further
shaping at lapel edge
Rep the last 4 rows 7 (7:7:7:8:8:8:8) more
times.
Next row: Work to 1 st before marker, pm,
Ml, KI, remove old marker, work to end.
25 (25:25:25:27:27:27:27) Sts between
marker and lapel end of row.
Workin St St for 3 (3;5:5:3:5:5:5) morerOWS
ending with RS facing for next row.
Next row: Knit to 2 sts before marker,
K2tog, (mark this point, it will be used
when making Under Collar), knit to end.
Next row (WS): Cast off 26
(26:26:26:28:28:28:28) stspurlwise, purltO
end.
Dec 1 st at neck edge on every row 3
(4:5:5:5:6:7:7) times.
Work in st st, without further shaping at
lapel edge, for a further l(0:l:l:l:0:l:3)
rows.
ARMHOLE SHAPING
AT THE SAME TIME as working the lapel,
continue with armhole shaping as foils:
Dec 1 st at armhole edge of every row 2
(2:2:2:2:4:4:4) times.
Dec 1 st at armhole edge of this and the foil
2 (2:3:4:4:3:3:4) RS rows ending with WS
facing.
Workl9 (19:21:19:21:23:25:25) TOWS
without further shaping at armhole edge.
Next row: KI, Ml, knit to end.
Work in st st for 5 rows.
Rep the last 6 rows twice more.
20(21:21:22:22:23:23:24) sts after lapel and
armhole shaping are completed.
The Knitter ф Issue Ten
Gosford
SHAPE SHOULDER
Row 1: Cast off4(5:5:5:5:5:5:5),knittoend.
Row 2 and all WS rows: Purl.
Row 3: Cast off 4(4:4:5:5:5:5:5), knit to end.
ROW 5: Cast off 4 (4:4:4:4:5:5:5), knit to
end.
Row 7: Cast off 4 (4:4:4:4:4:4:5), knit to
end.
Row 9: Cast off rem 4 sts.
RIGHT FRONT
Using 5mm needles and yarn A, cast on 47
(49:51:54:56:59:61:63) StS.
Beg with a knit row, work in st st for 14
rows.
Row 15: K17 (18:19:20:21:22:22:23), K2tog,
pm, skpo, K23 (24:25:27:28:30:32:33),
K2tog, Kl.
44 (46:48:51:53:56:58:60) Sts.
Row29: K16 (17:18:19:20:21:21:22), K2tog,
slm, skpo, K21 (22:23:25:26:28:30:31),
K2tog, Kl.
41 (43:45:48:50:53:55:57) Sts.
PLACE POCKET
Row41: K17 (18:19:20:21:22:22:23), slm, Kl,
cast Off 14, K9 (10:11:13:14:16:18:19)
(including st rem after cast off).
Row42: P9 (10:11:13:14:16:18:19), turn, cast
on 14, turn, purl to end.
SHAPE BODICE FRONT
Buttonholes are worked over Rows 1 & 2
and the next three 15th/16th rows.
Row 1 (buttonhole row 1): КЗ, cast off 3 sts,
K9 (10:11:12:13:14:14:15) (including St rem
after cast off), K2tog, slm, skpo, K19
(20:21:23:24:26:28:29), K2t0g, Kl.
Row 2 (buttonhole row 2): Purl to cast off
sts, turn, cast on 3 sts, turn, purl to end.
38 (40:42:45:47:50:52:54) Sts.
Row 11: Knit to last st, Ml, Kl.
Row 15: Knit to marker, Ml, slm, knit to
end.
Row 16: Purl.
Row 17 (buttonhole row 1): КЗ, cast off 3
sts, knit to end.
Row 18 (buttonhole row 2): Purl to cast off
sts, turn, cast on 3 sts, turn, purl to end.
Rows 21 & 31: As Row 11.
Rows 25 & 35: As Row 15.
Row 33 (buttonhole row 1): As Row 17.
Row 34 (buttonhole row 2): As Row 18.
Rows 36 to 40: Work five rows in st st.
44 (46:48:51:53:56:58:60) Sts.
SHAPE BUST
SRI and2: K37 (38:40:44:45:47:49:51),
wrpl, turn, purl to end.
SR 3 and4: K29 (30:31:34:35:36:37:39),
wrpl, turn, purl to end.
SR5and6: K21 (22:23:24:25:25:26:27),
wrpl, turn, purl to end.
SR7and8: K25 (26:27:29:30:31:32:33),
wrpl, turn, purl to end.
SR 9 and 10: (buttonhole rows 1 and 2): КЗ,
cast Off 3 StS, K27 (28:30:33:34:36:37:39),
wrpl, turn, purl to castoff sts, turn, cast
on 3 sts, turn, purl to end.
Row 41: Knit to last st, Ml, Kl.
45 (47:49:52:54:57:59:61) Sts.
Rows 42 to 44: Work in st st for 3 rows
without further shaping.
SHAPE LAPEL
The foil lapelincreases form the fold line.
Mark them with spare yarn. This will help
to align Front and Lining later.
Row 45: К 4, Ml, pm, knit to end.
46 (48:50:53:55:58:60:62) Sts.
Rows 46 to 48: Work in st st for 3 rows.
SHAPE ARMHOLE AND LAPEL
Lapelis shaped at the same time as
armhole. Read right through instructions
for Front before starting this section.
Row 1: Knit to marker, remove marker, Kl,
Ml, pm, knit to end.
Row2: Cast off4(4:4:5:6:6:7:7) Sts
purlwise, purl to end.
Work in st st for 2 rows without further
shaping at lapel edge.
Next row: Knit to marker, remove marker,
Kl, Ml, pm, knit to end.
Work in st st for 3 rows without further
shaping at lapel edge
Repthelast4rows7(7:7:7:8:8:8:8)more
times.
23 (23:23:23:25:25:25:25) StS between
marker and lapel end ofrow, 36
(36:36:36:40:40:40:40) TOWS from beg of
armhole shaping).
Next row: Knit to marker, remove marker,
Kl, Ml, pm, knit to end.
25 (25:25:25:27:27:27:27) Sts between
marker and lapel end of row.
Work in St St for 3 (3:5:5:3:5:5:5) more TOWS
ending with RS facing for next row.
Next row: Cast off 26
(26:26:26:28:28:28:28) StS (marking the
25th(25th:25th:25th:27th:27th:27th:27th)
st, this will be used when making the
Under Collar), knit to end.
Dec 1 st at neck edge on every row 4
(5:6:6:6:7:8:8) times.
Work in st st, without further shaping at
lapel edge, for a further 1 (0:l:l:l: 0:1:3)
rows.
SHAPE ARMHOLE
AT THE SAME TIME continue with armhole
edge shaping as foils:
Dec 1 st at armhole edge of every row 2
(2:2:2:2:4:4:4) times.
Dec 1 st at armhole edge of this and the foil 2
(2:3:4:4:3:3:4) RS rows ending with WS
facing.
Workl9 (19:21:19:21:23:25:25) TOWS
without further shaping.
Next row: Knit to last st, Ml, Kl.
Work in st st for 5 rows.
Rep the last 6 rows twice more.
20(21:21:22:22:23:23:24) sts after lapel and
armhole edge shaping are completed.
SHAPE SHOULDER
Row 1 and all RS rows: Knit.
Row2: Cast off 4 (5:5:5:5:5:5:5) Sts
purlwise, purl end.
Row 4: Castoff 4 (4:4:5:5:5:5:5) Sts
purlwise, purl to end.
Row6:Castoff4(4:4:4:4:5:5:5) Sts
purlwise, purl to end.
Row 8: Castoff 4 (4:4:4:4:4:4:5) Sts
purlwise, purl to end.
Row 10: Cast off rem 4 sts purlwise.
LEFT SLEEVE
OVERLAP
Using 5mm needles and yarn A, cast on 28
(28:28:29:29:29:30:30) Sts.
Beg with a knit row, work in st st for 6
rows.
Row 7: Knit to last st, Ml, Kl.
Work in st st for 5 rows.
Rep last 6 rows once more.
30 (30:30:31:31:31:32:32) StS. Break off yarn
and leave sts on a stitch holder.
UNDERLAP
Using 5mm needles and yarn A, cast on 16
(16:16:17:17:17:18:18) StS.
Beg with a knit row, work in st st for 6
rows.
Row 7: Kl, Ml, knit to end.
Work in st st for 5 rows.
Rep last 6 rows once more.
18 (18:18:19:19:19:20:20) Sts.
JOIN SLEEVE SECTIONS
Row 19: Kl, Ml, knit to last st of Underlap,
slip final st onto RH needle.
Transfer the 30 (30:30:31:31:31:32:32) sts
for the Overlap onto the LH needle. Slip the
last st of Under lap back onto LH needle.
K3tog (this joins both sections). Knit to last
The Knitter ф Issue Ten
st of Overlap, Ml, Kl.
48 (48:48:50:50:50:52:52) Sts.
'Work in St St for 5 (5:4:4:4:4:4:3) TOWS.
Next row: Cont in st st inc 1 st at both ends
ofthisandthe 9 (9:11:11:12:13:13:14) foil 6th
(6th:5th:5th:5th:5th:5th:4th)rOWS.
68 (68:72:74:76:78:80:82) Sts.
Work in St St for 25 (25:25:25:20:15:15:25)
more rows without further shaping.
SHAPE SLEEVEHEAD
Castoff 4 (4:4:5:6:6:7:7) Stsat beg of next
two rows.
Dec 1 st at both ends of every row 2
(2:2:2:2:4:4:4) times.
Dec 1 st at both ends of this and the foil 2
(2:3:4:4:3:3:4) RS rows ending with WS
facing.
50 (50:52:50:50:50:50:50) Sts.
Next row: Purl.
Dec 1 st at both ends of this and the foil 3
(3:3:2:5:6:7:7) RSrows ending with WS
facing. 42 (42:44:44:38:36:34:34) Sts.
Purl 1 row.
Dec 1 st at both ends of every row 12
(12:12:12:8:6:4:4) times.
18 (18:20:20:22:24:26:26) Sts.
Cast off 3 sts at beg of next two rows.
Cast off 3 (3:4:4:4:4:5:5) StS at beg of next
two rows.
Cast Off rem 6 (6:6:6:8:10:10:10) StS.
RIGHT SLEEVE
UNDERLAP
Using 5mm needles and yam A, cast on 16
(16:16:17:17:17:18:18) StS.
Beg with a knit row, work in st st for 6
rows.
Row 7: Knit to last st, Ml, Kl.
Work in st st for 5 rows.
Rep last 6 rows once more.
18 (18:18:19:19:19:20:20) StS.
Break off yarn and leave sts on a stitch
holder.
OVERLAP
Using 5mm needles and yarn A, cast on 28
(28:28:29:29:29:30:30) Sts.
Beg with knit row, work in st st for 6 rows.
Row 7: Kl, Ml, knit to end.
Work in st st for 5 rows.
Rep last 6 rows once more.
30 (30:30:31:31:31:32:32) StS.
JOIN SLEEVE SECTIONS
Row 19: Kl, Ml, knit to last 2 sts of Overlap,
slip final 2 sts onto RH needle.
Transfer the 18 (18:18:19:19:19:20:20) Sts for
the Underlap onto the LH needle. Slip the
last 2 sts of Overlap back onto LH needle.
SI 1, K2tog, psso (this joins both sections).
Knit to last st of Under lap, Ml, Kl.
48 (48:48:50:50:50:52:52) Sts.
Complete as for Left Sleeve starting at *.
INTERIM MAKING UP
Gently steam or press Back and Fronts
according to diagrams. Join Back and
Fronts together at shoulder seams.
UNDERCOLLAR
Using 5mm needles, yarn A and with RS
facing, pick up and K12
(12:13:14:14:14:15:16) StS from marker ОП
Right Front to shoulder seam, pick up and
K8 sts along edge of Right Back, К the 20
(22:24:24:26:28:30:30) StS ОП Stitch holder
for centre Back, pick up and K8 sts along
edge of Left Back, pick up and K12
(12:13:14:14:14:15:16) Sts from shoulder
seam to marker on Left Front.
60 (62:66:68:70:72:76:78) Sts.
Remove markers to avoid confusion with
other markers when making up.
Purl one row.
SR 1 & 2: Kl, Ml, K19 (19:20:21:21:21 =22:23),
wrpl, turn, purl to end.
SR 3 & 4: Kl, Ml, K15 (15:15:16:16=16:17:17),
wrpl, turn, purl to end.
SR 5 & 6: Kl, Ml, Kll (11:11:11:11:11:12:12),
Front & Side Linings,
knitted in Rennie
Handknits Castle, make
contrasting lapels for
an elegant, classically-
shaped jacket
wrpl, turn, purl to end.
SR 7 & 8: Kl, Ml, K7, wrpl, turn, purl to
end.
SR 9 & 10: Kl, Ml, КЗ, wrpl, turn, purl to
end.
Next row: Kl, Ml, knit to last st, Ml, Kl.
SR 11 & 12: P20 (20:21:22:22:22:23:24),
wrpl, turn, knit to last st, Ml, Kl.
SR 13 & 14: P16 (16:16:17:17:17:18:18), Wrpl,
turn, knit to last st, Ml, Kl.
SR 15 & 16: P12 (12:12:12:12:12:13:13), wrpl,
turn, knit to last st, Ml, Kl.
SR 17 & 18: P8, wrpl, turn, knit to last st,
M1,K1.
SR 19 & 20: P4, wrpl, turn, knit to last st,
M1,K1.
Next row: Purl.
72 (74:78:80:82:84:88:90) StS.
Inc 1 st at both ends of every RS row 3
times. 78 (80:84:86:88:90:94:96) Sts,
marking both ends of the last inc row and
ending with WS facing (this matches to the
12th (12th:12th:12th:13th:13th:13th:13th) St
on the cast off edge of the lapel).
Work in St St for 15 (15:15:15:17:17:17:17)
rows without further shaping. Cast off.
UPPER COLLAR
Using 3.25mm needles and yarn В cast on
78 (80:86:88:92:94:100:102) StS.
Work in st st for 2 rows.
SR 1 & 2: Kl, Ml, K25 (25:26:28:28:28:29:31)
wrpl, turn, purl to end.
The Knitter ф Issue Ten
Gosford
SR3 & 4: KI, Ml, K18 (18:19:20:20:20:21:22)
wrpl, turn, purl to end.
SR5 & 6: KI, Ml, K12 (12:12:13:13:13:13:14),
wrpl, turn, purl to end.
SR 7 & 8: KI, Ml, K6, wrpl, turn, purl to
end.
Next row: KI, Ml, knit to last st, Ml, KI.
SR9 & 10: P26 (26:27:29:29:29:30:32),
wrpl, turn, knit to last st, Ml, KI.
SR 11 & 12: P19 (19:20:21:21:21:22:23), wrpl,
turn, knit to last st, Ml, KI.
SR 13 & 14: P13 (13:13:14:14:14:14:15), Wrpl,
turn, knit to last st, Ml, KI.
SR 15 & 16: P7, wrpl, turn, knit to last st,
Ml, KI.
Next row: Purl.
88 (90:96:98:102:104:110:112) Sts.
Next row: KI, Ml, knit to last st, Ml, KI.
Next row: Purl.
Rep the last 2 rows once more.
Next row: KI, Ml, Kll (11:12:13:13:13:14:15),
Ml, Kll, Ml, K46 (48:52:52:56:58:62:62),
Ml, Kll, Ml, knit to last st, Ml, KI.
Next row: Purl.
98 (100:106:108:112:114:120:122) Sts.
Next row: KI, Ml, knit to last st, Ml, KI.
Next row: Purl.
Next row: K1,M1, K12
(12:13:14:14:14:15:16), Ml, K12, Ml, K50
(52:56:56:60:62:66:66), Ml, K12, Ml, knit
to last st, Ml, KI.
Next row: Purl.
Next row: KI, Ml, knit to last st, Ml, KI.
108 (110:116:118:122:124:130:132) Sts,
marking both ends of this row.
Work in St St for 25 (25:25:25:29:29:29:29)
rows without further shaping. Cast off.
CENTRE BACK FLAP LINING
Using 3.25mm needles and yarn В cast on
40 (43:46:48:51:53:53:56) Sts.
Work in st st for 14 rows.
Next row: K10, turn, purl to end.
On these 10 sts only, work in st st for a
further 22 rows.
Cast off these 10 sts.
With RS facing, rejoin yarn, cast off 20
(23:26:28:31:33:33:36) Sts, knitto end.
Work in st st for a further 23 rows. Cast off.
LEFT FRONT & SIDE LINING
Using 3.25mm needles and yarn В cast on
120 (123:128:134:137:145:150:154) Sts.
Work in st st for 14 rows.
Next row: K16 (16:16:16:18:18:18:18), cast
Off 84 (87:92:98:99:107:112:116) Sts, knitto
end. 20 sts.
Work in st st for 24 more rows on the 20 sts.
Next row (WS): Cast off 10 sts purlwise,
purl to end.
Work in st st for a further 16 rows ending
with RS facing. Cast off these 10 sts.
With WS facing, rejoin yarn to rem 16
(16:16:16:18:18:18:18) Sts, purl to end.
Work a further 108 rows in st st ending
with RS facing and marking both ends of
the 40th of these rows. This is the position
of the first button.
SHAPE LAPEL
Mark the lapel inc with spare yarn. This
will help to align Front and Lining later.
Row 1: K6, Ml, pm, knit to last st, Ml, KI.
Row 5: Knit to marker, remove marker, KI,
Ml, pm, knit to end.
Rows 9 to 12: Rep rows 5 to 8 once more.
20 (20:20:20:22:22:22:22) Sts.
Row 13: Knit to marker, remove marker,
KI, Ml, pm, knit to last st, Ml, KI.
Row 17: Knit to marker, remove marker,
KI, Ml, pm, knit to end.
Rows 21 to 24: Rep rows 17 to 20 once more.
Rows 25 to 60: Rep rows 13 to 24 three more
times. 36 (36:36:36:38:38:38:38) Sts.
Rep rows 17 to 20, 0 (O:O:O:2:2:2:2) more
times. 36 (36:36:36:40:40:40:40) Sts.
Next row: Knit to last st, Ml, KI.
37 (37:37:37:41:41:41:41) Sts, removing
marker.
Work in st st for 3 rows.
Next row: Knit to last st, Ml, KI.
Work in St St for 5 (5:9:9:5:9:11:13) TOWS.
Castoff.
RIGHT FRONT & SIDE LINING
Using 3.25mm needles and yarn В cast on
120 (123:128:134:137:145:150:154) Sts.
Work in st st for 14 rows.
Next row: K20, turn, purl to end.
On these 20 sts only, work in st st for 22
more rows.
Next row: Cast off 10 sts, knit to end.
Work in st st for 17 more rows ending with
RS facing. Cast off these 10 sts.
With RS facing, rejoin yarn and cast off 84
(87:92:98:99:107:112:116) Sts, knitto end.
16 (16:16:16:18:18:18:18) Sts.
Work a further 41 rows in st st ending with
RS facing.
Row 57 (buttonhole row 1): K8
(8:8:8:10:10:10:10), Cast off 4 Sts, knit to
end.
Row 58 (buttonhole row 2): P4, turn, cast
on 4 sts, turn, purl to end.
Work in st st for 18 rows.
Rep the last 20 rows two more times. Then
Rows 57 and 58 one more time (four holes).
Work in st st for a further six rows.
SHAPE LAPEL
Mark the lapel inc with spare yarn. This
will help to align Front and Lining later.
ROW1: KI, Ml, K9 (9:9:9:11:11:11:11), pm, Ml,
knit to end.
Row 5: Knit to 1 st before marker, place
second marker on needle, Ml, KI, remove
original marker, knit to end.
Rows 9 to 12: Rep Rows 5 to 8 once more.
Row 13: KI, Ml, knit to 1 st before marker,
place second marker on needle, Ml, KI,
remove original marker, knit to end.
Row 17: Knit to 1 st before marker, place
second marker on needle, Ml, KI, remove
original marker, knit to end.
Rows 21 to 24: Rep Rows 17 to 20 once more.
Rep Rows 13 to 24 three more times.
36 (36:36:36:38:38:38:38) Sts.
Rep Rows 17 to 20,0 (O:O:O:2:2:2:2) more
times.
36 (36:36:36:40:40:40:40) Sts.
Next row: KI, Ml, knit to end.
37 (37:37:37:41:41:41:41) Sts, removing
marker.
Work in st st for 3 rows.
Next row: KI, Ml, knit to end.
Work in St st for 5 (5:9:9:5:9:11:13) rows.
Castoff.
RIGHT SLEEVE LINING
Using 3.25mm needles and yarn В cast on 77
(77:77:80:80:80:83:83) Sts.
Work in st st for 14 rows.
Next row: K10, turn, purl to end.
On these 10 sts only, work in st st for 8 more
rows. Castoff.
With RS facing, rejoin yarn, cast off 47
(47:47:50:50:50:53:53)Sts,knittoend. 20
Sts.
Work in st st for a further 10 rows.
Next row: Cast off 10 sts purlwise, purl to
end.
Work 4 more rows in st st. Cast off.
LEFT SLEEVE LINING
Using 3.25mm needles and yarn В cast on 77
(77:77:80:80:80:83:83) Sts.
Work in st st for 14 rows.
Next row: K20, turn, purl to end.
On these 20 sts only, work in st st for 8 more
rows (24 rows in total from cast on edge).
Next row: Cast off 10 sts, knit to end.
Work 5 more rows in st st. Cast off all 10 sts.
With RS facing, rejoin yarn and cast off 47
The Knitter ф Issue Ten
Gosford
(47:47:50:50:50:53:53) Ste, knit to end.
lOsts.
Work in st st for 9 more rows. Cast off.
3S (make two)
Using 3.25mm needles and yarn B, cast on
19 sts.
Work in st st for 68 rows, marking both
ends of 64th row. Cast off.
POCKET FLAPS (make two)
Using 3.25mm needles and yarn В cast on
22 sts. Work in st st for 28 rows. Cast off.
MAKING UP
Gently press all rem pieces. Press or steam
all seams during construction.
SLEEVES
Sew sleeve seam together. Using Diagram
A and the photograph as a guide, join lining
to sleeve as foils:
With RS of sleeve facing RS of Uning, match
cast-on edges (D) and aligning E with the
top of the slit. Sew in place along the outer
edges (C & D). Align the cast-off edge of the
lining (F) with the top of the slit.
With RS together, fold lining along the fold
line and sew, joining G and H. Turn this
section RS out. Sew edges of lining (A & B)
to slit seam edge (I). Press.
Oversew cast-off edges at top of slit
together. Catch down lining edges in place
on WS. Turn RS out. Press.
POCKETFLAP
With RS together, he the pocket flap over
the upper edge of the pocket slit, sew the
cast-on edges together. Press seam open.
Fold Flap in half, with RS facing, and sew
the flap side seams. Turn Flap RS out. Catch
the cast-off edge to theWS of the Front.
POCKET LINING
With WS together, pin cast - on edge of the
Pocket Lining to cast-off edge of pocket
slit. Join with a buttonhole stitch.
On the WS, fold the Pocket Lining, RS tog,
matching the markers with pocket slit.
Sew the pocket lining sides together.
Oversew the rem flap of Pocket Lining to
WS of Front covering the Pocket Flap seam.
CENTRE BACK LINING
With RS of jacket and lining facing, lie the
Centre Back Lining over the Centre Back
matching cast-on edges and aligning
cast-off edge of the facing with top of
Centre Back slits. Sew in place along the
INSTRUCTIONS
outer edges. Turn RS out and press. Catch
down inner edges to WS of Body, taking
care not to let sts show on RS.
UPPER COLLAR AND FRONT LININGS
Mark the 12th (12th:12th:12th:13th:13th:
13th: 13th) cast-off st counting in from the
outside edge of the lapel on both Right and
Left Fronts. This point matches the
markers on the last Under Collar increase
row. On the WS, sew the collar to the Right
and Left lapels matching markers.
Mark the 19th (19th:19th:19th:22nd:22nd:
22nd: 22nd) st counting in from the outside
edge of the lapel on both Right and Left
Front Linings. With RS facing, join to collar
matching the cast - on edge of the coUar
with inside edge of the Lining, and
matching markers on collar (last increase
row) with the marker on the cast-off edge
of the Linings. Steam or press seams open.
JOINING LININGS TO BACK AND FRONTS
Join Back and Fronts together at side seam.
Using diagram В and photograph as a
guide, join the edge of the Left Front Lining
(A) to remaining edge of the Left Back slit,
matching the 10 st cast - off edge with the
top of the slit. Press seam open.
Rep for Right Front Lining and Right Back
slit, taking care not to twist the lining. To
help avoid this, pin the Lining to the jacket
in a few places up front edges and coUar,
with WS facing. Unpin after sewing seam.
Fold the Lining along the fold line. This
brings the longer piece to lie over the
section joined to the edge of the slit. Pin
edges В & C together.
With RS together, pin the facing to the
jacket from the Back slit, up the Front edge
to the start of the lapel on Left and Right
Fronts matching buttonholes. Continue to
pin matching the outer tip of the lapels, the
notch of the collar and the collar tips,
easing in the extra fullness. Sew edges
together. Turn RS out and press. Seam
should He at the edge from the Back slits to
the beg of the lapel. Extra fullness in lapel
and collar causes seam to lie on underside.
On the WS, oversew the cast - off edges of
the Centre Back Lining with the adjacent
cast-off edge of the FrontLiningon both
sides of the Back slit. Pin the remaining
section to the WS of the Back.
On the WS, catch down the edges of the
lining all the way round taking care not to
let the sts show on the RS.
In contrast, use buttonhole stitch to join
Lining to the Right Front at buttonholes.
Sew on larger buttons to match the
buttonholes.
Sew on two smaller buttons on the back,
each side of the slits.
Sew on two smaller buttons on each
sleeve slit. ©
The Knitter ф Issue Ten

-Ma so n -D ixo n l\ti i tti ng
{Notebooks
How
close to the
sheep?
Kay Gardiner and Ann Shayne
ponder the merits of handspun
and machine-made yarns
KAY AND ANN'S PHOTOGRAPH GALE ZUCKER
ANN: It’s bad. Handspun yam is threatening to wreck
my knitting.
On a recent, long airplane flight, I took a skein of
handspun with me. No pattern. Some size 3 needles.
That was all. Hours later, I had about a foot’s worth of
5-by-5 ribbing, wide enough for a scarf if you like
your scarves weirdly narrow and curled in a tight
tube. I’d been so mesmerized by the changing colours
that I never stopped to wonder if it was knitting worth
doing. Of course it was - such pretty colours!
We have long submitted that knitting and yarn
collecting are two separate hobbies. I suggest now that
there’s a third hobby: handspun contemplation.
I chase it down, a skein at a time. It’s confounding
stuff really, because spinners tend to make small
batches of these labour-intensive yarns. I have to hold
my breath when I pay for it - like when I buy a giant
bar of chocolate. Should I do this? Heckyeah, why not?
Here’s the thing about yarn made by a person: it’s
so very human. It’s there, in every inch of the yam
- constantly shifting tension, the way one ply goes
thin, then thick, and back to thin. Sometimes I can see
a spinner’s mood as I’m knitting - why so tight? She
The Knitter ф Issue Ten

must have been so crabby! There are places so smooth,
that I think she must’ve been having a great day.
The amount of human attention and focus within a
handspun skein is dizzying. A 2ply yarn has run
through a spinner’s hands three times - once for each
ply, then again to twist them together. If she is a dyer
too, then it went through that process as well. Faberg£
eggs, caviar, handspun.
I’ve been trying to avoid learning to spin, but I’m
sure I’ll need to do it, soon. And some Bluefaced
Leicester in the yard would cut down on lawn
maintenance. It could be a recession-buster after all.
KAY: I’ve been going to fibre festivals for a while now.
Well, to one big, juicy fibre festival: the New York
Sheep and Wool Festival, aka Rhinebeck, aka If You’re
Not Careful, You’ll Be Trying To Cram a Black Trash
Bag Containing An Entire Fleece Into The Trunk of The
Car, Missy. After a morning in the crisp October air,
surrounded by sheep with human faces, and sleek,
handmade spinning wheels (and people ecstatically
using them), it seems that every right-thinking
knitter should aspire to spinning, right?
I have come home with all manner of Fibre Craft
tools and kits. Rug-hooking gear, hand-carved lucets,
and even the occasional, exquisite drop-spindle - you
name it. But I have yet to be in danger of buying a
wheel, a fleece, or even any ready-to-spin fibre. Why?
The answer’s obvious: I love commercially-available
yarns. They keep getting better and better. And while
the quality yarns are not cheap, they’re not caviar
either, (think of them as smoked salmon). You can go
to the shop, pick from a range of colours, and buy
enough for a sweater or heck, a blanket.
Although today’s talented handspinners are making
beautiful, unique yarns that the manufacturers cannot
touch, I don’t think that I could ever approach their
skill level. Think of all the knitting time I’d have to put
into being even a mediocre spinner! I’d rather crack
open a fresh skein, and get going on my next project.
OK, I’m bracing for the stoning I’m going to get for
my heresy. But knitting is a big tent. Is it a crime to
love a label with a dye lot number on it? Ф
By Kay Gardiner and Ann Shayne, aka Mason-Dixon
Knitting (www.masondixonknitting.com)
The Knitter ф Issue Ten
fouisa flfarding
Miss Marple
Elegant tweedy jumper with attractive
striping and interesting lacy border
FOR A STATEMENT jumper that’s sure to
impress this season, Louisa Harding’s Miss
Marple design will suit and makes for a very
interesting knit. With a dainty picot -
trimmed hem and cuffs, a lacy border,
ribbed panel and the eyelet stripe pattern,
this combination of effects adds up to make
a jiunper full of sophistication.
It is worked in Louisa’s new yarn called
Willow Tweed - a mix of 40% merino wool
and 40% alpaca with 20% undyed natural
silk slubs for a wonderful, rustic - feeling
texture. There are 12 muted shades in the
evocatively-titled range.
Louisa reveals, “Taking my lead from the
tweed story that is really fashionable this
season, and the styling idea of ‘granny
chic ’, my aim was to modernise this
traditional fabric and who better to call the
jumper after than ‘Miss Marple’”.
Her design combines different stitches to
great effect to give the garment its shape.
Louisa goes on to say: “ I chose to use a lace
pattern at the hem as these stitches
naturally open up, then by reducing the
needle size as well as changing to a rib, the
shape is pulled in for the central waist
shaping and for the cuffs.’
THE COMBINATION OF PICOT EDGING, LACY
BORDER, RIBBED PANEL AND STRIPING THROUGHOUT ADD
UP TO A JUMPER FULL OF SOPHISTICATION

SIZE
10	12	14	16	18	20
™	86	91	97	102	107	112	cm
34	36	38	40	42	44	in
ACTUAL	90	95	101	106	112	117	cm
BUST	357г	3772	40	417?	44	46	in
ACTUAL	55	56	5872	587г	61	61	cm
LENGTH	2172	22	23	23	24	24	in
SLEEVE	4872	487j	487г	4872	487г	487г	cm
SEAM	19	19	i9	19	19	-|9	in
YARN
Louisa Harding Willow Tweed (40% alpaca, 40%
merino wool, 20% silk; 50g/116m skeins)
amusk(3)	8	8	9	9	10	10	<2s
BAQUA(7)	3	3	3	3	3	3	Ss
NEEDLES & ACCESSORIES
1 pair 3.25mm (size 10/ US 3) knitting
needles
1 pair 4mm (size 8/ US 6) knitting
needles
TENSION
22 sts and 26 rows to 10cm measured
over stocking stitch using 4mm needles
BACK AND FRONT (bothaM
Using 4mm needles and yarn В work picot
cast on as foils:
•Cast on 5 sts using the cable cast on
method, cast off 2 sts, slip st on RH needle
back onto LH needle*
(3 sts now on LH needle) rep from 'to *
until there are 99 (105:111:117:123:129) sts
on needle.
Work 2 rows in garter st, ending with RS
facing for next row.
Change to yarn A and beg with a К row
work 2 rows in st st.
Now work lace patt as foils:
Lace row 1 (RS): (K4, yo, K2tog tbl) 16
(17:18:19:20:21) times, КЗ.
Lace row 2 and every alt row: KI, P to last
st, KI.
Lace row5: K2, (K2tog, yo, Kl, yo, K2tog
tbl, Kl) 16 (17:18:19:20:21) times, Kl.
Lacerow5:Kl,K2tog,yo, (K3,yo,Sll,
K2tog, psso, yo) 15 (16:17:18:19:20) times,
K3,yo,K2togtbl, Kl.
Lace row7: КЗ, (yo, Si 1, K2tog, psso, yo,
КЗ) 16 (17:18:19:20:21) times.
Lace row 9: (K4, yo, K2tog tbl) 16
(17:18:19:20:21) times, КЗ.
Lace row 11: Kl, (yo, K2togtbl, K4) 16
(17:18:19:20:21) times, yo, K2 tog tbl.
Lace row 13: K2, (yo, K2togtbl, Kl, K2tog,
yo, Kl) 16 (17:18:19:20:21) times, Kl.
Lace row 15: КЗ, (yo, SI 1, K2tog, psso, yo,
КЗ) 16 (17:18:19:20:21) times.
Lace row 17: Kl, K2tog, yo, (КЗ, yo, SI 1,
K2tOg, pSSO, yo) 15 (16:17:18:19:20) times,
КЗ, yo, K2tog tbl, Kl.
Lace row 19: Kl, (yo, K2tog tbl, K4) 16
(17:18:19:20:21) times, yo, K2 tog tbl.
Lace row 20: Kl, P to last st, Kl.
Rep rows 1 to 10 once more, ending with RS
facing for next row.
Change to yarn В and work 2 rows in garter
st.
Change to yarn A.
Next row (RS): Knit.
Next row (WS)(eyelets): Kl, Pl, *yo, P2tog,
rep from * to last st, Kl.
Change to yarn В and work 2 rows in garter
st, ending with RS facing for next row.
Change to 3.25mm needles and yam A.
Next row (RS): Knit.
Next row: (КЗ, P3) 16 (17:18:19:20:21)
times, КЗ.
Next row (RS): (РЗ, КЗ) 16 (17:18:19:20:21)
times, P3.
Next row: (КЗ, P3) 16 (17:18:19:20:21)
times, КЗ.
The last 2 rows form the rib.
Work in rib for a further 16 (16:18:18:20:20)
rows.
Change to 4mm needles and yarn В and
work 2 rows in garter st.
Change to yarn A.
Next row (RS): Knit.
Next row (WS)(eyelets): Kl, Pl, 'yo, P2tog,
rep from * to last st, Kl.
Change to yarn В and work 2 rows in garter
st, ending with RS facing for next row.
Now work 18 rows in stripe patt as foils:
Using yarn A work 14 rows in st st, ending
with RS facing for next row.
The Knitter ф Issue Ten
Miss Marple
BLOCKING DIAGRAM
Willow Tweed is a beautiful yarn, with the silky
slubs giving extra interest to the fabric
Change to yarn B.
Next row (RS): (Kl, Pl) to last st, Kl.
Next row: (Kl, Pl) to last st, Kl.
Next row: (Kl, Pl) to last st, Kl.
Next row (WS): Purl.
Change back to yarn A.
These last 18 rows form the st st and striped
moss st patt and are rep throughout.
Cont to work in 18 row patt until work
measures 38 (38:39.5.39.5:40.5:40.5) cm
from cast-on edge, ending with RS facing
for next row.
SHAPE ARMHOLES
Keeping patt correct as set, cast off 4
(5:5:6:6:6) sts at beg of next 2 rows and 4
(4:5:5:5:6) sts at beg of 2 foil TOWS.
83(87:91:95:101:105) StS.
Next row (RS): КЗ, K2tog, К to last 5 sts,
K2tOg tbl, КЗ. 81 (85:89:93:99:103) StS.
Work 1 row.
Dec as above on next row andl (1:2:3:4:4)
foil alt rows. 77 (81:83:85:89:93) Sts. "
Cont without further shaping until
armhole measures 15 (15:16:16:17:17) cm,
ending with RS facing for next row.
SHAPE NECK AND SHOULDERS
Next row (RS): K18 (20:21:22:24:26), turn,
leave rem sts on a holder for neck and other
shoulder.
Dec 1 st at neck edge on next 6 rows.
12 (14:15:16:18:20) Sts.
Work 1 row, ending with RS facing for next
row.
For stockists and abbreviations, see p90
Cast off 6 (7:7:8:9:10) sts at beg of next row.
Work 1 row.
Cast off rem 6 (7:8:8:9:10) sts.
With RS facing, slip centre 41 sts onto a
holder for neck, rejoin yarn to rem sts, К to
end.
Dec 1 st at neck edge on next 6 rows.
12 (14:15:16:18:20) StS.
Work 2 rows, ending with WS facing for
next row.
Cast off 6 (7:7:8:9:10) sts at beg of next row.
Work 1 row.
Cast off rem 6 (7:8:8:9:10) sts.
SLEEVES (work both alike)
Using 4mm needles and yarn В work picot
cast on as foils:
'Cast on 5 sts using the cable cast on
method, cast off 2 sts, slip st on RH needle
back onto LH needle*
(3 sts now on LH needle) rep from 'to *
until there are 63 sts on needle
Work 2 rows in garter st, ending with RS
facing for next row.
The Knitter @ Issue Ten
Miss Marple
Change to yarn A and beg with a К row
work 2 rows in st st.
Now work lace patt as foils:
Lace row 1 (RS): (K4, yo, K2tog tbl) 10
times, КЗ.
Lace row 2 and every alt row: KI, P to last
st, KI.
Lace row3: K2, (K2tog, yo, KI, yo, K2tog
tbl, KI) 10 times, KI.
Lacerow5:Kl,K2tog,yo, (K3,yo, SI 1,
K2tog, psso, yo) 9 times, КЗ, yo, K2tog tbl,
KI.
Lace row 7: КЗ, (yo, SI 1, K2tog, psso, yo,
КЗ) 10 times.
Lace row 9: (K4, yo, K2tog tbl) 10 times,
КЗ.
Lace row 10: KI, P to last st, KI.
Change to yarn В and work 2 rows in garter
st.
Change to yam A.
Next row (RS): Knit.
Next row (WS)(eyelets): KI, Pl, *yo, P2tog,
rep from * to last st, KI.
Change to yarn В and work 2 rows in garter
st, ending with RS facing for next row.
Change to 3.25mm needles and yarn A.
Next row (RS): Knit.
Next row: (КЗ, P3) 10 times, КЗ.
Next row (RS): (РЗ, КЗ) 10 times, P3.
Next row: (КЗ, P3) 10 times, КЗ.
The last 2 rows form the rib.
Work in rib for a further 26 rows.
Change to 4mm needles and yarn В and
work 2 rows in garter st.
Change to yarn A.
Next row (RS): Knit.
Next row (WS)(eyelets): KI, Pl, 'yo, P2tog,
rep from' to last st, KI.
Change to yarn В and work 2 rows in garter
st, ending with RS facing for next row.
Next row (RS) (inc): Knit across row inc 8
(8:12:12:16:16) Sts evenly.
71 (71:75:75:79:79) sts.
Now work 18 rows in stripe patt as follows:
Using yarn A work 14 rows in st st, ending
with RS facing for next row.
Change to yarn В.
Next row (RS): (KI, Pl) to last st, KI.
Next row: (KI, Pl) to last st, KI.
Next row: (KI, Pl) to last st, KI.
Next row (WS): Purl.
These last 18 rows form the st st and striped
moss st patt and are rep throughout.
Cont to work in patt until work measures
48.5cm from cast- on edge, ending with RS
facing for next row.
SHAPE SLEEVEHEAD
Cast off 4 sts at beg of next 2 rows and 3 sts
at beg of 2 foil rows. 57 (57:61:61:65:65) sts.
Dec 1 at at each end of next 3 rowaand 2 foil
alt rows. 47 (47:51:51:55:55) Sts.
Work 3 rows.
Dec 1 st at each end of next row and 4 foil
4th rows. 37(37:41:41:45:45) Sts.
Work 1 row.
Dec 1 st at each end of next row and foil alt
row, then on every foil row to 27
(27:31:31:35:35) Sts.
Cast off 4 sts at beg of next 4 rows.
Castoffremll (11:15:15:19:19) sts.
MAKING UP
Block pieces gently, following any
instructions on the ball band.
Join right shoulder seam.
NECK EDGING
With RS facing and using 3.2 5mm needles
and yarn A, pick up and knit 10 sts down
left front neck, К across 41 sts on holder for
front neck, pick up and knit 10 sts to
shoulder, 9 stadown right back neck, К
across 41 sts on holder for back neck, and
pick up and knit 10 sts up left back neck to
shoulder. 121 sts.
Next row (WS): (KI, Pl) to last st, KI.
Next row (RS): (KI, Pl) to last st, KI.
Next row(WS): (KI, Pl) to last st, KI.
Change to yarn B.
Next row (RS): (KI, Pl) to last st, KI.
Cast off knitwise on WS.
Join left shoulder and neck edging seam.
Join side and sleeve seams.
Place centre of cast-off edge of sleeve to
shoulder seam. Set in sleeve, easing
sleevehead into armhole. О
The Knitter ф Issue Ten

Exclusive
Argyll Leaf
AN INTERESTING INTARSIA PATTERN OF LEAF MOTIFS FRAMED
BY A DIAMOND NETWORK; THIS SLIPOVER HAS A QUILTED EFFECT
AND IN PURE WOOL YARN, IT SUMS UP THE SEASON
of the garment, to ensure a close fit”.
For further guidance on working the
intarsia motifs in this pattern, see our
Masterclass article on page 84.
Sasha has created Argyll Leaf in Rowan’s
Scottish Tweed 4Ply wool; “ I felt this yarn
was ideal for a piece with a 1920s vintage
feel. ” The wool has a crisp, bouncy handle
and a 2ply construction. It is a 100% pure
wool yarn, in a wonderful muted colour
palette of 24 shades. The heathered,
tweedy tones are beautiful and you could
experiment with a range of colour schemes
to give different effects to the slipover.
Create a man’s slipover with a flurry of intarsia
leaves and V-neck, ideal for casual wear
THIS RELAXED SLIPOVER design by Sasha
Kagan sums up the season, and reminds us
of Keats’ ‘Ode to Autumn’ for its “Season of
mists and mellow fruitfulness”. With an
interesting intarsia pattern of leaf motifs
framed by a network of diamonds, this
classic design has an almost quilted effect.
Well- known for knits that are rich with
colour, Sasha says, “Intarsia is ideal for this
pattern, as the technique calls for you to
carry the background yarn along behind
the motifs, and weaving it in on every other
stitch”. She continues; “I have used a knit
one, purl one twisted rib for the entire back


SIZE
TO FIT 91 97 102 107 112 117 122 127 cm
CHEST
36 38 40 42 44 46 48 50 in
ACTUAL	94	99	104	109	114	119	124	129	cm
CHEST	37	39	41	43	45	47	49	51	jn
ACTUAL	61	61	63	63	65	65	67	67	cm
LENGTH	24	24	25	25	257г 25-. -	2б*Л	26V-	in
YARN
Rowan Scottish Tweed 4Ply (100% pure
new wool; 25g/110m balls)
MS GREY MIST (01) y	9	10	11	12	12	13	14	X25g BALLS
A CLARET . (13)	1	1	2	2	2	2	2	2	x25g BALLS
В RUST - (09)	1	1	2	2	2	2	2	2	X25g BALLS
C THATCH (18)	1	1	2	2	2	2	2	2	X25g BALLS
D HERRING (08)	1	1	2	2	2	2	2	2	x25g BALLS
E MACHAIR . (02)	1	1	2	2	2	2	2	2	X25g BALLS
FPEAT	- (19)	1	1	2	2	2	2	2	2	x25g BALLS
NEEDLES & ACCESSORIES
1 pair 2.75mm (size 12/ US 2) knitting needles
1 pair 3.25mm (size 10/ US 3) knitting needles
Stitch holders
Waste yarn
TENSION
31 sts and 34 rows to 10cm measured over
intarsia pattern, using 3.25mm knitting needles.
38 sts and 26 rows to 10cm measured over Ki,
PI twisted rib, using 3.25mm knitting needles.
BLOCKING DIAGRAM
47 (49:52:54:57:59:62:64) cm
BACK
Using 2.75mm needles and MS yarn cast on
145 (153:161:169:177:185:193:199) Sts.
Row 1 (RS): Pl, "KI tbl, Pl; rep from ’ to
end.
Row 2: KI, *P1 tbl, KI; rep from ’ to end.
These 2 rows form Twisted Rib, cont until
work measures 5cm.
Change to 3.25mm needles and continue to
work twisted rib as set until back measures
36 (36:37:37:38:38:39:39) cm from cast-on
edge, ending with RS facing for next row.
SHAPE ARMHOLES
Keeping patt correct cast off 10 sts at
beginning of next 2 rows then K2tog at
each end of the next and every foil alt row
until 101 (109:119:127:137:147:157:169)
sts rem.
Cont straight in patt until back measures
59 (59:61:61:63:63:65:65) CmfromcaSt-ОП
edge.
SHAPE SHOULDERS
Keeping patt correct, cast off 8
(9:11:12:14:15:17:19) sts at beginning of
next 4 rows then 7 (9:10:11:12:14:15:17) at
beginning of foil 2 rows.
Leave remaining 55 (55:55:57:57:59:59:59)
sts on a stitch holder.
FRONT
Using 2.75mm needles and MS cast on 145
(153:161:169:177:185:193:199) Sts.
Work Twisted Rib as set by Back for 5cm
increasing 1 st on last row of rib.
146 (154:162:170:178:186:194:200) Sts.
Change to 3.25mm needles and workfrom
chart Starting on St 4 (44:40:36:33:28:24:
21). Colourwork motifs are all worked in
stocking st. Continue from chart and keep
oak leaf centralised, working until Front
meas same as Back to beg of armhole
shaping, ending with RS facing for next
row.
SHAPE ARMHOLES
Keeping patt correct, cast off 10 sts at beg
ofnext2rows.
126 (134:142:150:158:166:174:180) Sts.
DIVIDE FOR NECK
Next row: K2tog, patt 59
(63:67:71:75:79:83:86) Sts, K2 tog tbl. Turn
leaving rem sto on a stitch holder.
Work 1 row straight.
Dec 1 st at armhole edge on every RS row 11
(11:10:10:9:8:7:6) times ATTHESAME
TIME, dec 1 st at neck edge on every 3rd
row until 23 (27:32:35:40:44:49:53) Sts
rem.
Back arm holes are more shaped than those at
the front, making a really comfortable fit
The Knitter ф Issue Ten
Argyll Leaf
For stockists and abbreviations, see p90
Cont straight until Front meas same as
Back to beg of shoulder shaping ending
with RS facing for next row.
SHAPE SHOULDER
Cast Off 8 (9:11:12:14:15:17:19) StS at beg of
next and foil alt row.
7 (9:10:11:12:14:15:17) StS.
Cast Off rem7 (9:10:11:12:14:15:17) StS.
With RS of work facing rejoin yarn to rem
63 (67:71:75:79:83:87:90) Stsof Front and
complete to match first side, reversing
shapings.
NECKBAND
Join Right shoulder «earn.
With RS facing using 2.75mm needles and
MS begin at Left Front shoulder seam, pick
Up and K76 (76:78:78:80:80:82:82) Sts
down side of neck to centre front and mark
with a coloured thread, then pick up 2 sts
from the centre front and mark again with
a coloured thread, pick up and K76
(76:78:78:80:80:82:82) St« Up Right side of
neck and К across 55
(55:55:57:57:59:59:59) Sts from BackNeck
stitch holder.
209 (209:213:215:219:221:225:225) Sts.
Work in Twisted Rib as set by Back,
shaping the neckband as foils:
KEY
□ Grey Mi st 01 К on RS, P on WS
|«| Grey Mist 01 P on RS, К on WS
 Peat 19
П Machair02
Щ Herring 08
| Thatch 18
	Rust 09
	Claret 13
Next Row (WS): Rib to within 2 sts of first
marker; P2tog, P2, P2tog tbl, rib to end.
Next Row: Rib to within 2 sts of marker,
skpo, K2, K2tog, rib to end.
Repeat these 2 rows 3 more times then cast
off in rib, still decreasing as set.
ARMBANDS
Join Left shoulder seam and neckband.
With RS facing MS and 2.75mm needles,
pickup andK170
(170:176:176:182:182:188:188) Sts around
armhole.
Work 8 rows in Twisted Rib as set by Back.
Cast off in Rib.
MAKING UP
Steam carefully following instructions on
ballband.
Tidy loose ends back into own colours.
Join remaining seams. Ф
The Knitter ф Issue Ten
Written in the
fancfscape
Take a walk with us across the valley as The Knitter investigates
how wool has shaped the UK’s green and pleasant land
WORDS fc PHOTOGRAPHS: Kate Davies
The Knitter ф Issue Ten
Written in the landscape
t every house there was a tenter
[woollen frame], and on every
tenter a piece of cloth, from
which, the sun glancing and
shining I thought was the most agreeable
sight that I ever saw... the hills rising and
falling so thick, and the valleys opening
sometimes one way, sometimes another,
yet look which we would, it was all the
same, innumerable houses and tenters.
...Daniel Defoe’s view of the upper
Calder Valley in his Tour through the Whole
Island of Great Britain (1724)
From medieval to modern times, Britain
has been transformed by textiles.
The history of our landscape and
our textiles are powerfully
interconnected, and today’s
knitters find themselves
increasingly interested in those
connections. Reviving local
traditions, experimenting with the
yarn of different regional breeds,
walking the many picturesque mill
trails, and exploring the stories
behind the fibres and the fabrics
we enjoy, can all add meaning to the
garments that we carefully make. Here is
one such story that comes from Yorkshire.
It all begins with wool. Slowly, the
packhorses pick their way across a
long-trusted route over the Pennine moor.
No food crops will grow on this land, but
this wild expanse provides grazing good
enough for the sheep that cover the hills.
The horses pass through villages where
women sit spinning the fleece of those
sheep, and where the children knit
stockings as they walk through the woods
and lanes. The horses move westward,
toward the dramatic crags and precipices
of the Calder valley, but the dealers on the
horses’ backs are not distracted by the
view. These men are only interested in
woollen cloth, and the place to find that
cloth is Heptonstall, the tiny village that
wove wool into the heart of Yorkshire.
From the middle of the sixteenth-
through to the early decades of the
nineteenth Century, Heptonstall was an
important centre of the domestic woollen
trade. Before Halifax had its famous piece
hall, and before mill chimneys began to
line the Calder valley, wool was woven,
processed, bought and sold here in stone
cottages built against the steep hillside.
•• T6e Pennines' exposed
village Infllops were deemed
light. wfricf) was idea ffor
weaving and airy
essentiaffor drying woof ••
Heptonstall’s situation may seem remote
and exposed today (especially to a visitor
ascending the packhorse route on foot),
but for the production of wool three
hundred years ago, its precipitous position
in the landscape was ideal. While the valley
bottoms were deemed damp and
unhealthy, on the hilltops there was plenty
of light (crucial for weaving) and plenty of
air (essential for the drying of wool on
tenters or frames). The village sat at the
hub of an informal network of trade routes
criss-crossing the Pennines, and, since the
Medieval monks at nearby Denholme
began keeping sheep for their high-quality
fleeces, Heptonstall had always been close
to good sources of fibre as well.
By the early eighteenth century, the
village was both populous and prosperous.
In their stone cottages through the long
days of summer, yeoman weavers plied
their trade as long as the light held out.
One resolute Heptonstall woman, so an
often-told local story goes, carried a
hundredweight of cloth three times a week
to Denholme, each time returning with
same weight of yam for her ailing husband
to weave. Clearly, this was a place
completely dedicated to the production of
the woollen cloth that was at this time
Britain’s most important
commodity. In the words of Daniel
Defoe; “Let no man wonder that
our woollen manufacture is
arrived to such a magnitude,
when, in a word, it may be said to
clothe the world”.
But the heyday of hand-woven
wool was not to last. Yorkshire’s
textile industry mechanised
rapidly in the second half of the
eighteenth century, and, while
nearby Hebden Bridge was at the heart of
this transformation, Heptonstall was not. A
new landscape was needed for the new
world of industrial textiles - the valley
bottoms, rather than the tops. Water lay in
the valley, and, for the new mill owners, it
offered power as well as the promise of
easy transportation. The wheels of Hebden
Bridge had long been used for the fulling
(felting) of Heptonstall’s woollen
broadcloth, and they now began to power
mules and jennies spinning worsted yarn
and cotton. Then came the Rochdale canal,
and later, the railway, and Hebden
boomed. While mills and dyeworks ►
The Knitter ф Issue Ten
Written in the landscape
O + 0 Follow our walk through Hepstonstall for a
picturesque insight into the village’s textile history
© Heptonstall’s cloth hall dates from the 16th
century О The Rochdale canal, which helped the
growth of the textile industry, is enjoyed by locals
and visitors alike © The railway and Hebden
Bridge Station saw a boom for the area
covered the waterways surrounding the
town, the steep valley sides along the old
packhorse route became crowded with a
growing population of workers in a
labyrinth of housing stacked several
storeys high.
By the time the last hand-weaver of
Heptonstall died in 1902, the fabric most
closely associated with the landscape of the
Upper Calder Valley was not wool, but
fustian (corduroy). Plantation-grown
cotton - the raw material of this industry -
had no links to Yorkshire itself, but what
connected this industry to the landscape
were the workers’ skills. The fustian
cutters of Hebden were accomplished
craftsmen and women, just as the hand-
weavers of Heptonstall had been a century
before. But though Hebden’s mills later
diversified into the manufacture of ready-
made clothing, in many ways, the valley’s
industrial moment had already passed. As
the wheels and chimneys quietened and
the sheds and dyehouses fell into
dereliction, the fabric of Hebden lay
waiting for a transformation.
Passing through this part of Yorkshire in
the early nineteenth century, William
Cobbett found it “most interesting”
because of its lack of corn and other crops
- because the land was so dominated by
textiles. And as you walk around the
beautiful spaces of Heptonstall and Hebden
Bridge today, you still gain a sense of this
historic dominance as your footsteps reveal
the story of the textiles that are written in
the landscape. You can read it in the
multi-storey mill-housing, in the windows
of the weavers’ cottages, in the canal locks
and towpaths, and in the stones of the old
packhorse road. And this particular
Yorkshire story does not really have an
ending - indeed, in many ways has come
full circle. Since the late 1960s, Hebden has
attracted artists, writers, designers and
makers, and the town is now a thriving
creative centre. As yarn and cloth were
once concerns of Heptonstall’s yeoman
weavers, so they are now the business of
Hebden’s many independent craftspeople.
Mills where wool was once fulled now
house small shops selling beautiful vintage
textiles. And while there is little weaving
done today in local cottages, you can still
seek out sewing advice from Grace at the
Darning Mushroom, pop into Attica to top
up your yam stash, meet knitters over a
pint at The White Lion, or take one of Carol
Leonard’s popular spinning workshops.
Carol is amazed by the transformation of
the fibre arts in recent years, “I now meet
so many young knitters,” she says, “they
are interested in how yarn behaves, in
where it comes from, and, of course, in the
connection of spinning and knitting to the
landscape of Yorkshire.” These local
connections are perhaps best encapsulated
in Hebden’s popular Centre for Alternative
Technology, appropriately housed in
Hebble End MUI. Through two impressive
projects - Power in the Landscape and,
most recently, From FuUing to Fustian -
the centre explores the distinctive history
and continuing importance of textUes to
the region. Their recent fustian-cutting
demonstration brought an almost-lost
craft to the eyes of a new generation.
“Though Hebden is full of craftspeople and
makers, no-one reaUy had any idea what
was actuaUy involved in cutting fustian
cloth,” says project organiser Justine
Wyatt, “it is so important to see that the
textUe skUls of the past continue to speak
to the crafts of the future. ” Such
thoughtful work in the landscape of
Yorkshire will ensure that this is the case.
The Knitter ф Issue Ten
Written in the landscape
Л textile history walk
From start to finish this walk takes under an
hour, but you can break it up with a cup of tea
in Heptonstall, and some leisurely browsing
around Hebden Bridge. The packhorse route
involves a steep gradient, but is well worth it.
Ordnance Survey: 0L211 South Pennines.
1.	Railway, wharf, and canal
Begin at Hebden Bridge station, opened in 1840
by the Manchester and Leeds Railway. The
coming of the railway transformed the
transportation of raw materials, finished textile
goods, and people. Follow the road away from
the station, turn left through a small park, and
follow the canal towpath toward the town. This
stretch of the Rochdale canal was opened in
1798, and the waterway has been successfully
restored. Once past the landing wharf, cross
the canal by one of the many little bridges you
will see alongside the locks.
2.	Town Centre
Turn toward the town centre along Bridge Gate.
A boundary stone on your right marks the
separation of the ancient townships of
Heptonstall and Wandsworth. This stone is a
reminder that the settlement of Hebden Bridge
was of secondary importance to these two
important woollen producing locales until the
mid nineteenth century. St George's Square is
a fine place to sit and watch the world go by,
and at here you will see the well-known
monument to the fustian knife - the
implement used by Hebden's textile workers to
cut the distinctive grooves in corduroy. The
knife points toward the site of Nutclough Mill,
once Britain's largest worker-producer textile
co-operative. There is a busy market on
Wednesdays and Thursdays and highlights of
the town’s numerous independent shops
include Attica (for yarn and craft supplies) and
Lucy and the Caterpillar (for vintage clothes
and textiles).
3.	Packhorse Bridge
Cross the river by the old packhorse bridge
(1510) from which the town takes its name.
A horse laden with woollen cloth would have
occupied the full width of the bridge. Looking
along the river you will see several chimneys
and water wheels - all evidence of Hebden’s
industrial textile heritage. On the other side of
the bridge is the area once known as ‘Buttress
Brink’. In the late nineteenth century, this was
the site of some imaginatively constructed
high-rise housing, tightly packed against the
steep sides of the valley. Many of the town’s
mill workers lived here, and these buildings
were demolished in the 1960s.
4.	Packhorse Route
Follow the cobbled stone walkway up the hill
toward Heptonstall, tracing the steps of the old
merchant traders and their galloway horses.
When the route meets the road, cross it, and
continue upwards for a few metres, before
joining the path at some steps on your left.
Continue on your way up toward the village
following the path through the lush woodland.
Pause at the top for breath, or just to enjoy the
view. As Victorian visitor John Crabtree put it:
“The scenery viewed from this elevated station
is indeed grand, romantic, beautiful and
picturesque; and the ascent commands a most
pleasing view of the rich vale of Calder”.
5.	Heptonstall
The path joins the road once more, and you
now enter Heptonstall. It is well worth
spending an hour or two in this beautiful
village. Wander up to the local museum
(housed in the old grammar school), which
includes a display of the interior of a weaver’s
cottage, and holds seasonal exhibitions.
Opposite the museum are the ruins of the
church of St Thomas, and, behind the pleasing
muddle of ancient gravestones, in the more
modern area of the churchyard, you will find
the sad grave of poet, Sylvia Plath. As you
re-enter the village, you see the sixteenth-
century cloth hall (now a private residence) on
your left, and the village is full of evidence of
the wool trade, from the names of the streets
and squares to the weavers’ cottages with
their iconic banks of windows. A little further
down the hill, you will find a lovely tea-room
serving home-made soup and cakes (the
ice-cream comes highly recommended).
6.	Hebble End Mill
Return to Hebden Bridge the way you came,
watching your step on the descent into town.
Re-join the towpath (past the Little Theatre),
turn right, and follow the canal round to Hebble
End Mill, home of the Alternative Technology
Centre. You can browse exhibitions and
information on projects there, take a break in
the cafe, or purchase fibre, wool and finished
garments from the local sheep rescue centre.
7.	Walking further...
Seasoned walkers can continue on to
Hardcastle Crags and Gibson Mill, a model of
sustainable redevelopment. The Mill and its
landscape are now managed by the National
Trust, and along their riverside trails you can
see many of the mill ponds and weirs that
supported the textile industry. The Upper
Calder Valley is a fine place for walkers
generally, and the Hebden Bridge Visitor Centre
provides maps and audio guides from local
walking groups.
Links:
Hebden Bridge Alternative Technology Centre:
vjvjvj.alternativetechnology.org.uk
Power in the Landscape project:
www.powerinthelandscape.co. uk
Hebden Bridge Local History Society:
www. hebdenbridgehis tory. org. uk
Carol and Pete Leonard: www.spindlers2.com
Hardcastle Crags and Gibson Mill:
www. nationaltrust, org. uk
О Yorkshire’s rose is
included in this bench
engraving at Hebden
Bridge 0 Sign for the
packhorse route to
Heptonstall © The
canal wharf is close to
the railway station at
the start of the walk
The Knitter ф Issue Ten
Jamieson & Smith Exclusive
SIZE
Head diameter: 46cm, but will stretch to 54cm
comfortably. From crown to brim of hat: 21cm.
YARN
Jamieson & Smith 2ply Jumper Weight (100%
Shetland wool; 25g/approx 115m)
A Shade 5, lx 25g ball
В Shade FC38,1 x 25g ball
C Shade FC12,1 x 25g ball
D Shade 121, lx 25g ball
EShade 4, lx25gball
F Shade 81,1 x 25g ball
NEEDLES
1 set 3.5mm (size 10-9/ US 4) double-pointed
needles or 3.5mm (size 10-9/ US 4) circular
needle
TENSION
28 sts and 36 rows to 10cm over stocking
stitch Fair Isle pattern using 3.5mm needles
ACCESSORIES
Stitch marker
SPECIAL ABBREVIATIONS
K2A: Knit 2 sts using yarn A.
P2B: Purl 2 sts using yarn B.
THE TRADITIONAL Fair Isle patterning
on this snug-fitting beanie hat is an
unmistakable feature of Shetland style.
Connie Williamson is the designer of
this exclusive pattern for Jamieson &
Smith, inspired by her retired knitting
teacher Florence, who showed her this
method for creating a star-shaped
crown for berets and beanie hats.
Adding this shaping into Hairst after
the smart Fair Isle repeats was a must,
though Connie admits: “The hardest
part was selecting the colours! I’ve
chosen tweedy browns and oranges of
the soft Jamieson & Smith 2ply jumper
yarn, then named it Hairst, which
means autumn in the Shetland dialect. ”
HAT
Using a set of 3.5mm double-pointed
needles, cast on 128 sts using yarn A.
Join to work in the round, taking care
not to twist sts. Place marker for start of
the round.
Round 1: 'K2A, P2B; rep from ’ to end of
round.
Rep this round until 12 rounds have
been worked in two - colour rib.
Joining in colours as necessary and
working using the Fair Isle technique,
work from Chart 1, repeating the 16 st
motif 8 times each round. As the hat is
worked in the round, all chart rows are
read from right to left.
Work rounds 1-30 straight from the
chart.
Round 31: Decrease 8 sts evenly across
the round. 120 sts.
Work rounds 1-17 of star shaping for
crown from Chart 2. The motif is
KEY
 Shades, К	□ Shade 121,К
□ ShadeFC38,K	 Shade 4, К
repeated 5 times in each round.
When chart is complete, 30 sts remain.
Thread yarn through sts and secure.
Weave in all ends on WS of work. Hand
wash and shape while wet. Ф
Worked using the Fair Isle technique, corrugated
rib makes a beautiful edging and sets off the
traditional patterning used for the rest of the hat
 Shade 5, К
□ ShadeFC38,К
0 no stitch
] * Shade 5, K3tog
 ShadeFC!2,K  Shade 81, К
For stockists and abbreviations, see p90
/eniliroivn
Exclusive
'HE BEAUTIFULLY SOFT YARN, BLENDED WITH SILK
L'irfk/
THIS INTRICATE MIX of cables and lace in
a fabulous chunky knit hasa wonderfully
intricate pattern to get your teeth into.
Designer Jeni Brown enthuses: “The
inspiration for my Graceful sweater came
from a beautiful stitch swatch that I saw.
andplayed around with for over a year’. I
made it into all sorts of accessories and I
loved it so much that I wanted to put it into
a garment somehow. ’’
She has chosen to use one of her own
Fyberspates yarns - Scrumptious Chunky,
knowing the silky sheen would bring out
that fabulous stitch definition, whilst also
being a fairly quick knit. “I decided on this
particular colour'. Biscuit, because it’s
subtle and very classic. As there is quite a
lot going on in the garment, I didn’t want
the colour to detract. Also being a lacy knit,
I wanted it still to be comfortable enough
that the wearer can choose to put a layer on
underneath,” Jeni says.
With a lace design like this Jeni advises to
knit up a swatch first, which goes up the
front and back. “It may not feel
particularly intuitive at first but it will
certainly help you get a proper feel for the
stitch pattern, ” recommends Jen i.
Luxurious roll- necked sweater with lacy
cabling for a stitch pattern to relish
AND WOOL, HAS A PERFECT SHEEN TO BRING OUT THE FABULOUS
STITCH DEFINITION OF CABLING AND LACE

SIZE
	6	8	10	12	14	16	18	20	22	24	26
TO FIT	76	81	86	91	97	102	107	112	117	122	127	cm
BUST	30	32	34	36	38	40	42	44	46	48	50	in
ACTUAL	81	86	91	97	102	107	112	117	122	127	132	cm
BUST	32	34	36	38	40	42	44	46	48	50	52	in
ACTUAL	53	53	55	55	55	56	58	58	58	60	60	cm
LENGTH	21	21	2172	217г	217г	22	23	23	23	237г	2372	in
SLEEVE	43	45	45	46	47	47	47	47	47	47	47	cm
SEAM	17	177г	1772	18	187г 187г 1872 187г				187г 187г		1872	in
YARN
Fyberspates Scrumptious Chunky (45% silk, 55% wool, 100g/122m
skeins)
™ 7	8	8	9	9	10 10 11	11	12 12
BODY LACE STITCH
Lace patt stitch for the body (to be worked
between markers). Chart A shows rows
1-12 and Chart В shows rows 13-24. These
should then be repeated as necessary.
Row 1: Kl, yo, K2tog, K2, yo, SSK, K2, yo,
SSK, P2, yo, K4, SSK, K6, K2tog, K4, yo,
P2, K2, yo, SSK, K4, SSK, yo, Kl.
Row 2: P4, Kl, yo, P2tog, P2, yo, P2tog, K2,
Pl, yo, P4, P2tog, P4, P2togtbl, P4, yo, Pl,
K2, P2, yo, P2tog, P2, Kl, P4.
Row3: K5, yo, SSK, K2, yo, SSK, P2, K2,
yo, K4, SSK, K2, K2tog, K4,yo, K2, P2, K2,
yo, SSK, K7.
Row 4: P4, Kl, yo, P2tog, P2, yo, P2tog, K2,
P3, yo, P4, P2tog, P2tog tbl, P4, yo, РЗ, K2,
P2,yo,P2tog, P2,K1,P4.
Rows 5-12: Rep rows 1 to 4 twice.
Row 13: Kl, yo, K2tog, K5, K2tog, K4, yo,
P2, (K2, yo, SSK) 3 times, P2, yo, K4, SSK,
K5, SSK, yo, Kl.
Row 14: P4, Kl, P2, P2tog tbl, P4, yo, Pl, K2
(P2, yo, P2tog) 3 times, K2, Pl, yo, P4,
P2tog,P2,Kl,P4.
Row 15: K6, K2tog, K4, yo, K2, P2, (K2, yo,
SSK) 3 times, P2, K2, yo, K4, SSK, K6.
Row 16: P4, Kl, P2tog tbl, P4, yo, РЗ, K2,
(P2, yo, P2tog) 3 times, K2, РЗ, yo, P4,
P2tog,Kl,P4.
Rows 17-24: Rep rows 13-16 twice.
SLEEVE LACE STITCH
Chart C shows lace stitch pattern for the
sleeves.
Row 1: Kl, yo, K4, SSK, K6, K2tog, K4, yo,
Kl.
Row 2: Kl, Pl, yo, P4, P2tog, P4, P2tog tbl,
P4,yo,Pl,Kl.
Row 3: КЗ, yo, K4, SSK, K2, K2tog, K4, yo,
КЗ.
Row4: Kl, РЗ, yo, P4, P2tog, P2togtbl, P4,
yo,P3,Kl.
BACK
Cast 0П 70 (74:78:82:86:90:94:98:102:106:
110) StS.
Size 6: Row 1: Kl, Pl, K4, P2, K4, Pl, pm,
[Row 1 of lace patt], pm, Pl, K4, P2, K4, Pl,
Kl.
Size 8: Row 1: Kl, (P2, K4) twice, P2, pm,
[Row 1 of lace patt], pm, (P2, K4) 2 times,
P2, Kl.
Size 10: Row 1: Kl, P2, (K4, P3) twice, pm,
[Row 1 of lace patt], pm, (РЗ, K4) twice, P2,
Kl.
Size 12: Row 1: Kl, Pl, K4, (P2, K4) twice,
Pl, pm, [Row 1 of lace patt], pm, Pl, (K4,
P2) twice, K4, Pl, Kl.
Size 14: Row 1: Kl, (P2, K4) 3 times, P2, pm,
[Row 1 of lace patt], pm, (P2, K4) 3 times,
P2, Kl.
Size 16: Rowl: Kl, (РЗ, K4) twice, P2, K4,
P2, pm, [Rowl of lace patt], pm, P2, K4,
P2,(K4,P3) twice, Kl.
Size 18: Rowl: Kl, (РЗ, K4) 3 times, P3, pm,
[Rowl of lace patt], pm,P3, (K4, P3) 3
times, Kl.
Size 20: Row 1: Kl, (P2, K4) 4 times, P2,
pm, [Rowl of lace patt], pm, (P2,K4)4
times, P2, Kl.
Size 22: Row 1: Kl, Pl, K4, (РЗ, K4) 3 times,
Intricate lace panels give an unusual shape at the
hem of this beautiful sweater
P2, pm, [Rowl of lace patt], pm,P2, (K4,
P3)3 times, K4, Pl, Kl.
Size 24: Row 1: Kl, P2, (K4, P3) 4 times,
pm, [Rowloflacepatt],pm, (P3, K4)4
times, P2,K1.
Size26: Rowl: Kl, (P2, K4) 5times,P2, pm,
[Rowl of lace patt], pm, P2, (K4, P2) 5
times, Kl.
All sizes
Row 2 (WS): Work to marker in rib as set in
rowl, slm, [Row 2 of lace patt], slm, work
to end in rib as set by previous row.
Row 3: Work in rib as set, but C4R instead
of each K4, slm, [Row 3 of lace patt], slm,
The Knitter ф Issue Ten
Graceful
NEEDLES & ACCESSORIES
1 pair 6mm (size 4/ US 10) knitting needles
1 circular 6mm (size 4/US10) knitting needle,
60cm long
Cable needle (cn)
Stitch markers
TENSION
16 sts and 24 rows to 10cm in stocking stitch
using 6mm needles
SPECIAL ABBREVIATIONS
C4L SI 2 sts to cn, hold at front, K2; K2 from cn
C4R: SI 2 sts to cn, hold at back, K2; K2 from cn
C2L: S11 st to cn, hold at front, KI; KI from cn
C2R: S11 st to cn, hold at back, Ki; KI from cn
BLOCKING DIAGRAM
For stockists and abbreviations, see p90
work in rib as set, but C4L instead of each
K4.
Row 4: Work in rib as set, slm, [Row 4 of
lace patt], slm, work in rib as set.
Row 5: Work as set, but C4R instead of each
K4, slm, [Row 5 of lace patt], slm, work as
set, but C4L instead of each K4.
Continue to work in rib and lace pattern as
set, with cables on each RS row, until row
24 has been worked. Repeat rows 1 - 24,
with cables on all RS rows, until work meas
32 (32:33:33:33:33:341/2:341/2:341/2:351/2:
357г) cm or until desired length to
underarm.
SHAPE ARMHOLES
Keeping patt correct, cast off 3
(3:3:4:4:4:4:4:4:5:5) Sts at the beg of the
next 2 rows. 64 (68:72:74:78:82:86:90:94:
96:100) Sts.
Then cast Offl(l:2:2:2:2:2:2:2:3:3) Sts at the
beg Of the next 8 (10:6:6:8:10:10:10:10:6:6)
rows.
56 (58:60:62:62:62:66:70:74:78:82) Sts.
Sizes 22,24,26 only
Castoff-( :-: :-: :-: :1:2:2) Stsatthe
Start of the next- ( :-:	:2:2:4)
TOWS. - (-:-:-:-:-:-:72:74:74)©tS.
All sizes
* * * Continue in pattern without shaping
until work measures 187г (18 -.. :19:197г:
191/2:2О1/2:2О1/2:21:21:211/г:211/2) Cm from
the initial underarm cast off.
SHAPE SHOULDERS
Loosely cast off 5 (5:6:6:6:6:6:6:7:7:7)stsat
beg of the next 6 rows.
26 (28:24:26:26:26:30:34:30:32:32) Sts.
Loosely cast off the rem sts.
FRONT
Work as for Back until *''.
Cont in patt without shaping until work
meas 1572 (151/2:16:161/2:161/2:171/2:171/2:18:
18:1872:187г) cm from the initial underarm
cast off, with RS facing for next row.
SHAPE NECK
Next row (RS): Work24 (25:26:27:27:27:
28:29:30:32:34) sts in patt and put these Sts
just worked on a st holder, cast off next 8
(8:8:8:8:8:10:12:14:14:16) StS, WOrkremStS
in patt.
§ Work one row.
Row 1: At the neck edge, cast off 2
(3:2:3:3:3:2:3:3:3:3) Sts.
Row 2: Work without shaping.
Row 3: At the neck edge, cast off 2
(2:2:2:2:2:2:3:2:3:3) Sts.
Row 4: Work without shaping.
Row 5: At the neck edge, cast off 2
(2:2:2:2:2:2:2:2:3:3) Sts.
Row 6: At the shoulder edge, cast off 5
(5:6:6:6:6:6:6:7:7:7) Sts.
Row 7: At the neck edge, cast off 2
(2:l:l:l:l:2:2:l:l:2)sts.
Row 3: At the shoulder edge, cast off 5
(5:6:6:6:6:6:6:7:7:7) Sts.
Row 9: At the neck edge, cast off 1
(1:1:1:1:1:2:1:1:1:2) Sts.
Row 10: At the shoulder edge, cast off final
5 (5:6:6:6:6:6:6:7:7:7) Sts. Break yarn.
With RS facing, rejoin yarn at armhole
edge of Left Front shoulder and work from
§ to complete shoulder.
SLEEVES
Cast ОП32 (34:34:34:36:36:38:40:40:42:42)
StS.
Size 6: Row 1: Pl, K4, Pl, pm, [Row 1 of
sleeve lace patt], pm, Pl, K4, Pl.
Sizes 8-12: Row 1: Pl, K4, P2, pm, [Row 1 of
sleeve lace patt], pm, P2, K4, Pl.
Sizes 14-16: Rowl:P2,K4,P2,pm, [Rowl
The Knitter ф Issue Ten
Fyberspates
Scrumptious Chunky is
a beautiful yarn to
work with. The silk
content gives the
knitted fabric an
amazing sheen.
Around eight vibrant
shades are available.
CHARTS
12
Chart A
KEV
□ К on RS, Pon WS
• P on RS, К on WS
|71 K2tog on RS, P2tog on WS
E3 SSK on RS, P2tog tbl on WS
|OI yo
Chart C (Sleeves)
20	15	10	5
of sleeve lace patt], pm, P2, K4, P2.
Size 18: Row 1: KI, P2, K4, P2, pm, [Row 1 of
sleeve lace patt], pm, P2, K4, P2, KI.
Sizes 20-22: Row 1: K2, P2, K4, P2, pm,
[Row 1 of sleeve lace patt], pm, P2, K4, P2,
K2.
Sizes 24-26: Row 1: Pl, K2, P2, K4, P2, pm,
[Row 1 of sleeve lace patt], pm, P2, K4, P2,
K2,P1.
All sizes
Row 2 (WS): Work to marker in rib as set,
slm, [Row 2 of sleeve lace patt], work in rib
as set to end of row.
Row 3: Work to marker in rib as set, slm,
[Row 3 of sleeve lace patt], slm, work in rib
as set, to end of row.
Row 4: Work to marker as set, slm, [Row 4
of sleeve lace patt], slm, work as set to end.
The following sleeve increases should be
incorporated into a 2x2 rib on each side of
the sleeve - working a C2R before the lace
patt and C2L after the lace patt when
working cable rows.
Repeat rows 5 - 8 (as below), increasing one
st at each end of every 6th (6th:6th:6th:
6th:4th:4th:4th:4th:4th:4th) TOW until 56
(58:60:62:64:70:72:76:80:84:88) Sts.
Row 5: Work to marker as set, but C4R
instead ofK4 and C2R instead of K2, slm,
[row 1 of sleeve lace patt], slm, work as set,
but C4L instead of K4 and C2L instead of
K2.
Row 6: Work to marker in rib as set, slm,
[Row 2 of sleeve lace patt], slm, work as set
to end.
Row 7: Work to marker as set, but C4R
insteadofK4 and C2R instead of K2, slm,
[Row 3 of sleeve lace patt], shn, work as
set, but C4L instead of K4 and C2L instead
of К 2, to end of row.
Row 8: Work to marker in rib as set, slm,
[Row 4 of sleeve lace patt], slm, work in rib
as set to end.
Co nt in patt until piece meas43 (45:45:46:
47:47:47:47:47:47:47) cm, ОГ until desired
length.
SLEEVEHEAD SHAPING
Keeping patt correct, cast off 4 (4:4:5:5:5:
5:5:5:6:6) st© at beg of the next 2 rows.
48 (50:52:52:54:60:62:66:70:72:76) Sts.
Dec 1 st each end of every other row (one st
in from the edge), 12 (13:14:10:11:14:15:17:
19:16:18) times.
24 (24:24:32:32:32:32:32:32:40:40) Sts.
Castoff3 (3:3:4:4:4:4:4:4:5:5) Sts at the
start of the next 4 rows. Cast off rem 12
(12:12:16:16:16:16:16:16:20:20) Sts.
MAKING UP
Block all pieces gently to desired
measurements. Sew shoulder seams. Set in
sleeves and sew sleeve and side seams.
COLLAR
Beg at the left shoulder seam, using 60cm
long 6mm circular needle, pick up and knit
sts around neck as foils:
16 (16:16:17:17:17:18:18:18:18) Stsdownleft
front edge, 10 (10:10:11:11:11:12:12:15:15) Sts
across front neck, 16 (16:16:17:17:17:18:
18:18:18) sts up right front edge,
42 (42:42:45:45:45:48:48:48:51:51) Sts
across back neck.
84 (84:84:90:90:90:96:96:102:102) Sts.
The cables on the collar are worked on the
inside, so they will show correctly when
the collar is worn folded down.
Row 1: *P2, K4; rep from * to end.
Row 2: *K2, P4; rep from * to end.
Row3: *P2, C4R; rep from * to end.
Repeat rows 2 and 3 until collar meas 15cm,
or to the desired length. Cast off.
Sew collar seam and weave in all ends. О
The Knitter ф Issue Ten
Exclusive
Gladstone bag
A smart felted and embellished bag - roomy enough
for everyday, it will add style to any outfit
JEANETTE SLOAN HAS created this
exciting, vibrant bag to knit and felt with
beading and embroidery that add touches
of interest. She tells us, “I was really
inspired by a trip I made to Morocco a
couple of years ago. I wanted to design
something with a twist on the traditionally
large carpet bags that are everywhere in
the Marrakesh souk, but scaled down for a
handbag. ” With these North African
influences, Jeanette’s Gladstone bag recalls
the 19th century Grand Tours to Europe
and beyond. Bringing home exotic
collectables was all part of the experience
for society gentlemen, and later ladies too,
and it’seasy to imagine those artifacts
adorning a country manor of that time.
Jeanette goes on; “The Jamieson and
Smith yarn that I’ve used for my design
gives a fantastic structure to the bag
when it is felted. I deliberately wanted to
keep the colour palette limited to
explore various different textures with
the embellishments.” She says, “The
subtle beading balances the more
obvious embroidery, tassels and buttons,
and then finishing it with beautiful
handles adds a sophisticated touch.”
THIS VIBRANT BAG WILL MAKE AN EXCITING KNIT
AND THEN BEADING, BUTTONS AND EMBROIDERY ADD FURTHER
TOUCHES OF TEXTURE AND INTEREST

Gladstone bag
BAG MEASUREMENTS
Finished felted bag measures 42cm (leVzin)
wide, 17cm (eVjin) high, 14cm (SVain) deep
excluding handles
YARN
Jamieson & Smith 2 Ply Jumper Weight (100%
Shetland wool; 25g/118m balls)
A Shade FC44 (Brown) 7 x 25g balls
В Shade 77 (Black) 2 x 25g balls
'C Shade 125 (Orange) 1 x 25g ball
D Shade 1403 (Red) 2 x 25g balls
E Shade 1A (Ecru) 2 x 25g balls
Twilleys Goldfingering (80% viscose, 20%
metallised polyester; 25g/100m balls)
*C Shade 64 (Orange) 1 x 25g ball
All yarns are used doubled throughout except
yarn C, which is used as a strand each of
Jamieson & Smith and Twilleys.
NEEDLES
1 pair of 5.5mm (size 5/ US9) knitting needles
Stitch markers
ACCESSORIES
330 x size 6/0 opaque beads in black
340 x 6/0 transparent rainbow beads in pink
16 x 15mm wide oval shell buttons
One pair of Trendsetter Lucite Bag Handles in
Brown/Black
13 cm x 41 cm piece of heavyweight card
30 cm wide x 50 cm long piece of lining fabric
1 x blunt-tipped needle for sewing up
1 x sharp-tipped needle for embroidery
TENSION
You may find it necessary to do more than one
swatch to check your tension, as you will need
to felt the swatch in order that your bag is the
correct size once felted. Tensions are given for
stitch patterns before and after felting.
BAG
BASE SECTION
Using 5.5mm needles and yarn A cast on 91
sts. Break off A, join in yarn В and continue
as foils:
Row 1 (RS): Using yarn B, KI, (SI 1 wyib,
КЗ) to last 2 sts, SI 1 wyib, KI.
Row 2: Pl, (Sil wyif, P3) to last 2 sts, SI 1
wyif, Pl. Break off yarn B, join in yam C.
Row 3: Using C, *K3, SI 1 wyib; rep from ’
to last3 sts, КЗ.
Row 4: "P3, SI 1 wyif; rep from * to last 3
sts, P3. Break off yarn C, join in yarn D.
Row5: UsingD,pattern as Rowl.
Row 6: Using D, pattern as Row 2. Break off
yarn D, join in yam E.
Row 7: Using E, pattern as Row 3.
Row 8: Using E, pattern as Row 4. Break off
yarn E, join in yarn A.
Row 9: Using A, pattern as Row 1.
Row 10: Using A, pattern as Row 2.
These 10 rows set both 10 row stripe and 4
row slip stitch pattern repeats. Continue
working as set by the last 10 rows until 52
rows have been worked in total.
Next row: Using yarn C, knit. Break off
yarn C and join in yarn A.
Next row (Decrease row): Using yarn A,
P6, *P2tog, P5; rep from * to last 8 sts,
P2tog,P6.79sts.
MAIN BAG FRONT SECTION
Thread beads (see Pattern Note above).
t Now start working from bottom right of
main chart and using the intarsia
technique, work placing beads and
shaping sides as instructed by chart until
Row 51 has been completed. Place a marker
at each end of Row 51 and continue to Row
68 then cast off rem 53 sts.
With RS facing and using yarn E pick up
and knit 91 sts into the cast - on edge of Bag
Base. Break off yarn E and join in yarn A
then work as for Main Bag Front section
from j- to end.
BAG SIDES (make two alike)
Before beginning, thread 96 black beads
onto one end of yarn A. Then with yam
doubled, RS facing and using 5.5mm
needles, pick up and knit 27 sts along side
edge of Bag Base worked in slip stitch stripe
pattern, turn work and purl one row.
Now starting at bottom right of side chart
work, shaping sides and placing beads as
instructed by Side chart, until Row 50 has
been completed then cast off rem 19 sts.
ADDING EMBROIDERY
Sew in all ends and steam gently on WS to
flatten fabric slightly, this makes it easier
to embroider as follows before felting.
Use photographs to guide. Using yarn E
doubled, work a line of backstitch, each
about 5mm long, around the edge of each
red diamond. Then using a blunt needle
threaded with a doubled end of
Goldfingering:
Bring needle through work to front just
below 1st backstitch.
Slide the needle upwards through the next
Gladstone bag
Slip stitch stripe pattern;
Before felting -19 sts and 29 rows to 10 cm
After felting - 21 Vj sts and 38 rows to 10 cm
Intarsia pattern;
Before felting - 18 sts and 24 rows to 10 cm
After felting - 19 sts and 29 rows to 10 cm
All measured over pattern using 5.5 mm
needles and yarn doubled
FELTING NOTE
The bag was felted in a 60°C wash for about an
hour, but as there can be huge differences
between different machines and wash
programmes you should do tests in your own
washing machine. Putting a towel or two into
the wash will help with the felting process.
When the wash is complete, allow the swatch
to dry and then measure your piece. If
necessary, try another swatch until the correct
tension is obtained.
For stockists and abbreviations, see p90
backstitch to the right - but not through
the fabric.
Bring needle back to the left and thread
down through 1st backstitch - you should
now have a loop that sits underneath the
stitches.
Pull slightly to flatten taking care not to
tighten too much, then take needle to the
right and slide upwards through 3rd
backstitch.
Bring needle back to the left and thread
down through 2nd backstitch.
Cont working in this way going forward
two and back through one to form a series
of loops around edge of each red diamond.
Using the photograph as a guide, work a
line of small chain stitches in yarn E
around the outside edge of each black
diamond.
In each of the eight channels created by the
single purl stitch, work a line of chain
stitch using a single end of yarn В then
using doubled end of yarn В Swiss darn the
stitches as indicated by chart.
Bag side sections: Using a single end of
yarn A, place a bullion knot about 1.5cm
long at the base of each beaded vertical line
as foils;
Bring needle through to front of work at
base of beaded line.
Take needle about 5mm below where it
first emerged (this is Point B) and insert
into fabric bringing tip out at starting point
but don’t pull through.
PATTERN NOTE
Although the background of the main bag
is worked in yarn A, you will be working
with 2 different colours of bead within a
row. To make this easier, the designer
Jeanette suggests using the intarsia
technique for the background, with 3
separate balls of yarn A, one each for the
left and right sides threaded with black
beads, and the third one for the centre,
threaded with pink beads. Thread the
beads before starting to work from the
chart, but don’t thread on too many at a
time or you may find that you run out of
yarn before you have knitted them all in.
To make it easier, thread beads onto just
one end of yarn.
Hold needle in one hand and with the other
wrap the yarn around the tip of the needle
about 30 times.
Holding the coiled threads firmly between
finger and thumb of left hand draw the tip
of the needle through with right hand
carefully loosening the coils of thread as
you go to allow the needle to eventually
pass through freely, even out the coil as
you go.
Insert the tip of needle to Point Band pull
through to back.
MAKING UP
With both RS facing and starting at bottom
corner of bag base and ending at bag
opening edge, sew seam taking care to
match the cast-off edge of side section to
marker placed at edge of Main Front I Back
section. Repeat for other 3 seams. Felt bag
and allow to dry thoroughly.
Once dry, sew shell buttons in position
and add 3 colours of bullion knots as
shown in photograph. Attach a tassel of
yarns A and В mixed at the centre of each
red diamond.
Cover the piece of cardboard with fabric to
reinforce bag base and place inside bag.
Pinch each side section at the centre of cast
off edge and bind with a large securing
stitch to create an inverted pleat.
Slide cast- off edge of Bag Front into slit in
bag handle and pull through until the black
stripe is visible on inside of handle only.
Sew flap to inside of bag to secure, repeat
for other side. Ф	►
The Knitter ф Issue Ten
Gladstone bag
Designer extract
cAUce ^tarmore
Elizabeth I
After the fiery English queen, this elegant design focuses on
shaping and incorporates delicate openwork patterning
YARN
Virtual Yams Alice Starmore Hebridean 2ply
(100% pure new wool; 25g/approx 85m skeins)
STRABHANN 17	19	21	x25g SKEINS
SIZE
TO FIT	81-86	89-94	96-102	cm
BUST	32-34	35-37	38-40	in
ACTUAL	94	100	106	cm
UNDER
ARM	37	3972	4172	in
ACTUAL	51	53	56	cm
LENGTH	20	21	22	in
SLEEVE	43	44	45	cm
SEAM	17	177г	1772	in
NEEDLES & ACCESSORIES
1 pair 3mm (size 11/ US 3) knitting needles
1 set of 2.75mm double-pointed needles or
circular needle
4 Stitch holders
Stitch markers
TENSION
27 sts and 40 rows to 10cm measured over
stocking stitch using 3mm knitting needles
CHARTS
On Back, Front and Sleeves (worked flat), odd
numbered rows are RS and read from right to
left. Even numbered rows are WS and read left
to right. On Neckband, Chart A is worked in the
round and all rows are read fom right to left.
For stockists and abbreviations, see p90
IT IS A THRILL to bring you this
breathtaking design by Alice Starmore,
named after the Virgin Queen. Alice
says, “I resisted the temptation to base
a design on Elizabeth’s sumptuous
clothing for state occasions, and
concentrated on the deep V-shape of
the period costume, which set off her
small waist. ” With the emphasis on
shaping, a centre panel features an
openwork diamond taken from a pair of
the hand-knitted silk stockings adored
by Elizabeth. Worked in Alice
Starmore’s Hebridean 2ply yarn, this
jumper is luxurious and soft enough to
be worn next to the skin.
BACK AND FRONT(bothalike)
Using 3mm needles, cast on 129
(137:145) sts.
Row 1 (RS): Knit.
Row 2: Knit.
Rows 3 and 4: Purl.
Work Chart A as foils;
Row 1 (RS): Reading from right to left,
rep the 8 patt sts 16 (17:18) times, patt
the last st as indicated.
Row 2 (WS): Reading from left to right,
patt the first st as indicated, rep the 8
patt sts 16 (17:18) times.
Cont as set and work through row 9 of
Chart A.
Next 2 Rows: Purl.
Next Row (WS): Knit. Break off yam.
SHAPE CURVED HEMLINE
With RS facing, si the first 42 (48:54) sts
purlwise to a spare needle; rejoin yarn
and К the next 45 (41:37) sts. Turn.
Next Row (WS): SI 1 purlwise, P44
(40:36), P6 from spare needle. Turn.
Next Row (RS): SI 1 purlwise, K56
(52:48). Turn.
Cont as set in st st and si the first st of
every row purlwise, working 6 more sts
at the end of every row until all 129
(137:145) sts are incorporated, thus
ending with WS facing for next row.
Next Row: Purl.
Next Row (RS): KI, K2tog, K123 (131:139),
SSK, KI. 127 (135:143) Sts.
Work straight in st st for 5 (7:9) rows.
Next Row (RS, Dec at Sides and Work First
Dart Dec): KI, K2tog, K28 (30:32), SSK, KI
tbl and mark this st for first dart, K2tog,
K55 (59:63), SSK, KI tbland mark this st
for second dart, K2tog, K28 (30:32), SSK,
KI. 121 (129:137) Sts.
Next Row (WS): P31 (33:35), Pl tbl (dart st),
P57 (61:65), Pl tbl (dart St), P31 (33:35).
Working dart sts through the back on
all foil rows, and st st over all other sts,
work 6 rows straight.
Next Row (RS, Dec at Sides and Work
Second Dart Dec): KI, K2tog, K26 (28:30),
SSK, KI tbl, K2tog, K53 (57:61), SSK, KI tbl,
K2tog, K26 (28:30), SSK, KI.
115 (123:131) Sts.
Work st st and dart sts as set and cont
straight for 7 rows.
Next Row (RS, Dec at Sides and Work Third
Dart Dec): KI, K2tog, K24 (26:28), SSK, KI
tbl, K2tog, K51 (55:59), SSK, KI tbl, K2tog,
K24 (26:28), SSK, KI.
109 (117:125) Sts.
Work st st and dart sts as set and cont
straight for 7 rows.
Next Row (RS, Dec at Sides and Work
Fourth Dart Dec): KI, K2tog, K22 (24:26),
SSK, KItbl, K2tog, K49 (53:57),SSK, KI
tbl, K2tog, K22 (24:26), SSK, KI.
103 (111:119) Sts.
Work st st and dart sts as set and cont
straight for 7 rows.
Next Row (RS, Dec at Sides and Work Fifth
Dart Dec): KI, K2tog, K20 (22:24), SSK, KI
tbl, K2tog, K47 (51:55), SSK, KI tbl, K2tog,
K20 (22:24), SSK, KI.
97 (105:113) Sts.
Work st st and dart sts as set and cont
straight for 8 rows.
Next Row (WS): Working dart sts as set,
P48 (52:56), KI (centre St), P48 (52:56).
Next Row (RS, Beg Centre Patt):
Working dart st as set, K47 (51:56), reading
from right to left, work row 1 of Chart В
over the next 3 sts, increasing 2 sts on
centre st as indicated, working dart st as
set,K47 (51:56).
Next Row (WS): Working dart st as set, P47
(51:56), reading from left to right, work
row 2 of Chart В over the next 5 sts,
increasing 2 sts at centre as indicated,
working dart st as set, P47 (51;56).
Continue as set, working Chart В over the
centre sts, incorporating 1 st from each
side into centre patt on next and every
following 4th row as indicated on the
Chart.
At the same time, Ml at each end of row
and at each side of darts on rows 11,19,27
and 35.6 sts are increased on each of these
rows, with a total of 127 (135:143) sts on
The Knitter ф Issue Ten
Elizabeth I
BLOCKING DIAGRAM
completion of row 35. The darts are now
completed.
Work st st over all sts at each side and
continue straight through row 40 of
Chart B, then work Chart C from row 41
through row 62 (66:66).
Note: When row 66 of Chart C has been
worked, the centre patt is continued by
working the centre 21 sts in repeats of
rows 41 through 66, while the diagonal
patt panel at each side continues to
incorporate 1 st into Moss Stitch at each
side of every 4th row as established.
Third Size Only: Working centre patt as
described in note above, patt 2 more rows.
SHAPE ARMHOLES (ALL SIZES)
Cont working centre patt as described
in note above and at the same time, cast
off 6 (7:7) sts at beg of next 2 rows. Dec 1
st at each end of next 2 rows. Patt 1 row
without shaping, then dec 1 st at each
end of next row.
Third Size Only: Rep the last 2 rows once
more.
All Sizes: Cont in patt as set and work 2
rows without shaping. Dec 1 st at each end
of next and every foil 4th row, working
these decs on RS rows a® foils:
KI, K2tog, patt to the last 3 sts, SSK, KI.
Cont as set until 83 (87:91) sts remain.
Patt 3 (.3:1) rows without shaping, thus
ending with RS facing for next row and
60 (64:68) armhole rows worked in
total.
SHAPE NECK
Next Row (RS):
First and Second Sizes: Dec at armhole
as set and keeping continuity, patt until
there are 12 sts on right needle, place
the next 57 (61:-) sts on a holder, leave
the rem 13 sts on a spare needle.
Third Size (RS): Keeping continuity,
patt the first 13 sts, place the next -
( :65) sts on a holder, leave the rem 13
sts on a spare needle.
All Sizes: ‘Turn and keeping continuity of
patt as far a&possible, continue to dec at
armhole on every 4th row as established
and shape neck edge as foils:
Dec 1 st at neck edge of next 4 rows. Patt
1 row without shaping, then dec at neck
edge of next and every foil alt row 3
times in all. 3 sts.
Next Row (WS): P3. Turn and SI 2tog
knitwise - KI - p2*/so. Break yarn and fasten
off yarn through the rem st."
With RS facing rejoin yarn to the 13 sts
on spare needle and keeping continuity,
patt the 13 sts, decreasing as established
at armhole edge of first and second
sizes.
Complete as previous side of neck,
working from * to ".
SLEEVES
Using 3mm needles, cast on 97 sts.
Row 1 (RS): Knit.
Row 2: Knit.
Rows 3 and 4: Purl.
Work Chart A as foils:
Row 1 (RS): Reading from right to left, rep
the 8 patt sts 12 times, patt the last st as
indicated.
Row 2 (WS): Reading from left to right, patt
the first st as indicated, rep the 8 patt sts 12
times.
Cont as set and work through row 9 of
Chart A.
Next 2 Rows: Purl.
Next Row (WS): Knit. Break off yarn.
SHAPE CURVED HEMLINE
With RS facing, si the first 40 sts
purlwise to a spare needle, rejoin yarn
and К the next 17 sts. Hirn.
Next Row (WS): SI 1 purlwise, P16, P8 from
spare needle. Turn.
Next Row (RS): SI 1 purlwise, K32. Turn.
Continue as set in st st and si the first st
of every row purlwise, working 8 more
sts at the end of every row until all 97
sts have been incorporated, thus ending
with WS facing for next row. Continue
in st st over all sts for 11 rows.
Next Row (RS, Work First Dart Dec):
K46, SSK, KI tbl and mark this st for
dart, K2tog, K46. 95 sts.
Working dart st through the back on all
rows, cont in st st for 11 rows.
Next Row (Work Second Dart Dec):
K45, SSK, KI tbl, K2tog, K45. 93 sts.
Cont working dart st and st st as set,
and dec as set at each side of dart st on
every foil 12th row until 87 sts rem, thus
working 5 dart dec rows in total.
Cont straight in st st over all sts until
sleeve meas 39 (36:33)cm from cast-on
edge, meas at side edge.
Cont in st st and inc 1 st at each end of
next and every foil 6th row 2 (5:8) times
in all. 91 (97:103) sts.
Then continue straight in st st without
any further shaping until sleeve meas 43
(44:45)cm from cast-on edge, meas at
side edge, with RS facing for next row.
SHAPE TOP
Continue in st st and cast off 6 (7:7) sts
at beg of next 2 rows. Dec 1 st at each
end of next 2 rows. Patt 1 row without
shaping, then dec 1 st at each end of
next row.
Third Size Only: Rep these last 2 rows once
more.
All Sizes: Co nt in patt as set and work 2
rows without shaping. Dec 1 st at each end
of next and every foil 4th row, working
decs as on back and front.
Cont as set until 41 (43:45) sts rem.
The Knitter ф Issue Ten
Elizabeth I
Work 1WS row. Place sts on a holder.
MAKING UP
Block out pieces to measurements
shown. Cover pieces with damp towels
and leave to dry.
Sew Sleeves to Back and Front at
armhole seams. Press seams very lightly
on WS, using a warm iron and damp
cloth.
NECKBAND
Using 2.75mm DPNs or circular needle,
beg at sleeve seam of back and knit up 8
sts evenly to neck holder, pick up and
dec from holder as foils;
+K3 (1:0), • K2tog, K5 (6:7); rep from ' 7
times in all, K2tog, КЗ (2:0) [49 (53:57)
sts rem from holder], knit up 8 sts
evenly to sleeve holder, pick up and dec
sleeve as foils:
First and Third Sizes: K2, ’K2tog, K5
( :6); rep from * 4 more times, K2tog,
K2 ( :1), [35 ( :39) sts rem from holder].
Second Size: K7, "K2tog, K7; rep from’ 3
more times, [-(39:-) sts rem from holder].
All Sizes: Knit up 8 sts evenly to front
holder, then rep from + to + + to
complete the rnd. 200 (216:224) sts.
Place a marker at beg of rnd. Purl 2
rnds. Knit 1 rnd.
Reading all rnds from right to left, beg
at rnd 1 of Chart A and rep the 8 patt st&
25 (27:28) times in the rnd. Work
through rnd 9. Knit 1 rnd. Purl 2 rnds.
Cast off purlwise.
Darn in loose ends and sew up side and
sleeve seams and press seams lightly on WS
as before. Ф
This design is taken
from Alice
Starmore’s book
Tudor Roses.
It is a wonderful
collection of
patterns, but
currently out of
print. Elizabeth I is also available
online through Alice’s website:
www.virtualyarns.co.uk as a kit,
including the Hebridean 2ply yarn
to complete the design. Many other
kits for patterns by Alice and Jade
Starmore are for sale here.
The Knitter ф Issue Ten
Elizabeth I
CHARTS
KEY
□ К on RS, Pon WS
H Pon RS, KonWS
Ц no stitch
Щ (KI tbl, Ki) into same st, then insert left hand needle point
between the vertical strand that runs down between the 2 sts
just made and К into this strand, making the third st of the group
[2] (Pl, yo, Pl) into same st, making 3 sts in the group
IsfiTTI SI first st to cn and hold at back, K2, P1 from cn
|TTTjg| SI first 2 sts to cn and hold at front, PI, K2 from cn
|jJT| SI first st to cn and hold at back, K1, K1 from cn
|~TLl| SI first st to cn and hold at front, K1, K1 from cn
|~i~j=| SI first st to cn and hold at front, PI, K1 from cn
|=H~l SI first st to cn and hold at back, K1, P1 from cn
|r/11 Г| SI first st to cn and hold at back, K2, K1 tbl from cn
|ТПУ| SI first 2 sts to cn and hold at front, K1 tbl, K2 from cn
[к] make knot - (KI, P1) twice into same st, then si the first 3 sts
made over the last st made
|5| yo
0 K2tog
E SSK
[A] SI 2 sts tog knitwise, K1, pass the 2 slipped sts over the К st
|_LtT[T| SI first st to cn and hold at back, K2, K1 from cn
|TT~rfj_| SI first 2 sts to cn and hold at front, K1, K2 from cn
0 K1 tbl on RS, PI tbl on WS
The Knitter ф Issue Ten
MASTERCLASS
Jane
rour intarsia
INTARSIA
MADE EASY
know-how on making'yc„.
colourwork knitting taiigle-free

Masterclass
There are two main ways to create different
coloured designs within your knitted piece.
These are Fair Isle (where yarns are woven or
stranded across the reverse side of the fabric)
and intarsia. ‘Intarsia’ is a noun to describe
the art or technique of decorating a surface
with inlaid patterns and is most commonly
historically referred to as a technique similar
to marquetry where images are produced
using wood, bone, stone and even ivory. The
craft was developed during the Renaissance
and examples exist all over the world.
However the term can also be attributed to
knitting and is used to describe the technique
used to create patterns with multiple colours.
As with the woodwork technique, areas of
colour are inlaid in one another using separate
pieces of yarn which are knitted to appear like
a jigsaw puzzle. This method creates a single
weight of fabric in which many colours can be
used to a row, unlike Fair Isle which produces
a thicker fabric and traditionally has just two
colours to a row.
About our expert
Jane Crowfoot is one
of the UK’s leading
knitting experts and
author of the book
Finishing Techniques
for Hand Knitters
(Search Press, £9.99)
FOLLOWING A PATTERN
Most colour work patterns will ask you to
proceed in a certain way. The pattern may
ask you to use the Fair Isle or intarsia
technique or a mixture of both. Indeed it is
my view that without an idea of how to
work both techniques you will be stumped
as some of the methods (such as carrying
colours from one place to another and
weaving in the yarn ends) transpose
between both Fair Isle and intarsia.
Over the past decade more and more
knitting patterns include a chart of
stitches. These charts not only save space,
but also give the knitter a visual idea of
how their knitting should progress. If you
have never tackled chart knitting before
then intarsia is the ideal starting place.
Each square or rectangle on the chart
represents a stitch (horizontally) and a row
(vertically). You may have a chart filled
with colour, or maybe one that has
symbols such as stars, dots and crosses to
represent the colour used.
In the Argyll Leaf pattern by Sasha Kagan
on page 56, we are given coloured squares
for each block of colour. It is always a good
idea to photocopy your chart; you may
want to enlarge it to make it easier to read.
You may even want to use a ruler to make
each line clearer to read (Post-it notes are
also good). Make sure that you line the
ruler up under the row you have completed
and do not block from sight the next row
up the chart, this will help you to see what
needs to be done on the next row and
whether or not you need to carry or weave
in any yarn to a certain place in preparation
for it.
PREPARATION
It is essential that you do some ground
work before you start knitting. The more
prepared you are the better and the less
likely you are to get in a major tangle.
To make a bobbin:
Bobbins are used when you do not wish to
have a whole ball of yam attached to the
knitted piece whilst working intarsia.
For larger areas of color you may wish to
wrap the yam in small plastic bags,
secured with elastic bands. You may want
to use plastic bobbins which are available
from most suppliers or you may want to
make your own.
О Wrap the yarn around two fingers of
your chosen hand in the form of a figure of
eight.
0 Carefully remove the yarn from the
fingers and cut the yarn. Wind this end of
yarn around the centre of the figure of
eight and secure tightly with a knot.
The Knitter ф Issue Ten
Intarsia
© When using a bobbin pull the yarn from
the centre of the bobbin (not the knotted
end) a little at a time and keep it as close to
the work as possible to avoid tangling.
Preparing the yarn:
Across a row of intarsia you could have
many bobbins or balls of colour hanging
from the reverse of the work. To prevent
these from becoming tangled and knotted,
it is definitely a good idea to keep these in
good order.
To roughly calculate how much yarn you
will use for each area of colour:
•	Count the number of stitches used by
each colour. I am going to use the example
of the ‘Claret’ pair of leaves at the centre
point of Sasha’s chart. The two leaves are
made from 90 stitches of this colour. Wrap
the yarn around the correct size knitting
needle 10 times and this will show you how
much yarn 10 stitches would use. Measure
this piece and multiply by your number of
stitches, for example; if 10 sts = 14cm, then
90 sts = 9 x 14 =126cm.
•	I also need to allow enough yarn to get
from one row up to the next. To allow for
the fact that you may also need to travel
across some stitches it is a good idea to add
an extra 2 stitches worth of yarn for every
row of colour. In this case that is another
46 sts worth of yarn so the calculation
would be 4.6 x 14 = 64.4 rounded up to
65cm.
•	I also need to allow enough yarn for the
tail end which will hang at the beginning
and the end of the motif. So I will add
another 15cm worth of yarn for each tail.
2 x 15 = 30cm
•	The total amount of yam needed for this
motif will be approximately 220cm. The
calculation is motif (126cm) + travelling
yarn (65cm) + tails (30cm) = 221cm yarn.
In this case I would round this up and cut
myself a yarn length of 230cm to be sure
that I had enough.
For Sasha’s design I would keep the
background colour (Grey Mist) as a full ball
and would wind off small amounts of all
the other colours.
WORKING THE FIRST ROW
In most cases the first row of a chart will be
a right side row.
•	Just underneath the first chart row,
write in pencil the number of stitches
needed by each colour on the first row.
•	Leaving a tail end of yarn approx 15cm
long, work your first piece of colour.
0 Pick up the next colour and (leaving a
similar tail end of yarn) work one stitch.
© To catch in this tail end of yarn take the
first colour used over the top of the second
then take the second across to the left (over
the first colour you used) and hold it over
your left index finger.
•	Insert your needle into the next stitch
and at the same time place it under the tail
end of the yam which is held on your left
index finger.
•	Knit the next stitch.
0 Let the tail end of yarn drop down to the
reverse of the work and knit the following
stitch. This will catch the yarn between
your stitches.
•	Repeat this process at each colour
change. This is a weaving technique for
Fair Isle and is used to carry yarn from one
place to another and for weaving in the
ends. For Fair Isle it is repeated a few times,
but for intarsia only one ‘weave’ is required
at the beginning of each yarn colour.
•	At the end of this row (and each
subsequent row), untangle the yarns.
WORKING THE NEXT ROW
(You will have the wrong side facing).
О Work along the row to the point where
The Knitter ф Issue Ten
Masterclass
you need to change colour. Insert the right
needle into the next stitch purlwise. Take
the yarn that is finished with over the top
of the next colour needed and drop to the
left side. Pick up the second colour
ensuring that the yarns remain crossed
over and continue according to pattern.
WORKING THE NEXT ROW
(You will have the right side facing).
О Work along the next row to the point
where you need to change colour. Insert
the right needle into the next stitch
knit wise.
0 Take the yarn that is finished with over
the top of the next colour needed and drop
to the left side. Pick up the second colour
ensuring that the yarns remain crossed and
continue according to pattern.
CARRYING THE YARN
© In Sasha’s Argyll Leaf pattern, she has
suggested that you carry the main shade
(Grey Mist) across the reverse of the leaf
motifs. This will create a double thickness
of fabric at these points and will give the
knitted piece more of a 3D effect.
To weave the background colour across the
reverse of the knitted piece, work as for the
weaving technique that I gave for the first
row, but repeat until the yarn has travelled
to where you need it, weaving every 2 or 3
stitches. It is essential that you do not leave
a gap any bigger than this between
catching the yam in, as otherwise you will
make your piece prone to puckering.
SEWING IN THE ENDS
Where yarn colours have been added in or
finished with you will be left with ends of
yarn attached to the knitted piece. In the
case of Fair Isle it may be preferable and
certainly quicker, to weave these ends in as
you work using the weaving- in technique
a© described. However, for the intarsia
technique a neater and safer alternative is
to sew in the ends. It is a REALLY good idea
to sew your ends in as you go along.
Perhaps sew them in after every pattern
repeat or allow 15 minutes towards the end
of your knitting session.
•	Thread a slightly sharp sewing needle
(such as a large tapestry needle) with the
end of yarn and sew around the outside of
the shape it has created. Do this by
weaving the yarn in and out of the points
where the colours have been crossed over,
making sure that you sew in the direction
that will close up gaps and doesn’t enlarge
any holes.
•	Pull the knitted fabric slightly to ensure
that the sewn stitches have not been
worked too tightly and secure by ©e wing
the yarn over itself a few times.
•	Do not cut the yarn too close to your
final stitch and leave an end a couple of
centimetres long. This will prevent the
yarn end from coming undone during
wearing and washing.
FIXING MISTAKES
If you find you have made a mistake in your
colourwork, there is no need to rip back,
it’s possible to just Swiss dam over small
areas of colour. О
The Knitter ф Issue Ten
CONTACT US
The Knitter Magazine, Future Publishing,
30 Monmouth Street, Bath BA1 2BW
TheKnitter@futurenet.com
GALLERY
This month, City Knitty in Edinburgh shares its latest creations.
Send in your own pictures and inspire other readers
“I’ve been knitting and crocheting on and off since my
childhood in the late 1960s, when my grandmother
showed me the basics. However, I only recently
discovered knitters’ communities like City Knitty through
the rise of the ‘New Craft’ culture here and in the USA.
“Although I don’t get to as many meetings as I’d like to,
I’m fairly active in the City Knitty online groups in Yahoo
and Ravelry. I’ve found this to be a valuable source of
information, advice and help. ”
MADELEINE SHEPHERD
-41
Gwen Fyfe
“These socks are knit
from the Best Foot
Forward pattern in
Betsy Lee McCarthy’s
book Knit Socks
- possibly my
favourite pattern
book of all time! They’re knit with wool
and an extended leg for our chilly
Edinburgh weather. I love little portable
projects like this. The twisted stitches
prevent having to carry around extra
needles, but end up with a nice cabled
appearance.”
Madeleine’s
project
“I may be quite unusual in that I
make art works using these skills
as well as clothing. Around a year
ago I set out to make a sculpture of
a planet described in a science-
fiction novel. I asked online if
anyone had come across a pattern
for its unusual shape. No-one had
done, but another City Knitty
member, Hugh Griffiths, offered
to write one using a computer
programme he’d developed!
Helward’s World, as it was called,
has been exhibited as a joint work
in a local exhibition and at a maths
conference in Washington DC.
“I really enjoy collaborative
projects as we all learn from each
other. I’ve also been involved in
the UK Hyperbolic Crochet Coral
Reef and am currently working on
another joint project though it
doesn’t involve knitting at all.
There’s more about my work on
my website www.
madeleineshepherd.co.uk. ”
The Knitter ф Issue Ten
Readers ’ Projects
Hugh Griffiths
“I made this Heart Hat in RYC Cashsoft
chunky yarn, so it is very warm and
cosy. The ribbing is knit quite loose,
so that the hat is not too snug.
“To make the heart pattern I wrote
a computer program to calculate the
position of each of the stitches and
decide which are inside and which
outside the heart. It then gives a list of the stitches at which
the colours change.”
Laura Allen
“I bought the yarn first from
Kris at Ecoknits, just because
I loved it so much. When I
wao looking for a project to
knit with it, it was Kris who
suggested Jean Moss’ Garnet
pattern. Initially I was
reticent, as I have only been
back knitting for a short time and wasn’t sure I’d
manage the lace edging, but I was persuaded to try.
It only took me four attempts to get it right.. .It was
a fairly fast knit (once I’d mastered the lace, that is).
“I love this sweater it goes with so many things
and you can change the look of it depending what
you wear underneath it.”
Georgina Allison
“I love knitting lace, and wear it summer and
winter: I thought this vivid green would look
great in any season. It is a Fyberspates 100%
Mongolian Cashmere and the pattern is called
Shetland Triangle by Evelyn A. Clark from
Wrap Style (Interweave Press). This is the
second Shetland Triangle I’ve done and
probably not the last. Despite appearances, it’s
such a simple, mesmerising pattern with only a
one row repeat (with a tweak at the edges to
account for the increases). I made a few more
repeats than the original pattern.
“Despite the gorgeously soft cashmere, I
should call this my recession project! The
pattern came from a library book and I used
just over 1/2 skein of yam.”
We'd love to see what
you've been knitting.
Email a picture of your
knitting to TheKnitter(a>
futurenet.com or post
a photo to The Knitter,
Future Publishing,
30 Monmouth Street,
Bath BAI 2BW
We'll choose our
favourites each month
and photograph them
in our studio herein
Bath. Please include
your name, address
and telephone number
or email address with
your pictures.
The Knitter ф Issue Ten
Suppliers’ details for this
issue, plus essential
abbreviations and errata
YARN
SUPPLIERS
VIRTUAL YARNS
mair i@ virtualyarns. com
www.virtualyarns.com
ROWAN
01484 681881
www. knitrowan, com
FYBERSPATES
01948 710808
www.fyberspates.co.uk
JAMIESON & SMITH
01595 693579
www.shetlandwoolbrokers.co.uk
RENNIE HANDKNITS
01779 871400
www.jcrennie.com
TWILLEYS
01943 872264
salee@ tbramsden. co. uk
MARION FOALE
01827 720333
foale@talk21. com
REGIA
01325 394237
www. coatscrafts. co.uk
SIRDAR/SUBLIME
01924 371501
www.sirdar, co.uk
DEBBIE BLISS/
LOUISA HARDING
c/o Designer Yarns
01535 664222
www. designeryarns .uk.c от
ACCESSORIES
PURLESCENCE
w w w.pur lescence. co. uk
DUPPDUPP
www. duppdupp. com
DUTTONS FOR
BUTTONS
01423 S02 092
www. duttonsfor buttons
.co.uk
SOAK/ CLOVER
0116 271 0033
www.eqsuk.com
TRENDSETTER
www. trendsetteryarns.com
CREATIVE
BEADCRAFT
01494 778818
www. creative b eadcraft. co.
uk
KNIT PRO
www.knitpro.eu
CHOPPED
TOMATOES
www.chopped-tomatoes,
com
BOOK
PUBLISHERS
GUILD OF MASTER-
CRAFTSMEN
01273 488005
ww w. thegmcgroup. com
HAMLYN
с/о Octopus Books
0207 5318400
www.octopusbooks/hamlyn.
co.uk
OTHERS
MACMILLAN
ww w. macmillan. org. uk
BELLEVUE TEA
www.bellevue-tea.co.uk
NATIONAL TRUST
www.nationaltrust, org.uk
ABBREVIATIONS
alt	alternate
approx	approximately
beg	beginning
ch st	crochet chain stitch
cn	cable needle
cont	continue
de	double crochet (US single crochet)
dec	decrease (work two stitches together)
DK	double knitting
DPN	double-pointed needle
est	established
foil	following
inc	increase (usually knit into same stitch twice)
К	knit
KFB	knit into front and back of stitch
K2tog	knit the next two stitches together
meas	measures
Ml	make one (increase 1 stitch)
MB	make a bobble
MS	main shade
P	purl
patt	pattern(s)
PB	place bead
PFB	purl into front and back of stitch
pm	place marker
prev	previous
psso	pass slipped stitch over
p2sso	pass 2 slipped stitches over
P2tog	purl 2 stitches together (1 stitch decreased)
P3tog	purl 3 stitches together (2 stitches decreased)
rem	remain(ing)
rep(s)	repeals)
rev st st	reverse stocking stitch
ERRATA
We have become aware of the
following errata:
ISSUE 8
Caper
Row numbers in bold on
pages 68-69, starting at row
13 and going up to 48 should
be numbered from 1 to 36
not 13 to 48 as printed.
RS	right side
skpo	slip 1 stitch, knit 1 stitch, pass slipped stitch over (1 stitch decreased)
SI	slip
si st	slip stitch
slm	slip marker
SSK	slip 2 stitches one at a time, knit 2 slipped stitches together
SSP	slip 2 stitches one at a time, purl 2 slipped stitches together through back of the loops
st(s)	stitch(es)
st st	stocking stitch
tbl	through the back of the loop
tog	together
WS	wrong side
wyib	with yarn in back
wyif	with yarn in front
yb	take yarn back
y<	bring yarn to front
yfwd	yarn forward
yo	yarn over
yrn	yarn round needle
ISSUE 4
Carnival Caridgan
Notes section
Eyelets: Rows should end
with P2tog and not K2tog.
Chart C: Rows 141 to 198 are
missing from Chart C for the
sleeves. They can be worked
from Chart A, Rows 5 to 62
instead.
ERRATA ONLINE
For regular updates of our
errata, go online to
www.simplyknitting.co.uk
and click on ‘The Knitter
- Errata and Clarifications’.
The Knitter ф Issue Ten
EVENING GLAMOUR
ON SALE WEDNESDAY (
Jennie Atkinson’s juniper Delicate lace shawl
Sequinned bolero from Jane Gottelier Pretty cardigan by Marie Wallin
Beaded evening gloves and scarf set Stunning Art Deco cushion
Elegant vintage cardigan Men’s evening socks Shrug and evening bag
Cabled tops for mother and daughter Nicky Epstein’s aran top