


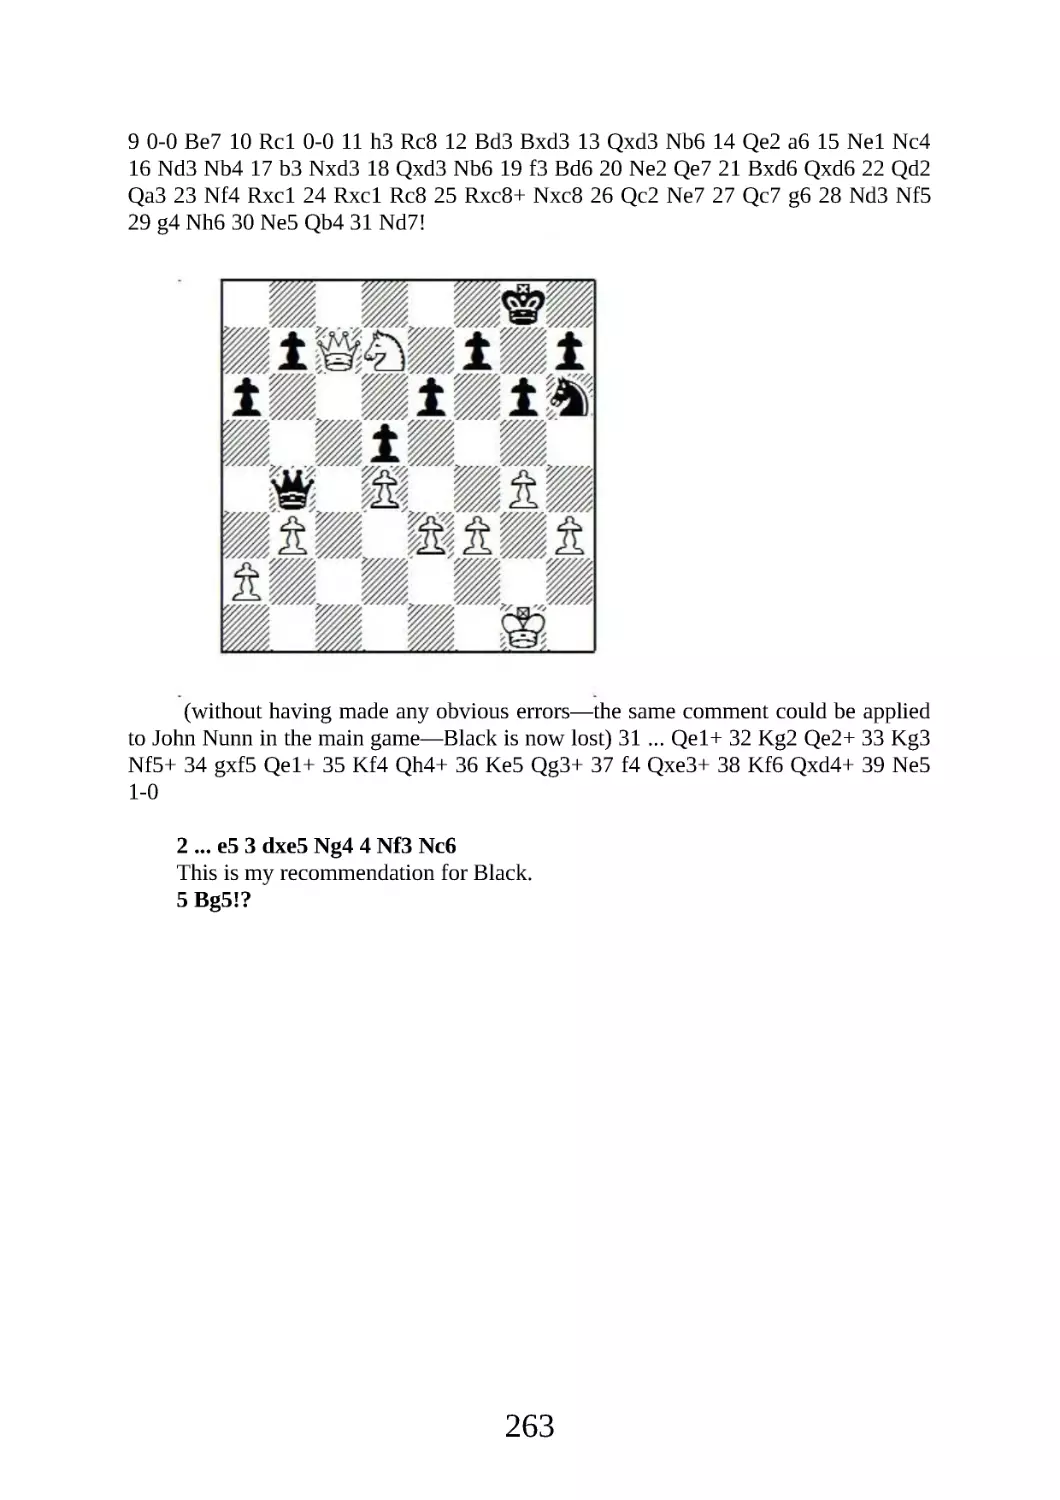


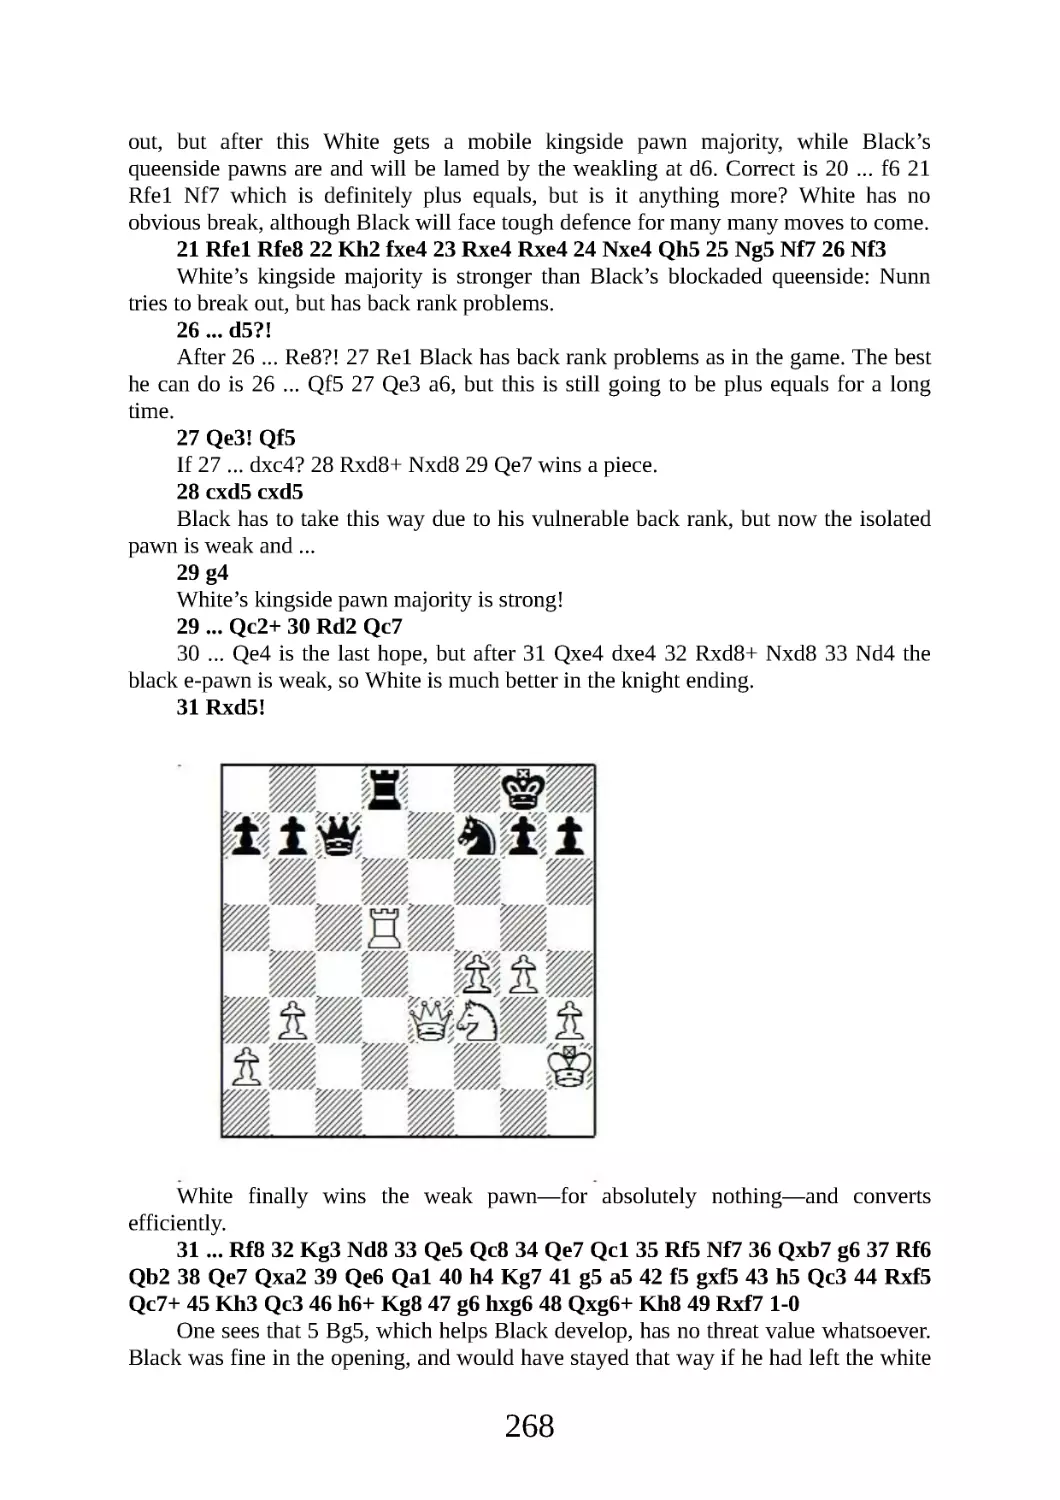


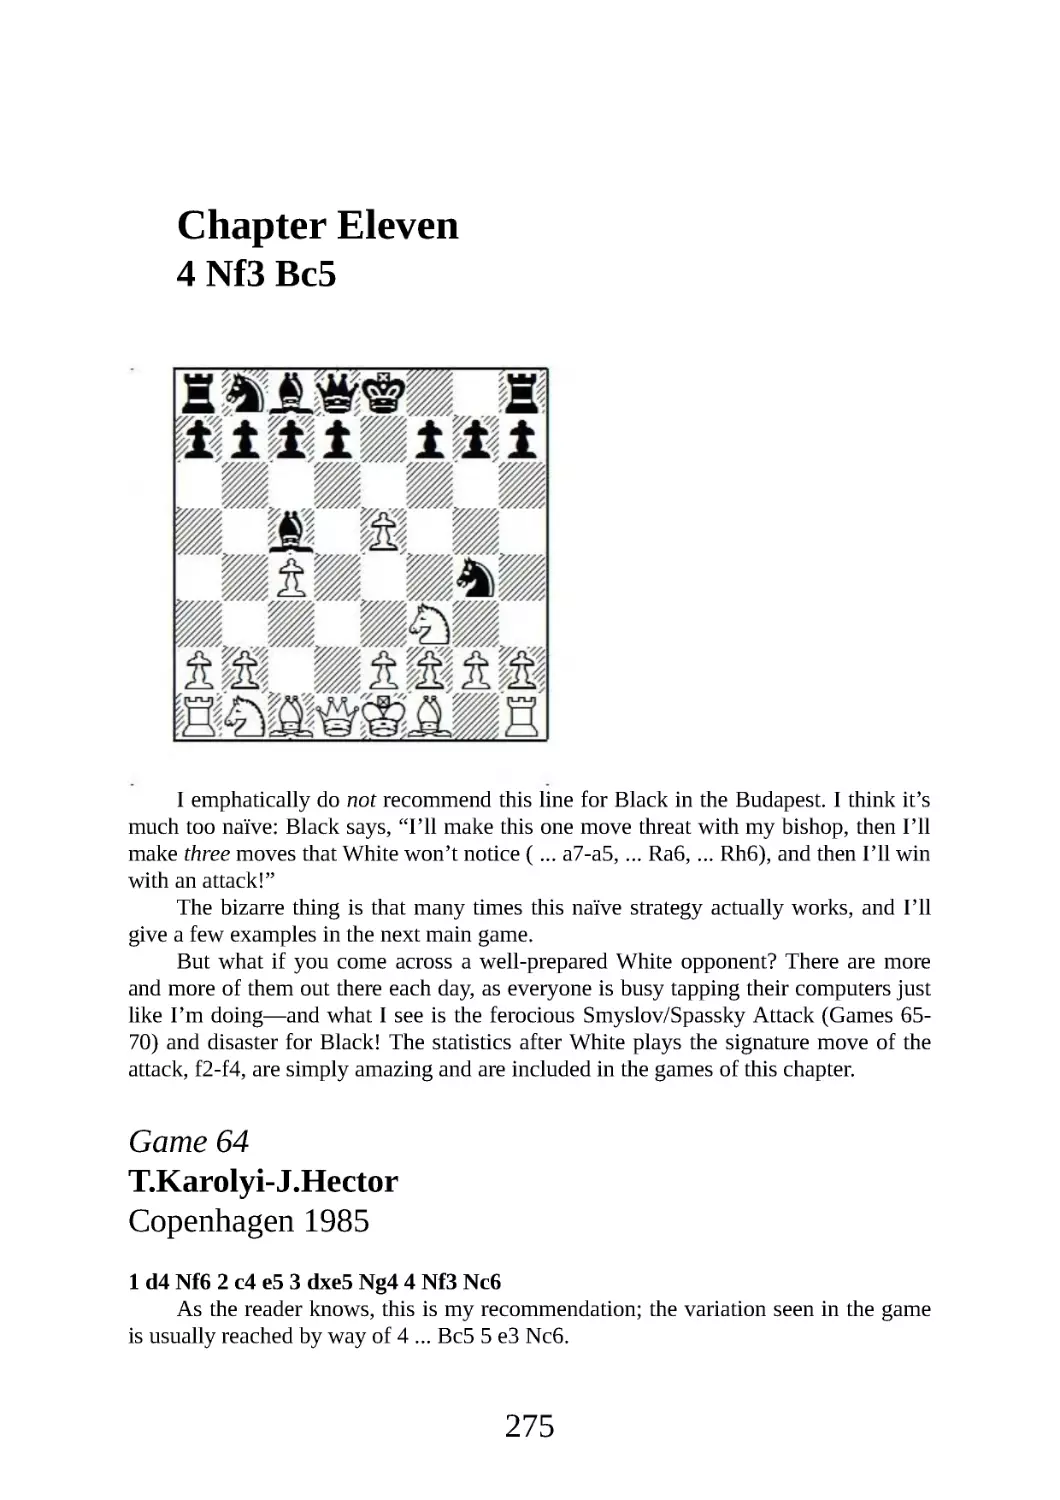

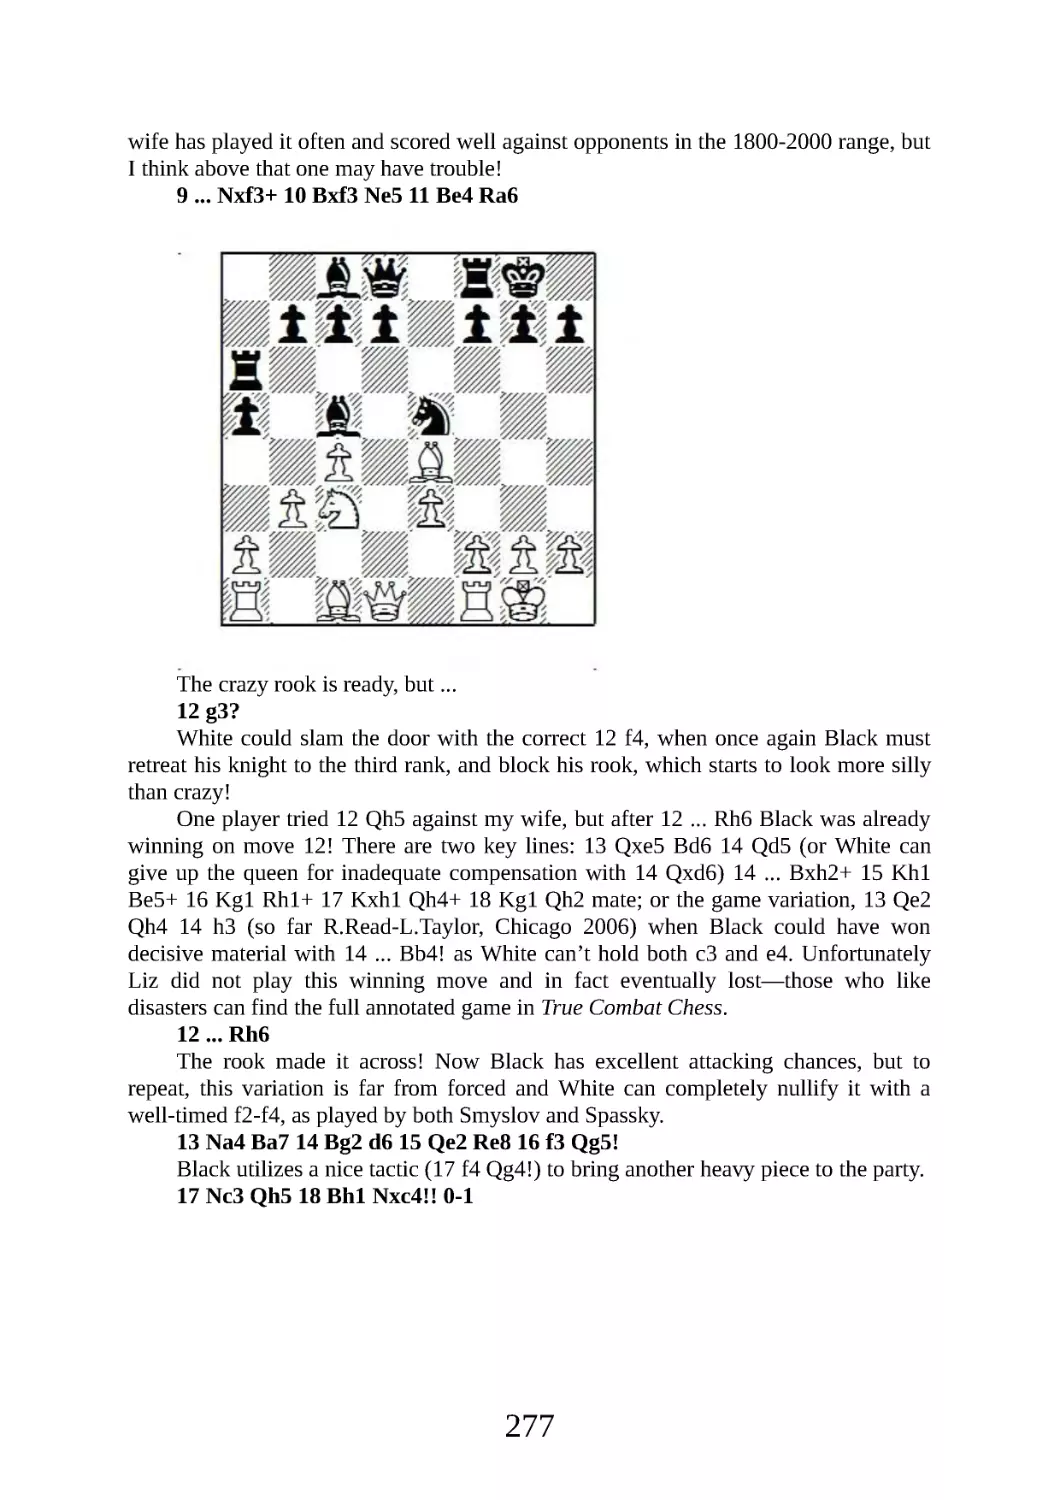


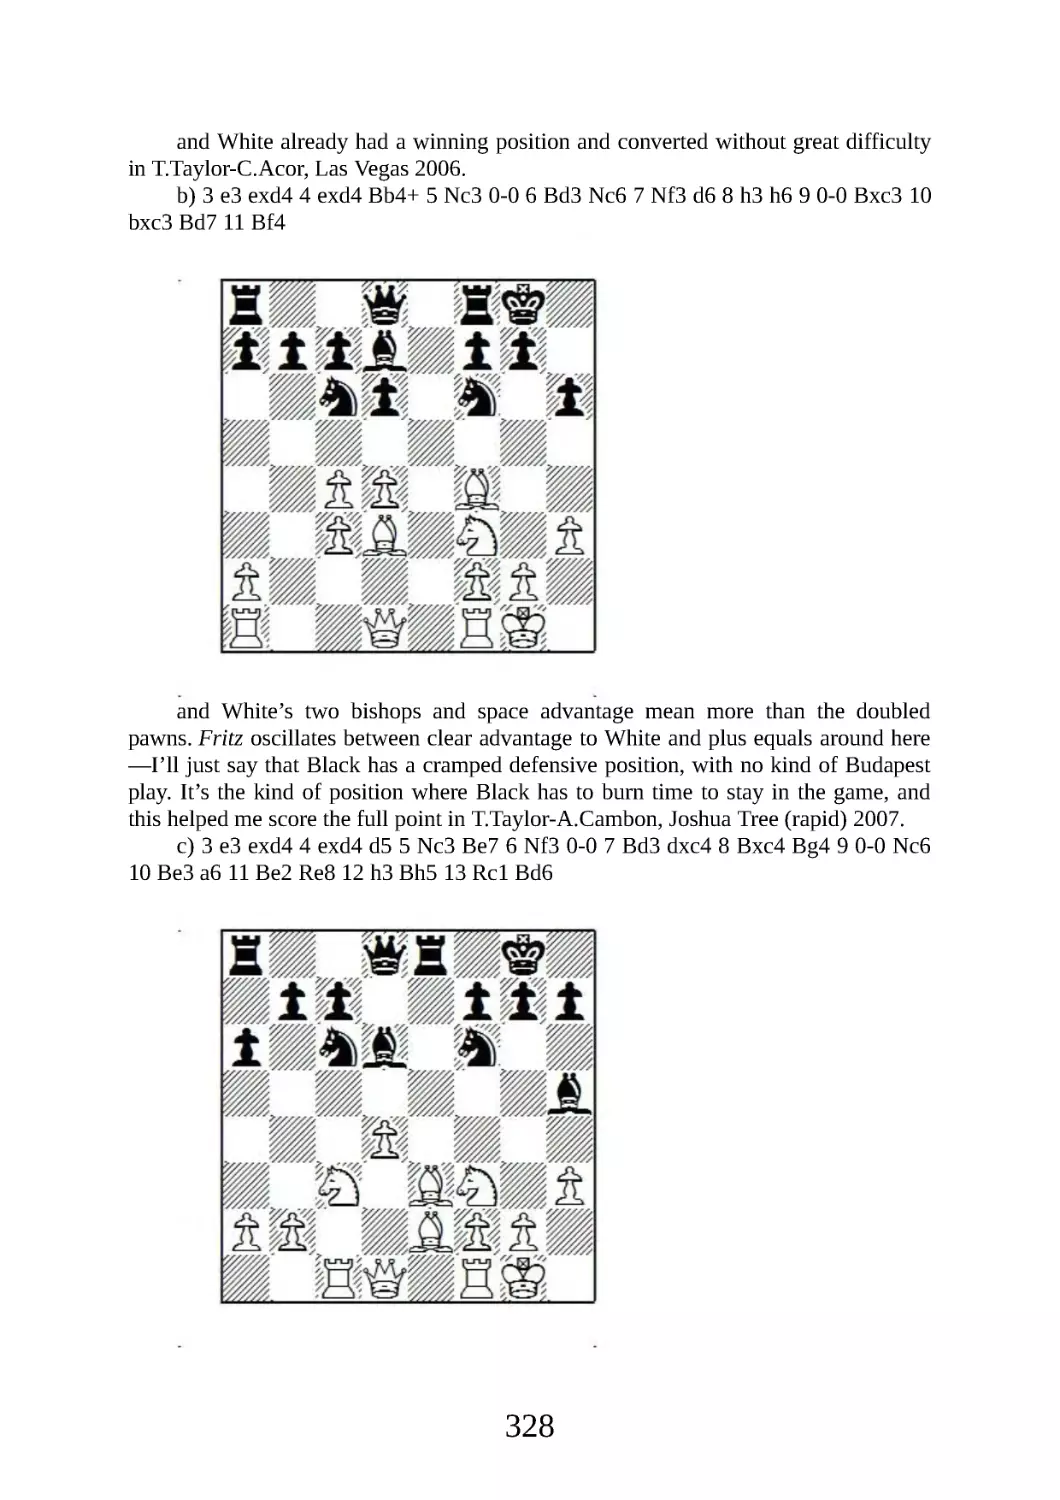


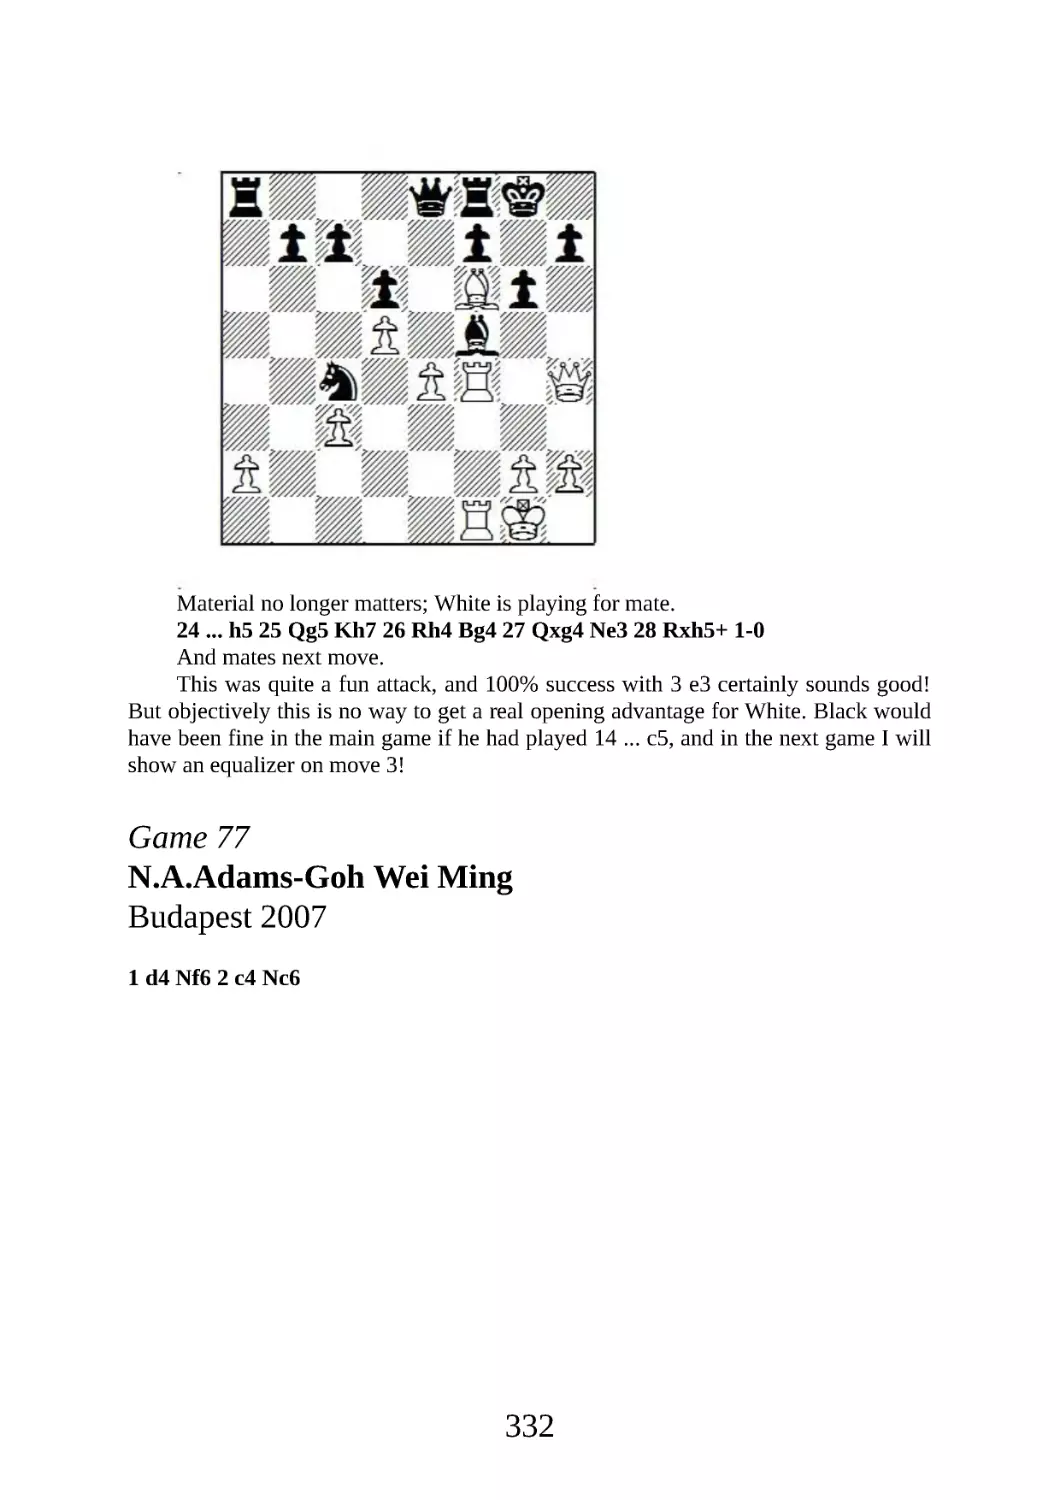
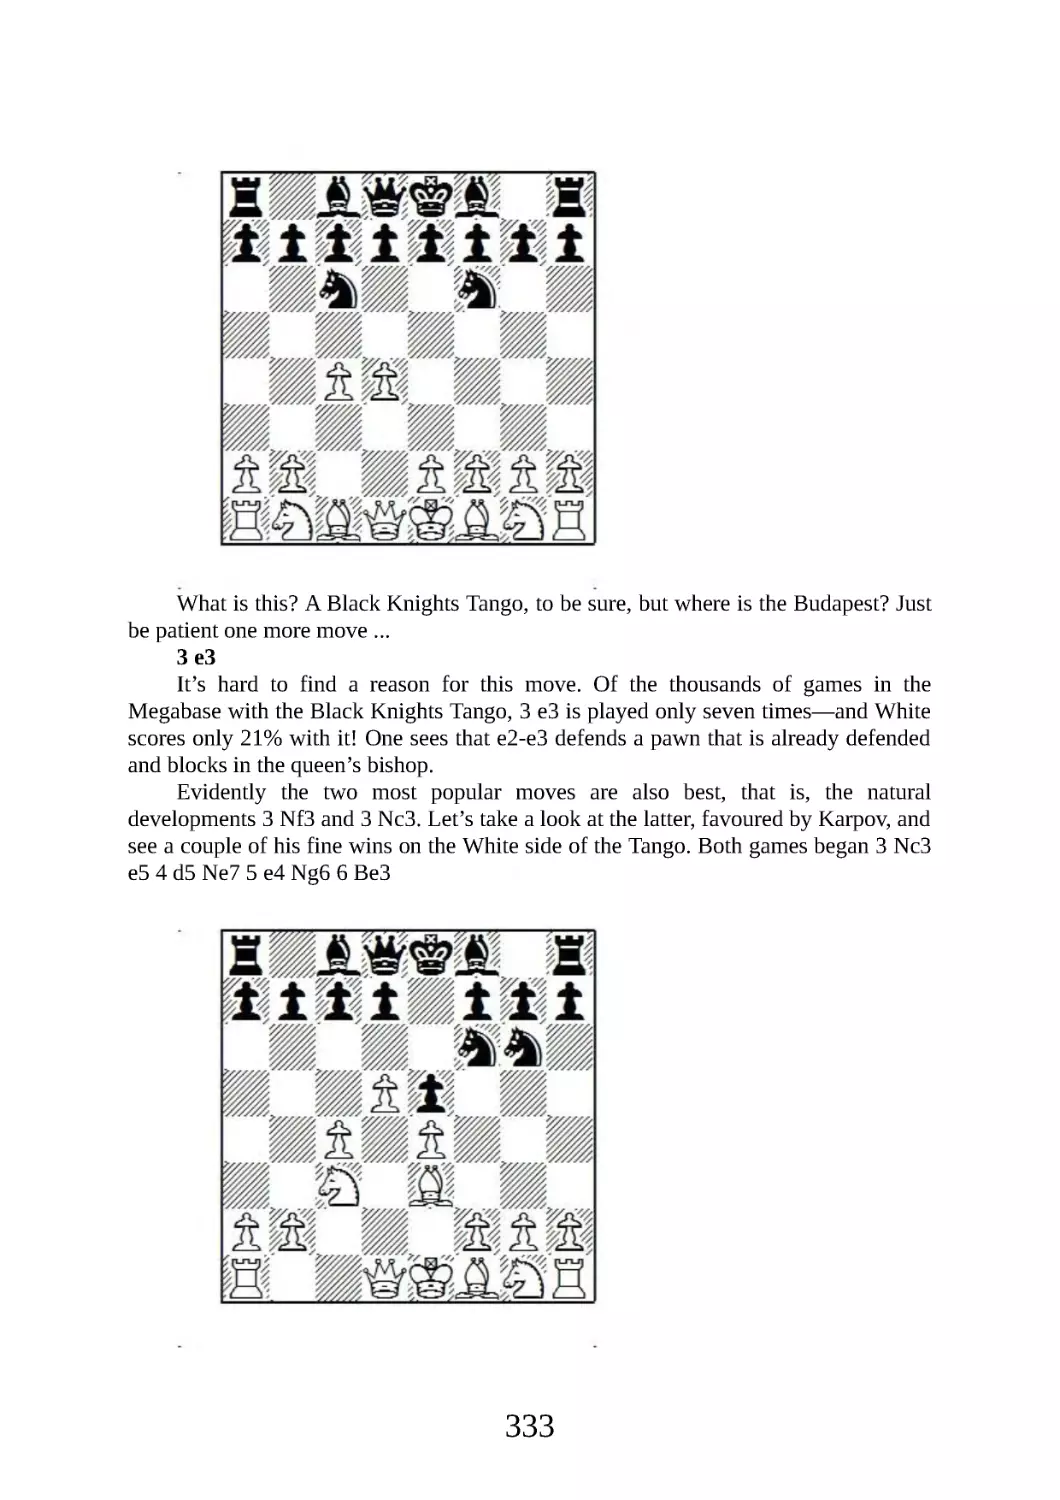


Текст
2
First published in 2009 by Gloucester Publishers plc (formerly Everyman Publishers
plc), Northburgh House, 10 Northburgh Street, London EC1V 0AT
Copyright © 2009 Timothy Taylor
The right of Timothy Taylor to be identified as the author of this work has been
asserted in accordance with the Copyrights, Designs and Patents Act 1988.
All rights reserved. No part of this publication may be reproduced, stored in a
retrieval system or transmitted in any form or by any means, electronic, electrostatic,
magnetic tape, photocopying, recording or otherwise, without prior permission of the
publisher.
British Library Cataloguing-in-Publication Data
A catalogue record for this book is available from the British Library.
ISBN: 978 1 85744 753 8
Distributed in North America by The Globe Pequot Press, P.O Box 480,
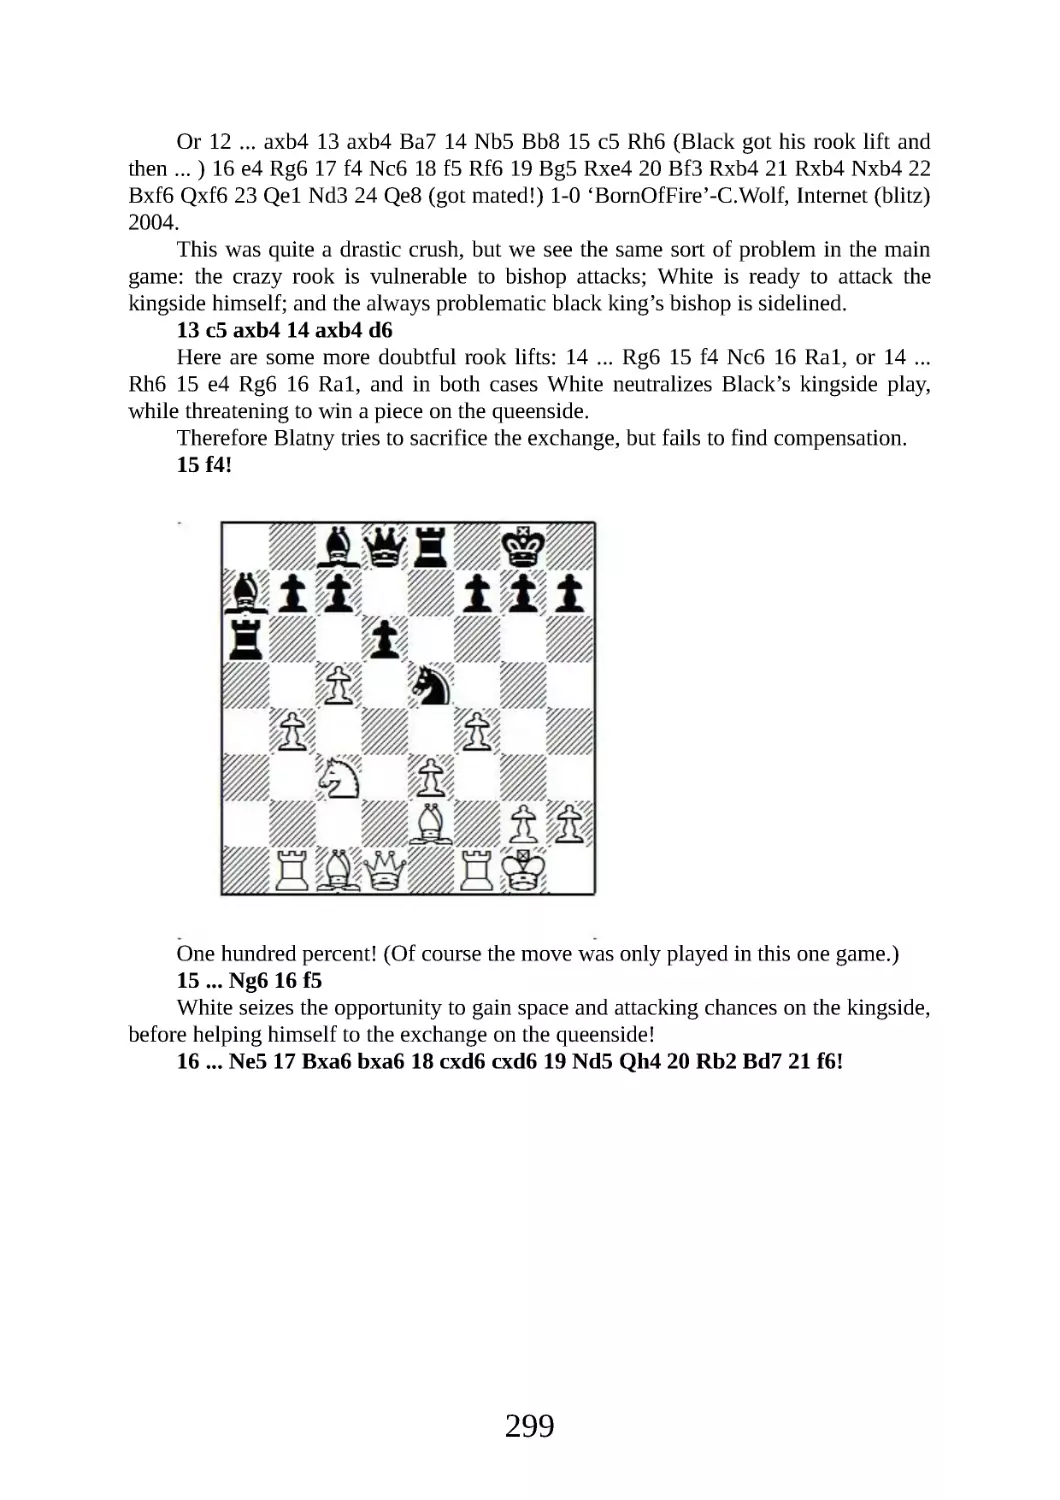
246 Goose Lane, Guilford, CT 06437-0480.
All other sales enquiries should be directed to Everyman Chess, Northburgh
House,
10 Northburgh Street, London EC1V 0AT
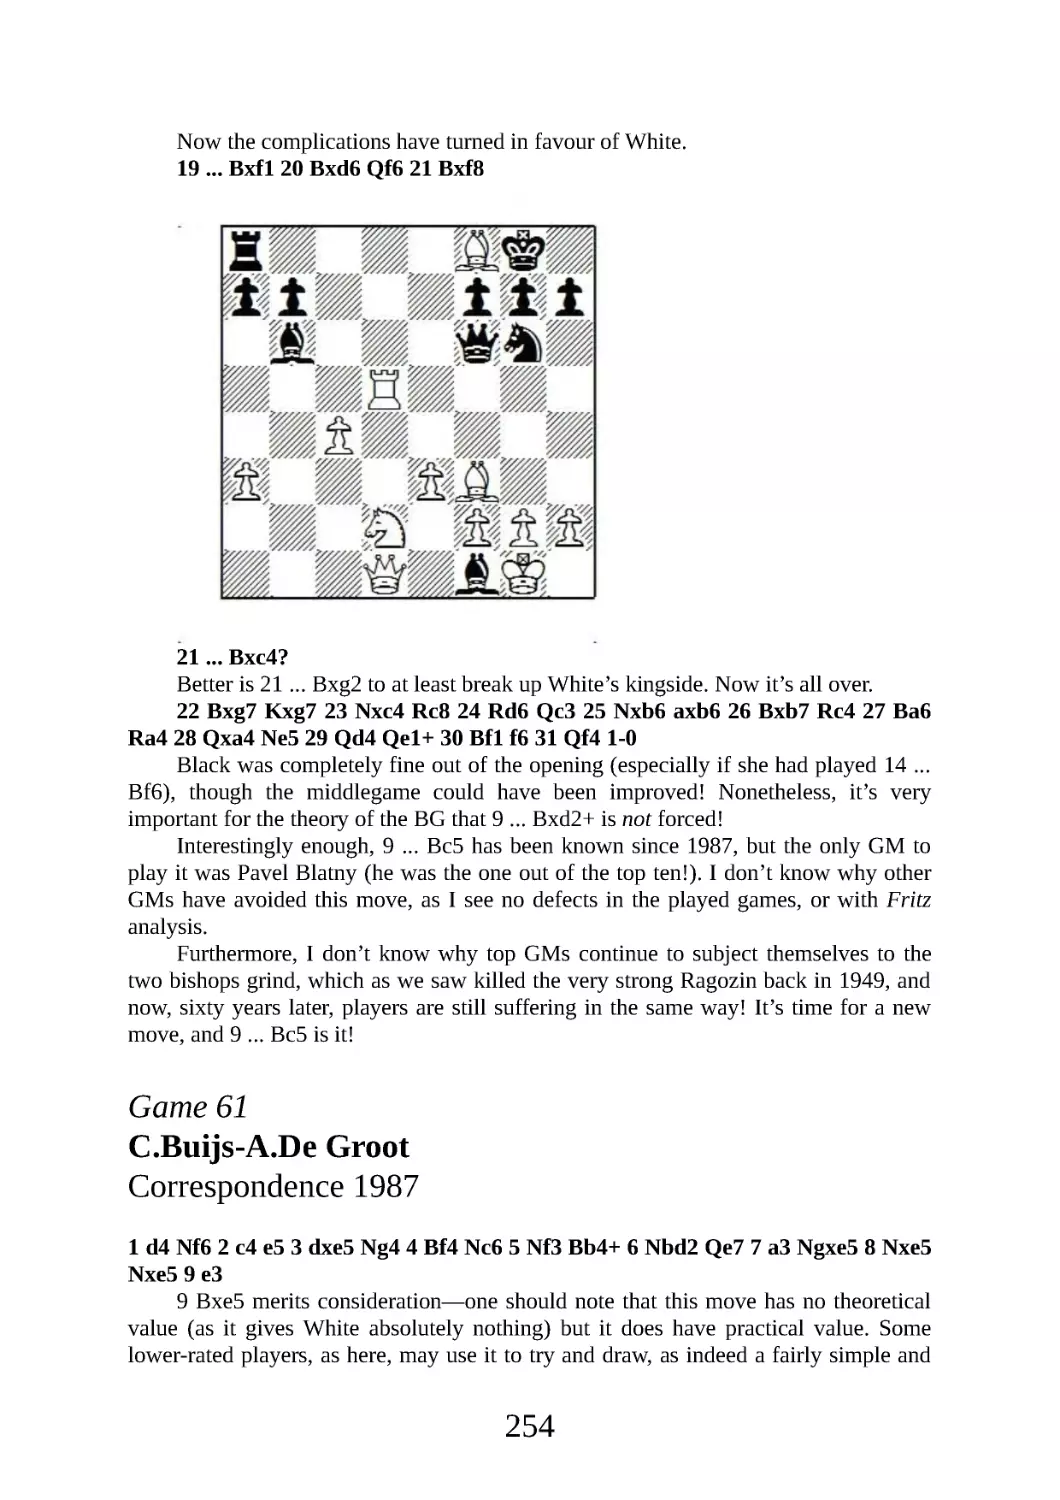
tel: 020 7253 7887 fax: 020 7490 3708
email: info@everymanchess.com; website: www.everymanchess.com
Everyman is the registered trade mark of Random House Inc. and is used in this
work under licence from Random House Inc.
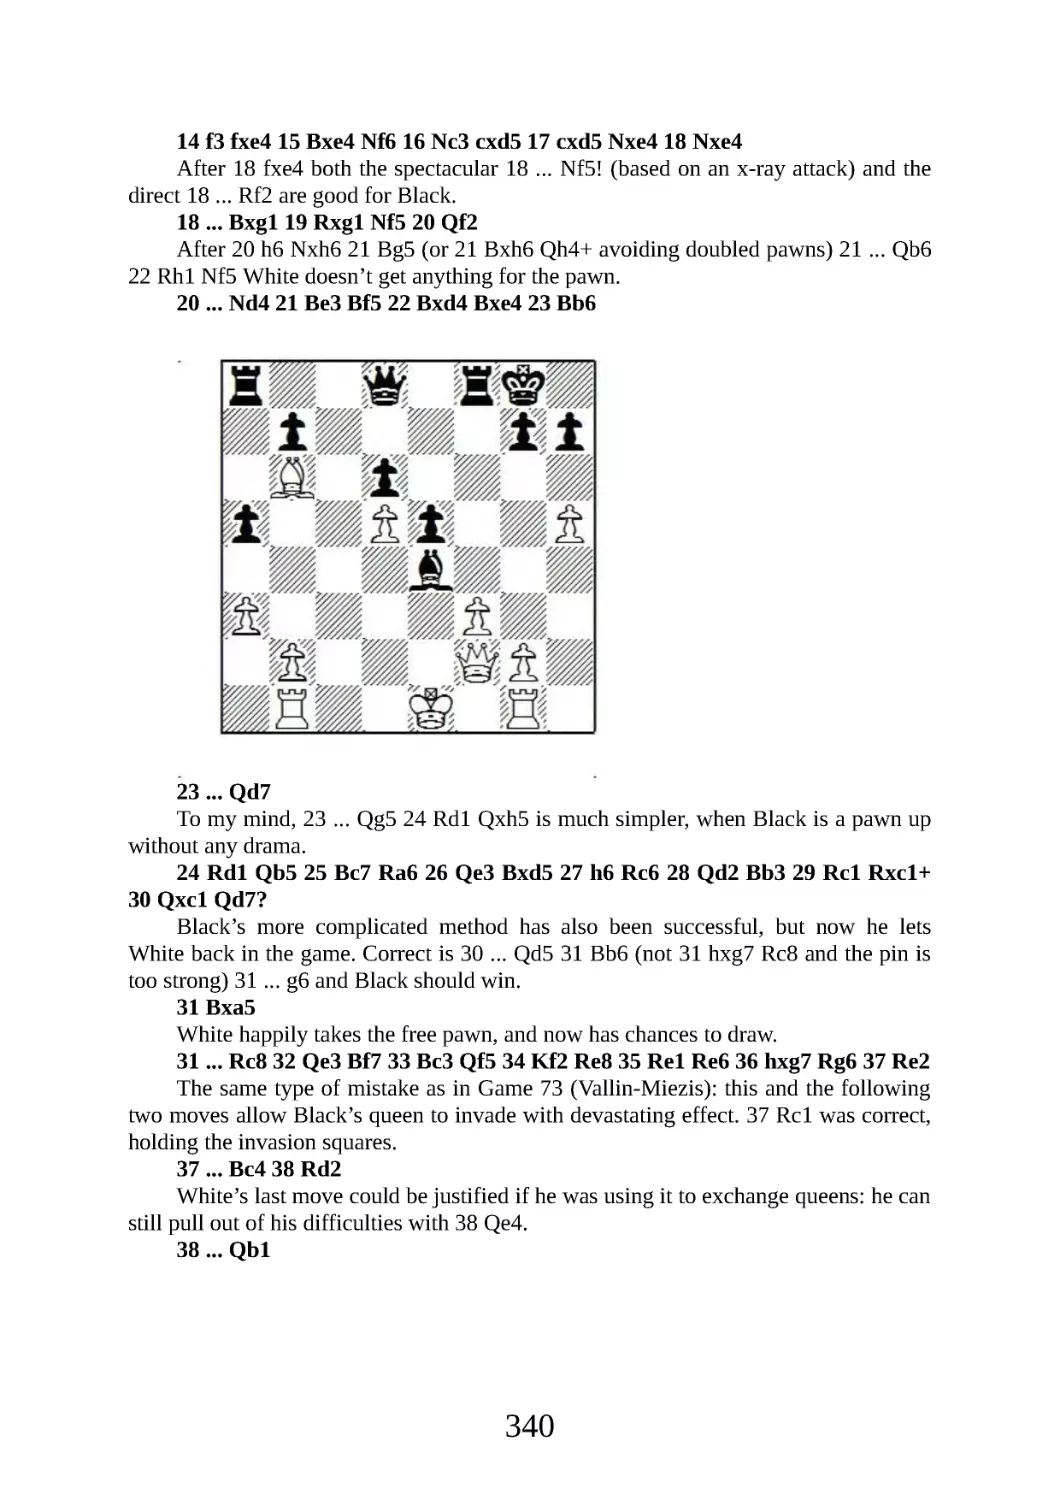
To my beautiful wife Liz
Everyman Chess Series
Chief advisor: Byron Jacobs
Commissioning editor: John Emms
Assistant editor: Richard Palliser
Typeset and edited by First Rank Publishing, Brighton.
Cover design by Horatio Monteverde.
Printed and bound in the US.
3
Contents
Bibliography
Introduction
Part I: The Alekhine Attack (4 e4)
1 The Alekhine Attack as played by Alekhine
2 Deviations
3 Alekhine Attack vs. 5 ... Ng6
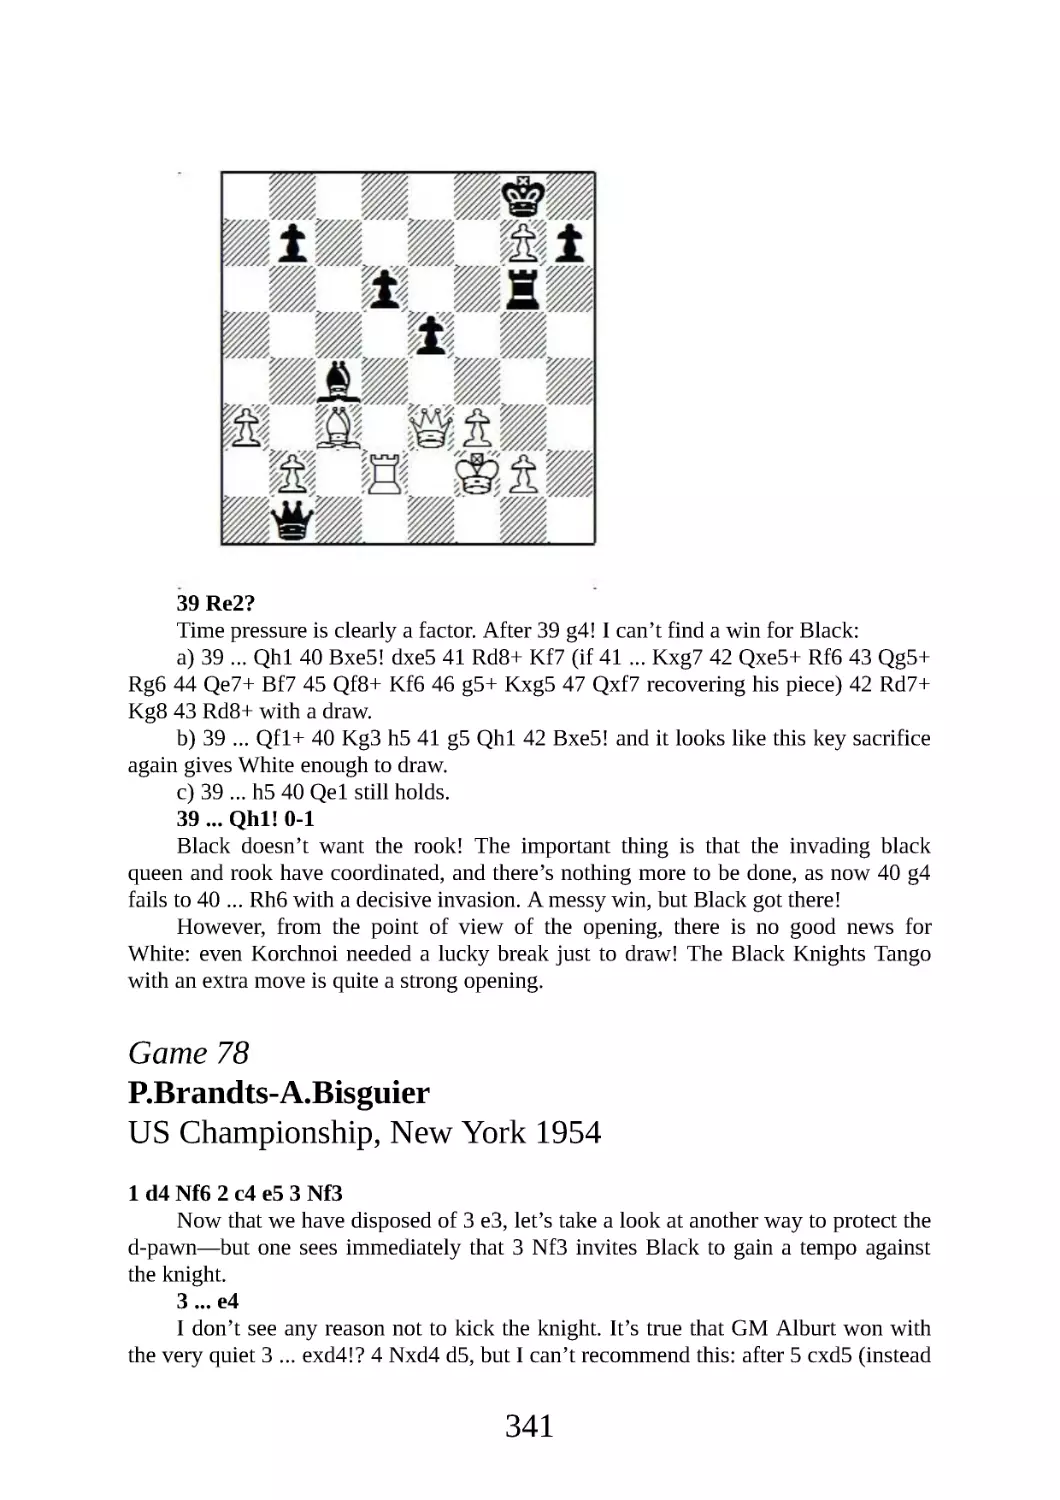
4 Alekhine Attack vs. 5 ... Nec6
5 Réti (4 ... h5!)
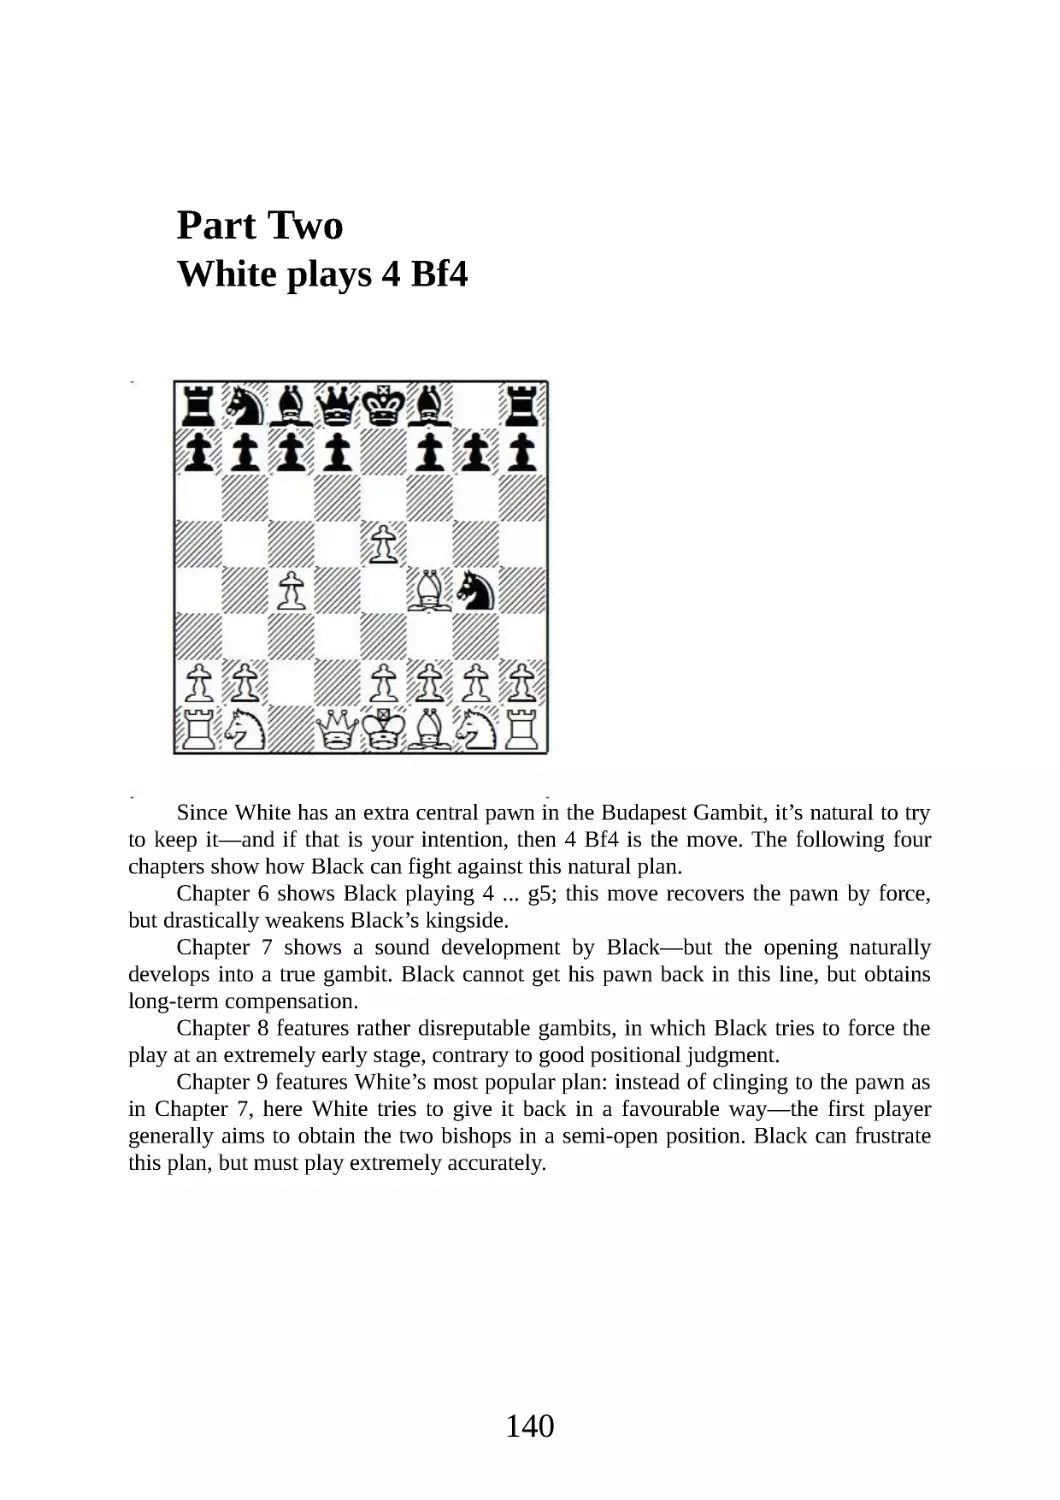
Part II: White plays 4 Bf4
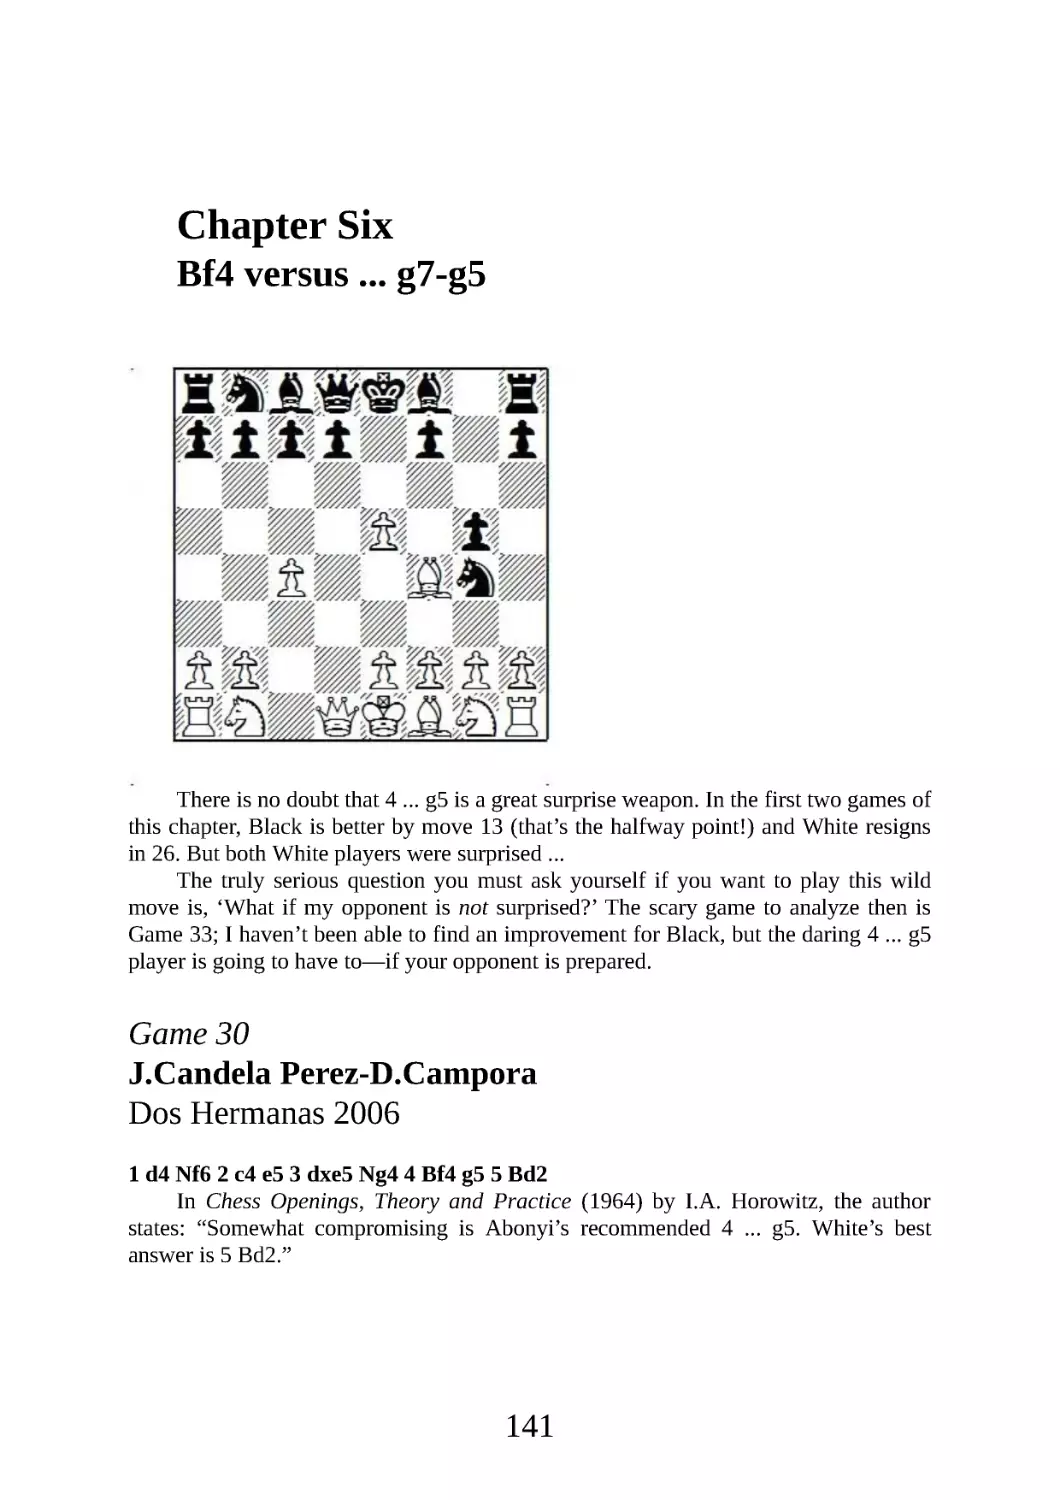
6 Bf4 vs. . .. g7-g5
7 The Original Budapest Gambit (Bf4 and Nc3)
8 Black Gambits against 4 Bf4
9 Bf4 Main Line with Nbd2
Part III: White plays 4 Nf3
10 4 Nf3 Nc6 when White avoids 5 Bf4
11 4 Nf3 Bc5
Part IV: Unusual Lines
12 The Quiet Ones: 4 Nc3, 4 e3, 4 Nh3
13 Materialism
14 White Declines the Budapest Gambit
15 The Fajarowicz Gambit
Conclusion
Index of Complete Games
4
Bibliography
Books
The Fabulous Budapest Gambit, Viktor Moskalenko (New in Chess 2007)
Budapest Fajarowicz, Lev Gutman (Batsford 2004)
My Best Games of Chess 1924-1937, Alexander Alekhine (G. Bell and Sons
1969)
Chess Openings Theory and Practice, I.A . Horowitz (Simon and Schuster 1964)
My Great Predecessors, Volumes I and IV, Garry Kasparov (Everyman
2003/2004)
Computer Programs and Databases
Chessbase.com
Fritz 11
Megabase 2008
MegaCorr4 (ChessMail)
Correspondence Database 2006 (ChessBase)
Chessgames.com
Acknowledgment
Extra special thanks to the champion of tournament organizers,
Mr. Budapest himself, Laszlo Nagy
5
Introduction
Let’s get to the heart of the matter right away: after months of hard work analyzing the
Budapest Gambit, in almost every case turning over barrels of conventional wisdom, I
have come to two clear conclusions, which are:
One: the Budapest Gambit is sound, and can be played at the highest level.
Two: the opening is quite difficult to play.
Elaborating on the second point, the main thing I noticed was that the BG is not a
“feel” opening. One can’t just learn a few ideas and then happily play the gambit in a
tournament game. In fact, every line demands accurate calculation, strong strategical
play and precise move orders.
And speaking of precise—a tiny difference in position can make one tenth move
‘best’ and another tenth move ‘losing!’ Here’s an example where a GM stumbles. One
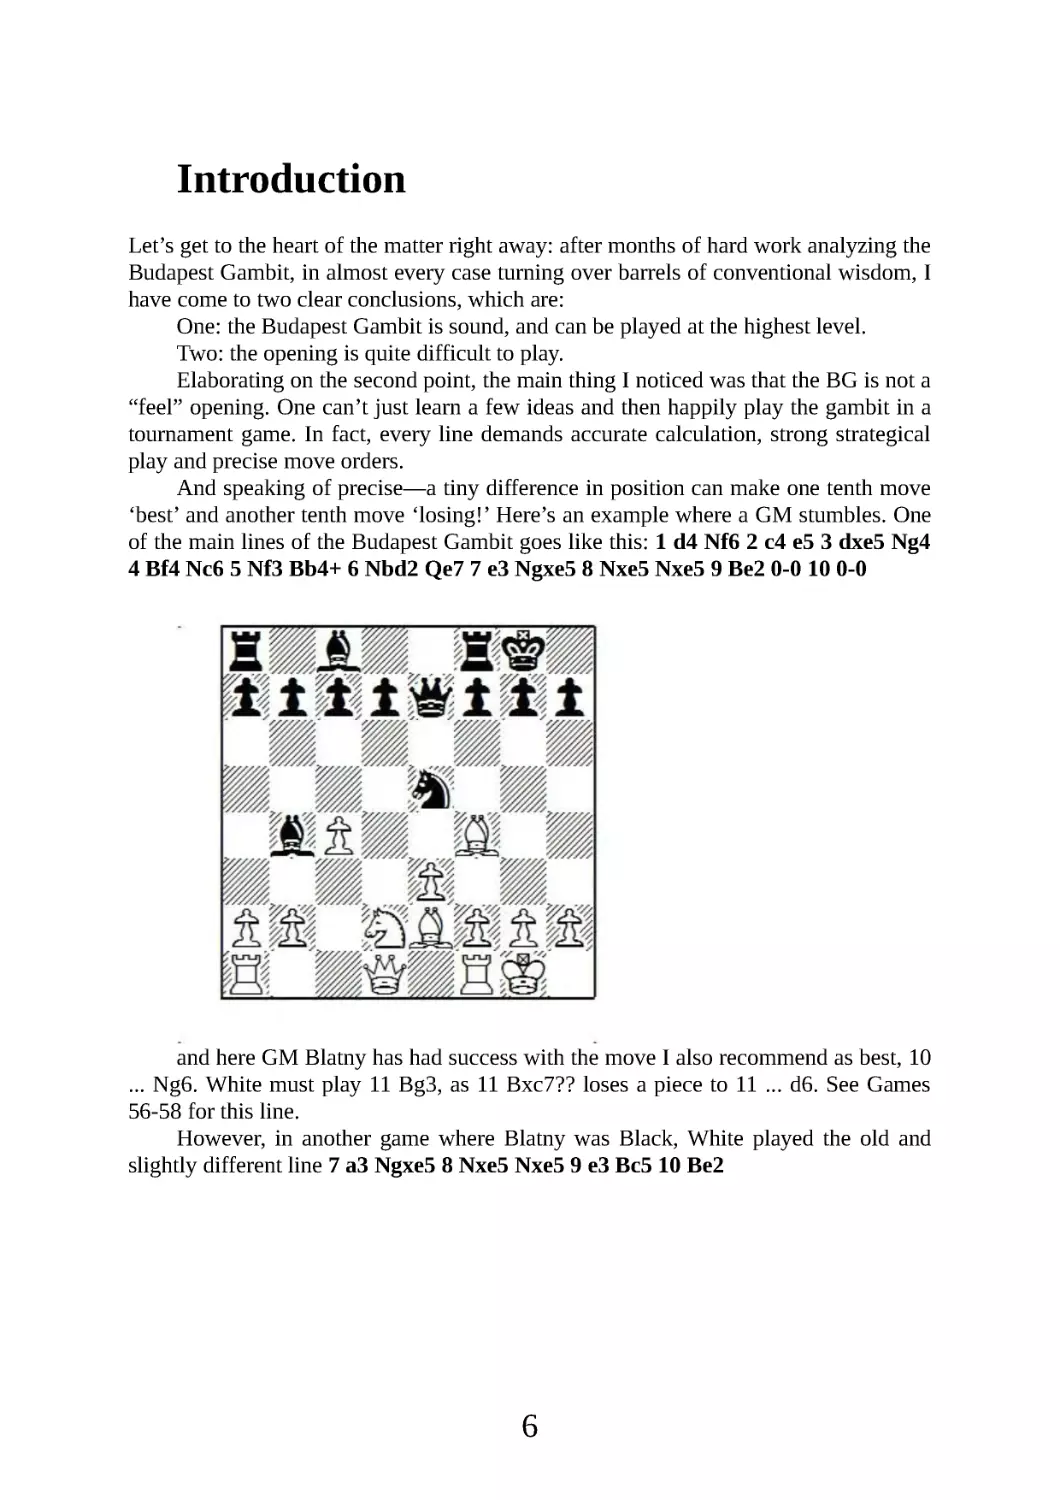
of the main lines of the Budapest Gambit goes like this: 1 d4 Nf6 2 c4 e5 3 dxe5 Ng4
4 Bf4 Nc6 5 Nf3 Bb4+ 6 Nbd2 Qe7 7 e3 Ngxe5 8 Nxe5 Nxe5 9 Be2 0-0 10 0-0
and here GM Blatny has had success with the move I also recommend as best, 10
... Ng6. White must play 11 Bg3, as 11 Bxc7?? loses a piece to 11 ... d6. See Games
56-58 for this line.
However, in another game where Blatny was Black, White played the old and
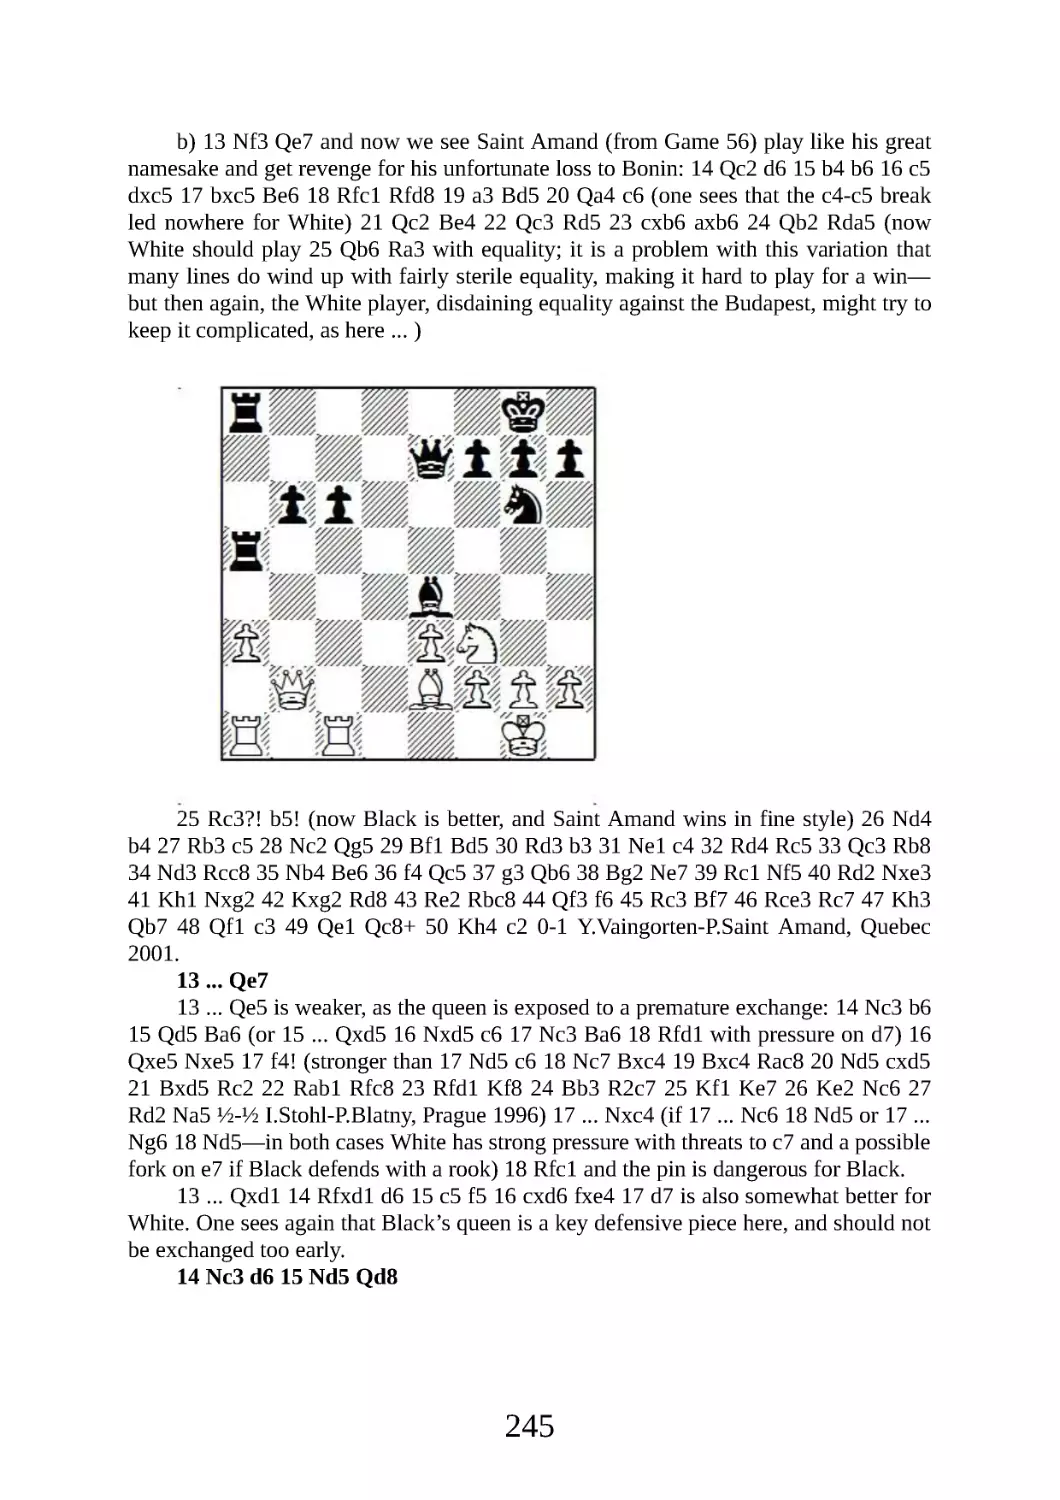
slightly different line 7 a3 Ngxe5 8 Nxe5 Nxe5 9 e3 Bc5 10 Be2
6
and now 10 ... d6 is correct, blocking the f4-bishop, but evidently confusing
variations (it’s the same move number, but just that little, crucial bit different) Blatny
played 10 ... Ng6 and White answered 11 Bxc7, taking a clear pawn, as 11 ... d6 does
nothing here since the bishop escapes via a5 (see the notes to Game 61 for this
debacle).
In other words it’s possible to lose right in the opening if you’re not careful.
Here’s an even more drastic example. I devote no less than five chapters to the
Alekhine Attack—which I think is the critical test of the Budapest Gambit—that
begins 1 d4 Nf6 2 c4 e5 3 dxe5 Ng4 4 e4 with the idea 4 ... Nxe5 5 f4, when White
has an extended Maróczy Bind and central domination. If Black allows this attack, he
is doomed to a difficult defence, as the first four chapters demonstrate. Therefore I
recommend Réti’s brilliant counterstroke 4 ... h5, which is analyzed in depth in
Chapter 5. My feeling is that the critical move thus comes on move 4 (!) and it’s
possible to be blown off the board if you miss it!
Another critical move comes in the popular variation 1 d4 Nf6 2 c4 e5 3 dxe5
Ng4 4 Nf3 and again Black faces a critical choice on move 4. I advocate 4 ... Nc6, as I
haven’t found any good defence to the Smyslov/Spassky Attack that occurs after 4 ...
Bc5 5 e3 and a later f2-f4 for White, where it often turns out that the bishop is
misplaced on c5, and White can attack the black king along the long diagonal.
So you have been warned!
But there is an upside, and a substantial one: if you do your homework, both by
studying this book and using your chess engine and especially, by thinking
independently (there are many new ideas to be found in the opening, often very early
in the game) then you, as Black, will have a significant advantage over your opponent.
I play 1 d4 as my main opening, and I only encounter a Budapest Gambit about once a
year. I think this is typical—so very few White players will have your expertise, and
even better for you, they might think the Gambit is unsound! These players may well
try to keep the gambit pawn, giving you the opportunity to win with savage attacks
(take a look at Games 34, 38, 39 and 73 among others).
7
There is also another, rather peculiar advantage to becoming a Budapest
Gambiteer. Many White 1 d4 players are uncomfortable playing against the Budapest
and so avoid it altogether. After 1 d4 Nf6—when they see that gleam in your eye!—
they play 2 Nf3 (most often) or sometimes 2 Bg5, and obviously the Budapest is not
possible after either of these moves, but the Trompowsky has been pretty well
defanged by 2 ... e6, and 2 Nf3 is just too quiet to give White very much.
Some personal statistics are appropriate here: after I signed on to write this book,
I tried to obtain the BG over the next seven months, in the course of which I played in
several tournaments and had Black 23 times. How many Budapest Gambits? Zero!
The box score reads like this: 15 games where I faced 1 e4 (no BG there!), two games
where I faced 1 c4, one 1 Nf3, and only five that started 1 d4 Nf6. Of those five, two
of my opponents went for the Trompowsky with 2 Bg5 (one of them made a draw),
and three went for “safety” (they didn’t get it!) with 2 Nf3. The result is that with
Black against 1 d4 I won four and drew only one against these less ambitious
openings, but I couldn’t get the Budapest!
Now don’t let this discourage you! By playing 1 ... Nf6, by somehow hinting that
you are about to throw a sharp gambit in White’s face, you often induce your opponent
to play a move that is simply inferior to the objectively best 2 c4.
Add in my 90% score against these second best moves and one can see that these
alternatives are simply not dangerous if one is well prepared. I would recommend that
any prospective Budapest player should also check out John Cox’s excellent book on
just that subject, Dealing with d4 Deviations, in which he maintains his enthusiasm
while writing about some of the most mind-numbingly boring openings in all of chess!
Now let’s get back to the subject at hand, the far from boring Budapest Gambit
which occurs after 2 c4 e5 (and it’s worth noting that, despite my personal statistics,
according to the Chessbase.com Opening Explorer, 2 c4 is by far the most likely move
— in fact it’s played more than three times as often as the second most popular, 2 Nf3).
I have tried to be objective throughout the book—after all, as a d4 player I want
to know the strongest line against the gambit, as well as Black’s best counterplay.
And objectively speaking, the Alekhine Attack must be the sternest test of the
gambit. From a practical point of view, however, 4 Nf3 is dangerous as so many
Budapest Gambiteers will follow old paths and try 4 ... Bc5, when the second player ’s
game is quite difficult (see Chapter 11). I don’t think 4 Bf4 is a big threat to the
Gambit’s existence, but (as Blatny’s mishap showed) Black must play extraordinarily
precisely. Even the best players in the world (see Chapter 9) have gone seriously astray
in this position, but I think Black is fine as long as he does not stick to outmoded
variations.
Other moves besides the big three (4 e4, 4 Bf4, 4 Nf3) should not trouble Black,
and declining with something like 3 e3 is likewise nothing if Black is prepared.
To complete this introduction, I offer two games of former World Champion
Vladimir Kramnik, who has been known to walk both sides of the Budapest street, and
a short win of my own, in the course of which the layout of the book is explained.
Game 1
8
V.Kramnik-S.Mamedyarov
Nice (rapid) 2008
After this game, many people asked, “How did the World Champion lose to the
Budapest Gambit?”
1 d4 Nf6 2 c4 e5 3 dxe5 Ng4 4 Nc3
This quiet move (along with 4 e3 and 4 Nh3) is focused on controlling d5
without spending any time trying to hold onto the extra pawn. These variations will be
fully examined in Chapter 12.
4 ... Nc6
As we will learn in the above cited chapter, this is already not so accurate—but I
find it refreshing to see an opening so little explored that a GM can make an
inaccuracy on move 4!
Since the pawn is unguarded, Black should take it: 4 ... Nxe5. If White continues
quietly with 5 e3, Black should play 5 ... d6 which gives his knight a retreat, prepares a
kingside fianchetto, and most important, retains the option of ... c7-c6 to kick any
white knight that might drop in on d5. See Game 72 for this precise defence.
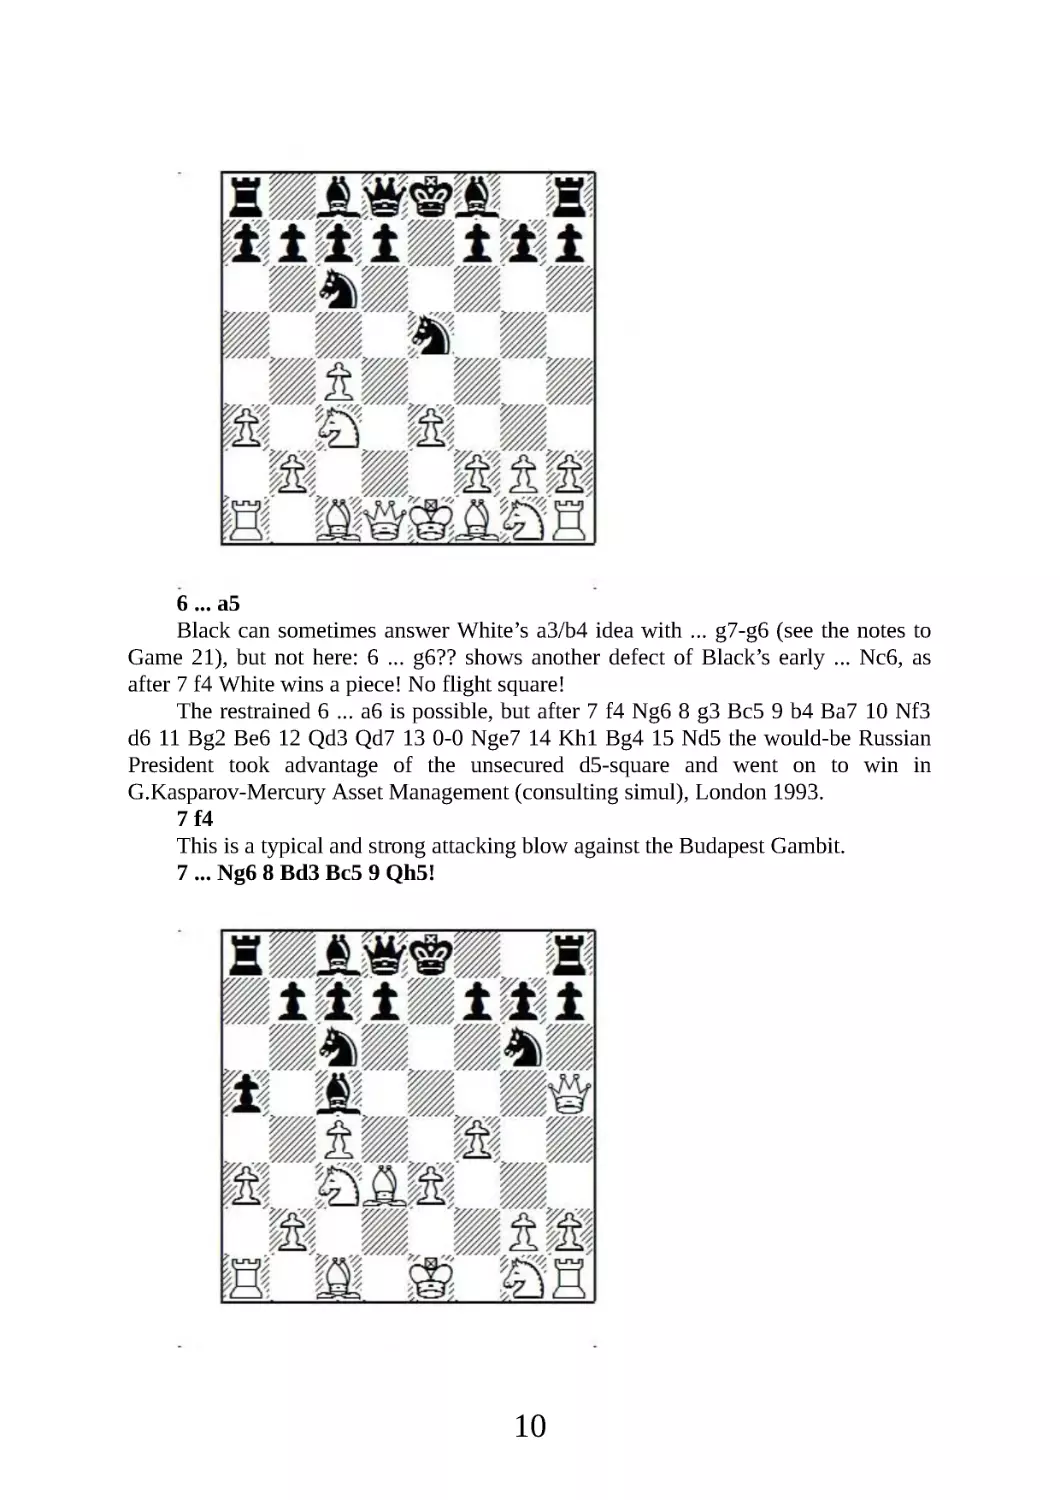
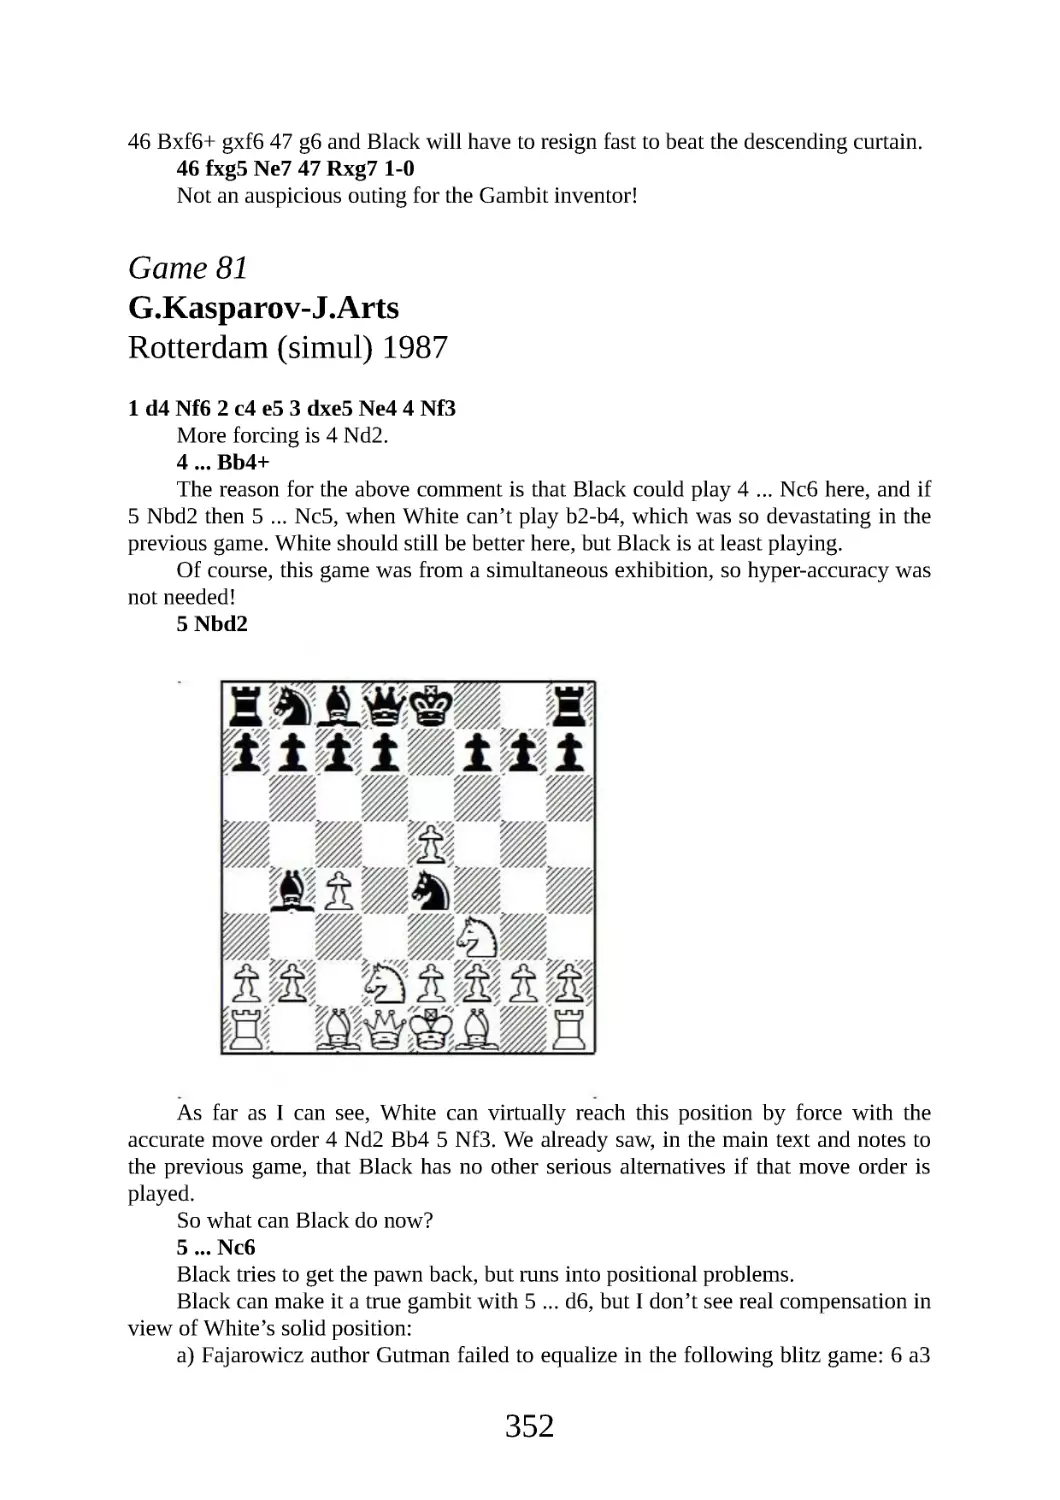
5 e3 Ngxe5 6 a3
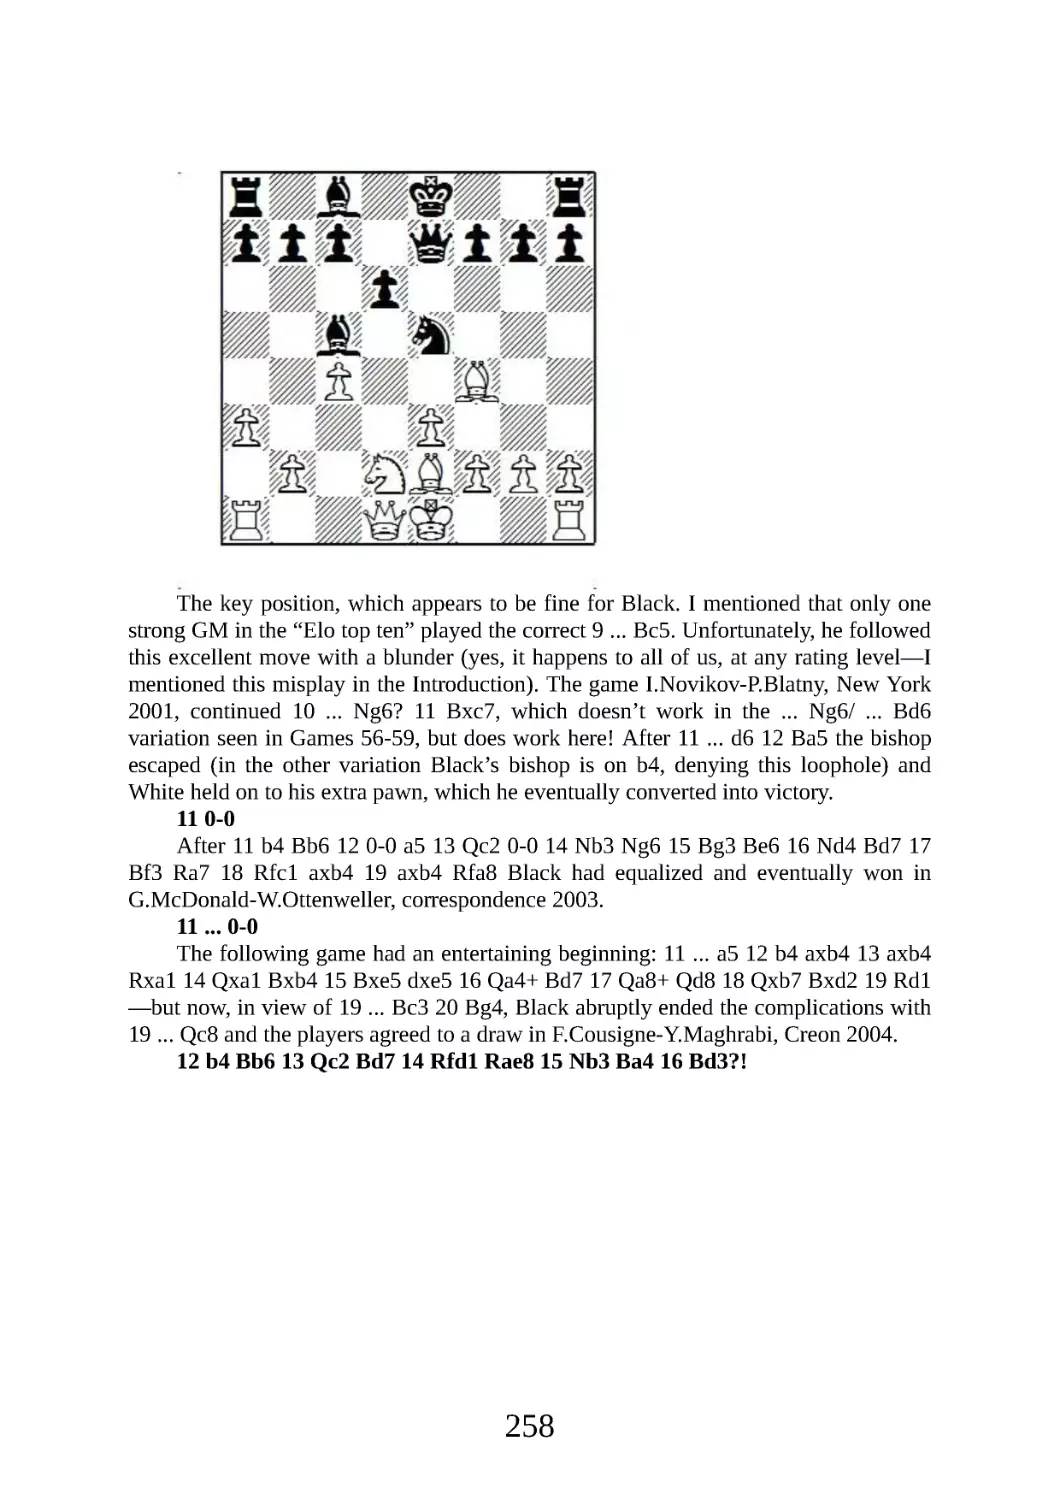
9
6 ... a5
Black can sometimes answer White’s a3/b4 idea with ... g7-g6 (see the notes to
Game 21), but not here: 6 ... g6?? shows another defect of Black’s early ... Nc6, as
after 7 f4 White wins a piece! No flight square!
The restrained 6 ... a6 is possible, but after 7 f4 Ng6 8 g3 Bc5 9 b4 Ba7 10 Nf3
d6 11 Bg2 Be6 12 Qd3 Qd7 13 0-0 Nge7 14 Kh1 Bg4 15 Nd5 the would-be Russian
President took advantage of the unsecured d5-square and went on to win in
G.Kasparov-Mercury Asset Management (consulting simul), London 1993.
7 f4
This is a typical and strong attacking blow against the Budapest Gambit.
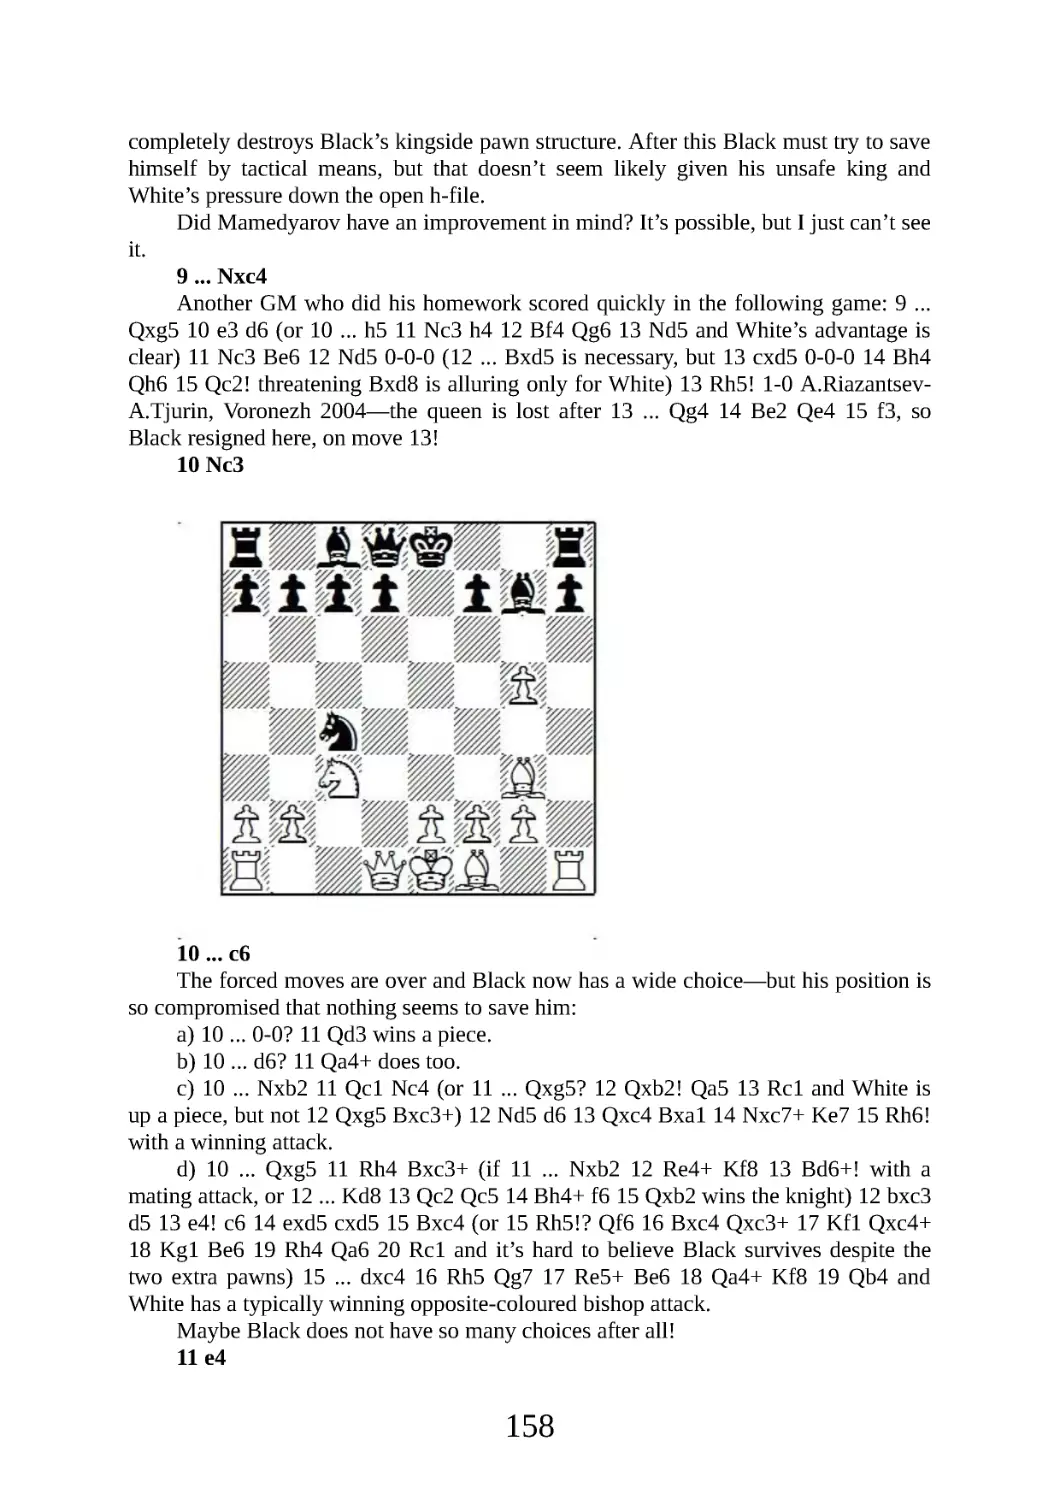
7 ... Ng6 8 Bd3 Bc5 9 Qh5!
10
Excellent! White attacks with gain of time. So far White has outplayed his
opponent.
9 ... d6!?
Here or on the next move Black should settle for a somewhat worse position—
instead he continues his “subtle” manoeuvres and walks to the edge of the precipice.
Best is 9 ... Qh4+ 10 Qxh4 Nxh4 11 g3 Ng6 12 Nf3 d6 (but not 12 ... 0-0?! 13
Nd5 Bd6 14 e4, when Black’s cramped position collapses in view of the weakness at
c7) 13 Nd5 Kd8 14 Ng5 Be6 15 Bd2 Nge7 16 Nxe6+ fxe6 17 Nc3 and White’s two
bishops give him the edge in the endgame.
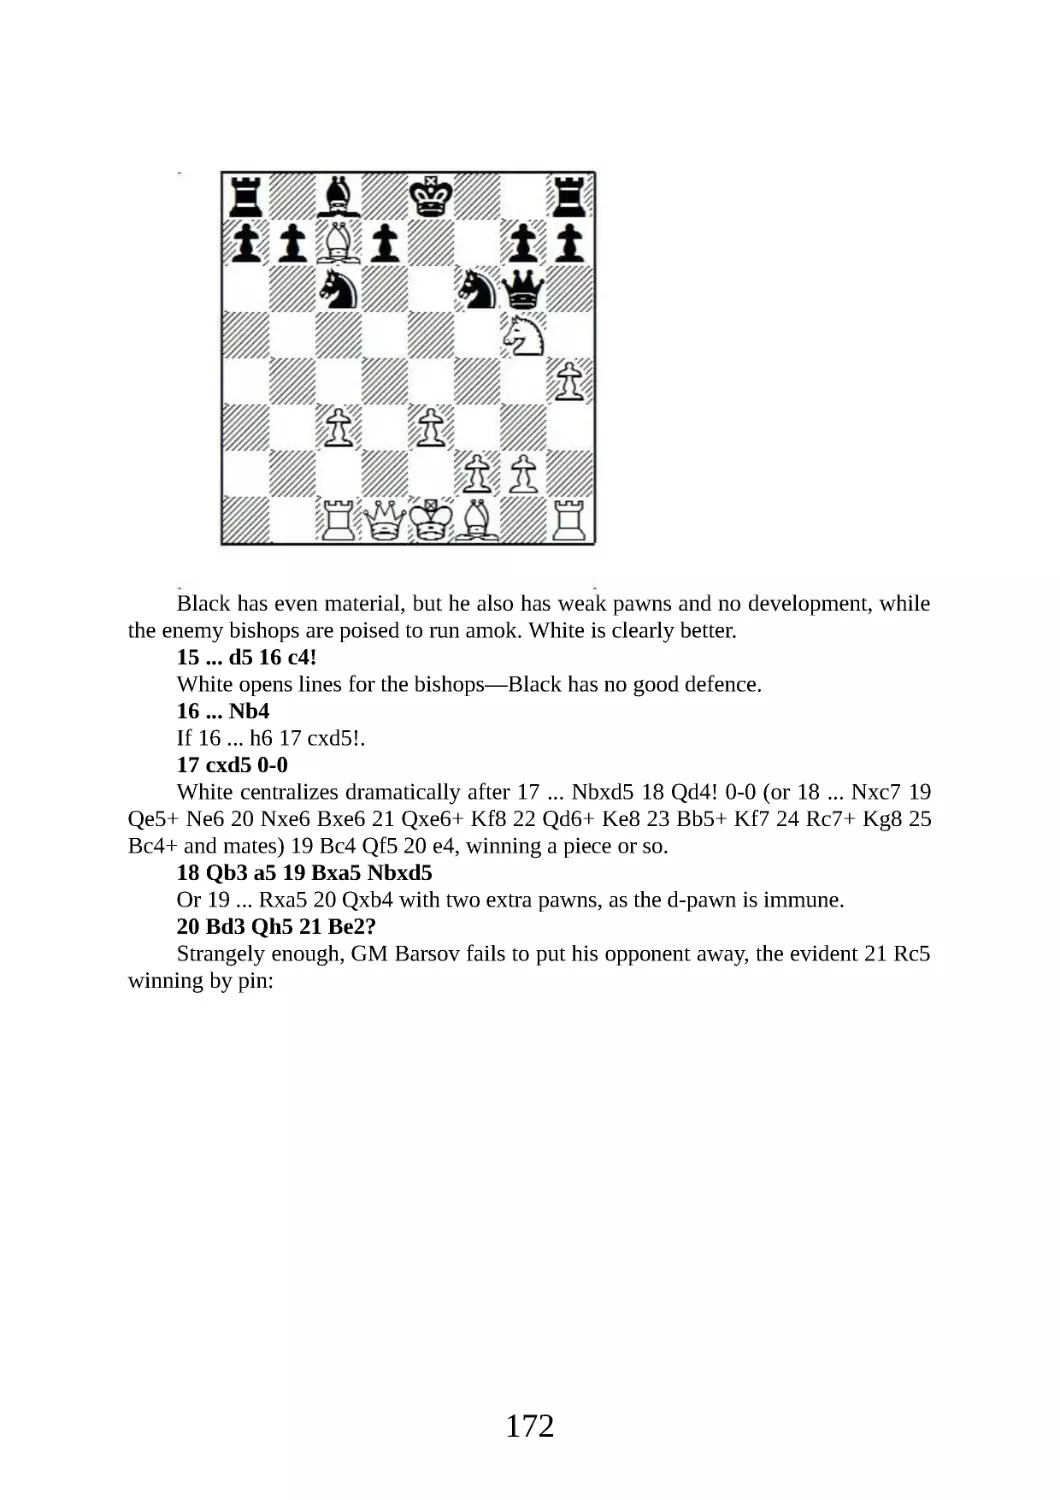
10 Nf3 a4?!
Extravagant! Correct is 10 ... 0-0 11 Ng5 h6 12 Nge4 Ba7 13 0-0 when Black
stays in the game, though White is somewhat better all across the board, with kingside
chances and knight leaps to b5 and d5.
11 Bd2?!
Kramnik misses his chance! 11 Ng5! would give White a tremendous attack and
close to a winning advantage. Black can’t play either ... h7-h6 or ... f7-f6, can’t castle,
and White can many times just take on h7 as his attack is worth more than the pin.
11 ... 0-0 12 Ne4
Now 12 Ng5 is too slow in view of 12 ... h6 13 Nge4 (not 13 Nxf7 Qh4+ 14
Qxh4 Nxh4 and White loses his far-flung knight) 13 ... Na5 14 0-0 Nb3 with
counterplay.
12 ... Qe8
13 0-0 -0
Simpler is 13 Nxc5 dxc5 14 0-0 (not 14 Qxc5?! Nxf4, but now White threatens
both taking the pawn as well as the central attack e3-e4) 14 ... f5 15 Rae1 Nge5 16
Qxe8 Nxf3+ 17 Rxf3 Rxe8 18 e4 with an endgame advantage; yes, Black has d4, but
White has the two bishops and the better pawn majority.
13 ... f5 14 Nxc5 dxc5 15 Kb1
White avoids 15 e4? Nxf4! picking off a pawn.
11
15 ... Nge7 16 Qh4
White tries for too much: again simpler is 16 Qxe8 Rxe8 17 Bc3 Bd7 18 Rhe1
Rad8 19 Bc2 Be6 20 Rxd8 Rxd8 21 Nd2 Ra8 22 e4 with a long-term advantage once
again due to his two bishops and superior pawn structure.
16 ... h6 17 Bc3 Be6 18 Rhg1 Rd8 19 Ka1 Rxd3! 20 Rxd3 Bxc4
White has just missed too many chances for advantage; now it’s Black’s turn, and
he’s not going to miss anything!
21 Bxg7
Kramnik tries for confusion, since Black is fine after 21 Rd2 Nd5.
21 ... Kxg7
The rook is immune: 21 ... Bxd3? 22 Qxh6 with a winning attack.
22 g4 Ng6!
Mamedyarov again shows restraint and refuses to be tempted by the poisoned
rook—if 22 ... Bxd3? something like the following variation would occur: 23 gxf5+
Kf7 24 Qh5+ Kf6 25 Qxh6+ Kxf5 26 Nh4+ Ke4 27 Qe6+ Ne5 28 Qxe5 mate.
23 gxf5 Rxf5 24 Rc3 Bf7 25 Qf2
12
Black has two pieces for a rook and a good position, and now begins the counter-
attack.
25 ... Qe6 26 b3 axb3 27 Nh4 Rh5 28 Kb2
White gets nowhere with 28 f5 Qf6 29 Nxg6 Qxc3+ 30 Kb1 Bxg6 31 Rxg6+
Kh7, when Black wins with his extra piece.
28 ... Qf6 29 Nxg6 Bxg6 30 e4 c4 31 Qd2
31 f5 doesn’t work here either—one sees the tactics favouring Black who simply
has more pieces to give, as the following variation shows: 31 ... Ne5 32 Kb1 Kh8 33
Rcg3 Rxf5 34 exf5 Bxf5+ 35 Kc1 Nd3+ 36 Rxd3 cxd3 and Black emerges with three
pawns for the exchange and a winning attack.
31 ... Qd4 32 Qxd4+ Nxd4 33 Rcg3
White loses simply after 33 Rxc4 Rxh2, and he still can’t make the critical 33 f5
work: Black wins with 33 ... Rxh2+ 34 Ka1 (or 34 Kb1 Nb5 and the knight comes in
with check) 34 ... Nb5 35 Rxg6+ Kh7 36 Rcg3 Ra2+ 37 Kb1 Nxa3+ 38 Kc1 b2+ wins
as Black queens with check.
33 ... Rxh2+ 34 Kb1 Kf7 35 Rxg6 c3
13
The connected pawns are decisive as White has no perpetual.
36 Rg7+ Ke8 37 R7g2
If 37 Rg8+ Kd7 38 R1g7+ Kc6 39 Rg6+ Kb5 40 Rg2 Rxg2 41 Rxg2 Nf3 and
Black will win the coming king and pawn ending as in the game; note that the black
king is still in the square of White’s f-pawn, and the fact that Black has a passed h-
pawn is crucial.
37 ... Rxg2 38 Rxg2 Nf3!
Black forces the aforementioned winning king and pawn ending.
39 Kc1 Nd2 0-1
After 40 Rxd2 cxd2+ 41 Kxd2 b2 42 Kc2 h5 the white king is outside the square,
while the black king handles White’s connected passed pawns.
Back to our opening question: How did the World Champion lose to the
Budapest Gambit? The answer lies not in the opening, but in the middlegame. The
Budapest certainly didn’t fare well in this game: Kramnik was clearly well prepared,
and played more accurately than Black in the early going—in fact he was on the verge
of a win, had he played 11 Ng5!.
After this he refused to take on a couple of nice +/= positions, and finally gave
Black chances—who seized them with both hands and played extremely well from
move 19 onwards.
So remember, this opening book may help you get a good opening—but you’re
going to have to win the game yourself!
Game 2
I.Odesskij-V.Kramnik
Samtredia 1987
Now we see Kramnik on the winning side, and my question is, “Why didn’t Kramnik
14
play the Budapest Gambit against Anand in their recent World Championship match?”
1 d4 Nf6 2 c4 e5 3 dxe5 Ng4 4 Nf3 Bc5
This is the most common move in the position, but I don’t recommend it—my
preference is for 4 ... Nc6. Find out why in Chapters 10 and 11.
On the other hand, I have to say 4 ... Bc5 can be deadly against an opponent
unprepared for the BG.
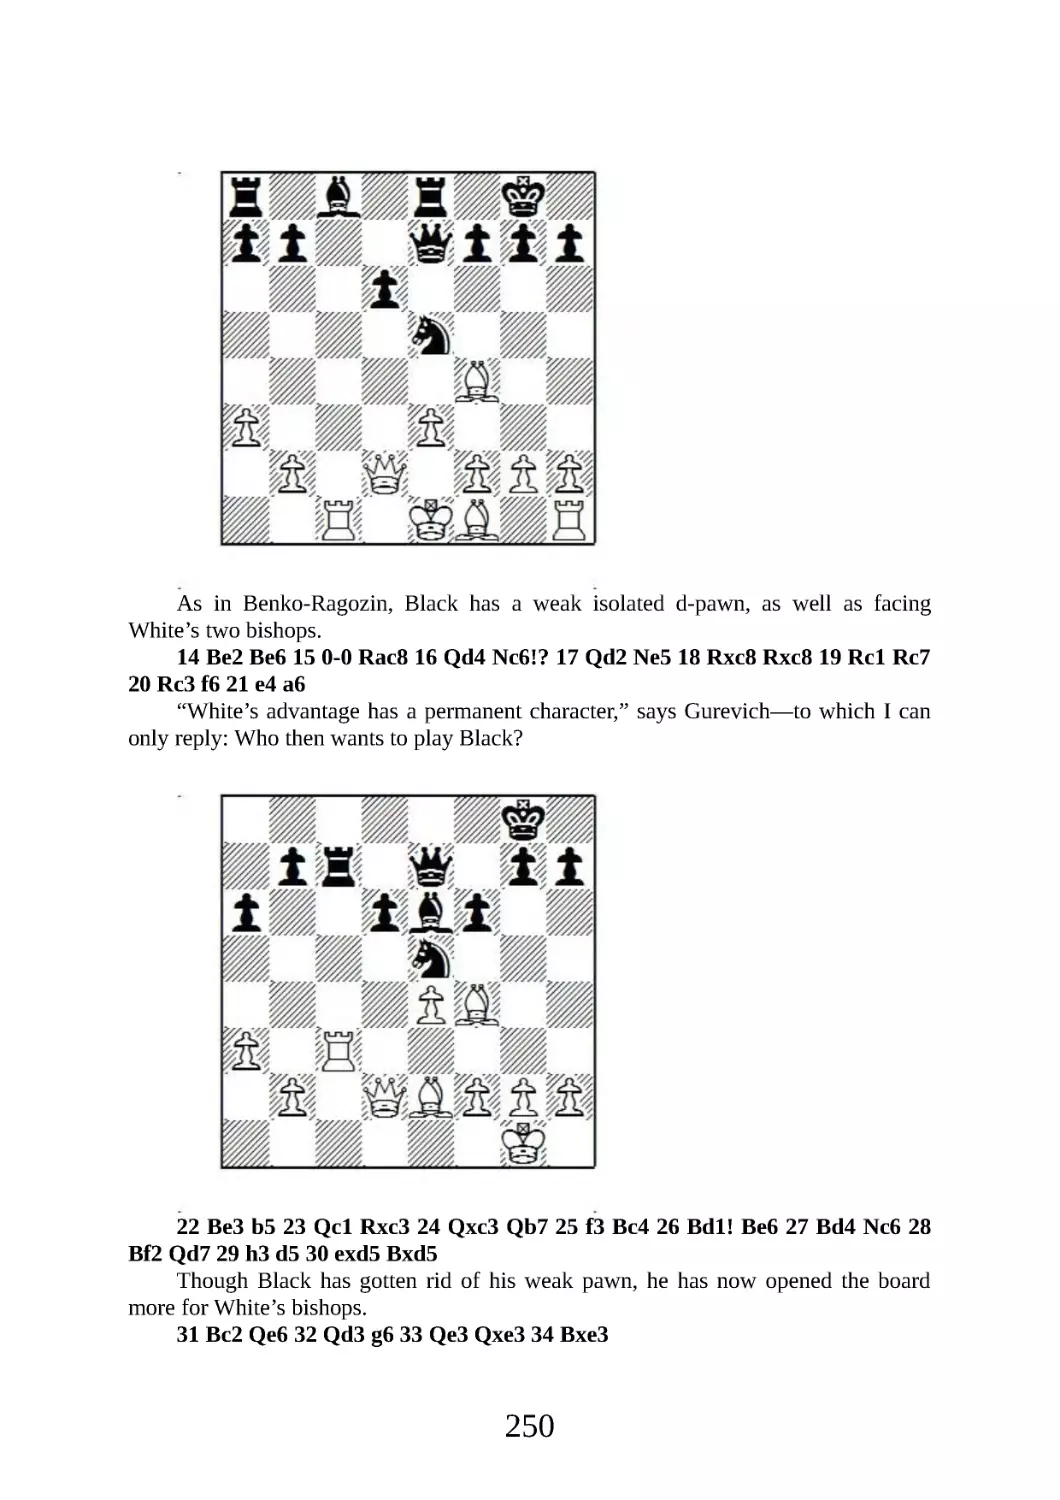
5 e3 Nc6 6 Nc3 0-0 7 Be2 Ngxe5 8 0-0 Nxf3+ 9 Bxf3 Ne5 10 Be2 Re8 11 b3
As I will show in Chapter 12, the best way for White to fight for the advantage is
f2-f4 here or after Kh1, as now Black is able to bring in another attacker ...
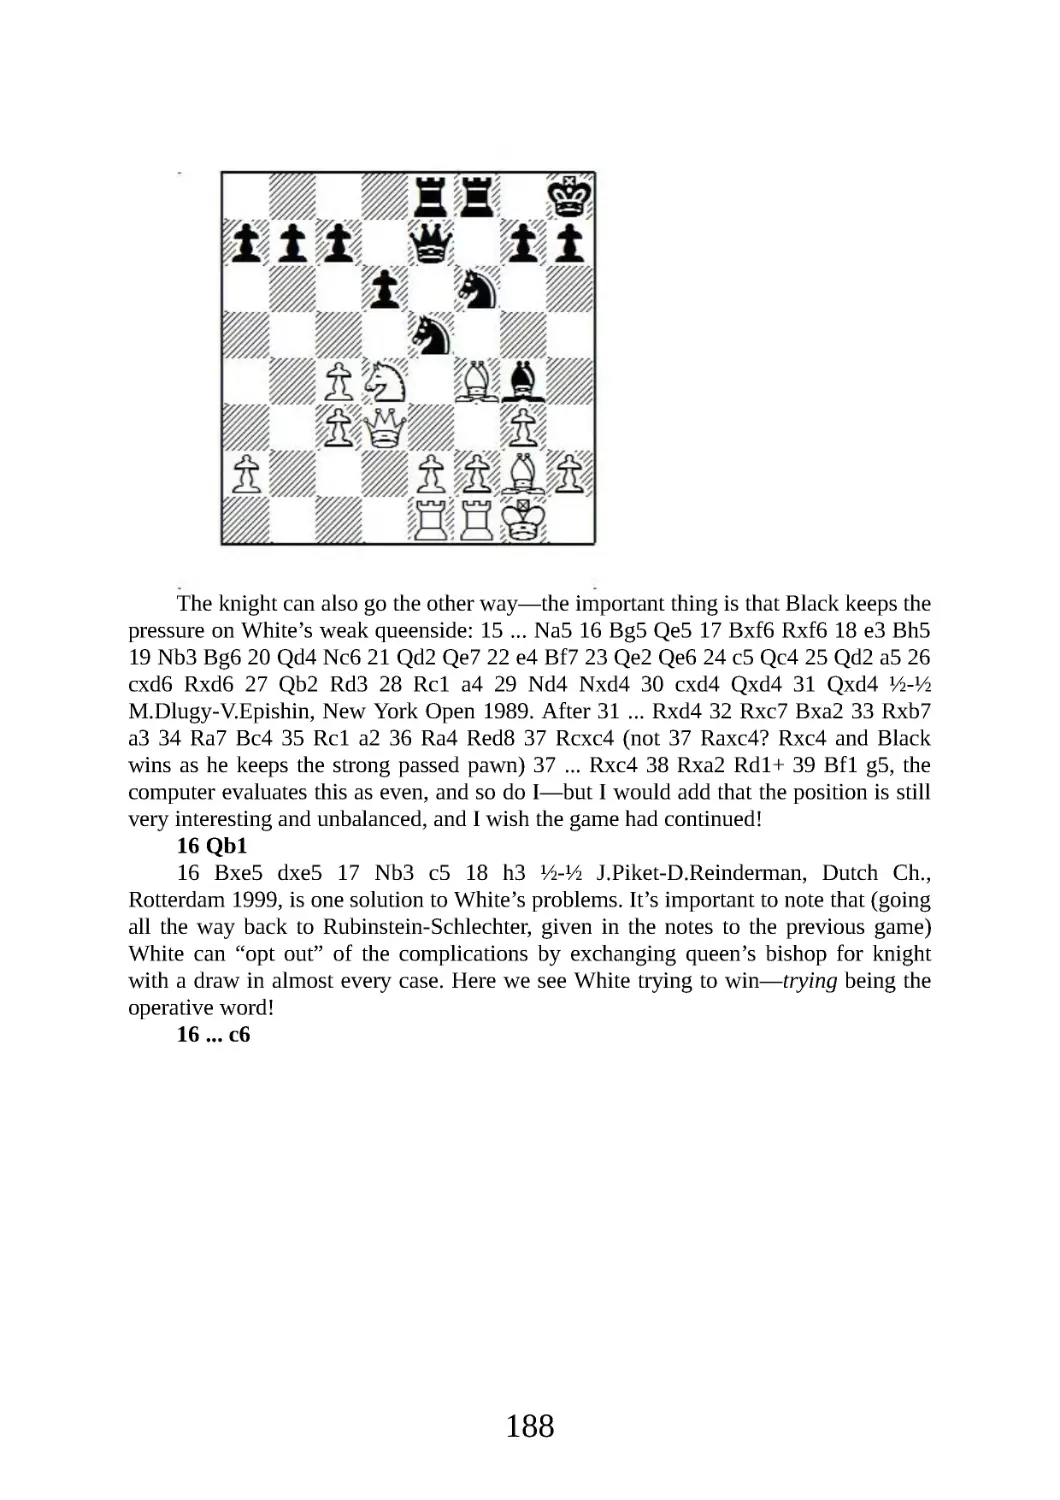
11 ... a5 12 Bb2 Ra6
And here it is! The “crazy rook” begins its journey.
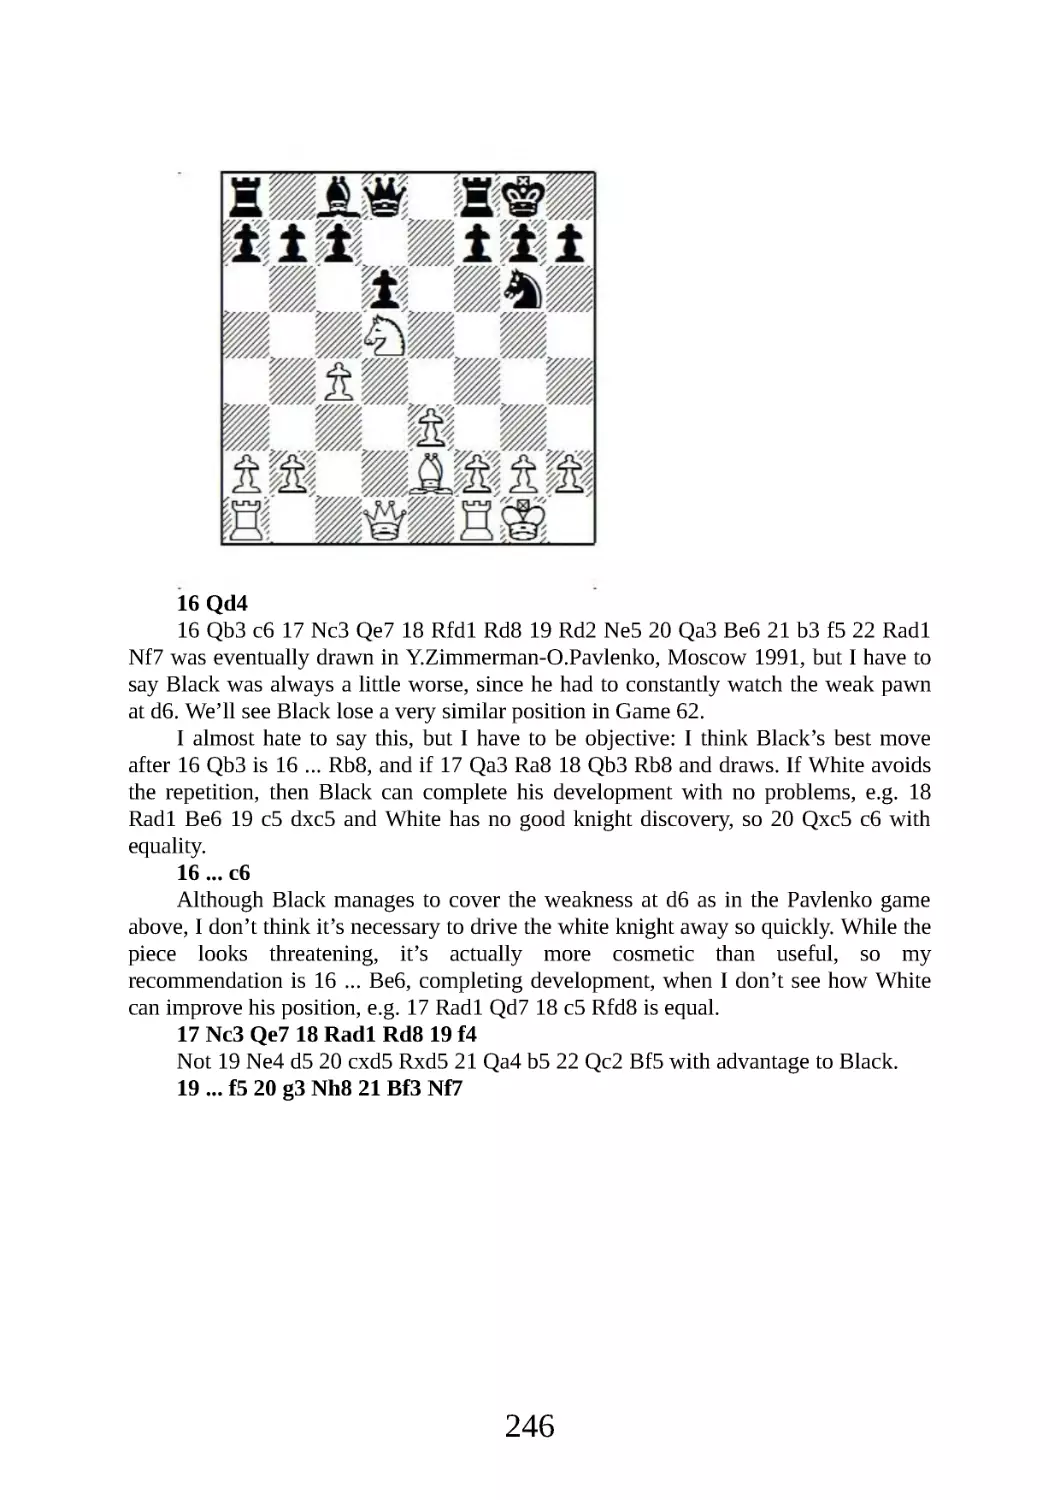
13 Qd5 Ba7 14 Ne4 Rae6 15 Ng3 d6 16 Qxa5
Kramnik scores with a deflecting pawn sacrifice. While White’s queen is off
pawn munching, Vlad throws everything at the white king.
16 ... Bb6 17 Qc3 Rh6 18 Rfd1 Qh4 19 Nf1 Rg6 20 b4 Bg4 21 Bxg4 Rxg4
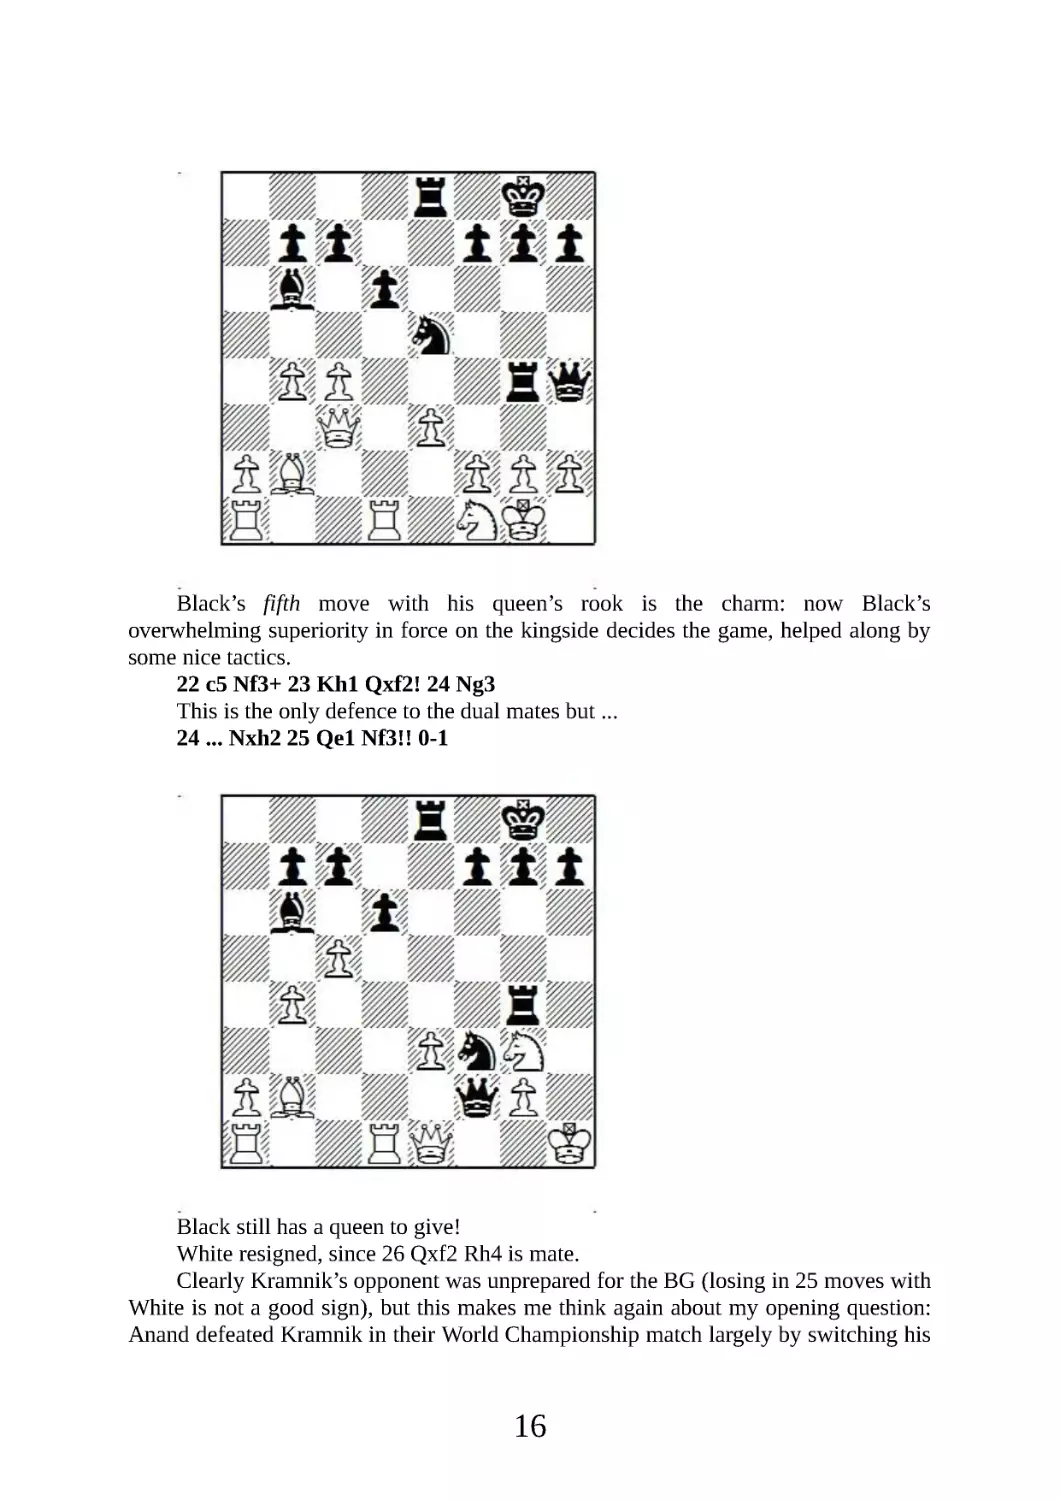
15
Black’s fifth move with his queen’s rook is the charm: now Black’s
overwhelming superiority in force on the kingside decides the game, helped along by
some nice tactics.
22 c5 Nf3+ 23 Kh1 Qxf2! 24 Ng3
This is the only defence to the dual mates but ...
24 ... Nxh2 25 Qe1 Nf3!! 0-1
Black still has a queen to give!
White resigned, since 26 Qxf2 Rh4 is mate.
Clearly Kramnik’s opponent was unprepared for the BG (losing in 25 moves with
White is not a good sign), but this makes me think again about my opening question:
Anand defeated Kramnik in their World Championship match largely by switching his
16
repertoire from 1 e4 to 1 d4. Would Anand have prepared deeply for the BG? I doubt
it! Imagine how a crushing victory like this would have raised Kramnik’s spirits! I
think Kramnik should have risked the Gambit, and maybe then he would still be World
Champion.
Game 3
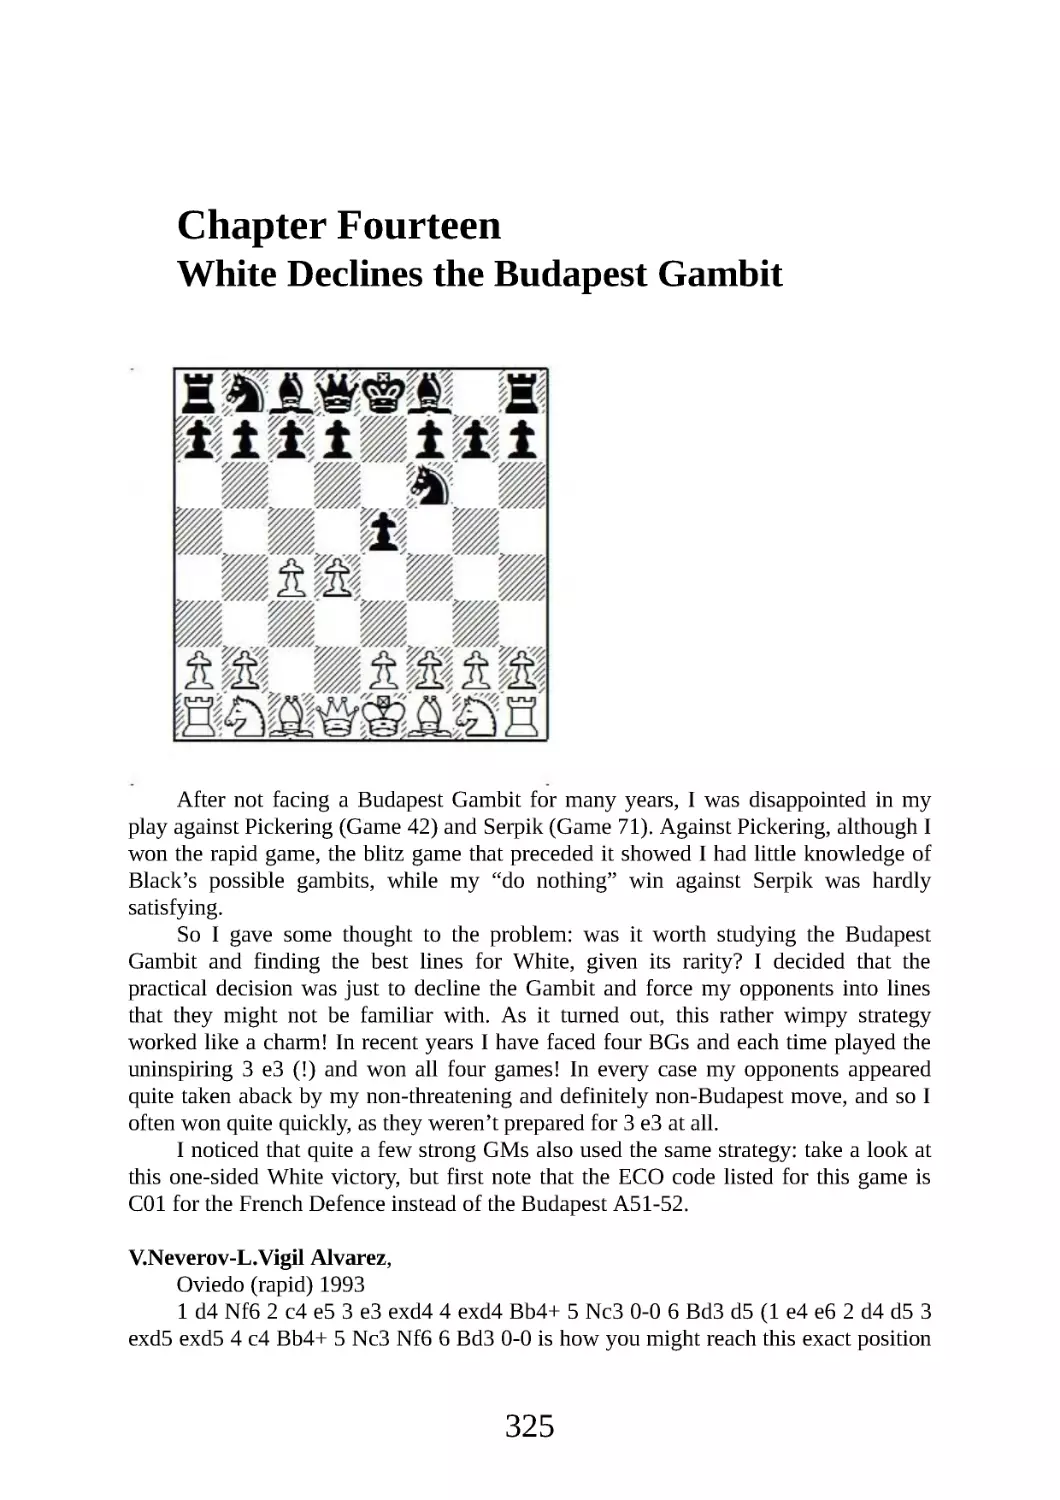
M.Jayson-T.Taylor
Los Angeles (rapid) 2005
The following was the last tournament game in which I reached the Budapest Gambit
as Black (by which I mean 1 d4 Nf6 2 c4 e5 3 dxe5—note that when White declines
the gambit, one gets a different opening altogether). I’ve used this short win to explain
the layout of the book in an informal manner.
The book is divided into four parts, each of which has at least two chapters. The
first three parts deal with important variations of the BG Accepted, where White
makes a serious attempt at an opening advantage, starting with 1 d4 Nf6 2 c4 e5 3 de5
Ng4 and now: Part I: 4 e4. Part II: 4 Bf4. Part III: 4 Nf3. Part IV deals with lesser
deviations for White, and Black’s offbeat try, the Fajarowicz Gambit.
By the way, whenever I refer to “the Mega” or “Megabase” I refer to the
Chessbase Megabase 2008 database. I have continuously updated the games, so this
book is current through March 2009. I have also supplemented this main database with
MegaCorr4 (ChessMail) and Correspondence Database 2006 (Chessbase). Finally, my
chess engine is Fritz 11.
1 d4 Nf6 2 c4
The Trompowsky shouldn’t surprise anyone these days, and if White plays 2 Nf3,
he can’t play the sharpest lines against virtually any Black opening: no Four Pawns
Attack or Sämisch against the King’s Indian, can’t play the Knesevic or main line
exchange vs. the Grünfeld, can’t fight the Nimzo-Indian with Anand’s f2-f3 or
Rubinstein’s Ng1-e2, and can only reach a weaker line of the QGD exchange!
But I will leave it to John Cox to explain such deviations—we now proceed to
the subject of this book: Black strikes boldly in the centre and the Budapest Gambit is
on the board!
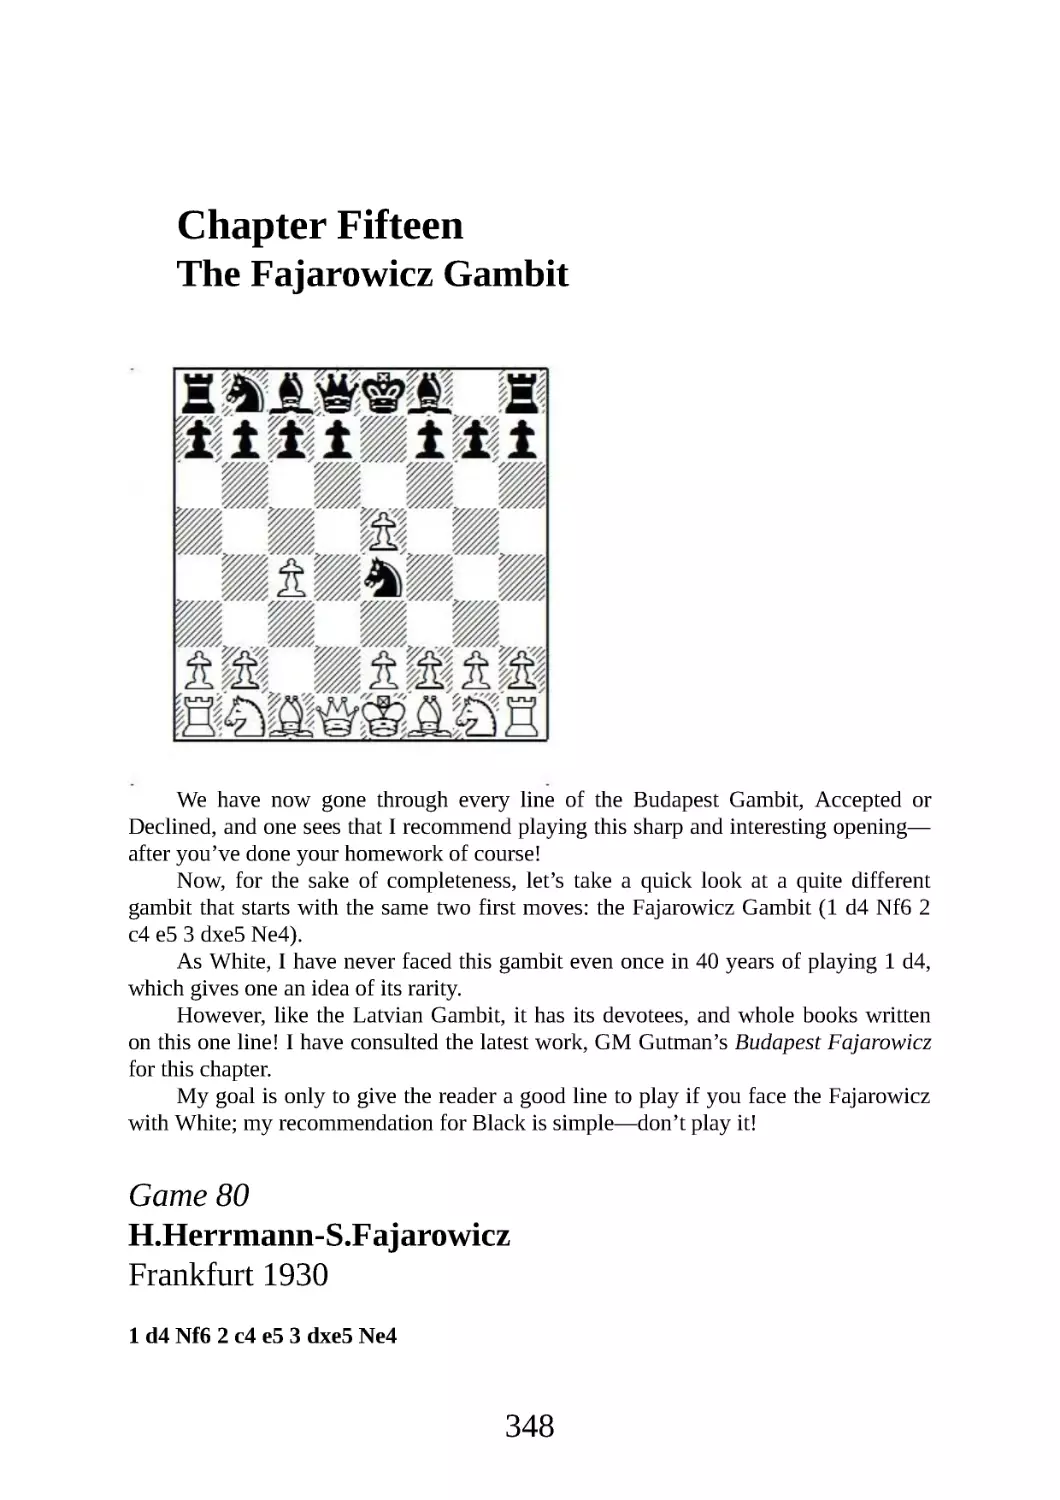
2 ... e5! 3 dxe5
Declining the Gambit with moves like 3 e3 or 3 Nf3 shouldn’t cause the well-
prepared BG player any problems—these modest alternatives are covered in Chapter
14.
3 ... Ng4
17
The true Budapest Gambit: Black threatens to take back on e5, and the knight
also eyes f2.
Very risky is 3 ... Ne4, the Fajarowicz Gambit. I don’t view this as a Budapest
Gambit at all—it’s really a completely different animal—and I don’t recommend it.
Nonetheless, for reasons of completeness, I give brief coverage in Part IV, Chapter 15.
4 Bf4
This important main line is covered in Part II, Chapters 6-9 . Two critical
alternatives are 4 e4, the Alekhine Attack (Part I, Chapters 1-5) and 4 Nf3 (Chapters
10-11). As mentioned in Game 1, the quiet but reasonable tries, 4 e3, 4 Nh3, 4 Nc3
will be discussed in Chapter 12. The not so reasonable tries 4 Qd4, 4 Qd5, 4 f4, where
White tries to hang onto the gambit pawn no matter what, will be defenestrated in
Chapter 13.
4 ... Nc6
4 ... g5 is the sharp and risky alternative: see Chapter 6. Over-ambitious gambit
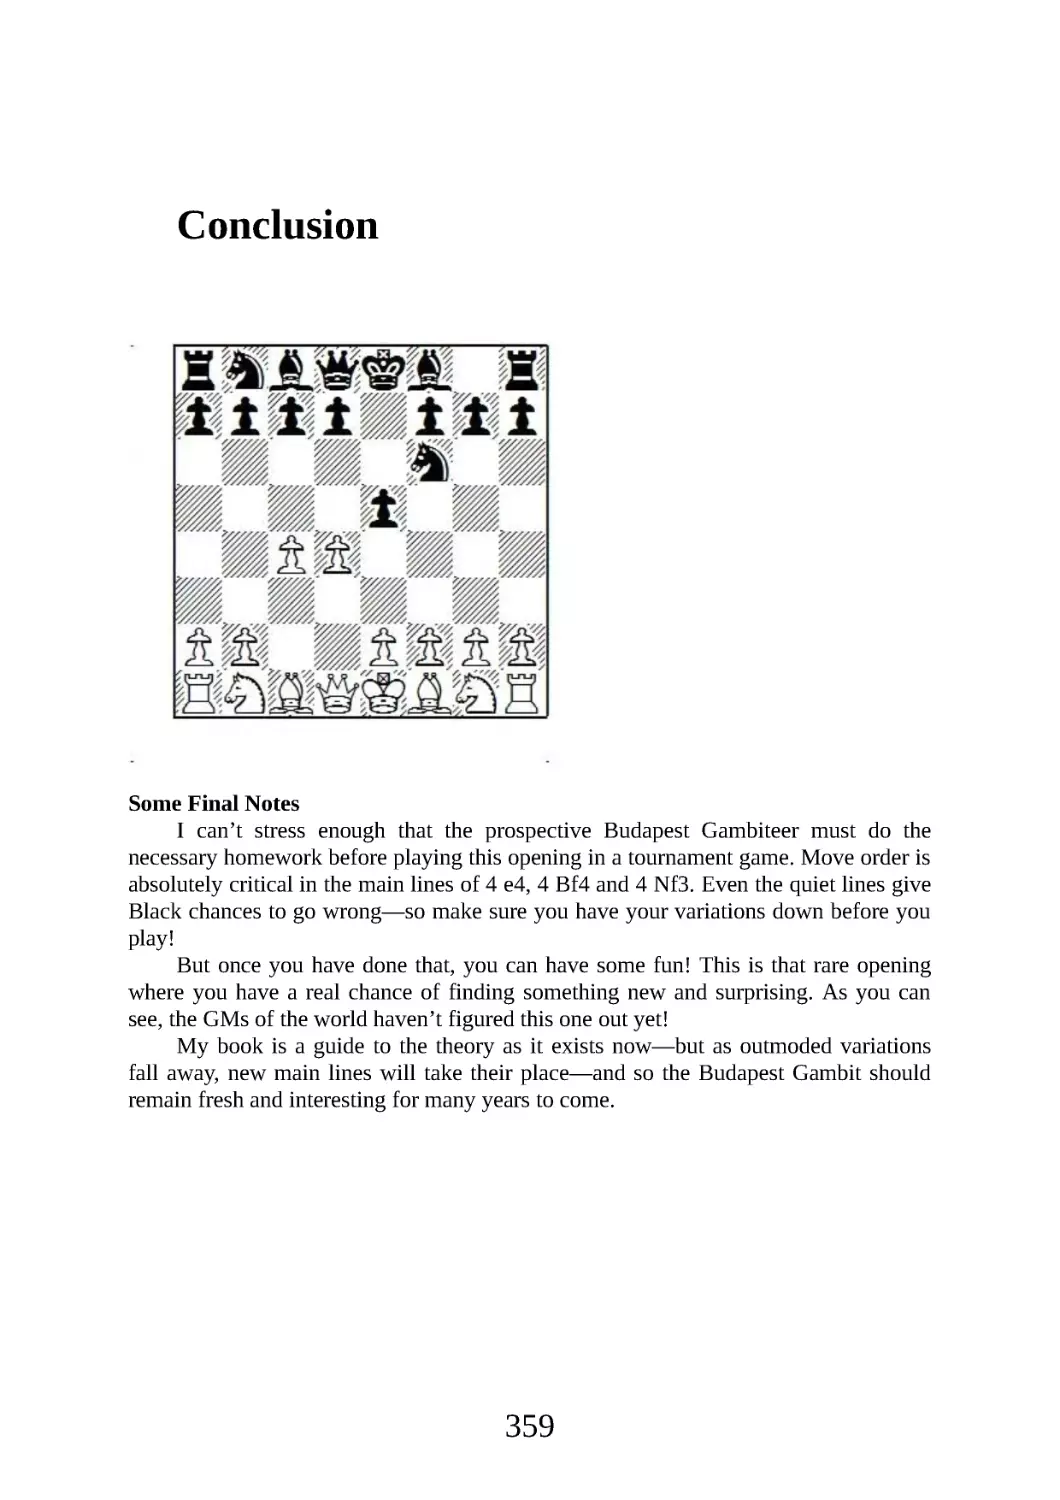
play such as 4 ... Bb4+ 5 Nd2 d6 will be covered in Chapter 8.
5 Nf3 Bb4+ 6 Nbd2
6 Nc3 tries to hold onto the pawn: see Chapter 7.
6 ... Qe7
This basic Budapest Gambit tabiya will be extensively covered in Chapter 9.
7 a3 Ngxe5 8 axb4
The slightly superior alternative 8 e3 will be examined in Games 59-61.
8 ... Nd3 mate
18
Here is every Budapest Gambiteer ’s dream: Mate in Eight!
Now that the pathways are marked, let’s go explore the Budapest Gambit—and I
promise, the rest of the games will be a little longer!
Timothy Taylor,
Los Angeles,
July 2009
19
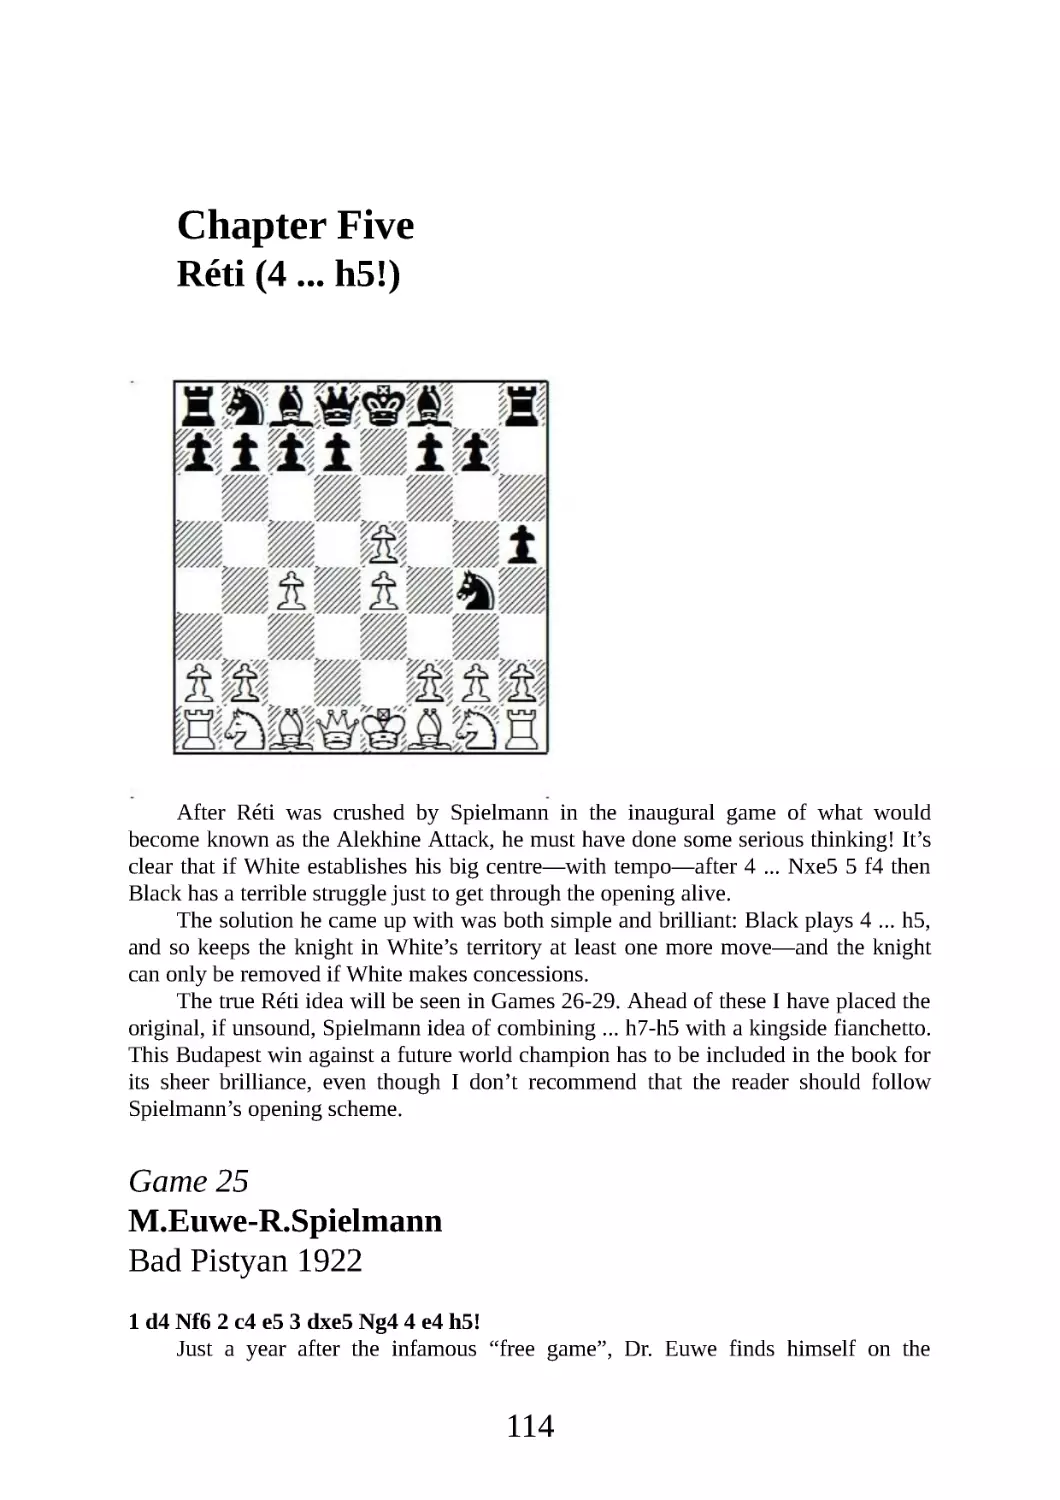
Part One
The Alekhine Attack (4 e4)
The Alekhine Attack was actually invented by the attacking genius Rudolf
Spielmann in the following game:
R.Spielmann-R.Réti
1st matchgame, Berlin 1919
1 d4 Nf6 2 c4 e5 3 dxe5 Ng4 4 e4 Nxe5 (after being hammered so ferociously here,
Réti realized he had to find a brake to slow down White’s attack—and he did, with 4
... h5!—see Chapter 5) 5 f4 Ng6 6 Be3 Bd6 7 Qd2 Qe7 8 Nc3 Bb4 9 Bd3 b6 10 Nge2
Bb7 11 Ng3 0-0 12 h4 Qd8 13 h5 Ne7 14 a3 Bc5 15 0-0 -0 d6 16 Bc2 Nd7 17 Qd3
Bxe3+ 18 Qxe3 f6 19 e5
19 ... fxe5 20 Qd3 Nf6 21 Nce4 Bxe4 22 Nxe4 Nxe4 23 Qxe4 Rxf4 24 Qxh7+
Kf7 25 Rdf1 Qh8 26 Rxf4+ exf4 27 Qe4 Re8 28 Qxf4+ Kg8 29 h6 g6 30 h7+ Kg7 31
Rf1 1-0
Alekhine then refined the system further, and it became a still more lethal
weapon in his hands. Chapter 1 gives all six of Alekhine’s tournament games with the
Budapest (five with White and one where he faced his own system as Black).
Chapter 2 features attempts by Black to avoid the main lines of the attack by
sacrificing material or tossing in ... Bb4+. As one will see, these tries don’t fare too
well.
Chapters 3 and 4 cover what most books call the main line of the Alekhine
Attack: 4 e4 Nxe5 5 f4 and now 5 ... Ng6 is Chapter 3 and 5 ... Nec6 is Chapter 4.
While these lines are very popular, I doubt you will want to play them as Black after
you get a good look at White’s attacking chances!
20
Chapter 5 covers what I consider to be the best defence to the Alekhine Attack,
namely Réti’s improvement, 4 ... h5!.
21
Chapter One
The Alekhine Attack as Played by Alekhine
If you can get through the following games without flinching, then you have the right
stuff to be a Budapest Gambiteer!
Game 4
A.Alekhine-M.Euwe
Amsterdam 1921
This is described in the Megabase as a “free game” and while I don’t know exactly
what that means, by the play it appears to be a casual encounter rather than a
tournament game. Alekhine plays inaccurately, then tries to blow his opponent off the
board—while Euwe sacs with wild abandon!
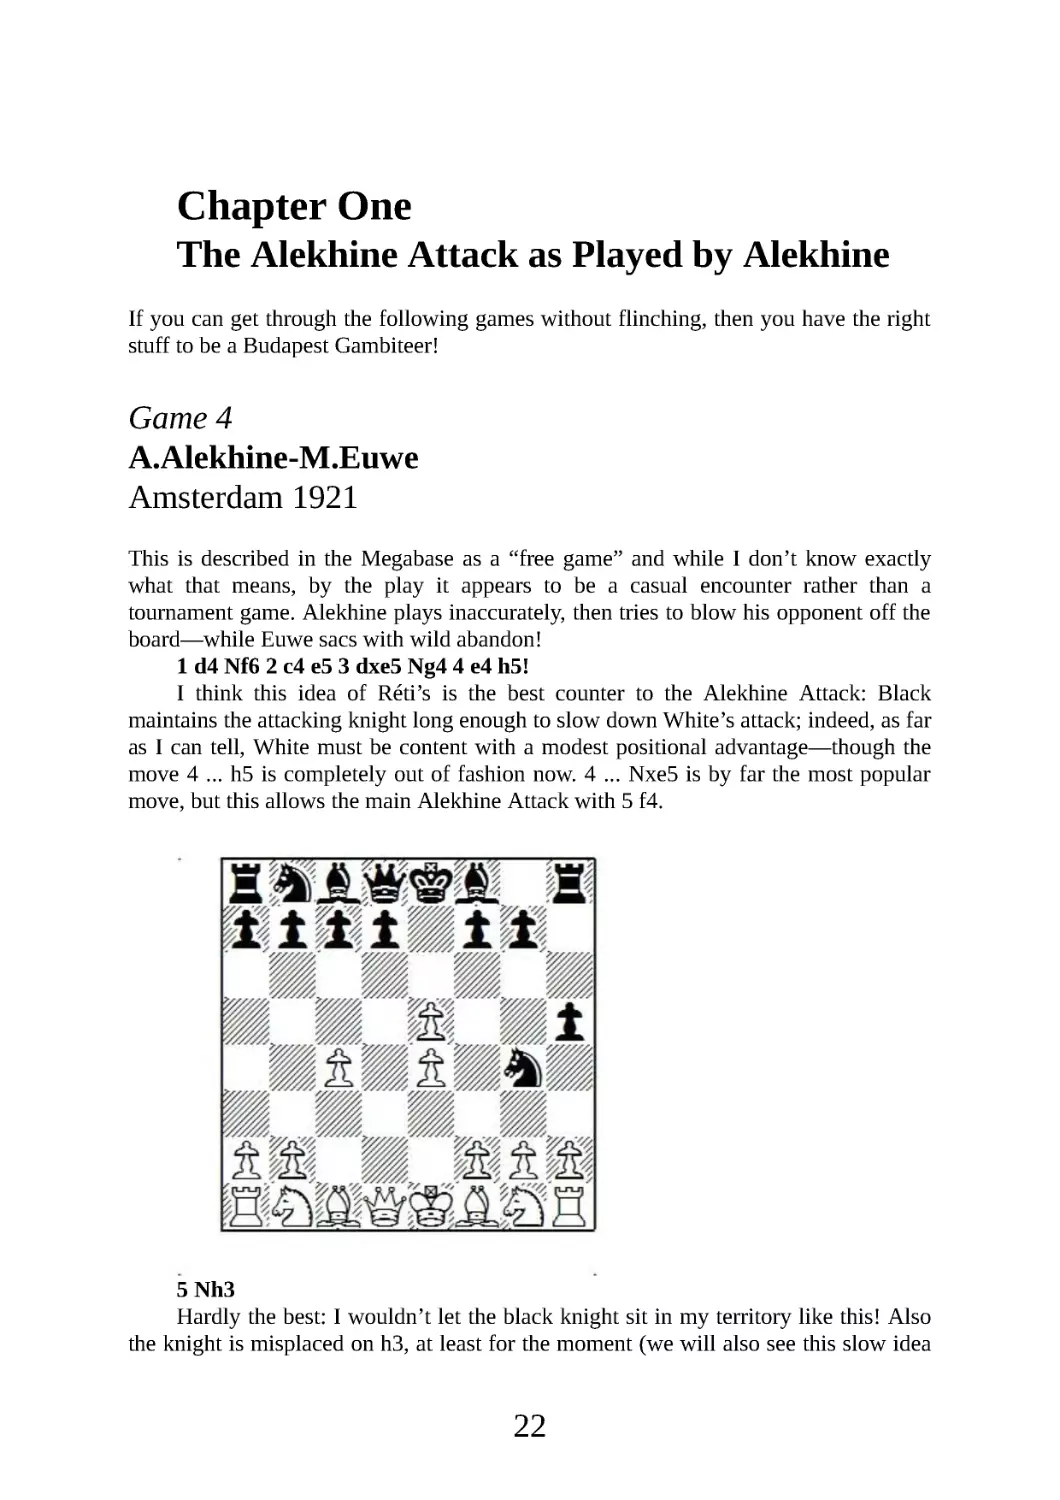
1 d4 Nf6 2 c4 e5 3 dxe5 Ng4 4 e4 h5!
I think this idea of Réti’s is the best counter to the Alekhine Attack: Black
maintains the attacking knight long enough to slow down White’s attack; indeed, as far
as I can tell, White must be content with a modest positional advantage—though the
move 4 ... h5 is completely out of fashion now. 4 ... Nxe5 is by far the most popular
move, but this allows the main Alekhine Attack with 5 f4.
5 Nh3
Hardly the best: I wouldn’t let the black knight sit in my territory like this! Also
the knight is misplaced on h3, at least for the moment (we will also see this slow idea
22
— White dreams of Nh3-f4-d5—in Chapter 12, but it’s no more effective there). I
recommend that one follow Petrosian (Game 29) and kick the black knight
immediately with 5 h3.
Note that the seemingly normal 5 Nf3?! is even worse, as Black answers 5 ...
Bc5!. Now White must desperately seek a draw, which shows the danger of leaving
the black knight in its advanced position. 6 Bg5 (weaker is 6 e6 Qf6 7 exf7+ and now,
instead of 7 ... Kf8 8 Qd5 Bxf2+ 9 Ke2 Nc6 10 h3 Be3 with a very unclear position
which was eventually drawn in H.Hohensee-K .Richter, Berlin 1928, Black should
have played the simple 7 ... Qxf7, recovering his pawn with some advantage) 6 ...
Bxf2+ 7 Ke2 f6 8 exf6 gxf6 9 h3 fxg5 10 hxg4 Bb6 11 Rxh5 Rxh5 and now not 12
gxh5 g4 with advantage to Black, but 12 Qd5!!, after which Fritz sees a draw by
perpetual check, but I see a lot of anxiety before making a miserable draw!
5 ... Nc6
For 5 ... Nxe5 see Game 25, Euwe-Spielmann—there Euwe loses on the White
side of this opening!
6 Nc3 Bc5
23
7 Nd5
7 Be2 looks best but is too slow now to get an advantage as the attacking knight
stays in place: 7 ... Ncxe5! (7 ... Ngxe5 takes the pressure off f2 so White can
successfully reposition with 8 Nf4) when none of White’s three tries trouble Black:
a) 8 Na4 (trying to shake off the pressure of Black’s three active minor pieces) 8
. .. Bb4+ 9 Bd2 Bxd2+ 10 Qxd2 d6 11 Nf4 0-0 12 Nxh5 Be6 13 b3 Qh4 14 Ng3 f5 with
a double-edged game where Black has compensation for the pawn; one could imagine
15 Bxg4 Nxg4 16 h3 Ne5 17 exf5 Bxf5 18 Nxf5 Rxf5 19 0-0 Nf3+ 20 gxf3 Rg5+ 21
Kh2 Rh5 with a winning attack for Black.
b) 8 0-0 a5 9 Ng5 Qf6 10 Nd5 Qd6 11 h3 f6! with a wildly double-edged game
where Black’s attacking chances should not be underestimated—note Black has threats
to h2 as well as f2.
c) 8 f4 Qh4+ and now, because of the bad knight on h3, 9 g3 is impossible, so
White must move his king: 9 Kf1 Nc6 10 Nd5 0-0 11 Nxc7 Rb8 and Black has good
compensation for the pawn.
7 ... Ncxe5 8 b4
24
Impetuous—White is overextended and has only one piece not on the edge of the
board, and that one can be kicked back!
8 ... Be7?
With the correct move Black could get the advantage, but now White exchanges
off the e7-bishop, activates his own dark-squared bishop on the long diagonal (where
it has no opponent) stops Black’s counter-attack, and so on ...
Best is 8 ... Bf8! after which ... c7-c6, driving back White’s only good piece, is
coming. Here are a few variations:
a) 9 f4 c6 10 fxe5 cxd5 and Black is better in view of the attacks on e4 and b4.
b) 9 f3 c6 10 fxg4 (10 Ne3? Bxb4+ wins for Black) 10 ... cxd5 with an attack
against b4 and g4.
c) 9 a3 c6 10 Ne3 Qf6 11 Ra2 a5 and White’s overextended pawn structure
collapses.
9 Bb2 c6 10 Nxe7 Qxe7 11 c5
What a difference a few moves make! Now White’s dark square bind (in the
absence of the Black’s dark-squared bishop) is virtually decisive.
11 ... a5 12 Qd4
White threatens to win a piece, so Black “sacrifices” it—but the alternative 12 ...
Ng6 13 f3 Nf6 14 b5 would have been positionally dreadful.
12 ... axb4 13 f3 Qh4+ 14 Kd1
25
White’s king runs a little bit, but that is hardly compensation for a piece:
Alekhine wins the won game with his usual precision.
14 ... d5 15 exd5 Be6 16 fxg4 Bxg4+ 17 Be2 0-0 -0 18 d6 Rhe8 19 Bxg4+ Nxg4
20 Kd2 Re5 21 Nf4 Qg5 22 h4 Qh6 23 Qxb4 Rxc5 24 Qxc5 Qxf4+ 25 Kc3 Nf2 26
Rhe1 Rxd6 27 Re8+ Kd7 28 Rae1 Rd3+ 29 Kc2 Qa4+ 30 Kb1 Rd1+ 31 Bc1 1-0
Black has run out of attacking pieces!
This game, inaccurate as it was, shows the power of White’s central attack (once
he gets his development going!). Alekhine took full control after a single mistake (8 ...
Be7?). But it also shows that White’s early pawn moves can leave weaknesses,
particularly along the c5-f2 diagonal, that in combination with Black’s strong knight
on g4 can be quite dangerous for White.
One has to be very careful not to fall behind in development, a lesson Alekhine
would forget once later, to his cost, versus Gilg—see Game 7.
Game 5
A.Alekhine-I.Rabinovich
Baden-Baden 1925
1 d4 Nf6 2 c4 e5 3 dxe5 Ng4 4 e4 Nxe5
This is by far the most popular move (997 games in the Mega, compared to 29
for 4 ... h5 and 38 for the gambit 4 ... d6, but popularity does not necessarily mean
best, as we will see.
4 ... Bb4+ cannot be recommended here or on the next move as it helps White
develop—see Game 12, Reshevsky-Seidman.
5 f4
26
The basic tabiya of the Alekhine Attack. Black now has a choice: 5 ... Ng6, as
played here, does not get in the way of the other pieces, but the knight is vulnerable to
the f4-f5 attack. The knight is safer on c6, but it blocks the natural developing square
for the b8-knight. Which one is better? Grandmaster annotators can become confused;
take a look at these duelling quotes from Jonathan Tisdall, an American GM who now
plays for Norway.
Analyzing the 1991 game between Mikhalchishin and Lendwai (Game 14 in this
book) Tisdall writes about 5 ... Ng6: “Lalic hints that this may be better than the
popular retreat to c6, and I have a feeling he is right. That line has a tendency to lead
to a traffic jam of Black’s minor pieces on the queenside. The line with a knight on g6
creates pressure against the f4-pawn. On a bad day, the Ng6 will get kicked around as
White mounts an attack, but we should be able to avoid that if we keep the possibility
in mind.”
Sounds good, but now we have Tisdall annotating the game Bacrot-Shirov from
2000 (this game is given in the notes to Game 23, Spirin-Kravchenko)—here he extols
5 ... Nc6: “A contentious decision, but this is probably better than 5 ... Ng6.”(!)
My feeling is that Black is in trouble already, no matter where he puts the knight.
I think the only good path for Black is the uncompromising 4 ... h5, as seen in the
previous game and fully analyzed in Games 25-29.
5 ... Ng6
For the unlucky sacrifices 5 ... Nbc6 and 5 ... Bc5 see the properly numbered
Game 13.
6 Nf3
I will cover the alternative 6 Be3 in Games 14 and 15.
6 ... Bc5
This logical-looking move, taking over the a7-g1 diagonal, is no longer played at
a high level as a result of the current game: I will fully analyze the modern alternative
6 ... Bb4+ in Games 16 and 17.
7 f5!
27
Alekhine awards himself this well-deserved exclam—Black is already in trouble
on move 7! Note that Alekhine brilliantly refutes his opponent’s seemingly sound
positional play by moving his f-pawn twice and his king’s knight twice in the opening
—no DDT for him! (You’ll get this joke if you read my previous book, True Combat
Chess.)
7 ... Nh4
Black is very cramped after the alternative 7 ... Ne7. According to the Megabase,
White has scored seven wins and only one draw from this position, e.g . 8 Nc3 d6 9
Na4 Bb4+ 10 Kf2 Nd7 11 a3 Bc5+ 12 Nxc5 Nxc5 13 Bd3 Nxd3+ 14 Qxd3 0-0 15 b4
Nc6 16 Bb2 Qe7 17 Rad1 Ne5 18 Bxe5 dxe5 19 Qd5 Re8 20 Rd3 c6 21 Qd6 Qxd6 22
Rxd6 f6 23 Rhd1 Kf7 24 g4 h6 25 h4 a5 26 b5 cxb5 27 cxb5 a4 28 g5 Ra5 29 Rb6
Ke7 30 gxf6+ gxf6 31 Rg1 Rf8 32 Nd2 Ra7 33 Nc4 Bd7 34 Ne3 Kd8 35 Rg7 Kc8 36
Nd5 Ra5 37 Ke3 Rxb5 38 Rxd7 Rxb6 39 Nxb6+ Kb8 1-0 I.Ivanov-G .Bendana
Guerrero, Boston 1988—a powerful win by the late American GM.
8 Ng5!
The second anti-positional move—but now Black’s divagating knight has no
moves that don’t allow capture, while White is threatening the double attack Qh5.
8 ... Qe7
If Black plays 8 ... h6, White won’t retreat: 9 Qh5! 0-0 10 Qxh4 Be7 11 Nc3 Re8
12 Qg4 Bxg5 13 Bxg5 hxg5 14 0-0 -0 Na6 15 h4 gxh4 16 Rxh4 b6 17 Be2 Bb7 18 Bf3
Re5 and now 19 Rdh1 would have won in C.Santos-M .Munoz Sanchez, Bled
Olympiad 2002.
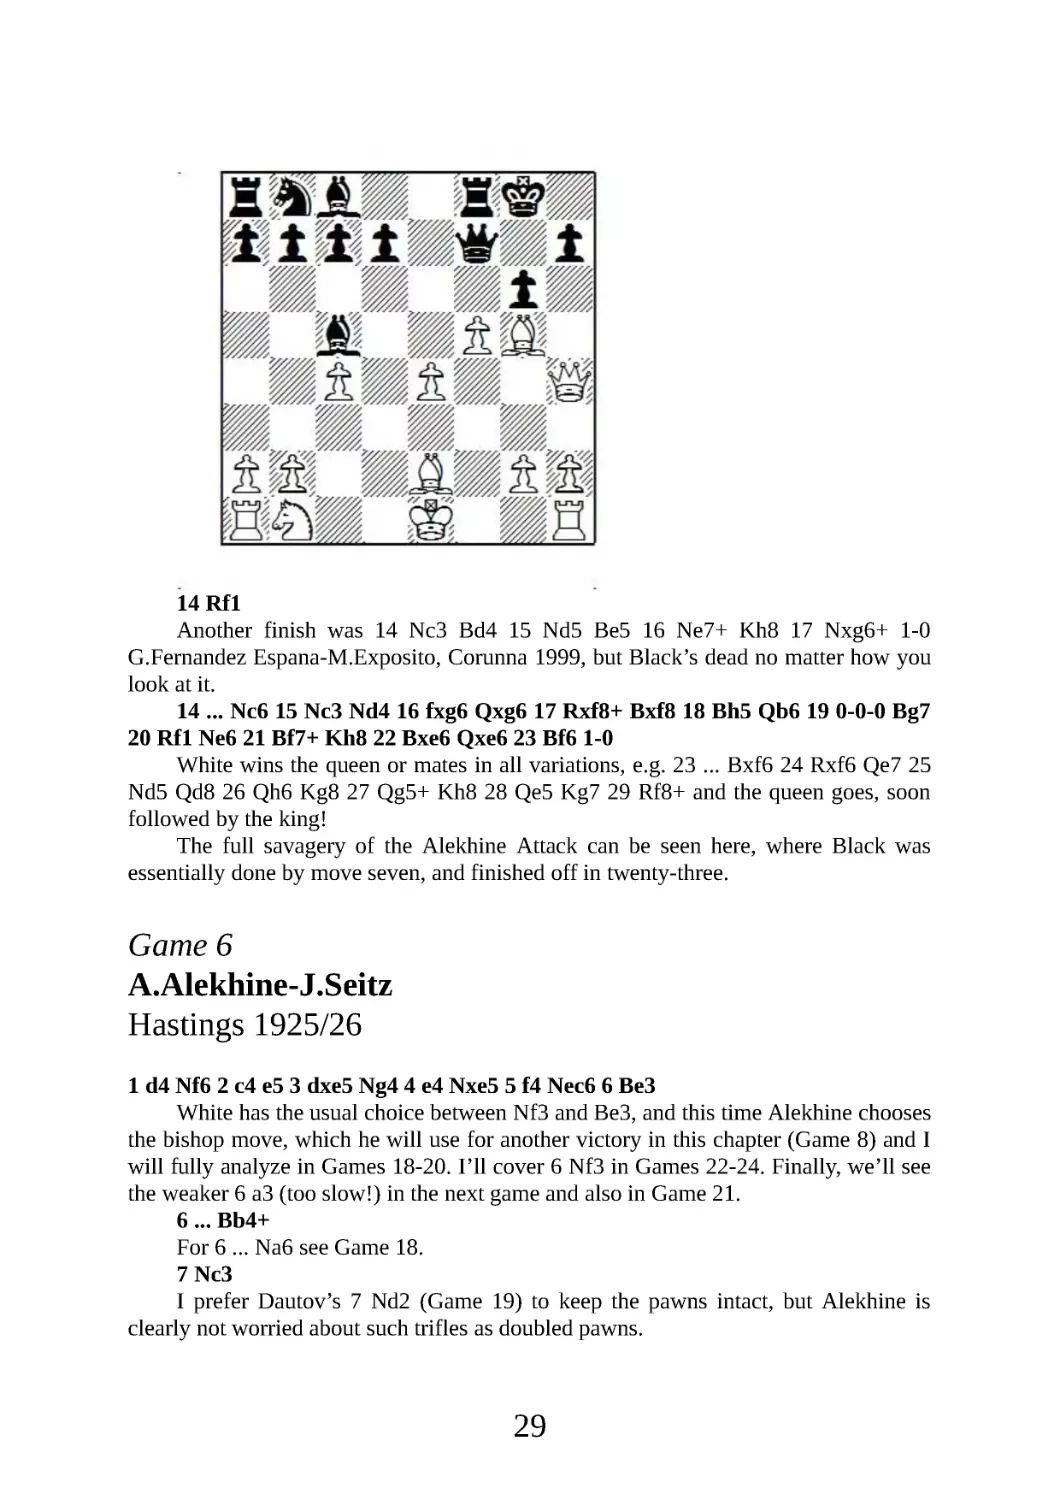
9 Qg4 f6 10 Qh5+ g6 11 Qxh4 fxg5 12 Bxg5 Qf7 13 Be2 0-0
28
14 Rf1
Another finish was 14 Nc3 Bd4 15 Nd5 Be5 16 Ne7+ Kh8 17 Nxg6+ 1-0
G.Fernandez Espana-M .Exposito, Corunna 1999, but Black’s dead no matter how you
look at it.
14 ... Nc6 15 Nc3 Nd4 16 fxg6 Qxg6 17 Rxf8+ Bxf8 18 Bh5 Qb6 19 0-0 -0 Bg7
20 Rf1 Ne6 21 Bf7+ Kh8 22 Bxe6 Qxe6 23 Bf6 1-0
White wins the queen or mates in all variations, e.g . 23 ... Bxf6 24 Rxf6 Qe7 25
Nd5 Qd8 26 Qh6 Kg8 27 Qg5+ Kh8 28 Qe5 Kg7 29 Rf8+ and the queen goes, soon
followed by the king!
The full savagery of the Alekhine Attack can be seen here, where Black was
essentially done by move seven, and finished off in twenty-three.
Game 6
A.Alekhine-J.Seitz
Hastings 1925/26
1 d4 Nf6 2 c4 e5 3 dxe5 Ng4 4 e4 Nxe5 5 f4 Nec6 6 Be3
White has the usual choice between Nf3 and Be3, and this time Alekhine chooses
the bishop move, which he will use for another victory in this chapter (Game 8) and I
will fully analyze in Games 18-20. I’ll cover 6 Nf3 in Games 22-24 . Finally, we’ll see
the weaker 6 a3 (too slow!) in the next game and also in Game 21.
6 ... Bb4+
For 6 ... Na6 see Game 18.
7 Nc3
I prefer Dautov’s 7 Nd2 (Game 19) to keep the pawns intact, but Alekhine is
clearly not worried about such trifles as doubled pawns.
29
7 ... Qe7?!
A typical mistake—in general, if Black gets a chance to give White doubled
isolated pawns in the BG, he should immediately do so, as in Cvitan-Rogers (Game
20). Another example: in the popular main line 4 Bf4 Nc6 5 Nf3 Bb4+ 6 Nc3 (covered
in Chapter 7), 6 ... Bxc3+ 7 bxc3 Qe7 is correct, while after 6 ... Qe7?! 7 Rc1 (as
played by Korchnoi in Game 37) White gets a pleasant advantage with no pawn
weaknesses.
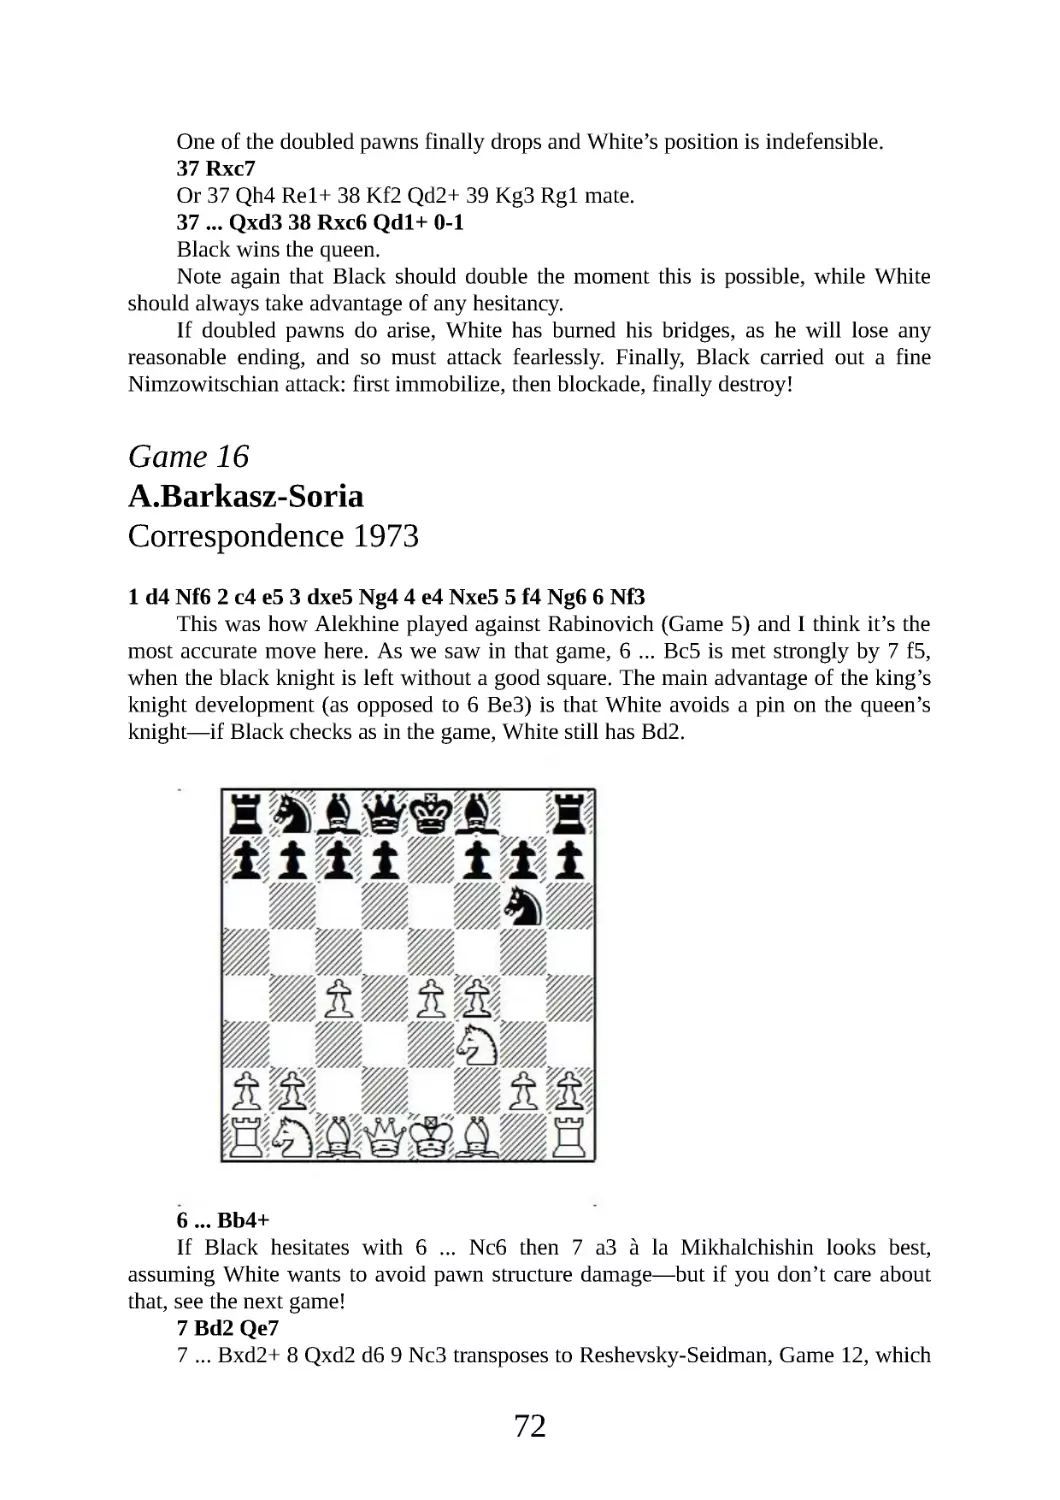
It’s a little more complicated here, but White can also get a clear advantage with
no structural damage by playing 8 Ne2! Qxe4 (otherwise 9 a3 and Black has no
compensation for White’s space advantage) 9 Kf2 Qg6 (the greedy 9 ... Qxc4 is
immediately fatal: 10 Nd4 Qc5 11 Ndb5 and a rook drops) 10 Nd5 Na6 11 a3 Bd6 12
Ng3 and White has a tremendous attack for the pawn.
Black correctly created the pawn weakness in the following game, and held his
own for quite a while: 7 ... Qh4+ (for the immediate 7 ... Bxc3+ see Game 20) 8 g3
Bxc3+ 9 bxc3 Qe7 10 Bd3 Na6 11 Bc2 b6 12 Nf3 Nc5 (Black succeeds in blockading
the doubled pawns and stands reasonably well, which is why I prefer 7 Nd2—that
said, we see that Keres manages to conjure up an attack anyway!) 13 0-0 Bb7 14 e5 0-
0-0 15 Nd4 f6 16 Nf5 Qf8 17 Bd4 g6 18 Ne3 fxe5 19 fxe5 Qh6 20 Nd5 Ne6 21 Qd3
Rhf8 22 Rf6 Qh5 23 Re1 Ncxd4 24 cxd4 Bxd5 25 Bd1 Bxc4 26 Qxc4 Qg5 27 Bf3
Kb8 28 Qd5 c6 29 Qd6+ Kb7 30 Rxf8 Rxf8 31 Qxd7+ Nc7 32 Qxc6+ 1-0 P.Keres-
K.Gilg, Prague 1937.
8 Bd3 f5
30
This is too risky in such an undeveloped position—since Alekhine did not cover
his knight, Black should still take it: 8 ... Bxc3+ followed by 9 ... Na6, holding c5,
looks best, similar to the Keres-Gilg game.
9 Qh5+
A typical “Grandmaster over-refinement” that helps Black block the d3-bishop.
Correct is the simple 9 Qf3 Bxc3+ 10 bxc3 fxe4 11 Bxe4 with advantage, e.g . 11 ... 0-
0 (or 11 ... d6 12 Bd5 Bg4 13 Qxg4 Qxe3+ 14 Kf1 and White is practically winning
with the rook coming to e1 soon) 12 Nh3 Re8 13 Ng5 h6 14 0-0 d6 (not 14 ... hxg5?
15 Bd5+ Kh7 16 Qh5 mate, or 15 ... Kf8 16 fxg5+ and mates) 15 Bd5+ Kh8 16 Rae1
with a winning attack.
9 ... g6 10 Qf3 Bxc3+ 11 bxc3 fxe4
Much better is 11 ... d6 and Black more or less holds, because of the gift tempo ...
g7-g6 that Black got in because of 9 Qh5+. Black consolidates after 12 exf5 Bxf5 13
Bxf5 gxf5 14 Ne2 Nd7 15 0-0 0-0 -0 16 Nd4 Rde8, while if 12 Nh3 fxe4 13 Bxe4 (13
Qxe4 Bxh3 destroys the rest of White’s pawns) 13 ... Bg4 14 Qxg4 Qxe4 and Black
has counterplay—one sees that, unlike in the note to move 9, White was unable to get
his bishop to d5 here.
12 Bxe4 0-0 13 Bd5+ Kh8 14 Nh3 d6
It doesn’t help to get the queens off: 14 ... Re8 15 Kf2 Qh4+ 16 Qg3 Qxg3+ 17
hxg3, still with a winning attack.
15 0-0
31
Since Black missed his chance on move 11, we see that ... g7-g6 now shows up
as a weakness. All White needs is one check on the long diagonal and the game will be
over.
15 ... Bxh3 16 Qxh3 Qd7 17 f5!
The Bird/Four Pawns Attack blow scores again! Even Fritz jumps to plus 3!
17 ... gxf5
17 ... Rxf5 18 Qh4 Na6 19 Rxf5 gxf5 20 Bh6 Qe7 21 Bg5 and wins is a typical
variation where the dark-squared bishop finds its way to the long diagonal.
18 Rab1 f4
Trying to divert the bishop from d4, as 18 ... Na6 19 Bxc6 bxc6 20 Bd4+ Kg8 21
Qg3+ wins immediately.
19 Bxf4 Qxh3 20 Be5+! 1-0
32
But White finds this check anyway, even though the square is twice covered!
Black resigns in view of 20 ... Nxe5 21 Rxf8+ Kg7 22 Rg8+ Kf6 23 gxh3 c6 24 Be4,
when White’s advantage of the exchange will soon be augmented ... by the rest of
Black’s pieces!
Though Alekhine did not play this game quite as accurately as the preceding one,
this time he won in only twenty moves as opposed to twenty-three!
Game 7
A.Alekhine-K.Gilg
Semmering 1926
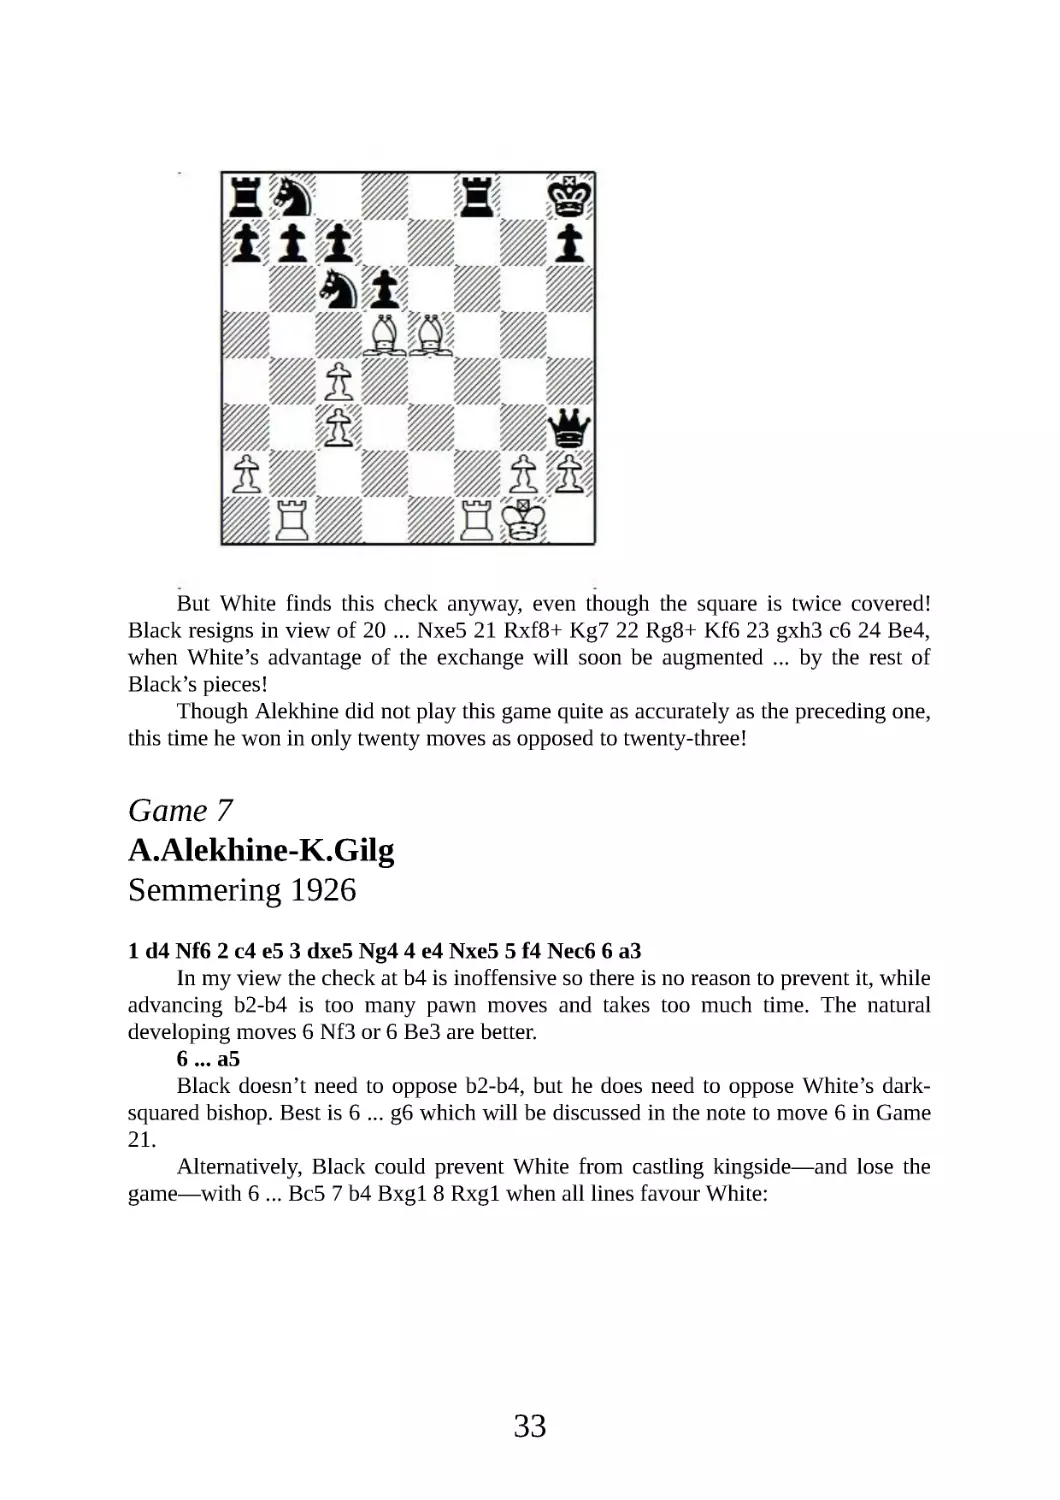
1 d4 Nf6 2 c4 e5 3 dxe5 Ng4 4 e4 Nxe5 5 f4 Nec6 6 a3
In my view the check at b4 is inoffensive so there is no reason to prevent it, while
advancing b2-b4 is too many pawn moves and takes too much time. The natural
developing moves 6 Nf3 or 6 Be3 are better.
6 ... a5
Black doesn’t need to oppose b2-b4, but he does need to oppose White’s dark-
squared bishop. Best is 6 ... g6 which will be discussed in the note to move 6 in Game
21.
Alternatively, Black could prevent White from castling kingside—and lose the
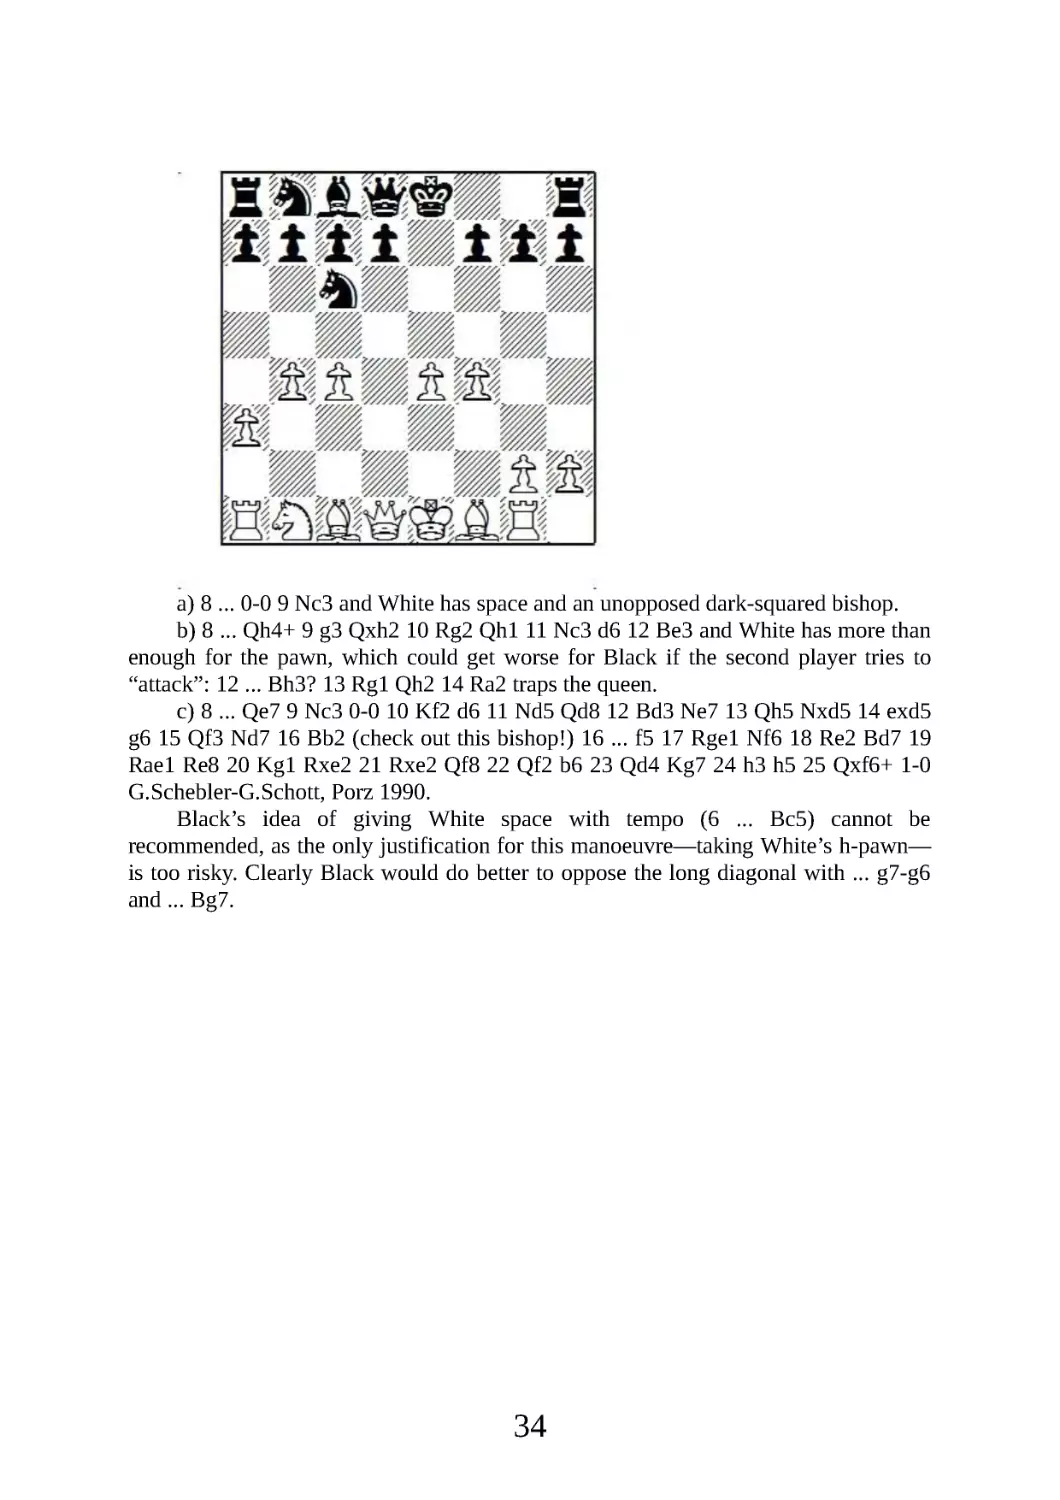
game—with 6 ... Bc5 7 b4 Bxg1 8 Rxg1 when all lines favour White:
33
a) 8 ... 0-0 9 Nc3 and White has space and an unopposed dark-squared bishop.
b) 8 ... Qh4+ 9 g3 Qxh2 10 Rg2 Qh1 11 Nc3 d6 12 Be3 and White has more than
enough for the pawn, which could get worse for Black if the second player tries to
“attack”: 12 ... Bh3? 13 Rg1 Qh2 14 Ra2 traps the queen.
c) 8 ... Qe7 9 Nc3 0-0 10 Kf2 d6 11 Nd5 Qd8 12 Bd3 Ne7 13 Qh5 Nxd5 14 exd5
g6 15 Qf3 Nd7 16 Bb2 (check out this bishop!) 16 ... f5 17 Rge1 Nf6 18 Re2 Bd7 19
Rae1 Re8 20 Kg1 Rxe2 21 Rxe2 Qf8 22 Qf2 b6 23 Qd4 Kg7 24 h3 h5 25 Qxf6+ 1-0
G.Schebler-G.Schott, Porz 1990.
Black’s idea of giving White space with tempo (6 ... Bc5) cannot be
recommended, as the only justification for this manoeuvre—taking White’s h-pawn—
is too risky. Clearly Black would do better to oppose the long diagonal with ... g7-g6
and ... Bg7.
34
7 Nc3 Bc5 8 Nd5
Perhaps Alekhine recalled his quick win vs. Euwe, but facing a determined
tournament competitor is not the same as a “free game!”
Better is the modest 8 Nf3 0-0 9 Bd3 as played by the Chinese GM Wang Yue, as
seen in the note to move 7 in Game 21.
8 ... 0-0 9 Bd3 d6 10 Qh5
Unlike the similar Kramnik sortie from Game 1, this move does not come with
either a threat or an attack! White has lost too much time in the opening (a2-a3, Nd5)
for such a primitive venture to succeed.
10 ... Nd7 11 Nf3 h6 12 g4?
Mr. Fritz offers the circumspect 12 Qh4 with equality, but Alekhine is determined
35
to attack at all cost—and the cost is one point—for his opponent!
12 ... Nf6 13 Nxf6+ Qxf6 14 f5 Nd4
Black’s counter-attack arrives at full speed, and our favourite chess machine says
Black already has a decisive advantage.
It is instructive to note the weaknesses caused by White’s non-essential pawn
moves: 6 a3 left a hole at b3, and 12 g4 weakened f3, and both of these are easily
targeted by Black’s powerful centralized knight.
15 g5
The great world champion runs forward to his doom.
15 ... Nxf3+ 16 Qxf3 hxg5 17 h4 Re8 18 Kd1
Or 18 hxg5 Qxf5 19 Qg3 Rxe4+ 20 Kd2 Rd4 21 Kc3 Rxd3+ 22 Qxd3 Qe5+ 23
Kb3 Bf5 with a decisive Shirovian attack.
18 ... gxh4 19 Kc2 Bd7 20 Bd2 Ra6 21 Qh5 Ba4+ 22 Kc1 Rb6 23 Ra2 Bd4 24
b4 Be3!
36
25 Bxe3 Qc3+ 26 Bc2 Qxe3+ 27 Kb1 Bxc2+ 28 Rxc2 axb4 29 Qxh4 bxa3+ 30
Ka2 Qh6 31 Qxh6
31 Qe1 Qf6 is worse, so Alekhine must go into a lost ending.
31 ... gxh6 32 Rxh6 Kg7 33 Rh4 Rb2+ 34 Rxb2 axb2 35 Kxb2
35 ... Rh8 36 f6+ Kg8 37 Rf4 Kf8 38 Kc3 Rh3+ 39 Kd2 Ke8 40 e5 dxe5 41
Rf5 Rh6 42 Rxe5+ Kd8 43 Rd5+ Kc8 44 Rf5 Kd7 45 Rd5+ Ke6 46 Rc5 c6 47 Ra5
Rh8 48 Ra7 Rb8 49 Kc3 Kxf6 50 Kb4 Ke5 51 Kc5 f5 52 Ra1 f4 53 Re1+ Kf5 54
Re7 b5 55 Kxc6 bxc4 56 Kd5 Rd8+ 57 Kxc4 f3 58 Kc3 Kf4 59 Rf7+ Kg3 60 Rg7+
Kf2 61 Rg6 Kf1 62 Rf6 f2
Black has reached the Lucena position—once Gilg demonstrates that he knows
the correct technique to win it, Alekhine resigns.
37
63 Rg6 Rd5 64 Kc2 Ke2 65 Re6+ Kf3 66 Rf6+ Ke3 67 Rf8 Rd4 0-1
Game 8
A.Alekhine-L.Gallego
Gijon 1944
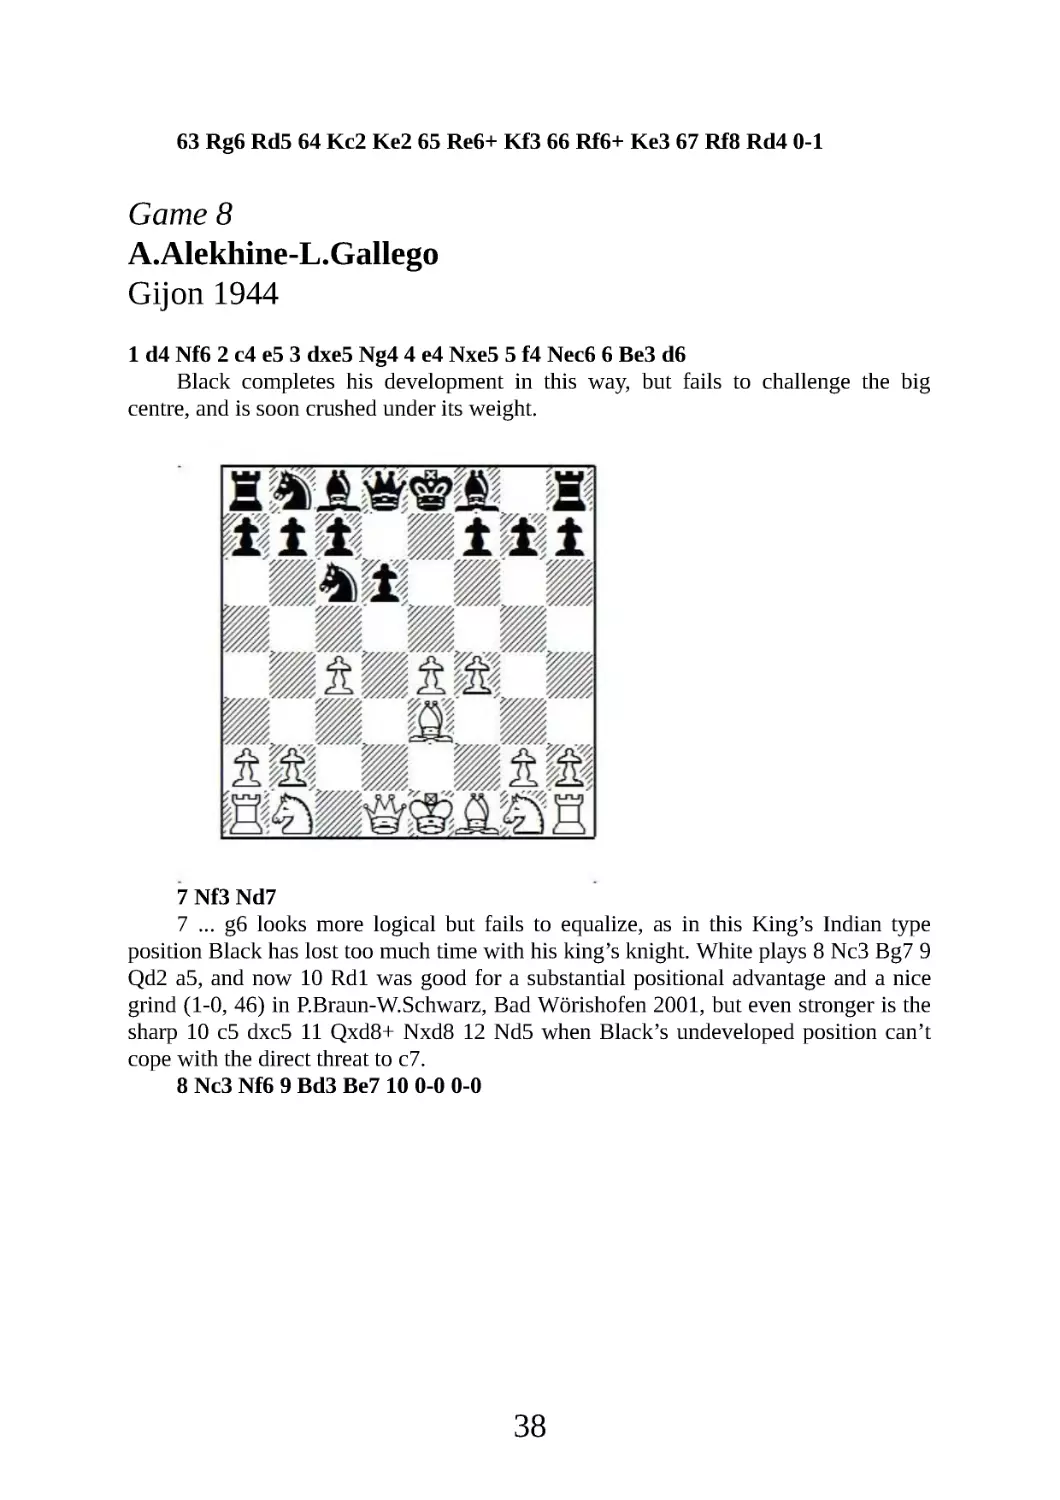
1 d4 Nf6 2 c4 e5 3 dxe5 Ng4 4 e4 Nxe5 5 f4 Nec6 6 Be3 d6
Black completes his development in this way, but fails to challenge the big
centre, and is soon crushed under its weight.
7 Nf3 Nd7
7 ... g6 looks more logical but fails to equalize, as in this King’s Indian type
position Black has lost too much time with his king’s knight. White plays 8 Nc3 Bg7 9
Qd2 a5, and now 10 Rd1 was good for a substantial positional advantage and a nice
grind (1-0, 46) in P.Braun-W.Schwarz, Bad Wörishofen 2001, but even stronger is the
sharp 10 c5 dxc5 11 Qxd8+ Nxd8 12 Nd5 when Black’s undeveloped position can’t
cope with the direct threat to c7.
8 Nc3 Nf6 9 Bd3 Be7 10 0-0 0-0
38
Black has developed and castled and is virtually lost.
11 h3 b6 12 a3 Ne8 13 Qc2 f5
Or 13 ... g6 14 b4 a6 15 Rad1 with slow strangulation.
14 exf5 Nf6 15 g4 Bd7 16 Rae1 Rb8 17 Nd5 Nxd5 18 cxd5 Na5 19 b4 Nb7 20
Nd4 Qc8 21 Rc1 Bd8 22 Nc6
Now Black could play 22 ... Ra8 23 Nxd8 Qxd8 24 Qxc7 Rb8 and fight on two
pawns down, but instead he saves the a-pawn and ...
22 ... a5 23 Na7 1-0
Loses his queen!
Simple development won’t do against the Alekhine Attack.
39
Game 9
G.Reid-A.Alekhine
Scarborough 1926
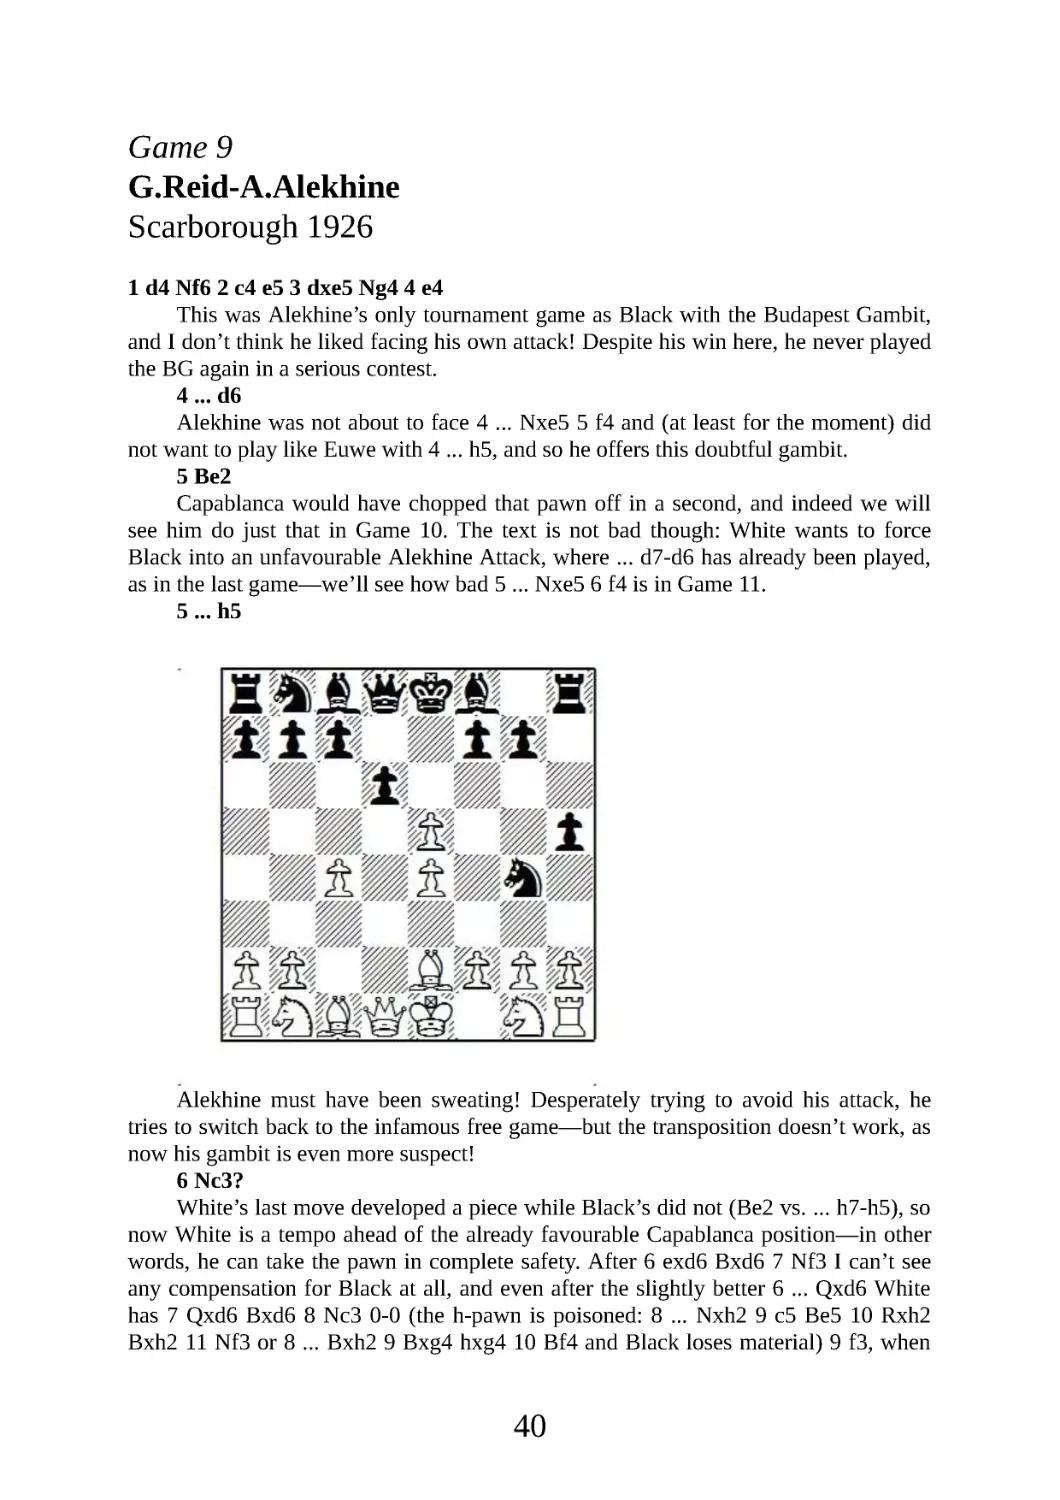
1 d4 Nf6 2 c4 e5 3 dxe5 Ng4 4 e4
This was Alekhine’s only tournament game as Black with the Budapest Gambit,
and I don’t think he liked facing his own attack! Despite his win here, he never played
the BG again in a serious contest.
4 ... d6
Alekhine was not about to face 4 ... Nxe5 5 f4 and (at least for the moment) did
not want to play like Euwe with 4 ... h5, and so he offers this doubtful gambit.
5 Be2
Capablanca would have chopped that pawn off in a second, and indeed we will
see him do just that in Game 10. The text is not bad though: White wants to force
Black into an unfavourable Alekhine Attack, where ... d7-d6 has already been played,
as in the last game—we’ll see how bad 5 ... Nxe5 6 f4 is in Game 11.
5 ... h5
Alekhine must have been sweating! Desperately trying to avoid his attack, he
tries to switch back to the infamous free game—but the transposition doesn’t work, as
now his gambit is even more suspect!
6 Nc3?
White’s last move developed a piece while Black’s did not (Be2 vs. .. . h7-h5), so
now White is a tempo ahead of the already favourable Capablanca position—in other
words, he can take the pawn in complete safety. After 6 exd6 Bxd6 7 Nf3 I can’t see
any compensation for Black at all, and even after the slightly better 6 ... Qxd6 White
has 7 Qxd6 Bxd6 8 Nc3 0-0 (the h-pawn is poisoned: 8 ... Nxh2 9 c5 Be5 10 Rxh2
Bxh2 11 Nf3 or 8 ... Bxh2 9 Bxg4 hxg4 10 Bf4 and Black loses material) 9 f3, when
40
Black has the bitter choice between trapping his own knight to get his pawn back (9 ...
Nxh2 with no exit visa) or returning to safety with 9 ... Nf6 and nothing at all for the
pawn.
6 ... Nc6 7 h3
7 exd6 is still a clear pawn, but the text is not bad if ...
7 ... Ngxe5
White follows with 8 f4!. The Alekhine Attack against Alekhine! Now if 8 ...
Ng6 White just plays 9 Nf3 with advantage, so Black is almost forced to try 8 ... Qh4+
9 Kf1
but it transpires that even here Black has no effective knight move, as can be
seen:
a) 9 ... Ng6 10 Nf3 Qf6 (or 10 ... Qg3 11 Nd5 and c7 cracks as so often in this
variation) 11 f5 Nge5 12 Bg5! wins the queen as there is no check on f3—note how
having the king on f1 actually helps White here.
b) 9 ... Ng4 10 g3 wins a piece.
c) 9 ... Nd7 10 Nf3 and one can see Black got no mileage out of the check, as
White can castle by hand: 10 ... Qd8 11 Kf2 Be7 12 Be3 with a typical Alekhine
Attack plus.
This would have been a dream position for the White player—but lacking
boldness, he played the prosaic ...
8 Nf3
And was lost in five more moves.
8 ... Nxf3+ 9 Bxf3 g6 10 Be3 Be6 11 Nd5 Ne5 12 Bd4 c6 13 Bxe5?
13 Ne3 is a much better try.
13 ... dxe5
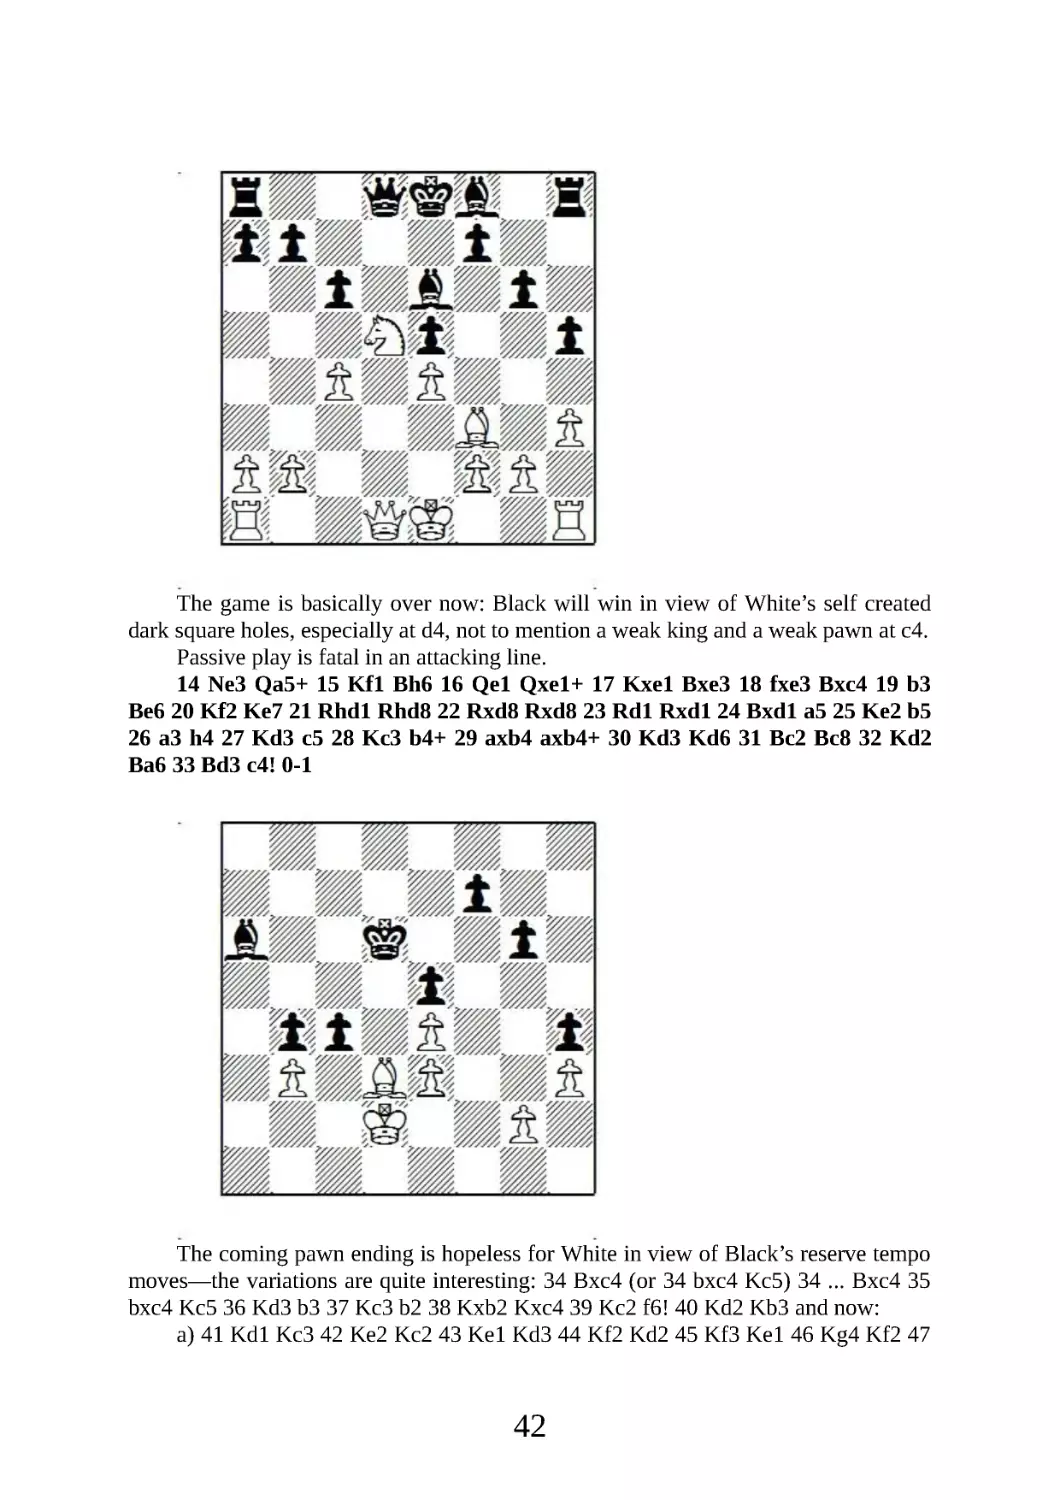
41
The game is basically over now: Black will win in view of White’s self created
dark square holes, especially at d4, not to mention a weak king and a weak pawn at c4.
Passive play is fatal in an attacking line.
14 Ne3 Qa5+ 15 Kf1 Bh6 16 Qe1 Qxe1+ 17 Kxe1 Bxe3 18 fxe3 Bxc4 19 b3
Be6 20 Kf2 Ke7 21 Rhd1 Rhd8 22 Rxd8 Rxd8 23 Rd1 Rxd1 24 Bxd1 a5 25 Ke2 b5
26 a3 h4 27 Kd3 c5 28 Kc3 b4+ 29 axb4 axb4+ 30 Kd3 Kd6 31 Bc2 Bc8 32 Kd2
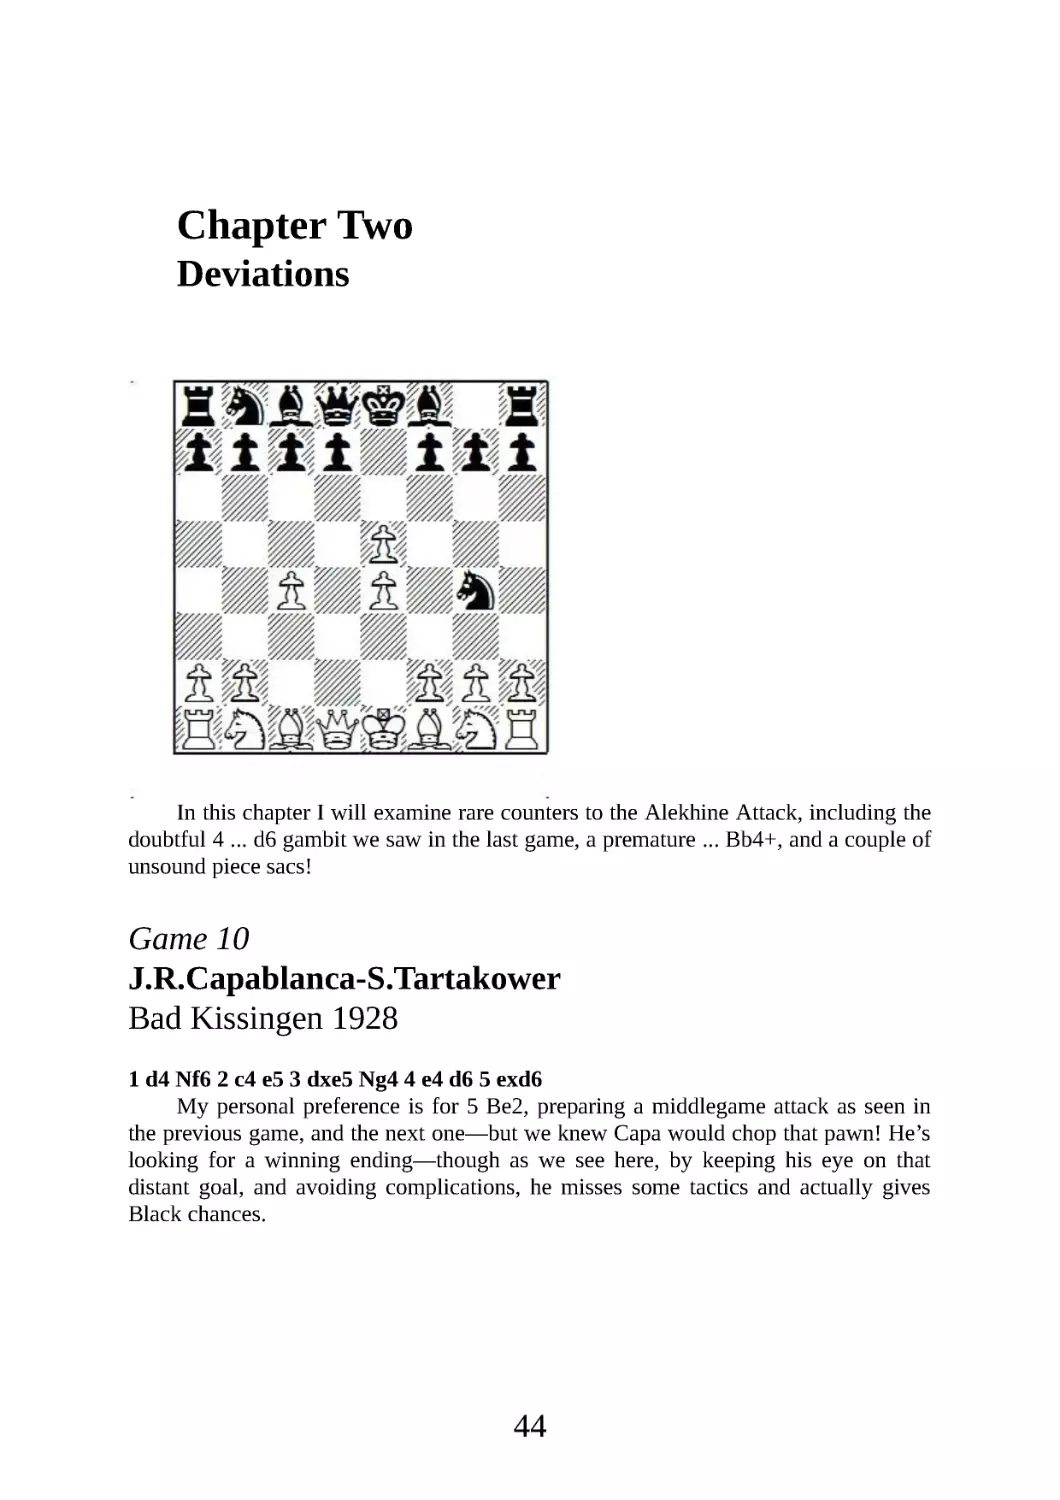
Ba6 33 Bd3 c4! 0-1
The coming pawn ending is hopeless for White in view of Black’s reserve tempo
moves—the variations are quite interesting: 34 Bxc4 (or 34 bxc4 Kc5) 34 ... Bxc4 35
bxc4 Kc5 36 Kd3 b3 37 Kc3 b2 38 Kxb2 Kxc4 39 Kc2 f6! 40 Kd2 Kb3 and now:
a) 41 Kd1 Kc3 42 Ke2 Kc2 43 Ke1 Kd3 44 Kf2 Kd2 45 Kf3 Ke1 46 Kg4 Kf2 47
42
Kxh4 Kxg2 48 Kg4 Kf2 49 h4 Kxe3 50 h5 gxh5+ 51 Kxh5 Kxe4 52 Kg6 Kf3 53 Kxf6
e4 and queens.
b) 41 Kd3 Kb2 42 Kd2 (or 42 Kc4 Kc2 43 Kd5 Kd3 44 Ke6 Kxe3 45 Kxf6 Kxe4
46 Kxg6 Kf4 47 Kh5 Kg3 48 Kg5 e4 and again the e-pawn promotes) 42 ... g5! 43
Kd1 Kc3 44 Ke2 Kc2 45 Kf3 Kd3 46 Kg4 Kxe4 47 Kh5 Kxe3 48 Kg6 Kf4 49 Kxf6 e4
and once again the e-pawn goes through.
Alekhine scored a nice technical win once he got his position after move 13, but I
would have liked to have seen his face after 4 e4!.
Summary
The really scary win here is Game 8, where Black plays ten seemingly reasonable
moves and then might as well resign. The 23 and 20-move debacles of Games 5 and 6
do not inspire confidence, nor does the gambit 4 ... d6 of Game 9. But one should note
Black was better out of the opening in Game 4, and actually won in Game 7.
I’m going to amplify this further in Chapters 3 and 4, but one should already be
getting the feeling that 4 ... Nxe5 against the Alekhine Attack is suspect. The only
reason Gilg got into Game 7 was due to Alekhine’s time wasting 6 a3.
This leaves the 4 ... h5 of Alekhine-Euwe as the last man standing, and I will give
full coverage of this line—that I consider critical and best—in Chapter 5.
43
Chapter Two
Deviations
In this chapter I will examine rare counters to the Alekhine Attack, including the
doubtful 4 ... d6 gambit we saw in the last game, a premature ... Bb4+, and a couple of
unsound piece sacs!
Game 10
J.R.Capablanca-S.Tartakower
Bad Kissingen 1928
1 d4 Nf6 2 c4 e5 3 dxe5 Ng4 4 e4 d6 5 exd6
My personal preference is for 5 Be2, preparing a middlegame attack as seen in
the previous game, and the next one—but we knew Capa would chop that pawn! He’s
looking for a winning ending—though as we see here, by keeping his eye on that
distant goal, and avoiding complications, he misses some tactics and actually gives
Black chances.
44
5 ... Bxd6
Since this doesn’t turn out well for Black at all, I was wondering if 5 ... Qxd6
might improve, so I tested it against my German sparring partner—and was crushed as
follows: 6 Qxd6 Bxd6 7 Be2 Nc6 8 Nf3 0-0 9 0-0 Re8 10 Nc3 f5 11 exf5 Bxf5 12 h3
Nge5 13 Nxe5?! Bxe5 14 Be3 Nd4 15 Bxd4 Bxd4 16 Rfe1 c6 17 Rad1 Rad8 18 Bf3
Rxe1+ 19 Rxe1 Bf6 20 Rd1 Rxd1+ 21 Nxd1 Bd3 22 b3 Bb1 23 a3 Ba2 24 b4 Bxc4
and Black was winning in T.Taylor-Comp Fritz 11, blitz game 2008. Careful analysis
reveals that I missed a subtle improvement: correct is the precise 13 Be3! Bd3 (both
13 ... Nd3 14 Nh4 and 13 ... Nxf3+ 14 Bxf3 Bd3 15 Bd5+ are good for White) 14
Nxe5 Bxe2 15 Nxe2 Bxe5 16 Rad1! and White keeps the pawn with winning chances.
But I think Black has some genuine practical play in this line, which is another
reason why I favour 5 Be2.
6 Be2!
Accurate! By developing with a threat White sets his opponent insoluble
problems, and also avoids the trick 6 Nf3? Bb4+ 7 Bd2 Bc5! and Black won in
J.Kinman-G .Koshnitsky, Perth 1928, as f2 falls.
6 ... f5
This fails tactically, but even after 6 ... Nf6 7 Nc3 (White scored a quick win with
7 Nf3 Nxe4 8 0-0 0-0 9 Nbd2 Re8 10 Nxe4 Rxe4 11 Bd3 Re8 12 Ng5 h6 13 Qh5 g6
14 Qxh6 1-0 S.Himmelmann-T.Schuler, Bremen 1992, but Black could have defended
better with 9 ... Nf6) 7 ... Nc6 8 Nf3 0-0 9 Be3, developing while threatening c4-c5,
it’s hard to see any real compensation for Black.
Note also that 6 ... h5 just transposes back to the note to move 6 of the previous
game, which showed that Black had nothing for the pawn there either.
7 exf5 Qe7
This should lose quickly, but on other moves Black is two pawns down for not
much.
8 Nf3?
Capablanca, dreaming of his pawn up ending, fails to notice that he can win a
45
piece right now!
Correct is 8 c5! when Black’s knight on g4 is hanging. After 8 ... Bxc5 9 Qa4+
Nc6 10 Qxg4 Black does not have enough for the piece:
a) 10 ... Nb4 11 Bg5 Nc2+ (11 ... Qe5 12 Qh5+ Kf8 13 f6 Nc2+ 14 Kd1 Nxa1 15
fxg7+ Kxg7 16 Bh6+ Kf6 17 Bg7+ wins the queen) 12 Kd1 Qe5 13 Qh5+ Kf8 14 Nf3
Qd5+ 15 Kxc2 Bxf5+ 16 Kc1 Qe4 (or if 16 ... Bxf2 17 Nc3 with a winning attack, as
Rf1 comes next) 17 Ne1 Bxf2 18 Rf1 Be3+ (18 ... Bxe1 19 Rxf5+ Qxf5 20 Be7+
again picks off the queen) 19 Bxe3 Qxe3+ 20 Nd2 Qc5+ 21 Bc4 and wins.
b) 10 ... Nd4 11 Qh5+ Qf7 (if 11 ... Kf8 12 f6! gxf6 13 Bh6+ Kg8 14 Nc3 Nc2+
15 Kd1 Nxa1 16 Bc4+ Be6 17 Qg4+ wins major material) 12 Qxf7+ Kxf7 13 Bd3 and
White is just a piece up.
c) 10 ... 0-0 11 Bg5 develops with gain of time, demonstrating that Black has
nothing real for the piece.
As far as I can see, this constitutes a clear refutation of the 4 ... d6, 5 ... Bxd6
gambit.
8 ... Bxf5 9 Bg5
White could also play to win more material with 9 Qd5, but it’s not so clear as
the above piece win. Black could get at least a confusing position after 9 ... Bg6 10
Qxb7 Bd3.
9 ... Nf6 10 Nc3 Nc6 11 Nd5 Qf7 12 0-0 0-0 -0 13 Nd4 Nxd4 14 Qxd4 c6 15
Bxf6 gxf6
46
16 Qxf6?
Another tactical mistake, and this one is even more serious—as after this move
White not only loses all his advantage, Black can start playing for a win!
Clearly White’s plan is to exchange queens, but as will be seen, this could
backfire. Instead of thinking of the ending, Capa should have thought of mating his
opponent in the middlegame!
Correct is to sac a piece with 16 Qxa7! cxd5 17 cxd5, when I can’t find a way out
for Black: 17 ... Rdg8 (17 ... Qxd5 loses more quickly, e.g . 18 Rac1+ Bc7 19 Rfd1 Qe5
20 Qa8 mate, or 18 ... Kd7 19 Rfd1 with a winning attack) 18 Rac1+ (but not 18 Bb5?
Bxh2+ 19 Kxh2 Qh5+ 20 Kg1 Rxg2+ 21 Kxg2 Rg8 and it’s White who gets mated) 18
... Kd7 (18 ... Bc7 fails to 19 Qa8+ Kd7 20 Bb5+ Ke7 21 Rfe1+ Be5 22 d6+ Kxd6 23
Qa3+ Ke6 24 Qb3+ Ke7 25 Rc7+ and wins) 19 Rfe1! (19 Qxb7+ Ke8 20 Qc6+ Qd7
21 Bb5 Qxc6 22 Rxc6 Bb8 23 Rxf6+ Bd7 would be more of a slog with the five
pawns for the piece) and now:
47
a) 19 ... Rxg2+ 20 Kxg2 Qg6+ (or 20 ... Qxd5+ 21 f3 and Black has no more
good checks) 21 Kh1 Be4+ 22 f3 Qh5 23 Qxb7+ Ke8 24 Rc8 mate.
b) 19 ... Bxh2+ 20 Kxh2 Rxg2+ 21 Kh1 Rg1+ (if 21 ... Qxd5 22 Bb5+ Qxb5 23
Qd4+ Qd5 24 Qxd5 mate) 22 Rxg1 Qxd5+ 23 f3+ and now that the checks are done,
Black will be mated.
c) 19 ... Qxd5 is relatively best, but after 20 g3 White has a safe king, while there
is no shelter for the black monarch. There are many variations, but White’s attack
looks decisive, e.g . 20 ... Bh3 (20 ... Ra8 21 Qb6 and 20 ... h5 21 Bc4 Qc6 22 Bxg8
both lose quickly) 21 Qa4+ Kd8 22 Bf1 Bxf1 23 Rxf1 Ke7 (if 23 ... h5 24 Rfd1 Qe5
25 Qa8+ Ke7 26 Qxb7+ Ke6 27 Re1 wins the queen) 24 Rfe1+ Kf7 (if 24 ... Be5 25 f4
recovers the sacrificed piece) 25 Rcd1 and it’s all over. A typical finish could be 25 ...
Qc5 26 Qd7+ Be7 27 Rd5 Qb4 28 Qe6+ Kf8 (or 28 ... Ke8 29 a3) 29 Rd7 Rg7 30
Rd8+ Bxd8 31 Qe8 mate.
But Capablanca was unable to switch gears and go over to the attack—and so
took the wrong pawn. Now he would be in serious trouble if Black played correctly ...
16 ... Qxf6??
But Tartakower misses his chance!
Black can take over the game with the Kotovian creeping move 16 ... Qg6!!
48
What to do? The knight is hanging, but if the knight moves, the queen is lost. If
the white queen exchanges itself, then Black breaks through on the h-file with good
winning chances. If White moves the knight with check, this happens: 17 Ne7+ Bxe7
18 Qxe7 Rhe8 and Black wins a piece.
What can White do? We’ve already seen that the knight check fails. Also bad are:
a) 17 Qxg6 hxg6 18 Nc3 Bxh2+ 19 Kh1 Rd2 and Black has a winning advantage
in view of the threats ... Be5+ and ... Rxb2.
b) 17 g4 Be6 18 Rac1 (not 18 Ne7+ Be7 19 Qxe7 as 19 ... Rd2 20 Rfe1 Bxg4
wins for Black) 18 ... Kb8 19 Qxg6 hxg6 20 Nc3 Bxh2+ 21 Kg2 Be5 22 Rh1 (not 22
Rfd1 Rh2+ 23 Kg1 Rdh8 with a big attack for Black) 22 ... Rxh1 23 Rxh1 Rd2 and
White is struggling to draw.
c) Fritz comes up with what is apparently the only save, 17 c5!, but even this
fails to equalize: 17 ... Qxf6 (or 17 ... Bxc5 18 Qc3 Be4 19 Nf4 Qf5 when Black is
only one pawn down and certainly has enough compensation with his strong bishops; I
would prefer Black here, but the ending looks even stronger) 18 Nxf6 Bxc5 19 Bg4
Bxg4 20 Nxg4 Rd2 and White is fighting for his life—Black will at least recover his
pawn with the better game.
So Capablanca’s “better ending” could have become just that—for Black!—
because he failed to force the win tactically at two crucial moments. One cannot win
every game in a technical positional style!
Of course, now that Black has blundered, Capa gets his position and wins just as
he had planned. There is truly no justice in chess.
17 Nxf6 Be5 18 Bg4 Bxf6
Or 18 ... Bxg4 19 Nxg4 Bxb2 20 Rad1.
19 Bxf5+ Kc7 20 Rad1 Bxb2 21 Rxd8 Rxd8 22 Bxh7 Rd4 23 g3
And now Capa takes his single extra pawn and grinds to victory; even the
opposite-coloured bishops fail to disturb his relentless technique.
49
23 ... Rxc4 24 h4 b5 25 Kg2 a5 26 h5 Bg7 27 f4 Bh6 28 Re1 Ra4 29 Bg8 Rd4
30 Re7+ Rd7 31 Rxd7+ Kxd7 32 Kf3 c5 33 g4 c4 34 g5 Bf8 35 h6 a4 36 f5 Kc6 37
h7 Bg7 38 f6 c3 39 Ke2 Bh8 40 f7 1-0
One can’t say too many good things about the 4 ... d6 gambit, but if you must
play it, take back with the queen when Black has practical chances. After the bishop
recapture, White was essentially winning by move 6, even though the game contained
various misadventures beyond that point!
Game 11
S.Reshevsky-A.Denker
Syracuse 1934
1 d4 Nf6 2 c4 e5 3 dxe5 Ng4 4 e4 d6 5 Be2
We saw this in Game 9: instead of accepting the gambit, White aims for a
favourable Alekhine Attack, where the f8-bishop is blocked.
5 ... Nxe5
We recall that after the alternative, Alekhine’s 5 ... h5 in the above-mentioned
game, White could have got the advantage with the simple 6 exd6 when Black has
nothing for the pawn, or in the game after 6 Nc3 Nc6 7 h3 Ngxe5 White could have
struck hard with 8 f4!.
6 f4
50
6 ... Ng4
No matter where Black’s knight moves, he will not have sufficient counterplay to
balance White’s space advantage with the f8-bishop blocked in—we saw this type of
play already in the Alekhine-Gallego crush, Game 8.
a) 6 ... Ng6 7 Nf3 Nc6 8 0-0 Be7 9 Nc3 0-0 10 Be3 Re8 11 Qd2 Bf6 12 Nd4 with
a clear space advantage in O.Katajisto-B.De Greif, Amsterdam Olympiad 1954.
b) 6 ... Nec6 7 Nf3 Be7 8 Nc3 0-0 and now White won quickly after 9 Nd5 Nd7
10 0-0 Nc5 11 e5 Re8?! (11 ... dxe5 puts Black back in the game) 12 b4 Nd7 13 b5
Ncb8 14 Ba3 in A.Fomin-N .Miasnikov, USSR 1955; but I think I would played less
impetuously and kept my pawns together with 9 0-0 and a steady positional advantage.
7 Nf3
Not 7 Bxg4 Qh4+ with counterplay.
7 ... Nc6 8 0-0 Bd7?!
Slightly better is 8 ... Be7 9 Nc3 0-0 10 h3 Nf6 11 Be3, but White has a sound
grip on the position while Black has no counterplay to speak of—e .g . 11 ... Nh5 12
Qe1 Bf6 13 Nd5 Bxb2 14 Rb1 Ba3 (14 ... Bf6 15 g4 snags the knight on rim) 15 e5
and White has a tremendous attack for a single pawn.
9 Nc3 Be7 10 h3 Nf6 11 e5!
51
The knight has no good square.
11 ... dxe5 12 fxe5 Ng8
Or 12 ... Nh5 13 Kh2 g6 14 Bh6 Bf8 15 Qc1 with a winning attack.
13 Be3 f6!?
13 ... Be6 14 Qc1 with Rd1 coming is virtually winning.
14 Bd3!
Reshevsky switches to direct attack.
14 ... fxe5
After the more solid 14 ... Be6 15 Qe2 White’s position is overwhelming.
15 Ng5! Nf6
If 15 ... Bxg5 16 Qh5+ g6 17 Bxg6+ hxg6 18 Qxg6+ Ke7 19 Bc5 mate.
52
16 Rxf6!
Black could resign.
16 ... Bxf6 17 Qh5+ g6 18 Bxg6+ hxg6 19 Qxg6+ Ke7 20 Qf7+ Kd6 21 c5
mate
In general, it’s clear (look how quickly White is winning these games!) that the
Budapest Gambiteer must be thoroughly prepared for the Alekhine Attack, and that
this attack in the hands of a bold attacking player is very dangerous indeed.
Specifically, I think the last two games show that 4 ... d6 is mistaken to put it
mildly: Black doesn’t get enough for the pawn after Capablanca’s gambit acceptance,
and falls under fierce attack after Reshevsky’s 5 Be2.
Game 12
S.Reshevsky-H.Seidman
US Championship, New York 1951
1 d4 Nf6 2 c4 e5 3 dxe5
Black can throw in an early ... Bb4+ at many points in the Alekhine Attack, but I
can’t see any value to it. In general, after the transaction ... Bb4+ and an exchange of
bishops on d2, White develops his queen while Black has released any pressure he had
on White’s position. Therefore Black should wait until White has played the b1-knight
out (to pin it) or moved the c1-bishop (Be3) so a check will force White to pin himself
or lose time with Be3-d2. The main game and notes show the gains White gets from
such premature checks.
3 ... Ng4
After 3 ... Bb4+ 4 Bd2 Bxd2+ 5 Qxd2 Ng4 6 Qf4 Black had no compensation for
the pawn in T.Kirschneck-C.Saing, German League 2005.
4 e4 Nxe5
4 ... Bb4+ is not much better here: 5 Bd2 Bxd2+ 6 Qxd2 Nxe5 7 f4 Nec6 8 Nf3
Qe7 9 Nc3 (White leads in development and has taken over the centre) 9 ... 0-0 10 Bd3
Nb4 11 Be2 f5 12 exf5 Rxf5 13 a3 N4a6 14 0-0 d6 (14 ... Nc5 15 Nd5 Qd6 16 Qc2
followed by Rad1 is winning for White) 15 Bd3 Rh5 16 Nd5 (White dominates the
board and has a huge lead in development) 16 ... Qf8 17 Rae1 Nd7 18 Ng5 Nf6 19
Ne7+ Kh8 20 Bg6! (a pretty finishing blow) 1-0 D.Sahovic-P.Kresoja, Belgrade 1993.
5 f4 Bb4+
Or here!
6 Bd2 Bxd2+ 7 Qxd2 Ng6 8 Nc3 d6 9 Nf3 0-0 10 Bd3 Nd7 11 0-0 Nc5 12 Bc2
White has obtained an ideal attacking set-up just by making natural moves.
Notice how the exchange on d2 helped White’s development flow, and of course there
was no awkward business of kingside castling prevented or delayed by ... Bc5.
53
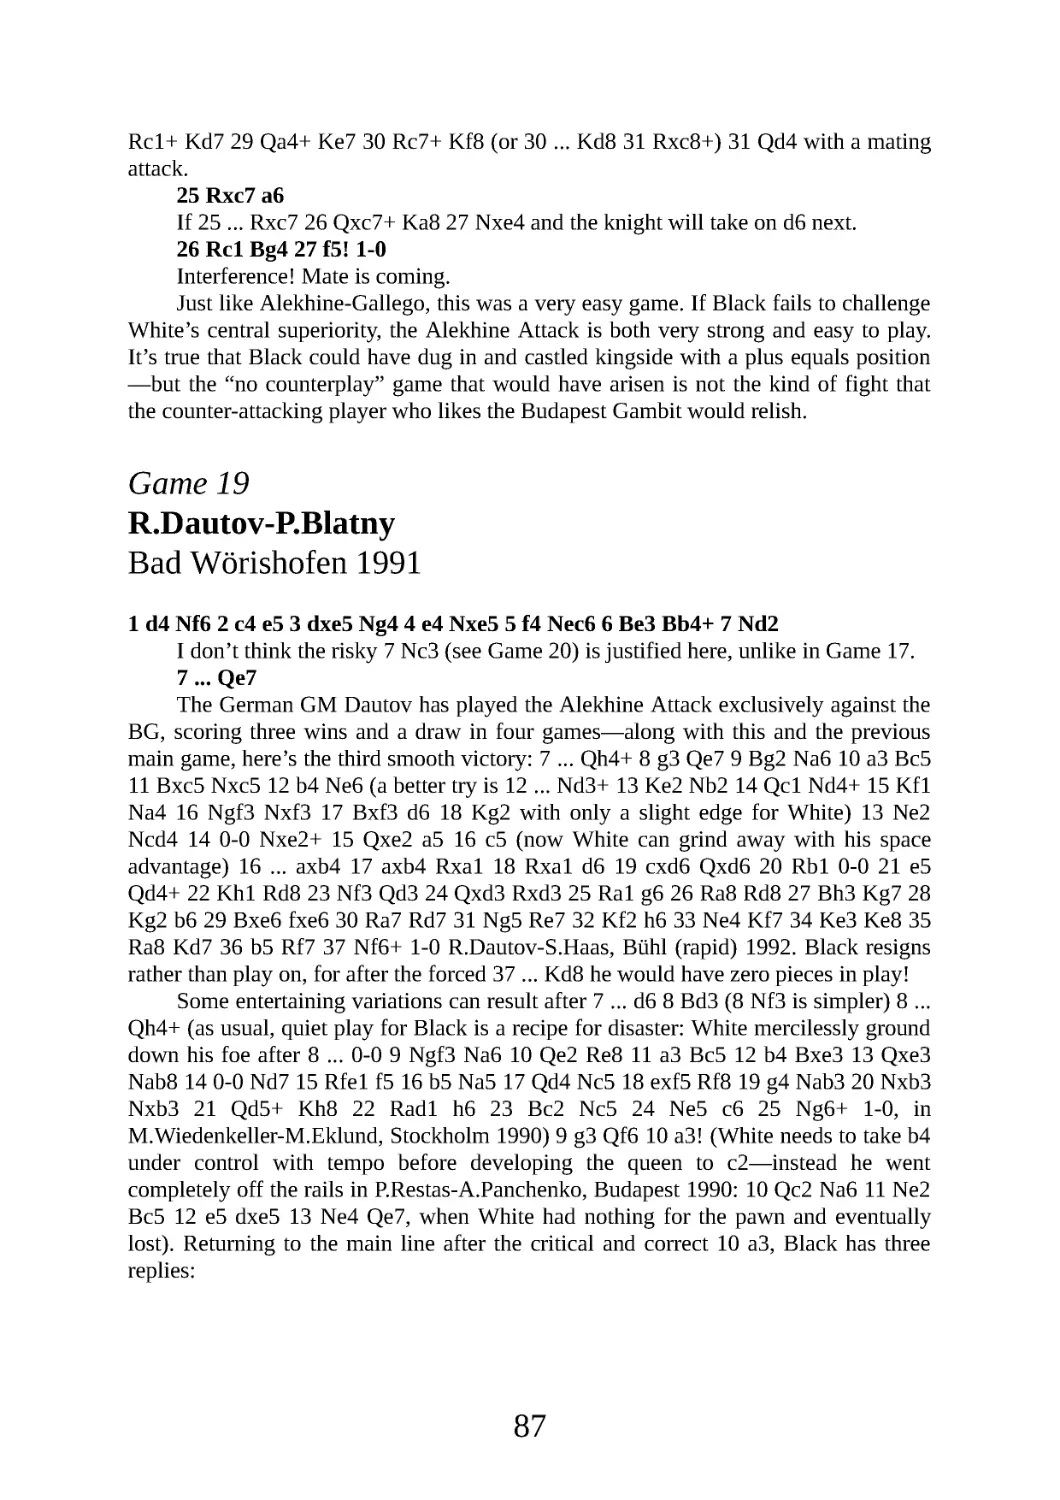
12 ... a5 13 Nd4 f6 14 Rae1 Bd7 15 Kh1 Re8 16 Re3 Bc6 17 b3 Nf8 18 a3 Kh8
19 Rfe1 Qe7 20 f5!
Lasker style! Reshevsky cramps Black’s king position, takes away e6 and g6
from the black knights, and prepares a direct attack on the king.
20 ... Ncd7 21 Nd5 Qd8 22 Nf4 Ne5 23 Qe2 Qe7 24 Rh3 Qf7 25 Nde6
One recalls that in the famous Lasker-Capablanca duel alluded to above, Black
had a serious counter-chance when he could have sacrificed the exchange for a knight
on e6:
Em.Lasker-J.R.Capablanca
St Petersburg 1914
1 e4 e5 2 Nf3 Nc6 3 Bb5 a6 4 Bxc6 dxc6 5 d4 exd4 6 Qxd4 Qxd4 7 Nxd4 Bd6 8
54
Nc3 Ne7 9 0-0 0-0 10 f4 Re8 11 Nb3 f6 12 f5 b6 13 Bf4 Bb7 14 Bxd6 cxd6 15 Nd4
Rad8 16 Ne6 Rd7 17 Rad1 Nc8 18 Rf2 b5 19 Rfd2 Rde7 20 b4 Kf7 21 a3
Here Black could have obtained good practical drawing chances with 21 ... Rxe6,
but missed his opportunity and went on to defeat: 21 ... Ba8 22 Kf2 Ra7 23 g4 h6 24
Rd3 a5 25 h4 axb4 26 axb4 Rae7 27 Kf3 Rg8 28 Kf4 g6 29 Rg3 g5+ 30 Kf3 Nb6 31
hxg5 hxg5 32 Rh3 Rd7 33 Kg3 Ke8 34 Rdh1 Bb7 35 e5 dxe5 36 Ne4 Nd5 37 N6c5
Bc8 38 Nxd7 Bxd7 39 Rh7 Rf8 40 Ra1 Kd8 41 Ra8+ Bc8 42 Nc5 1-0
Here, too, Black will have that opportunity, so perhaps White should have simply
kept the pressure with 25 Nd5.
25 ... Rac8
Black, like Capablanca, can’t muster the gumption to sacrifice the exchange. 25
. .. Nxe6 26 Nxe6 Rxe6! 27 fxe6 Qxe6 would be very hard for White to win.
26 b4 Bd7 27 Nxf8! Rxf8
55
Now White has a decisive attack—but misses the winning combination three
times in a row!
28 c5
28 Ng6+! wins as both defences are forcibly crushed:
a) 28 ... Nxg6 29 Rxh7+ Kxh7 (or 29 ... Kg8 30 Qh5 Bxf5 31 exf5 Rfe8 32 Be4
and White mates or wins massive material) 30 Qh5+ Kg8 31 fxg6 wins the queen.
b) 28 ... Kg8 29 Rxh7! (threatening mate in one, which always gets the
opponent’s attention!) 29 ... Qxc4 (or 29 ... Nxg6 30 Qh5 and wins as in line ‘a’) 30
Qh5 Rfd8 (not 30 ... Qxc2 31 Ne7 mate) 31 Nxe5 and mates.
28 ... dxc5 29 bxc5
29 Ng6+! wins.
29 ... a4 30 Bb1
30 Ng6+! wins.
30 ... Qe8 31 Ng6+!
Finally the light bulb comes on!
31 ... Nxg6 32 Rxh7+ Kxh7 33 Qh5+ Kg8 34 fxg6 Rf7 35 e5!
56
White adds the bishop to his attack.
35 ... Be6
This prolongs the game as long as possible, but there is no defence.
35 ... fxe5 fails to 36 Ba2 Be6 37 Qh7+ Kf8 38 gxf7 Qxf7 (also losing is 38 ...
Bxf7 39 Rf1 Rd8 40 Bxf7 Qxf7 41 Qh8+ Ke7 42 Rxf7 and White wins everything) 39
Bxe6 Qxe6 40 Rf1+ Ke7 (or 40 ... Ke8 41 Qxg7 Qe7 42 Qg6+ Kd7 43 Rd1+ and
White wins the queen for a pawn) 41 Qxg7+ Kd8 42 Rf8+ wins the queen for a rook,
which isn’t much better!.
Another hopeless try is 35 ... f5 36 e6 Bxe6 37 Ba2 Rf6 (taking the bishop allows
a slightly quicker mate: 37 ... Bxa2 38 Qh7+ Kf8 39 Qh8 mate) 38 Qh7+ Kf8 39 Qh8+
Ke7 40 Qxg7+ Rf7 41 Rxe6+ Kd7 42 Qd4 mate.
36 Qh7+ Kf8 37 Qh8+ Ke7 38 exf6+ Kd7
Now White gets a winning ending. The most entertaining try is 38 ... gxf6 (38 ...
Kxf6 allows mate in one with 39 Qh4) but White’s attack is nonetheless decisive after
39 Qh3! Kd7 40 Qd3+ Kc6 (or 40 ... Ke7 41 gxf7 Qxf7 42 Ba2 and White comes out a
piece ahead) 41 Qe4+ Kb5 (if 41 ... Kxc5 42 Qb4+ Kc6 43 Rc1+ Kd7 44 Rd1+ Kc6 45
Be4+ Bd5 46 Bxd5+ Kd7 47 Bxb7+ Ke6 48 Qe4 mate) 42 Qxb7+ Ka5 43 Bd3 with a
mating attack, e.g . 43 ... Bc4 (43 ... Ra8 allows 44 Qb4 mate) 44 Qb4+ Ka6 45 Qxc4+
Kb7 46 Qa6+ Kb8 47 Rb1+ Qb5 48 Rxb5 mate.
39 Qxe8+ Rxe8 40 gxf7 Bxf7 41 Bf5+ 1-0
57
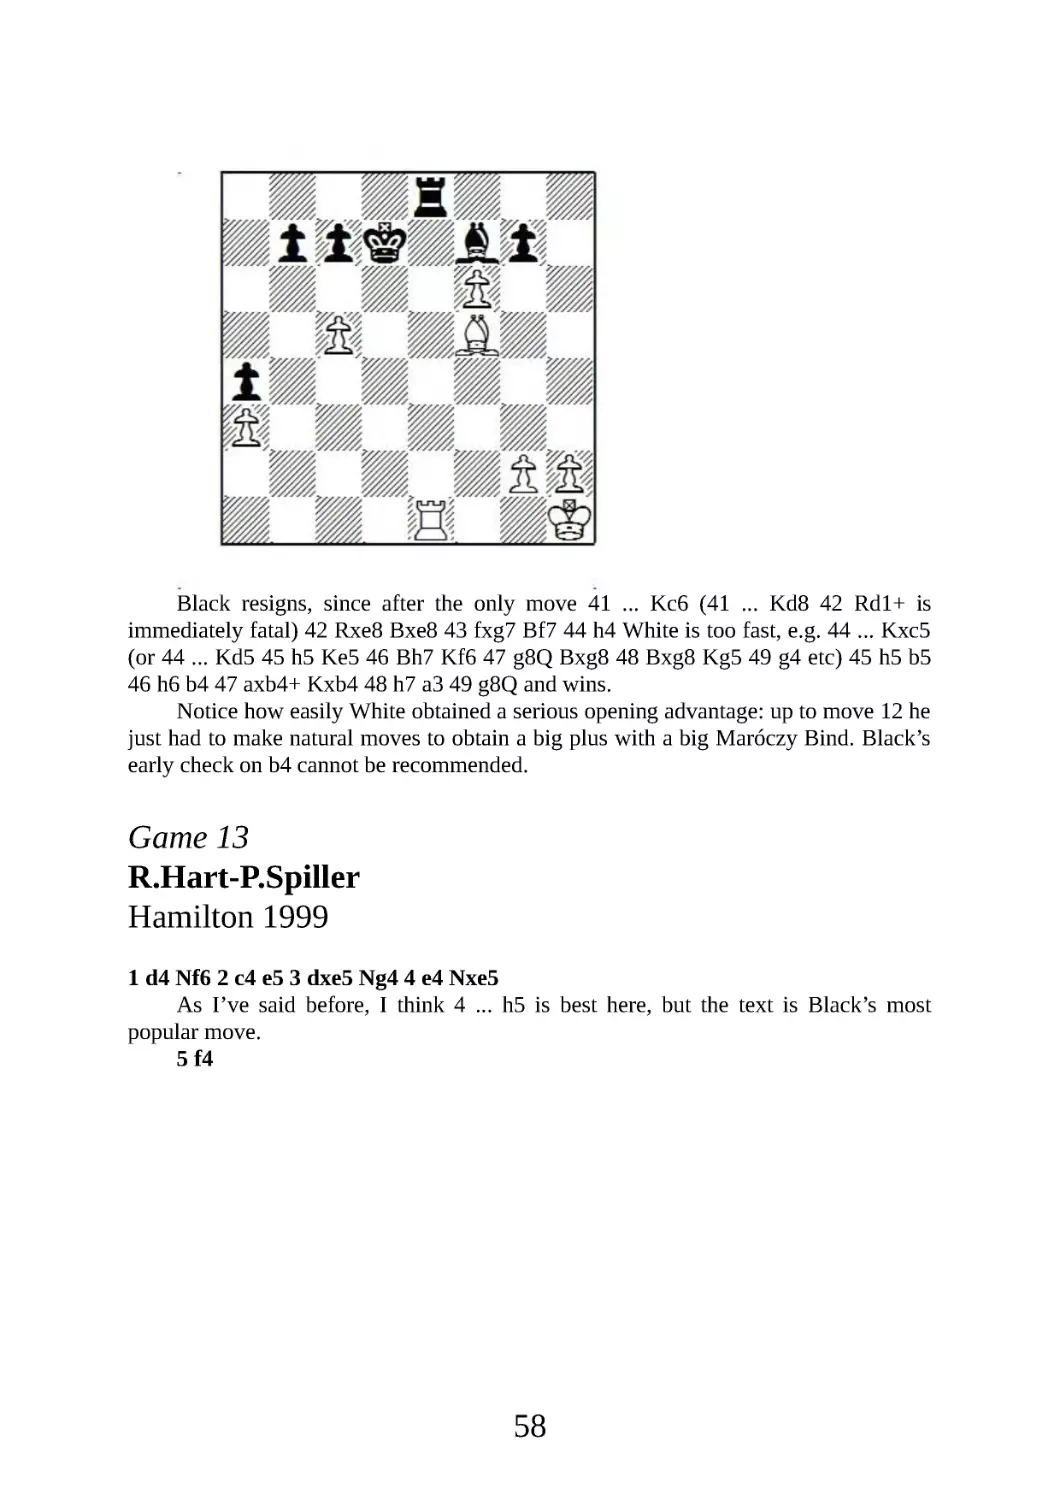
Black resigns, since after the only move 41 ... Kc6 (41 ... Kd8 42 Rd1+ is
immediately fatal) 42 Rxe8 Bxe8 43 fxg7 Bf7 44 h4 White is too fast, e.g . 44 ... Kxc5
(or 44 ... Kd5 45 h5 Ke5 46 Bh7 Kf6 47 g8Q Bxg8 48 Bxg8 Kg5 49 g4 etc) 45 h5 b5
46 h6 b4 47 axb4+ Kxb4 48 h7 a3 49 g8Q and wins.
Notice how easily White obtained a serious opening advantage: up to move 12 he
just had to make natural moves to obtain a big plus with a big Maróczy Bind. Black’s
early check on b4 cannot be recommended.
Game 13
R.Hart-P.Spiller
Hamilton 1999
1 d4 Nf6 2 c4 e5 3 dxe5 Ng4 4 e4 Nxe5
As I’ve said before, I think 4 ... h5 is best here, but the text is Black’s most
popular move.
5 f4
58
The next two chapters will be devoted to the knight retreats to g6 and c6
respectively; but before we get there, let’s consider this question: does Black have to
move the knight at all?
5 ... Nbc6
The other potential sacrifice, 5 ... Bc5, is weaker as there is no knight check on
b4, allowing a Qd3 defence as will be seen: 6 fxe5 Qh4+ 7 Kd2 Bxg1 (7 ... Qf4+ 8
Kc2 Qxe4+ 9 Qd3 is the point, when Black’s attack is stopped in its tracks—of course
this defence wouldn’t work with a black knight on c6) 8 Rxg1 Qf2+ 9 Be2 and Black
has no real compensation for the piece.
6 fxe5
6 Nc3 is a safe alternative, reverting to a typical Alekhine Attack, but my Fritz-
assisted analysis says there’s nothing wrong with just taking the piece.
6 ... Qh4+ 7 Kd2 Qf4+
59
Now White can draw with 8 Ke1 Qh4+ 9 Kd2 Qf4+ 10 Ke1 Qh4+ 1⁄2-1⁄2 L.Gomez
Cabrero-F.Fons Cervero, Valencia 1995, but let’s pass over that passivity and look at
White’s winning tries.
8 Kd3
The curious 8 Kc3 also seems to win for White:
a) 8 ... Qxe5+ plays into White’s hands, as the soon to be open e-file facilitates
exchanges that favour him: 9 Kd2 Qd4+ (or 9 ... Qf4+ 10 Ke1 Qh4+ 11 g3 Qxe4+ 12
Qe2 etc) 10 Ke1 Qxe4+ 11 Qe2 (the reason White wants the e-file open) 11 ... Qe6 12
Nf3 Bb4+ 13 Kf2 d6 (13 ... Bc5+ 14 Be3 just leads to more exchanges and the queens
still come off) 14 Qxe6+ fxe6 15 Be3 0-0 16 a3 Bc5 17 Bxc5 dxc5 18 Nc3 1-0
J.Rezek-P.Kipasso, correspondence 2001, as Black has nothing for the piece.
b) 8 ... Bb4+ fails to give adequate compensation either: 9 Kb3 Nd4+ 10 Kxb4
Qxe5 11 Kc3! Nf3+ (if 11 ... c5 12 Kd2! Qf4+ 13 Kd3 Qd6 14 Nc3 Nb3+ 15 Nd5
Nxa1 16 Bf4 or 14 ... b5 15 Nd5 bxc4+ 16 Ke3 Bb7 17 Bxc4 f5 18 Nf3 fxe4 19 Nxd4
cxd4+ 20 Qxd4 and White wins easily) 12 Kd3 Qd4+ 13 Ke2 Nxg1+ 14 Ke1 Qxe4+
15 Kd2 Qf4+ (after 15 ... Nh3 16 Nc3 Qd4+ 17 Kc2 Qxd1+ 18 Nxd1 or 16 ... Qc6 17
Qe1+ Kf8 18 Qh4 White emerges with two extra pieces) 16 Kc2 Qf2+ 17 Bd2 d6 18
Bd3 wins the trapped knight and soon the game.
However, the third king move is not the charm: 8 Kc2?! Qxe4+ 9 Bd3? Nb4+ 10
Kc3 Nxd3 11 Qxd3 Bb4+ 12 Kc2 Qxg2+ 0-1 Kartik-Tarrega, correspondence 2001,
was a disastrous loss for White!
60
8 ... Qxe5
Black has also tried two knight checks here:
a) 8 ... Nb4+ 9 Kc3 Qxe5+ 10 Kb3 Qxe4?! (but if 10 ... a5 11 Nc3 d6 12 Nf3 a4+
13 Nxa4 Qa5 14 Nc3 Qb6 15 Nb5 c6 16 Qd4 and Black’s attack comes to a halt; or 10
... b5 11 cxb5 a6 12 Nf3 Qc5 13 Nc3 axb5 14 a3 and once again Black is driven back
while White retains the extra piece) 11 Nc3 and White converted his extra piece in
V.Hendrix-R.Weir, correspondence 1993.
b) 8 ... Nxe5+ 9 Kc3 Qxe4 10 Nf3 d6 11 Bd3 (White also obtained a winning
position with 11 Qe2 in M.Hase-A .Kuhlmann, correspondence 1992) 11 ... Qxd3+
(better is 11 ... Qc6 but after 12 Na3 Black doesn’t really have anything for the piece)
12 Qxd3 Nxd3 13 Kxd3 and White went on to win in A.Közenkov-R.Nocci,
correspondence 1999.
9 Nc3
61
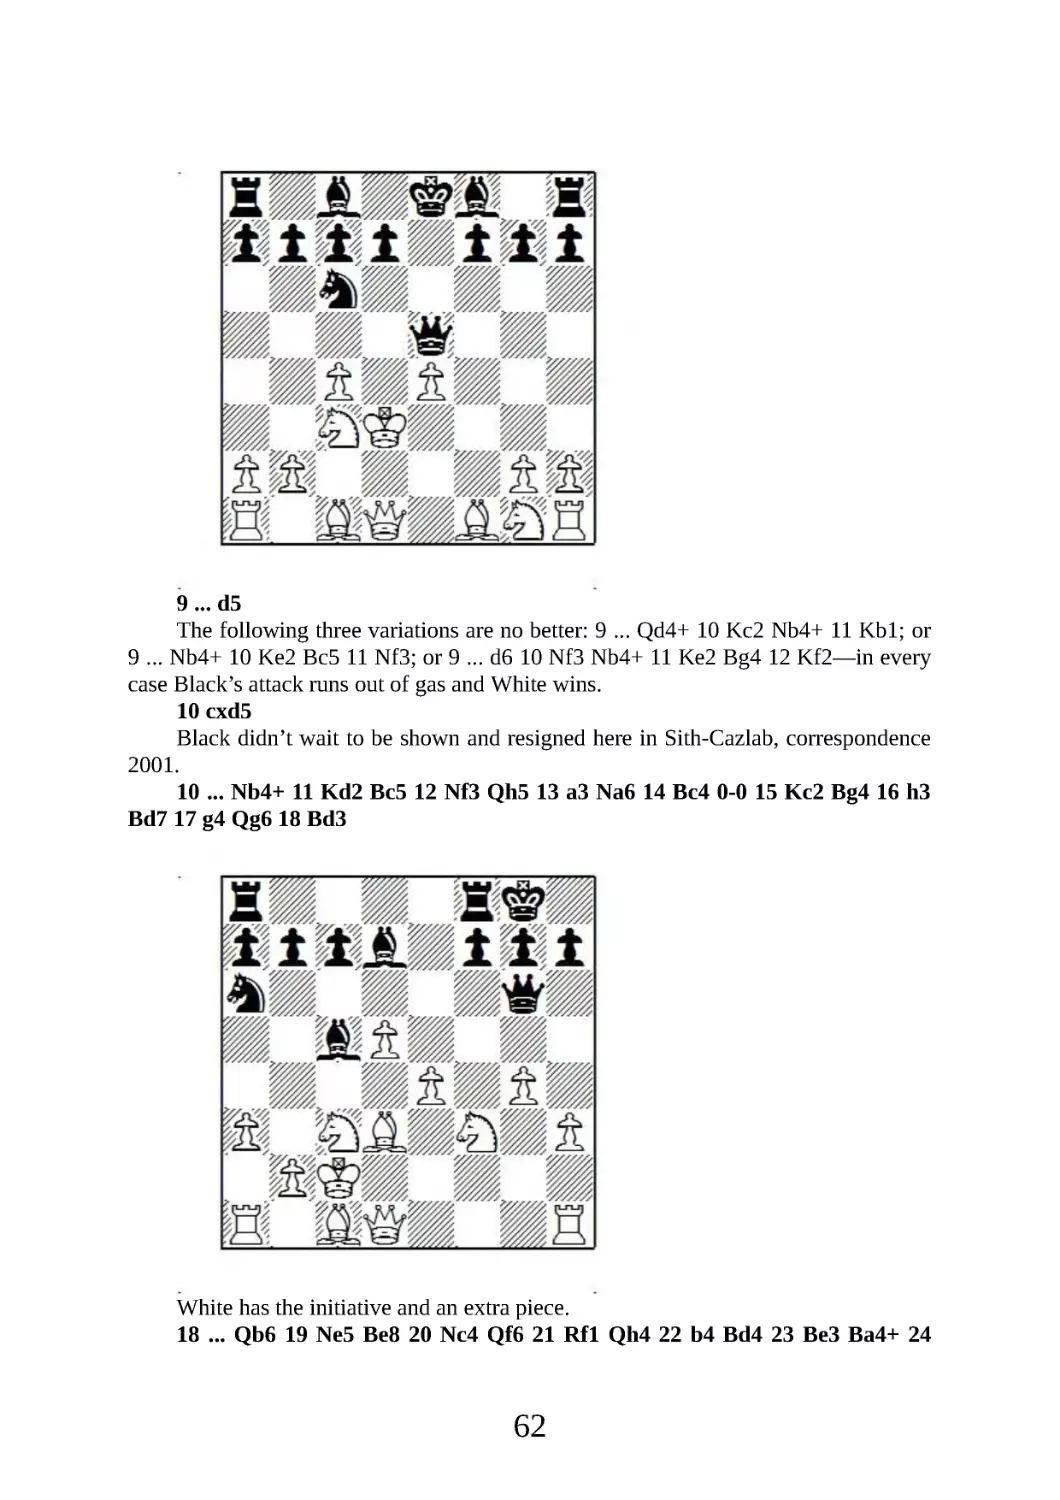
9 ... d5
The following three variations are no better: 9 ... Qd4+ 10 Kc2 Nb4+ 11 Kb1; or
9 ... Nb4+ 10 Ke2 Bc5 11 Nf3; or 9 ... d6 10 Nf3 Nb4+ 11 Ke2 Bg4 12 Kf2—in every
case Black’s attack runs out of gas and White wins.
10 cxd5
Black didn’t wait to be shown and resigned here in Sith-Cazlab, correspondence
2001.
10 ... Nb4+ 11 Kd2 Bc5 12 Nf3 Qh5 13 a3 Na6 14 Bc4 0-0 15 Kc2 Bg4 16 h3
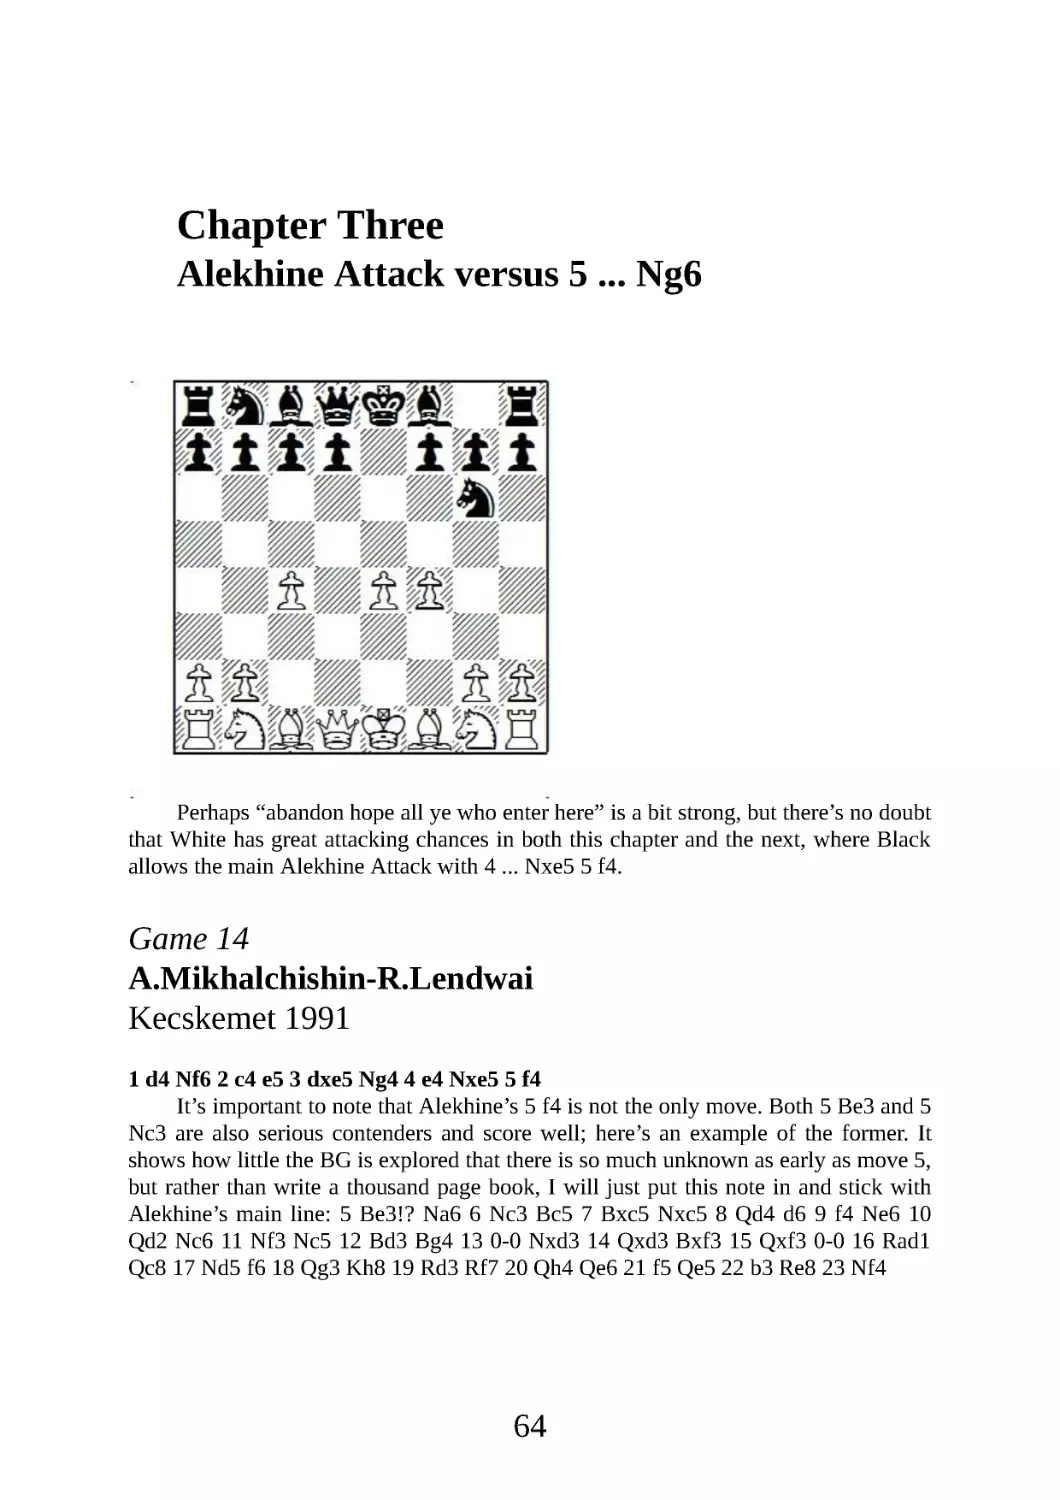
Bd7 17 g4 Qg6 18 Bd3
White has the initiative and an extra piece.
18 ... Qb6 19 Ne5 Be8 20 Nc4 Qf6 21 Rf1 Qh4 22 b4 Bd4 23 Be3 Ba4+ 24
62
Nxa4 Bxa1 25 Qxa1 b5 26 Nd2 Qxh3 27 Rf3 Qxg4 28 Qg1 Qd7 29 Nc3 c6 30 dxc6
Qxc6 31 Bxb5 Qe6 32 Bd4 g6 33 Rf6 1-0
White’s material advantage just might be adequate.
This full piece gambit gives a few practical chances (it is possible to win in 12
moves if White makes a serious error), but in general I cannot recommend it,
especially now that we are in the computer age. If White has looked at this line even a
little bit on a database—and sees that he can get to the basic tabiya after 8 Kd3 by
force—then there doesn’t seem to be any good advice for Black, except: don’t play this
line!
Summary
The conclusions are simple here: none of these lines are acceptable for Black.
The 4 ... d6 gambit is an unsound pawn offer, and Capablanca could have won a piece
on move 8, while Reshevsky’s alternate treatment led to mate in 21. Reshevsky again
hammered the premature ... Bb4+. Finally, the piece sacrifice on move 5 has been tried
repeatedly with no real success, and is consistently refuted by the computer.
63
Chapter Three
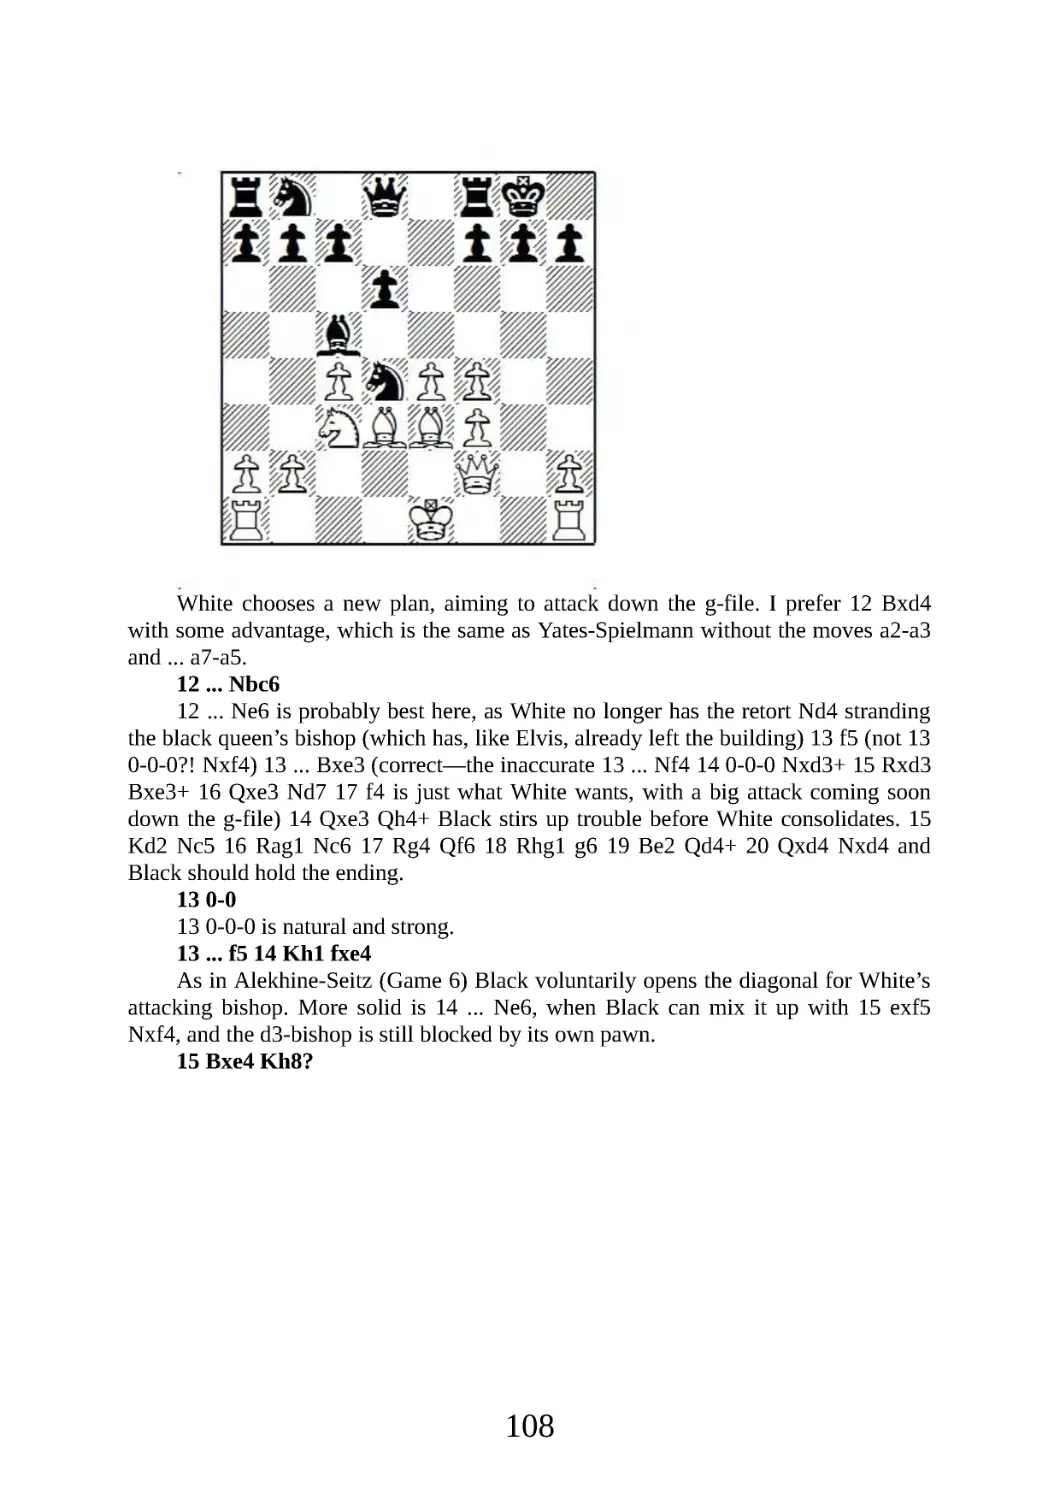
Alekhine Attack versus 5 ... Ng6
Perhaps “abandon hope all ye who enter here” is a bit strong, but there’s no doubt
that White has great attacking chances in both this chapter and the next, where Black
allows the main Alekhine Attack with 4 ... Nxe5 5 f4.
Game 14
A.Mikhalchishin-R.Lendwai
Kecskemet 1991
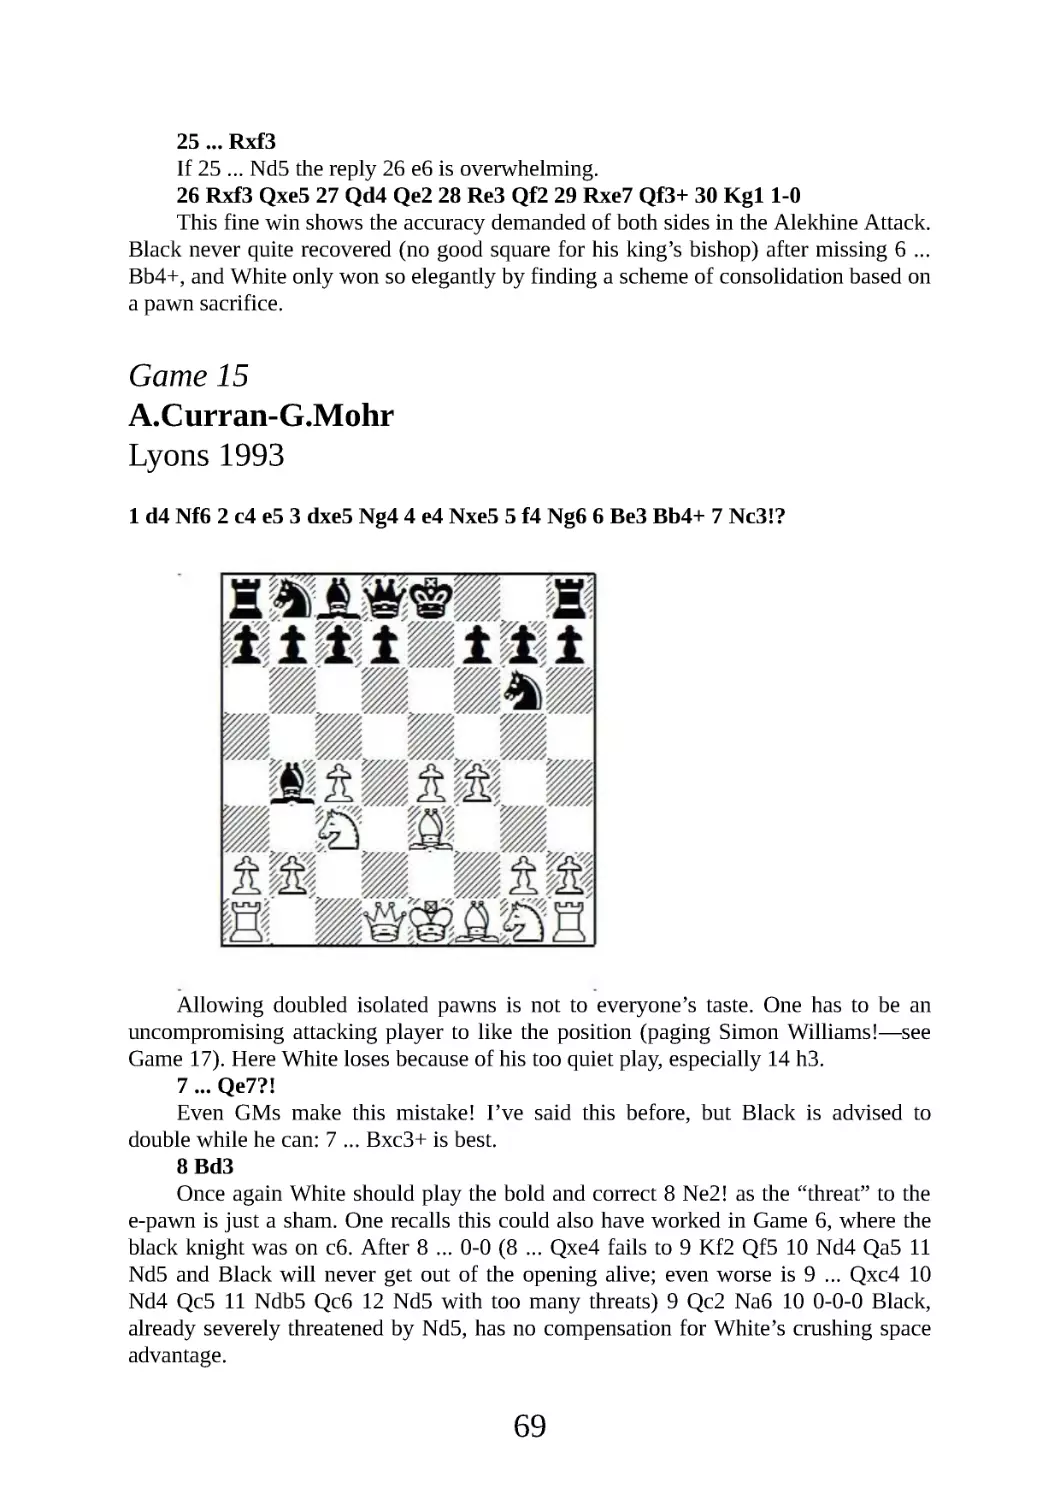
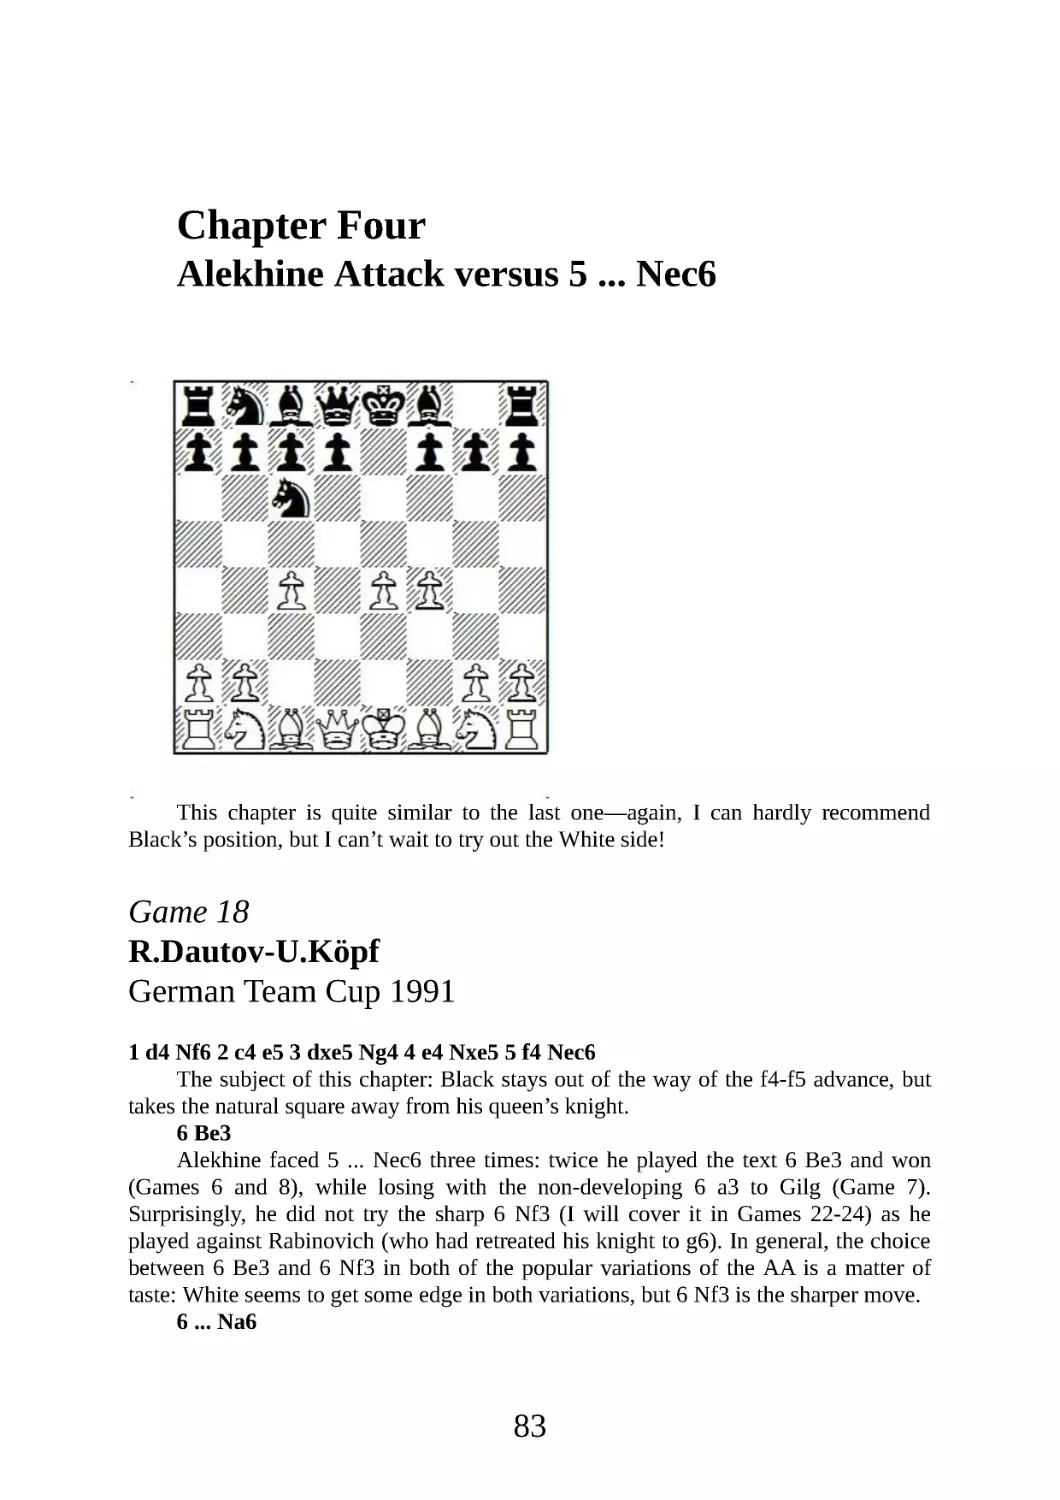
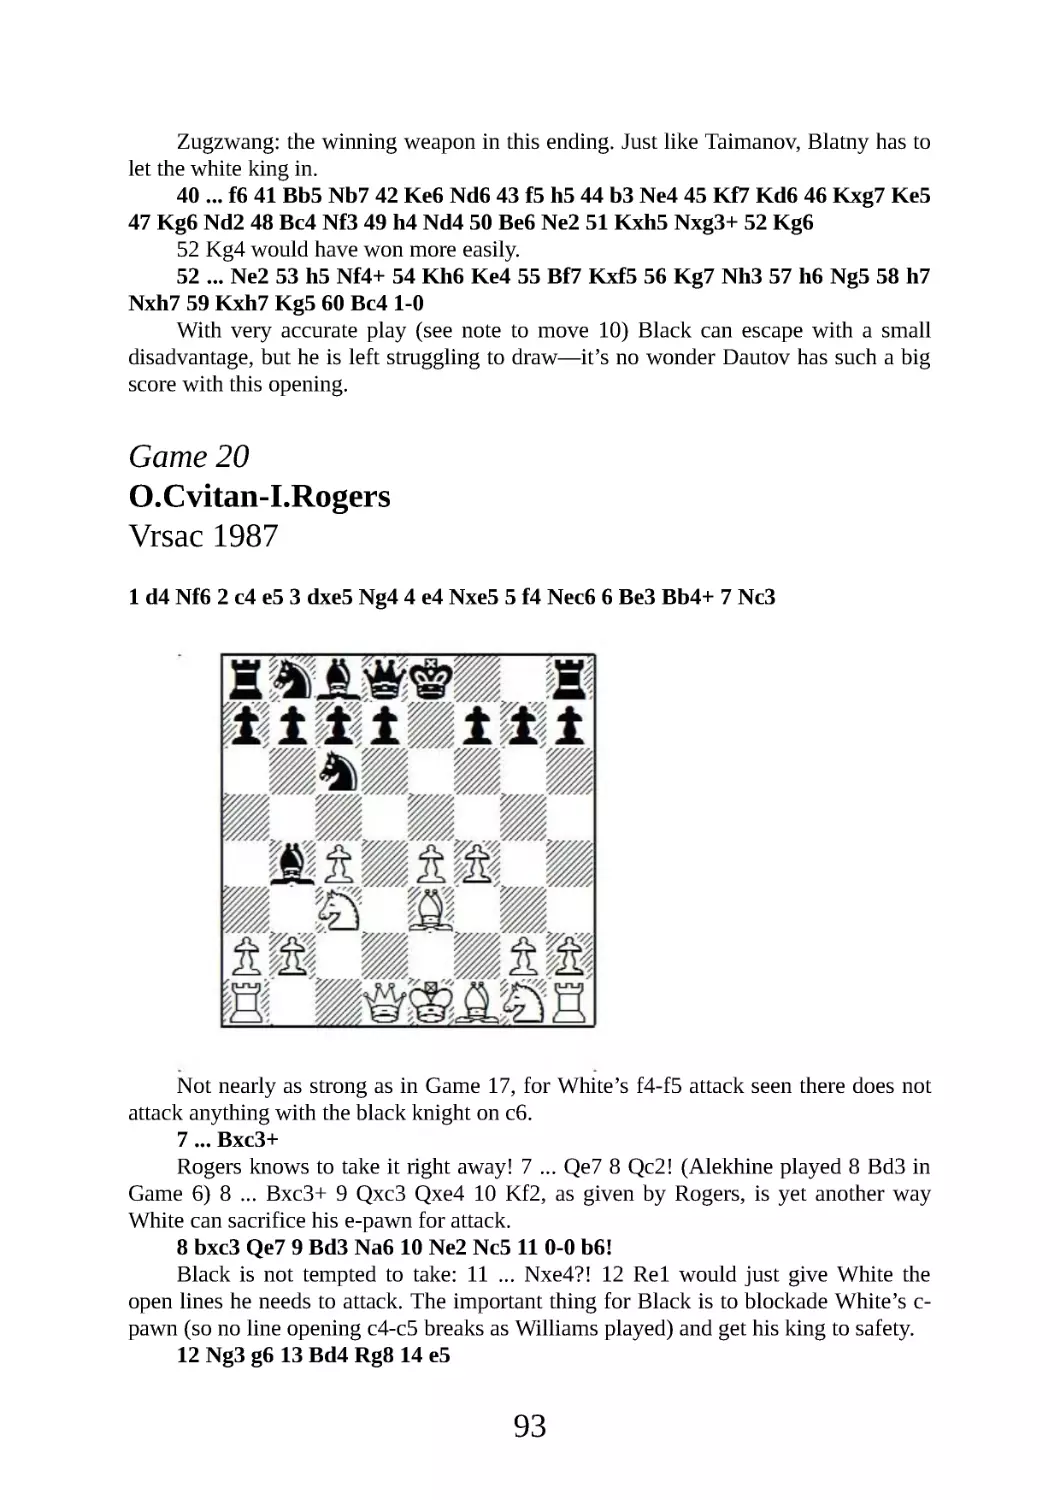
1 d4 Nf6 2 c4 e5 3 dxe5 Ng4 4 e4 Nxe5 5 f4
It’s important to note that Alekhine’s 5 f4 is not the only move. Both 5 Be3 and 5
Nc3 are also serious contenders and score well; here’s an example of the former. It
shows how little the BG is explored that there is so much unknown as early as move 5,
but rather than write a thousand page book, I will just put this note in and stick with
Alekhine’s main line: 5 Be3!? Na6 6 Nc3 Bc5 7 Bxc5 Nxc5 8 Qd4 d6 9 f4 Ne6 10
Qd2 Nc6 11 Nf3 Nc5 12 Bd3 Bg4 13 0-0 Nxd3 14 Qxd3 Bxf3 15 Qxf3 0-0 16 Rad1
Qc8 17 Nd5 f6 18 Qg3 Kh8 19 Rd3 Rf7 20 Qh4 Qe6 21 f5 Qe5 22 b3 Re8 23 Nf4
64
23 ... Kg8 (23 ... Qxe4 allows a pretty mate: 24 Ng6+ Kg8 25 Qxh7+! Kxh7 26
Rh3+ etc) 24 Re1 Qc5+ 25 Kh1 Ne5 26 Rg3 Qa5 27 Re2 Qa3 28 h3 Qc1+ 29 Kh2
Qd1 30 Rf2 Qe1 31 Ne6 Qb1 32 Rf4 Qxa2 33 Qh5 Ree7 34 Rh4 h6 35 Qd1 Kh7 36
Qc1 Rxe6 37 fxe6 Re7 38 Rxg7+ 1-0 V.Milov-M .Klauser, Swiss Team Ch. 2007.
5 ... Ng6
The somewhat more popular retreat to c6 will be covered in the next chapter.
6 Be3
As an AAA member, I prefer the Alekhine Approved Attack of 6 Nf3 (Games 5,
16 and 17) although the text move is quite playable and Mikhalchishin’s play is
impressive. Still, I think the “king wandering” lines (see the next note) give Black too
many practical chances.
Nonetheless, the game is important for demonstrating White’s attacking chances
after the smallest lapse.
6 ... Nc6
More usual and better is 6 ... Bb4+, which illuminates a slight problem with 6
Be3. It would seem absurd to go back with the bishop (of course Reshevsky got a big
advantage in a similar position with Bd2, but there he hadn’t previously moved the
bishop), so White has to block with the knight: 7 Nd2 (7 Nc3 allows doubled isolated
pawns, which give Black something to reach for in his difficult search for counterplay
— s e e the next game) 7 ... Qe7 8 Kf2 Bc5! (but not 8 ... Bxd2+?! 9 Qxd2 Qxe4 10 Bd3
when White has a tremendous attack for the pawn) 9 Qf3 Nc6 and it’s not so easy for
White to consolidate his position.
7 a3
While I don’t like this pawn move when thrown in too early (see Game 7) here it
has an important function:
65
White’s sixth move already took away c5, and now his seventh takes away b4
from the f8-bishop. Said piece can’t be fianchettoed with the knight blocking the g-
pawn, and ... Bd6 is anti-positional (see the following note). This leaves the very non-
threatening e7 as the only feasible square for the moment. Meanwhile, by preventing
the check, White can develop the queen’s knight to the best square, c3, with no fear of
doubled pawns.
Yes, there is a loss of time, but Mikhalchishin succeeds in consolidating his space
advantage anyway, with the aid of a pawn sacrifice.
7 ... b6
Trying to make a square for the bishop. The alternative 7 ... Bd6 is tricky but
positionally weak: if White does not allow an effective sacrifice the bishop is
obviously misplaced on d6.
a) 8 Nh3 0-0 9 Qh5?! (White has no time for this extravagance; 9 Nc3 is better) 9
. .. Qf6 10 e5 Ncxe5! 11 fxe5 Bxe5 (Black obtains good compensation for the piece in
view of White’s disorganized and undeveloped pieces) 12 Ng5 h6 13 Ne4 Qc6 14
Nbc3 Re8 15 Kd2 f5 16 Qxf5 d5 17 Nf6+ Bxf6 18 Qxd5+ Be6 19 Qxc6 bxc6 20 Re1
Bf5 21 Kc1 Bxc3! 22 bxc3 Rab8! 0-1 I.Potyavin-D .Novitzkij, St Petersburg 2005.
Instead ...
b) 8 g3 is best, as after this simple move Black has no plan: 8 ... Qf6 (trying to
play as in the Novitskij game, but this doesn’t work against solid White play—Black
should probably just accept the loss of tempo and go back with 8 ... Be7) 9 Nc3 and
Black’s position makes no sense. While White can continue to build up with natural
moves like Nf3 and Bg2, Black has to be careful that e4-e5 doesn’t just win a piece
(and it will, soon!) and so has full retreat in his future.
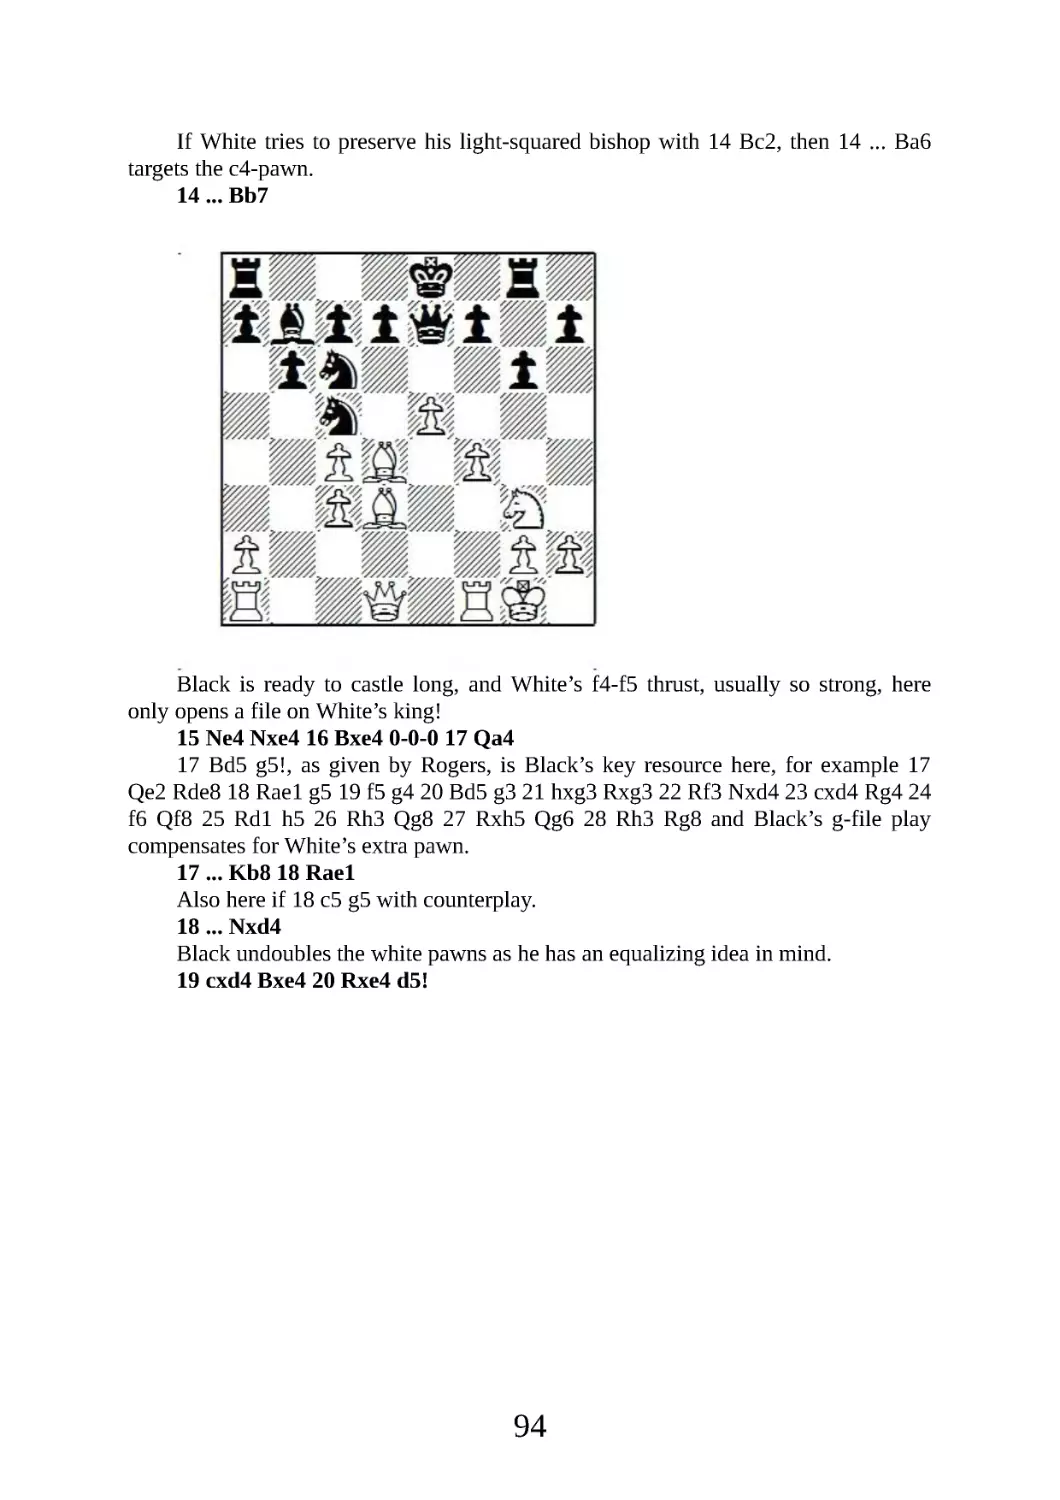
8 Nc3 Bc5 9 Qd3!?
Preparing the aforementioned pawn sacrifice. 9 Qd2 looks more natural, but
Black can stir up some trouble with 9 ... Na5.
9 ... 0-0 10 Nf3 Ba6 11 g3!
66
This pawn sacrifice is the only way to justify White’s seemingly random set-up—
but now everything makes sense! White has threats of h4-h5, either preceded or
followed by Bh3, targeting d7. The f-pawn is now securely protected, so the central e-
and f-pawn phalanx will stay intact.
All this for only one pawn? Go for it!
11 ... Bxc4
I don’t think Black has any choice, as otherwise White continues with the above
noted plans, and Black doesn’t even have any material to compensate.
12 Qxc4 Bxe3 13 Nd5 b5?
The only compensation Black has for his very difficult position is the extra pawn,
so giving it back is a serious, practically fatal mistake. Better is to hang on with 13 ...
Bc5 14 b4 Be7 15 h4 h5 16 Bh3 and White has pressure all over the board, but at least
the extra pawn may provide some solace.
14 Qc3! Bb6 15 Bxb5
67
15 ... Nce7
I don’t think there’s any way Black can overcome his problems now: White has
consolidated his space advantage and has attacking chances in the centre and on the
kingside, for example 15 ... Re8 16 0-0 -0 and Black can’t even take on e4 because of
17 Bxc6 winning a piece, and so must grovel even to maintain material equality.
16 Nxb6 cxb6 17 f5 Rc8
Or 17 ... Nh8 18 0-0 with a decisive positional advantage.
18 Qd3 Nh8 19 Bxd7 Rc5
19 ... Rc7 20 Rd1 doesn’t change anything—White has won a pawn while
maintaining his positional advantage, and finishes smoothly.
20 Rd1 Qc7 21 0-0 Rc2 22 Qb3 Re2 23 e5 Qc5+ 24 Kh1 Re3 25 Qa4
68
25 ... Rxf3
If 25 ... Nd5 the reply 26 e6 is overwhelming.
26 Rxf3 Qxe5 27 Qd4 Qe2 28 Re3 Qf2 29 Rxe7 Qf3+ 30 Kg1 1-0
This fine win shows the accuracy demanded of both sides in the Alekhine Attack.
Black never quite recovered (no good square for his king’s bishop) after missing 6 ...
Bb4+, and White only won so elegantly by finding a scheme of consolidation based on
a pawn sacrifice.
Game 15
A.Curran-G.Mohr
Lyons 1993
1 d4 Nf6 2 c4 e5 3 dxe5 Ng4 4 e4 Nxe5 5 f4 Ng6 6 Be3 Bb4+ 7 Nc3!?
Allowing doubled isolated pawns is not to everyone’s taste. One has to be an
uncompromising attacking player to like the position (paging Simon Williams!—see
Game 17). Here White loses because of his too quiet play, especially 14 h3.
7 ... Qe7?!
Even GMs make this mistake! I’ve said this before, but Black is advised to
double while he can: 7 ... Bxc3+ is best.
8 Bd3
Once again White should play the bold and correct 8 Ne2! as the “threat” to the
e-pawn is just a sham. One recalls this could also have worked in Game 6, where the
black knight was on c6. After 8 ... 0-0 (8 ... Qxe4 fails to 9 Kf2 Qf5 10 Nd4 Qa5 11
Nd5 and Black will never get out of the opening alive; even worse is 9 ... Qxc4 10
Nd4 Qc5 11 Ndb5 Qc6 12 Nd5 with too many threats) 9 Qc2 Na6 10 0-0 -0 Black,
already severely threatened by Nd5, has no compensation for White’s crushing space
advantage.
69
8 ... Bxc3+ 9 bxc3 0-0 10 Qd2 d6 11 Ne2 b6 12 0-0 Nd7 13 Ng3 Nf6
14 h3?
White must attack, or otherwise the split pawns will hurt him in the long run.
Correct is 14 Nf5 (fearlessly forward to the fifth rank!) 14 ... Qd8 (not 14 ... Bxf5 15
exf5 and Black can either play the positionally horrible 15 ... Nh8—one recalls the
knight ended up here in the previous game!—or lose tactically after 15 ... Nh4 16 g3
Ng4 17 Rae1 Rae8 18 gxh4 Nxe3 19 Qc1! d5 20 Rf3 and White wins a piece, having
avoided the trick 19 Rf3 Nxc4!) 15 Rae1 and White has an excellent attacking
position.
14 ... Bb7 15 Rae1 Rae8 16 Bd4 Qd8 17 Kh1 Nd7 18 Nf5
Too late: Black has set up an ideal arrangement of pieces and pawns: the white e-
pawn is immobilized and under attack, and the doubled c-pawns are likewise
restrained—in other words, Black has a full Nimzowitschian blockade.
18 ... f6 19 Qc2 Nc5!
70
One of White’s bishops goes, so he no longer has any compensation for his pawn
weaknesses.
20 Bxc5 bxc5 21 Kh2 Rf7 22 g4 Nf8 23 Re2 Kh8 24 Ng3 Qd7 25 Rb1 Bc6 26
Re3 Ne6 27 Rf1 g5!
Now that he has his position, Black plays very well. New weaknesses on the dark
squares are forced.
28 Ne2 Qe7 29 Rff3 gxf4 30 Nxf4 Nxf4 31 Rxf4 Qe5 32 Ref3 f5!
Exploiting various pins!
33 Kg1
If 33 exf5 Bxf3 or 33 gxf5 Rxf5 34 exf5 Bxf3 wins.
33 ... fxe4 34 Rxf7 exf3 35 Rxh7+ Kg8 36 Qf2 Qxc3
71
One of the doubled pawns finally drops and White’s position is indefensible.
37 Rxc7
Or 37 Qh4 Re1+ 38 Kf2 Qd2+ 39 Kg3 Rg1 mate.
37 ... Qxd3 38 Rxc6 Qd1+ 0-1
Black wins the queen.
Note again that Black should double the moment this is possible, while White
should always take advantage of any hesitancy.
If doubled pawns do arise, White has burned his bridges, as he will lose any
reasonable ending, and so must attack fearlessly. Finally, Black carried out a fine
Nimzowitschian attack: first immobilize, then blockade, finally destroy!
Game 16
A.Barkasz-Soria
Correspondence 1973
1 d4 Nf6 2 c4 e5 3 dxe5 Ng4 4 e4 Nxe5 5 f4 Ng6 6 Nf3
This was how Alekhine played against Rabinovich (Game 5) and I think it’s the
most accurate move here. As we saw in that game, 6 ... Bc5 is met strongly by 7 f5,
when the black knight is left without a good square. The main advantage of the king’s
knight development (as opposed to 6 Be3) is that White avoids a pin on the queen’s
knight—if Black checks as in the game, White still has Bd2.
6 ... Bb4+
If Black hesitates with 6 ... Nc6 then 7 a3 à la Mikhalchishin looks best,
assuming White wants to avoid pawn structure damage—but if you don’t care about
that, see the next game!
7 Bd2 Qe7
7 ... Bxd2+ 8 Qxd2 d6 9 Nc3 transposes to Reshevsky-Seidman, Game 12, which
72
we already know is good for White.
8 Nc3!
The key move: in many variations of the Alekhine Attack, White must not
hesitate to sac a pawn.
8 ... Bxc3
If Black declines with 8 ... 0-0 9 g3 (instead Fritz offers the rather outlandish 9
Nd5 Qxe4+ 10 Qe2 Bxd2+ 11 Kxd2 Qxe2+ 12 Bxe2 Na6 13 f5 c6 14 fxg6 cxd5 15
gxh7+ Kxh7 16 cxd5 which looks positively inhuman, but the machine claims all this
is good for White) 9 ... Na6 (9 ... Bxc3 10 Bxc3 Qxe4+ 11 Kf2 is a variation we will
see later in the game) 10 Qc2 Nc5 11 Nd5 Bxd2+ 12 Nxd2 with a typical AA space
advantage.
9 Bxc3 Qxe4+
9 ... Nxf4 looks best, but it’s certainly no fun for Black: 10 Bxg7 Rg8 11 Bc3
Nxg2+ (not 11 ... Qxe4+ 12 Kf2, when both Black’s queen and king are in danger) 12
Bxg2 Rxg2 13 Qd4 and White prepares to castle long with more than enough
compensation for the pawn—a possible continuation is 13 ... f6 14 0-0 -0 Nc6 15 Qd5
d6 16 Rhg1 Rxg1 17 Rxg1 Be6 18 Qh5+ Bf7 19 Qxh7 0-0 -0 20 Rg7 Rd7 21 b3 Ne5
22 Nxe5 fxe5 23 h4 with a pull for White due to his passed pawn.
10 Kf2 0-0
The second pawn is poisoned for the moment:
a) 10 ... Nxf4 11 Qd2! Ne6 12 Re1 Qg6 13 Bd3 f5 14 g4 Qxg4 15 Rhg1 Qh5 16
Rxg7 and White has a decisive attack in which every piece participates.
b) 10 ... Qxf4 11 Bxg7 Rg8 12 g3 and again White has a ferocious attack, e.g . 12
. .. Qf5 13 Bd3 Qa5 14 Re1+ Ne7 15 Rxe7+! Kxe7 16 Qe2+ Kd6 17 b4 Qxb4 18 Qe5+
Kc6 19 Rb1 Qc5 20 Nd4+ wins the queen.
73
11 Bd3?!
Too generous! White has a great position: huge lead in development (look at
Black’s sleeping queenside pieces), two bishops, the unopposed dark-squared bishop
aimed at the heart of the black king’s defence, the vulnerable black queen begging to
be hit, etc. In other words, there is no reason to rush. The simple 11 g3 limits the
sacrifice to one pawn, corrals Black’s only developed minor piece, and prepares both
Bd3 and h4-h5. White’s advantage is clear. For instance, 11 ... d6 12 Bd3 Qc6 13 h4
Bg4 14 h5 and now:
a) 14 ... Ne7 15 Bxh7+! Kxh7, when both the simple 16 Ng5+ and the fancy 16
h6 should win for White.
b) 14 ... Qf3+ 15 Qxf3 Bxf3 16 Kxf3 Ne7 17 Rae1 Nbc6 18 b4 Rfe8 19 b5 Nd8
20 Re2 Ne6 21 Rhe1 h6 22 f5 Nc5 23 Rxe7 Rxe7 24 Rxe7 Nxd3 25 Rxc7 and White
is much better in the endgame.
c) 14 ... Qc5+ 15 Kg2 Ne7 16 b4 Qc6 17 b5 and Black is practically forced to
enter the same kind of bad ending as in line ‘b’.
11 ... Qxf4 12 g3 Qd6 13 h4 h5?!
This creates a kingside weakness when Black needs to develop. Correct is 13 ...
Nc6 14 Qc2 h6 15 Rae1 b6 16 h5 Nge7 17 g4 f6 18 a3 a5 19 Rd1 Qe6 20 Rhe1 Qf7 21
Kg3 d6 22 b3 Ne5 and Black consolidated and went on to win in L.Castany Vilaseca-
S.Hernandez Gonzalez, Manresa 1993.
14 Ng5 Qb6+ 15 c5!
74
Suddenly White is back on top with this third pawn sacrifice! Now White has two
attacking paths for his queen (Qh5 and Qb3) and Black can’t meet both.
15 ... Qxc5+ 16 Kg2 f6 17 Qb3+ d5 18 Bb4 Qc6 19 Rac1 1-0
Black has no defence: if 19 ... Qd7 (or 19 ... Qb6 20 Qxd5+ Kh8 21 Bxf8 fxg5 22
Qf7 Qxb2+ 23 Rc2 Qf6 24 Qxg6 Qxg6 25 Bxg6 and the extra rook will prevail) 20
Bxg6 fxg5 21 Bxf8 Kxf8 22 Rhf1+ Kg8 23 Qf3 and Black’s non-developed position is
completely unable to stop the mating attack.
White’s pawn sacrifice looks very strong—but just sac one!
Game 17
S.K.Williams-N.Miezis
Oslo 2004
1 d4 Nf6 2 c4 e5 3 dxe5 Ng4 4 e4 Nxe5 5 f4 Ng6 6 Nf3 Bb4+
Another example of White’s attacking chances in this line: 6 ... Nc6 7 Bd3
(instead of the 7 a3 I recommended in the previous game—Novikov here and Williams
in the main game don’t care about doubled pawns!) 7 ... Bb4+ 8 Nc3 d6 9 0-0 Bxc3 10
bxc3 0-0 11 Nd4 Nge7 12 f5 (this kingside bind and rook lift to h3 is reminiscent of
Game 12, Reshevsky-Seidman) 12 ... f6 13 Rf3 Ne5 14 Rh3
75
14 ... g5? (Black weakens his kingside and allows White to maintain his two
bishops; correct is 14 ... Nxd3 15 Qxd3 Nc6 with defensive chances—and one must
remember, if White does not break through on the kingside, the queenside pawn
weaknesses may tell in the end) 15 Bc2 a6 16 Be3 Qe8 17 c5! d5 18 Bb3 c6 19 Nf3
Nf7 20 Bd4 dxe4 21 Nxg5! Nd5 (if 21 ... fxg5 22 Qh5 forces mate) 22 Nxh7 Ne5 23
Nxf8 Bxf5 24 Rg3+ Kxf8 25 Qf1 Qh5 26 Bxe5 fxe5 27 Rh3 1-0 I.Novikov-P.Blatny,
Poznan 1987.
7 Nc3!?
Instead of the solid 7 Bd2 seen in the previous game White goes for broke with
this sharp and aggressive move. The knight goes to its best square, and allows doubled
isolated pawns. The risk is that White’s attack will not go through, and the ending will
76
be lost—but for a certain kind of player, going all out to win, this is a great line!
7 ... d6
As my usual note says, Black should take on c3 right away—but Miezis may
have known that Williams is not interested in protecting that knight.
8 h4!
Not only planning to attack the knight, also supporting a bishop sortie to g5. This
is the kind of uncompromising move that the 7 Nc3 variation demands—and Simon
Williams is up to the task!
8 ... Qf6
Black goes pawn snatching but doesn’t get any! Glenn Flear recommends
manoeuvring the black queen to e7 and then to f6, but I think this is too slow in such a
sharp position. Flear gives 8 ... Bxc3+ 9 bxc3 Qe7 10 Bd3 Qf6 and says this is
“strong” for Black, without considering the simple answer 11 0-0
when none of the three hanging pawns appear very edible—in view of White’s
huge lead in development and the negative factor of the black queen which just invites
attacks. Here’s a look at what happens if Black munches anything:
a) 11 ... Nxf4 12 Ng5 h6 13 Rxf4 Qxc3 14 Nxf7 0-0 (or 14 ... Qxa1 15 Nxh8 and
White emerges with an extra piece) 15 Qh5 Qxa1 16 Nxh6+! gxh6 17 Qg6+ Qg7 18
Rxf8+ Kxf8 19 Bxh6 wins the queen.
b) 11 ... Qxc3 12 Rb1, with pressure on b7 and the threat of Bb2, is much better
for White.
c) 11 ... Nh4 12 Nd4 is the kind of position Simon Williams or I would have
happy dreams about: White has the mobile e- and f-pawn duo, Black’s only two
developed pieces are misplaced, and furthermore White has a huge lead in
development and total control of the centre. Fritz gives White a full point advantage
around here, and it’s hard not to agree—but hardened pawn snatchers are invited to
take a crack at it!.
I think 8 ... Nc6 is best, as development is critical in the face of White’s attack.
After 9 h5 Bxc3+ 10 bxc3 Nge7 11 h6 g6 Black has kept the position somewhat closed
77
against the opposing bishops, and has damaged the white pawn structure—but it’s still
a thankless task to hold this cramped position.
9 f5 Ne5 10 Bg5 Nxf3+ 11 Qxf3 Bxc3+ 12 bxc3 Qe5 13 0-0 -0
Obviously White has tremendous attacking chances here, with three strong pieces
out while Black only has his queen, which is about to be lost to Rd5. Black has to find
an improvement earlier (possibly 8 ... Nc6) if he wishes to play this line.
13 ... f6
If 13 ... 0-0 14 Rd5 Qe8 15 f6 g6 16 h5 with a winning attack.
14 Rd5?!
When you look at this game for the first time, it looks like a total walkover, but
it’s not that simple. In fact, Miezis actually had winning chances at one point—but
only because of a serious mistake by White. It’s hard to believe that this natural move
is it—but it is! The point is that, after the rook thrust, White still has to save his g5-
bishop, and this gives Black a vital development tempo, which puts him right back in
the game! And remember those weak pawns—White needs to win with an attack, or
may lose in the end. Of course, only superlative defence (very difficult when under the
intense pressure of Sacrificial Shock) could show the dark side of White’s move.
Anyway, the verdict of the opening is that White is much better here, and right
now White can seal his advantage with 14 Bf4! when no effective defence can be
found:
78
a) 14 ... Qa5 15 c5! (the key break—White gets this in before Black defends with
... Nbd7 as in the game) 15 ... Qxc5 (or 15 ... dxc5 16 Bc4 with a winning positional
advantage) 16 Rd5 Qa3+ 17 Kb1 Bd7 (17 ... Nc6 and 17 ... Nd7 both lose the queen to
18 Bc1 Qa4 19 Bb5 etc) 18 h5 h6 19 Qg3 Kf8 20 Rxd6! crashes through.
b) 14 ... Qc5 15 Qg3 Rg8 (if 15 ... 0-0 16 h5 Rf7 17 h6 tears up Black’s king
position) 16 Rd5 Qa3+ 17 Kb1 Nd7 18 c5 Nxc5 19 Bxd6 cxd6 20 Qxd6 with a
winning attack.
c) 14 ... Qe7 15 c5 dxc5 16 Bc4 with the same crushing positional advantage as
in the game, while only giving up one pawn.
I’m all for bold sacs, but one has to be careful: both this and the previous game
could both have gone the other way due to a bit of over-generosity!
14 ... Qe7 15 Bf4 Nd7!
Black gets a tempo, and he uses it correctly—he must develop! 15 ... b6 fails to
stop the breakthrough: 16 c5! bxc5 17 e5 fxe5 (not 17 ... dxe5 18 Be3) 18 Bg5 e4 (if
18 ... Qd7 19 Rxe5! targets the rook on a8 and other black pieces lying about on the
eighth rank!) 19 Qe3 Qd7 20 Qxe4+ Kf8 21 Bb5! Qf7 (after both 21 ... c6 22 Rxd6
Qxd6 23 Rd1 and 21 ... Qxb5 22 Qe7+ Kg8 23 f6! White forces mate) 22 Rd2 with a
winning attack.
16 c5!?
An excellent practical try. If White plays slowly Black develops and blockades,
e.g . 16 g4 b6 17 g5 Bb7 18 Rd4 Nc5 and it’s not clear how White breaks through.
16 ... Nxc5 17 Rxc5 dxc5 18 Bc4
79
White appears to have excellent compensation for the exchange and a pawn, but
it seems Black is actually better—with best play of course!
18 ... b5?
Sacrificial Shock! Black wants to strike back, but ice cold defence is required.
Best is 18 ... Bd7 which simply prepares queenside castling. If White tries to prevent
this with 19 Bxc7 Black has 19 ... Bxf5!, when it seems he can not only defend, but
actually play for victory with his material advantage.
19 Bd5
Now Black won’t castle either way in this game, and White is back on top.
19 ... Rb8 20 e5! Rb6
Not 20 ... fxe5 21 Re1, as Black will then have to give up his queen for two rooks
— and the black rooks aren’t playing.
21 Re1 Kd8 22 Rd1 Ke8 23 Re1 Kd8 24 Qd1
Now White finds the right path; Black should have played ... Kf8 on move 21 or
23.
80
24 ... c4
White should win in the long run after 24 ... fxe5 25 Bc6+ Bd7 26 Bg5 Qxg5+ 27
hxg5 Rxc6 28 Rxe5 and the queen will beat the rook and bishop.
25 exf6 Qa3+ 26 Kb1 Bxf5+
Black has no time for queenside counterplay: 26 ... b4 27 Bc6+ Bd7 28 Qxd7 is
mate.
27 Be4+ Bd7
If 27 ... Rd6 28 Bxd6 Bxe4+ 29 Rxe4 cxd6 30 Qd5 sets up a typically winning
queen and rook attack for White.
28 fxg7!
A new attacker! Black is lost.
81
28 ... Re8
If 28 ... Rg8 29 Qd5 quickly forces mate or results in a massive material gain.
29 Bxh7 Rxe1 30 g8Q+
Two queens in a GM game—a rare sight!
30 ... Re8 31 Qgd5 1-0
The queens rule.
A great game by Simon Williams; the bobble (14 Rd5?!) just shows he’s human,
and Black’s defensive task was inhumanly difficult—but still, if Black somehow
consolidates, he does win. So there was risk. But right now this line looks like another
way to get advantage for White against 5 ... Ng6, though my personal preference
would be for the Nf3/Bd2 line of Game 16.
Summary
Black can hope for survival after 6 Be3 by playing 6 ... Bb4+ immediately, and
taking on c3 immediately if White blocks with the knight, as seen in the notes to
Games 14 and 15, where Black did neither of those tasks correctly!
On the other hand, 6 Nf3 looks definitely stronger, and White gained a clear
opening advantage in both Games 16 and 17—though human error crept in on the
White side as well. Nonetheless I would not ask any prospective Budapest Gambiteer
to suffer through those attacks.
82
Chapter Four
Alekhine Attack versus 5 ... Nec6
This chapter is quite similar to the last one—again, I can hardly recommend
Black’s position, but I can’t wait to try out the White side!
Game 18
R.Dautov-U.Köpf
German Team Cup 1991
1 d4 Nf6 2 c4 e5 3 dxe5 Ng4 4 e4 Nxe5 5 f4 Nec6
The subject of this chapter: Black stays out of the way of the f4-f5 advance, but
takes the natural square away from his queen’s knight.
6 Be3
Alekhine faced 5 ... Nec6 three times: twice he played the text 6 Be3 and won
(Games 6 and 8), while losing with the non-developing 6 a3 to Gilg (Game 7).
Surprisingly, he did not try the sharp 6 Nf3 (I will cover it in Games 22-24) as he
played against Rabinovich (who had retreated his knight to g6). In general, the choice
between 6 Be3 and 6 Nf3 in both of the popular variations of the AA is a matter of
taste: White seems to get some edge in both variations, but 6 Nf3 is the sharper move.
6 ... Na6
83
Gallego (Game 8) played the self blocking 6 ... d6, and was essentially lost by
move 12! The text move (with the positional idea of exchanging White’s “good”
bishop with ... Bc5) is certainly better than 6 ... d6, but given that Black’s only real
chance to get some play is to stir up activity before White gets his pieces out, then the
slowness of the plan means it cannot be recommended. For the correct and speedier 6
. .. Bb4+ see the next game.
7 Nc3
The sharp young Budapest advocate, Belezky, also failed to disturb White’s
Maróczy Bind after a different knight move: 7 Nf3 Bc5 8 Bxc5 Nxc5 9 Nc3 d6 10 Bd3
Bg4 11 0-0 Nd4 12 Be2 Nxe2+ 13 Qxe2 0-0 14 h3 Bxf3 15 Qxf3 a5 16 Rad1 Qb8 17
Rfe1 Qa7 18 Kh1 (White has consolidated and stands clearly better ... ) 18 ... Rae8 19
Qg3 Kh8 20 Qf2 a4 (and now goes over to the attack) 21 e5! Qa6 (if 21 ... dxe5 22
Ne4) 22 Nb5 Qa5 23 Re2 f5 24 exf6 gxf6 25 Rxe8 Rxe8 26 Qh4 Nd7 27 Qg4 Re7 28
Kh2 Qb6 29 Nd4 Rg7 30 Qe2 Rg8 31 Nf5 Qa5 32 Nh6 Rf8 33 Rd3 Kg7 34 Rd5 Qa8
35 Qg4+ Kh8 36 Qxd7 1-0 I.Golichenko-S.Belezky, Kiev 2005.
7 ... Bc5 8 Qd2 d6 9 Bd3 Bg4 10 Nge2 Qh4+ 11 Ng3
84
11 ... Bxe3
After the immediate 11 ... 0-0 -0 12 0-0 Rhe8 13 Rae1 White consolidates his
position and Black has no compensation for his opponent’s central superiority, e.g . 13
. .. Kb8 (13 ... Nab4 14 Bb1 Na5 15 b3 fails to disturb White) 14 a3 Bxe3+ 15 Rxe3
Nc5 16 b4 Nb3 17 Qb2 with a clear advantage as none of Black’s minor pieces are
stable.
11 ... Nab4 looks relatively best, before the white bishop can comfortably retreat
to b1. After 12 a3 Nxd3+ 13 Qxd3 Black is still a little worse, e.g . 13 ... Bxe3 14 Qxe3
Bd7 (14 ... Qf6? 15 f5 is a lot worse!) 15 0-0 0-0 16 Nd5 Rac8, but more or less holds.
Castling queenside, as in above note and the game, looks extremely risky, as does
leaving the light-squared bishop in thin air on g4, where its retreat can be cut off.
12 Qxe3 Nc5 13 0-0 Nxd3 14 Qxd3 0-0 -0
14 ... Bd7 15 Nd5 Rc8 and ... 0-0 is preferable, with a somewhat worse but
playable game.
15 Nd5
85
White rules the centre.
15 ... Rhe8 16 b4
The cliché is that “the attack plays itself”, but what else can one say?
16 ... Kb8 17 b5 Ne7 18 a4 Nxd5
Or 18 ... c6 19 bxc6 Nxc6 (not 19 ... bxc6 20 Qb3+ Kc8 21 Rab1 and mates) 20
a5 with an attack, a permanent knight, and the open b-file.
19 cxd5
But now the c-file is a new avenue of attack.
19 ... Bc8 20 Rac1 g6 21 a5 Rd7 22 Rc4 Rde7 23 Qc3 f5 24 b6
24 ... fxe4
White rolls through after 24 ... axb6 25 axb6 cxb6 26 Qa3 Rc7 27 Rxc7 Kxc7 28
86
Rc1+ Kd7 29 Qa4+ Ke7 30 Rc7+ Kf8 (or 30 ... Kd8 31 Rxc8+) 31 Qd4 with a mating
attack.
25 Rxc7 a6
If 25 ... Rxc7 26 Qxc7+ Ka8 27 Nxe4 and the knight will take on d6 next.
26 Rc1 Bg4 27 f5! 1-0
Interference! Mate is coming.
Just like Alekhine-Gallego, this was a very easy game. If Black fails to challenge
White’s central superiority, the Alekhine Attack is both very strong and easy to play.
It’s true that Black could have dug in and castled kingside with a plus equals position
— but the “no counterplay” game that would have arisen is not the kind of fight that
the counter-attacking player who likes the Budapest Gambit would relish.
Game 19
R.Dautov-P.Blatny
Bad Wörishofen 1991
1 d4 Nf6 2 c4 e5 3 dxe5 Ng4 4 e4 Nxe5 5 f4 Nec6 6 Be3 Bb4+ 7 Nd2
I don’t think the risky 7 Nc3 (see Game 20) is justified here, unlike in Game 17.
7 ... Qe7
The German GM Dautov has played the Alekhine Attack exclusively against the
BG, scoring three wins and a draw in four games—along with this and the previous
main game, here’s the third smooth victory: 7 ... Qh4+ 8 g3 Qe7 9 Bg2 Na6 10 a3 Bc5
11 Bxc5 Nxc5 12 b4 Ne6 (a better try is 12 ... Nd3+ 13 Ke2 Nb2 14 Qc1 Nd4+ 15 Kf1
Na4 16 Ngf3 Nxf3 17 Bxf3 d6 18 Kg2 with only a slight edge for White) 13 Ne2
Ncd4 14 0-0 Nxe2+ 15 Qxe2 a5 16 c5 (now White can grind away with his space
advantage) 16 ... axb4 17 axb4 Rxa1 18 Rxa1 d6 19 cxd6 Qxd6 20 Rb1 0-0 21 e5
Qd4+ 22 Kh1 Rd8 23 Nf3 Qd3 24 Qxd3 Rxd3 25 Ra1 g6 26 Ra8 Rd8 27 Bh3 Kg7 28
Kg2 b6 29 Bxe6 fxe6 30 Ra7 Rd7 31 Ng5 Re7 32 Kf2 h6 33 Ne4 Kf7 34 Ke3 Ke8 35
Ra8 Kd7 36 b5 Rf7 37 Nf6+ 1-0 R.Dautov-S.Haas, Bühl (rapid) 1992. Black resigns
rather than play on, for after the forced 37 ... Kd8 he would have zero pieces in play!
Some entertaining variations can result after 7 ... d6 8 Bd3 (8 Nf3 is simpler) 8 ...
Qh4+ (as usual, quiet play for Black is a recipe for disaster: White mercilessly ground
down his foe after 8 ... 0-0 9 Ngf3 Na6 10 Qe2 Re8 11 a3 Bc5 12 b4 Bxe3 13 Qxe3
Nab8 14 0-0 Nd7 15 Rfe1 f5 16 b5 Na5 17 Qd4 Nc5 18 exf5 Rf8 19 g4 Nab3 20 Nxb3
Nxb3 21 Qd5+ Kh8 22 Rad1 h6 23 Bc2 Nc5 24 Ne5 c6 25 Ng6+ 1-0, in
M.Wiedenkeller-M .Eklund, Stockholm 1990) 9 g3 Qf6 10 a3! (White needs to take b4
under control with tempo before developing the queen to c2—instead he went
completely off the rails in P.Restas-A .Panchenko, Budapest 1990: 10 Qc2 Na6 11 Ne2
Bc5 12 e5 dxe5 13 Ne4 Qe7, when White had nothing for the pawn and eventually
lost). Returning to the main line after the critical and correct 10 a3, Black has three
replies:
87
a) 10 ... Bc5 11 Bxc5 dxc5 12 e5 with a clear advantage for White due to his
mobile kingside pawn majority.
b) 10 ... Ba5 11 Qc2 Nd4 12 Bxd4 Qxd4 13 Ne2 Qf6 (worse is 13 ... Qe3 14 b4
Bb6 15 Rf1 and the black queen is in danger) 14 0-0 -0 and White’s space outweighs
Black’s bishops.
c) 10 ... Qxb2 11 axb4 Nxb4 12 Ke2 Bg4+ 13 Ngf3 Bxf3+ 14 Kxf3 Nxd3 15 Rb1
Qf6 16 Rxb7 and White will recover his pawn with some advantage.
8 a3!
The typical Alekhine Attack pawn sacrifice. Less powerful is 8 Bd3 Na6 9 Ne2
Nc5 10 Qc2 d6 11 Nc3 Bxc3 12 Qxc3 Nxd3+ 13 Qxd3 0-0 and the opposite-coloured
bishops mean Black has a little more freedom and should hold the position.
8 ... Bc5
Dautov gives 8 ... Qxe4 9 Kf2 Bxd2 10 Qxd2 0-0 (10 ... Qg6?! 11 Bd3 f5 12 Nf3
is even stronger for White given the weak squares courtesy of ... f7-f5) 11 Bd3 Qe7 12
Nf3 d6 13 Rae1 (I think the immediate 13 b4, when Black’s knight is short of squares,
might be even stronger) 13 ... Qf6 14 Qc2 g6 15 b4 with good compensation for the
pawn.
9 Bxc5 Qxc5 10 Qf3!
88
10 ... Nd4?
This only helps White consolidate: if White completes his development without
disturbance, the space advantage will become ever more important. Dautov gives 10 ...
a5 11 Bd3 Nd4 12 Qf2 Nbc6 13 Ne2 intending Nc3 and 0-0 with advantage for White.
Relatively best is 10 ... d6 11 Bd3 Qb6 12 b4 0-0 13 Ne2 Nd4 14 Qf2 Nxe2 15
Bxe2 Re8, when one possible line is 16 0-0 Qxf2+ (Black has to get the queens off;
not 16 ... Nc6? 17 c5 dxc5 18 Nc4 Qa6 19 Nd6 and White wins) 17 Kxf2 Nc6 18 Ke3
a5 19 b5 Ne7 20 Kf2 Ng6 21 g3 b6 22 Bf3 Bb7 23 Rfe1 Re7 24 e5 Bxf3 25 Nxf3 dxe5
26 f5 Nf8 27 Nxe5 with only a slight edge for White.
11 Qc3 a5
12 Ndf3
89
12 0-0 -0! is given as a sharper attack by Dautov, and he’s right—but the risk-free
grind of the text is not bad either.
12 ... Nxf3+
If 12 ... Nbc6 13 0-0 -0 Nxf3 14 Rd5 Qe7 (both 14 ... Qf2 15 Nxf3 and 14 ... Qf8
15 Nxf3 give White a solid positional advantage) 15 Qxg7 Rf8 16 Nxf3 and White is
much better, as Black can hardly take on e4 in view of Bd3 with a fierce attack against
his uncastled king.
13 Nxf3 0-0 14 0-0 -0 Nc6 15 Rd5 Qe7 16 e5 d6 17 exd6 cxd6
This weakness at d6 will be very familiar to Beating the King’s Indian and
Grünfeld readers!
18 Bd3 Qe3+ 19 Qd2
Simple and good, though the pawn sacrifice 19 Kb1 is also very promising.
19 ... Qxd2+ 20 Kxd2 Rd8 21 Re1 Kf8 22 Ng5 h6 23 Ne4 Be6 24 Rxd6 Bxc4
25 Bxc4 Rxd6+ 26 Nxd6 Rd8 27 Re8+ Rxe8 28 Nxe8 Kxe8
90
White has traded his pawn structure advantage for the well-known plus of bishop
vs. knight with play on both sides of the board. The late Bobby Fischer was the
absolute master of this ending—here’s a famous example:
R.J.Fischer-M.Taimanov
4th matchgame, Vancouver 1971
1 e4 c5 2 Nf3 Nc6 3 d4 cxd4 4 Nxd4 Qc7 5 Nc3 e6 6 g3 a6 7 Bg2 Nf6 8 0-0
Nxd4 9 Qxd4 Bc5 10 Bf4 d6 11 Qd2 h6 12 Rad1 e5 13 Be3 Bg4 14 Bxc5 dxc5 15 f3
Be6 16 f4 Rd8 17 Nd5 Bxd5 18 exd5 e4 19 Rfe1 Rxd5 20 Rxe4+ Kd8 21 Qe2 Rxd1+
22 Qxd1+ Qd7 23 Qxd7+ Kxd7 24 Re5 b6 25 Bf1 a5 26 Bc4 Rf8 27 Kg2 Kd6 28 Kf3
Nd7 29 Re3 Nb8 30 Rd3+ Kc7 31 c3 Nc6 32 Re3 Kd6 33 a4 Ne7 34 h3 Nc6 35 h4 h5
36 Rd3+ Kc7 37 Rd5 f5 38 Rd2 Rf6 39 Re2 Kd7 40 Re3 g6 41 Bb5 Rd6 42 Ke2 Kd8
43 Rd3 Kc7 44 Rxd6 Kxd6 45 Kd3!
91
This position deserves a diagram—in the long run, the white king cannot be
prevented from penetrating into Black’s position: 45 ... Ne7 46 Be8 Kd5 47 Bf7+ Kd6
48 Kc4 Kc6 49 Be8+ Kb7 50 Kb5 Nc8 51 Bc6+ Kc7 52 Bd5 Ne7 53 Bf7 Kb7 54 Bb3
Ka7 55 Bd1 Kb7 56 Bf3+ Kc7 57 Ka6 Nc8 58 Bd5 Ne7 59 Bc4 Nc6 60 Bf7 Ne7 61
Be8 Kd8 62 Bxg6 Nxg6 63 Kxb6 Kd7 64 Kxc5 Ne7 65 b4 axb4 66 cxb4 Nc8 67 a5
Nd6 68 b5 Ne4+ 69 Kb6 Kc8 70 Kc6 Kb8 71 b6 1-0
29 Kd3!
Evidently always a good move in this kind of position!
29 ... Ke7 30 Ke4 Nd8 31 Ke5 Kd7 32 Bb5+ Kc7 33 Be8 Nc6+ 34 Ke4 Nd8 35
Kd5 Ne6 36 g3 Nd8 37 Ke5 Nc6+ 38 Ke4 Nd8 39 Kd5 b6 40 a4!
92
Zugzwang: the winning weapon in this ending. Just like Taimanov, Blatny has to
let the white king in.
40 ... f6 41 Bb5 Nb7 42 Ke6 Nd6 43 f5 h5 44 b3 Ne4 45 Kf7 Kd6 46 Kxg7 Ke5
47 Kg6 Nd2 48 Bc4 Nf3 49 h4 Nd4 50 Be6 Ne2 51 Kxh5 Nxg3+ 52 Kg6
52 Kg4 would have won more easily.
52 ... Ne2 53 h5 Nf4+ 54 Kh6 Ke4 55 Bf7 Kxf5 56 Kg7 Nh3 57 h6 Ng5 58 h7
Nxh7 59 Kxh7 Kg5 60 Bc4 1-0
With very accurate play (see note to move 10) Black can escape with a small
disadvantage, but he is left struggling to draw—it’s no wonder Dautov has such a big
score with this opening.
Game 20
O.Cvitan-I.Rogers
Vrsac 1987
1 d4 Nf6 2 c4 e5 3 dxe5 Ng4 4 e4 Nxe5 5 f4 Nec6 6 Be3 Bb4+ 7 Nc3
Not nearly as strong as in Game 17, for White’s f4-f5 attack seen there does not
attack anything with the black knight on c6.
7 ... Bxc3+
Rogers knows to take it right away! 7 ... Qe7 8 Qc2! (Alekhine played 8 Bd3 in
Game 6) 8 ... Bxc3+ 9 Qxc3 Qxe4 10 Kf2, as given by Rogers, is yet another way
White can sacrifice his e-pawn for attack.
8 bxc3 Qe7 9 Bd3 Na6 10 Ne2 Nc5 11 0-0 b6!
Black is not tempted to take: 11 ... Nxe4?! 12 Re1 would just give White the
open lines he needs to attack. The important thing for Black is to blockade White’s c-
pawn (so no line opening c4-c5 breaks as Williams played) and get his king to safety.
12 Ng3 g6 13 Bd4 Rg8 14 e5
93
If White tries to preserve his light-squared bishop with 14 Bc2, then 14 ... Ba6
targets the c4-pawn.
14 ... Bb7
Black is ready to castle long, and White’s f4-f5 thrust, usually so strong, here
only opens a file on White’s king!
15 Ne4 Nxe4 16 Bxe4 0-0 -0 17 Qa4
17 Bd5 g5!, as given by Rogers, is Black’s key resource here, for example 17
Qe2 Rde8 18 Rae1 g5 19 f5 g4 20 Bd5 g3 21 hxg3 Rxg3 22 Rf3 Nxd4 23 cxd4 Rg4 24
f6 Qf8 25 Rd1 h5 26 Rh3 Qg8 27 Rxh5 Qg6 28 Rh3 Rg8 and Black’s g-file play
compensates for White’s extra pawn.
17 ... Kb8 18 Rae1
Also here if 18 c5 g5 with counterplay.
18 ... Nxd4
Black undoubles the white pawns as he has an equalizing idea in mind.
19 cxd4 Bxe4 20 Rxe4 d5!
94
Here it is: since White can’t take en passant, Black reaches a position where
White has a backward d-pawn, which Black can blockade. But one should note that
White’s space advantage is still a factor, and he is in no danger despite the slight
pressure on d4—the game result of a draw is a fair outcome.
21 Re3 dxc4 22 Qxc4 Qe6 23 Rc3 Rd7 24 Qxe6 fxe6
Now we get a fairly boring four rook ending which pretty much goes nowhere
until the players agree to a draw.
25 Rc6 Re8 26 Rfc1 Ree7 27 R6c4 Rd5 28 Kf2 b5 29 Rc5 Rxd4 30 Rxb5+
Kc8 31 Ke3 Red7 32 Rc2 Ra4 33 g3 Ra3+ 34 Rb3 Rxb3+ 35 axb3 Rd1 36 h4 Rb1
37 Rc3 h5 38 Kd4 Kb7 39 Kc5 Rd1 40 b4 a6 41 g4 Rf1 42 gxh5 gxh5 43 Rg3 Rxf4
44 Rg6 Rxh4 45 Rxe6 Rh1 46 Rh6 h4 47 e6 h3 1⁄2-1⁄2
After 48 e7 Re1 49 Rxh3 Rxe7 50 Rh5 the two to one on the same side is dead
drawn.
Evidently Dautov’s 7 Nd2 is superior to this risky 7 Nc3 when Black has
retreated his knight to c6. This was a rare smooth draw for Black against the Alekhine
Attack!
Game 21
S.Tarrasch-A.Vajda
Semmering 1926
I had to put this game in because of the ending. I had seen Tarrasch-Mieses (given in
the notes to move 20) as a young boy, and it made an enormous impression on me—
then, looking at Budapest games, I discovered that Tarrasch had won virtually the
same ending twice!
1 d4 Nf6 2 c4 e5 3 dxe5 Ng4 4 e4 Nxe5 5 f4 Nec6 6 a3
We know that the general choice here in the AA is between the solid 6 Be3,
95
controlling the g1-a7 diagonal and enabling kingside castling (or sometimes the king
steps out to f2), and the sharp 6 Nf3, which ignores said diagonal (by playing 6 Nf3
White claims that ... Bc5 is not a real threat) and plans to meet ... Bb4+ with Bd2,
aiming for a favourable Reshevsky-style position.
As I have said before, my preference is for the sharper 6 Nf3, but both moves are
good.
Then there is a third move, 6 a3, as played here, which I do not recommend. We
recall that Alekhine lost his only game against the BG with this move, and
furthermore, Dautov allowed his only BG draw with this move!
Yes, a2-a3 can be strong in many variations of the AA—for example Game 14: 4
e4 Nxe5 5 f4 Ng6 6 Be3 Nc6 7 a3, when Black was suddenly left without a home for
his king’s bishop, and couldn’t even fianchetto it, in view of his blocking knight—but
to do it here, without provocation as it were, gives too much information to the
opponent. Of course the check on b4 is prevented, and 6 ... Bc5 is also bad after 7 b4,
as detailed in the notes to Alekhine-Gilg (Game 7).
But what if Black fianchettoes? Then 6 a3 is just a loss of tempo—which means
this is exactly how Black should play, when for once he gets decent prospects against
the Alekhine Attack. The following game illustrates this strategy and, like the main
game, also has a very interesting and theoretical ending: 6 ... g6!
This move, also recommended by Tisdall, is clearly best: White’s a2-a3 has no
function now, unless one counts enabling Ra2, as seen below! D.Rupel-D .Ludwig,
Hendersonville 2006, continued 7 Nf3 Bg7 8 Bd3 0-0 9 0-0 d6 10 h3 Nd7 11 Ra2 Nc5
12 b4 Nxd3 13 Qxd3 f5 (Black already stands well, having broken the bind) 14 Ng5
fxe4 15 Qd5+ Kh8 16 Bb2 (16 Nf7+? Rxf7 17 Qxf7 Nd4 18 Qd5 c6 19 Qa5 b6 20
Qa4 Be6 21 Nd2 e3 would lose for White) 16 ... Qe7 17 Bxg7+ Qxg7 18 Nxe4 Bf5 19
Raf2 Ne7 20 Qd3 Rad8 21 Qf3 d5.
96
Black has not only solved all his problems but has gained the upper hand—
though for a long time he is unable to clearly put the game away: 22 Ng3 Be6 23 Qe3
Bg8 24 cxd5 a6 25 Nc3 Nxd5 26 Nxd5 Bxd5 27 f5 gxf5 28 Nh5 Qg6 29 Qe5+ Kg8 30
Nf4 Qg7 31 Re1 c6 32 Nh5 Qxe5 33 Rxe5 Rd6 34 Rfxf5 Rxf5 35 Rxf5 Bf7 36 Nf4
Rd2 37 Rg5+ Kf8 38 Re5 Ra2 39 Re3 Bc4 40 Rc3 Bf7 41 Nd3 Bd5 42 Nf4 Bf7 43
Nd3 b6 44 Rxc6 Rxg2+ 45 Kxg2 Bd5+ 46 Kg3 Bxc6 47 Ne5 Bb5 48 Kf4 Ke7 49 Nf3
Bd7 50 h4 Kf6 51 Ne5 Bb5 52 Nf3 Kg6 53 Nd4 Bd7 54 Nf3 Kh5 55 Ne5 Bb5 56 Kg3
a5 57 bxa5 bxa5 58 a4 Bxa4 59 Nc4 Bb3 60 Nxa5 Bd5 61 Kh3?! (as the tablebase
confirms, White can draw with 61 Kf4! Kxh4 62 Ke5, giving up the h-pawn to free the
knight just in time, e.g . 62 ... h5 63 Kxd5 Kg3 64 Nc4 h4 65 Ke4 h3 66 Ne3 h2 67
Nf1+ and it’s dead!) 61 ... Kg6 62 Kg3? (White misses his last chance: 62 Kg4 could
still have saved him, e.g . 62 ... h5+ 63 Kf4 Kf6 64 Ke3! Kf5 65 Kd4 Ba2 66 Nc4 Bxc4
47 Kxc4 Kg4 48 Kd3 Kxh4 49 Ke2 Kg3 50 Kf1 and draws) 62 ... Kf5 63 Kh3 h5 64
Kg3 Ke4 65 Kg2 Kd3+ 66 Kg3 Ke3 67 Kh3 Kf3 68 Kh2 Kg4 (now one can’t even
imagine a save) 69 Kg1 Kxh4 70 Kh2 Kg4 71 Kg1 h4 72 Kh2 h3 73 Kg1 Kg3 74 Nc4
0-1 .
6 ... a5
97
This “automatic”, but in fact unnecessary, move gives White more chances than
the fianchetto.
7 Be3
7 Nc3 Bc5 8 Nd5?! is the Alekhine-Gilg debacle (Game 7); correct here is 8 Nf3
0-0 9 Bd3 d6 10 Bd2 Bg4 11 h3 Bxf3 12 Qxf3 Qh4+?! (this check turns out to be a
loss of time; Black should exploit the weakness at b3—the legacy of 6 a3—with 12 ...
Nd4 13 Qg3 Nb3 14 Rd1 Nxd2 15 Kxd2 Nc6 16 Kc1 Bd4 when it’s not clear White
has anything) 13 g3 Nd4 14 Qg4! (if Black takes, White gets a strong queenless
middlegame attack down the open h-file) 14 ... Qe7 15 0-0 -0 Nbc6 16 Nd5 Qd8 17
Bc3 f6 18 Kb1 Kh8 19 Qh5 Qd7 20 g4 g6 21 Qh6 Nb4 22 Bxd4 Bxd4 23 axb4 axb4
24 Bc2 1-0 Wang Yue-Li Haoyu, Tianjin 2001, which shows that the Alekhine Attack
can still knock ‘em dead in under 25 moves in the 21st century!
7 ... Na6 8 Bd3
Dautov’s only draw vs. the Budapest came in this variation—compared to his
smooth win in Game 18, a2-a3 again proved to be a tempo loss: 8 Nc3 Bc5 9 Qd2 d6
10 Bd3 Qh4+ 11 g3 Qh5 12 Kf2 0-0 13 Nf3 Bg4 14 Be2 Rfe8 15 h3 Bxf3 16 Bxf3
Bxe3+ 17 Qxe3 Qc5 18 Qxc5 Nxc5 19 Rad1 a4 (again the weak b3-square hurts
White) 20 Nd5 Na6 21 Nc3 Nc5 22 Nd5 Na6 23 Nc3 1⁄2-1⁄2 R.Dautov-L .Van Wely,
German League 1994.
8 ... Bc5 9 Qd2 Qh4+ 10 g3 Qe7 11 Nc3 Bxe3 12 Qxe3 Qc5 13 Qxc5 Nxc5 14
0-0 -0 d6 15 Bc2 Be6 16 Nd5 0-0 -0
98
17 h3
Tarrasch was the great master of the squeeze, but he’s a tempo away here: if 17
b3 to cover the queenside hole, Black gets counterplay against White’s undeveloped
kingside with 17 ... Bg4 18 Rd2 Rhe8 19 h3 Bd7 20 Nc3 f5!.
17 ... Rde8?
17 ... a4!, as in Dautov-Van Wely, would fix the weak square at b3, and so also
weaken the defence of the white c-pawn. Black would be fine, e.g . 18 Ne2 Na5 19
Nec3 Nxc4 20 Nxa4 with equality. But now Tarrasch consolidates his space
advantage, which never augured well for his opponents!
18 Ne2 a4 19 Nec3 Bd7
Better is 19 ... Na5 20 Nxa4 Nxc4 21 Nxc5 dxc5 22 e5 when White has some
advantage, but nothing like the game.
20 Nb5 Na6
At this point Tarrasch must have had a wonderful flashback:
S.Tarrasch-J.Mieses
Gothenburg 1920
1 e4 d5 2 exd5 Qxd5 3 Nc3 Qa5 4 d4 e5 5 Nf3 Bb4 6 Bd2 Bg4 7 Be2 exd4 8
Nxd4 Qe5 9 Ncb5 Bxe2 10 Qxe2 Bxd2+ 11 Kxd2 Qxe2+ 12 Kxe2 Na6 13 Rhe1 0-0 -0
99
14 Nxa7+! Kb8 15 Nac6+! (the key idea: White gets a rook and two pawns for
two knights) 15 ... bxc6 16 Nxc6+ Kc8 17 Nxd8 Kxd8 18 Rad1+ Ke8 19 Kd3+ Ne7
20 Kc4 h5 21 Rd3 Nb8 22 Rde3 Nbc6 23 b4 f6 24 f4 Kf7 25 a4 Rb8 26 c3 Rd8 27
Rd3 Rxd3 28 Kxd3 Ke8 29 a5 Kd7 30 a6 Nd5 31 Ra1 Na7 32 g3 c6 33 Ra4 Nb6 34
Ra5 g6 35 c4 Nbc8 36 Ra1 Nd6 37 Kd4 Ndc8 38 Kc5 Kc7 39 Re1 Nb6 40 Re7+ Nd7+
41 Rxd7+! (we will see this sac again too—the a- and b-pawns defeat the lone knight!)
41 ... Kxd7 42 b5 cxb5 43 cxb5 Nc8 44 b6 1-0
21 Ndxc7!!
One can imagine Tarrasch making this move with a flourish!
21 ... Nxc7 22 Nxd6+ Kb8 23 Nxe8 Bxe8 24 Bxa4
100
Rook and pawns against two knights—again!
24 ... Kc8 25 b4 f6 26 Kb2 h5 27 h4 Rg8 28 Kc3 Rf8 29 Rd6 Nd8 30 Bxe8
Nxe8 31 Rd2 Nf7 32 c5 Nc7 33 Rhd1 Ne6 34 Rd7 Rd8 35 Rxd8+ Nexd8 36 Rd5 g6
37 a4 Nh6 38 Rd6 Ng4 39 b5 Nf7 40 Rd2 g5 41 Rd5 Ne3 42 Rd3 gxf4 43 gxf4 Ng2
44 Rd5 Nxf4 45 Rf5 Ne2+ 46 Kd3 Ng3 47 Rxf6 Ne5+ 48 Kd4 Nd7 49 Rf2 Kd8 50
a5 Nxc5 51 Kxc5!
Again sac’ing the rook so that the same two pawns can defeat the last knight!
51 ... Nxe4+ 52 Kb6 Nxf2 53 Kxb7 Ne4 54 a6 Nd6+ 55 Kc6 Nxb5 56 Kxb5
Kc8 57 Kc6 1-0
Black resigns in view of 57 ... Kb8 58 Kd6 Ka7 59 Ke6 Kxa6 60 Kf6 Kb7 61
Kg6 Kc7 62 Kxh5 Kd7 63 Kg6 Ke8 64 Kg7 and the black king can’t make it to f8.
The early, unprovoked and unmotivated a2-a3 cannot be recommended; it
brought no opening success or victory even to Alekhine or Dautov; and while Tarrasch
won a brilliant endgame, he would have had nothing had Black exploited the b3 hole
with 17 ... a4, and less than nothing if right in the opening Black had used the gift
tempo to play 6 ... g6. The pawn moves that characterize the Alekhine Attack (e2-e4
and f2-f4) must be immediately reinforced with strong development—there is no time
(or need) for an early a2-a3.
In the next three games we will examine White’s sharpest response to 5 ... Nec6,
namely 6 Nf3.
Game 22
F.Yates-R.Spielmann
Carlsbad 1923
1 d4 Nf6 2 c4 e5 3 dxe5 Ng4 4 e4 Nxe5 5 f4 Nec6 6 Nf3
101
Perhaps as in the 5 ... Ng6 line, this is White’s sharpest and best.
6 ... Bc5
Similar to the 5 ... Ng6 variation, if Black plays ... Bb4+, White tries to transpose
to the favourable Reshevsky Attack seen in Game 12 (actually, with the knight on c6,
to the brutal Sahovic win given in the notes to said game), and if Black goes for the e-
pawn ... let him have it! White gets a very strong attack after 6 ... Bb4+ 7 Bd2 Qe7 8
Nc3 Bxc3 9 Bxc3 Qxe4+ 10 Kf2 0-0 (not 10 ... Qxf4 11 Bxg7 and White is winning)
11 Qd2. In other words, the check on b4 is not to be feared, so there’s no reason for an
early a2-a3.
Furthermore, without the a2-a3 tempo loss, fianchettoing doesn’t seem to work
well—after 6 ... g6 7 Be3 Bg7 8 Qd2 Na6 9 Nc3 White has a powerful attacking
position, and the levers f4-f5 and h2-h4-h5 are ready if Black castles kingside.
7 Nc3 d6 8 Bd3
This system, devised by the English master Frederick Yates, has stood the test of
time: White obtains a sound attacking position with natural developing moves.
8 ... 0-0
For 8 ... Bg4 see Game 24.
9 a3
102
Another unnecessary a-pawn move!
Yates’ own improvement, 9 Qe2, looks more accurate, as after the text 9 ... Bg4!
is possible, ignoring White’s “threat”. Then if 10 b4 Bd4 11 Bd2 Nd7 12 h3 Bxf3 13
Qxf3 a5 14 b5 Ne7 15 Rc1 Ng6 16 g3 Nc5 and Black gets good play. Note that
White’s queenside advance b4-b5 finally ended up favouring Black by ceding the c5-
square.
Returning to 9 Qe2, Yates played the following frustrating game: 9 ... Nd7 10
Be3 Bxe3 11 Qxe3 f5 12 0-0 Re8 13 Qd2 fxe4 14 Nxe4 Nf6 15 Rae1 Bf5 16 Ng3
Bxd3 17 Qxd3 Qd7 18 Ng5 Rxe1 19 Rxe1 Re8 20 N3e4 Kh8 21 Re3 Nxe4 22 Rxe4
Rxe4 23 Qxe4 g6 24 b3 b6 (this is one of those games where White was better all the
way, but somehow failed to win—I think Yates tried to cash in a little too quickly:
after the “joy of grinding” 25 Kf2, followed perhaps by a2-a3 and b3-b4, Black would
extremely hard pressed to defend both his airy king and vulnerable queenside) 25 Qe6
Qe7 26 h3 a5 27 g4 Qxe6 28 Nxe6 Nb4 29 a3 Nc2 30 Nxc7 Nxa3 31 Kf2 Kg8 32 Ke2
a4 33 bxa4 Nxc4 34 Nd5 Kf7 35 f5 h5 36 Kf3 hxg4+ 37 hxg4 gxf5 38 gxf5 Ne5+ 39
Ke4 Nd7 40 Kf4 Kg7 41 Kg5 Kf7 42 Kh4 Kg7 43 Kg3 Kh6 44 Kg4 Kg7 45 Kf4 Kh6
46 Ne7 1⁄2-1⁄2 F.Yates-C.Torres, Barcelona 1929.
9 ... a5
Now Black justifies White’s loss of time with his own, and England rejoices.
10 Qe2
103
White prepares the exchange of Black’s most active piece with Bc1-e3; we saw
Wang Yue’s 10 Bd2 in the notes to the previous game.
10 ... Bg4 11 Be3 Nd4 12 Qf2 Bxf3
The defensive 12 ... Ne6 fails to solve Black’s problems after the simple 13 Nd4,
when his light-squared bishop is left out in the cold, in constant danger of being cut off
by f4-f5.
13 Bxd4
This seems natural, but it’s also possible to play 13 gxf3 to open the g-file—for a
similar idea, see the next game.
13 ... Bxd4 14 Qxd4 Nc6
If 14 ... Bxg2 15 Rg1 Qh4+ 16 Qf2 Qxf2+ 17 Kxf2 Bh3 18 f5 h5 19 Rg3 Bg4 20
h3 and the mousetrap slams shut.
15 Qf2 Bh5 16 0-0
104
16 ... f5?
Opening lines for White’s attack! It’s possible to play 16 ... f6, safeguarding the
bishop, and then settle down for a long stubborn defence, but such defensive play did
not suit Spielmann’s style.
17 exf5 Bg4 18 f6! Qxf6
This capture is relatively best—both alternatives 18 ... Rxf6 19 Bxh7+ Kxh7 20
Qh4+ and 18 ... gxf6 19 Qg3 are disastrous—but now the knight comes in with tempo.
19 Nd5 Qd8 20 Rae1 Ne5
Black can struggle on with 20 ... Bf5 21 Qc2 Bxd3 22 Qxd3 Rf7 23 Rf3, but it’s
hard to imagine Black holding this in the long run.
21 Bxh7+! Kxh7 22 Qg3
105
White recovers his piece, leaving him with much the better position thanks to the
fact that he has shattered Black’s kingside.
22 ... c6 23 fxe5 cxd5 24 Rxf8 Qxf8 25 Qh4+ Kg8 26 Qxg4 dxe5 27 Qe6+ Qf7
28 Qxd5 Re8 29 Qxf7+ Kxf7 30 Re3 Rc8 31 Rxe5 Rxc4 32 Rb5 Rc7 33 Kf2 Kg6 34
Kf3 1-0
A second pawn falls.
Black has a very unpleasant defensive task vs. the Yates Attack (or perhaps the
Yates variation of the Alekhine Attack!), as further illustrated by two modern games.
Game 23
O.Spirin-V.Kravchenko
Krasnodar 2002
1 d4 Nf6 2 c4 e5 3 dxe5 Ng4 4 e4 Nxe5 5 f4 Nec6 6 Nf3 Bc5 7 Nc3 0-0 8 Bd3
An interesting statistical note is that White, following Yates, scores 75% in the
Mega with this natural move—which I might say is a case of “if it ain’t broke, don’t
fix it!”
Nonetheless, in a recent high-level game between Bacrot and Shirov the novelty
8 f5 was tried,
but in my view this move, that attacks nothing (there is no black knight on g6)
and solves Black’s knight traffic problems on the queenside (the knights can gallop
through the hole on e5), cannot be good. Indeed, Black won without particular
problems. I would have been very interested to see how Shirov would have reacted to
the Yates Attack!
Here’s the game: 8 f5 d6 9 Bg5 f6 10 Bf4 Re8 11 Qd5+ (as far as I can see both
move 8 and this are premature attacks leading nowhere) 11 ... Kh8 12 0-0 -0 Nd7 13 h4
Nce5 (Black finds a good base in the centre and ... ) 14 h5 h6 15 Qd2 Nf7 16 Bd3 Bb4
106
17 Bc2 Nc5 18 Qd5 Kg8 19 Ne2 c6 20 Qd4 Bxf5! (smashes White’s uncoordinated
position) 21 exf5 Rxe2 22 Ng1 Rxg2 23 a3 Qd7 24 axb4 Rxc2+! 25 Kxc2 Qxf5+ 26
Kc3 Ne6 27 Qe3 Nxf4 28 Nf3 a5 29 Ra1 axb4+ 30 Kxb4 Rd8 31 Rhf1 Qc2 32 Qc3
c5+ 0-1 E.Bacrot-A .Shirov, Sarajevo 2000.
8 ... d6 9 Qe2
White follows the Yates plan without the unnecessary 9 a3.
9 ... Bg4
White should also be prepared for Black’s two “forward” knight moves, though
neither comes to much against accurate play:
a) 9 ... Nd4 10 Nxd4 Bxd4 11 Nb5 and then:
a1) 11 ... Bf6 12 Be3 Nc6 13 0-0 a6 14 Nc3 Bxc3 (if 14 ... Bd7 15 Nd5) 15 bxc3
b6 (Black tries to prevent the c4-c5 break, but now the two white bishops run amok on
the open board) 16 e5 dxe5 17 Be4 Bd7 18 Rad1 Qc8 19 Rxd7! Qxd7 20 Qh5!
(sharper than 20 Qf3, which is also good enough) 20 ... g6 21 Qf3 Qe6 22 f5 Qxc4 23
Bh6 with a winning attack.
a2) 11 ... Bb6 12 Be3 Ba5+ (or 12 ... Bg4 13 Qxg4 Bxe3 14 Qg3 Bc5 15 0-0 -0
with good attacking chances) 13 Kf2 and White successfully castles by hand, keeping
his space advantage, and if Black pushes his luck with 13 ... Qh4+ 14 g3 Qh3 then
White wins immediately with 15 b4!.
b) 9 ... Nb4 (trying to take advantage of White having omitted a2-a3) 10 Be3
Nxd3+ (or if 10 ... N8a6 11 Bb1, followed by 12 a3, when Black’s pieces must go into
reverse!) 11 Qxd3 Na6 (11 ... Nc6 12 Bxc5 dxc5 13 Qxd8 gives White the better
ending in view of Black’s doubled pawns) 12 0-0 -0 with a typical Maróczy squeeze.
10 Be3 Nd4 11 Qf2 Bxf3 12 gxf3
107
White chooses a new plan, aiming to attack down the g-file. I prefer 12 Bxd4
with some advantage, which is the same as Yates-Spielmann without the moves a2-a3
and ... a7-a5.
12 ... Nbc6
12 ... Ne6 is probably best here, as White no longer has the retort Nd4 stranding
the black queen’s bishop (which has, like Elvis, already left the building) 13 f5 (not 13
0-0 -0?! Nxf4) 13 ... Bxe3 (correct—the inaccurate 13 ... Nf4 14 0-0 -0 Nxd3+ 15 Rxd3
Bxe3+ 16 Qxe3 Nd7 17 f4 is just what White wants, with a big attack coming soon
down the g-file) 14 Qxe3 Qh4+ Black stirs up trouble before White consolidates. 15
Kd2 Nc5 16 Rag1 Nc6 17 Rg4 Qf6 18 Rhg1 g6 19 Be2 Qd4+ 20 Qxd4 Nxd4 and
Black should hold the ending.
13 0-0
13 0-0 -0 is natural and strong.
13 ... f5 14 Kh1 fxe4
As in Alekhine-Seitz (Game 6) Black voluntarily opens the diagonal for White’s
attacking bishop. More solid is 14 ... Ne6, when Black can mix it up with 15 exf5
Nxf4, and the d3-bishop is still blocked by its own pawn.
15 Bxe4 Kh8?
108
Better is 15 ... Bb6.
Black misses the tactic that White actually plays on the move 17—but White
should have played it immediately!
16 Bd5?
Black’s cosmetically well-placed knight on d4 actually lacks solid support (we’ll
see this theme again in Game 68, where White does take immediate advantage).
16 b4! undermines with tempo, and White wins a whole piece after 16 ... Bb6 (or
16 ... Bxb4 17 Bxd4; also note that after 16 ... Nxb4 17 Bxd4 Black has no forking
tricks as in the main game, since White’s light-squared bishop still controls c2) 17 b5
etc.
16 ... Qd7?!
Black has two better moves:
a) 16 ... a5 17 Rad1 Qf6 18 Ne4 Qh6 19 Rg1 (not 19 Bxd4? Nxd4 20 Rxd4 Bxd4
21 Qxd4 c6 and the d5-bishop falls, so Black emerges the exchange ahead) 19 ... Ne6
20 Nxc5 Nxc5 21 Bxc6 bxc6 22 Bxc5 dxc5 23 Rd7 g6 and White has still not
completely won the battle of the terrible pawn structures!
b) 16 ... Bb6 (this gives the key dark-squared bishop solid protection, and
prepares to meet 17 b4 with 17 ... Nf5) 17 Rae1 Nf5 18 Bxb6 axb6 19 a3, when the
activity of White’s pieces is balanced by his pawn weaknesses.
17 b4!
This surprising tactical blow wins two pieces for a rook.
17 ... Nxb4
Black has no choice, for 17 ... Bb6 loses immediately to 18 b5.
18 Bxd4 Bxd4 19 Qxd4 Nc2
This move would not have been possible had White seen the b2-b4 tactic on
move 16.
20 Qd2 Nxa1 21 Rxa1 c6 22 Be4
109
Black has a rook and pawn vs. two pieces, and White’s pawn structure is terrible
—this is by no means clearly favourable to White until Black’s oversight on move 30.
22 ... Qf7 23 Qd3 Qxf4 24 Rb1 Rab8 25 Ne2 Qf6 26 Ng3 g6 27 Rd1 Rbd8 28
Nf1 Qb2 29 Ne3 Qe5 30 Ng4 Qg7
Black misses a trick: 30 ... Qb2 is correct, with chances to hold.
31 Qa3!
Fork!
31 ... Kg8 32 Qxa7 Ra8 33 Qf2 Qe7 34 Qb2
34 ... h5?
Fatally weakening the kingside, especially g6, the light square point of attack.
However, White’s advantage is now clear even after the better 34 ... Qg7, when White
110
would keep the queens on for attack with 35 Qb3.
35 Nf2 Rf6 36 Rb1 Ra7 37 Rg1 Kh7 38 Nh3 Qe5 39 Qc2 Ra3
Black can’t defend, as 39 ... Qe6 of course loses to 40 Ng5+.
40 Bxg6 1-0
The plan of attack on the g-file finally bore fruit, but one could also see various
Black defensive chances on the way.
I prefer Yates’ more solid method to both this game and to Wang Yue’s queenside
castling idea.
Game 24
I.Novikov-A.Moroz
Kherson 1989
1 d4 Nf6 2 c4 e5 3 dxe5 Ng4 4 e4 Nxe5 5 f4 Nec6 6 Nf3 Bc5 7 Nc3 d6 8 Bd3
The now familiar Yates Attack appears.
8 ... Bg4?!
Slightly inaccurate: I think 8 ... 0-0 transposing to the previous game is correct,
for then White must use a move to play Qe2; whereas here the queen goes to f3 in one,
and this gain of a key tempo means that queenside castling is more effective, as White
is that much quicker on the attack.
9 h3 Bxf3 10 Qxf3 Nd4 11 Qg3 0-0 12 Bd2
This is like Wang Hue without a2-a3 and ... a7-a5. This favours White, for
without the insertion of those rook pawn moves, Black doesn’t have the ... Nd4-b3
manoeuvre that would have tossed the proverbial monkey wrench into Wang’s attack.
So Novikov goes long—though of course White can play simply, castling
kingside à la Yates, with 12 Be3 Nbc6 13 0-0 Nb4 14 Rad1 and a steady advantage.
12 ... a6
111
The weakening a-pawn move occurs only on the Black side in this game! Black
should simply develop with 12 ... Nbc6 and try to hang on.
13 0-0 -0 b5 14 Kb1 bxc4 15 Bxc4
Black’s “line opening attack” has only activated White’s light-squared bishop.
15 ... Kh8?
There is no time for this: better is 15 ... Nd7 16 Be3 Nb5 17 Nxb5 axb5 18 Bxb5
Rb8 19 Bxd7 Bxe3 20 Qxe3 Qxd7 21 Rd3, when White maintains his extra pawn, but
Black has a little play for it.
16 Be3
16 ... Ne6
There is no defence—after 16 ... Nbc6 17 Bd5 White wins in all variations:
a) 17 ... Qe8 18 Bxd4 Nxd4 19 Bxa8 winning the exchange.
b) 17 ... Qb8 18 Bxd4 is essentially the same.
c) 17 ... Rb8 18 Bxc6 Nxc6 19 Bxc5 wins a piece.
17 Bxe6 Bxe3 18 Bd5 c6 19 Qxe3 cxd5 20 Rxd5
112
Black limits the damage to one pawn but his position is hopeless.
20 ... Nc6 21 Rhd1 Na5 22 Rxd6 Qc8 23 R6d5 Nc4 24 Qc5 Rb8 25 b3 h6 26
Rc1 Re8 27 Qxc8 Rexc8 28 Nd1 g5 29 fxg5 hxg5 30 Ka1 Na3 31 Rxc8+ Rxc8 32
Kb2 Nc2 33 a3! Ne1 34 Ne3 f5 35 Rd1 1-0
The black knight is trapped, and the best he can do is 35 ... f4 36 Rxe1 fxe3 37
Rxe3 with a routinely winning rook ending.
Summary
Black’s job in the main line Alekhine Attack is so difficult (after 4 ... Nxe5 5 f4)
that I cannot in good conscience recommend it to the prospective Budapest player. We
saw in this chapter that retreating to c6 hardly makes a difference, except perhaps in a
negative sense: apparently both 6 Be3 and 6 Nf3 give White the advantage here, so
White can decide to grind you down à la Dautov or hammer you like Novikov.
Black’s only chance in this line is some kind of misplay (the doubled c-pawns of
Game 20 didn’t work out well for White, and Black could have equalized after the too
slow 6 a3 in Game 21). But all in all the position after 5 f4 is good for White.
Therefore Black must find another way, which is the subject of the next chapter.
113
Chapter Five
Réti (4 ... h5!)
After Réti was crushed by Spielmann in the inaugural game of what would
become known as the Alekhine Attack, he must have done some serious thinking! It’s
clear that if White establishes his big centre—with tempo—after 4 ... Nxe5 5 f4 then
Black has a terrible struggle just to get through the opening alive.
The solution he came up with was both simple and brilliant: Black plays 4 ... h5,
and so keeps the knight in White’s territory at least one more move—and the knight
can only be removed if White makes concessions.
The true Réti idea will be seen in Games 26-29. Ahead of these I have placed the
original, if unsound, Spielmann idea of combining ... h7-h5 with a kingside fianchetto.
This Budapest win against a future world champion has to be included in the book for
its sheer brilliance, even though I don’t recommend that the reader should follow
Spielmann’s opening scheme.
Game 25
M.Euwe-R.Spielmann
Bad Pistyan 1922
1 d4 Nf6 2 c4 e5 3 dxe5 Ng4 4 e4 h5!
Just a year after the infamous “free game”, Dr. Euwe finds himself on the
114
opposite side of BG—and follows his conqueror, Alekhine, with ...
5 Nh3
This inferior move!
5 ... Nxe5
Not best: the idea of Réti’s 4 ... h5 is to keep the knight in action, in White’s
territory, as long as possible, and only move it when absolutely forced, for example
after 5 h3.
However, at this point the BG was not well worked out (in fact it still isn’t!) and
Spielmann’s hypermodern fianchetto idea—though it should have failed tactically—is
worth seeing as a precursor to some modern strategic ideas like the 6 ... g6 variation
given in the notes to Game 21.
That said, if we are looking for best play here, this was already demonstrated by
Euwe as Black in the free game (up to a point of course!). As analyzed in detail in
Game 4, Black could have obtained the advantage as early as move eight after the
correct 5 ... Nc6 6 Nc3 Bc5 7 Nd5 (one recalls that even on the less extravagant 7 Be2
Black would have had good counterplay with 7 ... Ncxe5, maintaining the attacking
knight at g4) 7 ... Ncxe5 8 b4 and now, instead of the game’s 8 ... Be7, Black had 8 ...
Bf8 with the idea of ... c7-c6, when White’s overextended position is cracking.
I do wonder where Euwe intended to improve.
6 Nc3 d6 7 Nf4 Nbc6?!
This move is incorrect for two reasons: one, the sacrifice of the h-pawn is
unsound; and two, Black now gives White the d5-square. Correct is 7 ... g6, defending
h5, and keeping ... c7-c6 in reserve should White move a knight to d5—a modern
version of this strategy can be seen in Game 72.
8 Be2
This gives White an excellent middlegame, but Euwe might also call Black’s
bluff and take, 8 Nxh5, and now:
115
a) 8 ... Qh4 9 Be2 Bg4 (even worse is 9 ... Nxc4 10 g3 Qh3 11 Nf4 winning a
piece) 10 Nf4 and White is just up a pawn.
b) 8 ... Ng4 9 Be2 Nce5 10 f4 Rxh5 11 fxe5 Rxh2 (if 11 ... Rxe5 12 Bf4 wins the
exchange) 12 Rxh2 Nxh2 13 Bf4 Ng4 14 Bxg4 Qh4+ 15 g3 Qxg4 16 Nb5 Qxd1+ 17
Rxd1 Kd8 18 exd6 and White has a pawn plus attack.
c) 8 ... Bg4 9 Be2 Bxe2 10 Qxe2 Nd4 11 Qd1 Ne6 (or 11 ... Rxh5 12 Qxd4) 12
Nf4 Qd7 13 Nxe6 fxe6 (White would win more easily after 13 ... Qxe6 14 Qd5 Nxc4
15 Qxb7) 14 Qe2 and Black has nothing visible for the pawn.
8 ... g6 9 Nfd5
While Spielmann’s idea was interesting, in the specific situation he has found
himself in a bad tactical position, where he risks being blown out in the opening.
Because Black retreated his active knight (and because Spielmann’s idea is to
fianchetto, so knight and king’s bishop cannot combine together against f2), the white
knight was not pinned down defending said square. Euwe has profited from his
experience to immediately reposition his knight away from the rim to the central
square it now so splendidly occupies—and because of the inaccuracy on move 7,
Black can’t kick the knight out with ... c7-c6. Furthermore, with the f2-pawn
unimpeded, White has the f2-f4-f5 attack in hand, levering hard against Black’s fragile
kingside and the point of attack at g6.
116
9 ... Be6 10 Nb5 Rc8
If 10 ... Bxd5 11 cxd5 with a big advantage for White no matter where Black
retreats the knight—this is not very surprising in view of White’s two bishops and
central pawn majority, not to mention the weak dark squares on Black’s kingside:
a) 11 ... Nb4 12 f4 Nd7 13 Bd2 Na6 14 Bc3 and Black is dead.
b) 11 ... Nb8 12 f4 a6 13 Nc3 Ng4 14 0-0 Bg7 15 h3 Qh4 16 hxg4 hxg4 17 Bxg4
Qg3 18 Rf2 Nd7 19 Qf3 and White holds the extra piece.
c) 11 ... Ne7 12 f4 Ng4 13 Qd4 and again White takes over the long black
diagonal with a big advantage.
11 f4 Ng4 12 Nxa7?
Resolute play is required, not pawn grabbing! Any Bird player would see the
devastating 12 f5! here.
117
Black can’t dream of saving the game, but can he even make it out of the opening
alive? Let’s take a look:
a) 12 ... Bd7 13 fxg6 fxg6 14 0-0 Bg7 15 Ndxc7+ Rxc7 16 Nxd6+ Ke7 17 Rf7+
Ke6 18 Qd5 mate! A mild illustration of the dangers facing Black!
b) 12 ... Bxd5 13 exd5 Nce5 14 fxg6 fxg6 15 0-0 (Black’s king is caught in the
centre) 15 ... c6 16 Nd4 Qb6 17 h3 Nh6 18 Be3! Nhf7 (or if 18 ... Qxb2 19 Rb1 Qa3
20 Rb3 Qa6 21 Qb1 with a winning attack) 19 Rb1 (White has no need to rush; he has
the two bishops and Black can’t coordinate) 19 ... Bh6 20 Bf2 Qa5 (even worse are 20
. .. 0-0 21 Nxc6 and 20 ... Qc7 21 Ne6) 21 Qb3 with a decisive positional advantage.
c) 12 ... gxf5 13 exf5 and Black’s prognosis is terminal, for example 13 ... Bxf5?!
(but if 13 ... Bd7 14 Bf4 with an overwhelming position, and the same can be said for
13 ... Bxd5 14 cxd5 Nce5 15 0-0) 14 0-0 Be6 15 Bxg4 Bxg4 (if 15 ... hxg4 16 Nf6+
Ke7 17 Bg5 wins the queen) 16 Qe1+ Be7 17 Bg5 Be6 18 Qc3 Rg8 (18 ... 0-0 19
Bxe7 Nxe7 20 Nf6+ Kh8 21 Nxh5+ f6 22 Rxf6 wins a piece at least) 19 Bxe7 Nxe7 20
Nf6+ Kf8 and one of the prettiest of White’s many ways to win is 21 Nh7+ Ke8 22
Nd4 Ng6 23 Nf6+ Ke7 24 Nf5+ Bxf5 25 Rxf5 Ne5 26 Rxe5+ Kxf6 27 Re8+ with a
fatal discovery.
And no, I don’t see a way Black can make it out of the opening alive—but
apparently Euwe did not realize how big his advantage was—or perhaps he was
looking on the wrong side of the board!
12 ... Nxa7 13 Qd4 c6!
118
Spielmann rises to the occasion! He removes Enemy Number One, the big knight
on d5, and disregards the material balance.
14 Bxg4
The position has undergone an amazing, even magical transformation in just two
moves. Now if 14 Qxh8 cxd5 15 exd5 Bf5 16 Qd4 Qh4+ 17 g3 Qe7 18 Qxa7 Bg7!
Black reaches a typical Spielmann attacking position—look at the white queen, and
the white king stuck in the centre. Even Mr. Fritz agrees Black is better here, as White
has no way to coordinate his position, despite his material advantage.
14 ... hxg4 15 Qxh8
15 Nf6+ Ke7 doesn’t worry Black.
15 ... cxd5
White’s best piece perishes, and his only “developed” piece now is his queen on
h8.
16 f5
If 16 exd5 Bxd5!? 17 cxd5 Qa5+ 18 Bd2 Qxd5 and Black has good
compensation for the material, as White’s king is stuck in the centre.
16 ... gxf5 17 exd5 Rxc4 18 dxe6 Re4+ 19 Kf2 Qb6+ 20 Kg3 d5!
119
The Art of Sacrifice maestro is in his element! Black’s last move means his
queen communicates with the kingside, and the diagonal d6-g3 opens up for a deadly
check.
21 Bf4
Fritz has rethought its brief flirtation with sacrificial shenanigans, and now
claims that White is better, but the variation offered is far from convincing: 21 exf7+
Kxf7 22 Qh7+ Ke8 23 Qh5+ Kd8 24 Bg5+ Kc8 25 Rac1+ Nc6 26 Qh8 Qc7+ 27 Kh4
and it looks to this human like Black still has a lot of play against White’s plank-
walking king after 27 ... Qd6.
In any case, in a practical game White’s problems after 15 ... cxd5 are virtually
insoluble.
21 ... Qxe6 22 Rhf1 Nc6 23 Rad1 d4 24 Rd3?
24 h3 was necessary, when Black would play 24 ... Ne7 with a continuing attack.
But now you can test your tactics: Black to play and win!
120
24 ... Rxf4!!
Decisive! Either the white king is lured to a forking square, or the black queen
penetrates with check.
25 Kxf4
If 25 Rxf4 Qe1+ 26 Rf2 Ne5 27 Rdd2 (or 27 Ra3 f4+ 28 Kxf4 Ng6+ 29 Kxg4
Nxh8 30 Ra8+ Ke7 and White can’t even get one of his two missing pieces back) 27 ...
Qe3+ 28 Kh4 Ng6+ 29 Kh5 d3! (the white queen can’t go anywhere important, e.g . 30
Qc3 Qh6 mate!) 30 Qh7 Nf4+ 31 Rxf4 Qxf4 32 Rxd3 Qxh2+ 33 Rh3 gxh3 and Black
comes out at least a queen ahead.
25 ... Ne5
The knight is immune, the threat is ... Ng6+, and the white rook is hanging! Too
much, even for a future World Champion.
26 Kg3
If White wants to test Black’s immunity, first the queen falls and then the king:
26 Qxe5 Bh6+ 27 Kg3 Qxe5+ 28 Kf2 Be3+ 29 Ke2 f4 30 Rb3 Qe4 31 Kd1 Qb1+ 32
Ke2 Qc2+ 33 Ke1 Qd2 mate.
26 ... Nxd3 0-1
121
Black has a material advantage and a winning attack—even though the king’s
bishop never quite got fianchettoed! A truly fabulous attacking game by Spielmann.
Nevertheless, while the middlegame was brilliant, if we look at the opening
objectively, we see that Black’s idea did not work. The idea of fianchettoing the f8-
bishop can be good in certain BG positions, but here should have been defeated by
resolute attacking play. On the other hand, 5 Nh3 still cannot be recommended in view
of the main line seen in Game 4.
We now return to Réti’s original idea, as seen in the inaugural game with 4 ... h5.
Game 26
H.Weenink-R.Réti
Amsterdam 1920
1 d4 Nf6 2 c4 e5 3 dxe5 Ng4 4 e4 h5
I’ve already given the serious reasons why this move is best, but the flippant one
appeals to me too: one can imagine the king of Hypermodern chess asking, ‘Why
should I take a centre pawn when I can move a rook pawn instead?’
5 Be2
This piece attack is not enough to make Réti withdraw his knight—after all,
White only threatens to win a pawn—a pawn Black can sacrifice!
5 ... Nc6!
Best and very important: Black maintains his bold king’s knight in its attacking
position, and will take the e-pawn back with the queen’s knight—unless White makes
some concession, such as spending a tempo to drive the knight away with the
weakening h2-h3 . It’s important to note that if White does that, he can’t follow ...
Ngxe5 with the natural f2-f4, as the g3-square has been weakened by the h-pawn
move. For example, in the game after 6 h3 Ngxe5, if Weenink plays 7 f4?! (which he
122
wisely avoided) Réti would reply 7 ... Qh4+ 8 Kf1 (forced as White obviously can’t
play g2-g3—we saw this type of weakness for White before, on the other side, when
White prematurely played a2-a3) 8 ... Bc5 with the better game.
Furthermore, if White takes the sacrificed pawn, Black gets very good play after
6 Bxg4?! hxg4 7 Qxg4 d5 (attacking while gaining space) 8 Qd1 (not 8 Qf4 Bb4+ 9
Kf1 dxe4 and Black, threatening mate on the move, is much better) 8 ... dxe4, when
Black will soon recover the remaining pawn; or even 8 ... d4 with a supercharged
Albin Counter-Gambit—Black has the h-file to add to his usual compensation, albeit
for two pawns instead of one. White didn’t make it to move 20 in the following game:
9 f4 Be6 10 b3 Bc5 11 a3 d3 12 Nf3 Bg4 13 b4 Bxf3 14 Qxf3 Qd4 15 bxc5 Qxa1 16
Qxd3 Rd8 17 Qb3 Qd4 18 Nc3 Rxh2! 0-1 P.Gunin-M .Aanstad, Tromsø 2001. White
resigned in view of the more than unpleasant 19 Rh2 Qg1+ 20 Ke2 Nd4+ winning the
queen.
Other fifth moves for Black are weaker: 5 ... Nxe5 is too compliant and, as we
will see in the next game, White can gain a small but steady advantage.
5 ... Bc5 looks tempting but fails to a tactical detail: 6 Bxg4 hxg4 (I give a
separate note below for 6 ... Qh4 and related variations) 7 Qxg4—the difference
between this and the Albin-style win given above is that there (5 ... Nc6 instead of 5 ...
Bc5) the g7-pawn was protected, but here it is hanging. This means White can safely
take on g4, after which there are two main variations:
123
a) 7 ... d5, as in Gunin-Aanstad, but now 8 Qxg7 and the difference is seen
immediately: Black fails to get adequate counterplay after 8 ... Qh4 9 Qf6! Qxe4+ (if 9
... Qxf6 10 exf6 dxe4 11 Nc3 Bf5 12 Nge2 and Black has no real compensation for
two pawns) 10 Ne2 Rh5 11 Nbc3 Qxc4 (or 11 ... Qxe5 12 Nxd5, again with two good
extra pawns) 12 Bg5 Nc6 13 Nf4! Bd4 (similar is 13 ... Be7 14 Nxh5! Bxf6 15 Nxf6+
Ke7 16 Ncxd5+ Ke6 17 b3 Qd4 18 0-0 with a winning attack) 14 Ncxd5 Bxe5 15
Nxh5 Bxf6 16 Nhxf6+ Kd8 (not 16 ... Kf8 17 Bh6 mate) 17 b3 Qc2 18 Rd1 again with
a winning attack.
b) 7 ... Nc6 8 Nf3 (simplest—now Qxg7 is a real threat; the immediate 8 Qxg7
Qh4 is not so clear here with the black queen’s knight out) 8 ... Kf8 (but not 8 ... d6 or
8 ... d5, as then 9 Qxg7 is crushing; Black does not have ... Qh4) 9 Nc3 d6 (9 ... d5 10
Qf4 d4 11 Nd5 is an Albin where everything has gone wrong for Black) 10 Qg3 and
Black doesn’t have enough for two pawns.
After 5 ... Bc5 6 Bxg4 I referred to the 6 ... Qh4 possibility. Again, this looks
tempting but nonetheless fails—White answers with the surprising 7 Be2! and makes a
square for his king! The game C.Partos-M .Ungureanu, Rumanian Ch., Bucharest
1965, continued 7 ... Qxf2+ 8 Kd2 Nc6 9 Kc3 a5 10 Nf3 b5 11 Qf1 b4+ 12 Kc2 Nd4+
13 Kd1 (White beats off the attack and ... ) 13 ... Qxf1+ 14 Rxf1 Ba6 15 Bd3 0-0 16
Nbd2 Rae8 17 Nb3 Nxf3 18 Rxf3 Bb6 19 a3! (takes over the initiative; Black could
resign here) 19 ... bxa3 20 Rxa3 Rxe5 21 Bd2 Rb8 22 Kc2 Ra8 23 h4 Bb7 24 Bc3 1-0 .
Now if the Black player knows the above game, he might try a trick! 5 ... Bb4+ is
a very interesting move. One recalls that in Game 12 White got an easy advantage in a
similar but not identical position by playing 6 Bd2. This move is still best, but White
must be cautious, as after 6 Bd2 Black can try 6 ... Bc5!? setting up the trick. Now if
White unwarily continues like Partos with 7 Bxg4 Qh4 8 Be2, he is mated by 8 ...
Qxf2!, as the bishop on d2 blocks the flight square!
However, the alert White player will trap the trapper and play 8 g3!. Then 8 ...
Qxg4 is forced, but after 9 Nc3 Black has no real compensation for the pawn.
So when all the tricks are said and done, Réti’s very accurate 5 ... Nc6 must be
124
regarded as best.
6 h3
After the logical continuation 6 Nf3 Bc5 7 0-0 Ncxe5
a very sharp and double-edged position has arisen. Black has maintained his
attacking knight, but White is poised to repel boarders with h2-h3 . On the other hand,
it’s possible h2-h3 doesn’t threaten anything because taking the knight might give
Black a dangerous attack down the h-file! What a mess! I wondered what GMs made
of this position; only to discover that already, on move 7 (!) there was not a single
game in the database. Not a GM game, not a master game, nothing from the U-10
Championship of Greenland!
I took a Fritz look at this position, but we were both bewildered. Therefore the
following variations do not come with recommendations, but rather with a warning:
Play at your own risk!!
Strange variation one: 8 Nxe5 Nxe5 9 Nc3 h4 10 Na4 h3!? with weird
counterplay, e.g . 11 Nxc5 hxg2 12 Kxg2 d6 13 Nd3 Qh4 14 Rh1 Qxe4+ 15 f3 Bh3+
16 Kf2 Qd4+ 17 Be3 Qh4+ 18 Kg1 Nxc4 with a position I promise you have never
seen before.
Strange variation two: 8 Nc3 Nxf2!? 9 Rxf2 Ng4 10 Nd4 Nxf2 11 Kxf2 Qf6+ 12
Ke3—this variation comes with a serving of fried liver.
Strange variation three: 8 Nc3 d6!? 9 Na4 Nxf3+ 10 Bxf3 Qh4 11 Bxg4 hxg4 12
Bf4 Qf6 13 Qd2 Bd4 and I will risk the evaluation that Black is slightly better.
Have fun!
6 ... Ngxe5 7 Be3 Bb4+ 8 Nd2
If 8 Nc3 Bxc3+ (right away!) 9 bxc3 Qf6 with good counterplay.
8 ... d6 9 Qc2 Be6
Black could take advantage of his advanced h-pawn to play the very sharp 9 ...
f5!?, with the idea 10 exf5 Qf6 when White is unable to support the new f-pawn with
g2-g4, which means Black recovers the pawn with the better game; White should play
10 Ngf3 instead of taking the pawn.
125
10 0-0 -0 Qe7 11 Nb3?!
Too quiet; correct is the Alekhine-style 11 f4 Nd7 12 Ngf3 (but not 12 f5 Bxf5!)
12 ... Bc5 13 Qc3 Bxe3 14 Qxe3 0-0 -0 with double-edged play.
11 ... a5!
Black begins an attack.
12 Kb1 a4 13 Nc1 a3 14 b3 Ba5!
A nice vacating manoeuvre, freeing b4 for the knight.
15 Nd3 Nxd3 16 Bxd3 0-0!
Réti realizes his attack is so strong that he can safely castle, despite the exposed
h-pawn. White won’t have time to exploit it!
17 g4 b5! 18 cxb5 Nb4 19 Qc1 Bxb3! 20 axb3
126
Now Black has a winning position and should reap the rewards for his brilliant
opening and middlegame play ... but instead Réti misses no less than four forced wins,
starting with the following two mover.
I’ll only lightly annotate the rest—the important thing is that Réti found a way to
fight back against the Alekhine Attack.
20 ... a2+
Win one is 20 ... Nxd3 21 Rxd3 Qxe4.
21 Ka1 Qe5+
Win two is the same: 21 ... Nxd3 22 Rxd3 Qxe4.
22 Qb2 Qxb2+
Win three is 22 ... Nxd3! 23 Qxe5 (not 23 Rxd3? Qxb2+ 24 Kxb2 Bc3+ and
queens) 23 ... Nxe5 24 Kxa2 hxg4, and despite material equality it’s impossible to
believe White can save the game, in view of his failed development and shattered
pawn structure.
23 Kxb2 Nxd3+ 24 Kc2 Ne1+
Win four is 24 ... Bb6 25 Ne2 Nxf2 26 Bxf2 Bxf2, when Black is a pawn up (a
big passed pawn!) and has the much superior minor piece.
25 Kb2 Rfb8
127
After this, no clear win can be found, as White finally develops his king’s knight!
Instead, 25 ... Nd3+ 26 Kc2 Bb6 returns to win number four.
Maybe not Kasparov, but all the rest of us have been there: great play followed
by horrible let-down!
Now White draws.
26 Ne2 Rxb5 27 Rhxe1 Bxe1 28 Rxe1 hxg4 29 hxg4 a1Q+ 30 Rxa1 Rxa1 31
Kxa1 Rxb3 32 Ka2 1⁄2-1⁄2
Réti’s brilliant innovation keeps the Budapest Gambit alive as a counter-attacking
system.
Game 27
R.Fine-H.Morton
US Championship, New York 1936
1 d4 Nf6 2 c4 e5 3 dxe5 Ng4 4 e4 h5 5 Be2 Nxe5
As seen in the previous game, 5 ... Nc6 is best. Taking here is contrary to Réti’s
idea, which is to keep the knight active on the fifth rank as long as possible.
6 Nf3!
128
Correct! White must play for a small advantage, and he gets it with this move—
but even after Black’s inaccuracy one advantage of Réti’s 4 ... h5 can be seen: White,
who probably was looking forward to the normal Alekhine Attack (4 ... Nxe5 5 f4)
must switch gears and play positionally. Fine self analyzes and handles the switch
well, but lesser players might have some psychological problems as they notice that
the Alekhine Attack is not effective here: 6 f4 Ng4 7 g3 (7 Bxg4 Qh4+ is good for
Black, who gains the two bishops at no cost) 7 ... Bc5 (this seems best, but also
possible is 7 ... Bb4+ 8 Nc3 Qe7 9 Qc2 Nc6 10 Nf3 h4 which gave Black active
counterplay and an eventual draw in J.R.Capablanca-S.Bernstein, New York simul
1928) 8 Bxg4 hxg4 9 Qxg4 0-0 and Black’s huge lead in development gives him
adequate compensation for the pawn.
Besides the played 6 Nf3 (best), and the inferior 6 f4, there is also a middle
course: the solid 6 Be3, though this didn’t give White much in the following game,
where Black was able to revive Spielmann’s fianchetto idea: 6 ... d6 7 Nd2 (Black gets
good play for the pawn after 7 Bxh5 Be6) 7 ... Nbc6 8 h3 g6. Black has time to
fianchetto in view of White’s slow play—or he would have time, had not the players
agreed to a draw here: 1⁄2-1⁄2 C.Schuster-G .Bianchi, Buenos Aires 2002.
By the way, this was the most recent game in which a titled player (Bianchi is an
IM) ventured Réti’s 4 ... h5. Given that he equalized easily, even without playing the
opening extremely accurately (5 ... Nxe5 instead of 5 ... Nc6) one would think that
some GMs might notice, and revive Réti’s plan. However, the GMs, as we saw in the
preceding two chapters, are still losing regularly with 4 ... Nxe5.
6 ... Nbc6 7 Be3
129
7 ... Ng4
Black can’t make the fianchetto work here: 7 ... g6 8 Nxe5 Nxe5 9 Bd4 with a
clear advantage to White in view of the f2-f4 threat.
8 Bg5 f6
8 ... Be7 9 Bxe7 Qxe7 10 Nc3 is a typical line for the 5 ... Nxe5 variation. White
will always be a little better, as he has a good Maróczy Bind, while Black’s ... h7-h5 is
just a weakness. This shows that Black must play actively in the opening, even at the
cost of material.
9 Bf4 Bc5
Or 9 ... g5 10 Bd2 Bc5 11 0-0 and Black’s attack doesn’t go through, but the
kingside weaknesses remain.
10 Bg3
130
10 ... f5
If 10 ... g5 11 h3 and Black is thrown back; Black’s best is 10 ... d6 with only a
slight advantage for White.
11 exf5 Qf6?
11 ... h4? 12 Nxh4 Rxh4 loses to 13 Bxg4, but Black could again play 11 ... d6
and stay at plus equals.
12 Nc3 Qxf5 13 0-0 d6 14 Nd5 Qd7
Black has moved his queen three times to get to a bad square.
15 Nh4
White’s king is safe so Fine goes over to the attack; Black can hardly hold in
view of the weakness of his kingside, especially g6 and h5.
15 ... 0-0 16 h3 Nge5 17 Bxh5 Nxc4 18 Rc1!
131
A nice touch: White attacks with all his forces and concludes stylishly.
18 ... b5 19 Ng6 Re8 20 b3 Nb6 21 b4 Nxb4 22 Nxb4 Bxb4 23 Qb3+ Nc4 24
Qxb4 c5 25 Qb3 Bb7 26 Nf4 Re7 27 Rfe1 a6 28 Bg4 Rxe1+ 29 Rxe1 Qc6 30 Be6+
Kh8 31 Qd1 g6 32 Nxg6+ Kg7 33 Nf4 Ne5 34 Rxe5 dxe5 1-0
White would play 35 Qg4+ when mate is forced in at most three moves.
While Black can get the worse half of a plus equals position here, I don’t think
that’s much to be excited about, and Réti’s 5 ... Nc6 must still be regarded as best.
Game 28
D.Fernandez Lago-J.Vela Ignacio
Mondariz 2004
1 d4 Nf6 2 c4 e5 3 dxe5 Ng4 4 e4 h5 5 f4
132
Can the Réti Variation be refuted by protecting the extra pawn? White tries out
this idea here.
One recalls that the obvious knight protection, 5 Nf3?!, fails to 5 ... Bc5, as we
saw in the notes to Game 4. The alternative piece protection, 5 Bf4, is a little better but
shouldn’t worry Black either: 5 ... Bc5 6 Bg3 (if 6 Nh3 simply 6 ... Nc6 and Black
recovers the pawn with a good game) 6 ... Nc6 7 Nc3 (not 7 Nf3? h4, winning for
Black) 7 ... d6! 8 Be2 (8 exd6? also loses to 8 ... h4, the point being that the knight on
g4 is now protected by the bishop) 8 ... Ngxe5 with a good game for Black.
The pawn move in the main game may be the worst of the three possible
protective moves, as White falls behind in development and weakens his position.
5 ... Bc5 6 Nh3 Nc6
6 ... 0-0 is also good, e.g . 7 a3 a5 8 g3 d6 9 Nc3? (but if 9 exd6 cxd6 with good
compensation) 9 ... dxe5 and Black was already better and went on to win in
Mari.Fuchs-M .Friebe, Leipzig 2004.
7 Qd5
7 Nc3 d6 8 exd6 cxd6 is the typical sacrifice of this variation: Black opens lines
not only for his queen’s bishop, but also for his queen, which may come out to a5 or
b6.
7 ... Be3?
Flashy but unsound—after the thematic 7 ... d6 Black opens the game again and
stands clearly better: his huge lead in development far outweighs White’s extra pawn.
8 Bxe3 Nxe3 9 Qd2 Nd4
133
The black knights look impressive, but after 10 Na3! they are actually forked and
weak! White wins after 10 ... Qh4+ 11 Nf2 Nxf1 12 Qd4 Nxh2 13 Nb5 when he has
both an attack and many threats to round up Black’s barely surviving pinned knight.
10 Bd3?? Qh4+
White forgot that the undeveloped bishop on f1 was necessary to protect the h3-
knight.
11 g3 Qxh3 12 Qxe3 Qg2 13 Rf1 Qxb2 0-1
Black wins material.
The exchange of blunders on moves 9 and 10 rob this game of aesthetic appeal,
but the notes indicate that positionally Black was fine, had he resolutely sacrificed a
pawn with 7 ... d6.
A vital point: even though Black delays recapturing the Budapest Gambit pawn
after 4 ... h5, White still has no good way to protect it.
Game 29
T.V.Petrosian-S.Flohr
Tbilisi (simul) 1942
1 d4 Nf6 2 c4 e5 3 dxe5 Ng4 4 e4 h5
Without ... h7-h5 in, an obvious point is that 4 ... Nxe5 5 f4 Qh4+?? fails to 6 g3
Qg4 7 Be2 winning a piece.
5 h3!
This is the critical test of Réti’s 4 ... h5—White immediately forces the knight
back.
134
5 ... Nxe5
Another obvious but important point: Black can’t maintain the knight at g4
because 5 ... Qh4 again loses a piece to 6 g3.
6 Be3
The third simple but critical point comes here: White would like to play 6 f4 but
can’t in view of 6 ... Qh4+ when, because of the weakness at g3, he has to play the
ugly 7 Ke2, after which Black is clearly better.
Thus, by elimination, we have come to this critical tabiya—critical, but virtually
unexplored. The Megabase has only three complete games from the position after 5 ...
Nxe5. The other two games will be incorporated in the notes.
I should also point out that while 6 Be3 was played in all three games, it’s not the
135
only move. For example, White could abandon any ideas of f2-f4 (à la Fine) and
simply play 6 Nf3 here, hoping to obtain a small positional advantage based on
Black’s exposed h-pawn.
6 ... Nbc6
The Spielmann-style 6 ... g6!? is interesting but untried. If 7 Nf3 (White gets
nothing from 7 Bd4 Nbc6 8 Bc3 Qh4! with the initiative), Black could play 7 ... d6,
banking on the weakness at d4 if the queens are exchanged, and on other moves Black
can continue in King’s Indian style.
6 ... Bb4+ has been also played: 7 Nc3 (if 7 Nd2 Qh4 and it’s unusually hard to
find a good way to sac the e-pawn—the problem is that, unlike previous chapters, the
black knight is still strongly posted in the centre) 7 ... Bxc3+ 8 bxc3
8 ... Qe7 (Black has his chances, having broken up the white pawn structure,
though White wins this messy game; another possibility here is 8 ... Qf6, eyeing c3) 9
Be2 d6 10 Nf3 Nxf3+ 11 Bxf3 Nc6 12 0-0 Ne5 13 Be2 Qh4 14 f4?! (White still wants
to get the classical AA move in, but it’s still too early!—better is 14 c5 to open lines
for the bishops) 14 ... Ng4?! (back to back errors!—after the sharp riposte 14 ... Qg3
Black stands well with multiple threats) 15 Bd4 (or 15 Bd2! and White, with the threat
of Be1, stops Black’s attack and stands better) 15 ... c5 16 Bf2 Nxf2 17 Rxf2 Rh6 18
Rb1 g5? 19 fxg5 Qxg5 20 Qd5 Qe7 21 e5 dxe5 22 Rd1 Bd7 23 Rdf1 Bc6 24 Qd2 Rh7
25 Rxf7 Rxf7 26 Bxh5 Rd8 27 Bxf7+ Qxf7 28 Qxd8+ Kxd8 29 Rxf7 Ke8 30 Rf5 1-0
R.Busch-F.Kirwald, Brackwede 1974.
One can’t learn too much from the later stages of this game, but the opening
position is very interesting; I certainly think Black has his chances after 8 bxc3 and I
would like to see some high-level practical tests.
7 Nc3 Bb4
136
8 Qd2
The right idea, to avoid doubled pawns, but the wrong square. White can get an
advantage with the accurate 8 Qb3 Qh4 (on the quiet 8 ... d6 9 0-0 -0 0-0 10 Nf3 White
is better with an attack and space in the centre, while if Black takes on f3 the g-file
may be used to attack the black king) 9 0-0 -0! Bxc3 10 Qxc3 Qxe4 (White always has
to be willing to make this sac in the Alekhine Attack!) 11 f4 Ng6 12 Nf3 0-0 13 Re1
Qf5 (not 13 ... Nxf4 14 Bd2 Qf5 15 Nh4 Qg5 16 g3 winning) 14 g4! and White has a
typically savage Alekhine Attack.
This means that Flohr ’s 6 ... Nbc6 was inaccurate, as after Kirwald’s 6 ... Bb4+
White could not avoid doubled pawns.
Note that the other way to avoid doubled pawns, 8 Rc1, is ineffective, as now
White can’t castle long. In the most recent game in the database (1982!) Black got a
good position out of the opening: 8 ... Qh4 9 Qd5 d6 10 g3, but now erred with 10 ...
Qf6 (instead, Black would have obtained good counterplay after 10 ... Qe7!, eyeing e4,
e.g . 11 f4 Nd7 12 Bg2 h4 13 g4 0-0 14 Nge2 Nc5 15 0-0 Be6 16 Qh5 Bxc4 and Black
is a pawn up with a good position, or if 15 b3? Bxc3+ 16 Nxc3 Nb4 17 Qd2 Nbd3+
wins the exchange) 11 f4 Ng6 12 Qd2 Bd7 13 Nge2 0-0 -0 14 a3 Bxc3 15 Nxc3 Qe7
(too late!—White has organized his position and now stands better) 16 Bg2 f5 17 0-0
Qf7 18 b4 Kb8 19 exf5 Qxf5 20 Qf2 Nge7 21 b5 Na5 22 Bxa7+ Ka8 23 Ne4 Nxc4 24
Rxc4 Bxb5 25 Rxc7 Nc6 26 Qb6 1-0 L.Bass-D .Sprenkle, Chicago 1982.
8 ... d6?
This lets White get back into a favourable Alekhine Attack. After the
hypermodern, Réti-style 8 ... Na5! 9 b3 b6, Black has excellent counterplay against the
white centre.
9 f4 Ng6 10 Nf3 Qe7
137
11 Bd3
One shouldn’t hesitate: correct is 11 0-0 -0 (the Alekhine Attack player must
always look for a favourable opportunity to sac the e-pawn—White clearly gets a
tremendous attack if taken, and if not, White avoids any tricks based on an e-file pin as
seen in the game) 11 ... Bxc3 (or if 11 ... Bd7 12 Bd3 with a clear positional
advantage) 12 Qxc3 Qxe4 13 Re1 0-0 14 Bd3 Qe7 15 Bd4 with a winning attack.
11 ... f5 12 exf5 Nxf4 13 0-0 -0 Bxc3 14 bxc3 Nxd3+ 15 Qxd3 Bd7
15 ... Bxf5!? 16 Qxf5 Qxe3+ is possible.
16 Rhe1 0-0 -0?
A fatal oversight: Black has succeeded in doubling White’s pawns and can get
back in the game after 16 ... 0-0 17 g4 Qf7 18 Ng5 Ne5! with counterplay against c4.
17 Bg5 Qf7 18 Bxd8 Rxd8 19 g4 Na5 20 Qd5!
138
The thirteen-year-old Tigran already displays his relentless technique!
20 ... Qxd5 21 cxd5 Rf8 22 Re7 g6 23 fxg6 hxg4 24 g7 Rg8 25 Rf7 Be8 26 Rf8
Rxg7 27 Rxe8+ Kd7 28 Re3 gxf3 29 Rxf3 Nc4 30 Rdf1 Ne5 31 Re3 Rh7 32 Rf4 c6
33 c4 Kc7 34 Kb2 Kb6 35 dxc6 bxc6 36 Kc3 Kc5 37 h4 Rb7 38 Rg3 a6 39 h5 Rh7
40 Rg5 a5 41 Rf6 Rb7 42 h6 Rb1 43 Rh5 Rc1+ 44 Kd2 Ra1 45 h7 1-0
Black can’t even sac anything for this pawn!
Petrosian’s 5 h3 is clearly critical for the Réti Variation, but so little explored that
one can’t draw any definite conclusions. Both 6 ... g6 and 6 ... Bb4+ look playable for
Black, but I would avoid Flohr ’s too slow 6 ... Nbc6, when Petrosian had some early
chances for advantage.
Summary
We can admire Spielmann’s brilliant middlegame play but his specific opening
moves cannot be recommended—however, his idea of fianchettoing the dark-squared
bishop is possible in certain lines, see the Bianchi game given in the notes to Game 27.
The “must study” game is Weenink-Réti (Game 26), which shows that Black
must not shrink from sacrifices if he is to maintain counterplay. Pawn snatching
doesn’t do much for White, as seen in the notes to that game and in Game 28.
Finally, even after the move I consider best for White, 5 h3 (Game 29), there is a
potential hole on g3 if he ever plays f2-f4—and this in turn means that ... Qh4+ can be
a dangerous countershot.
139
Part Two
White plays 4 Bf4
Since White has an extra central pawn in the Budapest Gambit, it’s natural to try
to keep it—and if that is your intention, then 4 Bf4 is the move. The following four
chapters show how Black can fight against this natural plan.
Chapter 6 shows Black playing 4 ... g5; this move recovers the pawn by force,
but drastically weakens Black’s kingside.
Chapter 7 shows a sound development by Black—but the opening naturally
develops into a true gambit. Black cannot get his pawn back in this line, but obtains
long-term compensation.
Chapter 8 features rather disreputable gambits, in which Black tries to force the
play at an extremely early stage, contrary to good positional judgment.
Chapter 9 features White’s most popular plan: instead of clinging to the pawn as
in Chapter 7, here White tries to give it back in a favourable way—the first player
generally aims to obtain the two bishops in a semi-open position. Black can frustrate
this plan, but must play extremely accurately.
140
Chapter Six
Bf4 versus ... g7-g5
There is no doubt that 4 ... g5 is a great surprise weapon. In the first two games of
this chapter, Black is better by move 13 (that’s the halfway point!) and White resigns
in 26. But both White players were surprised ...
The truly serious question you must ask yourself if you want to play this wild
move is, ‘What if my opponent is not surprised?’ The scary game to analyze then is
Game 33; I haven’t been able to find an improvement for Black, but the daring 4 ... g5
player is going to have to—if your opponent is prepared.
Game 30
J.Candela Perez-D.Campora
Dos Hermanas 2006
1 d4 Nf6 2 c4 e5 3 dxe5 Ng4 4 Bf4 g5 5 Bd2
In Chess Openings, Theory and Practice (1964) by I.A . Horowitz, the author
states: “Somewhat compromising is Abonyi’s recommended 4 ... g5. White’s best
answer is 5 Bd2.”
141
Such an offhand assessment cannot satisfy the modern player. I believe it was
John Nunn who said certain openings carry certain obligations; for example, if you
play the English Attack against the Sicilian Defence, then you must attack! Here White
has brought his bishop out before the knight—to avoid the line 4 Nf3 Bc5 5 e3 Nc6
when Black recovers his pawn with ease, if perhaps not with the best position—to
protect his extra pawn and put difficulties in the way of Black recovering it. Playing 5
Bd2 simply cancels out that plan (forfeits the obligation) and so Black equalizes with
ease and even has chances of advantage, as the main game and notes show.
5 ... Nxe5 6 Nf3
Completely innocuous is 6 e3 Bg7 7 Bc3 Qe7 8 Nf3 Nbc6 9 Be2 d6 10 0-0 0-0
11 Nxe5 dxe5 12 Nd2 f5 13 Qc2 Be6 and Black was already a little better in
K.Sakaev-G .Agamaliev, Internet (blitz) 2005. Note that White is a near 2700-rated
GM—this is the advantage of surprise!
6 ... Bg7
Weaker is 6 ... Nxf3+? 7 exf3 and the open lines help White, while the doubleton
can ram Black’s exposed g5-pawn—twice! After 7 ... Qe7+ (not 7 ... Bg7?! 8 Qe2+
and Black must move his king, as 8 ... Qe7 9 Qxe7+ Kxe7 10 Bxg5+ wins a pawn, but
after 8 ... Kf8 9 Nc3 White is just clearly better) 8 Be2 d6 (or 8 ... Bg7 9 Nc3 0-0 10 0-
0 Nc6 11 Re1 and White takes full advantage of his open lines) 9 0-0 Nc6 10 Nc3 Be6
11 Nd5 Qd8 12 Bc3 Ne5 13 f4! (there’s one ... ) 13 ... gxf4 14 Nxf4 Rg8 15 Nxe6 fxe6
16 Bxe5 dxe5 17 Bh5+ Ke7 18 Qf3 Rg7 19 Rad1 Qc8 20 Qe4 Rg5 21 Qh4 Bh6 22 f4!
(and now two!) 22 ... exf4 23 Rxf4 e5 24 Rf7+ Ke6 25 Qh3+ 1-0 M.Mitchell-
S.Belezky, Gibraltar 2005.
7 Nxe5
Black wins after 7 Bxg5?? Nxf3 and has good play after 7 Nxg5 Nxc4.
7 ... Bxe5 8 Bc3
142
8 ... Nc6
Another way is 8 ... Qe7 9 Bxe5 Qxe5 10 Nc3 d6 11 g3 Bd7 12 Bg2, as in
M.Narciso Dublan-S.Belezky, Badalona 2005, when Black should have played 12 ...
Nc6 and castled long with equality.
9 e3 d6 10 Bd3 g4
One sees that after 5 Bd2 Black has a number of different paths and no real
difficulties. Also good is 10 ... h5 11 a3 a5 12 Qc2 Qe7 13 Nd2 Be6 14 Nf3 Bxc3+ 15
Qxc3 0-0 -0 16 0-0 -0 g4 17 Nd4 Nxd4 18 exd4 Qg5+ 19 Kb1 Bf5 20 Bxf5+ Qxf5+ 21
Qc2 Qxc2+ 22 Kxc2 Rde8 23 Rhe1 Kd7 24 Kd3 1⁄2-1⁄2 P.Haba-S.Belezky, Internet
(blitz) 2004.
11 Qc2 Be6 12 Nd2
White can snatch with 12 Bxh7, but after 12 ... Qf6 13 Bxe5 Nxe5 14 Na3 0-0 -0
Black has great compensation for the pawn with his kingside space and open h-file.
12 ... Qf6 13 Ne4 Qg7
With this Réti-style queen/bishop long diagonal battery, Black completes his
development and stands better in view of his kingside play. Note that thanks to his
active pieces, Black’s advanced kingside pawns are a strength rather than a weakness.
143
14 0-0 -0 0-0 -0 15 Kb1 Kb8 16 Rc1 h5 17 Ng3?
White can’t think of anything to do and is crushed by the experienced
Argentinean GM. The last chance might be 17 h4, trying to fight back on the kingside.
17 ... Bxc3 18 Qxc3 Qxc3 19 Rxc3 Ne5 20 Kc2
Or 20 Be2 h4 21 Nf1 h3 with overwhelming kingside pressure.
20 ... d5! 21 cxd5 Bxd5
A simple fork, and good enough to win.
22 e4 Bxa2 23 Bb5
23 b3 Nxd3 is curtains.
23 ... c6 24 Ba4 Bc4 25 Bb3 Bd3+ 26 Kc1 h4 0-1
Absolute domination! But one cannot count on a modern player following what
144
was considered “best” in 1964!
Game 31
S.Gil Quilez-S.Belezky
Albacete 2004
1 d4 Nf6 2 c4 e5 3 dxe5 Ng4 4 Bf4 g5 5 Bg3
Correct.
5 ... Bg7 6 e3
Inconsistent and weak. Stronger is the evident 6 Nf3, developing and defending
the pawn, which will be examined in the next two games.
6 ... Nxe5 7 Nc3 h5!
Again White’s quiet play has allowed Black to solve his opening problems.
8 h3
After 8 h4 g4 Black has a typically solid structure on the kingside and stands well
with his space advantage there. Then 9 Nge2 d6 10 Nf4 Nbc6 transposes to Van Wely-
Mamedyarov, won by Black, which I will discuss in the notes to the next game.
8 ... h4 9 Bh2 d6 10 Nf3 Nbc6 11 Nd4?!
White should be thinking about equalizing, not avoiding piece exchanges, and
therefore correct is 11 Nxe5 Nxe5 12 Be2 Be6 13 Qb3 Qd7 14 0-0-0 0-0 -0 15 Nb5
with approximate equality.
11 ... Nxd4 12 exd4
Not 12 Qxd4?? Nf3+.
12 ... Nc6
Black seizes the d4-square; note that White’s buried bishop on h2 doesn’t
accomplish anything here.
13 d5
145
13 Qe2+ Kf8 14 0-0 -0 Bxd4 is good for Black, whose king escapes via g7.
13 ... Nd4
Black is already better with this strong knight, so we must be halfway through
the game!
14 Be2 Bf5 15 0-0 Qd7 16 Bg4 Bxg4 17 hxg4
17 Qxg4 is still only a little worse for White, but possibly she was labouring
under the delusion she was better, and continues to avoid exchanges.
17 ... 0-0 -0 18 Ne4 f5!
Now Black’s advanced pawns are powerful attackers. I doubt there’s any defence
for White, but the rest is interesting for Belezky’s masterly tactical blows.
19 Nxg5 fxg4 20 Bf4 Qf5 21 Be3 h3!
146
Black doesn’t need to defend his knight as his kingside pressure is
overwhelming.
22 Bxd4
If 22 gxh3 Nf3+ 23 Nxf3 gxf3 with a winning attack, or 22 f4 Nc2 with a family
fork.
22 ... hxg2 23 Kxg2
After 23 Re1 Qf4 24 Kxg2 Bxd4 Black wins a ton of material, while 23 Bxg7
Qf4! and mates is even prettier, as Black only needs one rook to finish White off!
23 ... Qf4 24 Rh1 Bxd4 25 f3 gxf3+ 26 Qxf3 Qxg5+ 0-1
Winning a piece with check.
Once again the unprepared opponent is hammered in 26 moves, but it is possible
to play better with White!
Game 32
O.Winfridsson-A.Ambrosi
Salsomaggiore Terme 2004
1 d4 Nf6 2 c4 e5 3 dxe5 Ng4 4 Bf4 g5
Can one surprise a 2600 plus GM—twice? Yes! Witness the following two games
between super GMs Loek Van Wely and Shakhriyar Mamedyarov.
In the first game between these two, Loek was clearly surprised by the Budapest
and especially by 4 ... g5?! (according to the Megabase, Van Wely had never faced this
move before, and he never would again—until his opponent sprung it on him for a
second time four years later!). The surprise worked: Mamedyarov got his position and
won stylishly, if not as quickly as he might have. Four years later, the two met again—
same opening, same 4 ... g5?!. One can see Van Wely had done his homework, but it
looks like he couldn’t quite remember it! If they had played four months later, he
would have been fine, but four years? Van Wely mixes up the move order, gets
nothing, and Mamedyarov nearly won again, though had to settle for a draw.
This is casino chess, but it worked! Here are the games.
Van Wely-Mamedyarov 2004: 4 ... g5 5 Bg3 Bg7 6 e3?! (surprised, Van Wely
makes this “cautious” move—but this just lets Black recover his pawn with a good
game; 6 Nf3 is correct) 6 ... Nxe5 7 Nc3 d6 8 h4 g4
147
(Black has gained space and has a solid kingside pawn formation—White should
not let him achieve this structure) 9 Nge2 Nbc6 10 Nf4 h5 11 Ncd5 Ne7 12 Nxe7
Qxe7 13 Qc2 Be6 14 Rc1 0-0 -0 15 Be2 Kb8 16 b4 (Black has no difficulties and now
makes an interesting pawn sacrifice to gain attacking chances on the kingside) 16 ...
Ng6 17 Nxg6 fxg6 18 Qxg6 Be5 19 Bxe5 dxe5 20 a3 Rhg8 21 Qc2 g3 22 f3 Qf6 23
Qc3 Qf5 24 Qc2 Qf6 25 Bd3 Rg4! (a clever rook lift, the point being 26 fxg4 Rxd3)
26 Qc3 Rxh4 (Black has won his pawn back and his advanced g-pawn is a
powerhouse) 27 Rg1 Rh2 28 Rd1 Bh3 29 Rd2 h4 30 Be4 Rxd2 31 Qxd2 Bc8 32 Qd5
Qh6 33 Ke2 h3 34 Qg8 Rxg2+ 35 Rxg2 hxg2 36 Bf5 a6 37 Qxc8+ Ka7 38 Be4 Qb6
(38 ... c6 wins immediately) 39 c5 Qb5+ 40 Bd3 Qc6 41 Be4 Qb5+ 42 Bd3 g1N+ 43
Kd2 Qc6 44 Qg4 Qxf3 45 Qg7 g2 46 Qxc7 Qc6 47 Qxc6 bxc6 48 Be4 Nf3+ 0-1 L.Van
Wely-S.Mamedyarov, Spanish Team Ch. 2004.
Now the rematch, four years later: 4 ... g5 5 Bg3 Nc6 6 h4 (almost right! yes, h2-
h4 is the right idea, but the execution is a little off: 6 Nf3 is correct, as I have said
before, and then after 6 ... Bg7 7 h4! with excellent chances for the advantage—see
next game) 6 ... Ngxe5 7 e3? (the same mistake again! White must break up the black
pawns, so 7 hxg5 is correct, still with some chance of an advantage) 7 ... g4 (now
Black is fine) 8 Nc3 h5 9 Rc1 Bg7 10 Nd5 Ne7 11 Ne2 Nf5 12 Qc2 d6 13 Bxe5 Bxe5
14 g3 c6 15 Ndf4 Qa5+
148
(and more than fine—Fritz already gives Black the edge, and I concur: Black has
space and attacking chances, while White has nowhere to put his king) 16 Nc3 Bxf4
17 exf4 0-0 18 Qd2 Re8+ 19 Be2 Qb6 20 Kf1 Qd4 21 Rd1 Qg7 22 Kg2 c5 23 Bd3
Nd4 24 Nb5 Nf3 (the rest is typical “rapid game complications”; with time to think
Black might find 24 ... b6!, bringing his last minor piece into the attacking formation,
when he is better—the tactical point is 24 Nxd6?! Qf6! 25 Nxe8 Bb7+ winning) 25
Qc3 Bd7 26 Qxg7+ Kxg7 27 Nxd6 Bc6 28 Nxe8+ Rxe8 29 Kf1 a6 30 b3 Re7 31 Bb1
a5 32 Bd3 a4 33 bxa4 Bxa4 34 Be2 Bc6 35 Rd6 Be4 36 Bd3 Nd2+ 37 Ke2 Nxc4 38
Bxc4 Bxh1+ 39 Kd2 Bc6 40 Bd5 Bb5 41 Kc3 Re2 42 Rb6 Ba6 43 Rb2 Rxb2 44 Kxb2
b6 45 Kc3 Bc8 46 a3 Kf6 47 Bc6 Ke6 48 Kc4 Kd6 49 Be4 Be6+ 50 Kb5 Kc7 51 f3
Bd7+ 52 Kc4 Kd6 53 Ba8 b5+ 54 Kc3 Be6 55 Bb7 f6 56 Be4 Bd7 57 Bb7 Kc7 58 Be4
Kd6 59 Bb7 Kc7 1⁄2-1⁄2 L.Van Wely-S.Mamedyarov, Nice (rapid) 2008.
I wonder if Mamedyarov will try this again in 2012!
5 Bg3 Bg7 6 Nf3 d6?
149
6 ... Nc6 is correct—see the next game for this and the inferior alternative 6 ...
Qe7.
The text move is a mistake, and from an opening point of view, we could stop
here. But I think the rest of the game, though far from perfectly played, is useful as a
cautionary tale. Clearly, 4 ... g5 raises this question: “Is this advanced pawn strong or
weak?” In the two previous games in this book, as well Mamedyarov’s given in the
notes, it became strong. But one must remember that pawns cannot move backward,
and too far advanced pawns, if they do not lead to middlegame advantage, can be
weak in the ending, as we will see here.
7 Nc3?
While this leads to some advantage for White, the first player should instead
refute Black’s gambit outright—by accepting it! After the fearless 7 exd6 Black is
doomed: 7 ... Bxb2 (this has to be Black’s idea, for if 7 ... cxd6 8 Nc3 and White is just
a good pawn up) 8 Nbd2 Bxa1 (or 8 ... cxd6 9 Rb1 with a big advantage in view of the
ragged black pawns) 9 dxc7 Qf6 10 cxb8Q Rxb8 11 Bxb8 and Black has no
compensation for the piece.
7 ... Nxe5 8 Nxe5 Bxe5 9 Bxe5 dxe5 10 Qxd8+ Kxd8 11 0-0 -0+ Ke8 12 h4
Better is 12 g3 Be6 13 Bg2 c6 14 Ne4 Ke7 15 b3 h6 16 Nc5 with a more
substantial endgame advantage.
12 ... g4 13 e3
150
Even White’s ultra quiet play has given him a slight edge; Black must essentially
play to draw, but at the same time, because of the potential weakness of his advanced
pawns, can’t exchange too many pieces. Ambrosi evidently doesn’t realize the
importance of the second point, until it’s too late!
13 ... c6 14 Ne4 Ke7 15 Nd6 Na6 16 Be2 h5 17 Rhf1 Rh6 18 Nxc8+ Rxc8 19 f3
g3
Better is to get rid of some pawns by 19 ... gxf3 20 Bxf3 (or 20 gxf3 Rg8 21 Rg1
Rxg1 22 Rxg1 Rg6 with equality) 20 ... f5 and White has only a marginal advantage in
view of Black’s single weakness at h5.
20 Rd2 f5 21 Rfd1 Rc7 22 Rd8 f4 23 exf4 exf4 24 R8d4 Rf6 25 Re4+ Re6 26
Rxe6+ Kxe6 27 Rd4 Ke5 28 Re4+ Kf5 29 Re8 Kf6 30 Rh8 Re7 31 Kd2 Rd7+?!
Black has one last chance: 31 ... Nb4 with the idea 32 a3 Nc2!, which puts him
back in the game. Instead he allows the exchange of rooks, with fatal consequences.
32 Kc3 Re7 33 Bd3 Nc5 34 Rh6+ Kg7 35 Rh7+ Kf6 36 Rxe7 Kxe7 37 Kd4
151
I put this game in the book for this exact position: Black’s advanced pawns need
to be supported by pieces, and Black must play for a middlegame attack, but both of
these strategical ideas have fallen by the wayside here, and now the advanced pawns
drop off the board.
37 ... b6 38 Be4 Ne6+
38 ... Kd6 fails to 39 Bg6, while if 38 ... Nxe4 39 Kxe4 and the king and pawn
ending is lost due to the vulnerable advanced pawns.
39 Ke5 c5 40 Bg6 Nd4 41 Kxf4 Ne2+ 42 Ke3 Nd4 43 Bxh5 a6 44 Bg6 b5 45
cxb5 axb5 46 Bd3 Kf6 47 b4 Ne6 48 bxc5 Nc7 49 Be4 b4 50 f4 Nb5 51 c6 Ke6 52
h5 Nc3 53 h6 1-0
Black still has his advanced g-pawn, but it’s no comfort to him now!
The dark side of Black’s early pawn advances can be seen here. Also, from the
opening point of view, the 6 ... d6 gambit can be considered refuted.
Game 33
B.Kouatly-E.Preissmann
Bagneux 1983
1 d4 Nf6 2 c4 e5 3 dxe5 Ng4 4 Bf4 g5 5 Bg3
152
Can Black avoid the game continuation where his pawns are badly split? Let’s go
move by move.
5 ... Bg7
Two other moves have been tried in the database, and one more looks plausible
(Black doesn’t have a wide choice because he is a pawn down). Let’s take a look.
a) 5 ... Bb4+ (inconsistent with 4 ... g5) 6 Nc3 Nc6 7 Nf3 Qe7 8 Qd5 f6 (this type
of gambit works as we will see in the next chapter, but only without ... g7-g5) 9 exf6
Qxf6 (not 9 ... Bxc3+ 10 bxc3 Qxf6 11 Rc1 h6 12 h3 and the black knight is lost, or if
11 ... d6 12 Nxg5 and White is two pawns up) and now I think 10 Rc1 is best, when
White should win easily as Black’s position is a wreck and he’s a pawn down. Instead,
in M.Stachel-F.Klicker, Ludweiler 1994, White played 10 Qe4+ and won with more
difficulty: 10 ... Ne7 11 Rc1 d6 12 h3 Nh6 13 e3 Nhf5 14 Bh2 Rf8 15 Be2 Nh4 16 0-0
Nxf3+ 17 Bxf3 c6 18 Bh5+ Kd8 19 Bg4 Bxg4 20 Qxg4 Bxc3 21 Rxc3 Ke8 22 Qh5+
Rf7 23 e4 Rd8 24 Qe2 Qe6 25 Re3 Ng6 26 Rd1 Nf4 27 Bxf4 Rxf4 28 Qh5+ Qf7 29
Qe2 Rd7 30 g3 Rf6 31 b3 Kf8 32 Rd2 Qe6 33 Kg2 Rdf7 34 Qd3 Qe5 35 Qc3 Qxc3 36
Rxc3 h5 37 Rcd3 Ke7 38 f3 h4 39 Rf2 Ke6 40 b4 a6 41 a4 Rh7 42 f4 gxf4 43 Rxf4
Rg6 44 g4 Rc7 45 c5 Rd7 46 Rxd6+ Rxd6 47 cxd6 Kxd6 48 Rf7 b5 49 axb5 axb5 50
Rf5 Ke7 51 g5 Rd6 52 Kf3 Rd4 53 g6 Rxb4 54 g7 Rb3+ 55 Kf4 Rg3 56 Rg5 Rxg5 57
Kxg5 Kf7 58 Kh6 Kg8 1-0 (Black resigned as he saw 59 e5 b4 60 e6 b3 61 e7 Kf7 62
g8Q+ Kxg8 63 e8Q mate).
b) 5 ... Nc6 6 Nf3 and now 6 ... Bg7 transposes to the main game. The only
reasonable alternative is 6 ... Qe7, but the queen is exposed to Nc3-d5, as will be seen:
7 Nc3 Ngxe5 8 Nd5 Nxf3+ 9 gxf3 Qb4+ (or 9 ... Qd8 10 Nxc7+ Qxc7 11 Bxc7 Bb4+
12 Qd2 and White emerges with a clear extra pawn) 10 Qd2 Qd2+ 11 Kd2 wins a
pawn, while 10 ... Qxc4 11 Rc1 wins everything.
c) 5 ... Qe7 is like variation ‘b’: 6 Nc3 Nxe5 7 Nf3 Nxf3+ 8 gxf3 and now 8 ...
Nc6 9 Nd5 transposes to ‘b’, while if 8 ... d6 9 Nd5 Qd8 10 Qd4 wins.
So no escape hatch there!
6 Nf3
153
6 ... Nc6
White is still a centre pawn ahead; What can Black do but try to get it back? We
saw that 6 ... d6 fails in Game 32, and 6 ... Qe7 is no better here than on the previous
move: 7 Nc3 Nxe5 (not 7 ... Nc6 8 Nd5 Qd8 9 e6 and White breaks through to c7) 8
Nd5 (best; but also good is 8 Nxe5 Bxe5 9 Nd5 Qd6 10 c5 Qe6 11 Nxc7+ Bxc7 12
Bxc7 and White was a pawn up with the better position and went on to win in J.Kubik-
Z.Fogarassy, Gyongyos 2001) 8 ... Nxf3+ 9 gxf3 Bxb2 10 Rb1 Bg7 11 Qd2 (not 11
Nxe7? Bc3+) 11 ... Qc5 12 Nxc7+ and White wins a rook.
These variations show that the slope is steep and slippery after 4 ... g5, and the
prepared White player can reach this position by force (or something even more
favourable) and now strike a powerful blow at Black’s advanced g-pawn.
7 h4!
154
In my opinion White stands clearly better here—and he just has to remember
seven moves! There are quite a few masters who can manage this, which is why I
would never recommend 4 ... g5 to a prospective Budapest Gambiteer.
But, if you are the gambling type, and really think you will surprise your
opponent—then you might score a quick win as in Games 30 and 31. Of course you
might also score a quick loss, like this one!
Just don’t blame me!
7 ... Ngxe5
We saw that in the two Van Wely-Mamedyarov games Black was able to slip by
with ... g5-g4 and create a solid pawn structure—but he obviously can’t do that here.
Nor can he maintain the g-pawn where it is: 7 ... h6 is weak as 8 hxg5 hxg5
opens the h-file and Black loses control of h7: 9 Rxh8+ Bxh8 10 Qc2 (eyeing h7!) 10
. .. Ngxe5 11 Nxe5 Bxe5 (if 11 ... Nxe5 12 Nc3 d6 13 Qh7 Bf6 14 Nd5 Kf8 15 0-0 -0
Nxc4 16 e4 Ne5 17 f4 gxf4 18 Bh4 is a pretty tactical win for White, or 15 ... Be6 16
e4 and Black is barely hanging on: White can build up smoothly to attack the exposed
king) 12 Bxe5 Nxe5 13 Nc3 d6 14 0-0 -0 (or White can play more sharply with 14
Qh7, e.g . 14 ... Be6 15 c5 b6 16 cxd6 cxd6 17 Qg7 and Black is in dire straits given
his complete lack of king safety) 14 ... b6 (no better is 14 ... f5 15 c5) 15 e3 Bb7 16
Qf5
155
(White now dominates the position and attacks on the light squares; note that
here the advanced g-pawn is a weakness which lets the white queen into this strong
attacking position) 16 ... g4 17 Nd5 (complete domination—White finishes smoothly)
17 ... Bxd5 18 cxd5 a6 19 Be2 Qd7 20 Qf6 Qe7 21 Qh8+ Qf8 22 Rh1 0-0 -0 23 Bxa6+
Kb8 24 Qf6 Nd7 25 Qd4 Ne5 26 Bb5 Kb7 27 Qa4 Ra8 28 Bc6+ Nxc6 29 dxc6+ Kb8
30 Qd4 f6 31 Qxg4 Rxa2 32 Rh7 Ra1+ 33 Kd2 d5 34 Rxc7 Ra7 35 Rxa7 Kxa7 36 c7
1-0 Z.Gyimesi-J .Dudas, Hungarian Team Ch. 1999. Now that was a well-prepared
Grandmaster!
So evidently Black has nothing better than to take on e5, which allows his
kingside to be shattered.
It doesn’t matter which knight Black takes with, as White will take it in any case,
leading to the game continuation or a favourable (for White) bishop exchange.
156
8 Nxe5
Simplest and best: Black might get some play after 8 Nxg5 h6 9 Ne4 Nxc4, and
certainly not 8 Nc3? when Black can avoid structural damage with 8 ... g4.
8 ... Nxe5
8 ... Bxe5 just weakens the dark squares, making Black’s position even more
difficult: 9 Bxe5 Nxe5 10 hxg5 Qxg5 11 Nc3 d6 (11 ... Nxc4 12 Qd4 Ne5 13 Nd5 Kd8
14 f4 Qg3+ 15 Kd1 and wins is a real dark square debacle!) 12 Nd5 Kd8 13 Qb3 Ng4
14 Qb4 Re8 15 e3 Qf5 16 Qd2 c6 17 Bd3 Qe5 18 Nc3 h5 19 0-0 -0 and White has a
clear advantage in view of his safe king and Black’s kingside holes.
9 hxg5
It seems the play (after 4 ... g5) is largely forced even to here, where White
157
completely destroys Black’s kingside pawn structure. After this Black must try to save
himself by tactical means, but that doesn’t seem likely given his unsafe king and
White’s pressure down the open h-file.
Did Mamedyarov have an improvement in mind? It’s possible, but I just can’t see
it.
9 ... Nxc4
Another GM who did his homework scored quickly in the following game: 9 ...
Qxg5 10 e3 d6 (or 10 ... h5 11 Nc3 h4 12 Bf4 Qg6 13 Nd5 and White’s advantage is
clear) 11 Nc3 Be6 12 Nd5 0-0 -0 (12 ... Bxd5 is necessary, but 13 cxd5 0-0 -0 14 Bh4
Qh6 15 Qc2! threatening Bxd8 is alluring only for White) 13 Rh5! 1-0 A.Riazantsev-
A.Tjurin, Voronezh 2004—the queen is lost after 13 ... Qg4 14 Be2 Qe4 15 f3, so
Black resigned here, on move 13!
10 Nc3
10 ... c6
The forced moves are over and Black now has a wide choice—but his position is
so compromised that nothing seems to save him:
a) 10 ... 0-0? 11 Qd3 wins a piece.
b) 10 ... d6? 11 Qa4+ does too.
c) 10 ... Nxb2 11 Qc1 Nc4 (or 11 ... Qxg5? 12 Qxb2! Qa5 13 Rc1 and White is
up a piece, but not 12 Qxg5 Bxc3+) 12 Nd5 d6 13 Qxc4 Bxa1 14 Nxc7+ Ke7 15 Rh6!
with a winning attack.
d) 10 ... Qxg5 11 Rh4 Bxc3+ (if 11 ... Nxb2 12 Re4+ Kf8 13 Bd6+! with a
mating attack, or 12 ... Kd8 13 Qc2 Qc5 14 Bh4+ f6 15 Qxb2 wins the knight) 12 bxc3
d5 13 e4! c6 14 exd5 cxd5 15 Bxc4 (or 15 Rh5!? Qf6 16 Bxc4 Qxc3+ 17 Kf1 Qxc4+
18 Kg1 Be6 19 Rh4 Qa6 20 Rc1 and it’s hard to believe Black survives despite the
two extra pawns) 15 ... dxc4 16 Rh5 Qg7 17 Re5+ Be6 18 Qa4+ Kf8 19 Qb4 and
White has a typically winning opposite-coloured bishop attack.
Maybe Black does not have so many choices after all!
11 e4
158
White brings his last minor piece into the game and attacks the knight. Other than
the following pawn snatch that doesn’t turn out well, about all Black has is 11 ... d5
which just leads to a bad ending: 12 Bxc4 dxc4 13 Qxd8+ Kxd8 14 0-0 -0+ Ke7 15
Bd6+ Ke8 16 Bc5 b6 17 Bd4 Bxd4 18 Rxd4 Be6 19 f4 and Black’s broken pawn
structure will plague him forever.
11 ... Nxb2 12 Qd2!
White continues to develop with attack!
12 ... Na4
Moskalenko suggests 12 ... d5 here (his idea is 13 Qb2 Qa5) but does not
consider White’s simplest answer, namely 13 exd5. With this move White recovers his
pawn and Black’s position does not inspire confidence: the black pieces are flung all
over the place with no cohesion, and the pawn structure is full of holes. After the
plausible continuation 13 ... Qe7+ (13 ... cxd5 14 Bb5+ Kf8 15 Rb1 Qa5 16 Nxd5 just
wins for White) 14 Be2 Nc4 (if 14 ... Na4 15 Na4 Ba1 16 d6 is crushing) 15 Qd3 Bg4
16 0-0! Bxe2 17 Nxe2 Bxa1 18 Qxc4 Bg7 19 dxc6 0-0 20 c7 and White’s strong
passed pawn gives him more than enough for the exchange.
There are many other variations, but I can’t find any saves for Black; the old rule
that tactics usually fail when the position is inferior to begin with seems to hold up
here.
13 Nxa4 Bxa1 14 Bd6
159
This is White’s idea: for only the exchange, he has immobilized Black’s
queenside pieces, while gale force winds blow through the dark squares.
14 ... b5
If 14 ... Bg7 15 e5 with tremendous compensation.
15 Nb2 Rg8
Or 15 ... Bb7 16 Qc3 Bxb2 (16 ... Rg8 17 Qe5+ and 16 ... f6 17 Be2 Kf7 18 Rh6
both win quickly for White) 17 Qxb2 f6 18 Be2 with a winning attack.
16 Rxh7 Bxb2 17 Qxb2 Qxg5 18 Rh8! 1-0
The finishing blow: Black can only resign, for if 18 ... f6 (or 18 ... Bb7 19 Qe5+
Qxe5 20 Rxg8 mate) 19 Rxg8+ Qxg8 20 Qxf6 and mate follows.
Summary
The last game of this chapter (and the Gyimesi and Riazantsev games given in
the notes) is absolutely crucial: three well-prepared GMs crush three gambling
gambiteers—beware!
I have no confidence at all in Black’s position after his pawns are split by 9 hxg5
— and I haven’t been able to find an improvement earlier—but you are welcome to try,
and good luck!
On the other hand, if you have psychologically profiled your opponent and are
sure he will react to 4 ... g5 with the passive 5 Bd2—then go ahead!
160
Chapter Seven
The Original Budapest Gambit (Bf4 and Nc3)
When Rubinstein was first confronted with what must have looked like an insane
gambit—Black gives away a centre pawn on move two?—his first reaction was just to
take the pawn and keep it! He did exactly that ... and resigned on move 24, just in time
to avoid mate—see the next game below.
White’s play has been improved since, of course—and this variation leads to
some of the most uncompromising and exciting chess in the Budapest Gambit. The
nearest analogy is to the Benko Gambit—Black gets long-term pressure against
White’s weak queenside (here White has doubled isolated c-pawns) and might pick
one off down the road, but there is no guarantee. The big difference between the
Budapest and the Benko is that in the latter Black rarely plays on the kingside—here,
Black has some Blackmar-Diemer style play, as the e- and f-files are open, so can
combine kingside play with queenside pressure. Meanwhile White tries to use his two
bishops and b-file pressure to prove that a pawn is indeed a pawn, and if he can
somehow trade a weak c-pawn for a healthy black pawn, then White will be on his
way to victory.
Following are eight uncompromising games.
Game 34
A.Rubinstein-M.Vidmar
161
Berlin 1918
1 d4 Nf6 2 c4 e5
This was the first serious tournament try-out for the Budapest Gambit—and it
ended in a resounding victory for Black against the great Rubinstein! After Rubinstein
lost to the same opening a second time later in the tournament, the Budapest Gambit’s
reputation was made!
3 dxe5 Ng4 4 Bf4 Nc6
This move and the next ( ... Bb4+) are Black’s solid system (as opposed to the
wild and risky 4 ... g5) against Bf4, and this is how I recommend that Black should
play. In fact, I also recommend this system against 4 Nf3, see Part Three, Chapter 10
— the move order there is 4 Nf3 Nc6 and now 5 Bf4 will transpose to the 4 Bf4 line.
5 Nf3 Bb4+
Black’s idea is to clear the e7-square for the queen to attack the e5-pawn for a
third time. If White wants to keep the extra pawn (and make the opening a true
gambit) he must make serious concessions: lose time with his queen and allow
doubled isolated pawns. The next few games show this uncompromising play by
White, leading always to double-edged and unbalanced positions, where I believe
Black holds his own.
6 Nc3
A key alternative, favoured by positional players like Benko and Karpov, is 6
Nbd2 which allows Black to recover the pawn. White hopes to gain the two bishops
and get some positional pressure without risk, but I don’t think this quiet system
should worry Black—see Chapter 9.
Another possibility for Black after 6 Nbd2 (or 4 ... Bb4+ 5 Nbd2, which is
usually just a transposition) is to offer some wild gambits with ... d7-d6 or ... f7-f6. I
don’t think these have much more than surprise value, but I cover them in Chapter 8.
6 ... Qe7
162
More precise is the immediate 6 ... Bxc3+, as now White could protect his c3-
knight with 7 Rc1—see Game 37 for complete analysis.
7 Qd5!?
This is the only way White can keep his pawn, but obviously such a move is
risky and committal. Now Black severely damages White’s pawn structure, and soon
gains time on the exposed queen.
7 ... Bxc3+ 8 bxc3 Qa3
This aggressive and tempting move defeated Rubinstein twice in this tournament,
but I have examined this position closely in the next two games, and I believe that
accurate play by White can refute this raid. Correct is 8 ... f6, which will be the subject
of Games 38-42 .
9 Rc1
Later in the tournament Rubinstein tried 9 Qd3 but was let down by his desire to
refute Black’s play at any cost. As one can see, his wild queen manoeuvring (Qd5-d3-
g3-g7-d4-a7-b7 only allowed Black to build up a winning attack: 9 ... Qa5 10 Rc1
Ngxe5 11 Nxe5 Nxe5 12 Qg3 d6 13 Qxg7 (White grabs a pawn on the kingside) 13 ...
Ng6 14 h4 h5 15 e4 Be6 16 Bg5 Kd7 17 f4 Rae8 18 Be2 Qxa2 19 0-0 Rhg8 20 Qd4
Qxe2 21 f5 Bxc4 22 fxg6 Rxe4 23 Qxa7 (and now on the queenside) 23 ... Rxg6 24
Rf2 Qd3 25 Qxb7 Re2 26 Rxe2 Qxe2 27 Ra1 Rg8 28 Ra7 Qe1+ 29 Kh2 Qe5+ 30 Kg1
Qc5+ 31 Kh1 Bd5 (and now, with nothing more to munch, White must resign for if 32
Qa6 Re8 with a mating attack) 0-1 A.Rubinstein-J .Mieses, Berlin 1918.
9 ... f6
Not 9 ... Qxa2, as pawn snatching doesn’t pay here—White can drive the black
pieces back and dominate the centre, as a surprisingly high-level game shows: 10 h3
Nh6 11 e4 Ng8 12 c5 Qa3 13 Bc4 Nd8 (Black has a “perfect” development!) 14 Be3
Ne7 15 Qd1 b6 16 0-0 bxc5 17 Qd3 Qa5 18 Rb1 c6 19 Ra1 Qc7 20 Bxc5 Ne6 21 Bd6
Qd8 22 Nd4 Ng6 23 Nxe6 dxe6 24 f4 f6 25 Qe3 a5 26 Qc5 Bd7 27 f5 1-0 S.Gligoric-
H.Westerinen, Venice 1971.
10 exf6
163
10 e6?! dxe6 11 Qh5+ not only fails to win a piece, but gives Black good
counterplay after 11 ... g6 12 Qxg4 e5.
10 ... Nxf6
11 Qd2
The queen is exposed to a ... Ne4 attack here. Better is 11 Qd3 (see the next
game), but best is 11 Qd1! which I think knocks 8 ... Qa3 out—see Game 36.
11 ... d6 12 Nd4 0-0
Premature is 12 ... Nxd4 13 cxd4 Ne4 14 Qe3 Qa5+ 15 Kd1 and Black is in
trouble because of the pin.
13 e3?
Now White pays heavily for his badly-placed queen. 13 f3 is necessary, though
164
White has nothing special—but he doesn’t lose in the opening either! After 13 ... Ne5
14 e4 Qc5 15 Nb3 Qc6 16 Bxe5 dxe5 Black had equalized in A.O’Kelly de Galway-
W.Heidenfeld, Dublin 1956. We have reached a position typical of this variation (there
will many more examples later) where White’s extra pawn is completely meaningless
in view of his shattered pawn structure.
13 ... Nxd4! 14 cxd4
If 14 exd4 Ne4 15 Qe3 Bf5 16 Be2 Rae8 17 0-0 Nxc3 and Black recovers his
pawn with advantage.
14 ... Ne4 15 Qc2 Qa5+
The point of undoubling White’s pawns is now seen: the white king must go for a
walk—does one see a plank stretching out to h5?
16 Ke2 Rxf4!!
Beautiful! Rubinstein must have been stunned! There he is, the master of 1 d4,
and an unknown opening is wreaking havoc!
17 exf4 Bf5 18 Qb2 Re8
The sacrifice of the exchange has opened the e-file and gained time for Black to
bring his last two pieces into play.
19 Kf3
Obviously the white king is in grave danger now, but if 19 Kd1? Qa4+ 20 Qb3
Nxf2+ and Black wins.
Nonetheless White has a defence with the Fritz-found (of course!) 19 f3! Nc3+
(not 19 ... Ng3+ 20 Kf2 Nxh1+ 21 Kg1 and White is actually better!) 20 Kf2 Na4 21
Qb5 Qd2+ 22 Kg3 Re6 23 Qxf5 Rg6+ 24 Kh3 Rh6+ 25 Kg4 Rg6+ with a draw.
19 ... Nd2+ 20 Kg3 Ne4+ 21 Kh4?
Was Rubinstein still playing for a win? Better is 21 Kf3, when Black should not
take the draw with 21 ... Nd2+, but should continue the attack with 21 ... h5 with the
better chances.
21 ... Re6!
165
White’s trapped king is doomed.
22 Be2 Rh6+ 23 Bh5 Rxh5+! 24 Kxh5 Bg6+ 0-1
After 25 Kg4 Qh5 is mate.
A beautiful win by Vidmar, and a stirring introduction for the Budapest Gambit.
One sees Rubinstein underestimating the (then) “no name” opening, and losing
quickly—and we see in the notes that after this game he was still unwilling to accept
that Black’s play was legitimate—trying for too much, he lost again!
Game 35
T.Taylor-L.Fuerstman
North Carolina 1990
1 d4 Nf6 2 c4 e5 3 dxe5 Ng4 4 Bf4 Bb4+ 5 Nc3 Bxc3+ 6 bxc3
166
To use my own nomenclature, this is a “pawn cracker” sacrifice: Black has given
up a pawn, and may not get it back for many moves, but his main compensation lies in
the fact that White’s queenside pawns are cracked, and with two sets of doubled pawns
and one isolani, Black clearly has long-term compensation.
6 ... Nc6 7 Nf3 Qe7 8 Qd5 Qa3
I was not prepared for this move, and so I played cautiously—I avoid
Rubinstein’s debacle but lose too much time with my queen to get a real advantage.
9 Rc1 f6 10 exf6 Nxf6 11 Qd3 0-0
Not 11 ... Qxa2 12 Bxc7 as the black queen is no longer on the white rook.
12 Qc2
White has to lose more time with his queen, for if 12 g3 d6 13 Bg2 Qxa2 14 c5
dxc5 15 Bxc7 Re8 16 0-0 Qxe2 and White did not have enough for the pawn in
Y.Yakovich-J .Coret Frasquet, Seville 1992. This idea of attacking e2 with queen and
rook is a key idea for Black (see also Game 42) when White fianchettoes (which gives
the light-squared bishop a good diagonal but also leaves the e-pawn without solid
protection).
12 ... d5!?
167
Black gains active counterplay in this way, but also opens the game for the white
bishops. Much more solid is 12 ... d6 13 g3 Re8 14 Bg2 Be6 15 Nd2 Qa6 with a
typically even game for Black; his pressure on White’s weak queenside balances the
extra pawn. Note to readers: this type of position occurs again and again in this main
line Budapest, so if you are uncomfortable with long-term compensation (while
materially being a physical pawn down) then this is not the opening for you!
13 g3!
I give back the pawn but complete my development. If 13 Qb3 Qxb3 14 axb3
dxc4 (not 14 ... Na5 15 cxd5 Nxb3 16 Rb1 Nxd5 17 Bxc7 Nxc7 18 Rxb3 b6 19 e4,
when Black probably doesn’t have enough for the pawn) 15 e3 cxb3 16 Bc4+ Kh8 17
Bxb3 a5 and Black’s passed pawn gives him counterplay.
13 ... dxc4 14 Bg2 Qa5 15 0-0 Ne7 16 Nd2 Bf5 17 Qb2 Ned5 18 Nxc4 Qc5 19
Ne3 Nxf4 20 gxf4
Black maintains compensation for the pawn (or pawns) in view of White’s
numerous weaknesses.
20 ... Be4 21 Bxe4 Nxe4 22 Qxb7
168
22 ... c6?
Black has played well up to here, and has full compensation for the material
sacrificed, in view of White’s disconnected position and shattered pawns. Correct now
is to bring the last piece into the fray: 22 ... Rae8! 23 Qd5+ Qxd5 24 Nxd5 c6 25 Nc7!
(not 25 Nb4? Rxf4 26 Nxc6 Re6 27 Nd4? Rg6+ 28 Kh1 Nxf2+ and Black actually
wins with a queenless attack—one can see the problems with White’s weakened
kingside) 25 ... Re7 26 Na6 Nd2 27 Rfe1 Rxf4 28 Nc5 (if 28 f3 Ra4 is fine for Black)
28 ... Rc4 29 Nb3 Rg4+ 30 Kh1 Ne4 31 Rf1 Rh4 32 Nd4 Rf7 33 Nf3 Rhf4 and Black’s
positional pressure is certainly worth one pawn.
23 Qb3+!
Now I get the queens off while the black queen’s rook is still a move away from
affecting the game.
23 ... Kh8 24 Qb4 Rae8
Too late; but no better is 24 ... Qxb4 25 cxb4 Rxf4 26 Rxc6 or 24 ... Rf4 25 Qc5.
25 Qxc5 Nxc5 26 f5 Ne4 27 Rfd1 g6 28 f3 Ng5 29 Rd3
169
29 ... Nh3+
White has consolidated and should win the one pawn up ending after 29 ... gxf5
30 Kf1, though this is better than the game.
30 Kf1 Nf4 31 Rd4 g5
Black can still limit the damage to one pawn: 31 ... Rxe3 32 Rxf4 gxf5 33 Kf2
Rfe8 34 Rc2 R3e5 (not 34 ... R8e5 35 Rxf5) 35 Rd2 and White should win, but there
are still technical difficulties.
32 Re4 Rb8 33 Re7 Rb2 34 Rc2 Rb1+ 35 Kf2 Rf6 36 Ng4!
White’s first attacking move of the game! Now White is, finally, clearly winning.
36 ... Rxf5 37 Rd2 Nd5 38 Rxa7 Rf8 39 c4 Nb6 40 Nf6! 1-0
Mate is forced.
That was a tough struggle!
In the next game let’s see what happens if White is prepared for 8 ... Qa3.
Game 36
A.Barsov-S.Kagirov
Uzbeki Ch., Tashkent 1993
1 d4 Nf6 2 c4 e5 3 dxe5 Ng4 4 Bf4 Nc6 5 Nf3 Bb4+ 6 Nc3 Bxc3+ 7 bxc3 Qe7 8 Qd5
Qa3 9 Rc1 f6
9 ... d6 is a daring but evidently unsound gambit—Black can’t really afford to go
two pawns down: 10 exd6 Be6 11 Qb5 cxd6 (Black must give up the b-pawn as he
can’t allow d6xc7 with deadly tripled pawns!) 12 Qxb7 Rc8 13 Qb3 Qc5 14 e3 (Black
might have compensation for one pawn, but given his own weakness at d6, he
certainly doesn’t have compensation for two pawns) 14 ... 0-0 15 Be2 Rb8 16 Qd1
Nge5 17 0-0 Rb2 18 Rc2 Rfb8 19 Nd4 Bxc4 20 Bxc4 Qxc4 21 Nxc6 Qxc6? (21 ...
Nxc6 22 Bxd6 is the lesser of the evils) 22 Rxb2 1-0 M.Dlugy-J .Mills, Chicago 1989,
170
as 22 ... Rxb2 23 Bxe5 wins a piece.
10 exf6 Nxf6 11 Qd1!
A lot of people will say 8 ... Qa3 is no good, but how many know how to refute
it? In fact, many might lose like Rubinstein! Certainly 8 ... Qa3 can be used as a
surprise weapon, just like 4 ... g5—but let me go on record again, that I don’t
recommend it, and Barsov’s move is the reason.
The key is the efficient use of the white queen: After 11 Qd1 the queen can get to
b3 in one move. Recall how in the previous game I had to get to the critical b-file by
using an extra tempo: Qd3-c2.
11 ... Qxa2
Black may as well snatch a pawn.
11 ... d6 12 Qb3! is the point of the variation, for if 12 ... Qxb3 13 axb3 Na5 14
Nd2 and Black has nothing for the pawn as White’s pawns are both defensible and
connected. So 12 ... Qc5 is forced, but then after 13 e3 Black can’t develop his c8-
bishop while he is threatened with Qb5, e.g . 13 ... 0-0 14 Bd3 Ne5 15 Bxe5 dxe5 16
Qb5 Qxb5 (if 16 ... Qd6 17 Rd1 a6 18 Qxe5 and White is two pawns up for nothing)
17 cxb5 Be6 (17 ... e4 18 Bc4+ doesn’t help Black) 18 Nxe5 and Black is toast.
Furthermore, Black doesn’t have 11 ... 0-0 because of the destructive 12 Bxc7.
Finally, 11 ... Ne4 12 Qc2 Qe7 fails, for as Harding has pointed out, the queen
now wanders back with nothing to show for herself. White won the following game in
crushing style: 13 g3 d6 14 Bg2 Nc5 15 0-0 0-0 16 Nd4 Ne5 17 Nb3 Bf5 18 e4! Nxe4
19 Bxe4 Nf3+ 20 Bxf3 Bxc2 21 Rxc2 c6 22 Rd1 Qf7 23 Bg2 Qxc4 24 Bxd6 Rfe8 25
Bf1 Qg4 26 Rcd2 Rad8 27 c4 Kh8 28 h3 Qh5 29 c5 h6 30 Nd4 Rd7 31 Ne2 Re4 32
Nf4 Qe8 33 Kh2 b6 34 Bg2 Kh7 35 Be5 Rxe5 36 Rxd7 Re1 37 Rd8 Qe5 38 R1d6 1-0
J.Van Oosterom-R.Reynolds, correspondence 1996.
12 Bxc7 Qxc4 13 e3 Qf7 14 Ng5 Qg6 15 h4
171
Black has even material, but he also has weak pawns and no development, while
the enemy bishops are poised to run amok. White is clearly better.
15 ... d5 16 c4!
White opens lines for the bishops—Black has no good defence.
16 ... Nb4
If 16 ... h6 17 cxd5!.
17 cxd5 0-0
White centralizes dramatically after 17 ... Nbxd5 18 Qd4! 0-0 (or 18 ... Nxc7 19
Qe5+ Ne6 20 Nxe6 Bxe6 21 Qxe6+ Kf8 22 Qd6+ Ke8 23 Bb5+ Kf7 24 Rc7+ Kg8 25
Bc4+ and mates) 19 Bc4 Qf5 20 e4, winning a piece or so.
18 Qb3 a5 19 Bxa5 Nbxd5
Or 19 ... Rxa5 20 Qxb4 with two extra pawns, as the d-pawn is immune.
20 Bd3 Qh5 21 Be2?
Strangely enough, GM Barsov fails to put his opponent away, the evident 21 Rc5
winning by pin:
172
a) 21 ... h6 22 Rxd5 Nxd5 23 Qxd5+ Kh8 24 Bc3! hxg5 (there is nothing else: 24
... Ra3 25 Qd6 forks, while 24 ... Bg4 25 Qxb7 Rg8 26 Nf7+ wins the queen) 25 g4!
(preparing a second deadly pin) 25 ... Bxg4 26 hxg5 Bh3 27 Qxb7 Rg8 28 Qg2! with a
pretty mate down the h-file.
b) 21 ... b6 22 Rxd5 Be6 23 Bxh7+ Kh8 (if 23 ... Nxh7 24 Nxe6 discovers on the
queen) 24 Nxe6 Nxd5 25 Nxf8 Rxf8 26 Be4 Nf6 27 Bb4 Nxe4 28 Bxf8 Qa5+ 29 Qb4
Qa1+ 30 Ke2 Qa2+ (30 ... Qxh1 31 Qxe4 is too easy) 31 Kf3 Qxf2+ 32 Kxe4 Qxg2+
33 Ke5 Qxh1 34 Qe7 and Black’s counterplay is finally over, while the extra white
piece is good enough, e.g . 34 ... Qh2+ (34 ... Qg2 allows a winning simplification: 35
Qxg7+ Qxg7+ 36 Bxg7+ Kxg7 37 Kd5 etc) 35 Kd5 Qg2+ 36 e4 Qd2+ 37 Kc6 Qc2+
38 Kb7! Qg2 39 Qxg7+ and the pawn ending wins as above.
21 ... Qg6 22 Bd2 h6 23 Bd3 Qh5 24 Be2 Qg6 25 Nf3 Be6 26 Qb5 1-0
173
Black is right back in the game now, but the Megabase score ends here—though
evidently White won, perhaps following time pressure and unrecorded moves. In any
case, I believe the extremely accurate 11 Qd1 refutes Black’s 8 ... Qa3 adventure,
which is not to say that many people would find that seemingly retrograde move over
the board!
The question you need to ask yourself (if you want to gamble with 4 ... g5 or 8 ...
Qa3) is this: “How well is my opponent prepared?” He doesn’t have to find the crusher
over the board if he already has it in his memory banks!
Game 37
V.Korchnoi-J.Gomez Esteban
Pamplona 1990
1 d4 Nf6 2 c4 e5 3 dxe5 Ng4 4 Bf4 Bb4+ 5 Nc3 Nc6 6 Nf3 Qe7?!
174
A common mistake, but now Black gets a joyless position without counterplay.
Remember, as soon as the opportunity to double White’s pawns arises, take it! We saw
this numerous times in the Alekhine Attack chapter, and the advice holds good here: 6
. .. Bxc3+ is best.
7 Rc1!?
Good for a steady plus, but also possible is the sharper 7 Qb3 Na5 (7 ... Ba5 8 e3
0-0 9 Be2 Ngxe5 10 Nxe5 Nxe5 11 0-0 Bxc3 12 Qxc3 d6 13 c5 is given by Atalik as
clearly better for White) 8 Qc2 Nxc4 9 a3 Ba5 10 e3 Ncxe5 11 b4 Bb6 12 Nd5 (White
is attacking fiercely!) 12 ... Qe6 (12 ... Qd6 13 0-0 -0 with many threats) 13 Nxe5 Nxe5
14 Nxc7+ Bxc7 15 Qxc7 f6 16 Be2 0-0 17 0-0, when White completed his
development with a huge positional advantage (two bishops, pawn structure) and went
on to win in R.Tavadian-O .Pavlenko, Armenian Junior Ch. 1983.
7 ... Ngxe5
7 ... f6?! 8 exf6 Nxf6 9 a3 Bxc3+ 10 Rxc3 0-0 11 Bxc7 Qf7 is a doubtful gambit
that paid off against an early mechanical monster: Black won after 12 Qd3 d5 with
counterplay in Comp Mephisto Portorose-P.Schneider, Porz 1989, but the present day
Fritz squelches all counterplay with 12 Bd6 and claims, probably correctly, a decisive
advantage for White.
8 Nxe5 Nxe5 9 a3
175
9 ... Bxc3+
Alternatives lose as follows: 9 ... Bc5 10 Nd5 Qd6 11 b4 and a piece goes, or if 9
... Bd6 10 c5 Bxc5 (10 ... Nf3+ 11 gxf3 Bxf4 12 Nd5 Qe5 13 Rc4 also wins a piece) 11
Nd5 Qd6 12 Bxe5 and a piece drops in a third way.
Therefore the text is correct—but now White gets the two bishops and an active
rook for nothing.
10 Rxc3
Black’s opening cannot be recommended—make sure you take that knight right
away!
10 ... 0-0 11 g3
Sharper is 11 c5, which could lead to an amazingly quick win: 11 ... Re8? 12
Bxe5 1-0 A.Barsov-A .Vehreschild, Goch 1994—Barsov didn’t miss this one! Of
course Black could have played 11 ... d6 12 cxd6 cxd6 13 e3 and suffered with his
isolated pawn.
11 ... d6 12 Bg2 Ng6 13 Bc1 Rb8 14 0-0 b6 15 e4
White has an excellent Maróczy Bind structure and the two bishops.
15 ... Bb7 16 Re1 f6 17 b3 Rfe8 18 Rce3 Qf7 19 Bb2 Re7 20 Qe2 a5 21 f4 Ba8
22 h4 Nf8
You don’t want to have to defend this position! On the other hand, it’s not that
easy for White to make progress.
23 Bf3 Nd7 24 Bh5 Qf8 25 b4 Bc6 26 Bd4 axb4 27 axb4 Ra8 28 Qc2 Kh8 29
Bg4 Qf7 30 h5 h6 31 Qe2 Rae8
176
32 Qd3?!
Korchnoi has manoeuvred excellently to this point and now could play 32 Bf5,
holding the e-pawn, while threatening Ra1 or Bg6. After this White’s patiently
increased advantage verges on decisive.
Unfortunately for the great Korchnoi, he not only misses this but begins to rush
...
32 ... Bb7 33 c5?
And now must struggle (successfully) to draw. Better is 33 R3e2 still with some
advantage.
33 ... bxc5 34 bxc5 Nxc5 35 Bxc5 dxc5 36 Bf3 f5 37 exf5 Rxe3 38 Rxe3 Rxe3
39 Qxe3 Bxf3 40 Qxf3 Qxf5
177
Black is now a pawn up, but it’s hard to win in view of his exposed king.
41 g4 Qc2 42 f5 Qd2 43 Kf1 Qd4 44 Qe2 Kh7 45 Kg2 c4 46 f6 Qxf6 47 Qxc4
Qe5 48 Kf3 Qd6 49 Kg2 Qe5 50 Kf3 c5 51 Kf2 Kh8 52 Kf3 Qe7 53 Qd5 Qc7 54
Qa8+ 1⁄2-1⁄2
While this game shows that White’s clear positional advantage after 7 Rc1 does
not win the game by itself, the long drawn out defence that Black had to endure was
not, I think, what the Budapest player was looking for! On any other day I have no
doubt Korchnoi would have ground it out to victory with 32 Bf5.
Game 38
K.S.Hansen-Mart.Jensen
Soro 1982
1 d4 Nf6 2 c4 e5 3 dxe5 Ng4 4 Bf4 Nc6 5 Nf3 Bb4+ 6 Nc3 Bxc3+!
Correct!
7 bxc3 Qe7 8 Qd5
We saw that 8 ... Qa3 is an interesting surprise weapon, but fails against exact
play. Black’s next has a good reputation, and is my recommendation as well: the queen
is well placed on e7, bearing down on White’s king, so there’s no reason to move it.
Meanwhile Black opens the e- and f-files for counterplay, Blackmar-Diemer style, and
accepts that he is playing a true gambit. Black defers recovering the pawn (though
given the weakness of the a2/c3/c4 complex, this is very possible later) and gains time
on the opponent’s queen.
8 ... f6!
9 exf6
The only good move—if 9 e6 Black has, as we have seen before, 9 ... dxe6! 10
Qh5+ g6 11 Qxg4 e5! 12 Qg3 exf4 13 Qxf4 Be6 14 e3 (or 14 Rd1 0-0 15 e3 Qa3 and
178
Black picks up one of the weak pawns with advantage) 14 ... 0-0 -0 15 Be2 g5 and
Black is already doing well. I’m going to repeat this comment again and again in this
section, but it is the essential idea: yes, Black is a pawn down, and won’t get it back
soon—but given that White’s queenside pawn complex is so weak, the extra pawn is
not felt. But you must be mentally prepared for this kind of play!
Here Black can use his lead in development to launch a minority attack in the
centre and on the kingside, while White has no counterplay: 16 Qe4 f5 17 Qc2 f4 18
Qe4 (18 exf4? Bxc4 is a typical theme where Black gains the advantage because of the
weak pawns and his pressure down the e-file) 18 ... Qf6 19 Nd4 Nxd4! (as in
Rubinstein-Vidmar, Black allows or forces White to straighten out his pawns, in order
to obtain some other advantage—here a vital tempo gain on White’s queen) 20 cxd4
Rhe8 21 Qe5 (if 21 Qxh7 Bf5 22 Qh5 fxe3 with attack) 21 ... Qxe5 22 dxe5 fxe3 23
fxe3 Bd7 24 0-0 Rxe5 25 Rf7 Rxe3 26 Kf2 Re5 27 Bf3 (not 27 Rxh7? Rf8+ 28 Bf3
g4, winning a piece) 27 ... g4 28 Bd1 h5 29 Rf4 Bc6 30 Be2 Rd2 31 Re1 Bxg2! (the
finishing blow; Black’s investment of one pawn paid off with a two plus pawn
dividend!) 32 Kxg2 Rexe2+ 33 Rxe2 Rxe2+ 34 Kg3 Rxa2 35 Rf5 Ra3+ 0-1
B.Bielicki-R.Lallemand, German League 2001.
9 ... Nxf6 10 Qd3 d6
Black must block the f4-bishop.
We have now reached the basic tabiya of the Original Budapest Gambit. Black
has made his pawn cracker sacrifice, and will have long-term play against White’s
shattered queenside. Black is also ready to castle, while it will take White three moves
to do so. Meanwhile, White has the two bishops and might be able to use the open b-
file.
In other words, we have reached a sharp position with contrasting advantages,
and all results are possible!
White must now make a choice: how to develop the king’s bishop? The move
generally considered best—played by Korchnoi and Shirov—is 11 g3. The idea is that
White might get some value out of the doubled pawns (the open b-file can tie in with
179
the bishop on g2, creating a focal point of attack at b7), while the fianchettoed bishop
also monitors the key central squares e4 and d5.
However, in this game White plays e2-e3 and Be2, where the light-squared cleric
is considerably less active, and Black has few opening problems.
11 e3
Given the innocuousness of this move, I am only going to give one game, but I’m
going to deal very seriously with the main line 11 g3, which will be seen in the final
three games of this chapter.
The curious 11 Bg5 has also been played by GMs, but I can’t figure out the logic
of it. Is the bishop better placed on g5 than on f4? Does White want to give up the two
bishops? Here are a couple of examples: 11 ... 0-0 12 e3 b6 (also possible is 12 ... Ne5
13 Nxe5 Qxe5 14 Bf4 Qa5 15 f3 Bf5 16 Qd2 Rfe8 17 Be2 h6 18 Bg3 Bd7 19 0-0 Qg5
20 Bf4 Qc5 21 Qd4 1⁄2-1⁄2 V.Dydyshko-E .Meduna, Czech League 2002; after 21 ...
Qxd4 22 cxd4 g5 23 Bg3 Rxe3 Black recovers his pawn with a good game) 13 Be2
Bb7 14 0-0 Rae8 15 Rab1 Qf7 16 Bxf6 Qxf6 17 Rb5 Ne5 18 Nxe5 dxe5 19 f4 c5!
(I’m baffled by White’s play, but quite happy about Black’s—now the white rook is
shut out of play while Black attacks the centre) 20 Rb2 Rd8 21 Qc2 Qe7 22 Bf3 Bxf3
23 Rxf3 exf4 24 exf4 Qe1+ 25 Rf1 Qe3+ 26 Qf2 Qxc3 (White gives back one
weakling, but three others are weak too!) 27 Rc2 Qd3 28 g3 Rfe8 29 Rfc1 Re4 30 Rc3
Qd2 31 Qxd2 Rxd2 32 R1c2? (probably time pressure, but even after 32 R3c2 Ree2
and Black is clearly better with his grip on the seventh rank) 32 ... Re1 mate, C.Ward-
P.Motwani, British Ch., Swansea 1987. This odd bishop move shouldn’t worry Black.
11 ... 0-0 12 Be2 Ne4 13 Nd4
After two losses against the Budapest Gambit, Rubinstein finally got on the
scoreboard—with a half point!—as follows: 13 Qc2 Nc5 14 Nd4 Ne5 (Black’s knights
dominate: the “two bishops” are only of defensive use) 15 0-0 Bd7 16 f3 Rae8 17 Bg3
Qf7 18 Bxe5 (Rubinstein can’t find a way to use his dark-squared bishop and so sells
it to get rid of one of the powerful knights) 18 ... Rxe5 19 e4 a6 20 Rae1 Be6 21 Nxe6
Qxe6 22 Rf2 Re8 23 Bf1 Qd7 24 Rd2 Qc6 25 Rb1 Qd7 26 Rd5 Qf7 27 Qd2 b6 28 Rd1
h6 29 Qf2 Kh8 30 Qe3 Qf6 31 g3 1⁄2-1⁄2 A.Rubinstein-C.Schlechter, Berlin 1918; White
can see no way forward in view of Black’s rock-solid blockade; note that the advance
f3-f4 is prevented by Black’s pressure on e4.
13 ... Nc5 14 Qd1 Ne5
180
Schlechter ’s two-fisted knight blockade appears again: Nimzowitsch would be
pleased at the way the active blockaders hold White’s position under restraint!
15 0-0 Bd7
A GM vs. GM encounter continued as follows: 15 ... Kh8 16 Rc1 Bd7 17 Qc2
Qf7 18 Bxe5 (White recognizes, like Rubinstein, that the knight pair is too dangerous
and eliminates one—most often in this case the result of the game is a draw, but as one
sees, Rogers had an opportunity on move 23) 18 ... dxe5 19 Nf3 Qe7 20 Nd2 Bc6 21
Bf3 e4 22 Be2 Rf6 (22 ... Rad8 23 Nb3 Ba4 24 Rcd1 Rxd1 25 Rxd1 Qf6 26 Rf1 Qb6
27 Rb1 Qf6 is a draw) 23 Nb3 Rh6 (increasing the pressure with 23 ... Raf8 is better )
24 Nxc5 Qxc5 25 Rcd1 Qe5 26 h3 Qg5 27 Bg4 Rg6 1⁄2-1⁄2 M.Vukic-I .Rogers, Reggio
Emilia 1983/84.
16 a4
White doesn’t want to take a knight with his “strong bishop” and so makes
useless moves that give Black time to set up a kingside attacking position.
16 ... a6 17 a5 Rae8 18 h3 Ng6 19 Bh2 Ne4 20 Qc2 Nh4!?
This works spectacularly well in the game, but I think it’s more accurate to bring
in the d7-bishop first: 20 ... c5 21 Nf3 Bc6 22 Rac1 Ng5 23 Nxg5 Qxg5 24 Bg3 Nh4
and Black is better.
21 Bd3 Ng5
181
22 Rab1?
This is White’s fatal error: he doesn’t sense the danger. Correct is 22 Bg3! which
looks like it forces Black to retreat (the uninspiring 22 ... Ng6) or else sac prematurely:
22 ... Nxg2 23 Kxg2 Bh3+ 24 Kh2 and the attack is running out of steam.
22 ... c5 23 Ne2 Bxh3!
This is the way—it’s better to give up the bishop, not the knight. Black smashes
the white king position and obtains a winning attack with his knight pair!
24 Nf4
Acceptance loses by force: 24 gxh3 Nxh3+ 25 Kh1 Nxf2+ 26 Kg1 (if 26 Rxf2
Rxf2 27 Bg3 Qxe3! and White must shed major material to avoid mate) 26 ... Qxe3 27
Bxh7+ Kh8 28 Nf4 (or 28 Rbc1 Qf3 and mates) 28 ... Ne4+ 29 Kh1 Kxh7 and Black is
material up while retaining the attack. White’s queenside pawns are still weak, and if
he insists on getting the queens off too many will drop, e.g . 30 Qd3 Qxd3 31 Nxd3
Nd2 32 Rxf8 Rxf8 33 Rd1 (if 33 Rxb7 Rf1+ 34 Bg1 Ndf3 and mates) 33 ... Nc4 with a
winning endgame.
24 ... Ngf3+
Simpler is 24 ... Bxg2 and Black wins, e.g . 25 Nxg2 Nhf3+ 26 Kh1 Rf6 27 Nf4
Rh6 28 Kg2 Rxh2+ 29 Kg3 Qf6 30 Rb6 Qh6 and mates.
25 gxf3 Nxf3+ 26 Kh1 Rxf4
Complicated, yes, but it works! Okay, I’ll give some beauty points ...
27 Bxf4
If 27 exf4 Bxf1 28 Bxh7+ Kh8 29 Be4 (or 29 Rxf1 Qh4 and mates) 29 ... Qxe4
30 Qxe4 Rxe4 31 Rxf1 Nxh2 32 Kxh2 Rxf4 and Black wins the endgame—note the
weak white pawns dropping again, the legacy of the pawn cracker sacrifice.
182
27 ... Rf8?
But this is going too far! Black has a simple mating attack with 27 ... Qh4 (this
move, threatening mate in two, was evidently too crude for the Black adventurer) 28
Bg3 Qh6 29 Bf4 (or 29 Bxh7+ Kh8 30 Qg6 Re6! and Black mates with the rook!) 29
. .. g5 and wins, e.g . 30 Bxh7+ Kh8 31 Qg6 Bg2+ 32 Kxg2 Nh4+ 33 Kg1 Nxg6 34
Bxg6 gxf4 35 Bxe8 f3 and mates.
28 Be4?
It looks like White can turn the tables with 28 Bg3 Qg5 29 Rg1 Qh5 30 Bxh7+!
as Black has given up too much material.
28 ... Rxf4 29 exf4 Qh4
Finally!
30 Bxf3 Bg4+ 31 Kg1 Bxf3 0-1
I would have preferred the quick and clean finish with 24 ... Bxg2, or even the
clear mating attack with 27 ... Qh4 to Black’s extravagant and possibly unsound win—
but let’s get back to the opening for a moment.
It’s clear that 11 e3 puts no pressure on Black, who can equalize rather easily
with Schlechter ’s two knight blockade—and play for more if White sticks to the
dogma that a bishop must be better than a knight!
We now go to the critical position of the Bf4/Nc3 line: namely White’s fianchetto
with 11 g3.
Game 39
VampireBat-Greweling
Internet (rapid) 2006
1 d4 Nf6 2 c4 e5 3 dxe5 Ng4 4 Bf4 Nc6 5 Nf3 Bb4+ 6 Nc3 Qe7
6 ... Bxc3+ is better.
183
7 Qd5 f6 8 exf6 Bxc3+ 9 bxc3 Nxf6 10 Qd3 d6 11 g3
11 ... 0-0
The Schlechter knight manoeuvre seen in the previous game fails with the white
bishop on g2—first, e4 is controlled; second, White has e3 for the queen (in Hansen-
Jensen there was a pawn there). Shirov shows the difference efficiently: 11 ... Ne4?!
12 Bg2 Nc5 13 Qe3! Qxe3 14 Bxe3 0-0 15 Nd4 Na5 16 Nb5 Na6 17 Bf4 Be6 18 c5!
(White succeeds in opening lines for both bishops, as Black’s queenside is fragile) 18
... g5 19 Bxg5 Rf5 20 Nd4 Rxg5 21 Nxe6 Re5 22 f4! Re3 (if 22 ... Re6 23 Bd5 Nc5 24
f5 wins) 23 cxd6 1-0 A.Shirov-D .Bang, Neuilly-sur-Seine (simul) 2001.
Black can try 11 ... b6 but this fianchetto for Black also seems ill-advised—the
point is presumably to control e4, but it turns out that e4 is tactically protected
anyway! Here’s another miniature: 12 Bg2 Bb7 13 0-0 Na5 14 Rae1 0-0 15 e4 Bxe4?
16 Qd1! Qd8 17 Rxe4 Nxe4 18 Qd5+ Kh8 19 Qxe4 Qe8 20 Qd3 1-0 S.Atalik-
T.Wippermann, Izmir 2006.
12 Bg2
184
The critical position of the Bf4/Nc3/g3 Budapest has arisen, which will be the
subject of the last three games of this chapter. Black has several possible moves, but I
think two are far superior to the rest: 12 ... Bg4, as seen here and in the next game, and
the direct 12 ... Re8 of Game 41. The positional idea of both these moves is to pressure
e2 before White consolidates. Less active moves will be considered in the following
note.
12 ... Bg4
It’s interesting that GM Ian Rogers has been on both sides of the debate here. As
Black he has played 12 ... Kh8
and got a good game after 13 0-0 Bg4, eventually winning in F.Zakaria-I .Rogers,
Auckland (rapid) 1997—but I think White gets the advantage with the so far untried
185
13 Nd4!—the idea is that White takes advantage of the lack of pressure on e2 to
centralize his knight and unmask the g2-bishop. I can’t find any way for Black to
equalize after this, e.g . 13 ... Ne5 14 Bxe5 dxe5 (or 14 ... Qxe5 15 0-0 and Black can’t
develop his queenside, whereas White can easily attack in the centre) 15 Nf5 and
White’s pressure on the light squares is alarming. If 15 ... Bxf5 (or 15 ... Qc5 16 Ne3
and White holds c4 while eyeing d5, and plans Rb1 to accentuate the power of the
fianchettoed bishop with at least a small edge) 16 Qxf5 e4 (trying to shut off the
dominant white bishop) 17 0-0 and Black’s king would much rather be on g8, where
it’s not back ranked, while the pawn on e4 lacks solid protection. These factors give
White the edge—though note that if Black were a tempo ahead (see Game 41) this
position would be playable for Black.
Another GM-played move is 12 ... Bd7, but this is even more clearly suspect.
Rogers (on the other side!) found a clever tactic, based on the fact that now Black’s c-
pawn is unprotected: 13 0-0 Rae8 14 c5! dxc5 (no matter how you slice it, White
exchanges a sick pawn for a healthy pawn—and there goes Black’s compensation!) 15
Bxc7 c4 (if 15 ... Qxe2 16 Qb1 b6 17 Bd6 Rf7 18 Ng5 wins the exchange) 16 Qd1
Ne4 17 Rc1 and White’s solid extra pawn was good enough for victory in I.Rogers-
N.Miezis, Reykjavik 2004.
13 0-0
13 Nd4 here (instead of after 12 ... Kh8) is a completely different story. Black
plays 13 ... Rae8 with heavy pressure against e2, and White’s king remains uncastled.
After 14 Nxc6 bxc6 15 Be3 (to shield the file; if 15 f3 Be6 16 c5 dxc5 and Black’s
strange pawn structure actually gives him very good squares for his pieces), Black
should not play the weak defensive move 15 ... Bd7 (as in D.Gurevich-D .Pacheco,
Buenos Aires 2005), but rather 15 ... c5 which effectively neutralizes both the white
bishops. Then Black can face the future with confidence: he has excellent long-term
counterplay against White’s fixed and weak queenside pawns.
13 ... Rae8 14 Rae1 Kh8
This is the set-up of choice of the highest-rated Budapest Gambiteers such as
186
GMs Reinderman and Epishin. According to the Megabase, Black has never lost from
this position—but given that there are only five games, one can’t make a definitive
statistical analysis. For the record there are two wins for Black and three draws. I think
Black is fully equal here: his active pieces and two open files, not to mention White’s
permanently shattered pawns, mean dynamic equality despite the material imbalance.
By the way, I mentioned, “high-rated GMs”—by this point you might be
wondering: who is “GM” Greweling? For that matter, who is his opponent, “GM”
VampireBat??
The short answer is I don’t know: the long answer is that this game was played in
a “freestyle” tournament, which means a tandem between man and computer—you
can use your computer to help you during the game, and your opponent does the same.
So each player is a two-headed monster with names to match!
I wonder if the human or the computer saw the knight sac that’s coming up?
15 Nd4
The following game is an interesting struggle between a GM (White) and an IM.
The GM feels that he must beat this “inferior” opening—but as you can see, he never
quite consolidates, never quite shakes off the pawn weaknesses, as Black keeps
circling round and round, needling White with threats to the a- and c-pawns. Finally
White, seemingly exasperated, blunders (34 h3) and Black strikes! 15 Bg5 Qf7 16
Bxf6 Qxf6 17 Nd2 Re5 18 f4 Ra5 19 Qc2 Be6 20 Rb1 Nd8 21 Rb5 Ra6 22 e4 Qf7 23
Rf2 Bd7 24 Rb1 Ne6 25 Nb3 Ra4 26 f5 Nd8 27 c5 Qe7 28 Rd1 Nf7 29 Rd4 Ne5 30
cxd6 cxd6 31 Qd1 Ra6 32 Rfd2 Qg5 33 Qe1 Qe7 34 h3?! (34 Qd1 Qg5 35 Rd6 Qe3+
36 Kh1 Rd6 37 Rd6 Ng4 38 Qc1 Nf2+ with a draw would be a more reasonable line)
34 ... Bxf5! (a fine tactical blow based on the unprotected white queen; note that White
manages to keep his extra pawn after this, but his structure is broken even more—four
pawn islands!—and Black also obtains the superior minor piece) 35 Qd1 Be6 36 Rxd6
Rxd6 37 Rxd6 Nc4 38 Rd4 Ne3 39 Qd2 Nxg2 40 Kxg2 h6 41 Qe2 Qc7 42 c4 Qc8 43
g4 h5 44 e5 b5 45 cxb5 Qc3 46 Rd3 Qc4 47 Nd4 Rd8 48 Qd1 Qxa2+ (Black has great
compensation for the pawn, and now White makes another error, this time fatal) 49
Rd2? (not 49 Kg3 h4+! 50 Kxh4 Qf2+ with a tremendous attack, but 49 Kg1 should be
about equal) 49 ... Rxd4! (Black wins a piece, and White is unable to get rid of all the
pawns) 50 Rxa2 Rxd1 51 Rxa7 hxg4 52 hxg4 Rb1 53 Re7 Bd5+ 54 Kg3 Rxb5 55
Re8+ Kh7 56 e6 Kg6 57 Kf4 Ra5 58 g5 Bc4 59 e7 Kf7 60 Rg8 Bb5 0-1 G.Barbero-
E.Brestian, Austrian Team Ch. 1995.
Another try for White is the Fritz suggestion 15 Qb1 which the machine initially
evaluates in White’s favour—but after 15 ... Na5 16 Qb5 b6 17 Nd2 Qf7 18 e4 Nd7 I
don’t see any plus at all for White; and now even Fritz says equal, as White’s doubled
c-pawns are a permanent problem.
15 ... Ne5
187
The knight can also go the other way—the important thing is that Black keeps the
pressure on White’s weak queenside: 15 ... Na5 16 Bg5 Qe5 17 Bxf6 Rxf6 18 e3 Bh5
19 Nb3 Bg6 20 Qd4 Nc6 21 Qd2 Qe7 22 e4 Bf7 23 Qe2 Qe6 24 c5 Qc4 25 Qd2 a5 26
cxd6 Rxd6 27 Qb2 Rd3 28 Rc1 a4 29 Nd4 Nxd4 30 cxd4 Qxd4 31 Qxd4 1⁄2-1⁄2
M.Dlugy-V.Epishin, New York Open 1989. After 31 ... Rxd4 32 Rxc7 Bxa2 33 Rxb7
a3 34 Ra7 Bc4 35 Rc1 a2 36 Ra4 Red8 37 Rcxc4 (not 37 Raxc4? Rxc4 and Black
wins as he keeps the strong passed pawn) 37 ... Rxc4 38 Rxa2 Rd1+ 39 Bf1 g5, the
computer evaluates this as even, and so do I—but I would add that the position is still
very interesting and unbalanced, and I wish the game had continued!
16 Qb1
16 Bxe5 dxe5 17 Nb3 c5 18 h3 1⁄2-1⁄2 J.Piket-D .Reinderman, Dutch Ch.,
Rotterdam 1999, is one solution to White’s problems. It’s important to note that (going
all the way back to Rubinstein-Schlechter, given in the notes to the previous game)
White can “opt out” of the complications by exchanging queen’s bishop for knight
with a draw in almost every case. Here we see White trying to win—trying being the
operative word!
16 ... c6
188
17 h3
Another of the three draws in the Megabase went like this: 17 f3 Bc8 18 Qb3
Nfd7 19 Rd1 Nc5 20 Qc2 Nxc4 (Black recovers his pawn with a good game but on the
very next move misses his chance!) 21 e4 Rd8 (instead of this quiet move that soon
leads to a draw, Black has 21 ... Rxf4! 22 gxf4 Ne3 recovering the exchange with a
slight advantage due to the superior pawn structure) 22 Bc1 Rfe8 23 Nb3 Na4 24 Nd4
Nc5 25 Nb3 Na4 26 Nd4 1⁄2-1⁄2 V.Ortiz Fernandez-L .Vigil Alvarez, Asturias 2001.
17 ... Bc8 18 Qb3 Nfd7 19 Rd1
White could try 19 Bxe5 Qxe5 20 f4 Qc5 21 e4 Nb6 22 Rf2 Qxc4 giving back a
worthless c-pawn to consolidate his position.
19 ... Ng6
189
Now Black preserves the knight pair, with more attacking chances than White
realizes. This game and the previous one have a lot in common: White makes a lot of
fairly useless manoeuvres on the queenside, while Black prepares methodically for a
kingside attack.
20 Be3 Nc5 21 Qb4?
The crucial mistake, as the queen gets shut out of play for the rest of the game.
Even though White has not played precisely accurately, he is still well in the
“approximately equal” stage if he keeps his queen in play. Correct is 21 Qc2 (the
queen must communicate with the kingside, and White does have a pawn to give) 21
. .. Ne5 22 Bc1 Nc4 23 e4 and, by giving the worthless extra pawn back to create some
play, a full-blooded position can be reached with chances for both sides. Black still has
a slightly superior pawn structure, but White has the two bishops and can advance in
the centre—and such a central presence should keep Black from effectively attacking
the king.
21 ... Ne4 22 Nc2 c5 23 Qb3 b6 24 Kh2 Bb7 25 a4 Bc6
White has done nothing over the past few moves, whereas Black has done a great
deal: all his pieces are on their ideal squares, poised for attack—in general I think
Black is clearly better now, regardless of White’s continuation.
26 f3
This provokes a powerful sacrifice, but it’s hard to find something better. Giving
up the light-squared bishop to get rid of one of the dangerous knights looks too
weakening (now White must regret not having taken off a knight with the dark-
squared bishop, which could more easily be spared). After 26 Bxe4 Qxe4 27 f3 Qe6
Black has a clear advantage as his queen targets White’s many weaknesses.
If White tries to wait with 26 Ra1, Black strikes at once with 26 ... h5 27 h4
Nxh4! 28 gxh4 Qxh4+ 29 Kg1 Nd2! (gaining a tempo by attacking the unfortunate
white queen, which has absolutely nothing to say while her king is massacred) 30
Bxd2 Bxg2 31 Kxg2 Re6 and mates.
26 ... Nxg3!!
190
Again the destructive sac, as above and in Hansen-Jensen. Basically the
combination works because White is playing without his queen, and his knight isn’t
helping much either. Meanwhile, Black is attacking with all his forces. By the way, my
guess is the sac was human intuition, with the computer helping to calculate the
following exact attacking blows.
27 Kxg3 Qe5+ 28 Kf2
28 f4 fails to 28 ... Nxf4! (Black destroys the pawn cover around the white king
and sets up a winning pin) 29 Bxf4 (or 29 Rxf4 g5 30 Bxc6 gxf4+ 31 Kg2 fxe3 32 Bf3
Rxf3 33 exf3 Rg8+ 34 Kf1 Qh2 35 Nxe3 Rg1 mate) 29 ... Rxf4 30 Rxf4 g5 31 Rdf1
(or 31 Bxc6 Qxf4+ 32 Kg2 Rxe2+ and mates) 31 ... gxf4+ 32 Rxf4 Rg8+ and mates.
28 ... Nh4
White must wish he had killed these knights earlier!
29 Rd5
If 29 Kg1 Qg3 30 Rf2 Rf6 31 Rd3 (or 31 Kf1 Rg6 and wins) 31 ... Be4! and
Black wins material as 32 fxe4 allows a quick mate after 32 ... Rxf2, and 32 Qb5 Re7
doesn’t change anything—a possible finish then would be 33 a5 (or 33 Rd2 Bxc2 and
Black wins his piece back with interest) 33 ... Bxd3 34 exd3 Nxf3+ with a winning
attack.
29 ... Qh2
30 Rg1
30 Rg5 Bxf3! 31 exf3 Nxf3 shows how much fun it is to play with an extra
queen! What does the prisoner on b3, walled in by the doubled pawns, have to say?
30 ... Rf6 31 Kf1 Rg6 32 Rg5 Rxg5 33 Bxg5 Nxg2 34 Rxg2 Qh1+ 35 Rg1
Or 35 Kf2 Rxe2+ 36 Kxe2 Qxg2+ 37 Kd1 Qxg5 and Black has recovered his
piece, has an extra pawn, and a clearly winning position.
35 ... Qxh3+ 36 Ke1 Rxe2+!
Black crashes through!
37 Kxe2
If 37 Kd1 Qxf3 38 Kc1 h6 39 Bd8 Be4 wins the house.
191
37 ... Qh2+ 38 Kf1
38 Kd3 Qxg1 39 Be3 Qd1+ 40 Bd2 Qf1+ 41 Ke3 Qxf3 is mate.
38 ... Bxf3
The threat of mate in one always gets the opponent’s attention!
39 Rg3 Be2+ 40 Ke1 Bh5! 41 Kf1
Or 41 Re3 Qg1+ 42 Kd2 Qd1 mate.
41 ... Qxg3 0-1
White resigns in view of 42 Be3 Qf3+ 43 Kg1 Bg6 44 Qb2 Qg3+ and mates next
move, or 42 Bd8 Qf4+ 43 Ke1 Qh2 44 Kf1 Bf3 and mates.
This was a beautiful attacking game. White clearly overestimated his position
and wandered off with his queen—but that does not detract from Black’s fine
strategical set-up (moves 21-25) and accurate sacrificial attack.
White players should be aware that the doubled c-pawns are sometimes more
trouble than they’re worth, and one could be sacrificed back (as in the crucial note to
move 21) to gain central play.
Game 40
Marc.Becker-S.Kewe
Duisburg 2003
The last two games were a lot of fun, but it’s not always so easy! Here we see the
dangers that Black can face.
1 d4 Nf6 2 c4 e5 3 dxe5 Ng4 4 Bf4 Bb4+ 5 Nc3 Bxc3+ 6 bxc3 Nc6 7 Nf3 Qe7 8
Qd5 f6 9 exf6 Nxf6 10 Qd3 d6 11 g3 0-0 12 Bg2 Bg4 13 Rb1!
192
I think this is better than playing the rook to e1 as in the last game. Here White
keeps his queen in the centre, where she belongs, and immediately makes a threat on
the b-file. Black must play accurately to equalize.
13 ... Rab8?!
Already a crucial mistake! If Black gets pinned down on the queenside, he won’t
get counterplay for his pawn. Correct is the counter-attacking 13 ... Na5! 14 Rb5 b6 15
0-0 Rae8 with active pieces and typical compensation. In the game, watch how
quickly Black goes downhill after setting up too defensively.
Remember, this is a gambit. Play sharply!
14 0-0 Kh8 15 Rb2 Na5
Not 15 ... Ne5?! 16 Bxe5 dxe5 17 Qe3 and White wins a pawn—note the active
white queen here.
16 Bg5 Qd7?!
Right now White’s queen’s rook is strong, and Black’s queen’s rook is passive.
Black needs to reverse that equation with 16 ... b6! 17 Nd4 Rbe8 when he gets right
back in the game.
17 Nd4 Bh5?!
17 ... b6 is still necessary.
18 Bxf6 Rxf6 19 Nb3
193
Now it’s too late. This idea of connecting the pawns is a recurring theme—
remember the idea Qd1-b3 in Game 36.
19 ... Bg6
Black has no good move here, since he failed to secure his queenside with ... b7-
b6. Both 19 ... Nc6 20 Nc5 and 19 ... b6 20 Nxa5 are losers for Black, while 19 ...
Nxb3 20 axb3 just leaves him a pawn down, facing a slow death.
20 Qd5 Rf5 21 Qd4 c5
Or 21 ... Nc6 22 Bxc6 Qxc6 23 Qxa7 Rff8 (if 23 ... Rbf8 24 Nd4 forks) 24 Qd4
and it’s hard to see compensation for two extra pawns.
22 Qg4 Nc6 23 Be4 Rf7 24 Qxd7 Rxd7
25 Bxc6
194
25 Nxc5 wins even faster.
25 ... bxc6 26 Rd2 Re7 27 Rfd1 Bh5 28 f3 Rbe8 29 Kf2 Re3 30 Na5 Rxc3 31
Rxd6 Rc2 32 R1d2 Rxd2 33 Rxd2 Bf7 34 Rd7 Bg8 35 Rxa7 h5 36 Ra6 Rb8 37
Rxc6 Rb2 38 Rxc5 Rxa2 39 Rxh5+ Bh7 40 Re5 Bd3 41 c5 Bxe2 42 Rxe2 Rxa5 43
Rc2 1-0
Three extra pawns is enough!
This game is an object lesson that one cannot play passively in the Budapest
Gambit. But note that Black would have been fine had he played accurately, especially
if he shook off the queenside pressure early, as given in the note to move 13.
Game 41
J.Aguiar Garcia-M.Sanjuan Garcia
Malaga 1994
1 d4 Nf6 2 c4 e5 3 dxe5 Ng4 4 Bf4 Bb4+ 5 Nc3 Nc6 6 Nf3 Bxc3+ 7 bxc3 Qe7 8 Qd5
f6 9 exf6 Nxf6 10 Qd3 d6 11 g3 0-0 12 Bg2 Re8
Call me primitive, but I like this obvious move—and besides, the threat down the
e-file means that we can add another pawn sacrifice category: now Black has given up
a pawn both as a pawn cracker and as a preventive, in that White can’t castle without
losing the pawn on e2.
As will be seen, White usually does give back the pawn, for other moves allow
Black a good game. Now here’s the problem: of the four games in the Mega that
continue 13 0-0 Qxe2, three end in draws and the fourth is a Black loss, albeit due to a
blunder. But what of the draws? I have to say that Black has every chance of
equalizing, but very limited winning chances. Now a draw with Black is definitely a
success at the international level, but in a local tournament where you need to win ...
then I suggest 12 ... Bg4 with a more complicated game.
195
13 0-0
It’s hard to find anything better, for any defence of e2 loses time (while the white
king stays in the centre) and Black is already threatening 13 ... Bf5! trying to divert the
white queen. In the database only two moves (other than 13 0-0) have been tried: 13
Ng5 and 13 Nd4. Besides this, I would consider 13 Be3 to shield the e-file. Let’s take
a look:
a) 13 Ng5 h6 14 Bd5+ Kf8 15 Nf3
15 ... Bf5! (White’s early violence rebounds to Black’s favour) 16 Qd2 Ne4 17
Bxe4 (better is 17 Qb2 Nxc3, though Black recovers his pawn with an easy game) 17
. .. Qxe4 18 Be3 Ne5 (Black is already better, as he gets his pawn back with a
continuing attack) 19 Qd4 Nxf3+ 20 exf3 Qxf3 21 Kd2 Re4 22 Qd5 Rae8 23 Rhe1
Be6 24 Qa5 Bxc4 25 Qxc7 Kg8 26 Rad1 d5 27 Kc1 R8e7 28 Qc8+ Kh7 29 Kb2 b5 30
Qc5 a5 31 Rd2 Qf7 32 Red1 b4 33 Rd4 bxc3+ 34 Kxc3 Rxe3+ 35 fxe3 Rxe3+ 36 Kb2
Qf2+ 37 R1d2 Re2 38 Qxa5? (this loses immediately, but if 38 Rxe2 Qxe2+ 39 Kc3
Qxa2 and Black should win with two pawns and an attack for the exchange) 38 ...
Qxd4+ 0-1 P.Pirkelbauer-E .Konrad, Austrian Team Ch. 2000.
b) 13 Nd4 Ne5 14 Bxe5 (14 Qc2 Nxc4 is fine for Black) 14 ... dxe5 15 Nf5 Bxf5
16 Qxf5 e4
196
reaches an interesting position. One recalls something similar could have come
about in Zakaria-Rogers (note to move 12 in Game 39) from the sequence 12 ... Kh8
13 Nd4 Ne5 14 Bxe5 dxe5 15 Nf5 Bxf5 16 Qxf5 e4 which I judged better for White,
especially since the black king was so misplaced. Here we have an almost identical
position, but Black is basically two tempi up: his king’s rook is at e8 instead of f8,
usefully defending the e-pawn, and his king is at g8, closer to the centre and not a
target for any back rank combinations. After 17 0-0 Rad8 18 Rfd1 (not 18 Qa5 b6! 19
Qxa7 Ra8 20 Qb7 Qc5 trapping the queen) 18 ... Rxd1+ 19 Rxd1 Qa3 Black stands
well, as his queen will devour at least one of White’s broken pawns.
c) 13 Be3 g6! (making a square for the king and supporting ... Bf5) 14 0-0 (White
can’t prevent the c8-bishop coming out: if 14 Nd4 Ne5 and Black wins his pawn back,
or 14 Nh4 Ne5 15 Qd4?! c5 16 Qf4 Nf7 and White is in big trouble in view of the
threat ... g6-g5; he would do better just to give the pawn back with 15 Qc2) 14 ... Bf5
15 Qd2 Ng4 and Black has good counterplay.
13 ... Qxe2 14 Qxe2 Rxe2
197
So there we have it: Black has gotten his pawn back with a rook on the seventh,
while White can now activate his bishops. Chances are about even.
15 Nd4 Nxd4 16 cxd4 Be6
Not bad either is the solid 16 ... h6 17 Bf3 Re7 18 Rfe1 Rxe1+ 19 Rxe1 Kf7 20
Rb1 g5 21 Be3 Rb8 22 h4 g4 23 Bg2 h5 24 Bf4 b6 25 c5 Bf5 26 Rb2 Rd8 27 cxd6
cxd6 28 Rb5 d5 29 Bg5, and now Black erred with 29 ... Be4? 30 Bxe4 dxe4 31 Rf5
and barely made a draw in R.Siegmund-R.Fröhlich, Oberstdorf 2005. Instead, Black
would have been perfectly equal had he played 29 ... Re8, when he gets counterplay
on the e-file and White’s threat to win the d-pawn is a sham, as can be seen: 30 Bxf6
Kxf6 31 Bxd5 (not 31 Rxd5 Re1+ 32 Kh2 Re2 and Black recovers his pawn with the
better game) 31 ... Rd8! with the threat of ... Bd3 draws easily.
17 Bxb7
Also possible is the quiet 17 Rfc1 Rb2 18 a3 Rf8 19 Rab1 Rxb1 20 Rxb1 b6 21
Rc1 Nd7?! (Black has no need to retreat; better is 21 ... h6 and if 22 c5 Nd5, giving up
a pawn for an opposite-coloured bishops draw) 22 Bc6 h6 23 Kg2 Nf6 24 h3 Kh7 25
Bd2 Bf5 26 f3 Bd7 27 Bxd7 Nxd7 28 Re1 Rf7 29 Bc3 Nb8 30 f4 Nd7 31 Kf3 g5 32
d5 gxf4 33 gxf4 Nc5 and here, while the black knight is solid, the long-range bishop
probably gives White a slight edge, which he could maintain with 34 Re2. Instead, he
played 34 Bd4? allowing 34 ... Rxf4+! and White had to scramble for a draw in
G.Curi-M .Saralegui, Uruguayan Ch. 1994.
17 ... Rb8 18 Bf3 Rc2
198
19 d5
If 19 Bd1 Black maintains the pressure with 19 ... Rc3 (Black’s one loss in this
variation occurred due to the blunder 19 ... Rcb2?, when after 20 Bb3 White was a
good pawn up and went on to win in J.Doeserich-K .Zeiler, German League 2000) 20
Bd2 (or 20 d5 Bh3 21 Re1 Rxc4 22 Bb3 Rcb4 and Black equalizes) 20 ... Rd3 21 Ba5
Rxd4 22 Bxc7 Rb7 23 Re1 Kf7 24 Ba5 Rxc4 with an equal if double-edged ending,
where Black’s passed d-pawn balances White’s two bishops.
19 ... Bg4
Also possible is 19 ... Bf5 20 Rfc1 Rbb2 with compensation, according to Flear.
20 Bxg4
Or 20 Bg2 Rbb2 and Black’s seventh rank pressure will at least regain the pawn.
199
20 ... Nxg4 21 Rac1 Rbb2 22 c5 Nxf2
Black recovers his pawn and best play leads to a draw.
23 Rxc2 Nh3+ 24 Kh1 Rxc2 25 cxd6 cxd6 26 Rc1
If 26 Bd6 Nf2+ results in a draw by repetition.
26 ... Rxa2 27 Rc8+ Kf7 28 Bxd6
At this point both 28 ... a5 and 28 ... Nf2+ are possible, but either of these would
probably draw as well; instead Black plays the forcing ...
28 ... Rd2 1⁄2-1⁄2
Which should draw as follows: 29 Rc7+ Kg6 30 Be5 Rxd5 31 Rxg7+ Kf5 32
Bc3 (not 32 Rxh7?! Ng5 33 Rxa7 Rxe5 and Black has the better half of a draw) 32 ...
h5 33 Rxa7 Rc5 34 Bd4 (or 34 Ra3 h4 35 gxh4 Kg4 36 Be1 Rf5 37 Rg3+ Kxh4 and
White’s remaining rook pawn isn’t going anywhere) 34 ... Rc2 and White can do
nothing with his king in a box.
Not wishing to play all this out, the players understandably agreed to a draw
straight away.
Black should make a draw from this ending (after 12 ... Re8 13 0-0 Qxe2 14
Qxe2 Rxe2), but he has to play exactly with no real winning chances. This is not to
everyone’s taste, but I’m not sure everyone will castle after 12 ... Re8 either, in which
case Black gets an easy game—and even if White does castle, the ending is not so
difficult.
Summary
One can gamble with 8 ... Qa3, just as one can gamble with 4 ... g5 from the
preceding chapter. You might win quickly—or you might lose just as fast! In any case,
your author does not recommend this move, but rather, the standard variation with 8 ...
f6.
In the main line where White plays a kingside fianchetto, Black gets long-term
counterplay with 12 ... Bg4 or very close to clear equality with 12 ... Re8. In any case,
this line of the Budapest should not be feared if Black is well prepared.
200
But I have to point out that you need to have these first twelve moves both
memorized and understood—you have to have these moves down cold! As I said in
the Introduction, the Budapest is not a “feel” opening where you can learn the general
ideas and just play. Rather, one must follow precise tactical sequences right in the
opening, and it would be difficult to come up with these over the board. I’m a little sad
about this, but that’s the way it is!
201
Chapter Eight
Black Gambits against 4 Bf4
It is possible to play in gambit style against 4 Bf4, and I present four of these,
going from worst to best—but I don’t recommend any of them. The Original Budapest
Gambit seen in the last chapter followed the natural positional flow of the opening,
and risk level was low. The next four games show Black trying to force the play
prematurely with no real positional justification. Tartakower ’s line in Game 45 is
semi-playable, but the rest can’t be recommended at all.
Game 42
T.Taylor-A.Pickering
Los Angeles (rapid) 2005
1 d4 Nf6 2 c4 e5 3 dxe5 Ng4 4 Bf4 Nc6 5 Nf3 Bc5?!
Extremely doubtful, but as we shall see, Black has a trick in mind. Correct is 5 ...
Bb4+.
6 e3 f6
6 ... Qe7, switching gears to try to get the pawn back, cannot be recommended.
White scored easily with 7 Nc3 in the following two games:
202
a) 7 ... Ngxe5 8 Nxe5 Nxe5 9 a3 (actually inaccurate—White wins a piece
immediately with 9 Nd5! Bb4+ 10 Ke2, or 9 ... Qd6 10 Qh5 as in the game) 9 ... a5
(better is 9 ... c6 with some hope) 10 Nd5 Qd6 11 Qh5 1-0 D.Lewinski-J .Boguslawski,
Torun 1991—that was quick!
b) The young Shabalov gets a lesson here: 7 ... Bb4 8 Rc1 0-0 9 Be2 Ngxe5 10 0-
0 Bxc3 11 Rxc3 d6 12 Nd4 Re8 13 Bg3 Bd7 14 Nb5 Bf5 15 e4! Bc8 (if 15 ... Bxe4 15
Re3 and White wins by pin) 16 f4 (White has an Alekhine Attack with all the
trimmings, while Black won’t last long) 16 ... Ng6 17 f5 Nf8 18 c5 Rd8 19 cxd6 cxd6
20 f6 gxf6 21 Bh4 Qxe4 22 Bxf6 Rd7 23 Rg3+ Ng6 24 Qd2 Qe8 25 h4 1-0 V.Bagirov-
A.Shabalov, Jurmala 1985.
7 exf6 Qxf6
203
There is a little story behind this game: my opponent “caught” me in this
variation in a blitz game (although his trick worked, he only equalized and I won the
game anyway) and then tried it again in a tournament game not much later. But I had
looked the line up in the interim! The book refutation proved good enough.
8 Qd2!
White scores 91% after this move in the Mega: this variation is a one trick pony
for Black, and if White makes the right move, as here, Black has nothing for the pawn.
8 Nc3?! Nxf2! is Black’s trick, based on 9 Kxf2 Qxf4 exploiting a pin. Someone
fell into this in a tournament game recently: After 10 Nd5 Qd6 Black was better and
went on to win in Ju.Wilson-N .Zykina, Dresden Olympiad 2008.
At least I saw that much in the blitz game! My encounter continued 9 Nd5 Qxb2
10 Qc1 Qxc1+ 11 Rxc1 Nxh1 12 Nxc7+ Kd8 13 Nxa8 with approximate equality,
though eventually 1-0 in T.Taylor-A .Pickering, Los Angeles (blitz) 2005.
8 ... Bb4
Now 8 ... Nxf2? fails to 9 Qxf2 Qxf4 10 exf4 and White comes out a piece ahead;
while after 8 ... d6 9 Nc3 Be6 10 a3 a5 11 Ne4 Qe7 12 Nxc5 dxc5 13 Be2 Rd8 14 Qc3
0-0 15 0-0 Bf5 16 Rad1 Nf6 17 Ne5 Nxe5 18 Qxe5 Qxe5 19 Bxe5 White was a good
pawn up and converted smoothly in R.Djurhuus-D .Lubbert, Gausdal 1991.
9 Nc3 d6
If 9 ... Bxc3 10 bxc3 d6 White uses Rogers’ trick and exchanges a doubled pawn
with 11 c5!.
10 Be2 Be6 11 0-0 0-0 12 Nd5!
It’s all over: the rest is just a technical exploitation of material advantage.
12 ... Qxf4
Black could prolong, but not save the game with 12 ... Bxd2 13 Nxf6+ Nxf6 14
Nxd2 etc.
13 Nxf4 Bxd2 14 Nxe6 Rf6 15 Nxd2 Nxh2 16 Kxh2 Rxe6 17 Bf3 Rh6+ 18 Kg1
Ne5 19 Bxb7 Rf8 20 Nf3 Nd3 21 Bd5+ Kh8 22 Ng5 Rhf6 23 Nxh7! Kxh7 24 Be4+
Kh8 25 Bxd3 g5 26 f3 Kg7 27 Kf2 g4 28 Ke2 g3 29 Rh1 Rh8 30 Rxh8 Kxh8 31
204
Rh1+ Kg8 32 Rh3 1-0
Yes, this kind of worked in a blitz game, but even if I hadn’t looked it up, I think
I could have found 8 Qd2! in a rapid game—and don’t ever play this at a Classical
time control!
Game 43
D.Dumitrache-O.Biti
Zagreb 1997
1 d4 Nf6 2 c4 e5 3 dxe5 Ng4 4 Bf4 Bb4+
4 ... Nc6 5 Nf3 Bb4+ 6 Nbd2 Qe7 is the most popular line of the Bf4 variation
(White blocks with the knight on d2 more than three times as often as Nc3) and this is
the subject of the next chapter. I also believe this is Black’s most accurate move order.
However, if Black plays this particular move order, with 4 ... Bb4+, another
dubious gambit is possible! This one’s quite tricky, but likely to lead to a quick loss for
Black if White is prepared.
5 Nd2 d6?!
I don’t think there’s any justification for sacrificing a central pawn like this—
Black is now two pawns down, and must rely on random tactics for compensation—
but it’s true White could get confused in the complications.
I recommend 5 ... Nc6, trying to transpose to the main line with 6 Nf3, though
White might successfully deviate with 6 a3.
6 exd6 Qf6 7 Nh3
205
7 ... Nxf2
Again this trick! But White should come out ahead in view of his good
development and continual threat to take on c7. If instead 7 ... Bxd6 8 Bxd6 Qxd6 9 e3
and Black is left a pawn down, as 9 ... Nxh2 10 c5! wins for White.
7 ... Qxb2 has also been tried, but after 8 Rb1 Qa3 9 Rb3 Qa5 10 dxc7! (White’s
key idea) 10 ... Nc6 11 a3 Be7 12 e3 Nf6 13 Qc1 Nd7 14 Qc3 White forced the queens
off and won with his passed pawn in E.Gleizerov-M .Ritova, Berlin 1996.
8 Kxf2 Bxh3 9 g3
Black has no good move; one sees the game destruction, and also a nice smash
on the bishop check—I don’t think there is justification for Black’s wild play right in
the opening.
206
9 ... Bxf1
Here’s the checking line: 9 ... Bc5+ 10 e3 g5 (if 10 ... Bf5 11 dxc7 Na6 12 Nf3
and Black doesn’t have compensation for two pawns, especially when one considers
the strong passer—White’s main trump in this variation—that is sitting so eagerly on
c7) 11 Ne4 Qxb2+ 12 Qe2! Qxa1 (relatively better is 12 ... Qxe2+ 13 Bxe2 gxf4 14
Nxc5 fxe3+ 15 Kxe3 cxd6 16 Nxb7 Ke7 17 Rhd1 when White only wins a pawn, and
Black is likely to survive for more than 17 moves) 13 Bxh3 Qxh1 (if 13 ... Qg7 14
dxc7 is again the key, with a quick win for White) 14 Qb2 (Black’s adventures have
left his position en prise: none of the captures work, but he fails to find safety in
castling either!) 14 ... 0-0 (14 ... Qxh2+ 15 Bg2 0-0 16 Nf6+ Kh8 17 Bxg5 is similar to
a game variant, where the black queen is lost to Ng4; while both 14 ... Qxe4 and 14 ...
gxf4 allow 15 Qh8 mate!) 15 Nf6+ Kh8 (not 15 ... Kg7 16 Ne8+ Kg6 17 Qg7+ Kh5 18
Qxh7 mate) 16 Bxg5 and now:
a) 16 ... c6 17 Ng4+ 1-0 G.Beikert-B.Chatalbashev, Sofia 1994; Black resigns as
mate is forced in at most three moves.
b) 16 ... h6 17 Bg2 Qd1 (if 17 ... Qxh2 18 Ng4+ wins the queen) 18 Bxh6 with
way too many threats, for example 18 ... Bxd6 19 Bg7+ leads to mate.
c) 16 ... Ba3 17 Qxa3 Qb1 (not 17 ... h6 18 Qd3! Qxh2+ 19 Kf3 Qh1+ 20 Kg4
and mates) 18 Qc3 Qg6 19 dxc7 and once again the passed pawn is decisive, e.g . 19 ...
Nc6 20 Nd7 Kg8 21 Nxf8 Rxf8 22 Bf6 Qh6 23 Kg2 Ne7 24 Qd4 Ng6 25 Bd8 and the
c7-pawn queens.
10 dxc7!
207
White takes a second pawn and gains a vital tempo by threatening to promote on
c8. As I said above, this pawn is White’s key trump, and I haven’t been able to find
any saves for Black.
10 ... Nc6
Or 10 ... Bh3 11 cxb8Q+ Rxb8 12 Qa4+ Qc6 13 Qxb4 Qg2+ 14 Ke3, when
Black’s attack is over and White is up a piece.
11 Rxf1 Bxd2
11 ... g5 loses immediately to 12 Ne4, and White is also winning, if not
absolutely immediately, after 11 ... Qxb2 12 Ne4.
12 Qxd2 g5
This loses by force, but one can understand Black’s desperation: if he makes the
normal move, 12 ... 0-0, White also castles (by hand) with 13 Kg1 and Black has
absolutely nothing for two pawns—one of which is perched on the seventh rank!
13 Qe3+
208
13 ... Ne7
Obviously 13 ... Kf8 loses to 14 Qc5+ Ke8 15 Qxg5, so the only other alternative
is 13 ... Kd7. But then the black king is in a mating net and can’t get out without
severe material loss. White wins as follows: 14 Rad1+ Kc8 15 Qd2 Qf5 (if 15 ... Qe6
16 Bxg5 Kxc7 17 Bf4+ and White keeps two extra pawns, or 15 ... Ne5 16 Qd8+
White comes out a piece up) 16 e4! Qh3 17 Bd6 (once again White threatens to
consolidate with Kg1, so Black has no choice) 17 ... Qxh2+ 18 Ke3 Qh3 (if 18 ...
Qxd2+ 19 Rxd2 and Rxf7 wins) 19 Be5! Re8 (if 19 ... Nxe5 20 Qd8+ Rd8 21 cxd8Q
mate) 20 Rxf7 a5 (or 20 ... b6 21 Qd8+ Nxd8 22 cxd8Q+ Rxd8 23 Rc7+ Kb8 24
Rxd8+ Qc8 25 Rdxc8 mate) 21 Qd8+ Rxd8 22 cxd8Q+ Nxd8 23 Rc7+ Kb8 24 Rxd8+
Ka7 25 Bd4+ Ka6 26 Rxa8 mate.
14 Qe5 Qxe5
Black has no choice, as 14 ... Qb6+ fails to 15 c5.
15 Bxe5 Rg8 16 Kg2
White has two extra pawns, one passed on the seventh, and the superior minor
piece: Curtains!
209
16 ... Rc8 17 Rf6 Nc6 18 Bd6 Nd4 19 Raf1 Rg6 20 Rxf7! 1-0
Black resigns as 20 ... Rxd6 21 Rf8+ Kd7 22 R1f7+ Ke6 23 Rxc8 Kxf7 24 Rd8
Rc6 25 c8Q Rxc8 26 Rxc8 Nxe2 27 Rc7+ is too easy.
As long as White knows the key idea (the pawn capturing its way to c7) this line
is dangerous only for Black. Playing this gambit would be fatal against a well-
prepared opponent.
Game 44
I.Jelen-P.Petek
Bled 1993
1 d4 Nf6 2 c4 e5 3 dxe5 Ng4 4 Bf4 Bb4+ 5 Nd2 f6
While Black does not give up his other central pawn here (5 ... d6 as seen in the
previous game), he doesn’t get real compensation either.
6 Ngf3 fxe5
Presumably this was Black’s idea, but 6 ... Nc6 7 exf6 Qxf6 is objectively better,
transposing to the next game.
7 Nxe5 Nxe5
Weaker is 7 ... Qf6 8 Nd3 Nxf2 (the generic trick for these dubious gambits is
more dubious than usual here—but if Black just castles, 8 ... 0-0, he has nothing for
the pawn after 9 e3) 9 Kxf2 Bxd2 10 Qxd2 g5 11 Qe3+ Kf7 12 Qc5 gxf4 13 Qxc7 Rf8
14 Qxf4 Kg7 15 Qxf6+ Rxf6+ 16 Ke3 and White is two pawns up for nothing.
Likewise 7 ... 0-0 8 Nd3 and Black’s compensation can’t be seen.
8 Bxe5
210
White’s idea is just to hang onto the pawn and eventually win. Black does have a
couple of half open files for his material—not absolutely nothing—but Black is clearly
struggling to equalize, and this is not the kind of position one should aim for after a
mere 8 moves.
8 ... 0-0 9 e3 d6 10 Bg3 Qf6 11 a3 Ba5 12 b4 Bb6 13 Be2 a5 14 b5 Bf5 15 0-0
Nd7 16 Nf3 Nc5 17 Nd4 Bg6 18 f3 Ne6 19 Bf2
There’s not much I can say about the preceding moves: White methodically
consolidates, and Black thrashes around, hoping for a little counterplay so that he
might make a draw.
In my opinion, his only chance for that “Holy Grail” of a half point comes right
here: Black should play 19 ... Bxd4 20 exd4 Nf4 21 Re1 Nxe2+ 22 Rxe2 Rfe8,
211
creating a bishops of opposite colour situation, and he can probably get all four rooks
off on the open file. Then if (a big if, granted) he can get the queens off as well, he
would have good drawing chances in the pure bishop ending. But this would be a long
slog for a miserable draw!
19 ... Rae8 20 Nxe6 Qxe6 21 e4
Now it’s all over: the hope of opposite-coloured bishops has gone; White has
fully consolidated with the extra pawn; the rest is technique.
21 ... Bxf2+ 22 Rxf2 Qf6 23 Rf1 Bf7 24 Qd2 b6 25 Rad1 Re5 26 Qd4 Qg6 27
Bd3 Rg5 28 Rd2 Qh6 29 Rdf2 Be6 30 f4 Rh5 31 g3 Bh3 32 Re1 Kh8 33 f5 Qg5 34
Qe3 Qe7 35 Rf4 Rg5 36 Rh4 Bg4 37 h3 Bh5 38 Rf4 Bf7 39 Be2 Qe5 40 h4 Rh5 41
Bxh5 Bxh5 42 g4 Bf7 43 Rc1 Re8 44 Kg2 d5 45 cxd5 Bxd5 46 Kf3 Bb7 47 Qd3
Qe7 48 f6 gxf6 49 Qd4 Kg7 50 g5 1-0
There are no real tricks in this line: Black is left struggling to draw without even
getting the chance to confuse his opponent! I can’t recommend this gambit either—it
calls for more suffering than I enjoy.
Game 45
A.Rubinstein-S.Tartakower
Bad Kissingen 1928
1 d4 Nf6 2 c4 e5 3 dxe5 Ng4 4 Bf4 Bb4+ 5 Nd2
After trying to refute the gambit outright with Nc3 when he first faced it—with
disastrous results—Rubinstein settled for this modest move, and did much better!
5 ... Nc6 6 Nf3 f6!?
The best of this bunch of gambits—in fact, this isn’t really a gambit at all, in that
Black quickly gets his pawn back. Unfortunately, he then gets a somewhat inferior
version of Chapter 9, but at least this line is playable!
212
7 exf6 Qxf6 8 g3
White needs to develop. 8 Bxc7?! Qxb2 9 e3 0-0 10 Be2 Bxd2+ 11 Nxd2 Nxf2,
winning for Black, shows the peril of pawn snatching!
8 ... Qxb2 9 Bg2 d6 10 0-0 0-0
Although Black has recovered his material, his queen is misplaced and his bishop
on b4 pins nothing. Black has no e-file play, and it may be an advantage for White that
there is no pawn on c3 (compared to the previous chapter) as there is no pawn block
(such as we saw in Game 39).
It’s time to take the initiative!
11 Nb3
Best is the pawn sacrifice 11 a3! Bxa3 (both 11 ... Bc5 and 11 ... Ba5 are met by
12 Ne4 with advantage, especially as White hasn’t even given a pawn) 12 Ne4 with
very good compensation. White threatens 13 Qd5+ Kh8 14 Rfb1 winning a piece,
while after 12 ... Bb4 13 Qd3 White has tremendous Benko-style play on the two open
queenside files. Rubinstein's quiet move allows a hidden defensive resource.
11 ... Qf6 12 Ng5 h6?
A serious mistake: Black can’t let the white knight centralize with tempo. Correct
is to fight this plan with 12 ... Qg6 (the defensive resource mentioned above—the idea
is 13 Ne4?! Bf5 chasing the knight out) 13 Nd4 Nxd4 14 Qxd4 Bc5 15 Qe4 Qh5! with
adequate counterplay.
13 Ne4
213
Now the white knights dominate the misplaced bishop, and Rubinstein wins in
forceful positional style.
13 ... Qf7 14 a3 Ba5 15 Nxa5 Nxa5 16 h3 Ne5
16 ... Nf6 fails to 17 Nxf6+ Qxf6 (or 17 ... gxf6 18 Bxh6) 18 Qd5+ picking off
the knight on the rim.
17 c5!
Now White’s only weakness goes away, while Black’s undeveloped position is
shattered.
17 ... g5 18 Bd2 d5?!
Black had to try to hang on with 18 ... Nac4, though after 19 cxd6 White’s
advantage is probably already decisive, as Black’s pawns are a wreck!
19 Nxg5!
White wins a pawn while maintaining the two bishops—this has always been
enough for Rubinstein.
214
19 ... hxg5 20 Bxa5 Be6 21 Bc3 Nc6 22 Qd2 Qf5 23 g4 Qf4 24 Bxd5 Bxd5 25
Qxd5+ Kh7 26 e3 Qf3 27 Qxg5 Qxh3 28 Qg7 mate
Tartakower always liked to be shown!
Summary
Of the dubious variations in this chapter, Tartakower ’s 6 ... f6!? is kind of
playable, but I can’t see a point to it: Rubinstein's natural development plus modern
Benko ideas (11 a3!) should give White a larger edge than is available in the main
lines of the next chapter, without risking much of anything.
215
Chapter Nine
Bf4 Main Line with Nbd2
This is far and away the most popular line in the 4 Bf4 variation. White pins his
hopes on quiet but rather venomous play. As mentioned before, this is a favourite of
positional players like Karpov and Benko: basically White tries to obtain the two
bishops at no cost, and then grind away!
However, the objective annotator has to wonder if giving up the two bishops is
forced: and my answer is “No!”
The first ten games in this chapter (Games 46-55) show high-rated players
playing Black “in the approved manner” ... and getting bad games; then we have three
independent thinkers doing much better in the opening (Games 56-58). I present then
another GM debacle, and finally some more independent thinking in Games 60-61.
I believe that the “independent” games demonstrate that Black does not have to
submit to prolonged suffering in the Budapest Gambit—but one must put away the
notion that higher-rated players always play the best moves.
Game 46
A.Karpov-N.Short
1st matchgame, Linares 1992
1 d4 Nf6 2 c4 e5 3 dxe5 Ng4 4 Bf4 Nc6 5 Nf3 Bb4+ 6 Nbd2
216
No doubled pawns for White here!
6 ... Qe7
This line is no gambit: Black is assured of getting the pawn back; the trick is not
to pay too much while recovering the material.
7 e3
7 a3 Ngxe5 8 Nxe5 Nxe5 9 e3 will be covered in Games 59-61.
7 ... Ngxe5 8 Nxe5 Nxe5 9 Be2 0-0 10 0-0
This is another of the basic tabiyas of the Budapest Gambit, with 428 games in
Megabase. White threatens to encircle the b4-bishop with moves like Nb3, a2-a3, and
c4-c5 if necessary. Black faces a critical choice, as his next move or moves sets the
foundation for the middlegame. What is Black’s best line? I believe I have a good
idea, but before we get there, what should Black not play?
To answer this question, we need look no further than, on calling up these 428
games, asking Chessbase to load them according to Elo Black. Let’s examine the top
ten games by rating, which feature two players (Nigel Short and Victor Korchnoi) who
have contested a match for the World Championship, and the others are all GMs. With
such a high-rated ensemble, we can be sure that many dubious moves will follow! So
I’m going to lightly annotate the top Elo Black 10—in all of which Black gets a worse
to lost position out of the opening—to give the reader some idea of what to avoid. As
to what is correct and best, we have to go somewhat lower on the Elo table ...
10 ... d6
Now the black king’s bishop is caught, and Black gets doubled pawns as well.
11 Nb3 b6 12 a3 Bc5 13 Nxc5 bxc5 14 b4 Nd7
If 14 ... cxb4 15 axb4 White gets a target down the open a-file.
15 Bg4 a5
For 15 ... Re8 see the next game.
16 Bxd7 Bxd7 17 bxc5 dxc5
217
Karpov gets his forte: a very technical position with a significant edge due to the
doubled black pawns, both of which are targeted by his bishop. Not surprisingly,
Karpov grinds his way to victory.
18 Qd5 Ra6 19 Qe5 Re6 20 Qxc7 Rc8 21 Qb7 Qe8 22 Rab1 h5 23 f3 Bc6 24
Qb2 h4 25 h3 f5 26 Qc2 Qg6 27 Qc3 a4 28 Rf2 Rce8 29 Rd1 Qh5 30 Qc2 Qg6 31
Kh1 Qf6 32 Qb2 Qe7 33 Rfd2 g5 34 Bd6 Qf7 35 Bxc5 g4 36 fxg4 fxg4 37 Rf2 Qh5
38 Qe2 Rg6 39 Rd6 Re4 40 Rd8+ Kh7 41 Rf7+ Rg7 42 Rxg7+ Kxg7 43 Qb2+ 1-0
In my humble opinion, 10 ... d6 cannot be recommended, as I would hate to
defend that joyless position after White catches the black bishop and doubles the c-
pawns. Still, Short has a different opinion, and tries again. Note that the top ten games
by Elo Black feature only six players—Short appears twice, and the Latvian
grandmaster Normunds Miezis four times.
Game 47
V.Ivanchuk-N.Short
Monte Carlo (blindfold rapid) 1993
1 d4 Nf6 2 c4 e5 3 dxe5 Ng4 4 Bf4 Nc6 5 Nf3 Bb4+ 6 Nbd2 Qe7 7 e3 Ngxe5 8 Nxe5
Nxe5 9 Be2 0-0 10 0-0 d6 11 Nb3 b6 12 a3 Bc5 13 Nxc5 bxc5 14 b4 Nd7 15 Bg4
Re8
218
To me this is not significantly different from the last game, but I am not rated
2700!
16 Rc1 a5 17 Bxd7 Bxd7 18 bxc5 dxc5
Black gets the same set of shattered pawns.
19 Qd5 Ra6
20 Bg5
Now if White wanted to play, certainly 20 Qb7 was possible. As far as I can see,
White just wins a pawn, and as in the previous game, Black will have a desperate
struggle to survive; e.g . 20 ... Rg6 21 f3 Bc6 22 Qa7 (not at once 22 Qxc7 Qxc7 23
Bxc7 Rxe3) 22 ... a4 23 Rb1 f5 24 Rb8 Kf7 25 Rxe8 Bxe8 26 Qxc7 and a pawn falls.
Black might have some hope of drawing due to the opposite-coloured bishops, but
219
with rooks still on there is certainly no clear draw.
20 ... Qd6 21 Bf4 Qe7 22 Bg5 1⁄2-1⁄2
As mentioned above, I don’t see any difference between this game and the
previous one: generally speaking, Black will have to defend a pawn down, opposite-
coloured bishops ending, and hope for a draw—certainly not my idea of fun!
Game 48
A.Riazantsev-V.Korchnoi
Chelyabinsk 2007
1 d4 Nf6 2 c4 e5 3 dxe5 Ng4 4 Bf4 Nc6 5 Nf3 Bb4+ 6 Nbd2 Qe7 7 e3 Ngxe5 8 Nxe5
Nxe5 9 Be2 0-0 10 0-0 Re8
Black diverges for the moment from the Short games, but ...
11 Nb3 d6 12 a3 Bc5 13 Nxc5 dxc5
Now gets the same inferior pawn structure.
14 Qd5 Ng6 15 Qf3 a5 16 Rad1 Nxf4 1⁄2-1⁄2
After 17 Qxf4 the position is a like a Ruy Lopez Exchange where Black does not
have the two bishops as compensation—in other words, White wins any king and
pawn ending due to his mobile kingside majority. Korchnoi as White would never
have given Black a draw here.
Game 49
V.Korchnoi-J.Piket
Monte Carlo (rapid) 1994
220
1 d4 Nf6 2 c4 e5 3 dxe5 Ng4 4 Bf4 Nc6 5 Nf3 Bb4+ 6 Nbd2 Qe7 7 e3 Ngxe5 8 Nxe5
Nxe5 9 Be2 0-0 10 0-0 d6 11 Nb3 b6
So far as in Karpov-Short, but now Korchnoi goes his own way. In my opinion
he should have followed his great rival and gained a persistent edge with 12 a3.
12 Nd4 a5 13 a3 Bc5 14 Re1 a4 15 Nb5 Bb7 16 Nc3 Bc6 17 Nd5 Qd7?!
White might be slightly better after 17 ... Qd8 (because of his strong knight on
d5) but Black is very solid.
18 Nb4!
Taking advantage of his opponent’s slip! Black must surrender the bishop, for if
18 ... Bb7?? 19 Bxe5 wins a piece.
Note that Korchnoi as White with a small edge (compare the previous game)
does not give a draw, but fights 60 moves for victory!
18 ... Rfe8 19 Nxc6 Qxc6
This is the kind of position that Black needs to avoid in the Nd2 variation. White
gets the two bishops and can grind all night! Here we see Korchnoi methodically set
up a winning position—miss the win—then win anyway! Ah, the quality chess of
rapid games!
221
20 Qc2 Re6 21 Bg3 h6 22 Kh1 Qe8 23 Rad1 Ra5 24 Rd5 Nd7 25 Bg4 Re7 26
Bh4 Re5 27 Red1 Rxd5 28 Rxd5 Ne5 29 Be2 Ng6 30 Bg3 Qe6 31 Rd1 Qf6 32 Bf3
Ne7 33 Be4 h5 34 h4 g6 35 Bd3 Nc6 36 Be4 Ne7 37 Kg1 Qe6 38 Bf4 b5
39 Qd2
Korchnoi, like Piket earlier, goes to the wrong square with his queen. 39 Qc3
should win, for if 39 ... Bb6 40 c5! dxc5 (if 40 ... Qxe4 41 cxb6 cxb6 42 Rxd6 is
decisive) 41 Rd8+ Kh7 42 Rh8 is mate, while if 39 ... Ra7 40 Bh6 f6 41 Bd3 and
White’s attack should bring him a pawn at least.
39 ... Ra7 40 Bd5 Nxd5 41 cxd5 Qe4 42 Kh2 b4 43 f3 Qc4 44 e4 bxa3 45 bxa3
Rb7 46 Bg5 Rb3 47 Qf4 Bd4 48 Bf6 Bxf6 49 Qxf6 Qc2
Now 49 ... Rxa3 favours Black! Obviously time pressure has set in.
222
50 Rd4 Rb2 51 Qg5 Kg7 52 e5 dxe5 53 Qxe5+ Kh7 54 Qg5 Qc3 55 Rf4 Kg7
56 Qe7
Suddenly White is winning again!
56 ... Rb8 57 Rxf7+ Kg8 58 Qe6 Kh8 59 Qxg6 Qe5+ 60 f4 1-0
This game is a good example of the strength of the two bishops in this kind of
Budapest position, and we will see several more examples in this section, starting with
the next game. That said, since gaining the two bishops was not forced (see note to
move 17), I think Korchnoi should have taken the Karpovian edge with 12 a3.
Game 50
E.Solozhenkin-N.Miezis
Gausdal 2001
1 d4 Nf6 2 c4 e5 3 dxe5 Ng4 4 Bf4 Nc6 5 Nf3 Bb4+ 6 Nbd2 Qe7 7 e3 Ncxe5 8 Nxe5
Nxe5 9 Be2 0-0 10 0-0 Bxd2
223
Black “solves” the problem of his dark-squared bishop, but gives White the two
bishops in a fairly open position. I consider this to be an “unforced error” like hitting
the ball into the net in tennis.
11 Qxd2 d6 12 Rac1 Be6 13 Rfd1 f6 14 Qc3 Qf7 15 Bg3 b6 16 f4 Nd7 17 Bf3
Rae8 18 b4 f5 19 Bc6 Re7 20 Bh4 Nf6
Just as in the last game, White’s two bishops give him active play on both sides
of the board—I don’t need Mr. Fritz to tell me it’s a clear advantage to White!
21 Qa3 Qh5 22 Bxf6 Rxf6 23 Bf3 Qe8 24 Qxa7 Bf7
White has outplayed his opponent and picked up a pawn for basically nothing.
Now correct was 25 Kf2! Bh5 (25 ... Rxe3 26 Qxc7 Ra3 27 Rc2 Qe3+ 28 Kf1 is
winning for White, as Black has no more play and d6 is hanging) 26 Bxh5 Qxh5 27
224
Qa8+ Rf8 28 Qf3 Qh4+ (not 28 ... Qxh2 29 Rh1 and the queen is trapped) 29 Kg1 and
Black has no real compensation for the pawn.
25 c5?
White blunders the pawn back, and Black gets the better game.
25 ... bxc5 26 bxc5 c6! 27 Qa5 d5 28 a4 Rxe3
29 Re1 Rfe6 30 Kf2 d4 31 Rxe3 dxe3+ 32 Kg1 Qb8 33 Qc3 Qxf4 34 a5 g5
34 ... Rh6 would win for Black. Black wins anyway, but it’s a bit more messy.
35 a6 e2 36 Re1 Re3 37 Qd2 Rxf3 38 Qd8+ Kg7 39 gxf3 Qe3+ 40 Kg2 g4 0-1
Black was in sorry shape after 20 Bh4, with the two bishops closing in—and
after White won the pawn, then 25 Kf2 would have forced Black into the thankless
task of defending a pawn down position with no real play. Yes, a strong GM won an
almost lost position, but that is no reason to continue playing a poor opening line.
By the way, this fortunate score was the only Black win among the Elo top ten!
Game 51
Z.Gyimesi-V.Nevednichy
Nagykanizsa 2003
1 d4 Nf6 2 c4 e5 3 dxe5 Ng4 4 Bf4 Nc6 5 Nf3 Bb4+ 6 Nbd2 Qe7 7 e3 Ncxe5 8 Nxe5
Nxe5 9 Be2 0-0 10 0-0 a5
A new tenth move, but now White asks ...
11 a3
225
Where can the bishop go?
11 ... Bxd2
All retreats give White a clear advantage: 11 ... Bd6 is of course bad due to 12
Ne4, and if 11 ... Bc5 12 Nb3 Bd6 (alternatives are no better: 12 ... Bb6 13 c5 Ba7 14
Rc1 a4 15 Qd4 Ng6 16 Qa4 Nf4 17 Qf4 with a good extra pawn, or 12 ... Ba7 13 Nxa5
Bxe3 14 Bxe3 Rxa5 15 Re1 and the bishops rule) 13 c5 Bc5 14 Nc5 Qc5 15 Rc1,
when White recovers his pawn while keeping the two bishops and damaging Black’s
pawn structure.
12 Qxd2
White has achieved the typical two bishops plus as seen in the previous game.
12 ... d6
Trying to take advantage of the hole at b3 fails: 12 ... a4 13 c5 f6 (not 13 ... Qxc5
14 Rac1 Qd6 15 Qxd6 cxd6 16 Rfd1 with a positionally won game) 14 Rac1 d6 15
cxd6 cxd6 16 Rfd1 Rd8 17 Qb4 and Black’s position was full of holes and convenient
targets in I.Rout-R.Farrell, Canberra 2002.
13 b4 axb4 14 axb4 Rxa1 15 Rxa1 b6 16 Bg3 f6 17 h3
226
Black has no compensation for the bishops and no active play; White unhurriedly
begins to grind.
17 ... Be6 18 Qc3 c5 19 Ra6 Qb7 20 b5 Qc7 21 Qc2 g6 22 Qa4 Rb8 23 f4 Nd7
24 Bf3 Nf8 25 Ra7 Qd8 26 Bc6 Rc8 27 Qa6 Rb8 28 Qa1 Rc8 29 Qa6 Rb8 30 Bh4
Utterly dominating. As in the previous game, White’s bishops attack from both
sides.
30 ... d5 31 cxd5 Bxd5 32 Qa1 Bf7 33 Bxf6 1-0
White gets a pawn, and a winning attack.
I’ve played GM Nevednichy, and I know how tough he is (see Game 72 for more
evidence), but it’s clear that here he never really got into the game. Black should avoid
this two bishop grind like the plague, for nothing good will come of it—for Black, that
227
is!
Game 52
C.Horvath-B.Chatalbashev
Elista Olympiad 1998
1 d4 Nf6 2 c4 e5 3 dxe5 Ng4 4 Bf4 Bb4+ 5 Nd2 Nc6 6 Ngf3 Qe7 7 e3 Ngxe5 8 Nxe5
Nxe5 9 Be2 0-0 10 0-0 d6 11 Nb3 Re8 12 a3 Bc5 13 Nxc5 dxc5 14 Qb3
For the alternative 14 Qd5 see Game 48.
14 ... b6
15 Bxe5
15 Qc3, retaining the bishop pair with some advantage, is better, but it will soon
become clear that White does not want to play.
15 ... Qxe5 16 Bf3 Rb8 17 Rad1 Be6 18 Bd5 Rbd8 19 Bxe6 Qxe6 20 Qa4 a5
21 Qc2 g6 22 a4 Qf6 23 b3 Rxd1 24 Rxd1 Rd8 25 Rxd8+ Qxd8 26 h3 h5 27 g3
Qd6 28 Kg2 Qc6+ 29 f3 Qf6 30 h4 1⁄2-1⁄2
If White gets the queens off, he wins—but such an exchange looks hard to force,
and a draw offer is easier.
White didn’t even try in this game, but he could have made Black work for his
draw.
Game 53
A.Smirnov-N.Miezis
Tallinn (rapid) 2005
228
1 d4 Nf6 2 c4 e5 3 dxe5 Ng4 4 Bf4 Nc6 5 Nf3 Bb4+ 6 Nbd2 Qe7 7 e3 Ncxe5 8 Nxe5
Nxe5 9 Be2 0-0 10 0-0 Bxd2
Miezis tries this again and ...
11 Qxd2 d6 12 b4 Be6 13 Qc3 f6 14 Rac1 b6 15 a3 a5 16 c5
Quickly finds himself in a life or death struggle to survive, as White opens lines
for his bishops.
16 ... axb4 17 axb4
Also good is 17 cxd6!? bxc3 18 dxe7 Rfe8 19 Rxc3 Rxe7 20 Rd1 with an ending
plus.
17 ... bxc5 18 bxc5 Ra2 19 Rc2 Rxc2 20 Qxc2 Rd8
If 20 ... dxc5 21 Ra1 Rb8 22 Ra5 g5 23 Bxe5 fxe5 24 f3 and White recovers his
pawn with a slight edge.
21 Ra1 Bf7 22 h3 g6 23 Qc3 Kg7 24 Ra7
229
24 ... d5
Black loses a pawn after 24 ... dxc5 25 Bxe5 fxe5 26 Qa5 Rd7 27 Bg4 Be6 28
Bxe6 Qxe6 29 Rxc7, though he might draw the ensuing four to three on the same side
ending.
Trying to avoid this, Miezis runs into something worse!
25 Bxe5
White wins a pawn anyway, but retains his c-pawn, which means his winning
chances rocket upward.
25 ... Qxe5
Or 25 ... fxe5 26 Qa5 Rc8 (if 26 ... Rd7 27 c6 is deadly) 27 Bg4 and White wins
the c-pawn.
26 Qxe5 fxe5 27 Rxc7
White is a clean pawn up and scores the full point.
27 ... Ra8 28 f4 Ra3 29 Kf2 exf4 30 exf4 Kf8 31 Bf3 Rc3 32 Ke2 d4 33 c6 h6
34 Ra7 h5 35 Kd2 Be6 36 Be4 h4 37 c7 Bc8 38 Bxg6 Ke7 39 Bf5 1-0
Maybe some extremely dour defence could have saved a draw here ... but maybe
not. The position was easy and fun to play for White, arduous and difficult for Black.
Game 54
M.Bluvshtein-N.Miezis
Calvia Olympiad 2004
1 d4 Nf6 2 c4 e5 3 dxe5 Ng4 4 Bf4 Nc6 5 Nf3 Bb4+ 6 Nbd2 Qe7 7 e3 Ncxe5 8 Nxe5
Nxe5 9 Be2 0-0 10 0-0 Bxd2
Third time charm?
11 Qxd2 d6 12 b4 Rd8 13 Qc3 f6 14 Rfd1 Bf5 15 Rd2 Bg6 16 Rad1 Bf7 17 a3
Qe6 18 c5
230
The typical break as seen in the previous game. White opens some lines for his
bishops and creates weaknesses in Black’s queenside. This is Paradise for a White
grinder—Hell for the suffering Black player (but then Miezis volunteered for this
torture!).
18 ... Rac8 19 h3 Qe8 20 Bg3 d5 21 e4! c6
If 21 ... dxe4 22 Rxd8 Rxd8 23 Rxd8 Qxd8 24 Bxe5 fxe5 25 Qxe5 and White is
much better due to the weakness of Black’s isolated pawn at e4.
22 exd5 cxd5 23 Re1 Nc4 24 Rd4 Qa4 25 Bd1 Qa6 26 Bg4 Ra8 27 Rd3
White happily grinds away!
27 ... Re8 28 Rxe8+ Rxe8 29 Bd7 Re4 30 a4 h5 31 a5 Re7 32 b5 Qxa5 33
Qxa5 Nxa5 34 c6 bxc6 35 bxc6 Be8 36 Bxe8 Rxe8 37 c7 Nc6 38 Rxd5
231
White converts to a favourable ending with the far superior minor piece.
38 ... Rc8 39 Rxh5 Kf7 40 Rc5 Ne7 41 Ra5 Ra8 42 Rb5 Rc8 43 Rb7 a5 44
Rb5 Nc6 45 Rb8 Na7 46 Rb6 Ke7 47 Ra6 Nb5 48 Rxa5 Nd6 49 Ra1 Rxc7 50 Re1+
Kd7 51 Rd1 Rc6 52 Kh2 Ke6 53 Rxd6+ Rxd6 54 Bxd6 Kxd6 55 Kg3 Ke5 56 Kg4
Ke6 57 f4 Kf7 58 Kh5 Kg8 59 Kg6 Kh8 60 h4 Kg8 61 h5 1-0
Black resigns in view of 61 ... Kf8 62 h6 gxh6 (or 62 ... Kg8 63 hxg7 f5 64 g4!
and mates) 63 Kxh6 Kf7 64 f5 and White wins the last black pawn.
After this horrific grind, I would certainly not play the Black position after 10 ...
Bxd2 again, but ...
Game 55
M.Rodshtein-N.Miezis
Winterthur 2004
1 d4 Nf6 2 c4 e5 3 dxe5 Ng4 4 Bf4 Nc6 5 Nf3 Bb4+ 6 Nbd2 Qe7 7 e3 Ncxe5 8 Nxe5
Nxe5 9 Be2 0-0 10 0-0 Bxd2
Here we go again!
11 Qxd2 d6 12 Rac1
A further check of the database reveals that Miezis had lost this position twice
before in earlier years (see this note and the next) bringing his total score with the line
to five losses and one win—and that win could certainly not be described as following
naturally from a good opening position! Here’s one: 12 b4 f6 13 Qc3 Bd7 14 Bg3
Rae8 15 Rac1 Be6 16 a3 Bf7 17 c5 (the usual recipe, White is better) 17 ... d5 18 c6
b6 19 Rfd1 Rd8 20 Rd4 Rd6 21 b5 a6 22 a4 axb5 23 axb5 Ra8 24 Ra1 Rxa1+ 25 Qxa1
Rd8 26 Ra4 g6 27 Qd4 Nc4 28 Ra7 Rc8 29 h4 Kg7 30 Bg4 Re8 31 Rxc7 Qb4 32
Qxd5 Re7 33 Rxe7 Qxe7 34 Qd7 Qe4 35 c7 Nd2 36 c8Q Qb1+ 37 Kh2 Nf1+ 38 Kh3
1-0 V.Mikhalevski-N .Miezis, Dieren 1997.
12 ... Rd8
And here’s the other: 12 ... Be6 13 Bg3 f5 14 Rfd1 Rfd8 15 Qc3 Nf7 16 Bf3 c6
17 h4 Rd7 18 b4 g5 19 Rd4 g4 20 Be2 c5 21 Rd2 Rad8 22 Rcd1 b6 23 a3 d5 24 bxc5
bxc5 25 Be5 Nxe5 26 Qxe5 Qf7 27 Qf4 Kg7 28 cxd5 Bxd5 29 Bb5 Rd6 30 Bc4 Qe6
31 e4! (the pin is fatal) and Black resigned, D.Bunzmann-N .Miezis, Bad Wörishofen
2000.
13 Qc3 f6 14 Bg3 Rb8 15 b4
232
White sets up the typical queenside attack: note that he has to do very little here
to get a good game, whereas Black must play with incredible accuracy just to survive.
15 ... b6 16 Rfd1 c5
Black stops the c4-c5 break seen in the last two games, but gives White a
pleasant target at d6.
17 a3 Bb7 18 Rd2 Rbc8 19 Qb3 Qc7 20 Rcd1
White gets the advantage with routine play.
20 ... Qc6 21 f3 Rb8 22 Qb1 g6 23 h4 Kg7 24 h5 Rbc8 25 Qb2
25 ... Kg8
If 25 ... Nf7 26 h6+ crushes. It’s hard to give good advice.
26 hxg6 hxg6 27 b5 Qe8
233
27 ... Qc7 28 f4 wins a pawn anyway: 28 ... Nd7 29 Rxd6 or 28 ... Nf7 29 Qxf6.
28 Rxd6 Rxd6 29 Rxd6 Nf7 30 Rxf6 Qxe3+ 31 Kf1 Nh8 32 Rd6 Re8 33 Rd7
Re7 34 Rd8+ Re8 35 Bf4 Qe6 36 Bh6 Qxe2+ 37 Qxe2 Rxd8 38 Qe6+ 1-0
Note that Black was about 150 Elo points higher rated than White (2377 vs.
2524) but never really got into the game.
Here are some interesting statistics on these top ten games. White won by a big
score, 71⁄2-21⁄2, or a 75% score for White.
This goes against the rating expectation, as Black was the higher-rated player in
five of the games, compared to four where White was higher, and one (Game 48)
where the players’ ratings were exactly the same. The average rating of the White
players was 2555; the average rating of the Black players was somewhat higher, 2585.
Even if you allow for White expecting to score more, given the rating difference
Black should have done better than a measly 25%!
Why did the top ten score so badly?
I believe the answer is very simple: they played the opening wrong. As I well
know, if you get a bad opening at this level you will be very lucky indeed to draw—
and that’s pretty much all Black could hope for in these ten games.
So what should Black play? My answer is: don’t play any of the above lines. For
my recommendation, see the next three games.
Game 56
J.Bonin-P.Saint Amand
Philadelphia 2001
1 d4 Nf6 2 c4 e5 3 dxe5 Ng4 4 Bf4 Nc6 5 Nf3 Bb4+ 6 Nbd2 Qe7 7 e3 Ngxe5 8 Nxe5
Nxe5 9 Be2 0-0
The year before this game, my old pal IM Jay Bonin had faced the unforced
Miezis-type exchange on d2 twice; and won both games in virtually identical style, as
can be seen. Whether at IM or GM level, this line is just too easy to play as White! 9
. .. d6 10 0-0 Bxd2 (there it is, thank you—after Black’s next we will have transposed
exactly to various Miezis debacles) 11 Qxd2 0-0 12 Rfd1 b6 13 b4 Bb7 14 c5! (the
typical break) 14 ... dxc5 15 bxc5 and now:
234
a) 15 ... Ng6 16 Bg3 Rfd8 17 Qc3 Bd5 18 c6 Nf8 19 Rd2 Be4 20 Rad1 Rxd2 21
Rxd2 Rd8 22 Rxd8 Qxd8 23 f3 Bd5 24 Qd2 Ne6 25 e4 Bxc6 26 Qxd8+ Nxd8 27 Bxc7
(White gets the two bishops vs. bishop and knight ending with unbalanced pawns and
grinds to victory) 27 ... Ne6 28 Bb8 a5 29 Kf2 Kf8 30 Ba7 b5 31 Bb6 a4 32 Ba5 Ke8
33 Ke3 Kd7 34 Bb4 Kc7 35 f4 g6 36 f5 Ng7 37 g4 Ne8 38 e5 Kd7 39 Ba5 h6 40 f6
Nc7 41 Bxc7 Kxc7 42 Kd4 Kb6 43 Bd3 Bd7 44 Bxg6 Be6 45 Bf5 Bxa2 46 e6 fxe6 47
Bg6 e5+ 48 Kxe5 Kc5 49 f7 Bxf7 50 Bxf7 b4 51 Be8 1-0 J.Bonin-L.Tamarkin, New
York 1991.
b) Jay had even more fun after 15 ... Qxc5 16 Rac1 Qe7 17 Qc3 Ng6 18 Qxc7
Qxc7 19 Bxc7 (White gets the two bishops vs. bishop and knight ending with
unbalanced pawns and grinds to victory—sorry about the repetitive note, but I couldn’t
think what else to say!) 19 ... Rac8 20 Bb5 Ra8 21 Bd7 f6 22 f3 Kh8 23 Kf2 Rf7 24
Be6 Re7 25 Bb3 Rc8 26 Bxb6 1-0 J.Bonin-E .Hall, Philadelphia 1991. (At least this
one was shorter!)
10 0-0
We know (from the holy ten) that the moves tried at that level: 10 ... Bxd2, 10 ...
Re8, 10 ... d6, 10 ... a5 all either give up the two bishops, or allow pawn weaknesses,
or both.
Black should avoid both Scylla and Charybdis! This is indeed quite possible.
10 ... Ng6!
235
Recommended by this lowly IM! The first point is that White can’t play 11 Bxc7
as 11 ... d6! wins a piece.
11 Bg3 Bd6!
The second point: Black keeps his pawn structure intact and exchanges bishop
for bishop, instead of bishop for knight. In this way I believe Black obtains a fully
playable game. Note that White can’t avoid this exchange with 12 f4 as e3 hangs.
12 Bxd6 Qxd6
Here a comment by Morozevich on a similar position is apropos: “With accurate
play Black can gradually equalize.” My point is that Black has not given up any
permanent advantages, such as the bishop pair that plagued Black through Miezis’s
games, and which Bonin used adroitly in the notes above to grind to victory. Here
236
Black has equal piece balance; and unlike Short or Korchnoi, does not have long-term
positional damage in the form of doubled pawns. The only problem in Black’s position
is that he is behind in development, but White has no targets, and is not set up to
attack, so with careful play I see no reason why Black can’t fully equalize—though as
we see in this game, accuracy is required!
13 Rc1
For 13 Qc2 see the next game, while in Game 58 I’ll examine various knight
jumps for White that offer the exchange of queens, such as 13 Ne4.
13 ... Qe5
The difference between this line and Black’s horrible struggles against the two
bishops is simply amazing: in the first place, Black couldn’t even put his queen on this
square in Bonin’s above victories, for it would be squarely in the path of the (here
nonexistent) white queen’s bishop.
14 Qc2 d6 15 Nf3
Another point in favour of this line is how much easier it is to play: instead of
horrible grovelling to draw, and sheer terror if White gets in the c4-c5 break, here if 15
c5 Qxc5 16 Qxc5 dxc5 17 Rxc5 c6 gives Black easy equality.
15 ... Qe7 16 Rfd1 b6 17 b4
Bonin tries for the same c4-c5 break that brought him success in the above
referenced games, but this attack means nothing without the two bishops backing it up
... if Black plays correctly!
17 ... Bb7
Black should challenge the white pawns, and 17 ... a5 is the simplest way to do
so: 18 a3 axb4 19 axb4 Bd7 20 Ra1 (not 20 c5?? Ba4, winning the exchange) 20 ...
Ne5 21 c5 Nxf3+ 22 Bxf3 Rxa1 23 Rxa1 dxc5 24 bxc5 Qxc5 25 Qxc5 bxc5 26 h3 c4
27 Rc1 Bb5 28 Bd5 Rc8 29 Bxc4 Bxc4 30 Rxc4 c5 31 Kf1 Kf8 32 Ke2 Ke7 33 Kd3
Kd6 and the rook ending should be drawn.
Instead of 17 ... a5, even 17 ... c5 looks possible, which one recalls did not work
at all in the previous game—but here Black gets counterplay on the kingside to
237
balance the weakness on d6, and can fearlessly advance with ... f7-f5 as there is no
danger on the long dark diagonal. After 18 a3 Bb7 19 Rd2 f5 20 Rcd1 Rad8 Black is
fine, with ... Ne5 on the agenda.
18 c5
After this move White gets a small pull.
18 ... dxc5 19 bxc5 Be4 20 Qc3 Rfd8 21 g3 Rxd1+ 22 Bxd1 Rd8 23 Nd4 Ne5
24 cxb6 cxb6 25 Qc7
25 ... Qxc7
Black should consider 25 ... Qf6, going for kingside counterplay at the cost of a
pawn. After 26 Qxa7 g5 Black has reasonable counterplay.
26 Rxc7 Nc6 27 Bf3 Nxd4 28 Bxe4 Nb5 29 Rc6 g6 30 a4 Nd6 31 Bd5 Rd7 32
e4 Kf8 33 Kg2 Ke7 34 e5
238
34 ... Nf5?
A blunder. Even now 34 ... Nb7 is practically even, as the knight will find a good
outpost on c5.
35 Bxf7!
White wins a clean pawn and scores the full point.
35 ... Nd4 36 Rf6 Rd8 37 Ba2 Rf8 38 Rxf8 Kxf8 39 Bc4 Ke7 40 f4 Nf5 41 Kf3
1-0
White got nothing out of the opening (Black had the equalizing 17 ... a5/17 ... c5
breaks), and even after getting an edge needed a lot of Black help to win—a far cry
from Bonin’s smooth two bishop wins!
Game 57
W.Cazzaniga-J.Ayza Ballester
Celle Ligure 1996
1 d4 Nf6 2 c4 e5 3 dxe5 Ng4 4 Bf4 Nc6 5 Nf3 Bb4+ 6 Nbd2 Qe7 7 e3 Ngxe5 8 Nxe5
Nxe5 9 Be2 0-0 10 0-0 Ng6 11 Bg3 Bd6 12 Bxd6
I reached this position in an Internet blitz game. My opponent appeared stunned
by my refusal to take on d2—after long thought he tried 12 Bf3 Bxg3 13 hxg3 d6 14
Qb3 Ne5 15 Rac1 Nxf3+ and then let his time run out! In any case, Black is at least
equal after 16 Nxf3 b6 17 Nd4 Bb7 with the strong unopposed bishop.
We didn’t see Black get left with the only bishop very much in the top ten!
12 ... Qxd6 13 Qc2
239
13 ... Qe7
13 ... Qe5 loses a move compared to the main game, but Black still equalized
comfortably: 14 Nf3 Qe7 15 c5 d6 16 cxd6 Qxd6 17 Rac1 c6 18 Rfd1 Qe7 19 Nd4
Bd7 20 a3 Rfc8 21 b4 a5! (the move missed in the previous game; here, as in the main
game, Black uses this to obtain queenside counterplay—not to beat this dead horse
even more, but in a White two bishops situation such an active move would probably
only open lines for White, whereas here it’s sound and gives good counterplay) 22
Nb3 axb4 23 axb4 Be6 24 Bc4 Bxc4 (24 ... Qxb4 25 Bxe6 fxe6 26 Nc5 with
counterplay is unnecessarily risky) 25 Qxc4 Rd8 26 h3 Rxd1+ 27 Rxd1 Rd8 28 Rxd8+
Qxd8 29 Nc5 b6 30 Nd3 h6 31 e4 Qd6 32 g3 Nf8 33 e5 Qd7 34 Kg2 Ne6 35 h4 h5 36
Qe4 Qd4 37 Qxd4 Nxd4 38 f3 Kf8 39 Kf2 Ke7 40 g4 Ke6 41 Ke3 Kd5 42 Nf4+ Kxe5
43 Nxh5 Nc2+ 44 Kd2 Nd4 45 Ke3 Nc2+ 46 Kd2 (not 46 Kf2 g6) 46 ... Nd4 47 Ke3
1⁄2-1⁄2 D.Adla-J .Gomez Baillo, Buenos Aires 1990.
14 c5 d5 15 cxd6 Qxd6 16 Rfd1
Or 16 Rac1 c6 17 Ne4 Qe7 18 Nc5 b6 19 Na4 c5 20 Bf3 Bb7 21 Bxb7 Qxb7 22
Nc3 Rad8 23 Rfd1 Rfe8 24 Rxd8 Rxd8 25 Rd1 Qa8 26 Kf1 h6 27 h3 Ne5 28 Rxd8+
Qxd8 29 Ke2 Qh4 30 Qf5 Qc4+ 31 Kd2 Ng6 32 Qd3 Qh4 33 Ne4 Qe7 34 Qd5 Ne5 35
f4 Nd7 36 Nc3 Nf6 37 Qd3 Qc7 38 b3 Kf8 39 a4 Ke7 40 Nb5 Qc6 41 Nxa7 Qxg2+ 42
Kc1 Qb7 43 Nb5 Qd5 44 Kc2 Qg2+ 45 Kb1 Qd5 46 Kc2 1⁄2-1⁄2 E.Arlandi-F.Marchand,
Turin 1996. This was a very well-played draw, and typical of the variation. It’s worth
pointing out that Black was over 200 points lower rated (2445-2220) but had no
problems. This quiet line may not appeal to all, but it’s better than suffering permanent
disadvantage!
16 ... Qe7 17 Rac1 c6 18 Nc4 Be6
240
Black completes his development with equality.
19 Nd6 Rfd8 20 Nf5 Qg5 21 Ng3 Qa5 22 a3 Qb6 23 b4 a5!
Black counters sharply on the queenside with this typical blow. Of course it’s
also possible to play simply with 23 ... Rxd1+ 24 Rxd1 Rd8 25 Rxd8+ Qxd8 26 Qc5
Qb6 27 Qxb6 axb6 28 Ne4 Kf8 29 Nd6 Ke7 30 Nc4 (not 30 Nxb7? Kd7, trapping the
knight) 30 ... Bxc4 31 Bxc4 Ne5 32 Bb3 f5 33 Kf1 Kd6 34 Ke2 c5 and Black has no
problems in the ending.
24 Qc3
24 Qc5 Qxc5 25 bxc5 Rxd1+ 26 Rxd1 Nf8 27 Ne4 Nd7 is equal as the
weaknesses at b7 and c5 balance each other.
24 ... axb4 25 axb4 Rxd1+ 26 Rxd1 Rd8 27 Rxd8+ Qxd8 28 Ne4 Bd5 29 Qd4
Qh4 30 f4?
241
A blunder: correct is 30 Bd3 f5 31 Nd6 Qxd4 32 exd4 Nf4 33 Bf1 (or 33 Bxf5
Nxg2 34 Nxb7 Ne1 with equality) 33 ... g6 34 Nxb7 Ne6 35 Nd6 Nxd4 36 b5 cxb5 37
Nxb5 Nxb5 38 Bxb5 with a dead draw.
30 ... Qe1+?
This move should come second! 30 ... Nxf4! 31 exf4 (or 31 Nf6+? Qxf6 32 Qxf6
Nxe2+ and a piece goes) 31 ... Qe1+ 32 Bf1 Qxe4 is a clean win for Black.
31 Bf1 Ne7
Even now 31 ... Nxf4 32 Nf6+ gxf6 33 Qxf4 h5 is better for Black.
32 Qc3
White could turn the tables with 32 Nd6—presumably both sides were in time
pressure.
32 ... Qb1 33 Nd2 Qe1 34 Qd3 f5 35 Qc2 Qa1 36 Qd3 b5
242
Black seizes the advantage again, fixing the weakness at b4, which soon ...
37 Kf2 Qb2 38 Qd4 Qxd4 39 exd4 Be6 40 Nf3 Nd5 41 Ne5 Nxb4
Drops off the board!
42 Bd3 Nxd3+ 43 Nxd3 Bd5 44 g3 Kf7 45 Ke3 Ke6 46 Kd2 Be4 0-1
The extra pawn is good enough.
This was a typical win for Black in this variation: First he equalizes with accurate
play, then outplays the opponent. It would have been an even better example had
Black won cleanly with 30 ... Nxf4, but tournament chess is still played by human
beings!
Again one notices the huge difference between the “deadly grind” positions that
the top GMs submitted themselves to, and the easy counterplay of this line, with ... a7-
a5 as a recurring theme.
And by the way—Black is a mere FM!
Game 58
J.Gustafsson-F.Lamprecht
Hamburg 1997
1 d4 Nf6 2 c4 e5 3 dxe5 Ng4 4 Nf3 Nc6
4 ... Bc5 is possible, but I recommend the text, transposing back to the Bf4 line—
see Part 3.
5 Bf4 Bb4+ 6 Nbd2 Qe7 7 e3 Ngxe5 8 Nxe5 Nxe5 9 Be2 0-0 10 0-0 Ng6 11 Bg3
Bd6 12 Bxd6 Qxd6 13 Ne4
243
White has other knight moves, but none of them do anything as long as Black
keeps the queens on. Black needs the queen to protect his position as he completes his
development.
a) 13 Nb3 Qe7 (13 ... Qxd1 is worse as 14 Rfxd1 d6 15 c5 is strong for White) 14
c5 and instead of 14 ... Rd8 15 Rc1 d6 16 c6 b6 when Black had a cramped game in
A.Belakovskaia-P.Blatny, New York Open 1996, I recommend 14 ... b6 right now.
This seems to equalize easily, e.g . 15 Rc1 Bb7 16 cxb6 (if White doesn’t go after
the pawn, Black has no problems, but even this goes nowhere due to a little
mousetrap) 16 ... axb6! (towards the centre!) 17 Rxc7 (17 a3 c5 is already good for
Black) 17 ... Bc6! (the point) 18 Bf3 (if 18 Nd4 Qd8 wins the exchange) 18 ... Bxf3 19
Qxf3 Rxa2 with equality.
244
b) 13 Nf3 Qe7 and now we see Saint Amand (from Game 56) play like his great
namesake and get revenge for his unfortunate loss to Bonin: 14 Qc2 d6 15 b4 b6 16 c5
dxc5 17 bxc5 Be6 18 Rfc1 Rfd8 19 a3 Bd5 20 Qa4 c6 (one sees that the c4-c5 break
led nowhere for White) 21 Qc2 Be4 22 Qc3 Rd5 23 cxb6 axb6 24 Qb2 Rda5 (now
White should play 25 Qb6 Ra3 with equality; it is a problem with this variation that
many lines do wind up with fairly sterile equality, making it hard to play for a win—
but then again, the White player, disdaining equality against the Budapest, might try to
keep it complicated, as here ... )
25 Rc3?! b5! (now Black is better, and Saint Amand wins in fine style) 26 Nd4
b4 27 Rb3 c5 28 Nc2 Qg5 29 Bf1 Bd5 30 Rd3 b3 31 Ne1 c4 32 Rd4 Rc5 33 Qc3 Rb8
34 Nd3 Rcc8 35 Nb4 Be6 36 f4 Qc5 37 g3 Qb6 38 Bg2 Ne7 39 Rc1 Nf5 40 Rd2 Nxe3
41 Kh1 Nxg2 42 Kxg2 Rd8 43 Re2 Rbc8 44 Qf3 f6 45 Rc3 Bf7 46 Rce3 Rc7 47 Kh3
Qb7 48 Qf1 c3 49 Qe1 Qc8+ 50 Kh4 c2 0-1 Y.Vaingorten-P.Saint Amand, Quebec
2001.
13 ... Qe7
13 ... Qe5 is weaker, as the queen is exposed to a premature exchange: 14 Nc3 b6
15 Qd5 Ba6 (or 15 ... Qxd5 16 Nxd5 c6 17 Nc3 Ba6 18 Rfd1 with pressure on d7) 16
Qxe5 Nxe5 17 f4! (stronger than 17 Nd5 c6 18 Nc7 Bxc4 19 Bxc4 Rac8 20 Nd5 cxd5
21 Bxd5 Rc2 22 Rab1 Rfc8 23 Rfd1 Kf8 24 Bb3 R2c7 25 Kf1 Ke7 26 Ke2 Nc6 27
Rd2 Na5 1⁄2-1⁄2 I.Stohl-P.Blatny, Prague 1996) 17 ... Nxc4 (if 17 ... Nc6 18 Nd5 or 17 ...
Ng6 18 Nd5—in both cases White has strong pressure with threats to c7 and a possible
fork on e7 if Black defends with a rook) 18 Rfc1 and the pin is dangerous for Black.
13 ... Qxd1 14 Rfxd1 d6 15 c5 f5 16 cxd6 fxe4 17 d7 is also somewhat better for
White. One sees again that Black’s queen is a key defensive piece here, and should not
be exchanged too early.
14 Nc3 d6 15 Nd5 Qd8
245
16 Qd4
16 Qb3 c6 17 Nc3 Qe7 18 Rfd1 Rd8 19 Rd2 Ne5 20 Qa3 Be6 21 b3 f5 22 Rad1
Nf7 was eventually drawn in Y.Zimmerman-O .Pavlenko, Moscow 1991, but I have to
say Black was always a little worse, since he had to constantly watch the weak pawn
at d6. We’ll see Black lose a very similar position in Game 62.
I almost hate to say this, but I have to be objective: I think Black’s best move
after 16 Qb3 is 16 ... Rb8, and if 17 Qa3 Ra8 18 Qb3 Rb8 and draws. If White avoids
the repetition, then Black can complete his development with no problems, e.g . 18
Rad1 Be6 19 c5 dxc5 and White has no good knight discovery, so 20 Qxc5 c6 with
equality.
16 ... c6
Although Black manages to cover the weakness at d6 as in the Pavlenko game
above, I don’t think it’s necessary to drive the white knight away so quickly. While the
piece looks threatening, it’s actually more cosmetic than useful, so my
recommendation is 16 ... Be6, completing development, when I don’t see how White
can improve his position, e.g . 17 Rad1 Qd7 18 c5 Rfd8 is equal.
17 Nc3 Qe7 18 Rad1 Rd8 19 f4
Not 19 Ne4 d5 20 cxd5 Rxd5 21 Qa4 b5 22 Qc2 Bf5 with advantage to Black.
19 ... f5 20 g3 Nh8 21 Bf3 Nf7
246
We saw this in the Pavlenko game; it looks solid, but is too passive for my taste.
22 Rfe1 Qc7 23 Kg2
23 e4 Qb6 24 Qf2 looks somewhat better for White, though Black may well hold
this.
23 ... Qb6 24 b3 Qxd4 25 Rxd4 Re8 26 Kf2 Be6 27 e4 Rad8 28 Red1 Kf8
This is similar to the note to move 23. White can play for a win with 29 exf5
Bxf5 30 g4, when Black may hold, but the defence is not easy in view of White’s
mobile kingside pawns, whereas it’s hard to get Black’s queenside pawn majority
going as it is restrained by the white rooks.
29 R4d2 Bc8 30 Re1 Re7 31 Rde2 Rde8 1⁄2-1⁄2
If Black plays 16 ... Be6 I don’t think he has any problems at all. I would avoid
the early ... c7-c6 with a long-term weakness at d6, even if I had to concede an early
draw.
In general I think this 10 ... Ng6/11 ... Bd6 line draws the fangs of Bf4/Nd2, and
while “draws” may be the operative word, it is certainly far superior to the “I give you
the two bishops to kill me with” lines!
Game 59
M.Gurevich-N.Miezis
Bonn 1996
1 d4 Nf6 2 c4 e5 3 dxe5 Ng4 4 Bf4 Nc6 5 Nf3 Bb4+ 6 Nbd2 Qe7 7 a3
247
This and the next two games take up the subject of 7 a3, where White tries to
compel the exchange of bishop for knight. We know such an exchange is favourable
for White—but is it forced?
7 ... Ncxe5 8 Nxe5
One recalls 8 axb4?? Nd3 mate from Game 3.
8 ... Nxe5 9 e3 Bxd2+
Positionally this exchange favours White: the strong black bishop is traded for
the inoffensive knight, and White gets the long-term advantage of the two bishops in a
semi-open game. Is this move forced? Is it even good? I’ll answer that in the next
game, but for now, I’ll just say that nine out of the Elo top ten play this move—with a
90% percent vote like that among the big guns, one can easily guess this move is not
best!
10 Qxd2
Miezis has faced this position three times, scoring two draws and this loss.
Overall against 6 Nbd2 he has scored, according to the Mega, one win, two draws, and
six losses—in every case he has exchanged bishop for knight.
10 ... 0-0
10 ... d6 is recommended as the best move here; let’s see how two GMs lose that
variation.
Pal Benko (on the White side) makes an excellent comment on this position:
“We’ve reached one of the key positions of the Budapest Gambit. White’s bishop pair
gives him a slight advantage. Black’s game, although solid, is also a bit passive, and
this kind of situation is not to the taste of most Budapest gambiteers.” I completely
agree with the Grandmaster! 11 Be2
248
11 ... Bd7 12 0-0 Bc6 13 Rac1 0-0 14 Bg3 f5 15 b4 Kh8 16 b5 Be8 17 c5! (White
opens lines for his bishops with this standard break) 17 ... Rd8 18 cxd6 cxd6 (Black
has a permanent pawn weakness—see also the main Miezis game) 19 Rfd1 Bf7 20
Qd4 b6 21 h4 Bb3 22 Rd2 Nf7 23 h5 Rd7 24 Bf3 Qf6 25 Qb4 Be6 26 Bc6 Rdd8 27
Bh4 (we’ve seen these criss-crossing bishops before! White has a decisive advantage)
27 ... Qh6 28 Bxd8 Rxd8 29 Qh4 g5 30 Qd4+ Qg7 31 Bd5 Bxd5 32 Qxd5 f4 33 e4 f3
34 Rc7 Rf8 35 gxf3 Qf6 36 Qf5 Qxf5 37 exf5 Kg7 38 Rxd6 Kg8 39 Rdd7 h6 40 f6 g4
41 f4 g3 42 fxg3 1-0 P.Benko-V.Ragozin, Budapest-Moscow match 1949.
Also good (for White!) is 11 ... a5 12 Qc3 b6 13 b4 0-0 14 0-0 Re8 15 c5 (the
typical break, which we have seen is very strong when backed up by the two bishops)
15 ... dxc5 16 bxc5 Qxc5 17 Qxc5 bxc5 18 Rfd1 Bb7 19 Rac1 c4 (Black’s doubled c-
pawns are both weak—remember Karpov-Short, Game 46) 20 Bxe5 Rxe5 21 Rd7 Ba6
22 Rxc7 g6 23 Bxc4 Bxc4 24 R1xc4 (sometimes such rook endings are drawn despite
the extra pawn, but I doubt that was much comfort to GM Meduna here) 24 ... Rb8 25
g4 h5 26 h3 hxg4 27 hxg4 Kf8 28 Ra7 Rg5 29 Rf4 Kg8 30 Raxf7 Rxg4+ 31 Rxg4
Kxf7 32 Rg5 Ra8 33 a4 Kf6 34 Rb5 Kg7 35 Kg2 Kh6 36 f4 Ra7 37 Kf3 Ra8 38 Re5
Kg7 39 Kg4 Kf6 40 e4 Ra6 41 Rb5 Kf7 42 Kg5 Ke7 43 Rb7+ Kf8 44 e5 Kg8 45 Rc7
Kf8 46 Rd7 Rc6 47 Ra7 1-0 Y.Razuvaev-E .Meduna, Prague 1992.
11 c5! Re8
If 11 ... Qxc5 12 Rc1 Qd6 13 Qxd6 cxd6 14 Rd1 and White recovers his pawn
with a long-term advantage.
12 Rc1 d6 13 cxd6 cxd6
249
As in Benko-Ragozin, Black has a weak isolated d-pawn, as well as facing
White’s two bishops.
14 Be2 Be6 15 0-0 Rac8 16 Qd4 Nc6!? 17 Qd2 Ne5 18 Rxc8 Rxc8 19 Rc1 Rc7
20 Rc3 f6 21 e4 a6
“White’s advantage has a permanent character,” says Gurevich—to which I can
only reply: Who then wants to play Black?
22 Be3 b5 23 Qc1 Rxc3 24 Qxc3 Qb7 25 f3 Bc4 26 Bd1! Be6 27 Bd4 Nc6 28
Bf2 Qd7 29 h3 d5 30 exd5 Bxd5
Though Black has gotten rid of his weak pawn, he has now opened the board
more for White’s bishops.
31 Bc2 Qe6 32 Qd3 g6 33 Qe3 Qxe3 34 Bxe3
250
Gurevich comments: “To hold such a position requires patience and good
defensive technique. Black’s position is weakened on both flanks, so he can’t allow
himself any mistakes. White, on the other hand, risks nothing and can try to win
almost forever.”
And you can imagine how much fun this is to defend, especially with a FIDE
increment digital clock, when White can literally play forever, as I discussed in True
Combat Chess.
34 ... Kf7 35 Kf2 Ke6 36 Bb6 f5 37 Be3 Bc4 38 g4!? Ne5 39 Kg3 Be2 40 Kf4
Bd3 41 Bd1 Bf1 42 Bd4 Nc6 43 gxf5+ gxf5 44 Bg7 Ne7 45 Kg3! Ng6 46 h4 Bc4 47
Bc2 Be2 48 h5 Ne5 49 Kf4 Bd3 50 Bd1 Nc4 51 Bc3 Nd6 52 Ke3 Bc4 53 Bc2
With White’s king getting to f4, I doubt there’s any way to hold this anymore.
53 ... Bf1 54 Kf4 Bh3 55 Bd3 Bg2 56 Bb4 h6 57 Kg3 Bh1 58 Be2 f4+ 59 Kxf4
Nf5 60 Bc3 Ne7 61 Kg3 Nd5 62 Bd2 Nf6 63 Kh2 Nxh5 64 Bd1 1-0
I do not recommend such an unpleasant defence!
But to find the better line for Black, we now have to consider the wisdom of
slightly lower-rated players!
Game 60
R.Higa-L.Taylor
Los Angeles 2006
1 d4 Nf6 2 c4 e5 3 dxe5 Ng4 4 Bf4 Nc6 5 Nf3 Bb4+ 6 Nbd2 Qe7 7 a3 Ngxe5 8 Nxe5
Nxe5 9 e3
In the book The Fabulous Budapest Gambit by GM Viktor Moskalenko, the
author gives 9 ... Bxd2+ with the following comment: “Forced: 9 ... Bd6?! 10 Ne4! (10
Be2?! Nd3+! 11 Bd3 Bf4 with counterplay) 10 ... Nxc4 11 Nxd6+ Nxd6 12 Rc1!”.
Liz, rated 1611 at the time of this game, did not know what she “should” play (as
251
in, what the GMs tell us to play). She didn’t like 9 ... Bxd2+ as it gives up the two
bishops to White’s advantage, as we have seen in many examples. She didn’t like 9 ...
Bd6 for the same reasons Moskalenko doesn’t—10 Ne4 is just too strong. So instead
she chose the tertium quid, the move Moskalenko left unmentioned ...
9 ... Bc5!
Which I think is the best! It turns out that 9 ... Bxd2+ is not forced at all, and I
believe with this accurate move, Black has every chance of equalizing. Note that, as in
my preferred 10 ... Ng6/11 ... Bd6 variation of Games 56-58, Black has not given up
any kind of permanent positional disadvantage—and there seem to be no tactical
drawbacks, as we will see.
10 b4 Bd4 11 Rb1
If 11 Ra2 (and not 11 exd4?? Nd3 with a typical Budapest mate!) 11 ... d6 12 Be2
Ng6 13 Bg3 (trying to win a pawn gives Black excellent counterplay: 13 Bxd6 cxd6
14 exd4 Nf4 15 g3 Nd3+ 16 Kf1 Bh3+ 17 Kg1 Nc1! is already good for Black, who
can attack on the light squares while White is playing without his king’s rook) 13 ...
Be5 14 0-0 Bxg3 (the typical bishop for bishop exchange) 15 hxg3 0-0 was fully equal
in A.Mirzoev-J .Gonzalez Manchon, Baynoles 2003.
11 ... d6 12 Be2
12 Ne4 Bb6 13 c5 dxc5 14 Qd5 (14 bxc5 Ba5+ is much worse for White, who
has no good way to get out of check) 14 ... f6 15 Nxc5 c6 and Black has already
equalized and may be a little better.
12 ... Bf5 13 Rb3 Ng6
252
14 Bg3
The tactics are again in Black’s favour: if 14 exd4 Nxf4 15 Re3? Nxg2+ wins by
fork, while if 14 Bxd6 cxd6 15 exd4 Nf4 16 g3 Bc2! wins material.
14 ... Bb6
Simpler is 14 ... Bf6, when Black’s two powerful bishops give her an excellent
game.
15 0-0 0-0 16 Bf3 c6 17 b5 cxb5?!
17 ... Rac8 is still completely equal.
18 Rxb5 Bd3?
An oversight—after 18 ... Ne5 Black is only slightly worse.
19 Rd5!
253
Now the complications have turned in favour of White.
19 ... Bxf1 20 Bxd6 Qf6 21 Bxf8
21 ... Bxc4?
Better is 21 ... Bxg2 to at least break up White’s kingside. Now it’s all over.
22 Bxg7 Kxg7 23 Nxc4 Rc8 24 Rd6 Qc3 25 Nxb6 axb6 26 Bxb7 Rc4 27 Ba6
Ra4 28 Qxa4 Ne5 29 Qd4 Qe1+ 30 Bf1 f6 31 Qf4 1-0
Black was completely fine out of the opening (especially if she had played 14 ...
Bf6), though the middlegame could have been improved! Nonetheless, it’s very
important for the theory of the BG that 9 ... Bxd2+ is not forced!
Interestingly enough, 9 ... Bc5 has been known since 1987, but the only GM to
play it was Pavel Blatny (he was the one out of the top ten!). I don’t know why other
GMs have avoided this move, as I see no defects in the played games, or with Fritz
analysis.
Furthermore, I don’t know why top GMs continue to subject themselves to the
two bishops grind, which as we saw killed the very strong Ragozin back in 1949, and
now, sixty years later, players are still suffering in the same way! It’s time for a new
move, and 9 ... Bc5 is it!
Game 61
C.Buijs-A.De Groot
Correspondence 1987
1 d4 Nf6 2 c4 e5 3 dxe5 Ng4 4 Bf4 Nc6 5 Nf3 Bb4+ 6 Nbd2 Qe7 7 a3 Ngxe5 8 Nxe5
Nxe5 9 e3
9 Bxe5 merits consideration—one should note that this move has no theoretical
value (as it gives White absolutely nothing) but it does have practical value. Some
lower-rated players, as here, may use it to try and draw, as indeed a fairly simple and
254
dead even position arises by force. 9 ... Bxd2+ (at least White doesn’t get the two
bishops!) 10 Qxd2 Qxe5 11 e3 d6 12 Be2 Bd7 13 Bf3 Bc6 14 Qd4.
The pieces are coming off, and there’s not much Black can do about it except
accept the reality and try to outplay his opponent in the endgame. Generally speaking,
a stronger player won’t play this line, and a weaker one, as here, may blunder—more
than once! W.Hackbarth-D .Pirrot, St Ingbert 1988, continued 14 ... Bxf3 15 Qxe5+
dxe5 16 gxf3 0-0 -0 17 Rd1 Rxd1+ 18 Kxd1 Rd8+ 19 Ke2 Rd6 20 Rg1 g6 21 Rc1 Kd7
22 c5 Rc6 23 Kd3 b6 24 cxb6 Rd6+ (not 24 ... Rxc1? 25 bxa7) 25 Ke4 cxb6 26 Rc2
Ke6 27 f4 f5+ 28 Kf3 e4+ 29 Ke2 Kd7 30 Rc4 a5 31 h3 (here 31 f3 exf3+ 32 Kxf3
Rd2 33 b4 is pretty much a dead draw) 31 ... Rd3 32 f3 Rb3 33 Rc2 Ke6 34 Rd2 Kf6
35 Kf2 Kg7 36 Re2 Kh6 37 fxe4 fxe4 38 Kg3 Kh5 39 h4 Rd3 40 f5 gxf5 41 Kf4 Rb3
42 Kxf5 Kxh4 43 Kxe4 Kg3 44 Kd4 Kf3 45 Rh2 Kg3 46 Rd2 b5 47 e4 b4 48 a4 Rf3
49 e5 Rf8 50 e6 Rd8+ 51 Ke3 Re8 52 Rd6 h5 53 Ke4 h4 54 Ke5 h3 55 Kf6 h2 56 Rd1
Rd8 57 Re1 Kf2 58 Rh1 (White still draws easily with 58 e7!) 58 ... Kg2 59 Rxh2+
Kxh2 60 e7 Rb8 61 Kf7 Kg2 62 e8Q Rxe8 63 Kxe8 Kf2 64 Kd7 Ke2 65 Kc6 Kd2 66
Kb5 Kc2 67 Kxa5 b3 68 Kb6 Kxb2 69 a5 Ka3 70 a6 b2 71 a7 b1Q+ 72 Kc7 Qe4 0-1 .
But it’s still drawn!! White, definitely the weaker player in this instance, probably did
not realize he had reached a well-known draw and resigned here—but if he plays 73
Kb8 Black can make no progress due to stalemate tricks, e.g . 73 ... Qb4+ 74 Ka8! and
Black can’t move his king up as the white king is stalemated. It is of course also
possible that White lost on time. In any case, the result shows up as 0-1 .
9 ... Bc5
255
10 Be2
There aren’t many games in the database with this line: seven with 10 b4 (which
we saw was harmless in the preceding game) and six with the text, 10 Be2.
Besides these main moves there are two knight attacks that must be considered,
10 Ne4 and 10 Nb3, which I will examine below:
a) 10 Ne4 Ng6 11 Nxc5 (not 11 Bg3?? Qxe4) 11 ... Nxf4 (Black follows the
theme of exchanging bishop for bishop) 12 Qd4 Ng6 13 Be2 d6 14 Ne4 0-0 15 0-0
Bf5 16 Nc3 Rfe8 with equality similar to the ... Ng6/Bd6 variation.
b) 10 Nb3 Bd6 (not 10 ... Bb6? 11 c5! Bxc5 12 Nxc5 Qxc5 13 Rc1 with a big
advantage to White—we’ve seen this theme before, especially in Game 59), when
White has four tries:
256
b1) 11 c5 Nd3+ 12 Bxd3 Bxf4 and Black for once has the two bishops, which
make up for his slight cramped game.
b2) 11 Be2 Nxc4 is a nice trick, snatching a pawn. White can probably get it
back, but while doing so Black can complete his development. A sample line is 12 Rc1
Bxf4 13 exf4 (not 13 Rxc4 Be5 and Black holds the pawn) 13 ... d5!? 14 Qxd5 Nb6 15
Qf3 Be6 16 0-0 0-0 and the computer says equal, though I prefer Black due to his
superior pawn structure and long-term chances based on his queenside pawn majority.
b3) 11 Bg3 c6 (not 11 ... b6?! 12 Nd4 with nasty threats of Nf5 and Nb5) 12 Nd4
Bc7 13 Be2 d6 14 0-0 0-0 and Black should gradually equalize, having made no
positional concessions (which is the theme of my recommendations in both the 7 e3
and 7 a3 variations). Note that in this position the d6-pawn is not particularly weak
(thanks to the presence of Black’s dark-squared bishop, similar to the fianchetto
variation of the King’s Indian)—but if dark-squared bishops have been exchanged (as
in the next game) a similar pawn structure confers White a nagging edge, since d6 is
hard to solidly protect.
b4) 11 Qd4 f6 can become wild:
b41) 12 c5 Nc6 13 Qc4 (13 cxd6?! Nxd4 14 dxe7 Nxb3 15 Rd1 d6 is good for
Black, who acquires an extra pawn) 13 ... Bxf4 14 Qxf4 d6 15 cxd6 Qxd6 16 Qxd6
cxd6 17 0-0 -0 Ke7 18 Nd4 Nxd4 19 Rxd4 Be6 and Black’s c-file play balances the
isolated pawn. Amusingly enough, White can lose this quickly if he gets greedy, e.g .
20 Be2 Rac8+ 21 Kb1 Rc5 22 Rhd1 Rhc8 23 Rxd6? (23 Rb4 is about even, though
Black has the more active game) 23 ... Bb3! wins as the d1-rook is overloaded.
b42) 12 Qe4 c6 (12 ... Nf7 is simpler; but not 12 ... 0-0? 13 c5 Bxc5 14 Qd5+ and
forks) 13 Nd4 0-0 14 Nf5 (if 14 Be2 Bc7 with typical gradual equalization) 14 ...
Bb4+! (a preventive sacrifice—White won’t castle in this game!) 15 axb4 (after 15
Kd1 Qf7 16 axb4 d5 17 cxd5 cxd5 18 Qb1 Qh5+ Black is doing very well) 15 ...
Qxb4+ 16 Kd1 d5 17 Qc2 Bxf5 18 Qxf5 dxc4 with a violent attack for the piece.
10 ... d6
257
The key position, which appears to be fine for Black. I mentioned that only one
strong GM in the “Elo top ten” played the correct 9 ... Bc5. Unfortunately, he followed
this excellent move with a blunder (yes, it happens to all of us, at any rating level—I
mentioned this misplay in the Introduction). The game I.Novikov-P.Blatny, New York
2001, continued 10 ... Ng6? 11 Bxc7, which doesn’t work in the ... Ng6/ ... Bd6
variation seen in Games 56-59, but does work here! After 11 ... d6 12 Ba5 the bishop
escaped (in the other variation Black’s bishop is on b4, denying this loophole) and
White held on to his extra pawn, which he eventually converted into victory.
11 0-0
After 11 b4 Bb6 12 0-0 a5 13 Qc2 0-0 14 Nb3 Ng6 15 Bg3 Be6 16 Nd4 Bd7 17
Bf3 Ra7 18 Rfc1 axb4 19 axb4 Rfa8 Black had equalized and eventually won in
G.McDonald-W.Ottenweller, correspondence 2003.
11 ... 0-0
The following game had an entertaining beginning: 11 ... a5 12 b4 axb4 13 axb4
Rxa1 14 Qxa1 Bxb4 15 Bxe5 dxe5 16 Qa4+ Bd7 17 Qa8+ Qd8 18 Qxb7 Bxd2 19 Rd1
—but now, in view of 19 ... Bc3 20 Bg4, Black abruptly ended the complications with
19 ... Qc8 and the players agreed to a draw in F.Cousigne-Y.Maghrabi, Creon 2004.
12 b4 Bb6 13 Qc2 Bd7 14 Rfd1 Rae8 15 Nb3 Ba4 16 Bd3?!
258
The unforced surrender of the bishop pair is something Black often does in the
Budapest—but hopefully my readers will not repeat that mistake! Now it’s White’s
turn to make this positional error: evidently better is 16 Rab1 c6 17 c5 Bc7 with
approximate equality.
16 ... Nxd3 17 Qxd3 a6 18 Rdc1 Bc6 19 c5 dxc5 20 Nxc5 Rd8 21 Qc3 Rfe8
22 Nxa6?
White tries the famously dubious “tactic from an inferior position” and pays the
penalty. Correct is 22 Rd1 h6 with only a small advantage to Black.
22 ... Qe4 0-1
White probably thought he could meet this with 23 f3—but then noticed that 23
. .. Qxf4 snaps off a piece.
259
Summary
Black is fine as long as he remembers that taking that sad knight on d2 is by no
means forced, and that in general he should exchange bishop for bishop instead. As
usual, there are highly spe-cific move orders, which must on no account be confused!
In the first part of this chapter (Games 46-58), after 7 e3 Ngxe5 8 Nxe5 Nxe5 9
Be2 0-0 10 0-0, my recommended solution is 10 ... Ng6 11 Bg3 Bd6 which is featured
in Games 56-58.
In the second part of the chapter (Games 59-61), against 7 a3 Ngxe5 8 Nxe5
Nxe5 9 e3, my recommended solution is 9 ... Bc5 10 Be2 (or 10 b4 Bd4) 10 ... d6!.
Again, one needs to have these move orders down cold before you step into the
tournament hall! Then you should be able to get a fully equal game—the only
drawback to this type of play is that some of the positions may be drawish. On the
other hand, White will probably be uncomfortable with such play: expecting a two
bishop grind, he gets absolutely nothing and must rethink how he can play the equal
position—and may even blunder, as in the final game of this chapter.
We end Part Two here; I believe the reader is now set to meet 4 Bf4 with
confidence, so on to White’s last major try, 4 Nf3.
260
Part Three
White plays 4 Nf3
Playing 4 Nf3 is no doubt the most natural move in the Budapest Gambit: White
simply develops and follows Lasker ’s knights before bishops maxim.
I recommend that Black reply 4 ... Nc6, and if White follows with 5 Bf4 we are
back in Part II, which is fine for Black if he knows his stuff.
Of course White could have obtained the Bf4 variations if he wanted to by
playing that move straight away, so many 4 Nf3 players want to avoid that
transposition. In the next chapter I will consider all moves other than 5 Bf4 that White
can play after 4 ... Nc6.
In Chapter 11 I will consider a markedly different Black strategy, starting with 4
... Bc5, which forces 5 e3. Many times Black then tries to attack with the “crazy rook”
as in Game 2—but in my opinion, this early aggression plays into White’s hands. I
concentrate in that chapter on the Smyslov/Spassky Attack, where White launches a
very dangerous kingside assault based on an early f2-f4 thrust.
261
Chapter Ten
4 Nf3 Nc6 when White avoids 5 Bf4
This is a very short chapter as the critical fifth move must be 5 Bf4—on other
moves Black simply recovers his pawn without making any concessions.
Game 62
L.Polugaevsky-J.Nunn
Biel 1986
1 d4 Nf6 2 c4
This game reminds me of the following classic battle between Spassky and
Larsen. White gets absolutely nothing out of the opening, then ... wins anyway! So a
warning to all Budapest Gambiteers: just because you solve your opening problems
doesn’t mean you will automatically win or draw!
Spassky played 2 Nf3 here—no Budapest! This move is usually a sign of pacific
intentions; indeed, if a draw had been agreed after move 12 no one would have been
surprised—but just watch what happens!
B.Spassky-B.Larsen
1st matchgame, Malmo 1968
1 d4 Nf6 2 Nf3 d5 3 c4 c6 4 cxd5 cxd5 5 Bf4 Nc6 6 Nc3 Bf5 7 e3 e6 8 Bb5 Nd7
262
9 0-0 Be7 10 Rc1 0-0 11 h3 Rc8 12 Bd3 Bxd3 13 Qxd3 Nb6 14 Qe2 a6 15 Ne1 Nc4
16 Nd3 Nb4 17 b3 Nxd3 18 Qxd3 Nb6 19 f3 Bd6 20 Ne2 Qe7 21 Bxd6 Qxd6 22 Qd2
Qa3 23 Nf4 Rxc1 24 Rxc1 Rc8 25 Rxc8+ Nxc8 26 Qc2 Ne7 27 Qc7 g6 28 Nd3 Nf5
29 g4 Nh6 30 Ne5 Qb4 31 Nd7!
(without having made any obvious errors—the same comment could be applied
to John Nunn in the main game—Black is now lost) 31 ... Qe1+ 32 Kg2 Qe2+ 33 Kg3
Nf5+ 34 gxf5 Qe1+ 35 Kf4 Qh4+ 36 Ke5 Qg3+ 37 f4 Qxe3+ 38 Kf6 Qxd4+ 39 Ne5
1-0
2 ... e5 3 dxe5 Ng4 4 Nf3 Nc6
This is my recommendation for Black.
5 Bg5!?
263
Of course White can play 5 Bf4, returning to Part II, but Polugaevsky obviously
didn’t want that line, as he started with 4 Nf3. One advantage of playing 4 ... Nc6 is
that it forces White out of his intended system, and if he avoids 5 Bf4, as here, he
usually allows Black easy equality.
Besides 5 Bf4, which we have already covered, and this game’s 5 Bg5, White has
also tried 5 e3, 5 Nc3, 5 a3 and 5 e4?!. These alternatives will be considered in the
following game.
5 ... Be7 6 Bxe7 Qxe7 7 Nc3 0-0
There is no need to rush with 7 ... Ngxe5 8 Nd5 Nxf3+ (or if 8 ... Qd8 9 Nxe5
Nxe5 10 Qd4 is awkward for Black, whose g-pawn is undefended) 9 gxf3 Qd8 10 f4
0-0 11 Rg1 when the g-file could be dangerous.
8 Nd5 Qd8 9 e3 Ngxe5 10 Nxe5 Nxe5 11 Be2 d6 12 0-0 c6?!
264
It seems harsh and cruel to label this a mistake, but go through the game and try
to find another one! After this, White always has pressure against the backward d6-
pawn, and Nunn never seems to equalize. There are a couple of possible
improvements later (for example on move 20), but nothing that promises full equality.
I have noted before in similar positions that, unless Black has a dark-squared bishop,
the d-pawn can become chronically weak in such a structure.
I think the reason for this move—this mistake, I have to say—is more
psychological than positional. White has a knight on my side of the board! I must get
rid of it!
But one should ask oneself what this visually obnoxious knight is actually doing
—answer: Nothing!
I think Black should go about his business, proceed with his own plans—and just
leave the silly knight there!
One can even apply primitive logic here: White has a half-open d-file and outpost
at d5, while in reverse, Black has a half-open e-file and potential outpost at e4.
So Black should aim to bother White in just the way White is bothering Black, by
bringing a knight to e4. If in the course of this journey White occupies e4 with a pawn,
then d4 becomes permanently weak, and Black might be able to drop a knight there
instead.
With this in mind the next two moves are easy: 12 ... Re8 13 Qd4 Bf5 with full
equality.
265
Black has completed his development and controls e4, and is thinking about a
knight manoeuvre like ... Nd7-c5-e4.
Here are a few variations that show that Black really does have an easy game—
with the right plan of course!
a) White tries to attack: 14 f3 a6 15 e4 Be6 16 f4 c5 17 Qc3 Nc6 and Black is at
least equal in view of the permanent d4-square.
b) White plays quietly: 14 Rfd1 Nd7 15 Rac1 (if 15 b4 a5 with good counterplay)
15 ... a5 16 b3 Nc5 and Black has an excellent game as his knight eyes e4.
c) White blunders: 14 e4? Nc6 and Black wins a pawn!
Note that in none of these variations did White’s “proud” knight at d5 have any
positive effect on the position. Indeed, in Variation ‘b’, at the point where I left off,
Mr. Fritz wants to withdraw the steed to c3 to defend against Black’s knight incursion!
13 Nc3 Be6 14 b3 Qa5 15 Qd2 Rad8 16 f4 Bg4
266
Black uses some trickery to exchange pieces, but his position doesn’t improve, as
Polugaevsky doesn’t fall for the likes of 17 fxe5? Bxe2 18 Rfc1 Bg4 19 exd6 Qe5 with
advantage to Black.
17 Bd1 Bxd1 18 Raxd1 Ng4
If 18 ... Nd7 19 Ne4 Qxd2 20 Rxd2 wins the infamous pawn.
19 h3 Nh6
It’s unpleasant to move the knight to the rim, but if 19 ... Nf6 20 Nd5 Qxd2 21
Nxf6+ adds a new weakness to Black’s structure.
20 e4
20 ... f5?!
I think this was Black’s last chance; it’s very understandable that he wants to lash
267
out, but after this White gets a mobile kingside pawn majority, while Black’s
queenside pawns are and will be lamed by the weakling at d6. Correct is 20 ... f6 21
Rfe1 Nf7 which is definitely plus equals, but is it anything more? White has no
obvious break, although Black will face tough defence for many many moves to come.
21 Rfe1 Rfe8 22 Kh2 fxe4 23 Rxe4 Rxe4 24 Nxe4 Qh5 25 Ng5 Nf7 26 Nf3
White’s kingside majority is stronger than Black’s blockaded queenside: Nunn
tries to break out, but has back rank problems.
26 ... d5?!
After 26 ... Re8?! 27 Re1 Black has back rank problems as in the game. The best
he can do is 26 ... Qf5 27 Qe3 a6, but this is still going to be plus equals for a long
time.
27 Qe3! Qf5
If 27 ... dxc4? 28 Rxd8+ Nxd8 29 Qe7 wins a piece.
28 cxd5 cxd5
Black has to take this way due to his vulnerable back rank, but now the isolated
pawn is weak and ...
29 g4
White’s kingside pawn majority is strong!
29 ... Qc2+ 30 Rd2 Qc7
30 ... Qe4 is the last hope, but after 31 Qxe4 dxe4 32 Rxd8+ Nxd8 33 Nd4 the
black e-pawn is weak, so White is much better in the knight ending.
31 Rxd5!
White finally wins the weak pawn—for absolutely nothing—and converts
efficiently.
31 ... Rf8 32 Kg3 Nd8 33 Qe5 Qc8 34 Qe7 Qc1 35 Rf5 Nf7 36 Qxb7 g6 37 Rf6
Qb2 38 Qe7 Qxa2 39 Qe6 Qa1 40 h4 Kg7 41 g5 a5 42 f5 gxf5 43 h5 Qc3 44 Rxf5
Qc7+ 45 Kh3 Qc3 46 h6+ Kg8 47 g6 hxg6 48 Qxg6+ Kh8 49 Rxf7 1-0
One sees that 5 Bg5, which helps Black develop, has no threat value whatsoever.
Black was fine in the opening, and would have stayed that way if he had left the white
268
knight alone—it wasn’t really doing anything, but was annoying simply by being in
the “Black half” of the board! By playing for his own fifth rank outpost, Black would
have been fine.
On the other hand, Polugaevsky must be credited for a good grind!
Game 63
G.Sosonko-H.Ree
Amsterdam 1982
1 d4 Nf6 2 c4 e5 3 dxe5 Ng4 4 Nf3 Nc6
When White plays 4 Nf3, it’s clear that he wants to play the variation 4 ... Bc5 5
e3—and with good reason, as I think this line gives him excellent chances for
advantage. However, when Black crosses him up with 4 ... Nc6, White has a tough
choice: 5 Bf4 returns to a line he rejected—otherwise why didn’t he force that line
with 4 Bf4 - ?
We saw in the previous game that, from a theoretical standpoint, the simplifying
5 Bg5 is nothing to fear.
In the main game we see White play 5 e3, but this looks like “hope chess” to me
— that is, White hopes Black will play 5 ... Bc5 and transpose to the line White wanted
in the first place—but Black has no reason to fulfil White’s dreams. In the game Black
finds another place for his king’s bishop.
White can’t play 5 e4?!, as after 5 ... Bc5 the awkward attack on f2 already gives
Black the better game.
There are a couple of other moves that have been tried, 5 Nc3 and 5 a3, and these
will be covered in the next note.
5 e3
5 Nc3 is a reasonable, if not very threatening developing move. After 5 ... Ngxe5
269
6 Nxe5 Nxe5
7 e4 Bc5 (but not 7 ... Bb4 8 f4 Bxc3+ 9 bxc3 Nc6 10 Ba3 d6 11 c5 and White
gets rid of the doubled pawns with advantage) 8 f4 (White got absolutely nowhere
with the premature attack 8 Qh5 d6 9 Bg5, as Black fully equalized with the
counterblow 9 ... Bg4 in F.Marshall-A .Kevitz, Bradley Beach 1929) 8 ... Nc6 9 Bd3 0-
0 10 Qf3 Nd4 11 Qg3 Re8 and White’s delayed Alekhine Attack is not working: White
can’t castle and Black is less cramped than usual due to the knight exchange on move
6, and also has counter-chances against the white centre.
In the above variation (after 5 Nc3 Ngxe5 6 Nxe5 Nxe5) GM Hebden tried 7 Qc2
once, and got an opening advantage after 7 ... Bb4 8 a3 Bxc3+ 9 Qxc3 (the reader
knows how much I dislike the unforced gift of the two bishops to White, without
getting doubled pawns or any compensation whatsoever) 9 ... Qf6
270
and now, instead of 10 e4?! (when the pawn was a target in M.Hebden-
Ju.Hodgson, Guernsey 1985), White should have played 10 g3 0-0 11 Bg2 and Black
is in difficulties, facing the eternal two bishops grind.
Of course Black has a better way to play: the inoffensive 7 Qc2 is only effective
against ... Bb4, but is misplaced if Black switches back to the main line of ... Bc5 we
will cover in Chapter 11. After 7 ... Bc5 White can’t utilize the pin, for if 8 Qe4 d6 9
f4? f5 and Black is much better, while on other moves Black has a sound development
and need not fear a future f2-f4, as he will have ... Ng4 in return, targeting e3.
White has also tried 5 a3, but as usual this is essentially a tempo loss, as long as
Black doesn’t overreact with ... a7-a5. After the simple 5 ... Ngxe5 6 e3 Nxf3+ 7 Qxf3
g6 Black solves the problem of his king’s bishop as in the Ludwig win given in the
notes to Game 21, and following 8 Bd2 Bg7 9 Bc3 0-0 10 Bxg7 Kxg7 11 Nc3 d6 12
Be2 Be6 Black was completely equal in B.Züger-H .Schussler, Vienna 1986. This
game ended in a draw—the only drawback of all these quiet lines is that there is a
fairly high drawing percentage, but that’s modern chess, alas. Too many White players
go straight for the draw from the opening, and it’s a tedious process to beat them!
5 ... Ngxe5 6 Be2 g6
271
I like the spirit of this active move: instead of placing the bishop where it “bites
on granite” at c5, Black takes advantage of White’s passive play and takes over the
long diagonal. If Black just wants simple equalization, he (or in this case, she) can also
play simple (or should I say boring) chess: 6 ... Bb4+ 7 Bd2 Bxd2+ 8 Qxd2 0-0 9 Nc3
d6 10 0-0 Bg4 11 Nxe5 Nxe5 12 Bxg4 Nxg4 13 h3 Nf6 14 Rfd1 a5 15 Nd5 Ne4 and
both knights have their outposts—time for a handshake! 1⁄2-1⁄2 N.Khurtsidze-
S.Gvetadze, Georgian Women’s Ch., Tbilisi 2007. In this line Black does not have to
face the more complex problems seen in the main game.
7 Nc3 Nxf3+ 8 Bxf3 Bg7 9 Qd2 d6 10 b3 Ne5 11 Bb2
White allows the doubled pawns, for if 11 Be2 Qg5 stirs up trouble.
11 ... Nxf3+ 12 gxf3
272
12 ... 0-0
Black has another chance for solid equalization here: 12 ... Be6!? 13 0-0 -0 Qd7
14 Nd5 f5 15 Nf4 Bxb2+ 16 Qxb2 0-0 -0, with the kings on the same side of the board.
13 0-0 -0 Bh3 14 Rhg1 Be6 15 Ne4 f5 16 Ng5 Bxb2+ 17 Qxb2 Qf6 18 f4
Black holds after 18 Rd4 Bd7 19 Rh4 Qxb2+ 20 Kxb2 h5 or 18 Nxe6 Qxe6 19
h4 Qf6 20 h5 Qxb2+ 21 Kxb2 Kf7 with equality—but these lines demand careful play
for Black, and if White wanted to play such a boring line, perhaps Black should have
bored him back with 6 ... Bb4+!?.
18 ... Qxb2+ 19 Kxb2 Bf7
20 c5
This basically forces a draw.
20 h4 is White’s last try for something, but shouldn’t get anywhere against
accurate play: 20 ... h6 21 Nf3 (21 Nxf7 Kxf7 22 h5 Rg8 is equal) 21 ... Kg7 22 h5 g5
23 fxg5 Bxh5 24 gxh6+ Kf6 25 Rg3 Rg8 26 Rdg1 Rxg3 27 Rxg3 Rh8 and Black
recovers his pawn, e.g . 28 Nd4 a6 29 Rh3 Bg4 30 Rh1 c5 31 Nc2 Kg6 with a draw in
view.
20 ... dxc5 21 Rd7 Rad8 22 Rgd1
Black has good counterplay after 22 Rxc7 Rd2+.
22 ... Rxd7 23 Rxd7 h6 24 Nf3 Rc8 25 Ne5 Be8 26 Re7 Kf8 27 Rh7
Not 27 Re6? as 27 ... Rd8 28 f3 Rd6 29 Rxd6 cxd6 wins for Black.
27 ... Kg8 28 Re7 Kf8 29 Rh7 Kg8 1⁄2-1⁄2
273
Again Black gets counterplay on the d-file if 30 Rxh6 Kg7 31 Rh3 Rd8, so the
game was called here on account of 30 Re7 with a draw by three-fold repetition.
Clearly a passive move like 5 e3 can’t give White any advantage (unless Black
gives in to White’s hope and plays the illogical 5 ... Bc5) and Black has at least two
ways to equalize.
Summary
These lines are completely inoffensive—and yet Nunn, a strong GM, lost after
such an opening! One must always seek the correct plan in the position, as even the
most boring game can turn poisonous!
274
Chapter Eleven
4 Nf3 Bc5
I emphatically do not recommend this line for Black in the Budapest. I think it’s
much too naïve: Black says, “I’ll make this one move threat with my bishop, then I’ll
make three moves that White won’t notice ( ... a7-a5, ... Ra6, ... Rh6), and then I’ll win
with an attack!”
The bizarre thing is that many times this naïve strategy actually works, and I’ll
give a few examples in the next main game.
But what if you come across a well-prepared White opponent? There are more
and more of them out there each day, as everyone is busy tapping their computers just
like I’m doing—and what I see is the ferocious Smyslov/Spassky Attack (Games 65-
70) and disaster for Black! The statistics after White plays the signature move of the
attack, f2-f4, are simply amazing and are included in the games of this chapter.
Game 64
T.Karolyi-J.Hector
Copenhagen 1985
1 d4 Nf6 2 c4 e5 3 dxe5 Ng4 4 Nf3 Nc6
As the reader knows, this is my recommendation; the variation seen in the game
is usually reached by way of 4 ... Bc5 5 e3 Nc6.
275
5 Nc3 Bc5
Again, I don’t recommend this move: instead, just take the pawn, which
transposes to the note to move 5 in the previous game.
6 e3
Black’s one-move attack is blocked, and after the usual exchange of knights on
e5, White will be able to attack with f2-f4, which is the subject of Games 65-70.
On the other hand, if White plays passively, then Black can attack and often win
quickly—as in this game and notes.
6 ... Ngxe5
7 Be2
The subject of this game is the “crazy rook” attack with ... Ra6-g6/h6. It’s not
something that can be forced, but it sure is fun if you can get it! Here’s one of several
examples: 7 Nxe5 Nxe5 8 a3 a5 9 Be2 0-0 10 0-0 Re8 11 b3 Ra6 (here comes the
rook!) 12 Nd5 Rg6 (caveman style, the rook lines up with the white king!) 13 b4 Ba7
14 f4 Nc6 15 c5 d6 16 f5 Rh6 17 f6 dxc5 18 b5 Be6 19 e4 Bxd5 20 Bxh6 Nd4 21 Bh5
Rxe4 22 Bxg7 c4 23 Kh1 Qd6 24 Re1 Qxh2+!! (beautiful!—this is death by double
rook lift!) 25 Kxh2 Rh4+ 26 Kg1 Ne2+ 27 Kf1 Ng3 mate, J.Dinckel-E .Kahn,
Budapest 2000.
7 ... 0-0 8 0-0 a5
Unapproved by your author, but in this game it works! We recall that Kramnik
also got his rook over eventually—here is Game 2 again: 8 ... Nxf3+ 9 Bxf3 Ne5 10
Be2 Re8 11 b3 a5 12 Bb2 Ra6 13 Qd5 Ba7 14 Ne4 Rae6 15 Ng3 d6 16 Qxa5 Bb6 17
Qc3 Rh6 18 Rfd1 Qh4 19 Nf1 Rg6 20 b4 Bg4 21 Bxg4 Rxg4 22 c5 Nf3+ 23 Kh1
Qxf2 24 Ng3 Nxh2 25 Qe1 Nf3 0-1 I.Odesskij-V.Kramnik, Samtredia 1987.
9 b3
9 Nxe5 Nxe5 10 f4 is correct (see Game 68, Johnson-Camarda). Note that the
black knight will then have to retreat to the third rank, blocking the path of the a8-rook
before it even gets to that rank—making the whole idea of the rook lift useless. One’s
success in playing this line for Black depends a lot on your opponent’s knowledge. My
276
wife has played it often and scored well against opponents in the 1800-2000 range, but
I think above that one may have trouble!
9 ... Nxf3+ 10 Bxf3 Ne5 11 Be4 Ra6
The crazy rook is ready, but ...
12 g3?
White could slam the door with the correct 12 f4, when once again Black must
retreat his knight to the third rank, and block his rook, which starts to look more silly
than crazy!
One player tried 12 Qh5 against my wife, but after 12 ... Rh6 Black was already
winning on move 12! There are two key lines: 13 Qxe5 Bd6 14 Qd5 (or White can
give up the queen for inadequate compensation with 14 Qxd6) 14 ... Bxh2+ 15 Kh1
Be5+ 16 Kg1 Rh1+ 17 Kxh1 Qh4+ 18 Kg1 Qh2 mate; or the game variation, 13 Qe2
Qh4 14 h3 (so far R.Read-L .Taylor, Chicago 2006) when Black could have won
decisive material with 14 ... Bb4! as White can’t hold both c3 and e4. Unfortunately
Liz did not play this winning move and in fact eventually lost—those who like
disasters can find the full annotated game in True Combat Chess.
12 ... Rh6
The rook made it across! Now Black has excellent attacking chances, but to
repeat, this variation is far from forced and White can completely nullify it with a
well-timed f2-f4, as played by both Smyslov and Spassky.
13 Na4 Ba7 14 Bg2 d6 15 Qe2 Re8 16 f3 Qg5!
Black utilizes a nice tactic (17 f4 Qg4!) to bring another heavy piece to the party.
17 Nc3 Qh5 18 Bh1 Nxc4!! 0-1
277
A crushing surprise! Black wins, for if 19 bxc4 (or 19 Qxc4 Qxh2 mate) 19 ...
Rxe3 20 Bxe3 Bxe3+ 21 Qxe3 (or 21 Rf2 Qxh2+ 22 Kf1 Qxh1 mate) 21 ... Qxh2
mate.
Such a quick, sparkling win (as well as the Kramnik and Kahn smashes given in
the notes) makes one want to play this line, and as I say, you may have good success at
a lower rating level. However, you can’t play this way against a well-prepared White
player, as you will never get your rook over.
And even if Black tries to play without the rook lift, he will still have trouble—
see Game 69.
Game 65
V.Smyslov-R.Blasek
Gelsenkirchen 1991
1 d4 Nf6 2 c4 e5 3 dxe5 Ng4 4 Nf3 Bc5 5 e3 Nc6 6 Nc3
278
When White attacks with f2-f4, his light-squared bishop logically belongs on d3
to aim at the black king’s usual residence. In most games White plays Be2 first, and
then Bd3 later—but the idea of Smyslov’s move order is to avoid developing the
bishop for the moment, and then if Black takes on e5 prematurely, White answers with
a knight exchange, f2-f4, and finally Bd3 in one move.
Black doesn’t have to allow this, but it’s a nice trick to catch the unwary!
A similar idea worked in a more recent game: 6 a3 a5 7 Nc3 Ngxe5 (still a
mistake: the insertion of a2-a3/ ... a7-a5 doesn’t help Black, who should have played 7
. .. 0-0) 8 Nxe5 Nxe5 9 f4 Ng6 10 Bd3 (gets there in one!) 10 ... d6 11 0-0 f5
(otherwise f5-f6 is dangerous) 12 Rb1 c6 13 b4 axb4 14 axb4 Ba7 15 Kh1 0-0 16 Rf3
(now White has a strong attack and soon ... ) 16 ... Be6 17 Rh3 d5 18 Qh5 dxc4 19
Be2 Rf6 20 Qxh7+ Kf8 21 Rg3 Bg8 22 Qh5 Bf7 23 b5 Kg8 24 Rh3 Bc5 25 bxc6 bxc6
26 Qh7+ Kf8 27 Rg3 Bg8 28 Qh5 Ne7 29 Qh8 Ng6 30 Rxg6 Rxg6 31 Bxc4 Ke7 32
Rb7+ Kd6 33 Qh5 Bxc4 34 Ne4+ (mates Black in the middle of the board!) 1-0
A.Beliavsky-S.Mamedyarov, Spanish Team Ch. 2005.
6 ... Ncxe5?!
Black should wait with 6 ... 0-0, when White should play 7 Be2, as seen in the
next few games. But if White does try to make 7 Bd3?! work, as in the following
game, he runs into trouble since both the bishop and c-pawn will be under attack after
Black’s capture on e5: 7 ... Re8 8 a3 Ngxe5 9 b4 Nxf3+ 10 Qxf3 Ne5 11 Qe2 Nxd3+
12 Qxd3 Bd6 13 0-0 b6 14 Ra2 a5 15 b5 Bb7 (Black already stands better, with two
bishops and attacking chances: as we have learned, 16 f4 is necessary here as always
when Black starts to line up—but White is oblivious to the danger) 16 Re2?! Bxh2+!!
(Blatny pulls off the classic Lasker double bishop sacrifice) 17 Kxh2 Qh4+ 18 Kg1
Bxg2 19 Kxg2 Qg4+ 20 Kh2 Re5 21 Qd5 Qh5+ 22 Kg1 Rg5+ 23 Qxg5 Qxg5+ 24
Kh1 Qf6 25 Bb2 Qf3+ 26 Kg1 Re8 27 Rd2 Qg4+ 28 Kh1 Re6 29 f3 Qh3+ 0-1
N.Gamboa-P.Blatny, New York Open 1996 (if 30 Kg1 Rg6+ 31 Kf2 Rg2+ 32 Ke1
Rxd2 kills).
7 Nxe5 Nxe5 8 f4!
279
With this and each remaining game in this chapter, I’m going to give White’s
scoring percentage (from the Megabase) with f2-f4! at the point where it is played, in
slightly different positions. Here White scores 83% with Smyslov’s 8 f4!. Not a
hopeful sign for Black!
8 ... Nc6 9 Bd3 h5
Black has no king safety after this, but if 9 ... 0-0 10 Qh5 wins in view of the
hanging bishop on c5, while after 9 ... d6 10 0-0 0-0 White has reached the basic
attacking position seen in the next few games but with an extra tempo.
10 0-0 d6 11 a3 a5 12 Bd2 Bg4 13 Qc2 h4 14 h3 Bd7 15 Ne4 Kf8 16 Nxc5
dxc5 17 Bc3 Qe7 18 Rae1 Rd8 19 Be4 Rh6 20 f5 b6 21 Bxc6! Bxc6
As is well known, opposite-coloured bishops favour the attacker; Black has no
280
serious defence.
22 Rf4 Qd6 23 Qf2 Qd3 24 Rxh4 Ke8 25 Rg4 Rh5 26 e4 Kd7 27 Qe2
Smyslov typically decides in the ending, but Black doesn’t get quite that far.
27 ... Qxe2 28 Rxe2 Re8 29 Bxg7 Rxf5
This shortens the “struggle”, but testing Smyslov’s technique with two extra
pawns is not a serious proposition.
30 Rd2+ 1-0
As we will see in the next five games, this line is difficult enough for Black—so
if you must play this variation, don’t let White get the basic attack with an extra
tempo! Black must wait for the f1-bishop to move before taking on e5: then White’s
winning percentage will be a little lower.
Game 66
B.Spassky-M.Illescas Cordoba
Linares 1990
1 d4 Nf6 2 c4 e5 3 dxe5 Ng4 4 Nf3 Bc5 5 e3 Nc6 6 Be2 Ngxe5
With the bishop on e2, this capture is now acceptable.
7 Nxe5
I learned firsthand about the power of the f2-f4 attack in this variation, courtesy
of GM Lev Gutman: 7 0-0 Nxf3+ 8 Bxf3 Ne5 9 Be2 d6 10 Nc3 Be6 11 b3 a6 12 f4!
Nc6 13 Kh1 f6 14 Bh5+ g6 15 f5! Bf7 16 Bf3 g5 17 Bxc6+ bxc6 18 Ne4 Qe7 19 Qf3
d5 20 Nxc5 Qxc5 21 Bb2 Qe7 22 cxd5 cxd5 23 Rac1 c5 24 h4 gxh4 25 Rfe1 Rd8 26
e4 d4 27 e5 fxe5 28 Qc6+ Kf8 29 Qh6+ Ke8 30 f6 Qc7 31 Qf4 Rd5 32 Bxd4!! (I can
still recall the shock of this move) 32 ... h3 33 Bxe5 Qc6 34 Bc3+ Kd7 35 Rcd1 Kc8
36 Rxd5 hxg2+ 37 Kg1 Qxd5 38 Re7 Qd8 39 Qg4+ Kb8 40 Rxf7 Qd5 41 Qg3+ 1-0
L.Gutman-T.Taylor, New York Open 1987.
7 ... Nxe5 8 Nc3 0-0 9 0-0 Re8 10 Kh1
281
It’s an open question whether the immediate 10 f4 is stronger—see the next
game.
10 ... a5
Black would like to bring his rook across, but Spassky is not about to allow it!
10 ... d6 is an alternative, when White can play f2-f4 or, as here, catch the black
king’s bishop. I’m amazed that Mohr drew the following game against Beliavsky: he is
worse virtually the whole game but hangs on for the half point! I would not
recommend this for Black, unless you have a hearty appetite for suffering!
11 Na4 b6 12 Bd2 a5 13 Nxc5 bxc5 14 f4 Nd7 15 Bf3 Rb8 16 Qc2 a4 17 Rae1
Nf6 18 Bc3 Ng4 19 e4 Qh4 20 h3 a3 21 b3 Nh6 22 f5 f6 23 Kh2 Nf7 24 g3 Qh6 25
Bd2 g5 26 h4 Qg7 27 Bc1 Bb7 28 Bxa3 Ne5 29 Bh5 Re7 30 Bc1 (better is 30 Bd1
282
Ra8 31 Bc1 and White should gradually convert the extra pawn—by allowing his
bishop to be cut off, Beliavsky allows some counterplay) 30 ... g4 31 Bf4 Kh8 32 Qd2
Rd7 33 Qc3 Re7 34 a3 Rg8 35 b4 cxb4 36 axb4 Ra8 37 Rf2 Qg8 38 c5 Ra2 39 Ree2
Rxe2 40 Rxe2 Bxe4 41 Rxe4 Nf3+ 42 Kh1 Rxe4 43 Qxf6+ Qg7 44 Qd8+ Qg8 45
Qxg8+ Kxg8 46 f6 Re2 47 f7+ Kg7 48 Bh6+ Kxh6 49 f8Q+ Kxh5 50 Qf5+ Kh6 1⁄2-1⁄2
A.Beliavsky-G .Mohr, Portoroz 1997. Heroic defence!
11 f4!
White scores a modest 67% with this move!
11 ... Nc6
Or 11 ... Ng6 12 f5 Ne5 13 f6 with a typical “pawn cracker” sacrifice, destroying
the black kingside, and White is better.
12 Bd3 d6
Not 12 ... Bxe3?! 13 Bxe3 Rxe3 14 Be4, trapping the rook; and there’s no point
to 12 ... Ra6 now: Spassky’s last move made sure there would be a knight in the way
of further travels—besides which, White can win by force with 13 Qh5!. In other
words, no crazy rooks allowed!
13 Qh5 h6
Better is 13 ... g6, when White should not be impetuous with 14 Qh6?! as 14 ...
f5 15 e4 Nb4 16 Bb1 Bd4 17 a3 Bg7 defends. Instead, he retains the advantage and
good attacking chances with 14 Qf3 as the following variations show:
283
a) 14 ... Be6 15 a3 a4 16 Bd2 Bb6 17 Rae1 Qf6 18 Ne4 and White’s centralized
pieces carry on the attack, while 18 ... Qxb2 fails to 19 Bc3—a key idea which will
also be seen in the main game.
b) 14 ... f5 15 Bd2 Nb4 16 Bb1 Be6 17 a3 Nc6 18 Bd3 Ne7 19 Rae1 a4 (or 19 ...
d5 20 cxd5 Nxd5 21 e4 and White dominates the centre) 20 e4 with a serious
advantage: the centre opens for White’s pieces, and the advantage in space helps his
attack.
c) 14 ... Nb4 (relatively best) 15 Bb1 Bd7 16 a3 Bc6 (or 16 ... Nc6 17 Nd5 Be6
18 Bd2 and the bishop once again heads for the long diagonal) 17 Qh3 Na6 (not 17 ...
Bd7 as White’s attack is too fast after 18 Qh6 Nc6 19 f5) 18 Bd2 Qf6 19 Bc2, when
White has snuffed out Black’s temporary initiative and can now play on the queenside
with Rb1, while looking for the best time to hit with f4-f5 on the kingside.
Black has a long unpleasant defence in store—but at least he’s still playing in this
variation.
14 Rf3 Nb4 15 Be4 c6 16 Rg3
White (not Black!) gets the rook lift, a hallmark of the Smyslov/Spassky Attack.
16 ... Qf6 17 Bd2 Na6 18 a3 Kf8 19 Bd3 Ba7 20 Ne2!
284
A dramatic positional problem for Black can now be clearly seen: the bishop on
a7 has nothing to say, while the long dark diagonal heading to the black king is about
to be seized by White, with decisive results. We saw this same theme in numerous
subvariations along the way—and this key idea is one reason why I don’t believe in 4
... Bc5 for Black.
20 ... Nc5
20 ... Qxb2 again loses to 21 Bc3; the fact is that Black has no defence.
21 Bc3 Qxc3 22 Nxc3 Nxd3 23 Rf1 Bxe3 24 Qe2 Nxf4 25 Qd1 1-0
Black has no good answer to the threat of Rxe3.
This was a tremendous attack by Spassky, and it’s even possible to speed it up—
see the next game!
Game 67
L.Comas Fabrego-R.Altisen Palmada
Catalonian Team Ch. 1995
1 d4 Nf6 2 c4 e5 3 dxe5 Ng4 4 Nf3 Bc5 5 e3 Nc6 6 Be2 Ngxe5
As noted before, this is acceptable now, if not completely safe. It’s also
dangerous to delay the capture for too long: 6 ... 0-0 7 0-0 Re8 8 Nc3 a5 transposes to
Game 70 where White has various methods of exploiting Black’s delaying action, of
which the strongest seems to be 9 Nd2!—full analysis in the notes to that game.
7 Nxe5 Nxe5 8 0-0 0-0 9 Nc3 Re8
For 9 ... a5 see the next game.
10 f4
285
With this accelerated attack White scores a happy 76%—happy for White, that
is!
10 ... Nc6
10 ... Ng6 11 f5 Ne5 12 f6 is the typical pawn cracker.
11 Bd3
After the less active retreat 11 Bf3, White won in curious fashion: he shuffled
around for a while, offered a draw by repetition—and then when his opponent played
for a win (or a loss!) suddenly acquired attacking mojo. He redirected his light-square
bishop to the b1-h7 diagonal—and finally won stylishly with a burst of sacrifices! 11
. .. d6 12 Ne4 Bb6 13 Qb3 Qe7 14 Kh1 a5 15 Nc3 Bc5 16 Nd5 Qd8 17 Bd2 Ne7 18
Rae1 Nf5 19 Qd3 c6 20 Nc3 Qh4 21 Kg1 Qe7 22 Kh1 Ba7 (Black should repeat with
22 ... Qh4 and be happy with a draw) 23 Ne4 Rxe4 24 Bxe4 Ng3+ 25 Kg1 Nxf1 26
Rxf1) 23 e4 Nd4 24 Bd1 (the bishop redirects!) Ne6 25 Qg3 Nc5 26 Bc2 (now White
has a delayed but no less powerful Alekhine Attack, and wins sharply) 26 ... Bd7 27 e5
dxe5 28 fxe5 Ne6 29 Ne4 Kh8 30 Nf6! gxf6 31 exf6 Qf8 32 Bxh7! Kxh7 33 Re4 Ng7
34 Rh4+ Kg8 35 Bh6 1-0 J.Medina-C.Del Prado Montoro, Ceuta 1993.
11 ... d6
Taking the pawn cannot be recommended: 11 ... Bxe3+ 12 Bxe3 Rxe3 13 Nd5
(13 Be4 Qe7 14 Qd5 Qb4 15 Kf2 is only slightly better for White) 13 ... Re8 14 Qh5
g6 15 Qh6 f5 16 Bxf5 (16 Rae1 Rxe1 17 Rxe1 Qf8 18 Re8! is even stronger) 16 ... d6
17 Bxg6 hxg6 18 Qxg6+ Kf8 19 Qh6+ Kf7 20 Qh7+ Kf8 21 Rae1 Rxe1 22 Rxe1 Bd7
23 Re3 Be8 24 Re6 Bf7 25 Qh8+ 1-0 P.Lombart-G .Marlier, Charleroi 2004. After 25
. .. Bg8 White has 26 Rg6 Kf7 27 Rg7+ Ke6 28 Qh3 mate, or 26 ... Ne7 27 Qg7+ Ke8
28 Nf6 mate.
12 Ne4
286
This move scores a tremendous success in this game after Black’s natural reply;
but given that Black has a stronger counter, White should consider playing in Spassky
style here with 12 Qh5. Clearly after 12 ... h6 13 Rf3 White can go after the king
directly as in the previous game, but even if 12 ... g6 13 Qf3 and White still has the
attacking chances we are familiar with, based on f4-f5 or eventually Bd2-c3, both of
these targeting Black’s weak kingside.
12 ... Bb6?!
Most people would play this without thinking, but Black must look more deeply
if he is to survive. The fact is this bishop means nothing here, so Black should be glad
to exchange it for a knight.
The best try is 12 ... Qe7! which has some tricks. First, if White takes the bishop,
Black gets some positional trumps which will prevent an immediate attack for White:
13 Nxc5 dxc5 14 Qh5 g6 15 Qf3 and now Black can block it up with 15 ... f5, or
perhaps stronger, just develop with 15 ... Be6, relying on his knight to come in to d4 if
White plays e3-e4, or fork on e5 if White plays f4-f5.
Furthermore, there is a tactic if White is unwary: 13 a3 Bxe3+! 14 Bxe3 f5 and
Black snaps off a pawn.
Therefore White has nothing better than 13 Kh1!, so taking on e3 will not be a
check—and one sees now that Spassky’s 10 Kh1 from the previous game was not such
a wasted move after all—it’s not for nothing Boris was World Champion! Black can
try 13 ... Nb4 (not 13 ... Bxe3? 14 Bxe3 f5 15 Nxg5 Qe3—no check!—16 Qh5 h6 17
Be4! and wins), but after 14 Nxc5 dxc5 15 Bb1 Rd8 16 Qe2 Nc6 17 b3 a5 18 Bb2
White’s quiet play has a lot of poison, as Black has no real compensation for the two
bishops (especially the unopposed dark-squared bishop) aiming at his king.
13 Qh5 g6
After 13 ... h6 14 Bd2 White prevents ... Nb4, and prepares to attack with Rf3
and Bc3.
14 Qh6
Usually White has to come back with the queen, but with the knight on e4
287
already, White can go straight for mate. The threat is Ng5 and there is no good
defence.
14 ... f5
This seems to lose by force, but even after 14 ... f6 White breaks through with 15
f5! Bxf5 16 Rxf5! Rxe4 (not 16 ... gxf5 17 Nxf6+ Kf7 18 Nh5 with a winning attack)
17 Bxe4 gxf5 18 Bxf5 and White is clearly better with his two bishops and Black’s
weak kingside pawns.
15 Ng5
15 ... Qe7
Black can defend h7 in two other ways, but neither holds up much better than the
main game:
a) 15 ... Re7 16 Bd2 Qf8 17 Qh3 Qg7 18 c5 Bxc5 19 Bc4+ Kh8 20 Rac1 Bb4 (or
20 ... a5 21 a3 Bd7 22 Rfe1 Rae8 23 Bc3 and the dark-sqaared bishop gets to the
killing diagonal—Black’s last try is an attempt to prevent this which ultimately fails)
21 Rc3! (the bishop is worth more than the rook here) 21 ... Bd7 22 a3 Ba5 23 b4 Bb6
24 Rd3 and contrast the dark-squared bishops: White is winning as Bc3 can’t be
stopped.
b) 15 ... Qd7 16 c5 Bxc5 17 Bc4+ d5 18 Rd1 Nb4 19 a3 Bf8 20 Qh3 Qe7 21
Rxd5! (White is again happy to give rook for minor piece—his bishops are the
winning pieces here) 21 ... Nxd5 22 Bxd5+ Kh8 23 Bf7 h6 24 Bd2 Bg7 25 Bxg6 Rf8
26 Bc3! (always a decisive move: this time White sets up a winning windmill!) 26 ...
Bxc3 27 Qxh6+ Kg8 28 Bh7+ Kh8 29 Bxf5+ Kg8 30 Bh7+ (the wheel of fortune
keeps turning!) 30 ... Kh8 31 Be4+ Kg8 32 Bd5+ Rf7 33 Bxf7+ Qxf7 34 Nxf7 Kxf7
35 bxc3 finito.
288
16 c5! Bxc5 17 Bc4+ Kh8 18 b4!
The game ends as the c1-bishop will make its first move.
18 ... Bxe3+
Or 18 ... Bxb4 19 Bb2.
19 Bxe3 Qxe3+ 20 Kh1 Qe7 21 Rae1 1-0
There is no reasonable way to avoid mate.
A truly savage attack (just 21 moves!) but the hyper acceleration (instead of
Boris’s slower Kh1 etc) gave Black some defensive chances.
Interestingly, the only way for Black to fight on the dark squares was to give up
his dark-squared bishop (12 ... Qe7). One sees that this is a fairly useless piece here
(12 ... Bb6 was a serious mistake) and White’s potential pressure on the long diagonal
289
was decisive.
Game 68
C.Johnson-K.Camarda
Tulsa 2007
1 d4 Nf6 2 c4 e5 3 dxe5 Ng4 4 Nf3 Bc5 5 e3 Nc6 6 Be2
After 6 Nc3 Belezky tried 6 ... a5 with a hyper-accelerated rook lift, but should
have been smashed Smyslov/Spassky style on move 15(!): 7 Be2 Ncxe5 8 Nxe5 Nxe5
9 0-0 Ra6 10 f4 (always the key move, so that the black knight interferes with the a8-
rook’s passage) 10 ... Ng6 11 Bd3 0-0 12 Qh5 Ba7 13 Nd5 Re8 14 f5 (the attack
continues ... ) 14 ... Re5 and now White should just put the game away with the rather
simple 15 Qh3, unpinning.
White wins major material or mates in all variations:
a) 15 ... Ne7 16 Nxe7+ Rxe7 17 f6 wins a rook at least in view of the threat 18
Qxh7+.
b) 15 ... d6 16 Qg3 Nf8 17 f6 g6 18 Bd2 c6 19 Ne7+ Kh8 20 c5 wins the
exchange while retaining the attack.
c) 15 ... Nf8 16 f6 g6 17 Qh6 Ne6 18 Ne7+ Kh8 19 Bxg6 fxg6 20 Nxg6+ Kg8 21
f7 is mate!
But as a cautionary tale, let me show how the game actually finished: 15 b3? c6
16 Bb2 cxd5 17 Qg4 Rxe3 18 Kh1 Rxd3 19 Rae1 Re3 20 Rxe3 Bxe3 21 Re1 d4 22
fxg6 Rxg6 23 Qe4 h6 24 h4 d5 25 cxd5 Rg4! (the crazy rook gets its revenge!) 0-1
J.Sebban-S.Belezky, Internet (blitz) 2004.
One sees the black rook lift always fails, regardless of when played, as long as
White counters with a well-timed f2-f4. But that doesn’t mean White wins
automatically, as we saw above—a crushing position might turn into a 25-move loss!
290
6 ... Ncxe5 7 Nxe5 Nxe5 8 Nc3 0-0 9 0-0 a5
Black wants to bring the rook over ...
10 f4!
Slam the door! White scores a perfectly respectable 71% after this.
10 ... Nc6
10 ... Ng6 11 f5 Ne5 12 f6 is the usual pawn cracker—here’s a sample
continuation: 12 ... gxf6 13 Nd5 Ra6 14 Qe1 Kh8 15 Qh4 Ng6 16 Qf2 Ne5 17 Bd2
Be7 18 Bc3 (as we have seen, the dark-squared bishop is deadly on the long diagonal)
18 ... Re6 19 Qh4 b6 20 Bf3 f5 (if 20 ... d6 21 Nf4 wins the exchange) 21 Qh3 and
White recovers his pawn with a big advantage.
11 Kh1
291
Also good is 11 Bd3 f5 12 Kh1 d6 13 Bd2 Be6 14 Qf3 Kh8 15 Rae1 Nb4 16 Be2
Qd7 17 a3 (all the Smyslov/Spassky Attack themes can be seen here: White drives the
black pieces back and gets his bishops to their ideal squares, d3 and c3) 17 ... Nc6 18
Bd3 Rae8 19 Nd5 Qf7 20 Bc3 Rc8 21 e4 Bxd5 22 exd5 Nd4?! (the knight turns out to
be weak on this central square!—better is 22 ... Ne7, though Black has only joyless
defence after 23 Re6) 23 Qd1 a4 (Black’s knight is trapped in the centre and must pay
a toll to survive, e.g . 23 ... Bb6 24 Bb1 c5 25 dxc6 Nxc6 26 Qxd6) 24 Qxa4 Qh5 25
Qd1 Qxd1 26 Rxd1 Rce8 27 Rfe1 1-0 R.Vera-A .Rodriguez, Corunna 1990.
11 ... Re8 12 e4
I put this game in to show that White does not have to follow Smyslov/Spassky
lines (as in the note above) but can also revert to the Alekhine Attack! Yes, White lost
a tempo with e3-e4, but one can say Black lost a tempo with ... a7-a5, which means
nothing in this variation—while the bishop on c5 fails to prevent castling (as
sometimes in the AA) since White has already castled, and said bishop, developed so
proudly with a threat on move 4, now attacks empty air!
12 ... d6 13 Bd2 Nd4 14 Bd3 Bd7 15 f5
15 Qh5 g6 16 Qd1 is an interesting idea, to give White’s f4-f5 push something to
bite on.
15 ... f6 16 Qg4 Bc6
Only the retreat 16 ... Nc6, followed by bringing the knight to e5, keeps Black in
the game, though White’s kingside space will always give him attacking chances.
17 Nd5 Bxd5
Suicidal—but sitting and waiting for Rae1-e3-g3 was evidently not a cheery
prospect.
18 exd5 c6 19 Bc3
292
As in the Vera game above, Black does not have enough central control to
maintain the knight outpost, so the cosmetically “strong” knight is weak!
19 ... Qb6 20 Rf4 Re3 21 Rxd4
Just like that, a full piece drops off the board.
21 ... Rae8 22 Re4 R8xe4 23 Bxe4 Bd4 24 dxc6 Bxc3 25 Bd5+ Kf8 26 bxc3
bxc6 27 Be6 Qb2 28 Rg1 Qf2 29 Qh5 1-0
White is a piece up and mate is coming.
The Vera game given in the notes, and the main game with a delayed Alekhine
continue to show the strength of the Smyslov/Spassky Attack. Note that White has a
fairly wide choice of attacking moves (early Kh1 or not, Bd3 or e3-e4, etc), while
Black is grimly defending and one slip (16 ... Bc6 instead of 16 ... Nc6) can be fatal.
Game 69
J.Lautier-I.Rogers
Novi Sad Olympiad 1990
1 d4 Nf6 2 c4 e5 3 dxe5 Ng4 4 Nf3 Bc5 5 e3 Nc6 6 Be2 Ngxe5
One notices that Rogers does not play ... a7-a5 at all in this game—but in an
earlier battle with US Champion Larry Christiansen he did flirt with the idea: 6 ... 0-0
7 Nc3 Re8 8 b3 (I would rather see the c1-bishop stay where it is for the moment, to
support e3 when White plays f2-f4, but it’s hard to argue with a 24-move win!) 8 ...
Ncxe5 9 0-0 Nxf3+ 10 Bxf3 Ne5 11 Bb2 a5 12 Ne4 Bf8 13 Bh5
293
13 ... Ng6 (Rogers realizes his rook will never make it across, since if 13 ... Ra6
then—all together now—14 f4! and Black has to block the third rank) 14 Bxg6 hxg6
15 Qf3 Qh4 16 Nc3 d6 17 h3 c6 18 Rad1 g5 19 Rd4 Qh7 20 Rfd1 Re6 (Rogers is still
hoping for some crazy rook action, but weakens his back rank) 21 Qg3 Rh6 22 f3 d5
23 cxd5 Bd6 (is there an attack?) 24 dxc6! (yes! for White!) 1-0 L.Christiansen-
I.Rogers, Wellington 1988.
7 Nc3 Nxf3+ 8 Bxf3 Ne5 9 Be2 0-0 10 0-0
White could consider playing 10 f4 at this point, as it forces the black knight to
the third rank, blocking any potential rook lift. One could imagine 10 ... Nc6 11 0-0 d6
12 a3 a5 13 Bd3 with a typical attacking position.
In the main game we observe that Rogers retreats to d7, which we haven’t seen
yet—but nonetheless fails to solve his problems.
10 ... d6 11 f4!
294
This move doesn’t go with the early draw, as it’s a bold and correct move, after
which White scores a lovely 73 %! That percentage would probably be higher if the
“opponents” had not been so intent on a GM draw here!
11 Na4 would be, in my opinion, a better route to a draw, as can be seen: 11 ...
Bb6 12 b3 Qh4 13 Nxb6 axb6 14 Bb2 Re8 15 Qd4 Qxd4 16 Bxd4 Bg4 17 Bxg4 Nxg4
18 a4 f5 19 h3 Ne5 20 Rfd1 Kf7 21 Kh2 g6 22 Kg3 Nd7 23 Kf3 h5 24 g4 fxg4+ 25
hxg4 Ne5+ 26 Bxe5 Rxe5 27 Rd4 1⁄2-1⁄2 T.Karolyi-I .Rogers, Tallinn 1985—I’m glad
the excitement finally ended!
11 ... Nd7
The knight prepares to blockade on f6, preventing an impetuous thrust of the f-
pawn. This may be better than the usual ... Ng6 or ... Nc6, but Black’s position is still
passive and defensive, and White has play on both sides of the board.
12 Bf3 Rb8 13 Qd3 Nf6 14 Bd2 c6 15 h3
15 Na4 gains the bishop pair with advantage—or was White waiting for Black’s
next move?
15 ... Qb6?!
295
16 Rfe1??
Now 16 Na4 is even stronger! It’s difficult to believe a GM missed this: after 16
... Qa6 (16 ... Qc7 17 Nxc5 dxc5 18 e4 is much the same) 17 Nxc5 dxc5 18 e4 White
is essentially up a pawn with the two bishops to boot—not to mention the fact that Mr.
Fritz is already clicking his heels and announcing decisive advantage to White!
16 ... Qxb2 17 Rab1 Qa3 1⁄2-1⁄2
The Grandmasters succeed in peace negotiations. The early ... d7-d6 seems to
give Black some defensive chances, but White can avoid even this small
inconvenience by advancing f2-f4 earlier. Yet even in the main game White had at
least two chances to catch Black’s dark-squared bishop and remain with the two
bishops and a large advantage.
I hope no one is so misled by the result that he will try out Black’s position after
move 15!
Game 70
E.Gleizerov-P.Blatny
Katowice 1992
1 d4 Nf6 2 c4 e5 3 dxe5 Ng4 4 Nf3 Bc5 5 e3 Nc6 6 Nc3 0-0 7 Be2 Re8 8 0-0 a5
When I was showing my wife some of the White walkovers with the
Smyslov/Spassky Attack, she suggested this move: preparing her beloved rook lift and
waiting, while White seemingly has no good way to advance f2-f4 with the knight in
the way! I liked the idea ... but then (curses!) refuted it with 9 Nd2!—see the following
note.
I was curious to see if this had been played before, and found a few games, this
GM/GM game being the highest Elo encounter.
9 a3!?
296
Gleizerov scores an impressive victory with this, but I think there are two other
lines that are very strong for White.
a) 9 Qd5 (untried but promising) 9 ... Qe7 (instead, 9 ... Ba7 blocks the rook,
while after 9 ... Bf8 10 e4 Ngxe5 11 Be3 White has a typical Maróczy Bind advantage)
10 Nb5 Nb4 (not 10 ... Bb6 11 c5 and c7 falls) 11 Qd2 Na6 12 b3 Nxe5 13 Nxe5 Qxe5
14 Bb2 Qg5 15 Bf3 with criss-crossing bishops and a nice positional advantage.
Even stronger is the move I came up with after staring at Liz’s idea for an hour:
b) 9 Nd2! (as far as I can see this just knocks Black’s line out, as it’s hard to find
any improvements in the forced play that follows) 9 ... Ngxe5 (Black has no other
good move—both of the following sacrifices are insufficient: 9 ... Nxe3 10 fxe3
Bxe3+ 11 Kh1 or 9 ... Nxf2 10 Kxf2 Qh4+ 11 Kg1 Bxe3+ 12 Kh1) 10 Nde4
and now three variations are basically identical, with yours truly and Mr. Fritz
concurring in “clear advantage to White” evaluations:
b1) 10 ... Bf8 11 f4! (the point of my manoeuvre: unfortunately for Black, the
knight must retreat to a bad square, enticing the f4-pawn to advance with tempo) 11 ...
Ng6 12 f5 Nge5 13 f6.
b2) 10 ... Be7 11 f4 Ng6 12 f5 Nge5 13 f6 anyway.
b3) 10 ... Ba7 11 f4 Ng6 12 f5 Nge5 13 f6.
Since Black has virtually no hope of surviving the above variations with his
shattered kingside, the best chance must be:
b4) 10 ... d6 11 Nxc5 dxc5 12 f4 Nd7 13 e4 Nd4 14 Bd3 and Black doesn’t get
mated, but the superior pawn structure and two bishops give White an enduring
advantage.
297
9 ... Ncxe5
A quick rook advance led to a quick disaster in the following game: 9 ... Ra6 10
Ne4 Ba7 (or 10 ... Bf8 11 Qc2 Ncxe5 12 Nxe5 Nxe5 13 f4 with a more traditional
Smyslov/Spassky advantage) 11 c5 (now the intrepid rook perishes!) 11 ... Ngxe5 12
Bxa6 bxa6 13 Nd4 Qh4 14 f3 Ne7 15 b4 f5 16 Nf2 Rf8 17 Bb2 c6 18 f4 Ng4 19 Nxg4
fxg4 20 g3 Qh3 21 e4 Rf6 22 Nf5 Nxf5 23 Bxf6 Nxg3 24 Qb3+ 1-0 H.Kandel-
B.Jehle, Ulm 1995.
10 Nxe5 Nxe5 11 Rb1! Ra6
Black insists on the rook lift, but White assumes the initiative across the whole
board.
12 b4 Ba7
298
Or 12 ... axb4 13 axb4 Ba7 14 Nb5 Bb8 15 c5 Rh6 (Black got his rook lift and
then ... ) 16 e4 Rg6 17 f4 Nc6 18 f5 Rf6 19 Bg5 Rxe4 20 Bf3 Rxb4 21 Rxb4 Nxb4 22
Bxf6 Qxf6 23 Qe1 Nd3 24 Qe8 (got mated!) 1-0 ‘BornOfFire’-C.Wolf, Internet (blitz)
2004.
This was quite a drastic crush, but we see the same sort of problem in the main
game: the crazy rook is vulnerable to bishop attacks; White is ready to attack the
kingside himself; and the always problematic black king’s bishop is sidelined.
13 c5 axb4 14 axb4 d6
Here are some more doubtful rook lifts: 14 ... Rg6 15 f4 Nc6 16 Ra1, or 14 ...
Rh6 15 e4 Rg6 16 Ra1, and in both cases White neutralizes Black’s kingside play,
while threatening to win a piece on the queenside.
Therefore Blatny tries to sacrifice the exchange, but fails to find compensation.
15 f4!
One hundred percent! (Of course the move was only played in this one game.)
15 ... Ng6 16 f5
White seizes the opportunity to gain space and attacking chances on the kingside,
before helping himself to the exchange on the queenside!
16 ... Ne5 17 Bxa6 bxa6 18 cxd6 cxd6 19 Nd5 Qh4 20 Rb2 Bd7 21 f6!
299
The typical breakthrough; White is winning.
21 ... g5 22 Ne7+ Kh8 23 Nf5 Bxf5 24 Rxf5 Nc4 25 Re2 h6 26 Qd3 Re6 27 Rf1
Qg4 28 h3 Qh4 29 Qf5 Qg3?
29 ... Qe4 would prolong the game without changing the result.
30 Qxe6! fxe6 31 f7 1-0
The mighty f-pawn goes through. There just doesn’t seem to be any way to make
the rook lift work, delayed or accelerated or whatever: as we saw in the main game,
and notes, White seems to have three ways to get a solid edge against this particular
method, with my 9 Nd2 looking like a direct knockout.
Summary
300
My conclusion is that 4 ... Bc5 cannot be recommended since White’s attack with
f2-f4 is just too strong. On the other hand, 4 ... Nc6 seems perfectly viable—as shown
in the previous chapter, White has nothing better than to return to the Bf4 variations,
which might not be to his taste, and are quite playable for Black in any case.
301
Part Four
Unusual Lines
White can legitimately play for the advantage against the Budapest with any of
the three lines from Parts I-III: 4 e4, 4 Bf4 or 4 Nf3. The first goes for a broad centre,
while the latter two make Black work to recover his pawn.
But what if White wishes to avoid main line theory? Then there are some offbeat
tries available, the most prominent being the fourth move alternatives 4 Nc3, 4 e3, 4
Nh3 seen in the next chapter.
Then there are the not so reasonable tries of Chapter 13, where White tries to
hold the pawn at any cost.
After this, in Chapter 14, I examine ways in which White can decline the gambit;
while Chapter 15 takes a quick look at the rather doubtful Fajarowicz Gambit.
302
Chapter Twelve
The Quiet Ones: 4 Nc3, 4 e3, 4 Nh3
These quiet fourth moves can all transpose to each other, and they have similar
ideas: White doesn’t try to keep the pawn, but aims instead for control of d5 and some
positional pressure.
Such lines are no threat to the Budapest Gambit, but Black should have a system
ready, and I have one in hand which can be played against all three of these moves—
see Game 72 for the recipe.
Games 71 and 73 feature inaccurate play by Black and White, respectively, and
show once again that such quiet positions can still be lost by either player if you don’t
pay attention!
Game 71
T.Taylor-I.Serpik
Los Angeles (rapid) 2004
1 d4 Nf6 2 c4 e5 3 dxe5 Ng4 4 Nc3
This move requires some explanation: as White I generally strive for the
advantage from the first move—so what am I doing playing so quietly? The fact is that
I hadn’t faced a Budapest in many years, and had absolutely nothing prepared. I didn’t
want to go into any critical lines in a rapid game, where my opponent might be booked
303
up—so I just made a natural but non-confrontational developing move.
4 ... Nxe5 5 e3
I am in full “do nothing” mode!
Note that this position could also have been reached by 4 e3 Nxe5 5 Nc3—
there’s no essential difference between the two move orders.
5 ... Nbc6
Slightly inaccurate, as Black usually needs ... c7-c6 to chase off a knight from d5.
One remembers from Game 62 that a ... c6/ ... d6 small centre works best when Black
keeps his dark-squared bishop—while if this bishop is exchanged, a white knight on
d5 can usually be tolerated.
5 ... d6! is the most accurate reply here: Black reserves d7 for a knight retreat,
and prepares ... g7-g6 and ... Nbd7, keeping ... c7-c6 in reserve. See the next game for
this precise defensive system.
6 Be2
As we saw back in Game 1, Kramnik’s 6 a3 a5 7 f4 gave White some advantage,
but “do nothing” was working so far!
6 ... d6 7 Nf3 Nxf3+ 8 Bxf3 Ne5
Kramnik’s sharp line given above would have taken advantage of Black’s slight
inaccuracy—my quiet play did not. Now Black has freed the c6-square for a pawn if
he needs it, and has equalized already.
9 Be2 Be7
Black must avoid 9 ... Qg5? 10 f4 Qxg2 11 Qd5 Qxd5 12 Nxd5 and White wins;
but 9 ... g6 is possible, as seen in a recent game: 10 b3 Bg7 11 Bb2 0-0 12 0-0 and now
12 ... f5 13 Qd2 c6 14 Rad1 Nf7 looks like the way to go, with a reasonable Leningrad
Dutch kind of position.
Instead Black made the positional mistake 12 ... Nc6, which allowed White to
settle a knight on d5 and build up behind it: 13 Qd2 Be6 14 Nd5 Rc8 15 Bxg7 Kxg7
16 Qb2+ f6 17 Nf4 Bd7 18 Bf3 Qe8 19 Rac1 Nd8 20 Rfd1 a6 21 c5 dxc5 22 Rxc5 c6
23 Rc4 Rf7 24 Rcd4 Ne6 and now, instead of the tension-releasing 25 Nxe6+ which
304
was played in S.Nessi-G .Facchetti, Bratto 2006 (and Black eventually won), White
has a forced win with the deadly pin 25 Re4.
10 0-0 0-0 11 b3 Bf6 12 Bb2 Re8 13 Qd2 Nd7 14 Rad1 a5 15 Ba3
My idea was to avoid the exchange of bishops, but this move is not that effective
— or one could say it is, as I consistently do nothing, and so lead my opponent to
believe that he can do anything!
Black’s next move is fine, but slightly complicated. He could just ignore my
manoeuvre by playing 15 ... g6 16 Nd5 Bg7, when I probably have nothing better than
17 Bb2 with equality, reminiscent of Polugaevsky-Nunn—but remember, if the dark-
squared bishops do come off, then Black should abjure ... c7-c6 and just play around
the knight on d5 by trying to get his own knight to e4.
15 ... Bxc3
Generally speaking, I am opposed to the unforced exchange of this bishop for a
knight in the Budapest, but it works in the specific situation, as Black has enough
kingside play—in other words, after the correct continuation, White would probably
have to exchange off one of his own bishops for a knight with equality.
16 Qxc3 Qf6 17 Qd2 Qh6 18 Bb2 Nf6 19 Bf3
305
19 ... Ne4
Seemingly natural, but there is a back rank problem.
Instead, Black could justify his play with 19 ... Ng4!. Now 20 Bxg4 Bxg4 is
equal, while if 20 h3 Ne5 21 Bd5 a4! Black has counterplay based on the weakness of
White’s pawn at c4, or 21 Be2 Qg6 22 Kh2 Bf5 and again Black’s activity offsets the
two bishops. Finally, White could take the knight with the other bishop (21 Bxe5), but
Black should still be able to gradually equalize.
The problem is that all this “equalization” is not what Black had in mind! He
wants to attack, and with 19 ... Ne4 has the following variation in mind: 20 Bxe4 Rxe4
21 c5 Rh4 22 h3 Bxh3 23 gxh3 Qg5+ 24 Kh2 Qg4 and mates.
This is very seductive, except that it just doesn’t work, as we will see. White’s
very quiet opening line doesn’t give him (or in this case, me!) any advantage—but
White does get a very solid position, and Black should not think that he can mate
White without any provocation!
20 Bxe4
I seemingly fall in with Black’s plans, but I have noticed a tactical detail ...
20 ... Rxe4 21 c5 Rh4 22 Be5!
306
I make my one good move of the game, and it’s all over: Black’s kingside attack
is snuffed out, and White wins a pawn.
22 ... Bg4 23 f3 Be6 24 cxd6 cxd6 25 Bf4 Qg6 26 Qxd6 1-0
White is up a clean pawn and went on to win after some unrecorded time
pressure moves.
So I won by doing absolutely nothing! The moral here is that if White plays for
“solid and equal”, then Black must answer in the same mode—you can’t win by
kingside attack just because you want to!
I say that, but then ... that’s pretty much what happens in the last game of this
chapter, Game 73—but the opponent helped out!
Game 72
K.Miraoui-V.Nevednichy
Sautron 2003
1 d4 Nf6 2 c4 e5 3 dxe5 Ng4 4 e3 Nxe5 5 Nh3
This shows a real obsession with the d5-square: now both white knights want to
go to d5, but knowing this, Black can plan ahead!
5 ... d6
307
I think this is the best move, and start of the best plan for Black in this position—
but also possible is 5 ... Ng6 to intercept White’s king’s knight on its route to d5—see
the next game.
6 Nf4 g6
This short game (with my wife unfortunately on the shorter end) shows the
dangers of ceding d5 to White’s knights: 6 ... Nbc6 7 Be2 Be7 8 Nc3 Be6 9 b3 Bf6 10
Bb2 Qd7 11 Qd2 0-0 -0 12 Nfd5 (Fritz already has White up by more than a full point;
Black has to play 12 ... Bxd5 and dig in for a painful defence) 12 ... Ne7? 13 Nxf6
gxf6 14 f4 N5c6 15 Ne4 f5 16 Nf6 1-0 J.Banawa-L .Taylor, Los Angeles 2006.
7 Be2 Bg7 8 0-0 0-0 9 Nc3 Nbd7!
Black’s perfect development in this variation: he plays a King’s Indian set-up and
308
reserves ... c7-c6 to kick out any knights that might want to settle on d5. In this way he
deprives White’s machinations of any real point.
10 Nfd5?
Continuing obsessively with his plan, but it doesn’t work here. Let’s take a look
at some alternatives:
a) 10 b3? Nxc4 wins a pawn.
b) 10 Qc2 a5 11 Bd2 Nc5 12 Rad1 f5 (setting up a good Leningrad Dutch
formation—note my comment to move 9 in the previous game, this is a common
resource for Black in this line) 13 Na4 b6 14 Nc3 Bb7 15 Ncd5 Rf7 16 Bc1 Qh4 17 b3
Re8 18 Bb2 Bc8 19 f3 g5 (beginning a Dutch-style attack) 20 Nd3 Ncxd3 21 Bxd3 f4
22 Be4 Be6 23 Qf2 Qh5 24 Bc1 Ref8 25 Rfe1 fxe3 26 Nxe3 h6 27 Qe2 Kh8 28 Rf1
Ng6 29 Bb2 Bxb2 30 Qxb2+ Ne5 31 Bd3 g4 32 fxg4 Bxg4 33 Rxf7 Rxf7 34 Rf1 Qg5
35 Qd2 Bf3 36 Bc2 Bxg2! (and crashes through!) 37 Rxf7 Bc6+ 38 Kf1 Nxf7 0-1
M.Gurevich-J .Tisdall, Akureyri 1988—another argument for the strength of Black’s
system, with a 2600 player biting the dust against an opponent almost 200 Elo points
lower.
c) 10 e4 is relatively best, which reaches a true KI formation with loss of tempo,
but is nonetheless about equal after 10 ... Nc5 11 Be3.
10 ... c6
This is the point of Black’s set-up, and the refutation of White’s!
11 Nb4?
A second mistake, and the game is over. White has to play the contorted 11 Nf4
Nb6 12 Qb3 just to survive the opening, but it’s obvious Black has excellent play after
12 ... a5.
11 ... Nb6
Winning a pawn, as 12 Qb3 loses to 12 ... Be6, and 12 b3 doesn’t protect
anything in view of 12 ... Nexc4!.
12 f4 Nexc4 13 e4 Qe7 14 f5 d5
309
Black breaks in the centre—with attack on the awkward knight on b4—and wins
easily.
15 f6 Bxf6 16 exd5 Bf5 17 Nc2 Rad8 18 g4 Bxc2 19 Qxc2 Ne3 20 Bxe3 Qxe3+
21 Kh1 Bxc3 22 bxc3 Rxd5 0-1
Now that’s the Nevednichy I know!
The Nh3 system is too artificial to really be effective, but remember, it can work
— a s Liz found out—if you play “normal” Budapest moves like ... Nb8-c6.
Black must be open minded, and willing to switch to King’s Indian or Leningrad
Dutch formations—and then the innocuousness of these quiet White systems is
revealed.
Game 73
G.Vallin-N.Miezis
Bogny sur Meuse 2003
1 d4 Nf6 2 c4 e5 3 dxe5 Ng4 4 e3 Nxe5 5 Nh3
Nevednichy’s ... d7-d6 and ... g7-g6 set-up gives Black good counter-chances,
but if one doesn’t want to play a King’s Indian or Leningrad Dutch system then there
is another possibility—if White plays this exact move order.
5 ... Ng6
310
Black answers White’s curious knight move with one of his own, and asks: Do
you really want to get doubled pawns?
6 e4
White answers the above question with a solid “No”—but it’s really not so clear
that the doubled pawns are bad: G.Wachinger-H .J .Doeres, Bad Neustadt 1992,
continued 6 Nc3 d6 7 Nf4 Nxf4 8 exf4 Be7 9 Bd3 f5 (or 9 ... Na6 10 f5 and Black is
rather cramped) 10 0-0 0-0 11 Nd5
(White has come out of the opening with an advantage: the e-file and two
bishops that he now obtains are more than enough compensation for the doubletons)
11 ... Na6 12 b4 Be6 13 Bd2 c6 14 Nxe7+ Qxe7 15 Re1 Qf7 16 Qc2 Nc7 17 Be3
b6 18 a4 c5 and now, instead 19 a5 Na6 20 bxc5 1⁄2-1⁄2 as in the game, White should
311
play 19 bxc5 at once—then no matter how you slice it (19 ... bxc5 20 Be2 or 19 ...
dxc5 20 a5) White has strong pressure, and the doubled pawns are not felt.
Now that I really look at this, I don’t like Black’s game much at all—which
means that Miezis’s 5 ... Ng6—with the evident idea of preventing Nf4—may not even
accomplish that basic goal!
On the other hand, even a second or third look doesn’t make me any fonder of
the following premature attack: 6 Qh5 Nc6 7 Nc3 Bb4 8 Bd2 d6 9 Be2 a5 10 0-0 Nce5
11 f4 Nd7 12 Nf2 Nf6 13 Qg5 0-0 14 Rad1 Re8 (Black has equalized; it’s not clear
what the white queen is doing all by itself!) 15 Bf3 Be6 16 b3 c6 17 Rfe1 d5 18 cxd5
cxd5 19 Nb5 Be7 20 Qg3 Ne4 21 Bxe4 dxe4 (Black has space and more active pieces,
but White manages to struggle successfully to draw) 22 Nd4 Bh4 23 Nxe6 Rxe6 24
Qg4 Bxf2+ 25 Kxf2 Qb6 26 Kg1 h5 27 Qg5 Rd6 28 f5 Ne5 29 f6 Ng6 30 fxg7 Qd8 31
Qxd8+ Raxd8 32 Re2 Ne5 33 Kf1 Kxg7 34 Ke1 Nd3+ 35 Kf1 Ne5 36 Ke1 Nd3+ 37
Kf1 Ne5 38 Ke1 Nd3+ 39 Kf1 Ne5 40 Ke1 Nd3+ 1⁄2-1⁄2 M.Marin-J .De la Villa Garcia,
Szirak Interzonal 1987.
6 ... Bc5 7 Nc3 Nc6 8 Be2 d6 9 Nf4 Nxf4 10 Bxf4 0-0 11 0-0 f5
This breaks up the white pawn centre and equalizes. Inferior is 11 ... Bd4 12 Qd3
g6 13 Be3 Bg7 14 f4 and White sets up an attacking position.
12 Qd2 Kh8 13 Rad1 Be6 14 exf5 Bxf5 15 Be3 Bxe3 16 Qxe3 Qh4
Black wants to attack, but this is not the best, as now White has a chance for a
small advantage. Correct is 16 ... Qd7 (staying close to the queenside pawns) 17 Nd5
Rae8 18 Qd2 Ne7 with solid equality.
17 Qg3?!
The queen is clearly misplaced here, and Black is right to avoid the exchange.
Instead, 17 f4 is the natural move, gaining space on the kingside and activating
the pawn majority. White gets the edge after 17 ... Rae8 18 Qd2, when the knight is
going to d5 and the black queen has nothing to say.
17 ... Qh6 18 Nd5
18 f4, intending to reposition with Qf2, still looks like the right way to go.
312
18 ... Rae8 19 Rfe1?
White must have completely missed Black’s next. After the simple 19 Bd3 the
game is equal; Fritz even claims a slight edge for White.
19 ... Bc2!
From around +0.23 on the Fritz (with 19 Bd3) to -1 .00 in a single move! Now
everything has gone wrong: Black invades White’s position, the white queen looks
horrible (as noted at move 17, it belongs on d2, which is exactly where the black
queen will be land in a moment!), and Black soon gets a direct attack on the white
king.
20 Ra1 Qd2
It’s a home invasion!
21 Ne3 Nd4 22 Bf1 Be4
With every move a new black piece invades White’s territory, and now comes ...
23 b3 Rf3!!
313
A tremendous blow!
24 Qh4
If 24 gxf3 Nxf3+ 25 Kh1 Nxe1+ wins. The best White has is 24 Red1 Rxg3 25
Rxd2 Nf3+ 26 Kh1 Rxg2 27 Bxg2 Nxd2, but Black ends up a good pawn ahead.
24 ... g5!
White is really paying for the bad queen! Now Her Royal Highness can no longer
defend f2.
25 Rad1
If 25 Qxg5 Qxf2+ 26 Kh1 Rg8 27 Qh6 Rxe3 and mates.
25 ... Qxe1 0-1
Desperado!
While Miezis’ final attack was won-derful, I can’t recommend 5 ... Ng6, for a
few reasons: First, if this move is supposed to prevent Nf4, it doesn’t, as demonstrated
in the note to move 6. Furthermore, Nevednichy’s defensive (or counter-attacking)
system can be played against all three of White’s quiet fifth moves (5 Nc3, 5 e3 and 5
Nh3), while 5 ... Ng6 only has a point—sort of—after 5 Nh3.
I don’t think the Budapest Gambiteer will face these not-so -challenging moves
that often, and I can’t see any reason to have to learn two different lines against them.
Finally, although Miezis won with a fine kingside attack, the move that began
said attack (16 ... Qh4) was actually an inaccuracy that could have given White the
edge.
Summary
The moves in the chapter had a brief vogue, but the well-prepared BG player
should have no problem against them. I recommend sticking with Nevednichy’s
system against all three of White’s quiet lines—the main difficulty for Black is making
the mental adjustment to play a rather “non-Budapest” kind of system that’s more like
a King’s Indian or Leningrad Dutch.
314
Chapter Thirteen
Materialism
Besides the sound developing moves that also defend the gambit pawn on e5 (4
Bf4 and 4 Nf3), White also has some much more doubtful ways of clinging to
material: 4 Qd4 or 4 Qd5, and 4 f4. The queen moves will be examined in the next
game, and 4 f4 in Game 75.
Game 74
A.Beliavsky-V.Epishin
Reggio Emilia 1991
1 d4 Nf6 2 c4 e5 3 dxe5 Ng4 4 Qd4
It’s not clear what the point of this move is, or why a GM of Beliavsky’s strength
would choose it. Black is forced into playing a tremendously strong gambit, after
which White can only hope and pray to make it out of the opening alive—or at least,
as here, make it to move 25!
If one must defend with the queen, then 4 Qd5 is much better than Beliavsky’s
move, as the queen can’t be hit by ... Nc6, while a too early ... Be6 might cause a
problem with the b-pawn. White can obtain equality after this move (which is all
White can hope for with either of these anti-positional defences—the difference being
that with 4 Qd4, equality remains only a hope, whereas after 4 Qd5 he should actually
315
succeed) as follows:
4 ... d6 5 Nf3 (not 5 exd6 Nc6 6 dxc7 Qxc7‚ with tremendous development and
attacking chances for the pawns) 5 ... c6 (Black should avoid 5 ... Be6?! 6 Qxb7 Nd7 7
Bg5 with advantage to White) 6 Qd4 (6 Qd2 Nxe5 7 Nxe5 dxe5 8 Qxd8+ Kxd8 is an
Old Indian type of ending where Black is probably a shade better) 6 ... Nxe5
7 Bf4! (if 7 Nxe5 Qa5+ and both 8 Nc3 dxe5 and 8 Bd2 dxe5! 9 Qe4 Bb4 are
slightly better for Black) 7 ... Nbd7 (7 ... Nxf3+ reminds me of the note to move 6 in
the previous game: White gets doubled pawns but a strong position after 8 exf3 Be6 9
Nc3) 8 Nc3 (not 8 Nxe5? dxe5 9 Bxe5 Qa5+ winning a piece) 8 ... Be7 9 e3 (if 9 Nxe5
dxe5 10 Bxe5 Nxe5 11 Qxe5 0-0 and Black’s bishops give him excellent
compensation for the pawn) 9 ... Qa5, when the position is double-edged but about
316
equal.
4 ... d6
Of course: Black defends g4 and attacks e5. It’s already difficult to give White
good advice, for example 5 Nf3 Nc6 6 Qd1 Be6 7 e3 dxe5 is good for Black.
5 exd6 Bxd6
Black is about to get a three-piece development lead with 6 ... Nc6—what can
White do?
6 Qe4+
This check helps Black develop, but there is nothing else really appetizing, as can
be seen:
a) Amazingly enough, 6 Qxg7?? has been played five times in the database, and
has given the white players five goose eggs! Here is one example: 6 ... Be5 7 Qg5
Qxg5 8 Bxg5 Bxb2 9 h3 Ne5 10 f4 h6 11 Nd2 (if 11 Bf6 Nd3+) 11 ... Bxa1 0-1
A.Solozhentseva-S.B.Ivanov, Gatchina 2001.
b) 6 c5 Nc6 7 Qe4+ Be7 and Black is close to winning with his huge lead in
development and threat of ... Qd1+.
c) 6 Nf3 keeps White in the game—sort of—and after 6 ... 0-0 White manages to
score a big 38% in the Mega! Here’s an amusing example: 7 e3 Nc6 8 Qd1 Bf5 9 a3
Qf6 10 Nc3 Rad8 11 Bd2 Nce5 12 h3 Nxf3+ 13 gxf3 Ne5 14 f4 Nd3+ 15 Bxd3 Bxd3
(it’s obvious that Black has and continues to have excellent compensation for the
pawn) 16 Qg4 c6 (simpler is 16 ... Rfe8 with the double threat of ... Bxc4 and ... Bxf4;
Black at least gets his pawn back with a large advantage—but instead the second
player goes for a “brilliancy” ... ) 17 0-0 -0 Rfe8 18 f3 h6 19 Rhg1 Bf5 20 Qg3 Rxe3—
and here it is!!
317
Black expects 21 Bxe3?? Qxc3+! 22 bxc3 Bxa3 mate. Unfortunately, White has
the zwischenzug 21 Qxg7+! Qxg7 22 Rxg7+ Kxg7 23 Bxe3 with approximate
equality, which would have been quite a cold shower of reality.
However, White was so impressed with Black’s “brilliancy” that he resigned! 0-1
K.Rechner-S.Bews, Kecskemet 1992. (Remember in a note to Game 61, White also
appeared to resign in a drawn position—is this an epidemic?)
While the finish was rather absurd, one must note that Black was much better out
of the opening, and shouldn’t have needed any tricks to win.
6 ... Be6 7 Nc3
After 7 Qxb7 Nd7 Black has tremendous compensation for two pawns.
7 ... 0-0
Not bad, but 7 ... Nc6! is better, with Black playing for an immediate crush by
castling long and putting the other rook on the e- or f-file. For example, 8 Nf3 Qd7 9
Ng5 Nf6 10 Qe3 0-0 -0 11 Nxe6 fxe6 and the betting is that White won’t make it to
move 25!
8 Nf3 Qd7 9 Nd4?
318
The sole raison d’être of White’s play is his extra pawn—once he gives it back,
Black is simply much better.
White’s best is 9 h3 Nf6 10 Qh4 which takes advantage of Black’s inaccuracy on
move 7—Black still has good compensation for the pawn, but no more than that.
9 ... Bxc4 10 Nf5 Be6 11 Nxd6 cxd6 12 g3 d5 13 Qf4 d4 14 Ne4 Bd5 15 f3
White can’t even develop: 15 Bg2 loses to 15 ... f5.
15 ... f5 16 Nc5 Qe7 17 Nd3
If 17 Qxd4 Bxf3 wins.
17 ... Nc6 18 h3 Nge5 19 Nxe5 Nxe5
Black has connected his rooks, and his minor pieces are ready to wreak havoc:
both ... Nd3+ and ... Nxf3+ are threatened. Meanwhile White has nothing developed
but his queen—which as we will see is on an unlucky square.
319
20 Kf2 d3 21 Bd2 dxe2 22 Bxe2 Bxf3!
Unlucky indeed! White can’t take because of ... Nd3+ forking.
23 Bb4 Qe6 24 Rhe1
Not 24 Bxf8 as 24 ... Ng4+ forces mate, e.g . 25 Kxf3 (or 25 Kg1 Qb6+) 25 ...
Qd5+ 26 Qe4 Qxe4 mate.
24 ... Bxe2 25 Qe3
There are no saves: 25 Kxe2 Qa6+ 26 Ke3 Rfe8 and the white king perishes in
the crossfire, or if 25 Rxe2 Nd3+ and Black emerges with an extra piece.
25 ... f4 0-1
If 26 gxf4 Rf4+ with a winning attack, or if 26 Qe2 then 26 ... Qb6+ wins the
queen.
320
While 4 Qd5 is somewhat playable, 4 Qd4 is ... not!
Of course neither can be recommended at all as serious moves, and the Budapest
Gambiteer should be delighted to meet them—especially 4 Qd4.
Game 75
B.Max-B.Reinhardt
Zell 1977
1 d4 Nf6 2 c4 e5 3 dxe5 Ng4 4 f4
This might not be quite as bad as 4 Qd4, but it certainly can’t be recommended:
White creates permanent weaknesses for himself as he falls behind in development,
and allows Black to prevent kingside castling.
4 ... Bc5 5 Nh3
Or 5 e3 Nxe3 6 Bxe3 Bxe3 7 Qf3 (so far U.Koch-V.Spielmann, Landau 1996)
and now Black should simply retreat, 7 ... Bc5, with material equality and the two
bishops. Instead he blundered with 7 ... Bc1? when 8 Qf2 trapped the impetuous
bishop!
5 ... d6
This looks the most accurate to me, despite the following computer crush: note
the date of that game. In 1988 computers snatched all pawns, and as we see here, died
of indigestion—but a modern computer will find 7 e6, when Black might still be
better, but the situation is confused by the hanging knight on g4. 5 ... Nc6 6 e4 d6 7
exd6 (7 e6!) 7 ... cxd6 8 Nc3 Qb6 9 Qd2 Be3 10 Qe2 Bd4 11 Nb5 0-0 12 f5 Bxf5! (the
human breaks through—one doesn’t see that these days!) 13 Kd1 Be6 14 Nxd6 Rad8
15 Bf4 Nce5 16 Kc1 Rxd6 17 Qc2 Rc8 18 Kb1 Bxc4 19 Bxc4 Rxc4 20 Qe2 Bxb2 21
Qxb2 Rb4 0-1 Comp Terminator-G .Hinrichsen, Seattle 1988.
6 Nc3
321
White’s problem is that, by clinging to the gambit pawn, he has so compromised
his position that he has no good way to give it back. On the other hand, if White tries
to keep his ill-gotten gains, then after 6 exd6 cxd6 Black, as in the computer-killing
game, has excellent compensation for the pawn due to numerous open lines of attack.
6 ... Nh6?
A criminal retreat in an attacking position. Correct is 6 ... Nc6 7 e4 (again 7 exd6
cxd6 gives Black a tremendous attack) 7 ... 0-0 8 g3 (not 8 Be2?? Qh4+ winning) 8 ...
dxe5 and Black recovers his pawn with a far superior position.
7 Nf2 Nf5 8 Qd3?
Black has just lost two moves with his knight, and White can take advantage by
playing 8 Nfe4! Bb4 9 exd6 cxd6 10 e3 and consolidate with the extra pawn.
8 ... 0-0 9 exd6 Nxd6 10 Nfe4 Bf5 11 Qf3 Nxe4 12 Nxe4 Bxe4 13 Qxe4 Nc6
322
Now, after the bobble, Black is back on track: he has excellent compensation
with open lines against White’s compromised position.
14 Bd2 Re8 15 Qd5 Qe7 16 Bc3 Bb4 17 Qg5 Bxc3+ 18 bxc3 Qe3
White can’t get his king out of the centre and so is mated there.
19 Qg3 Qc5 20 Qd3 Rad8!
Crushing.
21 Qc2 Qxc4 22 Qb3 Qxf4 23 g3 Qe4 24 Rg1 Ne5 25 Rg2 Nf3+ 0-1
Black’s next move will be 26 ... Qe3 mate.
Black was almost winning right out of the opening—then fell off his horse! But
somehow he got back on.
323
Summary
Of the three possible “extreme materialism” moves only 4 Qd5 looks playable,
though it’s not clear why White should risk such a line to maybe get equality. Black
should be delighted to see any of these variations.
324
Chapter Fourteen
White Declines the Budapest Gambit
After not facing a Budapest Gambit for many years, I was disappointed in my
play against Pickering (Game 42) and Serpik (Game 71). Against Pickering, although I
won the rapid game, the blitz game that preceded it showed I had little knowledge of
Black’s possible gambits, while my “do nothing” win against Serpik was hardly
satisfying.
So I gave some thought to the problem: was it worth studying the Budapest
Gambit and finding the best lines for White, given its rarity? I decided that the
practical decision was just to decline the Gambit and force my opponents into lines
that they might not be familiar with. As it turned out, this rather wimpy strategy
worked like a charm! In recent years I have faced four BGs and each time played the
uninspiring 3 e3 (!) and won all four games! In every case my opponents appeared
quite taken aback by my non-threatening and definitely non-Budapest move, and so I
often won quite quickly, as they weren’t prepared for 3 e3 at all.
I noticed that quite a few strong GMs also used the same strategy: take a look at
this one-sided White victory, but first note that the ECO code listed for this game is
C01 for the French Defence instead of the Budapest A51-52 .
V.Neverov-L.Vigil Alvarez,
Oviedo (rapid) 1993
1 d4 Nf6 2 c4 e5 3 e3 exd4 4 exd4 Bb4+ 5 Nc3 0-0 6 Bd3 d5 (1 e4 e6 2 d4 d5 3
exd5 exd5 4 c4 Bb4+ 5 Nc3 Nf6 6 Bd3 0-0 is how you might reach this exact position
325
via the French) 7 Ne2 Be6 8 c5 Bg4 9 0-0 Ba5 10 Bg5 c6 11 Qc2 h6 12 Bh4 Bc7 13 f3
Bc8 14 b4 Nbd7 15 b5
The first thing one should notice about this position is that the type of play—a
pawn chain game with White attacking on the queenside—does not look anything like
any Budapest Gambit variation whatsoever; and the second thing worth noting is that
Black is already busted on move 15! Black may well have had all his gambit
variations worked out to the nth degree—but when White crossed him up by declining,
he had no ammunition.
The rest of the game shows White hammering home his advantage in crushing
style: 15 ... Re8 16 bxc6 bxc6 17 Qa4 Nb8 (Black develops backward) 18 Rab1 Re3
19 Rfd1 a5 20 Bf2 Re8 21 Bg3 Nh5 22 Bxc7 Qxc7 23 Nxd5! (White wins a central
pawn for nothing—Black could have resigned now) 23 ... Qd8 24 Nb6 Ra7 25 d5 Qg5
26 f4 Qe7 27 Qd4 Bg4 28 d6 Qh4 29 g3 1-0
Don’t let this happen to you! Today, when so many practical players try so hard
to get “their” opening as opposed to “yours”, you absolutely need to be prepared for
“your” Gambit to be declined—and for that matter, you need to be well prepared for 2
Nf3 as well!
In this chapter I will cover declining with 3 e3, 3 Nf3 and 3 d5.
Game 76
T.Taylor-F.Alonzo
Los Angeles 2006
1 d4 Nf6 2 c4 e5 3 e3
326
My opponent became unhappy and settled in for a long think—in fact all four of
my would-be Budapest Gambit opponents had the same reaction.
What you should do if you face this move is smile and then instantly play 3 ...
Nc6, as I will recommend in the next game.
3 ... Bb4+
Here’s a brief look at my other three victories that started with the extremely
modest but disconcerting 3 e3:
a) 3 e3 exd4 4 exd4 d5 5 Nc3 dxc4 6 Bxc4 (Chessbase lists this as D20, a
Queen’s Gambit Accepted—I don’t think my opponent knew where he was!) 6 ... Bd6
7 Nf3 0-0 8 h3! Re8+ 9 Be3 Bf4 10 0-0 Bd6 (the pawn was poisoned) 11 Qb3 Rf8 12
Ne5 Qe7 13 Rfe1! Bxe5 14 dxe5 Qxe5 (this one is too) 15 Nd5
327
and White already had a winning position and converted without great difficulty
in T.Taylor-C.Acor, Las Vegas 2006.
b) 3 e3 exd4 4 exd4 Bb4+ 5 Nc3 0-0 6 Bd3 Nc6 7 Nf3 d6 8 h3 h6 9 0-0 Bxc3 10
bxc3 Bd7 11 Bf4
and White’s two bishops and space advantage mean more than the doubled
pawns. Fritz oscillates between clear advantage to White and plus equals around here
—I’ll just say that Black has a cramped defensive position, with no kind of Budapest
play. It’s the kind of position where Black has to burn time to stay in the game, and
this helped me score the full point in T.Taylor-A .Cambon, Joshua Tree (rapid) 2007.
c) 3 e3 exd4 4 exd4 d5 5 Nc3 Be7 6 Nf3 0-0 7 Bd3 dxc4 8 Bxc4 Bg4 9 0-0 Nc6
10 Be3 a6 11 Be2 Re8 12 h3 Bh5 13 Rc1 Bd6
328
and Black had equalized in this French system on the board—but not on the
clock. My opponent later blundered a piece in time pressure in T.Taylor-D .Baran, Los
Angeles (rapid) 2008.
Even when I got no advantage on the board, as in game ‘c’, I always got a
significant advantage on the clock, and always felt comfortable in the positions,
whereas my opponents were gasping like fish out of water.
One should study this line before you face it at the board!
4 Nc3 Bxc3+ 5 bxc3 Qe7 6 Ne2 0-0 7 Ng3 d6 8 Be2 Nc6
This type of position was quite comfortable for me, as I have played the Sämisch
Attack vs. the Nimzo-Indian Defence many times, and this structure is typical of that
opening.
However, my opponent seemed quite gloomy about this closed position, when he
had been clearly hoping for some open Budapest play! The point is not that Black’s
opening is bad—a Nimzo player might be very happy here—but that my opponent was
out of his element.
9 0-0 Re8 10 Rb1 Rb8 11 Qc2 g6 12 d5 Na5 13 e4 Nd7 14 Be3
329
14 ... Nc5?!
A Nimzo player would probably find 14 ... c5, when White’s doubled pawns are
either fixed after 15 Qa4 b6, when Black has long-term chances with play against c4,
or weakened after 15 dxc6 Nxc6. A double-edged game would ensue.
But now White has an opportunity, as the black knight has moved away from the
centre, and e5 in particular. Interestingly enough, the weakness of the pawn at a7 also
plays a role—which is another reason why Black should have blocked the diagonal of
my unopposed dark-squared bishop.
15 f4!
The standard Sämisch break, but evidently a surprise to my opponent. Now
White has an attack.
15 ... exf4
If 15 ... f6 16 fxe5 fxe5 17 Qd2 and Black is in trouble on the dark squares.
16 Rxf4 Nd7 17 Rbf1 Ne5 18 Bxa7 Ra8 19 Bd4
330
White is not trying to win a pawn, but rather to open the game. I think Black
should just accept the loss of the small unit and keep his blockading knight on e5 with
19 ... Rf8.
19 ... Naxc4?! 20 Bxc4 Nxc4
White has traded a valueless doubleton and now has a clear diagonal for the dark-
squared bishop.
21 Qf2 Rf8 22 Bf6
The attack is unstoppable, as the holes on the dark squares around the
undefended black king are catastrophic—it’s clear now that it would have been better
to be a pawn down than to face this attack.
22 ... Qe8 23 Nf5!
Five flamboyant f-file fighters flummox foe!
23 ... Bxf5
White could give up the queen after 23 ... h5 24 Rh4 Bxf5 25 Qxf5! gxf5 26
Rxh5 and mates; or Black could just end his suffering with 23 ... gxf5 24 Qg3 mate.
24 Qh4!
331
Material no longer matters; White is playing for mate.
24 ... h5 25 Qg5 Kh7 26 Rh4 Bg4 27 Qxg4 Ne3 28 Rxh5+ 1-0
And mates next move.
This was quite a fun attack, and 100% success with 3 e3 certainly sounds good!
But objectively this is no way to get a real opening advantage for White. Black would
have been fine in the main game if he had played 14 ... c5, and in the next game I will
show an equalizer on move 3!
Game 77
N.A.Adams-Goh Wei Ming
Budapest 2007
1 d4 Nf6 2 c4 Nc6
332
What is this? A Black Knights Tango, to be sure, but where is the Budapest? Just
be patient one more move ...
3 e3
It’s hard to find a reason for this move. Of the thousands of games in the
Megabase with the Black Knights Tango, 3 e3 is played only seven times—and White
scores only 21% with it! One sees that e2-e3 defends a pawn that is already defended
and blocks in the queen’s bishop.
Evidently the two most popular moves are also best, that is, the natural
developments 3 Nf3 and 3 Nc3. Let’s take a look at the latter, favoured by Karpov, and
see a couple of his fine wins on the White side of the Tango. Both games began 3 Nc3
e5 4 d5 Ne7 5 e4 Ng6 6 Be3
333
(take careful note of this position: White has an advantage in space, and has
prevented the active development of Black’s dark-squared bishop to c5—compare this
with the main game) 6 ... Bb4 7 f3 and now:
a) 7 ... Bxc3+ 8 bxc3 d6 9 Qd2 Nd7 10 h4 h6 11 g3 b6 12 Nh3 Nc5 13 Nf2 Qd7
14 Rb1 a5 15 f4 exf4 16 gxf4 Qe7 17 Bxc5 bxc5 18 h5 Nf8 19 Rg1
(White has a space advantage, and Black’s a- and g-pawns are both weak—as
one expects, Karpov grinds to victory) 19 ... f6 20 Bd3 Nd7 21 Qe2 Ba6 22 Ng4 Nb6
23 Ne3 Bc8 24 Qg2 Rg8 25 Qg6+ Kd8 26 Kd2 Bd7 27 Qh7 Qf8 28 Rg2 Kc8 29 Rbg1
Kb7 30 Rxg7 Rh8 31 Qg6 Be8 32 Qf5 Rd8 33 Qe6 Bxh5 34 Nf5 Nc8 35 e5 fxe5 36
fxe5 Qe8 37 Rb1+ Ka8 38 Rxc7 Qxe6 39 dxe6 dxe5 40 Rxc5 e4 41 Nd4 Rxd4 42
cxd4 exd3 43 Rxh5 1-0 A.Karpov-D .Chevallier, France 1993.
In a later game, Karpov’s opponent allowed him to avoid doubled pawns, as
follows:
b) 7 ... 0-0 8 Qd2 d6 9 Nge2 Nd7 10 0-0 -0 Bc5 11 g3 Bxe3 12 Qxe3 a6 13 Kb1
Rb8 14 Nc1 f5 15 exf5 Rxf5 16 Bd3 Rf7 17 Nb3 b6 18 h4 Nc5 19 Nxc5 bxc5 20 g4
Qf6 21 Bxg6 hxg6 22 Rd3 Qf4 23 Ne4 Qxe3 24 Rxe3 Rf4 25 Kc2 Bd7 26 Rh3 Rbf8
27 Rg3 Be8 28 Ra3
334
(Black has pawn weaknesses on both flanks—who could hold this against
Karpov?) 28 ... a5 29 Rxa5 Rxf3 30 Rxf3 Rxf3 31 Ra8 Kf8 32 Ng5 Rf2+ 33 Kc3 Ke7
34 Ra7 Rf4 35 Rxc7+ Bd7 36 a4 Kd8 37 Ra7 Rxg4 38 a5 Rxh4 39 a6 Rh1 40 Ne6+
Bxe6 41 dxe6 Rc1+ 42 Kd3 Ra1 43 Ke4 Re1+ 44 Kd5 Rd1+ 45 Kc6 Ra1 46 Rd7+
Ke8 47 a7 e4 48 Rxg7 e3 49 a8Q+ Rxa8 50 Rg8+ Ke7 51 Rxa8 e2 52 Ra1 1-0
A.Karpov-E .Llobel Cortell, exhibition match, Manises 2001.
3 ... e5
Now what do we have? Black has a successful Tango—Oh! This is a successful
Budapest!
My recommendation becomes clear: I say, if someone like me plays the far from
active 1 d4 Nf6 2 c4 e5 3 e3, then simply transpose to a great Tango with 3 ... Nc6,
335
thus reaching the position of the game. It’s easy to see that Black has equalized in the
centre and prepares rapid development with ... Bb4+ and ... 0-0 .
In this game White tries to make something of the position—but he would have
been better off trying to equalize, as he is an important tempo behind Karpov’s line.
4 d5
White plays like Karpov—not! This doesn’t go well with the pawn on e3; one
recalls Karpov played this centre pawn to e4 in one move.
a) 4 Nf3 is ineffective as well after 4 ... Bb4+ 5 Nc3 e4 6 Nd2 (not 6 Ne5 Qe7 7
Nxc6 dxc6 and Black dominates the board) 6 ... Bxc3 7 bxc3 d6
and one sees that White’s position is already under severe Nimzowitschian
restraint! Black won stylishly as follows: 8 c5 d5 9 Rb1 0-0 10 c4 Re8 11 Be2 Rb8 12
0-0 Be6 13 h3 dxc4 14 Nxc4 Nd5 (White’s pawn chain is solidly blockaded) 15 Bd2
Qd7 16 Kh2 f5 17 f4 exf3 18 gxf3 f4 19 e4 Bxh3 20 exd5 Nxd4 21 Bd3 Qxd5! 22 Rf2
(accepting the sacrifice with 22 Kxh3 Qh5+ 23 Kg2 Qg5+ 24 Kh1 Qh4+ 25 Kg2 Qg3+
26 Kh1 Re6 27 Bxf4 Qxf4 28 Rb2 Rh6+ 29 Kg1 Rd8 is also good for Black) 22 ...
Qh5 23 Kg1 Qh4 24 Be1 Qg3+ 25 Kh1 Rxe1+ 26 Qxe1 Nxf3 27 Qe2 Bg2+ 28 Rxg2
Qh3+ 29 Rh2 Nxh2 30 Qxh2 Qxd3 31 Rc1 Qd5+ 32 Qg2 f3 33 Qg4 f2+ 34 Kh2 Rf8
35 Rf1 Rf5 36 Ne3 Qe5+ 37 Qg3 Rh5+ 38 Kg2 Rg5 39 Ng4 Qxg3+ 40 Kxg3 h5 0-1
A.Gorbatow-T.Polak, Graz 1998—a beautiful win by the Czech GM.
b) 4 Nc3 transposes to a very high-level rapid game (the actual move order was 1
c4 Nf6 2 Nc3 e5 3 e3 Nc6 4 d4 with Korchnoi as White) and now Black, a certain GK,
played 4 ... Bb4 5 d5 Bxc3+ 6 bxc3 Ne7
336
7 d6 (Korchnoi attacks ferociously but gets nowhere in view of the weakness of
his doubled pawns; the restrained 7 Ne2 with equality may be best) 7 ... cxd6 8 Qxd6
Qa5 9 Qb4 Qc7 10 Ba3 Nc6 11 Qb1 d6 12 Qd3 Qa5 13 Bxd6 Bf5 14 Qxf5 Qxc3+ 15
Ke2 Qxa1 16 Nf3 Rd8 17 c5 Qxa2+ 18 Nd2 Nd5 19 g4 g6 20 Qd3 Nd4+ 21 Ke1
Rxd6? (another K, Alexander Kotov, would no doubt spot the creeping win here: 21 ...
Qb2!) 22 cxd6 Qa1+ 23 Nb1 Qa5+ 24 Kd1 Qa4+ 25 Ke1 Qa5+ 1⁄2-1⁄2 V.Korchnoi-
G.Kasparov, Zürich (rapid) 2001.
A fortunate draw for Victor, and once again no recommendation for the White
side of this line!
Maybe the next line is best, as tried by the highest-rated player who essayed 3 e3
against the Tango:
c) 4 dxe5!? (inconsistent after the defensive 3 e3, but perhaps White was having
second thoughts, and now openly plays to draw ... ) 4 ... Nxe5 5 Nd2 Bc5 6 Ngf3
Nxf3+ 7 Nxf3 0-0 8 Be2 d5 9 0-0 dxc4 10 Bxc4 (and succeeds) 1⁄2-1⁄2 H.Pihlajasalo-
S.Pitkanen, Finnish Ch., Helsinki 2001. Of course, Black’s difficulties were nil, which
is generally what I find in this variation. As far as I am concerned, (after 1 d4 Nf6 2 c4
e5 3 e3) the Tango transposition with 3 ... Nc6! knocks out White’s third move as a
winning try.
4 ... Ne7 5 Nc3 Ng6
337
6 a3
Now if White plays 6 e4, trying to reach Karpov’s system, Black utilizes his extra
tempo and counters with 6 ... Bc5 with a good position. In the Karpov games, the
white e-pawn was already on e4, so he could and did prevent Black’s ... Bc5 with 6
Be3.
We see that, essentially, White’s 3 e3 loses a tempo against the Black Knights
Tango, a free tempo which gives Black a good game—but no one played this against
me!
6 ... a5 7 Bd3 Bc5 8 Rb1 d6 9 Qc2
If 9 b4 Bb6 10 Na4 e4 11 Nxb6 cxb6 12 Bc2 Ne5 13 Qe2 Bf5 and Black is better,
as d3 beckons.
9 ... 0-0 10 h4?!
338
Karpov also played h2-h4 fairly early in both of his wins, but here the move is
too active given White’s doubtful position. Instead of Black being under Karpovian
restraint, here he has that active bishop on c5 and potential breaks with ... c7-c6, and
(if White plays e3-e4) with ... f7-f5. If I had to play White here, I’d try the modest 10
Nge2, but I prefer Black after 10 ... c6.
10 ... c6 11 h5 Ne7 12 e4
If 12 Nge2 cxd5 13 cxd5 h6! and Black’s solid position is preferable to White’s,
who has scattered pawns and an insecure king.
12 ... Ng4 13 Nd1 f5
The strength of Black’s dark-squared bishop is now especially evident, as it
begins to co-operate with his other pieces—Goh has a clear advantage.
339
14 f3 fxe4 15 Bxe4 Nf6 16 Nc3 cxd5 17 cxd5 Nxe4 18 Nxe4
After 18 fxe4 both the spectacular 18 ... Nf5! (based on an x-ray attack) and the
direct 18 ... Rf2 are good for Black.
18 ... Bxg1 19 Rxg1 Nf5 20 Qf2
After 20 h6 Nxh6 21 Bg5 (or 21 Bxh6 Qh4+ avoiding doubled pawns) 21 ... Qb6
22 Rh1 Nf5 White doesn’t get anything for the pawn.
20 ... Nd4 21 Be3 Bf5 22 Bxd4 Bxe4 23 Bb6
23 ... Qd7
To my mind, 23 ... Qg5 24 Rd1 Qxh5 is much simpler, when Black is a pawn up
without any drama.
24 Rd1 Qb5 25 Bc7 Ra6 26 Qe3 Bxd5 27 h6 Rc6 28 Qd2 Bb3 29 Rc1 Rxc1+
30 Qxc1 Qd7?
Black’s more complicated method has also been successful, but now he lets
White back in the game. Correct is 30 ... Qd5 31 Bb6 (not 31 hxg7 Rc8 and the pin is
too strong) 31 ... g6 and Black should win.
31 Bxa5
White happily takes the free pawn, and now has chances to draw.
31 ... Rc8 32 Qe3 Bf7 33 Bc3 Qf5 34 Kf2 Re8 35 Re1 Re6 36 hxg7 Rg6 37 Re2
The same type of mistake as in Game 73 (Vallin-Miezis): this and the following
two moves allow Black’s queen to invade with devastating effect. 37 Rc1 was correct,
holding the invasion squares.
37 ... Bc4 38 Rd2
White’s last move could be justified if he was using it to exchange queens: he can
still pull out of his difficulties with 38 Qe4.
38 ... Qb1
340
39 Re2?
Time pressure is clearly a factor. After 39 g4! I can’t find a win for Black:
a) 39 ... Qh1 40 Bxe5! dxe5 41 Rd8+ Kf7 (if 41 ... Kxg7 42 Qxe5+ Rf6 43 Qg5+
Rg6 44 Qe7+ Bf7 45 Qf8+ Kf6 46 g5+ Kxg5 47 Qxf7 recovering his piece) 42 Rd7+
Kg8 43 Rd8+ with a draw.
b) 39 ... Qf1+ 40 Kg3 h5 41 g5 Qh1 42 Bxe5! and it looks like this key sacrifice
again gives White enough to draw.
c) 39 ... h5 40 Qe1 still holds.
39 ... Qh1! 0-1
Black doesn’t want the rook! The important thing is that the invading black
queen and rook have coordinated, and there’s nothing more to be done, as now 40 g4
fails to 40 ... Rh6 with a decisive invasion. A messy win, but Black got there!
However, from the point of view of the opening, there is no good news for
White: even Korchnoi needed a lucky break just to draw! The Black Knights Tango
with an extra move is quite a strong opening.
Game 78
P.Brandts-A.Bisguier
US Championship, New York 1954
1 d4 Nf6 2 c4 e5 3 Nf3
Now that we have disposed of 3 e3, let’s take a look at another way to protect the
d-pawn—but one sees immediately that 3 Nf3 invites Black to gain a tempo against
the knight.
3 ... e4
I don’t see any reason not to kick the knight. It’s true that GM Alburt won with
the very quiet 3 ... exd4!? 4 Nxd4 d5, but I can’t recommend this: after 5 cxd5 (instead
341
of the weak 5 e3? of M.Berman-L .Alburt, Philadelphia 1993) 5 ... Nxd5 6 e4 White is
slightly better.
4 Nfd2
The terribly retrograde 4 Ng1 was actually played against me: 4 ... d5 5 Bg5 (5
e3 c6 6 h3 Bd6 also favoured Black in K.Panneke-A .Habermann, Wingst 2002) 5 ...
dxc4 6 Nc3 and now I should have simply kept the pawn with 6 ... Bb4, when White
has no real compensation. Instead in L.Belliard Alonzo-T.Taylor, Las Vegas 2006, I
over-complicated with 6 ... Nc6 and ended up losing the game! This shows that even
the worst openings don’t lose by themselves—one must still play a correct
middlegame!
4 ... c6
4 ... e3!? is possible, similar to a reversed Alekhine’s Defence variation (1 e4 Nf6
2 Nc3 d5 3 e5 Nfd7 4 e6!), but since the main game is at least equal for Black, I see no
reason for this wild sac. Especially as the defender has an extra tempo here—the very
useful c2-c4—which alleviates the effect of the obstructive sac, and makes the position
certainly double-edged, and possibly in White’s favour. The following short game is
quite entertaining (though not for Black!): 5 fxe3 d5 6 g3 h5 7 Nf3 h4 8 Nc3 hxg3 9
cxd5 Ng4 10 Ne4 Bb4+ 11 Bd2 Nxe3 12 Qb3 g2? 13 Qxe3 gxh1Q 14 Nf6+ 1-0
W.Broekman-D .Thevenot, Sautron 2005 (since 14 ... Kf8 15 Bxb4+ forces mate).
5 e3 d5 6 Nc3 Be7
We’ve reached a reversed French, Advance Variation, where the white knight is
misplaced on d2—it wants to be on f4, attacking the black pawn chain. Therefore, the
extra tempo that White has does not help him, and this position is fine for Black.
7 f3 exf3 8 Nxf3 0-0 9 Bd3 Be6 10 Ng5
10 cxd5 cxd5 11 0-0 Nc6 would be a typical French, where White—which
means, in this case, Black—is slightly better in view of the backward e-pawn.
10 ... Bg4 11 Qc2 h6 12 Nf3 c5!
342
Bisguier opens lines while White is not yet castled—Black is already better.
13 Ne2
Relatively best is 13 cxd5 Bxf3 (but not 13 ... Nxd5? 14 Nxd5 Qxd5 15 Bh7+
Kh8 16 Be4 Qd7 17 Ne5 and wins) 14 gxf3 cxd4 15 exd4 Nxd5 with advantage due to
White’s shattered pawns.
13 ... Bxf3 14 gxf3 Nc6
Black’s advantage has cranked up a notch, as White has not solved his
development problems or really shored up his flimsy centre.
15 Bd2 cxd4 16 exd4 dxc4 17 Qxc4 Rc8 18 Qa4 Nd5 19 Rg1 Bh4+ 20 Kf1
If 20 Ng3 the reply 20 ... Nb6 wins a pawn.
20 ... Ncb4! 0-1
343
At this point someone input the wrong move in the database, which gives 21
Be3?? and Black’s reply as 21 ... Qd6?? instead of 21 ... Nxe3 mate! Of course this
was Black’s idea: White can’t play 21 Bb4 in view of the same 21 ... Ne3 mate, so he
would hardly have missed taking the bishop! So let’s call the game here on account of
a typo, but I’m sure we can believe the result: Black won!
About the opening: allowing one’s knight to be driven with tempo to a bad square
does not exactly inspire confidence—as we saw here, Black was already better by
move 12. The BG player should definitely not fear this line.
Game 79
DoctorHeart-T.Taylor
Internet (blitz) 2008
1 d4 Nf6 2 c4 e5 3 d5
Certainly the weakest way to decline the gambit: this non-developing move
weakens White’s centre and creates a hole for Black’s dark-squared bishop. In other
words, by playing 3 ... Bc5 here, Black obtains an even more favourable variation of
Game 77 (Black did not even have to lose time with his queen’s knight).
Why would anyone play this? I haven’t the foggiest clue, but it is a staple of
Internet blitz. When you try to play the Budapest in that venue, White will almost
always avoid it on move 2 (2 Nf3 usually). However, if you actually get as far as 1 d4
Nf6 2 c4 e5 then, for some strange reason, White almost invariably plays 3 d5. You
then play 3 ... Bc5, White almost invariably plays 4 Bg5, and you waste a minute
deciding which way to win, with 4 ... Bxf2+ or 4 ... Nxe4.
I got tired of all that, and to entertain myself, played ...
3 ... b5!?
Which was so much fun, I can’t resist putting it in—but please note: one, I doubt
344
that it’s objectively correct; and two, if you meet this in a real game you should
probably play the logical 3 ... Bc5 as in the Goldin game below.
Here’s super-correct opening play by Black: 3 ... Bc5 4 e3 (passive but trickless
—whereas after the Internet preferred 4 Bg5?? Black can win in two ways, as
mentioned above: 4 ... Bxf2+ 5 Kxf2 Ng4+ 6 Ke1 Qxg5 7 Nf3 Qe3 8 Qd2 Qf2+ 9 Kd1
Ne3+ 0-1 K.Zimak-J .Sobek, Czech League 1993; or 4 ... Ne4 5 Be3 Bxe3 6 fxe3
Qh4+ and Black was winning in V.Tolar-R.Kaiser, Prague 2002) 4 ... 0-0 5 Nc3 d6 6
Be2 c6
and it’s pointless to go on—suffice it to say that Black is already better and the
GM eventually scored the full point in S.Freijedo Alvarez-A .Goldin, Oviedo (rapid)
1993.
4 c5?
The “logical” follow-up to 3 d5—White once again “slips by” Black’s attacking
pawn—though of course, in this case, he overlooks a “small” detail.
Obviously 4 cxb5 is correct, when Black gets some compensation with the
Benko-style 4 ... a6, though it doesn’t seem to be enough to please Mr. Fritz!
4 ... Bxc5
Thank you!
5 e3 a6 6 a3 Bb7 7 b4 Bb6 8 Nc3 0-0 9 Bb2 d6 10 Be2 Nbd7 11 Nf3 Rc8 12 0-0
c6 13 e4 cxd5 14 exd5 Rxc3!
345
I couldn’t resist the exchange sac. Now the black bishops run amok!
15 Bxc3 Nxd5 16 Bb2 Nf4 17 Re1 Nf6 18 Nh4 Ne4 19 Bf3 Qxh4 20 Bxe4
Qxf2+ 21 Kh1 Qxg2+! 0-1
How often does one get to play this kind of mate? I think I had more fun than
GM Goldin, who took 49 moves to win and didn’t get to sacrifice anything! But now
back to the opening: objectively 3 ... Bc5 is correct and at least equalizes for Black.
However, there is an argument for 3 ... b5!?: if someone plays 3 d5, you’ll
probably beat him whatever you play—so why not have some fun?
Summary
3 e3 should hardly give White the success that I have had with it—it’s obvious
that after 3 ... Nc6 Black has a fine Tango.
346
3 Nf3 e4 is also excellent for Black; so that only leaves the beginner ’s move 3
d5, after which logically one must “play like a Grandmaster” with 3 ... Bc5, or you can
indulge yourself with the risky but fun 3 ... b5!?.
347
Chapter Fifteen
The Fajarowicz Gambit
We have now gone through every line of the Budapest Gambit, Accepted or
Declined, and one sees that I recommend playing this sharp and interesting opening—
after you’ve done your homework of course!
Now, for the sake of completeness, let’s take a quick look at a quite different
gambit that starts with the same two first moves: the Fajarowicz Gambit (1 d4 Nf6 2
c4 e5 3 dxe5 Ne4).
As White, I have never faced this gambit even once in 40 years of playing 1 d4,
which gives one an idea of its rarity.
However, like the Latvian Gambit, it has its devotees, and whole books written
on this one line! I have consulted the latest work, GM Gutman’s Budapest Fajarowicz
for this chapter.
My goal is only to give the reader a good line to play if you face the Fajarowicz
with White; my recommendation for Black is simple—don’t play it!
Game 80
H.Herrmann-S.Fajarowicz
Frankfurt 1930
1 d4 Nf6 2 c4 e5 3 dxe5 Ne4
348
I have to admit right here that I don’t understand this gambit. Black is a pawn
down but, unlike in the regular Budapest, has no threat to get it back and no significant
lead in development.
In From’s Gambit after 1 f4 e5 2 fxe5 d6 3 exd6 Bxd6 Black at least has a mating
threat, but I don’t see anything here—and therefore White can develop with a threat of
his own.
4 Nd2
I think the game move is strong and simple and so ideal for the practical player.
White develops a piece and attacks Black’s only compensation for the pawn, his well-
placed knight.
Since this line works so well, I see no reason to study the complicated variations
after the move some regard as a refutation, namely the slow 4 a3.
4 ... Nc5
If Black has to retreat on the fourth move of a gambit, then something is already
seriously wrong. Instead:
a) 4 ... d5 fails to 5 cxd5, threatening 6 Qa4+. After 5 ... Bb4 White can force the
play with 6 a3 Bxd2+ 7 Bxd2 Qxd5 8 Bf4 reaching a position where Black has nothing
for the pawn.
b) 4 ... Nxd2 develops White, and after 5 Bxd2, again Black has nothing for the
pawn.
c) 4 ... Bb4 seems relatively best and is the most common move here. 5 Ngf3
then transposes to the next game.
5 b4
There are nine games in the Megabase with this position: White wins eight and
gives up one draw. It’s obvious that after 5 b4 White solves the development problem
of his queen’s bishop (which will defend the extra pawn) while gaining time and
space. In short, a clear advantage to White, two moves after the introduction of the
gambit!
Note that White can also play positionally without trying to hold the pawn—
349
while I prefer 5 b4 going for a quick knockout, it’s always good to see another classic
Alekhine win: 5 Ngf3 Nc6 6 g3 Qe7 7 Bg2 g6 8 Nb1! Nxe5 9 0-0 Nxf3+ 10 exf3 Bg7
11 Re1 Ne6 12 Nc3 0-0 13 Nd5 Qd8 14 f4 c6 15 Nc3 d6 16 Be3 Qc7 17 Rc1 Bd7 18
Qd2 Rad8 19 Red1 Bc8 20 Ne4 Nc5 21 Nxd6 Na4 22 c5 Nxb2 23 Re1 b5 24 cxb6!
Qxd6 25 Qxd6 Rxd6 26 bxa7 Bb7 27 Bc5 Rdd8 28 Bxf8 Kxf8 29 Bxc6 Bxc6 30 Rxc6
Ra8 31 Rb6 Rxa7 32 Rb8 mate, A.Alekhine-S.Tartakower, London 1932.
5 ... Ne6 6 a3
6 ... d6
If instead 6 ... f6 7 Bb2 fxe5 8 Bxe5 Be7 9 Ngf3 and Black doesn’t have enough
for the pawn.
Black has also tried 6 ... a5 without any success at all—following is the most
recent of White’s eight wins from the 5 b4 tabiya: 6 ... a5 7 b5 d6 8 exd6 Bxd6 9 Bb2
Nd7 10 Ngf3 0-0 11 g3 f5 12 Bg2 Qe8 13 0-0 Nec5 14 Nd4 a4 15 Qc2 Ne5 16 e3 Bd7
17 N2f3 Ng4 18 Ne2 Ne4 19 Nf4 g5 20 Nd5 Qh5 21 h3 Ngxf2 22 Rxf2 Bxg3 23 Rff1
Rae8 24 Nh2 Bxh2+ 25 Kxh2 g4 26 Bxe4 Qxh3+ 27 Kg1 1-0 M.Feige-S.Weitzer,
German League 2007. Black dredged up a lot of sound and fury on the kingside, but
the poet was right about what it signified!
Gutman has no faith in this line either: he gives as the main variation 6 ... b6 7
Ngf3 Bb7 8 e3 a5 9 b5 d6 10 exd6 Bxd6 11 Bb2 0-0 12 Be2 Nd7 13 0-0 Ndc5 14 Qc2
Qe7 15 Rfe1 Rad8 16 Rad1 and then states, “Black will be hard pressed to justify his
material deficit.”
7 exd6 Bxd6 8 Ne4 Be5 9 Qxd8+ Nxd8 10 Ra2
350
The queens are off the board, and White is a good pawn up.
10 ... Bf5 11 Nf3 Nbc6 12 Nxe5 Nxe5 13 Nd2 Ndc6 14 e4 Be6 15 f4!
Alekhine style—with an extra pawn!
15 ... Ng4 16 Nf3 0-0 -0 17 Rd2 Rde8 18 Bd3 Ne3 19 c5 f6 20 Re2 Ng4 21 h3
Nh6 22 Kf2 Rd8 23 Rd2 Rhf8 24 Bc2 Bd7 25 Rhd1 Nf7 26 Bb3 Nb8 27 Bb2 Rde8
28 Re1 Re7 29 Nd4 Rfe8 30 Rde2 Nh6 31 g4 Nc6 32 Nf5 Nxf5 33 exf5 h5 34 Be6
hxg4 35 hxg4 Nd8 36 Bxd7+ Kxd7 37 Rxe7+ Rxe7 38 Rh1 b6 39 Bd4 Nb7 40 Rh7
bxc5 41 bxc5 Nd8 42 Kf3 Nc6 43 Bc3 Rf7 44 g5 Ke8 45 Kg4
45 ... fxg5
Undoubling White’s pawns is obviously fatal, but the alternatives are no better: if
45 ... Kf8 46 g6 Rd7 47 Rh8+ Ke7 48 Rg8 and the key g7-pawn drops; or 45 ... Ke7
351
46 Bxf6+ gxf6 47 g6 and Black will have to resign fast to beat the descending curtain.
46 fxg5 Ne7 47 Rxg7 1-0
Not an auspicious outing for the Gambit inventor!
Game 81
G.Kasparov-J.Arts
Rotterdam (simul) 1987
1 d4 Nf6 2 c4 e5 3 dxe5 Ne4 4 Nf3
More forcing is 4 Nd2.
4 ... Bb4+
The reason for the above comment is that Black could play 4 ... Nc6 here, and if
5 Nbd2 then 5 ... Nc5, when White can’t play b2-b4, which was so devastating in the
previous game. White should still be better here, but Black is at least playing.
Of course, this game was from a simultaneous exhibition, so hyper-accuracy was
not needed!
5 Nbd2
As far as I can see, White can virtually reach this position by force with the
accurate move order 4 Nd2 Bb4 5 Nf3. We already saw, in the main text and notes to
the previous game, that Black has no other serious alternatives if that move order is
played.
So what can Black do now?
5 ... Nc6
Black tries to get the pawn back, but runs into positional problems.
Black can make it a true gambit with 5 ... d6, but I don’t see real compensation in
view of White’s solid position:
a) Fajarowicz author Gutman failed to equalize in the following blitz game: 6 a3
352
Bxd2+ 7 Bxd2 Nc6 (if 7 ... dxe5 White should probably just take the small two
bishops plus with 8 Be3) 8 exd6 Qxd6 9 Be3 Qe7 10 g3 0-0 11 Bg2 Be6 12 Qc2 Nd6
13 Bc5 b6 14 Bxd6 cxd6 15 0-0 Rac8 16 Qd3 Rfd8 17 b3 d5 18 cxd5 Rxd5 19 Qe3
Rc5 20 b4 Rc4 21 Rac1 (White has consolidated and kept the extra pawn) 21 ... Qd6
22 Rfd1 Rxc1 23 Qxc1 Qe7 24 Qe3 Rd8 25 Rc1 Rd6 26 Ng5 Qd7 27 Nxe6 Rxe6 28
Bh3 1-0 R.Dautov-L .Gutman, Internet (blitz) 2003. One recalls that Dautov is a great
foe of all things Budapest—see Games 18 and 19!
b) 6 exd6 Qxd6 7 a3 Bxd2+ and:
b1) 8 Bxd2 Qf6 9 Be3 Nc6 10 Qd5 Nd6 11 0-0 -0 (although White gets a small
edge with this move, I don’t think the game would have lasted 71 moves if he had
found the stronger 11 Bd4 Nxd4 12 Qxd4 Qxd4 13 Nxd4 Nxc4 14 Rc1 Nxb2 15 Rxc7
with a monster rook on the seventh) 11 ... Be6 12 Qg5 Qxg5 13 Nxg5 Bxc4 14 Bc5 0-
0-0 15 Bxd6 cxd6 16 e3 Bxf1 17 Rhxf1 Rd7 18 Rd5 and White ground out the ending
in N.Legky-P.Toulzac, St Quentin 1999.
b2) 8 Nxd2 Nc5 9 Qc2 Qe5 10 Nf3 Bf5 11 Nxe5 Bxc2 12 b4 Nb3 13 Ra2 Bf5 14
Bf4 a5 15 b5 was G.Siegel-P.Toulzac, French Team Ch. 1998. White has kept a good
grip on his extra pawn, and now proceeded to win in ... 113 moves!!.
There are other variations, but generally speaking, the gambit 5 ... d6 is, at best, a
struggle for survival—and possibly a very long struggle indeed!
6 g3
353
White takes aim at Black’s only good piece, the knight on e4. Note that Kasparov
is not trying to hold on to the pawn: he just wants to complete his development in a
sound way, so that after Black loses time getting the pawn back, White will have a
clear positional advantage.
6 ... Qe7
If 6 ... d6 7 Bg2 (White calmly develops, setting up a hidden attack on the
Fajarowicz knight; worse is 7 exd6 which gives Black some counterplay against f2, as
will be seen: 7 ... Qxd6 8 a3 Qc5! 9 e3 Bxd2+ 10 Nxd2 Nxd2 11 Bxd2 Be6 12 Qc2 0-
0-0 13 Be2 Ne5 14 0-0 -0 Nxc4 15 Bxc4 Bxc4 16 Bc3 f6 and Black, having recovered
his pawn, was slightly better in view of the light square weaknesses and went on to
win in A.Mandelbaum-A .Bisguier, Helsinki Olympiad 1952) 7 ... 0-0 (7 ... dxe5 fails
to 8 Nxe5 as the fianchettoed bishop is unmasked, e.g . 8 ... Nxd2 9 Bxc6+ bxc6 10
Bxd2 and Black has nothing for the pawn) 8 exd6 Qxd6 9 a3 Qc5 (this attack is now
ineffective since White is developed enough to castle out of danger) 10 0-0 Bxd2 11
Nxd2 Nxd2 12 Bxd2 Qxc4 13 Rc1 and Black can enjoy his struggle to draw, given
White’s powerful pair of bishops.
7 Bg2
354
7 ... Nxd2
Interesting variations can occur after 7 ... Nxe5 8 Nxe5 (or just 8 0-0 with a slight
edge, but I like the capture as it gives White a chance for attack if Black gets greedy) 8
. .. Qxe5 9 0-0 Nxd2 (9 ... f5 led to a quick death: 10 Nxe4 fxe4 11 Bf4 Qe7 12 Qd5 d6
13 Qb5+ picked up a piece and Black resigned in K.Opocensky-E .Griess, Nice 1938)
10 Bxd2 Qxb2 (greed kills, but 10 ... Bxd2 11 Qxd2 0-0 transposes to the unpleasant
main game) 11 Bf4! and White has more than enough compensation for the pawn:
a) 11 ... 0-0 12 Bxc7 and Black’s position is full of holes.
b) 11 ... Ba5 12 Rb1 Qf6 13 Qa4 Bb6 14 Rb5! Bd4 (not 14 ... 0-0 15 c5 a6 16
cxb6 or 15 ... c6 16 Rxb6 and White wins a piece) 15 Bxc7 with a positional smash as
in line ‘a’.
355
c) 11 ... d6 12 Rb1 Qa3 13 Rb3 Qa5 14 Re3+ Kf8 (if 14 ... Be6 15 Bxb7 Rb8 16
Bd5 and White has a long lasting initiative, e.g . 16 ... 0-0 17 Bxe6 fxe6 18 Rxe6 Qxa2
19 Qd5 Kh8 20 Re7 Qa5 21 Qc6 Rfc8 22 Rb1 a6 23 Kg2 Qb6 24 Qa4 a5 25 Qa1 Rg8
26 Bh6 and mates) 15 Rb3 and White has an excellent attack for the pawn, especially
given Black’s permanently uncastled king.
8 Bxd2 Bxd2+ 9 Qxd2 Nxe5 10 Nxe5 Qxe5
It’s hard to find an improvement for Black over these first ten moves, but now ...
11 0-0
White just has everything his way: a lead in development, more space, and the
much stronger minor piece. Black is going to have a hard time getting his bishop out
without making some serious concession.
If this is the best Black can do against 4 Nd2, then I pity the Fajarowicz player!
By the way, of the four games in the Megabase with this position, White wins
two and Black manages two draws; I would say that 75% score for White accurately
represents the practical evaluation of the position.
11 ... 0-0 12 b4
In a simul even a great world champion is not always accurate. 12 Rac1 looks
stronger, as the following game shows: 12 ... a5 (if 12 ... d6 13 Rc3 and Black can’t
develop, while White’s roving rook increases his edge) 13 c5 Ra6 14 f4 Qh5 15 Bf3
Qh3 16 e4 Rh6 Black gets in his rook lift, but after White’s simple reply there is no
attack—or rather, there is only an attack for White! 17 Rf2 b6 18 e5 Ba6 19 cxb6 cxb6
20 f5 Bb5 21 Qf4 (White threatens Bg4 trapping the queen; it’s really time to resign,
but then ... ) 21 ... Rc6 22 Bxc6 Bxc6 23 f6 g6 24 e6 h6 25 e7 Re8 26 Rxc6 g5 27 Qe4
dxc6 28 Qg6+! (we wouldn’t see this pretty finish!) 1-0 S.Testor-M .Schuler, German
League 2006.
12 ... Rb8 13 f4 Qe7 14 f5
Better is 14 c5, still with an edge.
14 ... Re8 15 f6
356
The attack is ineffective, as Black gets the queens off and, theoretically speaking,
should draw—but not against Garry!
15 ... Qe3+ 16 Qxe3 Rxe3 17 Rad1 d6
17 ... Rxe2 is too dangerous after 18 Rde1, when White gets the only open file
and Black is both back ranked and undeveloped.
18 c5 Be6 19 cxd6 cxd6 20 Rxd6 Rxe2 21 a4 b6?!
Too defensive—after the correct 21 ... Ra2 22 a5 gxf6 23 Rxf6 Rb2 24 Rf4 Rc8!
Black should draw.
22 fxg7 Rc8 23 Bc6
Black’s rook is shut off.
White has the somewhat better game, with more active pieces and Black’s split
357
pawns, and one can imagine Garry was coming around to this board faster and faster
as other opponents resigned! The Megabase ends the game score here with a victory
for the champion—evidently White won after some unrecorded moves.
1-0
Summary
There’s nothing more to say than that the Fajarowicz, unlike the Budapest, looks
like a very doubtful gambit.
358
Conclusion
Some Final Notes
I can’t stress enough that the prospective Budapest Gambiteer must do the
necessary homework before playing this opening in a tournament game. Move order is
absolutely critical in the main lines of 4 e4, 4 Bf4 and 4 Nf3. Even the quiet lines give
Black chances to go wrong—so make sure you have your variations down before you
play!
But once you have done that, you can have some fun! This is that rare opening
where you have a real chance of finding something new and surprising. As you can
see, the GMs of the world haven’t figured this one out yet!
My book is a guide to the theory as it exists now—but as outmoded variations
fall away, new main lines will take their place—and so the Budapest Gambit should
remain fresh and interesting for many years to come.
359
Index of Complete Games
Adams.N.A-Goh Wei Ming, Budapest 2007
Aguiar Garcia.J-Sanjuan Garcia.M, Malaga 1994
Alekhine.A-Euwe.M, Amsterdam 1921
Alekhine.A-Gallego.L, Gijon 1944
Alekhine.A-Gilg.K, Semmering 1926
Alekhine.A-Rabinovich.I, Baden-Baden 1925
Alekhine.A-Seitz.J, Hastings 1925/26
Barkasz.A-Soria, Correspondence 1973
Barsov.A-Kagirov.S, Uzbeki Ch., Tashkent 1993
Becker.Marc-Kewe.S, Duisburg 2003
Beliavsky.A-Epishin.V, Reggio Emilia 1991
Bluvshtein.M-Miezis.N, Calvia Olympiad 2004
Bonin.J-Saint Amand.P, Philadelphia 2001
Brandts.P-Bisguier.A, US Championship, New York 1954
Buijs.C-De Groot.A, Correspondence 1987
Candela Perez.J-Campora.D, Dos Hermanas 2006
Capablanca.J.R-Tartakower.S, Bad Kissingen 1928
Cazzaniga.W-Ayza Ballester.J, Celle Ligure 1996
Comas Fabrego.L-Altisen Palmada.R, Catalonian Team Ch. 1995
Curran.A-Mohr.G, Lyons 1993
Cvitan.O-Rogers.I, Vrsac 1987
Dautov.R-Blatny.P, Bad Wörishofen 1991
Dautov.R-Köpf.U, German Team Cup 1991
DoctorHeart-Taylor.T, Internet (blitz) 2008
Dumitrache.D-Biti.O, Zagreb 1997
Euwe.M-Spielmann.R, Bad Pistyan 1922
Fernandez Lago.D-Vela Ignacio.J, Mondariz 2004
Fine.R-Morton.H, US Championship, New York 1936
Gil Quilez.S-Belezky.S, Albacete 2004
Gleizerov.E-Blatny.P, Katowice 1992
Gurevich.M-Miezis.N, Bonn 1996
Gustafsson.J-Lamprecht.F, Hamburg 1997
Gyimesi.Z-Nevednichy.V, Nagykanizsa 2003
Hansen.K.S-Jensen.Mart, Soro 1982
Hart.R-Spiller.P, Hamilton 1999
Herrmann.H-Fajarowicz.S, Frankfurt 1930
Higa.R-Taylor.L, Los Angeles 2006
Horvath.C-Chatalbashev.B, Elista Olympiad 1998
Ivanchuk.V-Short.N, Monte Carlo (blindfold rapid) 1993
Jayson.M-Taylor.T, Los Angeles (rapid) 2005
360
Jelen.I-Petek.P, Bled 1993
Johnson.C-Camarda.K, Tulsa 2007
Karolyi.T-Hector.J, Copenhagen 1985
Karpov.A-Short.N, 1st matchgame, Linares 1992
Kasparov.G-Arts.J, Rotterdam (simul) 1987
Korchnoi.V-Gomez Esteban.J, Pamplona 1990
Korchnoi.V-Piket.J, Monte Carlo (rapid) 1994
Kouatly.B-Preissmann.E, Bagneux 1983
Kramnik.V-Mamedyarov.S, Nice (rapid) 2008
Lautier.J-Rogers.I, Novi Sad Olympiad 1990
Max.B-Reinhardt.B, Zell 1977
Mikhalchishin.A-Lendwai.R, Kecskemet 1991
Miraoui.K-Nevednichy.V, Sautron 2003
Novikov.I-Moroz.A, Kherson 1989
Odesskij.I-Kramnik.V, Samtredia 1987
Petrosian.T.V-Flohr.S, Tbilisi (simul) 1942
Polugaevsky.L-Nunn.J, Biel 1986
Reid.G-Alekhine.A, Scarborough 1926
Reshevsky.S-Denker.A, Syracuse 1934
Reshevsky.S-Seidman.H, US Championship, New York 1951
Riazantsev.A-Korchnoi.V, Chelyabinsk 2007
Rodshtein.M-Miezis.N, Winterthur 2004
Rubinstein.A-Tartakower.S, Bad Kissingen 1928
Rubinstein.A-Vidmar.M, Berlin 1918
Smirnov.A-Miezis.N, Tallinn (rapid) 2005
Smyslov.V-Blasek.R, Gelsenkirchen 1991
Solozhenkin.E-Miezis.N, Gausdal 2001
Sosonko.G-Ree.H, Amsterdam 1982
Spassky.B-Illescas Cordoba.M, Linares 1990
Spirin.O-Kravchenko.V, Krasnodar 2002
Tarrasch.S-Vajda.A, Semmering 1926
Taylor.T.-Pickering.A, Los Angeles (rapid) 2005
Taylor.T-Alonzo.F, Los Angeles 2006
Taylor.T-Fuerstman.L, North Carolina 1990
Taylor.T-Serpik.I, Los Angeles (rapid) 2004
Vallin.G-Miezis.N, Bogny sur Meuse 2003
VampireBat-Greweling, Internet (rapid) 2006
Weenink.H-Réti.R, Amsterdam 1920
Williams.S.K-Miezis.N, Oslo 2004
Winfridsson.O-Ambrosi.A, Salsomaggiore Terme 2004
Yates.F-Spielmann.R, Carlsbad 1923
361
Table of Contents
Bibliography
5
Introduction
6
Part I: The Alekhine Attack (4 e4)
20
1 The Alekhine Attack as played by Alekhine
22
2 Deviations
44
3 Alekhine Attack vs. 5 ... Ng6
64
4 Alekhine Attack vs. 5 ... Nec6
83
5 Réti (4 ... h5!)
114
Part II: White plays 4 Bf4
140
6 Bf4 vs. .. . g7-g5
141
7 The Original Budapest Gambit (Bf4 and Nc3)
161
8 Black Gambits against 4 Bf4
202
9 Bf4 Main Line with Nbd2
216
Part III: White plays 4 Nf3
261
10 4 Nf3 Nc6 when White avoids 5 Bf4
262
11 4 Nf3 Bc5
275
Part IV: Unusual Lines
302
12 The Quiet Ones: 4 Nc3, 4 e3, 4 Nh3
303
13 Materialism
315
14 White Declines the Budapest Gambit
325
15 The Fajarowicz Gambit
348
Conclusion
359
Index of Complete Games
360
Adams.N.A-Goh Wei Ming, Budapest 2007
332
Aguiar Garcia.J -Sanjuan Garcia.M, Malaga 1994
195
Alekhine.A-Euwe.M, Amsterdam 1921
22
Alekhine.A-Gallego.L, Gijon 1944
38
Alekhine.A-Gilg.K, Semmering 1926
33
Alekhine.A-Rabinovich.I, Baden-Baden 1925
26
Alekhine.A-Seitz.J, Hastings 1925/26
29
Barkasz.A -Soria, Correspondence 1973
72
362
Barsov.A-Kagirov.S, Uzbeki Ch., Tashkent 1993
192
Beliavsky.A -Epishin.V, Reggio Emilia 1991
315
Bluvshtein.M-Miezis.N, Calvia Olympiad 2004
234
Brandts.P -Bisguier.A, US Championship, New York 1954
341
Buijs.C-De Groot.A, Correspondence 1987
254
Candela Perez.J-Campora.D, Dos Hermanas 2006
141
Capablanca.J .R-Tartakower.S, Bad Kissingen 1928
44
Cazzaniga.W-Ayza Ballester.J, Celle Ligure 1996
239
Comas Fabrego.L-Altisen Palmada.R, Catalonian Team Ch. 1995 285
Curran.A -Mohr.G, Lyons 1993
69
Cvitan.O-Rogers.I, Vrsac 1987
93
Dautov.R-Blatny.P, Bad Wörishofen 1991
87
Dautov.R-Köpf.U, German Team Cup 1991
83
DoctorHeart-Taylor.T, Internet (blitz) 2008
344
Euwe.M -Spielmann.R, Bad Pistyan 1922
114
Fernandez Lago.D-Vela Ignacio.J, Mondariz 2004
132
Fine.R-Morton.H, US Championship, New York 1936
128
Gil Quilez.S -Belezky.S, Albacete 2004
145
Gleizerov.E-Blatny.P, Katowice 1992
296
363