


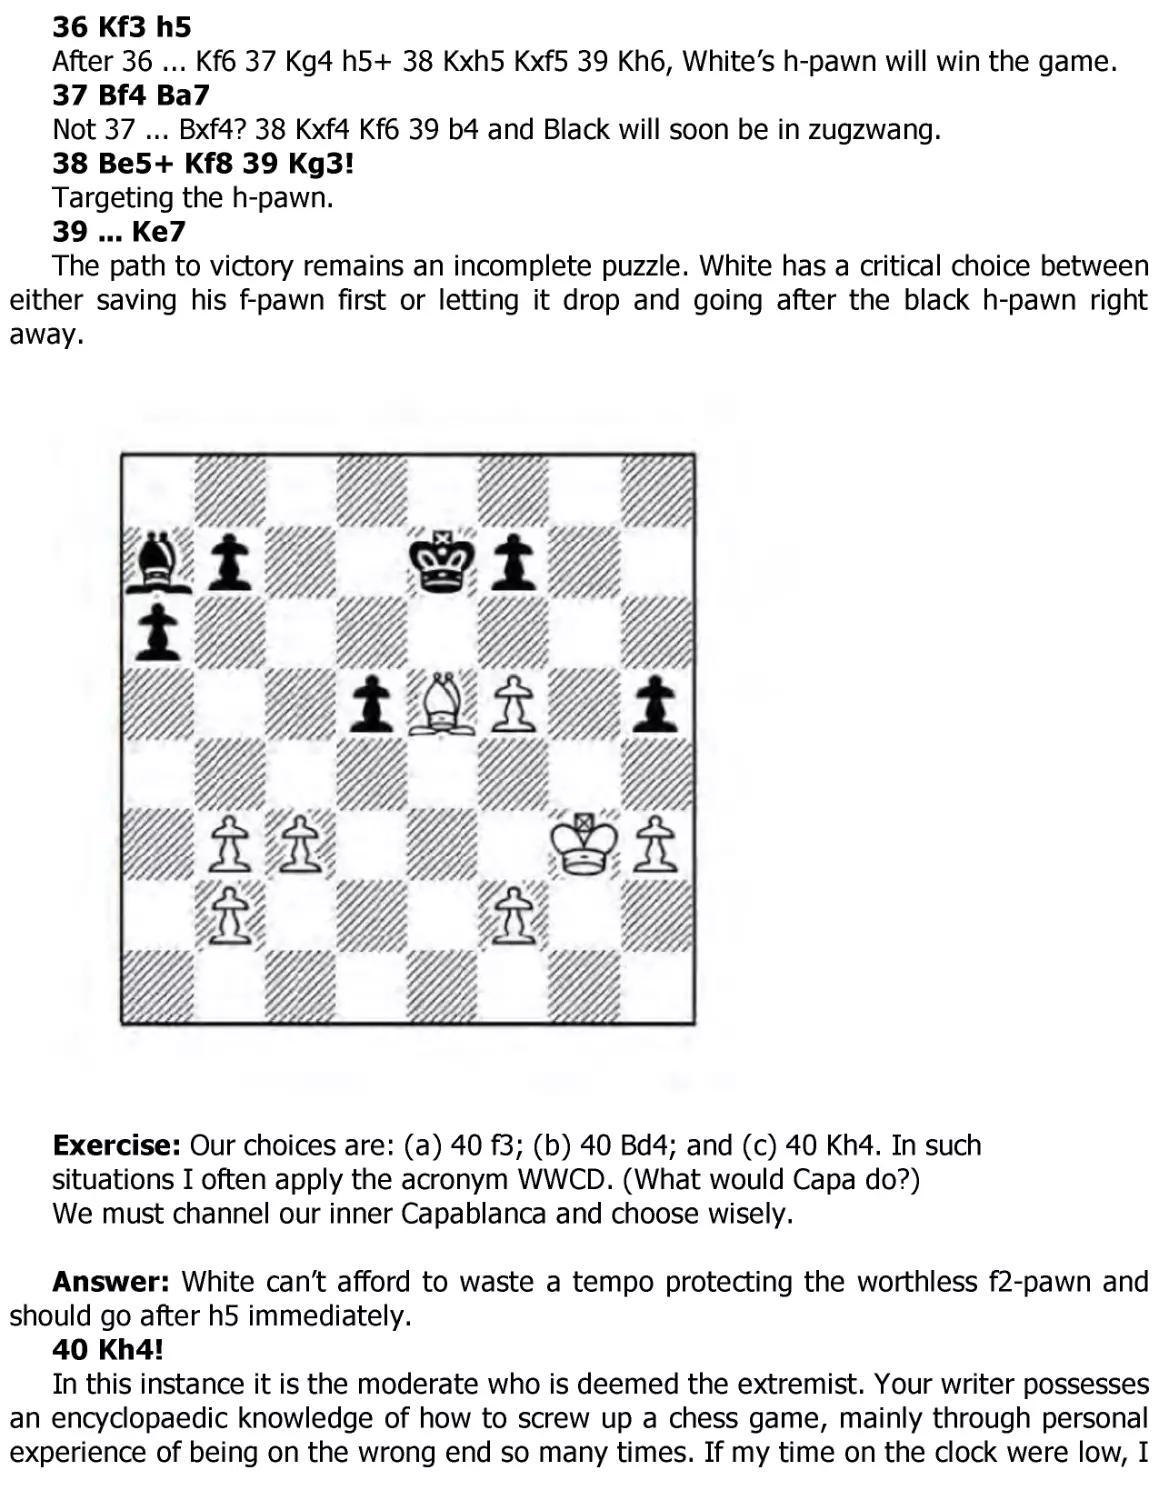
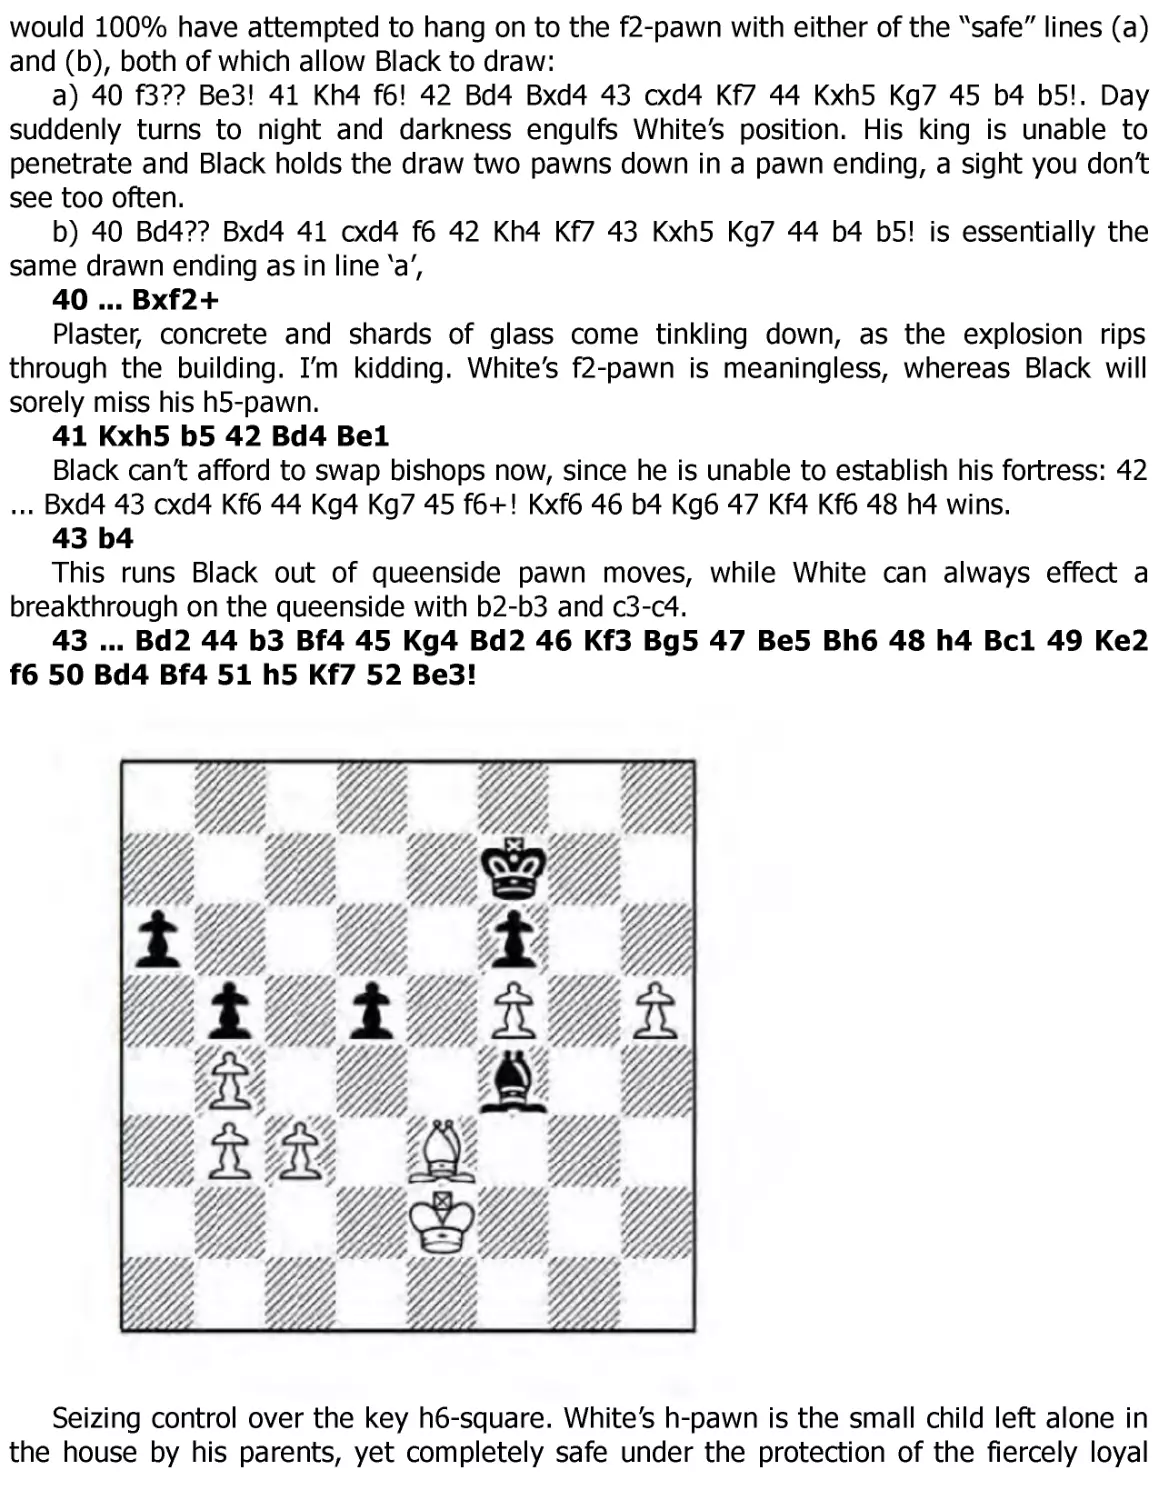

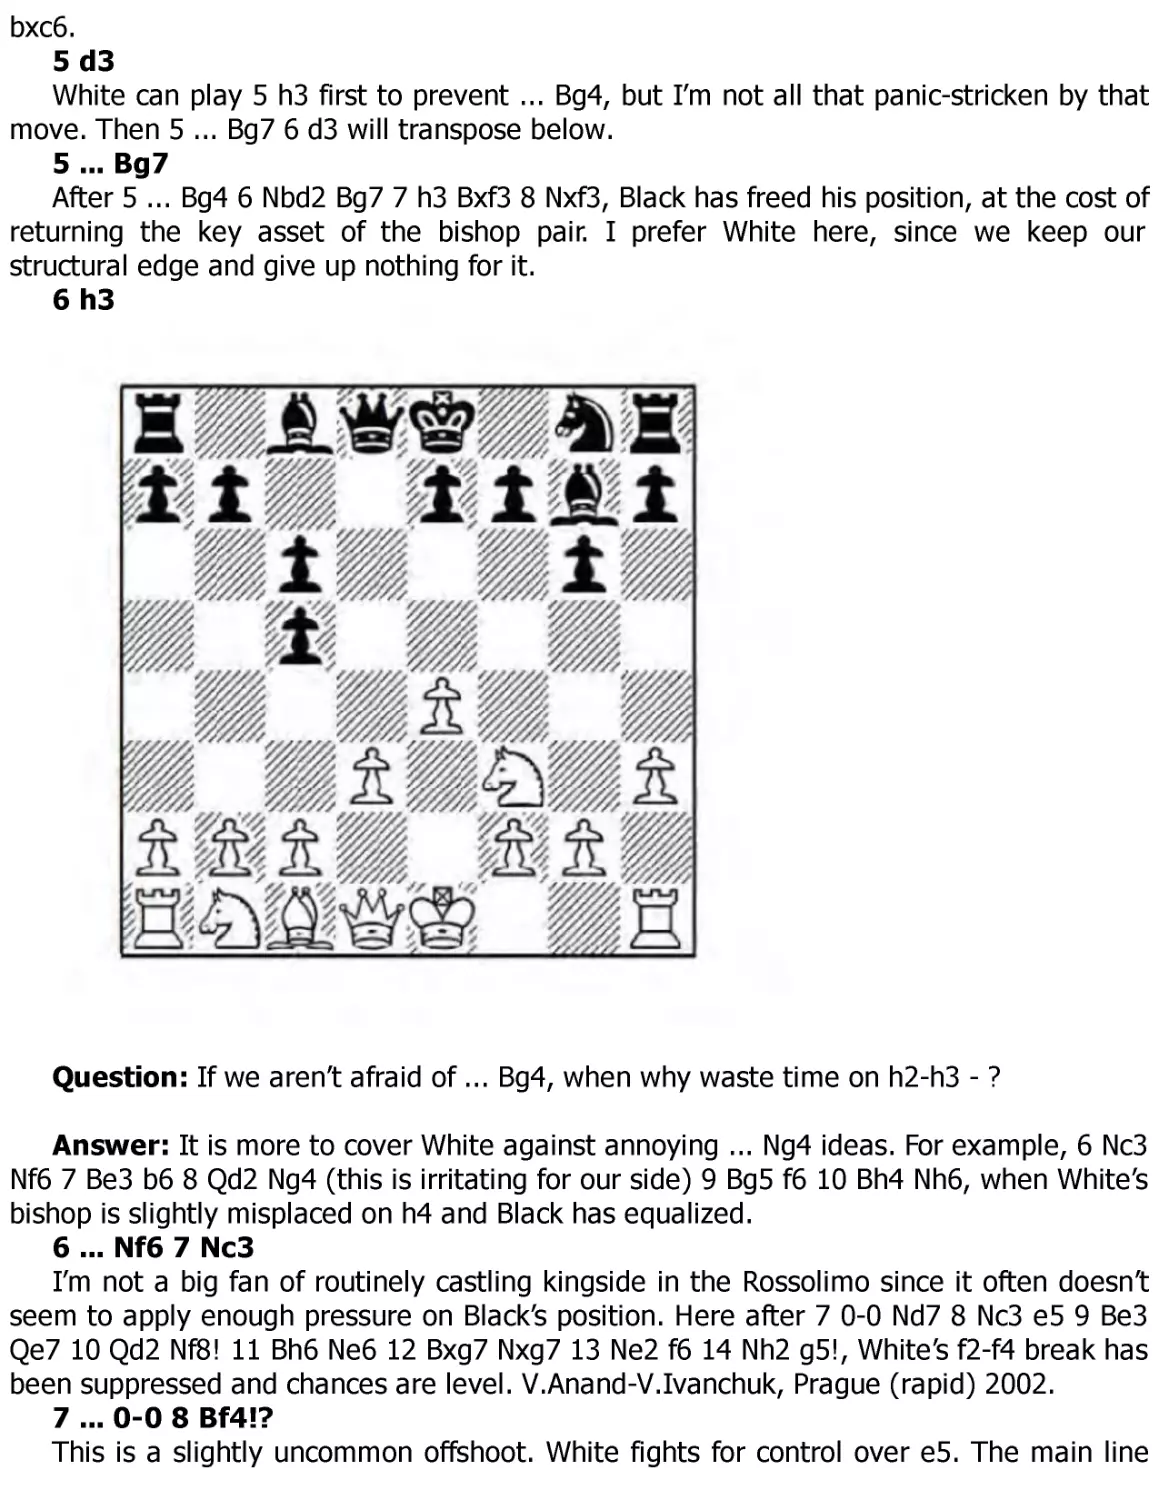


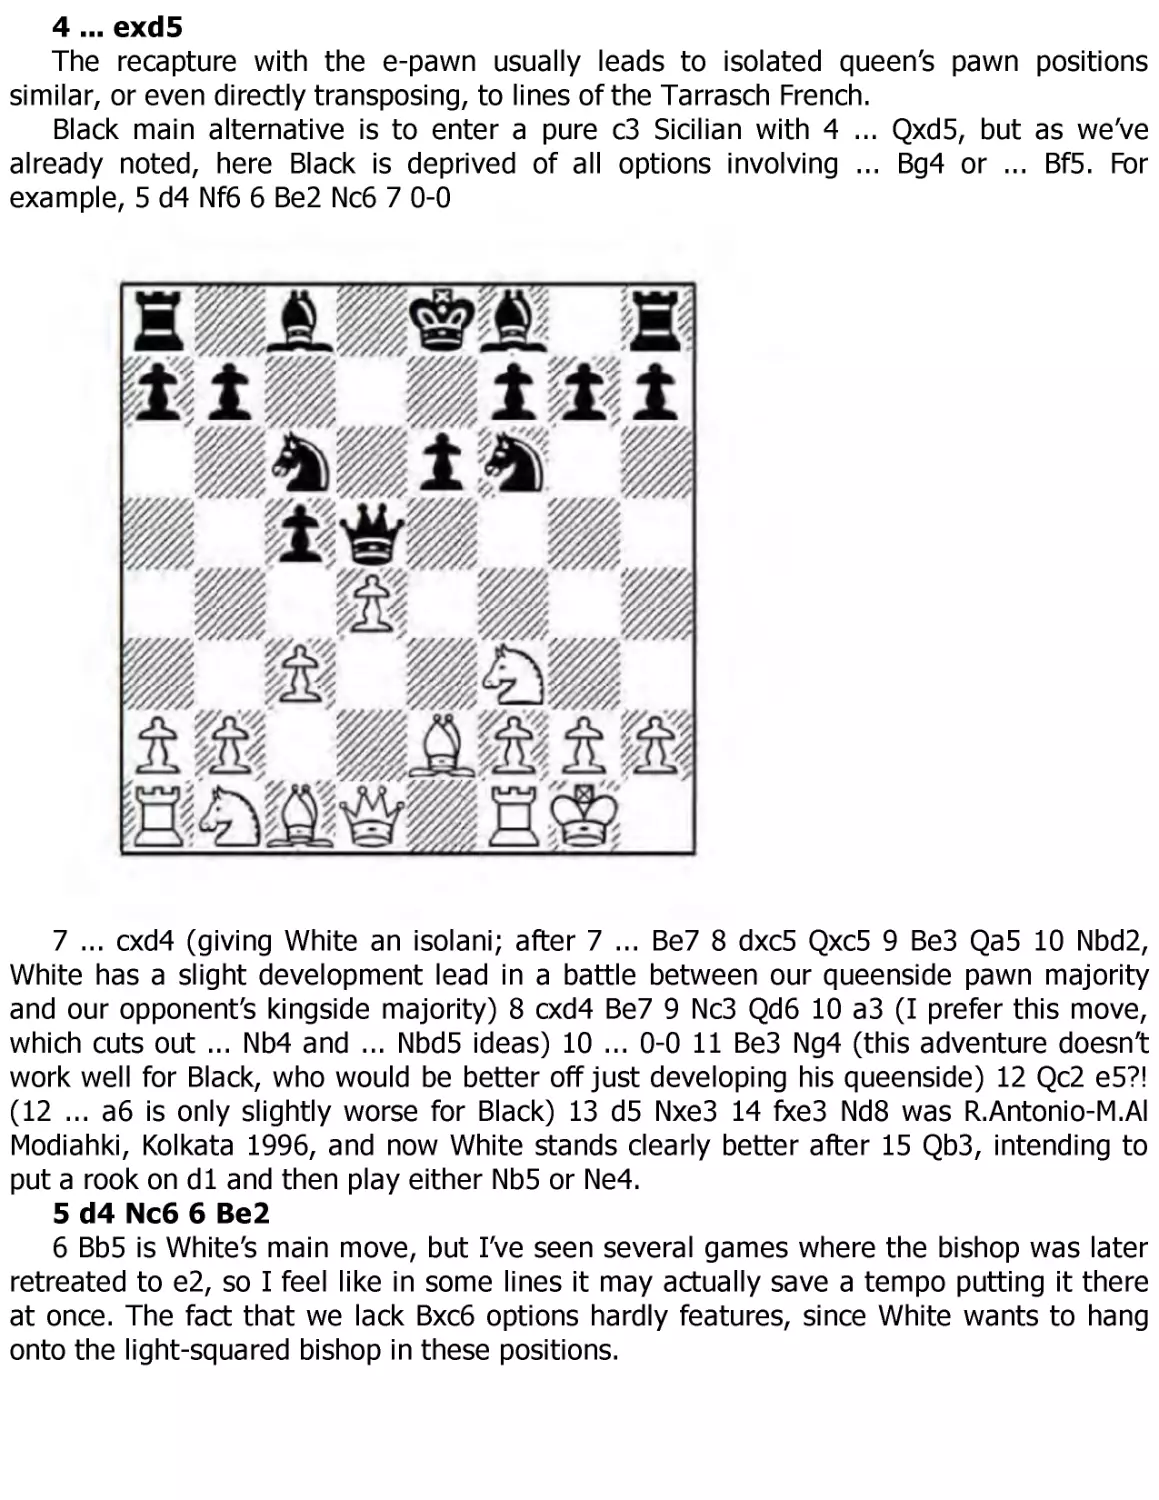


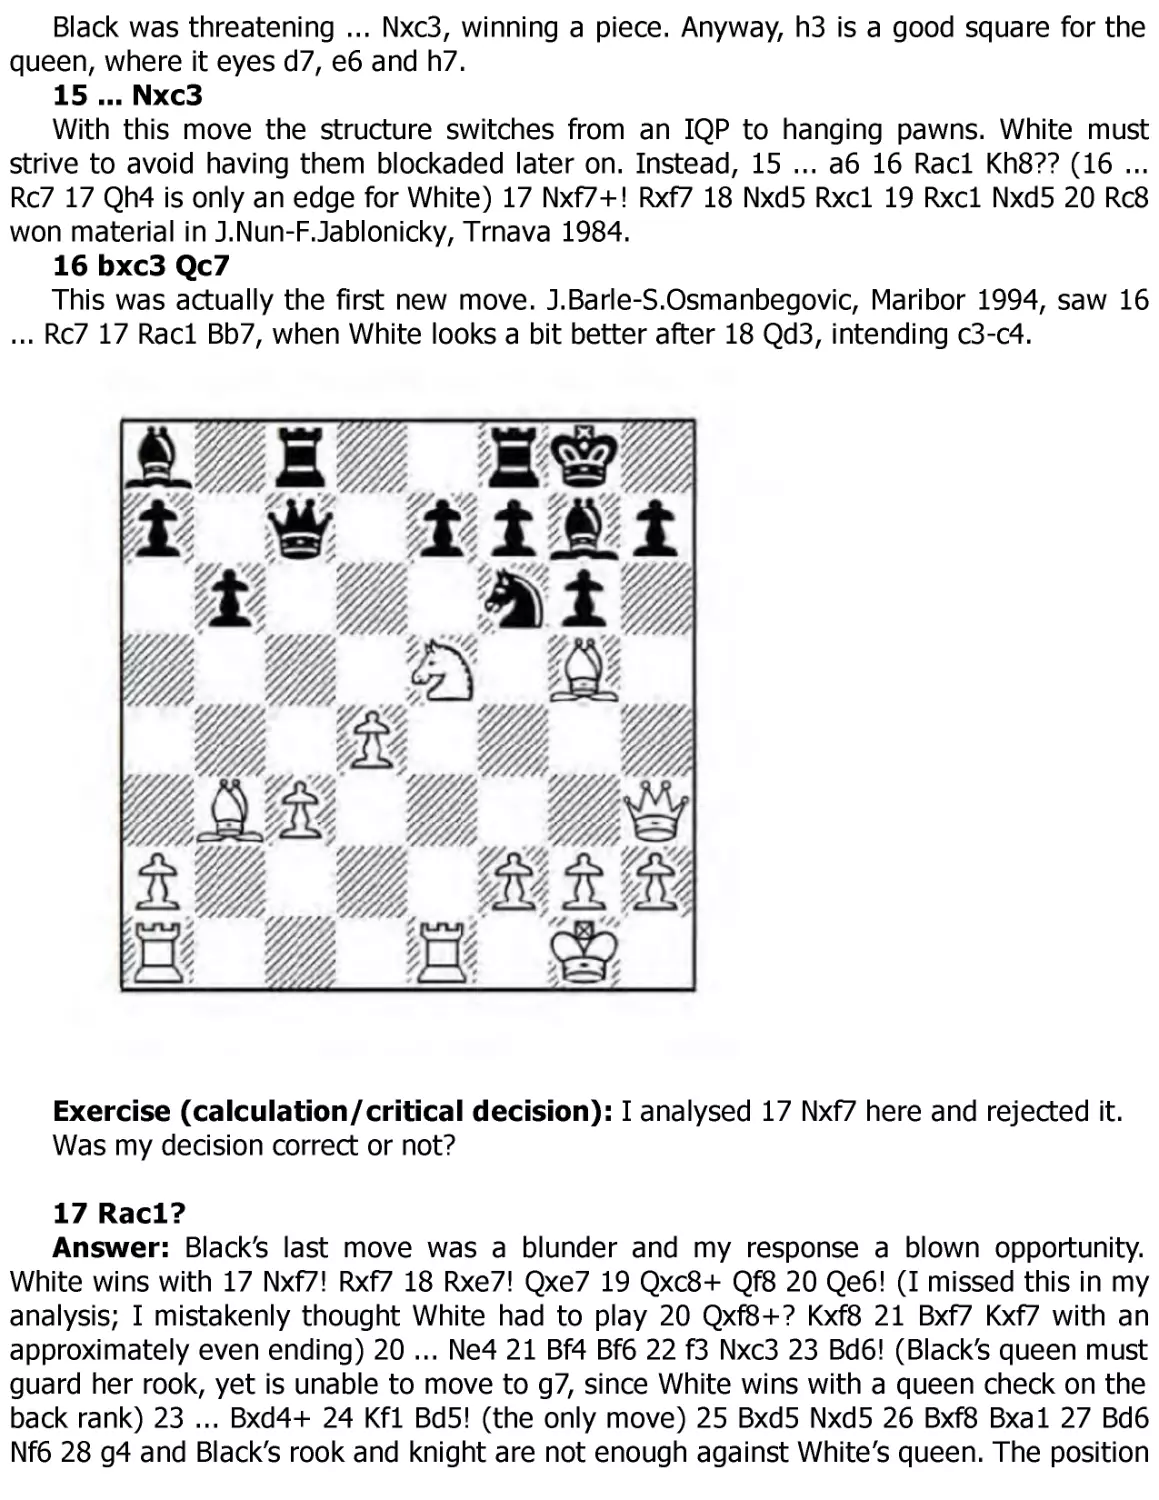

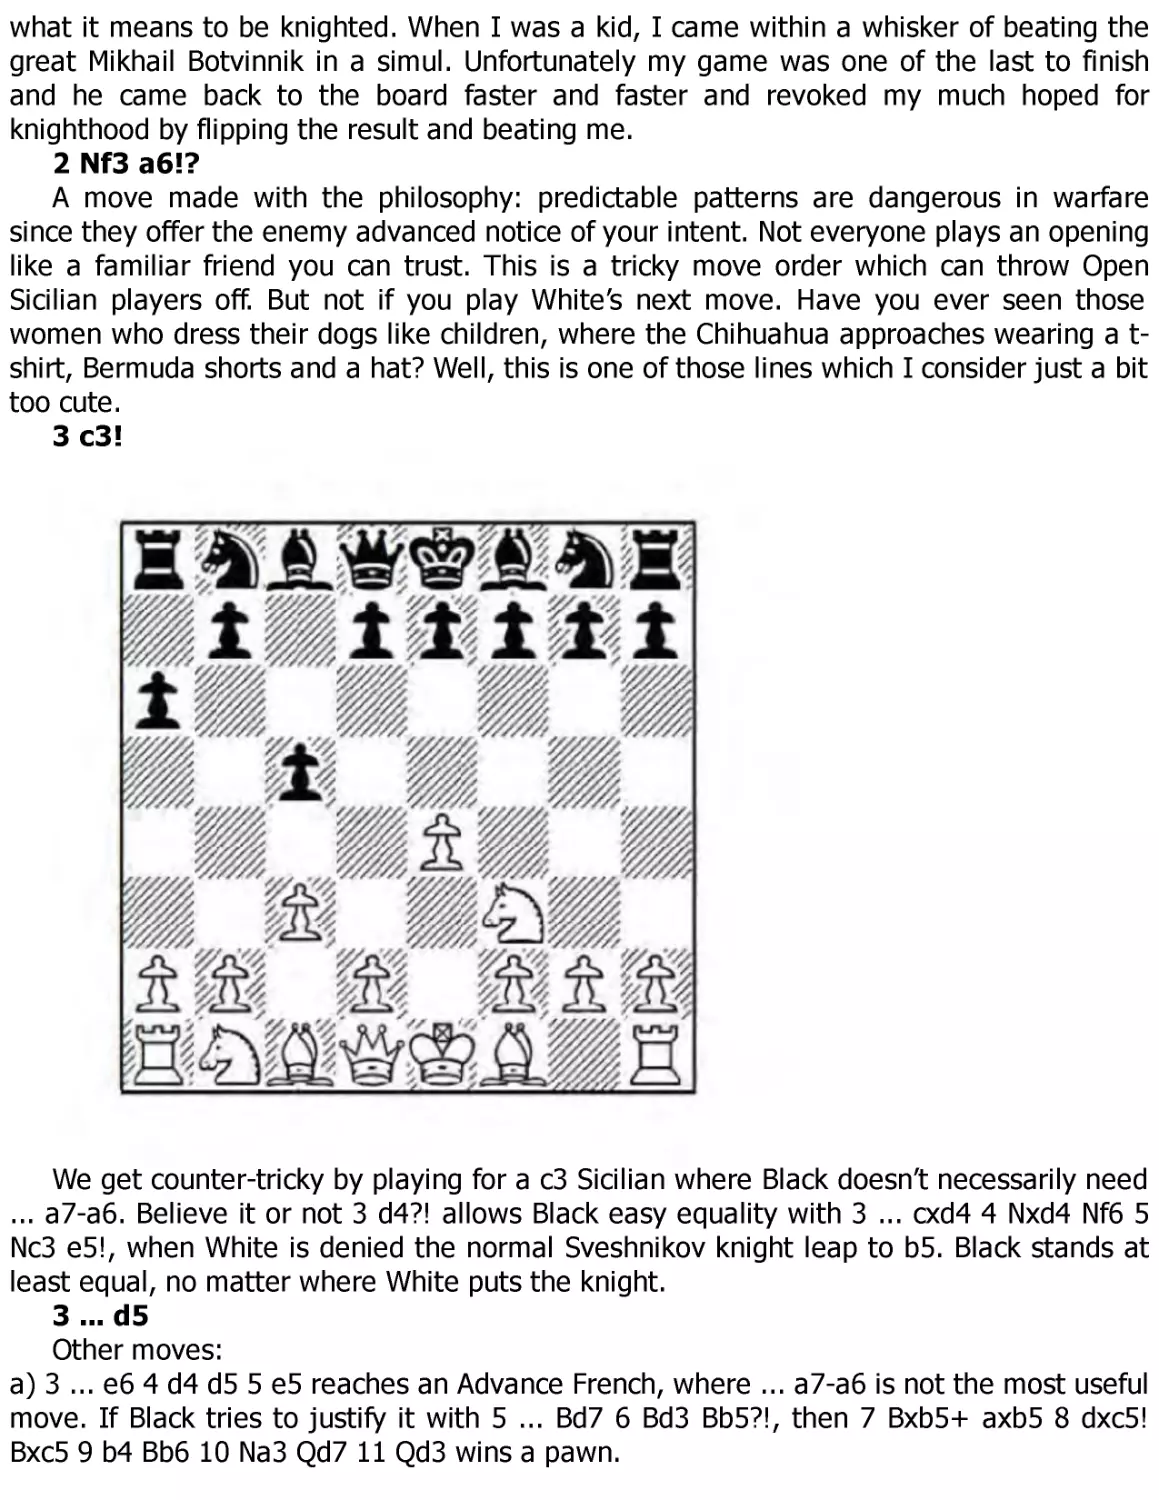


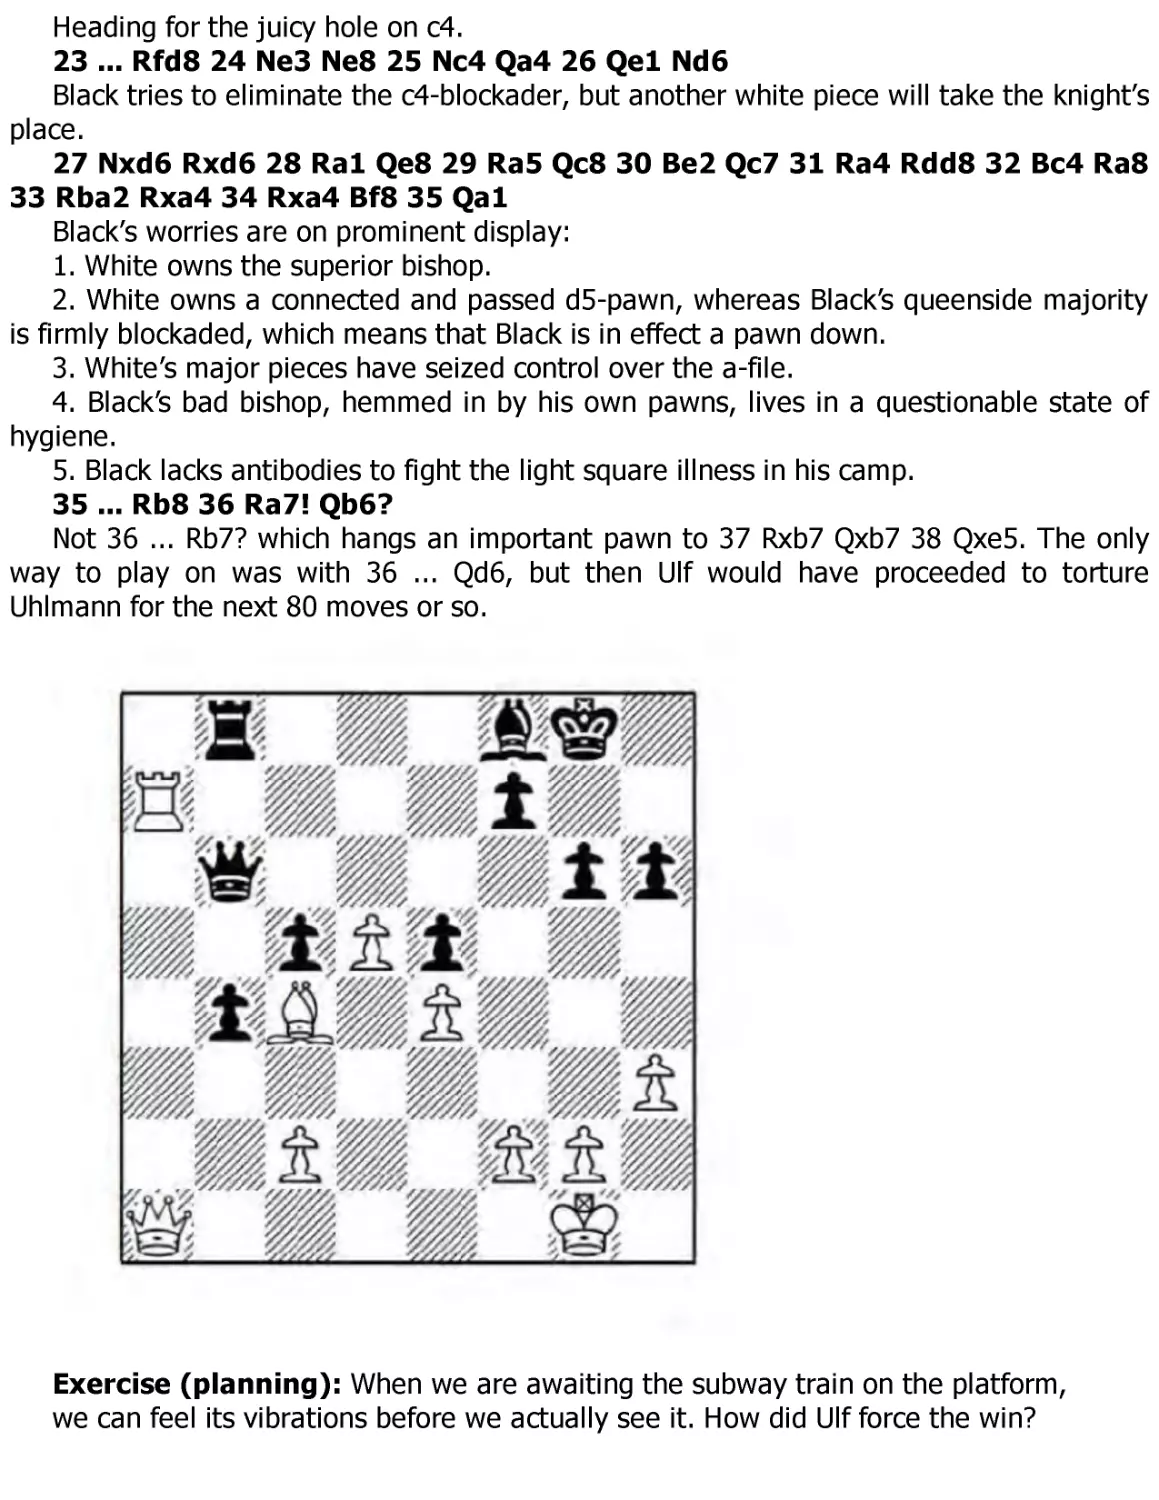
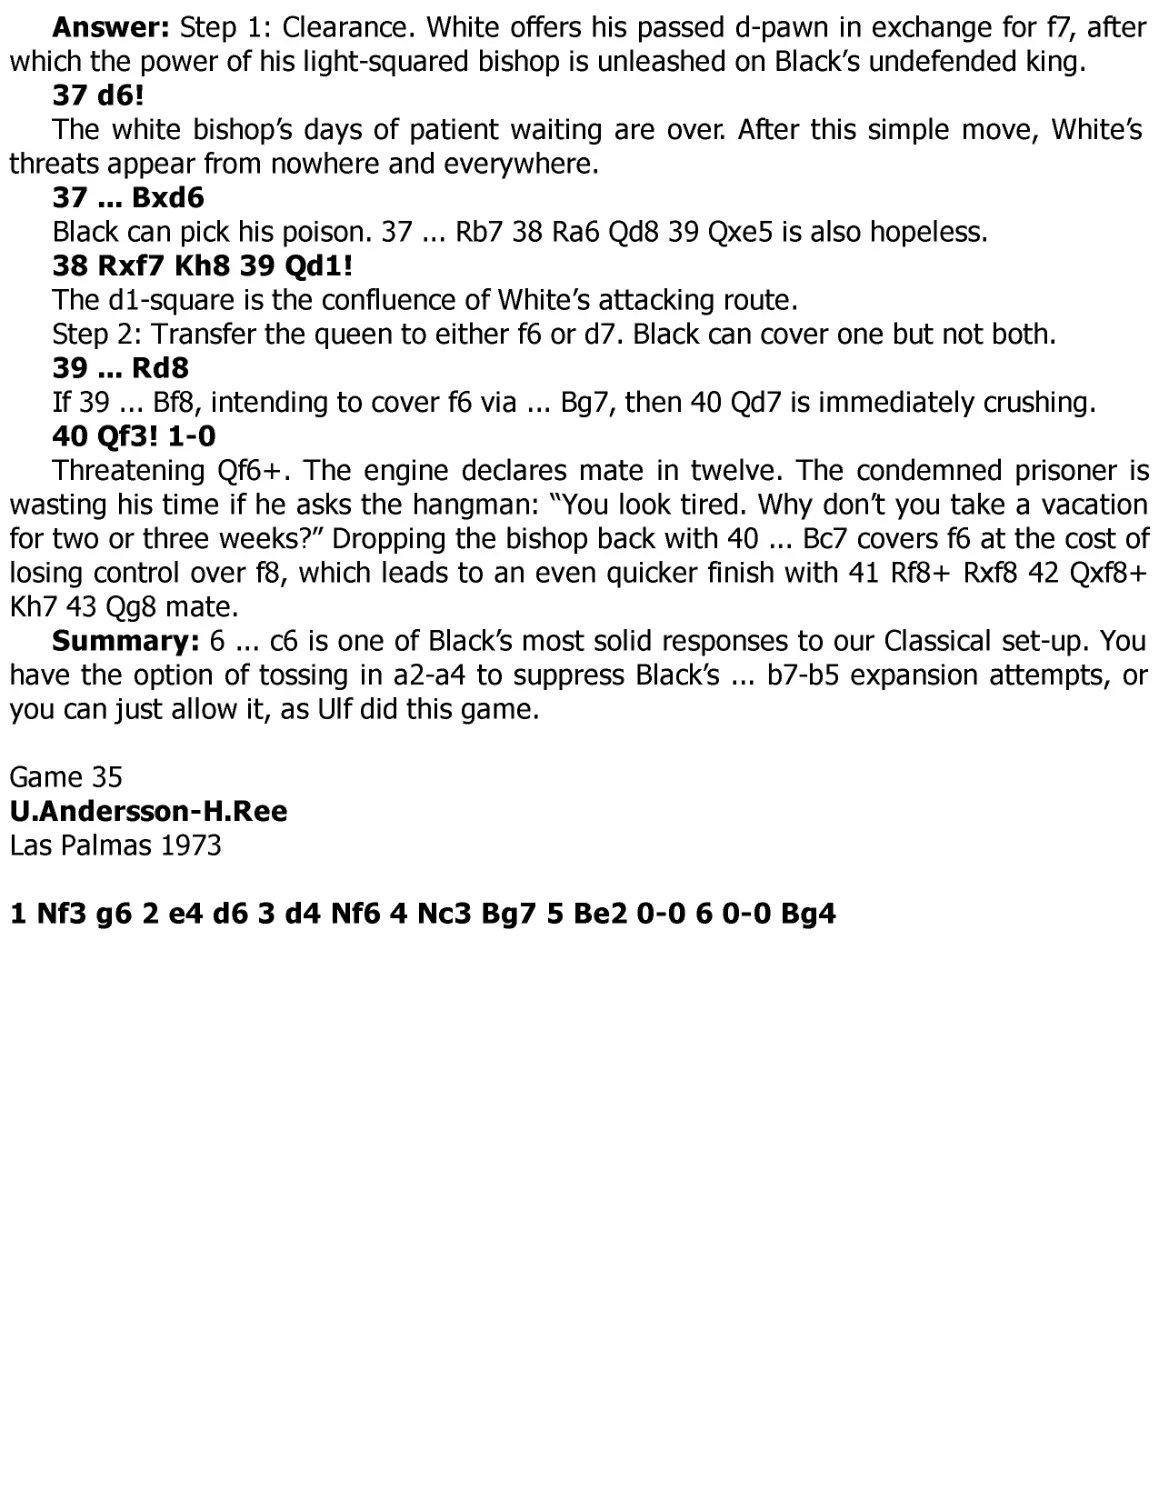
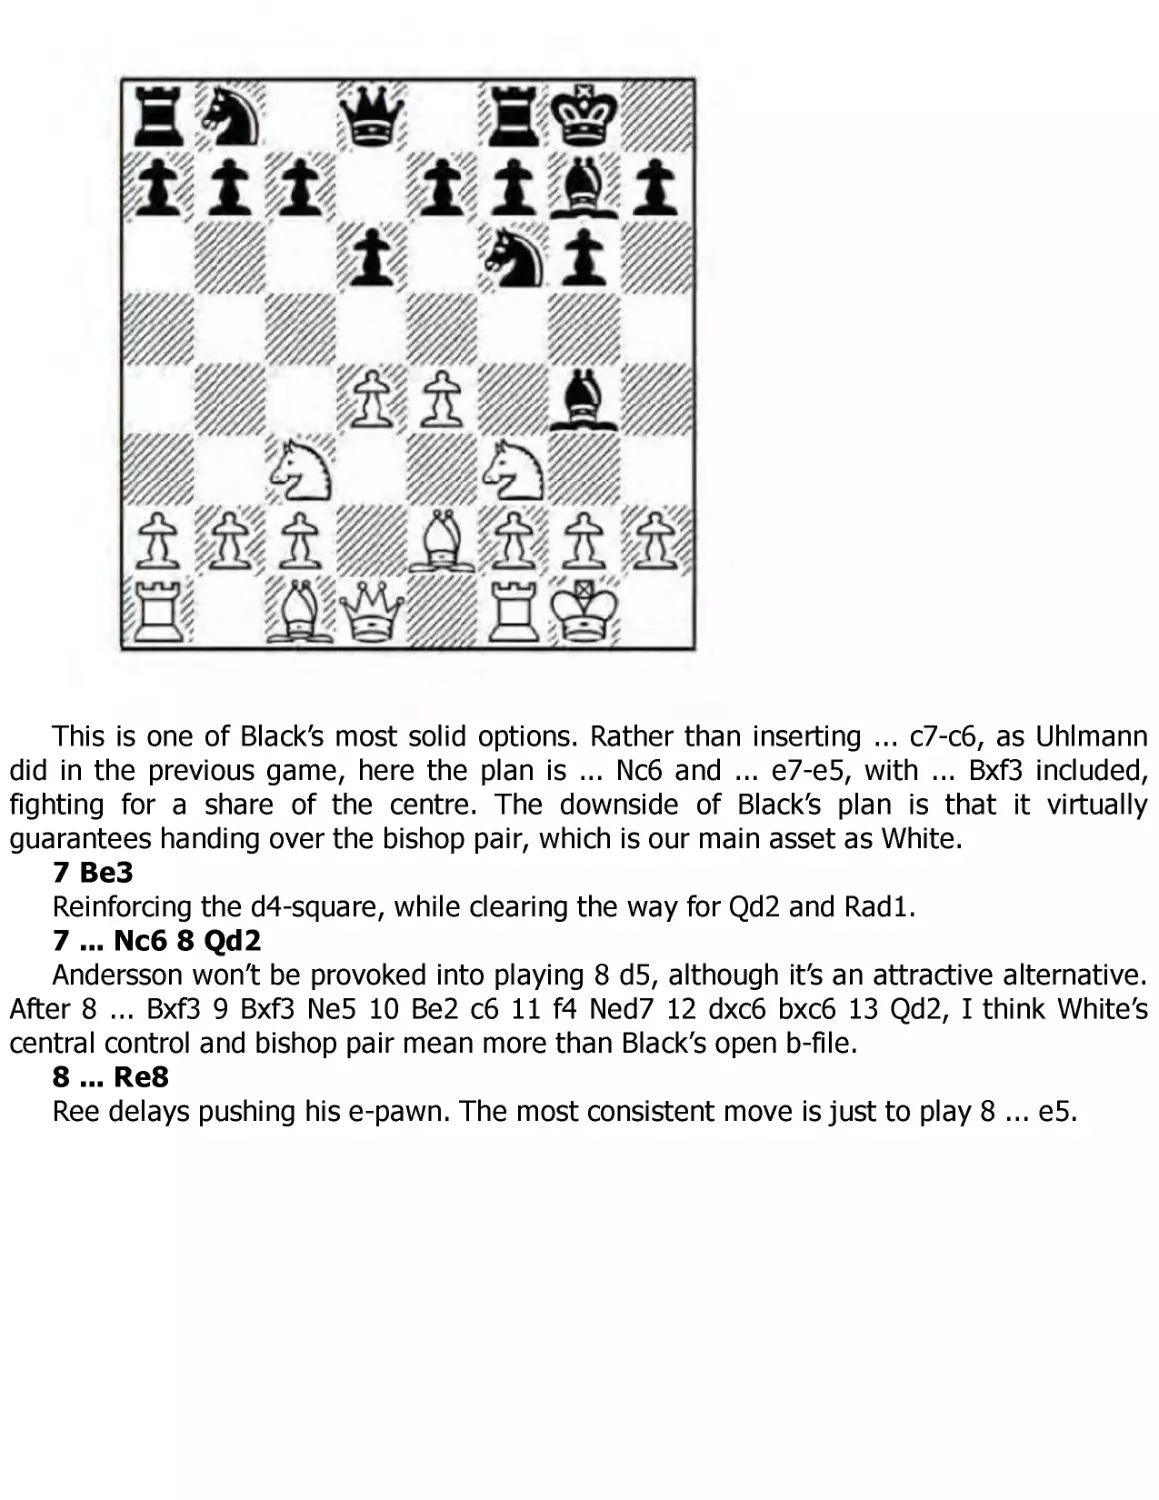

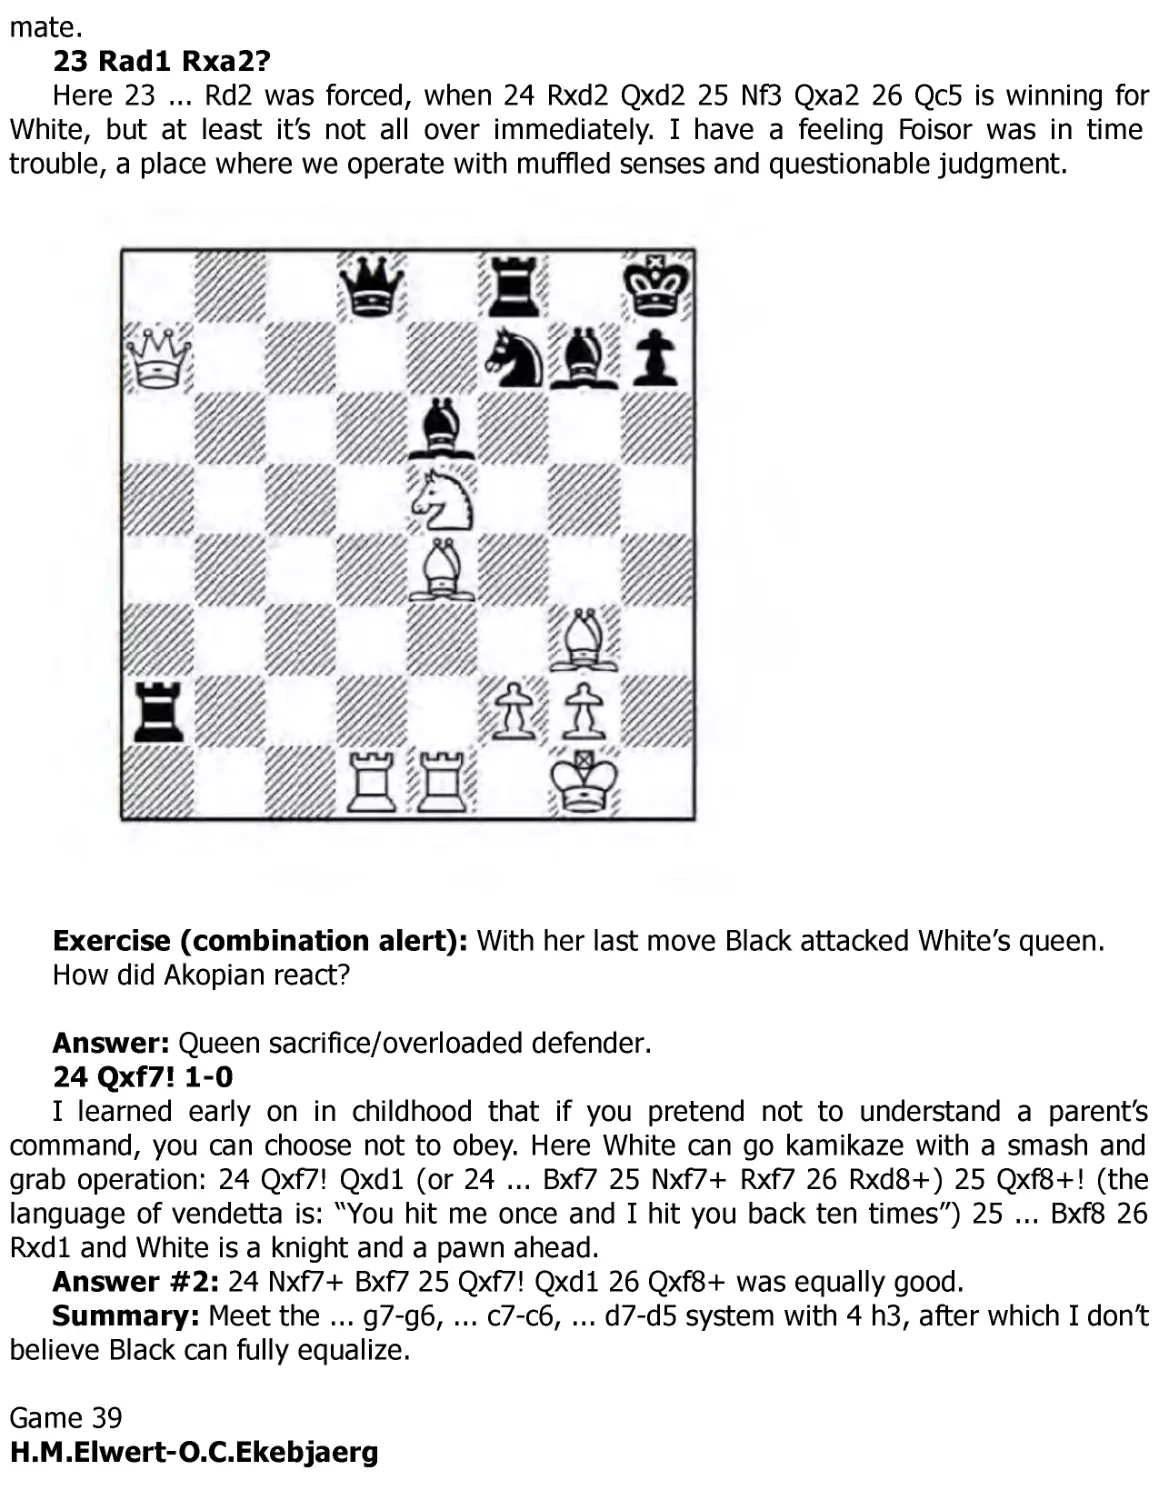
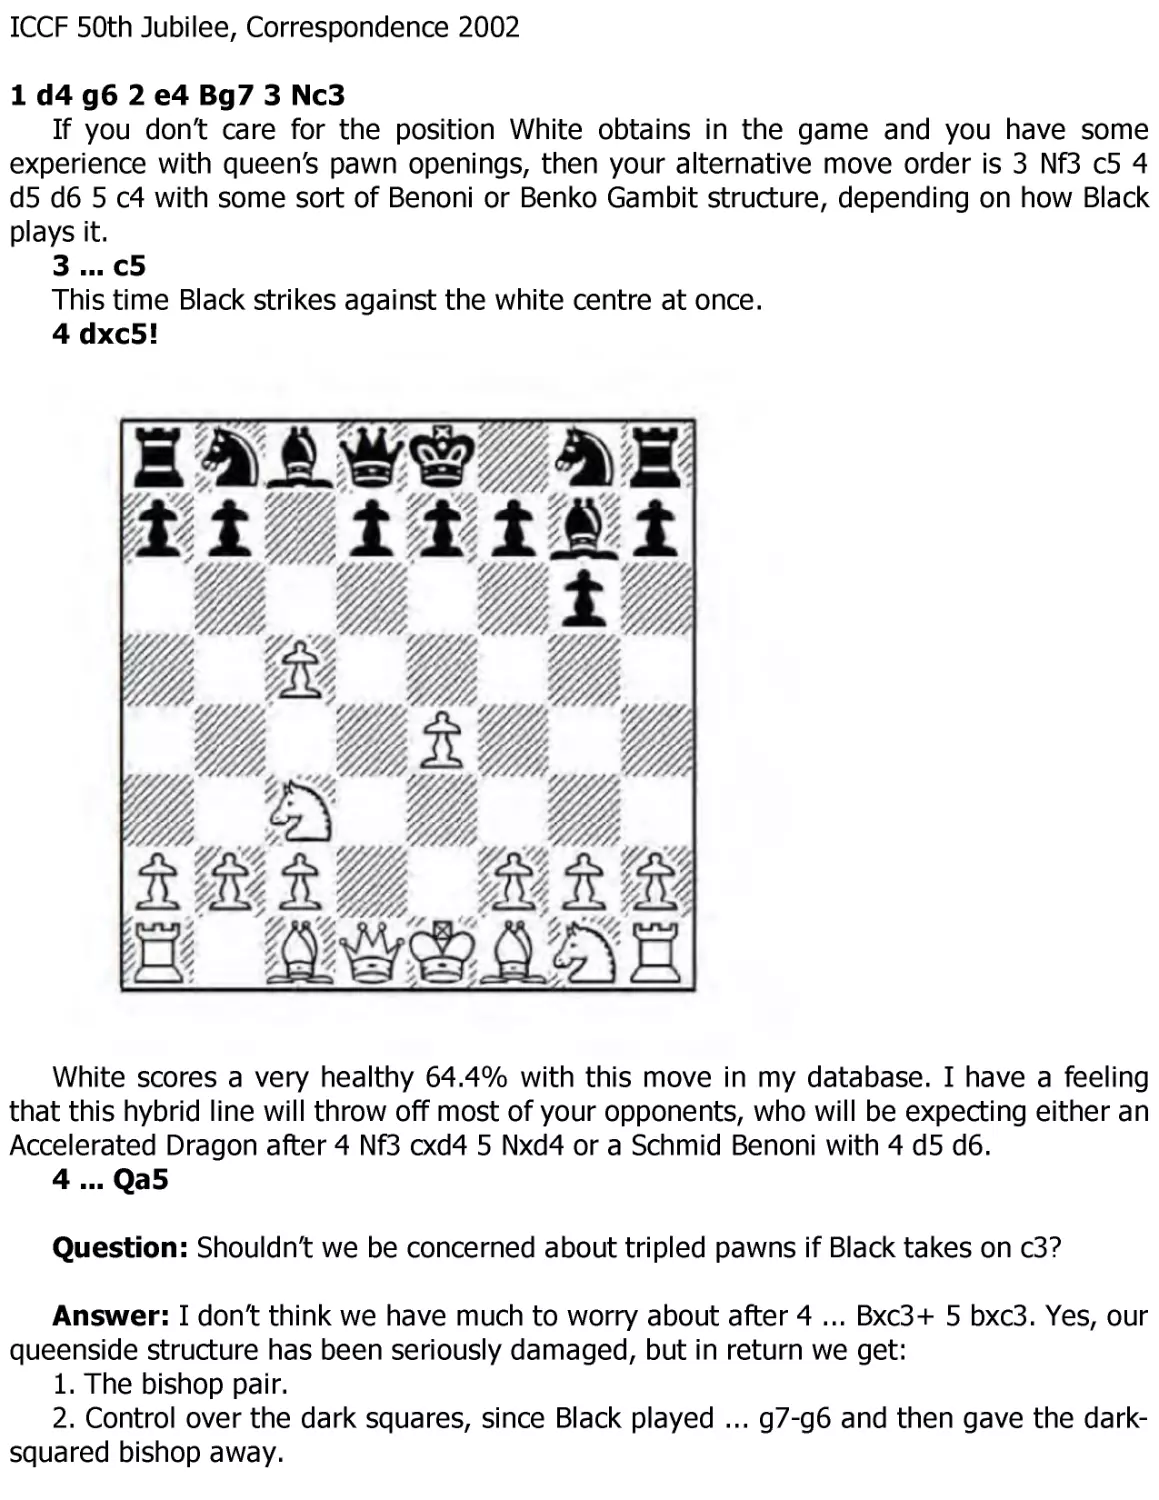
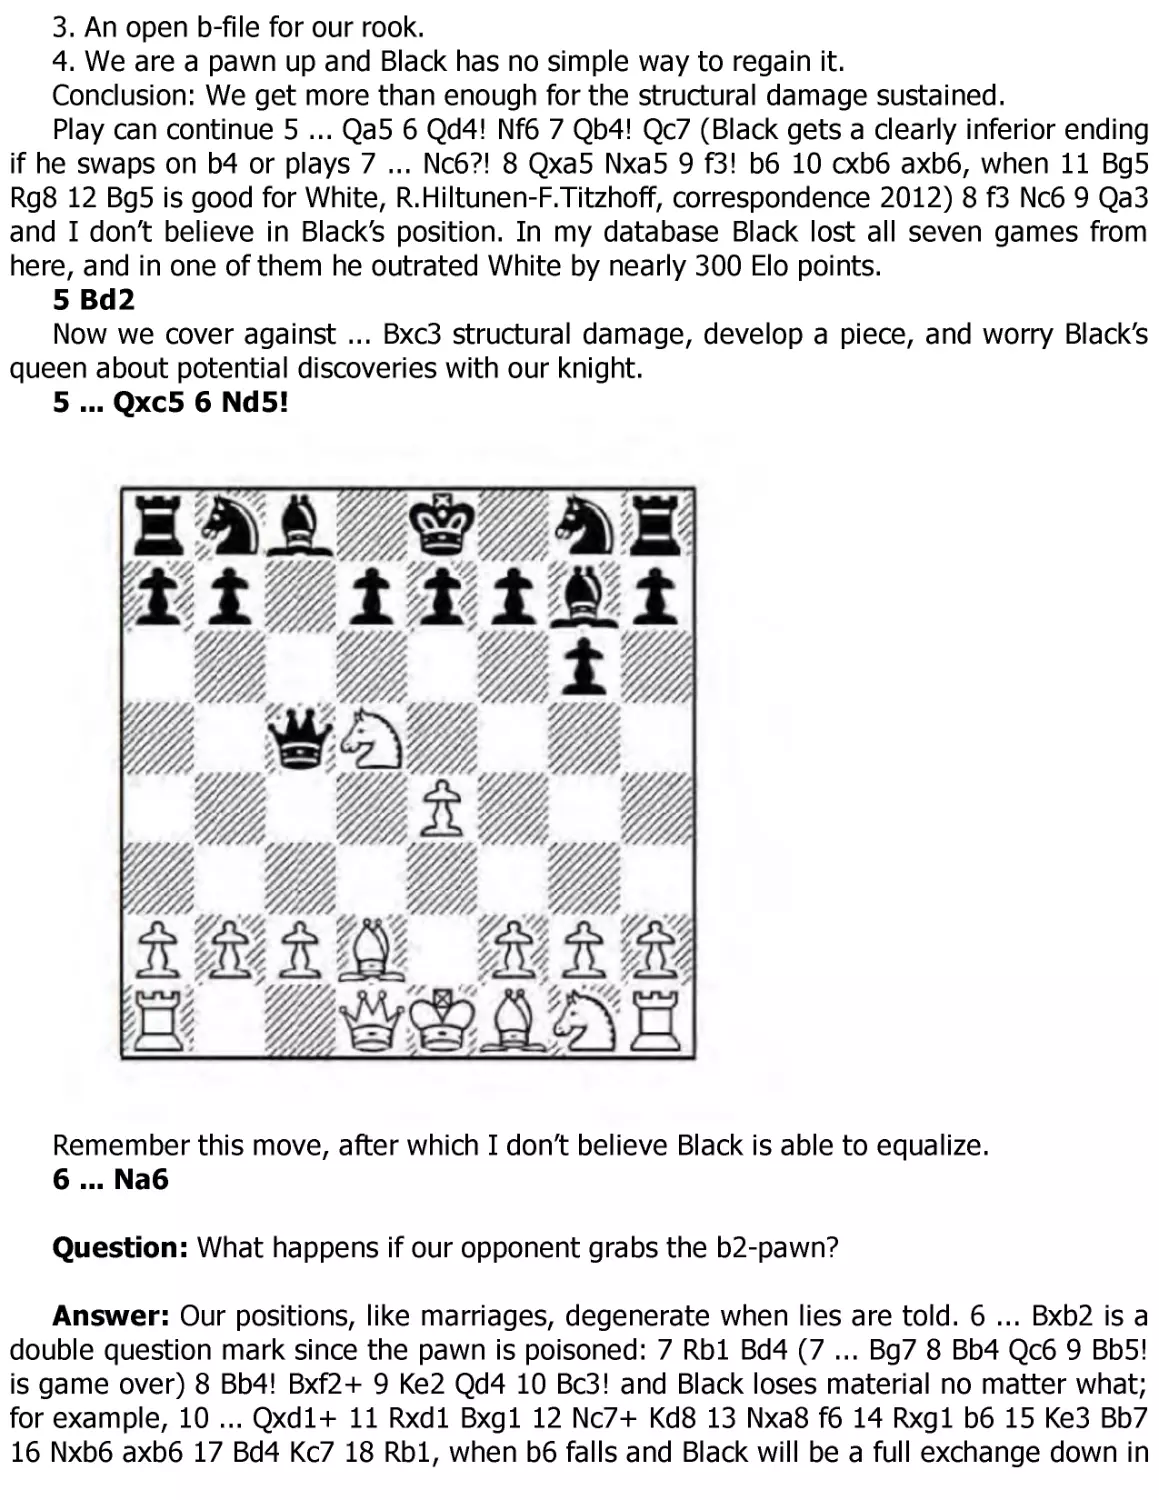
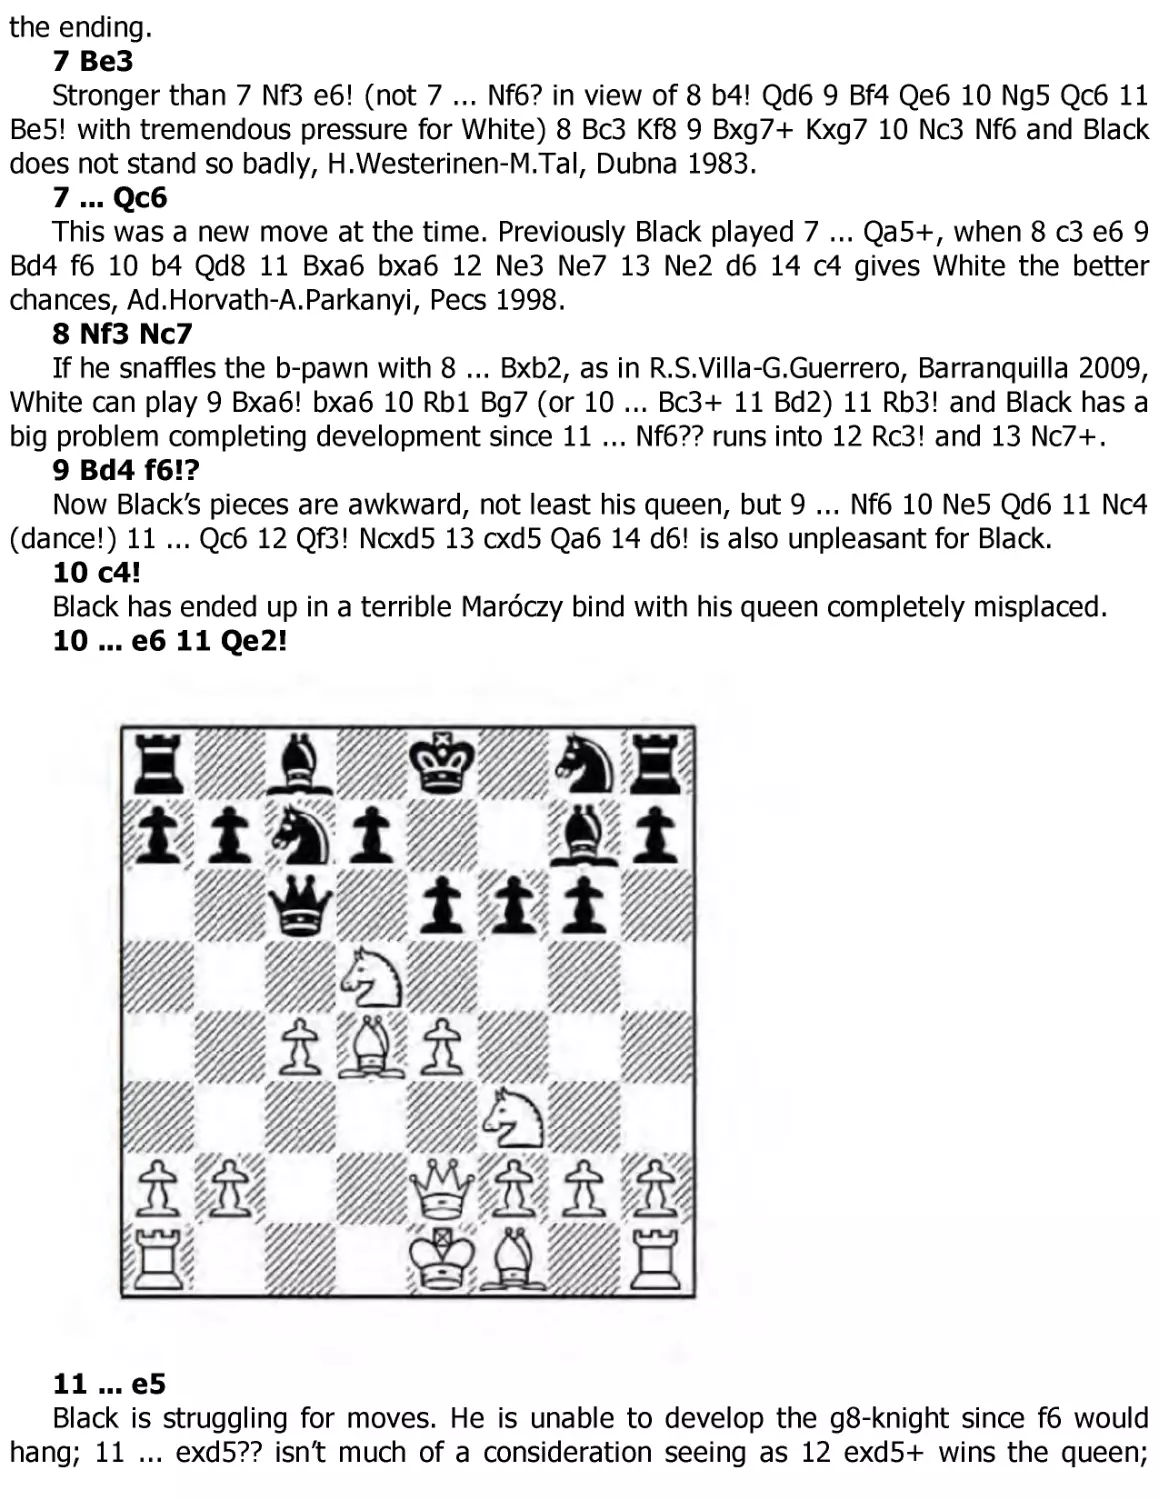


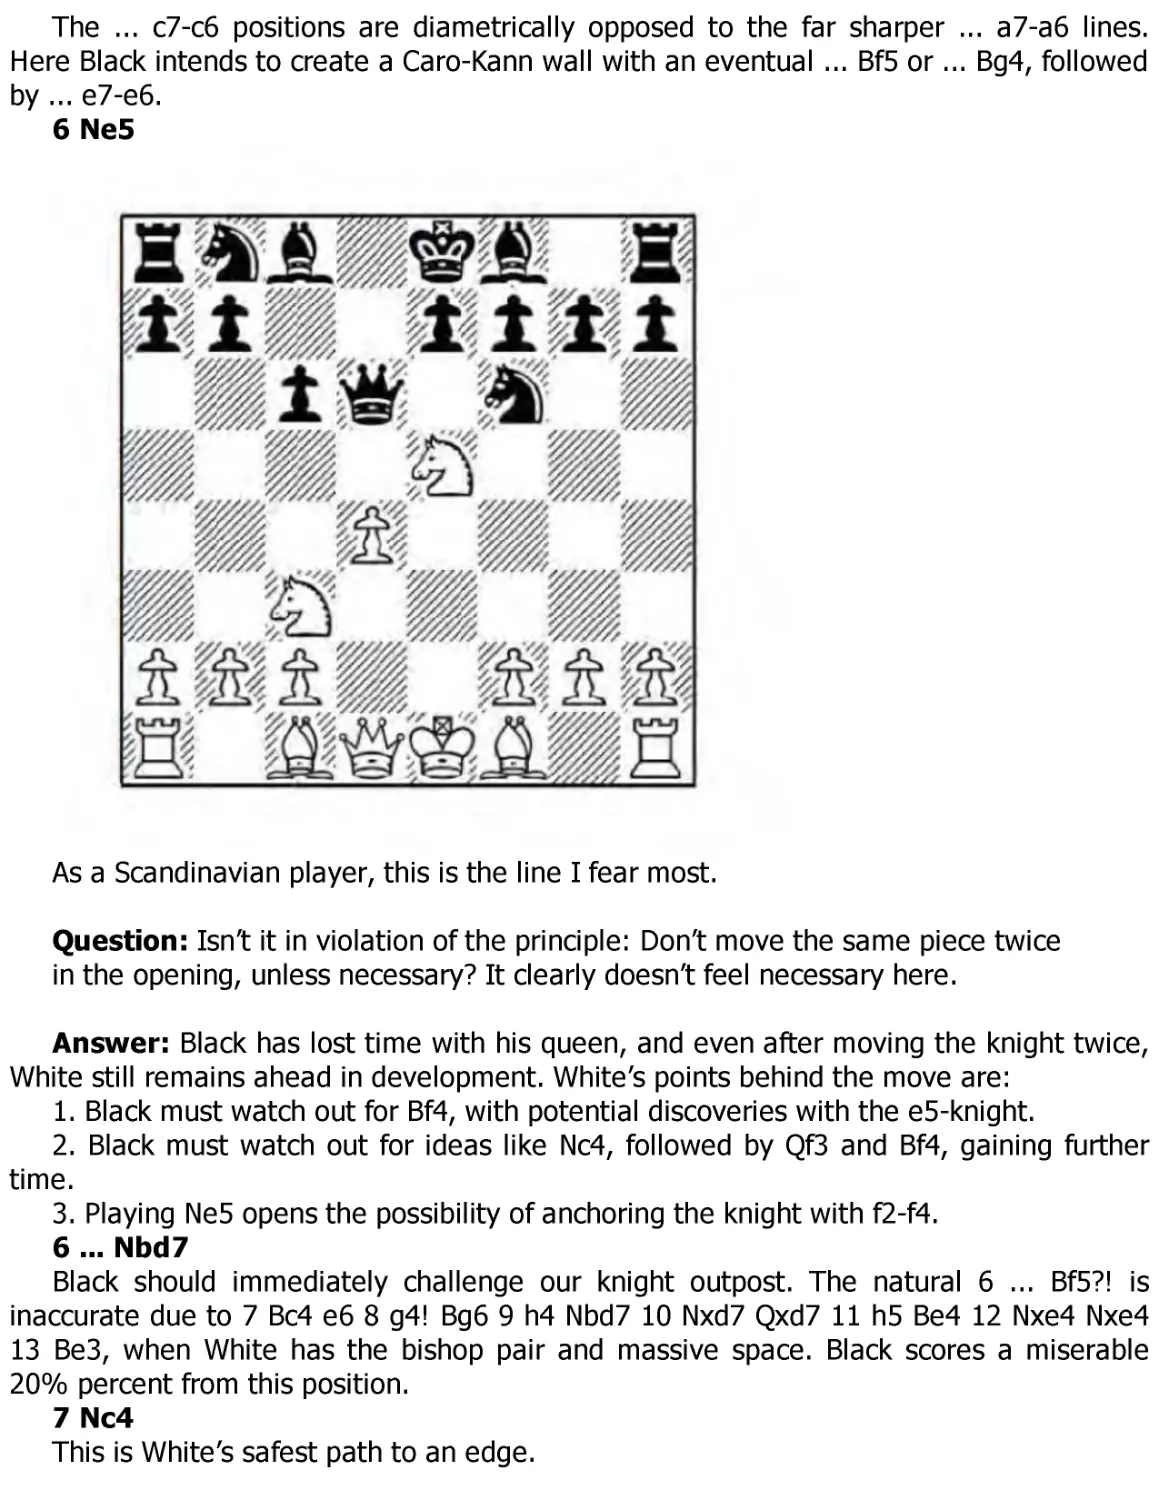

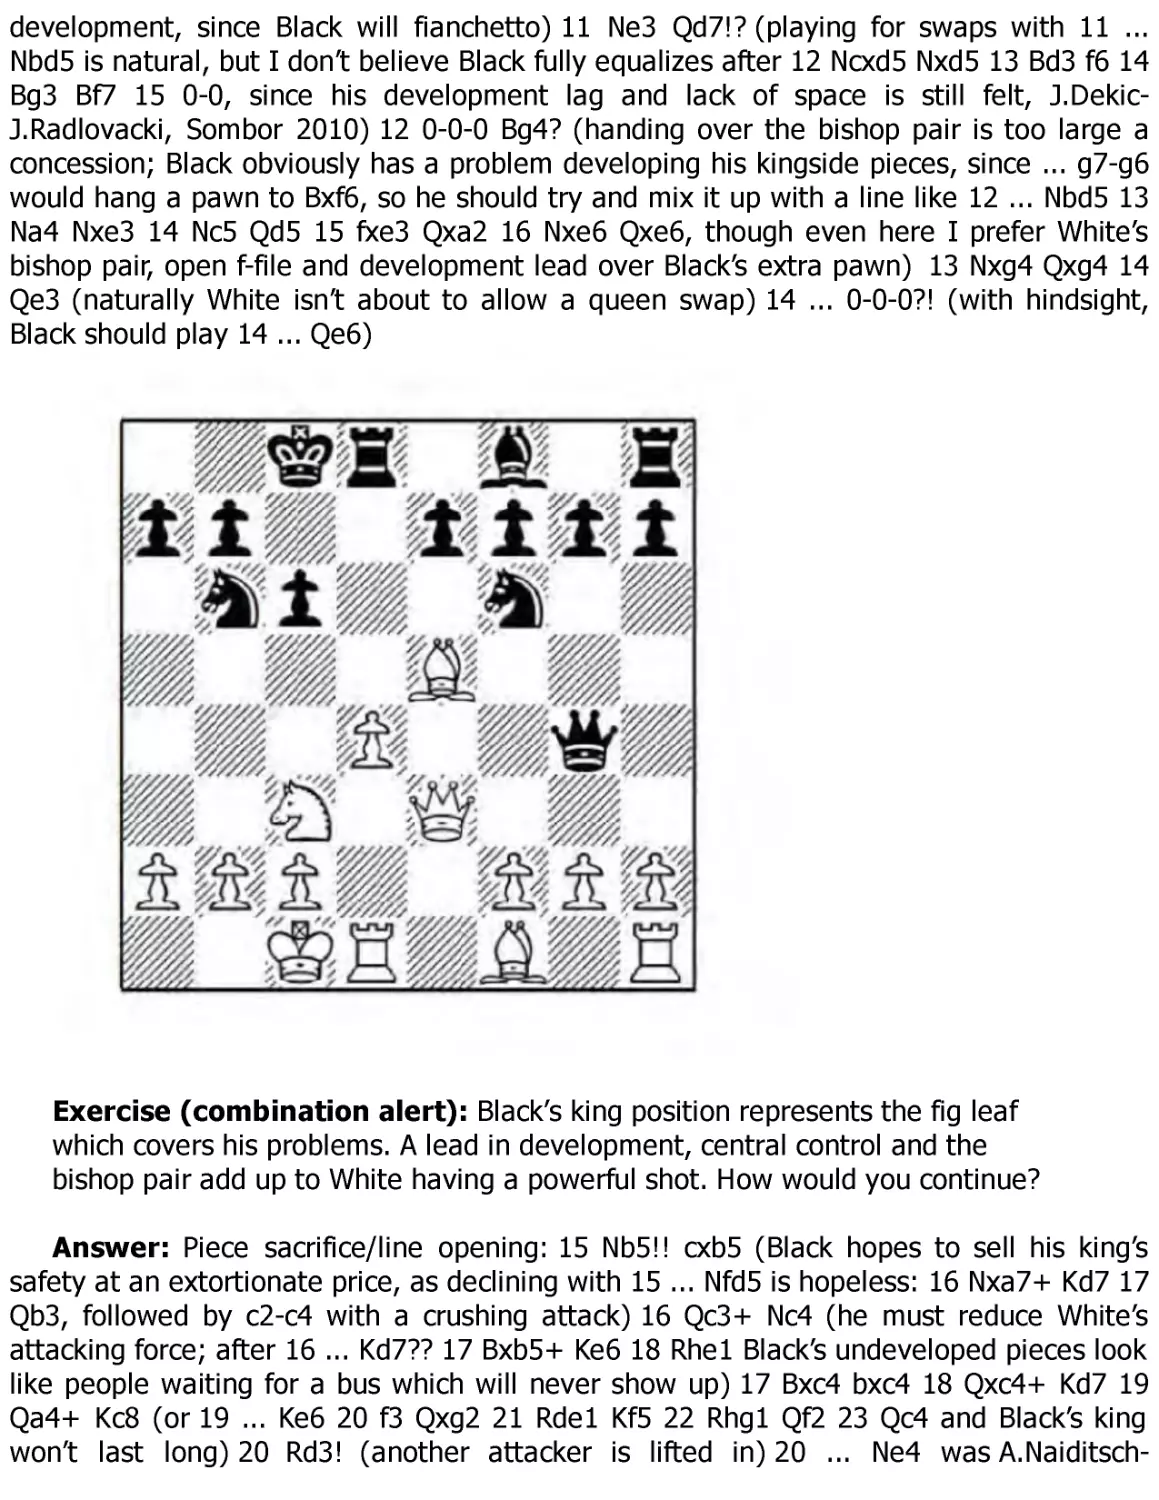
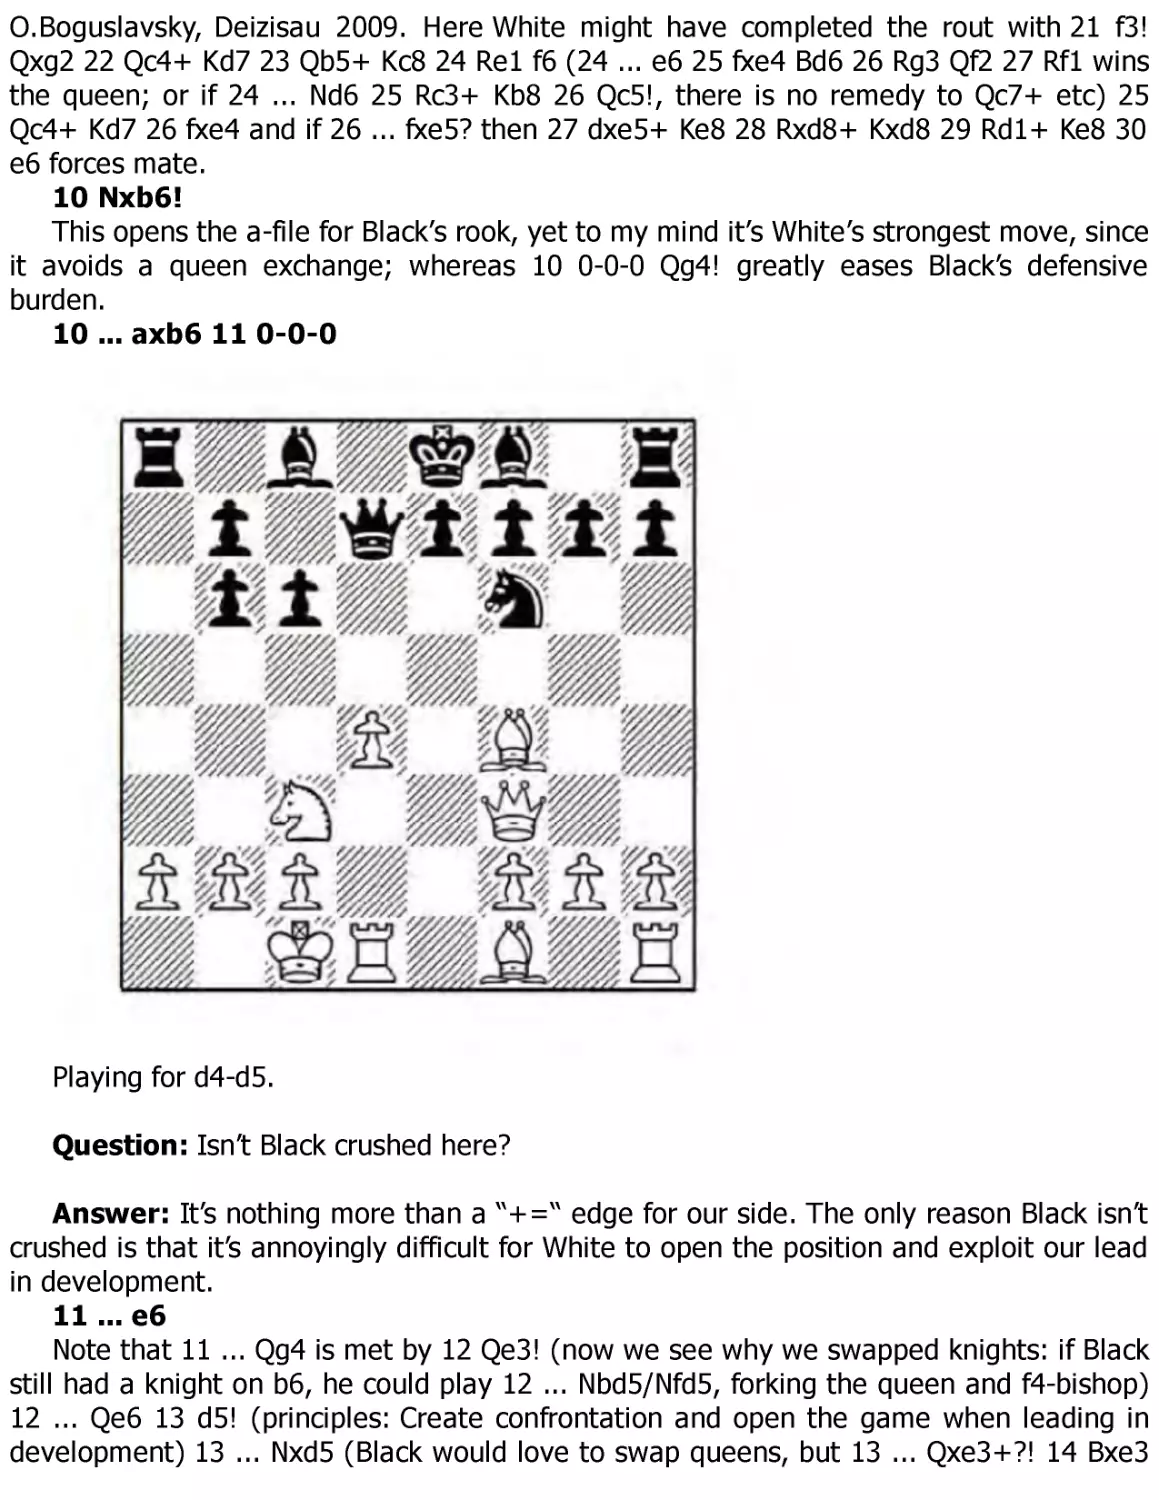
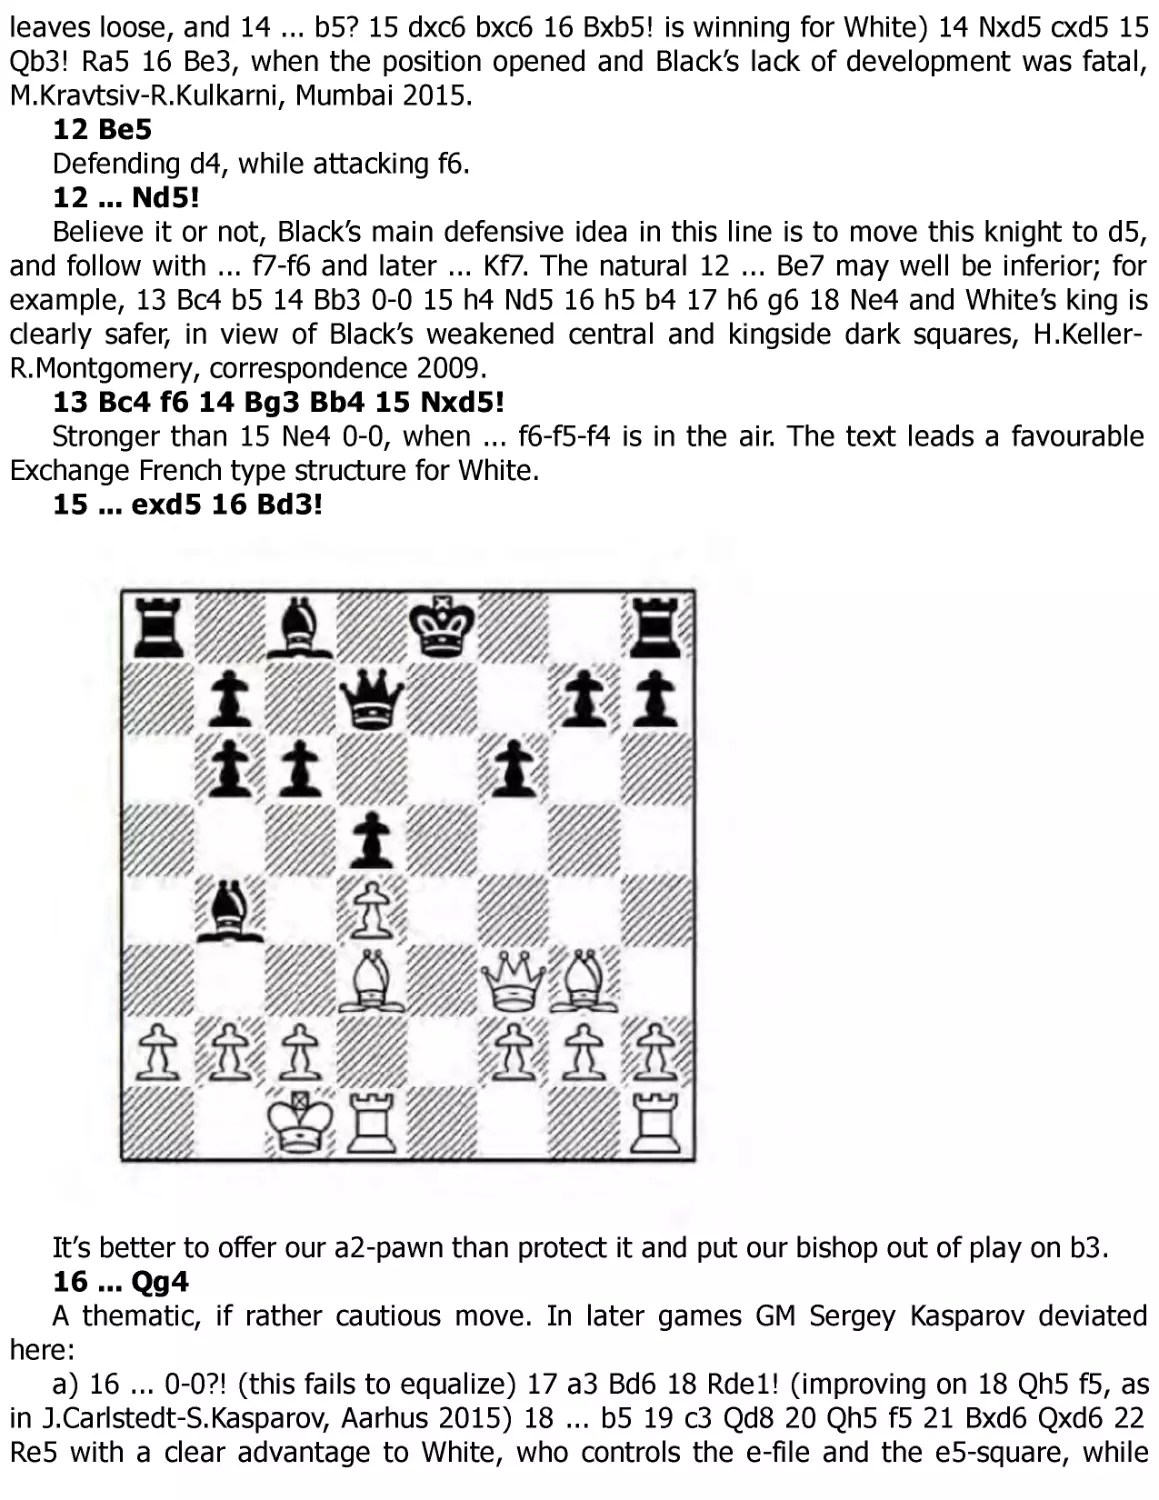


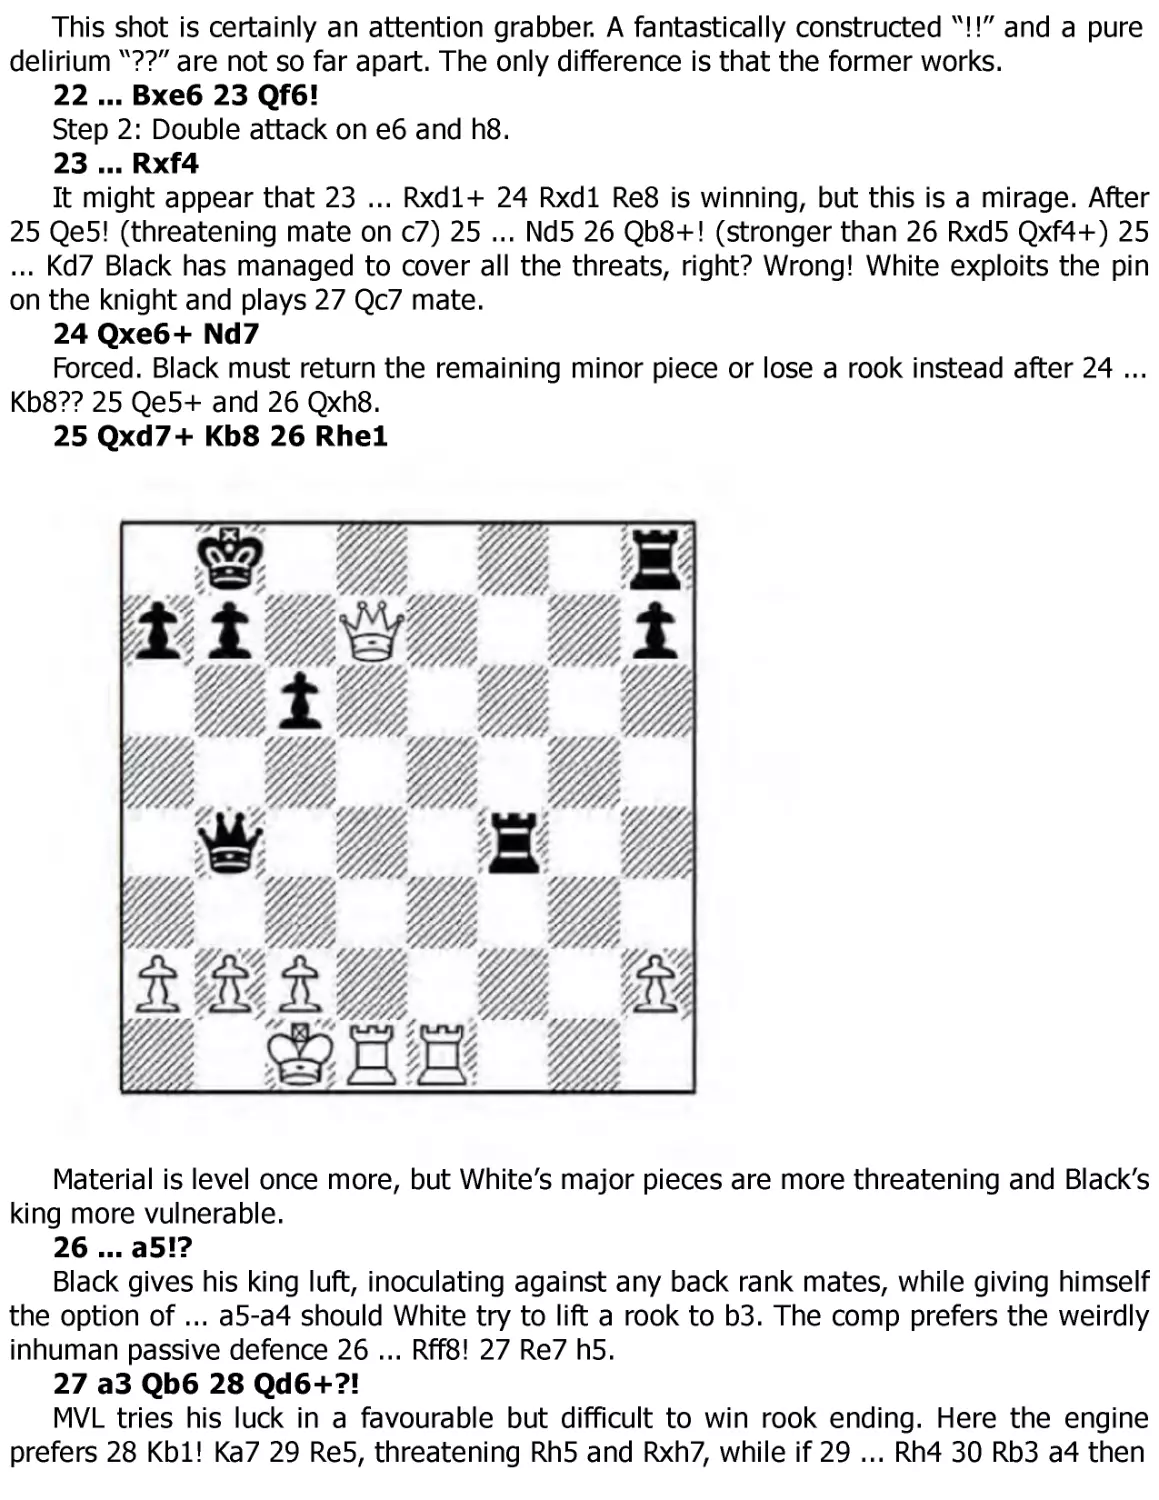
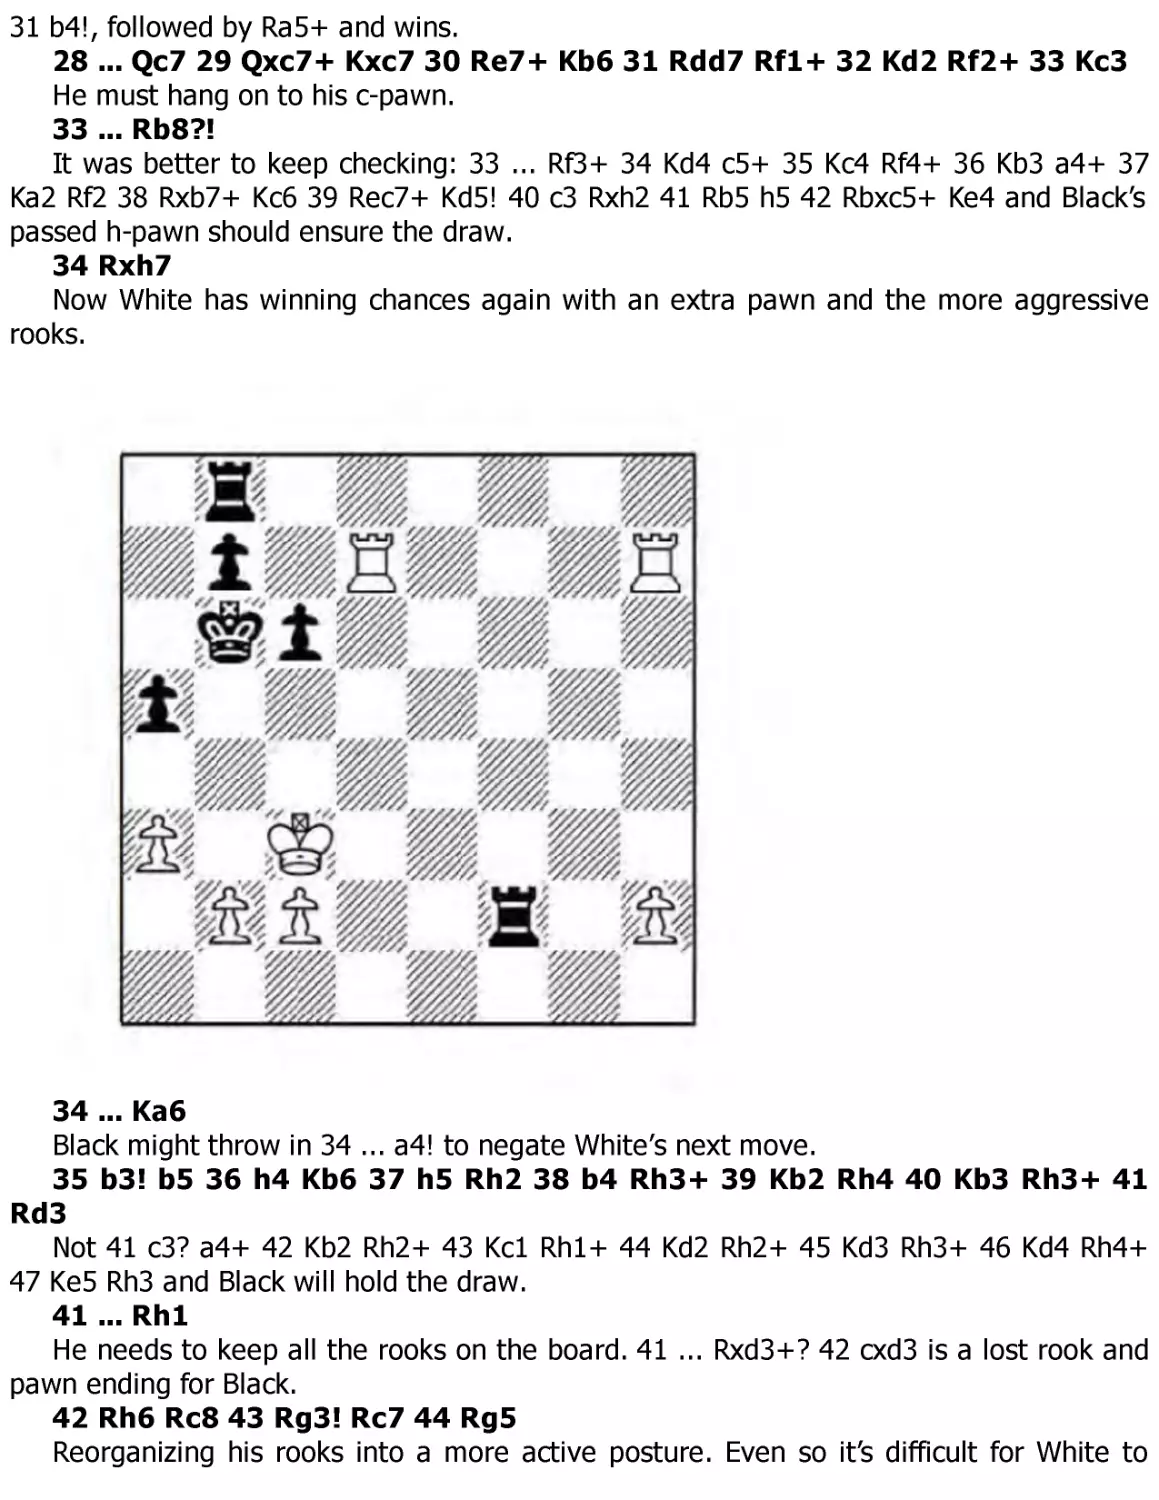
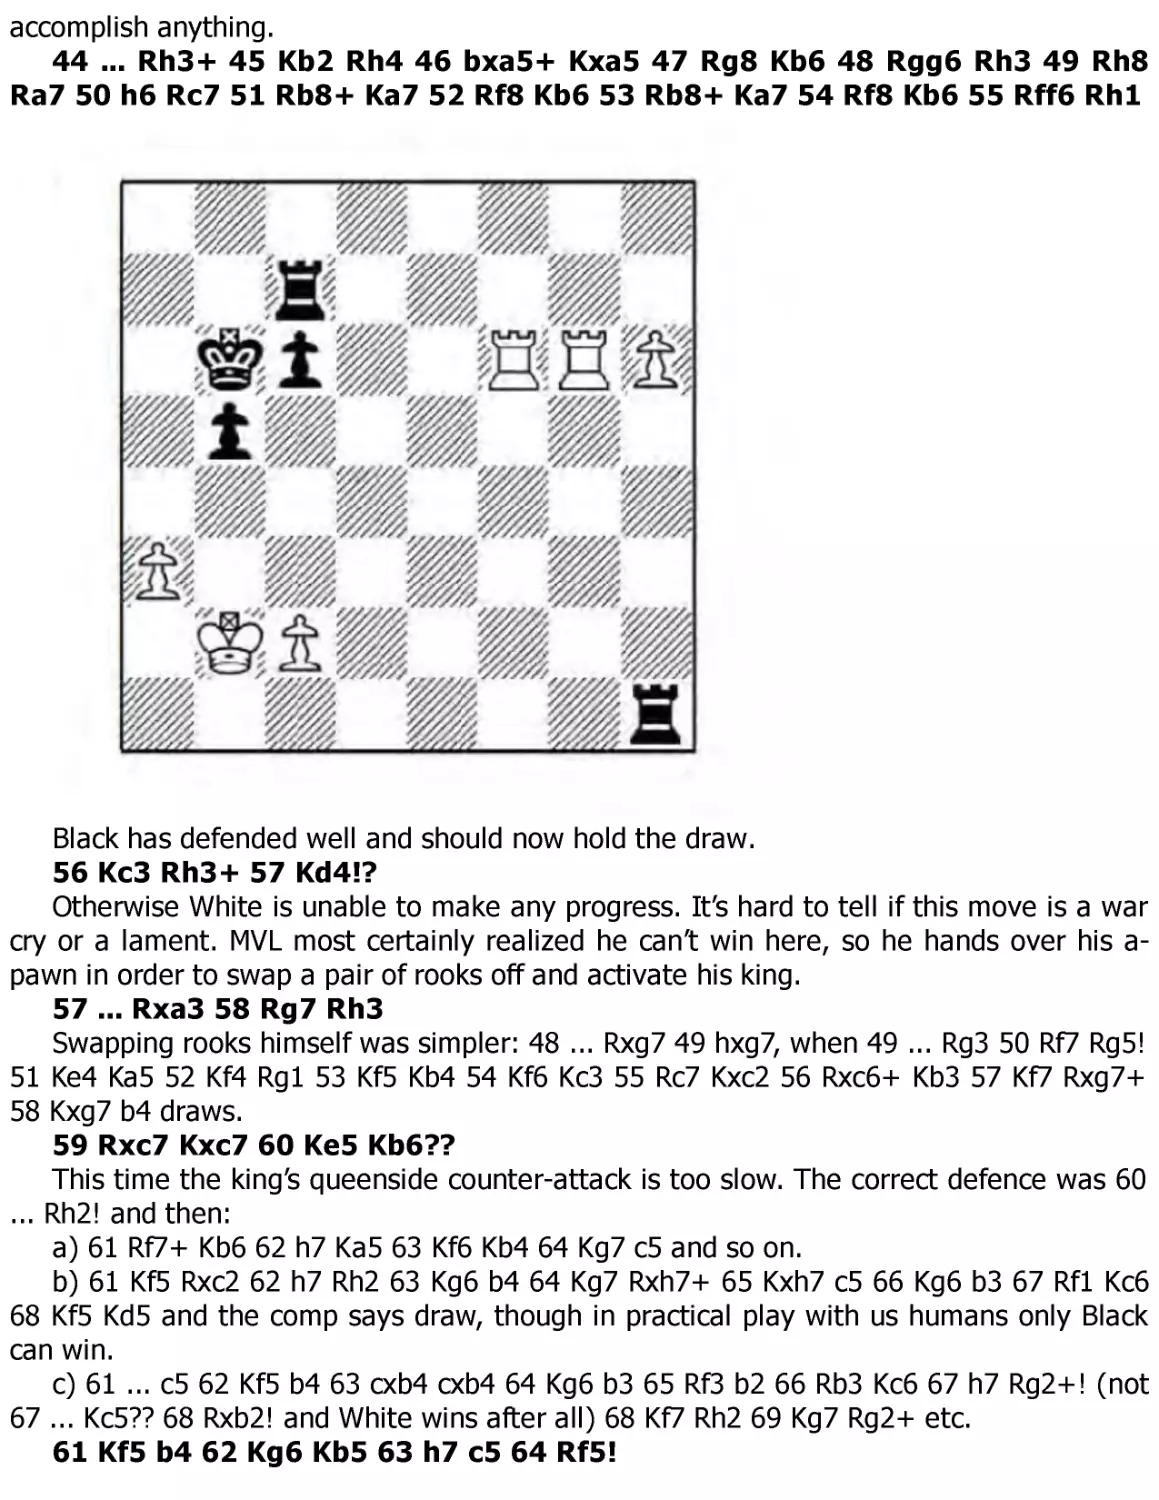
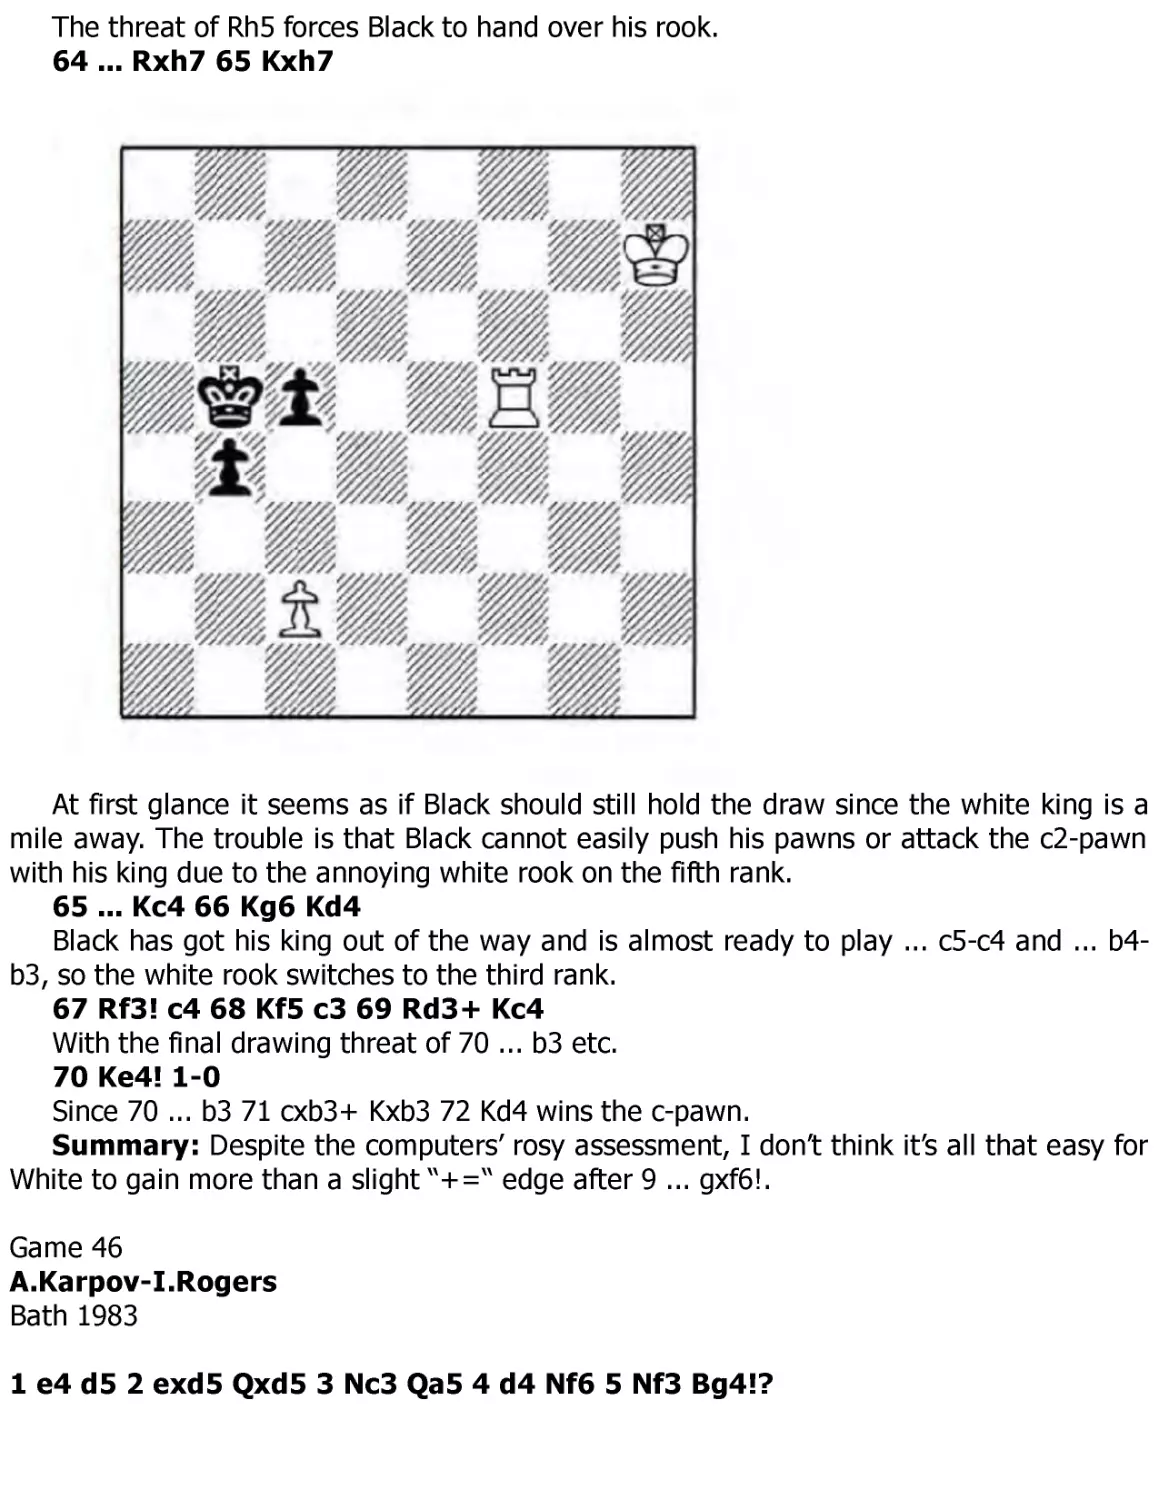

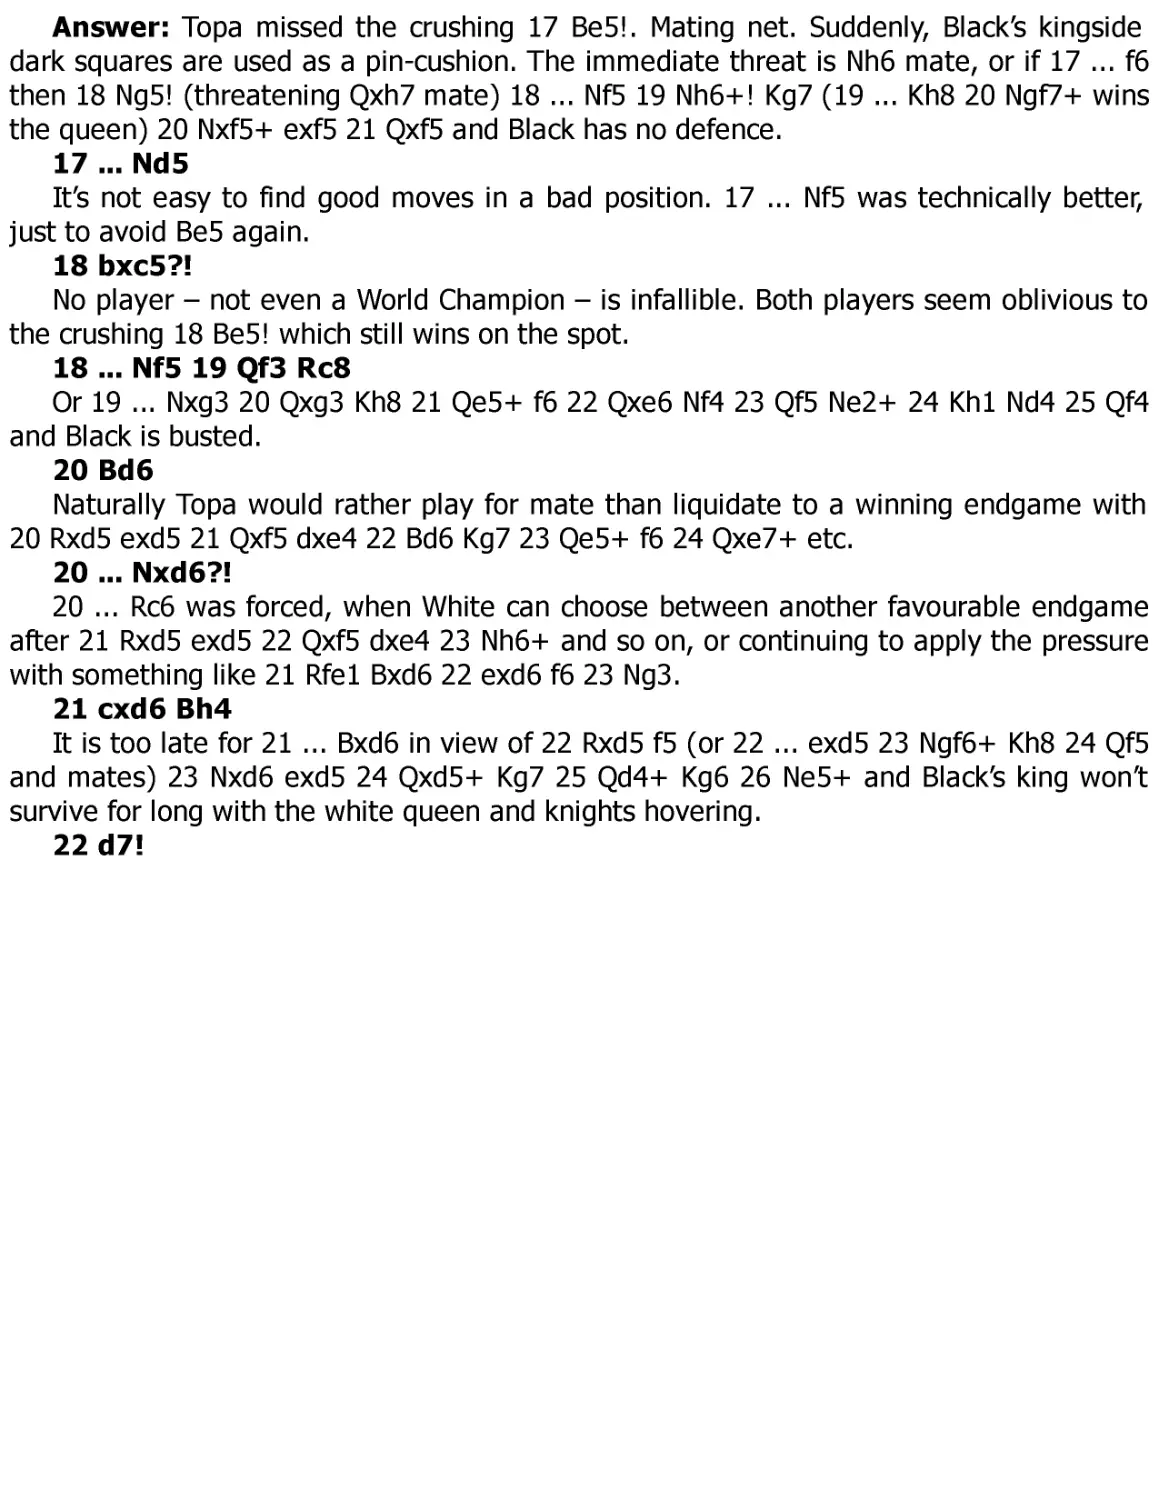
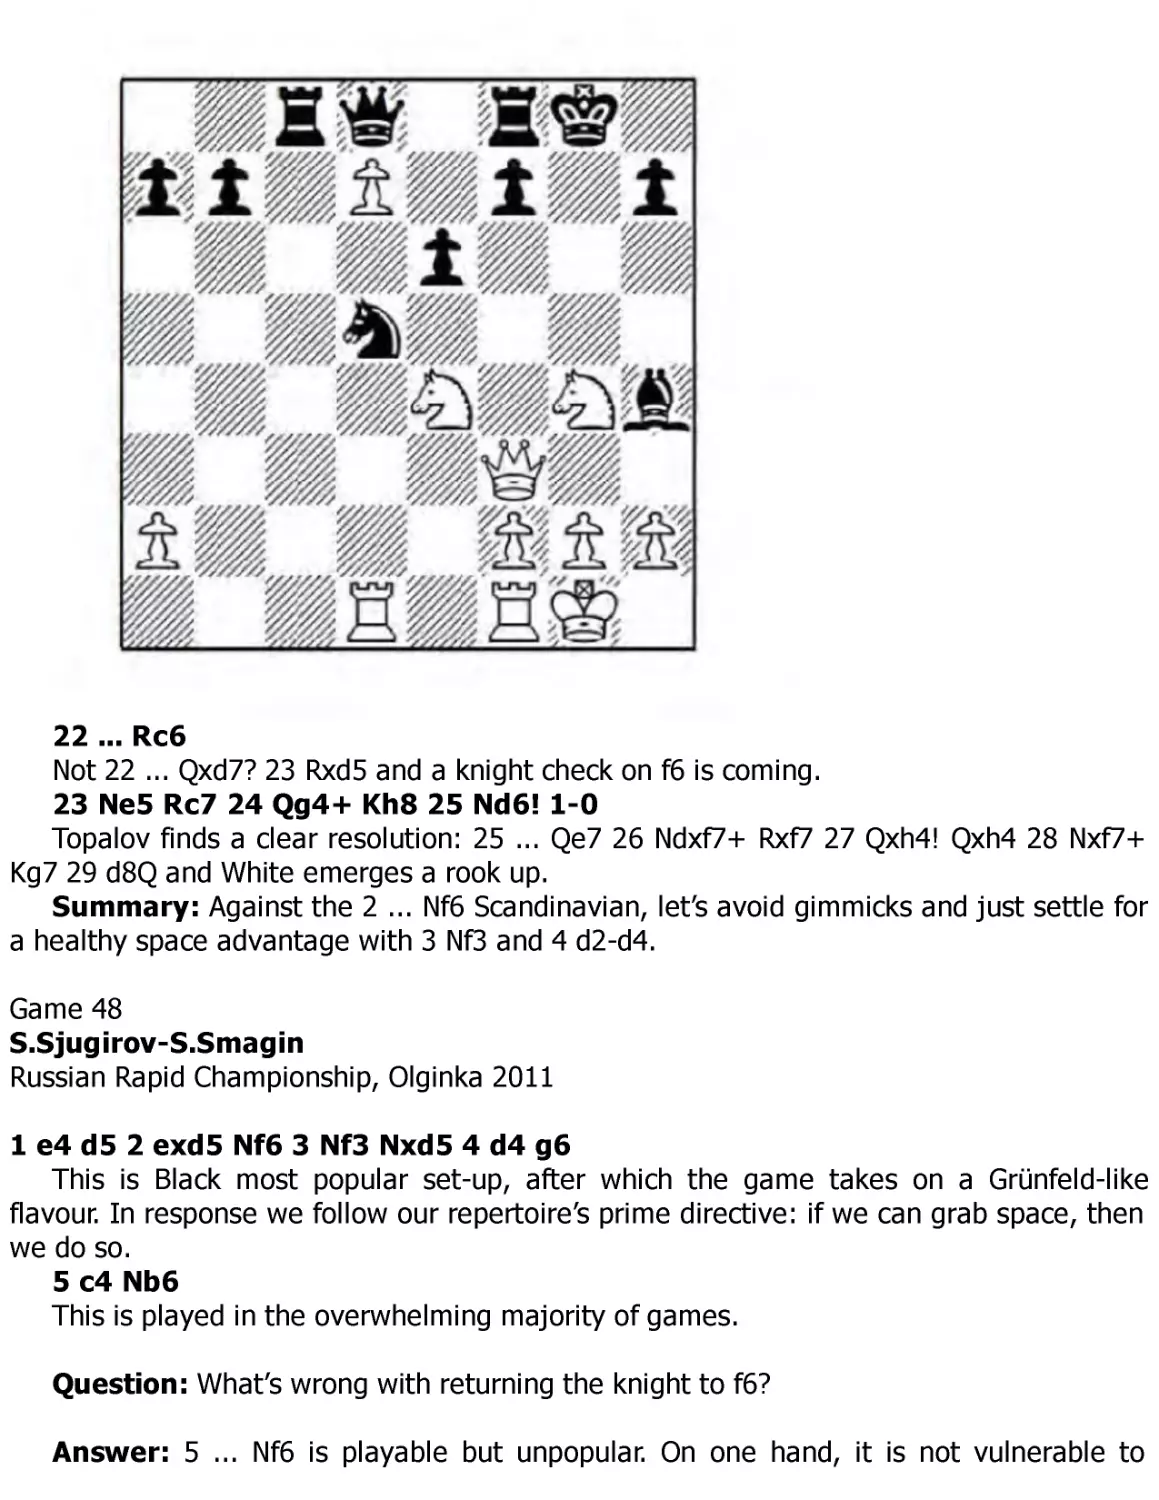
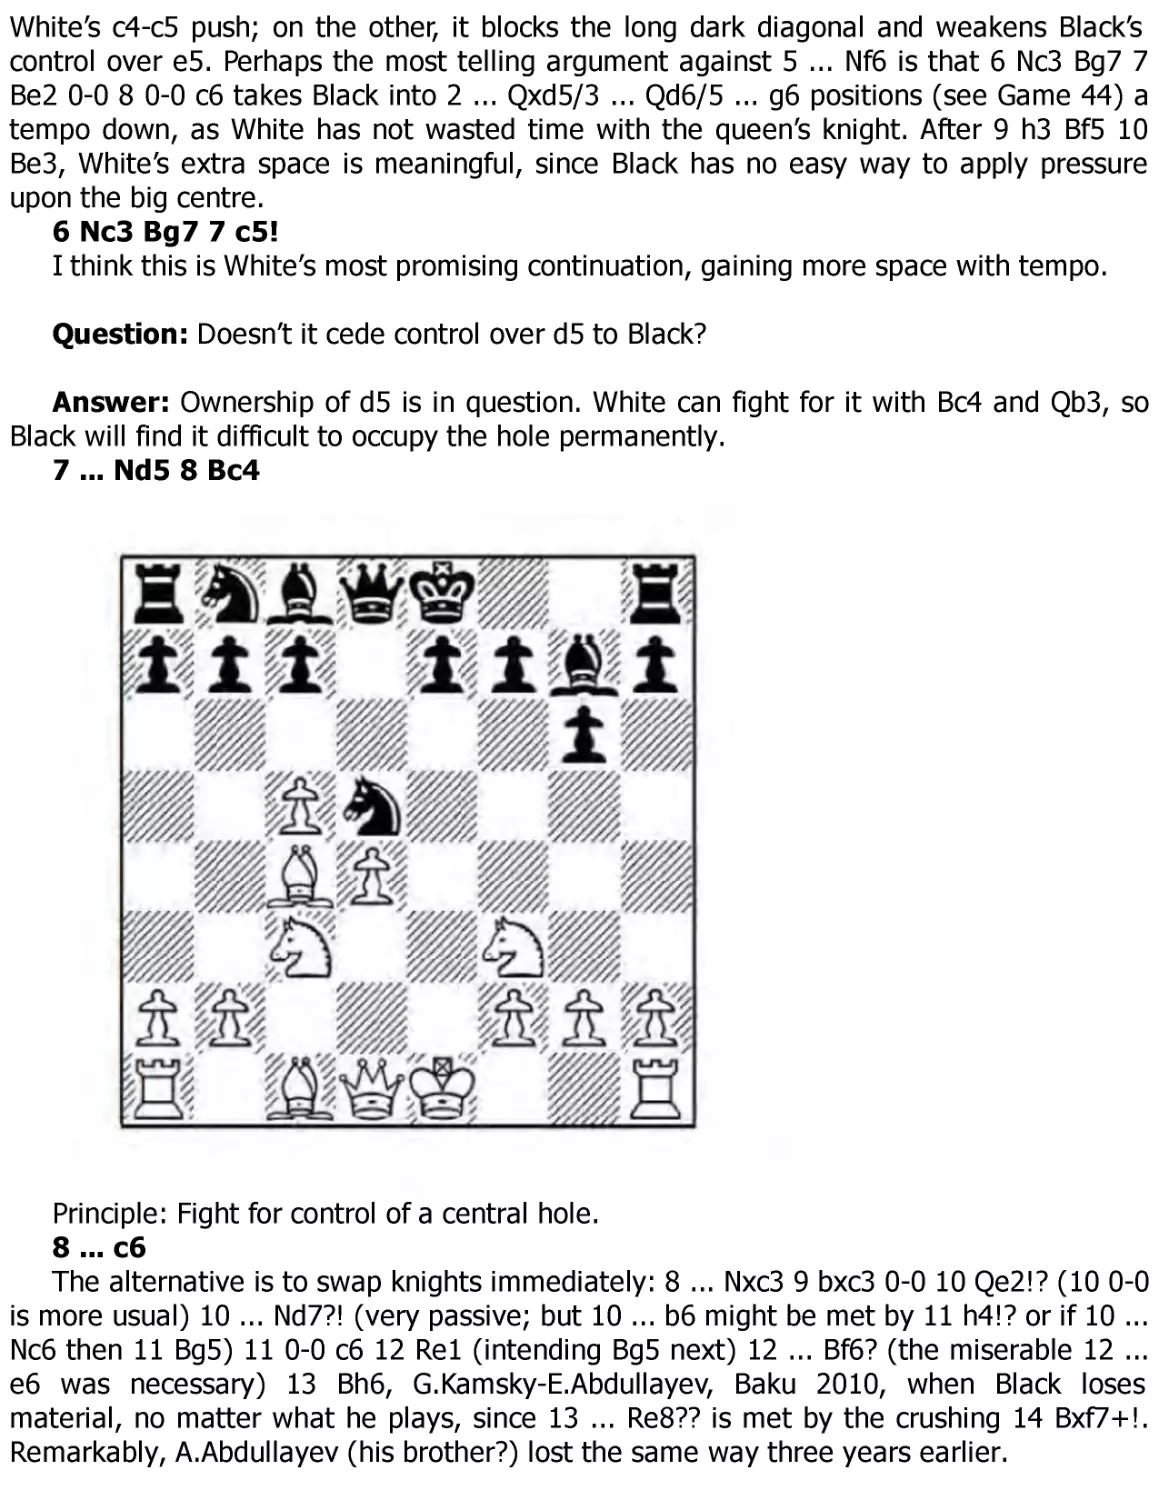

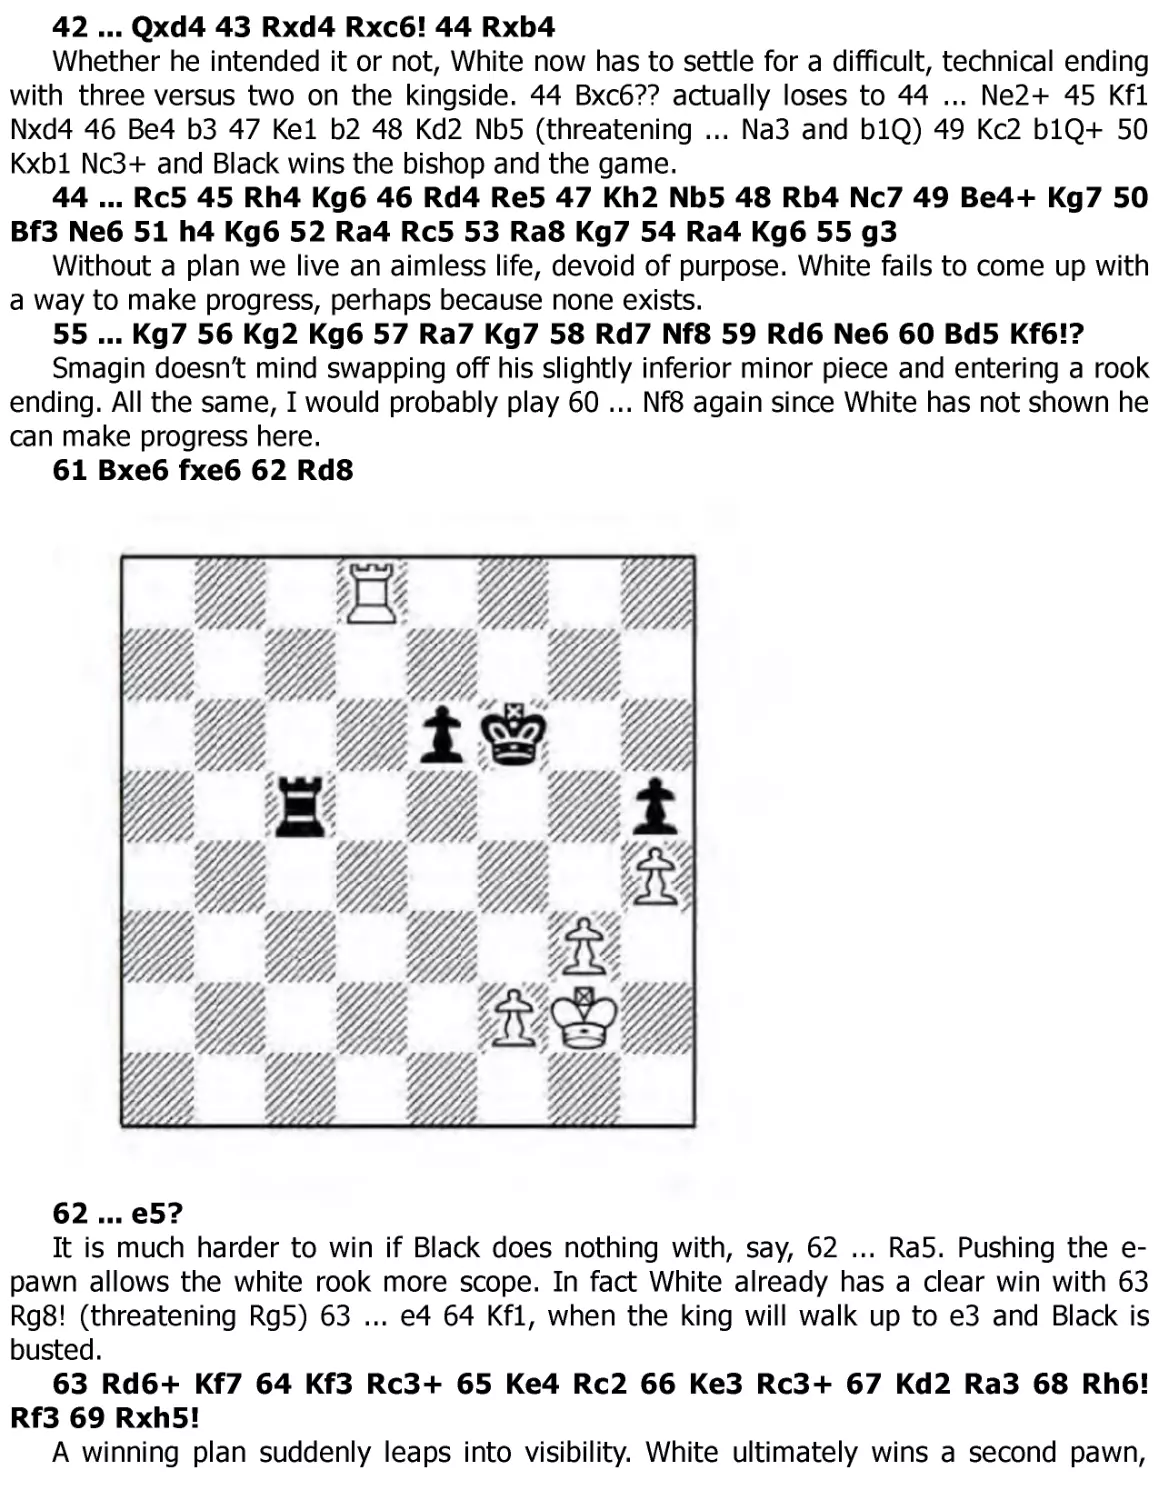

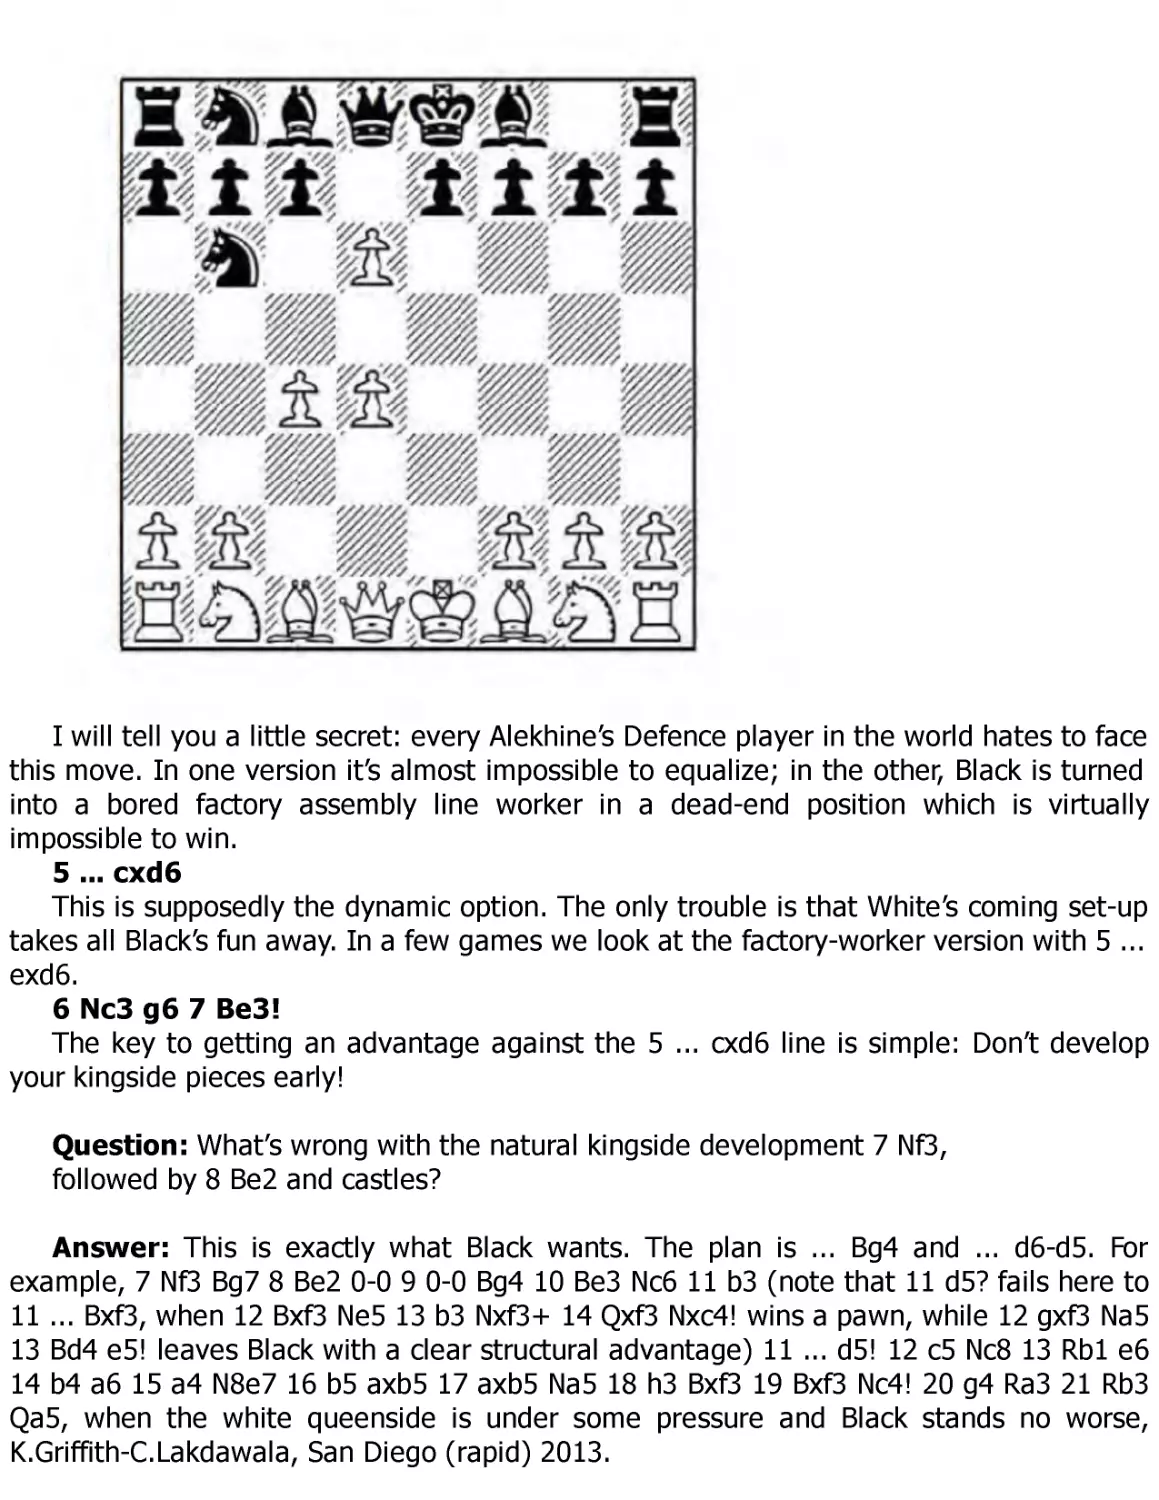
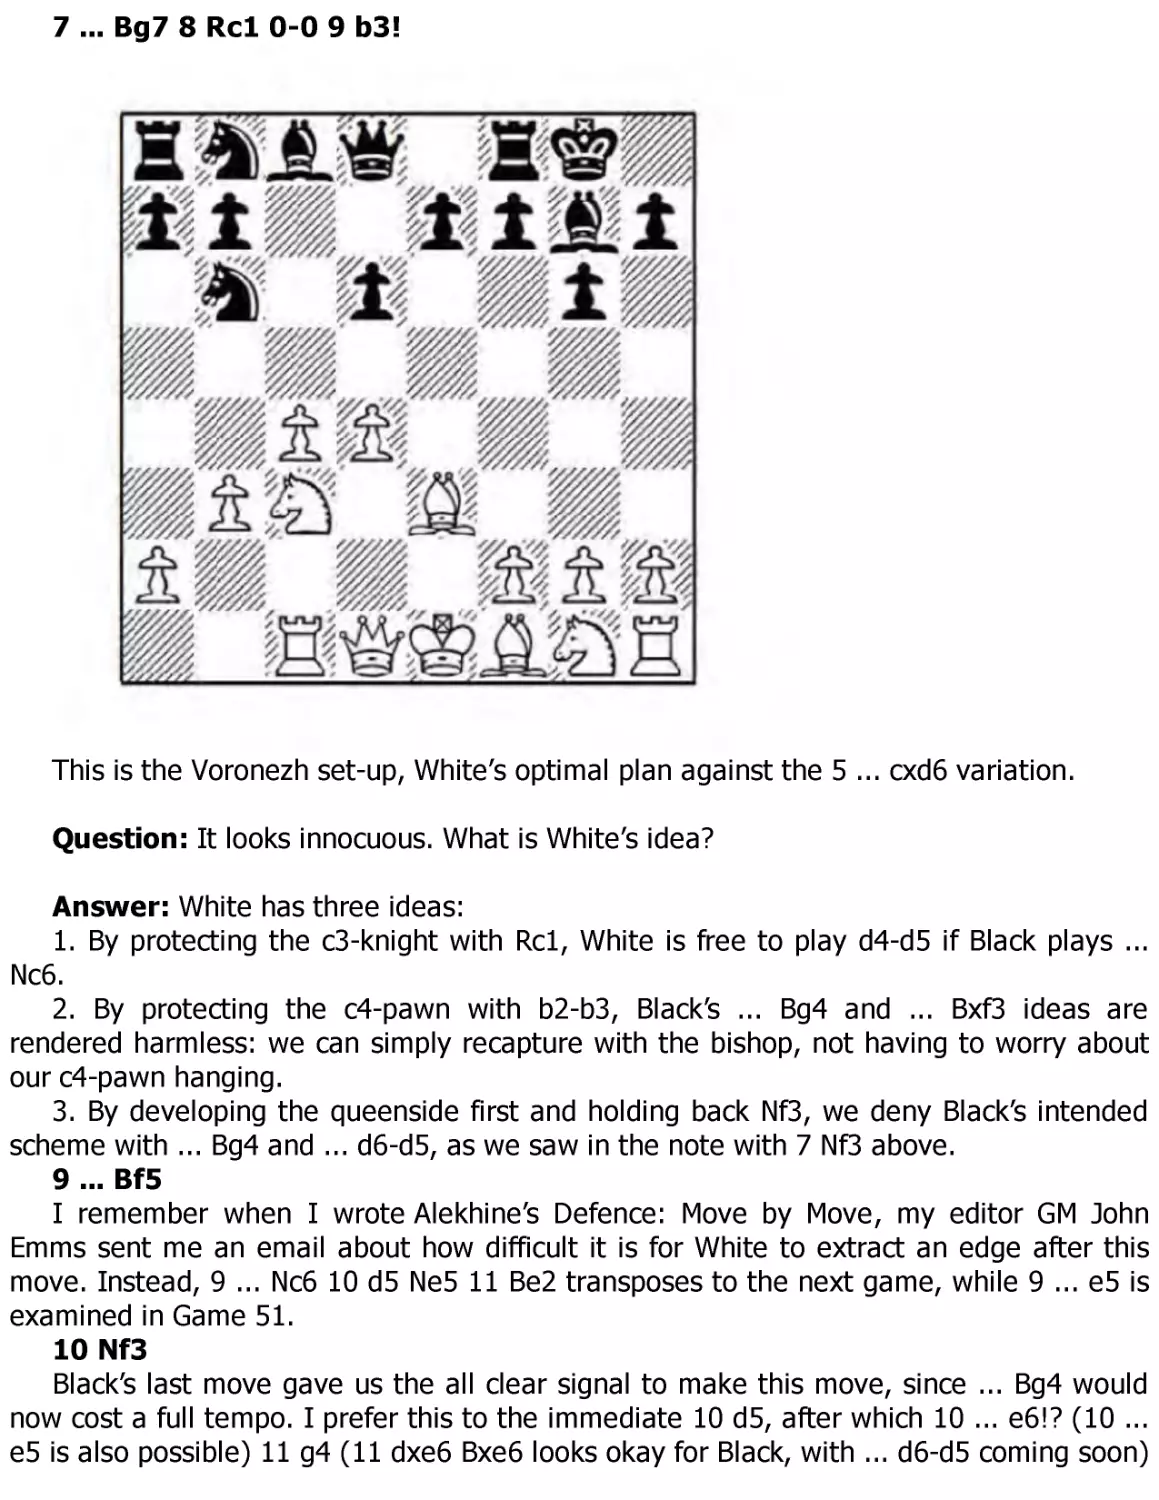


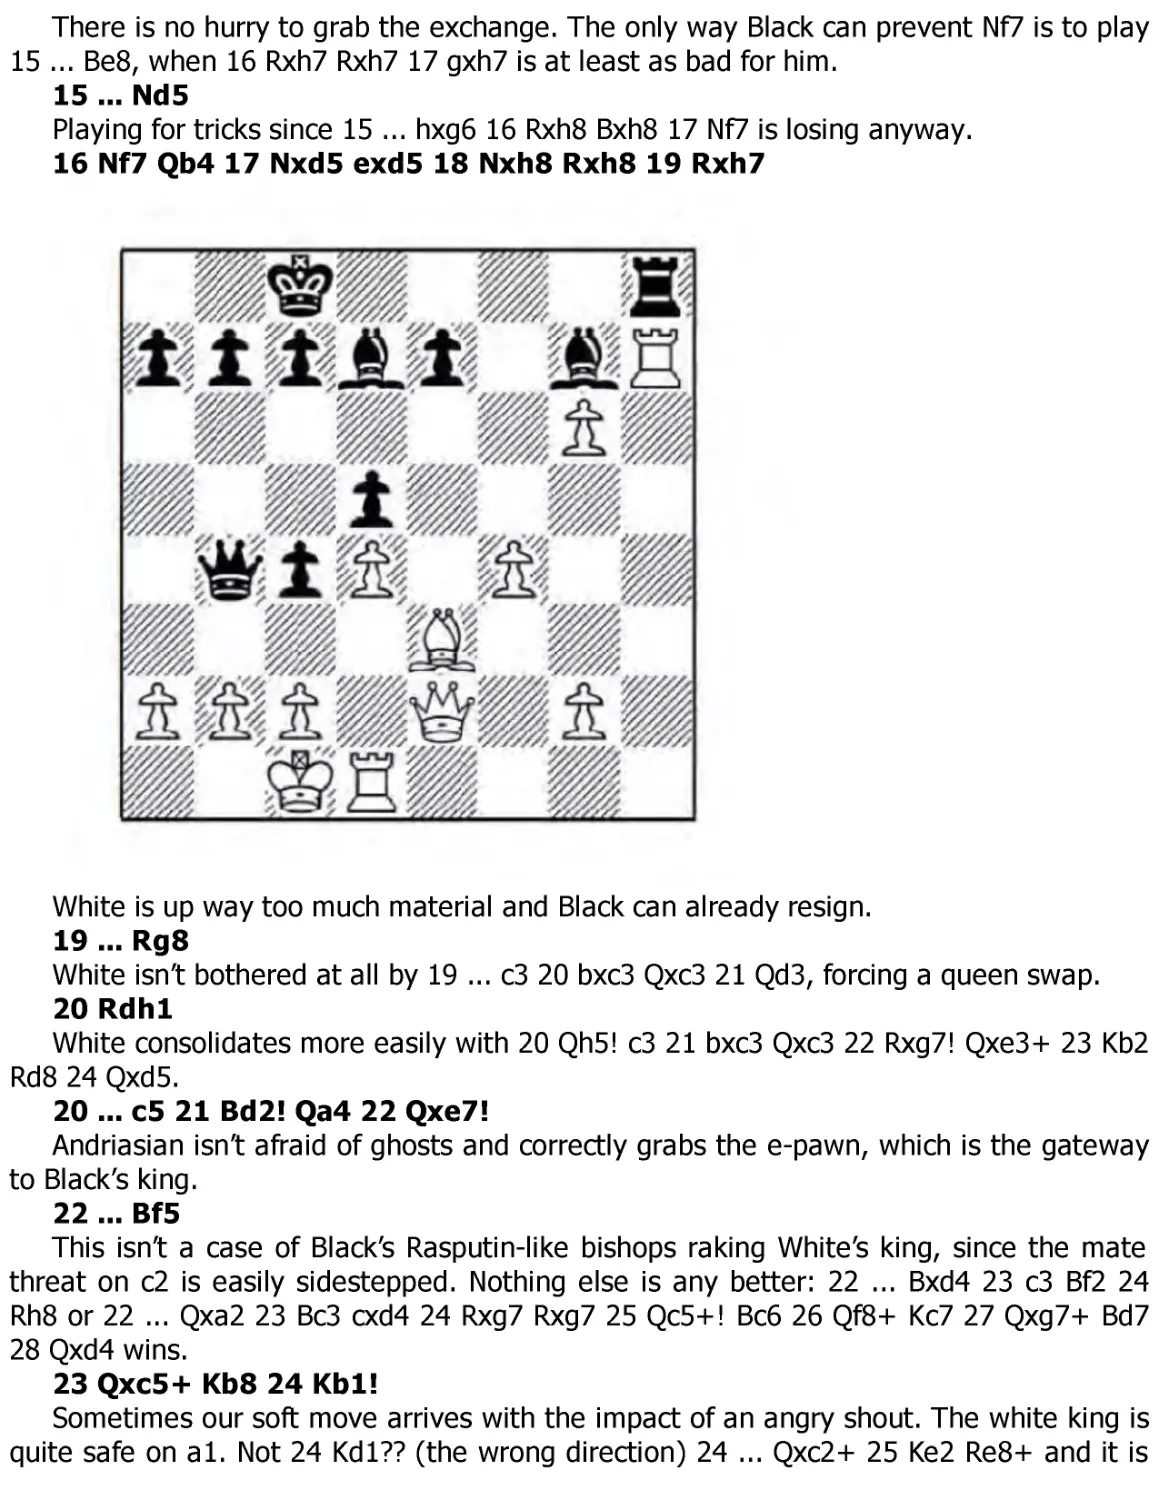
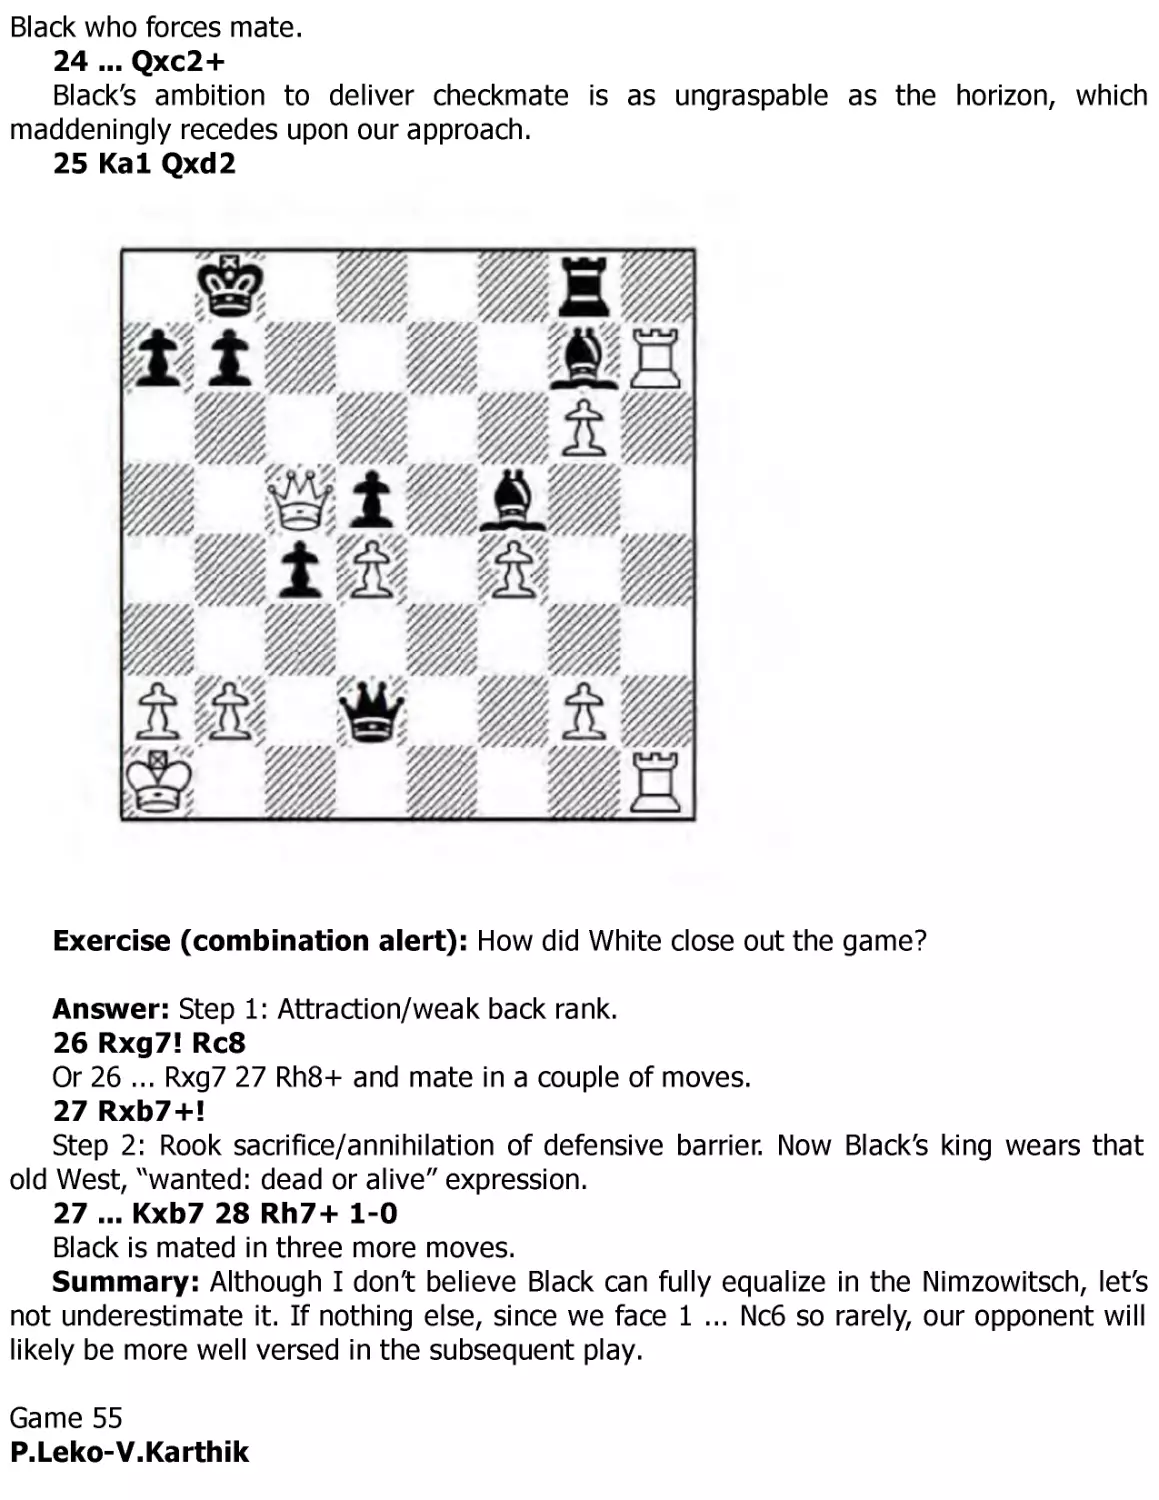

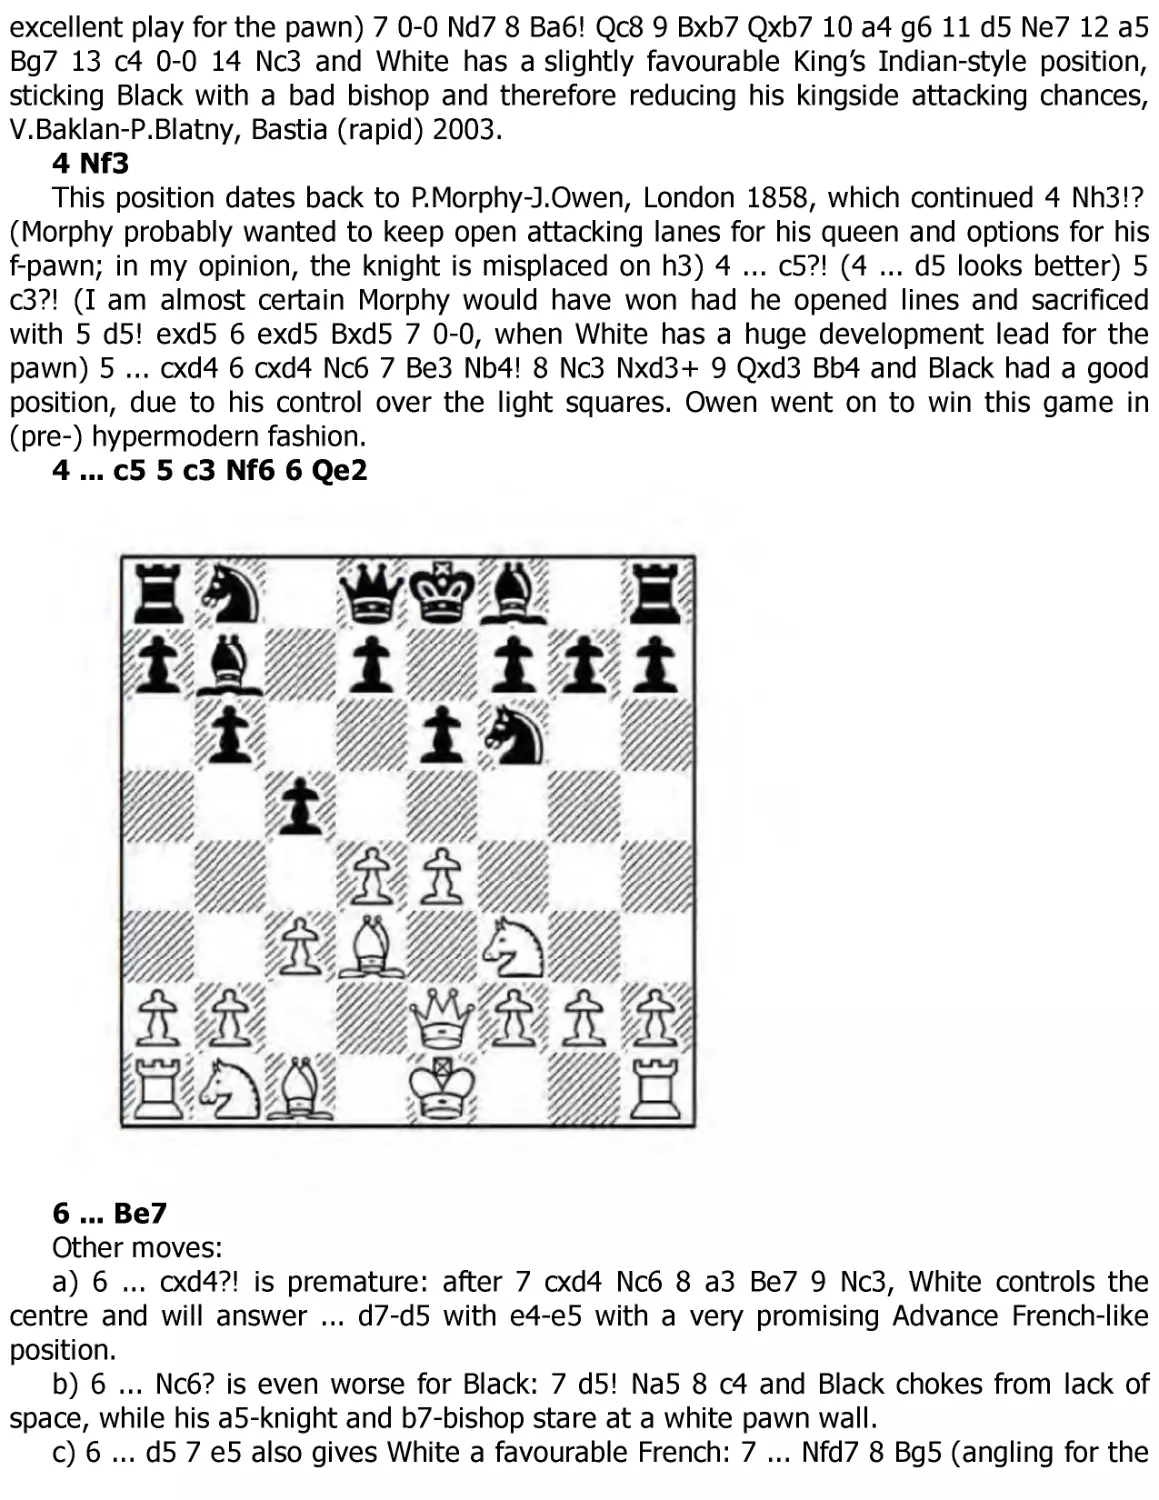
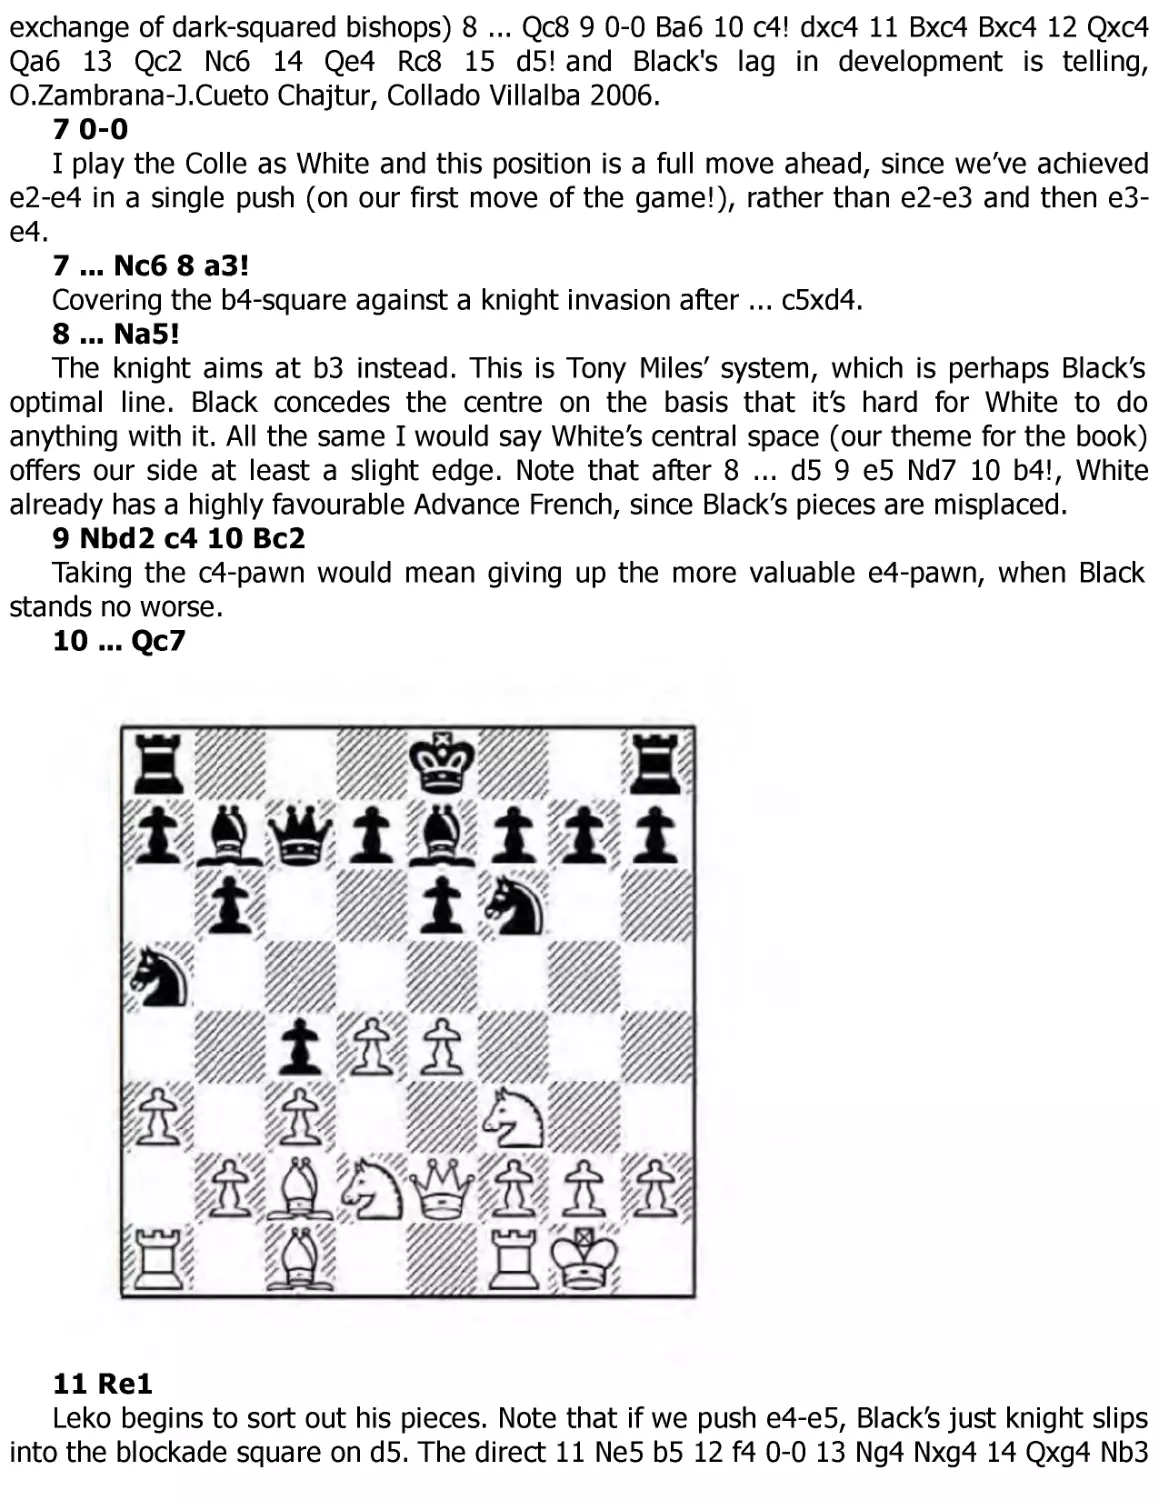


Текст
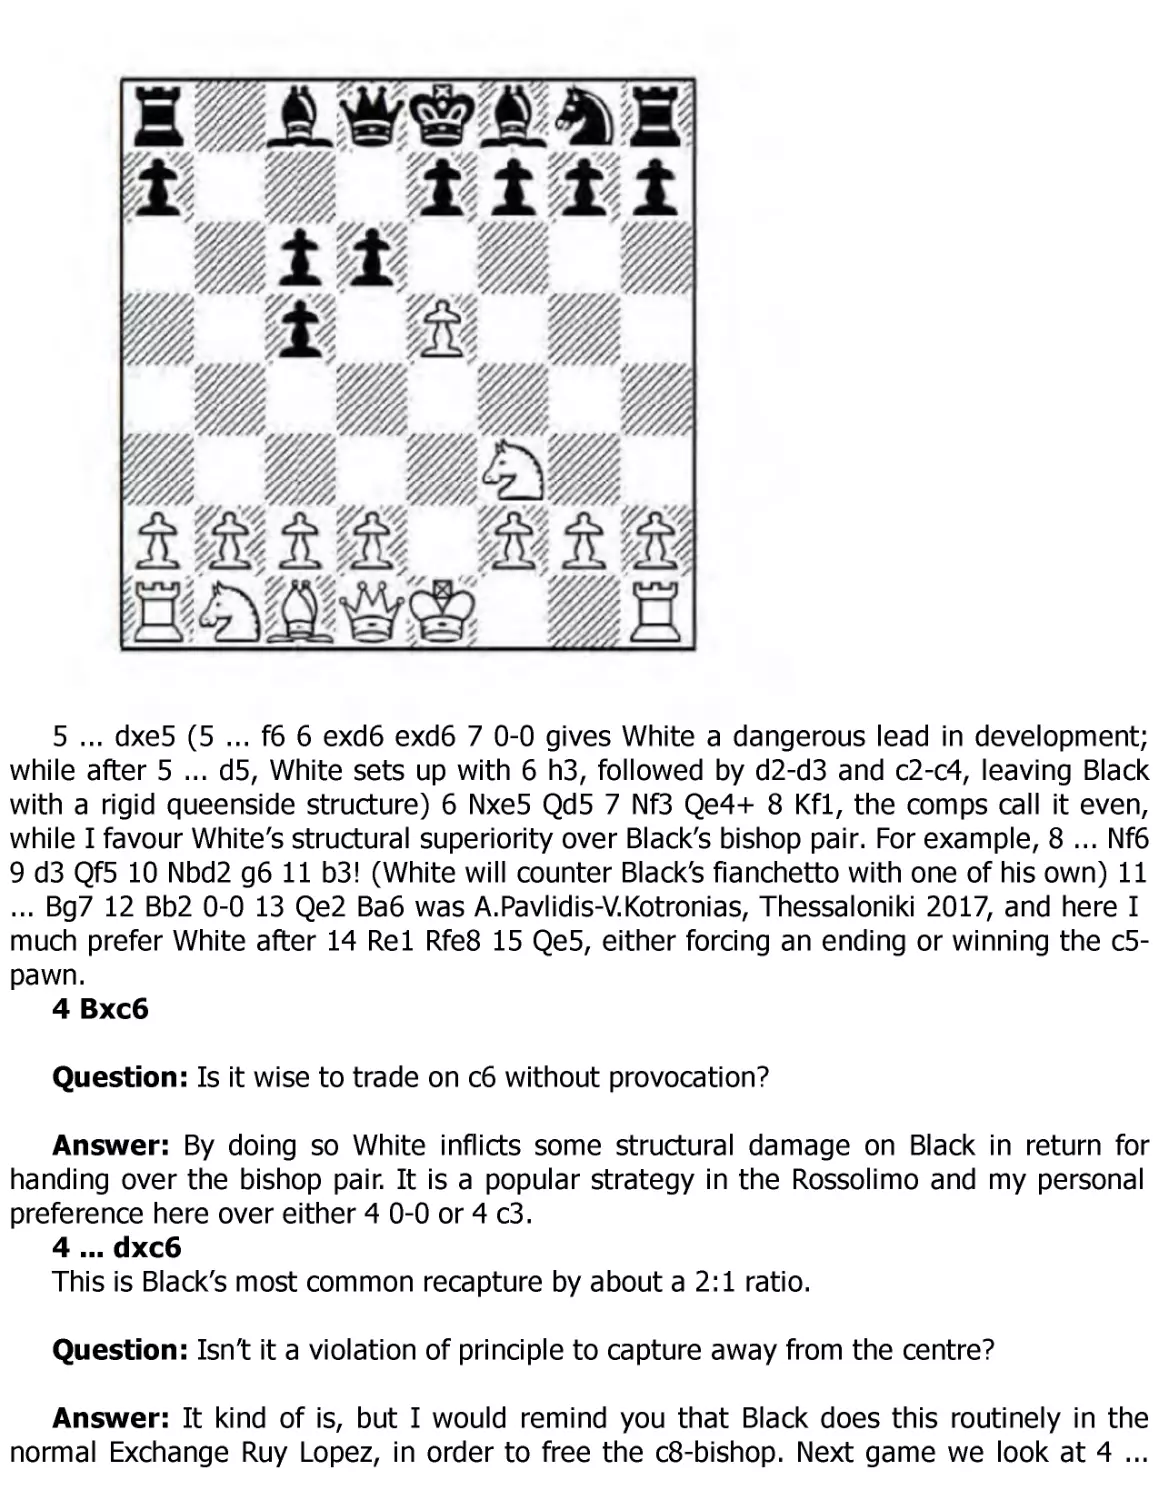
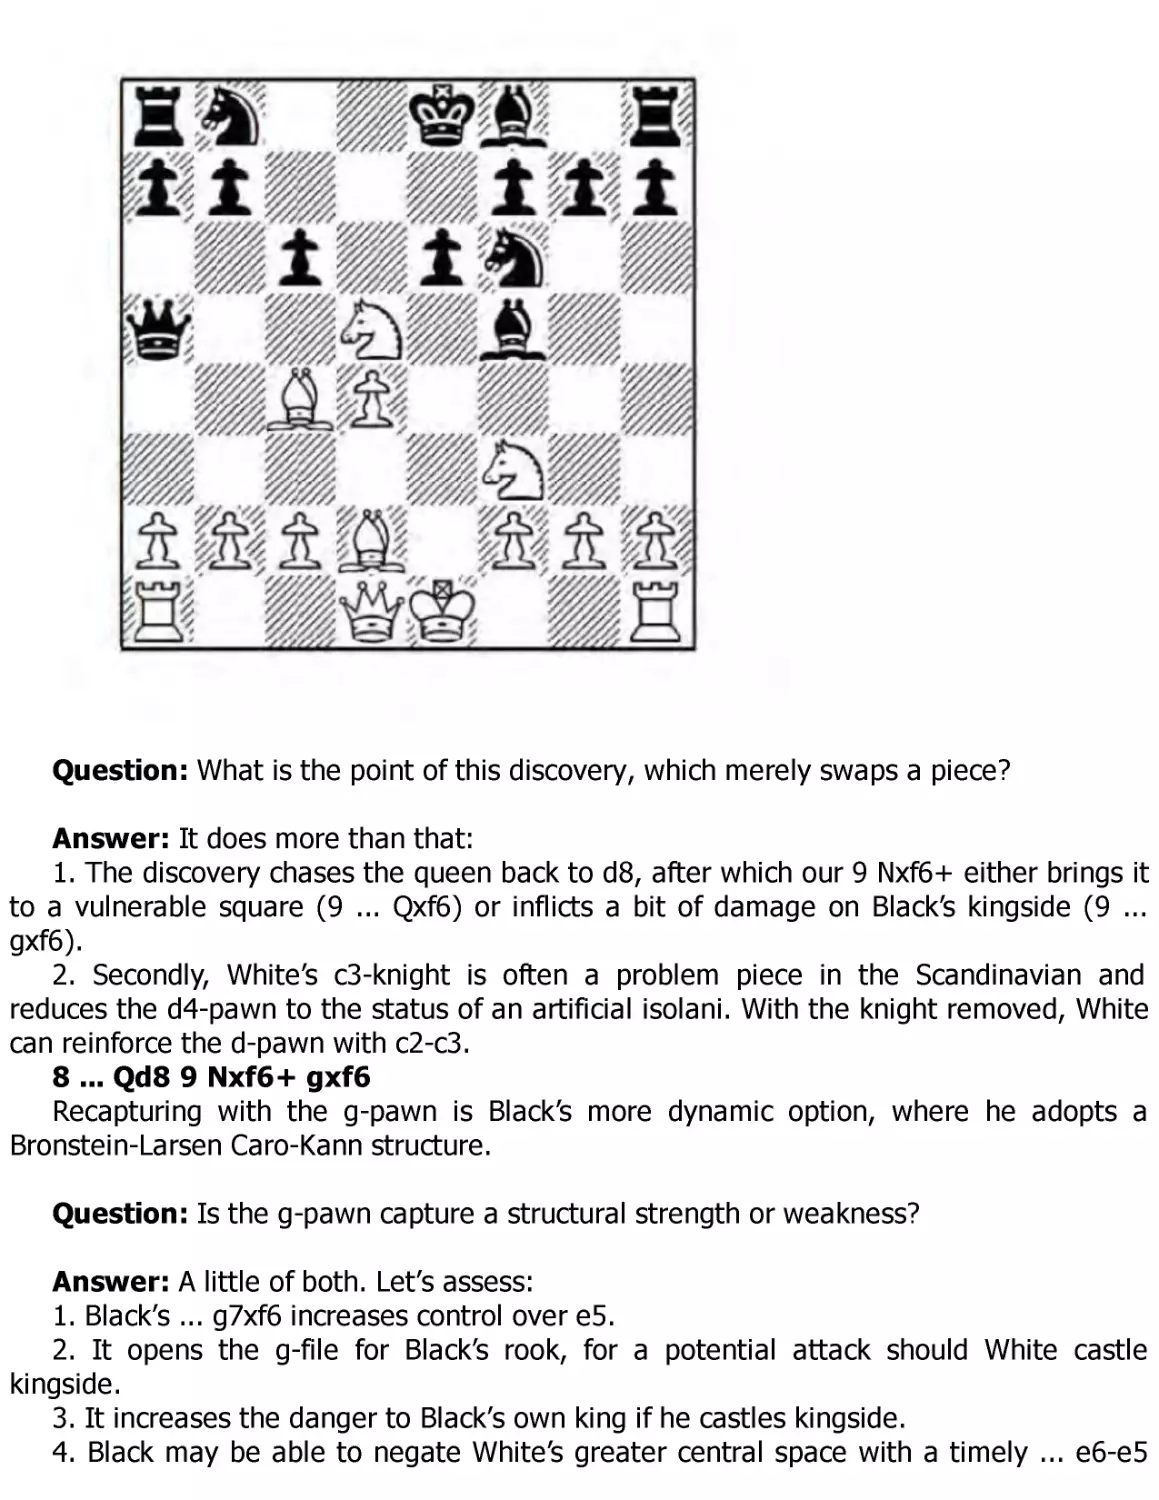
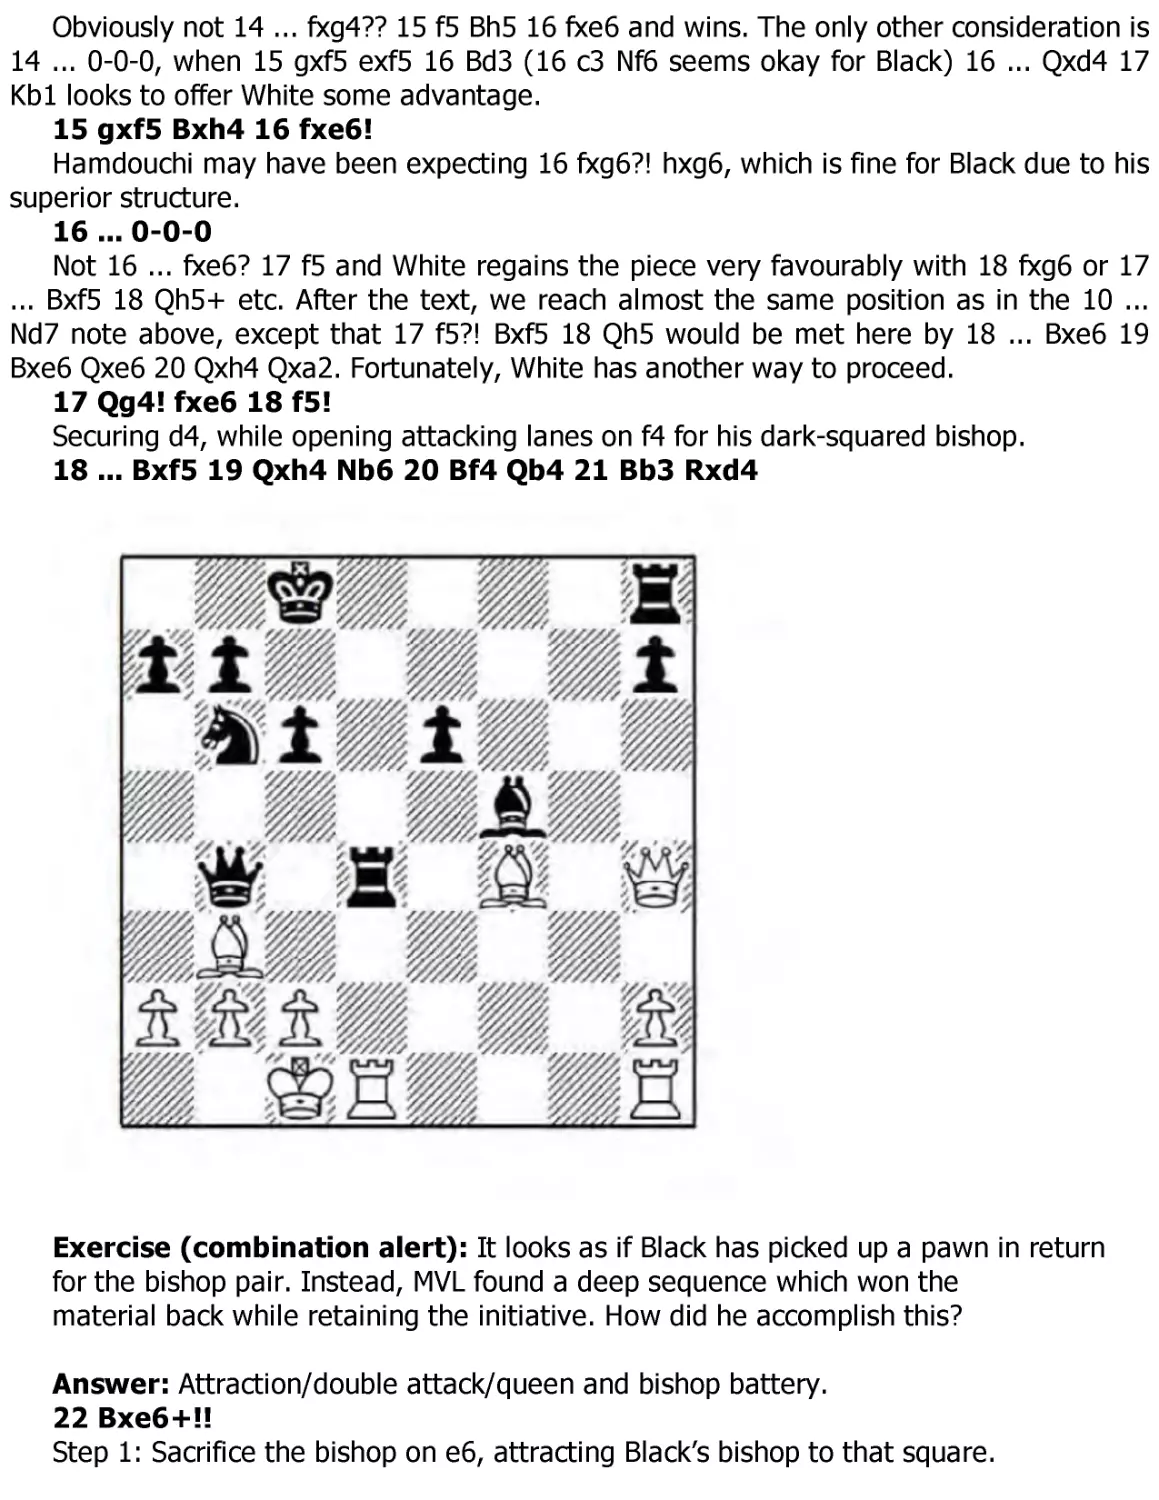
First published in 2018 by Gloucester Publishers Limited, London.
Copyright © 2018 Cyrus Lakdawala
The right of Cyrus Lakdawala to be identified as the author of this work has been
asserted in accordance with the Copyrights, Designs and Patents Act 1988.
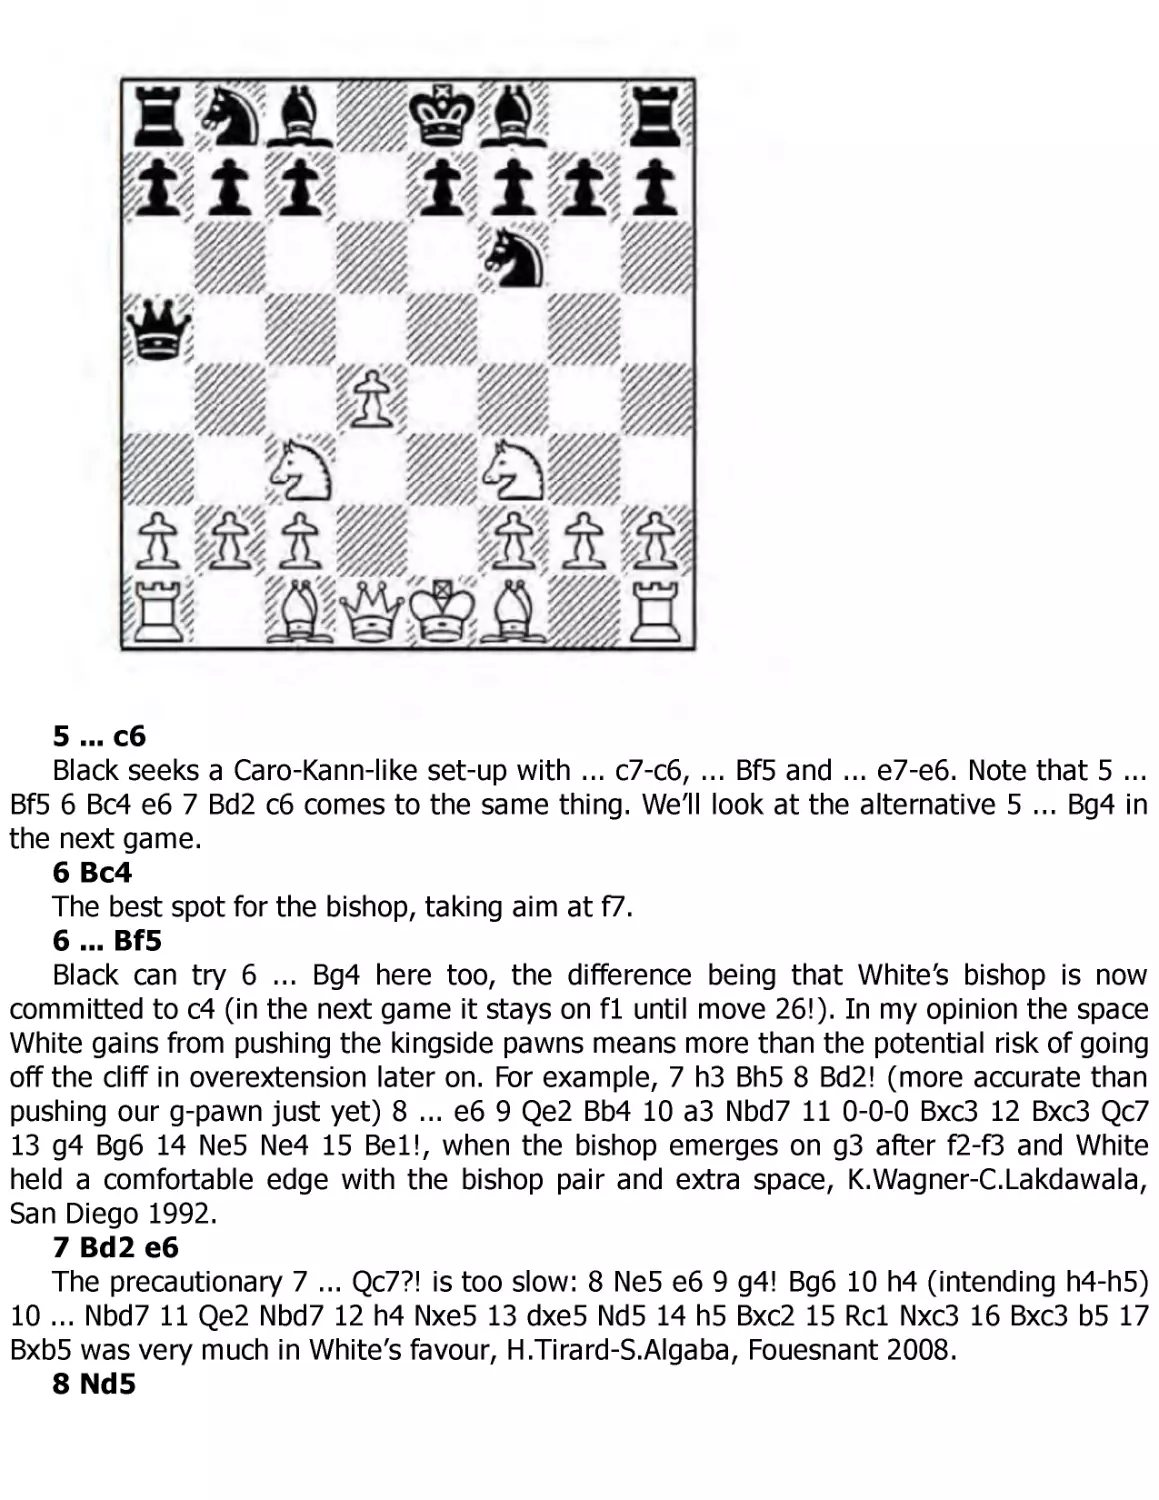
All rights reserved. No part of this publication may be reproduced, stored in a
retrieval system or transmitted in any form or by any means, electronic,
electrostatic, magnetic tape, photocopying, recording or otherwise,
without prior permission of the publisher.
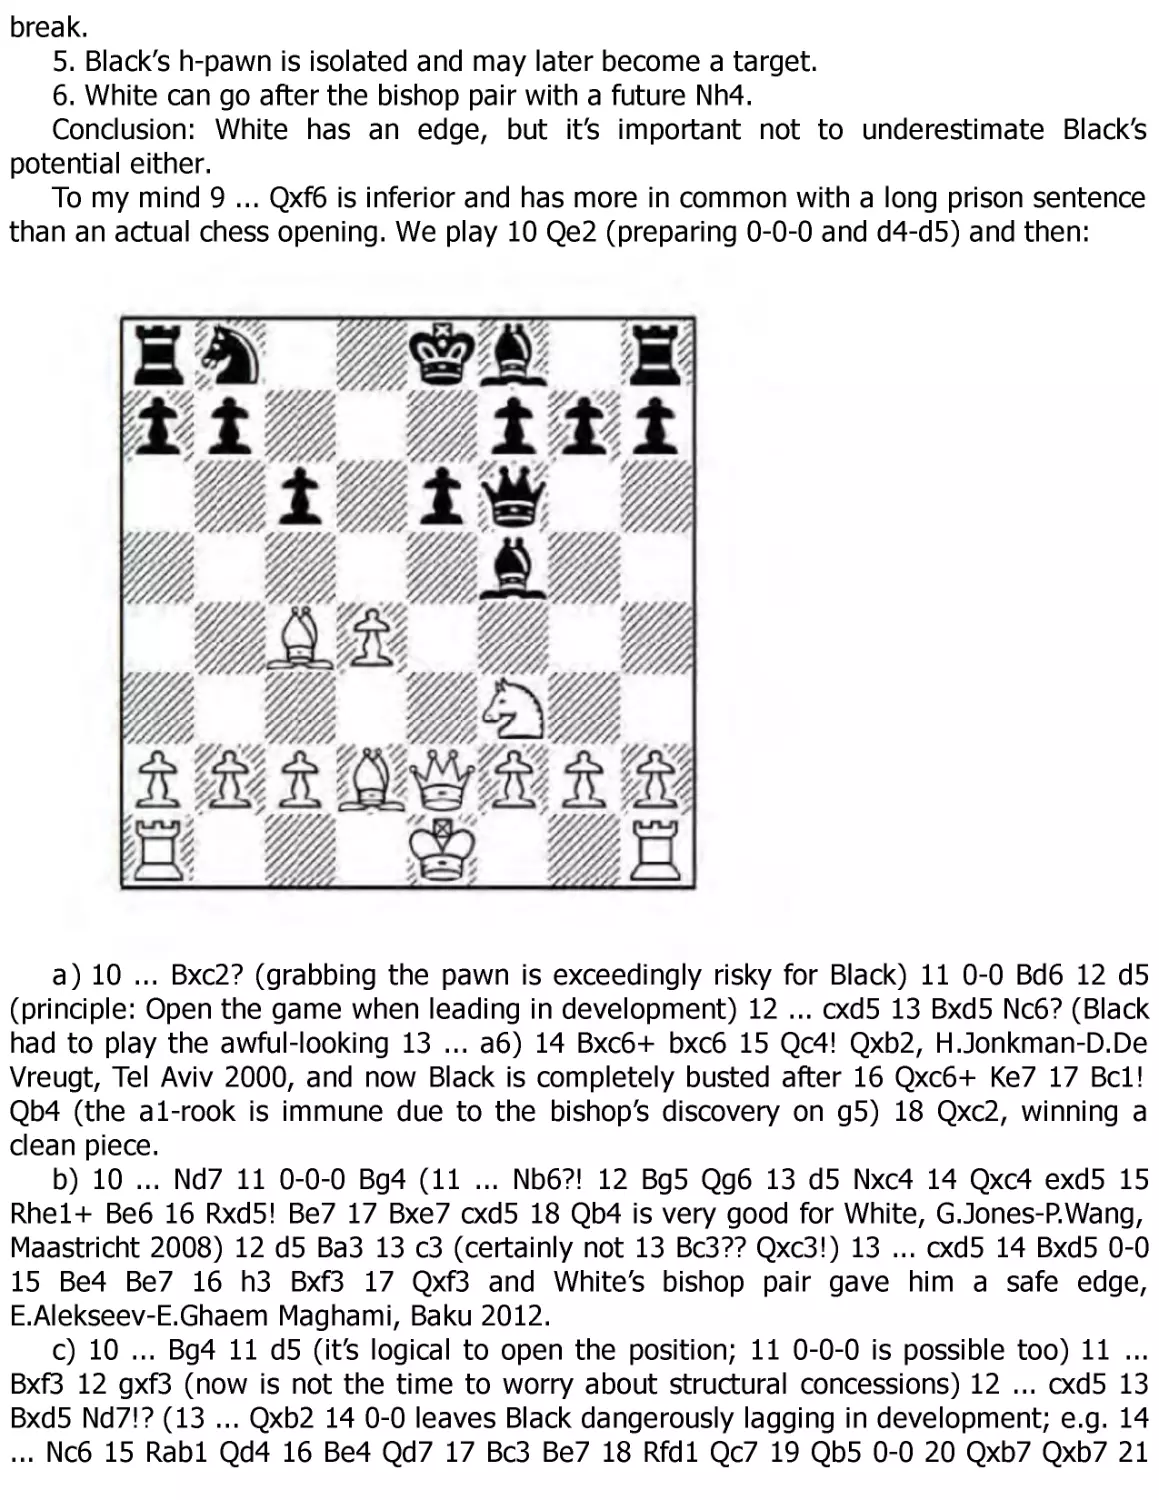
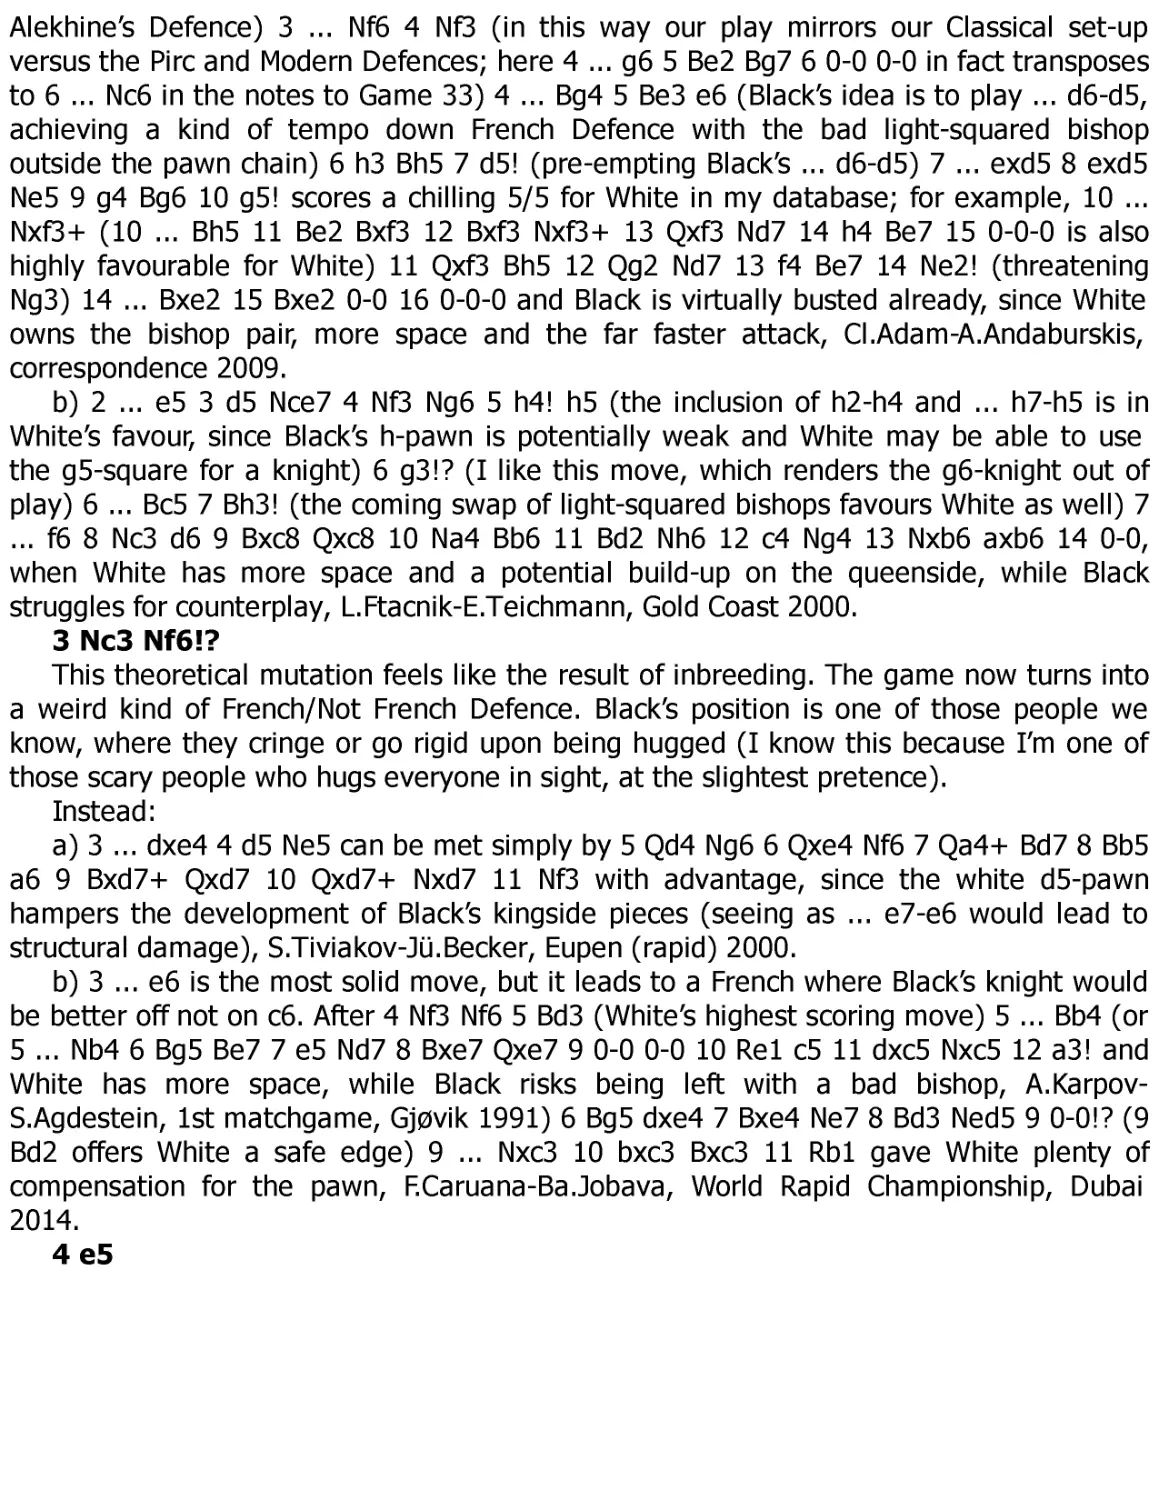
British Library Cataloguing-in-Publication Data
A catalogue record for this book is available from the British Library.
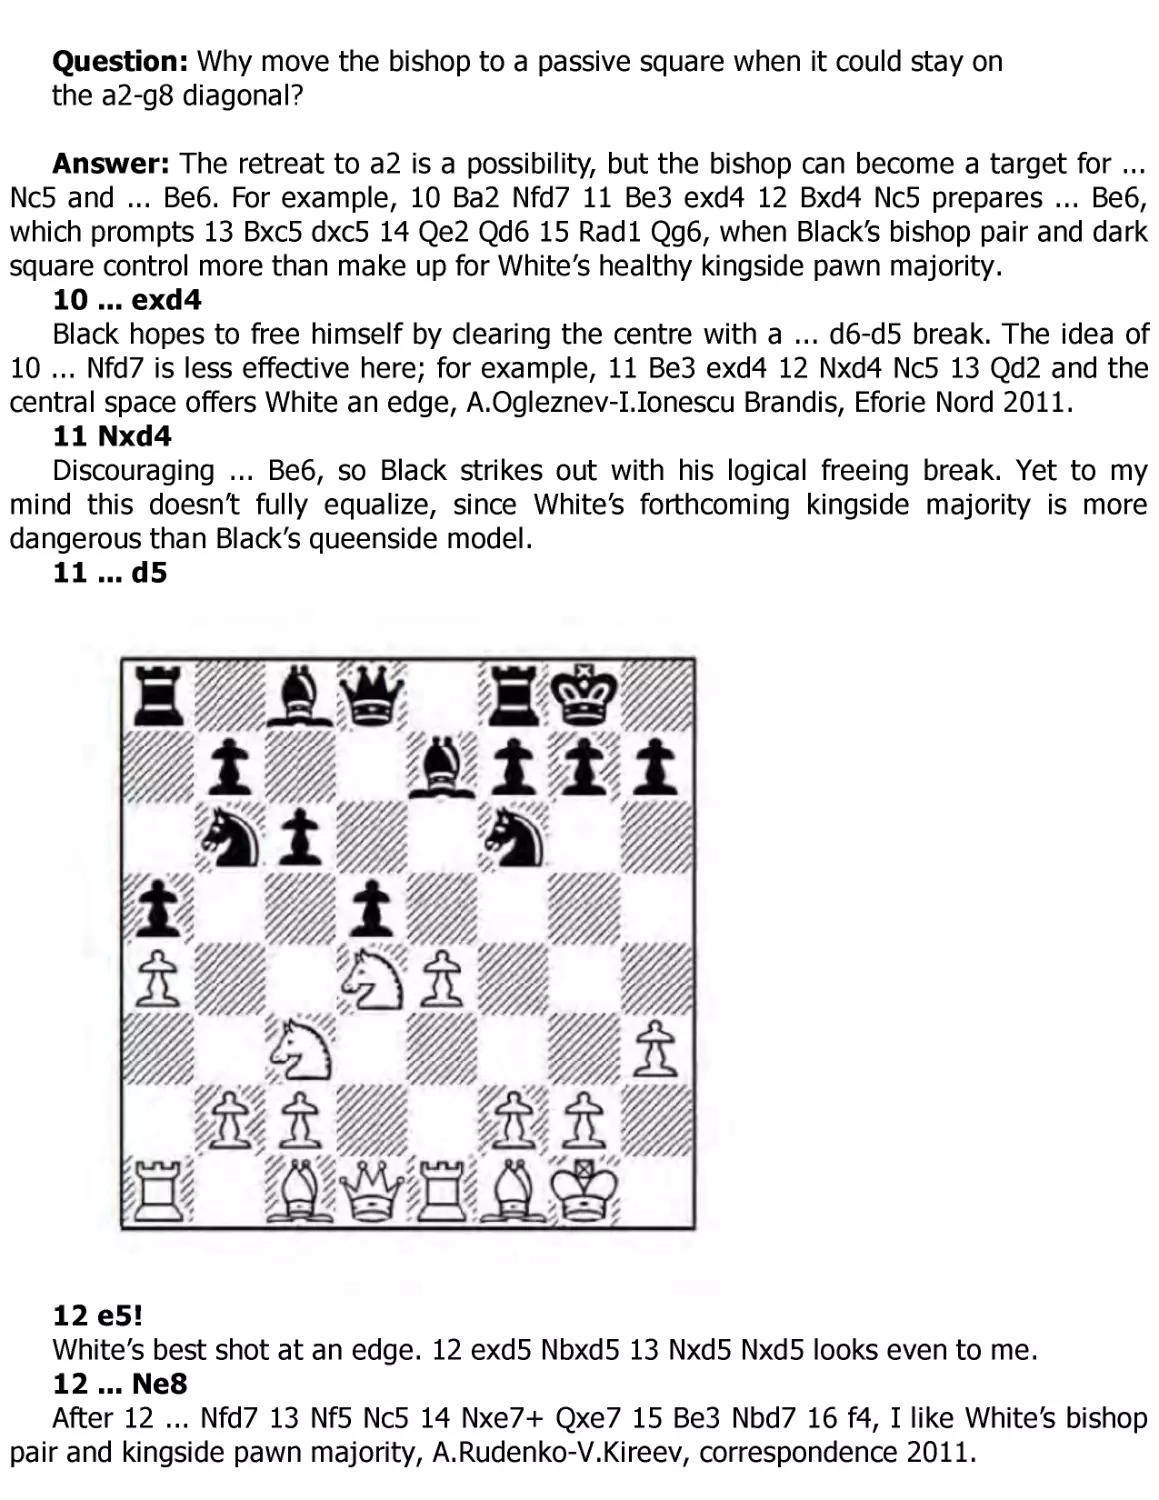
ISBN: 978 1 78194 476 9
Distributed in North America by National Book Network,
15200 NBN Way, Blue Ridge Summit, PA 17214. Ph: 717.794.3800.
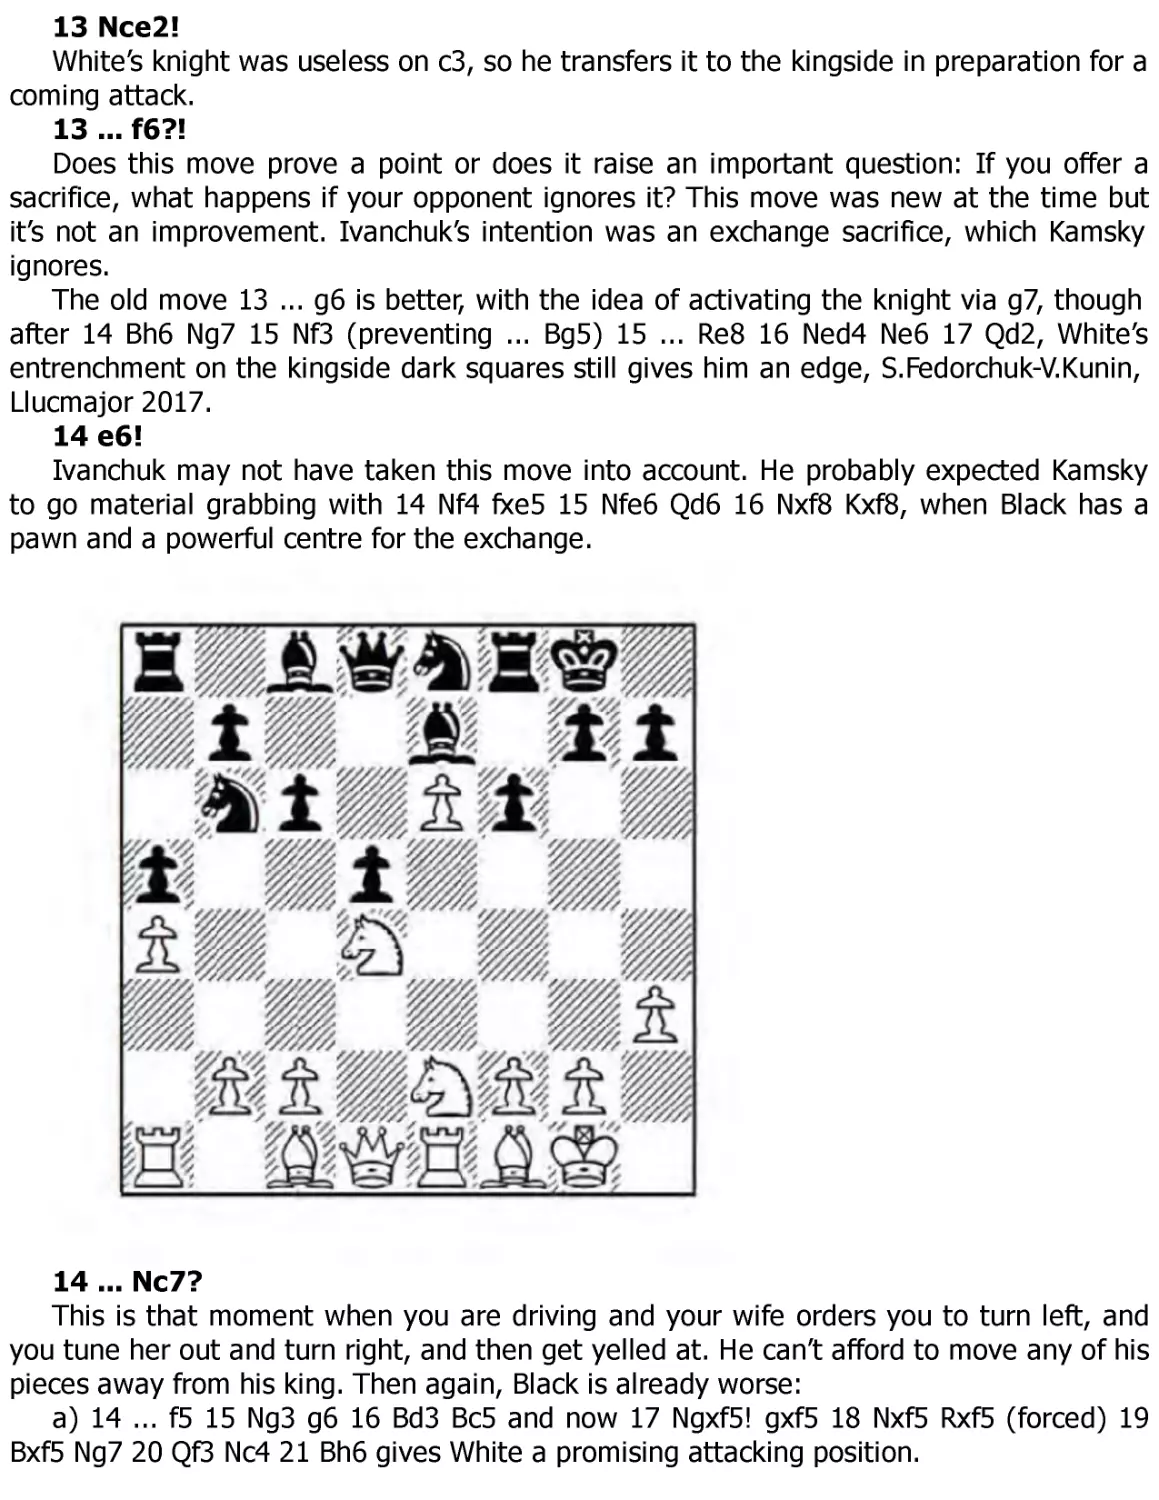
Distributed in Europe by Central Books Ltd.,
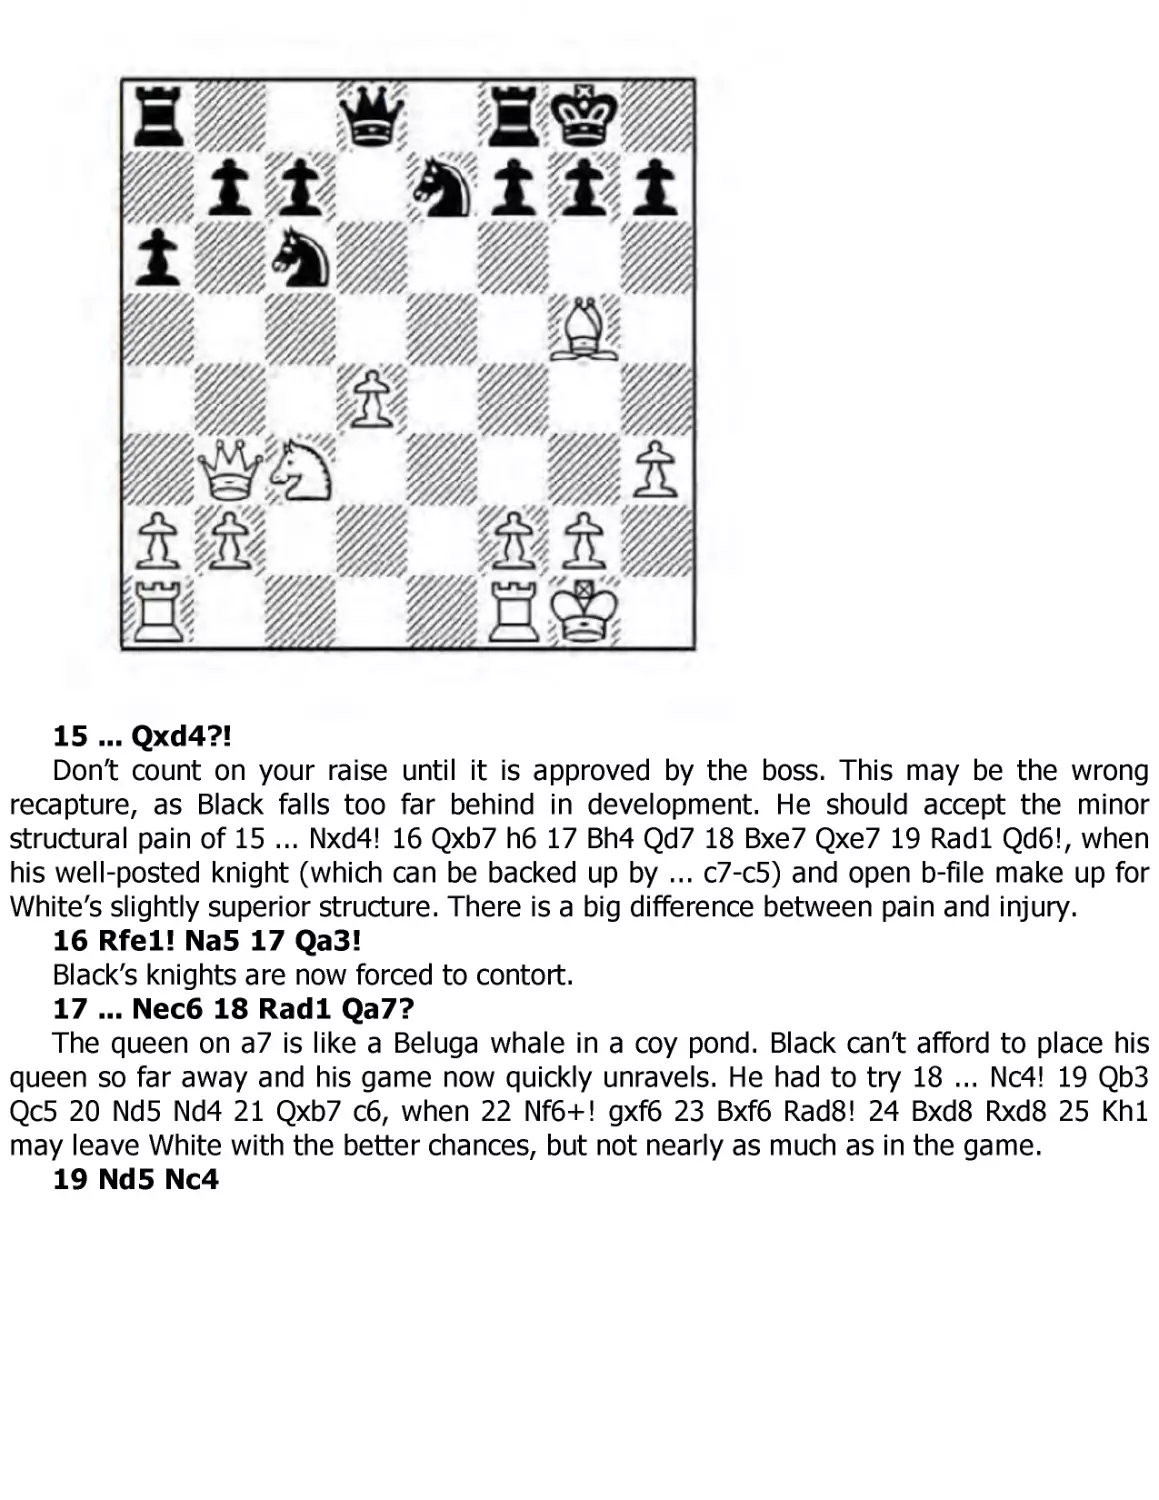
Central Books Ltd, 50 Freshwater Road, Chadwell Heath, London, RM8 1RX.
All other sales enquiries should be directed to Everyman Chess.
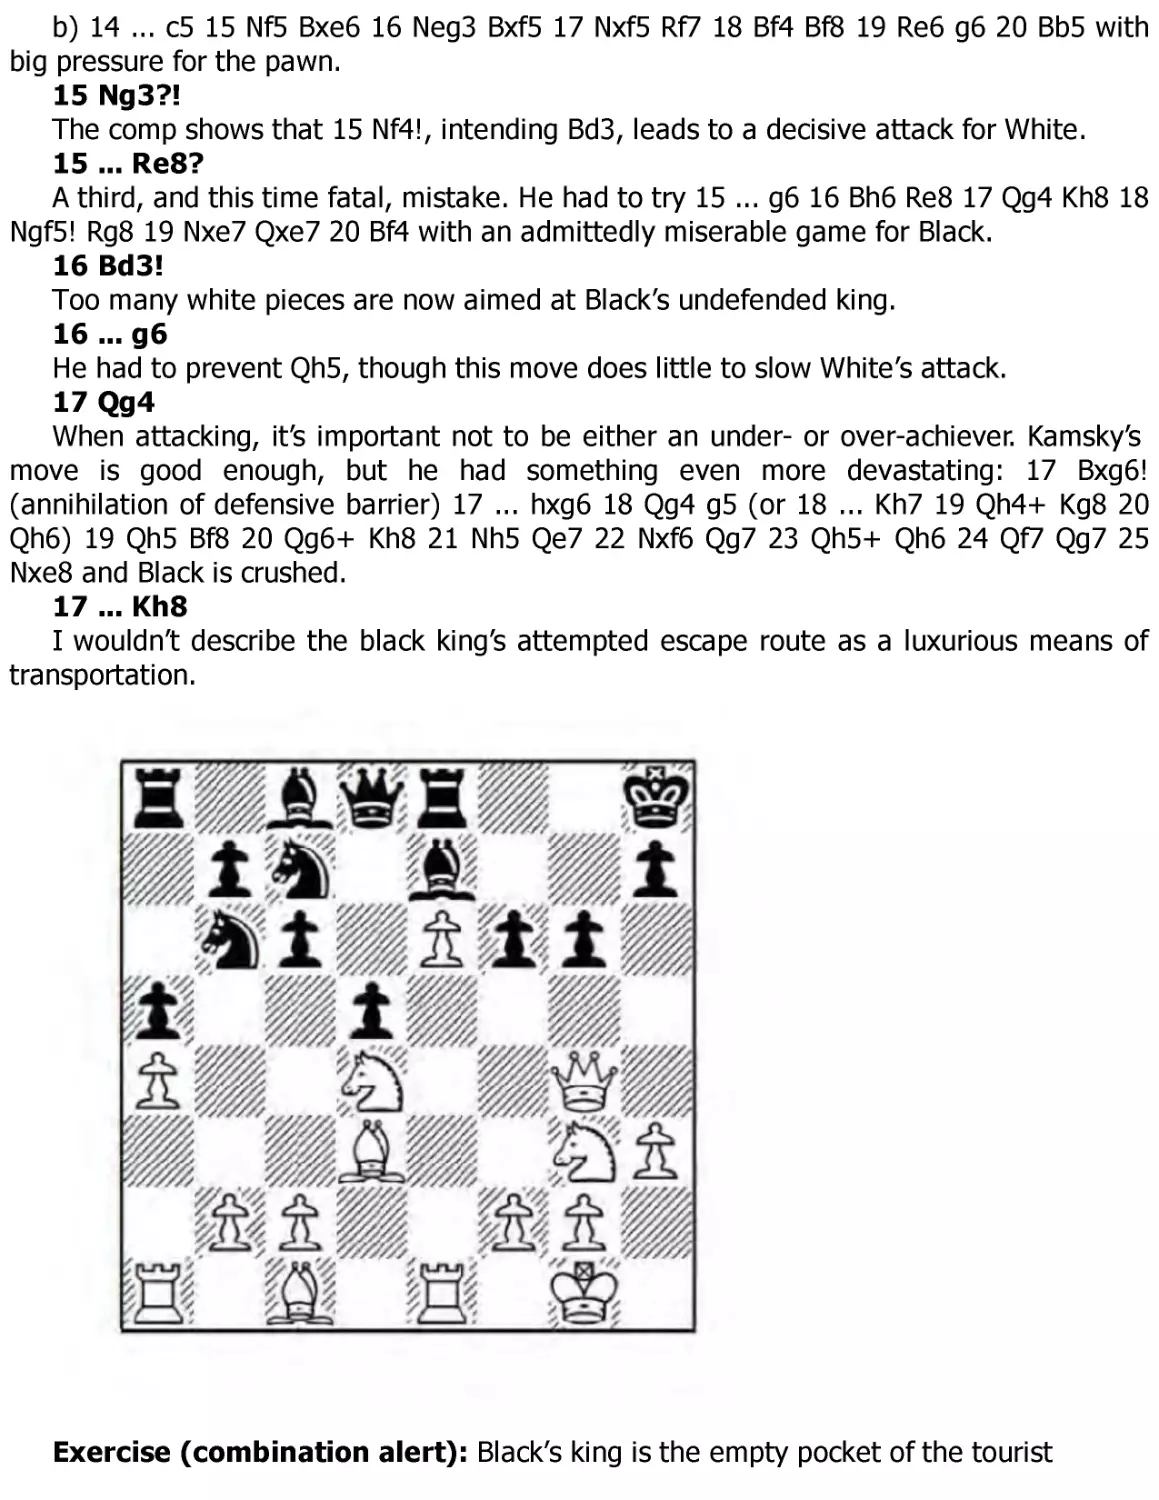
email: info@everymanchess.com; website: www.everymanchess.com
Everyman is the registered trade mark of Random House Inc. and is used in this work
under licence from Random House Inc.
Everyman Chess Series
Commissioning editor and advisor: Byron Jacobs
Typeset and edited by First Rank Publishing, Brighton.
Cover design by Horatio Monteverde.
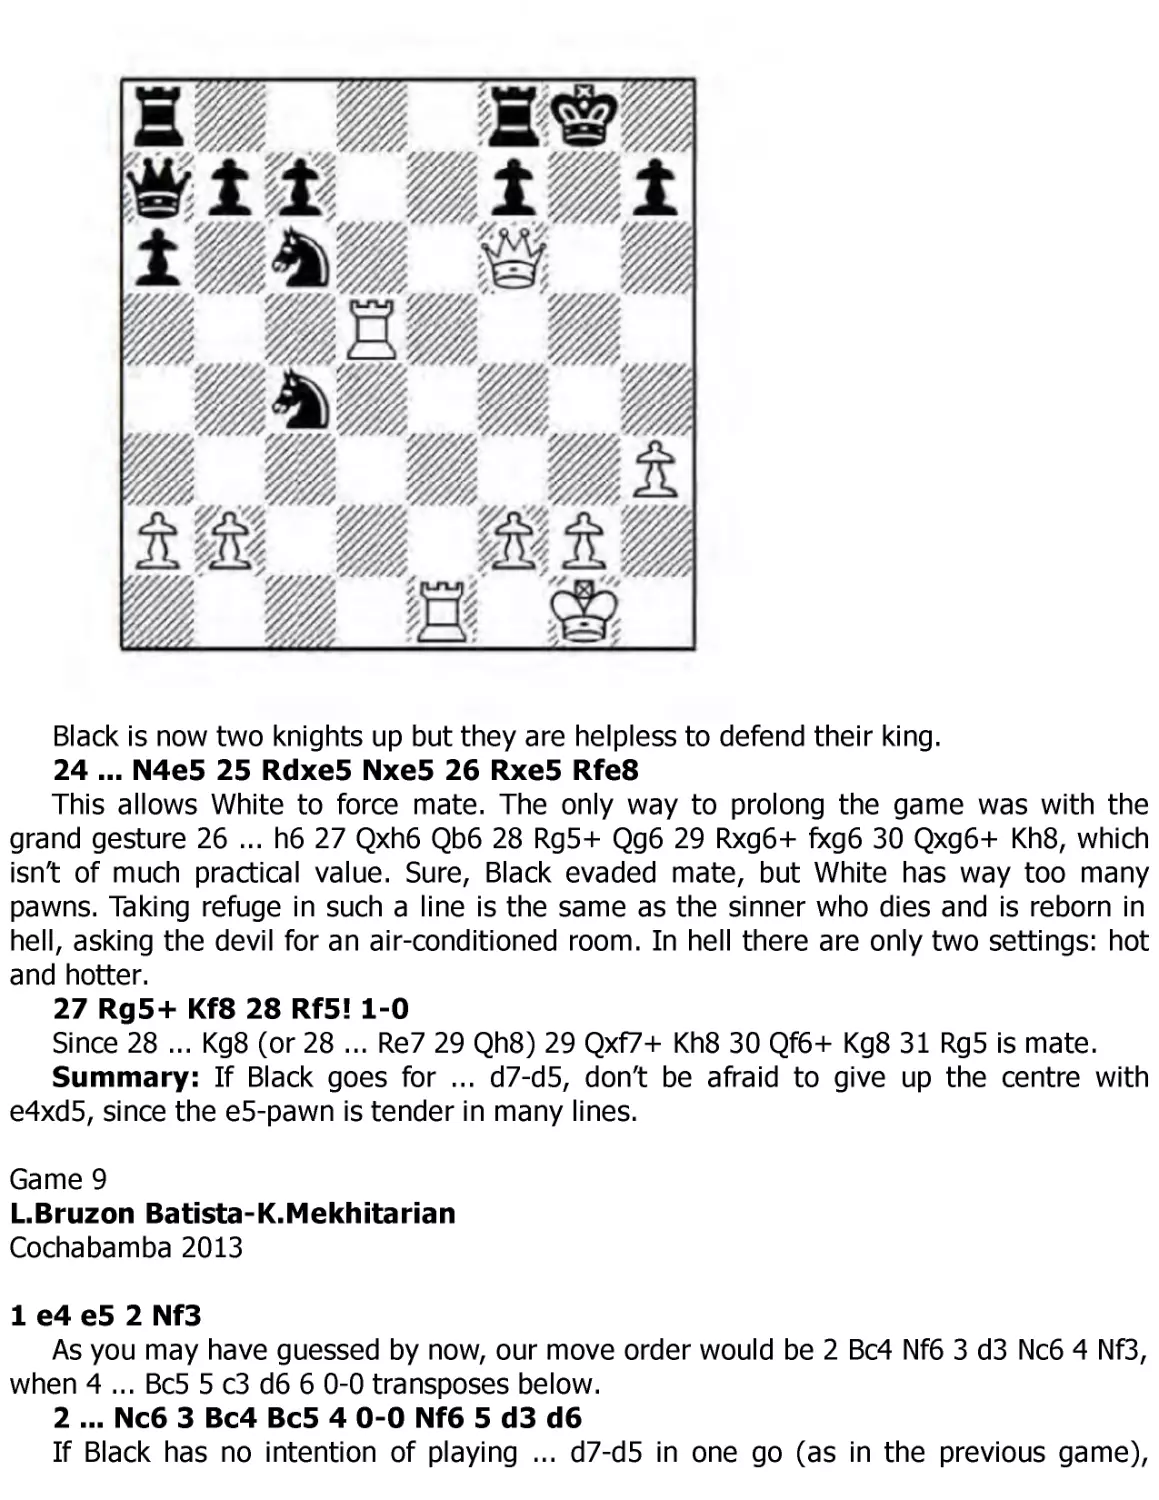
Printed by TJ International Limited, Padstow, Cornwall.
About the Author
Cyrus Lakdawala is an International Master, a former National Open and American
Open Champion, and a six-time State Champion. He has been teaching chess for over 30
years, and coaches some of the top junior players in the US.
Also by the Author:
Play the London System
A Ferocious Opening Repertoire
The Slav: Move by Move
1 ... d6: Move by Move
The Caro-Kann: Move by Move
The Four Knights: Move by Move
Capablanca: Move by Move
The Modern Defence: Move by Move
Kramnik: Move by Move
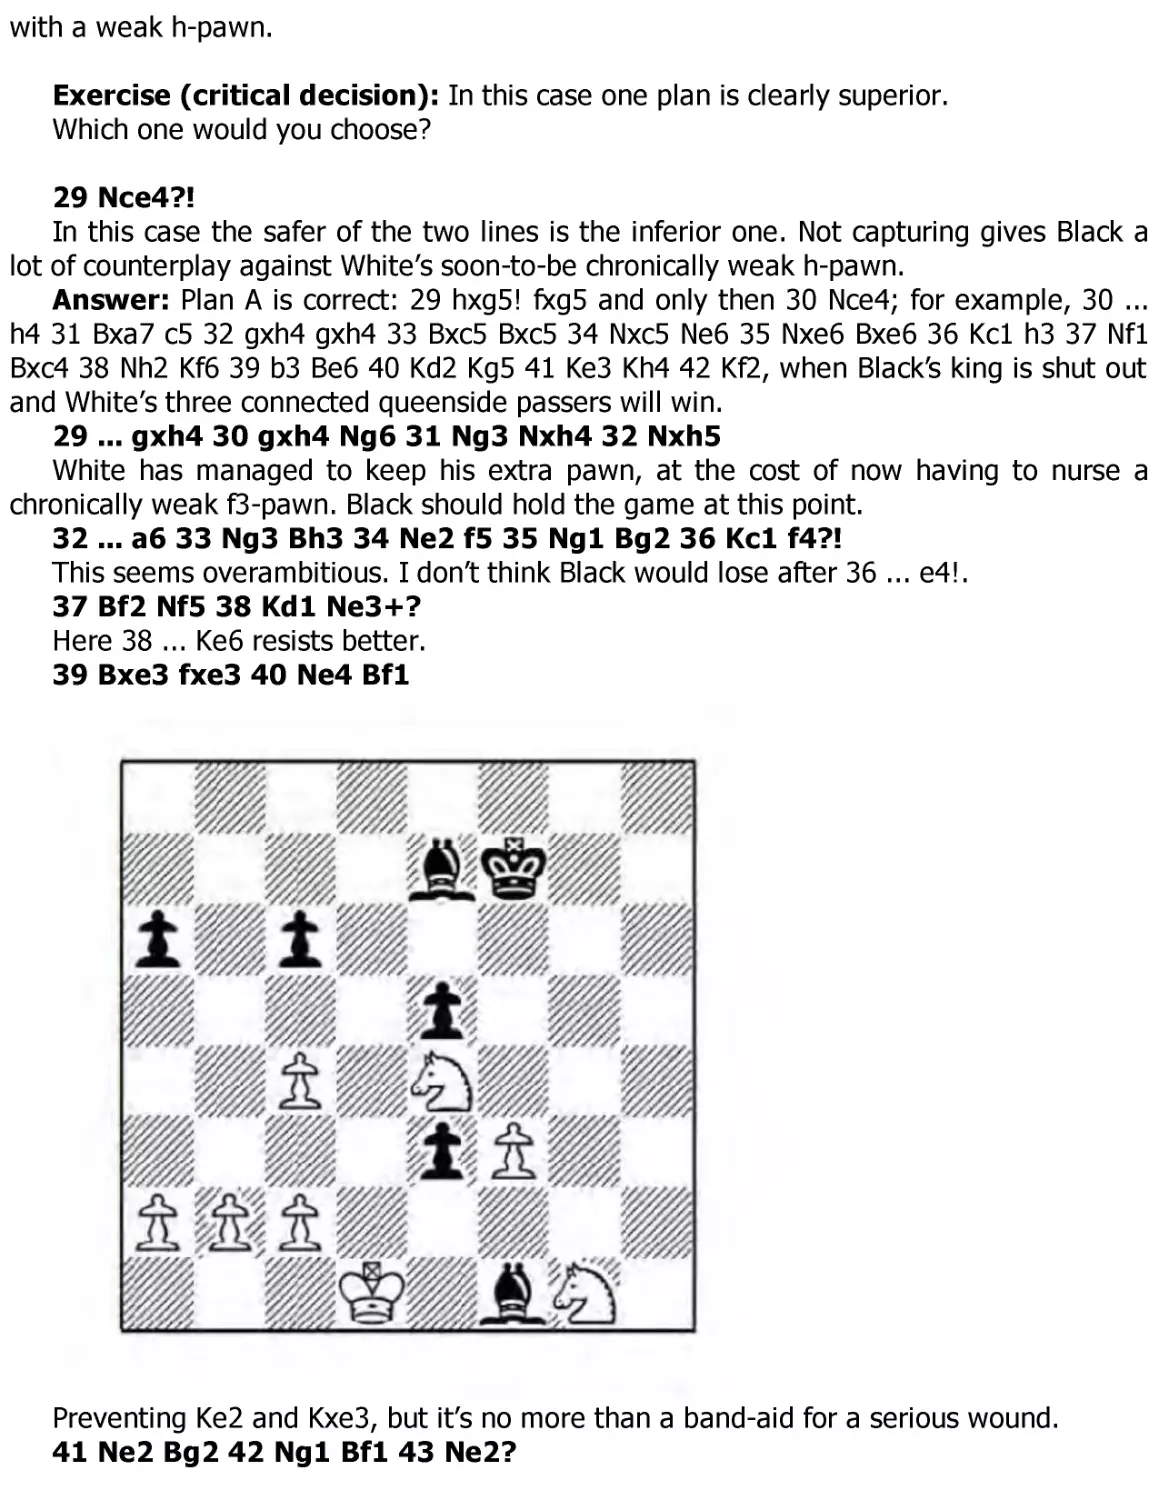
The Colle: Move by Move
The Scandinavian: Move by Move
Botvinnik: Move by Move
The Nimzo-Larsen Attack: Move by Move
Korchnoi: Move by Move
The Alekhine Defence: Move by Move
The Trompowsky Attack: Move by Move
Carlsen: Move by Move
The Classical French: Move by Move
Larsen: Move by Move
1 ... b6: Move by Move
Bird’s Opening: Move by Move
Petroff Defence: Move by Move
Fischer: Move by Move
Anti-Sicilians: Move by Move
Opening Repertoire: ... c6
First Steps: the Modern
Contents
About the Author
Introduction
1
2
3
4
5
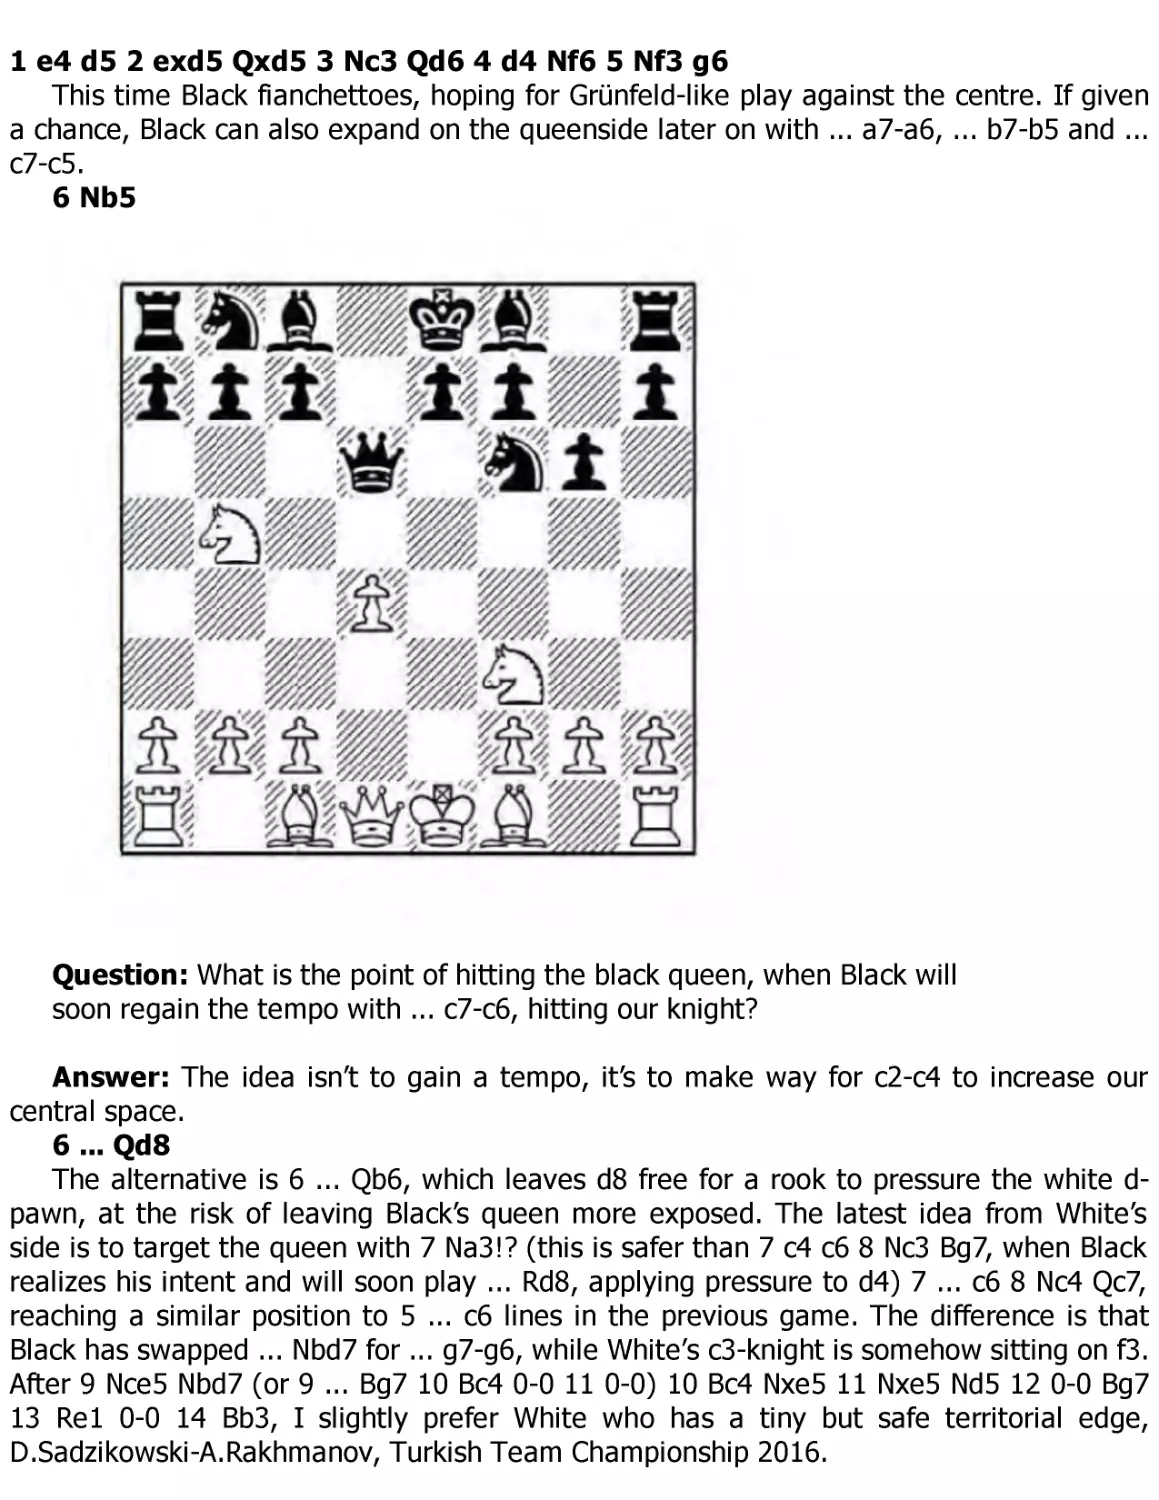
6
7
8
Bishop’s Opening
Sicilian Defence
French Defence
Caro-Kann Defence
Pirc, Modern and Philidor Defences
Scandinavian Defence
Alekhine’s Defence
Odds and Ends
Index of Complete Games
Introduction
The Ten Commandments say you should “Honour thy Father and thy Mother.” Yet I
routinely violate my dad’s advice. (My father was so bossy that his “advice” always felt
like a commandment.) He told me to open with 1 e4 (he always said “pawn to king’s
four”), claiming it was “clearly White’s best opening move”. My mother doesn’t play chess
and doesn’t really care if I open with 1 e4 or not. Throughout my career I disobeyed dad,
and in the vast majority of my games I open with either 1 Nf3 or 1 d4. For me, pushing
my e-pawn two squares on the first move is my version of wearing a disguise.
When we meet someone from another country, and another culture and religion,
allowances are made for the difference in custom and core belief. Most 1 e4 players I
know are – from my perspective – foreigners to my own style. When we return to our old
opening, long abandoned, we in a sense become foreigners in our own country of birth.
When I first learned chess at age eight, it never occurred to me that White had any other
option but to open with the king’s pawn. Later I discovered other first moves and drifted
away from pushing the e-pawn. I do return home from time to time and still play 1 e4.
Look, when it comes to calm, strategic openings like the Colle, London System, and 1
Nf3, I’m your Yoda. So when I got the desire to write a 1 e4 book, I designed a repertoire
suited to the quiet strategist, who wants to squeeze, rather than brawl. Mostly, anyway.
To believe the white pieces should extract a “+=“ edge is an uncontroversial
assumption. The argument begins with which move we choose to play first. A bit before
writing this book I looked up my stats: 1 d4 – 82.1%, not bad; 1 Nf3 – 83.5%, even
better; and then I looked up 1 e4 and braced myself for a failing grade – 89.0%. What? I
didn’t see that coming! In many of my other books I jokingly refer to the e-pawn push
with the annotation “1 e4?!”. Was Bobby Fischer right when he called 1 e4! “Best by
test”? So I asked Byron Jacobs if Everyman would be interested in a 1 e4! repertoire book
for the positional player.
Now I may score well with 1 e4, yet I feel intensely uncomfortable, since the positions
tend to be sharper than the ones I’m normally accustomed to. However, remember this:
the more we expose ourselves to a toxin, the more immunity we build up. In sharper
openings even a tactically-challenged dullard like me can play complex lines if I comp
them first, study them deeply into the middlegame (and, yes, even into the endings if
necessary), play them in online blitz and then, finally, dare to play 1 e4! over the board.
In this book I deliberately chose lines for White which are felt, rather than measured –
much like the difference between the vaguely comforting “glass of water”, when
juxtaposed with the scientist’s statement “10 fluid ounces of water”. Is there such a thing
as being over-educated? In chess I think there is, especially in our comped/database era
of information overload, and it’s often no fun for the average club player.
When we read a chess book, we shouldn’t feel like tourists in a strange land, asking
halting directions and then getting undecipherable answers from the native speaker. Our
memory, which reconstructs yet doesn’t necessarily comprehend, tends to work like a
storage chest: when it is too full, something old must be removed to make room for the
new. So very few of the lines picked for this book are elaborate theoretical climbs.
Instead, the repertoire was constructed with an eye to reaching two kinds of positions:
* Those where our side grabs extra space. Our opening philosophy is based on the blunt
declaration: “If you allow me to seize space, then I will do just that.”
* Clear positions, perfectly suited to the natural strategist. In this repertoire our goal is to
play 1 e4 like a peasant who seeks a simple, uninspiring life. Our repertoire in general
steers clear of the super-fashionable and merely seeks a solid foundation.
Opening fads change back and forth over the decades, yet with strategic lines the core
tends to remain the same. I have picked lines where, for the most part, our overall plan is
self-evident from the core structure.
Let’s take a look at our various battlegrounds:
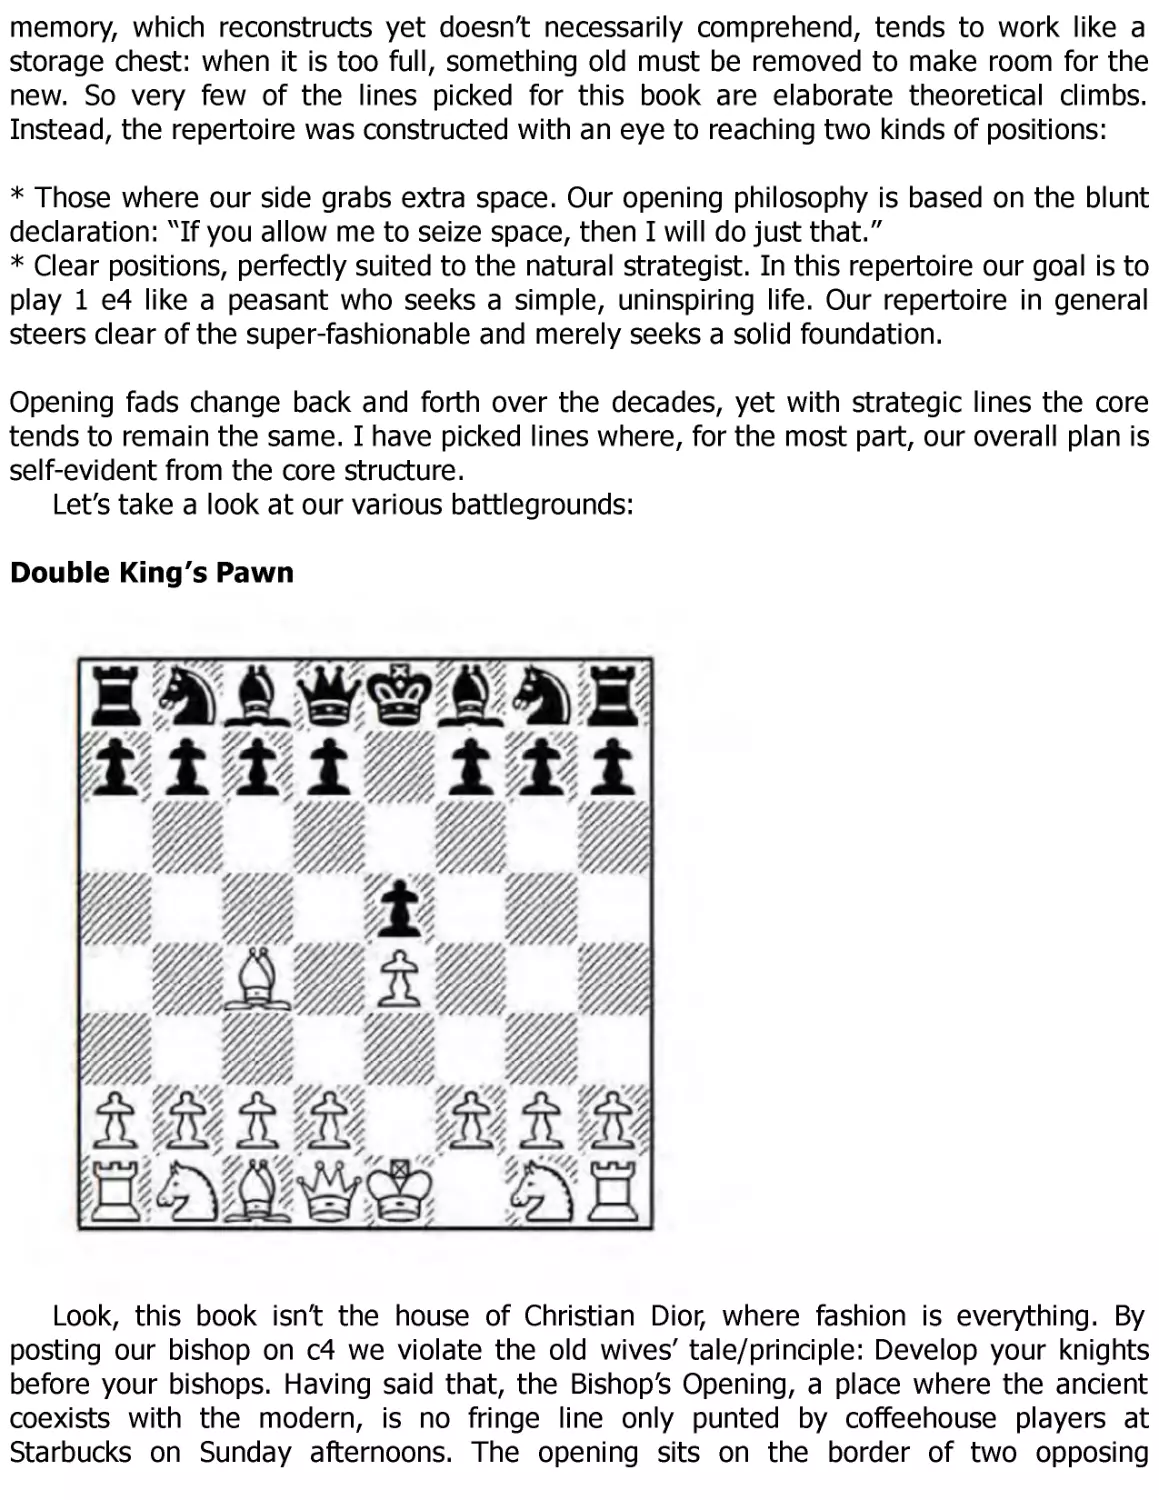
Double King’s Pawn
Look, this book isn’t the house of Christian Dior, where fashion is everything. By
posting our bishop on c4 we violate the old wives’ tale/principle: Develop your knights
before your bishops. Having said that, the Bishop’s Opening, a place where the ancient
coexists with the modern, is no fringe line only punted by coffeehouse players at
Starbucks on Sunday afternoons. The opening sits on the border of two opposing
counties: if White plays an early Nc3, the positions resemble the Vienna Game; if White
plays an early d2-d3 and c2-c3, we get Ruy-Lopez-like manoeuvring games, except
without the mountain of theory.
The value of the Bishop’s Opening lines lies not so much in the expectation of a
concrete advantage, as much as its practicality. First of all, we don’t need to study a line
against the Petroff’s Defence, which can arise from a 2 Nf3 move order. Secondly, the
Bishop’s Opening is dwarfed in popularity by lines like the Ruy Lopez and Scotch Game.
This means that your opponents are less likely to be up on the nuances.
You’ll notice that I have also included the Frankenstein-Dracula variation, which
certainly cannot be described as “positional”. That’s because I think it’s unsound, so the
positional player shouldn’t back off from playing the white side, even if it goes against our
natural style. But the reader is given a choice in any case, so you can always avoid it and
stick to d2-d3 and c2-c3 systems if you prefer.
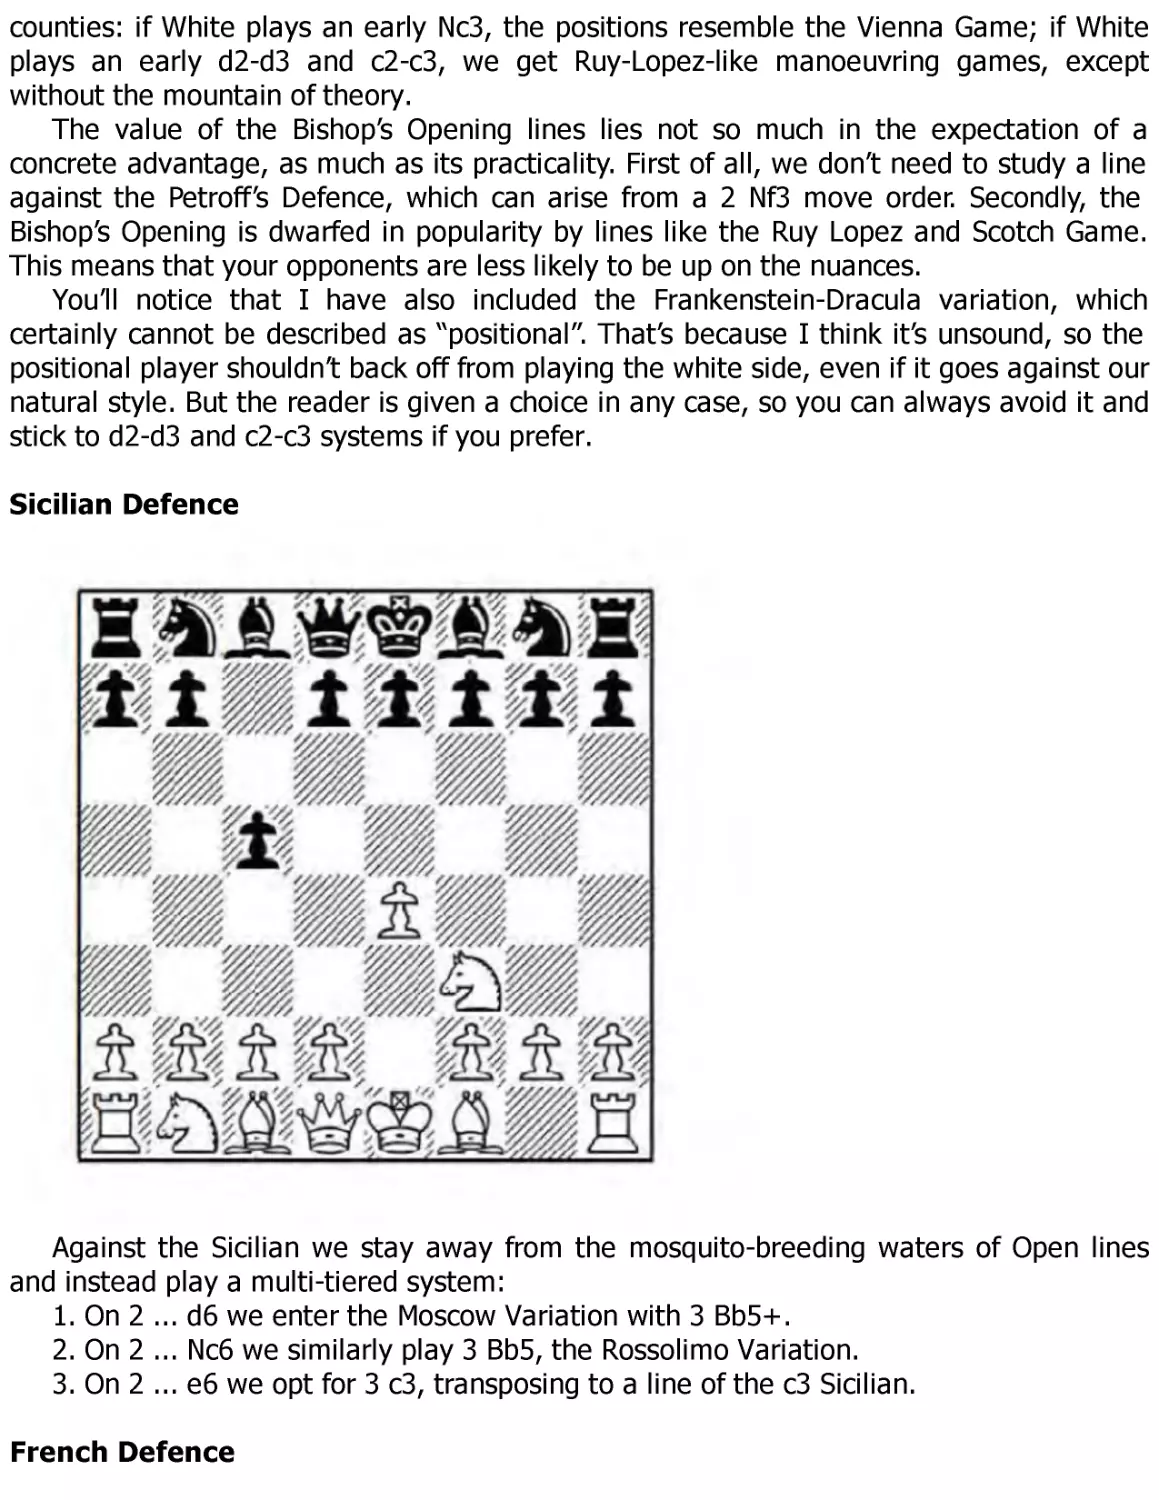
Sicilian Defence
Against the Sicilian we stay away from the mosquito-breeding waters of Open lines
and instead play a multi-tiered system:
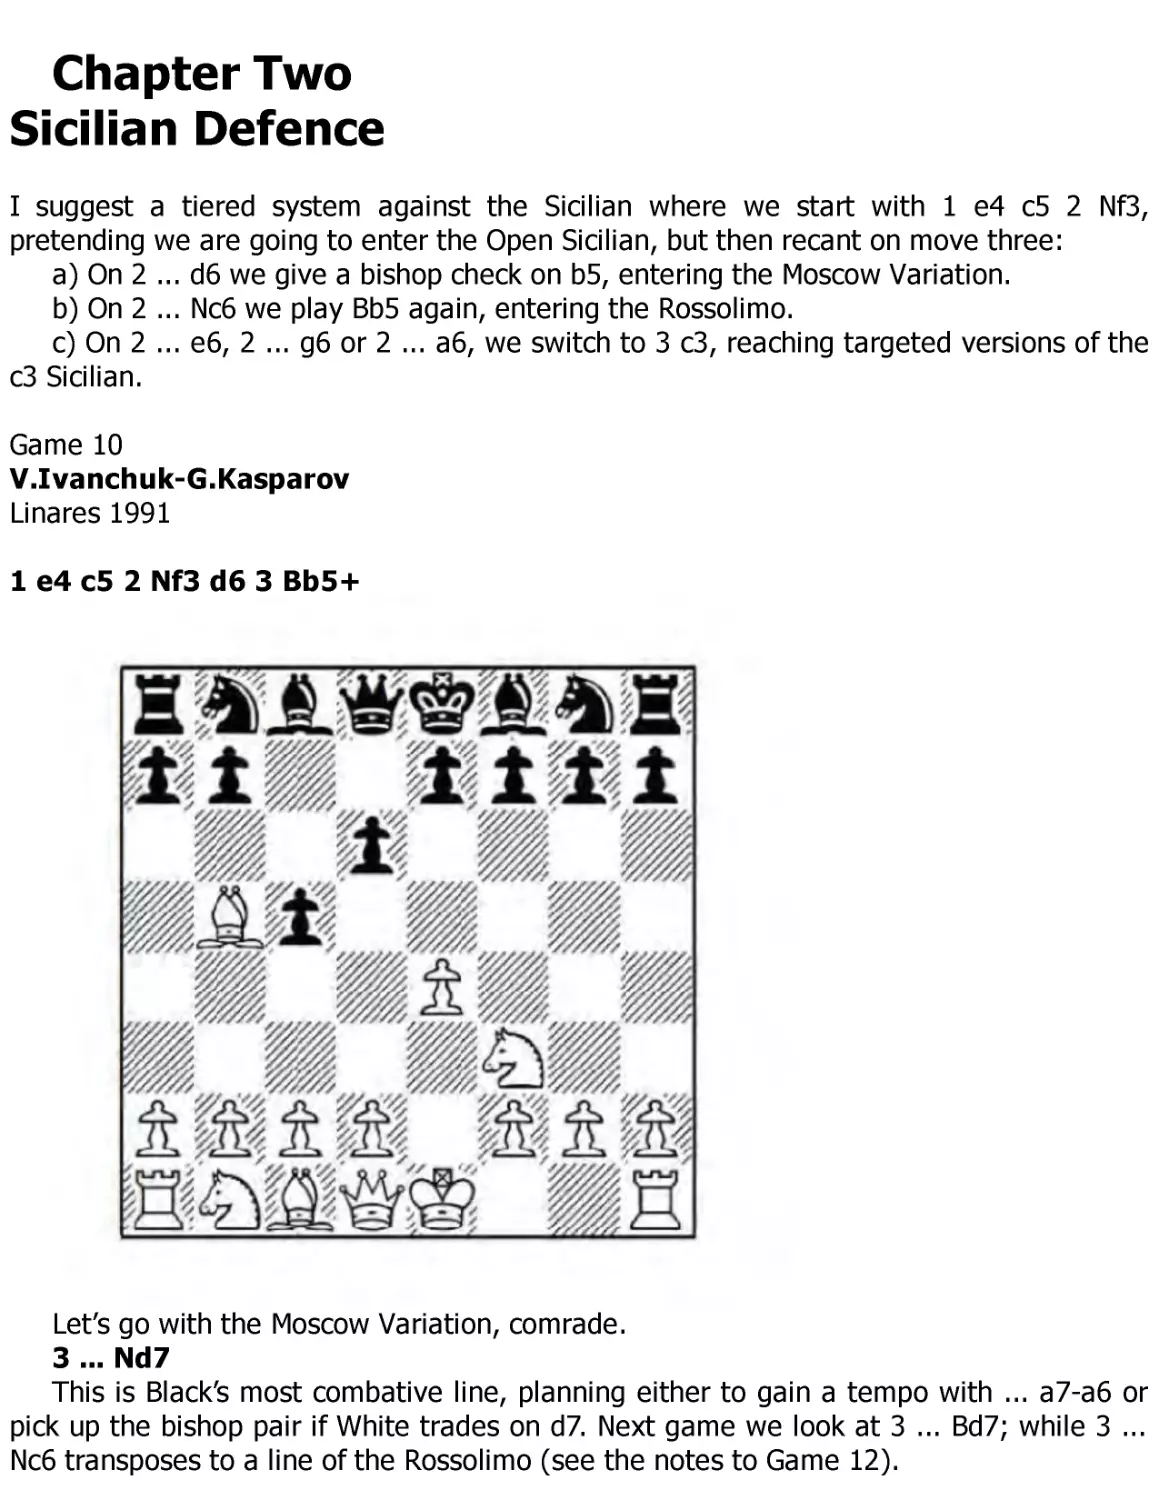
1. On 2 ... d6 we enter the Moscow Variation with 3 Bb5+.
2. On 2 ... Nc6 we similarly play 3 Bb5, the Rossolimo Variation.
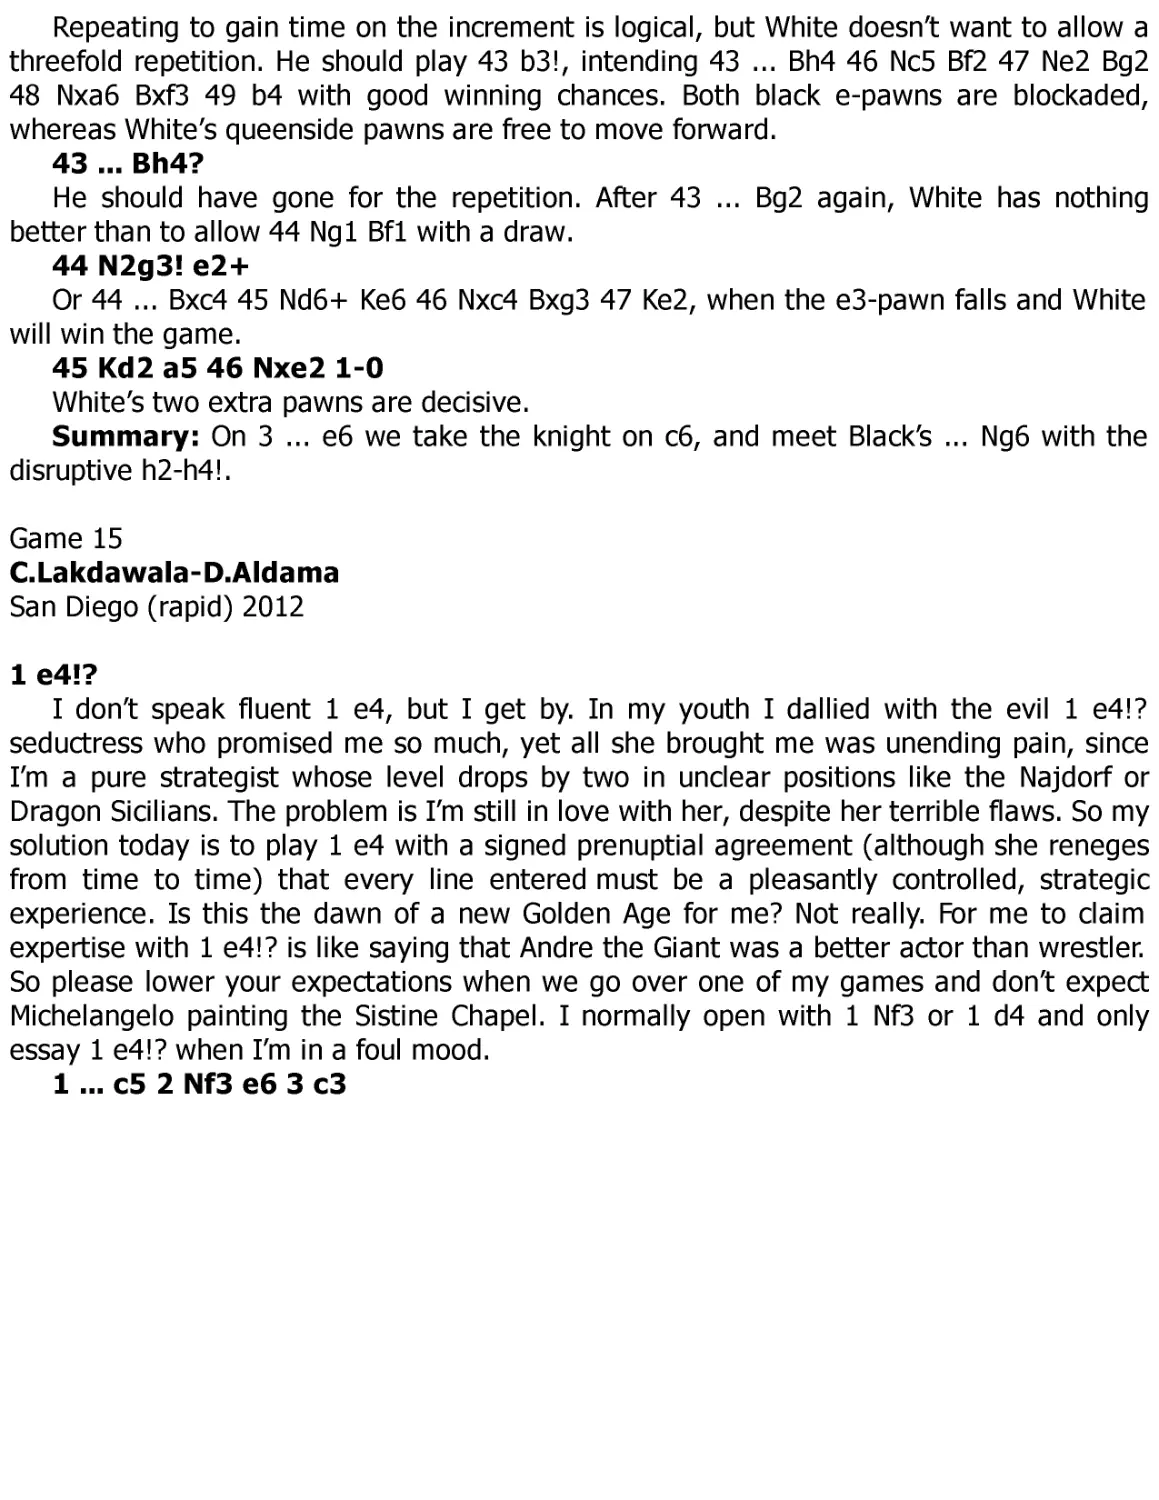
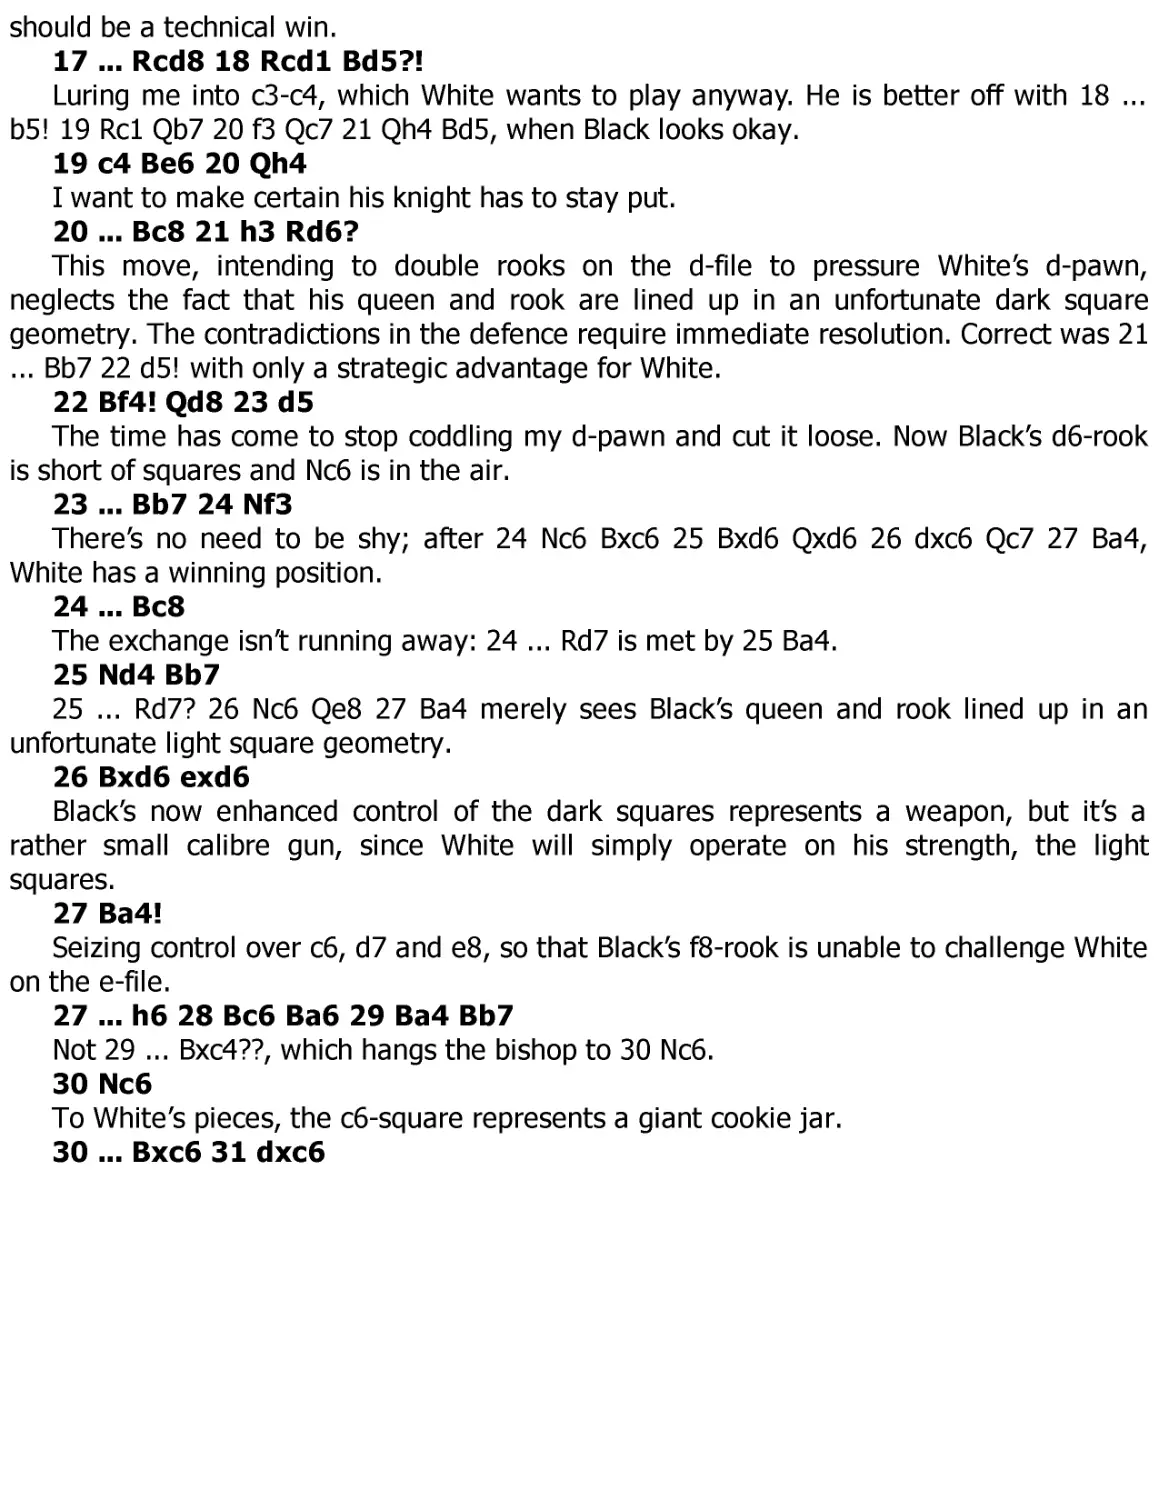
3. On 2 ... e6 we opt for 3 c3, transposing to a line of the c3 Sicilian.
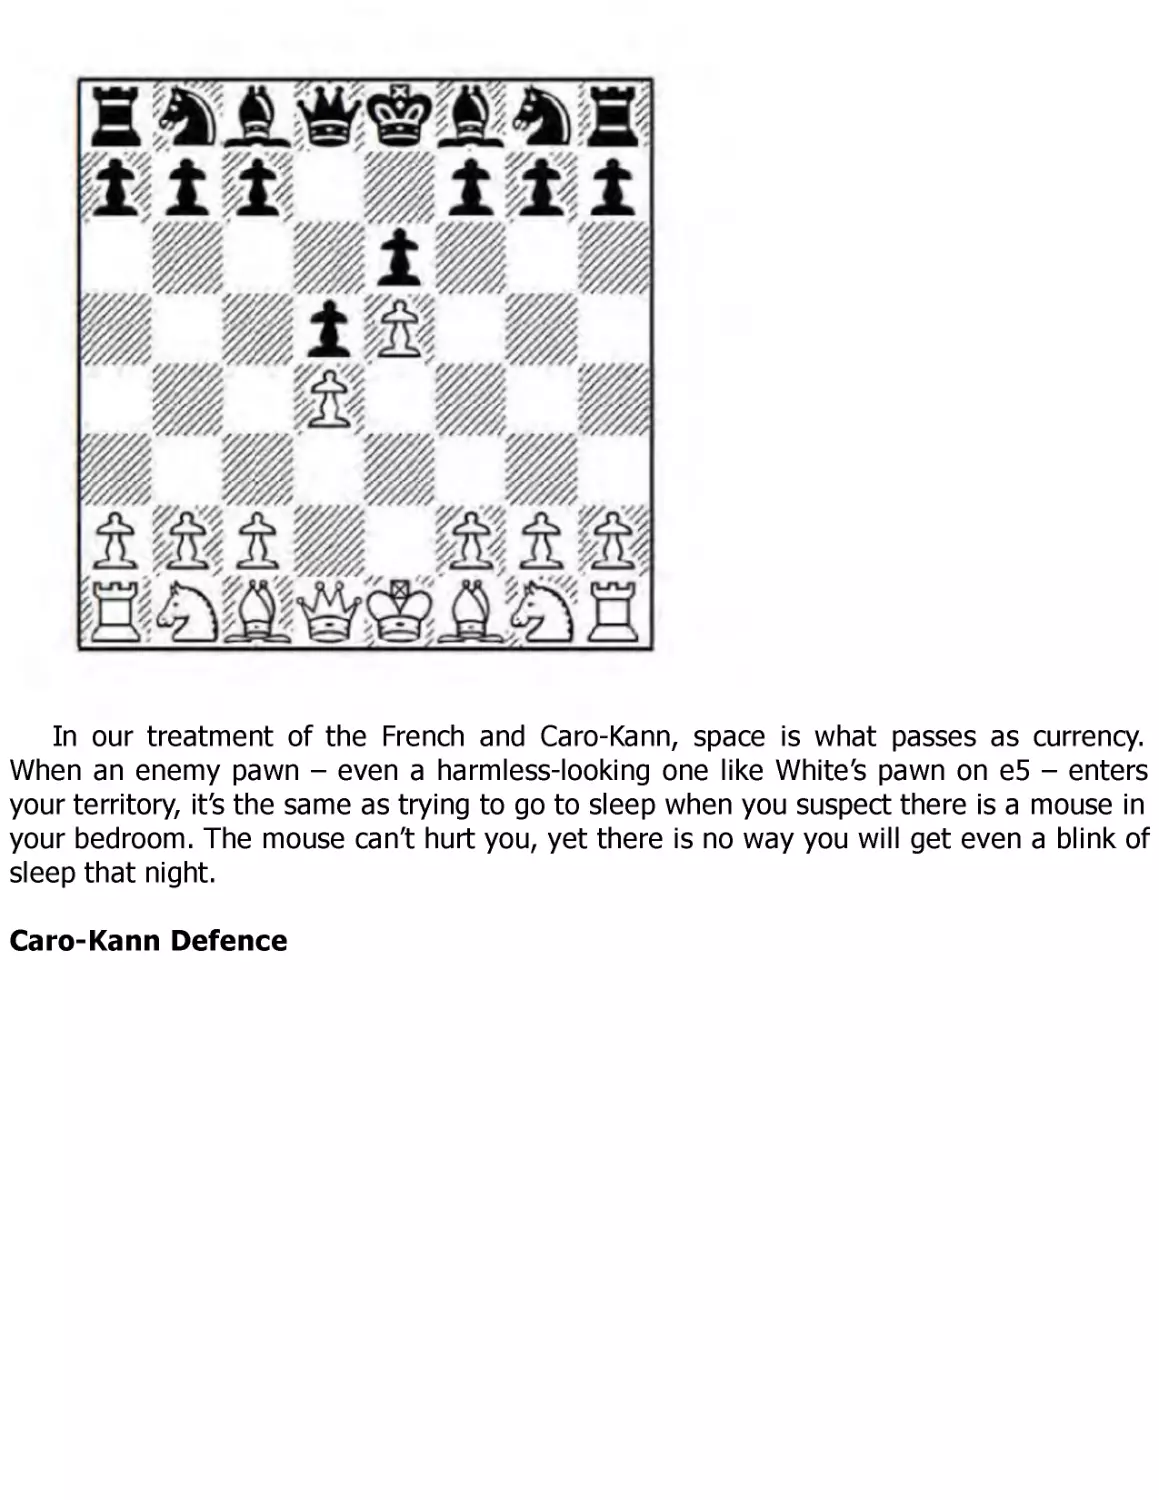
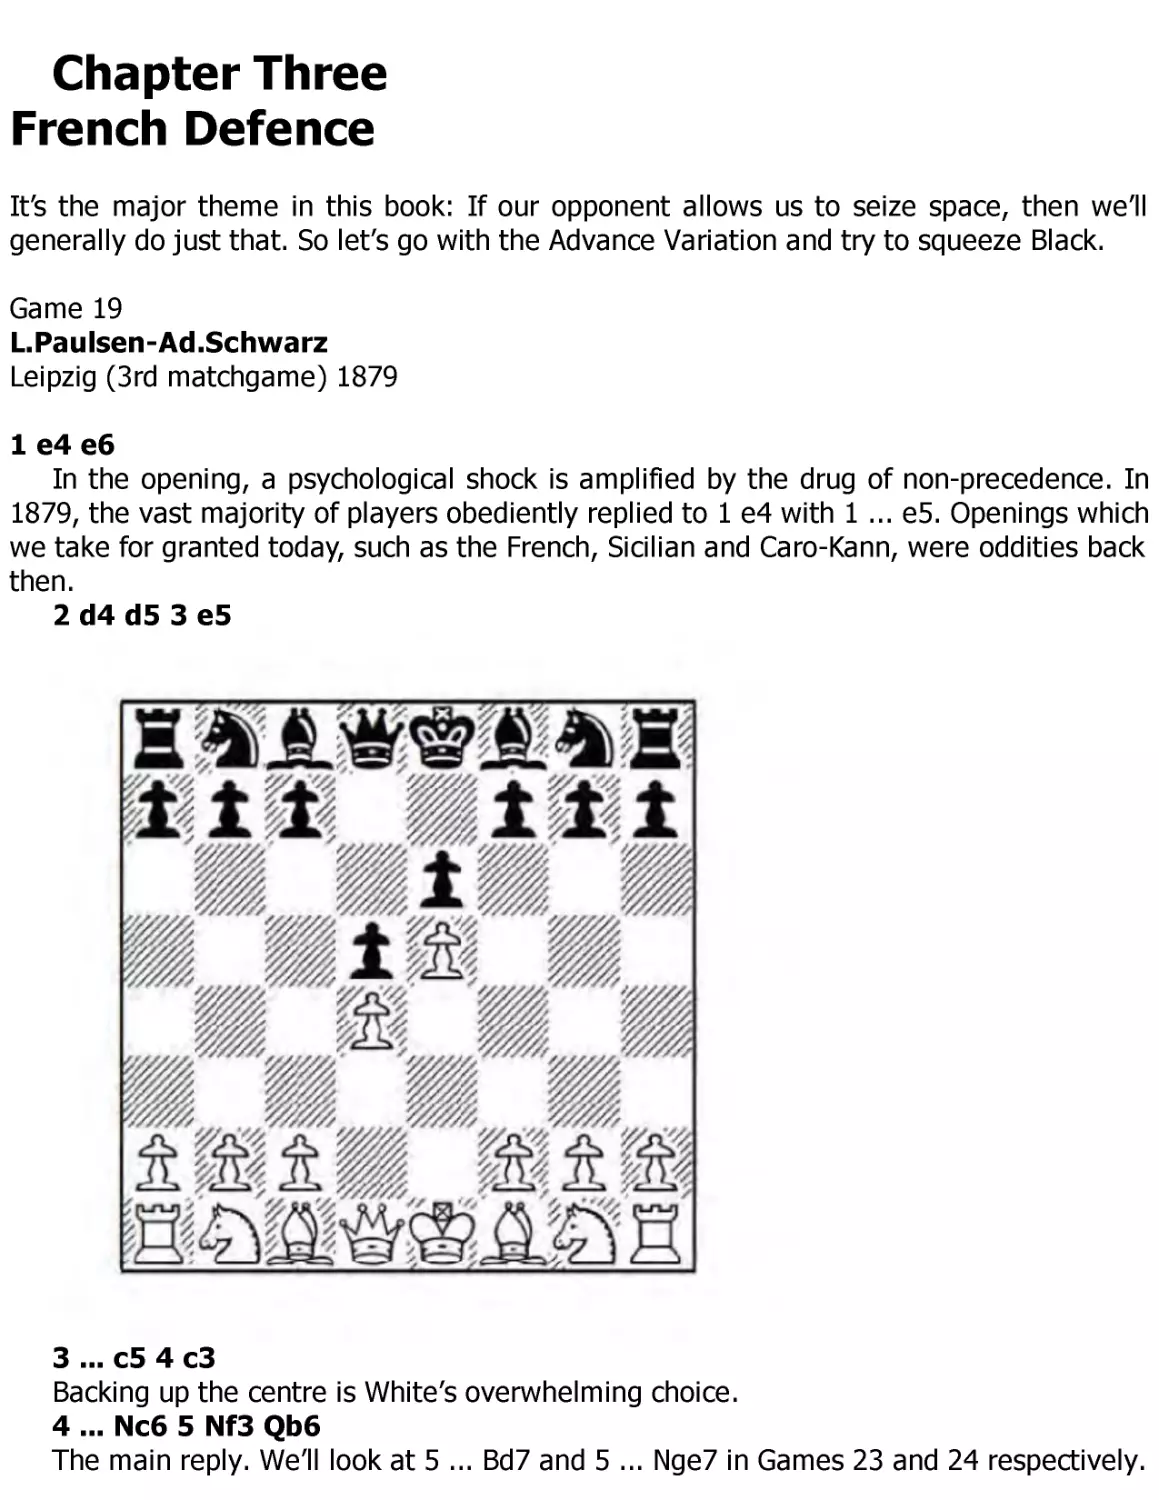
French Defence
In our treatment of the French and Caro-Kann, space is what passes as currency.
When an enemy pawn – even a harmless-looking one like White’s pawn on e5 – enters
your territory, it’s the same as trying to go to sleep when you suspect there is a mouse in
your bedroom. The mouse can’t hurt you, yet there is no way you will get even a blink of
sleep that night.
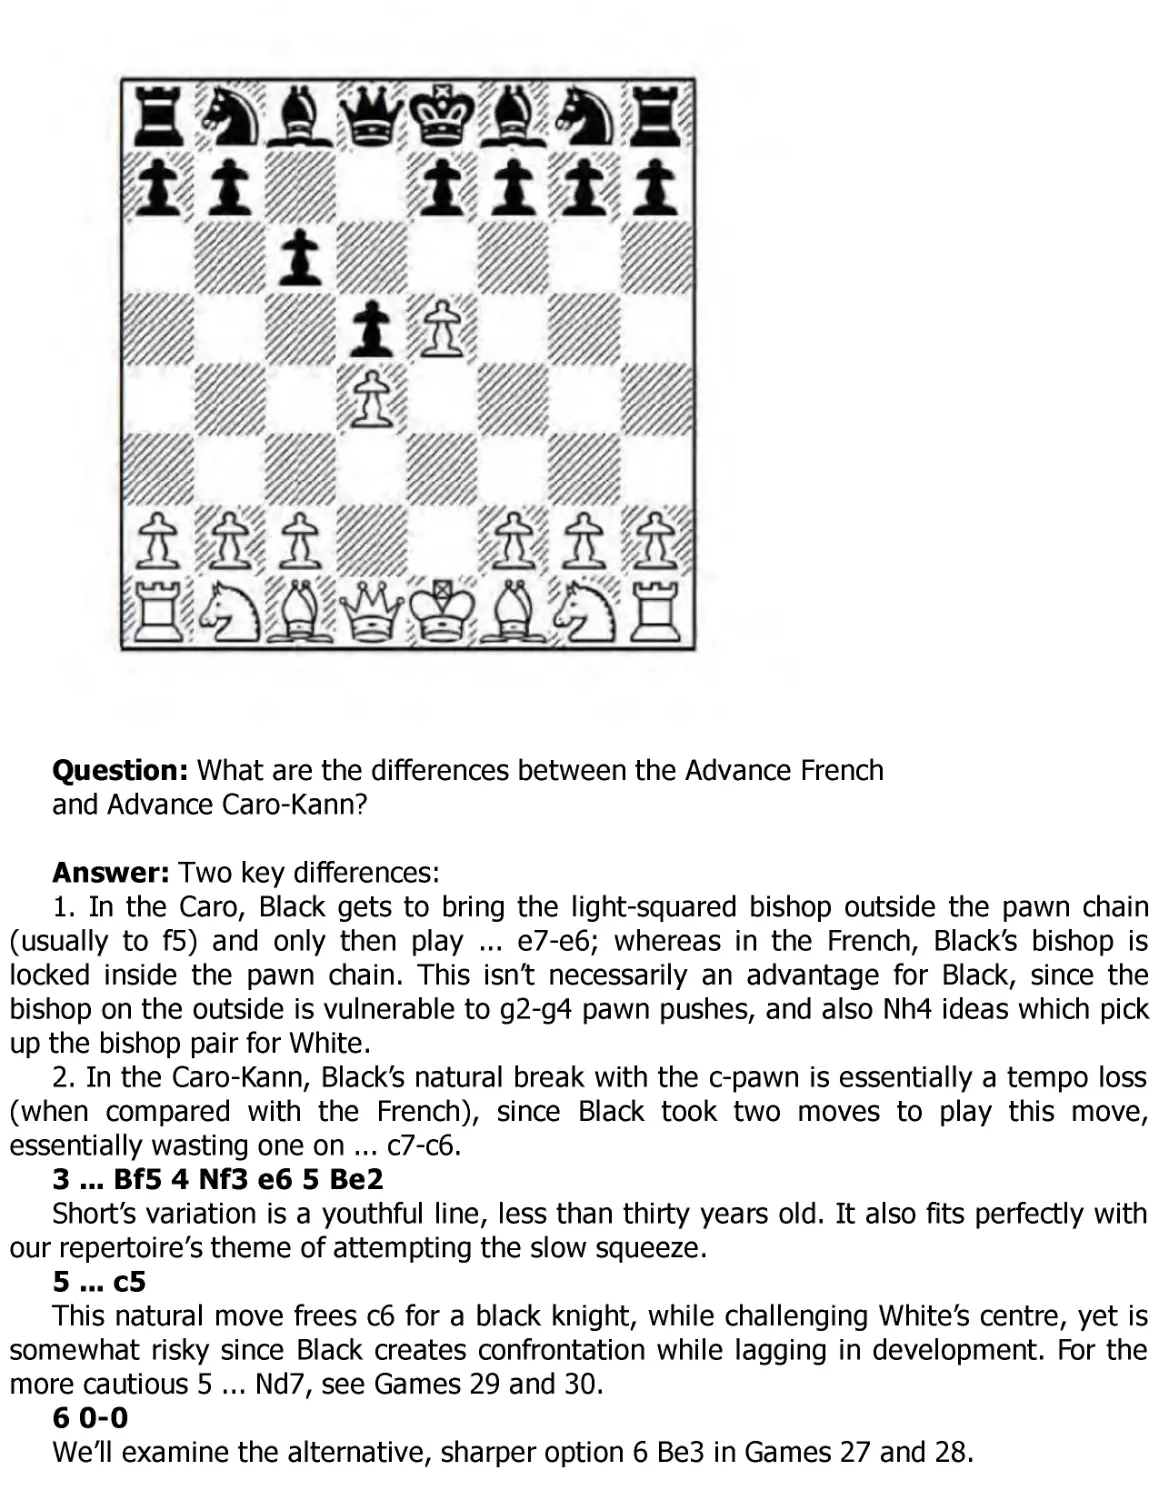
Caro-Kann Defence
The Advance Caro-Kann and Advance French are in fact different species, yet still
about as closely related as Cro-Magnon was to the Neanderthal.
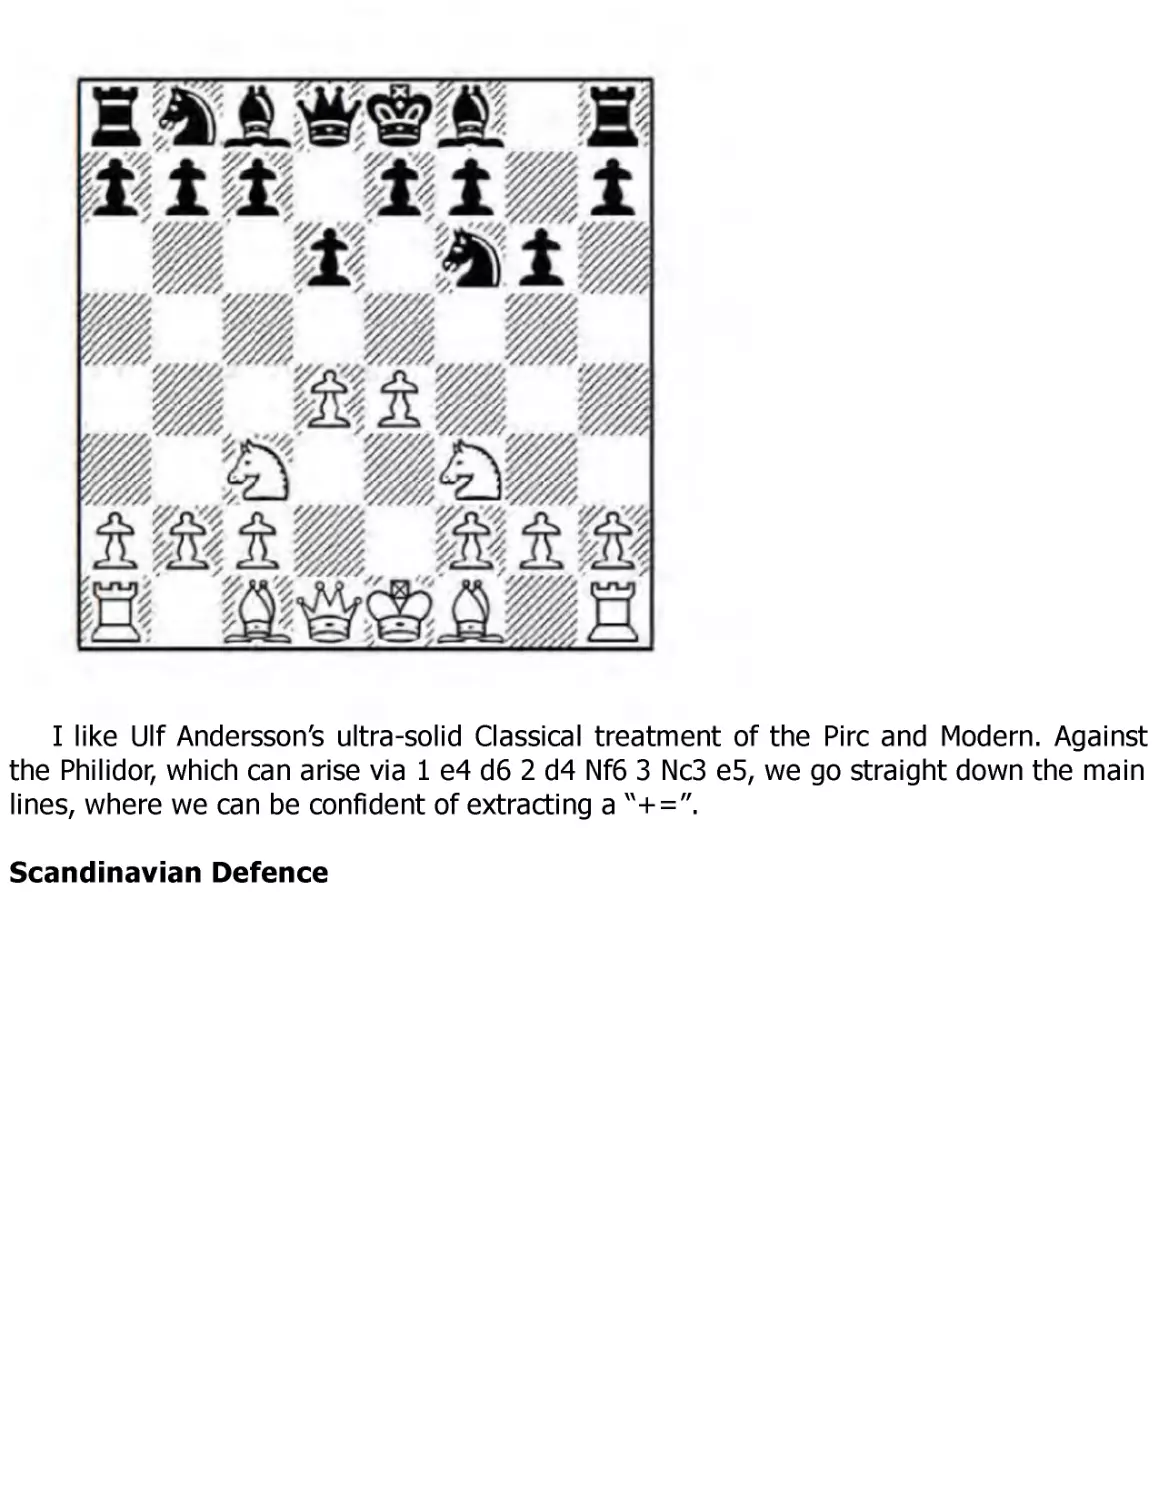
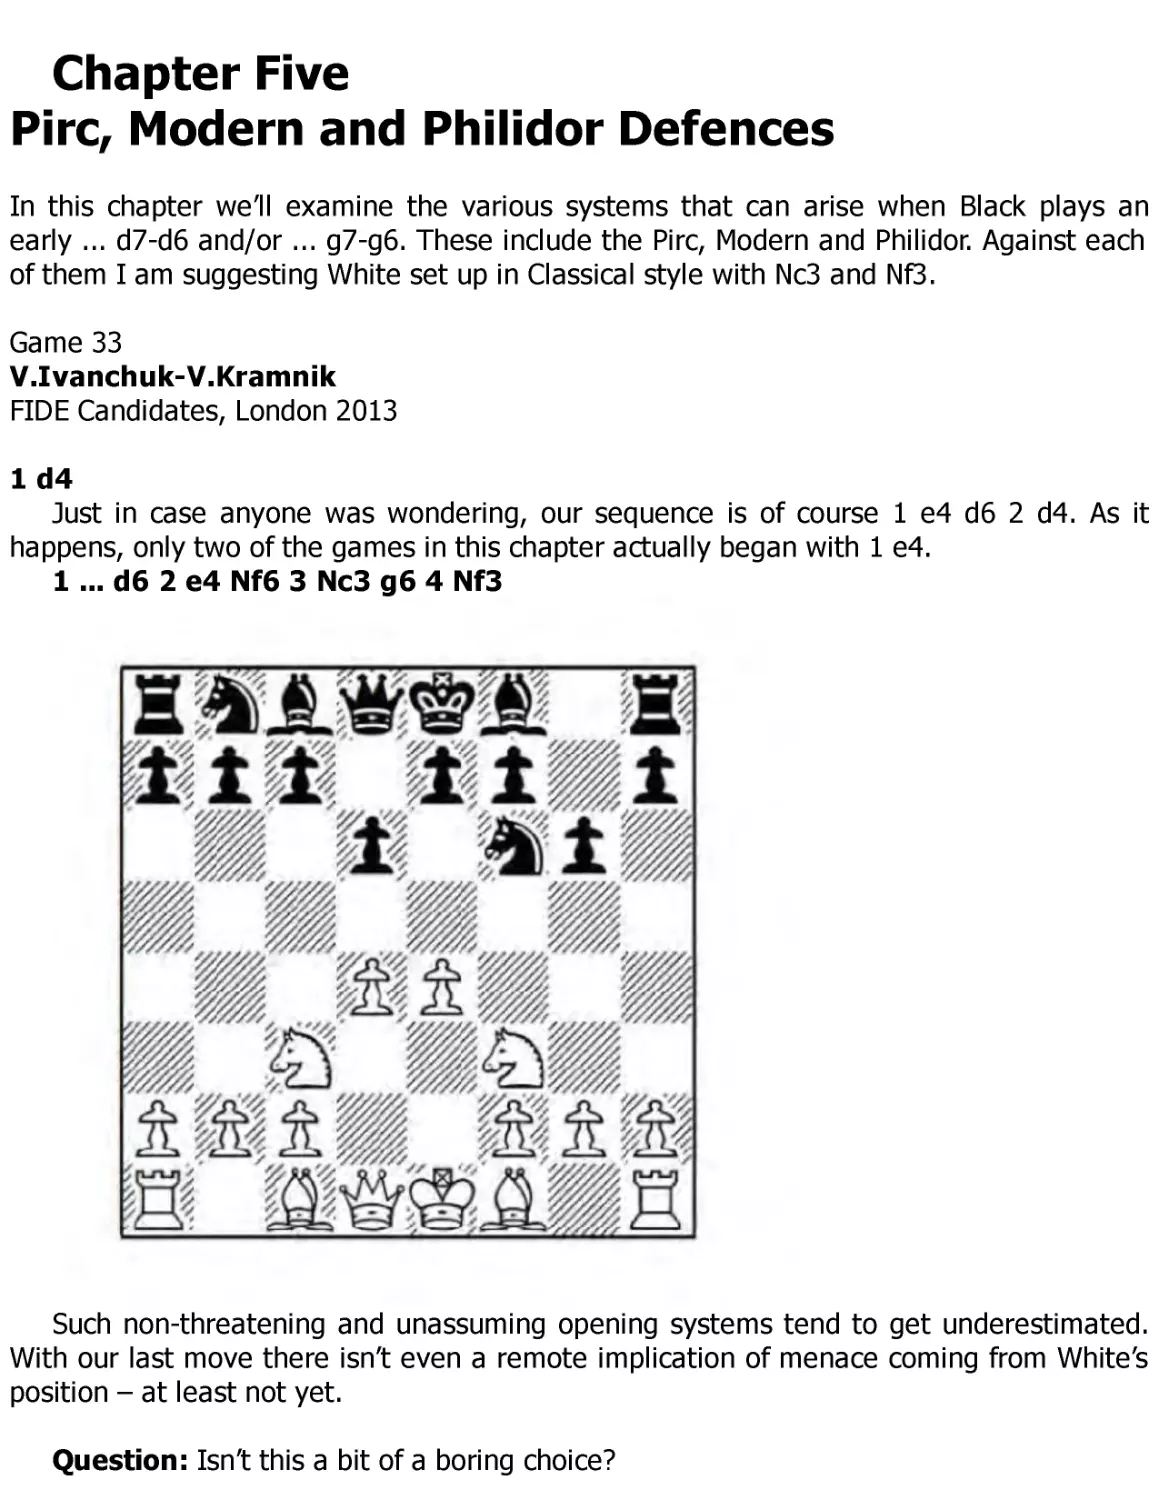
Pirc, Modern and Philidor Defences
I like Ulf Andersson’s ultra-solid Classical treatment of the Pirc and Modern. Against
the Philidor, which can arise via 1 e4 d6 2 d4 Nf6 3 Nc3 e5, we go straight down the main
lines, where we can be confident of extracting a “+=”.
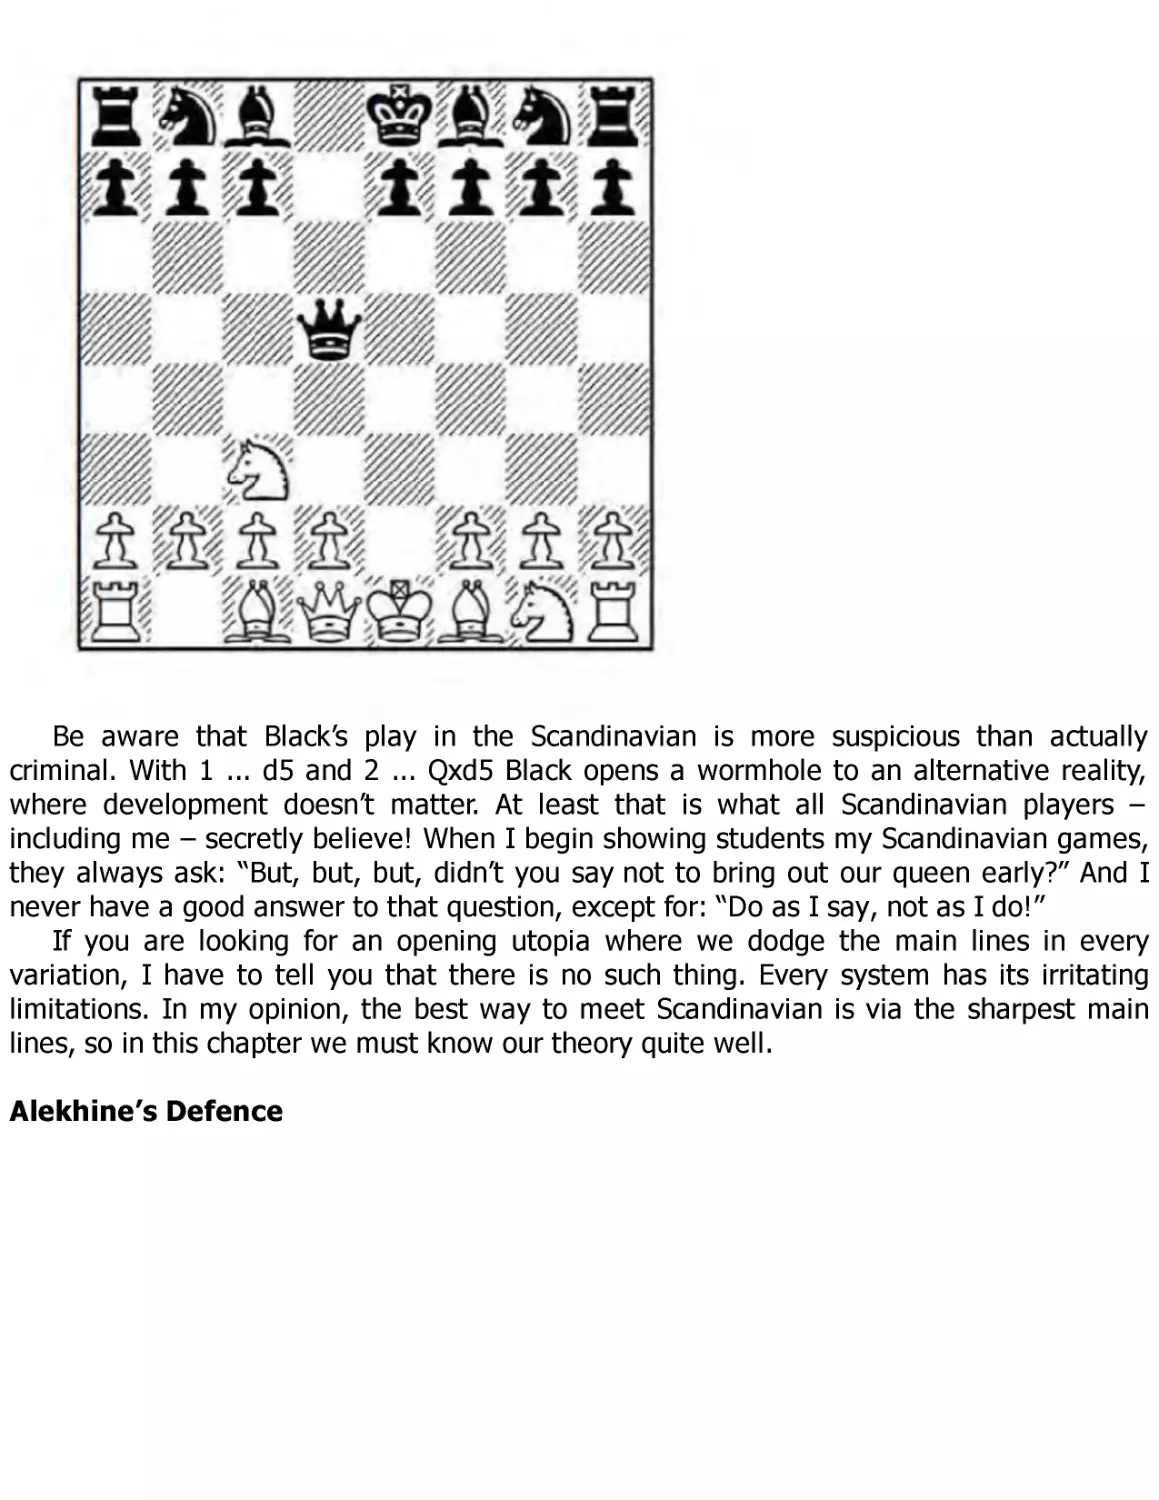
Scandinavian Defence
Be aware that Black’s play in the Scandinavian is more suspicious than actually
criminal. With 1 ... d5 and 2 ... Qxd5 Black opens a wormhole to an alternative reality,
where development doesn’t matter. At least that is what all Scandinavian players –
including me – secretly believe! When I begin showing students my Scandinavian games,
they always ask: “But, but, but, didn’t you say not to bring out our queen early?” And I
never have a good answer to that question, except for: “Do as I say, not as I do!”
If you are looking for an opening utopia where we dodge the main lines in every
variation, I have to tell you that there is no such thing. Every system has its irritating
limitations. In my opinion, the best way to meet Scandinavian is via the sharpest main
lines, so in this chapter we must know our theory quite well.
Alekhine’s Defence
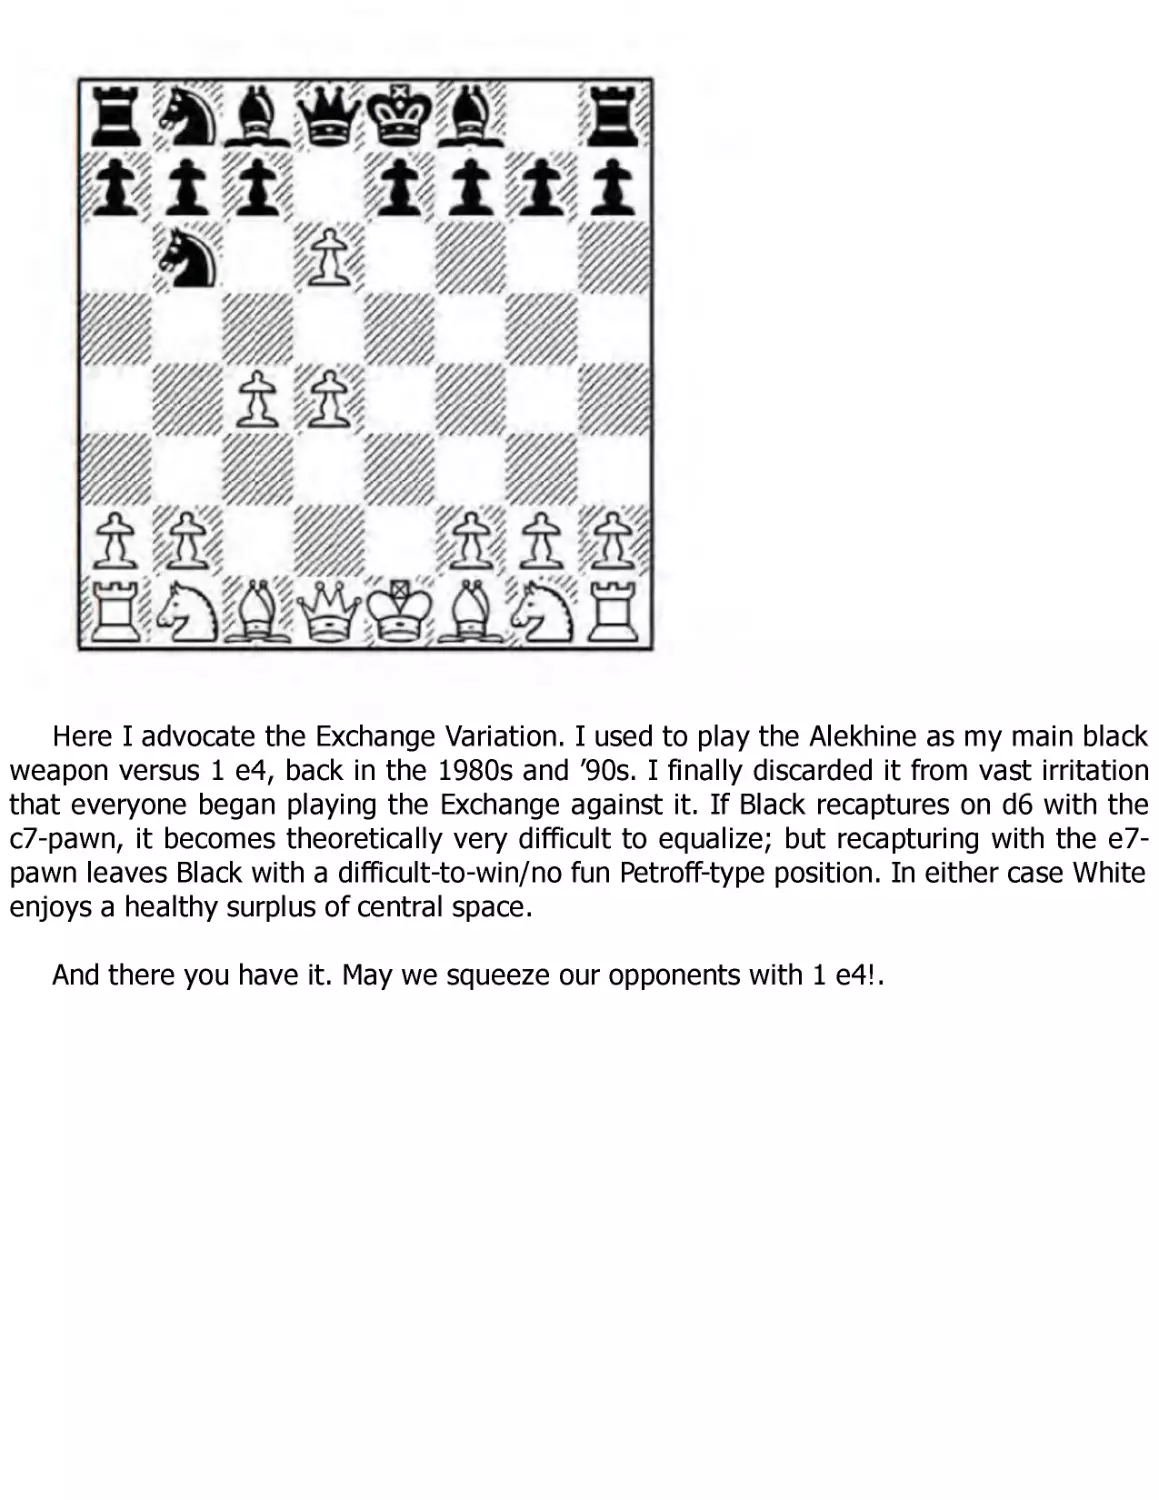
Here I advocate the Exchange Variation. I used to play the Alekhine as my main black
weapon versus 1 e4, back in the 1980s and ’90s. I finally discarded it from vast irritation
that everyone began playing the Exchange against it. If Black recaptures on d6 with the
c7-pawn, it becomes theoretically very difficult to equalize; but recapturing with the e7pawn leaves Black with a difficult-to-win/no fun Petroff-type position. In either case White
enjoys a healthy surplus of central space.
And there you have it. May we squeeze our opponents with 1 e4!.
Chapter One
Bishop’s Opening
In chess we all had checkered pasts, including flings with shady lines. You won’t see any
of those in this book, since it’s written for the hybrid 1 e4 player who is a strategist,
rather than a tactician. In this chapter I therefore advocate 1 e4 e5 2 Bc4.
I don’t know about you but when I was a kid my favourite trap was 2 ... Bc5 3 Qh5!!
Nf6?! 4 Qxf7 mate, after which I would take in the admiring looks of the other kids
observing my Morphyesque attacking skills. We are going to be a bit more subtle and
avoid my rather hasty third move. With the Bishop’s Opening, we attempt the crosspollination of the Italian Game and Closed Ruy Lopez with Nf3, d2-d3 and c2-c3, except
without the mounds of theory involved in both lines.
The Bishop’s Opening can also be played with an early Nc3, which leads to Vienna
Game positions. Either way the Bishop’s Opening has bite and is the serial killer with the
blandly non-threatening face of your next door neighbour.
Game 1
V.Ivanchuk-Bu Xiangzhi
Nanjing 2008
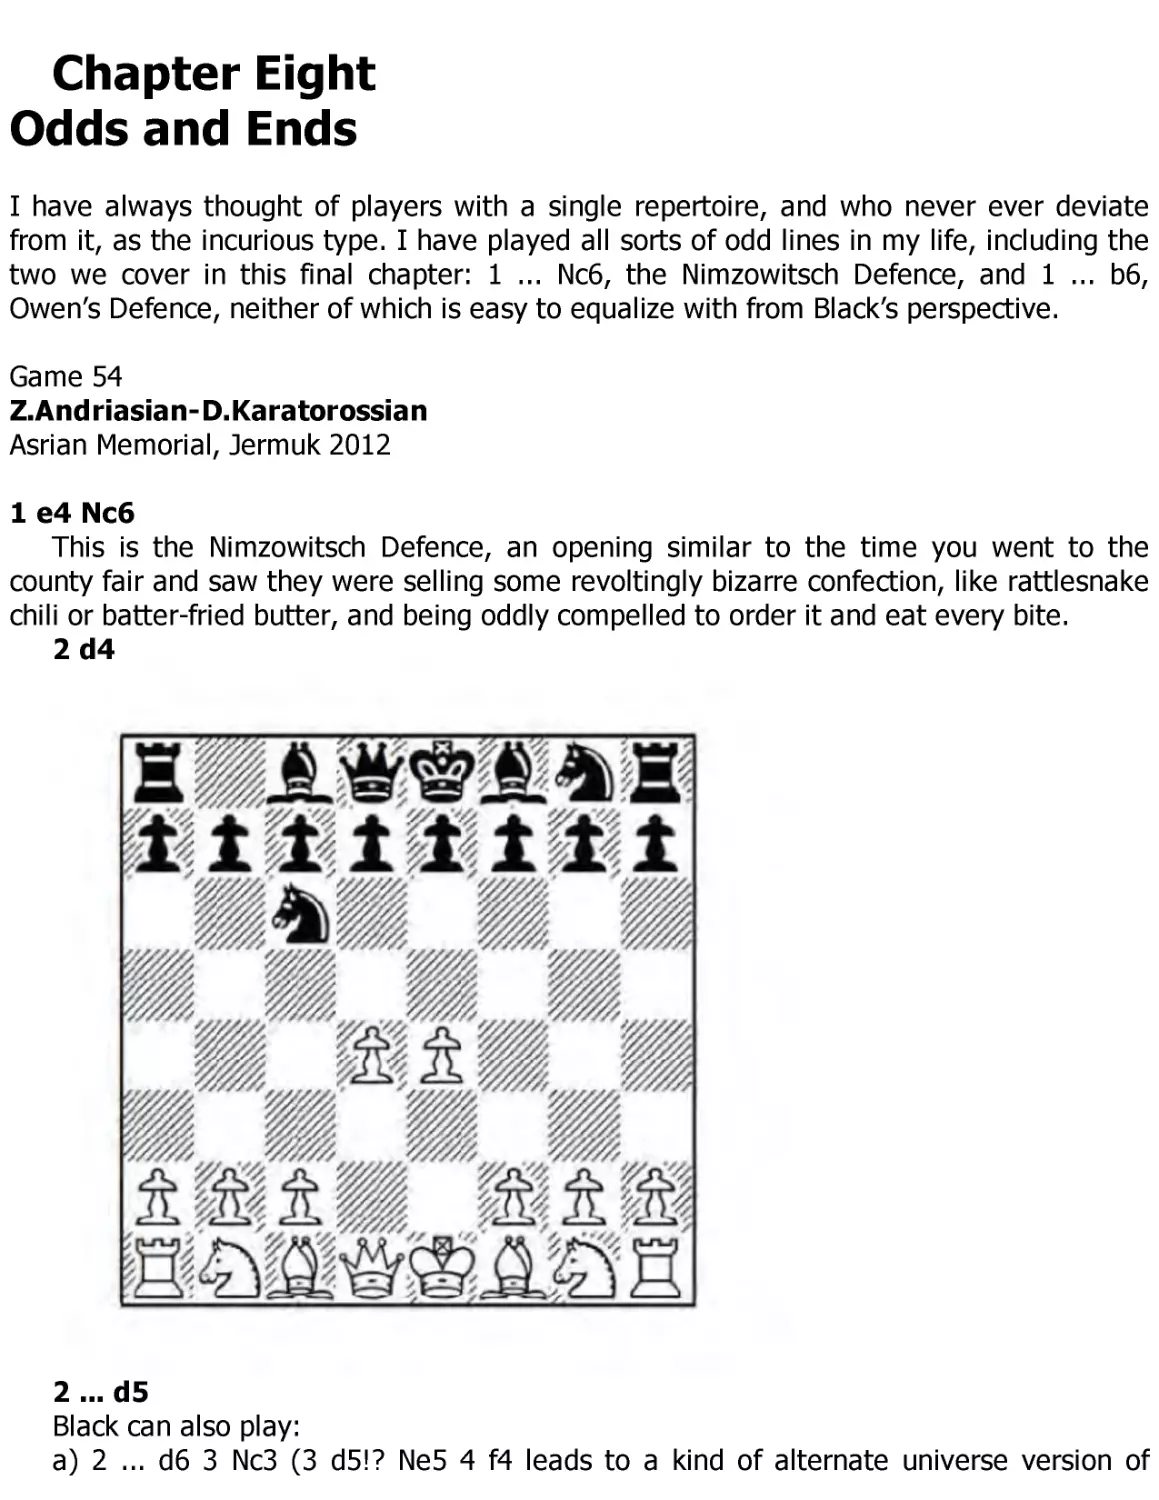
1 e4 e5 2 Nc3!?
Dammit! Ivanchuk’s move order messed me up in the very first game of the book.
2 ... Nf6 3 Bc4
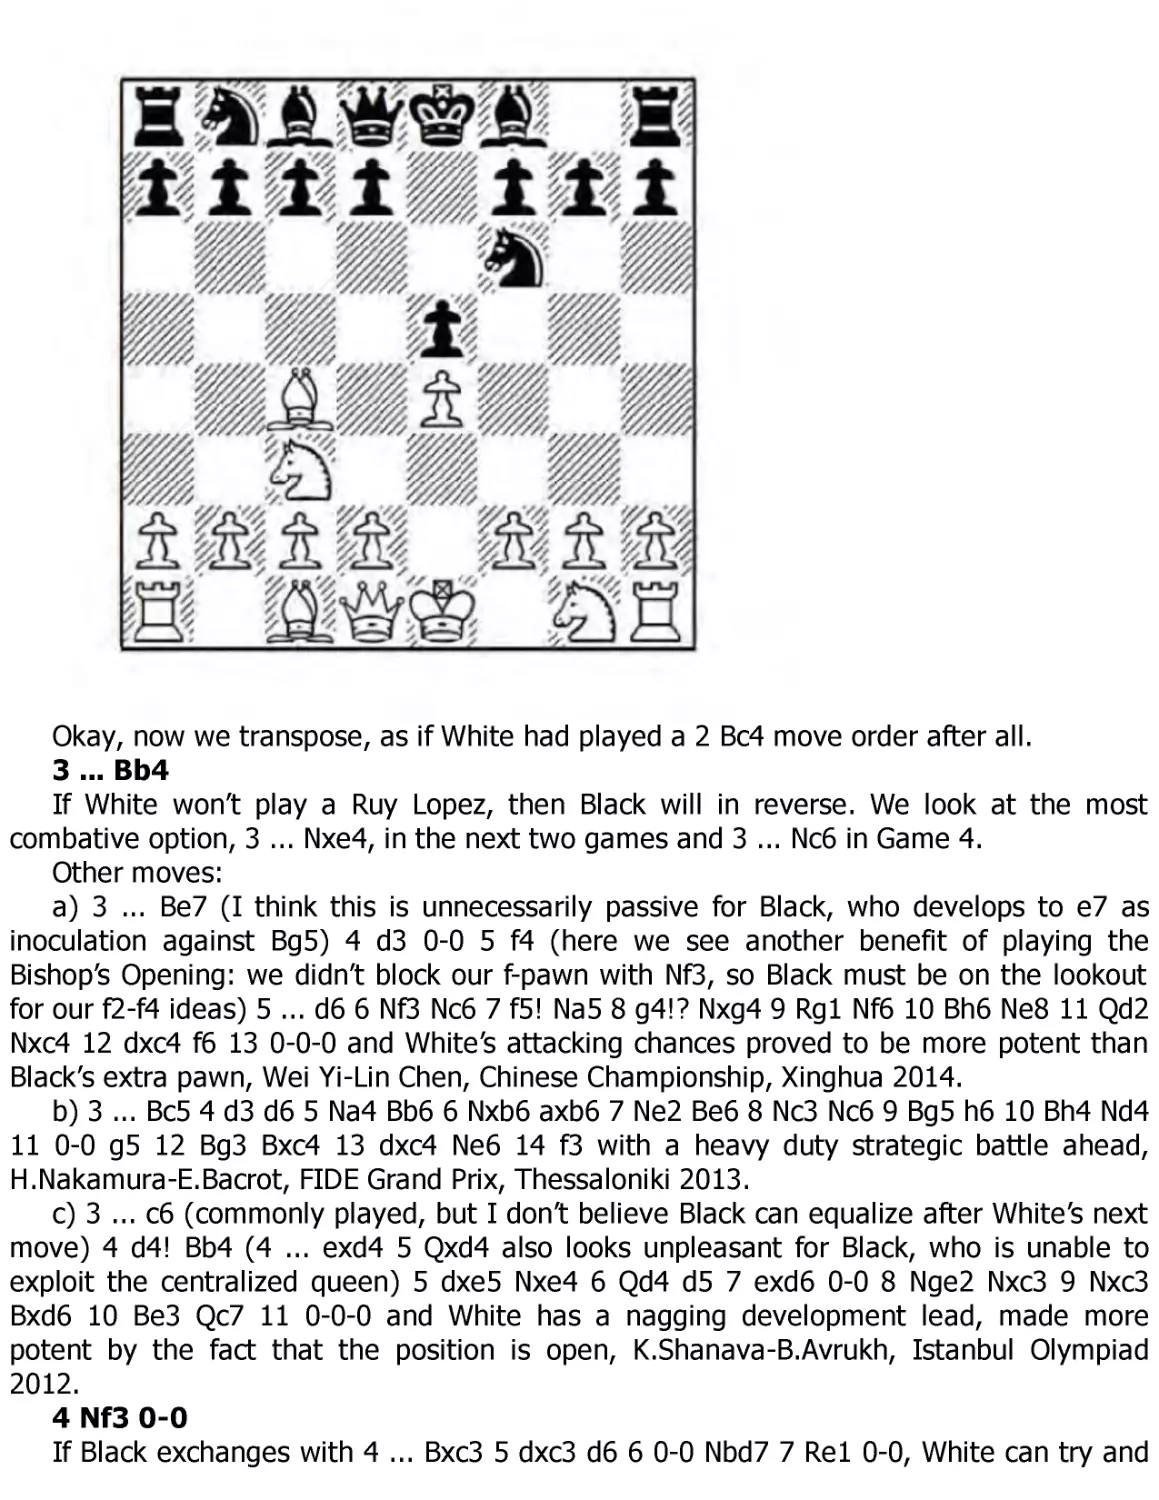
Okay, now we transpose, as if White had played a 2 Bc4 move order after all.
3 ... Bb4
If White won’t play a Ruy Lopez, then Black will in reverse. We look at the most
combative option, 3 ... Nxe4, in the next two games and 3 ... Nc6 in Game 4.
Other moves:
a) 3 ... Be7 (I think this is unnecessarily passive for Black, who develops to e7 as
inoculation against Bg5) 4 d3 0-0 5 f4 (here we see another benefit of playing the
Bishop’s Opening: we didn’t block our f-pawn with Nf3, so Black must be on the lookout
for our f2-f4 ideas) 5 ... d6 6 Nf3 Nc6 7 f5! Na5 8 g4!? Nxg4 9 Rg1 Nf6 10 Bh6 Ne8 11 Qd2
Nxc4 12 dxc4 f6 13 0-0-0 and White’s attacking chances proved to be more potent than
Black’s extra pawn, Wei Yi-Lin Chen, Chinese Championship, Xinghua 2014.
b) 3 ... Bc5 4 d3 d6 5 Na4 Bb6 6 Nxb6 axb6 7 Ne2 Be6 8 Nc3 Nc6 9 Bg5 h6 10 Bh4 Nd4
11 0-0 g5 12 Bg3 Bxc4 13 dxc4 Ne6 14 f3 with a heavy duty strategic battle ahead,
H.Nakamura-E.Bacrot, FIDE Grand Prix, Thessaloniki 2013.
c) 3 ... c6 (commonly played, but I don’t believe Black can equalize after White’s next
move) 4 d4! Bb4 (4 ... exd4 5 Qxd4 also looks unpleasant for Black, who is unable to
exploit the centralized queen) 5 dxe5 Nxe4 6 Qd4 d5 7 exd6 0-0 8 Nge2 Nxc3 9 Nxc3
Bxd6 10 Be3 Qc7 11 0-0-0 and White has a nagging development lead, made more
potent by the fact that the position is open, K.Shanava-B.Avrukh, Istanbul Olympiad
2012.
4 Nf3 0-0
If Black exchanges with 4 ... Bxc3 5 dxc3 d6 6 0-0 Nbd7 7 Re1 0-0, White can try and
make use of the bishop pair when the game opens up later on.
5 0-0 d6 6 Nd5!?
After 6 d3 Bxc3 7 bxc3 Be6 8 Bb3 Black looks fine.
6 ... Be6?!
Bu Xiangzhi tries a rare move which fails to equalize. Normal is 6 ... Nxd5 7 Bxd5 c6 8
Bb3 Bg4 9 c3 Ba5 10 h3 Bh5 11 d4 Nd7 12 Qd3 Bc7 13 Bg5 Qe8 (13 ... Nf6 14 dxe5 dxe5
15 Qxd8 Rfxd8 16 Nh4! offers White an edge in the ending) 14 g4 Bg6 15 Nh4, when I
like White’s aggressive position, Gild.Garcia-J.Sospedra Sebastian, Mislata 1993.
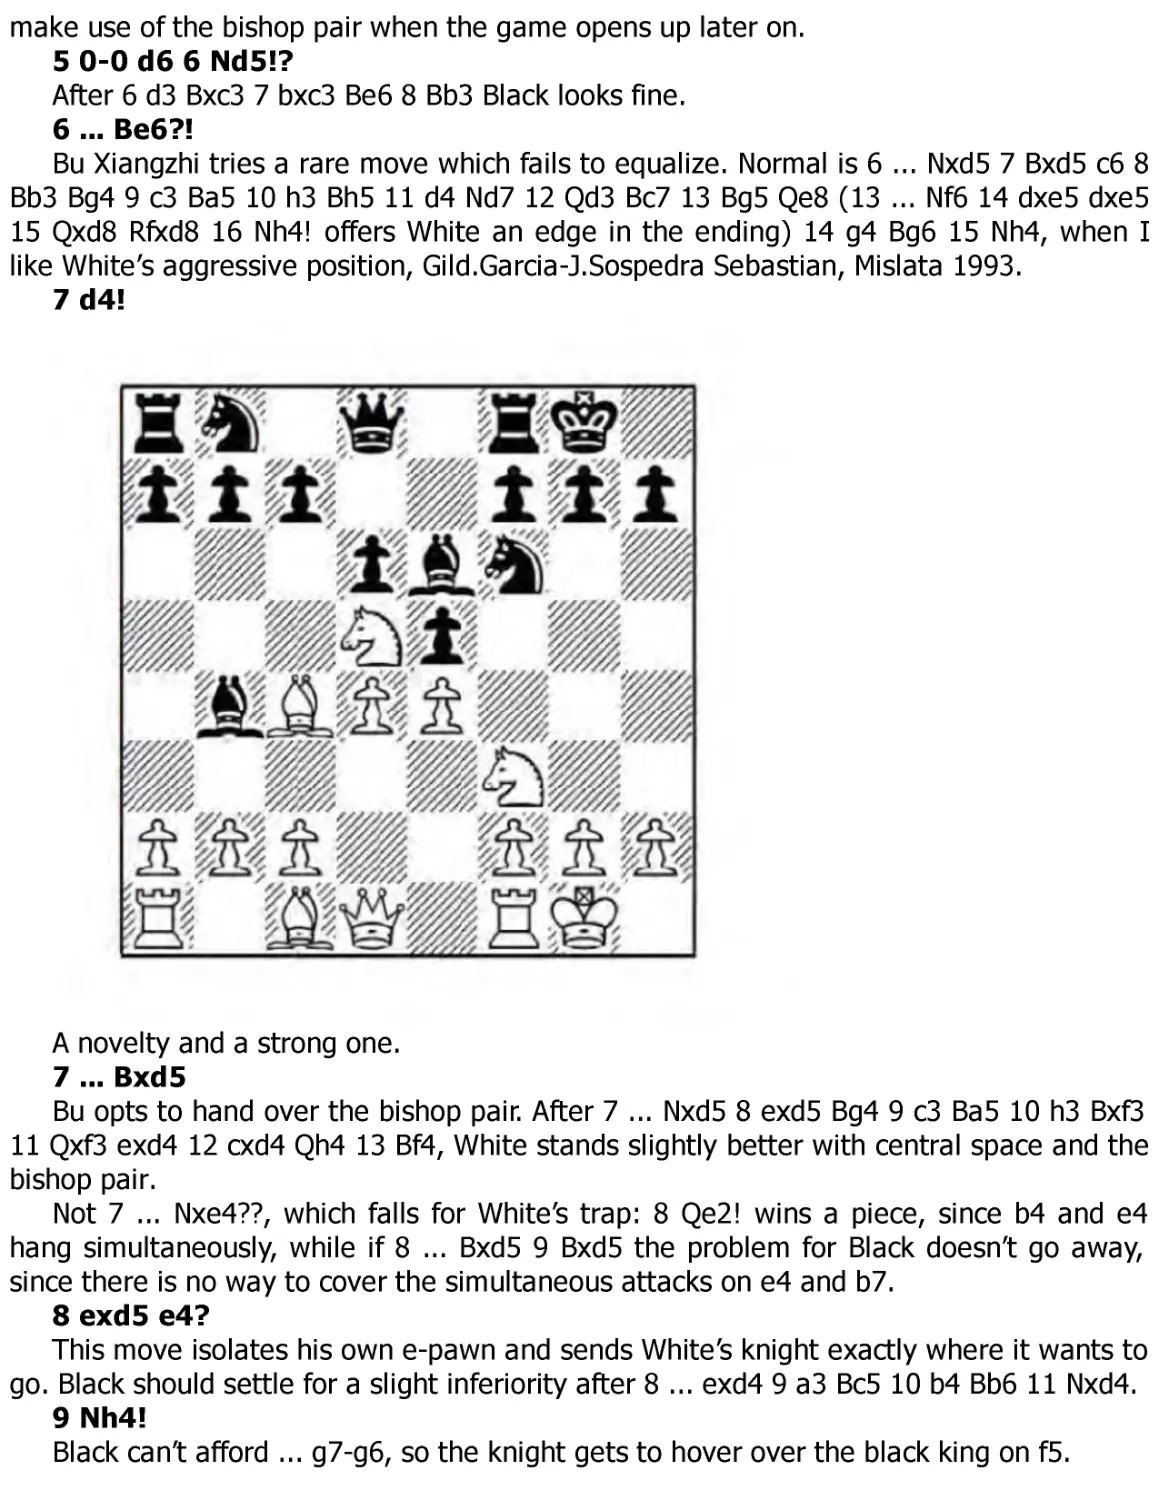
7 d4!
A novelty and a strong one.
7 ... Bxd5
Bu opts to hand over the bishop pair. After 7 ... Nxd5 8 exd5 Bg4 9 c3 Ba5 10 h3 Bxf3
11 Qxf3 exd4 12 cxd4 Qh4 13 Bf4, White stands slightly better with central space and the
bishop pair.
Not 7 ... Nxe4??, which falls for White’s trap: 8 Qe2! wins a piece, since b4 and e4
hang simultaneously, while if 8 ... Bxd5 9 Bxd5 the problem for Black doesn’t go away,
since there is no way to cover the simultaneous attacks on e4 and b7.
8 exd5 e4?
This move isolates his own e-pawn and sends White’s knight exactly where it wants to
go. Black should settle for a slight inferiority after 8 ... exd4 9 a3 Bc5 10 b4 Bb6 11 Nxd4.
9 Nh4!
Black can’t afford ... g7-g6, so the knight gets to hover over the black king on f5.
9 ... c6
Not 9 ... Nxd5?? 10 Bxd5 c6 because of 11 Nf5! cxd5 12 c3 Ba5 and now the winning
shot 13 Bh6! Qf6 14 Qg4, forcing 14 ... g6 15 Bxf8 with an extra exchange.
10 c3! Ba5
Taking the d5-pawn does not solve Black’s problems: 10 ... cxd5 (10 ... Nxd5?? is a
repeat of the previous blunder; i.e. 11 Nf5 Ba5 12 Bxd5 cxd5 13 Bh6! etc) 11 Bb3 Ba5 12
Bg5 Nbd7 13 Nf5 with mounting pressure for White.
11 Bg5 Nbd7
Not 11 ... h6? due to 12 Bxf6 Qxf6 13 Qg4 Re8 14 Rae1 and the e4-pawn falls, after
which Black is totally busted.
12 Nf5 Nb6
Attacking White’s bishop, as well as the d5-pawn ...
13 f3!!
... which Ivanchuk ignores! Our imagination is not limited merely to what we
presently understand. Ivanchuk offers a piece to open the f-file which, if accepted, would
devastate Black on f6 and g7. The rest of us would have played 13 Ne3, which gives
White the advantage but not as much as Ivanchuk’s move.
13 ... h6
The truth of White’s previous assertions suddenly dawns on Black’s bewildered
consciousness. This is that hated moment where we feel betrayed, since we met our
contractual obligations by following principles, and then the dreaded anomaly appears,
voiding the original agreement.
Bu’s move puts up the most resistance. After 13 ... exf3? 14 Qxf3 Nxc4 15 dxc6 bxc6
16 Nxg7 Nd2 17 Bxd2 Kxg7 18 Bg5, Black’s king is toast; while 13 ... Nxc4 14 fxe4 also
gives White a crushing attack, since there is no remedy to the coming Nxg7; for example,
14 ... Nxb2 15 Qc2 Nc4 16 dxc6 bxc6 17 Nxg7 Kxg7 18 Bxf6+ Qxf6 19 Rxf6 Kxf6 20 Qa4
d5 21 Qxc6+ Kg7 22 Rf1! f6 23 Qxd5 and wins.
14 Bh4 e3
Black must keep the f-file closed. 14 ... Nxc4 15 fxe4 is just as bad for Black as it was
a move earlier.
15 Qd3!
There is no reason to retreat the knight with 15 Nxe3.
15 ... Nxc4 16 Qxc4 Qd7!
Better than 16 ... cxd5 17 Qd3!, when Black’s kingside is tangled up.
17 Nxe3
All the same Ivanchuk has won a clean pawn with the superior position.
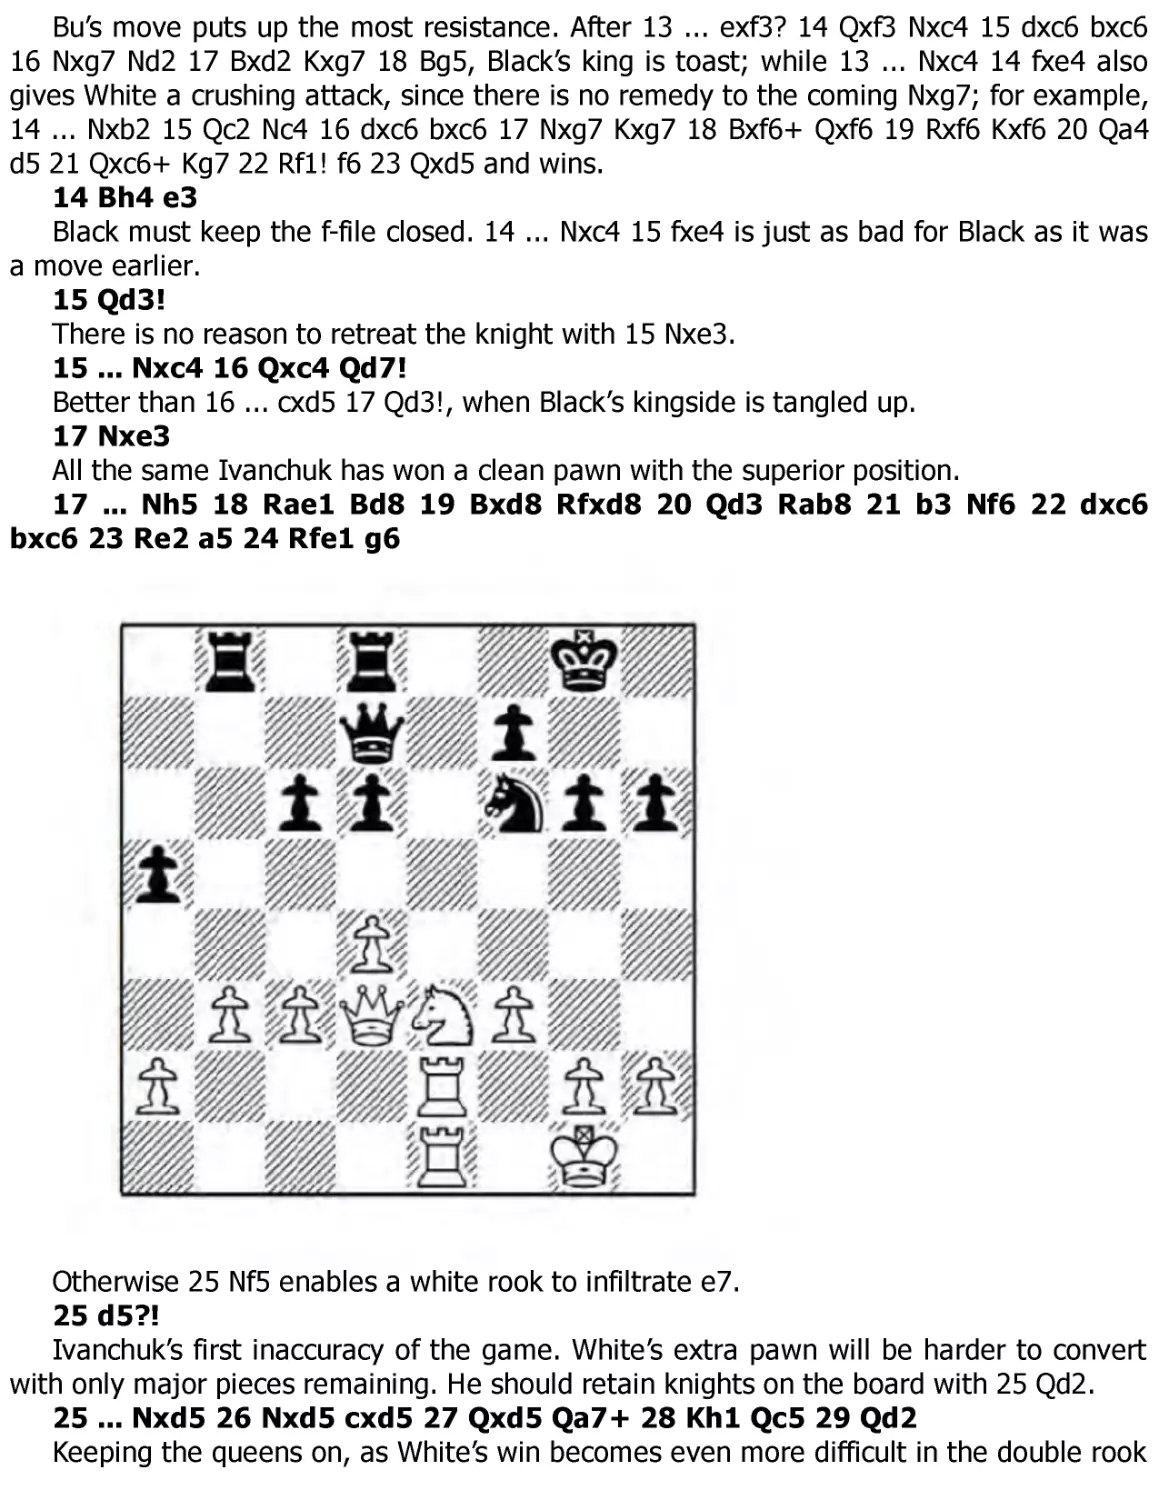
17 ... Nh5 18 Rae1 Bd8 19 Bxd8 Rfxd8 20 Qd3 Rab8 21 b3 Nf6 22 dxc6
bxc6 23 Re2 a5 24 Rfe1 g6
Otherwise 25 Nf5 enables a white rook to infiltrate e7.
25 d5?!
Ivanchuk’s first inaccuracy of the game. White’s extra pawn will be harder to convert
with only major pieces remaining. He should retain knights on the board with 25 Qd2.
25 ... Nxd5 26 Nxd5 cxd5 27 Qxd5 Qa7+ 28 Kh1 Qc5 29 Qd2
Keeping the queens on, as White’s win becomes even more difficult in the double rook
ending after 29 Qxc5?! dxc5.
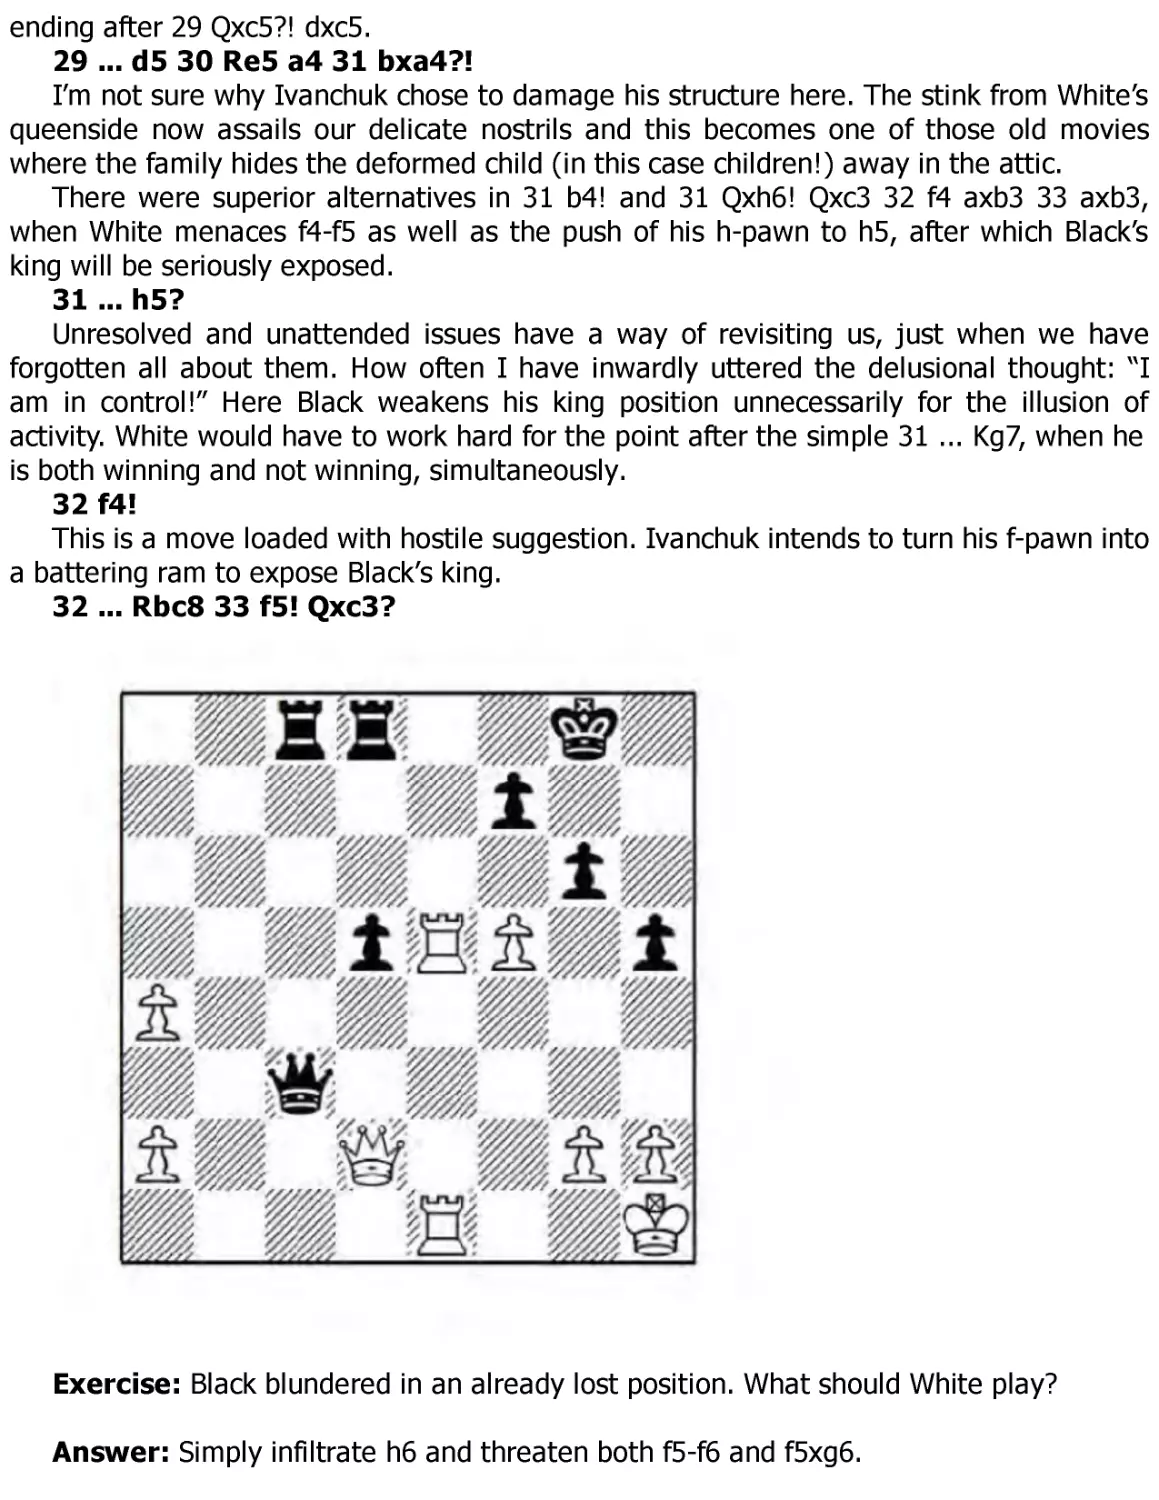
29 ... d5 30 Re5 a4 31 bxa4?!
I’m not sure why Ivanchuk chose to damage his structure here. The stink from White’s
queenside now assails our delicate nostrils and this becomes one of those old movies
where the family hides the deformed child (in this case children!) away in the attic.
There were superior alternatives in 31 b4! and 31 Qxh6! Qxc3 32 f4 axb3 33 axb3,
when White menaces f4-f5 as well as the push of his h-pawn to h5, after which Black’s
king will be seriously exposed.
31 ... h5?
Unresolved and unattended issues have a way of revisiting us, just when we have
forgotten all about them. How often I have inwardly uttered the delusional thought: “I
am in control!” Here Black weakens his king position unnecessarily for the illusion of
activity. White would have to work hard for the point after the simple 31 ... Kg7, when he
is both winning and not winning, simultaneously.
32 f4!
This is a move loaded with hostile suggestion. Ivanchuk intends to turn his f-pawn into
a battering ram to expose Black’s king.
32 ... Rbc8 33 f5! Qxc3?
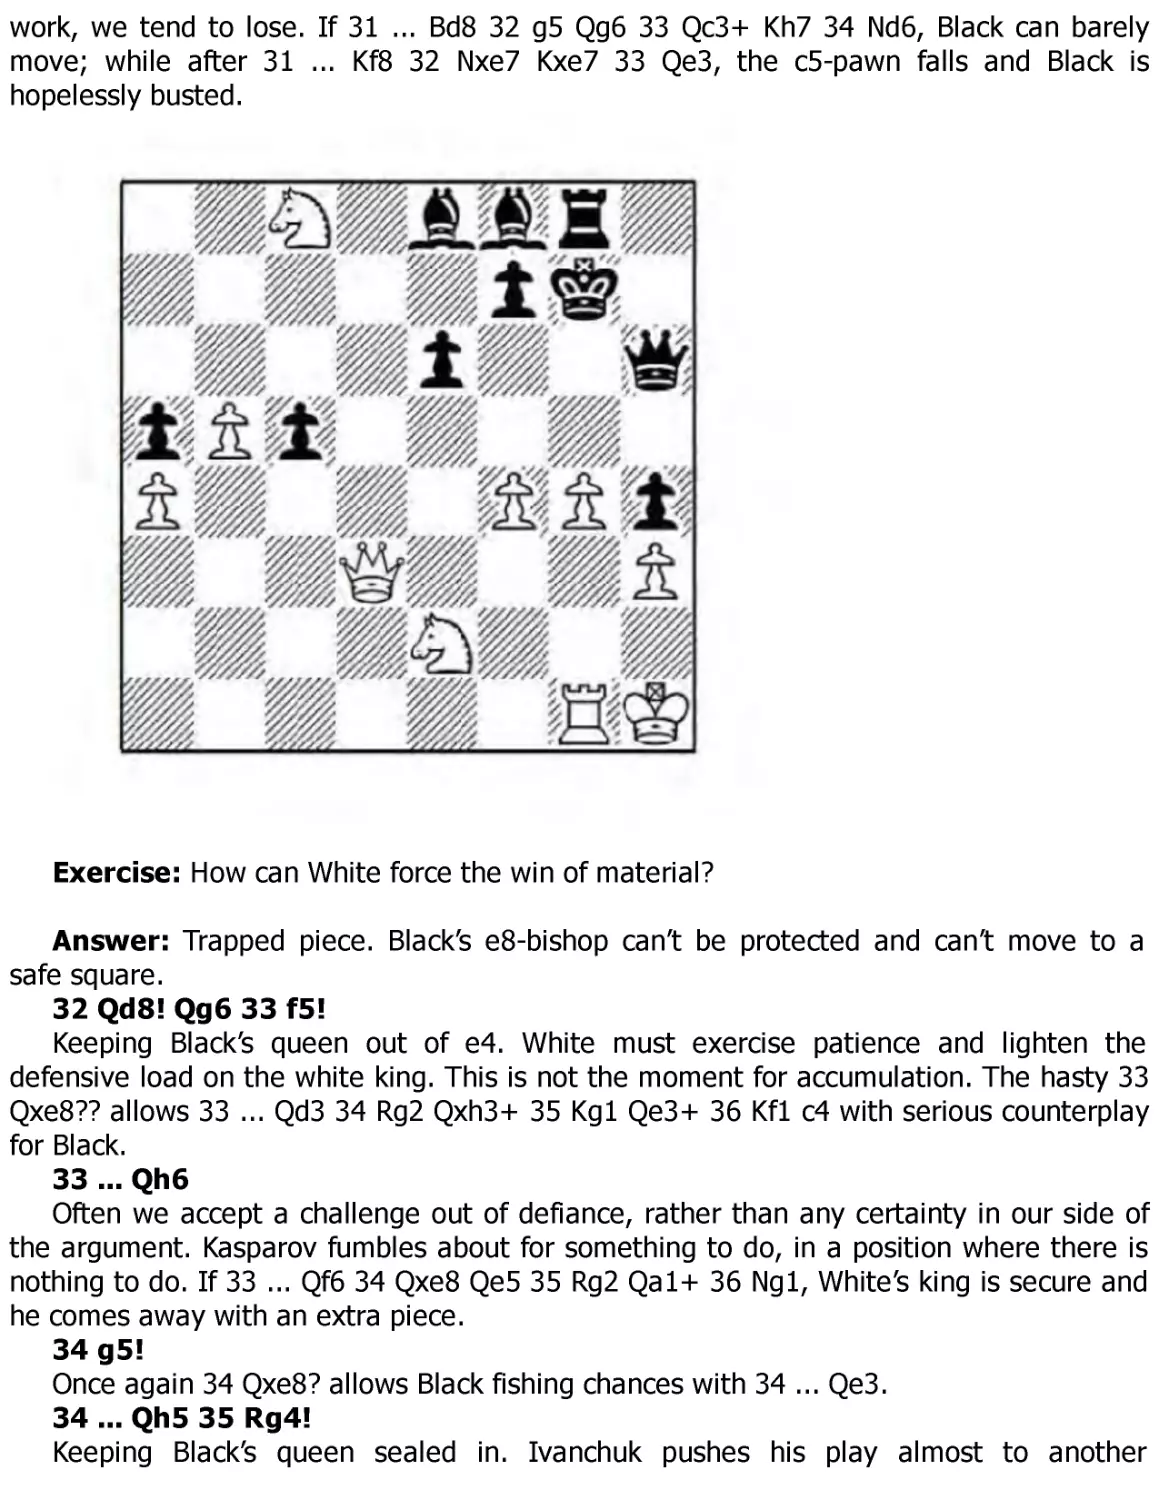
Exercise: Black blundered in an already lost position. What should White play?
Answer: Simply infiltrate h6 and threaten both f5-f6 and f5xg6.
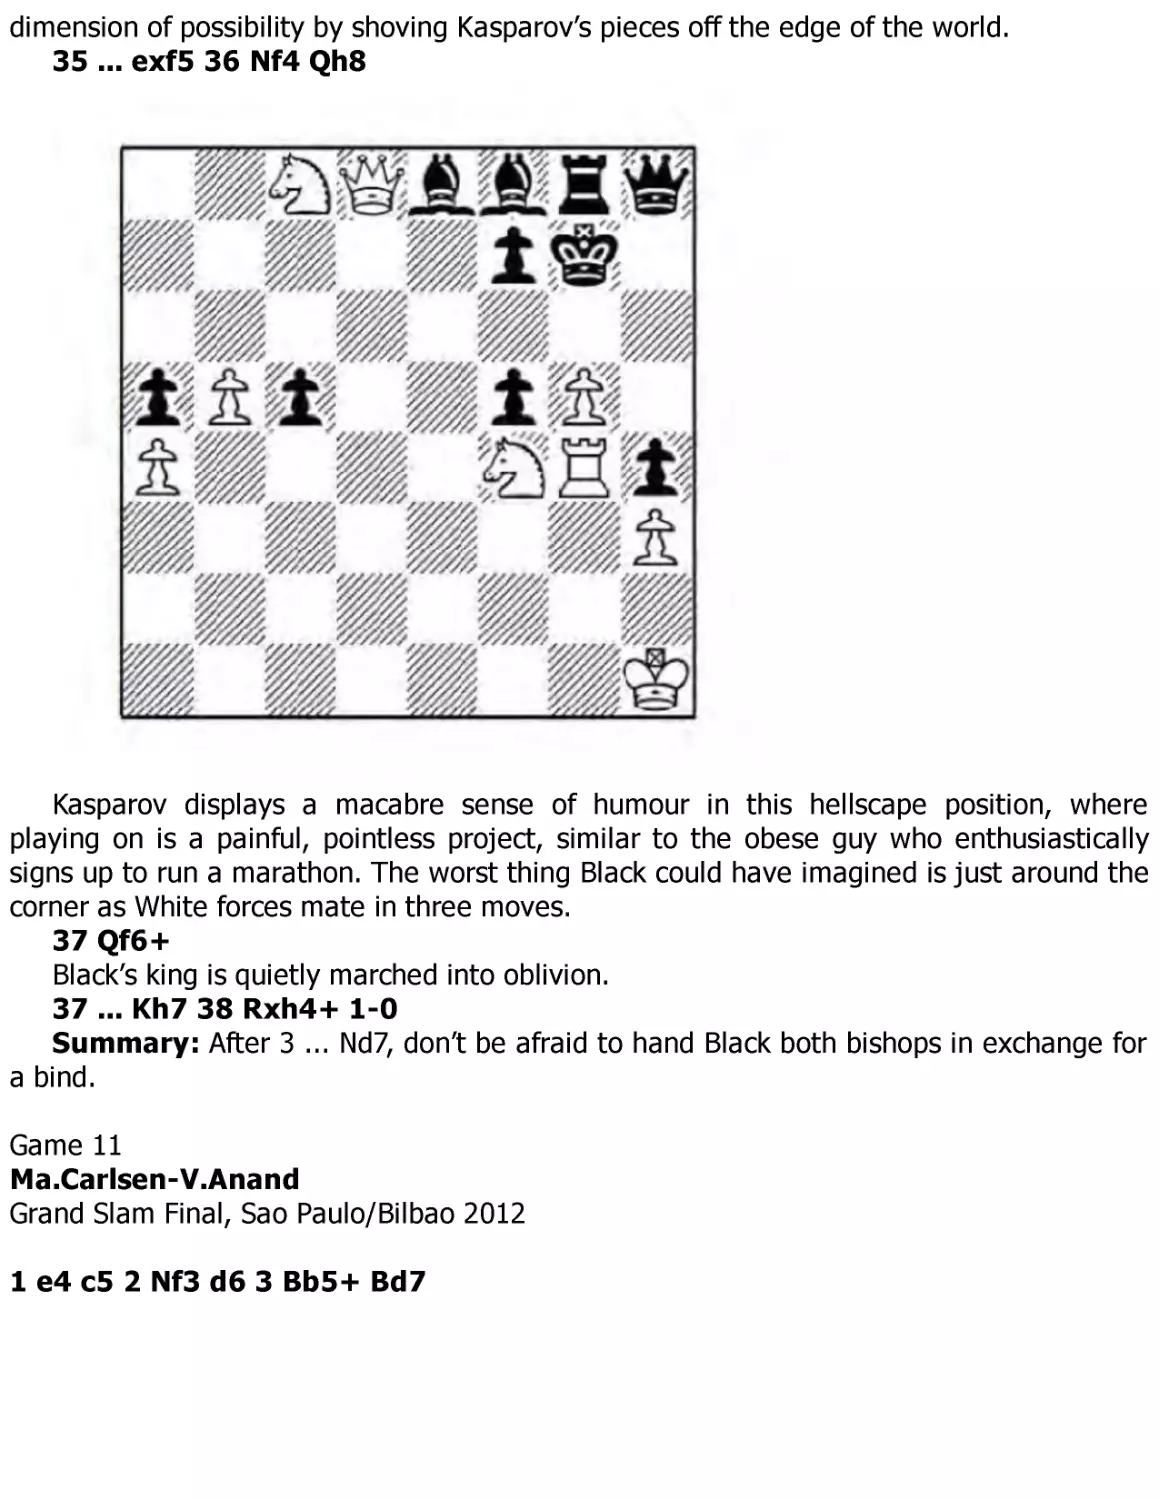
34 Qh6! 1-0
Now white attackers are iron filings drawn to the magnet of Black’s king. Note that
there are no back rank tricks since White’s queen continues to cover c1, while 34 ... gxf5
35 R5e3! will cost Black his queen.
Game 2
A.Shabalov-J.Parker
Lloyds Bank Open, London 1994
1 e4 e5 2 Nc3
Not again. Why won’t anyone play 2 Bc4 - ? Okay, stay calm. Our move order simply
flips it with 2 Bc4 Nf6 3 Nc3, transposing.
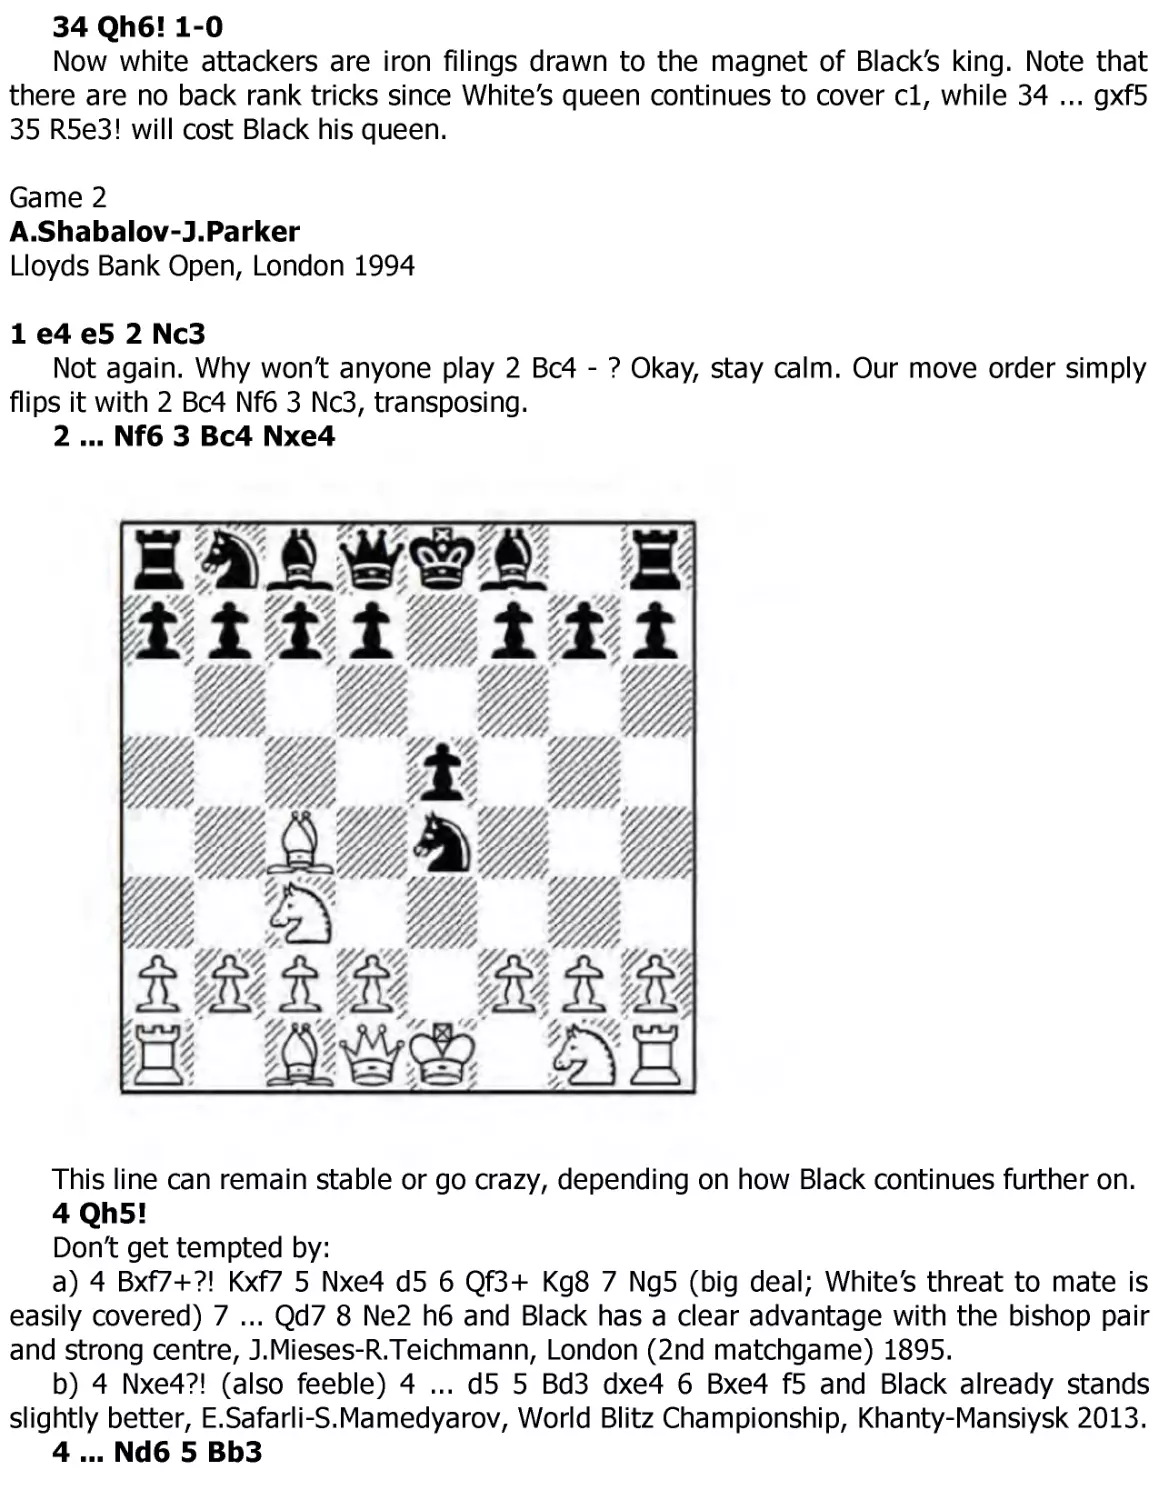
2 ... Nf6 3 Bc4 Nxe4
This line can remain stable or go crazy, depending on how Black continues further on.
4 Qh5!
Don’t get tempted by:
a) 4 Bxf7+?! Kxf7 5 Nxe4 d5 6 Qf3+ Kg8 7 Ng5 (big deal; White’s threat to mate is
easily covered) 7 ... Qd7 8 Ne2 h6 and Black has a clear advantage with the bishop pair
and strong centre, J.Mieses-R.Teichmann, London (2nd matchgame) 1895.
b) 4 Nxe4?! (also feeble) 4 ... d5 5 Bd3 dxe4 6 Bxe4 f5 and Black already stands
slightly better, E.Safarli-S.Mamedyarov, World Blitz Championship, Khanty-Mansiysk 2013.
4 ... Nd6 5 Bb3
Don’t chicken out by playing 5 Qxe5+ Qe7 either, since Black has easy equality in the
coming ending.
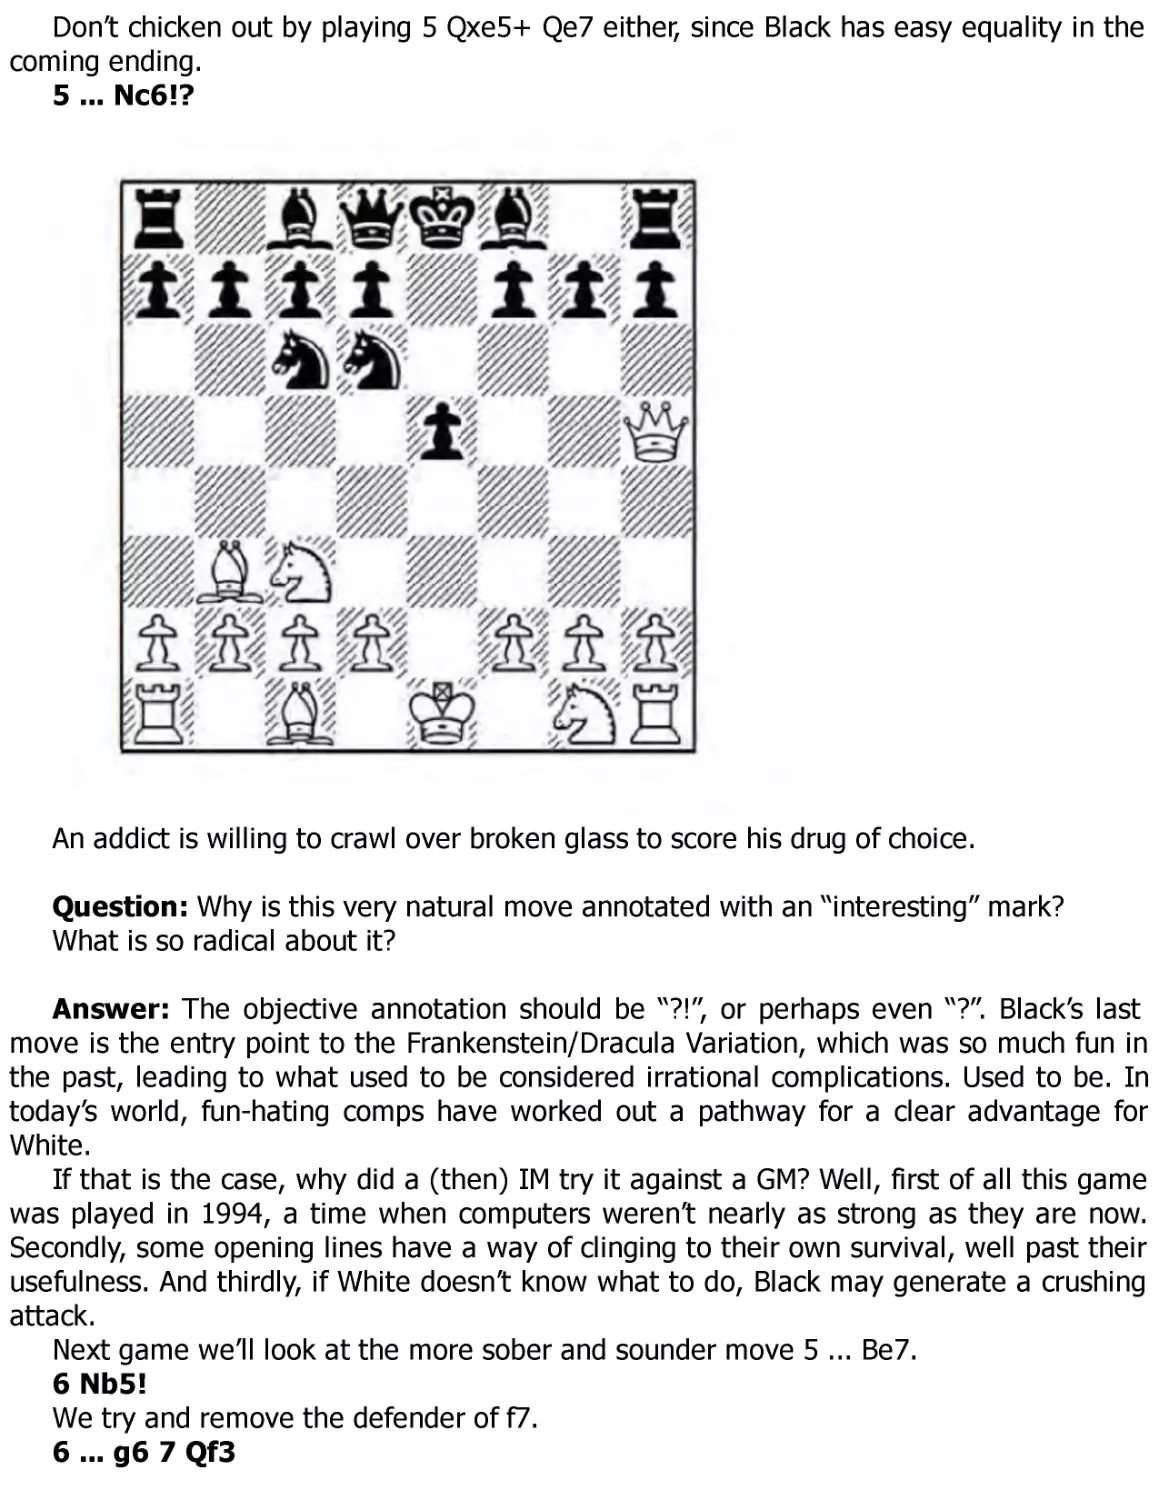
5 ... Nc6!?
An addict is willing to crawl over broken glass to score his drug of choice.
Question: Why is this very natural move annotated with an “interesting” mark?
What is so radical about it?
Answer: The objective annotation should be “?!”, or perhaps even “?”. Black’s last
move is the entry point to the Frankenstein/Dracula Variation, which was so much fun in
the past, leading to what used to be considered irrational complications. Used to be. In
today’s world, fun-hating comps have worked out a pathway for a clear advantage for
White.
If that is the case, why did a (then) IM try it against a GM? Well, first of all this game
was played in 1994, a time when computers weren’t nearly as strong as they are now.
Secondly, some opening lines have a way of clinging to their own survival, well past their
usefulness. And thirdly, if White doesn’t know what to do, Black may generate a crushing
attack.
Next game we’ll look at the more sober and sounder move 5 ... Be7.
6 Nb5!
We try and remove the defender of f7.
6 ... g6 7 Qf3
We renew the threat to f7.
7 ... f5 8 Qd5
And again!
8 ... Qe7
Most players put the queen on e7 so as not to block their future fianchetto after ...
Bg7. Alternatively, 8 ... Qf6 9 Nxc7+ Kd8 10 Nxa8 b6 11 Nxb6 (not here 11 d3 Bb7 12
h4?? Ne7! and the queen is trapped) 11 ... axb6 12 Ne2 Bb7 13 Qd3 is similar to the
game’s continuation.
9 Nxc7+
Is there such a thing as a necessary luxury? I think there is. We must win the
exchange, even if it hands Black a rather intimidating initiative over the next dozen or so
moves.
9 ... Kd8 10 Nxa8 b6
In most of the lines covered in the book, the theoretical climb is neither steep nor
insurmountable. This one is an exception. You need to comp the living daylights out of
this line if you allow it as White, since players who continue to offer the gambit are
scholars in the field of deception. In the old days attackers would love to play the Black
side, acting like a man who just purchased the Hope Diamond for $5 and a 25%-off
coupon at Subway Sandwich. The cold reality today is that Black gives up too much
material in pursuit of the initiative. Our only problem is to understand and remember the
analysis, which isn’t such an easy task.
Now and then I get a student who insists on playing this as Black. Their argument that
the line scored well in the past is, to me, the same as when your defence attorney argues
to the jury: “Maybe my client did murder the victim. But what about Al Capone and
Charles Manson? Didn’t they also kill people?” In the pre-engine days, I would be okay
with a student playing Black here, just for the practical chances it offers. In the
depressing computer era, such fun is frowned upon.
11 d3
Question: Why not play 11 Nxb6 first?
Answer: By declining to capture on b6, we follow Nancy Reagan’s motto: “Just say
no.” We can win another pawn with Nxb6, but I think Shabalov’s non-greedy move is
superior. Why? Because by not taking on b6 (right away), we prompt Black into
expending a precious tempo taking our stranded knight. We have a glut of material, yet
are seriously behind in development. So in essence we buy time by refusing to grab a
pawn.
There is an argument for the greed-first philosophy though. Let’s look: 11 Nxb6 axb6
12 Ne2 Bb7 13 Qd3 f4 14 0-0 Bg7 15 Qh3 f3! 16 gxf3 Nf5 17 Bd5 and the comp still likes
White. But I don’t. A human may have a rather difficult time defending this position.
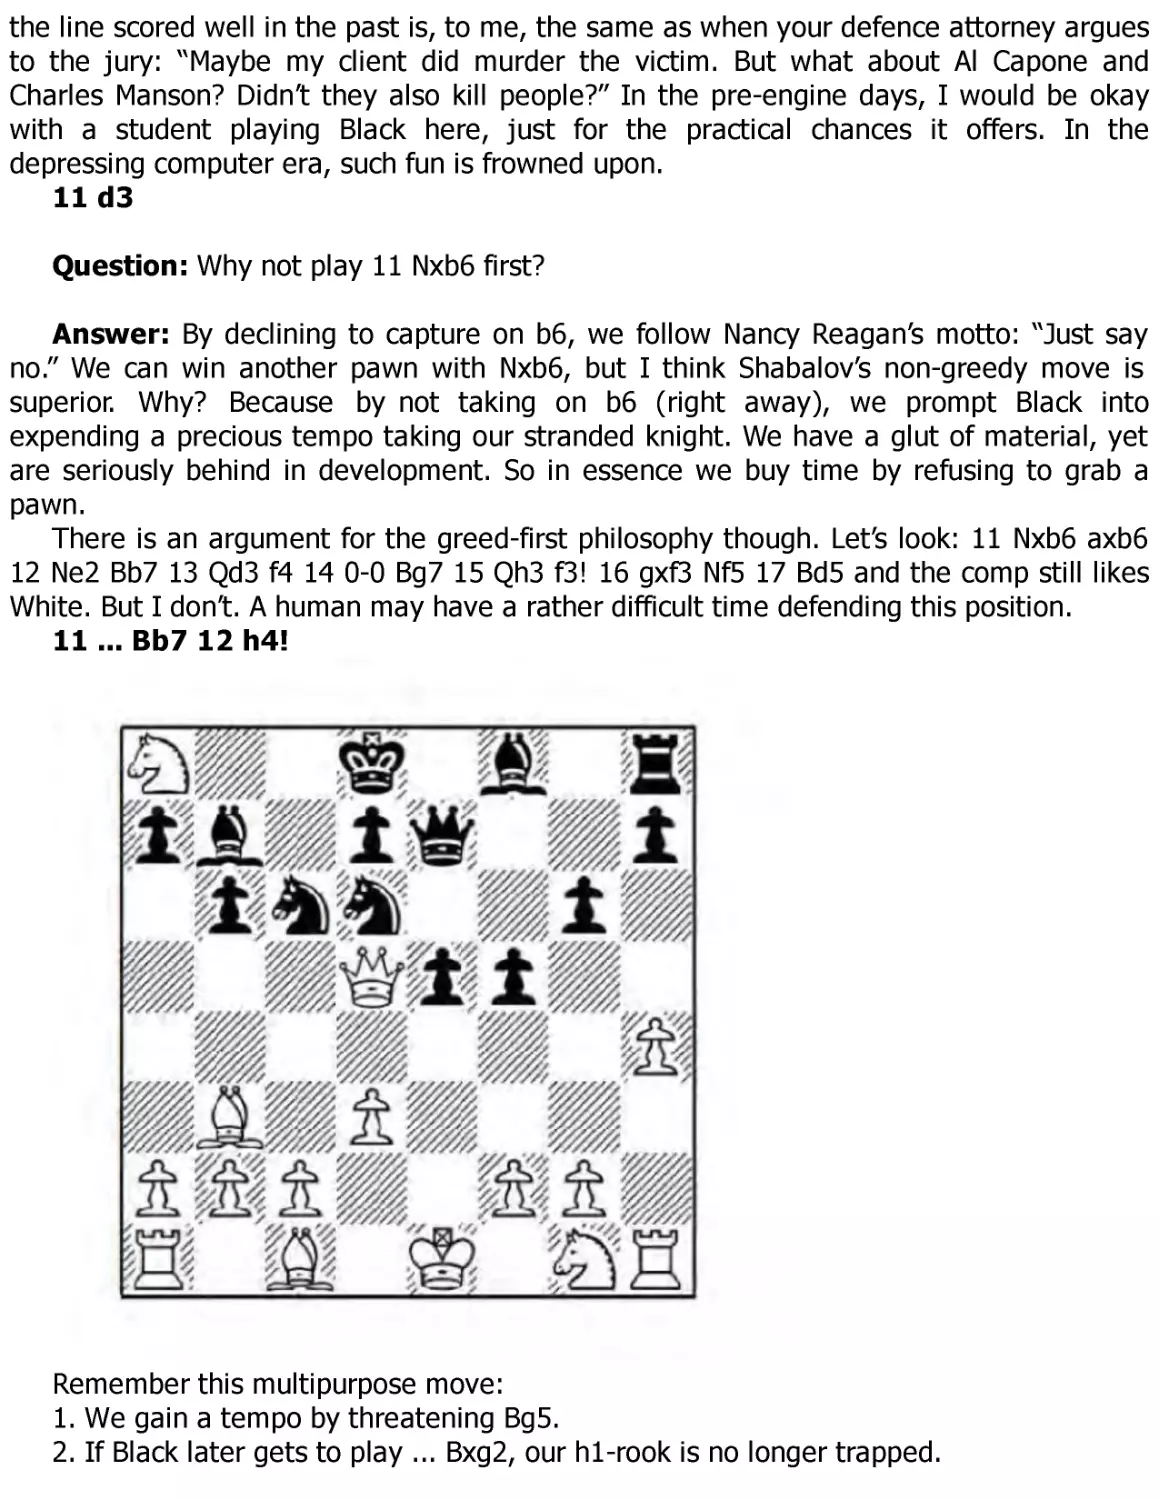
11 ... Bb7 12 h4!
Remember this multipurpose move:
1. We gain a tempo by threatening Bg5.
2. If Black later gets to play ... Bxg2, our h1-rook is no longer trapped.
12 ... h6?!
This looks like a wasted tempo. Black is better off with 12 ... f4 13 Qf3 Nd4 14 Qh3
Bxa8 (or 14 ... Bh6 15 c3) 15 c3 Nxb3 16 axb3, although even here I don’t see full
compensation for Black.
13 Nxb6!
Why not gobble a pawn, now that Black gave up a tempo with his previous move?
13 ... axb6 14 Qf3 Bg7
After 14 ... Nd4 15 Qh3 f4 16 Bd2 N6f5 17 Bc3 Bg7 18 0-0-0, I still don’t see full
compensation for Black.
15 Qh3
Shabalov isn’t going to push greed to its limits by going after the g6-pawn with the
inhuman 15 Qg3!? f4 16 Qxg6 h5 17 Ne2, even if the comp says White is winning here.
15 ... e4
Parker plays on the principle: Open the game and create confrontation when leading
in development.
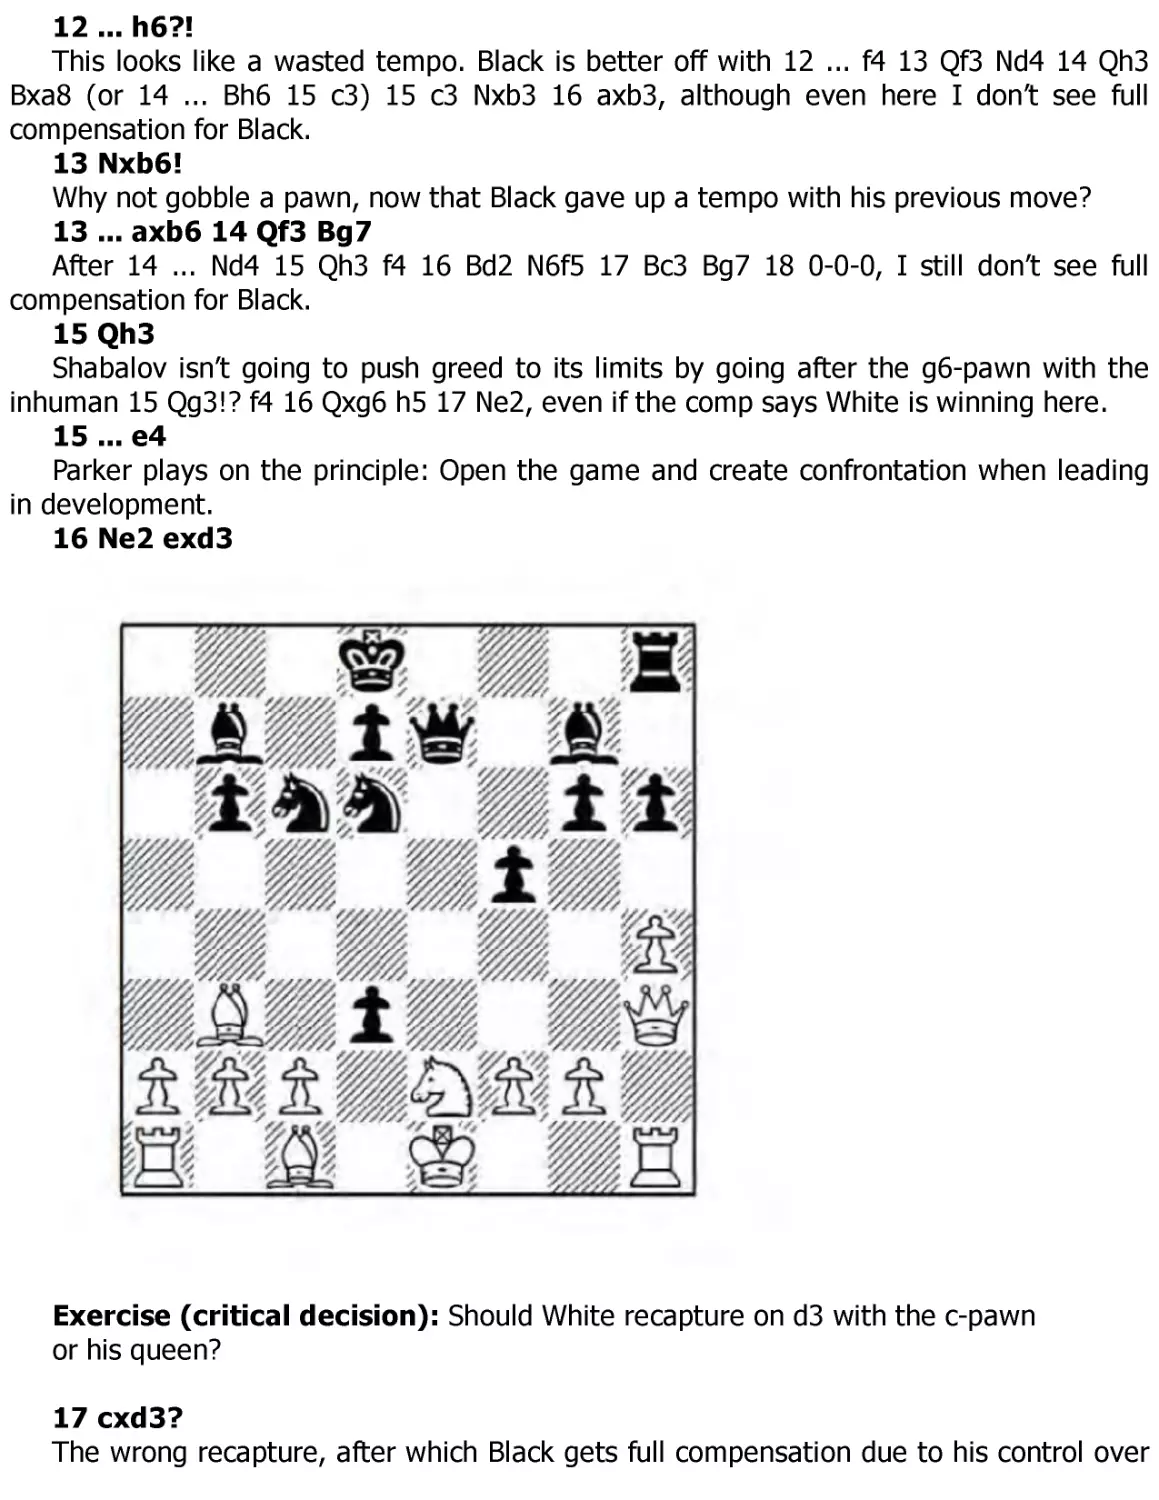
16 Ne2 exd3
Exercise (critical decision): Should White recapture on d3 with the c-pawn
or his queen?
17 cxd3?
The wrong recapture, after which Black gets full compensation due to his control over
d4.
Answer: 17 Qxd3! Ne5 18 Qe3 Bxg2 19 Qxb6+ Kc8 20 Qc5+ Kd8 21 Bf4! Bxh1 22 00-0 gives White a winning position.
17 ... Re8?
Black goes wrong in turn. He should play 17 ... Nd4! first, intending 18 Bd1 Re8 19
Be3 Nxe2 20 Bxe2 Nc8!, when there is no advantageous way to meet the threatened ...
f5-f4. For example, after 21 Qg3 Be5! 22 Qxg6 (not 22 f4?? Bd4!) 22 ... f4 23 Bd2 f3! 24
Bxf3! Bxb2+ 25 Be3 Bxf3 26 0-0! Bxa1 27 Bxb6+ Nxb6 28 Qxb6+ Kc8 29 Rxa1 Bc6, White
has nothing better than perpetual check.
18 Bd1?
The position’s head-spinning complexity gets to both sides, who can only grasp
isolated scraps of the overall design. White should play 18 Qe3!, threatening a queen
swap and also the b6-pawn, with a winning position.
18 ... f4?
The last in this string of mistakes. 18 ... Nd4! transposes to 17 ... Nd4! 18 Bd1 Re8
discussed in the above note.
19 Bxf4 Nf5 20 0-0
Now the velocity and mass of Black’s attack is insufficient to break down White’s
defensive wall.
20 ... Nxh4 21 Nc3
Not an error this time, though 21 Qe3 was again stronger, or else 21 Be3!, hitting b6
while continuing to fight for d4.
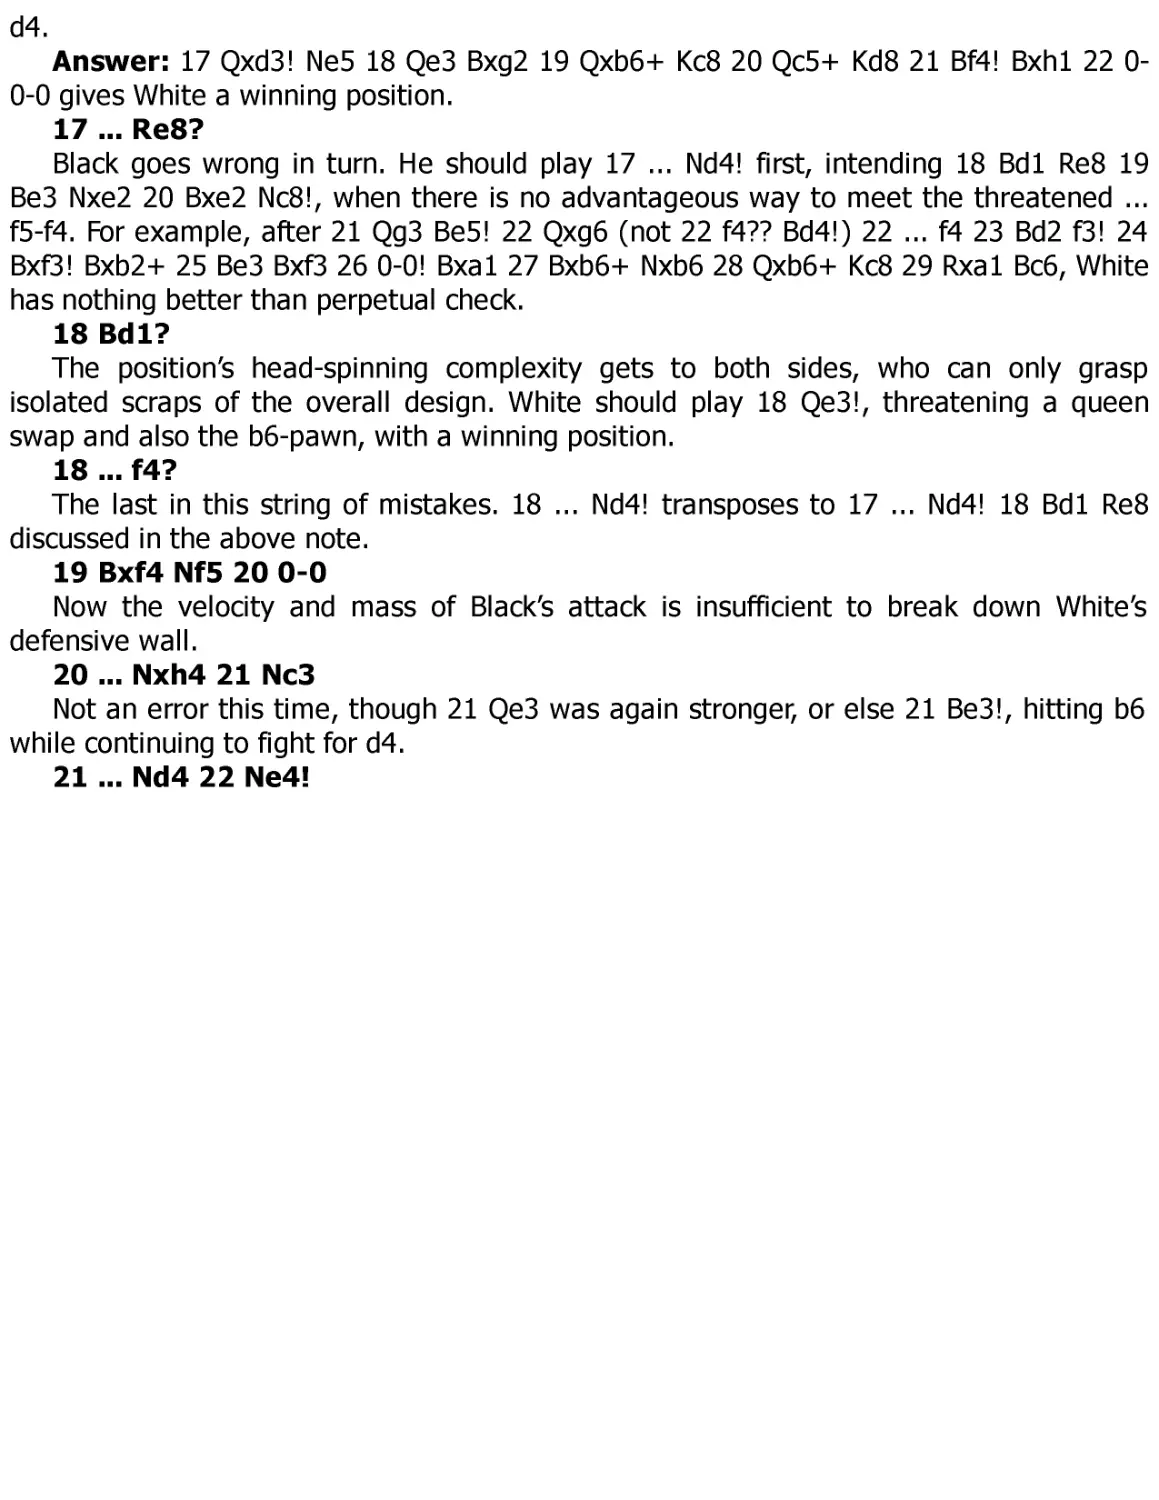
21 ... Nd4 22 Ne4!
Black’s light-squared bishop is deprived of much of its power now.
22 ... Bxe4
The immediate 22 ... g5 would be met by 23 Bd6, but exchanging on e4 doesn’t really
help.
23 dxe4 g5 24 Bg3 Qxe4 25 Rc1 Re6 26 Bg4! Nhf5 27 Bc7+ Ke7 28 Bxb6!
Since 28 ... Rxb6?? hangs the queen to 29 Rfe1.
28 ... h5 29 Bxh5!
Another pawn goes. Black’s rook can’t slide to h6, for the same reason it can’t take
White’s bishop on b6.
29 ... Qf4 30 Qa3+!
It suddenly becomes clear that Black’s king is in far greater danger than White’s.
30 ... Nd6 31 Rce1 Be5
Threatening mate.
32 g3 Qd2 33 Qa8! 1-0
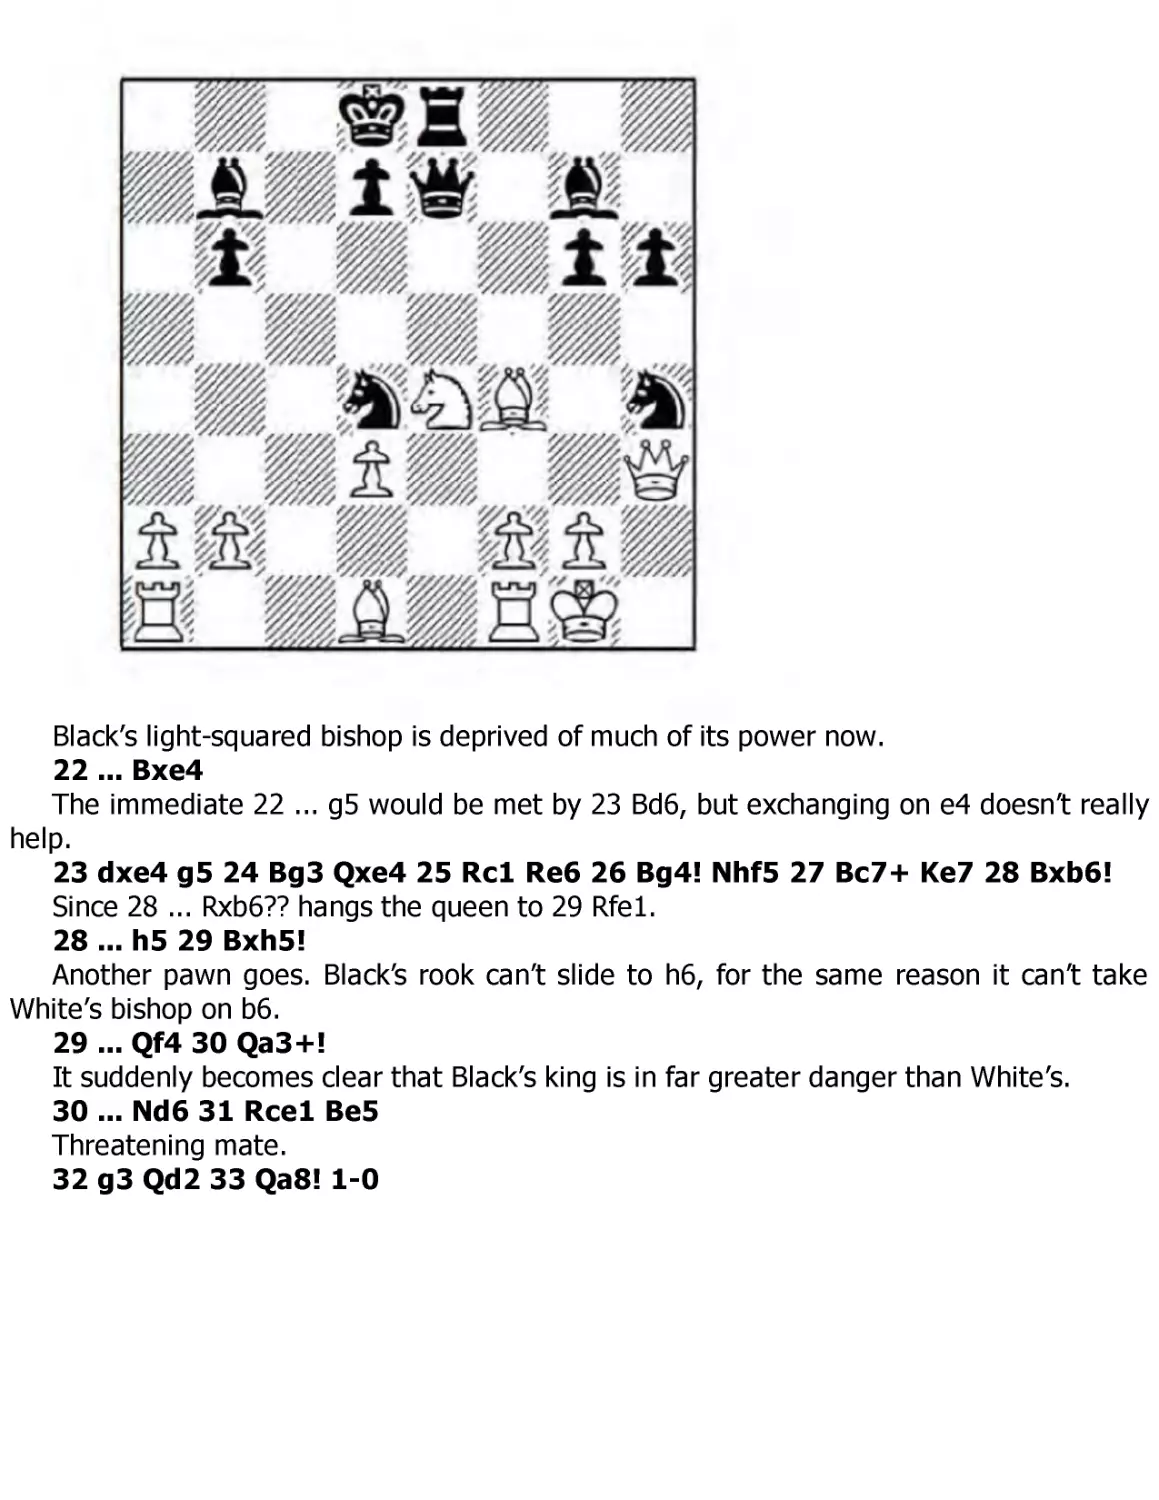
Do you remember a time in high school when everyone was smiling, as if enjoying a
private joke at your expense? Well, Black’s king feels that way now. After 33 ... Nf7 34
Bc5+ Bd6 35 Rd1! Ne2+ 36 Kg2 Qc2 37 Bxf7!, White wins heavy material.
Summary: Black’s attack in this line is a shooting star that briefly lights the heavens
and then quickly goes dark again in its inherent unsoundness. In the past, the
Frankenstein/Dracula was White’s bogeyman, a creature parents invented to compel
children into obedience. In our computer era, we should no longer fear it.
But I must add a warning for the reader: Don’t enter this line as White with
overconfidence, since it has a way of diluting common sense. Yes, the engines say the
line is unsound for Black, but from a practical standpoint, it’s not so easy for our side to
prove it. When we come into an opening with preconceived notions of sound and
unsound, if an anomaly pops up, we may react the wrong way, since we are too biased to
render a proper judgment. Just be aware that studying this line and actually playing it
over the board is the difference between looking at a holiday brochure and actually
travelling to and experiencing the location.
Game 3
F.Caruana-A.Giri
Wijk aan Zee 2014
1 e4 e5 2 Bc4
Finally – someone cooperates and opens with an actual Bishop’s Opening!
2 ... Nf6
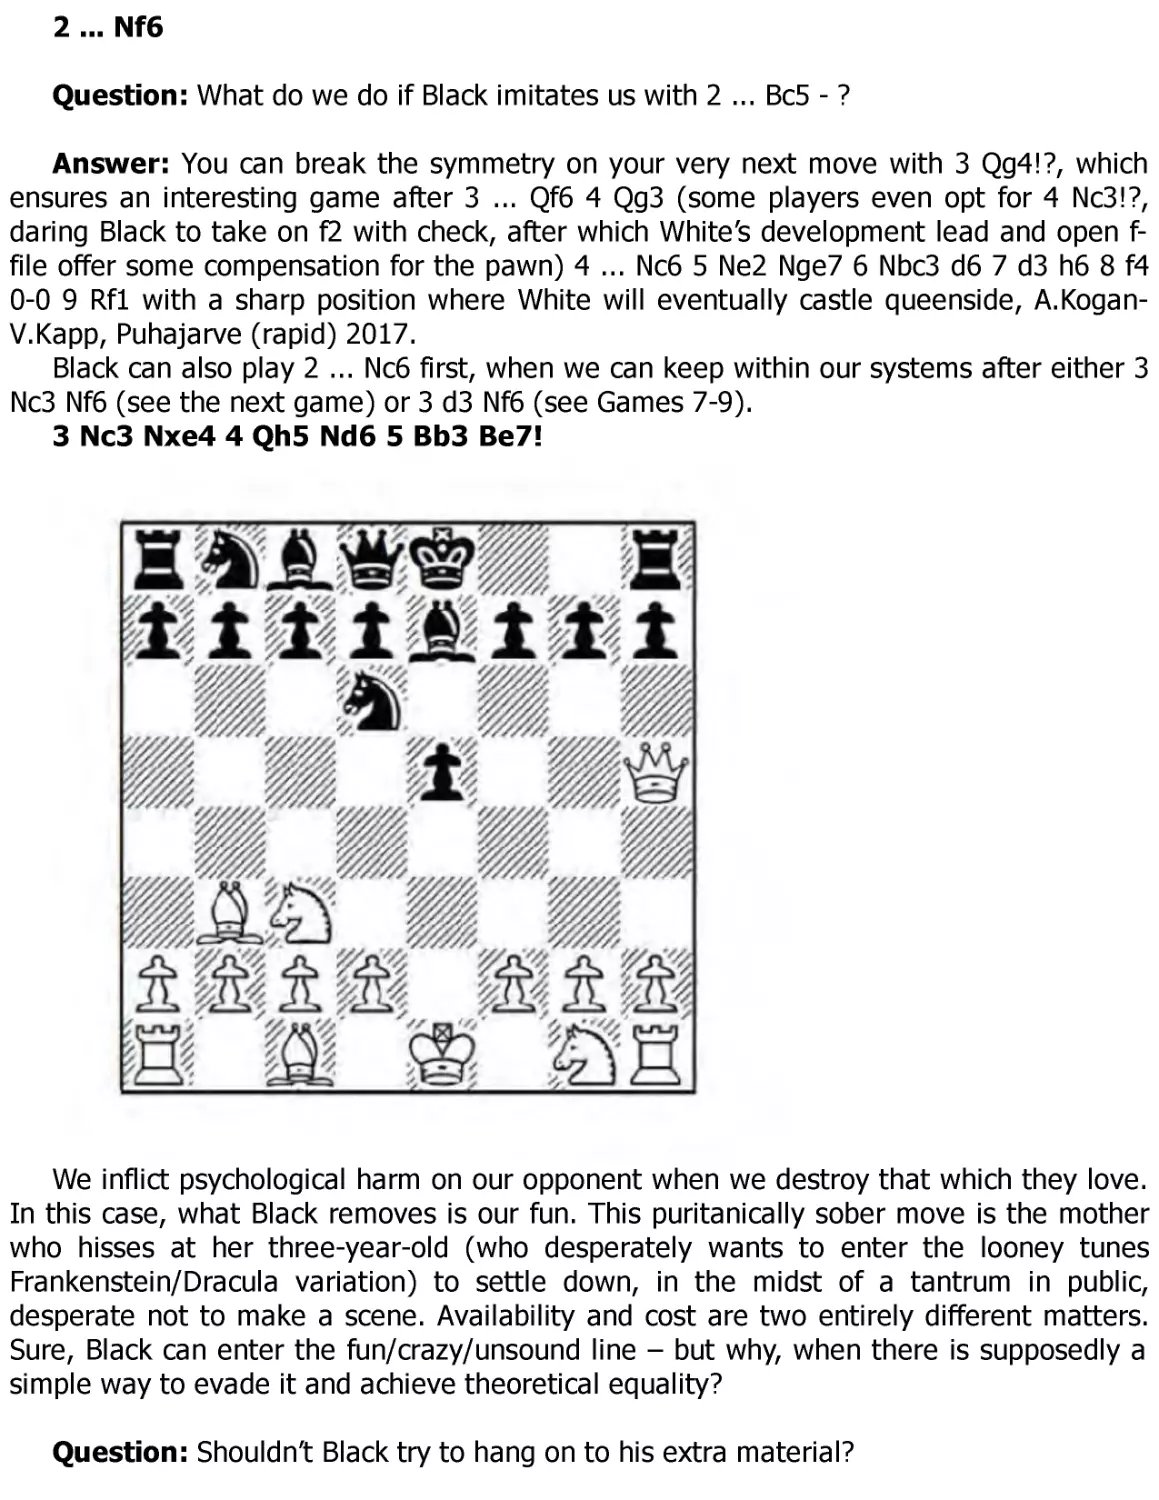
Question: What do we do if Black imitates us with 2 ... Bc5 - ?
Answer: You can break the symmetry on your very next move with 3 Qg4!?, which
ensures an interesting game after 3 ... Qf6 4 Qg3 (some players even opt for 4 Nc3!?,
daring Black to take on f2 with check, after which White’s development lead and open ffile offer some compensation for the pawn) 4 ... Nc6 5 Ne2 Nge7 6 Nbc3 d6 7 d3 h6 8 f4
0-0 9 Rf1 with a sharp position where White will eventually castle queenside, A.KoganV.Kapp, Puhajarve (rapid) 2017.
Black can also play 2 ... Nc6 first, when we can keep within our systems after either 3
Nc3 Nf6 (see the next game) or 3 d3 Nf6 (see Games 7-9).
3 Nc3 Nxe4 4 Qh5 Nd6 5 Bb3 Be7!
We inflict psychological harm on our opponent when we destroy that which they love.
In this case, what Black removes is our fun. This puritanically sober move is the mother
who hisses at her three-year-old (who desperately wants to enter the looney tunes
Frankenstein/Dracula variation) to settle down, in the midst of a tantrum in public,
desperate not to make a scene. Availability and cost are two entirely different matters.
Sure, Black can enter the fun/crazy/unsound line – but why, when there is supposedly a
simple way to evade it and achieve theoretical equality?
Question: Shouldn’t Black try to hang on to his extra material?
Answer: As the paterfamilias of the world’s dove faction, I heartily approve of this
chicken-out approach, since Black’s generosity in the main line of the
Frankenstein/Dracula has a way of overreaching the ability to pay the bill. 5 ... Be7 is the
modern interpretation and is, I believe, a clear improvement over the rather optimistic
exchange sacrifice we saw from last game. Giri’s move is commonly regarded as an
instant equalizer, which puts the 3 Nc3 line out of business for White. Yet looking at this
game, I discovered from Caruana’s play that Black’s claim to instant equality may be
premature, since White can still press, even in this simplified version.
6 Qxe5
White regains the lost pawn. Another option is 6 Nf3!?, which can lead to interesting
play: 6 ... 0-0 (simply 6 ... Nc6! 7 Nxe5 g6 is safer for Black) 7 h4!? (White makes it clear
that he isn’t interested in regaining the lost pawn and instead goes directly after Black’s
king) 7 ... Nc6 8 Ng5 h6 9 Qg6! Bxg5 10 hxg5 Qxg5 11 Qxg5 hxg5 12 d3 (objectively, 12
Nd5! is correct, picking off the c7-pawn) 12 ... Nf5 13 Bxg5?! (still 13 Nd5!) 13 ... Ncd4 14
Nd5 Nxb3 (here 14 ... c6! should consolidate) 15 Nf6+! (it doesn’t at first appear that
White has time to get away with this sacrifice) 15 ... gxf6 16 Bxf6 Ng7 17 axb3 Re8 18
g4! Re6 19 g5 b6? (19 ... Rxf6? 20 gxf6 Ne6 21 d4! d6 22 dxe5 dxe5 23 0-0-0 also wins
for White, but inserting 19 ... Ra6! 20 Rc1 Rxf6! 21 gxf6 Ne6 still holds the draw) 20 Ke2!
(White simply threatens to double rooks on the h-file) 20 ... e4 21 d4 e3 22 f3! (22 fxe3??
allows Black to escape after 22 ... Bb7) 22 ... d5 23 Rh4 Ba6+ 24 c4! dxc4 25 Rah1 1-0
E.Gufeld-U.Tarve, Tallinn 1969.
6 ... 0-0 7 d4
I like this approach better than 7 Nge2 Nc6 8 Qh5?! g6 9 Qf3 Nf5! 10 0-0 Ncd4 11
Nxd4 Nxd4, when Black will pick off the bishop pair with a pleasant edge.
7 ... Nc6 8 Qf4!
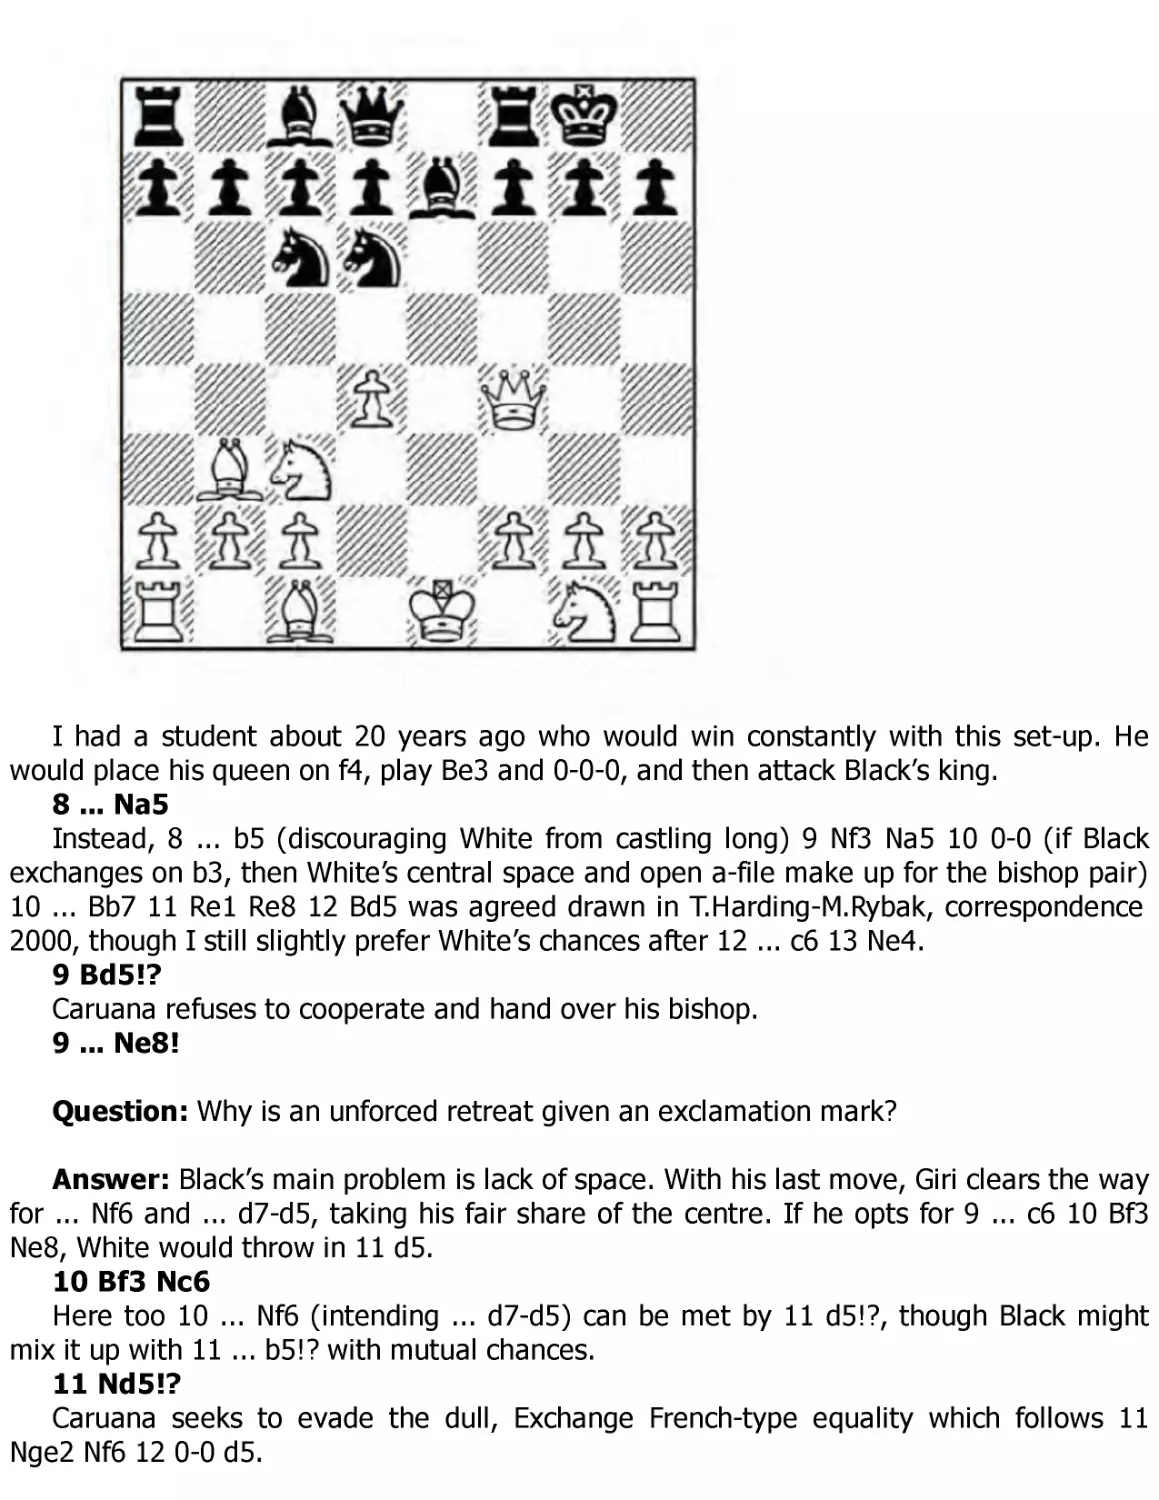
I had a student about 20 years ago who would win constantly with this set-up. He
would place his queen on f4, play Be3 and 0-0-0, and then attack Black’s king.
8 ... Na5
Instead, 8 ... b5 (discouraging White from castling long) 9 Nf3 Na5 10 0-0 (if Black
exchanges on b3, then White’s central space and open a-file make up for the bishop pair)
10 ... Bb7 11 Re1 Re8 12 Bd5 was agreed drawn in T.Harding-M.Rybak, correspondence
2000, though I still slightly prefer White’s chances after 12 ... c6 13 Ne4.
9 Bd5!?
Caruana refuses to cooperate and hand over his bishop.
9 ... Ne8!
Question: Why is an unforced retreat given an exclamation mark?
Answer: Black’s main problem is lack of space. With his last move, Giri clears the way
for ... Nf6 and ... d7-d5, taking his fair share of the centre. If he opts for 9 ... c6 10 Bf3
Ne8, White would throw in 11 d5.
10 Bf3 Nc6
Here too 10 ... Nf6 (intending ... d7-d5) can be met by 11 d5!?, though Black might
mix it up with 11 ... b5!? with mutual chances.
11 Nd5!?
Caruana seeks to evade the dull, Exchange French-type equality which follows 11
Nge2 Nf6 12 0-0 d5.
11 ... Bd6 12 Qd2
Question: Doesn’t this move block the c1-bishop’s development?
Answer: The problem is easily solved via a fianchetto, and Black’s d6-bishop is
obstructing his own development too.
12 ... b6
12 ... Nf6 would be met by 13 Ne3.
13 Ne2 Nf6 14 Ne3 Re8 15 0-0
White is now ready to play c2-c4 and reorganize his forces efficiently behind a nagging
central space advantage.
15 ... Bf8
Maybe Black should try something like 15 ... Ne4 16 Qd1 Ba6 17 c4 Ng5! 18 Bd5 Rb8
19 f4 Ne4 20 b3 Bb7, when White still has space but at least Black wrested control over
e4.
16 c4! g6?!
If White consolidates his position he will have a solid edge. 16 ... Rb8 17 b3 b5 might
offer Black some counterplay.
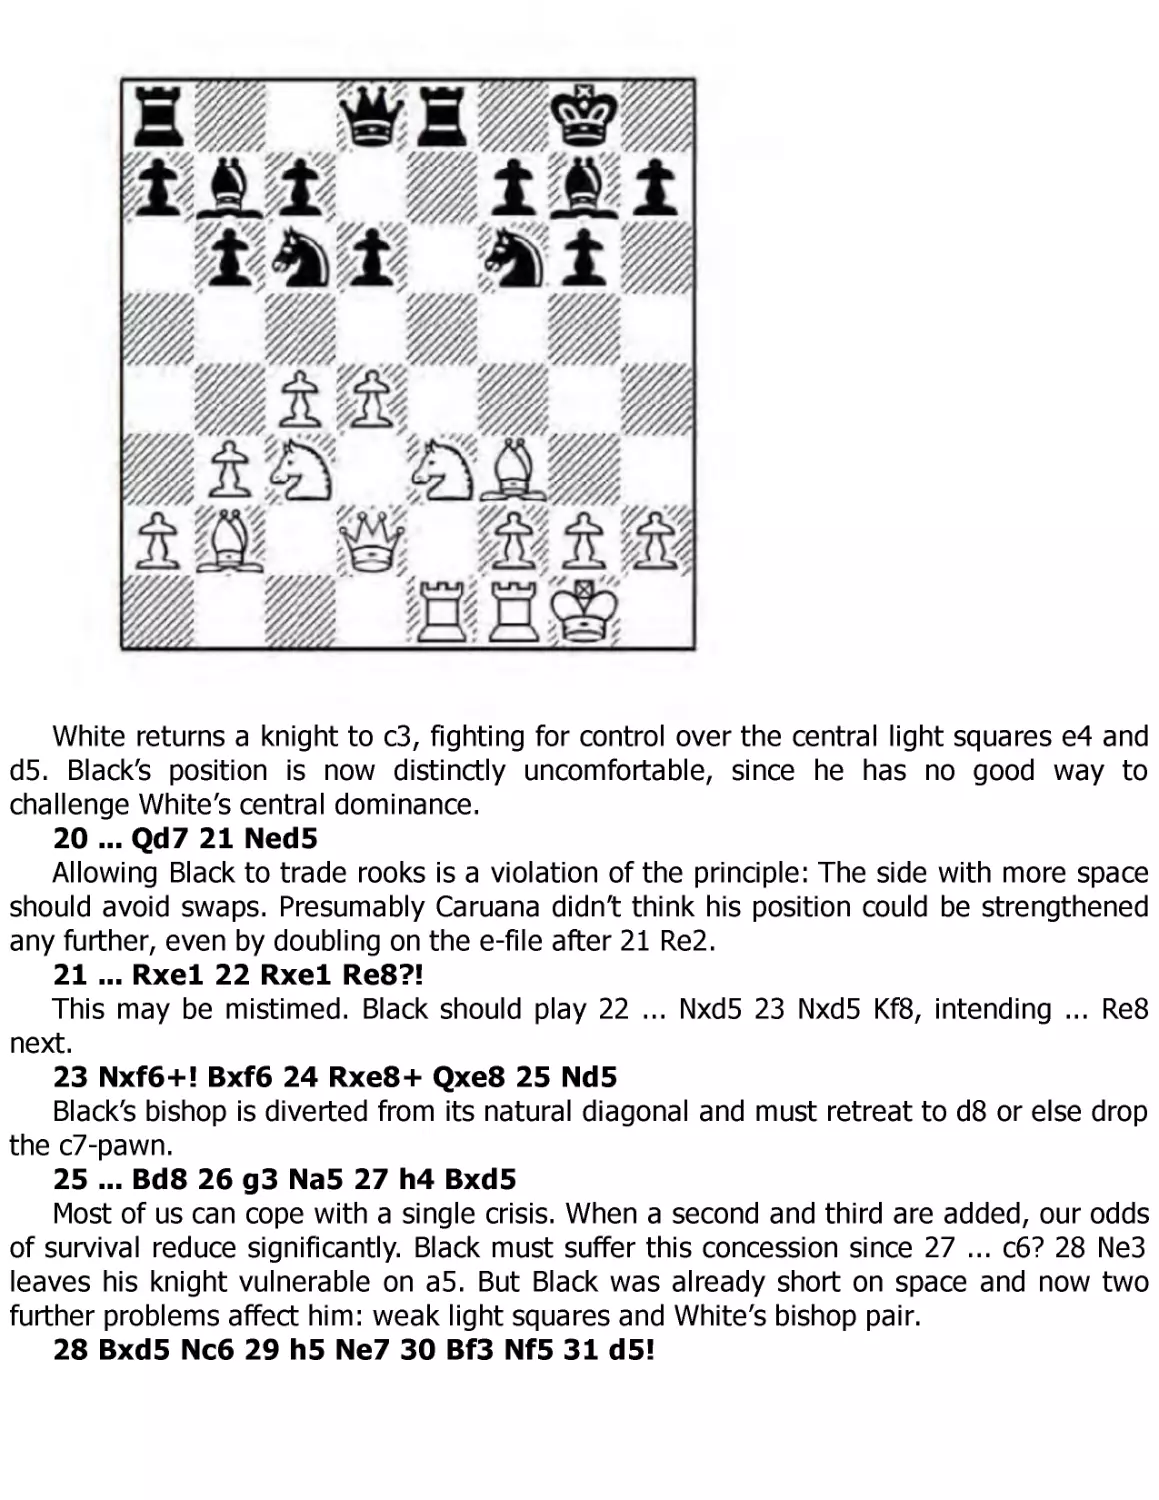
17 b3 Bg7 18 Bb2 Bb7 19 Rae1 d6 20 Nc3!
White returns a knight to c3, fighting for control over the central light squares e4 and
d5. Black’s position is now distinctly uncomfortable, since he has no good way to
challenge White’s central dominance.
20 ... Qd7 21 Ned5
Allowing Black to trade rooks is a violation of the principle: The side with more space
should avoid swaps. Presumably Caruana didn’t think his position could be strengthened
any further, even by doubling on the e-file after 21 Re2.
21 ... Rxe1 22 Rxe1 Re8?!
This may be mistimed. Black should play 22 ... Nxd5 23 Nxd5 Kf8, intending ... Re8
next.
23 Nxf6+! Bxf6 24 Rxe8+ Qxe8 25 Nd5
Black’s bishop is diverted from its natural diagonal and must retreat to d8 or else drop
the c7-pawn.
25 ... Bd8 26 g3 Na5 27 h4 Bxd5
Most of us can cope with a single crisis. When a second and third are added, our odds
of survival reduce significantly. Black must suffer this concession since 27 ... c6? 28 Ne3
leaves his knight vulnerable on a5. But Black was already short on space and now two
further problems affect him: weak light squares and White’s bishop pair.
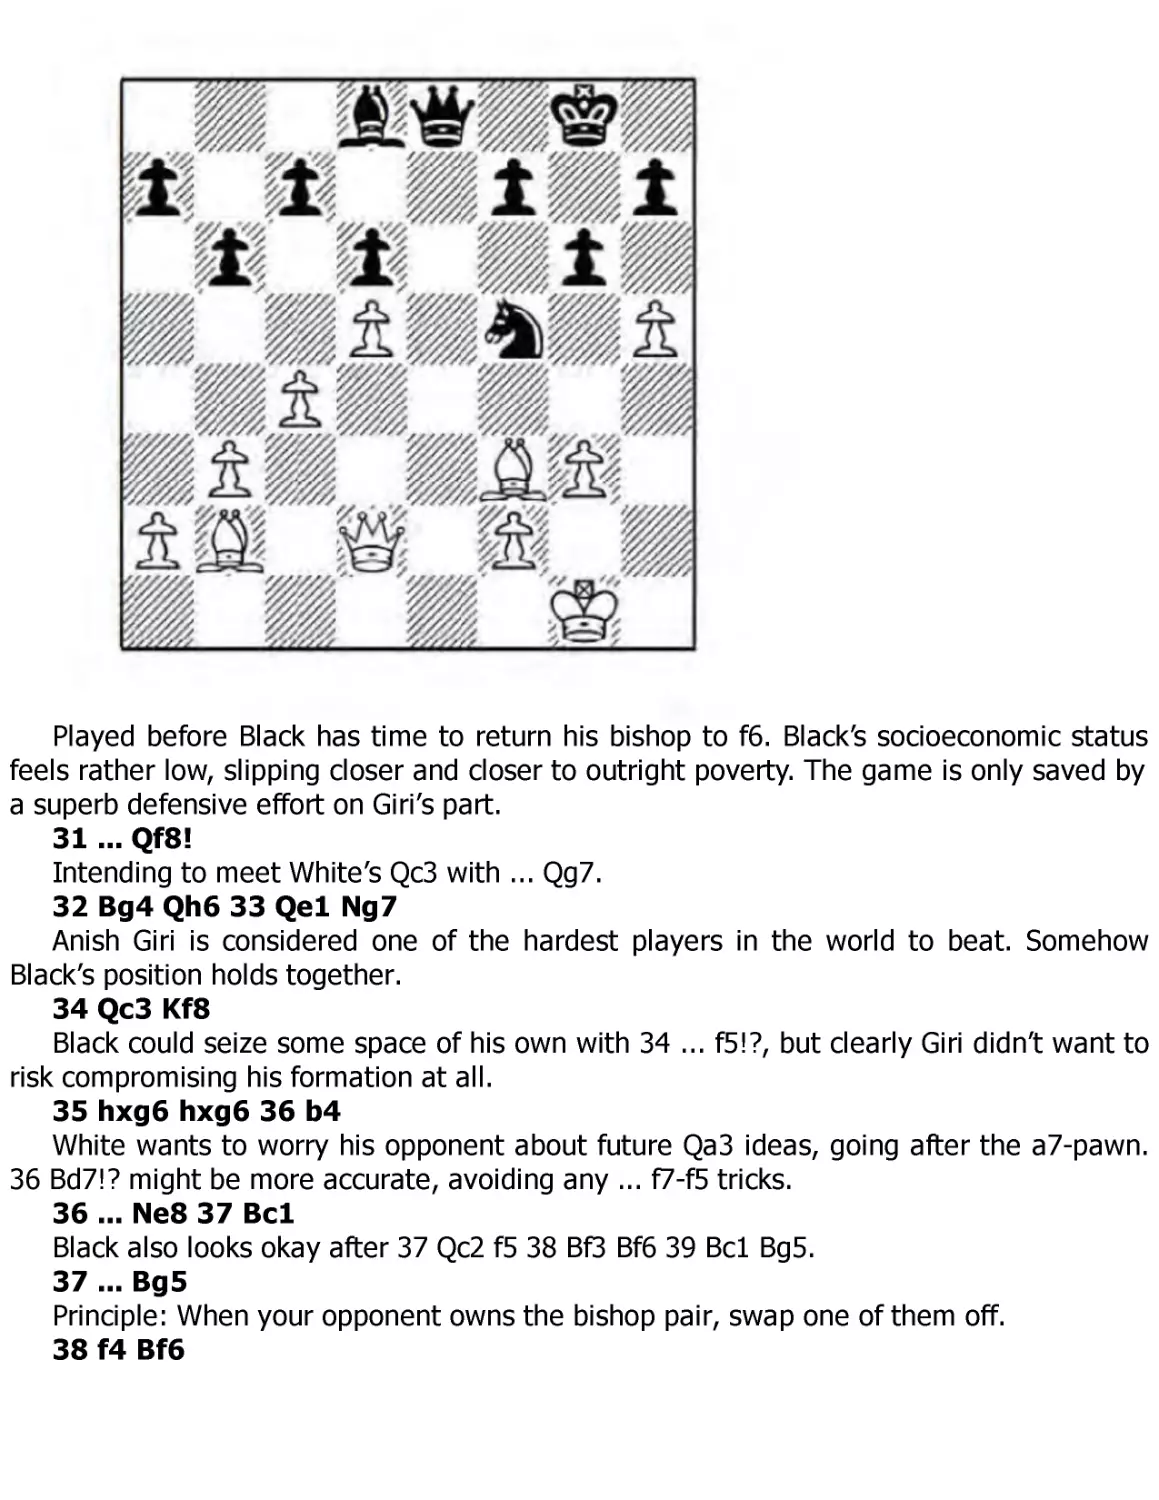
28 Bxd5 Nc6 29 h5 Ne7 30 Bf3 Nf5 31 d5!
Played before Black has time to return his bishop to f6. Black’s socioeconomic status
feels rather low, slipping closer and closer to outright poverty. The game is only saved by
a superb defensive effort on Giri’s part.
31 ... Qf8!
Intending to meet White’s Qc3 with ... Qg7.
32 Bg4 Qh6 33 Qe1 Ng7
Anish Giri is considered one of the hardest players in the world to beat. Somehow
Black’s position holds together.
34 Qc3 Kf8
Black could seize some space of his own with 34 ... f5!?, but clearly Giri didn’t want to
risk compromising his formation at all.
35 hxg6 hxg6 36 b4
White wants to worry his opponent about future Qa3 ideas, going after the a7-pawn.
36 Bd7!? might be more accurate, avoiding any ... f7-f5 tricks.
36 ... Ne8 37 Bc1
Black also looks okay after 37 Qc2 f5 38 Bf3 Bf6 39 Bc1 Bg5.
37 ... Bg5
Principle: When your opponent owns the bishop pair, swap one of them off.
38 f4 Bf6
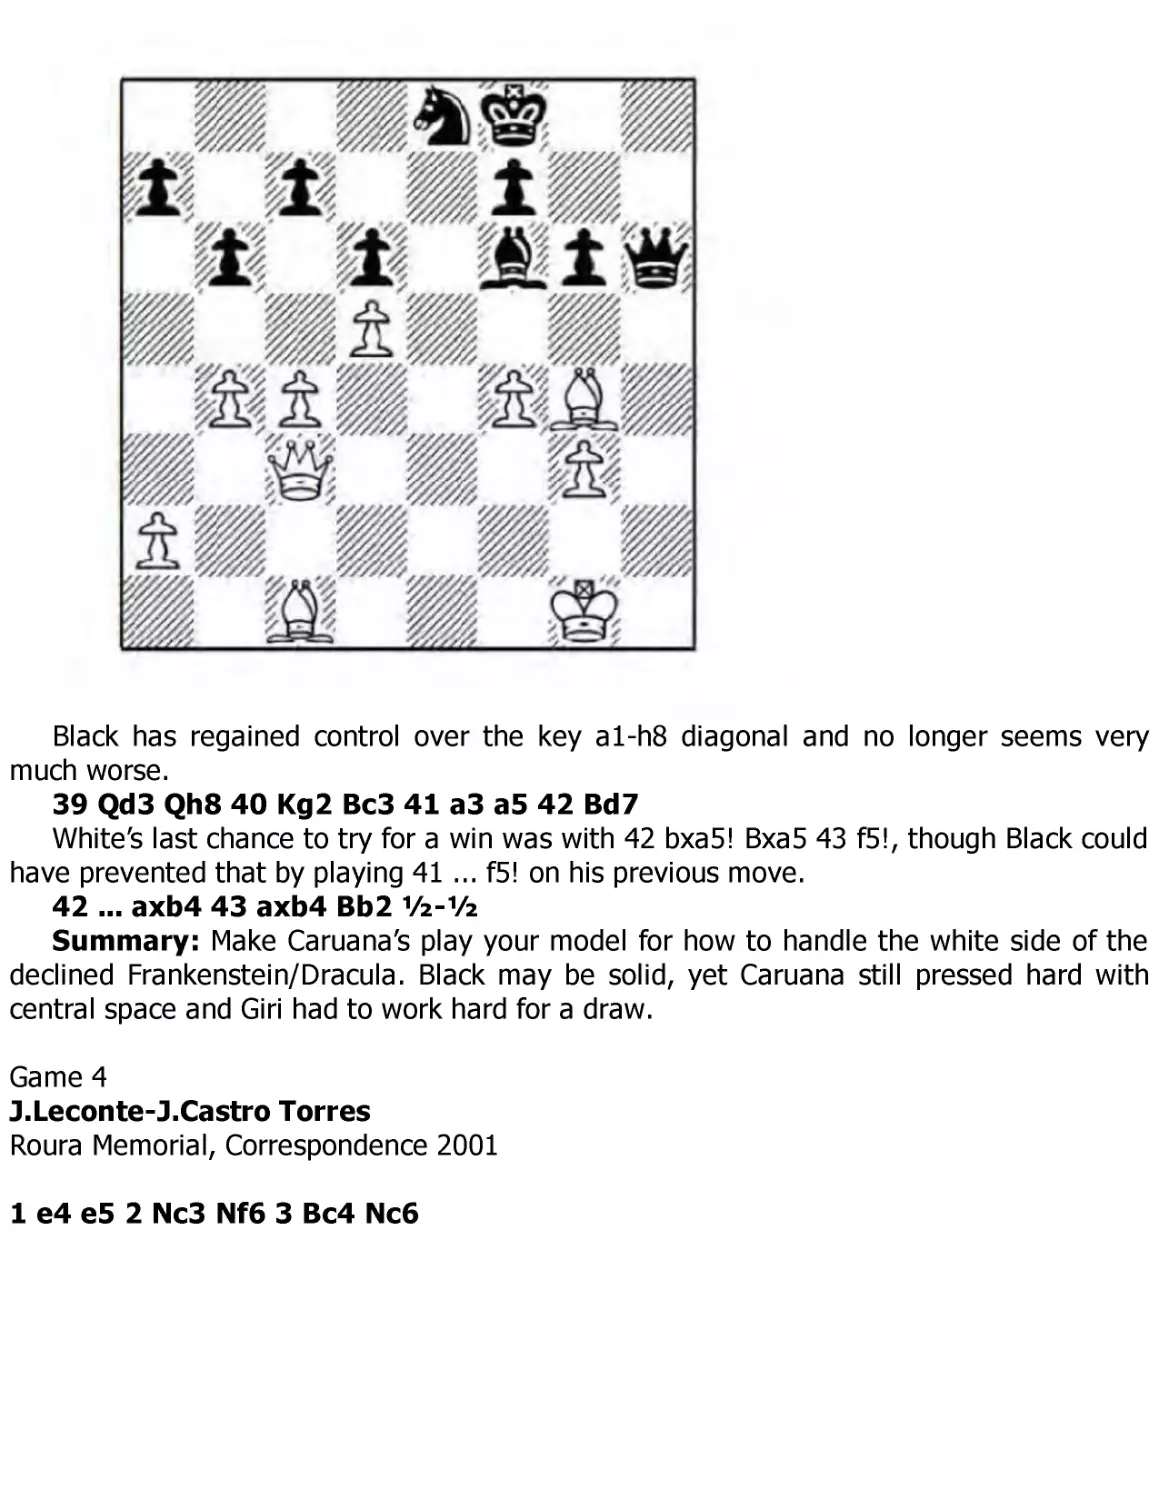
Black has regained control over the key a1-h8 diagonal and no longer seems very
much worse.
39 Qd3 Qh8 40 Kg2 Bc3 41 a3 a5 42 Bd7
White’s last chance to try for a win was with 42 bxa5! Bxa5 43 f5!, though Black could
have prevented that by playing 41 ... f5! on his previous move.
42 ... axb4 43 axb4 Bb2 ½-½
Summary: Make Caruana’s play your model for how to handle the white side of the
declined Frankenstein/Dracula. Black may be solid, yet Caruana still pressed hard with
central space and Giri had to work hard for a draw.
Game 4
J.Leconte-J.Castro Torres
Roura Memorial, Correspondence 2001
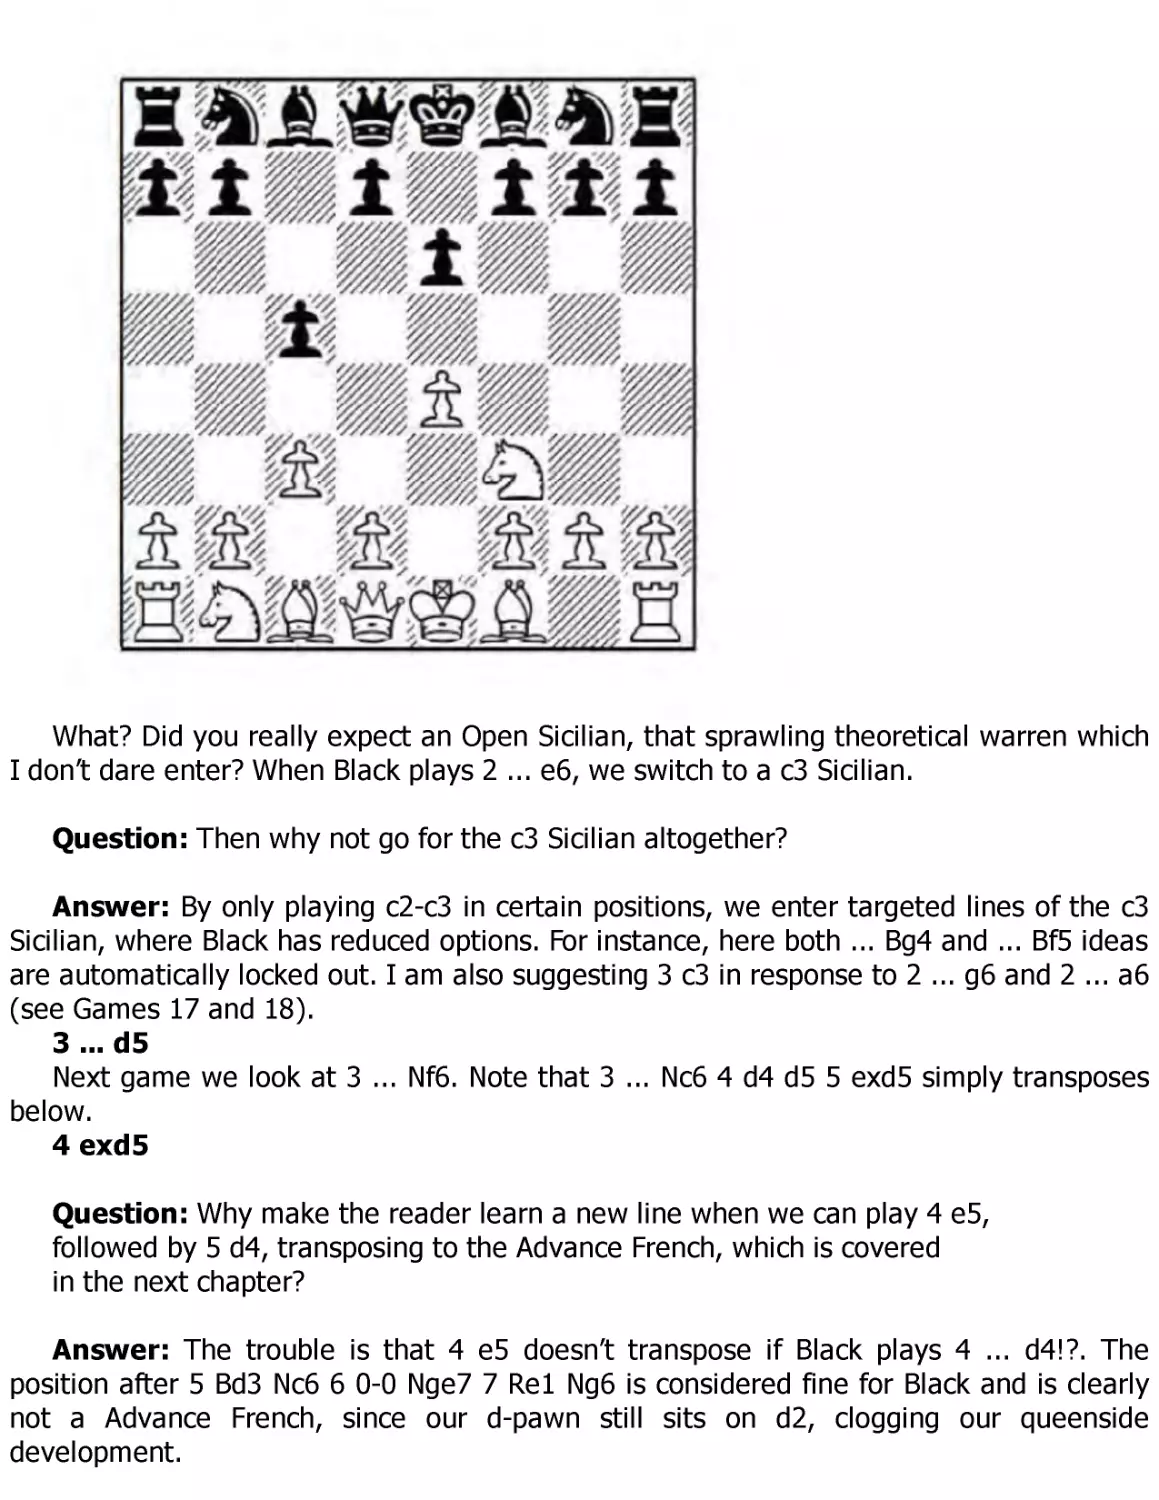
1 e4 e5 2 Nc3 Nf6 3 Bc4 Nc6
Categories tend to stretch widely, the way a sabre-toothed tiger and a Siamese cat
are both felines. If the Frankenstein/Dracula is the Sabre Tooth, then this unassuming
sensible line is the Siamese.
4 d3
By delaying Nf3, we keep open the possibility of f2-f4. The only problem with this plan
is that it allows Black to pick off the bishop pair on the next move. Alternatives:
a) 4 Nf3 Nxe4! (the standard equalizer) 5 Nxe4 d5 6 Bd3 dxe4 (the comp’s suggestion
6 ... Nb4!? is also playable) 7 Bxe4 Bd6 8 0-0 0-0 9 Re1 with a dynamically balanced
position, as in Er.Fernandez-Zhang Zhong, Manila 2007.
b) 4 f4?! looks rather shady to me. Black can engage the now-familiar mechanism 4 ...
Nxe4! 5 Nf3 (White turns it into a gambit) 5 ... Nxc3 6 dxc3 Qe7! 7 Qe2 (7 0-0?? looks
great for White, until we notice that it hangs a piece to 7 ... Qc5+) 7 ... exf4 (principle:
The side up material should seek exchanges) 8 Bxf4 Qxe2+ (queens are removed from
the board and White’s lead in development fails to compensate for his missing pawn) 9
Kxe2 d6 10 Ng5 Nd8 11 Kd2 h6 12 Rae1+ Be7 13 Nf3 Be6, when Black was well on his
way to consolidating his extra pawn, H.Spangenberg-S.Slipak, Mar del Plata 1992.
4 ... Na5!
This is the main test of our line, though I believe White may still have chances to
extract a touch of an edge here. Black picks up the bishop pair at the cost of a slight loss
of time and allowing us to strengthen our grip on the d5-square.
Black can also play:
a) 4 ... Be7 (ultra-conservative, aimed solely against a potential Bg5 which we’re not
really intending anyway) 5 f4! d6 6 Nf3 Bg4 7 h3 Bxf3 8 Qxf3 Nd4 9 Qf2 and I prefer
White due to his bishop pair and enhanced grip on the light squares, S.MamedyarovS.Davidov, European Junior Championship, Baku 2002.
b) 4 ... Bb4 5 Ne2 d5 6 exd5 Nxd5 7 0-0 Be6 8 Bxd5 Bxd5 9 f4 f6 (after 9 ... 0-0 10 f5
f6 11 Ng3 White’s control over e4 and the potential to attack Black’s king offer full
compensation for the bishop pair) 10 fxe5 Nxe5 11 Nxd5 Qxd5 12 c3 Bd6 13 Nf4 Qf7 14
d4, when I slightly prefer White due to his greater central control, B.Adhiban-A.Giri, Wijk
aan Zee 2017.
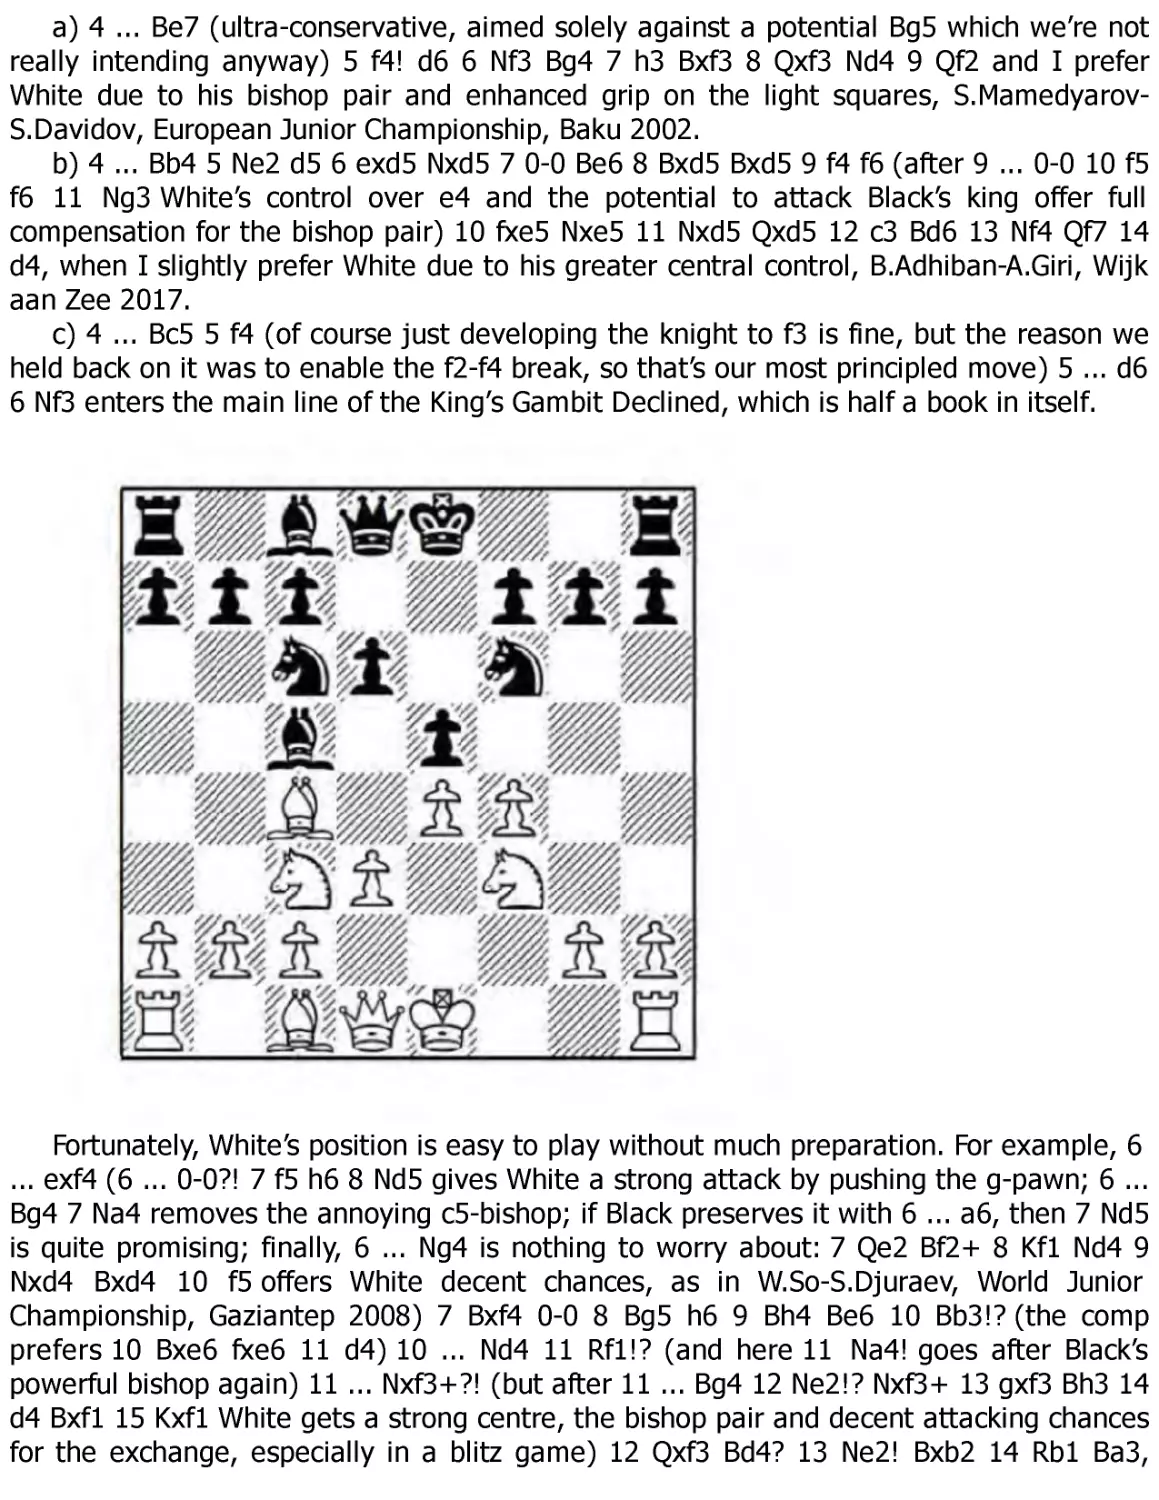
c) 4 ... Bc5 5 f4 (of course just developing the knight to f3 is fine, but the reason we
held back on it was to enable the f2-f4 break, so that’s our most principled move) 5 ... d6
6 Nf3 enters the main line of the King’s Gambit Declined, which is half a book in itself.
Fortunately, White’s position is easy to play without much preparation. For example, 6
... exf4 (6 ... 0-0?! 7 f5 h6 8 Nd5 gives White a strong attack by pushing the g-pawn; 6 ...
Bg4 7 Na4 removes the annoying c5-bishop; if Black preserves it with 6 ... a6, then 7 Nd5
is quite promising; finally, 6 ... Ng4 is nothing to worry about: 7 Qe2 Bf2+ 8 Kf1 Nd4 9
Nxd4 Bxd4 10 f5 offers White decent chances, as in W.So-S.Djuraev, World Junior
Championship, Gaziantep 2008) 7 Bxf4 0-0 8 Bg5 h6 9 Bh4 Be6 10 Bb3!? (the comp
prefers 10 Bxe6 fxe6 11 d4) 10 ... Nd4 11 Rf1!? (and here 11 Na4! goes after Black’s
powerful bishop again) 11 ... Nxf3+?! (but after 11 ... Bg4 12 Ne2!? Nxf3+ 13 gxf3 Bh3 14
d4 Bxf1 15 Kxf1 White gets a strong centre, the bishop pair and decent attacking chances
for the exchange, especially in a blitz game) 12 Qxf3 Bd4? 13 Ne2! Bxb2 14 Rb1 Ba3,
G.Kasparov-F.Caruana, St. Louis (blitz) 2016, and now 15 Bxe6 fxe6 16 d4 leaves Black
busted.
5 Nge2!
We want to align our structure to keep a clamp over d5, so we allow our bishop to sit
where it is, rather than retreat it to b3.
5 ... c6
Worrying us about a possible ... d7-d5. The immediate 5 ... Nxc4 6 dxc4 usually
reaches a similar position later on, since Black tends to toss in ... c7-c6 at some point,
though it’s not obligatory. Ma.Carlsen-A.Giri, Paris (rapid) 2016, saw 5 ... Bc5 6 0-0 0-0 7
a4 Nxc4 8 dxc4 a5 9 Qd3 (the idea is to challenge Black’s dark-squared bishop with Be3)
9 ... d6 10 b3 Be6 11 Be3 Nd7 12 Rad1 with a clamp on d5, while Black’s bishop pair will
soon be swapped off soon.
6 a4!
Question: Why play the pawn to a4, rather than a3?
Answer: Both moves threaten to keep the light-squared bishop with Ba2, thus
prompting Black to exchange it, but a2-a4 also suppresses any future ... b7-b5 breaks.
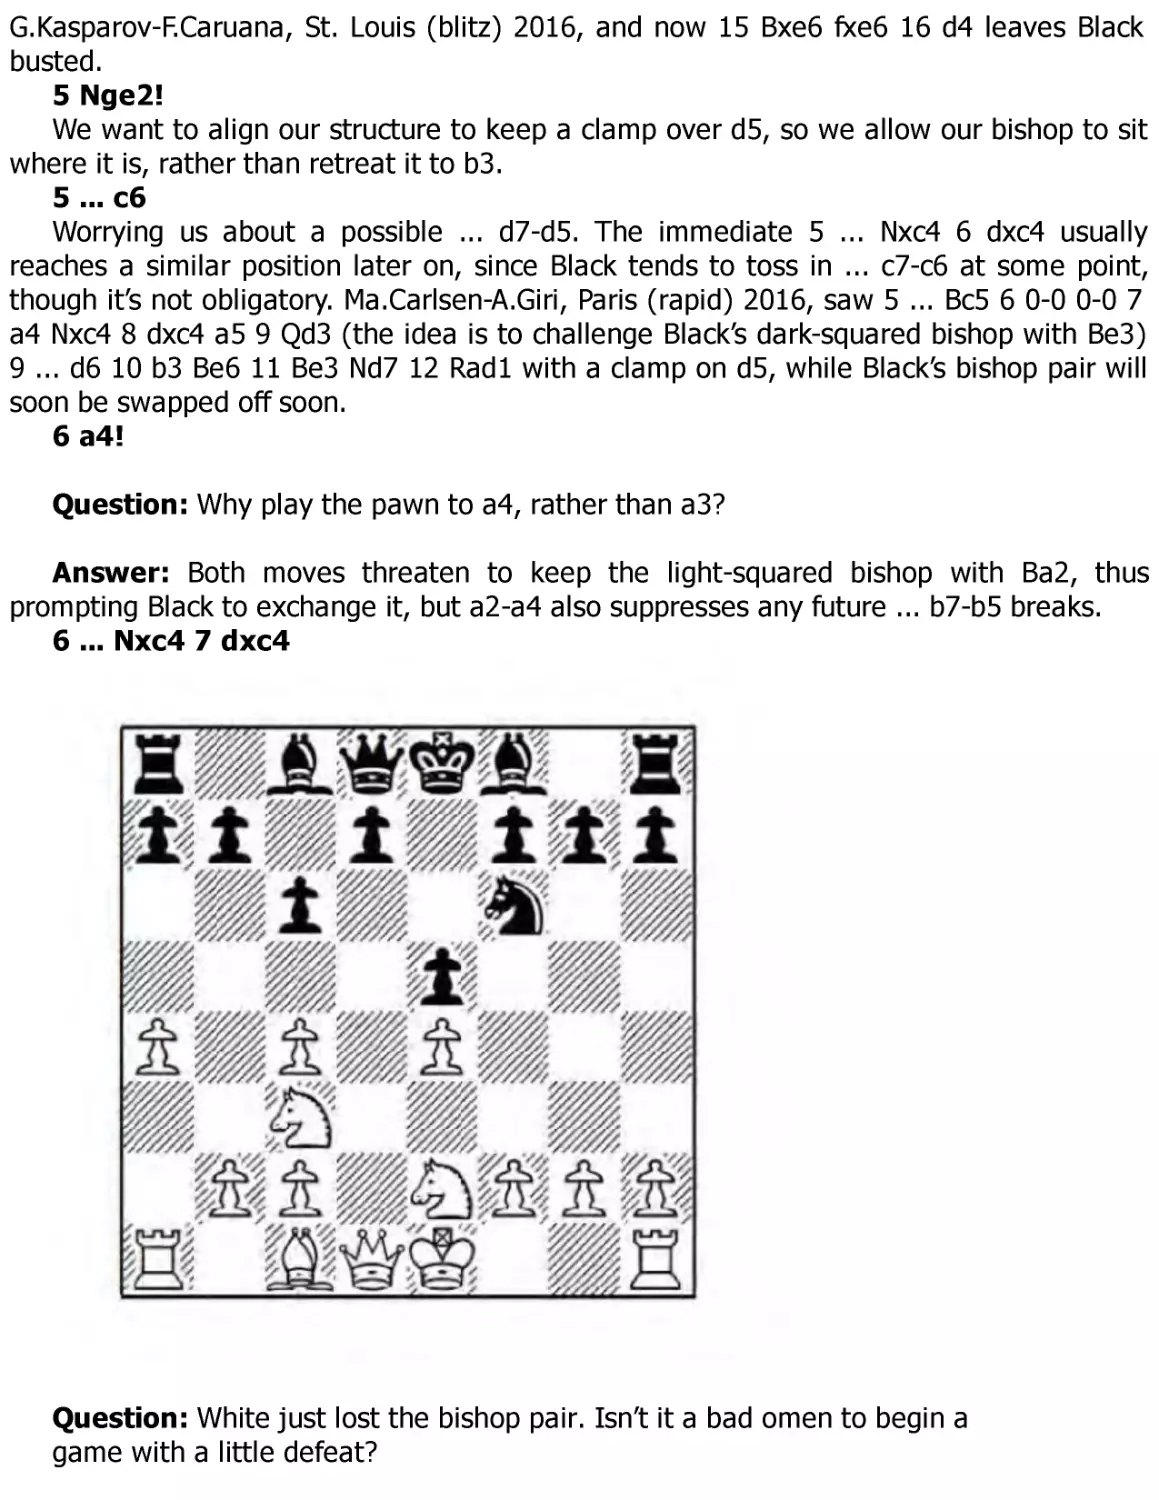
6 ... Nxc4 7 dxc4
Question: White just lost the bishop pair. Isn’t it a bad omen to begin a
game with a little defeat?
Answer: Well, we do get something of value for it:
1. Greater central space with pawns on e4 and c4, which are ethnically distinguishable
from their normal cousins where White’s pawns sit on e4 and d3.
2. White’s structure clamps down on both Black’s ... d7-d5 and ... b7-b5 breaks.
3. Black can get tied down to a backward d-pawn when it is later pushed to d6, since
White can pile on with ideas like Qd3, Rd1, b2-b3 and Ba3.
7 ... Be7
It’s perhaps a matter of taste whether Black develops the f8-bishop inside or outside
the pawn chain. After 7 ... Bc5 8 0-0 d6 9 Qd3 Be6 10 b3 0-0 11 Be3 (principle: When
your opponent owns the bishop pair, swap one of them away ) 11 ... Bb4 12 Rad1, White’s
game is still a touch easier to play with ideas of Na2 in the air, V.Mirumian-P.Wells, Berlin
1999.
8 0-0 d6 9 Qd3
Apart from supporting a pile on against d6, as outlined in the note to move seven,
from here the queen can also swing over to the kingside via the third rank if desired.
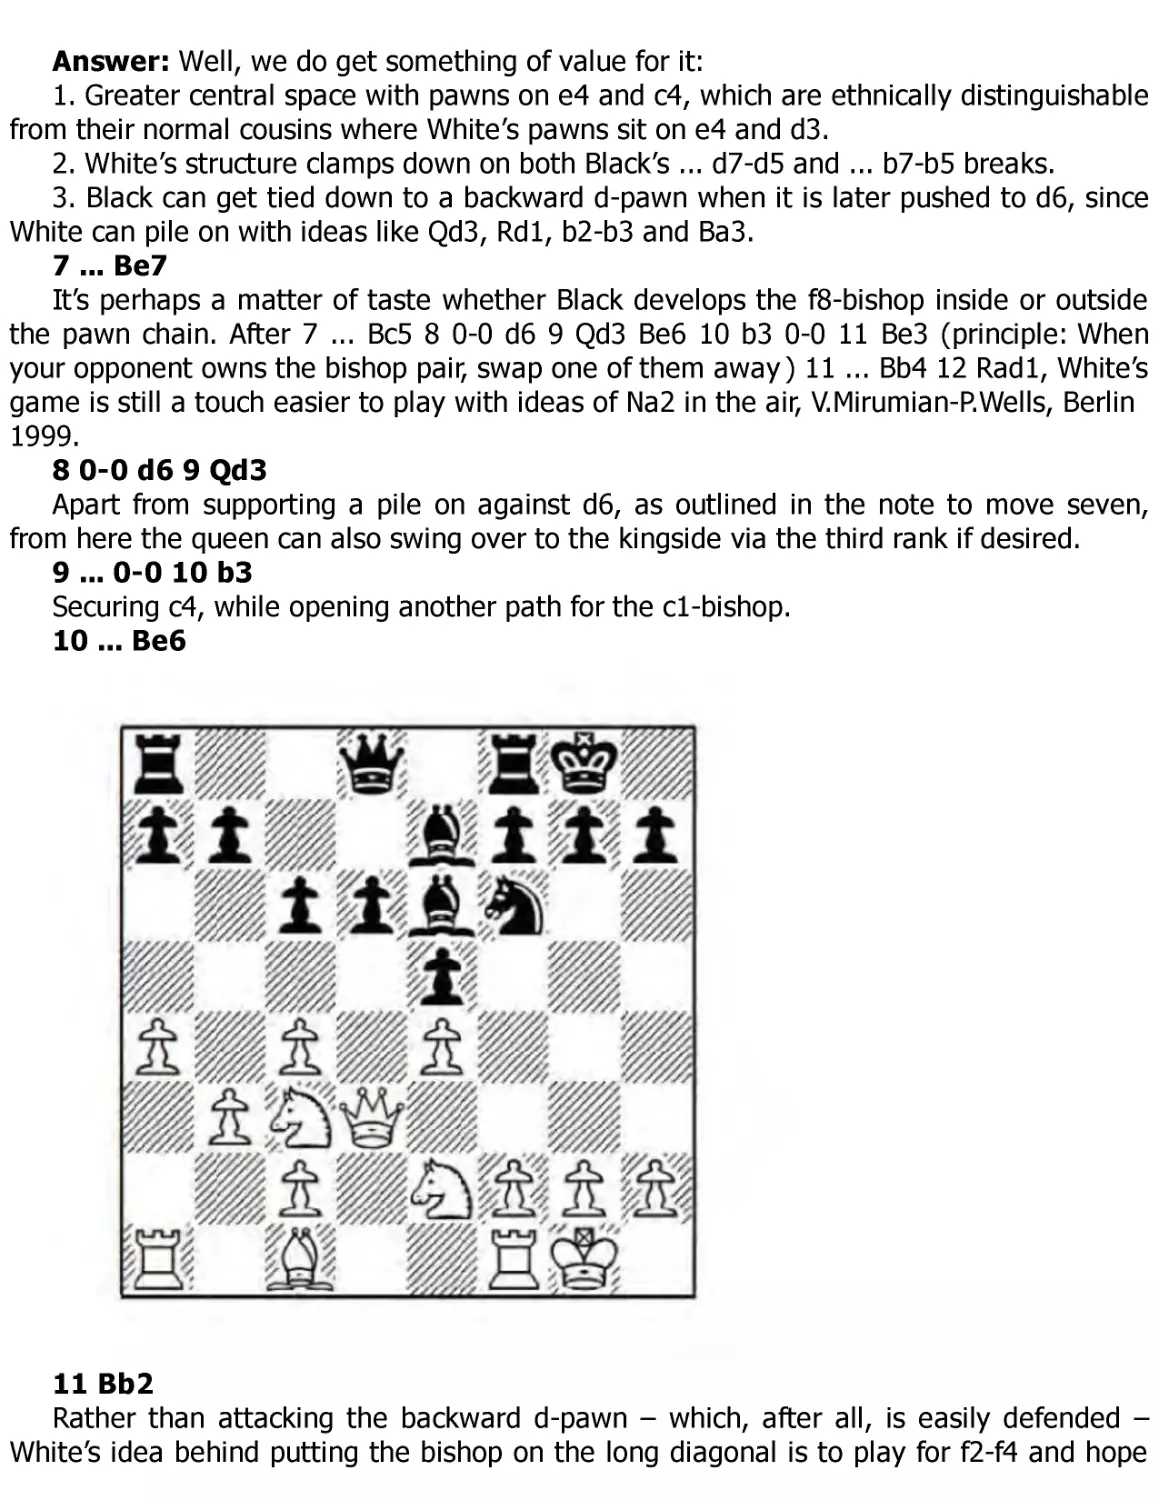
9 ... 0-0 10 b3
Securing c4, while opening another path for the c1-bishop.
10 ... Be6
11 Bb2
Rather than attacking the backward d-pawn – which, after all, is easily defended –
White’s idea behind putting the bishop on the long diagonal is to play for f2-f4 and hope
for chances on the kingside.
Instead, 11 Ba3 Qc7 12 Rfd1 Rfd8 13 Qe3 h6 14 h3 Bf8 15 Rd3 a6! (preparing
queenside counterplay) 16 Rad1 b5 17 cxb5 axb5 was V.Anand-J.Santos Latasa, Leon
(rapid) 2017, when chances look balanced after 18 f4.
11 ... Qa5
Black has generally opted to develop the queen on a5 where it is most active. The
comp’s unplayed suggestion 11 ... Nd7, intending ... Nc5, looks reasonable too.
12 f4
The armistice finally ends and contact arises between the two sides.
12 ... exf4
Played in all four games in the database. Black clears e5 and follows the principle:
Counter in the centre when attacked on the wing. For that reason a waiting move like 12
... Rfe8?! makes no sense, since 13 f5 Bc8 14 Kh1 gives White a free hand to attack on
the kingside.
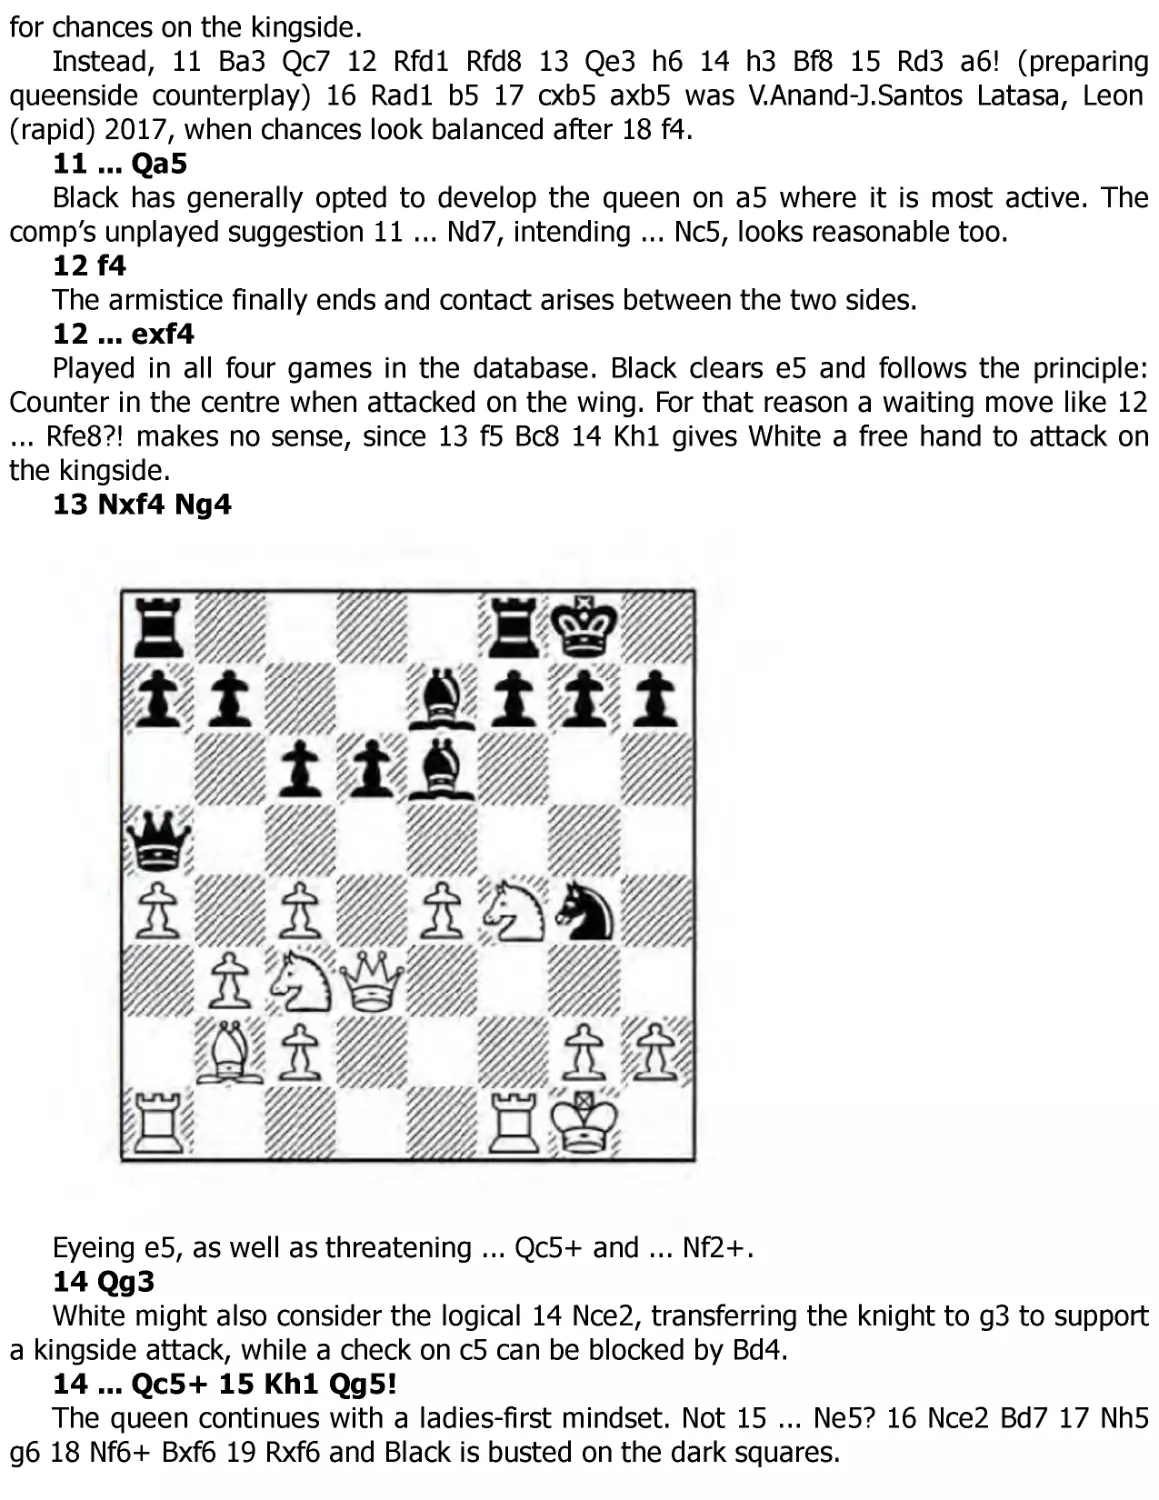
13 Nxf4 Ng4
Eyeing e5, as well as threatening ... Qc5+ and ... Nf2+.
14 Qg3
White might also consider the logical 14 Nce2, transferring the knight to g3 to support
a kingside attack, while a check on c5 can be blocked by Bd4.
14 ... Qc5+ 15 Kh1 Qg5!
The queen continues with a ladies-first mindset. Not 15 ... Ne5? 16 Nce2 Bd7 17 Nh5
g6 18 Nf6+ Bxf6 19 Rxf6 and Black is busted on the dark squares.
16 Nce2
Opening the b2-bishop’s diagonal to take aim at g7, with further ideas of Nd4. After 16
h3 Ne5 17 Nce2 Qxg3 18 Nxg3 g6, White’s edge was negligible, J.Da Riva Alonso-A.Eger,
correspondence 2008.
16 ... Bd7
This may be the start of Black’s troubles.
The natural idea of challenging the long diagonal with 16 ... Bf6?! also fails to
equalize: 17 Bxf6 Qxf6 18 h3 Nh6 (not 18 ... Ne5? 19 c5!) 19 Rad1 and White has an edge
since the d6-pawn is less secure than before.
I think Black’s best continuation lies in removing queens from the board with 16 ...
Qh4! 17 h3 Qxg3 18 Nxg3 and only now 18 ... Bf6. White can try 19 Bxf6 Nxf6 20 Nxe6
fxe6 21 e5! dxe5 22 Rfe1 Rad8 23 Rxe5 Rd2 24 Rc1, when the comp prefers White in the
ending, but in my opinion Black should hold the game after 24 ... Kf7 25 Nf1 (ejecting the
rook from the second rank, since f2 is an unsustainable square) 25 ... Rd6 26 Kg1 Rfd8 27
Rce1, as I doubt White will make anything of Black’s e6-isolani.
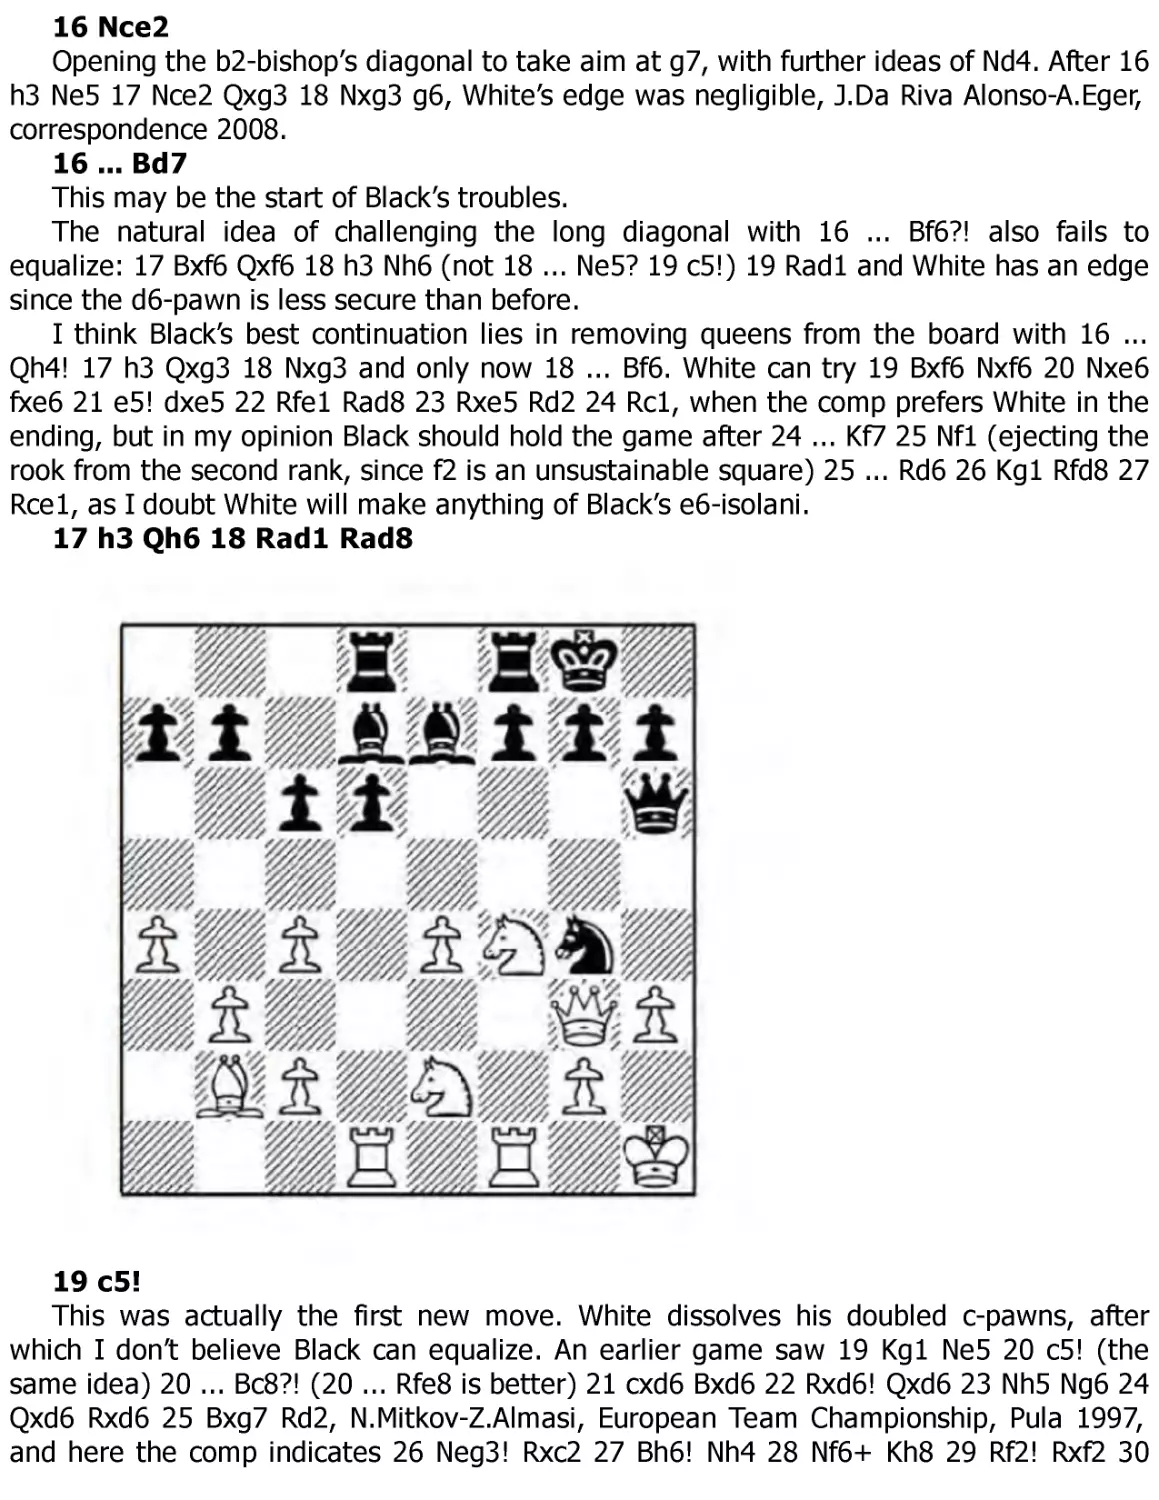
17 h3 Qh6 18 Rad1 Rad8
19 c5!
This was actually the first new move. White dissolves his doubled c-pawns, after
which I don’t believe Black can equalize. An earlier game saw 19 Kg1 Ne5 20 c5! (the
same idea) 20 ... Bc8?! (20 ... Rfe8 is better) 21 cxd6 Bxd6 22 Rxd6! Qxd6 23 Nh5 Ng6 24
Qxd6 Rxd6 25 Bxg7 Rd2, N.Mitkov-Z.Almasi, European Team Championship, Pula 1997,
and here the comp indicates 26 Neg3! Rxc2 27 Bh6! Nh4 28 Nf6+ Kh8 29 Rf2! Rxf2 30
Kxf2, when Black has nothing better than to hand back the exchange with 30 ... Rg8 and
enter a clearly inferior ending (if 30 ... Rd8 then 31 Ngh5! threatens Bg7 mate).
19 ... Bc8
The same slightly passive move. Black might do better to counter in the centre with
19 ... f5!? 20 cxd6 Bh4 21 Qc3 fxe4 22 Kg1 e3 23 hxg4 Bf2+ 24 Rxf2 exf2+ 25 Kxf2 Rxf4+
26 Nxf4 Qxf4+ 27 Kg1 Qxg4 28 Rd4, though I still like White’s attacking chances with the
opposite-coloured bishops.
20 Bc1!
Threatening Nd5. Black’s queen is suddenly short on squares.
20 ... Bh4
The only move. 20 ... Qh4?? isn’t possible since Black’s knight hangs after a queen
swap, while 20 ... g5?! looks awfully loose. It reminds me of that time as a kid when I
went over to a friend’s house after school and his 1960s traditional housewife/mother
began to curse like a sailor, having run out of gin and cigarettes. After 21 cxd6 Rxd6 (21
... Bxd6? is met by 22 Rxd6! Qxd6 23 Nh5 Qxg3 24 Nexg3, when Black is in deep trouble
on the dark squares around his king) 22 Nd3 f6 23 Kg1 Ne5 24 Nxe5, White wins a pawn.
21 Qf3
And not the careless 21 Qc3?? Nf2+, when White hangs the exchange.
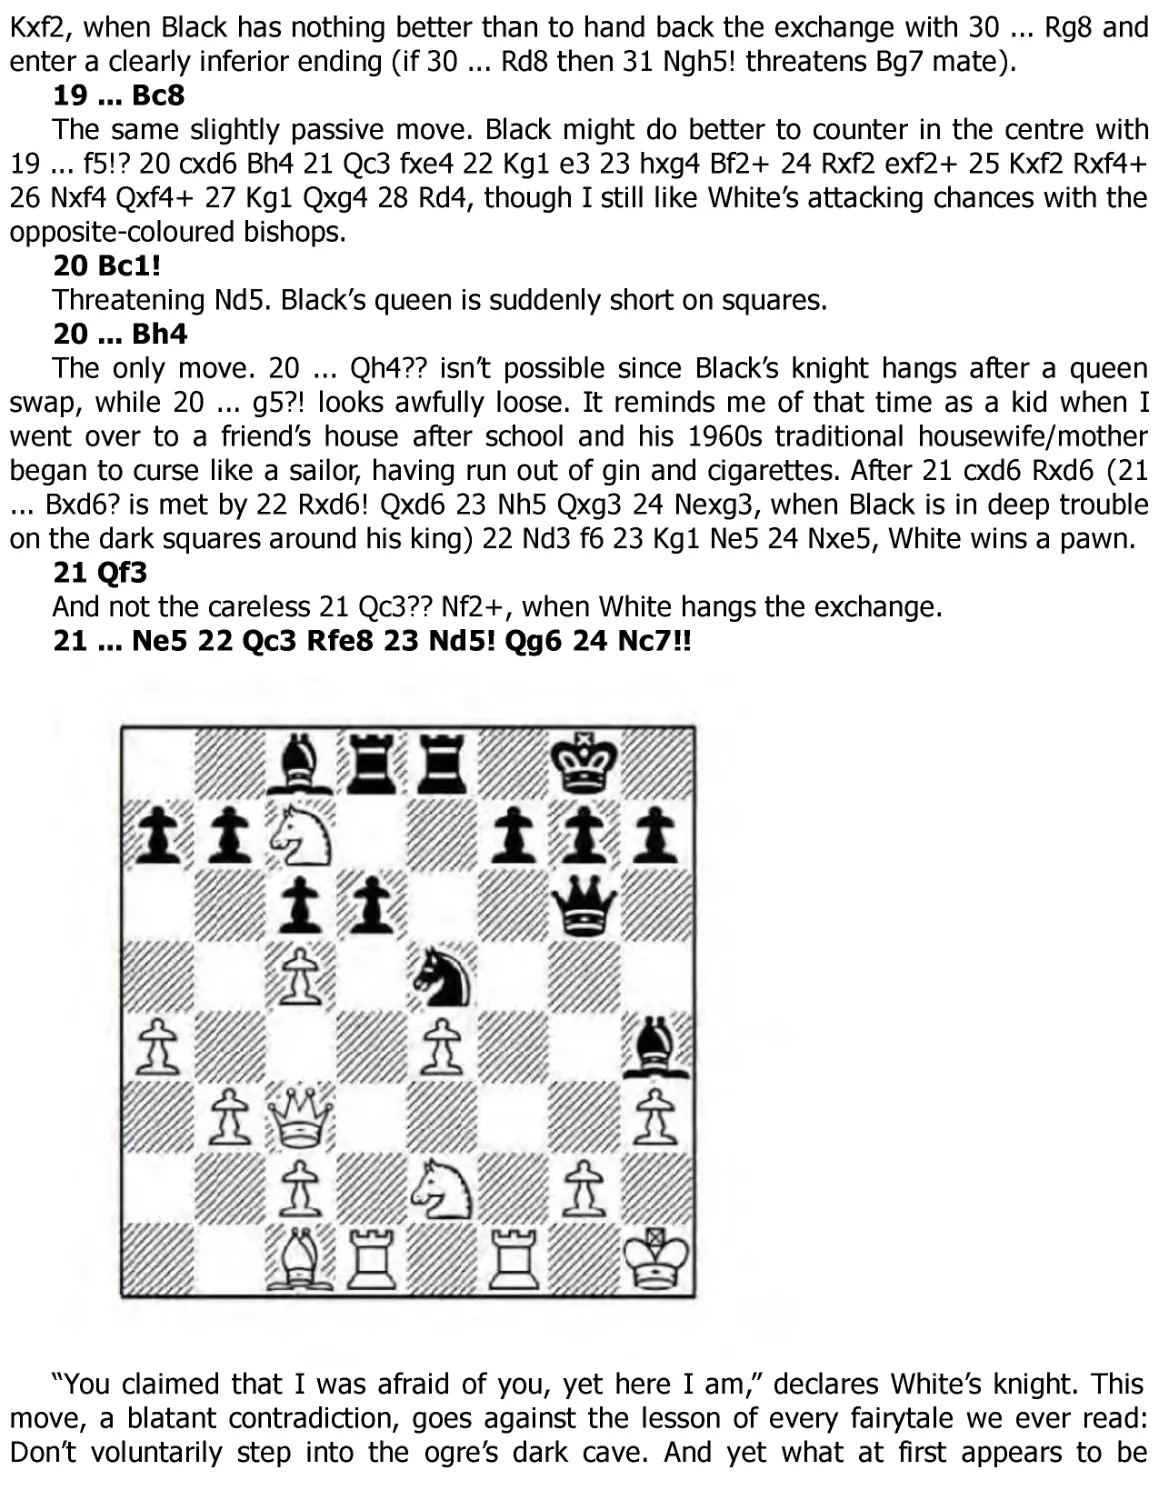
21 ... Ne5 22 Qc3 Rfe8 23 Nd5! Qg6 24 Nc7!!
“You claimed that I was afraid of you, yet here I am,” declares White’s knight. This
move, a blatant contradiction, goes against the lesson of every fairytale we ever read:
Don’t voluntarily step into the ogre’s dark cave. And yet what at first appears to be
voluntary exile for the knight turns out to be a powerful undermining idea. The problems
for Black are twofold:
1. White’s last move destabilizes e5 and, in general, inflicts extreme fragmentation in
Black’s piece harmony.
2. Oddly enough, there is no way for Black to trap and win the -knight.
A combination is that magical moment when an almost infinite range of possibilities
collapses into a single, streamlined solution. I’m not really sure this game really contains
a moment like that, so I question whether this move counts as a combination or is more
an incredibly deep assessment of White’s potential.
24 ... Rf8!
Black correctly waits for the storm to pass rather than trudge on in the rain. Not 24 ...
Re7?? 25 cxd6 Rxd6 26 Nf4 Qh6 27 Nfd5 and too many black pieces hang simultaneously.
25 Nf4! Qxe4
Given a choice between exile and death, most people prefer the former. 25 ... Qf6??
26 Nfe6 wins at least the exchange.
26 Bb2 Bf6?
This is the point in our game when we tell ourselves “don’t panic”, as we get more
and more panicked. Black’s only (and slim) prayer to try and hold the game lay in 26 ...
dxc5 27 Qxe5 Qxe5 28 Bxe5 Bf5 29 Nd3 Bxd3 30 Rxd3 Rxd3 31 cxd3 Rd8, and even then
White should be able to convert, despite his semi-trapped knight.
27 Rde1! Qf5 28 Nfd5 Qg5 29 Bc1! Qh4
Black’s queen appears here and there, as if she ran one of those small mom and pop
stores where the owners show up whenever they please.
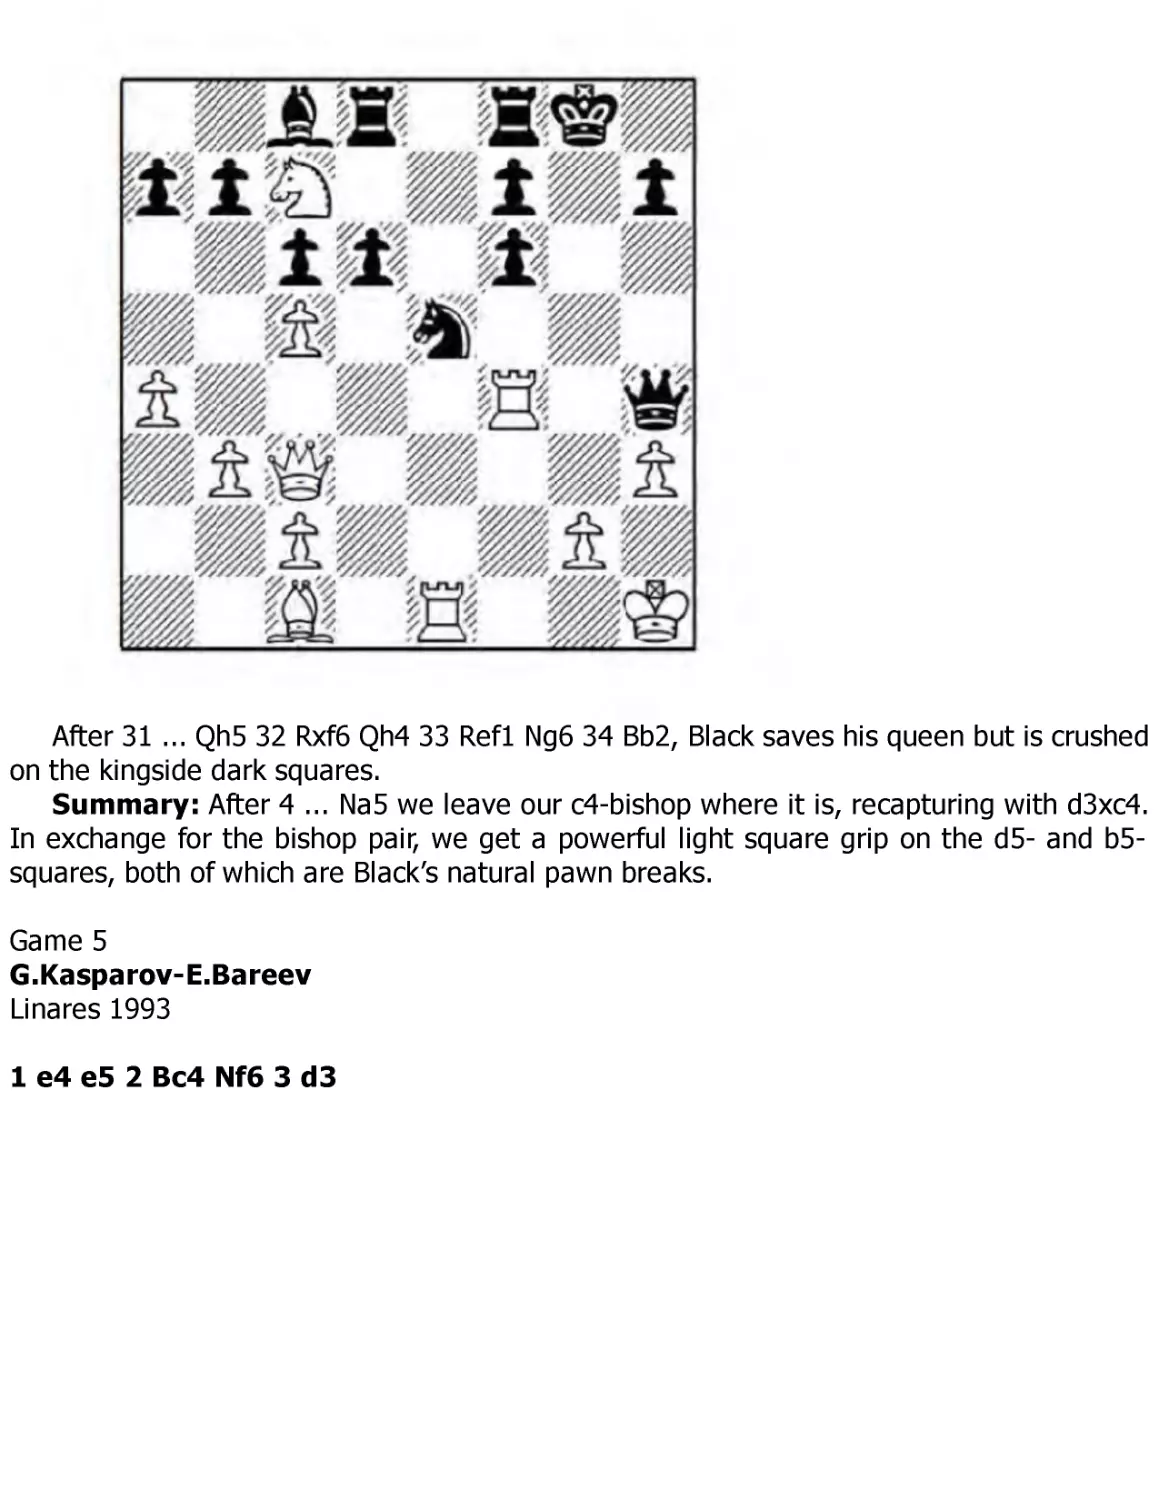
30 Nxf6+ gxf6 31 Rf4! 1-0
After 31 ... Qh5 32 Rxf6 Qh4 33 Ref1 Ng6 34 Bb2, Black saves his queen but is crushed
on the kingside dark squares.
Summary: After 4 ... Na5 we leave our c4-bishop where it is, recapturing with d3xc4.
In exchange for the bishop pair, we get a powerful light square grip on the d5- and b5squares, both of which are Black’s natural pawn breaks.
Game 5
G.Kasparov-E.Bareev
Linares 1993
1 e4 e5 2 Bc4 Nf6 3 d3
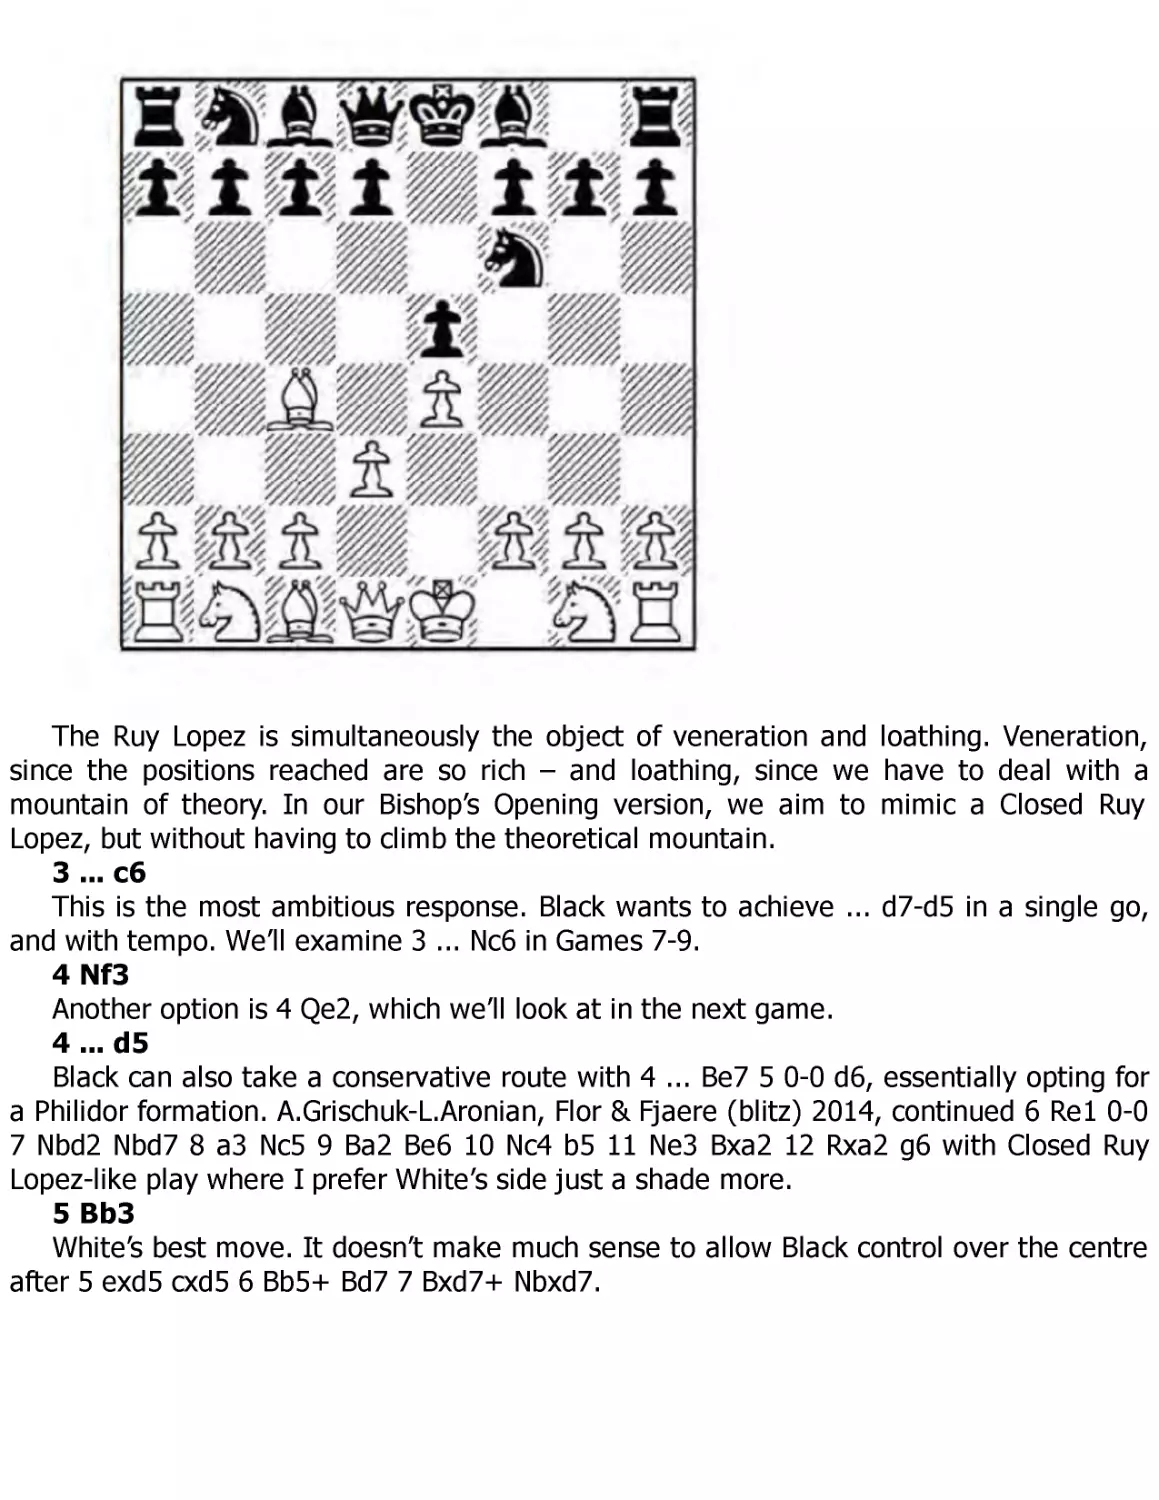
The Ruy Lopez is simultaneously the object of veneration and loathing. Veneration,
since the positions reached are so rich – and loathing, since we have to deal with a
mountain of theory. In our Bishop’s Opening version, we aim to mimic a Closed Ruy
Lopez, but without having to climb the theoretical mountain.
3 ... c6
This is the most ambitious response. Black wants to achieve ... d7-d5 in a single go,
and with tempo. We’ll examine 3 ... Nc6 in Games 7-9.
4 Nf3
Another option is 4 Qe2, which we’ll look at in the next game.
4 ... d5
Black can also take a conservative route with 4 ... Be7 5 0-0 d6, essentially opting for
a Philidor formation. A.Grischuk-L.Aronian, Flor & Fjaere (blitz) 2014, continued 6 Re1 0-0
7 Nbd2 Nbd7 8 a3 Nc5 9 Ba2 Be6 10 Nc4 b5 11 Ne3 Bxa2 12 Rxa2 g6 with Closed Ruy
Lopez-like play where I prefer White’s side just a shade more.
5 Bb3
White’s best move. It doesn’t make much sense to allow Black control over the centre
after 5 exd5 cxd5 6 Bb5+ Bd7 7 Bxd7+ Nbxd7.
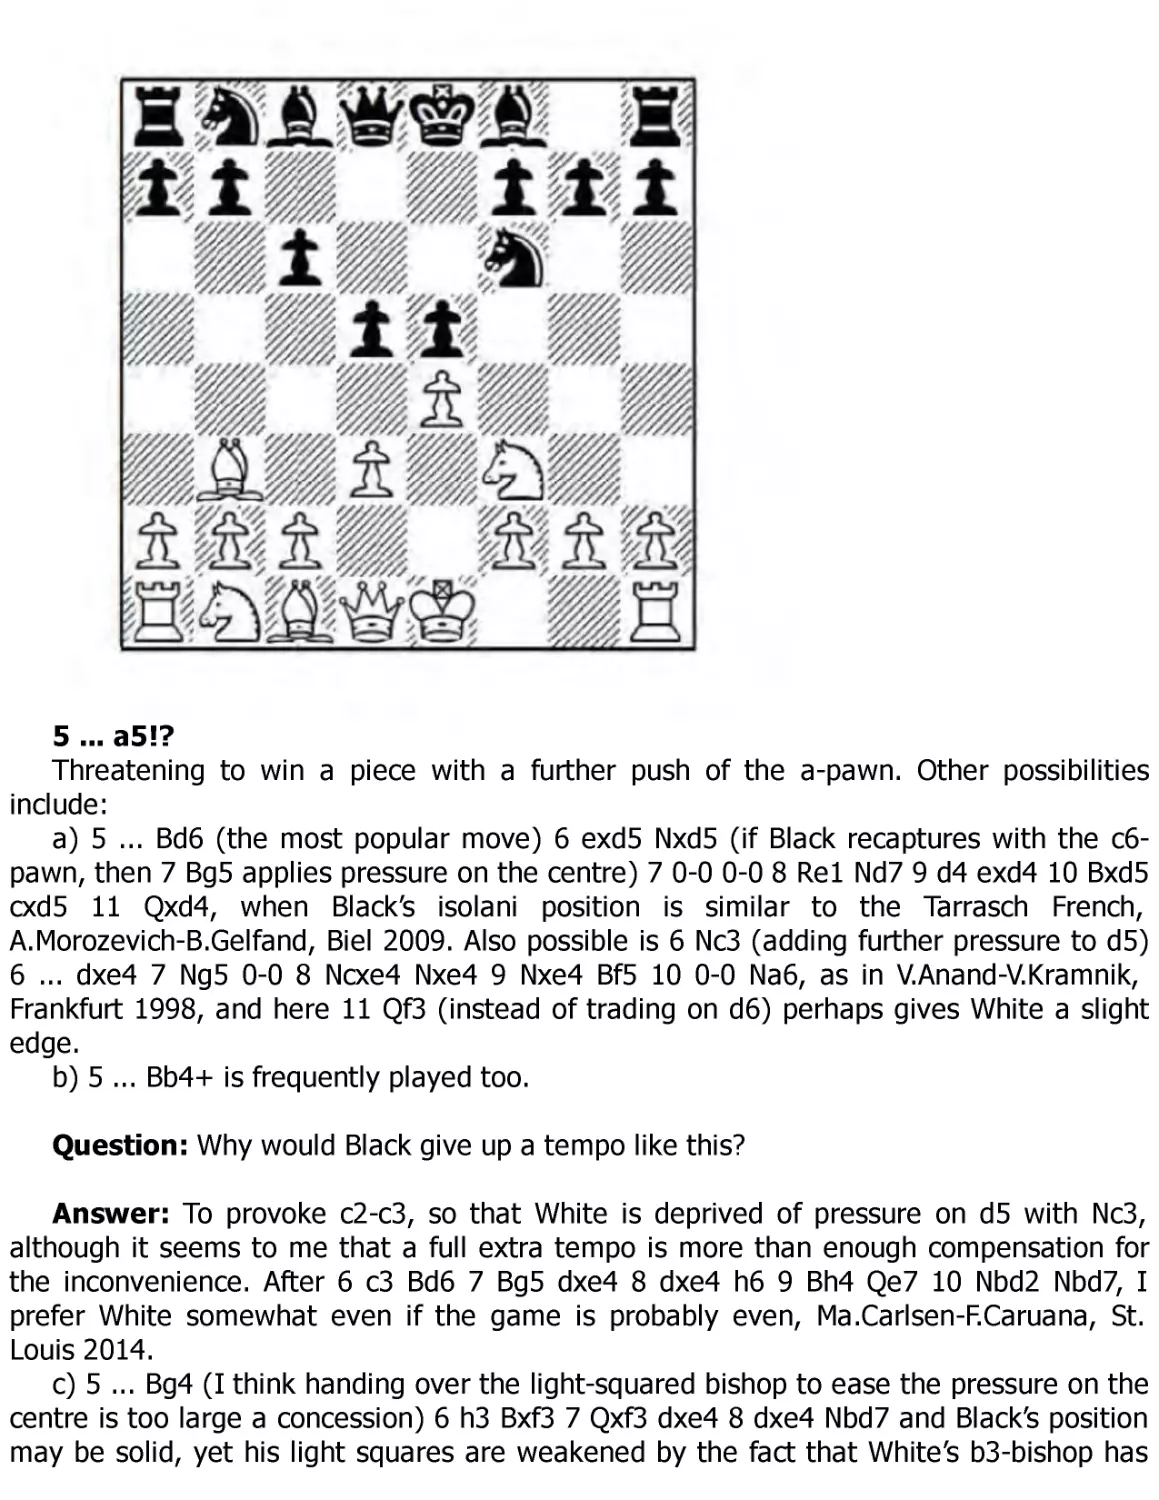
5 ... a5!?
Threatening to win a piece with a further push of the a-pawn. Other possibilities
include:
a) 5 ... Bd6 (the most popular move) 6 exd5 Nxd5 (if Black recaptures with the c6pawn, then 7 Bg5 applies pressure on the centre) 7 0-0 0-0 8 Re1 Nd7 9 d4 exd4 10 Bxd5
cxd5 11 Qxd4, when Black’s isolani position is similar to the Tarrasch French,
A.Morozevich-B.Gelfand, Biel 2009. Also possible is 6 Nc3 (adding further pressure to d5)
6 ... dxe4 7 Ng5 0-0 8 Ncxe4 Nxe4 9 Nxe4 Bf5 10 0-0 Na6, as in V.Anand-V.Kramnik,
Frankfurt 1998, and here 11 Qf3 (instead of trading on d6) perhaps gives White a slight
edge.
b) 5 ... Bb4+ is frequently played too.
Question: Why would Black give up a tempo like this?
Answer: To provoke c2-c3, so that White is deprived of pressure on d5 with Nc3,
although it seems to me that a full extra tempo is more than enough compensation for
the inconvenience. After 6 c3 Bd6 7 Bg5 dxe4 8 dxe4 h6 9 Bh4 Qe7 10 Nbd2 Nbd7, I
prefer White somewhat even if the game is probably even, Ma.Carlsen-F.Caruana, St.
Louis 2014.
c) 5 ... Bg4 (I think handing over the light-squared bishop to ease the pressure on the
centre is too large a concession) 6 h3 Bxf3 7 Qxf3 dxe4 8 dxe4 Nbd7 and Black’s position
may be solid, yet his light squares are weakened by the fact that White’s b3-bishop has
no black counterpart, S.Tiviakov-D.Miedema, Vlissingen 2007.
d) 5 ... dxe4 needs to be considered as well.
Question: Isn’t Black just better here?
Answer: You are assuming that White will either recapture on e4 or take on e5 and
fall for the trap ... Qa5+, winning a piece. Instead, White goes directly for f7 with 6 Ng5!
Be6 7 Nxe6! (I like this better than 7 Bxe6 fxe6 8 Nxe4! Nxe4 9 dxe4 Qxd1+ 10 Kxd1 with
the superior ending for White) 7 ... fxe6 8 0-0 and gets excellent compensation for the
pawn, with the bishop pair, superior structure, control over the light squares, and a lead
in development.
6 Nc3
Kasparov increases pressure on d5, while preventing ... a5-a4.
6 ... Bb4
Threatening to trap the white bishop with ... a5-a4 again.
Question: Why can’t Black play 6 ... d4 first and then follow with ... a5-a4 - ?
Answer: That’s a blunder. White ignores the threat and plays 7 Nxe5!, taking aim at
f7. If 7 ... dxc3? then 8 Nxf7 Qc7 9 Nxh8 and Black is busted.
7 a3
Putting the question to the black bishop and giving the b3-bishop a retreat square.
7 ... Bxc3+ 8 bxc3 Nbd7
Defending the e5-pawn. 8 ... dxe4 is met by 9 Nxe5 0-0 10 0-0, when the bishop pair
offers White an edge.
9 exd5
Principle: Open the game when you own the bishop pair.
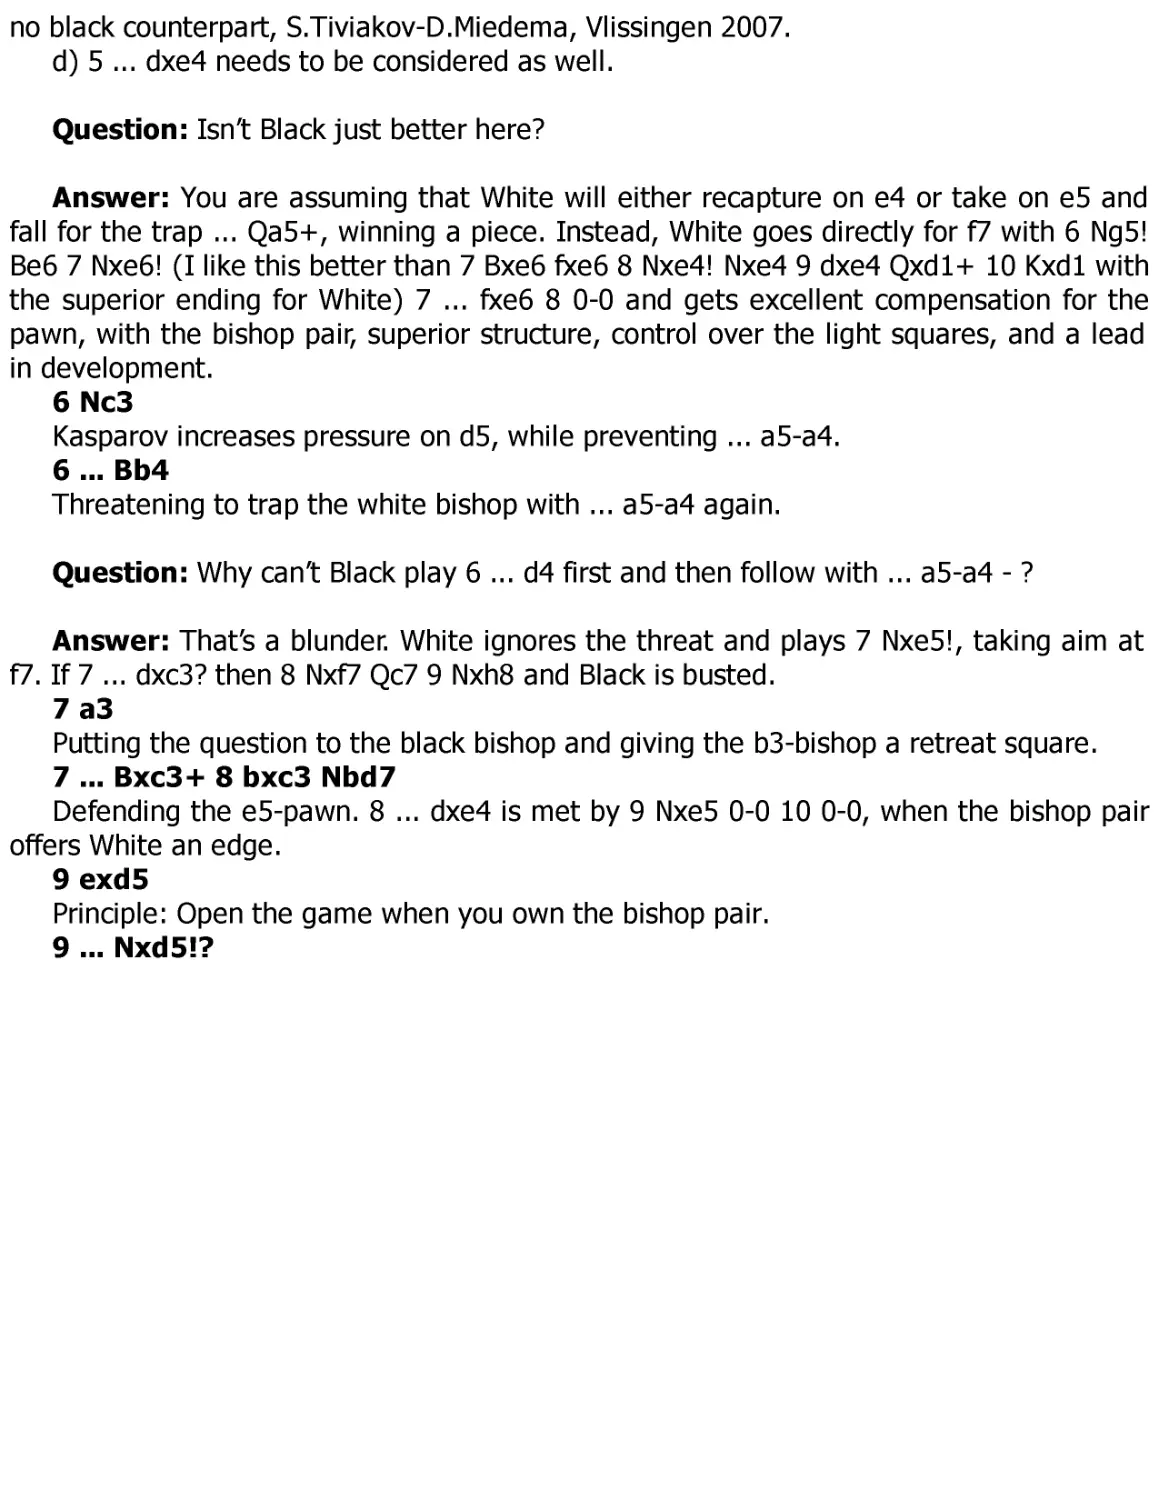
9 ... Nxd5!?
I don’t think this capture is the best. Black needs the centre to compensate for the
bishop pair, so 9 ... cxd5 10 0-0 0-0 11 Re1 Re8 looks stronger. I still slightly prefer
White, but the edge is really tiny.
10 0-0!
This confrontational pawn offer is completely sound, though 10 Bd2 is playable too.
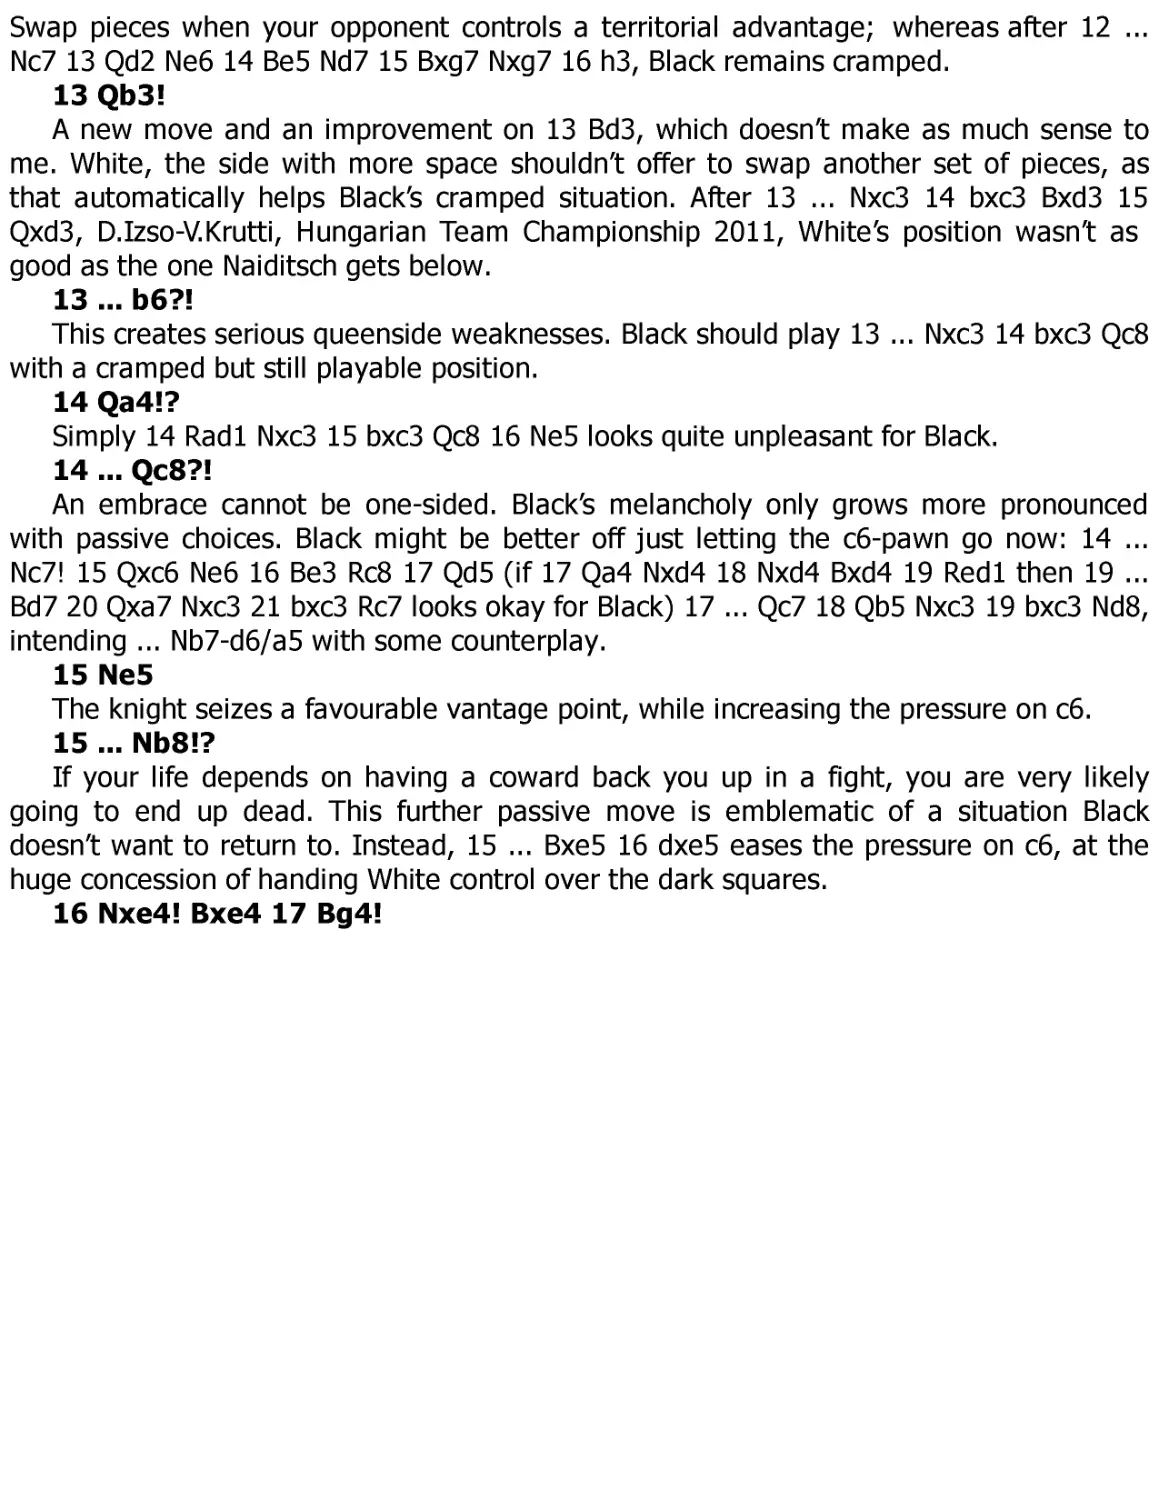
Watch how quickly Black got into trouble in this game: 10 ... 0-0 11 0-0 Qe7?! (the e-file
isn’t such a great spot for the queen; 11 ... f6 is better) 12 Re1 f6?! 13 d4! e4 14 c4 Nc7
15 Bf4 Ne8 16 c5+ Kh8 17 Nh4! (threatening Qh5 and Ng6 mate) 17 ... g6 18 Re3!
(threatening Nxg6+ and Rh3+) 18 ... Kg7 19 Rg3! (threatening a deadly check on f5) 19
... Nb8 20 Qh5! and 1-0 since Black gets mated, T.Abrahamyan-D.Haessel, Los Angeles
2011.
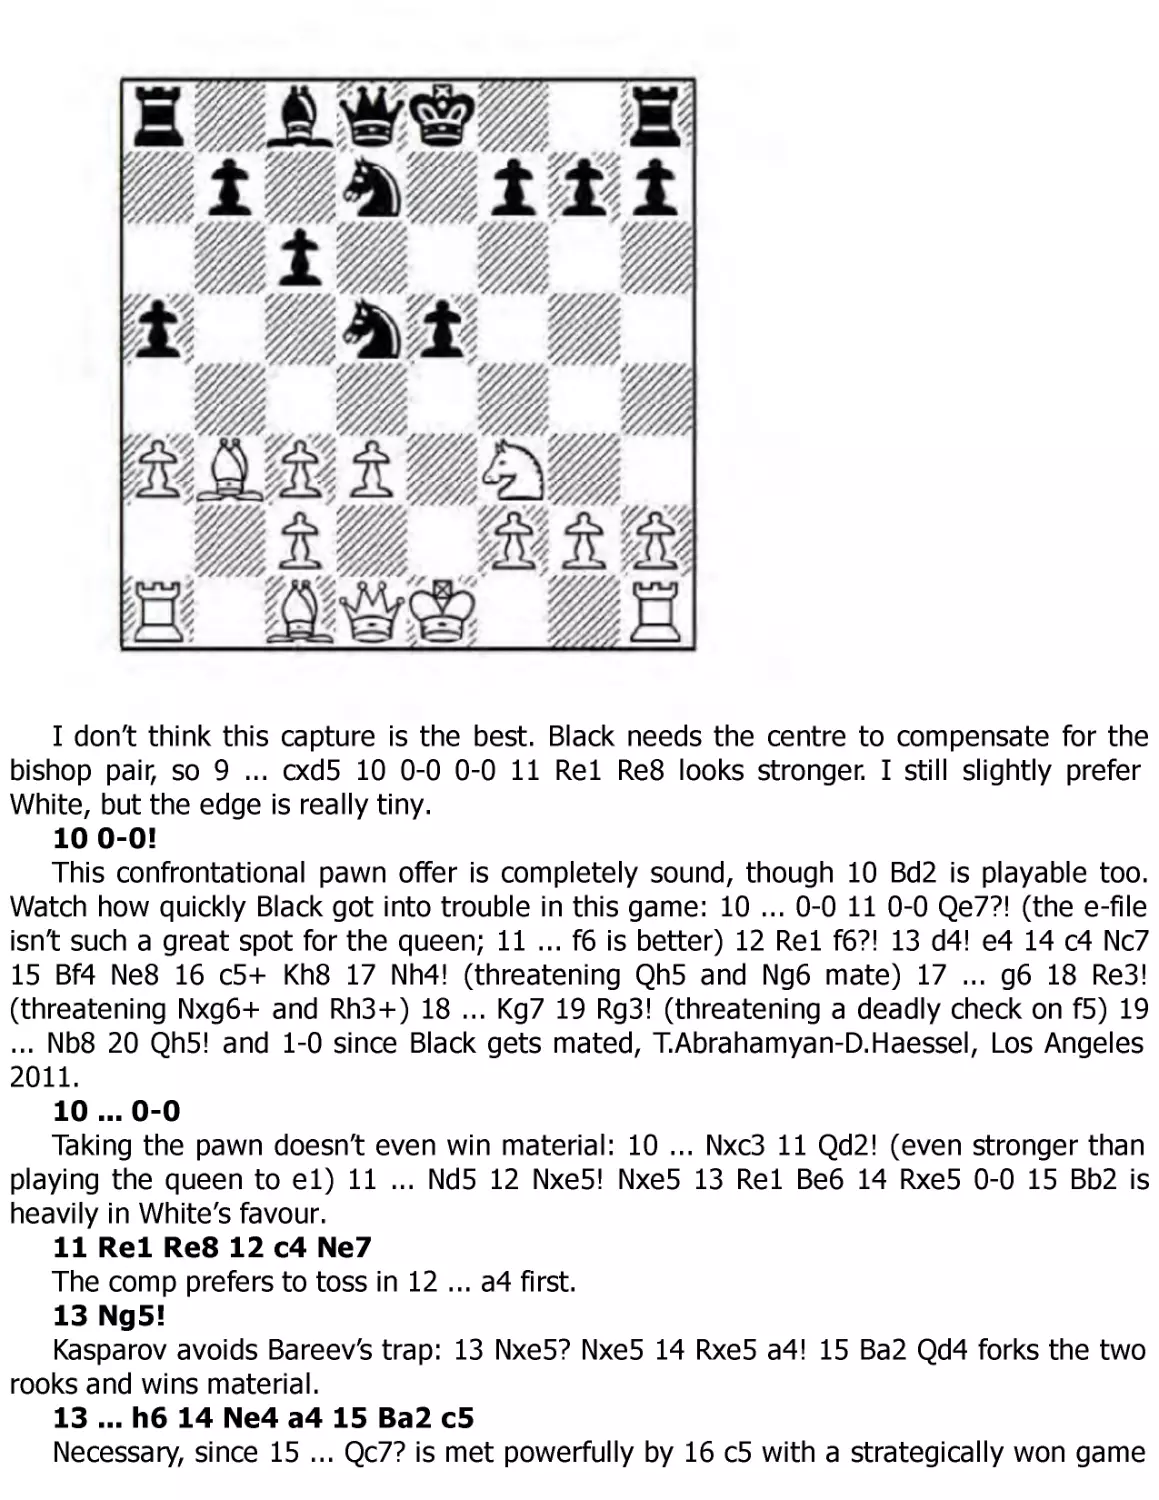
10 ... 0-0
Taking the pawn doesn’t even win material: 10 ... Nxc3 11 Qd2! (even stronger than
playing the queen to e1) 11 ... Nd5 12 Nxe5! Nxe5 13 Re1 Be6 14 Rxe5 0-0 15 Bb2 is
heavily in White’s favour.
11 Re1 Re8 12 c4 Ne7
The comp prefers to toss in 12 ... a4 first.
13 Ng5!
Kasparov avoids Bareev’s trap: 13 Nxe5? Nxe5 14 Rxe5 a4! 15 Ba2 Qd4 forks the two
rooks and wins material.
13 ... h6 14 Ne4 a4 15 Ba2 c5
Necessary, since 15 ... Qc7? is met powerfully by 16 c5 with a strategically won game
for White.
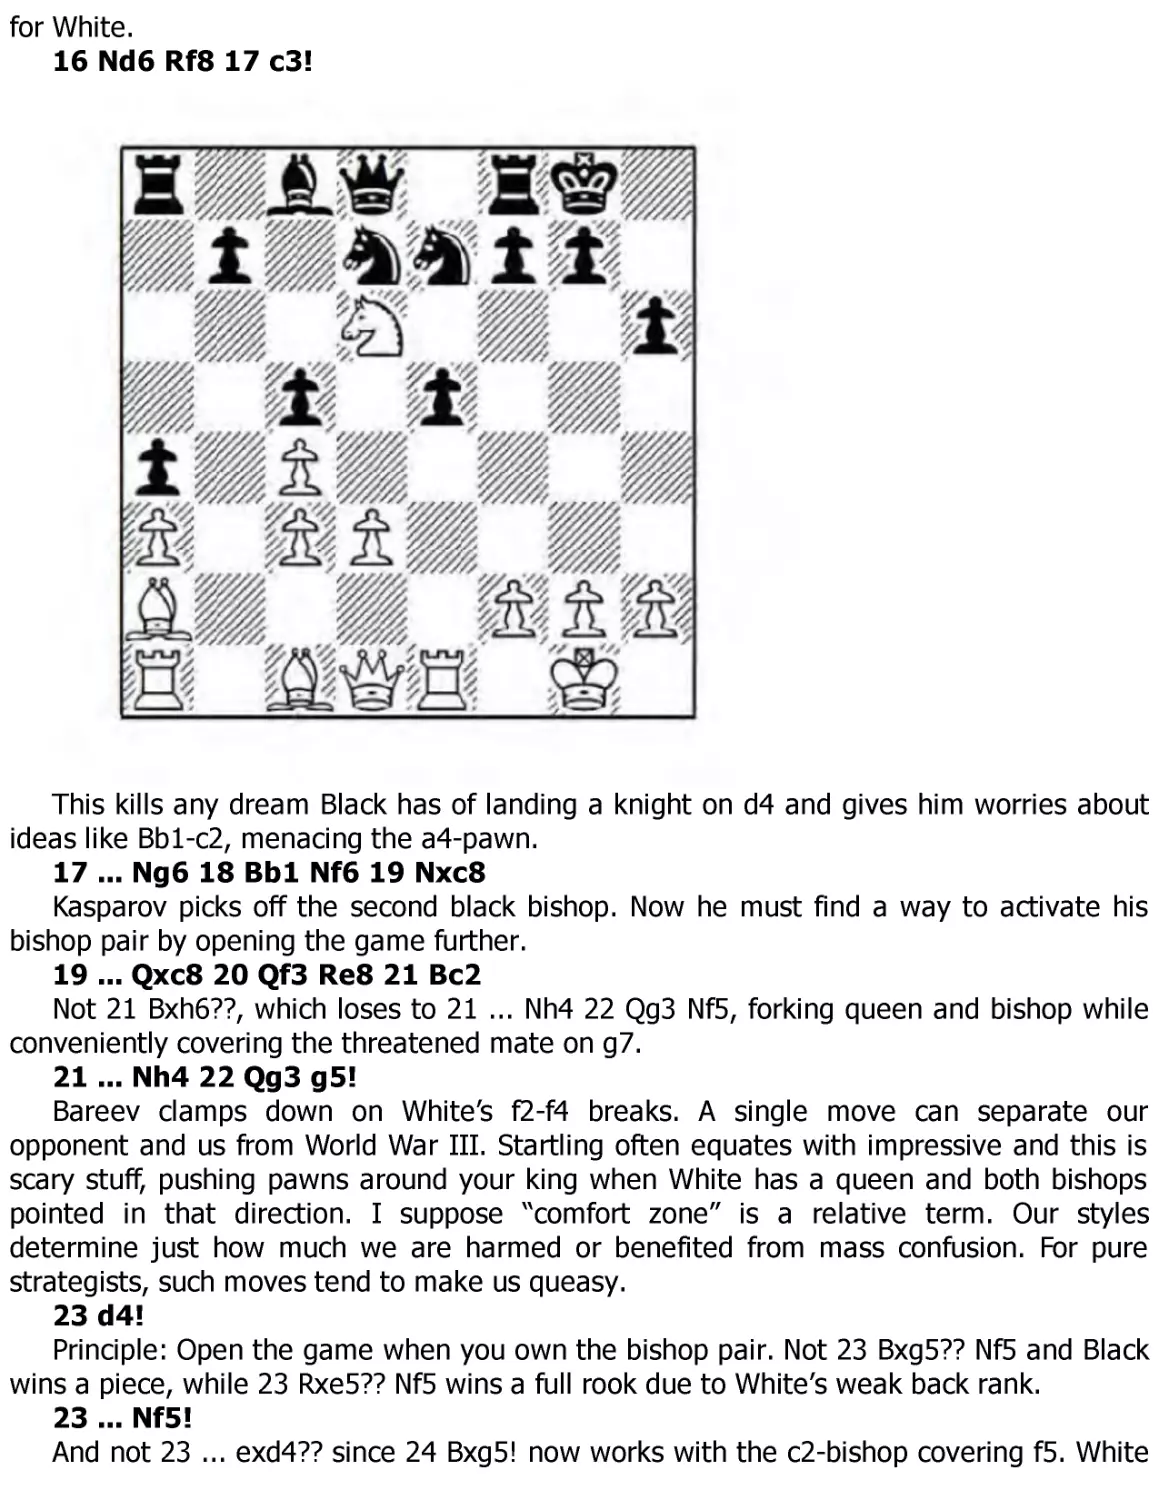
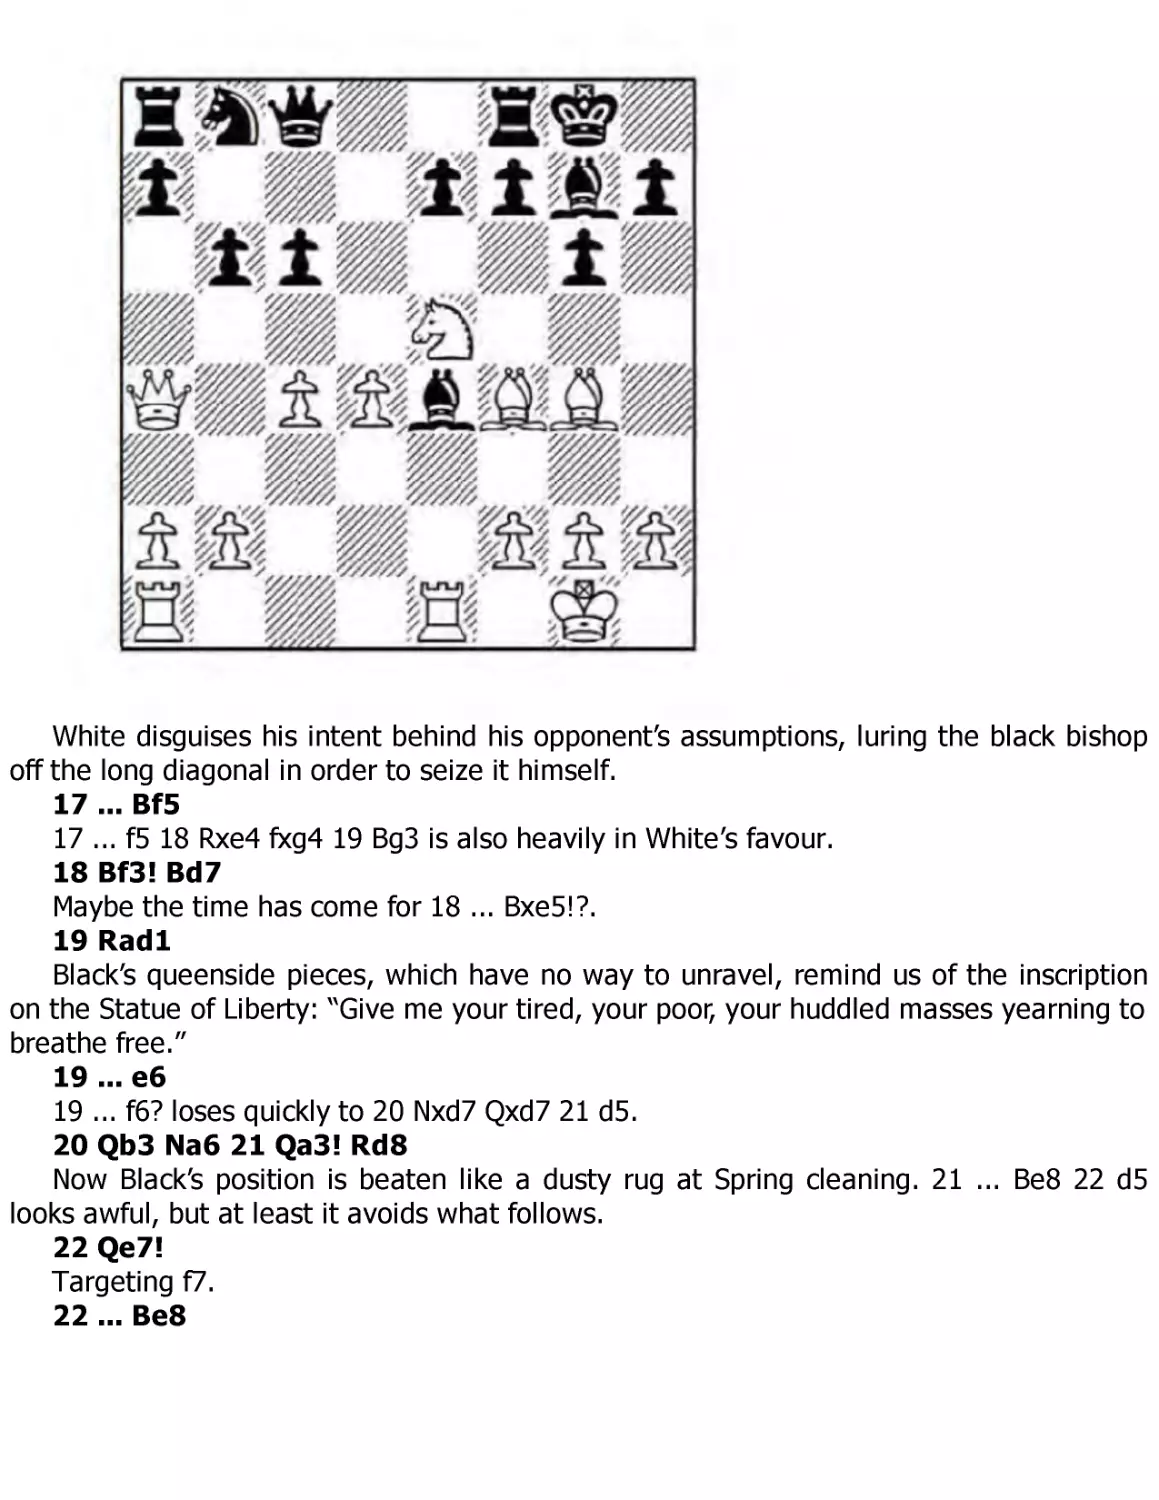
16 Nd6 Rf8 17 c3!
This kills any dream Black has of landing a knight on d4 and gives him worries about
ideas like Bb1-c2, menacing the a4-pawn.
17 ... Ng6 18 Bb1 Nf6 19 Nxc8
Kasparov picks off the second black bishop. Now he must find a way to activate his
bishop pair by opening the game further.
19 ... Qxc8 20 Qf3 Re8 21 Bc2
Not 21 Bxh6??, which loses to 21 ... Nh4 22 Qg3 Nf5, forking queen and bishop while
conveniently covering the threatened mate on g7.
21 ... Nh4 22 Qg3 g5!
Bareev clamps down on White’s f2-f4 breaks. A single move can separate our
opponent and us from World War III. Startling often equates with impressive and this is
scary stuff, pushing pawns around your king when White has a queen and both bishops
pointed in that direction. I suppose “comfort zone” is a relative term. Our styles
determine just how much we are harmed or benefited from mass confusion. For pure
strategists, such moves tend to make us queasy.
23 d4!
Principle: Open the game when you own the bishop pair. Not 23 Bxg5?? Nf5 and Black
wins a piece, while 23 Rxe5?? Nf5 wins a full rook due to White’s weak back rank.
23 ... Nf5!
And not 23 ... exd4?? since 24 Bxg5! now works with the c2-bishop covering f5. White
will regain the sacrificed piece with a winning position.
24 Qh3
24 ... e4
With the terrible threat of 25 ... g4, winning the queen. Playing these moves the other
way round is less effective, as after 24 ... g4 25 Qd3 e4 26 Qd2 cxd4 27 cxd4 Qxc4 28 Bb2
Qd5 29 Qf4, the white queen is more active than in the next note. The engine actually
gives White an edge here, although Black’s game still looks fully playable to my human
eyes.
25 f3!?
25 Bd1 is safer, but then White’s play hardly makes sense. Not 25 g3?? cxd4 26 cxd4
Nxd4 and Black is winning.
25 ... exf3
An idealist isn’t swayed by material gain. Black could and should win a pawn with 25
... cxd4! 26 cxd4 (or 26 fxe4 Qc5! 27 Kh1 d3) 26 ... Ra6 (26 ... Nxd4 27 Qxh6! Qc5 28 Be3
is less clear) 27 Bb2 Qxc4 28 Rac1 Qd5, when I like his centralized position and extra
pawn; I don’t really have faith in White’s compensation with his queen offside on h3.
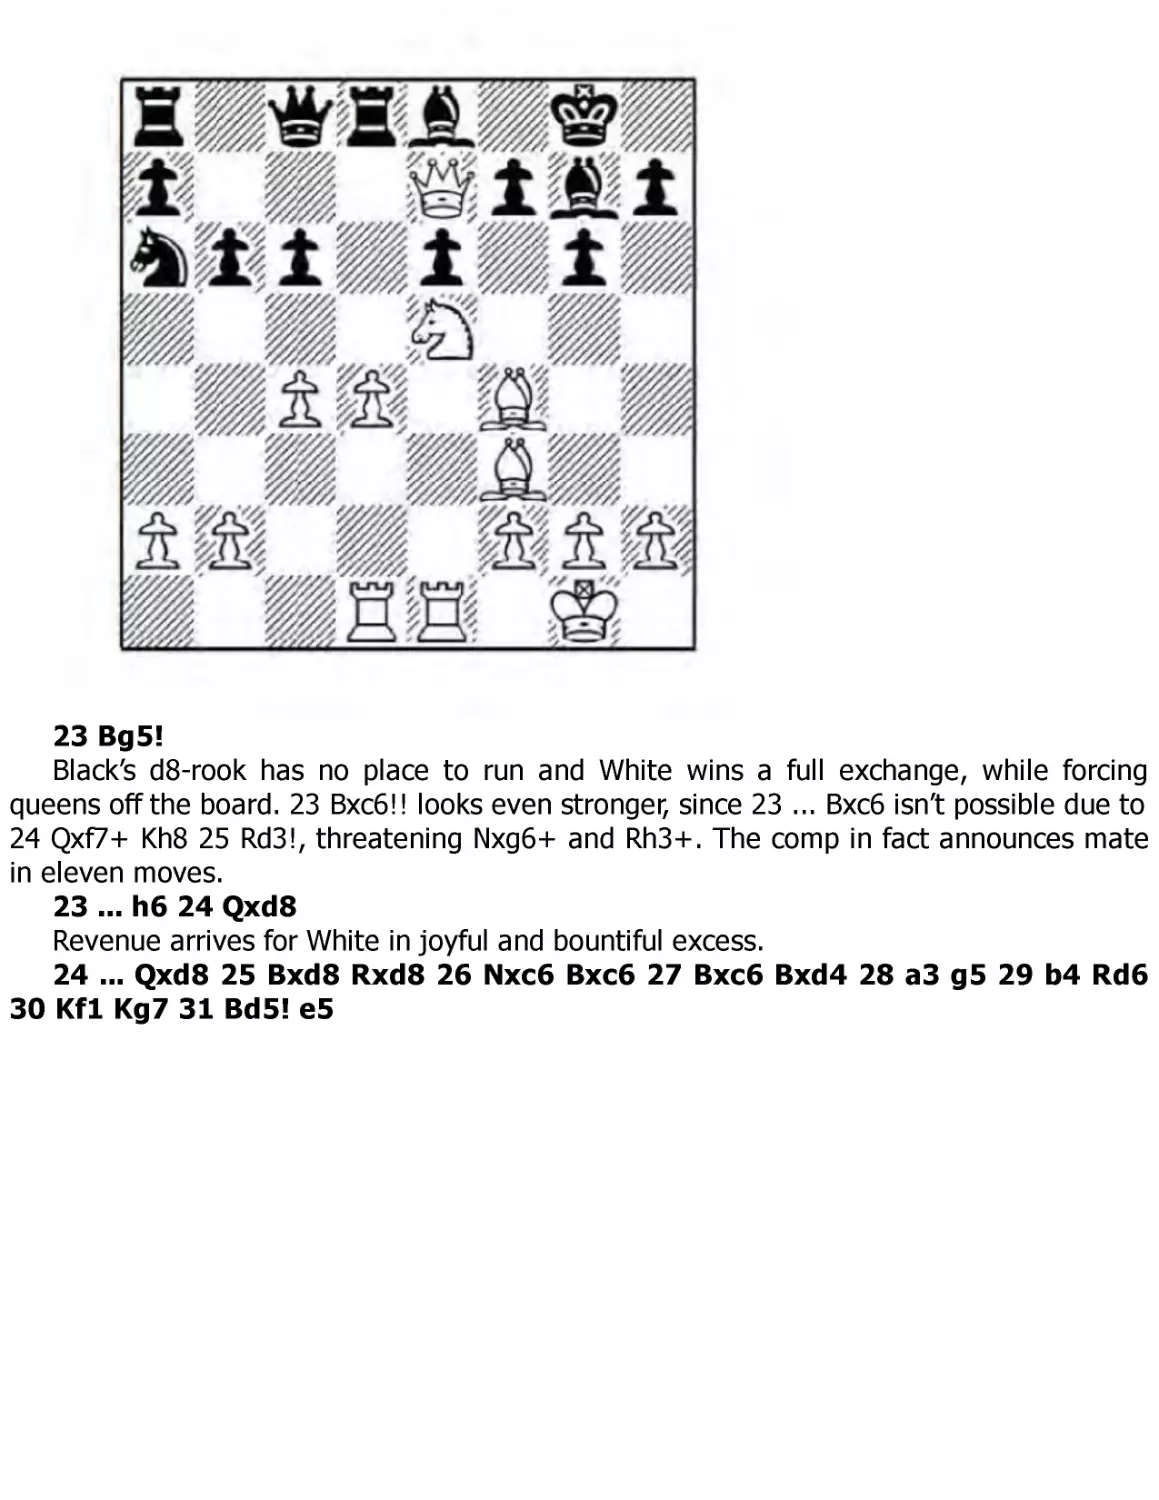
26 Rxe8+ Qxe8 27 Bxg5!
To cover the back rank. Not 27 Qxf5?? Qe1 mate.
27 ... hxg5
After 27 ... Qe2!? 28 Qxf3 Qxf3 29 gxf3 Nxd4 30 cxd4 hxg5 31 dxc5, White has
whatever chances are going in the ending, though a draw is the most likely result.
28 Qxf5 Qe3+ 29 Kh1 fxg2+ 30 Kxg2 Qe2+?!
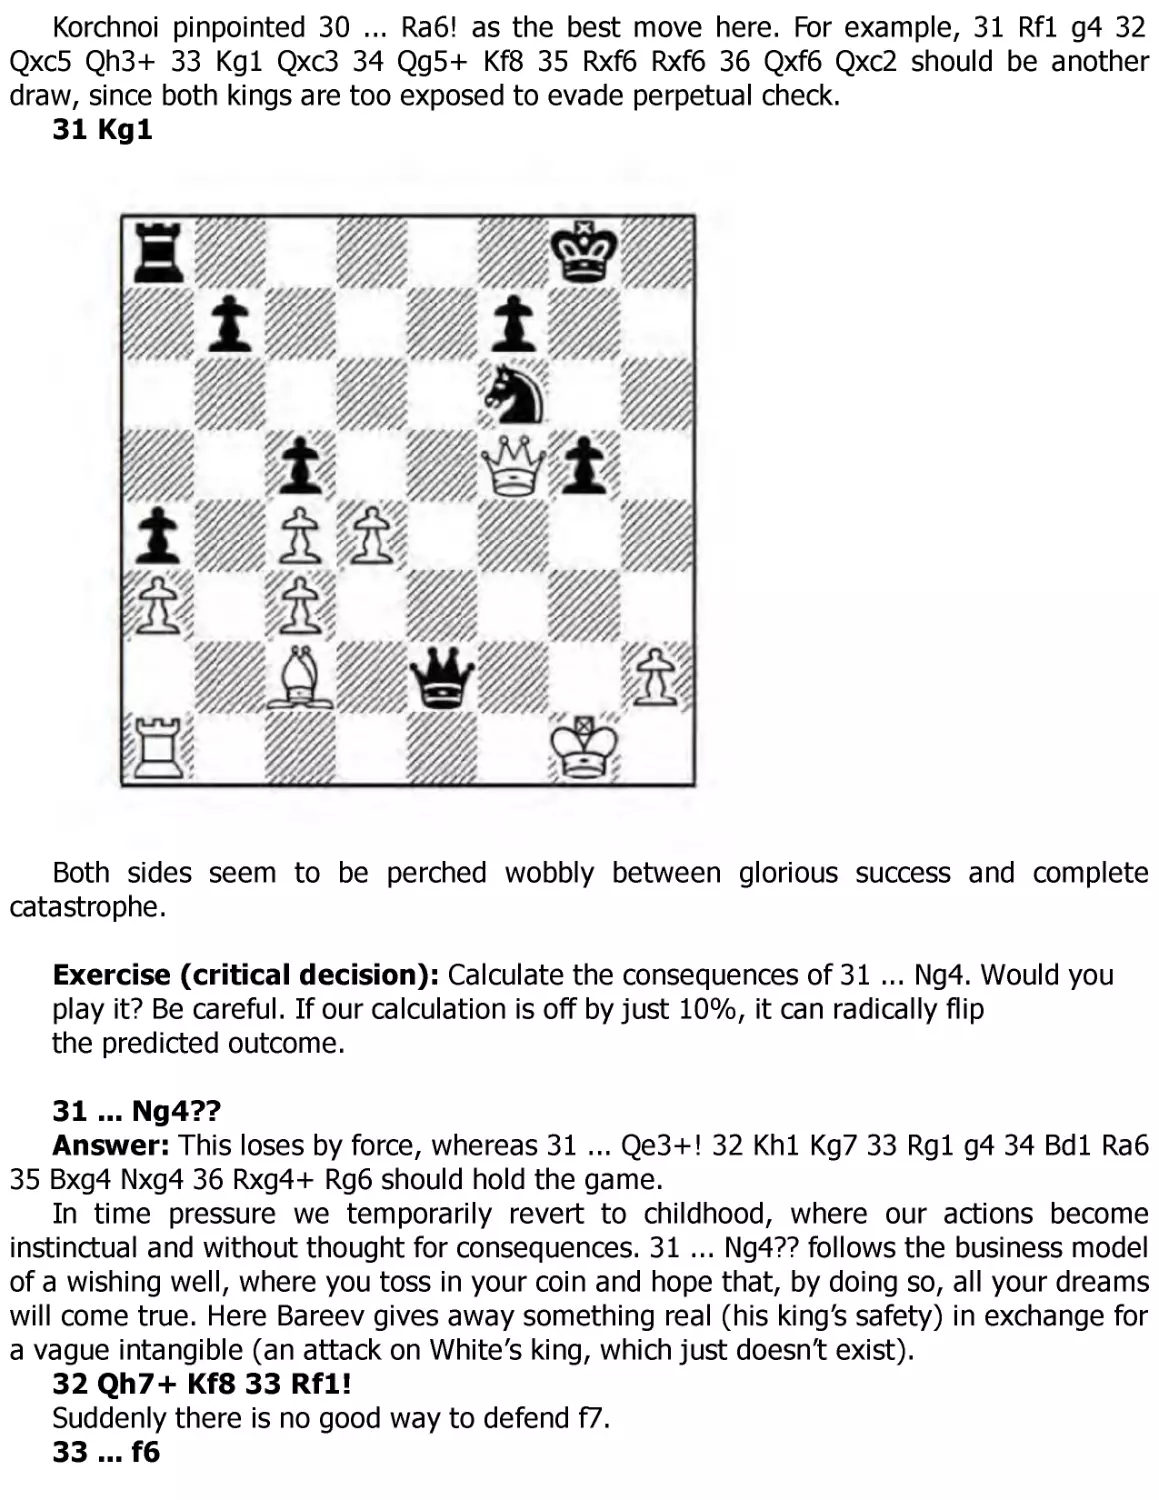
Korchnoi pinpointed 30 ... Ra6! as the best move here. For example, 31 Rf1 g4 32
Qxc5 Qh3+ 33 Kg1 Qxc3 34 Qg5+ Kf8 35 Rxf6 Rxf6 36 Qxf6 Qxc2 should be another
draw, since both kings are too exposed to evade perpetual check.
31 Kg1
Both sides seem to be perched wobbly between glorious success and complete
catastrophe.
Exercise (critical decision): Calculate the consequences of 31 ... Ng4. Would you
play it? Be careful. If our calculation is off by just 10%, it can radically flip
the predicted outcome.
31 ... Ng4??
Answer: This loses by force, whereas 31 ... Qe3+! 32 Kh1 Kg7 33 Rg1 g4 34 Bd1 Ra6
35 Bxg4 Nxg4 36 Rxg4+ Rg6 should hold the game.
In time pressure we temporarily revert to childhood, where our actions become
instinctual and without thought for consequences. 31 ... Ng4?? follows the business model
of a wishing well, where you toss in your coin and hope that, by doing so, all your dreams
will come true. Here Bareev gives away something real (his king’s safety) in exchange for
a vague intangible (an attack on White’s king, which just doesn’t exist).
32 Qh7+ Kf8 33 Rf1!
Suddenly there is no good way to defend f7.
33 ... f6
After 33 ... Qe3+ 34 Kh1 Nf2+ 35 Kg2, the white king dodges the checks.
34 Bg6! 1-0
The bishop thinks wicked thoughts in the dark. White threatens 35 Qf7 mate, while
after 34 ... Qe6 35 d5 Qg8 36 Qxb7, Black’s position is hopeless.
Summary: 3 ... c6 is Black’s most combative way to meet the Bishop’s Opening. We
actually cede the centre in this line, banking on our lead in development to generate a
compensatory initiative.
Game 6
Z.Almasi-D.Fridman
Bastia (rapid) 2013
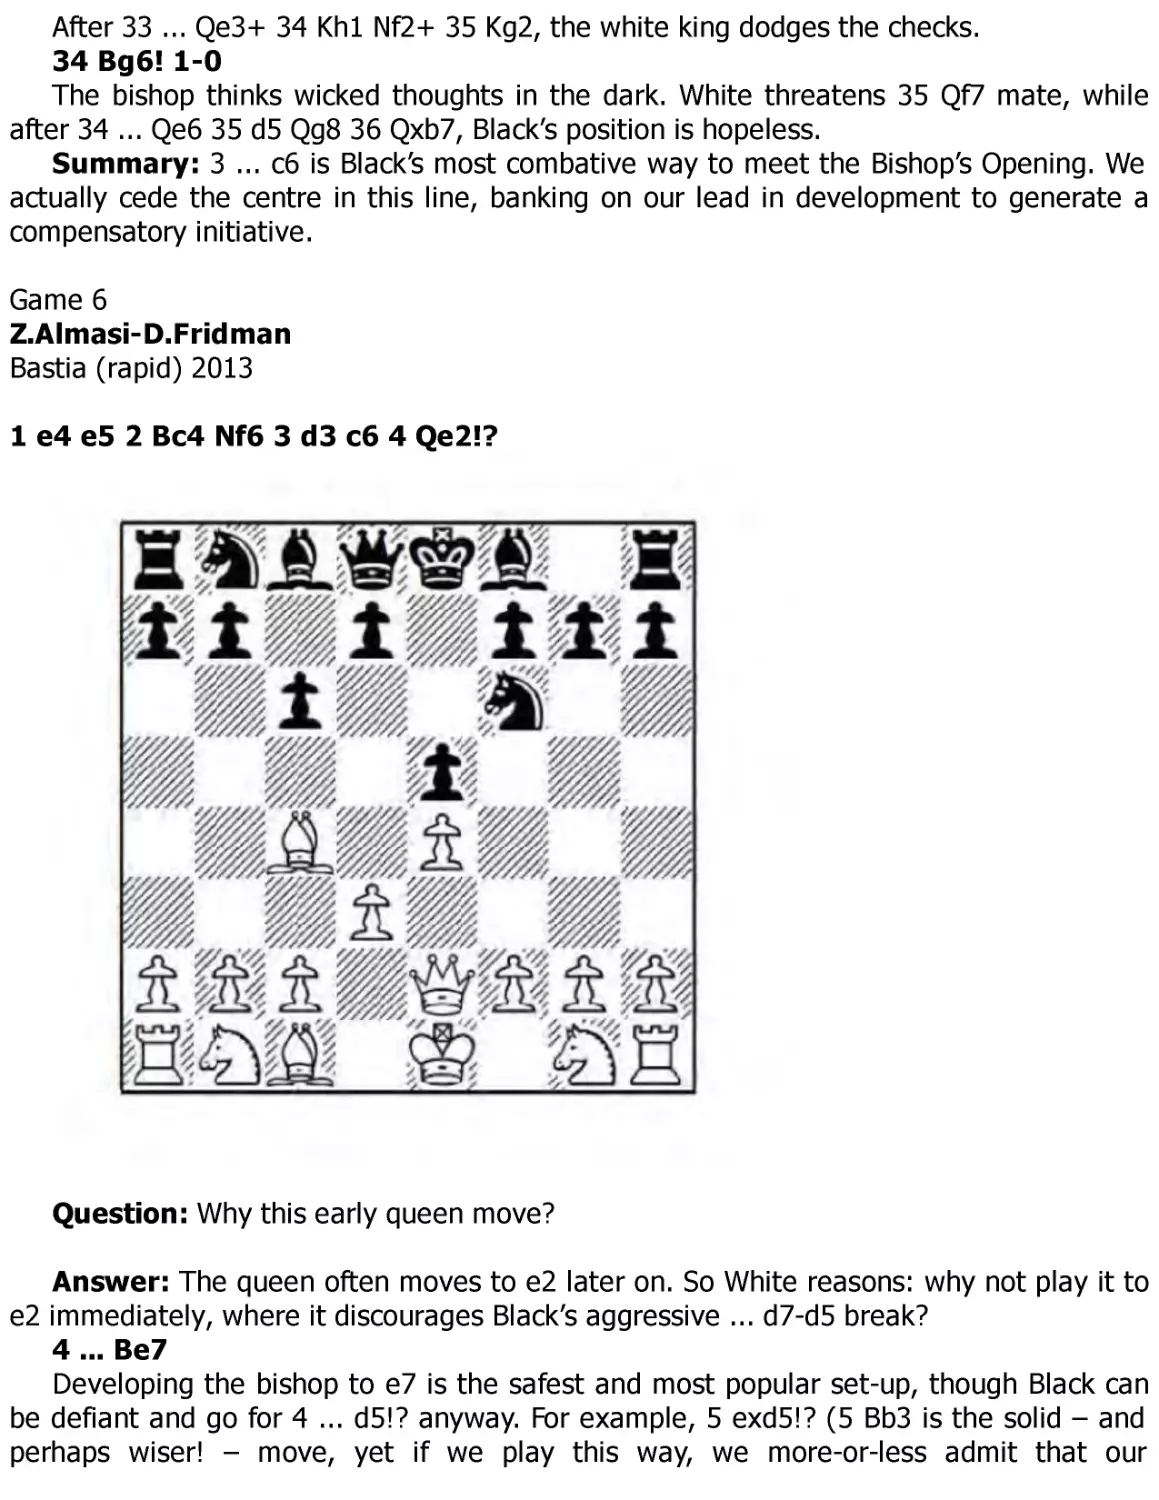
1 e4 e5 2 Bc4 Nf6 3 d3 c6 4 Qe2!?
Question: Why this early queen move?
Answer: The queen often moves to e2 later on. So White reasons: why not play it to
e2 immediately, where it discourages Black’s aggressive ... d7-d5 break?
4 ... Be7
Developing the bishop to e7 is the safest and most popular set-up, though Black can
be defiant and go for 4 ... d5!? anyway. For example, 5 exd5!? (5 Bb3 is the solid – and
perhaps wiser! – move, yet if we play this way, we more-or-less admit that our
“preventative” early Qe2 was no more than a bluff!) 5 ... cxd5 6 Qxe5+ Be7 7 Bb5+ Nc6
8 Nf3 0-0 9 Bxc6 bxc6 10 0-0 Bd6, Hou Yifan-A.R.Salem, Moscow 2010, when it feels to
me like Black’s centre, bishop pair and slight lead in development more than compensate
for the sacrificed pawn.
5 Nf3 0-0!
There is no need to defend the e5-pawn just yet. 6 Nxe5?? would be a primal screaminducing blunder after 6 ... Qa5 check, picking off the loose knight.
6 Bb3
As in the Ruy Lopez, the bishop usually ends up here whether or not Black plays ... d7d5.
6 ... d6 7 0-0 Bg4
If 7 ... Nbd7 then 8 c3 both strengthens White’s centre and gives the b3-bishop a
further retreat square at c2. J.Polgar-B.Gelfand, FIDE World Cup, Khanty-Mansiysk 2009,
continued 8 ... a5 9 a4!? b5 10 Bc2 Ba6 11 axb5 cxb5 12 Nbd2 Qc7 13 d4 a4 14 Bd3 Rfb8
with approximately balanced chances.
8 h3 Bh5
Exchanging on f3 looks illogical to me, since it hands White both the bishop pair and
light square control.
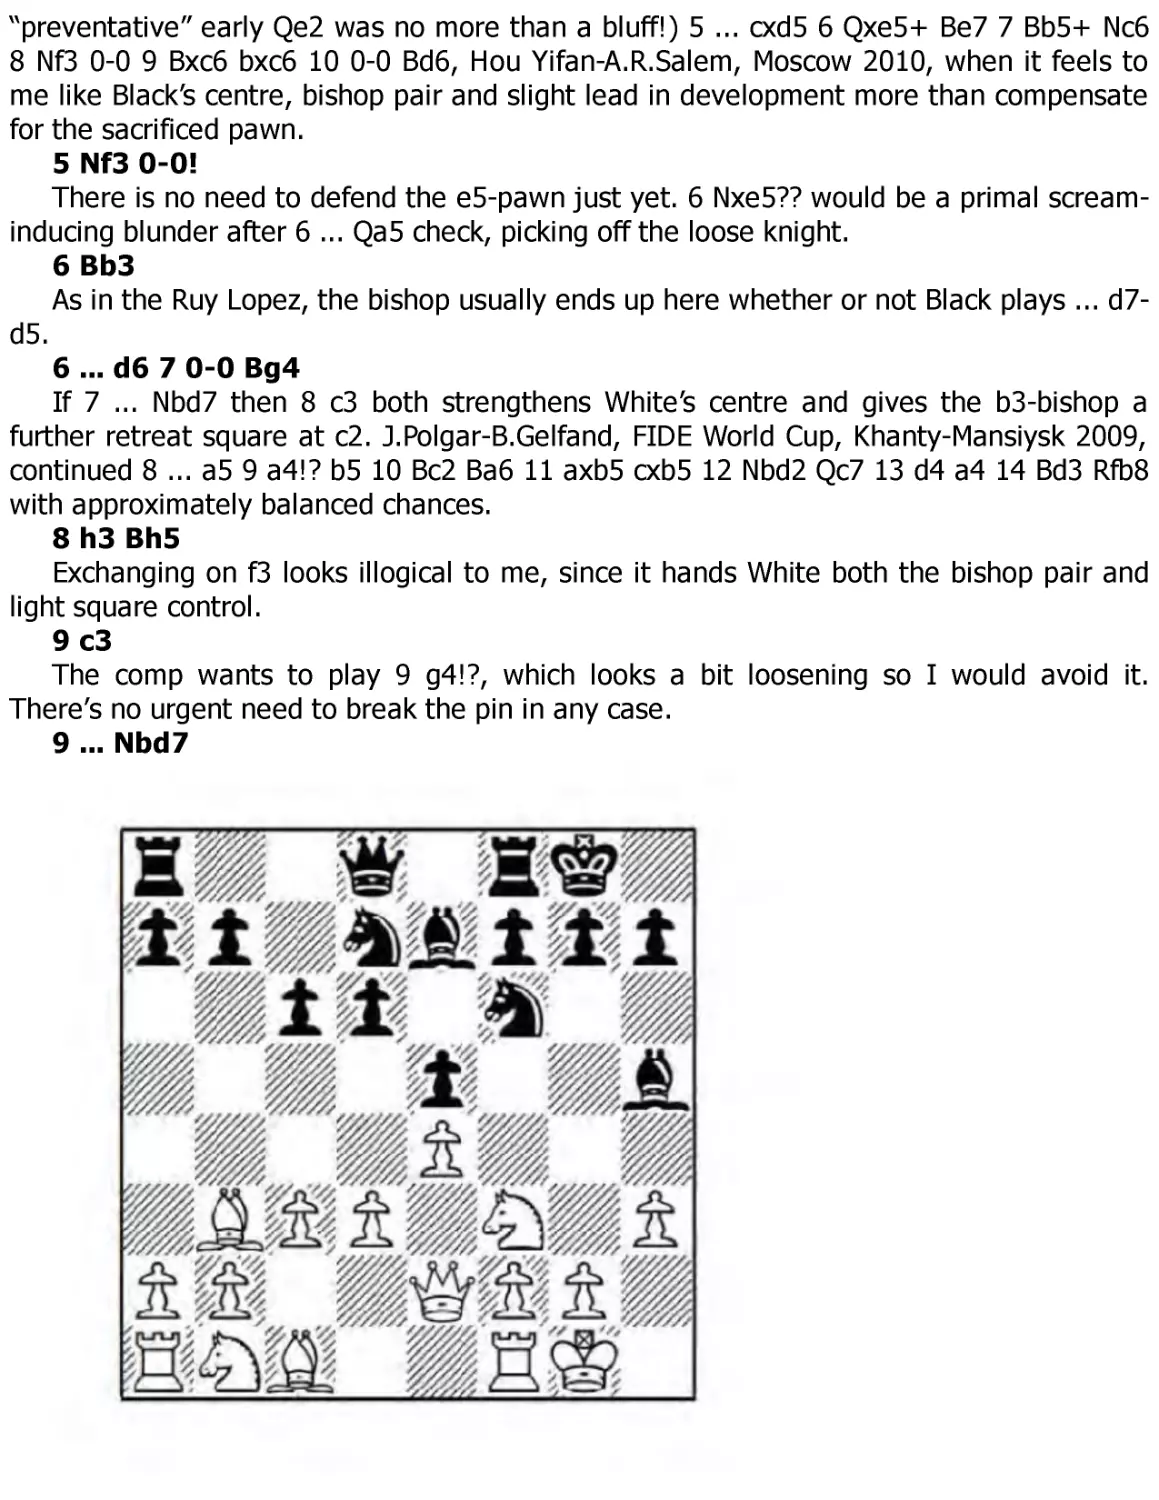
9 c3
The comp wants to play 9 g4!?, which looks a bit loosening so I would avoid it.
There’s no urgent need to break the pin in any case.
9 ... Nbd7
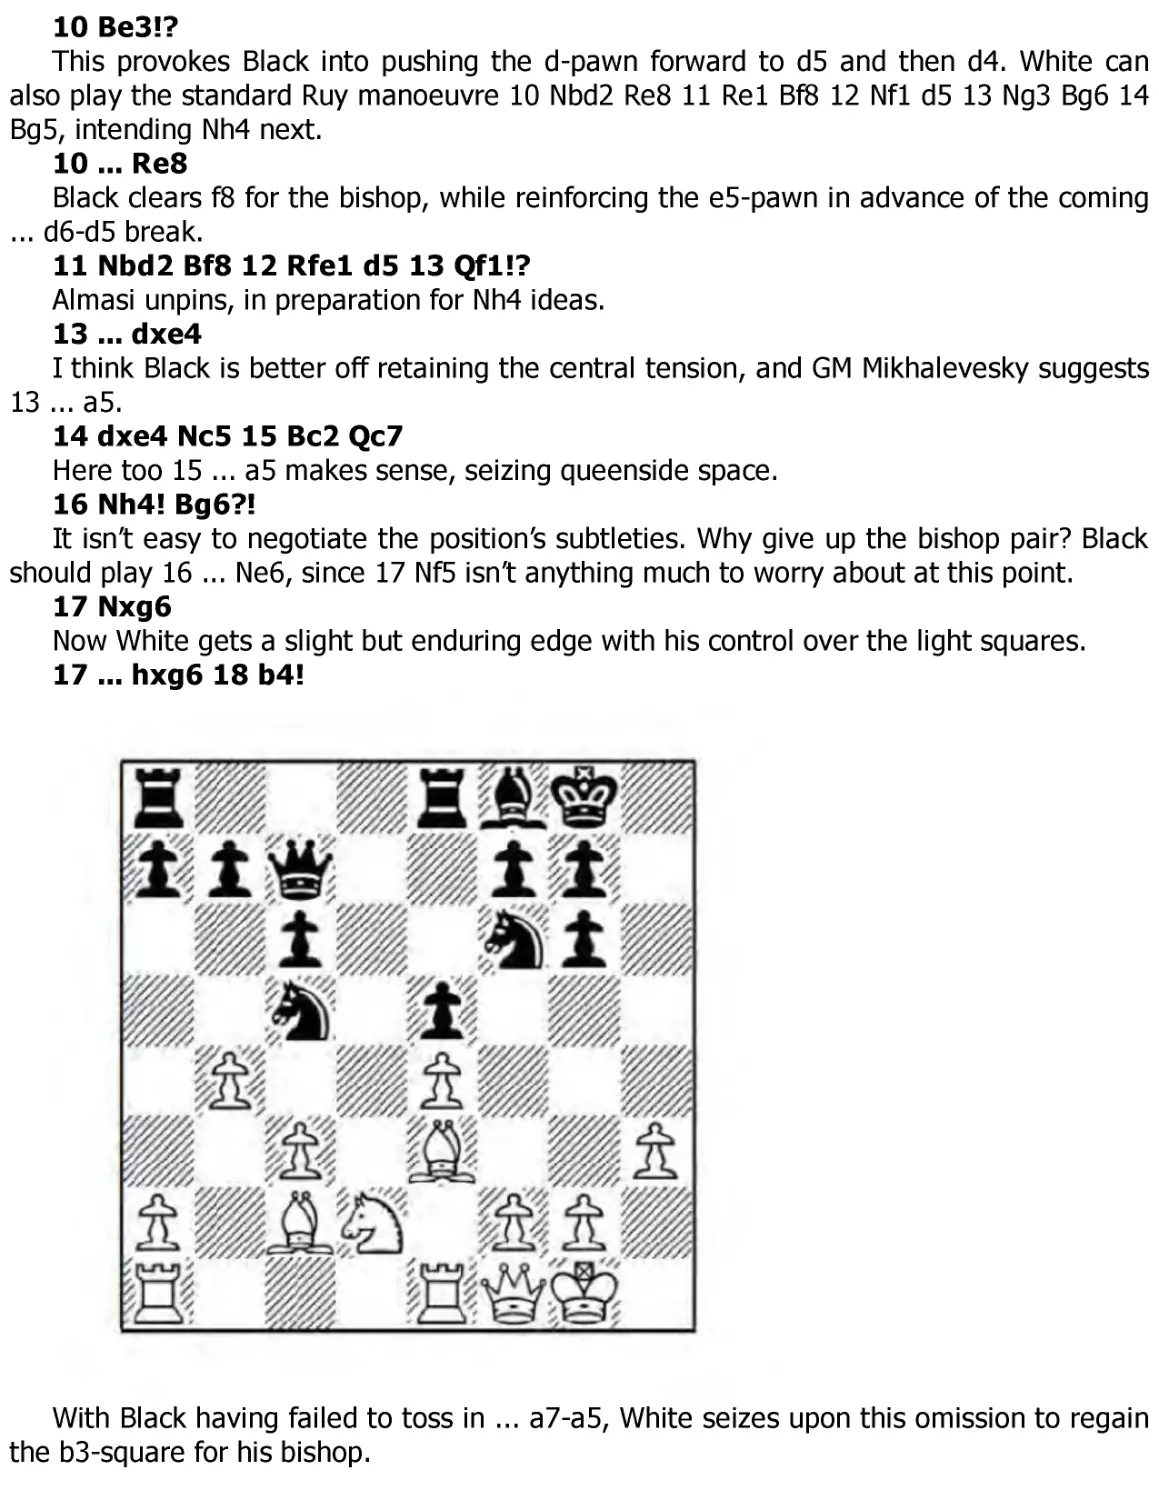
10 Be3!?
This provokes Black into pushing the d-pawn forward to d5 and then d4. White can
also play the standard Ruy manoeuvre 10 Nbd2 Re8 11 Re1 Bf8 12 Nf1 d5 13 Ng3 Bg6 14
Bg5, intending Nh4 next.
10 ... Re8
Black clears f8 for the bishop, while reinforcing the e5-pawn in advance of the coming
... d6-d5 break.
11 Nbd2 Bf8 12 Rfe1 d5 13 Qf1!?
Almasi unpins, in preparation for Nh4 ideas.
13 ... dxe4
I think Black is better off retaining the central tension, and GM Mikhalevesky suggests
13 ... a5.
14 dxe4 Nc5 15 Bc2 Qc7
Here too 15 ... a5 makes sense, seizing queenside space.
16 Nh4! Bg6?!
It isn’t easy to negotiate the position’s subtleties. Why give up the bishop pair? Black
should play 16 ... Ne6, since 17 Nf5 isn’t anything much to worry about at this point.
17 Nxg6
Now White gets a slight but enduring edge with his control over the light squares.
17 ... hxg6 18 b4!
With Black having failed to toss in ... a7-a5, White seizes upon this omission to regain
the b3-square for his bishop.
18 ... Ne6 19 Bb3 a5 20 a3 b5 21 Rac1 axb4
This looks premature. Black would be better off playing 21 ... Qb7 at once, when
White has to worry about possible ... c6-c5 breaks.
22 axb4 Qb7 23 Ra1!
This move displays a deep understanding of the position. The threat is to simply swap
on a8. If Black recaptures with his rook, his structure will be damaged after Bxe6; if he
recaptures with his queen (or swaps on a1 himself), then White seizes the a-file with Ra1.
23 ... Nc7
Avoiding the consequences outlined in the previous note. 23 ... c5 is met by 24 Rxa8
Qxa8 25 Qxb5 Rb8 26 Qf1 cxb4 27 Bxe6 fxe6 28 Ra1 with a long lasting structural
advantage for White.
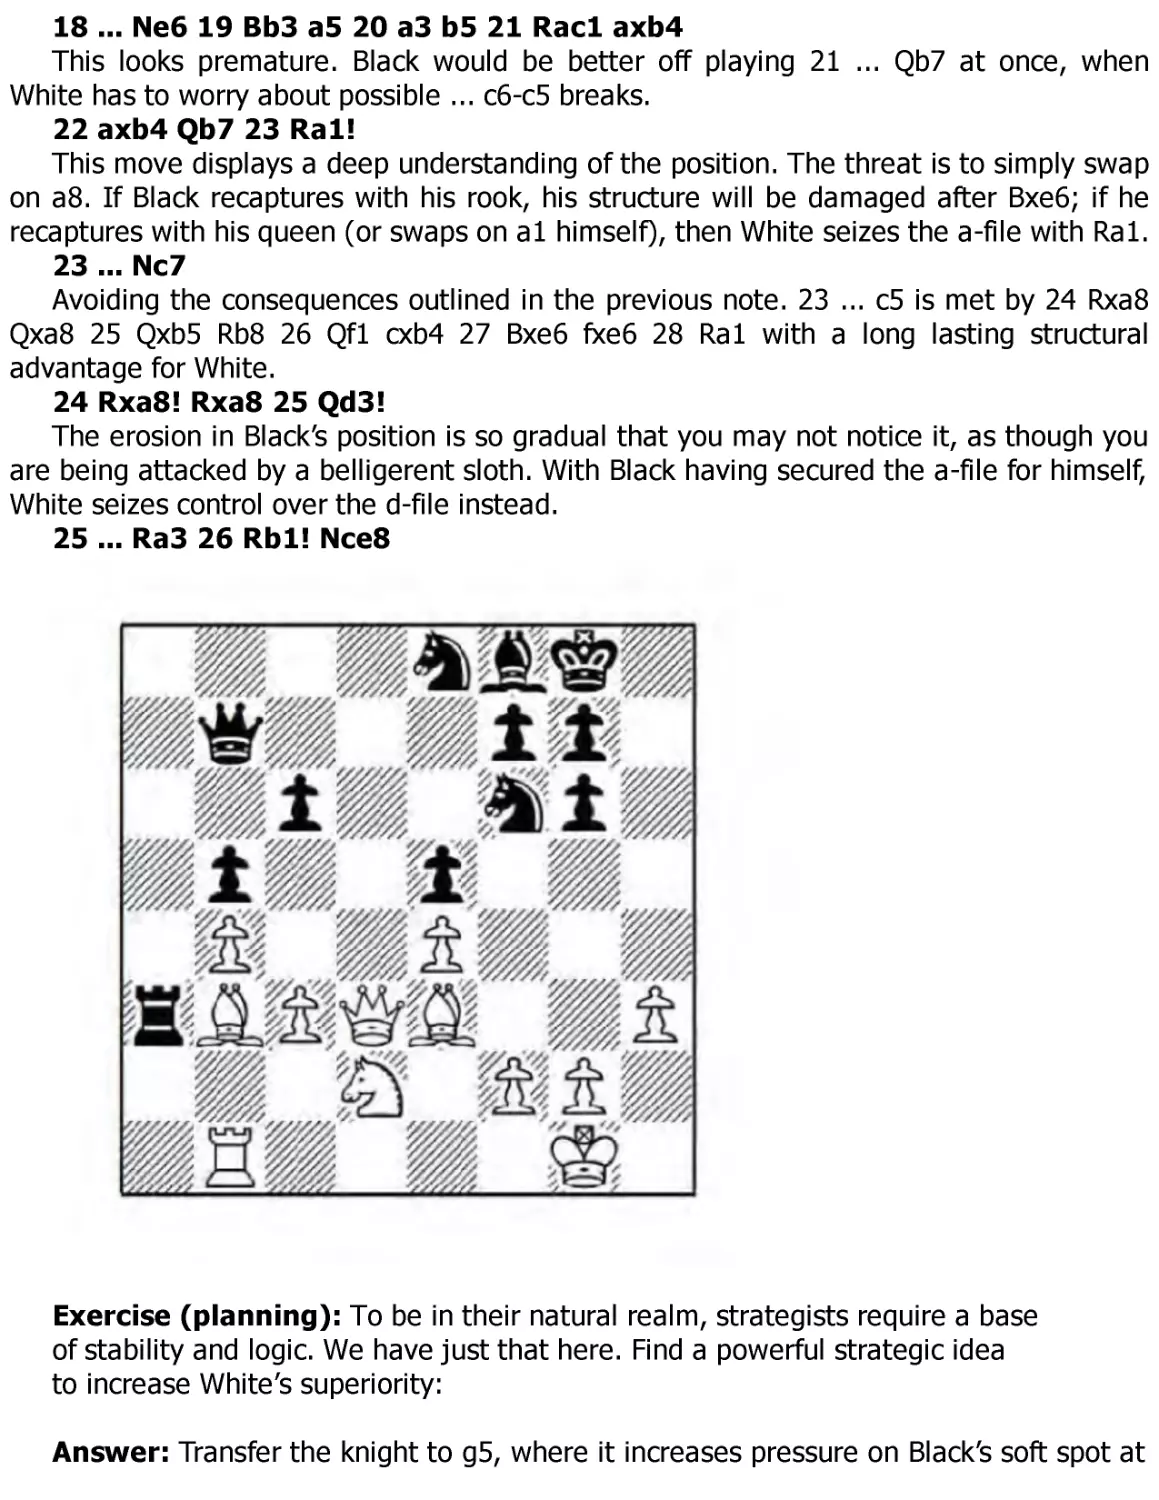
24 Rxa8! Rxa8 25 Qd3!
The erosion in Black’s position is so gradual that you may not notice it, as though you
are being attacked by a belligerent sloth. With Black having secured the a-file for himself,
White seizes control over the d-file instead.
25 ... Ra3 26 Rb1! Nce8
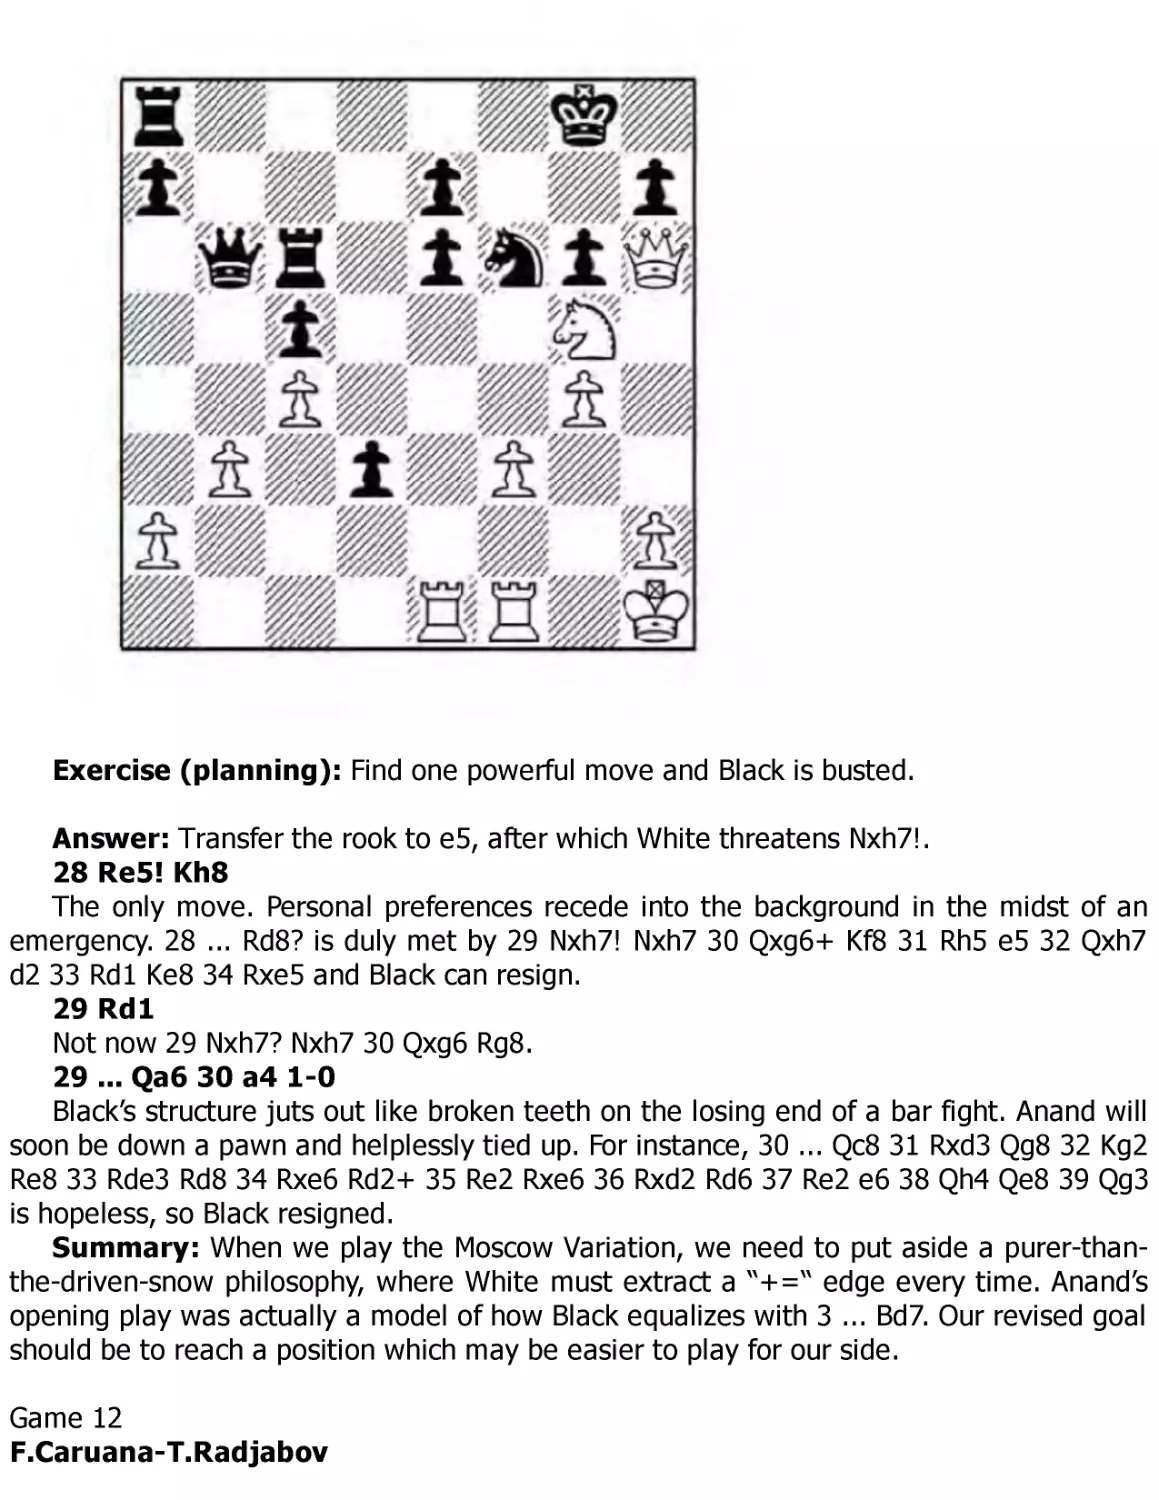
Exercise (planning): To be in their natural realm, strategists require a base
of stability and logic. We have just that here. Find a powerful strategic idea
to increase White’s superiority:
Answer: Transfer the knight to g5, where it increases pressure on Black’s soft spot at
f7.
27 Nf3! Nd7
Intending to defend with ... Nd6 without losing control of the c5-square.
28 Ng5
Consistent doesn’t always equate with best. White should pre-empt Black’s coming ...
Nd6 by playing 28 c4! bxc4 29 Qxc4 Nd6 30 Qc3 with a strategically won game, since
Black has weaknesses at c6, e5, f7, and on the d-file – and there is the immediate threat
of Bxf7+ and Qxa3 to deal with as well.
28 ... Nd6 29 Qd1 Be7
Casting an eye on the g5 intruder.
30 Bc5! Nxc5?!
This gives White a strong passed pawn. Black should prefer 30 ... Bxg5 31 Bxd6 Qa7,
when he is still in the game.
31 bxc5 Bxg5 32 cxd6
The advanced d-pawn is much more a strength than a weakness and Black quickly
gets tied down by it.
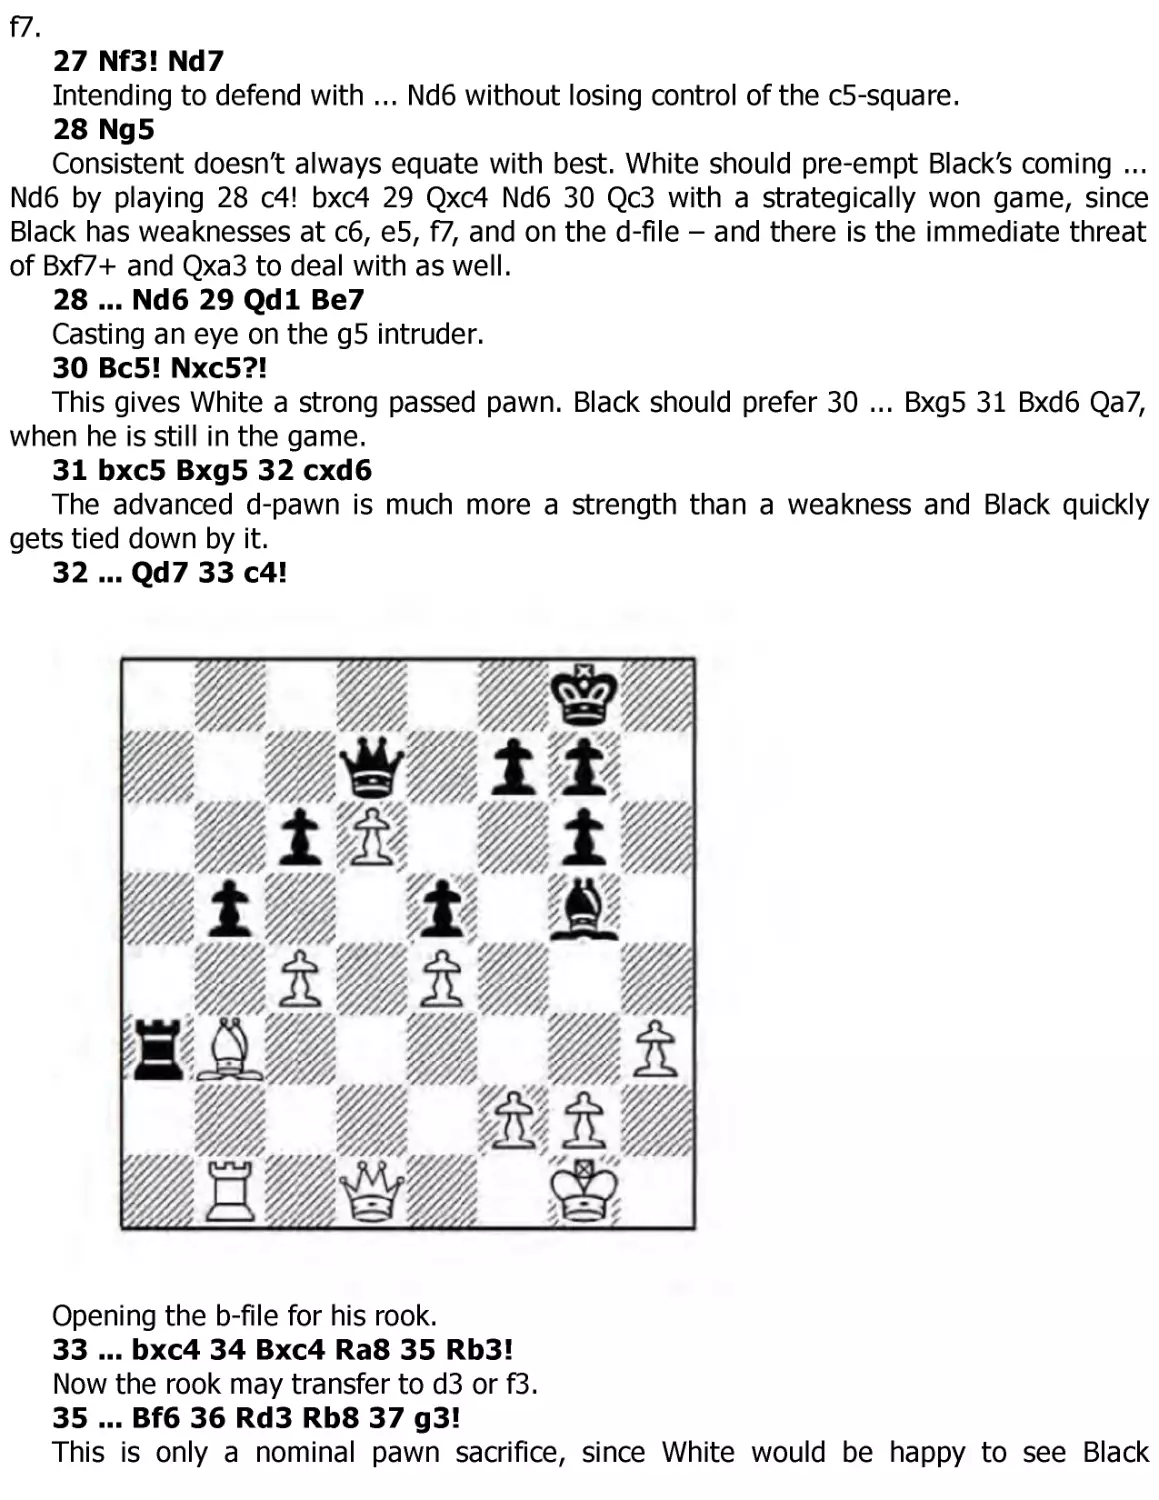
32 ... Qd7 33 c4!
Opening the b-file for his rook.
33 ... bxc4 34 Bxc4 Ra8 35 Rb3!
Now the rook may transfer to d3 or f3.
35 ... Bf6 36 Rd3 Rb8 37 g3!
This is only a nominal pawn sacrifice, since White would be happy to see Black
capture on h3. So Almasi gets to secure his king, with the additional option of pushing h3h4-h5, further probing Black’s weak light squares.
37 ... Rb4
Not 37 ... Qxh3?! 38 d7 Rd8 39 Qa4 c5 40 Qc6 Qg4 41 Qd5! with complete domination
for White.
38 Qc2 Kh7
Now if 38 ... Qxh3 39 d7 Bd8 40 Qa2!, Black has no good way to cover f7.
39 Kg2 Qb7?
A slave isn’t allowed to ask for a day off. We all tend to have short attention spans
when it comes to fulfilling unpleasant but necessary obligations. This attempt to activate
the queen is a dereliction of duty. She shouldn’t abandon the blockade of d7 but rather
vaccinate herself against temptation and await White’s intent with 39 ... Bd8.
40 d7
Principle: Passed pawns should be pushed.
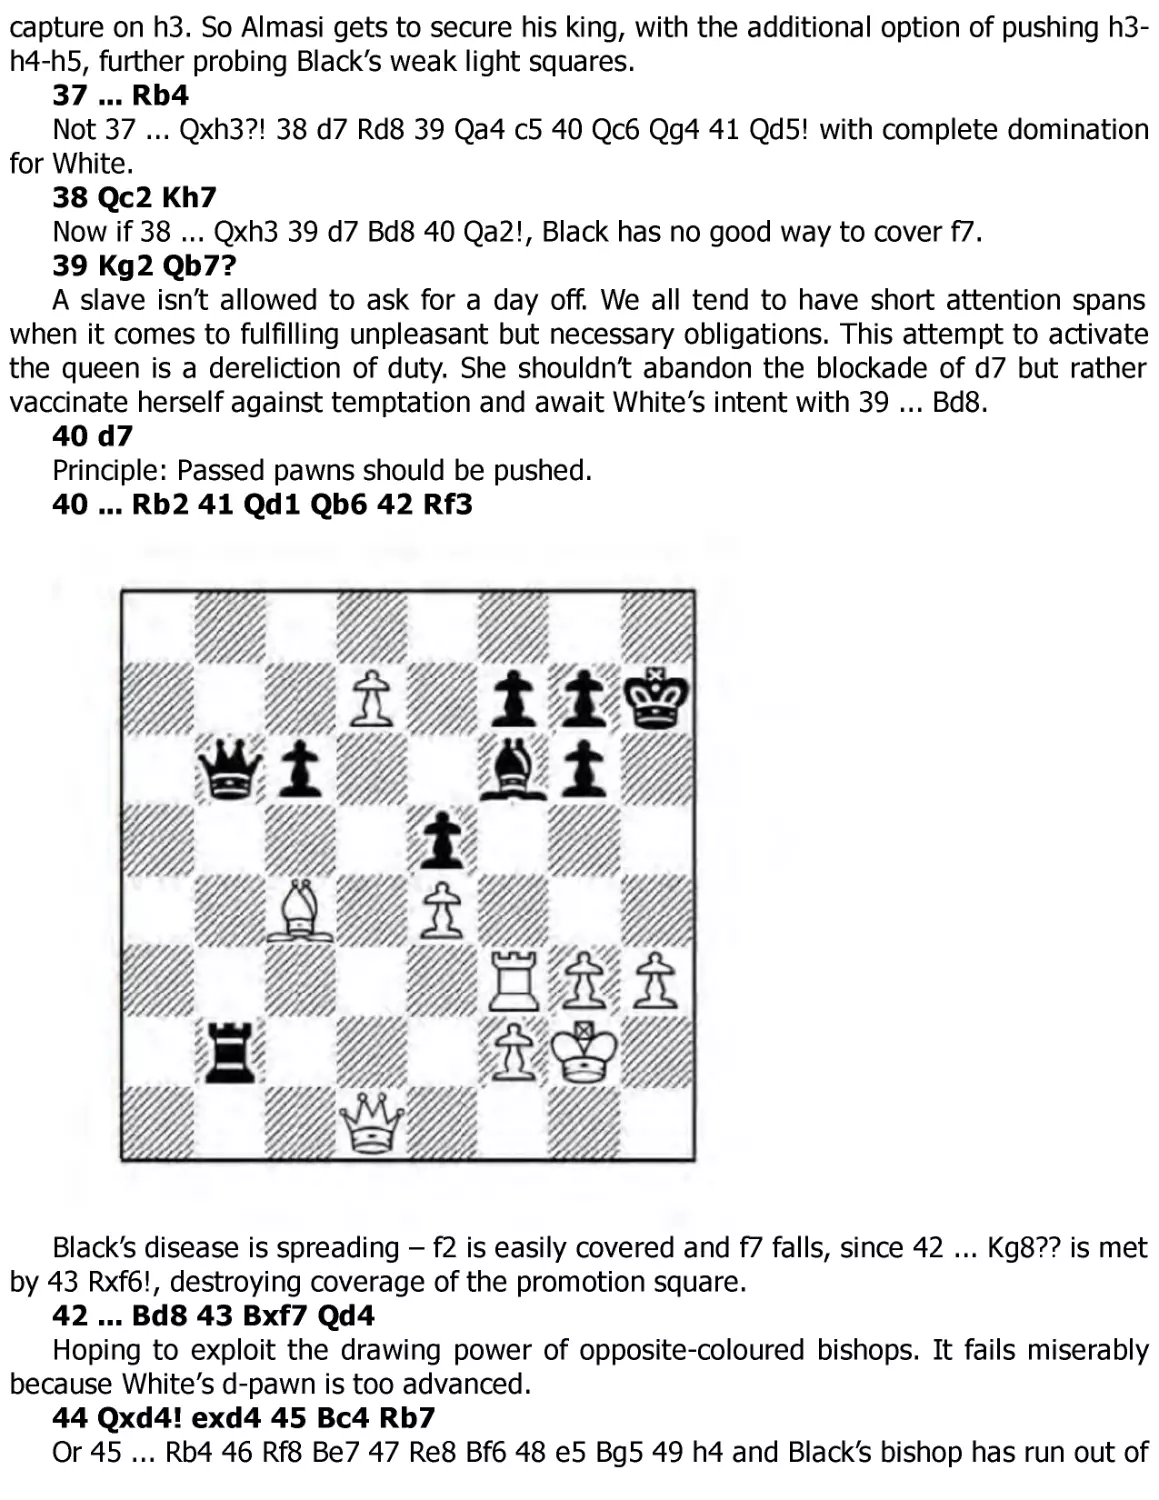
40 ... Rb2 41 Qd1 Qb6 42 Rf3
Black’s disease is spreading – f2 is easily covered and f7 falls, since 42 ... Kg8?? is met
by 43 Rxf6!, destroying coverage of the promotion square.
42 ... Bd8 43 Bxf7 Qd4
Hoping to exploit the drawing power of opposite-coloured bishops. It fails miserably
because White’s d-pawn is too advanced.
44 Qxd4! exd4 45 Bc4 Rb7
Or 45 ... Rb4 46 Rf8 Be7 47 Re8 Bf6 48 e5 Bg5 49 h4 and Black’s bishop has run out of
room on the diagonal.
46 Rf7 Rb4 47 Rf8 Ba5 48 Bg8+! 1-0
Since White wins a piece. Even stronger was 48 e5! Rxc4 49 e6 and a pawn promotes.
Game 7
Ma.Carlsen-Bu Xiangzhi
FIDE World Cup, Tbilisi 2017
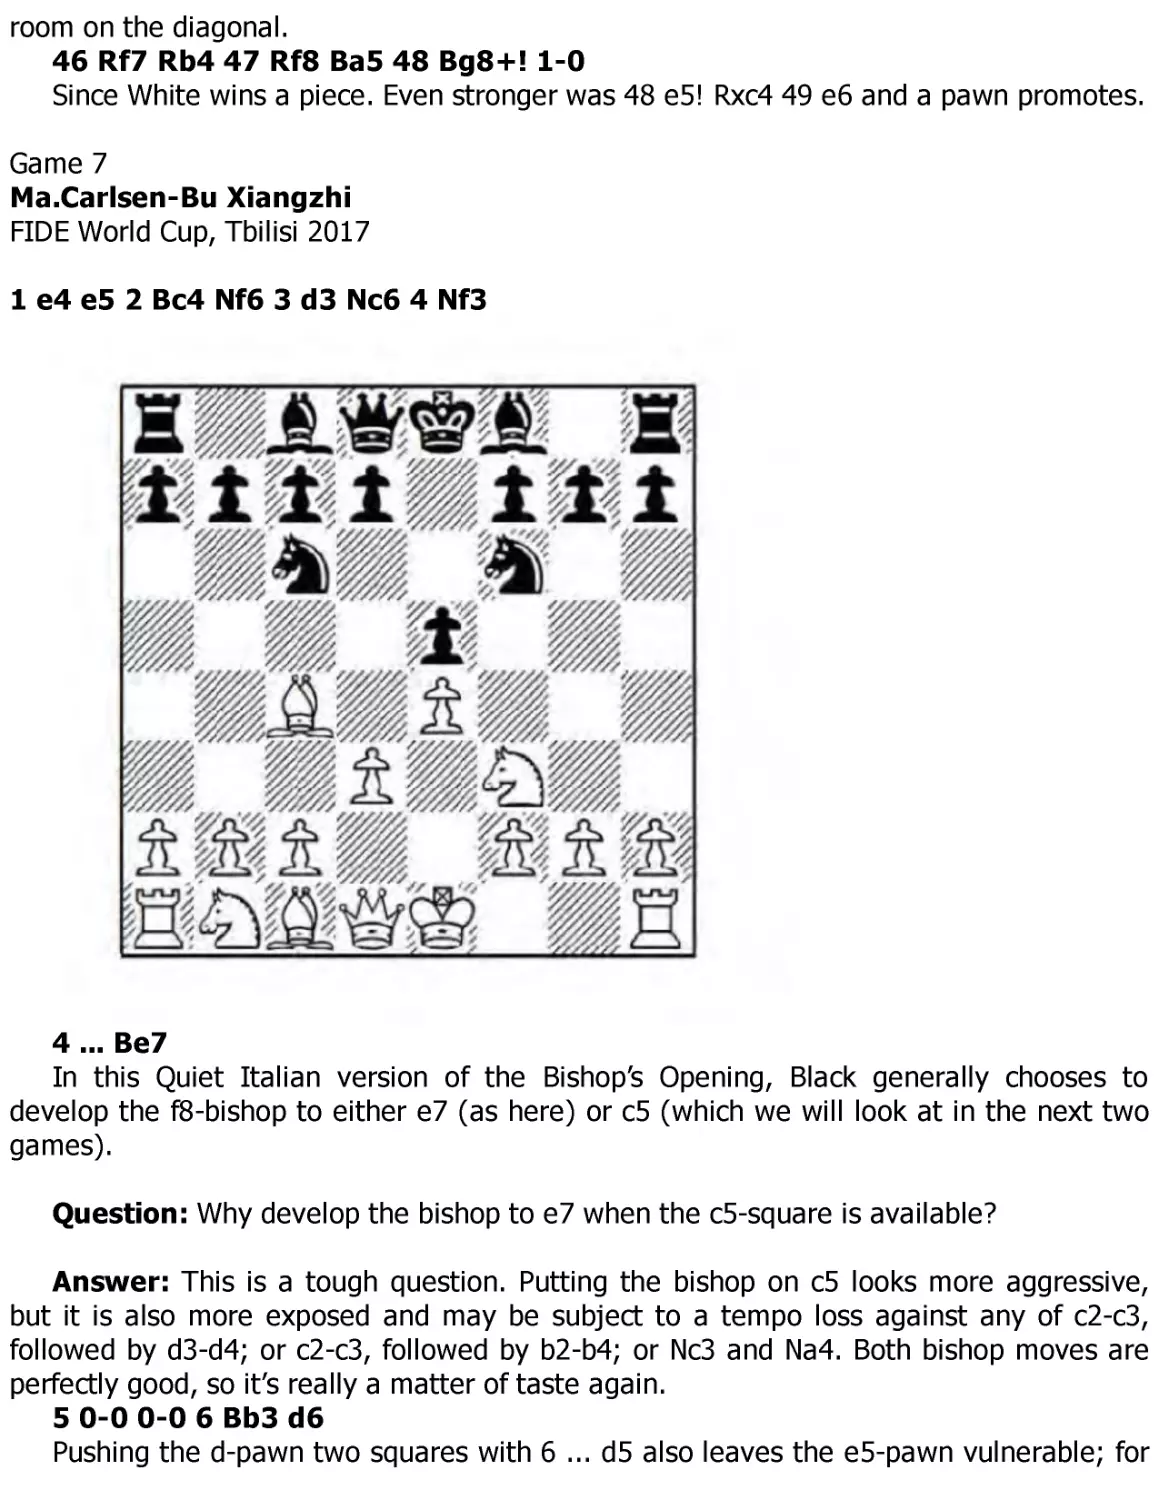
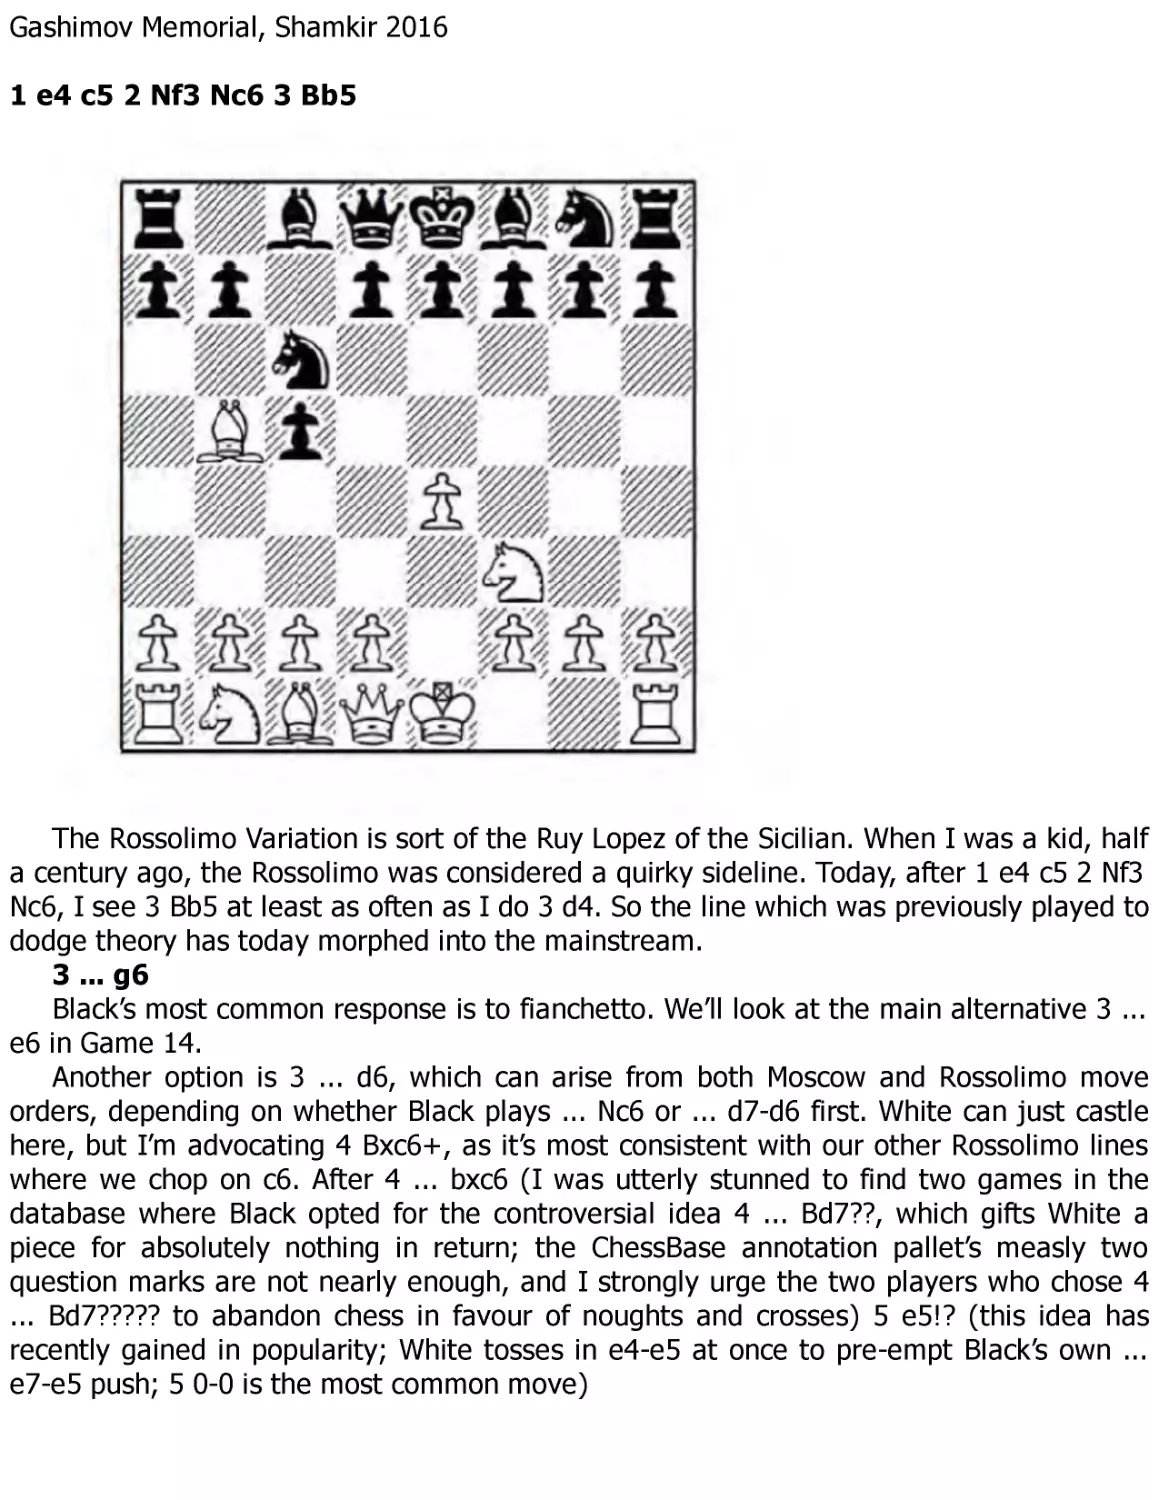
1 e4 e5 2 Bc4 Nf6 3 d3 Nc6 4 Nf3
4 ... Be7
In this Quiet Italian version of the Bishop’s Opening, Black generally chooses to
develop the f8-bishop to either e7 (as here) or c5 (which we will look at in the next two
games).
Question: Why develop the bishop to e7 when the c5-square is available?
Answer: This is a tough question. Putting the bishop on c5 looks more aggressive,
but it is also more exposed and may be subject to a tempo loss against any of c2-c3,
followed by d3-d4; or c2-c3, followed by b2-b4; or Nc3 and Na4. Both bishop moves are
perfectly good, so it’s really a matter of taste again.
5 0-0 0-0 6 Bb3 d6
Pushing the d-pawn two squares with 6 ... d5 also leaves the e5-pawn vulnerable; for
example, 7 exd5 Nxd5 8 Re1 Bg4 9 h3 Bxf3 (after 9 ... Bh5!? 10 g4 Bg6 11 Nxe5 Nxe5 12
Rxe5 c6 13 Qf3, it is unclear whether Black really has enough for the pawn) 10 Qxf3 Nd4!
11 Qxd5 Qxd5 12 Bxd5 Nxc2 13 Rxe5 Rae8 14 Re2 Nxa1 15 Bxb7 Bd6 16 Be3 f5 17 Bd5+
Kh8 18 g3 f4 19 gxf4 Bxf4 20 Na3 Re5 21 Bg2 and I prefer White's chances, though Black
managed to hold in S.Tiviakov-J.Hector, Helsingor 2008.
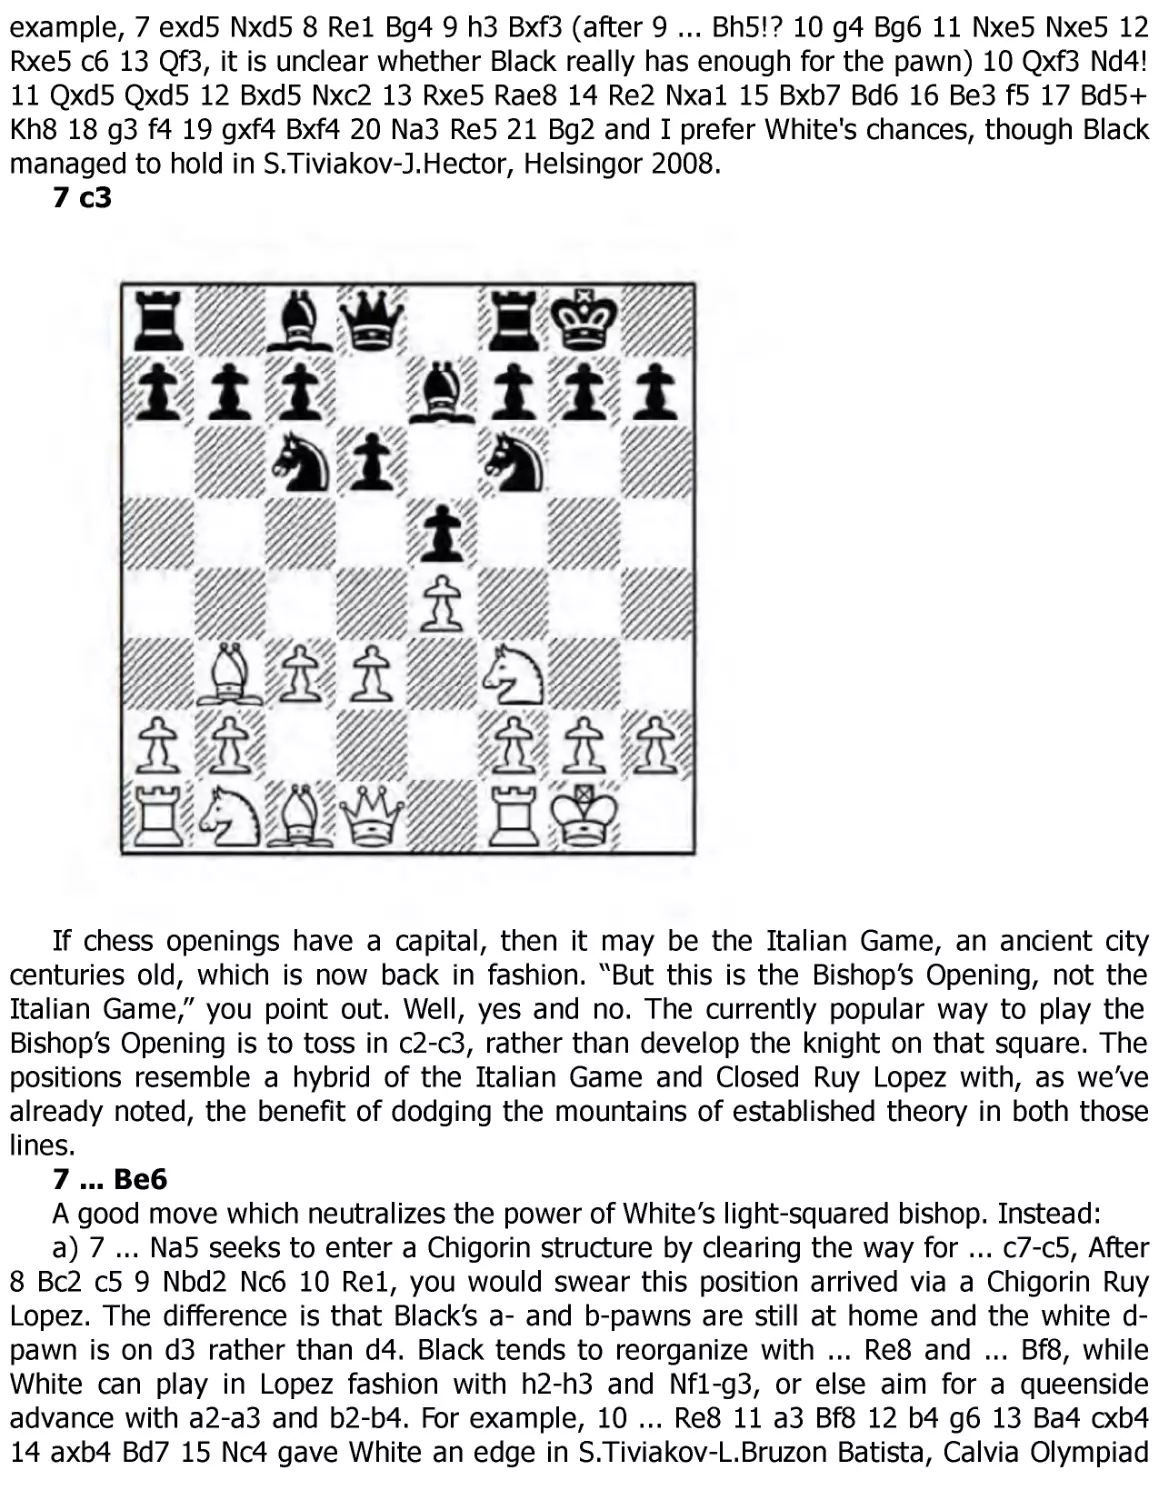
7 c3
If chess openings have a capital, then it may be the Italian Game, an ancient city
centuries old, which is now back in fashion. “But this is the Bishop’s Opening, not the
Italian Game,” you point out. Well, yes and no. The currently popular way to play the
Bishop’s Opening is to toss in c2-c3, rather than develop the knight on that square. The
positions resemble a hybrid of the Italian Game and Closed Ruy Lopez with, as we’ve
already noted, the benefit of dodging the mountains of established theory in both those
lines.
7 ... Be6
A good move which neutralizes the power of White’s light-squared bishop. Instead:
a) 7 ... Na5 seeks to enter a Chigorin structure by clearing the way for ... c7-c5, After
8 Bc2 c5 9 Nbd2 Nc6 10 Re1, you would swear this position arrived via a Chigorin Ruy
Lopez. The difference is that Black’s a- and b-pawns are still at home and the white dpawn is on d3 rather than d4. Black tends to reorganize with ... Re8 and ... Bf8, while
White can play in Lopez fashion with h2-h3 and Nf1-g3, or else aim for a queenside
advance with a2-a3 and b2-b4. For example, 10 ... Re8 11 a3 Bf8 12 b4 g6 13 Ba4 cxb4
14 axb4 Bd7 15 Nc4 gave White an edge in S.Tiviakov-L.Bruzon Batista, Calvia Olympiad
2004.
b) 7 ... Bg4 encourages the plan of Re1, h2-h3 and Nbd2-f1-g3. For example, 8 h3 Bh5
9 Re1 Nd7!? (heading for e6) 10 Nbd2 Nc5 11 Bc2 Ne6 12 Nf1 Ng5 13 N1h2 and White
looks a shade better, M.Haddouche-L.Rama, Dresden Olympiad 2008.
c) 7 ... h6 (preparing an original way to relieve Black’s slight cramp) 8 Nbd2 Nh7!? 9
Nc4 Ng5 10 Nxg5 hxg5?! (10 ... Bxg5 11 f4 only looks a shade better for White) 11 Qh5
Be6 12 Ne3 Bxb3 13 axb3 f6 14 h4! and the light squares around Black’s king are weak,
who is also saddled with a bad bishop, T.Radjabov-L.Aronian, Nice (rapid) 2009.
d) 7 ... d5!? tries to claim that the extra c2-c3 worsens White’s position in the 6 ... d5
line, as the d3-pawn is now more vulnerable. White therefore usually switches to 8 Nbd2
here; for example, 8 ... Bg4 9 h3 Bh5 10 Re1 dxe4 11 dxe4 Bc5 12 Qe2 h6? (12 ... Qe7
looks correct, though I still like White after 13 Ba4 or 13 Nf1) 13 Qb5! Qe7?! (but 13 ...
Bb6 14 Nxe5 a6 15 Nxc6 still picks off a pawn) 14 Qxb7 Na5 15 Qb5 Nxb3 16 Nxb3 Bd6 17
Nh4 and Black didn’t get any compensation for the missing pawn, T.Radjabov-S.Karjakin,
Nice (blindfold rapid) 2009.
8 Re1
A standard move. By placing his rook on the e-file, White reinforces the e4-pawn (in
order to engineer d3-d4 in the future), clears the path for a possible Nbd2-f1 manoeuvre,
and targets the e5-pawn (should Black be minded to push ... d6-d5).
8 ... Qd7 9 Nbd2 Rab8!?
An interesting idea. White often throws in Ba4 as preparation for d3-d4 in these
positions, and now that can be met simply by ... b7-b5, expanding on the queenside.
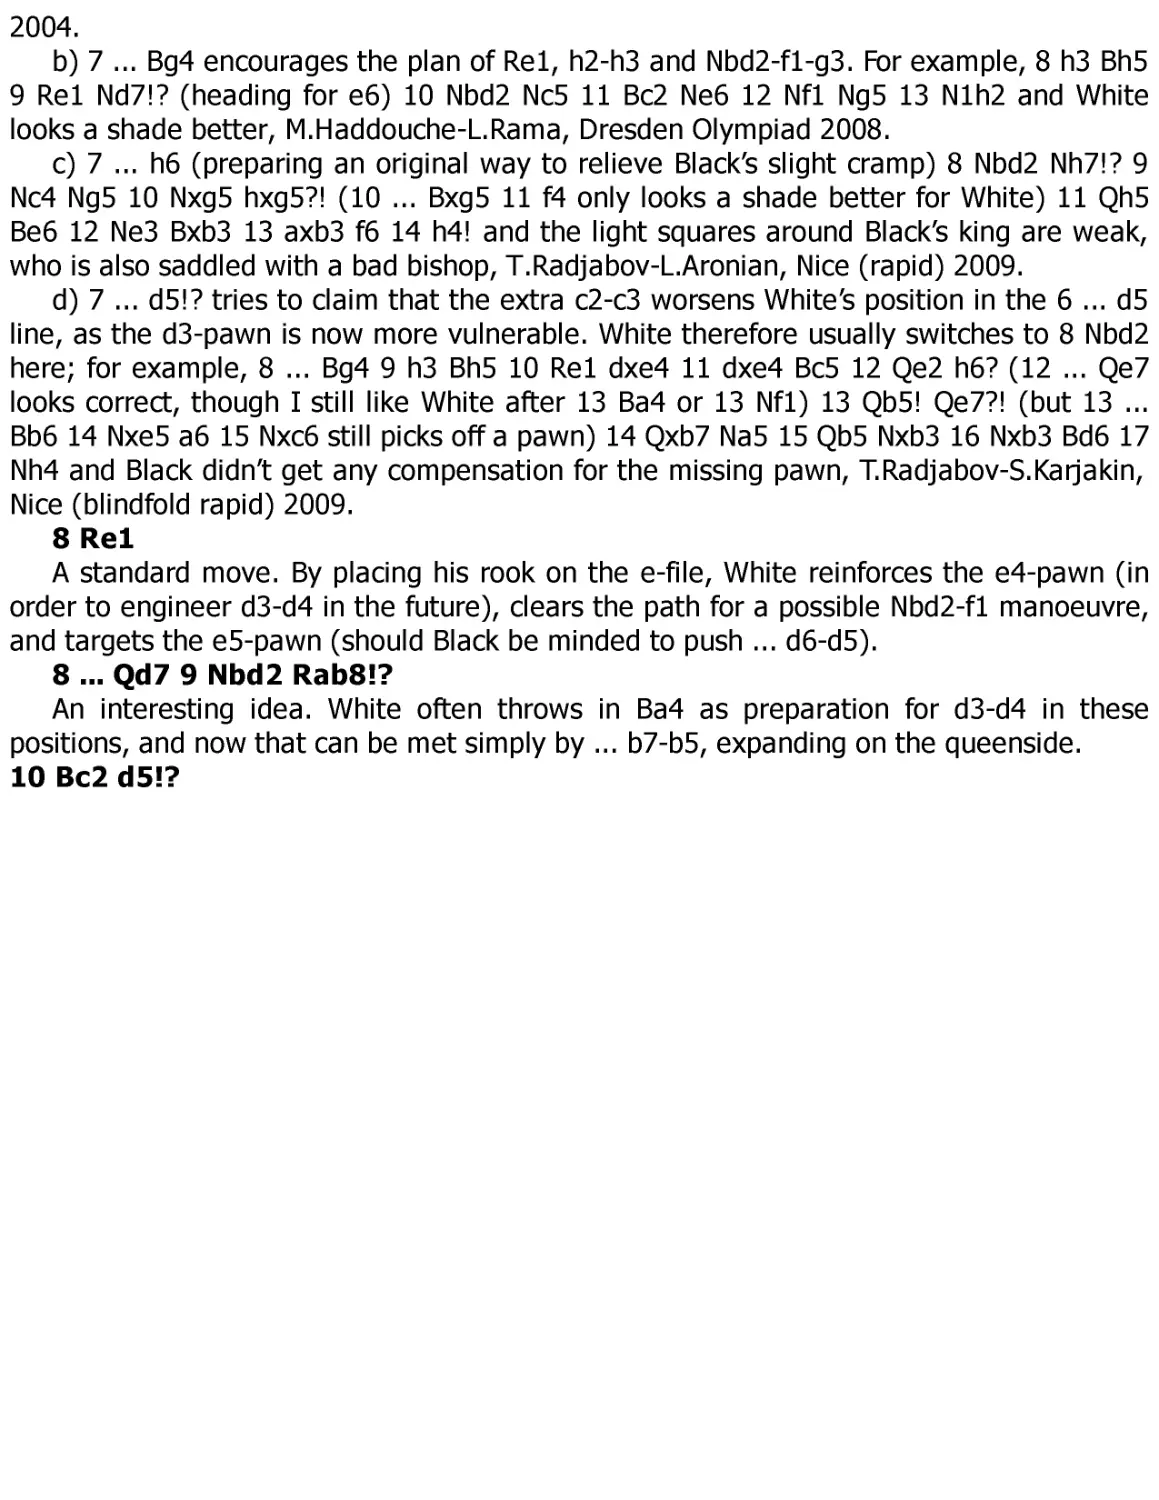
10 Bc2 d5!?
Bu Xiangzhi is an aggressive player and offers his e-pawn, in Marshall Gambit fashion.
Your cautious writer tends to pause in situations where others dare to proceed –
sacrificing on speculation is pretty low on my personal list of priorities – but many players
feel the other way around and live the chaotic life of crisis-mongers.
11 h3!?
Carlsen declines for the moment, preferring to prevent a black piece from appearing
at g4. However, Bu later finds a way to exploit the forward position of the h-pawn, so
there is an argument for immediate acceptance with 11 exd5 Bxd5 12 Nxe5 Nxe5 13 Rxe5
Bd6 14 Re2, when I’m not sure of Black’s full compensation for the pawn, even if he has
definite practical chances.
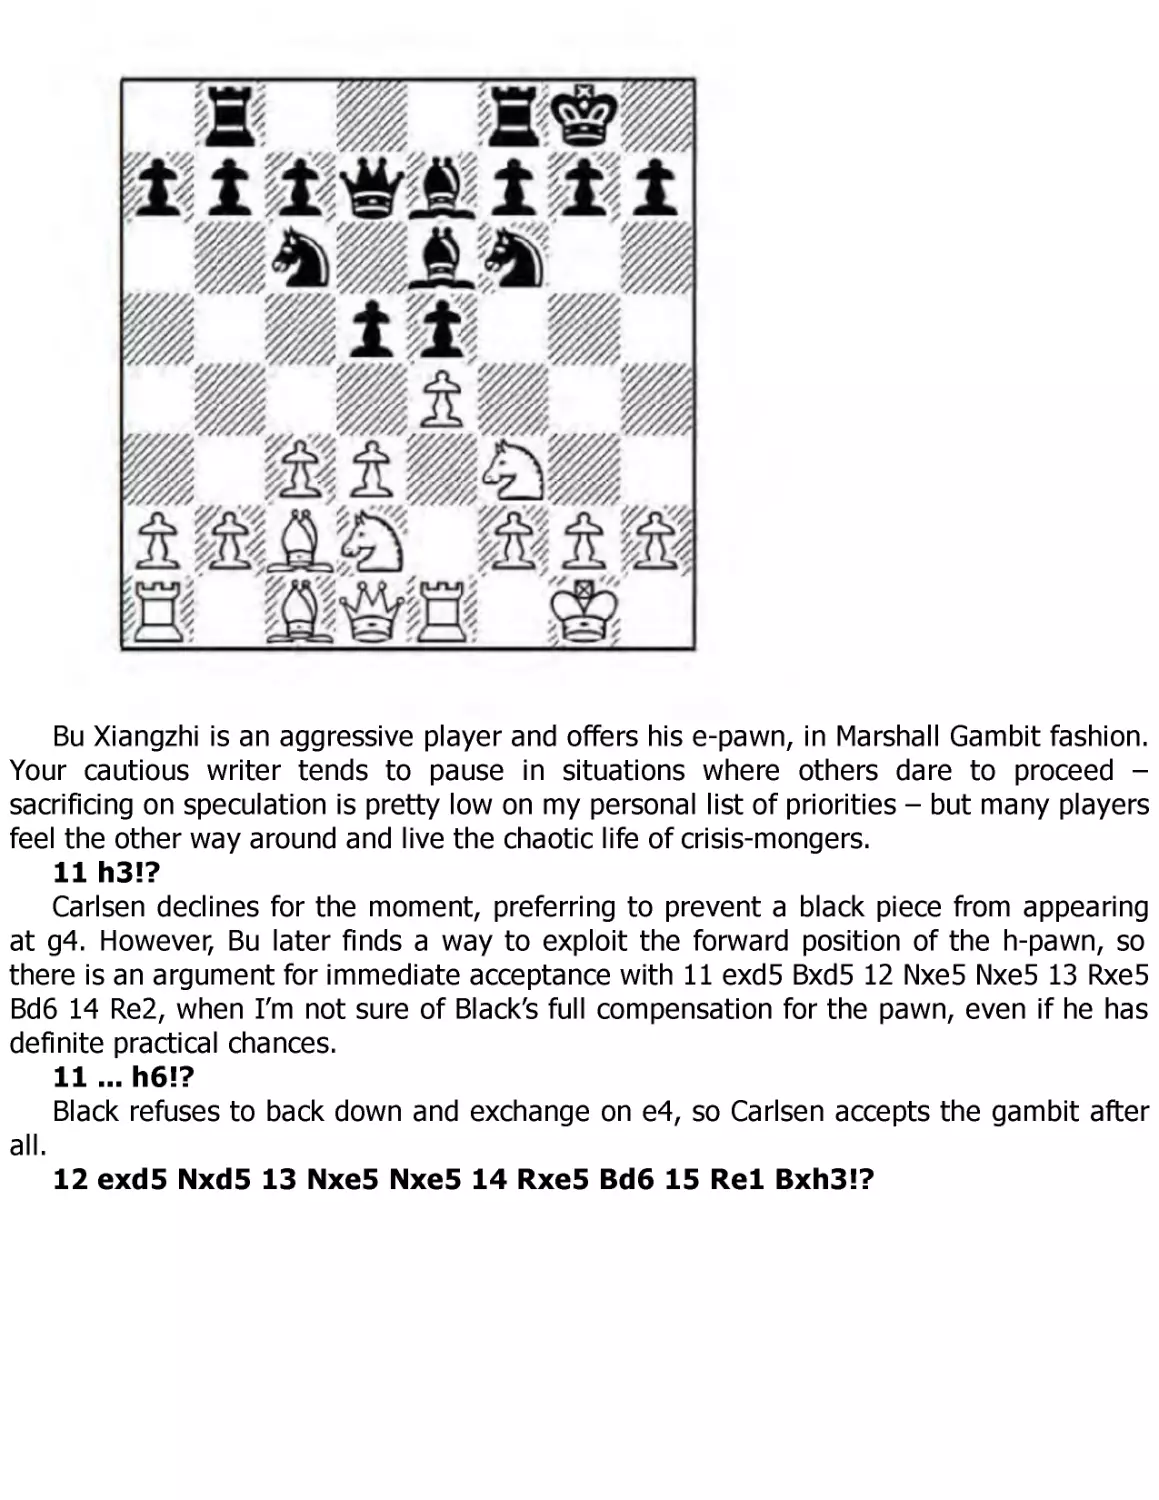
11 ... h6!?
Black refuses to back down and exchange on e4, so Carlsen accepts the gambit after
all.
12 exd5 Nxd5 13 Nxe5 Nxe5 14 Rxe5 Bd6 15 Re1 Bxh3!?
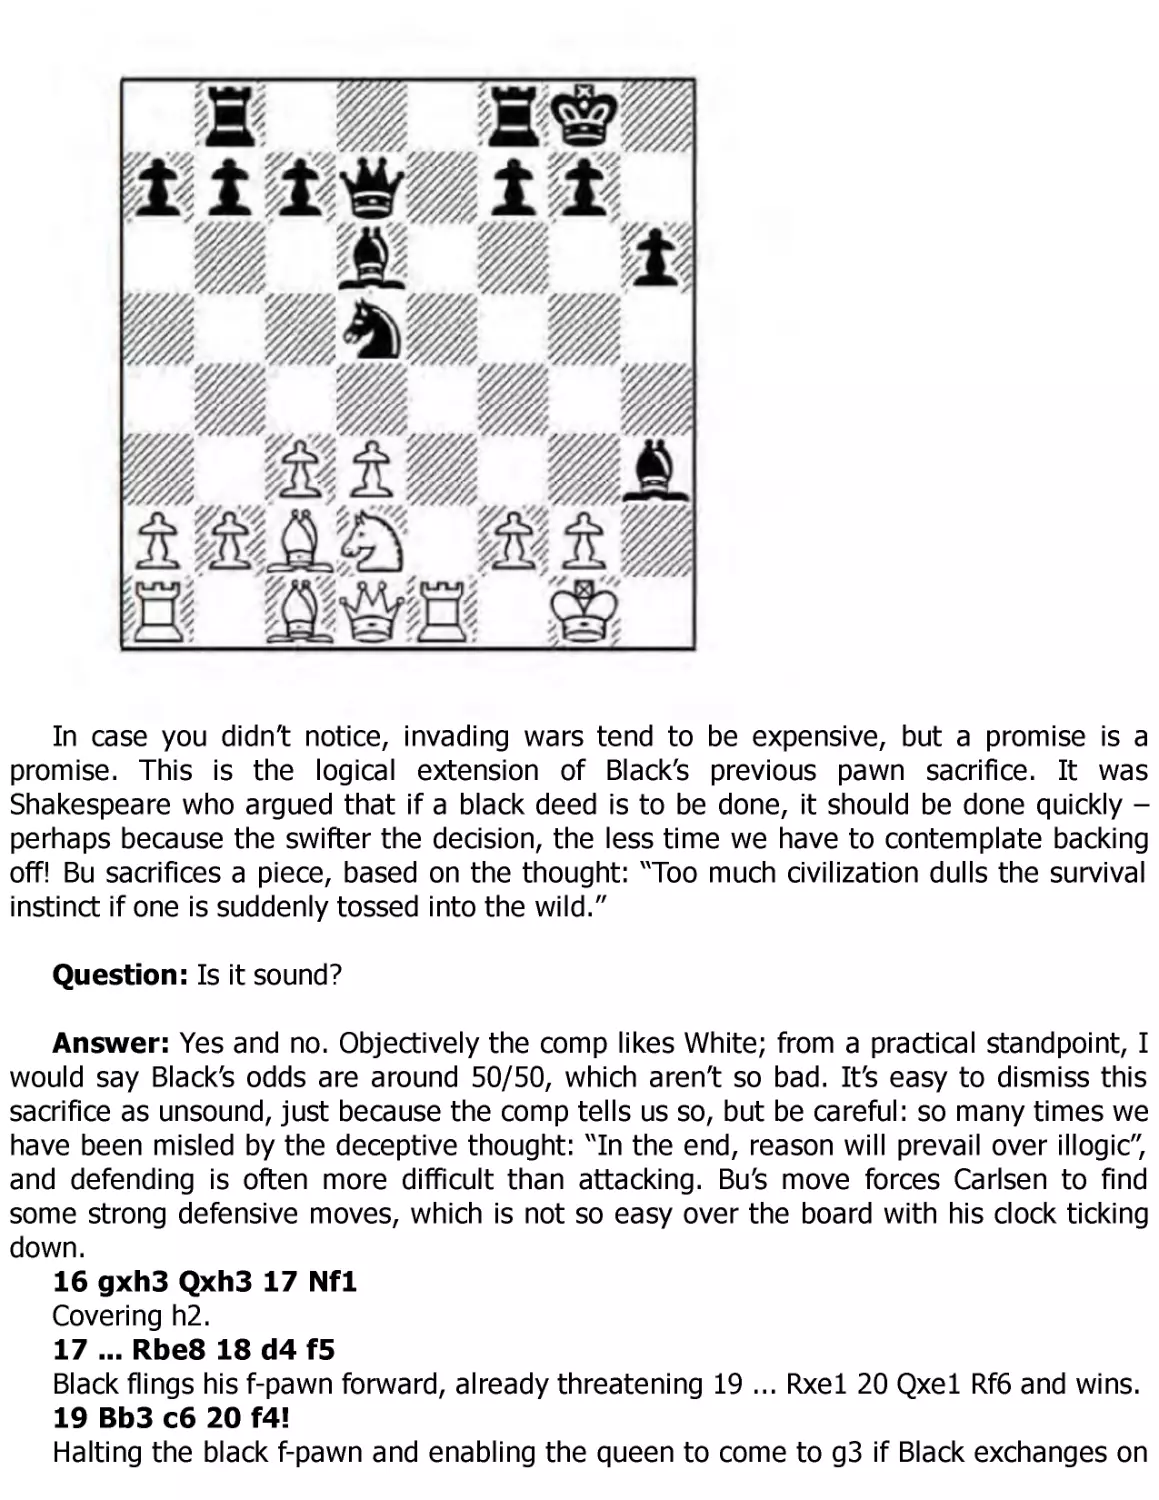
In case you didn’t notice, invading wars tend to be expensive, but a promise is a
promise. This is the logical extension of Black’s previous pawn sacrifice. It was
Shakespeare who argued that if a black deed is to be done, it should be done quickly –
perhaps because the swifter the decision, the less time we have to contemplate backing
off! Bu sacrifices a piece, based on the thought: “Too much civilization dulls the survival
instinct if one is suddenly tossed into the wild.”
Question: Is it sound?
Answer: Yes and no. Objectively the comp likes White; from a practical standpoint, I
would say Black’s odds are around 50/50, which aren’t so bad. It’s easy to dismiss this
sacrifice as unsound, just because the comp tells us so, but be careful: so many times we
have been misled by the deceptive thought: “In the end, reason will prevail over illogic”,
and defending is often more difficult than attacking. Bu’s move forces Carlsen to find
some strong defensive moves, which is not so easy over the board with his clock ticking
down.
16 gxh3 Qxh3 17 Nf1
Covering h2.
17 ... Rbe8 18 d4 f5
Black flings his f-pawn forward, already threatening 19 ... Rxe1 20 Qxe1 Rf6 and wins.
19 Bb3 c6 20 f4!
Halting the black f-pawn and enabling the queen to come to g3 if Black exchanges on
e1.
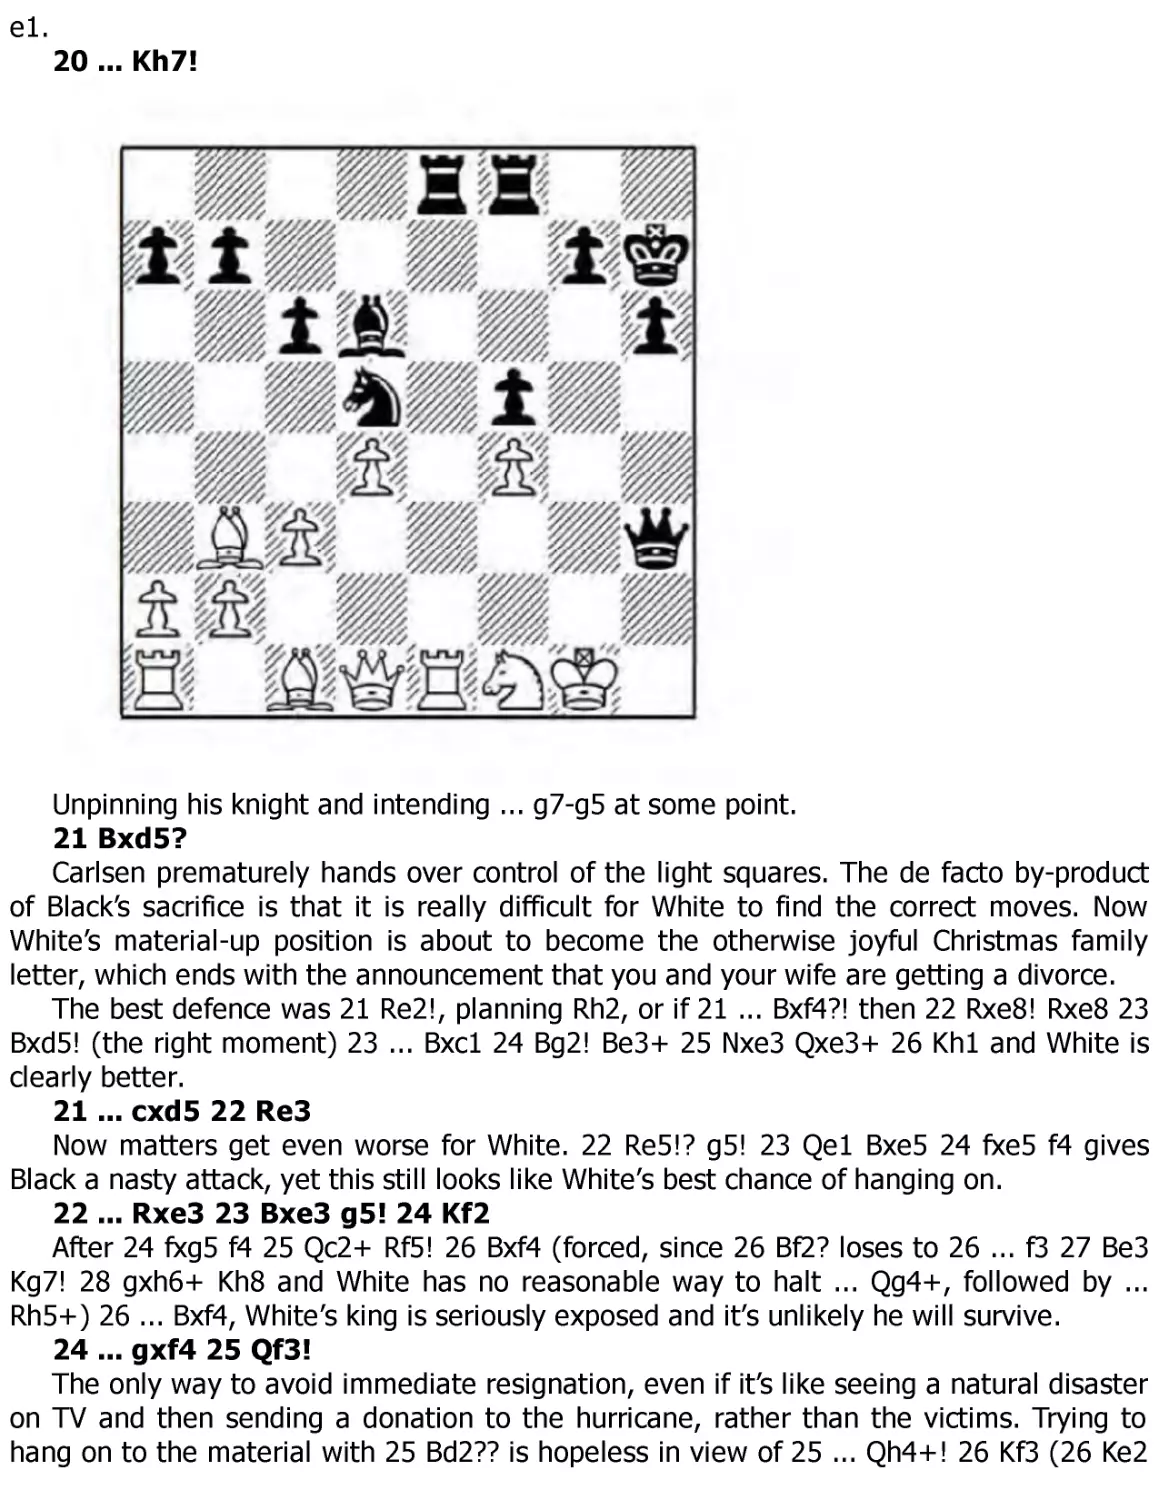
20 ... Kh7!
Unpinning his knight and intending ... g7-g5 at some point.
21 Bxd5?
Carlsen prematurely hands over control of the light squares. The de facto by-product
of Black’s sacrifice is that it is really difficult for White to find the correct moves. Now
White’s material-up position is about to become the otherwise joyful Christmas family
letter, which ends with the announcement that you and your wife are getting a divorce.
The best defence was 21 Re2!, planning Rh2, or if 21 ... Bxf4?! then 22 Rxe8! Rxe8 23
Bxd5! (the right moment) 23 ... Bxc1 24 Bg2! Be3+ 25 Nxe3 Qxe3+ 26 Kh1 and White is
clearly better.
21 ... cxd5 22 Re3
Now matters get even worse for White. 22 Re5!? g5! 23 Qe1 Bxe5 24 fxe5 f4 gives
Black a nasty attack, yet this still looks like White’s best chance of hanging on.
22 ... Rxe3 23 Bxe3 g5! 24 Kf2
After 24 fxg5 f4 25 Qc2+ Rf5! 26 Bxf4 (forced, since 26 Bf2? loses to 26 ... f3 27 Be3
Kg7! 28 gxh6+ Kh8 and White has no reasonable way to halt ... Qg4+, followed by ...
Rh5+) 26 ... Bxf4, White’s king is seriously exposed and it’s unlikely he will survive.
24 ... gxf4 25 Qf3!
The only way to avoid immediate resignation, even if it’s like seeing a natural disaster
on TV and then sending a donation to the hurricane, rather than the victims. Trying to
hang on to the material with 25 Bd2?? is hopeless in view of 25 ... Qh4+! 26 Kf3 (26 Ke2
f3+! forces mate) 26 ... Rg8 27 Qa4 Qg4+ 28 Kf2 Be7! and the engine declares mate in
twelve.
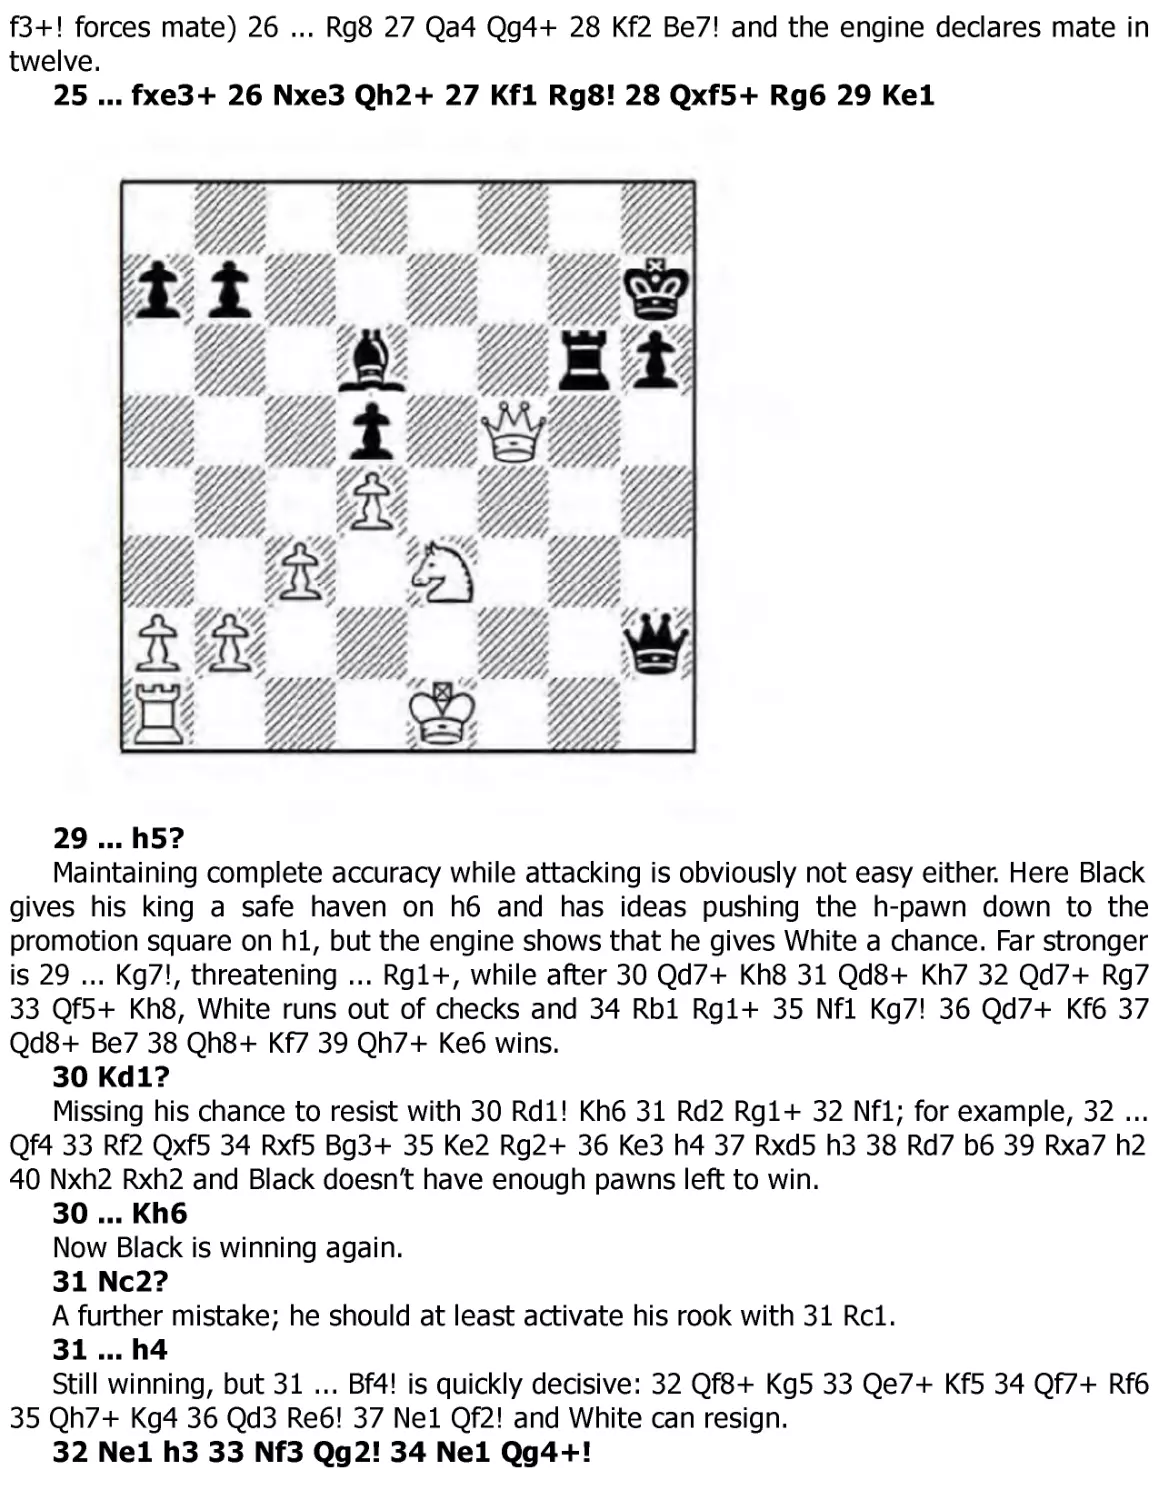
25 ... fxe3+ 26 Nxe3 Qh2+ 27 Kf1 Rg8! 28 Qxf5+ Rg6 29 Ke1
29 ... h5?
Maintaining complete accuracy while attacking is obviously not easy either. Here Black
gives his king a safe haven on h6 and has ideas pushing the h-pawn down to the
promotion square on h1, but the engine shows that he gives White a chance. Far stronger
is 29 ... Kg7!, threatening ... Rg1+, while after 30 Qd7+ Kh8 31 Qd8+ Kh7 32 Qd7+ Rg7
33 Qf5+ Kh8, White runs out of checks and 34 Rb1 Rg1+ 35 Nf1 Kg7! 36 Qd7+ Kf6 37
Qd8+ Be7 38 Qh8+ Kf7 39 Qh7+ Ke6 wins.
30 Kd1?
Missing his chance to resist with 30 Rd1! Kh6 31 Rd2 Rg1+ 32 Nf1; for example, 32 ...
Qf4 33 Rf2 Qxf5 34 Rxf5 Bg3+ 35 Ke2 Rg2+ 36 Ke3 h4 37 Rxd5 h3 38 Rd7 b6 39 Rxa7 h2
40 Nxh2 Rxh2 and Black doesn’t have enough pawns left to win.
30 ... Kh6
Now Black is winning again.
31 Nc2?
A further mistake; he should at least activate his rook with 31 Rc1.
31 ... h4
Still winning, but 31 ... Bf4! is quickly decisive: 32 Qf8+ Kg5 33 Qe7+ Kf5 34 Qf7+ Rf6
35 Qh7+ Kg4 36 Qd3 Re6! 37 Ne1 Qf2! and White can resign.
32 Ne1 h3 33 Nf3 Qg2! 34 Ne1 Qg4+!
The h-pawn can’t be stopped with queens off the board.
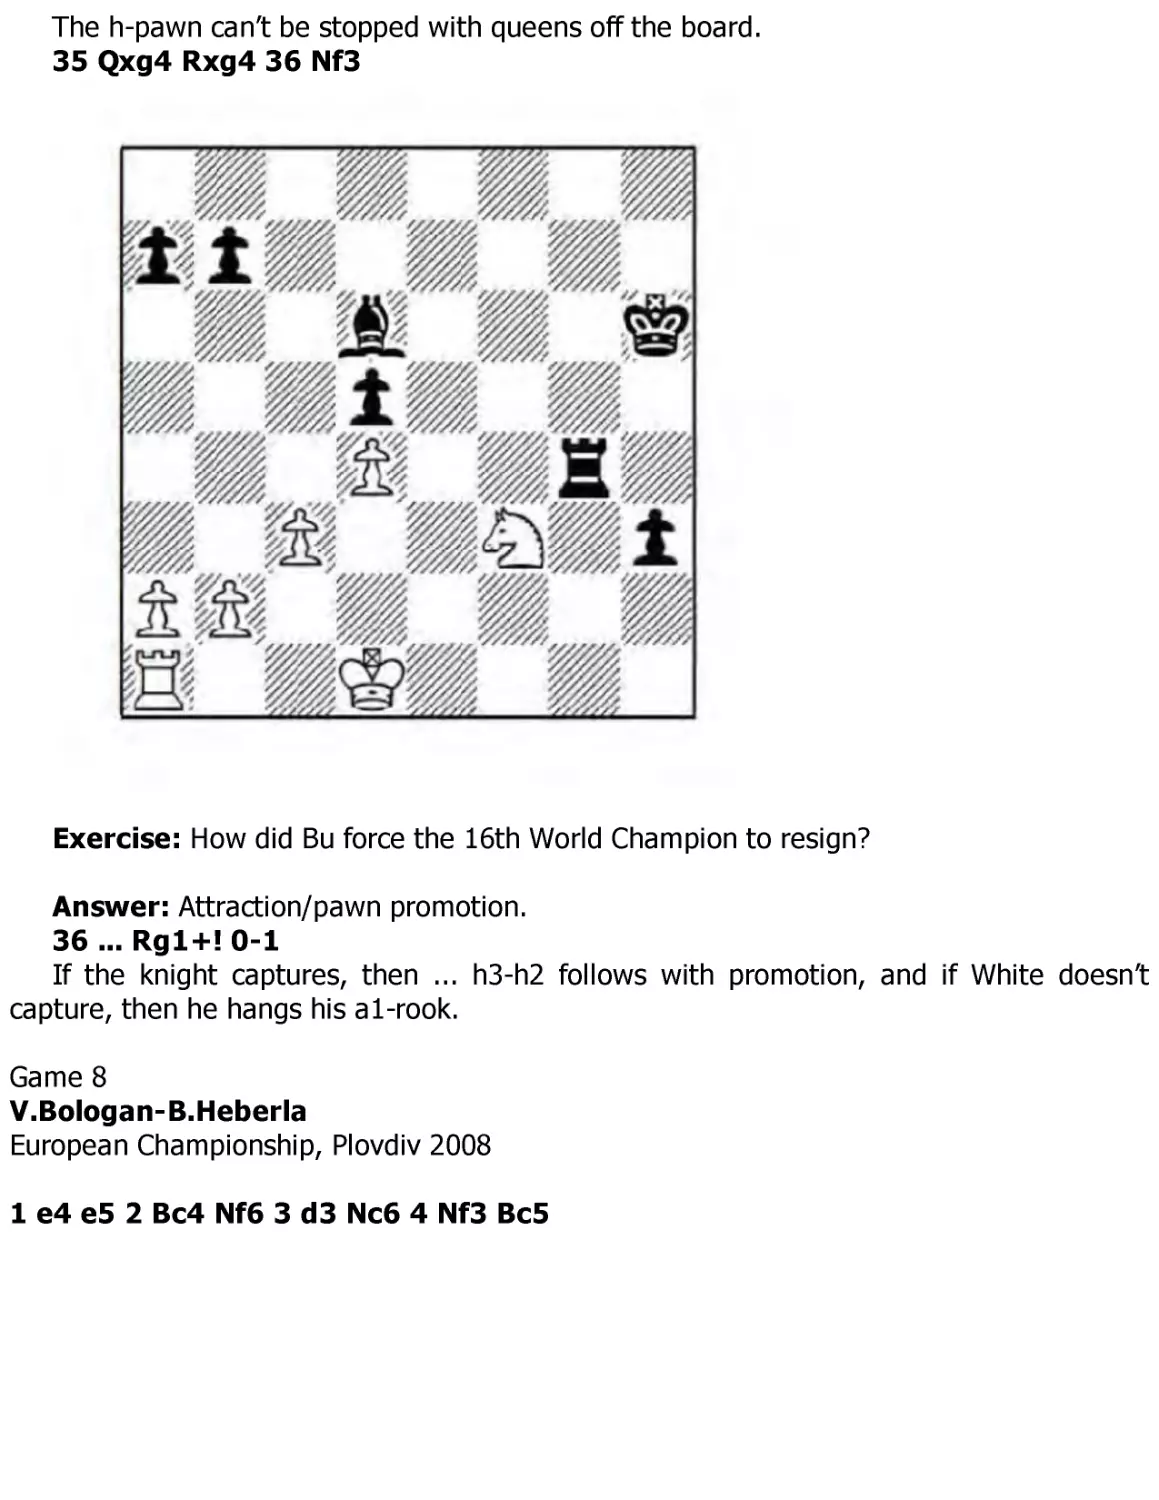
35 Qxg4 Rxg4 36 Nf3
Exercise: How did Bu force the 16th World Champion to resign?
Answer: Attraction/pawn promotion.
36 ... Rg1+! 0-1
If the knight captures, then ... h3-h2 follows with promotion, and if White doesn’t
capture, then he hangs his a1-rook.
Game 8
V.Bologan-B.Heberla
European Championship, Plovdiv 2008
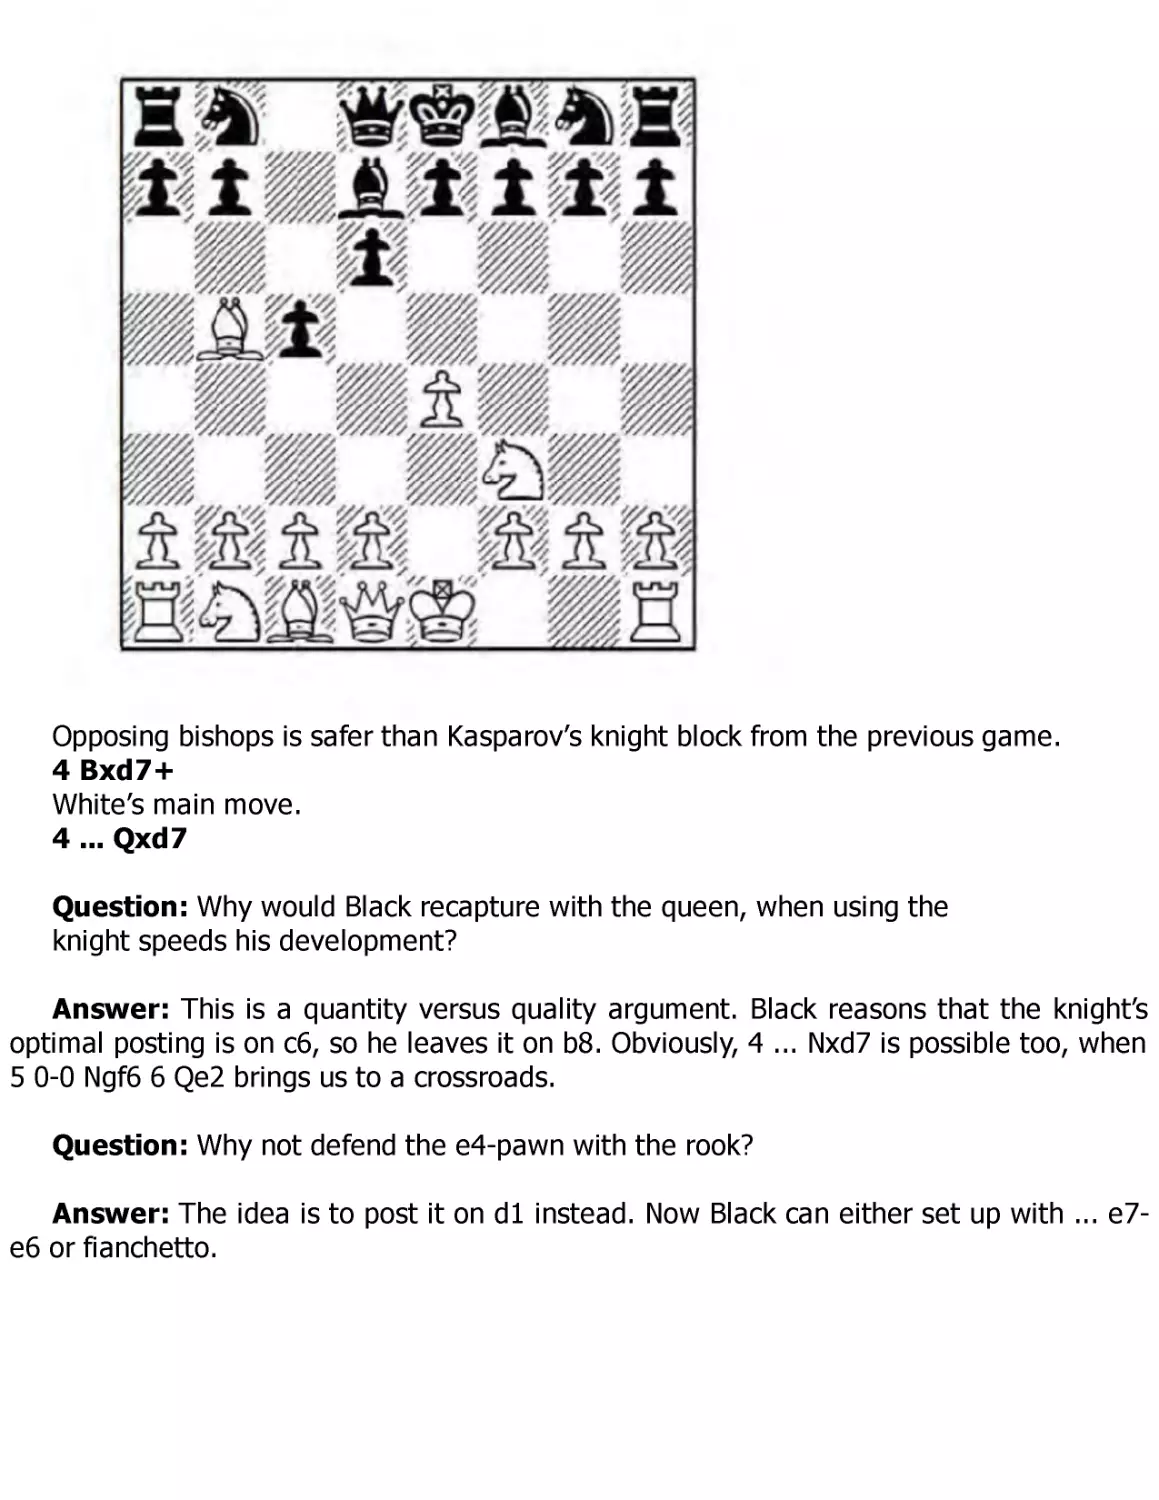
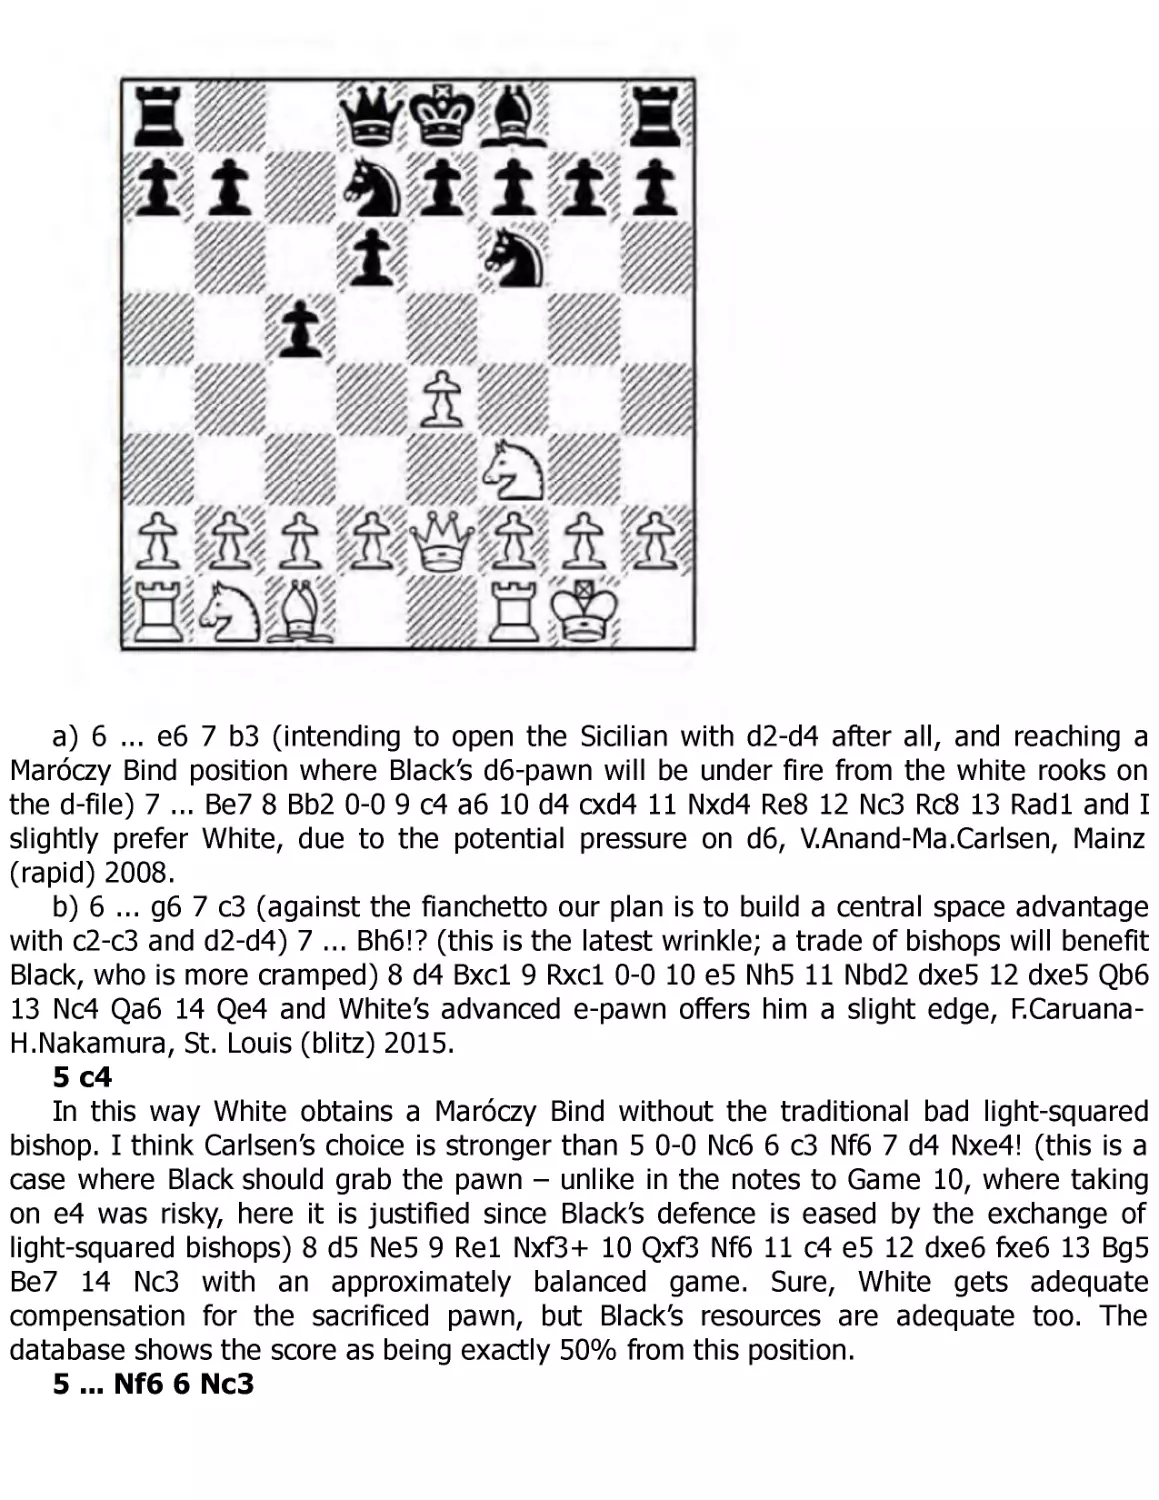
1 e4 e5 2 Bc4 Nf6 3 d3 Nc6 4 Nf3 Bc5
This time Black posts the bishop more aggressively on c5 in proper Italian style.
5 c3
Opening up possibilities of d3-d4, as well as b2-b4.
5 ... 0-0 6 Bb3
Question: What is the point of this move?
Answer: White inoculates himself against any ... Na5 ideas, going after the lightsquared bishop, and now has the option of responding to ... d7-d5 with Nbd2, instead of
exchanging on d5. For instance, after 6 0-0 d5!? White is forced to play 7 exd5, when 7 ...
Nxd5 8 Re1 Bg4 9 h3 Bh5 10 Nbd2 (10 g4?! looks a bit too risky, since 10 ... Bg6 11 Nxe5
Nxe5 12 Rxe5 c6 gives Black a kind of super Marshall Gambit position, and I don’t recall
too many of those where White tossed in g2-g4?!) 10 ... Bb6 11 Ne4 f6, Black has a
decent enough position, V.Moiseenko-A.Shirov, Finnish Team Championship 2015.
6 ... a6
Giving the c5-bishop a retreat square on a7. Often Black plays this on the previous
move, that is as soon as White might consider hitting the c5-bishop with b2-b4.
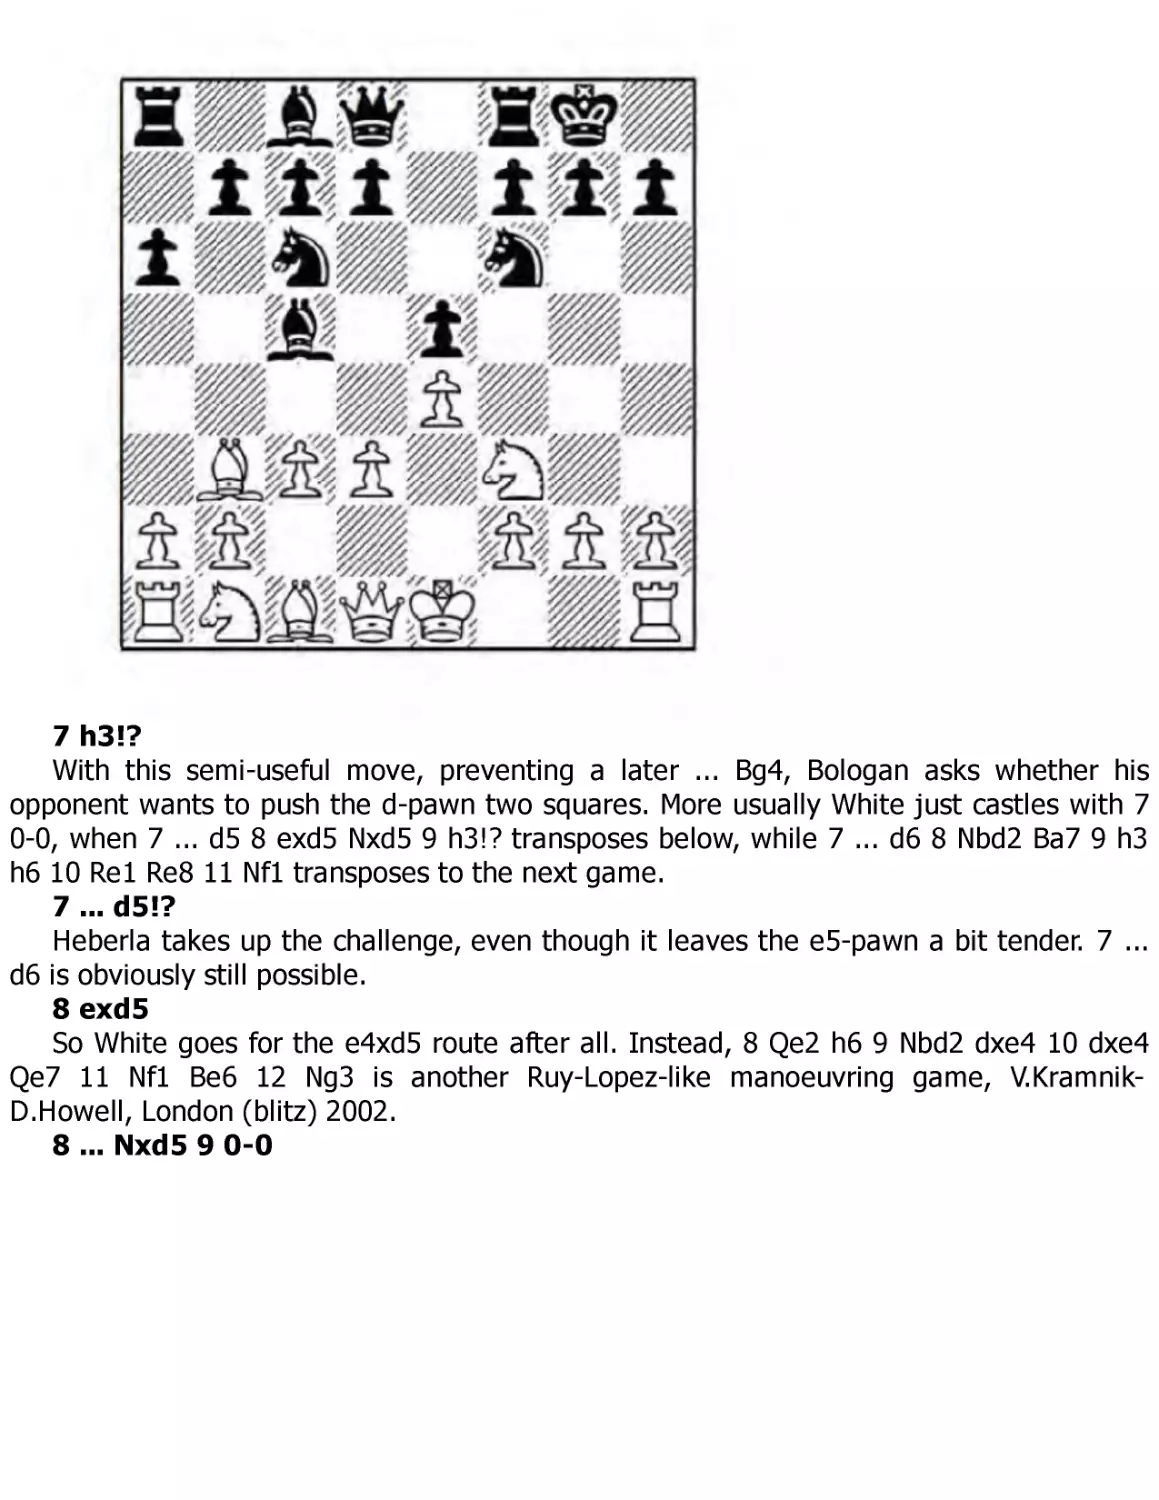
7 h3!?
With this semi-useful move, preventing a later ... Bg4, Bologan asks whether his
opponent wants to push the d-pawn two squares. More usually White just castles with 7
0-0, when 7 ... d5 8 exd5 Nxd5 9 h3!? transposes below, while 7 ... d6 8 Nbd2 Ba7 9 h3
h6 10 Re1 Re8 11 Nf1 transposes to the next game.
7 ... d5!?
Heberla takes up the challenge, even though it leaves the e5-pawn a bit tender. 7 ...
d6 is obviously still possible.
8 exd5
So White goes for the e4xd5 route after all. Instead, 8 Qe2 h6 9 Nbd2 dxe4 10 dxe4
Qe7 11 Nf1 Be6 12 Ng3 is another Ruy-Lopez-like manoeuvring game, V.KramnikD.Howell, London (blitz) 2002.
8 ... Nxd5 9 0-0
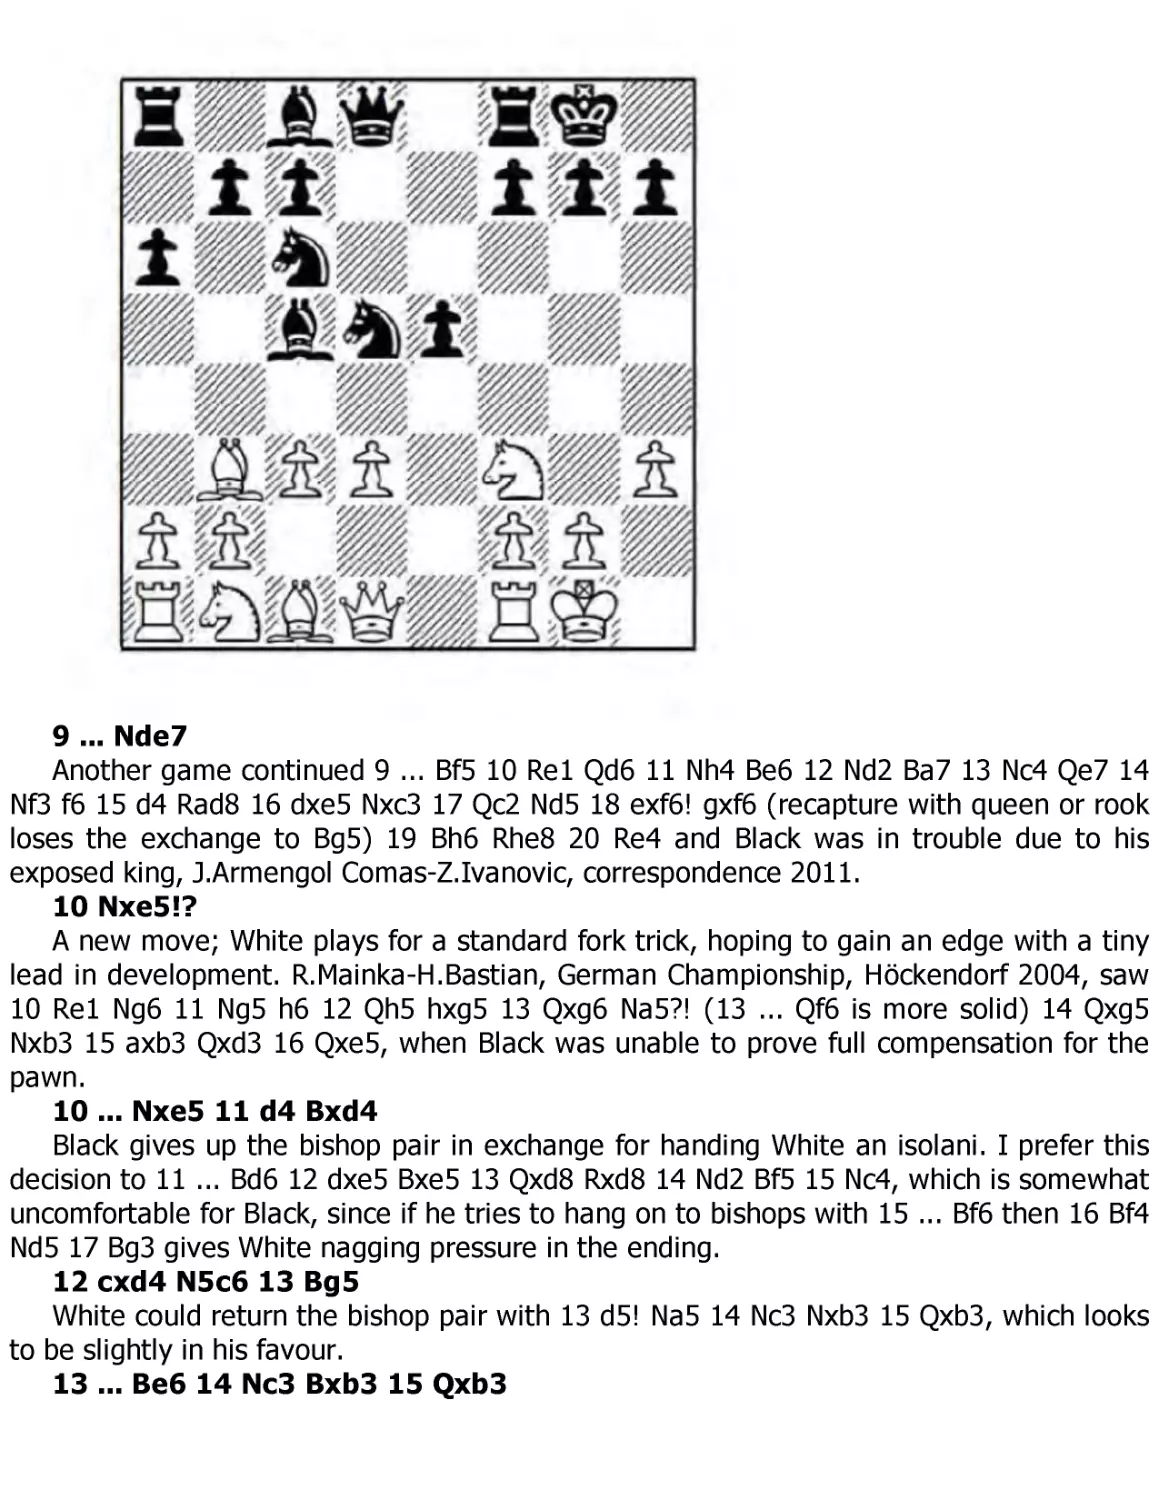
9 ... Nde7
Another game continued 9 ... Bf5 10 Re1 Qd6 11 Nh4 Be6 12 Nd2 Ba7 13 Nc4 Qe7 14
Nf3 f6 15 d4 Rad8 16 dxe5 Nxc3 17 Qc2 Nd5 18 exf6! gxf6 (recapture with queen or rook
loses the exchange to Bg5) 19 Bh6 Rhe8 20 Re4 and Black was in trouble due to his
exposed king, J.Armengol Comas-Z.Ivanovic, correspondence 2011.
10 Nxe5!?
A new move; White plays for a standard fork trick, hoping to gain an edge with a tiny
lead in development. R.Mainka-H.Bastian, German Championship, Höckendorf 2004, saw
10 Re1 Ng6 11 Ng5 h6 12 Qh5 hxg5 13 Qxg6 Na5?! (13 ... Qf6 is more solid) 14 Qxg5
Nxb3 15 axb3 Qxd3 16 Qxe5, when Black was unable to prove full compensation for the
pawn.
10 ... Nxe5 11 d4 Bxd4
Black gives up the bishop pair in exchange for handing White an isolani. I prefer this
decision to 11 ... Bd6 12 dxe5 Bxe5 13 Qxd8 Rxd8 14 Nd2 Bf5 15 Nc4, which is somewhat
uncomfortable for Black, since if he tries to hang on to bishops with 15 ... Bf6 then 16 Bf4
Nd5 17 Bg3 gives White nagging pressure in the ending.
12 cxd4 N5c6 13 Bg5
White could return the bishop pair with 13 d5! Na5 14 Nc3 Nxb3 15 Qxb3, which looks
to be slightly in his favour.
13 ... Be6 14 Nc3 Bxb3 15 Qxb3
15 ... Qxd4?!
Don’t count on your raise until it is approved by the boss. This may be the wrong
recapture, as Black falls too far behind in development. He should accept the minor
structural pain of 15 ... Nxd4! 16 Qxb7 h6 17 Bh4 Qd7 18 Bxe7 Qxe7 19 Rad1 Qd6!, when
his well-posted knight (which can be backed up by ... c7-c5) and open b-file make up for
White’s slightly superior structure. There is a big difference between pain and injury.
16 Rfe1! Na5 17 Qa3!
Black’s knights are now forced to contort.
17 ... Nec6 18 Rad1 Qa7?
The queen on a7 is like a Beluga whale in a coy pond. Black can’t afford to place his
queen so far away and his game now quickly unravels. He had to try 18 ... Nc4! 19 Qb3
Qc5 20 Nd5 Nd4 21 Qxb7 c6, when 22 Nf6+! gxf6 23 Bxf6 Rad8! 24 Bxd8 Rxd8 25 Kh1
may leave White with the better chances, but not nearly as much as in the game.
19 Nd5 Nc4
Exercise: Most of Black’s pieces are on the queenside, which makes his king
rather lonely. Find one powerful idea and White’s pieces turn into an army
of sentient self-replicating machines, whose only directive is to kill humanity
without conscience.
Answer #1: Annihilation of the defensive barrier.
20 Nf6+!
This is the punch line to the knight’s joke. Note that even 19 ... f6 would not have
prevented this move: White still plays 20 Nxf6+! gxf6 21 Bh6 Rf7 22 Re6! (target: f6) 22
... Qb8 23 Qg3+ Kh8 24 Rxf6! Qe8 25 Qf4 Qe2 26 Rd7! and overwhelms Black’s king to
force mate.
Answer #2: The simple path with 20 Qc3! is also crushing; for example, 20 ... Nd6
21 Bf6! g6 22 Qxc6! bxc6 23 Ne7 mate.
20 ... gxf6
Forced, since 20 ... Kh8 loses instantly to 21 Qd3! with a deadly double attack on h7
and the loose c4-knight.
21 Qg3!
There is nothing to it. Bologan simply points at the target and pulls the trigger.
21 ... fxg5
Or 21 ... Kg7 22 Bh4+ Kh6 23 Qf4+ Kg6 24 Qxf6+ Kh5 25 Qg5 mate.
22 Qxg5+ Kh8 23 Qf6+ Kg8 24 Rd5!
Black is now two knights up but they are helpless to defend their king.
24 ... N4e5 25 Rdxe5 Nxe5 26 Rxe5 Rfe8
This allows White to force mate. The only way to prolong the game was with the
grand gesture 26 ... h6 27 Qxh6 Qb6 28 Rg5+ Qg6 29 Rxg6+ fxg6 30 Qxg6+ Kh8, which
isn’t of much practical value. Sure, Black evaded mate, but White has way too many
pawns. Taking refuge in such a line is the same as the sinner who dies and is reborn in
hell, asking the devil for an air-conditioned room. In hell there are only two settings: hot
and hotter.
27 Rg5+ Kf8 28 Rf5! 1-0
Since 28 ... Kg8 (or 28 ... Re7 29 Qh8) 29 Qxf7+ Kh8 30 Qf6+ Kg8 31 Rg5 is mate.
Summary: If Black goes for ... d7-d5, don’t be afraid to give up the centre with
e4xd5, since the e5-pawn is tender in many lines.
Game 9
L.Bruzon Batista-K.Mekhitarian
Cochabamba 2013
1 e4 e5 2 Nf3
As you may have guessed by now, our move order would be 2 Bc4 Nf6 3 d3 Nc6 4 Nf3,
when 4 ... Bc5 5 c3 d6 6 0-0 transposes below.
2 ... Nc6 3 Bc4 Bc5 4 0-0 Nf6 5 d3 d6
If Black has no intention of playing ... d7-d5 in one go (as in the previous game),
there is no reason to delay putting the d-pawn on d6, its most most natural and common
square.
6 c3 a6
Now ... Na5 will bag White’s light-squared bishop, so he needs to secure it somehow.
7 Bb3
The modern era slips back into prehistoric times. People played this way in 1850; then
the variation’s popularity went dormant for nearly a century and a half; today it is all the
rage again. This is one of the key tabiyas that arises from the Bishop’s Opening as well as
the Italian Game. To claim that I truly understand these positions is to claim that I
understand Japanese history and culture because I drive a Toyota Prius. This line, which
seems so simple from the outside, can be difficult to master, since all the variations look
alike (to me at least), and yet they aren’t.
A key alternative is to give the bishop some air with 7 a4. One recent example,
V.Anand-H.Nakamura, Tal Memorial, Moscow (rapid) 2018, went 7 ... 0-0 8 h3 Ba7 9
Nbd2 h6 10 Re1 Ne7 (switching this knight to the kingside is a standard plan for Black) 11
Bb3 Ng6 12 d4 Re8 13 Bc2 Bd7 14 Nf1 c5 (seeking to resolve central tension) 15 dxc5
dxc5 16 Ne3 b5 17 axb5 axb5 18 c4! Bc6? (after 18 ... Bb6! 19 Rxa8 Qxa8 20 b3 White
holds only a microbe of an edge) 19 cxb5! Bxb5 20 Qxd8! (deflecting the e8-rook from
coverage of e5) 20 ... Rexd8 21 Nd5! Nxd5 22 exd5 c4 23 Bd2 Bd4 24 Rxa8 Rxa8 25 Bxg6
fxg6 26 Bc3 Rd8 27 Nxe5 Bxe5?! (Black’s drawing chances are higher after 27 ... Rxd5 28
Nxg6 Kf7) 28 Rxe5 Re8 29 f4 g5 30 Rxe8+ Bxe8 31 fxg5 hxg5 32 g4!, fixing g5 as a
perpetual target. Anand converted expertly, despite the presence of opposite-coloured
bishops.
7 ... h6
When an opening sees both sides getting ready for a forthcoming confrontation, the
move order tends to be very flexible. For instance, 7 ... Ba7 (or 7 ... 0-0 8 Nbd2 Ba7) 8
Nbd2 Ba7 9 h3 h6 10 Re1 Re8 (or 10 ... Be6 11 Nf1 Re8) 11 Nf1 Be6 are alternative
routes to the position at move 11 below. Via this one, S.Ganguly-S.Kayumov, World Rapid
Championship, Doha 2016, deviated with 10 ... Nh5 11 Nf1 Qf6 12 Be3 Nf4 13 d4 Ne7 14
Ng3 Neg6 15 Bc2 Nh4 16 Nxh4 Qxh4 17 Qf3, when the coming Nf5 is an issue, so Black
must either hand over the bishop pair or weaken his king with ... g7-g6.
8 Re1
White reinforces the e4-pawn in preparation for a possible d3-d4 and makes way for
the thematic Ruy knight manoeuvre.
8 ... Ba7
So that White’s d3-d4 won’t arrive with tempo.
9 Nbd2 0-0
Seeing as Black hasn’t yet committed to castling, he might try for a kingside pawn
storm with 9 ... g5!? 10 Nf1 g4 11 N3d2 h5 12 Ne3 h4, but after 13 Ndf1 Rg8 14 g3!,
S.Martinovic-M.Trifunovic, Belgrade 1988, White’s king is well defended and I feel that
Black is in greater danger of overextension than White getting mated.
10 Nf1
The knight may later be posted to e3, g3, or even h2 and then on to g4.
10 ... Re8
In a later game Mekhitarian opted for 10 ... Be6 11 Ng3 (now 11 h3 might be met by
11 ... d5!?) 11 ... Re8 12 Bxe6 Rxe6 13 Be3 Bxe3 14 Rxe3 d5 15 Qb3 Rb8 16 h3 Qd7 17
Rae1 dxe4 18 dxe4 Na5 19 Qc2 Rd8 and equalized in Ma.Carlsen-K.Mekhitarian, Caxias do
Sul (rapid) 2014, but the world champion is rarely put off by that. After 20 b3 g6 21 R3e2
Nc6 22 Nf1 Nh5 23 Ne3 Nf4 24 Rd2 Rd6 25 Red1 Qe6 26 b4 Kg7 27 a4 (White begins to
expand on the queenside) 27 ... Rxd2 28 Nxd2 h5?! 29 Nf3 Rd6 30 h4 Qd7 31 Rxd6 Qxd6
32 g3 Ne6 33 Nc4 Qd8? (33 ... Qe7 34 Nfxe5 Nxe5 35 Nxe5 Nc5! 36 Nxg6 Qxe4 should
still hold) 34 Ncxe5 Nxe5 35 Nxe5, Carlsen won a clean pawn and converted without a
problem.
11 h3 Be6
Black challenges White’s most active piece and prepares to strike first in the centre
with ... d6-d5.
12 N3h2
Bruzon is after a Ruy Lopez-like kingside build-up with Qf3, Ng3 and either Nf5 or Ng4.
White has also tried:
a) 12 Ng3 Qd7 13 Bc2 d5 14 exd5 Bxd5 15 Nh4!? (initiating a direct attacking plan; 15
Be3 is more steady) 15 ... Rad8 16 Nhf5 Kh8 17 d4!? exd4 18 Nxg7! Rxe1+ 19 Qxe1 Kxg7
(the comp shows the counter-sacrifice 19 ... Bxg2!? 20 Kxg2 d3 to be a satisfactory
defence) 20 Bxh6+ Kh8 21 Qd2 Rg8 22 Qf4 Qd6?? (a fatal blunder; after 22 ... Nh5! 23
Bg7+! Kxg7 24 Nxh5+ Kf8 25 Qh6+ Ke7 the game should still be drawn) 23 Qh4 Qxg3 24
fxg3 and Black had to resign in A.Giri-V.Anand, Stavanger (blitz) 2015.
b) 12 Bc2 d5 13 exd5 (White cedes central control in order to turn Black’s e5-pawn
into a potential liability) 13 ... Bxd5 14 Ng3 Bc5 15 b4 Bf8 (the bishop was better off
remaining on the a7-g1 diagonal) 16 a4 and if nothing else White’s queenside expansion
makes his position easier to play, V.Kramnik-V.Anand, Moscow 2016.
12 ... d5
Principle: Meet a wing attack with a counter in the centre. Although White hasn’t
really started attacking yet, the principle is still applicable.
13 Qf3 dxe4
I’m not so keen on this. Resolving the position in the centre seems to allow White to
build up leisurely on the kingside. Any other move that retains the central tension feels
more appropriate.
14 dxe4 Bxb3
This reduces White’s attackers at the cost of weakening the f5-square.
15 axb3 Qe7
15 ... Qd6 16 Ng3 Ne7 might be more accurate.
16 Ng3 Qe6
17 Nf5
White doesn’t need to play 17 b4 yet, after which 17 ... Ne7 18 Nh4 Nxg4 19 hxg4
Red8 20 Nf5 f6 was level in V.Bologan-V.Akopian, World Rapid Championship, KhantyMansiysk 2013, though White went on to win anyway.
17 ... Ne7!
Fighting for the f5-square. Not 17 ... Qxb3?? in view of 18 Bxh6 and wins.
18 Ng4 Nxg4
White was threatening to take on h6 with check, winning a pawn.
19 Qxg4
On 19 hxg4? Black would take the b3-pawn.
19 ... Nxf5 20 exf5 Qf6
Again 20 ... Qxb3?? loses instantly to 21 Bxh6.
21 Qf3 c6 22 Ra4!
The rook can now be transferred to either e4 or g4. White’s position feels a tad more
comfortable, despite the comp’s steady “0.00” assessment.
22 ... Rad8 23 Rae4 Rd5 24 g3
Whether the players realized it or not, this was actually the first new move. A month
before, O.Korneev-P.Maletin, Tashkent 2013, had gone 24 c4 Rd4 25 Be3 Rxe4 26 Qxe4
Bxe3 27 Rxe3 Rd8! 28 Qxe5 Rd1+ 29 Kh2 Qxe5+ 30 Rxe5 Kf8 and White was unable to
do anything with his extra pawn.
24 ... g6?!
It’s unwise to denude your king’s position without a solid promise of gains elsewhere.
This sharp response looks like an unjustified attempt to complicate and play for a win
from an otherwise passive position.
I’m not sure how White makes progress if Black sits tight with a sequence like 24 ...
Red8 25 Kg2 Rd3 26 Qh5 Bb8. Now the only plan I can see is to slowly push the kingside
pawns, but it stalls after 27 h4 c5 28 g4? (all this accomplishes is to put the queen out of
play) 28 ... a5 and the trouble is that White’s intended g4-g5 is always met by ... Qxf5.
25 g4 gxf5?! 26 gxf5 Kh7
Black has gambled that the white king is less secure than his own, which isn’t the case
since White has access to ideas like Qh5 and Rh4.
27 Kf1! Red8?
He should recruit his bishop for kingside defensive duties with 27 ... Bc5!, heading for
f8.
28 Qh5
There are two mind states to attacking:
1. That of a belligerent drunk who throws punches wildly in the bar.
2. That of a hired mob killer, who coldly plots a hit without emotion.
White’s coming attack is a case of number two on the list.
28 ... R5d6
This just hands over a pawn. Black’s problem is that 28 ... R8d6? allows 29 Bxh6!
Qxh6 30 Qxf7+ Qg7 31 Rh4+ Rh6 32 Rxh6+ Kxh6 33 Qe6+ Kh5 34 Re4 and White has a
decisive attack due to the twin threats of Rg4 and Qe8+.
29 Rxe5 Rd1!
A move played with the thought: A bad ending is better than getting mated. Black
finds a way to reduce material and safeguard his king somewhat.
30 Rxd1?!
A soldier, no matter how brave, is incomplete if he is left without weapons. This
exchange makes White’s win harder. Stronger was 30 Bf4! Rxe1+ 31 Rxe1, retaining a
pair of rooks on the board so he can keep attacking.
30 ... Rxd1+ 31 Qxd1 Qxe5 32 Qd7
With a double attack on f7 and b7.
32 ... Qd5?!
The bishop ending is lost. Black can put up more resistance by entering a queen
ending after 32 ... Kg7! 33 Qxb7 Bxf2 34 Bxh6+ Kxh6 35 Qxc6+ Kh7! 36 Kxf2 Qxf5+,
which won’t be so easy for White to convert.
33 Qxd5 cxd5
At first glance White’s measly extra doubled f5-pawn doesn’t look like it’s enough to
win the game. Bruzon proves otherwise with efficient technique.
34 Ke2 Kg7 35 Be3! Bb8
The pawn endgame after 35 ... Bxe3 36 Kxe3 is also winning for White: 36 ... Kf6 37
Kd4 Kxf5 38 c4! (this gains a crucial tempo and is much stronger than the obvious 38
Kxd5 Kf4 39 Kc5 Kf3 40 Kb6 Kxf2 41 c4 f5 42 c5 f4 43 Kxb7 f3 44 c6 Kg1 45 c7 f2 46 c8Q
f1Q, when White will have to navigate a queen endgame, needing always to watch out
for perpetual check tricks) 38 ... dxc4 39 bxc4 Kf4 40 Kc5 Kf3 41 Kb6 Kxf2 42 c5 f5 43
Kxb7 f4 44 c6 and Black is too slow in the race, mainly since his king blocks promotion.
36 Kf3 h5
After 36 ... Kf6 37 Kg4 h5+ 38 Kxh5 Kxf5 39 Kh6, White’s h-pawn will win the game.
37 Bf4 Ba7
Not 37 ... Bxf4? 38 Kxf4 Kf6 39 b4 and Black will soon be in zugzwang.
38 Be5+ Kf8 39 Kg3!
Targeting the h-pawn.
39 ... Ke7
The path to victory remains an incomplete puzzle. White has a critical choice between
either saving his f-pawn first or letting it drop and going after the black h-pawn right
away.
Exercise: Our choices are: (a) 40 f3; (b) 40 Bd4; and (c) 40 Kh4. In such
situations I often apply the acronym WWCD. (What would Capa do?)
We must channel our inner Capablanca and choose wisely.
Answer: White can’t afford to waste a tempo protecting the worthless f2-pawn and
should go after h5 immediately.
40 Kh4!
In this instance it is the moderate who is deemed the extremist. Your writer possesses
an encyclopaedic knowledge of how to screw up a chess game, mainly through personal
experience of being on the wrong end so many times. If my time on the clock were low, I
would 100% have attempted to hang on to the f2-pawn with either of the “safe” lines (a)
and (b), both of which allow Black to draw:
a) 40 f3?? Be3! 41 Kh4 f6! 42 Bd4 Bxd4 43 cxd4 Kf7 44 Kxh5 Kg7 45 b4 b5!. Day
suddenly turns to night and darkness engulfs White’s position. His king is unable to
penetrate and Black holds the draw two pawns down in a pawn ending, a sight you don’t
see too often.
b) 40 Bd4?? Bxd4 41 cxd4 f6 42 Kh4 Kf7 43 Kxh5 Kg7 44 b4 b5! is essentially the
same drawn ending as in line ‘a’,
40 ... Bxf2+
Plaster, concrete and shards of glass come tinkling down, as the explosion rips
through the building. I’m kidding. White’s f2-pawn is meaningless, whereas Black will
sorely miss his h5-pawn.
41 Kxh5 b5 42 Bd4 Be1
Black can’t afford to swap bishops now, since he is unable to establish his fortress: 42
... Bxd4 43 cxd4 Kf6 44 Kg4 Kg7 45 f6+! Kxf6 46 b4 Kg6 47 Kf4 Kf6 48 h4 wins.
43 b4
This runs Black out of queenside pawn moves, while White can always effect a
breakthrough on the queenside with b2-b3 and c3-c4.
43 ... Bd2 44 b3 Bf4 45 Kg4 Bd2 46 Kf3 Bg5 47 Be5 Bh6 48 h4 Bc1 49 Ke2
f6 50 Bd4 Bf4 51 h5 Kf7 52 Be3!
Seizing control over the key h6-square. White’s h-pawn is the small child left alone in
the house by his parents, yet completely safe under the protection of the fiercely loyal
e3-watchdog. Black’s king is unable to pass as both the g6- and h6-squares are cut off.
52 ... Be5 53 Kd3!
White’s winning plan is to pry open the queenside, while Black’s king is tied down on
the other side, keeping the h-pawn from promoting.
53 ... Kg7 54 c4 dxc4+ 55 bxc4 bxc4+ 56 Kxc4 Kf7 57 Bd2!
White’s bishop protects b4, leaving his king to run around elsewhere, and also
prevents any ... Bc7 and ... a6-a5 ideas.
57 ... Bd6 58 Kd5 Bf8
Black’s best chance was 58 ... Be5!, since it sets up a drawing trap: 59 Kc6 Kg7 60
Kb6 Bd6! 61 Kxa6?? Bxb4! 62 Bxb4 Kh6 63 Be7 Kxh5 64 Bxf6 Kg4 and draws. Instead,
White wins by using his bishop to safeguard his b-pawn: 61 Ka5! Be7 62 Be3 Bd6 63 Bc5!
Bg3 64 Kxa6 Kh6 65 b5 Kxh5 66 b6 Kg5 67 Be7! Kxf5 68 Bd8! (intending Bc7) 68 ... Bf2
69 b7 Bg3 70 Kb6 (threatening Bc7 again) 70 ... Bf2+ 71 Kc6 Ba7 72 Bc7 and there is no
remedy to the coming Kb5-a6.
59 Kc6 Kg7 60 Kd7 Kg8 61 Ke6 Bg7 62 h6 Bf8
After 62 ... Bh8 63 Ke7 Kh7 64 Kf7, tentacles wrap around Black’s king and bishop,
choking off their air supply. Zugzwang.
63 Kxf6 1-0
Chapter Two
Sicilian Defence
I suggest a tiered system against the Sicilian where we start with 1 e4 c5 2 Nf3,
pretending we are going to enter the Open Sicilian, but then recant on move three:
a) On 2 ... d6 we give a bishop check on b5, entering the Moscow Variation.
b) On 2 ... Nc6 we play Bb5 again, entering the Rossolimo.
c) On 2 ... e6, 2 ... g6 or 2 ... a6, we switch to 3 c3, reaching targeted versions of the
c3 Sicilian.
Game 10
V.Ivanchuk-G.Kasparov
Linares 1991
1 e4 c5 2 Nf3 d6 3 Bb5+
Let’s go with the Moscow Variation, comrade.
3 ... Nd7
This is Black’s most combative line, planning either to gain a tempo with ... a7-a6 or
pick up the bishop pair if White trades on d7. Next game we look at 3 ... Bd7; while 3 ...
Nc6 transposes to a line of the Rossolimo (see the notes to Game 12).
4 d4
Question: Didn’t you say we would avoid Open Sicilian positions?
Answer: It’s similar but not the same. In an Open Sicilian White’s light-squared
bishop is rarely developed to b5. Secondly, we don’t intend to recapture on d4 with our
knight.
4 ... Nf6
Instead, 4 ... cxd4 5 Qxd4 will most likely transpose to the game (after 5 ... Nf6 6 00), though sometimes not: 5 ... e5 6 Qd3 h6 7 0-0 Ngf6 8 c4 Be7 9 Nc3 0-0 10 Bxd7
(chopping before Black has a chance to play ... Nc5) 10 ... Bxd7 11 b3 (planning to add
heat to Black’s backward d-pawn with Ba3) 11 ... Qa5 12 a4 Rfd8 13 Ba3 Qc7? 14 Rfd1?
(missing 14 Nxe5!, winning a pawn) 14 ... Bc6 15 Rac1 a6 and White achieved a pleasant
space advantage, coupled with pressure on d6 and a hole on d5, C.Lakdawala-K.Griffith,
San Diego (rapid) 2012.
5 0-0!
Offering a pawn to speed development.
Question: Can’t White try the disruptive 5 e5 - ?
Answer: It leads to no advantage after 5 ... cxd4! (now ... Qa5+ is an immediate
threat) 6 Qxd4 dxe5 7 Nxe5 a6 and White has nothing.
5 ... cxd4
Grabbing the e-pawn is suicidally dangerous: 5 ... Nxe4?! 6 Re1 Nf6 7 dxc5 dxc5 8
Ng5! e6 (not 8 ... h6? 9 Nxf7 Kxf7 10 Bc4+ Ke8 11 Nc3, when Black’s king is caught in the
middle, his kingside light squares are ripe for invasion, and White threatens ideas like Bf4
and Nb5 – if the normally greedy comp assesses this as winning for White, it’s a really
bad sign) 9 Nc3 Be7 10 Qe2 (also strong is 10 Rxe6!, since Black is unable to take the
rook: 10 ... fxe6? 11 Nxe6 Qa5 12 Qe2! gives White a decisive attack) 10 ... a6 (or 10 ...
0-0 11 Nxe6! fxe6 12 Qxe6+ Kh8 13 Qxe7 and White is now a pawn up with a huge lead
in development) 11 Nxf7! Kxf7 12 Qxe6+ Kf8 13 Bc4 Qe8 14 Bf4 Nb8 15 Qd6! Nc6 16
Rxe7! Qxe7 17 Re1 Ne8 (17 ... Qxd6 18 Bxd6+ Ne7 19 Rxe7 is crushing) 18 Qd1 Qf6 19
Nd5 Qg6 20 Nc7! Bg4 (20 ... Nxc7 21 Bd6+ forces mate) 21 Qd5! (threatening to take on
c5) 21 ... Rd8 22 Qxc5+ Nd6 23 Bxd6+ Rxd6 24 Qxd6+! Qxd6 25 Re8 mate, E.AlekseevI.Krush, Baku 2013. If this allegory fails to teach us that theft leads to punishment, then
nothing will.
6 Qxd4
In this way White conveniently protects his e-pawn.
6 ... a6
Note that 6 ... e5 7 Qd3 returns to my game with Griffith above.
7 Bxd7+
Otherwise White is going backwards, so we hand over the bishop pair to retain our
lead in development.
7 ... Bxd7 8 Bg5
8 ... h6
If Black opts for 8 ... e6 we send our queen’s knight forward with 9 Nbd2 Bc6 10 Nc4
b5 11 Nb6!? (preparing a piece sacrifice) 11 ... Rb8 12 Nd5 exd5 13 exd5 Bb7 14 Rfe1+
Kd7 15 a4! (principle: Create confrontation and open the game when leading in
development) 15 ... Be7?! (Black should enter damage control mode with 15 ... b4) 16
axb5 axb5 17 Qd3 Qc7 18 Nd4 Qc4 19 Qh3+?! (the comp shows that 19 Qf5+! Kd8 20
Rxe7! gives White a winning attack) 19 ... Kd8 20 Nf5 Re8 21 Nxg7 Rg8? (21 ... Ne4 was
forced) 22 Rxe7! Kxe7 23 Bxf6+ Kxf6 24 Qh6+ Ke5 25 Re1+ Kxd5 26 Rd1+ Qd4 27 Qg5+
Kc4 28 b3+ Kc3 29 Qg3+ 1-0 B.Bok-R.Wojtaszek, World Rapid Championship, Doha 2016.
9 Bxf6 gxf6
We aren’t worried about Black’s bishops, just as long as the position doesn’t open up
later.
10 c4
Ivanchuk goes for a clamp.
10 ... e6 11 Nc3 Rc8 12 Kh1 h5 13 a4
Suppressing ... b7-b5 ideas.
13 ... h4 14 h3
Allowing the black pawn to h3 would weaken the light squares around White’s king.
14 ... Be7 15 b4 a5
Kasparov induces a hole on c5, for which he gets surprisingly little value.
16 b5 Qc7 17 Nd2 Qc5 18 Qd3
Black’s biggest (future) problem is his king, which has no complete safe haven. So
Ivanchuk retains queens on the board.
18 ... Rg8 19 Rae1 Qg5
It soon becomes clear that Black’s “attack” is the fake facade of a movie set.
20 Rg1
We hate it when someone answers our question with a question. Ivanchuk easily
defends g2 and asks Kasparov: “Now what?” It turns out that Black has no useful plan.
20 ... Qf4 21 Ref1
Simply protecting f2, after which White can drive the black queen away with Ne2 and
push his own f-pawn.
21 ... b6
The desperate attempt to open the game with 21 ... d5?! (threatening ... Bd6) fails to
22 Ne2! Qd6 23 exd5 f5 24 Nd4! exd5 25 Nxf5, when the game has indeed opened but is
heavily favouring White, whose king is far more secure than Black’s.
22 Ne2 Qh6
Exercise (planning): White has a choice of two powerful plans. Find one of them.
Answer #1: Clearance. Sacrifice the c-pawn in order to make way for Nc4.
23 c5!
A pragmatist only places his trust in something if it functions the way it’s supposed to.
Now White’s initiative grows, while Black has trouble coming up with compensatory
counterplay.
Answer #2: The straightforward 23 f4! is powerful too, intending eventually to push
to the fifth rank. For example, 23 ... Rc5 24 Nb3 Rc8 25 f5! Rg5 26 Rf3 Qg7 27 Qd4 Rb8
28 Qf2 Qh7 29 Nf4! with tremendous pressure for White.
23 ... Rxc5?
Not the best, though every version of the recapture leads to problems for Black:
a) 23 ... bxc5? 24 Nc4 and d6 falls.
b) 23 ... dxc5 24 Nc4 Rb8 25 f4 f5 (or 25 ... Bc8 26 f5 Kf8 27 Nd6) 26 Rd1 Bc8 27 Ne5
fxe4 28 Qxe4 Kf8 29 Qc6 Kg7 30 Kh2, intending g2-g3 with a clear advantage for White.
24 Nc4 Kf8 25 Nxb6
The loss of the b6-pawn means that Black now has to be on high alert for White’s
attempts to promote his own b-pawn.
25 ... Be8 26 f4
Intending f4-f5, which Black can’t allow. The knights dominate the bishops.
26 ... f5 27 exf5 Rxf5 28 Rc1 Kg7
29 g4!
Just when Black might have hoped to attack, a dark force awakens and White
announces that he is the one who does so. The simple 29 Nc8 was very strong too.
29 ... Rc5
Not 29 ... hxg3?, which fatally opens lines to Black’s king: 30 Qxg3+ Kf6 31 Qc3+ e5
32 fxe5+ dxe5 33 Nd5+ Ke6 34 Qc8+ Bd7 35 Nc7+ Kf6 36 Qa6+ Be6 37 Nd5 mate.
30 Rxc5 dxc5 31 Nc8 Bf8
On the chessboard there is no collection of unemployment cheques. If our pieces don’t
work, we tend to lose. If 31 ... Bd8 32 g5 Qg6 33 Qc3+ Kh7 34 Nd6, Black can barely
move; while after 31 ... Kf8 32 Nxe7 Kxe7 33 Qe3, the c5-pawn falls and Black is
hopelessly busted.
Exercise: How can White force the win of material?
Answer: Trapped piece. Black’s e8-bishop can’t be protected and can’t move to a
safe square.
32 Qd8! Qg6 33 f5!
Keeping Black’s queen out of e4. White must exercise patience and lighten the
defensive load on the white king. This is not the moment for accumulation. The hasty 33
Qxe8?? allows 33 ... Qd3 34 Rg2 Qxh3+ 35 Kg1 Qe3+ 36 Kf1 c4 with serious counterplay
for Black.
33 ... Qh6
Often we accept a challenge out of defiance, rather than any certainty in our side of
the argument. Kasparov fumbles about for something to do, in a position where there is
nothing to do. If 33 ... Qf6 34 Qxe8 Qe5 35 Rg2 Qa1+ 36 Ng1, White’s king is secure and
he comes away with an extra piece.
34 g5!
Once again 34 Qxe8? allows Black fishing chances with 34 ... Qe3.
34 ... Qh5 35 Rg4!
Keeping Black’s queen sealed in. Ivanchuk pushes his play almost to another
dimension of possibility by shoving Kasparov’s pieces off the edge of the world.
35 ... exf5 36 Nf4 Qh8
Kasparov displays a macabre sense of humour in this hellscape position, where
playing on is a painful, pointless project, similar to the obese guy who enthusiastically
signs up to run a marathon. The worst thing Black could have imagined is just around the
corner as White forces mate in three moves.
37 Qf6+
Black’s king is quietly marched into oblivion.
37 ... Kh7 38 Rxh4+ 1-0
Summary: After 3 ... Nd7, don’t be afraid to hand Black both bishops in exchange for
a bind.
Game 11
Ma.Carlsen-V.Anand
Grand Slam Final, Sao Paulo/Bilbao 2012
1 e4 c5 2 Nf3 d6 3 Bb5+ Bd7
Opposing bishops is safer than Kasparov’s knight block from the previous game.
4 Bxd7+
White’s main move.
4 ... Qxd7
Question: Why would Black recapture with the queen, when using the
knight speeds his development?
Answer: This is a quantity versus quality argument. Black reasons that the knight’s
optimal posting is on c6, so he leaves it on b8. Obviously, 4 ... Nxd7 is possible too, when
5 0-0 Ngf6 6 Qe2 brings us to a crossroads.
Question: Why not defend the e4-pawn with the rook?
Answer: The idea is to post it on d1 instead. Now Black can either set up with ... e7e6 or fianchetto.
a) 6 ... e6 7 b3 (intending to open the Sicilian with d2-d4 after all, and reaching a
Maróczy Bind position where Black’s d6-pawn will be under fire from the white rooks on
the d-file) 7 ... Be7 8 Bb2 0-0 9 c4 a6 10 d4 cxd4 11 Nxd4 Re8 12 Nc3 Rc8 13 Rad1 and I
slightly prefer White, due to the potential pressure on d6, V.Anand-Ma.Carlsen, Mainz
(rapid) 2008.
b) 6 ... g6 7 c3 (against the fianchetto our plan is to build a central space advantage
with c2-c3 and d2-d4) 7 ... Bh6!? (this is the latest wrinkle; a trade of bishops will benefit
Black, who is more cramped) 8 d4 Bxc1 9 Rxc1 0-0 10 e5 Nh5 11 Nbd2 dxe5 12 dxe5 Qb6
13 Nc4 Qa6 14 Qe4 and White’s advanced e-pawn offers him a slight edge, F.CaruanaH.Nakamura, St. Louis (blitz) 2015.
5 c4
In this way White obtains a Maróczy Bind without the traditional bad light-squared
bishop. I think Carlsen’s choice is stronger than 5 0-0 Nc6 6 c3 Nf6 7 d4 Nxe4! (this is a
case where Black should grab the pawn – unlike in the notes to Game 10, where taking
on e4 was risky, here it is justified since Black’s defence is eased by the exchange of
light-squared bishops) 8 d5 Ne5 9 Re1 Nxf3+ 10 Qxf3 Nf6 11 c4 e5 12 dxe6 fxe6 13 Bg5
Be7 14 Nc3 with an approximately balanced game. Sure, White gets adequate
compensation for the sacrificed pawn, but Black’s resources are adequate too. The
database shows the score as being exactly 50% from this position.
5 ... Nf6 6 Nc3
6 ... g6
The fianchetto is safer than going for an ... e7-e6 set-up, where Black’s backward dpawn may later become a source of concern. For instance, after 6 ... Nc6 7 d4 cxd4 8
Nxd4 e6 9 0-0 Be7 10 Be3 0-0 11 Qe2 a6 12 Rfd1, White has a tiny yet enduring space
edge.
7 d4 cxd4 8 Nxd4 Bg7 9 f3
White reinforces the e4-pawn, while clearing the way for Be3 without worrying about
... Ng4.
9 ... Qc7 10 b3 Qa5 11 Bb2 Nc6 12 0-0 0-0
13 Nce2
White gets nothing from the simplifying 13 Nd5 Nxd5 14 exd5 Nxd4 15 Bxd4 Bxd4+ 16
Qxd4 Rfe8 17 Rfe1 b5.
13 ... Rfd8!
Planning an unlikely-looking ... d6-d5 freeing break, based on the vulnerability of
White’s d4-knight.
Question: How is the knight vulnerable? It’s defended three times already.
Answer: Surprisingly, in a critical line Black can attack it with four pieces.
14 Bc3
In a later game White opted to play 14 Kh1 first, when 14 ... Rac8 15 Bc3 Qc7 16 Qd2
b6 17 Rad1 a6 18 a4 reached a more typical Maróczy Bind position. After 18 ... Na5 19
Qb2 Qb7 20 Rfe1 Nh5 21 Nc2 Nc6 22 Bxg7 Nxg7 23 Nc3 Na7?! (23 ... e6 looks correct) 24
Nd5 b5?! 25 cxb5 axb5 26 a5, White achieved a strategically won game, S.TiviakovJ.Xiong, Montreal 2014.
14 ... Qb6 15 Kh1 d5!
Anand frees his position with this clever tactic.
16 Nxc6
This swap helps Black’s structure, but there was little choice. After 16 exd5?! Nxd5! 17
cxd5 Rxd5 (as promised, four black pieces now attack the pinned knight) 18 Qe1 Nxd4 19
Bxd4 Bxd4 20 Nxd4 Rxd4 21 Qxe7 Rad8, Black has a definite edge with his active rooks.
16 ... bxc6 17 Qe1!
Cheapo alert. Carlsen moves his queen off the d-file and threatens Ba5, skewering
Black’s queen and d8-rook.
17 ... Rdc8!?
This move seems a bit artificial, whereas after 17 ... a5! 18 e5 Ne8 19 cxd5 Rxd5 20
Nf4 Rdd8, Black looks just fine.
18 e5 Ne8 19 e6!
In the absence of logic, intuition rises to the surface.
19 ... fxe6!?
I think this is the start of Black’s difficulties. For the pawn White gets endless pressure
down the e-file. Black might be better off playing 19 ... f6! 20 Ba5 Qe3 21 cxd5 cxd5 22
Rd1 Qxe6 23 Nc3 Qxe1 24 Rfxe1 e5 25 Nxd5 Rc2 26 a4 with equal chances in the ending.
20 Nf4 Bxc3 21 Qxc3 d4 22 Qd2 c5 23 Rae1 Ng7 24 g4!
Carlsen’s mind has lifted present day chess to a completely new level of ability.
White’s initiative, much like Sleeping Beauty, awaits revival from its dormant state. With
this powerful strategic idea White cuts off ... Nf5, while creating the mating threat of
Nh3!, Qh6 and Ng5 etc.
24 ... Rc6?!
Here Black should prefer 24 ... Qd6 25 Nh3! e5 26 Qg5 (or 26 Qh6 Ne6) 26 ... a5 27
Qxe5 Re8 28 Nf2 a4 with perhaps enough counterplay.
25 Nh3! Ne8?!
Anand, completely unprepared for Carlsen’s attack from nowhere, begins to lose the
ability to distinguish up from down. The only way to continue was 25 ... Qd8 26 Qh6 Kh8
27 Re4 Qg8 28 Nf4! (threatening a smothered mate on g6) 28 ... e5 29 Rxe5 Qf7 30 Nd3,
when Black has an uncomfortable but still playable position.
26 Qh6 Nf6 27 Ng5 d3?!
Anand decides to speed up the process, since he fears doing nothing in response to
Carlsen’s kingside build-up. Are Black’s formally dismal prospects altered by the push of
this passed pawn? The answer is no; whereas after 27 ... Qa6 28 Re5! Qc8 29 Rfe1 Qf8
30 Qxf8+ Rxf8 31 Nxe6 Rfc8 32 Nf4, White’s congratulatory celebration is postponed, but
Black has little hope of defending this ending.
Exercise (planning): Find one powerful move and Black is busted.
Answer: Transfer the rook to e5, after which White threatens Nxh7!.
28 Re5! Kh8
The only move. Personal preferences recede into the background in the midst of an
emergency. 28 ... Rd8? is duly met by 29 Nxh7! Nxh7 30 Qxg6+ Kf8 31 Rh5 e5 32 Qxh7
d2 33 Rd1 Ke8 34 Rxe5 and Black can resign.
29 Rd1
Not now 29 Nxh7? Nxh7 30 Qxg6 Rg8.
29 ... Qa6 30 a4 1-0
Black’s structure juts out like broken teeth on the losing end of a bar fight. Anand will
soon be down a pawn and helplessly tied up. For instance, 30 ... Qc8 31 Rxd3 Qg8 32 Kg2
Re8 33 Rde3 Rd8 34 Rxe6 Rd2+ 35 Re2 Rxe6 36 Rxd2 Rd6 37 Re2 e6 38 Qh4 Qe8 39 Qg3
is hopeless, so Black resigned.
Summary: When we play the Moscow Variation, we need to put aside a purer-thanthe-driven-snow philosophy, where White must extract a “+=“ edge every time. Anand’s
opening play was actually a model of how Black equalizes with 3 ... Bd7. Our revised goal
should be to reach a position which may be easier to play for our side.
Game 12
F.Caruana-T.Radjabov
Gashimov Memorial, Shamkir 2016
1 e4 c5 2 Nf3 Nc6 3 Bb5
The Rossolimo Variation is sort of the Ruy Lopez of the Sicilian. When I was a kid, half
a century ago, the Rossolimo was considered a quirky sideline. Today, after 1 e4 c5 2 Nf3
Nc6, I see 3 Bb5 at least as often as I do 3 d4. So the line which was previously played to
dodge theory has today morphed into the mainstream.
3 ... g6
Black’s most common response is to fianchetto. We’ll look at the main alternative 3 ...
e6 in Game 14.
Another option is 3 ... d6, which can arise from both Moscow and Rossolimo move
orders, depending on whether Black plays ... Nc6 or ... d7-d6 first. White can just castle
here, but I’m advocating 4 Bxc6+, as it’s most consistent with our other Rossolimo lines
where we chop on c6. After 4 ... bxc6 (I was utterly stunned to find two games in the
database where Black opted for the controversial idea 4 ... Bd7??, which gifts White a
piece for absolutely nothing in return; the ChessBase annotation pallet’s measly two
question marks are not nearly enough, and I strongly urge the two players who chose 4
... Bd7????? to abandon chess in favour of noughts and crosses) 5 e5!? (this idea has
recently gained in popularity; White tosses in e4-e5 at once to pre-empt Black’s own ...
e7-e5 push; 5 0-0 is the most common move)
5 ... dxe5 (5 ... f6 6 exd6 exd6 7 0-0 gives White a dangerous lead in development;
while after 5 ... d5, White sets up with 6 h3, followed by d2-d3 and c2-c4, leaving Black
with a rigid queenside structure) 6 Nxe5 Qd5 7 Nf3 Qe4+ 8 Kf1, the comps call it even,
while I favour White’s structural superiority over Black’s bishop pair. For example, 8 ... Nf6
9 d3 Qf5 10 Nbd2 g6 11 b3! (White will counter Black’s fianchetto with one of his own) 11
... Bg7 12 Bb2 0-0 13 Qe2 Ba6 was A.Pavlidis-V.Kotronias, Thessaloniki 2017, and here I
much prefer White after 14 Re1 Rfe8 15 Qe5, either forcing an ending or winning the c5pawn.
4 Bxc6
Question: Is it wise to trade on c6 without provocation?
Answer: By doing so White inflicts some structural damage on Black in return for
handing over the bishop pair. It is a popular strategy in the Rossolimo and my personal
preference here over either 4 0-0 or 4 c3.
4 ... dxc6
This is Black’s most common recapture by about a 2:1 ratio.
Question: Isn’t it a violation of principle to capture away from the centre?
Answer: It kind of is, but I would remind you that Black does this routinely in the
normal Exchange Ruy Lopez, in order to free the c8-bishop. Next game we look at 4 ...
bxc6.
5 d3
White can play 5 h3 first to prevent ... Bg4, but I’m not all that panic-stricken by that
move. Then 5 ... Bg7 6 d3 will transpose below.
5 ... Bg7
After 5 ... Bg4 6 Nbd2 Bg7 7 h3 Bxf3 8 Nxf3, Black has freed his position, at the cost of
returning the key asset of the bishop pair. I prefer White here, since we keep our
structural edge and give up nothing for it.
6 h3
Question: If we aren’t afraid of ... Bg4, when why waste time on h2-h3 - ?
Answer: It is more to cover White against annoying ... Ng4 ideas. For example, 6 Nc3
Nf6 7 Be3 b6 8 Qd2 Ng4 (this is irritating for our side) 9 Bg5 f6 10 Bh4 Nh6, when White’s
bishop is slightly misplaced on h4 and Black has equalized.
6 ... Nf6 7 Nc3
I’m not a big fan of routinely castling kingside in the Rossolimo since it often doesn’t
seem to apply enough pressure on Black’s position. Here after 7 0-0 Nd7 8 Nc3 e5 9 Be3
Qe7 10 Qd2 Nf8! 11 Bh6 Ne6 12 Bxg7 Nxg7 13 Ne2 f6 14 Nh2 g5!, White’s f2-f4 break has
been suppressed and chances are level. V.Anand-V.Ivanchuk, Prague (rapid) 2002.
7 ... 0-0 8 Bf4!?
This is a slightly uncommon offshoot. White fights for control over e5. The main line
runs 8 Be3 b6 9 Qd2 e5 (Black can’t do this with our bishop on f4) 10 Bh6 Qd6 11 0-0-0
with a sharp opposite wing attack position and mutual chances.
8 ... b6 9 Qd2
Preparing to go long. After 9 0-0 Ne8 10 Qd2 f6! 11 e5 fxe5 12 Bxe5 Rxf3! 13 Bxg7
Nxg7 14 gxf3 Qf8 15 Kh2, a draw was agreed in T.Koskela-P.Walczak, correspondence
2011, since 15 ... Bxh3! 16 Kxh3 Qxf3+ leads to perpetual check.
9 ... Re8 10 0-0-0!
When two opposing views of reality eventually merge, the predictable result will be an
explosion. Okay everyone, brace yourself: it’s time to “Cry ‘Havoc!’, and let slip the dogs
of war.”
Question: You said this book was for the 1 e4 strategist! So why castle long?
Answer: Nobody’s perfect! Sorry to renege on my earlier agreement, but here it’s
justified. This just isn’t one of those positions to be handled as delicately as some teasipping character from a Jane Austen novel. I don’t see a hope of a White edge after the
milquetoast kingside castling: for example, after 10 0-0 Nd7 (intending ... e7-e5, followed
by ... Nf8-e6) 11 e5 Nf8 (anyway) 12 Rfe1 Ne6 13 Bh6 Nd4 14 Nxd4 cxd4 15 Bxg7 Kxg7
16 Ne4 Be6, Black has at least equality.
10 ... a5 11 Ne5
White attacks c6, prevents ... e7-e5 ideas, while preparing a future Bh6 followed by
f2-f4.
11 ... b5!
Time is more important than material in opposing wing attacks.
12 Qe3
Not yet 12 Bh6?, as that hangs a pawn to the discovered attack 12 ... Nxe4!. Grabbing
the c6-pawn is also really risky since it gives up two precious tempi: after 12 Nxc6?! Qb6
13 Ne5 a4, I prefer Black’s accelerated attacking chances over White’s extra pawn.
12 ... Qb6
Defending the c5-pawn, which was certainly worth taking.
13 Bh6 Bh8
Radjabov naturally retains his dark-squared bishop, which is important both to his
defence and dreams of delivering a future blow on b2.
14 f4 a4 15 Rhf1
Threatening f4-f5 by the most direct route, which Black hurries to prevent.
15 ... e6?!
This move unnecessarily weakens the dark squares around his king. Black is better off
uncovering the dark-squared bishop with 15 ... Nd7, when 16 Nxd7 Bxd7 17 f5? a3! gives
Black a very strong attack, while 17 e5 can be met by 17 ... f5, keeping White’s knight out
of e4.
16 g4 a3?!
The scale of Black’s coming difficulties outweighs his good intentions to attack. He
should prefer 16 ... b4, when 17 Ne2 Ba6 18 Kb1 b3 19 cxb3 axb3 20 a3 still looks better
for White, but not as much as in the game.
Exercise (planning): What is White’s strongest continuation?
Answer: Pin.
17 b4!
This is a brilliant strategic decision. We don’t expect the side who is being attacked to
push pawns rashly in front of their king, yet Caruana does just that, banking on the power
of the annoying pin on the c5-pawn.
17 ... Nd7 18 Nxd7 Bxd7 19 e5!
Blunting the effect of the h8-bishop, while generating the strategic threat of Ne4.
19 ... f5
The knight must be kept out. 19 ... f6? is too slow in view of 20 Ne4 fxe5? 21 fxe5
Bxe5? 22 Qf2 and Black gets mated.
20 Ne2 Bg7
Otherwise the bishop languishes out of play, but swapping it off strips the black king
of his lone defender.
21 Bxg7 Kxg7 22 h4!
Every risky decision must be judged by its present benefits versus long-term negative
effects. Caruana decides to go for mate. A player less hard line (e.g. your writer) would
have bailed out into a winning ending with the gentler, safer, and more gutless 22
Qxc5!?.
22 ... fxg4 23 h5! gxh5 24 Ng3
Black’s king is completely exposed. Sometimes we don’t see a forcing continuation
and only appreciate that one ought to exist. We can always ask an engine to find it when
we get home. Here the comp pops out with 24 f5! exf5 25 Rh1 Kh8 26 Rxh5 Re7 27 Nf4
Rg8 28 e6 and Black can resign.
24 ... Kh8 25 Nxh5 Re7 26 Nf6 Be8
The prospect of this bishop coming to life via g6 forces White into taking decisive
action.
27 f5! exf5 28 Rxf5 Qc7 29 Rg5
Threatening mate on g8, while 29 ... Bg6? loses instantly to 30 Rxg6! fxg6 31 Rh1+
etc.
29 ... Rg7 30 Rh1!
Threatening Rxh7+ and then Rg8 mate.
30 ... Bg6 31 Rxg4 Qf7 32 Kb1!?
White takes time out to cover the a2-pawn. Objectively, taking the c5-pawn was
stronger; i.e. 32 Qxc5! Qxa2 33 Qxc6 Qb2+ 34 Kd2 or 32 bxc5! Qxa2 33 Qh6!, when there
is no remedy to the coming Rxg6 in either case.
32 ... cxb4 33 Qd4 Bf5?
This is merely adding honey to the hemlock. Just because it’s sweet, doesn’t mean the
poison won’t take effect. The engine identifies 33 ... Qa7 34 Qxb4 Bf5 as the best way to
prolong the game.
Exercise (combination alert): Black’s last move allows White a nice finish.
What did Caruana play?
Answer: Line opening/deflection/interference.
34 e6! Rxg4
Taking the pawn is no better: 34 ... Bxe6 is met by 35 Rxh7+!, while 34 ... Qxe6 runs
into 35 Nxh7!.
35 exf7!
Interference. This is part two of White’s combination.
35 ... Rxd4 36 Ne8! 1-0
The knight interferes with the a8-rook’s ability to cover the f7-pawn’s promotion
square and prevents the black king from approaching from g7 as well.
Game 13
I.Nepomniachtchi-A.Moiseenko
Rapid World Cup, Riga 2013
1 e4 c5 2 Nf3 Nc6 3 Bb5 g6 4 0-0
I prefer 4 Bxc6 first, waiting to see how Black recaptures before deciding whether to
castle or not. Then 4 ... bxc6 5 0-0 (obviously we’re not going queenside here) 5 ... Bg7
would transpose below.
4 ... Bg7 5 Bxc6 bxc6
By capturing towards the centre, Black follows principle at the cost of hampering his
queenside development slightly.
6 Re1
White supports the e-pawn, both where it is and if it should advance further to e5. In
particular, ... d7-d6 can now be met by e4-e5.
6 ... Nh6
Question: Why would Black decentralize the knight?
Answer: This is actually the main line. Black’s development scheme runs ... f7-f6, ...
Nf7 and ... d7-d6 with a highly flexible position in the centre. The idea is to seize control
over e5 without actually playing ... e7-e5. Instead:
a) 6 ... Nf6 gives the position an Alekhine’s Defence flavour: 7 e5 Nd5 8 c4 Nc7 9 d4
cxd4 10 Qxd4 0-0 11 Qh4 f6! (11 ... d6?! 12 Bh6 is considered favourable for White; e.g.
12 ... Ne6 13 Nc3 f6 14 Bxg7 Kxg7 15 exf6+ Rxf6, G.Kasparov-V.Salov, Dortmund 1992,
and here 16 Re3 puts Black in serious trouble) 12 Nc3 Ne6 13 Ne4 fxe5 14 Nfg5 Nxg5 15
Bxg5 Qb6 (15 ... Rf7? is met by 16 Nd6!) 16 Rad1 Qxb2 17 Rd2! Qb6 18 c5! and White
exerts some pressure on the central dark squares, A.Naiditsch-E.Sutovsky, European Cup,
Bilbao 2014.
b) 6 ... e5 is shockingly met by 7 b4!, which turns out to be a promising gambit: 7 ...
cxb4 8 a3 c5 (White also stands a shade better after 8 ... b3 9 cxb3 Ne7 10 Bb2,
intending d2-d4) 9 axb4 cxb4 10 d4 exd4 11 Bb2 d6 12 Nxd4 (threatening Nc6 and Bxg7)
12 ... Qd7?! (12 ... Qb6 is necessary) 13 Nd2 Bb7 14 Nc4 Nh6 15 Nf5! Bxb2 16 Ncxd6+
Kf8 17 Nxh6, when the massive development lead and attacking prospects give White a
winning position, R.J.Fischer-B.Spassky, St Stefan/Belgrade (11th matchgame) 1992.
7 c3
Making ready to build up a powerful centre with d2-d4 next.
7 ... 0-0 8 d4 cxd4 9 cxd4
9 ... f6!
I think this is Black’s best set-up; 9 ... d6 10 h3 f6 11 Nc3 Nf7 is similar; whereas 9 ...
d5 10 e5 f6 11 h3! Nf7 12 e6! (this pawn is more a strength than a potential weakness)
12 ... Nd6 13 Nc3 f5 14 Bf4 Ne4 15 Ne5 gave White a clear advantage in R.BerzinshT.Stremavicius, Liepaja 2017.
10 Nc3 Nf7 11 Be3
The alternative is to fianchetto the bishop: 11 b3 d6 12 Bb2 Bd7 13 Rc1 Qb6 14 Rc2
Qb7 15 Nd2 f5 16 e5 c5! 17 e6 cxd4 was Y.Yakovich-S.Iskusnyh, Maikop 1998, where I
prefer White’s piece to Black’s central pawns after 18 exf7+ Rxf7 19 Ncb1.
11 ... d6 12 h3
It’s a wise precaution to take ... Bg4 out of the equation.
12 ... Qa5 13 Qd2 Bd7
Maybe now is the best moment to break with 13 ... f5 14 exf5 Bxf5 15 Rac1, when I
only slightly prefer White.
14 Rac1 Rfe8 15 b3 Rad8 16 Qb2
Sliding out of the gaze of Black’s queen on a5.
16 ... f5
Black finally decides to push a pawn in the centre.
17 Bd2 fxe4 18 Nxe4 Qd5 19 Qa3! Ra8
You have to have a humble personality to make such a move, yet I think it’s the best
one. If Black bites with 19 ... Bxd4?! 20 Nxd4 Qxd4 21 Ba5 Ra8 22 Bc3 Qd5 23 Rcd1 Qh5
24 Qa4, White gets too much play on the dark squares and Black can barely move.
20 Qa6 Nd8 21 Nc3 Qf5 22 Re4 Ne6 23 Rce1 d5 24 Re5!?
Which is the more scary prospect: destitution or danger to one’s king? This is an
example of a purely intuitive strategic exchange sacrifice for enhanced power on a single
colour complex. The more materialistic comp prefers 24 Rg4 Bf6 25 Be3 with a nominal
edge for White, but no obvious plan.
24 ... Bxe5 25 Rxe5 Qf6 26 Qe2 Rf8 27 Bh6 Rf7
I prefer White’s game after this move, which seeks to hang on to all the material.
Black should perhaps try 27 ... Nf4 28 Bxf4 Qxf4 29 Re3! (not 29 Rxe7? Rae8 with
advantage) 29 ... Bf5 30 Na4, when White retains full dark square compensation for the
exchange but doesn’t stand any better.
28 Qe3 Ng7 29 Bg5 Qd6 30 Ne2?!
It looks more natural to head for the hole on c5 via 30 Na4!, but it seems
Nepomniachtchi is uninterested in the queenside.
30 ... Re8
Defending the e7-pawn. Black can also let it go with 30 ... Raf8!, since he stands
better after 31 Bxe7 Rxe7 32 Rxe7 Nf5 33 Rxd7 Qxd7.
31 Bf4 Qa3! 32 Qd2 Ref8
Returning the exchange with 32 ... Ne6!? 33 Bg3 Rxf3! 34 gxf3 Ng7 is possible.
33 Kh2?!
I’m not sure what this move was really for. 33 Bh6 looks roughly equal.
33 ... Nh5?!
Presumably hoping either to remove the white bishop or else return the exchange
with ... Rxf3 again. It looks better to play on the queenside with 33 ... a5!, when Black
has decent chances of an edge.
34 Rxh5!?
There is no problem the inventive human mind is unable to solve. For example, I
eliminated my double chin with the brilliant solution of growing a beard, which is so much
more utilitarian than eating less. In this case White asked himself the question: “How do
I revive my initiative?” The answer is a second exchange sacrifice. Here we see the
confluence of opposing philosophies: attack versus extra material, the stronger of which
will absorb the other. Nepomniachtchi goes all in to open up Black’s king.
Question: Isn’t this an excess of zeal? Usually when we choose, it’s a case of
one or the other, but not both!
Answer: No, this isn’t some kind of Natalie Portman Black Swan event. The sacrifice
is completely sound and it’s certainly more energetic than putting the bishop on h6 again.
It isn’t that remarkable to give up one exchange for strategic gains. Sacrificing two
exchanges, on the other hand, is another story. I suppose that when we disobey a single
prohibition, we are tempted to toss all of them aside. Shockingly, Komodo assesses this
at “0.00”, despite the fact that Black is effectively a rook up!
34 ... gxh5 35 Be5 Bf5 36 Nh4 Bg6 37 Qg5 Rf6
Black offers one exchange back.
38 f4!
No, thanks!
38 ... Qxa2
You have to have a high degree of confidence to play the way Nepom did in this
game. He sacs two exchanges and allows his queenside pawns to fall, all in the holy
name of attack. But whether Moiseenko should have taken the a-pawn is another matter.
The comp suggests 38 ... R8f7 39 Ng3 Rg7 40 Nxh5 Bxh5 41 Qxh5 Qc1! and sticks with its
“0.00” assessment. When we gorge ourselves on material while our king suffers, we feel
simultaneously sated and nauseated as if having just singlehandedly eaten an eight-piece
bucket of Kentucky Fried Chicken.
39 Ng3
Suddenly there are five attackers hovering over Black’s king and I prefer White now.
39 ... Qd2?!
It wasn’t too late for defensive sacrifices to be effective: 39 ... Kf7 40 f5 Qc2 41 Bxf6
exf6 42 fxg6+ hxg6 43 Qf4 Rc8 is still “0.00” according to the engine.
40 Nxh5 a5?
This is the dysfunction of an already pre-existing condition. Black had to try 40 ... Re6
41 Qg4 Rxe5 42 dxe5 Kf7, but he is in trouble anyway. If Black hands back all his material
now, what compensates him for his sickly king?
41 Nxf6+
Apparently 41 Qg4! was even stronger; e.g. 41 ... Qc2 42 Bxf6 Rxf6 43 Nxf6+ exf6 44
f5 with an extra piece and a decisive attack for White.
41 ... exf6 42 Bxf6 Rxf6
No choice. Black must return all his extra material and still has a weak king.
43 Qxf6 Be4 44 Qg5+ Kf7 45 Nf5!
The queen ending is won for White due to his dangerous passed f-pawn.
45 ... Bxf5 46 Qxf5+ Kg7 47 Qe5+ Kf7 48 f5 Qf2 49 Qe6+ Kf8 50 Qh6+!
In this way White covers the enemy check on f4, while preparing to advance his fpawn again.
50 ... Kg8 51 f6 Kf7 52 Qg7+ Ke6 53 Qg8+ Kd7
He can’t take the f-pawn because 53 ... Kxf6?? hangs the queen to 54 Qf8+.
54 Qxh7+ Kc8 55 Qh6
Once again covering f4.
55 ... c5 56 Qf8+ Kb7 57 Qe7+ Ka6 58 Qd6+ 1-0
Moiseenko has had enough. More black pawns are going to fall with check, after which
White can win as he pleases.
Summary: We meet 5 ... bxc6 with the plan Re1, c2-c3 and d2-d4, where our central
space compensates for Black’s bishop pair.
Game 14
A.Motylev-A.Tukhaev
Russian Cup, Khanty-Mansiysk 2015
1 e4 c5 2 Nf3 Nc6 3 Bb5 e6
With this move Black signals that he isn’t afraid of Bxc6. If White doesn’t take, then
Black follows with ... Nge7 and ... a7-a6, gaining time on the bishop. If White does take
(which I advocate in this book) then Black tends to develop with the convoluted ... Nge7,
... Ng6 and ... f7-f6, retaining maximum flexibility in the centre.
4 Bxc6
To run a successful business, we must stock the shelves with not only what the
customer wants, but also what the customer needs. So let’s keep it simple and be
consistent with our other Rossolimo lines and trade immediately on c6.
4 ... bxc6
Question: Is there anything wrong with 4 ... dxc6 - ?
Answer: Capturing away from the centre doesn’t make much sense here, since
Black’s light-squared bishop is already obstructed by the e6-pawn. It’s far more logical to
capture with the b-pawn, towards the centre.
5 d3
Having given away our light-squared bishop, we sensibly switch our central pawns to
the opposite colour of our remaining bishop.
5 ... Ne7
The usual move. Advancing in the centre with 5 ... d5 looks natural, but then Black’s
pawns risk becoming rigid. For example, 6 0-0 Nf6 (of course we don’t object to an ending
after 6 ... dxe4 7 dxe4 Qxd1 8 Rxd1, since Black’s queenside pawns are a wreck) 7 Nc3
Be7 8 Re1 0-0 9 b3 Ba6 (hoping to eliminate his doubled pawns and open the game for
the bishop pair with ... c5-c4) 10 Bb2, as in Hoang Thong Tu-Anh Dung Nguyen,
Vietnamese Championship, Dalat City 2005, has a kind of reversed Nimzo-Indian feel to it
and I slightly prefer White. If Black rushes with 10 ... c4?! then 11 e5 Nd7 12 dxc4 dxc4
13 Ne4 leaves the d6-square weak and White holds a clear structural advantage.
6 Qe2
Question: Why not castle?
Answer: Castling is played as well. I think Motylev’s move is more accurate, since it
keeps queenside castling options open. Remember, too, that Black’s unravelling plan
involves ... Ng6. By leaving the rook on h1 we can meet this with h2-h4, as we will indeed
see in the game.
6 ... Ng6
The consistent and most popular move – though, perhaps in view of White’s reply,
some players opt to defer ... Ng6 at this point. The drawback is that White might then
throw in Nh4. For example:
a) 6 ... Qc7 7 Nh4 Ng6 (or 7 ... h6 8 g3 g5 9 Ng2 e5 10 h4 with good play, P.JaraczA.Fedorov, European Championship, Warsaw 2005 ) 8 Nxg6 hxg6 9 e5 c4 10 dxc4 Rh5 11
Bf4 Rb8 12 b3 and Black does not have enough for the pawn, D.Svetushkin-J.Antoli Royo,
Roquetas de Mar 2015.
b) 6 ... f6 7 Nh4 g6 (not now 7 ... Ng6? 8 Qh5) 8 f4 Bg7 9 0-0 0-0 10 c4 d6 11 Nc3 f5
12 Nf3 (12 e5!? is also tempting) 12 ... fxe4 13 dxe4 Ba6 14 e5 Nf5 15 Rd1 and White
looks to have the better chances, L.Aronian-H.Nakamura, St. Louis (blitz) 2014.
7 h4!
This disruptive idea is annoying for Black.
7 ... h5
Allowing the white pawn to advance with 7 ... f6 8 h5 Ne5? 9 Nxe5 fxe5 10 Qg4 leads
to a difficult position for Black, since 10 ... Qf6 is met by 11 Rh3!, intending to slide the
rook to f3.
The problem with the text move is that kingside castling is now probably out of the
question, and if this is the case, where does Black put his king? The queenside is
damaged, so the centre is maybe the best option.
8 e5
We do this before Black plays ... e6-e5.
8 ... f6
Logically challenging our cramping e5-pawn. After 8 ... Be7 9 Qe4, Black is unable to
play ... f7-f6, while ... d7-d6 is obviously met by e5xd6.
9 Nbd2!?
White more often inserts 9 Qe4 Kf7, when 10 Nbd2 d5 11 exd6 Qxd6 leads to almost
the same position, if not quite.
9 ... d6
Elimination of the cramping e5-pawn is a priority for Black. Instead, 9 ... Nxe5?! 10
Nxe5 fxe5 11 Qxe5 Qf6 12 Qc7 leaves Black’s position full of dark square holes,
N.Kabanov-S.Arkhipov, Russian Team Championship 2001; while 9 ... Qc7 10 Nc4 Ba6 11
Qe4 Kf7 12 Bf4! Bxc4 13 dxc4 Nxf4 14 Qxf4 d5, R.Leitao-M.Gongora Reyes, Santa Clara
2003, and now 15 Rh3 is a favourable French Defence-type position for White.
10 exd6
Saddling Black with doubled/isolated c-pawns and a slightly weak a-pawn, as well as
a hole on c4.
10 ... Qxd6
10 ... Bxd6 11 Nc4 Bc7 12 Be3 Qd5 13 Nfd2! is good for White.
11 Ne4
Utilizing the fact that the e4-square is free. I would still have put the knight on c4
myself: 11 Nc4 Qd5 12 Ne3 Qd8 13 Nd2 e5 14 g3 Be6 15 b3 and I prefer White’s structure
over Black’s bishop pair and central space.
11 ... Qd5 12 Nc3 Qd8 13 Be3 Rb8 14 0-0-0
And this is why White didn’t castle kingside early.
14 ... c4?!
We all submit ourselves to risk to gain what we want out of life. In this case, risk
outruns the potential for reward. This move is based on the philosophy: good things come
to those who don’t wait. Black sacrifices a pawn, hoping to activate his dark-squared
bishop and start an attack on the enemy king, but he fails to generate the desired
threats.
Safer and better is 14 ... Qb6 15 b3 Qa5 16 Bd2 Kf7 17 Kb1 e5, though I still prefer
White’s structure over any attacking chances Black may have.
15 dxc4
Declining the pawn and going for board position is also worth a thought. After 15
Nd4!? Qb6 16 Nb3 cxd3 17 Qxd3 Ne5 18 Qe2 c5 19 Ne4 Ba6 20 Qd2, the c5-pawn is weak
and I think Black’s king is in greater danger than White’s.
15 ... Qa5
Worrying White with ideas like ... Bb4 or ... Ba3.
16 Qd3
Here 16 c5!? Qb4 17 Qd3! favours White too, since Black can’t take the b2-pawn: 17
... Qxb2+?? 18 Kd2 wins with threats of Rb1 and Qxg6+.
16 ... Kf7
Covering the loose knight.
17 Kb1 Be7 18 Ne4 e5
White is happy to swap rooks after 18 ... Rd8 19 Qe2.
19 Nfd2!
The knight transfers to b3, where it keeps White’s king safe on the b-file and seizes
control over c5.
19 ... Rd8 20 Nb3 Qc7
We see incontrovertible evidence of Black’s decline and it becomes clear his attack is
no charging grizzly bear, impossible to stop once it picks up speed. In fact he no longer
has any compensation for the pawn.
21 Qe2 Bg4 22 f3 Bf5 23 Nec5 Rxd1+ 24 Rxd1 Rd8
It sends mixed messages to sacrifice a pawn and then begin to swap pieces, rather
like the guy who sports a tattoo of a nude woman on his bicep with the word “Mother”
next to it.
25 Rxd8
Every trade helps White, especially as Black’s attacking chances fall to zero with the
heavy artillery off the board.
25 ... Qxd8 26 g3
Simply defending the h-pawn. The comp suggests 26 g4! Bc8 27 gxh5 Nxh4 28 Bf2 Nf5
29 Nd3, threatening a7 while contemplating f2-f4.
26 ... Nf8 27 Qd2
Following the principle: Swaps favour the material-up side, yet here we may see an
exception to the rule. The ending is not so easy for White to convert, due to Black’s
coming counterplay based on ... g7-g5. White might have been better off retaining
queens and playing 27 Ne4 a6 28 Kc1 Ne6 29 a3 Qd7 30 c5.
27 ... Qxd2 28 Nxd2
Normally, when I get a queen swap when up a pawn, my joy is that of a starving
chipmunk who happens to find a discarded box of chocolate-covered peanuts in the park.
White’s joy gets a bit dampened by Black’s next move.
28 ... g5!?
Now White has a dilemma:
a) If he exchanges on g5, Black will be able to create an outside passed pawn with ...
h5-h4.
b) If White refuses to capture, then Black will exchange on h4 himself, leaving White
with a weak h-pawn.
Exercise (critical decision): In this case one plan is clearly superior.
Which one would you choose?
29 Nce4?!
In this case the safer of the two lines is the inferior one. Not capturing gives Black a
lot of counterplay against White’s soon-to-be chronically weak h-pawn.
Answer: Plan A is correct: 29 hxg5! fxg5 and only then 30 Nce4; for example, 30 ...
h4 31 Bxa7 c5 32 gxh4 gxh4 33 Bxc5 Bxc5 34 Nxc5 Ne6 35 Nxe6 Bxe6 36 Kc1 h3 37 Nf1
Bxc4 38 Nh2 Kf6 39 b3 Be6 40 Kd2 Kg5 41 Ke3 Kh4 42 Kf2, when Black’s king is shut out
and White’s three connected queenside passers will win.
29 ... gxh4 30 gxh4 Ng6 31 Ng3 Nxh4 32 Nxh5
White has managed to keep his extra pawn, at the cost of now having to nurse a
chronically weak f3-pawn. Black should hold the game at this point.
32 ... a6 33 Ng3 Bh3 34 Ne2 f5 35 Ng1 Bg2 36 Kc1 f4?!
This seems overambitious. I don’t think Black would lose after 36 ... e4!.
37 Bf2 Nf5 38 Kd1 Ne3+?
Here 38 ... Ke6 resists better.
39 Bxe3 fxe3 40 Ne4 Bf1
Preventing Ke2 and Kxe3, but it’s no more than a band-aid for a serious wound.
41 Ne2 Bg2 42 Ng1 Bf1 43 Ne2?
Repeating to gain time on the increment is logical, but White doesn’t want to allow a
threefold repetition. He should play 43 b3!, intending 43 ... Bh4 46 Nc5 Bf2 47 Ne2 Bg2
48 Nxa6 Bxf3 49 b4 with good winning chances. Both black e-pawns are blockaded,
whereas White’s queenside pawns are free to move forward.
43 ... Bh4?
He should have gone for the repetition. After 43 ... Bg2 again, White has nothing
better than to allow 44 Ng1 Bf1 with a draw.
44 N2g3! e2+
Or 44 ... Bxc4 45 Nd6+ Ke6 46 Nxc4 Bxg3 47 Ke2, when the e3-pawn falls and White
will win the game.
45 Kd2 a5 46 Nxe2 1-0
White’s two extra pawns are decisive.
Summary: On 3 ... e6 we take the knight on c6, and meet Black’s ... Ng6 with the
disruptive h2-h4!.
Game 15
C.Lakdawala-D.Aldama
San Diego (rapid) 2012
1 e4!?
I don’t speak fluent 1 e4, but I get by. In my youth I dallied with the evil 1 e4!?
seductress who promised me so much, yet all she brought me was unending pain, since
I’m a pure strategist whose level drops by two in unclear positions like the Najdorf or
Dragon Sicilians. The problem is I’m still in love with her, despite her terrible flaws. So my
solution today is to play 1 e4 with a signed prenuptial agreement (although she reneges
from time to time) that every line entered must be a pleasantly controlled, strategic
experience. Is this the dawn of a new Golden Age for me? Not really. For me to claim
expertise with 1 e4!? is like saying that Andre the Giant was a better actor than wrestler.
So please lower your expectations when we go over one of my games and don’t expect
Michelangelo painting the Sistine Chapel. I normally open with 1 Nf3 or 1 d4 and only
essay 1 e4!? when I’m in a foul mood.
1 ... c5 2 Nf3 e6 3 c3
What? Did you really expect an Open Sicilian, that sprawling theoretical warren which
I don’t dare enter? When Black plays 2 ... e6, we switch to a c3 Sicilian.
Question: Then why not go for the c3 Sicilian altogether?
Answer: By only playing c2-c3 in certain positions, we enter targeted lines of the c3
Sicilian, where Black has reduced options. For instance, here both ... Bg4 and ... Bf5 ideas
are automatically locked out. I am also suggesting 3 c3 in response to 2 ... g6 and 2 ... a6
(see Games 17 and 18).
3 ... d5
Next game we look at 3 ... Nf6. Note that 3 ... Nc6 4 d4 d5 5 exd5 simply transposes
below.
4 exd5
Question: Why make the reader learn a new line when we can play 4 e5,
followed by 5 d4, transposing to the Advance French, which is covered
in the next chapter?
Answer: The trouble is that 4 e5 doesn’t transpose if Black plays 4 ... d4!?. The
position after 5 Bd3 Nc6 6 0-0 Nge7 7 Re1 Ng6 is considered fine for Black and is clearly
not a Advance French, since our d-pawn still sits on d2, clogging our queenside
development.
4 ... exd5
The recapture with the e-pawn usually leads to isolated queen’s pawn positions
similar, or even directly transposing, to lines of the Tarrasch French.
Black main alternative is to enter a pure c3 Sicilian with 4 ... Qxd5, but as we’ve
already noted, here Black is deprived of all options involving ... Bg4 or ... Bf5. For
example, 5 d4 Nf6 6 Be2 Nc6 7 0-0
7 ... cxd4 (giving White an isolani; after 7 ... Be7 8 dxc5 Qxc5 9 Be3 Qa5 10 Nbd2,
White has a slight development lead in a battle between our queenside pawn majority
and our opponent’s kingside majority) 8 cxd4 Be7 9 Nc3 Qd6 10 a3 (I prefer this move,
which cuts out ... Nb4 and ... Nbd5 ideas) 10 ... 0-0 11 Be3 Ng4 (this adventure doesn’t
work well for Black, who would be better off just developing his queenside) 12 Qc2 e5?!
(12 ... a6 is only slightly worse for Black) 13 d5 Nxe3 14 fxe3 Nd8 was R.Antonio-M.Al
Modiahki, Kolkata 1996, and now White stands clearly better after 15 Qb3, intending to
put a rook on d1 and then play either Nb5 or Ne4.
5 d4 Nc6 6 Be2
6 Bb5 is White’s main move, but I’ve seen several games where the bishop was later
retreated to e2, so I feel like in some lines it may actually save a tempo putting it there
at once. The fact that we lack Bxc6 options hardly features, since White wants to hang
onto the light-squared bishop in these positions.
6 ... Bd6
Black can set up in two other ways:
a) 6 ... Nf6 7 0-0 Be7 8 dxc5 Bxc5 9 Nbd2 0-0 10 Nb3 Bb6 11 Bg5 Re8 12 Nfd4 Qd6
(breaking the pin on the f6-knight) 13 Bh4 Ne4 14 Bf3 Bc7 15 Bg3 Nxg3 16 hxg3 and I
like White’s chances against the isolani, as opposed to Black’s bishop pair and greater
central space, I.Zaragatski-B.Tereick, Dresden 2005.
b) 6 ... c4 (evading an isolani position) 7 b3 cxb3 (7 ... b5? 8 a4 undermines Black’s
queenside, which can’t be backed by ... a7-a6) 8 axb3 Bd6 9 0-0 Nge7 10 c4 0-0 11 Nc3
and again I prefer White, this time due to his greater central influence, V.Onischuk-C.Ali
Marandi, European Championship, Gjakova 2016.
7 0-0 Nge7
The knight is more effective on e7 than f6 for two reasons:
1. White’s Bg5 pin is easily broken by ... f7-f6.
2. Black’s goal when taking on the isolani is to control the square in front of it. From
e7, Black’s knight has access to f5 – and also c6, should his other knight move or be
traded away.
8 dxc5
I duly hand my opponent an isolated queen’s pawn. One thing to remember is never
to trade on c5 before Black has moved the dark-squared bishop, either to d6 or e7.
8 ... Bxc5
Black’s isolani is not the fearful sparrow, separated from the flock. At least not yet. It
can become so in a late middlegame or ending, if White manages to swap queens and a
few pieces off.
9 Nbd2
Heading for b3 where it controls d4, the square in front of the isolani. Developing with
9 Bf4 first only helps Black find counterplay after 9 ... 0-0 10 Nbd2 Ng6 11 Bg3 f5!
(suddenly ... f5-f4 is threatened and White’s posting of the bishop on g3 doesn’t look so
great) 12 Nb3 Bb6 13 h3 f4 14 Bh2 Be6 and Black stood no worse, P.Craciun-C.Peptan,
Romanian Team Championship 2011.
9 ... 0-0 10 Nb3
10 ... Bb6
Aldama keeps the bishop on the a7-g1 diagonal, where it continues the fight for d4.
After 10 ... Bd6 11 Re1 Qc7 12 Be3 Bd7 13 Bc5! (principle: Swaps favour the side playing
against the isolani) 13 ... Rad8 14 Bxd6 Qxd6 15 Nbd4, I slightly prefer White since
Black’s chances of a successful attack have been diminished by the trade of dark-squared
bishops, P.Zarnicki-J.Pierrot, Buenos Aires 1998.
11 Nbd4 Re8 12 Be3
I decide to reinforce my d4-outpost.
12 ... Ng6
Black now has options of ... Nf4 and ... Nge5 in the future. 12 ... Bg4 13 Re1 Ng6 is
similar.
13 Re1 h6
A new move in the position. He doesn’t want to be bothered by Bg5 ideas. Instead,
W.Duer-N.Stanec, Austrian Team Championship 1998, saw 13 ... Bc7 14 g3! (I think it’s
worth weakening the light squares to seize control over f4) 14 ... a6, when White looks a
shade better after 15 Bf1, intending to fianchetto and take aim at d5.
14 Qc2
The queen vacates d1 for a rook, which places greater strain on Black’s d5-pawn. 14
Qb3 would be met by 14 ... Na5.
14 ... Qf6!?
He wants to bang his knight down on f4, at the cost of leaving his d-pawn
undefended, so I decide to go after it.
15 Qb3!?
I am perhaps just asking for trouble, pawn hunting like this. The comp prefers 15 Qd2,
fighting for control over f4.
15 ... Bg4
Defending the d-pawn again with 15 ... Be6?! makes little sense. After 16 Nxe6 fxe6
17 Bxb6 axb6 18 Qxb6 e5 19 Bf1, White wins a pawn anyway and I don’t think Black gets
enough for it.
16 h3!?
Whereas now 16 Qxd5 Rad8 17 Qb5 Nf4 18 Bxf4 Qxf4 offers Black full compensation
for the pawn.
16 ... Nxd4! 17 Bxd4!
I was intending 17 Nxd4 Bxe2 18 Rxe2 Nf4 19 Bxf4 Bxd4 20 Rxe8+ Rxe8 21 Bg3 Bb6
but realized in my analysis that Aldama had outcalculated me. If I grab with 22 Qxd5, he
has 22 ... Re2 and regains the pawn while retaining the more aggressive posture.
17 ... Bxd4 18 hxg4!?
See what happens when I open with 1 e4!?. I start to deliberately violate principles,
such as: Opposite-coloured bishops favour the attacking side, and here Aldama is the only
one doing the attacking. 18 Nxd4 Bxe2 19 Nxe2 was safer and better.
18 ... Bb6 19 Bb5!
What was I saying about saving a tempo on move six? Well, it doesn’t pay to be too
dogmatic about these things.
19 ... Re4!?
Aldama offers a pawn to lift his rook into the attack. 19 ... Rxe1+ 20 Rxe1 Nf4 21 Bf1
is approximately even.
20 Qxd5 Rxg4 21 Qxb7
Am I really playing White here? I have snatched a pawn, while Black’s pieces loom
ominously over my king.
21 ... Rd8 22 Re8+?
Your writer, though exceedingly wise and knowledgeable, is regrettably still a tad shy
of omniscient. I fear I will die of old age before I learn to play open positions with some
degree of competence. White is fine after 22 Rad1! (not 22 Bd7?? Rxd7! 23 Qxd7 Qxf3
and wins) 22 ... Rxd1 23 Rxd1 (threatening Qc8+ and Qxg4) 23 ... Qf5 24 Bd3 Rxg2+! 25
Kxg2 Nf4+ 26 Kf1 Nxd3 27 Qa8+ Kh7 28 Ng5+! hxg5 29 Qh1+ Kg6 30 Qc6+ f6 31 Qe8+
and draws.
22 ... Rxe8 23 Bxe8 Nh4??
Black’s once-controlled attack goes out of control and is the person dieting on only
600 calories combined for breakfast and lunch, and then going on a 3500 calorie binge at
the all-you-can-eat buffet dinner at Golden Corral. After the correct 23 ... Ne5! White is
busted.
Exercise (combination alert): Black’s last move was a blunder. Why?
Answer: Attraction/knight fork.
24 Qxf7+!
On many a Saturday night the missus (aka Nancy) can get a wee bit annoyed when I
return from a failed Gambito G/45 tournament and spoil the rest of the evening pouting,
because the poacher from Tijuana, IM Aldama, swindled me out of my well-deserved win
– for the hundredth time! This time, it’s me doing the swindling for a change.
24 ... Qxf7 25 Bxf7+ Kf8
25 ... Kxf7?? gets forked by 26 Ne5+.
26 Nxh4 Rxh4
Black is down two pawns so places his hopes in the drawing power of the oppositecoloured bishops.
27 Bd5 Rh5?!
27 ... Rf4 puts up more resistance.
28 Rd1 Rf5 29 Rd2 g5
The overload “combination” 29 ... Bxf2+?? 30 Rxf2 contains a teeny weeny flaw, in
that the intended ... Rxd5 is an illegal move, due to the pin on the f-file.
30 b4
I begin to push my 3:1 queenside pawn majority.
30 ... g4
Threatening ... g4-g3.
31 g3 Ke7 32 Kg2
Exercise (calculation): Does Black have a little combination here? And if so,
where is it?
32 ... h5
Answer: No. The tempting 32 ... Bxf2?? fails miserably, since White plays a double
zwischenzug with 33 Re2+! Kd6 34 Be4! and Black drops his bishop.
33 c4 Bc7 34 Bc6! Be5 35 Rd7+ Kf6 36 Be4!
White can’t chop the a7-pawn just yet. It’s necessary to kick Black’s rook off the f-file
first, as after 36 Rxa7?? Bd4!, Black is suddenly right back in the game.
36 ... Rg5 37 Rxa7 Bc3 38 Ra6+ Ke7 39 a3 Re5 40 f3 Be1 41 c5 gxf3+ 42
Kxf3 Rg5 43 Rg6!
Oh, no you don’t!
43 ... Rxg6 44 Bxg6 Bc3
Going after my queenside pawn chain.
45 Ke4! Bb2 46 Kd5! Bxa3 47 b5 Bb4 48 Bxh5 1-0
Bishops of opposite colours don’t usually matter when you are up three pawns.
Summary: When Black plays 3 ... d5, just take it, which gets us into a 2 ... d5 line of
the c3 Sicilian where Black has committed to an early ... e7-e6. Remember 4 e5 does not
have to transpose to an Advance French, since Black can play 4 ... d4!?, reaching an
entirely different position.
Game 16
C.Lakdawala-B.Baker
San Diego (rapid) 2011
1 e4 c5 2 Nf3 e6 3 c3 Nf6
Hitting the e4-pawn with the knight is Black’s other main option in the c3 Sicilian.
4 e5 Nd5 5 g3!?
The naturally cautious are still willing to fight, but only when doing so serves a
purpose. Your writer cannot be accurately described as an adventurous man, and my
repeated New Year’s Resolution to play braver chess usually evaporates by January 2nd.
Normally White plays for mate on the kingside in the ... Nf6 versions of the c3 Sicilian.
This sidestepping variation, which reasons “why risk shedding your own blood when a
strategic choice is an option?”, generally throws my opponents off theoretically, since it
virtually shifts the game into queen’s pawn channels. After Black carries out his standard
plan of exchanging his d-pawn for my e-pawn, we reach a position of opposing wing
majorities, which resemble a Catalan more than a c3 Sicilian. Meanwhile we delay
pushing d2-d4 until after we’ve castled.
5 ... Nc6 6 Bg2 d6 7 exd6 Bxd6 8 0-0 0-0 9 d4 cxd4
Swapping on d4 is Black’s main move. 9 ... b6 is also playable, when 10 c4 Nde7 11
Nc3 gives the game a different Catalan-like flavour.
10 Nxd4
No isolani. We’re playing for opposing wing majorities, backed up by our fianchettoed
light-squared bishop.
10 ... Nxd4
My opponent knows the theory, yet knowledge derived by study alone is a weak
substitute for actual experience, and the Catalan is alien to my opponent’s normal
repertoire.
Another set-up is 10 ... Bd7 11 c4 Nde7 12 Nc3 Nxd4 13 Qxd4 Bc6 14 Ne4 Nf5 15 Qc3
Bc7, M.Keller-T.Henrichs, Bad Wörishofen 2003, and here I would think about rolling the
queenside pawn majority with 16 b4.
11 Qxd4 Qb6?!
What we want and what we need don’t always match up. This is Black’s highest
scoring move in the database, yet I feel it’s inaccurate. I am happy to swap queens, since
White’s queenside majority will be more effective in an ending.
Instead, 11 ... Qc7 looks better, even though after 12 Nd2 Bd7 13 Ne4 Be5 14 Qd3
Bc6 15 f4 Qb6+ 16 Kh1 Bc7 17 c4 Nb4?! (17 ... Ne7 seems okay) 18 Qe2 Rfd8 19 Be3 Qa6
20 b3 Bb6 21 a3 Nd3 22 Rad1!, Black found himself in a little trouble, A.MorozevichP.Svidler, Russian Team Championship 2005.
12 Qxb6 Nxb6?!
Black shouldn’t try and preserve the integrity of his queenside structure. He is better
off with 12 ... axb6 13 c4 Nb4 14 Nc3, when White has only a slight advantage.
13 Rd1 Bc7
If 13 ... Be7 then 14 a4! puts pressure on Black, who has no easy way to develop his
queenside.
14 Na3
Making Black weaken b6 by inducing ... a7-a6 to keep the white knight out of b5.
14 ... a6 15 Be3 Rb8
A humble move made with the thought that work of any kind – no matter how menial
– is never degrading and only honourable. Black must find a way to get his queenside
pieces out.
16 Rd2 e5 17 b3 Be6 18 c4
White’s queenside initiative grows and Black’s game becomes decidedly
uncomfortable. You would almost swear that this position arose from a Catalan.
18 ... Rfd8 19 Rxd8+ Bxd8
Otherwise his b7-pawn falls.
20 Rd1 Bc7 21 Nc2 f6??
Black had to try 21 ... Nd7, after which 22 Nb4 keeps up the pressure.
Exercise (combination alert): Black just blundered on his last move.
If even your tactically myopic writer found a trick here, then so can you.
Answer: Attraction/Double attack.
22 Bxb6!
Step 1: Take Black’s knight on b6, attracting his bishop to this square.
22 ... Bxb6 23 Rd6
Step 2: Fork the two bishops.
23 ... Bf5
Black is lucky to have this counter-attack on the white knight, or he would just lose a
piece.
24 Rxb6 Bxc2 25 Rxb7
Not the best move. After 25 Bxb7! Kf8 26 c5 Black’s a-pawn falls as well, since he
lacks the time for 26 ... Bd3? in view of 27 c6 with c6-c7 to follow. All the same, I was
confident that Black would be unable to hold the bishop ending.
25 ... Rxb7 26 Bxb7 a5 27 c5
Threatening to race to c8.
27 ... Kf8 28 Bd5
This way my queenside pawns are safe.
28 ... Ke7
The only line which concerned me was 28 ... Bb1 29 a3 Ba2 30 Kf1 a4, but I worked
out the win as follows: 31 Ke2 Bxb3 (31 ... axb3 32 a4 is also hopeless) 32 Bxb3 axb3 33
Kd2 Ke7 34 Kc3 Kd7 35 Kxb3 Kc6 36 Kc4 f5 37 a4 g5 38 a5 e4 39 a6 f4 40 gxf4 gxf4 41
Kd4 e3 42 fxe3 f3 43 Kd3 and White’s king catches the f-pawn, whereas the white pawns
are immune. This line is simple, yet took a toll on my clock, since there is no room for
interpretation in king and pawn endings. One plus one must always equal two.
29 a3
Now b2-b4 is coming, when White gets two connected passed pawns.
29 ... Bd3 30 f3 f5 31 Kf2 Bb5 32 Ke3 g5 33 b4
The comp’s technique runs 33 g4! fxg4 34 fxg4 Bd7 35 b4! axb4 36 axb4 Bxg4 37 b5
Bf5 38 b6 Kd7 39 Be4! Be6 40 Bxh7! Kc6 41 Be4+ and wins.
33 ... axb4 34 axb4 h5 35 h4!
Fixing Black’s h-pawn on the same colour as his remaining bishop.
35 ... f4+ 36 gxf4 exf4+ 37 Ke4 Kf6 38 c6 gxh4 39 Kxf4 Ke7
Exercise (calculation): In your mind’s eye calculate the line 40 Ke5 h3 41 f4 Bf1,
intending 42 ... Bg2. What is the result of the promotion race?
Answer: White wins the race.
40 Ke5! h3 41 f4 Bf1 42 f5 Bg2 43 f6+
Having been raised by a strict disciplinarian father, I can tell you with great certainty
that a peremptory summoning was always a sign of trouble to come.
43 ... Kd8 44 f7 Ke7 45 f8Q+ Kxf8 46 c7 1-0
Game 17
C.Lakdawala-M.Nilsson
San Diego (rapid) 2011
1 e4
Feigning mastery in a profession I abandoned long ago.
1 ... c5 2 Nf3 g6
We’re now into the offbeat Sicilians. We’ll look at 2 ... a6!? in the final game of this
chapter. With the text Black hopes to reach a version of the Accelerated Dragon after 3
d4. Instead, we go for a reversed version of the English: 1 c4 e5 2 g3 c6, except with an
extra move thrown in, since we play it as White.
Another option is 2 ... Nf6!?, which is used more as a surprise weapon than a reliable
opening. Then 3 e5 Nd5 4 Nc3 e6 (4 ... Nxc3 5 dxc3 Nc6 6 Bc4 e6 7 Bf4 is obviously more
comfortable for White) 5 Nxd5 exd5 6 d4 Nc6 7 c3!? (the main line runs 7 dxc5! Bxc5 8
Qxd5, winning a pawn, but it can get very complicated and I’d just as soon not help
Black’s development) 7 ... d6 8 Bb5 reaches a nice-looking Rossolimo variation. For
example, 8 ... Be7 (or 8 ... c4?! 9 0-0 Be7 10 b3 cxb3 11 exd6 Qxd6 12 axb3 and White
has much the easier game, J.Polgar-V.Sikula, Hungarian Team Championship 2008) 8 ...
Be7 9 exd6 Bxd6 10 dxc5 Bxc5 11 Qe2+ Be6 12 Be3 Bxe3 13 Qxe3 0-0 14 0-0 gave White
a favourable isolani position in I.Salgado Lopez-T.Kantans, European Team
Championship, Reykjavik 2015.
3 c3
I always respond to Black’s 2 ... g6 with the delayed c3 Sicilian. My mother raised a
gentleman, so I refuse to get provoked into 3 d4?!.
3 ... Bg7
Black can resort to his standard c3 Sicilian moves as well:
a) 3 ... d5 4 exd5 Qxd5 5 d4 Bg7 6 Na3 (both Bc4 and Nb5 are in the air) 6 ... cxd4 7
Bc4 Qe4+ 8 Be3! Nh6! (not 8 ... dxe3?? due to 9 Bxf7+ Kxf7 10 Ng5+, forking king and
queen) 9 Nb5 0-0 10 cxd4 Na6 11 Nc3 Qc6 12 Qb3 Nf5 13 0-0 and White’s development
lead is good enough for an edge, I.Nepomniachtchi-Ma.Carlsen, World Junior
Championship, Chalkidiki 2003.
b) 3 ... Nf6 4 e5 Nd5 5 d4 cxd4 6 cxd4 (White can also recapture with the queen) 6 ...
Bg7 7 Qb3! Nb6 8 a4 d6 was Mi.Adams-V.Kramnik, Dortmund 2013, and now after 9
Bb5+ Nc6 10 a5 Be6 11 Qc3 Nd5 12 Bxc6+ bxc6 13 Qxc6+ Kf8 14 0-0, White’s game
looks slightly better. Black would have full compensation for the pawn if he was castled,
but with the king on f8 and the h8-rook out of play, I prefer White’s position.
4 d4 cxd4 5 cxd4 d5
Otherwise White controls the centre uncontested.
6 exd5!?
When your isolani-hating writer voluntarily takes one on, it’s similar to when an aunt
gives you a book for your birthday that you don’t really want to read. It’s more an
unpleasant assignment than an actual gift. In this case I get a reversed QGD Tarrasch,
where the extra move can come in handy, even if I don’t quite feel comfortable in the
open position. But to say a pure strategist shouldn’t take on structural weakness in return
for activity, is to adopt the anti-gun control position: the weapon is innocent from its
wielder.
Nevertheless, 6 e5 is a serious alternative, reaching a sort of Advance Caro-Kann.
After 6 ... Bg4 (Black’s main move, the idea being to dump a potentially bad bishop for
White’s knight; 6 ... Nc6 can be met by 7 h3 preventing ... Bg4) 7 Nbd2! (I like this move
best; White plans to recapture on f3 with the other knight, maintaining the defence of the
d4-pawn) 7 ... Nc6 8 h3 Bxf3 9 Nxf3 e6 10 Bd3 Nge7 11 0-0 Qb6 12 Be3 0-0 (12 ... Qxb2?!
13 Rb1 Qxa2 14 Bd2! is risky for Black, whose queen is in danger of being trapped after
Bc3 and Ra1) 13 Qd2, White’s central space offers an edge in this now French-like
structure.
6 ... Nf6 7 Bc4
This takes the game into a sideline of the Caro-Kann, Panov-Botvinnik Attack. 7 Bb5+
Nbd7 8 d6, aiming to hand Black an isolani as well, is White’s main continuation; for
example, 8 ... exd6 9 Qe2+ Qe7 10 Bf4 Qxe2+ 11 Bxe2 Ke7 12 Nc3 Nb6 13 0-0, though
I’m not sure White can really hope to extract much from Black’s slightly vulnerable king
position.
7 ... 0-0 8 Nc3 Nbd7
Now ... Nb6 is coming, after which Black will regain the d5-pawn. In the Panov White
usually prepares to meet this with Nge2-f4. Our king’s knight of course went to f3 on
move two.
9 0-0
What a brave guy. I decide to take on the isolani, rather than chicken out with 9 d6
exd6 10 0-0 Nb6 11 Bb3, when I doubt that White has very much.
9 ... Nb6 10 Bb3 Nbxd5
We have essentially reached a QGD Tarrasch with colours reversed. The isolani may
be a potential weakness in a future ending. In a middlegame it represents a strength,
since it gives White enhanced central control, as well as a hook to land a piece on e5.
11 Re1 b6
Black logically reinforces the blockading d5-square with a fianchetto.
12 Ne5
The knight jumps into e5.
12 ... Bb7 13 Qf3 Rc8 14 Bg5
Threatening Bxf6, exploiting the pin on the d5-knight, so Black secures his b7-bishop.
14 ... Ba8 15 Qh3
Black was threatening ... Nxc3, winning a piece. Anyway, h3 is a good square for the
queen, where it eyes d7, e6 and h7.
15 ... Nxc3
With this move the structure switches from an IQP to hanging pawns. White must
strive to avoid having them blockaded later on. Instead, 15 ... a6 16 Rac1 Kh8?? (16 ...
Rc7 17 Qh4 is only an edge for White) 17 Nxf7+! Rxf7 18 Nxd5 Rxc1 19 Rxc1 Nxd5 20 Rc8
won material in J.Nun-F.Jablonicky, Trnava 1984.
16 bxc3 Qc7
This was actually the first new move. J.Barle-S.Osmanbegovic, Maribor 1994, saw 16
... Rc7 17 Rac1 Bb7, when White looks a bit better after 18 Qd3, intending c3-c4.
Exercise (calculation/critical decision): I analysed 17 Nxf7 here and rejected it.
Was my decision correct or not?
17 Rac1?
Answer: Black’s last move was a blunder and my response a blown opportunity.
White wins with 17 Nxf7! Rxf7 18 Rxe7! Qxe7 19 Qxc8+ Qf8 20 Qe6! (I missed this in my
analysis; I mistakenly thought White had to play 20 Qxf8+? Kxf8 21 Bxf7 Kxf7 with an
approximately even ending) 20 ... Ne4 21 Bf4 Bf6 22 f3 Nxc3 23 Bd6! (Black’s queen must
guard her rook, yet is unable to move to g7, since White wins with a queen check on the
back rank) 23 ... Bxd4+ 24 Kf1 Bd5! (the only move) 25 Bxd5 Nxd5 26 Bxf8 Bxa1 27 Bd6
Nf6 28 g4 and Black’s rook and knight are not enough against White’s queen. The position
should be a technical win.
17 ... Rcd8 18 Rcd1 Bd5?!
Luring me into c3-c4, which White wants to play anyway. He is better off with 18 ...
b5! 19 Rc1 Qb7 20 f3 Qc7 21 Qh4 Bd5, when Black looks okay.
19 c4 Be6 20 Qh4
I want to make certain his knight has to stay put.
20 ... Bc8 21 h3 Rd6?
This move, intending to double rooks on the d-file to pressure White’s d-pawn,
neglects the fact that his queen and rook are lined up in an unfortunate dark square
geometry. The contradictions in the defence require immediate resolution. Correct was 21
... Bb7 22 d5! with only a strategic advantage for White.
22 Bf4! Qd8 23 d5
The time has come to stop coddling my d-pawn and cut it loose. Now Black’s d6-rook
is short of squares and Nc6 is in the air.
23 ... Bb7 24 Nf3
There’s no need to be shy; after 24 Nc6 Bxc6 25 Bxd6 Qxd6 26 dxc6 Qc7 27 Ba4,
White has a winning position.
24 ... Bc8
The exchange isn’t running away: 24 ... Rd7 is met by 25 Ba4.
25 Nd4 Bb7
25 ... Rd7? 26 Nc6 Qe8 27 Ba4 merely sees Black’s queen and rook lined up in an
unfortunate light square geometry.
26 Bxd6 exd6
Black’s now enhanced control of the dark squares represents a weapon, but it’s a
rather small calibre gun, since White will simply operate on his strength, the light
squares.
27 Ba4!
Seizing control over c6, d7 and e8, so that Black’s f8-rook is unable to challenge White
on the e-file.
27 ... h6 28 Bc6 Ba6 29 Ba4 Bb7
Not 29 ... Bxc4??, which hangs the bishop to 30 Nc6.
30 Nc6
To White’s pieces, the c6-square represents a giant cookie jar.
30 ... Bxc6 31 dxc6
White’s position is a place where the air is fresh and the water clean, whereas Black’s
is the place where the factories sluice their polluted waste:
1. White is up the exchange.
2. White owns a deeply passed c6-pawn.
3. Black’s d6-pawn is fragile and he has no counterplay.
31 ... g5!?
Sometimes not doing anything at all is the best thing you can do. This is the
equivalent of a distress call. Lashing out only hastens his loss.
32 Qd4 Ne8 33 Qd5 g4!?
Well, this isn’t going to be of much help.
34 hxg4 Qh4 35 Qf5! Nf6 36 Bc2 1-0
Since 37 c7 follows. Indeed, I could have played that straight away.
Summary: Meet 2 ... g6 by entering a c3 Sicilian, after which you can choose
between obtaining a QGD Tarrasch a move up (6 exd5), or an Advance French-like
position (6 e5).
Game 18
Ma.Carlsen-J.M.Beltran de Heredia Y Alon
Madrid (simul) 2008
1 e4 c5
When we pull off a gigantic upset (even if it’s in a simultaneous display), we know
what it means to be knighted. When I was a kid, I came within a whisker of beating the
great Mikhail Botvinnik in a simul. Unfortunately my game was one of the last to finish
and he came back to the board faster and faster and revoked my much hoped for
knighthood by flipping the result and beating me.
2 Nf3 a6!?
A move made with the philosophy: predictable patterns are dangerous in warfare
since they offer the enemy advanced notice of your intent. Not everyone plays an opening
like a familiar friend you can trust. This is a tricky move order which can throw Open
Sicilian players off. But not if you play White’s next move. Have you ever seen those
women who dress their dogs like children, where the Chihuahua approaches wearing a tshirt, Bermuda shorts and a hat? Well, this is one of those lines which I consider just a bit
too cute.
3 c3!
We get counter-tricky by playing for a c3 Sicilian where Black doesn’t necessarily need
... a7-a6. Believe it or not 3 d4?! allows Black easy equality with 3 ... cxd4 4 Nxd4 Nf6 5
Nc3 e5!, when White is denied the normal Sveshnikov knight leap to b5. Black stands at
least equal, no matter where White puts the knight.
3 ... d5
Other moves:
a) 3 ... e6 4 d4 d5 5 e5 reaches an Advance French, where ... a7-a6 is not the most useful
move. If Black tries to justify it with 5 ... Bd7 6 Bd3 Bb5?!, then 7 Bxb5+ axb5 8 dxc5!
Bxc5 9 b4 Bb6 10 Na3 Qd7 11 Qd3 wins a pawn.
b) 3 ... Nf6 4 e5 Nd5 5 d4 cxd4 6 Bc4! Nb6 7 Bb3 e6 (7 ... dxc3?! 8 Nxc3 gives White a
kind of super Smith-Morra Gambit, far more favourable now that Black wasted time with
the king’s knight) 8 cxd4 d5 9 Nc3 Be7 10 Bc2 Nc6 11 0-0 and Black’s king will come
under fire if he castles short, P.Ricardi-C.Sampaoli, San Luis 2007.
4 exd5 Qxd5
Black can also play it like an Icelandic Gambit with 4 ... Nf6!?, intending 5 c4 e6, when
c2-c3 will be a pure tempo loss. Instead, White can gain an edge after 5 d4 cxd4 (5 ...
Qxd5 transposes to the game) 6 Bc4! Nxd5 7 0-0 Nc6 8 cxd4 with a slightly favourable
isolani position since it isn’t clear if Black really needed ... a7-a6, M.Brunello-Z.Lanka,
Böblinger 2014.
5 d4
We reach a standard position of the ... Qxd5 line in the c3 Sicilian, except that Black
has committed to the rather unnecessary ... a7-a6.
5 ... Nf6 6 Be3 Bg4
With Black effectively a tempo behind (in view of his early ... a7-a6), it might be safer
to keep the light-squared bishop inside the pawn chain with 6 ... cxd4 7 cxd4 e6 8 Nc3
Qd6 9 Bd3 Nc6 10 0-0 Be7 11 a3 0-0, reaching a normal isolani position where Black’s
early ... a7-a6 doesn’t hurt him too much. All the same, I prefer White.
7 Be2 cxd4 8 cxd4 e6 9 0-0
White can throw in the Nc3 tempo-gain at any time.
9 ... Be7 10 h3 Bh5 11 Nc3
Black has a choice of three squares for his queen, none of which should fully equalize.
11 ... Qd8
The other moves:
a) 11 ... Qd6 12 Qb3! (attacking b7 while Black lags in development) 12 ... Qb4 13
Qxb4 Bxb4 14 a3 Bd6 15 d5! (principle: Create confrontation when leading in
development) 15 ... Bxf3 16 Bxf3 e5 (attempting to keep the position closed) 17 g4 gives
White a solid advantage with more space and the bishop pair, while Black is still several
moves from completing development.
b) 11 ... Qa5 12 Qb3! b5 (12 ... Qb4 transposes to line ‘a’) 13 a3! (White is ready for
d4-d5! again) 13 ... 0-0 (or 13 ... Nbd7 14 d5) 14 g4! Bg6 15 Ne5 also leaves Black in a
very uncomfortable situation.
12 Qb3!
Another way to exploit the development lead is to blast open the centre: 12 d5!? Nxd5
13 Nxd5 Qxd5 14 Qxd5 exd5 15 Rfd1 Nc6 16 Rxd5 Bg6 17 Rc1 Bf6 18 b3 0-0 (or 18 ...
Rd8?! 19 Rxd8+ Nxd8 20 Nd4) 19 Rd7 with nagging pressure for White in the ending.
12 ... Nc6!
Shared suffering tends to be a powerful unifier. Black finds a little trick to defend the
b7-pawn without defending it: 13 Qxb7?? Na5 traps White’s queen.
13 Rfd1?!
Carlsen doesn’t find the most promising way forward. 13 d5! is the correct move; for
example, 13 ... Na5 (13 ... exd5?! can now be met by 14 Qxb7!, since 14 ... Na5 15 Qb6
escapes) 14 Qb6 Nxd5 (14 ... exd5 15 Qxd8+ comes to the same thing) 15 Nxd5 exd5 16
Qxd8+ Bxd8 17 Rad1 Nc6 18 Rxd5 Bg6 19 Bc5 Be7 20 Ne5 with pressure for White in the
ending.
13 ... 0-0?!
Black escapes his troubles with 13 ... Na5! (chasing White’s queen away; this relieving
exhalation is the equivalent of a baby’s burp) 14 Qc2 Bg6 15 Qd2 Ne4! 16 Nxe4 Bxe4 with
an equal position, since Black gained control over d5.
14 d5!
Of course.
14 ... Na5 15 Qa4?!
As above, 15 Qb6! puts Black under more pressure.
15 ... Nxd5 16 Nxd5 exd5 17 Qd4 Bf6?!
After 17 ... Nc4! 18 Bxc4 Bxf3 19 gxf3 dxc4 20 Qxc4 Qa5, Black looks fine.
18 Qxd5 Qxd5 19 Rxd5
The double attack on a5 and h5 nets White the bishop pair in an open position.
19 ... Bxf3 20 Bxf3 Nc4 21 Bd4 Bxd4
Taking the b-pawn only benefits White after 21 ... Nxb2?! 22 Rb1.
22 Rxd4
For Black comes the disturbingly familiar recognition: he has given Magnus Carlsen –
the most dominant endgame player of our time – a clearly superior ending. What could
go wrong? It’s pretty clear which side owns the more potent minor piece.
22 ... Ne5?
Centralize your pieces is a good general principle but here it drops a pawn, after which
Black’s game slowly whimpers into dead silence. Not 22 ... Nxb2?? 23 Rb1 either, when
Black’s wayward knight is trapped. The miserable 22 ... Na5 23 Rd7 Rab8 is Black’s best
try, though 24 Rad1 leaves him completely tied down.
23 Bxb7 Rab8 24 Bxa6 Rxb2 25 a4
White’s undeveloped queen’s rook now sits conveniently behind the extra passed
pawn.
25 ... Ra8 26 Bf1 g6 27 a5 Nc6 28 Rd5 Rb4 29 a6 Nd4 30 a7 Nb3 31 Ra3
Nd4 32 Rd7 Ne6 33 g3!
Planning to transfer the bishop to the h1-a8 diagonal. Also effective is 33 Be2! Nd4 34
Bf3 Nxf3+ 35 Rxf3 f5 36 Rfd3! Re4 37 Rd8+ Re8 38 Rxe8+ Rxe8 39 Rb3, followed by Rb8.
33 ... Rb1 34 Kg2 Rb2 35 Bc4!
The bishop follows its prey remorselessly, insisting on claiming the diagonal. There is
no remedy to the coming Bd5.
35 ... Nc5 36 Rxf7 1-0
Chapter Three
French Defence
It’s the major theme in this book: If our opponent allows us to seize space, then we’ll
generally do just that. So let’s go with the Advance Variation and try to squeeze Black.
Game 19
L.Paulsen-Ad.Schwarz
Leipzig (3rd matchgame) 1879
1 e4 e6
In the opening, a psychological shock is amplified by the drug of non-precedence. In
1879, the vast majority of players obediently replied to 1 e4 with 1 ... e5. Openings which
we take for granted today, such as the French, Sicilian and Caro-Kann, were oddities back
then.
2 d4 d5 3 e5
3 ... c5 4 c3
Backing up the centre is White’s overwhelming choice.
4 ... Nc6 5 Nf3 Qb6
The main reply. We’ll look at 5 ... Bd7 and 5 ... Nge7 in Games 23 and 24 respectively.
6 a3
In this book we go with the plan of b2-b4.
Question: How does that help us?
Answer: We resolve the central tension, which tends to help White in Advance French
lines.
6 ... Bd7
Black chooses simply to develop and allow White to push the b-pawn. Another option
is to play 6 ... Nh6, as we’ll see in Game 21; and 6 ... Nge7 generally comes to the same
thing.
Black can also seek to prevent ... b2-b4. The main of doing that is with 6 ... c4, which
we’ll look at in Games 22 and 23. Pushing 6 ... a5 is less popular because the inclusion of
the two a-pawn moves is considered to favour White. In particular, The Milner-Barry
Gambit move 7 Bd3! is now not even a gambit, since we can play Bc2 without fear of ...
Nb4. After 7 ... Bd7 8 Bc2 (as first played in L.Paulsen-M.Bier, Braunschweig 1880) 8 ...
cxd4 9 cxd4 Nge7 10 Nc3, White’s space is oppressive for Black, who is unable to play the
normal ... Nf5.
7 b4 cxd4 8 cxd4 Nge7?!
Today we know that Black’s most accurate response is 8 ... Rc8 in order to prevent
White’s next move. We’ll examine this in the next game.
9 Nc3!
The absence of a black rook on c8 means that White can develop his knight to its best
square without fear of discovered attacks.
9 ... Nf5 10 Na4!
Chasing away an attacker of d4 with tempo, while heading for c5.
10 ... Qc7?!
Unwise. The queen is not safe on the open c-file. Black should go into damage control
mode and play 10 ... Qd8.
11 Bb2 Be7?!
Another inaccuracy. Black is better off keeping the white knight out of c5 with 11 ...
b6.
12 Rc1
Already threatening b4-b5.
12 ... a6 13 Nc5 Bxc5
Black hands over his good dark-squared bishop, but the alternative is to let White’s
powerful knight sit there on c5 in virtual perpetuity.
14 Rxc5 0-0 15 Bd3
Now worrying Black about Bxf5 and Rxd5.
15 ... Nfe7?
15 ... Rfc8 would at least have prevented White’s coming combination.
Exercise (combination alert): Black’s last move was a blunder. How did
Paulsen exploit it?
Answer: All the terms and conditions arise for a completely sound Greek Gift
sacrifice.
16 Bxh7+!
The SWAT team isn’t going to knock on the door, as this would allow the targets to
arm themselves. With such a theme the excitement of discovery is long past for the
present day reader. In Paulsen’s time it was too. Nevertheless, the Greek Gift sacrifice
remains more than just a trap. Just last year, in 2017, Aronian played a version of the
Greek Gift to beat reigning World Champion Magnus Carlsen, which is proof that this
tactic remains timeless.
16 ... Kxh7
Declining only loses more quickly: 16 ... Kh8?? 17 Ng5 g6 18 Qf3 (threatening Qf6
mate) 18 ... Nf5 19 Bxg6! and Black is crushed.
17 Ng5+ Kg6
Again, Black has little choice:
b) 17 ... Kh6? 18 Qg4 Rh8 19 Rc3 g6 20 Qf4 and Black either gets mated or loses his
queen.
a) 17 ... Kg8? 18 Qh5 Rfe8 19 Qxf7+ Kh8 20 Rc3 forces a quick mate after 20 ... Nf5
21 Rh3+ Nh6 22 Rxh6+!.
Exercise: Black’s exposed king is a reassuring sight. What is White’s
strongest continuation of his attack?
18 Qg4?
A partially built bomb isn’t yet a weapon. The Greek Gift sacrifice isn’t an automatic
win, it also has to be followed up correctly.
Answer: White has a decisive attack after 18 Qd3+! (not 18 h4? f6! 19 Qd3+ Nf5 20
h5+ Kh6 and Black stands no worse) 18 ... f5 19 h4! Qb8 20 h5+! Kh6 21 Bc1 and if 21 ...
f4 then 22 Qh7+! Kxg5 23 Qxg7+ Kf5 24 Rxc6! Bxc6 25 f3! and Black is mated next
move.
18 ... f5?
Rather than hitting the queen, Schwarz should go into schnell mode and hit the knight
with 18 ... f6!, not fearing 19 Nxe6+ as after 19 ... Kf7 20 Nxc7 Bxg4 21 Nxa8 Rxa8 Black
emerges with two knights for White’s rook and two pawns.
19 Qg3
Now White is back in charge.
19 ... Qc8?!
This doesn’t help at all. Black had to try 19 ... f4 20 Qg4 b6 21 Rc1 (not 21 Rc3?
Nxe5!) 21 ... Rac8, which at least prolongs the game.
20 Rc3!
The rook is needed on the kingside. The engine prefers the inhuman 20 Bc1!? with the
idea of 20 ... f4 21 Qd3+ Kxg5 22 Qh7 and wins, as Black has no good defence against 23
h4+ Kg4 24 f3+ Kg3 25 Rc2 and 26 Rh3 mate.
20 ... f4 21 Qg4 Nf5 22 Rh3!
Threatening Qh5 mate.
22 ... Rh8 23 Nxe6+ Kf7 24 Qxf5+ Ke7
Trying to run off. 24 ... Kg8 25 Rxh8+ Kxh8 26 Qh5+ Kg8 27 Ng5 would lead to a
more mundane victory.
Black’s king has climbed in and out of his coffin more times than Christopher Lee in his
seven roles as Count Dracula. Now it’s time to nail him in for good.
Exercise: Find a forcing continuation to finish the game.
Answer: Piece sacrifice.
25 Qg5+! Kxe6
Or 25 ... Kf7 26 Qxg7+ Kxe6 27 Qf6 mate.
26 Qg6+! Ke7
We reach the overkill stage, wishing Black would do us all a favour and resign, but in
the 19th Century everyone played on in such situations.
27 Qxg7+ 1-0
Such a vista of destruction and death is only seen in disaster movies; 27 ... Kd8 (or 27
... Ke6 28 Qf6 mate again) 28 Rxh8+ is crushing.
Game 20
E.Najer-L.Totsky
Cappelle-la-Grande 2004
1 e4 e6 2 d4 d5 3 e5 c5 4 c3 Qb6 5 Nf3 Bd7 6 a3 Nc6 7 b4 cxd4 8 cxd4 Rc8
An improvement on the previous game. By bringing his rook quickly to the c-file Black
prevents 9 Nc3, which would now be met by 9 ... Nxd4 with a discovered attack on the
c3-knight.
9 Be3 Nh6 10 Bd3
Question: Does Black have to worry about 10 Bxh6 - ?
Answer: No. Taking on h6 represents a clear loss of a tempo for White, rendering his
previous 9 Be3 completely redundant. Black has an excellent position after 10 ... gxh6,
followed by ... Bg7, ... 0-0 and ... f7-f6, opening the game for his bishop pair.
10 ... Ng4 11 0-0 Nxe3 12 fxe3 g6
13 Nbd2
This seems to be the most promising development.
a) 13 Ng5? is just a blunder due to the trick 13 ... Nxe5! 14 Qe2 (or 14 dxe5 Qxe3+)
14 ... Bh6 and White loses material for zero compensation.
b) 13 Qe1 Bh6 14 Nc3 can be met by 14 ... Ne7! (14 ... 0-0 15 Na4! Qd8 16 Nc5 looks
better for White, due to his powerful c5-knight, E.Sveshnikov-Y.Piskov, Bled 1990) 15 g4
Bxe3+!? 16 Qxe3 Rxc3 17 Rfc1 Rxc1+ 18 Rxc1 h6 and Black is no worse, even if White
has sufficient counterplay on the weakened dark squares.
c) 13 Nc3 is a sound pawn sacrifice, though after 13 ... Nxb4!? (13 ... Bh6 14 Qe1 is
line ‘b’) 14 Na4 Bxa4 15 Qxa4+ Nc6 16 Rab1 Qa5 17 Qxa5 Nxa5 18 Rb5 b6 19 Rxa5! bxa5
20 Bb5+ Kd8 21 Ng5 Kc7 22 Rxf7+ Kb6, White again only has enough play to equalize.
13 ... Bh6
Preventing Ng5, while threatening e3.
14 Qe2 Ne7
As well as uncovering the d7-bishop, the idea is to put so much heat on e3 with ... Nf5
that White will be obliged to give up his light-squared bishop. The routine 14 ... 0-0 15
Nb3, followed by Nc5, again looks a bit better for White.
15 g4
Keeping the knight out of f5. No one has tried the pawn sacrifice 15 Nb3 Nf5 16 Nc5!
(after 16 Bxf5 exf5 17 Rfc1 Rxc1+ 18 Rxc1 0-0, the players already agreed a draw in
M.Willow-V.Shubin, correspondence 2013) 16 ... Nxe3 17 Rfe1, which may be an
improvement. For example, 17 ... Rc7 18 Qf2 Nf5 19 g4 Ne7 20 Rf1 0-0 21 Qh4 looks to
give White a strong attack for the pawn.
15 ... Rc3?!
This effectively wastes a tempo. 15 ... Ba4! is preferable, keeping the knight out of
b3. White might consider 16 Rac1 0-0 17 Nb1!? intending Nc3, but 17 ... Rxc1 18 Rxc1 Rc8
should equalize without much difficulty.
16 Rfc1 Rxc1+
White stands better after 16 ... Qc7 17 Nb3 b6 18 Qd2 Rxc1+ 19 Rxc1 Qb8, B.HeberlaA.Moskalik, Polish Team Championship 1999, and now the cramping 20 b5!.
17 Rxc1 0-0
Now if 17 ... Ba4, then 18 Nb1 and Nc3 does offer something.
18 Nb3
White has emerged with an edge due to his extra space and the c5-square for his
knight, which means slightly more than Black’s bishop pair.
18 ... Rc8 19 Nc5 Qd8
Preparing to expel the white knight with ... b7-b6, so Najer decides to switch his focus
back to the kingside before Black can swap the other pair of rooks.
20 Rf1 Rc7 21 Qe1 b6!?
This creates a weakness on the queenside. Maybe he should just tolerate the c5intruder and look to exchange light-squared bishops via 21 ... Qe8 22 Qe2 a6 and 23 ...
Bb5, when Black seems okay to me.
22 Na6
White’s knight, even though offside, is annoying for Black and may be more valuable
than his d7-bishop.
22 ... Rc8 23 b5!
The theme of our repertoire is to squeeze Black!
23 ... Be8 24 a4 g5!?
With f5 unavailable, Black plays to activate his knight via g6. This is psychologically
and practically preferable to just sitting and waiting while White builds up on the kingside
with Kg2, h2-h4 and so on.
25 Qb1 Ng6
26 Bxg6!
Najer correctly sees that Black’s bishops will remain dormant and inferior to White’s
knights.
26 ... hxg6 27 Rc1 Bf8 28 Rc2
Intending to seize control of the c-file with Qc1 next.
28 ... Be7
Note that 28 ... Ba3 is only a temporary inconvenience after 29 Qb3 Be7 30 Rc3!,
followed by Qc2.
29 Qc1 Rxc2 30 Qxc2 Bd7 31 Kf2 Kf8 32 Ke2 Qc8?!
I think White would have had a much harder time converting if Black retained queens
and passed with a move like 32 ... Ke8.
33 Qxc8+
The ending is a place where complexity hides within simplicity. White correctly
assesses this one as favourable for his side. It’s a rare example of a pair of knights
dominating a pair of bishops.
33 ... Bxc8 34 Nb8!
Heading for c6.
34 ... Ke8?
This allows White to force a winning good knight versus bad bishop ending. Black had
to play 34 ... Bb7 35 Nd7+ Kg7!, when White can probe almost indefinitely, but it is not
necessarily losing.
35 Nc6 a6 36 Nxe7
There goes Black’s only defender of g5 and his remaining bishop is miserably designed
to fight off White’s remaining knight.
36 ... Kxe7
Exercise (critical decision): White to play and win.
37 bxa6?!
White still has chances after this move, but it’s not his best. Not 37 Nxg5?! either,
since Black can immediately regain the pawn after 37 ... axb5 38 axb5 Bd7.
Answer: The study-like 37 a5!! is crushing. For example, 37 ... bxa5 (37 ... axb5 38
axb6 Kd7 39 Nxg5 is also completely hopeless for Black) 38 b6 f6 39 exf6+ Kxf6 40 Kd3
Bb7 41 Kc3 Bc6 42 Ne5 Bb7 43 Kb3 Kg7 44 Ka4 Kf6 45 Kxa5 Ke7 46 Nd3! (who cares
about the g6-pawn?) 46 ... Kd6 47 Nc5 Kc6 48 Nxb7! Kxb7 49 h3 and the black king must
give way. The engine in fact declares mate in twelve.
37 ... Bxa6+ 38 Kd2 Bc4!
Now Black will pick up the a4-pawn, when White’s win is not so certain anymore.
39 Nxg5
39 Kc3 hangs the g4-pawn instead: 39 ... Be2 40 Nxg5 Bxg4 41 Kb4 Be2 and White’s
king is denied access to b5.
39 ... Bb3! 40 Nh7 Bxa4 41 h4
In this way White creates an outside passed pawn.
41 ... Bb5 42 h5 gxh5 43 gxh5
43 ... Bd7?
Black’s best chance to defend was 43 ... f6! 44 exf6+ (or 44 Nxf6 Kf7 45 h6 Kg6) 44 ...
Kf7 45 h6 Bc6 and it’s unclear whether White can make progress.
44 Kc3 Bc8 45 h6 Ba6 46 Ng5 Kf8 47 h7 Kg7 48 Nxf7
Although this little trick wins a pawn, the temporizing 48 Kb4! was even stronger; for
example, 48 ... Bd3 49 h8Q+ Kxg8 50 Nxf7+ Kg7 51 Nd8 Bf5 52 Kb5 and the white king
comes in decisively.
48 ... Kxh7 49 Ng5+ Kg6 50 Nxe6 Kf5 51 Ng7+ Kg6 52 Ne8 Kf7 53 Nc7 Bb7
54 Nb5 Ke6 55 Kb4 Bc6 56 Nc3 Kf5?
56 ... Kd7 would put up more resistance.
57 Na4!
The b6-gnome is no match for White’s muscular knight.
57 ... Ke4
Similarly 57 ... b5 58 Nc3 Bd7 59 Nxb5 Ke4 60 Nc7 Kxe3 61 Kc5 etc.
58 Nxb6 Kxe3 59 Kc5 1-0
White secures his base d4-pawn, while dooming Black’s d5-pawn.
Game 21
F.Caruana-F.Vallejo Pons
Grand Slam Final, Sao Paulo/Bilbao 2012
1 e4 e6 2 d4 d5 3 e5 c5 4 c3 Nc6 5 Nf3 Qb6 6 a3 Nh6
We saw this move in the previous game, after Black developed his queenside with ...
Bd7 and ... Rc8 first. Here he gets his knight out straight away.
7 b4 cxd4 8 cxd4
White plays 8 Bxh6 gxh6 9 cxd4 far less often, as the damage inflicted to Black’s
kingside is offset by the fact that we gives away our important dark-squared bishop for a
knight.
8 ... Nf5
9 Be3
I think this is more accurate than developing the bishop to b2.
Question: Doesn’t this just give away our important dark-squared bishop
for a knight?
Answer: Yes, but in this case, after ... Nxe3 and f2xe3, White gets the open f-file for
an attack and also reinforces d4.
I don’t like putting the bishop on b2 for two reasons. Firstly, it is quite passively placed
on that diagonal; and secondly it allows Black ... Na5! and ... Nc4 tricks. For example: 9
Bb2 Bd7 10 g4 (10 Bc3!? is clumsy: 10 ... h5 11 h4 Rc8 12 Qd2 a6 13 Qb2 Na7! 14 Bd3
Ba4! 15 0-0 Be7 16 g3 Nb5 with light square pressure for Black, E.Sevillano-C.Lakdawala,
San Diego rapid 2006) 10 ... Nfe7 11 Nc3 Na5! (this trick is only possible due to White’s
hanging b2-bishop) 12 Qc2 Nc4 13 Bxc4 dxc4 14 Nd2 Qc6 15 Nce4 Nc8 16 Nxc4 b5 17 Ne3
Qxc2 18 Nxc2 Nb6 and Black has excellent compensation for the pawn, even in an ending,
in view of the bishop pair, White’s vulnerability on the light squares (note the holes on c4
and d5) and his sprawling structure, which has an overextended feel, at least to me. The
comps call it even, whereas stylistically I prefer Black.
9 ... Bd7
Black wants to play ... Rc8 as soon as possible. Challenging White’s e5-grip with 9 ...
f6 is a key alternative; for example, 10 exf6 gxf6 11 Bd3 Nxe3 12 fxe3 Bh6 13 Qe2 Bd7 14
Nc3 Ne7 15 0-0 0-0 16 Rae1 Rac8 17 Nd1 Ng6 18 Nh4! f5 (18 ... Nxh4 19 Qh5 regains the
piece) 19 Qh5 and chances look balanced between White’s attacking prospects and
Black’s bishop pair, S.Zhigalko-Hou Yifan, Moscow 2010.
10 Bd3 Nxe3
Question: Earlier you indicated that White is happy for Black to take on e3.
So why would a strong GM like Vallejo Pons do it?
Answer: He may have feared the alternative, which is to allow White to take on f5.
After 10 ... Rc8 11 Bxf5 exf5 12 0-0. I slightly prefer White, when the game becomes a
battle between Black’s strength on the light squares versus White’s power on dark.
11 fxe3 g6
Black restricts the scope of White’s light-squared bishop and prepares to develop the
dark-squared bishop to h6, where its gaze fixes upon e3, at the cost of creating a dark
square puncture on f6, which makes his king less safe after castling short.
Instead, 11 ... Rc8 is less committal and directly prevents White’s Nc3. Then Yu
Yangyi-Ding Liren, Danzhou 2012, continued 12 0-0 Be7 13 Qe1 f5 14 exf6 Bxf6 15 Nc3 00 16 Na4 Qd8 17 Nc5 b6 18 Nxd7 Qxd7 and here I feel that White’s power on the light
squares is more influential than Black’s on dark.
12 Nc3!?
Quite likely this was a engine-generated continuation. Are opening theoreticians the
chess version of wise men and wise women, or have we turned into the sci-fi story where
the robot geneticist is the one who builds us humans? With this last move we note that
there are similarities between absolute freedom and complete chaos.
Question: Doesn’t this just fall for a beginner’s trap if Black plays ... Nxb4 - ?
Answer: Crazy people tend to believe they are sane and that it’s the rest of the world
who is unbalanced. Intuitive insight (or in this case, almost certainly incredible opening
preparation) goes way past the marshalling of ordinary data. With this shocking move,
which at first appears to deserve a double question mark, White gives away no less than
two pawns for a very promising attack on the other side of the board.
The alternative was simply 12 0-0 Bh6 13 Qe2 Rc8! (preventing Nc3) 14 Nbd2, when
we have transposed to the previous game.
12 ... Nxb4
This move is made with the thought: “When opportunity rides by, you had better be
ready to hop into the saddle.” How often have we mentally uttered those fatal words:
“It’s obvious”? It’s one thing to see the combination, and quite another to assess its
aftermath correctly. Accepting White’s gift of two pawns places Black under a fearsome
attack on the other side. Objectively, Black is still fine, but he is required to find all sorts
of defensive resources, which is not so easy at the board with a clock running down.
Perhaps Black should refrain with 12 ... Rc8, although it would take Gandhian-level
willpower to do so, the equivalent of placing a hot fudge sundae in front of a six-year-old
and telling him: “Our dentist says sugar is bad for children so I don’t want you to eat even
one bite of this.” After 13 Na4 Qd8 14 Nc5 Bxc5! 15 bxc5 b6 16 cxb6 axb6 17 0-0 0-0,
Black has only a slight inferiority.
13 axb4 Bxb4 14 0-0!
The first new move. In a previous game, White played 14 Rc1 Rc8 15 0-0 Rxc3 16
Rxc3 Bxc3 17 Ng5 0-0 18 Nxh7 Kxh7 19 Bxg6+ fxg6 20 Rxf8 Qb5 and had to work hard for
a draw, D.Petukhov-V.Doroshkievich, Krasnodar 2003.
14 ... Bxc3
It’s not a very good sign for Black that Komodo assesses this at “0.00”, despite the
two extra pawns.
15 Rc1!?
White’s posture is that of a crouch, in preparation for coming violence.
Question: Why didn’t Caruana play the tempo-gaining 15 Rb1 - ?
Answer: Presumably because after 15 ... Qd8 he could not then play Ng5. White still
has a very strong attack after 16 h4! h6 (if 16 ... 0-0 17 Ng5 h6, then 18 Rf6! hxg5 19
Bxg6! wins) 16 ... h6 17 Nh2 Bc6 18 Qc2 (or 18 h5!?) 18 ... Qa5 19 Bxg6!, when the comp
favours White, but it’s not entirely conclusive and certainly presents White with practical
difficulties, whereas Caruana’s move puts the emphasis on Black.
15 ... Rc8?
After this natural move White already gets a decisive attack. Black should bring his
bishop back into the defence as quickly as possible with 15 ... Bb4 16 Ng5 Be7! 17 Nxf7 00, when the comp maintains its “0.00” – but which human would think of doing that?
16 Ng5
We reach the “Oh-this-explains-everything” moment and White’s intent leaps into the
path of our gaze. Now f7 and (soon) h7 are in grave danger, while Black’s queen and
dark-squared bishop are on the wrong side of the board, unable to assist their king.
16 ... 0-0 17 Qg4
Another option is the quiet slide 17 Rb1! (not 17 Rf6?? due to 17 ... Bxd4+! 18 exd4
Qxd4+, followed by 19 ... Rxc1 and Black wins) 17 ... Qc7 (17 ... Bxd4! 18 Rxb6 Bxe3+ 19
Kh1 axb6 is Black’s best practical chance) 18 Rf6!, when White has an unstoppable
attack.
17 ... Bd2 18 Qh3
Threatening mate on the move.
18 ... h5 19 Rxc8?
Not the strongest. White should play 19 Rcd1, intending to follow with 20 g4 next, and
Black is lost.
19 ... Bxc8 20 Qf3!
When your presence is detected by the enemy, stealth becomes moot. Both g6 and f7
are threatened.
20 ... Qd8??
When we miscalculate, it turns into the tale of the man who commits murder and then
buries the body in his backyard. Then just as the police come to interview him, his
blasted Terrier digs it up in plain sight.
Black had to play 20 ... Qc7!, so that 21 Bxg6 can be met by 21 ... Bxe3+! (this
deflection miraculously saves him; White’s attack faces a decapitation of its ranks and
therefore its effectiveness) 22 Qxe3 fxg6 and White has no more than a draw; for
example, 23 Rf6 Qc2 24 Rxf8+ Kxf8 25 Qf3+ Qf5 26 Qa3+ Kg8 27 Qe7 Qb1+ 28 Kf2
Qc2+ 29 Kg3 Qd3+ 30 Nf3 Qf5 31 Qc7 Qf8 32 Ng5 h4+! 33 Kxh4 Qf4+ 34 g4 Qf2+ 35
Kh3 Qe3+ with perpetual check. True, White can strengthen his hand by playing 21 h4!
with numerous attacking ideas such as Kh1 (negating ... Bxe3), g2-g4, and Nh3-f4, when
Black still has a lot of work to do to survive. Nevertheless, this was his only chance.
21 Nxf7 Bxe3+ 22 Kh1
Of course White simply ignores the bishop here.
22 ... Qh4
22 ... Qe7 23 Bxg6 is equally hopeless.
23 Bxg6 Bg5
Exercise (combination alert): White to play and force the win.
Answer: Attraction.
24 Bh7+! 1-0
After 24 ... Kxh7 (or 24 ... Kg7 25 Qd3 with infiltration to g6) 25 Nxg5+ Qxg5 26 Qxf8,
Black will be mated soon.
Summary: The double pawn sacrifice with 12 Nc3!? is objectively about even, but
from a practical standpoint it forces our opponent to find multiple defensive resources to
survive.
Game 22
H.Nakamura-Y.Pelletier
Biel 2005
1 e4 e6 2 d4 d5 3 e5 c5 4 c3 Nc6 5 Nf3 Qb6 6 a3 c4
Black seizes queenside space and targets the b3-square, weakened by White’s pawn
moves a2-a3 and c2-c3. The cost is in relieving the central tension, which helps White
out, since we no longer have to worry about pressure on d4.
7 Nbd2 Na5
The knight logically zones in on the b3-hole.
Question: Isn’t Black violating principle by moving the same piece twice,
before completing development?
Answer: We are given an exemption to this principle in closed positions, where
quality takes precedence over quantity.
8 Be2
Another option is to develop the bishop via g2-g3.
Question: What are the differences from putting it on e2?
Answer: Obviously it takes an extra move more to play g2-g3 first and develop the
bishop that way. On the other hand, as we’ve just said, tempi are not so important in this
closed position, and fianchettoing the bishop (does it count as a fianchetto if the bishop is
developed to h3?) enables White to play against the weakened e6-pawn if Black decides
to push the f-pawn. For instance, 8 g3 Bd7 9 h4 (if White wants to put the bishop on h3,
it makes sense to push the h-pawn first; we’ll see the true fianchetto in the next game,
albeit without ... Qb6) 9 ... 0-0-0 10 Bh3 f5 11 exf6 gxf6 12 0-0 with potential pressure
down the e-file, albeit offset by Black’s central majority and open g-file.
8 ... Bd7 9 0-0 Ne7 10 Rb1
Worrying Black about line-opening b2-b3 ideas should Black castle long.
10 ... Qc7!
There are two ideas behind this further queen move:
1. It’s kind of a warning to White: “Play b2-b3, and I will capture and make a target of
your now backward c3-pawn.”
2. It clears b6 for the knight manoeuvre ... Nc8-b6-a4, when White must watch out for
piece sacrifices, such as on b2, c3 and a3, to obtain a queenside pawn mass.
11 Re1 Nc8! 12 Nf1
White’s knight heads for e3 or g3 and then onward in search of kingside targets.
12 ... Nb6 13 Bf4
Nimzowitsch approved. White overprotects e5 and eyes the black queen on c7 to
discourage even a thought of ... f7-f6 counterplay.
13 ... Ba4
This natural move was new at the time. Previous games had seen:
a) 13 ... Nb3 14 N3d2 Na5 15 Ng3 Ba4 16 Qc1 0-0-0 17 Nh5 Kb8 18 Nf3 Bb3 19 Nd2
Ba4 20 Nf3 Bb3 21 Nd2 and the players agreed to a repetition draw, just when the
position was getting interesting, Ni Hua-E.Bareev, Beijing (rapid) 2003.
b) 13 ... h6 14 Qd2 Be7 15 h4 0-0-0 16 Bg3 Rdg8 17 h5 Qd8 18 N3h2 Kb8 19 Bg4 Ka8
20 Ne3, making way for an f2-f4-f5 pawn break, J.M.Degraeve-W.Arencibia Rodriguez,
Guelph 2002.
14 Qc1 Nb3 15 Qe3 h6 16 h4
Nakamura begins to expand on the kingside, while suppressing any possibility of ...
g7-g5.
16 ... 0-0-0 17 h5!
Question: I understand that White’s push to h4 suppresses ... g7-g5,
but why spend a tempo advancing the pawn again?
Answer: His plan is also to push his f-pawn to f5 eventually. With the white h-pawn
already on the fifth rank, it won’t be so easy for Black to play ... g7-g6 without leaving a
lot of weak kingside pawns after h5xg6.
17 ... Na5
Intending either to bring his light-squared bishop into play via c2 or else force a
repetition draw with 18 Rbc1 Nb3 19 Rb1 Na5. Nakamura isn’t willing to accept the latter.
18 N3d2 Bc2 19 Rbc1 Bh7
White must now deal with the threat of ... Na4 and ... Nxb2.
20 Bd1!
Showing a major plus point to his earlier 8 Be2. The bishop is able to drop back and
cover the d1-a4 diagonal.
20 ... Kb8 21 Bc2!
Question: Didn’t White just offer a swap of his good bishop for Black’s bad
French bishop?
Answer: When a straight line fails, we need to think in curved lines. Principles are not
religious precepts which must be obeyed 100% of the time. White’s move is made with
two unspoken assumptions:
1. First of all, Black’s “bad” bishop is by no means bad when it rakes the b1-h7
diagonal.
2. Secondly, White’s plan is to enforce his f4-f5 pawn break. So swapping away a black
defender of f5 is logical.
21 ... Bxc2 22 Rxc2 Be7 23 Bh2
Clearing the way for the f-pawn to advance.
23 ... Ka8 24 Qh3!
The queen takes up the light-squared bishop’s traditional job: eyeing f5, while
preventing ... g7-g6, since h5xg6 ... f7xg6 then hangs the e6-pawn. Black responds by
reinforcing e6.
24 ... Qd7 25 f4 g6
This stalls White’s f4-f5 break, but not forever.
26 Ne3
More and more white pieces take aim at f5.
26 ... Rdg8 27 Nf3 Nc6 28 Kh1
The king vacates the g-file in preparation for g2-g4.
28 ... Bd8 29 g4
Comps share some characteristics of sentient consciousness, but very few. Despite the
engine’s “0.00” assessment, Black’s downgraded status is no longer debatable to most
humans.
29 ... Qe8 30 Rg1 Nd7 31 Re2 gxh5?!
We all rationalize wrongdoing with the thought: “It’s a small price to pay for the
greater good.” Black experiences increasing difficulty in holding back an outward
expression of resentment. His position was trial enough without a secondary problem on
his head. Until now Black’s pain was localized, but after this impatient move, which
unnecessarily creates further weaknesses in his camp, the pain spreads. Black can either
just wait and do nothing, which bears resemblance to a seriously ill person assuming the
mask of wellbeing while around others, or he can try the speculative 31 ... f6!? 32 f5! fxe5
33 fxg6 e4 34 Ne1 Bg5 35 N1c2 Ne7 36 Rf2 Nxg6!? 37 hxg6 Rxg6 with some, if not quite
enough, compensation for the sacrificed piece.
32 Qxh5 Qf8 33 f5
At long last White achieves his aim.
33 ... Bg5 34 Rf1 Qg7 35 Ng2
Now 35 ... Bd8 can be met by 36 Nf4!.
35 ... Qh7 36 Ref2 Nd8
Not 36 ... exf5?! 37 gxf5 Qxf5? 38 Nxg5 Qxg5 39 Qxf7 Nb6 40 Qf6 and White is
completely in control.
37 Ng1 Nb8 38 Ne2 Na6 39 Ng3 Re8
We have reached that frustrating point where we know our position is favourable, yet
are unable to come up with a clear plan on just how to proceed.
Exercise (planning): Nakamura plans with conviction, something his
opponent may only surmise, and found a clear, step-by-step way to increase
his advantage. Try and come up with a plan yourself.
40 Qh3!
Answer: Step 1: Clear h5 for the knight, after which Black is unable to double major
pieces on the g-file.
40 ... Re7 41 Nh5 Rc7 42 Bf4!
Step 2: Swap off dark-squared bishops, after which f6 is open to invasion from White’s
knight.
42 ... Nb8
Keeping the bishop with 42 ... Be7 gravely weakens h6 after 43 Ne3 Rd7 44 Rh2 Nc7
45 Nf6 Bxf6 46 exf6 exf5 47 g5 Nde6 48 Qxh6 Qxh6 49 Rxh6 Rdd8 50 Bxc7 Nxc7 51 Rxf5,
and Black is completely busted in the ending.
43 Bxg5
Step 2 is completed.
43 ... hxg5 44 Ne3 Nbc6 45 Rh2!
Step 3 begins. White will eventually seize control over the h-file.
45 ... Ne7 46 Rf3 Rc6 47 Nf6!
The h-file is White’s piñata. If he beats on it long enough, the candy emerges. We are
happy when we predict a future event, and even happier when we create that future
ourselves. Nakamura’s plan comes to fruition, forcing Black into a lost ending.
47 ... Qxh3
The queen must obey with a sigh of resignation. White’s coming control over the h-file
is decisive.
48 Rfxh3 Rxh3 49 Rxh3 b5
The “fact” that Black can go after b2 is a cherished fiction. It’s too slow; for example,
49 ... Rb6 50 Rh8! Nec6 51 Nfxd5! exd5 52 e6! fxe6 53 f6 Rxb2 54 f7 Rf2 55 Nf5! and the
interference forces promotion.
50 Nh7 exf5 51 gxf5 g4 52 Rh4 1-0
Black’s quartet of misfits isn’t going to get the job done. The g4-pawn falls, after
which White will go after f7 and d5.
Game 23
S.Movsesian-J.Jurek
Pardubice 1998
1 e4 e6 2 d4 d5 3 e5 c5 4 c3 Nc6 5 Nf3 Bd7
Black is going to try a different set-up, leaving his queen on d8 for the time being.
6 a3 c4 7 Nbd2 Na5 8 g3 Bc6
Question: What’s this about? Why waste a tempo to reinforce the d5-pawn?
Answer: The idea isn’t to reinforce d5. It’s in preparation for ... Qd7 and ... Ba4,
seizing more control over the queenside light squares. Then if White loses sight of the c2square, Black may activate the traditionally bad French bishop onto the more important
b1-h7 diagonal.
9 Bg2 Qd7 10 0-0 Ba4 11 Qe2 0-0-0
Question: Wasn’t Black intending to play 11 ... Bc2 - ?
Answer: He was, and in fact did in a later game. After 12 Ne1 Bg6 13 h4, as in
P.Haba-J.Jurek, Czech Championship, Lazne Bohdanec 1999, and now 13 ... h6 (Haba),
Black looks to have a satisfactory position for Black. As yet no one has played – or been
given the chance to play – the engines’ suggestion of 12 Nxc4!? Nb3 13 Nd6+ Bxd6 14
exd6 Nxa1 15 Ne5 Qa4 (otherwise Qb5+ wins) 16 d7+ Kf8 17 c4! with fearsome
compensation. Komodo assesses this heavily in White’s favour despite Black’s extra rook.
12 Ne1
Covering against ... Bc2, while preparing to expand on the kingside with f2-f4. It
seems as if Black’s opening idea has already failed. In fact the comps think Black stands
better here.
12 ... Kb8
13 f4
White hopes to achieve an eventual f4-f5 break, probably with the help of a g3-g4
push. Since there’s absolutely no hurry about this 13 Rb1 first may be more accurate,
intending to reorganize with Ndf3 and Be3 before getting down to business.
13 ... h5 14 Rb1
This way he can move the d2-knight to f3 without the loss of the c1-bishop after ...
Nb3.
14 ... Bb3
I’m not keen on this move, which rather helps White sort his position out. The comp’s
suggestion is 14 ... h4!? 15 g4 h3. It looks risky, since the far-flung h-pawn may later fall,
but in the meantime White’s pieces are treading on each other’s toes, while Black can
continue with ... Ne7 and then ... f7-f5 himself.
15 Nxb3
Otherwise Black may follow up with ... Qa4 and ... Bc2 at some point.
15 ... Nxb3 16 Be3 Ne7 17 Nc2 g6
Black now has a maximum lock on f5, but not a permanent one since White can
always bring more forces to bear there.
18 Rf3 Nc6 19 h3 b5
Black’s main counterplay lies in a future ... b5-b4 break.
Question: Doesn’t it strike you as odd that it’s an opposite wing castling
position and yet both sides attack on the side where they keep their king?
Answer: This is standard operating procedure in the ... c5-c4 lines of the Advance
French. Both kings are relatively secure (for now), since they both own so much space on
their respective flanks.
20 g4 hxg4 21 hxg4 Be7 22 f5
This is thematic yet risky, since by achieving his desired break White simultaneously
exposes his own king.
22 ... gxf5 23 gxf5 Rdg8
After 23 ... exf5!? 24 Rbf1 Rdg8 25 Rxf5, one of Black’s pawns will fall (either f7 or d5)
and I’m not so sure the open h- and g-files provide him with enough attacking
compensation.
24 f6
A surprising advance at first glance. Having worked hard to create an opening on the
kingside, White now shuts that side of the board down. The ideas are threefold:
1. White’s king is now a lot safer than in lines where Black is allowed to open with ...
e6xf5.
2. Black’s f7-pawn remains an eternal endgame target.
3. In an ending Black may also be vulnerable to sacrificial ideas on d5 or e6, utilizing
the f6-pawn as a promotion threat.
24 ... Bd8 25 Kf2
White plans to swap the rooks off, after which Black’s would-be attack comes to a
complete halt.
25 ... a5
25 ... Rh2 26 Rg3 doesn’t get Black anywhere.
26 Rh3?!
Swapping the more active rook seems wrong. I might have tossed in 28 Na1!? to
remove the dangerous knight.
26 ... Rxh3 27 Bxh3 b4 28 Bf4
Not actually a mistake, yet a preparation for one.
28 ... Bb6
Eyeing a piece sacrifice on d4, which White mistakenly provokes with his next move.
The straightforward 28 ... bxc3 29 bxc3 a4 is good too, despite allowing White to show
his potential ideas on the kingside; for example, 30 Ne3 Ba5 31 Qc2 (not 31 Nxc4? Bxc3)
31 ... Kb7 (or 31 ... Na7 32 Bg2 Nb5 33 Qh7 Qe8 34 Bxd5!) 32 Qh7 Rc8 33 Nxd5!? Qxd5
34 Qxf7+ Rc7 35 Qxe6, clearing the way for the kingside pawns, though after 45 ... Qe4!
46 Qf5 Qxf5 47 Bxf5 Bxc3 48 Kg3 Bxd4 49 Re1, they are only enough for a draw at best.
29 Ne3?
Eyeing a knight sacrifice on c4, but Black has a similar intent ahead of White’s
schedule. Instead, chances remain balanced after 29 Rg1. Note that Black cannot play
without any caution on the queenside; for example, after 29 ... Rxg1 30 Kxg1 bxc3 31
bxc3 a4 32 Ne3 Ba5 33 Qc2 Na7?? 34 Bxe6! Qxe6 (or 34 ... fxe6 35 Qg6) 35 Qf5!, White
forces a pawn through and wins.
29 ... Nbxd4!
The idea comes first and only then is the reality fleshed out. We don’t need to
calculate lines to make such a sacrifice. Our eyes just see that it’s promising. For the
piece Black gets at least two healthy pawns and a chance to roll his deep queenside
pawn majority.
30 cxd4 Bxd4
There is leeway to juggle the variables. I also like Black’s chances after 30 ... Nxd4 31
Qd1 b3.
31 b3!?
This attempt to strip the queenside pawn cover around Black’s king shouldn’t succeed.
31 ... c3
Not 31 ... Bxe5?! 32 Bxe5+ Nxe5 due to 33 Nxc4! and White picks off a key pawn.
32 axb4 Nxb4 33 Bg2 Qc6 34 Kf1
Exercise (planning): We feel Black’s fingers tightening around White’s throat.
If you find the correct idea, then White is busted. What would you play?
34 ... Qc5??
Jurek veers from the prominent line of reasoning to a side issue. Black’s queen and
bishop need to reverse positions.
Answer: 34 ... Bb6! is correct, intending ... Qc5, after which White has no meaningful
moves. For example, 35 Rc1 Qc5 36 Bf3 Qd4! 37 Bh2 c2 38 Ng4 Rc8 39 Kg2 Nd3! and
White can resign, since the c2-pawn can’t be touched due to a future fork on e1.
35 Rc1
Now chances are once again balanced.
35 ... Ka7 36 Bf3?!
Push relaxation too far and it turns into complacency. He should blockade the passed
c-pawn with 36 Nc2.
36 ... Rc8?!
This is beginning to look like mutual time trouble. 36 ... c2! ties White down again.
Principle: Passed pawns should be pushed!
37 Nc2! Nxc2 38 Qxc2 Rg8 39 Ke2 Rg6??
It’s a mistake to cling to a long-ago necessity, which is unneeded in the present. Black
fears Qh7 and misplaces his rook. He should have played 39 ... Kb8!, when 40 Qh7 can be
met by 40 ... Qb5+ (forcing the white queen to come back) 41 Qd3 Qb4, and if White
tries 42 Bxd5!? exd5 43 e6+ then 43 ... Ka7 44 exf7 Rf8 45 Bd6! Qxd6 46 Qxd4+ Kb7 47
Rxc3 Rxf7 should end in a draw.
Exercise: Why was Black’s move an error and how did White exploit it?
Answer: The fact that Black’s king, queen and bishop are lined up on the a7-diagonal
allows White to simplify decisively.
40 Qd3!
Threatening 41 Be3 (or even 41 Qxd4 Qxd4 42 Be3), after which Black will just be a
bishop down since his c3-pawn will drop off as well.
40 ... Rg1 41 Rxg1
Even stronger was 41 Be3! Bxe3 42 Rxc3! (zwischenzug) 42 ... Qb4 43 Qxe3+ and
Black is completely busted.
41 ... Bxg1
Now a simple expedient is all that Movsesian requires to fulfil his wish.
42 Be3!
The simplification is deadly. It poses Black an unanswerable question, kind of like
when someone responds to you in a conversation with “Oh?”
42 ... Bxe3 43 Qxe3 d4
Defending the queen with 43 ... Kb6 does not save Black. After 44 Qxc5+ Kxc5 45 Kd3
c2 46 Kxc2 Kd4 47 Kb2 Kxe5 48 Ka3 Kxf6 49 Ka4 and 50 Kxa5, the b-pawn is sufficient for
White to win.
44 Qe4 Qb5+ 45 Ke1 1-0
If 45 ... Kb8 46 Qxd4 c2 then 47 Qd8+ Ka7 48 Qc7+ Ka6 49 Be2 wins the queen.
Summary: Be aware of Black’s plan of ... c5-c4, ... Na5, ... Bc6, ... Qd7 and ... Ba4.
Our counterplay lies on the kingside with a f2-f4-f5 break.
Game 24
A.Grischuk-Er.Hansen
World Rapid Championship, Dubai 2014
1 e4 e6 2 d4 d5 3 e5 c5 4 c3 Nc6 5 Nf3 Nge7
This time Black delays the development of his queenside in favour of rushing his king’s
knight to f5.
6 Na3
Question: Aren’t we going to stick with our normal 6 a3 plan?
Answer: You can if you wish. Then 6 ... Qb6 7 b4 cxd4 8 cxd4 Nf5 transposes to
Game 21, while 6 ... c4 7 Nbd2 Na5 reaches similar positions to those in the previous two
games. However, Black’s early ... Nge7 gives us the option of setting up with Na3 and
Nc2 instead, which secures d4 without the aid of Be3. This means that we get to keep
both our bishops, since Black is denied the ... Nf5 (or ... Ng4) and ... Nxe3 plan.
6 ... cxd4 7 cxd4 Nf5 8 Nc2 Qb6 9 Bd3 Bd7
The insertion of 9 ... Bb4+ 10 Kf1 is only a minor inconvenience for White. After 10 ...
Be7 11 h4 h5 (otherwise g2-g4 follows) 12 g3 a5 13 Kg2 Bd7 14 Bxf5 exf5, as in
V.Malaniuk-S.Lputian, USSR Championship, Kiev 1986, and now 15 Ne3, White has a
favourable version of the 10 ... a5 line below.
10 0-0
Compared with the 5 ... Qb6 6 Bd3 cxd4 7 cxd4 Bd7 8 0-0 main line (which we’re not
examining), the inclusion of the extra knight moves means that White can develop his
kingside optimally without sacrificing a pawn, since 10 ... Nfxd4?? 11 Nfxd4 Nxd4? 12 Be3
Bc5 13 b4! wins a piece.
10 ... Be7?
This natural move is a mistake due to White’s reply. The correct way for Black to
justify his set-up is with 10 ... a5!, which prevents any expansion with b2-b4 and thereby
threatens to capture on d4. White usually responds with 11 Bxf5 (ceding control over the
light squares to expand his control over dark; 11 g4? fails to 11 ... Nfxd4! here, while 11
a3 is met by 11 ... a4!) 11 ... exf5 12 Ne3 Be6 13 g3, as in L.Dominguez PerezI.Ibragimov, Sochi 2012. The position is objectively even, but it’s instructive to watch how
White slowly achieves a winning position: 13 ... Be7 14 Ng2 h6 15 h4 0-0 16 Nf4 Rfc8 17
Re1 Rc7 18 Re2 Rac8 19 Be3 Nb4 20 Ne1 Qb5?! (Black should try 20 ... g5! to prevent
what follows) 21 a3 Na6 22 Ned3 a4 23 Rd2 Bf8 24 g4! Bd7 (after 24 ... fxg4?! 25 Nxe6
fxe6 26 Qxg4 White threatens both the e6- and h6-pawns) 25 g5! hxg5 26 hxg5 g6 27
Qf3 Be6 28 Kg2 Rc4 29 Rh1 and White soon had a decisive attack.
11 g4! Nh6
Sad, but necessary. He can’t take on d4 for the same reason as before; the retreat to
e7 is blocked by the bishop; and 11 ... Nh4? runs into 12 Nxh4 Bxh4 13 g5! (trapping the
bishop) 13 ... h5 (or 13 ... h6 14 Qh5) 14 Qf3! Nxd4 15 Qf4, when Black loses a piece for
not enough pawns.
12 h3
Shutting Black’s h6-knight out of play.
12 ... Rc8
Castling is no improvement. After 12 ... 0-0-0?! 13 Rb1 Kb8 14 b4 Ng8 15 Bd2 h5? 16
b5 Na5 17 Qe1, White won a piece in A.Volokitin-F.Caruana, World Blitz Championship,
Dubai 2014.
13 Rb1
Defending the b-pawn and planning to expand with b2-b4. He could actually eliminate
the Rb1 step and push 13 b4! at once, since 13 ... Nxb4?! 14 Nxb4 Bxb4 15 Rb1 Qa5 16
Qb3 Rc3?! 17 Qxb4 Qxb4 18 Rxb4 Rxd3 19 Rxb7 is a winning ending for White.
13 ... Ng8
Preventing b2-b4 with 13 ... a5 allows 14 Bxh6 gxh6 15 Qd2 Bf8 16 Rfc1, which also
looks unpleasant for Black.
14 b4 h5 15 g5!
Pawns are the cheapest and most efficient labour source for seizing territory. There is
no reason to hold back his plan’s fullest application. The players’ long-term visions are
clearly at odds. White plays for strangulation, while Black hopes the opposing pawns will
prove overextended. My feeling is that White’s chances are far higher. To play this line
well, we must be born squeezers. Pushing to g5 is a good deal for White, since it will be
some time before Black can even try to utilize his control of f5.
15 ... g6 16 Bd2 a6 17 a4 Bd8
He must make room for his g8-knight.
18 b5 axb5 19 axb5
19 Na3! is more accurate, and if 19 ... Na7 then 20 axb5.
19 ... Na5 20 Ne3 Ne7 21 Bb4!
White’s dark-squared bishop finds a powerful diagonal.
21 ... Nf5
When we play a skilled strategist, it feels like we are being manoeuvred into a place
not of our choosing. Black is desperate for exchanges.
22 Nxf5
Little by little Black is deprived of anything which brings joy in his position. This trade
is fine with White, who gets to plug the f5-hole with a black pawn.
22 ... gxf5 23 Bc5
23 ... Rxc5
At some point Black has to fight back. Unfortunately, this is one of those instances
where yanking a single snake from the Medusa’s head only leaves you in mortal danger
from all the others that remain alive. After 23 ... Qc7? 24 b6, Black is getting pushed off
the board, yet White’s initiative and squeezing power are hardly slowed down by Black’s
exchange sacrifice either.
24 dxc5 Qxc5 25 Qa4 Qc3 26 Be2!
Threatening to trap the queen with Rfc1, so Black has to retreat from White’s territory.
26 ... Qc5 27 Rfc1 Qb6 28 h4
White retains his strategic grip, supporting the g5-pawn and fixing the h5-pawn as a
potential target. Black just doesn’t have enough for the exchange.
28 ... 0-0 29 Qb4 Re8
30 Ra1
Preventing ... Be7 and virtually forcing Black’s next move, which takes the game into
an ending. If White wants to stay in the middlegame then 30 Nd2, uncovering an attack
on the h5-pawn, looks very strong as well.
30 ... Nc4
This doesn’t lose a pawn, since b5 falls.
31 Bxc4 dxc4 32 Rxc4 Be7
The immediate 32 ... Qxb5 33 Qxb5 Bxb5 34 Rc8 also leaves Black busted.
33 Qa5 Qxb5 34 Qxb5 Bxb5 35 Rc7!
Again forcing Black’s hand, and the rook isn’t going to get trapped within enemy lines.
35 ... Bc6 36 Nd4 Bd5
36 ... Bd8 fails to trap the rook, since White now has 37 Rc8.
37 Rac1!
With an exchange of rooks Black’s position will degenerate further.
37 ... b6 38 Rc8 Rxc8 39 Rxc8+ Kg7 40 Ne2!
Finally going after the h5-pawn.
40 ... Bc5 41 Nf4 Bf3
Black’s game is closer to a corpse than a living, breathing thing and the distance
between oppression and violence is just a short step away.
Exercise: Find one powerful idea and you force Black’s resignation.
Answer: Undermining.
42 g6! 1-0
The f7- and e6-squares are about to be the black king’s grassy knoll. After 42 g6!
(threatening Rc7) 42 ... fxg6 43 Nxe6+, Black’s king is deprived of safe squares since h6
gets mated by Rh8, while f7 and h7 get forked on g5.
Summary: When Black plays an early 5 ... Nge7, we can choose between carrying on
with 6 a3 as before or switching to a different plan with 6 Na3 and Nc2 to reinforce d4.
Chapter Four
Caro-Kann Defence
I consider open positions the invention of the devil, so let’s stay consistent with our line
against the French and play the Advance against the Caro-Kann as well. GM Alex Baburin
writes: “I am not an expert on the Caro-Kann, but it seems to me that at present Black is
doing quite well in the main line (3 Nc3 dxe4 4 Nxe4 Bf5) and in the Panov Attack (3 exd5
cxd5 4 c4). This explains why 3 e5 is so popular nowadays.” As a lifelong Caro-Kann
player, I always wince when my opponent pushes the e-pawn to the fifth rank, since it’s
not so easy to equalize against White’s bind.
Game 25
C.Lakdawala-S.L.Jones
Buena Park 1995
1 e4
When I push my e-pawn two squares on the first move, it’s essentially an attempt to
recapture the joy of my childhood. It’s all a matter of perspective. The snail who rides on
the shell of a tortoise may think: “Oh boy! This is going to be a wild ride!”. Yes, I risked 1
e4!?, but then again I knew for a 100% certainty that my opponent would play the CaroKann, which isn’t Black’s scariest response to 1 e4. Whoever invented the Caro-Kann (it’s
just a wild guess, but I’m thinking it was probably Mr. Caro and Mr. Kann) did so with an
eye towards defence.
1 ... c6 2 d4 d5 3 e5
Question: What are the differences between the Advance French
and Advance Caro-Kann?
Answer: Two key differences:
1. In the Caro, Black gets to bring the light-squared bishop outside the pawn chain
(usually to f5) and only then play ... e7-e6; whereas in the French, Black’s bishop is
locked inside the pawn chain. This isn’t necessarily an advantage for Black, since the
bishop on the outside is vulnerable to g2-g4 pawn pushes, and also Nh4 ideas which pick
up the bishop pair for White.
2. In the Caro-Kann, Black’s natural break with the c-pawn is essentially a tempo loss
(when compared with the French), since Black took two moves to play this move,
essentially wasting one on ... c7-c6.
3 ... Bf5 4 Nf3 e6 5 Be2
Short’s variation is a youthful line, less than thirty years old. It also fits perfectly with
our repertoire’s theme of attempting the slow squeeze.
5 ... c5
This natural move frees c6 for a black knight, while challenging White’s centre, yet is
somewhat risky since Black creates confrontation while lagging in development. For the
more cautious 5 ... Nd7, see Games 29 and 30.
6 0-0
We’ll examine the alternative, sharper option 6 Be3 in Games 27 and 28.
The counterthrust 6 c4 isn’t so effective once White has moved the light-squared
bishop, since a tempo will be lost when Black captures on c4. After 6 ... dxc4 7 Bxc4 Nc6
Black looks just fine and scores well from this position.
6 ... Nc6
Black can also try to bring the king’s knight to c6 after 6 ... Ne7. We’ll look at this
next.
7 c3
Just as in Advance French lines, we back up our d4-pawn with c2-c3.
7 ... cxd4
The trade immunizes Black from d4xc5 ideas, at the cost of clearing the c3-square for
White’s b1-knight. Other moves:
a) 7 ... Bg4 8 Be3 cxd4 9 cxd4 Nge7 10 Nc3 Nf5 11 Rc1 Be7 12 h3 Bxf3 13 Bxf3 0-0 14
Qd3 Rc8? (14 ... Nxe3 15 fxe3 Bg5 is correct) 15 Nxd5! Nfxd4?? (Black can still minimize
the damage with 15 ... Bg5) 16 Nxe7+ Qxe7 17 Bxd4 and 1-0 as White emerges a full
piece up, C.Lakdawala-S.Fairbairn, Las Vegas 1995.
b) 7 ... Qb6 8 dxc5! Bxc5 9 b4 (White gambles that the gain of time outweighs the
potential of structural weakness) 9 ... Be7 10 Be3 Qc7 11 Qa4 (pinning the knight and
threatening to push the b-pawn to b5 and b6; the immediate 11 b5!? is possible too, as
after 11 ... Nxe5!? 12 Nxe5 Qxe5 13 Bd4 Qc7 14 Bxg7 Bf6 15 Bxh8 Bxh8 16 Bd3, I’m not
so sure that Black obtains full compensation for the exchange) 11 ... Kf8 12 Bf4 g5 13 b5
gxf4 14 bxc6 bxc6 15 Qxf4, when I like White’s chances against Black’s insecure king,
V.Ostanin-M.Mubarakshin, Penza 2006.
8 cxd4 Nge7 9 Nc3 h6
9 ... Bg4 10 Be3 transposes to the 7 ... Bg4 line above.
10 Be3 Nc8
Question: Isn’t this a bit contorted?
Answer: It is, yet Black gets away with it since the position is closed for the moment,
and quality development overrides quantity. The knight makes room on e7 for the darksquared bishop and plans to emerge on b6, where it fights for control over c4.
11 Rc1 Be7
This was a new move at the time. N.Short-Y.Seirawan, Manila 1990, saw 11 ... a6 12
Na4! Nb6 13 Nc5 Bxc5 14 Rxc5 0-0 15 Qb3 Nd7 16 Rc3 Qb6 17 Rfc1 Qxb3 18 Rxb3 Rfb8
19 Nd2 Kf8 20 h4 Ke8 21 g4 Bh7 22 h5 Nd8 23 Rbc3 Nb6 24 Nb3! Na4?! 25 Rc7 Nxb2 26
Nc5 b5 27 g5! Nc4 (or 27 ... hxg5 28 Bxg5 Nc4 29 Re7+ Kf8 30 Nd7+ Kg8 31 Re8 mate)
28 gxh6 gxh6 29 Nd7! and Black’s position collapses since White threatens both the b8rook and a knight fork on f6.
12 Na4!
Remember this manoeuvre. Black can’t afford to play ... b7-b6, so it’s almost as if
there is a hole on c5, ready to be occupied by a white knight. Removing it with ... Bxc5 is
a large concession, as it yields White both the bishop pair and control over the dark
squares.
12 ... 0-0 13 Nc5 Rb8!
The rather illogical 13 ... Qc7?!, as in J.Sugden-F.Vangsgaard, Hastings 2016/17,
places Black’s queen vulnerably opposite the c1-rook; White looks clearly better after 14
b4.
14 Qd2 Bxc5?!
I don’t think this trade fits with ... Rb8. He should tolerate the knight’s presence a bit
longer and play 14 ... Nb6!, offering the b7-pawn. After 15 b3 (or 15 Nxb7 Rxb7 16 Rxc6
Nc4 17 Bxc4 Qd7 18 Bb5 Rxb5 19 Rfc1 Rb7 with the open b-file and the bishop pair) 15 ...
Nd7! 16 Nxb7 (maybe White should decline the pawn and just play 16 b4) 16 ... Rxb7 17
Rxc6 Bb4 18 Qb2 Nb8 19 Rcc1 Qe7 20 Qa1 Ba3, Black has decent dark square
compensation.
15 Rxc5
White has emerged well from the opening, with the bishop pair and potential on the
dark squares which he now controls.
15 ... Nb6 16 b3 Nd7 17 Rcc1 Rc8 18 Ne1
The knight wasn’t doing anything on f3 and is re-routed to the queenside.
18 ... Qb6
Black pressures d4 to prevent Nd3.
19 Nd3!
... which I play anyway.
19 ... Rc7
He can’t take the pawn because of 19 ... Nxd4? 20 Kh1!, threatening Rxc8 and Nc1,
winning the pinned knight.
20 Nc5 Qb4 21 Qb2!
I’m not about to let his knight into b4.
21 ... Nxc5 22 Rxc5 Rcc8
Planning to challenge the c-file after ... Ne7.
23 Rfc1 a6!
Black realizes in time that 23 ... Ne7?? walks into a queen trap after 24 Bd2 Qb6 25
Ba5.
24 h3 Qb6 25 Bd2
Eyeing more Ba5 tricks.
25 ... f6!
During the game I was pleased to see this, since it allows a slight opening of the
position for my bishop pair. After having analysed it, I think the move is Black’s best shot,
since going passive isn’t such a great idea here.
Question: How does White make progress if Black just sits there doing nothing?
Answer: I would slowly push my queenside pawns; for example, 25 ... Rfe8 26 Ba5
Qa7 27 a4 Bg6 28 b4! Kh7 29 Qd2! Kg8 30 b5! axb5 31 axb5 Ne7 32 b6 Qa8 33 Rc7 with
a crushing bind.
26 exf6 Rxf6 27 Be3 Rcf8 28 Qd2 Qb4!?
I was happy to swap queens now and enter a favourable ending.
29 Qxb4 Nxb4 30 Rc7 R8f7
After 30 ... Nxa2 31 R1c5 b6 32 R5c6 Nb4 33 Rxb6, Black will soon lose a pawn.
31 a3 Nc6 32 Rxf7 Rxf7 33 b4
I didn’t think my superior bishop would be enough to overcome the drawing power of
opposite bishops in the line 33 Bxa6 Nxd4 34 Bxd4 bxa6 35 Rc8+ Rf8 36 Rc3, when Black
should hold the draw.
33 ... e5!?
Bending the rules here and there can come perilously close to being a pure violation
of principle. On the one hand, Black’s pieces gain activity; on the other, he further opens
the game for my bishops.
34 dxe5 Nxe5 35 Rd1 Rd7 36 Bc5 Be6
Here 36 ... Nc4 looks better. Black shouldn’t be afraid of losing a pawn after 37 Rxd5
Rxd5 38 Bxc4 Be6 39 Bxd5 Bxd5, since he should draw this without any problems.
37 a4 Nc4 38 a5 Kf7 39 f4!?
Depriving his knight of e5, at the cost of weakening e4.
39 ... Nd6 40 g4
Threatening a cheapo with f4-f5 next, trapping his bishop.
40 ... g6 41 Kf2?!
White wants to bring up the king. The critical question is: Should it move to f2 or g2?
With hindsight I think g2 is the correct square. This is the wing-it moment just before the
job interview, where you realize to your horror that you forgot to brush your hair and only
have access to your fingers as an ad hoc comb. It’s good to play in a relaxed manner, but
not this relaxed. I saw that Black could force a position with opposite-coloured bishops
and mistakenly believe that it favoured me, due to Black’s existing punctures on the dark
squares. I should have preserved the bishops with 41 Kg2!, when White still has decent
winning chances.
41 ... Ne4+! 42 Ke3 Nc3
There goes my bishop pair and with it a major chunk of my advantage.
43 Re1 Nxe2 44 Rxe2 h5 45 Rg2 hxg4 46 hxg4 Ke8 47 Kd4 Rh7 48 Ke5
Kd7?
This is a step in the wrong direction. 48 ... Kf7! is correct, keeping the white king out
and intending ... Rh4 next.
49 Kf6
All looks content in White’s camp with an overwhelming king position – except for a
single worrisome exception: bishops of opposite colour. Here I folded my arms in the
universal gesture of confident superiority. Unfortunately, I was soon forced to unfold them
in a hurry, since my opponent defended with infuriating equilibrium.
49 ... Bf7
Black does his best to reorganize the disharmonious energy pervading his position.
50 Re2
Threatening Re7+.
50 ... Be8 51 Re5!
Now Black’s d-pawn falls.
51 ... d4 52 Bxd4 Rf7+ 53 Kg5 Re7!
He will hold the game if rooks are removed from the board.
54 Rc5 Ke6 55 Bf6 Rd7 56 Rc8 Kf7 57 Be5 Rd5
58 Rc7+?!
I continued my never-ending quest for the full point with messianic intensity, yet
found myself adrift rudderless when it came to the actual result. The comps, on the other
hand, are instantly certain that 58 Rxe8! Kxe8 59 Kxg6 is a straightforward win. Black is
ultimately helpless against the advanced connected passed pawns supported by king and
bishop; in some instances the white king can wander across to the queenside and take off
the other black pawns as well.
58 ... Rd7 59 Rc2 Rd5 60 Kh6?
It wasn’t too late to go back with 60 Rc7+ Rd7 61 Rc8, intending Rxe8 again.
60 ... Bc6!
Now Black is far more secure.
61 Rh2 Rd1 62 Kg5 Rh1!
Damn it. Why do good things keep happening to bad people? (That is, every opponent
I have ever played!) Sigh. Your writer, normally a kind man with Jobian patience, began
to get a wee bit irritated by the doggedness of Black’s defence. When we draw a game
we should have won, we tend to refight the battle again and again in our mind’s eye. I
grunted a non-committal “Ugh!” to his draw offer, giving myself the look of an educated
hog, pondering a difficult question posed by the farmer. If I swap rooks it’s a dead draw
due to the accursed bishops.
63 Rd2 Rg1 64 Rd3 Be4 65 Re3 Bf5!
Crap. Now I even lose my kingside pawns.
66 Rh3 Rxg4+ ½-½
Since 67 Kh6 Rxf4 68 Bxf4 Bxh3 69 Kg5 is dead drawn, despite Black’s “extra” pawn.
Summary: Short’s line against the Caro-Kann appears innocuous on the outside, but
as a Caro-Kann player myself it is probably the line I fear most from Black’s side.
Game 26
A.Grischuk-C.Lupulescu
European Team Championship, Warsaw 2013
1 e4 c6 2 d4 d5 3 e5 Bf5 4 Nf3 e6 5 Be2 Ne7
When we don’t know how our opponent plans to set up, we face an enemy with no
face and no name. Black is unafraid of Nh4 and develops his knight flexibly to e7, keeping
White guessing about his breaks.
6 0-0 c5
So Black plays ... c6-c5 after all, delaying it only one move. Alternatively, he can
remain solid and refuse to commit himself. We’ll look at the latter idea via 5 ... Nd7 in
Game 29.
7 c4
Based on the principle: Open the position when leading in development. This move
interferes with Black’s intended 7 ... Nec6, since 8 exd5 exd5 (or 8 ... Qxd5 9 Nc3 Qd8 10
d5) 9 Nc3 leaves him vulnerable in the centre.
Taking the c-pawn with 7 dxc5 is tempting too, seeing as Black is unable to recapture
immediately, with his f8-bishop blocked. What White should not do is play routinely with
something like 7 c3 Nec6 8 Be3 cxd4 9 cxd4 Nd7 10 Nc3 Be7, when Black has a
favourable version of the previous game.
7 ... Nbc6
Black refuses to fall too far behind in development or leave c5 unguarded. Instead,
after 7 ... dxc4 8 dxc5 Nbc6 9 Bxc4 Ng6 10 Be3 Be7 11 Nc3 0-0 12 Be2 Qb8 13 Nd2 Rd8
14 f4 Nd4 15 Nce4! Bxe4 16 Nxe4 Nf3+ 17 Bxf3 Rxd1 18 Rfxd1, I prefer White’s rook,
bishop, pawn and bind over Black’s queen, R.Kasimdzhanov-L.D.Nisipeanu, Baku
Olympiad 2016.
8 dxc5
Grischuk intends to hang on to this pawn. Another option is 8 Na3 a6 9 dxc5 d4 10
Qa4 Ng6 11 Rd1 Bxc5 12 b4! Ba7 13 c5 0-0 14 Nc4 Be4 15 Be3 d3 16 Ne1 Qd5 17 Nd6
Ngxe5 18 Nxe4 Qxe4 19 Nxd3 Nxd3 20 Bxd3 Qxb4 21 Qc2, when White has very active
play for the now pawn deficit, P.Leko-M.Roiz, World Team Championship, Ningbo 2011.
8 ... d4!?
With this tempting sacrifice Black gets a passed d-pawn, while White’s e5-pawn is
rather weak. I still prefer White, albeit due more to his lead in development than the
extra pawn at this stage. 8 ... dxc4 transposes to the 7 ... dxc4 note above.
9 Qb3
After 9 Qa4 Ng6 10 Rd1 d3, as in A.Kurilin-A.Arakeljan, Bolkhov 2017, the comp
recommends 11 Bxd3 Bxd3 12 Ne1 Ngxe5 13 Bf4 Bxc5 14 Bxe5 Bxf2+! 15 Kxf2 Qb6+ 16
Kg3 0-0-0 17 Bc3, whereas it feels to me that Black has loads of compensation for the
piece, with eternal attacking chances against White’s unsafe king.
9 ... Qc7
Black can regain the pawn after 9 ... Qd7 10 Rd1 Ng6 11 Nc3 Bxc5, but then 12 Qb5
b6 13 Na4 looks better for White, F.Nijboer-E.L’Ami, Dutch Championship, Boxtel 2011.
10 Na3 a6 11 Qa4 Rd8!
Rather than castling into it with 11 ... 0-0-0?! 12 b4!, A.Shomoev-P.Maletin, Barnaul
2011.
12 b4 Ng6
From here, the knight accomplishes three things:
1. It adds another attacker to e5.
2. It clears the way for Black to develop his kingside.
3. It eyes the f4-square. This is important because White would ideally like to play
Bb2, hitting the d4-pawn, which now leaves f4 open for Black’s knight.
13 Bd1!
Three games in Warsaw reached the position after 12 ... Ng6. The text is an
improvement over 13 Bb2 d3 (13 ... Nf4!? is also possible) 14 Bd1 Rd7, where Black looks
okay, A.Volokitin-M.Parligras, European Team Championship, Warsaw 2013. One point is
that 13 b5?! is met by 13 ... Ncxe5 14 bxa6+ Qc6!. By defending his queen, Grischuk rules
this possibility out. Another benefit is that the bishop is no longer vulnerable to ... Nf4
tricks.
13 ... Rd7
Black blocks the X-ray attack on his king, taking the sting out of White’s intended b4b5.
14 Nc2
Renewing the attack on the d4-pawn.
14 ... Bxc2!
Avoiding the tempting 14 ... Bd3?! 15 Re1 Bxc4, which runs into 16 Ncxd4! Nxd4 17
Nxd4 with advantage. Note that Black can’t recover his missing pawn with 17 ... Nxe5??
due to 18 Bf4 f6 19 Rc1 Bd5 20 Nxe6! Bxe6 21 c6! bxc6 22 Bxe5 fxe5 23 Rxc6 and White
has a crushing attack.
15 Bxc2 d3 16 Bd1 Be7
Here too taking the e5-pawn looks incorrect. After 16 ... Ngxe5?! 17 Nxe5 Qxe5 18
Rb1 d2 19 Bb2 Qe4 20 Bf3 Qxc4 21 Bxc6 bxc6 22 Qxc6, Black’s lag in development is
serious.
17 Bb2 0-0 18 Rb1 Rfd8 19 Re1
Question: Does Black have full compensation for the pawn?
Answer: The comps think so, whereas to me it seems as if Black’s compensation both
is and simultaneously is not. I feel like Black does have some compensation but, given a
choice, I would take White’s pawn up side any day.
19 ... Nh4 20 Nxh4 Bxh4 21 Re4 Be7 22 Bc3 Nd4 23 Rb2 g6
Here 23 ... a5! looks like a better try, as played in D.Andreikin-M.Parligras, European
Team Championship, Warsaw 2013, at the very same time as the current game. White
might consider 24 Qxa5!? Qxa5 25 bxa5 Bxc5 26 Bd2, when the extra pawn should count
for something.
24 Rd2 b6
Once again Black should try 24 ... a5!.
25 Qxa6 bxc5 26 b5!
Now if Black can’t get anything going, White’s passed a- and b-pawns will be decisive.
26 ... Qb8!
Threatening ... Ra7, trapping White’s queen.
27 b6!
Stronger than 27 Qa3 Bg5 28 Bxd4 Rxd4 29 Rxd4 Rxd4 30 Rxd3 Rxc4, when Black
regains either the b5- or e5- pawn with equality.
27 ... Qb7?
It’s not a great idea to live the opponent’s dream. In critical situations you either get it
right, or you don’t. There is no middle ground. I think this is the point where Black’s
compensation begins to sag. He shouldn’t be playing for an endgame just yet. After 27 ...
Rb7 28 Rb2 Nc2!, Black stands only slightly worse.
28 Qxb7 Rxb7 29 Rb2 Rdb8
Yes, b6 falls, but so do c5 and d3. Black perhaps relied too heavily on oppositecoloured bishops to blockade and save the game.
30 Bxd4 cxd4 31 Rxd4 Rxb6 32 Rxb6 Rxb6 33 Bb3 Ra6 34 Rxd3
We reach the situation where one side is fighting on one leg, maimed, but still
breathing. There is no room for misinterpretation when we agree to an ending two pawns
down.
34 ... g5 35 g3 h5 36 Kg2 Ra5 37 f4 h4
Following the principle: Swap pawns when behind on material.
38 Kf3 hxg3 39 hxg3 gxf4 40 gxf4 Kf8 41 Ke4 Ke8 42 Rh3 Ba3 43 Rh8+
Ke7 44 Rb8 Ra7 45 f5 exf5+ 46 Kxf5
We can add a dominant king position to White’s advantages.
46 ... Bc5 47 a4 Bf2 48 Bd1!
At first Grischuk’s plan is just a vague outline, the way a police artist attempts to get a
proper rendition of the wanted criminal from a rough sketch. The details are only added
later.
48 ... Bd4
Exercise (planning): How did Grischuk now increase his advantage?
Answer: Step 1: The bishop switches to the h1-a8 diagonal. The cross-examination
of Black’s king and f-pawn are about to begin.
49 Bf3!
The threat is Bc6! and Re8 mate, so White manages to transfer his bishop from a
passive to aggressive stance, without hanging the a4-pawn.
49 ... Kd7
Preventing Bc6. Of course not 49 ... Rxa4?? 50 Bc6! and Black has to give up the rook.
50 Rb7+!
Step 2: Swap rooks. Normally the pawn(s) up side in an opposite-coloured bishop
ending wants to keep rooks on the board. Here Grischuk sees that his advanced king
position, coupled with the weakness of f7, will be decisive.
50 ... Rxb7 51 Bxb7 Bb6
This allows White’s king into f6 and dooms the f7-pawn, but otherwise the a-pawn
advances and ties Black’s bishop to covering the a7-square. For example, 51 ... Ke7 52 a5
Bc5 53 a6 Ba7 54 Bd5 Bb6 and here the winning technique is 55 Bxf7! Kxf7 56 e6+ Ke7
57 Ke5 Ba7 58 Kd5 Bb6 59 c5 Ba7 60 c6 Kd8 61 Kd6 Bb8+ 62 c7+! Bxc7+ 63 Kc6 Bb8 64
Kb7, when Black’s bishop is pushed away and White promotes.
52 Kf6 Ke8 53 Bd5 Bd8+ 54 Kg7! Bc7 55 Bxf7+ Ke7 56 e6
An opposite-coloured bishop can only halt three pawns in exceptional circumstances,
and this isn’t one of them.
56 ... Bb6 57 Kg6 Kd6 58 Kf5 Bc5 59 a5 Bb4 60 a6 Bc5 61 Bh5! Bd4 62 Bg4
1-0
Zugzwang; Black must give way. After 62 ... Ke7 (or 62 ... Ba7 63 Kf6) 63 Ke4 Ba7 64
Kd5 Bb6 65 c5 Ba7 66 c6 Kd8 67 c7+!, a white pawn promotes.
Game 27
F.Caruana-M.Vachier-Lagrave
Sinquefield Cup, St. Louis 2014
1 e4 c6 2 d4 d5 3 e5 Bf5 4 Nf3 e6 5 Be2 c5 6 Be3
This is currently considered the most testing line. Instead of simply castling (as we
saw in the previous two games) or backing up d4 with c2-c3, White brings out another
piece, increasing his lead in development. Yet there are clear dangers involved as well.
Question: What dangers? How can developing be hazardous?
Answer: By bringing out the c1-bishop early, White is vulnerable to ideas of ... Qb6
and ... Qxb2, plundering a pawn.
6 ... Qb6!?
Sure, let’s go pawn grabbing and fall further behind in development. What could go
wrong? Despite its suicidal appearance, the engines assure us this move is still playable
for Black. We’ll look at less greedy – and perhaps less critical – alternatives in the next
game.
7 Nc3!
White’s most principled reply. This is our go-ahead-make-my-day moment. We offer
the b2-pawn, and even the c2- or a2-pawns, aiming to exploit our lead in development.
7 ... Nc6
The immediate 7 ... Qxb2 is also possible; for example, 8 Nb5 (8 Qb1!? is another
option) 8 ... c4! (8 ... Na6 9 dxc5! Bxc2 10 Qc1 is good for White) 9 Rb1 Qxa2 10 Nc7+
Kd8 11 Nxa8 Bxc2 12 Rxb7!? (12 Ra1 Bb4+ 13 Bd2 Bxd2+ 14 Kxd2! c3+ 15 Ke3 Qb2 16
Qc1 Nc6 is an irrational mess, unhelpfully rated “0.00” by the engine) 12 ... Bxd1 13
Rxb8+ Kd7 14 Bxd1 Ne7 15 0-0 h6 16 Bd2 with another crazy position that the comp calls
even, though I prefer White’s pieces over Black’s queen and pawns, A.AreshchenkoBa.Jobava, Burgas 2012.
8 0-0 Qxb2
Both sides set out their agendas, the origins of which are independent of each other.
Great. Thanks for making our day! Some of our opponents will meet our gambit with
hearty approval. On the surface it feels as if Black’s potential for reward is rather paltry in
comparison to the magnitude of the risk taken. What do the comps think? Well, they
helpfully tell us the position is unclear!
Question: Hey, what are you getting us into? Our b-pawn fell and our c-pawn
is next. Isn’t this supposed to be a “positional” opening repertoire for White?
Answer: Trust in our initiative! If this line works out well for Black, then a
development lead in an open position doesn’t matter and Morphy was either a liar or a
fool! I’m normally a writer who consistently refuses to heed my own counsel, but with this
pawn sacrifice I will make an exception and vow to play it as White if I get the chance.
One warning to Black too: Wealth does a person no good if you have no lifespan
remaining to spend it!
9 Qe1!
In my opinion, the most accurate move, which is dual-purpose:
1. White protects his c3-knight.
2. White evades a queen swap after Black’s coming ... Qxc2.
The alternative is to play 9 Nb5 again, but here after 9 ... c4! 10 Nc7+ Kd7 11 Nxa8
Bxc2, I like Black who will eventually win the a8-knight and emerge with several pawns
for the exchange, S.Karjakin-A.Morozevich, Nice (blindfold rapid) 2009.
9 ... cxd4
Black’s attempts to clog the centre with 9 ... c4 won’t stop White from opening the
queenside: 10 Rb1 Qxc2 11 Rxb7 Bb4 12 Rxb4! Nxb4 13 Bd1 Qd3 14 Ba4+ Kf8 15 Qa1
Bg4 16 Qb2 Rb8 17 Rb1 Bxf3 18 Bc2! saw Black’s queen weirdly trapped mid-board and
he didn’t get enough for it, S.Karjakin-V.Laznicka, Poikovsky 2011.
10 Bxd4!
10 Nxd4?! Bb4 11 Nxf5 Qxc3 12 Nd6+ Kf8! favours Black.
10 ... Nxd4!
Black needs to exchange knights first. 10 ... Bb4?! leaves him dangerously behind in
development after 11 Rb1 Qa3 12 Rb3 Qa5 13 a3! Bxc3 14 Bxc3 Qc7 15 Nd4 Nxd4 16
Bxd4.
11 Nxd4 Bb4
12 Ndb5
I might prefer 12 Rb1 Bxc3 (12 ... Qxc3 13 Rxb4 Qxe1 14 Rxe1 is much the same) 13
Rxb2 Bxe1 14 Rxe1 b6 15 Bb5+ Kf8 16 Nxf5 exf5 17 Rb3 Ne7 18 Rc3 a6 19 Bd7 g6 20
Rc7, followed by 21 e6 with excellent play for the pawn, V.Gashimov-V.Ivanchuk, Reggio
Emilia 2010/11.
12 ... Ba5
Covering c7 while maintaining the pin on the c3-knight. If 12 ... Bxc3?! 13 Nxc3 a6 14
Rb1 Qa3 15 Rxb7 Ne7, there is 16 Bb5+! Kf8 17 Bd3 Rc8 18 Ne2 with a clear advantage
for White, S.Karjakin-A.Tukhaev, European Cup, Plovdiv 2010.
13 Rb1 Qxc2 14 Rc1
Deviating from his earlier 14 Rb3 Ne7 15 Nd6+ Kf8 16 Nxb7 Bb6 17 Nd6 Ba5 18 Bf3,
S.Karjakin-D.Fridman, Dortmund 2012, where 18 ... h6!, intending ... g7-g5, looks to give
Black a decent position.
14 ... Qb2 15 g4!?
No draw! The risky idea is to follow with f2-f4-f5. After 15 Na4 Bxe1 16 Nxb2 Ba5 17
Nd6+ Ke7 18 Nxb7 (or 18 Nxf5+ exf5 19 Rc5 Bb6 20 Rxd5 Nh6) 18 ... Bb6, Black was
okay in S.Vidit-R.Svane, Moscow 2018.
15 ... Bg6 16 f4
A concept which strategists/logicians (like me) consistently fail to grasp is that
intellect has its limits. The comps call this position even. From a practical standpoint, I
think Black’s game is more difficult to play, since strong defensive moves tend not to be
as natural and easy to find as strong attacking moves.
16 ... Be4
Another option is to reinforce the d5-square with 16 ... Ne7; for example, 17 Nd6+ Kf8
18 f5 exf5 19 gxf5 Nxf5 20 Nxf5 Rc8 21 Nxd5! Qxc1 22 Qxa5 Qc5+ 23 Qxc5+ Rxc5 24
Nfe3 and the comp calls this messy ending dead level.
17 Rf2!
The rook is that ordinary, unremarkable stranger passing through town last week, who
you later discovered, by watching the news, is a wanted serial killer. Black’s queen is
greatly endangered by its presence on the same rank. White also sets a devilish trap.
17 ... Nh6?
There is no way to thrust normalcy into an environment where it can’t possibly exist.
The knight is out of play on h6.
The actual damage to Black’s position is far less than MVL may have believed.
Afterwards Caruana suggested the improvement 17 ... Kf8! 18 Bd3 Qb4, which was shown
to offer Black equal chances in S.Azarov-A.Shimanov, St. Louis 2017.
Question: What’s wrong with playing ... Bb6 and pinning the rook?
Answer: That was Caruana’s trap: 17 ... Bb6?? walks into 18 Na4! Bxf2+ 19 Kxf2
Qxa2 20 Qb4! with a decisive attack for White.
18 Bd3! Qb4?!
When you get hit by an unexpected shot (17 Rf2!), make certain that the damage
sustained is merely physical. Stay calm and don’t add psychological trauma to it as well.
Black had to try 18 ... Bb6 19 Nxe4 dxe4 20 Rcc2! (the black queen is trapped – this is as
awkward as that time a drunken Kanye West accosted Taylor Swift at the music awards)
20 ... Qxc2 21 Bxc2 Nxg4 22 Nd6+ Kf8 23 Nxe4 g6, when he remains in deep trouble yet
can continue to offer resistance.
19 Rb1 Qc5
This loses material for no compensation. Equally hopeless is 19 ... Qe7 20 Nd6+ Kf8
21 Bxe4 dxe4 22 g5! (not 22 Rxb7? Qh4) 22 ... Nf5 23 Rxb7 Qd8 24 Rxf7+ Kg8 25 Rxf5!
exf5 26 Qd1 and the queen’s appearance on d5 is decisive.
20 Nxe4!
The c3-pin is conveniently broken, as 20 ... Bxe1 21 Nbd6+ Kf8 22 Nxc5 Bxf2+ 23 Kxf2
leaves Black busted.
20 ... dxe4 21 Qxa5
Threatening deadly discovered checks to win the queen.
21 ... 0-0 22 Be2 e3 23 Rff1 Rfc8 24 Qe1
Caruana has consolidated and the rest is easy.
24 ... Qd5 25 Rb2 f6 26 Qg3
For what it’s worth, the comp gives 26 exf6! gxf6 27 Qh4 as stronger.
26 ... fxe5 27 fxe5 Rf8 28 Rxf8+ Rxf8 29 Qxe3 Nf7 30 Nc3 1-0
Black’s resistance is over since the ending is dead lost if his queen chops the e5-pawn.
Summary: When (or if) you opt for the dynamic 6 Be3, be prepared to sacrifice a
pawn or two for a dangerous lead in development.
Game 28
S.Karjakin-W.So
FIDE World Cup, Khanty-Mansiysk 2011
1 e4 c6 2 d4 d5 3 e5 Bf5 4 Nf3 e6 5 Be2 c5 6 Be3 cxd4
This seems a safer option than the ... Qb6 and ... Qxb2 plan of the previous game.
Black resolves the pressure on c5 by trading pawns. On the other hand, it also brings the
white knight powerfully into the centre.
I don’t believe Black equalizes with 6 ... Nd7, which is rather passive; for example, 7
Nbd2 Ne7 8 c4! (principle: Open the game when leading in development) 8 ... Nc6 (8 ...
cxd4 9 Nxd4 Nxe5!? 10 cxd5 Qxd5 11 0-0 offers White loads of compensation for the
missing pawn) 9 0-0 Be7 10 cxd5 exd5 11 dxc5 0-0 12 Nb3 Ndxe5 13 Nxe5 Nxe5 14 Nd4
with advantage to White, who controls d4, owns a valuable queenside majority, and can
also play against Black’s isolated queen’s pawn, A.Grischuk-M.Roiz, World Team
Championship, Ningbo 2011.
7 Nxd4
7 ... Ne7
N.Short-V.Malisauskas, Moscow Olympiad 1994, saw 7 ... Bg6 8 0-0 Nc6 9 c4! Nge7 10
Nc3 Nxd4 (not 10 ... Nxe5? 11 cxd5 exd5 12 Bb5+ N7c6 13 Re1 and Black is unable to
survive) 11 Bxd4 dxc4 12 Nb5 Nc6 13 Bxc4 Nxd4 14 Nxd4 Bc5 15 Qa4+ Ke7 16 Nb3, when
Black’s king found himself in deep trouble.
8 Nd2
This knight will transfer to f3, reinforcing its colleague on d4. After 8 c4 Nbc6 9 Qa4 a6
10 Na3 Qa5+ 11 Qxa5 Nxa5, Black is not significantly worse.
8 ... Nbc6 9 N2f3 Be4
Obviously 9 ... Bg4 10 0-0 Bxf3 comes to the same thing.
10 0-0 Bxf3
Black’s idea is to swap off the bad “French” bishop and leave himself with a remaining
“good” bishop, while destroying one of White’s key defenders of e5. The downside is that
Black hands over the bishop pair in a semi-open position.
Then again, if Black plays 10 ... Ng6 at once, then 11 Nxc6 bxc6 12 Ng5! picks up the
bishop pair in any case: 12 ... Be7 (not 12 ... Nxe5?! 13 Qd4 or 12 ... Bf5?! 13 g4 Be4 14
f3 Be7 15 Nxf7!, which both favour White) 13 Nxe4 dxe4 14 Qd4 Qd5 15 Bh5 Nxe5 16
Rad1 0-0 17 Qc3 and White had full compensation for the sacrificed pawn, F.CaruanaV.Laznicka, New Delhi 2011.
11 Nxf3 Ng6
We note an ideological crossover. The position looks as if it arose from a French
Defence, rather than a Caro-Kann.
Question: Isn’t our side losing an important pawn?
Answer: Our e5-pawn rests dangerously and is the shard of the broken bottle, just
daring some foot to step on it. If Black grabs the pawn we get great compensation in the
form of:
1. The bishop pair.
2. An increasing lead in development.
3. Yet more open lines, to augment those arising from our forthcoming pawn break.
12 c4!
Principles: Open the position and create confrontation when leading in development –
and in possession of the bishop pair.
12 ... dxc4 13 Bxc4 Qc7
Question: I see the subject, but where is the predicate? Why didn’t Black
swap queens and simply grab the e5-pawn?
Answer: Doing so merely enhances our development lead, even into the ending: 13
... Qxd1 14 Rfxd1 a6 (or 14 ... Ngxe5 15 Nxe5 Nxe5 16 Bb5+ Nc6 17 Rac1) 15 Bd3! Ngxe5
16 Nxe5 Nxe5 17 Be4 Nc6 18 Rac1 Rc8 19 Rd3 and in the four games in my database
from this position, Black managed to hold just one draw.
14 Qb3
Applying pressure against b7, in case Black decides to take the e-pawn. Previously
White played more conservatively with 14 Bb5 Be7 15 Qa4 0-0 16 Bxc6 bxc6 17 Qe4 Rab8
18 Bd4, when Black’s pressure on the b-file and control over d5 made up for his weak c6pawn, D.Navara-V.Laznicka, Novy Bor (4th matchgame) 2011.
14 ... Be7 15 Rac1 0-0 16 Bd3
The bishop wasn’t doing much on c4 and is better posted on the b1-h7 diagonal.
16 ... Rfd8
Black must weigh the happiness of profit with the dangers of survival. So he continues
to treat White’s e5-pawn with deference, refusing to snatch it, believing that security
takes precedence over adventure. Of course, by not taking the pawn, Black is in violation
of the psychological principle: Don’t issue a threat you are unable or unprepared to carry
out, since in doing so, you lose credibility.
17 Rfd1 Bf8 18 g3
18 ... Rd7
I just don’t see an easy path for Black to equalize. If 18 ... Ngxe5 19 Nxe5 Qxe5 20
Qxb7 Nb4 21 Be4 Nxa2, then 22 Bf4 Qf6 23 Rxd8 Rxd8 24 Rc7 g6 25 h4 h6 26 h5! leaves
Black in danger, since 26 ... gxh5?? loses at once to 27 Bh7+! Kg6 28 Rxf7+! Qxf7 29
Be5+ etc.
19 Be4
Quiet signals of an undercurrent of hostility are sent at Black’s queenside and pinned
c6-knight. It becomes clear that control has passed into White’s hands.
19 ... Rxd1+ 20 Rxd1 Rc8 21 Kg2
White’s seemingly unstealable e5-pawn is one of those cheap motel rooms where
everything of value is bolted to the floor. GM Milos Pavlovic wrote: “What I find
remarkable in this line is that the white pawn is simply doomed on e5 but still White has
strong pressure that is not easy to shake off. Such positions you don’t see often in
openings. Some similarities are the Benko or Catalan.”
21 ... Na5?
So’s position dips further after this move as White liquidates into a winning endgame.
Black had to try 21 ... a6 22 Rc1, which still looks unpleasant but not as much as in the
game.
22 Qa4 b6
Or 22 ... Qc4 23 Qxc4 Nxc4 24 Bxa7 Ngxe5 25 Bxb7 Rc7 26 Nxe5 Nxe5 27 Bb8 Rxb7 28
Bxe5 with a technical win for White.
23 Rd7
Seizing control over the seventh rank is decisive.
23 ... Qc4 24 Qxc4 Nxc4 25 Bd4 Bc5
If 25 ... a5 then 26 b3 ejects the defender of b6 and Black loses material.
26 Bxg6! hxg6 27 Bxc5
27 ... bxc5
Forced. 27 ... Rxc5? would be more than just a mild faux pas on Black’s part, in view
of 28 Rd8+ Kh7 29 Ng5+ Kh6 30 Nxf7+ Kh5 31 Rh8+ Kg4 32 Rh4+ Kf5 33 Rf4 mate.
28 b3 Nb6 29 Rxa7
White has won a clean pawn, which will soon advance down the board.
29 ... c4 30 bxc4 Nxc4 31 a4 f6
So feels that the damaged kingside conduit must be prodded into functioning again. If
Black doesn’t play this, his back rank remains vulnerable. If he does, he allows White’s
knight more influence.
32 exf6 gxf6 33 a5 e5 34 a6 Na5 35 Nh4!
Creating a further puncture in Black’s kingside which the white knight can enter.
35 ... Nc6 36 Rb7 g5 37 Nf5 Kf8
One move is as good as another. If 37 ... Ra8 then 38 Rc7! is decisive, since 38 ...
Rxa6 loses to 39 Rxc6 Rxc6 40 Ne7+ etc.
Exercise (combination alert): Or perhaps that should be “trick alert”.
One strong move induces Black’s resignation.
Answer: Attraction/simplification.
38 Rf7+! 1-0
Such shocking moves are the satisfying click of the silencer being attached to the hit
man’s pistol. After 38 ... Kxf7 39 Nd6+ Ke6 40 Nxc8, there is clearly a shortfall in Black’s
account, since White’s advanced a-pawn costs Black his remaining knight.
Summary: In the 6 ... cxd4 line, our e5-pawn is often doomed, but we get
tremendous compensation if Black decides to take it.
Game 29
A.Morshedi-C.Lakdawala
San Diego (rapid) 2011
1 e4 c6 2 d4 d5 3 e5 Bf5 4 Nf3 e6 5 Be2 Nd7
My wife Nancy is a genius at packing a suitcase and maximizing the economy of
space. In the 5 ... Nd7 line Black must find a way to develop within cramped quarters.
Question: Doesn’t this move stray from party doctrine, which states that
Black must aim for an early ... c6-c5 break, or risk getting strangled?
Answer: The Advance Caro can be played with a kind of breezy informality, since the
clogged position allows both sides great leeway in how to set up. If Black is going to play
for an early ... c6-c5, then his last move might well be considered inappropriate and
passive. The 5 ... Nd7 line, which is rapidly gaining in popularity, is a radical alteration
from the norm. Black doesn’t intend an early pawn assault on the centre, regarding that
in violation of the principle: Don’t open the position when lagging in development.
Instead, he plans to develop some pieces first and only then decide where to break – and
in the this line Black often prefers ... f7-f6.
Question: But doesn’t that violate the principle: A pawn chain should be
attacked at its base, not at its head?
Answer: Well, playing for ... f7-f6 would probably be a violation of principle if White
were able to back up e5 with f2-f4, but White’s f3-knight blocks that possibility here. So
the ... f7-f6 break can be very effective for Black.
6 0-0 Bg6
I tend to go for this retreat which makes room for my g8-knight on f5.
Another option is 6 ... Ne7. If White then decides to go after the bishop pair with 7
Nh4, Black can take the opportunity to strike back in the centre: 7 ... c5 8 c3 Be4! 9 Nd2
Nc6 10 Nxe4 dxe4 11 g3 Be7 12 Ng2 Qb6! and Black stands no worse, L.D.NisipeanuF.Berkes, Romanian Team Championship 2013.
I think White does better to play on the queenside with 7 Nbd2, intending to meet 7
... c5 with 8 c4! as in Game 26. Instead, 7 ... h6 is a snaky idea where Black plans ... g7g5 and ... Ng6, gambling that the attacking chances stemming from his kingside pawn
pushes outweigh the potential for weakness. (Note that this position can also arise via 6
... h6 7 Nbd2 Ne7.) For example, 8 Nb3 g5 9 Ne1 c5!? (9 ... Qc7 is more cautious; not
now 9 ... Ng6?? due to 10 g4 and the f5-bishop is lost) 10 Nxc5 Nxc5 11 dxc5 Nc6 12 Bd3
Bxc5 13 Bxf5 exf5 14 Nd3 Bb6 15 Be3! d4?! (Black should opt for 15 ... Bxe3 16 fxe3 Ne7
with only an edge for White in the complications) 16 Bd2 Qd7 17 a4 a6 18 b4 and Black
found himself in deep trouble, since his king was deprived of a safe haven across the
board, P.Svidler-H.Nakamura, Amsterdam 2009.
7 b3
The main alternative is to play 7 Nbd2 again. We will look at this in the next game.
Instead, after 7 Be3 Nh6!? 8 Nbd2 (I certainly don’t mind Bxh6 once White has already
moved his dark-squared bishop) 8 ... Nf5 9 c4 dxc4 10 Nxc4 Be7 11 Rc1 Nb6, Black stood
at least equal in K.Griffith-C.Lakdawala, San Diego (rapid) 2014.
7 ... Nh6!?
Question: Isn’t it crazy to allow White to damage your structure like this?
Answer: Not crazy at all. For the structural damage, Black gets the following:
1. The bishop pair.
2. Control over the dark squares, which is somewhat enhanced by the fact that White
has thrown in b2-b3.
3. An open g-file to attack White’s king.
Meanwhile Black’s king can castle queenside, or sometimes even kingside with the
plan ... Bg7, ... 0-0 and ... f7-f6.
8 Bxh6
A correct appraisal of the position isn’t easy. Believe it or not, I was actually happy to
see this move. I expected something like 8 c4! Nf5 9 Bb2 Be7 10 Nc3 0-0, after which
Black can play for ... f7-f6, although I still slightly prefer White.
8 ... gxh6 9 Nfd2?!
This contortion was a new move, which looks too artificial for White’s needs. His plan
is to blast open the f-file with f2-f4, Bg4 and f4-f5, but it doesn’t work out as he hopes.
The natural follow-up to his earlier b2-b3 is still to push the c-pawn, though I think Black
gets at least equal chances after, for instance, 9 c4 Bg7 10 Nc3 0-0 11 Rc1 a6 12 Qd2,
G.Glatt-L.Eperjesi, Hungarian Team Championship 2006, and now 12 ... dxc4 13 Bxc4 c5.
9 ... Qb6
My queen pressures d4 while clearing the way for castling queenside.
10 c3 c5
Question: Weren’t we supposed to be playing for ... f7-f6 - ?
Answer: We must be adaptable to the position’s requirements. White played
unnaturally with his earlier Nfd2?! and ... c6-c5 is the only reaction which tries to punish
it.
11 a4!?
If you pile one conjecture over another, it’s unlikely you will hit on the position’s truth.
White must be careful with these pawn pushes, since vast empires have a nasty habit of
declining and finally collapsing. 11 Nf3 is better, but it’s also an admission that his earlier
Nfd2?! was not such a great move.
11 ... cxd4 12 a5 Qc7
This level of obsequiousness hasn’t been practiced since the era of Henry VIII, many
of whose wives found themselves discarded or even headless when Henry’s mood went
sour. I should maybe have gone for it with 12 ... Qc5! 13 b4 Qe7! 14 cxd4 Qxb4, but I felt
White had some (if not full) compensation for his missing pawn and I didn’t want to get
greedy.
13 cxd4 a6
I want to make certain that he doesn’t weaken my queenside light squares by tossing
in a5-a6.
14 f4 0-0-0?
This move is as self-destructive as the farmer who owns the chicken who lays the
golden egg, thinking to himself: “Fried sounds good tonight.”
I underestimated the dangers to my king after b2-b4, otherwise I would have
blockaded the b-pawn with 14 ... Bb4!, when 15 Nf3 Nb8! 16 Nh4 Be7! Qe1 Nc6 18 f5
Bxh4 19 Qxh4 Bxf5 20 Nc3 Qe7 leaves Black with much the better chances.
15 Bg4?
Consistency is no virtue when you are on the wrong track. Much stronger was 15 b4!
Bxb4 16 Qa4 Be7 17 Na3 with a ferocious attack for White.
15 ... Kb8 16 f5?!
White’s initiative is the six-year-old who cuts eyeholes in the bed sheets, believing his
new persona as a ghost will scare the rest of the family. 16 Ra4! is better.
16 ... exf5 17 Bxf5
Exercise (combination alert): Black has a strong move at his disposal.
What would you play here?
Answer: Double attack.
17 ... Nxe5!
A sudden burst of energy sweeps over Black’s position. When White takes the knight
on e5, Black’s queen will recapture with a double attack on the a1-rook and f5-bishop.
The sanctity of all life argument doesn’t mean much when you are in pure survival mode
and willing to kill anyone who stands in your path. The variations are somewhat unclear
but I was pretty certain they were in my favour, an assessment the comps back up.
18 dxe5!
White has no real choice. 18 Bxg6?! Nxg6 would be an admission that he stands
worse.
18 ... Qxe5 19 Bxg6 Qxa1 20 Bxf7 Qxa5 21 Kh1 Bb4
Material is technically even, but the position isn’t. White’s minor pieces – especially his
b1-knight – are ineffective, while Black’s rooks thrive on the open files and the passed dpawn will be pushed down the board, cramping White further.
22 Nf3 Rhf8 23 Ne5
23 Be6 Qb6 24 Bg4 Qe3 25 h3 d4 26 Nbd2 Bxd2 27 Nxd2 Rxf1+ 28 Nxf1 Qf2 29 Qd3
Re8 is also miserable for White.
23 ... Qc7!
White’s targetless minor pieces dangle precariously in the centre.
24 Qh5?
Technically a mistake, though the endgame after 24 Nd3 Rxf7 25 Rxf7 Qxf7 26 Nxb4
Re8! 27 Nd2 Qe7! 28 Nd3 Qe2 29 Qxe2 Rxe2 30 Nf3 Re3 31 Nfe1 a5 32 Kg1 Kc7 33 Kf2
d4 is winning for Black anyway, who will create an outside passed a-pawn with ... b7-b5
and ... a5-a4.
24 ... Qc2?
In forcing variations we cannot have a gap in our intended sequence. I missed 24 ...
Rde8! (weak back rank/overloaded defenders) 25 Nd3 Re7! 26 Nxb4 Rexf7 27 Rg1 Rf1! 28
h3 Qc5!, which is a game ender.
25 Nf3?
White had to try 25 Qg4! Qc7 26 Qxb4 Qxe5 27 Nd2.
25 ... Qxb3
Again, I had better. The comp shows that I missed another instant win with 25 ...
Rd7! 26 Bxd5 Qc5! 27 Qe5+ Ka7 28 Bc4 Qxe5 29 Nxe5 Rxf1+ 30 Bxf1 Rd1 etc.
26 Be6 Qd3
White’s back rank is weak and his b1-knight is no more than a spectator.
27 Rc1 Ka8
In time pressure, the less we have to worry about, the better off we are. I didn’t want
to have to calculate his queen checks on every move.
28 Qe5?!
Not check.
Exercise (combination alert): When in time trouble and on the defensive,
our odds of blundering multiply exponentially. White’s last move was a
mistake in an already lost position. How did Black exploit it?
Answer: Annihilation of defensive barrier/attraction/pin.
28 ... Rxf3!
Step 1: Sacrifice the exchange on f3, luring White’s king to g1.
29 gxf3 Qxf3+ 30 Kg1 Bd6!
Step 2: Bring the dark-squared bishop into the attack.
31 Qe1 Bb8!
Threatening ... Ba7+.
32 Rc3
Here your writer’s lips curled upward into a beatific anticipatory smile. White needed
to make luft for his king with the horribly weakening 32 h4 – which is clearly hopeless
after, say, 32 ... Ba7+ 33 Kh2 Bf2 34 Qc3 Be3 35 Rc2 d4 – but he had no time left for
anything other than an instinctual response. When we are incurably busted, our position
doesn’t really care whether we accept the possibility or not. I suspect that when we make
a move like this, it’s maybe because subconsciously we want to die and get the game
over with.
32 ... Ba7+ 0-1
When an over-the-hill player wins a nice game, he reminds himself of who he once
was.
Summary: With the noncommittal 5 ... Nd7 Black leaves possible pawn breaks until
later, and then may play either ... c6-c5 or ... f7-f6, so we need to be prepared for all
eventualities.
Game 30
A.Grischuk-Ba.Jobava
FIDE Grand Prix, Tbilisi 2015
1 e4 c6 2 d4 d5 3 e5 Bf5 4 Nf3 e6 5 Be2 Nd7 6 0-0 Bg6 7 Nbd2
I think this is more promising than the previous game’s 7 b3. White isn’t planning to
chop a knight on h6, and so doesn’t worry about temporarily blocking the bishop’s
diagonal.
7 ... Nh6
8 Nb3
Clearing the c1-h6 diagonal again while suppressing Black’s ... c6-c5 break.
An alternative plan is to reorganize with 8 c3 Be7 9 Ne1 Nf5 10 Nd3 (heading for f4 to
target the g6-bishop and discourage ... f7-f6) 10 ... c5 (White has developed so slowly in
this version that Black is unafraid of opening the centre) 11 Nf3 cxd4 12 cxd4 Bh5?! (this
doesn’t work out as hoped; 12 ... Nb8!? and 13 ... Nc6 looks better) 13 Nf4 Bxf3 14 Bxf3
Qb6 15 Bg4! g6 (15 ... Qxd4?! 16 Bxf5 Qxd1 17 Rxd1 exf5 18 Nxd5 favours White) 16 Bxf5
gxf5 17 Be3 and Black had no counterplay, D.Jakovenko-R.Wojtaszek, French Team
Championship 2007.
8 ... Nf5 9 a4
Direct plans with g2-g4 are met satisfactorily met by ... Nh4. Instead, Grischuk decides
to gain more space on the queenside.
9 ... Rc8
This time Black doesn’t intend to play ... c6-c5 until his development has been
completed.
10 a5 Bh5
A new move. Black prepares to dump his bad bishop, while going after a defender of
d4. Routine development with 10 ... Be7 here might be met by 11 g4! Nh5 (now 11 ...
Nh4 12 Nxh4 Bxh4 13 f4 looks dangerous for Black) 11 ... Nh6 12 h3, intending a squeeze.
11 h3
Threatening g2-g4.
11 ... Bxf3 12 Bxf3 g6!?
Black wants to set up like a French, sans bad bishop. More natural is 12 ... Be7 13 Re1
0-0 14 c3 a6 and if 15 Bg4 then 15 ... g6 with only a tiny edge for White.
13 Re1
13 ... h5
Discouraging g2-g4, while preparing to rid White of the bishop pair with ... Bh6 next,
following the principle: If your opponent owns the bishop pair, then eliminate one of
them. The obvious drawback is that it leaves Black rather weak on the dark squares. This
might be the moment to throw in 13 ... c5, before White is ready to meet it with the
game-opening c2-c4.
14 Qd3 Bh6 15 Bxh6 Rxh6 16 c4! dxc4
Otherwise Black gets squeezed without counterplay.
17 Qxc4 Kf8 18 Rac1 Ne7
Black would like to activate his d7-knight, but it lacks access to b6 and 18 ... Nb8
(intending ... Na6-c7) runs into 19 d5!.
19 Qc3 Kg7 20 Nd2
Re-routing the knight to gaze at the dark holes in Black’s position.
20 ... Rh8 21 Nc4 Rb8
Black can no longer do anything but go passive and wait.
22 Be4 a6
Fixing the structure so that he doesn’t have to calculate a5-a6 on every turn, at the
cost of creating another hole on the dark squares.
23 Red1 Nc8?
It’s not that intimidating if you encounter a ferocious sloth in the wild, who works his
way into a deadly pounce, since you will be long gone by the time it gets around to it.
With his last very slow move, Black expresses concern over White’s growing control and
vows to do something about it, but his plan is incompatible with his position’s needs.
Exercise (combination alert): There are things we hope will happen and there
are things we know will happen. Of the two, the latter is a far more reliable
indicator. With his last move Black plans ... Na7 and ... Nb5. What did he overlook?
Answer: Pawn breakthrough/discovered attack.
24 d5!
This is the moment the faith healer touches the supplicants’ heads and the lame toss
away their crutches, mute begin to speak, and the blind see. Grischuk has an eye for
tactical opportunities along the a1-h8 diagonal and his game is greatly energized by this
thrust.
24 ... cxd5 25 Bxd5 b5
Nothing else is really any better:
a) 25 ... exd5 is met by 26 Rxd5! Qe7 27 Rxd7! and the rook can’t be touched due to
the e5-e6+ discovered attack on Black’s king and queen.
b) 25 ... Qe7 26 Bf3 sees Black paralysed. If he tries to free himself with 26 ... b6 27
Qe3 bxa5 28 Nxa5 Rb5 then 29 Bc6 Rxe5 30 Qc3 wins material.
26 Bc6! bxc4 27 Rxd7 Qg5 28 Bb7!
The bishop blights the outskirts and the a6-pawn is doomed.
28 ... Ne7 29 Qe3
White can almost play anything here. In a little time trouble Grischuk seizes the
chance to force an ending that is quite miserable for Black.
29 ... Qxe3 30 fxe3 Nf5
Or 30 ... Nd5 31 e4 Nb4 32 Rxc4 Nd3 33 Rcc7 Nxe5 34 Rd4, intending b2-b4 and Bxa6,
when White’s queenside passers will be decisive.
31 Rxc4!
When you buy in volume, the price is generally discounted. The e3-pawn doesn’t
matter. Jobava probably hoped for 31 Kf2?! Rhd8 32 Rxd8 Rxd8, when both ... Rb8 and ...
Rd2+ are threatened and Black gets more play than he deserves.
31 ... Nxe3 32 Rc6
The a6-pawn falls, after which Black is doomed.
32 ... Rhd8 33 Rxd8 Rxd8 34 Rxa6 Rd1+ 35 Kf2 Nc4
The worm on the fisherman’s hook only deludes itself when it thinks: “I’m a fighter
and will survive this ordeal.”
36 b3!
The e5-pawn isn’t important since White is way too fast in the race.
36 ... Nxe5 37 Rb6 Ra1 38 a6 Kf6
Exercise (technique): Find a clear plan for White to convert.
Answer: Block the a-file with b2-b4! and Ra5, forcing promotion of the a-pawn.
39 Rb5!
The most accurate move, preventing Black from bringing the king across; whereas 39
b4?! Ke7! 40 Rb5 Kd6 41 Ra5?? (41 Rxe5 Kxe5 42 b5 still wins) 41 ... Rxa5 42 bxa5 Nc6 is
only a draw.
39 ... Ra3 40 Ke2 h4 1-0
Before White follows through with 41 b4 and 42 Ra5, after which his a-pawn flutters
down the board like an Autumn leaf.
Summary: If Black refuses to break in the centre with either ... f7-f6 or ... c6-c5,
White should just gain more space with the plan Nb1-d2-b3, a2-a4-a5 and eventually c2c4.
Game 31
A.Grischuk-A.Shimanov
Aeroflot Rapid Final, Moscow 2013
1 e4 c6 2 d4 d5 3 e5 c5
Players who avoid 3 ... Bf5 clearly don’t subscribe to the philosophy: better the devil
we know, than a successor we don’t. This line is rapidly growing in popularity and is in
fact the one advocated in Opening Repertoire ... c6, which I co-wrote with IM Keaton
Kiewra.
Question: Isn’t Black just playing an Advance French a tempo down, since
he used a move on the now completely redundant ... c7-c6 - ?
Answer: Not quite. In the French Black is obviously committed to ... e7-e6 (on move
one!). In this tempo down version he still has the option of developing the traditionally
“bad” light-squared bishop outside the pawn chain with ... Bf5 or ... Bg4, and only then
playing ... e7-e6.
4 dxc5
Question: Is it really worth the time wasted to swipe such a pawn and
perhaps give Black the initiative?
Answer: The proceeds earned from theft must be balanced against the level of risk
involved. It makes no sense to rob a bank which contains just $37.50 of loose cash within
its vault. This feels different. In my opinion 4 dxc5 is White’s most testing line. We grab
the c5-pawn and then, if given the chance, try and hang on to it for dear life.
4 ... Nc6
Black develops and attacks White’s e5-pawn. Here 4 ... e6 is a major alternative,
against which I suggest 5 Nf3 again (see the next game).
5 Nf3
The old main line was 5 Bb5 e6 6 Be3, when White defends both the c5- and e5pawns and prompts Black into playing ... e7-e6. The problem is that keeping the material
usually means giving up both bishops; for example, 6 ... Ne7 7 c3 Bd7 (threatening ...
Nxe5) 8 Bxc6 Bxc6 9 Nf3 Nf5 10 Bd4 a5 11 0-0 Nxd4 12 cxd4 b6! 13 cxb6 Qxb6 and Black
gets huge compensation. So White has looked for different approaches.
5 ... Bg4
Black logically develops his “bad” bishop on the outside of his pawn chain before
playing ... e7-e6. We’ll examine the French-like 5 ... e6 in the next game.
6 c3
I prefer this to 6 Bb5 Qa5+ 7 Nc3 e6 8 Be3 Ne7 9 a3 0-0-0 10 b4 Bxf3 11 gxf3 Qc7,
since I think Black gets full compensation for the pawn after 12 Bxc6 Nxc6 13 Bf4 a6 14
Bg3 g5!, R.Edouard-D.Fridman, European Championship, Plovdiv 2012.
6 ... e6
Question: Why didn’t Black regain the pawn with 6 ... Nxe5 - ?
Answer: Chopping on e5 is a double question mark and falls into our trap: 7 Nxe5!
Bxd1 8 Bb5+ Qd7 9 Bxd7+ Kd8 10 Nxf7+ Kxd7 11 Kxd1, followed by Nxh8, when Black is
materially down almost the equivalent of a full queen.
7 b4
Grischuk secures the c5-pawn and creates an unpleasant queenside pawn majority.
After the alternative 7 Be3 a6 8 Nbd2 Nxe5 9 Be2 Nxf3+ 10 Nxf3 Nf6 11 Bd4 Be7 12 Bxf6
Bxf3 (12 ... Bxf6?? hangs a piece to 13 Qa4+) 13 Bxg7 Bxe2 14 Qxe2 Rg8 15 Be5 Bxc5 16
g3 Qg5, Black’s game looks okay to me, S.Zhigalko-V.Bernadskiy, Minsk (rapid) 2014.
7 ... Nge7
Other moves:
a) 7 ... Nxe5?? hangs a piece to 8 Qa4+ Nd7 9 Ne5 Ngf6 10 Bg5 Qc7 11 Bxf6 gxf6 12
Nxg4.
b) 7 ... Bxf3 8 Qxf3 Nxe5 is met by 9 Bb5+ Nc6 10 0-0 Nf6 11 Bf4 Be7 12 Nd2 0-0 13
Rfe1, when I prefer White’s bishop pair and queenside majority to Black’s extra pawn in
the centre, Z.Almasi-I.Khenkin, Istanbul Olympiad 2012.
c) 7 ... a6 8 Nbd2 Nxe5 9 Qa4+ Nd7 10 Ne5 Ngf6 11 Nxg4 Nxg4 12 Be2 was agreed
drawn in A.Tate-M.Esserman, Gibraltar 2017. I would certainly play on here as White.
8 Nbd2 a6?!
After this Black struggles to regain what was supposed to be only a temporarily
sacrificed pawn. Yet I’m not impressed with the main move 8 ... Qc7 either and like White
after 9 h3 Bxf3 10 Nxf3 Ng6 11 Bb5 Nxe5 12 0-0, with the bishop pair and a dangerous
lead in development.
9 Qa4!
A dual-purpose move, which breaks the pin on the f3-knight and simultaneously pins
Black’s main attacker of e5.
9 ... Bxf3 10 Nxf3
10 ... g6
This plan seems awfully slow, but I don’t see much compensation for Black in any
case:
a) 10 ... Ng6 is met by 11 Nd4! Nxe5 (otherwise 12 f4 defends it) 12 f4 Ng6 13 Nxc6
Qd7 14 Bb5! Rc8 15 Nd4 and White keeps the pawn.
b) 10 ... Qb8 is no improvement either; for example, 11 Be2 g6 12 Nd4! Bg7 (12 ...
Qxe5 is met by 13 b5 Nxd4 14 cxd4 Qc7 15 bxa6+ Nc6 16 Rb1 with a close to winning
position) 13 f4 0-0 14 0-0 and Black has no compensation for the missing pawn, F.BerkesR.Zelcic, Zadar 2010.
11 Bd3 Bg7 12 Bf4
The greedy rarely choose to give up that which they already have acquired.
12 ... 0-0 13 0-0 f6
The only way for Black to generate any counterplay. 13 ... Qb8 14 Rfe1 secures the epawn; 13 ... h6 is simply met by 14 h3; while 13 ... d4 14 c4 is also highly favourable for
White.
14 exf6 Bxf6
Black hopes for some play rolling his centre forward, but his e-pawn never moves
again.
15 Bh6! Re8
Our judgment can sometimes be clouded by stylistic bias. Sometimes the position
itself demands that we pay a terrible price for our survival. Black should perhaps try his
luck with the strategic exchange sac 15 ... Bxc3 16 Bxf8 Qxf8, when he at least controls
the dark squares.
16 Qb3 Nf5 17 Bxf5!
A far-seeing move. Grischuk understands that weakening the enemy king position is
more important than keeping his strong bishop, and he can restrain Black’s central pawns
by pressuring the one on d5.
17 ... gxf5
Not 17 ... exf5? 18 Rad1 Ne7 19 Bf4, when Bd6 is coming and the d5-pawn will fall.
18 Rad1 Qe7 19 Rfe1 Qf7 20 c4!?
Now attacking the centre directly. Another option was 20 Bg5 Bg7 21 Bf4!, when Black
is unable to advance with 21 ... e5? due to 22 Ng5 Qg6 23 Rxd5!.
20 ... d4?!
Black refuses to be shaken from his present frame of reference and continues with the
plan of pushing his central pawns, which aren’t going anywhere. Black should take his
chances with 20 ... dxc4! 21 Qxc4 e5!.
21 b5!
Undermining Black’s authority over e5.
21 ... Na5 22 Qd3
Now attacking the f5-pawn, to discourage Black from his desired ... e6-e5 push.
22 ... Qc7
If 22 ... e5 23 Qxf5 Nxc4 then 24 Re4! Bg7 25 Qg5 Kh8 26 Bxg7+ Qxg7 27 Qxg7+
Kxg7 28 bxa6 Rxa6 (or 28 ... bxa6 29 Rc1) 29 Nxd4 and the ending is lost for Black.
23 Ng5!
Reality’s outline begins to emerge from the chaos. Black’s king is in serious trouble.
23 ... Bxg5
A concession this large is anathema to everything Black cherishes. I’m certain
Shimanov was fully aware that White’s bishop now casts its giant shadow over the
kingside dark squares. Discovery of your opponent’s intent is immaterial if there is
nothing you can do about it. 23 ... Qd7 is met decisively by 24 Qg3 Kh8 25 Qd6.
24 Bxg5 Qxc5
Losing quickly. 24 ... Qg7 25 Bd2 is also hopeless for Black.
25 Bf6!
Threatening Qg3+. The black king is the equivalent of the 19th Century dandy out for
a stroll and getting the contents of someone’s chamber pot poured over his head.
25 ... Qc7 26 Be5 Qf7 27 Qxd4 Rac8 28 Re3! Nxc4 29 Rg3+ Kf8
Exercise (calculation): The only non-expendable component in our army is
our king. White to play and force mate in four moves.
Answer: The black king’s plans to go wenching with the white queen go horribly
astray when he finds himself handcuffed to the bed with his wallet missing.
30 Bg7+! 1-0
In view of 30 ... Kg8 (or 30 ... Ke7 31 Qd7 mate) 31 Bh6+ Qg6 32 Rxg6+ hxg6 33 Qg7
mate.
Summary: When Black plays 3 ... c5, let’s respond with 4 dxc5 and make our
opponent sweat over regaining the sacrificed pawn.
Game 32
S.Karjakin-V.Topalov
Gashimov Memorial, Shamkir 2017
1 e4 c6 2 d4 d5 3 e5 c5 4 dxc5 Nc6
The immediate 4 ... e6 is an important option, which can lead to different positions. I
suggest we continue with 5 Nf3 Bxc5 6 a3 anyway, when play usually transposes below
after 6 ... Ne7 (or 6 ... Nc6) 7 b4 Bb6 8 Bd3 Ng6 (or 8 ... Nbc6) 9 0-0 Nc6 and so on.
Question: Does Black have to follow suit?
Answer: Not necessarily, but it’s probably his best option:
a) 6 ... Qb6?! 7 Qd2 (this doesn’t really inconvenience White at all) 7 ... a5 8 Nc3 Bd7
9 Bd3 Ne7 10 0-0 h6 11 Qf4 a4 12 Rb1 Bc6 13 Qg3 and White is clearly better,
P.Motwani-K.Arkell, Lichfield 2000.
b) 6 ... a5!? prevents our intended b2-b4. That aside, a2-a3 is more useful than ... a7a5 in these French positions; for example, 7 Bd3 Ne7 8 0-0 Ng6 9 Bg5 Be7 10 Bxe7 Qxe7
11 Nc3 Bd7 12 Qd2 0-0 13 Rae1 Na6 14 Nd4 Nc5 15 f4 Nxd3 16 cxd3 Qc5 17 Qe3 f6 18
exf6 Rxf6 19 g3 and Black has to be careful not to end up in a bad bishop versus good
knight scenario, M.Rodshtein-K.Arkell, Hastings 2014/15.
5 Nf3 e6
In the Advance French (1 ... e6 2 d4 d5 3 e5 c5) the line with 4 dxc5 Nc6 5 Nf3 is
considered inferior for White. Here we have the exact same position, except with one
crucial difference. Since Black took two turns to push his c-pawn to c5, White now has the
move.
Question: Why would Black voluntarily lock in his light-squared bishop and
agree to play an Advance French a full tempo down?
Answer: For two reasons:
1. As we saw in the previous game, if Black plays 5 ... Bg4 White is sometimes able to
hang on to the extra pawn permanently. By playing 5 ... e6, Black pretty much
guarantees he will regain it.
2. As we’ve just noted, this line of the Advance French isn’t supposed to be that great
for White, so Black reckons he can absorb the loss of a tempo and still equalize.
6 a3
White adopts an idea from the Catalan/Queen’s Gambit Accepted (in reverse) and
plans, after Black’s bishop recaptures the c5-pawn, to gain time and space with b2-b4.
Question: You said that Black is pretty much guaranteed to regain the
c5-pawn after 5 ... e6. Is this really so if White responds with 6 Be3 - ?
Answer: True, in that version White hangs on to the material, but Black gets huge
Benko-Gambit-like compensation after 6 ... Nge7 7 c3 Nf5 8 Bd4 Bd7 9 a3 b6! 10 cxb6
Ncxd4 11 cxd4 Qxb6 12 Qd2 Rb8 13 Ra2 h5 14 Nc3 g5! with open lines on the queenside,
the bishop pair, and a clear initiative for the pawn, H.Müller-H.Hofstetter, correspondence
2002.
6 ... Bxc5
If Black prevents b2-b4 with 6 ... a5?! here, we would certainly switch to 7 Be3! Nge7
8 Bd3 Ng6 9 Bxg6 hxg6 10 Nc3 Bd7 11 Qe2, when White is virtually a pawn up for
nothing, V.Baklan-A.Kaczmarek, Krakow 2016.
7 b4
White seizes queenside space with tempo.
7 ... Bb6 8 Bd3 Nge7 9 0-0 Ng6 10 Bb2
Securely defending the e5-pawn.
10 ... Nf4!?
Black goes after our bishop pair at the cost of heavy time, since it took him four
moves with this knight to trade off a bishop which has only moved once. Analysis shows
that this idea may be overly optimistic on Black’s part.
Instead, 10 ... 0-0 11 Re1 f6 12 exf6 gxf6 is safer and probably stronger, when White
looks only a shade better. For example, after 13 c4 Nf4 14 Bf1 e5, as in S.MovsesianL.Paichadze, European Team Championship, Reykjavik 2015, White might try 15 Bc1!?
dxc4 16 Bxf4 exf4 17 Bxc4+ Kh8 18 Nc3, when I prefer his structure over Black’s bishop
pair.
11 c4!
Principle: In the opening a lead in development takes precedence over the bishop
pair, so open the game anyway.
11 ... Nxd3
If Black refuses to clarify the situation, White may push the c-pawn again; for
example, 11 ... 0-0 12 c5!? (12 Nc3 is also good) 12 ... Nxd3 (or 12 ... Bc7 13 Bc2) 13
Qxd3 Bc7 14 b5 Ne7 15 Nbd2 Bd7 16 a4 and I still prefer White.
12 Qxd3 dxc4
At some point Black will probably have to take on c4, since White builds pressure after
12 ... Ne7 13 Nc3 a6 14 Rfd1.
13 Qxc4 Ne7?!
White already has a dangerous development lead and this second knight move
increases it further. Black should minimize his disadvantage with 13 ... 0-0, intending 14
Nc3 Nd4.
14 Nc3 Bd7 15 Qg4! Bc6
Defending the g7-pawn tactically. Castling leaves Black in difficulties on the open files;
for example, 15 ... 0-0 16 Rfd1 Qc7 17 Rac1 Bc6 18 Nb5 and the knight will enter d6 with
a big advantage for White.
16 Rad1
Not 16 Qxg7?? Rg8 17 Qf6 Nf5! 18 Qxd8+ Rxd8 and Black is clearly better; while if 16
Rfd1?! Qc7 17 Rac1 then 17 ... Rd8! solves a lot of his problems.
16 ... Qc7 17 Ng5!
The hieroglyphics of this sacrifice are probably beyond the calculating abilities of most
humans – I’m certain Karjakin played the move intuitively, trusting in his open attacking
lanes to provide compensation for the pawn – but not the comps, who say it’s completely
sound.
17 ... Qxe5?
Black can’t afford this loss of time. He had to decline with 17 ... 0-0 18 b5 Be8 (18 ...
Bd5 runs into 19 Nxd5 Nxd5 20 Nxe6!) 19 Nce4! and even here Black is in deep trouble.
Note that the b5-pawn is poisoned in view of 19 ... Bxb5?? 20 Nf6+! Kh8 21 Ngxh7 Bxf1
22 Nxf8 with a winning attack for White.
18 b5! h5
Not 18 ... Bxb5?? 19 Nxb5 Qxb2 (or 19 ... Qxb5 20 Bxg7 Rg8 21 Ne4) 20 Nd6+ Kf8 21
Ngxf7 Rg8 22 Ng5 and Black is slaughtered.
19 Qh4 Bxb5?
This is still bad. The only chance was 19 ... Ng6 20 Qb4 Ba5!, though 21 Qb3 Qxg5 22
bxc6 0-0 23 Ne4 Qf4 24 cxb7 Rxb8 25 Nd6 remains highly favourable for White.
20 Rfe1 Qf5 21 Nxb5 Qxb5 22 Bxg7 Nf5
Exercise (combination alert): Maybe Topalov counted on his last move to save
him. It doesn’t. White to play and win.
Answer: Queen sacrifice/mating net.
23 Nxe6! fxe6
The white queen can’t be touched: 23 ... Nxh4?? 24 Nc7 is double checkmate, which
really should count as two points for the winning side, rather than one.
24 Rxe6+
Black’s exposed king has no prayer of survival.
24 ... Kf7 25 Qf6+ Kg8 26 Bxh8 Bxf2+ 27 Kh1! Qa4 28 Red6
One win is as good as another, even if the engine says that 28 Rd8+! Rxd8 29 Qxd8+
Kh7 30 Be5 forces mate.
28 ... Rf8 29 Qg6+ Kxh8 30 Rd7 1-0
Black must hand over his queen on d1 to stave off immediate mate.
Summary: By spending our extra tempo on a2-a3, intending b2-b4, we obtain a
promising version of an Advance French.
Chapter Five
Pirc, Modern and Philidor Defences
In this chapter we’ll examine the various systems that can arise when Black plays an
early ... d7-d6 and/or ... g7-g6. These include the Pirc, Modern and Philidor. Against each
of them I am suggesting White set up in Classical style with Nc3 and Nf3.
Game 33
V.Ivanchuk-V.Kramnik
FIDE Candidates, London 2013
1 d4
Just in case anyone was wondering, our sequence is of course 1 e4 d6 2 d4. As it
happens, only two of the games in this chapter actually began with 1 e4.
1 ... d6 2 e4 Nf6 3 Nc3 g6 4 Nf3
Such non-threatening and unassuming opening systems tend to get underestimated.
With our last move there isn’t even a remote implication of menace coming from White’s
position – at least not yet.
Question: Isn’t this a bit of a boring choice?
Answer: Do you seek the entertaining or do you seek the practical? We don’t have to
scorch Black’s position with fire and fury. So I suggest we stay away from the Austrian
Attack or Pseudo-Dragon lines which specialize in pillage. Instead, we develop classically
and hope to squeeze Black with our extra space. This is a set-up devoid of architectural
elaborations, whose main goal is simple functionality. In the past I always felt that
White’s Classical formation was harmlessly stodgy, kind of like wearing a suit to a football
game. Then I studied the White repertoire of GM Ulf Andersson and completely changed
my mind.
4 ... Bg7 5 Be2 0-0 6 0-0 a6
This is a hybrid variation where Black mixes Pirc and Modern ideas. ... a7-a6 lines are
Black’s staple in the Modern but are played less often in the Pirc. The main moves are 6
... c6 and 6 ... Bg4, which we’ll examine in the next two games. Black has also tried:
a) 6 ... c5 7 d5 (transposing to the Schmid Benoni) 7 ... Na6 8 h3 Nc7 9 a4 b6 10 Bf4
Bb7 11 Re1 a6 12 Bc4 Qd7 13 Qd3 (suppressing Black’s ... b6-b5 break) 13 ... Rad8 14
Rad1 Qc8 (Black has nothing to do, which allows White to transfer forces to the kingside)
15 Qe3 Rfe8 16 Bh6 Bh8 17 Ng5 Nd7 18 f4 and White brewed up a dangerous attack on
Black’s king, V.Ivanchuk-E.Torre, Biel 1989.
b) 6 ... Nbd7 is a bit passive and can be met by 7 e5! Ne8 (7 ... dxe5?! 8 dxe5 Ng4 9
e6 favours White) 8 Bf4 c6 9 Qc1! Qa5 10 Bg5, when Black has a rather unpleasant
position, F.Pessoa-J.Reis, correspondence 2010.
c) 6 ... Nc6 hopes to provoke White into pushing the d-pawn, which gains a tempo on
the c6-knight but enhances the power of Black’s g7-bishop. We’ll refuse to be provoked
and play simply 7 Be3, when 7 ... e5!? (7 ... Bg4 transposes to Game 35) 8 dxe5 Nxe5 (or
8 ... dxe5 9 Bb5!?) 9 Nxe5 dxe5 10 Qxd8 Rxd8 11 Rfd1 Rxd1+ 12 Rxd1 Be6 13 Nb5 Ne8
14 Nxa7 f5 15 f3 Nd6 16 a4 turned out well for White in R.Berzinsh-M.Pribyl, German
League 1999.
7 h3
This cuts out Black’s ... Bg4 options, while allowing White to play a future Be3 without
worrying about ... Ng4 either. Alternatively, 7 a4 b6 8 Re1 Bb7 9 Bf1 e6 10 h3 Nc6 is
maybe just a tiny edge for White.
7 ... Nc6!?
Kramnik thought he had to win this critical final round game (as it turns out he didn’t –
a drawn result would have made him, rather than Magnus Carlsen, the challenger to
Anand’s world championship title), so he tries to provokes Ivanchuk.
Instead, 7 ... b5 is normal, which can be met by 8 e5! Nfd7 9 Bf4 Nc6 10 Qc1 Bb7 11
Rd1 Nb6 12 a3 Na5 13 Bh6 and I’m not really sure what Black’s knights are doing,
whereas White can build on the kingside, M.Savic-Z.Stanic, Croatian Team Championship
2009.
8 Bg5!?
Ivanchuk probably wanted to throw Kramnik off his theory a bit. The normal
continuation is 8 a4 e5, when White again has to decide whether to push the d-pawn or
exchange on e5.
8 ... b5 9 a3
Preventing ... b5-b4 and ... Nxe4.
9 ... h6
If 9 ... Bb7 then 10 Qc1! keeps a stable advantage for White. The point of this slightly
strange square is that, after 10 ... e5 11 dxe5 Nxe5 12 Nxe5 dxe5, White can play 13 Rd1
with a good game, and the queen is coming to e3 in any case.
10 Be3!
Having provoked a small weakness on h6 the bishop is best placed keeping an eye on
it from e3 while also controlling the centre.
10 ... e5
This natural move doesn’t mix so well with Black’s set-up here since White can simply
exchange and play on the newly created hole at c5. On the other hand, 10 ... e6 11 Qd2
Kh7 12 Bd3 Bb7 13 a4! b4 14 Ne2 d5 15 e5 Ne4 16 Qe1 also looks good for White; while
after 10 ... d5!? 11 exd5 Nxd5 12 Nxd5 Qxd5, as in N.Moss-G.Vetter, correspondence
1997, White can try 13 c4! bxc4 14 Rc1 with a clear strategic advantage.
11 dxe5 dxe5
Exchanging knights with 11 ... Nxe5 12 Nxe5 dxe5 doesn’t help Black at all.
12 Qc1
Targeting h6, while preparing Rd1.
12 ... Kh7?!
After this Ivanchuk seizes a strategic advantage, and for a strategically aggressive
player like Kramnik to embrace such a move is the same as owning a pet piranha and
only feeding it lettuce and carrot tops – I guarantee you that it won’t be satisfied. Black
would do better to let the h-pawn go with 12 ... Nd4! 13 Bxh6 Bb7. I’m not sure whether
this offers full compensation for the pawn, but the comp seems perfectly happy with
Black’s position.
13 Bc5 Re8 14 Rd1 Bd7 15 b4! Qc8 16 Qe3
Ivanchuk increases his grip on c5, so Kramnik attempts to combat this by re-routing
his queen’s knight to e6.
16 ... Nd8 17 a4!
17 ... bxa4
Now Black’s two queenside isolanis are the stranded and forlorn aliens awaiting the
return of the mothership to save them. Not 17 ... c6? 18 Bd6 Ng8 19 axb5 axb5 20 Rxa8
Qxa8 21 Bxe5! and White wins a pawn.
18 Nxa4 Ne6 19 Bc4! Nh5?!
This ambitious knight forgets that he is part of a team and makes an unfortunate
unilateral decision. Kramnik, desperate for the win, or at least some counterplay,
attempts to whip up a kingside attack from a position of inferiority. 19 ... Bb5 20 Bb3 Bc6
21 Nd2 a5! is safer and better, eliminating one of his weak pawns.
20 Nc3!
The knight returns to the centre, ruling out ... a6-a5 liquidation ideas.
20 ... Nhf4
With plans of sacrificing a knight on g2 to open up the white king.
21 Nd5
Applying the principle: Counter in the centre when attacked on the wing. If White tries
to win the a-pawn with 21 Ba7, Black gets to shows his attacking ideas: 21 ... Nxg2! 22
Kxg2 Nf4+ 23 Kg1 Rxa7! 24 Qxa7 Bb5! 25 Bxb5 Qxh3 26 Bf1 Qg4+ with a draw by
perpetual check.
21 ... Bb5 22 Bb3 Bc6?!
The immediate 22 ... Qb7 was better, if Black wasn’t loath to move his queen off the
c8-h3 diagonal.
23 Ra5
Ivanchuk might have thrown in 23 Ne7! here. I’m sure both players considered the
consequences of 23 ... Nxg2 24 Kxg2 Rxe7 25 Bxe7 Nf4+ 26 Kg1 Qxh3, but it helps to
have the comp running to envisage that 27 Ng5+! hxg5 28 Qxh3 Nxh3+ 29 Kf1 Bxe4 30
Rd7 is then good for White.
23 ... Qb7 24 g3!!?
With some players the unexpected is a routine occurrence. Ivanchuk is one of those
streaky geniuses who, on any given day, can be the best player in the world. This pawn
sacrifice either kills Black’s would-be attack or opens the h-file for White’s own.
24 ... Nxh3+!?
Okay then, let’s go with the smash-and-grab robbery. If you’re playing for a win, there
is no choice but acceptance. In the same way it isn’t in a soldier’s nature simply to turn
and run when confronted by danger, no former World Champion cedes a game without a
fight. Kramnik accepts the challenge and grabs the h-pawn. 24 ... Nxc5 25 Rxc5 Ne6 26
Ra5 Nd4 is safer, but then 27 Nxd4 exd4 28 Qd3 maintains White’s strategic pressure.
25 Kg2 Nhg5 26 Rh1 Kg8
Not 26 ... Nxf3?? in view of the forced 27 Nf6+! Kh8 28 Rxh6+ Bxh6 29 Qxh6 mate.
But Speelman’s idea of 26 ... Nxe4!? was possible, when 27 Qxe4 f5 28 Qc4 Rad8 29 Be3
Bb5 30 Qh4 Rxd5 31 Bxh6 Rd6 leads to a very unclear position.
27 Nxg5 Nxg5 28 f3!
Securing e4, while threatening Ne7+, which forces Black’s next move.
28 ... Bxd5 29 Bxd5 c6 30 Bc4 Qc8?!
If the plan was to force White to keep his rook on h1, guarding h3, it quickly fails since
Black can’t maintain his knight on g5. He should probably just have played 30 ... Ne6 at
once.
31 Qb3 h5
This doesn’t turn out well but it’s hard to suggest an alternative way for Black to
obtain counterplay now. 31 ... Rd8 is also met by 32 Be3, covering d2 while threatening
the protector of f7.
32 Be3 Ne6 33 Rha1
There goes Black’s extra pawn, so Kramnik makes a desperate attempt to get at
White’s under-defended king.
33 ... h4!? 34 gxh4 Qd8 35 Rxa6?
Not the best. White should return his rook to h1 at once, when 35 Rh1 Qf6 36 Bxe6
Qxe6 37 Qxe6 Rxe6 gives him a strategically won ending.
35 ... Rc8?
Black has excellent chances to save himself in the line 35 ... Rxa6! 36 Rxa6 Nf4+! 37
Bxf4 exf4 38 Bxf7+ Kh8, threatening both ... Qd2+ and ... Qxh4. For instance, the e8-rook
can’t be touched in view of 39 Bxe8?? Qd2+ 40 Kh1 Qe1+ 41 Kg2 Bd4 with mate to
follow.
36 Rh1! Rc7
Exercise (planning): Come up with a clear plan to increase White’s strategic grip.
Answer: Step 1: Eliminate Black’s most active piece, while luring his rook to e6.
37 Bxe6! Rxe6 38 b5!
Step 2: Exploit the opposition of rooks on the sixth rank by playing b4-b5, which will
create a deadly passed pawn.
38 ... Rb7
38 ... cxb5 39 Rxe6 fxe6 40 Qxe6+ Rf7 41 Qxg6 is clearly hopeless for Black.
39 b6
Let’s count White’s blessings:
1. White regained the extra pawn.
2. His king remains relatively safe.
3. The passed b6-pawn ties Black down completely.
Conclusion. Black is busted.
39 ... c5 40 Rb1 40 ... Bf8 41 Qd5 Qb8
A queen swap gives Black zero chances to save the game, and 41 ... Rd7 42 Qa8!
Rd2+ 43 Kg3 gets him nowhere.
42 Rba1! Rd6
The b6-pawn is immune: 42 ... Rexb6?? 43 Rxb6 Rxb6 44 Ra8 Qd6 45 Bxc5 wins, while
42 ... Rbxb6?? 43 Ra8 Qc7 44 R1a7 Qc6 45 Bh6 forces mate.
43 Ra8!
This rook is the frog who is drawn to the princess, mistakenly assuming she feels a
mutual attraction.
43 ... Rxd5 44 Rxb8 Rxb8 45 exd5 Bd6
Or 45 ... Rxb6 46 Ra8 Kg7 47 Rxf8! Kxf8 48 Bxc5+ and White wins a piece.
46 Ra6 Rb7
Exercise (planning): The position’s once numerous complex components have
devolved into its essentials. Come up with a simple winning plan for White.
Answer: White’s king infiltrates the queenside via b5.
47 Kf1! 1-0
There is no reason for deception or misdirection when we are winning.
Game 34
U.Andersson-W.Uhlmann
Niksic 1978
1 Nf3
Ulf Andersson’s style has influenced my own more than any other player, except
Capablanca, and I have imitated/copycatted his white 1 Nf3 repertoire for nearly four
decades. It isn’t possible to fight an enemy you are unable to see, and that is exactly how
it feels to play him, since he just creeps up on you, without your knowing it. The way he
plays reminds us of one of those assassins with cold, dead eyes. I have played him 39
times in online blitz (with a depressing -9 score against my idol) and, perhaps just out of
spite, he didn’t open with 1 Nf3 in a single game against me!
1 ... g6 2 e4
Okay, back on track.
2 ... d6 3 d4 Nf6
Transposing into the Pirc. We’ll look at Modern continuations in Games 36 and 37.
4 Nc3 Bg7 5 Be2 0-0 6 0-0 c6
This is a more common continuation in the Pirc than the previous game’s ... a7-a6.
Question: What is Black’s intention with ... c7-c6 - ?
Answer: The following:
1. It gives Black’s f6-knight the d5-square should White play a future e4-e5, kicking it
away.
2. It keeps White’s pieces out of d5.
3. Black may expand on the queenside with ... b7-b5.
7 Re1
Another option is 7 h3, preventing both ... Bg4 and ... Ng4, and if 7 ... b5 8 a3 Nbd7
then 9 e5! Ne8 10 Bg5 f6 11 exf6 exf6 12 Bf4 and White has the more comfortable game,
A.Bernotas-M.Krasenkow, Jurmala (rapid) 2016.
Question: If one of Black’s ideas is to expand with ... b7-b5, then why
doesn’t White toss in a2-a4 to prevent it?
Answer: Doing so is in fact White’s main line. For example, 7 a4 a5 8 Be3 Na6 9 h3
(or 9 Nd2 Be6 10 h3 Nb4 11 f4!? Qb6, L.D.Nisipeanu-Er.Hansen, Ortisei 2013, and White
can build for a kingside attack with 12 Kh1, intending g2-g4 next, while Black lacks
targets for counterplay in the centre or on the queenside) 9 ... Nb4 10 Qd2 Qc7 11 Rad1
Re8 12 Rfe1 e5 13 dxe5 dxe5 14 Bc5! Bf8 15 Bxf8 Kxf8 16 Qh6+ Kg8 17 Rd2 Be6 18 Ng5
and Black is in an unpleasant position, S.Auch-A.Barreras Garcia, correspondence 2007.
Ulf Andersson generally encouraged his opponents to play ... b7-b5, interpreting the
expansion as a weakness in Black’s camp, rather than a strength.
7 ... Bg4
This bishop can be a problem piece for Black in many lines of the Pirc, so Uhlmann
prepares to swap it off for a defender of d4.
Instead, 7 ... Nbd7 8 Bf4 (this may be inaccurate, since a future ... e7-e5 will gain a
tempo; I prefer 8 h3 e5 9 dxe5 dxe5 10 a4 with a tiny edge for White) 8 ... Qa5! (8 ...
Qc7 9 e5! Nh5 10 exd6 exd6 11 Be3 f5 12 d5! f4 13 Bd4 was good for White in
U.Andersson-J.Van der Wiel, Tilburg 1984) 9 h3 (obviously 9 e5 Nh5 10 exd6?? doesn’t
work here) 9 ... e5 10 Be3 Re8 was U.Andersson-V.Ivanchuk, Monte Carlo (rapid) 1997,
which Ivanchuk later won, although after 11 dxe5 dxe5 12 a3 the comp still prefers
White.
8 Bg5 Qa5
It makes sense for Black to wait for h2-h3 before chopping the knight.
9 Qd2 Nbd7 10 Rad1 e5
Black finally seizes his fair share of the centre.
11 d5!?
This is an unexpected move by GM Andersson, who nearly always took on e5 in such
structures. Here, White might play on his bishop pair after 11 dxe5 dxe5 12 Qe3 Qb4 13
h3 Bxf3 14 Bxf3 Rfd8 15 Qc1 Nf8, even if the comp thinks Black is fine.
11 ... c5?!
Now Black looks decidedly worse, since White can eventually stick him with a bad
dark-squared bishop. Better was 11 ... cxd5! 12 Nxd5 Qxd2! (not 12 ... Qxa2?? 13 Ra1!
and Black has to give up a piece to save his queen) 13 Nxf6+ Bxf6 14 Bxd2 Rfc8 15 c3
Be6, when the endgame should be quite okay for Black, objectively speaking. Defending
it against Andersson might prove more tricky.
12 a4
Suppressing ... b7-b5.
12 ... a6 13 h3
Ulf picks up Black’s good bishop, while planting the seed for future light square
weaknesses.
13 ... Bxf3 14 Bxf3 b5 15 axb5 axb5 16 Rb1!
Now Black has to decide whether to play the strategically undesirable ... b5-b4
himself, or allow White a future b2-b4 thrust.
16 ... c4?!
Now White can push his b-pawn without any preparation at all. Black should opt for 16
... b4 17 Nd1 c4 18 Ne3 Rfc8 19 Qe2 Nb6 20 Ng4 Nbd7, as in L.Pecot-A.Blum,
correspondence 1999, which minimizes his disadvantage.
17 b4!
17 ... cxb3
This leaves his b-pawn exposed, but if Black doesn’t take en passant then his knight is
deprived of the c5-square. For instance, after 17 ... Qa6 18 g4! Black is strangled of
counterplay.
18 Rxb3 Rab8 19 Rb2
Not 19 Reb1? b4 20 Nd1 Nc5 and Black seizes the initiative. I might have gone for 19
Nb1! (offering a trade of queens) 19 ... b4 20 c3 bxc3 21 Qxc3 Qxc3 22 Rxc3 Nc5 23 Nd2
Rb4 24 Nc4, when d6 is chronically weak. After 24 ... Nxd5!? 25 exd5 e4 26 Rc2 exf3 27
Nxd6, White remains on top due to his passed d-pawn.
19 ... h6 20 Be3 Nc5?!
When on the defensive, it’s the waiting which is intolerable. Black should insert 20 ...
Rfc8 first.
21 Bxc5!
Ulf foresees that he can reach a favourable opposite-coloured bishops position.
21 ... dxc5 22 Reb1
Forcing Black’s queenside pawns onto the same colour squares as his remaining
bishop.
Question: Isn’t the same true of White’s position?
Answer: Not quite, since White’s bishop has more active potential, whereas Black’s is
doomed to chronic passivity.
22 ... b4 23 Nd1
Heading for the juicy hole on c4.
23 ... Rfd8 24 Ne3 Ne8 25 Nc4 Qa4 26 Qe1 Nd6
Black tries to eliminate the c4-blockader, but another white piece will take the knight’s
place.
27 Nxd6 Rxd6 28 Ra1 Qe8 29 Ra5 Qc8 30 Be2 Qc7 31 Ra4 Rdd8 32 Bc4 Ra8
33 Rba2 Rxa4 34 Rxa4 Bf8 35 Qa1
Black’s worries are on prominent display:
1. White owns the superior bishop.
2. White owns a connected and passed d5-pawn, whereas Black’s queenside majority
is firmly blockaded, which means that Black is in effect a pawn down.
3. White’s major pieces have seized control over the a-file.
4. Black’s bad bishop, hemmed in by his own pawns, lives in a questionable state of
hygiene.
5. Black lacks antibodies to fight the light square illness in his camp.
35 ... Rb8 36 Ra7! Qb6?
Not 36 ... Rb7? which hangs an important pawn to 37 Rxb7 Qxb7 38 Qxe5. The only
way to play on was with 36 ... Qd6, but then Ulf would have proceeded to torture
Uhlmann for the next 80 moves or so.
Exercise (planning): When we are awaiting the subway train on the platform,
we can feel its vibrations before we actually see it. How did Ulf force the win?
Answer: Step 1: Clearance. White offers his passed d-pawn in exchange for f7, after
which the power of his light-squared bishop is unleashed on Black’s undefended king.
37 d6!
The white bishop’s days of patient waiting are over. After this simple move, White’s
threats appear from nowhere and everywhere.
37 ... Bxd6
Black can pick his poison. 37 ... Rb7 38 Ra6 Qd8 39 Qxe5 is also hopeless.
38 Rxf7 Kh8 39 Qd1!
The d1-square is the confluence of White’s attacking route.
Step 2: Transfer the queen to either f6 or d7. Black can cover one but not both.
39 ... Rd8
If 39 ... Bf8, intending to cover f6 via ... Bg7, then 40 Qd7 is immediately crushing.
40 Qf3! 1-0
Threatening Qf6+. The engine declares mate in twelve. The condemned prisoner is
wasting his time if he asks the hangman: “You look tired. Why don’t you take a vacation
for two or three weeks?” Dropping the bishop back with 40 ... Bc7 covers f6 at the cost of
losing control over f8, which leads to an even quicker finish with 41 Rf8+ Rxf8 42 Qxf8+
Kh7 43 Qg8 mate.
Summary: 6 ... c6 is one of Black’s most solid responses to our Classical set-up. You
have the option of tossing in a2-a4 to suppress Black’s ... b7-b5 expansion attempts, or
you can just allow it, as Ulf did this game.
Game 35
U.Andersson-H.Ree
Las Palmas 1973
1 Nf3 g6 2 e4 d6 3 d4 Nf6 4 Nc3 Bg7 5 Be2 0-0 6 0-0 Bg4
This is one of Black’s most solid options. Rather than inserting ... c7-c6, as Uhlmann
did in the previous game, here the plan is ... Nc6 and ... e7-e5, with ... Bxf3 included,
fighting for a share of the centre. The downside of Black’s plan is that it virtually
guarantees handing over the bishop pair, which is our main asset as White.
7 Be3
Reinforcing the d4-square, while clearing the way for Qd2 and Rad1.
7 ... Nc6 8 Qd2
Andersson won’t be provoked into playing 8 d5, although it’s an attractive alternative.
After 8 ... Bxf3 9 Bxf3 Ne5 10 Be2 c6 11 f4 Ned7 12 dxc6 bxc6 13 Qd2, I think White’s
central control and bishop pair mean more than Black’s open b-file.
8 ... Re8
Ree delays pushing his e-pawn. The most consistent move is just to play 8 ... e5.
Question: Since seizing space is a main theme in this repertoire, I assume we
play 9 d5 here?
Answer: That move is playable, but the position after 9 ... Ne7 is like a King’s Indian
with c2-c4 missing, so White’s queenside play looks slow. Moreover, pushing to the fifth
rank is frowned upon by my ideological hero, GM Ulf Andersson, who is attracted more to
simplicity than space. Ulf nearly always takes when Black plays ... e7-e5.
Watch how he squeezed a future World Champion: 9 dxe5 dxe5 10 Rad1 Qe7 (10 ...
Re8 transposes to the next note) 11 Bg5! Bxf3 12 Bxf3 Nd4 13 Nd5! Qd6 14 c3 Nxf3+ 15
gxf3 Nxd5 16 Qxd5 Qxd5 17 Rxd5 f6 18 Be3 (White’s control over the d-file offers him a
pleasant ending where there can only be two results: he either wins or draws) 18 ... Rf7
19 Rfd1 b6 20 a4 f5 21 c4 Re8 22 c5 Bf8 23 cxb6 axb6 24 Rc1 c5!? 25 Kf1 Ra7 26 b3 Kf7
27 exf5 gxf5 28 f4 Bh6?! (28 ... Bg7 offers Black better chances of holding) 29 fxe5 Bxe3
30 fxe3 Rae7 31 Rd6 Re6 32 Rcd1 Ra8 33 Rd7+ Re7 34 Ke2 c4 35 bxc4 Rxd7 36 Rxd7+
Ke6 37 Rxh7 Rxa4 38 Kd3 Kxe5 39 Re7+ Kd6 40 Re8 and Ulf managed to convert his
extra pawn in the rook ending, U.Andersson-V.Anand, Novi Sad Olympiad 1990.
9 Rad1 Bxf3
Maybe it would be wiser to hold this back until White expends a tempo with the hpawn. Here 9 ... e5 10 dxe5 (10 d5?! Nd4! justifies Black’s set-up) 10 ... dxe5 11 h3 Bxf3
12 Bxf3 is basically the same position as in the next note, and with Black to move. Even
so, I prefer White; for example, after 12 ... a6 13 Na4!? Qe7 14 c3 Red8 15 Qc2 Nd7 16
b4!, White managed to convert his bishop pair and queenside space into an eventual win,
A.Miles-H.Schussler, Dortmund 1979.
10 Bxf3 e5
11 dxe5 Nxe5?!
I don’t like this recapture, since it allows White to add central space to his strategic
portfolio. Having said that, I don’t believe Black fully equalizes after 11 ... dxe5 either.
V.Spasov-B.Lalic, Salou 2005, continued 12 Qxd8 Rexd8 13 Nb5 Ne8 14 Rxd8 Rxd8 15 Rd1
Rxd1+ 16 Bxd1 a6 17 Nc3 and despite the symmetry I feel White’s bishop pair give him a
pleasant edge in the ending. Still, Black’s position seems better here than the one Ree
gets in the game.
12 Be2 a6
A semi-useful move, which keeps White’s pieces out of b5 and creates the option of a
future ... b7-b5.
13 Bg5 Nc6
Uncovering pressure against e4. After 13 ... Qc8 14 f4 Ned7, M.Sisniega-A.Zapata,
Novi Sad Olympiad 1990, and now 15 Bf3, I don’t see much counterplay for Black,
whereas White can work his bishop pair and central space.
14 f3
Ulf secures the e-pawn.
14 ... Qd7
Breaking the pin on his f6-knight.
15 Rfe1 Na7!?
This funny-looking move spells trouble for Black, who has no concrete plan other than
to wait. 15 ... b5 is more active but can also be perceived as a potential weakening of his
queenside.
16 Bc4
Ulf repositions his bishop, now that Black doesn’t have ... Na5 readily available.
16 ... Qc6 17 Bb3
Another option was 17 Bd5!? Nxd5 18 Nxd5 Kh8 19 c4!, when White has swapped his
advantage of the bishop pair for a powerful bind.
17 ... Qc5+ 18 Be3 Qa5 19 Qf2 Nb5?
Why tear down an old, dilapidated, substandard building and replace it with a brand
new substandard structure? After this move the position asks more of Black than he can
give, since his knight is insecure on b5. He should play 19 ... Nc8 with a rotten but still
playable position.
20 Ne2!
Principle: The side with more space should retain pieces on the board. White
threatens either 21 a4 or 21 c4, exploiting the black knight’s lack of squares, when 21 ...
Na7 22 Bxa7 c5 23 Rxd6 picks up a pawn.
20 ... c5
There was nothing better. 20 ... b6?? was out of the question in view of 21 Bd2, when
Black must cough up a piece to extricate his queen.
21 a4
Undermining the defender of d6.
21 ... c4
A desperate attempt to muck things up a bit in a essentially losing position. After 21
... Nc7 22 Rxd6, White is a clean pawn ahead with strategic advantages to boot.
22 Bxc4 Qxa4 23 Bb3 Qb4 24 Nf4!
Now threatening Nd3 and Bb6, trapping the black queen. With straightforward moves,
White has achieved a strategically won game:
1. He owns the bishop pair.
2. White dominates the light squares and d5 in particular.
3. Black’s d6-pawn is backward and chronically weak on the open file.
5. Black’s queen is in grave danger and its extrication will cost him material.
24 ... Nc7
Giving his queen air, at the cost of his d6-pawn.
25 Rd4
The rook ejects the lone defender of d6.
25 ... Qa5
Not 25 ... Qc5?? 26 Rc4 and White wins a piece.
26 Rxd6
Sometimes when the defending side loses a pawn like this, it’s actually a
psychological relief, similar to parents, whose child has been missing for ten years,
finding out that he died in an accident and his body has now been discovered. The pain
reduces a notch, since there is now some closure.
26 ... Qe5
With a double attack on d6 and b2. Black reasons: We can’t think to ourselves: “I will
do it afterwards” – with time-sensitive action, there may be no afterwards.
27 Rd2!?
I’m not so sure White had to give the pawn back. A greedier player (like me) would go
for 27 Rb6, hanging on to b2, since it doesn’t seem the rook can be trapped.
27 ... Qxb2!?
Black’s patience draws to its limits. This loses, but not taking the pawn also loses!
28 Bd4! Qa3 29 e5! Bh6
If 29 ... Nd7? then 30 e6! wins heavy material.
30 Qh4
The queen gives Black’s chaste bishop an adulterous smile. Instead, the comp points
out some killer geometry with 30 Rd3! (threatening Bxf7+ and Rxa3) 30 ... Qb4 31 Rb1!
(threatening Bxf7+ and Rxb4) 31 ... Qf8 32 Bc5 Qg7 33 exf6 and White wins a clear
piece.
30 ... Qa5
Black’s king position is the 1980s Flint Michigan Ford factory, now abandoned and
empty of machinery and with broken windows.
Exercise (combination alert): White missed a crushing shot here.
What should he play?
31 Qxf6
Multiple positions tend to arise in a single game, requiring stylistic shifts on our part.
So don’t make the assumption that you will land in one which perfectly complements your
strengths. Few players of his era played simple, logic-based positions better than Ulf
Andersson, which came with an almost casual assumption of his authority in this realm.
But like most pure strategists, he sometimes experienced trouble putting a wounded foe
away when the game got more complicated later on. To be fair, White is still winning
easily after 31 Qxf6, but it’s not his best move.
Answer: The strongest continuation was 31 Bxf7+! (annihilation of defensive barrier)
31 ... Kxf7 32 Qxf6+ Kg8 33 e6 Nxe6 34 Rxe6 Qxd2 35 Qh8+ Kf7 36 Qxh7+ Kf8 37 Nxg6
mate.
31 ... Ne6
Not 31 ... Qxd2? 32 Bxf7+ Kf8 33 Be6 mate.
32 Bxe6
Here 32 Nxe6! Qxd2 33 Re4! was stronger, with a crushing attack for White.
32 ... Rxe6 33 Nxe6 Qxd2 34 Bf2
White easily defends against Black’s threats, whereas his own are unstoppable.
34 ... fxe6 35 Qxe6+ Kh8
Exercise (planning): Find a clear winning idea for White:
Answer: Make way for the e-pawn’s forward march.
36 Qf7! Bg7 37 e6 Bd4
Threatening ... Qxe1 mate!
38 Bxd4+ Qxd4+ 39 Kf1! Qg7
Or 39 ... Qc4+ 40 Re2 and Black’s checks are already over.
40 Qd7! Qf8 1-0
Black resigned in view of 41 e7 Qe8 42 Qxb7, when there is no defence to 43 Qxa8!
Qxa8 44 e8Q+.
Summary: When Black plays the ... Bg4 and ... Nc6 line, we should rely on our
coming bishop pair to secure an edge.
Game 36
J.Gustafsson-A.Fier
Spanish Team Championship 2015
1 Nf3 g6
Another Modern move order. This time we’ll look at lines where Black does not simply
play ... Ngf6, transposing to the Pirc.
2 e4 Bg7 3 d4 d6 4 Nc3
4 ... a6
With our Classical move order, this is the main Modern line we need to worry about.
Instead:
a) 4 ... c6 is examined in the next game.
b) 4 ... Nd7 5 Bc4 e6 6 0-0 reaches similar positions to the main game and should
transpose if Black throws in ... a7-a6 and ... b7-b6 later on.
c) 4 ... Nc6 5 Be3 e5 6 dxe5 Nxe5 7 Nxe5 Bxe5 (7 ... dxe5? 8 Qxd8+ is just bad for
Black) 8 Qd2 Be6 9 0-0-0 and White has the better chances in the coming middlegame
with f2-f4 and Bh6 in the air, J.Cubas-N.Maqseed, Baku Olympiad 2016.
d) 4 ... Bg4 5 Be2 Nc6 6 Be3 is similar to Game 35; for example, 6 ... e5 7 dxe5 dxe5
8 Qxd8+ Rxd8 9 Nd5 Nf6!? (9 ... Rd7 10 Bb5 is also slightly unpleasant for Black) 10
Nxc7+ Kd7 11 Nb5 Nxe4 12 0-0-0+ Ke7 13 Bd3 a6, Y.Seirawan-L.Ljubojevic, Monte Carlo
(rapid) 1994, and now I would play 14 Bxe4 axb5 15 h3, when White stands slightly
better.
5 a4
I suggest we suppress Black’s intended ... b7-b5 break, just to reduce our opponent’s
options.
5 ... b6
Black’s main plan is to head for a Hippopotamus formation. Other moves:
a) 5 ... Nd7 6 Bc4 e6 7 0-0 will likely transpose to the game, since ... b7-b6 is Black’s
natural development.
b) 5 ... Nc6 6 h3!? (the usual 6 Be3 and 6 Be2 are good too) 6 ... e5 7 dxe5 Nxe5 8
Nxe5 Bxe5, A.Kharitonov-A.Tukhaev, Rethymno 2013, and here White’s lead in
development and space give him an edge after 9 Bd3 and 10 0-0.
c) 5 ... Bg4 6 Be3 Nc6 7 Be2 e5 improves on the 4 ... Bg4 line above, as White no
longer has access to Nb5 or Bb5 after 8 dxe5 etc. So we might switch to 8 d5 here; for
example, 8 ... Nce7 (8 ... Bxf3 9 Bxf3 Nd4 10 Bxd4 exd4 11 Ne2 is good for White) 9 h3
Bd7 (now swapping on f3 leaves Black with a passive King’s Indian-like position minus his
important light-squared bishop) 10 g4! c6, P.Svidler-J.Manion, New York Open 1995, and
now White looks comfortably better after 11 Nd2 cxd5 12 exd5 f5 13 Nc4 Nc8 14 gxf5
Bxf5 15 h4!.
6 Bc4
Taking aim at f7, which Black is obliged to block.
6 ... e6
After 6 ... Nf6?! 7 Qe2!, White’s coming e4-e5 push will be a major disruption; while 6
... Nd7?? would be a wonderful gift for our side: 7 Bxf7+! Kxf7 8 Ng5+ and Black loses his
queen or gets mated.
7 0-0 Ne7 8 Bf4 Nd7 9 Qd2 h6
Preventing White’s intended Bh6.
Question: Isn’t Black in trouble here? He lags in development and space,
and now can’t castle without dropping the h-pawn.
Answer: Black is in no way busted, despite the comp’s rosy assessment. The
Hippopotamus is fully playable for the following reasons:
1. White’s development lead is somewhat negated by the fact that he has no easy
way to open the game, since any d4-d5 thrust is met by ... e6-e5, while e4-e5 is met by
... d6-d5, clogging lanes.
2. On every move White must watch out for numerous potential pawn breaks from
Black: ... c7-c5, ... d6-d5, ... e6-e5, ... f7-f5, and even ... b6-b5 and ... g6-g5.
Having said that, I still think the position is “+=”. All I’m saying is, don’t overestimate
White’s chances too much.
10 Rfe1
Now White only needs Rad1 to achieve the Reinfeldian dream of perfect development
with control over the centre.
10 ... g5!?
Black seizes space on the kingside.
Question: Doesn’t his king risk getting mated by weakening like this?
Answer: Black’s king for now is uncommitted. It can remain in the centre, go kingside
or go queenside. So the move is justified.
11 Bg3 Ng6 12 h3
I once played the moronic 12 Rad1?? against my arch kid-nemesis and promptly lost a
piece to 12 ... g4!, C.Lakdawala-C.Delesle, Montreal Open 1975. So polite is your writer,
that I know how to say “thank you” in at least eight languages. Sigh. In a fair fight, so
many of my opponents have drawn blood from me that, today, I make it a point to play
as unfairly as possible!
12 ... Nf6
This was actually a novelty. Previously, Black had played 12 ... Bb7, when I think
White’s best is 13 d5! e5?! (Black normally wants to block, but not here, since White gets
an occupiable hole; better is 13 ... Qe7 14 Nd4 with only an edge for White) 14 Nd1!,
heading for f5, and if Black prevents that with ... Nf6 and ... Bc8, White can target the
queenside with a4-a5 and c2-c4, A.McClement-J.Rudd, Purley 2013.
13 e5!
Any confrontation is welcome for White, who grows tired of Black’s rope-a-dope
dodges.
13 ... Nh5 14 Bh2
It makes sense to preserve the bishop.
14 ... Nhf4?!
This variation is a delicate dance – although Black is only one move from castling, he
never gets the chance to do so. This is one of those moments of inattention, the way
everyone ignores the flight attendant relaying instructions on what to do in case the
plane crashes into the ocean below. Pushing past with 14 ... d5?! is no solution either, as
after 15 Bf1 c5 16 a5! the queenside opens dangerously, while 15 ... a5 gets hit on the
other side with 16 g4 Nhf4 17 h4!.
Using this moment to castle may be Black’s best option, though after 14 ... 0-0 15 Bd3
Nhf4 16 exd6 cxd6 17 Bxg6 fxg6 18 Bxf4 Rxf4 19 Qd3 I still prefer White, who can work
on multiple pawn targets in Black’s camp which mean more than the two bishops.
15 exd6
It is in White’s best interests to open the game when leading in development.
15 ... cxd6 16 Nd5!
Cleverly challenging Black’s f4-outpost.
16 ... Nxd5
I don’t see enough compensation for Black after 16 ... Bb7 17 Bxf4 gxf4 18 Nxf4 Nxf4
19 Qxf4; for example, 19 ... Qf6 20 Qxd6 Rd8 21 Qg3 Bxf3 22 gxf3 Rxd4 23 Bxa6 and so
on.
17 Bxd5 Ra7 18 Bc6+ Bd7 19 Be4!
Now both d6 and g6 are under attack.
19 ... Qc7 20 Bxg6 fxg6 21 Qb4!
Black is faced with multiple weaknesses and his king is stuck in the centre.
21 ... Bf8 22 Qb3!
Now e6 receives unwelcome scrutiny.
22 ... Be7
Exercise (combination alert): How did White win material?
Answer: Double attack.
23 Ne5!
The knight is immune and White threatens both Nxg6 and Nxd7 (followed by Rxe6).
23 ... Bc8 24 Nxg6 Rg8 25 Nxe7 Kxe7
The bishops of opposite colours are not a cause for optimism in Black’s camp, since
they favour the attacker in the middlegame.
26 d5! g4!?
A move based on the philosophy: if we are intent on suicide, then at least ensure it’s
not going to be a painful, drawn-out death. This looks like fiscal recklessness, but is it
really? The fortunate thing about not having any possessions or money is that you don’t
worry about losing them. Black tries a desperate counter attack, since 26 ... Rg6 (the
attempted lane-closing 26 ... e5? fails to 27 Bxe5! dxe5? 28 d6+ with simultaneous
attacks on c7 and g8) 27 Qd3 Kf7 28 Bxd6! is hopeless for Black; for example, 28 ... Qxd6
29 dxe6+ Rxe6 30 Qh7+ Kf8 31 Rxe6 Bxe6 32 Qxa7 and White has an extra exchange
and two pawns.
27 dxe6 Bb7
Targeting g2 and hoping for some swindling chances after either ... g4xh3 or ... Qc6.
28 Rad1 g3!?
If 28 ... Qc6 at once then 29 Bxd6+ Ke8 30 Qg3! easily covers all of Black’s threats.
29 Bxg3 Qc6
No, this isn’t a case of underworld creatures oozing from the earth’s surface. Black’s
“attack” is of a provisional status since White has a simple way to safeguard both g2 and
his bishop.
30 Bh4+ Ke8 31 f3 Qc5+
Or 31 ... Qxf3 32 Qxf3 Bxf3 33 Rxd6! (threatening Rd8 mate) 33 ... Rxg2+ 34 Kf1 Ra8
35 e7 Rg8 36 Rd8+ Kf7 37 e8Q+ Rxe8 38 Rexe8 leaves White a rook up.
32 Kh1 Qh5 33 e7! Qg6 34 Re2 d5
Exercise (combination alert): Black’s malnourished position is the body of
a famine victim. What is White’s most efficient way to put Black away?
Answer: Exchange sacrifice/annihilation of defensive barrier.
35 Rxd5! Bxd5 36 Qxd5 1-0
Reconnaissance reveals that the most effective route to Black’s king lies on d8. There
is no defence to the coming Qd8+ and pawn promotion.
Summary: When Black plays a pure Modern with ... a7-a6 against our Classical setup, toss in a2-a4 and you will likely get a Hippopotamus with a space and development
edge.
Game 37
D.Navara-K.Stupak
European Rapid Championship, Minsk 2015
1 d4 g6 2 e4 Bg7 3 Nc3 d6 4 Nf3 c6 5 a4
Again we suppress Black’s potential ... b7-b5 break.
5 ... e5?!
Black’s last move is an abstract cudgel of opposition, as opposed to the actual reality
that there is no opposition. This is a somewhat eccentric attempt to stay within pure
Modern lines by avoiding an early ... Nf6. In my opinion it goes too far and allows White a
lasting edge in the endgame.
Black’s most common continuation is simply to transpose to the Pirc with 5 ... Nf6,
though this can still be delayed for a move or two; for instance, 5 ... a5 6 Be2 Na6 7 0-0
Nf6 and now at last it’s a Pirc.
6 dxe5 dxe5 7 Qxd8+ Kxd8 8 Ng5
White goes after both the f7- and e6-squares.
8 ... Nh6 9 Bc4
9 ... Ke8
Presumably worried about the c1-bishop coming to the a3-f8 diagonal if he puts the
king on e7; for example, 9 ... Ke7 10 Be3 f6 11 Rd1! (White’s knight isn’t really hanging)
11 ... b6 12 f3! Na6 13 0-0 is difficult for Black.
I would probably have taken my chances in the inferior ending after 9 ... f6 10 Ne6+
Bxe6 11 Bxe6 Ke7 12 Ba2 Nf7 13 Be3 Nd7, when White can play for a win on the strength
of his bishop pair and control over the light squares.
10 0-0 Nd7
Black’s cumbersome idea is to try and unravel with ... Nf8, ... f7-f6 and ... Ne6, but it’s
terribly slow. Even now 10 ... f6 11 Ne6 Bxe6 12 Bxe6 Ke7 looks safer, despite the tempo
spent on ... Ke8.
11 a5!
Further restricting Black, who is unable to play either ... Nb6 or ... b7-b6. Black’s
pieces live the lives of galley slaves, existing in misery and cramped quarters.
11 ... Nf8 12 f4!
Principle: Open the game when leading in development. This applies in a queenless
middlegame as well.
12 ... exf4
He is obliged to increase White’s lead in development, since 12 ... f6?! runs into 13 f5!
gxf5 (or 13 ... fxg5 14 f6) 14 exf5 Nxf5 15 Nf7, winning material; while 12 ... Ne6?! 13
fxe5 Nxg5 14 Bxg5 Be6 15 Bxe6 fxe6 16 Bf6 leaves White with an extra pawn and a
superior position.
13 Bxf4 f6
13 ... Ne6 14 Bxe6! Bxe6 15 e5 Nf5 16 Nxe6 fxe6 17 Ne4 is also unpleasant for Black.
14 Nf3 Be6
When on the defensive, we savour even small pleasures. Black has finally managed to
develop his queenside pieces.
15 a6! b6
Not 15 ... Bxc4? 16 axb7 Rd8 17 Nd4! Bxf1 18 Nxc6 Nd7 19 Kxf1 Ng4 20 Nb5 Kf7 21
Rd1 and Black, although a rook up, is completely busted due to White’s passed b7-pawn.
16 Bd3 Nf7 17 Nd4
The double attack on e6 and c6 allows White to regain control over the a2-g8
diagonal.
17 ... Bd7 18 Bc4 Ne5 19 Bb3 Rc8
In case you’ve forgotten, Black is unable to castle long since that would be an illegal
move: he already moved his king.
20 Rad1 Rc7?!
Planning ... Bc8, ... Re7 and ... Ne6, after which it seems like Black’s period of solitary
confinement will soon end. This is an illusion. He should try something like 20 ... b5,
when he has a greatly inferior position but is still in the game.
21 Bg3 Bc8?
Exercise (combination alert): White has access to a winning sequence.
What did he play?
Answer: Attraction/pin/double attack.
22 Bxe5!
Step1: Exchange on e5, eliminating Black’s best piece and opening the f-file for
White’s rook.
22 ... fxe5 23 Nxc6!
Step 2: Sacrifice on c6, luring Black’s rook to the a4-e8 diagonal.
23 ... Bd7?
Don’t underestimate a threat just because it is issued softly – and if your opponent
plots to kill you, then don’t take an action which assists his intent. No setback can be
more severe than walking into a one move mate. Black survives a near miss only to end
up in a head-on collision.
The critical continuation was 23 ... Rxc6 24 Ba4 (Step 3: Pin) 24 ... Bd7 25 Rxd7! (Step
4: Attraction) 25 ... Kxd7 26 Rf7+ (Step 5: Double attack) 26 ... Ke6 27 Rxg7 Rc5 28 Rxa7
and the a-pawn will be decisive.
24 Bf7 mate
Summary: It’s not easy for Black to remain in a pure Modern Defence after 4 ... c6.
Ideas like 5 ... e5?! are gimmicky and only lead to inferior positions for Black.
Game 38
V.Akopian-C.Foisor
European Cup, Kemer 2007
1 e4 c6
Question: Did you misfile this game into the wrong chapter?
Answer: Please remain calm. We soon transpose. The Modern Defence move order
runs 1 ... g6 2 d4 Bg7 3 Nc3 c6 4 Nf3 d5 4 h3.
2 d4 g6 3 Nc3 d5
Question: Is this a Caro-Kann or a Modern Defence?
Answer: It’s a hybrid of both. Officially the line is under the Modern banner as the
Gurgenidze system.
4 h3
With this move we pre-empt a possible ... Bg4 pin of our (future!) f3-knight, whereas
4 Nf3 Bg4 allows Black to unload the problem light-squared bishop.
Question: Why don’t we play 4 e5, as in the Advance Caro-Kann?
Answer: Because this is an inferior version for White. In most Gurgenidze lines,
Black’s dark-squared bishop has been committed to g7 before White closes the centre
with e4-e5. Later on, Black often plays ... e7-e6 and then drops the bishop back to the
a3-f8 diagonal. Here, with the bishop still on f8, Black is effectively two tempi up on those
lines and can play, for instance, 4 ... h5 5 f4 Nh6 6 Nf3 Bg4 7 Be3 Nf5 8 Bf2 e6 with a
good position.
4 ... Bg7 5 Nf3
5 ... Nh6
Question: Why did Black develop the knight to the side of the board?
Answer: The idea is to continue with ... f7-f6 and ... Nf7, either challenging our
centre (if we play e4-e5) or eventually aiming for an ... e7-e5 break. This is a more
ambitious plan than exchanging pawns on e4 and developing the knight to f6. For
example:
a) 5 ... dxe4 6 Nxe4 Nd7 7 Bc4 Ngf6 8 Nxf6+ Nxf6 9 0-0 0-0 10 Re1 with a nagging
space edge for White, since Black is far off from achieving either ... c6-c5 or ... e7-e5
breaks, W.Browne-C.Lakdawala, Montreal (simul) 1976.
b) 5 ... Nf6 6 Bd3!? (a calmer option than 6 e5 Ne4 7 Nxe4 dxe4 8 Ng5 c5, which can
lead to great complications) 6 ... dxe4 7 Nxe4 Nxe4 8 Bxe4 Nd7 9 c3 0-0 10 Bg5 and I
slightly prefer White, T.Kulhanek-C.Foisor, European Cup, Kemer 2007.
6 Bd3
6 Bf4 is a major alternative, when 6 ... f6 7 exd5 cxd5 8 Nb5 0-0 9 c4! also offers
White a slight advantage. Avoid 9 Nc7?! e5! 10 Bxh6 Qxc7 11 Bxg7 Kxg7 12 dxe5 Qa5+
13 c3 fxe5, which is fine for Black, A.Barsov-J.Van Mil, Dutch Team Championship 1997.
6 ... 0-0 7 0-0 f6
Black duly prepares the ... Nf7 and ... e7-e5 plan.
8 Ne2!
White’s highest scoring move, clearing the way for c2-c4. After 8 Re1 Nf7 9 b3 Re8 10
Bb2 a6 11 Bf1 b5, Black again had a decent position, Z.Hracek-J.Van Mil, German League
2002.
8 ... Nf7
After 8 ... dxe4 9 Bxe4 Nf7 10 c3 e5 11 Bc2 Nd7 12 Bb3, White has a slight edge due
to his strong light-squared bishop, K.Spraggett-O.De la Riva Aguado, Catalan Team
Championship 2013.
9 exd5 cxd5 10 c4!
Our c2-c4 break is, to my mind, Black’s natural hazard in adopting this structure. We
chip away at d5 and deny Black the strong centre she seeks. We’re not afraid of taking on
an isolani after 10 ... dxc4 11 Bxc4 since ... f7-f6 isn’t a good fit for Black, who will be left
with an isolani herself if she then pushes ... e7-e5.
10 ... Nc6 11 cxd5
White can also play 11 Nf4 at once; for example, 11 ... Nb4 12 Be2 e5 13 dxe5 fxe5 14
Nxd5 Nxd5 15 Qxd5 Qxd5 16 cxd5 e4 17 Ng5 Nxg5 18 Bxg5 Bxb2 19 Rab1 Ba3 20 Bc4
Bd6 21 Rfe1 and White soon won a pawn in Mi.Adams-A.Martin, British League 1998.
11 ... Nb4 12 Nf4
12 Bc4 Nxd5 13 Nf4 also looks like a very good isolani position for White.
12 ... Nxd5
After 12 ... Nxd3 13 Qxd3 Qd6 14 Qb3, it won’t be easy for Black to regain the lost
pawn.
13 Qb3
Principle: When you own an isolani, fight for control of the square in front of it.
13 ... Nxf4
This helps White develop, but 13 ... e6 14 Bc4 is highly unpleasant for Black as well.
14 Bxf4 Kh8
Unpinning the f7-knight.
15 Rfe1
It becomes clear that Black has ended up in a gravely inferior anti-isolani position,
since the inclusion of ... f7-f6 gives him a backward e-pawn and a weakened e6-square.
On top of it, she lags in development in a semi-open position.
15 ... g5!?
When we have a choice between dying fighting or dying politely, human nature tends
to pick the former. For some reason most of us have mismatched characteristics where
we are either strong attackers and so-so defenders (as WGM Foisor perhaps is) or the
opposite where we shine on defence and stink at attack (as I am). So Foisor instinctively
goes with her strength, even if her “attack” is more a wish than the board’s reality. I don’t
have any better suggestions anyway, since I don’t know how Black might otherwise bring
her queenside pieces into play. Not liking the way the wind blows, Foisor attempts to
complicate and generate some kind of attack on the kingside. In doing so she violates the
principle: Avoid attacking from an inferior or cramped position. Sometimes change makes
life neither better nor worse, only different. I don’t think Black is much worse taking this
slightly unsound route than if she played “correctly” with 15 ... Nd6, since White has
tremendous strategic pressure.
16 Bg3 g4!?
A logical extension of her intent.
17 hxg4 Bxg4
Black sacrifices the b7-pawn to develop her queenside and open the g-file.
18 Qxb7 e5 19 Be4
Covering f3, while attacking a8.
19 ... Rb8 20 Qxa7 Rxb2?!
Black’s only chance to complicate lay in 20 ... f5!? 21 Bh4 Qd6; for example, 22 Be7
Qg6 23 Bxf8 Rxf8 24 Nh4 Qh5 25 Bd5 Ng5 26 Rac1 Qxh4 27 Rc7 e4 28 Rxg7 Nf3+ 29 gxf3
Bxf3, but then 30 Rxh7+! Qxh7 31 Qxh7+ Kxh7 32 Bb3!, followed by Bd1, probably leads
to a winning rook endgame for White, and he might avoid the whole thing with 22 Nh2! in
any case.
21 dxe5 fxe5
21 ... Bxf3 is met by the zwischenzug 22 exf6! Bxf6 23 Bxf3 and White is two pawns
up, while if Bd4 24 Qe7 Qxe7 25 Rxe7 Rxf2 26 Bxf2 Bxa1 27 a4, the single passed a-pawn
will be decisive.
Exercise (combination alert): How did White win material?
Answer: Overloaded defender.
22 Nxe5! Be6
Black can’t capture the knight because 22 ... Nxe5? 23 Bxe5 Bxe5? allows 24 Qxh7
mate.
23 Rad1 Rxa2?
Here 23 ... Rd2 was forced, when 24 Rxd2 Qxd2 25 Nf3 Qxa2 26 Qc5 is winning for
White, but at least it’s not all over immediately. I have a feeling Foisor was in time
trouble, a place where we operate with muffled senses and questionable judgment.
Exercise (combination alert): With her last move Black attacked White’s queen.
How did Akopian react?
Answer: Queen sacrifice/overloaded defender.
24 Qxf7! 1-0
I learned early on in childhood that if you pretend not to understand a parent’s
command, you can choose not to obey. Here White can go kamikaze with a smash and
grab operation: 24 Qxf7! Qxd1 (or 24 ... Bxf7 25 Nxf7+ Rxf7 26 Rxd8+) 25 Qxf8+! (the
language of vendetta is: “You hit me once and I hit you back ten times”) 25 ... Bxf8 26
Rxd1 and White is a knight and a pawn ahead.
Answer #2: 24 Nxf7+ Bxf7 25 Qxf7! Qxd1 26 Qxf8+ was equally good.
Summary: Meet the ... g7-g6, ... c7-c6, ... d7-d5 system with 4 h3, after which I don’t
believe Black can fully equalize.
Game 39
H.M.Elwert-O.C.Ekebjaerg
ICCF 50th Jubilee, Correspondence 2002
1 d4 g6 2 e4 Bg7 3 Nc3
If you don’t care for the position White obtains in the game and you have some
experience with queen’s pawn openings, then your alternative move order is 3 Nf3 c5 4
d5 d6 5 c4 with some sort of Benoni or Benko Gambit structure, depending on how Black
plays it.
3 ... c5
This time Black strikes against the white centre at once.
4 dxc5!
White scores a very healthy 64.4% with this move in my database. I have a feeling
that this hybrid line will throw off most of your opponents, who will be expecting either an
Accelerated Dragon after 4 Nf3 cxd4 5 Nxd4 or a Schmid Benoni with 4 d5 d6.
4 ... Qa5
Question: Shouldn’t we be concerned about tripled pawns if Black takes on c3?
Answer: I don’t think we have much to worry about after 4 ... Bxc3+ 5 bxc3. Yes, our
queenside structure has been seriously damaged, but in return we get:
1. The bishop pair.
2. Control over the dark squares, since Black played ... g7-g6 and then gave the darksquared bishop away.
3. An open b-file for our rook.
4. We are a pawn up and Black has no simple way to regain it.
Conclusion: We get more than enough for the structural damage sustained.
Play can continue 5 ... Qa5 6 Qd4! Nf6 7 Qb4! Qc7 (Black gets a clearly inferior ending
if he swaps on b4 or plays 7 ... Nc6?! 8 Qxa5 Nxa5 9 f3! b6 10 cxb6 axb6, when 11 Bg5
Rg8 12 Bg5 is good for White, R.Hiltunen-F.Titzhoff, correspondence 2012) 8 f3 Nc6 9 Qa3
and I don’t believe in Black’s position. In my database Black lost all seven games from
here, and in one of them he outrated White by nearly 300 Elo points.
5 Bd2
Now we cover against ... Bxc3 structural damage, develop a piece, and worry Black’s
queen about potential discoveries with our knight.
5 ... Qxc5 6 Nd5!
Remember this move, after which I don’t believe Black is able to equalize.
6 ... Na6
Question: What happens if our opponent grabs the b2-pawn?
Answer: Our positions, like marriages, degenerate when lies are told. 6 ... Bxb2 is a
double question mark since the pawn is poisoned: 7 Rb1 Bd4 (7 ... Bg7 8 Bb4 Qc6 9 Bb5!
is game over) 8 Bb4! Bxf2+ 9 Ke2 Qd4 10 Bc3! and Black loses material no matter what;
for example, 10 ... Qxd1+ 11 Rxd1 Bxg1 12 Nc7+ Kd8 13 Nxa8 f6 14 Rxg1 b6 15 Ke3 Bb7
16 Nxb6 axb6 17 Bd4 Kc7 18 Rb1, when b6 falls and Black will be a full exchange down in
the ending.
7 Be3
Stronger than 7 Nf3 e6! (not 7 ... Nf6? in view of 8 b4! Qd6 9 Bf4 Qe6 10 Ng5 Qc6 11
Be5! with tremendous pressure for White) 8 Bc3 Kf8 9 Bxg7+ Kxg7 10 Nc3 Nf6 and Black
does not stand so badly, H.Westerinen-M.Tal, Dubna 1983.
7 ... Qc6
This was a new move at the time. Previously Black played 7 ... Qa5+, when 8 c3 e6 9
Bd4 f6 10 b4 Qd8 11 Bxa6 bxa6 12 Ne3 Ne7 13 Ne2 d6 14 c4 gives White the better
chances, Ad.Horvath-A.Parkanyi, Pecs 1998.
8 Nf3 Nc7
If he snaffles the b-pawn with 8 ... Bxb2, as in R.S.Villa-G.Guerrero, Barranquilla 2009,
White can play 9 Bxa6! bxa6 10 Rb1 Bg7 (or 10 ... Bc3+ 11 Bd2) 11 Rb3! and Black has a
big problem completing development since 11 ... Nf6?? runs into 12 Rc3! and 13 Nc7+.
9 Bd4 f6!?
Now Black’s pieces are awkward, not least his queen, but 9 ... Nf6 10 Ne5 Qd6 11 Nc4
(dance!) 11 ... Qc6 12 Qf3! Ncxd5 13 cxd5 Qa6 14 d6! is also unpleasant for Black.
10 c4!
Black has ended up in a terrible Maróczy bind with his queen completely misplaced.
10 ... e6 11 Qe2!
11 ... e5
Black is struggling for moves. He is unable to develop the g8-knight since f6 would
hang; 11 ... exd5?? isn’t much of a consideration seeing as 12 exd5+ wins the queen;
while 11 ... Nxd5 12 cxd5 Qc7 13 Qb5! (cutting off ... Qa5+ and untangling his kingside)
13 ... Ne7 14 Bd3 exd5 15 exd5 0-0 16 0-0 b6 17 Rfe1 gives White a clear advantage.
12 Bc3 Nxd5 13 cxd5 Qb6 14 Nd2
Heading for c4.
14 ... Nh6 15 Nc4 Qc7 16 Bb4!
Eyeing d6, while clearing the c-file for the rook.
16 ... Nf7 17 Rc1
Threatening Nd6+ and Rxc7.
17 ... Qb8
This poor queen has been humiliated enough for one game.
18 Qf3!
Clearing the way for White’s f1-bishop to develop, while thinking about swinging
across to a3.
18 ... d6 19 h4! Ke7
If 19 ... h5 then 20 Qa3 (not 20 Qg3 0-0! 21 Qxg6?? Bg4, when ... Nh8 traps the
queen) 20 ... Ke7 21 Qg3 looks quite awful for Black.
20 g4
Suppressing ... f6-f5 breaks.
20 ... Bd7 21 g5!!
Before this move White’s attack was a loosely connected network. Now everything
comes together in perfect harmony. I’m sure Alpha Zero would be impressed with this
intuitive, comp-generated, line-opening sacrifice. White ruthlessly opens kingside lines,
after which Black’s king is not nearly as safe behind the dark-squared pawn bulwark as it
might seem. Indeed, a new problem arises to claim his attention: White will play Bh3,
exchange bishops, and then infiltrate e6 with his queen, via h3 or g4.
21 ... fxg5
If 21 ... f5?! then 22 Bh3 fxe4 (or 22 ... f4 23 Bxd7 Kxd7 24 Qh3+) 23 Qxe4 Qc8 24
Qe3 Bxh3 25 Nxd6! is decisive.
22 hxg5
The coming Bh3! will puncture the weak light squares, after which Black’s position is
that sensation where the amputee feels the lost limb, even though it’s no longer there.
22 ... b5!?
A great manipulator always makes you feel that every decision you take is actually
your own. If you take a shot at everything you think is dangerous, the only result is that
you run out of ammunition, since all you have accomplished is to shoot at shadows.
Black’s move is pure desperation and allows the white knight pieces into c6, but I don’t
see a cure to his troubles. For example, 22 ... Nxg5 23 Qe3 Nf7 24 Bh3! Bh6 (24 ... Bxh3
25 Nxd6! Nxd6 26 Qxh3 Kd8 27 Qe6 is hopeless for Black; and 24 ... Qe8 25 Nxd6! Nxd6
26 Bxd6+ is even more crushing, since 26 ... Kxd6 27 Qa3 is mate) 25 Qc3 Bxc1? runs
into 26 Bxd6+! Nxd6 27 Qxe5+ Kd8 28 Qf6+! with a winning attack, despite the fact that
at this moment White is a rook and bishop down.
23 Na5 Nxg5 24 Qg3 Nf7 25 Bh3!
Once again the elimination of Black’s light-squared bishop is White’s key to victory.
25 ... Qd8 26 Rc6!
Threatening Nb7!.
26 ... Rb8 27 Qc3 Be8 28 Be6 h5 29 Rc7+ 1-0
In view of 29 ... Kf8 30 Rxf7+! Bxf7 31 Nc6 Qc7 32 Qa3! Kg8 33 Bxd6 and Black is
cleaned out.
Summary: After 3 ... c5 4 dxc5 it’s difficult for Black to equalize, even if they know
the theory, which they probably won’t.
Game 40
S.Karjakin-R.Felgaer
Cuernavaca 2006
1 e4 d6 2 d4 Nf6 3 Nc3 e5
This is the modern route to Philidor’s Defence, traditionally reached via 1 ... e5 2 Nf3
d6 and so on. Of course we are playing 2 Bc4 there, when 2 ... d6 risks ending up in a
passive King’s Gambit position after a timely f2-f4. For example, 3 Nc3 Nf6 4 d3 c6 5 f4!
Bg4 6 Nf3 exf4 7 h3 Bxf3 8 Qxf3 Nbd7 9 Bxf4 Ne5 10 Qe2 Nxc4 11 dxc4 Nd7 12 0-0-0 and
White has a definite advantage with a lead in development and pressure against d6,
V.Ivanchuk-Z.Azmaiparashvili, European Cup, Panormo 2001.
4 Nf3
I suggest we enter the main lines of the Philidor, where it’s not all that easy for Black
to equalize.
Question: Doesn’t 4 dxe5 wreck Black’s castling?
Answer: It does, but it’s not so easy for White to prove an edge. In my database it is
Black, not White, who has a healthy plus score after 4 ... dxe5 5 Qxd8+ Kxd8, mainly
because this is a specialty position which most Philidor players will know better than we
will. I suggest that we stay away from it.
4 ... Nbd7 5 Bc4 Be7 6 0-0
A more sober choice than the lunge 6 Ng5 0-0 7 Bxf7+ Rxf7 8 Ne6 Qe8 9 Nxc7 Qd8 10
Nxa8 b5! 11 f3 Ba6 12 d5 Qxa8, when I prefer Black’s extra bishop and knight to White’s
rook and two pawns, B.Cuarta-C.Lakdawala, San Diego (rapid) 2016.
6 ... c6 7 a4
In order to slow down Black’s ... b7-b5 expansion attempt.
7 ... 0-0 8 Re1 b6
The idea is to play for an eventual ... b6-b5 break after ... Bb7 and ... a7-a6. We will
examine Black’s main alternative 8 ... a5 in the next game.
9 d5!
Disrupting Black’s plan by undermining his base c6-pawn. This position is considered a
key tabiya of the Philidor.
9 ... cxd5
And this is considered Black’s most accurate response. Other moves:
a) 9 ... Bb7 10 dxc6 Bxc6 11 Bg5 Rc8 12 Bxf6 (the fight is for control over d5, so we
logically remove one of Black’s defenders of that square) 12 ... Nxf6 13 Qd3 Qc7 14 b3
Rcd8 15 Rad1 offers a slight but stable edge for White, I.Doukhine-A.Gorjachev, Moscow
2006.
b) 9 ... c5?! (this allows White to open the queenside favourably) 10 a5! bxa5 11 Nd2
Nb6 12 Rxa5 Nxc4 13 Nxc4 Ne8 14 f4! exf4 15 Bxf4 and Black was already close to being
strategically busted, A.Miles-T.Gelashvili, European Championship, Saint Vincent 2000.
10 Nxd5 Bb7
The alternative is 10 ... Nxd5 11 Bxd5 Rb8, when G.Shahade-C.Lakdawala, San
Francisco 2001, continued 12 Qd3 Nf6 13 Bb3 h6 14 Nd2 Bb7 15 Nf1! Re8 16 Ng3 Bf8?! (I
should have tried 16 ... d5 17 exd5 Bxd5 18 Bxd5 Qxd5 19 Qxd5 Nxd5 20 Rxe5 Nb4 21
Re2 Bf6 22 c3 Rxe2 23 Nxe2 Rd8 24 Be3 Nd3 with some play for the pawn) 17 Nf5 (17
Rd1! gives White a stable edge) 17 ... d5! 18 Qg3 Kh7 19 exd5 Nxd5 20 Ne3 Nxe3 21
Bxe3 Qc7, and here 22 a5! still offers White a slight plus.
11 b3 Rc8 12 Re2!
By covering c2, White is now able to recapture on d5 with a piece, rather than with
the e4-pawn; i.e. 12 ... Nxd5 13 Bxd5 Bxd5 14 Qxd5. Azmaiparashvili has played this line
three times as Black; for example, 14 ... Nf6 15 Qd1 d5!? (Black hopes to avoid a bind by
sacrificing a pawn for piece play) 16 exd5 Qxd5 17 Qxd5!? (17 Bb2 might offer White an
edge) 17 ... Nxd5 18 Nxe5 Rfe8 19 c4 Nc3 and Black’s lead in development gave him
some compensation for the missing pawn, V.Nevednichy-Z.Azmaiparashvili, Nova Gorica
2005.
12 ... Nc5 13 Nxf6+ Bxf6 14 Bd5 Qd7 15 Ba3 Bxd5 16 Qxd5
White looks to have won the fight for control over d5, but the battle is not over yet.
16 ... Ne6
Threatening ... Nf4. After 16 ... Rfd8 17 Rd1 Ne6 18 Red2 Nd4 19 Nxd4 exd4 20 g3,
White has the slightly superior chances since Black’s d4-pawn may later fall, I.Teran
Alvarez-H.Saldano Dayer, Granada 2007.
17 Qb5
After 17 Qxd6 Qb7, Black’s counterplay on the open lines should give him enough for
the pawn.
17 ... Qb7
Exchanging queens with 17 ... Qxb5?! 18 axb5 benefits White since the a7-pawn
becomes a target.
18 Rae1 a6 19 Qb4
Here 19 Qd5 might be an improvement, even if 19 ... Qxd5 20 exd5 does block the d5square.
19 ... Rfd8
The rook was perhaps better placed on the f-file. After 19 ... Be7! 20 Qd2 Nf4 21 Re3
f5 22 c4 fxe4 23 Rxe4, Black’s Sveshnikov Sicilian-like kingside activity makes up for his
structural inferiority.
20 c4
You would almost swear this position arose from a Sicilian Defence rather than a
Philidor. White hopes for an edge from the following factors:
1. He owns the superior bishop.
2. He has a clamp on d5.
3. Black’s backward d6-pawn is a potential weakness.
Having said that, it’s not easy for White to prove an edge, since Black has power on
the dark squares and White must watch out for both ... b6-b5 and ... f7-f5 breaks.
20 ... Rd7
A later game, M.Panarin-D.Bocharov, Tyumen 2012, saw 20 ... Nc5 21 Re3 h6 22 h4
Be7, when chances look close to even after 23 g3.
21 Rd1 Be7
Threatening ... d6-d5, so the white queen has to retreat.
22 Qe1 b5!
Felgaer seizes the opportunity for his other thematic queenside pawn break, albeit at
the cost of allowing White to create an outside passed pawn.
23 cxb5 axb5 24 a5! Nf4?!
This sends White’s rook to where it wants to go. Black doesn’t look worse after 24 ...
Nc5!.
25 Ra2 f5?!
This pawn sacrifice to activate Black’s centre looks unsound. It’s okay to alter our
plans with changing conditions on the board, not so okay to alter them based on our
changing mood. When we know in our hearts that our risky idea is in fact dubious, and
yet play it anyway, we become the indulgent parent who can’t say “No!” to our petulant
brat of a child. What we prefer is always overridden by the demands of the position. Now
there is no way to reconcile the difference between his intent and the board’s actuality. A
calmer move would keep Black only slightly worse.
26 exf5 e4 27 a6!?
Attempting to deflect Black’s queen from e4.
27 ... Qa8?!
Black can reduce his disadvantage in the line 27 ... Qxa6! 28 Qxe4 b4 29 Qxf4 bxa3 30
Qe3 d5 31 Nd4, which cleans up his mess somewhat, yet his position still smells of
disinfectant. Black remains a pawn down and I don’t think the fact that he is now the one
with the passed a-pawn makes up for it completely.
28 g3!!
This is that moment when Neo taunts Agent Smith (the most evil agent in the entire
Matrix) by beckoning him to come and take the first swing. Black’s position collapses
shockingly quickly after this move, as the coming tripled pawns are blessings rather than
burdens.
28 ... exf3
Not 28 ... Nh5?! 29 Bb2! Nf6 (the white knight is immune due to the Qe6+ and Qxd7
threat) 30 Nd4 and White already achieves a winning position.
29 gxf4
Again threatening Qe6+ and Qxd7. A deal is struck, yet the satisfaction derived isn’t
mutual, since a kind of structural alchemy has taken place, highly favourable to White. At
first glance those ugly, isolated, tripled pawns look as out of place as a rat in an infant’s
nursery. In reality it is Black’s king, rather than White’s, who is in trouble.
29 ... Kh8
Or 29 ... Bf6 30 Qe6+ Rf7 31 Re1!, when 31 ... Qxa6? is met by 32 Bxd6 Qc6 33 Ra7
and Black is crushed.
30 Qe6 Rdc7 31 Bb2!
White secures the passed a6-pawn while pointing the bishop at g7 and threatening f5f6.
31 ... Bf8 32 a7!
Now Black has to worry about the a-pawn promoting as well.
32 ... Qc6 33 f6 Ra8
Exercise (planning): Karjakin’s game pulses with possibility. Come up with a
plan for White to achieve a decisive attack.
Answer: Clear the way for Rg1, which increases the pressure on g7 to an unbearable
level.
34 Kh1! Qd7
If 34 ... Rcxa7 then 35 Rg1! forces mate. Black decides to white-knuckle it and bear
the pain, but his defenders are fast running out of squares.
35 Qd5 Raxa7 36 Rxa7 Rxa7 37 Rg1 Qe8 38 f5! 1-0
There is no defence to f6xg7+, followed by f5-f6. For example, 38 ... h6 (or 38 ... Rf7
39 Qe6! Qxe6 40 fxe6 Rxf6 41 Bxf6 gxf6 42 Rc1!, followed by Rc7, e6-e7 and wins) 39
fxg7+ Bxg7 40 f6 (mess with one wasp and the entire hive will come pouring out in
defence of their brother) 40 ... Bf8 41 Qg8 is mate.
Game 41
G.Kamsky-V.Ivanchuk
Beijing (rapid) 2013
1 d4 d6 2 e4 Nf6 3 Nc3 e5 4 Nf3 Nbd7 5 Bc4 Be7 6 0-0 0-0 7 a4 c6 8 Re1 a5
Black’s plan with this move is completely different from that in the previous game. In
this version Black claims a bit of space on the queenside and intends a future ... e5xd4
with two ideas in mind:
1. Pressuring the white e-pawn with ... Re8, ... Bf8 and ... Nc5, now that the knight
can’t be kicked away by b2-b4.
2. Playing ... Nb6 and angling for a ... d6-d5 break.
9 h3
The main move, which prevents the c8-bishop from appearing on g4 later on. A good
alternative is 9 b3, when 9 ... exd4 10 Nxd4 Nb6 11 Bf1 d5 12 e5 Ne8 is very similar to
the game, but Black can also consider 9 ... Nb6 and 10 ... Bg4 here.
9 ... Nb6
We must also be ready to meet the following lines:
a) 9 ... exd4 10 Qxd4 (taking on d4 with the queen is logical since Black can’t chase it
away with ... Nc6 and we add pressure to Black’s backward d6-pawn) 10 ... Nc5 11 Bf4
Ne6 12 Bxe6 Bxe6 13 Rad1 Ne8 14 Qe3, when Black’s bishop pair doesn’t make up for the
fact that he is tied down to defence of d6 and without counterplay, D.Navara-M.Ivanov,
Icelandic Team Championship 2010.
b) 9 ... h6 10 Ba2 Re8 11 Be3 Qc7 12 Nh4 (eyeing f5) 12 ... Nf8 13 Qf3 Be6 14 Nf5 and
Black must either chop the knight and hand over the bishop pair, or allow the powerful
knight to hover over his king, V.Epishin-Mi.Adams, Terrassa 1991.
c) 9 ... Qc7 10 Be3 exd4 11 Nxd4 Nc5 12 Qf3 Nfd7 13 Qg3 Ne5 14 Ba2 and I prefer
White due to his greater central influence, R.Gerber-V.Kurochkin, European Cup, Novi Sad
2016.
10 Bf1
Question: Why move the bishop to a passive square when it could stay on
the a2-g8 diagonal?
Answer: The retreat to a2 is a possibility, but the bishop can become a target for ...
Nc5 and ... Be6. For example, 10 Ba2 Nfd7 11 Be3 exd4 12 Bxd4 Nc5 prepares ... Be6,
which prompts 13 Bxc5 dxc5 14 Qe2 Qd6 15 Rad1 Qg6, when Black’s bishop pair and dark
square control more than make up for White’s healthy kingside pawn majority.
10 ... exd4
Black hopes to free himself by clearing the centre with a ... d6-d5 break. The idea of
10 ... Nfd7 is less effective here; for example, 11 Be3 exd4 12 Nxd4 Nc5 13 Qd2 and the
central space offers White an edge, A.Ogleznev-I.Ionescu Brandis, Eforie Nord 2011.
11 Nxd4
Discouraging ... Be6, so Black strikes out with his logical freeing break. Yet to my
mind this doesn’t fully equalize, since White’s forthcoming kingside majority is more
dangerous than Black’s queenside model.
11 ... d5
12 e5!
White’s best shot at an edge. 12 exd5 Nbxd5 13 Nxd5 Nxd5 looks even to me.
12 ... Ne8
After 12 ... Nfd7 13 Nf5 Nc5 14 Nxe7+ Qxe7 15 Be3 Nbd7 16 f4, I like White’s bishop
pair and kingside pawn majority, A.Rudenko-V.Kireev, correspondence 2011.
13 Nce2!
White’s knight was useless on c3, so he transfers it to the kingside in preparation for a
coming attack.
13 ... f6?!
Does this move prove a point or does it raise an important question: If you offer a
sacrifice, what happens if your opponent ignores it? This move was new at the time but
it’s not an improvement. Ivanchuk’s intention was an exchange sacrifice, which Kamsky
ignores.
The old move 13 ... g6 is better, with the idea of activating the knight via g7, though
after 14 Bh6 Ng7 15 Nf3 (preventing ... Bg5) 15 ... Re8 16 Ned4 Ne6 17 Qd2, White’s
entrenchment on the kingside dark squares still gives him an edge, S.Fedorchuk-V.Kunin,
Llucmajor 2017.
14 e6!
Ivanchuk may not have taken this move into account. He probably expected Kamsky
to go material grabbing with 14 Nf4 fxe5 15 Nfe6 Qd6 16 Nxf8 Kxf8, when Black has a
pawn and a powerful centre for the exchange.
14 ... Nc7?
This is that moment when you are driving and your wife orders you to turn left, and
you tune her out and turn right, and then get yelled at. He can’t afford to move any of his
pieces away from his king. Then again, Black is already worse:
a) 14 ... f5 15 Ng3 g6 16 Bd3 Bc5 and now 17 Ngxf5! gxf5 18 Nxf5 Rxf5 (forced) 19
Bxf5 Ng7 20 Qf3 Nc4 21 Bh6 gives White a promising attacking position.
b) 14 ... c5 15 Nf5 Bxe6 16 Neg3 Bxf5 17 Nxf5 Rf7 18 Bf4 Bf8 19 Re6 g6 20 Bb5 with
big pressure for the pawn.
15 Ng3?!
The comp shows that 15 Nf4!, intending Bd3, leads to a decisive attack for White.
15 ... Re8?
A third, and this time fatal, mistake. He had to try 15 ... g6 16 Bh6 Re8 17 Qg4 Kh8 18
Ngf5! Rg8 19 Nxe7 Qxe7 20 Bf4 with an admittedly miserable game for Black.
16 Bd3!
Too many white pieces are now aimed at Black’s undefended king.
16 ... g6
He had to prevent Qh5, though this move does little to slow White’s attack.
17 Qg4
When attacking, it’s important not to be either an under- or over-achiever. Kamsky’s
move is good enough, but he had something even more devastating: 17 Bxg6!
(annihilation of defensive barrier) 17 ... hxg6 18 Qg4 g5 (or 18 ... Kh7 19 Qh4+ Kg8 20
Qh6) 19 Qh5 Bf8 20 Qg6+ Kh8 21 Nh5 Qe7 22 Nxf6 Qg7 23 Qh5+ Qh6 24 Qf7 Qg7 25
Nxe8 and Black is crushed.
17 ... Kh8
I wouldn’t describe the black king’s attempted escape route as a luxurious means of
transportation.
Exercise (combination alert): Black’s king is the empty pocket of the tourist
who got cleaned out at the tables in Las Vegas. How should White proceed
with his attack?
Answer: Step 1: Fling the g3-knight to f5.
18 Ngf5!
The knight can’t be taken: 18 ... gxf5? 19 Qxf5 and Black is mated.
18 ... Bf8
Your boat has capsized in the middle of the ocean, you are treading water, and you
think to yourself: “Could things get any worse?” And then you spot a pair of dark fins
racing in your direction.
Step 2: Transfer the knight to h4, targeting g6.
19 Nh4! Re7 20 Nxg6+
Step 3: Sacrifice on g6. So obvious that it’s not even worthy of an exclam. 20 Bxg6
also wins.
20 ... hxg6 21 Bxg6 1-0
Black’s position displays his wounds in clear view and he must hand over a load of
material to avoid mate.
Summary: Master the positions after 8 Re1, where White should achieve a strategic
edge with correct play.
Chapter Six
Scandinavian Defence
Against the Scandinavian I suggest we avoid gimmicks and go with the main lines, which
should yield us our birthright “+=”. When I was a kid, $1 would buy you four cups of
coffee. Today, it won’t even get you a sip at Starbucks (you are officially old when
everything reminds you of things which have already happened). In the same way, when
I was a kid, I was usually out of book well before move 10. Today, I’m lucky to be out of
book before move 20. This chapter is perhaps the hardest for the reader, since there is a
lot for us to memorize and, more importantly, understand.
Game 42
Y.Kryvorouchko-J.Tomczak
European Rapid Championship, Warsaw 2011
1 e4 d5 2 exd5 Qxd5
The ... Qxd5 Scandinavian flagrantly violates the prime directives, which state:
1. Don’t fall behind in development in the opening.
2. Don’t bring your queen out early in the opening, since this will most likely put you
in violation of directive number one.
The opening should be unsound but for some quirky reason isn’t. In fact, it’s not all
that easy for White to generate even an edge if Black knows what to do. I have been
playing the Scandinavian for about three and a half decades and still haven’t decided if
Black’s last move can be construed as provocation or a deliberate insult!
The alternative is 2 ... Nf6, which we’ll look at in Games 47 and 48.
3 Nc3
3 ... Qd6
This move is the new main line over swinging the queen to a5. I play both moves, and
both have their issues.
Question: What are the differences between 3 ... Qd6 and 3 ... Qa5 - ?
Answer: There are several:
1. When the queen is on a5, she is far more vulnerable to future traps based on White
playing Bd2 and a later Nd5 (in conjunction with a bishop on c4) or Nb5.
2. With the queen on a5, Black clears the way for ... Rd8 or ... 0-0-0, adding pressure
to White’s d4-pawn, which can almost feel like an artificial isolani, since we are unable to
support it with c2-c3.
3. On d6, the queen is vulnerable to future tempi loss with Nb5 or Bf4, or even c2-c4c5.
4. On d6, Black loses the ... Bb4 option, which is available in the ... Qa5 lines.
We’ll examine 3 ... Qa5 in Games 45 and 46.
The full retreat 3 ... Qd8 is inferior to my mind. After 4 d4 Nf6 5 Nf3 Bg4 6 h3 Bxf3 7
Qxf3 c6 8 Be3, White has an easy edge with a lead in development, the bishop pair, and
extra space. What more could White want from the opening?
4 d4
White stakes out superior space and control in the centre.
4 ... Nf6 5 Nf3 a6
We arrive at a key crossroads, where Black has the choice between a wild game with
the ... a7-a6 version (as here), a controlled Caro-Kann-type position with ... c7-c6 (as in
the next game), or Grünfeld-like play against the centre after ... g7-g6 (see Game 44).
6 g3
I think this is White’s most logical choice against the ... a7-a6 lines. It prepares a
fianchetto which makes Black’s planned ... b7-b5 dubious, while setting up a future tempo
gain with Bf4.
6 ... Bg4
Question: Why doesn’t Black challenge White’s fianchetto with one of his own?
Answer: 6 ... b5?! is strategically dubious for Black after 7 Bg2 Bb7 8 0-0 e6 9 Bf4
Qb6 10 a4! Bd6 11 Be3!; for example, 11 ... b4 12 a5 Qa7 13 d5 Bc5 14 dxe6! Bxe3 15
exf7+ Kxf7 16 Ne5+ Ke7 17 Bxb7 Qxb7 18 Qd3! bxc3 (18 ... Ba7? 19 Rae1 is crushing for
White) 19 Qxe3 Nbd7 20 Nxd7+! Kxd7 21 Rfd1+ Kc8 22 Qe6+ Kb8 23 Ra3! Re8 24 Qf5
cxb2 25 Rb3 and Black didn’t have enough for the queen, E.Sutovsky-D.Sermek, Terme
Zrece 2003.
7 Bg2 Nc6 8 0-0 0-0-0 9 h3 Bh5
The move consistent with Black’s strategy which is to go after White’s d4-pawn.
Question: Can’t Black just win the pawn immediately by chopping on f3?
Answer: Don’t worry, 9 ... Bxf3?! 10 Qxf3 Qxd4 11 Rd1 Qc4 12 Rxd8+ Nxd8 13 Bf4
offers excellent play for the pawn, as in G.Filev-V.Panbukchian, Plovdiv (rapid) 2017;
while after 11 ... Qb6, White can go for 12 Be3! Qxb2 13 Na4 Rxd1+ 14 Qxd1 Qa3 15 Nc5
e5 16 Nxb7! e4 17 Rb1 Qxa2 18 h4! (intending Bh3+) 18 ... Qe6 19 Bf1 with a decisive
attack.
10 Bf4
Gaining a tempo, while preventing Black’s intended ... e7-e5.
10 ... Qb4!
Be careful. In this line Black intends to grab pawns in front of his king and then live to
boast about it. On our part, we shouldn’t flinch.
11 g4
More accurate than 11 a3 Qxb2 12 Na4 (White’s most commonly played move, but it’s
not so great!) 12 ... Bxf3! 13 Qxf3 Qxd4, when I don’t believe in White’s compensation for
the missing pawns. The comp gives Black the edge as well. For example, after 14 Qb3
Na5 15 Bxb7+ Nxb7 16 Rab1 Nd6 17 Bxd6 Rxd6 18 c4!?, E.Liss-L.Gofshtein, Israeli Team
Championship 2003, and now 18 ... Qa7 19 c5 Rd5 20 Nb6+!? cxb6 21 cxb6 Qb7 22 Rc1+
Kb8 23 Rc7 e6! 24 Rxb7+ Kxb7, Black has more than enough for the queen.
11 ... Bg6 12 a3!
In case you didn’t know it, most attacks are expensive. Our most principled line is to
offer one pawn (and perhaps more) to play directly for mate. White gets nowhere with
the milquetoast 12 Qc1 e6 13 a3 Qb6 14 Be3 Nd5 and Black looks just fine, T.AbergelF.Grafl, Belgian Team Championship 2008.
12 ... Qxb2
The black queen operates with the fiscal zeal of a politician on the lookout for
campaign contributions. Dodging this principled pawn grab with 12 ... Qc4?! is not so
great. Silence can be an answer in itself. Sometimes we are able to extract information
by what our opponent doesn’t do. The refusal to take on b2 is in violation of the principle:
Don’t make a promise that you have no intention of keeping. After 13 g5 Nd5 14 Nxd5
Rxd5 15 c3! Rd8, P.Svidler-S.Tiviakov, Wijk aan Zee 2007, and now 16 Nh4, White has
stabilized his centre and Black doesn’t have much counterplay.
13 Qe1!
Multipurpose:
1. White covers the c3-knight.
2. White’s queen removes herself from the vulnerable d-file opposite Black’s d8-rook.
3. White is ready for Rb1 and Ne5, zoning in on Black’s most vulnerable point, b7.
White’s queenside structure may remind you of a rock band trashing their room after a
drug/alcohol binge, but just know that our attacking potential compensates.
13 ... e6!
Grabbing c2 is too greedy:
a) 13 ... Qxc2? 14 Rc1 Qb3 15 d5 Rxd5 16 Nxd5 Nxd5 17 Bg3 e6 18 Ne5 Nd4 19 Nxg6
hxg6 20 Qe5 and White won in Z.Agmanov-V.Sevgi, U-16 Olympiad, Ulaanbaatar 2015.
b) 13 ... Bxc2? 14 Qe3! Nd5 (or 14 ... Qb6 15 Rac1 Bg6 16 Ne5! Qxd4 17 Qf3!) 15
Nxd5 Rxd5, Donoso A.Sanchez-G.Hernandez Delgado, Spanish Team Championship 2010,
and now 16 Rfc1 Bg6 17 Ne5! is also winning for White.
14 Ne5!
The path to b7 must be cleared.
14 ... Nd5!
This move is Black’s best shot at equality.
a) 14 ... Bd6? 15 Rb1 Qxc2 has been seen in a few games, not least F.CaruanaA.Strikovic, Lorca 2005. The comp shows the way forward: 16 Bxc6! bxc6 17 Qe3! Ne4 18
Rbc1! (the correct rook) 18 ... Qd2 19 Nxg6 Qxe3 20 Bxe3 Nxc3 21 Nxh8 Ne2+ 22 Kg2
Rxh8 23 Rxc6 with an extra exchange and excellent winning chances for White.
b) 14 ... Rxd4?! 15 Rb1 Qxc2 (if 15 ... Qa3? 16 Bxc6 bxc6, J.Smeets-O.Foisor,
Romanian Team Championship 2009, then 17 Rb3! Qc5 18 Qe2 wins quickly) 16 Qe3! Bc5
17 Nxc6 bxc6 18 Qe5 Rxf4 19 Qxc5 Nd5 20 Rbc1 Qb3 21 Ne2 again gives White a
promising attack.
15 Nxd5 exd5 16 Nxc6 bxc6 17 Qa5
I hate our years of enforced memorization and dearly wish I knew a physicist who
could build a time machine and send me back to Morphy’s days. It’s move 17 and we are
still within the clutches of theory!
17 ... Bd6!
Fear for our safety can be a reliable way to keep an appointment. The a6-pawn must
be handed over to secure Black’s king. 17 ... Qb6!? seems too risky to me: after 18 Qd2
Bd6 19 Bxd6 cxd6 20 Rab1 Qc7 21 h4! h5, as in P.Hackman-D.Calvert, British Seniors
Championship, Coventry 2015, then 22 Rb3! looks to give White a winning attack.
18 Qxa6+ Qb7!
The queen tiptoes back into the house as quietly as the guilty wife who “worked late”,
having in reality just returned from a romp in the sack with a co-worker assistant 30
years her junior.
Trying to hide the king in plain sight with 18 ... Kd7?! is adventurous but inferior: 19
Bxd6 Kxd6 (the king has to advance since 19 ... cxd6?? loses quickly to 20 Qa7+ Ke6 21
Rae1+ Be4 22 Bxe4 dxe4 23 Rxe4+ Kd5 24 Qxf7+! Kxe4 25 Rd1! with mate in four
moves) 20 Bxd5!
Exercise (critical decision): Should Black accept the bishop sacrifice or back
down with 20 ... Qb6 - ?
Answer: The bishop is untouchable. Black should settle for a pawn down ending after
20 ... Qb6! 21 Qxb6 cxb6 22 Bb3, when White’s conversion is far from a sure thing.
Instead, A.Vovk-G.Kallai, Hungarian Team Championship 2017, continued 20 ... Kxd5?
21 Qa5+! Kd6 (21 ... Qb5 runs into 22 c4+! Kxc4 23 Rfc1+ Kd3 24 Qc3+ Ke4 25 Qe3+
Kd5 26 Qe5 mate) 22 Rab1? (the wrong rook; 22 Rfb1! was correct, forcing Black to
capture on c2) 22 ... Qxc2? (this move is in violation of the principle: Avoid grabbing
pawns if it opens enemy attacking lanes; Black has good chances to save the game after
22 ... Qa2!) 23 Rbc1 (winning, but not the strongest: 23 Qe5+! Kd7 24 Rb7! Rc8 25 Re1!
leaves Black helpless since 25 ... Rhe8 fails to the crushing overloading trick 26 Rxc7+!)
23 ... Qe4 24 Qc5+ Kd7 25 Rfe1 and Black resigned, perhaps a little prematurely now as
he could certainly fight on for a while after 25 ... Rde8! 26 Rxe4 Bxe4.
19 Qxb7+!
White relies on the fact that he owns a passed a-pawn, juxtaposed with Black’s more
crippled central majority in the ending.
19 ... Kxb7 20 Bxd6
If White inserts 20 Rfb1+ Ka7 21 Bxd6, Black has to play 21 ... Rxd6! (21 ... cxd6?! 22
Rb4! Rb8 23 c4! is highly favourable for White) 22 Ra2 Rb8 23 Rxb8 Kxb8 24 Rb2+ Ka7,
which was soon drawn in P.Carroll-S.Nichols, correspondence 2012.
20 ... cxd6 21 Ra2
Covering c2. White’s passed a-pawn offers a smidgeon of an edge, even if Black
should hold a draw with correct play.
21 ... Kc7 22 Rc1
Toying with the idea of c2-c4.
22 ... Rhe8 23 Bf3
Preventing the black’s rook entry into e2.
23 ... Rb8 24 Kg2 Kd7 25 a4
White finally utilizes his single trump in the position.
25 ... Rb4 26 c3 Rb3 27 a5 Bd3!
Switching to the a6-f1 diagonal to help halt the passed pawn.
28 a6 Ra8 29 Be2!
Black’s bishop was too active.
29 ... Bxe2?!
An inaccuracy, after which White can continue to press. Black should have played 29
... Bc4!, when 30 Bxc4 dxc4 31 a7 Rb7 32 Rca1 Rb3 33 Rc1 Rb7 is a draw by repetition.
30 Rxe2 Re8
Black probably intended 30 ... Rxa6 and then realized that after 31 Rce1 c5 32 Re7+
Kc6 33 Rxf7 Rxc3 34 Rxg7 c4 35 g5! the promotion race favours White.
31 Ra2 Rbb8?!
Black resists better with 31 ... c5! 32 a7 Ra8, keeping his rook active on the b-file.
32 a7 Ra8 33 Rb1 Kc7 34 Ra6
Threatening Rbb6.
34 ... Rec8 35 h4!
Principle: A single weakness in the opposing position is usually not enough to win. In
such cases, create a second front in the war. Black is completely tied down on the
queenside, so White switches focus to the other side of the board.
35 ... Kd7 36 Kf3 Rc7 37 Rba1 Rb7
More or less acknowledging that he should have left the other rook on the b-file at
move 31.
38 Ke3 Rb3 39 Kd3 Rb2 40 f3 h6 41 h5! Kc7 42 Re1! Kd7 43 Ra3!
Covering both his vulnerable pawns on c3 and a7.
43 ... Rb7 44 Rea1 Rb2 45 Ke3 Kc7 46 Kf4!
The king must assist with a breakthrough on his right flank. Black’s position is
conspicuous by the absence of kingside defenders.
46 ... Kd7 47 Kf5 Rf2 48 Kf4
Not necessary. Simply 48 f4! was strong, and if 48 ... g6+? 49 hxg6 fxg6+ 50 Kxg6
Rxf4 then 51 Rg1! and Black’s h-pawn falls, leaving White with a newly created passed gpawn.
48 ... Rb2 49 R1a2 1-0
Black either lost on time or saw the futility of playing on; for example, 49 ... Rb7 50
Kf5 Ke7 51 f4 Kd7 52 g5 Ke7 53 Ra6 Rc7 54 g6! fxg6+ (or 54 ... f6 55 Rb2! Raxa7 56
Rxa7 Rxa7 57 Rb8 with Rg8 to follow) 55 Kxg6 Kf8 56 f5 Kg8 57 Rb2! Rcc8 58 Rb7 and
wins.
Summary: Home preparation is our game before the game in the ... Qd6/ ... a7-a6
line. It’s our job to try and remember 20 moves of theory in this one! But merely
remembering isn’t enough. When we learn openings without true comprehension of the
ideas behind them, we become the priest with great scriptural knowledge, who secretly
sins every chance he gets.
Game 43
Y.Solodovnichenko-S.Kasparov
Padua 2012
1 e4 d5 2 exd5 Qxd5 3 Nc3 Qd6 4 d4 Nf6 5 Nf3 c6
The ... c7-c6 positions are diametrically opposed to the far sharper ... a7-a6 lines.
Here Black intends to create a Caro-Kann wall with an eventual ... Bf5 or ... Bg4, followed
by ... e7-e6.
6 Ne5
As a Scandinavian player, this is the line I fear most.
Question: Isn’t it in violation of the principle: Don’t move the same piece twice
in the opening, unless necessary? It clearly doesn’t feel necessary here.
Answer: Black has lost time with his queen, and even after moving the knight twice,
White still remains ahead in development. White’s points behind the move are:
1. Black must watch out for Bf4, with potential discoveries with the e5-knight.
2. Black must watch out for ideas like Nc4, followed by Qf3 and Bf4, gaining further
time.
3. Playing Ne5 opens the possibility of anchoring the knight with f2-f4.
6 ... Nbd7
Black should immediately challenge our knight outpost. The natural 6 ... Bf5?! is
inaccurate due to 7 Bc4 e6 8 g4! Bg6 9 h4 Nbd7 10 Nxd7 Qxd7 11 h5 Be4 12 Nxe4 Nxe4
13 Be3, when White has the bishop pair and massive space. Black scores a miserable
20% percent from this position.
7 Nc4
This is White’s safest path to an edge.
7 ... Qc7 8 Qf3
With the idea of Bf4 to follow.
8 ... Nb6
Black challenges the knight again, while giving his queen room to breathe.
9 Bf4 Qd7
Question: Why deliberately clog the development of the c8-bishop and,
by extension, his whole queenside?
Answer: Black’s idea is ... Qg4, which usually leads to a queen swap, following the
principle: The cramped side should seek exchanges.
The alternative is to retreat the queen all the way with 9 ... Qd8, leaving the bishop’s
diagonal open, though in that case Black lacks the simplifying ... Qg4 mechanism. In
response White protects the d-pawn with 10 Be5 (I’m begging the reader not to fall for
the boneheaded move 10 0-0-0??, which instantly hangs an exchange to 10 ... Bg4) and
then:
a) 10 ... Bg4 11 Qg3 h5 (believe it or not, this is Black’s main move) 12 h3 h4 13 Qf4
Be6 14 Nxb6! (stronger than 14 Ne3) 14 ... Qxb6 15 0-0-0 0-0-0 16 Be2 Qa5 17 a3 Nd7
18 d5! Bxd5 19 Nxd5 Nxe5 20 Qxe5 Rxd5 21 Qf4, when Black’s kingside development lag
is clearly felt, since the game is beginning to open, M.Kravtsiv-A.Nosenko, Ukrainian
Team Championship 2008.
b ) 10 ... Be6 (developing while pressuring c4; it doesn’t gum up his kingside
development, since Black will fianchetto) 11 Ne3 Qd7!? (playing for swaps with 11 ...
Nbd5 is natural, but I don’t believe Black fully equalizes after 12 Ncxd5 Nxd5 13 Bd3 f6 14
Bg3 Bf7 15 0-0, since his development lag and lack of space is still felt, J.DekicJ.Radlovacki, Sombor 2010) 12 0-0-0 Bg4? (handing over the bishop pair is too large a
concession; Black obviously has a problem developing his kingside pieces, since ... g7-g6
would hang a pawn to Bxf6, so he should try and mix it up with a line like 12 ... Nbd5 13
Na4 Nxe3 14 Nc5 Qd5 15 fxe3 Qxa2 16 Nxe6 Qxe6, though even here I prefer White’s
bishop pair, open f-file and development lead over Black’s extra pawn) 13 Nxg4 Qxg4 14
Qe3 (naturally White isn’t about to allow a queen swap) 14 ... 0-0-0?! (with hindsight,
Black should play 14 ... Qe6)
Exercise (combination alert): Black’s king position represents the fig leaf
which covers his problems. A lead in development, central control and the
bishop pair add up to White having a powerful shot. How would you continue?
Answer: Piece sacrifice/line opening: 15 Nb5!! cxb5 (Black hopes to sell his king’s
safety at an extortionate price, as declining with 15 ... Nfd5 is hopeless: 16 Nxa7+ Kd7 17
Qb3, followed by c2-c4 with a crushing attack) 16 Qc3+ Nc4 (he must reduce White’s
attacking force; after 16 ... Kd7?? 17 Bxb5+ Ke6 18 Rhe1 Black’s undeveloped pieces look
like people waiting for a bus which will never show up) 17 Bxc4 bxc4 18 Qxc4+ Kd7 19
Qa4+ Kc8 (or 19 ... Ke6 20 f3 Qxg2 21 Rde1 Kf5 22 Rhg1 Qf2 23 Qc4 and Black’s king
won’t last long) 20 Rd3! (another attacker is lifted in) 20 ... Ne4 was A.Naiditsch-
O.Boguslavsky, Deizisau 2009. Here White might have completed the rout with 21 f3!
Qxg2 22 Qc4+ Kd7 23 Qb5+ Kc8 24 Re1 f6 (24 ... e6 25 fxe4 Bd6 26 Rg3 Qf2 27 Rf1 wins
the queen; or if 24 ... Nd6 25 Rc3+ Kb8 26 Qc5!, there is no remedy to Qc7+ etc) 25
Qc4+ Kd7 26 fxe4 and if 26 ... fxe5? then 27 dxe5+ Ke8 28 Rxd8+ Kxd8 29 Rd1+ Ke8 30
e6 forces mate.
10 Nxb6!
This opens the a-file for Black’s rook, yet to my mind it’s White’s strongest move, since
it avoids a queen exchange; whereas 10 0-0-0 Qg4! greatly eases Black’s defensive
burden.
10 ... axb6 11 0-0-0
Playing for d4-d5.
Question: Isn’t Black crushed here?
Answer: It’s nothing more than a “+=“ edge for our side. The only reason Black isn’t
crushed is that it’s annoyingly difficult for White to open the position and exploit our lead
in development.
11 ... e6
Note that 11 ... Qg4 is met by 12 Qe3! (now we see why we swapped knights: if Black
still had a knight on b6, he could play 12 ... Nbd5/Nfd5, forking the queen and f4-bishop)
12 ... Qe6 13 d5! (principles: Create confrontation and open the game when leading in
development) 13 ... Nxd5 (Black would love to swap queens, but 13 ... Qxe3+?! 14 Bxe3
leaves loose, and 14 ... b5? 15 dxc6 bxc6 16 Bxb5! is winning for White) 14 Nxd5 cxd5 15
Qb3! Ra5 16 Be3, when the position opened and Black’s lack of development was fatal,
M.Kravtsiv-R.Kulkarni, Mumbai 2015.
12 Be5
Defending d4, while attacking f6.
12 ... Nd5!
Believe it or not, Black’s main defensive idea in this line is to move this knight to d5,
and follow with ... f7-f6 and later ... Kf7. The natural 12 ... Be7 may well be inferior; for
example, 13 Bc4 b5 14 Bb3 0-0 15 h4 Nd5 16 h5 b4 17 h6 g6 18 Ne4 and White’s king is
clearly safer, in view of Black’s weakened central and kingside dark squares, H.KellerR.Montgomery, correspondence 2009.
13 Bc4 f6 14 Bg3 Bb4 15 Nxd5!
Stronger than 15 Ne4 0-0, when ... f6-f5-f4 is in the air. The text leads a favourable
Exchange French type structure for White.
15 ... exd5 16 Bd3!
It’s better to offer our a2-pawn than protect it and put our bishop out of play on b3.
16 ... Qg4
A thematic, if rather cautious move. In later games GM Sergey Kasparov deviated
here:
a) 16 ... 0-0?! (this fails to equalize) 17 a3 Bd6 18 Rde1! (improving on 18 Qh5 f5, as
in J.Carlstedt-S.Kasparov, Aarhus 2015) 18 ... b5 19 c3 Qd8 20 Qh5 f5 21 Bxd6 Qxd6 22
Re5 with a clear advantage to White, who controls the e-file and the e5-square, while
Black is stuck with a bad bishop, M.Kravtsiv-V.Ivanchuk, World Blitz Championship, Berlin
2015.
b) 16 ... Rxa2 (this allows White a lasting initiative for the pawn) 17 Kb1 Ra8 18 c3
Be7 19 Qh5+ Kf8 20 h3 Kg8 21 Rde1 g6 22 Qe2 Kf7 23 Qe3 h5 24 Re2 b5 25 Rhe1 Bd8,
R.Baskin-S.Kasparov, Groningen 2015, and now after 26 Bb8! (the bishop can’t be
touched due to Qg3, with a double attack on b8 and g6) 26 ... h4 27 Qf4 g5 28 Qh2, Black
has an exceedingly difficult defence ahead.
17 Qe3+
White must try and keep queens on to extract the maximum from his development lead.
17 ... Kf7
After 17 ... Qe6 18 Qf4 Rxa2 (if 18 ... Qg4 again then 19 Qc7) 19 Kb1 Ra8 20 c3 Be7
21 Rhe1 Qd7 22 Qe3 Kf7 23 Rd2, followed by Rde2, White has more than enough
compensation for the pawn, since Black’s king remains unsafe and his pieces are a long
way from unravelling.
18 h3! Qe6 19 Qf3!
In this game White acts like his a-pawn is immortal. His continued sacrifice is made
with the thought: “Consider your venture a success if the minor injury you sustain (the
a2-pawn) is not as bad as the injury you inflict upon the opponent (White’s ongoing
initiative/attack).”
19 ... g6?!
If your wife tells you that she loves you, the worst (double question mark) response
you can make is: “And I find you perfectly satisfactory, too.” This is no time for an
undeclared or understated stance. If you are going to live with a miserable position, you
may as well be paid for it. Black should therefore try 19 ... Rxa2, when play might
continue 20 Kb1 Ra8 21 c3 Be7 22 Rde1 Qd7 23 Qh5+ Kg8 24 Re3 Bf8 25 Rhe1 g6 26 Qf3
Qf7 27 Re8 Kg7 28 Bh4. Okay, I admit that Black’s position is an ugly entity, but at least
in this version he has the consolation of an extra pawn, while in the game he wallows in
similar misery with even material.
20 c3 Bd6 21 Rde1 Qd7 22 Re3!?
I feel like White is taking heroism too far. There was nothing wrong with 22 Kb1,
when White has a fantastic position at no material cost.
22 ... Bxg3
Once again I think Black should go for 22 ... Rxa2 23 Kb1 Ra8 24 Rhe1 Rf8, when
White’s enduring initiative comes at the cost of a pawn.
23 Qxg3 Re8!
Not now 23 ... Rxa2? 24 Kb1 Ra8 25 Rhe1 Qd8 26 h4! and Black is almost in
zugzwang.
24 Rhe1 Rxe3 25 Qxe3 Qd8!?
Black’s pieces dance to White’s demands like indentured soldiers. This time 25 ...
Rxa2?? 26 Kb1 Ra8 27 Qh6 Kg8 28 Bxg6! is completely crushing.
26 h4!
Planning to loosen the enemy kingside further with h4-h5, while Black can hardly
move.
26 ... Bd7
Or 26 ... Rxa2 27 Kb1 Ra8 28 h5 with a winning attack for White.
27 h5
27 ... Qf8
So far both players have shown an almost spiritual disdain for all things material.
White has left a2 hanging since move 16, and Black has pointedly ignored the bait! This
time 27 ... Rxa2 could be met by 28 hxg6+ hxg6 29 Kb1 Ra8 30 Qg3 f5 31 Qd6 Be8 32
Qe6+ Kg7 33 Rh1 Qc7 34 Bxf5! Bf7 35 Qe3 Rh8 (Black still can’t touch the white bishop)
36 Rxh8 Kxh8 37 Qh6+ Kg8 38 Bxg6 Bxg6+ 39 Qxg6+ and White’s two connected
kingside passers will easily win the queen ending.
28 Rh1
Threatening h5xg6+ and Rh7+.
28 ... g5?!
Now Black’s game passes beyond hope of possible repair. He had to try 28 ... Qg7 29
Qf4 Kg8 30 hxg6 hxg6 31 Rh6 Be8.
29 Bxh7 Rxa2
Black is tired of striving for a casual tone of indifference and finally takes the a2-offer.
In doing so he is completely busted, but he is busted if he doesn’t take it.
30 Bg6+ Kg8 31 Kb1 Ra8
Exercise (planning): Black’s pieces are as mobile as clothing store mannequins.
Come up with a clear winning plan for White.
Answer: White’s simplest plan is to play his queen to e7 and force a won ending.
32 Re1! Rd8 33 Kc1 b5 34 Qe7! Qxe7 35 Rxe7
Zugzwang. Black’s f-pawn is doomed.
35 ... b6
Or 35 ... Bc8 36 Kc2 Bd7 37 Kb3 Bc8 38 Kb4 b6 (otherwise the white king comes in)
39 Rf7 Rf8 40 Rc7 and White wins.
36 h6 c5 37 Rg7+! Kh8 38 Rf7 f5 39 Bxf5 Bxf5 40 Rxf5
The rook ending is an easy win, since Black’s all queenside pawns are targets.
40 ... Kh7 41 Rxg5 Kxh6 42 Re5 b4 43 cxb4 cxb4 44 Kc2 Rf8 45 f3 Rg8 46
Re2 Rc8+ 47 Kb3 Rc4 48 Re6+ Kg7 49 Rxb6 Rxd4 50 Rxb4 Rd2 51 Kc3! 1-0
Black can’t touch the g2-pawn, due to Rg4+.
Summary: The ... Qd6/ ... c7-c6 Scandinavian isn’t easy to crack, despite White’s
lead in development, since it isn’t easy to open the game. I feel that 6 Ne5 is our best
shot of extracting an advantage, even though there is a lot of theory to learn.
Game 44
A.Naiditsch-A.Rakhmanov
Spanish Team Championship 2017
1 e4 d5 2 exd5 Qxd5 3 Nc3 Qd6 4 d4 Nf6 5 Nf3 g6
This time Black fianchettoes, hoping for Grünfeld-like play against the centre. If given
a chance, Black can also expand on the queenside later on with ... a7-a6, ... b7-b5 and ...
c7-c5.
6 Nb5
Question: What is the point of hitting the black queen, when Black will
soon regain the tempo with ... c7-c6, hitting our knight?
Answer: The idea isn’t to gain a tempo, it’s to make way for c2-c4 to increase our
central space.
6 ... Qd8
The alternative is 6 ... Qb6, which leaves d8 free for a rook to pressure the white dpawn, at the risk of leaving Black’s queen more exposed. The latest idea from White’s
side is to target the queen with 7 Na3!? (this is safer than 7 c4 c6 8 Nc3 Bg7, when Black
realizes his intent and will soon play ... Rd8, applying pressure to d4) 7 ... c6 8 Nc4 Qc7,
reaching a similar position to 5 ... c6 lines in the previous game. The difference is that
Black has swapped ... Nbd7 for ... g7-g6, while White’s c3-knight is somehow sitting on f3.
After 9 Nce5 Nbd7 (or 9 ... Bg7 10 Bc4 0-0 11 0-0) 10 Bc4 Nxe5 11 Nxe5 Nd5 12 0-0 Bg7
13 Re1 0-0 14 Bb3, I slightly prefer White who has a tiny but safe territorial edge,
D.Sadzikowski-A.Rakhmanov, Turkish Team Championship 2016.
7 c4
With Black’s queen on d8, there is no reason not to continue with our intended c2-c4
push.
7 ... Bg7
Another option is 7 ... c6 8 Nc3 Bg4 (8 ... Bg7 is similar to the game) 9 Be2 Bg7 10 0-0
0-0 11 h3 Bxf3 12 Bxf3 Ne8 13 Be3 Nd6 14 Qb3, when White is slightly better with more
space and the bishop pair, though Black’s position is very solid, G.Vucinic-S.Saric, Serbian
Team Championship 2017.
8 Bf4 Na6
Question: Isn’t Black’s knight out of play here?
Answer: No, it isn’t. The d5-square can be a problem in these lines, so Black’s
development scheme often includes ... Na6, ... c7-c6 and ... Nc7, where the knight keeps
watch over d5 and can later transfer to e6, applying pressure to d4.
9 Be2 0-0 10 0-0 c6
Possibly 10 ... Ne4 is more accurate; for example, 11 Rc1 c6 12 Nc3 Nxc3 13 bxc3 Bf5
14 Qb3 Qc8 and Black stands less badly than in the game and even managed to win from
here, S.Van Eijk-S.Tiviakov, Hoogeveen 2011.
11 Nc3 Bf5 12 Re1
12 ... Ne4
I think this is still a good move, even if the comps dislike it. It follows the principle:
Swap pieces when your opponent controls a territorial advantage; whereas after 12 ...
Nc7 13 Qd2 Ne6 14 Be5 Nd7 15 Bxg7 Nxg7 16 h3, Black remains cramped.
13 Qb3!
A new move and an improvement on 13 Bd3, which doesn’t make as much sense to
me. White, the side with more space shouldn’t offer to swap another set of pieces, as
that automatically helps Black’s cramped situation. After 13 ... Nxc3 14 bxc3 Bxd3 15
Qxd3, D.Izso-V.Krutti, Hungarian Team Championship 2011, White’s position wasn’t as
good as the one Naiditsch gets below.
13 ... b6?!
This creates serious queenside weaknesses. Black should play 13 ... Nxc3 14 bxc3 Qc8
with a cramped but still playable position.
14 Qa4!?
Simply 14 Rad1 Nxc3 15 bxc3 Qc8 16 Ne5 looks quite unpleasant for Black.
14 ... Qc8?!
An embrace cannot be one-sided. Black’s melancholy only grows more pronounced
with passive choices. Black might be better off just letting the c6-pawn go now: 14 ...
Nc7! 15 Qxc6 Ne6 16 Be3 Rc8 17 Qd5 (if 17 Qa4 Nxd4 18 Nxd4 Bxd4 19 Red1 then 19 ...
Bd7 20 Qxa7 Nxc3 21 bxc3 Rc7 looks okay for Black) 17 ... Qc7 18 Qb5 Nxc3 19 bxc3 Nd8,
intending ... Nb7-d6/a5 with some counterplay.
15 Ne5
The knight seizes a favourable vantage point, while increasing the pressure on c6.
15 ... Nb8!?
If your life depends on having a coward back you up in a fight, you are very likely
going to end up dead. This further passive move is emblematic of a situation Black
doesn’t want to return to. Instead, 15 ... Bxe5 16 dxe5 eases the pressure on c6, at the
huge concession of handing White control over the dark squares.
16 Nxe4! Bxe4 17 Bg4!
White disguises his intent behind his opponent’s assumptions, luring the black bishop
off the long diagonal in order to seize it himself.
17 ... Bf5
17 ... f5 18 Rxe4 fxg4 19 Bg3 is also heavily in White’s favour.
18 Bf3! Bd7
Maybe the time has come for 18 ... Bxe5!?.
19 Rad1
Black’s queenside pieces, which have no way to unravel, remind us of the inscription
on the Statue of Liberty: “Give me your tired, your poor, your huddled masses yearning to
breathe free.”
19 ... e6
19 ... f6? loses quickly to 20 Nxd7 Qxd7 21 d5.
20 Qb3 Na6 21 Qa3! Rd8
Now Black’s position is beaten like a dusty rug at Spring cleaning. 21 ... Be8 22 d5
looks awful, but at least it avoids what follows.
22 Qe7!
Targeting f7.
22 ... Be8
23 Bg5!
Black’s d8-rook has no place to run and White wins a full exchange, while forcing
queens off the board. 23 Bxc6!! looks even stronger, since 23 ... Bxc6 isn’t possible due to
24 Qxf7+ Kh8 25 Rd3!, threatening Nxg6+ and Rh3+. The comp in fact announces mate
in eleven moves.
23 ... h6 24 Qxd8
Revenue arrives for White in joyful and bountiful excess.
24 ... Qxd8 25 Bxd8 Rxd8 26 Nxc6 Bxc6 27 Bxc6 Bxd4 28 a3 g5 29 b4 Rd6
30 Kf1 Kg7 31 Bd5! e5
Exercise (technique): What is White’s easiest path to the win?
Answer: Simplification.
32 Rxd4!
Returning the exchange leads to a wipeout, as a vastly disproportionate share of the
benefits go to White, while Black is left with useless scraps.
32 ... exd4 33 Re7 b5 34 Rxf7+ Kg6 35 Rxa7 bxc4 36 Bxc4 Nb8
The knight, having left and returned and left again, now returns for the last time,
feeling like a different man who takes his place on the home base square.
37 Bb5 1-0
Now the knight is paralysed. Rakhmanov had either had enough or lost on time.
Game 45
M.Vachier-Lagrave-H.Hamdouchi
French Team Championship 2010
1 e4 d5 2 exd5 Qxd5 3 Nc3 Qa5
In the ... Qa5 Scandinavian lines, Black’s queen tends to be less secure than in the
more solid ... Qd6 lines. Just as there, I believe White’s best course to an advantage is to
go straight down the main theoretical lines.
4 d4 Nf6 5 Nf3
5 ... c6
Black seeks a Caro-Kann-like set-up with ... c7-c6, ... Bf5 and ... e7-e6. Note that 5 ...
Bf5 6 Bc4 e6 7 Bd2 c6 comes to the same thing. We’ll look at the alternative 5 ... Bg4 in
the next game.
6 Bc4
The best spot for the bishop, taking aim at f7.
6 ... Bf5
Black can try 6 ... Bg4 here too, the difference being that White’s bishop is now
committed to c4 (in the next game it stays on f1 until move 26!). In my opinion the space
White gains from pushing the kingside pawns means more than the potential risk of going
off the cliff in overextension later on. For example, 7 h3 Bh5 8 Bd2! (more accurate than
pushing our g-pawn just yet) 8 ... e6 9 Qe2 Bb4 10 a3 Nbd7 11 0-0-0 Bxc3 12 Bxc3 Qc7
13 g4 Bg6 14 Ne5 Ne4 15 Be1!, when the bishop emerges on g3 after f2-f3 and White
held a comfortable edge with the bishop pair and extra space, K.Wagner-C.Lakdawala,
San Diego 1992.
7 Bd2 e6
The precautionary 7 ... Qc7?! is too slow: 8 Ne5 e6 9 g4! Bg6 10 h4 (intending h4-h5)
10 ... Nbd7 11 Qe2 Nbd7 12 h4 Nxe5 13 dxe5 Nd5 14 h5 Bxc2 15 Rc1 Nxc3 16 Bxc3 b5 17
Bxb5 was very much in White’s favour, H.Tirard-S.Algaba, Fouesnant 2008.
8 Nd5
Question: What is the point of this discovery, which merely swaps a piece?
Answer: It does more than that:
1. The discovery chases the queen back to d8, after which our 9 Nxf6+ either brings it
to a vulnerable square (9 ... Qxf6) or inflicts a bit of damage on Black’s kingside (9 ...
gxf6).
2. Secondly, White’s c3-knight is often a problem piece in the Scandinavian and
reduces the d4-pawn to the status of an artificial isolani. With the knight removed, White
can reinforce the d-pawn with c2-c3.
8 ... Qd8 9 Nxf6+ gxf6
Recapturing with the g-pawn is Black’s more dynamic option, where he adopts a
Bronstein-Larsen Caro-Kann structure.
Question: Is the g-pawn capture a structural strength or weakness?
Answer: A little of both. Let’s assess:
1. Black’s ... g7xf6 increases control over e5.
2. It opens the g-file for Black’s rook, for a potential attack should White castle
kingside.
3. It increases the danger to Black’s own king if he castles kingside.
4. Black may be able to negate White’s greater central space with a timely ... e6-e5
break.
5. Black’s h-pawn is isolated and may later become a target.
6. White can go after the bishop pair with a future Nh4.
Conclusion: White has an edge, but it’s important not to underestimate Black’s
potential either.
To my mind 9 ... Qxf6 is inferior and has more in common with a long prison sentence
than an actual chess opening. We play 10 Qe2 (preparing 0-0-0 and d4-d5) and then:
a ) 10 ... Bxc2? (grabbing the pawn is exceedingly risky for Black) 11 0-0 Bd6 12 d5
(principle: Open the game when leading in development) 12 ... cxd5 13 Bxd5 Nc6? (Black
had to play the awful-looking 13 ... a6) 14 Bxc6+ bxc6 15 Qc4! Qxb2, H.Jonkman-D.De
Vreugt, Tel Aviv 2000, and now Black is completely busted after 16 Qxc6+ Ke7 17 Bc1!
Qb4 (the a1-rook is immune due to the bishop’s discovery on g5) 18 Qxc2, winning a
clean piece.
b) 10 ... Nd7 11 0-0-0 Bg4 (11 ... Nb6?! 12 Bg5 Qg6 13 d5 Nxc4 14 Qxc4 exd5 15
Rhe1+ Be6 16 Rxd5! Be7 17 Bxe7 cxd5 18 Qb4 is very good for White, G.Jones-P.Wang,
Maastricht 2008) 12 d5 Ba3 13 c3 (certainly not 13 Bc3?? Qxc3!) 13 ... cxd5 14 Bxd5 0-0
15 Be4 Be7 16 h3 Bxf3 17 Qxf3 and White’s bishop pair gave him a safe edge,
E.Alekseev-E.Ghaem Maghami, Baku 2012.
c) 10 ... Bg4 11 d5 (it’s logical to open the position; 11 0-0-0 is possible too) 11 ...
Bxf3 12 gxf3 (now is not the time to worry about structural concessions) 12 ... cxd5 13
Bxd5 Nd7!? (13 ... Qxb2 14 0-0 leaves Black dangerously lagging in development; e.g. 14
... Nc6 15 Rab1 Qd4 16 Be4 Qd7 17 Bc3 Be7 18 Rfd1 Qc7 19 Qb5 0-0 20 Qxb7 Qxb7 21
Rxb7 Rac8 22 Rdd7 and White has regained the pawn with nagging pressure in the
ending) 14 0-0-0 Ba3!? (using a trick to castle short but fancy isn’t always best; the
unglamourized 14 ... 0-0-0 looks preferable, e.g. 15 Be4 Nc5 16 Bc3 Qg5+ 17 Kb1 Rxd1+
18 Rxd1 Be7 19 b4! Nxe4 20 fxe4 Bf6 21 e5 Bd8 22 f4 Qe7 and Black’s game is passive
but still solid) 15 c3 0-0 16 Be4 Be7 (or if 16 ... Bc5 17 Rhg1 g6 18 Bc2 Rfd8 19 Qe4 Nf8
20 Rg2 Rd5 21 Rdg1 Rad8, M.Lahtinen-O.Kauppila, Kuopio 1998, then 22 Qh4! with a big
advantage, since taking the queen gets Black mated) 17 h4! (instead of 17 Bxh7+?! Kxh7
18 Qd3+ Kg8 19 Qxd7, A.Shirov-V.Salov, Madrid 1997, when 19 ... Rfd8! 20 Qxb7 Rab8 21
Qa6 Bc5 is okay for Black) 17 ... h6 18 Bg5! (simply 18 Be3 looks good too) 18 ... hxg5 19
Bh7+! Kh8 20 hxg5 Qxg5+ (or 20 ... Qf4+ 21 Kb1 Rfd8 22 Rd4!) 21 Kb1 Nf6 22 Bc2+ Kg8
23 Rdg1 Qf4 24 Qf1! g6 25 Qg2 and the forthcoming Bxg6 is decisive, according to Shirov.
10 Qe2!?
White offers the c2-pawn to increase his lead in development, or castle long if Black
declines. If you don’t want to risk the sacrifice, you can protect c2 with 10 Bb3 first, when
10 ... Nd7 11 Qe2 leads to similar positions.
10 ... Qd6!?
Question: Why block the f8-bishop’s development? Isn’t c7 a more natural
square for the queen?
Answer: This is a rare continuation, intending ... Nd7 and ... 0-0-0. The idea behind it
is to make sure White doesn’t have access to sacrifices on e6, which can happen far more
easily if Black’s queen is posted on c7.
Other moves:
a) 10 ... Bxc2!? is perhaps a touch greedy and doesn’t score well. After 11 0-0 Be7 12
Rfe1 Bg6 13 Bxe6! fxe6 14 Qxe6 Rf8 15 Bb4 Rf7 16 Bxe7 Rxe7 17 Qxf6, the comp calls it
even, and M.Roganovic-M.R.Savic, Serbian Team Championship 2017, was actually
agreed drawn right here. But as we all know, we humans are notoriously poor defenders
and the practical chances must go with White.
b) 10 ... Nd7 11 0-0-0 Qc7 12 Nh4 Bg6 13 f4 f5 14 g4! (this is identical to the game
except for the black queen’s posting on c7) 14 ... Be7 was M.Santo Roman-T.Kovarcik,
Saint Affrique 1999, where 15 gxf5 Bxh4 16 fxe6! 0-0-0 17 f5! Bxf5 18 Qh5 is better for
White.
11 0-0-0 Nd7 12 Nh4!
Beginning a thematic plan to disrupt Black’s casual development scheme. This
stronger than 12 Bc3, as in L.Tazzioli-G.Scipioni, Porto San Giorgio 2011, where White’s
intended d4-d5 is easily thwarted by 12 ... Nb6 13 Bb3 Nd5 14 Ba5 Nf4 15 Qf1 Bg4 and
Black stands no worse.
12 ... Bg6 13 f4!?
More or less forcing Black’s next move. The comp actually prefers 13 Bb3 0-0-0 14
Kb1, followed by g2-g4 and only then f2-f4. If 14 ... Qxd4?! then 15 Nxg6 hxg6 16 Ba5
and a single pawn fails to provide Black with full compensation for the exchange.
13 ... f5 14 g4!
14 ... Be7
Obviously not 14 ... fxg4?? 15 f5 Bh5 16 fxe6 and wins. The only other consideration is
14 ... 0-0-0, when 15 gxf5 exf5 16 Bd3 (16 c3 Nf6 seems okay for Black) 16 ... Qxd4 17
Kb1 looks to offer White some advantage.
15 gxf5 Bxh4 16 fxe6!
Hamdouchi may have been expecting 16 fxg6?! hxg6, which is fine for Black due to his
superior structure.
16 ... 0-0-0
Not 16 ... fxe6? 17 f5 and White regains the piece very favourably with 18 fxg6 or 17
... Bxf5 18 Qh5+ etc. After the text, we reach almost the same position as in the 10 ...
Nd7 note above, except that 17 f5?! Bxf5 18 Qh5 would be met here by 18 ... Bxe6 19
Bxe6 Qxe6 20 Qxh4 Qxa2. Fortunately, White has another way to proceed.
17 Qg4! fxe6 18 f5!
Securing d4, while opening attacking lanes on f4 for his dark-squared bishop.
18 ... Bxf5 19 Qxh4 Nb6 20 Bf4 Qb4 21 Bb3 Rxd4
Exercise (combination alert): It looks as if Black has picked up a pawn in return
for the bishop pair. Instead, MVL found a deep sequence which won the
material back while retaining the initiative. How did he accomplish this?
Answer: Attraction/double attack/queen and bishop battery.
22 Bxe6+!!
Step 1: Sacrifice the bishop on e6, attracting Black’s bishop to that square.
This shot is certainly an attention grabber. A fantastically constructed “!!” and a pure
delirium “??” are not so far apart. The only difference is that the former works.
22 ... Bxe6 23 Qf6!
Step 2: Double attack on e6 and h8.
23 ... Rxf4
It might appear that 23 ... Rxd1+ 24 Rxd1 Re8 is winning, but this is a mirage. After
25 Qe5! (threatening mate on c7) 25 ... Nd5 26 Qb8+! (stronger than 26 Rxd5 Qxf4+) 25
... Kd7 Black has managed to cover all the threats, right? Wrong! White exploits the pin
on the knight and plays 27 Qc7 mate.
24 Qxe6+ Nd7
Forced. Black must return the remaining minor piece or lose a rook instead after 24 ...
Kb8?? 25 Qe5+ and 26 Qxh8.
25 Qxd7+ Kb8 26 Rhe1
Material is level once more, but White’s major pieces are more threatening and Black’s
king more vulnerable.
26 ... a5!?
Black gives his king luft, inoculating against any back rank mates, while giving himself
the option of ... a5-a4 should White try to lift a rook to b3. The comp prefers the weirdly
inhuman passive defence 26 ... Rff8! 27 Re7 h5.
27 a3 Qb6 28 Qd6+?!
MVL tries his luck in a favourable but difficult to win rook ending. Here the engine
prefers 28 Kb1! Ka7 29 Re5, threatening Rh5 and Rxh7, while if 29 ... Rh4 30 Rb3 a4 then
31 b4!, followed by Ra5+ and wins.
28 ... Qc7 29 Qxc7+ Kxc7 30 Re7+ Kb6 31 Rdd7 Rf1+ 32 Kd2 Rf2+ 33 Kc3
He must hang on to his c-pawn.
33 ... Rb8?!
It was better to keep checking: 33 ... Rf3+ 34 Kd4 c5+ 35 Kc4 Rf4+ 36 Kb3 a4+ 37
Ka2 Rf2 38 Rxb7+ Kc6 39 Rec7+ Kd5! 40 c3 Rxh2 41 Rb5 h5 42 Rbxc5+ Ke4 and Black’s
passed h-pawn should ensure the draw.
34 Rxh7
Now White has winning chances again with an extra pawn and the more aggressive
rooks.
34 ... Ka6
Black might throw in 34 ... a4! to negate White’s next move.
35 b3! b5 36 h4 Kb6 37 h5 Rh2 38 b4 Rh3+ 39 Kb2 Rh4 40 Kb3 Rh3+ 41
Rd3
Not 41 c3? a4+ 42 Kb2 Rh2+ 43 Kc1 Rh1+ 44 Kd2 Rh2+ 45 Kd3 Rh3+ 46 Kd4 Rh4+
47 Ke5 Rh3 and Black will hold the draw.
41 ... Rh1
He needs to keep all the rooks on the board. 41 ... Rxd3+? 42 cxd3 is a lost rook and
pawn ending for Black.
42 Rh6 Rc8 43 Rg3! Rc7 44 Rg5
Reorganizing his rooks into a more active posture. Even so it’s difficult for White to
accomplish anything.
44 ... Rh3+ 45 Kb2 Rh4 46 bxa5+ Kxa5 47 Rg8 Kb6 48 Rgg6 Rh3 49 Rh8
Ra7 50 h6 Rc7 51 Rb8+ Ka7 52 Rf8 Kb6 53 Rb8+ Ka7 54 Rf8 Kb6 55 Rff6 Rh1
Black has defended well and should now hold the draw.
56 Kc3 Rh3+ 57 Kd4!?
Otherwise White is unable to make any progress. It’s hard to tell if this move is a war
cry or a lament. MVL most certainly realized he can’t win here, so he hands over his apawn in order to swap a pair of rooks off and activate his king.
57 ... Rxa3 58 Rg7 Rh3
Swapping rooks himself was simpler: 48 ... Rxg7 49 hxg7, when 49 ... Rg3 50 Rf7 Rg5!
51 Ke4 Ka5 52 Kf4 Rg1 53 Kf5 Kb4 54 Kf6 Kc3 55 Rc7 Kxc2 56 Rxc6+ Kb3 57 Kf7 Rxg7+
58 Kxg7 b4 draws.
59 Rxc7 Kxc7 60 Ke5 Kb6??
This time the king’s queenside counter-attack is too slow. The correct defence was 60
... Rh2! and then:
a) 61 Rf7+ Kb6 62 h7 Ka5 63 Kf6 Kb4 64 Kg7 c5 and so on.
b) 61 Kf5 Rxc2 62 h7 Rh2 63 Kg6 b4 64 Kg7 Rxh7+ 65 Kxh7 c5 66 Kg6 b3 67 Rf1 Kc6
68 Kf5 Kd5 and the comp says draw, though in practical play with us humans only Black
can win.
c) 61 ... c5 62 Kf5 b4 63 cxb4 cxb4 64 Kg6 b3 65 Rf3 b2 66 Rb3 Kc6 67 h7 Rg2+! (not
67 ... Kc5?? 68 Rxb2! and White wins after all) 68 Kf7 Rh2 69 Kg7 Rg2+ etc.
61 Kf5 b4 62 Kg6 Kb5 63 h7 c5 64 Rf5!
The threat of Rh5 forces Black to hand over his rook.
64 ... Rxh7 65 Kxh7
At first glance it seems as if Black should still hold the draw since the white king is a
mile away. The trouble is that Black cannot easily push his pawns or attack the c2-pawn
with his king due to the annoying white rook on the fifth rank.
65 ... Kc4 66 Kg6 Kd4
Black has got his king out of the way and is almost ready to play ... c5-c4 and ... b4b3, so the white rook switches to the third rank.
67 Rf3! c4 68 Kf5 c3 69 Rd3+ Kc4
With the final drawing threat of 70 ... b3 etc.
70 Ke4! 1-0
Since 70 ... b3 71 cxb3+ Kxb3 72 Kd4 wins the c-pawn.
Summary: Despite the computers’ rosy assessment, I don’t think it’s all that easy for
White to gain more than a slight “+=“ edge after 9 ... gxf6!.
Game 46
A.Karpov-I.Rogers
Bath 1983
1 e4 d5 2 exd5 Qxd5 3 Nc3 Qa5 4 d4 Nf6 5 Nf3 Bg4!?
All speculation contains the backdrop of the optimistic belief: “I can pull this off!”
Classical players are in love with order. Black’s move does its very best to toss some
anarchy into the mix. Some annotators consider this line a dangerously unsound fantasy.
I’m not so sure. I have a 71% score with it as Black and have been walking its mean
streets off and on for 35 years. I feel the line is shady but maybe not risen to the level of
unsound.
6 h3
Only with this forceful continuation can White hope for an advantage.
6 ... Bh5
White should be made to work for it. Exchanging with 6 ... Bxf3?! is feeble and leaves
Black clearly worse after 7 Qxf3 c6 8 Bd3.
7 g4 Bg6 8 Ne5
Going after Black’s bishop, while worrying our opponent about potential queen traps
with Nc4.
8 ... e6
I tested the rather crazy 8 ... Nbd7!? and came to the conclusion that the position is
heavily in White’s favour after 9 Nc4 Qa6 10 Bf4 (threatening Nd6+ and Bxa6) 10 ...
Qe6+! (Black’s only move) and now 11 Ne5 again.
9 h4!
This move is an attempt to domesticate an animal which is inherently wild. It is the
only continuation which scares me when I play Black.
9 ... Bb4!
After 9 ... Nbd7?! 10 Nc4 Qa6 11 h5 Be4 12 Nxe4 Nxe4 13 Qf3 Nd6 14 Nxd6+ Qxd6 15
c3, Black has a cramped, lifeless position, while also facing White’s two bishops,
Y.Rantanen-A.Krylov, Osterskars 1995.
10 Rh3?!
Today we know that 10 Bd2! is more accurate; for example, 10 ... Bxc3? (Black has to
stomach the inferior but playable position after 10 ... Nbd7 11 Nxd7 Kxd7 12 h5 Be4 13
Nxe4 Nxe4 14 c3 Be7 15 Be3, where White stands better with the two bishops, M.BagiZ.Varga, Budapest 2012) 11 Bxc3 Qb6, J.Humphrey-C.Lakdawala, San Diego (rapid)
2015, and here White missed the strong continuation 12 f3!, threatening simply h4-h5,
which induces 12 ... h5 13 Nxg6 fxg6 14 Qd3 and Black is strategically busted.
10 ... c6?
This is the equivalent of attempting to treat a profusely bleeding wound
homeopathically. Black’s position spirals into a downward arc, since he neglects to evict
White’s powerful e5-knight quickly enough. Instead:
a) 10 ... Bxc3+ 11 bxc3 (not 11 Rxc3? Nd5) 11 ... Nbd7 was Rogers’ later
improvement. Here White might try 12 Qe2!? Qa4 13 h5 Bxc2 14 Nc4 Be4 15 g5 Bf5 16
gxf6 Bxh3 17 Bxh3 gxf6 18 Bg2, when I prefer the two bishops to Black’s rook and two
pawns.
b) 10 ... Nbd7! (this looks best) 11 Nxd7 Nxd7 (or 11 ... Kxd7!?) 12 h5 (12 Bg2?! h5! is
good for Black) 12 ... Be4 13 Bd2 Bc6 with a reasonable position, although I still prefer
White.
11 Bd2 Qb6
Attacking d4, but White can just ignore it.
12 h5
Even stronger is 12 Qe2!, intending 12 ... Bxc2 (or 12 ... Qxd4 13 0-0-0) 13 Rc1 Bxc3
(the only way to save the piece) 14 bxc3 Ba4 15 g5 Nfd7 16 Nc4 Qc7 17 Qe4, threatening
Bf4, and Black is strategically busted.
12 ... Be4
12 ... Qxd4? is met by 13 Nf3 Bxc2 14 Qxc2 Qxg4 15 h6 and Black’s three pawns are
not nearly enough for the missing piece, since he lags heavily in development.
13 Re3
Another option is 13 g5! Bxc3 14 bxc3 Nd5 15 h6, when Black is haemorrhaging on the
dark squares. Here 13 Nc4?! Qxd4 14 Nxe4? Nxe4 15 Bxb4?? looks good too, except for
an important detail: 15 ... Qxf2 is mate!
13 ... Bxc3
Not 13 ... Qxd4?? due to 14 g5! and Black has too many hanging pieces.
14 Bxc3 Bd5
There is no time for 14 ... h6? in view of 15 Nc4! Qc7 16 Bb4! and White’s knight
invades d6.
15 g5 Ne4 16 Qg4! Nd6
The only good thing about pain is that it assures us we are still among the living. A
move like this is kind of an illness/attempted cure combined.
The counter-attack 16 ... Nxc3 17 bxc3 Qb2 can be met by 18 Rd1 b5 19 g6!, which is
quite awful for Black, since his king is pried open; for example, 19 ... hxg6 (19 ... f5?
allows the startling queen sacrifice 20 h6!!) 20 Bg2! Qxa2 21 Nxf7! Kxf7 22 Qxg6+ Kf8 23
Rg3 Rg8 24 h6 Nd7 25 h7 and Black is busted.
17 0-0-0 Nd7
Rogers finally challenges the e5-monster.
18 Be1!
Threatening c3-c4. Black’s position is clearly a revolution gone awry. Karpov’s move is
even stronger than 18 Nxd7 Kxd7 19 b3 with a big strategic advantage for White.
18 ... Nxe5 19 dxe5 Nf5
Exercise (combination alert): White’s e3-rook and a2-pawn are both attacked.
How should he respond?
Answer: 20 Rh3!
Renewing the c2-c4 threat which cannot be answered. Details matter. As we will see
in the coming moves, Karpov’s move wins a piece in all lines, but only if his rook goes to
h3.
Moving the rook elsewhere is inaccurate: 20 Rc3?! blocks the c-pawn, while 20 Ra3?!
0-0-0 21 c4 allows the bishop to hide in the corner with 21 ... Bh1, when Black still has
fishing chances; for example, 22 Rh3 Rxd1+ 23 Qxd1 Rd8 24 Qe2 Nd4! 25 Qg4 Qa6! 26
Ra3 Qb6 27 Ba5? Nb3+! 28 axb3 Qxf2 29 Bxd8 Qe3+ 30 Kb1 Be4+ 31 Ka2 Qe1! and
draws.
20 ... 0-0-0
The defence is left traumatized and bereft of saving options: 20 ... c5 is crushed by
the simple 21 Rxd5! exd5 22 Qxf5, while 20 ... Bxa2 fails to 21 Ra3 Bd5 22 c4 Qc5 (or 22
... Bh1 23 Rh3) 23 Ra5 b5 24 b4! Qb6 25 cxd5 and not only has White won a piece, Black
has no good recapture on d5 either.
21 c4
With the white rook covering h1, Black’s bishop now has no safe squares. Pinning the
c-pawn is only a very temporary measure.
21 ... Qc5 22 b4!
A salesperson’s main goal is to flip a “No” into a “Yes”.
22 ... Bf3 23 Rxd8+ Rxd8 24 Qxf3 Qxe5 25 Bc3
Just when Black thought it can’t get any worse, it gets worse. Karpov dismantles any
counterplay with embarrassing ease and Rogers’ position reached the level of debris from
a bombed city.
25 ... Qd6 26 Bd3 Nd4 27 Qxf7 Nf5 28 Bxf5 Qf4+ 29 Re3 1-0
Summary: As much as I hate to admit it, my beloved 5 ... Bg4 line fails to equalize.
White should meet it with the strongest plan of h2-h3, g2-g4, Ne5 and h2-h4!, after which
Black is struggling.
Game 47
V.Topalov-G.Kamsky
Wijk aan Zee 2006
1 e4 d5 2 exd5 Nf6
In my experience 2 ... Nf6 is played far less often than 2 ... Qxd5. Nonetheless, we
must still be ready for it.
3 Nf3
We aren’t going to try and refute this system by going for one of the numerous ways
White can hang on to the d5-pawn at the cost of development. Instead, we just develop
naturally, seize a slight space advantage as White, and then try and milk it.
3 ... Nxd5
After 3 ... Qxd5 4 Nc3 and 5 d4, we simply transpose to 2 ... Qxd5 lines.
4 d4
Here it is: we grab our central space, which is good enough for a slight, nagging edge.
4 ... Bf5
Toying with ... Nb4 ideas, which we put a stop to immediately. We’ll look at Black’s
most common option, 4 ... g6, in the next game.
The main alternative is 4 ... Bg4, when after 5 h3 Bh5, I suggest two possibilities:
a) 6 g4 Bg6 7 Ne5 (going after the bishop as in Game 46, though the similarity ends
there) 7 ... Nc6 8 Nxg6 hxg6 9 Bg2 Qd6 (or 9 ... e6 10 0-0 Bd6 11 Nc3! with a slight plus
for White) 10 Nc3 Nf4 11 Bxf4 Bxf4 12 Ne2! Qf6 13 c3 e5 14 Qa4 exd4 15 Nxd4 Bc5 16
Bxc6+ bxc6 17 Qxc6+ Qxc6 18 Nxc6 and Black does not have enough for the pawn,
S.Berzinsh-J.Sikora Lerch, Czech League 1995.
b) 6 Be2 (a steadier option) 6 ... Nc6 7 0-0 e6 8 c3 Be7 9 Ne5! Nxe5 (9 ... Bxe2 10
Qxe2 Nxe5 11 dxe5 0-0 12 Rd1 Qe8 13 c4 leaves White with a slight but nagging edge)
10 Bxh5 Ng6 and White has picked up the bishop pair while retaining his extra space,
Ma.Carlsen-B.Adhiban, Wijk aan Zee 2017.
5 Bd3!
We remove Black’s most active piece.
Question: Isn’t this move in violation of the principle: The side with extra
space should avoid swaps?
Answer: It is, yet I feel it’s an exception, since by exchanging the light-squared
bishops we leave our opponent with a lifeless, cramped game with no real plan other
than to wait.
5 ... Bxd3 6 Qxd3 e6 7 0-0
Question: Can’t White play to win a pawn with Qb5+ and Qxb7 - ?
Answer: Nyet! The pawn is poisoned: 7 Qb5+ Nc6! 8 Qxb7?? Ndb4 9 Qb5 (or 9 Bf4
Rb8 10 Qxc7 Qxc7 11 Bxc7 Rb7 with dual threats on c2 and c7, which cost White a piece)
9 ... Nxc2+ 10 Kd1 (or 10 Kf1 Qd7 and the rook in the corner is lost) 10 ... N2xd4 11 Nxd4
Qxd4+ and White is in trouble, a pawn down with his king stuck in the middle.
7 ... Nc6!?
I don’t really see what the knight does on c6 here. I would be more inclined to dig in
with the Maginot Line-inspired 7 ... c6 8 c4 Nf6 9 Nc3 Be7 10 Bf4 0-0 11 Rad1 Nbd7 and
Black has a solid, albeit lifeless position, F.Borkowski-N.Gaprindashvili, Sandomierz 1976.
8 c4
Let’s give the d5-knight the boot.
8 ... Nb6
After 8 ... Nf6 9 Nc3 Be7 10 Bf4, White scores over 80% from 11 games in my
database. Black’s position is suitable only for cave dwellers who like the darkness; it feels
squeezed, devoid of counterplay or objects of attack. That said, Kamsky’s move hardly
fares any better.
9 Nc3 Be7 10 Bf4 g5?
When presented with a crazy/tempting idea, we would do well to ask ourselves: “Is
this for real, or is it just a thought put into my head by the devil?” Black’s orderly/passive,
well-manicured position suddenly becomes the exact opposite of its former self in just a
single move. The pawn-grabbing theme ... g7-g5-g4 and something-takes-d4 is
sometimes seen in the French Defence, where the position is more closed. It is outright
shady in this more open game.
One of the most difficult decisions in chess is when to take action and when to bide your
time and wait. Sometimes it’s tempting to put aside old, reduced expectations and
replace them with crazy new ones. The counter argument is: it’s better to be realistic and
accept a hard truth than believe a pleasant fiction. I understand that Black is cramped
and without natural freeing breaks, but this lash out is unjustified. It may have worked on
a player rated 300 points lower. Odds are it will fail against a player of Topalov’s
towering strength.
The less ambitious but far more sane move 10 ... 0-0 is to be preferred. After 11 Rad1
Qd7, A.Dreev-N.Vlassov, Dos Hermanas (online game) 2001, and now 12 a3, Black
stands clearly worse but at least his position isn’t about to melt down.
11 Bg3!
Topa offers his d-pawn for an attack. Perhaps Kamsky expected 11 Be3 g4 12 Nd2
Qd7, when Black can castle long and his push of the g-pawn doesn’t look so outrageous.
11 ... g4 12 Ne5 Nxd4
After 12 ... Qxd4? 13 Qe2 Qc5 (castling queenside hangs f7) 14 Ne4 Qb4 15 b3, Black
is strategically busted. If 15 ... f5 then 16 Nxc6 bxc6 17 a3! Qxb3 18 Nd2 Qc2 19 Rfc1 Qa4
20 Qxe6 and Black can resign.
13 c5!
This brilliant second pawn sacrifice prevents Black from supporting the d4-knight with
13 ... c5.
13 ... Bxc5 14 Rad1 0-0!
A wisely pragmatic decision which follows the philosophy: if you fall off your bicycle
while learning to ride, you should just dust yourself off and hop back on. Believe it or not,
the comp thinks this is Black’s best shot to survive.
Instead, 14 ... Qe7 15 b4 0-0-0 16 bxc5 Nf3+ 17 gxf3 Rxd3 18 Rxd3 Qxc5 19 Rfd1
leaves White with too much for the queen, whereas 14 ... Nc6 15 Qe2 Bd6 16 Ne4 Nxe5
17 Bxe5 Bxe5 18 Rxd8+ Rxd8 19 Qb5+ Nd7 20 Nc5 doesn’t leave Black with enough.
15 Ne4
Not now 15 b4? Bxb4 and Black’s knight isn’t really hanging without White dropping
his c3-knight in turn.
15 ... Be7! 16 Nxg4!
Another brilliant decision. Kamsky’s g-pawn is his position’s Judas. Black certainly
planned for 16 Qxd4 Qxd4 17 Rxd4, when 17 ... f5! 18 Nc3 c5 19 Rf4 Bg5 regains
material, although even here White stands clearly better after 18 Rc1!.
16 ... c5?
Kamsky finally cracks under Topalov’s unbearable pressure. 16 ... f5? 17 Nh6+ Kg7 18
Be5+! Kxh6 19 Qh3+ Kg6 20 Rxd4 Nd5 21 Rd3 is decisive as well. He had to play 16 ...
f6! with a miserable but not yet losing position.
Exercise (combination alert): White is just a short stroll from the fulfilment of
his desires. What should he play.
17 b4
Still winning, but not best.
Answer: Topa missed the crushing 17 Be5!. Mating net. Suddenly, Black’s kingside
dark squares are used as a pin-cushion. The immediate threat is Nh6 mate, or if 17 ... f6
then 18 Ng5! (threatening Qxh7 mate) 18 ... Nf5 19 Nh6+! Kg7 (19 ... Kh8 20 Ngf7+ wins
the queen) 20 Nxf5+ exf5 21 Qxf5 and Black has no defence.
17 ... Nd5
It’s not easy to find good moves in a bad position. 17 ... Nf5 was technically better,
just to avoid Be5 again.
18 bxc5?!
No player – not even a World Champion – is infallible. Both players seem oblivious to
the crushing 18 Be5! which still wins on the spot.
18 ... Nf5 19 Qf3 Rc8
Or 19 ... Nxg3 20 Qxg3 Kh8 21 Qe5+ f6 22 Qxe6 Nf4 23 Qf5 Ne2+ 24 Kh1 Nd4 25 Qf4
and Black is busted.
20 Bd6
Naturally Topa would rather play for mate than liquidate to a winning endgame with
20 Rxd5 exd5 21 Qxf5 dxe4 22 Bd6 Kg7 23 Qe5+ f6 24 Qxe7+ etc.
20 ... Nxd6?!
20 ... Rc6 was forced, when White can choose between another favourable endgame
after 21 Rxd5 exd5 22 Qxf5 dxe4 23 Nh6+ and so on, or continuing to apply the pressure
with something like 21 Rfe1 Bxd6 22 exd6 f6 23 Ng3.
21 cxd6 Bh4
It is too late for 21 ... Bxd6 in view of 22 Rxd5 f5 (or 22 ... exd5 23 Ngf6+ Kh8 24 Qf5
and mates) 23 Nxd6 exd5 24 Qxd5+ Kg7 25 Qd4+ Kg6 26 Ne5+ and Black’s king won’t
survive for long with the white queen and knights hovering.
22 d7!
22 ... Rc6
Not 22 ... Qxd7? 23 Rxd5 and a knight check on f6 is coming.
23 Ne5 Rc7 24 Qg4+ Kh8 25 Nd6! 1-0
Topalov finds a clear resolution: 25 ... Qe7 26 Ndxf7+ Rxf7 27 Qxh4! Qxh4 28 Nxf7+
Kg7 29 d8Q and White emerges a rook up.
Summary: Against the 2 ... Nf6 Scandinavian, let’s avoid gimmicks and just settle for
a healthy space advantage with 3 Nf3 and 4 d2-d4.
Game 48
S.Sjugirov-S.Smagin
Russian Rapid Championship, Olginka 2011
1 e4 d5 2 exd5 Nf6 3 Nf3 Nxd5 4 d4 g6
This is Black most popular set-up, after which the game takes on a Grünfeld-like
flavour. In response we follow our repertoire’s prime directive: if we can grab space, then
we do so.
5 c4 Nb6
This is played in the overwhelming majority of games.
Question: What’s wrong with returning the knight to f6?
Answer: 5 ... Nf6 is playable but unpopular. On one hand, it is not vulnerable to
White’s c4-c5 push; on the other, it blocks the long dark diagonal and weakens Black’s
control over e5. Perhaps the most telling argument against 5 ... Nf6 is that 6 Nc3 Bg7 7
Be2 0-0 8 0-0 c6 takes Black into 2 ... Qxd5/3 ... Qd6/5 ... g6 positions (see Game 44) a
tempo down, as White has not wasted time with the queen’s knight. After 9 h3 Bf5 10
Be3, White’s extra space is meaningful, since Black has no easy way to apply pressure
upon the big centre.
6 Nc3 Bg7 7 c5!
I think this is White’s most promising continuation, gaining more space with tempo.
Question: Doesn’t it cede control over d5 to Black?
Answer: Ownership of d5 is in question. White can fight for it with Bc4 and Qb3, so
Black will find it difficult to occupy the hole permanently.
7 ... Nd5 8 Bc4
Principle: Fight for control of a central hole.
8 ... c6
The alternative is to swap knights immediately: 8 ... Nxc3 9 bxc3 0-0 10 Qe2!? (10 0-0
is more usual) 10 ... Nd7?! (very passive; but 10 ... b6 might be met by 11 h4!? or if 10 ...
Nc6 then 11 Bg5) 11 0-0 c6 12 Re1 (intending Bg5 next) 12 ... Bf6? (the miserable 12 ...
e6 was necessary) 13 Bh6, G.Kamsky-E.Abdullayev, Baku 2010, when Black loses
material, no matter what he plays, since 13 ... Re8?? is met by the crushing 14 Bxf7+!.
Remarkably, A.Abdullayev (his brother?) lost the same way three years earlier.
9 0-0 0-0 10 Qb3
White logically applies further pressure on the d5-knight. 10 Re1 is the main line; for
example, 10 ... Bg4 11 Bg5 Bf6 12 Bh6 Bg7 13 Bxg7 Kxg7 14 h3 Nxc3 15 bxc3 Bxf3 16
Qxf3 Nd7, S.Vysochin-A.Danin, Minsk 2006, and now 17 Rab1 looks to offer White a small
but pleasant edge.
10 ... Nxc3 11 bxc3 b5!
When our position is cramped, our wish is: “I’m not free yet, but someday I will be.”
11 ... b6 can be ignored with 12 Bg5! bxc5 13 Rfe1 (or 13 dxc5 Qc7 14 Rfe1 e6 15 Rad1
Nd7 16 Qa3) 13 ... Bf6 14 dxc5 Kg7 15 Rad1 Qc7 16 Bxf6+ exf6 17 Rd6 and White’s
activity outweighs the structural weakness, Kr.Georgiev-N.Lagopatis, Mitilini 1997.
12 Bd3!?
The main line is to exchange with 12 cxb6 axb6, but I don’t think Black has any real
problems here. The downside of not taking the b-pawn is that Black can fight back on the
central light squares and regain control of d5.
12 ... Be6 13 Qc2 Nd7
If Black throws in 13 ... a5 (intending to meet 14 a4 with 14 ... b4!), then 14 Re1 Bd5
15 Be4 Re8 16 Bg5 restricts his development somewhat.
14 a4! a6 15 Bg5
I prefer 15 Re1, as in H.Krüger-I.Topot, correspondence 2010, when White can toy
with the idea of a strategic exchange sacrifice on e6 as well.
15 ... Bd5?!
This looks like a dubious pawn sacrifice. 15 ... Re8 was correct. Black deals with his
pieces’ physical limitations as best he can, in the cramped quarters of his position. After
16 Be4 Qc8 17 Rfe1 Nf6 18 Bd3, the players agreed a draw in G.Gopal-M.Thejkumar,
Indian Championship, Chennai 2008.
16 axb5! axb5
White is unafraid of ... Bxf3, since Black’s light-squared bishop is his best piece, while
after 16 ... cxb5 17 Be4, White’s passed c-pawn is more powerful than Black’s passed apawn.
17 Rxa8 Qxa8 18 Bxe7 Re8 19 Bd6 Qa3
I don’t see enough compensation for Black’s missing pawn. 19 ... Bxf3 20 gxf3 Nf6 21
Qb3 is no improvement, since Black has no easy way to exploit the weak pawns and
squares around White’s king.
20 Nd2 h5
20 ... b4?! is simply met by 21 c4 Be6 22 Nb3.
21 h3 g5?
This is not the time for a buckshot approach, where we spray the wall and hope to hit
something. GM Smagin’s move just weakens his position, without much hope of
compensatory attacking chances.
22 Bh7+ Kh8 23 Bf5!
The f5-wound oozes black and putrid. White has a winning position with an extra
pawn, the bishop pair, and a superior structure. 23 Be4! Nf6 24 Bxd5 Nxd5 25 Qf5 looks
very strong as well.
23 ... Nf6 24 Be5 Ng8 25 Bxg7+ Kxg7 26 Ne4 Bxe4
This gives away his light squares. The engine prefers 26 ... Qa2 27 Qxa2 Bxa2 28
Nxg5, though the endgame two pawns down is clearly hopeless for Black.
27 Bxe4 Re6 28 Bf3 Nf6 29 Qf5?!
Now Black gets a bit of a chance. 29 Qd2! is more precise, when 29 ... g4 30 hxg4
hxg4 31 Bd1 Ne4 32 Qf4 Nxc3 (or 32 ... Qxc3 33 Bxg4) 33 Bxg4 b4 34 Bh5! is winning for
White.
29 ... Qxc3?!
Black puts up a better fight with 29 ... g4! 30 hxg4 hxg4 31 Bxg4 Nxg4 32 Qxg4+ Rg6
33 Qf3 b4! 34 Qe3 (not 34 cxb4?? since White’s queen hangs) 34 ... Qxc3, when 35 Qxc3?
bxc3 36 f3 Kf6 37 Rc1 Ke6 38 Rxc3 Kd5 39 Rd3 f5 40 Kf2 f4 looks like a fortress, although
35 Rc1! Qxe3 (or 35 ... Qb2 36 d5!) 36 fxe3 should still win for White.
30 Qxg5+ Kf8 31 Qh6+ Ke7 32 Qf4 b4
Black’s only prayer is to generate counterplay with the passed b-pawn.
33 Qc7+?
After 33 Rc1! Qb2 34 d5! cxd5 45 c6, White’s passed pawn will soon settle matters.
The text looks like a time trouble check. Indeed, the rest of the game looks like it was
conducted on the increment, so we won’t dwell on it too much.
33 ... Kf8 34 Bxc6 Qxd4?! 35 Bf3 Kg7?! 36 c6 Ne4 37 Qf4 Qd2 38 Qf5 Nd6
39 Qb1?! Nb5 40 Rd1 Qf4 41 Qd3?! Nc3 42 Qd4+
It’s a mistake to disregard another sector of the board, since it’s an integrated whole.
White goes for the endgame, perhaps overlooking Black’s trick.
42 ... Qxd4 43 Rxd4 Rxc6! 44 Rxb4
Whether he intended it or not, White now has to settle for a difficult, technical ending
with three versus two on the kingside. 44 Bxc6?? actually loses to 44 ... Ne2+ 45 Kf1
Nxd4 46 Be4 b3 47 Ke1 b2 48 Kd2 Nb5 (threatening ... Na3 and b1Q) 49 Kc2 b1Q+ 50
Kxb1 Nc3+ and Black wins the bishop and the game.
44 ... Rc5 45 Rh4 Kg6 46 Rd4 Re5 47 Kh2 Nb5 48 Rb4 Nc7 49 Be4+ Kg7 50
Bf3 Ne6 51 h4 Kg6 52 Ra4 Rc5 53 Ra8 Kg7 54 Ra4 Kg6 55 g3
Without a plan we live an aimless life, devoid of purpose. White fails to come up with
a way to make progress, perhaps because none exists.
55 ... Kg7 56 Kg2 Kg6 57 Ra7 Kg7 58 Rd7 Nf8 59 Rd6 Ne6 60 Bd5 Kf6!?
Smagin doesn’t mind swapping off his slightly inferior minor piece and entering a rook
ending. All the same, I would probably play 60 ... Nf8 again since White has not shown he
can make progress here.
61 Bxe6 fxe6 62 Rd8
62 ... e5?
It is much harder to win if Black does nothing with, say, 62 ... Ra5. Pushing the epawn allows the white rook more scope. In fact White already has a clear win with 63
Rg8! (threatening Rg5) 63 ... e4 64 Kf1, when the king will walk up to e3 and Black is
busted.
63 Rd6+ Kf7 64 Kf3 Rc3+ 65 Ke4 Rc2 66 Ke3 Rc3+ 67 Kd2 Ra3 68 Rh6!
Rf3 69 Rxh5!
A winning plan suddenly leaps into visibility. White ultimately wins a second pawn,
since he can easily secure his g- and h-pawns, while picking off Black’s stray e-pawn.
69 ... Rxf2+ 70 Ke3 Rf1 71 Rxe5
Believe or not, several of my students have bungled this two pawn up rook ending and
allowed draws, as indeed have I (with my time delay clock down to one second). For a
strong GM, with or without much time on the clock, the rest is simple.
71 ... Kg6 72 Rg5+ Kh6 73 Ke2 Rf6 74 Rg4 Kh5 75 Rf4 Ra6 76 Kf3 Ra3+ 77
Kg2 Ra1 78 Rf5+ Kh6 79 Rb5 Rc1 80 Kh3 Rc4 81 h5 Ra4 82 g4 Ra1 83 Rb6+
Kg5 84 Rg6+ Kf4 85 h6 Rh1+ 86 Kg2 Ra1 87 h7 Ra2+ 88 Kh3 Ra1 89 Rg7
Rh1+ 90 Kg2 Rh4 91 g5 1-0
Summary: Against the 4 ... g6 line, don’t be afraid to follow with c2-c4 and
eventually c4-c5!, since White’s extra space is often more important than the hole on d5.
Chapter Seven
Alekhine’s Defence
In the 1980s and 1990s I was in love with Alekhine’s Defence, with which I beat my first
GM. Then around the year 2000, something awful happened. Everyone began to play the
Exchange Variation with 5 exd6 and I started to hate my positions. If I recaptured with
my c-pawn, I nearly always got a rotten game. If I recaptured with my e-pawn, my
positions looked like some eternal “+=“ from a line of Petroff’s Defence where White,
with extra space, only plays for two results: a win or a draw. So I pretty much gave the
Alekhine up as my main defence against 1 e4. In this chapter I want to show you how to
make our opponent’s life miserable with the Exchange.
Game 49
M.Klekowski-G.Laketic
Fano 2016
1 e4 Nf6 2 e5 Nd5 3 d4 d6 4 c4
For some reason my uninformed ChessBase labels this as a Four Pawns Attack,
presumably assuming White will necessarily follow with 5 f4. No, it’s actually going to be
the Exchange Variation.
4 ... Nb6 5 exd6
I will tell you a little secret: every Alekhine’s Defence player in the world hates to face
this move. In one version it’s almost impossible to equalize; in the other, Black is turned
into a bored factory assembly line worker in a dead-end position which is virtually
impossible to win.
5 ... cxd6
This is supposedly the dynamic option. The only trouble is that White’s coming set-up
takes all Black’s fun away. In a few games we look at the factory-worker version with 5 ...
exd6.
6 Nc3 g6 7 Be3!
The key to getting an advantage against the 5 ... cxd6 line is simple: Don’t develop
your kingside pieces early!
Question: What’s wrong with the natural kingside development 7 Nf3,
followed by 8 Be2 and castles?
Answer: This is exactly what Black wants. The plan is ... Bg4 and ... d6-d5. For
example, 7 Nf3 Bg7 8 Be2 0-0 9 0-0 Bg4 10 Be3 Nc6 11 b3 (note that 11 d5? fails here to
11 ... Bxf3, when 12 Bxf3 Ne5 13 b3 Nxf3+ 14 Qxf3 Nxc4! wins a pawn, while 12 gxf3 Na5
13 Bd4 e5! leaves Black with a clear structural advantage) 11 ... d5! 12 c5 Nc8 13 Rb1 e6
14 b4 a6 15 a4 N8e7 16 b5 axb5 17 axb5 Na5 18 h3 Bxf3 19 Bxf3 Nc4! 20 g4 Ra3 21 Rb3
Qa5, when the white queenside is under some pressure and Black stands no worse,
K.Griffith-C.Lakdawala, San Diego (rapid) 2013.
7 ... Bg7 8 Rc1 0-0 9 b3!
This is the Voronezh set-up, White’s optimal plan against the 5 ... cxd6 variation.
Question: It looks innocuous. What is White’s idea?
Answer: White has three ideas:
1. By protecting the c3-knight with Rc1, White is free to play d4-d5 if Black plays ...
Nc6.
2. By protecting the c4-pawn with b2-b3, Black’s ... Bg4 and ... Bxf3 ideas are
rendered harmless: we can simply recapture with the bishop, not having to worry about
our c4-pawn hanging.
3. By developing the queenside first and holding back Nf3, we deny Black’s intended
scheme with ... Bg4 and ... d6-d5, as we saw in the note with 7 Nf3 above.
9 ... Bf5
I remember when I wrote Alekhine’s Defence: Move by Move, my editor GM John
Emms sent me an email about how difficult it is for White to extract an edge after this
move. Instead, 9 ... Nc6 10 d5 Ne5 11 Be2 transposes to the next game, while 9 ... e5 is
examined in Game 51.
10 Nf3
Black’s last move gave us the all clear signal to make this move, since ... Bg4 would
now cost a full tempo. I prefer this to the immediate 10 d5, after which 10 ... e6!? (10 ...
e5 is also possible) 11 g4 (11 dxe6 Bxe6 looks okay for Black, with ... d6-d5 coming soon)
11 ... Bxc3+! 12 Rxc3 Be4 13 f3 Bxd5! 14 exd5 Nxd5 15 Rd3, J.Adair-R.Tymrakiewicz,
British Championship, Canterbury 2010, and now 15 ... Nxe3 16 Rxe3 Qh4+ 17 Ke2 Nc6
gives Black two pawns and very interesting play for the piece.
10 ... d5
Otherwise Black will be pressed for space when White plays d4-d5. For example:
a) 10 ... Nc6 11 d5! Ne5 12 Nd4 Bd7 13 Be2 e6 14 dxe6 fxe6 15 0-0 Qe7 16 Qd2 and
White is clearly better, A.Muniz Pardino-E.Gago Garay, correspondence 2016.
b) 10 ... Bg4!? actually scores well in the databases. It probably helps that everyone
plays 11 Be2 here, allowing Black to complete his desired set-up with 11 ... d5, which is
still effective a move behind. I think 11 d5! is a clear improvement. We don’t need the
tempo on a c6-knight, since Black just gave us one with his bishop. After 11 ... N8d7 12
Be2 a5 13 0-0 Nc5 14 h3 Bxf3 15 Bxf3, White has both more space and the bishop pair.
11 c5
There is no benefit for White in maintaining the central tension.
11 ... Nc8 12 h3!?
Preventing Black from completing his scheme with ... Bg4, which would lead to the
same positions as after 10 ... Bg4 11 Be2 d5 above.
12 ... Nc6 13 Be2 Be4!
Foiled in his intended ... Bg4, Black tries another route, planning ... Bxf3, ... e7-e6, ...
N8e7 and ... Nf5 with huge pressure on the d4-pawn. If we allow this, we will be back in 7
Nf3 lines with a only the extra h2-h3 to show for it, so we’re more or less obliged to
continue as follows.
14 Nxe4! dxe4 15 Ng5 Nxd4 16 Nxe4
16 ... a6
Clearing a path for the c8-knight to c6, where it backs up its d4-comrade.
The only other game to reach this position continued 16 ... Qd5 17 Bxd4 Bxd4 (he
should recapture with the queen) 18 Bf3 Qd8 19 0-0 e5, N.Bashirli-D.Colindres, Baku
Olympiad 2016, and now White looks considerably better after 20 Qd2 Kg7 21 Rfd1 Qe7
22 Rc4!, intending Rxd4!, or if 22 ... Rd8?! then 23 Nc3! and Black is in deep trouble.
Black can also force the queens off with 16 ... Qa5+ 17 Qd2 Qxd2+ 18 Nxd2, but then
White looks to have the better chances in the ending with the queenside pawn majority.
17 Bc4
White wants to hang on to his bishop pair, while Black’s powerfully posted d4-knight
compensates.
17 ... Na7 18 h4!?
Making use of the fact that he hasn’t castled. 18 0-0 Nac6 19 Qd2 Qc7 20 Bf4 Be5 21
Bxe5 Qxe5 22 Rfe1 looks about even.
18 ... Nf5 19 h5 Nxe3 20 fxe3
It appears as if a few moths got into White’s kingside structure, but he’s happy to pay
the price for the removal of Black’s d4-knight.
20 ... Nc6
Swapping queens would be a mistake, since 20 ... Qxd1+? 21 Rxd1, followed by Rd7,
gives White a clear advantage. Black can’t challenge the d-file with 21 ... Rad8, as after
22 Rxd8 Rxd8 23 h6 Bb2 24 0-0 he doesn’t have a good way to protect the f7-pawn: 24 ...
e6 allows White’s knight entry to d6 or g5, while 24 ... Rf8 walks into 25 Rxf7! Rxf7 26
Ng5 Ba3 27 Bxf7+ Kh8 28 Ne4 with a clean extra pawn in the ending and Black’s king cut
off from the centre.
21 hxg6 hxg6?
Black underestimates the force of White’s coming kingside attack. This time he should
hurry to swap queens: 21 ... Qxd1+ 22 Rxd1 hxg6 23 Rd7 Rab8 24 Rf1 e6 25 Nd6 b5 with
an unpleasant but still defensible ending.
22 Qg4!
Threatening Qxg6.
22 ... Qa5+ 23 Kf1 Ne5 24 Qh4
Threatening mate.
24 ... Rfe8?
Here 24 ... Rfc8 25 Qxe7 Qd8 was relatively best, when Black is only a pawn down.
Exercise (combination alert): How should White proceed with his attack?
25 Ng5?
“Once my attack is uncaged, it will grow in power, without much tending on my part”
is a dangerously delusional thought. Now Black receives a stay of execution. White had
two ways to win:
Answer #1: 25 Be6! (threatening Ng5, Qh7+, Bxf7! etc; “God helps those who help
themselves,” comments the bishop) 25 ... fxe6 (the comp suggests just giving the
exchange away with 25 ... Rfc8) 26 Qh7+ Kf8 27 Kg1! (clearing the f-file for his d1-rook)
27 ... Nf3+ 28 gxf3 Qc7 29 Qxg6 Qe5 30 Ng5 and it’s game over.
Answer #2: 25 Bxf7+!! (even more brutal; the black king’s broken teeth rattle and
spew forth from this shot like thrown dice) 25 ... Nxf7 26 Qh7+ Kf8 27 Qxg6 Qb5+ 28 Rc4
Qc6 29 Nd6!! exd6 30 Rh7 Qd5 31 Qxg7+ Ke7 32 cxd6+ with a winning attack.
25 ... e6
Now Black looks fine, for one turn anyway.
26 Ne4 Red8??
Almost anything except this. For instance, 26 ... Kf8! 27 Nf6 Qd2 28 Re1 Nxc4 29 bxc4
Red8 and White has nothing better than 30 Nh7+ Ke8 31 Nf6+ Kf8 32 Nh7+ with
perpetual check.
Exercise: Red flags pop up all over the kingside, so much so that it feels like May
Day in Moscow. This time White didn’t miss his chance. How did he force a win?
Answer: Seize control over f8!
27 Qe7!
Now White threatens mate with 27 Nf6+ Bxf6 28 Qxf6 and 29 Rh8. The prospect of
new rewards mitigates the pain of an old reversal.
27 ... Ng4
The only way to prolong the game.
28 Qg5!
White’s queen, like the tide, sways in and out. 28 Rh3! would also win.
28 ... b5 29 Be2!
Black’s knight is lost. 29 ... Ne5 30 Nf6+ Kf8 31 Qxe5 Rd5 32 Nd7+! Kg8 (or 32 ...
Rxd7 33 Rh8+!) 33 Qe4 wins a clear piece, and 29 ... Nxe3+ 30 Qxe3 Qxa2 31 Nd6
clearly doesn’t give Black enough either.
29 ... Qa3 30 Rc2 f5 31 Bxg4 Rf8
Or 31 ... fxg4 32 Ke2! and the comp claims mate in twelve!
32 Ke2 Qb4 33 Qxg6! Qxe4 34 Qh7+ Kf7 35 Bh5+ Kf6
Black’s king is the guy (i.e. me) at the party he is forced to attend by his wife,
pretending that the host’s conversation is the most fascinating thing he ever heard.
36 Qg6+ Ke5 37 Qxg7+ Rf6 38 Qc7+ 1-0
Since 38 ... Kd5 39 Qd6 is mate.
Summary: With repetitive study, our eyes soon adjust to the dark interior of a new
opening system. Against 5 ... cxd6 in the Exchange, remember the Voronezh set-up,
which goes Nc3, Be3, Rc1, b2-b3 and, at the right time, d4-d5.
Game 50
A.Naiditsch-B.De Jonghe
Belgian Team Championship 2005
1 e4 Nf6 2 e5 Nd5 3 d4 d6 4 c4 Nb6 5 exd6 cxd6 6 Nc3 g6 7 Be3 Bg7 8 Rc1
Nc6
A less kind man would adorn this move with a dubious mark. Personally, I consider all
lines where Black plays ... Nc6 and White responds with d4-d5 to be clearly in the latter’s
favour. The same applies if Black plays 8 ... 0-0 9 b3! Nc6, when 10 d5 Ne5 11 Be2
transposes below.
9 d5! Ne5 10 Be2 0-0
Not 10 ... Nexc4?? 11 Bxc4 Nxc4 12 Qa4+ and Black loses a piece.
11 b3
This is a key tabiya in the 5 ... cxd6 Exchange, though I for one think the position is
quite dismal for Black and have no idea why players deliberately choose to venture it
from Black’s side. In my database White scores a heavy 74% from here.
11 ... Ned7
Retreating the knight in advance of being hit by f2-f4. The downside is that White can
now do without f2-f4 entirely. Other moves:
a) 11 ... f5!? is Black’s main choice, yet it’s no more successful: 12 f4 Ng4 13 Bxg4
fxg4 14 Nge2 Nd7 (or 14 ... e5 15 dxe6 Bxe6 16 0-0 Qe7 17 Qd2 Rae8 18 Bd4 and Black
carries the burden of structural weakness without a trace of compensating play, I.NatafJ.Hjartarson, Icelandic Team Championship 2004) 15 0-0 Nf6 16 Nd4, when Black’s sickly
e6-square and lack of space don’t bode well for his future, R.Edouard-P.Gesos, Greek
Team Championship 2011.
b) 11 ... Re8 12 f4 Ned7 13 Nf3 Nf6 14 0-0 e6 15 dxe6 Bxe6 16 Bd4 and has Black
failed to equalize, since a ... d6-d5 break will always be met by c4-c5, J.Magem BadalsI.Abreu Suarez, Spanish Championship, El Sauzal 2010.
c) 11 ... h5 (intending to meet f2-f4 with ... Ng4; White has a simple solution with his
next move) 12 h3 e6 13 Nf3 (developing makes more sense to me than exchanging on e6
and helping Black develop) 13 ... exd5 14 cxd5 Nxf3+ 15 Bxf3 Bf5 16 0-0 and White’s
space and potential queenside attack offer a slight but nagging edge, F.Tarrio OcanaL.Gonzaga Grego, correspondence 2011.
12 Nf3 Nf6 13 Nd4 Bd7
By going passive Black concedes a clear advantage due to the d5-pawn’s cramping
influence.
He should at least try 13 ... e6 (or 13 ... e5), fighting back in the centre, even at the
cost of accepting a loose structure. All the same, 14 dxe6 fxe6 (taking with the bishop
would just hand White the bishop pair) 15 0-0 is still very good for White, who now has
central pawn targets, O.Vozovic-A.Gutsko, Dnipropetrovsk 2000. Note that Black can’t
lash out with 15 ... d5??, since 16 c5 e5 (16 ... Nbd7 hangs the e6-pawn) 17 Nf3! d4 18
cxb6 dxe3 19 Bc4+ Kh8 20 Qxd8 Rxd8 21 Nxe5 leaves Black busted.
14 0-0 Qc8
This move emphasizes Black’s lack of air, and White’s next keeps him restricted.
15 h3 Rd8
Black hopes to push his e-pawn at some point and so reinforces d6 in preparation.
16 Bf3 Be8
The fact that Black’s position is free of apparent weaknesses is, to my mind, a pretty
crappy silver lining, since lack of space poisons its marrow. By playing this way, Black
violates the principle which states: When you are cramped, you must engineer some kind
of freeing pawn break. The problem is that every freeing break saddles him with real
weaknesses; for instance, 16 ... e5? 17 dxe6 fxe6 18 a4! Qb8 19 a5 Nc8 20 a6 is already
winning for White.
So Black goes into Maginot Line mode, hunkering down and hoping his inherent
solidity will eventually fend off White’s space. The trouble with going totally passive, as
Black does in this game, is that you turn the position into a still lake, where you can only
sit and watch while a creature slowly rises to the surface and then kills everyone in town.
17 Qd2 Nbd7 18 Rfe1 Nc5 19 Bg5
Black’s e7-pawn begins to come under fire.
19 ... Rd7 20 b4!
White seizes even more queenside space, with tempo.
20 ... Na6 21 Ne4
Uncovering support for both the b- and c-pawns.
21 ... Qd8 22 Nb5
I would probably give Black a crippled majority with 22 Nxf6+ exf6 23 Bf4, but there’s
no real hurry.
22 ... Nc7
Naiditsch might have been anticipating something like 22 ... Nxe4 23 Rxe4 f5 24 Ree1
Bf7 25 Nxd6! Rxd6 26 Bxe7 Qd7 27 Bxd6 Qxd6 28 c5, when the pawn roller rolls through.
23 Bxf6! Bxf6
After 23 ... exf6 24 Nxc7 Qxc7 25 g4! Black can barely breathe.
24 Nxf6+ exf6 25 Nc3 a5 26 b5!
White’s bind reaches alarming levels.
Question: Doesn’t this create a huge hole for Black to occupy on c5?
Answer: Principle: A hole isn’t a real hole if your opponent is unable to exploit or
occupy it. Black’s knight has no way to reach c5 and a rook can easily be chased away by
Ne4 or Na4.
26 ... Rc8 27 Qd4 f5
Black must keep White’s knight out of e4.
28 Na4!
Threatening to fork on b6 instead.
28 ... Na8?!
This dismal retreat is a move only Nimzowitsch could love. Black hopes to play ... b7b6 next and lock up the queenside, but he’s too slow. Then again, 28 ... Re7 is only
slightly less miserable; after 29 Nb6 Rb8 30 a4 Rxe1+ 31 Rxe1 Na8 32 Nxa8 Rxa8 33 c5
dxc5 34 Qxc5 Rc8 35 Qa3! b6 36 d6, White still has a strategically won game.
29 c5!
If your opponent refuses to make a choice, then make it for him.
29 ... dxc5
This loses material by force, while 29 ... Re7 30 c6 is just slow death.
30 Nxc5 Qb6
If 30 ... Re7 31 d6 Rxe1+ 32 Rxe1 b6 then 33 d7! wins material.
Exercise (combination alert): Black banked on this pin; however the instability
of his finances is about to come to light. How should White respond?
Answer: Queen sacrifice. White gets way too much for it.
31 Nxd7!
This is that scene from Trading Places , when pandemonium erupts on the
commodities floor of the New York Stock Exchange.
31 ... Qxd4 32 Rxc8 Nb6 33 Rcxe8+ Kg7 34 Nxb6 1-0
White’s philosophy is that Wall Street hedge fund managers don’t have enough and
require financial help. Boy, talk about the rich getting richer. Black’s queen, the final living
member of her family, is no match for the opposing army of pieces and passed d-pawn.
Summary: Black’s various ... Nc6?! tries look dubious to me and score poorly in the
database. Always meet them with d4-d5!, which gains space with tempo.
Game 51
T.J.Murray-L.Machycek
World Correspondence Championship 2007
1 e4 Nf6 2 e5 Nd5 3 d4 d6 4 c4 Nb6 5 exd6 cxd6 6 Nc3 g6 7 Be3 Bg7 8 Rc1 0-0
9 b3 e5!
This move has a bad reputation which may be unjustified. In my opinion this is Black’s
only way to play the 5 ... cxd6 line of the Exchange Alekhine.
10 dxe5!
Swapping on e5 is the only way for White to play for an advantage:
a) 10 Nf3 Nc6 11 dxe5 dxe5 12 Qxd8 Rxd8 13 c5 can be met by 13 ... Nd5 with
equality, because Black has already developed the b8-knight, whereas in the main line
Black must settle for the clogging d7-square.
b) 10 d5 isn’t so great either. Black looks at least equal in the King’s Indian-type
position after 10 ... f5. In fact I prefer Black’s mobile kingside pawn majority to White’s
queenside one. Note that 11 c5? is favourably met by 11 ... f4!.
10 ... dxe5 11 Qxd8
White is better placed to exploit weak squares in Black’s camp if queens come off the
board.
11 ... Rxd8 12 c5!
The game becomes a battle of majorities, with White’s 3:2 on the queenside versus
Black’s 4:3 on the kingside. With our last move we take advantage of the black rook’s
placement on d8 to push the knight to the awkward d7-square.
12 ... N6d7
An unfortunate necessity for Black, since 12 ... Nd5?? hangs material to the pin after
13 Rd1 Be6 14 Bc4 and Black can resign.
13 Bc4
13 Nf3 may be a distinction without much difference as it often comes to the same
thing. For example, 13 ... Nc6 14 Bc4 h6 15 Ne4 Na5 16 Bb5 a6 17 Be2 transposes to the
game, while after 16 Be2 f5 17 Nd6 Nc6 18 Bc4+ Kh7 19 h4! (threatening Ng5+!) 19 ...
Bf8 20 h5 f4 21 hxg6+ Kxg6 22 Bd2 Nxc5 23 Nf7 Re8 24 b4, White got full compensation
for the sacrificed pawn, A.Bachmann-W.Pajeken, Calvia 2004.
13 ... Nc6 14 Ne4
Targeting f7. White intends Nd6 next.
14 ... Na5!
Relieving the coming pressure on f7, even if it requires an awkward move. After 14 ...
Nf6 15 Nd6 Rd7 16 Nf3 h6 17 0-0 Re7 18 Nh4 Kf8 19 h3 Rb8 20 f4 e4 21 g4, White had
strong play on the kingside, Z.Strzemiecki-J.Krainski, Sepolno Kraj 2006.
15 Bb5
Inducing a further weakness on the dark squares. 15 Bg5!? Rf8 16 Bd5 is another
possibility.
15 ... a6 16 Be2 h6
Black cuts out both Ng5 and Bg5, while preparing to activate the kingside pawns with
... f7-f5.
17 Nf3 Nc6
After 17 ... f5 18 Nd6 Nc6 White has an extra option in 19 h4!? (suppressing Black’s
majority; 19 0-0 returns to the game) 19 ... e4 20 Nd2 Nb4 21 a3 Nd5 (21 ... Nd3+ 22
Bxd3 exd3 23 b4 also favours White) 22 Bc4 N7b6?! (after 22 ... N7f6 23 Bd4 Kf8 24 b4
Black has an inferior but still tolerable position) 23 cxb6 Rxd6 24 Bf4! Rd8 25 Bc7 Rd7 26
Nxe4! and White won a pawn in F.Fritsche-R.Rain, correspondence 2010, since if Black
takes the knight, then Rd1 instantly regains the piece.
18 0-0 f5 19 Nd6 e4!
Black has played the opening perfectly and stands only a shade worse. His last move
increases his central space, while clearing e5 for a knight.
20 Nd2 Nd4 21 Bc4+
White might still claim a strategic superiority with 21 Bxd4! Bxd4 22 b4 Ne5 23 N2c4
Nxc4 24 Bxc4+ Kg7 25 Rfd1, since Black has yet to mobilize his queenside.
21 ... Kh7 22 b4
Backing up the loose c5-pawn.
22 ... Nc6 23 f3
Breaking up the black pawn front.
23 ... Nde5
The infirm slowly begin to revitalize and regain their health, as Black is finally ready to
develop his queenside pieces. 23 ... Nf6 24 fxe4 Ng4 comes to the same thing.
Question: Hasn’t White just left the b-pawn en prise?
Answer: No, it’s a correct sacrifice: 23 ... exf3?! 24 Nxf3 Nxb4?! is met by 25 Rfe1!,
when White already threatens to win with 26 Bxh6! Bxh6 27 Re7+! Bg7 28 Ng5+ Kh6 (or
28 ... Kh8 29 Ndf7+ Kg8 30 Ne5+ and Nxg6 mate) 29 Ndf7+ Kh5 30 Be2+ Kh4 31 g3
mate, while after 25 ... Nc6 26 Be6! Black is tied down and can hardly avoid losing
material.
24 fxe4 Ng4 25 exf5!?
In chess we suffer two regrets:
1. We regret not taking opportune action.
2. We regret taking rash action.
This lash-out sacrifice, which seems to fall between the two extremes, clearly isn’t
made by someone who desires peace on earth and goodwill to all men and women. Your
writer is bursting full of honour when the odds are overwhelmingly in my favour and the
position requires a sacrifice. Wildly speculative piece sacrifices like this one, not so much.
On the other hand, Komodo rates it at “0.00”. If this is the case, then in an over-theboard game, with clocks ticking, White has to have the superior practical chances, since
Black’s position looks very difficult to play. Even in such a high-level correspondence
game, Murray must have felt it was his best try.
A later game saw the safer 25 Bf2 Nxf2 26 Kxf2 Nxb4 27 Ke2 b5 28 a3 bxc4 29 axb4
c3 30 N2c4 Rb8 31 e5 Rxb4 32 Rfe1 Be6 33 Rxc3, when White’s entrenched knights are
fully the equal of the black bishops, but he has no real winning chances and the players
soon agreed a draw, S.Ottesen-R.Rain, correspondence 2012.
25 ... Nxe3 26 fxg6+ Kxg6!
The black king doesn’t know where he is going and is in a big hurry to get there. We
reach one of those good news/bad news situations. The good news is that Black is up a
piece. The bad news is that his king is going for a ride up the board, surrounded by
hostiles. Obviously he can’t retreat: 26 ... Kh8?? 27 Nf7+ Kg8 28 Nxh6+ Kh8 29 Nf7+ Kg8
30 Nxd8+ Nxc4 31 Nxc6 Nxd2 32 Ne7+ Kh8 33 Rf4! and Black is crushed.
27 Bd3+ Kh5
Black’s king isn’t exactly breathing easy.
28 Rf3
Aiming to gain time on the knight. The direct 28 Rf4, intending Nf3 and Rh4 mate, is
defused by either 28 ... Rf8 or 28 ... Nd5.
28 ... Bd4!
I’m telling you now that, if this was an over-the-board game, White would have about
a 90% chance of victory, because Black’s defensive moves are so inhumanly difficult to
find. He can’t move his e3-knight because both 28 ... Nd5? 29 Nxc8 Raxc8 30 Rh3+ Kg5
31 Rf1 and 28 ... Ng4? 29 Rh3+ Kg5 30 N2e4+ give White a winning attack.
29 Nb3 Nd5+ 30 Kh1 Be5!
Going after the powerfully posted knight. The engines say this is Black’s only good
move here.
31 Nxc8 Raxc8 32 Rf5+!
Even in the endgame White’s attack is the chained pit bull terrier, straining to get at
the mail carrier.
32 ... Kg4
The thought “I will soon win” tends to be an audacious assumption while your
opponent still lives and plots against you. With the black king in imitation of Davy
Crockett, king of the wild frontier, the position certainly looks like an easy win for White.
But the comps say “no” and assess it as even.
33 h3+ Kh4 34 Rc4+ Nf4!
Forced, as well as forcing White’s hand.
35 Rcxf4+
If White’s previous sacrifice of a piece was his wild side, then regaining the exchange
is his conscience. He calls and splits the pot with two pawns for the exchange.
35 ... Bxf4 36 Rxf4+ Kg5 37 Rg4+ Kf6
Oh happy days are here again. Black’s king is finally safe.
38 Bc2!
Removing any entry point for Black’s rooks on the d-file.
38 ... h5 39 Rf4+ Kg7 40 Rh4 Kf6 41 a4 ½-½
The game is now objectively level. Nevertheless, I would play this on over the board,
since White is the only one who can win here.
Summary: If the 5 ... cxd6 line is playable, it is only because of 9 ... e5!. Meet this by
exchanging on e5, then swap queens and follow up with c4-c5!. Black’s position may be
playable, but White still holds a pleasant practical edge.
Game 52
J.K.Duda-O.Bortnyk
European Rapid Championship, Wroclaw 2014
1 e4 Nf6 2 e5 Nd5 3 d4 d6 4 c4 Nb6 5 exd6 exd6
If we live in a cage long enough, we become a zoo animal who thinks of it as home.
As mentioned earlier, I gave up Alekhine’s Defence as my main weapon against 1 e4
when I got sick of defending Black’s side here. From a standpoint of soundness, the
recapture with the e-pawn is both more sound and more solid than the recapture with the
c-pawn, which we looked at in the previous three games. The trouble is that it leads to a
cramped, serf(ish) Petroff’s Defence-like position, where Black must sweat under White’s
extra central space and mild “+=“ for 40+ moves. If you defend perfectly, the big reward
is a draw, since White’s position is virtually bullet-proof.
6 Nc3 Be7
It makes a difference if Black plays 6 ... Nc6 first. We’ll look at this in the final game of
the chapter.
7 Bd3 Nc6 8 Nge2
White avoids development to f3, which would allow Black a pin with ... Bg4.
8 ... Bg4
Black has to find a way to bring the bishop out somehow.
Question: Can Black try for an imbalance by picking up the bishop pair
with 8 ... Nb4 - ?
Answer: Unfortunately, that fails to achieve its end. White can just play 9 Bb1! and
the c4-pawn is immune due to a queen check on a4.
9 f3
9 ... Bh5
The tricky 9 ... Bh4+?! is met by 10 g3! Bxf3 11 0-0 Bxe2 12 Qxe2+ Be7 13 Nd5! Nxd5
(or 13 ... 0-0 14 Qe4 g6 15 Bh6) 14 cxd5 Nb4 (or 14 ... Nxd4 15 Qh5 g6 16 Qh6 with more
than enough play for the pawns) 15 Bb5+ c6 16 dxc6 bxc6 17 Ba4 Rc8, M.Schleich-R.Kotz,
German League 2011, and now the comp suggests the cute back and forth 18 Qc4! d5 19
Qe2, when Black has no good defence to the threatened a2-a3.
10 0-0 0-0 11 b3
Stabilizing c4.
11 ... Bf6
It makes more sense to me to play for a swap with 11 ... Bg6 to free his cramped
position somewhat. Still, 12 Be3 Re8 13 Bxg6 hxg6 14 Qd2 Bf6 15 d5 Ne5 16 Bf2 Nbd7 17
Ne4 is no fun for Black, who is unpleasantly cramped and can only fight for a draw,
P.Leko-V.Ivanchuk, World Rapid Cup, Odessa 2007.
12 Be3 Re8 13 Qd2 d5
If Black goes for 13 ... Bg6 here, then 14 Be4! denies him the easy swap he had in
mind, since capturing on e4 greatly enhances White’s structure.
Black has tried:
a) 14 ... Qd7 15 Nf4 (a good multipurpose move, increasing White’s grip on d5 and
worrying Black about Nxg6 possibilities) 15 ... Bg5 16 Rae1 Rad8, D.Tsoi-A.Cherepov, St
Petersburg 2017, when White looks clearly better after 17 Nxg6 Bxe3+ 18 Rxe3 hxg6 19
Rfe1, since Black lacks a constructive plan and can only await events.
b ) 14 ... a5 15 Nf4 Bg5 16 Rae1 a4 17 c5!? (this disruptive move leads to great
complications; a more strategically-minded player can opt for a stabilizing line like 17
Nfd5 Bxe3+ 18 Rxe3 with a steady plus for White) 17 ... dxc5 18 dxc5 Qxd2 19 Bxd2 Bxe4
20 cxb6! Bd3! (exploiting the pin on White’s f4-knight) 21 Rxe8+ Rxe8 22 Rd1 (so that his
f4-knight is free to move again) 22 ... Bc2 (or maybe not!) 23 Rc1 axb3 24 axb3, when 24
... Nd4? 25 bxc7 Bf5 26 Rd1 gave White a very dangerous passed pawn in J.L.Arizmendi
Martinez-C.Philippe, Andorra 2010. Black had to bite his lip and bear the pain with 24 ...
cxb6! 25 Rxc2 Nb4 26 Rc1 Bxf4 27 Bxf4 Nd3 28 Ne2! Nxc1 29 Nxc1, although White has
all the chances in the ending.
14 c5 Nc8
Black’s position’s lungs strain to take in air. He hasn’t equalized yet.
15 Rad1
M.Cornejo-J.Xiong, US Team Tournament 2014, saw 15 Rae1 Bg6 16 Bb5! N8e7, and
now 17 Nf4 maintains White’s advantage.
15 ... Bg6
16 Bxg6
Why swap in a position of extra space when we don’t have to? The same applies to 16
Rfe1 N8e7 17 Bxg6 Nxg6 18 Ng3 Bh4 19 Bf2 Rxe1+ 20 Rxe1 Nf8 and Black looks okay,
J.Lesot-J.M.Degraeve, Lille 2010. Instead, 16 Bb5! followed by 17 Nf4, as in the previous
note, might be a slight improvement.
16 ... hxg6 17 g4!
Depriving the black knights of f5, with the option of hassling the f6-bishop with g4-g5
as well. 17 Rfe1 is too routine and transposes to M.Simons-A.Baburin, Isle of Man 2011,
where 17 ... b6! 18 cxb6 axb6 19 Bf4 g5 20 Be3 Ra5 21 Rc1 Nd6, already gave Black a
good game.
17 ... b6
Black must chip away at White’s queenside space. From the other side, note that an
exchange of pawns on c5 justifies Duda’s decision to put his rook on d1.
18 Kg2 Qd7 19 Bf2 Nd8
The knight eyes the f4- and g5-squares (via e6) and allows Black to support his dpawn with ... c7-c6. The comp prefers 19 ... bxc5 20 dxc5 N8e7, though I still like White
after 21 Ne4 Be5 22 N4g3.
20 Nf4 Bg5?!
The cold war suddenly turns hot. To observe is good; to perceive and accurately
interpret your observation is better. This sacrifice looks like it’s based on either a
miscalculation or a misassessment. He should have played 20 ... Ne7 21 h4 g5 22 Nh5
Ne6 23 Nxf6+ gxf6 24 h5 (preventing ... Ng6) 24 ... f5 with a sharp game only slightly
favourable to White.
21 Ncxd5 c6
Black has banked on this move, after which 22 Nc3 bxc5 23 Ne4 Rxe4! 24 fxe4 Ne6 25
Be3 Bxf4 26 Bxf4 cxd4 gives him good play for the exchange. I’m guessing he overlooked
White’s reply. 21 ... Ne6 is also met by 22 h4!.
22 h4! Bxh4?!
There are worms living in this apple. Black regains his material, at the cost of opening
the h-file. He should try 22 ... Bh6 23 Nc3 Bxf4 24 Qxf4 Ne6 25 Qd2 Ne7, when the
blockade square on d5 provides some – if not enough – compensation for the missing
pawn.
23 Bxh4 cxd5 24 Bxd8!?
Presumably he didn’t like Black’s knight coming to e6. 24 Rfe1 looks even more
promising, and if 24 ... Ne6 then 25 Rxe6! Rxe6 (or 25 ... fxe6 26 Nxg6) 26 Nxe6 Qxe6 (or
26 ... fxe6 27 Qg5) 27 Re1 Qd7 28 Qe3 with a big advantage.
24 ... Rxd8 25 Rh1!
White’s simple plan is to double rooks on the h-file.
25 ... Ne7 26 Rh2 Rac8
27 Rdh1?
As planned, and threatening mate, but it’s mistimed and allows Black more chances to
defend. The comp shows that White should insert 27 g5!! first; for example, 27 ... Qf5 (27
... bxc5 28 Rdh1 Kf8 29 Rh8+ Ng8 30 Re1 is also very good for White) 28 Rdh1 Qxg5+ 29
Kf2 f5 (not 29 ... Kf8? 30 Ne6+) 30 Qe3 Qf6 31 Qe6+ Qxe6 32 Nxe6 Rd7 33 Ng5! Kf8 34
Rh8+ Ng8 35 Re1! bxc5 36 dxc5 a5 (36 ... Rxc5? walks into 37 Rxg8+! Kxg8 38 Re8
mate) 37 Re6! with a decisive bind.
27 ... f6
Making luft for his king.
28 b4 bxc5 29 dxc5!
White’s 3:1 queenside majority should be more effective than Black’s passed d-pawn.
29 ... g5!
In such situations the defender must take action. Sitting on the picket fence risks
getting impaled on it.
30 Nh5 Ng6 31 Qd3 Qf7 32 Kf2 Re8?
Probably both players were running short of time by now. The rook was better where
it was. Either 32 ... a5 or 32 ... Nh4 was correct.
33 Ng3
The tempting shot 33 Nxg7?, intending 33 ... Qxg7 (or 33 ... Kxg7? 34 Rh7+) 34
Qxd5+ Kf8 35 Rh7 Rcd8 36 Rxg7 Rxd5? 37 Rxg6 with an easily won rook ending, fails to
36 ... Kxg7! 37 Qc6 Rd2+ 38 Kg3 (38 Kf1? Re7 and 39 ... Nf4 even wins for Black) 38 ...
Ree2 and White has to take the repetition draw or get mated after ... Rg2+ and ... Nf4.
33 ... Nh4?!
This bid to regain some authority on the kingside is an attempt to conceal a weakness
and tout it as a strength. Black has better chances with 33 ... d4!? 34 Nf5 Qxa2+ 35 Kg3
Qd5, even if they come to nothing after 36 Nd6 Qe5+ (or 36 ... Nh4 37 Nxe8 Qe5+ 38 Kf2
Rxe8 39 Qe4!) 37 Kf2 Qe3+ 38 Qxe3 dxe3+ 39 Kg3 Rb8 40 Nxe8 Rxe8 41 Ra2.
34 Nf5
Removing the h4-obstruction.
34 ... d4 35 Nxh4 Qxa2+ 36 Kg3?!
Unlike a human body, a threat to one part of the chessboard doesn’t necessarily
constitute a threat to the whole. White’s king easily evades the black queen. The only
reason I’ve given his move a dubious mark is that engines show that White can save the
piece with 36 Kf1! Qa1+ 37 Kg2 Qb2+ 38 Kh3. But who would even consider 36 Kf1 at
the end of a rapid game?
36 ... gxh4+ 37 Rxh4 Kf7 38 Rh7??
The players swap blunders here. After 38 g5! Re5 39 gxf6 Rg5+ 40 Rg4, Black’s king is
too exposed to survive; whereas the text might be met by 38 ... Qe6! 39 Qxd4 a5 and the
comp actually claims equality!
38 ... Qd5??
When you are in danger, putting off the necessary until later comes with the mistaken
assumption there will be a later. This was Black’s final-straw moment.
Exercise (combination alert): White to play and win.
Answer: Rook sacrifice/annihilation of defensive barrier.
39 Rxg7+!
Now Black is mated by force. The defensive reinforcements are all injured, exhausted
or ill.
39 ... Kxg7 40 Rh7+ Kf8 41 Qg6 Re3
Or 41 ... Qe5+ 42 Kh3 and Black has run out of checks.
42 Qg7+ Ke8 43 Rh8+ 1-0
Summary: 5 ... exd6 is solid but about as much fun for Black as job on an assembly
line. It leads to positions where White tends either to win or draw, and rarely lose.
Game 53
A.Naiditsch-O.Gritsak
European Rapid Championship, Warsaw 2012
1 e4 Nf6 2 e5 Nd5 3 d4 d6 4 c4 Nb6 5 exd6 exd6 6 Nc3 Nc6
The idea of playing ... Nc6 before ... Be7 is that White’s Bd3 is now unavailable, since
d4 would hang.
7 h3
I like this solution to Black’s early ... Nc6. Tossing in h2-h3 allows us to play Nf3
without fear of ... Bg4. I prefer this to either 7 Nf3 Bg4, which solves the problem of how
to develop the c8-bishop; or 7 Be3 Be7 8 Bd3 0-0 9 Nge2 Nb4! 10 0-0 (White can’t play
10 Bb1 this time since the c4-pawn does hang) 10 ... Nxd3 11 Qxd3 and Black has
reduced his cramp with a piece exchange and picked up the bishop pair as well.
7 ... Be7 8 Nf3 Bf5
Black hurries to develop the bishop before White plays Bd3.
9 d5
White seizes more space since Black’s ... Nb4 and ... Nc2+ threat can now be negated
by Nd4.
9 ... Nb4
Alternatively, 9 ... Ne5 10 Nd4 Bg6 11 Be2 (here c4 isn’t hanging due to the queen
check on a4) 11 ... 0-0 12 b3 c5 13 dxc6 Nxc6 14 Be3 Bg5 (or 14 ... d6 15 c5! Nd7 16
Nxd5 Bxc5 17 0-0 Re8 18 Nxc6 bxc6 19 Bxc5 Nxc5 20 Nf4 with a tiny edge for White in
view of the weak c6-pawn, J.Smeets-R.Polaczek, German League 2007) 15 Bxg5 Qxg5 16
0-0 Qe5 17 Nxc6 bxc6 18 Qd2 Rad8 19 Bf3 and White’s game is weakness free, while
Black’s c and d-pawns may prove to be future targets, M.Womacka-M.Will, German
League 2007.
10 Nd4
We cover c2, with tempo on Black’s f5-bishop.
10 ... Bg6 11 a3 Na6
12 Be2
To my mind 12 b4 is more logical, since it deprives Black of use of c5. In my database
White lost both games from this position, but two games is too small a sample from
which to draw any conclusions. For instance, after 12 ... 0-0 13 Be2 Nb8 14 0-0 c5,
K.Berbatov-V.Kukov, Bulgarian Championship, Blagoevgrad 2010, and now 15 bxc5 dxc5
16 Nf3, I prefer White due to the connected passed d-pawn.
12 ... Nc5 13 0-0 0-0 14 f4!?
Intending f4-f5, which is more vigorous than 14 Be3.
14 ... h6 15 f5
Burying Black’s light-squared bishop at the cost of ceding control over the e5-square.
15 ... Bh7 16 b4
We are kicking Black around all over the place. Nevertheless, don’t overestimate
White’s advantage, since we risk overextension if we fail to squeeze Black properly.
16 ... Ncd7 17 Ne4 Nf6 18 Nf2!?
Principle: The side with more space should avoid swaps.
18 ... a5 19 Bb2 axb4 20 axb4 Rxa1
Conversely, swaps benefit Black, who is more cramped.
21 Bxa1
21 ... Qd7
If Black attempts to unravel with 21 ... Nfd7 and then offer a repetition draw after 22
Ne4 Nf6, we can decline with 23 Ng3 Nfd7 24 Nb5; for example, 24 ... Bf6 25 Nh5 Bxa1 26
Qxa1 Qg5 27 c5! dxc5 (or 27 ... Nxd5 28 cxd6) 28 Nxc7 Qe3+ 29 Kh2 favours White.
22 g4 c6
Gritsak hits back in the centre, fearful of getting slowly pushed off the board. The
comps prefer the non-committal 22 ... Ra8.
23 dxc6 bxc6 24 b5! cxb5 25 cxb5
Advantage White, who now has a dangerous passed b-pawn as well as use of the c6square for his d4-knight.
25 ... d5 26 Nc6 Bc5 27 Kg2?!
Naiditsch loses control. The blockading 27 Bd4! maintains a clear advantage.
27 ... Re8 28 Nd3?
Now 28 Be5 was necessary.
Exercise: Here Black misses an opportunity to turn the assessment upside down.
What should he play?
28 ... Be3?
Now the combination he is waiting for ceases to exist.
Answer: If your enemy is larger and stronger than you are, your only chance to win a
fight is to catch him off guard. Black should play 28 ... Nc4!, offering a piece. If White
takes the bait with 29 Nxc5? then comes 29 ... Ne3+ 30 Kh1 Qd6! 31 Qd2 Qg3! 32 Bd3
Nxf1 33 Qg2 (forced) 33 ... Qd6 34 Qxf1 Qxc5 and White is probably busted.
29 Nde5
White stands clearly better once again. 29 Bf3 Nc4 30 Nde5 looks even stronger
29 ... Qd6 30 Bf3 Qc5 31 Re1 h5
Desperately attempting to shake White’s kingside grip. 31 ... d4 32 Bxd4 Bxd4 33
Qxd4 is also hopeless, and if 33 ... Qxb5? then 34 Qd6! Nc8 35 Qc7 Rf8 36 Nxf7! wins.
32 Rxe3!?
Sometimes when we see something expensive, we buy it because it’s expensive,
craving the associated prestige. Although the text wins two pieces for a rook, it was
simpler to play 32 Qb3! Nc4 (33 ... Bd2 33 Re2 Bf4 34 Bd4! wins a piece) 33 Nxc4 dxc4 34
Qc3, when Black can hardly move. If 34 ... Bf4 then 35 Rxe8+ Nxe8 36 Qd4 Qxd4 37 Bxd4
and White will win with the b-pawn.
32 ... Qxe3 33 Bd4 Qf4?
He should have played 33 ... Qg5! 34 Bxb6 hxg4 35 hxg4 Bxf5 36 Qe2 Nxg4 37 Bxg4
Rxe5 38 Qxe5 Qxg4+ 39 Kf2 Qh4+ 40 Qg3 Qe4 with some drawing chances due to the
exposed white king and the fact that White only has one pawn left.
34 Bxb6 Ne4
Or 34 ... Rxe5 35 Bc7 Re2+ 36 Qxe2 Qxc7 37 Qe5.
35 Bxe4 Qxe4+ 36 Qf3 Rxe5 37 Nxe5 Qxe5 38 Bf2 hxg4 39 hxg4
White is winning easily since Black is virtually a piece down.
39 ... g6 40 Qe3 Qb2
After 40 ... Qxe3 41 Bxe3 gxf5 42 b6, Black’s bishop is unable to cover the b7-square.
41 b6 gxf5 42 Qg5+ Bg6
If 42 ... Kf8 then 43 b7! Qxb7 44 Qd8+ Kg7 45 Bd4+ f6 46 Qxf6+ Kg8 47 Qh8+ cleans
Black out.
43 gxf5 d4 44 Qd8+! Kh7 45 fxg6+ 1-0
After 45 ... Kxg6 46 Qxd4, the queen and bishop easily force the b-pawn through. In
fact the endgame databases state that it’s mate in fifteen moves at the latest.
Chapter Eight
Odds and Ends
I have always thought of players with a single repertoire, and who never ever deviate
from it, as the incurious type. I have played all sorts of odd lines in my life, including the
two we cover in this final chapter: 1 ... Nc6, the Nimzowitsch Defence, and 1 ... b6,
Owen’s Defence, neither of which is easy to equalize with from Black’s perspective.
Game 54
Z.Andriasian-D.Karatorossian
Asrian Memorial, Jermuk 2012
1 e4 Nc6
This is the Nimzowitsch Defence, an opening similar to the time you went to the
county fair and saw they were selling some revoltingly bizarre confection, like rattlesnake
chili or batter-fried butter, and being oddly compelled to order it and eat every bite.
2 d4
2 ... d5
Black can also play:
a) 2 ... d6 3 Nc3 (3 d5!? Ne5 4 f4 leads to a kind of alternate universe version of
Alekhine’s Defence) 3 ... Nf6 4 Nf3 (in this way our play mirrors our Classical set-up
versus the Pirc and Modern Defences; here 4 ... g6 5 Be2 Bg7 6 0-0 0-0 in fact transposes
to 6 ... Nc6 in the notes to Game 33) 4 ... Bg4 5 Be3 e6 (Black’s idea is to play ... d6-d5,
achieving a kind of tempo down French Defence with the bad light-squared bishop
outside the pawn chain) 6 h3 Bh5 7 d5! (pre-empting Black’s ... d6-d5) 7 ... exd5 8 exd5
Ne5 9 g4 Bg6 10 g5! scores a chilling 5/5 for White in my database; for example, 10 ...
Nxf3+ (10 ... Bh5 11 Be2 Bxf3 12 Bxf3 Nxf3+ 13 Qxf3 Nd7 14 h4 Be7 15 0-0-0 is also
highly favourable for White) 11 Qxf3 Bh5 12 Qg2 Nd7 13 f4 Be7 14 Ne2! (threatening
Ng3) 14 ... Bxe2 15 Bxe2 0-0 16 0-0-0 and Black is virtually busted already, since White
owns the bishop pair, more space and the far faster attack, Cl.Adam-A.Andaburskis,
correspondence 2009.
b) 2 ... e5 3 d5 Nce7 4 Nf3 Ng6 5 h4! h5 (the inclusion of h2-h4 and ... h7-h5 is in
White’s favour, since Black’s h-pawn is potentially weak and White may be able to use
the g5-square for a knight) 6 g3!? (I like this move, which renders the g6-knight out of
play) 6 ... Bc5 7 Bh3! (the coming swap of light-squared bishops favours White as well) 7
... f6 8 Nc3 d6 9 Bxc8 Qxc8 10 Na4 Bb6 11 Bd2 Nh6 12 c4 Ng4 13 Nxb6 axb6 14 0-0,
when White has more space and a potential build-up on the queenside, while Black
struggles for counterplay, L.Ftacnik-E.Teichmann, Gold Coast 2000.
3 Nc3 Nf6!?
This theoretical mutation feels like the result of inbreeding. The game now turns into
a weird kind of French/Not French Defence. Black’s position is one of those people we
know, where they cringe or go rigid upon being hugged (I know this because I’m one of
those scary people who hugs everyone in sight, at the slightest pretence).
Instead:
a) 3 ... dxe4 4 d5 Ne5 can be met simply by 5 Qd4 Ng6 6 Qxe4 Nf6 7 Qa4+ Bd7 8 Bb5
a6 9 Bxd7+ Qxd7 10 Qxd7+ Nxd7 11 Nf3 with advantage, since the white d5-pawn
hampers the development of Black’s kingside pieces (seeing as ... e7-e6 would lead to
structural damage), S.Tiviakov-Jü.Becker, Eupen (rapid) 2000.
b) 3 ... e6 is the most solid move, but it leads to a French where Black’s knight would
be better off not on c6. After 4 Nf3 Nf6 5 Bd3 (White’s highest scoring move) 5 ... Bb4 (or
5 ... Nb4 6 Bg5 Be7 7 e5 Nd7 8 Bxe7 Qxe7 9 0-0 0-0 10 Re1 c5 11 dxc5 Nxc5 12 a3! and
White has more space, while Black risks being left with a bad bishop, A.KarpovS.Agdestein, 1st matchgame, Gjøvik 1991) 6 Bg5 dxe4 7 Bxe4 Ne7 8 Bd3 Ned5 9 0-0!? (9
Bd2 offers White a safe edge) 9 ... Nxc3 10 bxc3 Bxc3 11 Rb1 gave White plenty of
compensation for the pawn, F.Caruana-Ba.Jobava, World Rapid Championship, Dubai
2014.
4 e5
4 ... Nd7
After 4 ... Ne4?! 5 Nxe4 dxe4 6 c3 Bf5 (or 6 ... f6 7 Ne2! fxe5 8 d5! Nb8 9 Ng3) 7 Ne2
e6 8 Ng3 Be7 (or 8 ... Bg6 9 Bb5) 9 Nxf5 exf5 10 g4!, White is already clearly better,
Jo.Benjamin-J.Mu, US Team Tournament 2017.
5 e6!
Did you know that squirrels are unable to find 80% of the nuts and acorns they hide?
So why save for the future? Now, however Black reacts, a fight is coming to him. I like
this clogging pawn sacrifice, after which it is very difficult for Black to free his position.
5 ... fxe6 6 f4!
Clamping down on e5.
6 ... g6 7 Nf3 Bg7 8 Be3
Another option is the belligerent 8 h4!? Nf6 9 Ne5 Nxe5? (he had to play the
admittedly risky 9 ... 0-0 and hope to survive after 10 g4!) 10 fxe5 Ne4 11 Nxe4 dxe4 12
h5 Rf8 13 c3 c5, T.L.Petrosian-M.Foisor, Golden Sands 2012, and now 14 hxg6 hxg6 (or
14 ... h5 15 Be3) 15 Rh7 Rg8 16 Qg4 leaves Black busted.
8 ... Na5!?
Black hopes his position is carried by the tides of Chance to the destination of whoknows-where. This artificial move, which is in violation of the principle: Don’t move the
same piece more than once in the opening, feels like an overcorrection. But I don’t know
what else to suggest since sensible moves also get Black into trouble. For example, 8 ...
Nf6 9 Be2 Ng4 10 Qd2 Nxe3 11 Qxe3 Nb4 12 0-0-0 c5 13 Bb5+ Kf8 14 dxc5 Qa5 15 Nd4
Nxa2+ 16 Nxa2 Qxa2 17 c3 a6 18 Bd3 Kf7 19 Rhe1 and Black was busted, N.Yakubboev-
B.Holmirzaev, Tashkent 2015.
9 h4!
Now h4-h5 is a serious issue for Black, since his king will be in grave danger should he
castle kingside. Meanwhile he is a million miles from castling long with his own pieces
clogging the way.
9 ... Nc4?
The only thing a desperate position is unable to tolerate is panic. Black’s pain was
endurable until now. His last move leads to a clearly lost position. Is it possible to remain
calm and relaxed, without blurring our sense of danger? If so, I haven’t found it in my
own games. 9 ... Nf6 10 Ne5 0-0 11 g4 looks rather terrifying for Black, but the comp
stays calm and claims it may just be playable for Black.
10 Bxc4 dxc4 11 Qe2 Nb6 12 h5 Qd6
Hurrying to castle long as soon as possible. 12 ... Nd5 13 Ne4 also looks miserable for
Black.
13 Ne5 Bd7 14 0-0-0 0-0-0!?
You can’t give something which isn’t yours in the first place. Black is willing to offer a
full exchange in order to castle and eliminate the monster on e5. The problem is that
Black gets killed if he doesn’t offer it: 14 ... Rg8 (or 14 ... Bxe5? 15 dxe5 Qc6 16 Bxb6
axb6 17 hxg6 and Black can resign) 15 hxg6 hxg6 16 Nxg6 and now Black can’t castle
since 16 ... 0-0-0? loses to 17 Ne4 Qb4 18 a3 Qa5 19 Nxe7+, picking off the exchange
anyway.
15 hxg6
There is no hurry to grab the exchange. The only way Black can prevent Nf7 is to play
15 ... Be8, when 16 Rxh7 Rxh7 17 gxh7 is at least as bad for him.
15 ... Nd5
Playing for tricks since 15 ... hxg6 16 Rxh8 Bxh8 17 Nf7 is losing anyway.
16 Nf7 Qb4 17 Nxd5 exd5 18 Nxh8 Rxh8 19 Rxh7
White is up way too much material and Black can already resign.
19 ... Rg8
White isn’t bothered at all by 19 ... c3 20 bxc3 Qxc3 21 Qd3, forcing a queen swap.
20 Rdh1
White consolidates more easily with 20 Qh5! c3 21 bxc3 Qxc3 22 Rxg7! Qxe3+ 23 Kb2
Rd8 24 Qxd5.
20 ... c5 21 Bd2! Qa4 22 Qxe7!
Andriasian isn’t afraid of ghosts and correctly grabs the e-pawn, which is the gateway
to Black’s king.
22 ... Bf5
This isn’t a case of Black’s Rasputin-like bishops raking White’s king, since the mate
threat on c2 is easily sidestepped. Nothing else is any better: 22 ... Bxd4 23 c3 Bf2 24
Rh8 or 22 ... Qxa2 23 Bc3 cxd4 24 Rxg7 Rxg7 25 Qc5+! Bc6 26 Qf8+ Kc7 27 Qxg7+ Bd7
28 Qxd4 wins.
23 Qxc5+ Kb8 24 Kb1!
Sometimes our soft move arrives with the impact of an angry shout. The white king is
quite safe on a1. Not 24 Kd1?? (the wrong direction) 24 ... Qxc2+ 25 Ke2 Re8+ and it is
Black who forces mate.
24 ... Qxc2+
Black’s ambition to deliver checkmate is as ungraspable as the horizon, which
maddeningly recedes upon our approach.
25 Ka1 Qxd2
Exercise (combination alert): How did White close out the game?
Answer: Step 1: Attraction/weak back rank.
26 Rxg7! Rc8
Or 26 ... Rxg7 27 Rh8+ and mate in a couple of moves.
27 Rxb7+!
Step 2: Rook sacrifice/annihilation of defensive barrier. Now Black’s king wears that
old West, “wanted: dead or alive” expression.
27 ... Kxb7 28 Rh7+ 1-0
Black is mated in three more moves.
Summary: Although I don’t believe Black can fully equalize in the Nimzowitsch, let’s
not underestimate it. If nothing else, since we face 1 ... Nc6 so rarely, our opponent will
likely be more well versed in the subsequent play.
Game 55
P.Leko-V.Karthik
Isle of Man 2016
1 e4 b6
Those who play Owen’s Defence allow curiosity to overwhelm fear. From a logical
standpoint, 1 ... b6 ought to be as good as 1 ... g6, but from my own experience I have
discovered this just isn’t the case. A few of my students open with 1 b3 as White and 1 ...
b6 as Black. They win games with 1 ... b6 only because they are more familiar than their
opponents with the quirky positions which may arise, not from an inherent foundation of
equality – which they very rarely get.
2 d4 Bb7 3 Bd3
White’s best move, leaving the b1-knight uncommitted.
3 ... e6
Instead:
a) 3 ... f5? has been pretty much worked out to be a bust for Black: 4 exf5! Bxg2 5
Qh5+ g6 6 fxg6 Bg7 7 gxh7+ Kf8 8 Nf3! (believe it or not, White’s h7-pawn is worth more
than Black’s g8-knight) 8 ... Nf6 9 Qg6 Bxf3 (after 9 ... Bxh1? 10 Bh6 Rxh7 11 Ng5! Bxh6
12 Nxh7+ Nxh7 13 Qxh6+ Kf7 14 Qxh7+ White forces mate) 10 Rg1 Rxh7 11 Qg3! Be4
12 Bxe4 Nxe4 13 Qf3+ Kg8 14 Qxe4 d5 15 Qe6+ Kh8 16 Nc3 and Black is just losing,
R.Thierry-J.Van den Braak, correspondence 2009. Apparently this analysis dates back to
1977.
b) 3 ... Nf6 4 Qe2 Nc6!? (4 ... e6 5 Nf3 c5 6 c3 transposes to the game) 5 c3 e5 6 Nf3
d6 (Black’s plan is to strongpoint e5, whereas 6 ... exd4 7 0-0! dxc3 8 Nxc3 gives White
excellent play for the pawn) 7 0-0 Nd7 8 Ba6! Qc8 9 Bxb7 Qxb7 10 a4 g6 11 d5 Ne7 12 a5
Bg7 13 c4 0-0 14 Nc3 and White has a slightly favourable King’s Indian-style position,
sticking Black with a bad bishop and therefore reducing his kingside attacking chances,
V.Baklan-P.Blatny, Bastia (rapid) 2003.
4 Nf3
This position dates back to P.Morphy-J.Owen, London 1858, which continued 4 Nh3!?
(Morphy probably wanted to keep open attacking lanes for his queen and options for his
f-pawn; in my opinion, the knight is misplaced on h3) 4 ... c5?! (4 ... d5 looks better) 5
c3?! (I am almost certain Morphy would have won had he opened lines and sacrificed
with 5 d5! exd5 6 exd5 Bxd5 7 0-0, when White has a huge development lead for the
pawn) 5 ... cxd4 6 cxd4 Nc6 7 Be3 Nb4! 8 Nc3 Nxd3+ 9 Qxd3 Bb4 and Black had a good
position, due to his control over the light squares. Owen went on to win this game in
(pre-) hypermodern fashion.
4 ... c5 5 c3 Nf6 6 Qe2
6 ... Be7
Other moves:
a) 6 ... cxd4?! is premature: after 7 cxd4 Nc6 8 a3 Be7 9 Nc3, White controls the
centre and will answer ... d7-d5 with e4-e5 with a very promising Advance French-like
position.
b) 6 ... Nc6? is even worse for Black: 7 d5! Na5 8 c4 and Black chokes from lack of
space, while his a5-knight and b7-bishop stare at a white pawn wall.
c) 6 ... d5 7 e5 also gives White a favourable French: 7 ... Nfd7 8 Bg5 (angling for the
exchange of dark-squared bishops) 8 ... Qc8 9 0-0 Ba6 10 c4! dxc4 11 Bxc4 Bxc4 12 Qxc4
Qa6 13 Qc2 Nc6 14 Qe4 Rc8 15 d5! and Black's lag in development is telling,
O.Zambrana-J.Cueto Chajtur, Collado Villalba 2006.
7 0-0
I play the Colle as White and this position is a full move ahead, since we’ve achieved
e2-e4 in a single push (on our first move of the game!), rather than e2-e3 and then e3e4.
7 ... Nc6 8 a3!
Covering the b4-square against a knight invasion after ... c5xd4.
8 ... Na5!
The knight aims at b3 instead. This is Tony Miles’ system, which is perhaps Black’s
optimal line. Black concedes the centre on the basis that it’s hard for White to do
anything with it. All the same I would say White’s central space (our theme for the book)
offers our side at least a slight edge. Note that after 8 ... d5 9 e5 Nd7 10 b4!, White
already has a highly favourable Advance French, since Black’s pieces are misplaced.
9 Nbd2 c4 10 Bc2
Taking the c4-pawn would mean giving up the more valuable e4-pawn, when Black
stands no worse.
10 ... Qc7
11 Re1
Leko begins to sort out his pieces. Note that if we push e4-e5, Black’s just knight slips
into the blockade square on d5. The direct 11 Ne5 b5 12 f4 0-0 13 Ng4 Nxg4 14 Qxg4 Nb3
15 Bxb3 cxb3 16 f5 exf5 17 exf5 Bd6 fails to get White anywhere either, J.DorfmanA.Miles, Tilburg 1992.
11 ... 0-0 12 Nf1
Simply 12 Rb1 is worth considering too, so that we can move our d2-knight without
loss of the bishop pair to a coming ... Nb3. On the other hand, Black’s idea of 12 ... Nh5 in
the game would then make more sense.
12 ... Nh5?!
This looks to me like a violation of the principle: Assert yourself too early from a
position of inferiority and chances are you will get slapped down and put back in your
place.
He should probably go for 12 ... Nb3!? 13 Bxb3 cxb3 14 Ng3 a5 15 a4! (preventing ...
a5-a4) 15 ... d5 16 e5 Ne4 17 Qd1 Nxg3 18 fxg3 Ba6 19 Qxb3 Rfc8, as in J.O’GradyJ.Pietrzak, correspondence 2012, when Black’s light square control and the potential for
counterplay with an eventual ... b6-b5 give him some compensation. All the same I
wouldn’t reckon much for his chances against Leko in this line.
13 Ne5
Cutting off ... Nf4, while opening an attack on the now dangling h5-knight.
13 ... g6?!
It looks dangerous to weaken the dark squares around his king. Black may be better
off taking the humble route with 13 ... Nf6 14 Bf4 d6 15 Ng4 Nd7 16 Nge3, though I still
like White here due to his unchallenged centre.
14 Bh6 Ng7 15 f4!
Leko targets the f6-square, planning Ng4 and e4-e5. If even a single square within
your camp catches a disease, its effects can spread like wildfire through the remainder of
your position.
15 ... d6 16 Ng4! Rae8
Supporting the e6-pawn so that he can push his f-pawn. The immediate 16 ... f5??
loses to 17 exf5 gxf5 18 Bxg7 Kxg7 19 Qxe6.
17 e5! f6 18 exf6 Bxf6 19 Nxf6+ Rxf6 20 Ne3 Nh5?!
Putting the knight back on h5 doesn’t make much sense. 20 ... Rf7 is better, although
Black’s dark squares remain critically weak after 21 Ng4 and 22 Bg5.
21 Qg4
Covering f4, while moving closer to Black’s king. Let’s record the battlefield’s
topography. Black looks upon his position with vast disapproval, due to the following
factors:
1. White owns more central space.
2. White owns the bishop pair.
3. White controls the kingside dark squares, which means that Black’s king is not
terribly secure.
4. Black’s e6-pawn is weak.
5. White’s forces wrap themselves around an f4-f5 pawn break, like bark around a
tree.
6. Black is famished for counterplay, since he has nothing on the queenside and can
only try and defend in the centre and kingside.
Conclusion: Black is busted.
21 ... Qc6 22 Re2 Bc8 23 Qh4
Or just 23 Qg5!, followed by Ng4, since 23 ... Rxf4? loses quickly to 24 Bxg6.
23 ... Rf7 24 Rf1 Qb5 25 Ng4!
The b2-pawn is chump change.
25 ... Rc7
Nothing works for Black: 25 ... Qxb2?? 26 Bxg6! Qxe2 27 Bxh5! forces a quick mate, or
if 25 ... Bd7 then 26 Bg5! Rff8 27 Nh6+ Kh8 28 g4 Ng7 29 Bf6 threatens 30 Nf7+, 31
Bxg6! and wins.
26 Ref2
Leko is in no hurry. Otherwise 26 f5! exf5 27 Rxe8+ Qxe8 28 Re1 Qd7 30 Bxf5! gxf5
31 Qxh5 and mates would be one way to finish the game.
26 ... Nc6 27 a4 Qa5 28 f5!
A terrible force once
hidden within the seams of White’s position struggles to get out. When we have a
strategically won game, the most dangerous thought is: “I love my position and wish it
would never change.” Leko, having mustered all his forces on the kingside, now takes
decisive action.
28 ... exf5
Seeing our opponent’s unity brings to light our own disorganization. Black won’t
survive the opening of his kingside.
29 Bxf5! 1-0
Since 29 ... Bxf5 30 Rxf5! gxf5 31 Qxh5 is hopeless for Black.
Summary: Our set-up against Owen’s Defence gets us a position from the main lines
of the Colle a full move up, since we achieve e2-e4 in a single move.
Index of Complete Games
Akopian.V-Foisor.C, European Cup, Kemer 2007
Almasi.Z-Fridman.D, Bastia (rapid) 2013
Andersson.U-Ree.H, Las Palmas 1973
Andersson.U-Uhlmann.W, Niksic 1978
Andriasian.Z-Karatorossian.D, Asrian Memorial, Jermuk 2012
Bologan.V-Heberla.B, European Championship, Plovdiv 2008
Bruzon Batista.L-Mekhitarian.K, Cochabamba 2013
Carlsen.Ma-Anand.V, Grand Slam Final, Sao Paulo/Bilbao 2012
Carlsen.Ma-Bu Xiangzhi, FIDE World Cup, Tbilisi 2017
Carlsen.M-Beltran de Heredia Y Alon.J, Madrid (simul) 2008
Caruana.F-Giri.A, Wijk aan Zee 2014
Caruana.F-Radjabov.T, Gashimov Memorial, Shamkir 2016
Caruana.F-Vachier-Lagrave.M, Sinquefield Cup, St. Louis 2014
Caruana.F-Vallejo Pons.F, Grand Slam Final, Sao Paulo/Bilbao 2012
Duda.J-Bortnyk.O, European Rapid Championship, Wroclaw 2014
Elwert.H-Ekebjaerg.O, ICCF 50th Jubilee, Correspondence 2002
Grischuk.A-Hansen.Er, World Rapid Championship, Dubai 2014
Grischuk.A-Jobava.B, FIDE Grand Prix, Tbilisi 2015
Grischuk.A-Lupulescu.C, European Team Championship, Warsaw 2013
Grischuk.A-Shimanov.A, Aeroflot Rapid Final, Moscow 2013
Gustafsson.J-Fier.A, Spanish Team Championship 2015
Ivanchuk.V-Bu Xiangzhi, Nanjing 2008
Ivanchuk.V-Kasparov.G, Linares 1991
Ivanchuk.V-Kramnik.V, FIDE Candidates, London 2013
Kamsky.G-Ivanchuk.V, Beijing (rapid) 2013
Karjakin.S-Felgaer.R, Cuernavaca 2006
Karjakin.S-So.W, FIDE World Cup, Khanty-Mansiysk 2011
Karjakin.S-Topalov.V, Gashimov Memorial, Shamkir 2017
Karpov.A-Rogers.I, Bath 1983
Kasparov.G-Bareev.E, Linares 1993
Klekowski.M-Laketic.G, Fano 2016
Kryvorouchko.Y-Tomczak.J, European Rapid Championship, Warsaw 2011
Lakdawala.C-Aldama.D, San Diego (rapid) 2012
Lakdawala.C-Baker.B, San Diego (rapid) 2011
Lakdawala.C-Jones.S, Buena Park 1995
Lakdawala.C-Nilsson.M, San Diego (rapid) 2011
Leconte.J-Castro Torres.J, Roura Memorial, Correspondence 2001
Leko.P-Karthik.V, Isle of Man 2016
Morshedi.A-Lakdawala.C, San Diego (rapid) 2011
Motylev.A-Tukhaev.A, Russian Cup, Khanty-Mansiysk 2015
Movsesian.S-Jurek.J, Pardubice 1998
Murray.T-Machycek.L, World Correspondence Championship 2007
Naiditsch.A-De Jonghe.B, Belgian Team Championship 2005
Naiditsch.A-Gritsak.O, European Rapid Championship, Warsaw 2012
Naiditsch.A-Rakhmanov.A, Spanish Team Championship 2017
Najer.E-Totsky.L, Cappelle-la-Grande 2004
Nakamura.H-Pelletier.Y, Biel 2005
Navara.D-Stupak.K, European Rapid Championship, Minsk 2015
Nepomniachtchi.I-Moiseenko.A, Rapid World Cup, Riga 2013
Paulsen.L-Schwarz.A, Leipzig (3rd matchgame) 1879
Shabalov.A-Parker.J, Lloyds Bank Open, London 1994
Sjugirov.S-Smagin.S, Russian Rapid Championship, Olginka 2011
Solodovnichenko.Y-Kasparov.S, Padua 2012
Topalov.V-Kamsky.G, Wijk aan Zee 2006
Vachier-Lagrave.M-Hamdouchi.H, French Team Championship 2010