/


Текст
cuts 9", 8.75", 8.5", 11.5", 11"
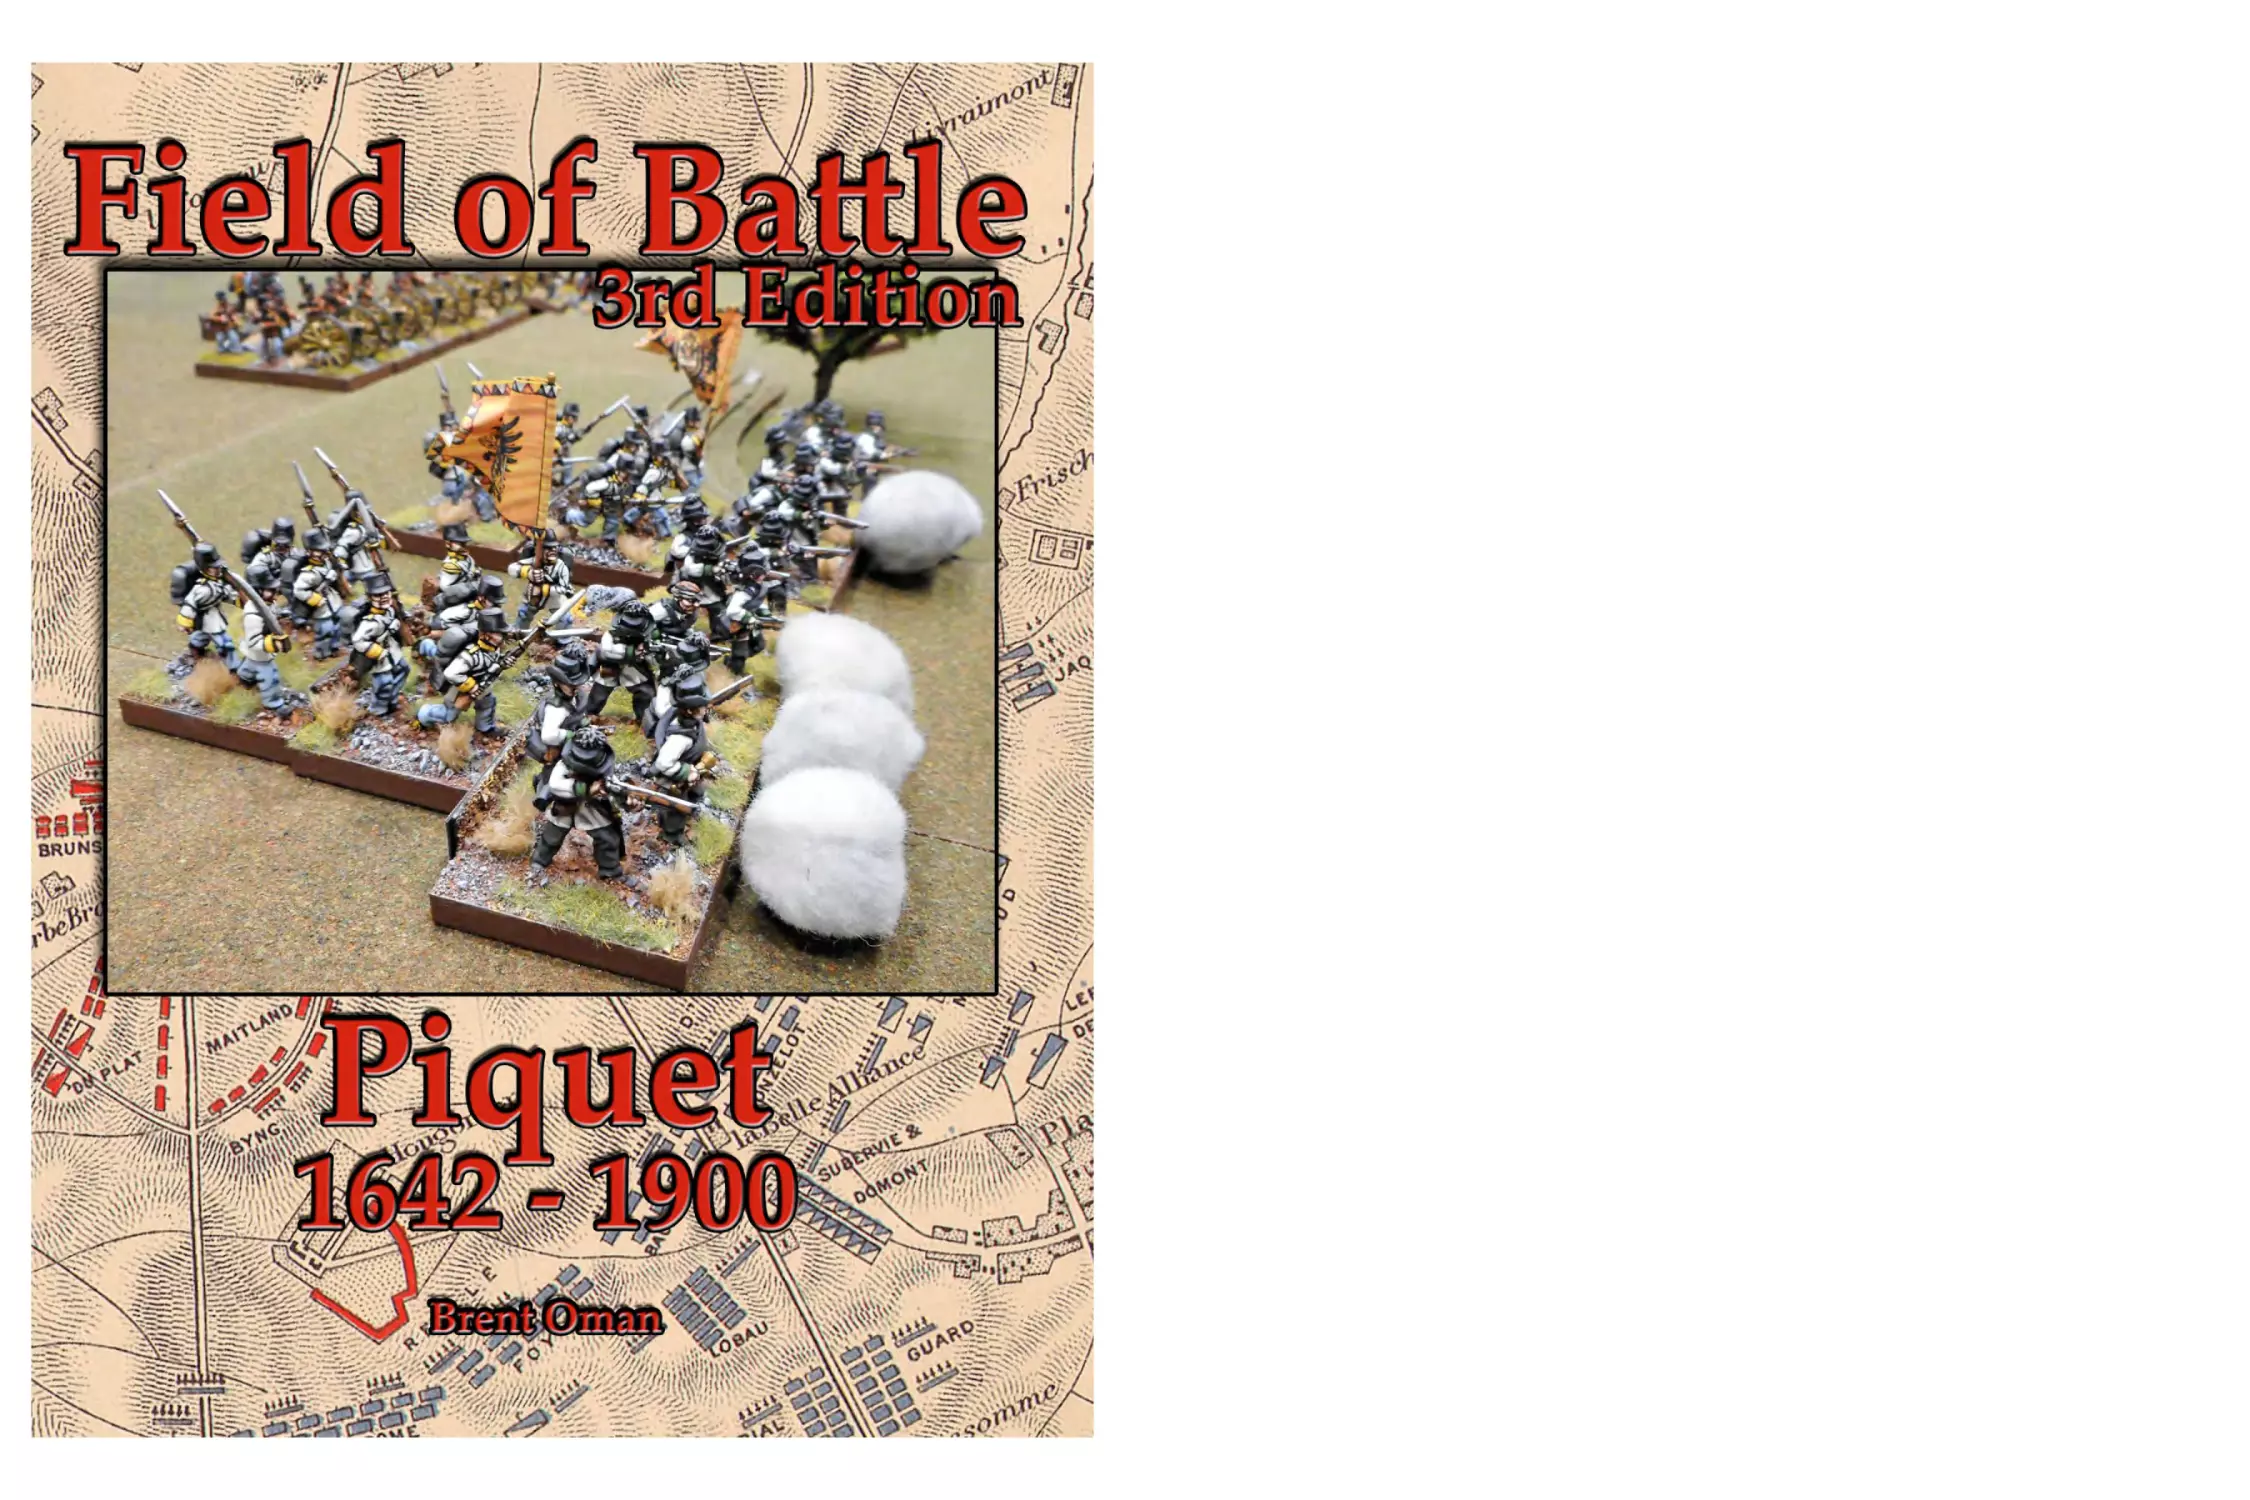
Field of Battle
3rd Edition
By Brent Oman
Piquet Inc.
8995 S. Edgewood Lane
Highlands Ranch, CO 80130
www.Piquet.com
www.piquetwargames.blogspot.com
Acknowledgments
Printing
Superior POD
130 Front Street
Vestal NY 13850
voice 607-240-5231
fax 607-348-1429
email info@superiorpod.com
3rd Edition Editing/Proofreading
Peter Anderson
Tim Couper
Gavin Shanks
3rd Edition Playtesters/Developers
Chris Caudill
Greg Cornell
Eric Miller
John Mumby
Rodney Postillion
Greg Rold
Terry Shockey
©2020 Brent Oman, Piquet Inc.
All rights reserved
1
cuts 9", 8.75", 8.5", 11.5", 11"
Table of Contents
1.0
1.1
1.11
1.2
1.3
1.31
1.4
1.5
2.0
2.1
2.11
2.2
2.3
2.4
2.41
2.42
2.5
2.51
2.6
3.0
3.1
3.2
4.0
4.1
4.11
4.2
4.21
4.22
4.23
4.24
4.25
4.26
4.27
4.28
4.3
4.31
4.32
Section Title
Introduction
Page
4
General Description
Rolling Won Even and Rolling Even
Scale Representations
Basing and Unit Representation
Unit Formations
Unit Integrity
Turns
4
6
7
7
8
11
14
Preparing to Play
15
Unit Ratings
How To Rate Units
Leadership
Leadership Ratings
Sequence Decks
Sequence Deck Grades
Sequence Deck Composition
Army Morale Points
Determining Army Morale Points
Command Groups
Initiative and Opportunity Actions
Opportunity Fire
Evasion
General Movement Rules
Movement Distances
Special Movement Considerations
Terrain
Terrain Definition
Terrain Effects on Movement
Movement In Town Sections
Movement and Rivers
Movement Across Bridges
Movement Across Fords
Movement and Fences and Walls
Movement and Hedges
Maneuvering
Formation Changes
Facing Changes
15
16
18
18
19
19
19
20
21
23
24
24
26
27
28
29
29
29
30
31
32
33
33
33
34
34
34
34
Section Title
4.4
4.5
4.51
4.52
Interpenetration
Movement Resulting from Fire or Melee Combat
Fall Back Moves
Rout Moves
5.0
5.1
5.11
5.12
5.13
5.14
5.15
5.16
5.17
5.18
5.2
5.21
5.22
5.23
5.24
5.25
5.26
5.3
5.4
5.41
5.42
5.43
6.0
6.1
6.11
6.2
7.0
7.1
7.2
8.0
8.1
9.0
10.0
2
Page
35
35
35
36
Combat
37
Fire Combat
Fire Combat Conventions
Weapons and Ranges
Firing in Woods or Orchards
Grand Battery
Fire Combat Table
Fire Combat Resolution
Towns and Fire Combat
Fire Combat Modifiers
Melee Combat
Contact Requirements for Melee
Initiating Melee
Melee Procedure
Melee Combat Table
Melee Combat Modifiers
Melee Results
Unique Melee Situations
Ordered and Disordered Unit Status Summary
Ordered
Disordered
Routed
37
38
40
41
41
42
43
44
45
49
49
50
51
52
53
57
60
64
64
64
64
Leadership
65
Leadership Table
Leadership Modifiers
Officer Loss Effects
Sequence Card Definitions
Standard Sequence Deck Cards
Special Sequence Deck Cards
Winning the Game
Margin of Victory
Glossary of Terms
Period Rules
65
66
67
68
68
74
79
79
79
81
cuts 9", 8.75", 8.5", 11.5", 11"
Table of Contents
11.0
11.1
11.11
11.12
11.13
11.2
11.21
11.22
11.3
11.31
11.32
11.4
11.41
11.42
11.5
11.6
11.61
11.62
11.63
11.64
11.7
11.71
11.72
11.73
11.8
11.81
11.82
11.83
11.84
11.9
11.91
11.92
12.0
13.0
Section Title
Season of Battle
Campaign Outline and Elements
Campaign Process
Battlefield Deck
Campaign Deck
Setting Up the Campaign
Creating Army Rosters
Determining National Morale Points Per Campaign Year
Page
125
Creating the Campaign Map
Assigning Area Victory Points
Assigning Area Terrain Densities
Playing the Campaign
Opposition Dice
Winning the Campaign
Campagn Card Definitions
Campaign Card and Battle Set Up Result
Battle Set Up
Additional Squares
Command Group Set Up
Strength
Post Battle Adjustments: National Morale Points and CiC Fate
National Morale Point Adjustments
Margin Of Victory
Losing Army CiC's Fate
Post Battle Adjustments for Units and Leaders
Checking for Units Eliminated
Checking for Units Routed Off the Table
Checking for Units Remaining On the Battlefield
Checking for Leaders
Pursuit and Recognition
Pursuit Points
Recognition Points
126
127
128
130
130
131
131
133
134
135
135
136
136
137
143
143
145
145
145
147
147
147
148
149
149
150
150
150
151
151
152
Designer Commentary
Appendix
153
156
3
cuts 9", 8.75", 8.5", 11.5", 11"
1.0 Introduction
Field of Battle covers the period from approximately 1642 to 1900. This time period provides some of the
most colorful gaming opportunities available. Field of Battle is a stand-alone game - no additional
supplements are necessary for play. The same basic rules and procedures are used for all periods. Period
specific rules (see 10.0 Period Rules) are provided to add color and unique features to the different wars
covered by Field of Battle. Period specific rules are included for the following wars:.
•
•
•
•
•
•
•
•
•
•
•
•
•
•
•
•
•
English Civil War 1642-1651
War of Spanish Succession 1701-1714
Great Northern War 1700-1721
Jacobite Rebellion 1745-1746
Seven Years War 1756-1763
American War of Independence 1775-1783
Napoleonic Wars 1799-1815
Mexican-American War 1846-1848
Anglo-Sikh Wars 1845-1846, 1848-1849
Crimean War 1853-1856
Franco-Austrian War 1859
American Civil War 1861-1865
Austro-Prussian War 1866
Franco-Prussian War 1870-1871
Russo-Turkish War 1877
Anglo-Zulu War 1879
Anglo-Sudan War 1881-1899
Field of Battle is designed to be fast playing. Games of 20 units per side can be completed in around 2 to 2
1/2 hours; smaller and larger games vary accordingly. The best way to learn to play Field of Battle is to
read the sections that discuss specifics of movement and combat, and then read the descriptions of actions
available on each card. The game mechanics and main combat modifiers are easily memorized. Don’t
worry about memorizing individual rules. Quickly read through the card definitions and get a feel for the
decisions that will be required during a game. Players can quickly learn specific rules by referring to the
Sequence card definitions as the cards are revealed. After a short learning phase, minimal rules reference
is required during play. Field of Battle is a mechanically very simple game to play, with very few table
references required.
Do not be intimidated by the length of the rules book! Field of Battle is a simple game to learn – as
suggested above, read the basic rules for the turn sequence, card play, movement, and combat, and then
use the cards as rules prompts during play. The rule book length is a result of all of the supporting
material for multiple periods, cards, and campaign system. There is no need to memorize specific sections
(movement in various terrain, for example) – just refer to the sections as needed.
1.1 General Description
Unit Integrity is a single digit value that reflects the current status, morale, and strength of a unit. Unit
Integrity may be lost and rallied throughout the game. Unit Integrity losses may be tracked on a roster, by
marking losses on units, or by removing stands.
4
cuts 9", 8.75", 8.5", 11.5", 11"
The Combat Die (CD) represents the unit's overall level of combat capability. The larger the Combat Die
size, the better the unit will be for both fire and melee combat. The Combat Die is modified based on the
situation and is rolled when firing at the enemy or when engaging in melee. Die sizes are referred to by
following the convention listed below.
D4: 4-sided die, numbered 1 to 4
D6: 6-sided die, numbered 1 to 6
D8: 8-sided die, numbered 1 to 8
D10: 10-sided die, numbered 1 to 10
D12: 12-sided die, numbered 1 to 12
D12+: 12-sided die, numbered 1 to 12, plus a modifier value
Die sizes are modified Up and Down the progression shown above, using modifier tables based on the
tactical situation. Note that when a D12 is modified Up, it is not a D20, but rather the Up value is added to
the D12 roll. A D12 roll has a maximum value of 12; any modified result in excess of 12 is ignored and the
result is 12. Note that there is no modified Die size smaller than a D4. Any modified result below a D4 is
ignored and a D4 is used.
Example: A D8 is modified Up 3. The progression would be D8 to D10 (Up 1) to D12 (Up 2) to D12+1 (Up
3).
Example: A D10 is modified Down 2. The progression would be D10 to D8 (Down 1) to D6 (Down 2).
Example: A D8 is modified Up 1 (to D10) and then Down 4 (D10 to D8 to D6 to D4 to less than a D4).
Since no result can be less than D4, a D4 is used.
Example: A D10 is modified Up 4. The progression would be D12, D12+1, D12+2, D12+3. The D12 roll is
an 11. The modified roll is 11 + 3 = 14, but the maximum roll result is 12. The final roll value is a 12.
A series of opposed die rolls are used during the game. When a die is to be rolled versus another die, the
enemy player should always roll the opposing die.
Prior to play, a single D20 is rolled to determine each unit's Combat Die. The result of the D20 roll is used
to determine a unit’s Combat Die, which is dependent on the troop type. Each unit's Combat Die size is
noted on a roster or by marking the unit in some manner. See 2.1 Unit Ratings.
Each officer's leadership skill is represented by their single Leadership Die (LD) size. Prior to play, each
officer is rated by rolling a D20. The D20 roll is cross referenced with the Leadership Quality (found in the
Army Characteristic Table) to determine the Leadership Die size. See 2.3 Leadership Ratings.
Each side determines the number of Army Morale Points that it has for the upcoming battle. See 2.5 Army
Morale Points.
Each side prepares its Sequence Deck by placing the specified number of each card type in its card deck.
See 2.4 Sequence Decks.
A turn consists of a varying number of Initiatives. Play begins with each side rolling their army commander's
(CiC) Leadership Die, with the side that rolls higher winning the Initiative. Ties end the turn. The side
winning the Initiative decides whether to act first (Active) or second (Reactive). The Active side plays from
5
cuts 9", 8.75", 8.5", 11.5", 11"
their Sequence Deck, and the Reactive side may use Opportunity Fire. See 1.5 Turns for a detailed
description.
The end of the game is determined by a Leadership failure during an Army Morale test, or as specified by
scenario or player agreement. See 2.5 Army Morale Points and the definition of the Army Morale card in
7.1 Standard Sequence Deck Cards.
1.11 Rolling Won Even and Rolling Even
A won Even result is a die roll in which a side rolls higher than the enemy roll while having an Even die roll.
If rolling a won Even when firing at the enemy, winning a melee, or rolling for movement, unique capabilities
and effects will result. These benefits are summarized in the table below, and on the play sheets. Specific
rules are explained in the Army Morale sequence card definition; 5.16 Fire Combat Resolution; 5.26 Melee
Results; 4.0 General Movement Rules, and the Move/Move 1 Command Group sequence card definitions.
Note that an Even die roll is the natural number rolled on the die - not a modified result.
Example: Hans rolls a D10 and rolls an 8, while the enemy rolls a 4. The result is a won Even roll.
Example: Pierre rolls a D8 and rolls a 4, while the enemy rolls a 7. While Pierre rolled even, he did not
win, so it is not a won Even roll.
Example: Fritz has a D12+1 and rolls a 7. The modified roll is 8, but the natural roll was a 7 and was not
even. Fritz did not get an Even roll.
Action
Fire
(see 5.16 Fire Combat
Resolution)
Melee
(See 5.26
Melee Results)
Movement
(See the Move/Move 1
Command Group
sequence card
definitions)
Benefit from Rolling Even
Roll won Even when firing at enemy unit:
Enemy infantry or cavalry falls back the difference in inches, Disordered.
• Enemy infantry in Square/Hedgehog holds, Disordered.
• Enemy Unlimbered artillery holds, Disordered
• Enemy units in Town Sections hold, Disordered
• Enemy units in Defensive Works hold, Disordered
Roll won Even and cause 2 UI or more losses on enemy unit:
Enemy infantry or cavalry routs the difference in inches.
Roll even when meleeing an enemy unit:
Ordered units remain Ordered.
• If a unit loses a melee and rolls even on all die rolls, the act of losing a
melee and falling back Disorders the unit
If the unit wins the melee, it may follow up to occupy enemy's position.
Roll won Even on Leadership Die roll for movement:
May change formation.
May change facing.
May immediate melee, depending on period and unit definitions.
6
cuts 9", 8.75", 8.5", 11.5", 11"
1.2 Scale Representations
Game Scales
• 1 Turn = Varying amount of time from 30 minutes to 2 hours
• 1" = 40 yards
• 1 Infantry Unit = 1 Infantry Battalion = 480 to 720 men
• 1 Cavalry Unit = 1 Cavalry Regiment = 400 to 600 men
• 1 Artillery Unit = 1 Artillery Battery = 6 to 8 guns and crew
1.3 Basing and Unit Representation
Individual base sizes are not critical to play in Field of Battle. Field of Battle can be played with virtually any
figure mounting system.
As a general guideline, the following sizes can be used.
Artillery and machine gun units consist of 2 stands; cavalry and infantry units consist of 4 stands. The
stand frontages work well with all figure scales. The number of figures per stand is irrelevant to game
play. Players are encouraged to base their armies as they prefer. The stand sizes shown below will
provide ample opportunity for mini-dioramas on the tabletop. If units on both sides are mounted similarly
and unit frontages in Line are approximately in the 4” to 8” range, the rule system can easily accommodate
differing mounting methods.
Troop Type
Artillery;
Machine Guns
Cavalry
Infantry
Officers
Basing and Unit Representation
Stand Size
1 1/2" wide x 3" deep
1 1/2" wide x 2 1/2" deep
1 1/2" wide x 1 1/2" deep
1 1/2" wide x 1 1/2" deep for Command
Group Officers;
2 1/2" x 2 1/2" for Army Commander (CiC)
Figures per Stand
1 Gun, 3 crew
2
3
1 or 2 for Command Group Officers;
2 or more for Army Commander (CiC)
Note that Field of Battle can be played with any scale of figure. If gamers wish to use 6mm or 10mm
figures and smaller frontage bases, ranges and all measured distances can be proportioned accordingly.
Alternatively, players using small scale figures with smaller unit frontages can measure in centimeters
instead of inches.
Example: A 6mm infantry unit is based so that it has a 3” frontage in line formation. The ranges and move
distances in Field of Battle assume a 4” to 8” infantry frontage in line formation, with an average frontage of
6”. The unit frontage ratio of 3/6 or can be applied by halving all measured distances.
7
cuts 9", 8.75", 8.5", 11.5", 11"
1.31 Unit Formations
The following formations are allowed, depending on army and period restrictions shown in 10.0 Period
Rules.
Attack Column - Attack Column is a good infantry assault formation (UP 1 for melee) but suffers a loss of
firepower (Down 1 for fire). The Attack Column formation for infantry represents not only actual closed
Columns of Companies and Columns of Divisions for the Napoleonic and American Civil War periods, but
also the much looser 1870 Prussian infantry battalion deployed in company columns. In later periods
cavalry can be deployed in Attack Column. Attack Column for cavalry represents a cavalry unit deployed in
multiple lines.
Line - Line is a good formation for fire and melee (no change for combat). Line is the basic linear combat
formation throughout the timeframe covered by Field of Battle. The density of the line formation varied
throughout the extended period included in the rules. Early in this time period, a line was densely packed
of typically three or more ranks. The American War of Independence and American Civil War featured
lines of 2 ranks, while Line for the Franco-Prussian War is more of a loose, open order formation. All are
represented with the same formation in the game. The basic combat formation for all cavalry is Line.
8
cuts 9", 8.75", 8.5", 11.5", 11"
Skirmish - Skirmish is represented on the tabletop by spreading the unit's stands out, leaving gaps
between the stands. These gaps should be a maximum of a stand width. Skirmish units are not terribly
effective in battle in the open field, but are very effective in Class II, III, and IV terrain.
Designer's Note: Throughout the period represented in Field of Battle, individual units increasingly
deployed their intrinsic skirmish screen. These are not represented on the battlefield, as it is assumed that
since both sides have roughly similar and equivalent intrinsic skirmish screens, they cancel each other out.
The primary function of skirmish units was to screen and provide information back to the main force
deployed in the combat winning close order formations.
Units in Skirmish formation are not “super units”, but they have their place on the battlefield.
Units deployed in Skirmish formation are more effective in terrain that provides cover, such as woods or
towns. All units in Skirmish formation move more rapidly in rough terrain than units in closed order
formations, and the Skirmish formation fire penalty does not apply in terrain that provides cover.
Units in Skirmish formation can attempt to evade from enemy infantry that moves into contact. See 3.2
Evasion. This allows units in Skirmish formation to harass and delay enemy infantry movement.
Entire units in Skirmish formation have little place on the open battlefield, as they cannot stand up to closed
order formations in close combat. Again, note that each unit is assumed to have their own skirmish troops
deployed in screens that are not represented on the table as that is below the scale of the game.
Units in Skirmish formation are much more mobile in rough terrain, reducing all Class II, III, and IV
movement penalties by one Class. See 4.22 Terrain Effects on Movement.
Units in Skirmish formation may move at their full movement rate to the rear. The unit ends the rear move
facing in the same direction as it was before the move.
Consult the period specific rules for those units that are suggested to be able to deploy into Skirmish
formation.
All dismounted cavalry units are in Skirmish formation.
All Native American units are deployed in Skirmish formation.
Units in Skirmish formation never receive the Up 1 modifier for initiating melee.
Infantry or dismounted cavalry units armed with repeating rifles ignore the Down 1 modifier when firing.
9
cuts 9", 8.75", 8.5", 11.5", 11"
Square - A defensive infantry formation that provides all around flank protection. While in Square, units
may not be flanked in melee. Units deployed in Square formation may not initiate melee, nor do they
receive the UP 1 Initiating Melee modifier. Units in Square formation do not move. This formation may not
be used in woods or towns.
Designer’s Note: Melees involving Squares are considered a special situation and have specific rules for
resolution. See 5.3 Unique Melee Situations. Squares are immobile and not “that easy” to quickly form and
change to or from.
March - Infantry and cavalry units are formed in March formation for quick, flexible movement. March is a
very poor combat formation, but a very maneuverable one. Units in March formation may move with
unlimited facing changes during movement. See 4.32 Facing Changes. Units may not fire while deployed
in March. Units in March formation never receive the Up 1 modifier for initiating melee.
Unlimbered - Unlimbered artillery or machine gun units are deployed and ready to fire. Artillery or machine
guns must be Unlimbered to fire. Unlimbered units do not move but may change facing.
Limbered – Limbered artillery or machine gun units are deployed in a movement formation. Units that are
Limbered are very maneuverable. Units in Limbered formation may move with unlimited facing changes
during movement. See 4.32 Facing Changes.
10
cuts 9", 8.75", 8.5", 11.5", 11"
Mass – Mass is used by irregular native troops, both cavalry and infantry. Mass represents an unformed
body of fighting men and can be represented either with stands arranged linearly (Line) or in depth (Attack
Column). Mass does not present any advantage or disadvantage for melee combat as it is a loosely
organized swarm rather than a dense body of men. Similarly, while the amorphous state of the Mass
formation doesn’t penalize the unit as a target in fire combat, a unit firing in Mass formation is penalized
due to the lack of fire control and training.
1.4 Unit Integrity
Unit Integrity (UI) is the all-encompassing title given to the physical, morale, and combat effectiveness of a
unit. Different unit types have different Unit Integrity values.
• Infantry units have 4 Unit Integrity.
• Cavalry units have 4 Unit Integrity
• Artillery and machine gun units have 3 Unit Integrity.
Unit Integrity is lost as a result of fire and melee combat.
For an explanation of combat Unit Integrity losses, see 5.16 Fire Combat Resolution and 5.26 Melee
Results. Hits are the difference between the opposing Combat Die rolls in melee or between Combat Die
and Defense Die rolls in fire combat (if the modified Fire Die roll is larger than the Defense Die roll). Each 3
hits taken by a unit reduce its Unit Integrity by 1. Hits accumulate from multiple units firing at the same
target unit at the same time. Hits do not accumulate from separate fires from the same unit.
Example: The Prussians fire at a French infantry battalion, inflicting 5 hits. The 5 hits cause 1 Unit Integrity
loss, with 2 hits remaining. The Prussians fire another unit at the French infantry battalion - causing an
additional 2 hits. The total number of hits is now 4 (2 remaining from the previous fire plus 2 hits from the
new fire). The 4 hits result in one more Unit Integrity loss, with a 1 hit remainder. The Prussians are now
out of units available to fire at the French infantry unit, and the 1 hit remainder is discarded.
Designer's Note: Unit Integrity losses may be tracked in a variety of ways. Unit Integrity can be tracked on
a roster, by placing markers on or near stands, or by removing stands. I prefer to leave figures on the table
and use a casualty marker to track Unit Integrity losses. In my games, a single marker with one, two, or
three rocks indicating a one, two, or three UI loss is placed adjacent to the unit.
11
cuts 9", 8.75", 8.5", 11.5", 11"
The French dragoon unit attacking the Prussian artillery in its flank in the foreground has a 2 UI loss marker
sitting on its base, while the Prussian infantry unit in the background has a 1 UI loss marker.
Unit Integrity and Effects
Unit
Integrity
4
3
2
1
0
Infantry
Cavalry
Artillery
Fully Capable;
No Modifiers for Loss
1 UI Lost
Down 1 For Fire & Melee
2 UI Lost
Down 2 for Fire & Melee
3 UI Lost
Down 3 for Fire & Melee
4 UI Lost
Destroyed
Fully Capable;
No Modifiers for Loss
1 UI Lost
Down 1 For Fire & Melee
2 UI Lost
Down 2 for Fire & Melee
3 UI Lost
Down 3 for Fire & Melee
4 UI Lost
Destroyed
NA
Fully Capable;
No Modifiers for Loss
1 UI Lost
Down 1 for Fire & Melee
2 UI Lost
Down 2 for Fire & Melee
3 UI Lost
Destroyed
When a unit’s Unit Integrity is reduced to zero, the unit is destroyed and removed from the game.
12
cuts 9", 8.75", 8.5", 11.5", 11"
Example: An infantry unit has 1 Unit Integrity remaining. It suffers a 2 Unit Integrity loss from enemy fire.
As this drops the Unit Integrity 0, the unit is removed from play.
Unit Integrity can be regained incrementally, even while a unit is routing, by performing successful Rally
actions on Leadership cards (see the Leadership card definition). If the Leadership die roll is 3 or more
higher than the opposing D8 roll, Unit Integrity is rebuilt at 1 Unit Integrity per 3 pips difference between the
die rolls.
Players may optionally elect to vary the starting Unit Integrity for exceptionally large or small units to meet
specific historical scenario requirements. Large cavalry and infantry units would begin the game with 5 UI.
Small cavalry and infantry units would begin with 3 UI, or in extreme cases 2 UI. Units that begin with 5 UI
do not suffer negative combat modifiers for UI loss until they are at 3 UI or less. Units that begin with less
than the standard UI for their type will begin the game with negative combat modifiers for UI loss.
Designer's Note: Field of Battle uses Unit Integrity to rate a unit's overall combat ability and durability. Unit
integrity is an abstraction of a unit's manpower and morale; its willingness to fight and its effectiveness in
doing so. There are no separate morale tests in Field of Battle; the effect of varying unit morale during the
battle is captured in the Unit Integrity of the unit as well as the unit's reaction to combat losses. Combat
losses in Unit Integrity represent not only casualties, but also morale losses, skulkers and stragglers - all
reducing the overall combat effectiveness of a unit. Unit Integrity can be regained during a game.
Casualties aren't magically being brought back to life; the Leadership Rally action represents steadying,
rallying, and reforming a unit.
While manpower is a part of Unit Integrity, my design philosophy is that quality and capability is more
critical than the sheer size of a unit. Standard unit sizes are used for ease of play, as well as ease of
collecting and creating armies. I do not believe that just because a unit might have a larger headcount it
would necessarily be a stronger unit.
Unit sizes can generally be scaled up or down one level of unit size without any detrimental effect on the
game. For example, a unit which is normally defined in Field of Battle as a battalion could represent a
regiment or it could also be scaled down to represent a company. This approach will allow gamers to game
widely varying sizes of games.
13
cuts 9", 8.75", 8.5", 11.5", 11"
1.5 Turns
Each turn represents a varying amount of time from 30 minutes to 2 hours.
Turns consist of a varying number of Initiatives. There is an Initiative die roll in each Initiative. Each side
rolls their army CiC's Leadership Die, with the difference in the die rolls being the number of Initiative Points
that are available for each side. The side rolling higher decides whether to act first (the Active side) or
second (the Reactive side). Both sides receive the same number of Initiative Points during their portion of
the Initiative.
Initiative Roll (LD vs. LD)
Active side plays from Sequence Deck
Reactive side may use Opportunity Actions
(Opportunity Fire at Firing/Maneuvering/Moving Enemy Units, Opportunity Evasion)
Reactive side plays from Sequence Deck
Active side may use Opportunity Actions
(Opportunity Fire at Firing/Maneuvering/Moving Enemy Units, Opportunity Evasion)
The side acting first (the Active side) turns Sequence cards from their Sequence Deck one at a time,
spending either 0 or 1 Initiative Point per card turned (depending on the card). The Active side then acts on
the Sequence card. This is repeated until the available Initiative Points are spent. The Reactive side may
use opportunity actions (opportunity Fire at maneuvering or moving enemy units, opportunity evasion)
during the Active side's Initiative. See 3.0 Initiative and Opportunity Actions.
After the Active side has finished its portion of the turn, the Reactive side turns Sequence cards from their
Sequence Deck one at a time, spending either 0 or 1 Initiative Point per card turned (depending on the
card). The Reactive side then acts on the Sequence card. This is repeated until the available Initiative
Points are spent. The Active side may use opportunity actions (opportunity Fire at maneuvering or moving
enemy units, cavalry evasion) during the Reactive side's Initiative. See 3.0 Initiative and Opportunity
Actions.
There is no Initiative Point cost per unit to act on a card. Initiative Points are only spent to turn cards. Some
cards do not cost an Initiative Point to turn. See 7.0 Sequence Card Definitions for the Initiative Point cost
for a card. Actions are performed on cards without any additional Initiative Point cost.
When the Active and Reactive sides have both turned and acted on their Sequence cards, both sides roll
their CiC Leadership Die for Initiative and the cycle begins again. The game continues, rolling for Initiative
as necessary.
Most Sequence cards do not have to be acted on unless required (See the Army Morale and Movement
card definitions for situations when actions are compulsory).
A turn ends for both sides when either:
• A side has turned and acted on their last Sequence Deck card.
• The opposing Leadership Die rolls for Initiative are equal.
14
At the end of a turn, all Sequence Cards are returned to their Sequence Deck and are shuffled prior to
beginning the next turn.
Note that the end of an initiative is defined as when both sides have had the opportunity to turn and act on
their cards. If the first side acting as the Active side turns and acts on their last card, the other side still
receives the same number of Initiative Points in their portion of the Initiative.
Example: The Confederates have 5 cards remaining and the Union has 6 cards remaining. The
Confederates win the Initiative roll by 5 and receive 5 Initiative Points. They elect to act first and use their 5
Initiative Points and end their Active portion of the Initiative with all the cards in their deck being turned.
The turn will end when the Union uses their 5 Initiative Points. The turn ends because the Confederates do
not have any cards remaining, even though the Union still has a card remaining.
Designer’s Note: Field of Battle’s turns contain much more activity than games with one movement phase
or combat phase per side per turn. When designing scenarios, rather than using a turn as the
measurement as to when reinforcements or flank marches arrive, instead use the number of Move cards.
For example, a scenario may specify that a flank march is to arrive at turn 4. In Field of Battle terms, this
means that the flanking force could move onto the board on the appearance of the 4th Move card.
2.0 Preparing for Play
Each unit and officer will have a rating that is randomly determined. See 2.1 Unit Ratings and 2.3
Leadership Ratings.
Each army will have a Sequence Deck that is composed of a specified number of Sequence Cards. Gather
the appropriate numbers of cards for each army's Sequence Deck and shuffle prior to play. Each army has
its own Sequence Deck. See 2.4 Sequence Decks.
Each army will have Army Morale Points that are based on the number of units and a random die roll.
Calculate the Army Morale Points prior to play. See 2.5 Army Morale Points.
Each army will organize their forces into Command Groups. See 2.6 Command Groups.
2.1 Unit Ratings
Each unit must have a Combat Die (CD) size that is randomly determined.
Each unit will also have a Defense Die (DD) size that is determined by the unit quality (Rabble, Raw,
Regular, Crack, Elite).
The Combat Die is used in fire and melee combat. The Combat Die is modified and rolled versus an
enemy unit’s Defense Die (fire combat) or modified Combat Die (melee combat). The Defense Die size is
never modified.
The Defense Die is the die size that is rolled when the unit is fired at by an enemy unit. The larger the
Defense Die size, the more resolute the unit. Rabble units have a D4 Defense Die, Raw units have a D4
Defense Die, Regular units have a D6 Defense Die, Crack units have a D8 Defense Die, and Elite units
have a D10 Defense Die.
15
Ratings
cuts 9", 8.75", 8.5", 11.5", 11"
cuts 9", 8.75", 8.5", 11.5", 11"
Note each unit’s Combat Die (CD) and Defense Die (DD) on a roster or by marking the unit with a label or
inconspicuous marker.
Rabble units are representative of the lowest possible quality units. Very low quality militia and untrained
or poorly trained regulars are troops that cannot be trusted to perform well in combat. A good portion of
Native units will be Rabble. Many Native units that are Skirmish units armed with muskets or rifles will be
Rabble. Rabble units have a D4 Defense Die.
Raw units are representative of lower quality regular units, well trained militia units, or tired veteran line
units. The bulk of Native units will be Raw. Raw units have a D4 Defense Die.
Regular units are the bulk of nearly every regular army. These are the regulars, the grunts, the heavy
lifters. Regular units include line infantry, and possibly units with a name reputation that have no proven
combat track record. The best quality Native units trained or intended for melee combat would be Regular.
Regular units have a D6 Defense Die.
Crack units are any units that have a proven high efficiency in combat. Crack units can be, but are not
limited to light infantry, grenadiers, typical guard units, and line units with a proven record of excellent
performance. Use historical research or scenario requirements to assign Crack status. Examples of units
that could be considered Crack would include converged grenadier battalions in the Seven Years War, the
Iron Brigade and Hood's Texans in the American Civil War. Crack units have a D8 Defense Die.
Elite units are "the best” and most dependable units in the army. These are units that inspire fear in the
enemy’s ranks. Elite units have a D10 Defense Die.
Designer's Note: Combat in Field of Battle emphasizes the relative quality of the opposing units in either
fire or melee combat. Higher quality units (Elite, for example) will lose Unit Integrity in fire combat less
easily than lower quality units (Rabble, for example). Higher quality units will tend to remain in fire combat
without falling back out of combat; lower quality units will tend to fall back more often. The Defense Die is a
simple method of incorporating unit quality and morale reaction to combat without any secondary morale
procedure.
2.11 How To Rate Units
To determine the Combat Die size for a unit, roll a D20 and cross index the result with the specific unit type
(light artillery, medium artillery, heavy artillery, machine gun, light cavalry, medium cavalry, heavy cavalry,
and infantry) and unit quality (Rabble, Raw, Regular, Crack, and Elite).
Example: A Regular heavy cavalry unit is being rated. The D20 die roll is a 13. The heavy cavalry unit
has a D12 Combat Die.
The unit rating table is shown on the following page.
16
Unit Rating Table
Unit Type
RABBLE
Light Artillery (3 lb. or less)
Medium Artillery (4 to 8 lb.) and Early MG
Heavy Artillery (9 lb. and larger) and Late MG
Light Cavalry
Medium Cavalry
Heavy Cavalry
Infantry
Unit Type
RAW
Light Artillery (3 lb. or less)
Medium Artillery (4 to 8 lb.) and Early MG
Heavy Artillery (9 lb. and larger) and Late MG
Light Cavalry
Medium Cavalry
Heavy Cavalry
Infantry
Unit Type
REGULAR
Light Artillery (3 lb. or less)
Medium Artillery (4 to 8 lb.) and Early MG
Heavy Artillery (9 lb. and larger) and Late MG
Light Cavalry
Medium Cavalry
Heavy Cavalry
Infantry
Unit Type
CRACK
Light Artillery (3 lb. or less)
Medium Artillery (4 to 8 lb.) and Early MG
Heavy Artillery (9 lb. and larger) and Late MG
Light Cavalry
Medium Cavalry
Heavy Cavalry
Infantry
Unit Type
ELITE
Light Artillery (3 lb. or less)
Medium Artillery (4 to 8 lb.) and Early MG
Heavy Artillery (9 lb. and larger) and Late MG
Light Cavalry
Medium Cavalry
Heavy Cavalry
Infantry
D8
1-16
1-12
1-5
1-14
D8
1-10
1-7
1-8
D8
1-6
1-4
1-4
D8
1-2
D8
-
Combat Die
D10
D12
17-20
13-20
6-17
18-20
1-13
14-20
1-10
11-20
1-15
16-20
15-20
Combat Die
D10
D12
11-20
8-19
20
1-6
7-15
1-10
11-20
1-7
8-18
1-4
5-12
9-18
19-20
Combat Die
D10
D12
7-18
19-20
5-16
17-18
1-4
5-13
1-7
8-18
1-4
5-15
1
2-12
5-16
17-18
Combat Die
D10
D12
3-8
9-19
1-4
5-15
1-2
3-11
1-4
5-15
1
2-12
1-9
1-4
5-15
Combat Die
D10
D12
1-5
6-16
1
2-12
1-7
1
2-12
1-9
1-6
1
2-12
D12+1
D12+1
16-20
19-20
13-20
D12+1
19-20
14-20
19-20
16-20
13-20
19-20
D12+1
20
16-20
12-20
16-20
13-20
10-20
16-20
D12+1
17-20
13-20
8-20
13-20
10-20
7-20
13-20
Designer’s Note: Players may wish to add further flexibility to the rating system by mixing and matching the
Combat and Defense Die ratings. Specific scenarios may require that brittle units (low Defense Die) have
good fighting skills (high Combat Die). In that case, assign a Defense Die as needed, and roll from the
Rabble, Raw, Regular, Crack, or Elite categories to determine the Combat Die.
17
Ratings
cuts 9", 8.75", 8.5", 11.5", 11"
cuts 9", 8.75", 8.5", 11.5", 11"
2.2 Leadership
Officers or Leaders are used to determine how much movement is available for their Command Group, to
rally Unit Integrity and rally Disordered and Routed units. Each officer must have a Leadership Die (LD)
size that is randomly determined or assigned per scenario requirements. The larger the Leadership Die,
the better the officer and the more likely that he will be successful.
Leadership Quality is a descriptor that categorizes the relative individual and collective command
capabilities of armies. Leadership Quality levels are Abysmal, Poor, Average, Skilled, and Exceptional.
2.3 Leadership Ratings
To determine Leadership Die sizes, roll a D20 and cross reference the die roll with the Leadership Quality.
Refer to the Rating Table shown below. On a roll of 1 or 2, the Leadership Die size for that officer is not
known at the start of the game and must be rolled after all battle deployments are complete and prior to the
first initiative roll. If another roll of 1 or 2 is made at that time, the Leadership is a D8.
Note that each officer has a Command Radius in inches equal to 2 times his Leadership Die size. Units
that are outside of their Leader’s Command Radius cannot be rallied or maneuvered.
Leadership
Quality
Abysmal
Poor
Average
Skilled
Exceptional
No Replacement Leadership Leadership Leadership Leadership
(Re-roll on next
Die
Die
Die
Die
Leadership card)
D8
D10
D12
D12+1
1-2
1-2
1-2
1-2
1-2
3-16
3-14
3-5
3
-
17-20
15-19
6-17
4-10
3-9
20
18-19
11-18
10-17
20
19-20
18-20
Example: An army has a Leadership Quality of Poor. The D20 roll is a 5. The officer's Leadership Die is a
D8.
Example: An army has a Leadership Quality of Exceptional. The D20 roll is a 15. The officer's Leadership
Die is a D12.
Example: An army has a Leadership Quality of Average. The D20 roll is a 2. The officer’s Leadership Die
is unknown at the start of the game. Officers are assigned to Command Groups and Command Groups
are deployed on the table. When all pre-game deployments are completed and immediately prior to the
first initiative roll, the officer rolls a D20 to determine his Leadership Die. He rolls a 7, resulting in a D10
Leadership Die.
18
cuts 9", 8.75", 8.5", 11.5", 11"
Each army will have a basic Sequence Deck consisting of a mix of 23 cards. Scenario specific optional
cards might also be included in a deck, which could take the total card count in the deck to more than 23
cards. These cards define the actions that the units in the army can make, and when they can take an
action. Each army will have a randomly determined grade of Sequence Deck. See 2.42 Sequence Deck
Composition.
2.41 Sequence Deck Grades
There are three grades of Sequence Decks available. The grades are:
Inferior - Relatively bad and inefficient staff and command capabilities.
Average - Middle of the road command and control. Most armies fall into this category.
Superior - The best possible command and control.
All three grades of sequence decks have equal numbers of Move, Fire, and Melee cards. Varying numbers
of Leadership cards provide the difference in the grades of Sequence Decks. The larger the number of
Leadership cards, the more resilient, flexible and useful the army will be in battle.
Designer's Note: Field of Battle gives each army's units equal opportunities for fire, melee, and movement.
The differences in the armies are in the flexibility and sophistication of their command and staff capabilities.
Armies with more Leadership cards will be better able to rally and hold their units in place during combat,
as well as being much more tactically proficient (more frequent opportunities to change formation or facing).
2.42 Sequence Deck Composition
Each grade of Sequence Deck has a unique combination of sequence cards. Each army will have a
randomly determined grade of Sequence Deck, based on the CiC’s quality. To determine the Sequence
Deck grade, cross reference the CiC Leadership Die and a D20 die roll. The results of the D20 die roll will
determine what grade of Sequence Deck the army will use for the upcoming battle.
CiC
Leadership
Die
D8
D10
D12
D12+1
Inferior
Sequence
Deck
1-10
1-5
NA
NA
Average
Sequence
Deck
11-20
6-15
1-10
1-5
Superior
Sequence
Deck
NA
16-20
11-20
6-20
Example: A Mahdist army has a D10 CiC Leadership Die. The Mahdist army rolls a D20 and cross
references the die roll with the CiC Leadership Die. The D20 roll is a 6. Looking at the Sequence Deck
Grade table, a die roll of 6 gives an Average Sequence Deck.
The composition of each grade of Sequence Deck is shown in the table below. The definition of each
sequence card is given in 7.0 Sequence Card Definitions.
19
Ratings
2.4 Sequence Decks
cuts 9", 8.75", 8.5", 11.5", 11"
If an army doesn't have either artillery or infantry (unlikely!) in its army, the army still includes all the
standard cards in its deck. The cards which have no functional use still cost 1 Initiative Point to turn. In
effect, they are a useless card that evens out the card count without giving a benefit to the army with fewer
unit types.
Card Name
Army Morale
Artillery Fire
Infantry Fire
Leadership
Lull
Melee
Move
Move 1 Command
Tactical Advantage
Standard Card Total
Sequence Deck Composition
Sequence Deck Grade
Inferior
Average
3
3
3
3
3
3
2
3
3
2
3
3
3
3
1
1
2
2
23
23
Superior
3
3
3
4
1
3
3
1
2
23
2.5 Army Morale Points
Army Morale Points are an abstract measure of an army’s morale, its will to fight, and its overall level of
determination. Each army starts the game with Army Morale Points. Army Morale Points are lost
throughout the course of the game.
Each Unit Integrity lost due to fire or melee combat costs 1 Army Morale Point.
• Routing units that lose Unit Integrity from fire or melee do not cause a loss of Army Morale Points.
• Units that rout off the table do not cause any additional loss of Army Morale Points.
When an army is out of Army Morale Points:
•
•
When an Army Morale card is revealed from the army's Sequence Deck, an Army Morale check is
immediately performed. See the Army Morale card definition.
If an army's units suffer Unit Integrity losses due to combat, the enemy army is awarded one Army
Morale Point for each Unit Integrity lost due to fire or melee.
Example: A Prussian army is out of Army Morale Points. A Prussian unit is hit and loses 3 Unit Integrity
and 3 Army Morale Points. Since the Prussian army is already at 0 Army Morale Points, the Prussian's
opponents are given the 3 Army Morale Points.
Designer's Note: Victory in Field of Battle is achieved through the destruction of the enemy and their will to
fight by damaging them to the point that they are out of Army Morale Points and quit the field. Other
objectives, be they geographical or abstract, are secondary to the destruction of the enemy force's will to
fight. I don’t believe in assigning victory points, time objectives, or objective points to guide a scenario. I
much prefer to let the tabletop terrain, the initial deployments on the table, the relative troop strengths, and
the player's tactical decisions drive the flow of the game. The flow is then natural and not contrived to force
players to seize specific victory locations and is instead focused on defeating the enemy's will to fight.
20
Ratings
cuts 9", 8.75", 8.5", 11.5", 11"
The black flag ECW infantry battalia has suffered 1 UI loss, as indicated by the 1 UI hit marker
2.51 Determining Army Morale Points
Prior to the start of the game, each side determines the number of Army Morale Points it has for the game.
Army Morale Points are randomly determined based on the size of the army. Count the number of artillery,
cavalry, and infantry units in each army. Roll a D12 die and cross reference the number of units in the
army with the result of the D12 roll. The result read from the table is the number of Army Morale Points the
army has for the upcoming game.
Designer’s Note: Army Morale Points can be tracked on paper or with chits or markers. I use poker chips
that are placed in a small cinch top bag so that the enemy cannot see how many AMP’s the army started
with or currently has left remaining.
21
cuts 9", 8.75", 8.5", 11.5", 11"
Army Morale Points
D12 Die Roll
Number of Units
1
2
3
4
5
6,7
8
9
10
11
12
4
3
3
3
4
4
4
4
4
5
5
5
5
4
4
4
5
5
5
5
6
6
6
6
6
5
5
5
5
6
6
6
7
7
7
8
7
5
6
6
6
7
7
7
8
8
8
9
8
6
6
7
7
8
8
8
9
9
10
10
9
7
7
8
8
9
9
9
10
10
11
11
10
8
8
9
9
10
10
11
11
12
12
13
11
8
9
9
10
10
11
12
12
13
13
14
12
9
10
10
11
11
12
13
13
14
14
15
13
10
10
11
12
12
13
14
14
15
16
16
14
11
11
12
13
13
14
15
15
16
17
18
15
11
12
13
14
14
15
16
17
17
18
19
16
12
13
14
14
15
16
17
18
18
19
20
17
13
14
14
15
16
17
18
19
20
20
21
18
14
14
15
16
17
18
19
20
21
22
23
19
14
15
16
17
18
19
20
21
22
23
24
20
15
16
17
18
19
20
21
22
23
24
25
21
16
17
18
19
20
21
22
23
24
25
26
22
17
18
19
20
21
22
23
24
25
26
28
23
17
18
20
21
22
23
24
25
26
28
29
24
18
19
20
22
23
24
25
26
28
29
30
25
19
20
21
23
24
25
26
28
29
30
31
26
20
21
22
23
25
26
27
29
30
31
33
27
20
22
23
24
26
27
28
30
31
32
34
28
21
22
24
25
27
28
29
31
32
34
35
29
22
23
25
26
28
29
30
32
33
35
36
30
23
24
26
27
29
30
32
33
35
36
38
31
23
25
26
28
29
31
33
34
36
37
39
32
24
26
27
29
30
32
34
35
37
38
40
33
25
26
28
30
31
33
35
36
38
40
41
34
26
27
29
31
32
34
36
37
39
41
43
35
26
28
30
32
33
35
37
39
40
42
44
36
27
29
31
32
34
36
38
40
41
43
45
37
28
30
31
33
35
37
39
41
43
44
46
38
29
30
32
34
36
38
40
42
44
46
48
39
29
31
33
35
37
39
41
43
45
47
49
40
30
32
34
36
38
40
42
44
46
48
50
Example: A Russian army has 17 units. The Russian commander takes a D12 and rolls a 9. The
Russians get 19 Army Morale Points for the battle.
22
cuts 9", 8.75", 8.5", 11.5", 11"
2.6 Command Groups
Command Groups are groupings of units under one officer. All units must be in a Command Group, and
each Command Group must have a commanding officer. Independent officers or units are not allowed.
Only the army commander may act independent of any Command Group. Command Groups may consist
entirely of one type of unit, or of multiple types of units.
There is no limit to the number of Command Groups that an army can form.
Players will find that it is a balancing act between forming numerous, small Command Groups (a high
proportion of officers) and fewer, large Command Groups. A good ratio is approximately 1 officer for every
3 to 4 units in the army.
Example: A Russian army has 21 units (14 infantry, 4 cavalry and 3 artillery). The Russians decide to split
their army as follows:
Infantry: 4 Command Groups - three Command Groups of 4 infantry units and one of 2 infantry units and 1
artillery unit.
Cavalry: 1 Command Group of 4 units.
Artillery: 1 Command Group of 2 units.
Multiple Federal Command Groups move to attack Confederate forces on a ridge. A Command Group
consisting of only an officer and an artillery battery provides support for two Command Groups, each with 3
infantry regiments. A Command Group to their left is composed of 3 infantry regiments and an artillery
battery.
23
cuts 9", 8.75", 8.5", 11.5", 11"
3.0 Initiative and Opportunity Actions
Each side rolls their army's CiC Leadership Die. The difference in the die rolls is the number of Initiative
Points available to each side during their segment of the Initiative. The side rolling higher decides whether
it wants to act first (the Active side) or second (the Reactive side) during the Initiative.
Example: The Prussians roll a 9 and the Austrians roll a 4. The difference is 5; there are 5 Initiative Points
in play. The Prussians decide to act first. The Prussians are the Active side and have 5 Initiative Points to
use for turning Sequence Cards. After the Prussians have completed their portion of the Initiative, the
Austrians (the Reactive side) also have 5 Initiative Points to use for turning Sequence Cards.
Field of Battle allows the Reactive side to perform opportunity actions that are defensive in nature in
reaction to threatening enemy activities. Threatening activities include enemy fire, enemy movement,
enemy movement to contact for melee, enemy changing facing, and enemy changes of formation.
Units that have not been marked as having fired may Opportunity Fire (see 3.1 Opportunity Fire).
Cavalry units and infantry in skirmish formation that are contacted by moving enemy infantry units may
evade (see 3.2 Evasion).
3.1 Opportunity Fire
Opportunity Fire may be performed by the Reactive side during the Active side's portion of the Initiative or
by the Active side during the Reactive side’s portion of the Initiative. Opportunity Fire may not be targeted
at stationary, passive enemy targets. Opportunity Fire may only be targeted at enemy units that are firing
or using movement or maneuver activities (moving, moving to contact on a Melee card, changing formation
or facing on Move or Leadership cards).
Example: The British have just won the last Initiative roll. The British are the Active side. The British turn a
Move card and the French want to fire before the British move out of range. The French fire 4 of their units
at the British during the British Active segment of the Initiative.
Pre-Emptive Opportunity Fire: Any move, change of facing, or change of formation currently being made
on Melee, Move, or Leadership cards may be pre-empted. Pre-emptive fire occurs prior to the enemy's
action or at a range chosen by the side performing Opportunity Fire. The firing player decides at which
point to resolve Opportunity Fire at moving targets. If an enemy unit is moving and receives Opportunity
Fire that forces the unit to fall back, the unit will fall back from the point at which it received the fire and halt
with no further movement. If an enemy unit is changing facing or changing formation and receives
Opportunity Fire that forces the unit to fall back, the unit will fall back and then carry out its action.
Example: An Austrian cavalry unit is moving toward a French artillery battery. The Austrians start 23”
away and have 3 move segments available. The French announce that they will opportunity fire at the
Austrians when they are 12” away. The French fire is resolved with appropriate modifiers at the 12” range.
The fire results in the Austrians losing 1 UI and falling back 3”. The Austrian 3” fall back move is measured
from the 12” point from the French artillery. The Austrian cavalry end up 15” away from the French artillery.
The Austrian cavalry move is done; they lose their two remaining move segments.
24
cuts 9", 8.75", 8.5", 11.5", 11"
Simultaneous Opportunity Fire: Opportunity Fire at enemy units that are firing and stationary (not acting
on a Melee, Move, or Leadership card) is resolved simultaneously.
Note that if an enemy unit moves and then fires (active card is a Melee or Move card), Opportunity Fire at
the moving unit would be resolved prior to the enemy unit’s fire (pre-emptive, since the Opportunity Fire is
occurring while the enemy is acting on a Melee or Move card).
Designer’s Note: Making Opportunity Fire pre-emptive penalizes the moving unit as it closes the distance to
the Opportunity Firing unit (since it is using its actions to move rather than fire). As the number of
Opportunity Fires are limited by the number of units available to fire (not being able to remove fire markers
until they get a Fire card during their segment), I felt it was necessary to reward a defensive postured unit
by resolving the effects of their fire first. Making Opportunity Fire pre-emptive vs. moving targets also
simplifies the entire Opportunity Fire process a great deal, keeping the excitement up and the game
moving.
Example: A French heavy cavalry unit is acting on a Move card and is moved towards a British infantry
unit. The British elect to Opportunity Fire at the cavalry unit. The French cavalry unit begins the move 10”
away from the British infantry unit. At the start of the move, the cavalry unit is out of musket range (6”).
The cavalry unit will move 8”, ending 2” away from the infantry unit. The British decide to resolve the
Opportunity Fire at the 2" range. In this case, that is Point Blank range.
Example: A Confederate infantry regiment starts 12” away from a Federal infantry regiment and moves 8”
closer, ending 4” away from the Federal unit. The Confederate commander decides to fire at the Federal
unit at the 4” range after the move was completed. The Federal commander elects to use Opportunity Fire
at the Confederate unit. The Federal fire and its effects are resolved prior to the Confederate fire, since the
Confederate unit is acting on a Move card.
Example: The British are the Active side. They declare fire from an artillery battery at an opposing French
artillery battery. The French player decides to return fire from their artillery battery. The fire from both units
is resolved simultaneously, and losses are then applied after both units have fired.
A Federal artillery regiment uses Opportunity Fire to fire at an onrushing Confederate infantry regiment
25
cuts 9", 8.75", 8.5", 11.5", 11"
Designer’s Note: Why are there no “hasty squares”, refused flanks, or cavalry countercharges in Field of
Battle? Aren’t those defensive actions? Shouldn’t they be represented in the game? Well – yes and no.
All those actions are typically those that gamers want to have in their bag of tricks to offset a bad initial
deployment, or to prevent the enemy from getting the jump on them. I don’t view them as actions that
would be the concern of the lowest level of command in the game – the Command Group officer (a brigade
or division officer, depending on how big you elect to make your Command Groups). “Hasty squares”,
refused flanks, and cavalry countercharges are the immediate tactical decisions made by battalion
commanders responding to directly impending enemy threats. In Field of Battle terms, these impending
enemy threats are essentially what are included in the Melee action. The competence and success of the
individual battalion commanders in responding to these threats to their specific units is represented in an
abstract manner by their Combat Die roll in melee resolution. Roll high and you have a battalion
commander that “knows his stuff”. Maybe the unit got into square just in time before the enemy cavalry
thundered home…maybe the Grenadier company on the flank of the battalion’s line refused their flank and
held off the enemy threat….maybe the cavalry regiment’s commander ordered a charge that resulted in his
unit spurring into an approaching enemy cavalry unit over the last few yards prior to contact rather than
being caught “flat footed”. Be creative – it's quite easy to bestow heroic reasons that the little lead lads
chased off the enemy. On the other hand, if the unit’s Combat Die roll is low in melee….well….somebody
has blundered! Where are those Grenadiers? How did the enemy appear on our flank? Where did that
cavalry come from? Why didn’t my skirmishers warn me that they were out there? Again – be creative!
You can easily make up more credible reasons for what has happened on the tabletop given the set of
circumstances that exist than can be accommodated by extra rules. Instead of agonizing over a long list of
conditions that allow you to do this or that, with this or that result, and consulting this or that table, all these
situations are included and abstracted in the melee result. The result is greatly increased speed of play,
and in my opinion – more fun in that it allows players to fill in the blanks and create the narrative of what is
happening on the table.
3.2 Evasion
Cavalry may attempt to evade infantry that move into contact.
Infantry in skirmish formation may attempt to evade infantry not in skirmish formation that move into
contact.
• The moving unit’s movement ceases on contact, regardless of any remaining movement and the
results of the evading unit’s evasion roll.
• Roll the evading unit’s Defense Die vs. the enemy foot unit’s Defense Die.
o The evading unit will move directly away from the enemy infantry a distance equal to the
difference in the die rolls.
▪ Evading units may not use evasion movement to improve their tactical situation.
▪ Evading units maintain their facing and formation.
o If the die rolls are equal, the units remain in contact. If the move to contact qualified for an
immediate melee, resolve the melee if desired.
o If the evading unit’s Defense Die roll is higher than the opposing Defense Die roll, the
evading unit remains Ordered if it was Ordered before the evasion attempt.
o If the evading unit’s Defense Die roll is equal to or lower than the opposing Defense Die
roll, the evading unit becomes Disordered.
▪ If the evading unit was already Disordered, they lose 1 UI.
• UI lost in the Evasion process does not result in a loss of Army Morale Points.
26
cuts 9", 8.75", 8.5", 11.5", 11"
4.0 General Movement Rules
Each Command Group rolls their officer's Leadership Die vs. a D6 to determine how many move segments
the Command Group units may use. Units may make 1 move per move segment.
Roll for each Command Group's movement and move that Command Group prior to rolling for other
Command Group movement.
Designer's Note: Just because you "can" move 3 segments doesn't necessarily mean that it is a good idea.
Players need to evaluate the tactical situation, take risks as appropriate, and live with their decisions.
Rolling for movement for all Command Groups and then moving is not allowed. This removes all risk taking
and decision making from the move process and eliminates drama and excitement from the move portion
of the game.
If a Command Group is currently leaderless, no unit in the Command Group may move.
If the Army CiC has been killed and has not been replaced, modify all Leadership Die sizes used for
movement rolls Down 2.
•
If the Leadership Die roll is 6 or more than the D6 die roll, each unit in the Command Group
receives 3 move segments.
•
If the Leadership Die roll is 3, 4, or 5 more than the D6 die roll, each unit in the Command Group
receives 2 move segments.
•
If the Leadership Die roll is less than or equal to the D6 die roll, or only beats the D6 roll by 1or 2,
each unit in the Command Group receives 1 move segment.
•
If the Leadership Die roll is a 1, no movement is allowed for any units in the Command Group.
•
If the Leadership Die roll is even and higher than the opposing roll:
o Units may immediate melee without waiting for a Melee card. Refer to the period specific
rules for any unit type limitations.
o All units in the Command Group may use a move segment to maneuver (one change
formation or facing, mount or dismount, limber or unlimber). A maneuver costs that unit
one move segment.
The Army CiC may roll for movement for one Command Group if the Command Group officer is within the
Army CiC's Command Radius. If the Army CiC rolls for movement, the results of his roll apply, even if
worse than the results of the Command Group officer's roll. Roll the Army CiC Leadership Die vs. a D6 die
and apply the normal move results. If the Army CiC is used to roll for movement, he is at risk. See the
Army Morale card definition.
27
Movement
Designer’s Note: Limbered artillery is not shown as being capable of evading infantry. This was a
deliberate omission. I feel that allowing limbered artillery to evade infantry would promote an undue
amount of aggression for artillery to closely approach enemy infantry. This is allowing too much of a
“safety blanket” for artillery. While there are historical precedents for artillery acting aggressively, they are
far more infrequent than frequent. I believe it is better to allow artillery to act aggressively, but at a risk that
the player must evaluate before taking the action.
cuts 9", 8.75", 8.5", 11.5", 11"
Cavalry and infantry units may move 1/2 their normal move distance backwards.
Units that are Disordered move at 1/2 all normal move distances.
Units may move at the oblique. An oblique move is measured by moving up to ½ of the unit’s frontage in
line per segment to the side and then forward in up to the full movement distance. A unit does not have to
move forward and may just oblique to the side.
Example: An infantry unit frontage in line is 6”. The unit may oblique ½ of the frontage, or 3”, per segment.
If the unit has 3 segments, it may move to the side up to 9” (3 segments at 3” per segment) and also
forward up to its 3 segment move of 24”. Note that if the unit is disordered, these move distances are
halved and the oblique move to the side would be 4.5” and a maximum forward move of 12”
Designer's Note: A bit of simple math - a 1/2 move penalty joined with another 1/2 move penalty is a
resultant 1/4 of the original move, not a "no movement" result. For example, infantry that is Disordered (1/2
move, or 4") in Class III terrain (another 1/2 move penalty, or 2") will move 2". The movement penalties are
multipliers and will always result in some movement ability.
Units in March or Limbered formation moving on a road move at 1 1/2 times their normal movement rate.
All routing units in an army are moved when a Move or Move 1 Command Group card is turned.
Command Group officers may move on the Move or Move 1 Command Group card. Command Group
officers receive the same number of move segments as rolled for their Command Group.
Army CiCs may only move on Leadership cards, and only receive 1 move segment.
Designer's Note: There is a difference in mobility between the Command Group officers and the Army CiC.
Command Group officers are in the thick of battle and are more intimately involved and active. The Army
CiC is in overall command of the army, and isn’t scurrying at will around the battlefield, dragging their HQ
staff behind them.
4.1 Movement Distances
In general, units may move up to the distances shown per move segment. Note that Unlimbered artillery
and units in Square do not move. Refer to period play sheets for the movement distances for the different
periods.
Movement Distances (per move segment)
Limbered Foot Artillery and Machine Guns
Cavalry and Horse Artillery
Infantry
Officers
Rout Movement
8”
12”
8”
16”
Infantry: 8"+D6”
Cavalry: 12"+D6”
Limbered Artillery and Machine Guns: 12”
Cavalry: 18”
Infantry: 12”
Road Movement
28
cuts 9", 8.75", 8.5", 11.5", 11"
4.11 Special Movement Considerations
Foot Artillery: Foot artillery units may only perform one action per move segment - move, limber, or
unlimber.
Horse Artillery: Horse artillery units may limber and move, move, or move and unlimber per move
segment.
Movement and Melee: A unit that moves and engages in melee will cease movement, except for any follow
up, fall back, or rout movement resulting from the melee.
4.2 Terrain
There are 4 classes of terrain that effect movement and combat In Field of Battle: Class I, Class II, Class
III, and Class IV.
Terrain combat modifiers are listed in 5.0 Combat.
Terrain can be defined as one Class for movement and another Class for cover in combat. Terrain that
counts as cover for combat will typically be, but not limited to, woods, towns, and defensive works. Terrain
that effects movement will typically be Class II, III, or IV terrain types such as hill edges, rough areas,
woods, and town sections. Create nuanced terrain by combining different terrain Classes in the same
area, such as wooded hills, or Class I open woods (line of sight) straddling a river (movement restriction).
Clever combinations of terrain and varieties of terrain for either movement or cover inside of a larger area
of terrain adds dimension and tactical challenges to the tabletop battlefield.
It is possible to define a terrain area that is Class II or higher for movement purposes but does not count as
cover for combat. Examples include open hill areas, boggy or rough movement areas. Class II hills stop
movement on contact but are not necessarily cover for any unit on the hill. Class III hills stop movement on
contact for entrance and exit but are not necessarily cover for any unit on the hill. By themselves, hills
effect line of sight and movement. Any cover on the hills would be added as wooded (Class II or III) or
rough areas with large rocks and brush, for example.
4.21 Terrain Definition
Class I Terrain: Represents open terrain types that do not impede movement. Class I terrain includes low
rolling hills or gentle rises that block line of sight. Plains and generally flat ground are Class I terrain, and
do not block line of sight or provide cover. A wooded area that is very light, or with no undergrowth, can be
Class I terrain and block line of sight, but provide no cover.
Class II Terrain: Represents more restrictive terrain that will impede movement and may block line of sight
and provide cover terrain modifiers. See 4.22 Terrain Effects on Movement. Steeper hills, small rivers,
streams typically restrict movement, while orchards, open woods, light earthworks and framed structure
town areas are examples of Class II terrain that can provide cover modifiers.
29
Movement
Firing and Moving: Units may fire before or after they move. A unit may not interrupt its movement to fire
and then continue moving.
cuts 9", 8.75", 8.5", 11.5", 11"
Designer's Note: My Town Sections are between 30 and 40 square inches (4"x8", 4"x10", 5"x6", 5"x7",
5"x8", 6" x 6"), with multiple buildings on each square or trapezoidal area. I leave enough ground space
free to place a unit in the Town Section. I use custom built buildings (effectively 20mm scale for my
25/28mm scale armies) to fit in the areas. By accentuating the vertical dimensions of the buildings while
minimizing the footprint of the buildings, they work well with the figures and give the illusion of a built up
area.
Class III Terrain: The most difficult terrain present in Field of Battle that can still be moved in or through.
Class III terrain impedes movement and can block line of sight and provide cover terrain modifiers. See
4.22 Terrain Effects on Movement. Areas of rugged ground, steep hills, rough forests and woods, rivers,
substantial town areas, bogs, and marshes are all typically Class III terrain. Permanent or semi-permanent
entrenchments, rough forests or woods, and brick or stone Town Sections are Class III cover.
Designer's Note: Be creative with terrain. You can mix terrain types - for example, use a Class II hill with
some or all of the hill covered with Class III woods. Have a Class II woods with sections of Class III woods
interspersed. You can make hills more difficult by applying the movement rules for every contour of the hill
that is contacted.
Class IV Terrain: Impassable for movement. Examples include cliffs, impassable rivers, and lakes. If the
Class IV terrain provides cover, the Class III modifier is used in combat.
4.22 Terrain Effects on Movement
•
If any part of the unit is in or contacting a terrain area, the unit suffers any applicable movement
penalties.
Movement is unaffected by Class I woods and hills.
Movement stops at contact with Class I streams.
• Class I Hills block line of sight, with no movement penalty. Units deployed on Class I Hills gain
combat modifiers if at a higher elevation than the enemy.
• Class I Woods block line of sight, with no movement penalty. Weapons range is limited to 6”. There
is no terrain modifier for combat in Class I woods.
Movement is affected by Class II terrain.
• Units that are moving into Class II terrain will stop all movement for that move segment when any
part of the unit contacts the border of the terrain.
• Units that are moving out of Class II terrain will stop all movement for that move segment when any
part of the unit contacts the border of the terrain.
• Movement in Class II terrain is at full speed.
• Units in Skirmish formation treat Class II terrain as Class I terrain for movement.
• Artillery treats Class II terrain as Class III terrain for movement.
• Mounted cavalry treats Class II terrain as Class III terrain for movement.
Designer’s Note: Depending on scenario or period, gamers may wish to require that cavalry in Class II
woods becomes Disordered. I think that can be an appropriate adjustment, but not one that I’d
automatically apply for all eras. Regardless of the rules adjustments or terrain specifications, it is typically
best to make sure each side knows the terrain definition and effects for the tabletop terrain prior to game
play.
30
Movement is affected by Class III terrain.
• Units that are moving into Class III terrain will stop all movement for that move segment when any
part of the unit contacts the border of the terrain.
• Units that are moving out of Class III terrain will stop all movement for that move segment when
any part of the unit contacts the border of the terrain.
• Movement in Class III terrain is at half speed.
• Units in Skirmish formation treat Class III terrain as Class II terrain for movement.
• Artillery treats Class III terrain as impassable Class IV terrain for movement.
• Mounted cavalry treats Class III terrain as impassable Class IV terrain for movement.
Movement considerations for Town Sections and rivers are treated separately. See 4.23 Town Sections
and 4.24 Rivers.
Units in March or Limbered formations that are on a road moving through terrain will ignore any terrain
penalty.
Units that are Disordered and moving in terrain will suffer both the half speed penalty for being Disordered
as well as the terrain penalty.
Units that fall back due to receiving hits in combat will move the full distance to the rear, ignoring any nonriver terrain effect on movement. Units that fall back stop on contact with a river.
Units that rout will move the full distance to the rear, ignoring any non-river terrain effect on movement.
Routing units that contact a river will stop on contact and lose 1 Unit Integrity. If the river is Class II or III,
the next move is a normal rout move measured from the point of contact. If the river is Class IV, the routing
unit is immediately removed from play.
4.23 Movement in Town Sections
Only infantry and dismounted cavalry may deploy into Town Sections.
Only 1 unit may be deployed in a Town Section at any one time. Units may not move into a town that is
occupied by a friendly or enemy unit.
Movement is affected by Town Sections
• Units moving into Town Sections will stop all movement for that move segment when any part of
the unit contacts the border of the Town Section.
• It requires one move segment to move from the border into a Town Section.
• Once a unit is in a Town Section, it is assumed to be in contact with all borders of that Town
Section and can move out in any direction.
• It requires one move segment to move from one Town Section into another Town Section.
• It requires one move segment to move out of a Town Section to touching the outside border of the
Town Section. The unit can be placed in any formation and facing, in contact with the outside
edge.
• Units moving out of a Town Section move from the border at full speed, in any formation and
facing.
31
Movement
cuts 9", 8.75", 8.5", 11.5", 11"
cuts 9", 8.75", 8.5", 11.5", 11"
Example:
Town Section B
3
6
5
2
1
4
Town Section A
An infantry unit has a move with 3 move segments. It moves from point 1 and contacts the border of Town
Section A at point 2. This ends the move in move segment 1. Move segment 2 is used to move from point
2 to inside Town Section A. At this point in the move, the unit inside Town Section A is in contact with all
four borders of Town Section A. Move segment 3 is used to move from point 3 ("touching the border") into
Town Section B at point 4.
Another move card will be required to leave Town Section B. A move card is turned (conveniently!). The
roll for movement is very successful, and the unit receives 2 more move segments. Its first move is from
point 4 to leave Town Section B. It moves outside the Town Section to point 5 and ends the first move in
line formation facing point 6. The second move segment is made at full speed and the unit ends its move
8" away from the border of Town Section B, at point 6.
Movement through town areas on roads may be made with no movement penalties if the moving unit is in
March or Limbered formation.
Example: Assume the same situation as in the example above, except that line 1-2-3-4-5-6 is a road
through the 6" wide Town Sections and the moving infantry unit is in March formation. Movement is rolled
for and the unit receives 3 move segments. The unit starts at point 1 (4" away from point 2), and measures
24", ending at point 6, 8" outside of Town Section B (4"+6"+6"+8"). Moving through towns by road is much
faster than moving through towns section by section!
4.24 Movement and Rivers
Rivers represent a potentially significant movement barrier and are treated uniquely for movement.
Class I Streams
• All units stop at contact with the stream.
• The next move segment for infantry and cavalry is at full speed.
• Artillery moves to the far edge of the stream on their next move segment.
Class II Minor Rivers
• All units stop at contact with the river's water area.
• The next move segment is to the far edge of the river's water area.
• Artillery may not move across a river unless by bridge or ford.
32
cuts 9", 8.75", 8.5", 11.5", 11"
Class IV Rivers
• Impassable except by movement over a bridge.
Units that fall back stop on contact with a river.
Routing units that contact a river will stop on contact and lose 1 Unit Integrity. The Unit Integrity loss does
not result in the loss of an Army Morale Point. If the river is Class II or III, the next move is a normal rout
move measured from the point of contact. If the river is Class IV, the routing unit is immediately removed
from play.
4.25 Movement Across Bridges
Crossing River on a Bridge
• All units not in March, Limbered, or Skirmish formation stop at contact with the bridge.
• The next move segment is up to a full segment and is measured from the contact point with the
bridge.
• Units in March, Limbered, or Skirmish formation move across the river without penalty.
4.26 Movement Across Fords
Movement across rivers using a ford is handled very similarly to bridge movement.
• All units not in March, Limbered, or Skirmish formation stop at contact with the ford.
• The next move segment is 1/2 speed and is measured from the contact point with the ford.
• Units in March or Limbered formation move across the river without penalty and may still apply any
road movement bonus.
4.27 Movement and Fences and Walls
•
•
•
•
On a won Even movement roll, cavalry and infantry units may move through fences and walls with
no movement penalties. Such movement through fences or walls results in a section of fencing
equal to the unit frontage is considered to have been sufficiently broken down (rails removed,
sections knocked down) that it no longer is a movement penalty or serves as cover.
On any other movement roll, a move segment ends on contact with the fence section. Movement
may continue if additional move segments are available.
Artillery may not move through a fence or wall.
Units in March, Limbered, or Skirmish formation move through a fence section with a gate without
penalty.
33
Movement
Class III Rivers
• All units stop at contact with the river's water area.
• Their next move segment is to the middle of the river's water area.
• A third move segment is required to move the unit to the far edge of the river's water area.
• Units moving across a Class III river are Disordered.
• Artillery may not move across the river unless by bridge or ford.
cuts 9", 8.75", 8.5", 11.5", 11"
4.28 Movement and Hedges
•
•
•
•
All cavalry and infantry units stop movement in a segment at contact with the hedge.
The next move segment is to the other side of the hedge, ending movement with the back of the
unit in contact with the hedge.
Artillery may not move through a hedge.
Units in March, Limbered, or Skirmish formation move through a hedge section with a gate without
penalty.
4.3 Maneuvering
• A unit may change both formation and facing on a Move or Move 1 Command card.
o Won Even movement roll is required.
o Note that a formation change and a facing change each cost 1 move segment.
• A unit may change either formation or facing on a Leadership card after all rally attempts are done.
4.31 Formation Changes
Units may change formation on Leadership or Move (with a won Even Leadership Die roll) cards. See the
specific card definitions for limitations that may apply.
Units changing formation will retain the same facing direction after the formation change.
Units change formation on the front center of the unit. The front center of the unit will not move during a
formation change.
Designer's Note: Some may feel that forcing units to change formation on the center of the unit and retain
the same center of the new formation's frontage is too restrictive. If so, feel free to allow changes of
formation to be made from any point in the unit's original frontage. In truth, we have probably played it both
ways! Just be consistent inside of a game, and no problems will arise.
4.32 Facing Changes
Units may change the direction they face on Leadership or Move (with a won Even Die roll) cards. See the
specific card definitions for limitations that may apply.
Units in March or Limbered formations may also change facing without limit on their Move card. Units
deployed in these formations may “snake” around the battlefield without restrictions.
Units may change face by either pivoting the unit on its center or by pivoting on one of its flanks.
Example: A Confederate officer rolls an 8 on his Leadership Die vs. a 2 on a Move card. The Command
Group has 3 move segments per unit. A Confederate artillery battery limbers (1 segment cost) and moves
2 segments for its 3 allowable move segments. A Confederate infantry regiment changes face (1
segment), moves 1 segment, and changes formation (1 segment) for its 3 allowable move segments.
34
cuts 9", 8.75", 8.5", 11.5", 11"
4.4 Interpenetration
Interpenetration is a voluntary action that is allowed with period specific exceptions. Refer to the period
rules for the exceptions.
Units may not interpenetrate and initiate melee on a Move or Move 1 Command card.
The moving unit must have enough movement to entirely clear the stationary unit.
4.5 Movement Resulting from Fire or Melee Combat
Units may be forced to fall back or rout based on a fire or melee combat result. Any unit that is forced to
fall back (whether from fire combat or from losing a melee) becomes Disordered.
Forced fall back or rout moves are made immediately after the fire or melee combat that caused them.
Designer's Note: Players will notice that units falling back or routing do not affect nearby units or units that
they contact or move through. After many, many games, I finally decided that including special rules for
those circumstances only added process - without any tangible added benefit to the game. Units falling
back and routing, along with any associated loss of Army Morale Points, are sufficient penalties.
4.51 Fall Back Moves
Units that are forced to fall back due to fire combat will usually fall back away from the enemy a distance in
inches equal to the total number of hits taken.
Fall back moves are made immediately after the fire or melee combat that caused them.
Fall Back Exceptions for Fire Combat
•
•
•
•
Units in Town Sections do not fall back but become Disordered.
Infantry units in Square/Hedgehog do not fall back but become Disordered.
Unlimbered artillery units do not fall back but become Disordered.
Units in fortifications (redoubts, trenches, earthworks, etc.) do not fall back but become Disordered
Units that lose Unit Integrity in melee and do not rout will usually fall back a distance in inches equal to the
total number of hits taken in the melee. There are exceptions to falling back as a result of melee combat.
Fall Back Exceptions for Melee Combat
•
•
Infantry units in Square/Hedgehog do not fall back but become Disordered.
Unlimbered artillery units do not fall back but become Disordered.
Units falling back ignore all terrain limitations, facing the enemy. Units falling back will move backwards
without changing facing or formation. Units falling back are Disordered.
35
Movement
A unit may only interpenetrate or be interpenetrated once per Move or Move 1 Command card.
cuts 9", 8.75", 8.5", 11.5", 11"
Units falling back will pass through friendly units as they fall back to the rear. Units may not end movement
intermixed with any other units. If fall back movement forced by fire or melee combat would force a unit
falling back to end its move intermixed with any friendly unit, the unit falling back will stop when it first
contacts the friendly unit.
Units falling back that contact enemy units will halt at that point.
Units in Town Sections that must fall back due to losing a melee will fall back one Town Section away from
the enemy. If all adjacent Town Sections are already occupied, the unit remains in its current Town
Section, Disordered. If there is no adjacent Town Section, the unit falling back measures its fall back move
from the appropriate edge of the Town Section.
4.52 Rout Moves
Initial rout moves are made immediately after the fire or melee combat that caused them. Routing units will
initially move a distance in inches equal to the total number of hits received in the fire or melee combat.
Rout moves are made directly to the rear, or away from threatening enemy units for the initial rout move.
Rout moves must be made as much as possible directly to the rear, or friendly table edge. No positional or
situational advantage can be gained by the movement of the routing unit.
When a Move or Move 1 Command Group card is turned, all routing units in that army are required to
move.
Rout move distances are determined by rolling a D6 and adding the result in inches to a single standard
move segment distance.
• Infantry rout movement is the sum of 8" plus a D6 roll.
• Cavalry rout movement is the sum of 12" plus a D6 roll.
Routing units ignore any and all terrain movement penalties.
Units in Town Sections that rout measure movement from the edge of the Town Section. If there are
adjacent Town Sections located directly towards their table edge, they will rout through 2 Town Sections. If
there is only 1 adjacent Town Section, they will rout through that Town Section and then D6". If there are
no adjacent Town Sections, they move normal rout move distances measured from the appropriate side of
the Town Section.
Example: A Prussian infantry battalion is deployed in a Town Section. It is routed in melee. The town
section that the Prussians are in has one adjacent Town Section. The rout move is made into the adjacent
Town Section plus D6". They roll a 4 and rout 4 inches out of the Town Section.
Routing units will pass through friendly units as they rout to the rear. Units may not end movement
intermixed with any other units. If rout movement forced by fire or melee combat would force a routing unit
to end its move intermixed with any friendly units, the routing unit moves a greater distance until it is
entirely clear of the intervening friendly units.
Routing units will stop on contact with the table edge. Unless rallied, they will move off the table and be
removed from the game on the next Move or Move 1 Command Group card.
36
cuts 9", 8.75", 8.5", 11.5", 11"
Routing units that contact enemy units or Town Sections containing enemy units are removed from the
table.
In all cases where a routing unit is removed from the table, no additional Army Morale Points are lost for the
unit removal.
5.0 Combat
5.1 Fire Combat
Fire combat may be used by artillery, infantry, and dismounted cavalry. Mounted cavalry cannot fire.
Limbered artillery cannot fire. Routing units cannot fire.
Note that units are not required to fire on a Fire card. Units may fire at any time that they are not marked
as having been previously fired. Units may fire during their Active or Reactive segments of the Initiative.
The frequency of fire is controlled by the appearance of the Fire (Artillery, Infantry, Rapid Fire, Rolling Fire)
cards.
Example: An artillery unit fires. A marker is placed in front of the artillery unit to indicate that it has fired
(cotton puff balls, or acrylic pillow stuffing work well for fire markers). The artillery unit cannot fire again
until after an Artillery Fire card is turned and the fire marker is removed.
Example: An Infantry Fire card is turned. An infantry unit is fired, a fire marker (smoke marker) is placed,
and immediately removed on the Fire card. Since it is now unmarked, the infantry unit decides to fire
again, and the fire marker is placed at the front of the infantry unit.
Two Austrian infantry battalions are marked as having fired. The front French battalion is also marked as
having been fired. None of the marked units can fire until the markers are removed on an Infantry Fire
card. Note that the French unit has lost 1 UI and is also Disordered (the end stand is misaligned/jumbled).
37
Fire Combat
There are two types of combat: Fire and Melee. Each type of combat is described in its own section.
cuts 9", 8.75", 8.5", 11.5", 11"
5.11 Fire Combat Conventions
Accumulating Hits: Hits accumulate from multiple units firing at a target unit if the firing is not interrupted
by the turn of a card.
Hits from a single unit do not accumulate from firing, using a Fire card, and firing. Units may fire, remove
fire markers on a Fire card, and then fire again at the same target, but the hits from the first fire are not
carried and added to any hit results from the second fire.
If any unit's fire causes hits that result in a fall back or rout move, that movement is made before any
additional fire is resolved.
Example: An Infantry Fire card is turned. An infantry unit is fired, causing 2 hits - insufficient to cause a
Unit Integrity loss to the target. A fire marker (smoke marker) is placed and is immediately removed on the
Fire card. The infantry unit decides to fire again, and the fire marker is placed at the front of the infantry
unit. The infantry fire causes 4 hits. The target loses 1 Unit Integrity. (Note that the 2 hits and the 4 hits,
separated by a Fire card, do not add together. The results of the separate fires are treated as unique
events).
Example: Two Federal infantry regiments both wish to fire at a Confederate infantry regiment. The first
Federal unit fires, achieving 2 hits. The second Federal infantry regiment fires, achieving 4 hits. The 4 hits
are added to the 2 hits from the first shot, giving a total of 6 hits and enough for a total of 2 Integrity losses.
Example: The Prussian player has 3 units he wants to fire at a French infantry battalion. The first unit fires
at point blank range and hits the French battalion with 4 hits on an even roll, forcing it to lose 1 Unit Integrity
with 1 remaining hit and fall back 3". The range has now increased for the fires from the remaining two
Prussian units. The second Prussian unit fires and hits the French battalion with 2 hits on an odd die roll.
The fire was not interrupted by the turn of any card, so the hits accumulate. The French battalion
previously had 1 hit, plus the two additional hits which now add up to 3 hits total and a second Unit Integrity
lost. The third Prussian unit fires and hits the French battalion with 1 more hit on an even die roll. The
additional hit is not enough to cause a Unit Integrity loss, but the even roll requires the French battalion to
fall back an additional 1". After all the fire is resolved, the French battalion is forced back 4" and has lost 2
Unit Integrity.
Arc of Fire: Units have a frontal firing arc of 45 degrees measured from each frontal corner of the unit.
Cover: The center of the target unit's frontage facing the firing unit determines the target unit's cover and
location in or on terrain. If the center of the target unit's frontage facing the firing unit is in the open, then
the unit receives no cover benefit. If the center of the target unit's frontage facing the firing unit is in or on
the edge of cover, then the unit receives the cover benefit. Similarly, if the center of the target unit's
frontage is on a higher hill level than the firing unit, then the target unit receives the benefit of being uphill.
Firing at Units in Contact with Friendly Units: Any fire by friendly units that is directed at an enemy unit
in contact with another friendly unit may possibly damage that friendly unit. Resolve fire at the enemy unit
using normal firing procedures and modifiers. After the fire at the enemy unit is resolved, resolve the fire at
the friendly unit. Regardless of the target orientation, modify the fire Combat Die UP 2 as for a flank/rear
fire and roll vs. the friendly unit's Defense Die. Apply normal results to the fire combat resolution.
38
cuts 9", 8.75", 8.5", 11.5", 11"
Example: An Austrian infantry battalion is in contact with a French cavalry regiment. An Austrian artillery
battery is nearby and elects to fire at the French cavalry to "help" the Austrian infantry. Assume the
modified Austrian artillery Fire Die is a D12 and the French Target Die is a D6. Both dice are rolled; the
Austrian roll is a 6 and the French roll is a 5. The French fall back 1", Disordered. The Fire Die is then
modified UP 2 to a D12+2 and rolled vs. the Austrian infantry's Fire Die (a D6). The Fire Die roll is a 9,
modified (D12+2) by adding 2, for a result of 11. The Austrian infantry roll a 2! The Austrian infantry lose 3
Unit Integrity (11-2=9; 9/3 = 3) but remain in place.
Line of Sight: At least one half of the target unit’s frontage must be in line of sight in the frontal firing arc
traced from the center of the firing unit. Line of sight is blocked by terrain and friendly or enemy units. Any
enemy unit in contact that qualifies for a frontal melee may be fired at regardless of the firing arc
restrictions.
Measuring Ranges: All ranges are measured from the center of the firing unit's frontage to the closest
point of the target unit. Note that by definition, any enemy unit in contact with the front or a front corner of
the unit is at the shortest firing range.
Mounted Fire: Mounted cavalry cannot fire. Dismounted cavalry may fire. Dismounted cavalry removes
fire markers on the Infantry Fire card.
Moving and Firing: Units may fire before or after movement. Once a unit has fired, it may not move any
more on that Move card.
Overhead Fire: Artillery units may fire over intervening units as long as either or both the artillery and the
target unit are on higher terrain than the intervening unit. The distant target unit must be at least 8” away
from the intervening unit.
Example: A Federal artillery unit is deployed on the crest of a Class II hill. A line of Federal infantry is 8” in
front of the artillery unit. A Confederate cavalry unit is 17” away from the artillery unit. The Federal artillery
unit may fire over the Federal infantry unit at the Confederate cavalry unit since the distance from the
Federal artillery unit to the Federal infantry unit is 9”, which is more than the 8” minimum distance.
39
Fire Combat
Hits: The number of hits is the difference between the Combat Die roll and the Defense Die roll.
cuts 9", 8.75", 8.5", 11.5", 11"
5.12 Weapons and Ranges
Musket: Smoothbore muskets or smoothbore carbines.
Rifle: Rifled small arms, including all rifled carbines of any type. Includes repeating rifles, Baker rifles,
Pennsylvania rifles, and early breechloading rifles like the Prussian Needlegun. Infantry or dismounted
cavalry units considered to be Skirmish units armed with repeating rifles ignore the Down 1 modifier for
firing.
Improved Rifle: Breechloading rifles, including French Chassepot, British Snider and Martini-Henry.
Smoothbore Artillery (SB): Includes all smoothbore muzzleloading artillery pieces, including howitzers, of
all weights.
Muzzleloading Rifled Artillery (MR): Includes all rifled muzzleloading artillery pieces, of all weights.
Parrot guns, Ordinance rifles, rifled French guns from 1859 through the Franco-Prussian war.
Breechloading Rifled Artillery (BR): Includes all rifled breechloading artillery pieces of all weights.
Whitworth guns, Krupp guns.
Machine Gun: Rate Gatling guns, Mitrailleuse, Gardner guns, and Nordenfeldt guns as Early MG. Rate
Maxim machine guns as Late MG.
Small arms and artillery weapon classifications and ranges are shown on the period playsheets.
Designer's Note: Ranges are simplified in Field of Battle. I don't believe that the weight of an artillery piece
(weight of shot fired) has an effect on the actual firing ranges on a battlefield. Heavier pieces required
more energy (powder) to fire a heavier shot roughly the same distance as a lighter piece firing a lighter
shot. For practical considerations in a tabletop game, there is no real range differentiation necessary.
Mark Adkin, in his brilliant book "The Waterloo Companion", page 257, states: "All guns could fire at greater
ranges, and occasionally did so, but these maximums were not effective battlefield ranges, and no selfrespecting artillery officer would waste ammunition by opening fire at targets much in excess of 900 - 1000
meters." More Adkin, from page 272: "where virtually all targets are made of flesh and blood, it is not the
weight of shot that makes a difference but the number of pieces firing, the rate of fire and the skill of the
gunners".
There are no specific rules for howitzers because of the scale of the game. Any special rules will make the
howitzer much more useful than was true in the field.
Similarly, there are no separate ranges for carbines. This is intentional. Since dismounted cavalry is only
allowed to be in Skirmish formation (Down 1 for firing), carbine fire is already at a disadvantage vs. longer
firearms. All infantry weapon ranges reflect more typical battlefield engagement ranges, limited by terrain
and vision, rather than by a weapon's ballistic properties.
40
cuts 9", 8.75", 8.5", 11.5", 11"
5.13 Firing in Woods or Orchards
Units firing through woods or at a target in woods, do so with a penalty based on the class of the woods.
• Fire through Class I woods or orchards is limited to 6".
• Fire through Class II woods or orchards is limited to 4".
• Fire through Class III woods is limited to 2".
• Units that are deployed in contact on the edge of woods and are firing out of the woods will fire
without penalty for the woods terrain class.
A Grand Battery consists of 2 or more artillery batteries in a single Command Group without any other troop
type. The artillery batteries must be in base to base contact when deployed.
•
•
•
Grand Batteries are only permitted as indicated in the period rules.
If the Grand Battery officer becomes a casualty, all batteries are Disordered.
Only flank batteries in a Grand Battery may maneuver.
Designer’s Note: Rather than reward a concentration of artillery with a bonus for fire or some other
modification to make them a “super unit”, the mere concentration of artillery in a small location by itself
creates a highly effective command. I created multiple Grand Battery rules and tested them all
extensively. At the end of the day, the grand battery effect takes care of itself with the firepower
concentration from multiple artillery units and the game plays better without adding layers of additional
rules. However, if you wish to differentiate between Grand Battery and individual battery fire, allow hits
from all units in the Grand Battery to accumulate, while disallowing hits from individual batteries to
accumulate.
A French Grand Battery (note the Command Group officer)
41
Fire Combat
5.14 Grand Battery
cuts 9", 8.75", 8.5", 11.5", 11"
5.15 Fire Combat Table
Fire
Combat
Roll Modified Combat Die (CD) vs. Opponent's Defense Die (DD)
Lose 1 UI & 1 Army Morale Point per 3 Hits
Lose 0 or 1 UI vs. Enemy Even Roll = Fall Back; Lose 2+ UI vs. Single Enemy Even Roll= Rout
Down 2
Down 1
No Change
Up 1
Up 2
Frontal
Infantry 1st Fire;
Tactical Advantage
vs. Flank
vs. Rear
Circumstance
Firing from Town
Orientation
Target Uphill
Disordered;
Per UI Loss
Musket: 6 - 4"
Rifle: 12 - 8"
Musket: 4 - 2"
Rifle: 8 - 0"
Musket: 2 - 0"
24 - 18"
18 - 12"
12 - 6"
Firer's Formation
Attack Column;
Skirmish in I;
Square
Infantry
Firing At
Skirmish;
Unlimbered
Line;
Skirmish in II, III, IV;
Unlimbered
Any Column;
Limbered;
Line;
Square
Limbered;
Line
Class I
Losses
Infantry Ranges
Artillery Ranges
Artillery
Firing At
Target Cover
36 - 24"
Skirmish
Unlimbered
Class III
Class II
6 - 0"
Any Column;
Square
NOTE: The Fire Combat Table shown above is from the Napoleonic playsheet. Use the period specific
playsheet for the era being played.
All fire is resolved by applying the modifiers shown in the Fire Combat table to the firing unit’s Combat Die.
All modifiers are shown as die size shifts. Up 1 indicates an increase of one die size, Down 1 indicates a
decrease of one die size, and so on. More than one modifier may apply per category. Apply the final total
of all modifiers to the firing unit's Combat Die size and roll vs. the enemy unit's Defense Die.
Example: A French infantry regiment armed with muskets (D10 Combat Die) in line is firing at a Russian
infantry regiment in line deployed on the crest of a hill 5" away. This is the French unit’s first fire in the
game. The modifiers are Down 1 (Uphill), Up 1 (1st Fire), Down 1 (Range), No Change (firing from Line),
No Change (firing at Line). The final modifier is Down 1 (2 Down 1s, 1 Up 1). The French would roll a D8
(D10 Down 1 to a D8) Combat Die.
42
cuts 9", 8.75", 8.5", 11.5", 11"
5.16 Fire Combat Resolution
All fire resolution consists of 2 stages:
• Determining hits and Unit Integrity losses.
• Applying any fall back or rout movement.
Apply the final modifier to the firing unit's Combat Die size and roll vs. the enemy unit's Defense Die. If the
firing unit's Combat Die roll is larger than the target unit's Defense Die roll, hits are taken by the target unit.
If the Combat Die roll is less than or equal to the Defense Die roll, the fire has no effect.
Unit Integrity Losses: For each 3 hits, the target unit loses one Unit Integrity and the army loses one
Army Morale Point.
Routing units that suffer Unit Integrity losses do not cause Army Morale Point losses.
Destroyed Units: Any unit that drops to 0 Unit Integrity is destroyed. Destroyed units are immediately
removed from the table.
Infantry units are eliminated and removed from play if they suffer four Unit Integrity losses.
Cavalry units are eliminated and removed from play if they suffer four Unit Integrity losses.
Artillery units are eliminated if they suffer three Unit Integrity losses.
Fall Back: If hits have been taken, and the firing unit's Combat Die roll is even, the target unit will usually
fall back a distance in inches equal to the number of hits taken. See 4.6 Movement Resulting from Fire or
Melee Combat and 4.61 Fall Back Moves.
Unlimbered artillery units do not fall back but remain in place, Disordered.
Example: A Union infantry regiment rolls a D12 Combat Die vs. a Confederate infantry regiment’s D6
Defense Die. The Combat Die roll is a 7, and the Defense Die roll is a 2. The number of hits is 5. The
Confederate regiment loses 1 Unit Integrity (5 divided by 3 = 1+, with the remainder dropped). Since the
Combat Die roll (of 7) is not even, the Confederates will not fall back.
Example: A Prussian infantry battalion rolls a D12+3 Combat Die vs. a French infantry battalion (Ordered)
that has a D6 Defense Die. The Prussians roll a D12 Combat Die and add 3 since the modified Combat
Die value is more than a D12. The Prussians roll a D12 and add 3 (a D12+3). The D12 Combat Die roll is
a 7, with the +3 addition resulting in a final total die roll of 10 (remember that the maximum roll is a 12,
regardless of the + modifier). The French Combat Die roll is a 6. The number of hits is 4. The French
infantry will lose 1 Unit Integrity (4 hits, 4/3 = 1 1/3). The French infantry unit will not fall back since the
Combat Die roll (of 7) was odd.
Example: A Russian cavalry regiment is fired at by a French artillery battery rolling a D10 Combat Die.
The Russian cavalry unit has a D6 Defense Die. The Combat Die roll is a 10 and the Defense Die roll is a
6. The number of hits is 4. The Russian cavalry regiment loses 1 Unit Integrity (3 hits and 1 remainder) and
is forced to fall back 4" (the number of hits) since the Combat Die roll was even.
43
Fire Combat
The number of hits is the difference between the Combat Die roll and the Defense Die roll.
Any remaining hits that were insufficient to cause a Unit Integrity loss do not carry over to the next Initiative.
cuts 9", 8.75", 8.5", 11.5", 11"
Rout: If the target unit suffers 2 or more Unit Integrity losses from a single fire Combat Die roll, and the
firing unit’s Combat Die roll is even, the target unit will rout 1” per hit. See 4.6 Movement Resulting from
Fire or Melee Combat and 4.62 Rout Moves.
Unlimbered artillery units do not rout but remain in place, Disordered.
Example: A Confederate infantry regiment is at Point Blank range from a Federal artillery battery. The
Federal battery fires, rolling a D12 vs the Confederate D6. The Federal roll is a 12, and the Confederate
roll is a 4. The Confederates suffer 2 UI lost, and the Federal roll is even, so the Confederates rout 8” (124).
Designer's Note: The fall back and rout game mechanism reflects a unit's morale quality to hold its place in
the firing line having taken effective fire. Since units roll their Defense Die (a relative measure of their
quality and morale) when fired at, unit morale is already considered in the firing resolution.
5.17 Towns and Fire Combat
Units deployed in Town Sections have no flanks or rear.
Units deployed in Town Sections fire at a Down 1 modifier.
There are no formation modifiers for the target unit deployed in a Town Section. The target unit receives
the appropriate modifier based on the terrain class of the Town Section.
Example: A French unit is deployed in a Class III Town Section. A Prussian unit (no Unit Integrity losses)
in line and Ordered is firing at the French with an Up 1 modifier for range. The final modifiers are Up 1
(range), Down 2 (Class III terrain) for a result of Down 1.
Units that are deployed in towns may fire at targets in adjacent Town Sections or at targets outside of the
town. Fire may not be directed through a Town Section.
Fire at targets in adjacent Town Sections uses the shortest range modifier. Fire at targets outside of a town
is measured from any point on the border of the Town Section to the closest point of the target unit.
Fire from outside of a Town Section at a target unit in a Town Section is measured from the center of the
firing unit to the closest point on the border of the Town Section. Fire may not be directed through a Town
Section.
44
cuts 9", 8.75", 8.5", 11.5", 11"
5.18 Fire Combat Modifiers
Note that not all fire combat modifiers apply to every period. As a result, some of the modifiers described
below are not shown in the Napoleonic fire combat table shown above. Use the period specific table for the
specific era being played.
Fire Combat Table: Circumstance
Firing from Town: Firing unit is deployed in a Town Section.
Highland Infantry: For the Jacobite Rebellion period only. Firing unit is a Highland infantry unit.
Infantry 1st Fire: Infantry units firing for the first time receive an UP 1 fire modifier. The 1st Fire bonus
does not apply to Skirmish units, Native units, dismounted cavalry units, or units that are in Towns.
Tactical Advantage: Firing unit plays a Tactical Advantage card. The Tactical Advantage card is used to
receive an additional Up 1 modifier for fire combat for any one unit. The Tactical Advantage card is placed
in the discard pile after being used, whether the attempt was successful or not. The Tactical Advantage
card is shuffled into the Sequence Deck at the end of the turn.
Designer's Note: The Tactical Advantage card is an abstract way to reward local unit commander's
Initiative and tactical prowess. The tactical advantage that is being awarded is below the level of
representation on the tabletop through unit position or terrain. It could represent an ideal use of small folds
in terrain, an unexpected counterattack, an unexplainable good run of luck, or even some tactical blunder
by the enemy.
45
Fire Combat
Counterbattery: For the English Civil War period only. Firing unit is firing at an unlimbered enemy gun
unit.
cuts 9", 8.75", 8.5", 11.5", 11"
Franco-Prussian French infantry positioned outside of two Town Sections
Fire Combat Table: Orientation
Target Uphill: Firing at a target that is uphill, at a higher elevation than the firing unit.
Frontal: Fire is being received by the target unit from any enemy unit that has the center of the firing unit's
frontage forward of a line traced along the front of the target unit's stands.
Frontal
vs. Flank: Fire is being received in the target unit's flank target zone. A flank fire occurs if the center of the
frontage of a stationary firing unit is in the target unit's flank target zone.
The flank target zone is formed by lines traced along the frontage of the target unit and along the edge of
the target unit. Flank fires receive an UP 1 modifier.
Flank
Flank
vs. Rear: Fire is being received in the target unit's rear target zone. A rear fire occurs if the center of the
frontage of the firing unit is in the target unit's rear target zone. The rear target zone is formed by lines
traced along the edges of the target unit. Rear fires receive an UP 2 modifier.
Rear
46
cuts 9", 8.75", 8.5", 11.5", 11"
Fire Combat Table: Losses
Disordered: Firing unit is Disordered.
Maneuver Disorder: For the English Civil War period only. Firing unit is marked as being Disordered due
to its change of facing resulting in Maneuver Disorder.
Per UI Loss: Down 1 die size per each Unit Integrity loss suffered by the firing unit.
Att. Col.: Firing unit is in Attack Column formation.
Skirmish in I: Firing unit is a Skirmish unit in open Class I terrain. Infantry or dismounted cavalry in
Skirmish formation armed with repeating rifles or carbines ignore the Down 1 modifier.
Square: Firing unit is in Square formation.
Company Column: For Prussian and German states infantry in the Franco-Prussian war that are
deployed in Company Column.
Line: Firing unit is in Line formation.
Skirmish in II, III, IV: Firing unit is a Skirmish unit in Class II, III, or IV terrain (not Town Sections). Note
that this eliminates the Skirmish penalty for being dispersed that a unit in Skirmish in the open has. This
makes units in skirmish formation most effective when operating in terrain.
Unlimbered: Firing artillery unit is Unlimbered.
Fire Combat Table: Foot Formation (ECW Only)
Pike Forward: For the English Civil War period only. Foot unit is deployed in Pike Forward formation.
Shot Forward: For the English Civil War period only. Foot unit is deployed in Shot Forward formation.
Commanded Shot and dismounted dragoons are always in Shot Forward formation.
Fire Combat Table: Foot Ranges (ECW Only)
Salvo: 4-0” (Shot Forward): For the English Civil War period only. Foot units deployed in Shot Forward
formation as well as Commanded Shot units may Salvo fire and receive an Up 1 modifier. Salvo fire
required a doubling of ranks, by bringing the back 3 ranks forward into gaps between files. This allowed all
infantry to fire at one time rather than by the less intense but more continuous fire by rotating files.
47
Fire Combat
Fire Combat Table: Firer's Formation
cuts 9", 8.75", 8.5", 11.5", 11"
Fire Combat Table: Infantry Firing At
Skirmish: Target unit is a Skirmish unit.
Unlimbered: Target unit is an Unlimbered artillery unit.
Any Column: Target unit is in any type of Column formation (Attack Column, March, or Company
Column).
Limbered: Target unit is a Limbered artillery unit.
Line: Target unit is in Line formation.
Mass: Target unit is a Native unit in Mass formation.
Square: Target unit is in Square formation.
Fire Combat Table: Artillery Firing At
Skirmish: Target unit is a Skirmish unit.
Unlimbered: Target unit is an Unlimbered artillery unit.
Limbered: Target unit is a Limbered artillery unit
Line: Target unit is in Line formation.
Mass: Target unit is a Native unit in Mass formation.
Any Column: Target unit is in any type of Column formation (Attack Column, March, or Company
Column).
Square: Target unit is in Square formation.
Fire Combat Table: Target Cover
Class III: Center of the frontage of the target unit facing the firing unit is in Class III terrain.
Class II: Center of the frontage of the target unit facing the firing unit is in Class II terrain.
Class I: Center of the frontage of the target unit facing the firing unit is in Class I terrain.
48
Melee Combat
cuts 9", 8.75", 8.5", 11.5", 11"
5.2 Melee Combat
Melee represents the complete commitment of troops to decisive combat – whether that be intense close
range infantry firefights that have resolution, or swirling cavalry clashes. Melee could just as easily result in
no physical contact between units, but simply the morale failure of a unit that loses its nerve and falls back
as a threatening enemy approaches. Melee will result in a clear cut winner – one side or the other will fall
back or rout.
See 5.3 Unique Melee Situations for special considerations for the following melee situations:
•
•
•
•
•
Flank or Rear Melee
Melee in Town Sections
Melee vs. March and Limbered Units
Squares in Melee
Two vs. One Unit Melees:
Designer’s Note: While the term “melee” is used, it should not be assumed that troops are engaging only
in hand to hand combat. Melee could just as easily be thought of as “close combat” composed of a
combination of intense point-blank fire, physical intimidation, and actual hand to hand combat.
5.21 Contact Requirements for Melee
Any point or portion of the attacking unit's frontage must be in contact with the enemy unit. There is no
requirement for lining up units. Any portion of the unit's front, or front corners that are in contact with the
enemy unit, qualifies for contact in melee.
49
cuts 9", 8.75", 8.5", 11.5", 11"
5.22 Initiating Melee
There are two different ways to qualify to initiate a melee: Use a Melee card and an Immediate Melee
conducted on a Move or Move 1 Command card.
•
Melee Card
o See the Melee card definition.
o Melee can always be resolved when a Melee card is turned if units are in contact.
o Melee can be resolved when a Melee card is revealed, and the attacking unit can make
qualifying contact on a move to melee that is made on the Melee card.
▪ Attacking (and supporting units, see 5.3 Unique Melee Situations, Two vs. One
Unit Melees) units may move up to 1/2 of a single move segment into contact on a
Melee card.
▪ The target unit must be in line of sight prior to any movement.
▪ The move must be without a change of face.
▪ Units may oblique per the normal movement rules.
▪ All terrain and Disordered movement penalties apply to the melee move to
contact.
▪ If the unit does not have enough movement to contact the enemy, it remains in
place and does not move.
o Melee is optional and not required if units are in contact.
o Units that are Limbered or in March may not initiate melee.
▪ See 5.3 Unique Melee Situations for special rules regarding forcing passage of
bridges, defiles, and fords.
•
Immediate Melee
o Refer to period rules to identify which units may Immediate Melee.
o Melee card not required.
o Immediate Melee is achieved on any Move or Move 1 Command card by rolling higher and
even for movement.
o The target unit must be in line of sight prior to any movement.
o Units may only change face on the first move segment.
o Units may oblique per the normal movement rules.
o Units that are Limbered or in March may not initiate melee.
▪ See 5.3 Unique Melee Situations for special rules regarding forcing passage of
bridges, defiles, and fords.
Designer's Note: Players determine in what order they wish to resolve melee. Players on either side can
also fire a unit prior to resolving melee, assuming they are not marked with a fire marker.
50
cuts 9", 8.75", 8.5", 11.5", 11"
5.23 Melee Procedure
Once a melee has been declared, both sides modify their Combat Die using the modifiers shown below.
Each side rolls their modified Combat Die and the results are compared.
Melee continues, re-rolling the Combat Die for each unit until one side wins the competitive die roll and
causes the opponent to lose a total of 1 or more Unit Integrity. The loss of Unit Integrity will result in the
losing unit falling back or routing out of contact. Hits carry over from roll to roll.
Note that the Melee Combat modifiers will likely change from roll to roll in a melee. The Combat Die
modifiers must be determined anew for each melee roll.
Round 1: Prussians roll a 7+1=8. French roll a 7. The French have 1 hit that carries
over to Round 2.
Round 2: Both sides are Disordered. The French are disordered because they lost the melee roll,
and the Prussians are Disordered because they rolled odd. since they rolled odd in
Round 1. The Prussians now roll a D12 and the French roll a D8. The Prussians roll a 5
and the French roll a 7. The Prussians suffer 2 hits. The Prussians carry over their
2 hits to Round 3, and the French carry their 1 hit from Round 1 to Round 3.
Round 3: No new modifiers apply. The Prussians roll a D12 and the French roll a D8.
The Prussians roll a 1 (!!!) and the French roll a 6. The Prussians suffer 5 hits.
The Prussians have now suffered a total of 7 hits (2 in Round 2 and 5 in Round
3). The 7 hits equate to a total Unit Integrity loss of 2 Unit Integrity. Since 1 or
more (2, in this case) Unit Integrity were lost, and no single roll resulted in 2 or
more Unit Integrity loss, the Prussians fall back.
51
Melee Combat
Example: The Prussians turn a Melee card. A Prussian infantry battalion resolves melee against a French
infantry battalion. The Prussians start with a modified D12+1 Combat Die. The French start with a
modified D10 Combat Die. The Prussians are initiating the first Round of melee.
cuts 9", 8.75", 8.5", 11.5", 11"
5.24 Melee Combat Table
The Melee Combat Table shown below from the Napoleonic playsheet. Use the period specific table for
the specific era being played.
Use the modifiers listed in the Melee Combat Table to modify each unit's Combat Die.
Roll Modified Combat Die (CD) vs. Modified Combat Die (CD)
Lose 1 UI & 1 Army Morale Point per 3 Hits;
Lose 1+ UI = Fall Back; Lose 2+ UI vs. Single Enemy Roll = Rout
Melee
Combat
Down 2
Circumstance
Outnumbered
Line/Att. Column vs.
Cavalry
Disordered;
Per UI Loss
Flanked/Rear
Cavalry vs. Infantry
Losses
Orientation
Formation
Terrain
Down 1
Limbered/Unlimb;
March;Skirmish
Opp. In Class III
No Change
Up 1
Town Melee
Higher DD;
Initiated Melee;
Tactical Advantage;
Uphill from Enemy
Up 2
Sq. vs. Cav.
Frontal
Line;
Square
Both in Class I
Opp. In Class II
vs. Flank
vs. Rear
Attack Column
Example: An Austrian cuirassier unit (Heavy Cavalry, D12 Combat Die) in Attack Column has moved into
contact with a French infantry unit (D10 Combat Die) in Line. Both units have a D6 Defense Die. Neither
unit has any Unit Integrity losses. The Austrians turn a Melee card. The Austrians decide to resolve the
melee. The melee modifiers for both sides are:
Austrians: Up 1 for Attack Column; Up 1 for Initiating Melee. The net final modifier for the Austrians is Up
2.
French: No modifiers.
The Austrians roll a D12+2 (D12 roll adding 2 to the roll) and the French roll a D10.
52
cuts 9", 8.75", 8.5", 11.5", 11"
5.25 Melee Combat Modifiers
Note that not all melee combat modifiers apply to every period. As a result, some of the modifiers
described below are not shown in the Napoleonic fire combat table shown above. Use the period specific
table for the specific era being played.
Melee Combat Table: Circumstance
Guns in Melee: Player’s unit is a gun unit. (ECW)
Mounted frontal vs. Pike Forward/Pike: Player’s unit is a mounted unit engaging a Pike Forward or Pike
foot unit frontally in melee. Mounted include Horse, Cuirassier, Dragoon, and Lancer units. (ECW)
Dragoons: Player’s unit is a Dragoon unit. (ECW)
Horse/Dragoons/Lancer vs. Cuirassier: Player’s unit is a Horse, Dragoon, or Lancer unit engaged in
melee vs. a Cuirassier unit. (ECW)
Outnumbered: Opponent has a unit supporting their primary attacking unit. See 5.3 Unique Melee
Situations, Two vs. One Unit Melees.
Rifles: Player’s unit is armed with rifles and no bayonets. (AWI)
Town Melee: Melee involves a unit deployed in a Town Section. All units in a Town Section or outside of
and contacting the Town Section use the same Town formation modifier. No other formation modifier
applies. Units deployed in Town Sections have no flanks or rear.
Higher DD: Player's unit has a higher DD (Defense Die).
Designer's Note: The "Higher DD" modifier is an acknowledgement that there is an advantage in class of
unit, perceived self-worth, and professional status, in melee. In effect, all Combat Die sizes are not equal!
A D10 Combat Die for a Raw unit in melee is not as good as a D10 Combat Die for a Crack unit, for
example. A veteran or guard unit would hold the power of self-confidence and intimidation over their foes.
Initiated Melee: The unit that chooses to initiate a melee on a Melee card or in any immediate melee
receives an UP 1 modifier. The Initiated Melee modifier only applies in Round 1 of a melee.
The following exceptions apply:
•
Artillery
o Artillery may not initiate melee and never receives the UP 1 Initiated Melee modifier.
•
Cavalry
o Cavalry that is in a melee in Class I terrain with infantry in any formation other than
Square/Hedgehog receives the UP 1 Initiated Melee modifier.
o Cavalry never receives the Initiated Melee modifier if in melee vs. any unit in Class II or
higher terrain or defensive works.
53
Melee Combat
Mounted vs. Hedgehog: Player’s unit is a mounted unit engaging a foot unit in Hedgehog formation in
melee. Mounted include Horse, Cuirassier, Dragoon, and Lancer units. (ECW)
cuts 9", 8.75", 8.5", 11.5", 11"
o The Initiated Melee modifier never applies for either side if the melee is vs. an infantry unit
in Square/Hedgehog formation.
o Cavalry moving across or currently in a river or stream do not receive the Initiated Melee
modifier. Their opponent does receive the Initiated Melee modifier.
•
Infantry
o Infantry never receives the UP 1 Initiated Melee in melee vs. cavalry.
o Infantry in Skirmish never receive the UP 1 Initiated Melee modifier.
o The Initiated Melee modifier never applies for either side if the melee is vs. an infantry unit
in Square/Hedgehog formation.
o Infantry moving across or currently in a river or stream do not receive the Initiated Melee
modifier. Their opponent does receive the Initiated Melee modifier.
Tactical Advantage: Player’s unit uses a Tactical Advantage card. See the Tactical Advantage card
description. The UP 1 modifier will only apply for the single Melee round for which it is played.
Throwing Spears: Native unit armed with throwing spears receive an Up 1 modifier in melee once in the
game.
Uphill from Enemy: Uphill or at a higher elevation than the target unit.
Mounted vs. Shot: Player’s unit is a mounted unit engaged in melee vs. a Commanded Shot unit.
Mounted include Horse, Cuirassier, Dragoon, and Lancer units. (ECW)
Any vs. Gun: Player’s unit is any unit engaged in melee vs. a Gun unit. (ECW)
Melee Combat Table: Cavalry vs. Infantry
Line/Att. Column vs. Cavalry: Infantry in Line or Attack Column formation are in melee vs. cavalry.
(Anglo-Sikh Wars, Mexican-American War; Napoleonic Wars)
Line vs. Cavalry: Player’s unit is infantry in Line vs. Cavalry. (American War of Independence, Great
Northern War, Jacobite Rebellion, Seven Years War)
Sq. vs. Cav.: Infantry in Square formation are in melee vs. cavalry. (Anglo-Sikh Wars, Mexican-American
Wars, Napoleonic Wars, War of the Spanish Succession)
Melee Combat Table: Losses
Disordered: Player's unit is Disordered
Maneuver Disorder: Player’s unit is currently Maneuver Disordered. (ECW)
Per UI Loss: Down 1 for each Unit Integrity loss.
54
cuts 9", 8.75", 8.5", 11.5", 11"
Melee Combat Table: Orientation
Flanked/Rear: Player’s unit is contacted and meleed in its flank or rear. See the qualifying requirements
below for Flank and Rear melees.
Frontal: Unit is contacted along the front edge of its stands or corners of the front stands by an enemy unit
that is engaging it in melee.
Frontal
Flank
Flank
vs. Rear: Melee is being initiated in the target unit's rear target zone. A rear attack occurs if the center of
the frontage of the attacking unit is in the target unit's rear target zone. The rear target zone is formed by
lines traced along the edges of the target unit. Rear melees receive an UP 2 modifier for the attacker in the
first round of melee. If the melee continues to a second round, the attacker receives an UP 1 modifier. If
the melee should continue, there are no modifiers from the third round until the melee is resolved.
Rear
55
Melee Combat
vs. Flank: Melee is being initiated in the target unit's flank target zone. A flank attack occurs if the center
of the frontage of the attacking unit is in the target unit's flank target. The flank target zone is formed by a
line traced along the frontage of the target unit and a line traced along the edge of the target unit. Flank
melees receive an UP 1 modifier for the attacker in the first round of melee. The UP 1 modifier does not
apply after the first round of a melee.
cuts 9", 8.75", 8.5", 11.5", 11"
Melee Combat Table: Formation
Shot: Player’s unit is a Commanded Shot unit. (ECW)
Shot Forward: Player’s unit is a Foot unit in Shot Forward formation. (ECW)
Pike Forward/Pike: Player’s unit is a Foot unit in Pike Forward formation or is a Commanded Pike unit.
(ECW)
Limbered/Unlimb.: Player's artillery unit is Limbered or Unlimbered.
March: Player's unit is in March formation.
Skirmish: Player's unit is in Skirmish formation.
Line: Player's unit is in Line formation.
Mass: Player’s unit is in Mass formation.
Square: Player’s unit is in Square formation.
Attack Column: Player's unit is in Attack Column formation.
Company Column: Player’s unit is a Prussian or German States infantry unit in Company Column
formation. (Franco-Prussian War).
Melee Combat Table: Terrain
Opp. In Class III: Center of the frontage of the enemy unit is in Class III terrain. All units from both sides
that are involved in a Town Section melee apply the town’s terrain class modifier.
Opp. In Class II: Center of the frontage of the enemy unit is in Class II terrain. All units from both sides
that are involved in a Town Section melee apply the town’s terrain class modifier.
Both In Class I: Center of the frontage of both the enemy unit and the friendly unit is in Class I terrain.
56
cuts 9", 8.75", 8.5", 11.5", 11"
5.26 Melee Results
Compare the two modified Combat Die rolls. Melee continues, re-rolling the Combat Die for each unit until
one side inflicts 1 or more Unit Integrity loss, forcing the opponent to fall back out of contact or rout,
depending on the UI loss. Hits carry over from round to round until one side is forced to fall back or rout.
Note that the Melee Combat modifiers will likely change from round to round in a melee. The Combat Die
modifiers must be determined anew for each melee round.
•
Fall Back
o If the winner of the competitive die rolls causes 1 Unit Integrity loss in a single melee roll,
the loser falls back.
o If the winner of the competitive die rolls causes 1 or more Unit Integrity loss over multiple
melee rolls, the loser falls back.
o See Fall Back below.
•
Rout
o If the winner of the competitive die roll causes 2 or more Unit Integrity losses in a single
melee roll, the loser will rout.
o See Routs below.
Example: A French unit is in melee with a British unit. In the first combat roll, the French roll a 7 to the
British 5. The British have 2 hits. As the winning French roll did not cause a Unit Integrity loss, the melee
continues. In the second combat roll, the French roll a 3 to the British 4. The French have 1 hit, and the
British still have 2 hits. No Unit Integrity have yet been lost, so the melee continues. The French roll a 2
and the British roll a 1. The British suffer 1 more hit, and now have 3 hits. The 3 hits result in a 1 Unit
Integrity loss for the British. The British fall back 3" (the fall back distance in inches being equal to the total
number of hits).
Example: A Union regiment is in melee vs. a Confederate regiment. The Union regiment rolls an 8 to the
Confederate 2. The Confederates suffer 6 hits, which is a 2 UI loss. Since the winning Union Combat Die
roll caused 2 or more Unit Integrity loss in a single roll, the Confederates rout. The rout move is 6" (the rout
distance in inches being equal to the number of hits).
Unit Integrity Losses: The losing unit loses 1 Unit Integrity for every 3 hits.
Army Morale Point Losses: The losing side loses 1 Army Morale Point for every Unit Integrity lost from a
non-routing unit. Routing units that suffer Unit Integrity losses do not cause Army Morale Point losses.
Army Morale Point losses are limited by the amount of remaining Unit Integrity; the maximum amount of
Army Morale Points that can be lost is the current Unit Integrity of the unit (a unit can't lose more than it
has). Army Morale Points are only lost for those Unit Integrity that are lost due to hits.
Following Up: Units that win a final melee round with an even Combat Die roll may follow up by moving
up to 2" and take the position previously occupied by the enemy unit. Units that follow up may not end their
move in contact with the enemy and may only move forward to the location previously held by the enemy.
57
Melee Combat
Hits are defined as the difference in the Combat Die rolls. Units losing Unit Integrity and losing the melee
will be pushed back, routed, or destroyed, depending on the total number of hits and the difference in the
final melee round Combat Die rolls. The conditions that qualify for each result are shown below.
cuts 9", 8.75", 8.5", 11.5", 11"
Fall Back: Units that lose 1 or more Unit Integrity and are not routed will usually fall back a distance (in
inches) equal to the total number of hits. See 4.6 Movement Resulting from Fire or Melee Combat and 4.61
Fall Back Moves.
Units that are falling back will pass through friendly units as they fall back to the rear. Units may not end
movement intermixed with any other units. If fall back movement would force a unit that is falling back to
end its move intermixed with any friendly unit, the unit will instead stop when it first contacts the friendly
unit.
Units that are falling back and contact enemy units will halt at that point.
Ordered and Disordered Status:
Units that win any melee round with an even Combat Die roll remain Ordered if they were Ordered prior to
the roll.
Units that lose a melee round or win a melee round with an odd die roll are Disordered. This includes
losing the final melee round and falling back or routing.
Pursuit (Optional): Players may elect to account for post melee pursuit for specific periods and units. For
example, early English Civil War cavalry, other period cavalry by scenario, and native irregulars may be
susceptible to pursuit. The specific units that may pursue after a won melee must be identified prior to
play.
In any melee where a winning pursuit susceptible unit ends the melee with an odd die roll, the unit pursues.
• The pursuing unit loses the same number of UI as the beaten unit.
• Army Morale Points are not lost for the UI lost pursuing.
• If the pursuit UI loss reduces the unit to 0 UI, the unit is removed from play.
The unit does not actually move towards the enemy but remains in place as the command location for the
unit upon which the pursuing portion of the unit will attempt to be rallied.
Unit integrity lost in pursuit can be rallied using the normal rally procedures on the Leadership card.
Example: A British cavalry unit in a Peninsular Napoleonic game is in a melee with a French cavalry unit.
The British cavalry roll a 7 on their melee die and the French roll a 1. The French lose 2 UI and 2 Army
Morale Points and rout. Since the British cavalry rolled odd, they pursue. The British cavalry also lose 2
UI, but they British do not lose any Army Morale Points. Note that if the British cavalry had started the
melee with only 1 or 2 UI, they would be eliminated since the pursuit loss of 2 UI would drop them to 0 UI.
Example: An ECW Parliamentarian horse unit is in a melee with a Royalist dragoon unit. The dragoon unit
has 1 UI remaining. In the melee, the Parliamentarian horse unit causes a 2UI loss while rolling odd, so
they will pursue. The Royalist dragoons lose their 1 remaining UI. The Parliamentarian horse unit also
loses 1 UI, as that is the amount of UI loss to the Royalist dragoons, regardless of the total UI lost.
58
cuts 9", 8.75", 8.5", 11.5", 11"
Designer’s Note: I struggled through numerous iterations of pursuit rules while working on the 3rd edition of
Field of Battle. Some used actual on table pursuing unit movement, but that ran into all kinds of issues
such as how long does a unit pursue, what happens with intervening units, etc. Other options were more
abstract but didn’t achieve the effect I was seeking. The optional pursuit rule presented above represents a
portion, sometimes a significant portion, of the winning unit taking off after the beaten foe. Note that there
are no restrictions on what the pursuing unit can do – if you want to stay aggressive and continue to attack
the enemy – that is your choice! Just remember that they’ve just suffered UI losses, even though they won
the melee.
I also went through many period specific lists defining which units could pursue, but inevitably that left some
unit or unit type out and would doubtless be at odds with some player’s perceptions. So – define which
units or unit types you want to have as pursuit susceptible for your specific scenarios based on your game
requirements and historical research.
See 4.5 Movement Resulting from Fire or Melee Combat and 4.52 Rout Moves.
Routing units will pass through friendly units as they rout to the rear. Units may not end movement
intermixed with any other units. If rout movement forced by fire or melee combat would force a routing unit
to end its move intermixed with any friendly unit, the routing unit moves a greater distance until it is entirely
clear of the intervening friendly unit.
Example: A Russian infantry unit at 4 Unit Integrity loses 2 Unit Integrity in melee. The Russian infantry
unit is routed. The Russians lose 2 Army Morale Points for the 2 Unit Integrity lost in the melee.
Destroyed Units:
•
•
•
Artillery units that are routed in melee are destroyed.
Any unit in that drops to 0 Unit Integrity is destroyed.
Routed units contacted by an enemy unit that is not limbered or in March formation is destroyed.
Destroyed units are immediately removed from the table. If a unit is destroyed, the Army Morale Points lost
are calculated normally as explained above. Morale Points are only lost for Unit Integrity that is lost in the
combat; not for the total Unit Integrity that is lost when the unit is destroyed. Army Morale Points are not
lost for destroying a routing unit.
Example: A French cavalry unit melees a British infantry unit (with 1 Unit Integrity). The French roll a 12,
and the British roll a 4. 2 Unit Integrity are lost, and the British unit drops to -1 Unit Integrity, so the British
are destroyed. The total Army Morale Points lost is 1 (The British unit started with only 1 Unit Integrity;
even though the melee resulted in 2 Unit Integrity losses, the maximum number of Army Morale Points that
can be lost is the number of Unit Integrity remaining on the unit).
59
Melee Combat
Routs: Units that lose 2 or more Unit Integrity in a single melee roll will usually rout. Artillery is eliminated.
Units routed in melee are immediately turned around and move a distance equal to the total number of hits.
cuts 9", 8.75", 8.5", 11.5", 11"
5.3 Unique Melee Situations
Flank or Rear Melee: Follow normal melee procedures, modifiers and results. Flank melee modifiers only
apply to the first round of the melee. Rear melees have the rear melee modifiers apply to the first round of
the melee and flank modifiers to the second round of melee (if a second round is fought). After using the
flank modifiers for 1 round (for flank melees) and rear and flank modifiers for a maximum of 2 rounds (1 for
rear, 1 for flank), normal frontal modifiers apply. If the unit that is initially attacked in the flank or rear wins
the final melee round, it may change facing to face the direction from which the attack was received.
Melee and Defended Bridges/Defiles/Fords: If a defending unit is deployed as to prohibit a moving
attacking unit to pass over or through a narrow area such as a bridge, defile, or ford and deploy on the
other side, the attacking unit may attempt to force passage.
Forcing passage is an attempt by an attacking cavalry or infantry unit to attack and clear a defending unit
from the bridge, defile, or ford. The attacking unit must be in March formation to attempt to force passage.
This is the only time that a unit deployed in March may initiate melee.
Designer’s Note: While the attacking unit may appear on the tabletop to be in March formation, it is really
in a combat ready configuration- a forlorn hope used to gain the terrain objective. The narrow frontage of
the attacking unit is required to allow it to traverse the limited space available in or on the bridge, defile, or
ford.
The attacker may initiate melee on a Melee card or with an Immediate Melee on a won Even roll on a Move
or Move 1 Command card.
Follow the normal melee procedures.
Normal melee modifiers apply with the following exceptions:
• Neither side receives the Initiated Melee modifier.
• Neither side receives modifiers for the formation in which they are deployed.
If the attacking unit wins the melee and pushes back the defending unit, the attacking unit is allowed to take
the defender’s location and also change formation.
Any fire by the defending unit or other units at the attacking unit will receive an UP1 modifier due to the
attacking unit being in a tight mass while on or crossing the narrow area. All other normal fire modifiers
apply.
Attacking units may not fire while in March formation to force passage.
Designer’s Note: I view these types of melees as assaults that are rapid and messy scrums. I think these
situations should come down to unit quality and relative losses rather than the defender jockeying for an
advantage by deploying in X or Y formation to get a better melee modifier. In short – you probably want to
use good or inspired troops (better Defense Die? Tactical Advantage?) to push your way to the objective
and brush aside that pesky enemy unit.
60
cuts 9", 8.75", 8.5", 11.5", 11"
Melee in Town Sections: Only infantry or dismounted cavalry may be deployed and melee in Town
Sections.
Units deployed in Town Sections have no flanks or rear.
All units from both sides that are involved in a Town Section melee apply the town’s terrain class modifier.
Units involved in a Town Section melee do not receive any positive or negative formation modifiers for
being in any other formation configuration.
If a unit is touching a Town Section, it may resolve melee with an enemy unit deployed in the Town Section
on a Melee card, or if its Command Group Leadership roll for movement was won and even. Refer to the
period specific rules to identify which troop types qualify to immediate melee.
If the unit deployed in the Town Section is defeated in melee and is forced to fall back but does not rout, it
is moved per 4.61 Fall back Moves. The winning unit remains outside of the Town Section and does not
immediately deploy into the Town Section unless it has rolled an even number during the melee which
would allow it to follow up and take the defending unit's position. The winning unit may always move into
the Town Section on a subsequent Move card per 4.23 Movement in Town Sections.
Example: A French infantry unit in Attack Column is in contact with a Class III Town Section containing an
Austrian infantry unit. The French turn a Melee card and decide to assault the Town Section. The French
melee modifiers are Up 1 for Initiating Melee, No Change for the Town Melee circumstance (even though
the unit is deployed in an Attack Column), and Down 2 for Opponent in Class III terrain. The final French
melee modifier is Down 1(Down 2, No Change, Up 1 = Down 1). The Austrian melee modifiers are No
Change for the Town Melee circumstance and Down 2 for Opponent in Class III terrain for a net modifier of
Down 2. Note that even though on the tabletop one unit appears to be “in” the town section and one is
“out” of the town section, they are both actually engaged in a town area and therefor both receive the
terrain modifier.
Melee vs. March and Limbered Units: Units that are Limbered or are in March formation are Disordered
automatically prior to resolving the melee. Resolve the melee with a single round of melee, rerolling any
ties. A unit in March or Limbered formation may not cause UI losses to the enemy unit, but the enemy unit
may be Disordered if it rolls odd in the melee. The unit in March or Limbered formation will always Fall
Back or Rout the difference in the melee die rolls. Regardless of the rolls, the March or Limbered unit will
lose the melee, but will only lose Army Morale Points and UI as determined by the melee combat rolls.
Artillery units that are routed in melee are destroyed.
Example: In a Seven Years War game, a Prussian artillery unit is limbered when it is contacted by an
Austrian infantry unit on a won Even movement, resulting in an immediate melee. Both units have a D10
Combat Die. The Austrians are UP 1 for Initiated Melee, taking them to a D12. The Prussian artillery is
automatically Disordered for Down 1 and Down 2 for Limbered/Unlimbered. The Prussians have a net of
D4. (D10 Down 3 to a D4). The melee is then resolved with a D12 vs. a D4. Consider two different roll
combinations:
1. The Austrians roll a 7 and the Prussians roll a 3. The Prussians are Disordered, lose 1 UI
and 1 Army Morale Point and fall back 4”. The Austrians are Disordered.
2. The Austrians roll a 1 and the Prussians roll a 4. The Prussians are Disordered, lose the
melee but do not lose any UI and fall back 3”. The Austrians are Disordered.
61
Melee Combat
If the unit deployed in the Town Section is routed in melee, the routing unit is moved per 4.62 Rout Moves,
and the winning unit is deployed into the Town Section.
cuts 9", 8.75", 8.5", 11.5", 11"
Squares in Melee: Squares are an immobile defensive formation. Refer to the period playsheet for the
appropriate melee modifiers.
English Civil War units in Hedgehog formation use the same “Squares in Melee” special rules.
• Neither side receives the Up 1 for initiating melee.
• Squares can never be flanked.
• Squares that lose a melee with a Fall Back result remain in place, Disordered.
Note that the only way to win a melee vs. a square is to cause a rout due to inflicting 2 Unit Integrity losses
in a single round of melee, or to eliminate the square by reducing it to 0 UI.
Two vs. One Unit Melees: An attacking unit and a supporting unit melee a single enemy unit on a Melee
card or with an immediate melee on a Move card.
•The attacker designates the melee unit and the supporting unit from his two melee units.
•The attacking and supporting units must be in qualifying contact with the enemy unit.
• In an immediate melee, both the attacking and supporting units must be allowed to
immediate melee per the period specific rules.
• Only the attacking unit's Combat Die and Defense Die is used in the melee.
• The supporting unit forces the "Outnumbered" Down 1 modifier on the enemy unit.
• All hits and Unit Integrity losses on the attacking and supporting units are applied only to the
attacking unit. Support units do not suffer hits or Unit Integrity losses.
If the attacking unit is defeated but not routed, apply fall back and disorder results to both the attacking and
supporting unit.
If the attacking unit is routed, apply rout movement results to it. The supporting unit will fall back,
Disordered, the same distance as the routing melee unit.
Note that Two vs. One melee situations are initiated only by an attacker that is initiating the melee.
Example: 2 Prussian infantry units in Attack Column are in contact with a French infantry unit. The Melee
card is turned. Assume that the modified Combat Die values for the Prussians are D12 and D10, and the
French Combat Die is a D10. The Prussians decide to designate the D12 unit as the attacking unit and use
the D10 unit as the supporting unit. The French suffer the Down 1 modifier for being "Outnumbered” and
drop to a D8. The Prussian D12 roll is a 10 and the French D8 roll is a 4. The French unit is routed (2 UI
lost to a single melee roll), loses 2 Unit Integrity and 2 Army Morale Points are lost. The French unit routs
6" (one inch per hit).
Example: A Federal army turns a Melee card. 2 Federal infantry regiments in Attack Column elect to
resolve a frontal melee with a single Confederate infantry regiment deployed in Line. All the units are in the
open. One of the Federal regiments has 1 Unit Integrity loss and has a D10 Combat Die. The other
Federal regiment has lost 2 Unit Integrity and has a D8 Combat Die. The Confederate regiment has a D12
Combat Die. At the start of the melee, all units are Ordered. The final modified Combat Die values are:
62
cuts 9", 8.75", 8.5", 11.5", 11"
Federal: The Federal commander evaluates the modifiers for each of his potential attacking units to
determine which he prefers to use.
Unit 1: Starts at D10. Initiating Melee Up 1. Attack Column Up 1. Down 1 for Unit Integrity loss. No other
modifiers apply, so the final modified Combat Die is a D12.
Unit 2: Starts at a D8. Initiating Melee Up 1. Attack Column Up 1, Down 2 for Unit Integrity losses. The
final modified Combat Die is a D8 (D8, Up 2, Down 2)
The Federal commander decides to use Unit 1 as the attacking unit since it has the higher modified
Combat Die. Unit 2 is designated as the supporting unit.
The Federals roll a 5, and the Confederates roll a 10 on their D10 Combat Die. The Federal regiment loses
its melee. Since the Federal unit loses 1 UI, it falls back Disordered. The fall back distance is equal to the
number of hits, or 5”. The support unit also falls back 5" Disordered. The Confederate regiment stays
Ordered since their Combat Die roll was even. The Federals lose 1 Army Morale Point for the Unit Integrity
loss.
Example: Consider the same units and ratings as above, but now the Federals roll a 3 and the
Confederates roll a 10 on their D10 Combat Die. The Federal regiment loses its melee, losing 2 UI and
routs! The rout distance is equal to the number of hits, or 7”. The supporting unit doesn't rout but falls back
7" Disordered. The supporting unit does not suffer any UI losses. The Confederate regiment stays Ordered
since their Combat Die roll was even. The Federals lose 2 Army Morale Points for the UI loss.
63
Melee Combat
Confederate: Starts at a D12. Modified Down 1 for being Outnumbered. The final modified Combat Die is
a D10 (D12, Down 1)
cuts 9", 8.75", 8.5", 11.5", 11"
5.4 Ordered and Disordered Unit Status Summary
Units will be Ordered, Disordered, or Routed. Unit status can change depending on combat results. The
unit status, combat causes, and effects are summarized below.
5.41 Ordered
Ordered units are under control and move at full speed, with no penalties for being Disordered or Routed.
5.42 Disordered
Units become Disordered for any of the following reasons:
• Units that fall back due to hits received in fire combat become Disordered.
• Unlimbered artillery units, infantry squares, foot in hedgehog, units in Town Sections, and units in
Defensive Works will not fall back, but still become Disordered.
• Units that lose a melee round or win a melee round with an odd die roll, are Disordered.
• All units in a Command Group are Disordered if the Command Group officer is removed as a
casualty.
• Disorder penalties:
o Disordered units move at 1/2 the normal distance.
o Disordered units move at the oblique 1/2 the normal distance.
o Disordered units sidestep 1/2 the normal distance.
o Disordered units are Down 1 in both fire and melee combat.
Designer’s Note: I find that an easy method to mark units as being Disordered is to simply jumble the unit’s
stands so they have a disordered appearance.
5.43 Routed
Units become Routed for any of the following reasons:
• Target unit suffers 2 or more Unit Integrity losses from a single fire Combat Die roll, and the firing
unit’s Combat Die roll is even.
• Units that lose 2 or more Unit Integrity in a single melee round will usually rout.
• Rout penalties:
o Routed units may only move toward friendly table edge at full speed plus a random die roll
on every Move card.
o Routed units do not cause casualties.
64
cuts 9", 8.75", 8.5", 11.5", 11"
6.0 Leadership
All Leadership actions occur on the Leadership card. Refer to the Leadership card definition for all the
possible actions and effects that may occur. Command Group officer quality determines how effective and
flexible units and Command Groups are.
6.1 Leadership Table
Note that not all leadership modifiers apply to every period. As a result, some of the modifiers described
below are not shown in the Napoleonic leadership table shown below. Use the period specific table for the
specific era being played.
Roll Modified Leadership Die (LD) vs. D8
Rally 1 UI per 3 > D8; Rally Disorder, Routers if >D8
Circumstance
Down 2
Down 1
Contact
0 Remaining AMPs;
Routing;
Within 12"
No Change
Up 1
Over 12"
In Town Section;
Per Daring Deed;
Tactical Advantage
Up 2
Designer's Note: For Leadership tests, the leader will always roll his modified Leadership Die vs. a D8.
This is different than for fire combat, as I felt it should more difficult to rally troops than it is to lose their Unit
Integrity to casualties and morale situations. As can be seen from the modifiers, units will have a much
better chance to rally the farther they are away from the enemy. Routing units will be very difficult to rally.
Austrian officer leading an assault
65
Leadership
Leadership
cuts 9", 8.75", 8.5", 11.5", 11"
6.11 Leadership Modifiers
Note that the modifiers below are shown for each period playsheet. Not all modifiers will apply to each
period.
Leadership Table: Circumstance
Contact: An enemy unit is in contact with the unit for which the Leadership test is being made.
0 Remaining AMPs: The army is out of Army Morale Points.
Routing: Unit is currently routing.
Within 12": A non-routing enemy unit is within 12" and is in line of sight of the unit for which the Leadership
test is being made.
Over 12": The closest non-routing enemy unit is over 12" distant of the unit for which the Leadership test is
being made.
In Town Section: The unit is deployed in a Town Section.
Per Daring Deed: Officers may perform a Daring Deed hoping to inspire their troops on a rally attempt.
An officer may perform Daring Deeds for multiple units on a Leadership card, but only one Daring Deed per
unit. Officers performing a Daring Deed can modify the Leadership Die Up 1, Up 2, or Up 3. Inspiration
does come at a risk, as the enemy notices the officer’s presence and efforts. Each Up modifier increases
the risk of the officer becoming a casualty. Once the rally attempt has been made, immediately make an
officer casualty roll, rolling a D12. If the D12 roll is equal to or less than 1 plus the number of Up 1
modifiers (1, 2, or 3), the officer is lost.
Designer’s Note: Daring Deeds allow leaders to take a risk to inspire their troops by making a grand
gesture. Nothing better demonstrates this act than the action taken by Confederate General Albert Sidney
Johnson at the battle of Shiloh – described by Timothy Smith in his book Shiloh: Conquer or Perish:
“…this was a critical point in the critical gamble. (Albert Sidney) Johnson had to make a difference, and he
had to do it himself…Johnston thus used his considerable personal charisma, riding the line and whipping
he men into a frenzy. He “told us a few more charges and the day was ours”….Riding along the line of
soldiers, Johnston tapped their bayonets with the little tin cup he had taken from the Wisconsin camp.
“These must do the work,” he shouted….Johnston wheeled Fire Eater around and yelled, “I will lead you!””
Who wouldn’t haven’t been inspired by that action? It looks like an Up 3 to me!
Tactical Advantage: A Tactical Advantage card is played to modify the Leadership Roll.
Inf. w/Two Inf. <6”: Only used for English Civil War period games. All Foot unit types that have two or
more friendly Foot units within 6” of any point of the testing unit receives an Up 1 modifier. This modifier
reinforces the period tendency to keep Foot units in close support of each other.
66
cuts 9", 8.75", 8.5", 11.5", 11"
6.2 Officer Loss Effects
Effects of Losing a Command Group Officer
Effects remain until a replacement Command Group officer is created.
•
•
If a Command Group officer fails a Survival Test, all the units in his Command Group immediately
become Disordered.
Units in a Command Group without an officer may not move on a Move card.
Effects of Losing the Army Commander (CiC)
•
If the Army CiC has been killed and has not been replaced:
o Modify all Leadership Die sizes used for movement rolls Down 2.
o Regardless of which side wins the initiative roll, the enemy CiC decides if he wishes to act
first or second.
o When a Lull card is turned in the army without a Commander, there is no dice off. The
enemy immediately turns 1 card in their Sequence Deck and acts on it.
o When a Lull card is turned by the enemy, the Lull card is ignored.
o If Army Morale Points remain and an Army Morale card is turned, the army rolls a D6 vs.
an enemy D12.
▪ If the D12 roll is less than or equal to the D6 roll, no Army Morale Points are lost.
▪ If the D12 roll is 1 or 2 greater than the D6 roll, 1 Army Morale Point is lost.
▪ If the D12 roll is 3, 4, or 5 greater than the D6 roll, 2 Army Morale Points are lost.
▪ If the D12 roll is 6, 7, or 8 greater than the D6 roll, 3 Army Morale Points are lost.
▪ If the D12 roll is 9, 10, or 11 greater than the D6 roll, 4 Army Morale Points are
lost.
o If the army has 0 Army Morale Points or drops to 0 Army Morale Points on this Army
Morale card, the army quits the battle.
Example: The Austrian CiC has been eliminated. The French and Austrians roll for Initiative. The French
roll a 3 and the Austrians roll a 7. There are 4 Initiative Points. The French get to decide whether to act
first or second, even though they lost the initiative roll.
Example: The French CiC has used his Leadership Die to help Rally units since the last Infantry Fire card
is turned. A new Army Morale card is turned, and the French CiC must now check for survival. He rolls a 1
on a D12. The French CiC is eliminated!
67
Leadership
Effects remain until a replacement Army Commander is created.
cuts 9", 8.75", 8.5", 11.5", 11"
7.0 Sequence Card Definitions
Each Sequence card allows certain specified actions. The full definitions of the actions allowed on each
card are shown below. A brief summary of the actions allowed is shown on each card.
Only one action can be performed per card per unit. Multiple units or Command Groups may act on a card,
but no unit or Command Group may act twice with the same action on the same card.
Sequence decks always include the standard cards. There are also special sequence cards that may be
added to a Sequence Deck for specific scenario requirements.
Each card will cost 0 Initiative Points, 1 Initiative Point, or either 0 or 1 Initiative (the Army Morale card).
The Initiative Point cost for the card is shown on each card.
7.1 Standard Sequence Deck Cards
Army Morale
Tests are performed when an army’s Army Morale card is turned:
• If an army is at 0 Army Morale Points, it must test to determine if it will continue the battle.
• Survival tests are made for any qualifying CiC or Command Group officer.
If the army has not lost any units and does not have any routing units currently on the table, the Army
Morale card costs zero (0) Initiative Points.
If the army has lost any units, or there are any routing units currently on the table, the Army Morale card
costs 1 Initiative Point. If the Army Morale is at zero (0), the Army Morale card costs 1 Initiative Point.
Army Morale Test: If the army is out of Army Morale Points, an Army Morale test must be taken when an
Army Morale card is turned. If the army still has Army Morale Points remaining when an Army Morale card
is turned, do not perform the Army Morale test.
The army’s CiC rolls his Leadership Die vs. a D12 when the army is forced to test Army Morale.
Example: A Prussian army is out of Army Morale Points. For the first time since the army ran out of Army
Morale points, the Army Morale card is turned. The army must test morale. The Prussian CiC has a D12
Leadership Die. The test uses his unmodified Leadership Die. The Prussian CiC rolls his D12 vs. the
competitive D12 and wins the roll. The game continues. The Prussian army remains at 0 Army Morale
Points.
If the army's CiC has been eliminated and has not been replaced when an Army Morale Test is required, no
test is taken. The army simply quits the battle.
Army Morale Test Results: If the Leadership Die roll is greater than the D12 die roll, the testing army may
either continue with the battle, or decided to voluntarily quit the battlefield and end the battle.
• If the Leadership Die roll is less than or equal to the D12 die roll, the army retires from the field and
the game immediately ends.
68
cuts 9", 8.75", 8.5", 11.5", 11"
Example: A Prussian army is out of Army Morale Points. The Prussian turns his Army Morale card. The
Prussian army is now subject to Army Morale tests, rolling their CiC Leadership Die vs. a D12. The
Prussian CiC has a D10 Leadership Die. His roll is a 7, and the opposing D12 roll is a 4. The Prussian
army has passed the Army Morale Test. The Prussian CiC may elect to continue with the game, or if the
situation appears unwinnable in his judgment, he may voluntarily quit the battle. The Prussian CiC
examines the table and decides that his army is sufficiently damaged, and the opponent is in such good
shape that he will voluntarily quit the battle.
Designer's Note: By the time an army drops to 0 Army Morale Points, it has suffered a significant amount
of damage. Armies that fail the test are forced to immediately quit the battle, regardless of the margin of
the die roll failure. The option of continuing or quitting the battle on a won Army Morale Test gives players
the opportunity to decide for themselves if the game is still relatively even (both sides possibly having
suffered significant losses - maybe the enemy is near 0 Army Morale Points themselves!), or if the situation
appears to be bad enough that there is no point in continuing.
Officer Survival Test: A Survival Test is taken for any Command Group officer who has had at least one
unit in his Command Group involved in melee, targeted by fire, or contacted by an enemy since the last
Army Morale Card was turned.
A Survival Test is taken by the army CiC if he has been contacted by an enemy unit or has used his
Leadership Die in a Move or Rally attempt since the previous Army Morale card was turned.
To perform a Survival Test for an officer not contacted by an enemy unit, roll a D12.
• If the D12 Die roll is a 1, the officer is eliminated.
Artillery Fire
Remove fire markers from artillery or machine gun units that have fired. Units with fire markers may not
fire.
Note that Limbered artillery units may use the Artillery Fire card to remove fire markers.
Designer's Note: Since the Fire cards are a game mechanism that controls the frequency of fire, and does
not represent any literal reloading process, even Limbered guns can have their fire markers removed.
A unit that is moving may fire prior to movement and move normally. A unit that fires during the move will
stop moving at the point that it fires.
Units may fire at any time during their Active phase of the Initiative or with Opportunity Fire during their
Reactive phase of the Initiative. Units that have fired must be marked in some manner to show that they
have fired. One marker is placed for each individual artillery unit or machine gun unit. Cotton puffs or
pompoms work well as fire markers.
Note that units are not required to fire on the Artillery Fire card.
69
Card Definitions
To perform a Survival Test for an officer contacted by an enemy unit, immediately roll a D12.
• If the D12 Die roll is a 1 or 2, the officer is eliminated.
• On any other D12 roll, the officer evades a distance equal to the number rolled on the D12.
cuts 9", 8.75", 8.5", 11.5", 11"
Infantry Fire
Remove fire markers from infantry and dismounted cavalry units that have fired. Units with fire markers
may not fire.
A unit that is moving may fire prior to movement and move normally. A unit that fires during the move will
stop moving at the point that it fires.
Units may fire at any time during their Active phase of the Initiative or with Opportunity Fire during their
Reactive phase of the Initiative. Units that have fired must be marked in some manner to show that they
have fired. One marker is placed for each unit. Cotton puffs or pompoms work well as fire markers.
Routed units may not use the Infantry Fire card to remove fire markers.
Designer's Note: Routed is a condition reflecting a unit's near destruction as an effective unit. The penalty
of not allowing the use of an Infantry Fire card is used to emphasize the perilous condition of the unit.
Note that units are not required to fire on the Infantry Fire card.
Leadership
A Leadership card may be used to:
• Move officers
• Replace lost officers
• Rally losses (disorder, rout, UI)
o If a Leadership Die roll is a 1 on a Rally attempt, no further rally attempts are made on the
present Leadership card.
o An officer may attempt to rally multiple units on a Leadership card but may make only one
rally attempt per unit.
• Change formation or facing
o All rally attempts must be completed before changing any unit’s formation or facing
o If a Leadership Die roll is a 1 on a Rally attempt, no facing or formation changes can be
made on the present Leadership card.
o Multiple units may change facing or formation on a Leadership card, but each unit may only
perform one of either changing face or formation.
• An officer may attempt to rally a unit and that unit may also change formation or facing on the same
Leadership card.
Daring Deed: Officers may perform a Daring Deed hoping to inspire their troops on a rally attempt. An
officer may perform Daring Deeds for multiple units on a Leadership card, but only one Daring Deed per
unit. Officers performing a Daring Deed can modify the Leadership Die Up 1, Up 2, or Up 3. Inspiration
does come at a risk, as the enemy notices the officer’s presence and efforts. Each Up modifier increases
the risk of the officer becoming a casualty. Once the rally attempt has been made, immediately make an
officer casualty roll, rolling a D12. If the D12 roll is equal to or less than 1 plus the number of Up 1
modifiers (1, 2, or 3), the officer is lost.
Example: Hiram T. Fandango, of the Philadelphia Fandangos, is going to attempt to rally the 48th
Pennsylvania Volunteers. Hiram decides that it is crucial that the 48th rally, so he throws caution to the
70
cuts 9", 8.75", 8.5", 11.5", 11"
wind and performs a Daring Deed, adding an Up 3 to the Leadership Die modifier. Hiram rolls the modified
Leadership Die and…..Success! The 48th rallies! Hiram now must roll a D12 to determine if his
courageous act will go unpunished. If he rolls a 1-4 (1 plus the number of Up modifiers, in this case 3), he
will become a casualty. Hiram nervously rolls the D12 and rolls a 3! Hiram has evidently galloped directly
into the line of fire of an enemy volley while performing his Daring Deed and is dropped like a bad habit.
Officer Movement: While Command Group officers may always move at their full movement speed with
their Command Groups on the Move card, they may also move on the Leadership card. All officer
movement on a Leadership card is 16", ignoring any and all terrain penalties. Army CiCs may only move
on the Leadership card.
Maneuver: Units may change either facing or formation after all Rally attempts are done. Note that if a
Leadership Die roll is a 1 on a Rally attempt, no facing or formation changes can be made on the present
Leadership card.
• Change Facing
o All units may change facing by up to 180º. Facing changes are made by pivoting on a flank
or center of the unit.
Rally: Rally attempts are made on Leadership cards to rebuild Unit Integrity, rally routing units, and to
Order units.
The unit must be within the Command Group officer's Command Radius. A Command Group officer may
attempt to Rally multiple units in his Command Group on a Leadership card. Only one rally attempt may be
made per unit on a Leadership card.
The army commander (CiC) may attempt to rally and/or maneuver any one unit within his Command
Radius. Note that if the army commander (CiC) attempts to rally or maneuver a unit, he is at risk and must
check for survival on the next Army Morale card.
A Leadership Die roll is made vs. an opposing D8 roll, modifying the Leadership Die for any and all unit
conditions that apply for the Rally attempt. Note that a Leader may be able to Order a unit without
successfully rallying any Unit Integrity.
The amount a Leadership Die roll beats the opposing D8 roll on a Leadership test will determine the
success of the rally attempt.
If the Leadership Die roll is a 1, the attempt fails, and no further Rally attempts may be made by the officer
on the present Leadership card.
71
Card Definitions
• Change Formation
o Units may change formation.
▪ The front of the new formation remains at the same position and facing as the front
of the old formation.
▪ The only exception is for units changing from March into Line or from Line into
March. Units changing from March into Line or from Line into March may do so by
simply turning stands to the right or left and facing 90º from the unit’s original
facing.
o Cavalry units may mount or dismount.
o Artillery units may limber or unlimber.
cuts 9", 8.75", 8.5", 11.5", 11"
• Disorder
o Units are Ordered if the LD roll is greater than the opposing D8 roll.
• Rout
o Routing units are rallied and Ordered if the LD roll is greater than the opposing D8 roll.
o When a routing unit is rallied, it may face in any direction, and may be formed into any
formation.
• UI Loss
o 1 UI is rallied for every increment of 3 that the LD roll is higher than the opposing D8 roll.
Example: Officer A is attempting to rally an infantry unit that has lost 3 Unit Integrity. Officer A has a D10
Leadership Die. Assuming no modifiers apply, Officer A rolls a 6 on his D10, vs. a 3 on the enemy's D8.
The unit has rallied 1 Unit Integrity (6 – 3 = 3) and now only has 2 Unit Integrity losses.
Example: A routing unit is being tested to rally. The officer's Leadership Die roll is a 7 vs. a 4 on the
enemy's D8. The unit has rallied and recovered 1 Unit Integrity (7 - 4 =3). The unit is rallied from routing
to Ordered.
Replacing Lost CiC: When the next Leadership card is drawn, roll a D20.
•
•
•
On a roll of 1 or 2, the CiC command position remains vacant until a future attempt is successfully
made on a subsequent Leadership card.
On any other roll, randomly select the replacement Army Commander from Command Group
officers presently in play on the next Leadership card that is turned.
o Assign numbers to the Command Group officers on the table and roll a die size that is
equal to or greater than the number of Command Group officers.
o The number rolled is the new army commander.
Immediately rate a replacement Command Group officer as described below.
Replacing Lost Officers:
• A replacement officer is placed with the Command Group on the next Leadership card that is
turned.
• Rate the officer as described in 2.2 Leadership and 2.3 Leadership Ratings, using the rating table
below.
• A replacement officer may immediately make rally attempts on the current Leadership card.
• On a D20 roll of 1 or 2, the command position remains vacant until a future attempt is successfully
made on a subsequent Leadership card.
Leadership
Quality
Abysmal
Poor
Average
Skilled
Exceptional
No Replacement Leadership Leadership Leadership Leadership
(Re-roll on next
Die
Die
Die
Die
Leadership card)
D8
D10
D12
D12+1
1-2
1-2
1-2
1-2
1-2
3-16
2-14
3-5
3
-
72
17-20
15-19
6-17
4-10
3-9
20
18-19
11-18
10-17
20
19-20
18-20
cuts 9", 8.75", 8.5", 11.5", 11"
Lull
The Lull card represents periods of inactivity. No action is taken, and the army dawdles and wastes time.
The Lull by the friendly army gives a chance for the enemy to seize the initiative and act on a single card.
Each side rolls their CiC Leadership Die. If the enemy die roll is greater than the friendly die roll, the enemy
may immediately turn 1 card in their Sequence Deck and act on it. After the card is turned and acted upon,
play resumes with the friendly army's actions.
Note: The chance to seize the initiative may pass back and forth between armies if Lull cards are played
sequentially by each army.
Melee
The Melee card allows units to initiate melee. A Melee card may be acted on by all units that are in contact
or that are within 1/2 of a single move segment of an enemy unit and move to contact
Designer's Note: The ability to move 1/2 of a single move segment into contact on a Melee card is a new
feature. This gives attacking units more opportunities to close to and resolve contact.
Attacking (and supporting) units may move up to 1/2 of a single move segment into contact on a Melee
card. The target unit must be in line of sight. The move must be without a change of face. Units may
oblique per the normal movement rules. All terrain and Disordered movement penalties apply to the melee
move to contact. If the unit does not have enough movement to contact the enemy, it remains in place and
does not move.
See 5.2 Melee Combat.
Move
Artillery, cavalry, and infantry units may move on a Move card.
When a Move card is turned, all routing units in that army are required to move.
See 4.0 General Movement Rules for specific movement rules.
Move 1 Command
A single Command Group may move on the Move 1 Command card.
Artillery, cavalry, and infantry units may move on a Move 1 Command card.
When a Move 1 Command card is turned, all routing units in that army are required to move.
See 4.0 General Movement Rules.
73
Card Definitions
Initiating a melee is voluntary. The unit acting on the Melee card receives an Up 1 Melee modifier in the
first round of a melee. Note that units that initiate a melee vs. a Square, as well as the Square, do not
receive the Up 1 modifier for initiating melee. Each unit may only initiate one melee per Melee Card,
regardless of how many enemy units it is contacting.
cuts 9", 8.75", 8.5", 11.5", 11"
Tactical Advantage
A maximum of 2 Tactical Advantages may be in play for an army at any time. The Tactical Advantage
cards may be held once turned and played when desired to receive an Up 1 modifier on ANY die roll other
than an Army Morale test. Only 1 Tactical Advantage card may be played per side per roll. Once played,
the Tactical Advantage card is discarded until it is returned to the Sequence Deck at the end of the turn. All
Tactical Advantage cards (used or unused) are returned to the Sequence deck and shuffled at the end of a
turn.
Designer's Note: Players will want to judge when it is best to apply the Up 1 modifier to their Combat Die,
Defense Die, or Leadership Die. The Tactical Advantage card is useful in combat situations and also
represents all the low level tactical situations and environments that are below the scale of representation
of the game. Did the Command Group's skirmishers clear out the enemy to allow for more efficient
movement and deployment? Maybe - make up your own reason why the Up 1 modifier that was used for
the Leadership Die roll resulted in three move segments! This is the narrative component of the game.
Enjoy creating the storyline - it's certainly more interesting than simply thinking "I used the Up 1 to modify
General 3 to a D12 and he rolled for three move segments". Maybe the slope on that hill was less than
suspected? Maybe the Command Group's junior officers were on their game and handled their troops
well?
Don’t feel limited to my definition of the Tactical Advantage card. Redefine it as you feel is necessary for
your games or scenarios. Maybe it allows a one segment move by light troops (on anything but a roll of 1
on their Defense Die), or maybe it allows removal of a fire marker for a single unit, or maybe it can be held
and played as a change of face or formation for one unit. Use your imagination!
7.2 Special Sequence Deck Cards
Frenzied Charge
The Frenzied Charge card allows units as defined by scenario (for example – Jacobite Highlander infantry,
Mahdist, Zulu, and irregular natives) to initiate melee. A Frenzied Charge card may be acted on by all units
that are in contact or that are within a single move segment of an enemy unit and move to contact.
The Frenzied Charge card costs 0 Initiative Points to turn and play.
Designer's Note: The ability to move a single move segment into contact on a Frenzied Charge card
makes units able to use the card a threatening proposition!
Initiating a melee is voluntary. The unit acting on the Frenzied Melee card receives an Up 1 Melee modifier
in the first round of a melee. Each unit may only initiate one melee per Frenzied Melee Card, regardless of
how many enemy units it is contacting.
Attacking (and supporting) units may move up to a full single move segment into contact on a Frenzied
Charge card. The target unit must be in line of sight. The move must be without a change of face. Units
may oblique per the normal movement rules. All terrain and Disordered movement penalties apply to the
melee move to contact. If the unit does not have enough movement to contact the enemy, it remains in
place and does not move.
74
cuts 9", 8.75", 8.5", 11.5", 11"
Incident (Optional)
The Incident card is an optional use card and is used to add scenario specific events to a game. The
Incident card can be removed after its first appearance or it can remain in the deck for the duration of the
game. The choice is up to the scenario designer.
Incidents occur after the Incident card is turned when the die rolls meet the incident criteria. Incidents are
specific to a single unit at a time.
The Incident card costs 0 Initiative Points to turn and play.
The incident is defined by scenario or player agreement prior to start of play. Examples of incidents are
shown below.
Ammunition:
• After the Incident card is turned, on any fire for the remainder of the turn where the firing unit’s
Combat Die roll is odd and less than the target unit’s odd Defense Die roll, the firing unit is out of
ammunition.
• It may not fire until it is replenished, which occurs at the end of the turn.
Ragged Fire:
• After the Incident card is turned, on any fire for the remainder of the turn where the firing unit’s
Combat Die roll is odd and less than the target unit’s odd Defense Die roll, the firing unit is firing
out of control.
• Place two fire markers on the unit instead of one. Both fire markers must be removed before the
unit can fire again by removing one marker per Fire card.
Rash Advance:
• Prior to the start of the game, determine if any Leader is characterized as Rash.
• Roll a D20. If the roll is 16-20, that Leader is Rash.
• After the Incident card is turned, on any movement roll for the remainder of the turn where the
Leader’s Leadership Die roll is odd (including a roll of 1) and less than the opposing side’s odd D6
roll, the command will advance directly forward a distance in inches equal to the sum of the die
rolls.
• The Command Group Leader must immediately check for survival.
• Roll a D12. On a roll of 1 the Leader is removed.
• Any contacts caused by the rash advance will result in immediate melees.
Timid Advance:
• Prior to the start of the game, determine if any Leader is characterized as Timid.
• Roll a D20. If the roll is 1-5, that Leader is Timid.
• After the Incident card is turned, on any movement roll for the remainder of the turn where the
Leader’s Leadership Die roll is odd (including a roll of 1) and less than the opposing side’s odd D6
roll, the command will advance at half speed.
75
Special Card Definitions
Stand Off:
• After the Incident card is turned, for any melee for the remainder of the turn if both unit’s Combat
Die rolls are odd and no UI losses are caused, the melee ends.
• Both units fall back out of contact a distance equal to the difference in the die rolls.
cuts 9", 8.75", 8.5", 11.5", 11"
Cowardly Retreat:
• Prior to the start of the game, determine if any Leader is characterized as a Coward.
• Roll a D20. If the roll is 6-7, that Leader is Cowardly.
• After the Incident card is turned, on any movement roll for the remainder of the turn where the
Leader’s Leadership Die roll is odd (including a roll of 1) and less than the opposing side’s odd D6
roll, the command will fall back at full speed.
Special Event (Optional)
The Special Event card is an optional use card and is used to add scenario specific events to a game. The
Special Event card can be removed after its first appearance or it can remain in the deck for the duration of
the game. The choice is up to the scenario designer.
The Special Event card costs 0 Initiative Points to turn and play.
Card activated special events occur when the Special Event card is turned and if event conditions exist.
The special event is defined by scenario or player agreement prior to start of play. Examples of special
events are shown below.
Advance:
• For each Command Group not in Town Sections or in defensive works, roll the Command Group
Officer's Leadership Die vs. a D6.
• If the Leadership Die roll is greater than the D6 roll, the Command Group does not advance.
• If the Leadership Die roll is less than or equal to the D6 roll, the Command Group advances one
move segment.
• Command Groups made up of only artillery units ignore the Advance! card.
Fanatic Action:
• Any Native units with line of sight to an enemy unit will advance directly towards the closest enemy
unit.
• Units moving on a Fanatic Action card will roll for movement individually, unit by unit.
o Instead of using the Command Group Leadership Die, units moving on a Fanatic Action
card will modify their Defense Die Up 3 and using that die to roll vs. the enemy D6.
Reinforcements Arrive:
• Per scenario requirements, any off table reinforcements arrive at the pre-arranged table edge
location.
Resolve:
• Any unit that is within a distance in inches equal to the enemy's Defense Die must roll its Defense
Die vs. the enemy's Defense Die.
• If the unit rolls equal to or greater than the enemy's Defense Die roll, it passes the test without any
adverse effect.
• If the unit rolls less than the enemy's Defense Die roll, it fails the test, goes Disordered, and
immediately moves directly away from the enemy unit a distance equal to the difference in the
Defense Die rolls.
76
cuts 9", 8.75", 8.5", 11.5", 11"
Sneaky Heathens:
• Added only to a colonial power’s Sequence Deck.
• When turned in the colonial power’s deck, the Native opponent may immediately move.
• Follow normal procedures for movement as described in the Move card definition.
• The colonial power resumes play during their Initiative after the Natives have moved.
Sniper:
• Designate any non-CiC leader in the opposing army as a target for a sniper.
• The turning side rolls a D12. If they roll a 1, the target leader is eliminated.
Uncontrolled Charge:
• Any cavalry or infantry unit that has a direct line of sight to an enemy unit will charge towards that
enemy unit.
• If any move results in contact, melee must be immediately resolved following normal procedures.
• Follow normal movement procedures but roll each unit's Combat Die vs. a D6 to determine how
many movement segments are allowed.
• Units will continue to charge towards enemy units until contact is made or they pass a Rally test.
Wildcard:
• Designate as any card presently in the army’s sequence deck.
• Resolve actions as per the designated sequence card.
Special Card Definitions
Withdraw:
• Each Command Group rolls their Command Group officer's LD vs. a D6.
• If the Leadership Die roll is greater than the D6 die roll, the Command Group holds in place.
• If the Leadership Die roll is less than or equal to the D6 die roll, the Command immediately retreats
one full move segment rearward (at full speed, without penalty for moving backwards).
• Withdrawing units remain in the same formation and with the same facing as they had at the start
of the move.
77
cuts 9", 8.75", 8.5", 11.5", 11"
Rapid Fire
Add the Rapid Fire card to the Sequence Deck of any army with units that are armed with breechloading
weapons, repeating weapons, or machine guns. The Rapid Fire card remains in the Sequence Deck for the
duration of the game.
Remove fire markers from infantry, dismounted cavalry, and artillery units armed with breechloading,
repeating, or machine guns.
Units may fire at any time during their Active phase of the Initiative or with Opportunity Fire during their
Reactive phase of the Initiative. Units that have fired must be marked in some manner to show that they
have fired. One marker is placed for each unit. Units with fire markers may not fire. Cotton puffs or
pompoms work well as fire markers.
Note that units are not required to fire on the Rapid Fire card.
Routing units may not use the Rapid Fire card to remove fire markers.
Rapid Fire cards cost 0 Initiative Points to turn and play.
Rolling Fire
Add the Rolling Fire card to the Sequence Deck of any army with units that are armed with repeating
weapons or late machine guns. The Rolling Fire card remains in the Sequence Deck for the duration of the
game.
Remove fire markers from infantry and dismounted cavalry armed with repeating weapons, and late
machine gun units.
Units may fire at any time during their Active phase of the Initiative or with Opportunity Fire during their
Reactive phase of the Initiative. Units that have fired must be marked in some manner to show that they
have fired. One marker is placed for each unit. Units with fire markers may not fire. Cotton puffs or
pompoms work well as fire markers.
Note that units are not required to fire on the Rolling Fire card.
Routing units may not use the Rolling Fire card to remove fire markers.
The Rolling Fire card costs 0 Initiative Points to turn and play.
78
cuts 9", 8.75", 8.5", 11.5", 11"
8.0 Winning the Game
A Field of Battle game will have a definite end, with the winner clearly defined. The winner of the battle will
be determined by the Army Morale card procedure. An army that is reduced to zero Army Morale Points
that fails an Army Morale test is forced to quit the field and loses the battle.
8.1 Margin of Victory
When an army fails an Army Morale test that forces the end of the game, the margin of victory can be
determined.
Count the number of Army Morale Points remaining for the winning army.
Minor Victory:
< = ½ of starting Army Morale Points remaining when opponent fails
Army Morale test.
Major Victory:
> ½ of starting Army Morale Points remaining when opponent fails
Army Morale test.
Crushing Victory: > starting Army Morale Point total
9.0 Glossary of Terms
Army Morale Points: An abstract measure of the cumulative will and morale of the tabletop army. Army
Morale Points are established prior to play and are lost in fire and melee combat. See 2.5 Army Morale
Points.
CiC: Commander in Chief. The tabletop army’s overall commanding officer.
Combat Die: A single die size that represents the combat ability of a unit. The Combat Die size is
modified in fire and melee combat. See 2.1 Unit Ratings and 2.11 How To Rate Units.
Command Group: Command Groups are groupings of units under one officer. Each Command Group
must have a commanding officer. Independent officers are not allowed. Only the army commander may
act independently of any Command Group. Command Groups may consist entirely of one type of unit, or
of multiple types of unit. See 2.6 Command Groups.
Command Radius: Command radius is the range measured from a leader that is the limit of his command
influence. To rally a unit, the unit being rallied must be within the leader’s command radius.
For the English Civil War, a leader’s command radius is a distance in inches equal to his Leadership Die
size. For other periods, a leader’s command radius is a distance in inches equal to two times his
Leadership Die size. See 2.2 Leadership.
Defense Die: A die size that represents the class of a unit. The Defense Die captures the morale quality
of a unit. The Defense Die is rolled by a target unit when it is fired at by the enemy. See 2.1 Unit Ratings
and 2.11 How To Rate Units.
79
cuts 9", 8.75", 8.5", 11.5", 11"
Disordered: Unit status as a result of combat. Units that are Disordered are less effective in fire and
melee combat. They also move at 1/2 the normal distance.
Hits: The difference between Combat Die rolls in fire or melee combat.
Immediate Melee: A unit may Immediate Melee if its Command Group Leadership roll for movement was
won and Even. Refer to the period specific rules to identify which troop types qualify to immediate melee.
Leadership Die: A single die size that abstractly captures the abilities of a commanding officer (CiC) or
Command Group officer. The Leadership Die is used for Rally tests and for movement actions.
Ordered: A state of being in control and combat effective.
Supporting Unit: A supporting unit is used with an attacking unit to melee a single enemy unit on a Melee
card or with an immediate melee on a Move card. The use of a supporting unit forces the “Outnumbered”
Down 1 modifier on the enemy. The supporting unit does not roll its Combat Die in the melee.
80
cuts 9", 8.75", 8.5", 11.5", 11"
10.0 Period Rules
Rules, army lists, and playsheets are provided for the following periods:
•
•
•
•
•
•
•
•
•
•
•
•
•
•
•
•
•
English Civil War 1642-1651
War of Spanish Succession 1701-1714
Great Northern War 1700-1721
Jacobite Rebellion 1745-1746
Seven Years War 1756-1763
American War of Independence 1775-1783
Napoleonic Wars 1792-1815
Mexican-American War 1846-1848
Anglo-Sikh Wars 1845-1846/1848-1849
Crimean War 1853-1856
Austro-Franco War 1859
American Civil War 1861-1865
Austro-Prussian War 1866
Franco-Prussian War 1870-71
Russo-Turkish War 1877
Anglo-Zulu War 1879
Sudan Wars 1881-1899
The army lists are guidelines to help in the creation and rating of armies. The modifiers and ratings listed
should be considered as suggestions and not requirements. They should be used along with independent
research and opinion to rate armies for play. Players may elect to design specific scenarios and assign
Leadership Die, Combat Die, and Defense Die sizes to best fit their scenario requirements.
The suggested Leadership and troop Qualities can vary by up or down one level.
Period Rules
Example: An army has a suggested Leadership Quality for the CiC of Average, and a suggested
Leadership Quality for the Command Group officers of Skilled. The CiC's Leadership Quality for the game
could be Poor, Average, or Skilled. The Command Group officer's Leadership Quality could be Average,
Skilled, or Exceptional.
81
cuts 9", 8.75", 8.5", 11.5", 11"
English Civil War 1642-1651
English Civil War 1642-1651
Royalist
1642-44
Royalist
1645-51
Parliamentarian
1642-44
Parliamentarian
1645-51
(New Model)
Montrose
Scots
Scots
Covenenters
CiC LQ
Av erage
Poor
Poor
Av erage
Skilled
Poor
Cmd. Group
LQ
Av erage
Av erage
Av erage
Skilled
Av erage
Av erage
Hedgehog
Hedgehog
Hedgehog
Hedgehog
Hedgehog
Hedgehog
Pike Forw ard
Pike Forw ard
Pike Forw ard Pike Forw ard
Shot Forw ard
Shot Forw ard
Shot Forw ard Shot Forw ard
Infantry
Pike Forw ard Pike Forw ard
Formations
Shot Forw ard Shot Forw ard
Cavalry
Formations
Skirmish
Units
Grand Battery
Line
Line
Line
Line
Line
Line
None
None
None
None
None
None
No
No
No
No
No
No
Rabble
Dragoons
Raw
Foot
Foot
Dragoons
Foot
Foot
Guns
Guns
Guns
Guns
Horse
Horse
Horse
Dragoons
Regular
Crack
Foot
Horse
Dragoons
Foot
Foot
Foot
Foot
Horse
Guns
Guns
Guns
Horse
Horse
Horse
Cuirassier
Dragoons
Foot
Foot
Horse
Horse
Foot
Elite
Playsheet: English Civil War 1642-1651
82
Highlanders
Foot
Highlanders
Horse
Foot
Foot
Highlanders
Highlanders
Irish Foot
Guns
Guns
Horse
Horse
Lancers
Dragoons
Foot
Foot
Irish Foot
Horse
Horse
cuts 9", 8.75", 8.5", 11.5", 11"
Basing
English Civil War Basing
Troop Type
Guns
Horse
Foot - Pike
Commanded Pike
Foot - Shot
Commanded Shot
Officers
Stand Size
Figures per Stand
Stands per
Unit
2
1 1/2" wide x 3" deep
1 Gun, 3 crew
2 1/2" wide x 2 1/4" deep
3
2
2" wide x 2" deep
6
1 per foot unit
2" wide x 2" deep
6
2
1 1/2" wide x 1 1/2" deep
3
2 per foot unit
2 1/2" wide x 1 1/2" deep
6
2
1 1/2" wide x 1 1/2" deep for 1 or 2 for Command Group
Command Group Officers;
Officers;
NA
2 1/2" x 2 1/2" for Army
2 or more for Army
Commander (CiC)
Commander (CiC)
Note that the basing shown is a suggestion and represents the author’s collection. Any basing will work
with the rules.
Unit Types
The following troop types are used in the ECW game.
Infantry Types:
•
Foot units are combined pike and shot units that have 3 stands: 2 flank stands of Shot and 1
center stand of Pike.
•
Commanded Shot units are units armed only with firearms and have 2 stands of Shot.
•
Commanded Pike units are units armed only with pike and have 2 stands of Pike.
Mounted Types:
Horse units represent the bulk of cavalry, armed with sword and pistol and wearing some combination of
buff coats and partial armor. Horse are further segmented into Gallopers or Trotters. Horse units have 2
stands of figures.
Dragoon units are typically unarmored and armed with muskets. Dragoon units are of limited use as a
mounted melee unit and are primarily useful as a dismounted force. Dragoon units have 2 stands of
figures.
83
Period Rules
Cuirassier units have completely armored riders and are extremely limited in number. Cuirassier units are
armed with sword and pistol. Cuirassier are further segmented into Gallopers or Trotters but will typically
be Gallopers. Cuirassier units have 2 stands of figures.
cuts 9", 8.75", 8.5", 11.5", 11"
Lancer units are lightly armored and armed with a lance (surprisingly). Lancer units have 2 stands of
figures.
Artillery Types:
All artillery is referred to as Guns in the ECW rules. Guns can be of weights from Extra Light through
Heavy. Gun units have 2 stands of guns.
Unit Formations
Infantry Formations:
•
Commanded Pike: Commanded Pike units consist solely of pike armed foot. The two pike stands
are in edge to edge contact in a line formation. Commanded Pike counts as Pike Forward in
melee. Commanded Pike has no fire capacity.
Commanded Pike
•
Commanded Shot: Commanded Shot units consist solely of shot armed foot. Dismounted
dragoons and Highlander infantry armed with muskets are treated as Commanded Shot. The two
shot stands are in edge to edge contact in a line formation. Commanded Shot counts as Shot
Forward for fire combat. Commanded Shot is poor in melee.
Commanded Shot
84
cuts 9", 8.75", 8.5", 11.5", 11"
Foot: Foot units have 2 stands of Shot and 1 stand of Pike. Foot units may be in the following
formations:
o Hedgehog: Shot stands are placed with the back of their bases on any two sides of the center
pike stand. This formation has no flanks in melee and is defensive in nature. Units in
Hedgehog may not move.
Hedgehog
o Pike Forward: All stands are aligned along their rear edge. This formation is better for melee,
but worse for fire. Note that Commanded Pike are always considered to be in Pike Forward
formation.
Pike
Shot
Shot
Pike Forward
o Shot Forward: All stands are aligned along their front edge. This formation is better for fire,
but worse for melee. Units must be in Shot Forward to use Salvo fire. Note that Commanded
Shot are always considered to be in Shot Forward formation.
Shot
Pike
Shot
Shot Forward
Period Rules
•
85
cuts 9", 8.75", 8.5", 11.5", 11"
o March: All infantry units (Foot, Commanded Shot, Commanded Pike) may be in March
formation. March is a very poor combat formation, but a maneuverable one. Units in March
formation may move with unlimited facing changes during movement. Units may not fire while
deployed in March. Units in March formation never initiate melee.
March
Mounted Formations: Mounted units may only be in Line or March formation.
•
Line: Stands are in edge to edge contact. This formation represents both a 3 rank formation
based on the Swedish style as well as the 6 rank Dutch style deployment.
Line
86
cuts 9", 8.75", 8.5", 11.5", 11"
•
March: All mounted units may be in March formation. March is a very poor combat formation, but
a maneuverable one. Units in March formation may move with unlimited facing changes during
movement. Units may not fire while deployed in March. Units in March formation never initiate
melee.
March
Guns: Guns may be limbered or unlimbered.
•
Limbered: Limbered gun units are a movement formation. Units that are Limbered are very
maneuverable. Units in Limbered formation may move with unlimited facing changes during
movement.
Unlimbered
•
Unlimbered: Guns are deployed unlimbered in base to base contact.
Designer’s Note: March formation is included for completeness, but it should be used sparingly in set piece
battles. Scenario designers should limit its use in battle scenarios as it would provide a degree of flexibility
and maneuverability that wasn’t present in a typical ECW battle. For small scale or encounter games, or
games with an opportunity to force passage of a bridge, defile, or for, March formation might be used.
87
Period Rules
Unlimbered
cuts 9", 8.75", 8.5", 11.5", 11"
Unit Integrity
Units have the following Unit Integrity (UI):
• Infantry (Foot, Commanded Pike, Commanded Shot) 4 UI
• Mounted (Horse, Cuirassier, Lancer, Mounted and unmounted Dragoons) 3 UI
• Artillery 2 UI
88
cuts 9", 8.75", 8.5", 11.5", 11"
Unit Combat Die Rating Table
English Civil War Unit Combat Die Ratings
RABBLE
D8
1-18
1-15
Extra Light Gun (Falconet)
Light Gun (Saker)
Medium Gun (Demi-Culverin)
Heavy Gun (Culverin)
Dragoon
Horse
Cuirassier
Foot
1-7
1-7
Unit Type
RAW
D8
1-17
1-14
1-6
1-6
Extra Light Gun (Falconet)
Light Gun (Saker)
Medium Gun (Demi-Culverin)
Heavy Gun (Culverin)
Dragoon
Horse
Cuirassier
Foot
Unit Type
REGULAR
D8
1-16
1-13
1-5
1-5
Extra Light Gun (Falconet)
Light Gun (Saker)
Medium Gun (Demi-Culverin)
Heavy Gun (Culverin)
Dragoon
Horse
Cuirassier
Foot
Unit Type
CRACK
D8
1-15
1-12
1-4
1-4
Extra Light Gun (Falconet)
Light Gun (Saker)
Medium Gun (Demi-Culverin)
Heavy Gun (Culverin)
Dragoon
Horse
Cuirassier
Foot
Unit Type
ELITE
D8
1-14
1-11
1-3
1-3
Extra Light Gun (Falconet)
Light Gun (Saker)
Medium Gun (Demi-Culverin)
Heavy Gun (Culverin)
Dragoon
Horse
Cuirassier
Foot
89
Combat Die
D10
D12
19-20
16-20
1-18
19-20
1-13
14-20
8-17
18-20
1-7
8-17
1-5
6-14
8-17
18-20
Combat Die
D10
D12
18-20
15-20
1-17
18-20
1-12
13-20
7-16
17-19
1-6
7-16
1-4
5-13
7-16
17-19
Combat Die
D10
D12
17-20
14-20
1-16
17-20
1-11
12-20
6-15
16-18
1-5
6-15
1-3
4-12
6-15
16-18
Combat Die
D10
D12
16-20
13-20
1-15
16-20
1-10
11-20
5-14
15-17
1-4
5-14
1-2
3-11
5-14
15-17
Combat Die
D10
D12
15-20
12-20
1-14
15-20
1-9
10-20
4-13
14-16
1-3
4-13
1
2-10
4-13
14-16
D12+1
18-20
15-20
D12+1
20
17-20
14-20
20
D12+1
19-20
16-20
13-20
19-20
D12+1
18-20
15-20
12-20
18-20
D12+1
17-20
14-20
11-20
17-20
Period Rules
Unit Type
cuts 9", 8.75", 8.5", 11.5", 11"
Movement
Guns: Once unlimbered, guns cannot be limbered and repositioned.
Immediate Melee: Commanded Pike, Foot units and Galloper Horse units may immediate melee on a won
Even movement die roll.
Interpenetration: Horse and foot may not interpenetrate each other or their own type. However, either
may interpenetrate artillery.
Maneuver: Change of facing is unlimited for all types on a won Even movement roll or on a Leadership
card. Foot (Pike and Shot, Commanded Pike, Commanded Shot), dismounted dragoons, and guns must
test to determine if they change face effectively or end their change in Disorder. After the unit has
maneuvered, roll the unit’s Defense Die vs. a D6. If the unit’s roll does not beat the D6 roll, a Maneuver
Disorder marker is placed on the unit. Note that changing formation (to or from any formation) does not
require a maneuver test.
Maneuver Disorder: A foot, dismounted dragoon, or gun unit failing a Maneuver Disorder test becomes
Maneuver Disordered.
• A Maneuver Disorder marker is automatically removed on a Leadership card after all rally attempts
are completed.
o Maneuver Disorder is not rallied if the Command Group’s Leadership Die roll is a 1 on any
rally attempt. The next opportunity to remove a Maneuver Disorder would be on the next
Leadership card..
Movement in Terrain: Guns and Horse treat Class II terrain as Class III and Class III as impassable
Class IV. Foot and Commanded Pike units treat Class II Woods as Class III and Class III Woods as
impassable Class IV woods.
Move Distance for Foot Units: Foot and Commanded Pike move slower in this period due to organization
by ranks rather than file. Foot and Commanded Pike units move 6” per move segment. Commanded Shot
move 8” per move segment.
Fire Combat
Arc of Fire: Foot fire directly ahead. Guns have 45 degree arc of fire to either flank. If any part of an
enemy unit is in the arc of fire they may be fired at.
Disorder Fire and Melee Modifiers: A unit may have a maximum of 1 combat caused Disorder and 1
Maneuver Disorder. The maximum penalty is Down 2 if the unit has both combat and Maneuver Disorder.
Formation Modifiers: Note that the Foot Formation modifier line is only for the formation of the firing unit.
There are no modifiers for the formation of the target unit as all units in this period are relatively deep and
dense, thus presenting little differentiation as targets.
Salvo Fire: Represents the doubling of ranks and firing all or nearly all a unit. Salvo Fire is only available
at the shortest 0-4” range band by units in Shot Forward formation.
90
cuts 9", 8.75", 8.5", 11.5", 11"
Melee Combat
Disorder Fire and Melee Modifiers: A unit may have a maximum of 1 combat-caused Disorder, and 1
Maneuver Disorder. The maximum penalty is Down 2, if the unit has both combat and Maneuver Disorder.
Gallopers and Trotters: Horse will be either Gallopers or Trotters. Gallopers rely on the mass impact of
rapid movement and closing to overthrow the enemy. Trotters rely on the discharge of firearms
immediately prior to contact to disrupt their enemy to gain an initial advantage.
•
Gallopers
o Receive the Up 1 initiating melee modifier when they initiate a melee.
o May immediate melee on a won Even movement roll.
•
Trotters
• Both units in the melee roll their Defense Die. If the Trotters roll higher, they receive the Up 1
initiating melee modifier (their pre-melee point blank fire impacted their enemy).
o Note that if Trotters roll higher than Gallopers, and the Gallopers initiated the melee,
then both would receive the Up 1 modifier.
Highlanders: If an army has Highland infantry, add the Frenzied Charge card. The Frenzied Charge card
costs 0 Initiative Points.
Royalist Cuirassier: Early Royalist armies may include a maximum of 1 Cuirassier unit. Cuirassier units
act as Gallopers, and other Mounted units that are in melee vs. Cuirassier units suffer a Down 1 melee
modifier.
Scottish Lancers: Only receive the Up 1 initiating melee modifier when they initiate a melee in Class I
terrain. May immediate melee on a won Even movement roll.
Leadership
Foot Rally Modifier: To reward keeping Command Groups relatively compact, foot units receive an Up 1
Leadership modifier if there are two friendly foot units within 6”.
Leadership Radius: An officer’s leadership range in inches is equal to his Leadership Die size.
Period Rules
Rallying Maneuver Disorder: Rallied automatically on a Leadership card after all other Rally attempts
have been completed. Note that if a 1 is rolled on any previous rally attempt, the Maneuver Disorder may
not be rallied.
91
cuts 9", 8.75", 8.5", 11.5", 11"
War of Spanish Succession 1701-1714
War of the Spanish Succession 1704-1714
CiC LQ
Cmd. Group
LQ
Infantry
Formations
Cavalry
Formations
Skirmish
Units
Grand Battery
Rabble
Raw
Regular
Austrian
Bavarian
British
Denmark
Dutch
French
Palatinate
Piedmont
Savoy
Prussian
Spanish
Skilled
Poor
Skilled
Poor
Poor
Poor
Poor
Poor
Poor
Poor
Average
Poor
Skilled
Poor
Average
Poor
Poor
Poor
Poor
Poor
Line
Line
Line
Line
Line
Line
Line
Line
Line
Line
Line
Line
Line
Line
Line
Line
Line
Line
Line
Line
None
None
None
None
None
None
None
None
None
None
No
No
No
No
No
No
No
No
No
No
Hussars
Cavalry
Infantry
Cavalry
Infantry
Cavalry
Infantry
Dragoons
Infantry
Hussars
Cavalry
Infantry
Cavalry
Infantry
Artillery
Cavalry
Infantry
Hussars
Artillery
Cavalry
Infantry
Dragoons
Artillery
Cavalry
Infantry
Artillery
Cavalry
Infantry
Artillery
Cavalry
Infantry
Grenadier
Grenadier
Guards
Garde
Gendarme
Maison Du
Roi
Infantry
Grenadier
Leibregt.
zu Pferd
Guard
Horse Guard
Non-German
or
Walloon
Inf.
Dragoons
Hussars
Non-German
or
Walloon Inf.
Artillery
Cavalry
Infantry
Cuirassier
Dragoons
Crack
Cuirassier
Grenadier
Elite
Grenadier
Fusiliers
Hussars
Artillery
Cavalry
Infantry
Artillery
Cavalry
Infantry
Artillery
Cavalry
Infantry
Cavalry
Infantry
Grenadier
Grenadier
Guards
Foot Guards
Horse Guards
Foot Guard
Leibgarde
Horse Guard
Cuirassier
Grenadier
Artillery
Cavalry
Infantry
Cuirassier
Artillery
Cavalry
Infantry
Foot Guard
Foot Guard
Grenadier
Grenadier
Gendarmes
Guard du Corps
Cuirassier
Guard
du Corps
Playsheet: War of the Spanish Succession 1701-1714
Arc of Fire: Infantry fire directly ahead. Artillery have 45 degree arc of fire to either flank. If any part of an
enemy unit is in the arc of fire they may be fired at.
Artillery Units: After being unlimbered, artillery cannot be limbered and repositioned, but may maneuver
to change facing.
Formations: Both cavalry and infantry use Line formation.
Immediate Melee: Grenadiers and shock cavalry may immediate melee on a won Even movement roll.
Others may only initiate melee on a Melee card.
Interpenetration: Cavalry and infantry may not interpenetrate other cavalry and infantry units. Cavalry
and infantry may interpenetrate artillery without any penalty.
92
cuts 9", 8.75", 8.5", 11.5", 11"
Pistol Cavalry: Austrian, Bavarian, Dane, French, Palatinate, Piedmont Savoy, Prussian and Spanish
cavalry are considered Pistol cavalry. Pistol cavalry may only initiate melees on a Melee card.
Period Rules
Shock Cavalry: British and Dutch cavalry may immediate melee on a won Even movement roll.
93
cuts 9", 8.75", 8.5", 11.5", 11"
Great Northern War 1700-1721
Great Northern War 1700-1721
CiC LQ
Cmd. Group
LQ
Infantry
Formations
Cavalry
Formations
Skirmish
Units
Grand Battery
Russian
1700-1708
Russian
1708-1721
Aby smal
Poor
Aby smal
Poor
Poor
Poor
Skilled
Line
Line
Line
Line
Line
Line
Line
Line
Line
Line
None
None
None
None
None
No
No
No
No
No
Infantry
Rabble
Cossacks
Dragoons
Militia
Raw
Saxon
Aby smal
Poor
Dragoons
Cossacks
Cossacks
Dragoons
Infantry
Guard
Crack
Grenadier
Guard Dragoon
Skilled
Ex ceptional
Infantry
Militia
Infantry
Artillery
Poor
Sweden
Cossacks
Infantry
Cav alry
Dragoons
Regular
Polish
Artillery
Artillery
Infantry
Cav alry
Dragoons
Infantry
Guard
Artillery
Infantry
Dragoons
Cav alry
Artillery
Cav alry
Artillery
Cav alry
Infantry
Infantry
Grenadier
Guard
Guard Dragoon
Grenadier
Horse Grenadier
Cav alry
Dragoons
Grenadiers
Life Guards
Horse
Elite
Guards
Drabants
Playsheet: Great Northern War 1700-1721
Arc of Fire: Infantry fire directly ahead. Artillery have 45 degree arc of fire to either flank. If any part of an
enemy unit is in the arc of fire they may be fired at.
Formations: Both cavalry and infantry use Line formation.
Immediate Melee: Swedish units (infantry and shock cavalry) may immediate melee on a won Even
movement roll. Others may only initiate melee on a Melee card.
Interpenetration: Cavalry and infantry may not interpenetrate other cavalry and infantry units. Cavalry
and infantry may interpenetrate artillery without any penalty. Cavalry and infantry may interpenetrate
artillery without any penalty.
94
cuts 9", 8.75", 8.5", 11.5", 11"
Pistol Cavalry: Russian and Saxon cavalry are considered Pistol cavalry and may only initiate melees on a
Melee card.
Period Rules
Shock Cavalry: Swedish and Polish cavalry may immediate melee on a won Even movement roll.
95
cuts 9", 8.75", 8.5", 11.5", 11"
Jacobite Rebellion 1745-1746
Jacobite Rebellion 1745-1746
British
CiC LQ
Aby smal
Poor
Jacobite
Poor
Av erage
Poor
Line
Line
Line
Line
Skirmish Units
None
None
Grand Battery
No
No
Cmd. Group LQ
Infantry
Formations
Cavalry
Formations
Cav alry
Rabble
Artillery
Raw
Infantry
Cav alry
Infantry
Artillery
Regular
Cav alry
Infantry
Infantry
Crack
Infantry
Infantry
Elite
Playsheet: Jacobite Rebellion 1745-1746
Formations: Both cavalry and infantry use Line formation.
Immediate Melee: Cavalry and Highlanders may immediate melee on a won Even movement roll. Others
may only initiate melee on a Melee card.
Interpenetration: Cavalry and non-Highlander infantry may interpenetrate their own type. Units that are
interpenetrating move through the interpenetrated unit and halt their movement at that point, with the back
of their unit’s stands in contact with the front of the interpenetrated unit’s stands. Cavalry and infantry may
interpenetrate artillery without any penalty. Highlander infantry may not interpenetrate or be
interpenetrated.
Jacobite Sequence Deck: Add the Frenzied Charge card. The Frenzied Charge card costs 0 Initiative
Points.
Highland Fire: Highland infantry is modified Down 1 for all fire.
96
cuts 9", 8.75", 8.5", 11.5", 11"
Seven Years War 1756-1763
Seven Years War 1756-1763
Austrian
British
Av erage
Av erage
French
Prussian
1760-63
Prussian Western Russian
1756-59 Theatre 1756-60
Aby smal
CiC LQ
Poor
Ex cept.
Skilled
Av erage
Cmd. Group
LQ
Infantry
Formations
Cavalry
Formations
Skilled
Av erage
Av erage
Poor
Line
Line
Line
Line
Attack
Attack
Line
Line
Line
Column
Column
Line
Line
Jaeger
Jaeger
No
No
Ex cept.
Russian
1761-63 Reichsarmee
Aby smal
Poor
Poor
Av erage
Poor
Saxon
Swedish
Aby smal
Poor
Av erage
Aby smal
Poor
Av erage
Av erage
Poor
Line
Line
Line
Line
Line
Line
Line
Line
Line
Line
Line
FreiCorps
None
No
No
Av erage
Chasseur
Skirmish
Units
Grenze
American
American
Croats
Indians
Indians
Pandouts
Rangers
Courier du
No
No
Cossacks Cossacks
FreiCorps
Jaeger
Bois
Grand Battery
No
American
Rabble
American
Indians
Indians
Courier du
Regular
Infantry
American
Garrison
Indians
Artillery
Artillery
Cav alry
Cav alry
Infantry
Infantry
Grenze
Highlanders
Cuirassier
Crack
Grenadier
Grenadier
Fusiliers
Fusiliers
Dragoons
Infantry
Cossacks
Hussars
Artillery
Artillery
Artillery
Cav alry
Cav alry
Artillery
Artillery
Infantry
Infantry
Infantry
Cav alry
Cav alry
Dragoons
Jaeger
Fusiliers
Infantry
Infantry
Hussars
Cuirassier
Hussars
Grenadier
Grenadier
Gendarmerie Cuirassier
Guard
Hussars
Grenadier
Cuirassier
Grenadier
Infantry
Artillery
Cav alry
Infantry
Grenadier
No
Indelta
FreiCorps
Infantry
Cav alry
Carbineer
Elite
Cossacks Cossacks
Infantry
Infantry
Chasseur
No
FrieCorps
Bois
Raw
No
Indelta
Infantry
Hussars
Dragoons
Artillery
Cav alry
Infantry
Artillery
Cav alry
Infantry
Dragoons
Grenadier
Grenadier
Horse
Grenadier
Grenadier Liv garde
Grenadier
Guard
du Corps
Immediate Melee: Cavalry and grenadier infantry may immediate melee on a won Even movement roll.
Others may only initiate melee on a Melee card.
97
Period Rules
Playsheet: Seven Years War 1756-1763
cuts 9", 8.75", 8.5", 11.5", 11"
Interpenetration: Cavalry and infantry may interpenetrate their own type. Units that are interpenetrating
move through the interpenetrated unit and halt their movement at that point, with the back of their unit’s
stands in contact with the front of the interpenetrated unit’s stands. Cavalry and infantry may interpenetrate
artillery without any penalty.
Skirmish Units: Croats/Pandours and Jaegers may use Skirmish formation.
98
cuts 9", 8.75", 8.5", 11.5", 11"
American War of Independence 1775-1783
American War of Independence 1775-1783
American American
1775-76
1777
CiC LQ
Cmd. Group
LQ
Infantry
Formations
Cavalry
Formations
Skirmish
Units
Grand Battery
Poor
Av erage
Av erage
Av erage
Av erage
Av erage
Av erage
Skilled
Skilled
Line
Line
Line
Line
Line
Line
Line
Line
Line
Line
Line
Line
Rifles
Rifles
Rifles
American
American
American
American
Indians
Jaeger
Indians
No
Indians
No
Indians
No
Lt. Infantry
No
No
Infantry
American
Militia
Artillery
Cav alry
Infantry
American
Indians
Militia
Cav alry
Infantry
American
Indians
Militia
Indians
American
Cav alry
Loy alist
Infantry
Militia
Indians
Artillery
Militia
Cav alry
Loy alist
Infantry
Regulars
Militia
Artillery
Artillery
Cav alry
Rifles
Infantry
Infantry
Militia
Rifles
Cossacks
Indians
Militia
American
No
Loy alist
American
Artillery
Crack
French
Av erage
Indians
Regular
German
Poor
Cav alry
Raw
Av erage
British
Av erage
Av erage
Poor
Artillery
Rabble
Poor
American
1778-83
Lt. Infantry
Rifles
Artillery
Cav alry
Infantry
Grenadier
Lt. Infantry
Highlander
Artillery
Infantry
Grenadier
Jaeger
Grenadier
Elite
Playsheet: American War of Independence 1775-1783
Cavalry Type: All cavalry is rated as Light Cavalry.
Rifles and Militia in Melee: Rifles and Militia never receive the Up 1 modifier for Initiating Melee.
Skirmish Units: American rifle units, Jaegers, and Native American units are may use Skirmish formation.
99
Period Rules
Immediate Melee: Cavalry, and British, German, Hessian and French infantry may immediate melee on a
won Even movement roll. Others may only initiate melee on a Melee card.
cuts 9", 8.75", 8.5", 11.5", 11"
Unit Size (optional): All units were typically smaller during the American War of Independence. Game
play is unaffected, but gamers may want to use the following unit sizes for reference when creating
scenarios.
1 Infantry Unit = 240 to 360 men
1 Cavalry Unit = 200 to 300 men
1 Artillery Unit = 3 to 4 guns and crew
100
cuts 9", 8.75", 8.5", 11.5", 11"
Napoleonic Wars 1792-1815
Napoleonic Wars 1792-1815
1792-1808
Austria
1809-15
Bavaria
Austria
1798-1807
Britain
1808-11
Britain
Britain
Brunswick
1812-15
Denmark
Dutch
Beltian
CiC LQ
Abysmal
Poor
Poor
Abysmal
Skilled
Except.
Average
Abysmal
Poor
Cmd. Group
LQ
Abysmal
Poor
Poor
Poor
Average
Skilled
Average
Poor
Poor
Infantry
Formations
Line
Square
Attack Col.
Line
Square
Attack Col.
Line
Square
Line
Square
Line
Square
Line
Square
Line
Square
Attack Col.
Line
Square
Attack Col.
Line
Square
Attack Col.
Line
Attack Col.
Line
Attack Col.
Line
Attack Col.
Line
Attack Col.
Line
Attack Col.
Line
Attack Col.
Line
Attack Col.
Line
Jaeger
Jaeger
Rifles
Rifles
Rifles
Jaeger
Jaegers
Lt. Infantry
Yes
No
No
Yes
Yes
No
No
Cavalry
Attack Col.
Line
Formations
Skirmish
Jaeger
Units
Grand Battery
No
Cavalry
Infantry
Cavalry
Infantry
Grenze
Cavalry
Infantry
Cavalry
Infantry
Cavalry
Infantry
Cavalry
Infantry
Cavalry
Infantry
Artillery
Cavalry
Infantry
Artillery
Cavalry
Infantry
Artillery
Cavalry
Infantry
Artillery
Cavalry
Infantry
Artillery
Cavalry
Infantry
Artillery
Cavalry
Infantry
KGL
Artillery
Cavalry
Infantry
KGL
Artillery
Cavalry
Infantry
Lt. Infantry
Artillery
Cavalry
Infantry
Artillery
Cavalry
Infantry
Regular
Crack
Elite
Grenze
Cuirassier
Grenadier
Jaeger
Artillery
Cuirassier
Grenadier
Cuirassier
Chevauleger
Chevauleger
Grenadier
Grenadier
Jaeger
Jaeger
Cavalry
Cavalry
Infantry
Artillery
Artillery
Artillery
Hussars
Lt. Infantry Lt. Infantry
Gren. Guard Lt. Infantry
Uhlans
Highlanders Highlanders
Highlanders
Lt. Infantry
KGL
KGL
Leib-Regmt.
Horse Art.
Rifles
Liv Regiments
Kings Livguard
Livjager Corps
Jutland Lt.
Dragoons
Horse Art.
Horse Art.
Highlanders
Rifles
Rifles
Period Rules
Rabble
Raw
No
Cavalry
Infantry
Artillery
Cavalry
Infantry
101
cuts 9", 8.75", 8.5", 11.5", 11"
Napoleonic Wars 1792-1815
France
1792-1804
France
1805-1806
France
1807-1812
France
1813
France
1814
France
1815
CiC LQ
Av erage
Ex ceptional
Skilled
Av erage
Skilled
Av erage
Cmd. Group
LQ
Av erage
Ex ceptional
Skilled
Poor
Av erage
Poor
Infantry
Formations
Cavalry
Formations
Skirmish
Units
Grand Battery
Rabble
Raw
Regular
Crack
Elite
Att. Column
Att. Column Att. Column
Line
Line
Line
Square
Square
Square
Att. Column
Att. Column Att. Column
Line
Line
Line
Lt. Infantry
Lt. Infantry
Lt. Infantry
Yes
Yes
Yes
Infantry
Att.
Att.
Att.
Column
Column
Column
Line
Line
Line
Square
Square
Square
Att.
Att.
Att.
Column
Column
Column
Line
Line
Line
Lt. Infantry Lt. Infantry Lt. Infantry
Yes
Yes
Cav alry
Cav alry
Infantry
Infantry
Yes
Infantry
Cav alry
Cav alry
Cav alry
Cav alry
Cav alry
Cav alry
Infantry
Infantry
Infantry
Infantry
Artillery
Infantry
Artillery
Infantry
Artillery
Cav alry
Cav alry
Cav alry
Infantry
Infantry
Infantry
Artillery
Artillery
Artillery
Cav alry
Cav alry
Cav alry
Infantry
Infantry
Infantry
Horse Art.
Horse Art.
Horse Art.
Cuirassier
Cuirassier
Artillery
Carbinier
Carbinier
Cuirassier
Hussars
Hussars
Lt. Infantry
Lt. Infantry
Horse Art.
Lt. Infantry
Horse Art.
Infantry
Horse Art.
Guard
Guard
Young
Horse Art. Horse Art. Horse Art.
Cuirassier
Cuirassier
Cuirassier
Cuirassier Cuirassier Cuirassier
Carabinier
Carabinier
Guard
Old Guard Old Guard Old Guard
102
Lt. Infantry Lt. Infantry Lt. Infantry
Horse Art. Horse Art. Horse Art.
Artillery
Artillery
Artillery
Cuirassier Cuirassier Cuirassier
Young
Young
Infantry
cuts 9", 8.75", 8.5", 11.5", 11"
Napoleonic Wars 1792-1815
German
States
Baden
HesseCiC LQ
Cmd. Group
LQ
Infantry
Formations
Cavalry
Formations
Skirmish
Units
Grand Battery
Rabble
Raw
Neopolitan Ottoman
Portugal
Portugal
Darmstadt
Italy
Mameluk
1806-14
Turk
Poland
1800-11
1812-15
Poor
Aby smal
Aby smal
Aby smal
Skilled
Skilled
Aby smal
Av erage
Poor
Aby smal
Aby smal
Aby smal
Av erage
Av erage
Aby smal
Av erage
Att. Column
Att. Column
Line
Line
Square
Square
Att. Column
Att. Column
Line
Att. Column
Line
Line
Line
Mass
Line
Mass
Jaeger
Lt. Infantry
None
Lt. Infantry
No
Yes
No
No
Att. Column
Mass
Line
Square
Att.
Line
Column
Mass
Line
Square
Att.
Column
Line
Irregulars Lt. Infantry
No
No
Att. Column
Line
Square
Line
Square
Att. Column
Att. Column
Line
Line
Cacadores
Cacadores
No
No
Prov incial
Artillery
Artillery
Cav alry
Cav alry
Infantry
Infantry
Artillery
Artillery
Artillery
Artillery
Cav alry
Cav alry
Cav alry
Cav alry
Infantry
Infantry
Infantry
Infantry
Artillery
Cav alry
Artillery
Cav alry
Infantry
Infantry
Sekhans
Infantry
Cav alry
Yoruks
Prov incial
Artillery
Janissaries
Sekhans
Derbants
Artillery
Artillery
Cav alry
Cav alry
Infantry
Infantry
Cav alry
Infantry
Yoruks
Artillery
Regular
Artillery
Artillery
Cav alry
Cav alry
Infantry
Infantry
Artillery
Cav alry
Cav alry
Infantry
Lt. Infantry
Janissaries
Nizam-IJedid
Artillery
Cav alry
Artillery
Artillery
Suv arileri
Infantry
Infantry
Infantry
Sipahi
Lt. Infantry
Cacadores
Cacadores
Djelli
Janissary
Guard
Arnout
Regina
Crack
Drag.
Cav alry
Guard
Guard
Sekhans
Uhlans
Albanian
Hussars
Sekhans
Greek
Sekhans
Guard
Cav alry
Cav alry
Period Rules
Elite
103
cuts 9", 8.75", 8.5", 11.5", 11"
Napoleonic Wars 1792-1815
Prussia
1792-1807
Prussia
1808-15
Aby smal
Av erage
Russia
1792-1811
Russia
1812-15
1792-1809
Saxony
1810-15
Spain
1800-10
Spain
1811-15
Sweden
Av erage
Aby smal
Av erage
Aby smal
Av erage
Poor
Av erage
Aby smal
Poor
Aby smal
Poor
Poor
Line
Line
Line
Line
Line
Square
Square
Square
Square
Square
Att.
Att.
Column
Column
Att. Column
Att. Column
Att. Column
Line
Line
Line
Line
Line
Lt. Infantry
Lt. Infantry
Jaeger
No
Saxony
Aby smal
CiC LQ
Poor
Av erage
Cmd. Group
LQ
Infantry
Formations
Cavalry
Formations
Skirmish
Units
Grand Battery
Aby smal
Line
Square
Att. Column
Line
Jaeger
No
Rabble
Raw
Regular
Crack
Elite
Av erage
Att. Column
Line
Square
Line
Square
Att. Column Att. Column
Line
Line
Jaeger
Jaeger
Schutzen
Cossacks
Yes
Yes
Landw ehr
Cav alry
Aby smal
Landw ehr
Artillery
Artillery
Cav alry
Cav alry
Cossacks
Cossacks
Artillery
Cav alry
Att. Column
Line
Square
Att. Column
Line
Lt. Infantry
Schutzen
Yes
No
Infantry
Cav alry
Artillery
Artillery
Infantry
Infantry
Infantry
Artillery
Cav alry
Infantry
Infantry
Fusiliers
Cuirassier
Lt. Infantry
Cuirassier
Grenadiers
Jaegers
Hussars
Hussars
Jaegers
Schutzen
Grenadiers
Grenadiers
Infantry
Artillery
Artillery
Cav alry
Cav alry
Infantry
Infantry
Guard
104
No
No
Artillery
Artillery
Cav alry
Cav alry
Infantry
Infantry
Cav alry
Artillery
Artillery
Artillery
Cav alry
Cav alry
Cav alry
Infantry
Infantry
Infantry
Artillery
Artillery
Guards
Cav alry
Hussars
Infantry
Infantry
Cav alry
Cuirassier Cuirassier
Grenadiers Leib Guard
Jaegers
Jaegers
Guard Gren. Guard Gren.
Guard
No
Cav alry
Fusiliers
Infantry
Schutzen
Lt. Infantry
Leib
Guard
Cuirassier
Guards
Carabinier
Jaeger
cuts 9", 8.75", 8.5", 11.5", 11"
Napoleonic Wars 1792-1815
United States United States Britain
Wesphalia
1812-13
1814-15
War of 1812
Wurttemburg
CiC LQ
Aby smal
Av erage
Av erage
Poor
Poor
Cmd. Group
LQ
Poor
Av erage
Poor
Poor
Poor
Line
Line
Line
Att. Column
Att. Column
Square
Square
Square
Line
Line
Square
Square
Cavalry
Formations
Skirmish
Units
Grand Battery
Att. Column
Att. Column
Att. Column
Att. Column
Att. Column
Line
Line
Line
Line
Line
Rifles
Rifles
Rifles
Lt. Infantry
Lt. Infantry
No
No
No
No
No
Artillery
Artillery
Rabble
Cav alry
Cav alry
Infantry
Formations
Infantry
Raw
Regular
Infantry
Artillery
Artillery
Cav alry
Cav alry
Infantry
Infantry
Artillery
Artillery
Artillery
Artillery
Artillery
Cav alry
Cav alry
Cav alry
Cav alry
Cav alry
Infantry
Infantry
Infantry
Infantry
Infantry
Rifles
Rifles
Lt. Infantry
Hussars
Cav alry
Guard
Guard
Cav alry
Canadian Inf.
Artillery
Crack
Highlanders
Artillery
Artillery
Cav alry
Cav alry
Infantry
Infantry
Rifles
Elite
Playsheet: Napoleonic Wars 1792-1815
Period Rules
British Rifles in Close Order: If a Rifle battalion is used on the battlefield in close order formation (most
likely line formation), they will fire using the smoothbore musket ranges.
105
cuts 9", 8.75", 8.5", 11.5", 11"
Congreve Rockets: Rockets use Smoothbore artillery ranges but cannot fire at targets closer than 12".
Use the ratings for Smoothbore artillery, and rate according to the weight of the rocket ordinance (Light,
Medium, Heavy). Rocket units reload on the Artillery Fire card. Place two fire markers on a rocket unit
when it fires. Modify the Combat Die using normal modifiers and resolve the fire using normal procedures.
Remove 1 fire marker per Artillery Fire card. Rockets are very inaccurate and will have a lower Combat
Die than most other artillery. Subtract 5 from the D20 roll when rating rocket batteries. The path of the
rocket flight may affect both friendly and enemy units. Roll a D6 when a rocket battery fires to determine
the path of the rocket.
• On a roll of 1, the rocket’s path is along a line traced from the center of the rocket battery unit to a
point D12” to the firer’s left of the center of the target unit.
o Any unit that is under the path of the rocket must roll their Defense Die vs a D8. If the
Defense Die roll is less than the D8, the unit becomes Disordered.
• On a roll of 2, the rocket’s path is along a line traced from the center of the rocket battery unit to a
point D6” to the firer’s left of the center of the target unit.
o Any unit that is under the path of the rocket must roll their Defense Die vs a D8. If the
Defense Die roll is less than the D8, the unit becomes Disordered.
• On a roll of 3 or 4, the rocket’s path is along a line traced from the center of the rocket battery unit
to the center of the target unit.
o Any unit that is under the path of the rocket must roll their Defense Die vs a D8. If the
Defense Die roll is less than the D8, the unit becomes Disordered.
o Follow normal fire combat resolution rules to determine the effectiveness of the fire on the
target unit.
• On a roll of 5, the rocket’s path is along a line traced from the center of the rocket battery unit to a
point D6” to the firer’s right of the center of the target unit.
o Any unit that is under the path of the rocket must roll their Defense Die vs a D8. If the
Defense Die roll is less than the D8, the unit becomes Disordered.
• On a roll of 6, the rocket’s path is along a line traced from the center of the rocket battery unit to a
point D12” to the firer’s right of the center of the target unit.
o Any unit that is under the path of the rocket must roll their Defense Die vs a D8. If the
Defense Die roll is less than the D8, the unit becomes Disordered.
Immediate Melee: All cavalry may immediate melee on a won Even movement roll. All infantry in Attack
Column may immediate melee. British infantry in Line may immediate melee. All other infantry may only
melee on a Melee card.
106
cuts 9", 8.75", 8.5", 11.5", 11"
Mexican-American War 1846-1848
Mexican American War 1846-1848
CiC LQ
Cmd. Group LQ
Infantry Formations
Cavalry Formations
Mexico
United States
Aby smal
Skilled
Aby smal
Skilled
Att. Column
Att. Column
Line
Line
Square
Square
Att. Column
Att. Column
Line
Lt. Infantry
Skirmish Units
Grand Battery
Line
Rifles
Tex as Rangers
No
No
Artillery
Rabble
Infantry
Artillery
Raw
Cav alry
Infantry
Cav alry
Regular
Crack
Infantry
San Patricio Battalion
Lt. Infantry
Artillery
Cav alry
Infantry
Artillery ,
Rifles,
Tex as Rangers
Elite
Playsheet: Mexican-American War 1846-1848
Immediate Melee: All cavalry and US infantry may immediate melee on a won Even movement roll.
Others may only initiate melee on a Melee card.
Mexican Artillery: May not move except to maneuver once deployed.
Mexican Powder: Mexican gunpowder was very low quality, which affected the range and impact of both
artillery and infantry weapons. Mexican artillery and infantry range bands as shown on the period
playsheet are shorter than comparable US weapons.
Period Rules
US Artillery: Add 6 to the d20 roll when rating US artillery batteries.
107
cuts 9", 8.75", 8.5", 11.5", 11"
Anglo-Sikh Wars 1845-1846/1848-1849
Anglo-Sikh Wars 1845-1846/1848-1849
British East India Company
Sikh
CiC LQ
Skilled
Abysmal
Cmd. Group LQ
Skilled
Infantry Formations
Att. Column
Line
Square
Cavalry Formations
Att. Column
Line
Skirmish Units
Rifles
Grand Battery
No
Raw
Crack
Elite
None
No
Cavalry
Native Irregular Cavalry
Native Irregular Infantry
Cavalry
Native Irregular Cavalry
Native Irregular Infantry
Rabble
Regular
Abysmal
Att. Column
Line
Mass
Square
Att. Column
Line
Mass
Artillery
Cavalry
Infantry
Artillery
Infantry
Artillery
Infantry
Artillery
Rifles
Playsheet: Anglo-Sikh Wars 1845-1846/1848-1849
Immediate Melee: British cavalry and infantry, Sikh cavalry and infantry may immediate melee on a
won Even movement roll. Sepoy cavalry and infantry and native irregular cavalry and infantry may only
initiate melee on a Melee card.
108
cuts 9", 8.75", 8.5", 11.5", 11"
Crimean War 1853-1856
Crimean War 1853-1856
Britain
France
Russia
Turkey
CiC LQ
Aby smal
Av erage
Poor
Poor
Cmd. Group
LQ
Poor
Skilled
Poor
Poor
Att. Column
Column
Infantry
Formations
Cavalry
Formations
Line
Square
Att. Column
Line
Att. Column
Line
Square
Rifles
Grand Battery
Yes
Line
a Pied
Zouav es
Yes
Raw
Artillery
Infantry
Line
Square
Line
Cossacks
Jaeger
Yes
Cossacks
Rabble
Regular
Square
Att. Column Att. Column
Chasseurs
Skirmish
Units
Att.
Att.
Column
Line
Albanians
Yes
Cav alry
Infantry
Cossacks
Cav alry
Infantry
Infantry
Artillery
Artillery
Artillery
Cav alry
Cav alry
Cav alry
Infantry
Infantry
Infantry
Cav alry
Crack
Highlanders
Rifles
Elite
Zouav es
Chasseurs
a Pied
Zouav es
Playsheet: Crimean War 1853-1856
Period Rules
Immediate Melee: Cavalry and French, Russian Infantry may immediate melee on a won Even movement
roll. Others may only initiate melee on a Melee card.
109
cuts 9", 8.75", 8.5", 11.5", 11"
Franco-Austrian War 1859
Franco-Austrian War 1859
Austria
France
Piedmont
Poor
Skilled
Average
Average
Skilled
Skilled
Line
Att. Column
Line
Att. Column
Line
Att. Column
Line
Att. Column
Line
Att. Column
Line
Skirmish
Units
Jaegers
Chasseurs a
Pied
Zouaves
Lt. Infantry
Grand Battery
Yes
Yes
Yes
CiC LQ
Cmd. Group
LQ
Infantry
Formations
Cavalry
Formations
Rabble
Raw
Infantry
Regular
Artillery
Cavalry
Infantry
Crack
Artillery
Cavalry
Elite
Jaegers
Artillery
Cavalry
Infantry
Chasseurs a
Pied
Zouaves
Artillery
Cavalry
Infantry
Artillery
Cavalry
Infantry
Guard
Playsheet: Franco-Austrian War 1859
Formations: French infantry may be deployed in either attack column or line. Austrian infantry may be
deployed only in line. Austrian Jaegers and French Chasseurs may also deploy in Skirmish formation.
Weapons: Austrian artillery is armed with smoothbore cannons. French artillery is armed with rifled
cannons. Both Austrian and French infantry are armed with rifles.
Immediate Melee: All cavalry as well as French infantry may initiate immediate melee on a won Even
move roll. Others may initiate melee only on a Melee card.
110
cuts 9", 8.75", 8.5", 11.5", 11"
American Civil War 1861-1865
American Civil War 1861-1865
Confederate
Federal
Confederate
Federal
1861-62 East 1861-62 East 1861-62 West 1861-62 West
CiC LQ
Exceptional
Exceptional
Poor
Average
Cmd. Group
Skilled
Exceptional
Poor
Poor
LQ
Infantry
Att. Column
Att. Column
Att. Column
Att. Column
Line
Line
Line
Line
Formations
Cavalry
Att. Column
Att. Column
Att. Column
Att. Column
Line
Line
Line
Line
Formations
Skirmish Dismounted Cav. Dismounted Cav. Dismounted Cav. Dismounted Cav.
Infantry
Infantry
Infantry
Infantry
Units
Grand Battery
Yes
Rabble
Raw
Regular
Artillery
Cavalry
Infantry
Artillery
Cavalry
Infantry
Crack
Infantry
Elite
Infantry
Yes
Yes
Yes
Cavalry
Artillery
Infantry
Infantry
Cavalry
Infantry
Artillery
Infantry
Cavalry
Infantry
Artillery
Cavalry
Infantry
Artillery
Infantry
Artillery
Cavalry
Infantry
Artillery
Cavalry
Infantry
Cavalry
Artillery
Artillery
American Civil War 1861-1865
CiC LQ
Cmd. Group
LQ
Infantry
Formations
Cavalry
Formations
Skirmish
Units
Grand Battery
Confederate
1863 East
Federal
1863 East
Confederate
1863 West
Federal
1863 West
Ex ceptional
Skilled
Poor
Skilled
Skilled
Skilled
Av erage
Skilled
Att. Column
Att. Column
Att. Column
Att. Column
Line
Line
Line
Line
Att. Column
Att. Column
Att. Column
Att. Column
Line
Line
Line
Line
Dismounted
Dismounted
Dismounted
Dismounted
Cav .
Cav .
Cav .
Cav .
Infantry
Infantry
Infantry
Infantry
Yes
Yes
Yes
Yes
Artillery
Cav alry
Artillery
Artillery
Artillery
Artillery
Cav alry
Cav alry
Cav alry
Cav alry
Infantry
Infantry
Infantry
Infantry
Rabble
Regular
Crack
Elite
Cav alry
Infantry
Infantry
Artillery
Cav alry
Infantry
Artillery
111
Artillery
Infantry
Cav alry
Infantry
Artillery
Cav alry
Infantry
Period Rules
Raw
cuts 9", 8.75", 8.5", 11.5", 11"
American Civil War 1861-1865
Confederate
Federal
Confederate
Federal
1864-65 East 1864-65 East 1864-65 West 1864-65 West
CiC LQ
Cmd. Group
LQ
Infantry
Formations
Cavalry
Formations
Skirmish
Units
Skilled
Ex ceptional
Poor
Skilled
Av erage
Skilled
Poor
Skilled
Att. Column
Att. Column
Att. Column
Att. Column
Line
Line
Line
Line
Att. Column
Att. Column
Att. Column
Att. Column
Line
Line
Line
Line
Dismounted
Dismounted
Dismounted
Dismounted
Cav .
Cav .
Cav .
Cav .
Infantry
Infantry
Infantry
Infantry
Grand Battery
Yes
Yes
Yes
Yes
Rabble
Infantry
Infantry
Artillery
Artillery
Raw
Regular
Infantry
Infantry
Artillery
Artillery
Artillery
Artillery
Cav alry
Cav alry
Cav alry
Cav alry
Infantry
Infantry
Infantry
Infantry
Infantry
Cav alry
Artillery
Crack
Elite
Infantry
Infantry
Cav alry
Artillery
Infantry
Infantry
Artillery
Artillery
Infantry
Infantry
Playsheet: American Civil War 1861-1865
Cavalry: All cavalry is rated as Light Cavalry.
Dismounted Cavalry: Dismounted cavalry are Skirmish units. Mounted and dismounted cavalry have 3
Unit Integrity. Dismounted cavalry may fire. Dismounted cavalry will typically use the carbine ranges.
Mounted infantry will use smoothbore or rifle ranges. Mounting or dismounting takes a move segment on a
Move card and can be performed on an even die roll for movement. Mounting or dismounting can also be
performed by maneuvering on a Leadership card. Place a horseholder marker at the point that the cavalry
unit dismounts. Horseholders are not a game unit but are merely a marker to indicate where the cavalry
unit dismounted and must return to mount. Horseholders may not be attacked. If a dismounted unit routs,
it is on foot until rallied. If a routing dismounted unit is rallied, the rallied unit may either be mounted or
dismounted at the player's discretion.
Breechloading Weapons: If any units are armed with breechloading weapons (artillery, cavalry, or
infantry), add the Rapid Fire card to their sequence deck.
Repeating Weapons: If any cavalry or infantry units are armed with repeating weapons add the Rapid
Fire and Rolling Fire card to their sequence deck.
112
cuts 9", 8.75", 8.5", 11.5", 11"
Gunboats: Gunboats move on Move and Move 1 Command Group cards. Gunboats move 12” with the
river current and 6” against the river current. Any gunboat movement that is not directly up or down river is
reduced by 3”.
Artillery may be deployed in full (2 stands) or half battery (1 stand) units on gunboats. Single stand artillery
units are Down 1 when firing. Measure all fire from the center of the artillery unit’s frontage onboard the
gunboat.
Gunboats receiving fire will not fall back, regardless of the fire combat. Gunboats never become
Disordered.
Immediate Melee: All cavalry and infantry may immediate melee on a won Even movement roll.
Period Rules
Skirmish Units: All infantry units may be deployed in Skirmish formation. Dismounted cavalry is deployed
in Skirmish formation.
113
cuts 9", 8.75", 8.5", 11.5", 11"
Austro-Prussian War 1866
Austro-Prussian War 1866
Austria
Bavaria
Italy
Saxony
Prussia
CiC LQ
Aby smal
Aby smal
Poor
Poor
Ex ceptional
Cmd. Group
LQ
Poor
Aby smal
Poor
Poor
Skilled
Infantry
Att. Column Att. Column Att. Column Att. Column
Line
Line
Line
Formations Line (no mov e)
Cavalry
Formations
Skirmish
Units
Att. Column
Grand Battery
Att. Column Att. Column
Line
Att. Column
Att. Column
Line
Line
Line
Line
Line
Jaegers
Jaegers
Bersaglieri
Jaegers
Jaegers
Yes
Yes
Yes
Yes
Yes
Artillery
Rabble
Infantry
Cav alry
Infantry
Infantry
Raw
Regular
Infantry
Artillery
Infantry
Artillery
Cav alry
Infantry
Artillery
Artillery
Infantry
Cav alry
Artillery
Artillery
Artillery
Artillery
Artillery
Cav alry
Cav alry
Cav alry
Cav alry
Cav alry
Infantry
Infantry
Infantry
Infantry
Infantry
Jaegers
Bersaglieri
Jaegers
Infantry
Artillery
Crack
Cuirassier
Hussars
Elite
Jaegers
Jaegers
Playsheet: Austro-Prussian War 1866
Austrian Infantry: The Austrian army had been suitably impressed by the French success using shock
tactics in 1859 that they focused their tactics on shock prior to and in the 1866 war. Austrian infantry may
only move when in Attack Column formation. Austrians may be deployed in Line but may not move in Line.
Units in Line may still maneuver.
Immediate Melee: Cavalry and Austrian infantry in Attack Column may immediate melee on a won Even
movement roll. Others may only initiate melee on a Melee card.
Prussian Artillery: Prussians in this war were very sensitive to losses of their prized rifled Krupp artillery.
When a Prussian Krupp artillery battery is eliminated, an additional AMP is lost.
Prussian Infantry: Prussian infantry may only be deployed in Line. Prussian infantry only melees on a
Melee card and may not immediate melee.
Prussian Sequence Deck: Add 1 Rapid Fire card to the Prussian sequence deck. All Prussian infantry
and Krupp artillery may use the Rapid Fire card. This represents the superior firepower of the
breechloading Needlegun rifle and the breechloading Krupp guns.
114
cuts 9", 8.75", 8.5", 11.5", 11"
Franco-Prussian War 1870-1871
Franco-Prussian War 1870-1871
Imperial
Republican
France
France
Av erage
Aby smal
Poor
Bavaria
CiC LQ
Cmd. Group
LQ
Infantry
Formations
Cavalry
Formations
Skirmish
Units
Grand Battery
Co. Column
Line
Att. Column
Prussia
Wurttemburg
Poor
Ex ceptional
Av erage
Av erage
Av erage
Skilled
Poor
Line
Line
Co. Column
Co. Column
Att. Column Att. Column
Regular
Crack
Elite
Line
Att. Column
Att. Column
Line
Line
Line
Line
Line
Jaegers
Chasseurs
Chasseurs
Jaegers
Jaegers
Yes
Yes
Yes
Yes
Rabble
Raw
Line
Yes
Artillery
Artillery
Cav alry
Cav alry
Infantry
Infantry
Artillery
Artillery
Cav alry
Artillery
Infantry
Infantry
Artillery
Artillery
Artillery
Artillery
Artillery
Cav alry
Cav alry
Cav alry
Cav alry
Cav alry
Infantry
Infantry
Infantry
Infantry
Infantry
Turcos
Jaegers
Zouav es
Cav alry
Cav alry
Infantry
Cav alry
Infantry
Artillery
Chasseurs
Infantry
Jaegers
Jaegers
Chasseurs
Artillery
Guard
Guard
Playsheet: Franco-Prussian War 1870-1871
•
French artillery is muzzleloading and suffered from poor fuses.
o French artillery only uses the Artillery Fire cards and may not use the Rapid Fire card .
o Use the shorter French artillery fire ranges shown on the playsheet.
o Subtract 4 from the D20 roll when rating French artillery.
•
Prussian artillery is armed with rapid firing and longer ranged breechloading Krupp guns.
o Add the Rapid Fire card to the Prussian sequence deck. All Prussian artillery may use the
Rapid Fire card.
o Use the longer Prussian artillery fire ranges shown on the playsheet.
o Add 4 to the D20 roll when rating Krupp guns.
Ground Scale: Since all units are in looser order and weapon ranges have grown, as well as to keep a
good game ratio of movement to firing ranges, the ground scale is approximately 1”=80 yards.
115
Period Rules
Artillery Guns: All artillery pieces are rifled. The French artillery is muzzleloading while the Prussian
artillery is breechloading. To reflect the different capabilities of the guns, use the following rules:
cuts 9", 8.75", 8.5", 11.5", 11"
Immediate Melee: Cavalry, Prussian infantry in Company Column, and Turcos/Zouaves may immediate
melee. Others may only initiate melee on a Melee card.
Infantry Formations: French infantry may only use Line Formation. Prussian and German states infantry
may use Company Column or Line. Company Column is represented on the table as a closed formation
appearing as an Attack Column. This tabletop formation portrays the actual Company Column which was
an extended order combination of a skirmish screen fronting open companies in platoon columns, spaced
linearly behind the skirmish screen.
Infantry Rifles: Infantry are armed with rapid firing breechloading rifles. To reflect the different
capabilities of the rifles, use the following rules:
•
French infantry is armed with the most advanced rifle of the time, the Chassepot rifle.
o Add the Rapid Fire card to the French sequence deck. All French infantry may use the
Rapid Fire card.
o Use the longer French infantry fire ranges shown on the playsheet
•
Prussian infantry is armed with the Needlegun breechloading rifle.
o Add the Rapid Fire card to the Prussian sequence deck. All Prussian infantry may use the
Rapid Fire card.
o Use the shorter Prussian infantry fire ranges shown on the playsheet.
•
Bavarian infantry is armed with the Podewils breechloading rifle.
o Bavarian infantry only uses the Infantry Fire cards and may not use the Rapid Fire card.
o Use the longer Bavarian infantry fire ranges shown on the playsheet.
Mitrailleuse: The French Mitrailleuse is rated as an Early MG. Mitrailleuse units use the Artillery Fire and
Rapid Fire cards.
Sequence Deck: Add the Rapid Fire card to both the French and Prussian sequence decks. Unit use is
as defined above.
116
cuts 9", 8.75", 8.5", 11.5", 11"
Russo-Turkish War 1877
Russo-Turkish War 1877
Romania
Russia
Turkey
Poor
Average
Poor
Poor
Average
Average
Line
Att. Column
Line
Line
Att. Column
Line
Att. Column
Line
Att. Column
Line
Skirmish
Units
Rifles
Rifles
Bashi Bazouks
Circassians
Kurds
Grand Battery
Yes
Yes
Yes
Reserve/Militia
Infantry
Bashi Bazouks
Artillery
Circassians
Dragoons
Infantry
Kurds
Reserve
Infantry
Artillery
Dragoons
Infantry
CiC LQ
Cmd. Group
LQ
Infantry
Formations
Cavalry
Formations
Rabble
Raw
Artillery
Cavalry
Infantry
Bulgarian
Legion
Cossacks
Regular
Artillery
Cavalry
Infantry
Artillery
Cavalry
Infantry
Crack
Grenadiers
Rifles
Elite
Guard
Playsheet: Russo-Turkish War 1877
Artillery Guns: All artillery pieces are breechloading rifled guns.
o Add the Rapid Fire card to all sequence decks. All artillery may use the Rapid Fire card.
Immediate Melee: Infantry may immediate melee. Others may only initiate melee on a Melee card.
Period Rules
Infantry Formations: All infantry may use line or attack column formations. Only units capable of
skirmishing may use skirmish formation. See the army list for suggested troop types that may be in
skirmish formation.
117
cuts 9", 8.75", 8.5", 11.5", 11"
Infantry Rifles: All infantry is armed with rapid firing breechloading rifles. To reflect the different
capabilities of the rifles, use the following rules:
•
Russian infantry is armed with breechloading (BL) rifles or muzzleloading rifles (ML).
o Add the Rapid Fire card to the Russian sequence deck. All Russian infantry armed with
BL rifles may use the Rapid Fire card.
o Guard and Grenadier units are armed with BL rifles.
o 80% of Rifle units are armed with BL rifles, 20% with ML rifles
o 50% of regular infantry units are armed with BL rifles, 50% with ML rifles.
o 20% of regular cavalry is armed with repeating carbines. All other cavalry is armed with
carbines.
•
Turkish infantry is armed with breechloading (BL) rifles or muzzleloading rifles (ML).
o Add the Rapid Fire card to the Turkish sequence deck. All Turkish infantry armed with BL
rifles may use the Rapid Fire card.
o 60% of Reserve infantry units are armed with BL rifles, 40% with ML rifles.
o 20% of militia units are armed with BL rifles, 50% with ML rifles, 30% with muskets (M) .
o 70% of regular cavalry is armed with repeating carbines. All other cavalry is armed with
carbines.
•
Romanian infantry is armed with breechloading (BL) rifles or muzzleloading rifles (ML).
o Add the Rapid Fire card to the Romanian sequence deck. All Romanian infantry armed
with BL rifles may use the Rapid Fire card.
o 20% of regular infantry units are armed with BL rifles, 80% with ML rifles.
o 40% of Rifle units are armed with BL rifles, 60% with ML rifles.
o All cavalry is armed with carbines.
Sequence Deck: Add the Rapid Fire card to all sequence decks. Unit use is as defined above. If any
units are armed with repeating weapons add the Rolling Fire card to their sequence deck.
118
cuts 9", 8.75", 8.5", 11.5", 11"
Anglo-Zulu War 1879
Anglo-Zulu War 1879
British
CiC LQ
Cmd. Group
LQ
Infantry
Formations
Cavalry
Formations
Skirmish
Units
Grand Battery
Natal
Native
Contingent
Av erage
Colonial
Horse
Zulu
Av erage
Skilled
Poor
Poor
Av erage
Skilled
Line
Line
Line
Mass
Att. Column
Line
Line
All
No
Att. Column
Line
All
No
No
No
Cav alry
Rifles
Cav alry
Infantry
NNC
Rabble
NNH
NNC
Raw
NNH
Artillery
Regular
Cav alry
Infantry
Highlanders
KRRC
Crack
Dragoon
Infantry
Guards
Lancers
Elite
Playsheet: Anglo-Zulu War 1879
Army Morale Points (Optional): As the Imperial army may most likely be significantly outnumbered,
scenario designers may wish to add 25-50% additional Army Morale Points to the Imperial army. When
determining the total number of units in the Imperial army to use when rolling for Army Morale Points, add
an extra 25 to 50% to the unit total and then roll for Army Morale. Note that his rule is optional and can be
used at the scenario designer's discretion.
Immediate Melee: British lancers and Zulu infantry (non-firearm armed) may immediate melee on a won
Even movement roll. Others may only initiate melee on a melee card.
Interpenetration: Units in Mass formation may not interpenetrate other units in Mass formation.
Multiple Unit Squares: Infantry, dismounted cavalry, and artillery or machine gun units may form multiple
unit squares. All units must be in contact with another friendly unit, and the total formation must be in a
roughly square (rectangle) shape. Units in a multiple unit square use the special rules for squares in melee
while the units constitute a "square". A square is formed of units in flank contact with other friendly units
119
Period Rules
Machine Guns: British machine guns are rated as an Early MG and use the Artillery Fire and Rapid Fire
cards.
cuts 9", 8.75", 8.5", 11.5", 11"
that are arranged in a square or rectangular formation. A multiple unit square remains a square until the
unit is voluntarily broken up, or a component unit is routed or eliminated. Once a multiple unit square is
broken up, normal melee modifiers and procedures are followed. Fire at units that are in a multiple unit
square is modified based on the individual target unit’s formation. Multiple unit squares consisting entirely
of infantry or dismounted cavalry may move at the 1/4 infantry sidestep/backwards move rate (2").
Non-imperialist armies may not use multiple unit squares.
Rockets: Rockets use Smoothbore artillery ranges but cannot fire at targets closer than 12". Use the
ratings for Smoothbore artillery, and rate according to the weight of the rocket ordinance (Light, Medium,
Heavy). Rocket units reload on the Artillery Fire card. Place two fire markers on a rocket unit when it fires.
Modify the Combat Die using normal modifiers and resolve the fire using normal procedures. Remove 1
fire marker per Artillery Fire card. Rockets are very inaccurate and will have a lower Combat Die than
most other artillery. Subtract 5 from the D20 roll when rating rocket batteries. The path of the rocket flight
may affect both friendly and enemy units. Roll a D6 when a rocket battery fires to determine the path of the
rocket.
• On a roll of 1, the rocket’s path is along a line traced from the center of the rocket battery unit to a
point D12” to the firer’s left of the center of the target unit.
o Any unit that is under the path of the rocket must roll their Defense Die vs a D8. If the
Defense Die roll is less than the D8, the unit becomes Disordered.
• On a roll of 2, the rocket’s path is along a line traced from the center of the rocket battery unit to a
point D6” to the firer’s left of the center of the target unit.
o Any unit that is under the path of the rocket must roll their Defense Die vs a D8. If the
Defense Die roll is less than the D8, the unit becomes Disordered.
• On a roll of 3 or 4, the rocket’s path is along a line traced from the center of the rocket battery unit
to the center of the target unit.
o Any unit that is under the path of the rocket must roll their Defense Die vs a D8. If the
Defense Die roll is less than the D8, the unit becomes Disordered.
o Follow normal fire combat resolution rules to determine the effectiveness of the fire on the
target unit.
• On a roll of 5, the rocket’s path is along a line traced from the center of the rocket battery unit to a
point D6” to the firer’s right of the center of the target unit.
o Any unit that is under the path of the rocket must roll their Defense Die vs a D8. If the
Defense Die roll is less than the D8, the unit becomes Disordered.
• On a roll of 6, the rocket’s path is along a line traced from the center of the rocket battery unit to a
point D12” to the firer’s right of the center of the target unit.
o Any unit that is under the path of the rocket must roll their Defense Die vs a D8. If the
Defense Die roll is less than the D8, the unit becomes Disordered.
Sequence Deck: Add 3 Frenzied Charge cards to the Zulu sequence deck. Zulus (without firearms) may
use the Frenzied Charge card. If there are any Zulu units with firearms, the Zulu sequence deck has one
Infantry Fire card. If there are no Zulu units with firearms, remove all Infantry Fire cards. Remove all
Artillery Fire cards from the Zulu sequence deck.
Add the Rapid Fire card to the British sequence deck. All British units use the Rapid Fire card.
Unit Formations: All Zulu units are in Mass. British are in Line or Skirmish. Colonial Horse are in Line
or Skirmish (if dismounted). Natal Native Contingent and Natal Native Horse are in Line.
120
cuts 9", 8.75", 8.5", 11.5", 11"
Unit Size (optional): It is possible to play scenarios where companies are the tactical units represented
without any adverse effect on play.
1 Infantry Unit = 80 to 120 men
1 Cavalry Unit = 60 to 100 men
1 Artillery Unit = 1 to 2 guns and crew
Zulu Movement: Zulus move at 10” per segment. Modify Zulu Command Group leaders Leadership die
sizes Up 1 for all movement rolls.
Zulu Throwing Spears: Zulus could be armed with 1 or 2 throwing spears in addition to their primary
stabbing assegai. If throwing spears are to be used in a scenario, allow Zulu units a one-time Up 1 melee
modifier (for throwing their spears).
Period Rules
Zulus With Firearms: A very limited number of Zulu units may have firearms. These units are still
deployed in Mass. Subtract 4 from the D20 roll when rolling for the unit’s Combat Die size prior to the
game.
121
cuts 9", 8.75", 8.5", 11.5", 11"
Anglo-Sudan War 1881-1899
Anglo-Sudan War 1881-1899
Mahdists
Mahdists
1881-89
1881-89
West. Sudan East. Sudan
CiC LQ
Cmd. Group
LQ
Infantry
Formations
Cavalry
Formations
Skirmish
Units
Grand Battery
British
1884-85
British
1885-99
Poor
Poor
Abysmal
Abysmal
Average
Skilled
Poor
Poor
Poor
Abysmal
Average
Skilled
Mass
Mass
Mass
Line
Square
Line
Square
Line
Square
Mass
Mass
Mass
Attack Col.
Line
Attack Col.
Line
Attack Col.
Line
None
None
None
None
No
No
No
No
Rabble
Artillery
Infantry
Non-Jihadya
Riflemen
Raw
Cavalry
Infantry
Jihadya
Riflemen
Regular
Mahdists
1890-99
Egypt
1881-85
Unreformed
Army
Infantry
Artillery
Riflemen
Cavalry
Infantry
Dismounted Cav. Dismounted Cav.
Infantry
Infantry
No
No
Bashi Bazouks
Bazingers
Artillery
Gendarmes
Infantry
Infantry
Irregulars
Cavalry
Artillery
Infantry
Cavalry
Bengal Infantry
NonInfantry
Egyptian Infantry
Muluazimayya
Sudanese
Riflemen
Infantry
Cavalry
Infantry
Muluazimayya
Riflemen
Artillery
Artillery
Cavalry
Infantry
Egyptian Camel
Corps
Guards
Highlanders
KRRC
Naval Brigade
Crack
Artillery
Cavalry
Infantry
Egyptian
Regulars
Sudanese
Regulars
Guards
Highlanders
Elite
Playsheet: Anglo-Sudan War 1881-1899
Army Morale Points: As the Imperial army may most likely be significantly outnumbered, scenario
designers may wish to add 25-50% additional Army Morale Points to the Imperial army. When determining
the total number of units in the Imperial army to use when rolling for Army Morale Points, add an extra 25 to
50% to the unit total and then roll for Army Morale. Note that his rule is optional and can be used at the
scenario designer's discretion.
122
cuts 9", 8.75", 8.5", 11.5", 11"
Gunboats: Gunboats move on Move and Move 1 Command Group cards. Gunboats move 12” with the
river current and 6” against the river current. Any gunboat movement that is not directly up or down river is
reduced by 3”.
Artillery may be deployed in full (2 stands) or half battery (1 stand) units on gunboats. Single stand artillery
units are Down 1 when firing. Measure all fire from the center of the artillery unit’s frontage onboard the
gunboat.
Gunboats receiving fire will not fall back, regardless of the fire combat. Gunboats never become
Disordered.
Interpenetration: Units in Mass formation may not interpenetrate other units in Mass formation.
Immediate Melee: British cavalry and Mahdist infantry may immediate melee on a won Even movement
roll. Others may only initiate melee on a melee card.
Machine Guns: Prior to the 1899 campaign, British machine guns are rated as an Early MG and use the
Artillery Fire and Rapid Fire cards.
For the 1899 campaign, British machine guns are Maxim machine guns which are rated as Late MG.
Armies with Maxim machine guns add both the Rapid Fire and Rolling Fire to their sequence decks.
Mahdist Movement: Modify Mahdist Command Group leaders Leadership die sizes Up 1 for all
movement rolls.
Mahdists With Firearms: Mahdist units with firearms are deployed in Line. Subtract 2 from the D20 roll
when rolling for the unit’s Combat Die size prior to the game.
Multiple Unit Squares: Infantry, dismounted cavalry, and artillery or machine gun units may form multiple
unit squares. All units must be in contact with another friendly unit, and the total formation must be in a
roughly square (rectangle) shape. Units in a multiple unit square use the special rules for squares in melee
if the units constitute a "square". A square is formed of units in flank contact with other friendly units that
are arranged in a square or rectangular formation. A multiple unit square remains a square until the unit is
voluntarily broken up, or a component unit is routed or eliminated. Once a multiple unit square is broken
up, normal melee modifiers and procedures are followed. Fire at units that are in a multiple unit square is
modified based on the individual target unit’s formation. Multiple unit squares consisting entirely of infantry
or dismounted cavalry may move at the 1/4 infantry sidestep/backwards move rate (2").
Non-imperialist armies may not use multiple unit squares.
For the 1881 and early war period, add one Rapid Fire card to the British sequence deck.
For the 1899 war, add one Rapid Fire and one Rolling Fire card to the British sequence deck. All British
and allied Egyptian and Sudanese artillery, dismounted cavalry, and infantry units use their appropriate fire
cards plus the Rapid Fire card. Machine guns use the Artillery Fire, Rapid Fire, and Rolling Fire card.
123
Period Rules
Sequence Deck: Add 3 Frenzied Charge cards to the Mahdist sequence deck. Mahdist units (without
firearms) may use the Frenzied Charge card. If there are any Mahdist units with firearms, the Mahdist
sequence deck has two Infantry Fire cards. If there are no Mahdist units with firearms, remove all Infantry
Fire cards. If there are no artillery units in the Mahdist army, remove all Artillery Fire cards from the
Mahdist sequence deck. If there are artillery units in the Mahdist army, the Mahdist Sequence deck will
have two Artillery Fire cards.
cuts 9", 8.75", 8.5", 11.5", 11"
Unit Size (optional): It is possible to play scenarios where companies are the tactical units represented
without any adverse effect on play. Use the Tactical game firing ranges.
1 Infantry Unit = 80 to 120 men
1 Cavalry Unit = 60 to 100 men
1 Artillery Unit =1 to 2 guns and crew
124
cuts 9", 8.75", 8.5", 11.5", 11"
11.0 Season of Battle
Season of Battle is a campaign system that focuses on a single operational command group from opposing
armies in a defined combat theatre. Players maneuver the forces on the theatre map, resolve battles on
the tabletop, and adjust the characteristics and strength of the operational forces between battles.
Campaigns can last anywhere from a single season or less to multiple seasons, depending on the outcome
of the tabletop battles.
Season of Battle is a linked battle and battle generation campaign system. While it is aimed at tabletop
games played with Field of Battle, it can be adapted to be used with most game systems. Season of Battle
requires a minimum of record keeping and allows for player decisions to form the context and situation for
each battle in the campaign.
Season of Battle was designed so that it doesn't take much time to set up and administer, comes to a
definite conclusion, and allows you to follow an army's progression through a series of battles. The system
is designed to provide the tactical situation, with operational maneuvering that provides context for the
battle. The system is designed so that it gives each side a reasonable chance at victory. After all, while
many gamers may say that they like to play in an unbalanced scenario, those tend to not be much fun if
gaming opportunities are limited.
SoB uses a single deck of cards to create the campaign actions and battlefield selection. The campaign
map consists of a home area for each side, a central starting area for the campaign, and regions in each
side’s home territory. A campaign consists of one to multiple campaign seasons (Spring, Summer, Fall,
Winter). Each side begins the campaign with a randomly determined number of National Morale Points
that are lost throughout the campaign. Victory for a campaign season is achieved when an army’s National
Morale Point total drops to 0. Victory for the campaign is achieved when an army is defeated in their home
area.
Each area is defined as Open, Moderate, or Dense. These titles characterize the general density and type
of terrain in that area. Each density of area has tactical battlefield maps assigned to it, which are used to
select the battlefield for the tactical tabletop game.
A single campaign deck is used by both sides to run the campaign. One pass through the campaign deck
is defined as a Season. The Seasons are further defined as Spring, Summer, Fall, Winter. The campaign
deck is used to create both army’s status and the tactical situation for the upcoming battle.
An army roster is created for each army at the start of the campaign. The roster lists each unit and officer
along with their Combat/Defense/Leadership Die values, and the beginning National Morale Point total.
The roster is used to track any increase/decrease in the unit and leader capability after a battle, as well as
tracking the National Morale Points.
That's pretty much it. It's fast, smooth, and doesn't take the focus away from the tactical game which is
why we're playing with miniatures!
125
cuts 9", 8.75", 8.5", 11.5", 11"
11.1 Campaign Outline and Elements
A campaign consists of one to multiple years.
A year has four seasons: Spring, Summer, Fall, and Winter.
A battle is fought in each season.
The campaign is won if one side wins a battle in the opponent’s home area.
A season is won if either side’s National Morale Point total has dropped to zero or less than zero after a
battle.
If a shorter campaign time frame is desired, simply change the campaign turn to be a month and the
“season” then becomes a week. So, a campaign would consist of one to multiple months. A month has
four weeks (“seasons”). A battle is fought in each week. If using this method, still check for weather in
each week, but the weather roll would change only when moving to a month in a different season (of
weather)
~ 126 ~
cuts 9", 8.75", 8.5", 11.5", 11"
11.11 Campaign Process
The steps needed to play a campaign are explained individually in detail in their own unique sections in the
rules. The summary of steps involved in playing a campaign are:
1) Create campaign map.
a) Name areas.
b) Assign area victory points.
c) Assign area terrain densities.
2) Separate battlefield maps into Open, Moderate, Dense card decks.
3) Create army rosters.
a) Rate armies.
b) Rate leaders.
4) Determine National Morale Points.
5) Create campaign card deck
a) Add 7 campaign cards of each army color.
b) Add 2 Weather cards.
6) Place engagement marker at starting area in the center area on campaign map.
7) Roll each army’s CiC Leadership Die.
a) High roll selects starting campaign season.
b) High roll elects to draw first or second from campaign deck
c) The side drawing and revealing the card is the Active side.
8) Proceed through campaign deck play.
a) Alternate play, 1 card draw per side, taking turns as the Active side.
b) Note campaign results with markers on the campaign map perimeter tracking log, or on a separate
campaign log.
9) Battle is forced by play of Battle card, or by end of Season.
10) Roll each army’s CiC Leadership Die to determine battle set up.
11) Resolve battle.
12) If an army loses a battle in their home area, they lose the campaign.
13) Resolve post battle effects.
a) Adjust National Morale Points.
b) Adjust unit and leader ratings per post battle process results.
14) If the enemy’s National Morale Point total drops to 0 after a battle that is not in the enemy’s home area,
the winning army may move the Engagement Area one space following allowable routes in any
direction.
15) If the campaign year ends and the campaign is not complete, both sides may carry over a portion of
their remaining National Morale Points.
a) Roll a D10 for each increment of 10 National Morale Points remaining, ignoring any remainder less
than 10.
b) The number rolled is the amount of National Morale Points that are carried over to the next year.
Example: A side has 26 NMPs remaining. The army would roll a D10 twice (ignoring the 6 point
remainder). If they rolled a 3 and a 9, they would carry over 12 NMPs to the next year in the
campaign.
16) If the campaign continues into the next year, roll for the new year’s National Morale Point totals for
each army, add any National Morale Points rolled over, and return to step 8.
~ 127 ~
cuts 9", 8.75", 8.5", 11.5", 11"
11.12 Battlefield Deck
The Battlefield deck is a deck of 54 cards that are used to create the tabletop game terrain. Each
battlefield map shows the terrain and the map number (in this example, Map 2).
Each building shown on the maps is a Town Section.
Town Sections
Road
River
Woods
Hill contour
The map is broken into 1’x1’ square zones on the tabletop. These zones are also used to identify set up
areas as the game scenario is generated. An army can deploy in any of the 9 squares along their edge of
the table, as well as in any of the additional squares gained in the pre-battle campaign process.
If the game table is of a different size than the 5’x9’ shown on the battlefield map, the zones and table size
can be scaled to fit the available table size.
Example: If the game table is 5’ x 9’, a 1’x1’ grid can be used, giving 5 zones x 9 zones, or 45 zones for
the table. If the table is 4’x6’, an 8” x 8” grid could be used, giving a 6 zone by 9 zone table area (54
zones). The key is to set up the grid system that is used to identify terrain placement and set up areas.
The zones don’t need to be marked on the tabletop. My terrain is based on 12” square tiles, so they
naturally provide the grid on the table.
~ 128 ~
cuts 9", 8.75", 8.5", 11.5", 11"
Designer’s Note: The terrain shown on each map can be treated as a guideline. The terrain on the maps
matches my terrain collection. I realize that no one will have exactly what I have, nor will there be any
consistency from gamer to gamer. There is no requirement to match the hill contours or other details
exactly. For example, if multiple individual hills can be used to create the hilly area on the bottom corner of
Map 2. Players will need to be aware that the actual tabletop terrain may vary from the map depending on
the available terrain resources in the group’s collection.
Likewise, there is nothing magical about these battle maps. Users are encouraged to create their own
library of battle maps that match their available terrain and use those for the campaign. My original maps
were sketches that I photocopied onto card stock. Create maps (remembering that you need to create 52
maps!) that fit your available terrain and the layouts you prefer. It’s your campaign – make it the way you
enjoy it!
Each battlefield is further defined as either Open, Moderate, or Dense. The maps in each category are:
• Open
o Map Numbers 1 to 18
• Moderate
o Map Numbers 19 to 36
• Dense
o Map Numbers 37 to 54
Terrain classes for each terrain area or item are randomly assigned by rolling a D10 and referring to the
table below.
OPEN
Hills
Rivers
Towns
Woods
Hills
Rivers
Moderate
Towns
Woods
Dense
Hills
Rivers
Towns
Woods
I
1-5
1-6
NA
1
I
1-3
1-4
NA
1
I
1-2
1-4
NA
NA
~ 129 ~
II
6-9
7-10
1-6
2-9
II
4-7
5-9
1-6
2-7
II
3-5
5-7
1-6
1-5
III
10
NA
7-10
10
III
8-10
10
7-10
8-10
III
6-10
8-10
7-10
6-10
cuts 9", 8.75", 8.5", 11.5", 11"
Designer’s Note: Period or geography adjustments can easily be made for any campaign map. The
campaign maps show the typical “wargamer green” map with representative town areas and terrain. Users
should feel free to declare changes to the maps based on the area or era of the campaign they are playing.
For example, if playing a campaign in an arid location, simply rule that any river is in fact a dry riverbed or
wadi. If playing an ACW campaign, replace town areas with wooded areas. The only limit is the
imagination. Players should feel free to create a terrain table that represents the period in which the
campaign is set, as well as their personal preferences. I find that Class III rivers inevitably create “traffic
jam at the bridge” games, so I rarely use Class III rivers.
11.13 Campaign Deck
The campaign deck consists of 7 action cards of an identifying color for each side, plus two yellow Weather
cards.
Each side is assigned a color for their campaign deck. The deck colors are dark blue, light blue, red,
green, gray, and white. An easy way to select the color is to assign a color that matches the primary
uniform color recognized for that army.
Example: An American Civil War Federal army would use the dark blue cards, and the Confederate army
would use the gray cards.
The color-coded campaign cards for each side are:
•
•
•
•
•
Battle
Move (3 each)
Plan & Prepare
Supply
Operational Initiative
Each army’s 7 colored cards plus the two yellow Weather cards are gathered into a single 16 card
campaign deck and shuffled.
11.2 Setting Up the Campaign
Players select the period for the campaign and select armies for the campaign season. Each army’s
composition (the number and type of units) remains the same throughout a campaign system. While the
quality of units in a game can vary from game to game depending on postgame adjustments, the basic
army remains unchanged. Depending on the period and player preferences, armies can be of equal size
and composition or can be historically uneven in size. For most similarly armed and organized armies,
numerically similar forces work well.
~ 130 ~
cuts 9", 8.75", 8.5", 11.5", 11"
11.21 Create Army Rosters
Prior to campaign or tabletop play, a roster is completed for each army. The roster lists the army’s units
and leaders. The initial ratings (Combat Die/Defense Die for units; Leadership Die for leaders) are shown
on the roster. Any changes resulting from the post battle adjustment phase are noted on the roster, and
the adjusted unit or Leadership values are used in the next battle. All changes are permanent unless
changed (either up or down) in a subsequent post battle adjustment phase.
All units and leaders are organized into Command Groups in the roster listing. Command Groups can only
be changed or reorganized on the Plan & Prepare card.
A roster sheet is provided in the Appendix.
11.22 Determining National Morale Points Per Campaign Year
National Morale Points (NMPs) are an abstraction of the resources available to each Campaign Army.
NMPs are randomly determined prior to the Campaign year and are adjusted after each battle.
NMP’s are determined for each campaign year by rolling three times on the Morale Point table shown
below by cross referencing the Campaign Army size (in number of units) with a D12 die roll. The results
of the three rolls are added together to arrive at the total number of NMPs for the campaign year.
Example: A French campaign army from 1870 has 21 units. The French player rolls the D12 three times.
The D12 rolls are 4, 9, and 5. The rolls result in 19, 23, and 20 National Morale Points. These are added
together, giving the French a total of 62 National Morale Points for the campaign year (19+23+20=62
NMPs).
A battle ends one of two ways. An army will lose by failing an Army Morale test, or an army may voluntarily
forfeit the game at any point when they have zero morale points and an Army Morale card is turned.
~ 131 ~
cuts 9", 8.75", 8.5", 11.5", 11"
Number of Units
National Morale Points
D12 Die Roll
4
5
6
7
8
9
10
11
12
13
14
15
16
17
18
19
20
21
22
23
24
25
26
27
28
29
30
31
32
33
34
35
36
37
38
39
40
1
3
4
5
5
6
7
8
8
9
10
11
11
12
13
14
14
15
16
17
17
18
19
20
20
21
22
23
23
24
25
26
26
27
28
29
29
30
2
3
4
5
6
6
7
8
9
10
10
11
12
13
14
14
15
16
17
18
18
19
20
21
22
22
23
24
25
26
26
27
28
29
30
30
31
32
3
3
4
5
6
7
8
9
9
10
11
12
13
14
14
15
16
17
18
19
20
20
21
22
23
24
25
26
26
27
28
29
30
31
31
32
33
34
4
4
5
5
6
7
8
9
10
11
12
13
14
14
15
16
17
18
19
20
21
22
23
23
24
25
26
27
28
29
30
31
32
32
33
34
35
36
5
4
5
6
7
8
9
10
10
11
12
13
14
15
16
17
18
19
20
21
22
23
24
25
26
27
28
29
29
30
31
32
33
34
35
36
37
38
~ 132 ~
6,7
4
5
6
7
8
9
10
11
12
13
14
15
16
17
18
19
20
21
22
23
24
25
26
27
28
29
30
31
32
33
34
35
36
37
38
39
40
8
4
5
6
7
8
9
11
12
13
14
15
16
17
18
19
20
21
22
23
24
25
26
27
28
29
30
32
33
34
35
36
37
38
39
40
41
42
9
4
6
7
8
9
10
11
12
13
14
15
17
18
19
20
21
22
23
24
25
26
28
29
30
31
32
33
34
35
36
37
39
40
41
42
43
44
10
5
6
7
8
9
10
12
13
14
15
16
17
18
20
21
22
23
24
25
26
28
29
30
31
32
33
35
36
37
38
39
40
41
43
44
45
46
11
5
6
7
8
10
11
12
13
14
16
17
18
19
20
22
23
24
25
26
28
29
30
31
32
34
35
36
37
38
40
41
42
43
44
46
47
48
12
5
6
8
9
10
11
13
14
15
16
18
19
20
21
23
24
25
26
28
29
30
31
33
34
35
36
38
39
40
41
43
44
45
46
48
49
50
cuts 9", 8.75", 8.5", 11.5", 11"
11.3 Creating the Campaign Map
The map shown below is from an American Civil War campaign. A map without names, victory points, and
terrain densities is included in the appendix for creating campaign maps.
Move Modifiers: UP 1 if Moving to a Lower Terrain Density Area
Down 1 if Moving to a Higher Terrain Density Area
Spring
Summer
1-3 Good; 4+ Bad
Bad: DN1 on Move
` Bad: DN1 on Supply
1 Bad; 2+ Good
Bad: DN1 on Supply
Supply: Friendly UP2
Enemy Down 2
Supply: Friendly UP1
Enemy Down 1
Season of Battle
Supply: Friendly
Win Ties
Supply: Friendly
Win Ties
5
5
5
O
Winter
1-8 Bad; 9+ Good
Bad: DN1 on Move
Bad: DN1 on Supply
Supply: Friendly UP1
Enemy Down 1
6
Strasburg
Amelia CH
Fall
1-5 Bad; 6+ Good
Bad: DN1 on Move
Bad: DN1 on Supply
7
Harpers Ferry
M
Sharpsburg
M
M
Warrenton
6
8
9
O
4
10
Ma na ssa s
Fred.burg
Hanover Junct.
O
Washington
O
O
D
Chanc'ville
8
4
M
Fairfax CH
Petersburg
D
D
8
4
M
7
Alexandria
Falmouth
Spotsylvania
Cold Harbor
M
O
4
D
Occoquan
O
UP1 Modifier:
Home D4/Enemy D4+5
6
7
Charles City
UP1 Modifier:
Home D4+1/Enemy D4+4
Tac Init.
Supply Effect on Strength
Orient Map
+5%
1,2 squares
Gettysburg
7
10
M
6
O
New Market
D
Richmond
Supply: Friendly UP2
Enemy Down 2
+10%
-5%
O
UP1 Modifier:
Home D4+2/Enemy D4+3
UP1 Modifier:
Home D4+2/Enemy D4+3
UP1 Mod:
Home D4+1
Enemy D4+4
Supply Effect on Strength
-10%
Strengths and Advantages
-10%
-5%
10%
5%
3+D6 Init.
UP1 Mod:
Home D4
Enemy D4+5
Tac Init.
Orient Map
1,2 squares
3+D6 Init.
The campaign map is an area movement map. Movement between areas is only allowed via lines
connecting the areas.
Designer’s Note: The map can be modified as desired or ignored entirely if you wish to create your own
map. I suggest that any new map keep roughly the same dimensions (number of areas, regions) to
maintain the campaign deck size and map in relative proportion. Note that the map has a minimum of 5
area pathways between the center area and either home area. I find that a 5 area pathway/distance from
the center location and the home areas strikes a good balance between being able to get to the opponent’s
home area too quickly and helps avoid being mired in a campaign where movement doesn’t seem to result
in any appreciable change.
It is possible to create a map that mimics historical geographies and transport routes. The map provided is
a general map that can have area names added for flavor. As it is not possible for me to correctly guess
which eras and theatres would be best fits for everyone’s preferences, I’ve elected to provide a generic
map that can be used as a basis for virtually any campaign era or location.
The map is broken into regions. The regions are separated by dotted lines.
The starting area for the campaign is the center area.
Each army has a home area located in the region closest to their edge of the map.
~ 133 ~
cuts 9", 8.75", 8.5", 11.5", 11"
Each area has a Victory Point value that is randomly assigned to it prior to the start of the campaign.
Each area has the terrain density (Open, Moderate, Dense) randomly assigned to it prior to the start of the
campaign. The terrain density is used to identify the battlefields that are available in that area, as well as
the terrain class on the battlefield maps.
The top and bottom of the campaign map shows comments that apply to game situations in each region.
• The top of the map shows Leadership Die roll modifiers that apply in those regions when the
Supply card is turned.
• The bottom of the map shows the randomly determined number of National Morale Points that can
be spent to modify the Leadership Die roll Up 1 for ANY die roll.
Designer’s Note: The modifiers make it easier to pass supply tests when in your own regions, and more
difficult to pass supply tests when in the enemy’s regions. Players can elect to use National Morale Points
to further modify any die roll. This can be a risky enterprise – how much of a chance should be taken to
modify a Supply roll? What if you really want to get to a specific area for a battle? Is it worth spending
National Morale Points?
While not necessary, it adds color to the campaign to name each area. Names can be assigned based on
the actual names in the area of an historical campaign, or fictional names can be created. The area
names do not materially impact the campaign, but there is more satisfaction knowing that you just moved
out of Frederick and into the Shenandoah Valley, rather than moving from Area 4 to Area 6.
A good source of names can be found in historical reference works, grand tactical or operational level
board games, or even by using modern online maps and noting modern names of major towns that could
be used for area names (adjusted as necessary to fit the era being represented).
11.31 Assigning Area Victory Points
Each home area is worth 10 Victory Points (VPs).
All other areas have their VP total randomly assigned. Take a standard deck of playing cards and
separate all 4 of the 4’s, 5’s, 6’s, 7’s, 8’s. Add a single 9 to the pile of cards. The resulting deck has 21
cards.
Shuffle the 21 cards. Select an area in which to begin and draw the top card. Note the value of the card in
that area on the map as the area’s VP total. Discard that card. Move on to the next area, draw the next
card and note the value of the card in that area on the map as the area’s VP total. Discard that card.
Repeat this process until all areas have had a VP value assigned.
~ 134 ~
cuts 9", 8.75", 8.5", 11.5", 11"
11.32 Assigning Area Terrain Densities
All areas have their terrain density (Open, Moderate, Dense) randomly assigned. Use the same 21 card
deck that was used to assign VPs (see 11.31 above).
The density of terrain in an area is determined by the value of the card turned for that area.
• Open:
4’s and 5’s
• Moderate: 6’s and 7’s
• Dense:
8’s and 9
Shuffle the 21 cards. Select and area in which to begin and draw the top card. Note the value of the card
and the density it represents. Record the density in that area on the map. Discard that card. Repeat this
process until all areas have had a terrain density assigned.
11.4 Playing the Campaign
A campaign turn is a season (Spring, Summer, Fall, or Winter).
• A turn of play through the campaign deck is a season, which will always result in one battle.
A campaign year consists of four campaign seasons.
Campaign actions are controlled by a single deck (See 11.13 Campaign Deck) that has action cards of
each player’s army’s colors, plus two Weather cards.
A marker is placed in the center location of the campaign map to begin the campaign. The marker is
moved from area to area via the lines linking adjacent areas on the campaign map as a result of either side
electing to move on Move cards.
Designer’s Note: The marker represents the general area in which both sides’ armies are currently located.
Both side’s armies are assumed to be in general contact with each other through outpost and
reconnaissance efforts. The movement of the marker from area to area represents the grand tactical
maneuvering of the two armies as they stay in proximity of each other on the campaign map. Note that the
engagement marker can be any marker as chosen by the players, for example a coin or a die. Its function
is only to indicate the area currently in play.
To begin the turn, each side rolls their Leadership Die.
• The side rolling higher may elect to act first or second drawing a card. This order remains for the
remainder of the card draws in the campaign season.
• The campaign turn begins with the Spring season.
Designer’s Note: Campaigns will typically begin in the Spring to allow more seasons in the campaign turn.
However, if players wish to introduce a twist, the player rolling higher to begin the turn can elect to begin
the campaign in any season they wish. Maybe the enemy is close to their home area as a result of
previous season’s play and they want “General Winter” to help slow the enemy movement, so they elect to
begin the campaign year in the Winter. Who knows?
Each side alternates drawing and acting on action cards from the campaign deck until either battle is
forced, or the campaign deck is exhausted at which time battle is forced. There will always be a battle in
each season.
~ 135 ~
cuts 9", 8.75", 8.5", 11.5", 11"
Players act on an action card by rolling their modified Leadership Die (LD) vs. the opponent’s Opposition
Die. If they are acting on a card that is the color of their deck, their Leadership Die is unmodified. If they
are acting on a card that is the color of the opponent’s deck, their Leadership Die is modified Down 1. An
LD roll higher than the Opposition Die roll is a success. Check each card’s definition to determine the
range of results for success.
11.41 Opposition Dice
Opposition Dice represent the allocation of the army’s resources to resist and impede enemy actions in the
campaign theatre. Opposition Dice are an abstraction of cavalry screens, cavalry raids, light forces
delaying enemy actions, raids on supply trains, etc.
An Opposition Die is the die that is rolled against the enemy Leadership Die on a campaign card. Each
side begins the campaign season with seven Opposition Dice. The mix of Opposition Dice available to an
army depends on the Leadership Die size for that army.
Leadership Die
D12+1
D12
D10
D8
Opposition Dice
D6, D8, D10,D10, D12, D12
D6, D6, D8, D8 D10, D12, D12
D4, D6, D8, D8, D10, D10, D12
D4, D4, D6, D8, D8, D8, D10
Players will need to determine which enemy action they want to act against the most aggressively and play
larger Opposition Dice accordingly.
During campaign card play each season, each side selects an Opposition Die to roll against the Active
enemy’s LD roll. Once an Opposition Die has been rolled, it is removed from play until the total pool of
Opposition Dice is replenished at the start of the next turn, or by replenishing all Opposition Dice on a Plan
and Prepare card.
11.42 Winning the Campaign
A campaign is won if:
•
One side still has National Morale Points after a battle and:
o The opposing side’s National Morale Point total has dropped to zero or less than zero
after a battle.
Any other combination of National Morale Point totals after a battle results in a continuation of the
campaign.
Designer’s Note: Campaigns have the potential to reach a tipping point where one side loses more than its
share of battles and the campaign outcome is obvious. Players can lose interest at that point. Some
players may not want the competitive nature of scoring with National Morale Point totals. Feel free to not
declare a “winner” if one side runs out of National Morale Points and instead just continue the campaign but
move it to a different theatre, with different troop qualities and rosters. A campaign is all about the narrative
that is created. Some gamers will be perfectly satisfied using Season of Battles to provide a framework for
a “never ending” campaign.
~ 136 ~
cuts 9", 8.75", 8.5", 11.5", 11"
11.5 Campaign Card Definitions
Campaign Card Definitions
A summary of actions and effects of each campaign card is printed on the card. A full description of each
card follows below.
Battle
Battle
When the Battle card is turned, the active player may roll to determine if they can activate the card.
Note that they are not required to make the attempt. The active player rolls their modified LD vs. the
Opposition Die.
•
•
•
If the card is the army’s color, there is no modification to the LD.
If the card is the enemy’s color, the LD is modified Down 1.
The LD is modified Up 1 if National Morale Points are expended. The number of NMPS spent
varies depending on the region of the map in which the engagement area is located.
If the modified LD roll is larger than the Opposition Die roll, the active player may act with the Battle
card and immediately force a battle. If the active player won the roll with an Even roll, he may hold the
card and play at any time at his discretion.
See 11.6 Campaign Card and Battle Set Up Result to set up the table top battle situation.
~ 137 ~
cuts 9", 8.75", 8.5", 11.5", 11"
Move
Move
When the Move card is turned, the active player may roll to determine if they can activate the card.
Note that they are not required to make the attempt.
•
•
•
•
•
If the card is the army’s color, there is no modification to the LD.
If the card is the enemy’s color, the LD is modified Down 1.
If moving to a more dense area from a less dense area, the LD is modified Down 1.
If moving to a less dense area from a more dense area, the LD is modified Up 1.
The LD is modified Up 1 if National Morale Points are expended. The number of NMPs spent
varies depending on the region of the map in which the engagement area is located.
The active player rolls their modified LD vs. the Opposition Die. If the modified LD roll is larger than the
Opposition Die roll, the active player may act on the Move card and move one area to an adjacent
linked area.
~ 138 ~
cuts 9", 8.75", 8.5", 11.5", 11"
Operational Initiative
Operational
Initiative
When the Operational Initiative card is turned, the active player rolls to determine if they can activate
the card and hold it for use when battle is forced.
• If the card is the army’s color, there is no modification to the LD.
• If the card is the enemy’s color, the LD is modified Down 1.
• The LD is modified Up 1 if National Morale Points are expended. The number of NMPS spent
varies depending on the region of the map in which the engagement area is located.
The Active player rolls their modified LD vs. the Opposition Die. If the modified LD roll is larger than
the Opposition Die roll, the Active player may hold the Operational Initiative card and act on it when
battle is forced. Any one of three actions may be selected:
•
•
•
Choose the battlefield map orientation, and select which map edge each army will use for set
up. Note that if this option is selected, the army playing the Operational Initiative card will
select the battlefield map orientation regardless of which army wins the battle set up LD roll.
Receive additional set up squares.
o If the winning die roll is odd, receive 1 additional set up square. The square must
have edge to edge contact with any other set up square for that army.
o If the winning die roll is even, receive 2 additional set up squares. The square must
have edge to edge contact with any other set up square for that army.
Receive an additional 3+D6 initiative points to be added to any single initiative during the
game. Roll a D6 and add 3 to the roll to determinine the bonus points available. This option
can be declared at any time during the game, and does not need to be declared prior to an
initiative roll. The maximum number of initiative points (original plus the 3+D6 roll) is 11,
regardless of the D6 roll.
~ 139 ~
cuts 9", 8.75", 8.5", 11.5", 11"
Plan & Prepare
Plan & Prepare
When the Plan & Prepare card is turned, the active player may roll to determine if they can activate the
card. Note that they are not required to make the attempt.
•
•
•
If the card is the army’s color, there is no modification to the LD.
If the card is the enemy’s color, the LD is modified Down 1.
The LD is modified Up 1 if National Morale Points are expended. The number of NMPS spent
varies depending on the region of the map in which the engagement area is located.
The active player rolls their modified LD vs. the Opposition Die. If the modified LD roll is larger than the
Opposition Die roll, the active player may select any one of the three items as the action.
Promote New Officer: The army can elect to remove and replace any Command Group officer with a
new officer. Roll for the new officer’s Leadership Die rating per the standard Field of Battle process.
Re-roll rolls of 1 or 2. The new result applies regardless of the new officer’s rating.
Replenish all Opposition Dice: Return all used Opposition Dice to bring the Opposition Dice pool to full
size.
Reconfigure Command Groups: This is the only time that Command Groups can be reformed and
reconfigured. Units can be shifted from one Command Group to another. Officers can be reassigned.
Note all Command Group changes on the army roster.
~ 140 ~
cuts 9", 8.75", 8.5", 11.5", 11"
Supply
Supply
When the Supply card is turned, the active player must roll to determine if they can activate the card.
•
•
•
•
If the card is the army’s color, there is no modification to the LD.
If the card is the enemy’s color, the LD is modified Down 1.
The LD roll is modified depending on the region of the map in which the engagement area is
located. See 11.3 Creating the Campaign Map.
o The closer an army is to its home area, the easier it is to be supplied, and the resulting
modifier is Up 1 or Up 2.
o The further an army is from its home area, the harder it is to be supplied, and the
resulting modifier is Down 1 or Down 2.
o Armies testing for supply in the area adjacent to the starting area on their side of the
campaign map win any tie rolls.
The LD is modified Up 1 if National Morale Points are expended. The number of NMPs spent
varies depending on the region of the map in which the engagement area is located.
The active player rolls their modified LD vs. the Opposition Die.
• If the modified LD roll is larger than the Opposition Die roll, the active player’s army strength
(for Army Morale Point count) increases 5%.
• If the modified LD roll is equal to or smaller than the Opposition Die roll, the active player’s
army strength (for Army Morale Point count) decreases 5%.
~ 141 ~
cuts 9", 8.75", 8.5", 11.5", 11"
Weather
Weather
The player who turns the Weather card rolls a D10 and checks if the weather changes based on the die
roll and the Season. Apply any new weather effects for the remainder of the turn.
If two Weather cards are turned in succession, a battle is resolved immediately. The battle is set up per
Battle Set Up in the Battle card definition. Upon completion of the battle, the campaign season ends.
~ 142 ~
cuts 9", 8.75", 8.5", 11.5", 11"
11.6 Campaign Card and Battle Set Up Results
Once battle has been forced by a successful play of a Battle card, the unique on-table circumstances for
the battle are determined.
11.61 Battle Set Up
Once battle has been declared, each side rolls their LD and consults the table below. The winner cross
references the difference in the die rolls on the left side of the table (Leadership Die Roll Winner) and the
loser references the difference in the die rolls on the right side of the table (Leadership Die Roll Loser).
The LD die roll difference will specify the amount of benefit each side receives for the Battlefield Selection,
Strength, Extra Areas, and Terrain & Works categories.
Leadership Die Roll Winner ("Attacker")
Roll
Difference
1
Battlefield
Selection
Strength
2 Battlefields
Roll
Difference
3
3 Battlefields
4 Battlefields
4
5
6
7
8
9
10
11
5 Battlefields
Roll
Difference
1
Add 15%
To Unit
Count
Add 20% to
Unit Count
Add 30% to
Unit Count
Extra Areas
Roll
Difference
Terrain & Works
1
Choose ONE of:
Place 1 Earthwork
Remove 2 Terrain Features
Define 2 Terrain Features
5 Extra Squares
2 Extra Squares
2
Add 25% to
Unit Count
6 Battlefields
Extra Areas
1
No Effect
2
Leadership Die Roll Loser ("Defender")
2
2
4 Extra Squares
3
3 Extra Squares
4
5
6
7
8
9
10
11
3
3
4
4 Extra Squares
5 Extra Squares
5
6
7
8
9
10
11
4
3 Extra Squares
2 Extra Squares
5
6
7
8
9
10
11
Choose ONE of:
Place 1 Earthwork
Remove 1 Terrain Feature
Define 1 Terrain Feature
Choose ONE of:
Remove 1 Terrain Feature
Define 1 Terrain Feature
Define 1 Terrain Feature
If the LD rolls are equal, one randomly determined Command Group from one or both armies will begin
the game offboard. After noting the tied die roll value, re-roll the LD’s until a non-tie result is obtained
and then consult the Battlefield Selection, Strength, Extra Areas, and Terrain & Works table above.
The side with a lower LD roll is the “defender”, and the side with a higher LD roll is the “attacker”.
The tied LD die roll indicates which armies have a Command Group initially offboard.
Tied LD Roll Results
• 1,2,3
o Defender begins the game with a Command Group offboard.
• 4,5,6,7
o Both armies begin the game with a Command Group offboard.
• 8,9,10,11,12
o Attacker begins the game with a Command Group offboard
~ 143 ~
cuts 9", 8.75", 8.5", 11.5", 11"
The offboard Command Group begins the game off the table edge a number of move segments equal
to a D10 die roll.
To randomly determine the offboard Command Group, number off the Command Groups from 1 to a
number equal to the number of Command Groups in the army. Roll a die size equal to or larger than
the number of Command Groups. The number rolled is the number of the Command Group that
begins offboard. If a die roll is larger than the number of Command Groups, reroll until a number in the
range of available Command Groups is rolled.
Example: A Confederate army has 7 Command Groups. The Confederate commander numbers his
Command Groups 1 through 7. He selects a D8 to roll (equal to or larger than the number of
Command Groups). The roll is an 8. There are only 7 Command Groups so the D8 is rerolled. The
reroll is a 3. The Command Group numbered “3” will begin the game offboard.
Prior to the start of the game, the arrival location for the offboard Command Group must either be
indicated to the game umpire, or noted in secret. The arrival location must be in any table edge area
eligible for initial setup, which includes any additional squares that may have been located on a table
end.
Command Groups will be at the table edge upon receiving the number of move segments specified.
The next move segments will allow the Command Group to move onto the table.
Example: The Prussians turn a Battle card. They elect to attempt to play the card and force battle.
The Prussian CiC LD is a D10. The French have a D8 Opposition Die assigned for Battle that they
elect to roll. The Battle card that was turned is the Prussian’s card, so they do not modify their
Leadership Die size. The Prussians roll a 7 and the French roll a 2. The Prussians are successful in
getting the card and forcing battle. Since they rolled odd, they may not hold the card.
Both sides roll their LD. The Prussians roll their D10. The French LD is also a D10. The die rolls are
both 5. Since the LD rolls tied, someone will begin with a Command Group off the table. In this
example, the tie die roll is a 5, so both armies begin with a Command Group offboard. The Prussians
secretly roll a D10 to determine how many move segments their Command Group will be offboard and
roll a 4, meaning that the Command Group will take 4 move segments to reach the table edge. The
French roll a 10 on their roll, meaning that their offboard Command Group will take 10 move segments
to reach the table edge.
~ 144 ~
cuts 9", 8.75", 8.5", 11.5", 11"
11.62 Additional Squares
The map is broken into 1’x1’ square zones on the tabletop. An army can deploy in any of the 9 squares
along their edge of the table, as well as in any of the additional squares gained in the pre-battle campaign
process.
Additional squares must have a side adjacent to any friendly square, either a baseline square or another
additional square. Additional squares may be placed adjacent to an enemy square.
Additional squares are identified and marked in an alternating fashion until all squares have been noted.
To determine which army acts first or second to identify squares, roll each army’s LD. Total the number of
all mounted units, light infantry, and native units in each army. The side with a larger total receives an Up 1
modifier to their LD roll. Re-roll any ties. The army with the higher LD roll has the option to declare to mark
one additional square first or second. Alternate between the sides, one square at a time, until all additional
squares have been identified.
11.63 Command Group Set Up
When placing the armies on the table, the army rolling higher for placing additional squares also has the
option to place Command Groups first or second. Each army places a Command Group (in an allowed
square, in the formation and facing desired to start the game), alternating placement until all Command
Groups have been placed on the table.
Command Groups cannot be placed in a square adjacent to or in a square with corner to corner contact
with another square that contains an enemy Command Group.
Note that the order in which Command Groups are placed can “seize the high ground” and keep the enemy
out of areas, and even areas they had selected as additional areas since opposing army’s units cannot be
deployed within an adjacent square. Tricky!
11.64 Strength
For the army with the higher Strength, refer to the following strength table and cross reference the
additional strength percentage and the army’s number of units. The number shown is now the number of
units to be used when rolling for Army Morale Points. For any decimal value, roll a D10. If the D10 roll is
less than or equal to the decimal value, the army strength value is rounded up to the next integer value.
Remember to add both the battle set up roll and supply roll strength modifiers together to arrive at the final
total modifier.
Example: An Austrian has a +20% Strength advantage. The Austrian army has 27 units in their army.
Checking the table below, 27 units +20% shows a value of 32.4. The Austrians will end up rolling on the
Army Morale Points table on either the 32 or 33 # Units column depending on the D10 roll for the fraction.
In this case, that fraction is 4. On a roll of 1 to 4, the Austrians get to round up to 33 units. On a roll of 5 to
10 (0), they would remain at 32 units. The Austrians roll a 2 on a D10. They will check for Army Morale
Points on the 33 unit line.
~ 145 ~
cuts 9", 8.75", 8.5", 11.5", 11"
Army Strength
# Units
% Strength Change
-10%
-5%
+5%
+10%
+15%
+20%
+25%
+30%
12
10.8
11.4
12.6
13.2
13.8
14.4
15.0
15.6
13
11.7
12.4
13.7
14.3
15.0
15.6
16.3
16.9
14
12.6
13.3
14.7
15.4
16.1
16.8
17.5
18.2
15
13.5
14.3
15.8
16.5
17.3
18.0
18.8
19.5
16
14.4
15.2
16.8
17.6
18.4
19.2
20.0
20.8
17
15.3
16.2
17.9
18.7
19.6
20.4
21.3
22.1
18
16.2
17.1
18.9
19.8
20.7
21.6
22.5
23.4
19
17.1
18.1
20.0
20.9
21.9
22.8
23.8
24.7
20
18.0
19.0
21.0
22
23.0
24.0
25.0
26.0
21
18.9
20.0
22.1
23.1
24.2
25.2
26.3
27.3
22
19.8
20.9
23.1
24.2
25.3
26.4
27.5
28.6
23
20.7
21.9
24.2
25.3
26.5
27.6
28.8
29.9
24
21.6
22.8
25.2
26.4
27.6
28.8
30.0
31.2
25
22.5
23.8
26.3
27.5
28.8
30.0
31.3
32.5
26
23.4
24.7
27.3
28.6
29.9
31.2
32.5
33.8
27
24.3
25.7
28.4
29.7
31.1
32.4
33.8
35.1
28
25.2
26.6
29.4
30.8
32.2
33.6
35.0
36.4
29
26.1
27.6
30.5
31.9
33.4
34.8
36.3
37.7
30
27.0
28.5
31.5
33
34.5
36.0
37.5
39.0
31
27.9
29.5
32.6
34.1
35.7
37.2
38.8
40.3
32
28.8
30.4
33.6
35.2
36.8
38.4
40.0
41.6
33
29.7
31.4
34.7
36.3
38.0
39.6
41.3
42.9
34
30.6
32.3
35.7
37.4
39.1
40.8
42.5
44.2
35
31.5
33.3
36.8
38.5
40.3
42.0
43.8
45.5
36
32.4
34.2
37.8
39.6
41.4
43.2
45.0
46.8
What? Strength doesn’t change the number of units on the table?
Exactly. We played through many iterations to arrive at the current strength rules. Early versions had
units or Command Groups being removed from an army. The resulting games tended to be one sided with
limited tactical options for the physically outnumbered army. Changing to adjusting the Army Morale Points
based on strength advantages or disadvantages, allows armies to still have enough units to be fun to play,
but the resilience or brittleness of an army either high or low in morale is well reflected.
~ 146 ~
cuts 9", 8.75", 8.5", 11.5", 11"
11.7 Post Battle Adjustments: National Morale Points and CiC Fate
After each battle, National Morale Points are adjusted. Based on the margin of victory, the losing army’s
CiC is at risk of being replaced.
11.71 National Morale Point Adjustments
NMPs are adjusted after each Battle. At the end of the battle, one Campaign Army will lose by failing an
Army Morale test and end the game at 0 Army Morale Points, or by conceding on an Army Morale test.
The winning Campaign Army will typically still have Army Morale Points remaining. To adjust the NMPs,
subtract the net loss in Army Morale Points for each army in the battle from the pre-battle NMP.
Losing Army: New NMP Total = Previous NMP Total – AMPs lost in Battle
Winning Army: New NMP Total = Previous NMP Total – AMPs lost in Battle+ AMPs Awarded from Enemy
+ Area VP
Example: An Austrian army begins a battle with 27 NMPs. The French army begins the battle with 31
NMPs. The Austrian army begins the battle with 22 Army Morale Points, and the French army begins the
battle with 17 Army Morale Points. The Austrians win the battle in a 5 VP area, losing 13 of their own
Army Morale Points, but are awarded 4 French Army Morale Points during the battle. The French army
ends the battle with 0 Army Morale Points.
The NMP total is adjusted:
Austrians: 27-13+4+5 = 23 National Morale Points Remaining
French: 31-17=14 National Morale Points Remaining
11.72 Margin of Victory
The decisiveness of a victory will determine the fate of the losing army’s CiC. Generals that lose must
answer to the home government or higher command. The worse the loss, the more likely the losing
General will be sacked and replaced.
The margin of victory depends on the number of Army Morale Points the winning army has at the end of the
battle compared to their Army Morale Point total at the start of the battle.
•
•
•
Marginal Victory: The winning army has less than or equal to half of their starting Army Morale
Points
Decisive Victory: The winning army has more than half of their starting Army Morale Points.
Crushing Victory: The winning army has equal to or more than their starting Army Morale Points.
~ 147 ~
cuts 9", 8.75", 8.5", 11.5", 11"
11.73 Losing Army CiC’s Fate
The losing army’s CiC can be sacked and removed from his post if his army suffers a sufficiently bad or
embarrassing defeat.
•
•
•
Marginal Victory: The losing army’s CiC remains in command of the army.
Decisive Victory: The losing army’s CiC may be sacked.
o Roll the CiC’s Leadership, modified Down 1, vs. a D12
▪ If the Leadership Die roll is less than or equal to the D12 die roll, the CiC is
sacked.
• Randomly select the new CiC from the officers listed on the army roster.
Replace the promoted officer with a new officer.
Crushing Victory: The losing army’s CiC may be sacked.
o Roll the CiC’s Leadership, modified Down 2, vs. a D12
▪ If the Leadership Die roll is less than or equal to the D12 die roll, the CiC is
sacked.
• Randomly select the new CiC from the officers listed on the army roster.
Replace the promoted officer with a new officer.
If an army’s CiC is of a royal family, or owes the position to royal patronage, it is highly unlikely that they
would be sacked. If this is the instance in the campaign, sack a junior officer by following the normal CiC
replacement procedure.
I recommend that the replacement CiC just be randomly selected from the list of officers on the army roster.
This is as easy as assigning a number to each officer and rolling a corresponding die size with the number
rolled designating the next CiC. For example, the army has 6 officers. Number them 1 to 6 and roll a D6.
If a 3 is rolled, officer number 3 is the new CiC. If there were 7 officers, roll a D8 and reroll a roll of 8, etc.
This takes the selection out of the player’s hands, so that he doesn’t conveniently promote his D12 subcommander to be the new CiC! Besides – history is full of examples of Generals being promoted based
more on political reasons than on competence.
~ 148 ~
cuts 9", 8.75", 8.5", 11.5", 11"
11.8 Post Battle Adjustments for Units and Leaders
Each army will roll a D12 for each unit and leader that participated in the Battle. The D12 die roll will
determine if the unit’s quality is adjusted up or down for the next battle in the campaign.
Check all units and leaders in this order:
• First: Check for units eliminated in the battle as described below.
• Second: Check for units routed off the table in the battle as described below.
• Third: Check for units remaining on the battlefield as described below.
o Modify any rolls for pursuit or recognition.
• Fourth: Check for all leaders as described below.
Designer’s Note: Hey wait a minute! This seems too random! Rolling a D12 to determine if a unit quality
changes over the course of the campaign?
All I can say is “yes”.
I’ve tried all manner of methods to track and elevate or degrade unit quality over the course of a campaign.
All resulted in much more paperwork than I wanted, with no additional flavor or detail added. Regardless
of whether an army wins or loses, I believe that individual units in that army perceive their OWN state much
better than the army’s state. So, while an army might have won, a unit may have had heavy losses or
have suffered a substantial number of casualties to their junior officers or senior command staff which
would greatly affect the performance of the unit moving forward. Similarly, even in a losing army a unit
could perceive that it had done its part and carried itself proudly in the battle.
I find it fascinating to watch the battle by battle change of an army’s personality as unit quality changes – up
or down. It is thrilling to see some units continually climb the quality ladder and become fearsome and
deadly. On the other hand, it is equally stunning to watch some units spiral downward and become
obviously untrustworthy on the “Field of Battle”.
Obviously, you can modify as you wish to reflect your personal preferences. One suggestion has been to
modify winner’s rolls with a +1 modifier, and loser’s rolls with a -1 modifier. This certainly would give more
weight to the odds of winners getting better. However, be careful that you don’t create situations where
army’s become unstoppable steamrollers as the campaign progresses.
11.81 Checking for Units Eliminated
Roll a D12 for each unit.
•
•
On a roll of 1 or 2, that unit is eliminated from the campaign roster for the duration of the campaign.
On a roll of 3 or 4, it is not present for the next battle, and its Defense Die is modified Down 1 when
it returns. The new Defense Die is noted on the roster. If the Defense Die is already a D4, the
Combat Die is modified Down 1 and is noted on the roster.
~ 149 ~
cuts 9", 8.75", 8.5", 11.5", 11"
11.82 Checking for Units Routed Off of Table
Roll a D12 for each unit.
•
•
On a roll of 1 that unit is eliminated from the campaign roster for the next battle, and its Defense
Die is modified Down 1 when it returns.
On a roll of 2 or 3, the unit is present for the next battle, but its Defense Die is modified Down 1.
The new Defense Die is noted on the roster. If the Defense Die is already a D4, the Combat Die is
modified Down 1 and is noted on the roster.
11.83 Checking for Units Remaining on the Battlefield
Each side rolls a D12 for each unit remaining on the table. Apply any modifiers for Pursuit or Recognition:
•
•
On a roll of 1, the unit Defense Die is modified Down 1 and is noted on the roster. If the Defense
Die is already a D4, the Combat Die is modified Down 1 and is noted on the roster.
On a roll of 12, the unit Defense Die is modified Up 1, and is noted on the roster. If the Defense
Die is already a D10, the Combat Die is modified Up 1 and is noted on the roster.
11.84 Checking for Leaders
Each side rolls a D12 for each leader.
•
•
On a roll of 1, the Leadership Die is modified Down 1 and is noted on the roster. The minimum
Leadership Die is a D8.
On a roll of 12, the Leadership Die is modified Up 1 and is noted on the roster. The maximum
Leadership Die is a D12+1.
If a unit’s quality goes up or down, consult the roster and write down the new higher or lower Defense Die
for the unit. After the battle, and prior to the next battle, go through the roster and roll for each unit’s new
Combat Die, using the Field of Battle 3 Unit Quality table with the unit’s new Defense Die category. See
2.11 How To Rate Units.
Example: A line infantry battalion, with a D10 Combat Die, and a D6 Defense Die, has gone up in quality in
the post battle adjustment. The Defense Die is increased to a D8 and noted on the roster. The FoB3 Unit
Quality table is consulted on the D8, Crack, category, and a D20 is rolled to determine the unit’s new rating.
The result of the die roll gives the unit a D10 Combat Die.
If a unit is already at the maximum Defense Die (D10) or minimum Defense Die (D4) and a post battle
adjustment would require it to go higher than the maximum, or lower than the minimum, the Defense Die
remains unchanged and the Combat Die is instead adjusted up or down from its current value. In this case,
the new Combat Die is not rolled for, but is simply modified up or down from its pre-adjustment value.
If the unit already has the minimum or maximum Combat Die rating, no further adjustment of the Combat
Die is possible. In this case, add or subtract 1 Unit Integrity from the unit and mark on the roster.
~ 150 ~
cuts 9", 8.75", 8.5", 11.5", 11"
Example: An elite light infantry battalion, with a D12 Combat Die, and a D10 Defense Die, has gone up in
quality in the post battle adjustment. The maximum Defense Die is a D10, so it cannot increase. In this
case, the Defense Die stays at a D10, and the Combat Die is increased Up 1 from a D12 to a D12+1.
In the next battle, the same light infantry battalion, is recognized for its performance and is adjusted
upwards again. Its Defense Die cannot increase beyond a D10, and the Combat Die is already at the
maximum D12+1. In this case, a Unit Integrity is added to the unit and it is now a 5 unit integrity, D12+1
Combat Die, D10 Defense Die, unit. Ouch!
Example: A raw militia battalion, with a D8 Combat Die, and a D4 Defense Die, has gone down in quality in
the post battle adjustment. The minimum Defense Die is a D4, so it cannot decrease. In this case, the
Defense Die stays at a D4, and the Combat Die is decreased down 1 from a D4. However, its Defense Die
cannot decrease below a D4, and the Combat Die is already at the minimum D8. In this case, a Unit
Integrity is subtracted from the unit and it is now a 3 unit integrity, D8 Combat Die, D4 Defense Die, unit.
Vegetables with muskets!
Each army starts by rolling for the units that were eliminated, routed off the table, or routing and still on the
table.
11.9 Pursuit and Recognition
The army that wins the battle will have several Army Morale Points remaining. Those points are called
Discretionary Points. Discretionary Points are used to determine the number of Pursuit Points and
Recognition Points available to the winning side. The winning army splits this pool of points up and assigns
them to either pursuit or recognition.
11.91 Pursuit Points
Pursuit Points can be assigned from the Discretionary Point sum to “pursue” enemy units attempting to
degrade their capability for the next battle. The winning army can declare “Pursuit” on any enemy unit
remaining on the table at the end of the game and assigning 1 to 3 Pursuit Points per unit. The winning
army does this until all the Pursuit Points have been assigned. The winning army selects the units to be
pursued based on their best knowledge of the enemy unit’s performance in the game. The enemy does not
need to reveal the quality of any of the units in his army. Any unit that has Pursuit Points assigned to it by
the enemy will modify their Defense Die Down 1 on the army roster if the D12 roll is less than or equal to 1
plus the number of Pursuit Points assigned to it.
Example: A French army has 9 Army Morale Points remaining after defeating an Austrian army in an 1809
campaign. The French army therefore has 9 Discretionary Points. The French elect to use all 9
Discretionary Points as Pursuit Points. The French decide to assign 3 PPs to an Austrian Grenadier unit, 2
PPs to a particularly good artillery unit, 2 PPs to a line infantry unit, 2 PPs to a Cuirassier unit. The
Grenadiers will therefore go down 1 level on a D12 roll of 1 to 4 (1 plus the 3 PPs assigned). The artillery
will go down 1 level on a D12 roll of 1 to 3 (1 plus the 2 PPs assigned). The line infantry unit will go down
1 level on a D12 roll of 1 to 3 (1 plus the 2 PPs assigned). The cuirassier unit will go down 1 level on a D12
roll of 1 to 4 (1 plus the 3 PPs assigned). The Austrian CiC takes a deep breath and rolls his D12s. The
roll for the Grenadiers is a 5. They pass and do not have their quality adjusted. The roll for the artillery is a
~ 151 ~
cuts 9", 8.75", 8.5", 11.5", 11"
3, and the artillery unit will then have its quality adjusted down by 1 level. The line infantry rolls a 7 and do
not have their quality adjusted. The roll for the Cuirassier unit is a 1 and its quality is adjusted down by 1
level.
11.92 Recognition Points
Recognition Points can be assigned from the Discretionary Point sum to “recognize” friendly units
remaining on the battlefield with the intent of upgrading their rating for the next battle. The winning army
can assign a maximum of 3 Recognition Points per unit. The winning army selects the units that they want
to recognize. A D12 is rolled, and the number of Recognition Points assigned is added to the D12 roll. If
the modified D12 roll is 12 or higher, the unit Defense Die size is modified Up 1 and is changed on the army
roster. If the quality level is already a maximum of 12, the Combat Die size is modified Up 1.
Example: An English SYW army won the battle and has 11 AMP’s remaining, giving 11 Discretionary
Points. They decide to use 8 of those Discretionary Points for Pursuit, leaving 3 for Recognition. The
English resolve their Pursuit Points and now assign their 3 remaining Discretionary Points as Recognition
points. They decide to try to give themselves the best chance at an increased quality for 1 unit and place
all 3 recognition points on one infantry unit with a D6 Defense Die. The English player will roll a D12 and
add 3 to the die roll, looking for a sum of 12 or higher. The D12 roll is a 9, giving a total of 12, so the foot
unit goes up from a D6 to a D8 Defense Die.
~ 152 ~
cuts 9", 8.75", 8.5", 11.5", 11"
12.0 Designer Commentary
My Designer’s Notes are scattered throughout the rules, addressing specific rules instances, so I’m using
this section as a commentary on why things are the way they are and what items are new.
One of the most obvious is that there are period specific playsheets for each period, instead of the previous
“one size fits all” approach in the first and second editions of the rules. As I played more and more (and
more) Field of Battle games across multiple eras, I found myself tweaking the playsheets to better reflect
my perception of that period. Along with the period specific playsheets, there are greatly expanded period
specific rules. The combination of these allows each period to have its own unique feel while using the
same basic mechanics and processes.
While the second edition rules played fast, I kept striving for faster play and reducing wasted time in
procedure. The reduced sequence deck size allows turns to proceed more rapidly. The Maneuver card
was eliminated and its function of regulating facing and formation changes was added to the Leadership
card. During play, I observed that the Maneuver card rarely seemed to be used. I’d watch games and
see the players reaction when they turned a Maneuver card – and that reaction was generally a “who cares
– I don’t need it now”. So – whack. The Maneuver card went away. With that simple change, each card
now carries more weight and value.
Opportunity evasion was added, after seeing it work so well in Pulse of Battle. This allows for more tactical
flexibility and risk taking which always enhances a game.
Rather than a generic UP1 modifier for all fire vs. deep formations (attack columns), in general artillery is
now UP1 vs. attack columns and low muzzle velocity small arms are no change firing vs. attack columns.
This had the desired effect of allowing players more opportunity to use attack columns when attacking
infantry without being butchered. Units in attack column are already at a disadvantage (DOWN1 when
firing), and I wanted to get away from double penalties (UP for one side and DOWN for the other side).
This modifier tweak brings tactical balance back to the game.
One of the major changes was adding a limit of one interpenetration per unit per move card. I’d seen a
“rolling wave” attack tactic develop over the life of Field of Battle. While very effective in game turns, the
multiple unit interpenetration ability to always feed a fresh unit to the front was very “gamey”, and not
historically supportable. This simple limit still allows free interpenetration…..just not unlimited
interpenetration!
The movement rules for terrain were expanded, and some terrain types were added.
The fire frequency card names were changed from Infantry Firepower and Artillery Firepower to Infantry
Fire and Artillery Fire. I felt that the new names, while simple, had a better period feel.
The name change to Fire cards required changing the names of the Fire cards for faster firing/higher
firepower weapon armed units (breechloaders, repeaters). The new optional cards for their use became
Rapid Fire and Rolling Fire. Again, a simple change, but much more evocative card titles than before.
Rather than add a specially named card for a large number of special events and incidents, the rules use
Special Event and Incident cards. The players can choose from a menu of events and incidents for their
particular scenario and have those triggered by the appropriate card type. This also helps save card
~ 153 ~
cuts 9", 8.75", 8.5", 11.5", 11"
costs– not only for me as the publisher, but for you as the gamer. You get more variety with lower cost.
That’s always a great trade-off!
To prevent the unrealistic ability of units to zoom to a flank, then face and charge into melee, the immediate
melee rules now require that any change of face by the charging unit is made on the first move segment.
This still allows movement flexibility for the charging unit, but it eliminates the gamey tactic of questionable
moves just to get a positive melee modifier.
A major change was the addition of the English Civil Wars period rules and playsheet. I’d originally
intended to publish the ECW rules as a separate set (titled “Give Fire”), but ultimately I wanted to add it to
the rules to expand the eras covered in the third edition, as well as giving customers more bang for their
purchasing buck. I think the ECW rules work really well and focus on the big picture of battle and
command. Foot units (battalia, or small regiments) are treated as a single unit, not individual units of pike
and shot that fight and react independently. You won’t find rules for the ratio of pikes or shot in a foot unit,
as I find those to be an oddly specific wargame rules fixation. Personally, I don’t think it made a whit of
difference, so that’s why it isn’t in the rules. At some point I will turn to the Thirty Years War and release
those period rules. The TYW isn’t included in FoB3 because it has more tactical and troop variety than the
ECW to include in the rules and I want to make sure it “feels right”. At some point, I just had to say,
“enough is enough” and get FoB3 published.
The rules also include a complete campaign system, Season of Battles. I’d originally planned on the
campaign system being a stand alone product, but eventually I decided that I wanted to include it in the
main rules to make them a complete package. Season of Battles is an abstract system that plays very fast
and with minimal paperwork required. I can’t even remember how many tweaks the system went through
until it reached the final version included in the rules. One of the key concepts is the use of area
movement, with the movement being the movement of the engaged position of the two field armies rather
than the independent movement of opposing armies. I did this because it became tiresome to write rules
limiting a player’s ability to evade or chase an opposing army in an attempt to gang up and get a numerical
advantage. True – every real army prefers to have a numerical advantage. However, this is a game and
the primary goal of every game should be to have fun! No one enjoys a campaign generated game that
gives them little hope of winning and the prospect of just being a punching bag for their opponent. Season
of Battles avoids that by using the engagement area movement as well as adjusting army morale points for
numerical advantage rather than removing an army’s units.
The main thing to remember when playing Season of Battles is that it is a set of governing rules that
creates a structure to play a campaign. A campaign will give you an output of fun and memories that is
directly proportional to the effort you put into it. The Season of Battle procedures are very fast and easy.
Add your own color and character to your campaign! Create a campaign newsletter or journal. Add
colorful reasons why units have increased or decreased in their ratings. Allow the campaign to build the
uniqueness and character in your armies that we all love to see.
One of the key components in Season of Battles is the deck of tabletop battlefield maps. The map
features are based on the terrain I have and the tile system I use to create terrain. After all, I had to create
maps from something, so since I wrote the rules – they use my terrain! That being said, interpret the maps
to use the terrain you have on hand. Don’t worry about exactly duplicating the maps. Maps were
notoriously inaccurate and lacking in detail in these eras.
And lastly, I’d like to present an alternative basing system that I’ve remounted all of my armies to use. I
love the feel of big stands with multiple figures – a nice, substantial heft. I also enjoy creating the mini~ 154 ~
cuts 9", 8.75", 8.5", 11.5", 11"
diorama effect that larger stands allow. Some of the photos included in the rules show units mounted with
this alternative system.
The alternative basing system uses 2 stands per unit for all unit types. The stand width for cavalry and
infantry is increased to 2 ¼” per stand.
This mounting system provides several advantages:
• The figures are more protected, as fewer stands are being moved.
• The time to move units is reduced since fewer stands are being moved.
• Figure stands are mini dioramas rather than more sparsely populated stands.
• Fewer cavalry castings required, making it easier and faster to collect large numbers of cavalry
units.
The number of infantry figures per stand is adjusted to reflect decreasing unit densities through the eras.
Use 6 infantry figures per stand for everything before 1859, and 5 infantry figures per stand for everything
from 1859 onwards.
Skirmish units (rifles, light infantry used primarily/exclusively as skirmishing units, skirmishing natives) use
4 infantry figures per stand.
Troop Type
Artillery;
Machine Guns
Cavalry
Infantry
Officers
Alternative Basing System
Stand Size
Stands per Unit /Figures per Stand
1 1/2" wide x 3" deep
2 stands/1 Gun, 3 crew
2 1/4" wide x 2 1/2" deep
2 1/4" wide x 1 1/2" deep
1 1/2" wide x 1 1/2" deep for Command
Group Officers;
2 1/2" x 2 1/2" for Army Commander (CiC)
2 stands/ 3 figures
2 stands/6 figures prior to 1859,5 figures
1859 and later,4 figures for skirmishing
units
1 or 2 for Command Group Officers;
2 or more for Army Commander (CiC)
Field of Battle 3rd Edition is refined and expanded, yet faster playing than FoB2. I’ve enjoyed every
second of the journey from 2nd edition to the completion of the 3rd edition. I’m certain that there will be new
periods added with period specific rules and playsheets, but there won’t be a 4th edition. Third edition
should stand the test of time for a very long time.
Have fun and enjoy your games!
Brent Oman
February 2020
~ 155 ~
cuts 9", 8.75", 8.5", 11.5", 11"
13.0 Appendix
The reference material for playing Field of Battle 3rd Edition and Season of battles includes:
Field of Battle Sequence Deck Card Sheets
Field of Battle Playsheets
Season of Battle Sequence Deck Card Sheets
Season of Battle Battlefield Card Sheets
Season of Battle Campaign Map
Season of Battle Army Roster Sheet
Permission is granted to photocopy any of the above reference material for personal use.
“Are you sure you want to do that?”
~ 156 ~
cuts 9", 8.75", 8.5", 11.5", 11"
Army Morale Army Morale Army Morale
Leader Survival Test
•
Roll D12 Per Leader
Leader Eliminated on a 1
▪
Leader Survival Test
•
Roll D12 Per Leader
Leader Eliminated on a 1
▪
Army Morale Test
•
CiC LD vs. D12
▪
▪
If CiC LD > D12
Game Continues
If CiC LD <= D12
Game Over
▪
▪
•
Roll D12 Per Leader
Leader Eliminated on a 1
▪
Army Morale Test
•
CiC LD vs. D12
▪
▪
If CiC LD > D12
Game Continues
If CiC LD <= D12
Game Over
Army Morale Test
•
CiC LD vs. D12
▪
▪
If CiC LD > D12
Game Continues
If CiC LD <= D12
Game Over
0/1 IP
0/1 IP
0/1 IP
Artillery
Fire
Artillery
Fire
Artillery
Fire
Fire
Fire
Fire
Fire Unmarked Units
▪
Leader Survival Test
Unit remains unmarked
after fire
Unit may fire again and marker is
placed on unit
Hits are not additive from first
and second fire from the same unit
Fire Unmarked Units
▪
▪
▪
Unit remains unmarked
after fire
Unit may fire again and marker is
placed on unit
Hits are not additive from first
and second fire from the same unit
Fire Unmarked Units
▪
▪
▪
Unit remains unmarked
after fire
Unit may fire again and marker is
placed on unit
Hits are not additive from first
and second fire from the same unit
Remove Fire Markers
Remove Fire Markers
Remove Fire Markers
Remove Existing Markers
Remove Existing Markers
Remove Existing Markers
▪
Unit may fire and marker is
placed on unit
▪
Unit may fire and marker is
placed on unit
1 IP
1 IP
1 IP
Infantry
Fire
Infantry
Fire
Fire
Fire
Fire
Fire Unmarked Units
▪
▪
▪
Unit may fire and marker is
placed on unit
Infantry
Fire
Fire Unmarked Units
▪
▪
Unit remains unmarked
after fire
Unit may fire again and marker is
placed on unit
Hits are not additive from first
and second fire from the same unit
▪
▪
Unit remains unmarked
after fire
Unit may fire again and marker is
placed on unit
Hits are not additive from first
and second fire from the same unit
Fire Unmarked Units
▪
▪
▪
Unit remains unmarked
after fire
Unit may fire again and marker is
placed on unit
Hits are not additive from first
and second fire from the same unit
Remove Fire Markers
Remove Fire Markers
Remove Fire Markers
Remove Existing Markers
Remove Existing Markers
▪
▪
Remove Existing Markers
Unit may fire and marker is
placed on unit
1 IP
Unit may fire and marker is
placed on unit
1 IP
▪
Unit may fire and marker is
placed on unit
1 IP
cuts 9", 8.75", 8.5", 11.5", 11"
Leadership
Leadership
Leadership
Move Leaders
Move Leaders
Move Leaders
Rally
Rally
Rally
•
LD vs. D8
Rally 1 UI per 3 higher
Rally if higher
If LD roll = 1
All Rally and Maneuver ends
▪
▪
▪
•
LD vs. D8
Rally 1 UI per 3 higher
Rally if higher
If LD roll = 1
All Rally and Maneuver ends
▪
▪
▪
Maneuver
•
LD vs. D8
Rally 1 UI per 3 higher
Rally if higher
If LD roll = 1
All Rally and Maneuver ends
▪
▪
▪
Maneuver
Maneuver
1 IP
1 IP
1 IP
Leadership
Lull
Lull
Move Leaders
LD vs. LD
LD vs. LD
Rally
•
LD vs. D8
Rally 1 UI per 3 higher
Rally if higher
If LD roll = 1
All Rally and Maneuver ends
▪
▪
▪
•
Initiative Side Wins
No effect
▪
•
Non-Initiative Side Wins
Draw card and act
▪
•
Initiative Side Wins
No effect
▪
•
Non-Initiative Side Wins
Draw card and act
▪
Maneuver
•
•
1 IP
1 IP
1 IP
Lull
Tactical
Advantage
Tactical
Advantage
LD vs. LD
Hold And Modify Roll UP1
Hold And Modify Roll UP1
Initiative Side Wins
▪
No effect
Non-Initiative Side Wins
▪
Draw card and act
•
•
•
•
1 IP
Initiative Roll
Leadership Roll
•
•
Combat Roll
•
Movement Roll
•
a)
b)
a)
b)
a)
b)
Own LD Roll
Own D8 Opposing Roll
Combat Die
Defense Die
Own Roll
Own D6 Opposing Roll
1 IP
Initiative Roll
Leadership Roll
a)
b)
Own LD Roll
Own D8 Opposing Roll
Combat Roll
a)
b)
Combat Die
Defense Die
Movement Roll
a)
b)
Own Roll
Own D6 Opposing Roll
1 IP
cuts 9", 8.75", 8.5", 11.5", 11"
Melee
Melee
Melee
Resolve Melee
Resolve Melee
Resolve Melee
CD vs. CD
•
•
May Move ½ Segment To Contact
No Maneuver or Oblique Move
Win Even
•
•
Remain In Command
May Follow Up
CD vs. CD
CD vs. CD
Win Even
Win Even
•
•
•
•
May Move ½ Segment To Contact
No Maneuver or Oblique Move
Remain In Command
May Follow Up
1 IP
•
•
May Move ½ Segment To Contact
No Maneuver or Oblique Move
•
•
Remain In Command
May Follow Up
1 IP
1 IP
Move
Move
Move
Move All Units
Move All Units
Move All Units
LD vs. D6
LD vs. D6
LD vs. D6
•
•
•
LD roll = 1: No move
•
•
Lose/Tie/Win by 1,2
▪
1 move segment
Win by 3 to 5
▪
2 move segments
Win by 6 to 11
▪
3 move segments
Win Even
• Melee (per period rules)
• Maneuver
LD roll = 1: No move
•
•
▪
1 move segment
▪
2 move segments
•
Win by 6 to 11
▪
3 move segments
Win Even
• Melee (per period rules)
• Maneuver
Lose/Tie/Win by 1,2
▪
1 move segment
Win by 3 to 5
▪
2 move segments
Win by 6 to 11
▪
3 move segments
Win Even
• Melee (per period rules)
• Maneuver
1 IP
1 IP
Move 1
Command
Move
Melee
Move Units
Move All Units
Resolve Melee
LD vs. D6
LD vs. D6
•
•
LD roll = 1: No move
•
•
Win by 3 to 5
1 IP
•
LD roll = 1: No move
Lose/Tie/Win by 1,2
Lose/Tie/Win by 1,2
▪
1 move segment
Win by 3 to 5
▪
2 move segments
Win by 6 to 11
▪
3 move segments
Win Even
• Melee (per period rules)
• Maneuver
1 IP
LD roll = 1: No move
•
•
Lose/Tie/Win by 1,2
▪
1 move segment
Win by 3 to 5
▪
2 move segments
Win by 6 to 11
▪
3 move segments
CD vs. CD
•
•
May Move ½ Segment To Contact
No Maneuver or Oblique Move
Win Even
•
•
Remain In Command
May Follow Up
Win Even
• Melee (per period rules)
• Maneuver
1 IP
1 IP
cuts 9", 8.75", 8.5", 11.5", 11"
Frenzied
Charge
Frenzied
Charge
Incident
Resolve Melee
Resolve Melee
Resolve Incident
CD vs. CD
CD vs. CD
Win Even
Win Even
•
•
•
•
May Move Full Segment To Contact
No Maneuver
Remain In Command
May Follow Up
•
•
•
•
May Move Full Segment To Contact
No Maneuver
Remain In Command
May Follow Up
0 IP
0 IP
0 IP
Special
Event
Special
Event
Rapid
Fire
Resolve Event
Resolve Event
Fire
Fire Unmarked Units
▪
▪
▪
Unit remains unmarked
after fire
Unit may fire again and marker is
placed on unit
Hits are not additive from first
and second fire from the same unit
Remove Fire Markers
Remove Existing Markers
▪
0 IP
0 IP
Unit may fire and marker is
placed on unit
0 IP
Rapid
Fire
Rolling
Fire
Rolling
Fire
Fire
Fire
Fire
Fire Unmarked Units
Fire Unmarked Units
Fire Unmarked Units
▪
▪
▪
▪
▪
Unit remains unmarked
after fire
Unit may fire again and marker is
placed on unit
Hits are not additive from first
and second fire from the same unit
▪
▪
Unit remains unmarked
after fire
Unit may fire again and marker is
placed on unit
Hits are not additive from first
and second fire from the same unit
▪
▪
Unit remains unmarked
after fire
Unit may fire again and marker is
placed on unit
Hits are not additive from first
and second fire from the same unit
Remove Fire Markers
Remove Fire Markers
Remove Fire Markers
Remove Existing Markers
Remove Existing Markers
Remove Existing Markers
▪
▪
▪
Unit may fire and marker is
placed on unit
0 IP
Unit may fire and marker is
placed on unit
0 IP
Unit may fire and marker is
placed on unit
0 IP
cuts 9", 8.75", 8.5", 11.5", 11"
English Civil War 1642-1651
Fire
Combat
Roll Modified Combat Die (CD) vs. Opponent's Defense Die (DD)
Lose 1 UI & 1 Army Morale Point per 3 Hits
Lose 0 or 1 UI vs. Enemy Even Roll = Fall Back; Lose 2+ UI vs. Enemy Even Roll= Rout
Down 2
Down 1
Counterbattery
Foot Formation
Firing from Town
Target Uphill
Disordered;
Maneuver Disorder;
Per UI Loss
Pike Forward
Shot Forward
Foot Ranges
8 - 4"
4 - 0"
24 - 12"
Class II
12 - 0"
Class I
Circumstance
Orientation
Losses
Artillery Ranges
Target Cover
Melee
Combat
Circumstance
36 - 24"
Class III
Down 2
Down 1
Guns in Melee;
Mounted frontal vs.
Pike Forward/Pike;
Mounted vs. Hedgehog
Dragoons;
Outnumbered;
Horse/Dragoons/Lancer vs.
Cuirassier
Disordered;
Maneuver Disorder;
Per UI Loss
Flanked/Rear
Orientation
Formation
March; Shot
Shot Forward
Terrain
Opp. In Class III
Opp. In Class II
Down 2
Move Distance
Up 2
Frontal
vs. Rear
Salvo: 4 - 0"
(Shot Forward)
No Change
Up 1
Up 2
Town Melee
Higher DD;
Initiated Melee;
Tactical Advantage;
Uphill from Enemy
Mounted vs. Shot;
Any vs. Gun
vs. Flank
vs. Rear
Frontal
Pike Forward/Pike;
Hedgehog
Both in Class I
Roll Modified Leadership Die (LD) vs. D8
Rally 1 UI per 3 > D8; Rally Disorder, Routers if >D8
Horse failing by 3 or more lose 1 UI (No AMP loss)
Leadership
Move
Up 1
Tactical Advantage
vs. Flank
Roll Modified Combat Die (CD) vs. Modified Combat Die (CD)
Lose 1 UI & 1 Army Morale Point per 3 Hits;
Lose 1+ UI = Fall Back; Lose 2+ UI vs. Single Enemy Roll = Rout/Guns Eliminated
Losses
Circumstance
No Change
In Contact w/Enemy
Down 1
0 Remaining AMPs;
Routing;
Within 12"
No Change
Up 1
Over 12"
In Town Section;
Per Daring Deed;
Tactical Advantage;
Inf. w/Two Inf. < 6"
Up 2
LD vs. D6: Win By 6+, = 3 Moves; Win By 3-5 = 2 Moves; Lose/Tie/Win by 1 or 2 = 1 Move;
If LD Roll =1, No Move
On a won even LD roll: Horse and Guns may Maneuver; Commanded Pike, Foot and Gallopers may
Melee
Cavalry: 12"
Foot/Pike: 6"
Shot: 8"
Guns: 4"
Officers: 16"
Routers:
Move + D6"
cuts 9", 8.75", 8.5", 11.5", 11"
War of the Spanish Succession 1701-1714
Fire
Combat
Roll Modified Combat Die (CD) vs. Opponent's Defense Die (DD)
Lose 1 UI & 1 Army Morale Point per 3 Hits
Lose 0 or 1 UI vs. Enemy Even Roll = Fall Back; Lose 2+ UI vs. Single Enemy Even Roll= Rout
Down 2
Down 1
No Change
Up 1
Up 2
Infantry 1st Fire;
Tactical Advantage
vs. Flank
vs. Rear
12 - 6"
6 - 0"
Circumstance
Firing from Town
Orientation
Target Uphill
Disordered;
Per UI Loss
Frontal
6 - 4"
4 - 0"
24 - 18"
18 - 12"
Losses
Infantry Ranges
Artillery Ranges
36 - 24"
Firer's Formation
Infantry
Firing At
Artillery
Firing At
Target Cover
Melee
Combat
Unlimbered
Unlimbered
Class III
Class II
Line;
Unlimbered
Any Column;
Limbered;
Line
Line;
Limbered
Class I
Any Column
Roll Modified Combat Die (CD) vs. Modified Combat Die (CD)
Lose 1 UI & 1 Army Morale Point per 3 Hits;
Lose 1+ UI = Fall Back; Lose 2+ UI vs. Single Enemy Roll = Rout/Artillery Eliminated
Down 2
Circumstance
Down 1
Outnumbered
No Change
Up 1
Town Melee
Higher DD;
Initiated Melee;
Tactical Advantage;
Uphill from Enemy
Cavalry vs. Infantry
Line vs. Cav.
Disordered;
Per UI Loss
Flanked/Rear
Losses
Orientation
Formation
Terrain
Limbered/Unlimb;
March
Opp. In Class III
Move
Frontal
vs. Flank
vs. Rear
Line
Opp. In Class II
Both in Class I
Roll Modified Leadership Die (LD) vs. D8
Rally 1 UI per 3 > D8; Rally Disorder, Routers if >D8
Leadership
Circumstance
Up 2
Down 2
Down 1
Contact
0 Remaining AMPs;
Routing;
Within 12"
No Change
Up 1
Over 12"
In Town Section;
Per Daring Deed;
Tactical Advantage
Up 2
LD vs. D6: Win By 6+ = 3 Moves; Win By 3-5 = 2 Moves;
Lose/Tie/Win by 1 or 2 = 1 Move; If LD Roll =1, No Move
On a won Even LD roll; all may Maneuver, Shock Cavalry/Grenadiers may Melee
Artillery:
6"
Cavalry:
12"
Infantry:
8"
Officers:
16"
Routers:
Move + D6"
cuts 9", 8.75", 8.5", 11.5", 11"
Great Northern War 1700-1721
Fire
Combat
Roll Modified Combat Die (CD) vs. Opponent's Defense Die (DD)
Lose 1 UI & 1 Army Morale Point per 3 Hits
Lose 0 or 1 UI vs. Enemy Even Roll = Fall Back; Lose 2+ UI vs. Single Enemy Even Roll= Rout
Down 2
Down 1
No Change
Up 1
Up 2
Infantry 1st Fire;
Tactical Advantage
vs. Flank
vs. Rear
12 - 6"
6 - 0"
Circumstance
Firing from Town
Orientation
Target Uphill
Disordered;
Per UI Loss
Frontal
6 - 4"
4 - 0"
24 - 18"
18 - 12"
Losses
Infantry Ranges
Artillery Ranges
36 - 24"
Firer's Formation
Line; Unlimbered
Infantry
Firing At
Artillery
Firing At
Target Cover
Melee
Combat
Unlimbered
Unlimbered
Class III
Class II
Any Column;
Limbered;
Line
Limbered;
Line
Class I
Any Column
Roll Modified Combat Die (CD) vs. Modified Combat Die (CD)
Lose 1 UI & 1 Army Morale Point per 3 Hits;
Lose 1+ UI = Fall Back; Lose 2+ UI vs. Single Enemy Roll = Rout/Artillery Eliminated
Down 2
Circumstance
Down 1
Outnumbered
No Change
Up 1
Town Melee
Higher DD;
Initiated Melee;
Tactical Advantage;
Uphill from Enemy
Cavalry vs. Infantry
Line vs. Cav.
Disordered;
Per UI Loss
Flanked/Rear
Losses
Orientation
Formation
Terrain
Limbered/Unlimb;
March
Opp. In Class III
Frontal
vs. Flank
vs. Rear
Line
Opp. In Class II
Both in Class I
Roll Modified Leadership Die (LD) vs. D8
Rally 1 UI per 3 > D8; Rally Disorder, Routers if >D8
Leadership
Circumstance
Up 2
Down 2
Down 1
Contact
0 Remaining AMPs;
Routing;
Within 12"
No Change
Up 1
Over 12"
In Town Section;
Per Daring Deed;
Tactical Advantage
Up 2
LD vs. D6: Win By 6+ = 3 Moves; Win By 3-5 = 2 Moves;
Lose/Tie/Win by 1 or 2 = 1 Move; If LD Roll =1, No Move
On a won Even LD roll; all may Maneuver, Swedish may Melee
Move
Artillery:
6"
Cavalry:
12"
Infantry:
8"
Officers:
16"
Routers:
Move + D6"
cuts 9", 8.75", 8.5", 11.5", 11"
Jacobite Rebellion 1745-1746
Fire
Combat
Roll Modified Combat Die (CD) vs. Opponent's Defense Die (DD)
Lose 1 UI & 1 Army Morale Point per 3 Hits
Lose 0 or 1 UI vs. Enemy Even Roll = Fall Back; Lose 2+ UI vs. Single Enemy Even Roll= Rout
Down 2
Circumstance
Orientation
Losses
Infantry Ranges
Artillery Ranges
36 - 24"
No Change
Up 1
Up 2
Firing from Town;
Highland infantry
Target Uphill
Disordered;
Per UI Loss
Down 1
Frontal
Infantry 1st Fire;
Tactical Advantage
vs. Flank
vs. Rear
6 - 4"
4 - 2"
2 - 0"
24 - 18"
18 - 12"
12 - 6"
Firer's Formation
Line; Unlimbered
Infantry
Firing At
Artillery
Firing At
Target Cover
Melee
Combat
Unlimbered
Unlimbered
Class III
Class II
Any Column;
Limbered;
Line
Limbered;
Line
Class I
Any Column
Roll Modified Combat Die (CD) vs. Modified Combat Die (CD)
Lose 1 UI & 1 Army Morale Point per 3 Hits;
Lose 1+ UI = Fall Back; Lose 2+ UI vs. Single Enemy Roll = Rout/Artillery Eliminated
Down 2
Circumstance
Down 1
Outnumbered
No Change
Up 1
Town Melee
Higher DD;
Initiated Melee;
Tactical Advantage;
Uphill from Enemy
Cavalry vs. Infantry
Disordered;
Per UI Loss
Flanked/Rear
Orientation
Terrain
Limbered/Unlimb;
March
Opp. In Class III
Move
Frontal
vs. Flank
vs. Rear
Line
Opp. In Class II
Both in Class I
Roll Modified Leadership Die (LD) vs. D8
Rally 1 UI per 3 > D8; Rally Disorder, Routers if >D8
Leadership
Circumstance
Up 2
Line vs. Cav.
Losses
Formation
6 - 0"
Down 2
Down 1
Contact
0 Remaining AMPs;
Routing;
Within 12"
No Change
Up 1
Over 12"
In Town Section;
Per Daring Deed;
Tactical Advantage
Up 2
LD vs. D6: Win By 6+ = 3 Moves; Win By 3-5 = 2 Moves;
Lose/Tie/Win by 1 or 2 = 1 Move; If LD Roll =1, No Move
On a won Even LD roll; all may Maneuver, Cavalry and Highlanders may Melee
Artillery:
8"
Cavalry:
12"
Infantry:
8"
Officers:
16"
Routers:
Move + D6"
cuts 9", 8.75", 8.5", 11.5", 11"
Seven Years War 1756-1763
Fire
Combat
Roll Modified Combat Die (CD) vs. Opponent's Defense Die (DD)
Lose 1 UI & 1 Army Morale Point per 3 Hits
Lose 0 or 1 UI vs. Enemy Even Roll = Fall Back; Lose 2+ UI vs. Single Enemy Even Roll= Rout
Down 2
Down 1
No Change
Up 1
Up 2
vs. Rear
Circumstance
Firing from Town
Orientation
Target Uphill
Disordered;
Per UI Loss
Frontal
Infantry 1st Fire;
Tactical Advantage
vs. Flank
6 - 4"
4 - 2"
2 - 0"
24 - 18"
18 - 12"
12 - 6"
Losses
Infantry Ranges
Artillery Ranges
36 - 24"
Firer's Formation
Skirmish in I
Infantry
Firing At
Skirmish;
Unlimbered
Artillery
Firing At
Target Cover
Melee
Combat
Skirmish
Unlimbered
Class III
Class II
Line;
Skirmish in II, III, IV;
Unlimbered
Any Column;
Limbered;
Line
Limbered;
Line
Class I
Any Column
Roll Modified Combat Die (CD) vs. Modified Combat Die (CD)
Lose 1 UI & 1 Army Morale Point per 3 Hits;
Lose 1+ UI = Fall Back; Lose 2+ UI vs. Single Enemy Roll = Rout/Artillery Eliminated
Down 2
Down 1
Circumstance
Outnumbered
No Change
Up 1
Town Melee
Higher DD;
Initiated Melee;
Tactical Advantage;
Uphill from Enemy
Cavalry vs. Infantry
Disordered;
Per UI Loss
Flanked/Rear
Orientation
Terrain
Limbered/Unlimb;
March;Skirmish
Opp. In Class III
Frontal
vs. Flank
vs. Rear
Line
Opp. In Class II
Both in Class I
Roll Modified Leadership Die (LD) vs. D8
Rally 1 UI per 3 > D8; Rally Disorder, Routers if >D8
Leadership
Circumstance
Up 2
Line vs. Cav.
Losses
Formation
6 - 0"
Down 2
Down 1
Contact
0 Remaining AMPs;
Routing;
Within 12"
No Change
Up 1
Over 12"
In Town Section;
Per Daring Deed;
Tactical Advantage
Up 2
LD vs. D6: Win By 6+ = 3 Moves; Win By 3-5 = 2 Moves;
Lose/Tie/Win by 1 or 2 = 1 Move; If LD Roll =1, No Move
On a won Even LD roll; all may Maneuver, Cavalry/Grenadiers may Melee
Move
Artillery:
8"
Cavalry:
12"
Infantry:
8"
Officers:
16"
Routers:
Move + D6"
cuts 9", 8.75", 8.5", 11.5", 11"
American War of Independence 1775-1783
Fire
Combat
Roll Modified Combat Die (CD) vs. Opponent's Defense Die (DD)
Lose 1 UI & 1 Army Morale Point per 3 Hits
Lose 0 or 1 UI vs. Enemy Even Roll = Fall Back; Lose 2+ UI vs. Single Enemy Even Roll= Rout
Down 2
Down 1
No Change
Up 1
Up 2
Frontal
Infantry 1st Fire;
Tactical Advantage
vs. Flank
vs. Rear
Circumstance
Firing from Town
Orientation
Target Uphill
Disordered;
Per UI Loss
Musket: 6 - 4"
Rifle: 12 - 8"
Musket: 4 - 2"
Rifle: 8 - 0"
Musket: 2 - 0"
SB: 24 - 18"
SB: 18 - 12"
SB: 12 - 6"
Losses
Infantry Ranges
Artillery Ranges
SB: 36 - 24"
Firer's Formation
Skirmish in I
Infantry
Firing At
Skirmish;
Unlimbered
Artillery
Firing At
Target Cover
Melee
Combat
Skirmish
Unlimbered
Class III
Class II
Line;
Skirmish in II, III, IV;
Unlimbered
Any Column;
Limbered;
Line
Limbered;
Line
Class I
Any Column
Roll Modified Combat Die (CD) vs. Modified Combat Die (CD)
Lose 1 UI & 1 Army Morale Point per 3 Hits;
Lose 1+ UI = Fall Back; Lose 2+ UI vs. Single Enemy Roll = Rout/Artillery Eliminated
Down 2
Down 1
Outnumbered;
Rifles
Circumstance
No Change
Up 1
Town Melee
Higher DD;
Initiated Melee;
Tactical Advantage;
Uphill from Enemy
Cavalry vs. Infantry
Disordered;
Per UI Loss
Flanked/Rear
Orientation
Terrain
Limbered/Unlimb;
March;Skirmish
Opp. In Class III
Frontal
vs. Flank
vs. Rear
Line
Opp. In Class II
Both in Class I
Roll Modified Leadership Die (LD) vs. D8
Rally 1 UI per 3 > D8; Rally Disorder, Routers if >D8
Leadership
Circumstance
Up 2
Line vs. Cav.
Losses
Formation
SB: 6 - 0"
Down 2
Down 1
No Change
Up 1
Contact
0 Remaining AMPs;
Routing;
Within 12"
Over 12"
In Town Section;
Per Daring Deed;
Tactical Advantage
Up 2
LD vs. D6: Win By 6+ = 3 Moves; Win By 3-5 = 2 Moves;
Lose/Tie/Win by 1 or 2 = 1 Move; If LD Roll =1, No Move
On a won Even LD roll; all may Maneuver,
Cavalry, British, German, Hessian, French Infantry may Melee
Move
Artillery: 8"
Cavalry: 12"
Infantry: 8"
Officers:
16"
Routers:
Move + D6"
cuts 9", 8.75", 8.5", 11.5", 11"
Napoleonic Wars 1792-1815
Fire
Combat
Roll Modified Combat Die (CD) vs. Opponent's Defense Die (DD)
Lose 1 UI & 1 Army Morale Point per 3 Hits
Lose 0 or 1 UI vs. Enemy Even Roll = Fall Back; Lose 2+ UI vs. Single Enemy Even Roll= Rout
Down 2
Down 1
No Change
Up 1
Up 2
Frontal
Infantry 1st Fire;
Tactical Advantage
vs. Flank
vs. Rear
Circumstance
Firing from Town
Orientation
Target Uphill
Disordered;
Per UI Loss
Musket: 6 - 4"
Rifle: 12 - 8"
Musket: 4 - 2"
Rifle: 8 - 0"
Musket: 2 - 0"
24 - 18"
18 - 12"
12 - 6"
Firer's Formation
Attack Column;
Skirmish in I;
Square
Infantry
Firing At
Skirmish;
Unlimbered
Line;
Skirmish in II, III, IV;
Unlimbered
Any Column;
Limbered;
Line;
Square
Limbered;
Line
Class I
Losses
Infantry Ranges
Artillery Ranges
Artillery
Firing At
Target Cover
Melee
Combat
36 - 24"
Skirmish
Unlimbered
Class III
Class II
Circumstance
Line/Att. Column vs.
Cavalry
Disordered;
Per UI Loss
Flanked/Rear
Losses
Orientation
Limbered/Unlimb;
March;Skirmish
Opp. In Class III
Move
Opp. In Class II
No Change
Up 1
Town Melee
Higher DD;
Initiated Melee;
Tactical Advantage;
Uphill from Enemy
Up 2
Sq. vs. Cav.
Frontal
Line;
Square
Both in Class I
vs. Rear
vs. Flank
Attack Column
Roll Modified Leadership Die (LD) vs. D8
Rally 1 UI per 3 > D8; Rally Disorder, Routers if >D8
Leadership
Circumstance
Down 1
Outnumbered
Cavalry vs. Infantry
Terrain
Any Column;
Square
Roll Modified Combat Die (CD) vs. Modified Combat Die (CD)
Lose 1 UI & 1 Army Morale Point per 3 Hits;
Lose 1+ UI = Fall Back; Lose 2+ UI vs. Single Enemy Roll = Rout/Artillery Eliminated
Down 2
Formation
6 - 0"
Down 2
Down 1
No Change
Up 1
Contact
0 Remaining AMPs;
Routing;
Within 12"
Over 12"
In Town Section;
Per Daring Deed;
Tactical Advantage
Up 2
LD vs. D6: Win By 6+ = 3 Moves; Win By 3-5 = 2 Moves;
Lose/Tie/Win by 1 or 2 = 1 Move; If LD Roll =1, No Move
On a won even LD roll; may Maneuver, Cavalry/Att. Col/British in Line may Melee
Foot Artillery: 8"
Horse Artillery: 10"
Cavalry:
12"
Infantry:
8"
Officers:
16"
Routers:
Move + D6"
cuts 9", 8.75", 8.5", 11.5", 11"
Mexican-American War 1846-1848
Fire
Combat
Roll Modified Combat Die (CD) vs. Opponent's Defense Die (DD)
Lose 1 UI & 1 Army Morale Point per 3 Hits
Lose 0 or 1 UI vs. Enemy Even Roll = Fall Back; Lose 2+ UI vs. Single Enemy Even Roll= Rout
Down 2
Down 1
Circumstance
Firing from Town
Orientation
Target Uphill
Disordered;
Per UI Loss
Mex. Musket: 6 - 3"
Rifle: 12 - 8"
US Musket: 6 - 4"
Mex.: 20 - 10"
US: 24 - 18"
Attack Column;
Skirmish in I;
Square
Losses
Infantry Ranges
Artillery Ranges
Mex.: 30 - 20"
US: 36 - 24"
Firer's Formation
Infantry
Firing At
Artillery
Firing At
Target Cover
Melee
Combat
Skirmish;
Unlimbered
Skirmish
Unlimbered
Class III
Class II
Down 1
Circumstance
Outnumbered
Line/Att. Column vs.
Cavalry
Disordered;
Per UI Loss
Flanked/Rear
Cavalry vs. Infantry
Losses
Orientation
Terrain
Limbered/Unlimb;
March;Skirmish
Opp. In Class III
Move
Up 2
Frontal
vs. Rear
Mex. Musket: 3 - 1"
Rifle: 8 - 0"
US Musket: 4 - 2"
Mex.: 10 - 6"
US: 18 - 12"
Line;
Skirmish in II, III, IV;
Unlimbered
Any Column;
Limbered;
Line;
Square
Limbered;
Line
Class I
Mex. Musket: 1 - 0"
US Musket: 2 - 0"
Mex.: 6 - 3"
US: 12 - 6"
Mex.: 3 - 0"
US: 6 - 0"
Any Column;
Square
Opp. In Class II
No Change
Up 1
Town Melee
Higher DD;
Initiated Melee;
Tactical Advantage;
Uphill from Enemy
Up 2
Sq. vs. Cav.
Frontal
Line;
Square
Both in Class I
vs. Flank
vs. Rear
Attack Column
Roll Modified Leadership Die (LD) vs. D8
Rally 1 UI per 3 > D8; Rally Disorder, Routers if >D8
Leadership
Circumstance
Up 1
Infantry 1st Fire;
Tactical Advantage
vs. Flank
Roll Modified Combat Die (CD) vs. Modified Combat Die (CD)
Lose 1 UI & 1 Army Morale Point per 3 Hits;
Lose 1+ UI = Fall Back; Lose 2+ UI vs. Single Enemy Roll = Rout/Artillery Eliminated
Down 2
Formation
No Change
Down 2
Down 1
Contact
0 Remaining AMPs;
Routing;
Within 12"
No Change
Up 1
Over 12"
In Town Section;
Per Daring Deed;
Tactical Advantage
Up 2
LD vs. D6: Win By 6+ = 3 Moves; Win By 3-5 = 2 Moves;
Lose/Tie/Win by 1 or 2 = 1 Move; If LD Roll =1, No Move
On a won even LD roll; may Maneuver, Cavalry and US Infantry may Melee
Foot Artillery: 8"
Horse Artillery: 10"
Cavalry:
12"
Infantry:
8"
Officers:
16"
Routers:
Move + D6"
cuts 9", 8.75", 8.5", 11.5", 11"
Anglo-Sikh Wars 1845-1846/1848-1849
Fire
Combat
Roll Modified Combat Die (CD) vs. Opponent's Defense Die (DD)
Lose 1 UI & 1 Army Morale Point per 3 Hits
Lose 0 or 1 UI vs. Enemy Even Roll = Fall Back; Lose 2+ UI vs. Single Enemy Even Roll= Rout
Down 2
Down 1
Circumstance
Firing from Town
Orientation
Target Uphill
Disordered;
Per UI Loss
6 - 4"
24 - 18"
Losses
Inf. Ranges
Art. Ranges
36 - 24"
Firer's Formation
Mass
Infantry
Firing At
Attack Column;
Skirmish in I; Square
Skirmish;
Unlimbered
No Change
Up 1
Up 2
Frontal
Infantry 1st Fire;
Tactical Advantage
vs. Flank
vs. Rear
2 - 0"
12 - 6"
6 - 0"
4 - 2"
18 - 12"
Line;
Skirmish in II, III, IV;
Unlimbered
Any Column;
Limbered;
Line; Mass;
Square
Artillery
Firing At
Skirmish
Unlimbered
Limbered ;
Line
Target Cover
Class III
Class II
Class I
Melee
Combat
Roll Modified Combat Die (CD) vs. Modified Combat Die (CD)
Lose 1 UI & 1 Army Morale Point per 3 Hits;
Lose 1+ UI = Fall Back; Lose 2+ UI vs. Single Enemy Roll = Rout/Artillery Eliminated
Down 2
Circumstance
Line/Att. Column vs.
Cavalry
Disordered;
Per UI Loss
Flanked/Rear
Losses
Orientation
Formation
Limbered/Unlimb;
March;Skirmish
Terrain
Opp. In Class III
Opp. In Class II
No Change
Up 1
Town Melee
Higher DD;
Initiated Melee;
Tactical Advantage;
Uphill from Enemy
Up 2
Sq. vs. Cav.
Frontal
Line;
Mass;
Square
Both in Class I
vs. Flank
vs. Rear
Attack Column
Roll Modified Leadership Die (LD) vs. D8
Rally 1 UI per 3 > D8; Rally Disorder, Routers if >D8
Leadership
Move
Down 1
Outnumbered
Cavalry vs. Infantry
Circumstance
Any Column;
Mass;
Square
Down 2
Down 1
Contact
0 Remaining AMPs;
Routing;
Within 12"
No Change
Up 1
Over 12"
In Town Section;
Per Daring Deed;
Tactical Advantage
Up 2
LD vs. D6: Win By 6+ = 3 Moves; Win By 3-5 = 2 Moves;
Lose/Tie/Win by 1 or 2 = 1 Move; If LD Roll =1, No Move
On a won even LD roll; may Maneuver, British, Sikh Cavalry and Infantry may Melee
Foot Artillery: 8"
Horse Artillery: 10"
Cavalry:
12"
Infantry:
8"
Officers:
16"
Routers:
Move + D6"
cuts 9", 8.75", 8.5", 11.5", 11"
Crimean War 1853-1856
Fire
Combat
Roll Modified Combat Die (CD) vs. Opponent's Defense Die (DD)
Lose 1 UI & 1 Army Morale Point per 3 Hits
Lose 0 or 1 UI vs. Enemy Even Roll = Fall Back; Lose 2+ UI vs. Single Enemy Even Roll= Rout
Down 2
Down 1
Circumstance
Firing from Town
Orientation
Target Uphill
Disordered;
Per UI Loss
Rifle: 12 - 8"
Smoothbore: 6-4"
24 - 18"
Losses
Infantry Ranges
Artillery Ranges
36 - 24"
Firer's Formation
Attack Column;
Skirmish in I
Infantry
Firing At
Skirmish;
Unlimbered
Artillery
Firing At
Target Cover
Melee
Combat
Skirmish
Unlimbered
Class III
Class II
Circumstance
Losses
Orientation
Terrain
Limbered/Unlimb.;
March;
Skirmish
Opp. In Class III
Move
Up 2
Frontal
vs. Rear
Rifle: 4 - 0"
Smoothbore: 2-0"
12 - 6"
6 - 0"
Rifle: 8 - 4"
Smoothbore: 4-2"
18 - 12"
Line;
Skirmish in II, III, IV;
Unlimbered
Any Column;
Limbered;
Line;
Square
Line;
Limbered
Class I
Any Column;
Square
Down 1
No Change
Up 1
Outnumbered
Town Melee
Higher DD;
Initiated Melee;
Tactical Advantage;
Uphill from Enemy
Disordered;
Per UI Loss
Flanked/Rear
Frontal
vs. Flank
Line
Attack Column
Opp. In Class II
Up 2
vs. Rear
Both in Class I
Roll Modified Leadership Die (LD) vs. D8
Rally 1 UI per 3 > D8; Rally Disorder, Routers if >D8
Leadership
Circumstance
Up 1
Infantry 1st Fire;
Tactical Advantage
vs. Flank
Roll Modified Combat Die (CD) vs. Modified Combat Die (CD)
Lose 1 UI & 1 Army Morale Point per 3 Hits;
Lose 1+ UI = Fall Back; Lose 2+ UI vs. Single Enemy Roll = Rout/Artillery Eliminated
Down 2
Formation
No Change
Down 2
Down 1
Contact
0 Remaining AMPs;
Routing;
Within 12"
No Change
Up 1
Over 12"
In Town Section;
Per Daring Deed;
Tactical Advantage
Up 2
LD vs. D6: Win By 6+ = 3 Moves; Win By 3-5 = 2 Moves;
Lose/Tie/Win by 1 or 2 = 1 Move; If LD Roll =1, No Move
On a won even LD roll; may Maneuver, Cavalry and French/Russian Infantry may Melee
Artillery: 10"
Cavalry: 12"
Infantry: 8"
Officers: 16"
Routers:
Move + D6"
cuts 9", 8.75", 8.5", 11.5", 11"
Franco-Austrian War 1859
Fire
Combat
Roll Modified Combat Die (CD) vs. Opponent's Defense Die (DD)
Lose 1 UI & 1 Army Morale Point per 3 Hits
Lose 0 or 1 UI vs. Enemy Even Roll = Fall Back; Lose 2+ UI vs. Single Enemy Even Roll= Rout
Down 2
Down 1
Circumstance
Firing from Town
Orientation
Target Uphill
Disordered;
Per UI Loss
12 - 8"
Austrian: 12-6"
French: 16 - 8"
Losses
Infantry Ranges
Artillery Ranges
Austrian: 24- 12"
French: 32 - 16"
Firer's Formation
Attack Column;
Skirmish in I
Infantry
Firing At
Skirmish;
Unlimbered
Artillery
Firing At
Target Cover
Melee
Combat
Skirmish
Unlimbered
Class III
Class II
No Change
Up 1
Up 2
Frontal
Infantry 1st Fire;
Tactical Advantage
vs. Flank
vs. Rear
8- 4"
Austrian: 6 - 3"
French: 8 - 4"
Line;
Skirmish in II, III, IV;
Unlimbered
Any Column;
Limbered;
Line
Limbered;
Line
Class I
4 - 0"
Austrian: 3 - 0"
French: 4 - 0"
Any Column
Roll Modified Combat Die (CD) vs. Modified Combat Die (CD)
Lose 1 UI & 1 Army Morale Point per 3 Hits;
Lose 1+ UI = Fall Back; Lose 2+ UI vs. Single Enemy Roll = Rout/Artillery Eliminated
Down 2
Circumstance
Down 1
No Change
Up 1
Outnumbered
Town Melee
Higher DD;
Initiated Melee;
Tactical Advantage;
Uphill from Enemy
Disordered;
Per UI Loss
Flanked/Rear
Frontal
vs. Flank
Line
Attack Column
Up 2
Tactical Situation
Losses
Orientation
Formation
Terrain
Limbered/Unlimb.;
March
Opp. In Class III
Move
Both in Class I
Roll Modified Leadership Die (LD) vs. D8
Rally 1 UI per 3 > D8; Rally Disorder, Routers if >D8
Command
Circumstance
Opp. In Class II
vs. Rear
Down 2
Down 1
Contact
0 Remaining AMPs;
Routing;
Within 12"
No Change
Up 1
Over 12"
In Town Section;
Per Daring Deed;
Tactical Advantage
Up 2
LD vs. D6: Win By 6+ = 3 Moves; Win By 3-5 = 2 Moves;
Lose/Tie/Win by 1 or 2 = 1 Move; If LD Roll =1, No Move
On a won even LD roll; may Maneuver, Cavalry and French Infantry may Melee
Artillery: 10"
Cavalry: 12"
Infantry: 8"
Officers: 16"
Routers: Move + D6"
cuts 9", 8.75", 8.5", 11.5", 11"
American Civil War 1861-1865
Fire
Combat
Roll Modified Combat Die (CD) vs. Opponent's Defense Die (DD)
Lose 1 UI & 1 Army Morale Point per 3 Hits
Lose 0 or 1 UI vs. Enemy Even Roll = Fall Back; Lose 2+ UI vs. Single Enemy Even Roll= Rout
Down 2
Down 1
Circumstance
Firing from Town
Orientation
Target Uphill
Disordered;
Per UI Loss
Carbine: 8-6"
Rifle: 12 - 8"
Smoothbore: 6-4"
Rifled: 24 - 18"
Smoothbore: 20 - 14"
Losses
Infantry Ranges
Artillery Ranges
Rifled: 36-24"
Smoothbore: 28-20"
Firer's Formation
Attack Column;
Skirmish in I
Infantry
Firing At
Skirmish;
Unlimbered
Artillery
Firing At
Target Cover
Melee
Combat
Skirmish
Unlimbered
Class III
Class II
Circumstance
Losses
Orientation
Terrain
Limbered/Unlimb.;
March;
Skirmish
Opp. In Class III
Up 2
Frontal
vs. Rear
Carbine: 2 - 0"
Rifle: 4 - 0"
Smoothbore: 2-0"
Rifled: 8 - 0"
Smoothbore: 8 - 4"
Smoothbore: 4 - 0"
Carbine: 6 - 2"
Rifle: 8 - 4"
Smoothbore: 4-2"
Rifled: 18 - 8"
Smoothbore: 14 - 8"
Line;
Skirmish in II, III, IV;
Unlimbered
Any Column;
Limbered;
Line
Limbered;
Line
Class I
Any Column
Down 1
No Change
Up 1
Outnumbered
Town Melee
Higher DD;
Initiated Melee;
Tactical Advantage;
Uphill from Enemy
Disordered;
Per UI Loss
Flanked/Rear
Frontal
vs. Flank
Line
Attack Column
Opp. In Class II
Up 2
vs. Rear
Both in Class I
Roll Modified Leadership Die (LD) vs. D8
Rally 1 UI per 3 > D8; Rally Disorder, Routers if >D8
Leadership
Circumstance
Up 1
Infantry 1st Fire;
Tactical Advantage
vs. Flank
Roll Modified Combat Die (CD) vs. Modified Combat Die (CD)
Lose 1 UI & 1 Army Morale Point per 3 Hits;
Lose 1+ UI = Fall Back; Lose 2+ UI vs. Single Enemy Roll = Rout/Artillery Eliminated
Down 2
Formation
No Change
Down 2
Down 1
Contact
0 Remaining AMPs;
Routing;
Within 12"
No Change
Up 1
Over 12"
In Town Section;
Per Daring Deed;
Tactical Advantage
Up 2
LD vs. D6: Win By 6+ = 3 Moves; Win By 3-5 = 2 Moves;
Lose/Tie/Win by 1 or 2 = 1 Move; If LD Roll =1, No Move
On a won even LD roll; may Maneuver and Melee
Move
Artillery: 10"
Cavalry: 12"
Infantry: 8"
Officers: 16"
Routers:
Move + D6"
cuts 9", 8.75", 8.5", 11.5", 11"
Austro-Prussian War 1866
Fire
Combat
Roll Modified Combat Die (CD) vs. Opponent's Defense Die (DD)
Lose 1 UI & 1 Army Morale Point per 3 Hits
Lose 0 or 1 UI vs. Enemy Even Roll = Fall Back; Lose 2+ UI vs. Single Enemy Even Roll= Rout
Down 2
Down 1
Circumstance
Firing from Town
Orientation
Target Uphill
Disordered;
Per UI Loss
Austrian: 12-8"
Losses
Infantry Ranges
Artillery Ranges
Austrian: 32 - 16"
Prussian BL: 32-16"
Prussian SB: 24- 12"
Austrian: 16-8"
Prussian BL: 16-8"
Prussian SB: 12-6"
Firer's Formation
Attack Column;
Skirmish in I
Infantry
Firing At
Skirmish;
Unlimbered
Artillery
Firing At
Target Cover
Melee
Combat
Skirmish
Unlimbered
Class III
Class II
Circumstance
Losses
Orientation
Terrain
Limbered/Unlimb.;
March
Opp. In Class III
Move
Up 2
Frontal
vs. Rear
Austrian: 8-2"
Prussian: 8-4"
Austrian: 8-4"
Prussian BL: 8-4"
Prussian SB: 6-3"
Line;
Skirmish in II, III, IV;
Unlimbered
Any Column;
Limbered;
Line
Limbered;
Line
Class I
Austrian: 2-0"
Prussian: 4-0"
Austrian: 4-0"
Prussian BL: 4-0"
Prussian SB: 3-0"
Any Column
Down 1
No Change
Up 1
Outnumbered
Town Melee
Higher DD;
Initiated Melee;
Tactical Advantage;
Uphill from Enemy
Disordered;
Per UI Loss
Flanked/Rear
Frontal
vs. Flank
Skirmish
Line
Attack Column
Opp. In Class II
Both in Class I
Up 2
vs. Rear
Roll Modified Leadership Die (LD) vs. D8
Rally 1 UI per 3 > D8; Rally Disorder, Routers if >D8
Leadership
Circumstance
Up 1
Infantry 1st Fire;
Tactical Advantage
vs. Flank
Roll Modified Combat Die (CD) vs. Modified Combat Die (CD)
Lose 1 UI & 1 Army Morale Point per 3 Hits;
Lose 1+ UI = Fall Back; Lose 2+ UI vs. Single Enemy Roll = Rout/Artillery Eliminated
Down 2
Formation
No Change
Down 2
Down 1
Contact
0 Remaining AMPs;
Routing;
Within 12"
No Change
Up 1
Over 12"
In Town Section;
Per Daring Deed;
Tactical Advantage
Up 2
LD vs. D6: Win By 6+ = 3 Moves; Win By 3-5 = 2 Moves;
Lose/Tie/Win by 1 or 2 = 1 Move; If LD Roll =1, No Move
On a won even LD roll; may Maneuver, Cavalry and Austrian Infantry (Att. Col.) may Melee
Artillery: 10"
Cavalry: 12"
Infantry: 8"
Officers: 16"
Routers:
Move + D6"
cuts 9", 8.75", 8.5", 11.5", 11"
Franco-Prussian War 1870-1871
Fire
Combat
Roll Modified Combat Die (CD) vs. Opponent's Defense Die (DD)
Lose 1 UI & 1 Army Morale Point per 3 Hits
Lose 0 or 1 UI vs. Enemy Even Roll = Fall Back; Lose 2+ UI vs. Single Enemy Even Roll= Rout
Down 2
Down 1
Circumstance
Firing from Town
Orientation
Target Uphill
Disordered;
Per UI Loss
French: 12 - 8"
Losses
Infantry Ranges
French: 28- 12"
Artillery Ranges
Prussian: 36 - 24"
French: 14-8"
Mitrailleuse: 12 - 8"
Prussian: 24 - 18"
Firer's Formation
Skirmish in I
Infantry
Firing At
Skirmish;
Unlimbered
Artillery
Firing At
Target Cover
Melee
Combat
Skirmish
Unlimbered
Class III
Class II
Circumstance
Losses
Orientation
Terrain
Limbered/Unlimb;
March
Opp. In Class III
Up 2
Frontal
vs. Rear
French: 8- 4"
Prussian: 8- 4"
French: 8 - 4"
Mitrailleuse: 8 - 4"
Prussian: 18 - 6"
Company Column;
Line;
Skirmish in II, III, IV;
Unlimbered
Any Column;
Limbered;
Line
Limbered;
Line
Class I
French: 4 - 0"
Prussian: 4 - 0"
French: 4 - 0"
Mitrailleuse: 4 - 0"
Prussian: 6 - 0"
Any Column
Down 1
No Change
Up 1
Outnumbered
Town Melee
Higher DD;
Initiated Melee;
Tactical Adv.;
Uphill from Enemy
Disordered;
Per UI Loss
Flanked/Rear
Frontal
vs. Flank
Skirmish
Line
Company Column
Opp. In Class II
Both in Class I
Up 2
vs. Rear
Roll Modified Leadership Die (LD) vs. D8
Rally 1 UI per 3 > D8; Rally Disorder, Routers if >D8
Leadership
Circumstance
Up 1
Infantry 1st Fire;
Tactical Advantage
vs. Flank
Roll Modified Combat Die (CD) vs. Modified Combat Die (CD)
Lose 1 UI & 1 Army Morale Point per 3 Hits;
Lose 1+ UI = Fall Back; Lose 2+ UI vs. Single Enemy Roll = Rout/Artillery Eliminated
Down 2
Formation
No Change
Down 2
Down 1
Contact
0 Remaining AMPs;
Routing;
Within 12"
No Change
Up 1
Over 12"
In Town Section;
Per Daring Deed;
Tactical Advantage
Up 2
LD vs. D6: Win By 6+ = 3 Moves; Win By 3-5 = 2 Moves;
Lose/Tie/Win by 1 or 2 = 1 Move; If LD Roll =1, No Move
On a won even LD roll; may Maneuver,
Cavalry,Prussian Infantry (Co. Col.), Turcos, Zouaves may Melee
Move
Artillery: 10"
Cavalry: 12"
Infantry: 8"
Officers: 16"
Routers: Move + D6"
cuts 9", 8.75", 8.5", 11.5", 11"
Russo-Turkish War 1877
Fire
Combat
Roll Modified Combat Die (CD) vs. Opponent's Defense Die (DD)
Lose 1 UI & 1 Army Morale Point per 3 Hits
Lose 0 or 1 UI vs. Enemy Even Roll = Fall Back; Lose 2+ UI vs. Single Enemy Even Roll= Rout
Down 2
Down 1
Circumstance
Firing from Town
Orientation
Target Uphill
Disordered;
Per UI Loss
BL: 12-8"
ML: 10-8"
Musket: 6-4"
24 - 18"
Losses
Infantry Ranges
Artillery Ranges
36 - 24"
Firer's Formation
Attack Column;
Skirmish in I
Infantry
Firing At
Skirmish;
Unlimbered
Artillery
Firing At
Target Cover
Melee
Combat
Skirmish
Unlimbered
Class III
Class II
Circumstance
Losses
Orientation
Terrain
Limbered/Unlimb;
March
Opp. In Class III
Up 2
Frontal
vs. Rear
BL: 8-4"
ML: 8-4"
Musket: 4-2"
18 - 6"
Line;
Skirmish in II, III, IV;
Unlimbered
Any Column;
Limbered;
Line
Limbered;
Line
Class I
BL: 4-0"
ML: 4-0"
Musket: 2-0"
6 - 0"
Any Column
Down 1
No Change
Up 1
Outnumbered
Town Melee
Higher DD;
Initiated Melee;
Tactical Adv.;
Uphill from Enemy
Disordered;
Per UI Loss
Flanked/Rear
Frontal
vs. Flank
Skirmish
Line
Attack Column
Opp. In Class II
Both in Class I
Up 2
vs. Rear
Roll Modified Leadership Die (LD) vs. D8
Rally 1 UI per 3 > D8; Rally Disorder, Routers if >D8
Leadership
Circumstance
Up 1
Infantry 1st Fire;
Tactical Advantage
vs. Flank
Roll Modified Combat Die (CD) vs. Modified Combat Die (CD)
Lose 1 UI & 1 Army Morale Point per 3 Hits;
Lose 1+ UI = Fall Back; Lose 2+ UI vs. Single Enemy Roll = Rout/Artillery Eliminated
Down 2
Formation
No Change
Down 2
Down 1
Contact
0 Remaining AMPs;
Routing;
Within 12"
No Change
Up 1
Over 12"
In Town Section;
Per Daring Deed;
Tactical Advantage
Up 2
LD vs. D6: Win By 6+ = 3 Moves; Win By 3-5 = 2 Moves;
Lose/Tie/Win by 1 or 2 = 1 Move; If LD Roll =1, No Move
On a won even LD roll; may Maneuver, Infantry may Melee
Move
Artillery: 10"
Cavalry: 12"
Infantry: 8"
Officers: 16"
Routers: Move + D6"
cuts 9", 8.75", 8.5", 11.5", 11"
Anglo-Zulu War 1879
Fire
Combat
Roll Modified Combat Die (CD) vs. Opponent's Defense Die (DD)
Lose 1 UI & 1 Army Morale Point per 3 Hits
Lose 0 or 1 UI vs. Enemy Even Roll = Fall Back; Lose 2+ UI vs. Single Enemy Even Roll= Rout
Down 2
Down 1
No Change
Up 1
Up 2
vs. Rear
Circumstance
Firing from Town
Orientation
Target Uphill
Disordered;
Per UI Loss
Frontal
Infantry 1st Fire;
Tactical Advantage
vs. Flank
16 - 12"
12- 8"
8 - 0"
30 - 20"
Mass;
Skirmish in I;
Square
20- 10"
Line;
Skirmish in II, III, IV;
Unlimbered
Limbered;
Line;
March;
Mass
Limbered;
Line
Class I
10 - 0"
Losses
Infantry & MG Ranges
Artillery Ranges
40 - 30"
Firer's Formation
Infantry
Firing At
Artillery
Firing At
Target Cover
Melee
Combat
Skirmish;
Unlimbered
Skirmish
Unlimbered
Class III
Class II
Roll Modified Combat Die (CD) vs. Modified Combat Die (CD)
Lose 1 UI & 1 Army Morale Point per 3 Hits;
Lose 1+ UI = Fall Back; Lose 2+ UI vs. Single Enemy Roll = Rout/Artillery Eliminated
Down 2
Circumstance
Disordered;
Per UI Loss
Flanked/Rear
Orientation
Terrain
Limbered/Unlimb;
March
Opp. In Class III
Down 2
Move
Skirmish
Opp. In Class II
No Change
Up 1
Town Melee
Higher DD;
Initiated Melee;
Tactical Adv.;
Throwing Spears;
Uphill from Enemy
Frontal
Line;
Mass
Both in Class I
vs. Flank
Up 2
vs. Rear
Roll Modified Leadership Die (LD) vs. D8
Rally 1 UI per 3 > D8; Rally Disorder, Routers if >D8
Leadership
Circumstance
Down 1
Outnumbered
Losses
Formation
March;
Mass
Down 1
No Change
Up 1
Up 2
0 Remaining AMPs;
Per Daring Deed;
Contact
Routing;
Over 12"
Tactical Advantage
Within 12"
LD vs. D6: Win By 6+ = 3 Moves; Win By 3-5 = 2 Moves;
Lose/Tie/Win by 1 or 2 = 1 Move; If LD Roll =1, No Move
On a won even LD roll; may Maneuver, Lancers and Zulu infantry (non-firearm) may Melee
Infantry: 8"
Routers:
Artillery: 10"
Cavalry: 12"
Officers: 16"
Zulu: 10"
Move + D6"
cuts 9", 8.75", 8.5", 11.5", 11"
Anglo-Sudan War 1881-1899
Fire
Combat
Roll Modified Combat Die (CD) vs. Opponent's Defense Die (DD)
Lose 1 UI & 1 Army Morale Point per 3 Hits
Lose 0 or 1 UI vs. Enemy Even Roll = Fall Back; Lose 2+ UI vs. Single Enemy Even Roll= Rout
Down 2
Down 1
No Change
Up 1
Up 2
vs. Rear
Circumstance
Firing from Town
Orientation
Target Uphill
Disordered;
Per UI Loss
Frontal
Infantry 1st Fire;
Tactical Advantage
vs. Flank
16 - 12"
12- 8"
8 - 0"
30 - 20"
Mass;
Skirmish in I;
Square
20- 10"
Line;
Skirmish in II, III, IV;
Unlimbered
Limbered;
Line;
March;
Mass;
Square
10 - 0"
Losses
Infantry & MG Ranges
Artillery Ranges
40 - 30"
Firer's Formation
Infantry
Firing At
Skirmish;
Unlimbered
Artillery
Firing At
Skirmish
Unlimbered
Limbered;
Line
Target Cover
Class III
Class II
Class I
Melee
Combat
Roll Modified Combat Die (CD) vs. Modified Combat Die (CD)
Lose 1 UI & 1 Army Morale Point per 3 Hits;
Lose 1+ UI = Fall Back; Lose 2+ UI vs. Single Enemy Roll = Rout/Artillery Eliminated
Down 2
Circumstance
Disordered;
Per UI Loss
Flanked/Rear
Orientation
Terrain
Limbered/Unlimb;
March
Opp. In Class III
Move
Skirmish
Opp. In Class II
No Change
Up 1
Town Melee
Higher DD;
Initiated Melee;
Tactical Adv.;
Uphill from Enemy
Frontal
Line;
Mass
Both in Class I
vs. Flank
Up 2
vs. Rear
Roll Modified Leadership Die (LD) vs. D8
Rally 1 UI per 3 > D8; Rally Disorder, Routers if >D8
Leadership
Circumstance
Down 1
Outnumbered
Losses
Formation
March;
Mass;
Square
Down 2
Down 1
No Change
Up 1
Contact
0 Remaining AMPs;
Routing;
Within 12"
Over 12"
Per Daring Deed;
Tactical Advantage
Up 2
LD vs. D6: Win By 6+ = 3 Moves; Win By 3-5 = 2 Moves;
Lose/Tie/Win by 1 or 2 = 1 Move; If LD Roll =1, No Move
On a won even LD roll; may Maneuver, Cavalry and Mahdist infantry may Melee
Artillery: 10"
Cavalry: 12"
Infantry: 8"
Mahdist: 10"
Officers: 16"
Routers:
Move + D6"
cuts 9", 8.75", 8.5", 11.5", 11"
Battle
Move
Move
Roll LD vs. Opposition Die
▪
▪
▪
▪
▪
LD Modifiers:
LD Down 1 if Opponent’s card
LD Modified by Seasonal Modifier
LD Down 1 moving to higher density area
LD Up 1 moving to lower density area
▪
▪
▪
Results:
Move 1 area if higher
No move if equal or lower
Move
Operational
Initiative
Plan & Prepare
Supply
Weather
cuts 9", 8.75", 8.5", 11.5", 11"
Battle
Move
Move
Move
Operational
Initiative
Battle
Supply
Operational
Initiative
Plan & Prepare
cuts 9", 8.75", 8.5", 11.5", 11"
Battle
Move
Move
Move
Operational
Initiative
Move
Plan & Prepare
Supply
Move
cuts 9", 8.75", 8.5", 11.5", 11"
Battle
Move
Move
Move
Operational
Initiative
Weather
Plan & Prepare
Supply
Move
cuts 9", 8.75", 8.5", 11.5", 11"
Battle
Move
Move
Move
Operational
Initiative
Supply
Plan & Prepare
Supply
Plan & Prepare
cuts 9", 8.75", 8.5", 11.5", 11"
cuts 9", 8.75", 8.5", 11.5", 11"
cuts 9", 8.75", 8.5", 11.5", 11"
cuts 9", 8.75", 8.5", 11.5", 11"
cuts 9", 8.75", 8.5", 11.5", 11"
cuts 9", 8.75", 8.5", 11.5", 11"
cuts 9", 8.75", 8.5", 11.5", 11"
Move Modifiers: UP 1 if Moving to a Lower Terrain Density Area
Down 1 if Moving to a Higher Terrain Density Area
1-3 Good; 4+ Bad
Bad: DN1 on Move
Spring
1 Bad; 2+ Good
Bad: DN1 on Supply
Summer
Supply: Friendly UP1
Enemy Down 1
` Bad: DN1 on Supply
Supply: Friendly UP2
Enemy Down 2
UP1 Modifier:
Home D4+1/Enemy D4+4
Supply: Friendly
Win Ties
UP1 Modifier:
Home D4+2/Enemy D4+3
Supply: Friendly
Win Ties
Strengths and Advantages
-10%
Fall
1-8 Bad; 9+ Good
Bad: DN1 on Move
Bad: DN1 on Supply
Winter
UP1 Mod:
Home D4
Enemy D4+5
Supply: Friendly UP2
Enemy Down 2
1-5 Bad; 6+ Good
Bad: DN1 on Move
Bad: DN1 on Supply
Supply: Friendly UP1
Enemy Down 1
UP1 Mod:
Home D4+1
Enemy D4+4
Tac Init.
1,2 squares
Supply Effect on Strength
10%
Orient Map
-5%
5%
UP1 Modifier:
Home D4+2/Enemy D4+3
Season of Battle
-10%
3+D6 Init.
Move Modifiers: UP 1 if Moving to a Lower Terrain Density Area
Down 1 if Moving to a Higher Terrain Density Area
Supply Effect on Strength
UP1 Modifier:
Home D4/Enemy D4+5
Tac Init.
-5%
+5%
+10%
Orient Map
1,2 squares
3+D6 Init.
cuts 9", 8.75", 8.5", 11.5", 11"
Battle of
Unit ID
Deck
Army
Morale
Points
National
Morale
Points
Season of Battle Army Roster
Finish
Start
Start
Finish
Finish
Start
Start
Finish
Finish
Battle #
Start
Finish
Battle #
Finish
Start
Battle #
Start
Finish
Battle #
Start
CiC
LD1
LD2
LD3
LD4
LD5
LD6