/


Теги: military affairs field manual cynology
Год: 1972

Текст
FM 20-20
FIELD MANUAL
BASIC TRAINING AND CARE
OF MILITARY DOGS
HEADQUARTERS, DEPARTMENT OF THE ARMY
JULY 1972
FM 20-20
Field Manual
No. 20-20
HEADQUARTERS
DEPARTMENT OF THE ARMY
Washington, D. C., 14 July
1972
PART
ONE.
INTRODUCTION
Chapter
Section
1.
2.
3.
4.
I.
II.
HI.
Chapter
5.
Section
I.
II.
III.
PART
TWO.
Chapter
Section
6.
I.
II.
BASIC TRAINING AND CARE
OF MILITARY DOGS
GENERAL_______________________________________________________
HISTORY OF WAR DOGS ___________________________ ______________
HANDLER PERSONNEL ____________________________________________
PROCUREMENT, SAFETY, AND TRANSPORTATION OF MILITARY DOGS ..
Procurement __________________________________________________
Safety __________________ ____________________________________
Transportation of Dogs _______________________________________
PROCUREMENT, USE, AND MAINTENANCE OF MILITARY DOG
EQUIPMENT
Procurement ..________________________________________________
Use_________________________________________________________...
Maintenance___________________________________________________
HEALTH OF THE MILITARY DOG
Chapter
Section
7.
I.
II.
III.
VETERINARY SERVICES
Who Provides the Services _____
Types of Service_______________
HEALTH, CARE, AND FEEDING
Diseases and Their Prevention_
Care __________________________
Feeding ______________.._______
PART THREE.
LOGISTICAL SUPPORT AND ADMINISTRATION
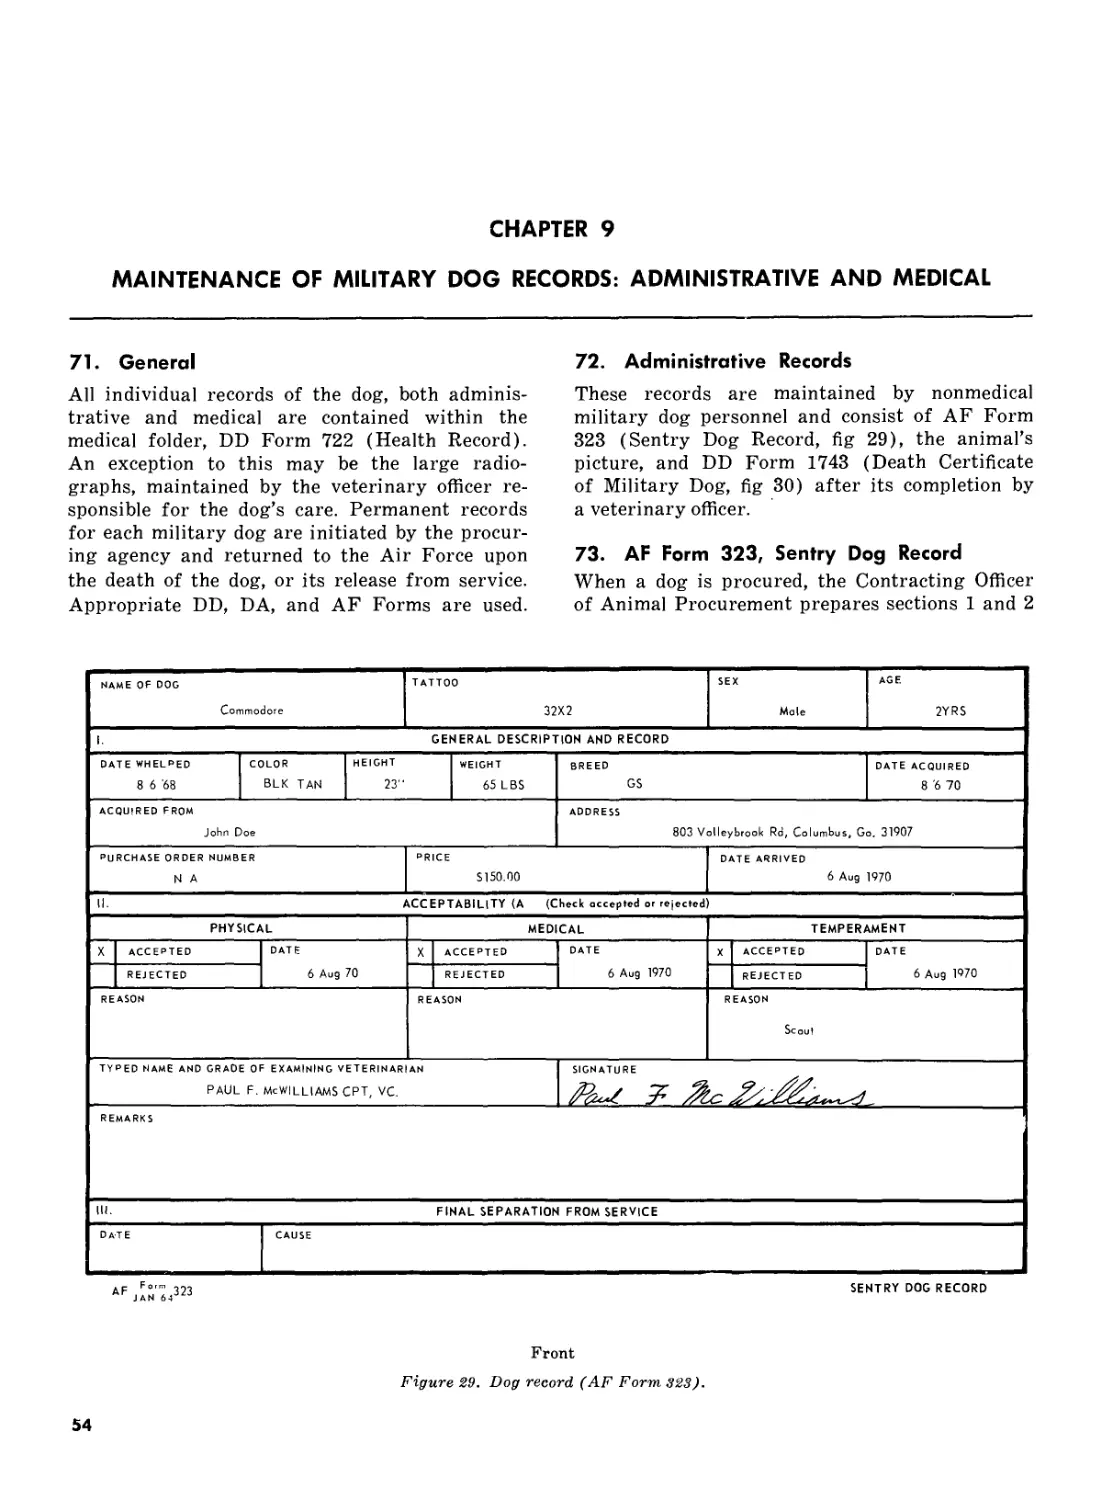
8.
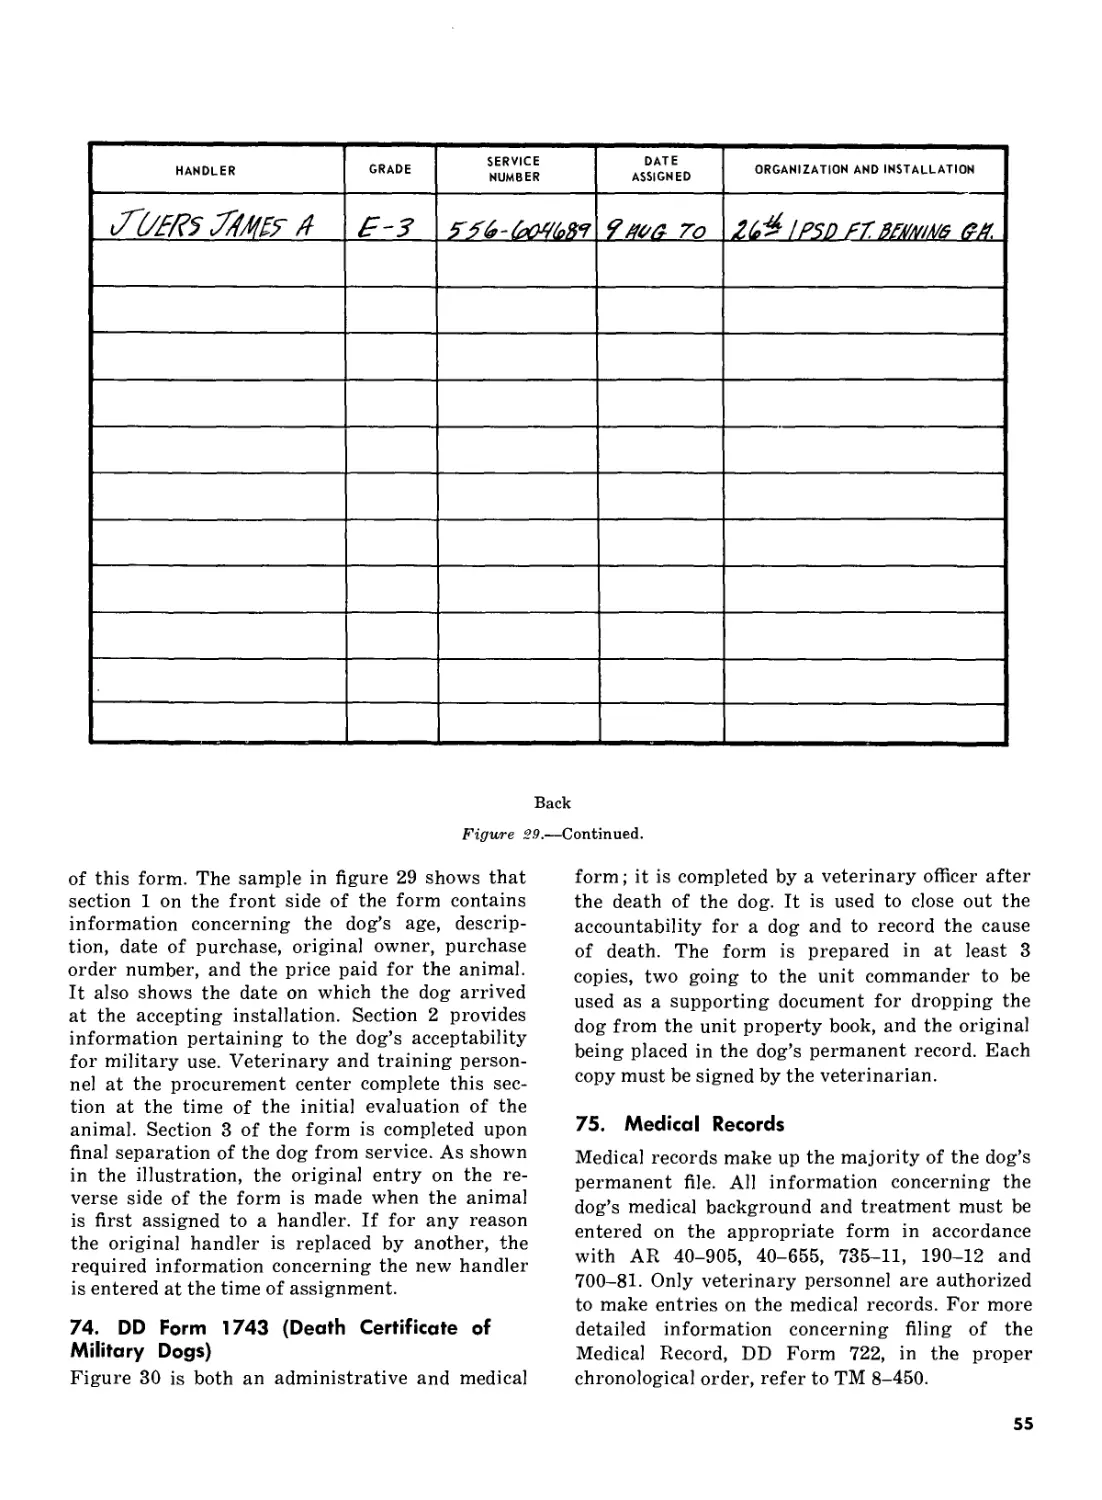
I.
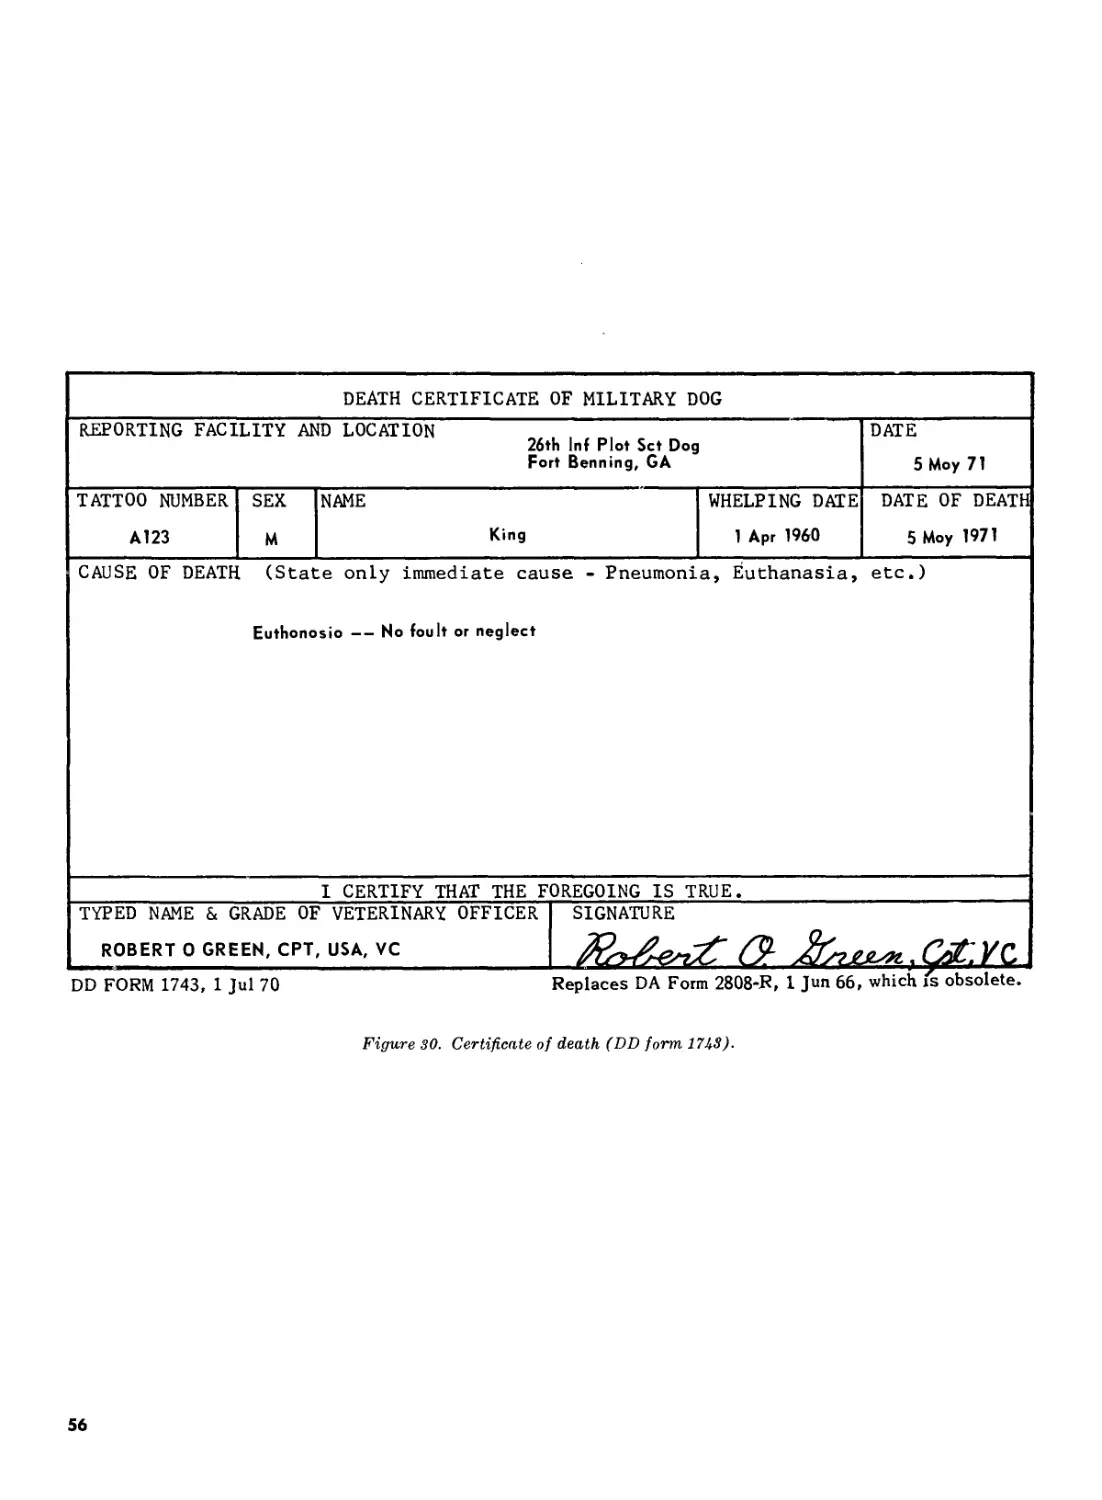
Chapter
Section
II. III.
Chapter 9.
PART FOUR.
Chapter 10.
Section
I.
II.
Chapter
Section
KENNEL AND TRAINING AREA
Selection of Sites ________ ______________
Construction and Maintenance_... _________
Equipment and Supplies____________________
MAINTENANCE OF MILITARY DOG RECORDS:
ADMINISTRATIVE AND MEDICAL ______________
TRAINING
Appendix
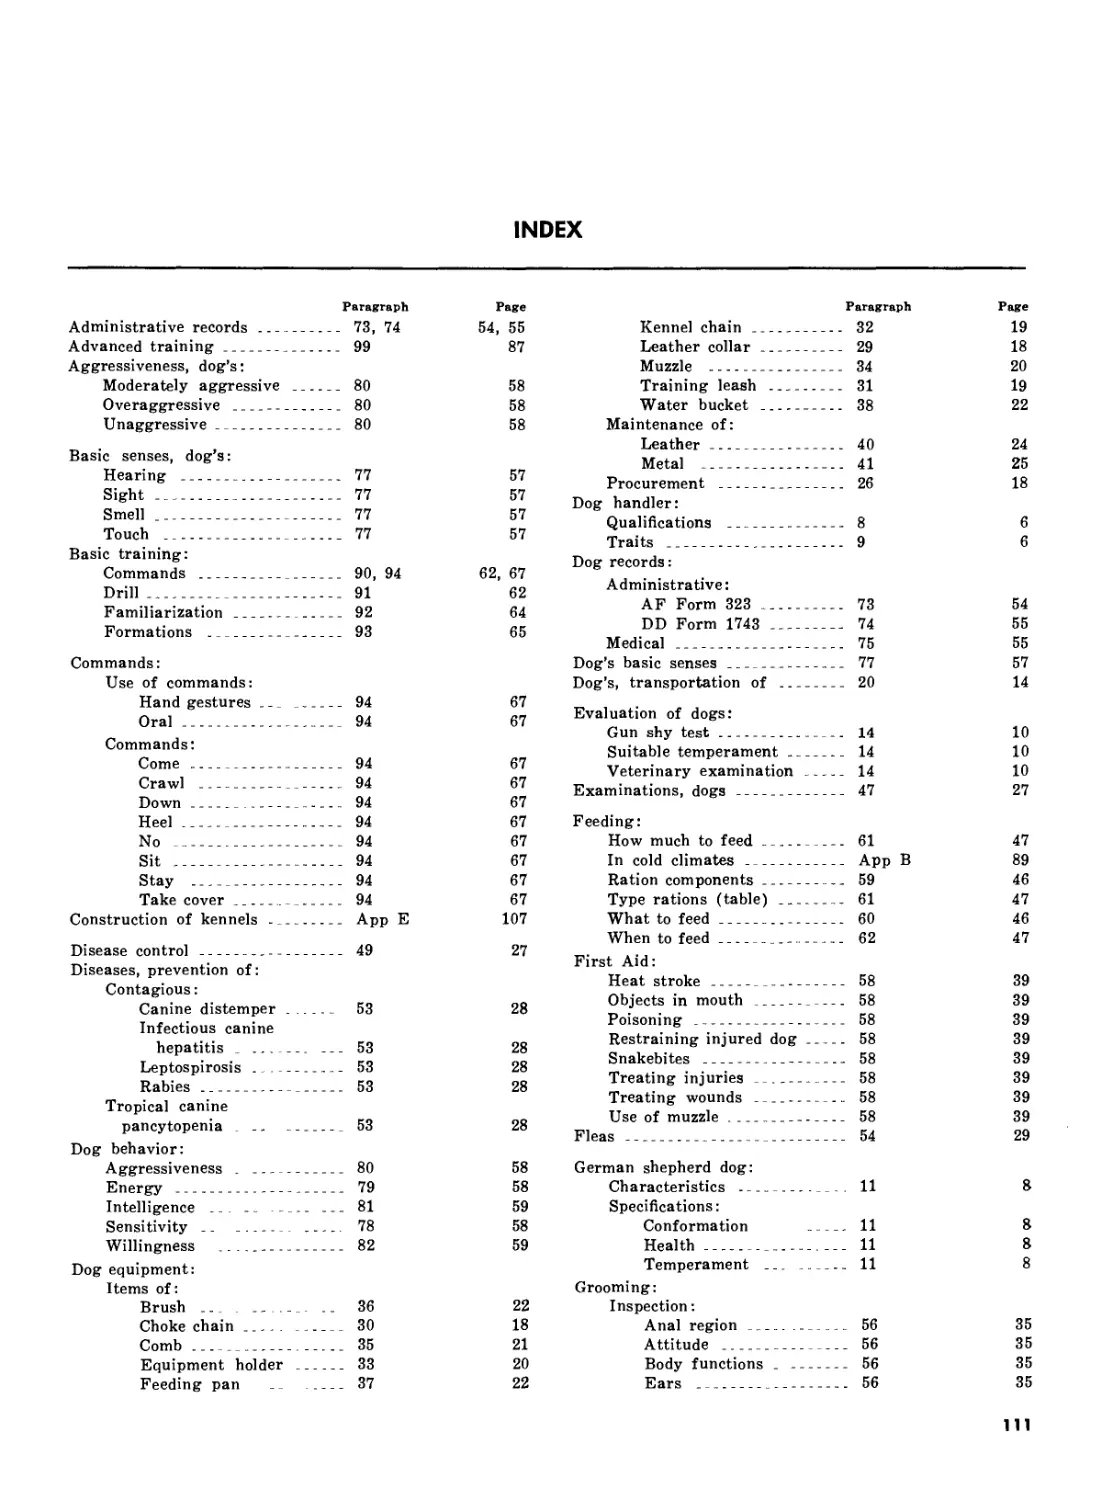
INDEX
11.
I.
II.
III.
A.
B.
C.
D.
E.
BEHAVIOR OF DOGS AND PRINCIPLES OF DOG TRAINING
Behavior and Motivation __________________________________
Principles of Dog Training__________________________--____
OBEDIENCE TRAINING
Basic Training ___________________________________________
Intermediate Training_________ ___________________________
Advanced Training________________________ ________________
REFERENCES__________________..___
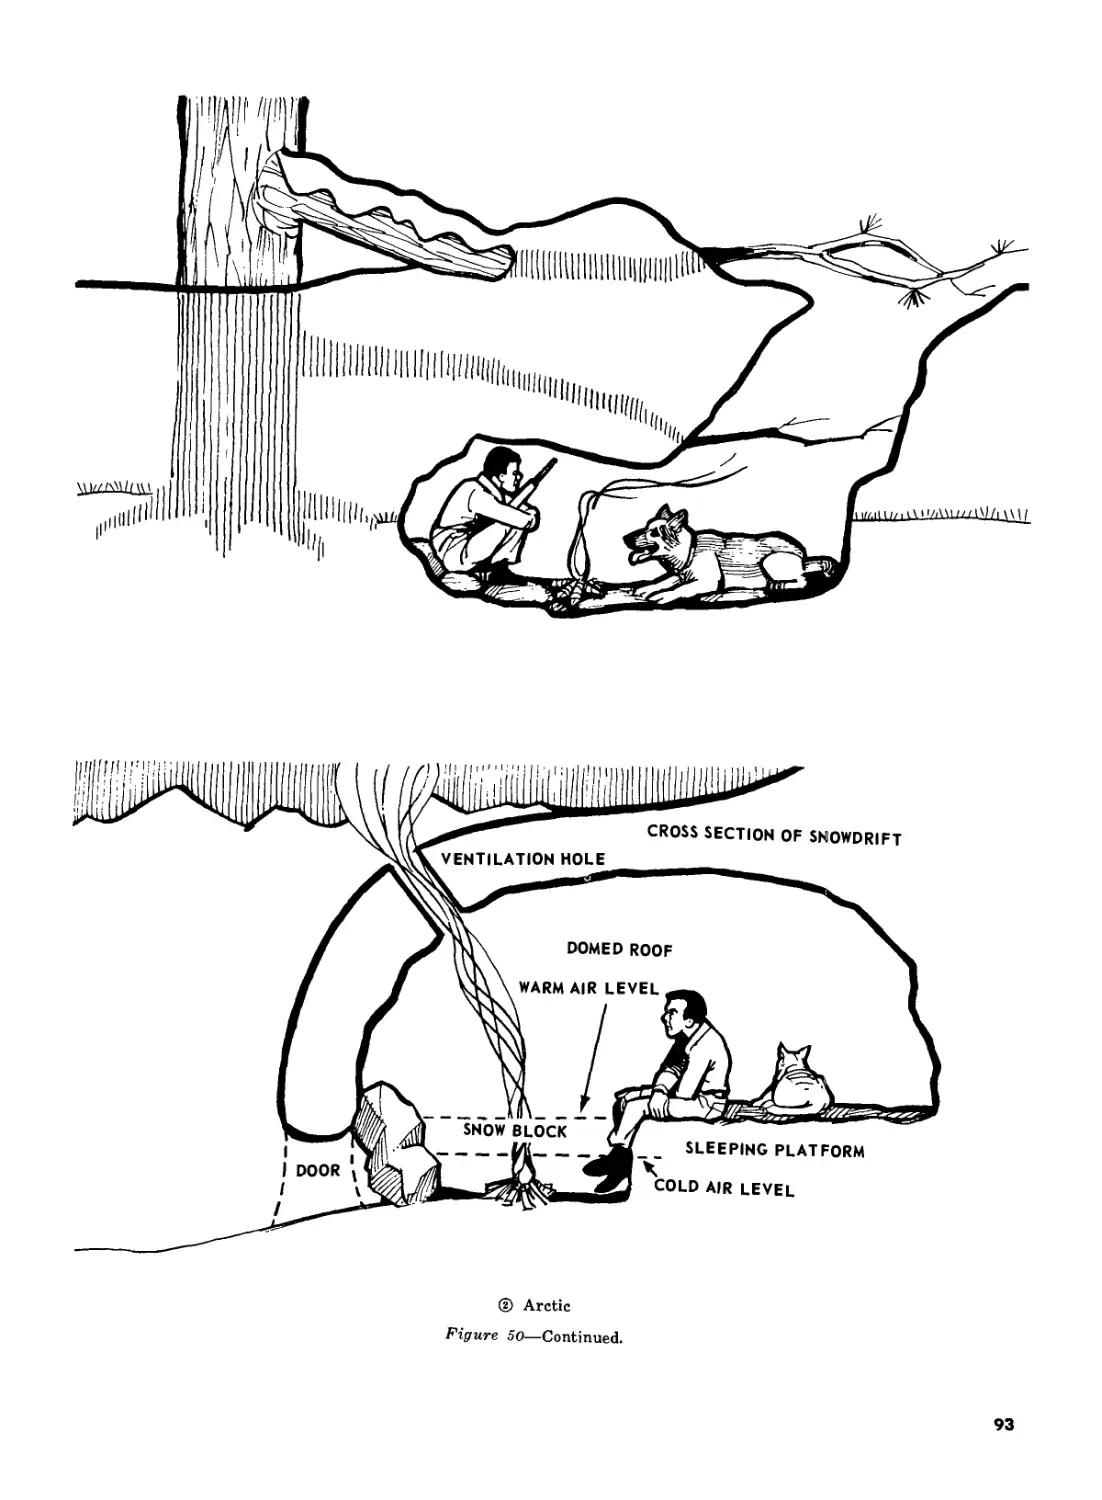
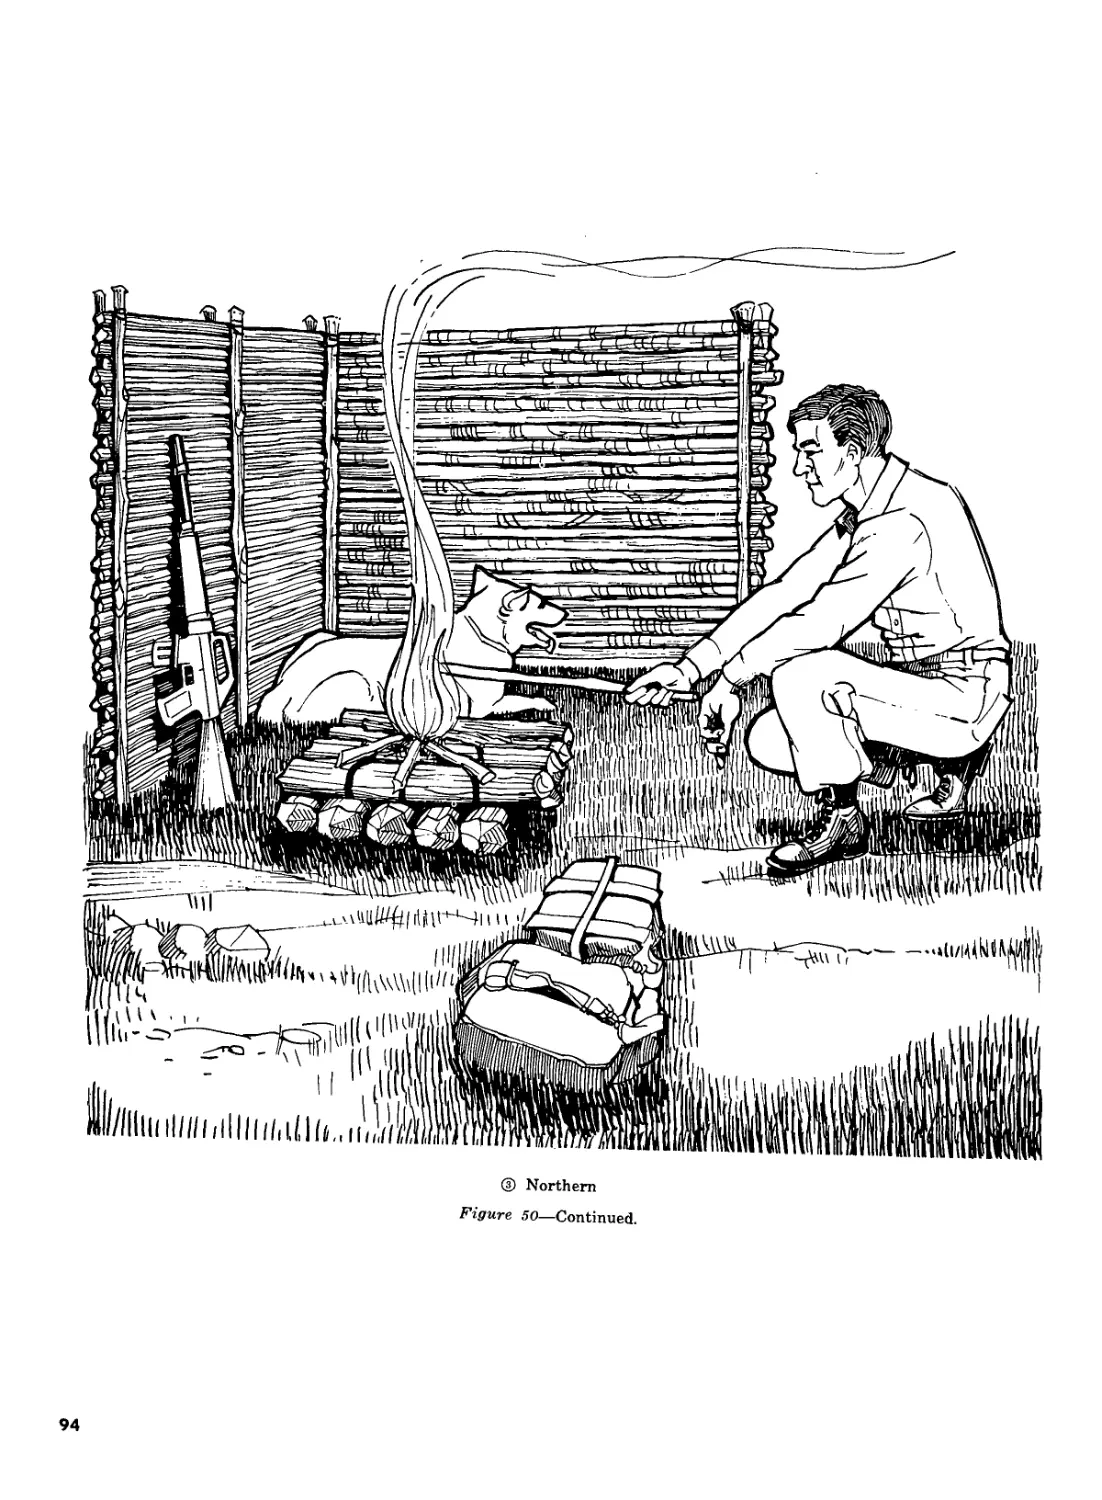
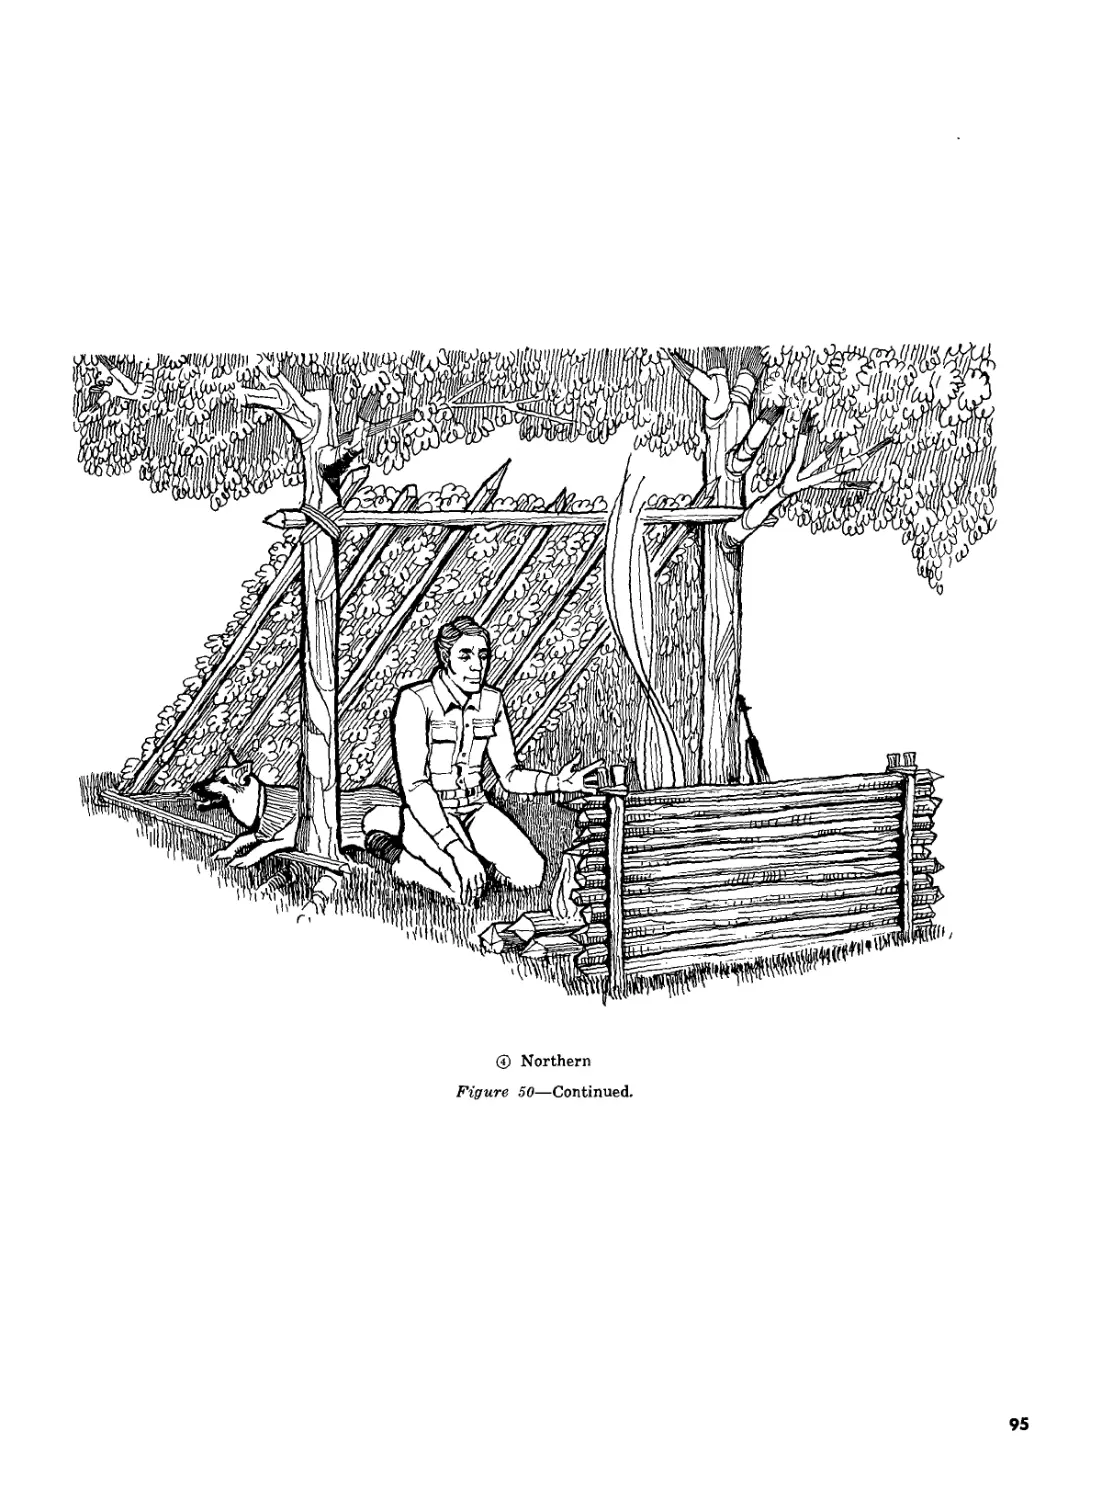
FEEDING AND CARE IN COLD CLIMATES _
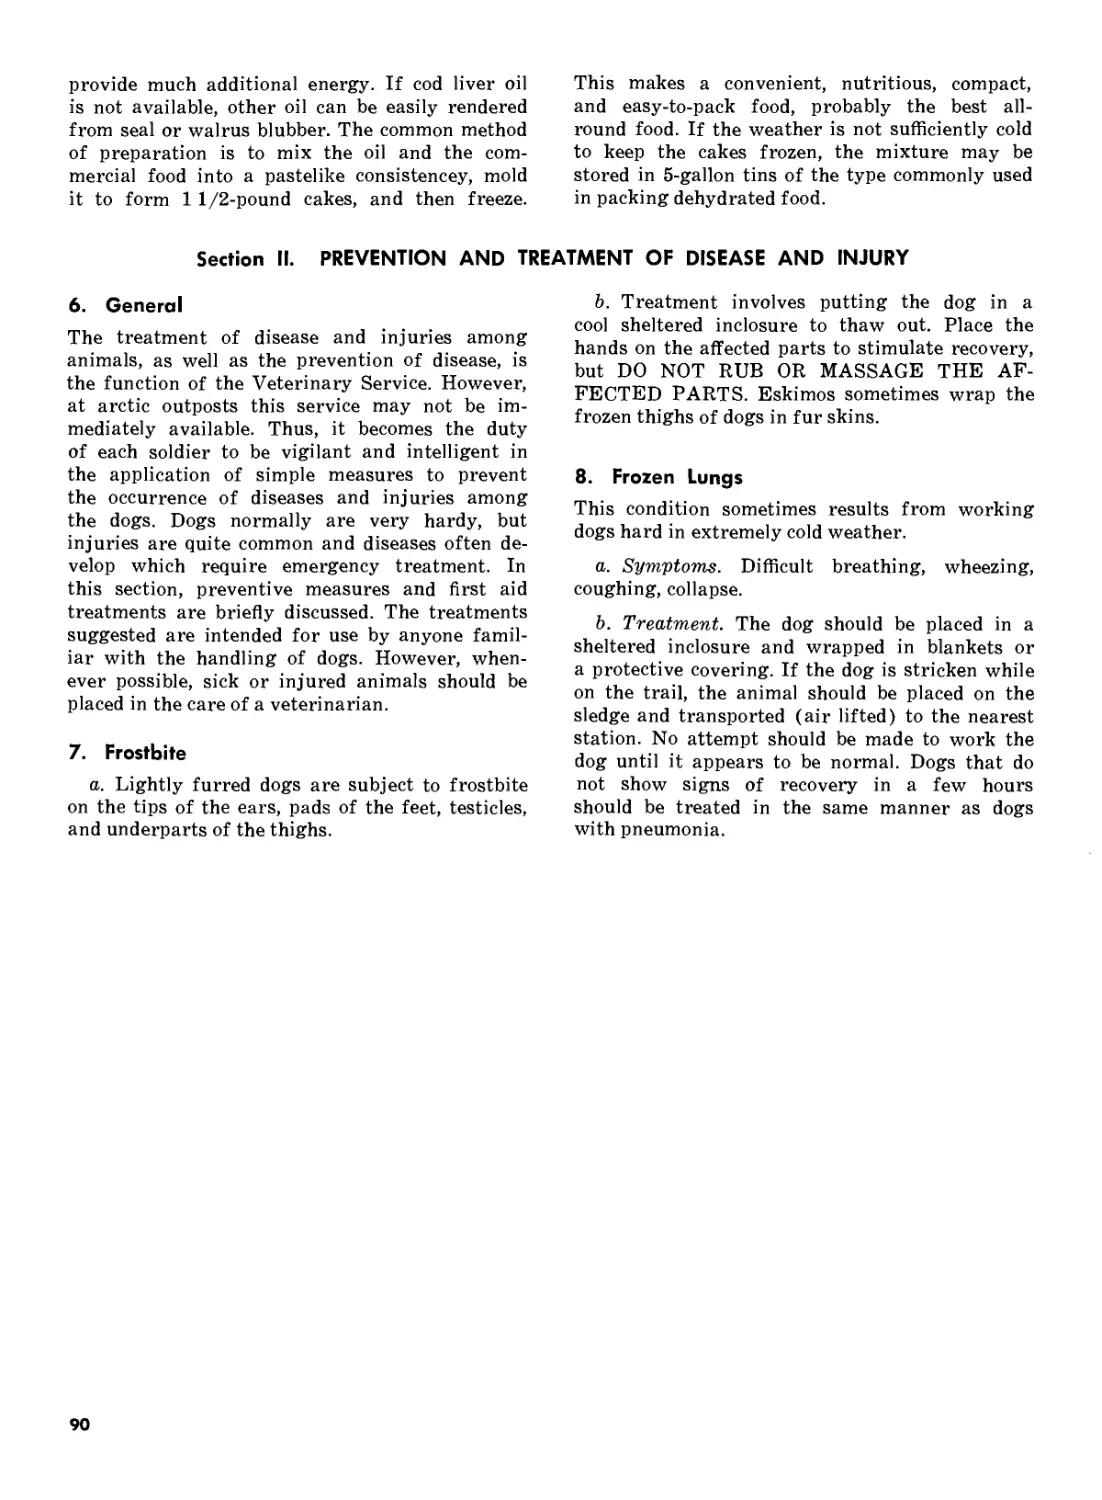
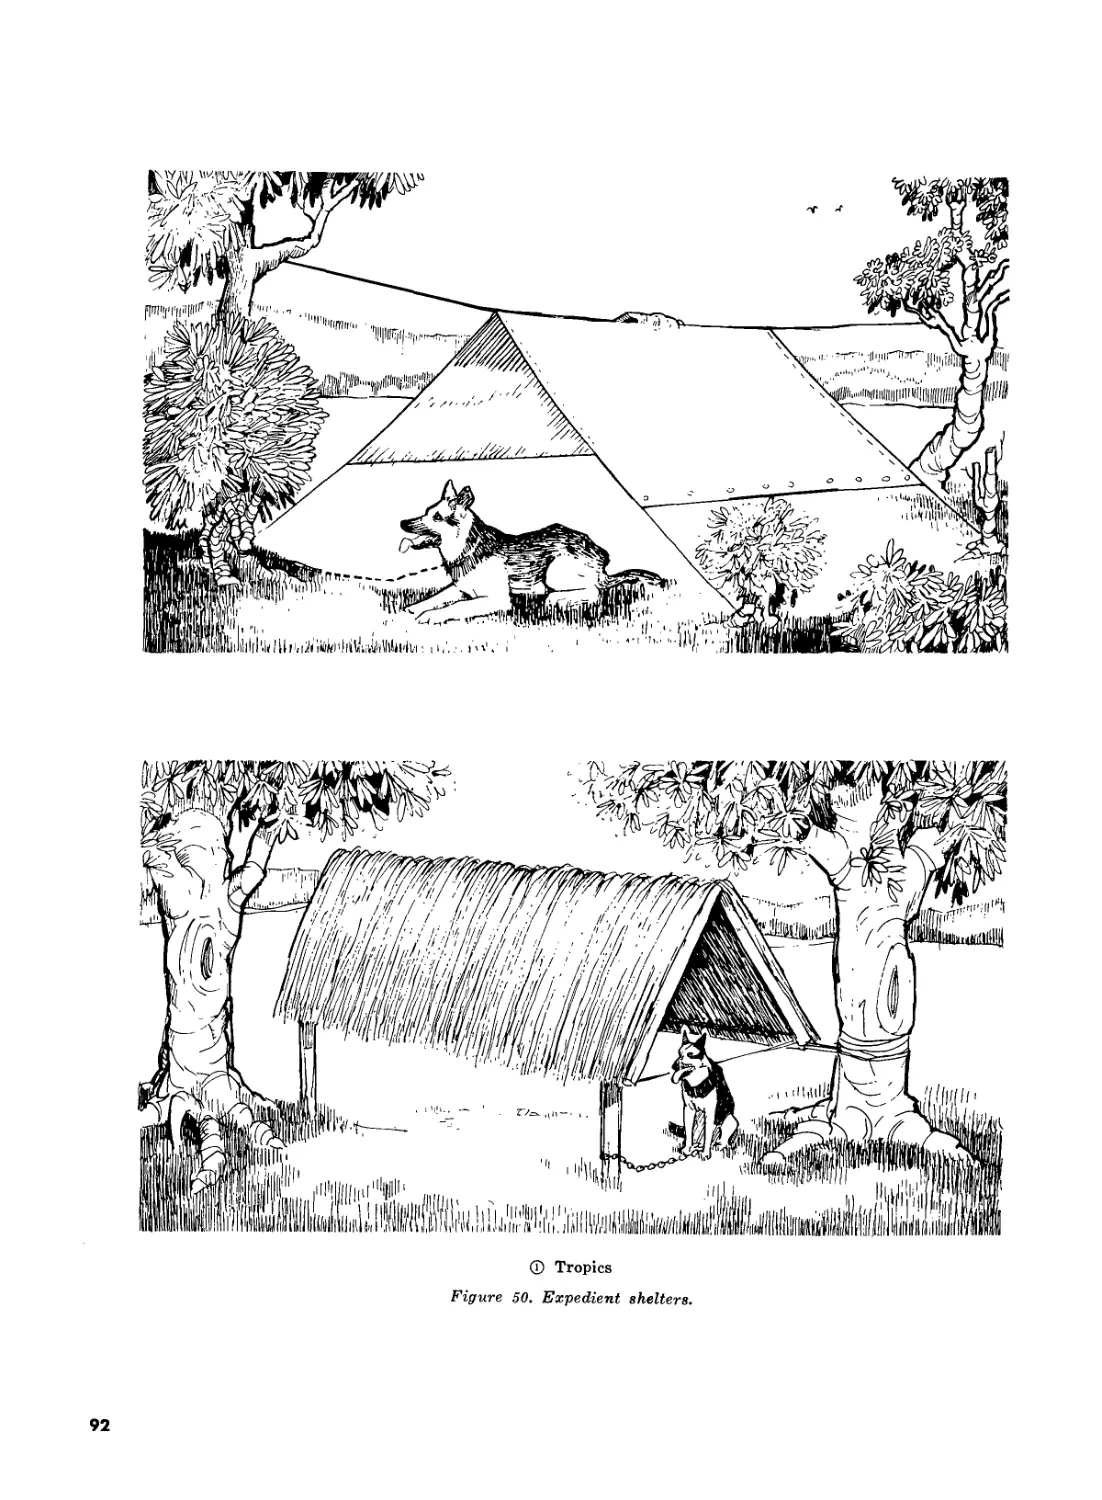
SHELTERS ________________________
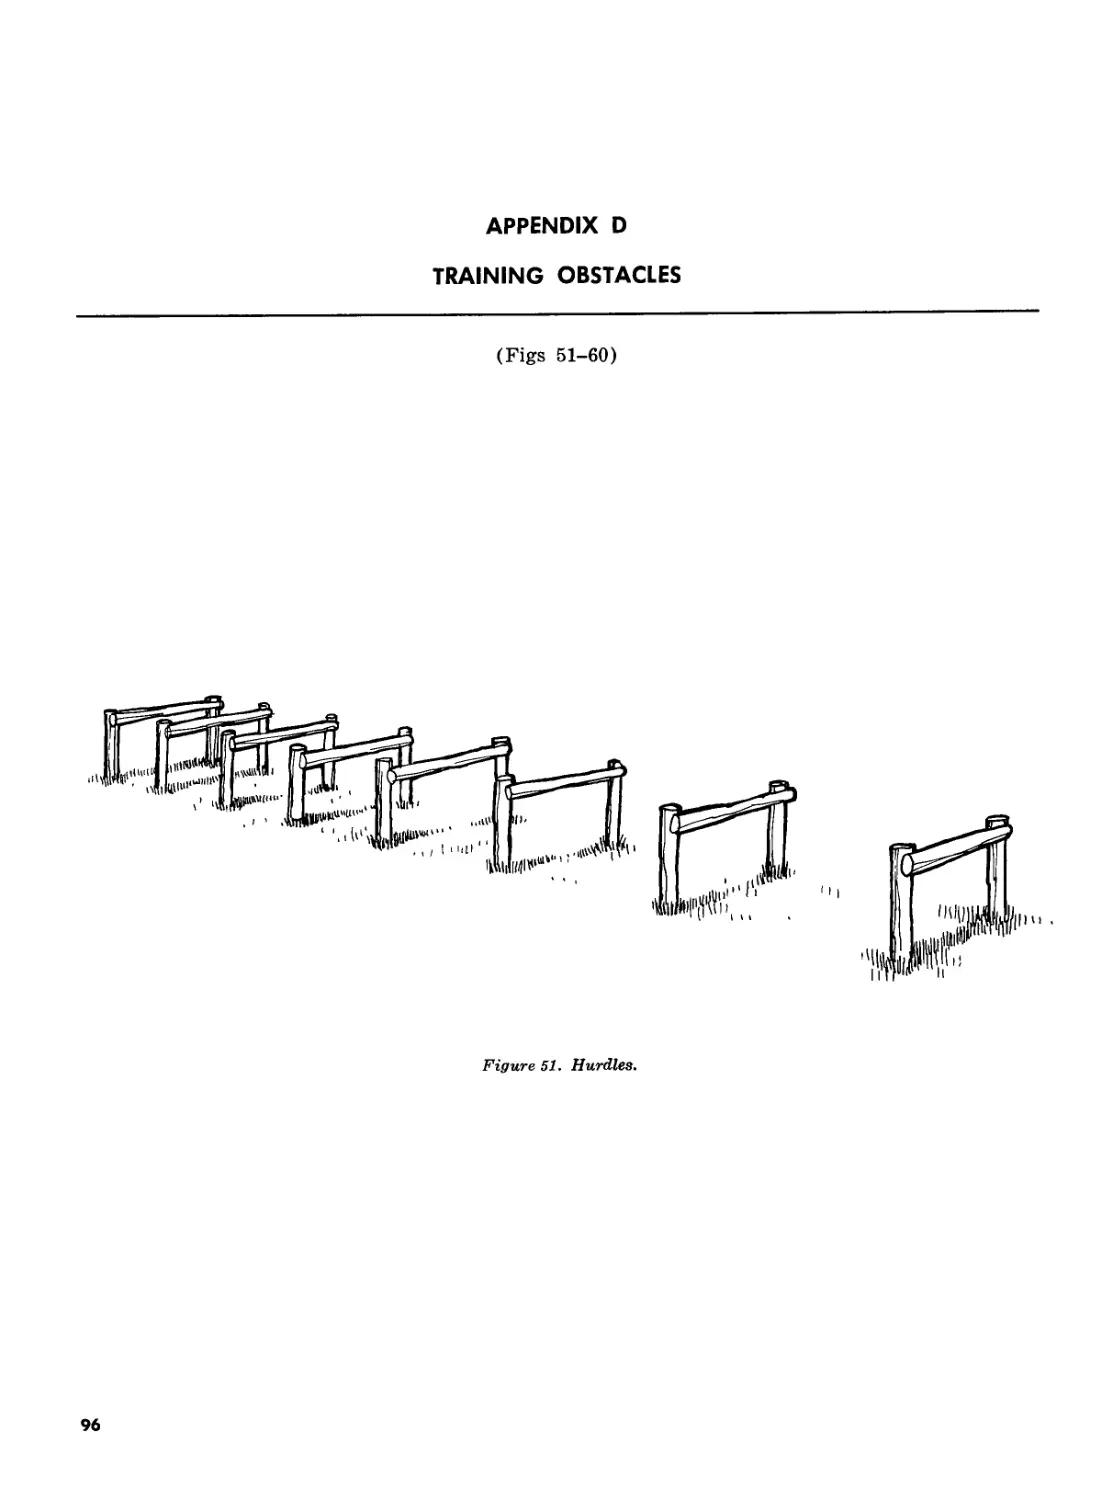
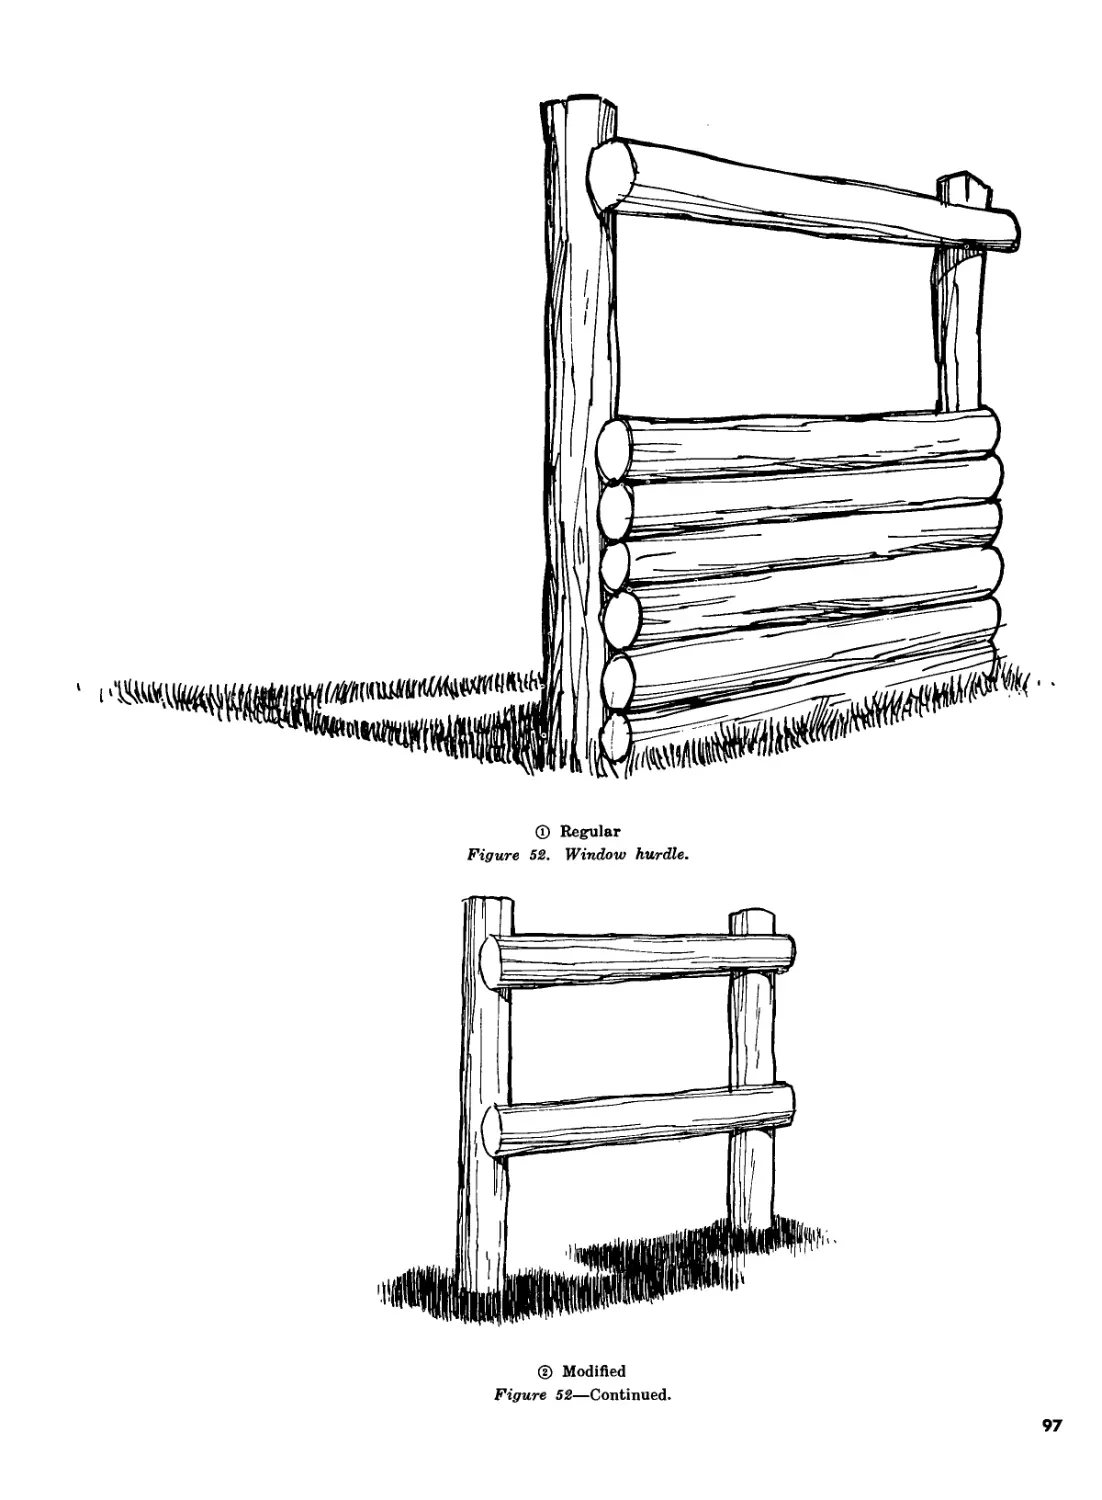
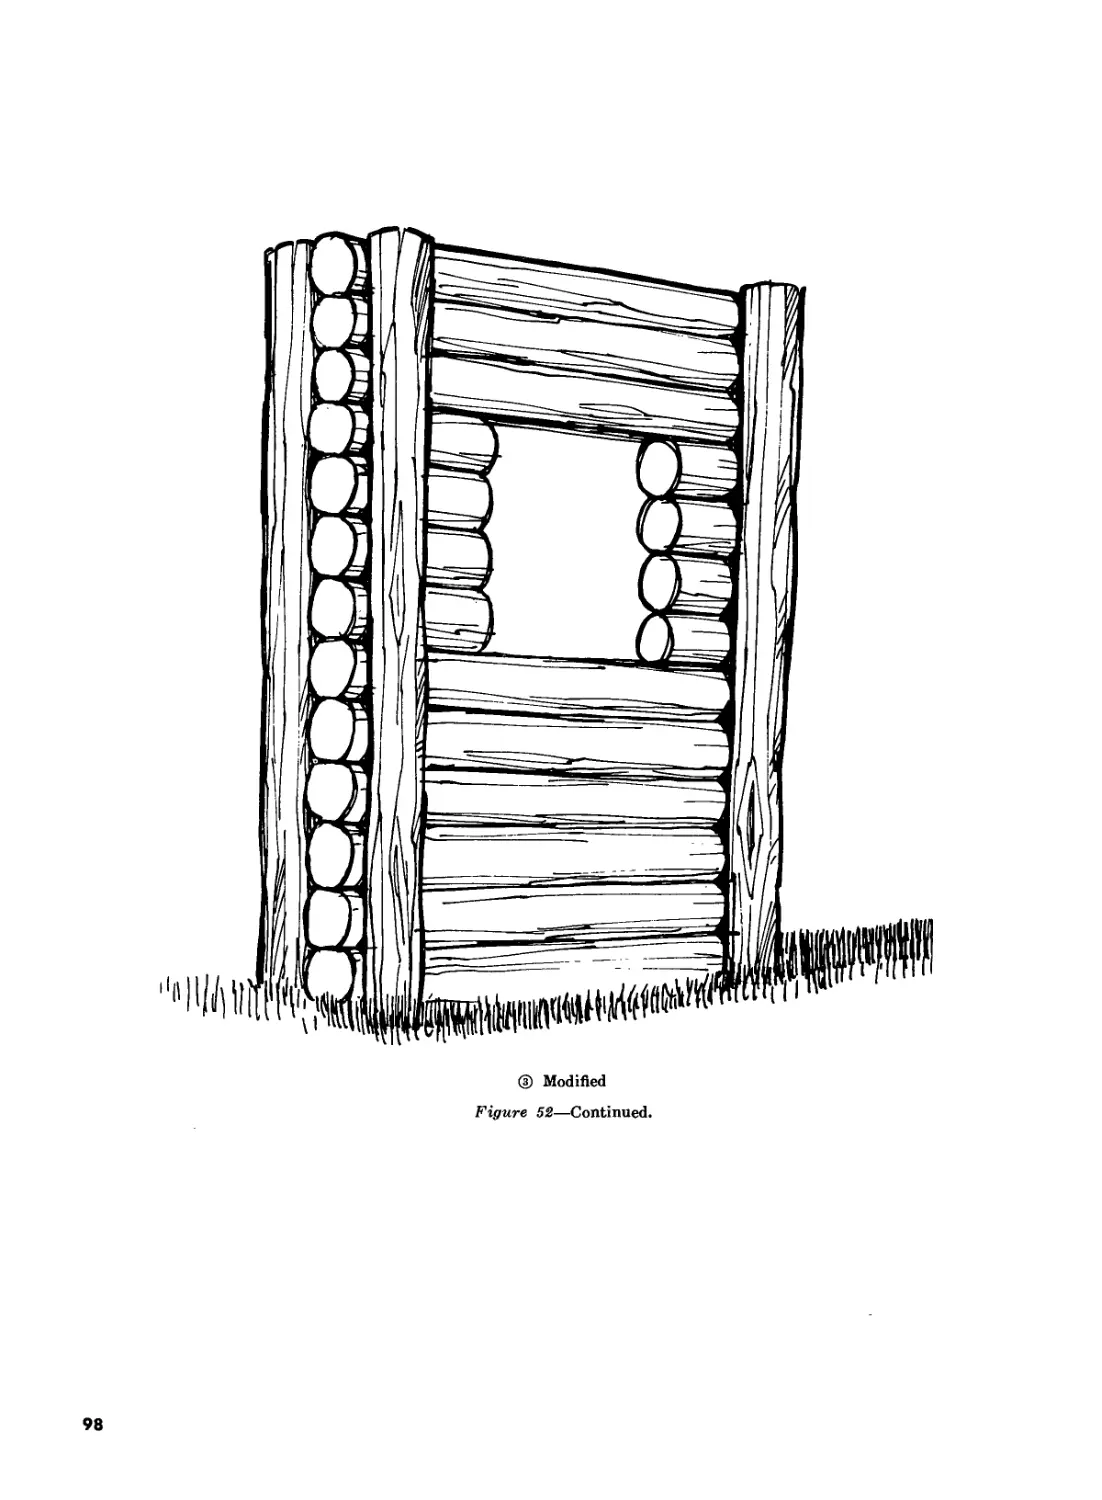
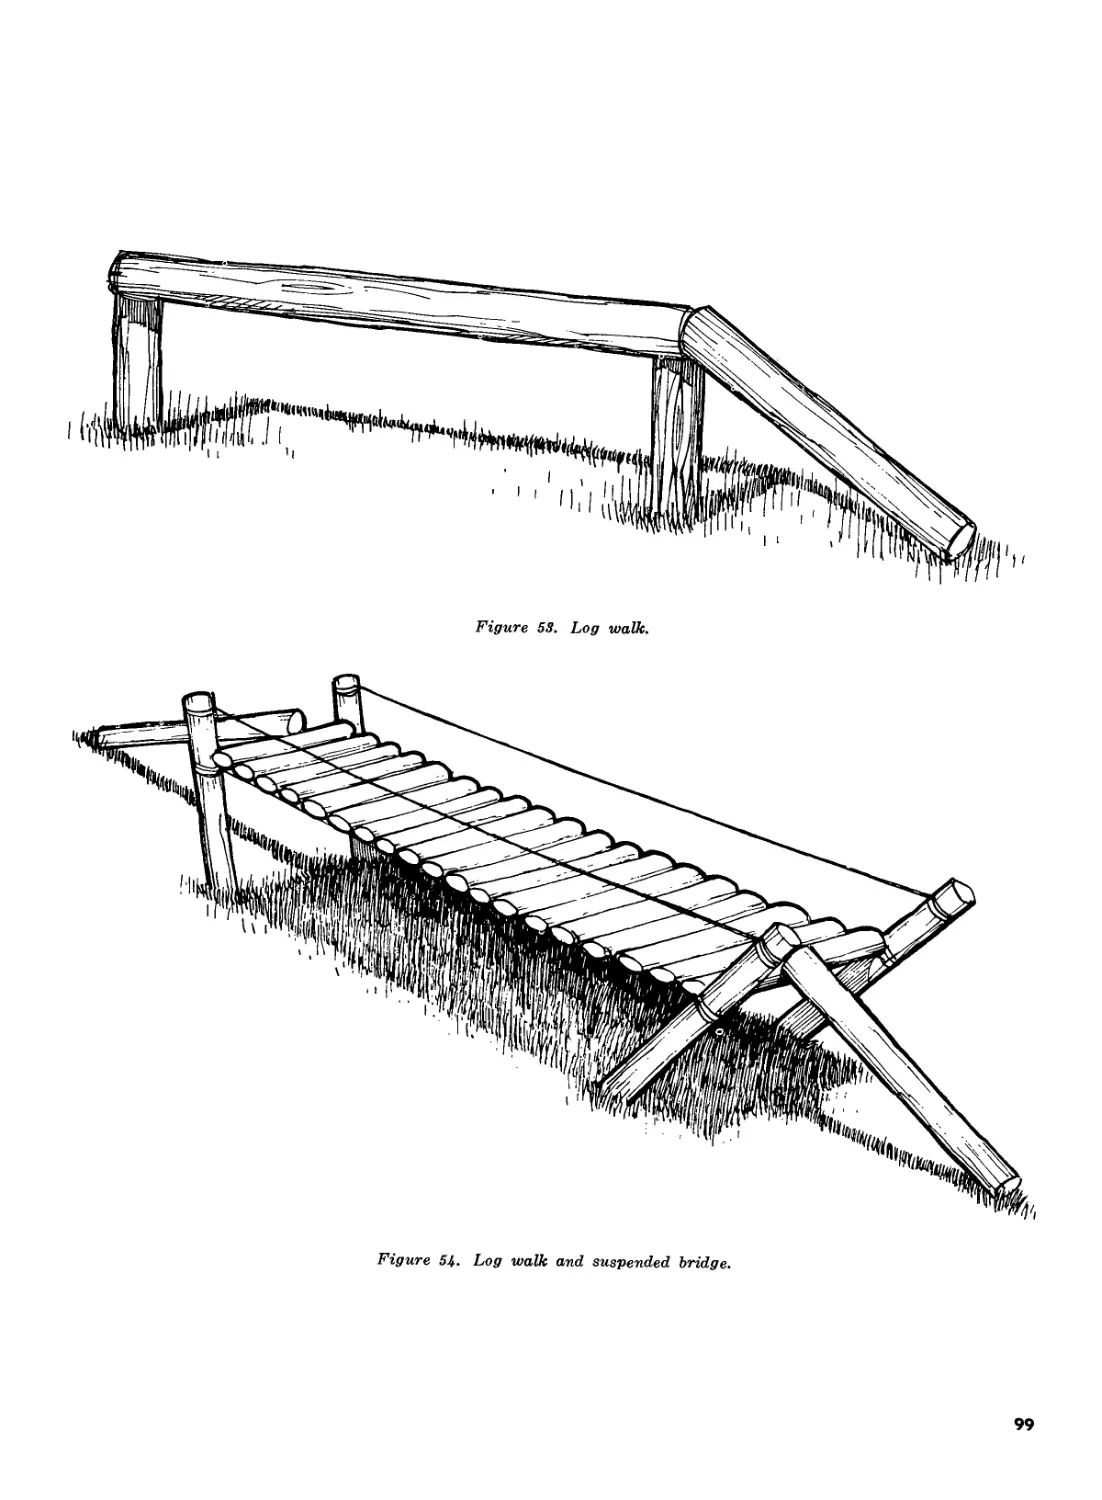
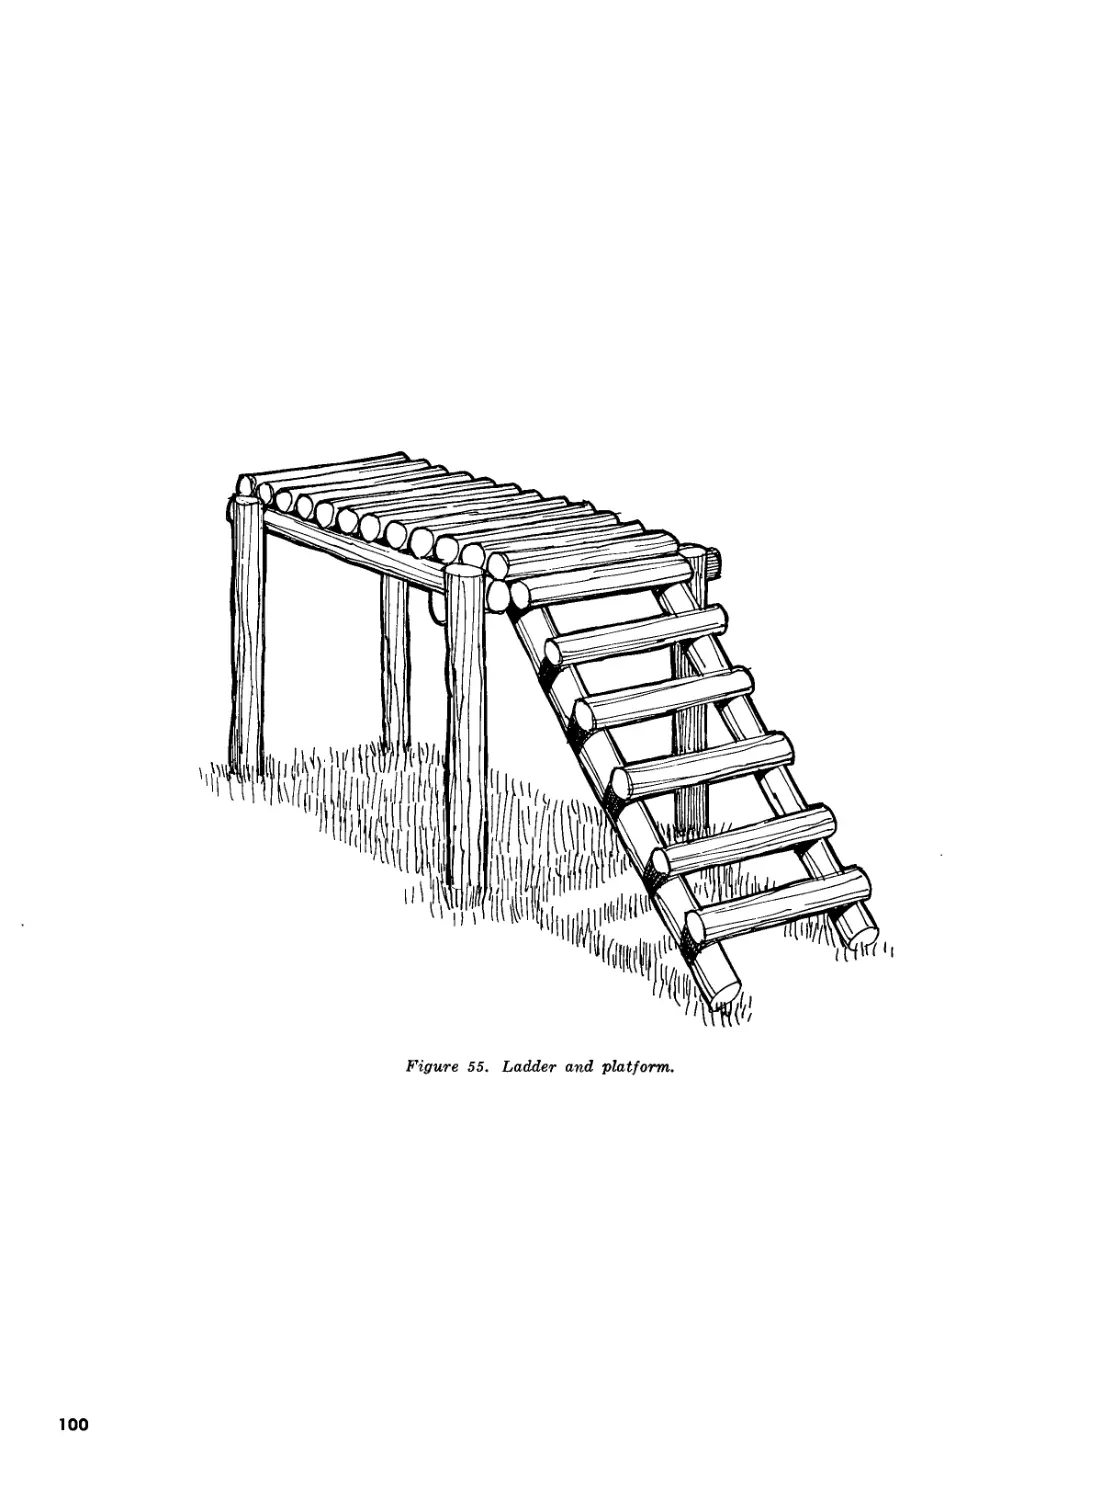
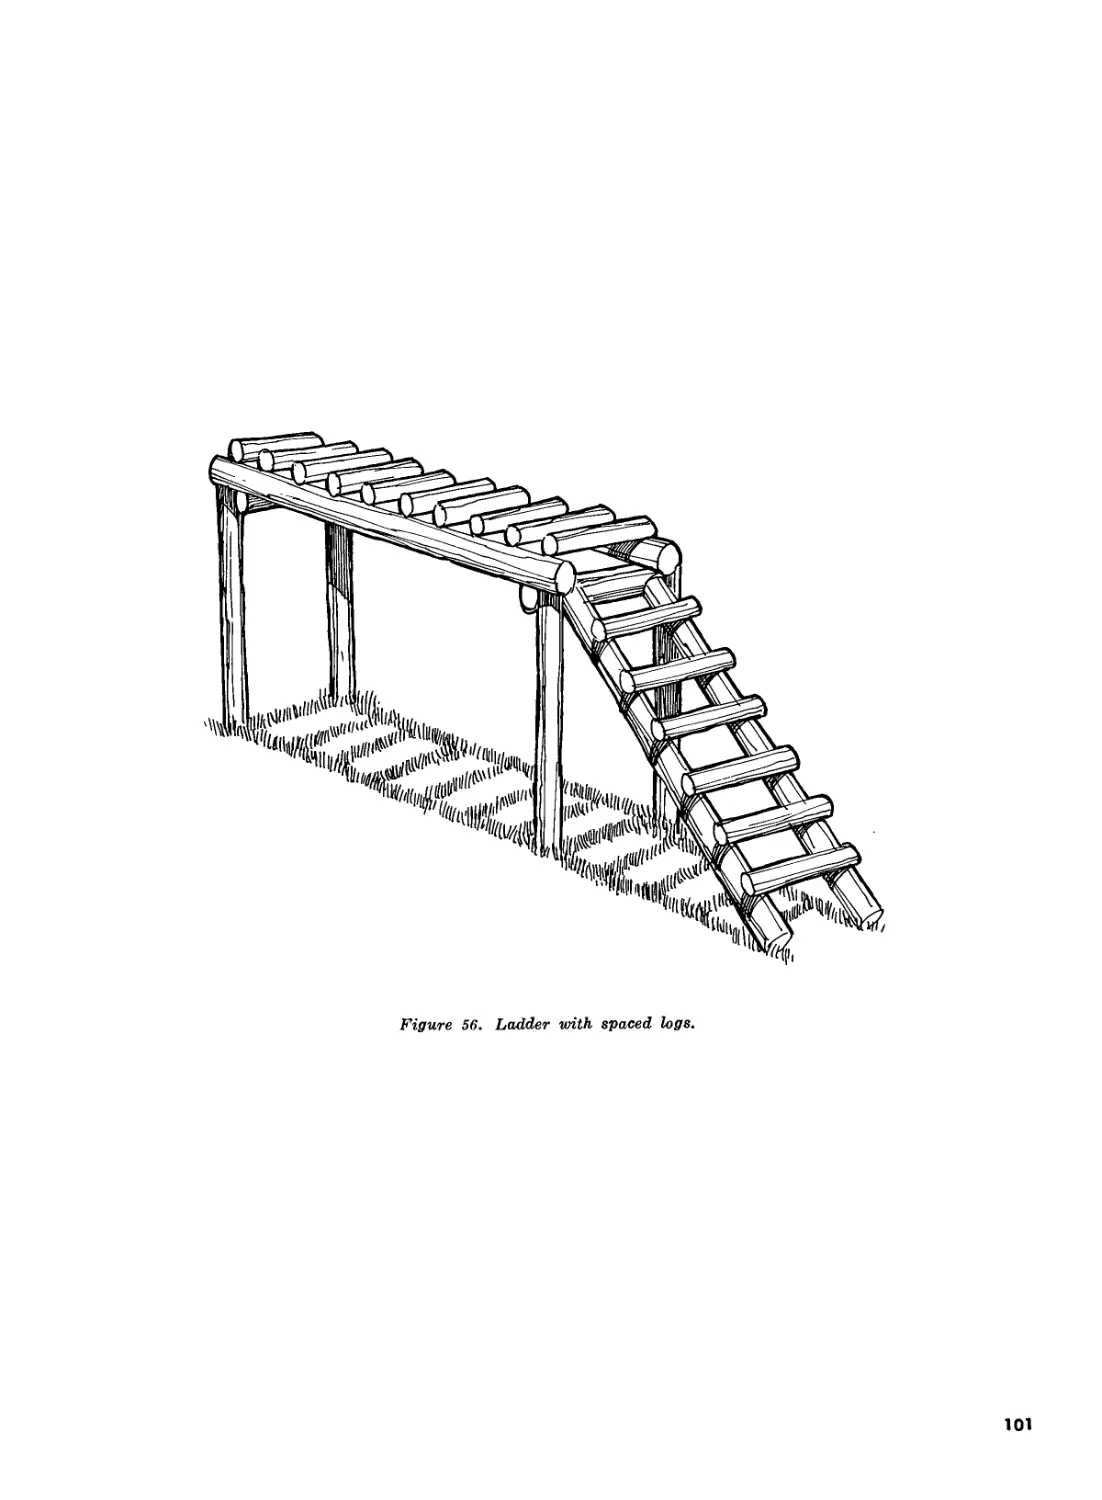
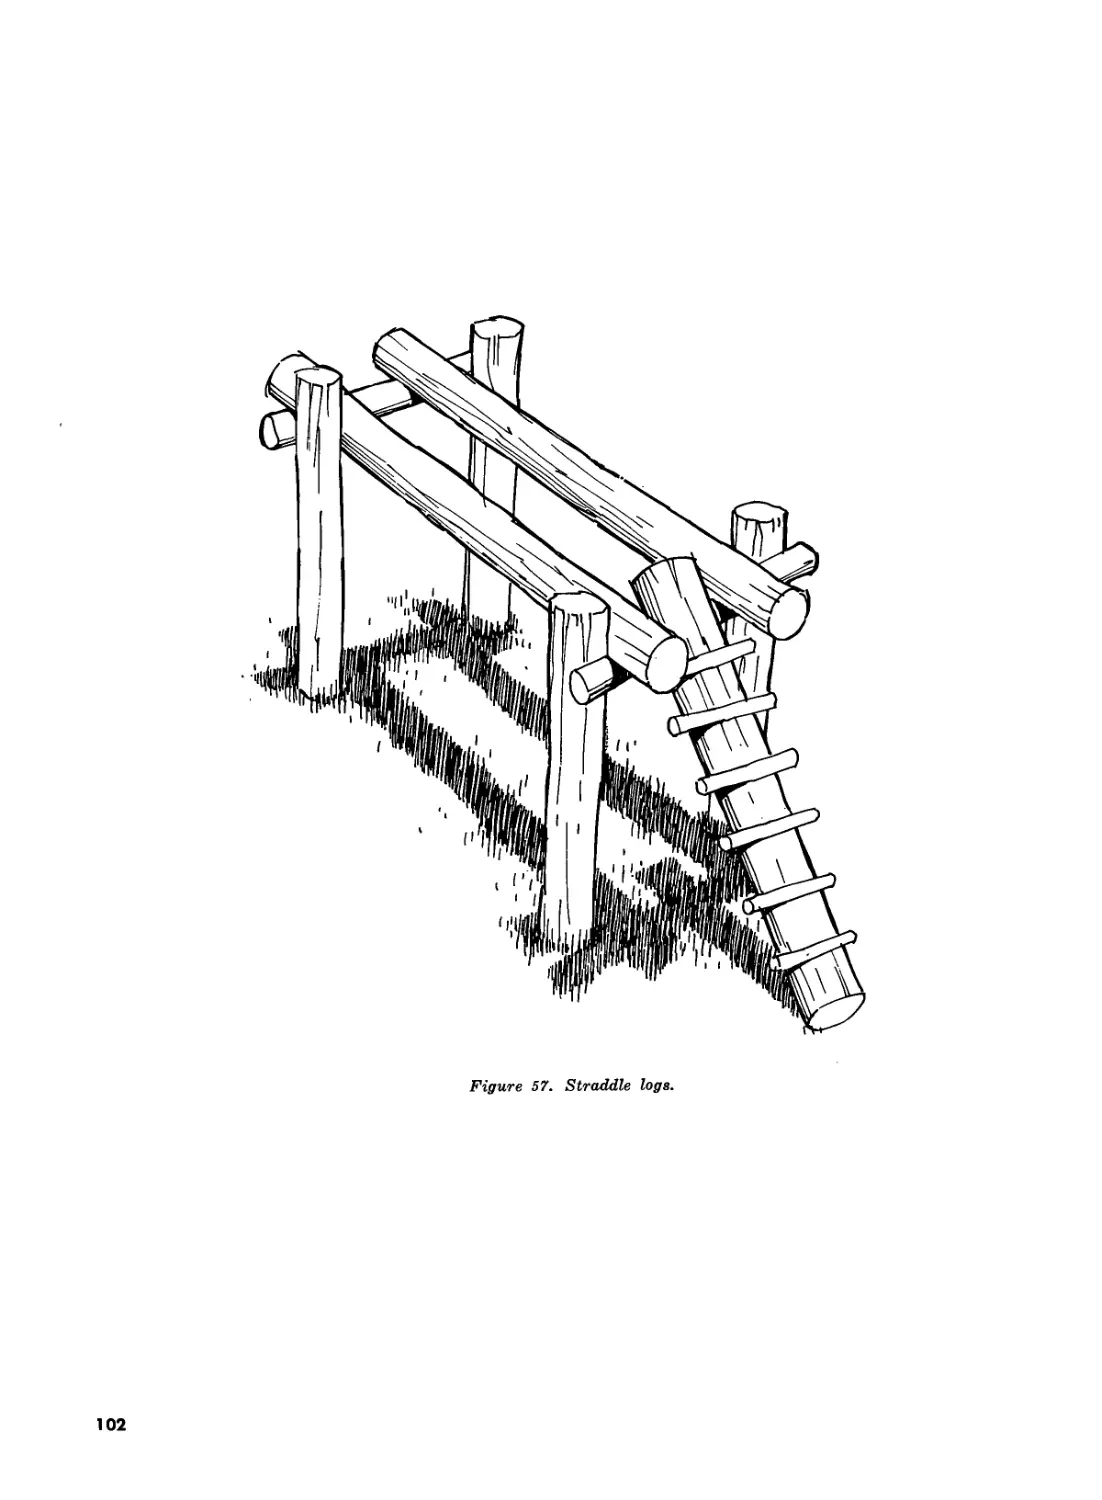
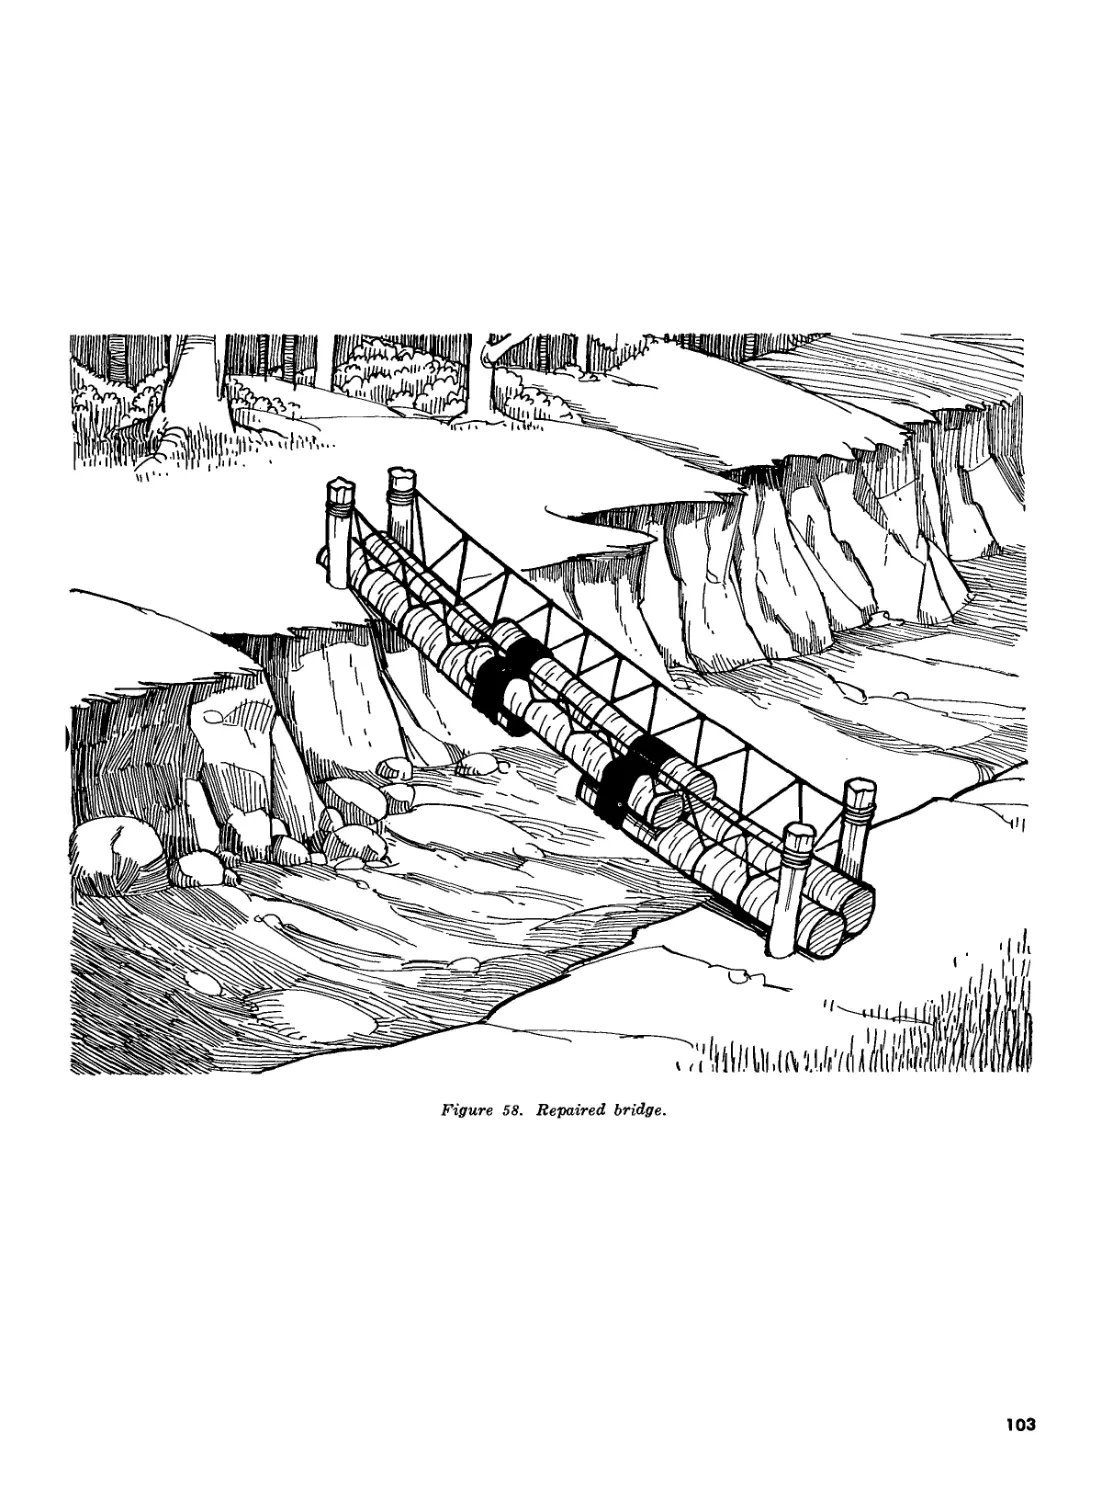
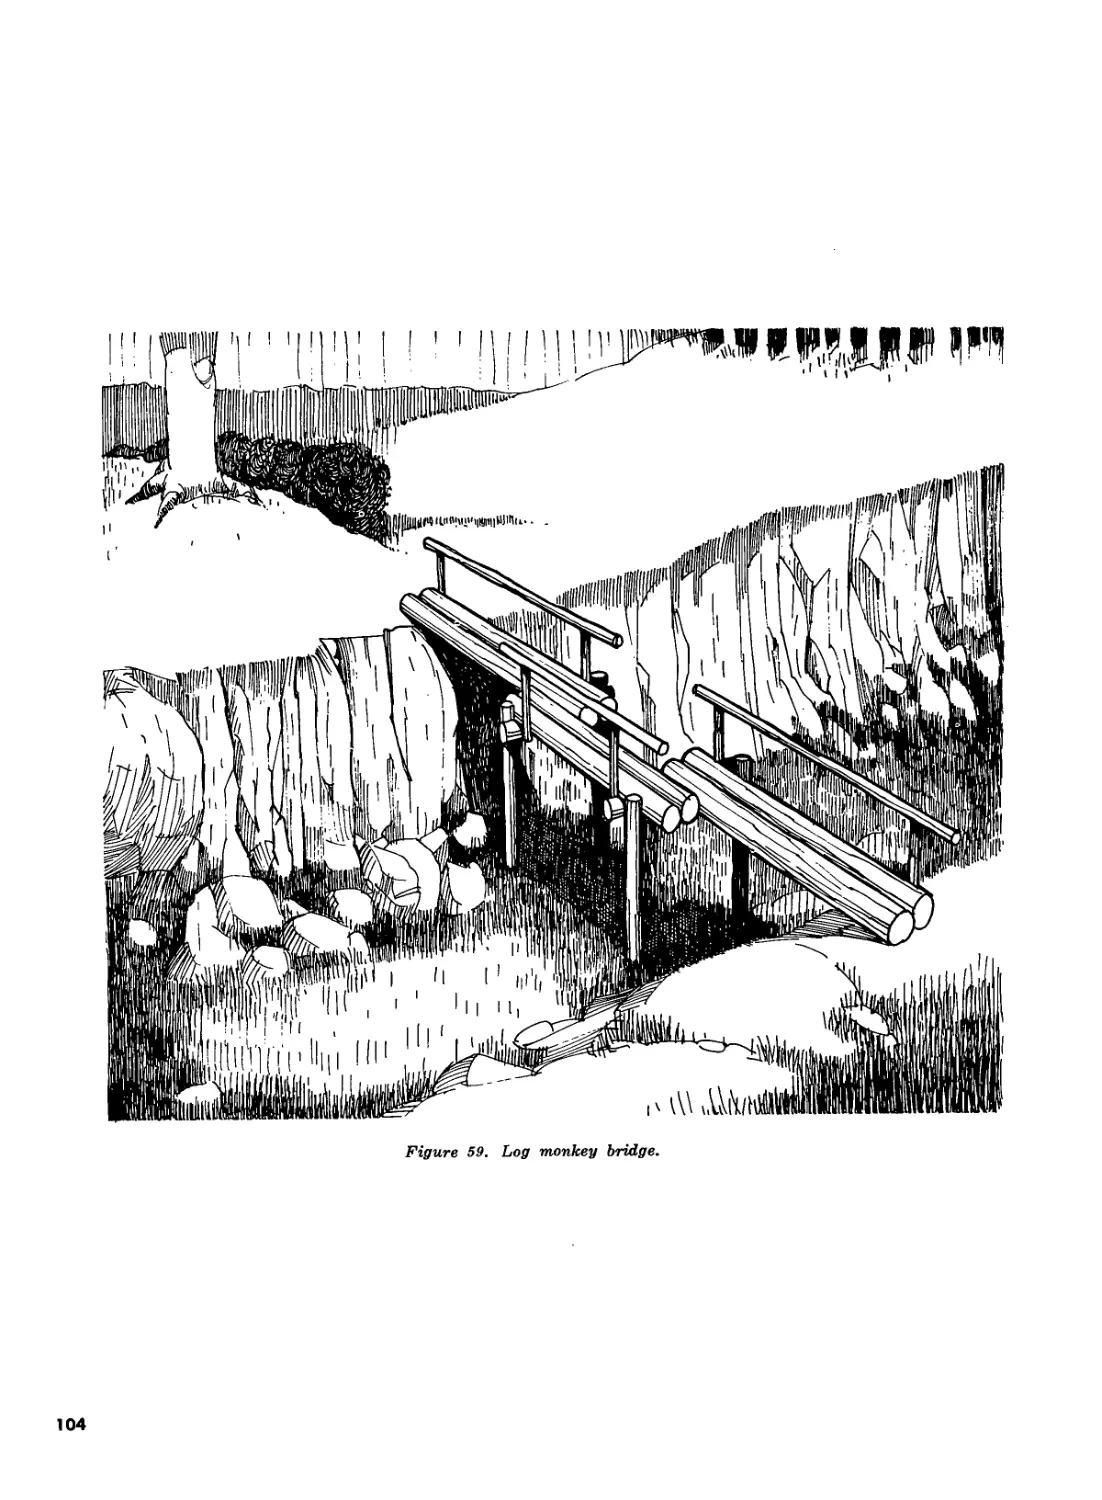
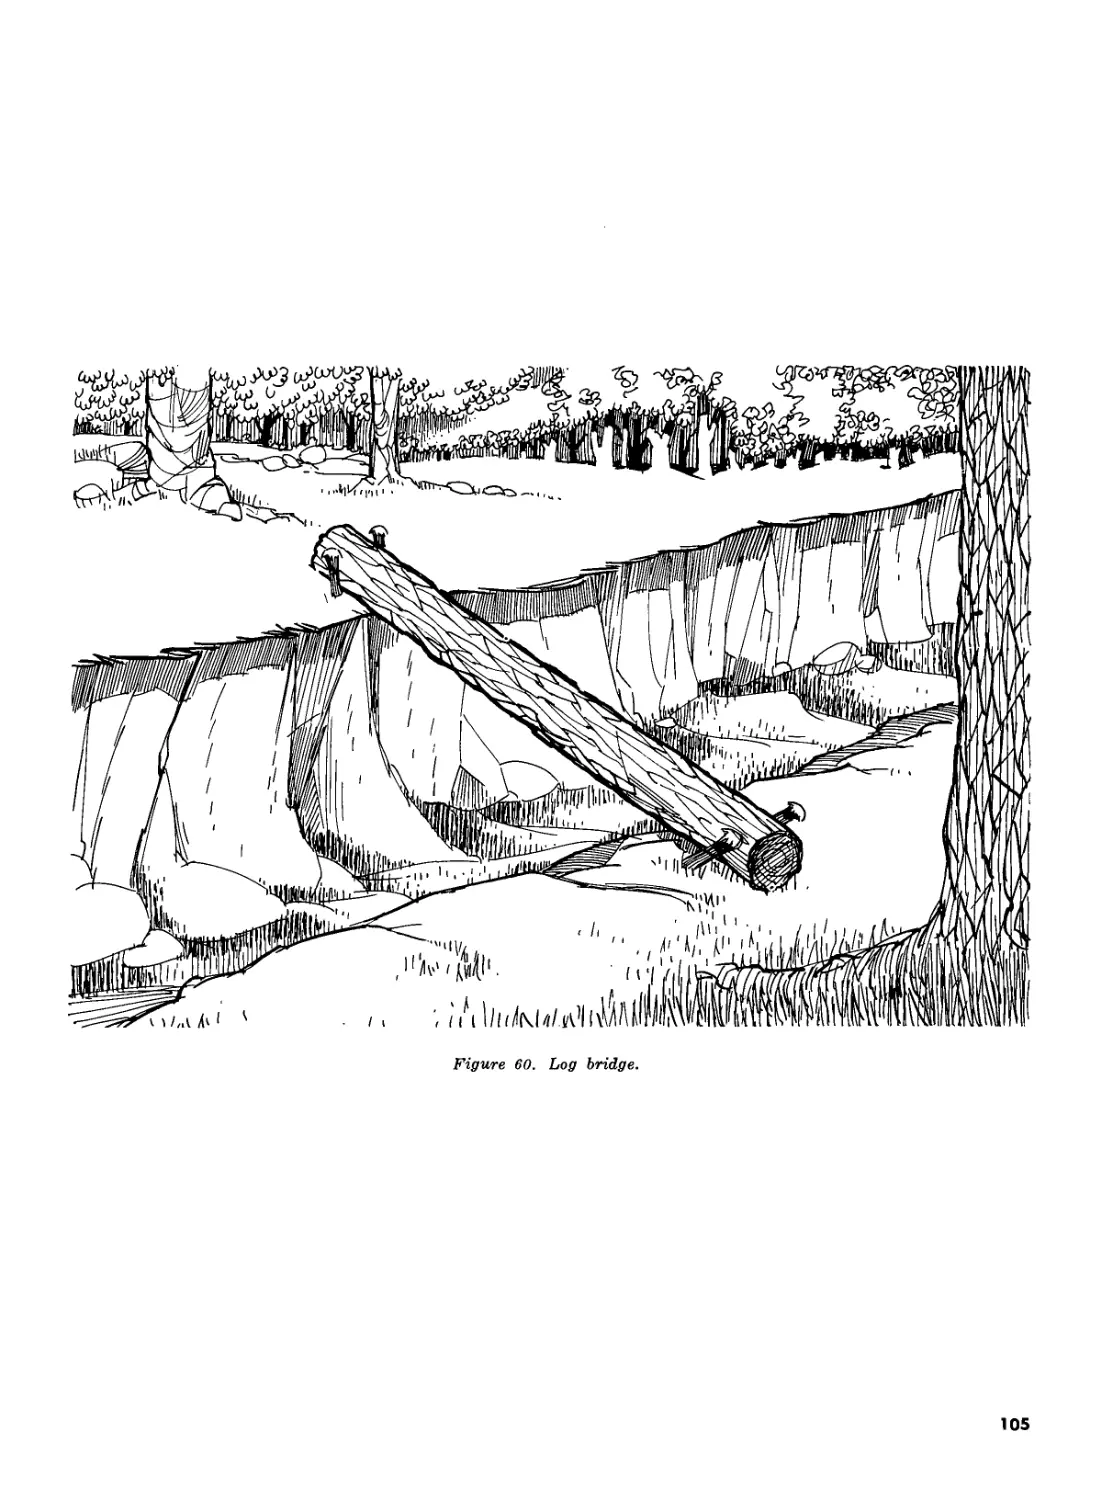
TRAINING OBSTACLES_______________
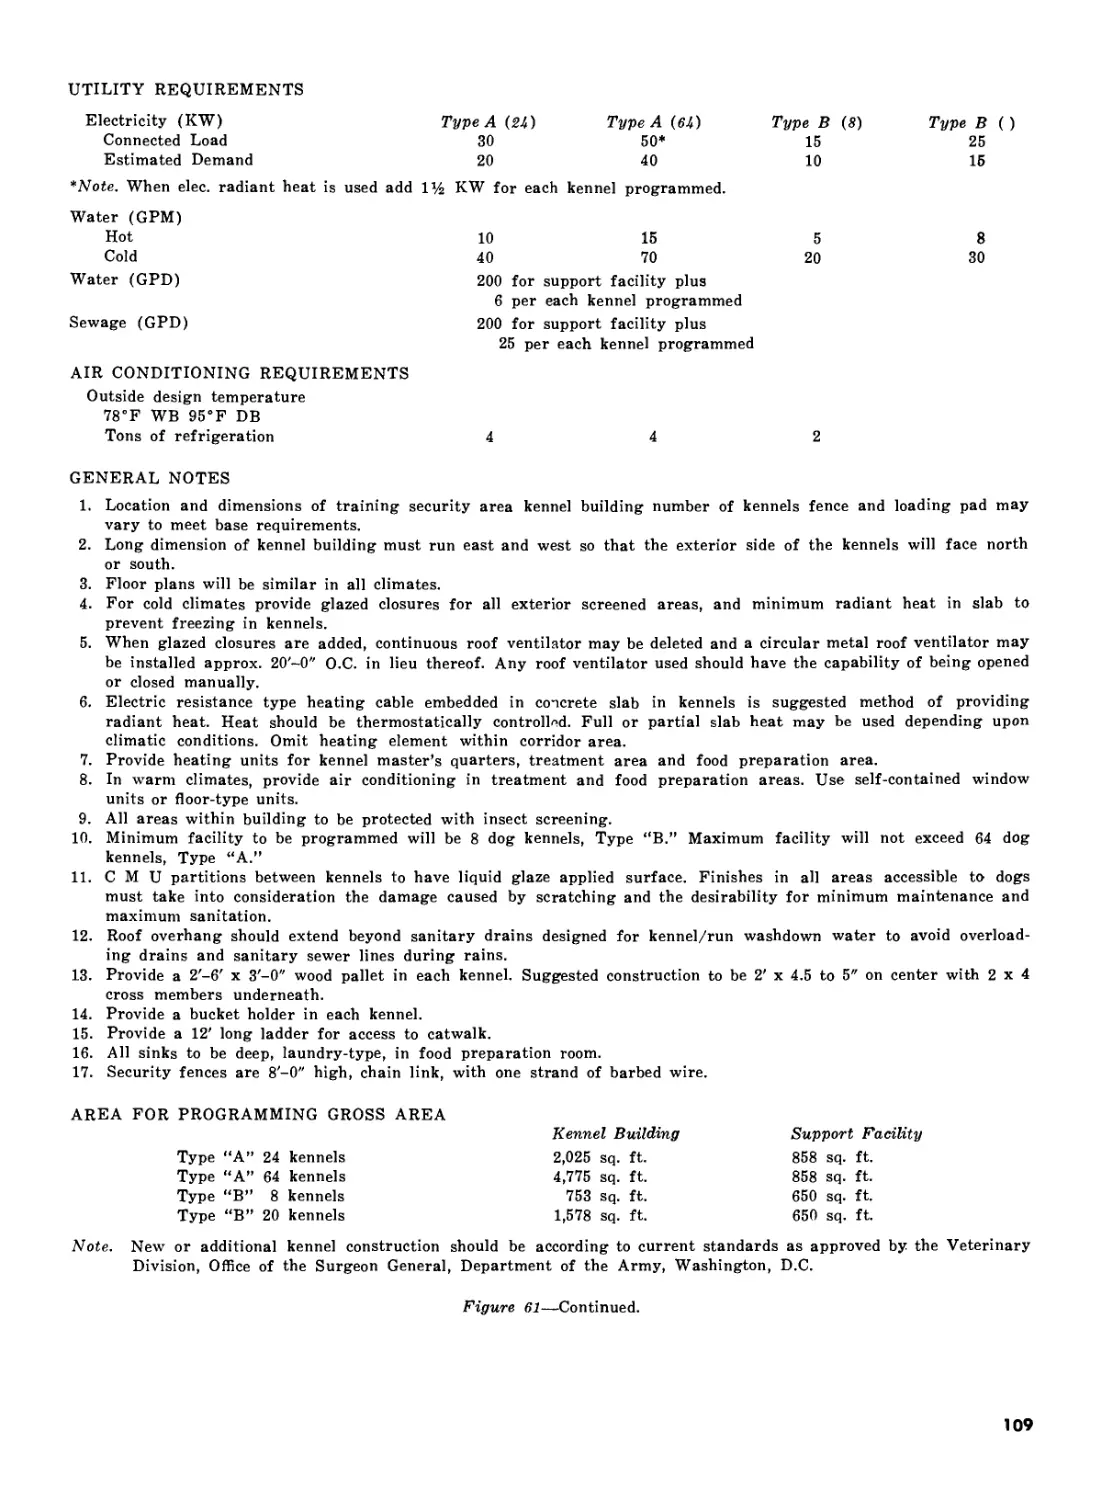
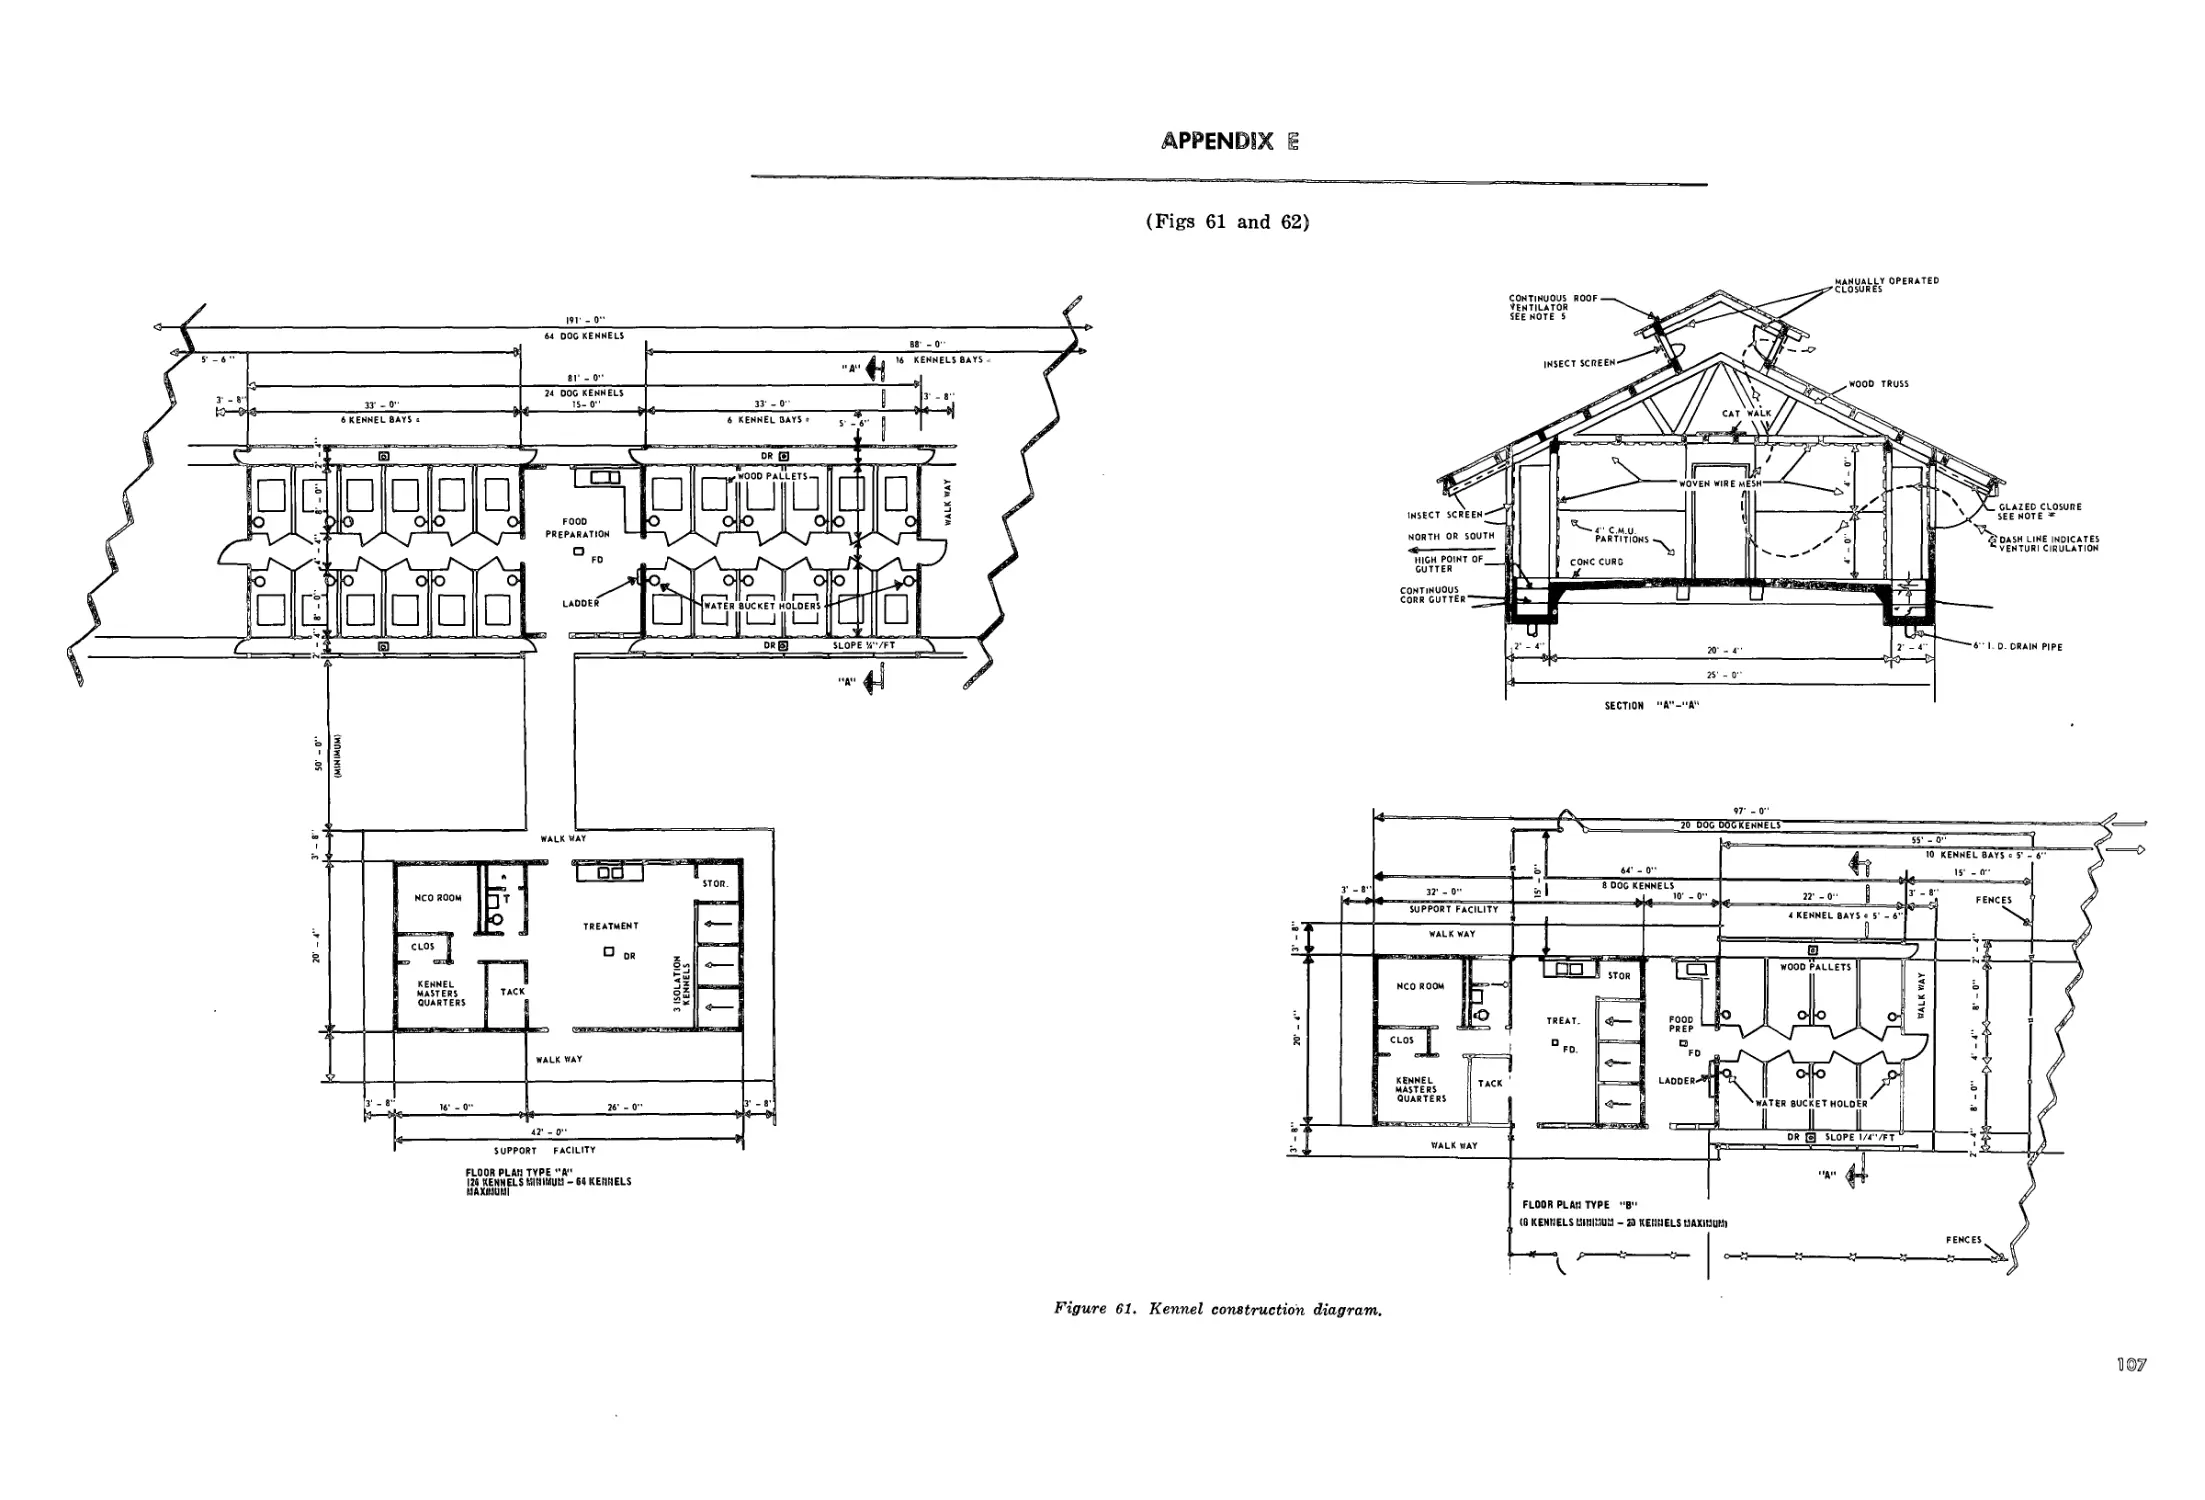
KENNEL CONSTRUCTION DIAGRAM _____
Paragraphs Page
1, 2 3
3—5 4
6—9 6
10—15 8
. 16—19 11
. 20—25 14
. 26,27 18
. 28—38 18
. 39—41 24
42—44 26
. 45—51 26
. 52—55 28
56—58 35
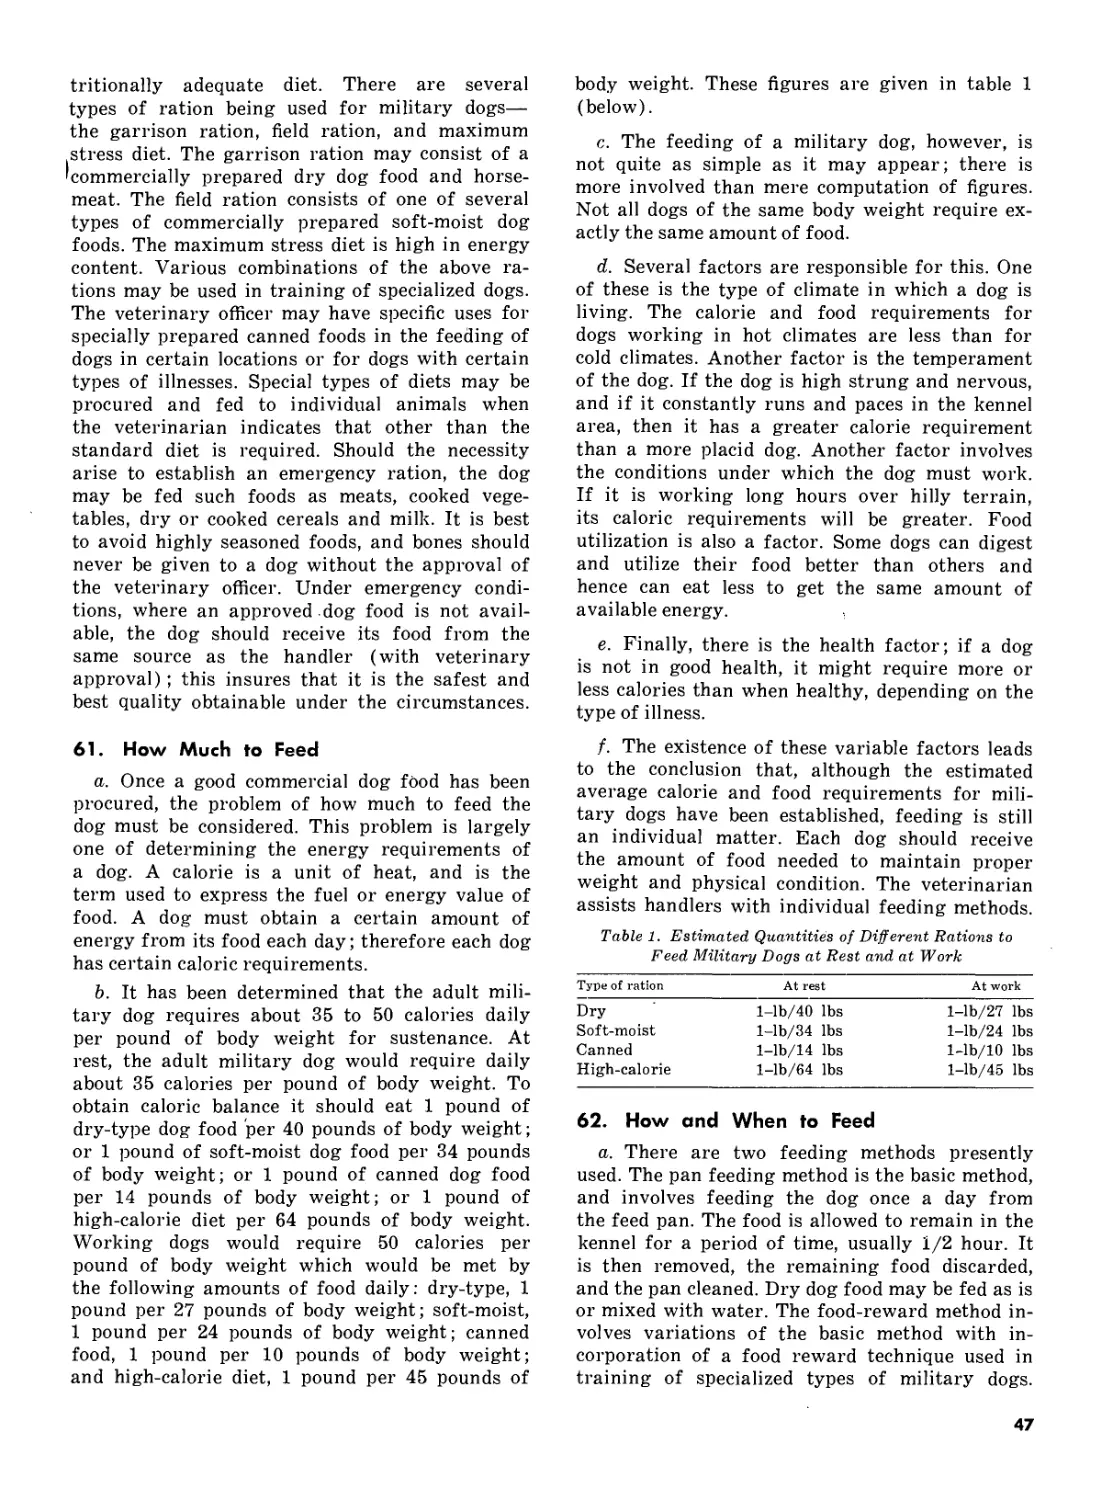
. 59—62 46
. 63—65 49
. 66,67 50
. 68—70 53
71—75 54
76—83 57
84—88 60
89—94 62
. 95—97 85
. 98,99 87
.. 88
89
91
96
107
111
*This manual supersedes FM 20-20, 1 May 1967.
1
PART ONE
INTRODUCTION
CHAPTER 1
GENERAL
1. Purpose and Scope
a. This manual provides general guidance on
the selection, care, and basic training of all
military working dogs used by the US Army
regardless of specialized function. It also dis-
cusses those administrative and logistical sup-
port functions necessary in order to sustain can-
ine operations. Specific information concerning
employment techniques and specialized training
procedures is contained in other publications that
deal with specialized canine functions.
b. The material contained herein is applicable
without modification to both nuclear and non-
nuclear warfare.
c. Users of this publication are encouraged to
submit recommended changes or comments to
improve the publication. Comments should be
keyed to the specific page, paragraph, and line
of the text in which the change is recommended.
Reasons should be provided for each comment
to insure understanding and complete evalua-
tion. Comments should be prepared using DA
Form 2028 (Recommended Changes to Publica-
tions) and forwarded direct to the Commandant,
United States Army Infantry School, Fort Ben-
ning, Georgia 31905.
2. Military Dog Missions
a. Deputy Chief of Staff for Personnel (DCS-
PER). Assumes overall responsibility for moni-
torship and coordination of matters relating to
The Military Dog Program.
b. United States Army Infantry School.
Trains instructors, leaders, handlers, and dogs
for infantry utilization, as appropriate, in the
US Army and US Marine Corps; conducts ap-
plied research and development in infantry uses
and training of military dogs as directed.
c. United States Army Military Police School.
Trains instructors, leaders, and handlers in can-
ine skills associated with military police utiliza-
tion of dogs, and makes special studies, as re-
quired, on military police utilization of canines.
d. United States Air Force. Trains instruc-
tors, handlers, and dogs in the sentry dog pro-
gram for all services, and makes special studies
as required.
e. Command Responsibility. Commanders are
responsible for the proper employment, handling,
care, and continued training of military dogs as-
signed to their units.
3
CHAPTER 2
HISTORY OF WAR DOGS
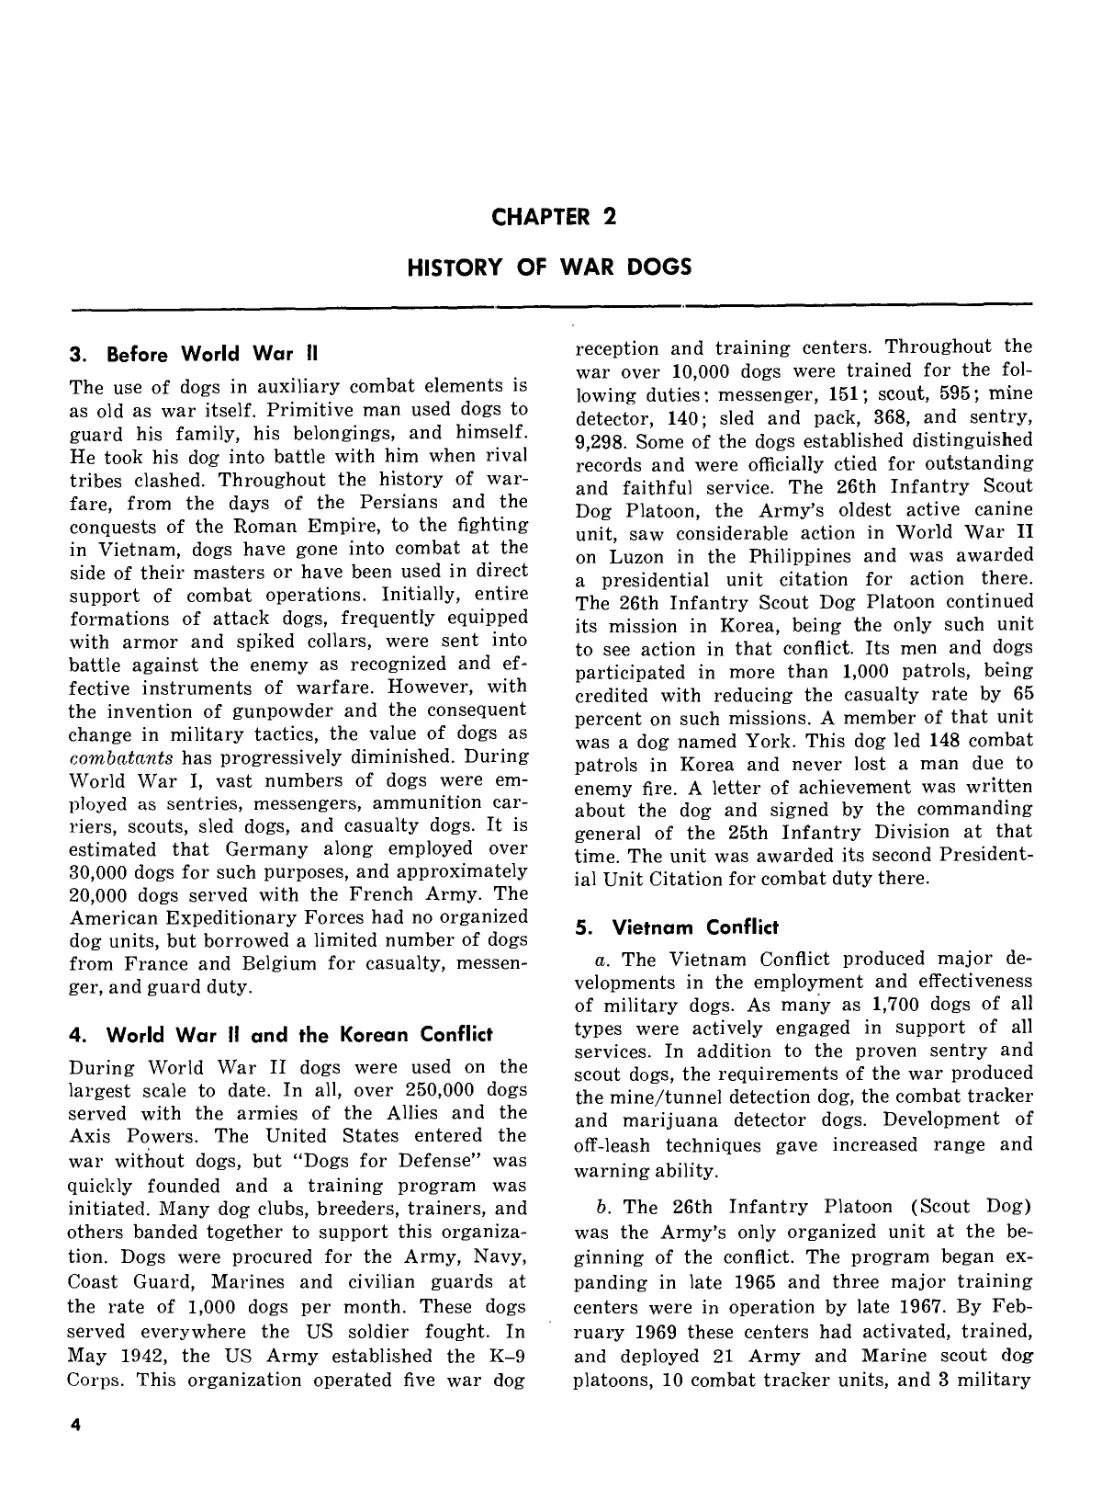
3. Before World War II
The use of dogs in auxiliary combat elements is
as old as war itself. Primitive man used dogs to
guard his family, his belongings, and himself.
He took his dog into battle with him when rival
tribes clashed. Throughout the history of war-
fare, from the days of the Persians and the
conquests of the Roman Empire, to the fighting
in Vietnam, dogs have gone into combat at the
side of their masters or have been used in direct
support of combat operations. Initially, entire
formations of attack dogs, frequently equipped
with armor and spiked collars, were sent into
battle against the enemy as recognized and ef-
fective instruments of warfare. However, with
the invention of gunpowder and the consequent
change in military tactics, the value of dogs as
combatants has progressively diminished. During
World War I, vast numbers of dogs were em-
ployed as sentries, messengers, ammunition car-
riers, scouts, sled dogs, and casualty dogs. It is
estimated that Germany along employed over
30,000 dogs for such purposes, and approximately
20,000 dogs served with the French Army. The
American Expeditionary Forces had no organized
dog units, but borrowed a limited number of dogs
from France and Belgium for casualty, messen-
ger, and guard duty.
4. World War II and the Korean Conflict
During World War II dogs were used on the
largest scale to date. In all, over 250,000 dogs
served with the armies of the Allies and the
Axis Powers. The United States entered the
war without dogs, but “Dogs for Defense” was
quickly founded and a training program was
initiated. Many dog clubs, breeders, trainers, and
others banded together to support this organiza-
tion. Dogs were procured for the Army, Navy,
Coast Guard, Marines and civilian guards at
the rate of 1,000 dogs per month. These dogs
served everywhere the US soldier fought. In
May 1942, the US Army established the K-9
Corps. This organization operated five war dog
reception and training centers. Throughout the
war over 10,000 dogs were trained for the fol-
lowing duties: messenger, 151; scout, 595; mine
detector, 140; sled and pack, 368, and sentry,
9,298. Some of the dogs established distinguished
records and were officially ctied for outstanding
and faithful service. The 26th Infantry Scout
Dog Platoon, the Army’s oldest active canine
unit, saw considerable action in World War II
on Luzon in the Philippines and was awarded
a presidential unit citation for action there.
The 26th Infantry Scout Dog Platoon continued
its mission in Korea, being the only such unit
to see action in that conflict. Its men and dogs
participated in more than 1,000 patrols, being
credited with reducing the casualty rate by 65
percent on such missions. A member of that unit
was a dog named York. This dog led 148 combat
patrols in Korea and never lost a man due to
enemy fire. A letter of achievement was written
about the dog and signed by the commanding
general of the 25th Infantry Division at that
time. The unit was awarded its second President-
ial Unit Citation for combat duty there.
5. Vietnam Conflict
a. The Vietnam Conflict produced major de-
velopments in the employment and effectiveness
of military dogs. As many as 1,700 dogs of all
types were actively engaged in support of all
services. In addition to the proven sentry and
scout dogs, the requirements of the war produced
the mine/tunnel detection dog, the combat tracker
and marijuana detector dogs. Development of
off-leash techniques gave increased range and
warning ability.
b. The 26th Infantry Platoon (Scout Dog)
was the Army’s only organized unit at the be-
ginning of the conflict. The program began ex-
panding in late 1965 and three major training
centers were in operation by late 1967. By Feb-
ruary 1969 these centers had activated, trained,
and deployed 21 Army and Marine scout dog
platoons, 10 combat tracker units, and 3 military
4
police sentry dog companies. These units employ-
ed some 700 sentry, 650 scout, 100 mine tunnel
detection, and 50 combat tracker dogs.
c. Throughout the Vietnam Conflict, the Mili-
tary Police Corps used dogs with considerable
success. Most of these were sentry dogs used to
safeguard critical installations such as ports and
airfields. A new dimension in canine utilization
was realized when marijuana detector dog teams
were trained and deployed to assist military
police in suppressing illicit drug traffic. Sentry
and marijuana detector dog teams are deployed
world-wide in support of military police.
d. The infantry was well provided with tact-
ical dogs. The scout dogs provided silent, early
warning of the enemy and supported every type
of combat operation. After contact with the
enemy was broken, the combat trackers and visual
trackers were called in to follow him. Deploy-
ment of the mine/tunnel detection dog in 1969
was a major breakthrough in countermine war-
fare. These dogs, employed with the infantry, or
with the combat engineers on road sweeps, gave
the soldier his best defense against the enemy’s
profusion of casualty-producing devices, and sur-
passed the most sophisticated electronic detec-
tors in some instances.
e. An important outgrowth of the conflict was
the development of canine research and develop-
ment efforts. These ongoing efforts were able to
initiate the first steps toward developing a more
intelligent and stronger military dog; training
dogs to detect specific drugs and explosives; de-
veloping multiple-purpose dogs; and employment
of tactical dogs by electronic remote control.
5
CHAPTER 3
HANDLER PERSONNEL
6. Introduction
In addition to meeting the special qualifications
of the regular infantry soldier, or military police-
man, military dog handlers and supervisors spe-
cialize in the activities of the military dog pro-
gram. This chapter explains the source, qualifica-
tions, duties, and responsibilities of military dog
handler personnel.
7. Source
Military dog trainers, handlers, and supervisors
must demonstrate a high degree of competence
in all facets of dog care, training, and employ-
ment. Normally, personnel selected for training as
dog handlers are assigned from either infantry
or military police career fields in MOS 11B or
95B. Instructor personnel are qualified military
dog trainers in MOS 00C4 and usually enter the
Army dog program subsequent to practical train-
ing and experience in handling either infantry
or military police working dogs. Insofar as pos-
sible all personnel participating in the Army dog
program are volunteers.
8. Qualifications
There are no purely objective methods of deter-
mining how well a prospective handler qualifies
in the desirable traits of a dog handler. However,
prospective handlers cannot be selected haphaz-
ardly. Interviews provide a satisfactory basis for
selection if carefully conducted. Each candidate
should be examined before he is permitted to
undergo any training with military dogs. To
insure the effectiveness of this procedure, each
candidate should undergo a second interview
after 3 weeks of training. At this time the candi-
date should be able to give a reasonably clear and
intelligent account of the instruction he has re-
ceived and his attitude toward military dog train-
ing should be carefully checked.
9. Essential Traits
To successfully care for and train dogs, handlers
must possess certain characteristic traits such as
proper attitude, patience and perserverance,
mental and physical coordination, resourceful-
ness, dependability, and physical endurance.
a. Friendly Attitude Toward Dogs. Any in-
dividual selected to train and handle dogs must
have a genuine fondness for and interest in dogs.
If this quality cannot be readily determined in
prospective handlers, they should be considered
unacceptable.
b. Patience and Perserverance. Handler per-
sonnel cannot force desired behavior upon dogs
nor can they expect the dogs to learn as rapidly
as human beings. Efficient handler personnel are
undisturbed by a dog’s apparent inability to cor-
rectly accomplish a feat; they do not lose control
of their tempers easily. Instead, they accept the
fact that dogs must be taught slowly and that
most exercises must be repeated often before the
dogs learn to execute certain tasks properly.
c. Mental and Physical Coordination. Handler
personnel must be able to convey their wishes
to their dogs by gestures as well as by voice. This
requires a large amount of mental and physical
coordination. Vocal commands must be clear and
concise; when necessary, hand signals or gestures
must be given simultaneously with vocal com-
mands.
d. Resourcefulness. Although most training
procedures are carefully set forth for handler
personnel, situations will arise which call for ac-
tions not covered by any set rules. To be success-
ful, handler personnel must recognize these situa-
tions and be able to improvise means with which
they can control them. Rules for training dogs
are designed to apply to most dogs; however, no
two dogs are exactly alike with regard to their
characteristics and their ability to learn. Because
of this, established rules for training and hand-
ling may be adapted to fit the needs of the in-
dividual animal. Good dog handlers and super-
visors, through their resourcefulness, determine
what is needed and devise methods to achieve the
desired outcome.
6
e. Dependability. The welfare of the dog is en-
tirely in the hands of the handler. Dogs cannot
disclose how they are being treated. Their physical
well-being depends, primarily, on the willingness
of the handler to do such manual labor as neces-
sary regarding kennel management, feeding, and
dog cleanliness. Failure in these responsibilities
means failure of the training program.
/. Physical Endit,rance. Not only must the
handler be able to show good coordination, he
must be able to maintain his efforts as long as
necessary. The handler must be able to “out last”
his dog during each training period. This includes
being able to swim, since overseas operations in-
clude water-borne patrols.
7
CHAPTER 4
PROCUREMENT, SAFETY, AND TRANSPORTATION OF MILITARY DOGS
Section I. PROCUREMENT
10. General
This section describes the method used for pro-
curing dogs in the United States. Under normal
conditions only two breeds of dog are procured,
the German Shepherd and the Labrador Re-
triever.
11. The German Shepherd
This breed has been selected over others for use
in the military dog program because German
Shepherds are available in the numbers required
and have the best combination of characteristics
for most military work.
a. Characteristics. One of the most important
characteristics of the German Shepherd is its
ability to adapt to different climatic conditions.
The breed has a double coat of hair; the outer
coat is long, coarse, and somewhat water resist-
ant; the undercoat is soft and furry, and grows
thick when the weather or climate is cold. The
German Shepherd has a long, tireless gaint; it
is strong, alert, fearless, and agile. The German
Shepard is not a vicious animal; however, it has
a natural distrust of strange persons or strange
situations.
b. Specifications. Breeds other than the Ger-
man Shepherd have been tested and found ac-
ceptable for use as military dogs when required.
The German Shepherd, however, has been se-
lected as the breed best suited for most military
duty; the specifications discussed here are for
that breed only. Not all German Shepherds are
physically or tempermentally fit to become mili-
tary dogs. For this reason the United States Air
Force (which procures all military dogs) has
rigid specifications which each dog must meet
before being accepted for training.
(1) Conformation. To be acceptable for pro-
curement, a dog must be representative of the
German Shepherd breed of any color except all
white.
(a) The dog must be a sturdy, compact,
working type.
(b) It must reveal evidence of power, en-
durance, and energy.
(c) The dog may be of either sex, but
female animals require a veterinary certificate
indicating that a complete ovario-hysterectomy
(spay) operation has been performed at least 60
days before the preshipment veterinary physical
examination.
(d) The animal must be at least 23 inches
in height; this is measured by a perpendicular
line from the top of its shoulder blade to the
ground. The coat should be parted or pushed down
so that the measurement shows only the actual
height of the dog’s frame or structure.
(e) The dog must weight at least
60 pounds.
(/) It must be between 12 and 36 months
of age when offered for sale or donation.
(g) It should have good muscle tone, clear
eyes, and an alert attitude.
(h) Its coat should be lustrous and in a
good state of grooming. The outer coat should be
dense. The undercoat varies in density with the
season of the year and with the geographical
region from which the animal comes.
(i) A dog with minor breed defects
(coarse or domed head, hanging ears, tail defect,
and the like) is not necessarily disqualified.
(У) A male which has been castrated or
which has one or both testicles undescended is
acceptable.
(k) The dog must have strong teeth; but
not more than four may be missing. None of the
missing teeth may be a canine tooth. A dog with
serious erosion of the enamel of its teeth or
with badly worn teeth is not acceptable.
(I) A dog with an overshot or undershot
jaw is not acceptable.
(2) Structure and locomotion. Physically, a
8
dog selected for use in the military dog program
must meet generally acceptable standards for the
German Shepherd breed, although minor defects
which do not interfere with its ability to perform
military duty may be allowed.
(a) The body and legs of an acceptable
animal must be well proportioned.
(b) The animal must have good bone
structure and a deep chest with well-sprung ribs.
(c) The pasterns must be strong and
springy.
(d) The feet must be well positioned; the
toes must be short and well arched, with thick,
tough pads.
(e) The gait of an acceptable animal must
be generally within breed standards although
minor defects are not important. Any gait defect
which interferes with the animal’s ability to per-
form strenuous duty is disqualifying.
(3) Temperament. An acceptable dog must
show evidence of typical German Shepherd char-
acter and temperament as defined by the breed
standard. Alertness, aggessiveness, steadiness,
vigor, and responsiveness are necessary quali-
ties.
(a) A timid, shrinking, or cowardly ani-
mal is not acceptable.
(b) An acceptable animal must be moder-
ately aggressive.
(c) A gun-shy animal is not acceptable.
A gun-shy dog cowers when it hears a gunshot
or similar noise. There are a number of possible
reasons for this; one is that a gun may have
been fires very close to its head and may have
actually damaged the eardrum. Consequently, the
dog naturally dislikes the sound of a gunshot
and cowers when it hears one.
(d) A “gun-green” animal may be accept-
able. The gun-green animal probably has never
been exposed to gunfire and does not know what
it is. Therefore, it may act curious or it may
appear to be rather suspicious. The dog does not
appear brave around gunfire, but it is not actually
afraid of the sound.
(4) State of health. In conjunction with the
temperament and physical soundness of the dog,
its overall state of health must be considered;
an animal must be in a good state of health as
determined by a military veterinary officer at the
procurement facility. A dog in poor physical con-
dition or afflicted with a disqualifying disease is
not acceptable for use as a military dog. The
following diseases, conditions or defects are dis-
qualifying:
(a) Evidence of a contagious disease or
condition that renders the animal unsuitable for
immediate training.
(h) Heartworms; as determined by the
Knott’s test.
(c) Defective sense of hearing, vision, or
smell.
(d) Bone or joint disease including hip
dysplasia, which in the judgment of veterinary
officers at procurement installations impairs the
ability of the animal to perform maximally.
12. The Labrador Retriever
This breed was selected for use in the Army Dog
Program (tracking phase) because of its demon-
strated ability to perform the tasks required and
the fact that Labrador Retrievers are available
for procurement in sufficient numbers to meet
Army needs.
a. Characteristics. Although other breeds can
be used for tracking, the Labrador Retriever was
selected because of its well developed olfactory
ability, endurance, training willingness, and
ability to adapt to varied climatic conditions. Not
vicious animals, they work well around people
and develop rapport with their handlers quite
easily. A strongly built, short coupled, very ac-
tive dog, the Labrador Retriever can traverse all
types of terrain with little difficulty.
b. Specifications. Male or spayed females be-
tween the ages of 1 and 5 years that weigh at
least 45 pounds, and are a minimum of 20 inches
in height are acceptable for training if they meet
other prerequisites. Colors will range from black
to yellow, with black or chocolate colored
animals preferred. Since all Labrador Retrievers
are not physically or temperamentally suited for
military purposes the US Air Force has estab-
lished rigid specifications which each dog must
meet prior to being accepted for training.
(1) Conformation. Muscular body, strong
back, straight forelimbs, steep sloping pasterns,
and strong muscular hindquarters. Toes not
splayed or bunched, with well cushioned pads on
the feet. Level and well-alined teeth that are not
excessively undershot or overshot. No more than
four teeth may be missing, none of which may
be a canine tooth. Forefeet do not turn inward
or outward and the hocks are well bent, straight
from front to back and perpendicular.
(2) Temperament. Alert; not overly sensi-
tive to overt stimuli with resultant trembling,
cowering, or fleeing but still sensitive to sound
and touch; should evidence willingness for guid-
ance and have an ability to retain instruction;
should be sufficiently aggressive to perform as re-
9
quired. Must not be gun shy, although gun-green
animals are acceptable.
(3) State of Health. Health requirements
are generally the same as those for the German
Shepherd.
13. Procurement Procedures
a. AR 700-81 directs the US Air Force to pro-
cure all military working dogs to be used by US
Military Forces.
Note: A dog owner who is interested in donating or
selling a dog to the United States Government for use as a
military working dog should direct all inquiries to:
Department of Defense Dog Center, Lackland AFB, Texas
78236. The center will forward complete instructions to the
owner.
b. A licensed veterinarian must perform a pre-
shipment physical examination on any dog of-
fered to the Government.
c. When completed forms and questionnaires
are received from an owner, the Dog Acceptance
Board determines whether the dog is acceptable
for military examination. If the dog is acceptable
the owner is notified.
d. The owner is instructed to ship the dog at
Government expense in the crate provided by the
Procurement Center. The Government reserves
the right to reject an unsuitable dog within a
reasonable period of time. A rejected dog, if re-
quested by his owner, is returned at Government
expense. The owner is asked to return the empty
crate at Government expense.
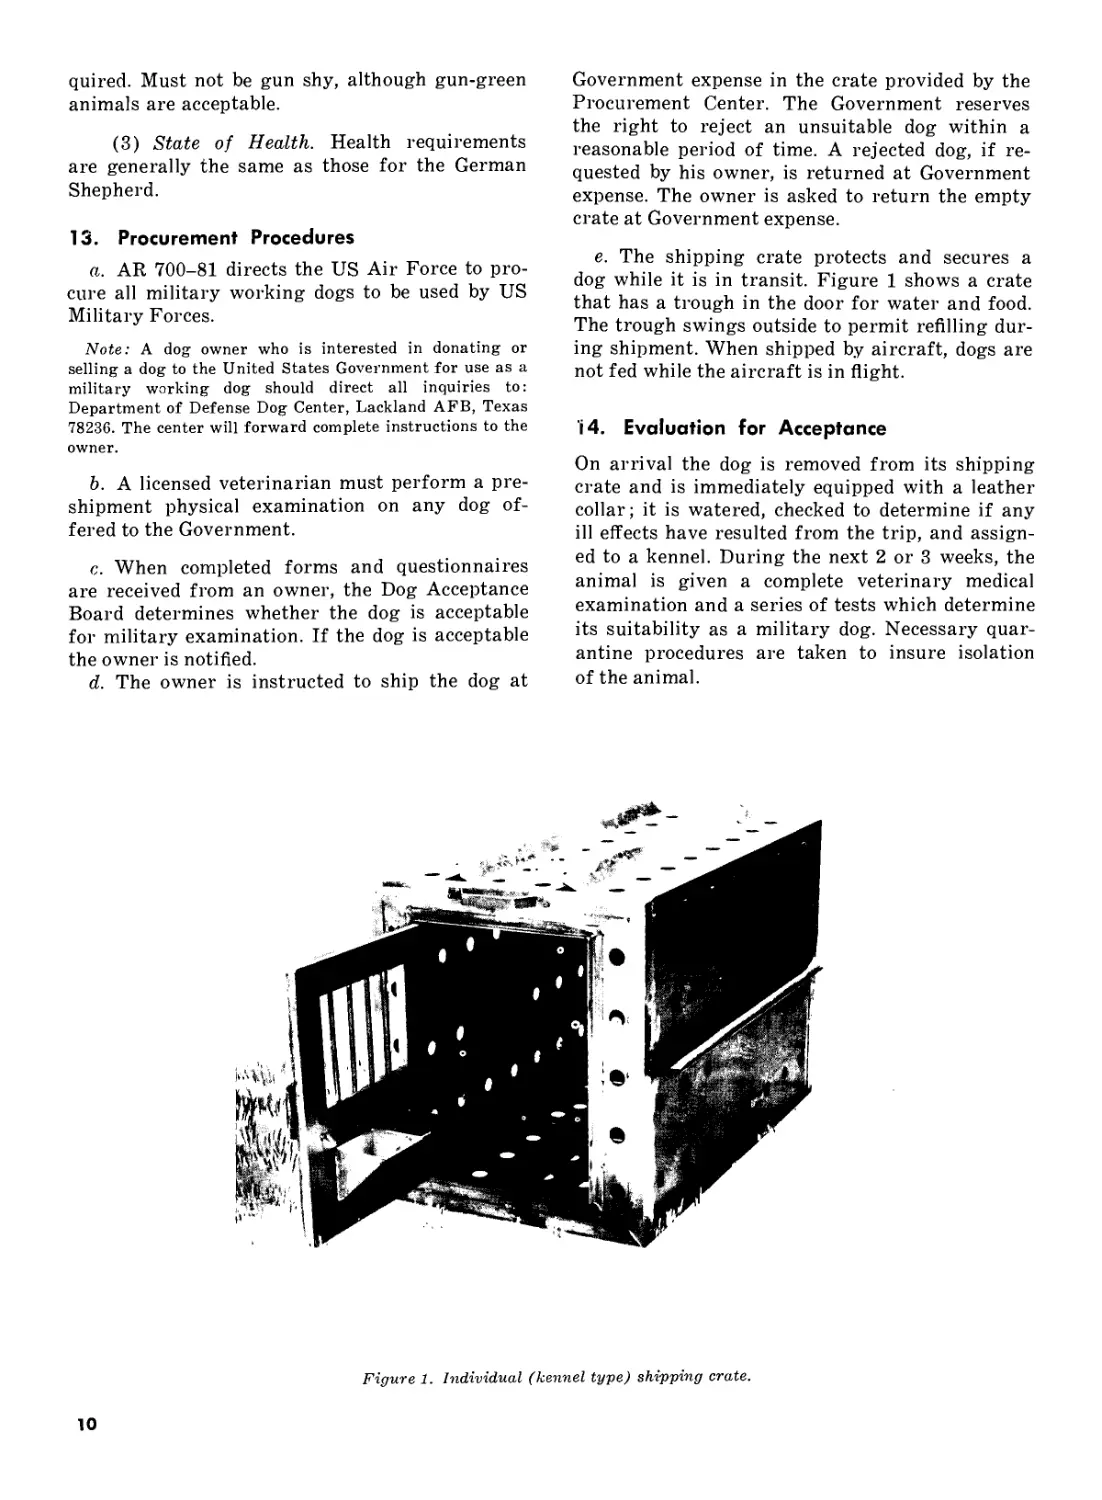
e. The shipping crate protects and secures a
dog while it is in transit. Figure 1 shows a crate
that has a trough in the door for water and food.
The trough swings outside to permit refilling dur-
ing shipment. When shipped by aircraft, dogs are
not fed while the aircraft is in flight.
i4. Evaluation for Acceptance
On arrival the dog is removed from its shipping
crate and is immediately equipped with a leather
collar; it is watered, checked to determine if any
ill effects have resulted from the trip, and assign-
ed to a kennel. During the next 2 or 3 weeks, the
animal is given a complete veterinary medical
examination and a series of tests which determine
its suitability as a military dog. Necessary quar-
antine procedures are taken to insure isolation
of the animal.
Figure 1. Individual (kennel type) shipping crate.
10
a. Veterinary Medical Examination. A veteri-
nary member of the Dog Acceptance Board in-
sures that each dog receives a veterinary medical
examination to determine if it meets the required
specifications. This examination includes a blood
test for evidence of heartworm infection, a plevic
X-ray (radiograph) to determine whether or not
the dog has hip dysplasia, which is disqualifying,
and foreleg X-rays (radiographs) to determine
whether or not the dog has elbow dysplasia which
is disqualifying. A dog that does not pass the
examination is declared unfit and returned to its
owner or otherwise disposed of in accordance
with regulations.
b. Test for Gun Shyness. A dog is accustomed
to gunfire when a small caliber weapon is fired
near it and the dog shows little or no reaction to
the noise. Some dogs cannot be trained to re-
main calm under gunfire; such a dog is declared
unsuitable for service in the military dog pro-
gram.
(1) A dog may be accustomed to gunfire
by discharging a small caliber weapon or by ex-
ploding firecrackers from a distance. It is best to
begin this familiarization when the dog is en-
gaged in some activity which absorbs its atten-
tion. This helps it to become subconsciously ac-
customed to this type of noise. The most success-
ful procedure is to have the shooting done as
casually and intermittently as possible.
(2) Weapons should never be fired too close
to a dog. The minimum distance to begin firing is
50 yards; it is best to fire the first round from
a distance of 75 to 100 years. As familiarization
continues, the weapon may be fired closer, but
no closer than 15 yards. When a dog shows alarm,
do not attempt to force it to sit quietly while
firing is repeated. Discontinue firing for the time
being and resume when the dog is no longer in a
Section II.
16. General
Military dog handler personnel must learn good
safety habits and must practice them at all
times. Some people believe that military dogs,
whether on leash or loose, are walking safety
hazards. Safety conscious personnel can prevent
military dogs from committing unsafe acts and
thereby dispel such misconceptions. Safety prac-
tices must begin the minute a person enters a
kennel area.
17. In and Around the Kennel Area
a. Personnel must refrain from running or
state of alarm. A gun-shy dog does not become
accustomed to gunfire and is rejected.
(3) The test for gun shyness is for evalua-
tion purposes only and is not to be confused with
gunfire training which is covered in another
chapter.
c. Test for Suitable Temperament. This test
determines whether a dog responds appropriately
to mild agitation. To perform this test, someone
approaches the dog and strikes at it with a rolled
burlap bag or some other harmless device. The
dog should respond by growling, barking, or at-
tempting to bite the agitator. Some dogs, when
initially exposed to mild agitation, will be startled
for a few seconds and may appear frightened.
This response should not cause a dog to be dis-
qualified. If, however, the dog repeatedly acts
frightened by the agitator it is unsuitable for
training.
15. Tattooing Procedures
The assignment of brand/tattoo numbers is the
responsibility of the Department of Defense Dog
Center. An animal accepted for the dog program
is tattooed with Preston brand numbers on the
inside of its left ear. In cases of heavy ear pigmen-
tation, the tattoo may be applied on the inner
side, of the left flank. With the Preston branding
system, it is possible to tattoo up to 4,000 animals
with each letter assigned. If the letter “a” is
used, the first animal tattooed receives the tattoo
“A000,” the second “A001,” the third, “A002,”
and so on through “A999.” This accounts for the
first one thousand. The second thousand dogs are
tattooed “0A00,” “0A01,” “0A02,” through “9A-
99.” The third thousand are tattooed “00A0.”
“00A1,” “00A2”, through “99A9,” and the fourth
thousand “000A,” “001A,” “002A,” through “99-
9A.”
SAFETY
engaging in any type of “horseplay” in or near
the kennel area. Such actions tend to stimulate
kenneled dogs and could create a situation where-
in a dog might break out of its kennel or run and
cause injury to itself, a person, or another dog.
b. A handler must use caution to maintain con-
trol of his dog when moving it from one place
to another within the kennel area. This can be
done by grasping the dog’s leash so that the dog
remains very close. A handler can shorten the
leash sufficiently by securing the loop of the
leash to his right wrist and placing his left hand
on the leash with the knuckles facing upward,
as illustrated in figure 2. Notice that the handler
places his left hand near the snap; the hand is
never placed directly on the snap.
c. There are a number of other specific safety
precautions to observe while in and around the
kennel area. Some of these are:
(1) When the dogs are inside their runs, se-
cure all gates and doors to the runs.
(2) When dogs are kenneled in birdcage-
type kennels or temporary kennel boxes, fit their
leather collars so that they are not able to back
out of them.
(3) Use caution to avoid sudden movements
in and around the area.
(4) Use extreme care while cleaning, feed-
ing, and watering strange dogs.
(5) In the event that a loose dog appears in
any area, the first person to notice the animal
must give the alarm, “loose dog,” and everyone
in the area, except the dog’s handler, must im-
mediately apply a hasty muzzle on his own dog,
kneel, and hold the dog close to his chest with
the dog’s head beneath his arm. The handler then
retrieves the dog by coaxing it to come close
enough to be caught and properly secured.
(6) Handlers must allow a safe distance be-
tween their dogs and any other dogs or persons
in the area. This is done to make sure that dog
teams do not come into contact with one another.
Kennel areas are planned for a one-way traffic
system so that no two dogs are brought face-to-
face. This system must be observed at all times.
(7) Handlers with dogs on leash must give
an ora] warning upon entering or leaving the
kennel area and at any time there is an obstructed
Figure 2. Short leash.
12
view. They must call out, “dog coming through,”
“in,” “around,” or “by,” whichever is appropriate.
(8) Handler and kennel personnel must rec-
ognize signs which indicate that a dog is pre-
paring to bite. Such signs include growling, curl-
ing lips or baring teeth, staring and standing
perfectly still, and rising of hackles on neck.
(9) Personnel should never turn their backs
on a dog; never kick, slap, or hit a dog; never
speak or move in a threatening manner around
strange dogs.
18. In and Around the Training Area
Although kennel areas are surrounded by fences
so that it is almost impossible for a dog to escape
from such an area, this protection is not usually
provided around training areas. Because of this,
personnel must be more safety conscious while in
and around the training area. The following are
some of the most important safety precautions
to be observed in and around this area:
a. While moving to and from designated train-
ing areas, and during break and grooming periods,
handlers must always keep their leashes looped
over their wrists. This precaution helps to prevent
the leash from slipping out of a handler’s grasp.
b. A safe distance must be maintained between
other teams and other people. As a rule, there
should be at least 15 feet between dogs or be-
tween a dog and another person. When it be-
comes necessary to approach other dog teams,
dogs must be held on short leashes. A greater
distance is allowed during break periods because
this is the time set aside for dogs to romp and
play at the end of the leash.
c. When accompanied by his dog the handler
should not sit or lie down because he would be in
an extremely awkward position to control the
dog if it should suddenly lunge.
d. To pass articles to another person, the hand-
ler places the articles on the ground and takes his
dog from the immediate area so that the other
person can safely retrieve the articles.
e. The handler must not tie his dog to any
object with the leash because the dog is capable
of chewing through the leash, breaking it, gain-
ing freedom, and perhaps causing injury to others
or itself.
f. A dog must never be staked out unobserved
or left unobserved with a muzzle on.
g. The handler must never tie his dog to a
vehicle. The dog might receive a serious injury
if the vehicle is moved.
h. Many dogs have a natural desire to fight
other dogs when they are brought together. It is
important to follow safe procedures when break-
ing up a dogfight. To begin with, breaking up a
dogfight is a two-man project; no one should
attempt to accomplish it alone. Fighting dogs
should never be pulled apart; pulling them apart
may cause a ripping and tearing of the flesh and
may disable the dogs. In breaking up a dogfight
each handler should—
(1) Keep his leash taut as he gradually
works his hand toward the snap of the leash.
(2) Hold the snap end of the leash firmly
with his right hand and slip his left hand under-
neath the dog’s collar.
(3) Grasp the collar tightly with his left
hand.
(4) Grab the throat of his dog with the right
hand at a point just below the dog’s lower jaw.
(5) Choke his dog until the air supply is cut
off, thus forcing the dog to release its hold.
i. If a handler is bitten by a dog, he uses the
same procedure to effect a release as used to
separate two fighting dogs. Never attempt to jerk
away from the dog because this action may cause
a serious wound.
j. An alert handler can avoid being bitten by
his own dog. If the dog attempts to bite: grab
the leash close to the dog’s neck; hold the animal’s
front feet off the ground; extend arms to push
the dog away; and, at the same time, slowly turn
in a circle to keep the dog off balance. This pro-
cedure serves two purposes: it keeps the dog from
seriously harming its handler, and it is a means
for the handler to rebuke this dog for attempting
to attack.
k. Until a dog has received all of its initial
training, most of its time is spent in either the
kennel area or the training area; therefore, it
is important that the handler be especially aware
of his safety responsibilities while in these areas.
19. In and Around Veterinary Treatment
Facilities
a. The opportunity for violation of good safety
practices exists when the handler presents his
dog to a veterinary officer for examination or
treatment. The handler must keep in mind that
his dog is in strange surroundings, among'strange
people, for treatment that is unusual and, some-
times, painful. This is an abnormal situation for
the dog, and its behavior may not be what the
handler expects. Therefore, the handler must al-
13
ways be alert and prepared to control his animal
while medical care is being provided.
b. Because of the flow of dog traffic during
clinical hours, the distance between dogs presents
a safety problem. A dog must always be kept at
a proper and safe distance from other dogs or
people. Before entering or leaving a doorway or
passageway, the handler must make a habit of
giving a loud, clear, vocal warning, “dog coming
through!” This helps to prevent the dog from
walking into someone. The handler must observe
his dog’s actions at all times and keep it on a
short leash while in this area.
c. Before reporting to the veterinary clinic,
the handler should muzzle his dog; he should
follow the verterinarian’s instructions relative to
using the muzzle. Strict attention must be given
to all instructions received while the dog is being
examined and treated. Generally, it helps calm
the dog if the handler soothes it with kind words
and actions.
d. The handler must not neglect to use all of
the safety practices he has learned throughout
his training as a dog handler. He should follow
and observe all local policies pertaining to safety
instructions.
Section III. TRANSPORTATION OF DOGS
20. General
A dog may be transported from one location to
another by various means. In most cases, the
handler cares for, feeds, waters, and exercises
his dog during transit. Certain techniques and
methods will insure the health and safety of the
handler and his dog.
21. Loading
The safest method of loading a dog is to use a
ramp. Most vehicles can be equipped with a
cleated ramp which does not require modifica-
tion to the vehicle. If it is impossible to ramp-
equip a vehicle, a loading ramp at the kennel
facility and one or more at the dismount area
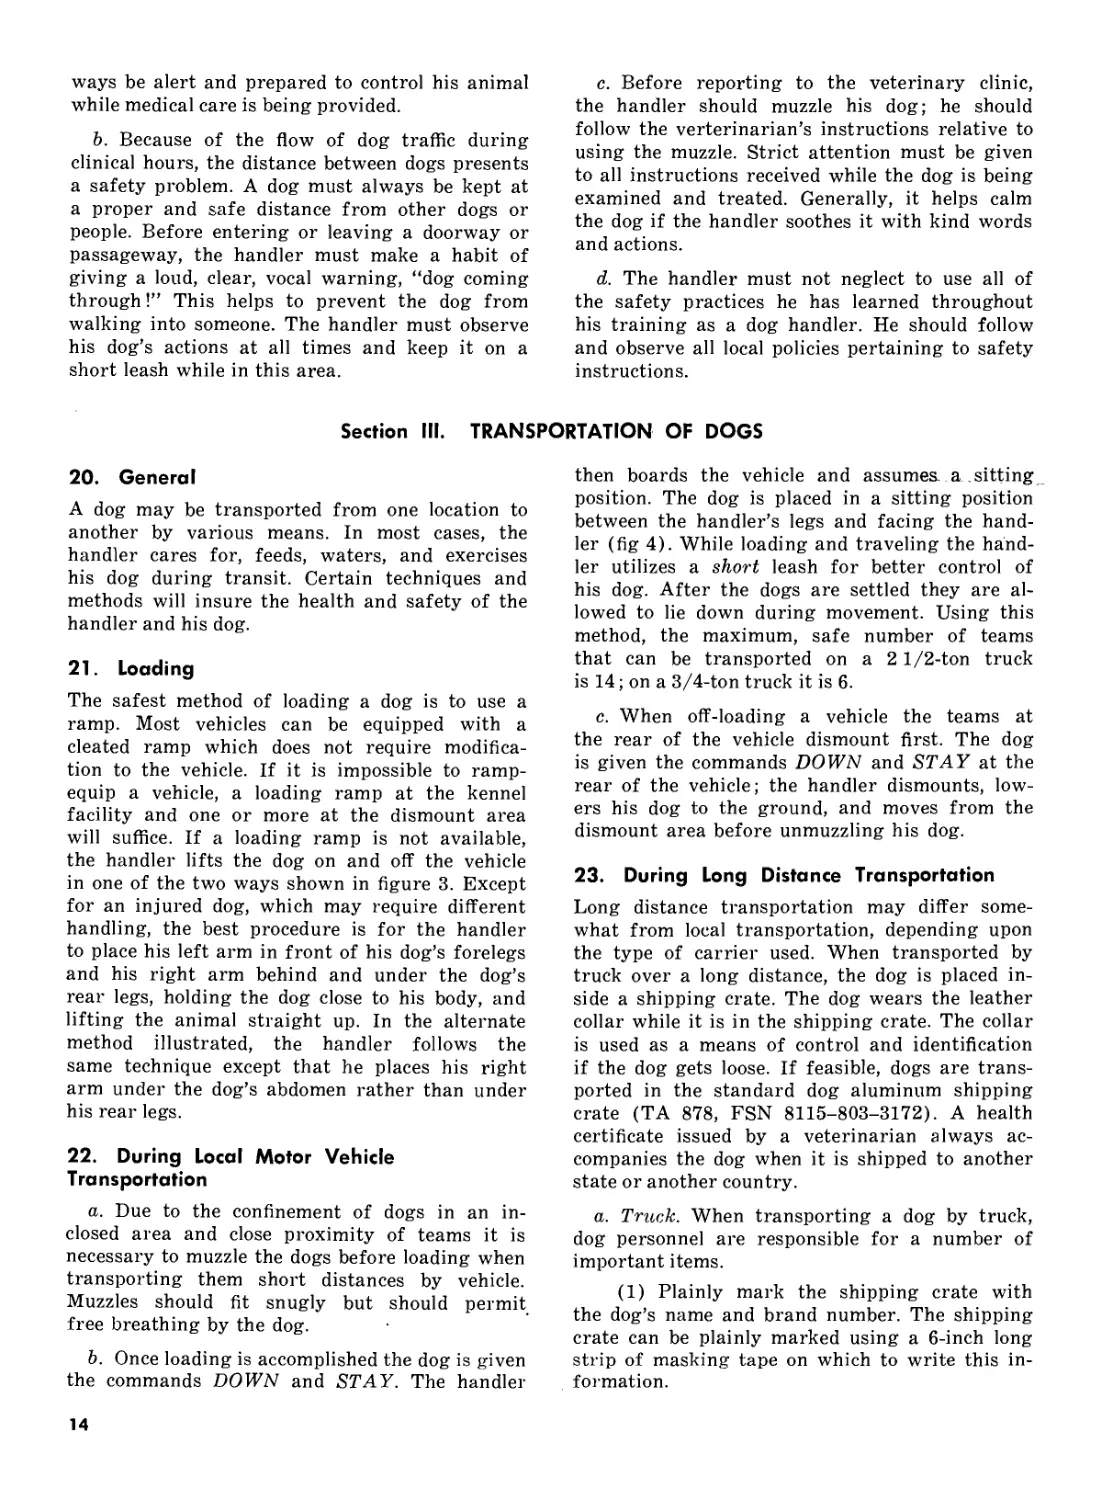
will suffice. If a loading ramp is not available,
the handler lifts the dog on and off the vehicle
in one of the two ways shown in figure 3. Except
for an injured dog, which may require different
handling, the best procedure is for the handler
to place his left arm in front of his dog’s forelegs
and his right arm behind and under the dog’s
rear legs, holding the dog close to his body, and
lifting the animal straight up. In the alternate
method illustrated, the handler follows the
same technique except that he places his right
arm under the dog’s abdomen rather than under
his rear legs.
22. During Local Motor Vehicle
Transportation
a. Due to the confinement of dogs in an in-
closed area and close proximity of teams it is
necessary to muzzle the dogs before loading when
transporting them short distances by vehicle.
Muzzles should fit snugly but should permit
free breathing by the dog.
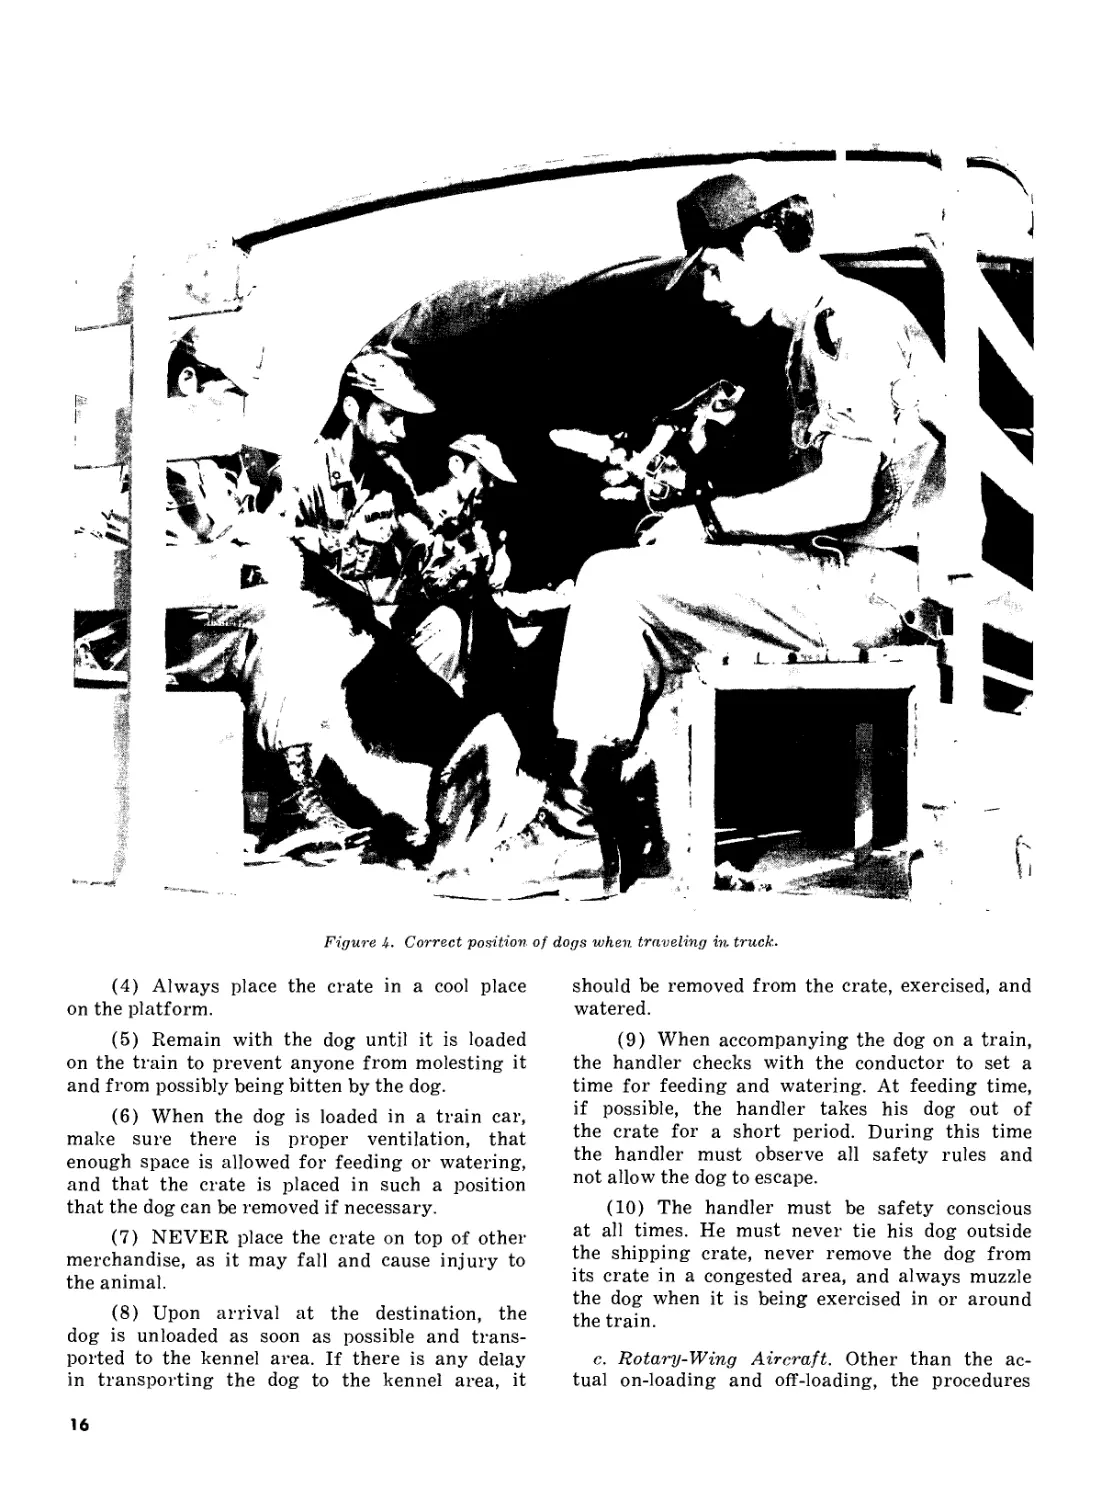
b. Once loading is accomplished the dog is given
the commands DOWN and STAY. The handler
then boards the vehicle and assumes, a sitting
position. The dog is placed in a sitting position
between the handler’s legs and facing the hand-
ler (fig 4). While loading and traveling the hand-
ler utilizes a short leash for better control of
his dog. After the dogs are settled they are al-
lowed to lie down during movement. Using this
method, the maximum, safe number of teams
that can be transported on a 2 1/2-ton truck
is 14; on a 3/4-ton truck it is 6.
c. When off-loading a vehicle the teams at
the rear of the vehicle dismount first. The dog
is given the commands DOWN and STAY at the
rear of the vehicle; the handler dismounts, low-
ers his dog to the ground, and moves from the
dismount area before unmuzzling his dog.
23. During Long Distance Transportation
Long distance transportation may differ some-
what from local transportation, depending upon
the type of carrier used. When transported by
truck over a long distance, the dog is placed in-
side a shipping crate. The dog wears the leather
collar while it is in the shipping crate. The collar
is used as a means of control and identification
if the dog gets loose. If feasible, dogs are trans-
ported in the standard dog aluminum shipping
crate (TA 878, FSN 8115-803-3172). A health
certificate issued by a veterinarian always ac-
companies the dog when it is shipped to another
state or another country.
a. Truck. When transporting a dog by truck,
dog personnel are responsible for a number of
important items.
(1) Plainly mark the shipping crate with
the dog’s name and brand number. The shipping
crate can be plainly marked using a 6-inch long
strip of masking tape on which to write this in-
formation.
14
4
Figure 3.
(2) When shipping dogs, the shipping crate
must be marked in bold letters “DANGER—
DOG.”
(3) Arrange the crate on the truck to in-
sure proper ventilation; place the crate in an
area free from exhaust fumes.
(4) Allow sufficient room to remove the dog
from its crate for exercise, food, or water, or in
case of an emergency.
(5) Handle the crate carefully to prevent
accidents. Dropping the crate might result in an
injury to personnel as well as to the dog.
(6) If the vehicle is in an accident, remove
the dog from its crate, check it for possible in-
jury, and exercise it until the vehicle is ready to
proceed.
Lifting dog.
b. Train. When the dog is shipped by train,
it is placed in a clearly marked shipping crate.
(1) When handlers do not accompany their
dogs, detailed instructions for feeding and wa-
tering must be attached to the crates; these in-
structions are obtained from the post veterinar-
ian.
(2) Contact shipping officials to determine
the time the dog is to be loaded; it is important
that the dog arrive at the shipping office as near
loading time as possible.
(3) Do not leave the dog on the platform in
its crate for a long period of time; if there is a
delay, remove the dog from the crate and exer-
cise it, then water the dog before putting it back
in the crate.
15
Figure 4. Correct position of dogs when traveling in. truck.
(4) Always place the crate in a cool place
on the platform.
(5) Remain with the dog until it is loaded
on the train to prevent anyone from molesting it
and from possibly being bitten by the dog.
(6) When the dog is loaded in a train car,
make sure there is proper ventilation, that
enough space is allowed for feeding or watering,
and that the crate is placed in such a position
that the dog can be removed if necessary.
(7) NEVER place the crate on top of other
merchandise, as it may fall and cause injury to
the animal.
(8) Upon arrival at the destination, the
dog is unloaded as soon as possible and trans-
ported to the kennel area. If there is any delay
in transporting the dog to the kennel area, it
should be removed from the crate, exercised, and
watered.
(9) When accompanying the dog on a train,
the handler checks with the conductor to set a
time for feeding and watering. At feeding time,
if possible, the handler takes his dog out of
the crate for a short period. During this time
the handler must observe all safety rules and
not allow the dog to escape.
(10) The handler must be safety conscious
at all times. He must never tie his dog outside
the shipping crate, never remove the dog from
its crate in a congested area, and always muzzle
the dog when it is being exercised in or around
the train.
c. Rotary-Wing Aircraft. Other than the ac-
tual on-loading and off-loading, the procedures
16
used in local motor vehicle transportation apply
to helicopter movement. Due to the close proxi-
mity of personnel, control of the dogs is neces-
sary at all times.
(1) Huey UH1D. Load at the sides, ap-
proaching from the front. The tail rotor is a
danger area and should be avoided at all times.
As a precaution dogs should be loaded last. At
first most dogs will have to be helped aboard
but after a few lifts the majority are able to
jump aboard. Unloading will be done as quickly
as possible.
(2) Chinook CH-47. Always enter and exit
by the rear ramp.
d. Fixed-Wing Aircraft. In most instances, the
procedures used in train transportation apply to
aircraft transportation. Normally, a dog is not
fed and watered while the aircraft is in flight.
However, during prolonged trips by air dogs are
removed from their crates, fed, and watered at
programmed stops. The handler makes sure that
the crate is secured in the aircraft before takeoff
and is removed from the aircraft as soon as pos-
sible upon reaching the destination. He is
extremely careful at all times to prevent anyone
from molesting the dog or allowing it to escape.
He checks frequently to insure that the dog is
comfortable while en route. It is usually desirable
that the dogs be tranquilized prior to shipment
(provided the dog is not be worked within 48
hours of arrival).
e. It must be remembered that the high noise,
vibration, and noxious fumes levels found around
many aircraft will cause shifts in threshold sen-
sitivity levels of both handler and dog. Thus a
dog would not be able to operate all its senses
at peak efficiency immediately after exiting from
aircraft, or for that matter, from a motorized
vehicle or boat. These impairments of sight, smell,
and hearing usually are temporary and the dog,
and handler, should be back to normal within 20
to 30 minutes.
24. During Hot Weather
To prevent heat stroke, care must be taken when
transporting dogs in shipping crates. The follow-
ing safeguards must be taken by dog handlers.
a. Transport dogs in air-conditioned or well-
ventilated vehicles only.
b. At depots and terminals, give adequate and
frequent supplies of fresh water.
c. In case of vehicular breakdown, unload
each dog and take it to a cool place.
d. Load crates to effect maximum ventilation.
Never place baggage on top of or immediately
around a crate.
e. Avoid loading dogs into crates that have
been standing in the sun.
f. Never allow crated dogs to stand in the sun;
place them in a shaded, well-ventilated area.
g. Check dogs frequently to be sure that they
are not becoming overheated.
25. During Inclement Weather
Metal cages transmit cold very easily to the oc-
cupants. The following safeguards must be taken
by dog personnel:
a. Dogs will not be subjected to extremes of
cold, wind, or precipitation. External protection
will be provided.
b. Crated dogs will not be left in low lying
areas or in standing water.
17
CHAPTER 5
PROCUREMENT, USE, AND MAINTENANCE OF MILITARY DOG EQUIPMENT
Section I. PROCUREMENT
26. What and When to Procure
Equipment allowances for the military dog pro-
gram are listed in applicable tables of organiza-
tion and equipment, tables of allowances, com-
mon tables of allowances, and supply bulletins.
They include the items described below in section
II.
27. How and Where to Procure
All items of equipment are procured through
normal supply channels except items of specialized
equipment such as electronic training devices.
Section
28. General
The proper use of equipment is important be-
cause the military dog learns to associate each
item of equipment with some activity in which it
is involved. Through proper use of these items,
the handler can communicate his wishes to the
dog and control and discipline it. Each piece of
equipment has been designed for a specific pur-
pose. The handler must become acquainted with
what the items are and how and why they are
used in a certain way. The items of equipment
described in this section are recommended be-
cause they have been tested and proved satis-
factory for training purposes. This by no means
implies that minor changes and improvements
to equipment cannot be made to meet local re-
quirements.
29. Leather Collar
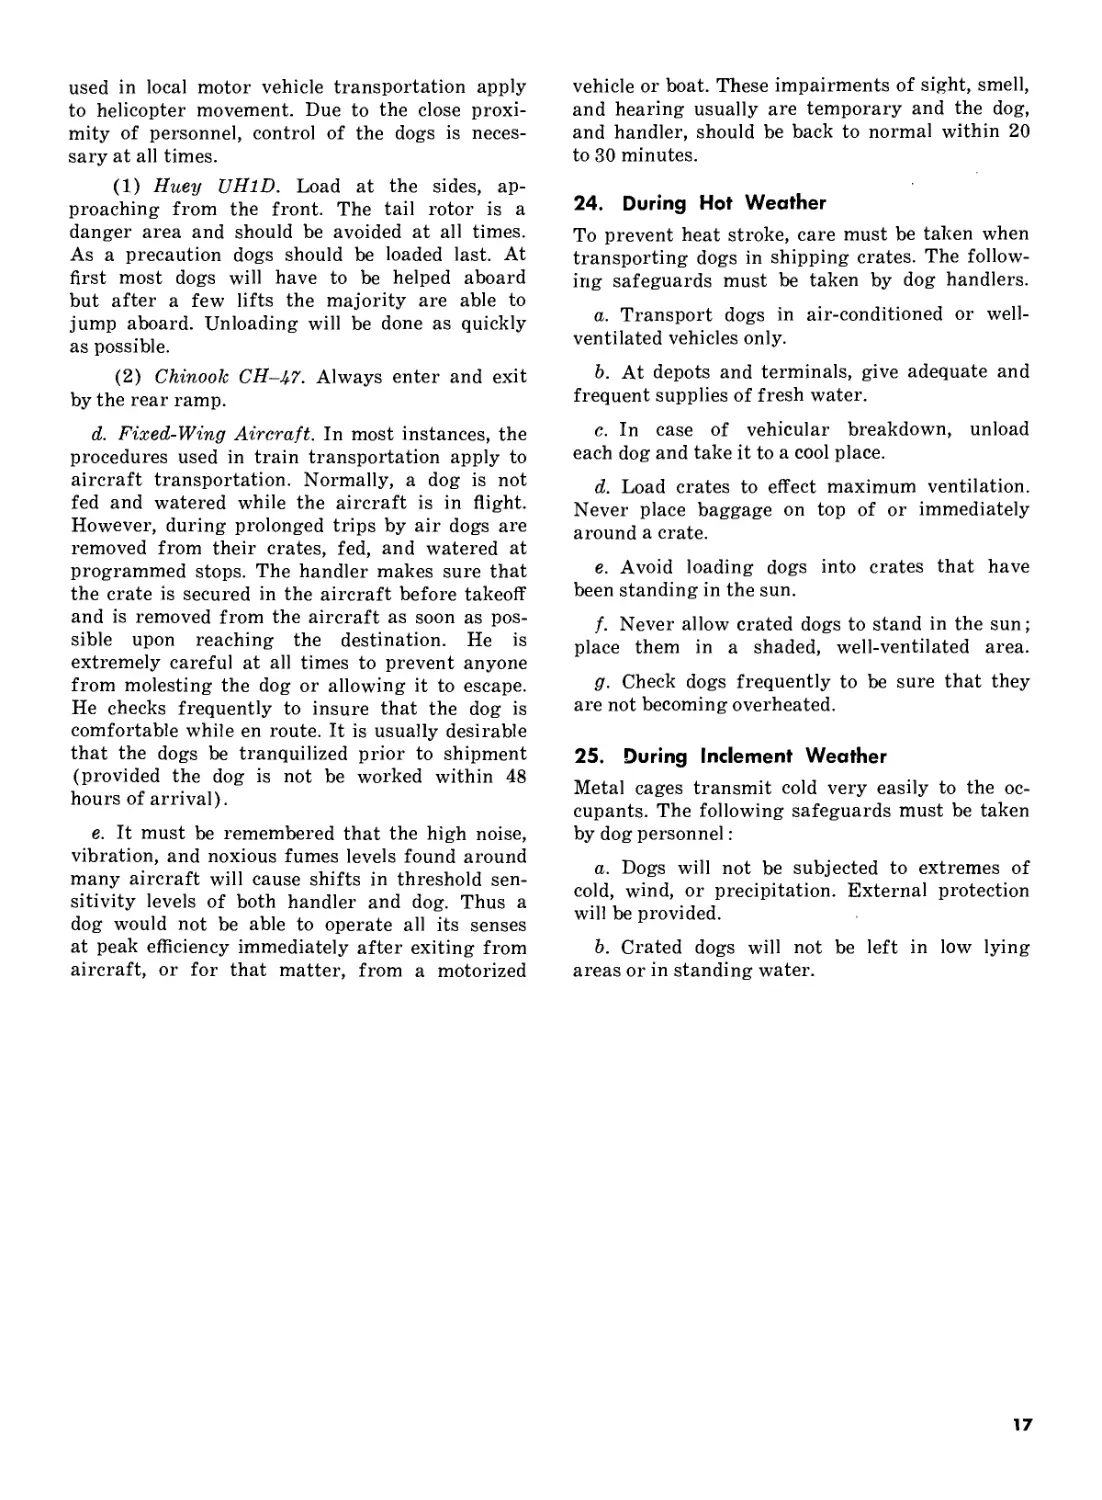
a. The dog wears a leather collar (fig 5) while
it is—
(1) chained to a stake.
(2) secured to the kennel box.
(3) being transported long distances in a
shipping crate.
b. When putting the leather collar on the dog
tighten the collar enough to insert only two fin-
gers between the collar and the dog’s neck (fig
5). This is done to prevent the collar from slip-
ping off and to make sure that it is not too
II. USE
loose. After the collar is adjusted and buckled
in place, run the end of the collar through the
loop so the buckle will not come unfastened.
30. Choke Chain
a. Another item of equipment which the dog
wears around its neck is the choke chain. The
dog normally wears the choke chain while per-
forming obedience training, while being taken to
or from its kennel, or while being transported
in the back of a vehicle. The choke chain must
be worn correctly. Instructions for putting the
choke chain (fig 6) on the dog follow:
(1) Hold one of the rings of the chain in
the right hand between the thumb and index
finger; hold the other ring in the left hand be-
tween the thumb and index finger; hold the
ring in the left hand so that it is in a flat or hor-
izontal position.
(2) Raise the right hand directly over the
left hand; allow the length of chain between the
two rings to fall through the ring held in the
left hand.
(3) Place the choke chain over the dog’s
head.
(4) Then snap the leash into the ring on
the free end of the choke chain.
b. When the choke chain is on correctly, the
pull of the leash is from left to right when the
18
Figure 5. Adjusting the leather collar.
dog is on the handler’s left or “heel” side. This
permits the chain to release when slack is given
in the leash. If the pull is from right to left,
the chain clings to the dog’s neck and continues
to choke it even though the leash has slack.
31. Training Leash
Two different leashes are used in dog work.
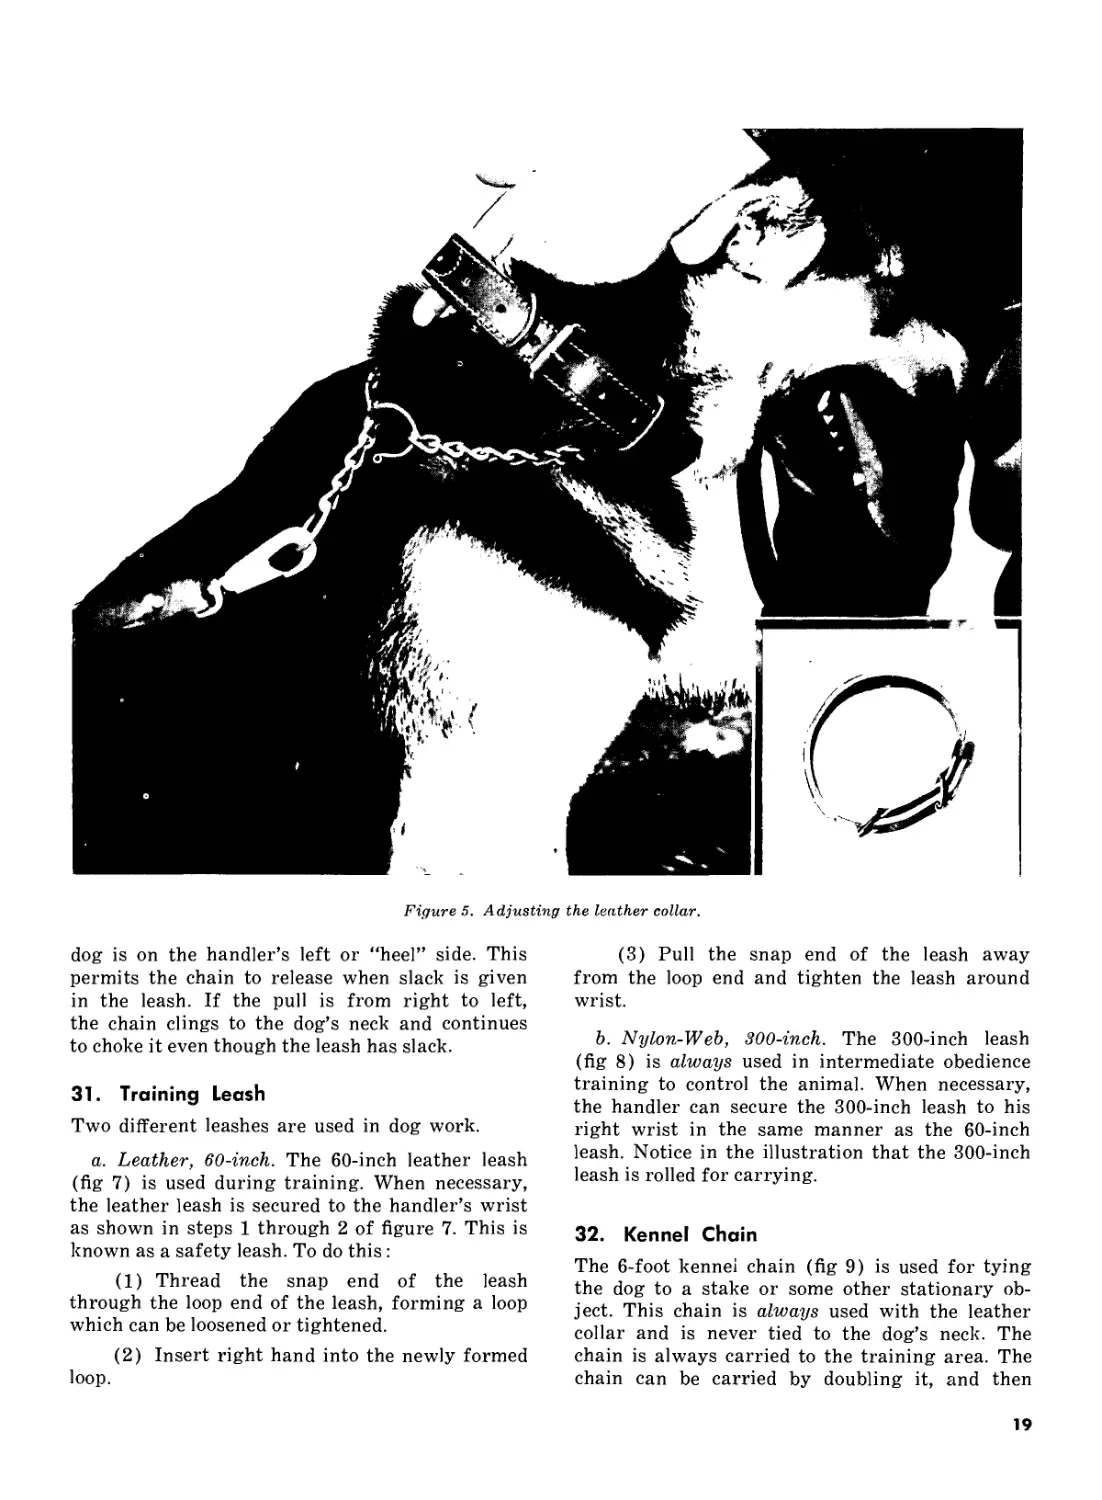
a. Leather, 60-inch. The 60-inch leather leash
(fig 7) is used during training. When necessary,
the leather leash is secured to the handler’s wrist
as shown in steps 1 through 2 of figure 7. This is
known as a safety leash. To do this :
(1) Thread the snap end of the leash
through the loop end of the leash, forming a loop
which can be loosened or tightened.
(2) Insert right hand into the newly formed
loop.
(3) Pull the snap end of the leash away
from the loop end and tighten the leash around
wrist.
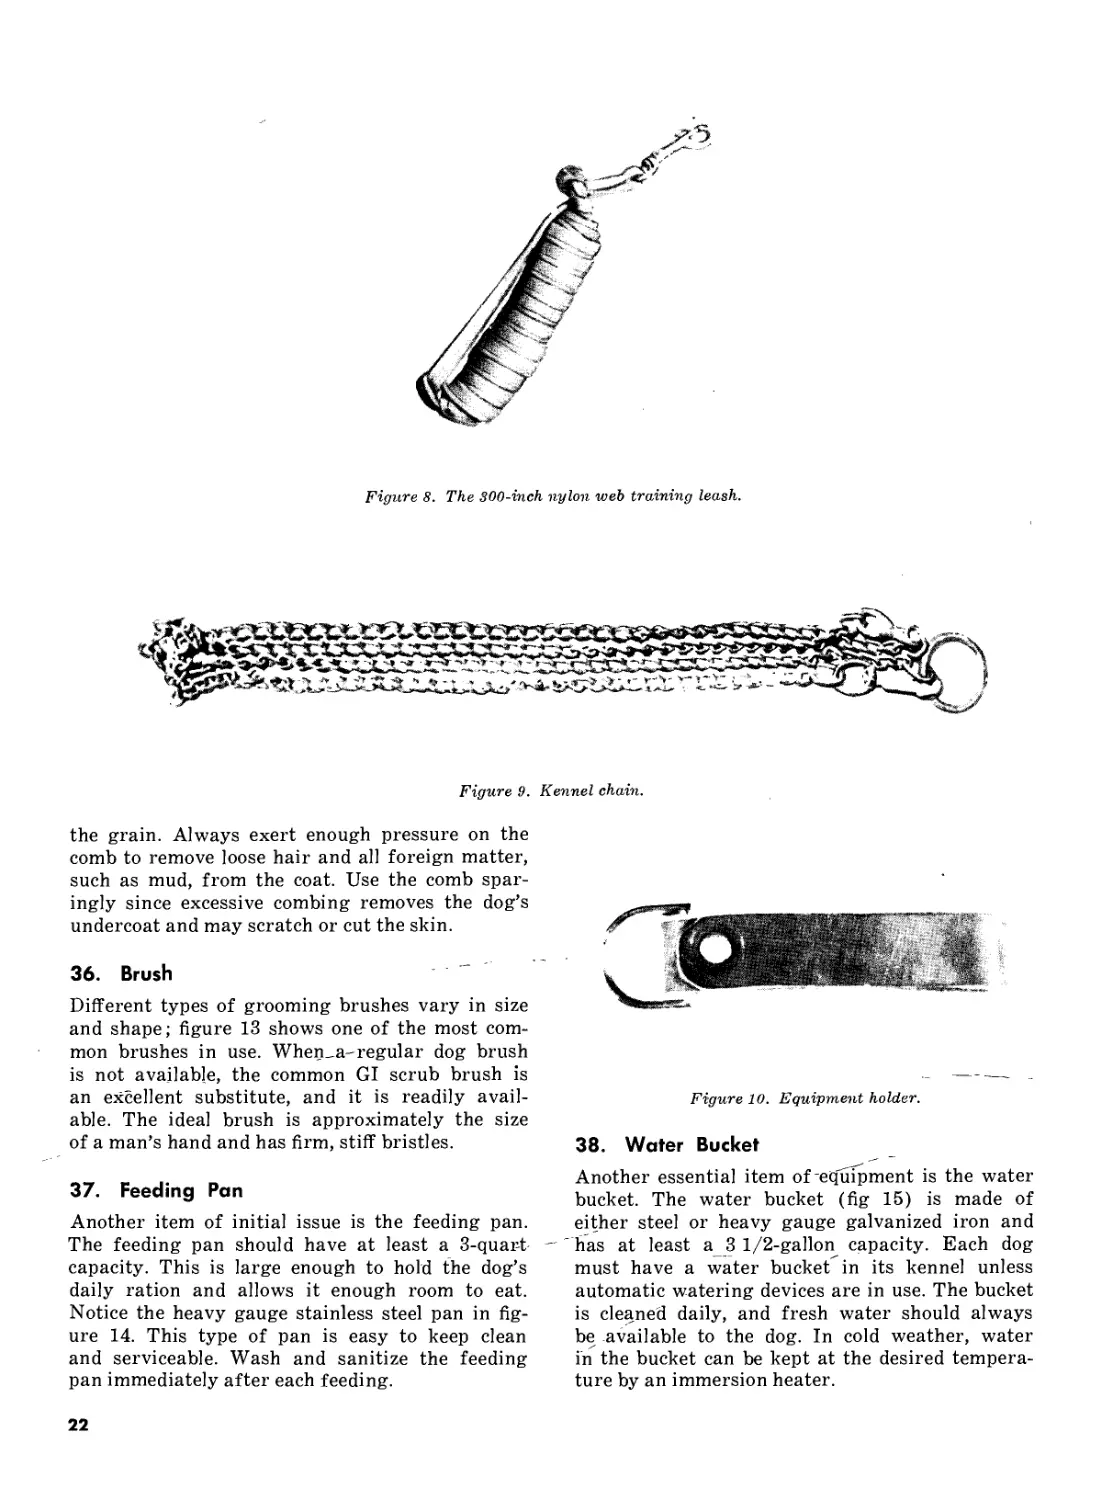
b. Nylon-Web, 300-inch. The 300-inch leash
(fig 8) is always used in intermediate obedience
training to control the animal. When necessary,
the handler can secure the 300-inch leash to his
right wrist in the same manner as the 60-inch
leash. Notice in the illustration that the 300-inch
leash is rolled for carrying.
32. Kennel Chain
The 6-foot kennel chain (fig 9) is used for tying
the dog to a stake or some other stationary ob-
ject. This chain is always used with the leather
collar and is never tied to the dog’s neck. The
chain is always carried to the training area. The
chain can be carried by doubling it, and then
19
Figure 6. Placing the choke chain on the dog.
wrapping it around the handler’s waist or diag-
onally across his body. The leather leash should
not be used to stake out an animal during breaks
in field training.
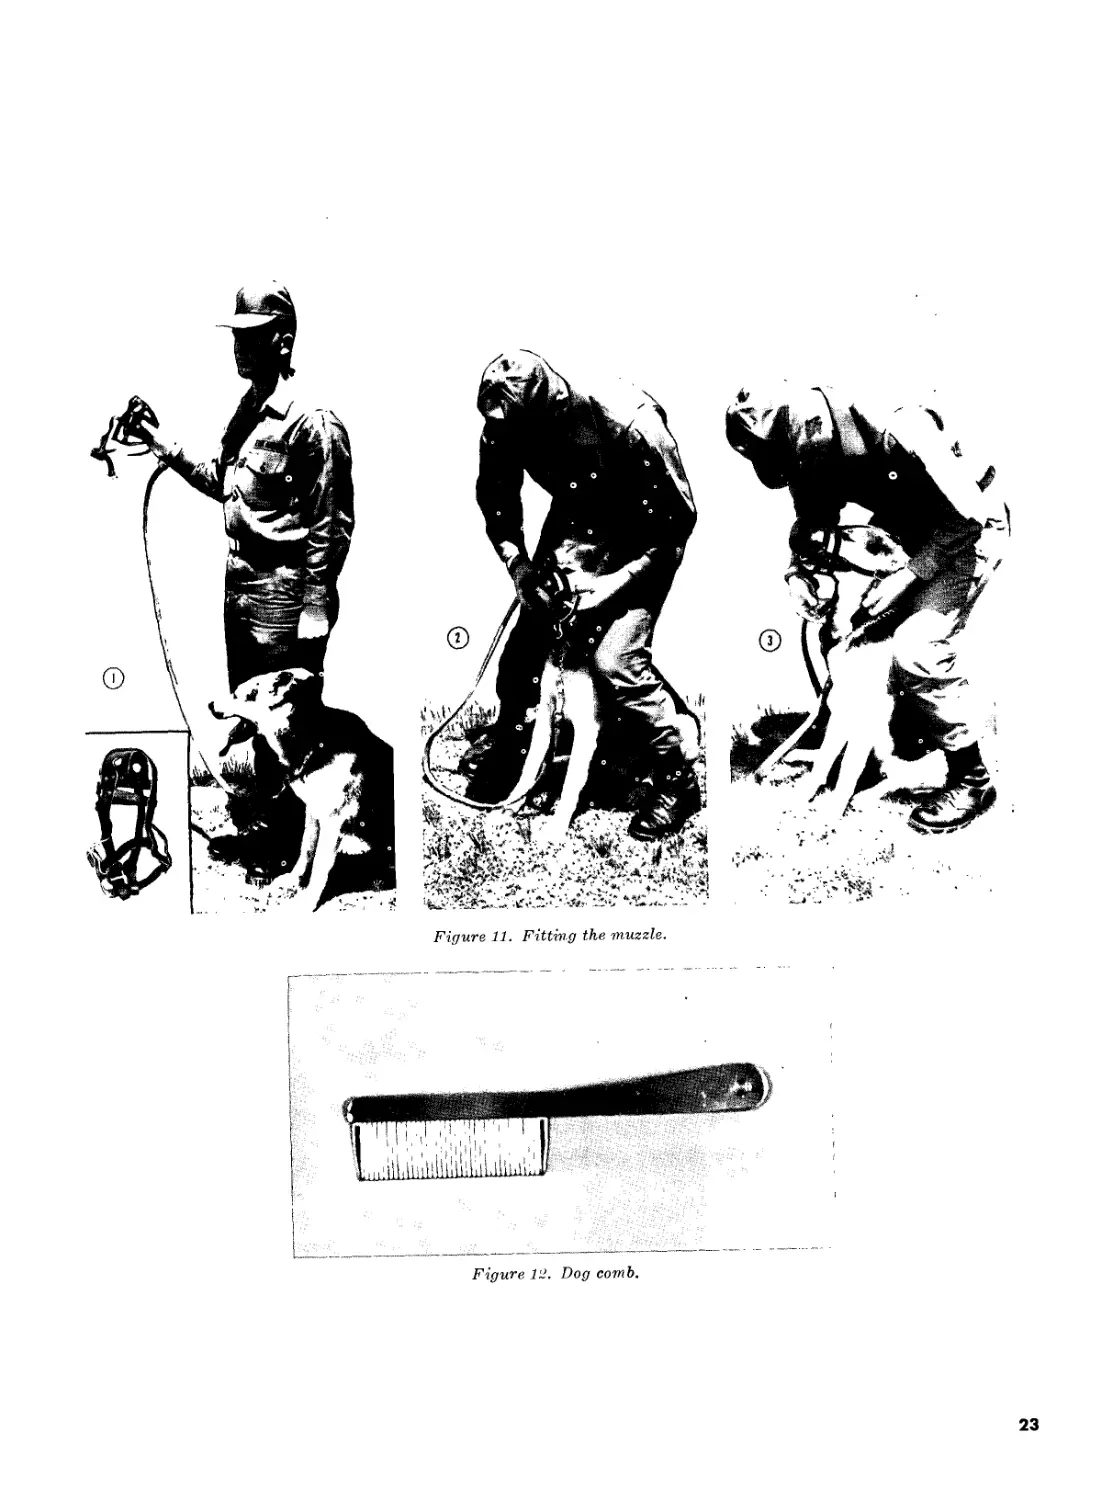
33. Equipment Holder
This holder (fig 10) is used to discourage the
handler from hanging any equipment from his
trouser belt loops. Items of equipment can be
snapped to it and carried so that the handler’s
hands remain free.
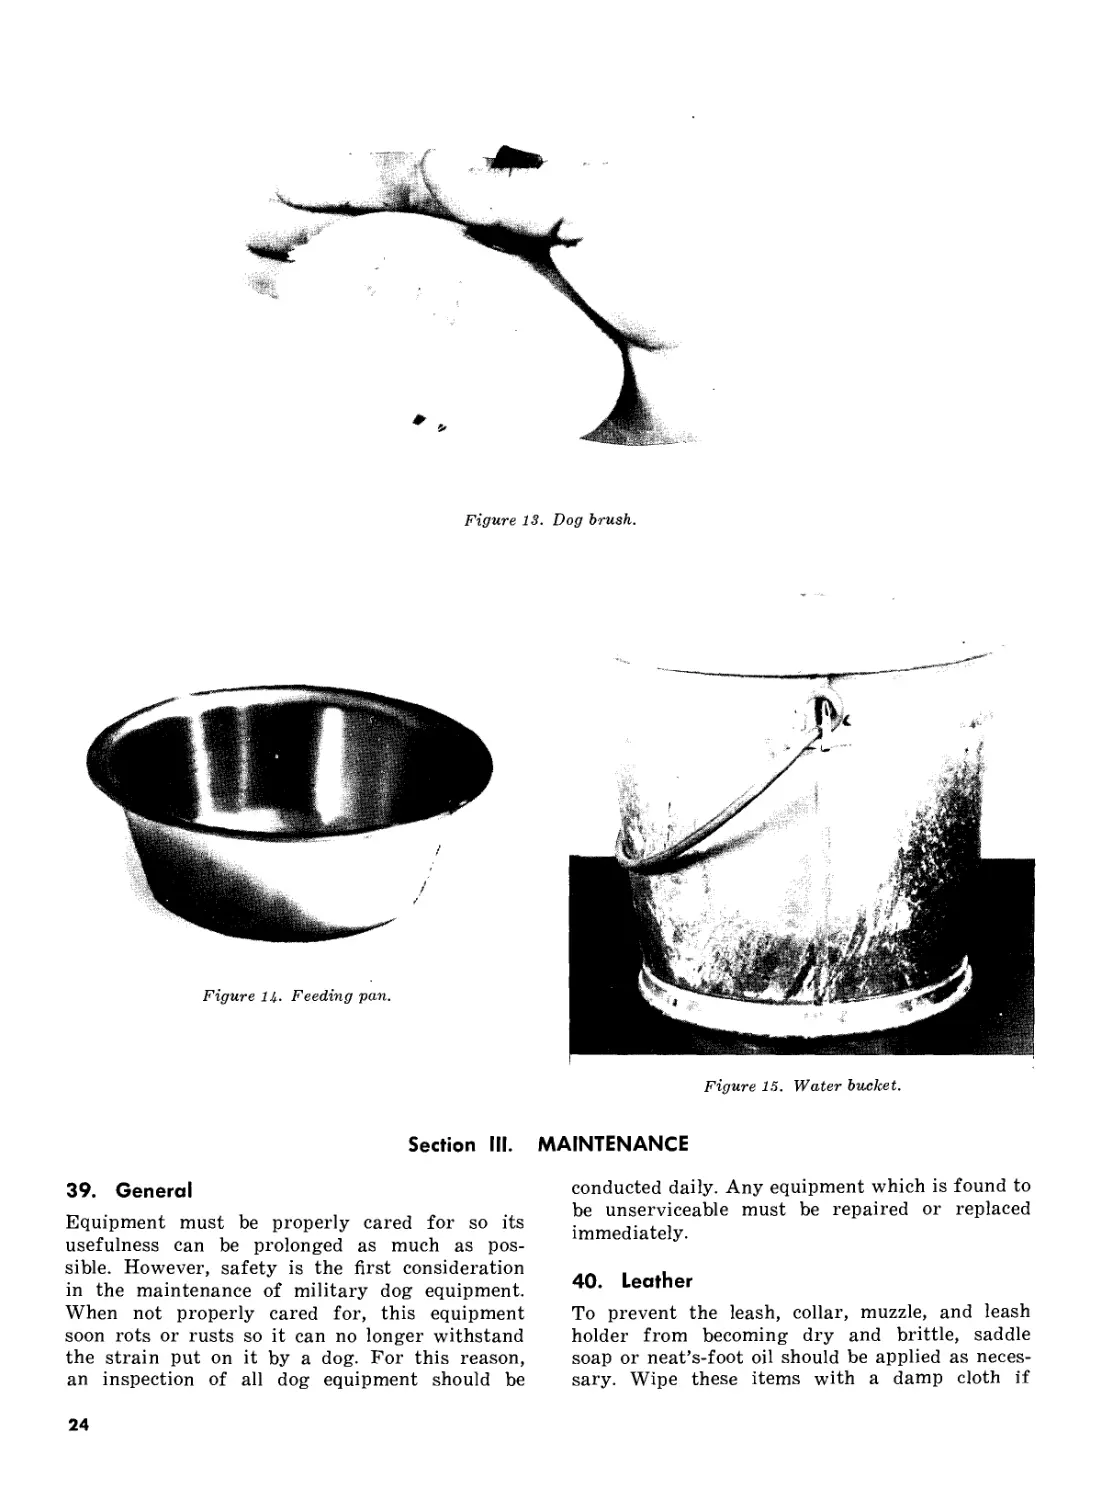
34. Muzzle
A muzzle is a device by which a handler can pre-
vent his dog from injuring other dogs, innocent
people, or himself. One of the most commonly
used muzzles is shown in figure 11. Normally, a
dog does not wear a muzzle during training per-
iods because it is distracting and the dog devotes
its efforts toward removing the muzzle. Thus,
the benefits of training are lost. However, dogs
that are known to be aggressive should be muz-
zled while being groomed. Although grooming is
20
Figure 7. Securing leather leash to wrist.
generally enjoyable for the dog, it does not pre-
clude the dog’s biting. Any muzzle, particularly
if it is too large or incorrectly adjusted, is not a
guarantee against being bitten.
a. Use the steps shown in figure 11 when put-
ting the muzzle on the dog.
(1) Hold the basket of the muzzle in right
hand; fold all straps back over the basket of the
muzzle.
(2) Place the basket of the muzzle over the
dog’s nose and mouth; bring the straps back
over the dog’s head.
(3) Secure the straps.
b. Each dog is fitted for its leather muzzle.
The side straps must be adjusted so the dog’s
nose is not jammed against the inside of the
basket. The strap around the dog’s neck must be
fastened tight enough to keep the muzzle on
properly and yet afford the dog proper breathing.
The fit of the muzzle must be closely checked
from time to time because the straps stretch
with age.
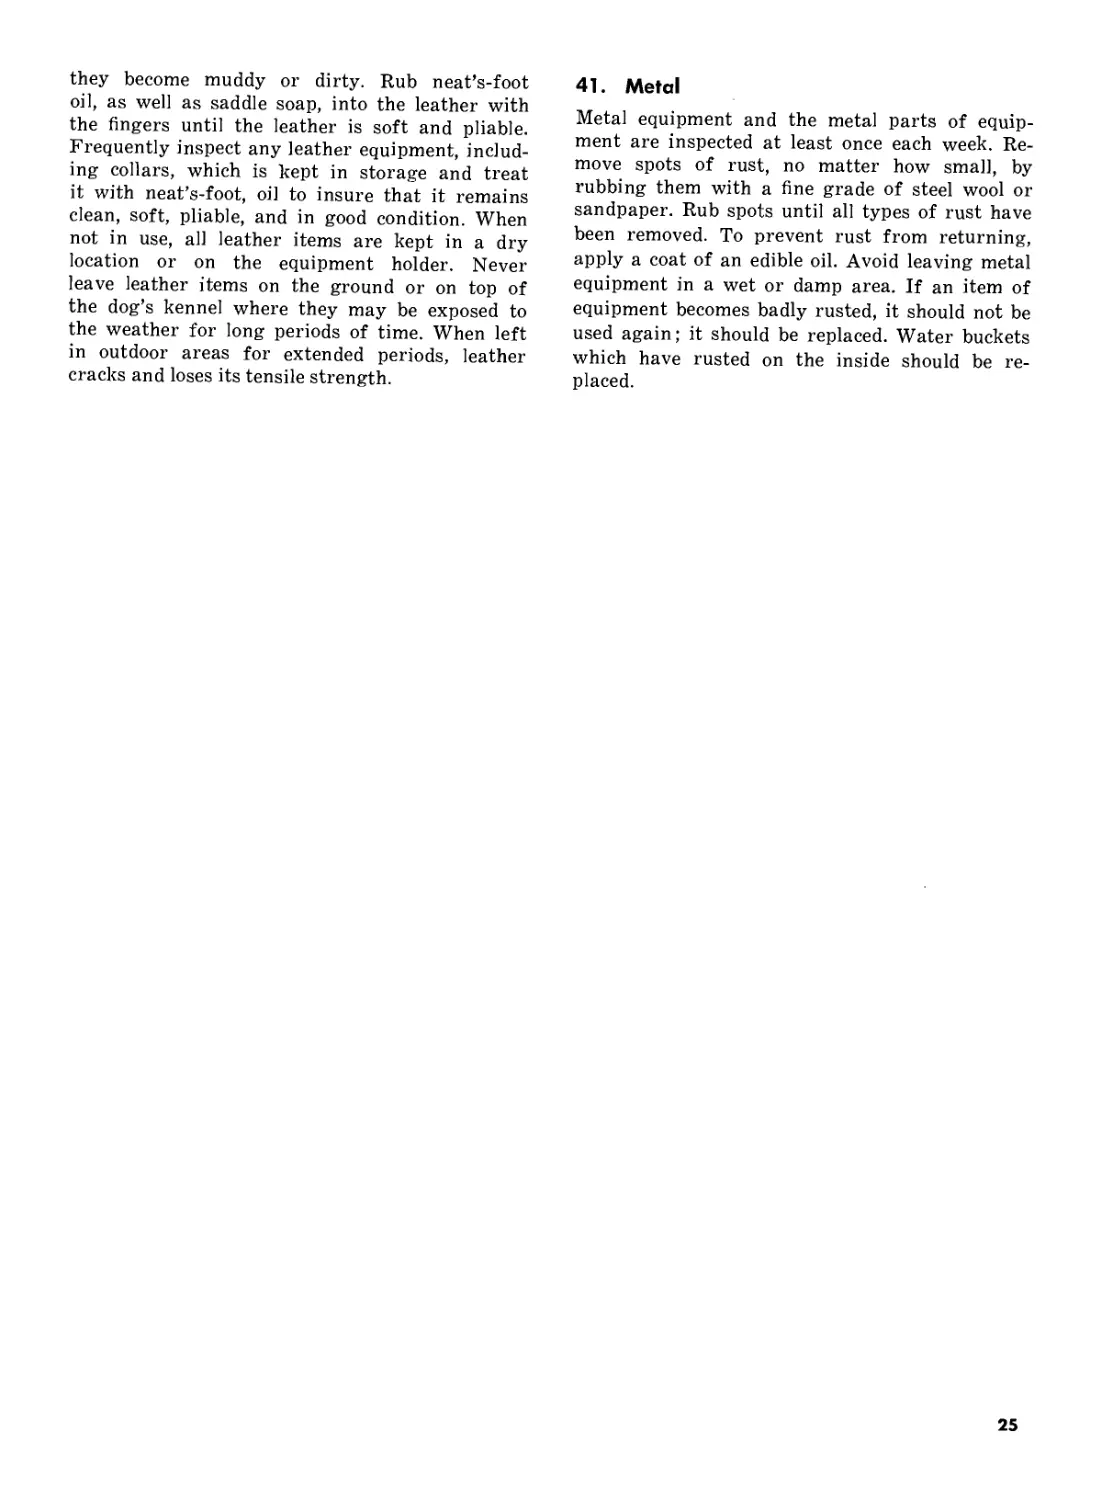
35. Comb
There are- several types of grooming combs; one
type is shown in' figure 12. When combing the
dog, comb lightly with the grain, never against
21
Figure 8. The 300-inch nylon web training leash.
Figure 9. Kennel chain.
the grain. Always exert enough pressure on the
comb to remove loose hair and all foreign matter,
such as mud, from the coat. Use the comb spar-
ingly since excessive combing removes the dog’s
undercoat and may scratch or cut the skin.
36. Brush
Different types of grooming brushes vary in size
and shape; figure 13 shows one of the most com-
mon brushes in use. When^a-regular dog brush
is not available, the common GI scrub brush is
an excellent substitute, and it is readily avail-
able. The ideal brush is approximately the size
of a man’s hand and has firm, stiff bristles.
37. Feeding Pan
Another item of initial issue is the feeding pan.
The feeding pan should have at least a 3-quart
capacity. This is large enough to hold the dog’s
daily ration and allows it enough room to eat.
Notice the heavy gauge stainless steel pan in fig-
ure 14. This type of pan is easy to keep clean
and serviceable. Wash and sanitize the feeding
pan immediately after each feeding.
Figure 10. Equipment holder.
38. Water Bucket
Another essential item of equipment is the water
bucket. The water bucket (fig 15) is made of
either steel or heavy gauge galvanized iron and
has at least a 3 1/2-gallon capacity. Each dog
must have a water bucket in its kennel unless
automatic watering devices are in use. The bucket
is cleaned daily, and fresh water should always
be available to the dog. In cold weather, water
in the bucket can be kept at the desired tempera-
ture by an immersion heater.
22
Figure 11. Fitting the muzzle.
Figure 12. Dog comb.
23
Figure 13. Dog brush.
Figure Ц. Feeding pan.
Figure 15. Water bucket.
Section III. MAINTENANCE
39. General
Equipment must be properly cared for so its
usefulness can be prolonged as much as pos-
sible. However, safety is the first consideration
in the maintenance of military dog equipment.
When not properly cared for, this equipment
soon rots or rusts so it can no longer withstand
the strain put on it by a dog. For this reason,
an inspection of all dog equipment should be
conducted daily. Any equipment which is found to
be unserviceable must be repaired or replaced
immediately.
40. Leather
To prevent the leash, collar, muzzle, and leash
holder from becoming dry and brittle, saddle
soap or neat’s-foot oil should be applied as neces-
sary. Wipe these items with a damp cloth if
24
they become muddy or dirty. Rub neat’s-foot
oil, as well as saddle soap, into the leather with
the fingers until the leather is soft and pliable.
Frequently inspect any leather equipment, includ-
ing collars, which is kept in storage and treat
it with neat’s-foot, oil to insure that it remains
clean, soft, pliable, and in good condition. When
not in use, all leather items are kept in a dry
location or on the equipment holder. Never
leave leather items on the ground or on top of
the dog’s kennel where they may be exposed to
the weather for long periods of time. When left
in outdoor areas for extended periods, leather
cracks and loses its tensile strength.
41. Metal
Metal equipment and the metal parts of equip-
ment are inspected at least once each week. Re-
move spots of rust, no matter how small, by
rubbing them with a fine grade of steel wool or
sandpaper. Rub spots until all types of rust have
been removed. To prevent rust from returning,
apply a coat of an edible oil. Avoid leaving metal
equipment in a wet or damp area. If an item of
equipment becomes badly rusted, it should not be
used again; it should be replaced. Water buckets
which have rusted on the inside should be re-
placed.
25
PART TWO
HEALTH OF THE MILITARY DOG
CHAPTER 6
VETERINARY SERVICES
Section I. WHO PROVIDES THE SERVICES
42. Medical Service
In accordance with AR 40-1, the Army Veterin-
ary Corps is responsible for providing veterinary
medical service for military dogs at all levels of
command. At installations to which dogs are
assigned, post veterinarians and attending veter-
inarians provide this service.
43. Veterinarian
Professional veterinary services are available at
military installations. The senior veterinarian as-
signed to an Army installation is designated as
“veterinarian.” At installations not having a vet-
erinarian, an “attending veterinarian” provides
medical care for dogs.
44. Attending Veterinarian
When conditions require it, military veterinary
officers may be assigned, in addition to their
other duties, as attending veterinarians for other
conveniently located military installations. Under
the provisions of AR 40-3, the commander or
designated representative of the Army post or
unit to which dogs are attached or assigned is
authorized to approve civilian veterinary care for
these dogs. However, such civilian veterinary
medical care is authorized only when a military
veterinarian is not available, or when veterinary
medical requirements for care are beyond the
capabilities of the local treatment facility. Re-
gardless of who provides the veterinary medical
services, all persons who are responsible in any
way for the dog program should become familiar
with the veterinary medical services that are avail-
able.
Section II. TYPES OF SERVICE
45. General
a. The Surgeon General, United States Army,
through his Veterinary Service, provides profes-
sional support for the military dog program.
This support includes medical care and treatment
of military dogs at training facilities and duty
stations; sanitary inspection of kennel facilities;
the professional review of plans for new construc-
tion and modifications for kennels, support build-
ings, and sites; establishment of an adequate
diet and feeding program; and instruction and
guidance in all matters relative to the health of
military dogs.
b. Through his training, knowledge, and ex-
perience, the veterinarian is skilled in providing
treatment for the military dog that is affected
by disease or injury. However, the veterinarian
depends on the individual handler and the vet-
erinary specialist for assistance. He depends on
these individuals to detect and report health prob-
lems as soon as possible and to administer es-
sential first aid measures in emergency situations.
He also requires their assistance in the adminis-
tration of medication to the dog.
c. There are a number of activities, other than
the actual treatment of sick or injured animals,
for which the veterinary officer must assume re-
sponsibility; some of these are discussed briefly
in the paragraphs below.
26
46. Immunization
Military dogs are routinely immunized against
four contagious diseases: canine distemper, in-
fectious canine hepatitis, leptospirosis, and ra-
bies. The immunization program is initiated at
the procurement or training facility, and is con-
tinued on a periodic basis throughout the dog’s
service life.
47. Routine Physical Examinations
Military dogs receive a variety of routine phy-
sical examinations. These examinations by a vet-
erinarian are conducted to detect evidence of in-
jury or disease and are important in the control
of communicable diseases as well as the safe
shipment and continued well-being of the mili-
tary dog.
a. Predeparture. A predeparture physical is
given whenever a military dog is to be moved or
shipped from one installation or command to an-
other, shipped interstate, or shipped to a foreign
country. At this time DD Form 1744 (Veterin-
ary Health Certificate) is prepared and accom-
panies the dog.
b. Arrival. An arrival physical is given as soon
as possible after arrival at a new installation
and prior to contact with other animals.
c. Semiannual. Military dogs receive semian-
nual physicals in accordance with AR 40-655
and 40-905.
48. Facility Inspections
The veterinary officer also serves as an inspector
of the military dog facilities; he inspects these
facilities at frequent intervals. During these in-
spections, the veterinarian determines the stand-
ard of sanitation which is being maintained, the
adequacy of insect and rodent control measures,
and the general status of health of the dogs as
evidenced by their appearance and state of
grooming. He also examines the facilities for
safety hazards and for disturbing influences
which may interfere with the rest and relaxation
of the dogs. He is interested in the structural
adequacy of the kennels and the suitability of
their design for prevailing climatic conditions
in the area, as well as the adequacy of the diet
which the dogs are fed. As a result of these in-
spections, the veterinarian is able to make appro-
priate recommendations to help prevent disease
and injury.
49. Zoonotic Disease Control Program
The term “Zoonotic disease control” refers to one
of the very important functions of the veterin-
arian. The zoonoses are those diseases which
may be naturally transmitted between vertebrate
animals and man. Several of the diseases that
affect dogs may be transmitted to personnel.
Ringworm (a skin disease caused by a fungus),
rabies, and leptospirosis are examples of such dis-
eases. The veterinarian advises personnel about
measures designed to prevent the transmission of
zoonoses.
50. Instruction of Personnel
Another of the veterinarian’s important functions
is that of keeping personnel informed about mat-
ters concerning the health of military dogs.
He instructs handlers and veterinary technicians
in all matters concerning the health of their dogs.
Care, management, feeding, and first aid are some
of the subjects this training covers. Through this
instruction, the veterinarian strives to give the
handler a better understanding of the health
needs of his dog and to increase the handler’s
capability to care for his dog.
51. Medical Records
The maintenance of current military dog medi-
cal records is another function in which the vet-
erinarian must take an active part, in accordance
with AR 40-905. Certain records must be kept
relative to the health of each dog and to the
medical care each receives. The veterinarian is
responsible for entering on these records his
medical observations of each dog and the im-
munizations, medical examinations, and treat-
ments each receives. Medical records are covered
in detail in chapter 9.
27
CHAPTER 7
HEALTH, CARE, AND FEEDING
Section I. DISEASES AND THEIR PREVENTION
52. General
a. The importance and nature of the work re-
quired of the Army military dog places it in a
special class, even among the working breeds of
dogs. The number of duty hours, the physical ex-
ertion, and the constant vigilance which must be
maintained by the dog while on patrol are de-
manding on the dog’s body. Thus, the health of
the dog is important to the successful accomplish-
ment of the team’s function, and every effort
must be made to keep the animal in the best
possible state of health.
b. The veterinarian is able to apply his skill
and training in his efforts towards treatment,
prevention, and control of diseases, but he re-
quires the handler’s help. The handler must be
able to recognize signs of disease and immedi-
ately report these to the veterinarian.
53. Contagious Diseases of Dogs
A contagious disease is one which can be trans-
mitted or spread from one animal to another.
Some of the contagious diseases of dogs can be
spread not only from one dog to another but also
to man. This section emphasizes the handler’s
responsibilities in providing for his dog’s health.
It is not feasible to present here all of the many
diseases which can affect dogs; therefore, only
the most common and most serious diseases are
discussed. For further detailed information, refer
to TM 8-450.
a. Canine Distemper. This is a widespread vi-
ral disease. It is a very serious, highly contagious
disease, and it is often fatal. It is a common dis-
ease of dogs, with puppies and nonvaccinated
dogs being most susceptible. Canine distemper is
usually spread from one infected dog to another
through the air. Many of the tissues and organs
of the body (including the brain, lungs, and in-
testines) are affected by this virus. An infected
animal may show the following signs: yellowish
discharge from the eyes and nose, coughing, fever,
loss of appetite, loss of vitality, diarrhea, and
convulsions. Vaccination is an extremely import-
ant and effective method of controlling canine
distemper.
b. Infectious Canine Hepatitis. This is also a
widespread viral disease of dogs; and, as with
distemper, it is seen most commonly in young
dogs but may affect animals of all ages. The
majority of infected animals recover after a long
period of recuperation. Infectious canine hepa-
titis is spread from one animal to another
through contaminated feeding and drinking pans
and through the urine from infected dogs. Pri-
marily, this virus affects the blood vessels of the
liver. Signs of the disease resemble those of dis-
temper in many cases, and it is often difficult
to distinguish between the two diseases. The most
prominent symptoms are fever, loss of vitality,
and loss of appetite. Immunization is used to
prevent this disease.
c. Leptospirosis. The disease is caused by
spiral micro-organisms of the genus leptospira,
and it is fairly common in dogs. Animals other
than dogs can be infected by the disease, and it
can be transmitted to man. It is a serious disease
and many infected dogs die. Leptospirosis is
spread through the urine of the infected animals.
Dogs and rats are common sources of infection.
Signs may include muscular stiffness and sore-
ness, fever, reddening of the membranes of the
mouth and eyes, loss of appetite, vomiting, and
diarrhea. As with distemper and infectious can-
ine hepatitis, immunization is the method used to
prevent the disease. To control the spread of lep-
tospirosis, the kennel area must be kept free of
rats, and the food and water supply must be pro-
tected from contamination by urine from infected
dogs. The possibility of human infection with
leptospirosis points out the need for personal hy-
giene when handling dogs. Since there are sev-
eral diseases which can be passed from dog to
man, the handler must always wash his hands
thoroughly after handling his dog. In localities
28
in which leptospirosis is known or suspected to
exist dogs should not be allowed to unncessarily
enter streams, rivers, or other bodies of water
since they may be contaminated from the urine
of infected animals.
d. Rabies. This disease, also called hydropho-
bia, is one of the most serious diseases of men
and animals. It is caused by a virus and affects
all warmblooded animals. Some countries of the
world are free of the disease, but in most, includ-
ing the United States, it is still a problem. It is
spread through the saliva of infected animals;
for this reason, it is usually associated with a bite
from an infected animal. All warmblooded ani-
mals may be infected by rabies, and most in-
fected animals die. In the United States, some
of the animals most frequently affected are skunks,
raccoons, bats, foxes, dogs, cattle, and cats. In an
animal with rabies, the nerves, spinal cord, and
brain are the parts of the body which are most
affected. Signs of rabies may include a sudden
change of disposition, excitement difficulty in
swallowing water or food, paralysis, and coma.
Dogs with rabies often have a paralysis of the
muscles in the jaw and the lower jaw remains
partially dropped. Such an animal may appear to
have something lodged in the mouth or throat.
It is always wise for the handler to have an ani-
|mal with such symptoms examined by a veter-
inarian rather than attempt an examination him-
self. Immunization against rabies is required by
AR 40-655. Because rabies is spread through the
saliva of an infected animal the handler should
report to the veterinarian any wounds he or his
dog receive by being bitten, even though the bit-
ing animal appeared healthy at the time of the
biting; this includes handlers who are bitten by
their own dogs.
e. Tropical Canine Pancytopenia. Tropical Can-
ine Pancytopenia (TCP) is an infectious disease
affecting large numbers of military dogs in
Southeast Asia. Especially affected are German
Shepherds. The most common sign of the disease
is nosebleed, which may be accompanied by swol-
len legs, small or large hemorrhages in the skin,
loss of weight, decrease in appetite, very high
fever, weakness, and difficulty in breathing. Very
often death occurs within 7 days following the
onset of characteristic signs, although some dogs
may live several months before succumbing to
the disease. The disease is believed to be trans-
mitted by ticks. Decrease and/or complete ab-
sence of the disease is seen where strict tick con-
trol methods are employed. There is no known
treatment or vaccine for TCP. Tetracycline ther-
apy may be effective in helping to control and
prevent new outbreaks of the disease, especially
when used in conjunction with good tick control
measures. Most methods of treatment, including
antibiotics and whole-blood transfusions, have
not been too successful once the animal shows
apparent signs of TCP, consequently strict con-
trol of tick infestations is of the utmost import-
ance.
54. Parasitic Infections
Parasites that live on the outside of a host’s
body, such as ticks, fleas, and mites, are called
external parasites; those that live inside the body,
such as various worms, are called internal para-
sites. Many of these live in the intestines, and
one type lives in the dog’s heart. All parasites
are harmful to the health of the dog, and some
can spread diseases to the dog or to the hand-
ler. Parasites should be controlled as much as pos-
sible. When speaking of parasites, the term “life
cycle” refers to the stages of development in the
parasite’s life from its beginning as an egg or
larva (immature form) to the time it becomes
an adult. A knowledge of the life cycle is import-
ant in the control of parasites.
a. External Parasites. The parasites discussed
here are all small insects. These parasites, which
live on and in the skin, cause damage by sucking
blood or by feeding on the dog’s tissues. In doing
so they produce an irritation, and the dog re-
sponds by biting and scratching at itself.
(1) Ticks. These small parasites are com-
mon in many parts of the world. They suck the
blood from the animal and, when present in large
numbers, may cause a serious anemia. Ticks can
most often be observed standing still on the dog’s
body with their heads buried deep in the skin.
Through their bites, ticks are important vectors
of disease producing agents, such as bacteria and
rickettsiae in animals as well as man. Exercise
care when handling ticks and request instruc-
tions from the veterinary officer before trying to
remove them. Ticks do not necessarily spend all
of their lives on the body of the dog. They may
be found in bedding or in cracks in the floors
and sides of the kennel; they may be present in
the grass and bushes of the training and working
areas. Control, therefore, does not depend only
on treating the individual animal. It may also
be necessary to treat the kennels and training
and working areas with insecticides. Treatment
with insecticides must be accomplished only with
the approval of the veterinary officer, as many
chemicals can be harmful to dogs.
(2) Fleas. These pests torment the dog, irri-
tate its skin, and spread disease; they are most
often observed as they crawl or hop very rapidly
29
through the dog’s coat of hair. They are very
difficult to control because they do not spend all
of their time on the body but live in bedding
and in the cracks of the kennel. Control depends
upon repeated individual treatment and kennel
sanitation.
(3) Lice. There are two types of lice which
affect dogs: biting lice and sucking lice. Biting
lice live off the dog’s tissues; sucking lice suck
the dog’s blood. Both produce great irritation.
Biting lice may be observed crawling over the
skin and through the hair. When feeding, sucking
lice are usually immobile and attach themselves
so that they are perpendicular to the skin of the
host. The eggs of lice are called nits and are
found as small white or gray crescent shaped
objects fastened to the hairs. Lice, unlike fleas
and ticks, can live only a short time when they
are not on the dog’s body. Control therefore, de-
pends more on the treatment of affected animals.
(4) Mites. There are several types of small
parasites called mites which affect dogs and pro-
duce a condition known as mange. One of these,
the ear mite, lives in the ear canals and causes
a severe irritation. Affected dogs not only scratch
at the ears but may hold their heads to one side
and frequently shake their heads. The ear canals
usually contain a large amount of dark-colored
discharge. Ear mites are small but are visible to
the naked eye as tiny white crawling specks.
Most of the other mites which affect the dog live
in the animal’s skin, but one lives in the nasal
passages. These mites are too small to be seen
with the naked eye and can be seen only with
the aid of a microscope. The control of mites
depends on the treatment of the affected animal.
b. Internal Parasites. The parasites which live
in the body may cause damage by irritating the
tissues, by constantly robbing the body of blood
or essential parts of the diet, or by interfering
with a specific body action. Of the internal para-
sites discussed here, only a part of the life cycle
is spent in the body of the infected dog. The
control measures for these parasites are based
largely on a knowledge of that part of the life
cycle which is spent outside the body.
(1) Hookworms. One of the most harmful
parasites that lives in the dog’s intestine is the
hookworm. These parasites are small and thread-
like, only 1/3 to 4/5 of an inch in length. They
suck blood and also cause blood loss by grasping
and tearing at the intestinal wall with the many
teeth in their mouths. Figure 16 shows the life
cycle of a hookworm. The adult lives in the dog’s
intestine, and eggs are produced by the female
hookworms. The eggs are passed in the infected
dog’s feces. Immature hookworms (larvae) de-
velop from these eggs, and these larvae can then
infect the same dog or another dog. The larvae
gain entrance to the body by penetrating the dog’s
skin or by being swallowed as the dog licks the
the ground or himself. After the larvae gain
entrance to the body, they pass directly to the
intestine or migrate through the body tissues to
the lungs. Those reaching the lungs are coughed
up and swallowed, thereby reaching the intes-
tine. Once they are in the intestine, they develop
into adult hookworms and the life cycle begins
again. Dogs infected with hookworms may have
a variety of symptoms, depending on the severity
of the infection. Membranes of the mouth and
eyes may be pale; feces may be loose and contain
blood; the animal may lose weight. The veteri-
narian makes a diagnosis of the disease when, by
microscopic examination, he finds hookworm eggs
in the animal’s feces. Control measures consist
of treating the individual animal and, to a large
extent, on good sanitation. The handler who has
a knowledge of the hookworm’s life cycle should
understand the importance of keeping the kennel
area and training ground free of feces, since feces
from infected dogs are the source of infection
for healthy animals.
(2) Roundworms. These adult parasites also
live in the intestine. They are much larger than
hookworms and vary in length from 2 to 8
inches. Adult roundworms cause trouble by de-
priving the affected animal of essential nutrients
in the diet. The life cycle is similar to that of
the hookworm but the eggs do not develop into
larvae until swallowed. They then enter the blood
stream and migrate to such organs as the liver,
kidney, and lungs, producing great damage in
the process. Most finally reach the lungs where
they are coughed up and swallowed to return to
the intestine to mature. Symptoms shown by an
infected animal may include vomiting, diarrhea,
loss of weight, and coughing. As with hook-
worms, the diagnosis is made by finding the eggs
in the feces; occasionally, adult worms may be
vomited or passed in the feces, in which case
they may be seen by the handler. Control meas-
ure depend upon treating the individual animal
and upon good sanitation in the kennel area.
(3) Whipworms. These intestinal parasites
are much smaller than roundworms but larger
than hookworms. The life cycle is different from
that of the hookworms and roundworms in that
the whipworm larvae do not enter the blood-
stream or migrate to other organs; they maturei
in the intestine of the dog. Symptoms of infection
may include diarrhea, loss of weight, and paleness
of the membranes of the mouth and eyes. The
30
EGGS HATCH
Figure 16. Life cycle of hookworm.
diagnosis is made by microscopic observation of
the characteristic eggs in the feces. Control meas-
ures depend upon treating the individual animal
and upon good sanitation in the kennel area.
(4) Tapeworms. These worms are long, flat,
and ribbonlike in appearance. They have many
segments and a head. The tapeworm uses its
head to attach itself to the wall of the intestine.
Several kinds of tapeworms may infect the dog’s
intestine; only one of the most common ones is
described here. As figure 17 shows, the life cycle
of the tapeworm is rather complex. After the
proglotteds with eggs have passed in the dog’s
feces, they are eaten by the larvae (immature
form) of the dog flea, the external parasite pre-
viously described. The larva of the tapeworm de-
velops in the flea; and when the adult flea is
eaten by a dog, the tapeworm larva gains en-
trance to the dog’s intestines where it develops
into an adult tapeworm. The symptoms pro-
duced by tapeworms may not be too noticeable.
They may include diarrhea, loss of appetite, and
loss of weight. Some tapeworms pass through the
bodies of rabbits, mice, or squirrels (instead of
the flea) during their life cycle. Dogs become in-
fected by eating a rabbit or other animal which
31
DOG EATS
ADULT FLEA
ADULT WORM
FOUND IN DOG’S
INtESTINE
FLEA LARVAE
EAT EGGS
SEGMENTS CONTAINING
EGGS VOIDED IN DOG’S FECES
FLEA LARVA
DEVELOPS INTO
ADULT FLEA
WHICH CONTAINS
THE TAPEWORM
LARVAE
Figure 17. Life cycle of tapeworm.
LIFE CYCLE
TAPEWORM
contains the tapeworm larvae. Often the eggs
of the tapeworm cannot be detected by the veteri-
narian during feces examinations. Many times,
however, segments may be seen in the feces or
among the hairs in the dog’s anal region. They
are small white objects about 1/4 of an inch long
and they may be moving in a rhythmic manner.
Control measures include treatment of the in-
fected animal, good sanitation in the kennel area,
control of fleas, and not allowing thd dog to eat
animals which are likely sources of infection.
(5) Heartworms. Unlike the other internal
parasites that have been described, the adult
heartworm is found in the heart and lungs rather
than in the intestine. The heartworm interferes!
with the dog’s heart action and circulation. The
adult worms are threadlike in appearance and
are from 6 to 11 inches long. As the life cycle
32
HEARTWORM
THROUGH
TO HEART
MALE AND FEMALE
ADULT WORM IN THE
HEART, MATE, THEN
FEMALE DISCHARGES
MICROFILARIA INTO
BLOODSTREAM.
SWALLOWS WHILE
FEEDING ON DOG’ S
BLOOD
LIFE CYCLE
MIGRATION OF
LARVAE
TISSUES
MOSQUITO FEEDS ON
DOG, DEPOSITING
LARVAE IN TISSUES
DEVELOPMENT
OF LARVAE IN
MOSQUITO
Figure IS. Life cycle of heartworm.
in figure 18 shows, the adult worms in the heart
produce larvae which are called microfilariae.
These microfilariae circulate in the infected
animal’s bloodstream where they may be picked
up by mosquitoes, the insect responsible for the
spread of the heartworm parasite from one dog
to another. The larvae continue their develop-
Jment in the mosquito and then after a period
of time are introduced into a dog’s tissues as
the mosquito is biting. The microfilariae mature
and then travel to the heart of the dog and de-
velop into adults; the life cycle is ready to begin
again. Dogs infected with heartworms may ex-
hibit coughing, loss of weight, difficult breathing,
and a loss of stamina. The disease is diagnosed
by the veterinarian when he finds microfilariae
during a blood test. Treatment is then given to
kill the adult worms and the microfilariae. Con-
trol measures consist of treating and quarantin-
ing infected dogs to prevent them from serving as
33
sources of infection, and of controlling mosqui-
toes in the area. Treatment of infected dogs
includes kennel rest of up to 6 months.
55. Sanitation
Cleanliness is one of the most important factors
contributing to the good health of dogs. Sanitary
measures must be practiced in and around the
kennel area at all times, and a good standard of
cleanliness must be maintained. The existence
of a good standard of sanitation in a kennel
facility does not just happen; it is the result of a
cooperative effort on the part of the handlers,
supervisors, kennel support personnel, and the
veterinary officer. Through their knowledge of
the needs of each kennel, the veterinarian and
supervisors arrive at the standard of sanitation
which must be maintained; each handler and the
kennel support personnel are responsible for
maintaining the established standard. The exist-
ence of a disease in one dog, which might be
passed on to another dog or to all of the dogs
in the unit, is the concern of every handler. A
disease which spreads through the kennels may
seriously impair the effectiveness of a handler’s
unit if a large number of animals become ill and
have to be removed from duty. Disease control
and sanitation cannot be separated, and there
are many specific ways in which a good level of
sanitation can be maintained.
a. Kitchen. The kitchen in the kennel support
building must be kept as clean as possible. Food
prepared with dirty hands and in dirty utensils
is a source from which a dog may contract some
disease. To prevent disease, clean and sanitize
the food and water pans daily, and constantly
maintain the kitchen in a clean condition. When
transporting feed pans from the kitchen to the
individual dogs, never stack the pans on top of
one another. The bottom of one pan may pass
dirt or disease to the food in another pan. Clean
the utensils used in the preparation of food im-
mediately after each food preparation period.
One particular piece of equipment which must be
cleaned is the can opener; clean the blade after
each food preparation period. Clean clothes and
clean hands are important items for personnel
engaged in food preparation. Store food in rat-
proof areas so that dry meal or cans are not
soiled by rat urine or stools. The type of food
used is also important—use only those foods
approved by the veterinary officer.
b. Kennels. The kennels must be kept clean
and in a good state of repair. Clean each oc-
cupied kennel daily. Sweep kennels each day and
scrub them at least once each week, more often
if necessary. In cold climates, place straw or
other material on the floor of each kennel for
bedding; stir straw bedding daily and chnge it
at least once each week. Other bedding is
changed as needed. Replace wet or damp bedding
immediately. When a dog is moved from one
kennel to another, old bedding, if present, is re-
moved and burned. The kennel is cleaned
thoroughly and disinfected as outlined by the
veterinary officer. Use only those disinfectants
approved by the veterinarian. Whenever possi-
ble, expose the cleaned and disinfected kennels
to sunlight.
c. Runs. These are the areas around the in-
dividual kennel which are surfaced with cement
or gravel. The proper care of runs is important
and must be accomplished routinely. As previous-
ly mentioned, feces are a common source of in-
fection in the spread of disease. Remove them
from the runs as often as necessary during the
day. Before washing down cement runs, remove
as much of the feces as possible. This prevents
the splashing of feces into an adjacent run, on1
the ground around the run, or on a dog in the
adjacent run. The method of disposing of feces
depends on local conditions at each particular
kennel and on the type of sewage disposal system
which is present. Where feces must be carried
from the kennel area in cans, these cans must
be cleaned and disinfected after each use. Dis-
posal plastic liners inside cans are desirable.
Usually two or more thicknesses must be used.
d. Kennel Area in General. In the entire ken-
nel area, there must be no accumulation of refuse
and garbage which would attract rats and in-
sects. The area, particularly the training grounds,
must be kept free of feces. In regions where
mosquitoes are a problem, control measures must
be taken around ditches and swampy areas which
are in the vicinity of the kennels. Several kinds
of disinfectants can be used around a kennel
area. They can be used to disinfect feeding pans,
kennels, and runs. Disinfectants and disinfecting
procedures must be used only with the approval
of the veterinary officer.
34
Section II. CARE
56. Grooming and Inspection
Routine grooming and inspection are important
events in the life of a military dog—so important,
in fact, that they must be accomplished on a
daily basis the year around. The handler must
realize that grooming is essential to the proper
care of the dog’s skin and coat of hair. During
the inspection of his dog, the handler looks for
signs of illness or disease which may be affect-
ing the health of the animal. A large part of the
inspection is performed while the dog is being
groomed. The daily grooming and inspection pe-
riod should be a pleasant experience for the
handler and his dog. This is the time when the
two of them can relax while they do something
useful together. The dog looks forward to its
daily grooming, and the handler knows that he
is contributing directly to the fulfillment of his
responsibility for the dog’s health.
a. Grooming. German Shepherd dogs have a
double coat of hair. The deeper layer or under-
coat is composed of soft woolly hair, and the outer-
coat is composed of stiff hair which is somewhat
oily and water resistant. The coat offers the dog
protection from rain, excessive heat, and cold.
(1) To groom the dog, first give it a brisk
rubdown with the fingertips moving against the
grain, then rub with the grain to remove the hair
as shown in step 1 of figure 19. This loosens any
dead skin, hair, or dirt and brings it to the sur-
face; it also massages the skin. Follow the rub-
down with a thorough but gentle brushing against
the grain, as shown in step 2, to remove the
loosened skin, hair, and dirt. Next, brush the
Figure 19. Grooming.
35
coat with the grain, as shown in step 3. This
returns the hair to its natural position. Finally,
rub the coat with the palms of the hands with
the grain of the hair, as shown in step 4. This
helps distribute the oil and gives the coat a
glossy appearance. Occasionally, comb the dog’s
coat; but in the winter, combing should be limit-
ed to avoid tearing out the warm undercoat.
(2) Bathing is not a part of routine groom-
ing, but occasionally a bath may be necessary.
A dog’s skin has many glands which produce an
oily substance. This oily substance keeps the skin
soft and prevents it from drying and cracking.
In addition, it protects the coat of hair and makes
it water repellent. When a dog is bathed too
often, the natural oil is removed and the skin and
hair become unnaturally dry, resulting in skin
problems.
(3) Rely on the advice of the veterinary
officer as to the frequency of bathing, the type
of soap to use, and how to protect the dog’s eyes
and ears. A thorough rinsing after the bath is
important; if soap is left in the coat it becomes
sticky, collects dirt, and may cause skin irritation.
(4) Dry the dog with a towel or suitable
substitute. After it has been dried as thoroughly
as possible, the dog may be gently exercised in
the sun to complete the drying. Do not bathe a
dog in cold or wet weather unless it can remain
in a warm place until completely dry.
b. Inspection. Routine daily inspection is a
part of, but is by no means limited to, the groom-
ing and inspection period. During the formal
grooming and inspection period, take this opport-
unity to check over each part of the dog’s ana-
tomy for signs or symptoms of illness or injury.
Inspection, however, is a continuing process, so
always be alert for symptoms of illness or injury.
(1) After the handler has had his dog for
some time, he knows what the dog should look
like and how it should act when healthy and well.
The handler knows what is normal for his dog:
how its coat of hair looks, how many bowel move-
ments it has a day, and how much it eats each
day. When making his daily inspection, he uses
this knowledge to detect anything about his dog
which is abnormal. For example, the animal may
not have eaten all of its food for a day or two;
it may have an area of hair loss and reddened
skin somewhere on the body; or it may have a
discharge coming from the nose.
(2) When a handler notices anything abnor-
mal about the appearance or actions of his dog,
he reports it immediately. Do not attempt to
diagnose the illness and apply home remedies,
which can often do more harm than good. Rely
on the veterinarian who is trained to provide ex-
pert medical care for the dog. The veterinarian
depends on the handler to detect and report any
symptoms of illness or injury. The early detec-
tion of any illness or injury is important, if treat-
ment begins early, the dog has a better chance
for a rapid and complete recovery.
(3) The handler must learn the terms which
are used to describe the various parts of a dog’s
external anatomy. This enables him to read in-
telligently about his dog, to report symptoms of
illness or injury accurately, and to understand
the veterinarian’s instructions for treatment.
Figure 20 is designed to aid the handler in learn-
ing the parts of his dog’s anatomy.
(4) During inspection, it is necessary that
the handler check some specific places on his dog
for symptoms of disease and injury.
(a) Eyes. The dog’s eyes are often refer-
red to as the mirror of its body. This means
that illnesses of the body are frequently accom-
panied by changes in the eyes. In addition, many
illnesses affect only the eyes. Normally, a dog’s
eyes are bright and clear. The surrounding mem-
branes should be a healthy pink in color. The
small wedge-shaped membrane at the inner corner
of the eyes is known as the nicitating membrane
or the third eyelid. Normally, this covers only a
very small part of the inner portion of the eye.
Look for any of the following symptoms of ill-
ness or injury: a reddish or yellowish discolora-
tion of the membranes and whites of the eyes,
paleness of the membranes of the eyes, the pres-
ence of whitish or yellowish discharges from the
eyes, and cloudiness or other discoloration of the
clear portion of the eyes (cornea). Other symp-
toms to watch for are puffiness of the lids, the
lids held partially or completely closed, or the
nicitating membranes covering more than the
normal part of the cornea. Be careful not to in-
jure the dog’s eyes when examining them.
(b) Nose. The black pad at the end of a
dog’s nose is usually shiny and moist. If it is
persistently dry and dull, this may be a symptom
of illness. Other symptoms to look for are: the
presence of a watery, yellowish, or red-tinged
discharge coming from or caked around the ex-
ternal openings of the nose; sneezing, snorting,
and pawing at the nose. Do not probe into the
dog’s nose with any object under any circum-
stances.
(c) Ears. The erect external portion of the
ear is called the ear flap. Leading downward from
the base of the ear flap is the ear canal. The
portion of the canal which can be seen with the
36
SKULL
OCCIPUT
Figure 20. External anatomy of the dog.
naked eye is known as the vertical canal. The
deeper portion, which cannot be seen, is the hori-
zontal canal. Small quantities of brownish wax
are frequently seen in the vertical canal and are
normal. The presence of a reddish discoloration,
swelling, or large amounts of discharge in the
ear canal are abnormal and should be reported.
Other symptoms to report include: a foul odor
coming from the canals, shaking of the head,
drooping of one or both ears, holding the ear-
flap down, holding the head to one side, twitching
the ear, scratching or pawing at the ear, and
evidence of pain when the ear is touched. Dirt
and wax can be removed from the inner part of
the earflap in a number of ways. Consult the
veterinarian about the method to use. Have the
ears checked by the veterinarian even when they
appear to only need cleaning, because something
.else may be wrong. Never probe into the ears
Jbanal with any object.
(d) Mouth. When the handler looks into
the dog’s mouth, numerous things are checked.
Normally, the gums and inner aspect of the lips
are salmon pink. The teeth are firm and shining
white in color. Symptoms of illness to look for
include paleness of the gums and membranes,
redness and bleeding of the gums, sores of various
types, persistent drooling, bloody saliva, and a
foul breath. Loose and broken teeth, tartar ac-
cumulations on the teeth, and foreign objects
lodged between the teeth are other conditions to
report. Also notice any gagging or pawing at the
mouth.
(e) Skin and hair coat. Under normal con-
ditions, the hair coat of the dog has a glossy
appearance the dog is well fed and well groomed,
and the skin is soft and pliable. The hair coat
is subject to changes in appearance when the
climate and season change. The undercoat is thick-
er and more prominent in cold climates or seasons,
shedding is more noticeable in hot climates or
seasons. These changes in the dog’s coat are
normal. The following conditions are indications
of skin trouble: reddening, scabbing, moist dis-
37
charges, scratching, shedding that is abnormal
for the season or climate, loss of hair in one or
several spots, dryness, and loss of pliability. Al-
ways watch for fleas, ticks, and lice. Frequently
these insects and parasites are first noticed
around the ears, at the back of the neck, along
the backbone, and around the tail and anal reg-
ions.
(/) Feet. Proper care and attention must
be given to the dog’s feet if the animal is to
carry out its duties effectively. Inspect the dog’s
feet for foreign objects that may be caught in
the pads or hair, for cuts and bruises, and for
abrasion of the pads. The dog usually keeps its
nails worn to the proper length so the tips of the
nails do not touch the ground when it stands.
Sometimes, however, the nails become so long
they can interfere with the dog’s work. Report
this and any broken or split nails. Pay particular
attention to the nails on the dewclaws since they
are not worn down by contact with the ground
and may grow until they curve back into the
dog’s leg. Note any lameness shown by the dog
because this may indicate a foot problem.
(g) Limbs. Carefully check the legs of the
dog, as well as the feet. Wounds, swellings, and
sores of various kinds may be found. Lameness
is also a common symptom of problems in the legs
and is reported at once. On the forelegs opposite
the outer part of the elbow there may develop
an area of hairless, thickened skin known as a
callus. This is an area about an inch in diameter.
When the dog lies down or gets up, a pressure
and abrasive action are exerted on the callus, and
it may become inflamed. If this happens report
it to the veterinarian.
(h) Genitals. If the dog is a male, there
are certain things to look for in the genital organs.
The penis is located in a fold of skin known as
the prepuce or sheath. Normally, a small amount
of greenish-yellow discharge comes from the pre-
puce which the dog removes while cleaning it-
self. If this discharge is present in excessive
amounts, report it to the veterinarian. The penis
is subject to a variety of injuries; report im-
mediately the appearance of blood from the pre-
puce. The scrotum is the pouch of skin in which
the testicles are located; note any swelling, red-
dening, or scabbing of the scrotum. In the fe-
male dog, the external opening of the genital
tract is called the vulva. Normally, there is no
discharge from the vulva. Reddening of the vulva,
or of the skin in the area, and a discharge from
the vulva should be reported to the veterinarian.
(г) Anal region. The last portion of the
dog’s digestive tract is called the rectum, and the
opening from the rectum to the outside of the
body is called the anus. On either side of the
rectum near the anus is a small gland known as
the anal gland anl these specialized glands, which
secrete a brownish, foul-smelling substance, have
a sac called the anal sac. Sometimes, the opening
of the sac gets clogged and becomes swollen and
painful. Look for any swelling and reddening of
the skin in the area or of the anus itself. When
the anal glands need to be emptied or are infected,
the dog may turn to bite at the area or may slide
along the ground while in a sitting position.
Report any of these symptoms to the veterinarian.
(7) Attitude. The dog’s attitude is one of
the best indications of its general state of health.
Through close association with and knowledge of
his dog, a handler can readily detect a change of
attitude. If the dog tires easily or begins to show
undue nervousness, loss of vitality and energy, an
increased desire for sleep, or inattention while on
post or in training, report this immediately.
(k) Body functions. This refers to the
natural functions which are continuously carried
on by the body: breathing, digestion, formation
of waste products, and the like. Disturbances in
these natural functions are accompanied by many
symptoms. Alertness in detecting them is im-
portant. Notice any increase or decrease in ap-
petite or thirst or any change in the manner of
breathing, such as an unusual amount of panting.
Vomiting may occur, or there may be a change
in the nature of the intestinal contents as evi-
denced by a very soft or watery feces. Blood may
be seen in the vomitus or feces. Whenever possi-
ble, watch the dog when it starts urinating or
having a bowel movement. By doing so, you may
be able to detect blood in the urine or to detect
that the dog is having difficulty with the passage
of urine or feces. If blood is present in the urine,
notice whether it is passed at the beginning or the
end of urination or whether it is distributed
throughout the entire passage of urine. If blood
is present in the feces, note its character; e.g., is
it bright red or dark and tarry, and the amount
seen. Occasionally, entire specimens of internal
parasites may be noted in the feces. These should
be collected in containers with tight fitting lids
and promptly submitted to the veterinary officer.
Pay attention to the frequency of urination and
bowel movements and report increases or de-
creases in the frequency of either.
(Z) Temperature. A dog’s body tempera-
ture can readily be determined and is one of the
best indications of the animal’s state of health.
Normally, the rectal temperature is between 101°
and 102° F. Variations from this range frequent-
ly indicate an illness of some type; however,
some variation in temperature may not be ab-
normal—as, for example, a temperature rise fol-
lowing exercise or agitation. Always consult the
veterinarian when variations from the normal
are detected. A dog’s temperature is always taken
rectally, and the thermometer is left in the rectum
from 2 to 3 minutes before the reading is taken.
Hold on to the thermometer to prevent it from
completely entering the dog’s rectum. Lubrication
of the thermometer with soap or mineral oil
greatly increases the ease of its insertion into
the rectum. As a safety precaution, muzzle the
dog before taking its temperature.
(m) Kennel and run. In routine inspec-
tions always include a check of the run and in-
side of the kennel. This check may reveal evidence
of vomiting, abnormal feces, or blood from a
wound that might otherwise go unnoticed.
57. Administering Medication
During the course of any treatment given a dog,
the veterinary officer requires the handler’s as-
sistance. The handler has to restrain the dog and
may have to administer medication. In the follow-
ing discussion, various methods are described for
giving medicine by mouth. The procedures de-
scribed are those for a right-handed person; a
left-handed person can use the same procedures
by reversing positions.
a. Capsules or Tablets. The veterinary officer
may ask the handler to administer medicine in
the form of capsules or tablets. He may advise the
handler to give these in food, or it may be nec-
essary for the handler to place the capsules or
tablets in his dog’s mouth so the dog can swallow
them. The recommended procedure for giving
capsules or tablets is shown in figure 21. In step
1, the handler places the fingers of his left hand
over the muzzle and inserts his left thumb under
the lip and between the dog’s upper and lower
teeth directly behind the upper right canine tooth.
Use caution in doing this, and do not force the
dog’s lip against its teeth for this causes undue
pain and increases the dog’s resistance to treat-
ment. In step 2, the handler applies pressure to
the roof of the dog’s mouth by the second and
third fingers of the left hand. The handler then
places the capsule or tablet into the dog’s throat
with his right hand. Place the medicine in the
throat to the extreme rear of the tongue to pre-
vent the dog from spitting it out, and withdraw
the right hand. Steps 3 and 4 show how the
dog’s mouth is held shut and the handler mas-
sages the dog’s throat to ease the pill or capsule
down. The entire procedure must be done as
smoothly and quickly as possible, for a fumbling
or delayed approach increases the dog’s apprehen-
sion and resentment.
b. Liquid Medication.
(1) The administration of liquid medicine is
best done with the assistance of another person.
The leather muzzle should be in place to provide
added safety for the assistant; however, the muz-
zle was not used in figure 22 because it would ob-
struct the view of the proper procedure to follow
in administering the liquid.
(2) With his left hand, the handler holds
the upper and lower jaws together, as shown in
step 1. With his right hand, the assistant pulls
the dog’s lip out away from the teeth, as shown
in step 2. As this is done, the dog’s nose is pointed
upward, and a natural pouch is formed by the lip.
The assistant now pours the liquid into this pouch,
as illustrated in step 3.
(3) Use caution in giving liquid medicine
by mouth. Elevate the head only to an angle just
above the horizontal; if the head is raised any
higher, the dog has difficulty in swallowing. Give
the liquid slowly, thereby giving the dog adequate
time for swallowing. If given too rapidly, the
liquid may get into the dog’s trachea, nose, or
lungs, thus causing resentment and possible dam-
age. Use particular caution in giving oily liquids
or liquids that have a bland taste. If any signs of
distress appear, such as coughing or struggling,
allow the dog to rest before proceeding further.
58. First Aid
The first part of this chapter stressed the im-
portance of reporting signs and symptoms of
injury and disease to the veterinary officer as
soon as possible. However, there are times when
the handler must take emergency measures to
protect the health of his dog. First aid is used
in an emergency situation to save life, to prevent
further injury, and to reduce pain. The handler
must understand how and when first aid is used
so that he may act in the best interests of his
dog. In all emergency situations, notify the vet-
erinarian as soon as possible, and seek and use
the assistance of anyone who may be available.
a. Restraint. When a dog has been injured or is
suffering from any condition in which it experi-
ences acute pain or distress, the handler’s urgent
action is required. In this case, the dog may re-
spond to its handler’s attention in an unpredicta-
ble manner. The dog may struggle violently and
even attempt to bite. These are natural and nor-
mal reactions for a dog under such circum-
stances, but these reactions may result in further
injury to the dog, to the handler, or to anyone
assisting the handler.
(1) It is important that the handler prop-
erly control and restrain his dog before attempt-
39
Figure 21. Administering capsule or tablet.
ing to administer first aid in any emergency
situation. He should approach the distressed
animal in the correct manner. Because of his close
relationship to his dog, he should be able to ap-
proach the dog with confidence; the dog knows
and trusts its handler. As the handler confid-
40
Figure 22. Administering liquid preparation.
ently approaches, he should speak in a soothing
and calm voice. In this way, he can overcome
the dog’s fear or apprehension.
(2) Whether or not to apply a muzzle to
the dog depends on the nature of the emergency
situation. If the animal is unconscious, a leather
muzzle must not be applied. If there is difficulty
in breathing or if there are severe wounds about
the head, it is not wise to use a muzzle. In most
cases, however, a muzzle should be used to pro-
tect the handler and anyone helping him.
(3) There are several types of muzzles which
may be used, and the regular leather basket
muzzle is the best of these. This is the most
comfortable muzzle; it also permits freer breath-
ing. It will cause the least alarm and appre-
hension since the dog is already familiar with it.
The leather basket muzzle should be used when-
ever possible in an emergency situation. Remem-
ber, however, that the dog can still inflict a wound
with such a muzzle on, so exercise caution.
(4) Another type of muzzle which can be
used is called the hasty muzzle. As figure 23
shows, the actual application of this muzzle is a
simple matter. First, tighten the choke chain on
the dog’s neck by pulling the leash tightly with
the right hand. Place the left hand, palm up, under
the choke chain on the dog’s neck; grasp the
leash tightly as it passes through the palm of the
left hand, as shown in step 1. Then wrap the
leash once around the dog’s neck and bring it
down the left side of the dog’s head, as shown in
step 2. Finally, wrap the leash twice around the
dog’s muzzle (fig 20) and grasp it tightly with
the left hand, as shown in step 3. This type
muzzle may be used when the leather muzzle is
not available or when it is believed that the
leather muzzle would not provide adequate safety.
(5) Do not use the hasty muzzle when the
dog is having difficulty in breathing or when
there is an indication that it may vomit; do not
leave it on for long periods of time in hot weather.
Still another type of muzzle which can be used
is a makeshift muzzle constructed from a neck-
tie, bootlace, piece of gauze bandage, or some
other article. The easiest and most effective means
of applying a makeshift muzzle is to place the
center of a gauze strip under the dog’s lower
jaw and bring the ends up to tie a single knot
about halfway between the dog’s nose and eyes,
as shown in step 1 of figure 24. Bring the loose
ends down one on each side of the mouth and
cross them under the lower jaw, as shown in
step 2. Bring the loose ends up behind the ears,
one on each side of the neck, and tie them in a
bowknot at the back of the head, as shown in
step 3. This type of muzzle has the same uses
and the same limitations as the leash muzzle.
Observe the dog closely and if it shows any
difficulty in breathing or any indications that it
may vomit, quickly remove the muzzle.
b. Wounds. A frequent emergency that arises
with military dogs is the foot or leg wound in
which there is active bleeding. In all bleeding
wounds, the flow of blood (hemorrhage) must
be controlled; this is the first thing to be done.
(1) The quickest way to control bleeding of
the foot or leg is to grasp the leg above the
wound with the hand, as shown in figure 25.
Apply just enough pressure to control the bleed-
41
)
ing. Replace the hand pressure with a tourniquet
or pressure bandage as soon as possible. A
tourniquet can be improvised from a number of
articles, such as a leash, belt, necktie, bootlace,
or a piece of gauze bandage. Figure 26 shows a
tourniquet that has been made from a leash. A
stick or similar object is used to apply pressure.
(2) Remember that the tourniquet will in-
terfere with the blood supply to the part of the
leg below the tourniquet; this can seriously dam-
age the leg. Therefore, apply a tourniquet 3 or 4
inches above the wound with just enough pres-
sure to control the bleeding. In case of a foot
pad wound, a pressure bandage works better than
a tourniquet.
(3) Apply a pressure bandage as soon as
possible to a leg or foot wound in which bleeding
is a problem. Strips of cloth, gauze, bandaging
material, and adhesive tape are useful in the con-
struction of such a bandage. Before applying
these wrapping materials, place a clean piece of
cloth or gauze immediately over the wound. Do
not wrap the bandage tight enough to cut off
circulation. It should be just tight enough to con-
trol the bleeding. Once the pressure bandage is
securely in place, remove the tourniquet. Never
apply a bandage over a tourniquet because the
tourniquet may be forgotten and left on too long.
Remember, tourniquets are temporary devices
and are to be used for the shortest possible
42
Figure 2i. Applying gauze muzzle.
periods of time. Seek veterinary service as soon
as possible.
(4) If bleeding occurs from a wound in an
area where it is impossible to use a tourniquet,
other means of controlling the hemorrhage must
be taken. It may be possible to close the wound
with your fingers, thus stopping the flow of blood.
You may be able to stop the bleeding by making
and applying a compress. To do this, press a
Carlisle-type of sterile dressing or a handker-
chief over the wound and, if possible, secure the
compress with a bandage. As in all cases of bleed-
ing, do what you can to control it and then
send or call for help.
(5) Normally, the treatment of wounds is
left to the veterinarian. Where necessary, how-
ever, certain things can be done in the prelim-
inary treatment of skin wounds in which the ur-
gent arrest of bleeding is not a problem. Trim
the hair from the wound and wound edges, being
careful that no hair falls into the wound. A
moist, sterile gauze pad placed gently over the
wound will prevent this. Flush the wound out
thoroughly with water, and place a piece of clean,
sterile gauze bandage over it for protection
against further contamination.
c. Injuries. As described here, an injury occurs
when the bones or internal organs of a dog have
been damaged as a result of a blow, a fall, a gun-
shot or shrapnel wound, or from some other
cause.
(1) Broken bones or fractures have not oc-
curred with great frequency among military dogs;
however, injuries of this type do happen occas-
ionally. Such injuries may occur when dogs are
loaded or unloaded from trucks, or they may
occur during training exercises at the confi-
dence course. Most fractures that occur are in
one or more of a dog’s limbs. Regardless of how
they occur, fractures are serious injuries.
(2) If you know or suspect that a fracture
has occurred, immediately restrain the animal
properly so as to prevent possible injury to your-
self. Make every effort to quiet the animal to
minimize the possibility of further injury to the
fracture site. Send for help; in the meantime
keep the dog quiet and warm. The dog must be
kept warm because some degree of shock usually
accompanies a serious fracture. Whenever pos-
sible, keep the dog at the place of injury until
the veterinarian arrives. If this is not practical
because of weather conditions or the time factor,
move the dog.
(3) Before moving a dog with a fractured
leg, it is advisable to apply a splint to the leg
whenever possible. The handler cannot splint
those leg fractures that occur high on the limb.
Splinting consists of fastening the leg to a firm
object such as a stick or board by means of ad-
hesive tape, gauze bandage, strips of cloth, the
leash or other suitable material. The splint is de-
signed to immobilize the leg at the fracture site
and to prevent further injury. Apply the splint
firmly but not so tightly that blood circulation
in the leg is impaired. If the ends of the broken
bone are protruding through the skin, cover
the area with a clean, sterile gauze bandage be-
fore applying the splint.
(4) Splinting must be done before attempt-
ing to transport the dog. A litter can be made
from available materials. Care must be exercised
to prevent the dog from jumping off the litter
and sustaining further injury.
(5) Do not attempt to set the fracture. This
43
Figure 25. Control bleeding with hand on pressure point.
causes the dog to suffer needlessly and might re-
sult in greater damage at the fracture site. This
is a job that must be done by a veterinarian.
(6) Injury to internal organs of the body
may be accompanied by internal bleeding and
shock, in which case paleness of the membranes
of the dog’s mouth and eyes, or difficulty in
breathing, may be apparent. Sometimes, the inner
surface of the lips feels cold. If you suspect that
your dog may be suffering from internal injuries,
keep it warm and as quiet as possible. Seek as-
sistance immediately; and if it is necessary to
move the animal, use a litter to carefully trans-
port the dog.
(7) It is not desirable to overwarm an an-
imal in shock. It is better that it be slightly
cool than too warm. The prevention of heat
loss from under the dog is equally as important
as covering. Just enough covering to prevent ex-
cess loss of body heat is needed.
(8) Do not offer water to an injured dog.
Its tongue may be moistened, but the drinking of
water is prohibited when internal injuries are
suspected.
d. Snakebites. In the event a dog is bitten
by a poisonous snake, and after the snake is
killed and saved for identification, try to keep
the dog quiet and calm. Send for help immedi-
ately. The dog must be transported to the treat-
ment facility in a vehicle or carried in the hand-
ler’s arms. Poison moves more rapidly through
the bloodstream when panic or exertion occurs;
therefore, it is emphasized that the dog be kept
as quiet as possible. Bites occur on the face or
neck of the dog; in these cases, immediately re-
move the choke chain and be prepared to loosen
or remove the collar (and/or muzzle). Swelling
occurs rapidly after a snakebite, and these
items of equipment may interfere with breath-
ing. It is extremely important that the veter-
inarian be notified as quickly as possible. When
possible, bring the dead snake with the dog to
the veterinarian. This is an invaluable aid to the
veterinarian in determining what course of treat-
ment to start.
e. Foreign Objects in the Mouth. A dog may
occasionally get a stick or some other foreign
object lodged in its mouth or throat. When this
occurs, the dog may cough and gag, have difficulty
44
Figure 26. Leash tourniquet.
in swallowing, paw at the mouth, and drool.
Should these symptoms appear, be very cautious
because an animal with rabies may show similar
symptoms. If the dog is obviously having great
difficulty in breathing and you can see the for-
eign object, attempt to remove it. In all cases,
whether the foreign object has been removed or
not, contact the veterinarian immediately.
f. Poisoning. The handler can usually prevent
his dog from becoming poisoned. In the approach
to all types of diseases and injuries, prevention
is the desired goal. With the dog under careful
control, it is not a great problem to prevent it
from eating anything except its normal ration. If
food material other than that in its ration is dis-
covered in a place where the dog can find it, it
must be regarded with suspicion, and the handler
should not permit his dog to eat it. Such a dis-
covery might suggest the possibility of an attempt
by an intruder to perform some act of sabotage.
A possible source of poisoning for dogs is rat
poison. There are several types of rat poison, and
many of them are harmful to dogs. Such agents
are used in the kennel area only by the official in-
sect and rodent control agency on the post and
with the approval of the post veterinarian. The
signs of poisoning vary with the poison concerned
and may be similar to those of many disease con-
ditions. Unless you are certain that your dog has
eaten a poisonous substance, it is not wise to treat
it for poisoning. If, in spite of all precautions, the
dog has eaten poison, immediate action is neces-
sary. Request assistance at once. If a veterinarian
is not immediately available, give the dog some-
thing to cause vomiting; a salt solution can
safely be used for this purpose. Such a solution
45
can be prepared by a adding a tablespoonful of
salt to a glass of water. Give the salt solution by
mouth, in the same manner that liquid medicine
is administered, until vomiting occurs. Then keep
the dog quiet and warm until the veterinarian
arrives.
g. Heat Stroke. Heat stroke represents a very
serious medical emergency in which immediate
action by the handler may be necessary to save
the animal’s life. Heat stroke results when a dog
is unable to eliminate its body heat rapidly
enough. In the summertime, or in hot climates,
overheating is seen occasionally in working dogs;
overheating may even occur at night. In hot
weather, a dog may become overheated during
training and when it is being transported. Symp-
toms of heat stroke may include weakness, un-
steady gait, vomiting, difficult or labored breath-
ing, convulsions, and collapse; there is a very
high body temperature of 106°—107° or more.
First aid treatment consists of carrying the ani-
mal as rapidly as possible to the nearest shade
and quickly lowering the body heat of the ani-
Section III.
59. Essential Ration Components
To keep a dog in a state of good health a proper
diet is necessary; such a diet must satisfy the
energy requirements of the dog, and it must pro-
vide all of the essential components of a balanced
ration. In this section, consideration is given to
what a good diet for the dog must contain and
also what, when, and how much to feed. For
more detailed information concerning nutri-
tion, refer to TM 8-450.
a. The dog's diet requires basically the same
essential components as does the handler’s. It
must contain sufficient quantities of protein, car-
bohydrates, fats, vitamins, and minerals. A dog
also requires a certain amount of water each
day.
b. Proteins are sometimes called tissue build-
ers; this means that they are primarily involved
in the growth and structure of the tissues of the
body (muscle, tendons). Fats and carbohydrates
are more commonly referred to an energy pro-
ducers ; that is, they provide the necessary fuel
so that the body is able to work. Vitamins (A, Bl,
D) and minerals (calcium, iron, phosphorus)
serve a wide variety of uses in the dog’s body.
Calcium, phosphorus and vitamin D, for example,
are involved in bone structure and growth; vita-
min A plays an important role in vision; iron
is an important component of blood.
c. Some of the dog foods which are high in
mal. Body heat can be lowered by pouring water
from a canteen on the dog’s head, body, and
stomach, and fanning this same area with a
shirt or cap. If a stream or body of water is
available, immerse the animal; be sure that the
dog’s head is above the water at all times so
that water cannot get into the lungs. If ice is
available, message it over the body and legs. Ice
packs may be placed on the inside of the forelegs
near the body or on the inside of the dog’s
thighs. Large blood vessels are close to the surface
in these areas and body temperatures can be
rapidly lowered by this means. If the animal
must be moved more than a few yards to the
shade or to the treatment facility, hand carry or
transport it in a vehicle. Walking or running it
only serves to increase the overheating problem.
To prevent overheating, keep training and vigor-
ous exercise to a minimum in very hot weather;
allow frequent rest periods and provide small
amounts of drinking water at frequent intervals.
Also, adequate ventilation is necessary when a
dog is being transported.
FEEDING
proteins are horse meat, beef scraps, liver meal,
fish meal, milk and eggs. Carbohydrates are
found in large amounts in sugars, starches and
cellulose which are contained in such foods as
corn, potatoes, oats, barley, rice, wheat, and
candy. Butter, lard, and vegetable oils are ex-
amples of foods which are high in fat content.
Vitamins and minerals are found in a wide var-
iety of foods. For example, milk and bone meal
are high in calcium content, cod liver oil in vita-
min D and vitamin A, meat and oatmeal in
vitamin Bl.
d. Water is a component of the food which
the handler feeds his dog. But there is not
enough water in the food to supply all of the
animal’s needs; therefore, a continuous supply of
fresh, clean water in adequate quantities must
always be available to the dog.
60. What to Feed
A high quality commercially prepared dog food
should be used to insure that the dog is getting
the required amounts of protein, carbohydrates,
fats, vitamins, and minerals. Compared to the
old feeding method of using homemade mixtures
of meats and vegetables, the use of commercially
prepared dog food conserves time, manpower, ma-
terial, and storage space. Most important, the
commercial dog food made to guaranteed analysis
in accordance with Army standards insures that
the dog is receiving a scientifically balanced, nu-
46
tritionally adequate diet. There are several
types of ration being used for military dogs—
the garrison ration, field ration, and maximum
stress diet. The garrison ration may consist of a
'commercially prepared dry dog food and horse-
meat. The field ration consists of one of several
types of commercially prepared soft-moist dog
foods. The maximum stress diet is high in energy
content. Various combinations of the above ra-
tions may be used in training of specialized dogs.
The veterinary officer may have specific uses for
specially prepared canned foods in the feeding of
dogs in certain locations or for dogs with certain
types of illnesses. Special types of diets may be
procured and fed to individual animals when
the veterinarian indicates that other than the
standard diet is required. Should the necessity
arise to establish an emergency ration, the dog
may be fed such foods as meats, cooked vege-
tables, dry or cooked cereals and milk. It is best
to avoid highly seasoned foods, and bones should
never be given to a dog without the approval of
the veterinary officer. Under emergency condi-
tions, where an approved dog food is not avail-
able, the dog should receive its food from the
same source as the handler (with veterinary
approval) ; this insures that it is the safest and
best quality obtainable under the circumstances.
61. How Much to Feed
a. Once a good commercial dog food has been
procured, the problem of how much to feed the
dog must be considered. This problem is largely
one of determining the energy requirements of
a dog. A calorie is a unit of heat, and is the
term used to express the fuel or energy value of
food. A dog must obtain a certain amount of
energy from its food each day; therefore each dog
has certain caloric requirements.
b. It has been determined that the adult mili-
tary dog requires about 35 to 50 calories daily
per pound of body weight for sustenance. At
rest, the adult military dog would require daily
about 35 calories per pound of body weight. To
obtain caloric balance it should eat 1 pound of
dry-type dog food per 40 pounds of body weight;
or 1 pound of soft-moist dog food per 34 pounds
of body weight; or 1 pound of canned dog food
per 14 pounds of body weight; or 1 pound of
high-calorie diet per 64 pounds of body weight.
Working dogs would require 50 calories per
pound of body weight which would be met by
the following amounts of food daily: dry-type, 1
pound per 27 pounds of body weight; soft-moist,
1 pound per 24 pounds of body weight; canned
food, 1 pound per 10 pounds of body weight;
and high-calorie diet, 1 pound per 45 pounds of
body weight. These figures are given in table 1
(below).
c. The feeding of a military dog, however, is
not quite as simple as it may appear; there is
more involved than mere computation of figures.
Not all dogs of the same body weight require ex-
actly the same amount of food.
d. Several factors are responsible for this. One
of these is the type of climate in which a dog is
living. The calorie and food requirements for
dogs working in hot climates are less than for
cold climates. Another factor is the temperament
of the dog. If the dog is high strung and nervous,
and if it constantly runs and paces in the kennel
area, then it has a greater calorie requirement
than a more placid dog. Another factor involves
the conditions under which the dog must work.
If it is working long hours over hilly terrain,
its caloric requirements will be greater. Food
utilization is also a factor. Some dogs can digest
and utilize their food better than others and
hence can eat less to get the same amount of
available energy.
e. Finally, there is the health factor; if a dog
is not in good health, it might require more or
less calories than when healthy, depending on the
type of illness.
f. The existence of these variable factors leads
to the conclusion that, although the estimated
average calorie and food requirements for mili-
tary dogs have been established, feeding is still
an individual matter. Each dog should receive
the amount of food needed to maintain proper
weight and physical condition. The veterinarian
assists handlers with individual feeding methods.
Table 1. Estimated Quantities of Different Rations to
Feed Military Dogs at Rest and at Work
Type of ration At rest At work
Dry l-lb/40 lbs l-lb/27 lbs
Soft-moist l-lb/34 lbs l-lb/24 lbs
Canned l-lb/14 lbs l-lb/10 lbs
High-calorie l-lb/64 lbs l-lb/45 lbs
62. How and When to Feed
a. There are two feeding methods presently
used. The pan feeding method is the basic method,
and involves feeding the dog once a day from
the feed pan. The food is allowed to remain in the
kennel for a period of time, usually 1/2 hour. It
is then removed, the remaining food discarded,
and the pan cleaned. Dry dog food may be fed as is
or mixed with water. The food-reward method in-
volves variations of the basic method with in-
corporation of a food reward technique used in
training of specialized types of military dogs.
47
b. Veterinary personnel determine how much
food each dog receives daily by observation of
the dog’s average food intake requirements and
by consideration of the variable factors which af-
fect these requirements. With the pan-feeding
method, when to feed is important. It depends
largely on the work schedule of the dog. Avoid
feeding a dog just before or just after strenuous
exercise. Violent exercise after a heavy meal pre-
disposes a dog to gastric torsion (twisting of
the stomach or “flip-flop stomach”), bloat, or|
some other gastrointestinal illness. A dog should
not be fed just after it has come in from duty or
from a training period because this interferes
with digestion.
48
PART THREE
LOGISTICAL SUPPORT AND ADMINISTRATION
CHAPTER 8
KENNEL AND TRAINING AREA
Section I. SELECTION OF SITES
63. General
Before military dogs are assigned to using or-
ganizations, suitable facilities for kenneling
them must be provided. Various factors must be
taken into consideration before the construction
of such facilities. Factors such as the health
and comfort of dogs are considered in the con-
struction of kennels and runs, as well as certain
management and safety factors.
*64. Kennel
Haphazard placement of kennel facilities for mili-
tary dogs must be avoided. The following es-
tablished standards must be observed when se-
lecting a satisfactory location for kennel facili-
ties : adequate drainage, minimal noise, availabil-
ity of an approved water source, and access to
the proper firefighting equipment.
a. Drainage. If possible, kennels and runs are
constructed so that floors slope toward drains.
This provides adequate drainage and eliminates
the possibility of any water standing in the area.
The drainage system is designed so that each
kennel run is drained independently to prevent
contamination (app E).
b. Noise. The military dog facility is located,
if possible, in an area where there are few dis-
tractions to the dogs and where they are not a
nuisance to personnel. Anything which might be
harmful to their senses must be avoided. Military
dogs must get enough rest to be alert and efficient
while on duty. Therefore, kennels should be as
isolated as possible from traveled roads, housing
b^reas, playgrounds, and congested working areas
to insure a minimum of noise and distraction.
A dog which is alerted repeatedly by the sound
of industrial activity or children playing cannot
get the required amount of rest. Built-up areas on
the post should be at least 150 to 200 yards
from the kennel facilities; this is usually far
enough away to prevent most distracting noises
from adversely affecting dogs. To further reduce
noise and distractions, kennels should be located
so that natural barriers, such as hills, trees, and
large shrubs intervene between built-up areas
and the kennel facilities. When there are no nat-
ural barriers in the area it may be necessary
to construct artificial barriers.
c. Water Supply. Water has many uses at a
kennel site. Large quantities are needed for clean-
ing purposes. It is also used to mix dog food
and as drinking water. An adequate water supply
must also be available to provide fire protection.
The water supply at the kennel site must come
from a source which has been approved for hu-
man consumption. Impure water can be a source
of disease for dogs as well as their handlers.
d. Fire Protection. Water-type fire extin-
guishers are generally used in the kennel area.
At least one such fire extinguisher must be pro-
vided for each 2,500 square feet of floor space
in the kennel and support buildings. Local sur-
roundings, however, may cause the type and num-
ber of fire extinguishers to vary. Because of this,
local installation fire department officials are con-
sulted to establish local requirements. Accessibil-
ity to firefighting vehicles is considered in the
determination of a kennel location.
e. Lighting. The kennel area must be well
lighted to prevent accidents to dogs and handlers
when they are going to and from the kennels
at night. Lights of sufficient wattage can be in-
stalled on standards at alternate kennels and
spaced on opposite sides of service aisles (app E).
49
f. Run Shading. Grass matting, salvage tent-
ing, or tarpaulin materials stretched over fences
around the kennel runs and supported by cross
wires are economical ways of providing adequate
shade during hot weather. Shade material should
be secured to the support wiring to prevent it
from blowing away.
65. Training Area
A training area is necessary to conduct all phases
of obedience training. When determining the re-
quirements of a training area, various factors
must be considered if training is to be effective.
a. Surface. The area used for obedience train-
ing must be free of anything which would be
harmful to the handler and his dog. This in-
cludes such items as broken glass, sandburs, and
sharp rocks. The surface of the terrain should
be as level as possible, and all holes filled to pre-
vent an accident or injury.
b. Availability. It is desirable that the training
area be located within easy walking distance
from the kennel area. This eliminates transporta-
tion problems and saves time.
c. Noise. The same requirements apply to the
training area as apply to the kennel area. It
should be at least 150 to 200 yards from any of
the built-up areas already described. This mini-
mizes distractions.
d. Size. The size of the area used to conduct
field training depends largely upon the number
of handlers that will be training their dogs at a
given time. Ideally, terrain used for military pur-
poses should offer such natural obstacles as
streams, woods, brush, hills, and plains.
Section II. CONSTRUCTION AND MAINTENANCE
66. Kennel
The purpose of any kennel is to provide protec-
tion from the elements and a healthy, restful
environment for the dog. The major areas of
concern are shade, heat when necessary, ventila-
tion, drainage, ease of cleaning, separation of
dogs, and safety. One should strive to prevent
dogs from disturbing one another while in their
kennels. Both permanent and temporary construc-
tion should be considered.
a. Permanent. These kennels should include
properly sloping concrete floors, concrete and
wire dividers, wire gates, wire ceilings, and ven-
tilated metal roofs. They should have kitchen
facilities, treatment areas, and be easily adapted
to weather changes (cold, monsoons, heat, etc.).
One such plan is shown in appendix E. Perman-
ent kennels may also be constructed out of cement
blocks, with metal being used for the roofs. In
such kennels, the stake out chains are used to
tether the dogs. Prior to construction of perman-
ent kennels, commanders should consult veterin-
ary and engineer personnel.
b. Temporary. These temporary kennels may
be constructed using dog shipping crates with
stake out chains (1, fig 27). Shade and protection
from the elements may be achieved with ponchos,
tarps, or parachute canopies over the crates.
Crates may be set on stakes to raise them off
the ground to allow for drainage and ventilation.
A field expedient, combat type, temporary kennel
may be constructed using a 4 foot x 4 foot wooden
pallet for a floor, wooden ammunition boxes
filled with sand for three sides, and a half culvert
(sand-bagged) for the roof, 2, figure 27. Tempor-
ary kennels may also be constructed using empty
55-gallon drums set on cement blocks. One end of
the drum must be cut out and the edges smoothed
to prevent injury. The floor of the drum should
be covered with straw or a blanket.
c. Fencing. The kennels, runs, and support
buildings will be surrounded by a compound
fence. This fence is constructed of 7- to 9-gauge,
2-inch maximum, chain link fencing and is 8 feet
high. Fence posts are set in concrete with the
inside diameter open to the ground (soil) be-
low the concrete and capped on top. Manufac-
turer’s standard designs may be used.
d. Off Limits Signs. These signs are posted in
sufficient numbers on all sides of the kennel area
to act as a deterrent to unauthorized personnel
who might otherwise enter the area. These signs
usually measure 30 inches by 40 inches and are
lettered as shown in figure 28, and should be
placed so they may be seen at least 50 yards be-
fore approaching the restricted area. When mili-
tary dogs are located in foreign countries, the
signs are also lettered in the language of the
host country. Construction specifications and
standards are contained in AR 385-30.
e. Kennel Maintenance. Proper maintenance of
the dog’s kennel and run makes the upkeep easy
and inexpensive; this is done by observing and
correcting minor discrepancies before they be-
come major problems. The handler must inspect
his dog’s kennel daily; loose or worn hinges on
the door are repaired or replaced; the sides of
the kennel are inspected, both inside and out.
Any discrepancy noted during these daily inspec-
tions of the dog’s living area, that cannot be
50
Figure 27. Field expedient shelter.
readily corrected, is reported immediately to the
proper authority. In this way, the dog’s kennel
is kept in good condition, and the dog may be
saved from unnecessary injury.
67. Training Areas: Types of Training
This area includes the confidence course, the obed-
ience training area, and the field training area.
The maintenance of these areas must be of such
quality as to provide a suitable training environ-
ment. A good confidence course, which can be
constructed of salvage materials, has many differ-
ent types of obstacles ; hurdles of different heights,
not to exceed 3 feet; scaling walls of varying
heights, not to exceed 6 feet; ditches or water
barriers for the dog to jump over; tunnels for
crawling; and logs or ladders for teaching sure-
footedness. The tops of all hurdles are padded so
that the dog cannot injure itself while running
the course. Both the 5- and 6-foot scaling walls
must be properly constructed with horizontal
cross strips and rubber matting on the front side
to provide for better footing; the front side must
be sloped 10° to 24° in the direction of the dog’s
jump; and a safety platform must be built on the
backside 2 feet below the top of each wall. The
purpose of the platform is to break the dog’s
jump. The confidence course must be kept in a
good state of repair. It must be inspected period-
ically to insure that it is being properly main-
tained to provide the safest and most effective
training environment possible. It is essential that
the obedience and field training areas be properly
maintained. All objects that might be harmful to
the handler or his dog are cleared from the area.
A periodic inspection of these areas insures that
they are being properly policed.
51
Figure 27—Continued.
OFF LIMITS
DANGER
MILITARY DOG AREA
Figure 28. Off limits sign.
52
Section 111. EQUIPMENT AND SUPPLIES
68. Equipment
The kennel noncommissioned officer in charge
must make sure that supplies are readily avail-
able when needed. He should maintain a working
stock of equipment and take a periodic inventory
to determine what supplies are needed.
69. Rations
All dog food must originate in clean, sanitary
plants and must be manufactured, packaged,
stored, and transported in conformance with
good commercial practices as determined by the
USA Veterinary Service.
70. Forms
A variety of forms are needed to establish ade-
quate administrative and medical records. After
determining the number of forms needed, a re-
quest is submitted to the local post publications
office.
53
CHAPTER 9
MAINTENANCE OF MILITARY DOG RECORDS: ADMINISTRATIVE AND MEDICAL
71. General
All individual records of the dog, both adminis-
trative and medical are contained within the
medical folder, DD Form 722 (Health Record).
An exception to this may be the large radio-
graphs, maintained by the veterinary officer re-
sponsible for the dog’s care. Permanent records
for each military dog are initiated by the procur-
ing agency and returned to the Air Force upon
the death of the dog, or its release from service.
Appropriate DD, DA, and AF Forms are used.
72. Administrative Records
These records are maintained by nonmedical
military dog personnel and consist of AF Form
323 (Sentry Dog Record, fig 29), the animal’s
picture, and DD Form 1743 (Death Certificate
of Military Dog, fig 30) after its completion by
a veterinary officer.
73. AF Form 323, Sentry Dog Record
When a dog is procured, the Contracting Officer
of Animal Procurement prepares sections 1 and 2
NAME OF DOG Commodore TATTOO 32X2 SEX Male AG e 2YRS
1. GENERAL DESCRIPTION AND RECORD
DATE WHELPED 8 6 *68 COLOR BLK TAN HEIGHT 23” WEIGHT 65 LBS BREED GS DATE ACQUIRED 8 '6 70
ACQUIRED FROM John Doe ADDRESS 803 Volleybrook Rd, Columbus, Go, 31907
PURCHASE ORDER NUMBER N A PRICE S150.00 DATE ARRIVED 6 Aug 1970
II. ACCEPTABILITY (A (Check accepted or rejected)
PHYSICAL MEDICAL TEMPERAMENT
X accepted DATE 6 Aug 70 X accepted DATE 6 Aug 1970 X ACCEPTED DATE 6 Aug 1970
REJECTED REJECTED REJECTED
REASON REASON REASON Seoul
TYPED NAME AND GRADE OF EXAMINING VETERINARIAN paul f. mcwilliams cpt, vc. SIGNATURE
REMARKS
III. FINAL SEPARATION FROM SERVICE
Date CAUSE
AF F°"" 323 SENTRY DOG RECORD
JAN 64
Front
Figure 29. Dog record (AF Form. 323).
54
HANDLER GRADE SERVICE NUMBER DATE ASSIGNED ORGANIZATION AND INSTALLATION
.ZzW Жгу A E-3 70 2L& /PSD FTGP.
Back
Figure 29.—Continued.
of this form. The sample in figure 29 shows that
section 1 on the front side of the form contains
information concerning the dog’s age, descrip-
tion, date of purchase, original owner, purchase
order number, and the price paid for the animal.
It also shows the date on which the dog arrived
at the accepting installation. Section 2 provides
information pertaining to the dog’s acceptability
for military use. Veterinary and training person-
nel at the procurement center complete this sec-
tion at the time of the initial evaluation of the
animal. Section 3 of the form is completed upon
final separation of the dog from service. As shown
in the illustration, the original entry on the re-
verse side of the form is made when the animal
is first assigned to a handler. If for any reason
the original handler is replaced by another, the
required information concerning the new handler
is entered at the time of assignment.
74. DD Form 1743 (Death Certificate of
Military Dogs)
Figure 30 is both an administrative and medical
form; it is completed by a veterinary officer after
the death of the dog. It is used to close out the
accountability for a dog and to record the cause
of death. The form is prepared in at least 3
copies, two going to the unit commander to be
used as a supporting document for dropping the
dog from the unit property book, and the original
being placed in the dog’s permanent record. Each
copy must be signed by the veterinarian.
75. Medical Records
Medical records make up the majority of the dog’s
permanent file. All information concerning the
dog’s medical background and treatment must be
entered on the appropriate form in accordance
with AR 40-905, 40-655, 735-11, 190-12 and
700-81. Only veterinary personnel are authorized
to make entries on the medical records. For more
detailed information concerning filing of the
Medical Record, DD Form 722, in the proper
chronological order, refer to TM 8-450.
55
DEATH CERTIFICATE OF MILITARY DOG
REPORTING FACILITY AND LOCATION 26th Inf Plot Set Dog Fort Benning, GA DATE 5 Moy 71
TATTOO NUMBER A123 SEX M NAME King WHELPING DATE 1 Apr 1960 DATE OF DEATH 5 Moy 1971
CAUSE OF DEATH (State only immediate cause - Pneumonia, Euthanasia, etc.) Euthonosio — No foult or neglect
I CERTIFY THAT THE FOREGOING IS TRUE.
TYPED NAME & GRADE OF VETERINARY OFFICER ROBERT 0 GREEN, CPT, USA, VC SIGNATURE
Replaces DA Form 2808-R, 1 Jun 66, which is obsolete.
DD FORM 1743, 1 Jul 70
Figure 30. Certificate of death (DD form 17ЬЗ).
56
PART FOUR
TRAINING
CHAPTER 10
BEHAVIOR OF DOGS AND PRINCIPLES OF DOG TRAINING
Section I. BEHAVIOR AND MOTIVATION
76. General
The behavior of the military working dog is the
result of many factors. Some of these are here-
dity, natural instincts, basic senses, past exper-
iences, and basic drives. Because of the depth
and complexity of this subject, only those be-
havorial factors which are most important in the
training and utilization of military dogs are con-
sidered. In this section, special emphasis is given
to a dog’s basic senses. Not only must the factors
influencing behavior be recognized but also the
types of behavior dogs exhibit must be considered.
The behavior exhibited by dogs can be discussed
using many of the same terms used in referring
to human behavior. The behavioral characteris-
tics considered essential in training and utiliza-
tion of military dogs are sensitivity, energy, ag-
gressiveness, intelligence, and willingness.
77. Basic Senses
Dog and man possess the same basic senses. Both
use their senses to detect and alert on personnel
and objects which are foreign to a given area.
The senses of the dog, in order of importance to
utilization and training are smell, hearing, sight,
and touch.
a. Smell. One of the reasons why the dog has
been selected for military work is that it has a
keen sense of smell. Studies have shown that a
dog responds to odor traces of all known sorts
and in dilutions far more extreme than can be de-
tected by man. Furthermore, it can distinguish
between many odors which seem to human be-
ings to be similar. The dog’s sense of smell is
invaluable to the handler because a great part of
the dog’s role as a detector depends upon its
ability to pick up a scent.
b. Hearing. The dog’s sense of hearing is an-
other reason why this animal is invaluable when
used in military operations. A dog has an acute
sense of hearing. It can detect sounds twenty
times better than man which means that it can
detect sounds that would completely escape the
notice of the handler. The dog’s sense of hearing
is also important because it is the principal med-
ium through which the handler communicates
with the dog. Some dogs appear to understand
accurately the feelings and wishes of their hand-
lers as they are conveyed by voice. Usually a
word spoken in an encouraging tone, such as
“Good boy,” pleases a dog; a cross word such
as the admonition “No,” tends to depress the
dog. It is important that the dog respond to a
number of oral commands, for a dog soon learns
to associate the sound and tone of a word with
the action expected of it.
c. Sight. Besides being taught to react cor-
rectly to voice commands, the dog must also be
taught to obey hand gestures, it does this through
its sense of sight. With one exception—the ability
to detect movement—a dog’s vision cannot be
compared favorably with that of the human.
To the dog, everything probably appears to be
constantly blurred and out of focus. In addition,
it is probably unable to discriminate between
colors and sees everything as a black and white
or grayish picture. It is not known (at this
time) just how well a dog can see, or determine,
colors. However, it can detect a moving object
ten times better than man, and responds to it.
d. Touch. There is a wide variation among
dogs in their responsiveness to the sense of touch.
Certain dogs are very susceptible to caress or
physical correction; others appear to be rather
insensitive to it. Consequently, a dog’s sense of
57
touch can be determined when it is petted or cor-
rected. Some dogs seem to understand physical
praise or correction better than oral praise or
correction.
78. Sensitivity
The term “sensitivity” refers to the type and
degree of response a dog shows to a certain
stimulus. The oversensitive dog may be startled
by a stimulus that would evoke only a mild re-
sponse from an unsensitive dog. The response of
the oversensitive dog is often one of shyness or
fright; the unsensitive dog responding to the
same stimulus might merely turn its head or show
no response at all. Sensitivity of sound and touch
are completely independent of one another. For
this reason, the sound of a gun may actually
hurt a dog’s ears and yet a slap with the hand may
not bother it. In selecting a dog team, the char-
acteristics of the handler should be matched with
the sensitivity of the dog. Certain men lack the
proper range or tone of voice and are unable to
appeal to a dog successfully through its hearing.
However, these same men may be excellent in
handling a dog manually because of a certain
fitness in muscular control and coordination.
There should be no difficulty in rating a dog’s re-
sponse to stimuli, and, from a practical stand-
point, this rating becomes helpful. The handler
can form a definite opinion about the response his
dog shows toward the stimuli of sound and touch
during normal day-to-day contact with the dog.
a. Oversensitive Dogs. If the dog reacts ex-
cessively to a given stimulus, it may be over-
sensitive. An oversensitive dog is so handicapped
that it is not likely to demonstrate its intelli-
gence in a usable form. A dog which is oversensi-
tive to either sound or touch, or both, is difficult
to train and is usually considered unreliable. A
dog that is oversensitive to sound may bolt at the
sound of a gunshot. A dog that is oversensitive
to touch may lie down and shake all over, as if
frightened, when it is petted.
b. Unsensitive Dogs. A dog that is unsensitive
to both sound and touch is difficult to train. A
dog that is unsensitive to sound may not react
at all when the sterm admonition “No” is used.
If it is unsensitive to touch, it may not react at
all when the handler pets it. A dog unsensitive to
either sound or touch, but not to both, can be
instructed readily enough if the handler uses the
correct approach. In such a case, the handler uses
either his voice or his hand, whichever is appro-
priate.
c. Moderately Sensitive Dogs. A moderately
sensitive dog is somewhat sensitive to both sound
and touch. With proper training, this dog re-
sponds willingly to hand gestures and vocal com-
mands. It is trustworthy, willing, and ready to
obey the given commands. The wisdom with
which this dog is handled is the deciding factor
in how well it performs. Properly trained, this
dog is the ideal military dog.
79. Energy
Dogs differ not only in their degree of sensitivity
but also in the degree of energy they show. A
dog’s behavior with regard to energy is quite
evident. The term “energy,” as used here, refers
to the degree of spontaneous activity of the
dog—the speed and extent of its movements in
general, not in response to any certain command.
Dogs differ widely in the degree of spontaneous
activity exhibited, and the task of rating them in
this respect is easier than that of rating for other
functional traits. Different dogs show two ex-
treme degrees of energy—one dog is the shift-
less, lazy animal which shows no energy whatever
unless required; the other is the animal that
seems eager to move, wants to be active, and
seems to be always on the go. The average dog is
between these two extremes, a willing worker
but not always on the go. Above average energy
is not particularly necessary for military pur-
poses, but a dog that possesses this trait can be
trained to control some of its extra energy. A dog
that shows little or no energy is difficult to train
and should not be accepted for duty.
80. Aggressiveness
A dog that is energetic is not necessarily ag-
gressive. There are three general degrees: over-
aggressive, unaggressive, and moderately aggres-
sive. Each dog must be classified for aggressive-
ness to determine what action is necessary to
decrease its aggressiveness, increase it, or per-
haps maintain it at a constant level.
a. Overaggressive Dog. When an overaggressive
dog sights a decoy, it usually becomes greatly
excited, lunges at the end of its leash, and con-
tinues to lunge after the decoy disappears. Cau-
tion must be exercised while working with an
overaggressive dog because it may attempt to
bite anyone within reach during a period of excite-
ment. Training procedures are designed to con-
trol, rather than arouse, the overaggressive dog.
b. Unaggressive Dog. This animal reacts nega-
tively to the approach of a decoy. It may stand
still, wag its tail, throw itself on the ground, or
try to run away from the decoy. Training pro-
cedures consist of exercises which tend to de-
58
velop confidence and courage in the unaggressive
dog.
c. Moderately Aggressive Dog. The ideal mili-
* tary dog is moderately aggressive. A moderately
aggressive dog is the easiest to train. Upon seeing
a decoy it becomes alert, shows suspicion of the
decoy, and exhibits an eagerness to move towards
the decoy. The majority of German Shepherd
dogs fall into the moderately aggressive category,
and normal training procedures are based upon
this type of aggressiveness.
81. Intelligence
Generally, intelligence is the trait most closely
related to a dog’s success in training for work.
Among the lower animals, the dog is rated as
highly intelligent. A dog can be taught to re-
spond correctly to a large number of spoken
words. Only a few words are needed under
ordinary working conditions, but some dogs have
been known to respond to over 100 oral com-
mands. A dog’s rating for intelligence is based
upon its ability to retain and use what it has
learned. A dog can be rated high in intelligence
if it is unusually capable of profiting by exper-
ience. A highly intelligent dog may be success-
ful only when working with a handler who pleases
it. With another handler, it may be unwilling and
give the appearance of being stupid.
82. Willingness
a. This term is an arbitrary one used to refer
to the dog’s reaction to the commands given by
the handler. It applies to the way the dog re-
sponds to a command and to its apparent cheer-
fulness and acceptance in learning new duties.
The dog may make the correct response to a
command, or it may make some other response.
In either case, if it makes an enthusiastic at-
tempt, it is considered willing.
b. A dog is ranked high in willingness if it
continuously responds to a given command in
an effort to fulfill it, even though reward or cor-
rection is not immediate. Whether the dog pos-
sesses the required intelligence and physical
strength, or whether it succeeds or fails, is not
considered in determining willingness.
c. If the handler must constantly coax his dog
along or admonish it before the dog works satis-
factorily, it is considered an unwilling worker.
A great number of dogs are perfectly capable of
executing the required movements but are
strongly inclined not to do so. An unwilling dog
may appear to make a distinction between work
and play, and may take great pleasure in re-
trieving, searching for objects, and in taking
jumps. The same dog may at times go to its
handler spontaneously and apparently suggest a
romp which may include any of the mentioned
acts. When this situation is reversed and the
handler initiates the activity, the dog, if un-
willing, may seem to have forgotten all it ever
knew.
d. A dog’s willingness can be advanced or re-
tarded by its handler. Improper handling may
make a dog less willing at one time than at
another time. For example, if the handler lacks
patience, the dog may work willingly during the
first few minutes of a training period but un-
willingly during the remainder of the period.
e. Unwillingness can be confused with a lack
of intelligence or with lack of sensitivity. If the
correct approach is not used, a dog that is un-
sensitive to either sound or touch may appear to
behave unwillingly to the commands and motiva-
tion given by the handler.
83. Motivation
As the handler becomes familiar with his dog’s
behavior, he learns the correct approach to use
to motivate the dog. A dog should be motivated
with an intangible reward.
a. Intangible Reward. Unlike most animals, a
dogs does not require special inducements, such
as food, to work or train. Kindness, shown either
by oral praise or by a casual caress, is usually
enough to thoroughly motivate the dog. More than
any other form of reward, the dog wants the
approval of its handler.
(1) A dog seems to have a natural tendency
to become attached to and seek companionship
from its handler. The handler feeds, grooms,
trains, and works his dog. As a result of this, the
dog responds to commands, reacts to correction,
and accepts praise. Through the handler’s con-
stant use of the oral admonition “No” when the
dog misbehaves or otherwise needs correcting the
dog learns to distinguish between praise and cor-
rection. The dog is eager to please the handler,
and if the dog is praised each time it does its
work correctly, it is anxious to advance to new
training exercises. It is important that the hand-
ler honor the dog’s affection.
(2) After a friendly relationship has been
established between the dog and its handler, this
relationship becomes the motivation needed to
train the animal to become an efficient dog. Some
type of corrective action must always be present;
yet, it is more pleasant and more convenient to
relay upon the dog’s willingness to serve its
59
handler. Thus, a dog is properly motivated by
an intangible rather than a tangible reward.
b. Tangible Reward. A tangible reward, such
as food, should be used only in training of spe-
Section II. PRINCIPLES
84. Know-How
The most fundamental principle of training is
that the handler must know how each maneuver,
act, technique, method, and position is accom-
plished before he can properly train his dog.
There are standards of performance described
for each training exercise; the handler must ad-
here to the proper methods and techniques so
that these standards are achieved. He must con-
scientiously apply all of the principles with in-
terest, enthusiasm, and a desire to attain perfec-
tion. He must demand complete obedience from
his dog at all times. If the handler is negligent in
his training procedures, the results are reflected
in the dog’s performance; therefore, it is essential
that the handler possess personal discipline. This
is especially true during the time he is applying
the principle of repetition.
85. Repetition
The method by which dogs learn and become
proficient in performing a task is repetition. It
is essential that the dog be given the same com-
mand over and over again until the desired re-
sponse is obtained. However, both the handler
and his dog can lose efficiency by practicing any
one command too much during one period. After
practicing a command for 4 or 5 minutes, it is
best to move on to another command; if this is
not possible, at least 10 minutes should elapse
before resuming practice of the original com-
mand. In the early stages of training, it is im-
portant to show the dog what to do when given
a particular command. If necessary, the dog must
be put into the proper position. Repeat the pro-
cedure as often as necessary until the dog learns
what to do when given the command. Never allow
the dog to assume a position incorrectly; if it
begins to make an incorrect movement, correct
it immediately; then, begin the exercise again,
making sure that the dog does not make the same
mistake.
86. Patience
One of the most important requirements of a dog
handler is patience. To make a dog perform the
same exercise repeatedly until it is properly ex-
ecuted is a task that requires the ultimate in self-
cialized dogs and/or when directed by competent
authority. The food-reward or food-conditioning
method of training is described in manuals on
the training of specialized dogs.
OF DOG TRAINING
control. When a handler loses his temper, he
loses control; this confuses the dog. Patience
along with firmness results in a better trained
dog.
87. Praise
The handler who displays patience can motivate
his dog properly through praise. Whenever the
dog successfully executes a command, even if its
performance has taken more time than expected,
always reward it with a pat on the head or praise
it in some other way. The dog is anxious to please
its handler, and the handler should respond by
praising the dog lavishly. When it is praised
highly, the dog senses that it has done the cor-
rect thing, and does it more readily the next
time the same command is given. Several effective
methods are used to praise a dog. Kind words
often do the trick. One handler might prefer to
pat his dog each time he wishes to reward him.
Another handler might allow his dog a few min-
utes in which to romp and play, or he may allow
the dog to perform its favorite exercises. Still
another handler may apply a combination of
these methods of praise. Each dog requires a spe-
cial method. Each handler must determine which
method of praise best suits his dog; this can be
done during the handler’s early association with
the dog. If the handler is to maintain his dog’s
enthusiasm for work, each training period must
be concluded with petting, praise, and encourage-
ment. When the dog’s performance of the training
exercise does not warrant praise, allow it to per-
form a short exercise which it knows thoroughly
and does well so it can earn a reward. Although
the dog must be amply rewarded for those ex-
ercises performed correctly, it must be corrected
when its performance is not satisfactory.
88. Correction
A dog does not understand right from wrong as
humans do. Reward and correction are the means
by which a dog is taught. If the dog does an
exercise incorrectly, do not allow it to go uncor-
rected. Withholding praise, or the simple admoni-
tion “No,” spoken reprovingly, or a sharp jerk
on the leash, usually proves to be sufficient for
correction purposes.
60
a. Timing is probably the most important fac-
tor in administering any form of correction.
Therefore, a reprimand, in whatever form, should
be administered immediately when the incorrect
act is performed. A dog cannot mentally connect
a reprimand with an incorrect action committed
sometime before the reprimand.
b. Never correct a dog for clumsiness, slowness
in learning, or inability to understand what is
expected of it. In these cases, correction slows
down the dog’s training instead of accelerating
it.
c. Observation, patience, self-control, and dis-
cretion are essential in correction. If the dog
makes a mistake the handler may be at fault,
and the handler should think for a second about
why the mistake was made. Proper correction
indicates proper thinking.
61
CHAPTER И
OBEDIENCE TRAINING
Section I. BASIC TRAINING
89. General
Obedience training produces a reliable, obedient,
well-trained dog. The specific methods of training
outlined in this chapter are suitable for the
fundamental training of all military dogs. In
certain cases where the prescribed method may
prove ineffective, the trainer may vary his tech-
niques to achieve the desired level of training.
The normal training period consists of approxi-
mately 20 minutes of obedience training followed
by a 10-minute break. However, the age of the
dog, climatic condition, and the number of dogs
undergoing training may govern the length of
the training period. During break periods, it is
important that the dog be given an opportunity
to rest and relax. In hot climates, the dog should
have a place to rest which provides some type of
shade.
90. Commands
Basic obedience training is applicable to both
man and dog. The handler must first learn the
different movements before he can begin training
the dog. Then, the handler must teach his dog
the different movements and commands.
a. While training his dog, the handler receives
commands that are exactly like those used in all
military drills. However, the execution of these
commands, in some cases, is quite different. The
command has two definite parts, the preparatory
command and the command of execution. The
handler must not anticipate a command of ex-
ecution before it is given.
b. The dog is given only the commands of ex-
ecution. Most of these commands are one syllable
words, and they are easily given. If the com-
mands are given clearly, they are easy for a dog
to learn. Even though a word may have no mean-
ing to a dog, the dog learns to associate the
sound of a word with the exercise it is to perform.
c. To prevent any misunderstanding of the
commands given in this chapter, the first letter
of each word in preparatory commands is capita-
lized, and all letters in commands of execution
are capitalized. To further distinguish between
the two parts of a command, a comma indicating
a pause always appears between the preparatory
command and the command of execution. For
example, when the handler is commanded to face
to the rear, the command is shown as About,
FACE. Because all commands given directly to
the dog are commands of execution they appear,
for example, as HEEL. To prevent any unneces-
sary duplication, the illustrations referenced in
the next paragraph depict the handler with his
dog. (At this stage of training, however, the han-
dler has not been assigned a dog.) The handler’s
position and movements are the same whether he
is training with or without a dog.
91. Drill
Military drill with a dog requires more physical
movement than does regular military drill. To get
in the correct position, the handler and dog need
enough room to make their movements together.
a. Positions. The handler must be completely
familiar with the basic positions that are ex-
plained in this section by word and picture. The
positions and their correct execution, in every de-
tail, are learned without a dog before the handler
proceeds to train with a dog.
(1) Attention. The position of attention is
a two-count movement. Take, for example, the
command Squad, ATTENTION. At the prepara-
tory command Squad, the handler assumes the
normal position of attention. At the command of
execution ATTENTION, the handler takes one
full step forward with his left foot and brings his
right foot beside his left foot.
(2) Rests. All rest commands are executed
from the halt and only from the position of at-
tention. The commands are: Parade, Rest, AT
EAST; REST; and FALL OUT.
(a) In the command Parade, REST, at
62
the preparatory command Parade, the dog is
placed in a down position and given the command
STAY, as shown in step 1 of figure 31. At the
command of execution REST, the handler steps
over and across his dog’s back with his left foot,
as shown in step 2. The left foot comes to rest
on the ground next to the dog’s left side and paral-
lel to the handler’s right foot, as shown in step
3. The legs are kept straight so that the weight
of the body rests equally on both feet. At the same
time, the handler places his left hand behind his
back. The palm of the left hand is to the rear,
and the fingers are closed and extended. The right
hand and arm remain at the handler’s right side.
These are not precision movements which might
cause the handler to kick the dog or cause the
dog to jump. Silence and immobility are required
while at the position of parade rest.
Note: After the handler has learned the position of
parade rest, he will find there is an exception in executing
the command of attention. From the position of parade
rest, the step forward is not taken. The handler steps back
over the dog with his left foot and assumes the position
of attention.
(b) At the command AT EASE, the left
foot is kept in place. Silence is required but mo-
tion is permitted.
(c) At the command REST, the left foot
is kept in place. Silence and immobility are not
required.
(d) At the command FALL OUT, the
handler leaves ranks but remains in the immediate
area. At the command FALL IN, the former place
is resumed at the position of attention in the
formation prescribed.
b. Movements. With the exception of three, all
marching movements executed by a dog team are
the same as those used during regular military
drill. Right step, left step, and backward march
are never executed by a socut dog team. The
execution of all facing movements executed by
the handler and his dog are different from reg-
ular military drill.
(1) Facings. All facing movements are ex-
ecuted at a normal cadence and from the halt.
(a) The command Right, FACE, is a
four-count movement, as shown in steps 1, 2, 3,
and 4 of figure 32. At the command of execution
FACE, the handler takes one step forward with
the left foot while at the same time giving the
command to HEEL and slapping his left leg with
the palm of his hand. On the second count, he
pivots 90 degrees to the right on the balls of
both feet. On the third count, he takes one step
forward with the right foot. On the fourth count,
Figure 31. Parade rest.
63
Figure 32. Facing movements; right face.
he places the left foot beside the right foot as in
the position of attention and gives the command
SIT.
(b) The command Left, FACE, is a
four-count movement, as shown in steps 1, 2, 3,
and 4 of figure 33. At the command of execution
FACE, the handler takes one step forward with
the right foot. On the second count, he pivots 90
degrees to the left on the balls of both feet while
at the same time giving the command to HEEL
and slapping his left leg with the palm of his
hand. On the third count, he takes one step for-
ward with the left foot. On the fourth count, he
places the right foot beside the left foot as in the
position of attention and gives the command
SIT.
(c) The command About, FACE is a four-
count movement, as shown in steps 1, 2, 3, and 4
of figure 34. At the command of execution FACE,
the handler takes one step forward with the left
foot while at the same time giving the command
HEEL. On the second count, he pivots 180
degrees to the right and faces to the rear. On the
third count, he takes one step with the left foot
in the new direction while at the same time
giving the command HEEL. On the fourth count,
he places the right foot beside the left foot as in
the position of attention and gives the command
SIT.
(2) Marching. During initial training and
until proficiency is acquired, it may be necessary
to use specific techniques in executing marching
movements. For example, when the command of
execution is given on right turns (such as REAR,
MARCH, RIGHT FLANK, and COLUMN
RIGHT), the handler can hold his right arm
along his right side and slightly to the rear. This
causes the leash to become taut when the handler
makes his turn, thus, the dog remains close to its
handler’s side.
92. Familiarization
a. After the handler becomes proficient in
drill positions and movements he is then as-
signed his dog. However, before the dog can be
trained, the handler must develop a freindly re-
lationship with his dog during a period of fami-
liarization.
b. The handler must proceed cautiously with
his newly assigned dog. He must not attempt to
enter the dog’s kennel until he has been accepted
by the dog, and then only when he has been
instructed to do so under the supervision of his
trainer. The dog becomes accustomed to the
handler’s voice and smell if the handler remains
close to but outside of the dog’s kennel. The dog
may be petted around the head and shoulders if
it shows no indications of disliking the handler.
The handler must refrain from putting his hands
on the dog’s flanks during this time, because
some dogs are quite sensitive in this area.
c. The handler now enters the dog’s kennel,
but he must be careful not to make any sudden
movements or gestures. He may coax, but not force
the dog to his side. If the dog becomes unruly,
the handler should try to avoid becoming fright-
ened. He does not attempt to push the animal
away but backs slowly out of the kennel. Even
after a satisfactory relationship has been estab-
lished, the handler always speaks to the dog be-
fore entering the kennel.
d. In some cases, the handler may require as-
sistance from other personnel in effecting the
64
Figure 33. Facing movements; left face.
proper relationship with his dog. If the dog does
not allow its handler in the kennel within a
reasonable length of time, it may be necessary
for a kennel supervisor, or someone from the
kennel support personnel who has been accepted
by the dog, to enter the kennel and muzzle the
dog. The handler can then enter the kennel and
begin his association with the dog.
e. The dog may be taken from its kennel after
it has accepted its handler. At this time, the
handler must follow all safety precautions ex-
plicitly. This is no time for the handler to display
his initiative and ingenuity. Serious problems
could arise from such actions that could com-
promise both safety and future usefulness of the
dog. The handler should pet and talk to the dog
and allow it to romp and play. When a good
handler-dog realtionship has been established,
the military dog team begins obedience training.
93. Formations
Three types of formations are used to teach the
dog basic obedience. Each formation is designed
for a specific purpose; however, each is flexible
enough to be used for other training purposes.
Basic obedience usually begins in the circle form-
ation.
a. Circle. The heel position is one of the first
positions that the dog learns. It can learn this
quite rapidly in a formation that requires the
dog to walk to the handler’s left side without
making any sharp turns. In the circle formation,
the dog walks around in a circle at the handler’s
side. Upon command, the handler can reverse his
65
Figure 3^. Facing movements; about face.
Figure 35. Circle formation.
I
direction, or, when necessary, he can stop and
stand facing either the inside or the outside of
the circle. The trainer usually stands in the center
of the circle so he can observe all of the dogs as
they are training. Other commands can be
taught in this type of formation, such as SIT,
DOWN, and STAY. Another feature of this for-
mation is that of safety. As more dogs are trained,
the circle can be expanded to allow ample space
for each dog to maneuver. Figure 35 shows a
66
Figure 36. Line formation.
group of handlers teaching their dogs to walk at
the heel position. The trainer has positioned him-
self so that by turning he can keep his eyes on
all of the dogs, or, if necessary, on one particular
dog.
b. Square. The square formation is used to
teach the dog movements which require sharp
turns. Left turns or right turns can be made from
this formation, depending on the direction the
handler is walking. This is an excellent formation
to use in teaching the dog to stay in the correct
heel position when making a sharp turn. This
formation can be adjusted in size, and a safe
distance can be maintained between dogs. The
trainer positions himself where he can observe
the dogs for correctness of performance. Hand-
lers keep their dogs close at their sides as they
execute right turns.
c. Line. The line formation can be used effec-
tively to teach commands which require the hand-
ler and dog to be separated by the length of the
leash. This formation is especially helpful when
teaching a dog the commands of STAY and
COME. The trainer positions himself anywhere
along the line and observes the entire group of
dogs at the same time. In figure 36 the dogs are
being taught the command STAY. The line for-
mation is also used for intermediate and ad-
vanced obedience training when a dog is learning
to react to commands given from a greater dis-
tance than the length of the leather leash. This
formation is also used during agitation training.
94. Commands
While training his dog, the handler uses both his
voice and his hands to convey commands to the
dog. If the dog is to react favorably to com-
mands, the handler must have his dog’s undivided
attention. Not only must the handler know what
responses are expected from his dog, he must
know how to achieve the desired responses; he
can then proceed with confidence in himself and
in his ability to use the commands properly.
a. Use of Commands. Simple commands are
used to teach a dog obedience. They are short
words or signals which, when given properly,
are easy for a dog to grasp. The handler uses
both oral commands and hand gestures to train
his dog; therefore, it is of the utmost importance
that the handler give these commands and ges-
tures in a correct manner.
(1) Oral. The word used in an oral com-
mand is of little importance; it is the sound of
the word that the dog associates with the move-
ment required. For this reason, the handler must
consistently give the command in the same man-
ner and in the same tone of voice. It doesn’t
matter if his voice is high pitched or low pitch-
ed ; but he must always use the same firm, clear,
decisive tone of voice in giving a command.
(2) Hand gestures. Hand gestures are
taught so that in actual field employment dog will
respond to silent commands. When first intro-
duced they are given simultaneously with the ap-
propriate oral command. Voice commands and
hand gestures can be given independently after
the handler and his dog become proficient in
the use of commands. As training progresses,
the dog learns what is expected of it when the
appropriate gesture is given.
b. Commands Taught. The commands taught
during basic obedience training are used
throughout the handler’s association with his
dog. The proficiency gained in basic obedience
is reflected in all further training and working of
the dog. The standards of performance for the
67
dog are printed in italics in the following discus-
sion of each command.
(1) Heel. The initial command in dog train-
ing is the command HEEL. All additional com-
mands or exercises start with and end in the
heel position. The dog is trained to walk, stand,
or sit at its handler’s left side, with the dog’s
right shoulder in line with the handler’s left
knee. The dog’s body should be parallel with the
handler’s body, and the dog must neither forge
ahead nor lag behind.
(a) The verbal command is HEEL, and
the gesture command is made by slapping the
left leg with the left hand open. During initial
training, the verbal command and the hand ges-
ture are given simultaneously until the dog team
becomes proficient. These commands can be given
individually or need not be given at all when the
dog has learned to stay in the proper heel psoition.
(b) Most verbal commands cannot be
taught independently of each other. The com-
mands SIT, STAY, and the command NO are
taught in conjunction with the command HEEL.
(Each of these commands is explained in detail
later.)
(c) During initial training, the command
HEEL may be used frequently as a training aid,
but after the dog has learned this command, it
should not be used excessively. As the dog develops
proficiency, the handler gives the command
HEEL only when he starts, halts, or changes di-
rections. For example:
1. When called to attention, the com-
mand HEEL is given as the left foot strikes the
ground.
2. At the command Forward, MARCH,
the command HEEL is given simultaneously with
the first forward step.
3. On movements toward the left, the
command is given as the handler pivots.
4. On movements toward the right (in-
cluding Rear, MARCH), the command is given
as the handler pivots.
5. When coming to a halt, the command
HEEL is given one pace before halting.
(d) When walking with its handler, the
dog may get out of the heel position by moving
ahead. The handler corrects the dog by giving a
sharp jerk on the leash and by repeating the
command HEEL. When necessary, the handler
may give the command NO just before repeating
the command HEEL. When a dog lags behind, it
is coaxed into the proper heel position, not
jerked.
(e) When the handler halts, his dog
should assume the heel position; if it does not
get in the proper position, it must be corrected
immediately. When the dog is not facing the
right direction, the handler places his left
hand, palm up, lightly under the dog’s abdomen
and shifts it until it faces in the proper direc-
tion. A dog that gets in a position that is too
close to the handler can be corrected by placing
the left hand against the right side of the dog’s
abdomen and pushing gently. When the dog is
too far away, the handler places his left hand on
the dog’s left hip and pulls the dog into proper
position.
(2) No. The command NO is a verbal re-
primand and must be given in a harsh, firm voice.
This command is used to correct the dog after it
has made a mistake. At the command NO, the
dog should cease that activity for which it is
being corrected. If the command NO isn’t enough
to correct the dog, a jerk on the leash is used
in conjunction with the command. This type of
correction is used continually throughout train-
ing whenever the dog shows any lack of obedience
to its handler’s commands. The handler observes
his dog closely at all times and gives the com-
mand NO if the dog begins to break position or
perform incorrectly. For example, if the dog is in
the down position and decides to sit up, the
handler can readily spot his dog preparing to
move and can immediately give the command
NO. By using this procedure, the handler can
usually prevent his dog from making improper
movements.
(3) Sit. The command SIT is taught in con-
junction with the command HEEL. In the heel-
sit position, the dog sits beside the handler’s left
leg; its body is parallel to, and its right shoulder
in line with, the handler’s left knee, as shown in
figure 37. When given the command SIT, the
dog may be either standing or lying down. Upon
hearing the command, it must promptly assume
a sitting position. After learning the command
SIT, the dog must automatically sit without com-
mand when coming to a halt from marching.
(a) The command SIT is given in a
sharp, concise tone of voice. When this command
is given, the handler grasps the leash several
inches above the choke chain with his right hand.
Figure 38 shows the handler placing his left
hand over the hips of the dog with the fingers
positioned at the base of the dog’s tail; he them
gives an upward jerk on the leash and pushes
down and forward on his dog’s croup with his
left hand.
(b) The handler must not place his left
hand on the dog’s back or too high on the dog’s
hips. As training progresses and the dog learns
68
Figure 37. Sit position.
what it is expected to do when given the com-
mand SIT, physical assistance is no longer re-
quired.
(c) If the dog does not sit facing directly
forward, the handler swings the dog’s body
around into the correct position. This is done by
using the left hand to push or pull its hind-
quarters into the desired position. If the dog sits
behind the handler or too far from his side,
the handler pulls the dog’s head to the left side
with the leash; the left hand is used to restrain
the dog to prevent it from getting up and follow-
ing the leash. This type of correction is most ef-
fective if given just as the dog is in the act of
(sitting, before its hindquarters have touched the
ground.
(d) During the introduction of the com-
mand SIT, the dog may get slightly out of posi-
tion. If this happens, the handler must not force
his dog into the correct position. After the dog
learns what is expected of it and it becomes
more proficient, the handler can then make cor-
rections on the dog’s position. The dog must be
praised each time it assumes the correct sitting
position.
(e) The handler may also give the com-
mand SIT while he is out in front of his dog at
the end of the leash. In this position, the dog is
in the standing position facing toward the hand-
ler. During the introduction of SIT from the end
of the leash, the handler holds the end of the
leash in his left hand. He steps forward one step
with his right foot, grasps the leash approxi-
mately 12 inches from the choke chain and gives
an upward jerk and the verbal command SIT,
as shown in 1, figure 39. After giving his dog
69
Figure 38. Teaching dog to sit.
the gesture and verbal command STAY, he brings
his right foot back alongside his left foot (2,
fig 39). Once the dog becomes proficient in the
command SIT, the handler discontinues the
step-in with the right foot. Instead, he gives the
proper hand gesture in addition to the verbal
command SIT. To give this gesture, the handler
holds the end of the leash in his left hand and
makes an upward gesture with his right hand,
as shown in figure 40. If the dog continues to
disobey, then the handler can jerk the dog while
at the same time giving the command SIT. Be-
cause the dog needs to be jerked and not pulled,
the handler should hit or slap the leash instead
of grabbing. This produces a quick jerk instead
of a pulling sensation.
(4) Stay. When the dog has shown obedience
to the preceding commands, the handler may be-
gin teaching the command STAY. This com-
mand is given in a firm tone of voice. It may be
given while the dog is in any position. On hearing
the command STAY, the dog must stay in the
same position which it held when given the com-
mand. Furthermore, the dog must remain in
that position until the handler gives it another
command.
(a) Initial training in the command
STAY is conducted while the dog is in the sit
position. When the dog is at its handler’s side,
either standing, sitting, or lying down, the ges-
ture for it to stay is given simultaneously with
the oral command. To do this, the handler gives
the command STAY in a firm, steady tone as he(
brings his left hand, palm toward the dog, back
in a short, decisive gesture. The handler does not
slap the dog but brings his hand straight back
70
Figure 39. Introducing dog to sit hand gesture at end of leash.
to his dog’s nose, as shown in figure 41. This
gesture conveys the necessary authority when
skillfully executed; it appears as a threat when
poorly executed.
(b) To begin an exercise at the end of the
leash, the handler first moves from beside his
dog to the end of the leash; to do this, the com-
mand STAY is given in a firm voice along with
a decisive hand gesture. Then, the handler steps
forward with his right foot. The dog should never
move when his handler takes a step with his
right foot. The handler then walks to the end
of the leash, does an about face, and faces his
dog.
(c) The handler does not move the full
length of the leash from the dog when this exer-
cise is first practiced. Also, to prevent the dog
from becoming too tired, the practice periods
are short. As the dog’s performance improves,
the distance between the handler and dog are
increased.
(d) While moving away from the dog to
the end of the leash, the handler changes the
leash from the right hand to the left hand. The
handler then extends his arm and hand so that
the palm of the hand faces directly toward his
dog, as shown in figure 42. If the dog begins to
move, it is corrected immediately; the handler
gives the command STAY. If the dog actually
breaks position, the handler gives the command
NO, SIT (as the dog is put in the sit position),
and STAY (as he gives the proper hand gesture).
71
Figure 39—Continued.
(5) Down. As the dog’s performance in ex-
ecuting the commands HEEL, SIT, NO, and
STAY improves the handler then starts teach-
ing the command DOWN. A dog frequently re-
sists this exericse; therefore, it is not repeated
too often in succession. To prevent this resistance,
it sometimes helps if the handler alternates from
this exercise to the heeling and sitting exercises.
(a) In the down position, the dog lies
parallel to the handler’s body, and its right
shoulder is in line with the handler’s left foot,
as shown in figure 43. If the dog rolls on its
side it is not in the down position and should
be corrected immediately. Physical correction is
made by placing the dog in the proper position
and by giving the command STAY.
(b) When given the command DOWN,
the dog must lie down promptly. When the hand-
ler first introduces this command, the dog is in
the heel-sit position. The command is given in a
firm, steady voice; at the same time, the handler
bends down and places his left hand on the
leash just above the snap. As the handler gives
the verbal command DOWN, he pulls down on the
leash with the left hand, as shown in figure 44.
(If the dog has a small neck, it may cause slack
72
Figure 40. Sit hand gesture at end of leash.
in the chain. In this case, it may be necessary
to grab the choke chain instead of the leash to
have enough room to pull downward.) If pulling
on the dog’s leash does not put it in the down
position, the handler will have to simultaneously
pull the dog’s front legs forward. After the dog
is in the down position, the command STAY (in
conjunction with the hand gesture for stay) is
given so that the dog remains in the down posi-
tion when the handler returns to the position of
attention.
(c) The handler must use extreme caution
during the introduction of the command DOWN,
because the dog may resent the use of force. The
handler’s position is such that he could easily
be bitten if the dog snapped. The left hand may
be used as an effective aid to safety because it is
on the choke chain, and the handler can push
the dog away from his face, leg, or right hand.
(d) After the dog has executed the
DOWN command satisfactorily, it is kept in posi-
tion for a short time while the handler stands
at its right side. Then the dog is given the com-
mand SIT, and if it comes to the sit position
satisfactorily, it is highly praised. If the dog’s
performance is unsatisfactory, the handler gives
the command SIT and at the same time jerks
up on the leash; this should cause the dog to sit
73
Figure bl. Stay hand gesture, handler beside dog.
up. If this fails, the handler must give the com-
mand NO, SIT and jerk harder on the leash.
(e) The handler repeats this exercise, us-
ing the command DOWN until his dog ceases to re-
sist it. If at any time the dog shows signs that
it may break position, it is corrected by using
the command STAY. If the dog needs correction
while it is in the down position, the handler
does not move his feet because this movement
may confuse the dog. When the dog breaks posi-
tion, the handler immediately puts the dog back
into the sit position and again gives it the com-
mand DOWN.
(/) As the dog’s performance of the com-
mand DOWN improves, the handler should re-
frain from pulling down on the choke chain until
the dog has an opportunity to obey the command
and gesture.
(g) After the dog becomes proficient at
executing the command DOWN, the handler can
begin another exercise using the command
DOWN. With the dog in the sit position, the
handler gives the command STAY. The handler
then moves to the end of the leash, changing the
leash to his left hand before completing the move.
Figure 45 shows the procedures used during the
introduction of the command DOWN from the
end of the 60-inch leash. The handler steps for-
ward one step with his right foot and grasps the
leash about 6 inches from the choke chain. He
then gives a downward jerk and the verbal com-
mand DOWN. Once the dog is down, the handler
74
Figure Ь2. Stay hand gesture, handler in front of dog.
gives the gesture and verbal command STAY
and brings his right foot back alongside his left
foot. As the dog makes progress, the step in can
be discontinued. The handler gives the command
DOWN, and a sweeping downward gesture is
made with the right hand, as shown in figure 46.
The handler may praise his dog when it executes
the DOWN position.
(6) Take cover. The command TAKE
COVER is not a command to the dog but to the
handler. This command is taught to prevent the
dog from becoming alarmed or confused when his
handler drops to the ground. This cover action
is necessary when the handler must assume a de-
fensive position to protect himself. At the same
time the handler drops to the ground, he gives
his dog the command DOWN. The dog then
goes to the down position as the handler drops
to the ground. When the handler first practices
this exercise, he must not drop to the ground
too suddenly, if he does, his dog may become
frightened and attempt to jump up. After several
trials the dog becomes accustomed to this exer-
cise.
(7) Come. The final command taught dur-
ing basic obedience training is the command
COME. The other basic obedience commands,
particularly the command STAY, must have
been taught and the dog must be performing
satisfactorily before the handler teaches the
command COME. To execute this movement cor-
rectly, the dog, upon hearing its name called fol-
lowed by the command COME and the proper
gesture, comes promptly to the heel position at
75
Figure ЬЗ. Down position.
his handler’s side. To begin this exercise, the
handler gives his dog the command STAY. Step-
ping off with the right foot, the handler moves
to the end of the leash and turns to face his
dog. He calls his dog’s name, and follows it with
the command COME: ’for example: Duke!
COME. (During the progression of training,
calling the dog’s name is omitted.) As the hand-
ler calls and gives the command COME, he tugs
lightly on the leash to suggest the meaning of the
command and gives the gesture shown in figure
47. After giving the appropriate gesture, he
quickly changes the end of the leash to his right
hand and gives the command HEEL. During the
early stages of this exercise, the handler may be
more effective in teaching the command COME
if he uses the following method. As the dog ad-
Figure Ц. Down hand gesture, handler beside dog.
vances, the handler steps back with his left foot,
grasps the other end of the leash with his left
hand, and guides the dog around and into the
heel position. When the dog is in the heel posi-
tion, the handler assumes the position of atten-
tion and gives the command SIT.
(8) Crawl. On the command CRAWL, the
dog is either beside or facing toward the handler.
(This movement is useful if the dog team comes
under enemy fire or observation.) When first
teaching a dog to crawl, the handler should not
lie down beside the dog because the animal could
become irritated and might snap at the hand-
ler’s face. Instead, the handler should kneel down
in front of the dog and make the dog crawl to-
ward him by pulling on the leash. While the
76
Figure 45. Introduction of down -position at end of leash.
Figure 46. Down gesture at end of leash.
Figure Ь7. Come gesture.
handler is pulling on the leash he should use
the hand gesture for CRAWL, which is done by
waving the hand from side to side in front of
the dog’s face. If the dog tries to rise, the hand-
ler pulls down and forward on the choke chain
and at the same time gives the command CRAWL.
When the dog becomes proficient at crawling,
the handler stands facing the dog at a distance
of several feet and gives the oral command, and
the hand gesture, to CRAWL (fig 48). When
the dog has progressed satisfactorily in this
phase of training the handler can give the com-
mand DOWN and then lie down beside the dog.
Now the handler starts to crawl, gives the com-
mand CRAWL, and encourages the dog to crawl
beside him. After teaching the basic commands
HEEL, NO, SIT, STAY, DOWN, TAKE COVER,
COME and CRAWL, the handler is ready to ad-
vance to the next phase of training, intermediate
obedience training.
78
Figure Ь7—Continued.
79
Figure 17—Continued.
80
Figure 47—Continued.
81
Figure U7—Continued.
82
Figure ЬТ—Continued.
83
Figure !>7—Continued.
84
Figure Ь8. Crawl position.
Section II. INTERMEDIATE TRAINING
95. General
Intermediate obedience training consists primar-
ily of teaching the dog to be obedient while the
handler is at the end of the 300-inch training
leash. Obedience at the obstacle course is also a
part of this training.
96. Commands From a Distance
a. The primary objective of the training is to
further develop the control the handler has over
his dog. The dog must be taught to execute all
of the basic commands at a distance from his
handler. The techniques used with the leather
leash can be used with the 300-inch web training
leash. If the dog does not react properly to com-
mands while on the 300-inch leash, the handler
reverts to the use of the 60-inch leash. Patience
and repetition are necessary when conducting
this training.
b. Initially, it is difficult to train a dog to stay
in any given position while its handler may be
as much as 25 feet away. When the handler
goes more than 4 or 5 feet beyond his dog, the
dog may have a tendency to break position. This
is natural, because the dog has developed a liking
for its handler and may want to follow him. The
handler must repeat all exercises until he has
complete control over his dog; this requires pa-
tience.
c. The handlers place their dogs in a line
when conducting obedience training from the end
of the 300-inch leash. The dog must be taught to
sit and to lie down when given the appropriate
vocal command or hand gesture. Both are used
simultaneously in the beginning, but as training
progresses, the dog is taught to react separately
to either the vocal command or the hand gesture.
Usually, it is best to train the dog in distant
obedience for a while and then work it on the
confidence course.
97. Confidence Course
a. Most military dogs perform strenuous duty.
Because of this, the handler cannot expect his
dog to maintain maximum proficiency unless it
is in top physical condition. In addition to receiv-
ing proper food and medical care, it must be ex-
ercised frequently and regularly; however, the
85
Figure U9. Types of obstacles.
handler must consider his dog’s age and physical
ability.
b. A confidence course provides an excellent
medium for exercise. The use of such a course
aids the handler in developing control over his
dog, and builds the dog’s self-confidence. In order
to be beneficial, the course must contain several
different types of obstacles. Figure 49 depicts
three obstacles which could be used in a confi-
dence course.
c. Almost any dog can jump a 3-foot hurdle.
Because of the military dog’s size, this is not
too difficult. The purpose of this training is to
get the dog to jump on command. At this stage
of training, the dog has been taught to walk in
the heel position at his handler’s side. The com-
mand used during this exercise is HUP. Upon
hearing this command, the dog jumps or scales
the obstacles and then returns to its handler’s
side in the heel position.
d. The dog may have been taught to jump
over hedges or other obstacles but may be afraid
of a hurdle. For this reason, it is often advisable
to start this exercise using a hurdle that has
removable boards. Almost all of the boards can
be removed until the hurdle is low enough for
the dog to walk over. The handler begins this
exercise by stepping over the hurdle with his
left foot as he simultaneously gives the com-
mand HUP. If the dog hesitates or balks, the
handler stops on the far side and coaxes or helps
the dog over by tugging on the leash. After the
dog successfully crosses the hurdle, the handler
steps away from it, praises his dog, and then
gives the command HEEL.
86
e. This exercise is continued until the dog can
walk or jump over the hurdle without help. When
the dog clears the hurdle at its initial height,
the boards can be inserted one at a time until
a height of not more than 3 feet has been at-
tained.
f. By the time the handler inserts three or four
boards, the dog should be so proficient in the
execution of the command HUP that the handler
need not continue to step over the hurdle with
his dog. Instead, the handler passes around the
hurdle on the right side; the leash is slack and
in his left hand. As the handler passes the hurdle,
he gives the command HUP. If this procedure is
followed, the dog soon learns to jump over the
hurdle when the handler gives the command HUP
before passing the hurdle.
g. It is important that practice in jumping
and scaling not be overdone in any one period.
Although the dog may enjoy these exercises, they
are very tiring. In determining the length of these
exercises, the handler must consider his dog’s
age and the weather. He must not overwork his
dog during hot weather. A young dog can stand
longer and more rigorous training exercises than
an older dog. Specific instructions can be obtained
from the veterinarian as to what training on the
confidence course old dogs and dogs with medical
problems should receive.
h. When a dog is taught to crawl through a
tunnel, it is usually necessary for his handler to
assist it. The dog can be walked to the end of
the tunnel to examine it. Then the handler holds
the leash close to the snap, coils the remainder
of the leash, and throws it through the tunnel.
Section III. AD
98. Purpose
The purpose of advanced obedience training is
to gain the control needed by a dog team before
advancing to the more specialized phases of dog
training. The handler must have complete con-
trol over his dog during the performance of field
problems and security duties.
99. Off-Leash Obedience Training
a. This training is conducted by working a dog
off leash and at varying distances from the hand-
The handler then attaches the snap to his dog’s
choke chain, puts the dog in the DOWN position,
and commands it to STAY. The handler then
moves to the other end of the tunnel, looks through
it so the dog can see him, and coaxes the dog
through; if necessary, the handler tugs on the
leash; this indicates to the dog that its handler
wants it to come through the tunnel. The com-
mands COME and CRAWL may also be used
during initial training.
i. After the dog has accomplished this exer-
cise, it is praised and the exercise is repeated un-
til the handler’s assistance is no longer required.
j. When the dog is taught to walk along a log
or ladder, the handler stays close to the dog’s
side and continuously encourages it. If the dog
jumps off the log before completing the walk,
it is praised for having walked that far; then,
the exercise is undertaken again. The dog soon
gains confidence in its ability to walk over the
obstacle and does so while its handler walks along
near or beside it.
k. Caution must be used during this exercise.
Before the exercise begins, the log or ladder is
checked to determine its condition. If the log
or ladder is wet and slippery, it must be dried
to prevent injury to the animal.
I. When the dog is completely obedient and
correctly executes the commands given it from a
distance, and when it boldly traverses the con-
fidence course without error, the objectives of
the intermediate phase of obedience training
have been accomplished. The handler then pro-
ceeds to the advanced phase of obedience training.
«ICED TRAINING
ler; all of the commands taught in basic and in-
termediate obedience training are used. If any
difficulty is encountered during this phase of
training, the handler immediately reverts to the
use of the 300-inch training leash. Because the
dog is off leash, it is absolutely essential that all
commands be obeyed immediately.
b. To prevent the possibility of dog fights dur-
ing the initial phase of this training, a good
procedure is to muzzle all dogs. However, this
procedure is discontinued as soon as possible
because it is distracting to the dog.
87
APPENDIX A
REFERENCES
AR 40-1 AR 40-3 AR 40-655 AR 40-905 AR 190-12 AR 385-30 AR 700-81 AR 735-11 FM 21-75 FM 31-25 FM 31-35 FM 31-70 FM 31-71 FM 31-72 TM 8-450 ATP 7-167 ASubjScd 7-39 ATT 7-167 Composition, Mission, and Functions of the Army Medical Department. Medical, Dental, and Veterinary Care. Prevention and Control of Communicable Diseases of Animals. Veterinary Animal Services. Military Police Working Dogs. Safety Color Code Markings and Signs. Department of Defense Dog Program. Accounting for Lost, Damaged, and Destroyed Property. Combat Training of the Individual Soldier and Patrolling. Desert Operations. Jungle Operations. Basic Cold Weather Manual. Northern Operations. Mountain Operations. Veterinary Specialist. Infantry Platoon (Scout Dog) (TOE 7-167). Infantry Platoon (Scout Dog). Infantry Platoon (Scout Dog) (TOE 7-167).
88
APPENDIX В
FEEDING AND CARE IN COLD CLIMATES
Section I.
1. Well-Balanced Diet
In cold weather a well-balanced diet helps keep
a dog warm. The dog requires a well-balanced ra-
tion of protein (meat and/or fish), fat, and car-
bohydrates. The amount of fat and carbohydrates
may be increased in cold weather to provide
quick energy for the dog. Nutritious carbohy-
drates are found in foods such as oatmeal, corn,
and rice meal. Fat can be provided in a com-
bination of animal fat and vegetable oils such
as corn oil. A daily level of protein must be
given to the dog or it will soon develop deficiency
symptoms. A quarter of the ration should be
protein.
2. Sources of Protein
Walrus or seal meat is regarded as an excellent
food for dogs. White whale, nor-whal, polar bear,
reindeer, caribou, and fish also are good. Salmon
is commonly used in Alaska, while cod, halibut,
salmon-trout or char, and shark are the most
nutritious fish in the eastern Canadian arctic
and Greenland area. Fresh shark flesh is poison-
ous and should never be fed to dogs except in
food emergencies, and then only in very small
amounts. If boiled for several hours or dried,
or after it is a week old, shark flesh can be
eaten safely and is fairly good dog food. An all
meat diet fed over a long period of time may
produce deficiency disease. The feeding of whole
carcasses provides a better balance than meat
alone. (Do not feed polar bear livers.)
3. Watering
Usually it is not necessary to water dogs if clean
snow is available. If there is no snow, the dogs
should be watered early in the morning and
shortly before their afternoon feeding. If dry
food is used, it is well to offer water to the dogs
at least half an hour after the meal. Special
efforts should be made to provide the animal with
potable drinking water. Dehydration in cold cli-
FEEDING
mates is a serious problem requiring extra care
to get adequate water to the dog.
4. Feeding Time
Working dogs should be fed only once a day, and
the feeding should take place at the end of the
day’s work. When fed before or in the middle
of the workday, the dogs often refuse to work
and frequently may vomit. Dogs should be rested
at least half an hour after work and before being
fed. At the kennel, when the dogs are not working,
they should be fed at a specified time. When in
the kennel a dog in poor condition should be
fed twice a day to be brought back into good
shape.
5. Patrol Food
a. Patrol food must be prepared in advance,
although in some parts of western and eastern
Canadian arctic regions it will be possible for
experienced hunters to obtain seal or walrus meat
while traveling. If game is available on patrol,
it will materially reduce the weight to be carried
by the dog team.
b. Dried fish is a common trail food. Fish can
be freshly caught, and prepared by cutting it
into strips and hanging it up to dry.
c. If fuel is abundant, cooked rice and fish
may be used as a patrol food. It has the advantage
of taking up very little space. For each dog
2 1/2 pounds of cooked rice (about 6 ounces, dry)
are mixed and cooked with 1/8 to 1/4 pound of
fish. In addition, each dog is fed 1/2 pound of
dried fish.
d. An excellent dog food commonly used on op-
erations in the Antarctic is a mixture of a com-
mercial dog food with seal oil or preferably cod
liver oil. Commercial dog food alone will not
keep the dogs in good condition over long per-
iods; the high caloric value of the added oil will
89
provide much additional energy. If cod liver oil
is not available, other oil can be easily rendered
from seal or walrus blubber. The common method
of preparation is to mix the oil and the com-
mercial food into a pastelike consistencey, mold
it to form 1 1/2-pound cakes, and then freeze.
This makes a convenient, nutritious, compact,
and easy-to-pack food, probably the best all-
round food. If the weather is not sufficiently cold
to keep the cakes frozen, the mixture may be
stored in 5-gallon tins of the type commonly used
in packing dehydrated food.
Section II. PREVENTION AND TREATMENT OF DISEASE AND INJURY
6. General
The treatment of disease and injuries among
animals, as well as the prevention of disease, is
the function of the Veterinary Service. However,
at arctic outposts this service may not be im-
mediately available. Thus, it becomes the duty
of each soldier to be vigilant and intelligent in
the application of simple measures to prevent
the occurrence of diseases and injuries among
the dogs. Dogs normally are very hardy, but
injuries are quite common and diseases often de-
velop which require emergency treatment. In
this section, preventive measures and first aid
treatments are briefly discussed. The treatments
suggested are intended for use by anyone famil-
iar with the handling of dogs. However, when-
ever possible, sick or injured animals should be
placed in the care of a veterinarian.
7. Frostbite
a. Lightly furred dogs are subject to frostbite
on the tips of the ears, pads of the feet, testicles,
and underparts of the thighs.
b. Treatment involves putting the dog in a
cool sheltered inclosure to thaw out. Place the
hands on the affected parts to stimulate recovery,
but DO NOT RUB OR MASSAGE THE AF-
FECTED PARTS. Eskimos sometimes wrap the
frozen thighs of dogs in fur skins.
8. Frozen Lungs
This condition sometimes results from working
dogs hard in extremely cold weather.
a. Symptoms. Difficult breathing, wheezing,
coughing, collapse.
b. Treatment. The dog should be placed in a
sheltered inclosure and wrapped in blankets or
a protective covering. If the dog is stricken while
on the trail, the animal should be placed on the
sledge and transported (air lifted) to the nearest
station. No attempt should be made to work the
dog until it appears to be normal. Dogs that do
not show signs of recovery in a few hours
should be treated in the same manner as dogs
with pneumonia.
90
APPENDIX С
SHELTERS
1. Flexibility
The German Shepherd can be used in the military
dog role anywhere in the world, including arctic
regions, due to the animal’s ability to adjust to
climatic conditions. In the North, for example,
it develops heavy undercoat to protect it from
the cold.
2. Employment
a. Military dog teams may be assigned to work
with mountain and/or ski troops operating
10,000 to 12,000 feet above sea level. However,
in order to function efficiently at such high alti-
tudes the handler and dog must be trained to
move over cliffs, rocks, ravines, glaciers, and
deep snow.
b. It is essential that both handler and dog
become acclimatized to and be trained at the
high terrestial elevations where they are to be
used. Habitation must be continuous because ele-
vation acclimatization is rapidly lost upon re-
turning to lower elevations.
c. The handler must be able to use snowshoes
and be able to ski.
d. The handler’s knowledge must also include
how to prepare shelters. Satisfactory shelters
may be found in caves, under overhanging cliffs,
behind thick bushes, or may be constructed from
saplings and tree boughs or shelter halves. The
type of operation and weather conditions will us-
ually dictate how much time can be spent in
shelter preparation. Digging foxholes in northern
regions is usually difficult because of the stony
soil, frozen earth, and bedrock which is often
close to the land surface. In areas covered by vol-
canic tuff digging is relatively easy, however.
And in areas where rocks and boulders exist
shelters may be constructed from such material
(fig 50).
3. Bivouacs
Setting up bivouac areas will vary according to
the terrain encountered on a particular operation.
Living conditions are improved, however, if the
area is used longer than one night (FM 31-71,
31-35).
91
® Tropics
Figure 50. Expedient shelters.
92
® Arctic
Figure 50—Continued.
93
@ Northern
Figure 50—Continued.
94
@ Northern
Figure 50—Continued.
95
APPENDIX D
TRAINING OBSTACLES
(Figs 51-60)
Figure 51. Hurdles.
96
® Regular
Figure 52. Window hurdle.
® Modified
Figure 52—Continued.
97
® Modified
Figure 52—Continued.
98
Figure 53. Log walk.
Figure 54.
Log walk and suspended bridge.
99
Figure 55. Ladder and platform.
100
Figure 56. Ladder with spaced logs.
101
Figure 57. Straddle logs.
102
Figure 58. Repaired bridge.
103
Figure 59. Log monkey bridge.
104
Figure 60. Log bridge.
105
APPENDIX E
(Figs 61 and 62)
Figure 61. Kennel construction diagram.
(Located in back of manual.)
107
UTILITY REQUIREMENTS
Electricity (KW) Connected Load Estimated Demand Type A (24) Type A (61t) 30 50* 20 40 Type В (8) 15 10 Tj/pe В ( ) 25 15
*Note. When elec, radiant heat is used add Water (GPM) Hot 1% KW for each kennel programmed. 10 15 5 8
Cold 40 70 20 30
Water (GPD) Sewage (GPD) AIR CONDITIONING REQUIREMENTS Outside design temperature 78°F WB 95°F DB Tons of refrigeration 200 for support facility plus 6 per each kennel programmed 200 for support facility plus 25 per each kennel programmed 4 4 2
GENERAL NOTES
1. Location and dimensions of training security area kennel building number of kennels fence and loading pad may
vary to meet base requirements.
2. Long dimension of kennel building must run east and west so that the exterior side of the kennels will face north
or south.
3. Floor plans will be similar in all climates.
4. For cold climates provide glazed closures for all exterior screened areas, and minimum radiant heat in slab to
prevent freezing in kennels.
5. When glazed closures are added, continuous roof ventilator may be deleted and a circular metal roof ventilator may
be installed approx. 20'-0" O.C. in lieu thereof. Any roof ventilator used should have the capability of being opened
or closed manually.
6. Electric resistance type heating cable embedded in concrete slab in kennels is suggested method of providing
radiant heat. Heat should be thermostatically controlled. Full or partial slab heat may be used depending upon
climatic conditions. Omit heating element within corridor area.
7. Provide heating units for kennel master’s quarters, treatment area and food preparation area.
8. In warm climates, provide air conditioning in treatment and food preparation areas. Use self-contained window
units or floor-type units.
9. All areas within building to be protected with insect screening.
10. Minimum facility to be programmed will be 8 dog kennels, Type “B.” Maximum facility will not exceed 64 dog
kennels, Type “A.”
11. С M U partitions between kennels to have liquid glaze applied surface. Finishes in all areas accessible to dogs
must take into consideration the damage caused by scratching and the desirability for minimum maintenance and
maximum sanitation.
12. Roof overhang should extend beyond sanitary drains designed for kennel/run washdown water to avoid overload-
ing drains and sanitary sewer lines during rains.
13. Provide a 2'-6' x З'-O" wood pallet in each kennel. Suggested construction to be 2' x 4.5 to 5" on center with 2x4
cross members underneath.
14. Provide a bucket holder in each kennel.
15. Provide a 12' long ladder for access to catwalk.
16. All sinks to be deep, laundry-type, in food preparation room.
17. Security fences are 8'-0" high, chain link, with one strand of barbed wire.
AREA FOR PROGRAMMING GROSS AREA
Kennel Building Support Facility
Type “A” 24 kennels 2,025 sq. ft. 858 sq. ft.
Type “A” 64 kennels 4,775 sq. ft. 858 sq. ft.
Type “B” 8 kennels 753 sq. ft. 650 sq. ft.
Type “B” 20 kennels 1,578 sq. ft. 650 sq. ft.
Note. New or additional kennel construction should be according to current standards as approved by the Veterinary
Division, Office of the Surgeon General, Department of the Army, Washington, D.C.
Figure 61—Continued.
109
Figure 62. Type kennel area.
110
INDEX
Paragraph Page Paragraph Page
Administrative records ... 73, 74 54, 55 Kennel chain . 32 19
Advanced training ... 99 87 Leather collar . 29 18
Aggressiveness, dog’s: Muzzle . 34 20
Moderately aggressive ... 80 58 Training leash . 31 19
Overaggressive ... 80 58 Water bucket . 38 22
Unaggressive ... 80 58 Maintenance of:
Basic senses, dog’s: Leather .. . . . . 40 24
Metal .. . _ . 41 25
Hearing ... 77 57 Procurement .... . 26 18
Sight ... 77 57 Dog handler:
Smell Touch ... 77 ... 77 57 57 Qualifications Traits . 8 . 9 6 6
Basic training: Dog records:
Commands _ _ _ _ _ ... 90, 94 62, 67
Drill ... 91 62 Administrative:
Familiarization ... ... 92 64 AF Form 323 . 73 54
Formations ... 93 65 DD Form 1743 . 74 55
Medical . 75 55
Commands: Dog’s basic senses . 77 57
Use of commands: Dog’s, transportation of . 20 14
Hand gestures . ... 94 67 Evaluation of dogs:
Oral ... 94 67 10
Gun shy test .. .. .. .. . 14
Commands: .... 94 Suitable temperament . 14 10
Come 67 Veterinary examination . 14 10
Crawl 94 67 Examinations, dogs . 47 27
Down . ... 94 67
Heel ... 94 67 Feeding:
No ... 94 67 How much to feed . 61 47
Sit .... 94 67 In cold climates . Арр В 89
Stay .... 94 67 Ration components . 59 46
Take cover ... 94 67 Type rations (table) . 61 47
Construction of kennels Арр E 107 What to feed . 60 46
When to feed . _ . 62 47
Disease control .... 49 27 First Aid: Heat stroke Objects in mouth Poisoning
Diseases, prevention of: Contagious: Canine distemper . ... Infectious canine ... 53 28 . 58 . 58 . 58 39 39 39
hepatitis _ Leptospirosis .. Rabies ... 53 .... 53 .... 53 28 28 28 Restraining injured dog Snakebites Treating injuries . 58 .. 58 .. 58 39 39 39
Tropical canine Treating wounds Use of muzzle . . _. . .. 58 .. 58 39 39
pancytopenia . _, 53 28 Fleas _ _ . _ .. 54 29
Dog behavior:
Aggressiveness . .... 80 58 German shepherd dog:
Energy 79 58 Characteristics . . 11 8
Intelligence .. . . ... 81 59 Specifications:
Sensitivity .. .. . .... 78 58 Conformation .. 11 8
Willingness .. .. 82 59 Health ...... .. 11 8
Dog equipment: Temperament ... .. 11 8
Items of: Grooming:
Brush .. 36 22 Inspection:
Choke chain 30 18 Anal region .. 56 35
Comb _ .... 35 21 Attitude .. 56 35
Equipment holder _ .... 33 20 Body functions . .. 56 35
Feeding pan .... 37 22 Ears .. 56 35
in
Paragraph Page
Eyes 56 35
Feet 56 35
Genitals 56 35
Limbs 56 35
Mouth 56 , 35
Nose 56 35
Skin 56 35
Temperature 56 35
Routine 56 35
Handler personnel: Qualifications 8 6
Source of 7 6
Traits, required 9 6
Heartworm 54 29
Heat stroke, treatment of 58 39
History, war dogs 3, 5 4
Hookworm 54 29
Injuries, treatment of 58 39
Immunizations __ 46 27
Intelligence, dog’s 81 59
Intermediate training: Commands _ _ 96 85
Confidence course 97 85
Kennel area, safety 17 11
Kennels: Construction: Fencing 66 50
Permanent 66 50
Temporary 66 50
Drainage 64 49
Equipment/supplies 68 53
Fire protection 64 49
Lighting 64 49
Maintenance 66 50
Noise 64 49
Signs 66 50
Water supply 64 49
Kennel, type construction _ _. App E, 107,
64, 66 49, 50
68 53
Labrador Retriever dog: Characteristics . _ 12 9
Specifications: Conformation . 12 9
Health 12 9
Temperament . 12 9
Lice 54 29
Medical records . 51, 75 27, 55
Medication, administering: Capsules/tablets 57 39
Liquid 57 39
Military dog: Evaluation .. _ 14 10
Procurement - . 13 10
Tattooing 15 11
Types of 11, 12 8, 9
Military dog missions _. .. . ___ 2 3
Motivation, dog’s _ _ 83 59
Muzzle, use of 58 39
Off-leash obedience training 99 87
Off-limits signs . ... 66 50
Parasites: External: Fleas 54 29
Lice „ ... _ _ 54 29
Paragraph Page
Ticks _____________________ 54 29
Internal:
Heartworm 54 29
Hookworm 54 29
Roundworm 54 29
Tapeworm 54 29
Whipworm 54 29
Poisoning, treatment of 58 39
Procurement of dogs 13 10
Roundworm 54 29
Safety:
Kennel area 17 11
Training area , 18 13
Veterinary area 19 13
Sanitation:
Kennels 55 34
Kitchen 55 34
Runs 55 34
Sensitivity, dog’s:
Moderately sensitive 78 58
Oversensitive 78 58
Unsensitive 78 58
Shelters, expedient App C 91
Snakebites, treatment of 58 39
Tapeworm 54 29
Tatooing of dogs 15 11
Ticks 54 29
Training area:
Safety 18 13
Size 65 50
Surface 65 50
Types of 67 51
Training course obstacles App D 96
Training principals:
Correction 88 60
Know-how 84 60
Patience 86 60
Praise 87 60
Repetition 85 60
Transportation of dogs:
During hot weather 24 17
During inclement weather 25 17
Loading 21 14
Long distance:
Airplane 23 14
Helicopter 23 14
Train 23 14
Truck 23 14
Motor vehicle 22 14
Types of military dogs 11, 12 8, 9
Veterinary area, safety 19 13
Veterinary services:
Disease control 49 27
Examinations 47 27
Facility inspections . .. 48 27
Immunizations 46 27
Medical records 51 27
Veterinarians .. . 43, 44 26
War dog history:
Pre-WWI 3 4
Vietnam 5 4
WWII, Korean War . 4 4
Whipworm 54 29
Willingness, dog’s 82 59
Wounds, treatment of 58 39
112
By Order of the Secretary of the Army:
Official:
VERNE L. BOWERS,
Major General, United States Army,
The Adjutant General.
BRUCE PALMER, JR.,
General, United States Army,
Acting Chief of Staff.
Distribution:
To be distributed in accordance with DA Form 12-11 requirements for Military Dog Training
and Employment.
Й U.S. GOVERNMENT PRINTING OFFICE: 1972-714-583/5023
FLOOR PLAN TYPE ”A"
120 KENNELS MINIMUM - 84 KENNELS
MAXIMUM!
APPENDIX E
(Figs 61 and 62)
Figure 61. Kennel construction diagram.
w