/


Теги: military unarmed defense
Год: 1942


Текст
FM 21-150
WAR DEPARTMENT
BASIC FIELD MANUAL
UNARMED DEFENSE
FOR THE
AMERICAN SOLDIER
June 30, 1942
FM 21-150
BASIC FIELD MANUAL
UNARMED DEFENSE
FOR THE AMERICAN SOLDIER
UNITED STATES
GOVERNMENT PRINTING OFFICE
WASHINGTON : 1942
WAR DEPARTMENT,
Washington, June 30, 1942.
FM 21-150, Unarmed Defense for the American Soldier,
is published for the information and guidance of all concerned.
[A. G. 062.11 (5-3-42). I
By order of the Secretary of War:
G. C. MARSHALL,
Chief of Staff.
Official :
J. A. ULIO,
Major General,
The Adjutant General.
Distribution :
D (5); R 1-10, 17 (5); Bn 7 (1), 11, 18 (5), 19 (10);
C 7 (5), 19 (20).
(For explanation of symbols see FM 21-6.)
и
TABLE OF CONTENTS
Paragraphs Page
Section I. General_______________________________ 1-6 1
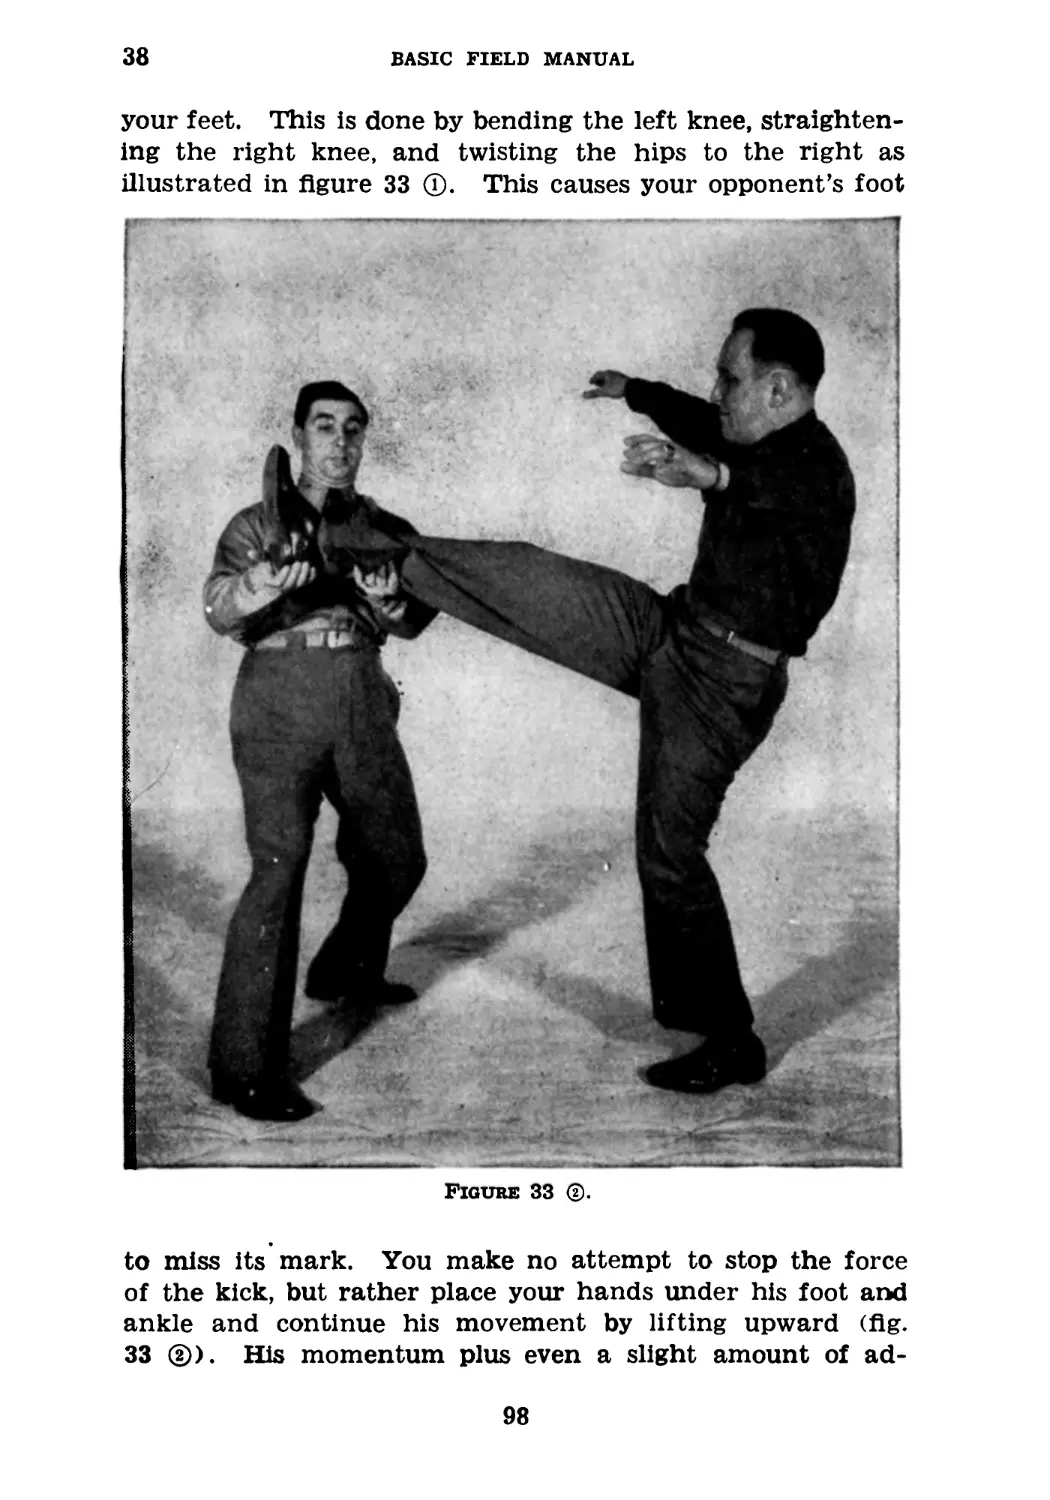
II. Basic principles________________________ 7 5
III. Wrist escapes_______________________ 8-16 12
IV. Escapes from body holds------------ 17-26 40
V. Defenses against choke holds------ 27-37 70
VI. Defenses against kicks------------- 38-Л0 97
VII. Taking prisoners___________________ 41-48 105
VIII. Defenses against knife and sword__ 49-55 129
IX. Defenses against blows with club, and
technique of club_____________________ 56-61 150
X. Defenses against pistol____________ 62-70 172
XI. Defenses against rifle_____________ 71-74 202
XU, Defenses against wrestling holds__ 75-81 219
XIII*. Defenses against grips on garments or
hair______________________________________ 82-88 237
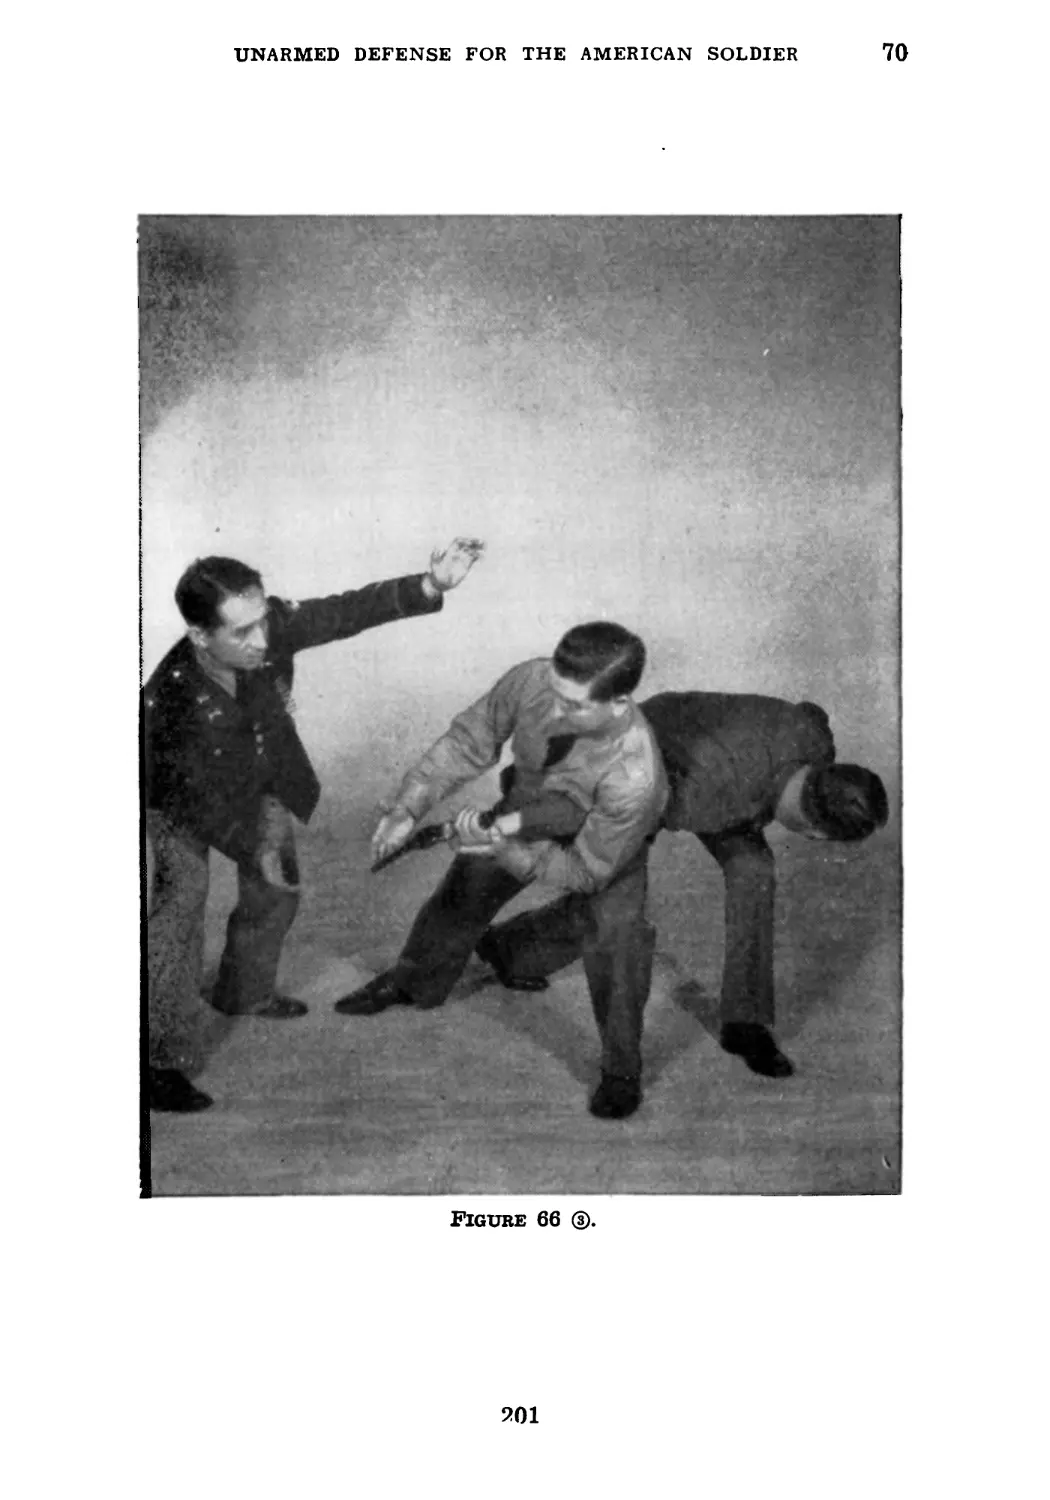
XIV. Defenses against fist attacks_ ____ 89-102 259
XV. Incapacitating an opponent---------- 103-112 294
Index_________________________________________________ 312
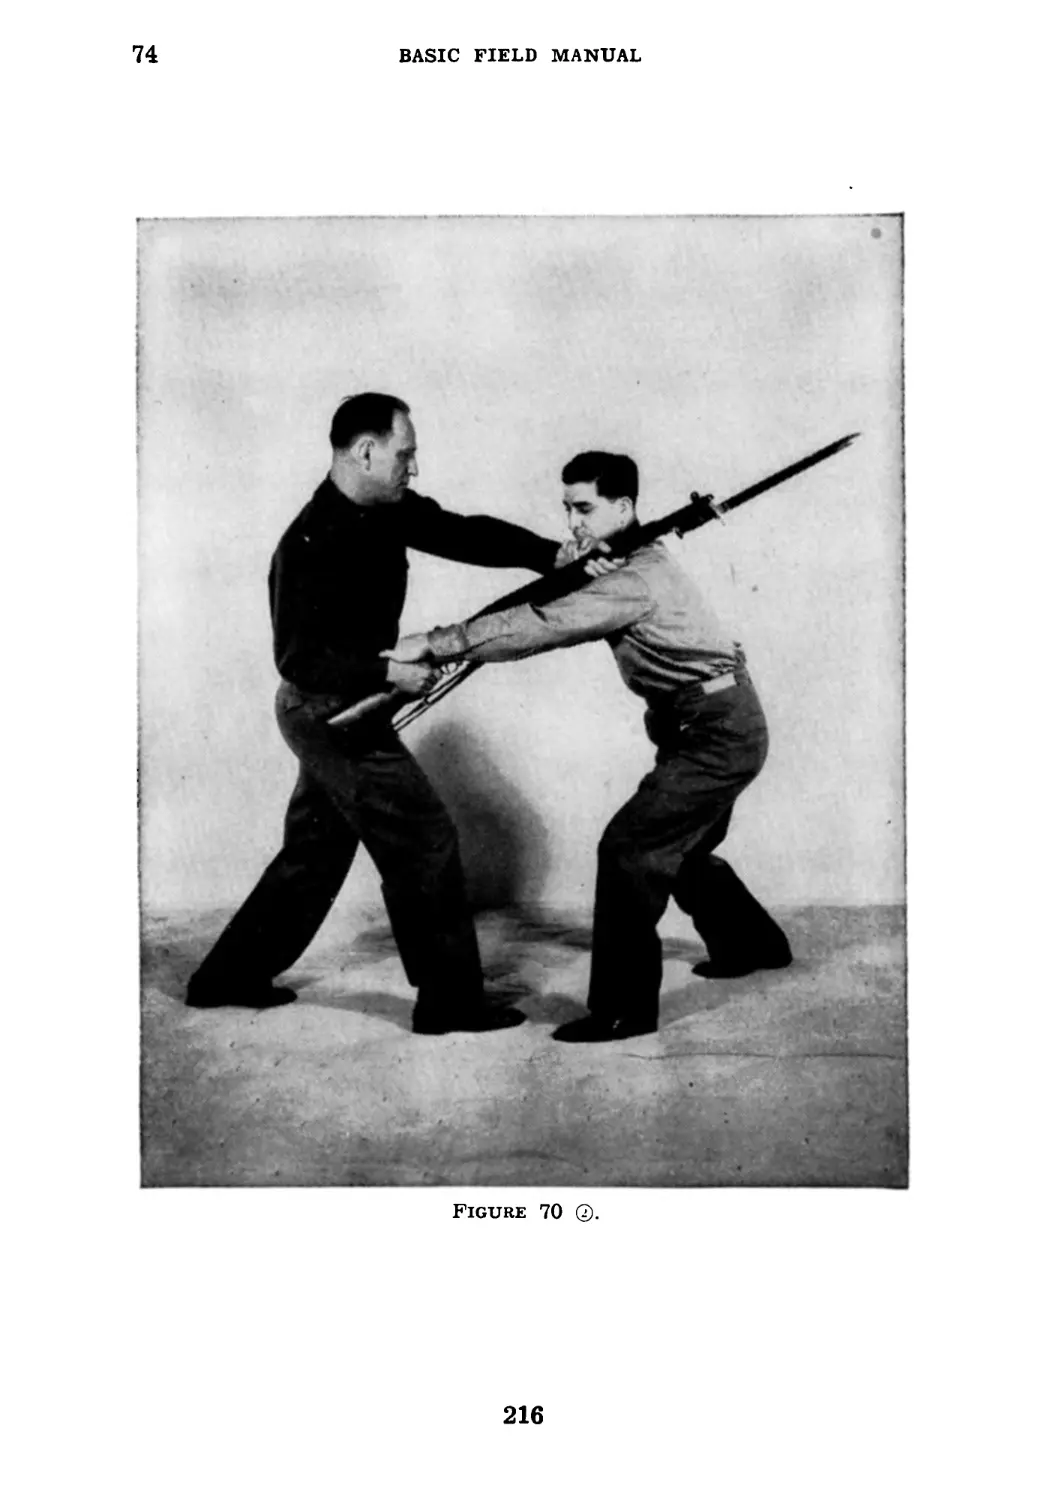
III
BASIC FIELD MANUAL
UNARMED DEFENSE FOR THE AMERICAN SOLDIER
Section I
GENERAL
1. Scope.—This manual describes a method of self-protec-
tion available to the American soldier, if through any circum-
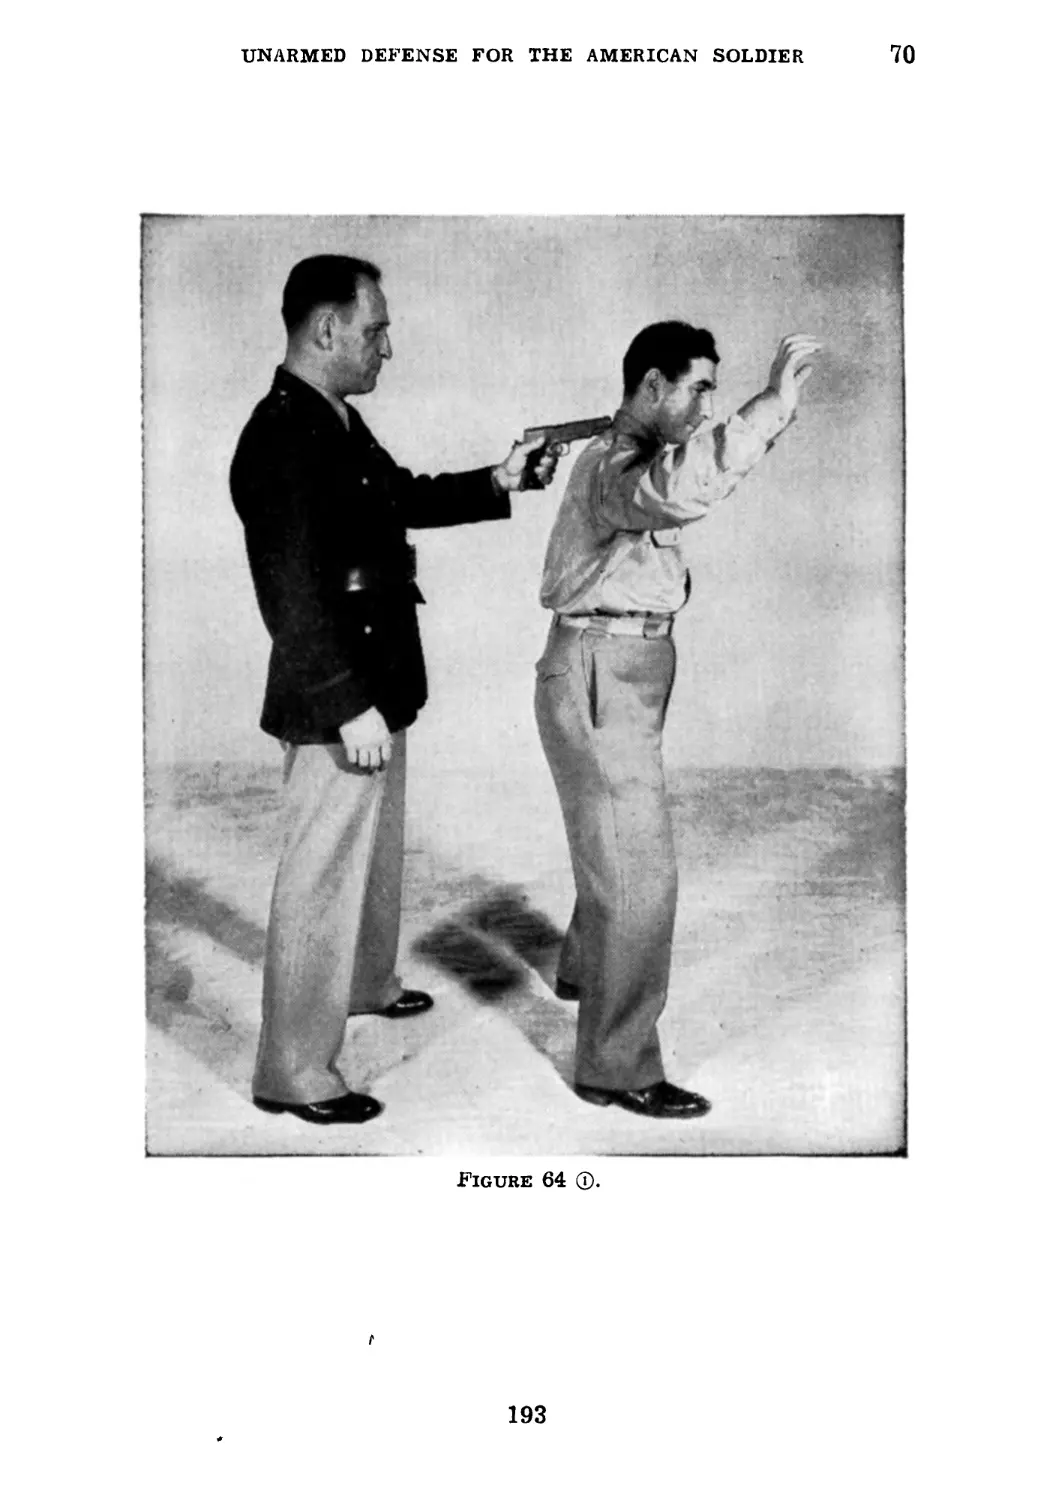
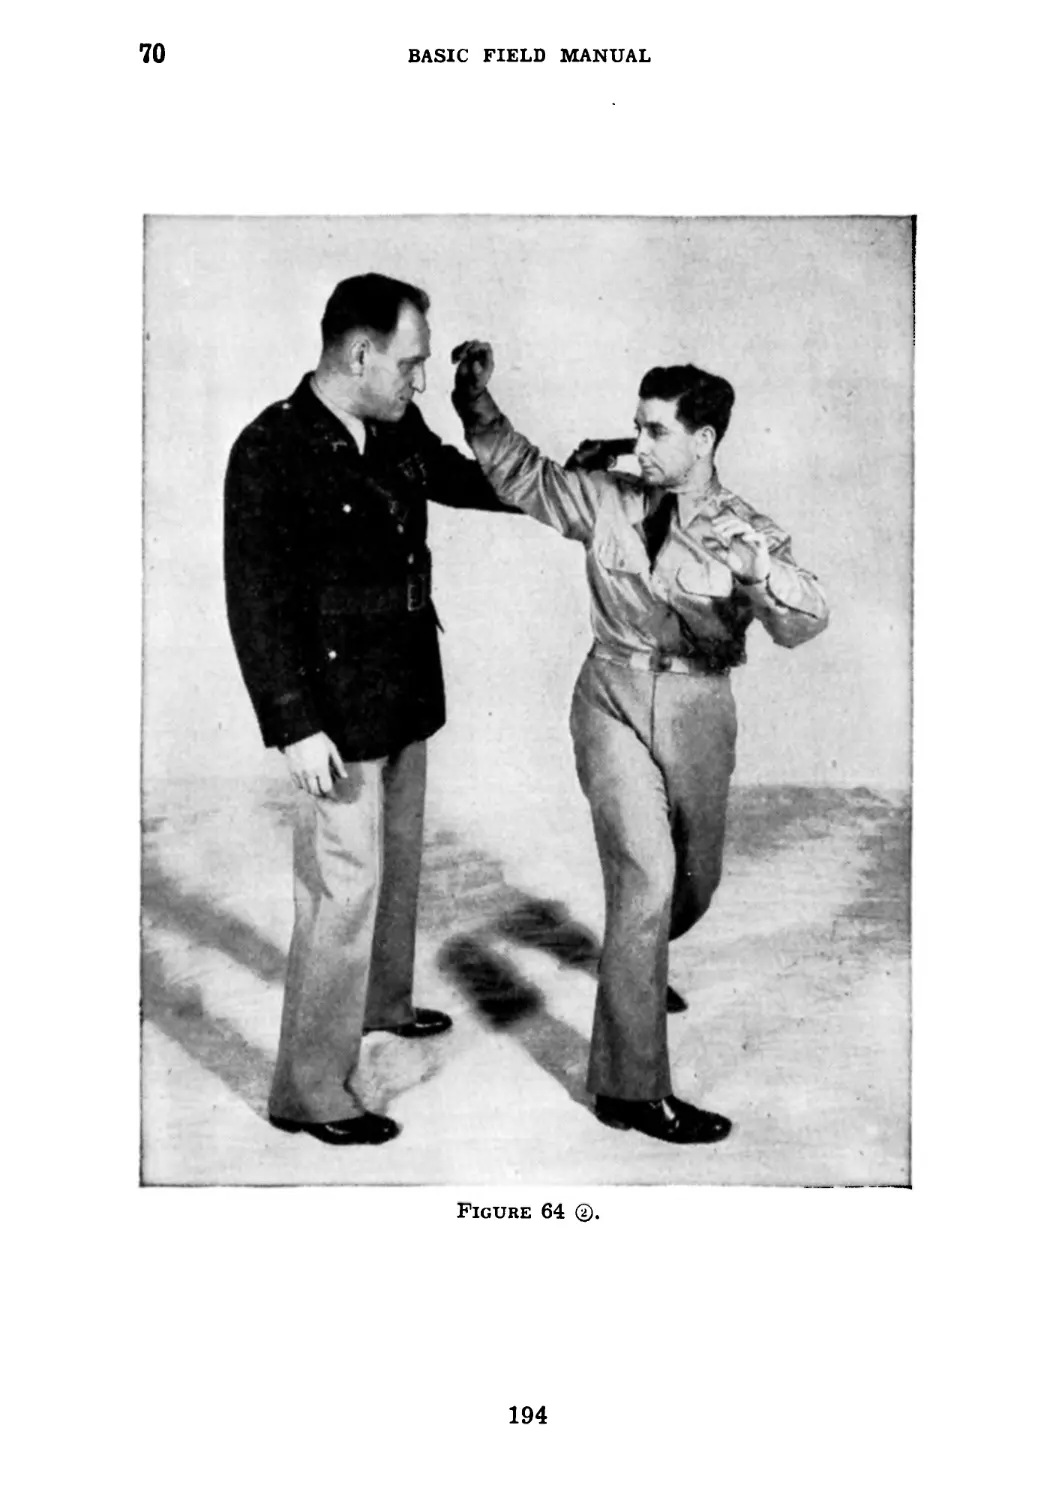
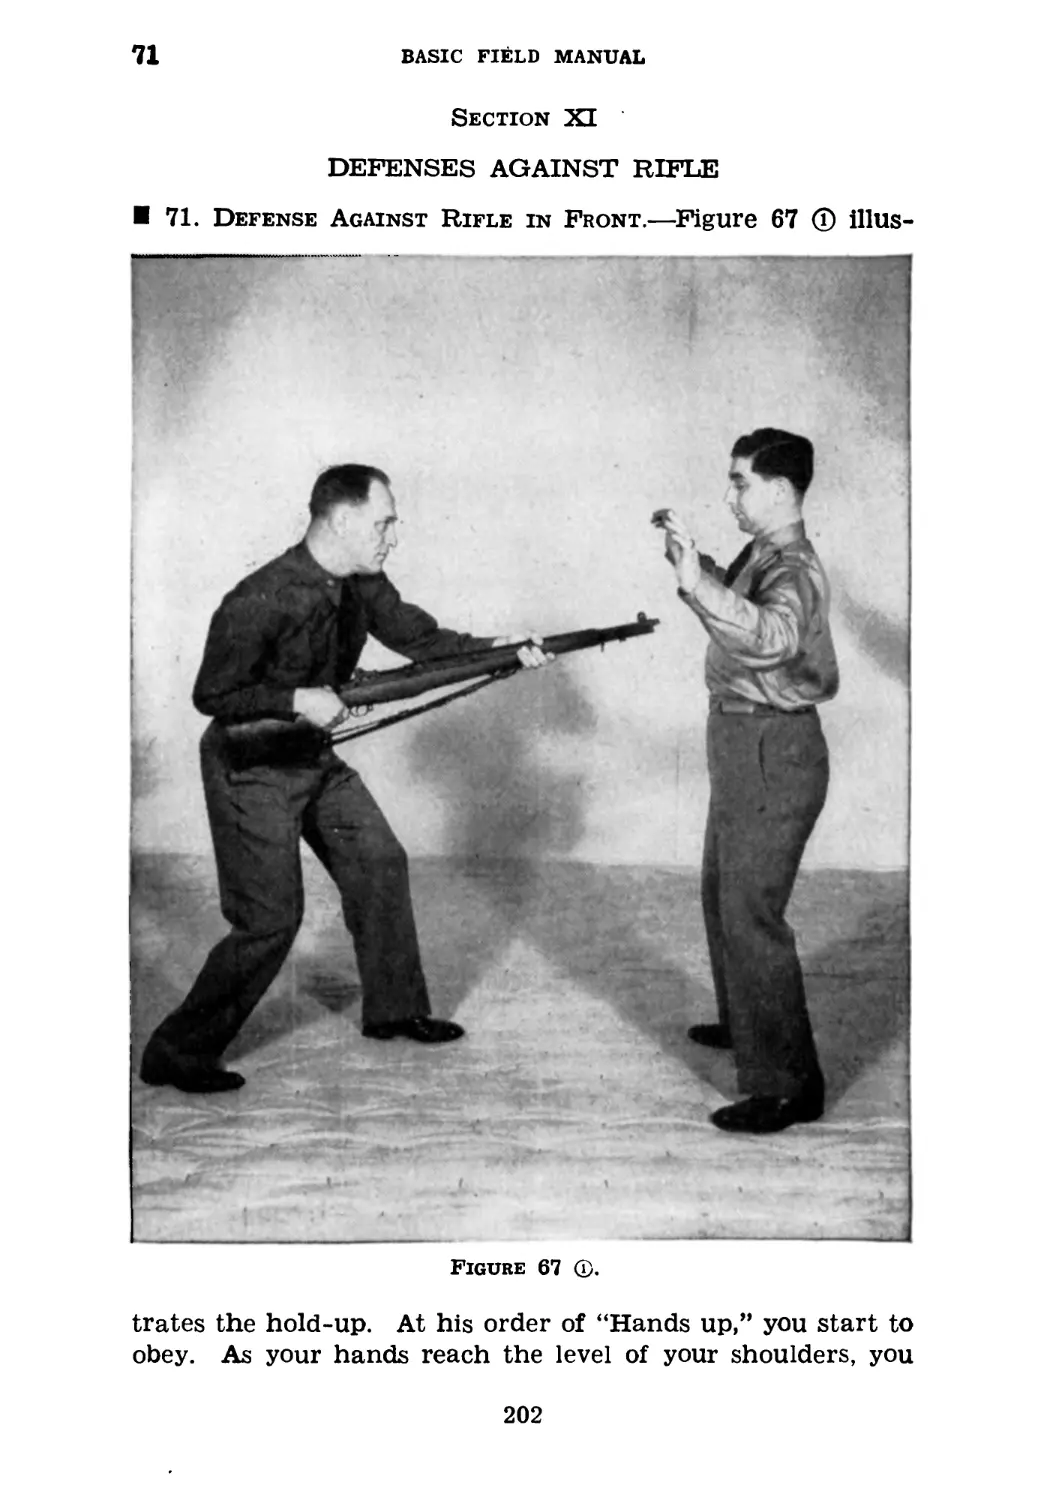
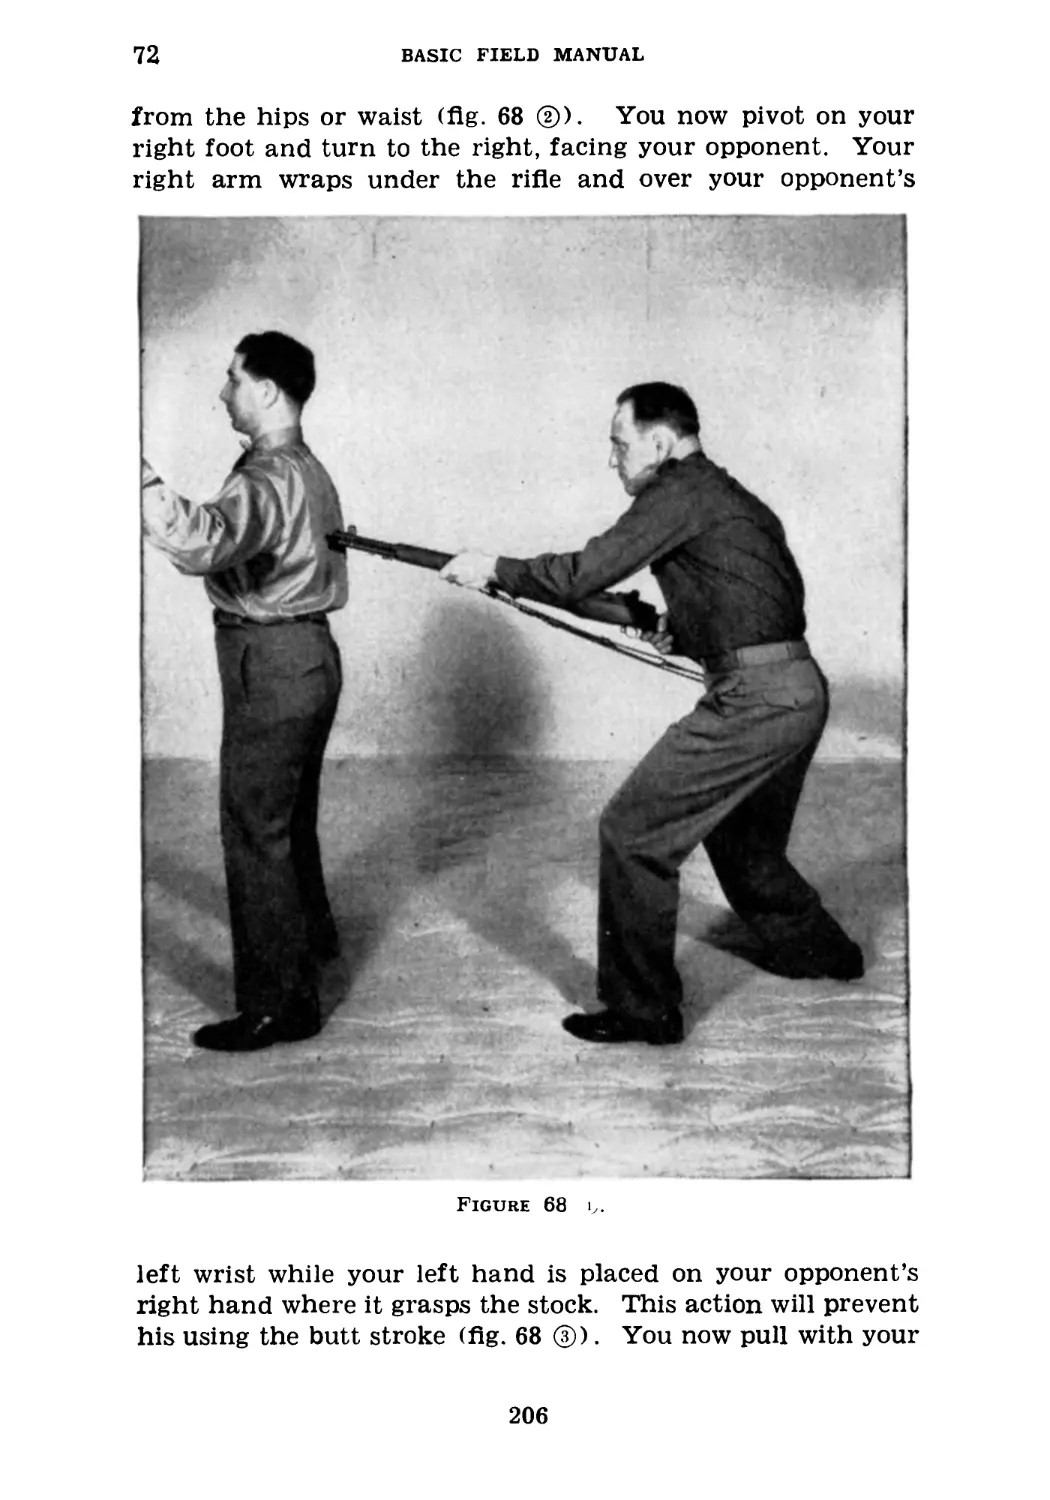
stance he is unarmed or unable to use his weapons.
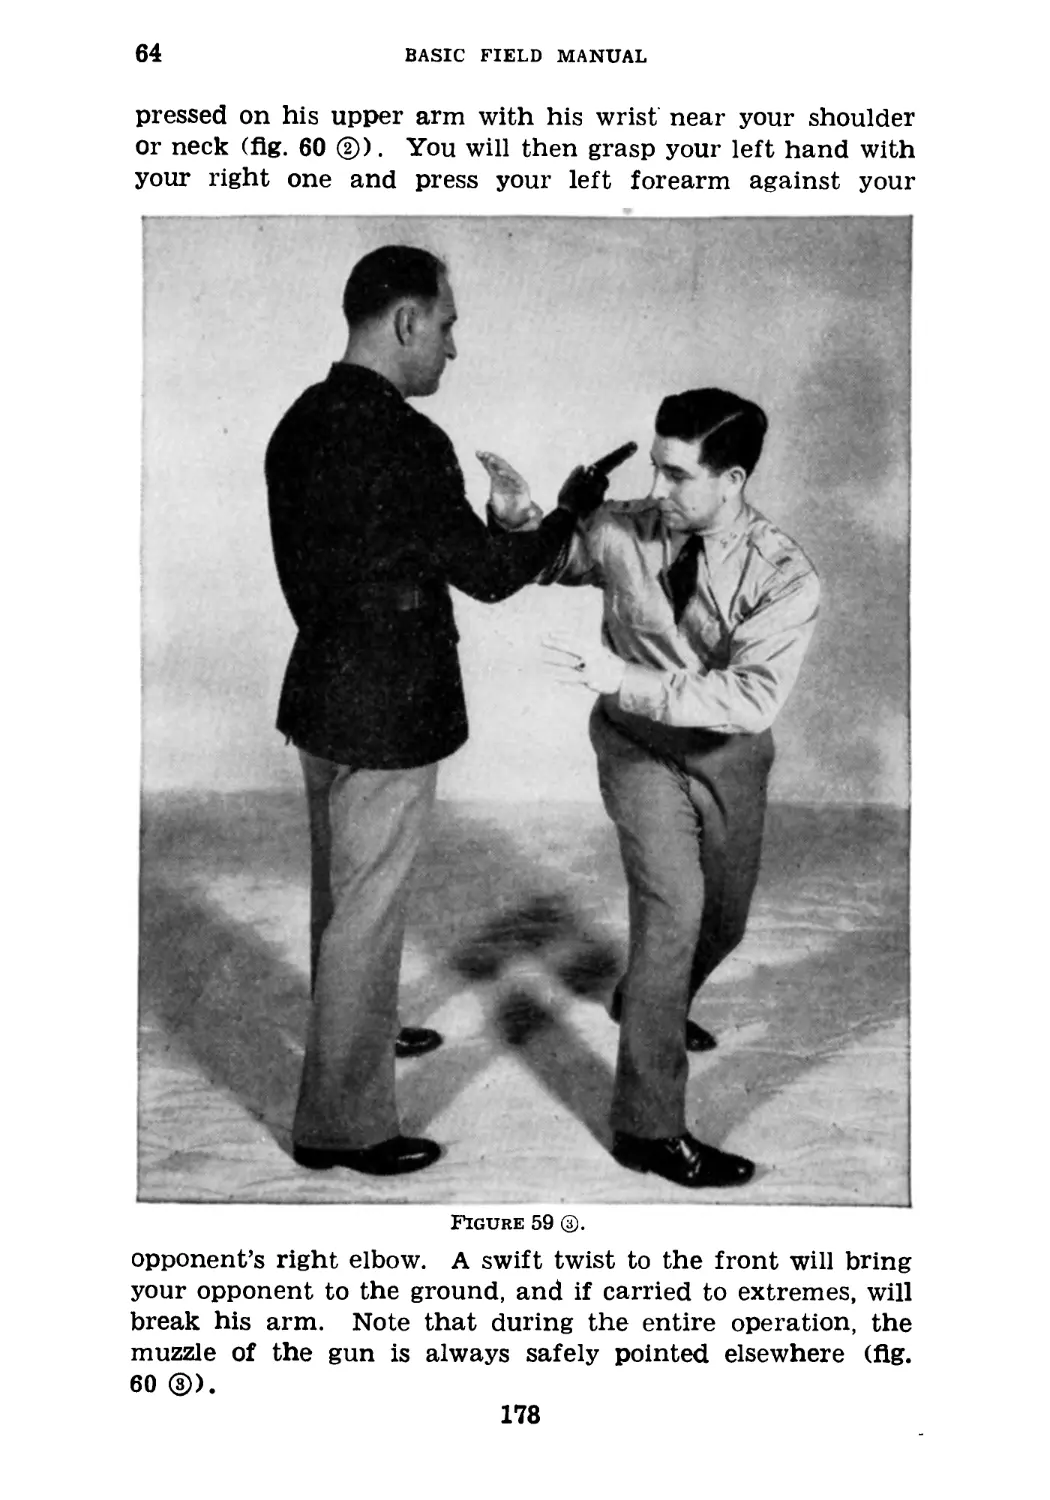
2. Purpose of Training.—The object of this training is to
develop the soldier in the art of unarmed self-defense, and
to improve his skill in the use of his basic weapons, through
speeded reflexes. Confidence in his own ability unarmed,
like confidence in his weapons, makes a man a better soldier.
3. Necessity for Training in Unarmed Defense.—The av-
erage soldier, if trained only in the use of his weapons, loses
his effectiveness if these weapons are lost or fail to function.
However, particularly in hand-to-hand fighting, if a soldier
should be deprived of his weapon or have it destroyed, he is
at the mercy of the enemy. This appears to apply mainly to
the Infantry, and probably the greatest value of American
unarmed defense will be to that arm. Nevertheless, in these
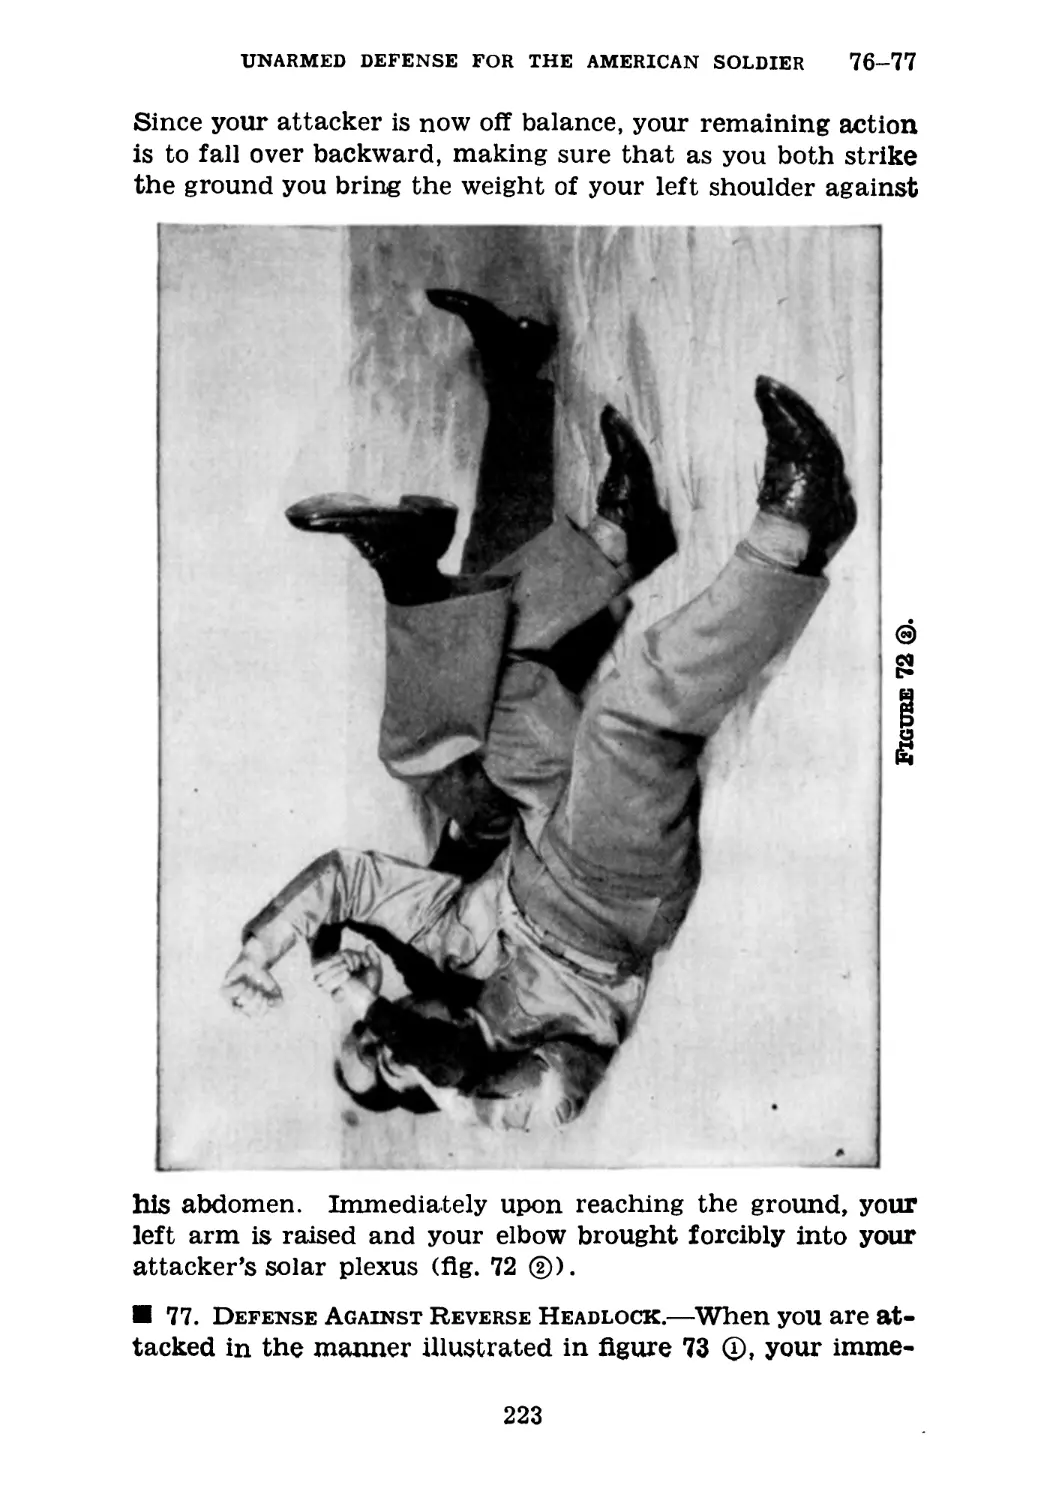
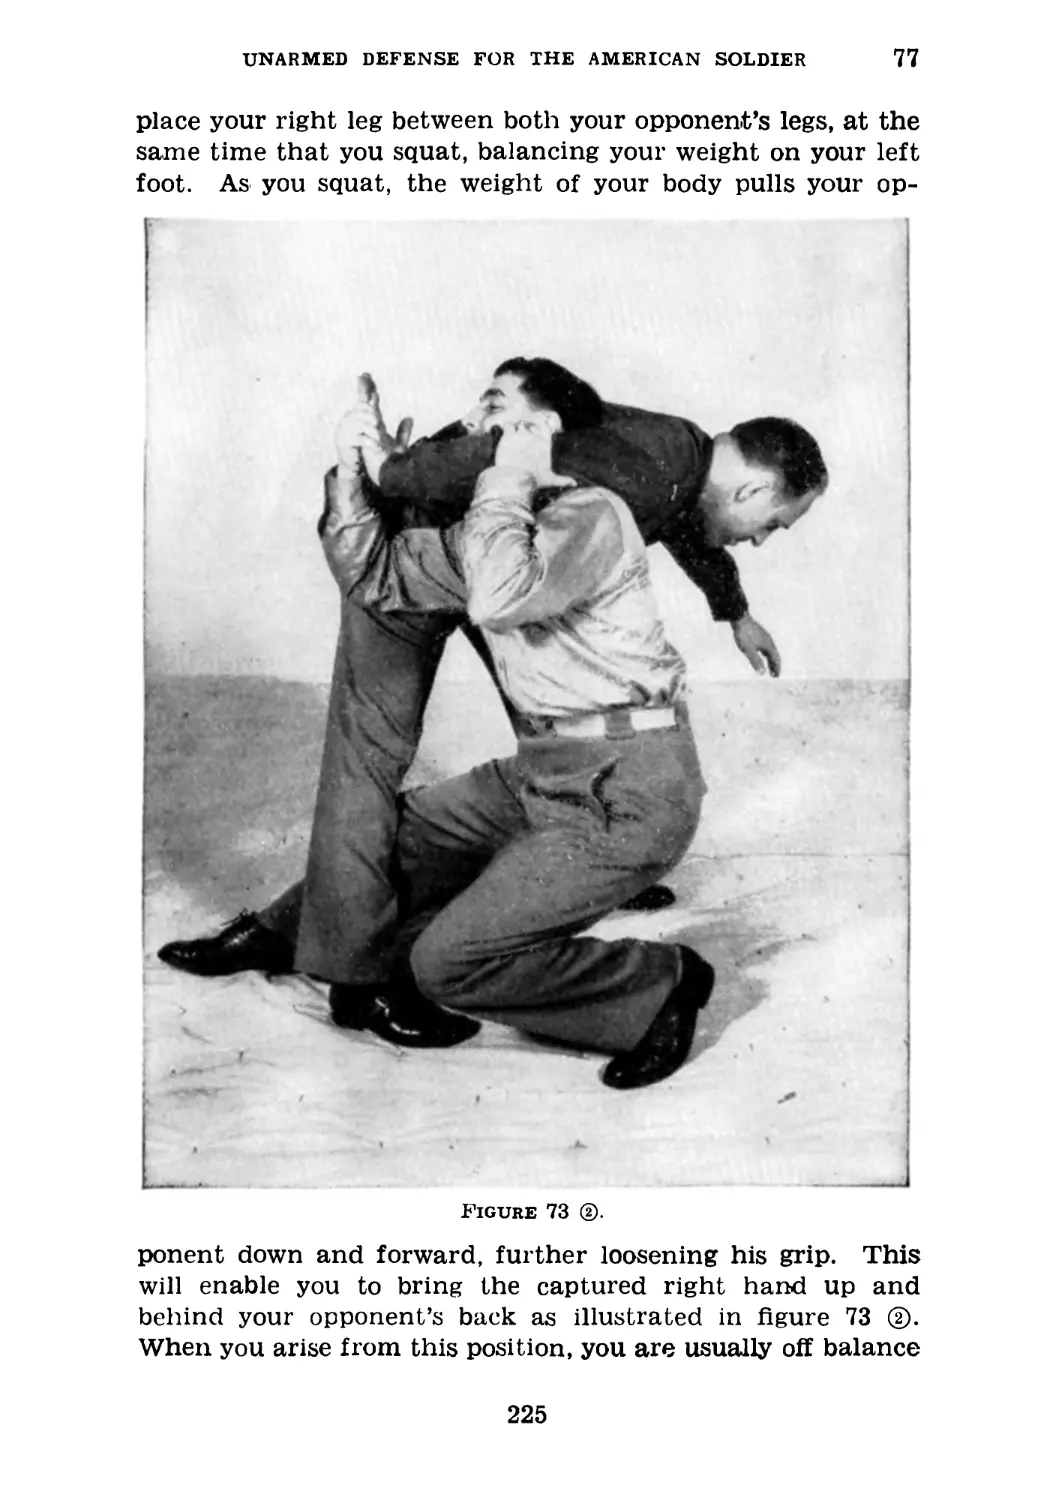
days of fluid warfare, troops in rear echelons, artillery, and
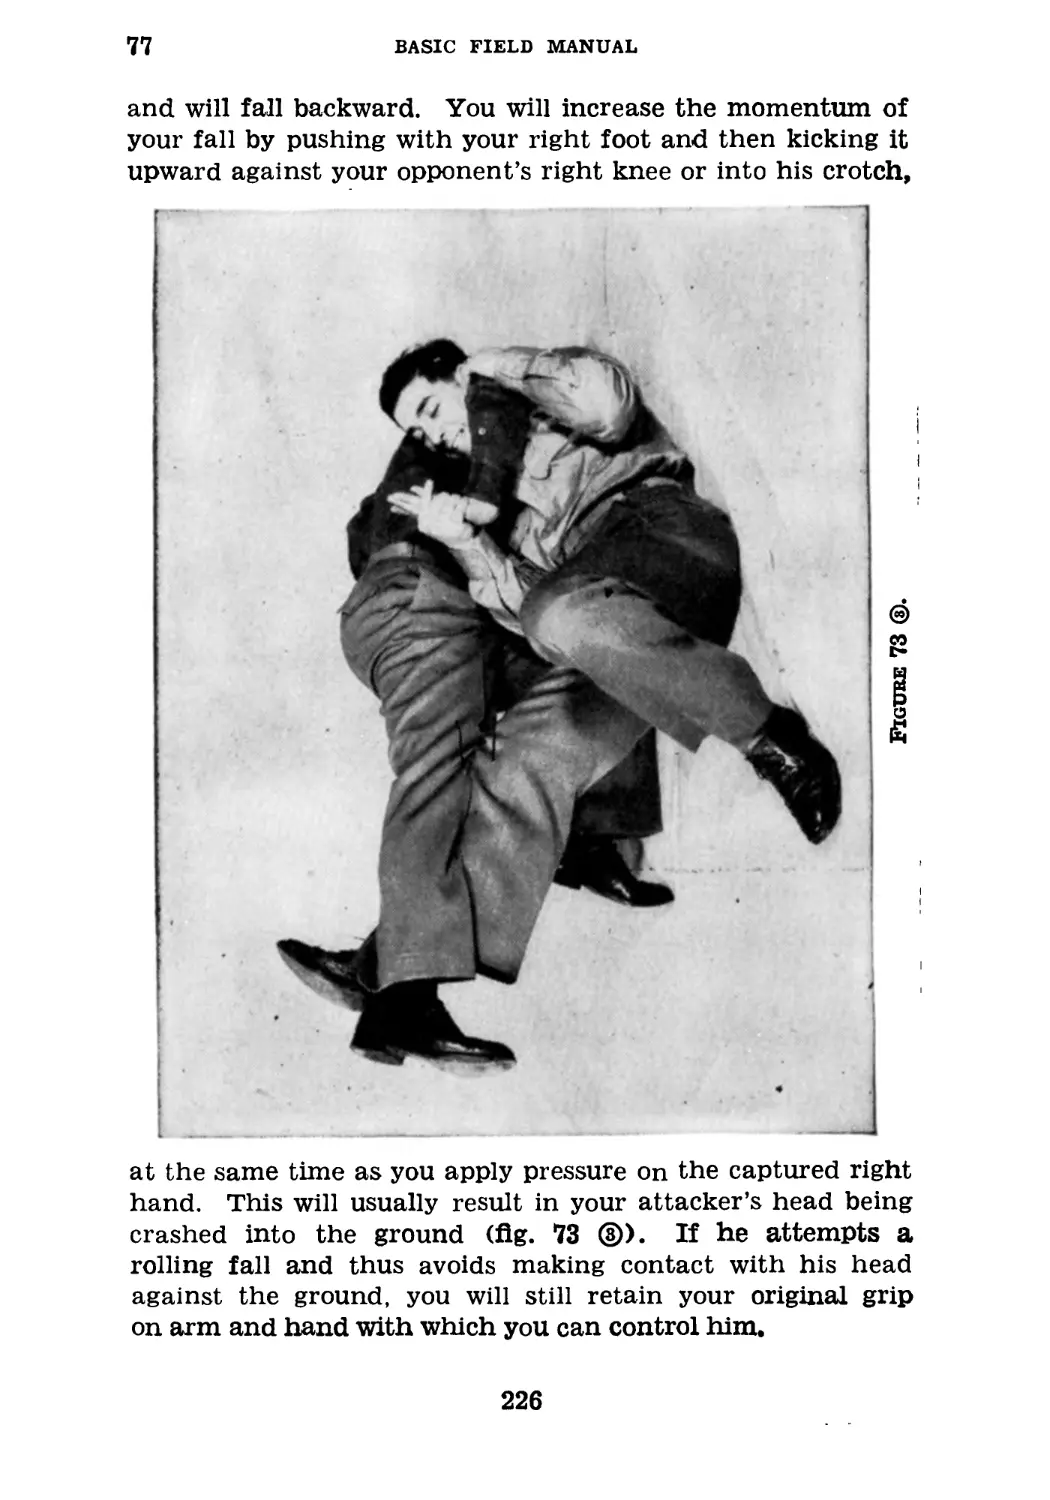
antitank units might find themselves in hand-to-hand com-
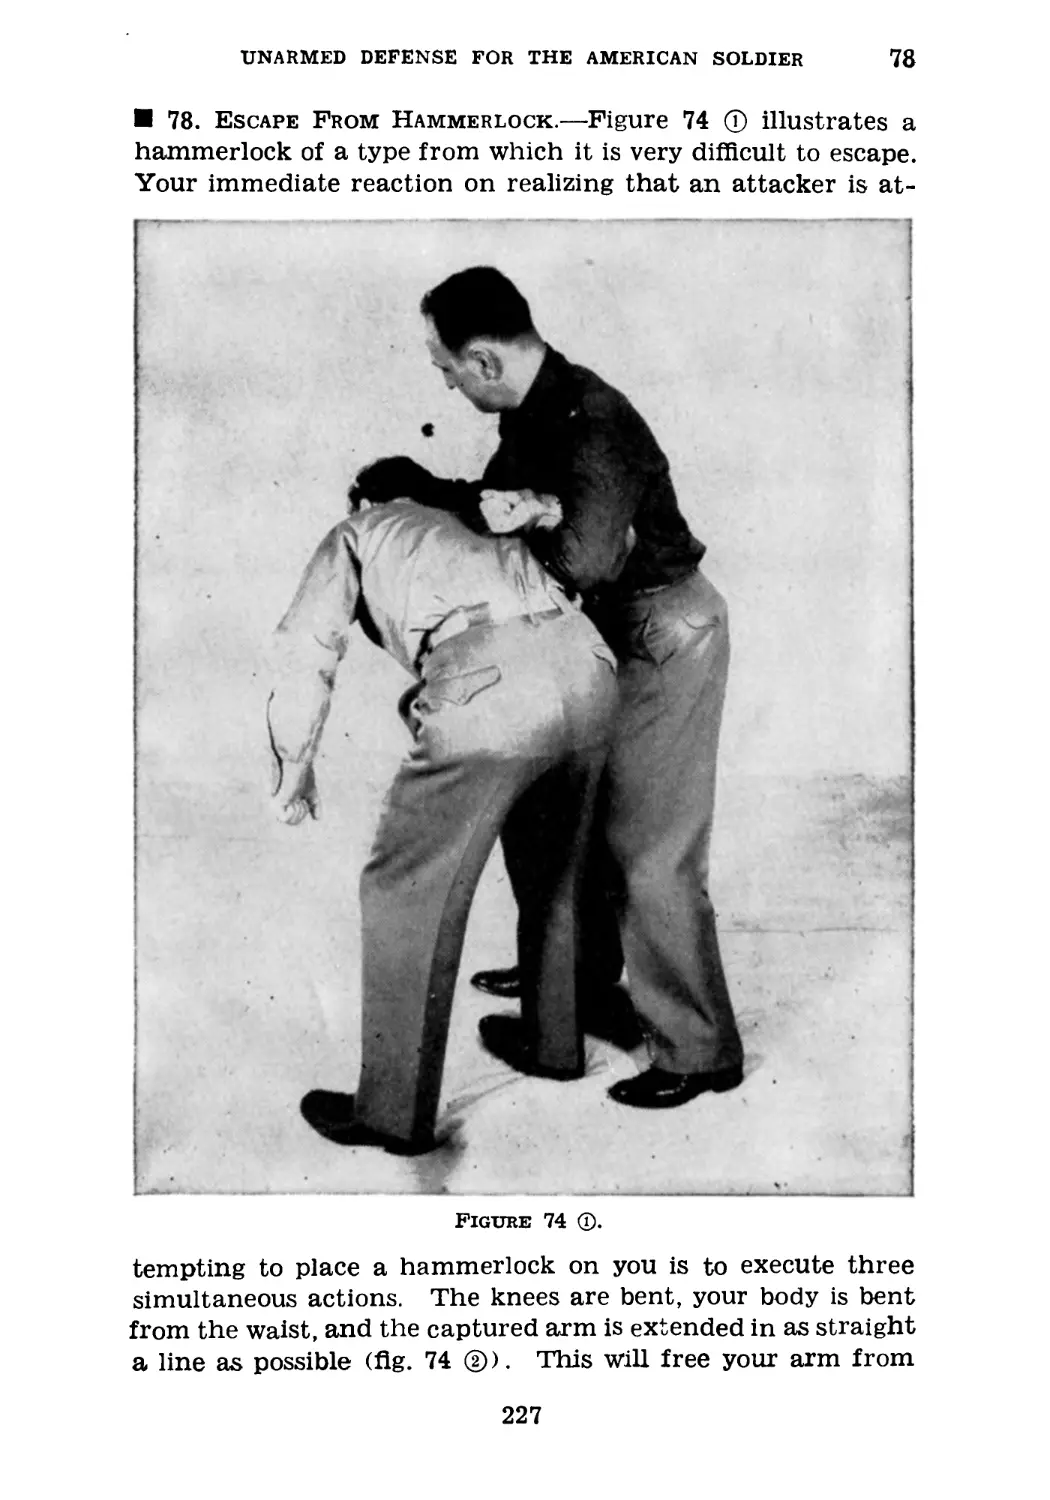
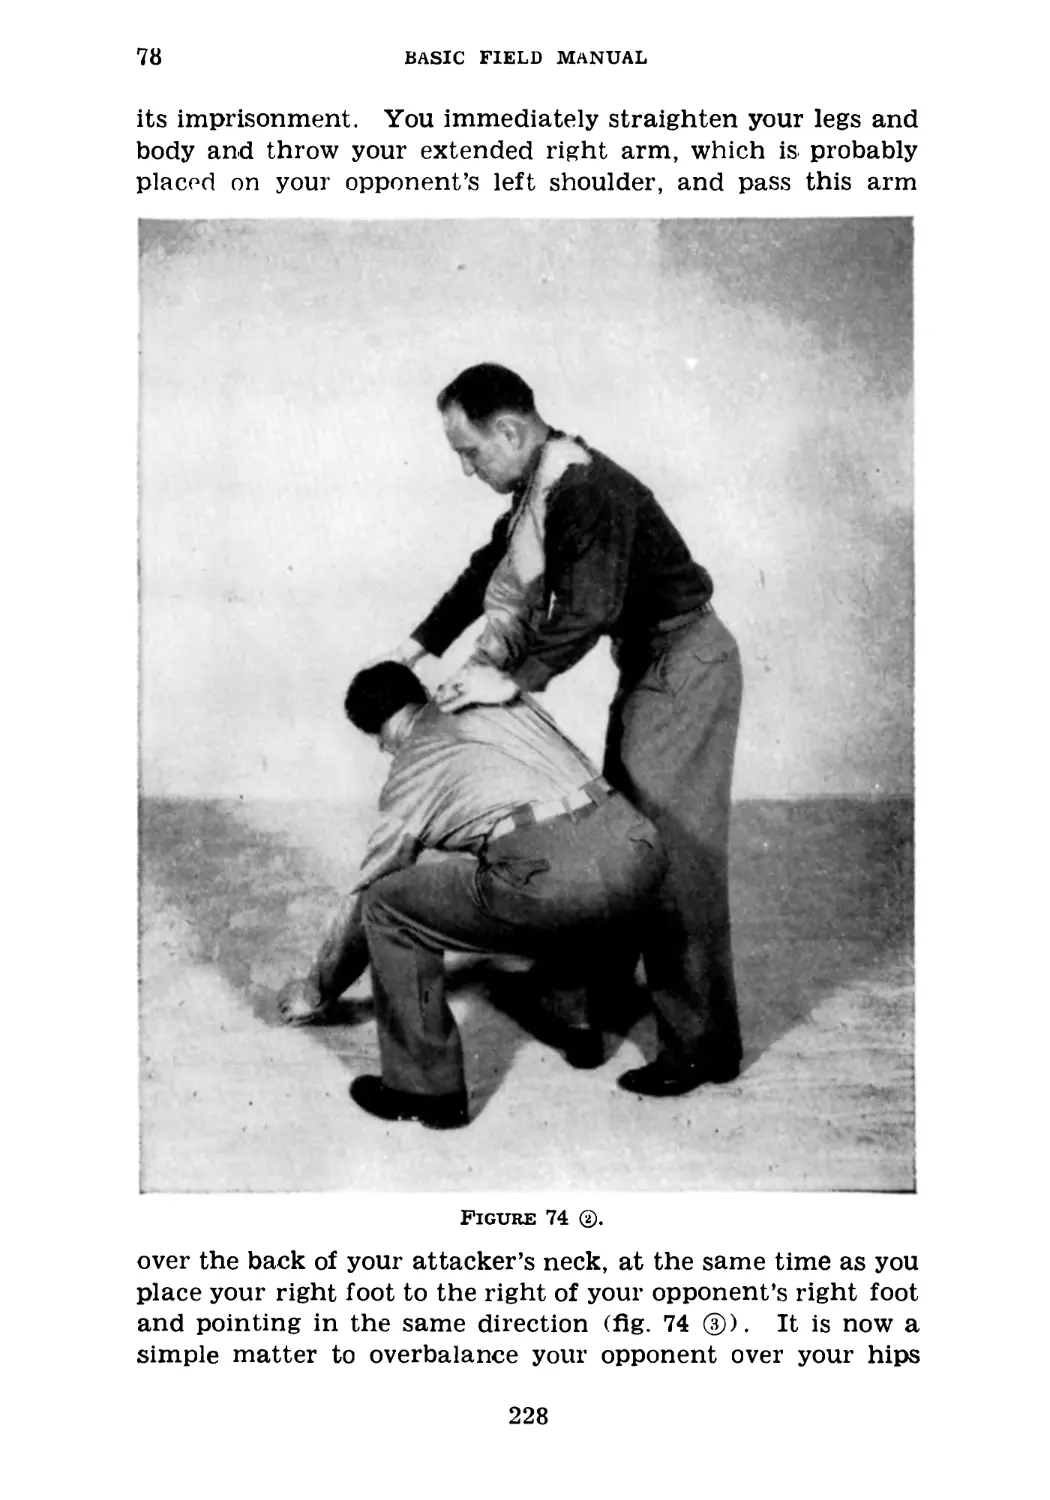
bat with no defensive weapons except sidearms and bare
hands.
4. Training Program.—The training of the soldier in un-
armed defense requires no special equipment or uniform.
Clothing will depend upon the season of the year and the
state of the weather. Work outdoors is preferable since a
greater number of men can be trained simultaneously. Thirty
minutes’ instructidn or practice each day will make a man
adept in a very short period of time. If no additional time
is available, this part of the training can be integrated into
1
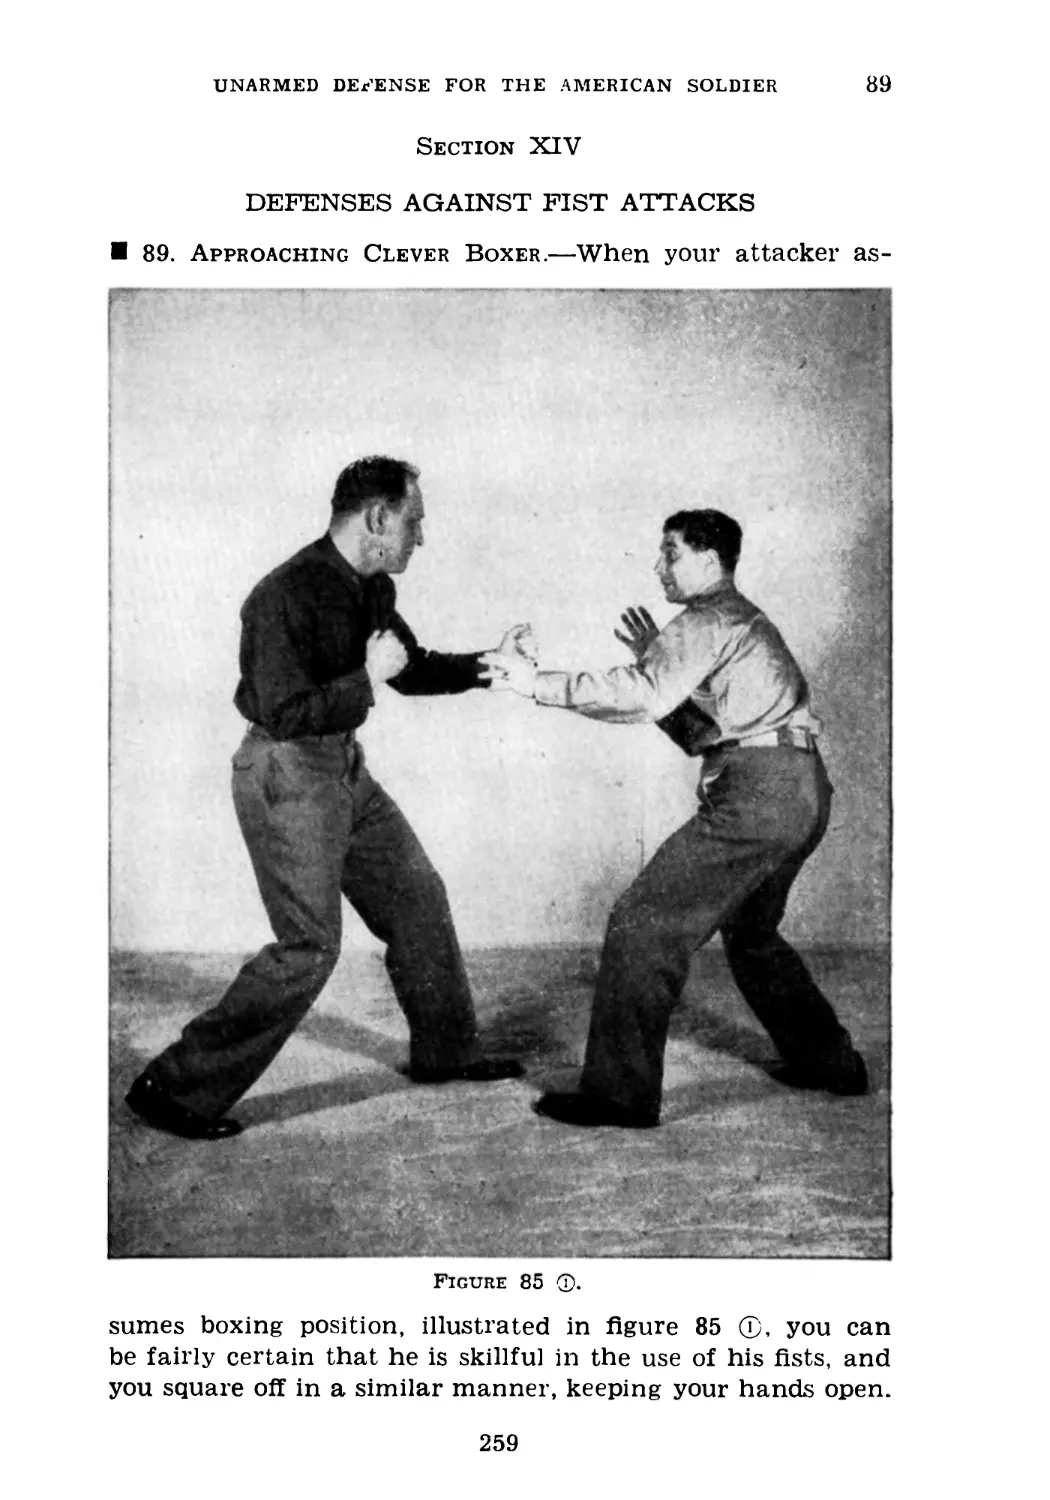
4-5
BASIC FIELD MANUAL
the physical training program. It is desirable, in order to
obtain the maximum results, that the instruction follow
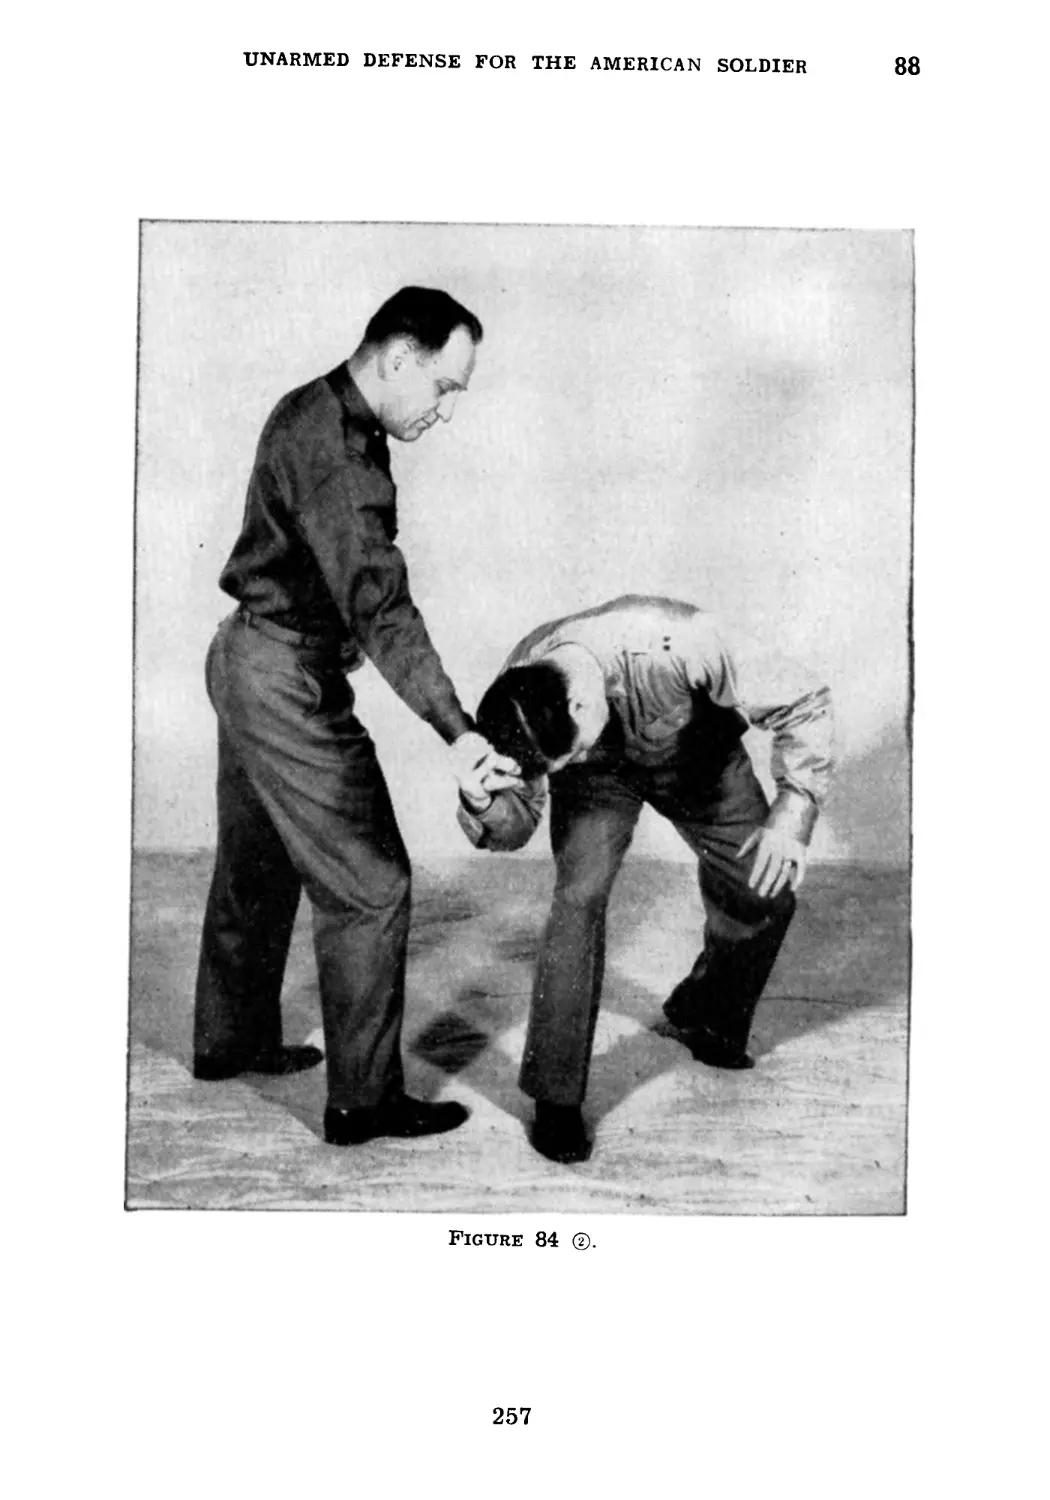
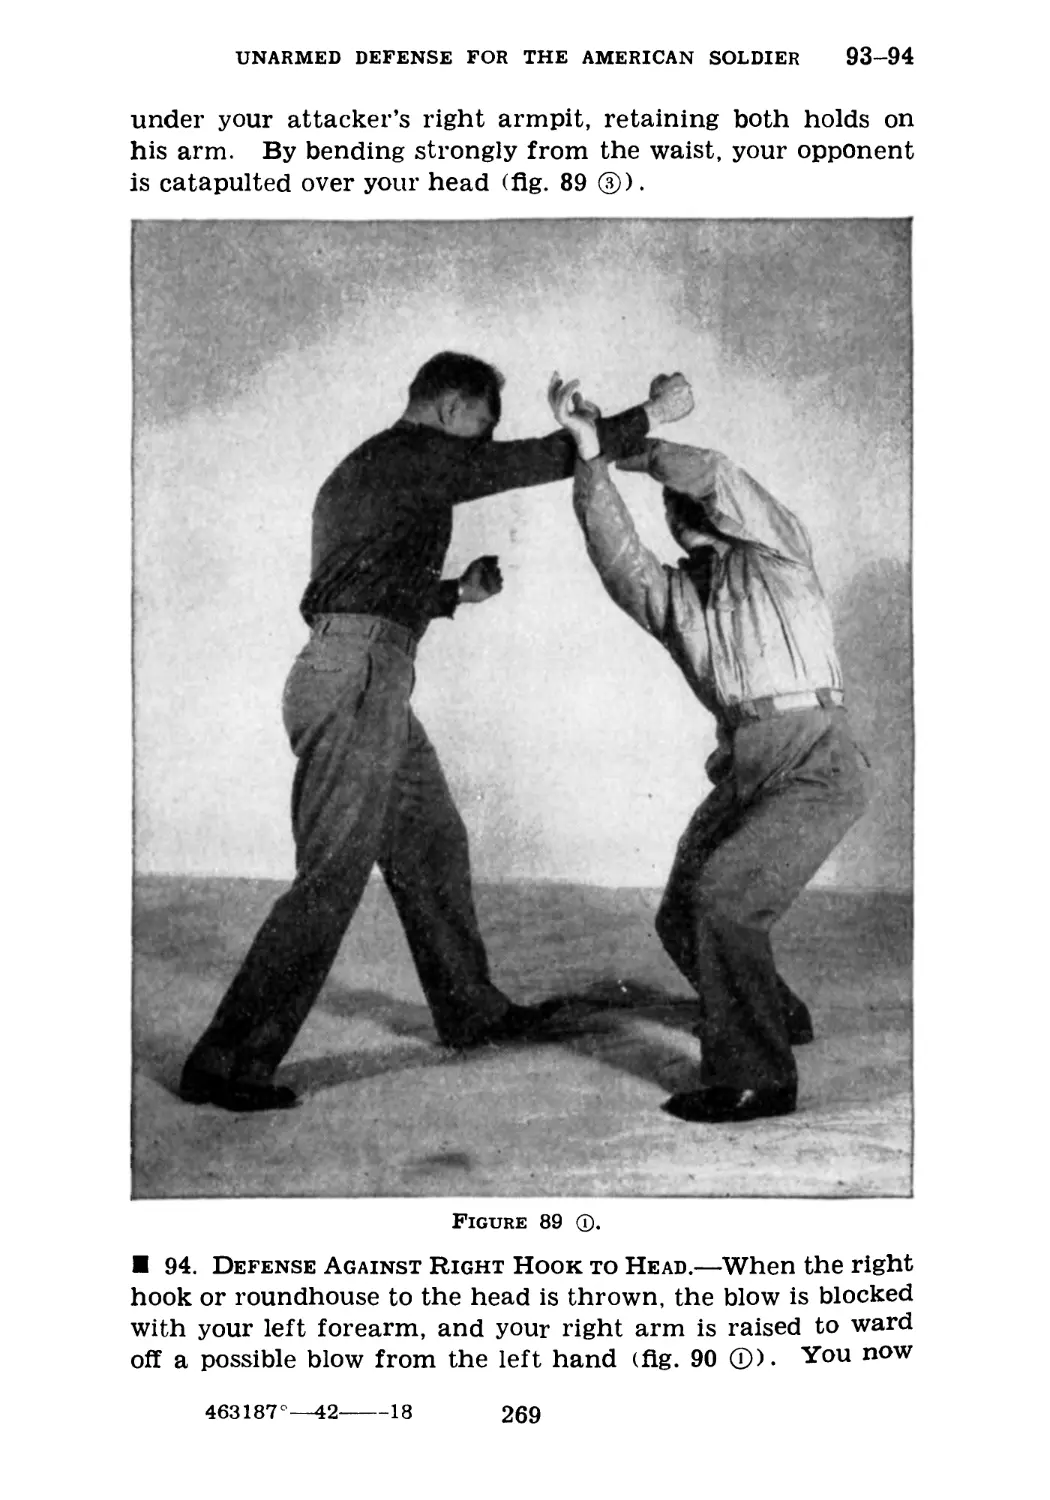
closely the steps outlined in this manual. However, it is
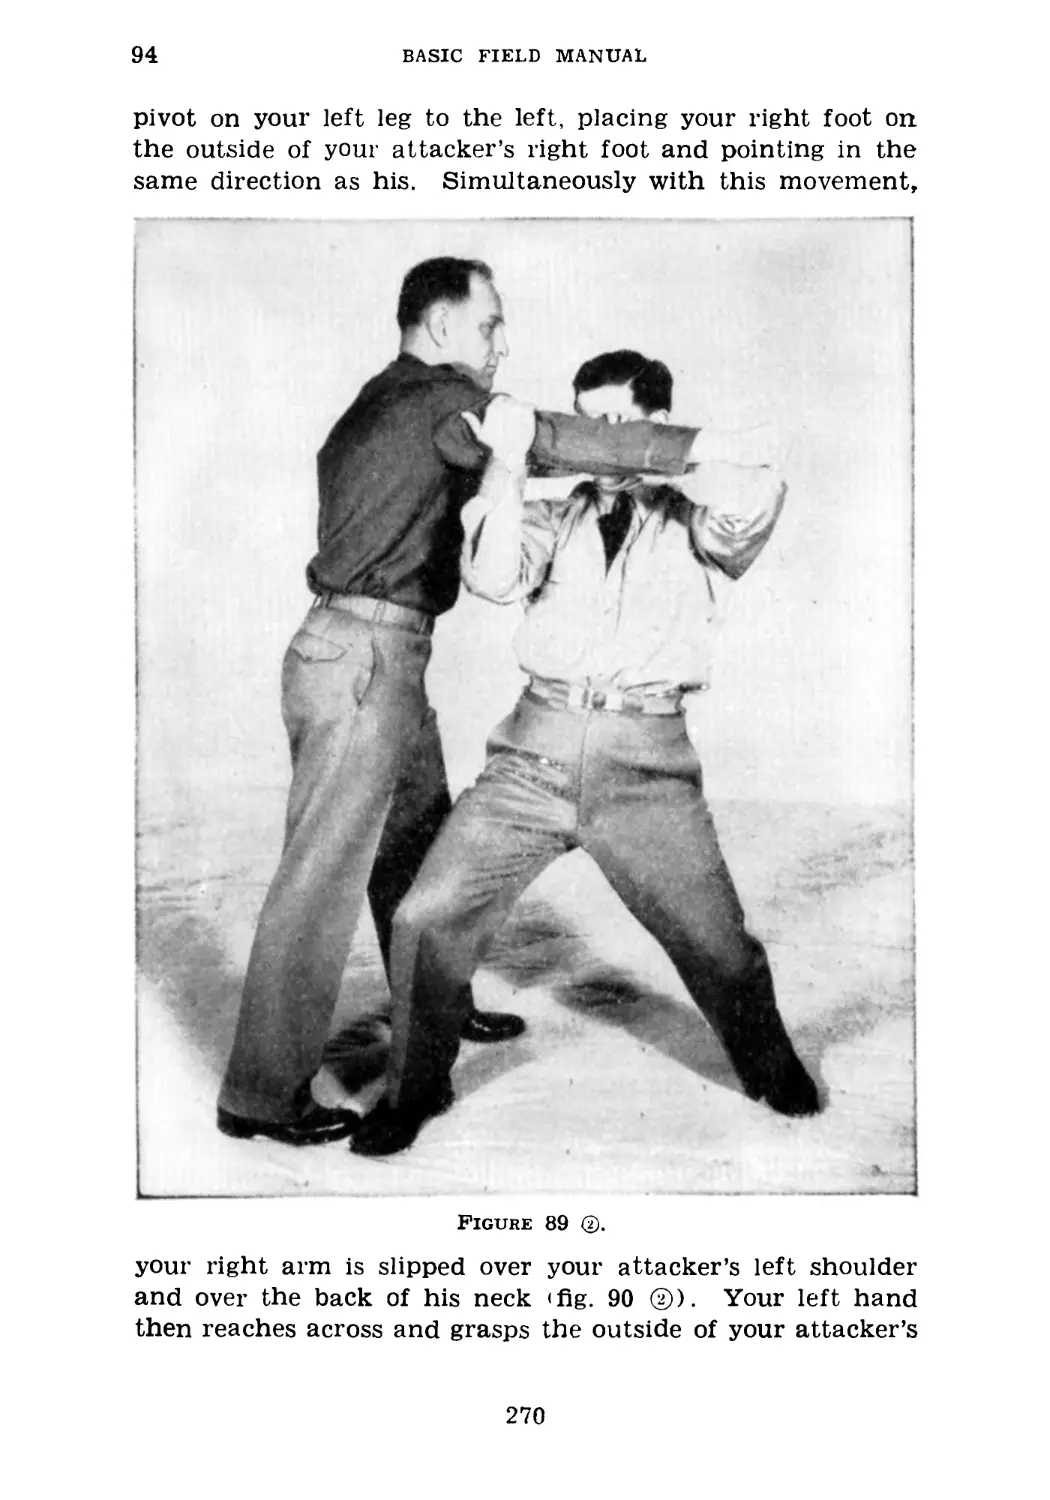
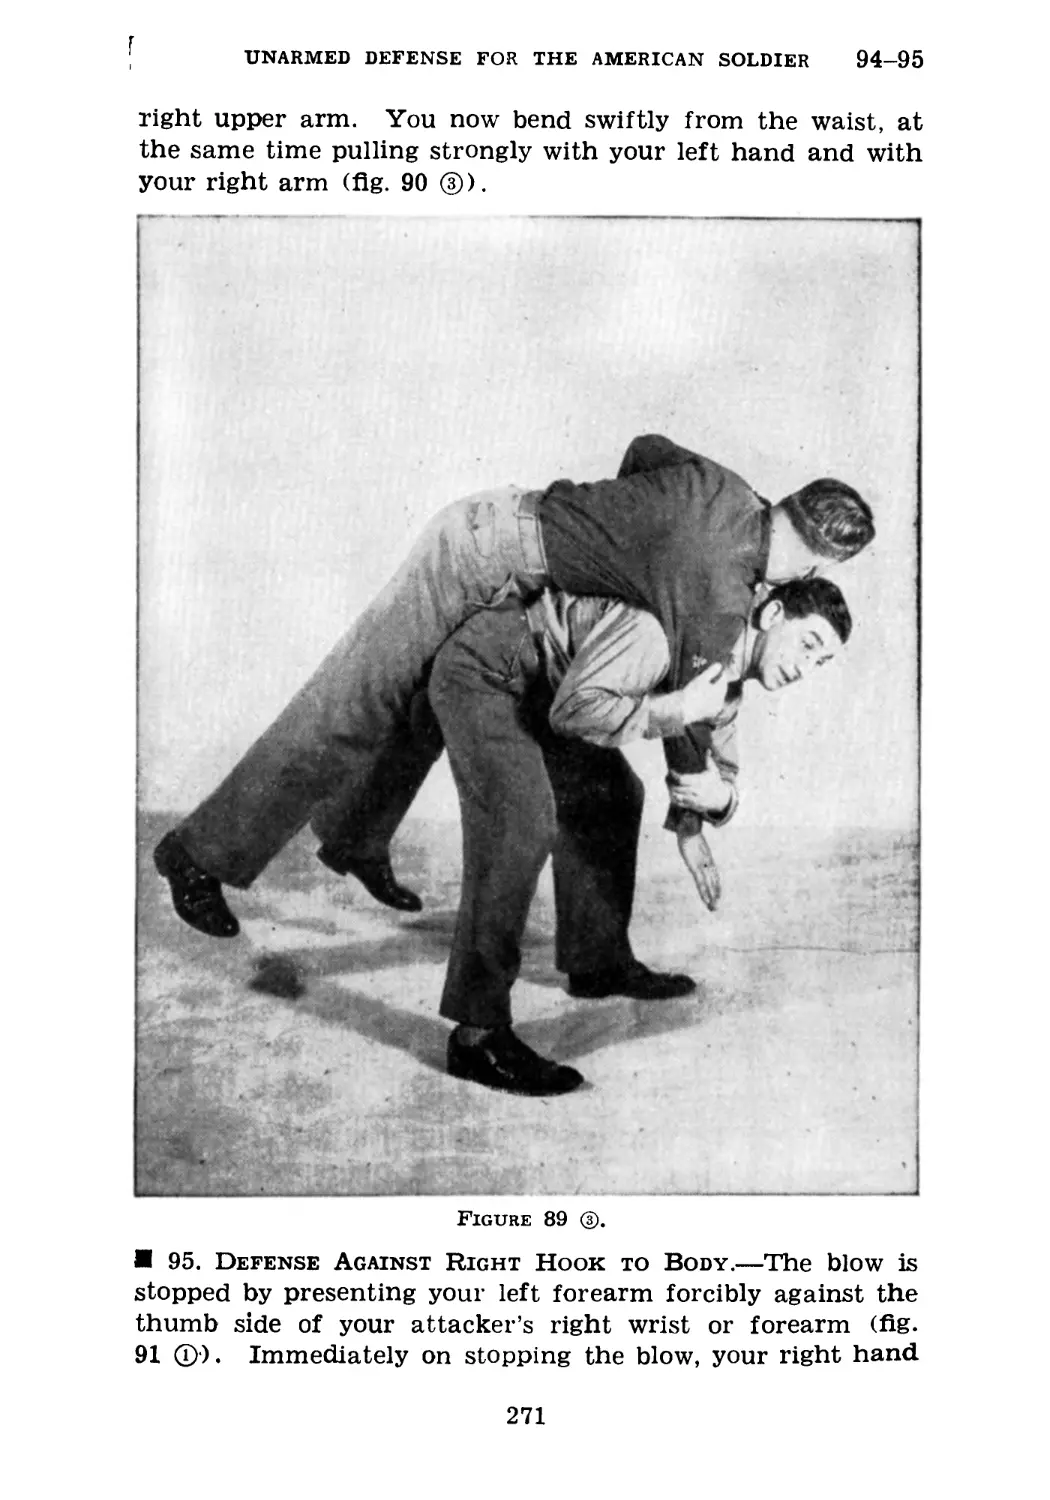
realized that all units will not have the time to go through
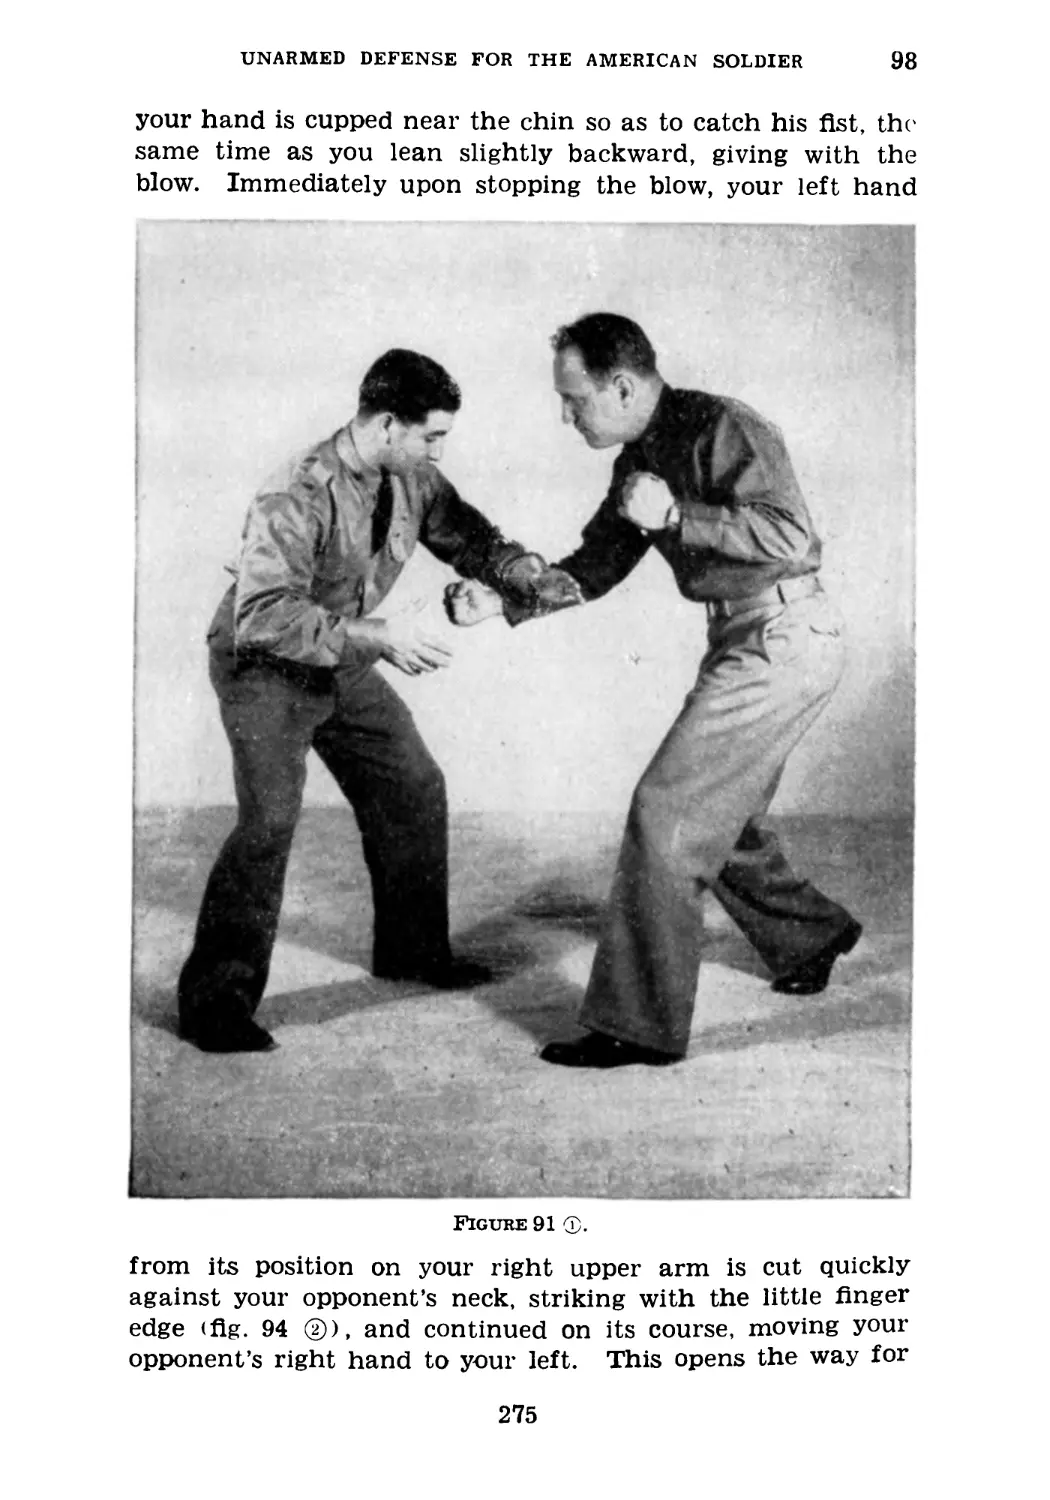
the entire book. For units with a limited time allotment for
this subject, it is recommended that the following be taught:
a. Section II.—Principles of unarmed defense.
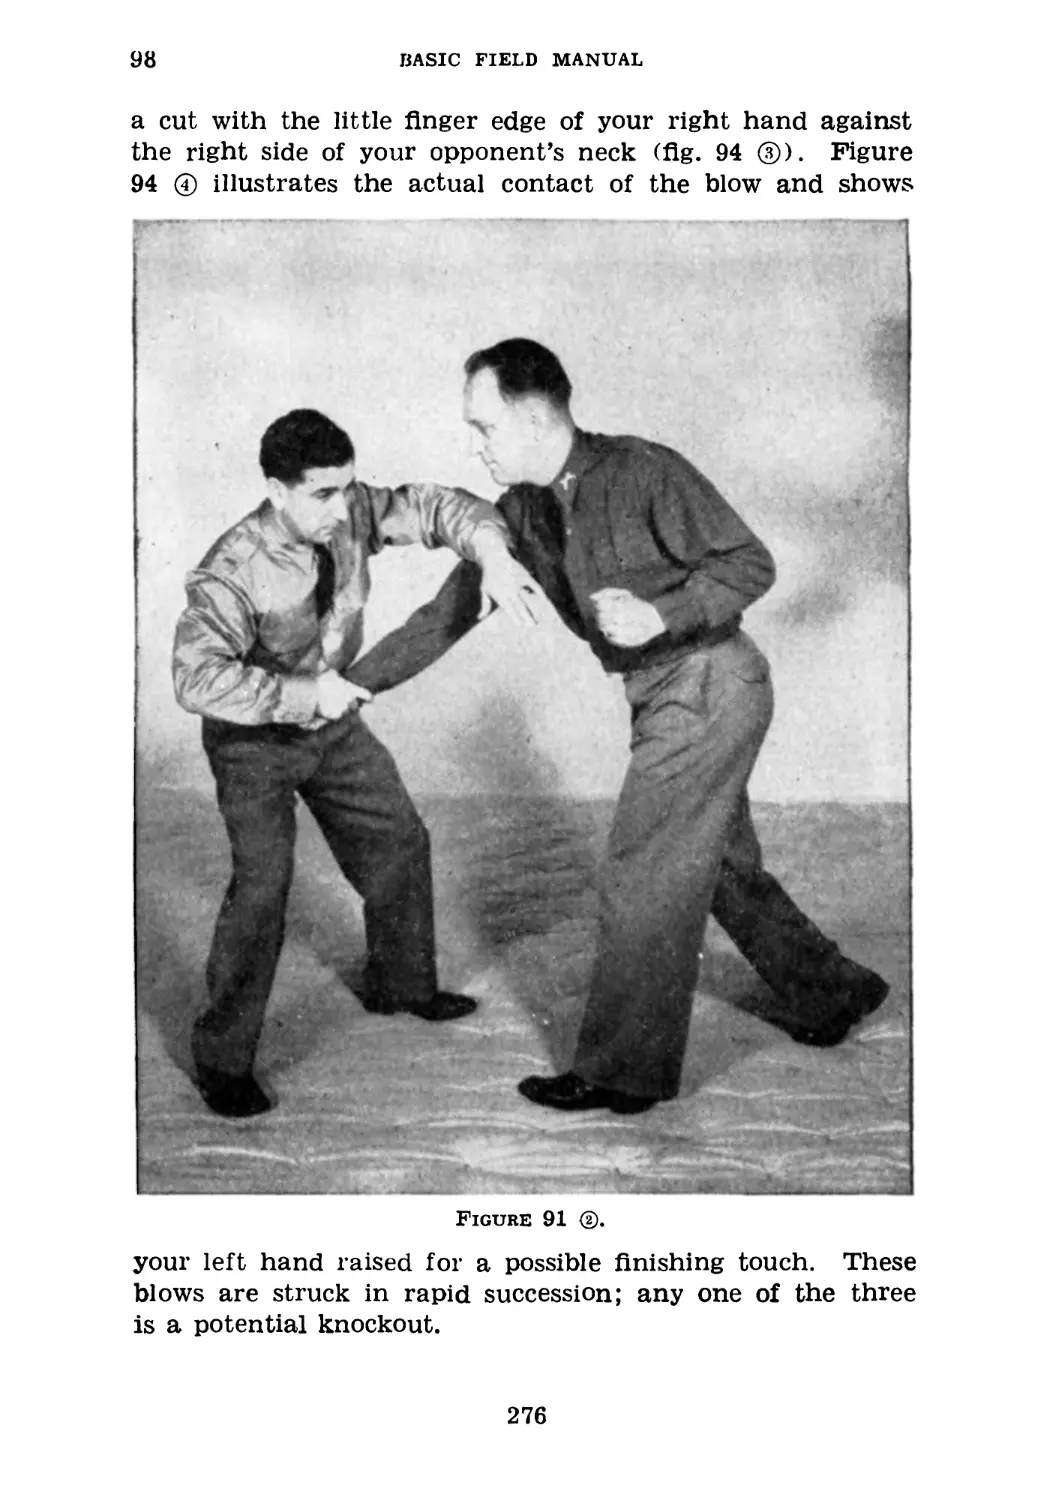
b. Section III.
(1) One escape from underarm front body hold.
(2) One escape from front overarm body hold.
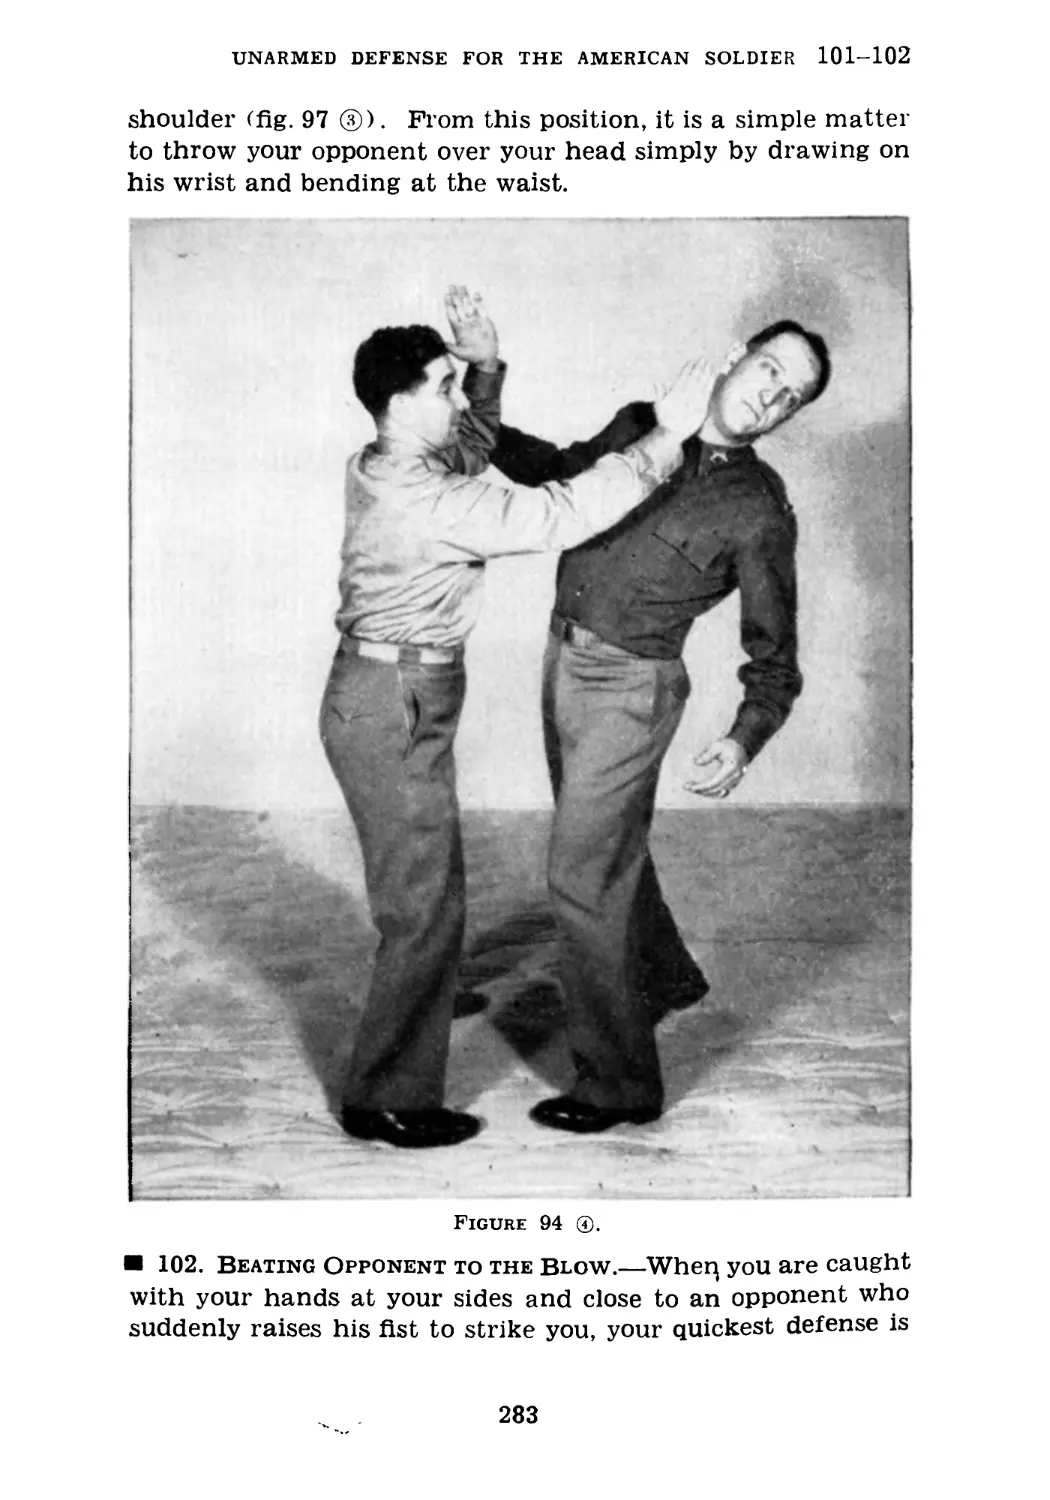
(3) One escape from rear underarm body hold.
c. Section V.
(1) One escape from two-handed front choke.
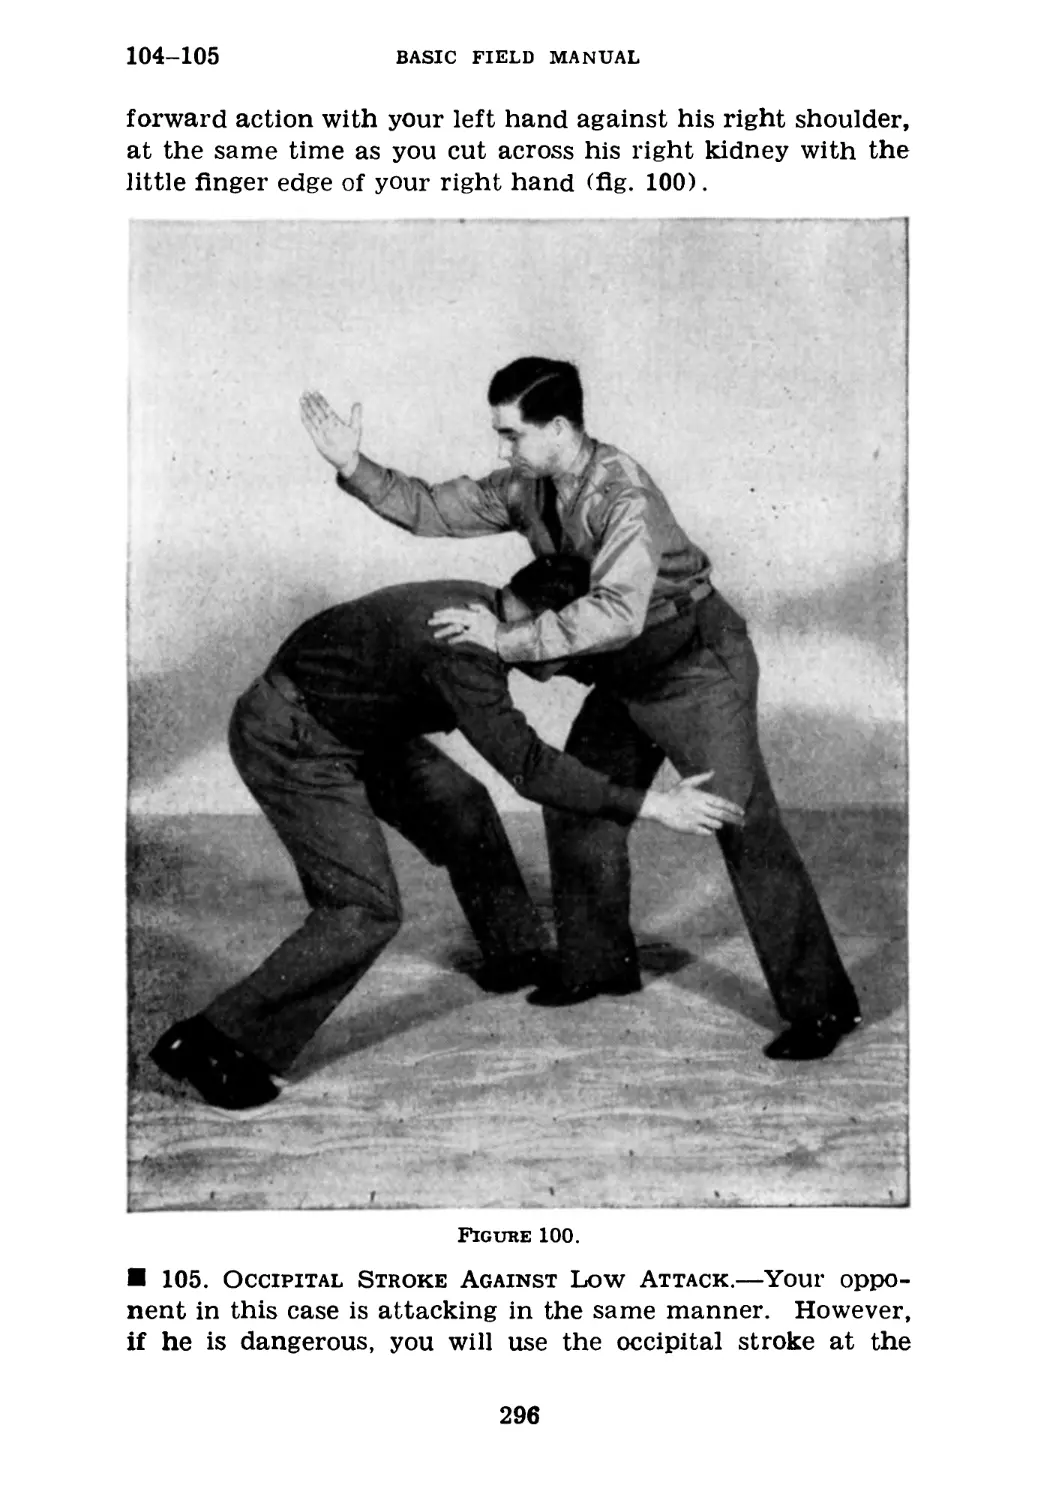
(2) One escape from two-handed rear choke.
(3) One escape from one-arm rear strangle.
d. Section VIII.
(1) One defense for downward stroke of knife.
(2) One defense for upward stroke of knife.
(3) One defense for downward sword cut.
(4) One defense for sword lunge.
e. Section IX.
(1) One defense for downward blow of club.
(2) One defense for side stroke of club.
(3) One defense for reverse stroke of club.
/. Section X.
(1) One defense for pistol in front, right or left hand.
(2) One defense for pistol in back, right or left hand.
g. Section XI.—Complete section.
For military police units with limited time, it is recom-
mended that in addition to the above, sections VI, VII, IX, X,
XII, and XIV be practiced in their entirety.
5. Background of Unarmed Defense.—The original name
of the method described in this manual has been lost in
antiquity, but the art was developed by Chinese monks ap-
proximately in the twelfth century. The monastic rules
forbade the monks to use weapons, but as they were constantly
being attacked by nomads and robber bands, they had to
devise a weaponless defense, utilizing only the skill of their
bodies and the quickness of their brains. Through long ex-
2
UNARMED DEFENSE FOR THE AMERICAN SOLDIER
5-6
periment, trial and error, and loss of life they developed a
means of defense that has remained basically unchanged
through centuries. Late in the twelfth century, the Japanese
became aware of this art and, characteristically, they copied
it and claimed it as their own. They named this art “Jiu
Jitsu,” and established a genealogy for it which they claimed
extended back to their mythological age. The Jiu means
“gentle” and Jitsu means “art” or “practice.” Therefore,
Jiu Jitsu is “the gentle art.” The systems taught were
multitudinous and varied until the year 1882 when Professor
Jigoro Kano, a man who had studied all the better systems,
established the Kodokan, “a school for studying the way”
and called his system “Judo.” This name means “the way,
or principle.” This school, with its roots in Tokyo, sent out
branches throughout the civilized world. One branch,
founded in 1921, had its headquarters in New York. It was
called “The New York Dojo,” and while catering mainly to
Japanese, admitted Occidentals who were interested. How-
ever, progress of the Occidentals was slow, due to the fact
that their instruction was mainly in competitive work. The
holds were ineffective because the correct principles were not
taught. Very little of the defensive or protective tactics
was taught. Since this was the type of Judo in which the
average American was interested, he soon dropped out of the
school. A group of young Americans, disgusted with this
procedure, set out to develop a system of self-defense suited
to the American temperament and needs. They called their
organization “The American Judo Club” and dedicated them-
selves to removing Oriental terminology from the new sys-
tem. They produced as good a system as the Japanese and
far outstripped it in the effectiveness of method. With a
knowledge of American unarmed defense the American sol-
dier will be equipped to meet the Judo men in the game
which they have chosen to claim as their own.
6. Methods of Training.—a. Regulation physical training
formations may be used for practice (see FM 21-20). From
the extended formation of four columns have the first and
second columns face each other and the third and fourth
columns face each other. Each man will then have a part-
3
6
BASIC FIELD MANUAL
ner with whom to practice. Special note should be taken
that the even-numbered men do not uncover. The above
formation applies to a unit the size of a platoon or larger.
Any unit smaller than a platoon should be formed in a column
of twos and then have the columns face each other. It is
recommended that when working throwing tricks, twice the
normal distance be taken.
b. The instructor will explain the attack and demonstrate
the proper defense on a competent assistant, executing the
movement rapidly to show its effectiveness. The defense is
then executed again, as near slow motion as possible with an
accompanying explanation. The attacking squads and the
opposing defending squads are then designated, possibly using
the letter “a” for attackers and letter “b” for defenders. At
a given signal the attackers move to the attack and the de-
fenders attempt to work the proper defense while the as-
sistant instructors make corrections. Emphasis should be
placed on precision first. Speed can be developed later.
Most of the defenses are equally effective on either side. When
two defending squads have mastered the defense, the situ-
ation is reversed and the defending squads become attackers.
Progress to a new trick is made only when the students have
demonstrated a working knowledge of the previous one. No
more than three tricks should be taught in any 30-minute
period, as confusion would result. Encourage the men to
practice in their spare time, emphasizing that proficiency
in unarmed defense is predicated on repetition until a move-
ment becomes almost instinctive. It is not difficult to arouse
the interest of the men in this subject, since the desire to
excel physically is a characteristic of the average American.
Since even the smallest can be shown that his lack of size
is no handicap, there will be no difficulty arising from indif-
ference. The main problem will be to keep enthusiasts from
trying more tricks than they can possibly assimilate. An-
other point that should be emphasized is the desirability
of eliminating the stigma of the so-called “foul tactic” which
is usually ascribed to unarmed defense. It might be well to
point out that an individual who attacks with a club, knife,
gun, or any other weapon is not subscribing to any recognized
rules of combat. In hand-to-hand combat, there are no
4
UNARMED DEFENSE FOR THE AMERICAN SOLDIER
6-7
referees, no judges, and no timekeeper. You are on your own.
No measure of defense is too extreme when your life is in
danger. The defenses in this manual might be the means
of saving your life or the life of a comrade.
Section П
BASIC PRINCIPLES
7. Principles of Unarmed Defense.—It is of the utmost
importance that in order to learn unarmed defense in the
manner necessary to use it effectively, the principles be first
mastered.
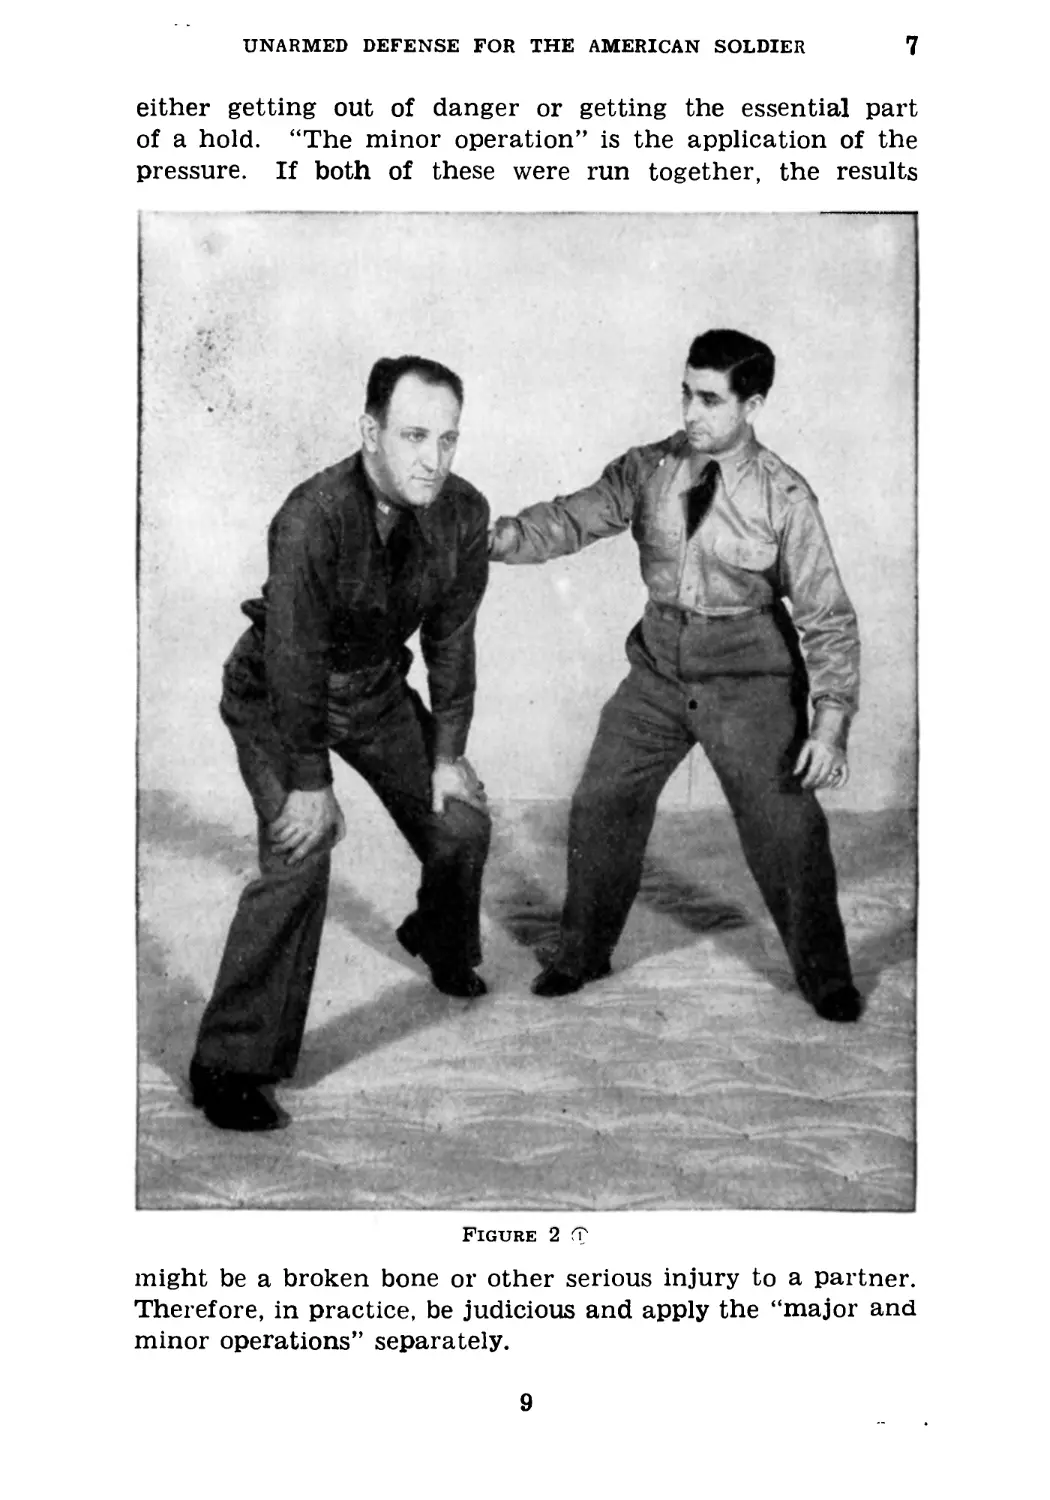
a. The first principle is “balance.” The accompanying
illustrations will be used to point out the principle of bal-
ance. Figure 1 ® illustrates a man in balance with his legs
apart. It is shown that the individual in this position is
on balance from right to left and from left to right. How-
ever, figure 1 ® shows that he is definitely off balance for-
ward, and figure 1 ® shows that he is also off balance back-
ward. It is usually assumed that when an individual assumes
the position of the charge he is on balance all the way around.
Figure 2 ® shows that in a position of charge with the right
foot forward, the individual is on balance from right front
to left rear and from left rear to right front. However,
figure 2 ® shows that in this position he is off balance to the
right rear, and figure 2 ® shows that he is off balance to the
left front. Notice the small amount of effort required to take
an individual off balance when you know in what directions
he is strong and in what directions he is weak. No matter
what position an individual assumes, he is off balance in some
direction.
b. The second principle is “use of the internal oblique
muscles.” These muscles have been named by the Japanese
Shita-hara, pronounced “stahara.” The internal oblique
muscles are located in the center of the body in the lower
abdomen between the hip bones. The power for every de-
fense must come or be centered in these muscles.
c. Principle three is the ability to utilize an opponent’s
momentum or an opponent’s strength to bring about his
5
1
BASIC FIELD MANUAL
downfall. You always assume that your opponent is stronger
than you are and never attempt to oppose him directly, but
rather utilize his impetus or momentum to carry him on his
Figure 1 jd.
way, the difference being that you direct the movement.
d. Principle four is to attack your opponent on the spot
6
UNARMED DEFENSE FOR THE AMERICAN SOLDIER
7
where he is weakest with the greatest amount of power that
you can concentrate on that one point. The axiom of this
principle is “My maximum strength against your minimum.”
Figure 1
To illustrate this point, if an opponent were to grasp your
wrist, instead of trying to tear your wrist from between his
7
7
BASIC FIELD MANUAL
fingers by main strength of your arms, you would attempt
to concentrate the power of your legs, body, and arms
against his fingers.
Figure 1
e. The fifth and last principle is a knowledge of “the major
and minor operations.” This knowledge is essential to pre-
vent injury while practicing. “The major operation” means
8
UNARMED DEFENSE FOR THE AMERICAN SOLDIER
7
either getting out of danger or getting the essential part
of a hold. “The minor operation” is the application of the
pressure. If both of these were run together, the results
Figure 2 (T
might be a broken bone or other serious injury to a partner.
Therefore, in practice, be judicious and apply the “major and
minor operations” separately.
9
7
BASIC FIELD MANUAL
Figure 2 ®
10
UNARMED DEFENSE FOR THE AMERICAN SOLDIER
7
Figure 2 @
11
8
BASIC FIELD MANUAL
Section III
WRIST ESCAPES
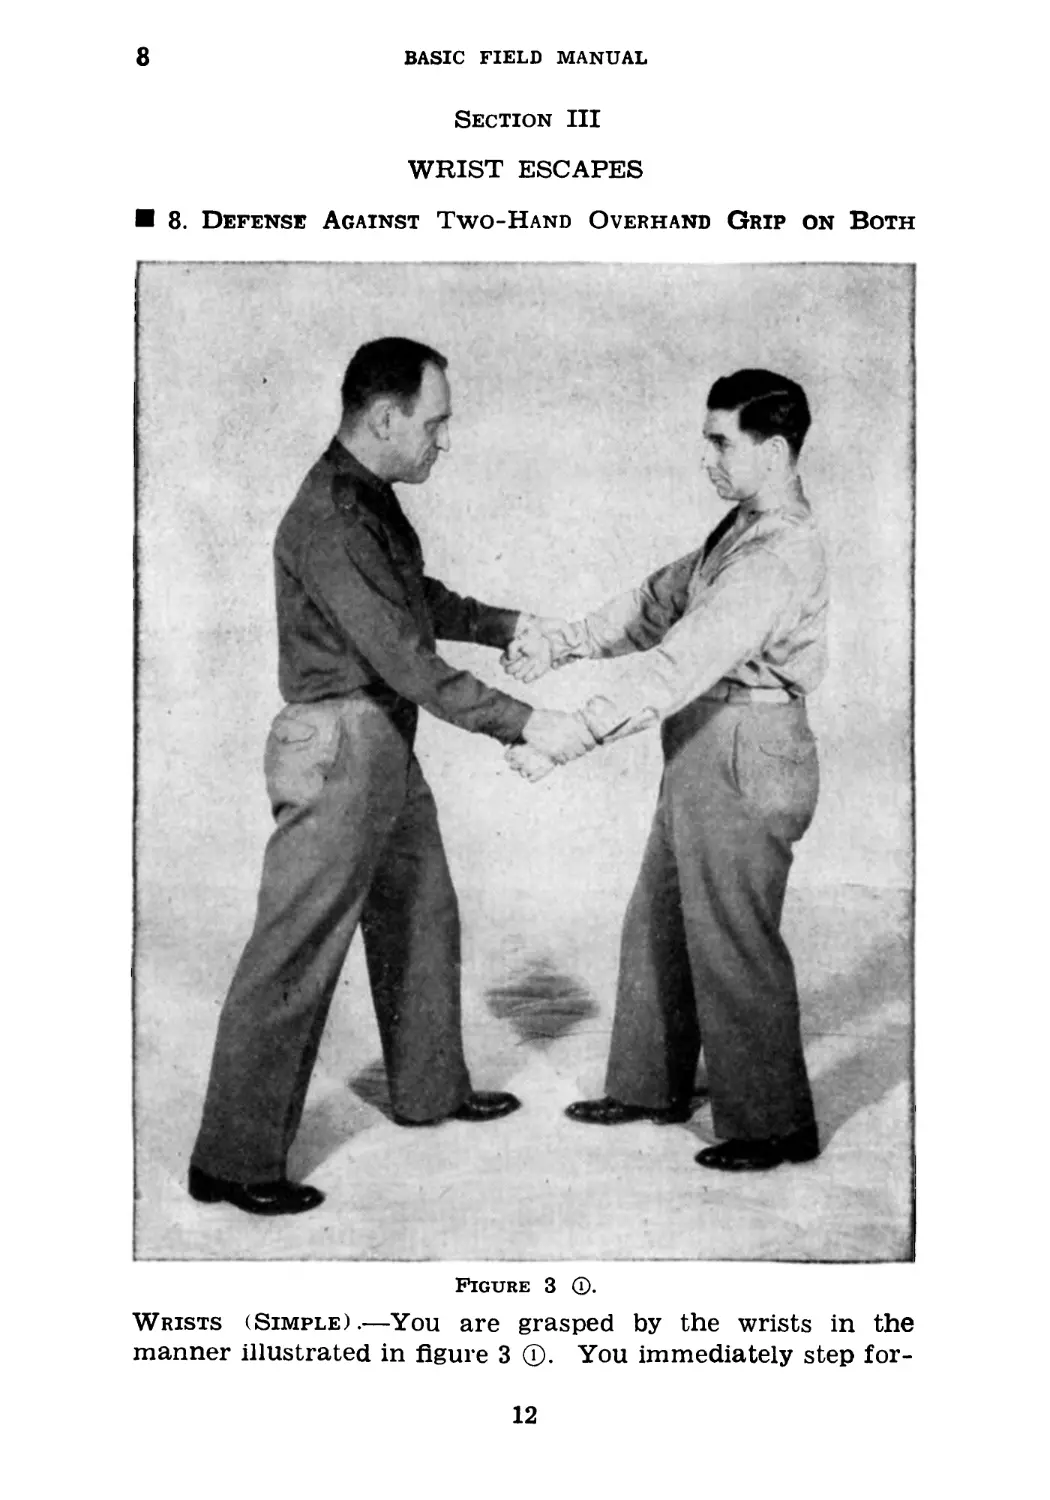
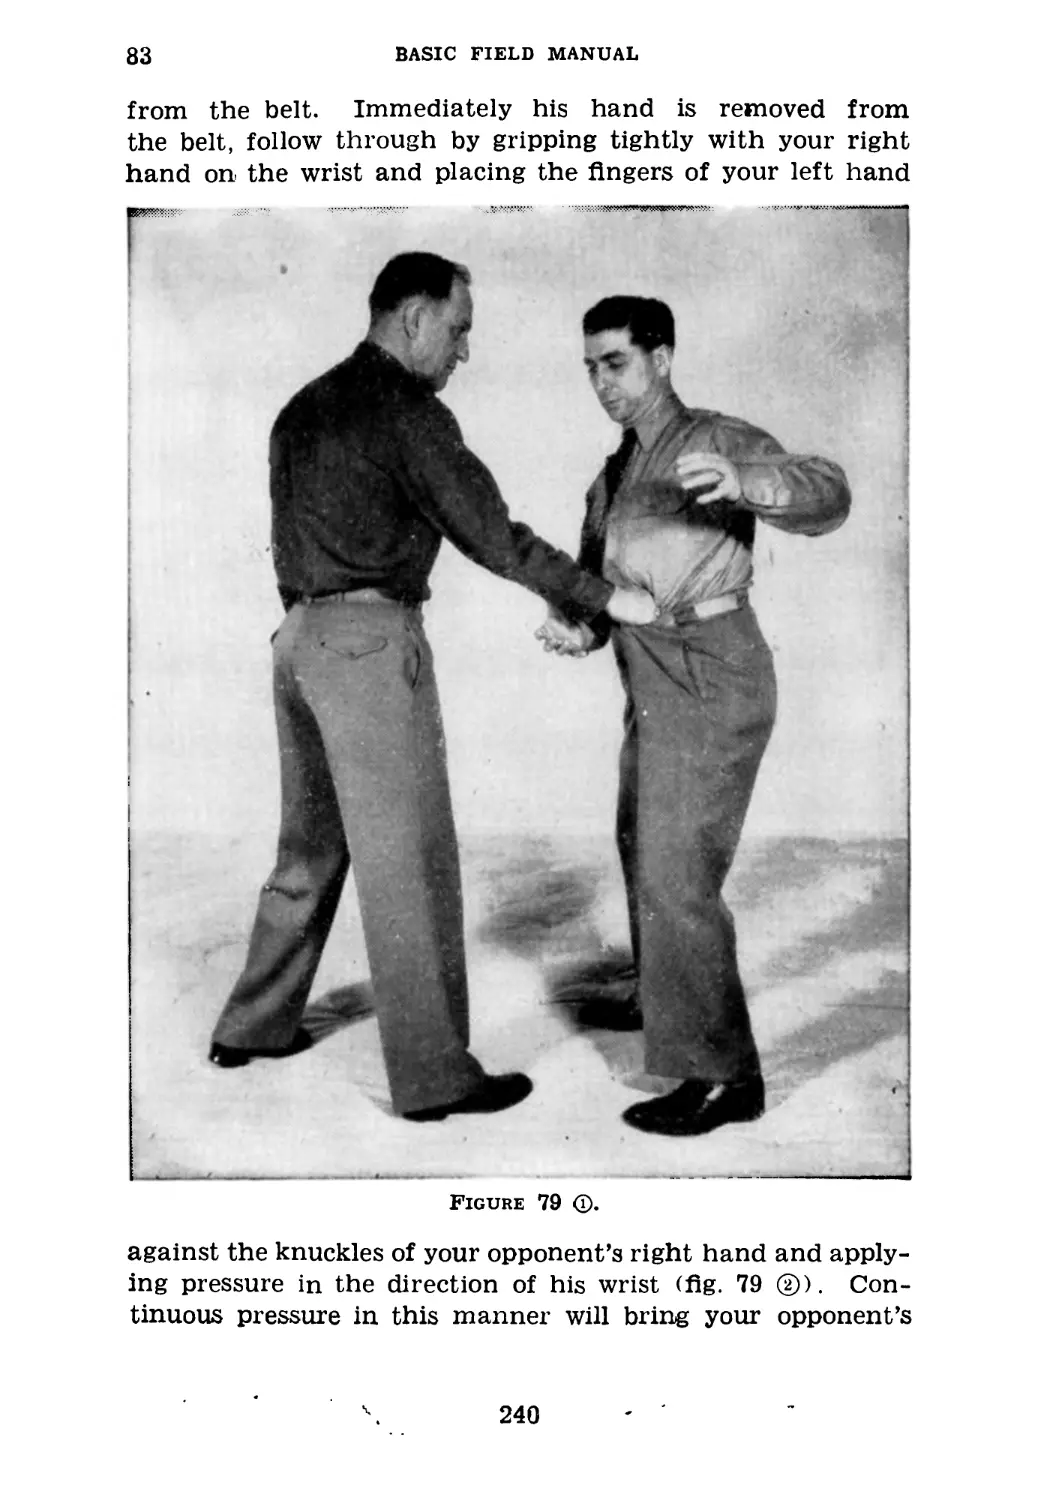
8. Defense Against Two-Hand Overhand Grip on Both
Figure 3 ®.
Wrists (Simple).—You are grasped by the wrists in the
manner illustrated in figure 3 ®. You immediately step for-
12
UNARMED DEFENSE FOR THE AMERICAN SOLDIER
8
ward with either foot, in this case (fig. 3 ®) the right one,
at the same time bending the arms so that the elbows are
close to the lower abdomen. The escape is accomplished by
Figure 3
straightening the legs, pulling back with the body, and pushing
the arms upward in one motion (fig. 3 ®). The faster this
defense is worked, the more effective the escape.
463187 -—42----2
13
9
BASIC FIELD MANUAL
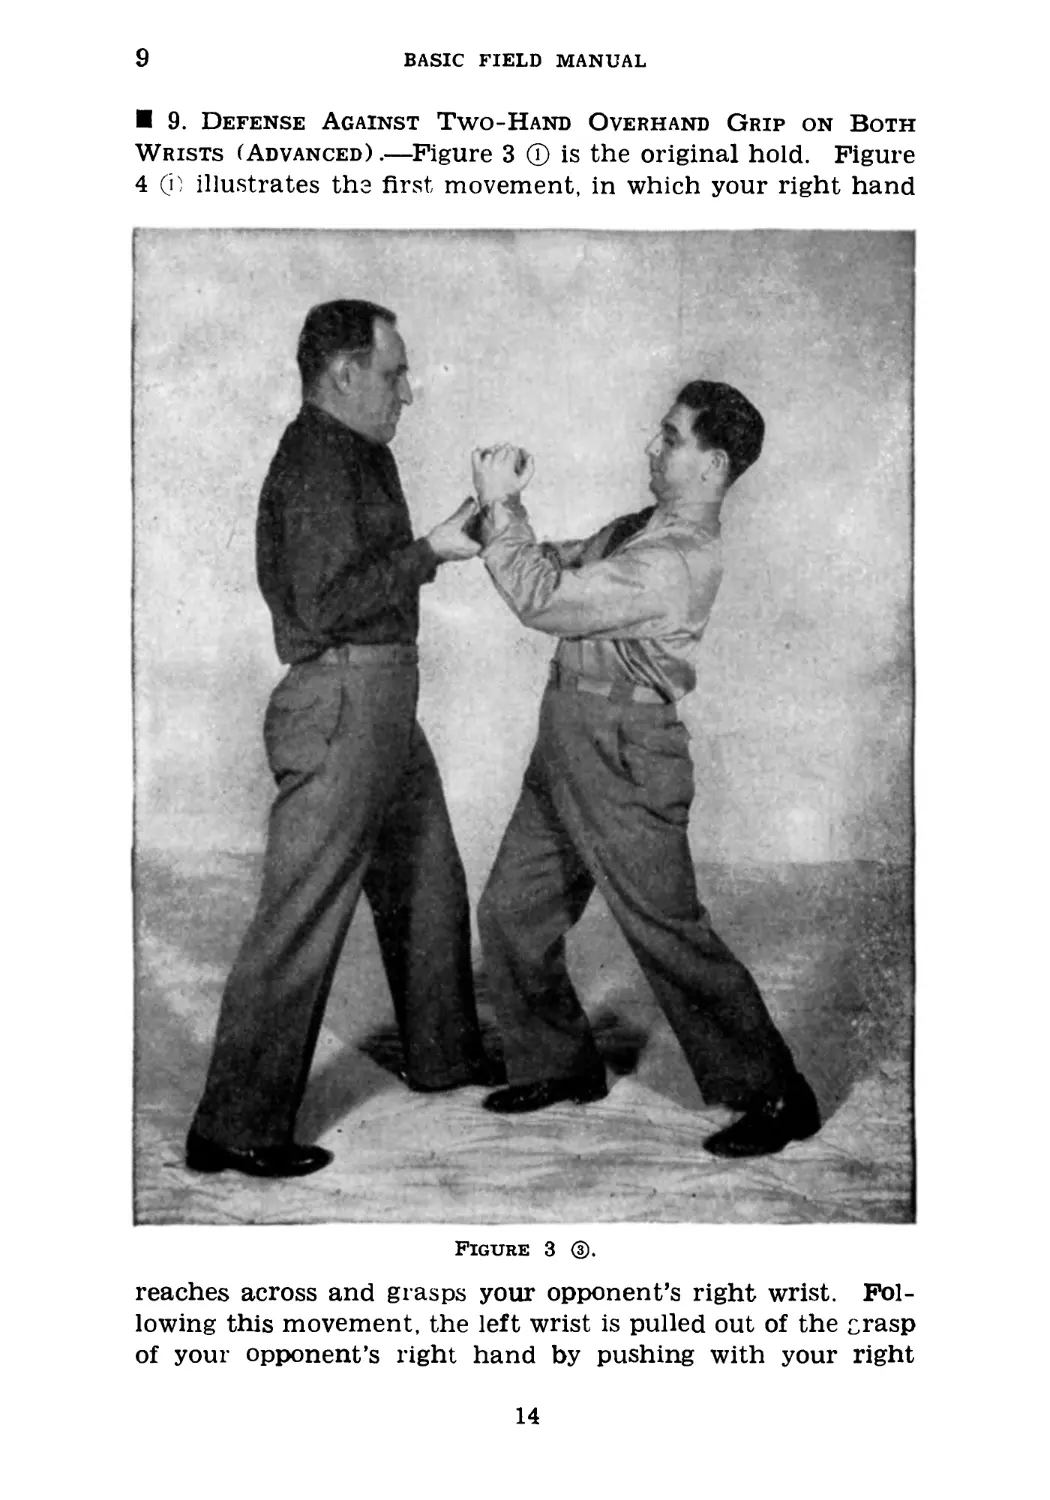
9. Defense Against Two-Hand Overhand Grip on Both
Wrists (Advanced) .—Figure 3 © is the original hold. Figure
4 © illustrates the first movement, in which your right hand
Figure 3 ®.
reaches across and grasps your opponent’s right wrist. Fol-
lowing this movement, the left wrist is pulled out of the crasp
of your opponent’s right hand by pushing with your right
14
UNARMED DEFENSE FOR THE AMERICAN SOLDIER
9
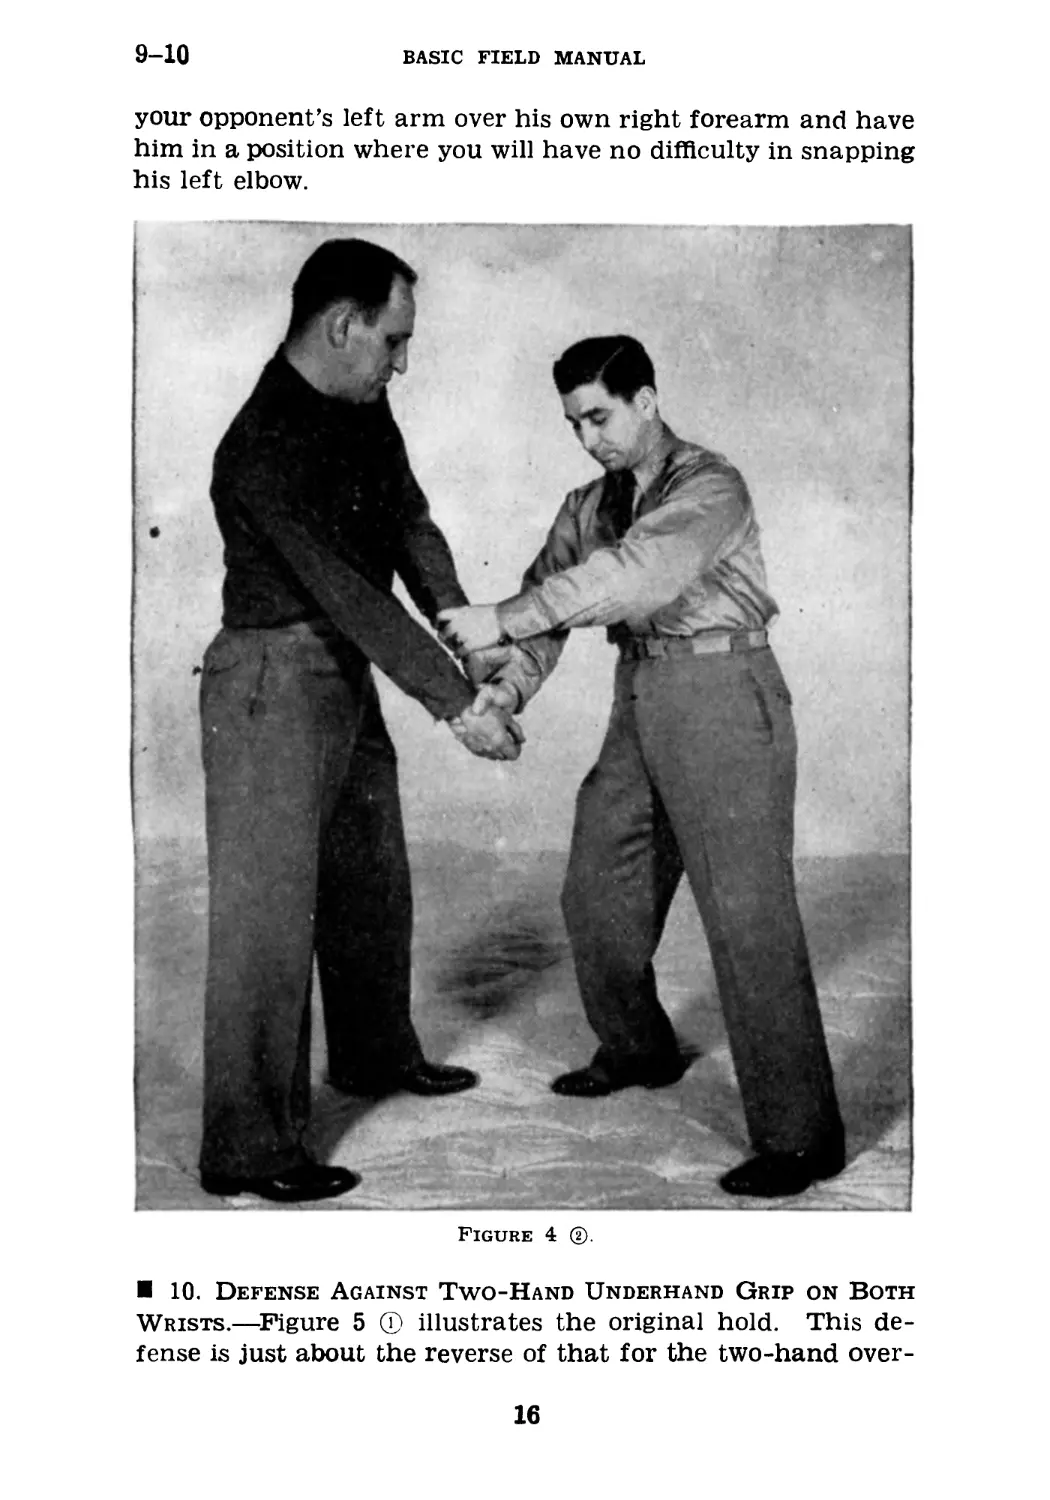
hand and pulling with your left arm. Figure 4 (2) illustrates
that you have reached across with your freed left hand and
grasped your opponent’s left wrist with your thumb up. By
Figure 4 ?.
pushing on his left wrist, you will find no difficulty in releas-
ing his grip on your right wrist. Figure 4 ® illustrates
the completion of the defense, showing that you have lifted
15
9-10
BASIC FIELD MANUAL
your opponent’s left arm over his own right forearm and have
him in a position where you will have no difficulty in snapping
his left elbow.
Figure 4 ®.
10. Defense Against Two-Hand Underhand Grip on Both
Wrists.—Figure 5 © illustrates the original hold. This de-
fense is just about the reverse of that for the two-hand over-
16
UNARMED DEFENSE FOR THE AMERICAN SOLDIER
10
hand grip on both wrists. The elbows are again brought
close to the lower abdomen and a step forward is again taken
as illustrated in figure 5 ®. Then, turning the head to one
Figure 4
side to avoid bumping heads with a hard-headed opponent
(fig. 5 ®), the body is bent swiftly from the waist. At the
same time, pressure is brought to bear on your opponent’s
thumb, accomplishing the escape as in figure 5 ®.
17
11
BASIC FIELD MANUAL
11. Defense Against Left-Hand Grip on Right Wrist, or
Right-Hand Grip on Left Wrist «Simple).—Figure 6 © illus-
Figure 5 c.
trates the original hold. Your attacker has grasped your
right wrist with his left hand. Your immediate action is to
18
UNARMED DEFENSE FOR THE AMERICAN SOLDIER
11
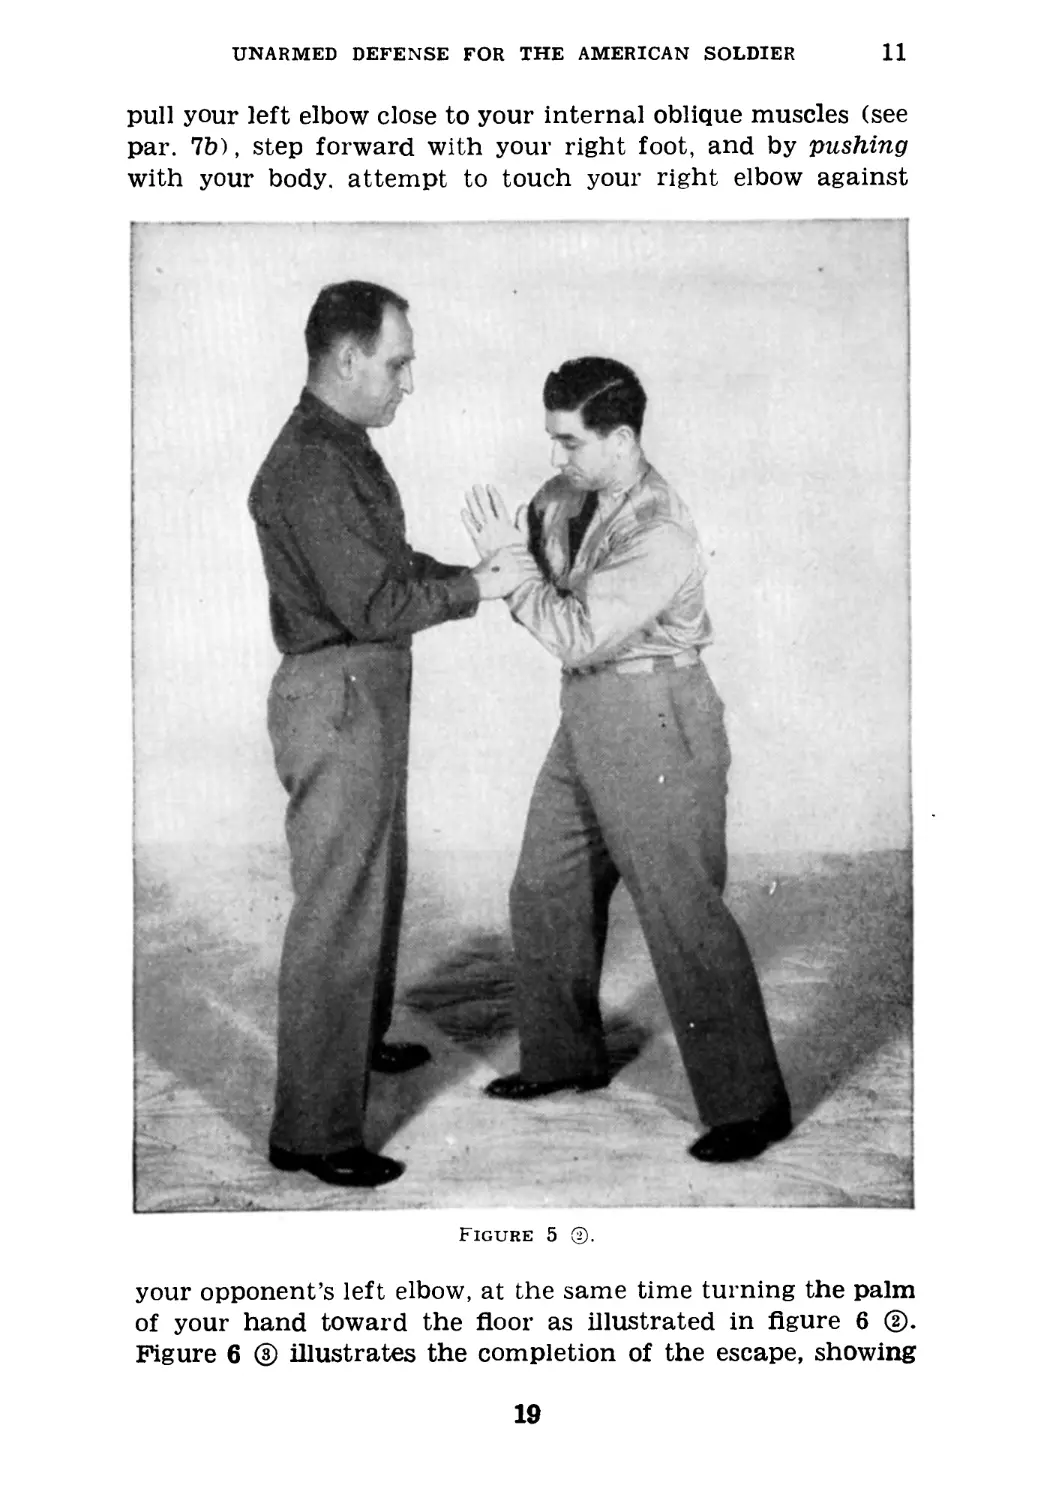
pull your left elbow close to your internal oblique muscles (see
par. 7b), step forward with your right foot, and by pushing
with your body, attempt to touch your right elbow against
Figure 5
your opponent’s left elbow, at the same time turning the palm
of your hand toward the floor as illustrated in figure 6 ®.
Figure 6 ® illustrates the completion of the escape, showing
19
11-12
BASIC FIELD MANUAL
that your right hand is then in position to be brought smartly
across your opponent’s neck.
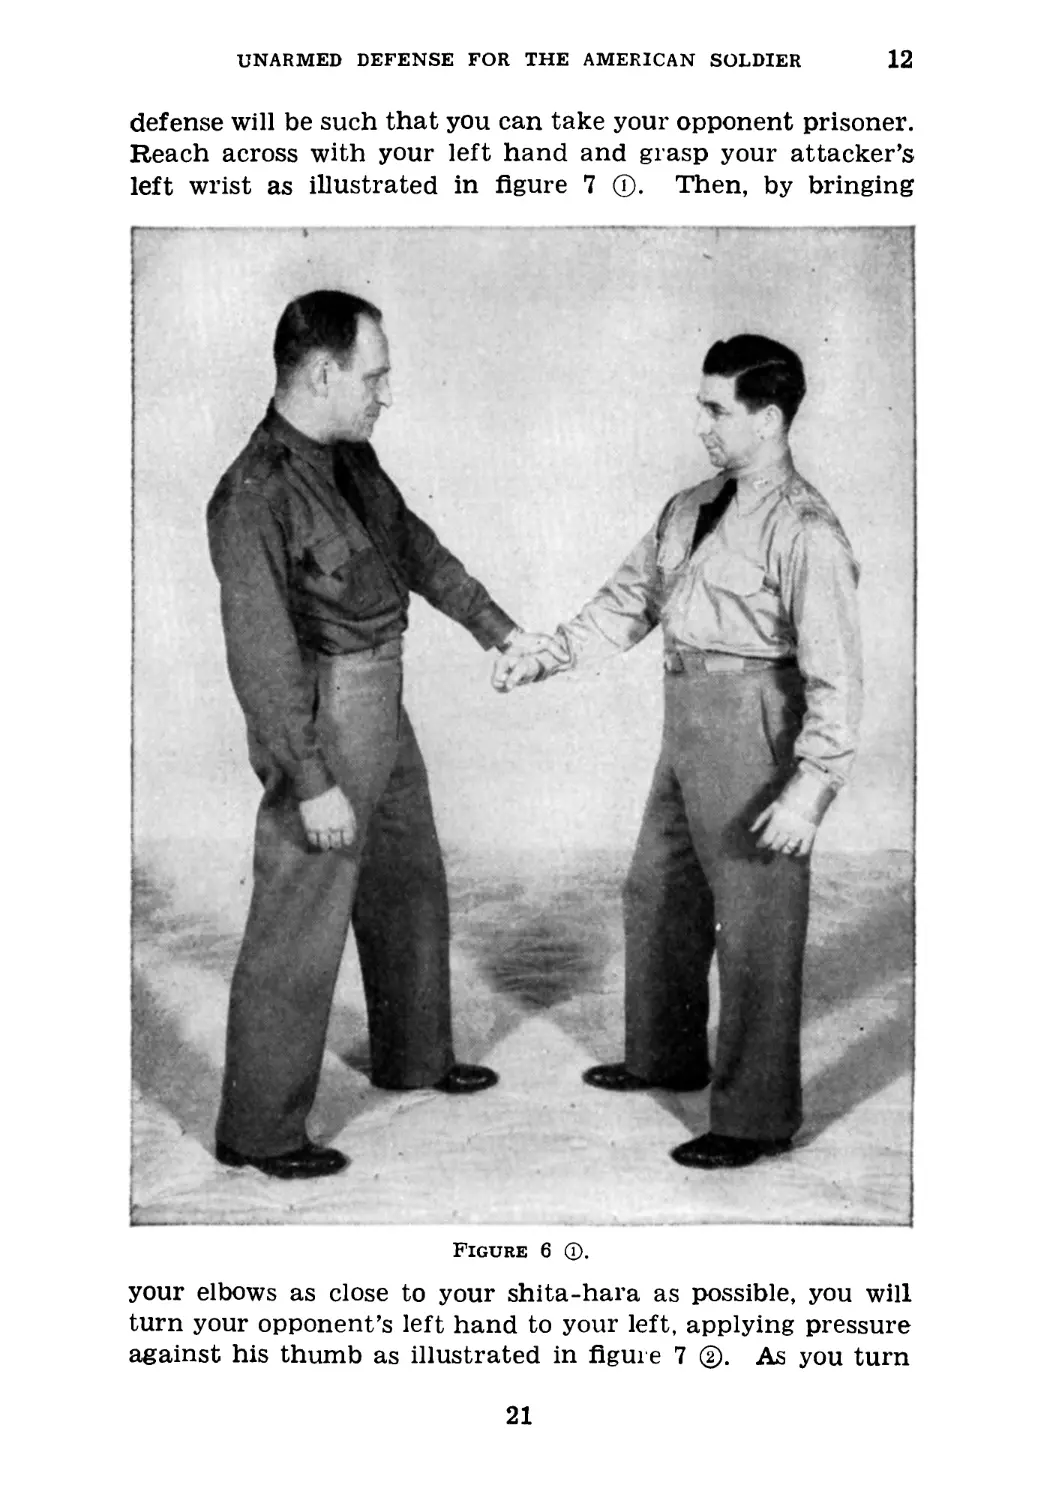
12. Defense Against Left-Hand Grip on Right Wrist, or
Figure 5 ®.
Right-Hand Grip on Left Wrist (Advanced).—The original
hold is the same as in figure 6 Q. This time, however, your
20
UNARMED DEFENSE FOR THE AMERICAN SOLDIER
12
defense will be such that you can take your opponent prisoner.
Reach across with your left hand and grasp your attacker’s
left wrist as illustrated in figure 7 ®. Then, by bringing
Figure 6 (T).
your elbows as close to your shita-hara as possible, you will
turn your opponent’s left hand to your left, applying pressure
against his thumb as illustrated in figure 7 ®. As you turn
21
12
BASIC FIELD MANUAL
the wrist, the thumb of your left hand is placed in the center
of the knuckles on the back of your opponent’s hand. As
soon as your opponent has been forced to turn his back par-
Figure 6
tially to you, you will then reinforce the hold with your left
hand with an identical one with your right hand. This will
bring you to the position illustrated in figure 7 ®. The close-
22
UNARMED DEFENSE FOR THE AMERICAN SOLDIER
12
up in figure 7 © shows you the proper hold on your opponent’s
hand. The pressure, when it is necessary, will be applied
toward your opponent’s forearm rather than to either side.
Figure 6
Your elbows will be kept close to your side. All pressure will
emanate from the shita-hara. You can now march your
opponent anywhere you see fit. He is your prisoner.
23
13
BASIC FIELD MANUAL
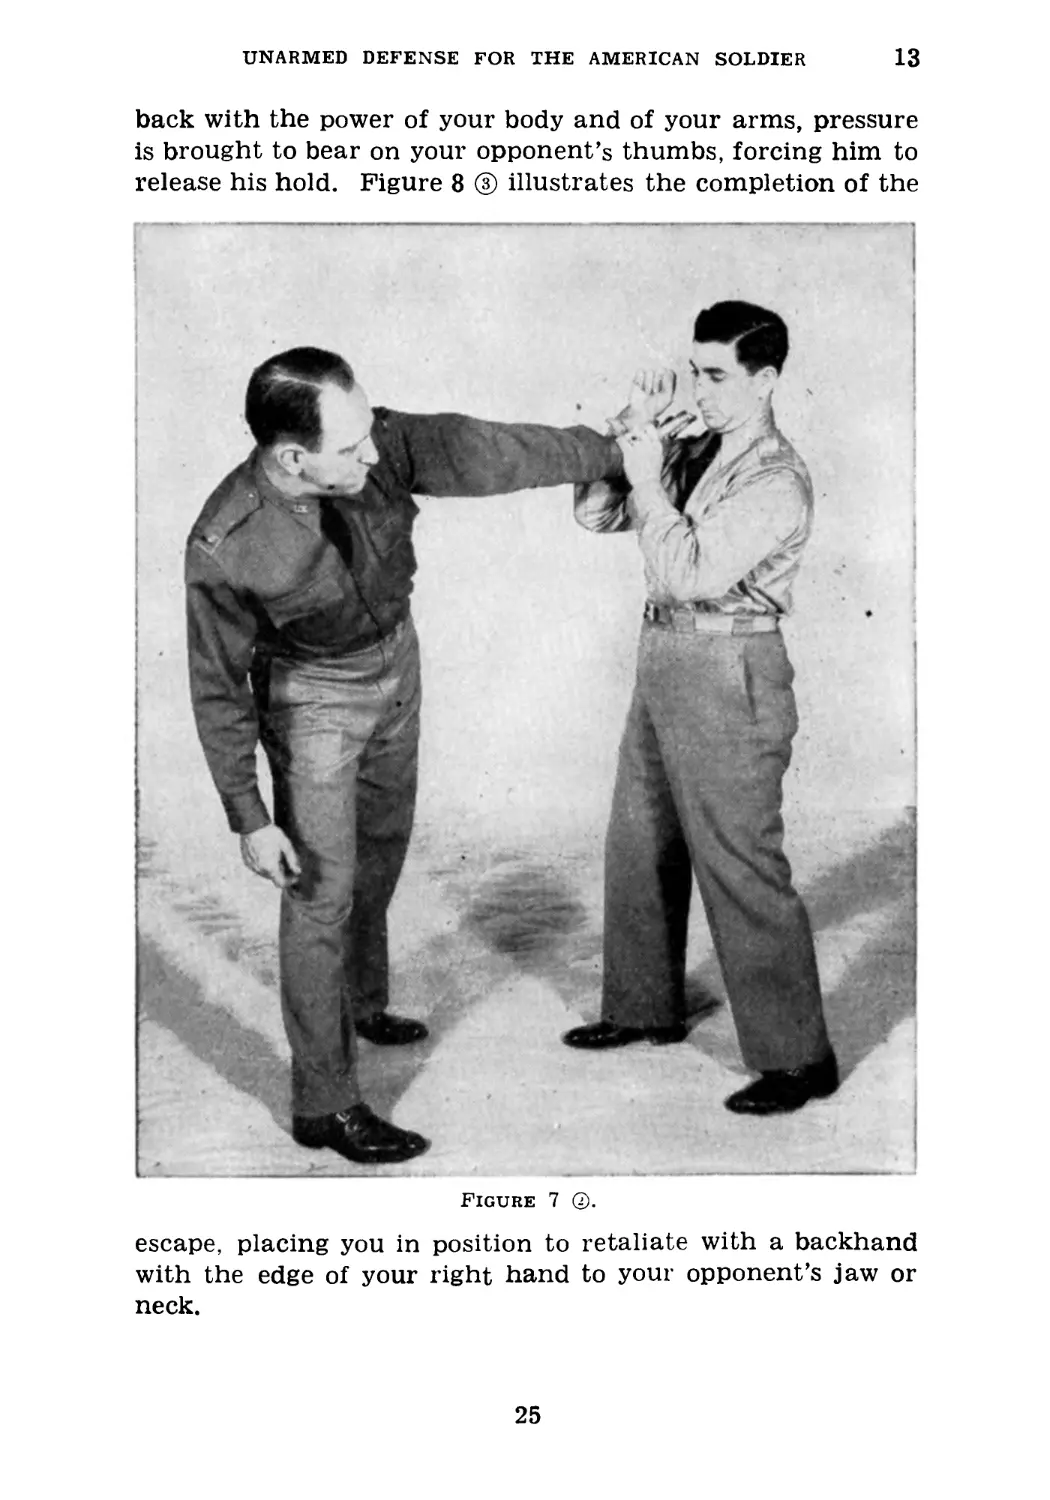
13. Defense Against Two-Hand Grip on One Wrist.—
Figure 8 ® illustrates your opponent grasping your right
wrist with both his hands. Now step forward with your
Figure 7 ф
right leg, bending both knees, body upright, and bring your
right elbow close to your shita-hara. Your left hand will
reach across and grasp your right fist. The position is
illustrated in figure 8 ®. By straightening your legs, pulling
24
UNARMED DEFENSE FOR THE AMERICAN SOLDIER
13
back with the power of your body and of your arms, pressure
is brought to bear on your opponent’s thumbs, forcing him to
release his hold. Figure 8 ® illustrates the completion of the
Figure 7
escape, placing you in position to retaliate with a backhand
with the edge of your right hand to your opponent’s jaw or
neck.
25
14
BASIC FIELD MANUAL
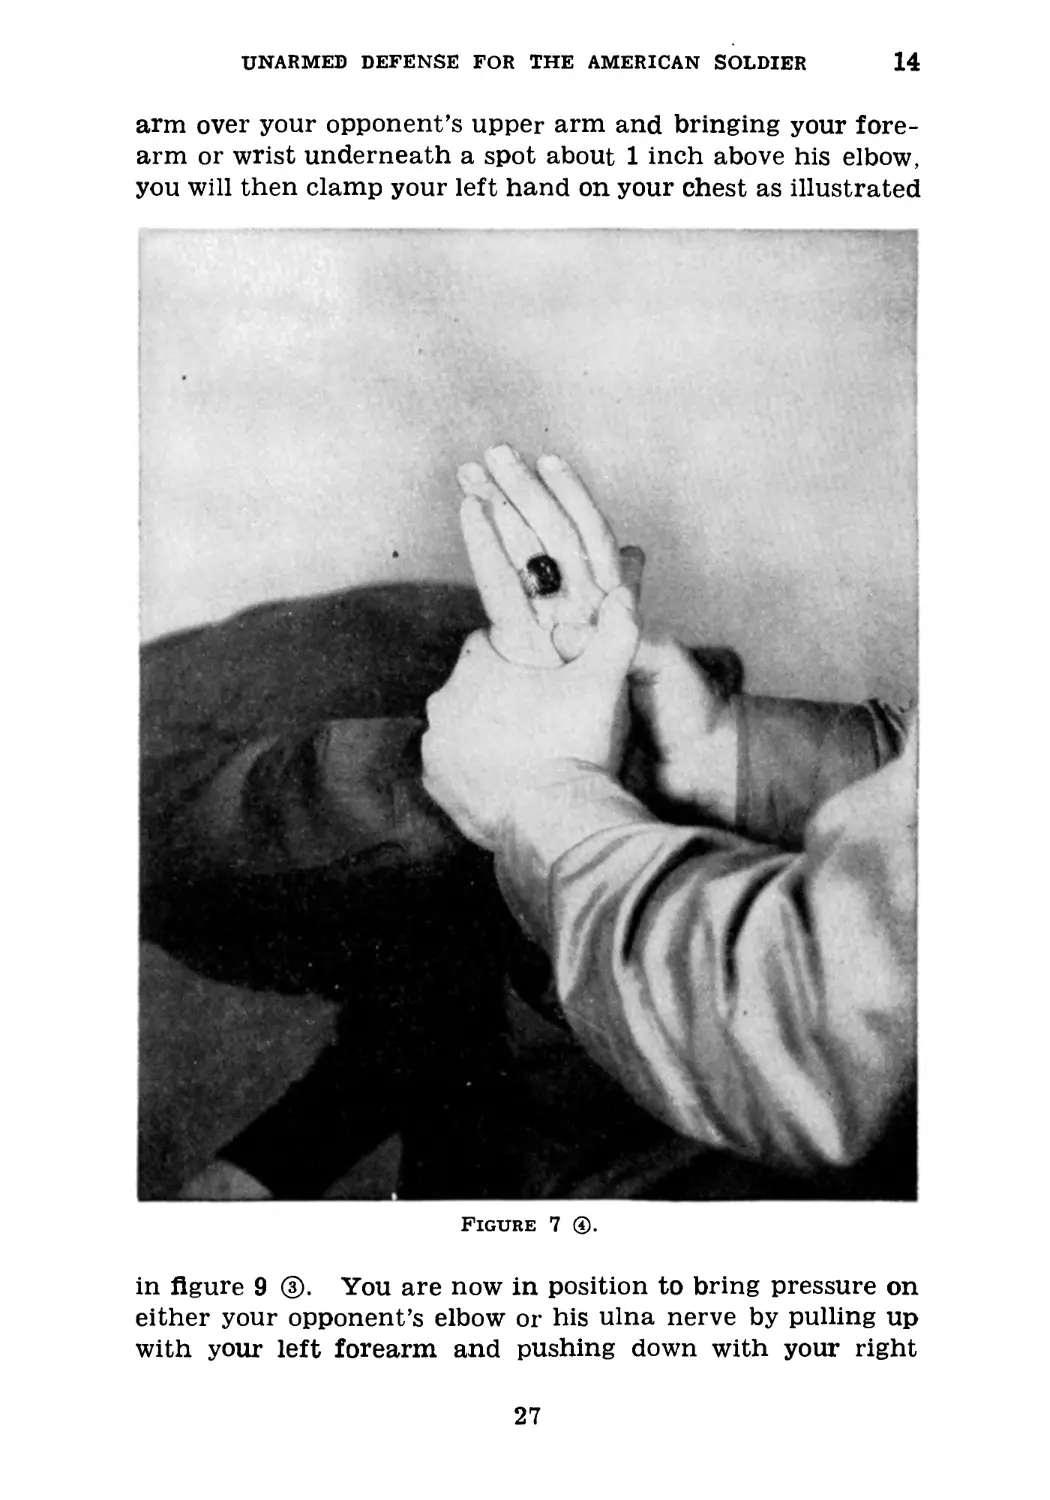
14. Defense Against Right-Hand Grip on Right Wrist,
or Left-Hand Grip on Left Wrist.—In the case illustrated by
figure 9 ®, your opponent has grasped your right wrist with
his right hand. Your immediate reaction is to grasp his right
Figure 7 @.
wrist with your right hand, taking a long step to his right
rear with your left foot, pulling his right arm underneath your
left arm as illustrated in figure 9 ®. Wrapping your upper
26
UNARMED DEFENSE FOR THE AMERICAN SOLDIER
14
arm over your opponent’s upper arm and bringing your fore-
arm or wrist underneath a spot about 1 inch above his elbow,
you will then clamp your left hand on your chest as illustrated
Figure 7 ®.
in figure 9 ®. You are now in position to bring pressure on
either your opponent’s elbow or his ulna nerve by pulling up
with your left forearm and pushing down with your right
27
14-15
BASIC FIELD MANUAL
arm. This will force your opponent to his toes and give you
complete control of the situation. Care should be taken in
working this defense, since it is very easy to break an arm
utilizing this procedure.
Figure 8 Q.
15. Defense Against Left-Hand Grip on Right Wrist, or
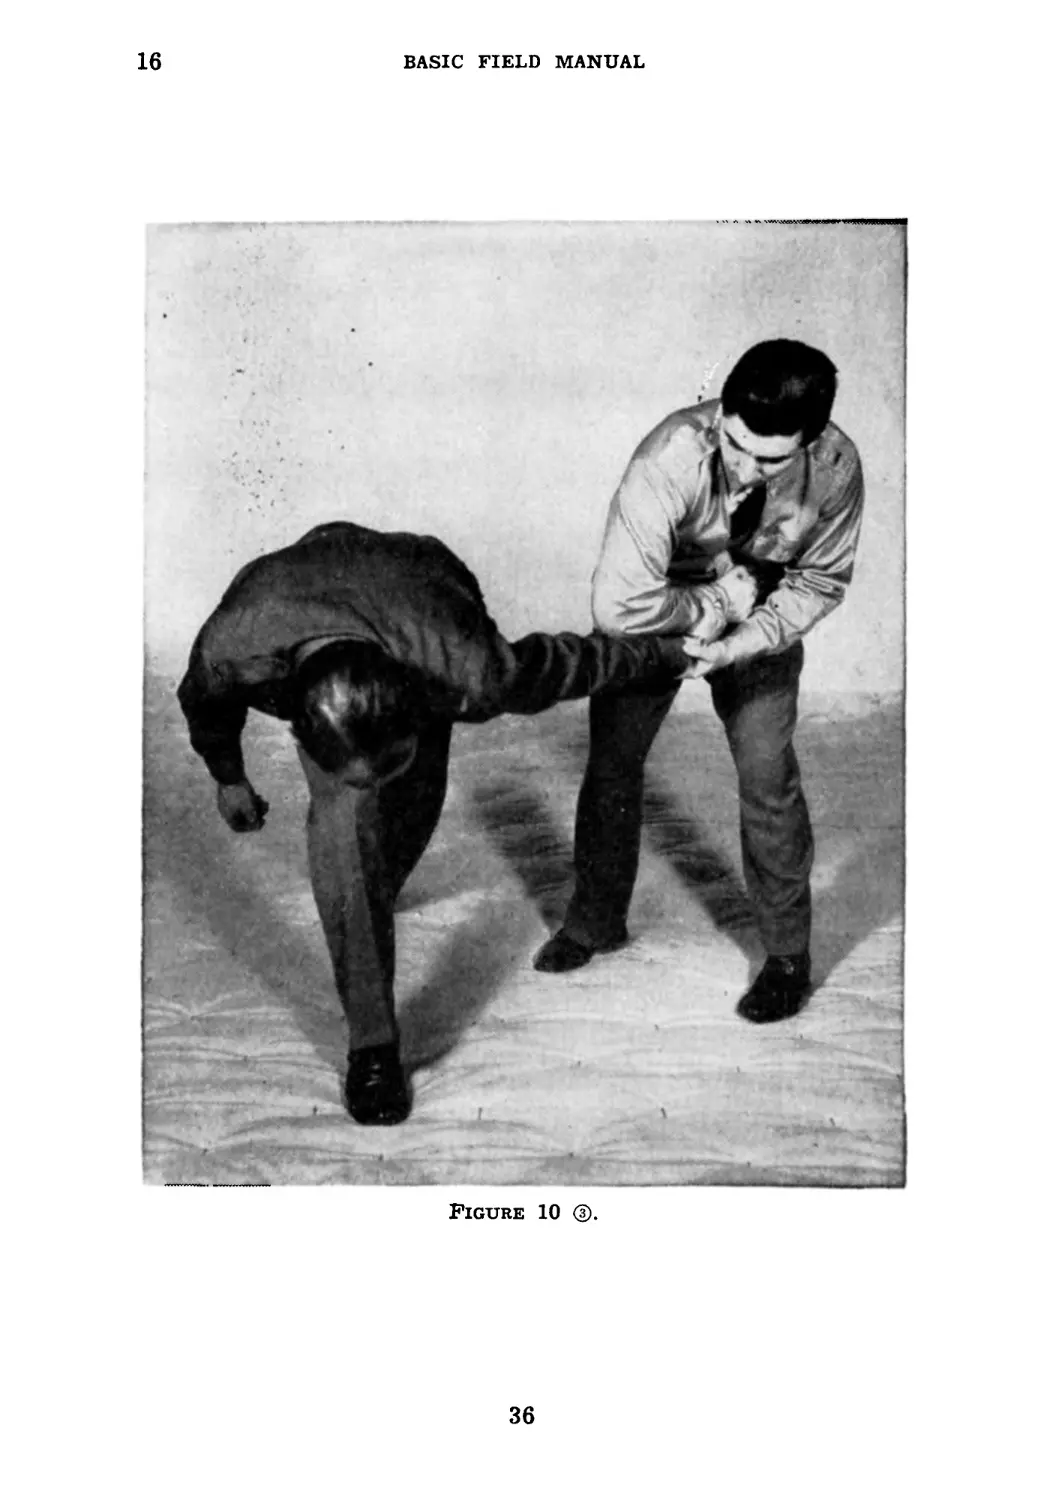
Right-Hand Grip on Left Wrist (Fingers Uppermost).—
Figure 10 ® illustrates the original hold, showing your op-
28
UNARMED DEFENSE FOR THE AMERICAN SOLDIER
15
ponent grasping your right wrist overhand with his left hand.
Your immediate reaction is to reach across with your left
hand and grasp his wrist with your thumb uppermost, at the
Figure 8 ®.
same time stepping forward with your right foot as illustrated
in figure 10 ®. You then prevent him from releasing the
grip on your wrist by pulling with your left hand, keeping it
close to your right. You then endeavor to place your right
463187—42-
29
15-16
BASIC FIELD MANUAL
elbow on your opponent’s left elbow by pushing with the body
and arm and continuing the pressure. This will bring him
to the position illustrated in figure 10 ® or completely to the
Figure 8 @.
ground. If done rapidly, it can also result in a broken arm.
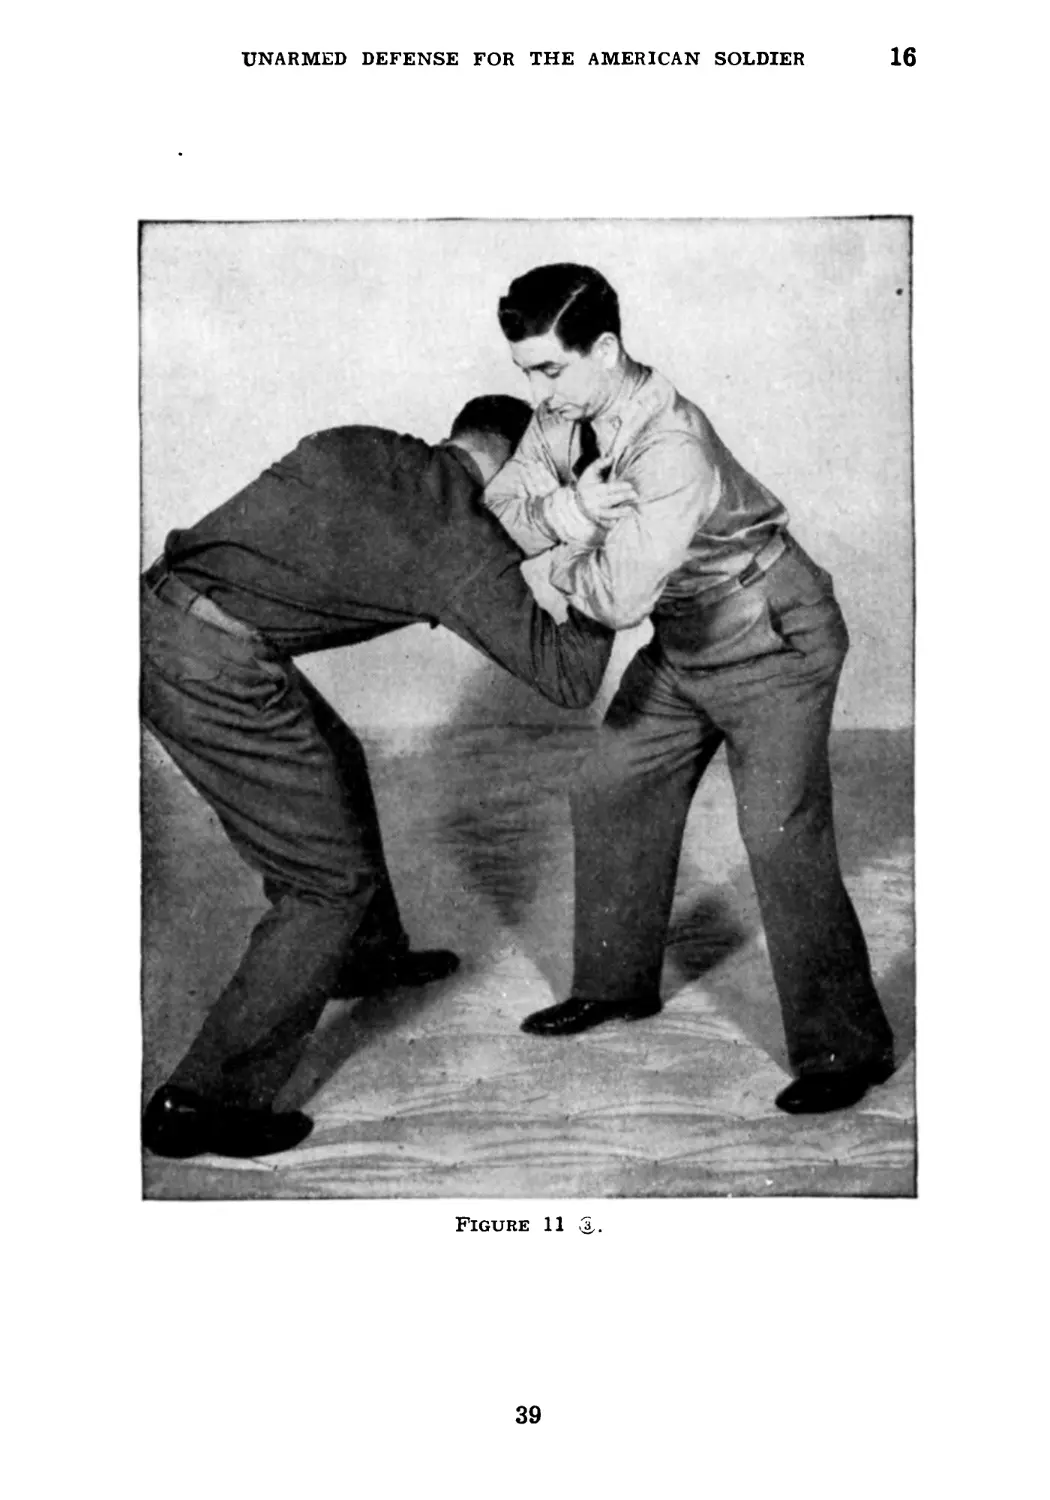
16. Defense Against Right-Hand Grip on Right Wrist,
or Left-Hand Grip on Left Wrist (Fingers Uppermost) .—
30
UNARMED DEFENSE FOR THE AMERICAN SOLDIER
16
This, on the surface, appears to be the same hold as in fig-
ure 10 ®, but it is not, since in one case the grip is with the
hand on the same side, and in this case the grip is from
Figure 9 (T).
the hand on the opposite side as illustrated in figure 11 ®,
where your opponent is grasping your right wrist with his right
hand. Your first action is to place your right hand on your
31
16
BASIC FIELD MANUAL
right biceps and your left forearm over the back of your
opponent’s hand, preventing him from releasing his grip, as
illustrated in figure 11 ®. Continue the movement of your
Figure 9 ®.
left hand to the right, bringing it over the back of his right
hand, under your right forearm, and locking it on your
right biceps as illustrated in figure 11 ®. Holding him close
32
UNARMED DEFENSE FOR THE AMERICAN SOLDIER
16
to your chest, it is a simple matter to bend from the waist
and thus force your opponent to his knees.
Figure 9 ®.
33
16
BASIC FIELD MANUAL
Figure 10 Q.
34
UNARMED DEFENSE FOR THE AMERICAN SOLDIER
16
Figure 10 ®.
35
16
BASIC FIELD MANUAL
Figure 10
36
UNARMED DEFENSE FOR THE AMERICAN SOLDIER
16
Figure 11 (T).
37
16
BASIC FIELD MANUAL
Figure 11 ®.
38
UNARMED DEFENSE FOR THE AMERICAN SOLDIER
16
Figure 11 &
39
17
BASIC FIELD MANUAL
Section TV
ESCAPES FROM BODY HOLDS
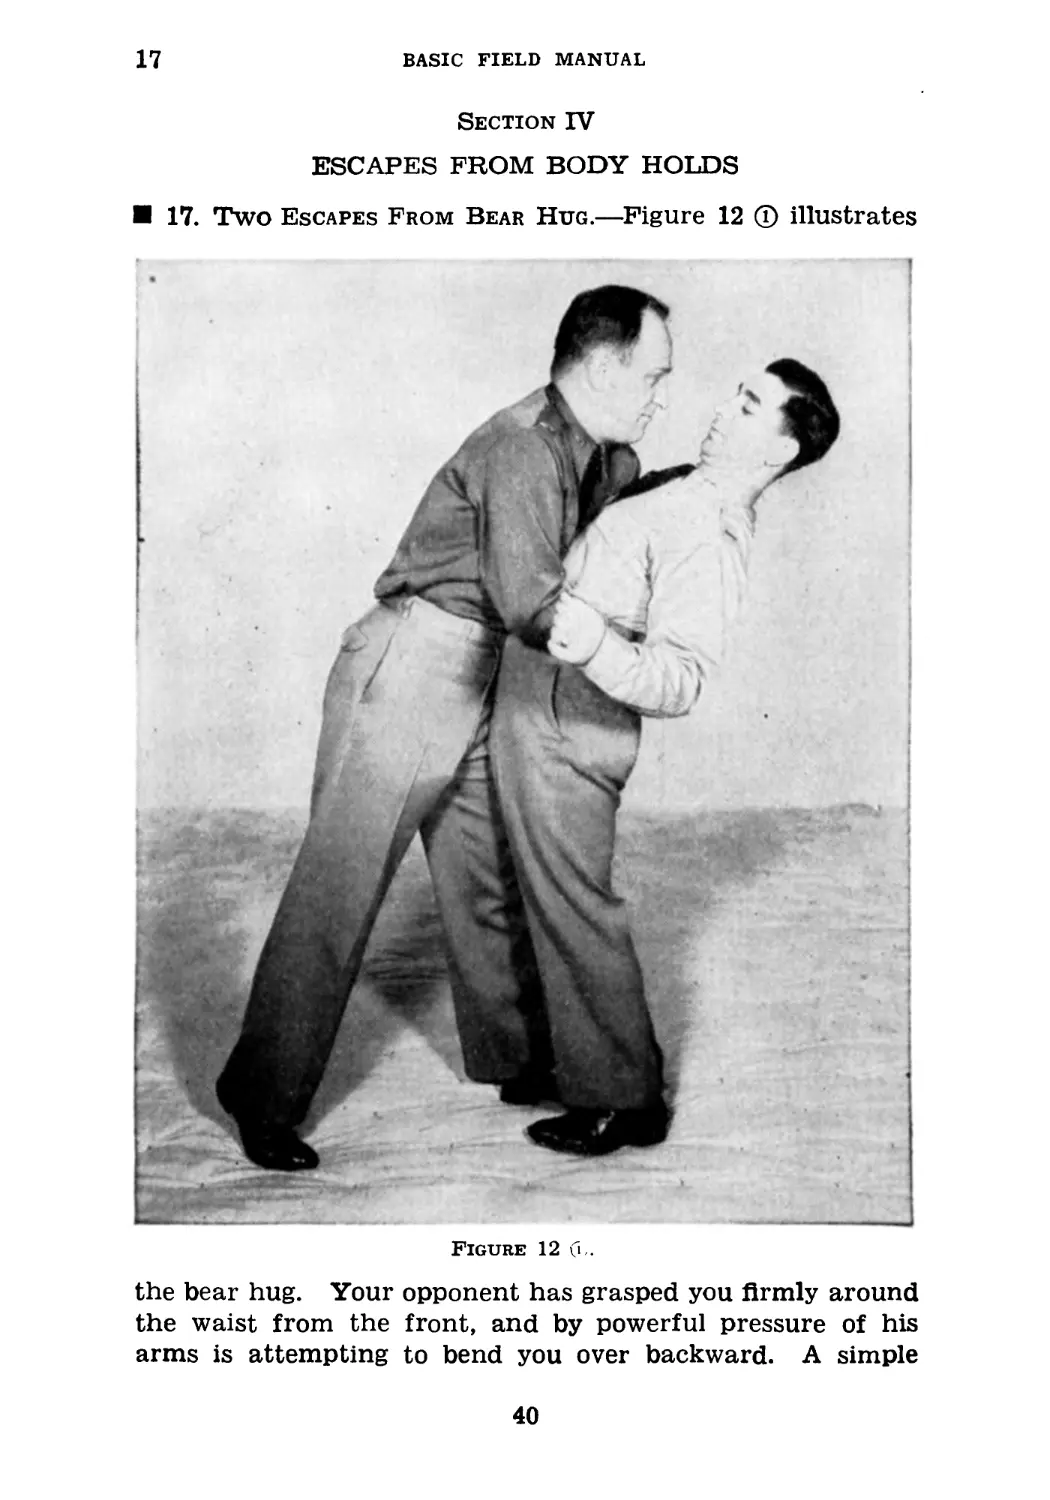
17. Two Escapes From Bear Hug.—Figure 12 ® illustrates
Figure 12 (i .
the bear hug. Your opponent has grasped you firmly around
the waist from the front, and by powerful pressure of his
arms is attempting to bend you over backward. A simple
40
UNARMED DEFENSE FOR THE AMERICAN SOLDIER
17
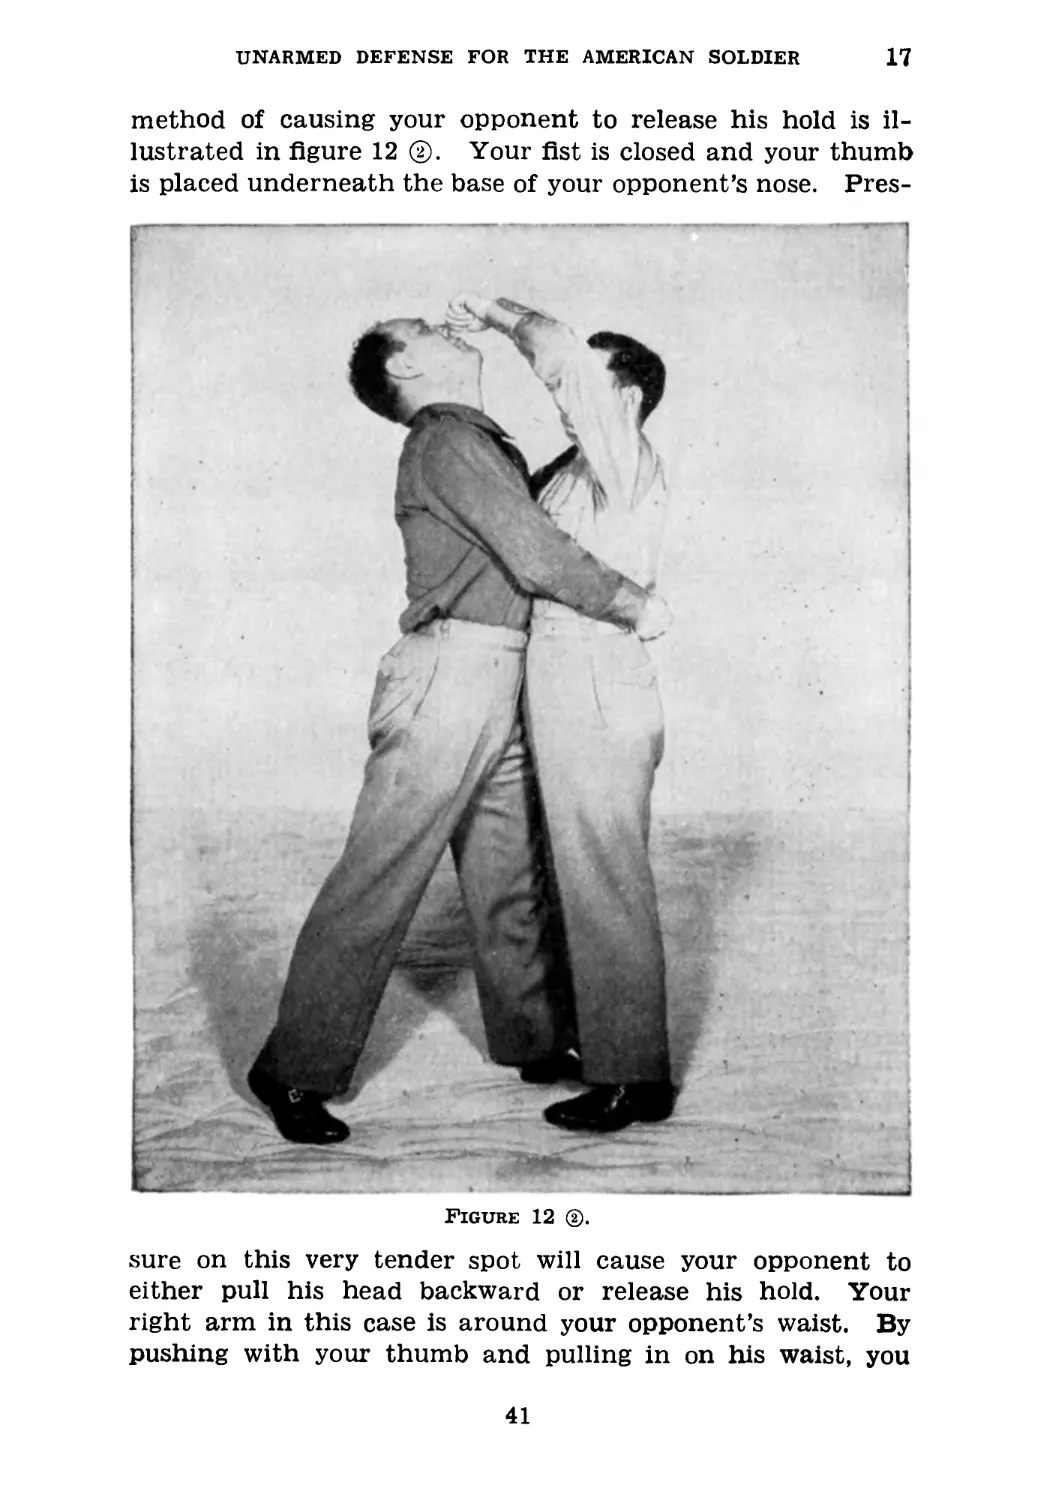
method of causing your opponent to release his hold is il-
lustrated in figure 12 Your fist is closed and your thumb
is placed underneath the base of your opponent’s nose. Pres-
Figure 12 ®.
sure on this very tender spot will cause your opponent to
either pull his head backward or release his hold. Your
right arm in this case is around your opponent’s waist. By
pushing with your thumb and pulling in on his waist, you
41
17
BASIC FIELD MANUAL
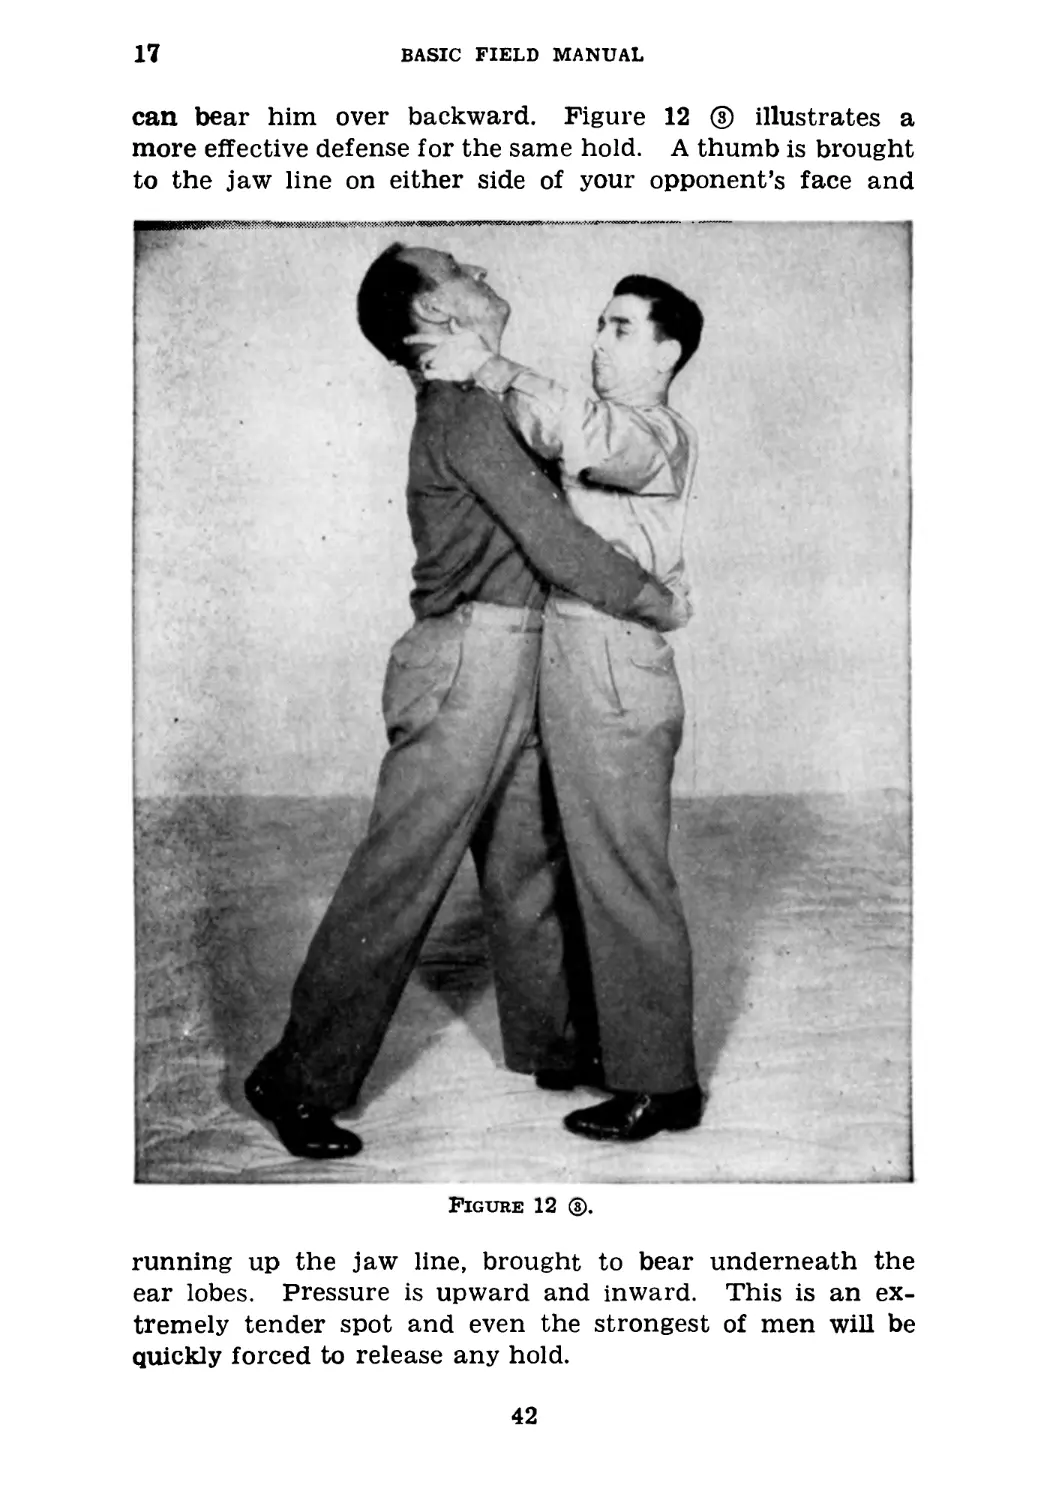
can bear him over backward. Figure 12 ® illustrates a
more effective defense for the same hold. A thumb is brought
to the jaw line on either side of your opponent’s face and
Figure 12 ®.
running up the jaw line, brought to bear underneath the
ear lobes. Pressure is upward and inward. This is an ex-
tremely tender spot and even the strongest of men will be
quickly forced to release any hold.
42
UNARMED DEFENSE FOR THE AMERICAN SOLDIER
18
18. Escape From Front Overarm Body Hold.—Figure 13 ®
illustrates that your oponent has grasped you around the
body, including both your arms, so that you cannot use the
Figure 13 ®.
escapes explained by figure 12 @ and ®. Your first reaction
is to bring your thumbs strongly into your opponent’s groin,
forcing his hips backward as illustrated in figure 13 ®.
This leaves a space between your hips and his. Now pivot
43
18
BASIC FIELD MANUAL
your hips on your left foot without moving it from the origi-
nal spot, placing your right foot on the outside of your
opponent’s right foot, with the toe pointing in the same
Figure 13 ®.
direction as his. Your right arm slips up under his left arm-
pit and grasps him anywhere in back. Your left hand grasps
his upper arm, pulling strongly as illustrated in figure 13 ®.
You now strike him strongly in the middle with your hips,
44
UNARMED DEFENSE FOR THE AMERICAN SOLDIER 18-19
at the same time twisting to the left, lifting with your right
arm and pulling with your left hand. This will propel your
opponent over your hips and to the ground with very little
effort.
Figure 13
19. Escape From Chin Shove.—A dangerous individual and
possibly a powerful one is the one who attempts the attack
463187°—42---4
45
19
BASIC FIELD MANUAL
illustrated in figure 14 ®. He grasps you firmly around the
waist with his left hand and pushes strongly under your
chin with his right hand, attempting to break your neck.
Figure 13 @.
Your initial actions must be simultaneous. Push his right
wrist upward with your left hand at the same time that you
pull your head backward, pushing his hand and arm up
46
UNARMED DEFENSE FOR THE AMERICAN SOLDIER
19
in the manner illustrated in figure 14 ®. Now pivot on your
left foot to the left, keeping your left foot in place, placing
your right foot on the outside of your opponent’s right foot
Figure 14 ф.
and pointing in the same direction. At the same time, you
slip your right arm over his left shoulder and grasp his right
shoulder blade as illustrated in figure 14 ®. You are now
in position to throw him over your hips, as shown in figure
13 ®.
47
20
BASIC FIELD MANUAL
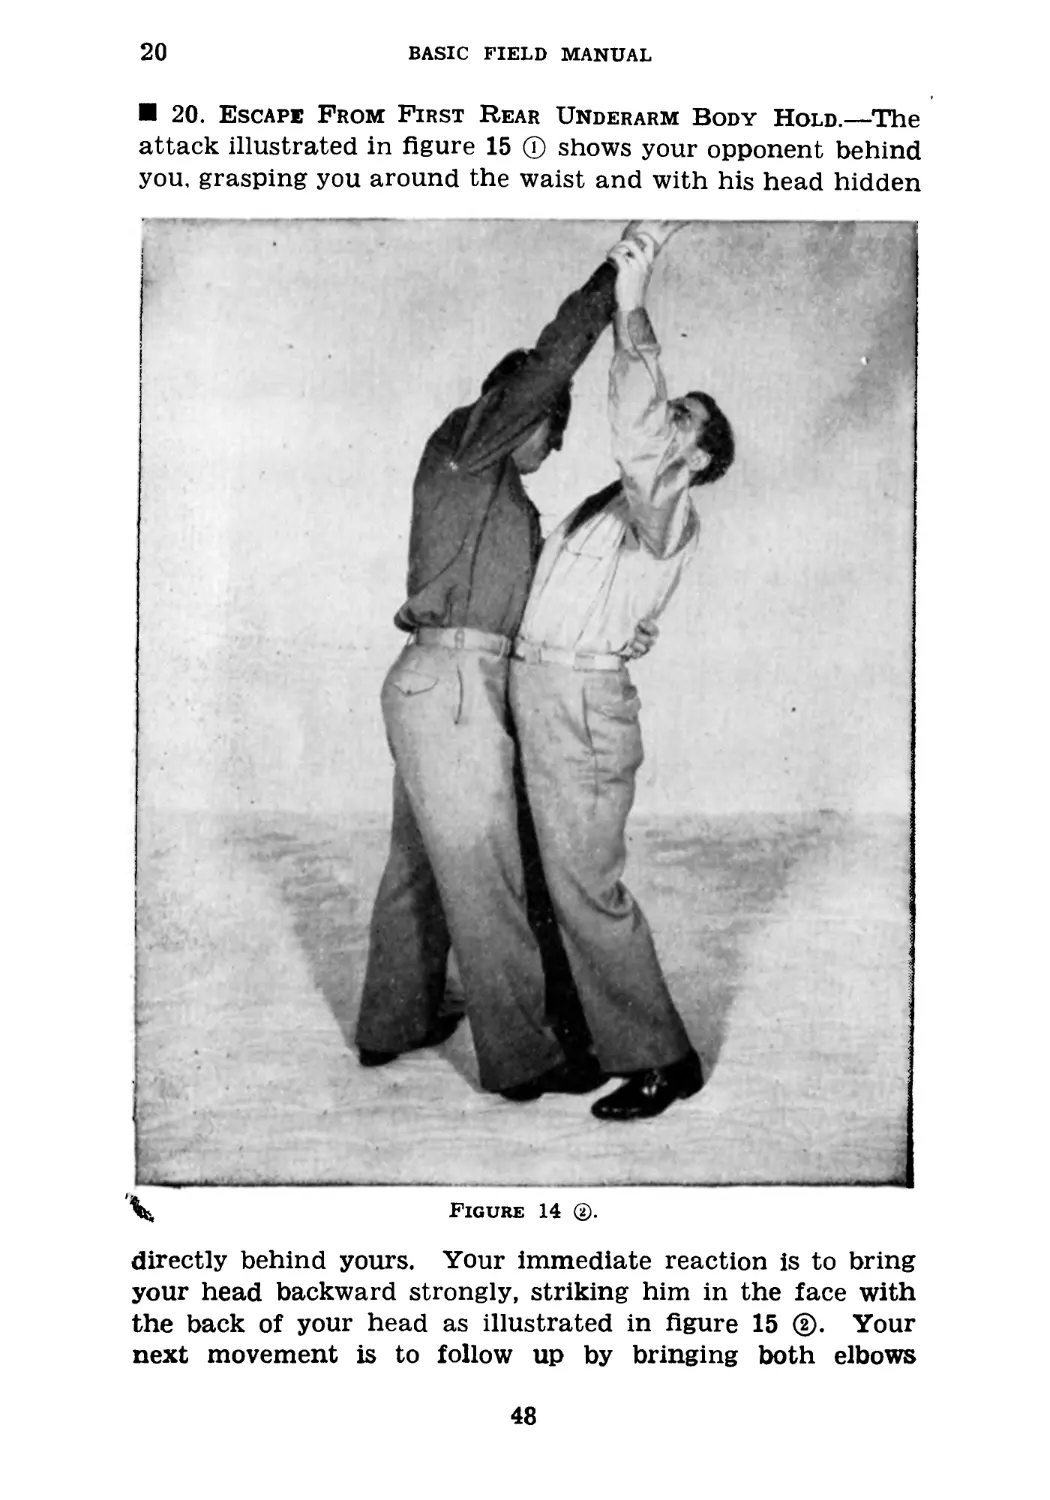
20. Escape From First Rear Underarm Body Hold.—The
attack illustrated in figure 15 ® shows your opponent behind
you, grasping you around the waist and with his head hidden
directly behind yours. Your immediate reaction is to bring
your head backward strongly, striking him in the face with
the back of your head as illustrated in figure 15 ®. Your
next movement is to follow up by bringing both elbows
48
UNARMED DEFENSE FOR THE AMERICAN SOLDIER 20-21
shoulder high and pivoting swiftly from left to right and
from right to left as illustrated in figure 15 ®. It is impos-
sible for you to miss striking him somewhere in the head
F
Figure 14 ®.
by means of this movement. On being struck in this manner,
the results are usually devastating to your attacker.
21. Escape From Second- Rear Underarm Body Hold.—Op-
ponent grasps you as illustrated in figure 16 ф. Reach down
49
21
BASIC FIELD MANUAL
with your left hand, placing it just above your opponent’s
left knee. Most of your weight will be borne on your left
arm and his left leg as illustrated in figure 16 ®. By rest-
Figure 15 (T).
ing your weight in this manner, you then have a firm basis
on which to pivot when you lift both feet from the ground
and throw your left leg behind your opponent’s right one.
50
UNARMED DEFENSE FOR THE AMERICAN SOLDIER
21
As soon as your feet are firmly planted on the ground, you
bring your left hand under your opponent’s left knee joint
and your right hand under your opponent’s right knee joint,
Figure 15
figure 16 ®. By lifting and leaning backward, you can now*
easily overbalance your opponent over your left kn,ee (fig. 16
®).
51
22
BASIC FIELD MANUAL
22. Escape From Third Rear Underarm Body Hold.—Your
opponent uses the same grasp around the waist, under the
arms from the rear, but this time braces himself by placing
Figure 15 ®.
one leg between yours and getting his head out of reach of
your arms by placing it behind your shoulder blade (fig.
17 ф). Your immediate action is to bend swiftly from the
waist, arms extended, and grasp your opponent’s ankle (fig.
52
UNARMED DEFENSE FOR THE AMERICAN SOLDIER
23
17 @). Keeping your grasp on the ankle, you now straighten
your body. This brings pressure to bear on your opponent’s
knee, causing him to release his hold and drop on his back
Figure 16
(fig. 17 ®). If your opponent should retain his hold, you
merely fall backward on top of him, sitting on his midsection
with great force.
53
23
BASIC FIELD MANUAL
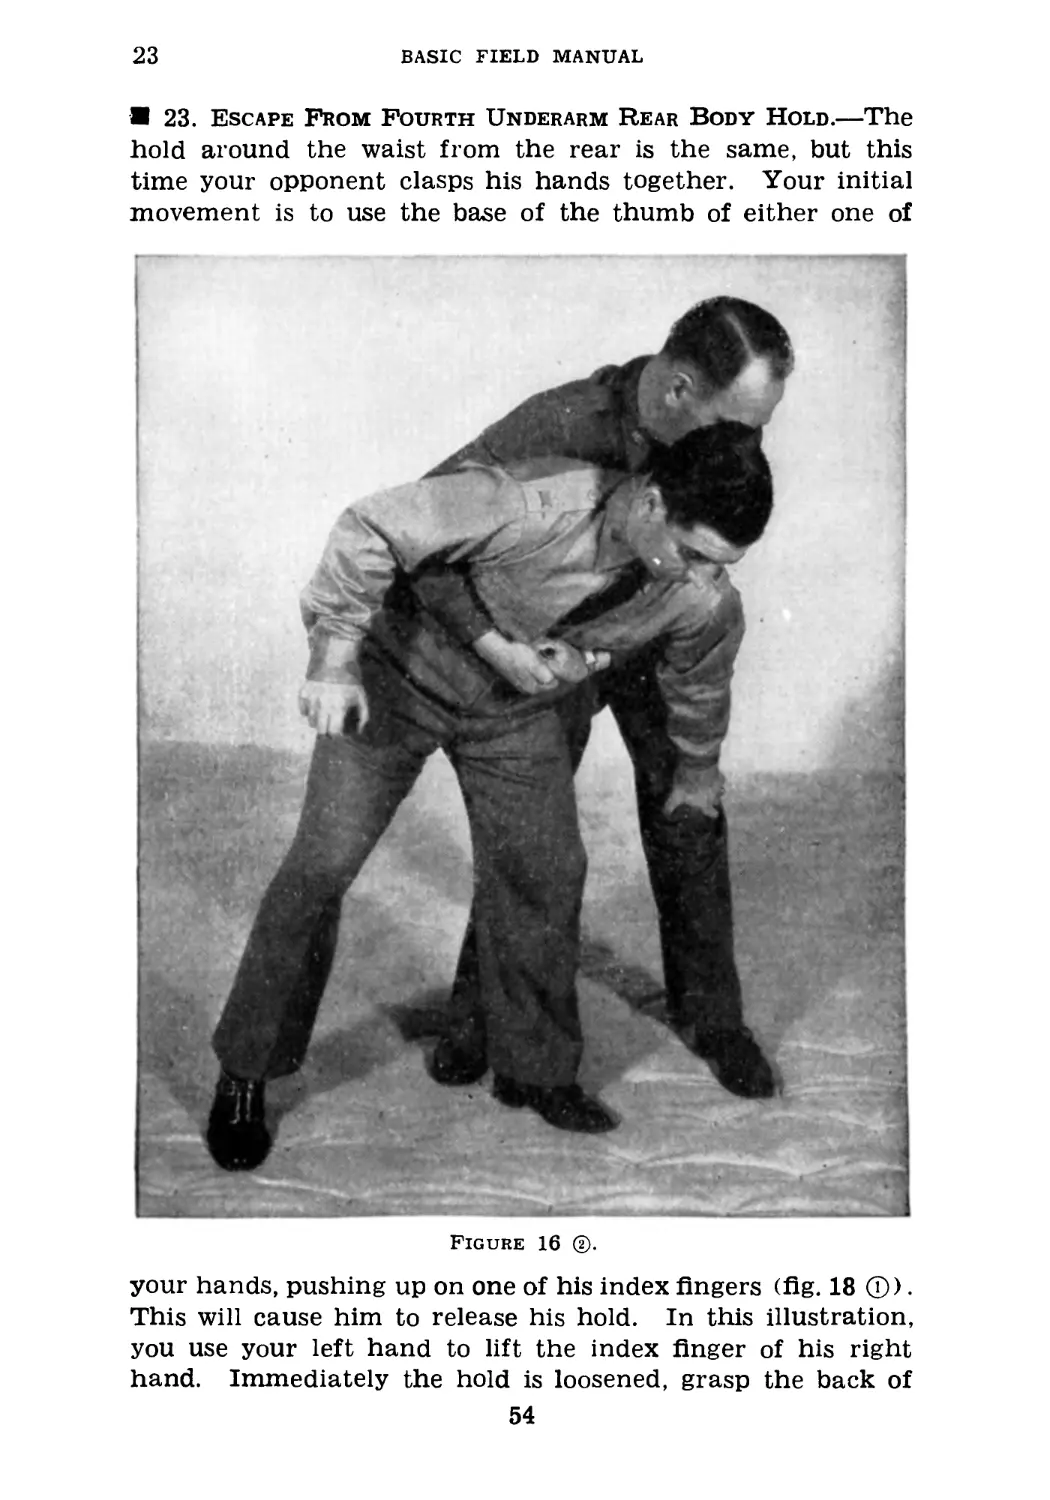
23. Escape From Fourth Underarm Rear Body Hold.—The
hold around the waist from the rear is the same, but this
time your opponent clasps his hands together. Your initial
movement is to use the base of the thumb of either one of
Figure 16 ®.
your hands, pushing up on one of his index fingers (fig. 18 ©).
This will cause him to release his hold. In this illustration,
you use your left hand to lift the index finger of his right
hand. Immediately the hold is loosened, grasp the back of
54
UNARMED DEFENSE FOR THE AMERICAN SOLDIER
22
your opponent’s right hand with your right thumb, the
fingers of your right hand clasping the palm of his hand
around the little finger edge (fig. 18 ®). By bringing your
Figure 16 ®.
elbows close to your midsection and turning to the right, you
will cause your opponent to turn his back to you due to the
pressure brought on his wrist. During this turn, you will
reinforce your original grasp with your right hand with an
55
23-24
BASIC FIELD MANUAL
identical grasp with your left (fig. 7®). Terminating in the
position illustrated in figure 18 ®, your elbows are close to
your body and you maintain control of your opponent by
Figure 16 ®.
pressure of your thumbs against the back of his hand. In
this position, you can march your opponent anywhere you
please.
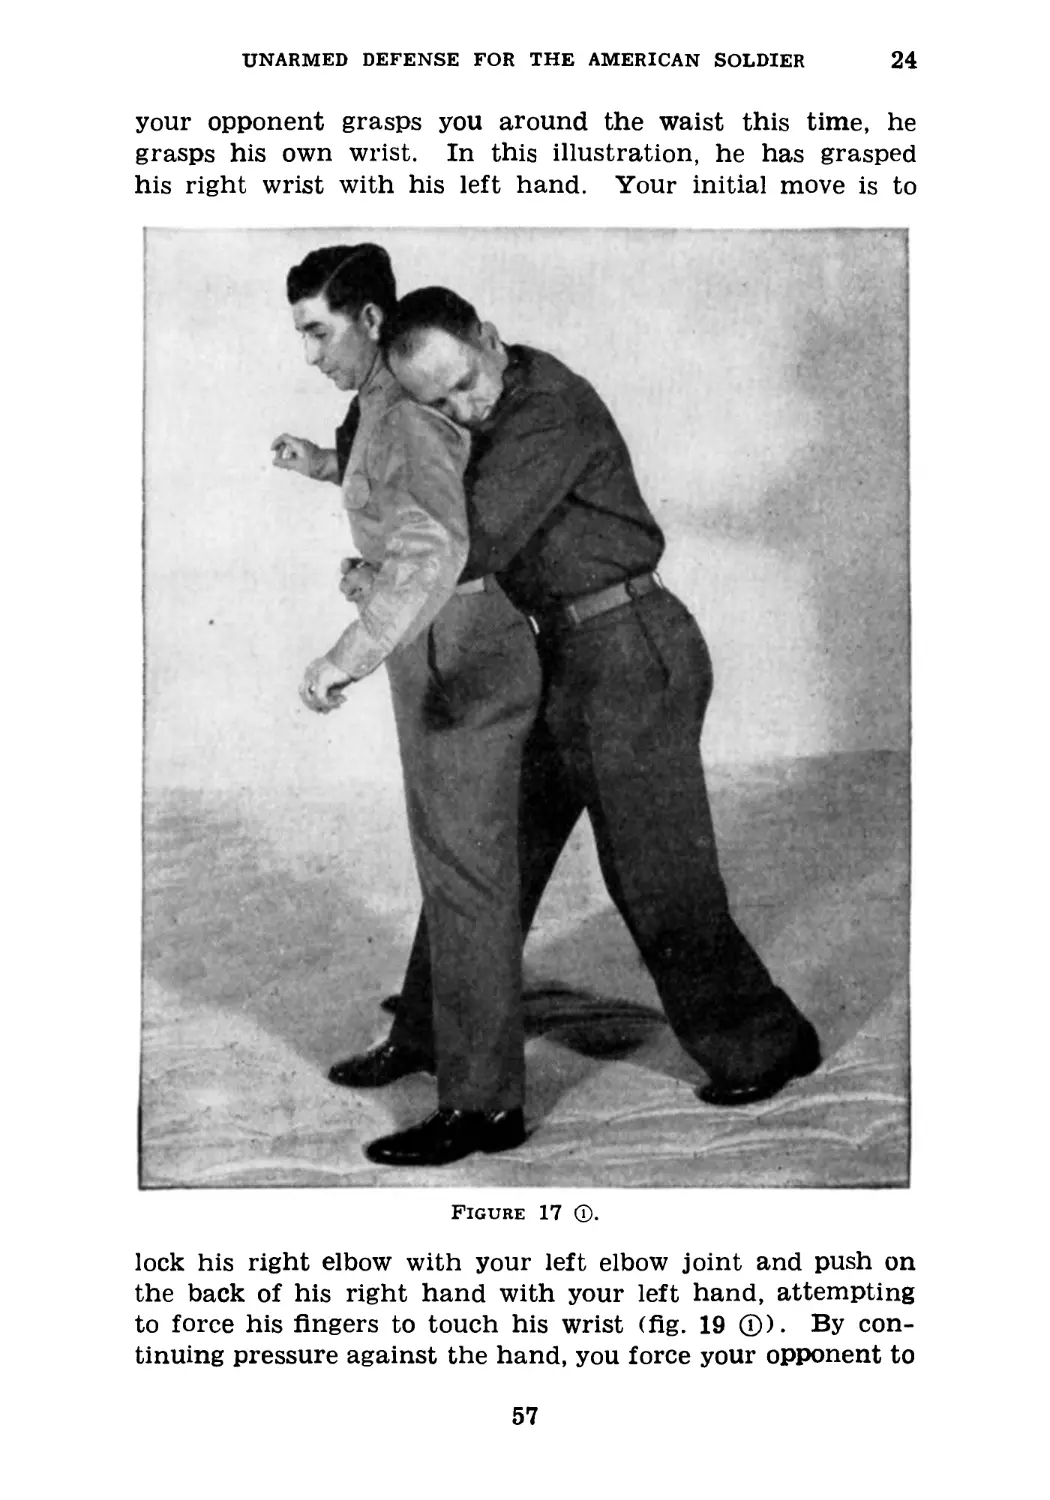
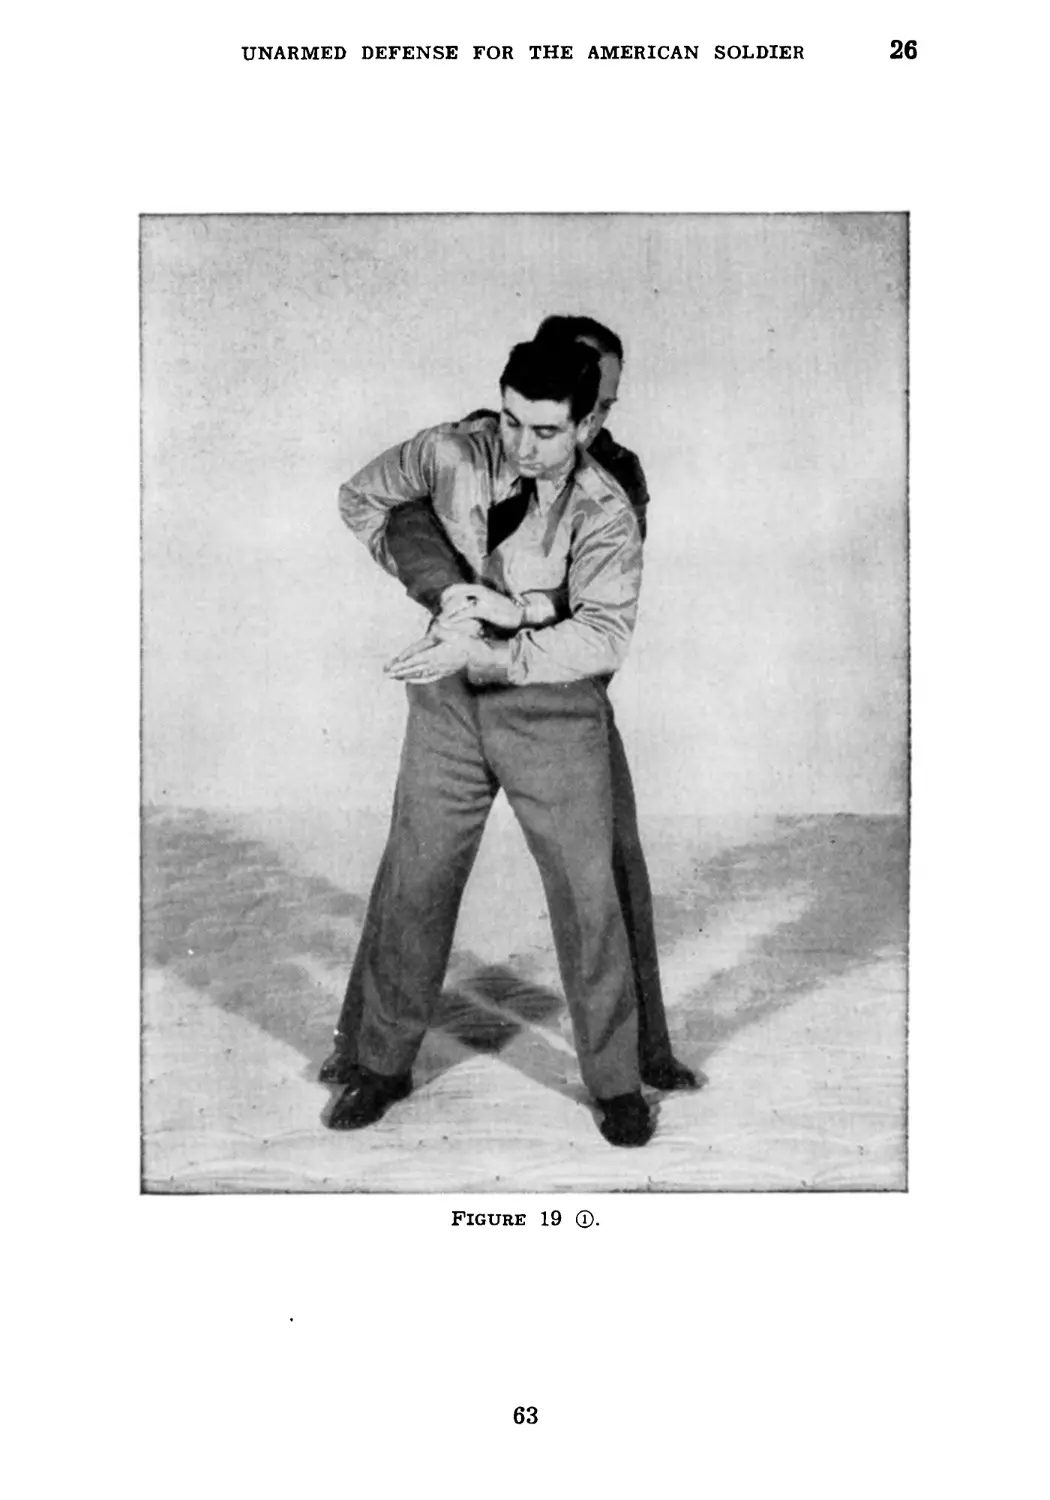
24. Escape From Fifth Underarm Rear Body Hold.—When
56
UNARMED DEFENSE FOR THE AMERICAN SOLDIER
24
your opponent grasps you around the waist this time, he
grasps his own wrist. In this illustration, he has grasped
his right wrist with his left hand. Your initial move is to
Figure 17 ф.
lock his right elbow with your left elbow joint and push on
the back of his right hand with your left hand, attempting
to force his fingers to touch his wrist (fig. 19 ф). By con-
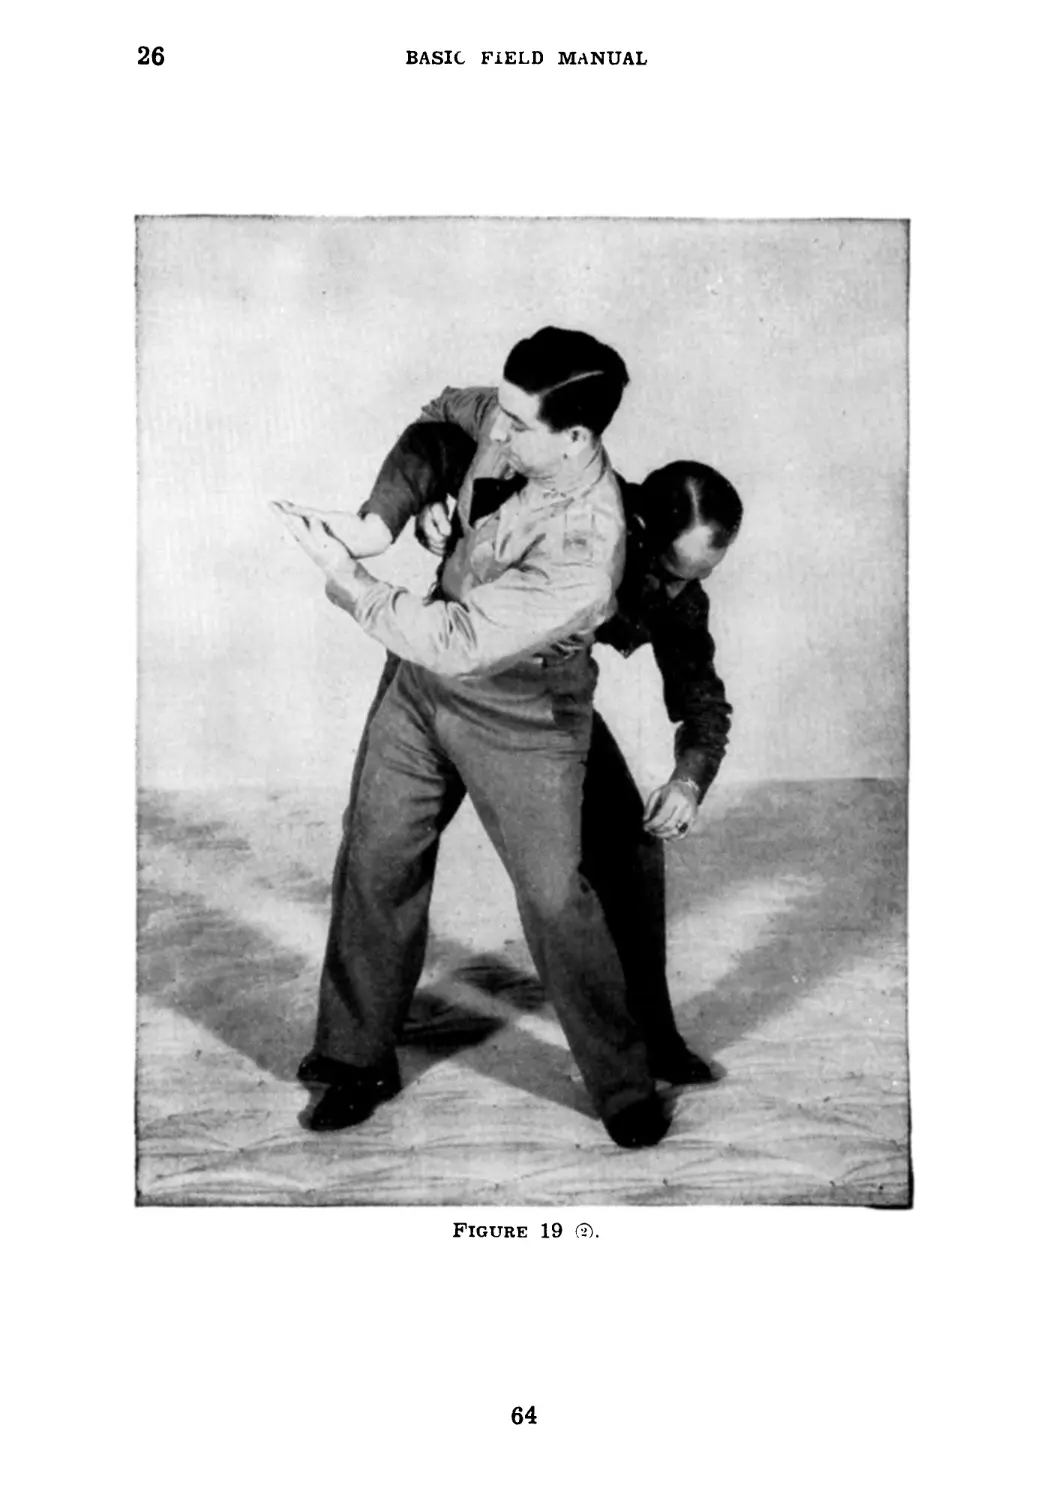
tinuing pressure against the hand, you force your opponent to
57
24-25
BASIC FIELD MANUAL
release his hold and by turning your body, you can take him
into several of the come-alongs which will be explained
later (fig. 19 ®). Extreme pressure can cause the dislocation
of the wrist, or even a broken wrist.
Figure 17 ®.
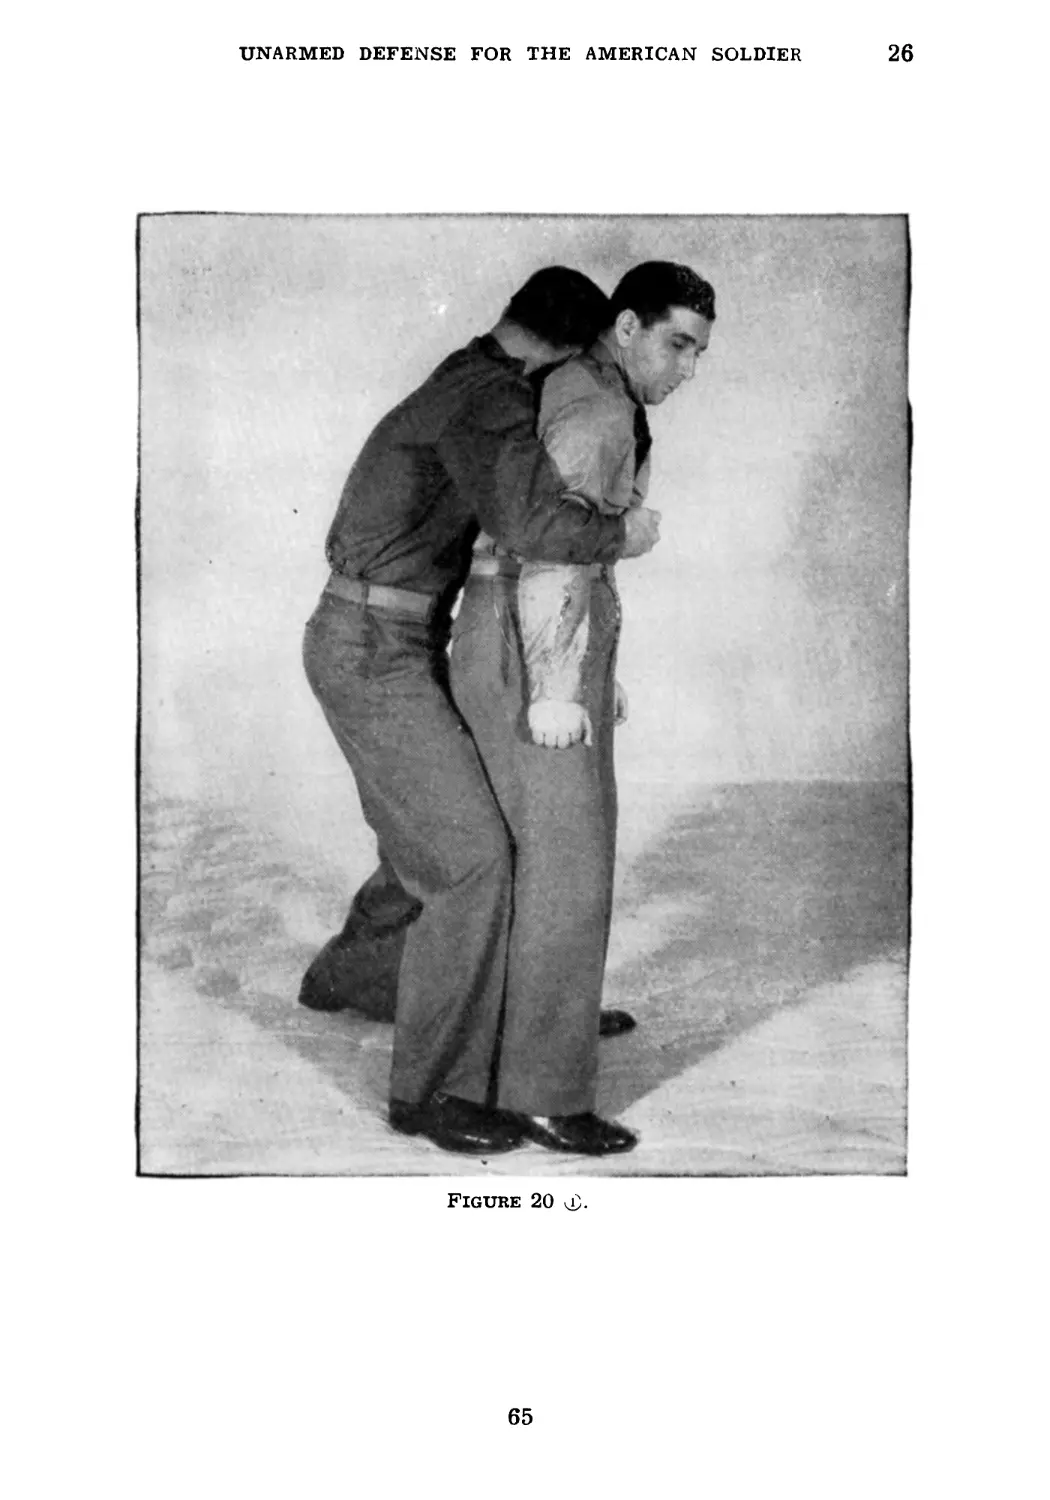
25. Escape From First Overarm Rear Body Hold.—Your
opponent grasps you from the rear and over the arms tightly
(fig. 20 ф). Your initial movement is to cause him to loosen
58
UNARMED DEFENSE FOR THE AMERICAN SOLDIER
25
his hold even momentarily by either stepping on his instep
or kicking him in the shin with your heel. The moment you
feel the hold loosen, lower your body by bending your knees,
Figure 17
and, at the same time, raise your elbows to shoulder height
(fig. 20 ®). From this position swing your elbows backward
alternately; swing with the power of the shoulders and mid-
59
25-26
BASIC FIELD MANUAL
section, your elbows striking your opponent in either the short
ribs or the solar plexus (fig. 20 ®). The first blow is usually
a knock-out but very seldom can your opponent release his
hold entirely before being struck two or three times.
Figure 18 ф.
26. Escape From Second Overarm Rear Body Hold.—The
original attack by your opponent is again over the arms from
60
UNARMED DEFENSE FOR THE AMERICAN SOLDIER
26
the rear. Your initial movement is the same, loosening the
grip by means of stepping on the instep or kicking the shins
and raising the elbows shoulder high, lowering the body
Figure 18 ®.
simultaneously by bending the knees (fig. 20®). Then reach
up with your right hand, grasping your opponent’s right upper
arm just above the elbow, your left hand grasping his right
463187 42----5
61
26
BASIC FIELD MANUAL
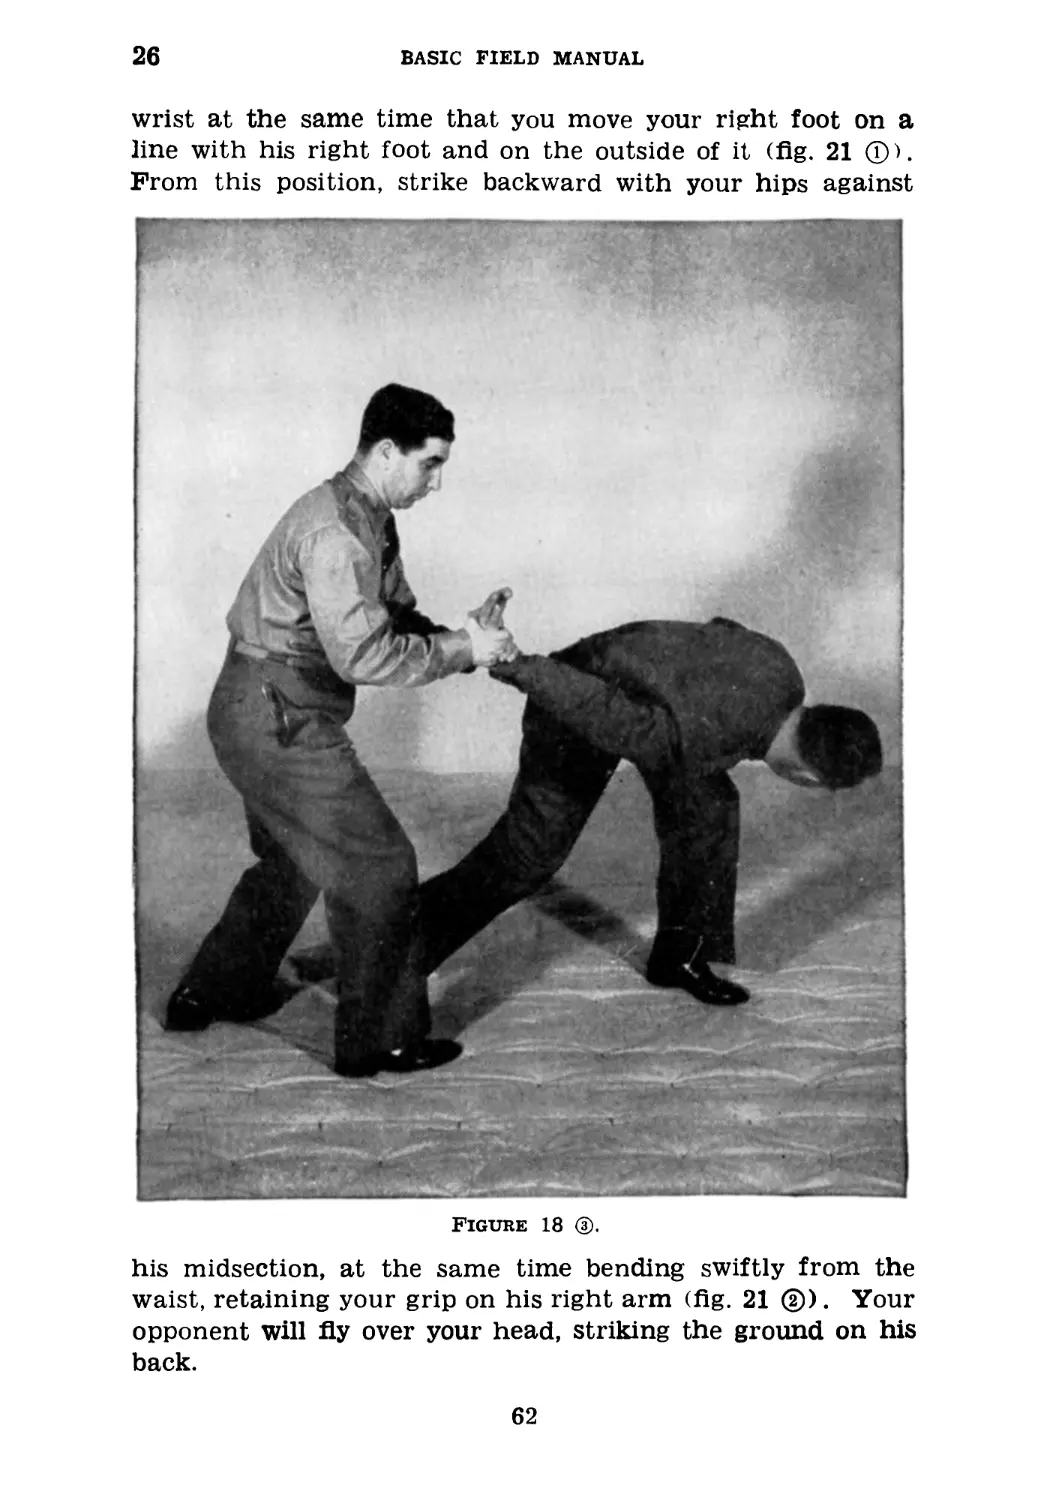
wrist at the same time that you move your right foot on a
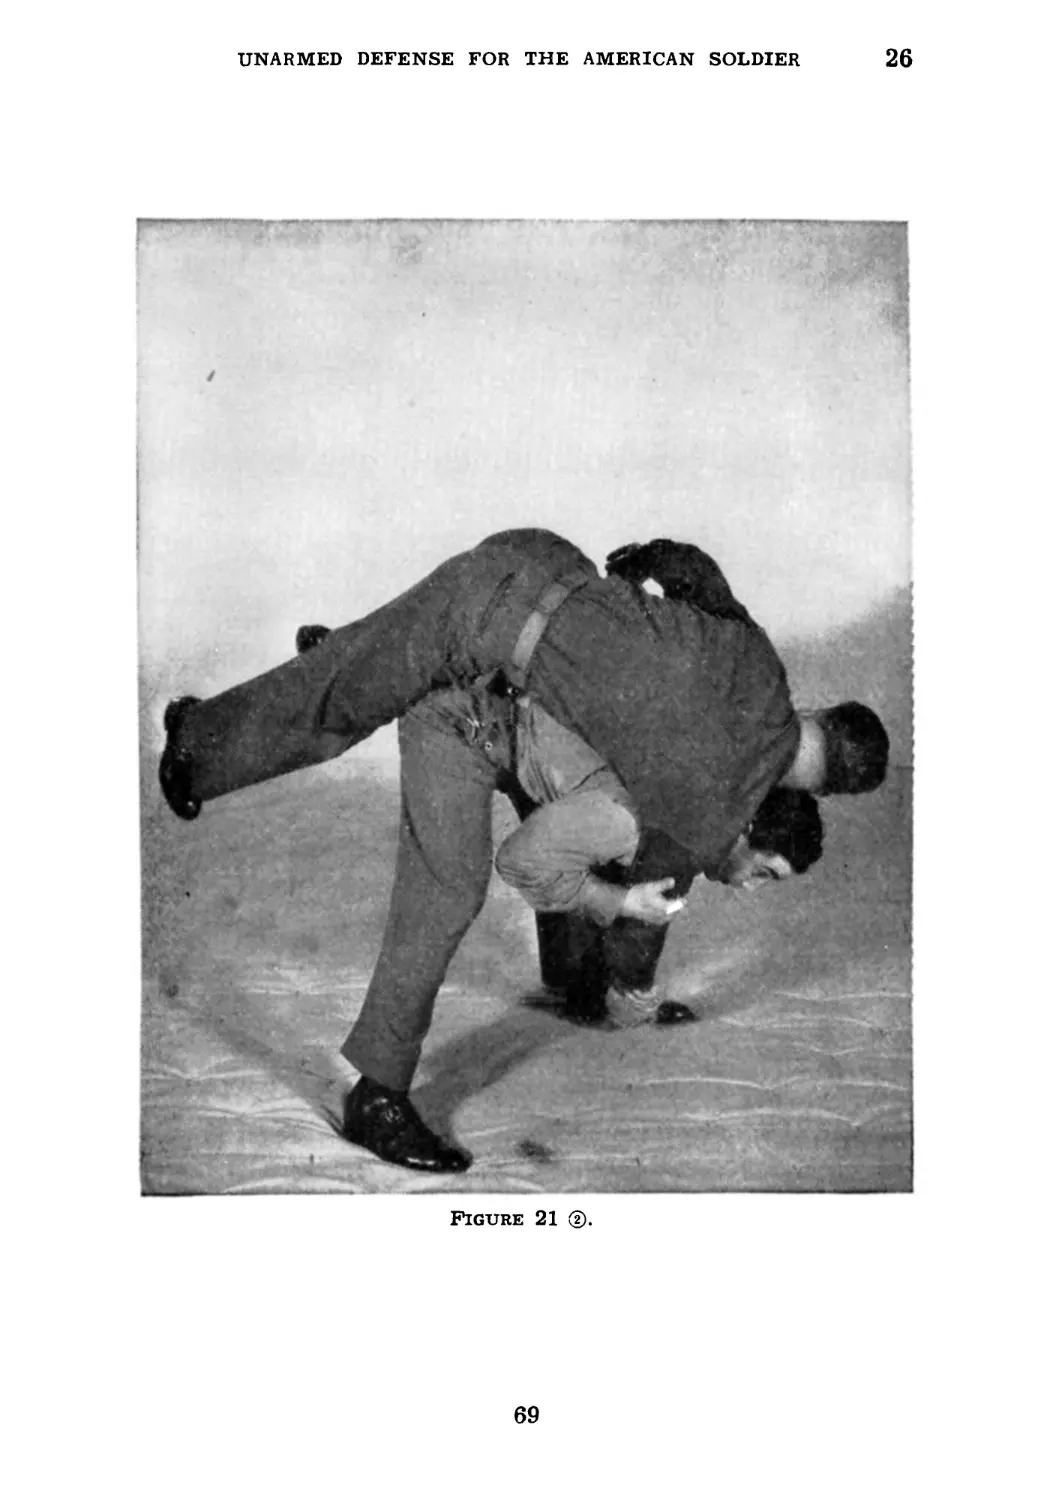
line with his right foot and on the outside of it (fig. 21 ®).
From this position, strike backward with your hips against
Figure 18 ®.
his midsection, at the same time bending swiftly from the
waist, retaining your grip on his right arm (fig. 21 ®). Your
opponent will fly over your head, striking the ground on his
back.
62
UNARMED DEFENSE FOR THE AMERICAN SOLDIER
26
Figure 19 ф.
63
26
BASIC FIELD MANUAL
Figure 19 (2).
64
UNARMED DEFENSE FOR THE AMERICAN SOLDIER
26
Figure 20
65
26
BASIC FIELD MANUAL
Figure 20 ®.
66
UNARMED DEFENSE FOR THE AMERICAN SOLDIER
26
Figure 20 ®.
67
26
BASIC FIELD MANUAL
Figure 21 ф.
68
UNARMED DEFENSE FOR THE AMERICAN SOLDIER
26
Figure 21 (5).
69
27 BASIC FIELD MANUAL
\
Section V
DEFENSES AGAINST CHOKE HOLDS
27. First Defense Against Two-hand Front Choke.—Your
Figure 22 ф.
opponent grasps you around the throat from the front with
both hands (fig. 22 Q). Reach up with your right hand,
70
UNARMED DEFENSE FOR THE AMERICAN SOLDIER
27
grasping the base of his thumb with your four fingers and
the back of his hand with your right thumb, at the same time
as you bend slightly to the right (fig. 22 ®). This movement
Figure 22 ®.
will loosen his grip on your throat and make it a simple matter
for you to remove his right hand. Immediately reinforce the
right-hand grip with a similar grip with your left hand,
71
27
BASIC FIELD MANUAL
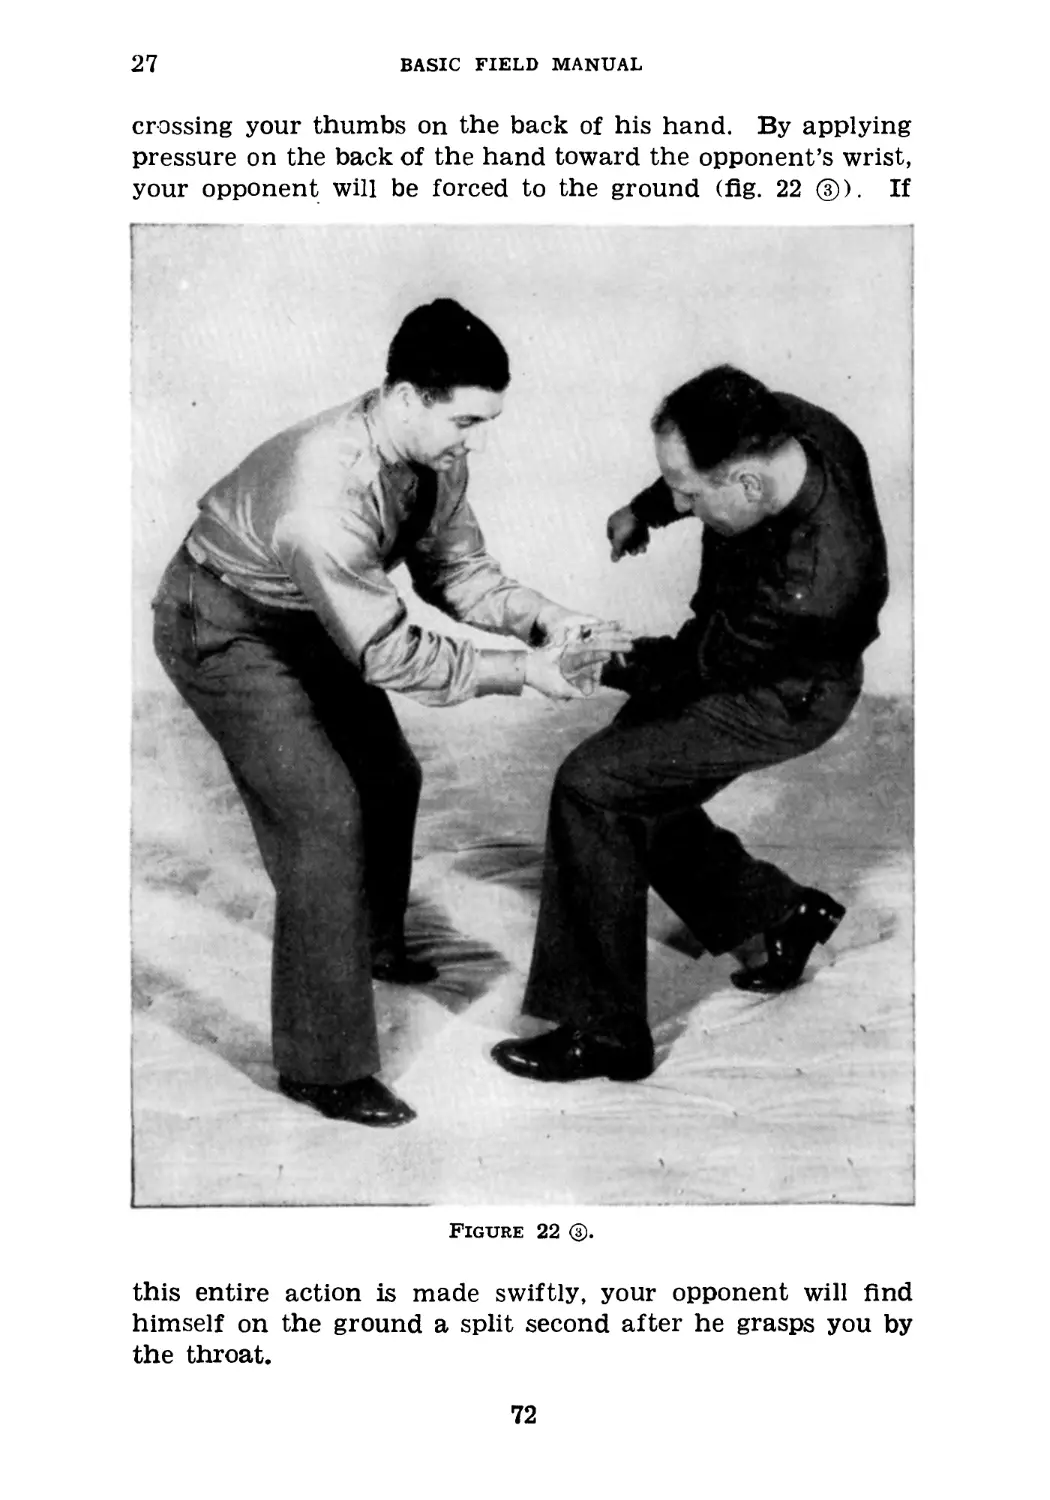
crossing your thumbs on the back of his hand. By applying
pressure on the back of the hand toward the opponent’s wrist,
your opponent will be forced to the ground (fig. 22 @). If
Figure 22 (5).
this entire action is made swiftly, your opponent will find
himself on the ground a split second after he grasps you by
the throat.
72
UNARMED DEFENSE FOR THE AMERICAN SOLDIER
28
28. Second Defense Against Two-hand Front Choke.—
Your opponent again grasps you around the throat from the
front with both hands. This time, instead of throwing him,
Figure 23 (T).
you wish to take him a prisoner. Your initial action is to
reach under his left arm with your right forearm, placing
your hand on top of his right hand. Your fingers grasp the
73
28
BASIC FIELD MANUAL
palm of his right hand around
thumb is on the back (fig. 23
pulling your opponent’s right
the little finger edge, and your
©). Now turn to your right,
hand away from your throat
Figure 23 ®.
and turning his hand in the same direction as you are turning
your body. This will cause him to turn his back to you.
Now reinforce your original grip on his right hand with a
74
UNARMED DEFENSE FOR THE AMERICAN SOLDIER 28-29
similar grip with your left hand. Your defense will terminate
as illustrated in figure 23 ®. In this position, he is your
Figure 24 Q.
prisoner and can be moved where you will by applying pres-
sure toward his wrist.
29. Third Defense Against Two-hand Front Choke.—
Your opponent again grasps you arotmd the throat from the
75
29
BASIC FIELD MANUAL
front with two hands. Your defense this time will be such as
to bring your opponent into a position where you can march
him at a great distance without losing control. Your right
Figure 24 Q.
arm this time goes over his left arm and under his right one,
the back of your hand resting underneath his right wrist.
Your right hand forms a cup into which your fist will rest
76
UNARMED DEFENSE FOR THE AMERICAN SOLDIER
29
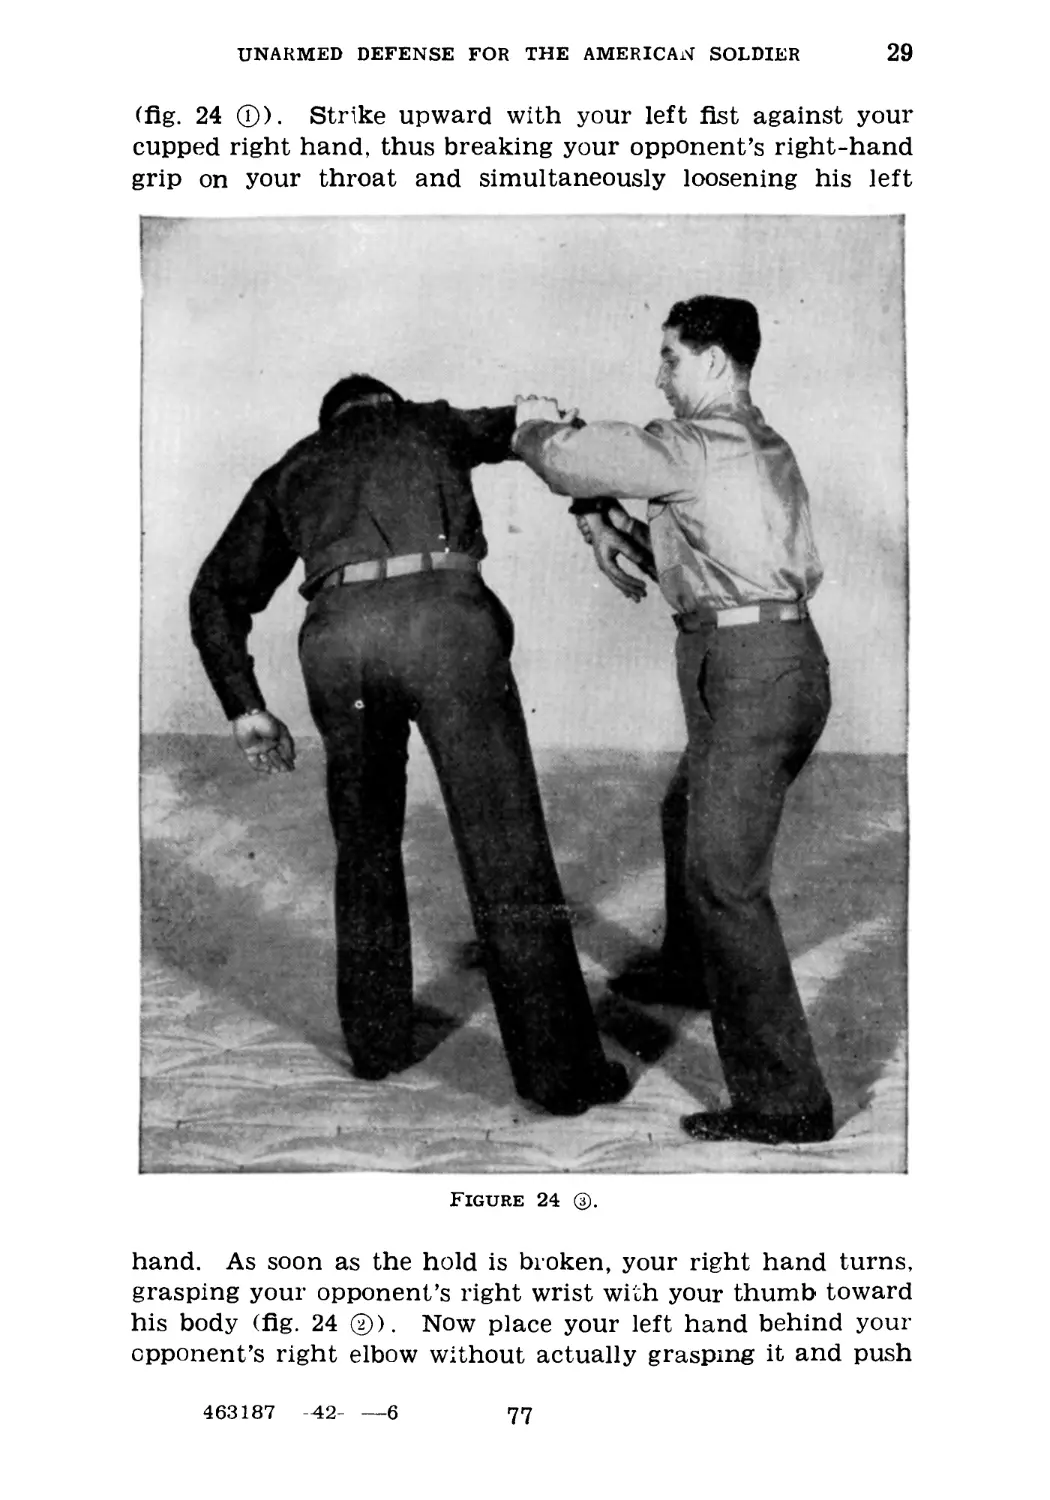
(fig. 24 ®). Strike upward with your left fist against your
cupped right hand, thus breaking your opponent’s right-hand
grip on your throat and simultaneously loosening his left
Figure 24 ®.
hand. As soon as the hold is broken, your right hand turns,
grasping your opponent’s right wrist with your thumb toward
his body (fig. 24 ®). Now place your left hand behind your
opponent’s right elbow without actually grasping it and push
463187 --42- —6
77
29
BASIC FIELD MANUAL
with your left arm and pull with your right hand, causing
your opponent to pivot, at the same time bending his right
arm (fig. 24 ®). You now have sufficient control of his right
Figure 24 ©.
wrist to bend his arm at the elbow, bringing his right hand
into the crook of your left elbow and slipping your left hand
up his arm to a point near the shoulder which you can then
78
UNARMED DEFENSE FOR THE AMERICAN SOLDIER
29
grasp, terminating in the position illustrated in figure 24 ®.
You can now apply extreme pressure, when necessary, forcing
his right hand up his back. However, this procedure is not
Figure 25 ф.
recommended except when meeting resistance. This is simply
a means of marching a man where you wish him to go, utiliz-
ing but one arm and leaving the other one free for any
necessary action.
79
30
BASIC FIELD MANUAL
30. Defense Against Two-hand Front Choke by a Tall
Man.—This will describe the proper defense when you are
being choked by a very tall man, against whom some of the
Figure 25 ®.
previous defenses might not work. Step forward with your
right foot, crossing your right arm with some force over both
your opponent’s arms, with the palm of your hand toward the
ground (fig. 25 ®). By turning your body to the right, using
80
UNARMED DEFENSE FOR THE AMERICAN SOLDIER 30-31
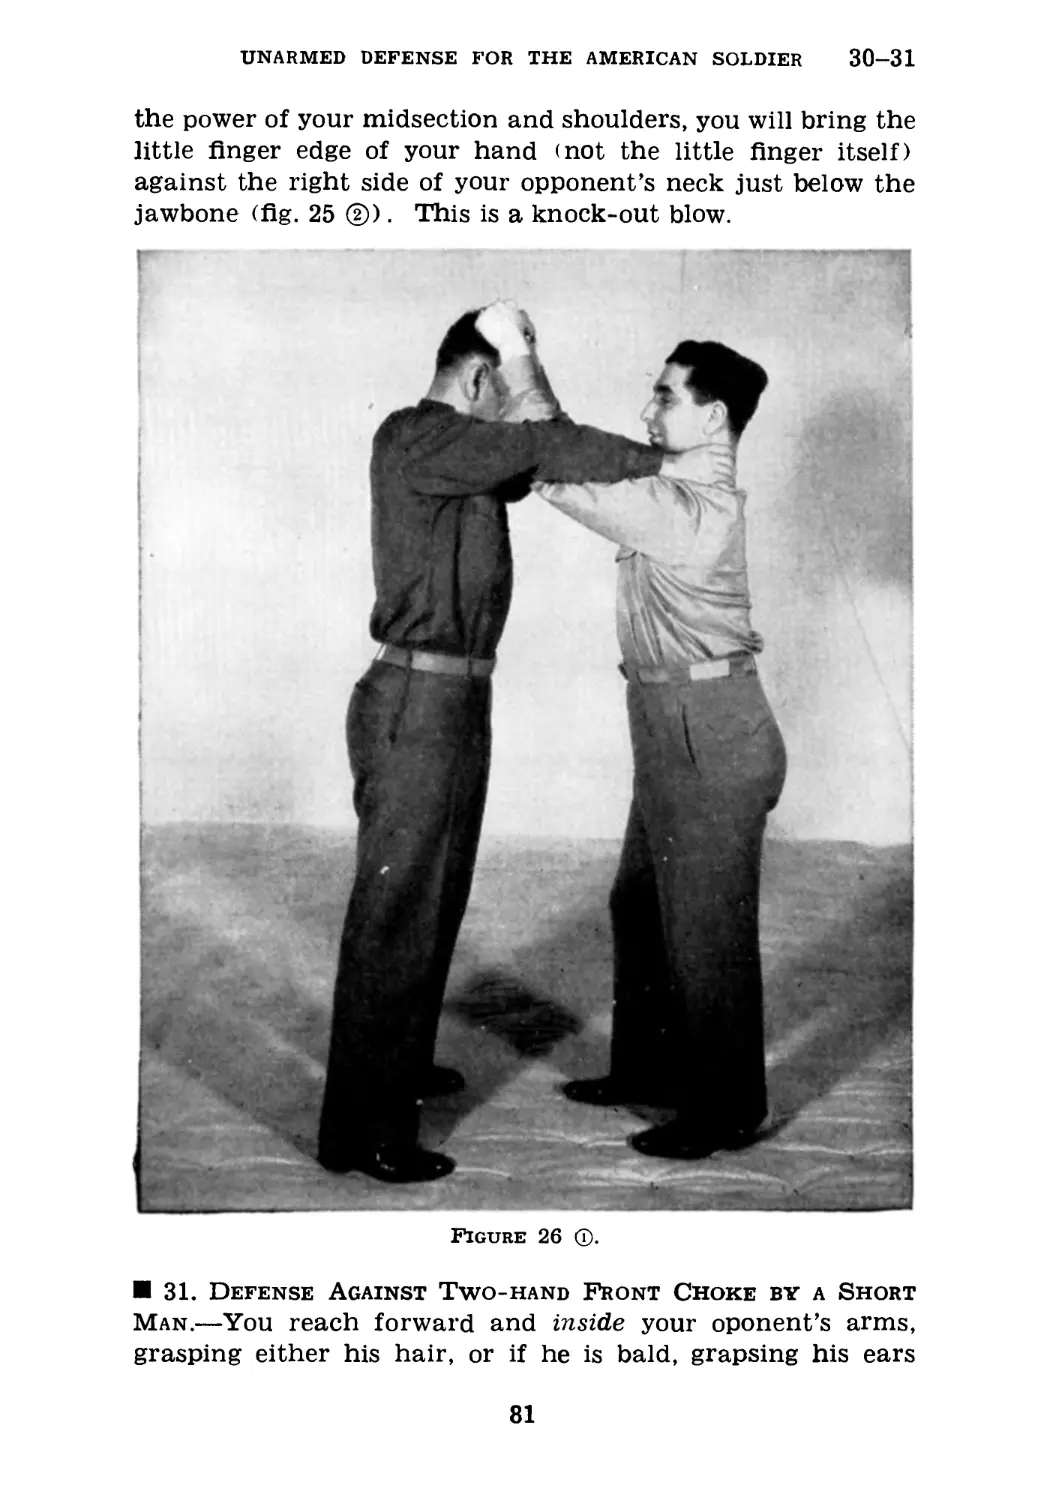
the power of your midsection and shoulders, you will bring the
little finger edge of your hand (not the little finger itself)
against the right side of your opponent’s neck just below the
jawbone (fig. 25 ®). This is a knock-out blow.
Figure 26 Q.
31. Defense Against Two-hand Front Choke by a Short
Man.—You reach forward and inside your oponent’s arms,
grasping either his hair, or if he is bald, grapsing his ears
81
31
BASIC FIELD MANUAL
(fig. 26 ©). You then pull downward on either hair or ears
at the same time raising your knee. This will bring your
opponent’s face downward with great force as your knee
Figure 26 ®.
travels upward with an equal amount of power, meeting
somewhere in between (fig. 26 ®). Since these two objects
are approaching each other, the force is multiplied. Since
your knee or thigh is definitely more capable of taking pun-
82
UNARMED DEFENSE FOR THE AMERICAN SOLDIER 31-32
ishment than your opponent’s face, the results are plainly
evident.
32. First Defense Against Two-hand Front Choke Against
the Wall.—Ordinarily, an individual who attempts to choke
Figure 27
you in this fashion extends his arms, squeezes with the
fingers, and pushes you against the wall (fig. 27 ©). Your
83
32
BASIC FIELD MANUAL
immediate action is to bring the heel of your hands, one on
either side of his elbows, applying pressure inward (toward
each other) and away from you (fig. 27 ®). The reaction
Figure 27 ®.
is such as to prevent your opponent from using the power of
his fingers, and he will find that he cannot choke you, try
as he will.
84
UNARMED DEFENSE FOR THE AMERICAN SOLDIER
33
33. Second Defense Against Two-hand Front Choke Against
the Wall.—You reach under your opponent’s right arm and
over his left one. placing your fingers on the outside of his
Figure 28 (T).
left elbow. You also place the palm of your right hand over
the same elbow if necessary, over your own fingers (fig. 28
O). By applying sharp pressure from the body on this
85
33-34
BASIC FIELD MANUAL
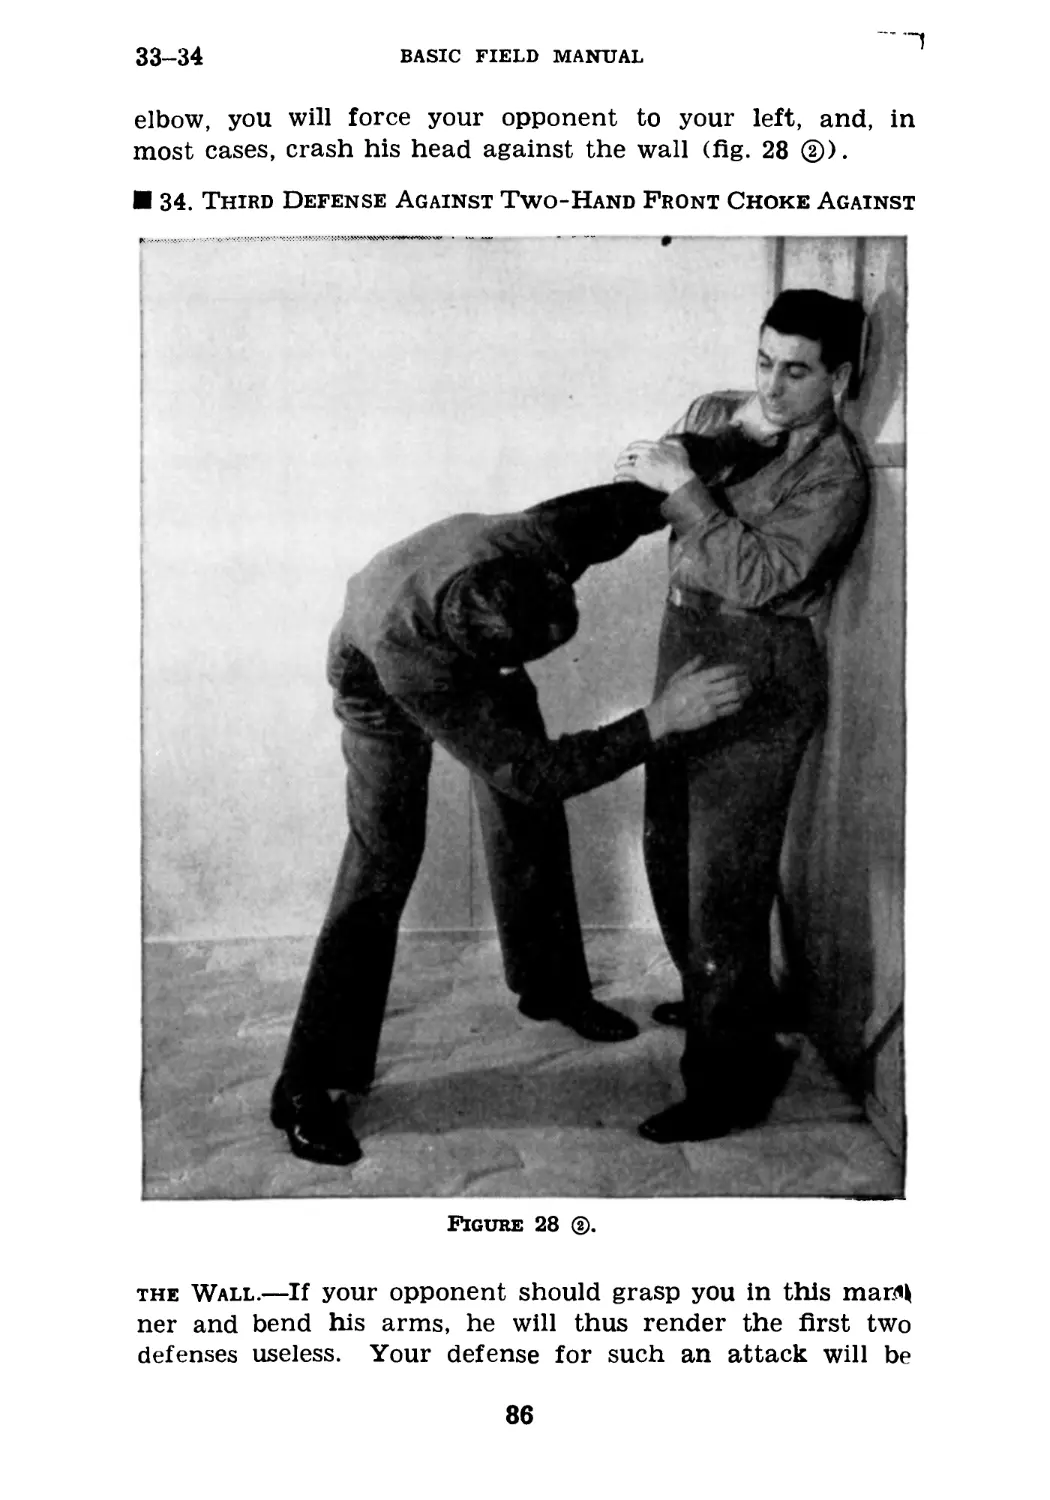
elbow, you will force your opponent to your left, and, in
most cases, crash his head against the wall (fig. 28 ®).
34. Third Defense Against Two-Hand Front Choke Against
Figure 28 ®.
the Wall.—If your opponent should grasp you in this mar.<i|
ner and bend his arms, he will thus render the first two
defenses useless. Your defense for such an attack will be
86
UNARMED DEFENSE FOR THE AMERICAN SOLDIER
34
to raise your left hand, the back of the hand toward the
ground, and strike with the power of the body and shoulders,
aiming the blow at the soft spot between the hip bone and
Figure 29.
the floating ribs. Contact is made with the little finger edge
of the hand (fig. 29). This blow can be delivered by either
hand on either side, depending on whether you are right-
handed or left-handed. It will cause your opponent to re-
87
34-35
BASIC FIELD MANUAL
lease his hold, and, in most cases, also deprive him of his
wind for a good space of time.
35. Defense Against One-Arm Strangle From Rear.—Your
Figure 30 ф.
opponent attacks as illustrated in figure 30 ®. Your initial
action is to place your chin in the crook of your opponent’s
elbow so that he cannot choke you, at the same time grasping
88
UNARMED DEFENSE FOR THE AMERICAN SOLDIER
35
the back of his arm just above the elbow with your right hand
and placing your right foot just on the outside of his right
foot (fig. 30 ®). By striking backward with your hips against
Figure 30 ®.
his midsection, retaining your hold on his upper arm with
your right hand and bending from the waist swiftly, you will
catapult your opponent over your head and to the ground
(fig. 30 @).
89
36
BASIC FIELD MANUAL
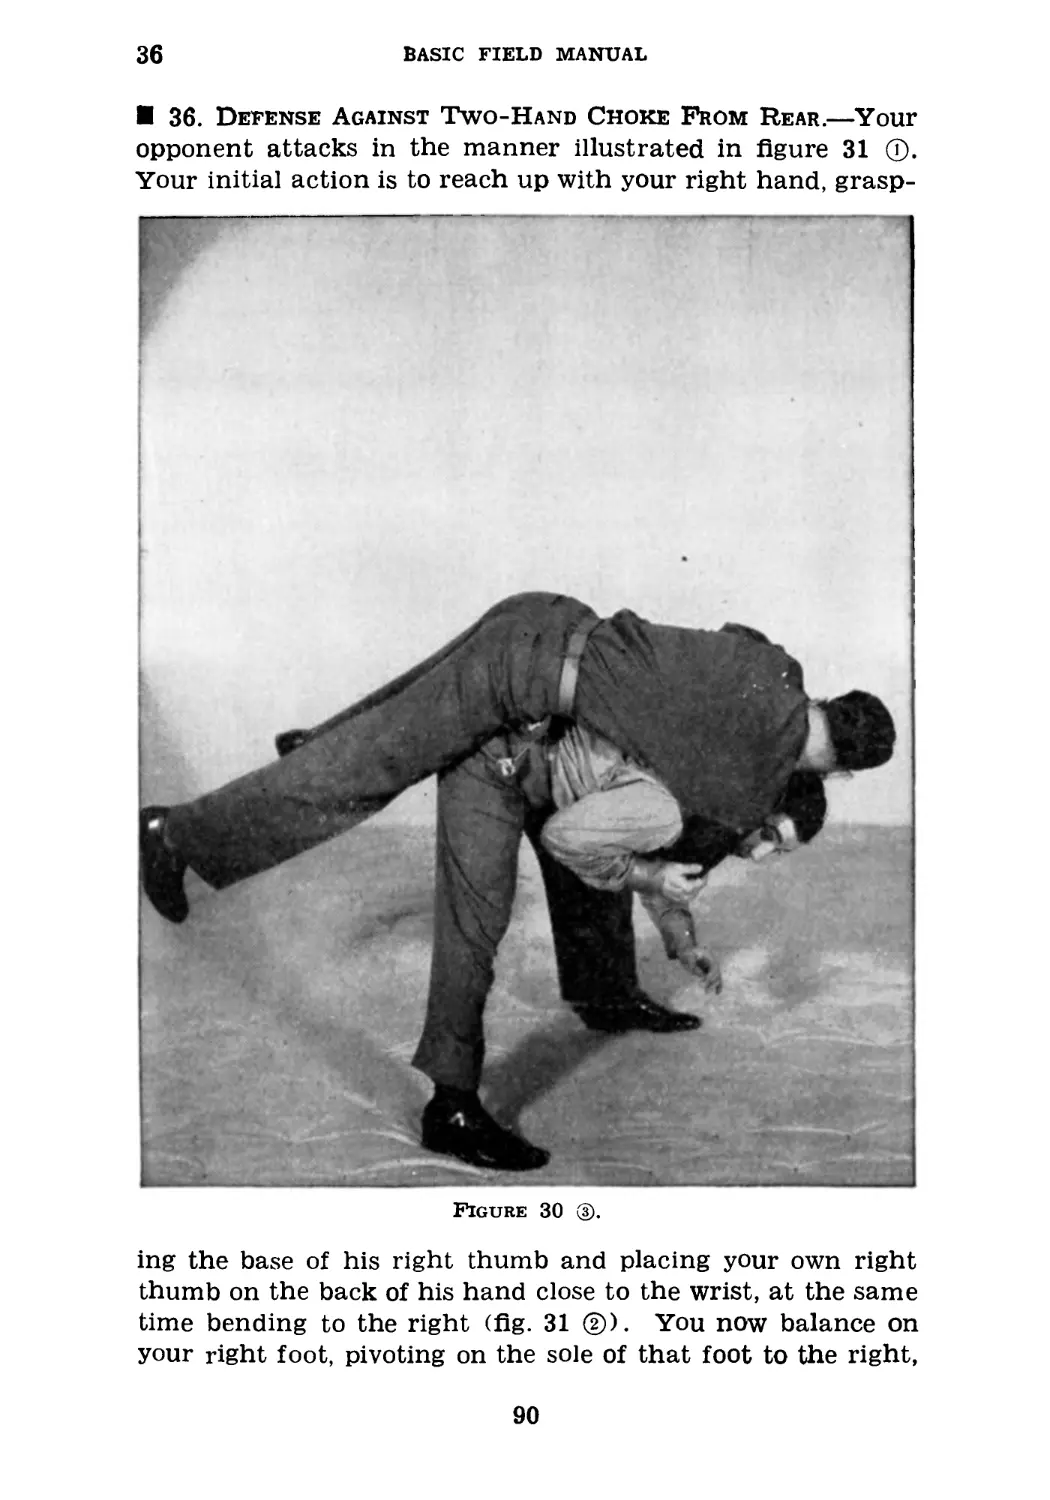
36. Defense Against Two-Hand Choke From Rear.—Your
opponent attacks in the manner illustrated in figure 31 ©.
Your initial action is to reach up with your right hand, grasp-
Figure 30 ®.
ing the base of his right thumb and placing your own right
thumb on the back of his hand close to the wrist, at the same
time bending to the right (fig. 31 ®). You now balance on
your right foot, pivoting on the sole of that foot to the right,
90
UNARMED DEFENSE FOR THE AMERICAN SOLDIER
36
Using your left leg for momentum. As soon as you have
executed half a right turn, you will reinforce your right-hand
grip on your opponent’s right hand with a grip with your
Figure 31 (T).
left hand, twisting strongly to your left (fig. 31 ®). This
will result in your opponent either executing a somersault,
usually landing on his head, or having his wrist dislocated or
broken.
91
37
BASIC FIELD MANUAL
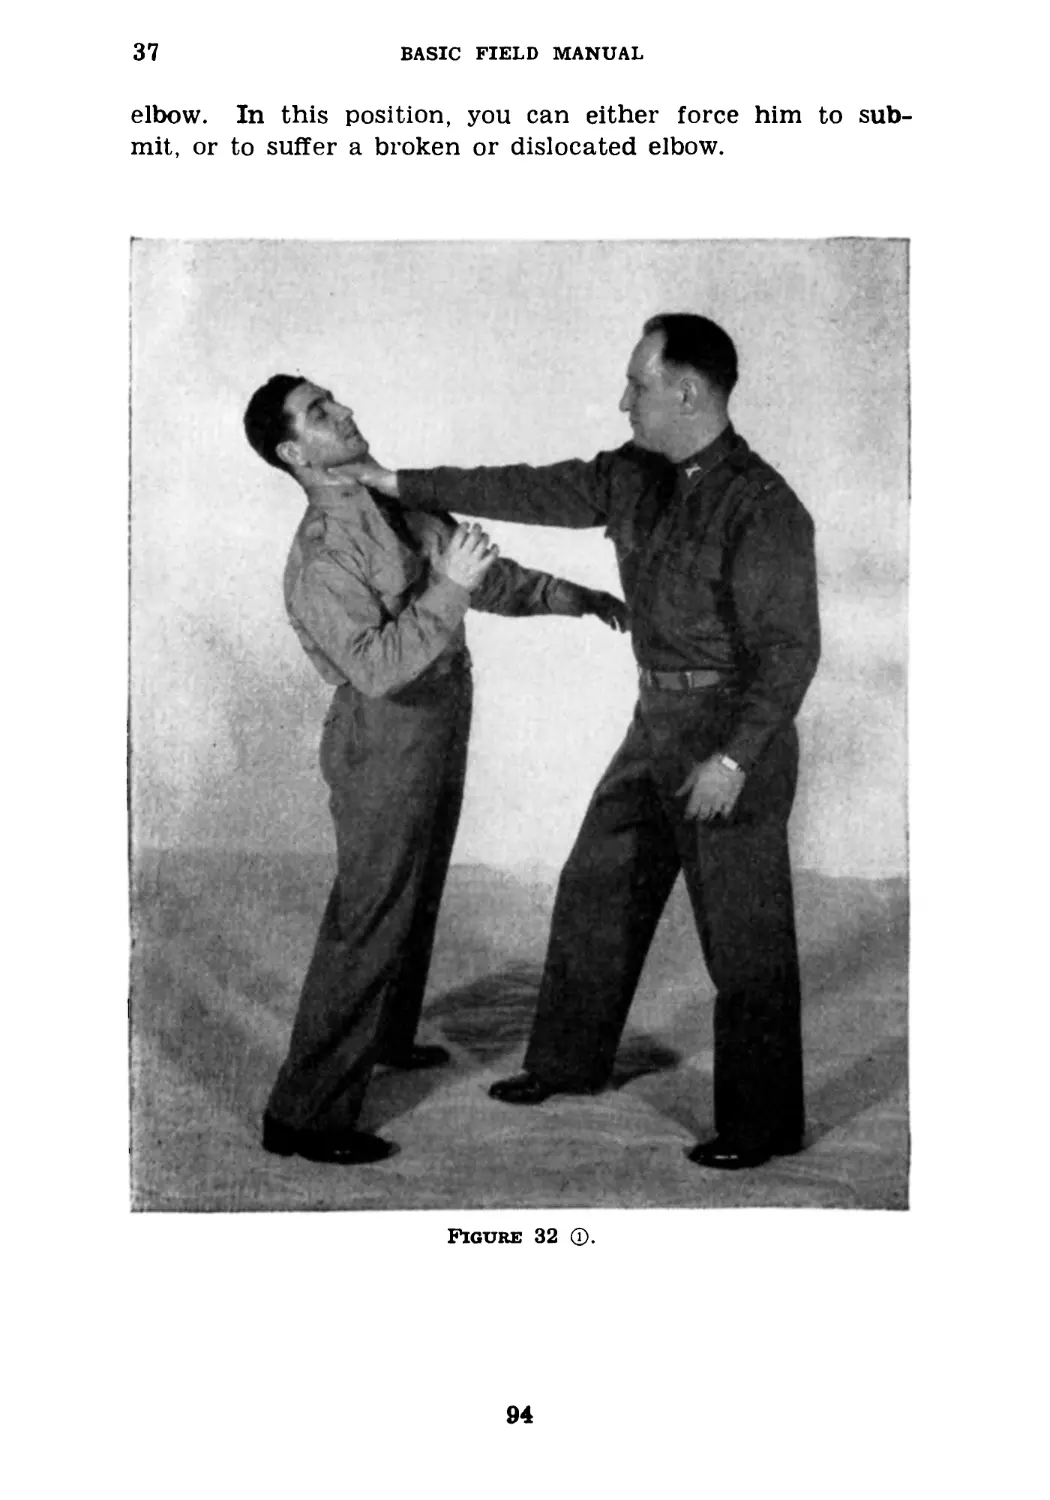
37. Defense Against One-Hand Front Choke.—Your op-
ponent attacks by grasping you by the throat with his right
hand and attempting to choke you as illustrated in figure
Figure 31 ®.
32 ®. You step backward with your right foot, at the same
time grasping his right wrist with your right hand and holding
it close to your throat. Place your left foot between and
in front of his legs (fig. 32 ®). Bring your left arm over
92
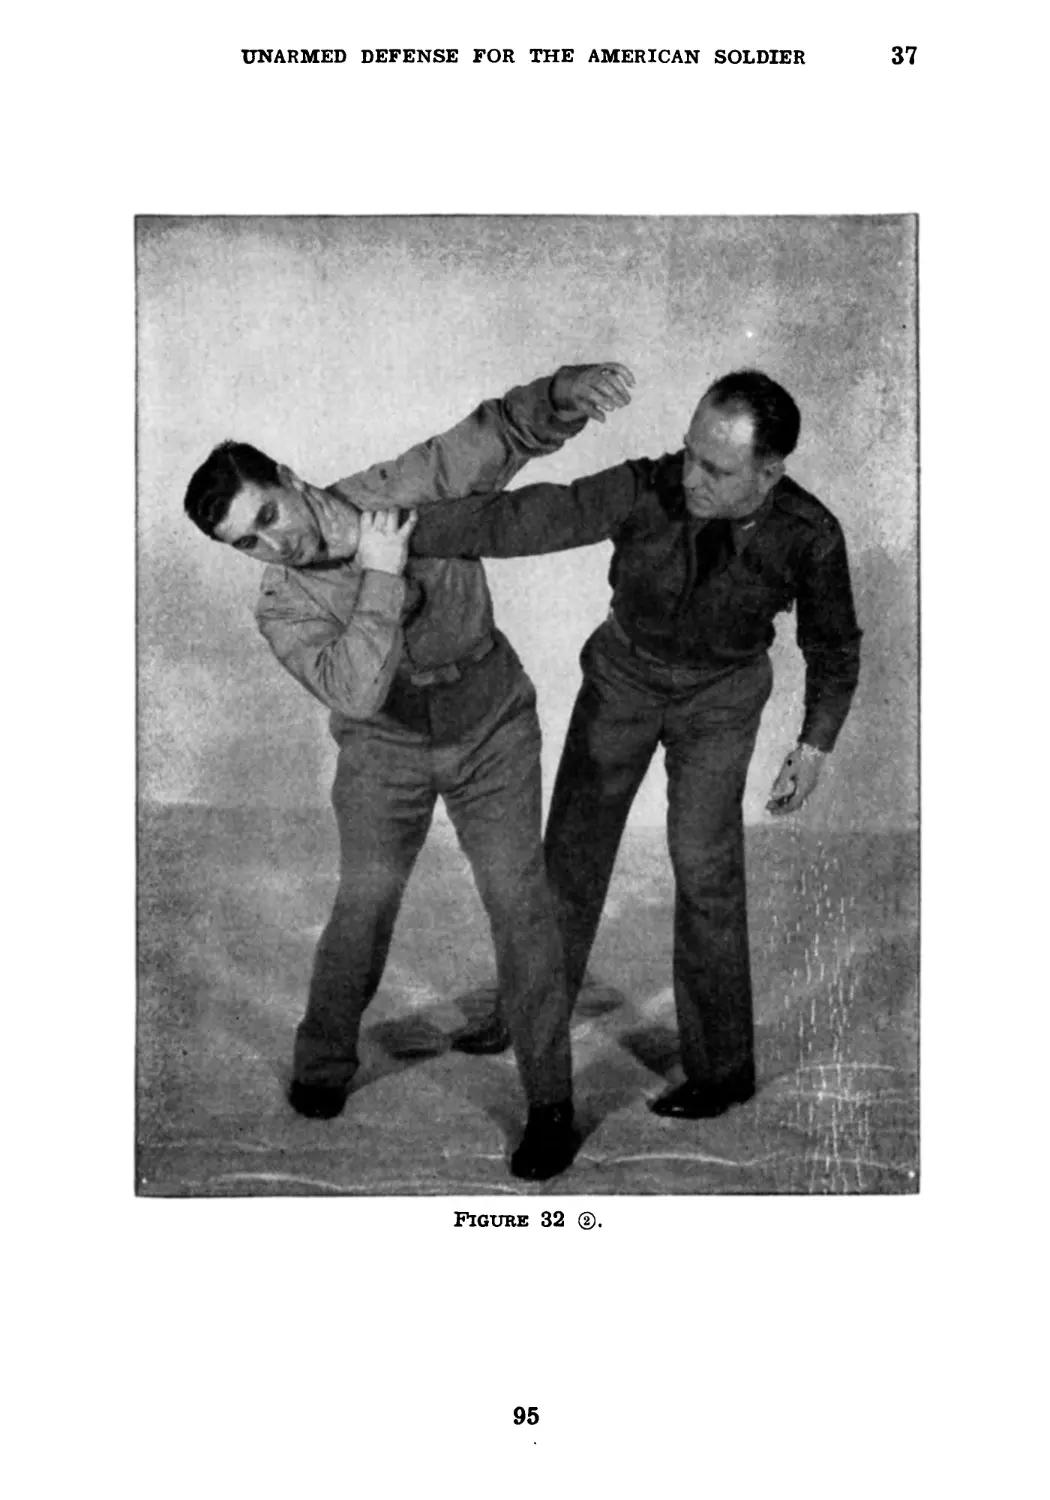
UNARMED DEFENSE FOR THE AMERICAN SOLDIER
37
your opponent’s right elbow without touching it with your
hand; retaining your grasp on your opponent’s right wrist
with your right hand, you bring your armpit on top of his
Figure 31 ®.
right elbow, and turning to the right, reinforce the grasp
on his wrist with a similar grasp with your left hand. Now
bring pressure to bear by lifting upward on the captured
right wrist and pushing downward with your armpit on his
463187 --42-
93
7
37
BASIC FIELD MANUAL
elbow. In this position, you can either force him to sub-
mit, or to suffer a broken or dislocated elbow.
Figure 32 (T).
94
UNARMED DEFENSE FOR THE AMERICAN SOLDIER
37
Figure 32 ®.
95
37
BASIC FIELD MANUAL
Figure 32 ®.
96
UNARMED DEFENSE FOR THE AMERICAN SOLDIER
38
Section VI
DEFENSES AGAINST KICKS
38. First Defense Against Kick with Right Foot.—When
you are just within reach of your opponent’s foot, and he
Figure 33 u).
suddenly reaches out, attempting to kick you in the groin,
you execute a side movement of your body without moving
97
38
BASIC FIELD MANUAL
your feet. This is done by bending the left knee, straighten-
ing the right knee, and twisting the hips to the right as
illustrated in figure 33 ®. This causes your opponent’s foot
Figure 33
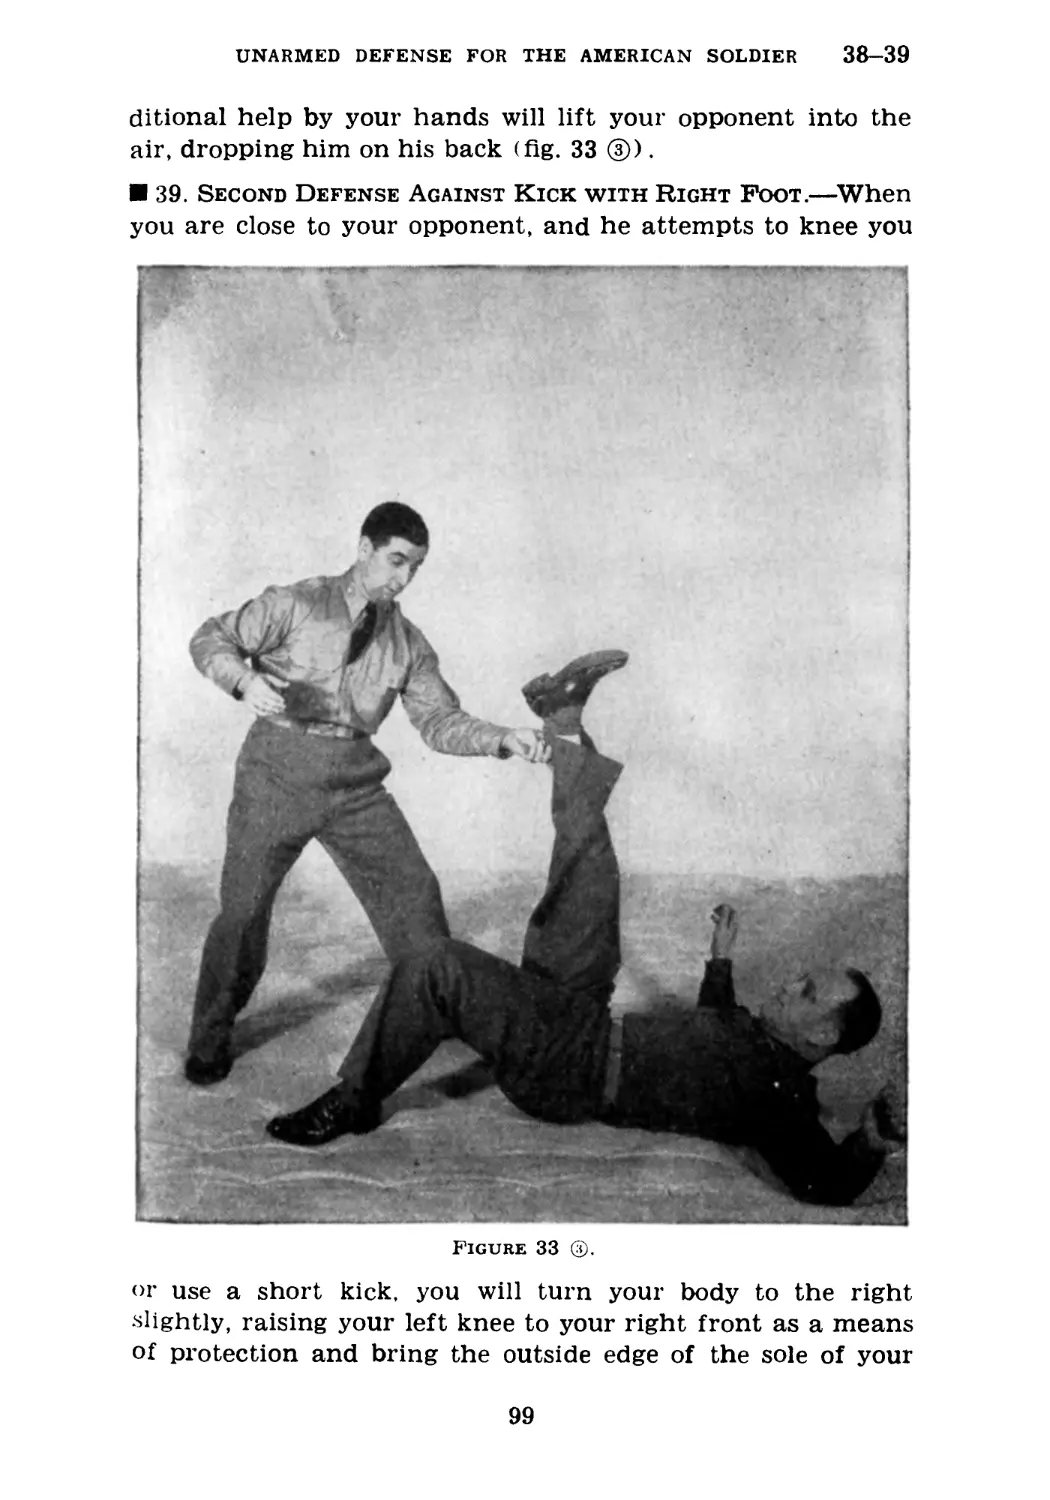
to miss its mark. You make no attempt to stop the force
of the kick, but rather place your hands under his foot and
ankle and continue his movement by lifting upward (fig.
33 ®). His momentum plus even a slight amount of ad-
98
UNARMED DEFENSE FOR THE AMERICAN SOLDIER
38-39
ditional help by your hands will lift your opponent into the
air, dropping him on his back (fig. 33 ®).
39. Second Defense Against Kick with Right Foot.—When
you are close to your opponent, and he attempts to knee you
Figure 33 ®.
or use a short kick, you will turn your body to the right
•slightly, raising your left knee to your right front as a means
of protection and bring the outside edge of the sole of your
99
39-40
BASIC FIELD MANUAL
shoe to catch the blow (fig. 34 ®). When your opponent’s
shin makes contact with the hard edge of your shoe, the
results will be painful and effective (fig 34 ©).
Figure 34 ф.
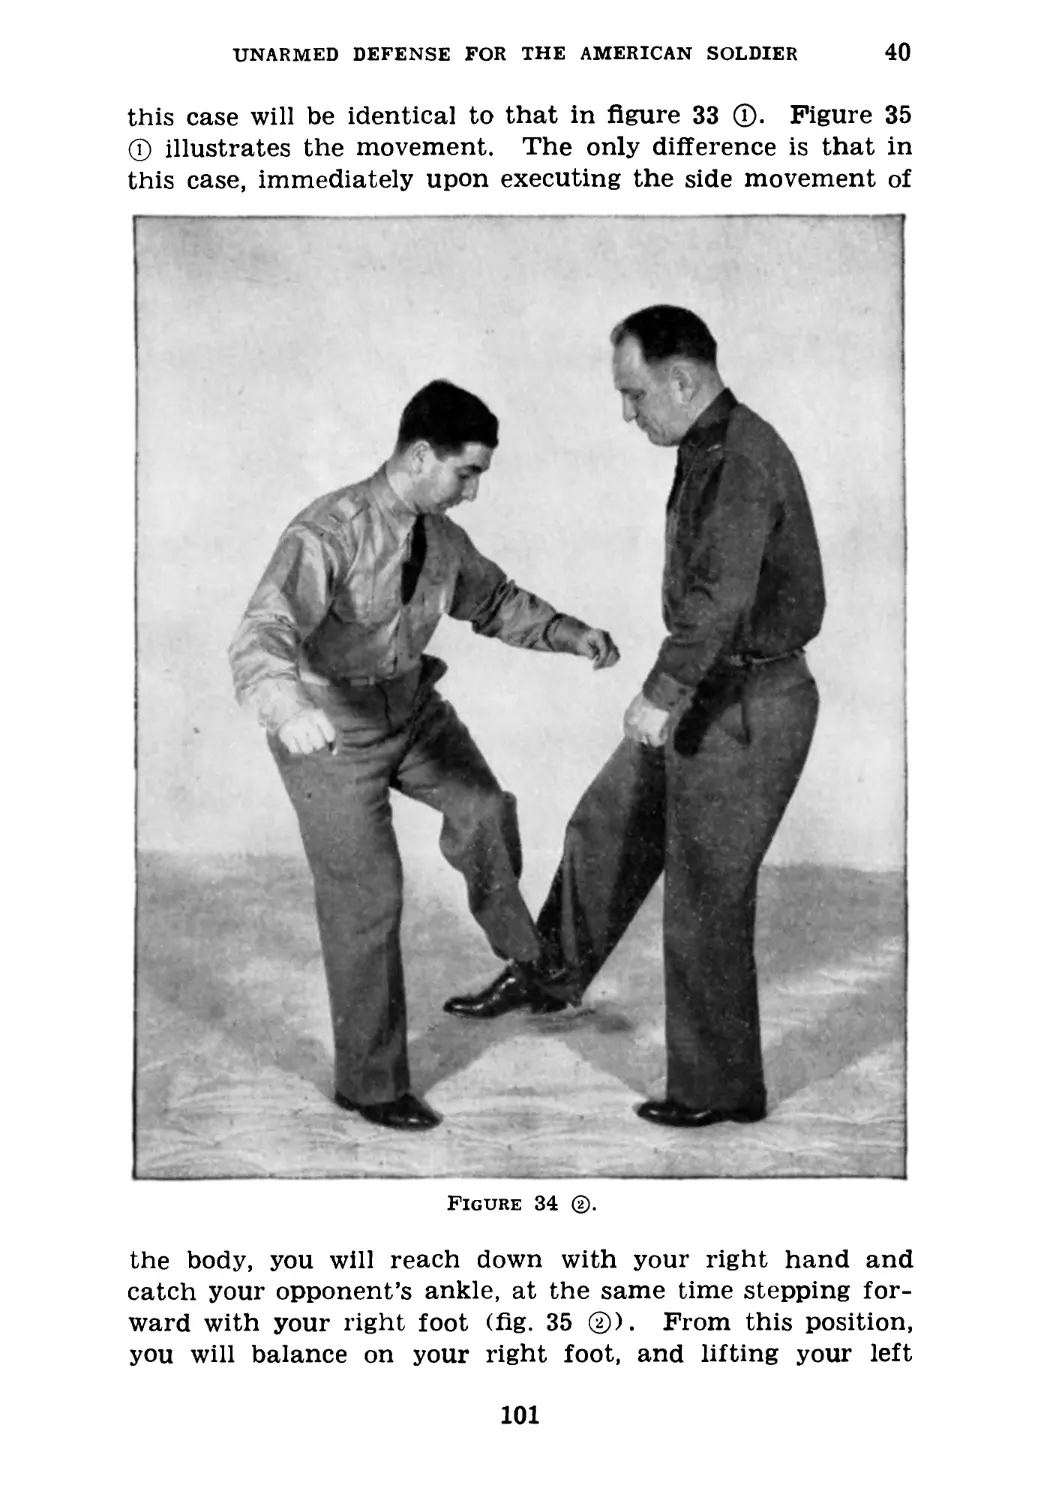
40. Defense Against Kick with Left Foot.—Since you can
never be sure with which foot your opponent intends to kick,
the initial side movement of your body must always be in
the same direction. Therefore, your initial movement in
100
UNARMED DEFENSE FOR THE AMERICAN SOLDIER
40
this case will be identical to that in figure 33 ©. Figure 35
© illustrates the movement. The only difference is that in
this case, immediately upon executing the side movement of
Figure 34
the body, you will reach down with your right hand and
catch your opponent’s ankle, at the same time stepping for-
ward with your right foot (fig. 35 ®). From this position,
you will balance on your right foot, and lifting your left
101
40
BASIC FIELD MANUAL
foot, strike forcibly with the calf against the back of your
opponent’s knee, at the same time striking him under the
chin with the heel of your left hand (fig. 35 ®). The results
are self-evident.
Figure 35 ф.
102
UNARMED DEFENSE FOR THE AMERICAN SOLDIER
40
Figure 35 ®.
103
40
BASIC FIELD MANUAL
Figure 35 (y.
104
UNARMED DEFENSE FOR THE AMERICAN SOLDIER
41
Section VII
TAKING PRISONERS
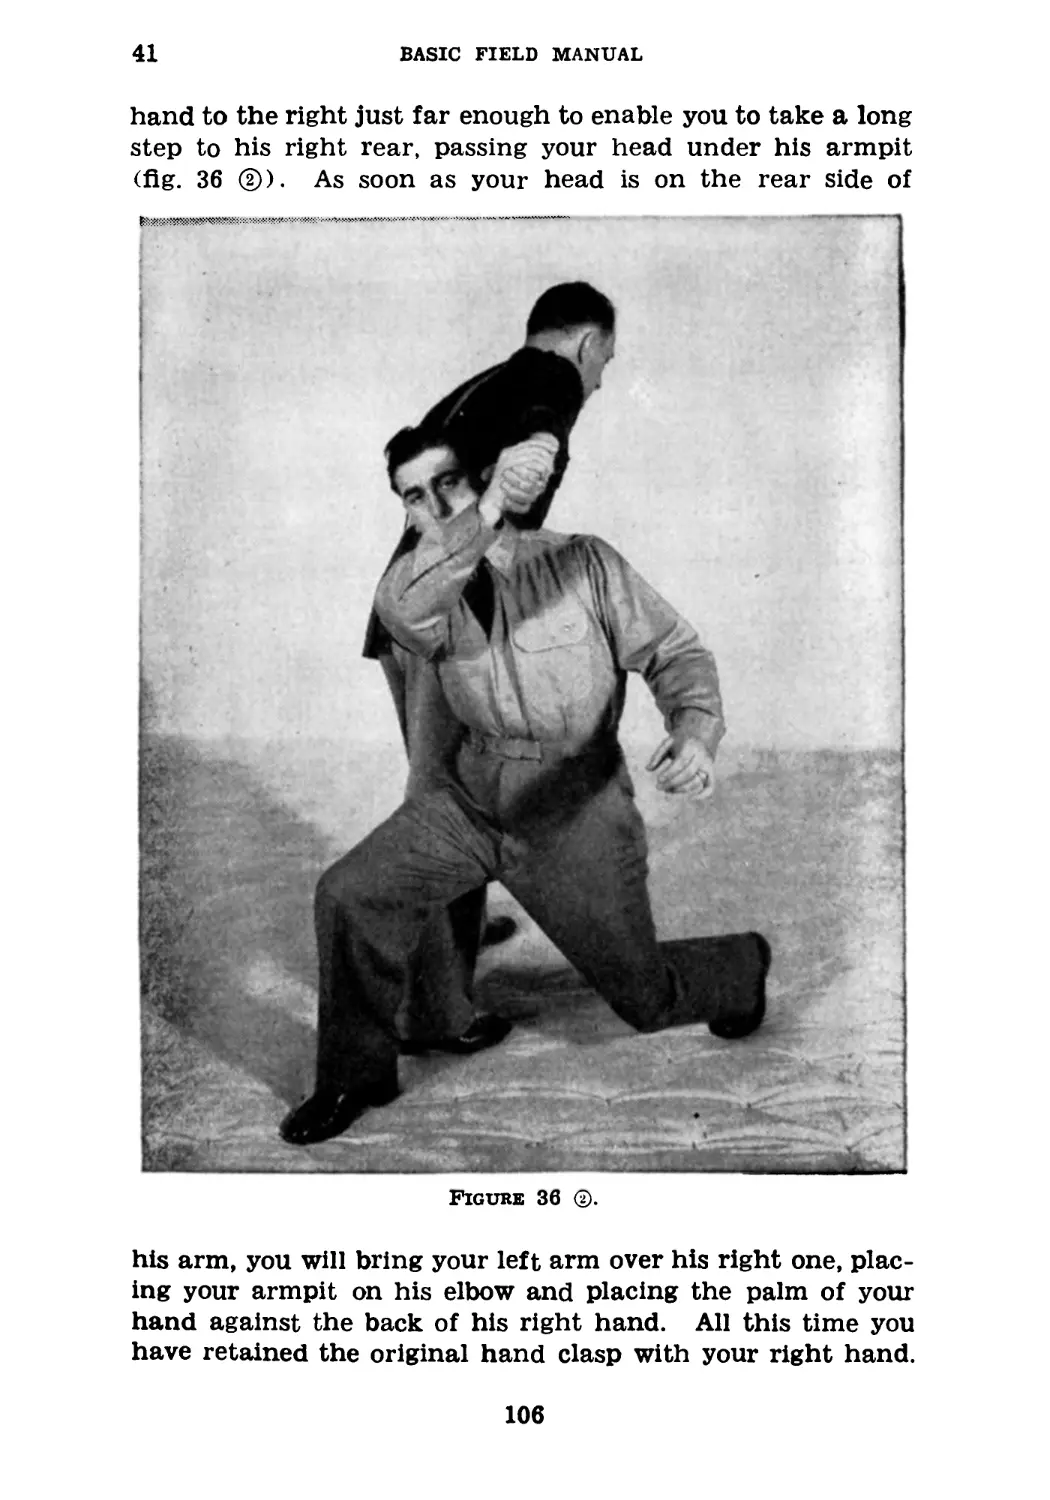
41. Handling a Hand-Squeezer.—Figure 36 ® illustrates
a powerful man squeezing with such force as to cause your
Figure 36 Q.
knees to buckle. Your initial movement is to bend the knees
slightly, pretending to give way, raise your opponent’s right
С1Ю5
41
BASIC FIELD MANUAL
hand to the right just far enough to enable you to take a long
step to his right rear, passing your head under his armpit
(fig. 36 ®). As soon as your head is on the rear side of
Figure 36 ®.
his arm, you will bring your left arm over his right one, plac-
ing your armpit on his elbow and placing the palm of your
hand against the back of his right hand. All this time you
have retained the original hand clasp with your right hand.
106
UNARMED DEFENSE FOR THE AMERICAN SOLDIER 41-42
You can now subdue your opponent by lifting up on the cap-
tured hand and pressing downward with the armpit against
his elbow (fig. 36 ®).
Figure 36 @.
42. Ejecting a Troublesome Visitor.—It is, at times, neces-
sary to eject an individual from an establishment without
causing a great deal of commotion. This is usually done in
cases of an obstreperous drunk. A drunk is always willing
107
42
BASIC FIELD MANUAL
to shake hands. Therefore, you will come toward him and
grasp his right hand with your right one (fig. 37 ®). If he
doesn’t want to grasp hands, grasp his wrist from the inside.
Figure 37 ©.
You will then lift the captured right arm just high enough
to permit you to pass your left arm under it, at the same
time stepping to your opponent’s right with your left foot
(fig. 37 ©). Now grasp his left lapel or his left collar and by
108
UNARMED DEFENSE FOR THE AMERICAN SOLDIER 42-43
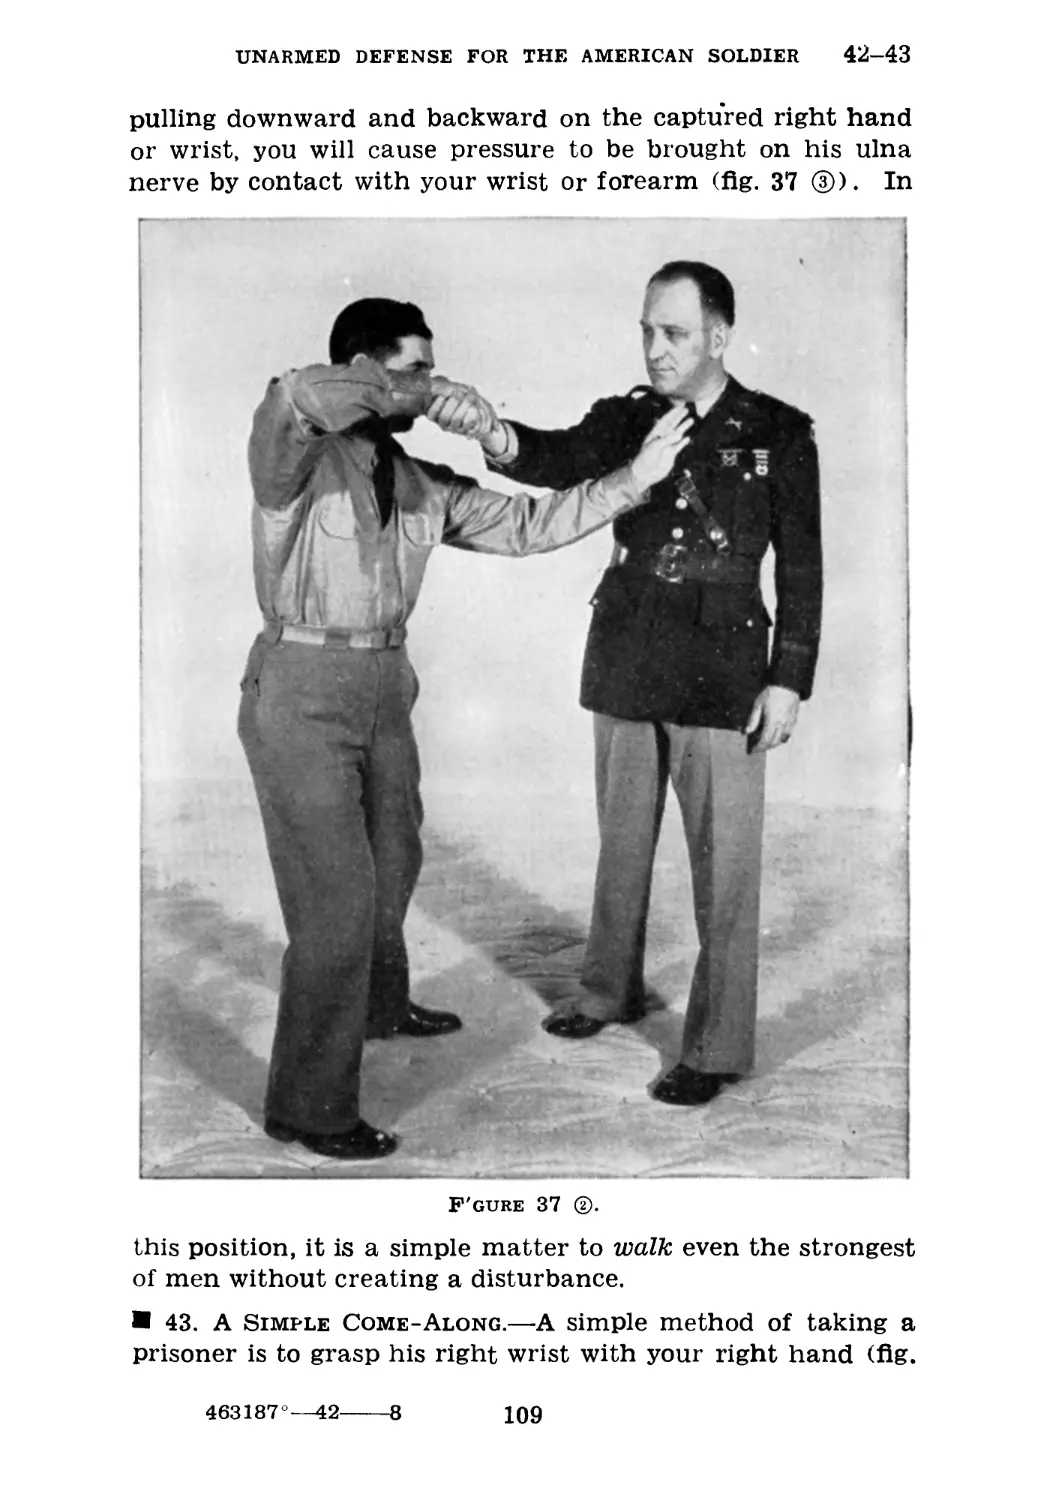
pulling downward and backward on the captured right hand
or wrist, you will cause pressure to be brought on his ulna
nerve by contact with your wrist or forearm (fig. 37 ®). In
F'gure 37 ®.
this position, it is a simple matter to walk even the strongest
of men without creating a disturbance.
43. A Simple Come-Along.—A simple method of taking a
prisoner is to grasp his right wrist with your right hand (fig.
463187°—42---8
109
43
BASIC FIELD MANUAL
38 ®), taking a step with your left foot to his right side, at
the same time pulling the captured right arm toward you.
This time, you will reach your left upper arm over his upper
Figure 37 (з).
arm (fig. 38 ®), and bring your forearm or sharp wrist bone
under the back of his upper arm, locking your hand on your
chest. Keeping his thumb uppermost and applying pressure
downward on the captured right wrist will expose the ulna
110
UNARMED DEFENSE FOR THE AMERICAN SOLDIER 43-44
nerve to contact with your left wrist or forearm, bringing
your opponent to his toes and making it simple to take him
along (fig. 38 ®).
Figure 38 ©.
44. Alternate for Simple Come-Along When Meeting
Resistance.—When attempting a simple come-along, occa-
sionally your opponent will frustrate your attempt by bend-
111
44
BASIC FIELD MANUAL
ing his elbow as illustrated in figure 39 ®. You will then
simply utilize the energy expended by him in bending his
arm by continuing its upward course, retaining your hold on
Figure 38 ®.
his right wrist with your right hand by sliding your hand
around. Then bring the edge of your left forearm hard
against the crook of his right elbow, causing it to bend further,
112
UNARMED DEFENSE FOR THE AMERICAN SOLDIER
44
and lock your left hand on your right wrist or forearm (fig.
39 ®). You will then bring your elbows as close as possible to
your body, making sure that one of your elbows is on either side
Figure 38
of the captured right arm. It is now a simple matter to bring
your opponent to the ground simply by bending from the
hips (fig. 39 ®).
113
45
BASIC FIELD MANUAL
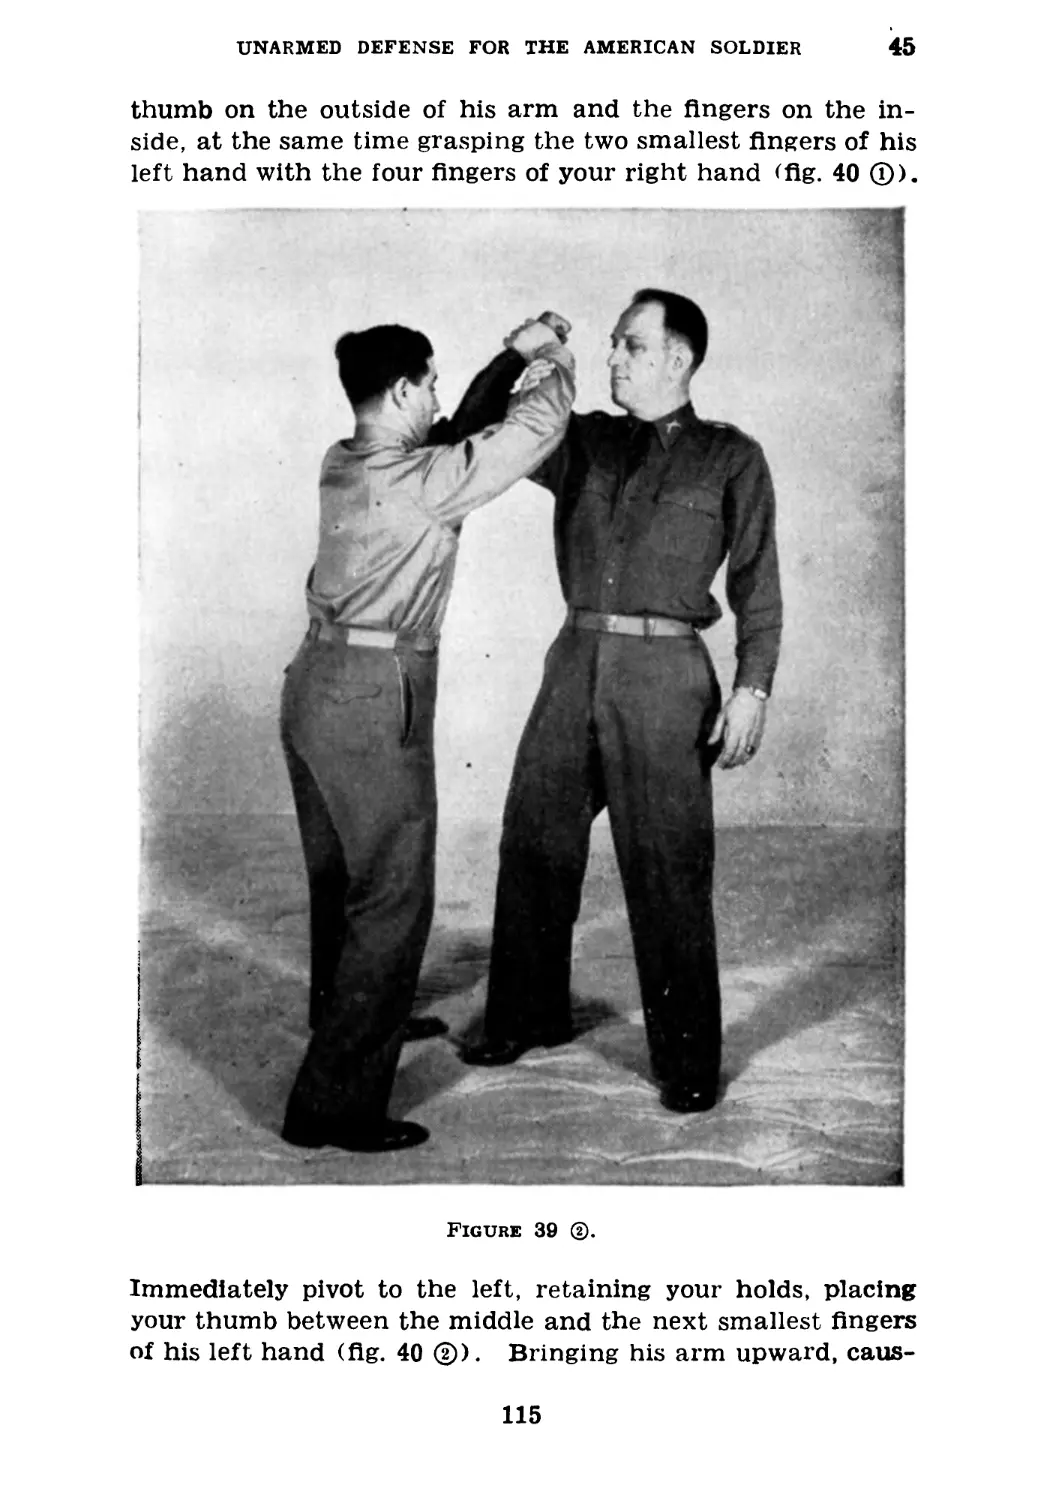
fl 45. Taking an Approaching Man Prisoner.—This hold is
very effective when you wish to take an approaching individ-
ual prisoner with such rapidity that he will not have time to
Figure 39 ф.
utilize his weapons. You will pretend to pass on his left side,
apparently ignoring him, but as you come opposite, raise your
left hand and grasp his biceps just above the elbow with your
114
UNARMED DEFENSE FOR THE AMERICAN SOLDIER
45
thumb on the outside of his arm and the fingers on the in-
side, at the same time grasping the two smallest fingers of his
left hand with the four fingers of your right hand (fig. 40 ®).
Figure 39 ®.
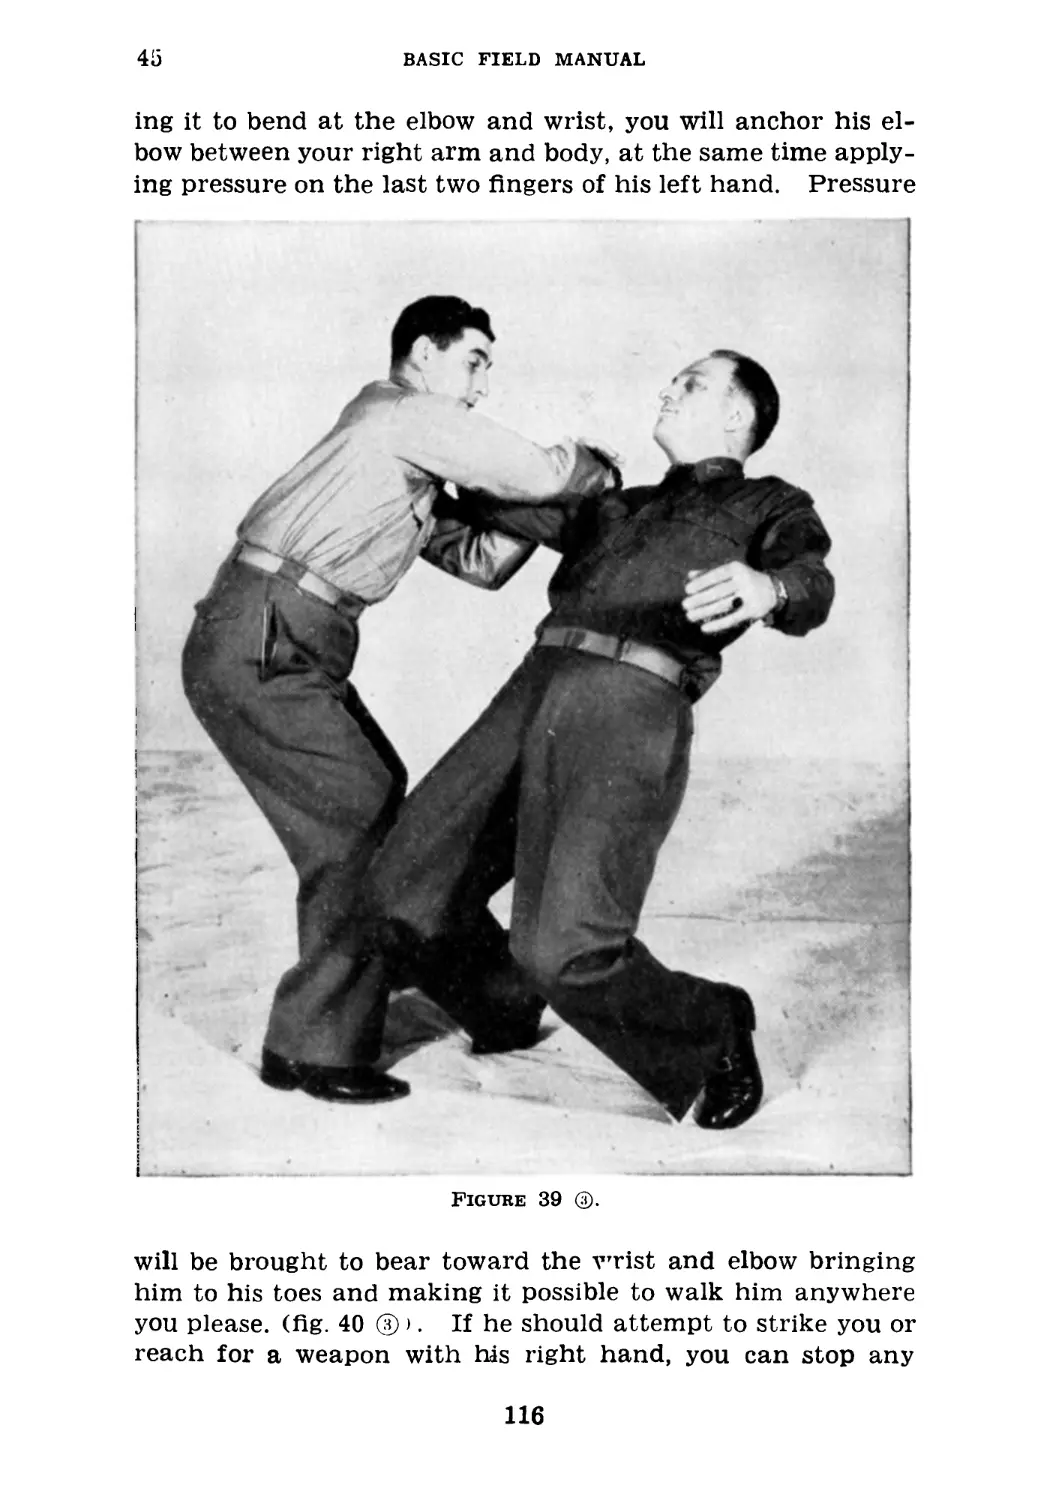
Immediately pivot to the left, retaining your holds, placing
your thumb between the middle and the next smallest fingers
of his left hand (fig. 40 ®). Bringing his arm upward, caus-
115
45
BASIC FIELD MANUAL
ing it to bend at the elbow and wrist, you will anchor his el-
bow between your right arm and body, at the same time apply-
ing pressure on the last two fingers of his left hand. Pressure
Figure 39 @.
will be brought to bear toward the vrrist and elbow bringing
him to his toes and making it possible to walk him anywhere
you please, (fig. 40 ® >. If he should attempt to strike you or
reach for a weapon with his right hand, you can stop any
116
UNARMED DEFENSE FOR THE AMERICAN SOLDIER
45-46
action by applying a greater degree of pressure on the cap-
tured left wrist.
46. Fingers Come-Along.—This is a come-along that is
Figure 40 ф.
very easy to get, but it cannot be utilized for any great dis-
tance. You reach for your opponent’s right hand with your
left one, grasping either two or three of his fingers (fig. 41 ®).
117
46
BASIC FIELD MANUAL
Grasping the fingers tightly, turn the palm of your oppo-
nent’s hand upward and bend his fingers backward toward
his wrist, maintaining control with the power of your elbow
Figure 40 (5).
close to your body (fig. 41 By applying a greater degree
of pressure, your opponent will be forced to his toes to pre-
vent his fingers from being broken and you will be enabled
118
UNARMED DEFENSE FOR THE AMERICAN SOLDIER 46-47
to march him where you see fit. If he attempts to turn,
simply apply a greater amount of pressure.
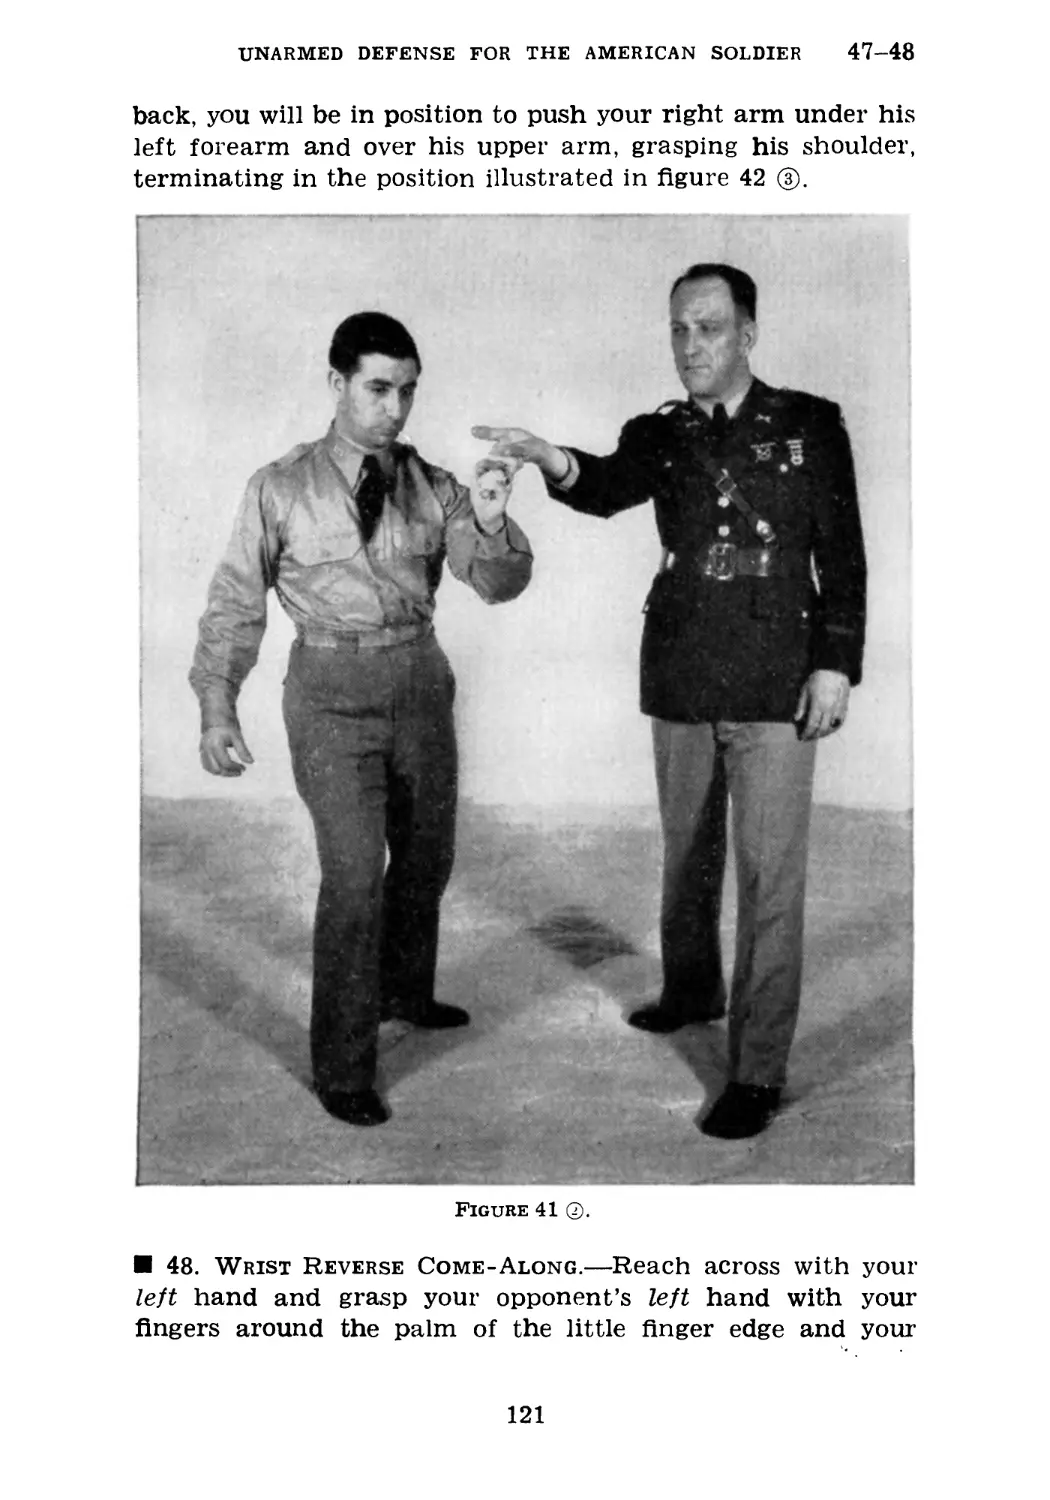
47. Lock Come-Along.—This come-along can be used for
Figure 40 ®.
walking a dangerous individual on long distances. As you
come opposite your opponent, place your right wrist against
his left wrist (without attempting to grasp it) and your left
119
47
BASIC FIELD MANUAL
hand will grasp his upper arm just above the elbow, your
fingers to the rear (fig. 42 ®). Now push to the rear with
your right forearm and pull toward you with your left hand,
Figure 41 ©.
which will cause your opponent to bend at the waist and also
cause his arm to bend upward and to the rear (fig. 42 @).
As your opponent’s left arm comes to a right angle up his
120
UNARMED DEFENSE FOR THE AMERICAN SOLDIER 47-48
back, you will be in position to push your right arm under his
left forearm and over his upper arm, grasping his shoulder,
terminating in the position illustrated in figure 42
Figure 41 @.
48. Wrist Reverse Come-Along.—Reach across with your
left hand and grasp your opponent’s left hand with your
fingers around the palm of the little finger edge and your
121
48
BASIC FIELD MANUAL
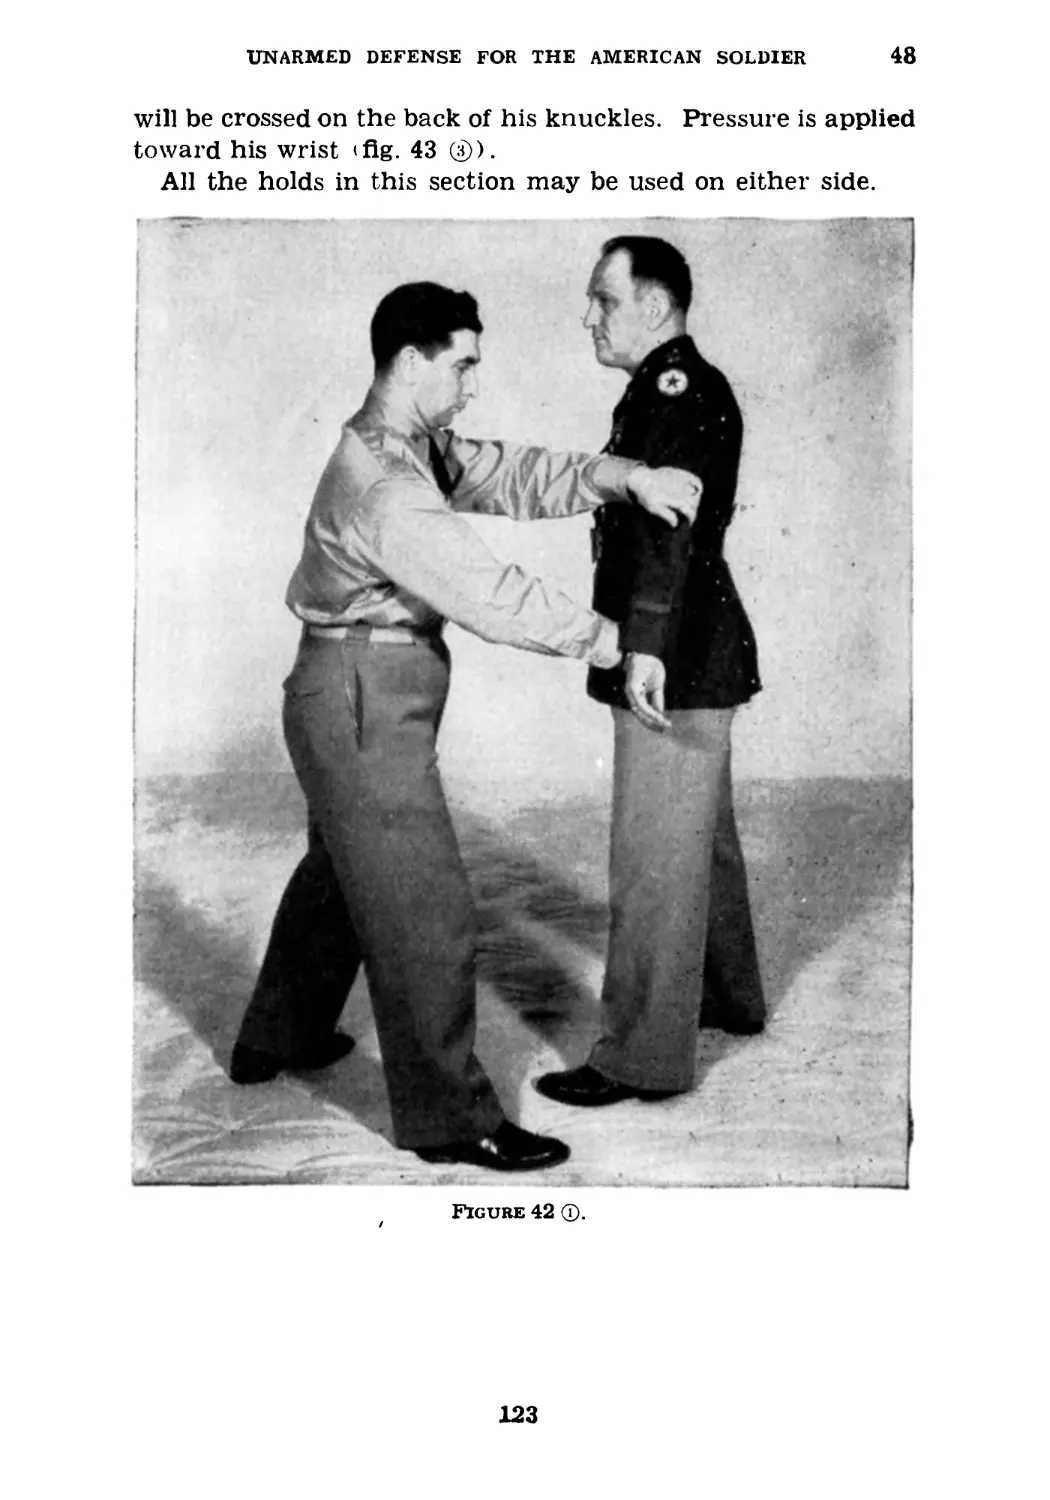
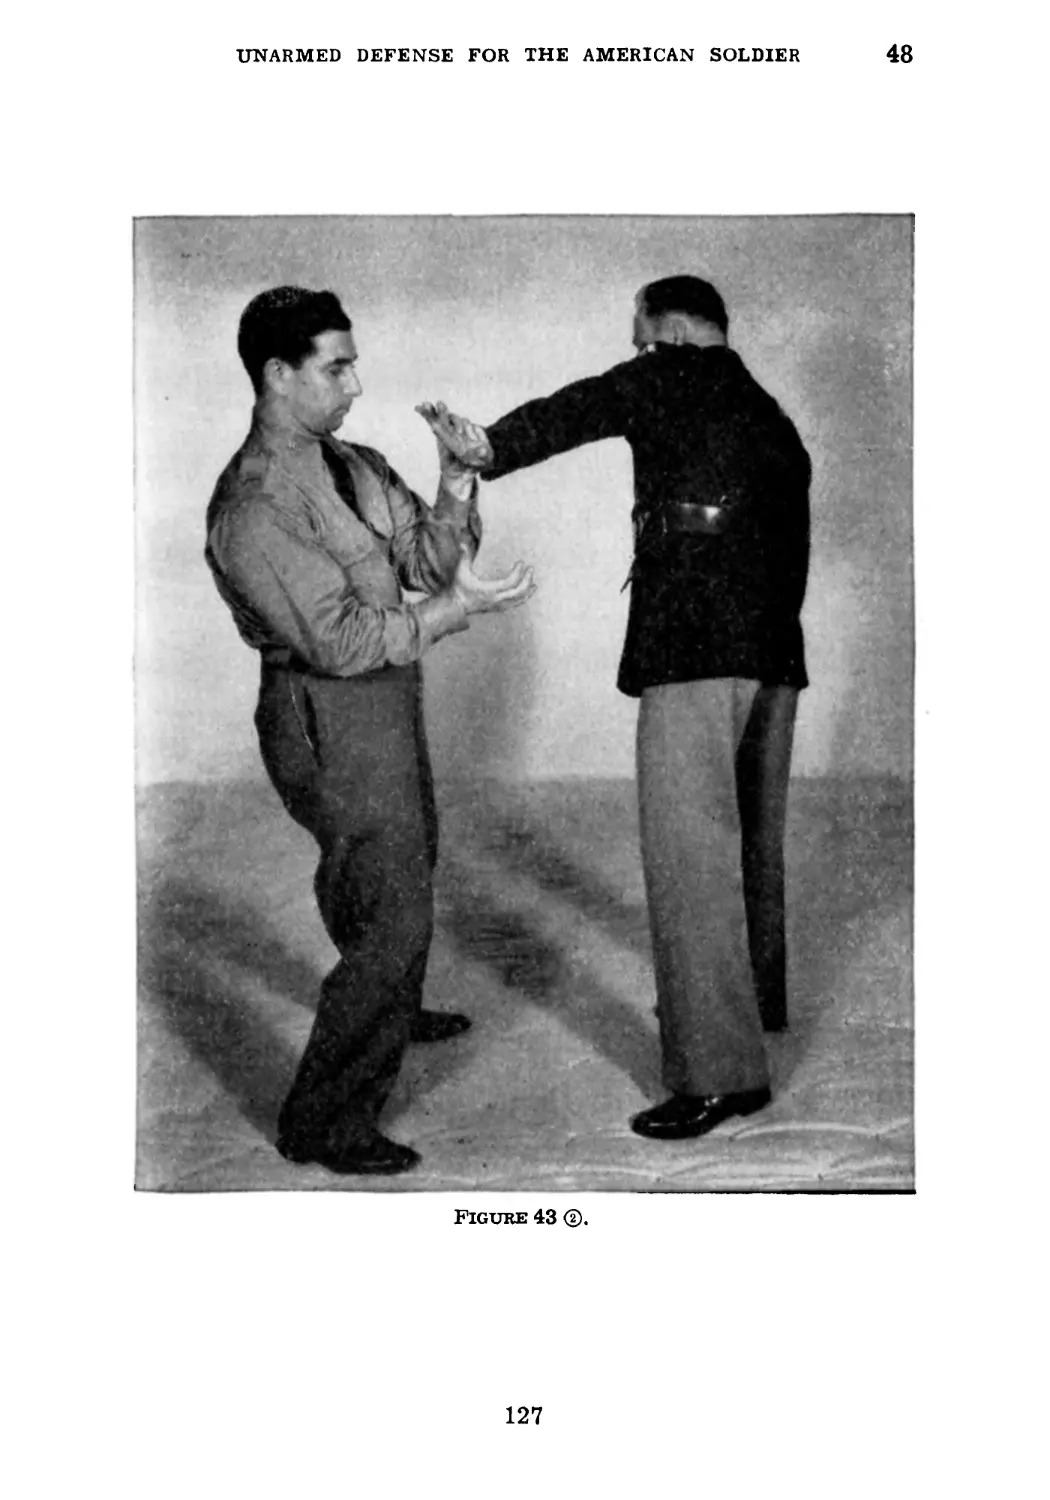
thumb on the back of his knuckles (fig. 43 ®). Now bring
your left elbow close to your low abdomen and turn your
opponent’s hand to your left (fig. 43 ®). Then reinforce
Figure 41 ®.
your original hold with a similar hold with your right hand,
terminating in a position where the fingers of both your hands
will be grasped on the palm of his left hand and your thumbs
122
UNARMED DEFENSE FOR THE AMERICAN SOLDIER
48
will be crossed on the back of his knuckles. Pressure is applied
toward his wrist <fig. 43 ®).
All the holds in this section may be used on either side.
Figure 42 ф.
123
48
BASIC FIELD MANUAL
Figure 42 ®
124
UNARMED DEFENSE FOR THE AMERICAN SOLDIER
48
Figure 42
463187 42-----9
125
48
BASIC FIELD MANUAL
Figure 43 Q.
126
UNARMED DEFENSE FOR THE AMERICAN SOLDIER
48
Figure 43 (2).
127
48
BASIC FIELD MANUAL
Figure 43 ®.
128
UNARMED DEFENSE FOR THE AMERICAN SOLDIER
49
Section VIII
DEFENSES AGAINST KNIFE AND SWORD
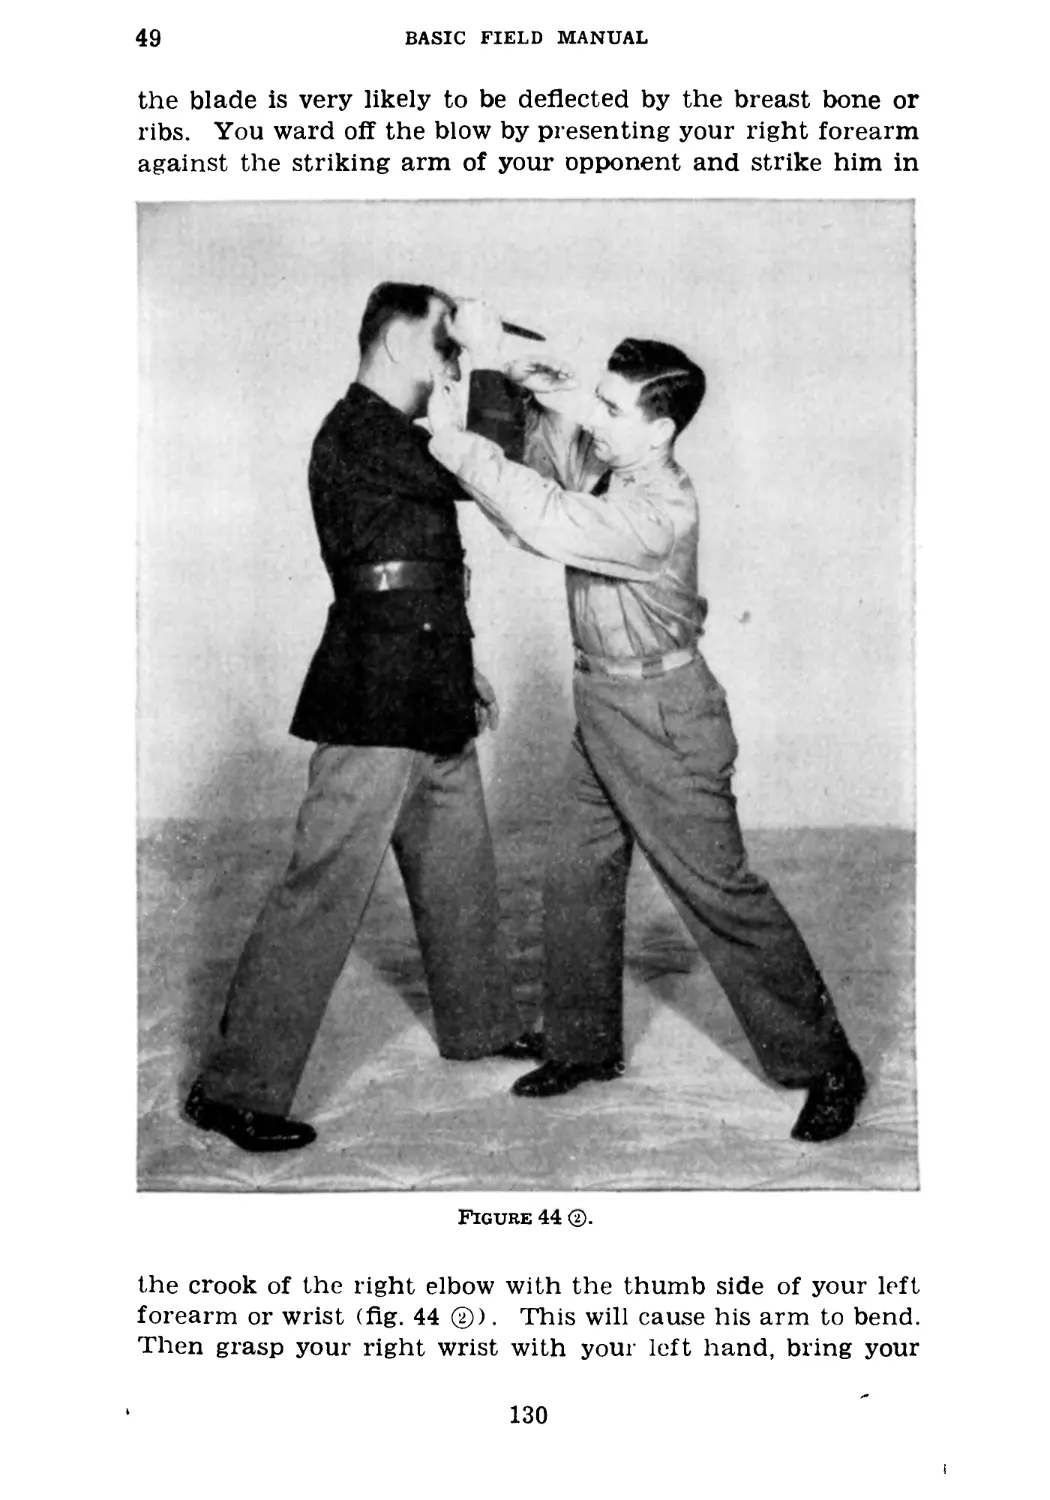
49. Defense Against Downward Stroke of Knife.—Your
FIGURE 44 Q).
opponent attacks in the manner illustrated in figure 44 ®.
Only an angry man or an individual who has had no training
in the use of the knife would use this mode of attack, since
129
49
BASIC FIELD MANUAL
the blade is very likely to be deflected by the breast bone or
ribs. You ward off the blow by presenting your right forearm
against the striking arm of your opponent and strike him in
Figure 44 @.
the crook of the right elbow with the thumb side of your left
forearm or wrist (fig. 44 ®). This will cause his arm to bend.
Then grasp your right wrist with your left hand, bring your
130
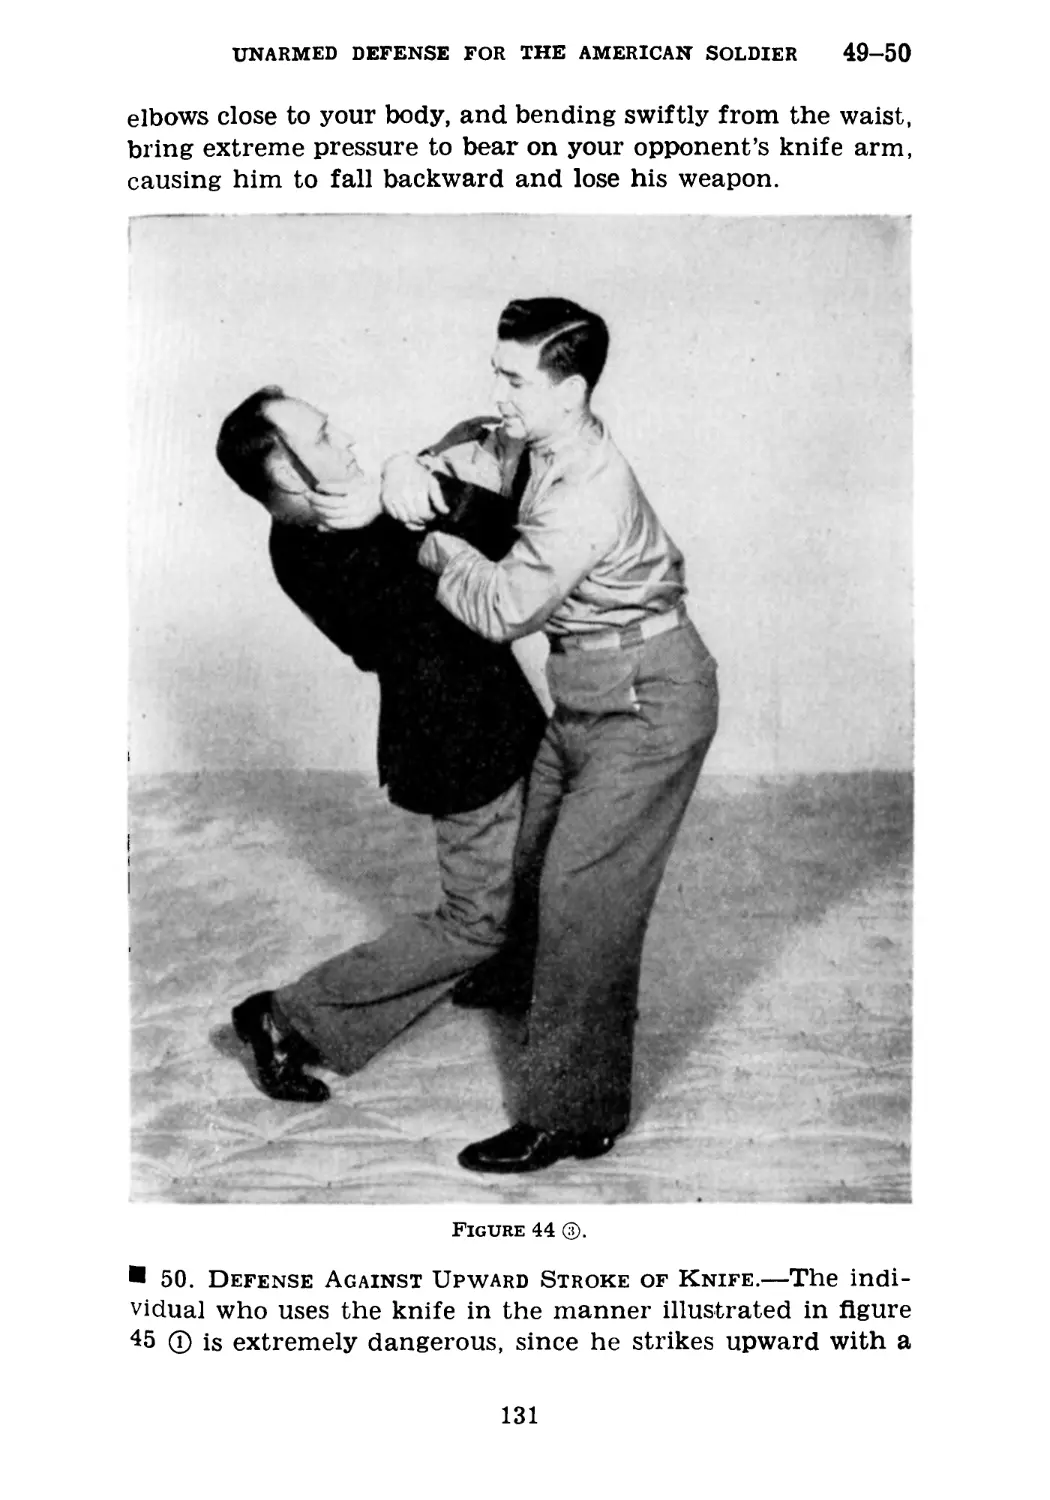
UNARMED DEFENSE FOR THE AMERICAN SOLDIER 49-50
elbows close to your body, and bending swiftly from the waist,
bring extreme pressure to bear on your opponent’s knife arm,
causing him to fall backward and lose his weapon.
Figure 44 ®.
50. Defense Against Upward Stroke of Knife.—The indi-
vidual who uses the knife in the manner illustrated in figure
45 © is extremely dangerous, since he strikes upward with a
131
50
BASIC FIELD MANUAL
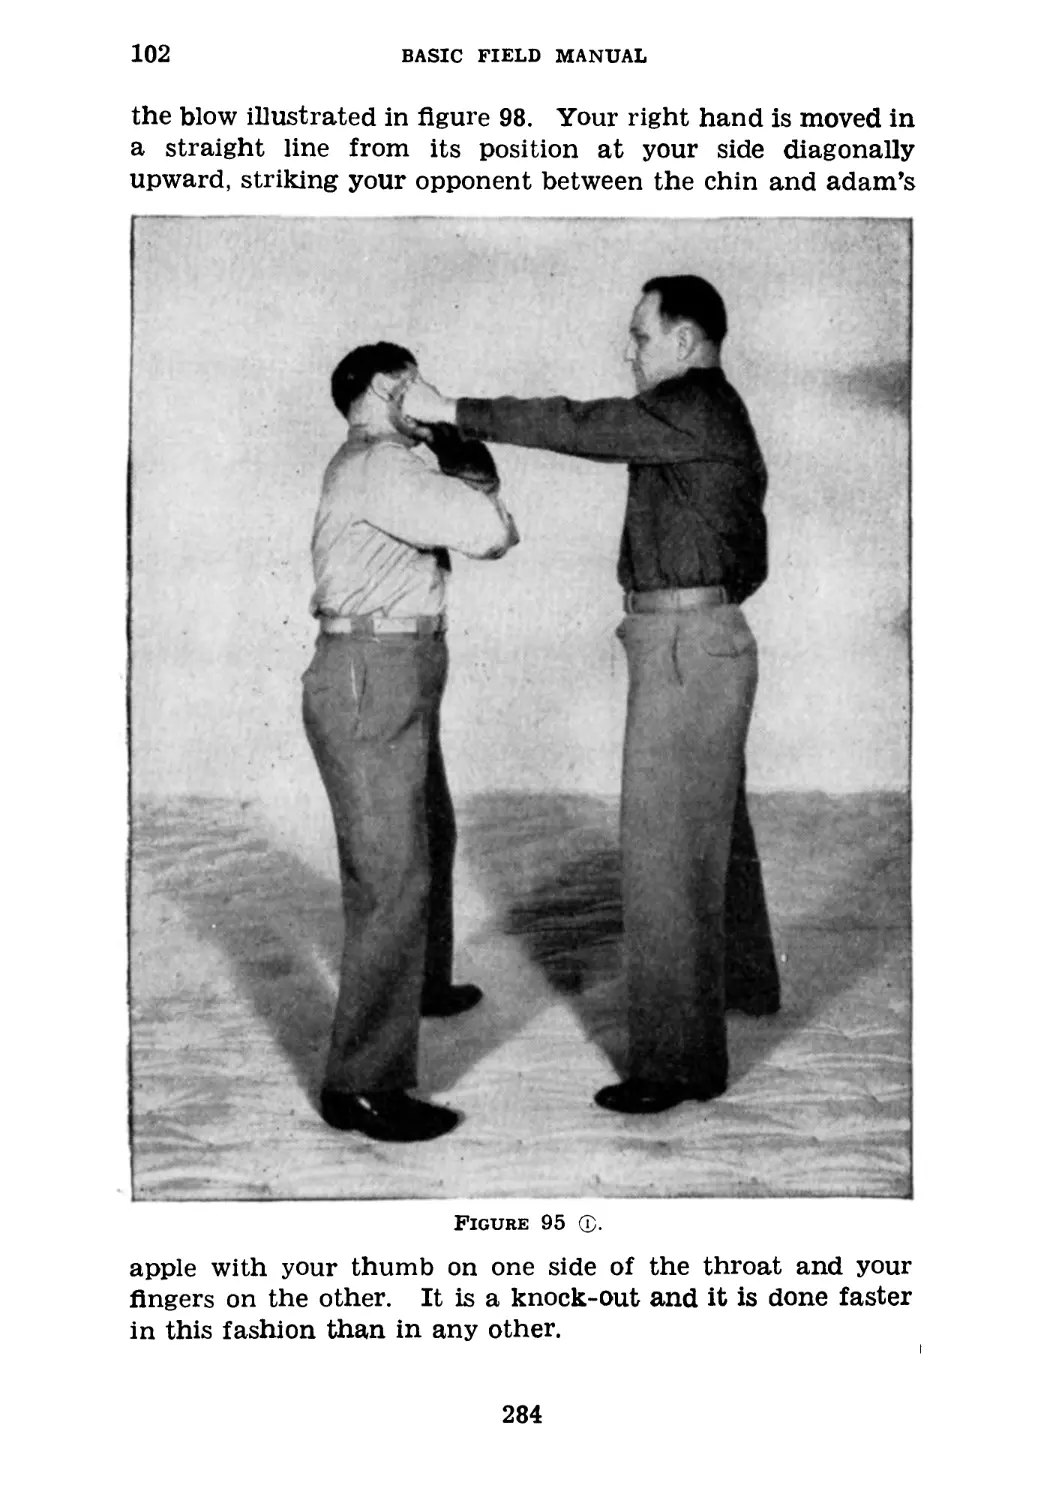
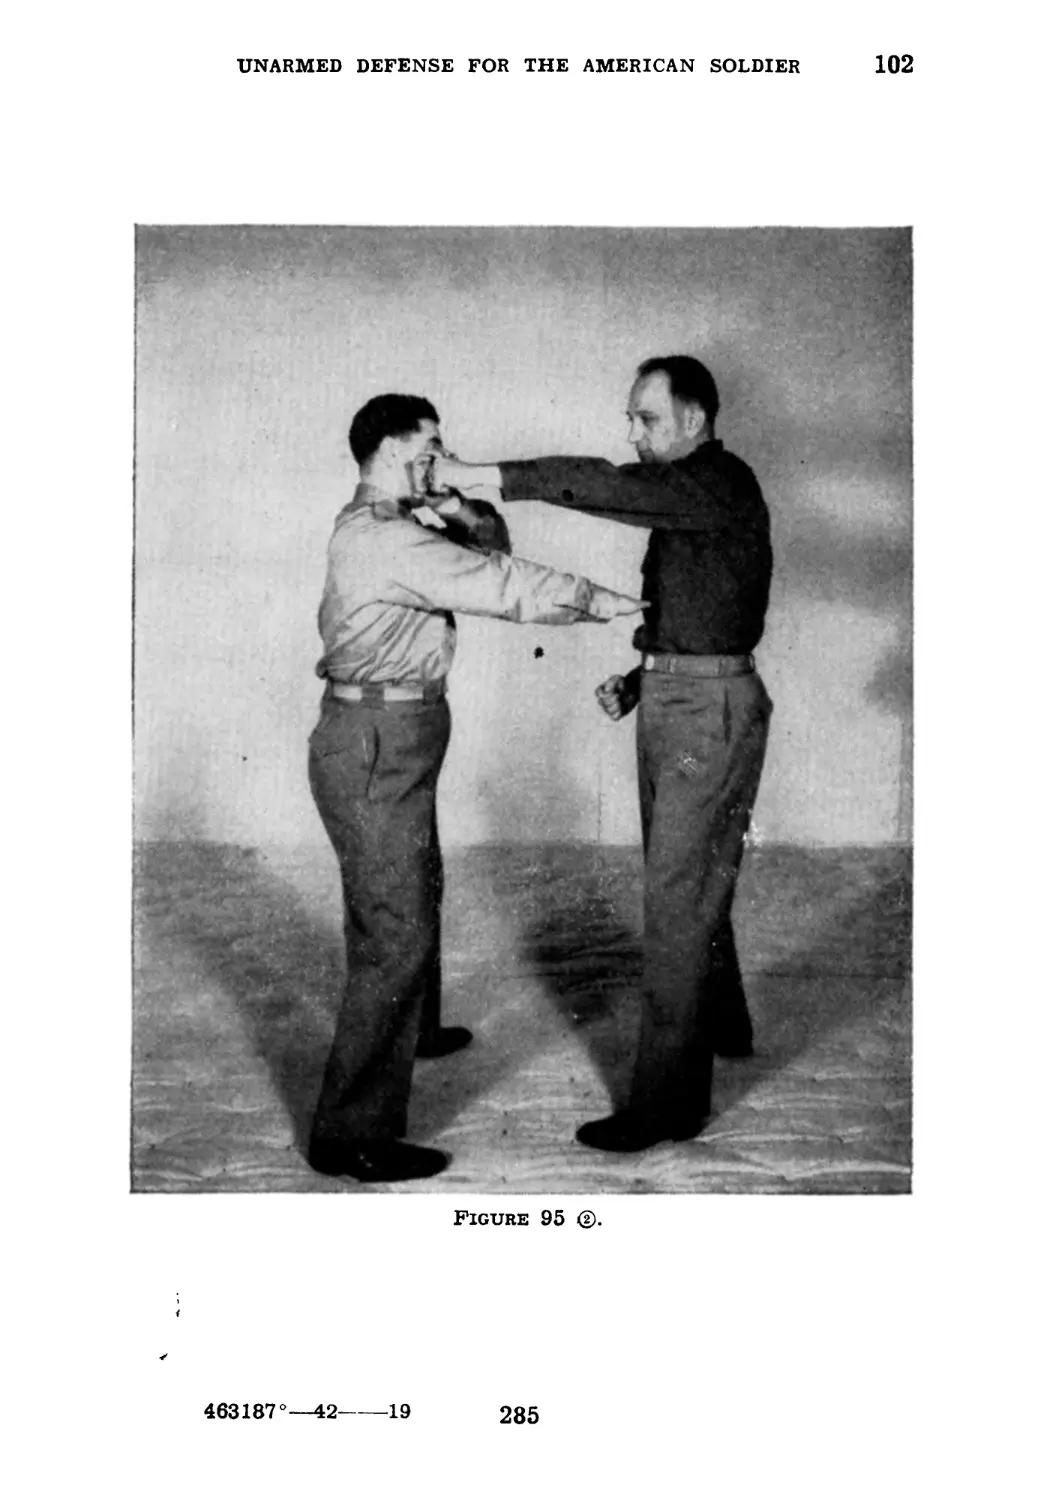
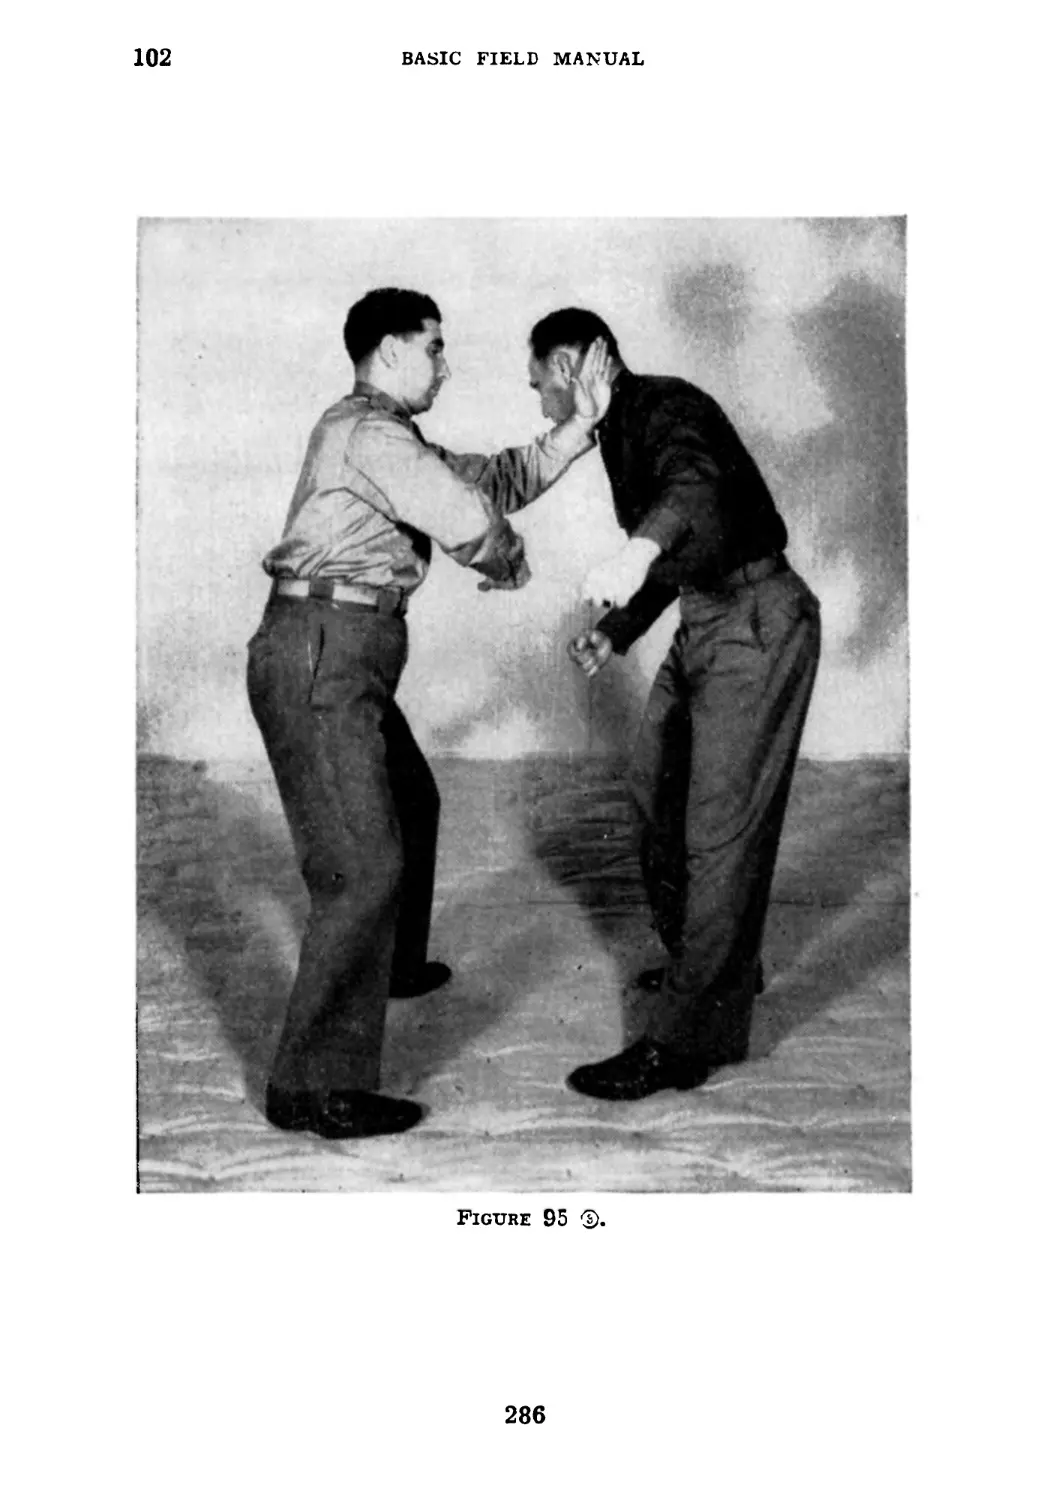
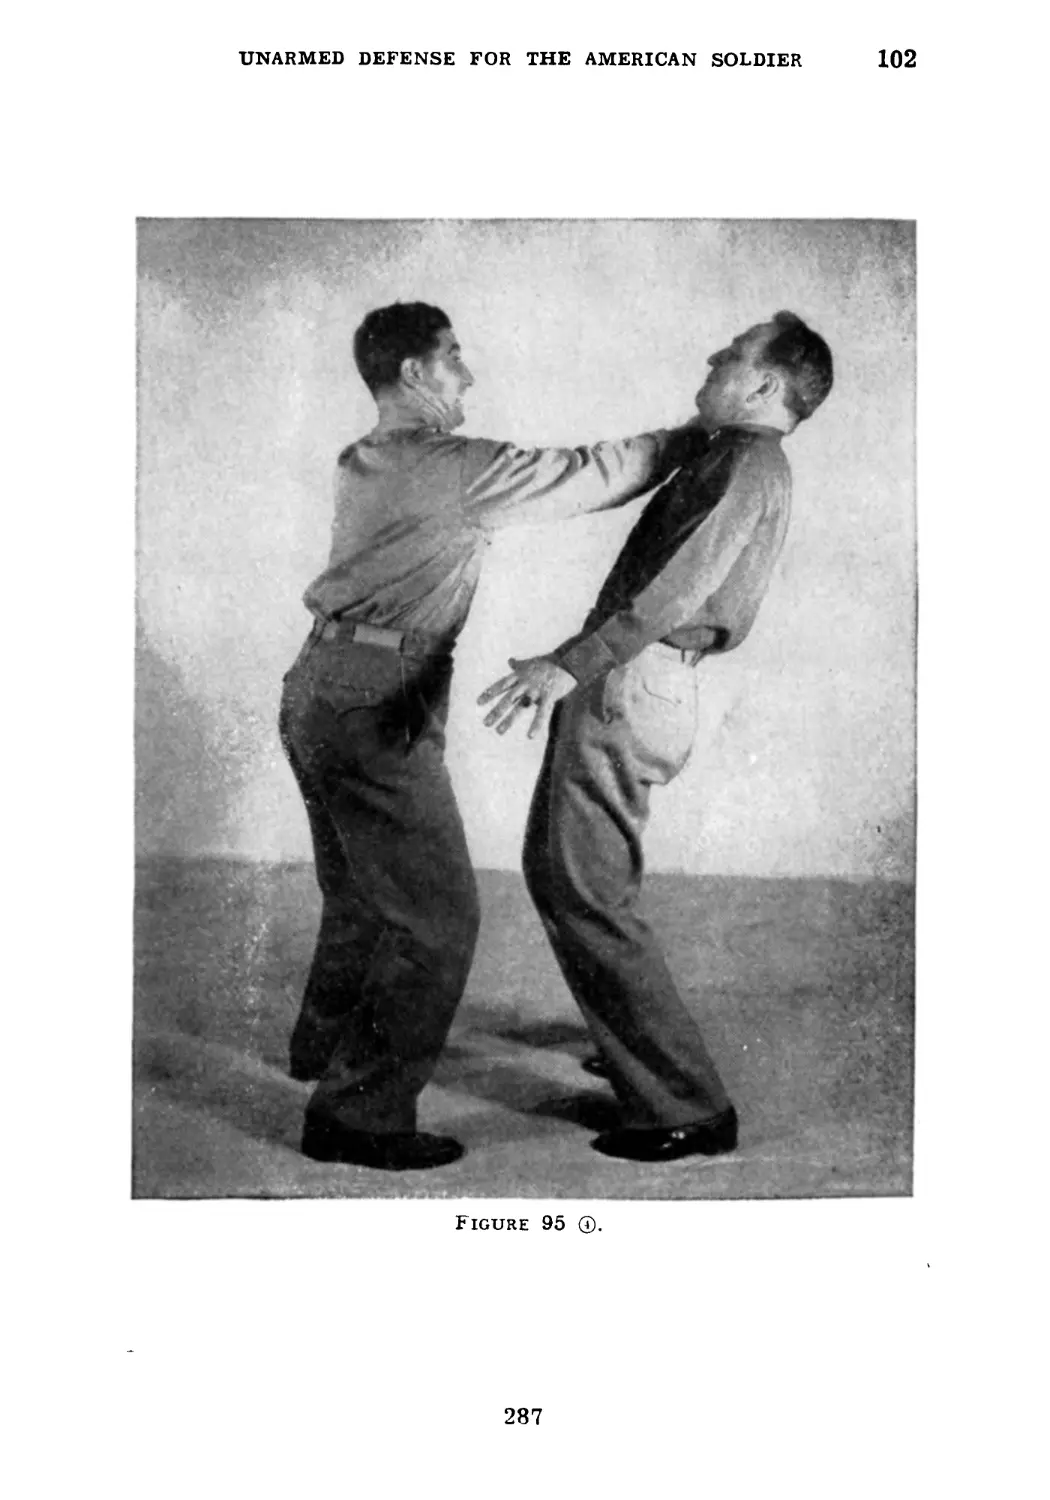
short snappy movement, aiming at the soft parts of the ab-
domen. И he strikes home, he is likely to impose a fatal
wound. You block the stroke by bringing the little finger edge
Figure 45 ®.
of your left arm against your opponent’s wrist or forearm.
As an added precaution, a simultaneous movement will be the
side twist of the body as described in previous sections. Right
132
UNARMED DEFENSE FOR THE AMERICAN SOLDIER
50
leg is straightened, left knee is bent, and your body turns to
the right. Immediately the blow is stopped, the right hand
grasps your attacker’s right hand with your thumb on the
Figure 45 ®.
back of his knuckles and your fingers around the palm side of
his hand. Contact is retained with your left arm against his
left forearm (fig. 45 ®). You now reinforce your right-hand
133
50
BASIC FIELD MANUAL
hold with a similar hold with your left hand which will result
in your thumbs crossing on the back of his knuckles and the
fingers of both your hands meeting in the center of the palm
Figure 45 Cy,.
of his hand. You will now twist his wrist to your left and
bend his hand at an angle of 45° toward his forearm (fig.
45 ®).
134
UNARMED DEFENSE FOR THE AMERICAN SOLDIER
51
51. Defense Against Back-hand Slash With Knife.—A very
common attack with the knife is the one illustrated in figure
46 ®. Two simultaneous actions are necessary in your defense.
Figure 46 ®.
The knees'are bent and the body lowered without ducking
your head; at the same time, your right arm is raised and the
forearm or wrist presented against the forearm or wrist of the
striking arm of your attacker (fig. 46 ®). Immediately the
135
51
BASIC FIELD MANUAL
blow is stopped, youf left hand reaches over your head, grasps
your opponent’s knife hand with your fingers around the palm
of his hand, and your thumb in the center of the back of his
Figure 46(2).
knuckles. Pressure is continued with your right wrist against
his right wrist. You now start to twist the captured knife
hand to your left (fig. 46 ®). You then reinforce your left-
hand hold with a similar hold with your right hand, thumbs
136
UNARMED DEFENSE FOR THE AMERICAN SOLDIER
51
in the center of the knuckles and fingers around the palm or
hilt of your opponent’s knife hand. A twist to your left or
pressure at an angle of 45° bending your opponent’s hand
Figure 46 ®.
against his wrist will cause him to lose his weapon, and, in
many cases, suffer a broken or dislocated wrist.
137
52
BASIC FIELD MANUAL
52. Defense Against Wary Approach With Knife.—Your
opponent attacks in the manner illustrated in figure 47 ®. His
left foot is extended and his left hand is extended to ward off
any of your possible blows. His knife hand is held close to
his hip, ready to strike when an opening occurs. This is an
extremely dangerous antagonist. He is well-prepared and
well-trained and your defense must be perfect. If it is pos-
sible to use anything as a weapon, a chair, table, tobacco,
dust, or any object at all with which you can strike him,
138
UNARMEB DEFENSE FOR THE AMERICAN SOLDIER
52
throw in his eyes, or wrap around his arm, it is advisable to
use it. However, if you are not in a position where you have
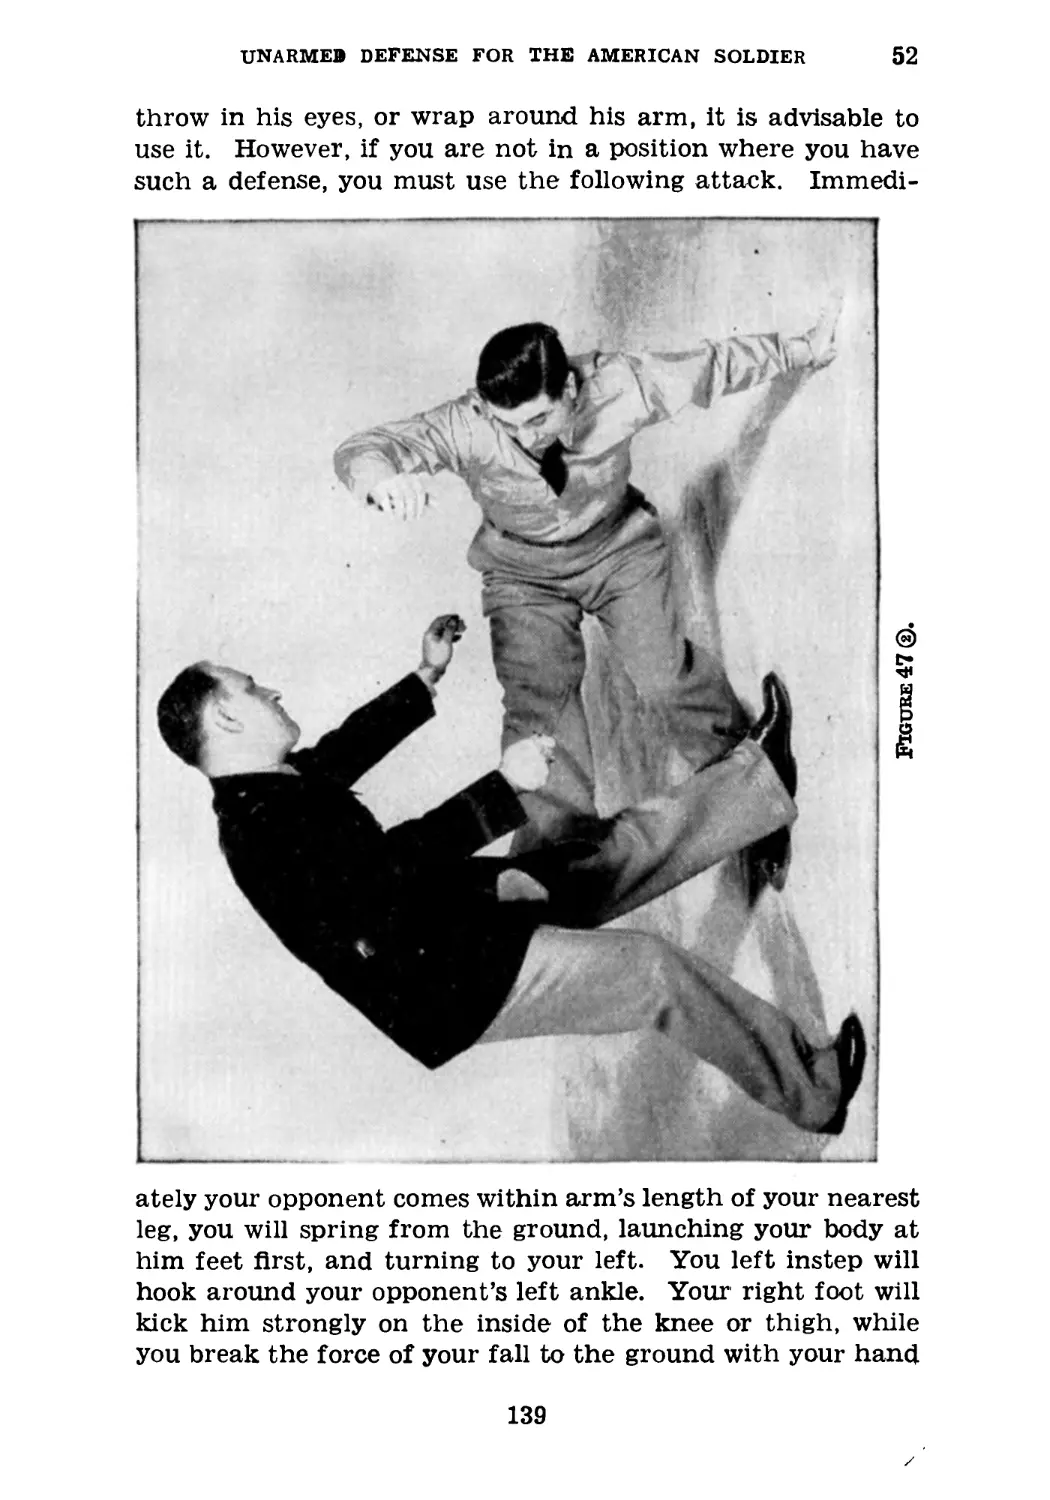
such a defense, you must use the following attack. Immedi-
ately your opponent comes within arm’s length of your nearest
leg, you will spring from the ground, launching your body at
him feet first, and turning to your left. You left instep will
hook around your opponent’s left ankle. Your right foot will
kick him strongly on the inside of the knee or thigh, while
you break the force of your fall to the ground with your hand
139
52-53
BASIC FIELD MANUAL
or arm (fig. 47 ®). This scissoring motion done rapidly and
taking your opponent by surprise will drop him on his back.
The best he can possibly do with his knife is cut at your feet
or lower leg. Immediately you both strike the ground, you
will raise your right foot and bring your heel viciously into his
groin or midsection (fig. 47 ®).
53. Lunge With the Sword.—An individual trained in the
use of the foil or epee will approach you in the manner illus-
140
UNARMED DEFENSE FOR THE AMERICAN SOLDIER
53
trated in figure 48 ®. While swords are not used to any great
extent in modern warfare, the opportunity might present it-
self when you will have the need for this defense. As your
opponent lunges with the sword, with the point aimed at your
midsection, you execute the sideward movement of the body,
previously described, to the right, at the same time tapping
the blade of the attacking weapon smartly with either your
forearm or wrist (the weapon should not be grasped with the
463187°-—42----10
141
53-54
BASIC FIELD MANUAL
hand (fig. 48 ©). Immediately you have tapped the sword
aside, you will take a short step with your left foot and imme-
diately raise your right leg, kicking your opponent behind the
Figure 48
knee joint forcibly, at the same time that you bring the heel
of your right hand against your opponent’s chin (fig. 48 ®).
54. Defense Against Straight Saber Cut.—The average sa-
berman will attempt the downward cut illustrated in figure
142
UNARMED DEFENSE FOR THE AMERICAN SOLDIER
54
49 ®. Your immediate action is to step as close to your op-
ponent as possible, bringing your left forearm against his strik-
ing arm (fig. 49 ®). Immediately you have broken the force
Figure 48 ®.
of the blow, raise your right knee and your right hand simul-
taneously. The fingers of your right hand, palm uppermost,
will be brought with great force into your opponent’s solar
Plexus while your knee is simultaneously brought into his
groin (fig. 49 ®).
143
55
BASIC FIELD MANUAL
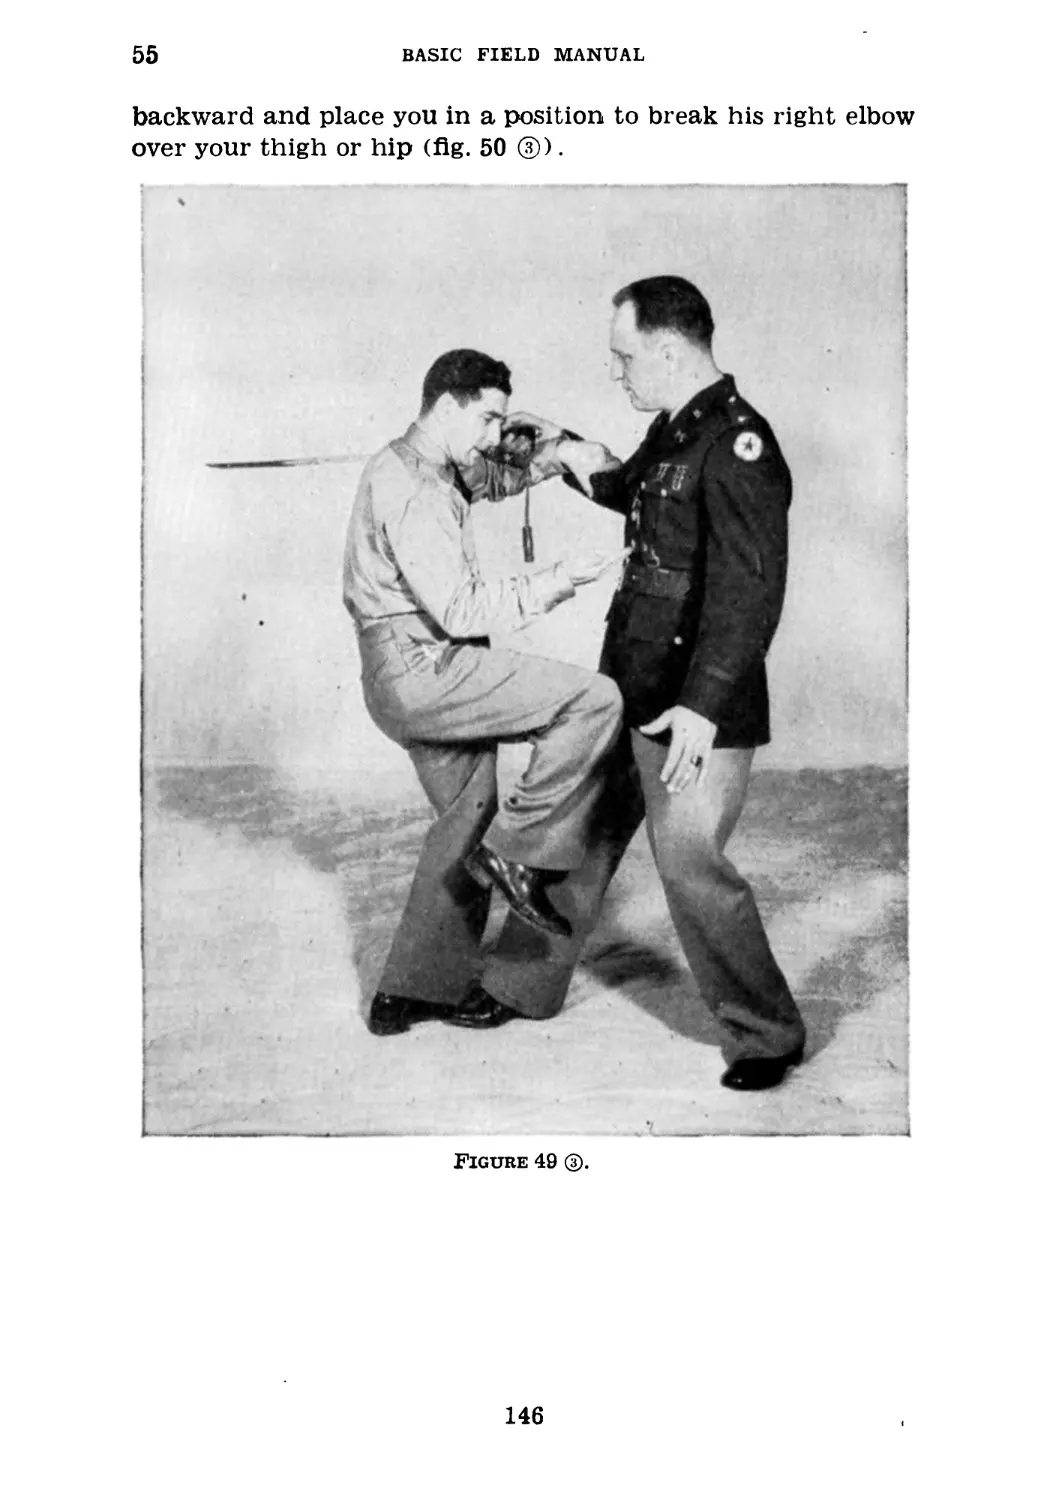
55. Defense Against Cross-cut With Saber.—It is unusual
for a trained individual to attempt a cut illustrated in figure
50 ©, but if the attempt is made, you will step with your
Figure 49 ф.
right leg and present your right forearm against your op-
ponent’s striking arm. You will make no attempt to stop the
blow directly, but will continue its momentum in the direction
in which it is moving, stepping to your opponent’s right rear
with your left leg, and reaching over his left shoulder with
144
UNARMED DEFENSE FOR THE AMERICAN SOLDIER
55
your left hand (fig. 50 ®). You will now be in a position
behind your opponent, grasping his wrist with the palm
turned away from your body. Grasp his right lapel with your
Figure 49
left hand, crossing over the front of your opponent’s throat.
Simultaneously, raise your right leg and placing the sole of
your foot against the back of your opponent’s right knee
joint push strongly. This action will topple your opponent
145
55
BASIC FIELD MANUAL
backward and place you in a position to break his right elbow
over your thigh or hip (fig. 50 ®).
Figure 49 ®.
146
UNARMED DEFENSE FOR THE AMERICAN SOLDIER
55
Figure 50
147
55
BASIC FIELD MANUAL
Figure 50 ®.
148
UNARMED DEFENSE FOR THE AMERICAN SOLDIER
55
Figure 50
149
56
BASIC FIELD MANUAL
Section IX
DEFENSES AGAINST BLOWS WITH CLUB, AND TECH-
NIQUE OF CLUB
56. Defense Against Downward Blow With Club.—As
Figure 51 (T).
your opponent strikes a downward blow with the club, you
will present your left forearm against his right forearm in
150
UNARMED DEFENSE FOR THE AMERICAN SOLDIER
56
the manner illustrated in figure 51 ®. You will make no
attempt to stop the blow directly, but rather deflect it to your
left so as to enable you to wrap your left arm around his
Figure 51 ®.
right one, bringing your wrist under his right elbow (fig.
51 ®). Your further action is to place your right hand on
your opponent’s shoulder or upper arm and lock your left
hand on your own forearm (fig. 51 @). You are now in a
151
56-57
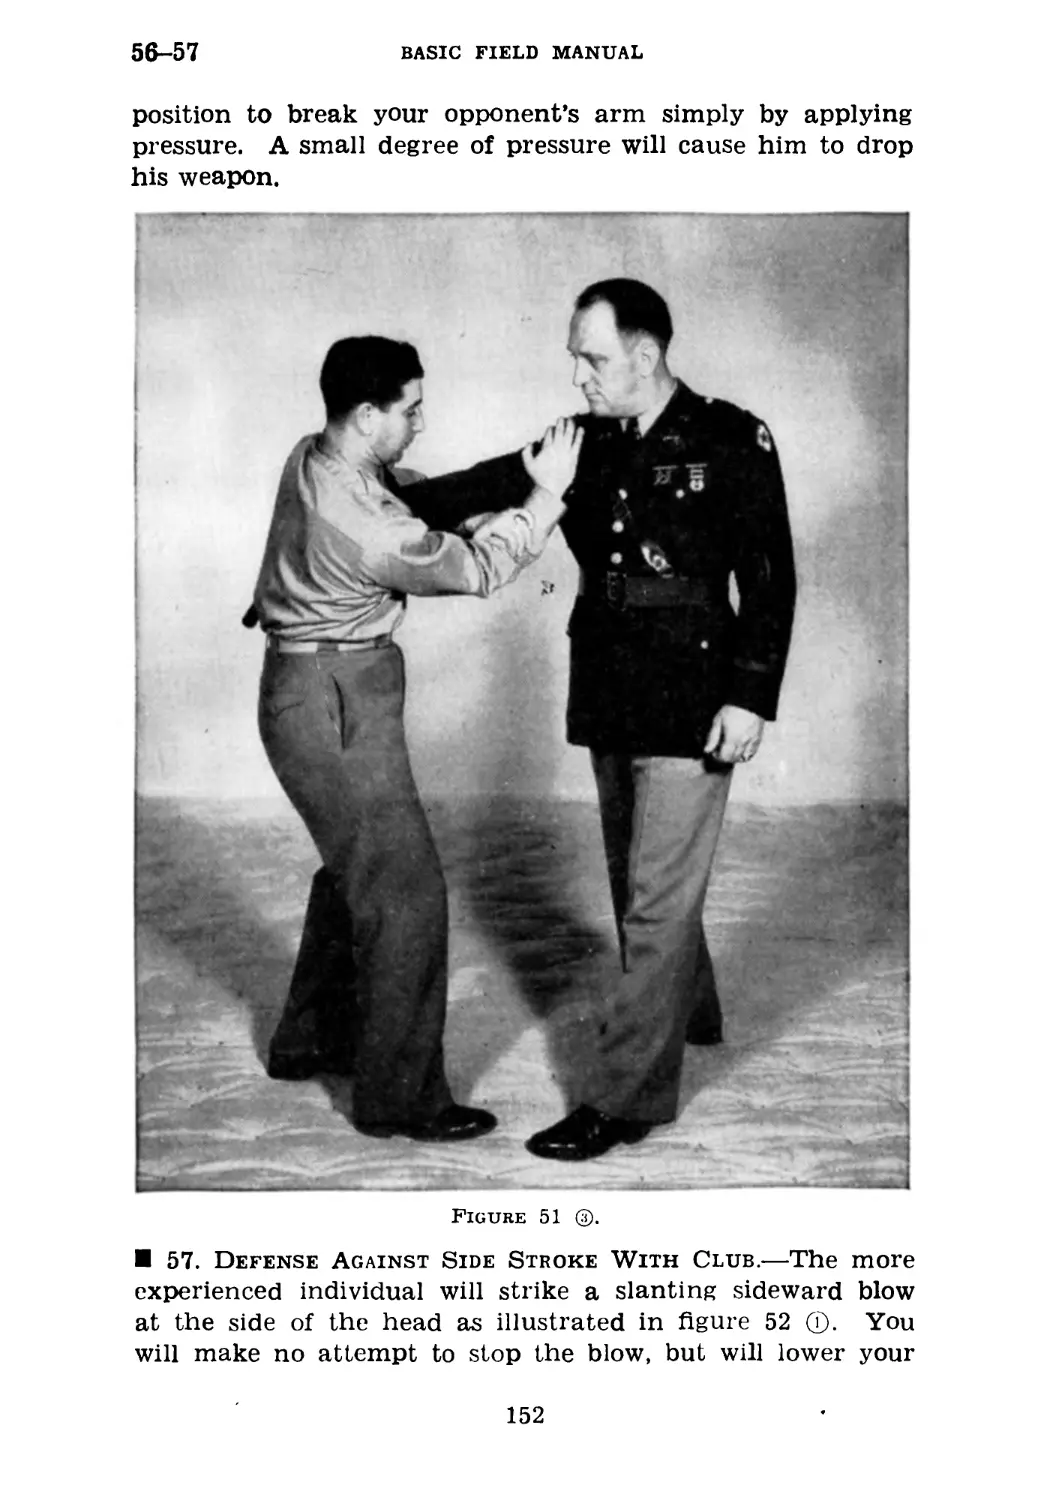
BASIC FIELD MANUAL
position to break your opponent’s arm simply by applying
pressure. A small degree of pressure will cause him to drop
his weapon.
Figure 51 ®.
57. Defense Against Side Stroke With Club.—The more
experienced individual will strike a slanting sideward blow
at the side of the head as illustrated in figure 52 ф. You
will make no attempt to stop the blow, but will lower your
152
UNARMED DEFENSE FOR THE AMERICAN SOLDIER
57
head out of range by bending the knees, at the same time
reaching upward with your left hand or arm (without grasp-
ing your opponent’s club arm) and striking your opponent’s
Figure 52 (T).
forearm, continuing its momentum over your head (fig. 52 ®).
This will turn your opponent completely off balance. You
will now take a long step with your right leg to your oppo-
nent’s right, at the same time twisting your body to your
153
57-58
BASIC FIELD MANUAL
left and raising your right arm shoulder-high with the back
of your body and shoulders. Your elbow will make contact
in the soft spot on your opponent’s side between the hip bone
Figure 52 ®.
and the short ribs (fig. 52 ®). A man struck in this manner
will drop as though shot.
58. How To Hold Club.—The club, when it is carried, should
be used only with the left hand. The thong should be of a
154
UNARMED DEFENSE FOR THE AMERICAN SOLDIER
58
length suited to the hand of the individual who is to use it.
In wrapping the thong around the hand or arm, the following
procedure should be followed. The thumb is first hooked
Figure 52 ©.
through the loop of the thong (fig. 53 ®). The thong is
then brought over the back of the hand (fig. 53 ®), and the
handle of the club brought up from the little finger edge and
then grasped by the hand with the grip illustrated in figure
155
58
BASIC FIELD MANUAL
53 ®. The club should not be used as a bludgeon except in
dire necessity, but should be used as an extension of the
arm. It is a much more effective weapon if it is used to jab
Figure 53 ®.
rather than to strike. Practice in using the club in this
manner will render it very effective as a defense against attack
by many types of weapons. It can then be used in parrying
blows or turning aside thrusts in the same manner as the
156
UNARMED DEFENSE FOR THE AMERICAN SOLDIER 58-59
fencer uses the foil. When it is necessary to stop a charging
opponent or to subdue a recalcitrant individual, a jab to the
solar plexus is extremely efficient (fig. 54 ©). If your oppo-
Figure 53 ®.
nent is so close as to render the body jab impractical, the
chin or throat jab is equally effective (fig. 54 ®).
59. Where To Strike if Necessary.—If an opponent or
opponents are moving in and you do not wish to damage
463187°—42----11
157
59
BASIC FIELD MANUAL
them severely, their desire for combat can often be cooled
by the blow to the wrist or hands (fig. 55 ®), or by the blow
to the shin (fig. 55 ®). If it becomes necessary to put a dan-
Figure 53 ®.
gerous antagonist out of action, the blow to the side of the
throat just under the jaw line (fig. 55 ®), is efficient without
being dangerous. The backhand blow to the opposite side of
the throat (fig. 55 ®), is equally effective.
158
UNARMED DEFENSE FOR THE AMERICAN SOLDIER
60
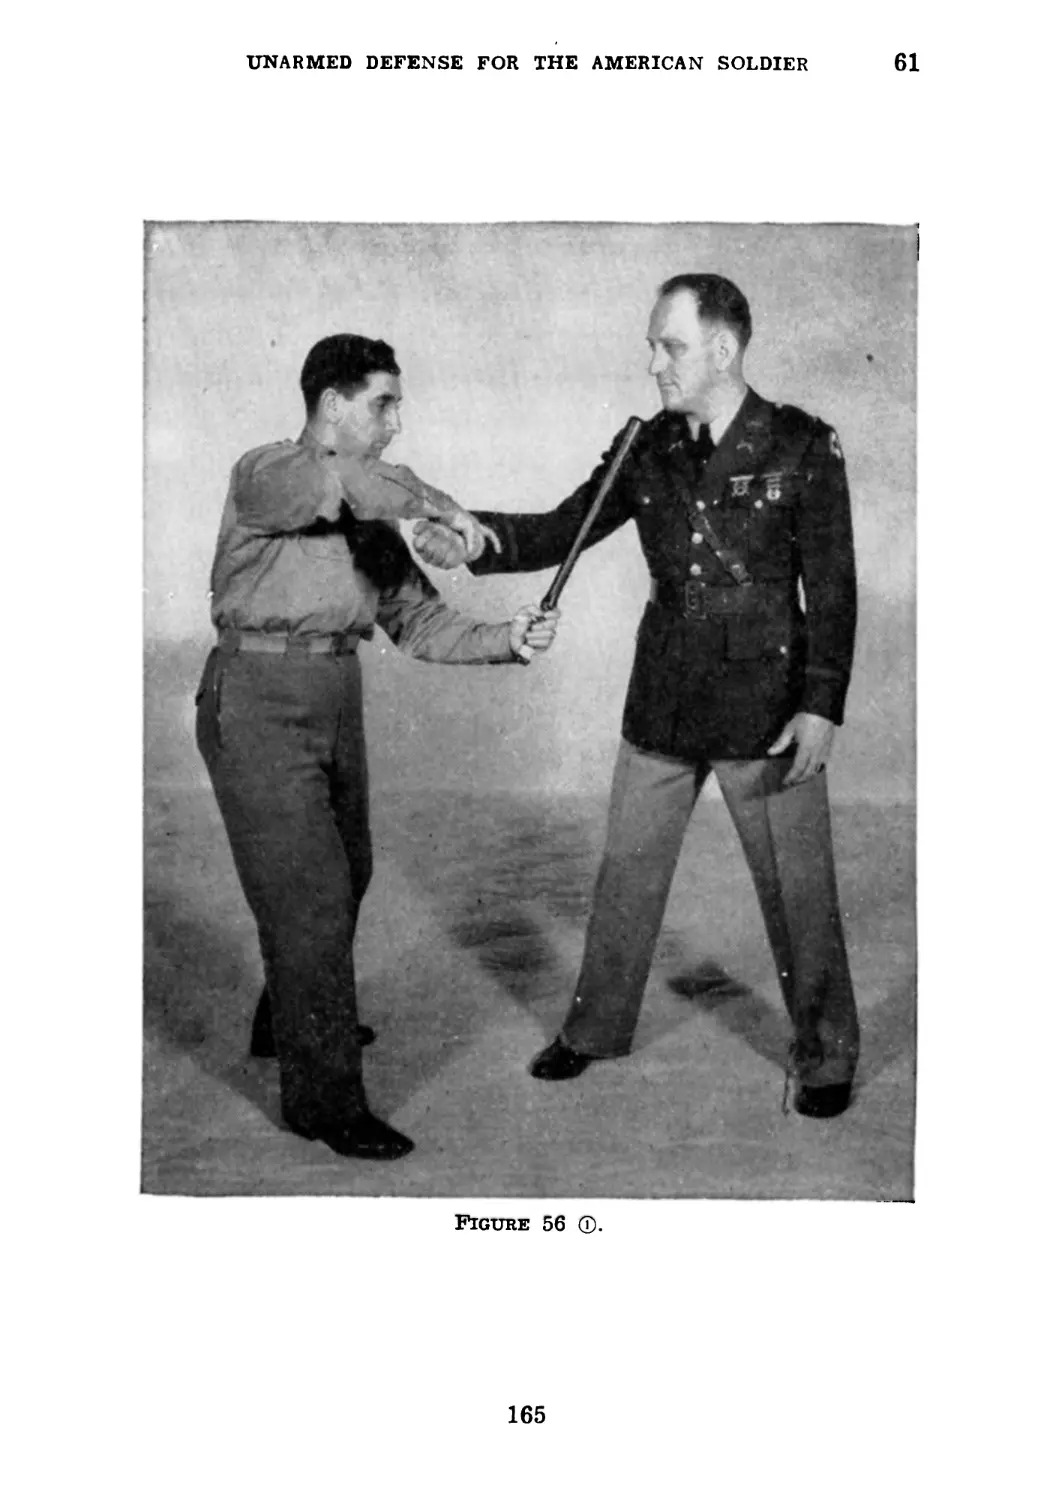
60. Using Club as Come-Along.—The most efficient use of
the club is its use as an adjunct in taking a man prisoner
without causing him bodily harm. The club is still in the
Figure 54 ®.
left hand. Your right hand grasps your opponent’s right
wrist, and lifting his arm slightly, the club is thrust under
his arm (fig. 56 ®), over his shoulder with its end lodged
just behind your opponent’s neck (fig. 56 ®). Your hand
159
60
BASIC FIELD MANUAL
grasping the hilt of the night stick should be just behind your
opponent’s upper arm with your thumb against his ulna nerve
two inches above the elbow. Pressure is applied downward
Figure 54 @.
and backward with your right hand on your opponent’s right
wrist. Your opponent will be forced to his toes by the pain.
However, he will be in no danger of having his arm broken
(fig. 56 ®).
160
UNARME0 DEFENSE FOR THE AMERICAN SOLDIER
61
61. Using Club as Handcuff.—You have utilized the stand-
ard procedure of searching a prisoner, placing his hands
against the wall and causing him to extend his legs as far to
Figure 55 ®.
the rear as possible. Since he is dangerous, you now wish to
secure him in such a manner as to enable you to march him
where you will. You will place your right foot just inside of
your opponent’s right foot in order to be in position to drop
him to the ground if he becomes belligerent, and order him
161
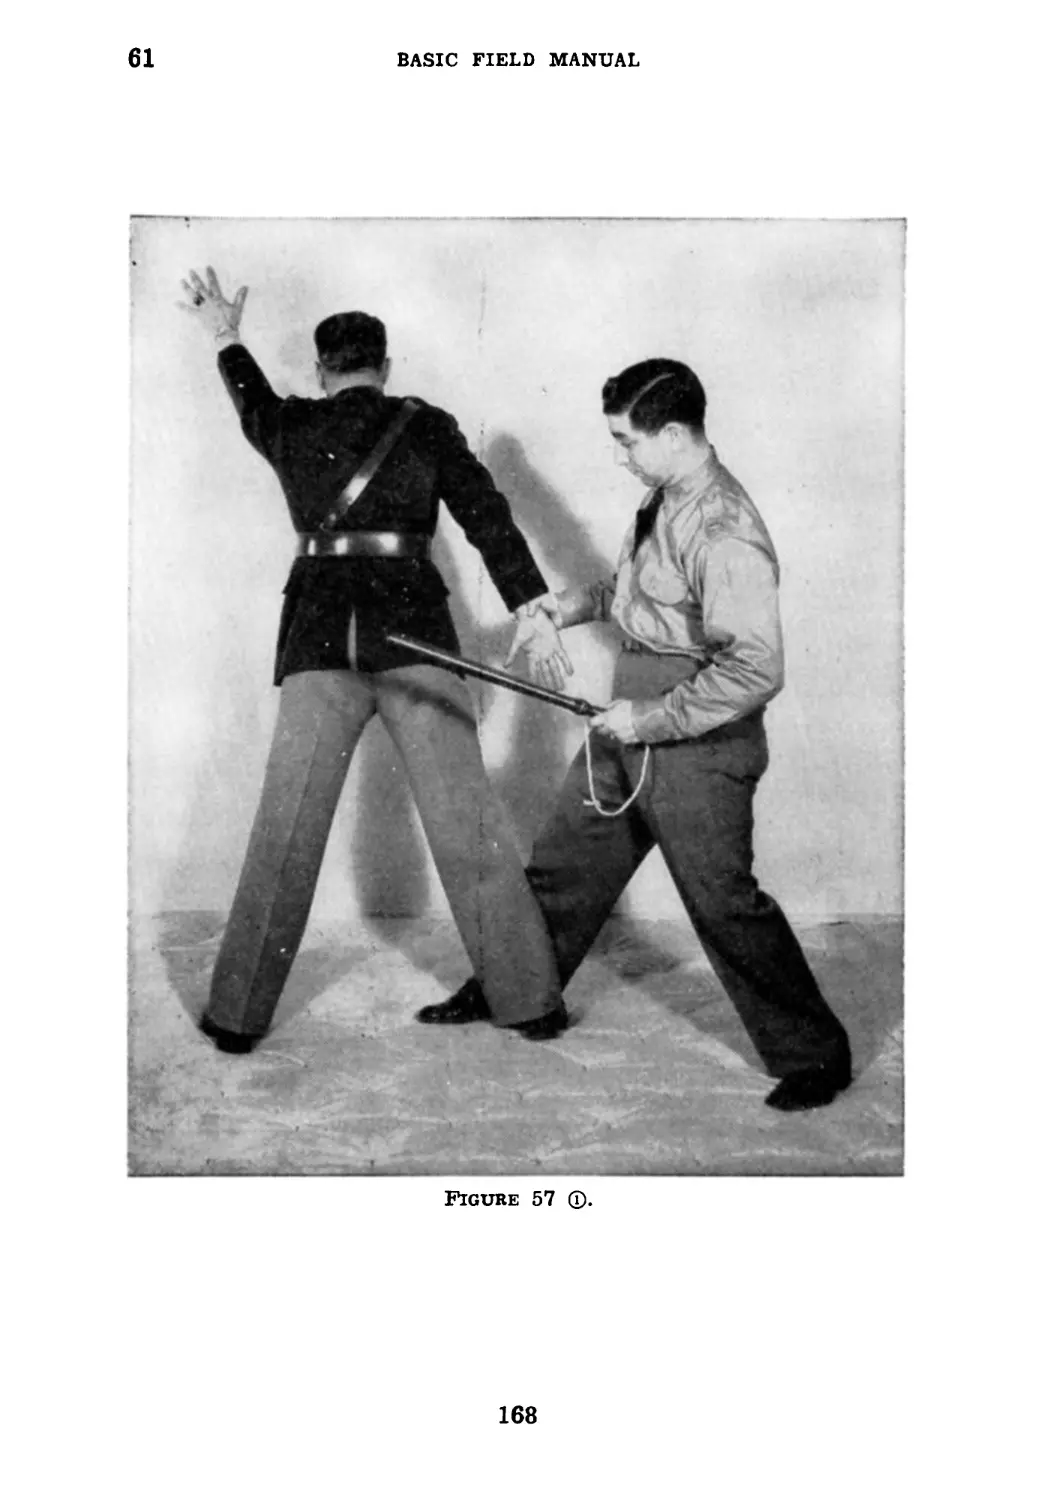
61
BASIC FIELD MANUAL
to bling his right wrist backward, at which time you will
grasp it with your right hand (fig. 57 ®). Now place one
loop of the thong of your club over his right wrist and bend
Figure 55 ®.
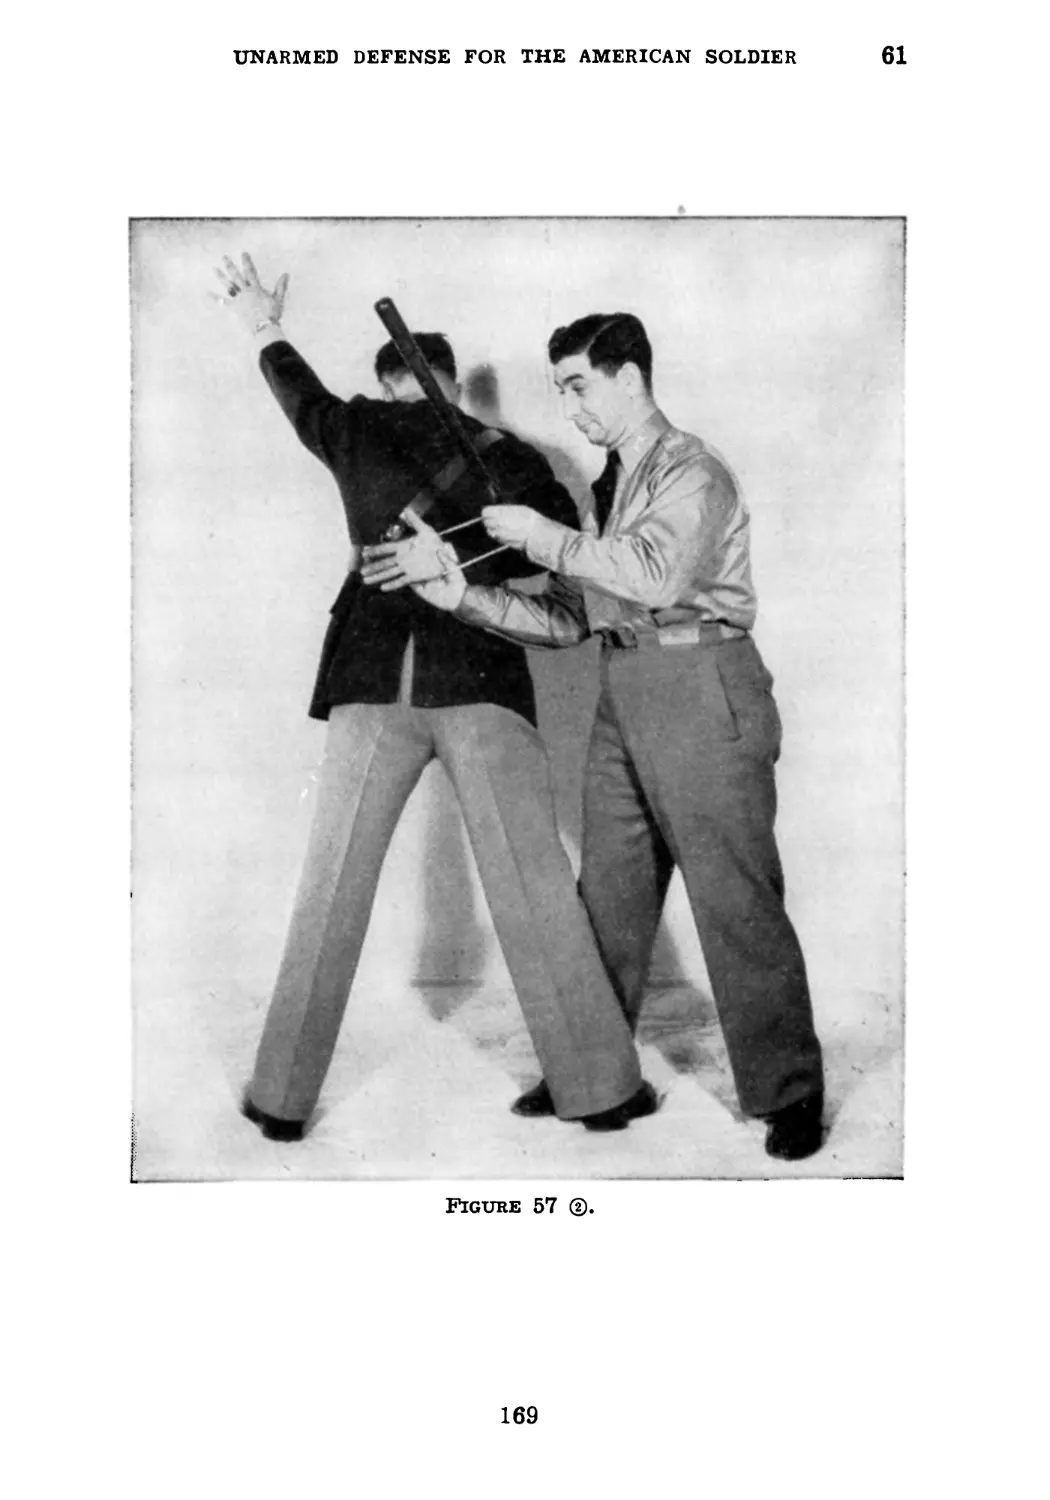
his right arm at right angles up his back (fig. 57 ®). Order
him to place the top of his head against the wall and to
bring his left arm backward. If he fails to obey this order, a
slight push on his right arm up his back will change his mind.
162
UNARMED DEFENSE FOR THE AMERICAN SOLDIER
61
When he does bring back the left arm, you will insert that
hand through the thong also (fig. 57 ®). You will now slip
the handle of the club as close to your opponent’s body as pos-
Figure 56 ®.
sible with the long part of the club extending up the back
almost to the neck. Grasping the hilt of the club (fig. 57 @),
you will be in position to march your prisoner where you will.
163
61
BASIC FIELD MANUAL
Figure 56 ®.
164
UNARMED DEFENSE FOR THE AMERICAN SOLDIER
61
Figure 56
165
61
BASIC FIELD MANUAL
Figure 56 ®.
166
UNARMED DEFENSE FOR THE AMERICAN SOLDIER
61
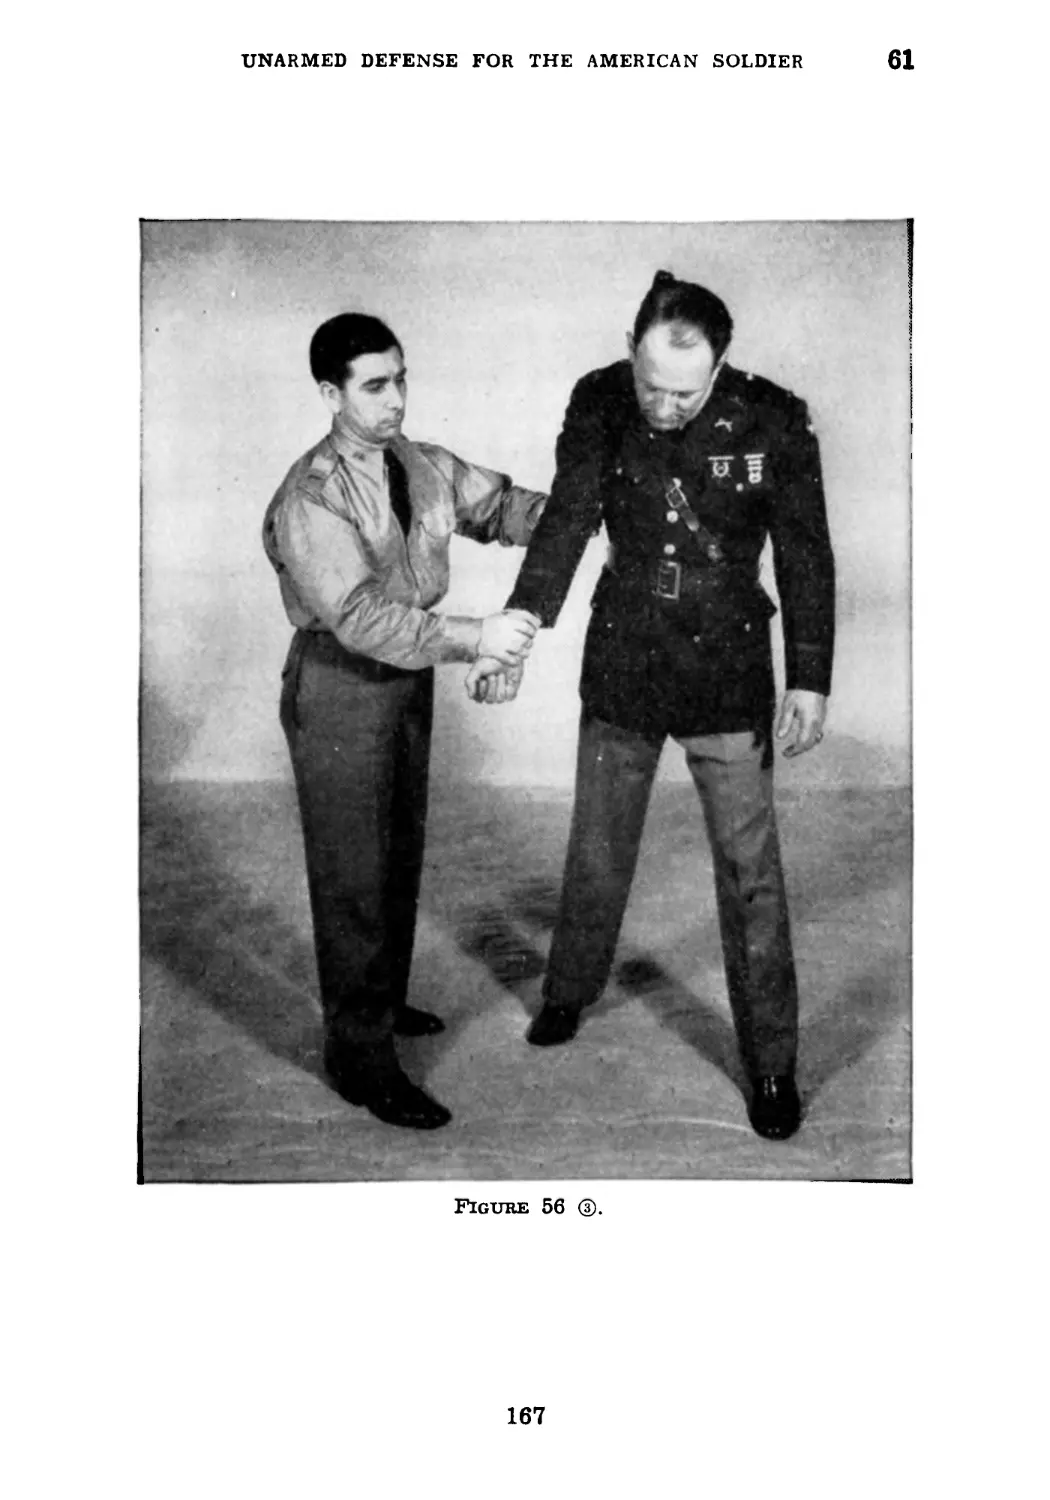
Figure 56
167
61
BASIC FIELD MANUAL
Figure 57 ®.
168
UNARMED DEFENSE FOR THE AMERICAN SOLDIER
61
Figure 57 ®.
169
61
BASIC FIELD MANUAL
Figure 57 ®.
170
UNARMED DEFENSE FOR THE AMERICAN SOLDIER
61
Figure 57
171
62
BASIC FIELD MANUAL
Section X
DEFENSES AGAINST PISTOL
62. Defense Against Gun in Front.—Your opponent orders
Figure 58 ф.
you to raise your arms as illustrated in figure 58 ф. Note
that while the hands are raised, the elbows are maintained as
low as possible. You immediately use your side body pivot
172
UNARMED DEFENSE FOR THE AMERICAN SOLDIER
62
as previously described and strike your opponent’s wrist with
your left forearm (fig. 58 ®). You will immediately grasp the
barrel of the gun, assuring yourself that your hand is not
Figure 58 ®.
near the muzzle, and at the same time push downward on your
opponent’s right wrist (fig. 58 ®). By maintaining pressure
with your left hand, you will now have excellent fulcrum with
463187 -42
12
173
62-63
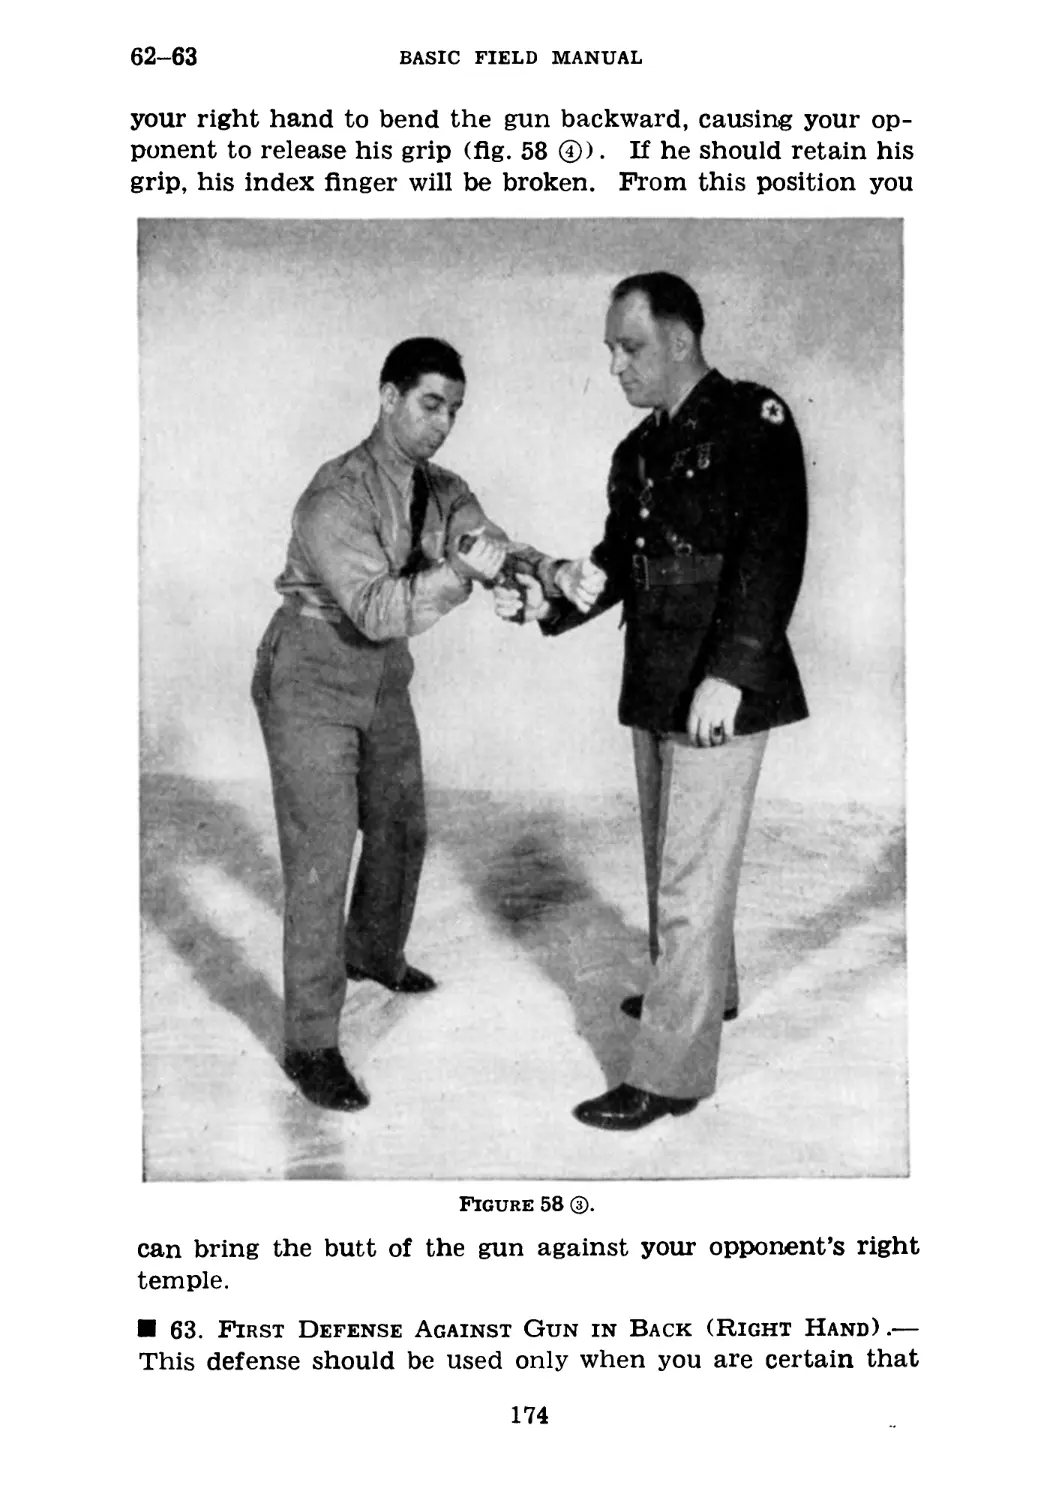
BASIC FIELD MANUAL
your right hand to bend the gun backward, causing your op-
ponent to release his grip (fig. 58 @). If he should retain his
grip, his index finger will be broken. From this position you
Figure 58 ®.
can bring the butt of the gun against your opponent’s right
temple.
63. First Defense Against Gun in Back (Right Hand) .—
This defense should be used only when you are certain that
174
UNARMED DEFENSE FOR THE AMERICAN SOLDIER
63
the gun is in your opponent’s right hand (fig. 59 ©). Also note
that again the elbows are as close to the waist as possible,
even though the hands are elevated. You again execute the
Figure 58 ®.
body side twist, at the same time bringing your elbow against
your opponent’s forearm (fig. 59 ®). Note that the feet have
not moved. The right arm is then brought under your op-
ponent’s right forearm and placed on his elbow joint in such
175
63
BASIC FIELD MANUAL
a manner that his forearm rests in the crook of your right
elbow (fig. 59 ®). You will now place your left hand on top
of your right and bend swiftly from the waist. This will bring
Figure 59
your opponent to the ground and force him to drop his weapon
(fig. 59 ®).
176
UNARMED DEFENSE FOR THE AMERICAN SOLDIER
64
64. Second Defense Against Gun in Back (Right Hand) .—
In this defense also you must be sure that your opponent is
holding the gun in his right hand. The gun is again some-
Figure 59 (5).
where in the lower back. Your side twist this time is to the
left instead of to the right, striking your opponent’s wrist
or forearm with your left elbow (fig. 60 ®). Your left arm
is then wrapped behind your opponent’s right elbow and
177
64
BASIC FIELD MANUAL
pressed on his upper arm with his wrist near your shoulder
or neck (fig. 60 ®). You will then grasp your left hand with
your right one and press your left forearm against your
Figure 59 @.
opponent’s right elbow. A swift twist to the front will bring
your opponent to the ground, and if carried to extremes, will
break his arm. Note that during the entire operation, the
muzzle of the gun is always safely pointed elsewhere (fig.
60 ®).
178
UNARMED DEFENSE FOR THE AMERICAN SOLDIER
65
65. Third Defense Against Gun in Back (Left Hand).—
This defense is equally effective when the gun is held in either
your opponent’s right or left hand. It does not make any
Figure 59 ®.
difference whether you know in what hand it is held since
your initial move is the same. The description here will be
given for the gun held in the left hand, but the action can be
duplicated for the right. Figure 61 ® illustrates the original
179
65
BASIC FIELD MANUAL
hold-up. The body side twist is executed to the right. Your
right elbow strikes your opponent’s hand or wrist (fig. 61 ®).
You then pivot to the right, and placing your left hand or
Figure 60 ©.
wrist against your opponent’s left wrist and grasping the
barrel of the gun with your right hand, palm upward, you
will bring pressure to bear on his hand and trigger finger
by pushing the barrel toward his elbow. This will release his
180
UNARMED DEFENSE FOR THE AMERICAN SOLDIER 65-66
hold on the pistol and possibly break the captured index
finger (fig. 61 ®). You will now have the gun in your pos-
session and opposite your left shoulder. By reversing strongly
Figure 60 ®.
to the right, you can strike the gunman on the chin or neck
with the butt of the pistol (fig. 61 ©).
66. First Defense Against Gun in Back of Neck (Right
Hand) .—This defense is practical only when you are certain
181
66
BASIC FIELD MANUAL
that the gun is held in your attacker’s right hand. Note that
in raising the arms, the elbows are this time shoulder-high
(fig. 62 ©). The body pivot is executed to the left, your left
Figure 60
arm coming under your attacker’s right elbow (fig. 62 ®).
You then reach across with your right hand and grasp your
own left hand. Twisting forward and bringing pressure to
bear on your opponent’s elbow with your left forearm, you
182
UNARMED DEFENSE FOR THE AMERICAN SOLDIER 66-67
can either break the arm or force him to the ground, causing
him to release his weapon, which is safely cuddled behind
your neck (fig. 62 ®).
Figure 61
67. Second Defense Against Gun in Back of Neck (Right
Hand) .—This defense is primarily for an attack with the gun
held in the right hand. However, the initial movement can
be used for right or left hand. Therefore, the first movement
183
67
BASIC FIELD MANUAL
of the defense will be executed even if you do not know in
which hand your attacker is holding the pistol. Note that
the elbows are held shoulder-high (fig. 63 ®). The body pivot
Figure 61
is executed to the right; at the same time, your right upper
arm comes over your opponent’s right wrist (if the gun should
be in your opponent’s left hand, it would come over his left
184
UNARMED DEFENSE FOR THE AMERICAN SOLDIER
67
wrist) (fig. 63 ®). You pivot on your right foot and your
left foot steps close to your opponent’s right foot. Your right
upper arm holds your opponent’s wrist close to your right
Figure 61 (S).
side. Your left arm is crossed under your opponent’s right
upper arm, and your left hand grasps his left lapel. By grasp-
ing his right wrist close to your side and lifting with your left
185
67-68
BASIC FIELD MANUAL
upper arm, pressure is brought to bear on your opponent’s
right elbow, bringing him to his toes and enabling you to
march him where you will (fig. 63 ®).
Figure 61 ©.
68. Third Defense Against Gun in Back of Neck (Left
Hand) .—Note that again the elbows are carried shoulder-high
(fig. 64 ®). The initial movement in this defense is identical
186
UNARMED DEFENSE FOR THE AMERICAN SOLDIER
68
with that in figure 63 ®. The body twist is executed toward
the right and the right arm is brought over your opponent’s
left wrist (fig. 64 ®). You now pivot on your right foot, and
Figure 62 Q.
placing your left hand against your opponent’s shoulder or
upper arm, you bring your right forearm or wrist under your
opponent’s left elbow and lock it on your own left forearm.
187
68-69
BASIC FIELD MANUAL
It is now a simple matter to apply the pressure swiftly to cause
your attacker to drop his weapon. Severe pressure will result
in a broken arm.
Figure 62 ®.
69. Helping a Friend in Need.—You are standing behind a
gunman who has held up a friend, but who is unaware of your
presence (fig. 65 ©). Note that as you approach from the
188
UNARMED DEFENSE FOR THE AMERICAN SOLDIER
69
rear, your right hand is carried low, and your left one shoul-
der-high. When you place your hands on your opponent ,
both hands must grasp simultaneously. The right hand, palm
Figure 62
up, lifts on your opponent’s hand while your left hand is
pressed behind his right upper arm and pushes (fig. 65 ®).
By continuing pressure against the upper arm with your left
hand and by turning your body to the left and continuing
463187°—42----13
189
69-70
BASIC FIELD MANUAL
pressure to your opponent’s rear against his right hand, you
can topple him to the ground or dislocate his shoulder (fig.
65 ®).
Figure 63 ф.
70. Defense Against Individual Who Is Holding You and
Partner at Point of Gun.—Your original position is illustrated
in figure 66 ®. The gunman is moving the muzzle of the gun
slowly from your friend to yourself and back again. He is
190
UNARMED DEFENSE FOR THE AMERICAN SOLDIER
70
attempting to keep you both covered. As the gun swings away
from you, step forward with your left foot, and placing your
hand on the back of the attacker’s gun hand, push strongly to
Figure 63 ®.
his left (fig. 66 ®). Now take a step with your right foot, fol-
lowed by a quick long step with your left one, at the same time
twisting the captured hand to your opponent’s left, turning it
in such a manner that his palm will be turned uppermost and
191
70
BASIC FIELD MANUAL
your left armpit will be brought in contact with his right
elbow. By bearing down on the right elbow with your armpit
and lifting up on the captured hand, excruciating pain is
Figure 63 ®.
brought to bear on the gun arm. This will cause him to release
his weapon or failing to do so, you will have to break his arm
(fig. 66 ®).
192
UNARMED DEFENSE FOR THE AMERICAN SOLDIER
70
Figure 64
193
70
BASIC FIELD MANUAL
Figure 64
194
UNARMED DEFENSE FOR THE AMERICAN SOLDIER
70
Figure 64 ®.
195
70
BASIC FIELD MANUAL
Figure 65 <1 .
196
UNARMED DEFENSE FOR THE AMERICAN SOLDIER
70
Figure 65 ®.
197
70
BASIC FIELD MANUAL
Figure 65 ®.
198
UNARMED DEFENSE FOR THE AMERICAN SOLDIER
70
Figure 66 ©.
199
70
BASIC FIELD MANUAL
Figure 66 ®.
200
UNARMED DEFENSE FOR THE AMERICAN SOLDIER
70
Figure 66 ®.
201
71
BASIC FIELD MANUAL
Section XI
DEFENSES AGAINST RIFLE
71. Defense Against Rifle in Front.—Figure 67 ® illus-
Figure 67 ф.
trates the hold-up. At his order of “Hands up,” you start to
obey. As your hands reach the level of your shoulders, you
202
UNARMED DEFENSE FOR THE AMERICAN SOLDIER
71
immediately execute the body twist to the right as previously
described and strike the muzzle of the rifle away from your
body with your left forearm or wrist (fig. 67 ®). You imme-
Figure 67 ®.
diately follow this movement by stepping forward with your
left foot, grasping the rifle over your opponent’s left hand
with your right one, and grasping his right hand with your
left one, thus preventing him from following through with
203
71
BASIC FIELD MANUAL
a butt stroke (fig. 67 ®). You are now in excellent position
to apply leverage, pulling with your left hand and pushing
with your right one, at the same time stepping to your oppo-
hIGURE 67 (3).
nent’s right with your own right foot. This will take him
off balance and at the same time enable you to strike him
on the head with the muzzle of the rifle (fig. 67 ®).
204
UNARMED DEFENSE FOR THE AMERICAN SOLDIER \72
72. Defense AgaInst Rifle in Back.—Figure 68 ® illus-
trates a man holding you up with a rifle in your back. You
start to elevate your hands as ordered, and when your hands
Figure 67
reach shoulder height, you execute the side twist to the right,
bringing your elbow back so as to strike the muzzle of the rifle.
This will deflect it away from your body. Your feet are not
moved from their original position. All the twist is made
463187 - 42----14
205
72
BASIC FIELD MANUAL
from the hips or waist (fig. 68 ®). You now pivot on your
right foot and turn to the right, facing your opponent. Your
right arm wraps under the rifle and over your opponent’s
Figure 68 ь.
left wrist while your left hand is placed on your opponent’s
right hand where it grasps the stock. This action will prevent
his using the butt stroke (fig. 68 ®). You now pull with your
206
UNARMED DEFENSE FOR THE AMERICAN SOLDIER
73
left hand and push with your right shoulder and right arnL
forcing your opponent to the ground and causing him to*
release the rifle (fig. 68 @).
Figure 68 ®.
73. Defense Against Long Lunge With Bayoneted Rifle.—
Figure 69 ® depicts an unarmed man facing a man armed
with a rifle and bayonet. As your attacker executes the long
207
BASIC FIELD MANUAL
73 /
/
Itmge, you execute the body side twist to the right; at the
same time strike either the bayonet or the muzzle of the rifle
with your wrist or forearm, deflecting it from your body
Figure 68 (3).
(fig. 69 ®). Immediately the bayonet passes your body»
take a step forward with your left foot and grasp either the
bayonet hilt and muzzle or the stock of the rifle over your
208
UNARMED DEFENSE FOR THE AMERICAN SOLDIER \ 73
opponent’s left hand, at the same time as you grasp his righ^
hand with your left one where he grasps the stock (fig.^
69 ®). Your next action is to pull with your left hand toward
Figure 68 ©.
your body, at the same time as you push upward and back-
ward against the rifle with your right hand, simultaneously
balancing on your left foot and kicking your attacker behind
his right knee joint with the calf of your right leg (fig. 69 ®).
209
73-74
BASIC FIELD MANUAL
Your attacker loses the rifle and, as he falls, you step back-
ward, turning the rifle so that the blade of the bayonet is in
a horizontal position. This will simplify the entrance of the
bayonet between your attacker’s ribs when you follow through
with a lunge of your own (fig. 69 @).
74. Defense Against Short Lunge With Bayoneted
Rifle.—This attack is launched from closer range than the
former one. The defense may be the same as for the long
210
UNARMED DEFENSE FOR THE AMERICAN SOLDIER
74
lunge with the bayonet. However, this is an additional de-
fense that may be better suited to some individuals. The
side body twist is executed to the left, at the same time that
the right forearm or wrist is brought against the barrel of
the rifle, deflecting the bayonet from your body (fig. 70 ф).
As soon as the bayonet has passed your body, grasp your
opponent’s left hand where it grasps the stock with your
right hand, at the same time as you take a long step to your
opponent’s right, reaching under the rifle with your left hand
211
74
BASIC FIELD MANUAL
and pressing your left shoulder against the stock. Your right
hand will then grasp over his right hand where it grasps the
small of the stock (fig. 70 ®). You now pull with your left
hand and push with your right one at the same time as you
balance on your left foot and strike your attacker with great
force with the calf of your right leg behind the knee joint
of his right leg (fig. 70 @). Your opponent will fall to the
ground, losing his grasp on the rifle. Retaining your grasp
212
UNARMED DEFENSE FOR THE AMERICAN SOLDIER
74
on the rifle, you will take one step backward and present the
bayonet blade on a horizontal plane in position for a short
lunge between your opponent’s ribs (fig. 70 ®).
Figure 69
213
74
BASIC FIELD MANUAL
Figure 69
214
UNARMED DEFENSE FOR THE AMERICAN SOLDIER
74
Figure 70 (j).
?15
74
BASIC FIELD MANUAL
Figure 70
216
UNARMED DEFENSE FOR THE AMERICAN SOLDIER
74
Figure 70
217
74
BASIC FIELD MANUAL
Figure 70
218
UNARMED DEFENSE FOR THE AMERICAN SOLDIER
75
Section XII
DEFENSES AGAINST WRESTLING HOLDS
75. First Defense Against Headlock From the Side.—Fig-
Figure 71 rD.
ure 71 ф illustrates the manner in which your opponent will
grasp you around the head, locking it close between his arm
219
75
BASIC FIELD MANUAL
and chest. You immediately bend your left knee, bringing
your knee cap against the back of your opponent’s right knee
joint, causing his knee to buckle; at the same time you draw
Figure 71 ®.
down on his right wrist with your left hand and pull to the
right with your right hand grasping his right upper arm, thus
making a small space through which to draw your head (fig.
71 ©). Immediately you withdraw your head, bring your op-
220
UNARMED DEFENSE FOR THE AMERICAN SOLDIER
75
ponent’s right wrist behind his back with the pressure of your
left wrist or hand, then slide your left hand and forearm
between the back of your opponent’s wrist and grasp it on
Figure 71
the top and rear of his right shoulder. His arm will then be
locked in the manner illustrated in figure 71
463187°—42—--15
221
76
BASIC FIELD MANUAL
76. Second Defense Against Headlock From the Side.—
The original hold is the same as in the defense for the first
headlock. However, it is realized that it is not always possible
to make a sufficient opening between his arm and body
Figure 72 ®.
through which to withdraw your head. Therefore, in the sec-
ond defense, immediately you cause his knee to buckle in the
same manner as in the above defense, bring your left arm and
shoulder in front of your opponent’s right hip (fig. 72 ф).
222
UNARMED DEFENSE FOR THE AMERICAN SOLDIER 76-77
Since your attacker is now off balance, your remaining action
is to fall over backward, making sure that as you both strike
the ground you bring the weight of your left shoulder against
his abdomen. Immediately upon reaching the ground, your
left arm is raised and your elbow brought forcibly into your
attacker’s solar plexus (fig. 72 ®).
77. Defense Against Reverse Headlock.—When you are at-
tacked in the manner illustrated in figure 73 ®, your imme-
223
77
BASIC FIELD MANUAL
diate reaction- is to grasp your opponent’s right elbow with
your left hand and his right hand with your left hand, your
thumb placed on the back of your opponent’s right hand over
Figure 73 ф.
the center of his knuckles while the fingers of your right hand
are wrapped around the little finger edge of his hand. From
this position, the hand is turned toward the wrist, causing con-
siderable pain and loosening of the grip. From this position,
224
UNARMED DEFENSE FOR THE AMERICAN SOLDIER
77
place your right leg between both your opponent’s legs, at the
same time that you squat, balancing your weight on your left
foot. As you squat, the weight of your body pulls your op-
Figure 73 ®.
ponent down and forward, further loosening his grip. This
will enable you to bring the captured right hand up and
behind your opponent’s back as illustrated in figure 73 ©.
When you arise from this position, you are usually off balance
225
77
BASIC FIELD MANUAL
and will fall backward. You will increase the momentum of
your fall by pushing with your right foot and then kicking it
upward against your opponent’s right knee or into his crotch,
g
£
at the same time as you apply pressure on the captured right
hand. This will usually result in your attacker’s head being
crashed into the ground (fig. 73 ®). If he attempts a
rolling fall and thus avoids making contact with his head
against the ground, you will still retain your original grip
on arm and hand with which you can control him.
226
UNARMED DEFENSE FOR THE AMERICAN SOLDIER
78
78. Escape From Hammerlock.—Figure 74 ф illustrates a
hammerlock of a type from which it is very difficult to escape.
Your immediate reaction on realizing that an attacker is at-
Figure 74 (D.
tempting to place a hammerlock on you is to execute three
simultaneous actions. The knees are bent, your body is bent
from the waist, and the captured arm is extended in as straight
a line as possible (fig. 74 ®). This will free your arm from
227
78
BASIC FIELD MANUAL
its imprisonment. You immediately straighten your legs and
body and throw your extended right arm, which is probably
placed on your opponent’s left shoulder, and pass this arm
Figure 74 ®.
over the back of your attacker’s neck, at the same time as you
place your right foot to the right of your opponent’s right foot
and pointing in the same direction (fig. 74 ®). It is now a
simple matter to overbalance your opponent over your hips
228
UNARMED DEFENSE FOR THE AMERICAN SOLDIER 78-79
by simply pivoting to the left and pulling strongly with your
right arm across the back of his neck (fig. 74 ©).
79. Defense Against Flying Tackle.—It is usually a diffi-
Figure 74 @.
cult thing to avoid a flying tackle executed by a skilled athlete.
Your best defense is to permit him to get as close as possible
and then raise your knee quickly so as to bring your knee cap
in violent contact with some part of his face (fig. 75).
229
80
BASIC FIELD MANUAL
80. Defense Against Full Nelson.—Figure 76 ® illustrates
the hold known to the wrestling profession as the full nelson.
It is usually a dangerous hold when executed by a well-trained
wrestler. Your immediate reaction is to leap into the air, per-
mitting your weight to be supported by your attacker’s arms,
twist to the left, and bring your left leg behind your op-
ponent’s right leg (fig. 76 ®). Immediately upon striking the
ground behind your opponent, drive your right knee forcibly
against the back of your opponent’s right knee joint (fig. 76
230
UNARMED DEFENSE FOR THE AMERICAN SOLDIER 80-81
@), and immediately fall to add momentum to your left arm.
As you strike the ground, your left elbow makes contact with
your opponent’s throat or chin.
81. Defense Against Flying Mare.—Figure 77 (D illustrates
another hold well-known to the wrestling gentry. Apparently
in this illustration, the man being attacked is lost. Immedi-
ately you realize that your opponent is attempting a flying
mare, you bring the thumb of your free hand, which in this
case happens to be the left one, and dig deeply into the nerve
231
81
BASIC FIELD MANUAL
tissues just above your opponent’s hip bone (fig. 77 ®). While
this spot is not necessarily sensitive in all individuals, it will
cause loss of motor power in the legs of any person.
Figure 76 Cl
232
UNARMED DEFENSE FOR THE AMERICAN SOLDIER
81
Figure 76 (2).
233
81
BASIC FIELD MANUAL
Figure 76 ®.
234
UNARMED DEFENSE FOR THE AMERICAN SOLDIER
81
Figure 77 (Г).
235
81
BASIC FIELD MANUAL
Figure 77 ®.
236
UNARMED DEFENSE FOR THE AMERICAN SOLDIER
82
Section XIII
DEFENSES AGAINST GRIPS ON GARMENTS OR HAIR
82. Defense Against Collar Hold From Rear.—Figure 78 ф
Figure 78 ф.
illustrates the situation where your opponent has grasped your
collar from the rear with his right hand and is starting to
pull you backwards. As you feel the pull on the collar, do not
463187—42---16
237
82
BASIC FIELD MANUAL
attempt to resist it, but rather use it to help you in pivoting on
your left foot and turning to the right. As you turn, place
your left hand on the wrist of the attacking arm of your op-
Figure 78 ®.
ponent in order to prevent him from loosening his hold on
your collar (fig. 78 ®). In the same motion, strike the back
238
UNARMED DEFENSE FOR THE AMERICAN SOLDIER 82-83
of your opponent’s right knee joint with the calf of your right
leg simultaneously with a straight-arm blow with the heel of
your right hand against your opponent’s chin (fig. 78 ®).
Figure 78
83. Defense Against Hold on Belt.—Figure 79 ф illustrates
the original hold. Since the hold in this case is on the left
side of the belt, the right hand is brought upward, palm up-
permost, striking your attacker’s right wrist, releasing the hold
239
83
BASIC FIELD MANUAL
from the belt. Immediately his hand is removed from
the belt, follow through by gripping tightly with your right
hand on the wrist and placing the fingers of your left hand
Figure 79 ф.
against the knuckles of your opponent’s right hand and apply-
ing pressure in the direction of his wrist (fig. 79 ®). Con-
tinuous pressure in this manner will bring your opponent’s
240
UNARMED DEFENSE FOR THE AMERICAN SOLDIER
83-84
hand up his back on the right side, and you can further bring
him to his toes in a very painful position by pressure under
his chin with your right hand (fig. 79 @).
Figure 79 ®.
84. Defense Against Chest Push.—Figure 80 © illustrates
the manner in which a great many fights are started. One
individual pushes the other on the chest. The individual
pushed feels that he has to retaliate, and so it goes until some-
241
84
BASIC FIELD MANUAL
body starts throwing punches. Immediately your opponent’s
hand rests on your chest, place both hands over his hand,
which in this case happens to be the right one (fig. 80 ®).
Figure 79 (5).
Holding his hand tightly against your chest, bend swiftly
from the waist and slightly at the knees (fig. 80 ®). This will
usually bring your attacker to the ground with very little
effort on your part. However, if you feel it necessary to take
242
UNARMED DEFENSE FOR THE AMERICAN SOLDIER
84
him a prisoner, you will not take him all the way to the
ground, but will simply make him buckle at the knees; keep-
ing the pressure of your right hand on the back of his right
Figure 80 ф.
one, you will place your left hand on the back of his right
elbow (fig. 80 @), and by applying pressure, prevent him
from removing his hand. You will now bend your knees to
as great a degree as possible and take a long step with your
243
84
BASIC FIELD MANUAL
right foot to your opponent’s right rear (fig. 80 ®). As soon
as your right foot strikes the ground, you will balance on it
and turn to the left, which will bring you behind your oppo-
Figure 80 ®.
nent and facing in the same direction as he is. His hand is
still retained against your chest and the hold on his elbow
is also retained. His arm will be at right angles to his back.
244
UNARMED DEFENSE FOR THE AMERICAN SOLDIER 84-85
It is now a simple matter to shift your right hand to his upper
arm and your left one to his hand and control him by pressure
up his back (fig. 80 ©).
85. Defense Against Grip on Front of Garment, Thumb
'Out.—When your shirt or tie is gripped with the thumb out
as illustrated in figure 81 ®, you will immediately reach up
with your right hand, placing the four fingers around the
245
85-86
BASIC FIELD MANUAL
base of your attacker’s thumb along the back of his hand,
while the entire first and second joints of your thumb are
placed under the inside of his thumb and pressed backward
(fig. 81 ©). With this hold your opponent can be brought
to the ground with very little effort.
86. Defense Against Grip on Front of Garment, Thumb
In.—If your shirt or tie is gripped with the thumb turned
inward as illustrated in figure 82 ®, you grip the outside of
246
UNARMED DEFENSE FOR THE AMERICAN SOLDIER
86
the base of your opponent’s thumb with your four fingers
and place your first and second fingers over your opponent’s
fingernail and attempt to force the first joint of his thumb
Figure 80 ©.
toward the third joint. This will cause excruciating pain and
very sudden release of any grip your opponent may have
had (fig. 82 ©).
247
87
BASIC FIELD MANUAL
87. Defense Against Hair Hold From Front With Right
Hand.—Reach upward with your right hand, placing your
fingers around the little finger edge of his hand and grasping
the palm while the thumb is placed on the back of the
Figure 80 ®.
knuckles (fig. 83 ®). Holding his hand close to your head,
you now execute a half right-face and bending from the waist
get your head as close to the ground as possible (fig. 83 ®).
This will bring considerable strain on your attacker’s wrist
248
UNARMED DEFENSE FOR IHE AMERICAN SOLDIER
87
and possibly cause him to release his hold. As soon as his
hold loosens, you will reinforce your original right-hand hold
with a similar grip with your left hand which will mean that
Figure 81 ф.
both your thumbs will be crossed over the back of his knuckles
and the fingers of both hands will meet in the palm of the
hand. By applying pressure on the hand toward his wrist,
he will be forced to turn and walk where you will (fig. 83 ®).
249
88
BASIC FIELD MANUAL
88. Defense Against Hair Hold From Rear.—Figure 84 ®
illustrates the original attack. Before turning your body,
your right hand reaches upward and is placed over your op-
Figure 81
ponent’s right hand, your four fingers wrapped around the
base of his thumb and your thumb on the back of his hand.
You now execute a half right-face, bending from the waist,
250
UNARMED DEFENSE FOR THE AMERICAN SOLDIER
88
getting your head as close to the ground as possible. The
strain on your opponent’s wrist will cause him to loosen his
grip (fig. 84 ©). You will now pivot on your right foot, fac-
Figure 82
ing your opponent, and reinforcing your original hold with a
similar hold with your left hand, twist powerfully to your left.
Your opponent will either execute a complete somersault or
suffer a broken wrist (fig. 84 ®).
251
88
BASIC FIELD MANUAL
Figure 82
252
UNARMED DEFENSE FOR THE AMERICAN SOLDIER
88
Figure 83 ф.
463187°—42---17
253
88
BASIC FIELD MANUAL
Figure 83 3
254
UNARMED DEFENSE FOR THE AMERICAN SOLDIER
88
Figure 83 ®.
255
88
BASIC FIELD MANUAL
Figure 84 6).
256
UNARMED DEFENSE FOR THE AMERICAN SOLDIER
88
Figure 84
257
88
BASIC FIELD MANUAL
Ж I
Figure 84
258
UNARMED DEFENSE FOR THE AMERICAN SOLDIER
89
Section XIV
DEFENSES AGAINST FIST ATTACKS
89. Approaching Clever Boxer.—When your attacker as-
Figure 85 Q.
sumes boxing position, illustrated in figure 85 ®, you can
be fairly certain that he is skillful in the use of his fists, and
you square off in a similar manner, keeping your hands open.
259
89
BASIC FIELD MANUAL
When you get just out of reach of a possible left jab, you
will suddenly launch your body through the air at your op-
ponent, turning toward the left as your spring. Your lower
Figure 85
left leg will strike behind your opponent’s left knee joint
while the back of your right leg will catch him across the
center of his body (fig. 85 ®). Your left hand will be used
to break the force of your fall and your right one to ward off
260
UNARMED DEFENSE FOR THE AMERICAN SOLDIER
89-90
a possible jab by your attacker. This scissoring action on
your part will bring your opponent to the ground with great
force. You can immediately follow through by lifting your
right foot and bringing the heel down into your opponent’s
midsection.
90. Defense Against Left Jab to Head.—When your op-
ponent throws a left jab to your head, you break the blow
with the outside of your right forearm, keeping your left
261
90
BASIC FIELD MANUAL
hand and arm extended to ward off a possible right cross
(fig. 86 ©). You then take a short step forward with your
right foot and shifting your balance to it, raise your left leg
Figure 86 ®.
and bring the calf against the back of your attacker’s left
knee joint, at the same time as you bring the heel of your
left hand against his chin (fig. 86 ©).
262
UNARMED DEFENSE FOR THE AMERICAN SOLDIER
91
91. Defense Against Left Hook to Head.—When the left
hook is brought to the head, the head is drawn backward
just far enough to avoid the blow, and the right forearm is
Figure 86 ®.
lifted so as to contact your opponent’s left wrist or forearm
while your right hand is placed on the back of his elbow
(fig. 87 ф). By continuing the momentum of his blow toward
263
91-92
BASIC FIELD MANUAL
your left, his left hand and wrist will slide naturally into the
crook of your left elbow while your right hand pushes strongly
against his left elbow. It is now a simple matter to lock both
Figure 87 ф.
your hands over that joint (fig. 87 ®). This can be used
as a come-along as well as an arm breaker.
92. Defense Against Left Hook to Body.—The blow is
stopped with the little finger edge of your right forearm,
264
UNARMED DEFENSE FOR THE AMERICAN SOLDIER
92
which is presented strongly against your opponent’s left fore-
arm. Your left hand is raised as a defense against a possible
follow through with your opponent’s right hand (fig. 88 ®).
Figure 87 ®. (
You now reach across with your left hand, grasping the back
of your opponent’s left elbow and pulling the elbow toward
you, at the same time as you press to his rear with your right
forearm against his left wrist (fig. 88 ®). Your right arm
265
92
BASIC FIELD MANUAL
is then brought under your attacker’s left armpit and over
his shoulder; simultaneously with this action, you pivot on
your left foot, placing your right foot to the right of your
Figure 88 (D.
attacker’s right foot and pointing in the same direction as his.
You immediately reinforce the right hand on his shoulder
266
UNARMED DEFENSE FOR THE AMERICAN SOLDIER
92-93
with your left hand (fig. 88 ®). By striking backward with
your hips and twisting your body forward and to the left, your
opponent will be propelled over your hips.
Figure 88 Q.
93. Defense Against Right Cross to Head.—When a right
cross is thrown to your head, your arms are crossed at the
forearms with your left arm being closest to your face, catch-
ing your opponent’s blow in the crook or V formed by your
267
93
BASIC FIELD MANUAL
forearms (fig. 89 ®). As soon as the blow is stopped, your left
hand is turned with the thumb toward your opponent’s body
and the fingers grasping his forearm and you take a long step
Figure 88 0.
with your right foot, placing it to the right front of your
opponent’s right foot, and immediately grasp his upper arm
from the outside with your right hand (fig. 89 ®). You im-
mediately pivot to the left, bringing your right shoulder
268
UNARMED DEFENSE FOR THE AMERICAN SOLDIER
93-94
under your attacker’s right armpit, retaining both holds on
his arm. By bending strongly from the waist, your opponent
is catapulted over your head (fig. 89 ®).
Figure 89
94. Defense Against Right Hook to Head.—When the right
hook or roundhouse to the head is thrown, the blow is blocked
with your left forearm, and your right arm is raised to ward
off a possible blow from the left hand (fig. 90 ф). You now
463187°—42---18
269
94
BASIC FIELD MANUAL
pivot on your left leg to the left, placing your right foot on
the outside of your attacker’s right foot and pointing in the
same direction as his. Simultaneously with this movement,
Figure 89
your right arm is slipped over your attacker’s left shoulder
and over the back of his neck < fig. 90 ®). Your left hand
then reaches across and grasps the outside of your attacker’s
270
UNARMED DEFENSE FOR THE AMERICAN SOLDIER 94-95
right upper arm. You now bend swiftly from the waist, at
the same time pulling strongly with your left hand and with
your right arm (fig. 90 @).
Figure 89 ®.
95. Defense Against Right Hook to Body.—The blow is
stopped by presenting your left forearm forcibly against the
thumb side of your attacker’s right wrist or forearm (fig.
91 ©•). Immediately on stopping the blow, your right hand
271
95
BASIC FIELD MANUAL
grasps your attacker’s right wrist and pulls him toward you
(fig. 91 ®). You now step to your opponent’s right rear with
your left foot, at the same time wrapping your left arm around
Figure 90 Q.
your attacker’s right arm and locking your hand on your
chest (fig. 91 ®). In this position, extreme pressure can be
brought to bear on his elbow joint.
272
UNARMED DEFENSE FOR THE AMERICAN SOLDIER
96
96. Defense Against Uppercut.—Your defense against the
uppercut is to bring the little finger edge of the hand nearest
the attacking arm forcibly against the base of your attacker’s
Figure 90
upper arm (fig. 92). If an individual is struck on this spot,
the arm will be paralyzed for a short space of time.
273
97-98
BASIC FIELD MANUAL
97. How To Stand When Expecting Trouble.—Figure 93
illustrates the proper stance for an individual who is expect-
ing trouble from someone with whom he is conversing. Note
the manner in which the hands are clasped. In this position,
Figure 90 ®.
you have a perfect all-around defense for an unexpected blow
by your opponent using either hand.
98. Defense Against Sudden Right-Hand Blow.—As your
opponent launches his sudden right-hand blow to your chin
274
UNARMED DEFENSE FOR THE AMERICAN SOLDIER
98
your hand is cupped near the chin so as to catch his fist, the
same time as you lean slightly backward, giving with the
blow. Immediately upon stopping the blow, your left hand
Figure 91 (Г
from its position on your right upper arm is cut quickly
against your opponent’s neck, striking with the little finger
edge (fig. 94 ®), and continued on its course, moving your
opponent’s right hand to your left. This opens the way for
275
98
BASIC FIELD MANUAL
a cut with the little finger edge of your right hand against
the right side of your opponent’s neck (fig. 94 ®). Figure
94 © illustrates the actual contact of the blow and shows
Figure 91 ®.
your left hand raised for a possible finishing touch. These
blows are struck in rapid succession; any one of the three
is a potential knockout.
276
UNARMED DEFENSE FOR THE AMERICAN SOLDIER
99
99. Defense Against Sudden Left-Hand Blow.—As your
opponent throws a sudden left-hand blow, your cupped left
hand catches it close to your chin as you bend your body
Figure 91 C£.
slightly backward in order to give with the blow (fig. 95 (D>.
Immediately upon stopping the blow, your right hand, which
was clasped on your left upper arm, is cut quickly to your
right, striking your opponent in the solar plexus with the
277
99
BASIC FIELD MANUAL
tips of your fingers (fig. 95 ®). This blow is immediately
followed by a strong cross-cut to the left side of your oppo-
nent’s neck with the little finger edge of the left hand
Figure 92.
(fig. 95 ®). Your right hand, which was waist-high, is
then brought diagonally upward, striking your opponent’s
throat with the little finger edge of the hand while your
left hand is cocked for a possible finishing touch (fig. 95 @).
278
UNARMED DEFENSE FOR THE AMERICAN SOLDIER
100
100. First Method of Holding Individual Whom You Are
Trying To Quiet, But Who Might Suddenly Strike.—When
you suspect that an individual whom you are trying to quiet
Figure 93.
might strike you without warning, you hold him loosely by
his left elbow with your right hand (fig. 96 ®). You are on
the alert for a possible blow and immediately that he starts
a blow with either hand, you swing him to your left, using
279
100-101
BASIC FIELD MANUAL
your right hand gripping his left elbow as a turning lever.
This will expose his left side for a cross-cut by the little finger
edge of your left hand (fig. 96 ®). The blow makes contact
Figure 94 ®.
in the soft spot between your attacker’s hip bone and his
short ribs.
101. Second Method of Holding Individual Whom You Are
280
UNARMED DEFENSE FOR THE AMERICAN SOLDIER
101
Trying To Quiet, But Wko Might Suddenly Strike.—The
method illustrated in figure 97 ®, grasping your opponent’s
left wrist with your right hand, is not as safe as the first
Figure 94 <5).
method. However, if he should suddenly strike with his
right hand, you move his left arm to your left so as to catch
his right-hand blow (fig. 97 ©). Immediately his blow is
stopped, you grasp the projecting right wrist with your left
281
101
BASIC FIELD MANUAL
hand with the palm of your hand turned to the left and the
thumb down. (Study illustration.) You now pivot to the
left on your left foot, placing your right foot on the outside
Figure 94 @.
of your opponent’s right foot, and face in the same direction
as he is facing. You bring both his arms over your right
282
UNARMED DEFENSE FOR THE AMERICAN SOLDIER 101-102
shoulder (fig. 97 @). From this position, it is a simple matter
to throw your opponent over your head simply by drawing on
his wrist and bending at the waist.
Figure 94 ®.
102. Beating Opponent to the Blow.—Wheq you are caught
with your hands at your sides and close to an opponent who
suddenly raises his fist to strike you, your quickest defense is
283
102
BASIC FIELD MANUAL
the blow illustrated in figure 98. Your right hand is moved in
a straight line from its position at your side diagonally
upward, striking your opponent between the chin and adam’s
Figure 95 ф.
apple with your thumb on one side of the throat and your
fingers on the other. It is a knock-out and it is done faster
in this fashion than in any other.
284
UNARMED DEFENSE FOR THE AMERICAN SOLDIER
102
Figure 95
463187°—42---19
285
102
BASIC FIELD MANUAL
1
Figure 95
286
UNARMED DEFENSE FOR THE AMERICAN SOLDIER
102
Figure 95
287
102
BASIC FIELD MANUAL
Figure 96 ®.
288
UNARMED DEFENSE FOR THE AMERICAN SOLDIER
102
Figure 96 ®.
289
102
BASIC FIELD MANUAL
Figure 97 ф.
290
UNARMED DEFENSE FOR THE AMERICAN SOLDIER
102
Figure 97 ®
291
102
BASIC FIELD MANUAL
Figure 97
292
UNARMED DEFENSE FOR IHE AMERICAN SOLDIER
102
Figure 98.
293
103
BASIC FIELD MANUAL
Section XV
INCAPACITATING AN OPPONENT
103. Taking Man Down From Rear.—Figure 99 ® illus-
Figure 99 J).
trates the start of the proper method of bringing a dan-
gerous opponent to the ground from the rear. Note that the
hands and foot are making contact simultaneously. The
294
UNARMED DEFENSE FOR THE AMERICAN SOLDIER 103-104
hands strike down on the shoulders and pull backward at
the same instant as the sole of the right foot kicks strongly
against the back of your victim’s knee joint (fig. 99 ©). This
Figure 99
attack will drop your victim fiat on the ground in an instant.
104. Kidney Stroke Against Low Attack.—When an op-
ponent attempts to grasp you around the legs, you stop his
295
104-105
BASIC FIELD MANUAL
forward action with your left hand against his right shoulder,
at the same time as you cut across his right kidney with the
little finger edge of your right hand (fig. 100).
Figure 100.
105. Occipital Stroke Against Low Attack.—Your oppo-
nent in this case is attacking in the same manner. However,
if he is dangerous, you will use the occipital stroke at the
296
UNARMED DEFENSE FOR THE AMERICAN SOLDIER 105-106
base of the neck with the little finger edge of your right hand.
The stop is made with your left hand as before described
(fig. 101).
Figure 101.
106. Clavicle Stroke (Breaking Collar Bone.)—If the col-
lar bone is struck at the back of its arch with the little finger
edge of either hand in the manner illustrated in figure 102,
it will result in a clean break.
297
107
BASIC FIELD MANUAL
107. Simple Front Choke.—This again is a defense for a
low attack. The momentum of your opponent is again slowed
with your left hand against his right shoulder while your right
Figure 102.
forearm is slipped under your attacker’s throat. His head is
midway between your armpit and your chest (fig. 103 ®).
As your hand reaches your attacker’s throat, it is clasped on
your left wrist. Pressure is applied by leaning backward and
298
UNARMED DEFENSE FOR THE AMERICAN SOLDIER
107
lifting with your right forearm <fig. 103 ®). A more ad-
vanced choke and one which acts more swiftly is the one
illustrated in figure 103 ®. Instead of locking the hand, the
Figure 103 Q.
fingers of your left hand grasp the little finger edge of your
right hand and pull strongly toward your chest, at the same
time as you lean backward.
299
108
BASIC FIELD MANUAL
108. Simple Rear Choke.—The rear choke is utilized from
the position of the rear take-down previously illustrated in
figure 99 ® and ®. As your victim falls backward, your
FIgure 103 ®.
left hand is placed on the back of his head while your right
forearm is crossed from the right under his neck (fig. 104 ®).
It is further brought to the left and locked on your left fore-
,arm (fig. 104 ®). From this position, pressure is brought
300
UNARMED DEFENSE FOR THE AMERICAN SOLDIER
108
to bear by pressing with the hand on the back of the head
and leaning forward. A quicker and more potent choke from
the same position is illustrated in figure 104 Instead of
Figure 103 ®.
locking the left hand on the back of your victim’s head, it
grasps the little finger edge of your right hand and is drawn
quickly toward your chest as your right shoulder pushes
against the victim’s head.
463187°—42----20
301
109-110
BASIC FIELD MANUAL
109. Subclavian Nerve Pinch.—This is a very painful nerve
center and is a very good method to use in causing your victim
to release an object or a person. The thumb is dug into a point
figure 104 ф.
at the base of the neck and just above the clavicle bone
(fig. 105).
110. Axillary Nerve Pinch.—This nerve pinch has the
302
UNARMED DEFENSE FOR THE AMERICAN SOLDIER 110-111
same function as the subclavian. It is a very good method of
walking an individual inconspicuously out of a room or any
place that you will. The thumb or fingers can be brought to
Figure 104 (2).
bear on an exposed nerve underneath the armpit and close
to the base of the bone in the upper arm (fig. 106).
111. Cross Collar Hold.—This is a certain method of
subduing an individual quickly. To be effective, it must be
303
Ill
BASIC FIELD MANUAL
worked on an individual with an open collar or open lapels
on his coat or jacket. The hands are crossed at the wrist
and the fingers grasp the collar on the opposite side with
figure 104 ®.
the fingers inside and the thumb on the outside (fig. 107 ©).
Grasping strongly with the fingers, the arms are then
scissored, causing your opponent to drop to the ground
unconscious within a second (fig. 107 ®).
304
UNARMED DEFENSE FOR THE AMERICAN SOLDIER
112
112. Death Blows.—The three following blows are to be
used only in dire emergency, when it is absolutely essential
that your attacker is put out of action permanently:
Figure 105.
a. Eye stroke.—A blow struck with the little finger edge
of the hand in the manner illustrated in figure 108 will break
a paper-thin bone, driving a sliver into the brain and causing
instant death.
305
112
BASIC FIELD MANUAL
b. Nose s'troke.—A blow struck in the manner illustrated in
figure 109 with a great deal of force will cause death; a lighter
blow, very severe concussion. The blow is struck with the
Figure 106.
edge of the hand underneath the nose and diagonally toward
the ears.
c. Celiac plexus stroke.—The blow illustrated in figure 110,
struck just below the base of the breast bone with the fingers
306
UNARMED DEFENSE FOR THE AMERICAN SOLDIER
112
held as closely together as possible and with the palm upper-
most, will burst the aorta, causing death due to internal
hemorrhage.
Figure 107 2 •
307
112
BASIC FIELD MANUAL
Figure 107
308
UNARMED DEFENSE FOR THE AMERICAN SOLDIER
112
Figure 108.
309
112
BASIC FIELD MANUAL
Figure 109.
ВВЦ
310
UNARMED DEFENSE FOR THE AMERICAN SOLDIER
112
Figure 110.
311
INDEX
Paragraph Page
Axillary nerve pinch------------------------------ 110 302
Background, unarmed defense------------------------- 5 2
Balance___________________________________________ 7 5
Basic principles------------------------------------ 7 5
Bayoneted rifle:
Long lunge------------------------------------- 73 207
Short lunge____________________________________ 74 210
Bear hug------------------------------------------- 17 40
Belt hold___________________________ -- -------- 83 239
Body holds:
Bear hug----------------- _. --------------- 17 40
Chin shove_______________ __________________ 19 45
Overarm, front—----------------- . _ ------- 18 43
Overarm, rear:
First escape____________________________ 25 58
Second escape--------------------------- 26 60
Underarm, rear:
First escape_______________________________ 20 48
Second escape------------------------------ 21 49
Third escape_______________________________ 22 52
Fourth escape____________________________ 23 53
Fifth escape_______ _______________________ 24 56
Boxers. (See Fist attacks.)
Celiac plexus stroke_____________________________ 112 305
Chest push_______________________________________ 84 241
Chin shove_______________________________________ 19 45
Choke holds:
One-arm strangle from rear--------------------- 35 88
One-hand, front___________________ - ------- 37 92
Simple:
Front___________________________________ 107 298
Rear________________________ ___________ 108 300
Two-hand, front:
By short man----------------------------------- 31 81
By tall man________________________________ 30 80
First defense______________________________ 27 70
Second defense----- ----------------------- 28 73
Third defense____________________________ 29 75
Two-hand, front, against wall:
First defense__________________________________ 32 83
Second defense_____________________________ 33 85
Third defense______________________________ 34 86
Two-hand, rear________________________________ 36 90
Clavicle stroke___________________________________ 106 297
Clothing worn while training________________________ 4 1
Club :
Come-along, use as_____ ___ ___ _ -------- 60 159
Defense against—
Downward blow______________________________ 56 150
Side stroke----------------------------- 57 152
312
INDEX
Club—Continued. Paragraph Page
Handcuff_______________________________________ 61 161
Holding_______________________________________ 58 154
Where to strike________________________________ 59 157
Collar bone, breaking____________________________ 106 297
Collar hold from rear______________________________ 82 237
Come-along:
Alternate----------------------------------------- 44 111
Club, use_____________________________________ 60 159
Fingers_______________________________________ 46 117
Lock__________________________________________ 47 119
Simple______________________________________ 43 109
Wrist reverse_______________________________ 48 121
Cross collar hold______________________________ 111 303
Death holds_________________________________ - 112 305
Ejecting a troublesome visitor . _________________ 42 107
Eye stroke_______________________________________ 112 305
First attacks:
Approaching clever boxer_______. _ 89 259
Beating them to the blow______ _ - _ 102 283
Holding an individual:
First method___________ ____________ __ 100 279
Second method____________________________ 101 280
How to stand when expecting trouble___________ 97 273
Left hook to body___________________________ 92 264
Left hook to head_____________________________ 91 263
Left jab to head______________________________ 90 261
Right cross to head___________________________ 93 267
Right hook to body--------- __ ------- ---- 95 271
Right hook to head____________________________ 94 269
Suden right-hand blow________ 98 274
Sudden left-hand blow._____ . _ ___________ 99 277
Uppercut_______________ . ------ 96 273
Flying mare________________ ___ _ _ _______ 81 231
Flying tackle_______________________ __________ 79 229
Full nelson________________ . _ __ _________ 80 230
Garments, grips on:
Belt___________________________ 83 239
Chest push__________________. ____ __ 84 241
Collar hold from rear_________ . _ _______ 82 237
Front, thumb in________ _ .________ ___ 86 246
Front, thumb out______________ ____________ 85 245
Hair hold:
Front, wKh right hand- ______________________ 87 247
Rear__________________________________________ 88 250
Hammerlock________________________________________ 78 227
Hand-squeezer__________________________________ 41 105
Handcuff, use of club_____________________________ 61 161
Headlock:
Reverse___________________________________________ 77 223
Side_______________________________________ 75.76 219,221
Holding an individual__________________________ 100, 101 279, 280
313
INDEX
Incapacitating an opponent: Paragraph Page
Axillary nerve pinch--- ----------------------- 110 302
Choke, simple front---------------------------- 107 298
Choke, simple rear_____________________________ 108 300
Clavicle stroke (breaking collar bone)--------- 106 297
Cross collar hold______________________________ ill 303
Death blows____________________________________ 112 305
Kidney stroke__________________________________ 104 295
Occipital stroke_______________________________ 105 296
Subclavian nerve pinch- ----------------------- 109 302
Taking man down from rear---------------------- 103 294
Internal oblique muscles- _ ------------------------- 7 5
Kicks:
Left foot______________________________________ 40 100
Right foot:
First defense___________________________________ 38 97
Second defense_____________________________ 39 99
Kidney stroke______________________________________ 104 295
Knife:
Bank-hand slash_______________________________ 51 135
Cross-cut with saber____________________________ 55 144
Downward stroke_________________________________ 49 129
Lunge with sword- ______________________________ 53 140
Straight saber cut------------------------------ 54 142
Upward stroke___________________________________ 50 131
Wary approach___________________________________ 52 138
Lunge with sword----------- ------------- - 53 140
Major and minor operations------------------------- 7 5
Methods of training-. _ -------------- — 6 3
Necessity for training_______________________________ 3 1
Nose stroke___________________________ - __ 112 305
Occipital stroke___________________________________ 105 296
Opponent’s strength, use_____________________________ 7 5
Origin of Jiu Jitsu________ . _ ------ - ------- 5 2
Overarm rear body hold___________ _ — 25,26 58
Pistol:
Back (right hand) :
First defense__________ _ _ ____________________ 63 174
Second defense______________________________ 64 177
Third defense_______________________________ 65 179
Back of neck (right hand :
First defense__________ . __________________ 66 181
Second defense______________________________ 67 183
Third defense_______________________________ 68 186
Friend in need_________________________________ 69 188
Front________________________________________ 62 172
Two individuals at point of gun________________ 70 190
Principles, basic------— --------------- 7 5
Prisoners, taking:
Approaching man---------------------------- 45 IP
314
INDEX
Prisoners, taking—Continued.
Come-along: Paragraph Page
Alternate for simple___________________ 44 111
Fingers____________________________ 46 117
Lock____________ 119
Simple_______________________ . _______ 43 109
Wrist reverse________________ _ _ 48 121
Ejecting a troublesome visitor _______________ 42 107
Hand-squeezer_______________________________ 41 105
Program, training__________________________________ 4 1
Purpose of training________________________________ 2 1
Rifle:
Back______________________________________________ 72 205
Bayoneted:
Long lunge________________________________ 73 207
Short lunge----------------------------- 74 210
Front_______________________ . _______ 71 202
Saber cut:
Cross-cut_______________________ _ ___ ______ 55 144
Straight_________________________ _ . 54 142
Slash, back-hand_____________________— ________ 51 135
Standing, when expecting blow________ . — 97 273
Strangle, one-arm, from rear____________ ______ 35 88
Subclavian nerve pinch________________ . . ____ 109 302
Sword, lunge------------------------------- _ - 53 140
Training methods_______________________________ 6 3
Training program------------------------------- 4 1
Underarm rear body hold-------------- _ . ----- 20 -24 48
Uppercut______________________________________ 96 273
Weakest spot, attack----------------------------- 7 5
Wrestling holds:
Flying mare_________________________________ 81 231
Flying tackle_________________________________ 79 229
Full nelson_________________________________ 80 230
Hammerlock__________________ - _ _ -------- 78 227
Headlock, from side:
First defense__________________________ 75 219
Second defense__________________ _ — 76 221
Headlock, reverse-------------------------- 77 223
Wrist escapes:
Left-hand grip on right wrist or right hand
grip on left wrist_____________________ 11,12,15 18,20,28
Right-hand grip on right wrist, or left hand
grip on left wrist________________________ 14, 16 25. 30
Two-hand grip on one wrist----------------- 13 24
Two-hand overhand grip on both wrists------ 8, 9 12, 14
Two-hand underhand grip on both wrists----- 10 16
О
315