/


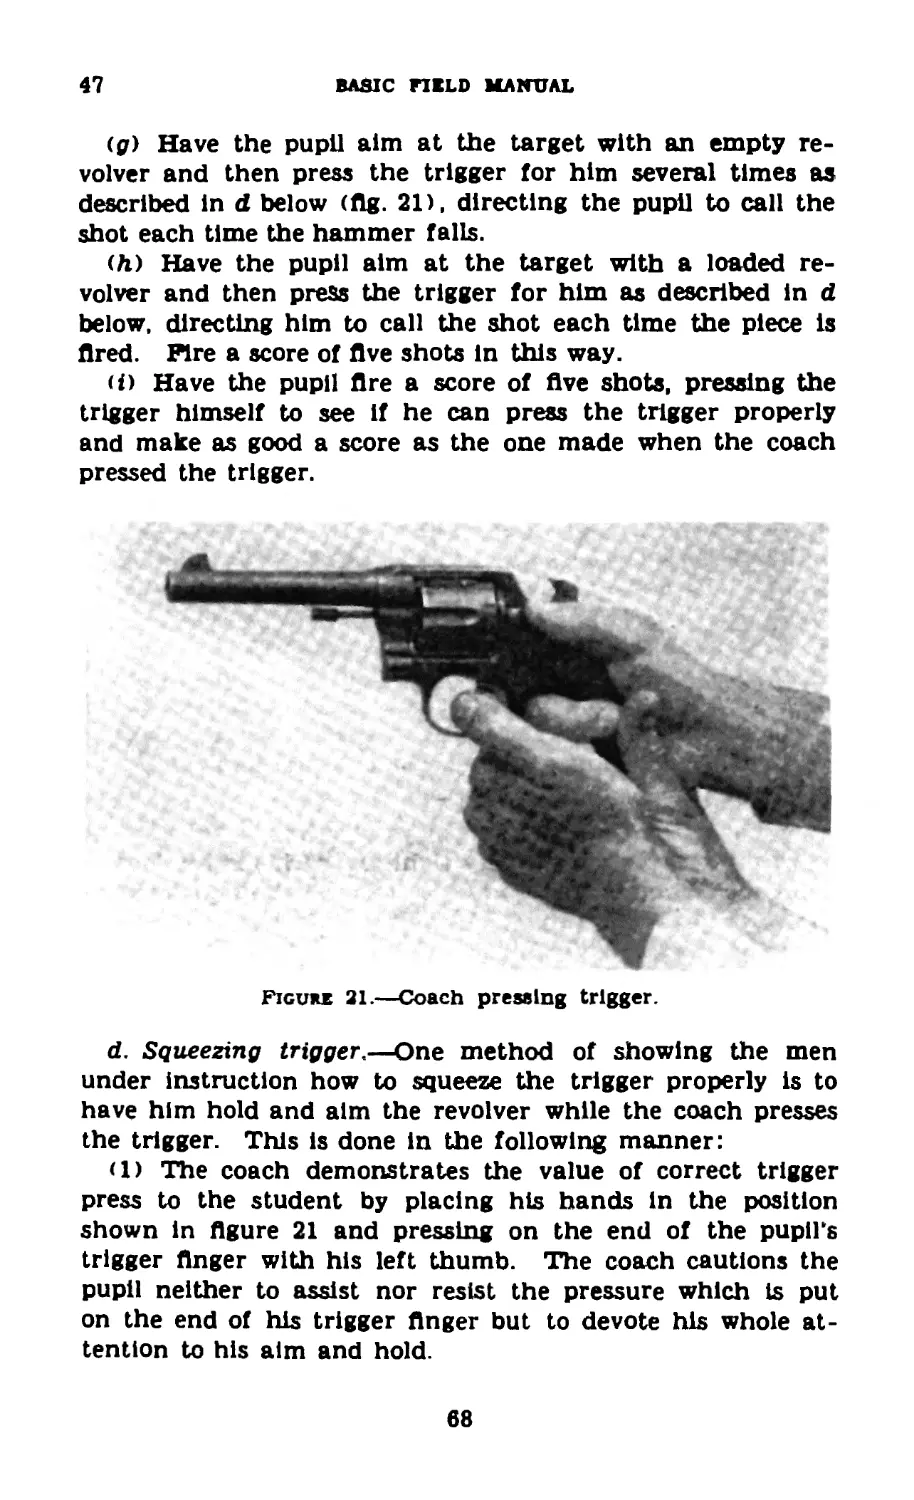


Теги: weapons military affairs
Год: 1941


Текст
BASIC FIELD MANUAL
REVOLVER, COLT, CALIBER .45,
M1917, AND REVOLVER, SMITH
AND WESSON, CALIBER .45,
M1917
Prepared under direction of the
Chief of Cavalry
UNITED STATES
GOVERNMENT PRINTING OFFICE
WASHINGTON : 1»41
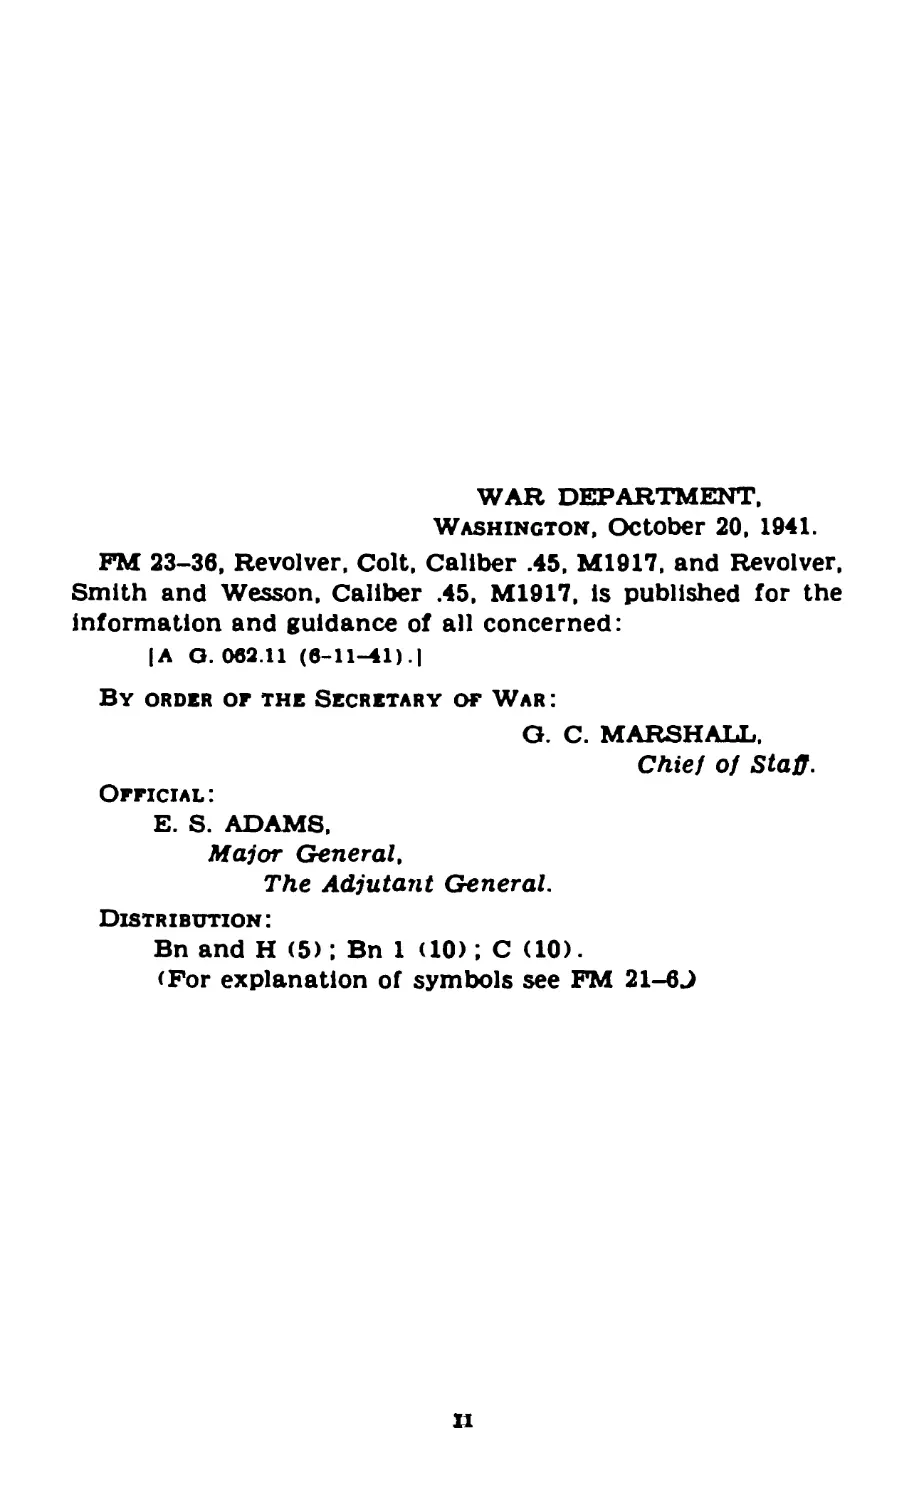
WAR DEPARTMENT,
Washington, October 20, 1941.
FM 23-36, Revolver, Colt, Caliber .45, M1917, and Revolver,
Smith and Wesson, Caliber .45, M1917, is published for the
information and guidance of all concerned:
| A O. 062.11 (6-11-41). |
By order of the Secretary of War :
G. C. MARSHALL,
Chief of Staff.
Official :
E. S. ADAMS,
Major General,
The Adjutant General.
Distribution:
Bn and H (5) *, Bn 1 (10); C (10).
(For explanation of symbols see FM 21-6J
ii
TABLE OF CONTENTS
Chapter 1. Mechanical Tiaining. Paragraphs Page
Section I. Description_____________________ 1-2 1
II. Disassembling and assembling.— 3-6 3
Ш. Care and cleaning________________ 7-13 15
IV. Functioning................ 14-17 19
V. Spare parts and accessories_____18-19 25
VI. Ammunition__________________ 20-27 26
VII. Individual safety precautions... 28-29 30
Chapter 2. Manual of the Pistol. Loading and
Firing. Dismounted........................... 30-36 32
Chapter 3. Known-Distance Targets. Dismounted.
Section I. Preparatory training.............. 37-43 37
II. Courses to be fired............ 44-46 64
III. Conduct of range practice______ 47-53 66
IV. Known-distance targets and ranges;
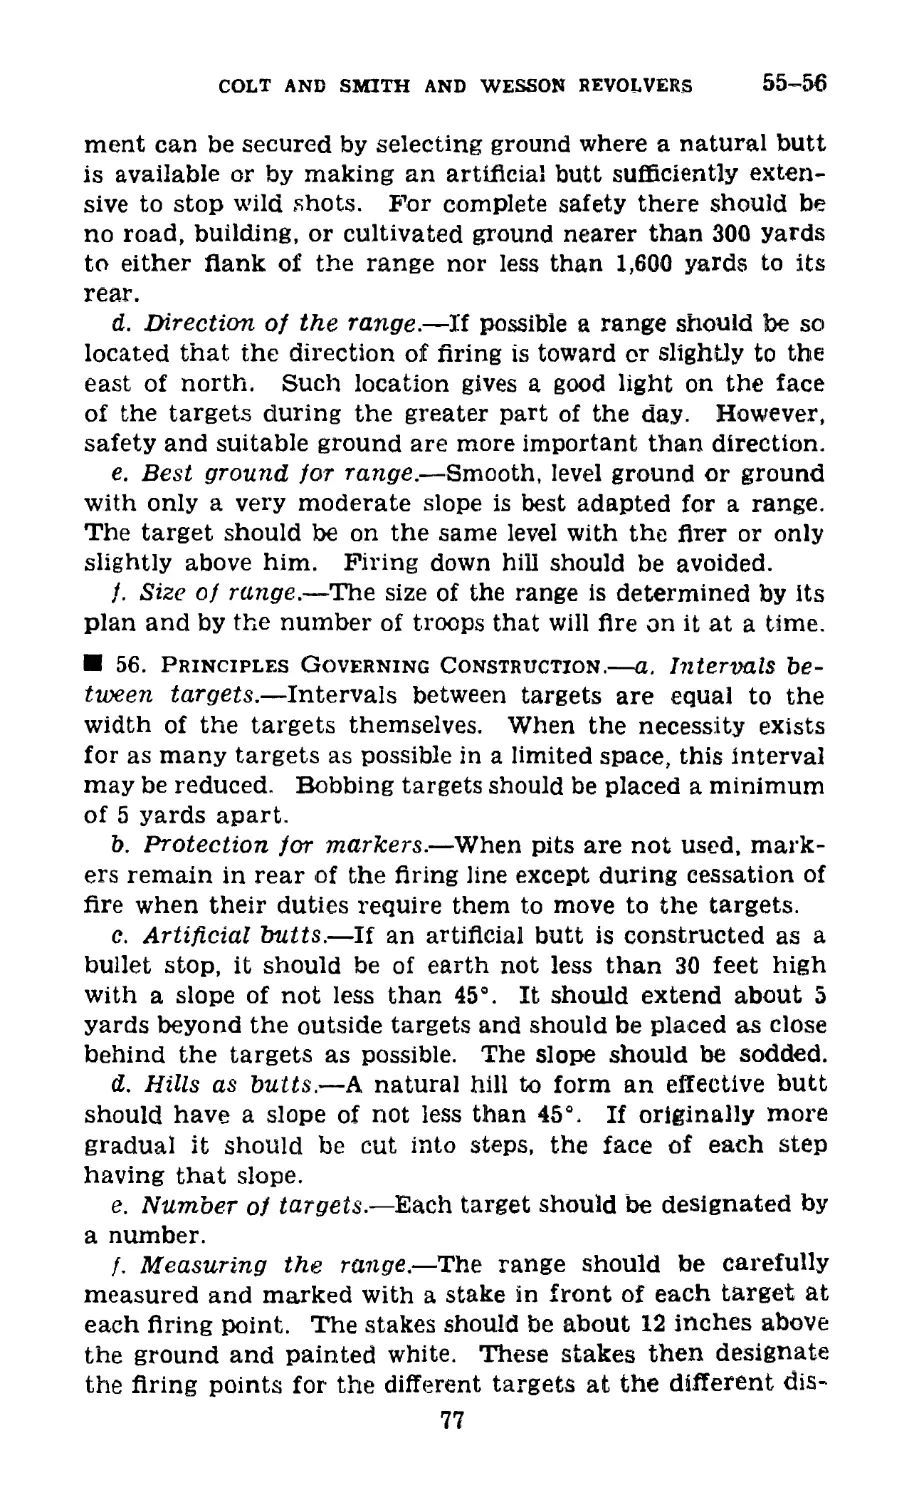
range precautions__________________ 54-56 74
V. Small-bore practice____________ 57-61 78
Снартеж 4. Firing at Field Targets...........62-65
Снартеж 5. Advice то Instructors.
Section I. General________________________ 66-67
II. Mechanical training...........68-73
III. Manual of the pistol_____________ 74
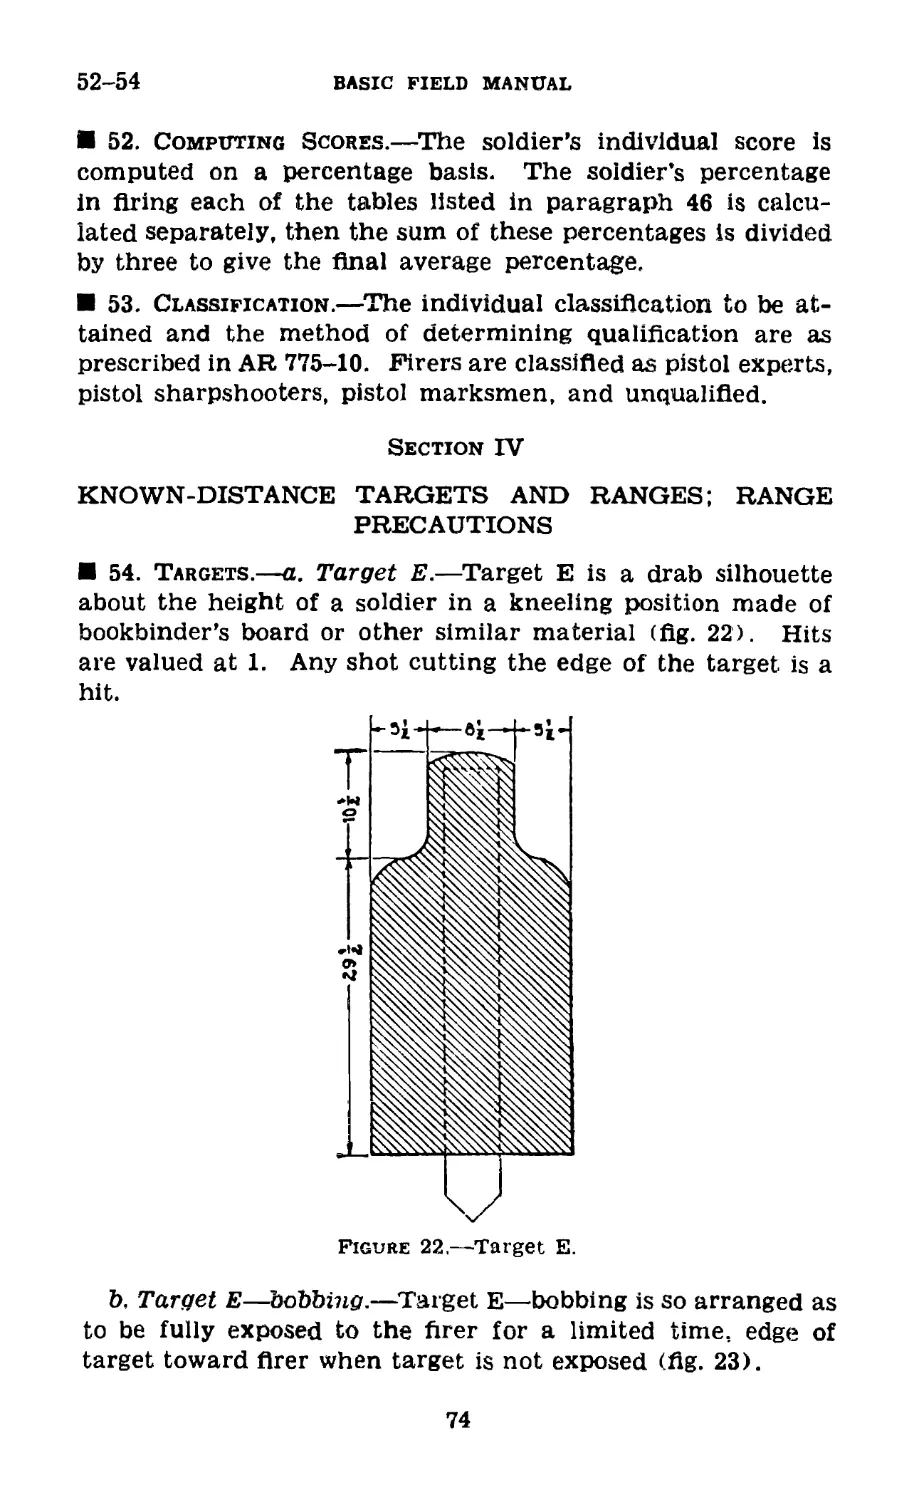
IV. Marksmanship.________________ 75-78
Index______________________________________________ 89
S S33S
ш
FM 23-36
BASIC FIELD MANUAL
REVOLVER, COLT, CALIBEB .45, M1917, AND RE-
VOLVER, SMITH AND WESSON. CALIBEB .45, M1917
CHAPTER 1
MECHANICAL TRAINING
Paragraphs
Section I. Description__________________________________ 12
II. Disassembling and assembling_________________ 3-6
Ш. Care and cleaning____________________________ 7-13
IV. Functioning............................ 14-17
V. Spare parts and accessories............ 18-19
VI. Ammunition............................... 20-27
VII. Individual safety precautions________________28-29
Skction I
DESCRIPTION
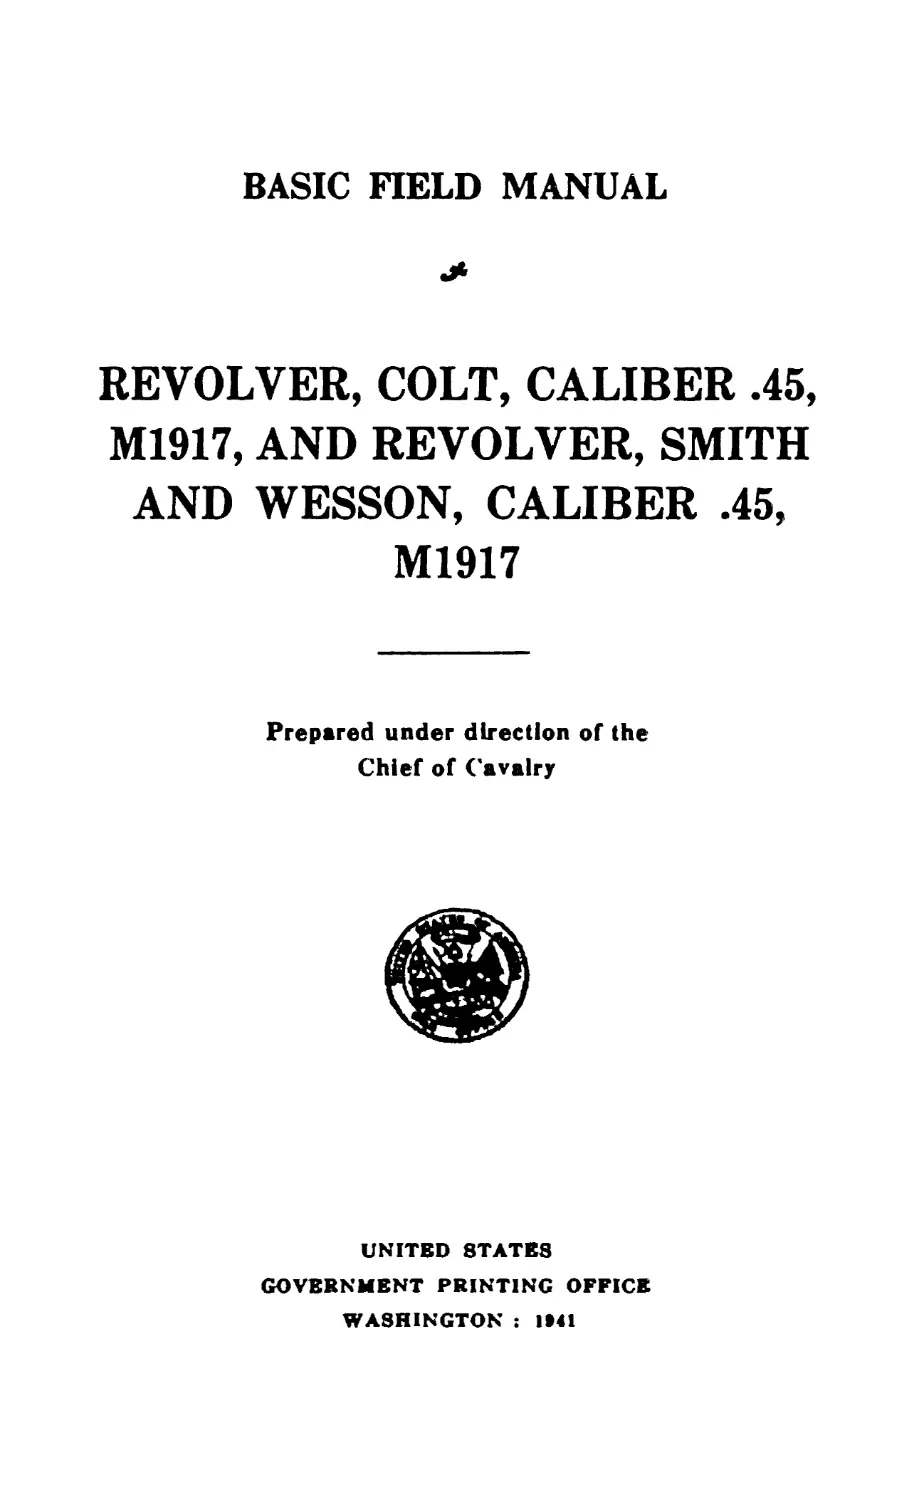
1. Gxnkral.—a. The Colt revolver, caliber .45. M1917, and
the Smith and Wesson revolver, caliber .45, M1917, are single
shot, breech loading hand weapons. Each is provided with a
cylinder having six chambers arranged about a central axis
so that six shots may be fired before reloading is necessary.
Both weapons may be fired either single action or double
Figuu 1.—Colt revolver, caliber .45. M1917—assembled view.
1
1-2
BASIC FIELD MANUAL
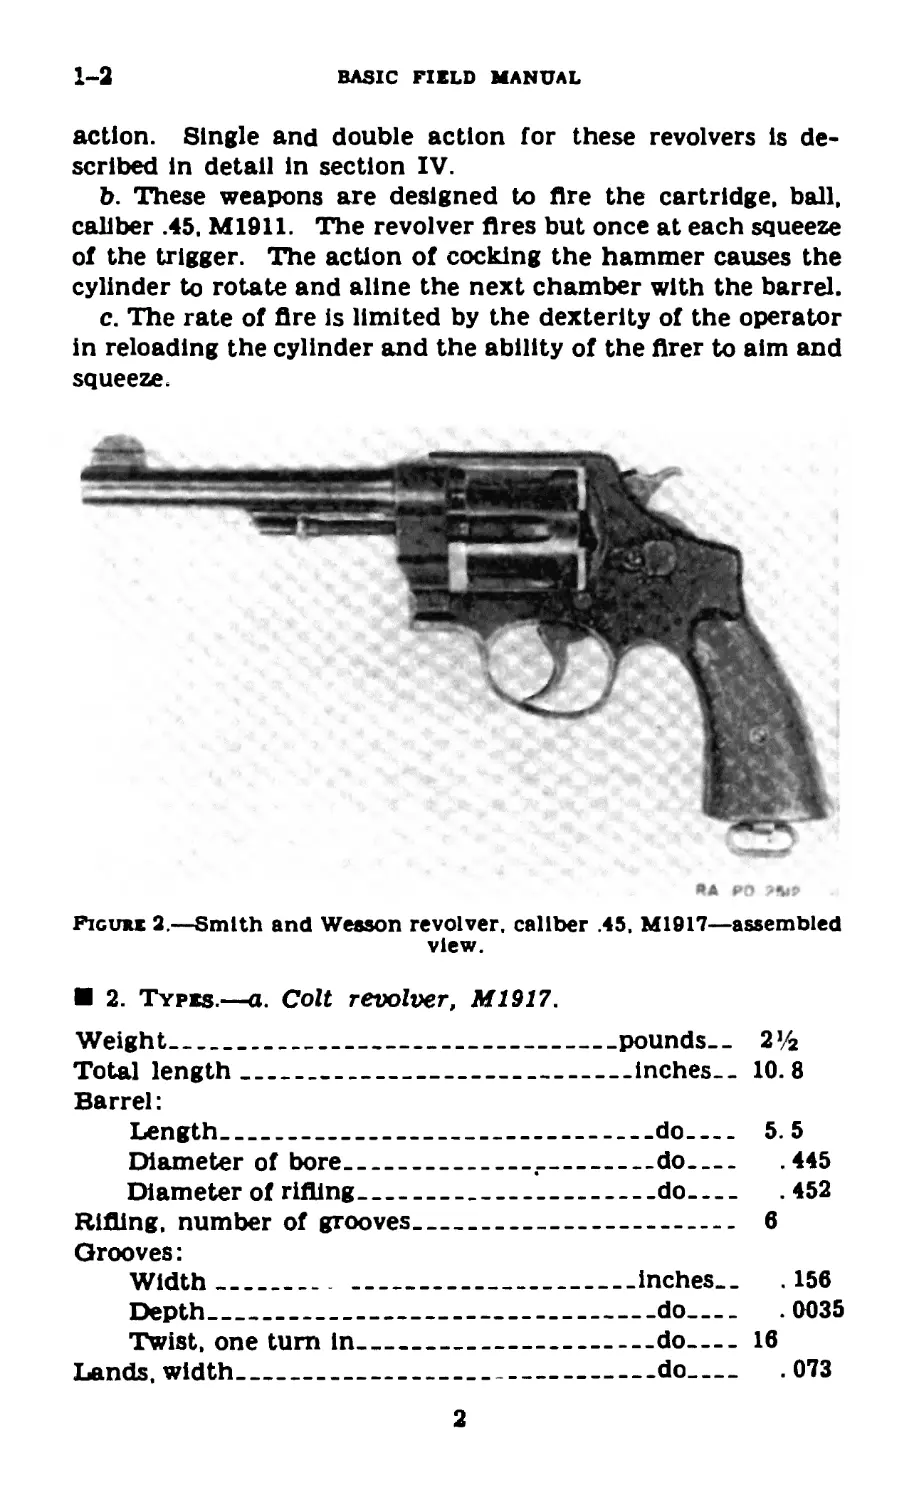
action. Single and double action for these revolvers is de-
scribed in detail in section IV.
b. These weapons are designed to fire the cartridge, ball,
caliber .45, M1911. The revolver fires but once at each squeeze
of the trigger. The action of cocking the hammer causes the
cylinder to rotate and aline the next chamber with the barrel.
c. The rate of fire is limited by the dexterity of the operator
in reloading the cylinder and the ability of the firer to aim and
squeeze.
• Л PO
Figure 2.—Smith and Wesson revolver, caliber .45, M1917—assembled
view.
2. Types.—a. Colt revolver, M1917.
Weight______
Total length
Barrel:
pounds.. 2,z2
.-inches.- 10.8
Length_________________________________do----- 5.5
Diameter of bore______________.________do----- . 445
Diameter of rifling____________________do----- . 452
Rifling, number of grooves________________________ 6
Grooves:
Width__________________________________inches. _ . 156
Depth__________________________________do_____ . 0035
Twist, one turn in---------------------do-___ 16
Lands, width_______________________________do----- . 073
2
COLT AND SMITH AND WESSON REVOLVERS
2-3
Cylinder:
Length-----------------------------------inches-- 1. 595
Diameter_____________________________do_____ 1.695
Chambers:
Number______________________________________ 6
Diameter:
Maximum__________________________________inches. - . 4795
Minimum______________________________do_____ . 473
Front sight above axis of bore___________do----- . 7325
b. Smith and Weuon revolver, M1917.
Weight___________________________________pounds.. 2У<
Total length-----------------------------inches-- 10.79
Barrel:
Length___________________________________do_ 5.5
Diameter of bore_____________________do.____ .445
Rifling, number of grooves---------------------- 6
Grooves:
Width____________________________________inches— . 157
Depth________________________________do_____ . 003
Twist, one turn in___________________do.____14.659
Lands, width_____________________________do_____ . 075
Cylinder:
Length___________________________________do_ 1. 537
Diameter-----------------------------do_____ 1. 708
Chambers:
Number______________________________________ 6
Diameter:
Maximum---------------------------------inches. _ . 480
Minimum_______________________________ .do__ .4795
Front sight above axis of bore_____________do___ . 794
Section II
DISASSEMBLING AND ASSEMBLING
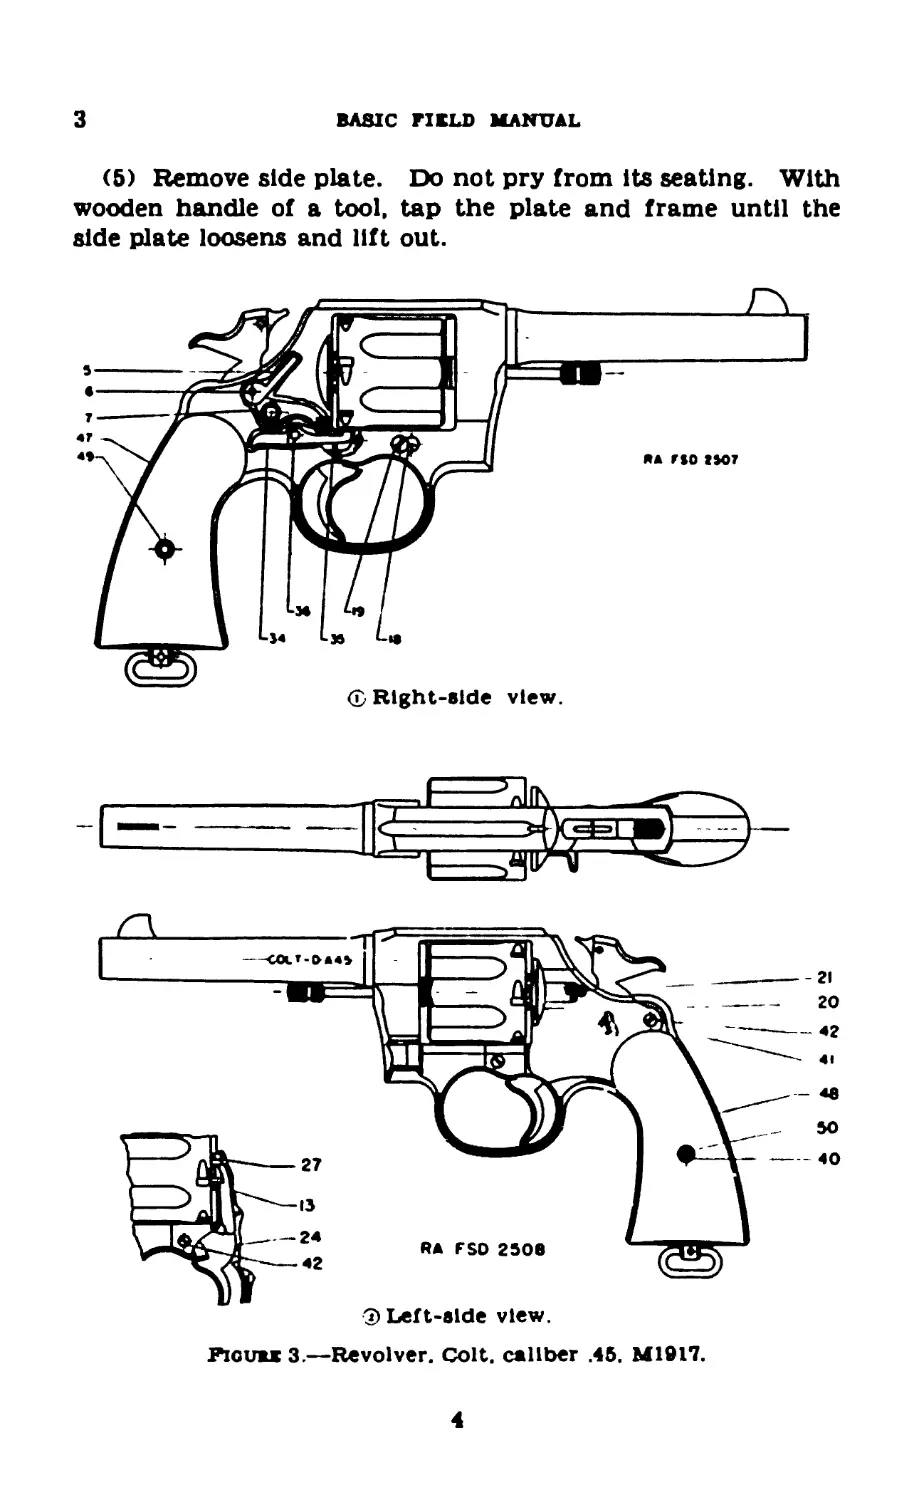
3. Disassembling Colt Revolver (fig. 3).—a. (1) Remove
crane lock screw (19) and crane lock (18) (fig. 3(D).
(2) Press latch (20) (fig. 3®) to the rear, push cylinder
to the left, and remove the cylinder and crane assembly by
pushing to the front.
(3) Remove stock screw and stocks.
(4) Remove side plate screws.
3
3
BASIC FI KU) MANUAL
(5) Remove side plate. Do not pry from its seating. With
wooden handle of a tool, tap the plate and frame until the
side plate loosens and lift out.
G Right-side view.
3) Left-side view.
Figuu 3.—Revolver. Colt, caliber .45, M1917.
4
COLT AND SMITH AND WESSON REVOLVERS
3
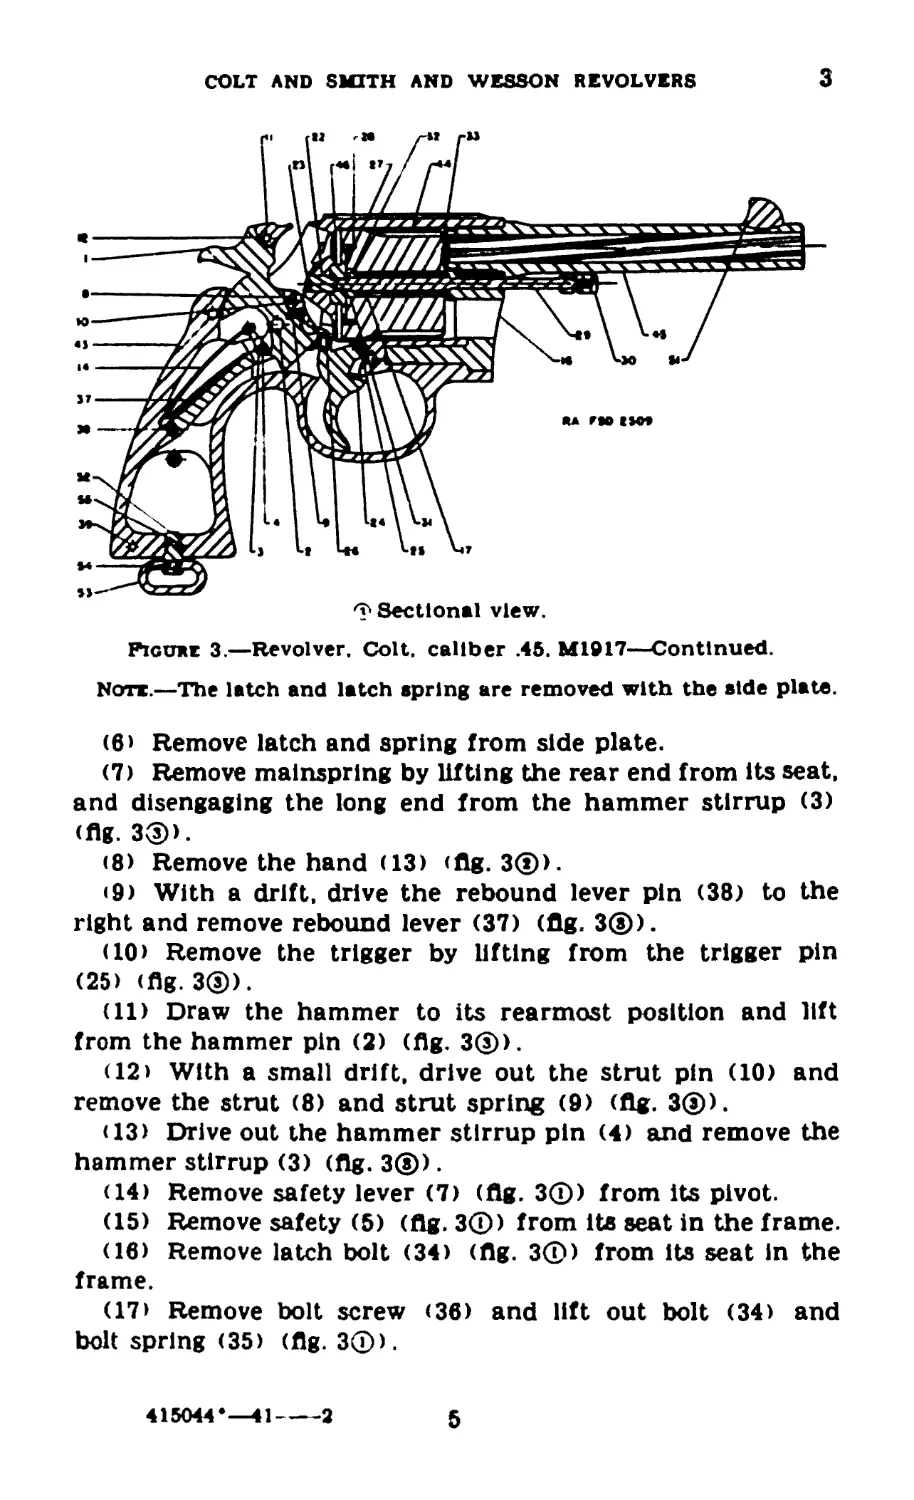
Sectional view.
Figuke 3.—Revolver. Colt, caliber .45. M1917—Continued.
Note.—The latch and latch spring are removed with the side plate.
(6> Remove latch and spring from side plate.
(7) Remove mainspring by lifting the rear end from its seat,
and disengaging the long end from the hammer stirrup (3)
(fig. 3®>.
(8> Remove the hand (13) (fig. 3®).
(9) With a drift, drive the rebound lever pin (38) to the
right and remove rebound lever (37) (fig.- 3®).
(10) Remove the trigger by lifting from the trigger pin
(25) (flg. 3®).
(11) Draw the hammer to its rearmost position and lift
from the hammer pin (2) (flg. 3®).
(12> With a small drift, drive out the strut pin (10) and
remove the strut (8) and strut spring (9) (fig. 3®).
(13) Drive out the hammer stirrup pin (4) and remove the
hammer stirrup (3) (fig. 3®).
(14) Remove safety lever (7) (flg. 3®) from its pivot.
(15) Remove safety (5) (flg. 3®) from Its seat in the frame.
(16) Remove latch bolt (34) (fig. 3®) from its seat in the
frame.
(17> Remove bolt screw (36) and lift out bolt (34) and
bolt spring (35) (fig. 3®).
415044*—41----2
5
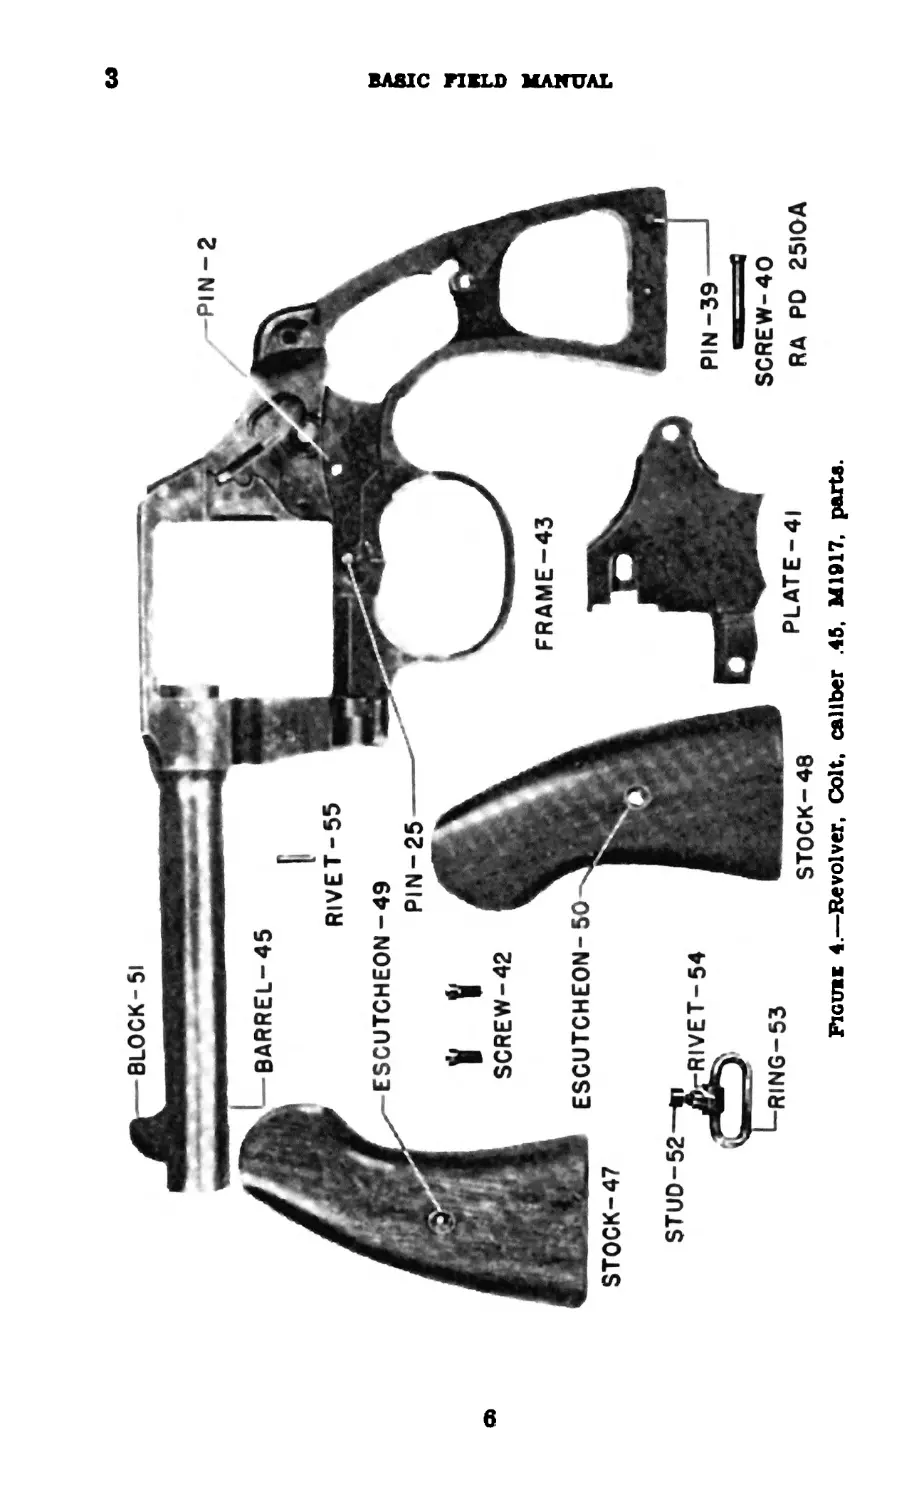
BLOCK-51
Figure 4.—Revolver, Colt, caliber .45, M1917, parts.
BASIC FIELD
ROD-29
SPRING-33 HEAD-30
CYLINDER-44
g Ж»
BUSHING-17 SPRING-21
RA PD 25HA LATCH-20
COLT AND SMITH AND WESSON REVOLVERS
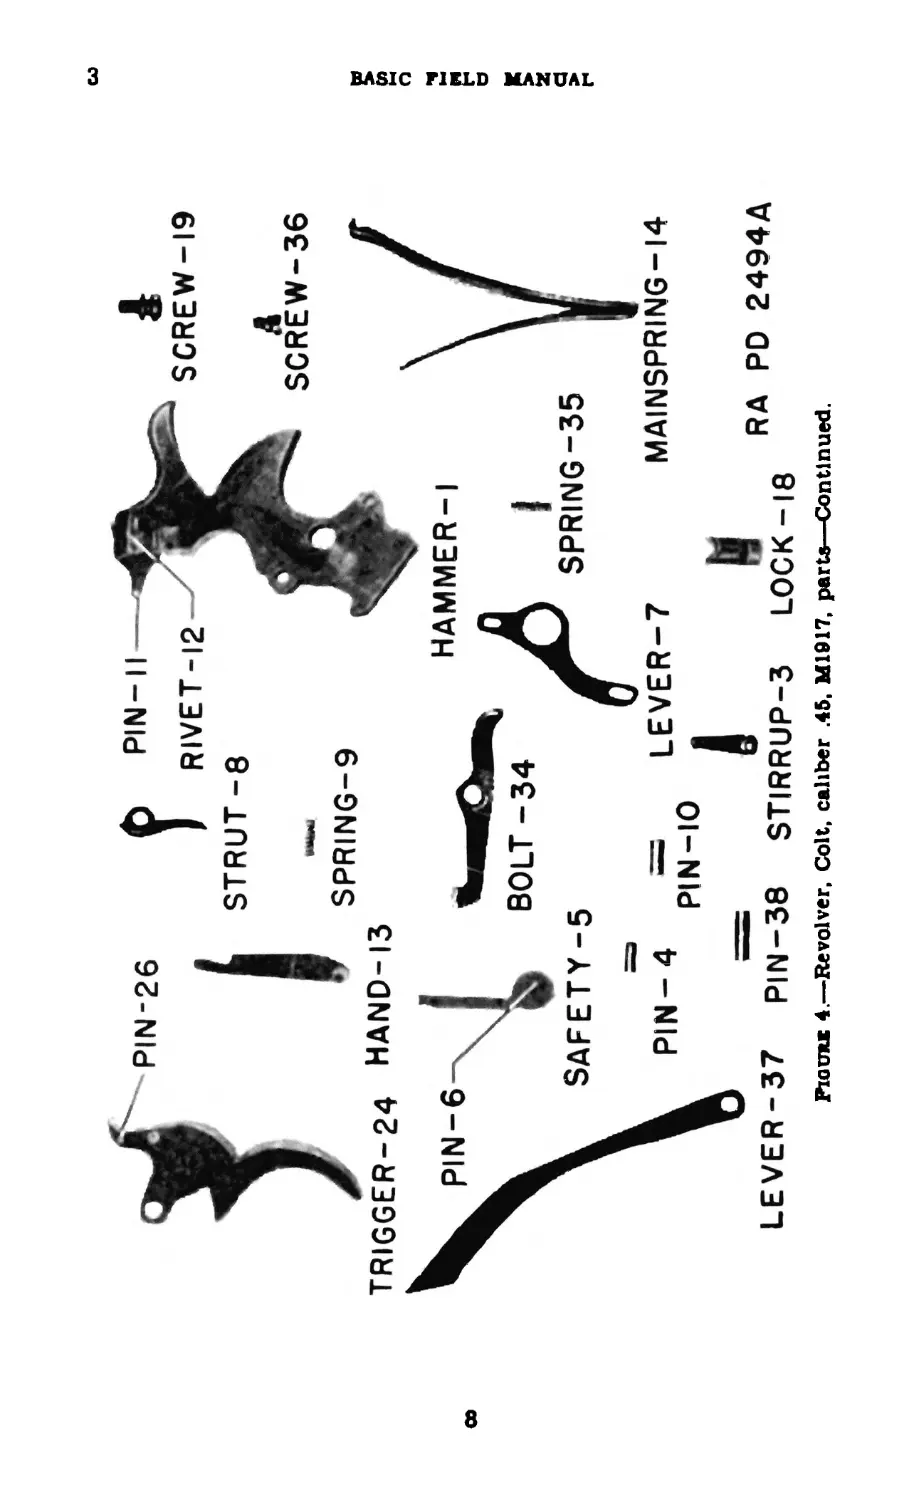
Pxouu 4.—Revolver, Colt, caliber .45, M1017, parts—Continued.
w
00
Figure 4.—Revolver, Colt, caliber .45, M1917, parts—Continued.
co
BASIC FIELD MANUAL
COLT AND SMITH AND WESSON REVOLVERS
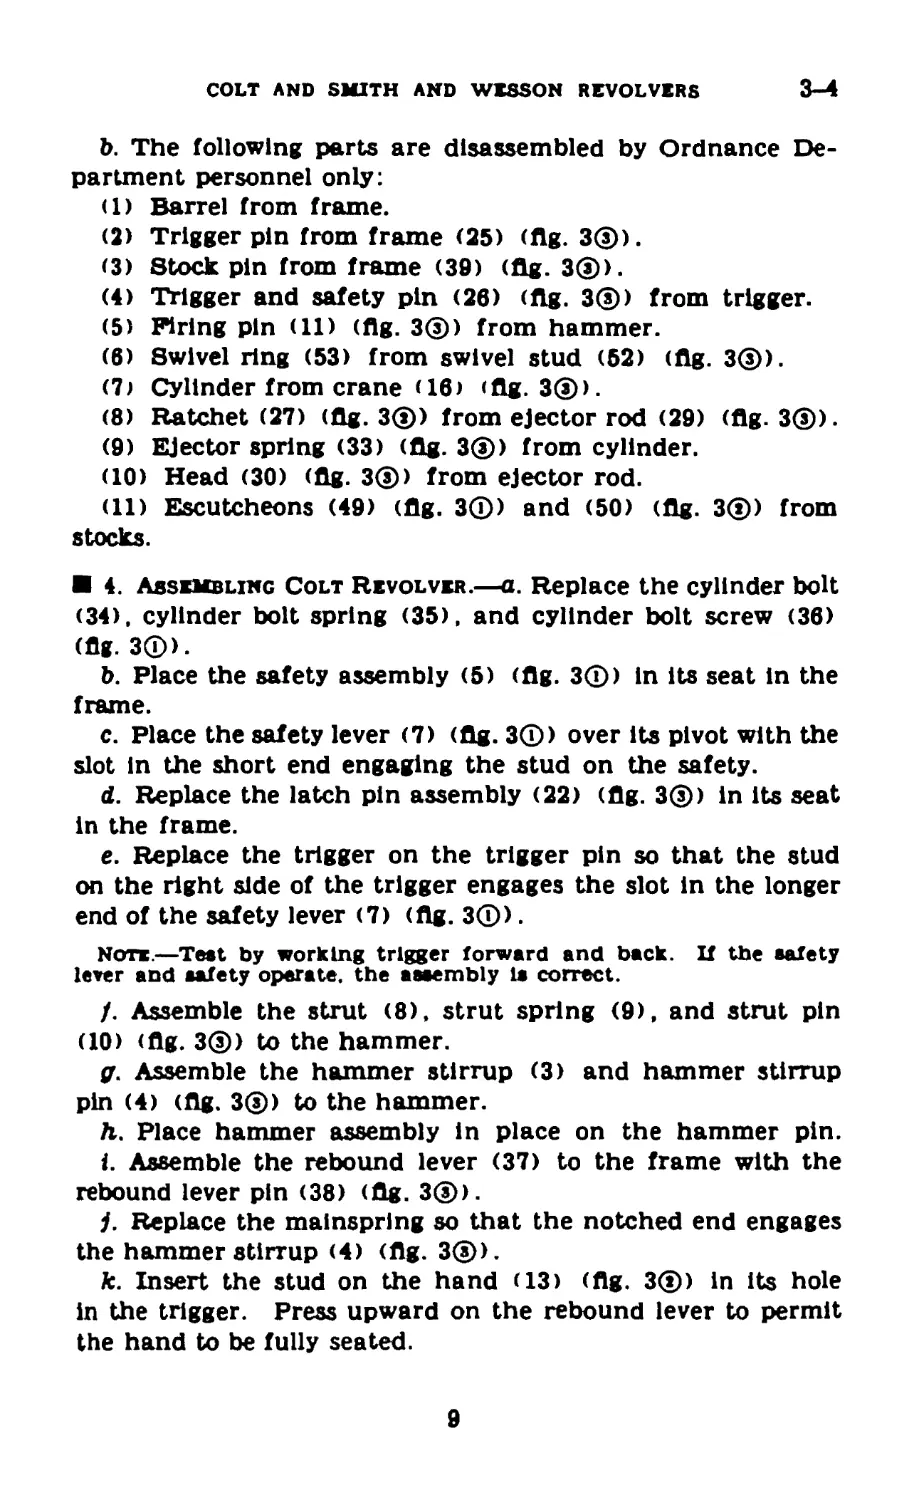
3-4
b. The following parts are disassembled by Ordnance De-
partment personnel only:
(1) Barrel from frame.
(2) Trigger pin from frame (25) (fig. 3®).
(3) Stock pin from frame (39) (fig. 3®).
(4) Trigger and safety pin (26) (fig. 3®) from trigger.
(5) Firing pin (11) (fig. 3®) from hammer.
(6) Swivel ring (53) from swivel stud (52) (fig. 3®).
(7) Cylinder from crane (16) (fig. 3®).
(8) Ratchet (27) (fig. 3®) from ejector rod (29) (fig. 3®).
(9) Ejector spring (33) (fig. 3®) from cylinder.
(10) Head (30) (flg. 3®) from ejector rod.
(11) Escutcheons (49) (fig. 3®) and (50) (fig. 3®) from
stocks.
4. Assembling Colt Revolver.—a. Replace the cylinder bolt
(34). cylinder bolt spring (35). and cylinder bolt screw (36)
(fig. 3®).
b. Place the safety assembly (5) (fig. 3®) in its seat in the
frame.
c. Place the safety lever (7) (fig. 3®) over its pivot with the
slot in the short end engaging the stud on the safety.
d. Replace the latch pin assembly (22) (fig. 3®) In Its seat
In the frame.
e. Replace the trigger on the trigger pin so that the stud
on the right side of the trigger engages the slot in the longer
end of the safety lever (7) (fig. 3®).
Note.—Test by working trigger forward and back. If the safety
lever and safety operate, the assembly Is correct.
/. Assemble the strut (8). strut spring (9), and strut pin
(10) (fig. 3®) to the hammer.
ff. Assemble the hammer stirrup (3) and hammer stirrup
pin (4) (fig. 3®) to the hammer.
Л. Place hammer assembly in place on the hammer pin.
i. Assemble the rebound lever (37) to the frame with the
rebound lever pin (38) (fig. 3®).
/. Replace the mainspring so that the notched end engages
the hammer stirrup (4) (fig. 3®).
k. Insert the stud on the hand (13) (fig. 3®) in its hole
in the trigger. Press upward on the rebound lever to permit
the hand to be fully seated.
9
4-5
BASIC FIELD MANUAL
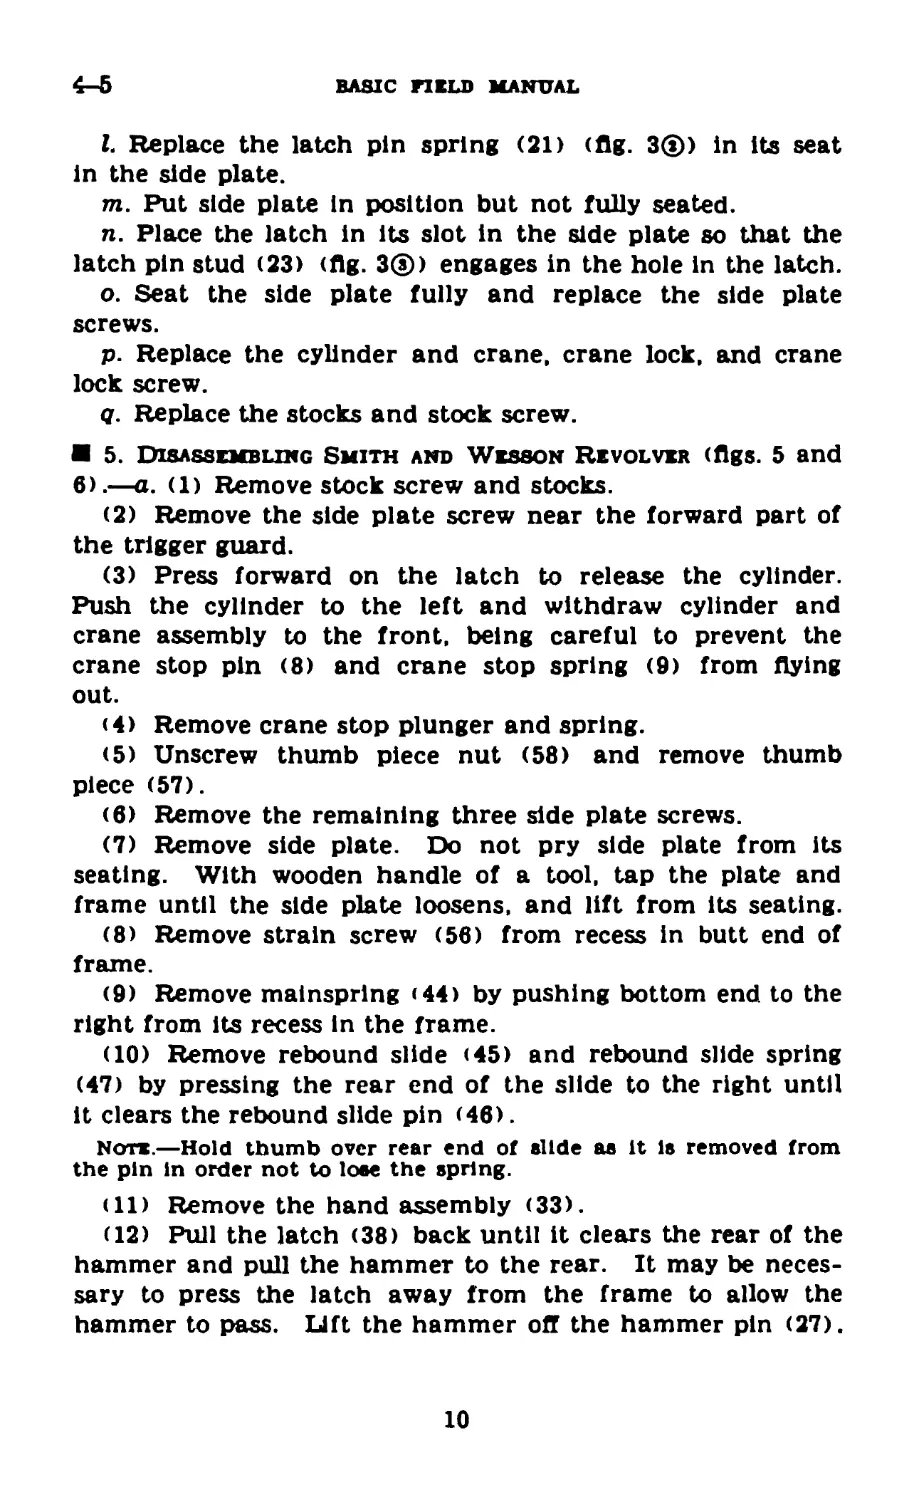
Z. Replace the latch pin spring (21) (fig. 3®) in its seat
in the side plate.
m. Put side plate in position but not fully seated.
n. Place the latch in its slot in the side plate so that the
latch pin stud (23) (fig. 3®) engages in the hole in the latch.
o. Seat the side plate fully and replace the side plate
screws.
p. Replace the cylinder and crane, crane lock, and crane
lock screw.
q. Replace the stocks and stock screw.
5. Disassembling Smith and Wesson Revolver (figs. 5 and
6).—a. (1) Remove stock screw and stocks.
(2) Remove the side plate screw near the forward part of
the trigger guard.
(3) Press forward on the latch to release the cylinder.
Push the cylinder to the left and withdraw cylinder and
crane assembly to the front, being careful to prevent the
crane stop pin (8) and crane stop spring (9) from flying
out.
(4) Remove crane stop plunger and spring.
(5) Unscrew thumb piece nut (58) and remove thumb
piece (57).
(6) Remove the remaining three side plate screws.
(7) Remove side plate. Do not pry side plate from its
seating. With wooden handle of a tool, tap the plate and
frame until the side plate loosens, and lift from its seating.
(8) Remove strain screw (56) from recess in butt end of
frame.
(9) Remove mainspring (44) by pushing bottom end to the
right from Its recess in the frame.
(10) Remove rebound slide (45) and rebound slide spring
(47) by pressing the rear end of the slide to the right until
it clears the rebound slide pin (46).
Non.—Hold thumb over rear end of slide as it is removed from
the pin in order not to lose the spring.
(11) Remove the hand assembly (33).
(12) Pull the latch (38) back until it clears the rear of the
hammer and pull the hammer to the rear. It may be neces-
sary to press the latch away from the frame to allow the
hammer to pass. Lift the hammer off the hammer pin (27).
10
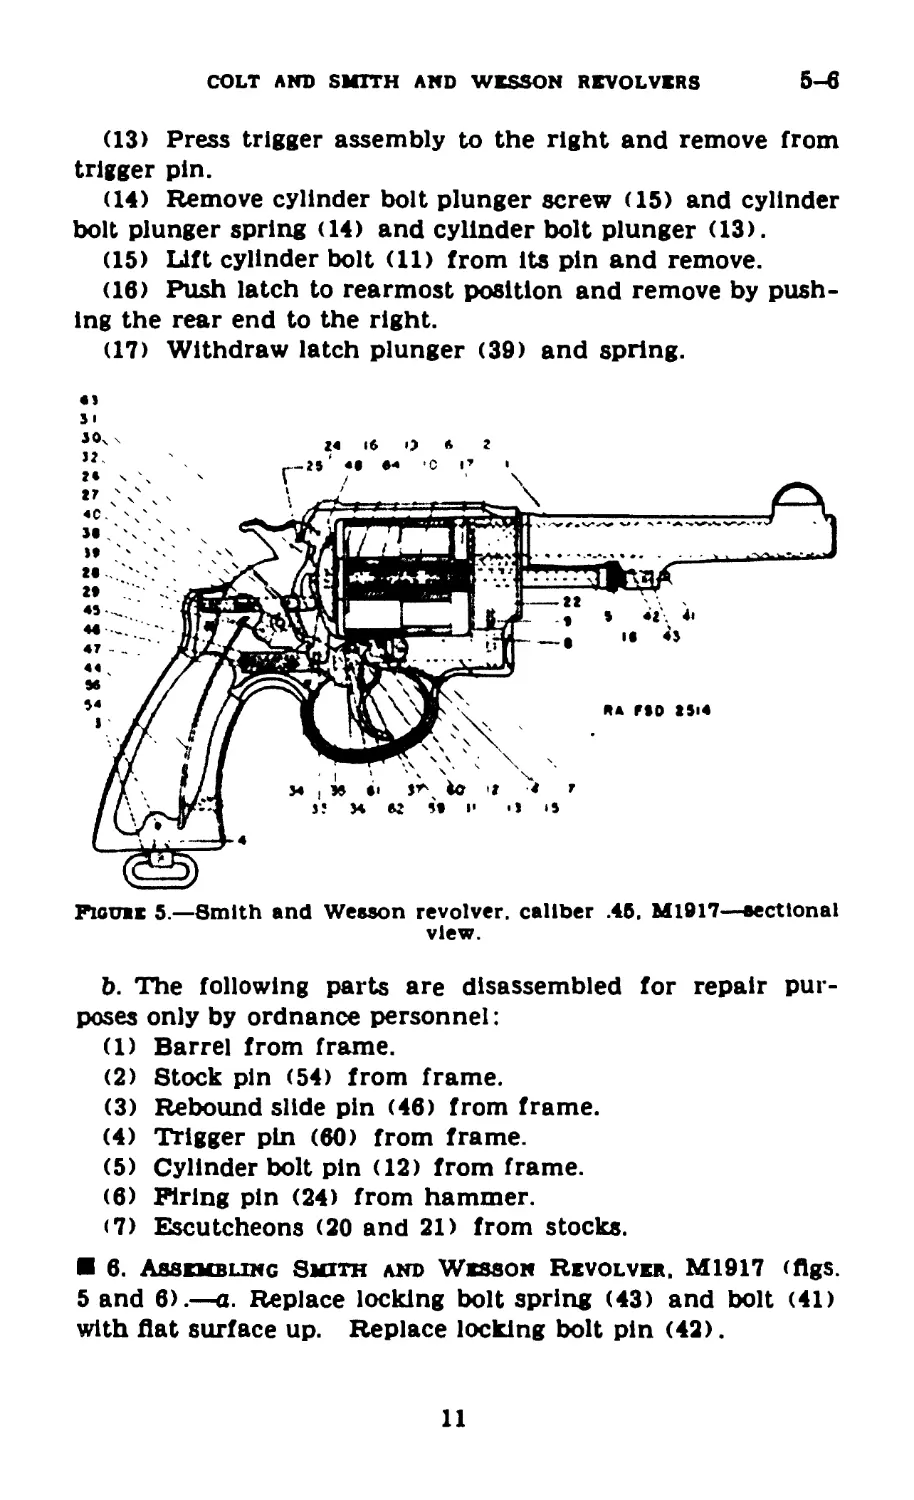
COLT AND SMITH AND WESSON REVOLVERS
5-6
(13) Press trigger assembly to the right and remove from
trigger pin.
(14) Remove cylinder bolt plunger screw (15) and cylinder
bolt plunger spring (14) and cylinder bolt plunger (13).
(15) Lift cylinder bolt (11) from its pin and remove.
(16) Push latch to rearmost position and remove by push-
ing the rear end to the right.
(17) Withdraw latch plunger (39) and spring.
b. The following parts are disassembled for repair pur-
poses only by ordnance personnel:
(1) Barrel from frame.
(2) Stock pin (54) from frame.
(3) Rebound slide pin (46) from frame.
(4) Trigger pin (60) from frame.
(5) Cylinder bolt pin (12) from frame.
(6) Firing pin (24) from hammer.
(7) Escutcheons (20 and 21) from stocks.
6. Assembling Smith and Wesson Revolver. M1917 (figs.
5 and 6).—a. Replace locking bolt spring (43) and bolt (41)
with flat surface up. Replace locking bolt pin (42).
11
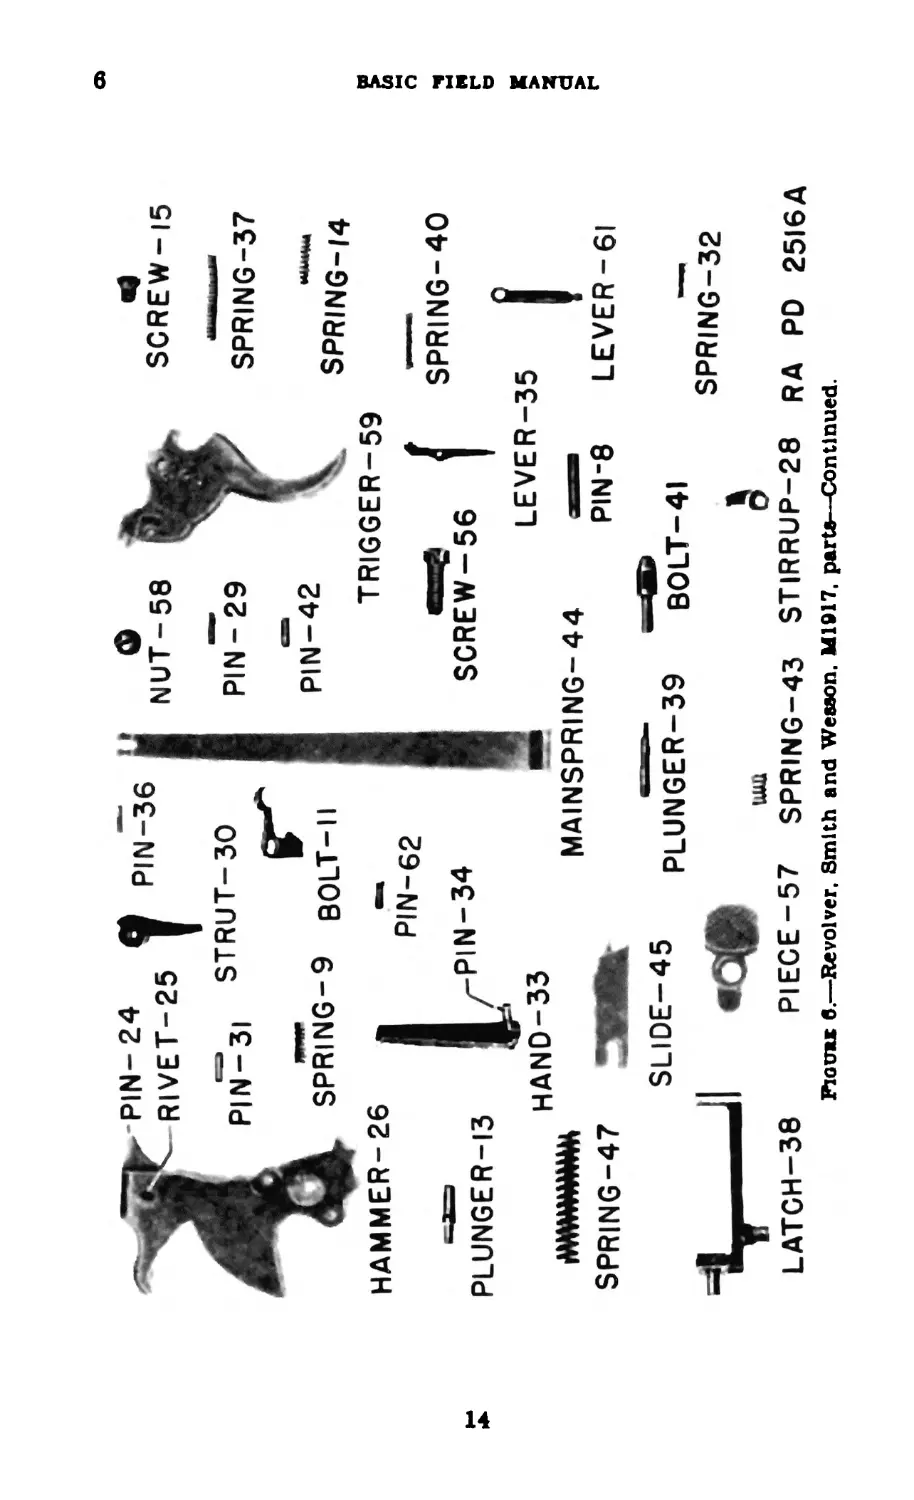
Piouax в.—Revolver. Smith and Wesson, M1917. parts.
BASIC FIELD
W09T»
irywmwmrr .........
SPRING-6 ROD-5
CRANE —7 RA pq 2495Д
COLT AND SMITH AND WESSON REVOLVERS
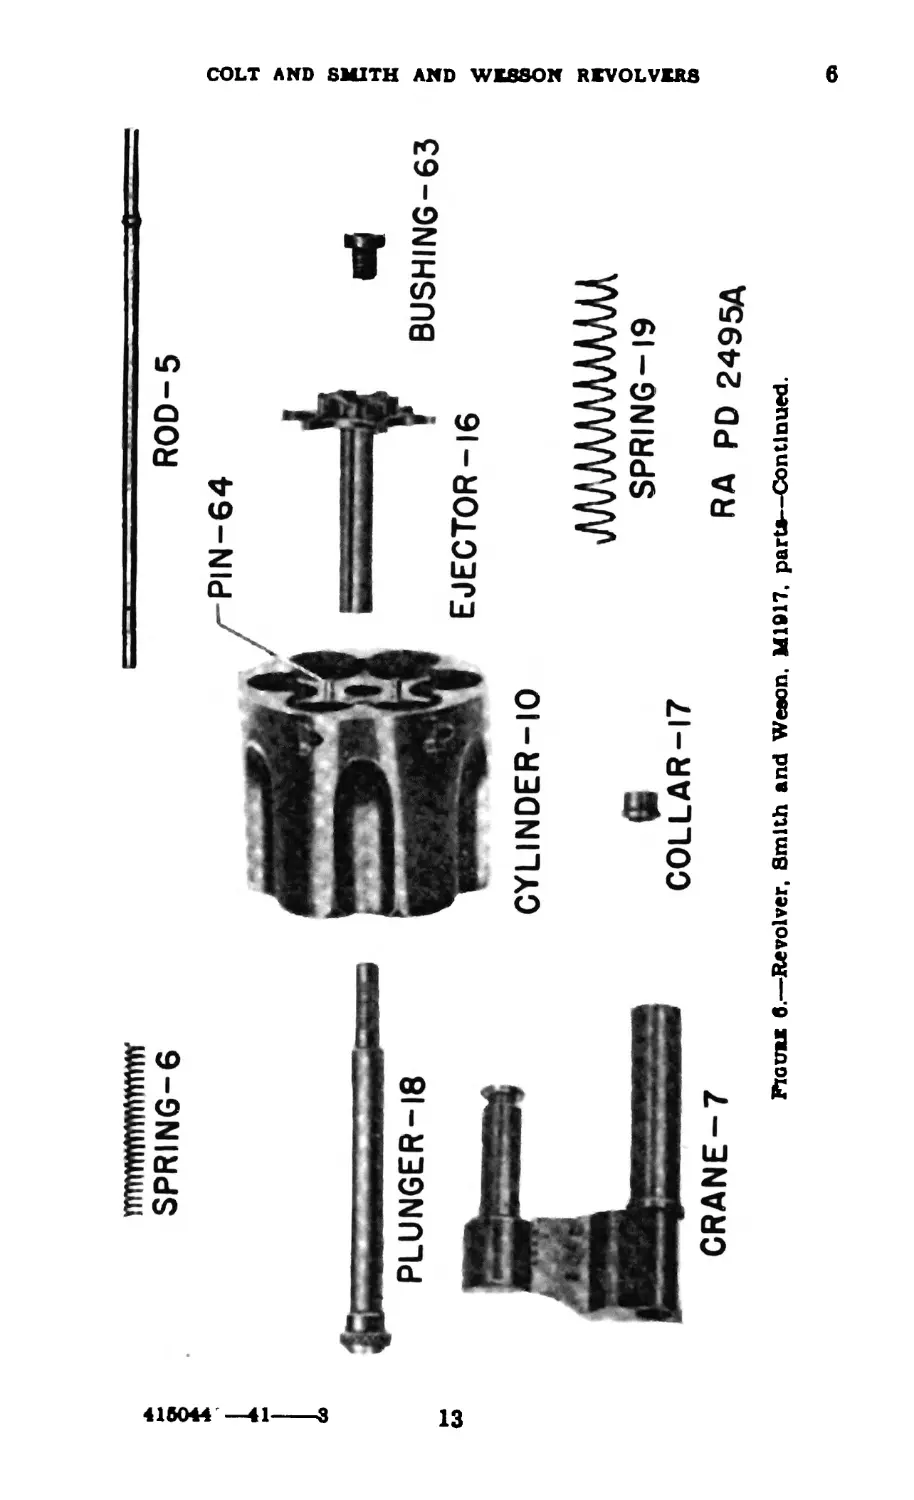
Figuu 6.—Revolver, Smith and Weson. M1917, parte—Continued.
HAMMER-26
PIN- 24
RIVET-25
PIN-36
PIN-31 STRUT-30
SPRING-9 BOLT-11
PIN - 29
PIN-42
Q
NUT-58
SCREW-15
SPRING-37
TRIGGER-59
SPRING-14
PLUNGER-13
PIN-62
PIN-34
SCREW-56
SPRING-40
HAND-33
LEVER-35
MAINSPRING-44
SPRING-47 ТМЖ
SLIDE-45
PIN-8
LATCH-38
PLUNGER-39
urn
BOLT-41
LEVER-61
SPRING-32
BASIC FIELD MANUAL
PIECE-57 SPRING-43 STIRRUP-28 RA PD 25I6A
Piouu 8.—Revolver, Smith and Wesson. M1617, parts—Continued.
COLT AND SMITH AND WESSON REVOLVERS 6-7
b. Replace cylinder bolt (11) on its pin. Replace cylinder
bolt plunger (13), cylinder bolt spring (14), and cylinder bolt
screw (15).
c. Assemble the hand (33) to the trigger as follows: With
the blade of a screw driver or drift, depress the forward end
of the hand lever (35) against the hand lever spring (37).
Place the hand pin (34) in its hole in the trigger so that the
lug alongside the hand pin is engaged below the rear end of
the hand lever.
d. Replace assembled trigger and hand on the trigger pin,
holding the upper end of the hand to the rear to clear the
frame, and with the rear end of the trigger lever (61) in its
topmost position.
e. Replace the latch plunger (39) and latch plunger spring
(40) in the recess in the rear end of the latch (38).
/. Replace latch in its guide in the frame by pressing the
plunger (39) forward.
g. Replace the hammer assembly on the hammer pin.
Note.—To accomplish thia the trigger should be Ln the rearmost
position and the latch should be held to the rear.
h. Put rebound spring (47) into the rebound slide (45) and
replace the assembly on the rebound slide pin (46) with bev-
eled end forward, so that the rear end of the trigger lever
engages the notch in the forward face of the rebound slide.
i. Replace the mainspring by engaging the hooks on the
upper end with the hammer stirrup (28) and then pressing
the lower end into its recess in the frame.
j. Replace the mainspring strain screw (56).
k. Replace the side plate and all side plate screws but the
forward one.
I. Replace crane stop plunger and crane stop plunger spring
(9) in hole in crane.
m. Assemble crane (7) and cylinder assembly to frame.
n. Replace the remaining side plate screw.
o. Replace the thumb piece (57) and thumb piece nut (58).
p. Replace the stocks and stock screw.
Section Ш
CARE AND CLEANING
7. General.—a. Careful and conscientious work is re-
quired to keep revolvers in a condition that will insure perfect
15
7-9
BASIC FIELD MANUAL
functioning of the mechanism and continued accuracy of the
barrel. It is essential that exposed parts of the mechanism
be kept cleaned and oiled.
b. The mechanism also requires care to prevent rust or
an accumulation of sand or dirt in the interior. Revolvers
are not usually disassembled for cleaning under ordinary
conditions. After immersion in water, after contamination
by gas, or if excessive amounts of dirt or sand get into the
interior, the side plate should be removed and the mechanism
cleaned, dried, and oiled. The side plate is removed only
under the supervision of an officer or noncommissioned
officer.
8. Procedure.—a. Care and cleaning of the revolver In-
clude the ordinary care to preserve its condition and appear-
ance in garrisons, posts, and camps, and in campaign.
b. Damp air and sweaty hands are great promoters of rust.
The revolver should be cleaned and protected after every
drill or handling. Special precautions are necessary when
the revolver has been used on rainy days and after tours of
guard duty.
c. To clean the revolver, rub it with a rag which has been
lightly oiled and then clean with a perfectly dry rag. Swab
the bore and chambers with an oily flannel patch and then
with a perfectly dry one. Dust out all crevices with a small,
clean brush.
d. Immediately after cleaning, to protect the revolver,
swab the bore and chambers thoroughly with a flannel
patch saturated with oil, sperm, if available, or oil, engine,
SAE 10 or SAE 30. Wipe over all metal parts with an oily
rag, applying a few drops of oil to all exposed working sur-
faces of the mechanism. Oil applied in the openings for the
trigger, hammer, latch, and cylinder lock will work into the
mechanism.
e. After cleaning and protecting the revolver, place it in
the revolver rack without any covering whatever. The use
of canvas or similar covers is prohibited as they collect mois-
ture and rust the metal parts. While barracks are being
swept, revolver racks will be covered with a piece of canvas
to protect the revolvers from dust.
9. Care After Firing.—a. When a revolver has been fired,
the bore and chambers will be cleaned thoroughly not later
16
COLT AND SMITH AND WESSON REVOLVERS
9-10
than the evening of the day on which it is fired. Thereafter
it will be cleaned and oiled each day for at least the next
three succeeding days.
b. To clean the bore after firing, first open the cylinder
and hold the revolver with the muzzle pointed downward,
toward the operator, and hold the cylinder in its full open
position. The cleaning rod with a patch soaked in hot water
and issue soap, hot water alone, or cold water is inserted in
the muzzle and moved forward and back for about a minute.
During this operation the patch is frequently dipped in
water to keep it wet. When the bore is wet, a brass or bronze
wire brush should be run all the way through the bore, then
all the way back three of four times. A water-soaked patch
should again be pushed forward and back through the bore.
Then wipe the cleaning rod dry, and using dry, clean flannel
patches, thoroughly swab the bore until it is clean. Examine
the bore carefully for metal fouling.
Caution: After firing do not oil the bore before cleaning.
This will eliminate the difficulty of removing an oil deposit in
addition to the removal of the powdered salt.
Non.—If available, authorized bore cleaning fluid should be used
in lieu of the water solutions referred to above.
c. Repeat the operation in b above for each of the cham-
bers of the cylinder, holding the revolver with the muzzle
toward the operator, cylinder beneath the frame.
Caution: After firing do not oil the chambers before
cleaning.
d. Saturate a clean flannel patch with sperm oil and swab
the bore and chambers with the patch, making certain that
the bore and all exposed metal parts of the revolver are cov-
ered with a thin coat of oil.
e. Due to corrosion caused from the gas which escapes
between the barrel and the cylinder, the following parts re-
quire special care after firing:
(1) The frame just above the cylinder in the rear of the
barrel.
(2) The nose of the hammer.
(3) The firing pin channel and the hammer groove in the
frame.
10. Rules for Care or Revolver on the Range.—a. Always
clean at the end of each day’s shooting. A revolver that has
been fired should not be left overnight without cleaning.
17
10-13
BASIC FIELD MANUAL
b. Never fire a revolver with any dust, dirt, mud, or snow
in the bore.
c. Before loading the revolver make sure that no patch,
rag, or other object has been left in the barret
d. During range firing, a noncommissioned officer will be
placed in charge of the cleaning of revolvers in the cleaning
racks.
11. Care During Extreme Cold Weather.—Use oil, lubri-
cating, for aircraft instruments and machine guns, U. S. A.
Specification No. 2-27, sparingly on the working parts after
carefully removing all oil by washing with solvent, dry
cleaning.
12. Care After Chemical Attack.—a. Revolvers should be
disassembled and cleaned as soon as possible after a chemical
attack.
b. Oil will prevent corrosion for about 12 hours.
c. Clean all parts in boiling water containing a little soda
ash, if available.
d. All traces of chemical must be removed from ammunition
with a slightly oiled rag; then thoroughly dry the ammunition.
e. Rust-preventive compound resists chemical corrosion
more than light oil. In many exposures, especially those of
long duration, ammunition treated with sperm oil evidences
more severe corrosion than unprotected cartridges.
13. Important Points to be Observed.—a. After firing the
revolver, never leave it uncleaned overnight. The damage
done is then irreparable.
b. Keep the revolver clean and lightly lubricated but do
not let it become gummy with oil.
c. Do not place the revolver on the ground where sand or
dirt may enter the bore or mechanism.
d. Do not plug the muzzle of the revolver with a patch or
plug. One may forget to remove it before firing, in which
case the discharge may bulge or burst the barrel at the
muzzle.
e. A revolver kept in a leather holster may rust due to
moisture absorbed by the leather from the atmosphere, even
though the holster may appear to be perfectly dry. If the
holster is wet and the revolver must be carried therein, cover
the revolver with a thick coat of oil.
18
COLT AND SMITH AND WESSON REVOLVERS
13-15
/. The hammer should not be snapped when the revolver
Is partially disassembled.
g. Pressure on the trigger must be released sufficiently after
each shot to permit the trigger to reengage the hammer strut
in single action firing, and to permit the trigger to engage
the hammer strut in double action firing.
h. The side plate should not be removed except under the
supervision of an officer or noncommissioned officer.
i. Never attempt to remove the side plate by prying It out
of place.
j. The crane and cylinder of the Colt revolver must not be
dismounted except by ordnance personnel.
k. Never attempt to open the cylinder when the hammer
is cocked or partly cocked.
I. Never attempt to cock the hammer until the cylinder Is
fully closed and locked In the frame.
Section IV
FUNCTIONING
14. Methods of Operation.—a. The chambers of the cyl-
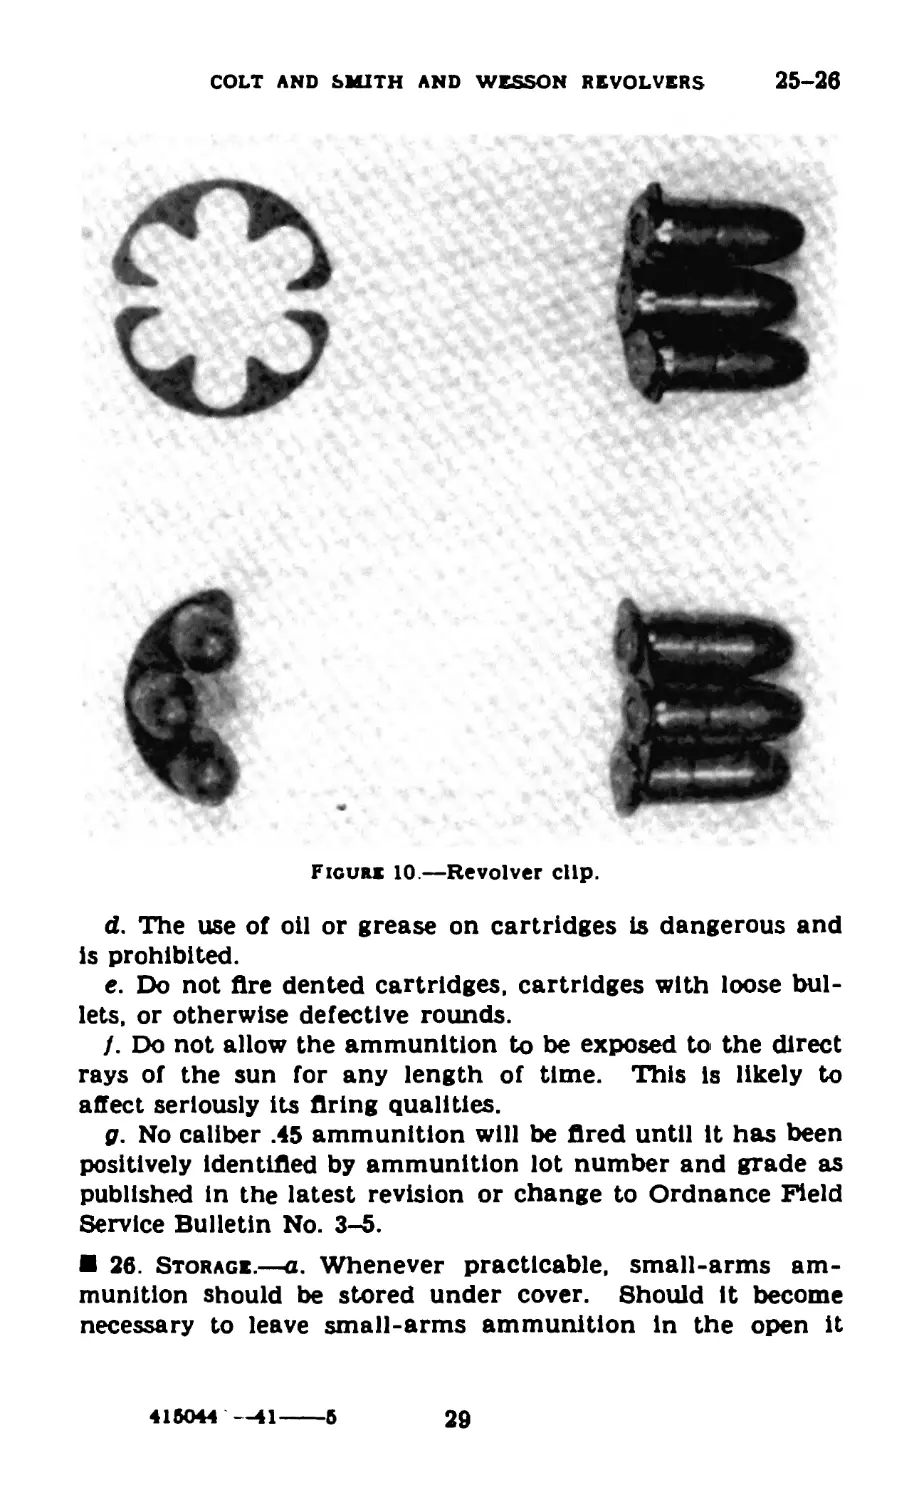
inder are loaded with six cartridges, either singly or In clips
of three rounds. When the cylinder is closed the revolver
is ready for firing.
* b. In firing double action, pressure is applied to the trigger
until the hammer falls, firing the cartridge.
c. In firing single action, the hammer is cocked by pressure
to the rear with the trigger fully released. Pressure on the
trigger releases the hammer which falls, firing the cartridge.
d. To lower cocked hammer on a loaded chamber without
firing, draw hammer slightly to rear with the thumb; press
the trigger to disengage from hammer; let hammer down
slowly a short distance, and release trigger. Lower hammer
as far as it will go.
15. Safety Devices.—a. General.—It is impossible for the
firing pin to discharge or even touch the primer except on
receiving the full blow of the hammer.
b. Automatic safety devices.—(1) Colt revolver.—The safety
lever which is pinned to the trigger moves the safety upward
in front of the hammer when the trigger is released after
firing a shot. The safety prevents the hammer moving
forward sufficiently to strike the primer until pressure is
19
15-16
BASIC FIELD MANUAL
again applied to the trigger, thereby moving the safety down-
ward out of the way. Thus an accidental blow on the ham-
mer cannot cause the revolver to fire. Hie nose of the
cylinder bolt actuated by the cylinder bolt spring projects
through a slot In the frame and engages one of the rectan-
gular cuts in the cylinder. This insures positive alinement
of one of the chambers of the cylinder with the barrel.
(2) Smith and Wesson revolver.—A projection on the
lower end of the hammer resting against the upper surface
of the rebound slide prevents the hammer moving sufficiently
far forward to strike the primer, except when the trigger is
all the way to the rear. Thus an accidental blow on the
hammer cannot cause the revolver to fire. The lug on the
upper rear end of the cylinder bolt actuated by cylinder
bolt spring projects through a slot in the frame and engages
one of the rectangular cuts in the cylinder. This insures
positive alinement of one of the chambers of the cylinder
with the barrel.
16. Detailed Functioning of Colt Revolver, M1917 (fig.
3).—a. The lock mechanism is contained in the frame and
consists of the hammer with its stirrup, stirrup pin, strut,
strut pin, and strut spring; the trigger with its pin; the
rebound lever; the hand; the cylinder bolt with its spring;
the mainspring, which also serves as a rebound lever spring,
the hand spring, the trigger spring; the safety and safety
lever.
b. Hie hammer and trigger are pivoted on their respective
pins, which are fastened in the right side of the frame. The
rebound lever is pivoted on its pin within the grip of the
frame. The lower end of the mainspring fits into a slot in
the frame, and its upper end engages the hammer stirrup.
c. The lower arm of the mainspring bears on the upper
surface of the rebound lever, so that the latter, when the
trigger is released after firing a shot, carries the hammer
back to its safety position and forces the trigger forward,
bringing the hand back to its forward and lowest position.
The safety lever, being pinned to the trigger, moves the
safety upward in front of the hammer by this same motion.
d. The revolver may be used either single action or double
action. In firing double action, pressure upon the trigger
causes its upper edge to engage the hammer strut and
20
COLT AND SMITH AND WESSON REVOLVERS
16
thereby raises the hammer until nearly in full-cock posi-
tion, when the strut will escape from the trigger, and the
hammer, under action of the mainspring, will fall and strike
the cartridge. In firing single action, the hammer Is first
pulled back with the thumb until the upper edge of the
trigger engages in the full-cock notch in the front end of
the lower part of the hammer. Pressure on the trigger will
release the hammer, which, under the action of the main-
spring, will fall and strike the cartridge.
e. The bolt Is pivoted on its screw, which is supported in
the right side of the frame. The bolt spring pressing upward
causes the nose of the bolt to project through a slot in the
frame ready to enter one of the rectangular cuts In the sur-
face of the cylinder. During the first part of the movement
of the trigger in cocking the revolver, the nose of the bolt is
withdrawn from the cylinder by the rear end of the bolt
coming into contact with the lug on the rebound lever, per-
mitting the rotation of the cylinder. The object of the bolt
is to hold the firing chamber in line with the barrel, and
also to prevent the cylinder making more than one-sixth of
a revolution at the time of cocking.
/. The hand is attached by its pivot to the trigger, and as
the latter swinge on its pin when the hammer is being cocked,
the hand is raised, revolves the cylinder, and serves with the
bolt to lock the cylinder in proper position at time of firing,
that is, the axis of the chamber containing the cartridge to
be fired coincides with the axis of the bore of the barrel.
The pressure of the rebound lever on the lug on the hand
insures the engagement of the hand with the ratchet.
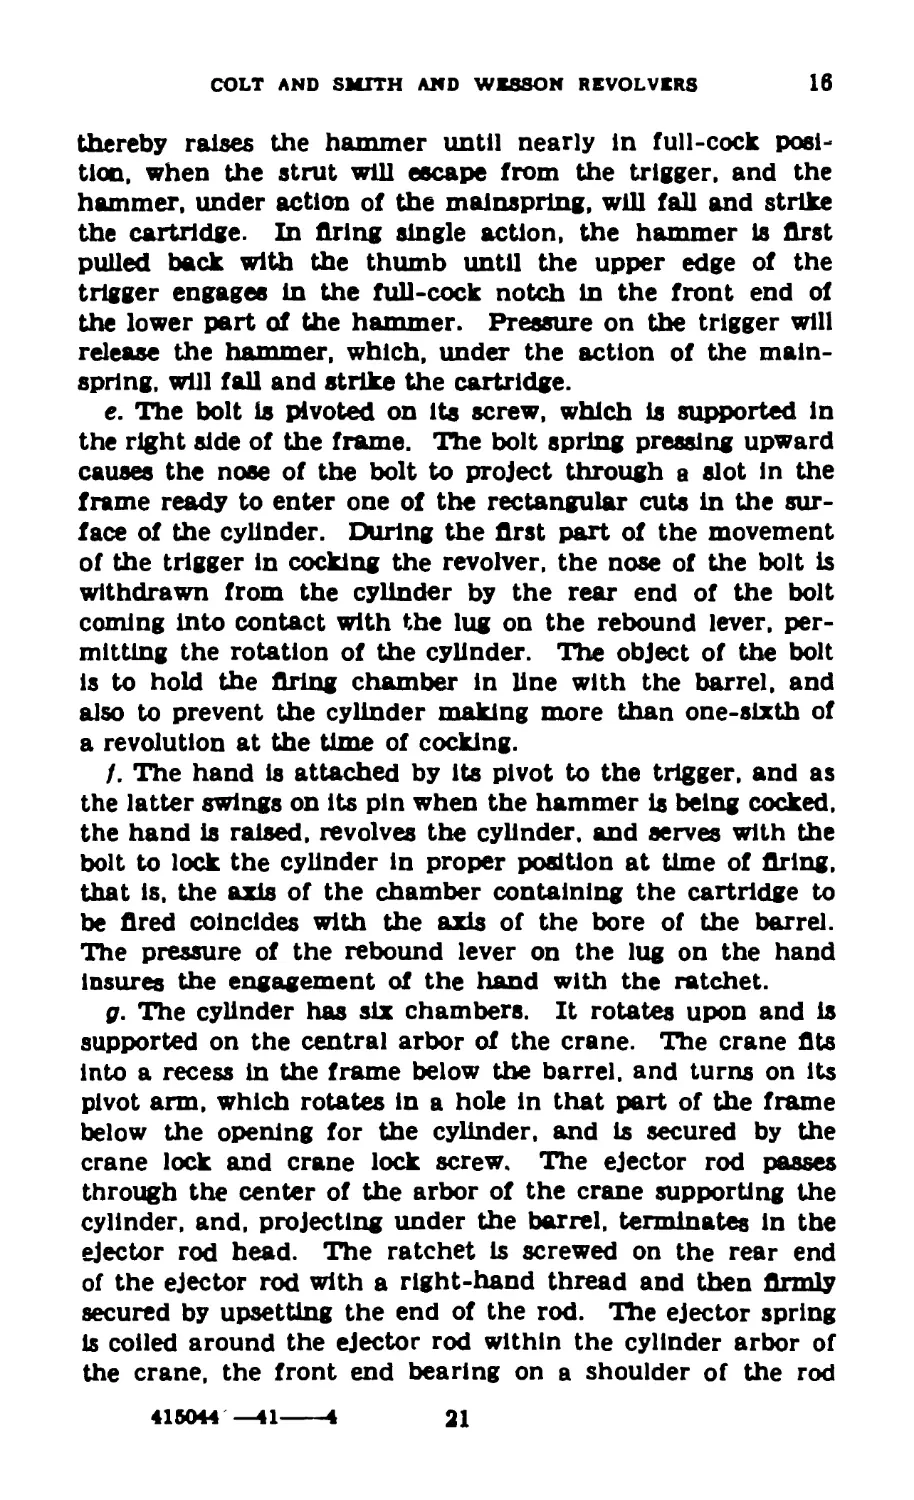
g. The cylinder has six chambers. It rotates upon and is
supported on the central arbor of the crane. The crane fits
into a recess in the frame below the barrel, and turns on its
pivot arm, which rotates in a hole in that part of the frame
below the opening for the cylinder, and is secured by the
crane lock and crane lock screw. The ejector rod passes
through the center of the arbor of the crane supporting the
cylinder, and, projecting under the barrel, terminates in the
ejector rod head. The ratchet is screwed on the rear end
of the ejector rod with a right-hand thread and then firmly
secured by upsetting the end of the rod. The ejector spring
is coiled around the ejector rod within the cylinder arbor of
the crane, the front end bearing on a shoulder of the rod
416044 —41------4
21
16-17
BASIC FIELD MANUAL
and the rear end on the crane bushing, which Is screwed with
a right-hand thread into and closes the cylinder arbor.
h. The latch slides longitudinally on the left side of the side
plate, and is connected to the latch pin by the latch pin stud,
causing it to follow the movement of the latch. The latch
pin slides in a hole in the frame, and when the cylinder is
swung into the frame, the latch pin, under action of the latch
spring, is forced into a recess in the ejector and locks the
cylinder in position for firing. The latch spring is contained
in a hole in the side plate in the rear of the latch slot. Tbe
recoil plate is driven into its recess in the frame and secured
therein by slightly upsetting the rim.
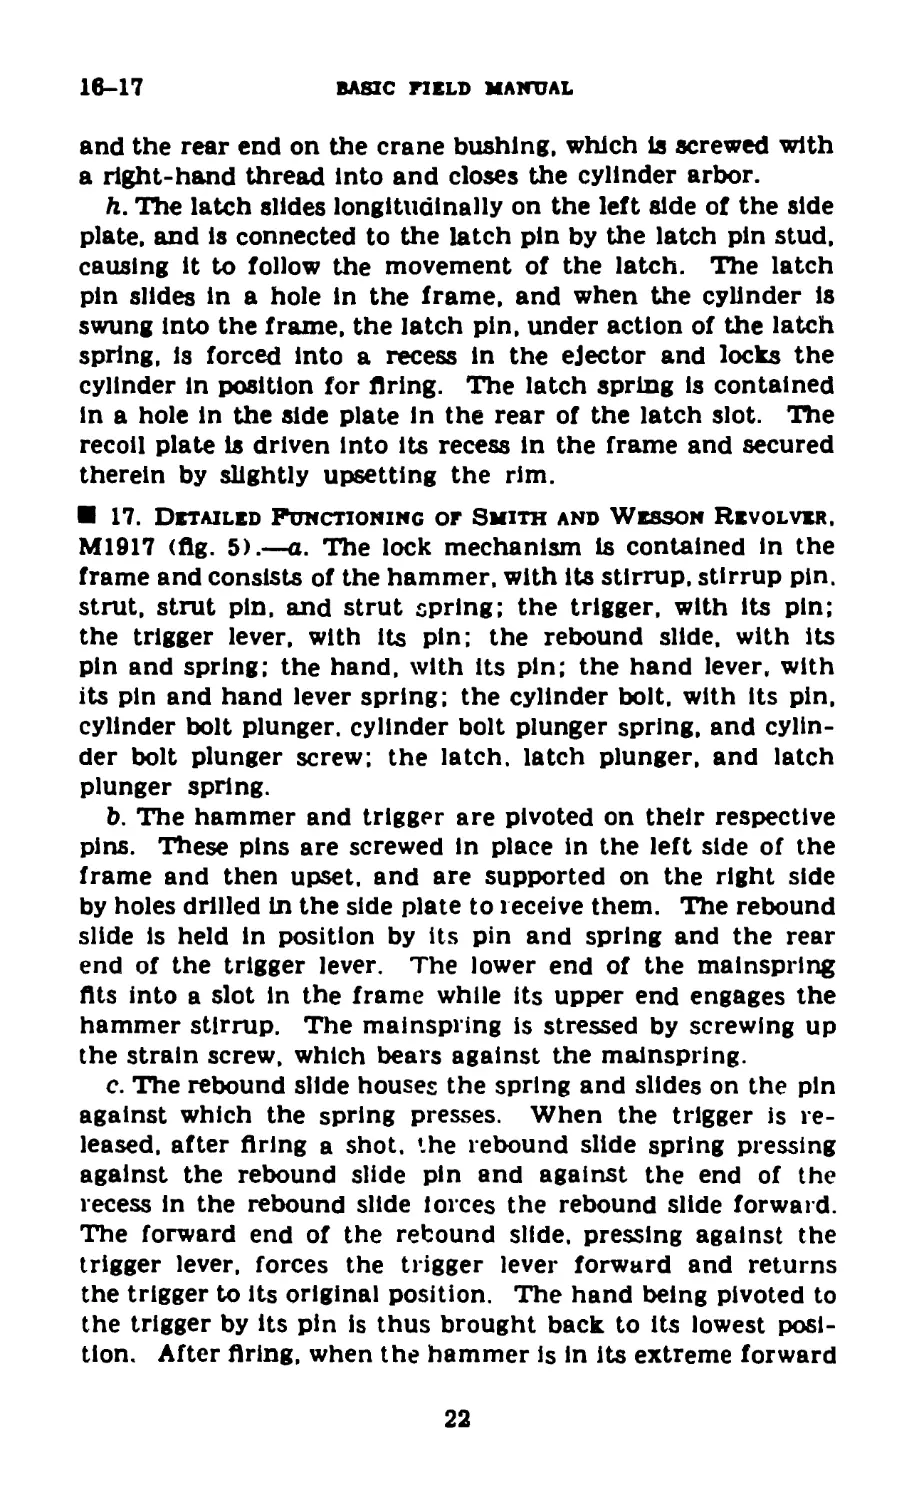
17. Detailed Functioning of Smith and Wesson Revolver,
M1917 (fig. 5).—a. The lock mechanism is contained in the
frame and consists of the hammer, with its stirrup, stirrup pin.
strut, strut pin, and strut spring; the trigger, with its pin;
the trigger lever, with its pin; the rebound slide, with its
pin and spring; the hand, with its pin; the hand lever, with
its pin and hand lever spring; the cylinder bolt, with its pin,
cylinder bolt plunger, cylinder bolt plunger spring, and cylin-
der bolt plunger screw; the latch, latch plunger, and latch
plunger spring.
b. The hammer and trigger are pivoted on their respective
pins. These pins are screwed in place in the left side of the
frame and then upset, and are supported on the right side
by holes drilled in the side plate to receive them. The rebound
slide is held in position by its pin and spring and the rear
end of the trigger lever. The lower end of the mainspring
fits into a slot in the frame while its upper end engages the
hammer stirrup. The mainspring is stressed by screwing up
the strain screw, which bears against the mainspring.
c. The rebound slide houses the spring and slides on the pin
against which the spring presses. When the trigger is re-
leased, after firing a shot, the rebound slide spring pressing
against the rebound slide pin and against the end of the
recess in the rebound slide forces the rebound slide forward.
The forward end of the rebound slide, pressing against the
trigger lever, forces the trigger lever forward and returns
the trigger to its original position. The hand being pivoted to
the trigger by its pin is thus brought back to its lowest posi-
tion. After firing, when the hammer is in its extreme forward
22
COLT AND SMITH AND WESSON REVOLVERS
17
position, the lowest projection on the hammer lies in the
notch on the front end of the rebound slide. As the rebound
slide moves forward, the hammer projection is forced out of
the notch and on to the fiat surface of the slide in the rear
of the notch, thus moving the hammer back to its safety
position.
d. The revolver may be used either single action or double
action. In firing double action, pressure on the trigger causes
its upper edge to engage the hammer strut and raise the
hammer until the trigger nose itself actually comes into con-
tact with the hammer. After this, the trigger continues to
raise the hammer until the hammer is nearly in its full-cock
position, when the hammer will escape from the trigger nose
and under action of the mainspring will fall, causing the firing
pin to strike the cartridge. In firing single action, the hammer
is first pulled back with the thumb until the upper edge of the
trigger engages in the full-cock notch in the front end of the
lower part of the hammer. Pressure on the trigger will then
release the hammer, which, under action of the mainspring,
will fall and cause the firing pin to strike the cartridge.
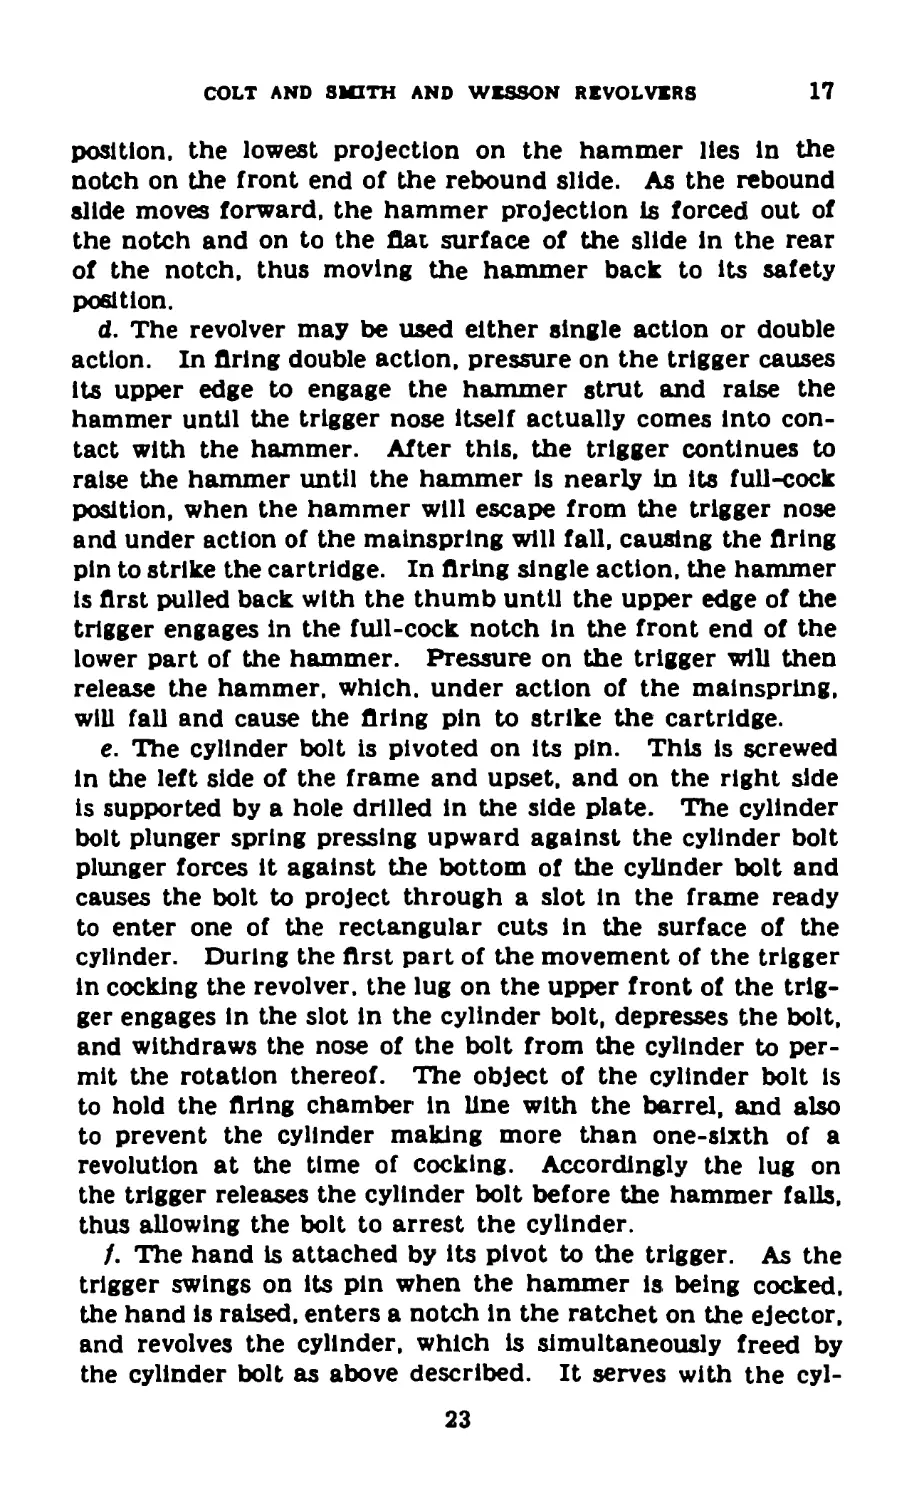
e. The cylinder bolt is pivoted on its pin. This is screwed
in the left side of the frame and upset, and on the right side
is supported by a hole drilled in the side plate. The cylinder
bolt plunger spring pressing upward against the cylinder bolt
plunger forces it against the bottom of the cylinder bolt and
causes the bolt to project through a slot in the frame ready
to enter one of the rectangular cuts in the surface of the
cylinder. During the first part of the movement of the trigger
in cocking the revolver, the lug on the upper front of the trig-
ger engages in the slot in the cylinder bolt, depresses the bolt,
and withdraws the nose of the bolt from the cylinder to per-
mit the rotation thereof. The object of the cylinder bolt is
to hold the firing chamber in line with the barrel, and also
to prevent the cylinder making more than one-sixth of a
revolution at the time of cocking. Accordingly the lug on
the trigger releases the cylinder bolt before the hammer falls,
thus allowing the bolt to arrest the cylinder.
/. The hand is attached by its pivot to the trigger. As the
trigger swings on its pin when the hammer is being cocked,
the hand is raised, enters a notch in the ratchet on the ejector,
and revolves the cylinder, which is simultaneously freed by
the cylinder bolt as above described. It serves with the cyl-
23
17
BASIC FIELD MANUAL
in de г bolt, after the bolt is released by the trigger, to maintain
the cylinder in proper position at the time of firing, that is,
when the axis of the chamber containing the cartridge to be
fired coincides with the axis of the bore of the barrel. The
hand lever actuated by the hand lever spring, both of which
are housed within the trigger, presses against the lug on the
hand and insures the engagement of the hand with the
ratchet.
g. The cylinder has six chambers. It rotates upon and is
supported by the central arbor of the crane. The crane fits
into a recess in the frame below the barrel and turns on its
pivot arm, which rotates in a hole in that part of the frame
below the opening for the cylinder. The ejector plunger en-
ters the arbor of the crane and is held in place by the thread
on its rear end which engages the corresponding thread in
the front end of the ejector. The shoulder on the ejector
plunger bears against the ejector collar so that when the
ejector plunger is screwed into its housing in the ejector the
ejector spring is compressed. The ejector plunger terminates
at its front end in the ejector plunger head. The ejector, of
which the ratchet forms a part, consists of a rod and the star-
shaped ejector head which engages the clip to cause ejection of
the shells. It is forged in one piece. The ejector spring sur-
rounds the ejector within the arbor of the crane, the front end
bearing on the ejector collar and the rear end on the shoulder
in the rear end of the cylinder.
h. The latch slides longitudinally in its groove within the
left side of the frame. It is connected to the thumb piece
by the thumb piece nut and is actuated by the latch plunger
and latch plunger spring, each housed within the body of the
latch. The center rod passes through the ejector plunger
and ejector projecting at the rear end of the cylinder to
lock the cylinder In position. The shoulder of the center
rod at its rear end bears against the ejector while the ejector
plunger bears against the center rod spring, keeping the
center rod in place. The front end of the center rod does
not come quite flush with the head of the ejector plunger,
thus allowing a recess in the head of the ejector plunger into
which the locking bolt enters. The latch and the hammer
interengage to form an interlock, which prevents cocking of
the hammer when the cylinder is unlatched, and prevents
unlatching of the cylinder while the hammer is cocked.
24
COLT AND SMITH AND WESSON REVOLVERS
17-18
Since the latch is forced forward by Its spring when the
cylinder Is swung out of the frame, the revolver cannot be
cocked unless the cylinder is In position In the frame and
latched.
i. *Ihe locking bolt is retained In position In its housing
by the locking bolt pin and Is actuated by the locking bolt
spring. The cylinder when closed is retained in its position
in the frame and held securely In proper allnement by the
center rod which enters its recess in the frame and by the
locking bolt, which enters the recess in the head of the
ejector plunger. When opening the cylinder, the thumb
piece is pushed forward, thus forcing the latch forward.
The nose of the latch pushes the center rod out of its recess.
The forward movement of the center rod forces the locking
bolt forward, thus releasing the cylinder. When the cylinder
is swung to the left, out of the frame, it is maintained In its
extreme outward position by the crane stop pin which is forced
by the crane stop spring into a small depression drilled in
the frame.
j. The frame lug is driven into its recess in the frame and
riveted. It serves as a stop to the cylinder when ejection of
cartridge cases takes place.
Section V
SPARE PARTS AND ACCESSORIES
18. Spare Parts.—In time, certain parts of the revolver
become unserviceable through breakage or wear resulting
from continuous usage. For this reason spare parts are pro-
vided for replacement purposes. They should be kept clean
and lightly oiled to prevent rust. They are divided into two
groups: organization spare parts and maintenance spare parts.
a. Organization spare parts.—These are extra parts pro-
vided with the revolver for replacement of the parts most
likely to fail, for use in making minor repairs, and in general
care of the revolver. Sets of spare parts should be kept
complete at all times. Whenever a spare part is taken to
replace a defective part In the revolver, the defective part
should be repaired or a new one substituted in the spare parts
set as soon as possible. The allowance of these spare parts
is prescribed In SNL B-7.
25
18-22
BASIC FIELD MANUAL
b. Maintenance spare parts.—These are sets of parts pro-
vided for the use of ordnance maintenance companies and
include all parts necessary to repair the revolver. The allow-
ance of maintenance spare parts is prescribed in the ad-
dendum to SNL B-7.
19. Accessories.—The names or general characteristics
of many of the accessories required with the revolver indicate
their use and application. They consist of the holster, lan-
yard, cartridge clips, and pistol cleaning kit; and for post,
camp, or station issue, arm lockers and arm racks. The
pistol cleaning kit contains cleaning brushes and rods, pistol
screw drivers, an oiler, and a small brass can In which the
set of spare parts is carried.
Section VI
AMMUNITION
20. General.—The information in this section pertaining
to the ammunition authorized for use in the revolver, caliber
.45. M1917, includes a description of the cartridges, means of
identification, care, use, and ballistic data.
21. Classification.—The types of ammunition provided
for this revolver are—
a. Ball, for use against personnel and light materiel targets.
b. Dummy, for training (cartridges are inert).
c. Blank, for training.
22. Lot Number.—When ammunition is manufactured, an
ammunition lot number which becomes an essential part of
the marking is assigned in accordance with pertinent specifi-
cations. This lot number is marked on all packing containers
and on the identification card inclosed in each packing box.
It is required for all purposes of record, including grading
and use, reports on condition, functioning, and accidents in
which the ammunition might be involved. Only those lots of
grades appropriate for the weapon will be fired. Since it is
impractical to mark the ammunition lot number on each
individual cartridge, every effort win be made to maintain
the ammunition lot number with the cartridges once they
are removed from their original packing. Cartridges which
have been removed from the original packing and for which
the ammunition lot number has been lost are placed in grade 3.
26
COLT AND SMITH AND WESSON REVOLVERS
22-25
It is therefore obvious that when cartridges are removed
from their original packings they should be so marked that
the ammunition lot number is preserved.
23. Grade.—AR 775-10 provides for the order in which lots
and grades of ammunition are to be used. Ordnance Field
Service Bulletin No. 3-5 lists numerically every lot of small-
arms ammunition with its correct grade as established by
the office of the Chief of Ordnance. Only lots of proper
grade will be fired. Grade 3 indicates unserviceable ammu-
nition which will not be fired.
24. Identification.—a. Markings.—The contents of orig-
inal boxes are readily identified by the markings on the box.
Similar markings on the carton label Identify the contents
of each carton.
b. Color bands.—Color bands painted on the sides and ends
of the packing boxes further identify the various types of
ammunition. The following color bands are used:
Cartridge, ball________________________________Red
Cartridge, dummy________________________________Green
Cartridge, blank-------------------------------Blue
c. Types and models.—One model of caliber .45 ball cart-
ridge, one model of caliber .45 blank cartridge, and one model
of caliber .45 dummy cartridge are authorized for use in the
caliber .45 revolver. These cartridges are designated—
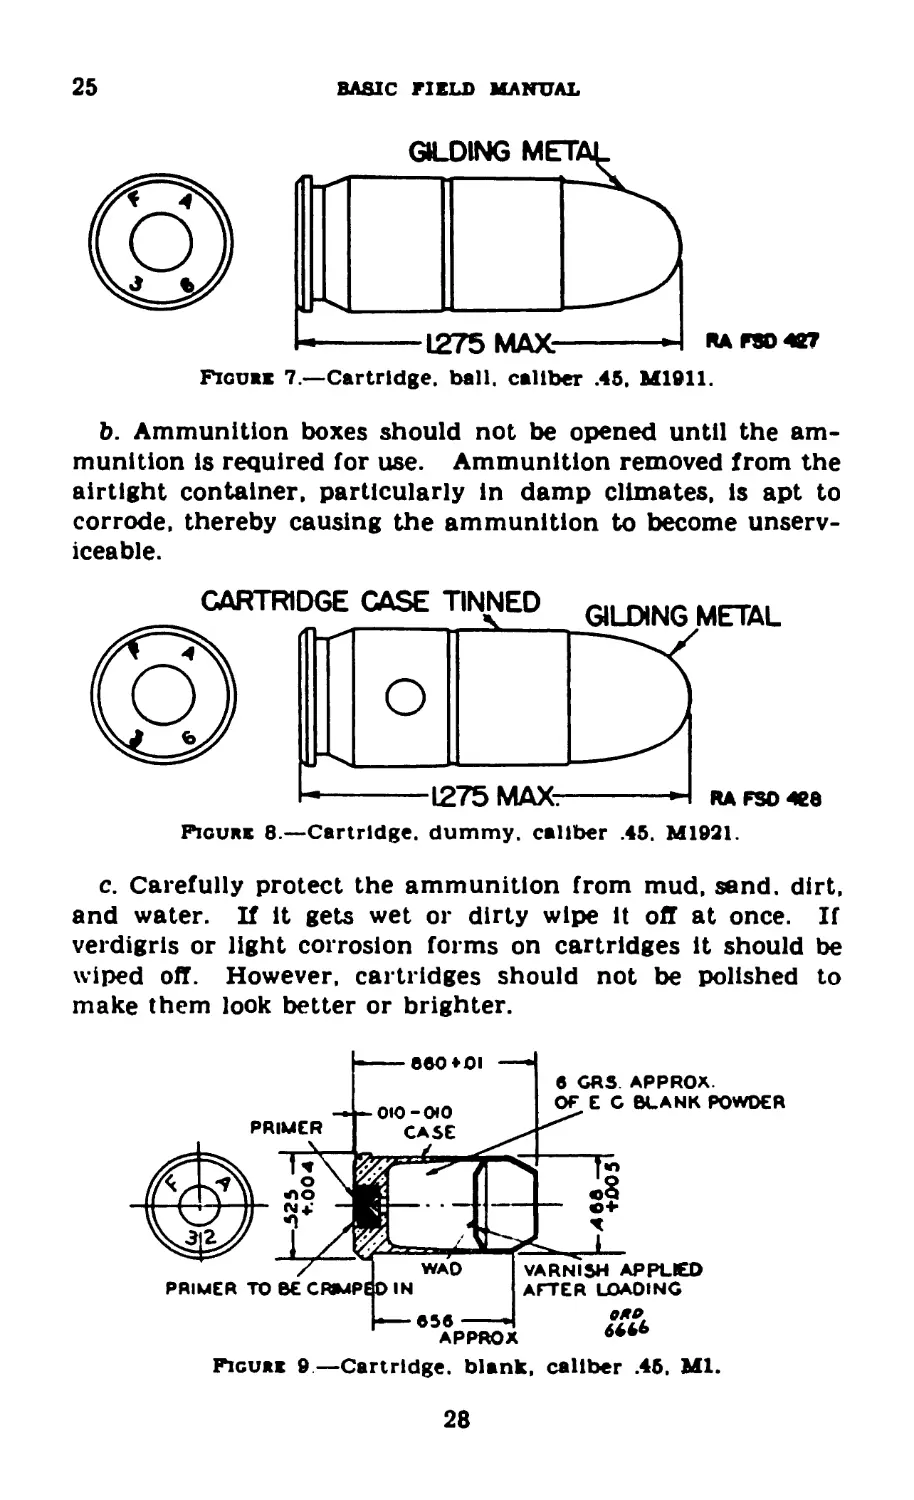
(1) Cartridge, ball, caliber .45, M1911.
(2) Cartridge, dummy, caliber .45. M1921.
(3) Cartridge, blank, caliber .45, Ml.
The dummy cartridge is distinguished by its cartridge case
which is tinned and has a Ув-lnch hole in the body. The
blank cartridge is characterized by the absence of a bullet.
It Is provided with a rim which permits it to be fired in and
extracted from the revolver without clips.
25. Care, Handling, and Preservation.—a. Small-arms am-
munition as compared with other types is not dangerous to
handle. However, care must be observed to keep the boxes
from becoming broken or damaged. All broken boxes must
be immediately repaired and careful attention given so that
all markings are transferred to the new parts of the box.
The metal liner should be air-tested and sealed if equipment
for this work is available.
27
25
BASIC FIELD MANUAL
Figure 7—Cartridge. ball, caliber .45. M1911.
b. Ammunition boxes should not be opened until the am-
munition is required for use. Ammunition removed from the
airtight container, particularly in damp climates, is apt to
corrode, thereby causing the ammunition to become unserv-
iceable.
Figure 8.—Cartridge, dummy, caliber .45. M1921.
c. Carefully protect the ammunition from mud. send. dirt,
and water. If it gets wet or dirty wipe it off at once. If
verdigris or light corrosion forms on cartridges it should be
wiped off. However, cartridges should not be polished to
make them look better or brighter.
— 655 —ч
approx
ON
Figure 9—Cartridge, blank, caliber .45. Ml.
28
COLT AND SMITH AND WESSON REVOLVERS
25-26
Figure 10.—Revolver clip.
d. The use of oil or grease on cartridges is dangerous and
is prohibited.
e. Do not fire dented cartridges, cartridges with loose bul-
lets, or otherwise defective rounds.
/. Do not allow the ammunition to be exposed to the direct
rays of the sun for any length of time. This is likely to
affect seriously its firing qualities.
g. No caliber .45 ammunition will be fired until it has been
positively identified by ammunition lot number and grade as
published in the latest revision or change to Ordnance Field
Service Bulletin No. 3-5.
26. Storage.—a. Whenever practicable, small-arms am-
munition should be stored under cover. Should it become
necessary to leave small-arms ammunition in the open it
415044—41----5
29
2G-28
BASIC FIELD MANUAL
should be raised on dunnage at least в Inches from the
ground and the pile covered with a double thickness of paulin.
Suitable trenches should be dug to prevent water flowing
under the pile.
b. Fire hazard.—If fired into or placed in a Are, small-arms
ammunition does not explode violently. There are small
individual explosions of each cartridge, the case flying In one
direction and the bullet in another. In case of flre it is
advisable to keep those not engaged in fighting the flre at
least 200 yards from the flre and have them He on the
ground. It is unlikely that the bullets and cases will fly over
200 yards.
27. Ballistic Data.—a. Average velocity of ball ammuni-
tion at 25 feet from muzzle, 800 feet per second.
b. Approximate maximum range, 1,600 yards.
Section VII
INDIVIDUAL SAFETY PRECAUTIONS
28. Rules for Safety.—Before ball ammunition is issued,
the soldier must know the essential rules for safety with the
revolver. The following rules are taught as soon as the re-
cruit is sufficiently familiar with the revolver to understand
them. They should be enforced by constant repetition and
coaching until their observance becomes the soldier's fixed
habit when handling the revolver. When units carrying the
revolver are first formed, the officer or noncommissioned
officer in charge causes the men to execute inspection pistol.
a. Execute unload every time the revolver is picked up for
any purpose. Never trust your memory. Consider every re-
volver as loaded until you have proved it otherwise.
b. Always unload the revolver if it is to be left where some-
one else may handle it.
c. Always point the revolver up when snapping it after
examination. Keep the hammer fully down when the re-
volver is not loaded.
d. Never place the finger within the trigger guard until
you intend to flre or to snap for practice.
e. Never point the revolver at anyone you do not intend
to shoot, nor in a direction where an accidental discharge
may do harm. On the range, do not snap for practice while
standing back of the firing line.
30
COLT AND SMITH AND WESSON REVOLVERS
23-29
/. Before loading, open the cylinder and look through the
bore to see that it is free from obstruction.
g. On the range, do not load the revolver until the time
for firing.
h. Never turn around at the firing point while you hold a
loaded revolver in your hand, because by so doing you may
point it at the man firing alongside of you.
i. On the range, do not cock the revolver until immediate
use is anticipated. If there is any delay, lower the hammer
and recock it only when ready to fire.
1. If the revolver falls to fire, open the cylinder and unload
if the hammer is down. If the hammer is cocked or partly
cocked, a breakage has occurred. In this case hold the re-
volver at raise pistol and announce the fact to the officer
in charge.
k. To remove a cartridge not fired, open the cylinder and
eject, first lowering the hammer if cocked.
I. In campaign, the revolver is carried in the holster fully
loaded with the hammer down. The cocked revolver should
never be put in the holster whether or not it is loaded.
m. The safety device should be tested frequently.
29. Test of Safety Devices.—a. Safety.—With the re-
volver unloaded and cylinder closed, cock the hammer. Hold-
ing the hammer back with the thumb, press the trigger and
let the hammer move forward about Уч inch, still holding
with the thumb. Release the trigger. Then release the ham-
mer and let it fly forward. If the firing pin projects through
the hole in the frame, the safety is faulty.
b. Cylinder bolt.—With the hammer down attempt to ro-
tate the cylinder. If more than about Уц inch in rotation is
possible, the cylinder bolt is faulty. Repeat this test with the
hammer fully cocked.
Non.—With the hammer about one-fourth cocked the cylinder
rotates freely
31
CHAPTER 2
MANUAL OF THE PISTOL, LOADING AND FIRING,
DISMOUNTED
30. General.—a. The movements herein described differ in
purpose from the manual of arms for the rifle in that they are
not designed to be executed in exact unison. Furthermore,
with only a few exceptions, there is no real necessity for their
simultaneous execution. They are not, therefore, planned as
a disciplinary drill to be executed in cadence with snap and
prescision, but merely as simple, quick, and safe methods of
handling the revolver. Commands are prescribed only for
such movements as may be occasionally executed simultane-
ously by the squad or larger unit.
b. The revolver is used as a substitute for the automatic
pistol. For this reason and in the interests of simplicity the
term pistol is used in all commands.
c. In general, movements begin and end at the position of
RAISE PISTOL.
d. Commands for flring, when required, are limited to com-
mence FIRING and CEASE FIRING.
e. Officers and enlisted men armed with the revolver remain
at the position of attention during the manual of arms,
except when their units are presented to their commanders or
are presented during ceremonies, at retreat, and at guard
mounting. In such cases they execute the hand salute at the
command of execution ARMS of 1. present, 2. ARMS, and
resume the position of attention at the command of execution
of the next command.
/. When the lanyard is used, it should be of such length that
the arm may be fully extended without constraint.
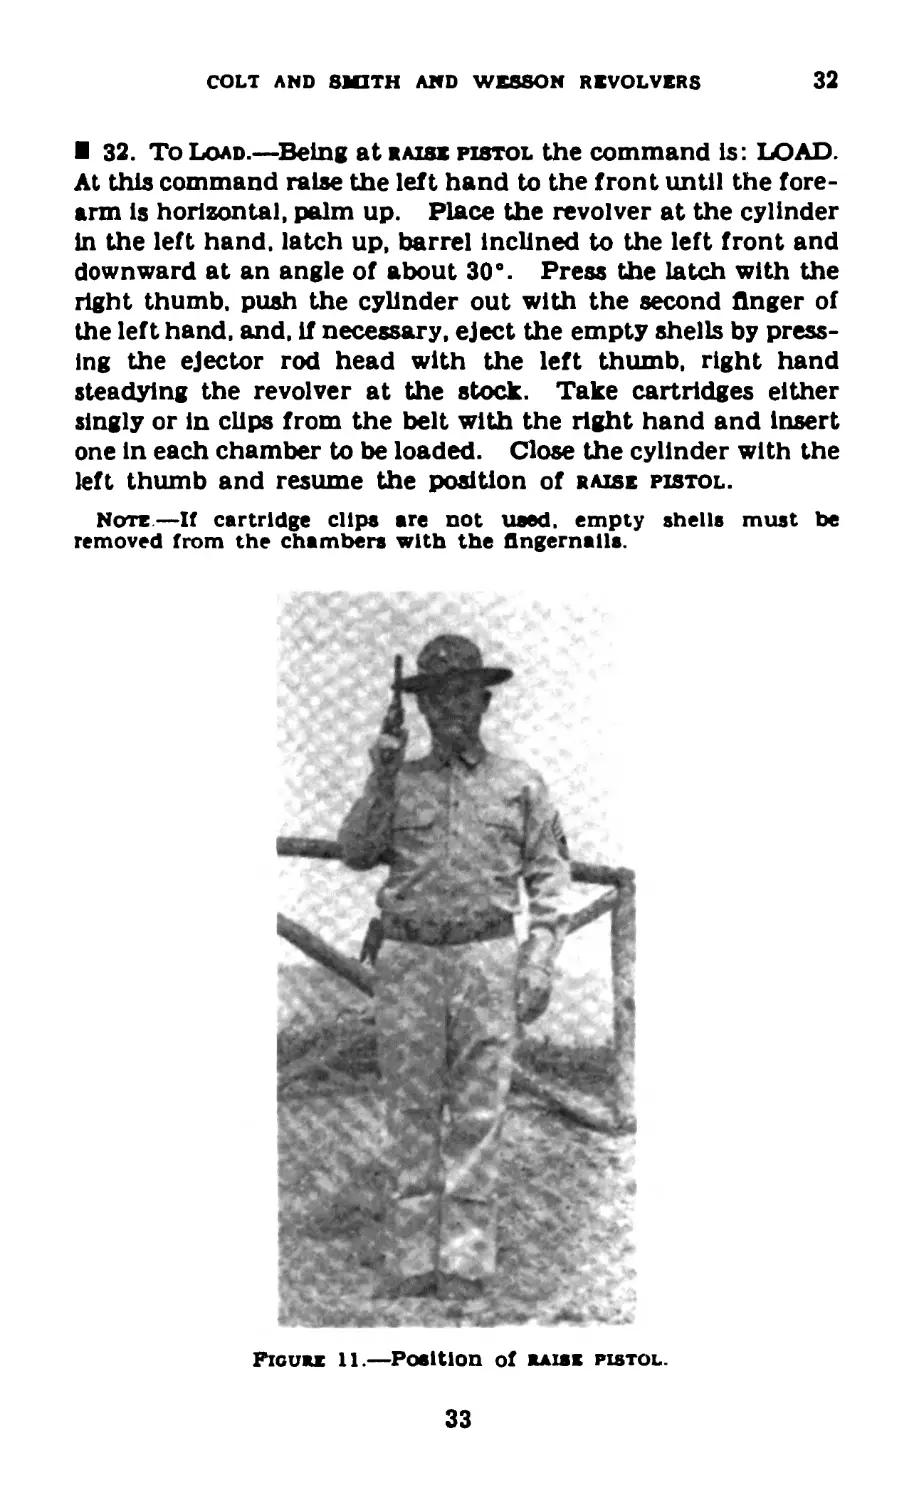
31. To Raise Pistol (flg. 11).—The commands are: 1. raise,
2. PISTOL. At the command pistol unbutton the flap of the
holster with the right hand then turn the back of the hand
inward and grasp the stock. Draw the revolver from the hol-
ster; reverse it, muzzle up. the thumb and last three fingers
holding the stock, the forefinger extended outside the trigger
guard, the barrel of the revolver to the rear and Inclined to the
front at an angle of 30°, the hand as high as, and 6 Inches in
front of, the point of the right shoulder. This is the position
of raise pistol.
32
COLT AND SMITH AND WESSON REVOLVERS
32
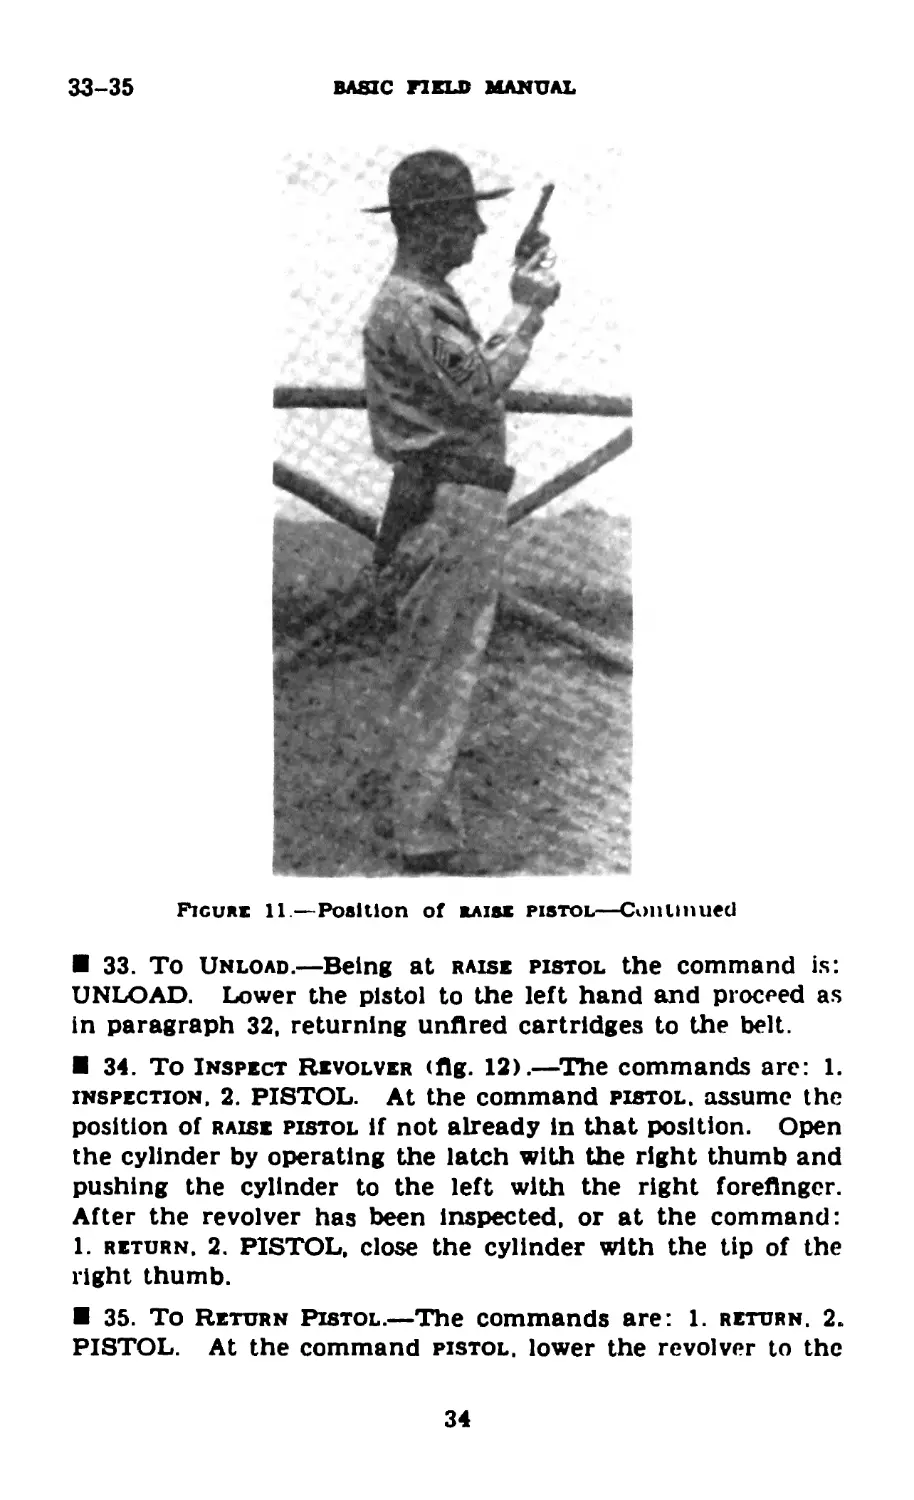
32. To Load.—Being at raise pistol the command is : LOAD.
At this command raise the left hand to the front until the fore-
arm is horizontal, palm up. Place the revolver at the cylinder
in the left hand, latch up, barrel inclined to the left front and
downward at an angle of about 30°. Press the latch with the
right thumb, push the cylinder out with the second finger of
the left hand, and, if necessary, eject the empty shells by press-
ing the ejector rod head with the left thumb, right hand
steadying the revolver at the stock. Take cartridges either
singly or in clips from the belt with the right hand and insert
one in each chamber to be loaded. Close the cylinder with the
left thumb and resume the position of raise pistol.
Note—If cartridge clips are not used, empty shells must be
removed from the chambers with the fingernails.
33
33-35
BASIC FIELD MANUAL
Figure 11.—Position of raise pistol—Continued
33. To Unload.—Being at raise pistol the command is:
UNLOAD. Lower the pistol to the left hand and proceed as
in paragraph 32, returning unflred cartridges to the belt.
34. To Inspect Revolver (flg. 12).—The commands are: 1.
inspection. 2. PISTOL. At the command pistol, assume the
position of raise pistol if not already in that position. Open
the cylinder by operating the latch with the right thumb and
pushing the cylinder to the left with the right forefinger.
After the revolver has been inspected, or at the command:
1. return, 2. PISTOL, close the cylinder with the tip of the
right thumb.
35. To Return Pistol.—The commands are: 1. return. 2.
PISTOL. At the command pistol, lower the revolver to the
34
COLT AND SMITH AND WESSON REVOLVERS
35-36
Figure 12.—Position of inspection pistol.
holster, reversing it. muzzle down, back of the hand to the
body: raise the flap of the holster with the right thumb;
insert the pistol in the holster and thrust It home; button the
flap of the holster with the right hand.
36. To Fire—Fully Loaded With Ball Ammunition.—a.
Single action.—Cock the revolver with the right thumb and
squeeze the trigger for each shot.
b. Double action.—Executed as in a above except that the
revolver is cocked by pressing steadily on the trigger.
c. Partially loaded cylinder.—(1) If one or more of the
chambers are empty, the cylinder should be rotated so
that a loaded chamber will be moved into line with the
barrel when the revolver is cocked. With the hammer of
the Colt revolver down, the first loaded chamber should be
next on the left of the chamber alined with the barrel, since
35
Зв BASIC FIELD MANUAL
the cylinder rotates clockwise. With the hammer of the
Smith and Wesson revolver down, the first loaded chamber
should be next on the right of the chamber alined with the
barrel, since the cylinder of the Smith and Wesson revolver
rotates counterclockwise.
(2) The closed cylinder may be rotated to its proper
position by holding the hammer back at about one-fourth
full cock.
36
CHAPTER 3
KNOWN-DISTANCE TARGETS, DISMOUNTED
Paragraphs
вволок I. Preparatory training___________________________37-43
П. Courses to be fired____________________________44-46
Ш. Conduct of range practice_______________________47-53
IV. Known-distance targets and ranges; range pre-
cautions___________________________________________ 54-56
V. Small-bore practice.-------------------------- 57-61
Section I
PREPARATORY TRAINING
I 37. Instruction and Practice.—a. Relative value.—(1) Re-
volver firing is a purely mechanical operation that any man
who is physically and mentally fit to be a soldier can learn
to do well If properly instructed. The methods of instruction
must be the same as are used in teaching any mechanical
operation. The soldier must be taught the various steps in
their proper order and must be carefully watched and cor-
rected whenever he makes a mistake.
(2) Good shooting is more the result of careful Instruction
than of mere practice. Unless properly instructed, men In-
stinctively do the wrong thing in firing the revolver. They
instinctively jerk the trigger which Is the cause of flinching.
Hence, mere practice fixes the instinctive bad habits.
(3) If, however, a man has been first thoroughly instructed
in the mechanism of correct shooting and is then carefully
and properly coached when he begins firing, correct shooting
habits rapidly become fixed.
(4) The ultimate object of the training Is to develop the
ability to fire one or more accurate shots quickly, but training
must begin with carefully coached slow fire to attain accuracy
and be followed by practice that will gradually shorten
the time without sacrificing the accuracy.
b. Methods of instruction.—(1) Revolver Instruction is
divided into two phases, preparatory Instruction and range
firing. In the preparatory instruction the soldier learns prac-
tically all the principles of good shooting. In range firing he
cultivates the will power to apply these principles when using
ball ammunition until proper, fixed habits have been
acquired.
415044 —41------6
37
37
BASIC FIELD MANUAL
(2) The principles of good shooting are simple and easy to
learn except the trigger squeeze, which is difficult to apply to
a loaded revolver. To this important item most of the in-
structor's time is devoted during the period of range practice.
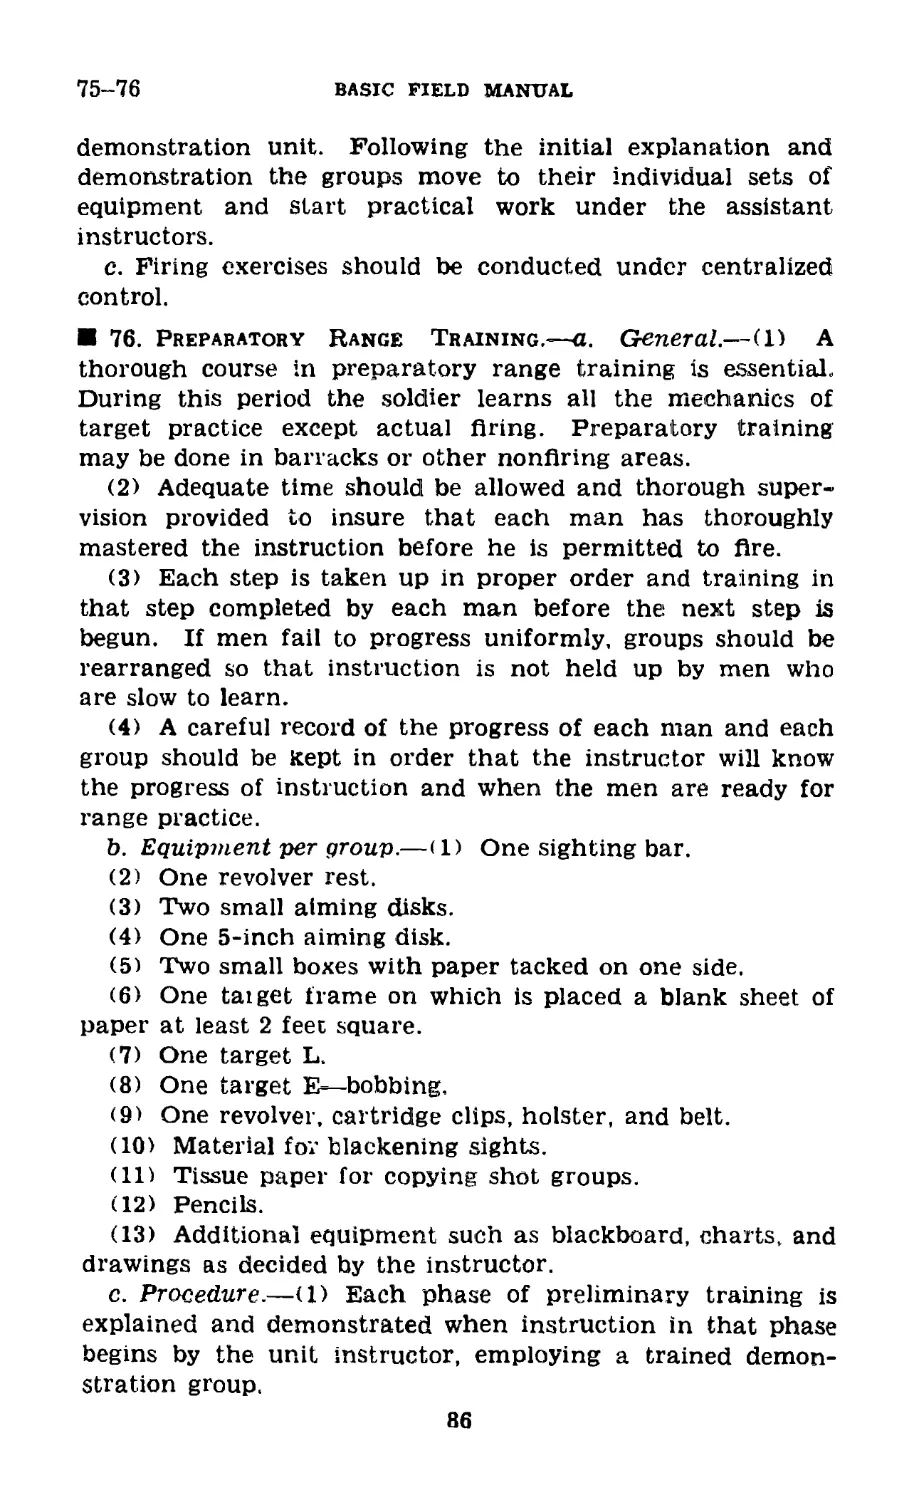
<3) The six distinct steps in the preparatory instruction
are—
(a) Aiming exercises.
(b) Position exercises.
<c> Trigger-squeeze exercises.
(d) Rapid-fire exercises.
<e) Quick-fire exercises.
(/) Examination on preparatory work.
(4) The steps are progressive and must always be taught
in proper sequence.
(5) Each of the first five steps begins with a talk by the
instructor and a demonstration by a squad which the in-
structor puts through the exercises that are to constitute the
day's work. He shows how the corporal organizes the work
in the squad so that no man is idle and how the members of
each pair coach one another when they are not under instruc-
tion by an officer or a noncommissioned officer. He shows
exactly how to execute each of the exercises about to be taken
up and explains its purpose and application in revolver
shooting.
<6) The instructor who gives these very essential talks and
demonstrations may be the organization commander, or he
may be a specially qualified officer who has been detailed as
instructor. But the actual application of the demonstrated
exercises to the men of the command must be by the officers
and noncommissioned officers of the organization undergoing
instruction.
(7) Instruction must be thorough and must be individual.
General instruction of groups of men is not enough. The in-
structors must see that each man understands each and
every point and can apply it.
<8) In peacetime training and in war, when time is avail-
able for a complete course of instruction and practice, the
form shown in paragraph 33c (which should be explained in
the first talk) must be kept by each squad leader and by each
platoon leader Independently. This form shows at a glance
just how much each man knows about each feature of train-
38
COLT AMD SMITH AND WK8SON REVOLVXRS
37
Ing and permits concentration of instruction where most
needed.
(9) Interest and enthusiasm must be sustained and every-
thing possible should be done to stimulate them. If the ex-
ercises are carried out in a manner approximately correct and
as a routine piece of work, results will be very disappointing.
(10) It Is of utmost Importance that the trigger squeeze be
explained In such a manner as to give the soldier a clear un-
derstanding of how It should be executed.
(11) All authorities on shooting agree that the trigger
must be squeezed with a steady increase of pressure. If a
man knows when his revolver will go off It is because he sud-
denly gives the trigger all the pressure necessary. Con-
versely, If the increase of pressure Is steady the man cannot
know when the revolver will be discharged. Hence, he is in-
structed to squeeze the trigger in such a way as not to know
just when the hammer will fall. This does not mean that the
process is necessarily a slow one and that it will take a com-
paratively long time to flre a shot. Through training, a man
can reduce the time used in pressing the trigger to as brief a
period as 1 second and still press it In such a manner that he
does not know Just what part of the second the discharge will
take place. When the soldier has acquired the ability to
squeeze the trigger properly, even though it be very slowly, he
soon learns to shorten the time without changing the process.
(12) Whenever a man Is In a firing position, whether it be
a preparatory instruction or during practice firing, he must
have a coach beside him to watch him and point out his
errors.
(13) None of the preparatory exercises are executed by
command or in unison by a group of men. Instruction is
Individual at all times. The men are placed in pairs and
alternate in coaching each other. This method gives each
man the necessary physical rest without halting the progress
of his instruction. He is learning while watching another
man and attempting to correct his mistakes.
(14) A great deal of preparatory practice is necessary in
order to strengthen the muscles of the hand and arm and
to fix the habit of correct trigger squeeze. The periods of
exercise should not ordinarily be of long duration. Three
or four 10-mlnute periods per day for a month will produce
good results on the range. These periods of Instruction can
39
37-38
BASIC FIELD MANUAL
often be held during waits when troops are on maneuvers or
held exercises. Some kind of a mark can always be found
that will serve as an aiming point.
(15) It is a good plan to have full-sized pistol targets placed
in the vicinity of the barracks to encourage the men to spend
part of their time in preparatory practice.
(18) The preparatory exercises should be held out of doors
with full-sized pistol targets, but during inclement weather
they can be held indoors, using miniature targets, with good
results.
c. Scope of preparatory instruction.—(1) Each man's re-
volver is closely examined for defects before the beginning
of the preparatory instruction.
(2) Every man who is to Are on the range should be put
through the preparatory course. Part of the preparatory
instruction may have escaped the men the previous year and
part of it has certainly been forgotten; in any case it is
beneficial to go over it anew and refresh the mind on the
subject.
(3) In peace, noncommissioned officers should be put
through a rigid test before the period of preparatory instruc-
tion for the organization begins. This Is also desirable in
war when time is available.
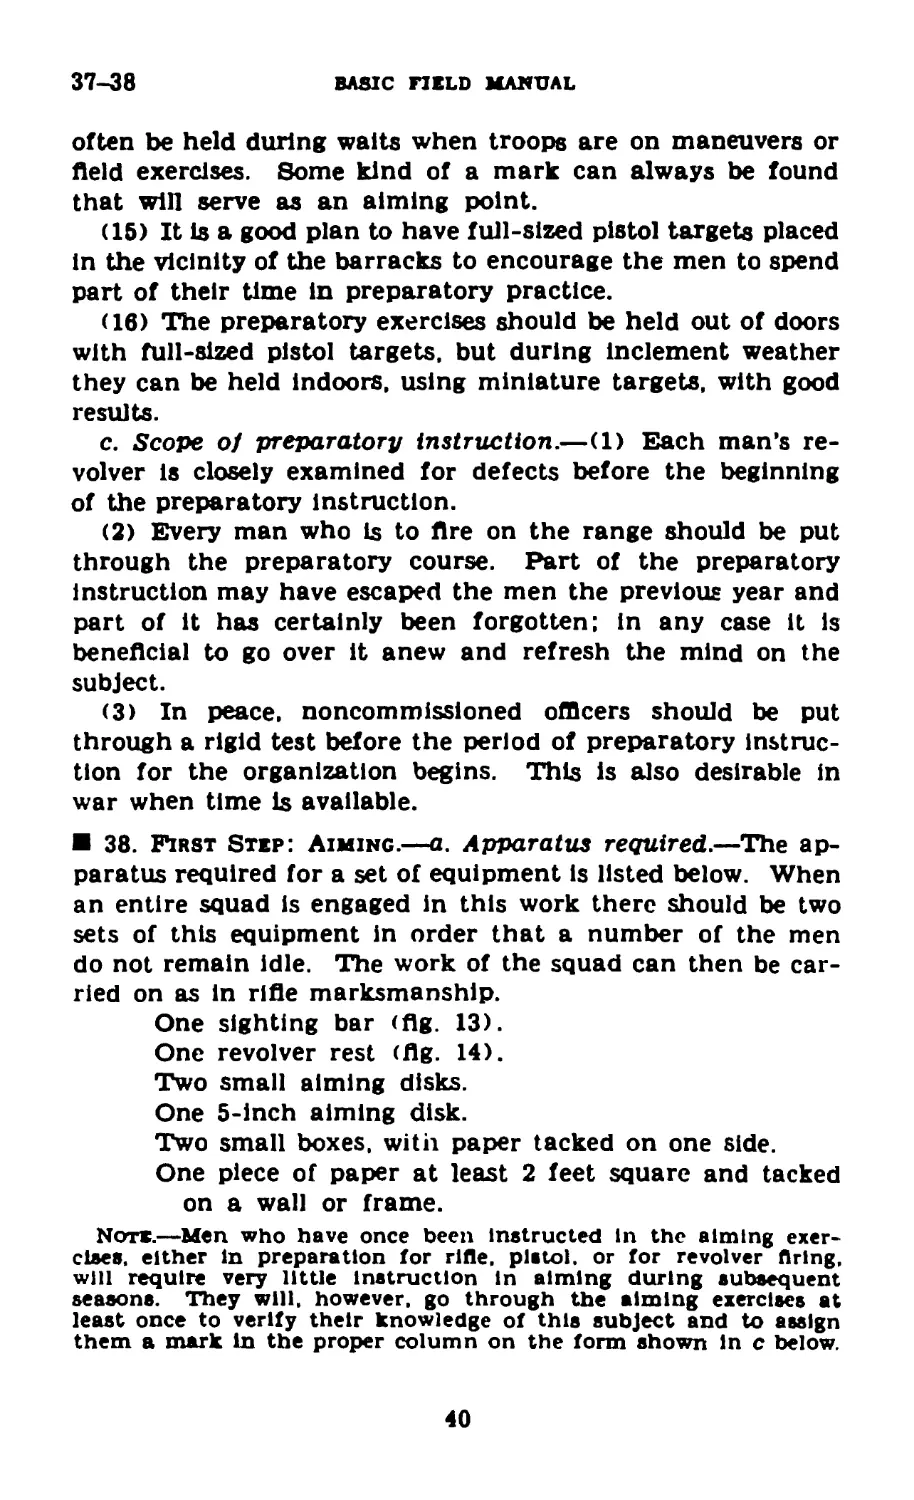
38. First Step: Aiming.—a. Apparatus required.—The ap-
paratus required for a set of equipment is listed below. When
an entire squad is engaged in this work there should be two
sets of this equipment in order that a number of the men
do not remain idle. The work of the squad can then be car-
ried on as in rifle marksmanship.
One sighting bar (flg. 13).
One revolver rest (flg. 14).
Two small aiming disks.
One 5-inch aiming disk.
Two small boxes, with paper tacked on one side.
One piece of paper at least 2 feet square and tacked
on a wall or frame.
Note.—Men who have once been Instructed in the aiming exer-
cises. either in preparation for rifle, pistol, or for revolver flring,
will require very little instruction in aiming during subsequent
seasons. They will, however, go through the aiming exercises at
least once to verify their knowledge of this subject and to assign
them a mark in the proper column on the form shown In c below.
40
COLT AND SMITH AND WESSON REVOLVERS
38
--- I
Ф Top Vieuu
*Ф Зк>е V»euu
□
Тогда»
front Sight
I
(di
□
r“%?*eh'
Open Sight
/5r;
fbtatd’C Shape
Ф Construction
HO*e ye from Tbp Center
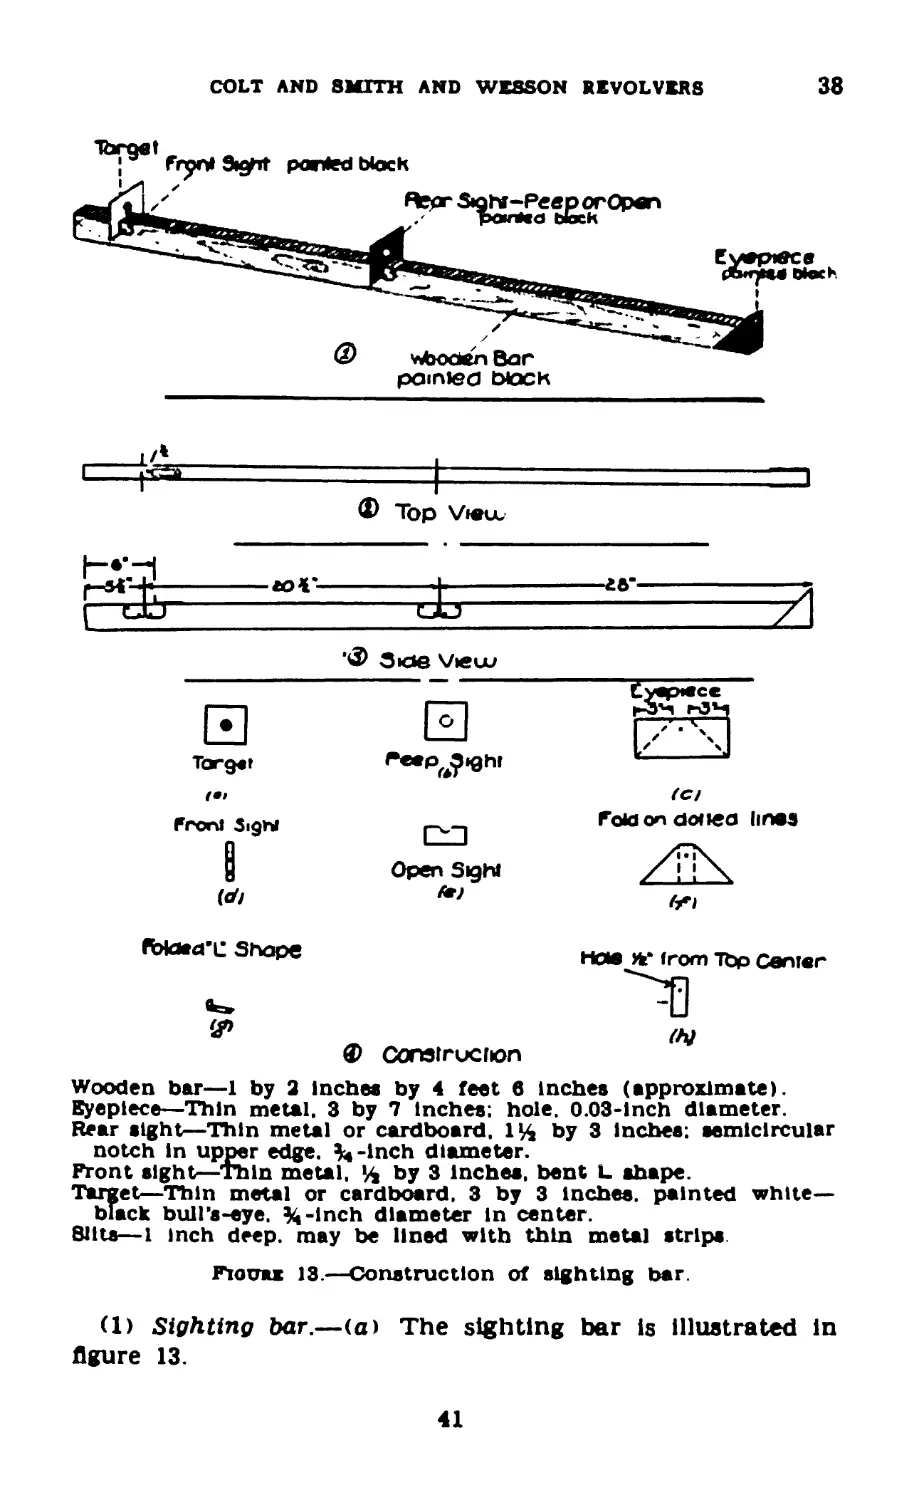
Wooden bar—1 by 2 inches by 4 feet 6 inches (approximate).
Eyepiece—Thin metal. 3 by 7 inches: hole. 0.03-lnch diameter.
Rear sight—Thin metal or cardboard. 1ft by 3 inches: semicircular
notch in upper edge. %-Inch diameter.
Front sight—thin metal, ft by 3 inches, bent L shape.
Taraet—Thin metal or cardboard. 3 by 3 inches, painted white-
black bull’s-eye. %-inch diameter in center.
Silts—1 inch deep, may be lined with thin metal strips
Fionas 13.—Construction of sighting bar.
(1) Sighting bar.—(a) The sighting bar is illustrated in
figure 13.
41
38
BASIC FISLD MANUAL
Fiouu 14.—Revolver rest.
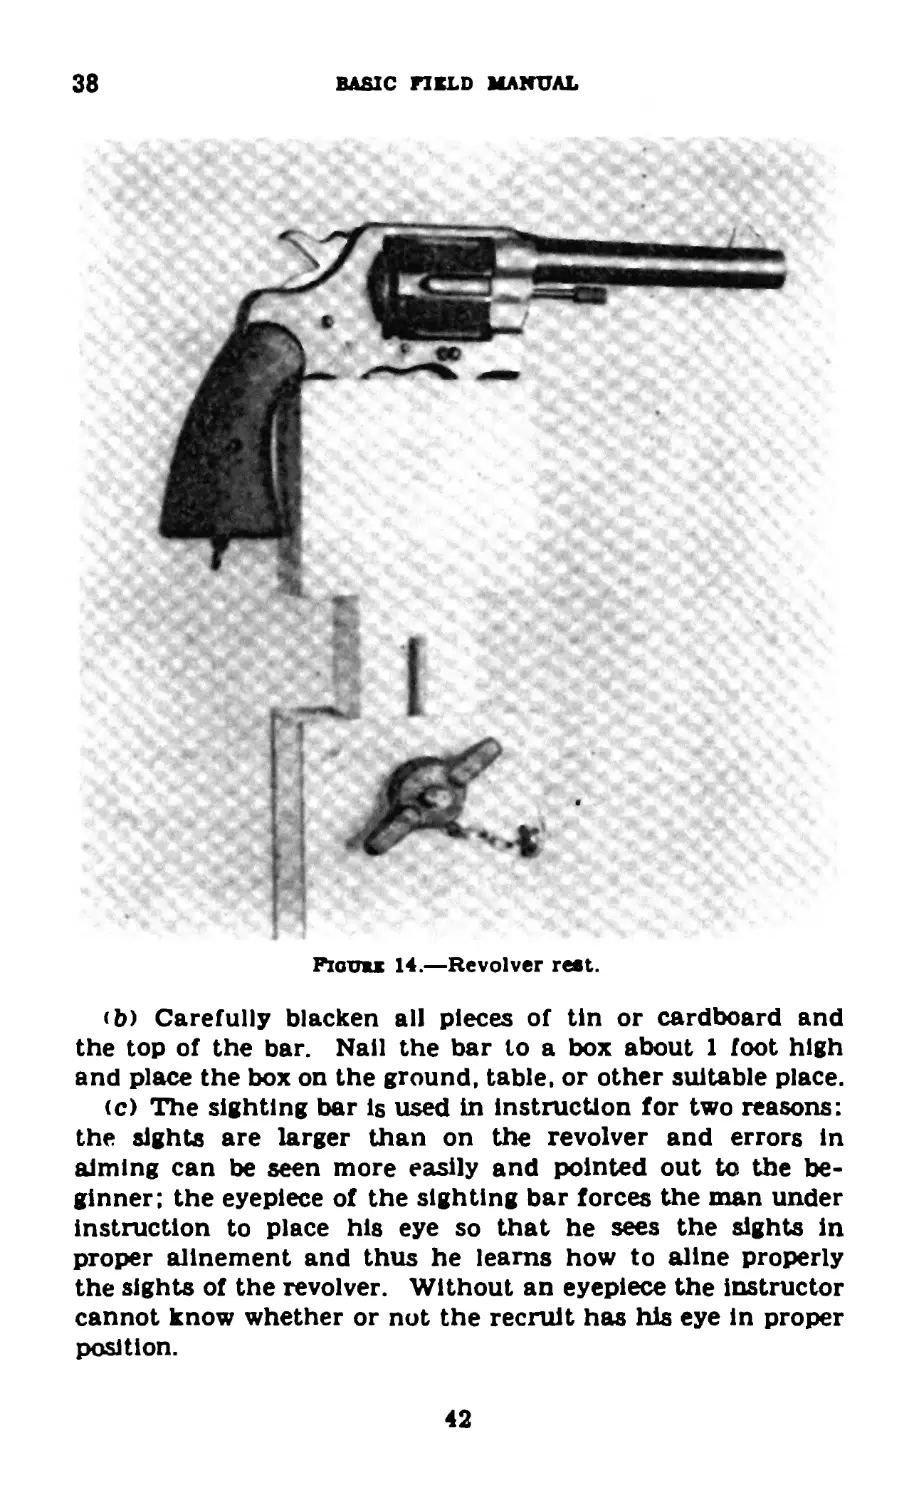
<b) Carefully blacken all pieces of tin or cardboard and
the top of the bar. Nail the bar to a box about 1 foot high
and place the box on the ground, table, or other suitable place.
(c) The sighting bar is used in instruction for two reasons:
the sights are larger than on the revolver and errors in
aiming can be seen more easily and pointed out to the be-
ginner: the eyepiece of the sighting bar forces the man under
instruction to place his eye so that he sees the sights in
proper alinement and thus he learns how to aline properly
the sights of the revolver. Without an eyepiece the instructor
cannot know whether or not the recruit has his eye in proper
position.
42
COLT AND SMITH AND WESSON REVOLVERS
38
(2) Kevotoer rest.—(a) To construct a sighting rest for
the revolver (flg. 14), build a frame of wood so that the re-
volver is supported therein. Screw or nail this frame to the
top of a post or other object so that the revolver when in
position is approximately horizontal. A suitable sighting
rest for the revolver may be easily improvised by cutting an
additional notch to hold the revolver in one end of the box
used as a rifle rest.
(b) Having first learned the principles of aiming by means
of the sighting bar, the soldier is taught to apply them to the
revolver on its rest.
(3) Aiming disks.—(a) For each sighting bar and each
revolver rest, a small disk (3 Inches in diameter) is made of
white cardboard or of tin with white paper pasted on it and
with a small bull's-eye in the center. In the exact center
of the bull’s-eye is a small hole Just large enough to admit
the point of a pencil. For indoor or close-range work the
bull's-eye should not be larger than a 50-cent piece.
(b) There should be one 5-inch aiming disk for each squad
lor shot-group exercise at 25 yards. The large disk should be
of tin, painted black, with a handle 4 or 5 feet long and of
the same color as the paper on which the shot groups are to
be made.
b. Sighting exercises.—(1) First exercise.—(a) The squad
leader or instructor shows a sighting bar to his squad or group
and points out the front and rear sights, the eyepiece, and
the removable target. He explains the use of the sighting bar
as follows:
1. The front and rear sights on the sighting bar repre-
sent enlarged revolver sights.
2. The sighting bar is used in the first sighting exercise
because with it small errors can be seen easily and
explained to the pupil.
3. The eyepiece requires the pupil to place his eye in
such position that he sees the sights in exactly the
same alinement as seen by the coach.
4. There is no eyepiece on the revolver, but the pupil
learns by use of the sighting bar how to aline the
sights properly when using the revolver.
5. The removable target attached to the end of the
sighting bar is a simple method of readily alining
the sights on a bull's-eye.
43
38
BASIC FIKLD MANUAL
(b) The Instructor, using the open sight, adjusts the sights
of the sighting bar with target removed to illustrate a correct
alinement of the sights. He has each man of the assembled
group look through the eyepiece at each of the sight
adjustments.
(c) The instructor adjusts the sights of the sighting bar
with various small errors in sight alinement and has each man
of the assembled group endeavor to detect the errors.
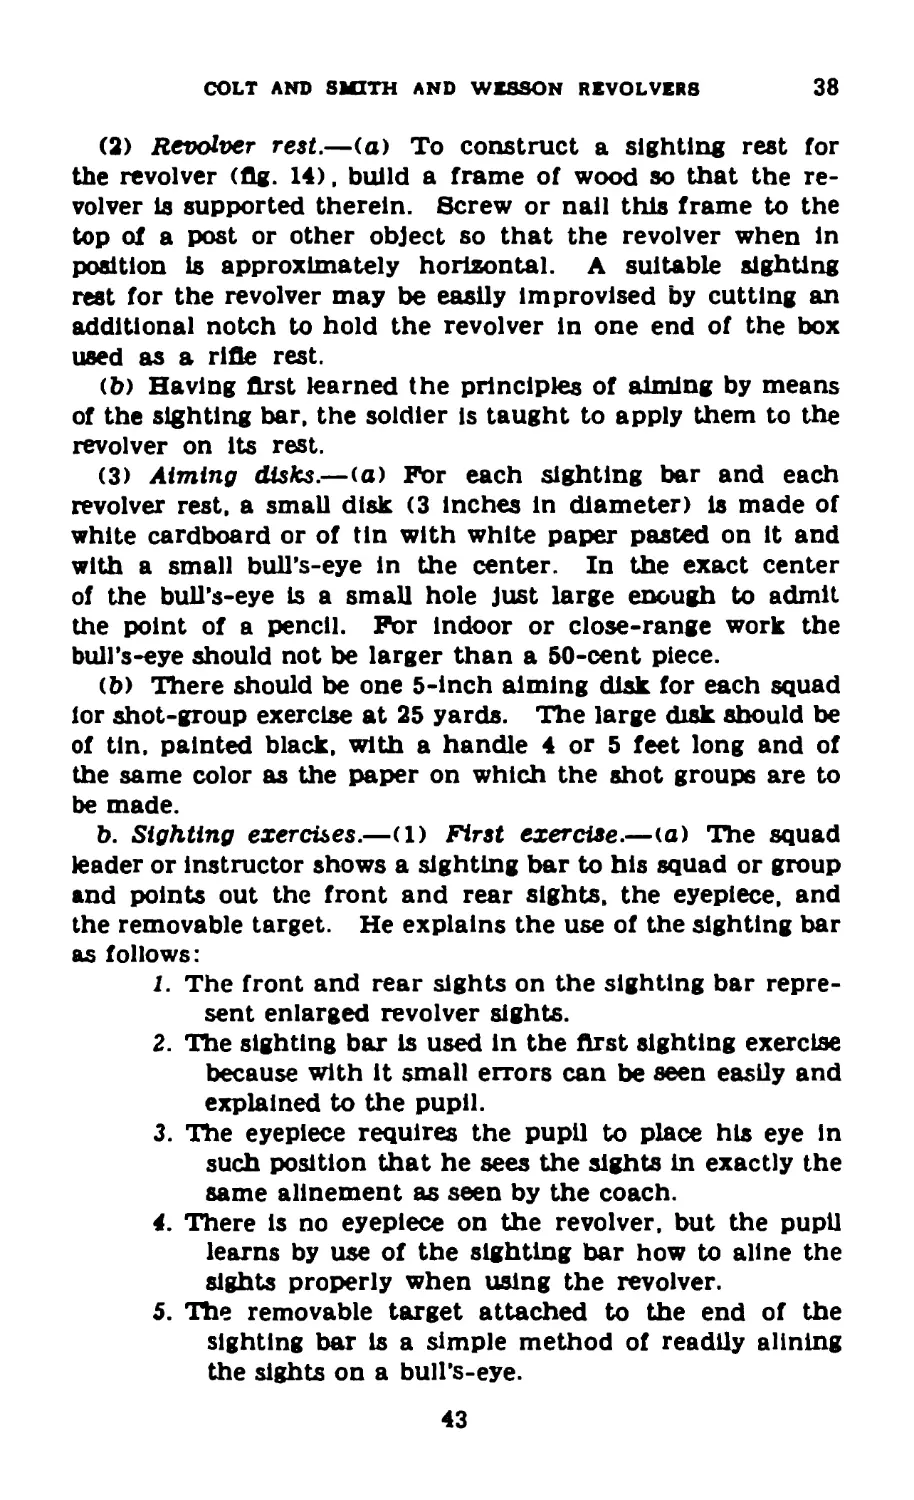
(d) The instructor describes a correct aim, again showing
the illustration to each man (fig. 15). He explains that the
top of the front sight Is seen through the middle of the open
sight and is raised to a height so that its top is level with
the outside edges of the open sight and Just touches the
bottom of the bull’s-eye so that all of the bull's-eye can be
clearly seen.
Figure 15.—Normal open sight.
(e) The instructor explains that the eye should be focused
on the bull's-eye in aiming, and he assures himself by ques-
tioning the pupils that each man understands what is meant
by focusing the eye on the bull’s-eye.
(/) The instructor adjusts the sights of the sighting bar
and the removable target so as to illustrate a correct aim
and has each man of the group look through the eyepiece to
observe this correct aim.
(?) The instructor adjusts the sights and the removable
target of the sighting bar so as to illustrate various small
errors and has each man in the group attempt to detect the
error.
ih) The exercise described above having been completed by
the squad leader or other instructor, the men are placed in
pairs and the exercise is repeated by the coach-and-pupil
method.
<2) Second exercise.—(a) With the revolver on the re-
volver rest and the sights pointing at a blank sheet of paper
44
COLT AMD SMITH AND WESSON REVOLVERS
38
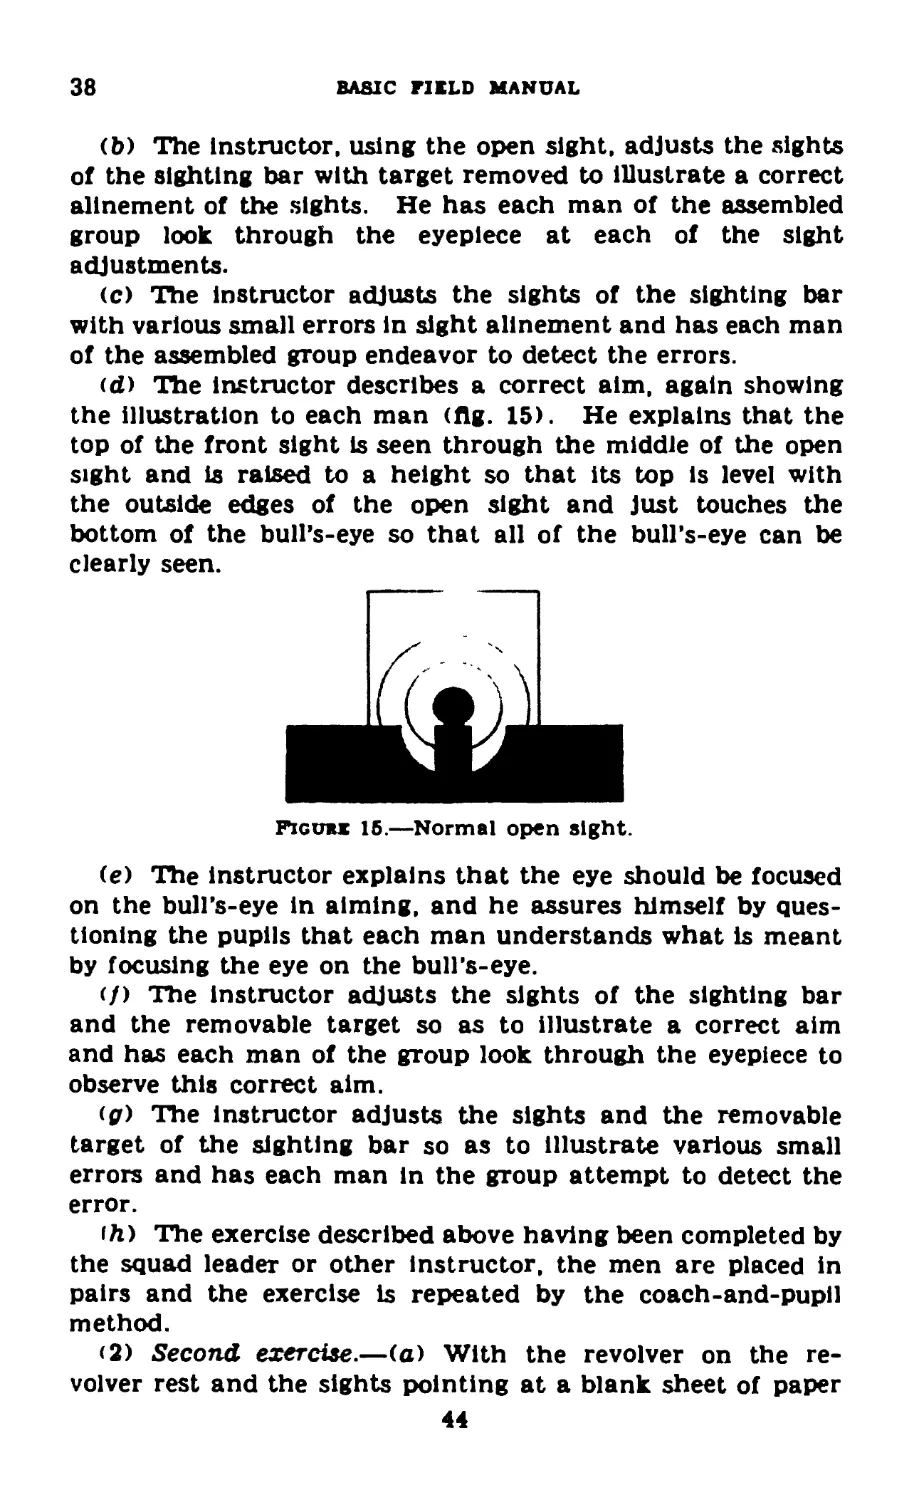
on a board or on the wall, stand with the head in the same
relative position as in firing the revolver and look through
the sights (fig. 16). Then by signal or by word have the disk
moved until the bottom edge of the bull’s-eye is in exact
alinement with the sights. Then command HOLD and move
away from the revolver and let the man undergoing instruc-
tion look through the sights to see the proper alm.
Fiouu 16.—Sighting exercise.
(b) Have the man under instruction look through the
sights while he directs the disk to be moved until the sights are
alined on the bottom of the bull’s-eye. The instructor then
looks through the sights to see if any error has been made.
(c) Have the sights adjusted on the bull’s-eye with vari-
ous very slight errors and see if the man under Instruction
can detect them readily.
(3) Third exercise.—Using the sighting rest for the re-
volver, require the man under instruction to direct the
marker to move the disk until the sights are aimed at the
bottom edge of the bull’s-eye and to command HOLD. The
instructor then looks at the aim. and after noticing whether
45
38
BASIC FIELD MANUAL
the alm is right or wrong commands: MARK. The markere
without moving the disk, makes a pencil mark on the paper
through the hole in the center of the bull’s-eye. Repeat the
operation until three marks have been made. The instructor
looks at the aim each time, but he says nothing to the man
until all three marks have been made and joined together so
as to make a shot group. The faults, if any, are then pointed
out. The size and shape of the shot group are discussed and
the exercise is repeated several times. At 30 feet, using the
small bull's-eye, the shot group should be small enough to be
covered by a dime.
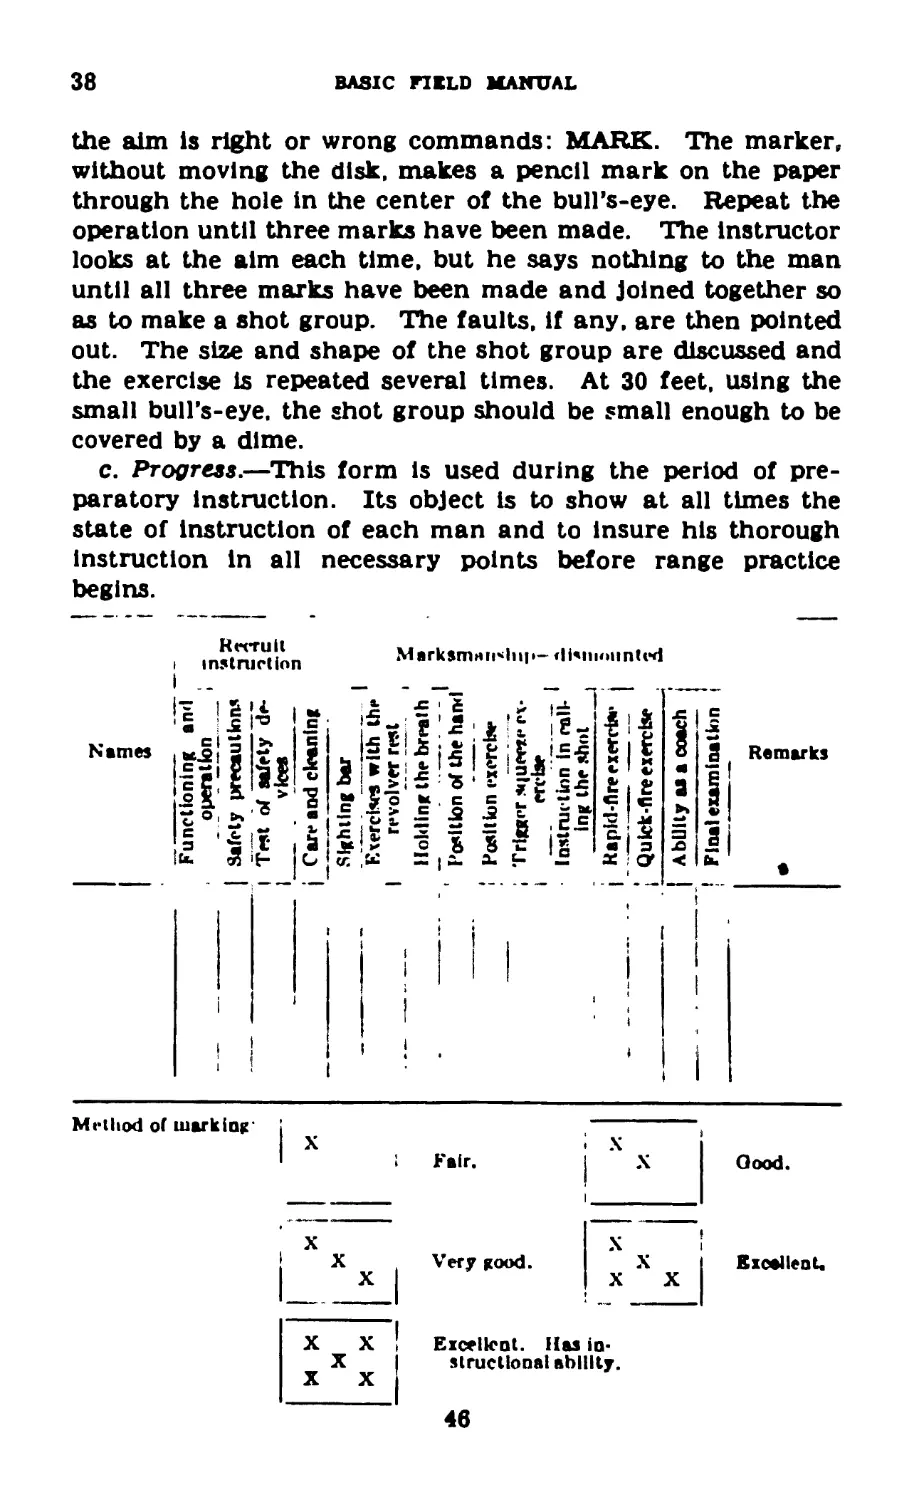
c. Progress,—This form is used during the period of pre-
paratory instruction. Its object is to show at all times the
state of instruction of each man and to insure his thorough
instruction in all necessary points before range practice
begins.
Method o( marking* :
X
Good.
Excellent,
Excellent. Has in-
structional ability.
46
COLT AND SMITH AND WESSON REVOLVERS
39
39. Second Step: Position.—a. Essentials of proper posi-
tion.—To assume the proper position for firing it is necessary
to know how to aim, how to grasp the revolver, how to hold
the breath properly, and the correct position of the body with
relation to the target.
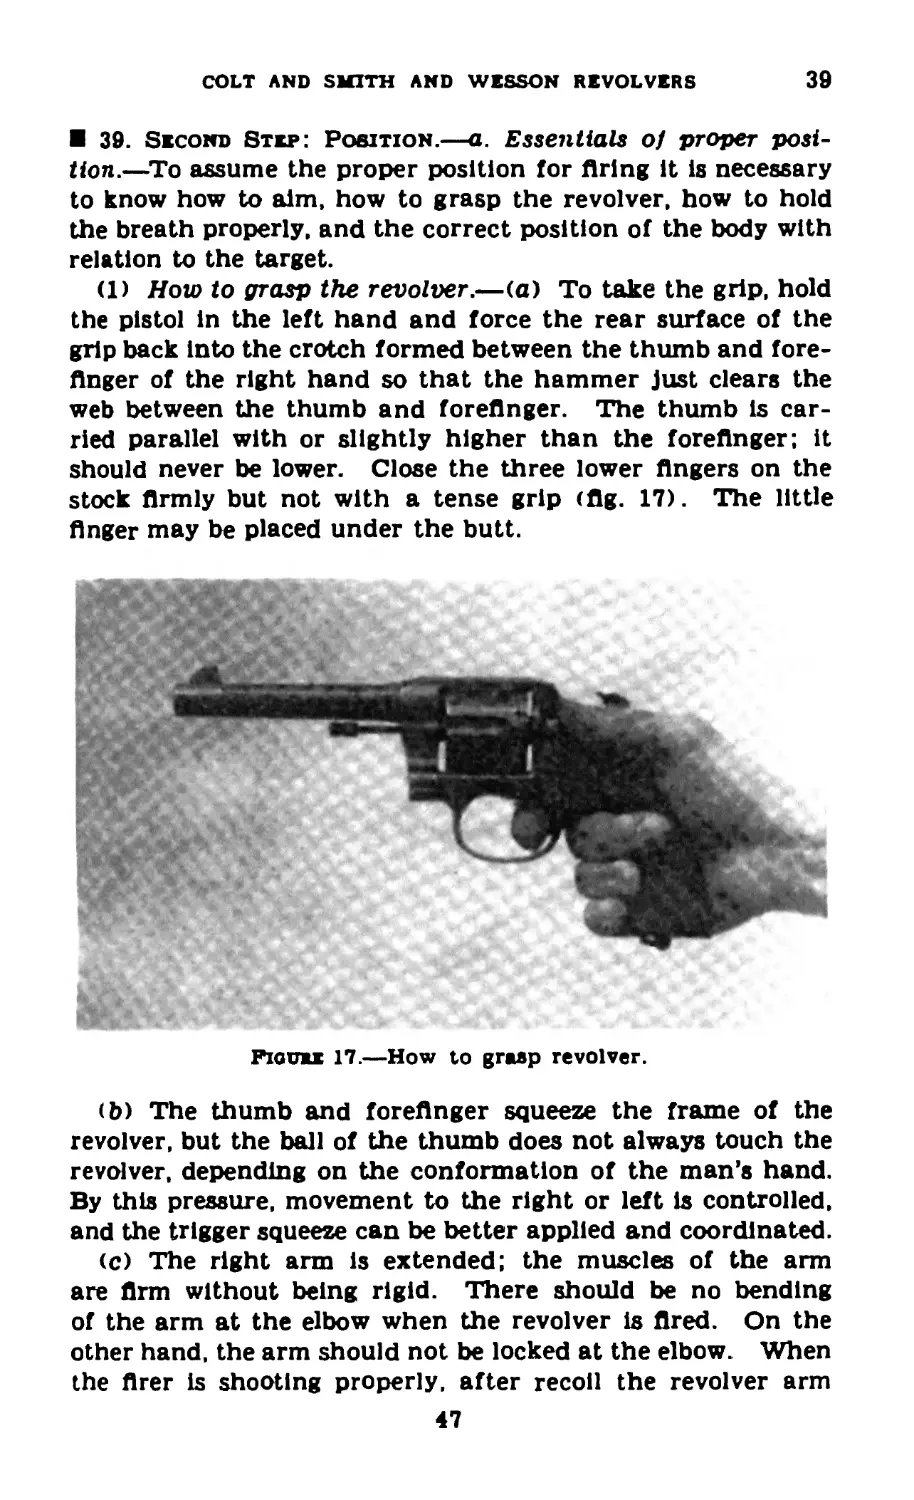
(1) How to grasp the revolver.—(a) To take the grip, hold
the pistol in the left hand and force the rear surface of the
grip back into the crotch formed between the thumb and fore-
finger of the right hand so that the hammer Just clears the
web between the thumb and forefinger. The thumb is car-
ried parallel with or slightly higher than the forefinger; it
should never be lower. Close the three lower fingers on the
stock firmly but not with a tense grip (fig. 17). The little
finger may be placed under the butt.
Figure 17.—How to grasp revolver.
(b) The thumb and forefinger squeeze the frame of the
revolver, but the ball of the thumb does not always touch the
revolver, depending on the conformation of the man’s hand.
By this pressure, movement to the right or left is controlled,
and the trigger squeeze can be better applied and coordinated.
(c) The right arm is extended; the muscles of the arm
are firm without being rigid. There should be no bending
of the arm at the elbow when the revolver is fired. On the
other hand, the arm should not be locked at the elbow. When
the firer is shooting properly, after recoil the revolver arm
47
39
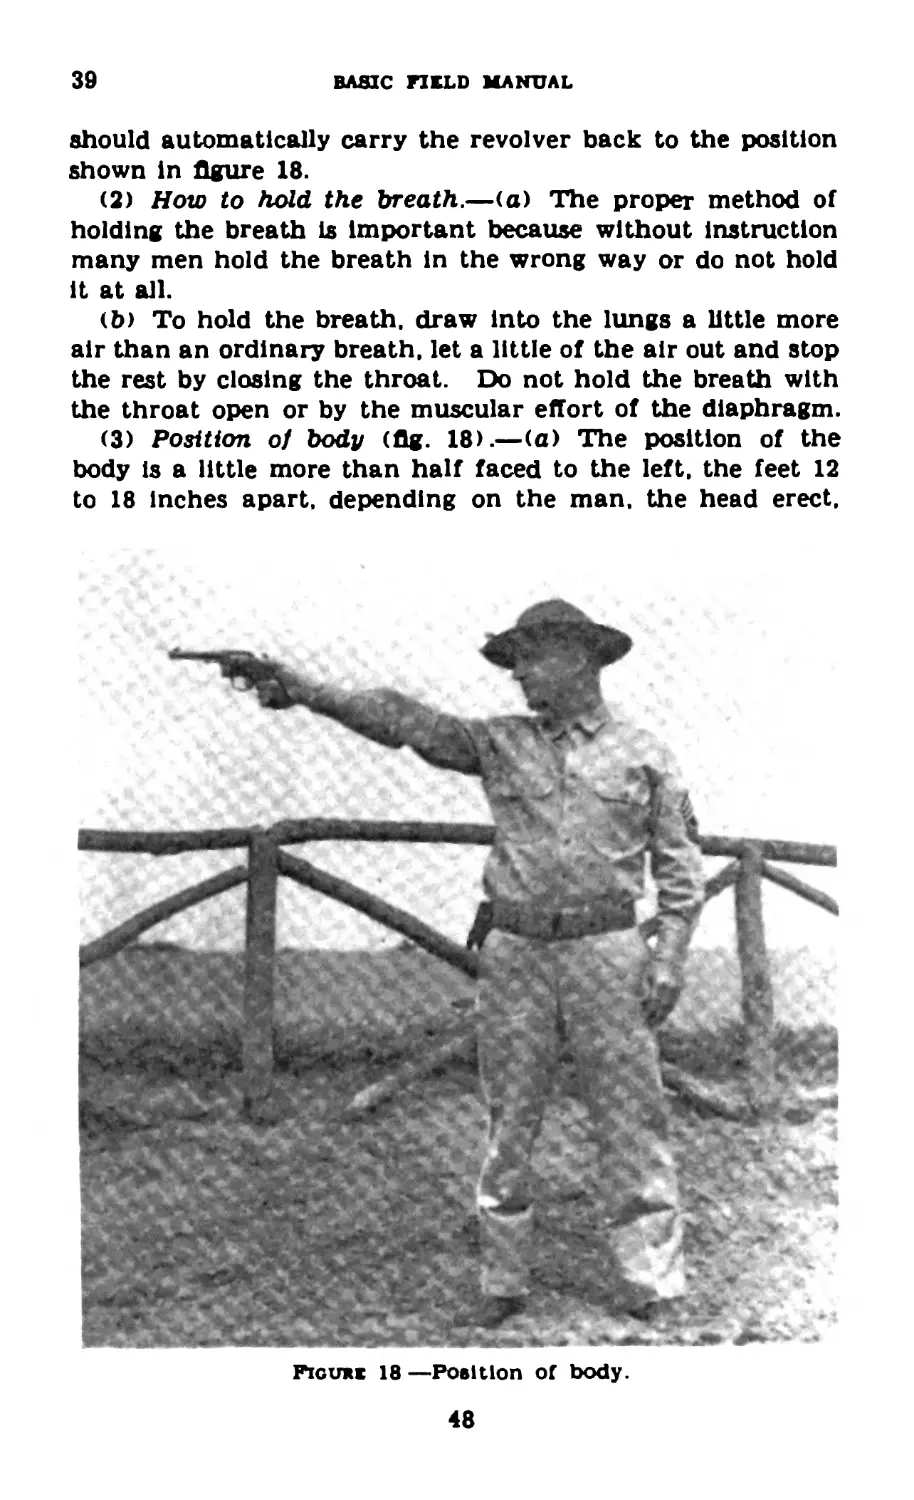
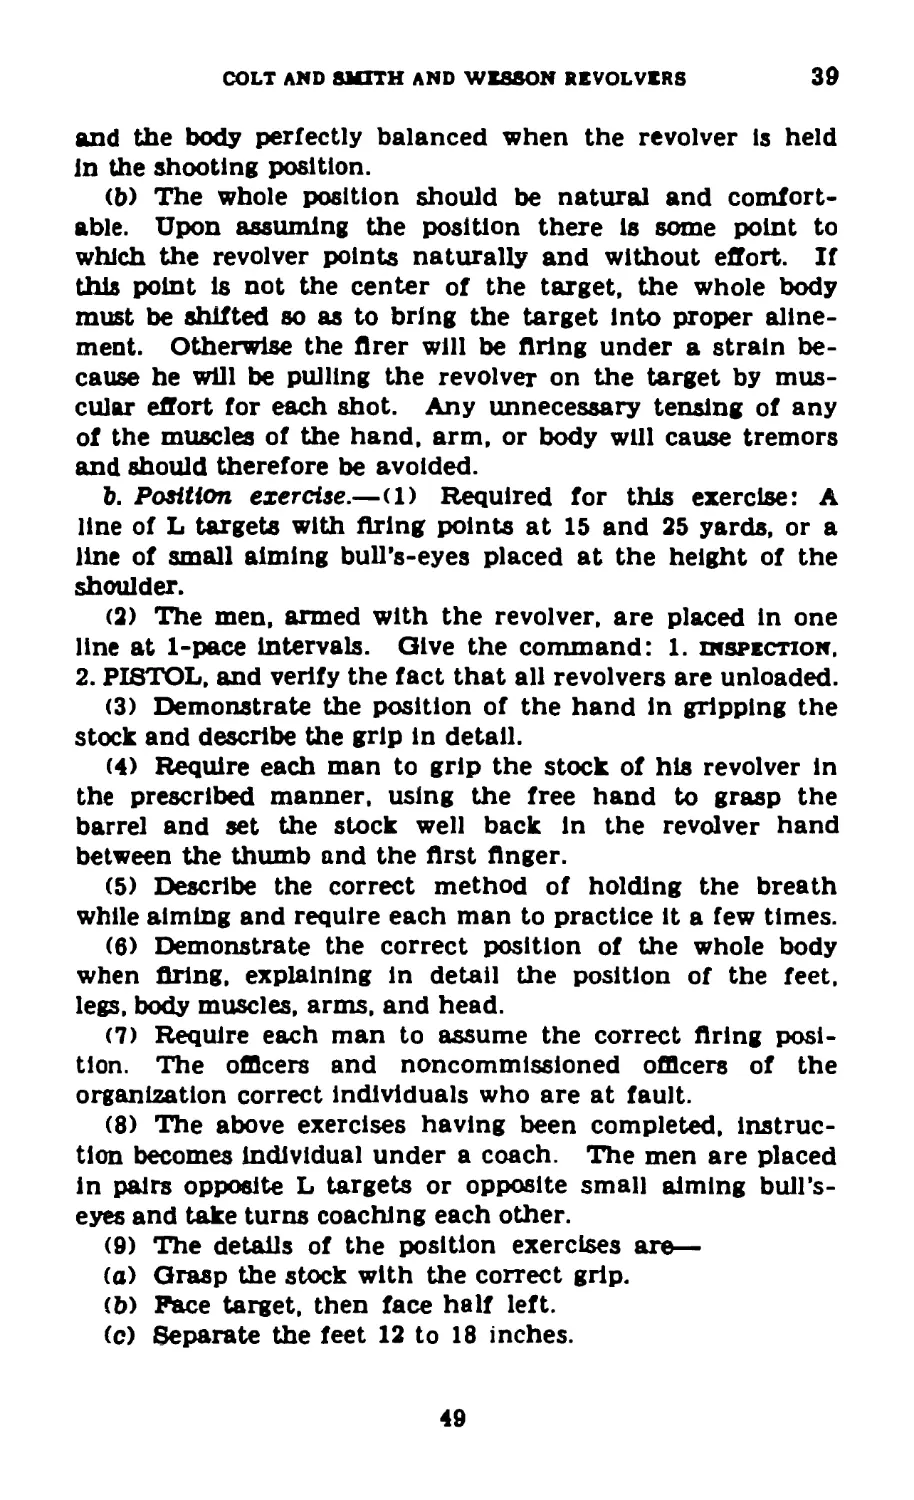
BASIC FIELD MANUAL
should automatically carry the revolver back to the position
shown in figure 18.
(2) How to hold the breath.—(a) The proper method of
holding the breath is Important because without instruction
many men hold the breath in the wrong way or do not hold
it at all.
(b) To hold the breath, draw into the lungs a little more
air than an ordinary breath, let a little of the air out and stop
the rest by closing the throat. Do not hold the breath with
the throat open or by the muscular effort of the diaphragm.
(3) Position of body (fig. 18).—(a) The position of the
body is a little more than half faced to the left, the feet 12
to 18 inches apart, depending on the man, the head erect.
Figure 18 —Position of body.
48
COLT AND SMITH AND WESSON REVOLVERS
39
and the body perfectly balanced when the revolver is held
In the shooting position.
(b) The whole position should be natural and comfort-
able. Upon assuming the position there is some point to
which the revolver points naturally and without effort. If
this point is not the center of the target, the whole body
must be shifted so as to bring the target into proper aline-
ment. Otherwise the flrer will be firing under a strain be-
cause he will be pulling the revolver on the target by mus-
cular effort for each shot. Any unnecessary tensing of any
of the muscles of the hand, arm, or body will cause tremors
and should therefore be avoided.
b. Position exercise.—(1) Required for this exercise: A
line of L targets with firing points at 15 and 25 yards, or a
line of small aiming bull’s-eyes placed at the height of the
shoulder.
(2) The men, armed with the revolver, are placed in one
line at 1-pace intervals. Give the command: 1. inspection.
2. PISTOL, and verify the fact that all revolvers are unloaded.
(3) Demonstrate the position of the hand in gripping the
stock and describe the grip in detail.
(4) Require each man to grip the stock of his revolver in
the prescribed manner, using the free hand to grasp the
barrel and set the stock well back in the revolver hand
between the thumb and the first finger.
(5) Describe the correct method of holding the breath
while aiming and require each man to practice it a few times.
(6) Demonstrate the correct position of the whole body
when firing, explaining in detail the position of the feet,
legs, body muscles, arms, and head.
(7) Require each man to assume the correct firing posi-
tion. The officers and noncommissioned officers of the
organization correct individuals who are at fault.
(8) The above exercises having been completed, instruc-
tion becomes individual under a coach. The men are placed
in pairs opposite L targets or opposite small aiming bull's-
eyes and take turns coaching each other.
(9) The details of the position exercises are—
(a) Grasp the stock with the correct grip.
(b) Face target, then face half left.
(c) Separate the feet 12 to 18 inches.
49
39-40
BASIC FIELD MANUAL
(d) AUne the sights on the bottom edge of the bull's-eye,
arm extended.
(e) Hold the breath.
(/) As soon as the arm becomes tired or the aim becomes
unsteady, assume the position of raise pistol.
(p) The revolver should be removed from the right hand
and the muscles of the hand, arm, and shoulder relaxed and
exercised before resuming the grip. This should also be
done between shots in slow fire.
(10) After the firer has completed the position exercise he
may repeat it with a weight, such as a pair of field glasses
in a case suspended from the right arm. The weight is
suspended first between shoulder and elbow, then from the
forearm, then from the wrist, and finally from the barrel
of the revolver, interspersed with short rests. The value
of this exercise lies in developing the muscles of the shoulder
and arm.
(11) (a) The hammer is not raised during the position
exercises and the trigger is grasped very lightly with the
finger.
(b) After a short rest repeat the exercise.
<c) The man acting as coach watches carefully and corrects
all errors.
(d) The man under instruction and the coach change
places as the officer in charge of the Instruction desires.
This should be every 3 to 5 minutes.
(e) Only a few hours in all should be devoted to the po-
sition exercises, as all of its details are included in the
trigger-squeeze exercise.
40. Third Step: Trigger Squeeze.—a. Importance of cor-
rect trigger squeeze.—(1) The recruit can readily learn to
aim and hold the aim either on the bull’s-eye or very close
to it for at least 10 seconds. When he has learned to press
the trigger in such a manner as not to spoil his hold he
becomes a good shot. All men flinch in firing the revolver
if they know the exact instant at which the discharge is
to take place. This is an involuntary action which cannot
be controlled. A sudden pressure of the trigger may de-
range the aim slightly, but the extreme inaccuracy of a
shot fired in this way is due mainly to the flinch, that is,
50
COLT AND SMITH AND WESSON REVOLVERS
40
the thrusting forward of the hand to meet the shock of
recoil. Any man who holds the sights of the revolver as
nearly on the bull's-eye as possible and continues to press
on the trigger with a uniformly Increasing pressure until the
revolver goes off is a good shot. Any man who has learned
to increase the pressure on the trigger only when the sights
are In alinement with the bull’s-eye, who holds the pressure
when the muzzle swerves, and who continues with the pres-
sure when the sights are again in line with the bull's-eye is
an excellent shot. Any man who tries to "catch his sights”
as they touch the bull’s-eye and to set the revolver off at that
instant is a very bad shot.
<2) The apparent unsteadiness of the revolver while being
held on the bull’s-eye does not cause much variation in the
striking place of the bullet due to the fact that the movement
is of the whole extended arm and revolver. But the flinch
which always accompanies the sudden pressure of the trigger
deflects the muzzle of the revolver and causes the bullet to
strike far from the mark. In squeezing the trigger the pres-
sure must be straight to the rear. There is a tendency on
the part of some men to press the trigger also to the left.
b. Calling the shot.—To call the shot is to state where the
sights were pointed at the instant the hammer fell: thus, high,
a little low, to the left, slightly to the right, bull’s-eye, etc.
If the soldier cannot call his shot correctly in range practice
he did not press the trigger properly and consequently did
not know where the sights were pointed when the hammer fell.
c. Trigger-squeeze exercises.—(1) First exercise.—(a) Re-
quired for this exercise: A line of L targets with a firing
point at 25 yards.
(b) Give the command: 1. inspection, 2. PISTOL, and
verify the fact that all revolvers are unloaded.
(c) The squad leader explains to his squad the details of
this exercise which are—
1. Cock the piece. .
2. Take the correct grip.
3. Take the correct position.
4. Aline the sights on the target and start the squeeze,
gradually increasing the pressure on the trigger
until the hammer falls.
5. Call the shot.
51
40-41
BASIC FIELD MANUAL
6. Rest the hand.
7. Repeat the above operations, firing double action.
Note.—In squeezing the trigger in firing double action, the fixer
should squeeze rapidly until the hammer Is almost back to the full
cock position. He then continues the squeeze as explained above.
Repeated practice accustoms the firer to the feel of the trigger in
this method of firing.
(d) The squad leader assures himself that all the men
understand the details of this exercise. The work is then
carried on by pairs working together, coach and pupil. Mem-
bers of the squad should change over frequently to avoid
tiring the muscles of the arm. Extended trigger-squeeze
exercise is necessary and the periods should be short but
frequent.
(e) The duties of the coach are to—
1. See that the firer takes the correct grip.
2. See that the firer takes a correct position.
3. Watch the hand of the firer to see that he is grad-
ually increasing the pressure on the trigger.
4. See that the firer rests his shooting hand after the
hammer falls.
5. See that the firer calls the shot each time.
(2) Second exercise.—(a) Give the command: 1. inspection,
2. PISTOL, and verify the fact that all revolvers are unloaded.
(b) The squad leader explains to his squad the details of
this exercise, which are—
1. Cock the piece.
2. Take the correct grip.
3. Take the correct position.
4. Aline the sights on the target and start the squeeze.
Close the eyes and continue to squeeze until the
hammer falls.
5. When the hammer falls, open the eyes and check
the aim to see if it has been deranged.
6. Repeat the above exercise, firing double action.
• Note.—The firer should be able to keep on the target. If he is
off persistently, he should check on his grip and position to see
that they are correct.
(c) The duties of the coach in this exercise are the same
as in the first trigger-squeeze exercise.
41. Fourth Step: Rapid Fire.—a. When taken up.—Train-
ing for rapid fire should be taken up after the principles of
52
COLT AND SMITH AND WESSON REVOLVERS
41
slow Are, particularly the trigger squeeze, are thoroughly un-
derstood. and some facility in applying them has been gained.
b. General principles.—(1) Rapid Are is the same as slow
Are except that the piece remains pointed at the target for
Ave consecutive shots, and there is no pause or delay between
the discharge of one shot and the application of the opera-
tions to Are the next shot.
(2) To attain the degree of accuracy required for pro-
ficiency in rapid Are, the revolver must be cocked by use of
the thumb and not by using double action.
(3) Basically, the grip on the stock (except for a slightly
tighter feel and the fact that the Anger tips now contact the
stock). the position of the arm. and the position of the body
are the same as for slow Are.
<4) It is important that a uniform grip be maintained
throughout the Aring of the score. Any shift in the position
of the revolver in the hand or variation in the pressure of
the hand and Angers during the Aring of the score results in
inaccuracy. A great deal of practice “dry shooting” is neces-
sary to develop skill.
(5) To Are the first shot, the revolver is brought from the
position of raise pistol by the shortest route to the Aring posi-
tion with the sights properly alined on the aiming point.
This is done by a smooth but deliberate and rapid extension
of the right arm straight from the shoulder, cocking the
piece, inserting the forefinger in the trigger guard during the
movement, and holding the breath.
(6) In rapid fire, time is gained by—
(a) Taking position accurately.
(b) Applying a heavy initial pressure on the trigger as
soon as the sights are alined and then maintaining a con-
tinuously Increasing pressure until the shot is fired.
<c) Rapid and smooth cocking of the piece.
<d) Keeping the focus of the eye on the bull’s-eye during
the firing of the entire string.
(e) Absorbing the shock of recoil at the shoulder, not at
the wrist or elbow, thereby reducing the movement of the gun
to a minimum.
Caution: Every effort should be made to overcome the
disastrous tendency to save time by pulling the trigger quickly
when the aim is perfect.
53
41
BASIC FI BLD MANUAL
c. Cocking revolver.—(1) General.—There are two methods
of cocking the revolver for the succeeding shots, the side
method and the straight-back method. Both methods are
good. Each requires a great deal of practice before sufficient
skill is acquired to cock the hammer without shifting the
position of the stock in the hand. The method to be used by
the individual depends upon the size, shape, and muscular
development of the hand. For that reason both methods
should be taught and practiced until it is determined which
one proves the more satisfactory. Thereafter only that
method should be practiced.
Figurk 19.—Side method of cocking revolver.
(2) Side method (fig. 19).—(a) The recoil of the revolver
causes it to rise about 4 to 6 inches above the point of aim.
As it reaches the top of the upward movement, relax the grip
slightly and place the ball of the thumb on the spur of the
hammer. Exert a downward pressure with the thumb and at
the same time move the muzzle with a wrist motion to the
right about 4 inches. This combined action of the thumb
and movement of the muzzle causes the hammer to snap to
full cock.
(b> During this movement it is Important that the fingers
on the left side of the stock be kept in place to assist in con-
trolling the revolver.
54
COLT AND SMITH AND WKSOON RKVOLVKRS
41
(c) Immediately after the hammer has snapped to the full
cock position, the revolver is moved back into aiming position
and the thumb replaced along the side of the frame.
(d) During the operation of cocking and bringing the re-
volver back to the aiming position, the muzzle must be kept
elevated so that the front sight is visible and can be readily
alined in the rear sight notch. This obviates the possibility
of losing time in hunting for the front sight and in alining it
in the rear sight notch which often occurs when the muzzle
is allowed to sag.
(e) Some individuals may experience difficulty in keeping
the grip in the same position on the revolver during the firing
of a string. In most cases the hand tends to work higher on
the stock thus restricting the action of the thumb in cocking,
and making it necessary to regrasp the revolver in the middle
of the string. This difficulty may be overcome by altering
the grip slightly so that the little finger is placed under the
bottom of the butt of the stock (fig. 17).
(3) Straight-back method (fig. 20).—(a) With this method
of cocking the revolver, the grip is not loosened nor is the
revolver shifted from its line of recoil. As soon as the shot is
fired and while the gun is in recoil, the thumb is placed on
the hammer spur and the hammer drawn straight back to
the full cock position by the action of the thumb only. Dur-
ing the time the hammer is being drawn back, the revolver is
lowered from its uppermost recoil position to the aiming posi-
tion. As soon as the hammer is cocked, the thumb is replaced
alongside the frame.
(b) This method is simpler and has the following advan-
tages over the side method:
1. Permits the grip to be more uniformly maintained
throughout the firing of the rapid-fire string.
2. Since there is no side movement of the revolver
during the process of cocking, the sights can be
more readily realined and brought back on the
point of aim.
(c) The straight back method has the disadvantage, how-
ever. that many men are unable to flex their thumbs suffi-
ciently to draw the hammer all the way back. This causes
the thumb to become cramped when the hammer is about
two-thirds of the way to full cock, and necessitates regrip-
55
41
BASIC FIKLD MANUAL
<J)
Fiсuke 20 —Straight-back method of cocking revolver.
ping the piece to complete the cocking of the hammer. This
is a very bad feature as it results in a loss of time and cadence
in firing the string. This difficulty may, In some cases, be
obviated by slightly lowering the grip. However, care should
be exercised that the grip is not too low, as this results in the
stock sliding further into the hand with each shot fired.
56
COLT AMD SMITH AND WESSON REVOLVERS
41
Men who experience this difficulty should be required to use
the side method of cocking the hammer.
d. Cocking exercise.—(1) General.—This exercise is held
for the purpose of acquiring a smooth and rapid cocking
operation.
(2) Practice in cocking the revolver should be conducted
employing both of the above-described methods In order to
enable the soldier to determine which method is best adapted
to the conformation and flexibility of his hand. Thereafter,
only the method selected is practiced. Before being con-
sidered proficient, the soldier must be able to cock the re-
volver at least 15 times in 10 seconds. The first hour of
rapid-fire training should be devoted to cocking exercises.
Thereafter, each pupil should be given additional practice
from time to time until he is considered proficient.
(3) Procedure.—The exercise is conducted by the coach-
and-pupil method. The instructor explains and demon-
strates both methods. Emphasis is placed on the following
points: The importance of maintaining a uniform grip; the
necessity of keeping the muzzle of the revolver high; and the
advantages of keeping the eye focused on the front sight.
This exercise should not be continued longer than about 10
seconds at a time. Frequent changes of coach and pupil
are necessary to prevent undue tiring of the muscles of the
arm and hand. After requiring the pupil and his coach to
take position on the line, the instructor commands: 1.
COCKING EXERCISE—ready, 2. EXERCISE, 3. CEASE FIRING,
4. REST. At the first command the pupil grasps the grip as
described in paragraph 39 and extends the revolver to the
firing position. At the second command the eye is focused
on the front sight, without attempting to aim, and the trigger
is squeezed causing the hammer to fall. The operations of
cocking the hammer by one of the prescribed methods are
then continued until cxasx fixing is given, when the revolver
is brought to the position of raise pistol. At the command
rest, the revolver is returned to raise pistol while the hand
and arm are rested.
(4) Duties of the coach.—In the cocking exercise the
coach insures that—
(a) The grip is properly taken.
57
41
BASIC FIELD MANUAL
(b) The muzzle is kept elevated during the cocking of the
hammer.
(c) The eye is kept focused on the front sight.
(d) The trigger is allowed to move to its forward position
Immediately after the hammer falls.
(e) In the side method, the same grip is taken after each
cocking operation: the fingers are kept in place on the stock;
and the muzzle is moved to the right by the action of the
wrist and not by moving the arm.
(/) In the straight-back method, the grip, except for the
action of the thumb, is not shifted or loosened; the hammer
is drawn back by the action of the thumb only; and the
revolver remains in the same plane during the cocking
operation.
e. Rapid-fire exercise.—(1) Required for this exercise: A
row of L targets or a row of aiming bull’s-eyes.
(2) Give the command: 1. inspection. 2. PISTOL, and
verify the fact that all revolvers are unloaded.
(3) Explain to the assembled command that the trigger
squeeze is the same in rapid fire as in slow fire.
(4) Demonstrate the correct method of bringing the re-
volver by the shortest route to the aiming position. Show
how this is done from raise pistol and in drawing the revolver
from the holster in an emergency.
(5) Show how the revolver is held to facilitate rapid cock-
ing with the right thumb without disarranging the hold.
(6) Demonstrate the method of cocking the revolver with
the right thumb, without bending the elbow.
(7) Show how the revolver is kept as nearly on the mark
as possible during the whole score. Caution the men to
avoid unnecessary flourishes or movements between shots.
(8) Demonstrate—
(a) The action of the revolver in recoil when a shot is
fired.
(b) How the arm should not be permitted to bend at the
elbow.
(c) How the revolver should move upward through a small
arc and be deflected from the original point of alm only a
short distance.
(d) How the forefinger should move forward after the ex-
plosion only far enough to allow the trigger to become reen-
58
COLT AND SMITH AND WESSON REVOLVERS
41-42
gaged with the hammer and immediately after cocking start
pressing the trigger for the next shot.
<e) How the eye should not be allowed to close when the
explosion occurs.
(/) How the breath should be held for each shot.
(9) (a) The above demonstrations having been completed,
the men are placed in front of the line of targets in pairs,
one to practice and one to coach. The exercise is then
carried on exactly the same as rapid flre in range practice.
If a line of disappearing targets has been arranged for this
exercise, the targets appear, remain in sight the allotted time,
and then disappear. While the targets are in sight, each
man undergoing instruction attempts to flre flve shots (sim-
ulated flre), cocking the piece for each shot except the first
with the thumb.
(b) If the targets are stationary the exercise begins with
the command: 1. commence, 2. FIRING, and ends with the
command: 1. cease, 2. FIRING.
(c) After each three or four scores of simulated flre the men
of each pair are directed to change places, the flrer becoming
the coach and the coach becoming the flrer.
(10) (a) In this exercise the coach carefully watches the
man and corrects all errors in grip, position, trigger squeeze,
cocking and manipulation of the piece, paying particular at-
tention to the trigger squeeze.
(b) Rapid-fire exercises should be frequent but not of long
duration.
(c) It is advisable to extend the time limits several seconds
when rapid-flre exercise is first taken up. The time limit
is then gradually reduced until it corresponds to the time
prescribed for range firing, record practice.
42. Fifth Step: Quick Fire.—a. Training for quick fire.—
(1) The training for quick flre is taken up after the rapid-flre
exercise has been practiced sufficiently to be understood thor-
oughly. Thereafter, exercises in slow flre. rapid flre, and
quick flre should all be continued until the end of the period
of preparatory training.
(2) For each shot the revolver is brought from raise pistol
to the aiming position by the shortest route after the target
appears.
(3) The revolver is cocked with the thumb after each shot
In this exercise before the position of raise pistol is resumed.
59
42
BASIC FIELD MANUAL
b. Quick-fire exercise.—(1) Required for this exercise: A
line of E targets that can be operated as bobbing targets from
a pit or screen, or a line of E targets so arranged on pivots
that the edge can be turned toward the firer when the target
is not exposed.
(2) Give the command: 1. inspection, 2. PISTOL, and ver-
ify the fact that all revolvers are unloaded.
(3) Explain to the assembled command that the trigger
squeeze is the same in quick fire as in slow fire.
(4) Demonstrate the correct method of bringing the piece
from raise pistol to the aiming position.
(5) Show how the revolver is cocked between shots.
(6) The above demonstrations having been completed, the
men are placed in pairs in front of the line of bobbing targets,
one man of each pair to act as coach for the other man. The
exercise is then carried on exactly the same as quick fire in
range practice. The targets appear, remain in sight the allot-
ted time, and then disappear. After the targets appear each
man undergoing instruction brings his revolver from raise
pistol to the aiming position, aims, fires one shot (simulated
fire), recocks his piece, and returns to the position of raise
pistol. After three or four scores of simulated fire the men of
each pair are directed to change places.
(7) The coach watches carefully the man going through
the exercises and corrects all errors in the grip, position, hold-
ing the breath, trigger squeeze, cocking and the manipulation
of the piece, paying particular attention to the trigger squeeze.
It is advisable to extend the time limit about 2 seconds for each
shot when quick-firing exercise is first taken up. The time
is then gradually reduced until it corresponds to the time pre-
scribed for range firing, record practice.
(8) When disappearing targets cannot be provided for this
exercise it may be held with stationary E targets. The com-
mand UP is given to signify that the targets are in sight, and
the command DOWN to signify that they have been with-
drawn.
(9) Practice in quick fire should be held frequently, but the
periods of practice should not be of long duration.
(10) If the range is some distance from the area designated
for preparatory exercises, or it is impracticable to arrange for
a line of bobbing targets. L targets may be substituted for the
bobbing targets.
80
COLT AND SMITH AND WESSON REVOLVERS
43
43. Sixth Step: Examination.—At the completion of the
preparatory instruction, the instructor should assure himself
by an examination that every man understands thoroughly
and can explain every phase of the preparatory training. The
questions and answers given below are merely examples. Each
man should be required to explain each item in his own words.
Instructor: Examine your revolver to see that it is unloaded.
Q. What are the safety devices on the revolver? A. The
safety and the cylinder bolt.
Q. Show me how you test the safety. A. I cock the revolver,
hold the hammer back with the thumb while pressing the
trigger to disengage it from the hammer, let the hammer down
a little way, release the trigger, then release the hammer. I
see if the hammer falls all the way forward.
Q. Show me how you test the cylinder bolt. A,. With the
hammer down I attempt to rotate the cylinder. If it moves
more than about Vh inch in either direction the revolver is
faulty.
Q. If the tests of the safety devices fail at any time, what
should you do? A. I should report the matter at once to my
platoon or company commander.
Q. Show me how to load the Colt revolver with three (five)
loose rounds so that it will fire the first time it is cocked and
each time thereafter. A. I open the cylinder and insert three
(five) cartridges in consecutive chambers. I then close the
cylinder, pull back the hammer to about one-fourth full cock
position and rotate the cylinder until the first loaded chamber
is next on the right of the empty chamber alined with the
barrel.
Q. Show me how you let the hammer down on a loaded
revolver without firing. A. I pull the hammer a little to the
rear of full cock with the thumb and holding it back I press the
trigger, let the hammer forward about *4 inch with the thumb,
release the trigger, and then lower the hammer all the way
with the thumb.
Q. What is this (indicating a sighting bar) ? A. A sighting
bar.
Q. What is it used for? A. To teach men how to aim.
Q. Why is it better than a revolver for this purpose? A.
Because the sights are much larger and slight errors can be
seen more easily and pointed out.
Q. What does this represent? A. The front sight.
61
43
BASIC FIELD MANUAL
Q. What does this represent? A. The rear sight.
Q. What is this? A. The eyepiece.
Q. What is It for? A. To make the man hold his head in
the right place so that he will see the sights properly alined.
Q. Is there an eyepiece on the revolver? A. No. A man
learns by the sighting bar how the sights look when properly
alined, and he must hold the revolver while aiming so as to
see the sights in the same way.
Q. Adjust the sights of this sighting bar so that they are
in proper allnement with each other. (Verified by instructor.)
Q. Now that the sights are properly adjusted, have the small
bull’s-eye moved until the sights are aimed at it properly.
(Verified by instructor.)
Q. Tell me what is wrong with this aim. (The instructor
now adjusts the sights of the sighting bar on the bull’s-eye
with various very slight errors, requiring the man to point out
the error.)
Q. Show me how you grip the stock of the revolver.
Q. Show me the position you take when you are going to
shoot.
Q. How do you squeeze the trigger? A. I squeeze it with
such a steady increase of pressure as not to know exactly
when the hammer will fall.
Q. If the sights get slightly out of allnement while you are
squeezing the trigger, what do you do? A. I hold the pressure
I have on the trigger and go on with the increase of pressure
only when the sights become alined again.
Q. If you do this can your shot be a bad one? A. No.
Q. Why? A. Because I cannot flinch, for I do not know
when to flinch, and the sights will always be lined up with the
bull’s-eye when the shot is fired because I never increase the
pressure on the trigger except when the sights are properly
alined.
Q. When you are practicing in slow flre and your arm be-
comes unsteady and your aim uncertain, what should you do?
A. I should come back to raise pistol without firing the shot
and then try again after a short rest.
Q. If it is Impossible for you to hold the revolver steady,
can you still do good shooting? A. Yes; if I press the trigger
properly.
Q. Tell me why that is. A. Because the natural unsteadi-
ness of the arm moves the whole revolver and the barrel
62
COLT AND SMITH AND WESSON REVOLVERS
43
remains nearly parallel to the line ef sight. But if I give the
trigger a sudden pressure the front end of the barrel will be
thrown out of line with the target, and the bullets will strike
far out from the mark.
Q. What causes this deflection of one end of the revolver
when the trigger is given a sudden pressure? A. The sudden
pressure itself causes some of it, but most of it is caused by
the flinch that always accompanies this kind of a trigger
pressure.
Q. What does a man do when he flinches in shooting a
revolver? A. He usually thrusts his hand forward as if trying
to meet the shock by suddenly stiffening all his muscles.
Q. Must the trigger always be squeezed slowly in order to
do it correctly? A. No. I squeeze it the same way in rapid
Are and quick Are. The time is shorter but the process is the
same.
Q. What is meant by calling the shot? A. To say where
you think the bullet will hit as soon as you shoot and before
the shot is marked.
Q. How can you do this? A. By noticing exactly where the
sights point at the time the revolver is flred.
Q. If a man cannot call his shot correctly, what does it
indicate? A. That he did not squeeze the trigger properly
and consequently did not know where the sights were pointed
at the instant the discharge took place.
Q. Show me how you hold your breath while aiming.
Q. Take your revolver. Alm at that bull’s-eye and squeeze
the trigger a few times, calling the shot each time. (The
instructor particularly notes the holding of the breath.)
Q. Show me how you come to a position of аш from raise
pistol.
Q. Show me how you come to the aiming position in draw-
ing the revolver from the holster in an emergency.
Q. Take this revolver and fire a rapid Are score at that
target (simulated Are). I will command COMMENCE FIR-
ING to start the score and CEASE FIRING to stop it.
Q. Fire a score (simulated Are) at that quick-flre target.
I will give the command UP when it is supposed to come
Into sight, and the command DOWN when it is supposed to
be withdrawn from view.
Q. What do you do in case a cartridge misses Are in com-
bat? A, I recock the pistol for the next shot.
63
43-45
BASIC FI BLD MANUAL
Q. Are there any points about revolver firing that you do
not understand?
Non.—In all the demonatrationa by the man undergoing exam-
ination the inatructor carefully notes all points that are covered
in the preparatory exercises. Each man la put through a thorough
teat along the line Indicated in these questions and answers before
he is allowed to fire.
Section II
COURSES TO BE FIRED
44. General.—AR 775-10 prescribes details as to who will
fire and ammunition allowances.
45. Instruction Practice.—The following tables prescribe
the firing in instruction practice in the order followed by the
individual soldier. Target L is used in much of the practice
as the bull's-eye makes competition keener and shows up
errors as no other target can.
a. Slow fire.
Table I.—Slow fire—target L
I | Score*
««"•" ! Tira* 'Ж'
IS yard* . . | No time limit ........................... 1
25 yar<b . . . | do .................................... 1
Unlimited time is permitted for slow fire in order to permit
proper explanation of the causes of errors and indication of
corresponding remedies. It is intended to be the elementary
phase of instruction in the proper manipulation of the
weapon and for determining and correcting the personal
errors of the firer.
b. Rapid fire.
Table II —Rapid fire—target L
Кепке
Scores
(5 shots
each),
minimum
15 yards ....................... 15 seconds |м»г *core 1
25 yard* ...................... I seconds |»cr score 1
64
COLT AND SMITH AND WESSON REVOLVERS
45-46
If pits are used, time is taken at the pits as in rapid-fire
rifle practice. If pits are not used, time is taken at the
firing point. The target being up, the soldier stands with
the loaded weapon at raise pistol. The command READY
is given and the soldier cocks his revolver and resumes the
position of raise pistol. The command: 1. commence, 2.
FIRING, is given and the soldier must fire one score within
the prescribed limit of time, at the end of which the com-
mand: 1. cease, 2. FIRING, is given. Intervals of time are
measured from the last words of the commands.
c. Quick flre.
Table HI.—Quick flre—target E—bobbing
Range
Time
Scores
(5 shots
each),
* minimum
IS yards
25 yards . .
3 seconds per shot
3 seconds per shot.
46. Record Practice.—The following tables prescribe the
firing in record practice in the order followed by the indi-
vidual soldier. The procedure is as in instruction practice.
a. Slow flre.
Tabu IV.—Slow flre—target L
Range
Time
. Scores (5
’ shots each)
25 yards
No time limit
b. Rapid flre.
Tabu V.—Rapid flre—target L
Range
Time
I Scores (5
t shots each)
15 yards
25 yards
15 seconds per score
20 «econds per score
2
2
65
46-47
BASIC FIELD MANUAL
c. Quick fire.
Table VI —Quick fire—target E—bobbing
Rinyr
Time
Scores (5
shots etch >
23 yards
3 seconds per shot
Section 1П
CONDUCT OP RANGE PRACTICE
47. Coaching Methods.—a. Range practice.—(1) The ob-
ject of range practice is to teach the men to apply with a
loaded revolver the principles of good shooting that they
have learned during the preparatory exercises..
(2) Each man while firing must have a coach to correct
him whenever he violates any of these principles.
(3) Slow-flre practice should be carried on until the man
under instruction thoroughly understands the principles of
good shooting.
(4) When rapid fire and quick fire are first taken up. the
time limit should be extended a few seconds. The time
should then be gradually reduced until the scores are being
fired in the time prescribed for record practice.
b. Dummy cartridges.—(1) Dummy cartridges are of great
value in teaching both slow and rapid fire.
(2) Dummy cartridges must not be used except on the
firing line of the pistol range. The same precautions are ob-
served as in using service ammunition.
c. Slow fire.—(1) The coach stands on the left side of the
flrer in such a position as to be able to observe the latter's
trigger finger, his grip, his eye. and his position. It is the
duty of the coach to correct all errors. The coach fills the
clips for the flrer and hands them to him. At the beginning
of range practice the clips should be filled partly with service
ammunition and partly with dummy cartridges, in which case
the coach loads the revolver. The flrer must not know how
many dummy cartridges are in the clip or the order in which
they are loaded.
(2) The object of using dummy cartridges is to show the
coach whether or not the man under instruction is squeezing
66
COLT AND SMITH AND WESSON REVOLVERS
47
the trigger correctly, and in case of an Improper trigger
squeeze to bring the fact forcibly to the attention of the firer
himself. When a loaded cartridge is fired, the flinch is often
masked by the recoil of the revolver and the flrer is not con-
scious of having flinched. When the hammer falls on a
dummy cartridge which the flrer thinks is loaded, the sudden
stiffening of the muscles and the thrusting forward of the
hand to meet the shock that does not come are apparent to
everybody in the vicinity, including the firer himself. The
mixing of dummy cartridges with service ammunition causes
the man to make a determined effort to press the trigger
properly for all shots.
(3) The firing of scores with dummy cartridges and serv-
ice ammunition should not be confined to the early stages of
training. It is advisable to have some practice of this kind
each day during the entire period of instruction practice.
(4) The following items of instruction are given to a pupil
on beginning range practice, even though that person has
already done a great deal of shooting. Once a person has
been put through this instruction it is usually not necessary
to repeat it during subsequent periods of range practice.
(a) Explain the method of grasping the piece.
(b) Show the amount of force used in gripping the stock
by grasping the pupil's hand, saying: “This is too tight a
grip*’ (gripping his hand very tightly). “This is too loose a
grip" (gripping his hand loosely). “This is the right amount
of force to use in gripping the stock" (gripping his hand
with the firm but comfortable grip that should be used in
shooting).
(c) Explain and demonstrate the position of the body, the
feet, and the arm (par. 39 and fig. 18). and have the pupil
assume this position.
id) Explain the proper method of aiming.
(e) Explain that any man can alm and hold well enough
for a good score. Have the pupil assume the proper position
and aim at the target with an empty revolver without at-
tempting to press the trigger to see how long he can hold
the sights on or near the bull's-eye. Explain to him that
this aiming at the target with an empty gun demonstrates
how near to the center his bullets will strike provided he
presses the trigger properly.
(/) Explain the proper method of pressing the trigger.
67
47
BASIC FIELD MANUAL
(g) Have the pupil aim at the target with an empty re-
volver and then press the trigger for him several times as
described in d below (flg. 21), directing the pupil to call the
shot each time the hammer falls.
(Л) Have the pupil aim at the target with a loaded re-
volver and then press the trigger for him as described in d
below, directing him to call the shot each time the piece is
fired. Fire a score of five shots in this way.
(i) Have the pupil fire a score of five shots, pressing the
trigger himself to see if he can press the trigger properly
and make as good a score as the one made when the coach
pressed the trigger.
Figure 21.—Coach pressing trigger.
d. Squeezing trigger.—One method of showing the men
under instruction how to squeeze the trigger properly is to
have him hold and aim the revolver while the coach presses
the trigger. This is done in the following manner:
<1) The coach demonstrates the value of correct trigger
press to the student by placing his hands in the position
shown in figure 21 and pressing on the end of the pupil's
trigger finger with his left thumb. The coach cautions the
pupil neither to assist nor resist the pressure which is put
on the end of his trigger finger but to devote his whole at-
tention to his alm and hold.
68
COLT AND SMITH AND WESSON REVOLVERS
47-48
(2) The coach must be careful to apply a slow, steady
pressure to the finger of the pupil and at the same time not
interfere with the pupil's aim while applying this pressure.
As a rule, the coach should consume from 5 to 10 seconds in
putting sufficient pressure on the pupil's finger to fire the
revolver.
(3) When pressing the trigger for a pupil as above de-
scribed, the coach should hold his head well to the rear to
keep from having his left ear too near the muzzle of the piece.
(4) If the flrer shows a tendency to apply the last part
of the squeeze himself by giving the trigger a sudden pres-
sure, he is directed to remove his finger from the trigger
guard, and the coach applies the pressure directly to the
trigger instead of through the finger of the man under
instruction.
e. Calling the shot.—Men should be required to call each
shot in slow fire. If a man does not call the shot immediately
after firing, the coach directs him to do so.
/. Coaching rapid fire.—(1) The firing of scores with
dummy cartridges and service ammunition mixed is a very
valuable form of rapid-fire practice. The coach loads the
revolver In such a way that the flrer cannot know the order
in which the cartridges are placed.
(2) The coach must watch the man closely, and each time
he is seen to flinch, whether on a loaded or a dummy cart-
ridge, the coach should caution him.
(3) When the hammer falls on a dummy cartridge the
flrer cocks the revolver and continues the exercise.
g. Coaching quick fire.—(1) The use of dummy cartridges
and the coaching methods are the same in quick fire as in
rapid fire.
(2) The occasional use of dummy cartridges in both rapid
fire and quick fire should be continued throughout the entire
period of instruction practice.
48. Safety Precautions on the Range.—a. Never place
a cartridge in the chamber of the revolver until you have
taken your place on the firing line and received the command:
LOAD.
b. Always open the cylinder and eject all cartridges before
you leave the firing point.
c. Always hold the loaded revolver at the position of raise
pistol except while aiming and cocking.
89
48-49
BASIC FIELD MANUAL
d. When firing ceases temporarily, hold the piece at raise
pistol. Do not assume any position except raise pistol with-
out first unloading.
e. If one or more cartridges remain unfired at the end
of a rapid-fire or quick-fire score, unload immediately.
49. Range Organization.—a. The work on the range should
be so organized that no man is idle for any length of time.
A good arrangement is four or six orders per target. It
should never be necessary to assign more than six orders. If
there is not a sufficient number of targets to provide for this,
the extra men should remain off the range and be given other
instruction.
b. One method is to have a line of pistol targets on a flank
of each firing point of the rifle range so arranged that the
firing points of the rifle range and of the pistol range are on
one line. There should be about 50 yards interval between
the rifle range and the pistol range. The targets may be
placed on the ground instead of in pits. The bobbing targets
are arranged to revolve on their own axis and are operated
from behind the firing line by means of cords. When the
targets are to be marked the whole line ceases firing, unloads
revolvers, and moves up to the targets to record the hits and
paste the shot holes. In slow fire the coach can keep the firer
informed as to the location of his hits by use of field glasses.
c. When the time is short and range facilities and proper
supervision permit, rifle firing and dismounted revolver firing
may be carried on at the same time. While one group is
firing on the rifle range the other is firing on the pistol range.
As the men complete a score with the rifle they move to the
pistol range and their places at the rifle firing point are filled
by men who have completed a score of revolver firing. As
soon as all men present have completed their scores with the
rifle, the whole group moves back to the next firing point
(moving the pistol targets if necessary) and continue as
before with the alternate rifle and revolver firing.
d. The pistol targets may be placed so that the line of fire
is at right angles to the line of fire of the rifle range if the
terrain permits. When it is not practicable to have revolver
firing and rifle firing at the same time, other means should
be adopted to keep the men occupied while they are not
actually firing or coaching.
70
COLT AND SMITH AND WESSON REVOLVERS
50-51
50. Target Details.—The personnel for the supervision,
operation, and scoring of targets during recorded firing con-
sists of officers, noncommissioned officers, and privates as
follows:
a. One commissioned officer assigned to each four targets.
The officer will take up and sign each duplicate score card
as soon as a complete score is recorded.
b. One noncommissioned officer assigned to each target to
enter scores on the duplicate score cards and to direct and
supervise the detail pasting the target. This noncommis-
sioned officer will be selected, except at a one-company post,
from an organization other than the one firing on the target
which he supervises. When the post is garrisoned by a single
company so that it is impossible to detail noncommissioned
officers of other companies to supervise the marking and
scoring, those duties are performed by the noncommissioned
officers of the firing company.
c. One or two privates to operate, mark, and paste each
target.
d. When the targets are not placed in pits, target details
may be reduced to one commissioned officer for each four tar-
gets, one noncommissioned officer for not to exceed each two
targets, and one private to each target.
e. The noncommissioned officer examines the target after
each score is fired and enters the score on the score card,
initialing same. He directs the private to paste the target
after the score is recorded and marked and examines the
target to see that no shot holes are left unpasted.
51. Regulations Governing Record Practice.—a. Coach-
ing prohibited.—Coaching of any nature after the firer takes
his place on the firing point is prohibited. No person may
render or attempt to render the firer any assistance what-
ever while he is taking his position or after he has taken his
position at the firing point. Each firer must observe the
location of his own hits.
Ъ. Shelter for firer.—Sheds or shelter for the firer are not
permitted on any range.
c. Cleaning.—Cleaning is permitted only between scores.
d. Gloves.—A glove may be worn on either or both hands.
e. Pieces loaded on command.—Pieces are not loaded ex-
cept by command or until position for firing has been taken.
71
51
BASIC FIELD MANUAL
/. Shots cutting edge of bull’s-eye or line.—Any shot cut-
ting the edge of the figure or bull’s-eye is signaled and re-
corded as a hit in the figure or the bull’s-eye. Because the
limiting line of each division of the target is the outer edge
of the line separating it from the exterior division,, a shot
touching this line is signaled and recorded as a hit in the
higher division.
g. Slow fire score interrupted.—If a slow fire score is in-
terrupted through no fault of the person firing,, the unfired
shots necessary to complete the score are fired at the first
opportunity thereafter.
h. Misses.—In all firing before any miss is recorded the
target is carefully examined by an officer.
i. Accidental discharges.—All shots fired by the soldier
after he has taken his place on the firing line (and it is his
turn to fire, the target being ready) are considered in his
score even if his piece was not directed toward the target
or is accidentally discharged.
1. Firing on wrong target.—Shots fired upon the wrong
target are entered as misses upon the score of the man firing
no matter what the value of the hits upon the wrong target
may be. In rapid fire the soldier at fault is credited with
only such hits as he may have made on his own target.
k. Two shots on same target.—In slow fire, if two shots
strike a target at the same time or nearly the same time,
and if one of these shots was fired from the firing point
assigned to that target, the hit having the highest of the
two values is entered on the soldier’s score and no record is
made of the other hit.
I. Withdrawing target prematurely.—In slow fire, if the
target is withdrawn from the firing position just as the shot
is fired, the scorer at- that firing point at once reports the
fact to the officer in charge of the scoring on that target.,
That officer Investigates to see if the case is as represented.
Being satisfied that such is the case he directs that the shot
be not considered and that the man fire another shot.
туг, Misfires.—In case of a misfire in rapid fire or quick
fire the soldier ceases firing and takes the position of raised
pistol. In rapid fire the score is repeated. In quick fire
the score is continued after the defective cartridge has been
replaced.
72
COLT AND SMITH AND WESSON REVOLVERS
51
n. Unused cartridges in rapid flre.—Each unfired cartridge
is recorded as a miss.
o. Disabled revolver—If during the firing of a rapid or
quick fire score the revolver becomes disabled through no
fault of the flrer, the procedure outlined in m above is
followed.
p. More than five shots in rapid flre.—When a target has
more than five hits in rapid flre it is not marked unless all the
hits have the same value. It is then marked and the flrer
given that value for each shot he actually fired, not to exceed
five.
q. Cocking revolver for first shot in rapid flre.—The flrer
may cock the revolver for the first shot in rapid fire and
quick fire prior to the appearance of the target or before
the command commence firing is given.
r. Score cards and scoring.—(1) Entries on all score cards
are made in ink or with indelible pencil. No alteration or
correction is made on the card except by the organization
commander who Initials each alteration or correction made.
(2) The scores at each firing point are kept by a non-
commissioned officer of some organization other than that
firing on the target to which he is assigned, except in case
of a one-company garrison when company officers exercise
special care to insure correct scoring. As soon as a score
is completed the score card is signed by the scorer, taken
up and signed by the officer supervising the scoring, and
turned over to the organization commander. Except when
required for entering new scores on the range, score cards
are retained in the personal possession of the organization
commander and not allowed in the hands of an enlisted man
from the beginning of record practice until the required
reports of range practice have been rendered.
(3) In the pit the officer keeps the scores for the targets
to which he is assigned. As soon as a score is completed he
signs the score card. He turns these cards over to the or-
ganization commander at the end of the day’s firing or at
such times as requested.
(4) Upon completion of record firing and after the qualifi-
cation order is issued, the pit score cards of each man are at-
tached to his official score card kept at the firing point. These
cards are kept available for inspection among the company
records for 1 year and then destroyed.
73
52-54
BASIC FIELD MANUAL
52. Computing Scores.—The soldier’s individual score is
computed on a percentage basis. The soldier’s percentage
in firing each of the tables listed in paragraph 46 is calcu-
lated separately, then the sum of these percentages is divided
by three to give the final average percentage.
53. Classification.—The individual classification to be at-
tained and the method of determining qualification are as
prescribed in AR 775-10. Firers are classified as pistol experts,
pistol sharpshooters, pistol marksmen, and unqualified.
Section IV
KNOWN-DISTANCE TARGETS AND RANGES; RANGE
PRECAUTIONS
54. Targets.—a. Target E.—Target E is a drab silhouette
about the height of a soldier in a kneeling position made of
bookbinder’s board or other similar material (fig. 22). Hits
are valued at 1. Any shot cutting the edge of the target is a
hit.
Figure 22.—Target E.
b, Target E—bobbing.—Target E—bobbing is so arranged as
to be fully exposed to the firer for a limited time, edge of
target toward flrer when target is not exposed (fig. 23).
74
COLT AND SMITH AND WESSON REVOLVERS
54-55
c. Target L.—Target L is a rectangle 6 feet high and 4 feet
wide, with black circular bull’s-eye, 5 inches in diameter and
seven outer rings (fig. 24). Value of hits in the bull’s-eye, 10.
The diameter of each ring and value of hits are as follows:
Diameter
Value of
hit
8И inches________________________________________________________ ______
12 inches -... ---------- ------ ..._______ ___ _______ .. . __
15И inches___________ _____________________ ________________________ ..
19 inches__________________________________ ___________ .. _________ . ....
22 И inches..---------------------------------------------- .. _________
26 inches_______________________________________________________________
46 inches. --------------------------------------------------------- -----
Outer, remainder of target _______________________________________________
9
8
7
6
5
4
3
2
d. Small-bore targets.—No specific targets are prescribed for
small-bore practice with the revolver, and any suitable targets
may be used. If the targets specified in paragraph 60 are not
available, the following targets issued by the Ordnance De-
partment are suitable and may be used: Rifle—SB-A-2. SB-
A—3, and SB—B—5.
55. Ranges.—a. General.—Class A target ranges for the
rifle as described in FM 23-5 and 23-10 may be used for
revolver practice, if available. The pistol target L may be
placed on the sliding target carriage for both slow and rapid
fire. Bobbing targets are not ordinarily placed in the pits
of rifle ranges but are set up nearby. If sufficient space is
available, ground other than rifle ranges is used for revolver
practice.
b. Rules for selection.—As the nature and extent of the
ground available for revolver practice and also the general
climatic conditions are often widely dissimilar for different
military posts, it is impossible to prescribe any particular
rules governing the selection of ranges, but only to express
certain general conditions to which ranges should be* made
to conform.
c. Safety necessary.—For posts situated in thickly settled
localities where the extent of military reservation is limited,
the first condition to be fulfilled is that of safety for those
living or working near or passing by the range. This require-
75
55
BASIC FIELD MANUAL
Figure 24.—Target L.
76
COLT AND SMITH AND WESSON REVOLVERS
56-56
meat can be secured by selecting ground where a natural butt
is available or by making an artificial butt sufficiently exten-
sive to stop wild shots. For complete safety there should be
no road, building, or cultivated ground nearer than 300 yards
to either flank of the range nor less than 1,600 yards to its
rear.
d. Direction of the range.—If possible a range should be so
located that the direction of firing is toward or slightly to the
east of north. Such location gives a good light on the face
of the targets during the greater part of the day. However,
safety and suitable ground are more important than direction.
e. Best ground for range.—Smooth, level ground or ground
with only a very moderate slope is best adapted for a range.
The target should be on the same level with the firer or only
slightly above him. Firing down hill should be avoided.
/. Size of range.—The size of the range is determined by its
plan and by the number of troops that will fire on it at a time.
56. Principles Governing Construction.—a. Intervals be-
tween targets.—Intervals between targets are equal to the
width of the targets themselves. When the necessity exists
for as many targets as possible in a limited space, this interval
may be reduced. Bobbing targets should be placed a minimum
of 5 yards apart.
b. Protection for markers.—When pits are not used, mark-
ers remain in rear of the firing line except during cessation of
fire when their duties require them to move to the targets.
c. Artificial butts.—If an artificial butt is constructed as a
bullet stop, it should be of earth not less than 30 feet high
with a slope of not less than 45°. It should extend about 5
yards beyond the outside targets and should be placed as close
behind the targets as possible. The slope should be sodded.
d. Hills as butts.—A natural hill to form an effective butt
should have a slope of not less than 45°. If originally more
gradual it should be cut into steps, the face of each step
having that slope.
e. Number of targets.—Each target should be designated by
a number.
Л Measuring the range.—The range should be carefully
measured and marked with a stake in front of each target at
each firing point. The stakes should be about 12 inches above
the ground and painted white. These stakes then designate
the firing points for the different targets at the different dis-
77
56-59
BASIC FIELD MANUAL
tances. Particular care should be taken that each stake thus
placed is on a line at right angles to the face of its own
target.
g. Danger signals.—One or more danger signals are placed
near the range to warn passersby when firing is in progress,
They should be placed on the roads or on the crest of the hlU
where they can be plainly seen by those passing.
Section V
SMALL-BORE PRACTICE
57. General.—Where facilities and equipment permit, all
soldiers who have satisfactorily passed the examination on
preparatory exercises should be advanced to small-bore prac-
tice before taking up range practice. The actual firing and
observed results stimulate endeavor. Rapid progress, par-
ticularly in teaching trigger squeeze, may be made. There is
no recoil or loud report to induce nervousness or flinching and
the soldier soon learns that he can make good scores if he
observes the proper methods and precautions in which he has
been instructed. Small-bore practice is not only valuable to
the beginner but it affords to the good shot a means of re-
taining his efficiency throughout the year. Continued prac-
tice is essential in maintaining revolver marksmanship.
58. Object.—The object of small-bore practice is to pro-
vide a form of marksmanship training with the caliber .22 re-
volver and ammunition which represents the application of
the principles taught in the preparatory exercises. Small-
bore practice provides an excellent means of improving the
shooting of organizations and sustaining interest in marks-
manship throughout the year. Every effort should be made
by all organizations to fire the small-bore course prior to the
regular marksmanship season. The firing of this course en-
ables the organization commander to visualize the state of
training of his command and to concentrate his efforts on
the training of those who are most deficient.
59. Continuous Practice.—Small-bore practice should be
carried on throughout the year subject to such limitations as
may be imposed by available ammunition and range facilities.
All persons who have never been properly instructed in shoot-
ing methods prescribed herein should be given a thorough
course of preparatory instruction before being permitted to
78
COLT AND SMITH AND WESSON REVOLVERS
59-B1
fire on the small-bore range. All small-bore practice is prop-
erly organized and supervised in accordance with the methods
of instruction as prescribed in this manual.
60. Small-Bore Practice Course.—Prior to range firing,
the minimum number of scores shown in the following small-
bore practice table should be fired by each individual required
to fire the revolver, dismounted. The procedure of firing is
similar to that in range firing. No reports of the results of
small-bore practice are required, but the firing record of
individuals should be posted in order to stimulate interest
and competition among the men of the organizations.
Small-Ъоте practice table
Slow-fire target
Rapid-fire target
Quick-fire target
Iron small-bore tar-
get or paper target X
Same as slow fire
Target E—bobbing
Time
Time
Time
5 yards
No time limit...
20 seconds per
10 yards...
15 yards...
....do.
score.
____do___________
3 seconds per
shot.
о
и
61. Additional Practice.—In addition to the minimum
number of scores prescribed in the table above, small-bore
practice should be carried on throughout the year, the amount
and details of the practice being left to the discretion of the
organization commander. Varied targets such as tin cans,
bottles, pendulums, and moving targets stimulate interest.
Matches between individuals and teams of the same or differ-
ent units should be promoted.
79
CHAPTER 4
FIRING AT FIELD TARGETS
62. General.—a. After individual practice is completed, fir-
ing at field targets may be commenced by all organizations
authorized to fire this practice.
b. This firing is practiced by squads.
63. Field Firing Range.—Eight targets E—bobbing are
placed approximately in line with 5-yard intervals and with
ropes sufficiently long to reach behind the starting line. The
starting line is 50 yards from the targets and is marked by a
flag at each side of the range. The area should be clear of
trees and high brush, level or sloping gently upward toward the
targets.
64. Field Firing Course.—The following table outlines the
course to be fired. The course may be repeated at will as
often as is consistent with ammunition allowances.
Formation Scores Targets Range Pace
Squad of 8 men de- 2 scores, each man fir- । 8 targets E— Between 50 . Walk..
ployed at 5-yard ing 6 shots in each bobbing. and 15 1
intervals. score. I 1 1 yards. I 1 1
Note.—Hits are valued at 1. Any shot cutting the edge of the
target is a hit.
65. Method of Firing Course.—a. The squad is formed
at the starting line facing the targets with 5-yard intervals.
Fully loaded revolvers are in holsters.
b. The officer in charge of firing commands: 1, forward,. 2.
MARCH. All men move toward the targets at the walk.
By signal the officer in charge of firing causes the targets
to be exposed for 6 seconds when the line has moved forward
about 5 yards.
c. When the targets first appear, the men individually
draw and raise the revolver and cock the hammer. They
fire as many shots as they desire at each exposure of the
target. During the periods when the targets are exposed
all men must halt. During periods when targets are not
80
COLT AND SMITH AND WESSON REVOLVERS
65
exposed all men move toward the targets at the walk with
revolvers at raise pistol.
d. The officer in charge of firing causes the targets to be
exposed 3 seconds after the line of men has advanced each
5 yards, until men reach a line 15 yards from the targets
where the targets are exposed for the last time. Thus tar-
gets are exposed six times; the first time for 6 seconds and
all other times for 3 seconds.
e. Each man must fire only on the target directly in front
of him. He may fire by single action or double action.
/. Care must be taken that the line be kept approximately
dressed. If a man gets 3 yards in front of or behind the line,
he must be cautioned of his error and must correct it
immediately.
g. For purposes of safety a noncommissioned officer is sta-
tioned in rear of the squad and follows it forward during each
run to enforce the provisions of / above.
h. Firing ceases on command of the officer In charge of
firing. Men stand fast, revolvers are unloaded, and the officer
in charge of firing commands: 1. inspection, 2. PISTOL, 3.
return, 4. PISTOL.
81
CHAPTER 5
ADVICE TO INSTRUCTORS
Paragraphs
Section I. General----------------------------------- 66-67
II. Mechanical training________________________68-73
III. Manual of the pistol_________________________ 74
IV. Marksmanship_________—---------------------- 75-78
Section I
GENERAL
66. Provisions Not Mandatory.—The information and sug-
gestions contained in this chapter are not mandatory unless
so specifically stated. They are furnished as a guide for the
personnel responsible for the instruction of troops in the
subjects contained herein.
67. Method of Instruction.—The applicatory system of
instruction is used for instruction in subjects of the nature
found in this manual. This system consists of explanation,
demonstration, application (practical work), and examina-
tion. (See FM 21-5.)
a. Explanation.—The initial explanation and demonstra-
tion of any particular phase of the instruction are presented
to the assembled unit by the instructor assisted by essential
demonstration personnel. The general purpose of the entire
course or period of instruction should be explained first. The
various phases or steps of the course should then be presented
in a series of explanations and demonstrations.
b. Demonstration.—(1) Demonstrations which are skill-
fully conceived and executed expedite and simplify instruction
as well as stimulate interest. Successful demonstrations are
usually short and concise. They leave the student with an
exact impression stripped of superfluous details. The demon-
strations incident to all subjects should be arranged in progres-
sive sequence, and where practicable should alternate with
practical work to permit the student to fix these successive
phases of instruction in his mind.
(2) The men who constitute the demonstration unit should
be carefully selected for their intelligence, ability, and ap-
pearance. They should be thoroughly trained and rehearsed
in the duties they are to perform so that the demonstration
82
COLT AND SMITH AND WESSON REVOLVERS
67-68
will proceed smoothly and illustrate clearly and simply the
phase of instruction being presented.
(3) The equipment used for demonstrations should be the
best available. A demonstration platform or an area in
which the students can be assembled quickly at a position
from which they can see and hear every part of the demon-
stration is essential.
(4) Interest is added and valuable instruction given by re-
peating demonstrations, including common errors, and re-
quiring the students to detect these errors.
c. Application (practical work).—(1) This third step of
instruction is of major importance since it gives the student
an opportunity to actually accomplish that which has been
previously explained and demonstrated.
(2) During the practical work phase of instruction, best
results are obtained if the unit is divided into groups. Groups
should consist of from four to eight men depending upon the
number of men undergoing instruction and the number of
assistant instructors available. Each group is provided with
a set of equipment and placed under the direct supervision
of a trained assistant instructor. The group then executes
the prevously demonstrated phase of instruction, individuals
rotating within the groups, until all men have mastered the
instruction.
(3) The initial allotment of time and equipment should be
made carefully. However, the instructor should not hesitate
to alter this allotment if the majority of the men fail to
master the instruction within the allotted time or are kept at
one exercise to the point of boredom. The frequent rotation
of duties within each group is preferable to keeping each
man in one position for a long time.
d. Examination.—An informal oral or practical examina-
tion should be conducted upon completion of each phase of
instruction. In addition to the required examination before
starting range practice, the organization commander should
conduct such additional examinations as are necessary to
insure that all men have completed the training.
Section П
MECHANICAL TRAINING
68. General.—The entire unit to be instructed is assembled
in a suitable area and divided into conveniently sized groups,
83
68-72
BASIC FIELD MANUAL
each under the supervision of an assistant instructor. The
instruction is centralized under the supervision of the unit
instructor. Explanation and demonstration are concurrent,
each assistant instructor demonstrating the elements of the
particular phase of instruction as the instructor explains it
from the platform. For short periods of practical work the
instruction is decentralized under the assistant instructors.
69. Disassembly and Assembly of Revolver.—a. Equip-
ment required.—One revolver per man; one pistol cleaning
kit per group.
b. Procedure.—(1) Have assistant instructor disassemble
and assemble the revolver while the instructor is explaining
the procedure.
(2) Assistant instructors explain and demonstrate the pro-
cedure, and each student performs each operation in unison
with the assistant instructor. When acquainted with the
procedure each student disassembles and assembles the
revolver without assistance.
(3) Ask questions.
70. Care and Cleaning.—a. Equipment.—Same as para-
graph 69 plus additional for special demonstrations.
b. Procedure.—(1) Explain the need for keeping the re-
volver clean, lubricated, and in proper condition, comparing
it with any other piece of machinery.
(2) Explain the proper method of cleaning, at the same
time demonstrating the process.
(3) Instruction in cleaning is carried out throughout the
year under supervision of squad and platoon commanders.
(4) Ask questions. Inspect revolvers frequently.
71. Functioning.—a. Equipment.—Same as paragraph 69.
b. Procedure.—(1) Explain the various steps which take
place in firing the revolver, both single action and double
action.
(2) Ask questions.
72. Accessories.—a. Equipment.—One each of the acces-
sories listed in paragraph 19.
b. Procedure.—(1) Explain and demonstrate the use of each
accessory.
(2) Students examine accessories.
(3) Ask questions.
84
COLT AND SMITH AND WESSON REVOLVERS
73-75
73. Individual Safety Precautions.—a. Equipment.—Same
as paragraph 69.
b. Procedure,—(1) Explain and demonstrate the various
safety rules listed in paragraph 28. Explain and demonstrate
tests for safety devices.
(2) Students practice the application of the various safety
rules and make the tests of safety devices. Observation of the
rules for safety becomes a habit only after constant practice
over a long period. Squad, platoon, and other commanders
should be constantly alert to enforce the safety rules at every
opportunity.
(3) Ask questions.
Section 1П
MANUAL OF THE PISTOL
74. General.—a. Instruction in the manual of the pistol
is carried out concurrently with dismounted drill and with
previous instruction in this chapter. Manual of the pistol
lends itself well to the applicatory system of instruction.
b. Equipment.—Each man is equipped with a revolver, two
cartridge clips, holster, and belt.
c. Procedure.—(1) The instructor explains and demon-
strates each movement in the manual of the pistol, employing
a trained demonstration unit.
(2) Groups are separated under assistant instructors and
are drilled in the various movements.
(3) Each group is tested by the instructor at the end of each
period and a critique is conducted.
Section IV
MARKSMANSHIP
75. General.—a. Marksmanship is the basic step in train-
ing the soldier to employ successfully the revolver in combat,
A soldier subconsciously employs in combat the principles he
has been taught in marksmanship, hence these principles
must be sound.
b. The procedure used In conducting marksmanship in-
struction is similar to that used in the preceding sections of
this chapter except that it is more decentralized. During
instruction in preparatory exercises the entire unit is as-
sembled initially under the unit instructor assisted by a trained
85
75-76
BASIC FIELD MANUAL
demonstration unit. Following the initial explanation and
demonstration the groups move to their individual sets of
equipment and start practical work under the assistant
instructors.
c. Firing exercises should be conducted under centralized
control.
76. Preparatory Range Training.—a. General.—(1) A
thorough course in preparatory range training is essential.
During this period the soldier learns all the mechanics of
target practice except actual firing. Preparatory training
may be done in barracks or other nonfiring areas.
(2) Adequate time should be allowed and thorough super-
vision provided to insure that each man has thoroughly
mastered the instruction before he is permitted to fire.
(3) Each step is taken up in proper order and training in
that step completed by each man before the next step is
begun. If men fail to progress uniformly, groups should be
rearranged so that instruction is not held up by men who
are slow to learn.
(4) A careful record of the progress of each man and each
group should be kept in order that the instructor will know
the progress of instruction and when the men are ready for
range practice.
b. Equipment per group.—(1) One sighting bar.
(2) One revolver rest.
(3) Two small aiming disks.
(4) One 5-inch aiming disk.
(5) Two small boxes with paper tacked on one side.
(6) One tai get frame on which is placed a blank sheet of
paper at least 2 feet square.
(7) One target L.
(8) One target E—bobbing.
(9) One revolver, cartridge clips, holster, and belt.
(10) Material for blackening sights.
(11) Tissue paper for copying shot groups.
(12) Pencils.
(13) Additional equipment such as blackboard, charts, and
drawings as decided by the instructor.
c. Procedure.—(1) Each phase of preliminary training is
explained and demonstrated when instruction in that phase
begins by the unit instructor, employing a trained demon-
stration group.
86
COLT AND SMITH AND WESSON REVOLVERS
76-78
(2) Groups are separated and practical work, is conducted
under the supervision of assistant instructors.
(3) Examination is conducted by asking questions and by
observing the results obtained by each man during practical
work.
77. Firing of Course.—a. General.—Details of adminis-
tration and supply are determined to a large extent by the
number of men undergoing instruction and the range facilities
available. These matters should be anticipated in order that
men who are firing will not be distracted. Men who are wait-
ing to fire may be perfecting preliminary instruction or they
may derive valuable instruction by watching others flre and by
listening to critiques.
b. Equipment.—Instruction in marksmanship is facilitated
by having all revolvers in perfect mechanical condition.
78. Construction of Targets and Ranges.—a. General.—
For detailed information relative to targets and target ac-
cessories see Table of Allowances, Targets and Target
Equipment.
b. Targets.—When regular printed targets are not available,
suitable substitutes can be made on sheets of wrapping paper.
Dimensions should be accurate. Improvised targets can be
made in large numbers by improvising a stencil using heavy
linoleum.
c. Ranges.—(1) General.—The range should be level and
open and, if practicable, so located that fire can be delivered
against a steep hill or bank in rear of the targets. Semi-
permanent bases should be constructed to facilitate placing
targets in position and changing targets with the minimum
delay or confusion.
(2) Marksmanship course.—Targets should be spaced from
3 to 5 yards apart. The depth of the range should be not less
than 40 yards.
(3) Field firing.—Ground rising gently toward the targets
with a hill in rear of the targets should be selected if available.
Avoid shooting down hill. The range should be at least 50
yards wide by 100 yards long,
87
INDEX
Paragraph Page
Accessories___________________________________ 19,72 26,84
Additional practice___________________________ 61 79
Advice to instructors. (See Instruction.)
Aiming-------------------------_-------------- 38 40
Ammunition:
Allowance_______________________________________ 44 64
Ballistic data__________________________________ 27 30
Care____________________________________________ 25 27
Grade_________________________________________ 23 27
Handling_____________________________~____ 25 27
Identification___________________________________24 27
Lot number______________________________________ 22 26
Preservation____________________________________ 25 27
Storage_________________________________________ 26 29
Assembling revolvers:
Colt_________________________________________________ 4 9
Instruction methods___________________________ 69 84
Smith and Wesson--------------------------------- 6 11
Ballistic data, ammunition-------------------------- 27 30
Care, ammunition____________________________________ 25 27
Care and cleaning, revolvers:
After chemical attack___________________________ 12 18
After firing_____________________________________ 9 16
Cold weather____________________________________ 11 18
Instruction methods____________________________ 70 84
Points to be observed--------------------------- 13 18
Procedure________________________________________ 8 16
Purpose__________________________________________ 7 15
Rules for, on range----------------------------- 10 17
Chemical attack, care and cleaning revolvers
after___________________________________________ 7,12 15,18
Classification:
Ammunition__________________________________________ 21 26
Firers__________________________________________ 53 74
Cleaning revolvers (see also Care and cleaning,
revolvers)____________________________________ 7-13,70 15,84
Coaching methods in range practice------------------ 47 66
Cold weather, care of revolvers during______________ 11 18
Commands, firing:
Inspection______________________________________ 34 34
Load___________________ ___-_____________- 32 33
Raise pistol______________________________- 31 32
Return-.___________________________________ 35 34
Unload________________________________________ 33 34
Computing scores____________________________________ 52 74
Construction, targets and ranges--------------- 56,78 77,87
Courses:
Field firing-___________________________________ 64 80
Known-distance targets:
Instruction practice----------------------- 45 64
Record practice______________________ 46 65
Small bore-________________=______________ 60 79
89
INDEX
Descriptions: Paragraph
Revolvers----------------------------------- 1,2
Targets-------------------------—— -- 54
Ranges----------------------------------------- 55
Detailed functioning of revolvers------------ 16,17
Disassembling revolvers:
Colt_____________________________________________________ 3
Instruction method---------------------------- 69
Smith and Wesson — ---------------------------- 5
Examination at end of preparatory instruction.. 43
Field firing:
Course____________________________________ 64, 65
Range..___________________________________ 63
Fire pistol— _________________________________ 36
Firers. classification----=------------------- 53
Firing (see also Marksmanship) :
Care of revolver after__________________________ 9
Commands------------------------------------ 30-36
Functioning of revolvers:
Colt___________________________________________ 16
Instruction methods_________________________ 71
Methods of operation--------------------------- 14
Safety devices_______________________________ 15
Smith and Wesson_______________________________ 17
Grades, ammunition.,.=----------------------------- 23
Handling ammunition-------------------------------- 25
Identification, ammunition------------------------- 24
Instruction (see also Courses; Ranges; Targets) :
Advice to Instructors----------------------- 66-78
Construction, targets and ranges----- 78
Manual of the pistol______________________ 74
Marksmanship___________________________ 75-78
Firing of course-----------------------77
Preparatory range training____________ 76
Procedure_____________________________ 75
Mechanical training____________________ 68-73
Accessories__________________________ 72
Care and cleaning____________________ 70
Disassembly and assembly of revol-
ver __________________________________ 69
Functioning of revolver — . .----------71
Safety precautions_______________________ 73
Practice..._____________________________ 37.45
Preparatory training_______________________ 37-43
Inspect revolver__________......._______...... 34
Known-distance targets (see also Targets;
Ranges__________________________________’__ 54—56
Load pistol___________________________________ 32
Lot numbers, ammunition_________________________ 22
Manual of the pistol__________________________30h-36, 74
Marksmanship:
Aiming_____________________________________ 38
Courses to be fired_______________________ 44-46
Examination^ _______________________________ 43
Page
1,2
74
75
20,22
3
84
10
61
80
80
35
74
16
32
20
84
19
19
22
27
27
27
82
87
85
85
87
86
85
83
84
84
84
84
85
37, 64
37
34
74
33
26
32,85
40
64
61
90
INDEX
Marksmanship—Continued. Paragraph Page
Instruction methods------------------------ 75-78 85
Instruction practice----------------------- 37,45 37.64
Position for firing---------------------------- 39 47
Quick-fire_____________________________________ 42 59
Rapid fire______________________________________ 41 52
Range practice. (See Practice.)
Trigger squeeze---------------------------------- 40 50
Record practice__________________________________ 46 65
Operation of revolver. (See Functioning.)
Parts and accessories--------------------------— 18 25
Pistol, manual instruction--------------------- 30-36,74 32,85
Position for firing revolver------------------- 39 47
Practice:
Field:
Course____________________________________ 64,65 80
Range--------------------------------------- 63 80
Ranges:
Coaching methods--------------------------- 47 66
Flrers, classification---..------------------ 53 74
Marksmanship. (See Marksmanship.)
Organization_________________________________ 49 70
Record practice, regulations governing. _ 51 71
Safety precautions--------------------------- 48 69
Scores, computation__________________________ 52 74
Target details------------------------------- 50 71
Small-bore____________________________________ 57-61 78
Protection, ammunition------------------------------- 25 27
Quick-fire, training in______________________________ 42 59
Raise pistol----------------------------------------- 31 32
Range:
Care of revolver on___________________________________ 10 17
Construction_____________________________________ 56 77
Field____________________________________________ 63 80
Organization------------------------------------- 49 70
Practice. (See Practice.)
Record practice, regulations_____________________ 51 71
Safety precautions_______________________________ 11 18
Site, selection---------------------------------- 55 75
Target details_________________________________ 50 71
Rapid fire, training--------------------------- 41, 47 52,66
Record practice________________________________ 46, 51 65, 71
Regulations governing record practice________________ 51 71
Return pistol________________________________________ 35 34
Rules:
Care of revolver_________________________________ 13 18
Cold weather_______________________________ 10 17
During range practice_________________________11 18
Safety_________________________________________ 28 30
Safety devices, functioning____________________ 15,29 19,31
Test___________________________________-___ 29 31
Safety precautions:
Instruction methods._______________________.____ 73 85
Rules for___________________________________ 28,48 30,69
Safety devices____..________________________ 15,29 19,31
Scores, computation._________________________________ 52 74
Slow fire____________________________________________ 47 66
91
INDEX
Small-bore practice: Paragraph Page
Additional practice___________________________ 61 79
Course______________________________________ 60 79
Objects__________________________________ 57,58 78
Spare parts and accessories__________________ 18,19 25, 26
Steps In marksmanship training----------------- 38-43 40
Storage, ammunition------------------------------- 26 29
Target details____________________________________ 50 71
Targets:
Construction_________________________________ 56 77
Field_____________________________________ 62-65 80
Types----------------------------------------- 54 74
Test for safety devices--------------------------- 29 31
Trigger squeeze________________________________ 40,47 50,66
Types:
Ammunition________________________________________ 21 26
Revolvers______________________________________ 2 2
Targets_______________________________________ 54 74
Unload pistol_____________________________________ 33 34.
О
92