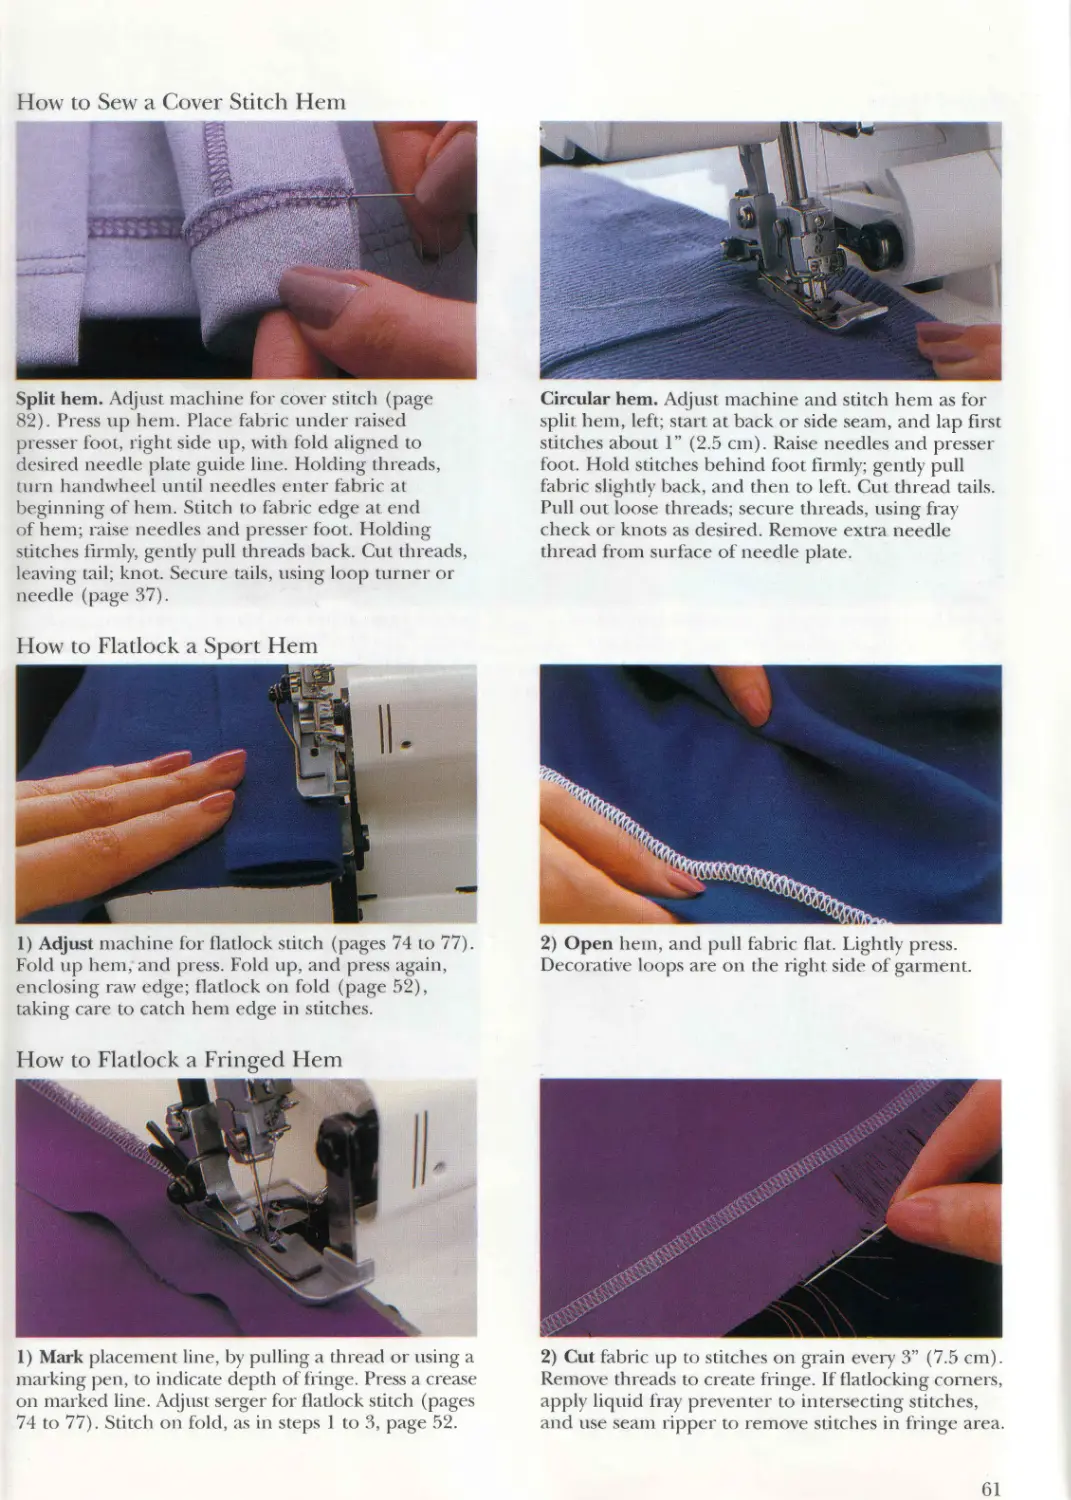
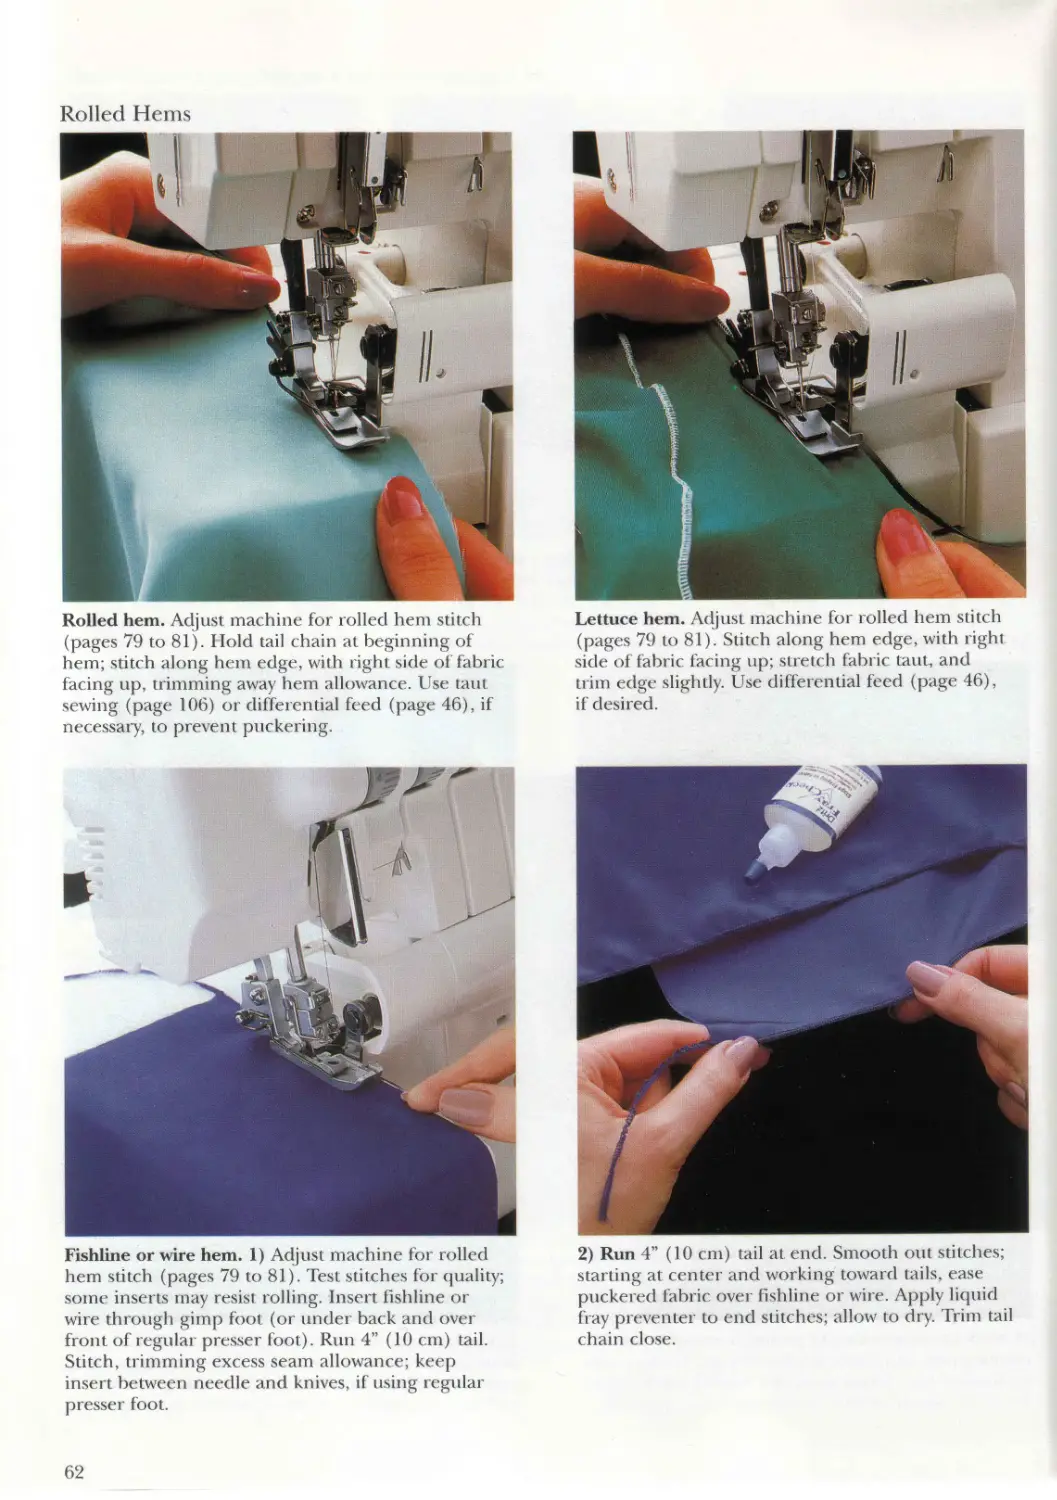
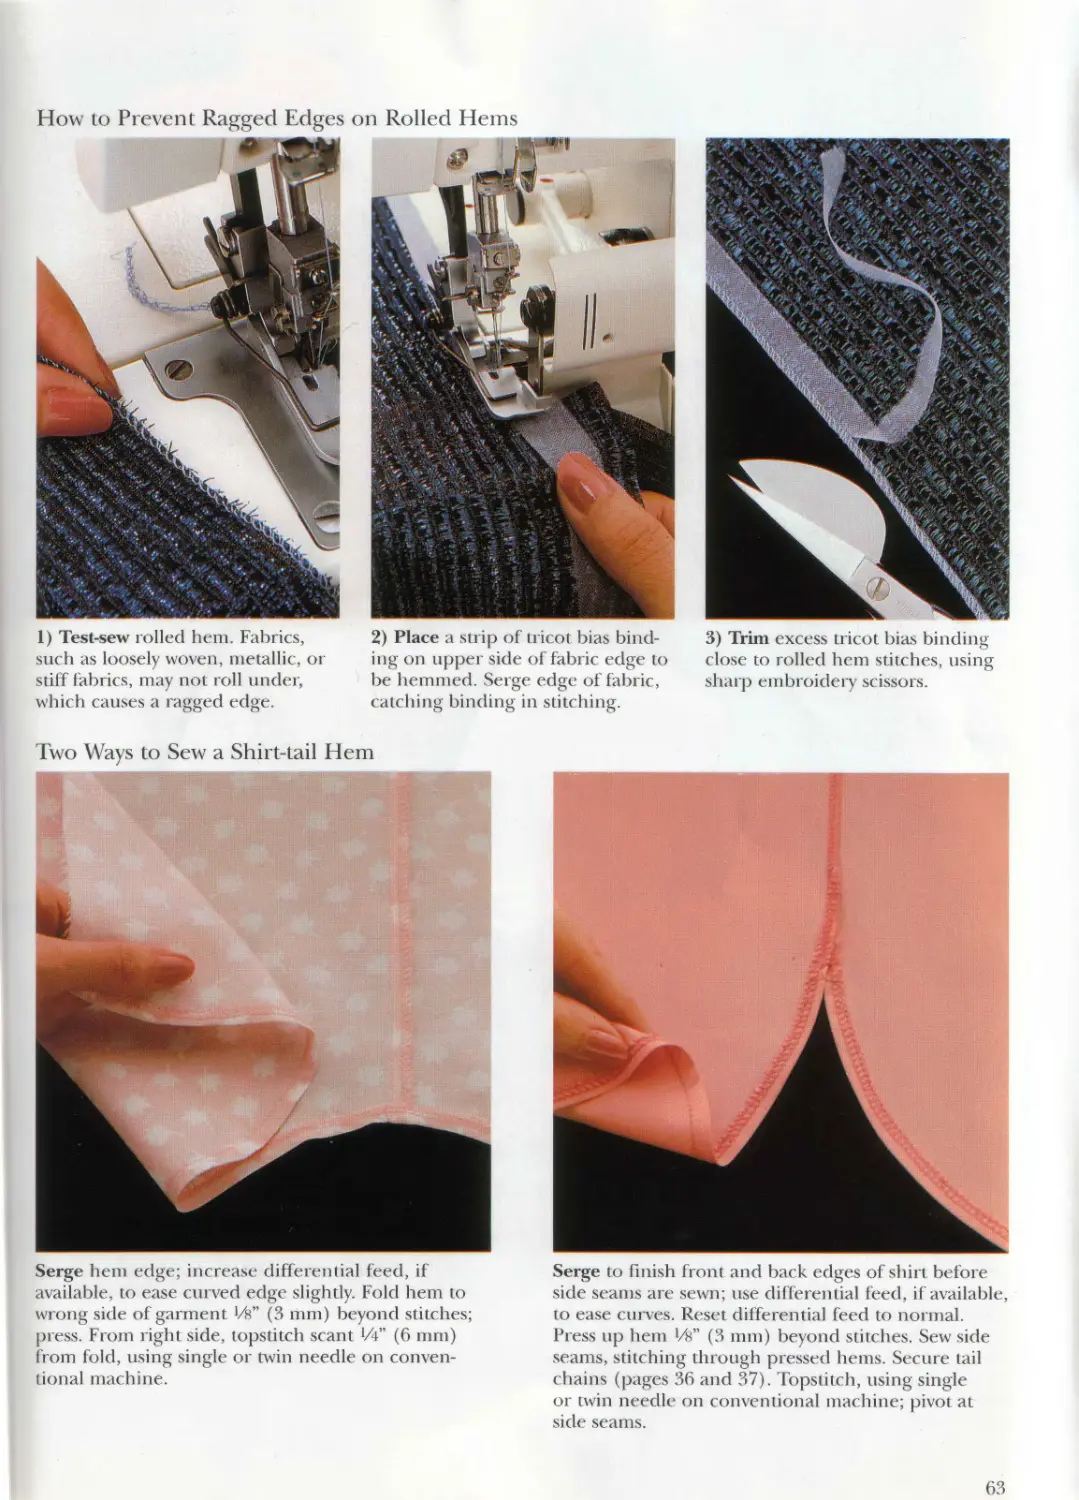
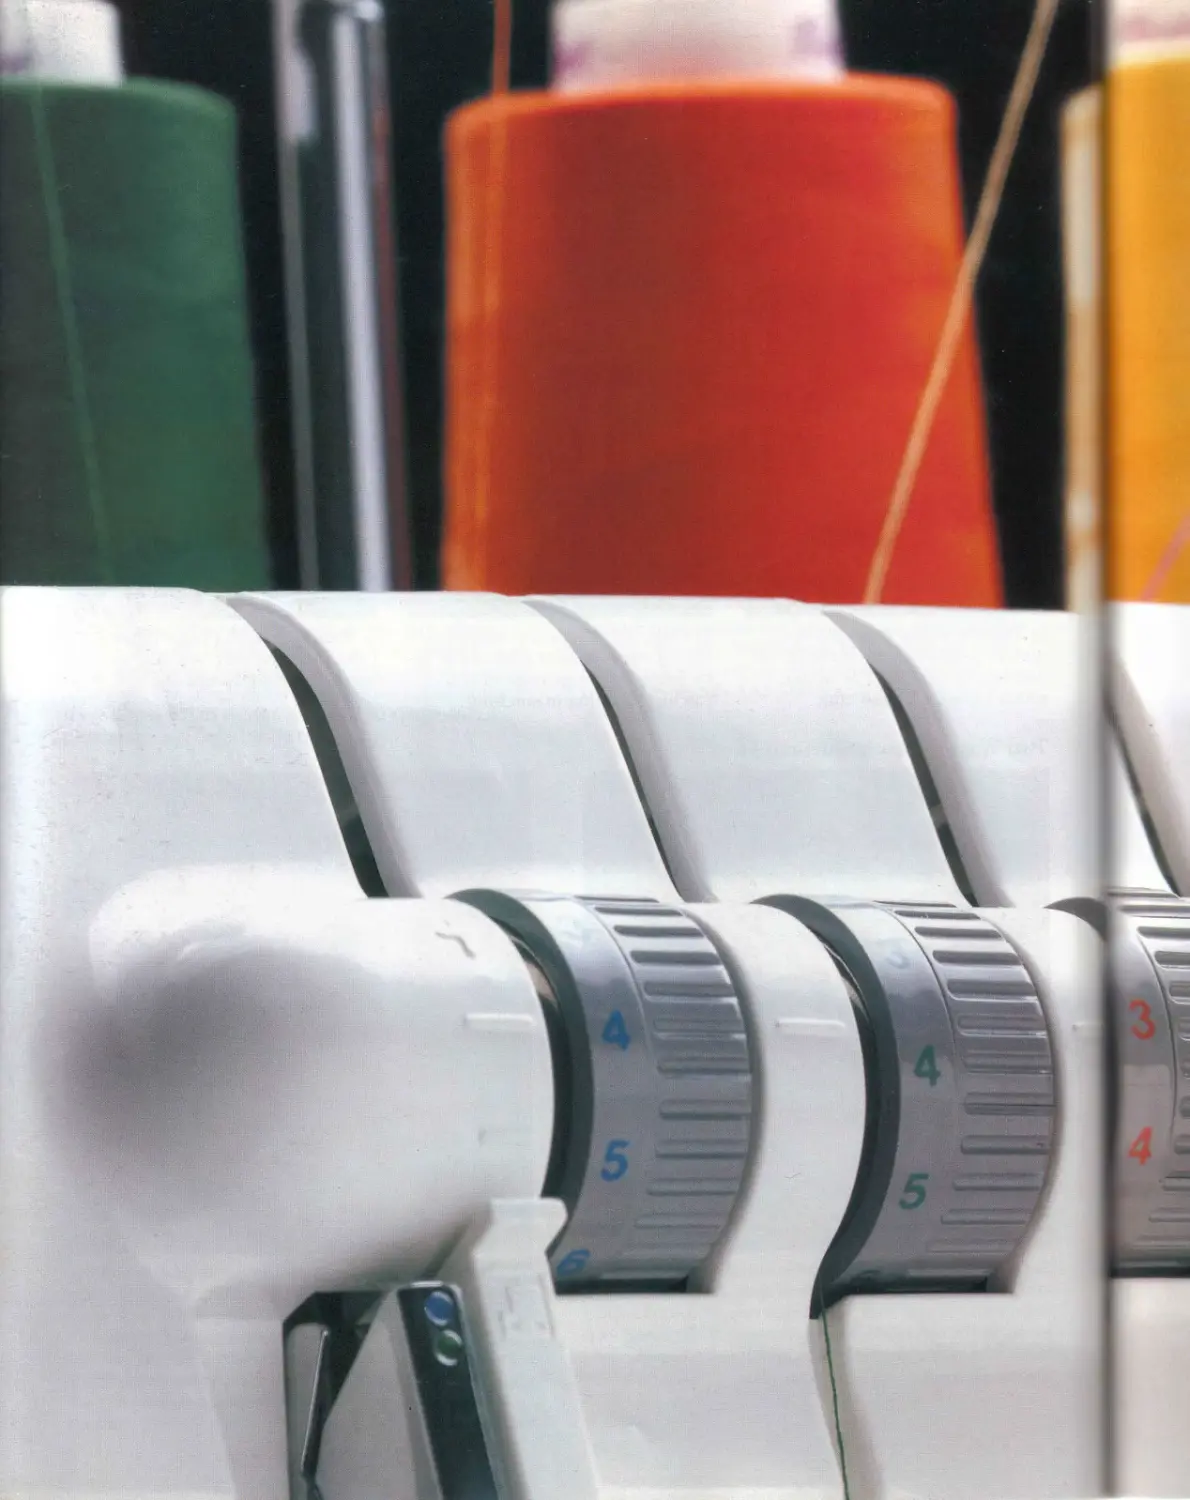
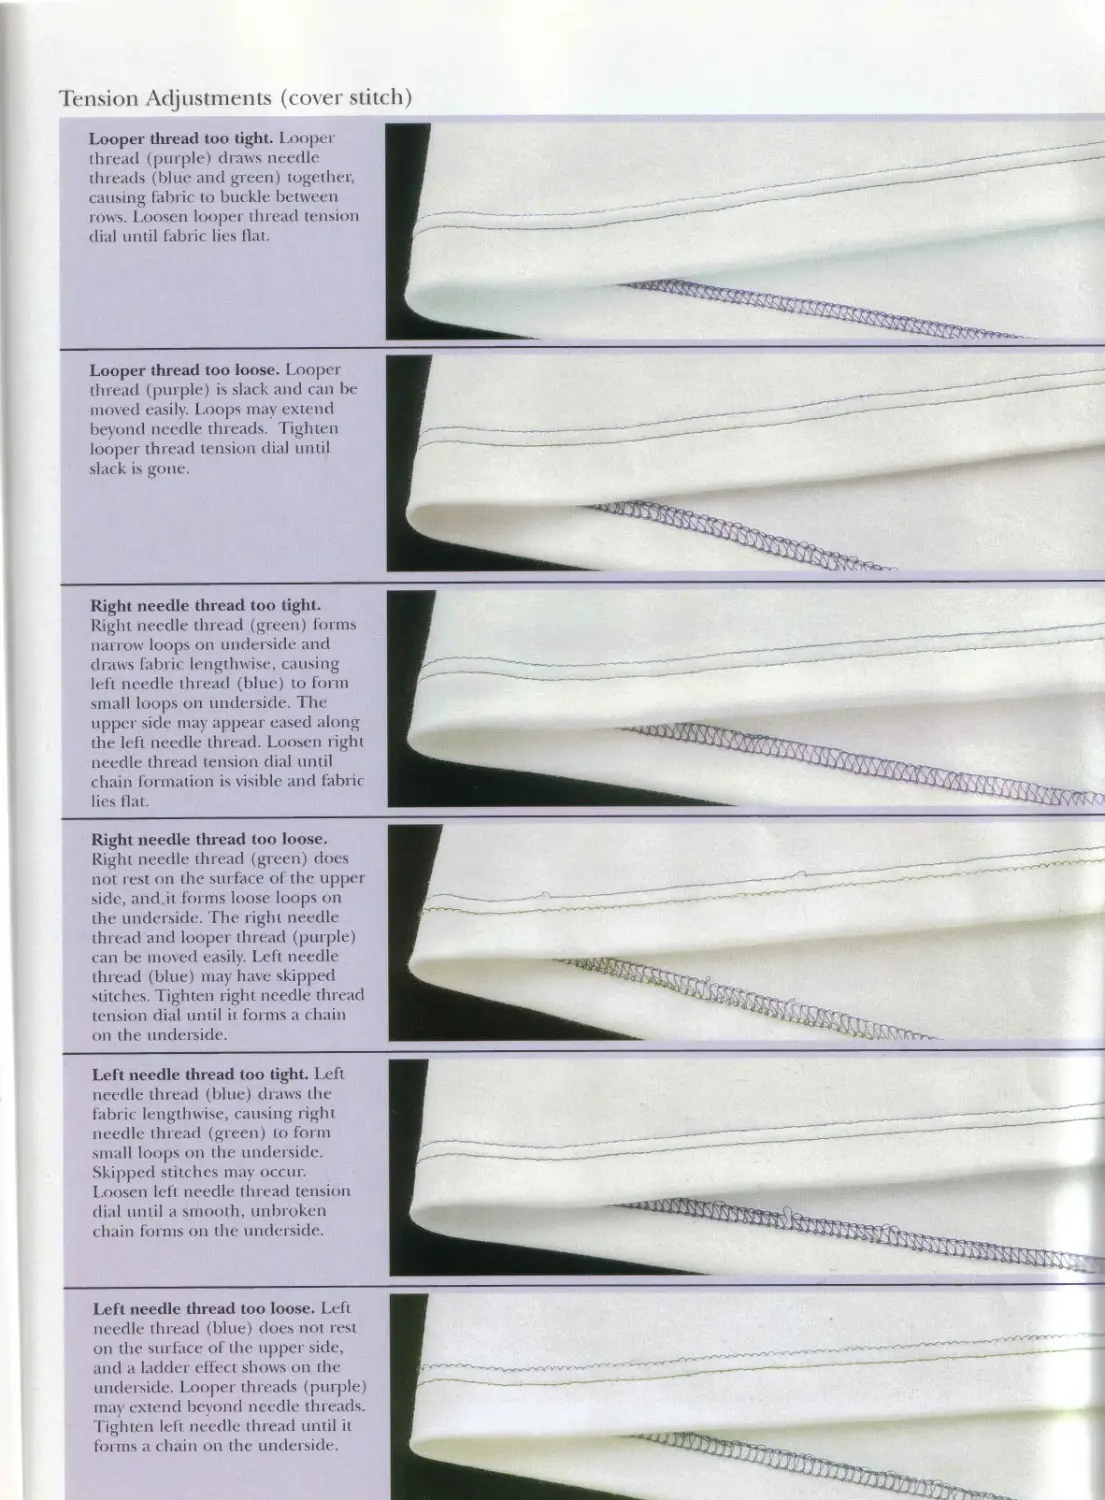
/


Текст
international
MINNETONKA, MINNESOTA
- : ' ' ;
I "I • I...............‘ .
Illi III' . . I. * ' fl
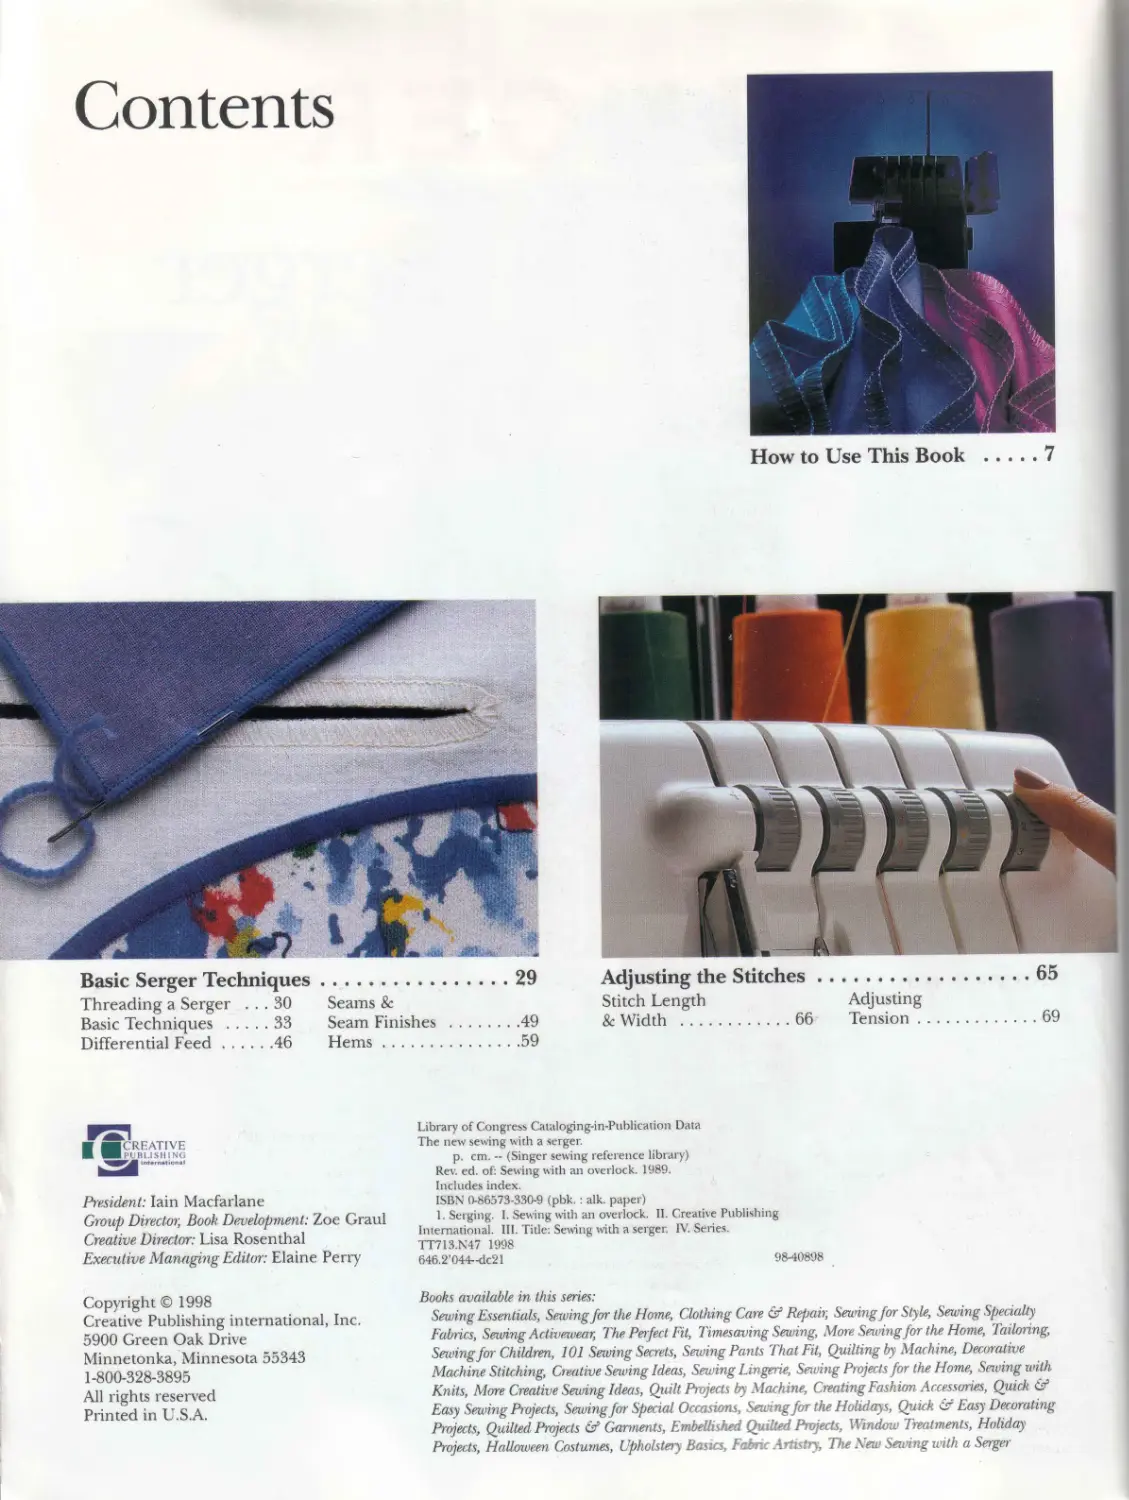
Contents
How to Use This Book .......7
Basic Serger Techniques..........................29
Threading a Serger ... 30 Seams &
Basic Techniques .....33 Seam Finishes ........49
Differential Feed....46 Hems..................59
Adjusting the Stitches..........................65
Stitch Length Adjusting
8c Width .............66 Tension.............69
international
President: Iain Macfarlane
Group Director, Book Development: Zoe Graul
Creative Director: Lisa Rosenthal
Executive Managing Editor: Elaine Perry
Library of Congress Cataloging-in-Publication Data
The new sewing with a serger.
p. cm. — (Singer sewing reference library)
Rev. ed. of: Sewing with an overlock. 1989.
Includes index.
ISBN 0-86573-330-9 (pbk. : alk. paper)
1. Serging. I. Sewing with an overlock. II. Creative Publishing
International. III. Title: Sewing with a serger. IV. Series.
TT713.N47 1998
646.2’044- -dc21 98-40898
Copyright © 1998
Creative Publishing international, Inc.
5900 Green Oak Drive
Minnetonka. Minnesota 55343
1-800-328-3895
All rights reserved
Printed in U.S.A.
Books available in this series:
Sewing Essentials, Sewing for the Home, Clothing (are & Repair, Sewing far Style, Sewing Specialty
Fabrics, Sewing Activewear, The Perfect Fit, Timesaving Sewing, More Sewing for the Home, Tailoring,
Sewing for Children, 101 Sewing Secrets, Sewing Pants That Fit, Quilting by Machine, Decorative
Machine Stitching, Creative Sewing Ideas, Sewing Lingerie, Sewing Projects for the Home, Sewing with
Knits, More Creative Sewing Ideas. Quilt Projects by Machine, Creating Fashion Accessories, Quick &
Easy Sewing Projects, Sewing for Special Occasions, Sewing for the Holidays, Quick CT Easy Decorating
Projects, Quilted Projects & Garments, Embellished Quilted Projects, Windou Treatments, Holiday
Projects, Halloween Costumes. Upholstery Bastes I Artistry, The S>wi c with a Sergei
Introducing Sergers . . . .
Uses for a Serger ......10
The Serger...............12
How Sergers
Work....................14
Buying a Serger .........18
..........................9
Accessories..............21
Buying Thread............22
Organizing the
Sewing Room..............25
Maintenance..............26
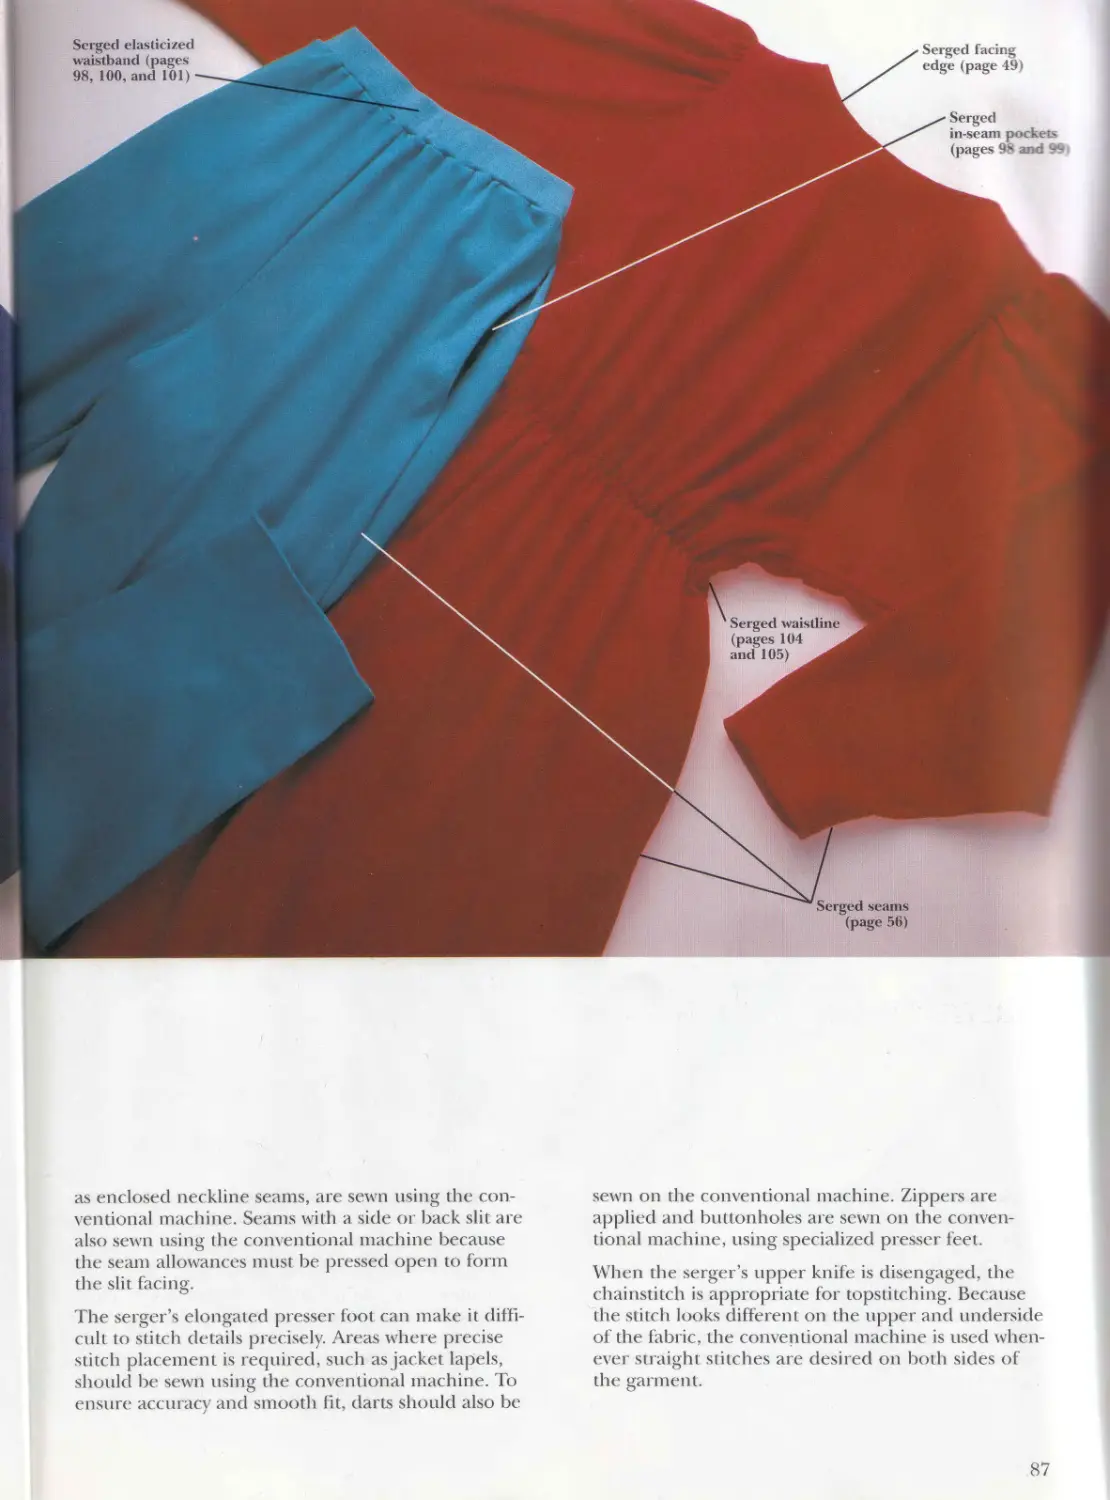
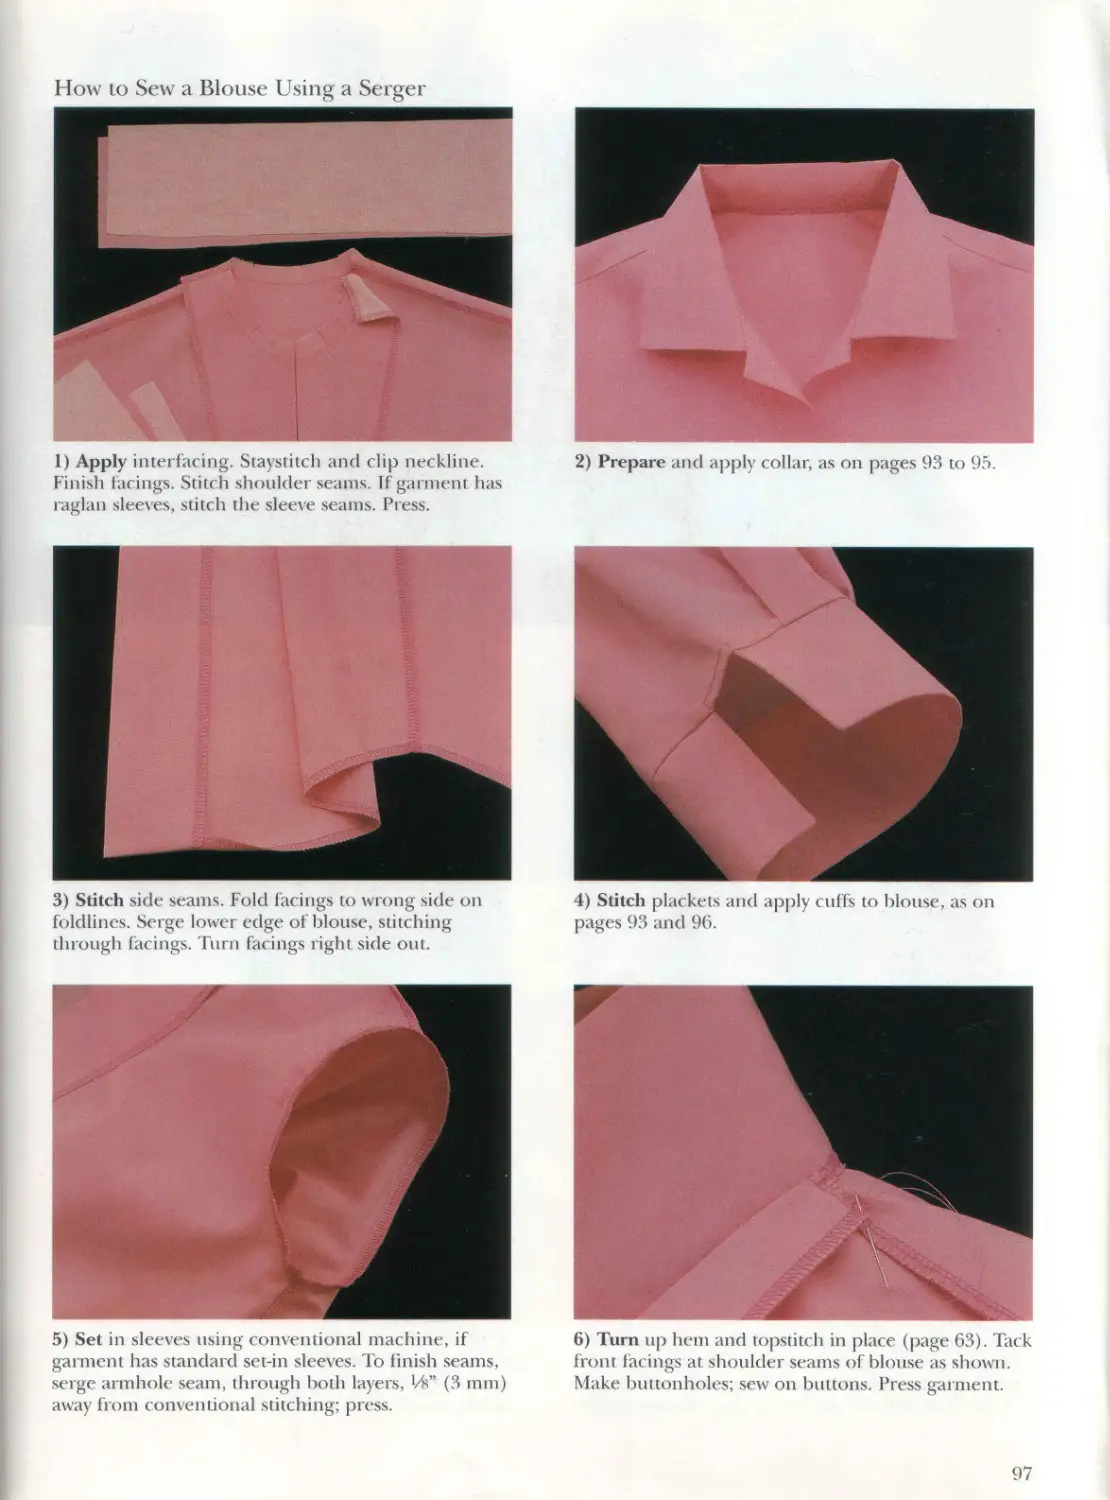
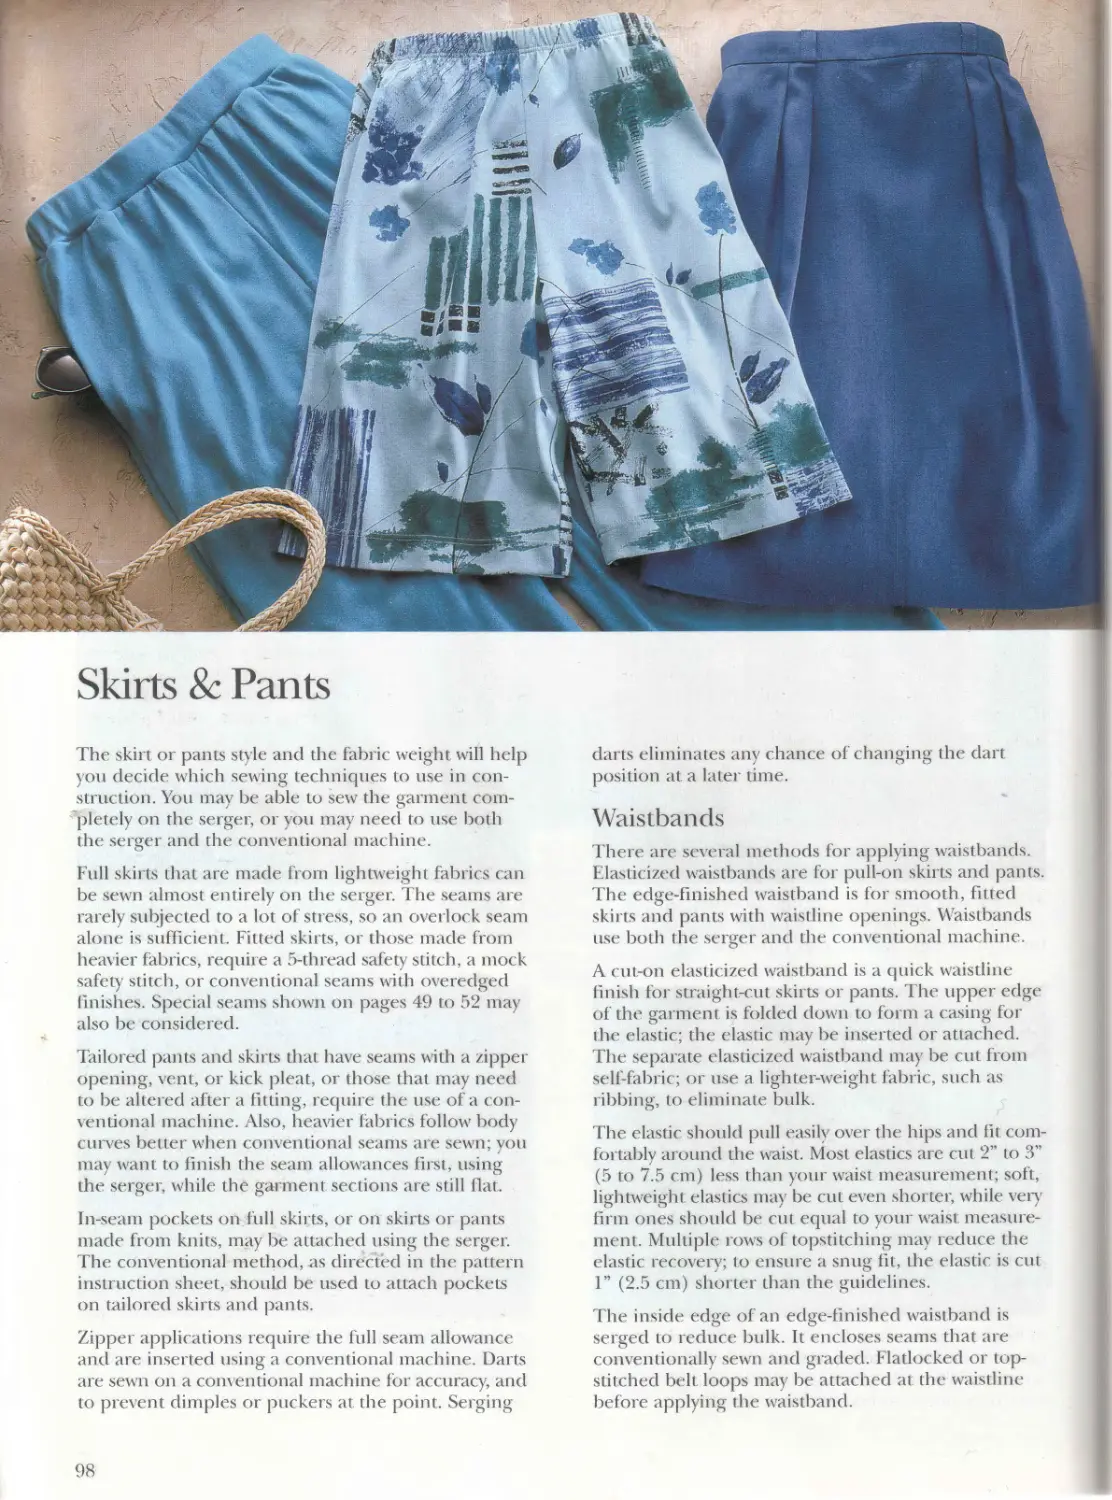
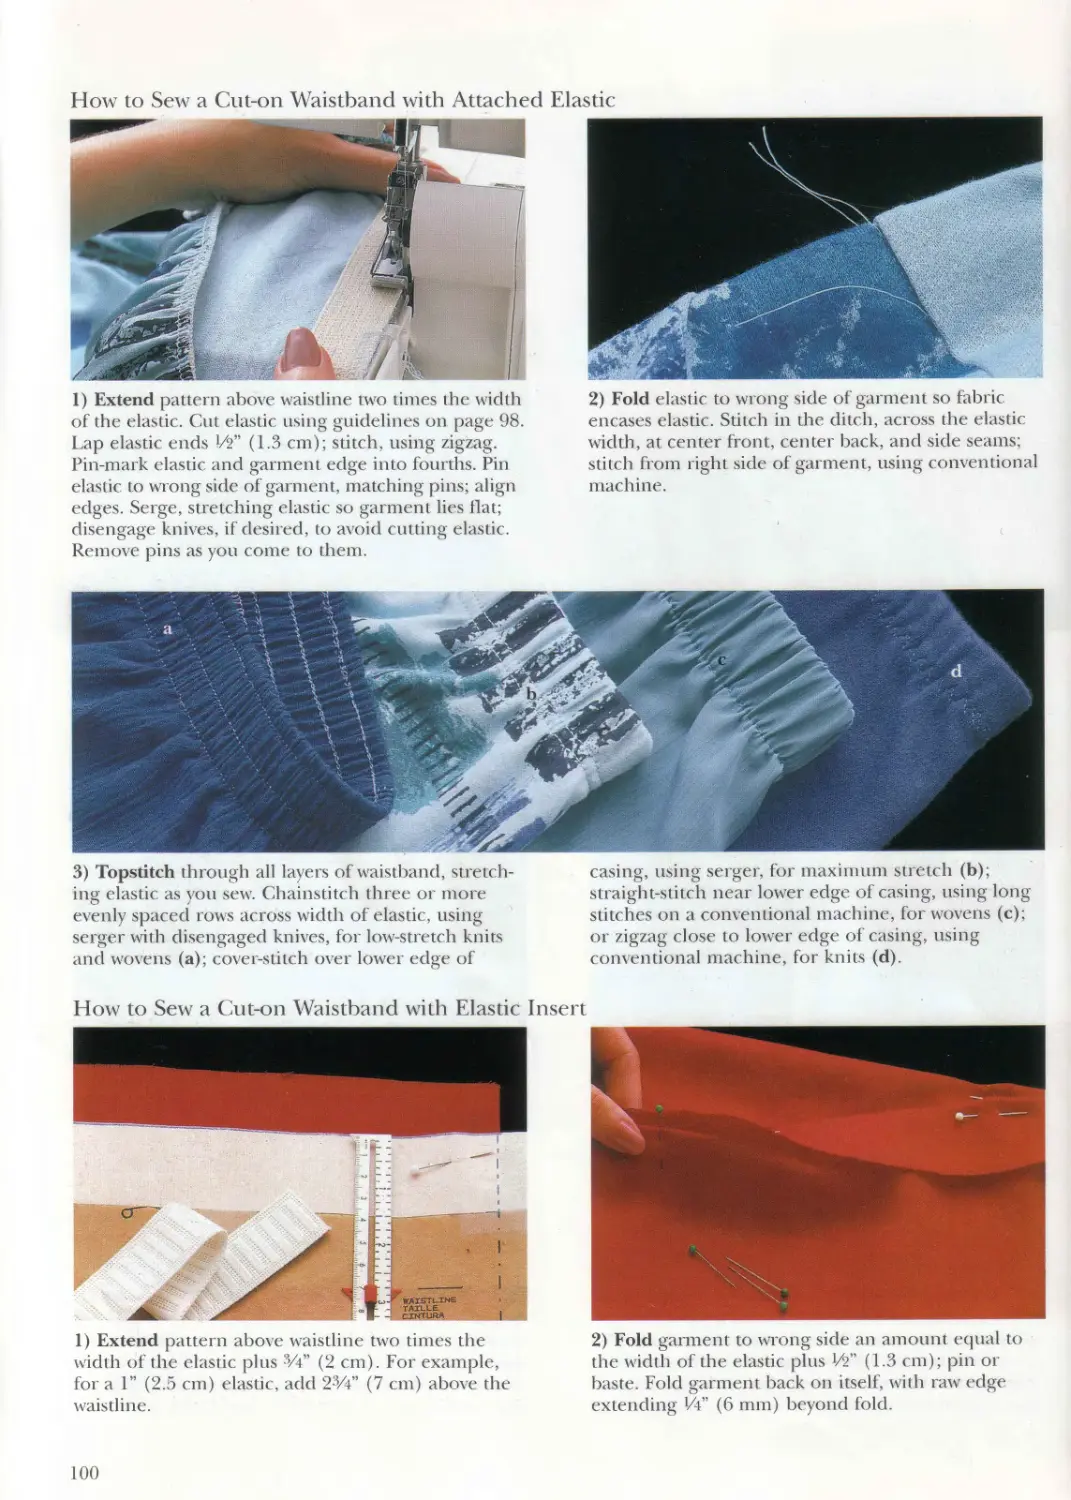
Garment Construction
Garment
Construction................86
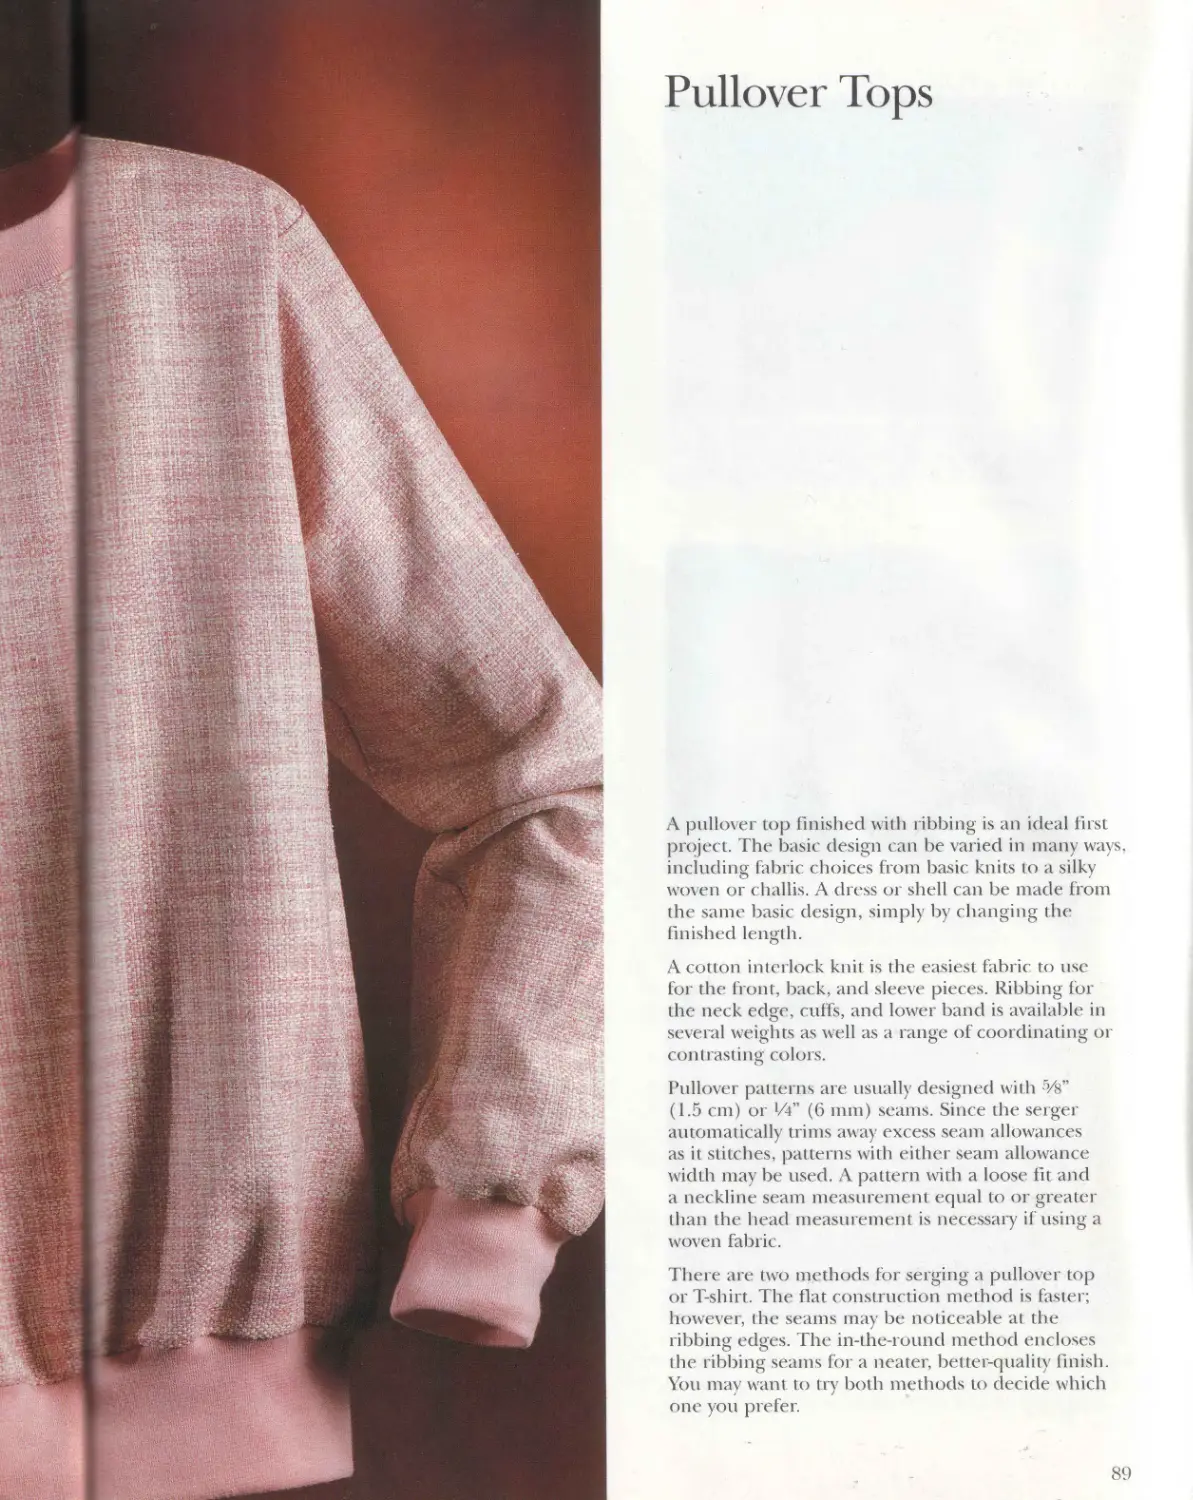
Pullover Tops .............89
Blouses....................93
Skirts & Pants.............98
..........................85
Dresses .................104
Sewing Special
Fabrics ..................106
Sweaters ................108
Activewear...............110
Special Effects
Special Decorative
.................113
Ideas for Decorative
Stitches..........114
Selecting Decorative
Threads ...........118
Stitching.........120
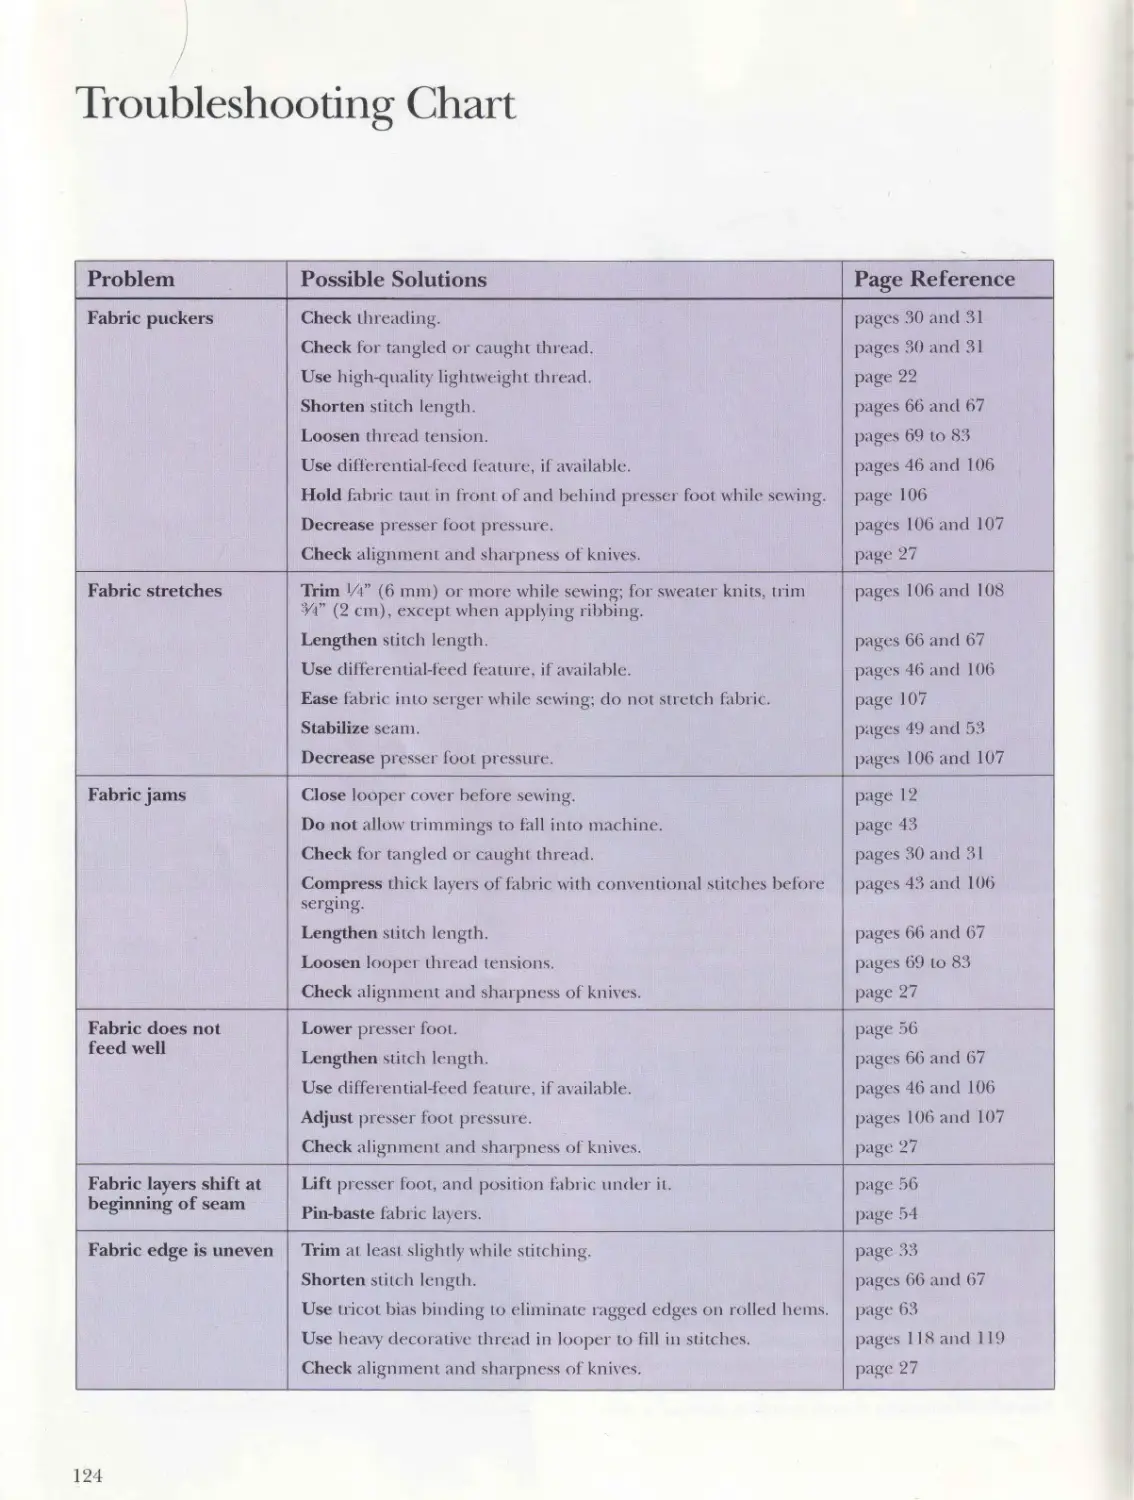
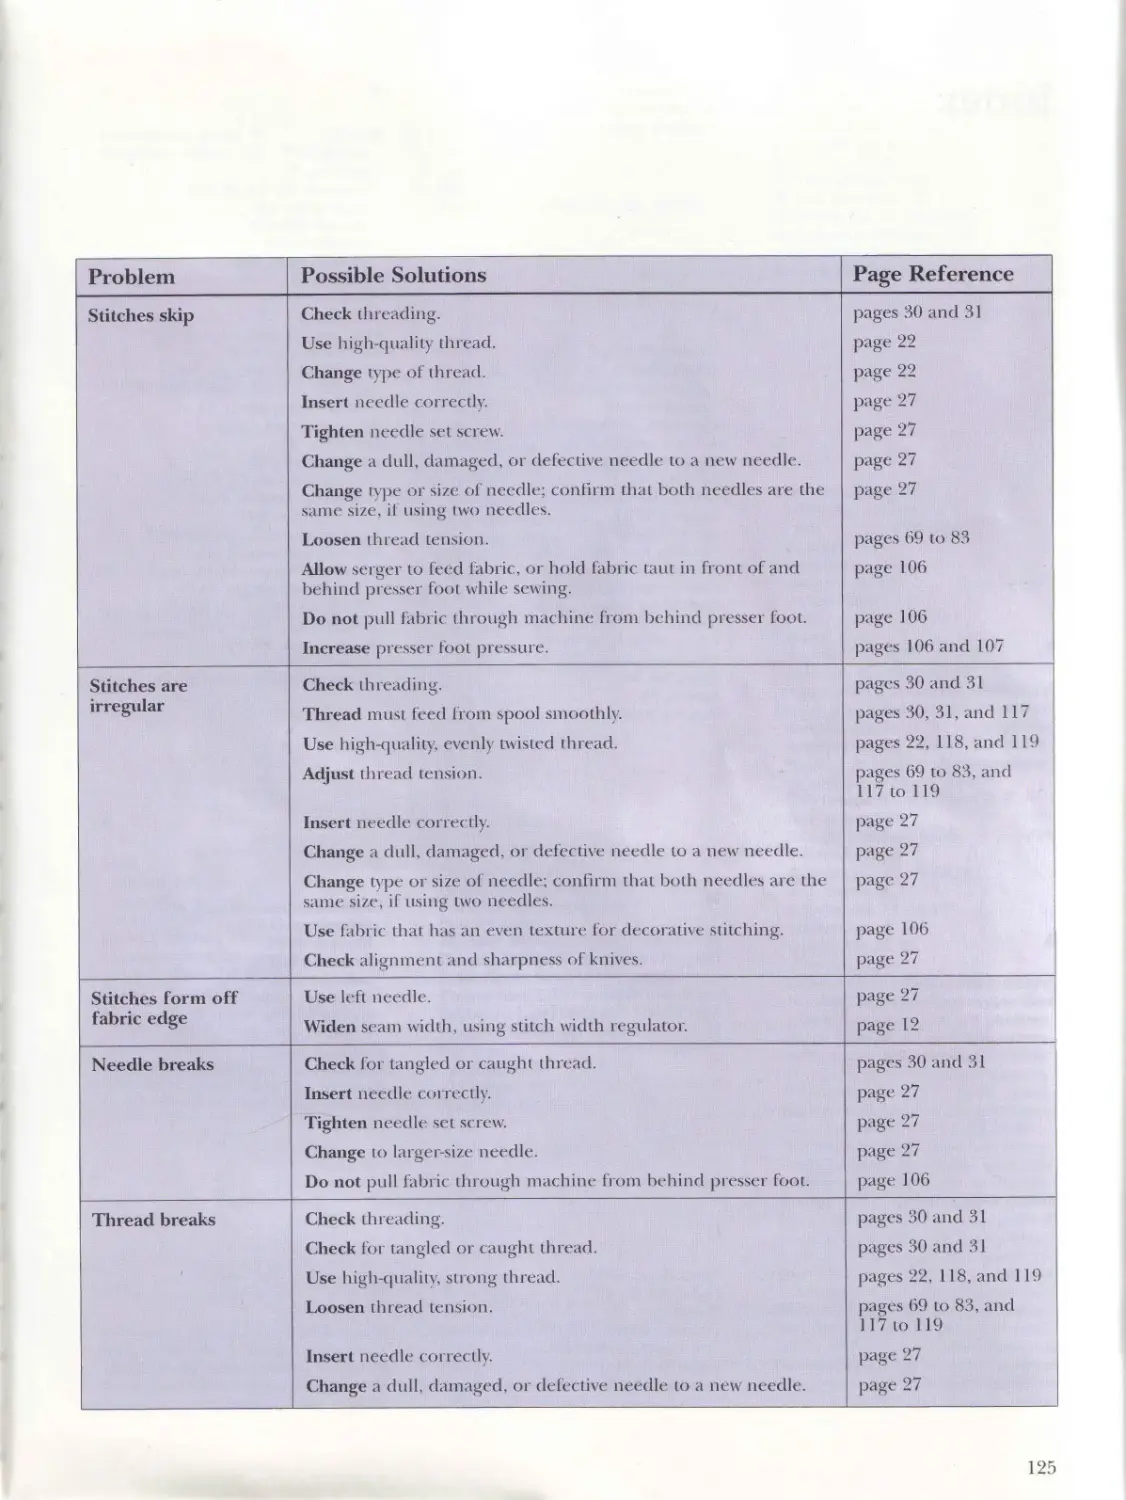
Troubleshooting
Chart ............124
THE NEW SEWING WITH A SERGER
Created by: The Editors of Creative Publishing
international, Inc., in cooperation with
the Sewing Education Department, Singer
Sewing Company. Singer is a trademark of
The Singer Company Limited and is used
under license.
Senior Editor: Linda Neubauer
Project Manager: Jill Anderson
Senior Art Director: Delores Swanson
Editor/Writ er: Nancy Sundeen
Copy Editor: J anice Cauley
Lead Project & Prop Stylist: Joanne Wawra
Project & Prop Stylist: Christine Jahns
Sample Production Manager: Elizabeth Reichow
Lead Samplemaker: Phyllis Galbraith
Samplemakers: Arlene Dohrman. Sharon
Eklund. Bridget Haugh, Virginia Mateen,
Delores Minkema
Senior Technical Photo Stylist: Bridget Haugh
Technical Photo Stylists: Sharon Eklund,
Nancy Sundeen
Studio Services Manager: Marcia Chambers
Photo Services Coordinator: Carol Osterhus
Photographers: Tate Carlson, Rex Irmen,
Andrea Rugg, Greg Wallace
Manager, Production Services: Kim Gerber
Production Staff: Curt Ellering, Laura
Hokkanen, Kay Wethern
Desktop Publishing Specialist: Laurie
Kristensen
Consultant: Becky Hanson
Contributors: Burda Patterns; Chandlers Shoes;
Clotilde; Coats & Clark; DMC Corporation;
Environmental Lighting Concepts, Inc.;
Gingher, Inc.; Kwik Sew Pattern Company;
Madeira; The McCall Pattern Company;
Minnetonka Mills, Inc.; Pentapco, Inc.;
Rowenta, Inc.; Simplicity Pattern
Company, Inc.; The Singer Sewing
Company; Swiss-Metrosene, Inc.; Tacony
Corporation; Vogue/Butterick Patterns;
William E. Wright Co.; YLI Corporation
Printed on American paper by:
R. R. Donnelley & Sons Co.
01 00 99 98 / 5 4 3 2 1
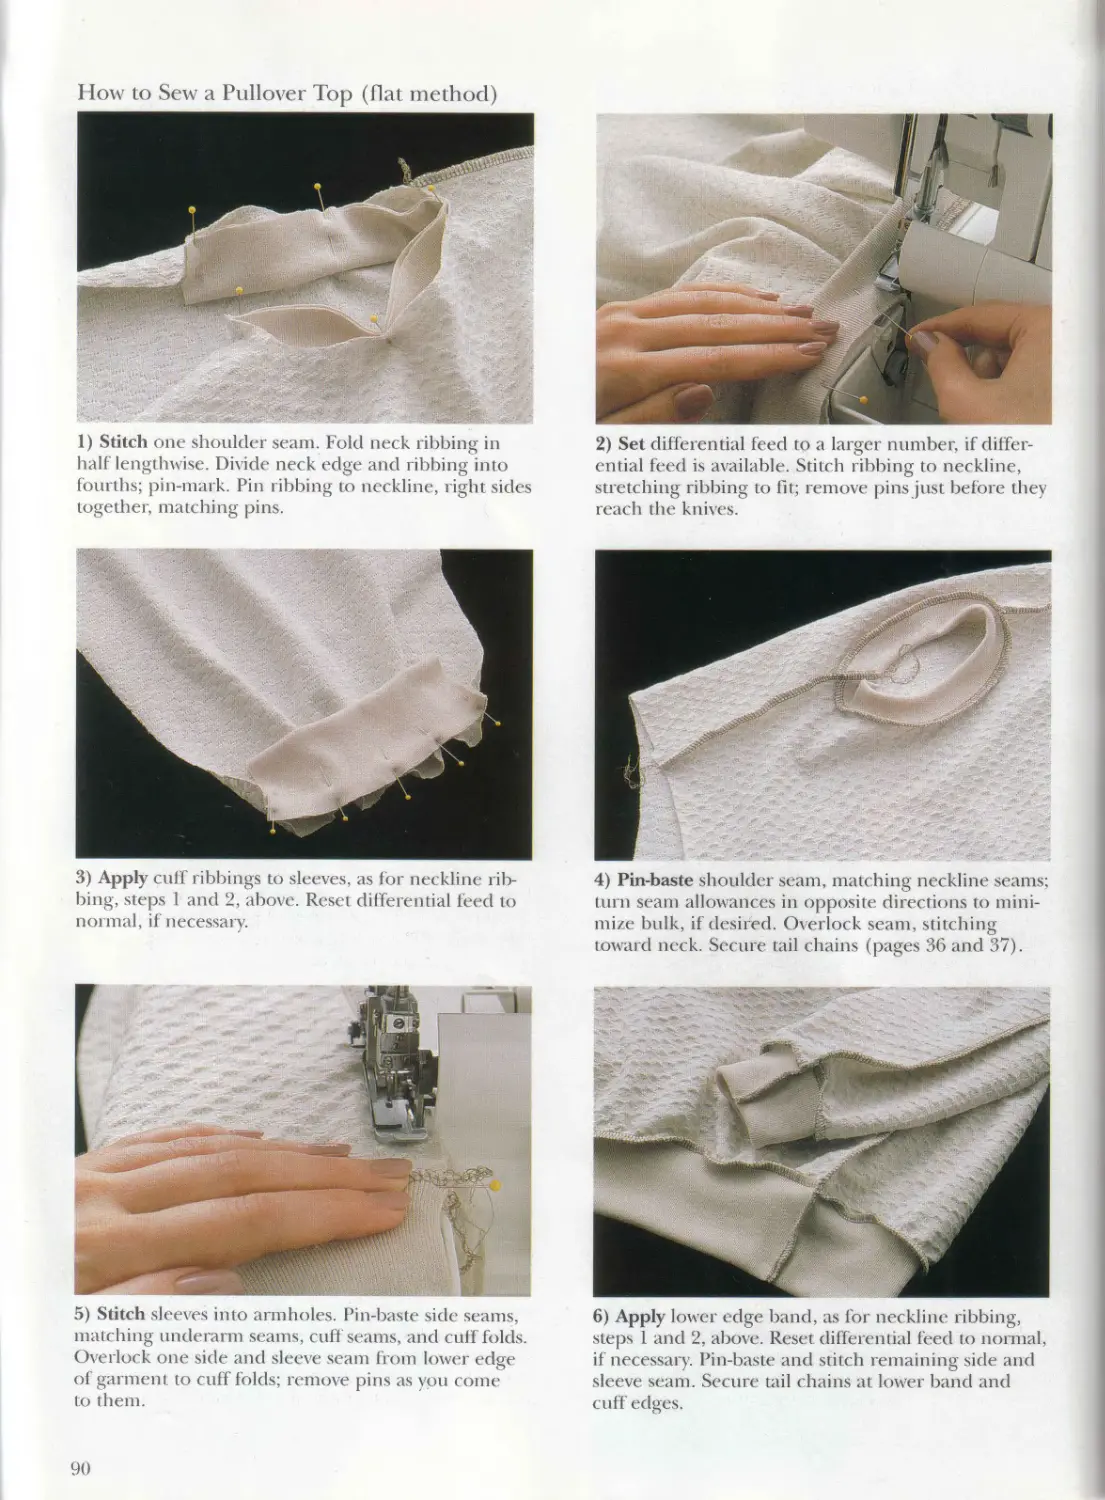
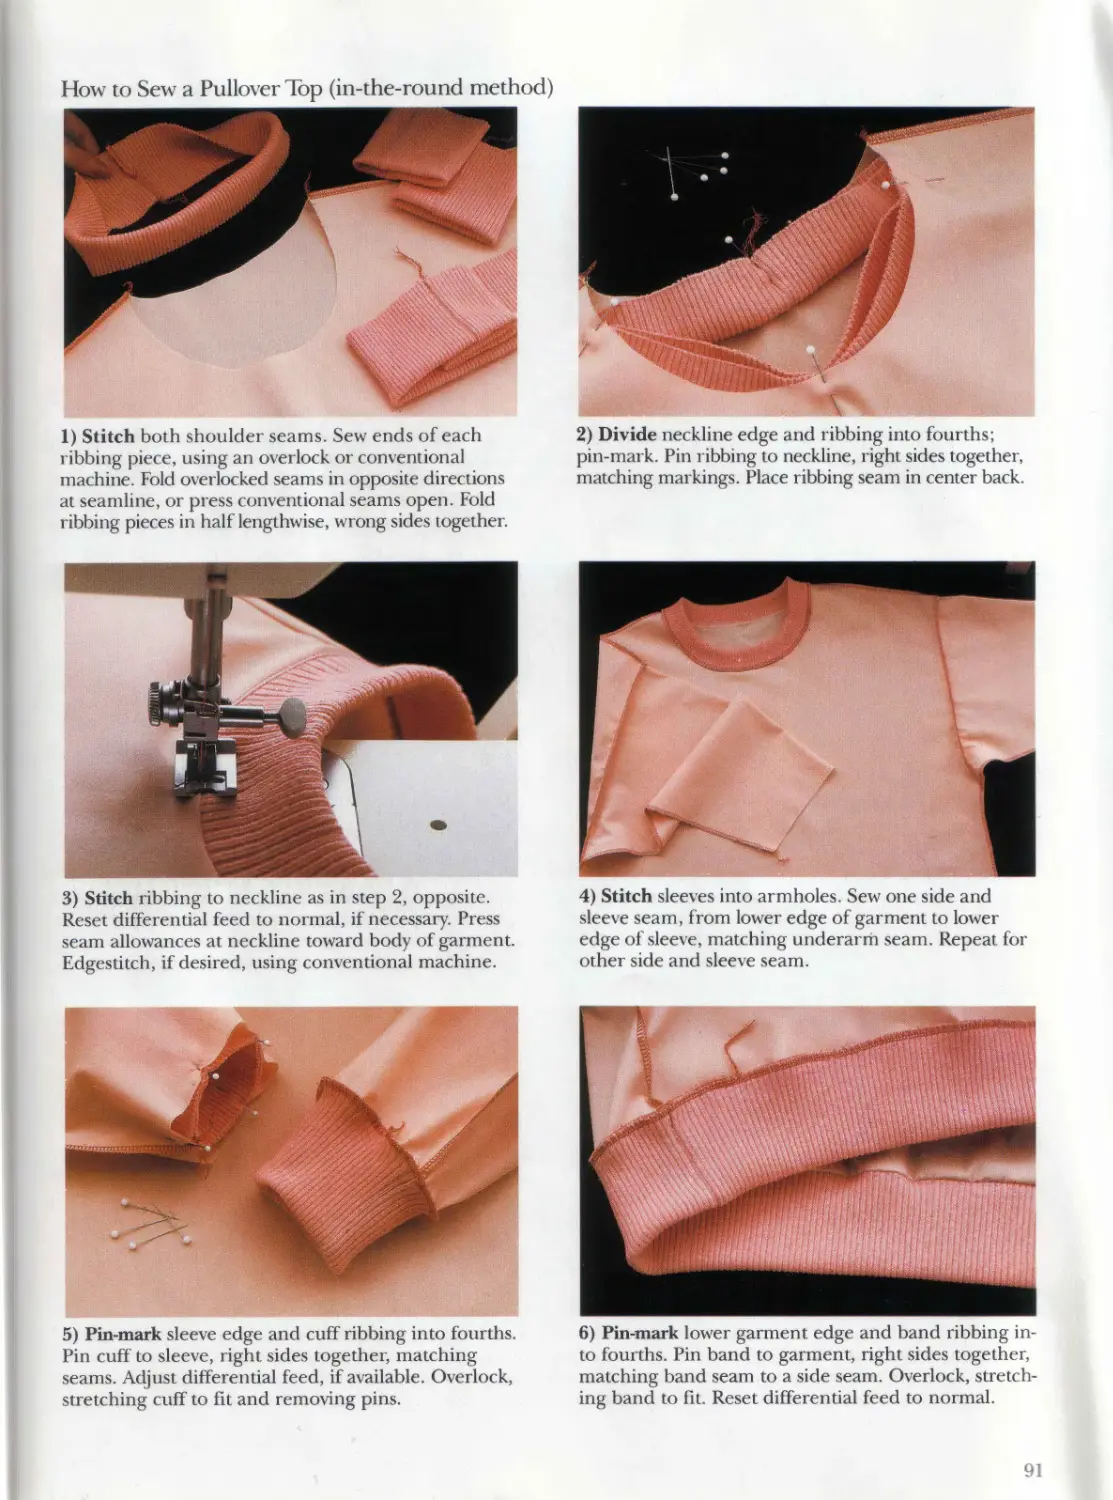
How to Use This Book
Sergers appeared on the home-sewing market in the
1970s. Since then, many different types of machines
have been introduced, including machines that use
three, four, and five threads. Differential feed is now
available on most models, and a variety of specialized
presser feet make sewing tasks easy.
Look through The New Sewing with a Serger for
inspiration and ideas. The step-by-step photographs
will help you learn up-to-date methods for serging
and how to identify stitch problems. Contrasting
thread has been used in many of the photos so the
stitches can be seen easily.
Introducing Sergers
The first section of this book, Introducing Sergers,
shows you the kinds of sewing that can be done on a
serger. You can stitch seams, trim seam allowances,
and finish seams all in one step. Learn how a serger
works, and discover the variety of stitches it can
make, from standard seams to professional hems.
If vou already own a serger, you may discover new
wavs to use it. Or, if you are considering buying one,
this section may help you decide whether serger
sewing is for you. It offers helpful tips for buying a
serger, using the accessories, selecting just the right
thread, and caring for your machine.
You will be introduced to a new vocabulary and even
learn how to arrange your sewing room to accommo-
date the extra machine.
Basic Serger Techniques
At first, you may be intimidated by this new piece of
equipment. The section, Basic Serger Techniques,
helps you through the getting-acquainted process.
You can easily learn the quick threading and
rethreading techniques and avoid the common
threading mistakes that cause stitching problems.
There are special techniques developed for trimming
awav just the right amount of fabric, for sewing seams,
hems, corners, and curves, even for removing stitches
the easy way. Practice these methods before sewing a
garment to gain confidence and skill.
Adjusting the Stitches
To achieve the best results on each fabric, adjust the
stitch length, width, and tension according to the
guidelines in the section, Adjusting the Stitches.
These pages can serve as a reference as you continue
to work with new fabrics and stitches.
This section will help you develop confidence in
adjusting the tension dials. Learn what the correct
tension looks like for each stitch type and how to
adjust your machine to achieve good stitches.
Garment Construction
A serger makes sewing more efficient than ever
before. Discover new methods for stitching collars,
hems, cuffs, plackets, waistbands, and waistlines. The
section, Garment Construction, includes step-by-step
instructions for using your serger to make pullover
tops, blouses, skirts, dresses, and activewear.
Find out how to serge special fabrics, such as silkies,
sheers, swimwear, and laces. Learn how easy it is to
sew sweaters using the sweater knit fabrics and
sweater bodies that sergers handle so beautifully.
Special Effects
Enjoy creating one-of-a-kind garments with the
special effects of decorative stitching. Learn how
to achieve custom finishes with your serger using
special threads, such as texturized nylon, rayon, silk,
metallic, and topstitching thread, and even ribbon
and yarn.
Use the troubleshooting chart when you encounter a
stitch problem. With this quick checklist, most prob-
lems can be easily solved.
7
III nil nil
llllllll II 111
"W",
i.’n
Л^'-ГЛ Л1’
Introducing Sergers
Illi
» *м-.<
таг,'.
i.Si
А’’"
1
W
В
A<
?..,b'
ПТ-1Г ’ -
V' , ’
*L.
М1МВШ
"?11
В
Ш
Ж
i,!.". in ' 7 •
U lh H IV
r,n
’ * 11111111111111111 Li 11
.7,1,4 ’HjUHioim и
.ty'v'to'l'lv’
III II III IP '^’1141
ой
I ftllllb
%’
"'".'.'Л'1'' V
>iV i'i"i7iiiiiiA А Л к
•Ы?.,il'1,il b'B •
•’’thi A'trt lie \ j
l(’’’•A'* *” A'lHi^i ji-.il-./'
Br.r I
’н'Л'У ’
Hi il.n.Ti. J
i"' |||"|||Л||'|,11|'|и‘л ‘
in . -‘1 i1- ...................
2
v..,
Л'7,'
:C:
«
'm ?!
w
та
Ml
ЯИЯЯ
.ffz
_
.'4 ' '
I II Hill
,77.' AV
1 A I.' '.’-"’I' '. 1 ,
niiii'iA A* i 1 '
'*'ii,'ia,i' iA ' „у'Жта'ж
< In in И >i i - " - ' nliiiii- |l n> it
„v "/.л'.".та ''lAc'i'u'.'h'W
/та та1 'C'"'"l'i'i'ili"i'ii
'Вта f'A"
11 - и и-ip -11 iiiiihii'iiA
.
.
таж-тата!
"i.IWi yin- ii । u l
&
та" Я
}.
I. .4. 7, 7. " ". 7, to ,7.. .
к'таЭДИ'Л "Л*
.та ' '
- '';< B'B. 5
Ai ’
i'i.. г
'S«>
aw .
- -|.'Ж
lAAViSAlZAlff
•If'
i'
. 1....Й ..,W .A
. :'::''
.pa
ЛОТ,
»
-SV.".',.
„ та .та "та
80'
'. ;. । •
,-Г таг! ii .
ж» :!1
A-1'*'*"
^нА'АЧА’A'.' .
Ж.1 '''Л71
,4’^
лАК'
'.'та ж1 ", 'itf , A'.
.i"..1”' ,|л%,а№
MBS?
fAUi
В 'ii ’шта"'"
a;.;/ - " .‘B";'
4
ж
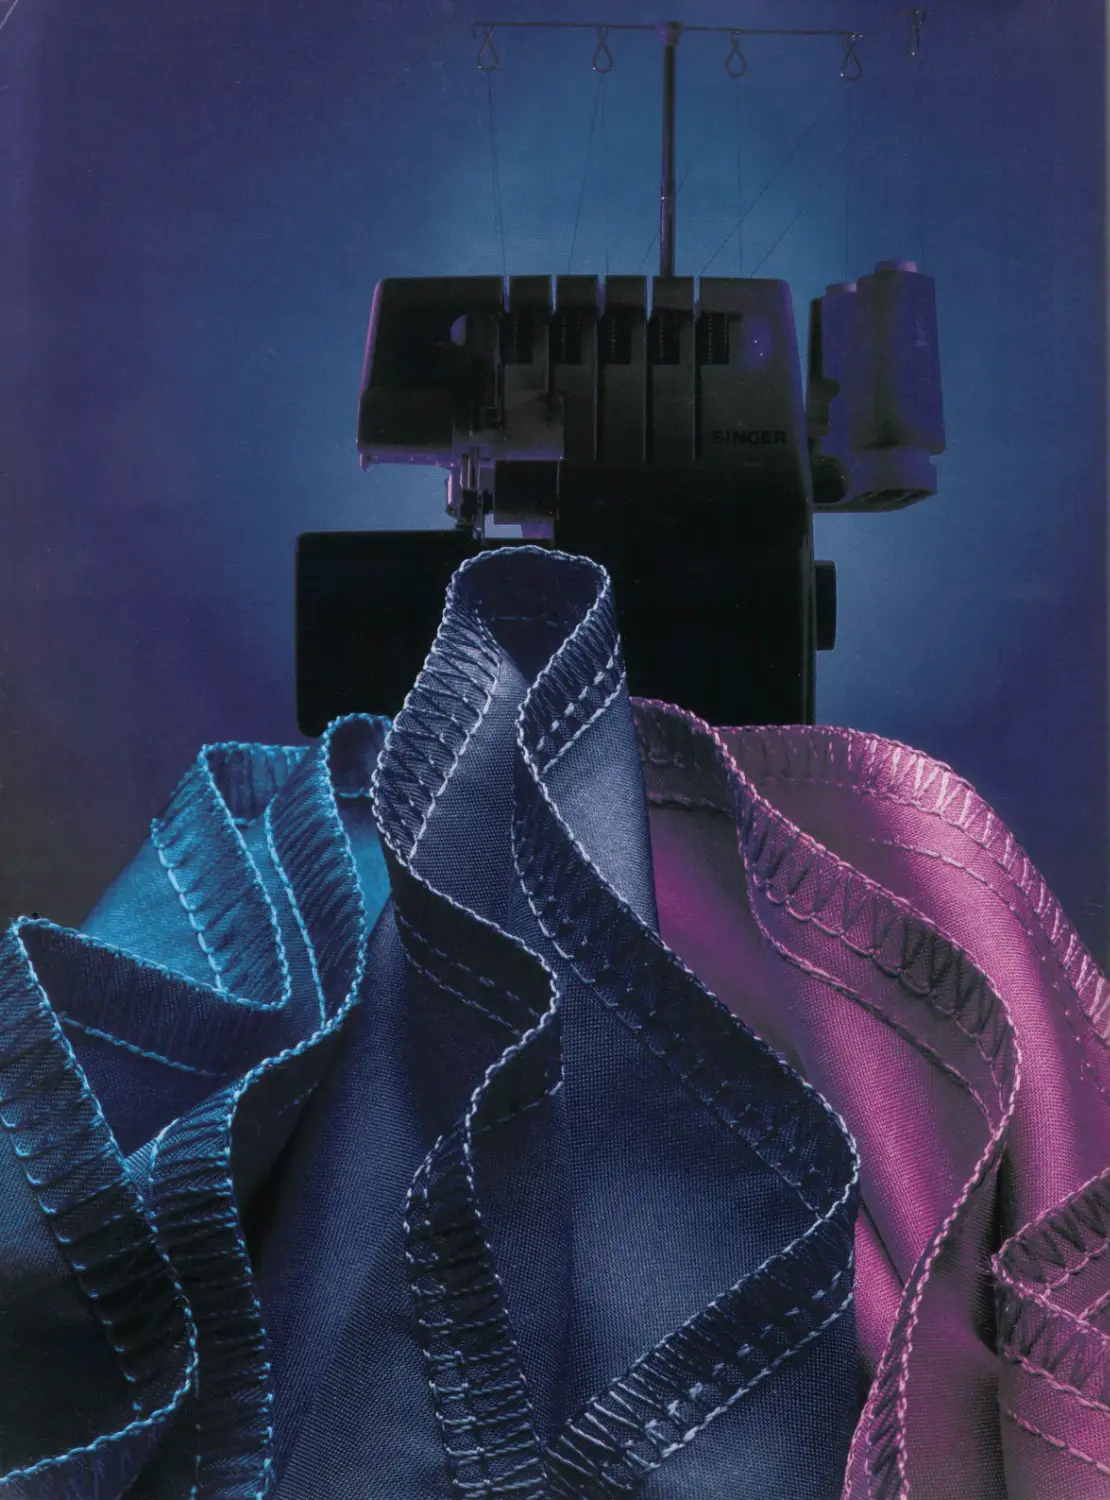
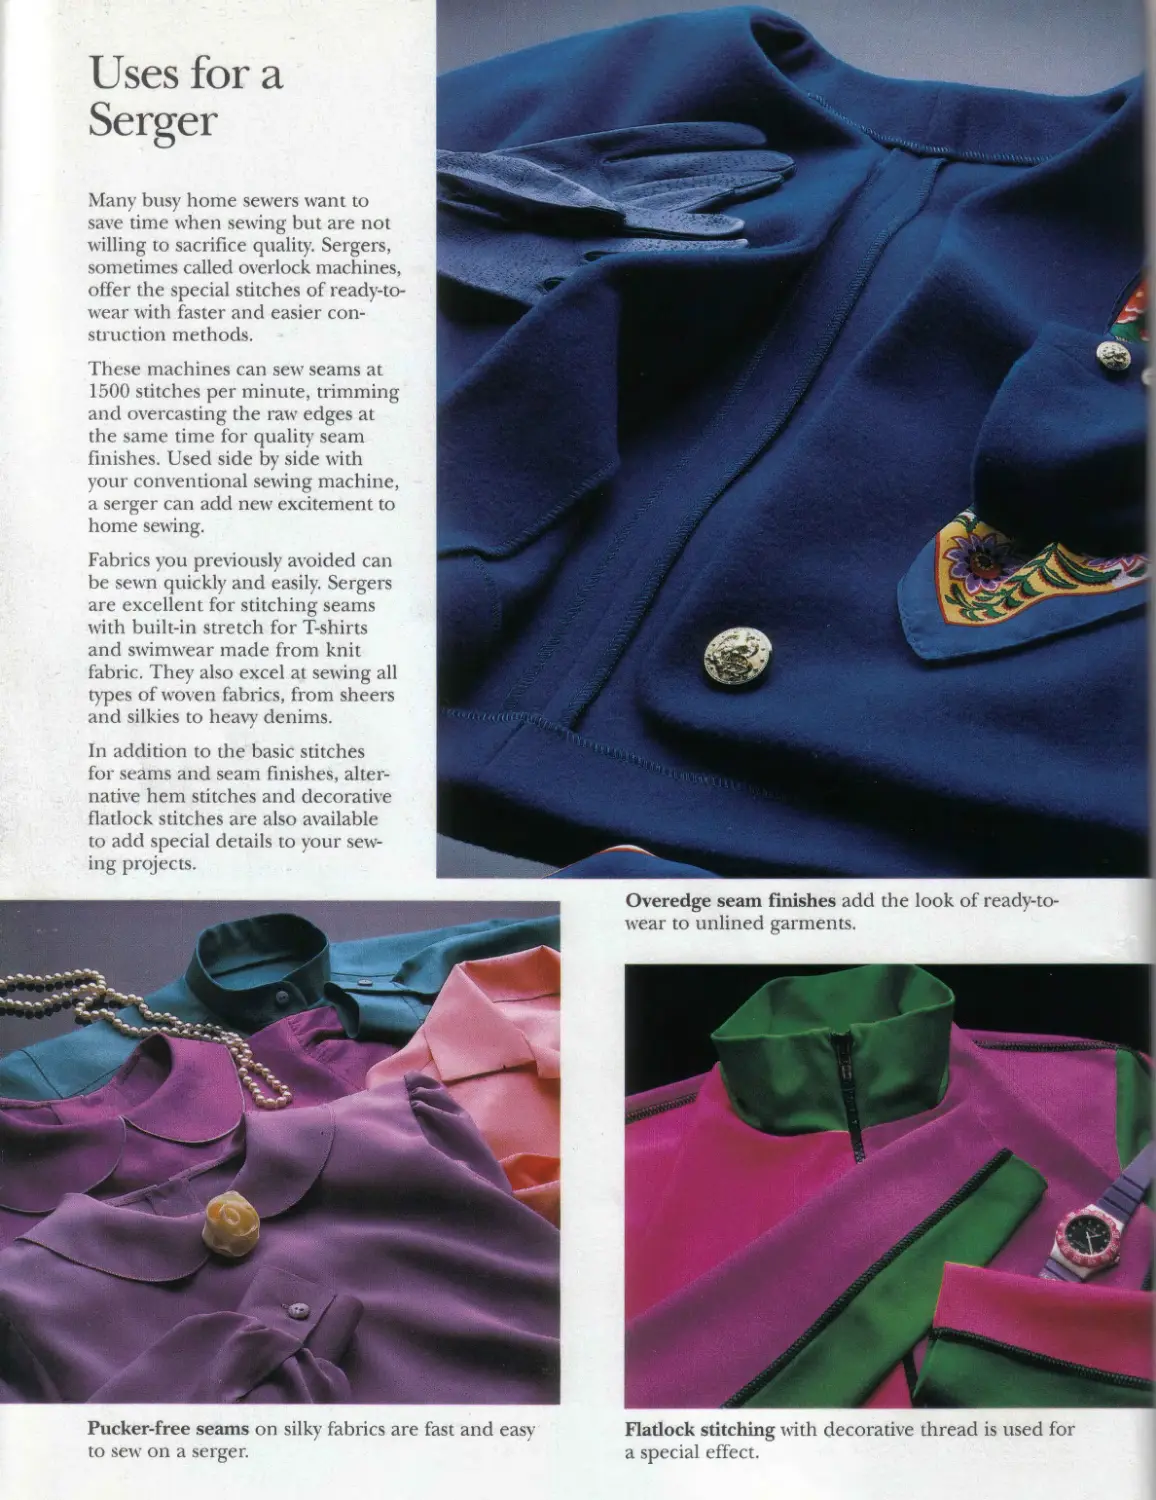
Uses for a
Serger
Many busy home sewers want to
save time when sewing but are not
willing to sacrifice quality. Sergers,
sometimes called overlock machines,
offer the special stitches of ready-to-
wear with faster and easier con-
struction methods.
' These machines can sew seams at
1500 stitches per minute, trimming
and overcasting the raw edges at
the same time for qualitv seam
finishes. Used side by side with
your conventional sewing machine,
a serger can add new excitement to
home sewing.
Fabrics you previously avoided can
be sewn quickly and easily. Sergers
are excellent for stitching seams
with built-in stretch for T-shirts
and swimwear made from knit
fabric. They also excel at sewing all
types of woven fabrics, from sheers
and silkies to heavy denims.
In addition to the basic stitches
for seams and seam finishes, alter-
native hem stitches and decorative
flatlock stitches are also available
to add special details to vour sew-
ing projects.
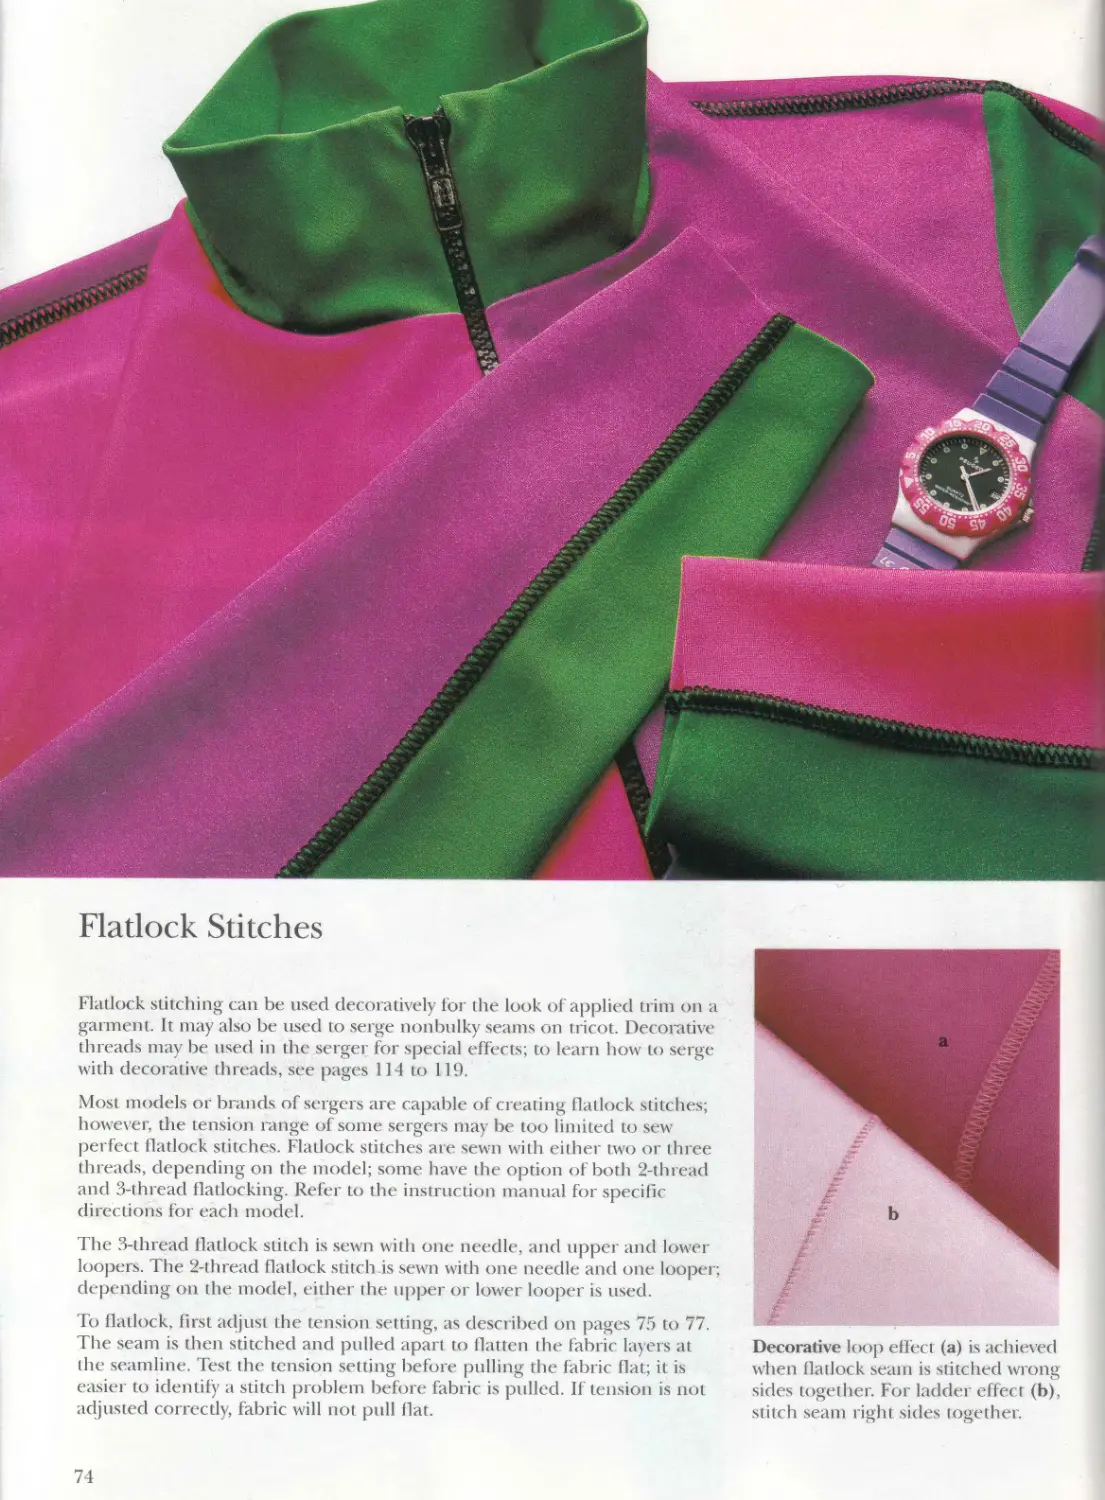
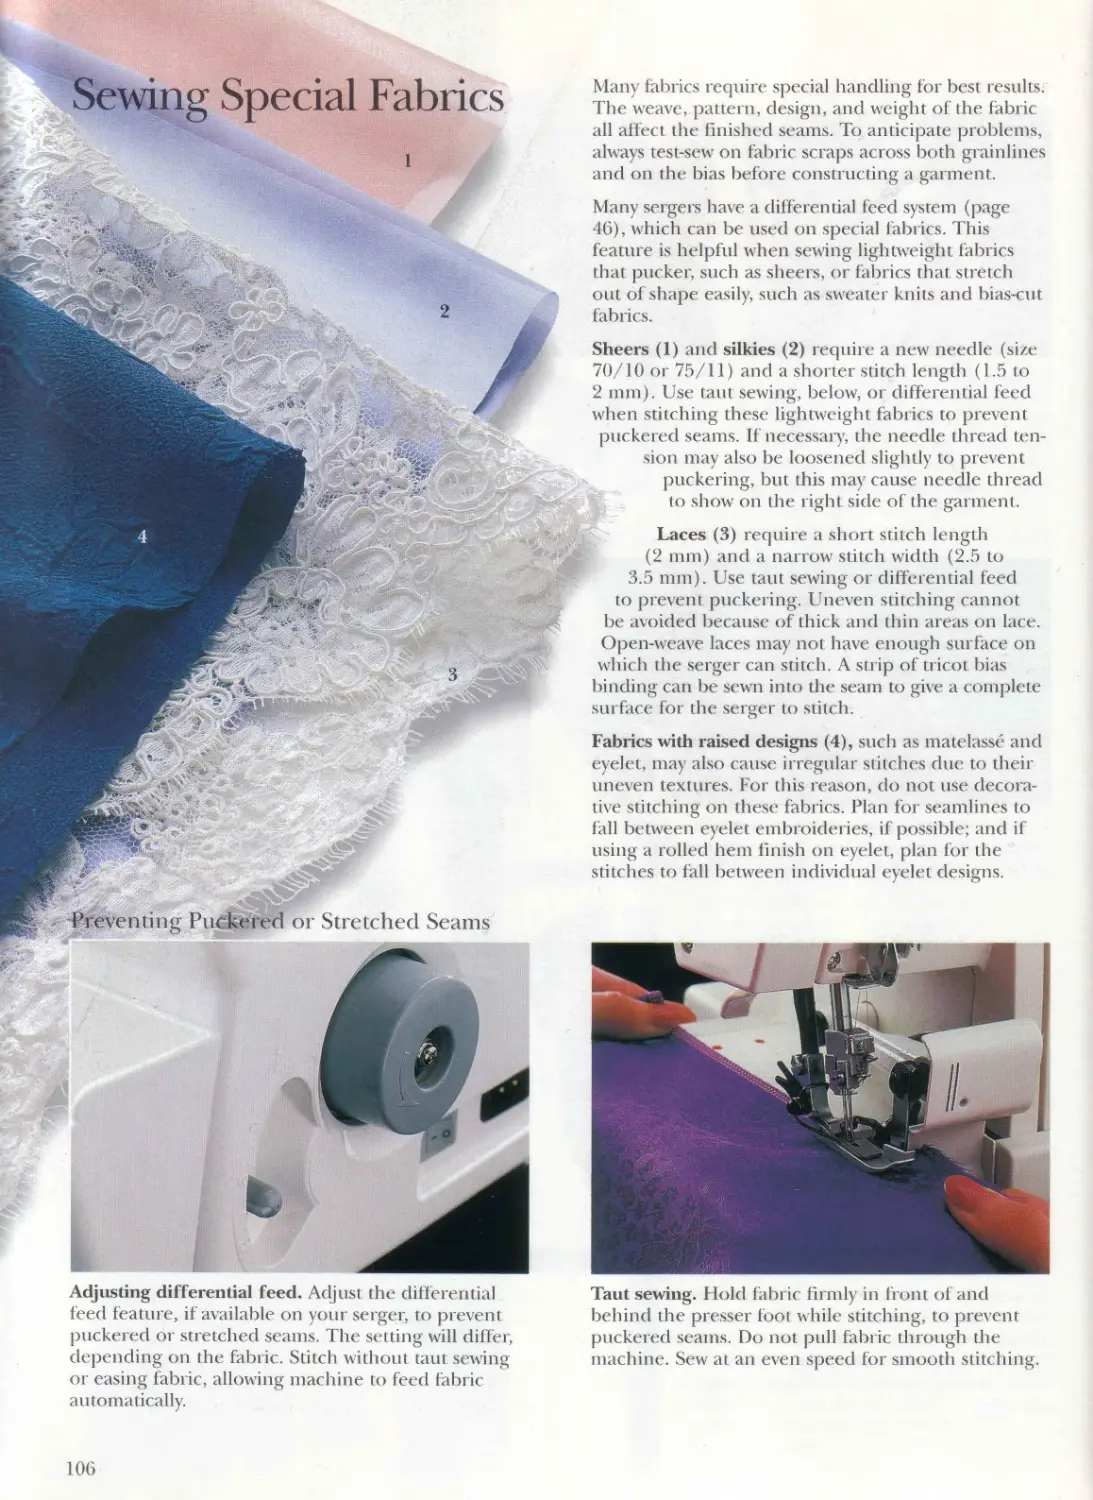
Pucker-free seams on silky fabrics are fast and easy
to sew on a serger.
Overedge seam finishes add the look of ready-to-
wear to unlined garments.
Flatlock stitching with decorative thread is used for
a special effect .
Rolled hems are narrow, neat edge finishes for
ruffles and hems.
..V
Й
Serged seams are stitched as selvages are trimmed
away. Differential feed makes gathers easy.
sewing swim-
wear from
two-way stretch
knit fabric.
Overlock
stitches that
stretch are
Sweater knit fabrics and ribbings are sewn without
fear of the fabric raveling.
11
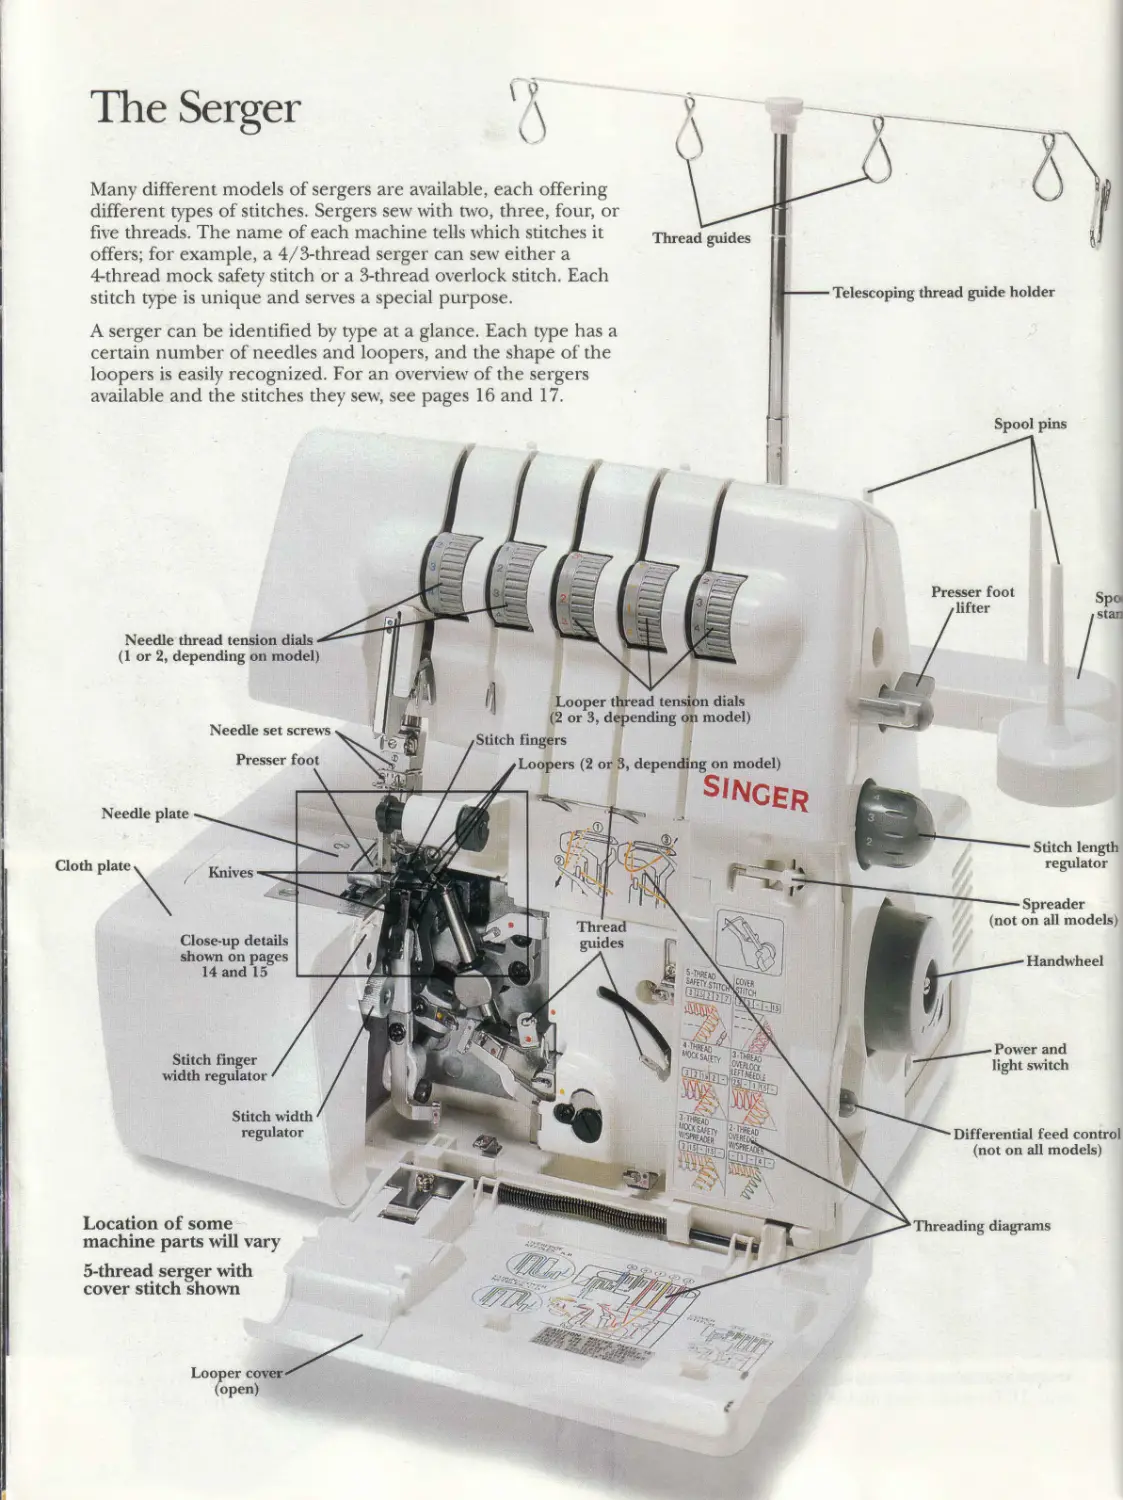
The Serger
Many different models of sergers are available, each offering
different types of stitches. Sergers sew with two, three, four, or
five threads. The name of each machine tells which stitches it
offers; for example, a 4/3-thread serger can sew either a
4-thread mock safety stitch or a 3-thread overlock stitch. Each
stitch type is unique and serves a special purpose.
A serger can be identified by type at a glance. Each type has a
certain number of needles and loopers, and the shape of the
loopers is easily recognized. For an overview of the sergers
available and the stitches they sew, see pages 16 and 17.
Needle set screws
Knives
Handwheel
War,
Threading diagrams
Stitch finger
width regulate
'vfe
'«PRE®
!-.w-
&ХГ.
Stitch length
regulator
Needle thread tension dials •
(1 or 2, depending on model)
Stitch width
regulator
Thread
guides
Power and
light switch
Differential feed control
(not on all models)
Presser foot
/ lifter
Close-up details
shown on pages
14 and 15
Looper cover
(open)
Spreader
(not on all models
Location of some
machine parts will vary
5-thread serger with
cover slitch shown
or 3, depending on model)
s'NC£r
Looper thread tension dials
(2 or 3, depending on model)
Stitch fingers
у Loopers (2
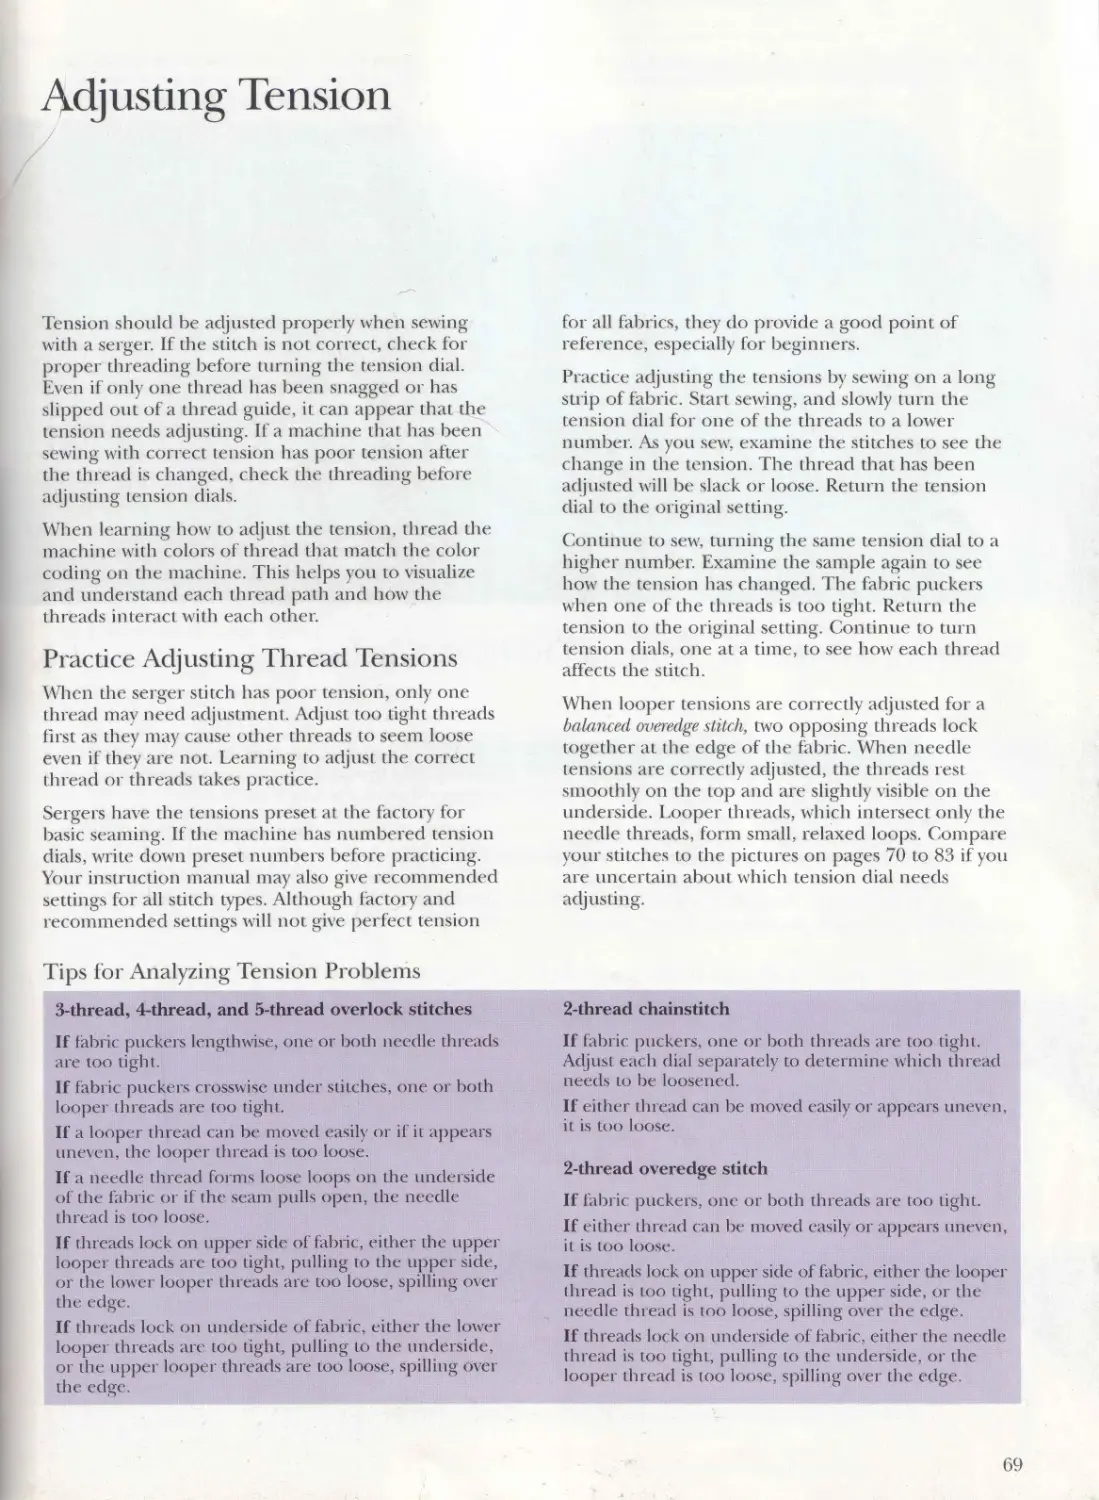
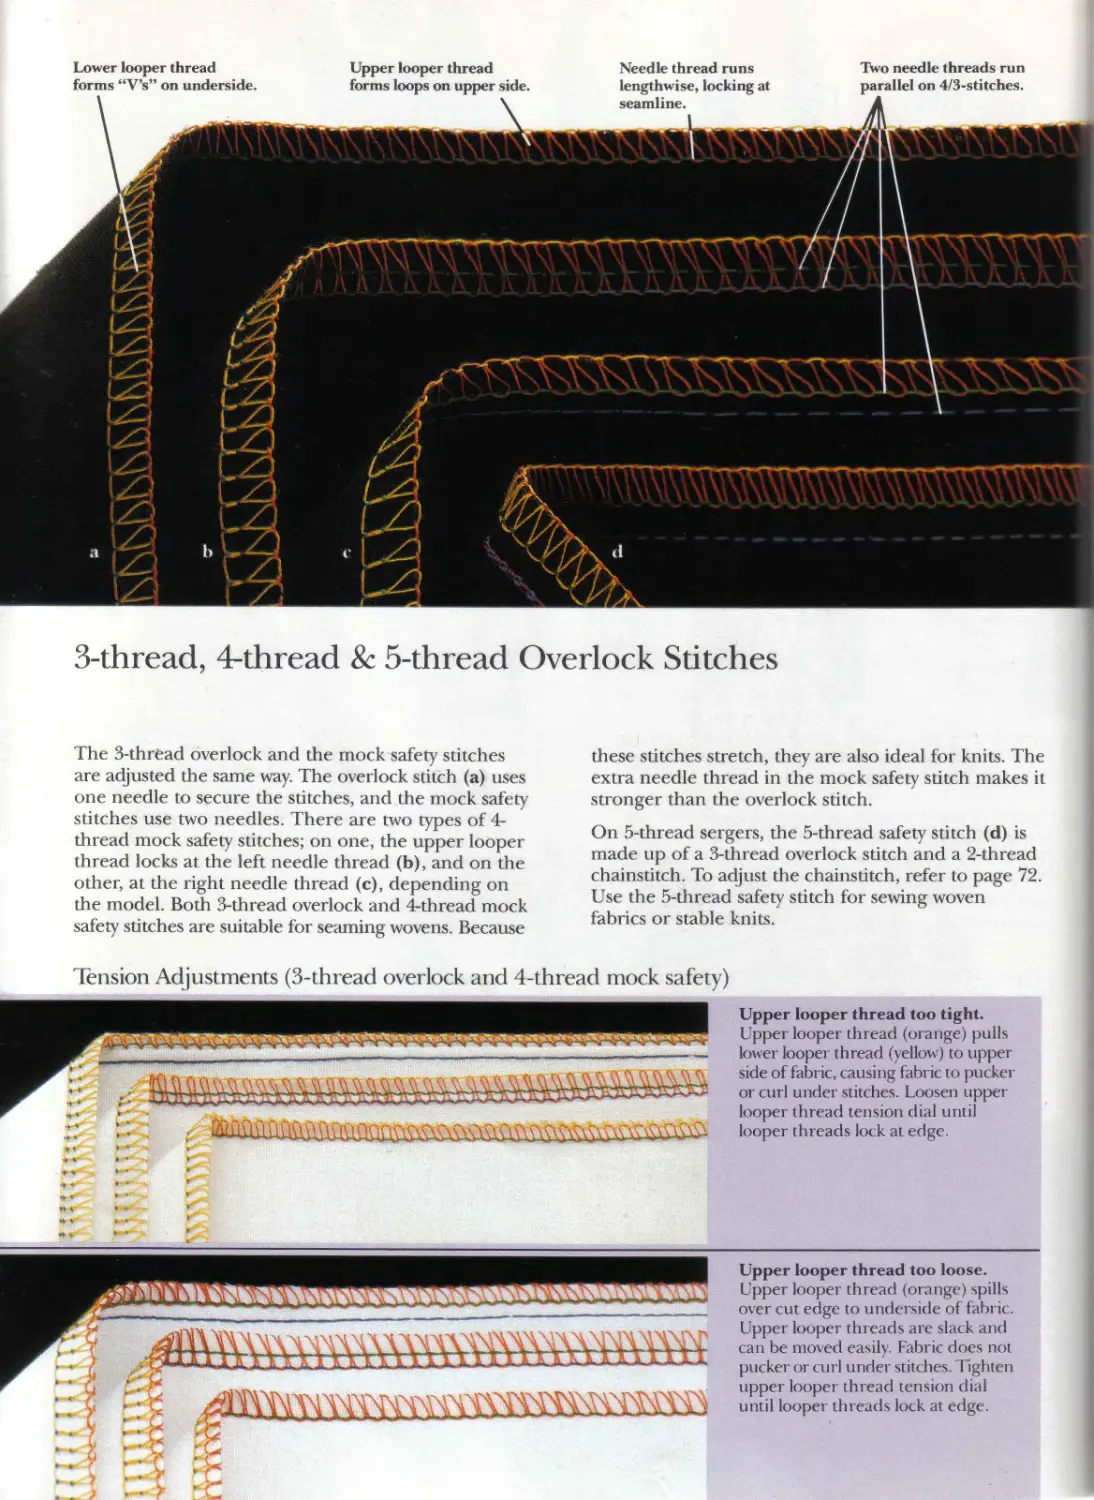
How to Identify Types of Sergers
3-thread serger has one needle and two loopers:
an upper looper (a) and a lower looper (b). It sews
a 3-thread overlock stitch; some models, called
3/2-thread sergers, convert to sew the 2-thread
overedge stitch.
4/3-thread serger has two needles and two loopers:
an upper looper (a) and a lower looper (b). It sews a
4-thread mock safety stitch similar to the 3-thread
overlock stitch; an extra needle thread secures the
stitches. It sews the 3-thread overlock stitch when only
one needle is used. A 4/3/2-thread serger also sews
the 2-thread overedge stitch.
9
4/2-thread serger has two needles and two loopers:
an upper looper (a) and a chainstitch lower looper
(b). It sews a 4-thread safety stitch consisting of a
2-thread chainstitch and a 2-thread overedge, which
are stitched simultaneously. The chainstitch and the
overedge stitch can each be used separately. This
serger will not sew a 3-thread overlock stitch.
5-thread serger has two needles and three loopers: an
upper looper (a); a lower looper (b); and a chainstitch
looper (c). It sews a 5-thread safety stitch with a 2-thread
chainstitch and a 3-thread overlock stitch. Some 5-
thread machines also sew a 4-thread safety stitch, a
2-thread overedge stitch, and a 4-thread or 3-thread
mock safety stitch. Each stitch may be used separately.
Some 5-thread sergers convert to sew the cover stitch.
13
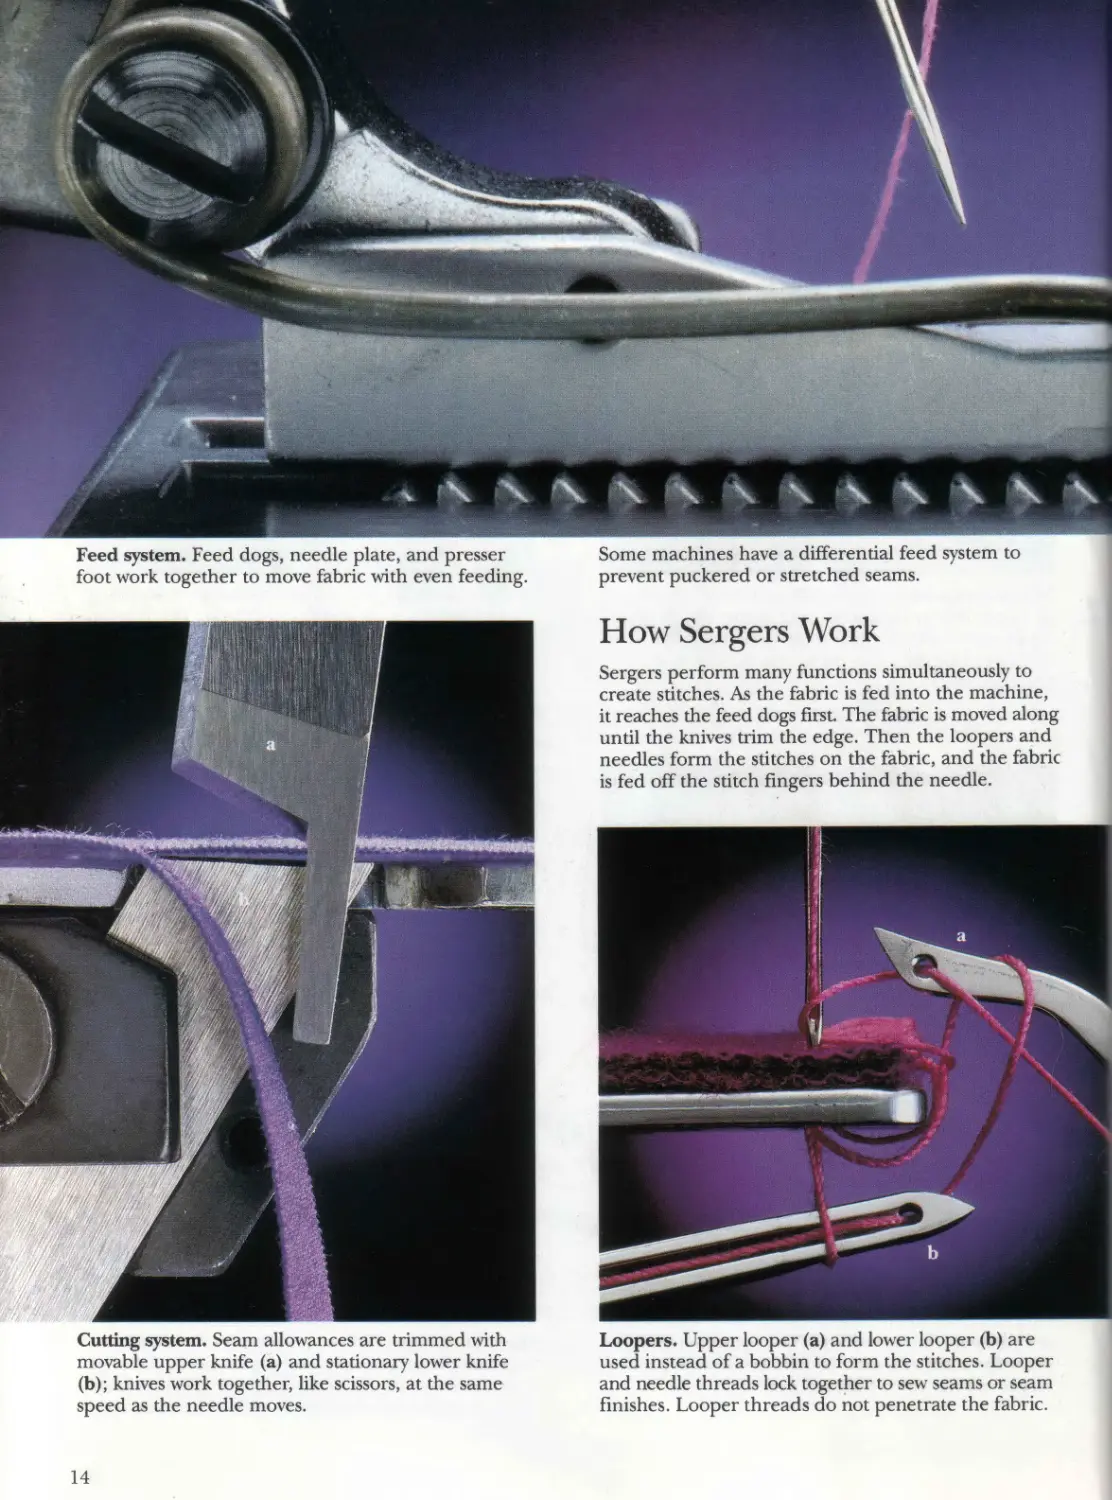
Feed system. Feed dogs, needle plate, and presser
foot work together to move fabric with even feeding.
Some machines have a differential feed system to
prevent puckered or stretched seams.
Cutting system. Seam allowances are trimmed with
movable upper knife (a) and stationary lower knife
(b); knives work together, like scissors, at the same
speed as the needle moves.
How Sergers Work
Sergers perform many functions simultaneously to
create stitches. As the fabric is fed into the machine,
it reaches the feed dogs first. The fabric is moved along
until the knives trim the edge. Then the loopers and
needles form the stitches on the fabric, and the fabric
is fed off the stitch fingers behind the needle.
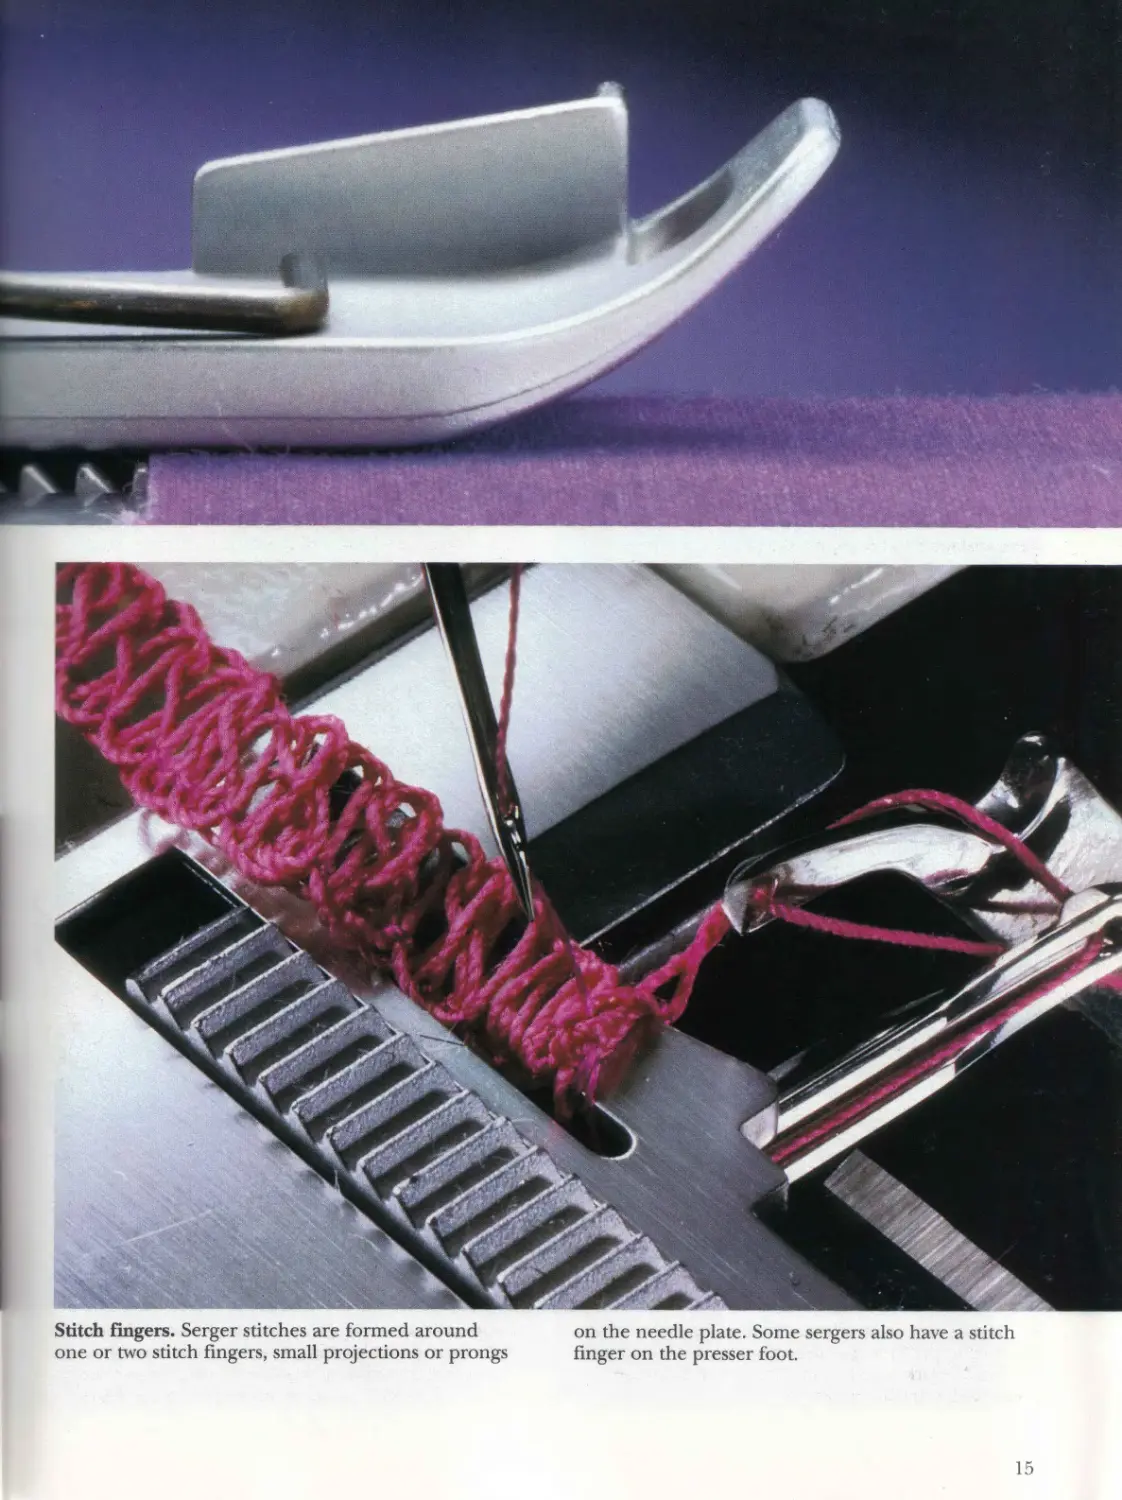
Loopers. Upper looper (a) and lower looper (b) are
used instead of a bobbin to form the stitches. Looper
and needle threads lock together to sew seams or seam
finishes. Looper threads do not penetrate the fabric.
14
Stitch fingers. Serger stitches are formed around
one or two stitch fingers, small projections or prongs
on the needle plate. Some sergers also have a stitch
finger on the presser foot.
15
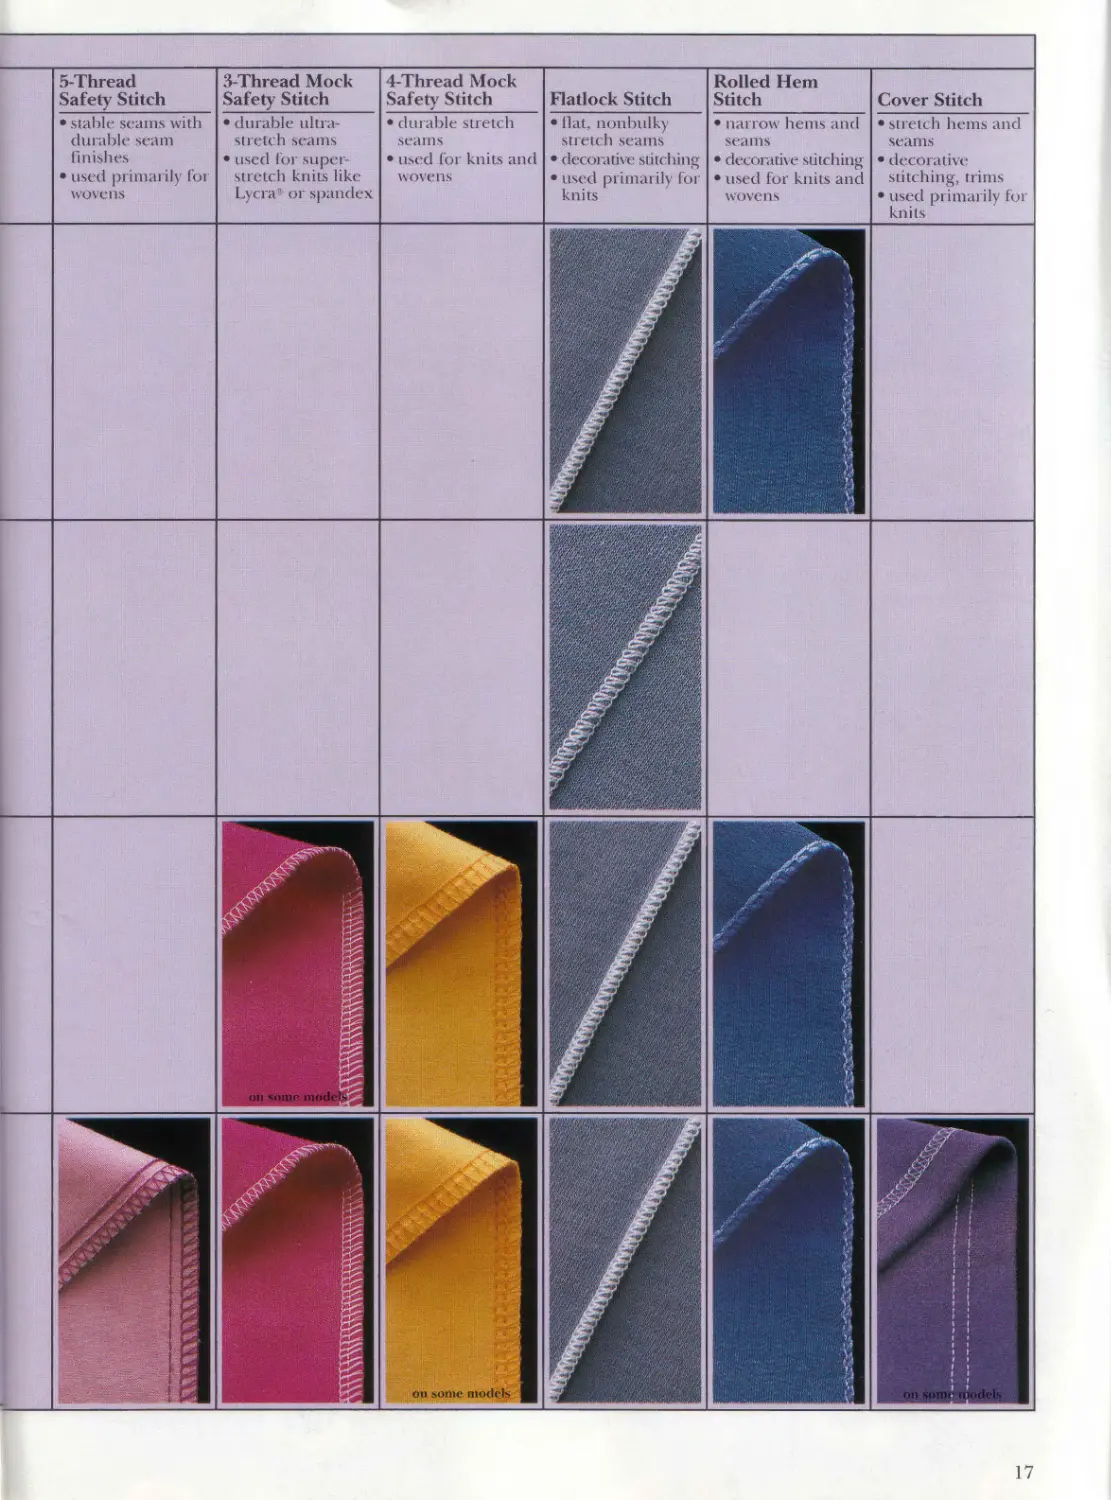
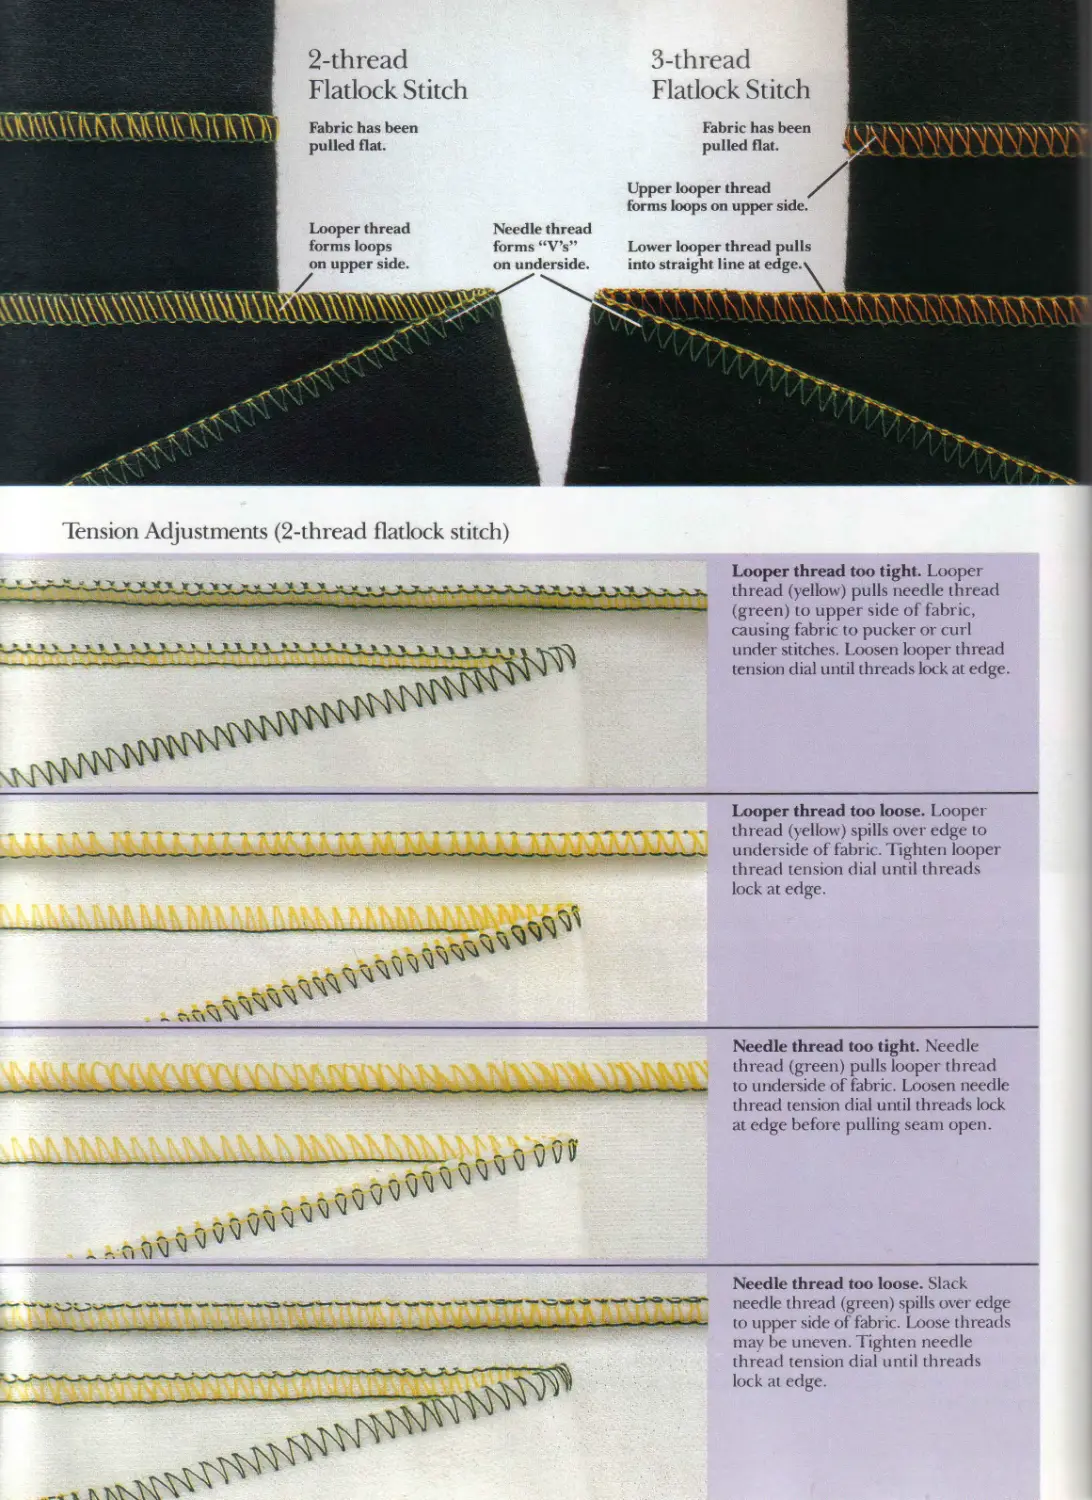
Types of Stitches
The Stitches
& Their Uses
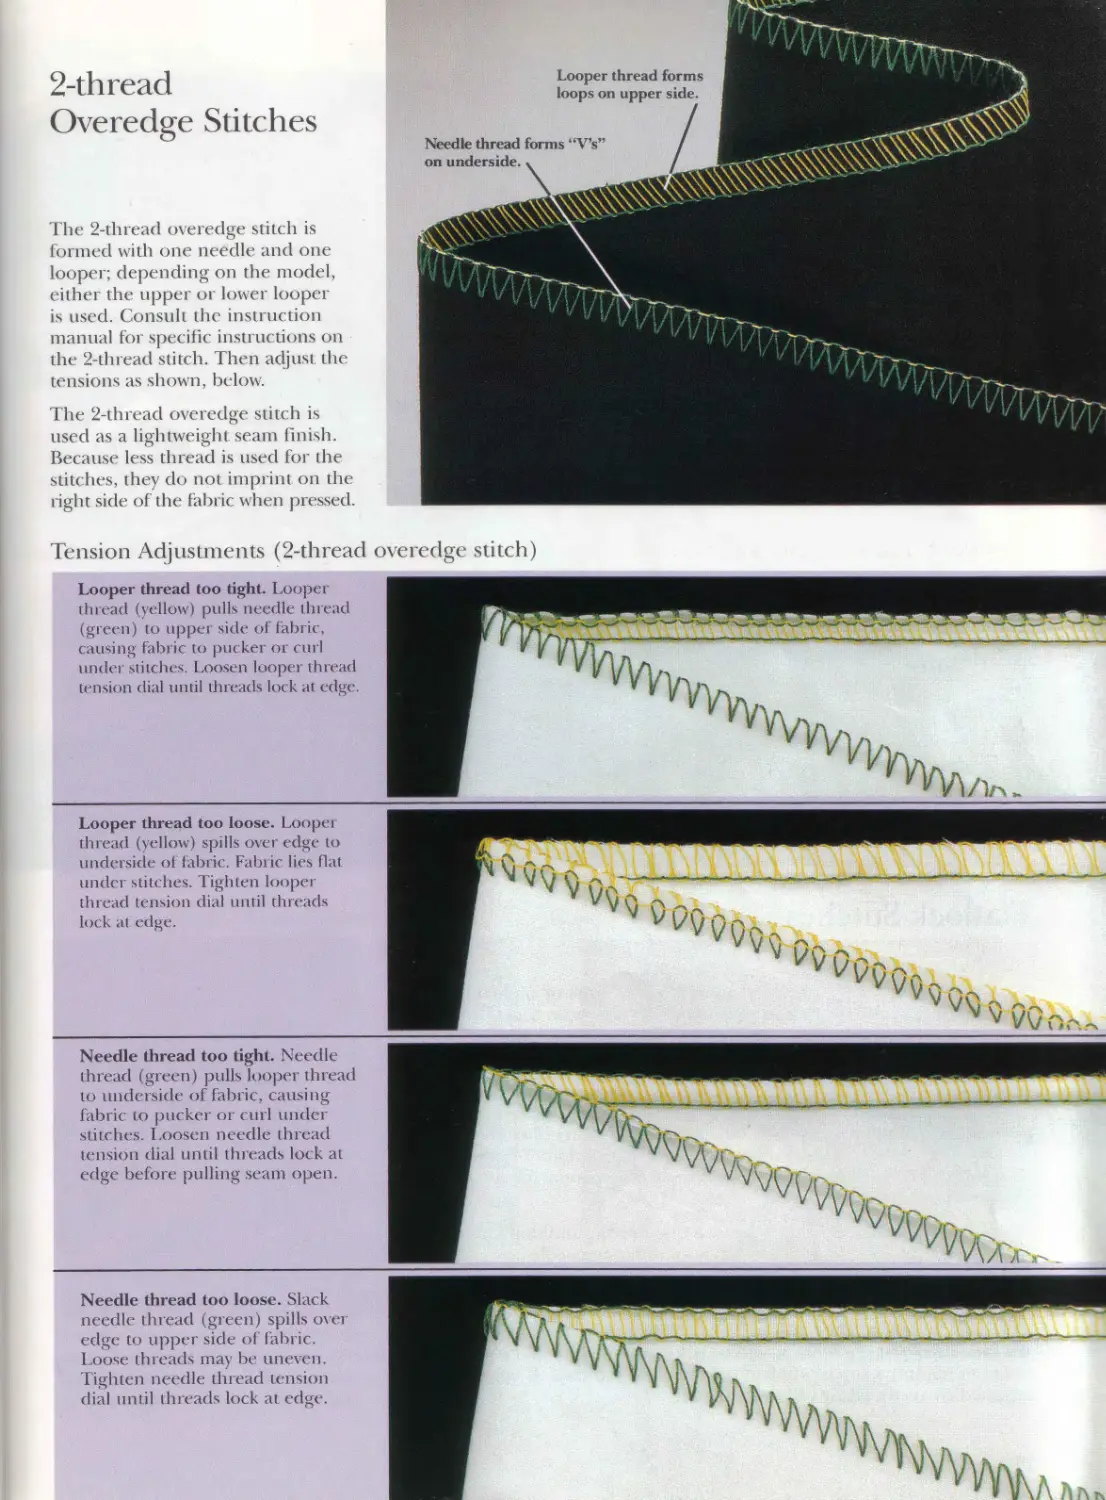
2-Thread
Overedge Stitch
• lightweight seam
finishes
• used for wovens
3-Thread
Overlock Stitch
• stretch seams
• durable seams or
seam finishes
• used for knits and
wove ns
2-Thread
Chainstitch
• stable basting stitch
• decorative
topstitching
• used primarily for
wovens
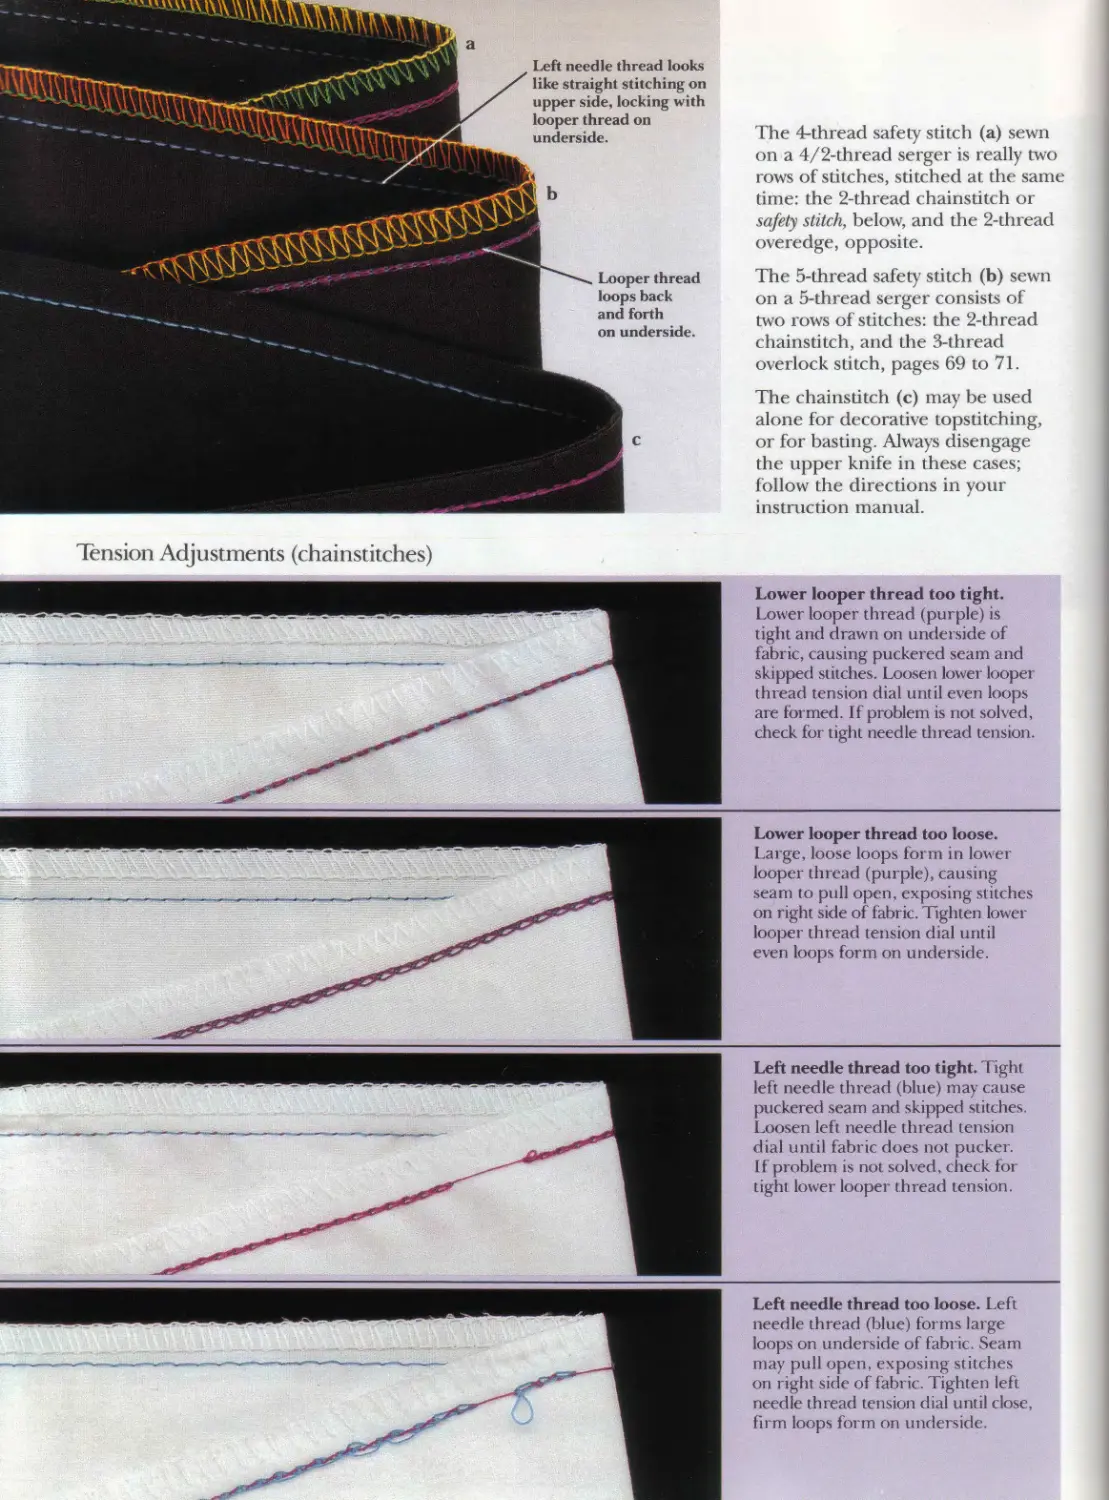
4-Thread
Safety Stitch
• stable seams with
lightweight seam
finishes
• used primarily for
wovens
Types of Sergers
2/3 or 3-Thread Serger
4/2-Thread Serger
4/3/2 or 4/3-Thread Serger
5/4/3/2-Thread Serger
16
5- Thread
Safety Stitch
• stable seams with
durable seam
finishes
• used primarily tor
wove ns
3-3 bread Mock
Safety Stitch
• durable ultra-
stretch seams
• used for super-
stretch knits like
Lycra® or spandex
4-Thread Mock
Safetv Stitch
• durable stretch
seams
• used for knits and
wove ns
Flatlock Stitch
• flat nonbulk)
stretch seams
• decoratixe stitching
• used primarily for
knits
Rolled Hem
Stitch
• narrow hems and
seams
• decorative stitching
• used for knits and
xvovens
(-over Stitch
• stretch hems and
seams
* decoiatixe
stitching, trims
• used primarily for
knits
17
Buying a Serger
When shopping for a serger, keep in mind the same
basic questions you would ask if buving a conven-
tional sewing machine. Shop with an assortment of
woven and knit fabric scraps of various weights. Tell
the dealer what type of sewing you plan to do and
which fabrics you usually use. Test several models
and note how the machines handle the fabrics.
Sergers appear very different from conventional
machines, and you may feel more comfortable if
someone is willing to guide you through the learning
process. Learn how to thread the machine from start
to finish, and turn the tension dials at random to see
how easily you can restore the perfect stitch. Ask the
dealer to explain the stitch width and length controls,
because they do vary from model to model-
Various special features are available on sergers. Have
all features, such as differential feed, rolled hem. and
cover stitch, explained and demonstrated; learn what
adjustments are required for changing bom one to
another. Compare features from model to model to be
sure that the machine you purchase will meet your needs.
Some features may be more important to you than
others, depending on the type of sewing you want to
do. For example, diffeiential feed, available on many
models, speeds your sewing if you frequently gather
fabric, and it is helpful for preventing puckered seams
on silky fabrics or stretched seams on sweater knits.
J
You will find it easier to ask pertinent questions and
to understand the dealer demonstrations if you are
familiar with howT sergers work. Read about the dif-
ferent types of machines and the stitches they sew
(pages 12 to 17) before you shop. Also check the
chart, below; to become familiar with the vocabulary
used to define the parts of the machine and its
various stitches.
Your satisfaction with your serger will depend, to a
great extent, on your dealer. It is important to pur-
chase a serger from a dealer you like and trust, since
you are also buying the service and experience of
that dealer. Lind out if lessons are available; ask
questions during the lessons to be sure everything is
clear. Find out who does the repair service.
The Vocabulary
Balanced stitch. A stitch that is adjusted so threads lock
together at the edge ot the fabric.
Bite. Another name for stitch width.
Chainstitch. A stitch sewn on a 4/2-thread or 5-thi ead
machine that interlocks the leit needle thread with the
chain looper thread. This stitch does not overlock the
fabric edge.
Converter. Another name for a spreader.
Cover stitch. A specially stitch that does not trim or
overedge; the upper knife is disengaged and two
needle threads create parallel rows of stitching secured
by a lower looper thread.
Differential feed. A feature available on many models
that prevents puckered or stretched seams and is used
to gather fabrics.
Flatlock stitch. A special decorative stitch that allows
the fabric to be pulled Hat. It show's a looped thread on
one side of the fabric and ladder stitches on the other
side.
Knives. I’he two blades of a serger that trim or cut the
fabric list before the stitches are formed.
Ladder stitches. The short parallel sntch f ormal ion
seen on the underside ol a llatlock stitch.
Loopers. Parts of a serger that deliver thre ads to iiuer-
locl with needle threads. Loopers do not pierce the
fabric; the upper looper thread sits on the top side of
the fabric and the lower looper thiead sits on the
underside.
Mock safety stitch. Commonly, the 4-th read ultra-
stretch stitch sewn on a 4/3 2-thread serger; a 3-th read
mod safety stitch is also available on some models.
The 3-thrcad stitch will stretch farther than the 4-
thread sntch.
Overcast stitch. Another name for over edge stitch.
Overedge stitch. A stitch that finishes the edge of the
fabric to prevent raveling but is not used lor seaming.
Overlock machine. Another name for a serger.
Overlock stitch. A stitch that locks together at the edge
of the seam allowance, finishing die edges as well as
sewing the seam.
Rolled hem stitch. A stitch that tolls under the edge of
the fabric and covers it with thread.
Safety stitch. Anoihcr name for chainstitch.
Serger. A sewing machine that simultaneously stitches,
trims, and finishes seams.
Spreader. A Jeanne of some serger models that blocks
me eve of the upper looper during the formation ot
reduced-thn ad strcches. The lower looper thread is
forced to serve as the* tipper looper thread; two-thread
versions of stitches that tisualJ) require three or lour
threads reduce bulk and improve stretchabilitv.
Stitch finger, he metal prong or prongs on the needle
plate or presser oot. Stitches form around the stitch
finger and the fabric edge at die same time.
Completed stitch is fed off the back of the finger.
Stitch length. 1 he distance in millimeters between
needle penetrations.
Stitch width. The distance in millimeters be’ween
needle thread and the trimmed edge of ihe faliric.
Tail chain. Stitches, formed ove r the stitch finger, that
are locked t< gelher and left on the machine after the
seam is completed.
Tension dial. The part of the machine* that is turned to
adjust the tension of each thread.
Tension disc. An internal pressure plate in the tension
assenilih. Each disc is aduisted by turning the tension
dial, creating pressure, or tension, on the thread to
regulate stitch formation.
18
Accessories
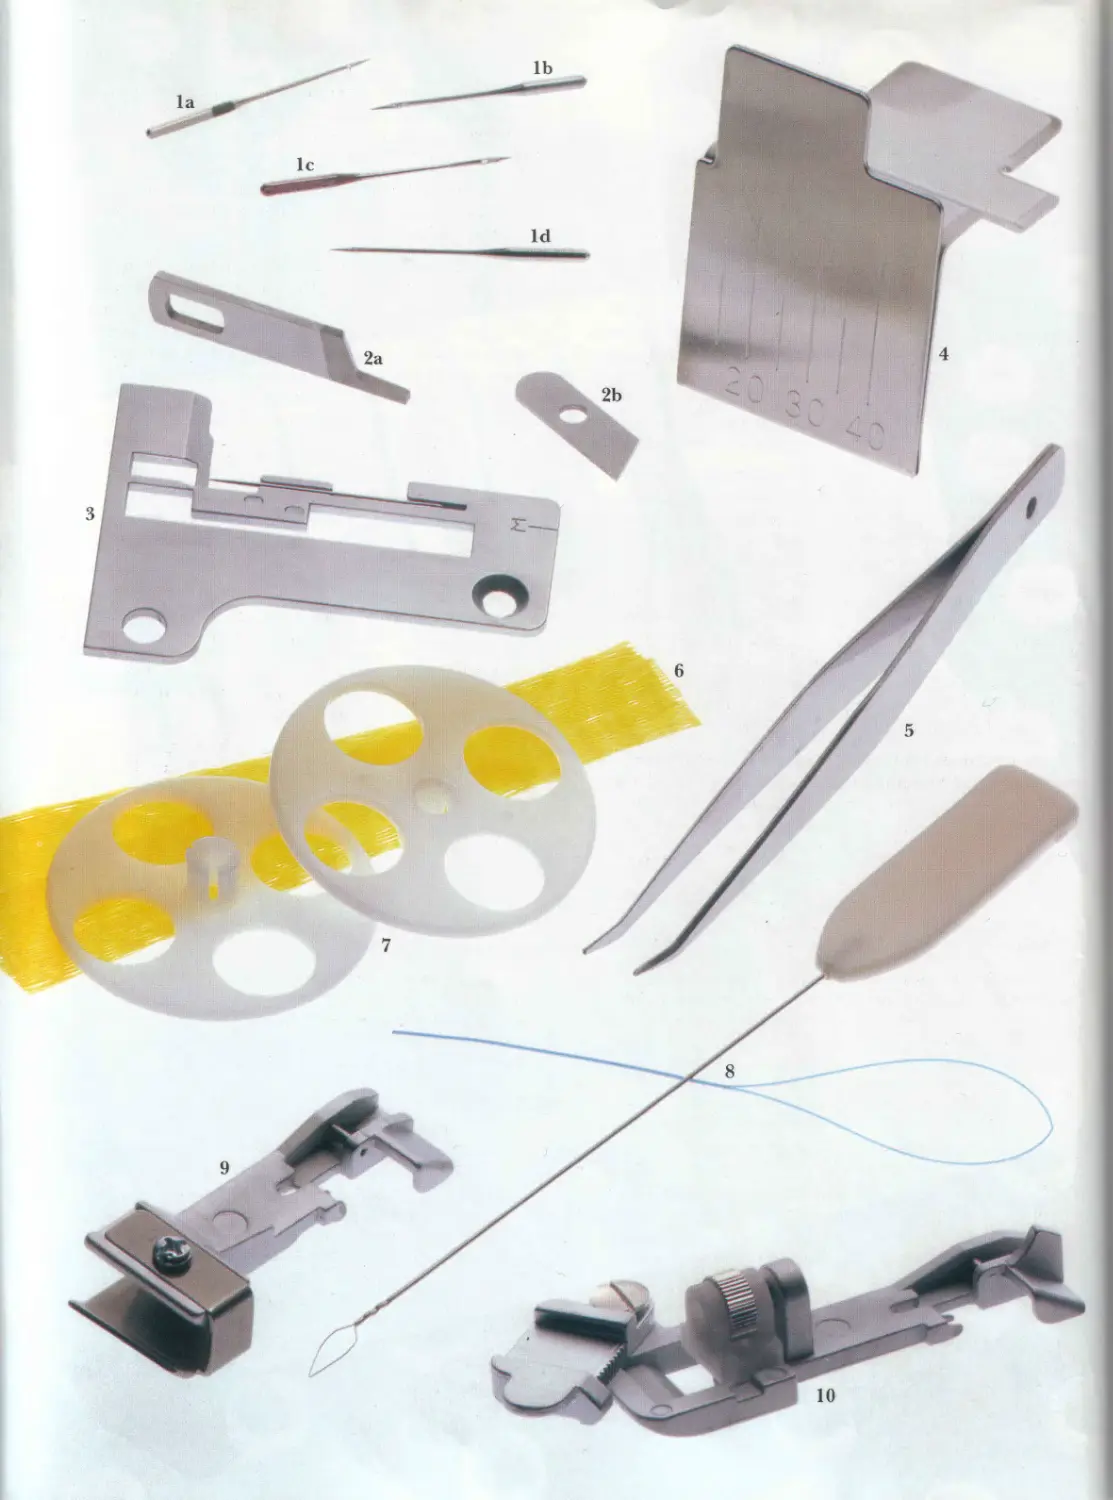
Every serger comes with an accessory kit. The
instruction manual that comes with the machine
describes the use for each tool. The accessories
supplied with a serger will vary, depending on the
model. Learning to use them correctly will make
sewing time more productive.
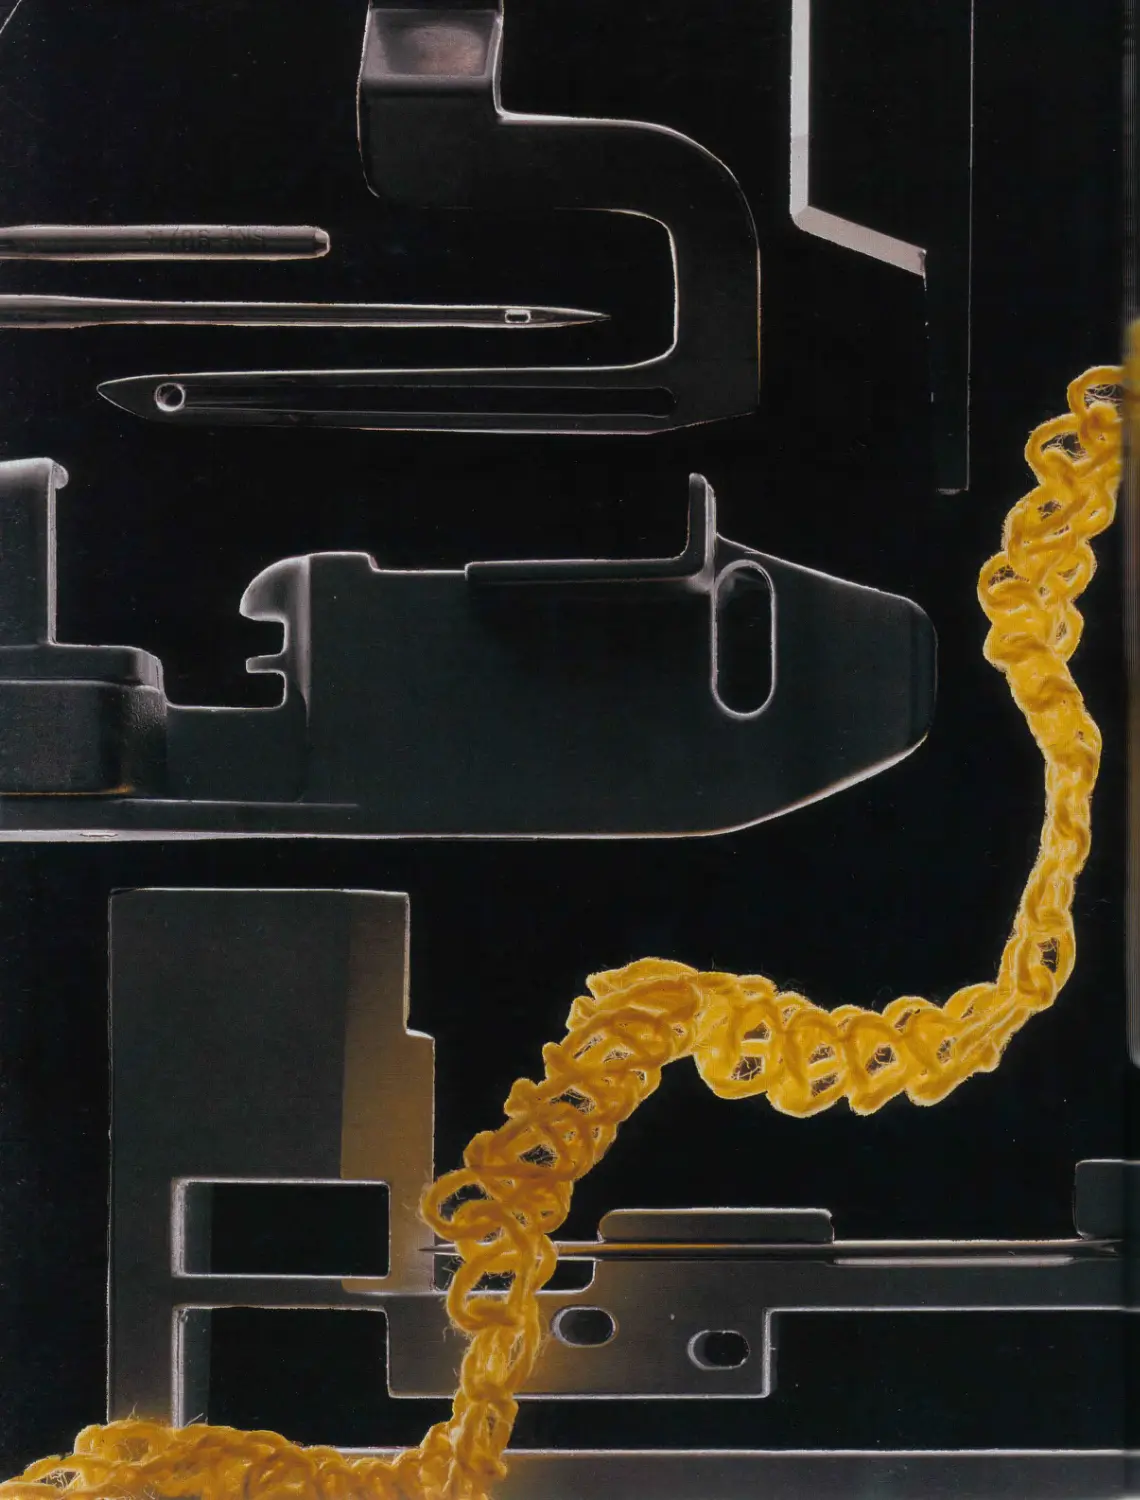
Needles vaiy from one model to another. Industrial
needles are available with flat (la) or round (lb) shank.
Conventional sewing machine needles (1c) and
special embroidery needles with a long eye (Id) can
be used in some sergers. Check the serger instruction
manual for the correct type of needle to be used in
vour machine.
Knives trim the excess seam allowances before the
seam is stitched. The upper blade (2a) is movable
and cuts against the stationary lower blade (2b) with
the same action as scissors. .
Rolled hem plate (3) is necessary when the rolled
hem stitch is not a built-in feature. Some brands may
also require the use of a rolled hem presser foot.
These attachments may or may not come with the
machine at the time of purchase. Additional rolled
hem plates with stitch fingers of different sizes may
be needed to change the stitch width.
О
Sewing guides (4) may be provided to guide fabric
evenly while hemming or decorative stitching. They
may be secured to the front of the serger or to the
presser foot.
Tweezers (5) are helpful for threading a serger and
are useful in areas with limited space for fingers.
Hold the end of the thread with the tweezers while
guiding it through the eye ol a looper or needle.
Tweezers are available in several styles.
Nets (6) prevent specialty threads from tangling or
slipping off the spools. Use them with rayon, metallic,
and parallel-wound monofilament nylon thread.
Spool caps (7) are placed directly over conventional
thread spools to provide even feeding of the thread.
To prevent thread snags and possible thread
breakage, place die spool rim notch on the bottom.
Looper threaders (8) may be used to thread the
lower looper. They are also useful for threading the
eye of a needle.
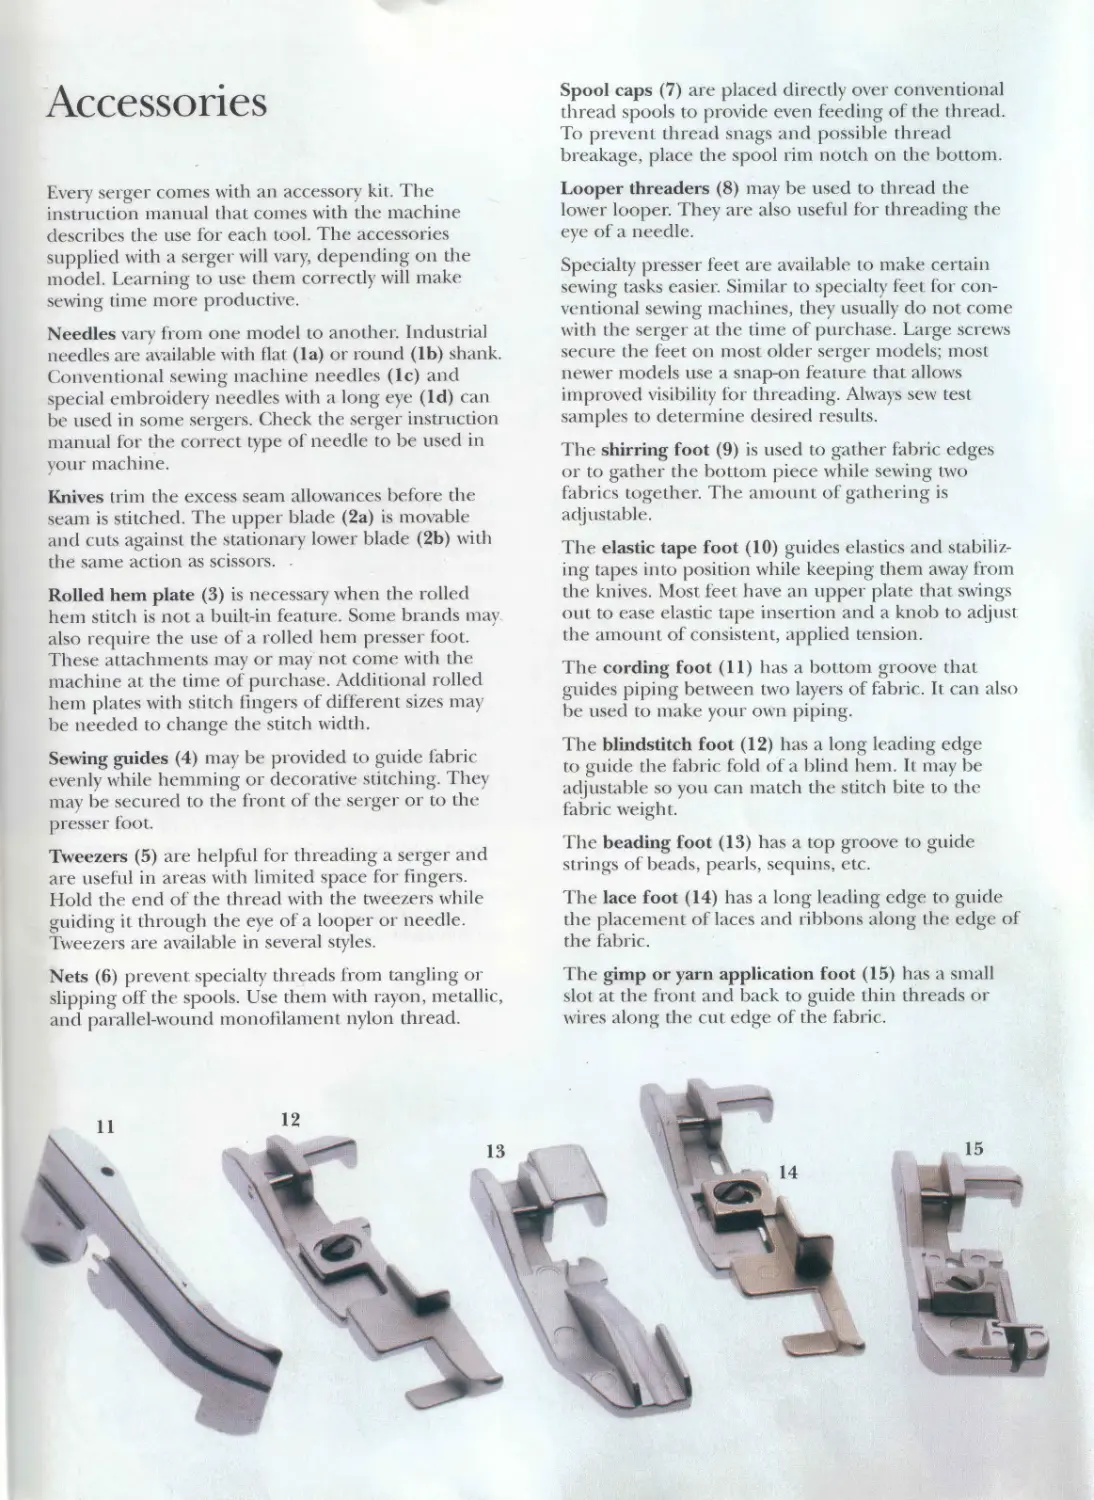
Specialty presser feet are available to make certain
sewing tasks easier. Similar to specialty feet for con-
ventional sewing machines, they usually do not come
with the serger at the time of purchase. Large screws
secure the feet on most older serger models; most
newer models use a snap-on feature that allows
improved visibility for threading. Always sew test
samples to determine desired results.
he shirring foot (9) is used to gather fabric edges
or to gather the bottom piece while sewing two
fabrics together. The amount of gathering is
adjustable.
The elastic tape foot (10) guides elastics and stabiliz-
ing tapes into position while keeping them away from
the knives. Most feet have an upper plate that swings
out to ease elastic tape insertion and a knob to adjust
the amount of consistent, applied tension.
The cording foot (11) has a bottom groove that
guides piping between two layers of fabric. It can also
be used to make your own piping.
The blindstitch foot (12) has a long leading edge
to guide the fabric fold of a blind hem. It may be
adjustable so you can match the stitch bite to the
fabric weight.
The beading foot (13) has a top groove to guide
strings of beads, pearls, sequins, etc.
The lace foot (14) has a long leading edge to guide
the placement of laces and ribbons along the edge of
the fabric.
Lhe gimp or yarn application foot (15) has a small
slot at the front and back to guide thin threads or
wires along the cut edge of the fabric.
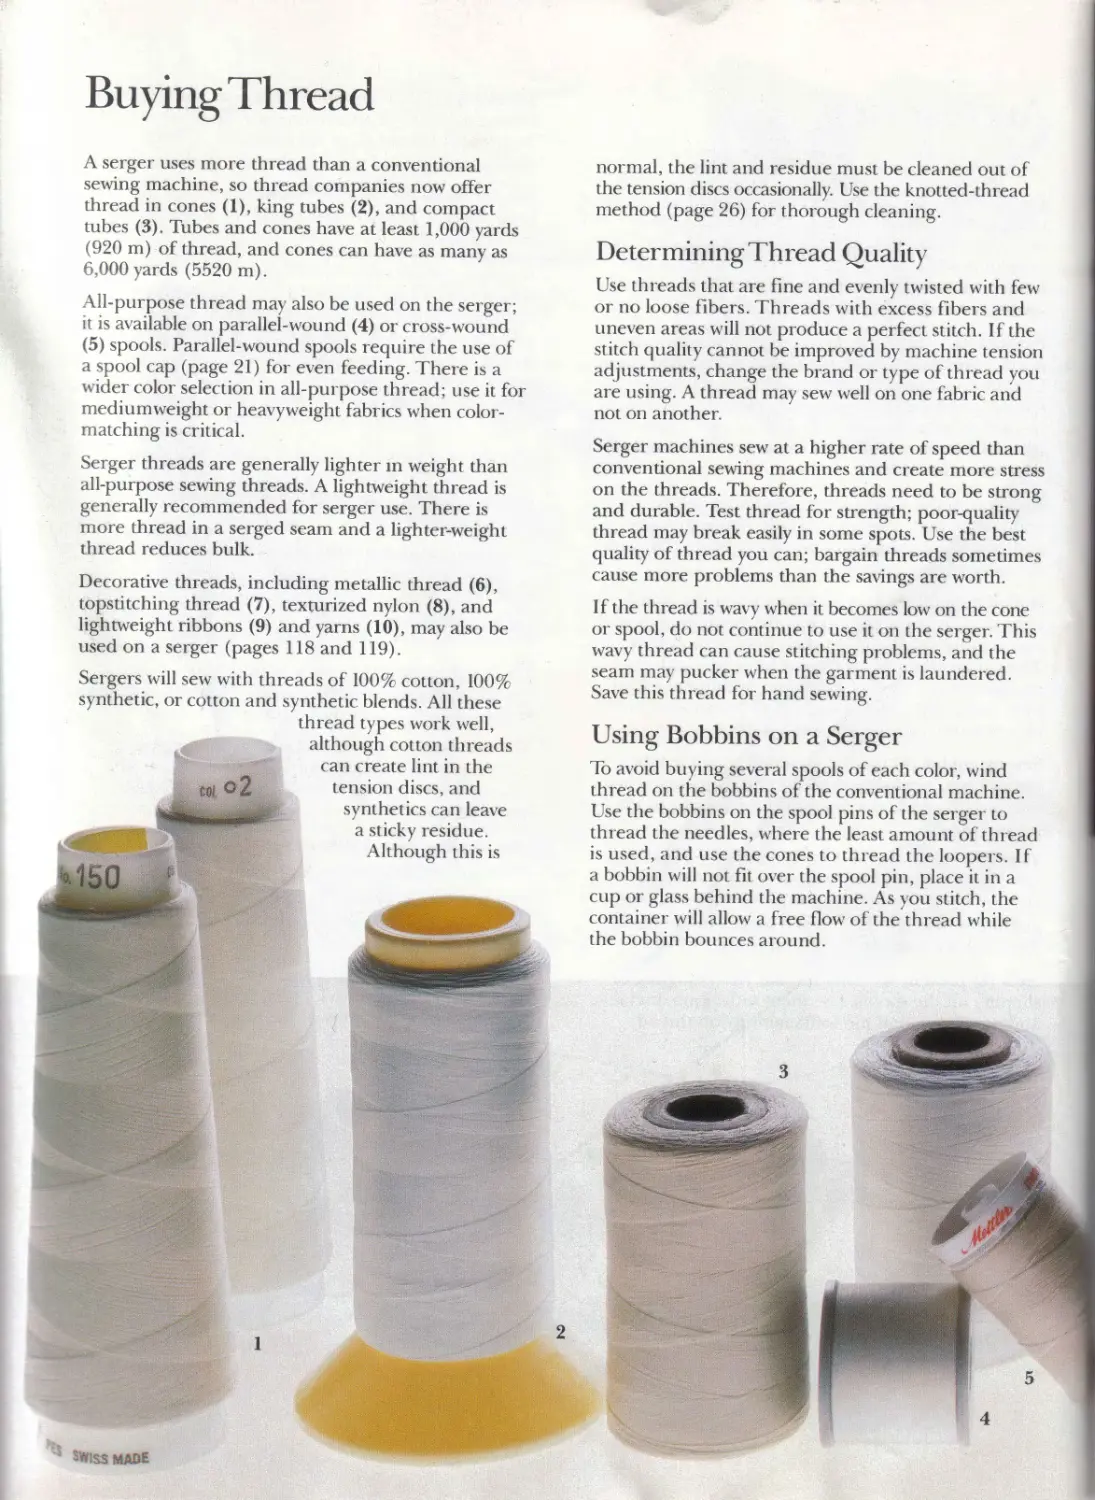
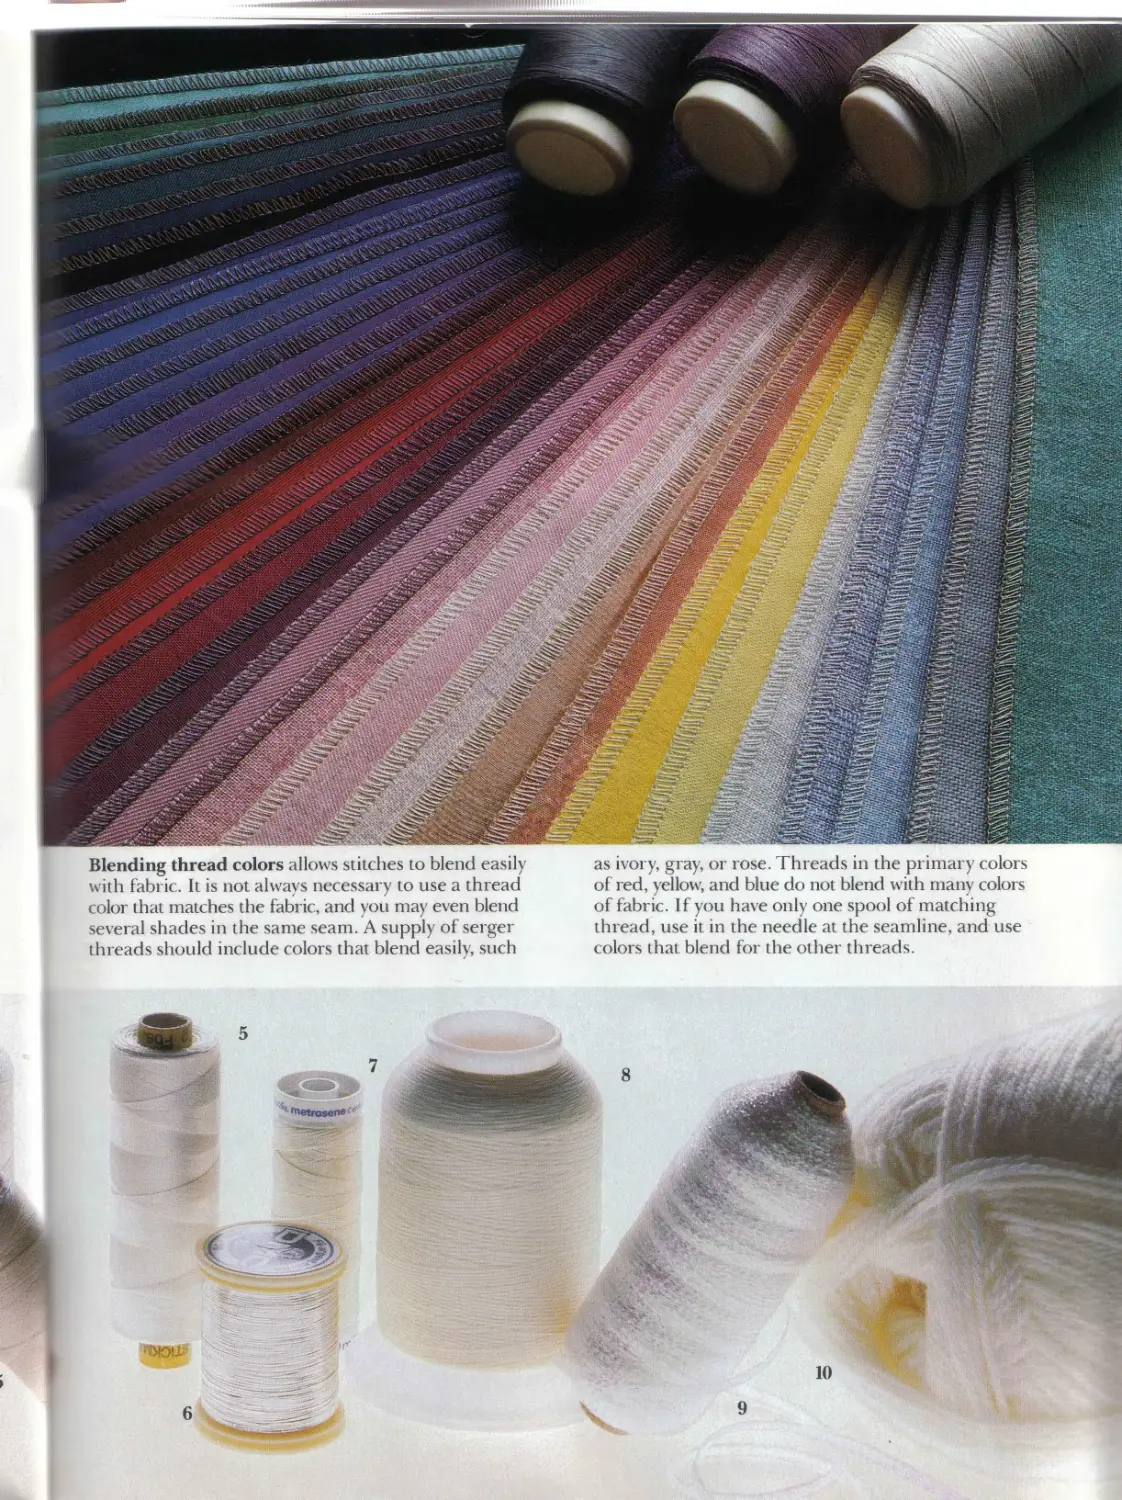
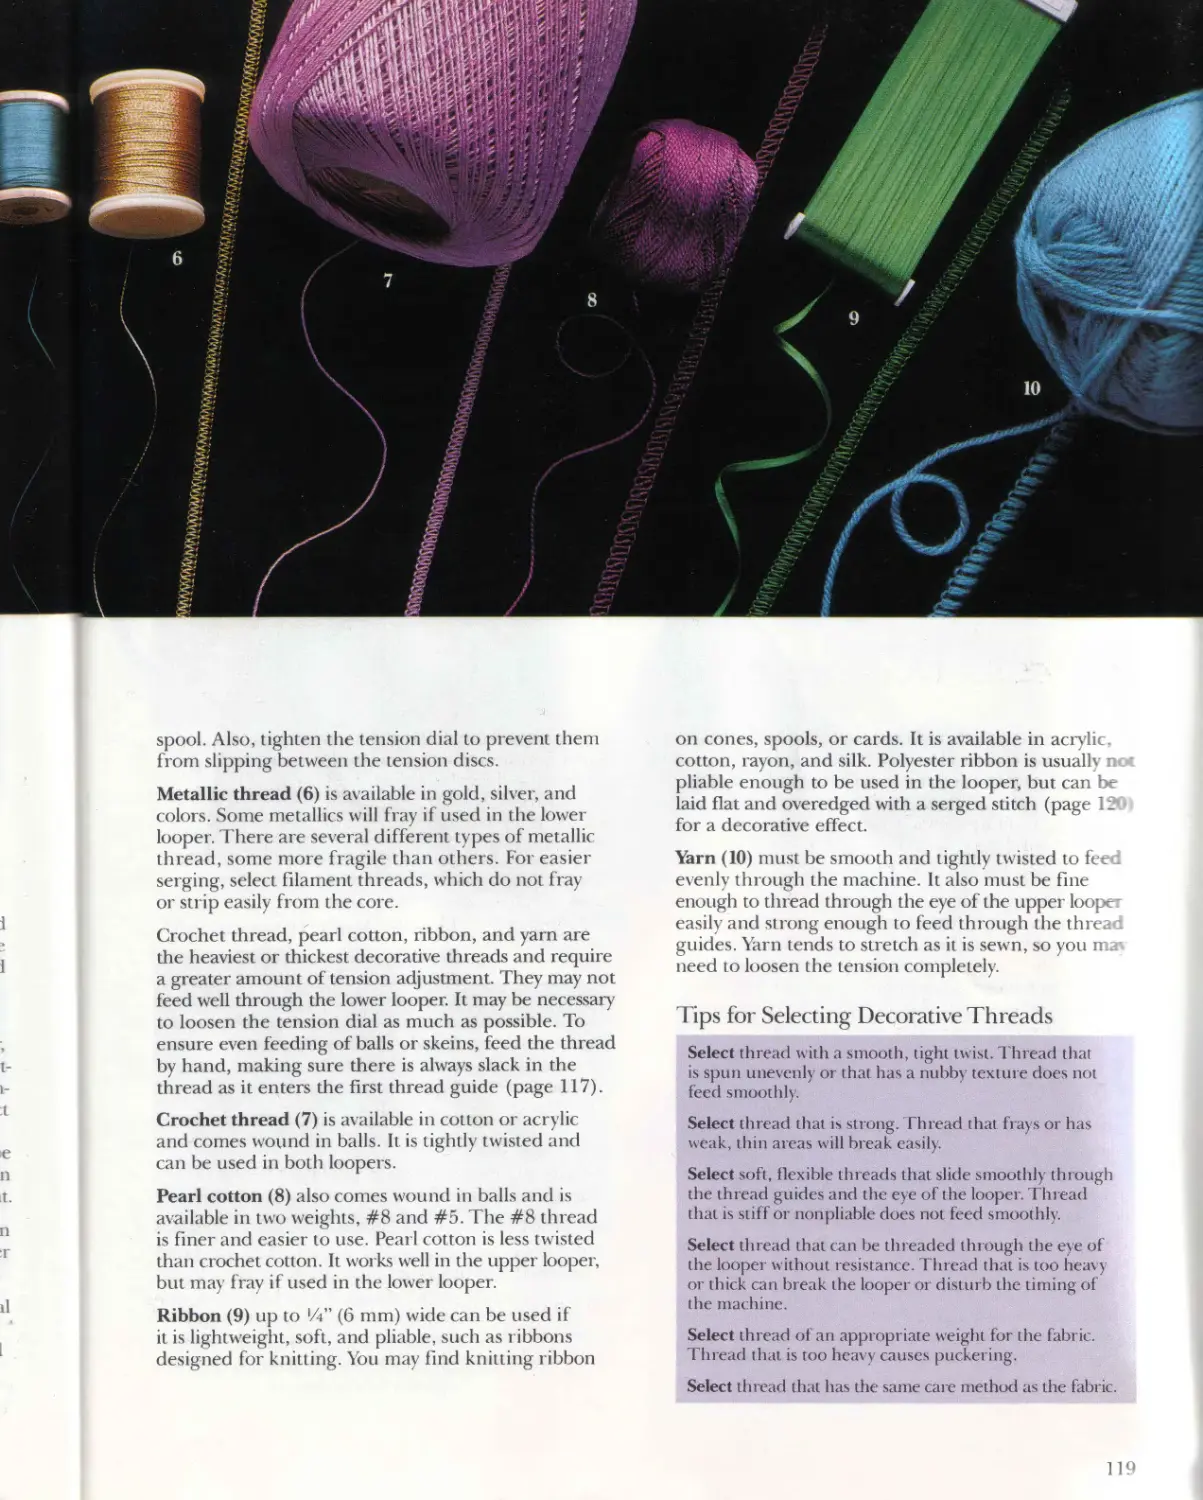
Buying Thread
5
A serger uses more thread than a conventional
sewing machine, so thread companies now offer
thread in cones (1), king tubes (2), and compact
tubes (3). Tubes and cones have at least 1,000 yards
(920 m) of thread, and cones can have as many as
6,000 yards (5520 m).
All-purpose thread may also be used on the serger;
it is available on parallel-wound (4) or cross-wound
(5) spools. Parallel-wound spools require the use of
a spool cap (page 21) for even feeding. There is a
wider color selection in all-purpose thread; use it for
mediumweight or heavyweight fabrics when color-
matching is critical.
Serger threads are generally lighter in weight than
all-purpose sewing threads. A lightweight thread is
generally recommended for serger use. There is
more thread in a serged seam and a lighter-weight
thread reduces bulk.
Decorative threads, including metallic thread (6),
topstitching thread (7), texturized nylon (8), and
lightweight ribbons (9) and yarns (10), may also be
used on a serger (pages 118 and 119).
Sergers will sew with threads of 1009c cotton. 100%
synthetic, or cotton and synthetic blends. All these
thread types work well,
although cotton threads
can create lint in the
tension discs, and
synthetics can leave
a sticky residue.
Although this is
normal, the lint and residue must be cleaned out of
the tension discs occasionally. Use the knotted-thread
method (page 26) for thorough cleaning.
Determining Thread Quality
Use threads that are fine and evenly twisted with few
or no loose fibers. Threads with excess fibers and
uneven areas will not produce a perfect stitch. If the
stitch quality cannot be improved by machine tension
adjustments, change the brand or type of thread you
are using. A thread may sew well on one fabric and
not on another.
Serger machines sew at a higher rate of speed than
conventional sewing machines and create more stress
on the threads. Therefore, threads need to be strong
and durable. Test thread for strength; poor-quality
thread may break easily in some spots. Use the best
quality of thread you can; bargain threads sometimes
cause more problems than the savings are worth.
I f the thread is wavy when it becomes low on the cone
or spool, do not continue to use it on the serger. This
wavy thread can cause stitching problems, and the
seam may pucker when the garment is laundered.
Save this thread for hand sewing.
Using Bobbins on a Serger
To avoid buying several spools of each color, wind
thread on the bobbins of the conventional machine.
Use the bobbins on the spool pins of the serger to
thread the needles, where the least amount of thread
is used, and use the cones to thread the loopers. If
a bobbin will not tit over the spool pin, place it in a
cup or glass behind the machine. As you stitch, the
container will allow a free flow of the thread while
the bobbin bounces around.
"•
Blending thread colors allows stitches to blend easily
with fabric. It is not always necessary to use a thread
color that matches the fabric, and you may even blend
several shades in the same seam. A supply of serger
threads should include colors that blend easily, such
as ivory, gray, or rose. Threads in the primary colors
of red, yellow, and blue do not blend with many colors
of fabric. 1 f you have only one spool of matching
thread, use it in the needle at the seamline, and use
colors that blend for the other threads.
10
9
Organizing the Sewing Room
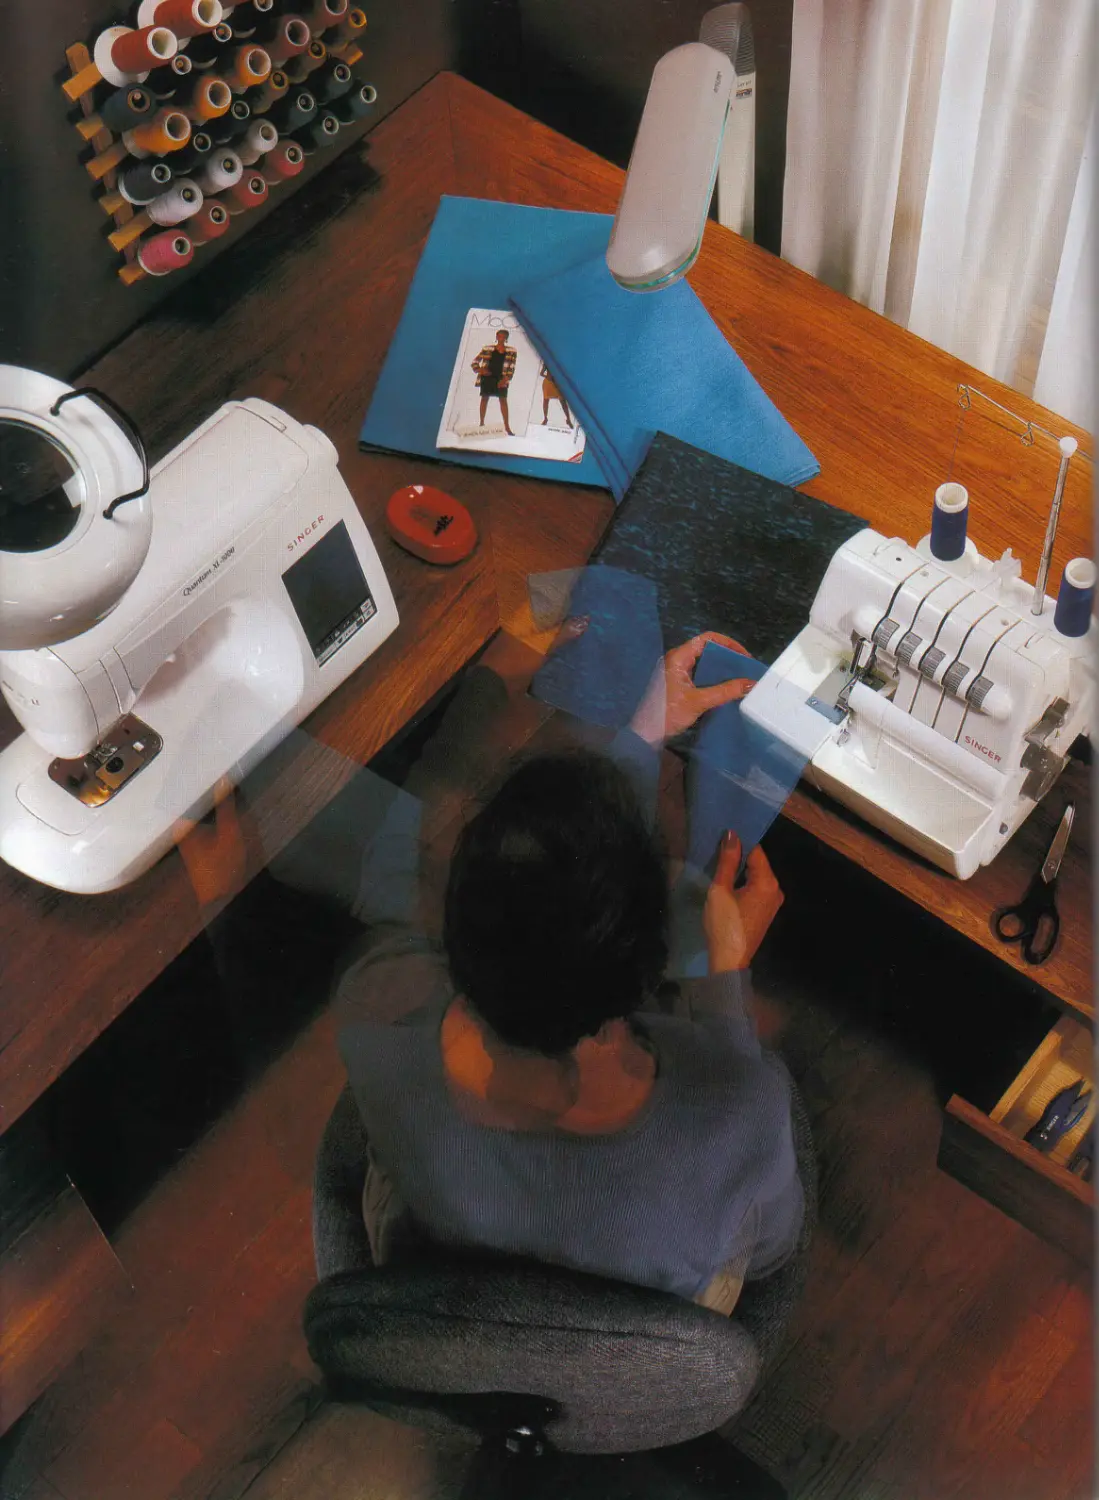
Sewing room organization is a major contributing
factor to successful sewing. Even small spaces can
\ ield comfortable work areas in the home.
For comfortable and productive sewing, both the
merger and the conventional sewing machine should be
within easv reach and placed so you can move from
>ne machine to the other, without changing chairs.
A rolling chair is a good choice; it works best on a
clear mat over carpeting or on an uncarpeted floor.
Manufacturers of sewing room, computer, and general
ffice furniture produce cabinets and tables to accom-
modate both machines. Corner units, which place the
machines at right angles to each other, and straight-
line designs, which place machines side by side, are
available There are also fold-up table units to fit
either the serger or the conventional sewing machine.
1 hese units require a minimum of storage space.
Cone thread racks contribute to an organized
sewing room. A selection of basic colors of serger
thread should be placed near the sewing area for
convenience.
Good lighting is essential. Natural light, although
ideal, is not always available. Many auxiliary lamps
are available, including lamps that can be clamped
onto a table edge and small lamps designed to attach
to the machine. Some lamps include a magnifying
glass. Others provide full-spectrum lighting; they are
superb task lights because they eliminate the dis-
tortion of yellow light and the irritating flicker and
glare common with other bulbs.
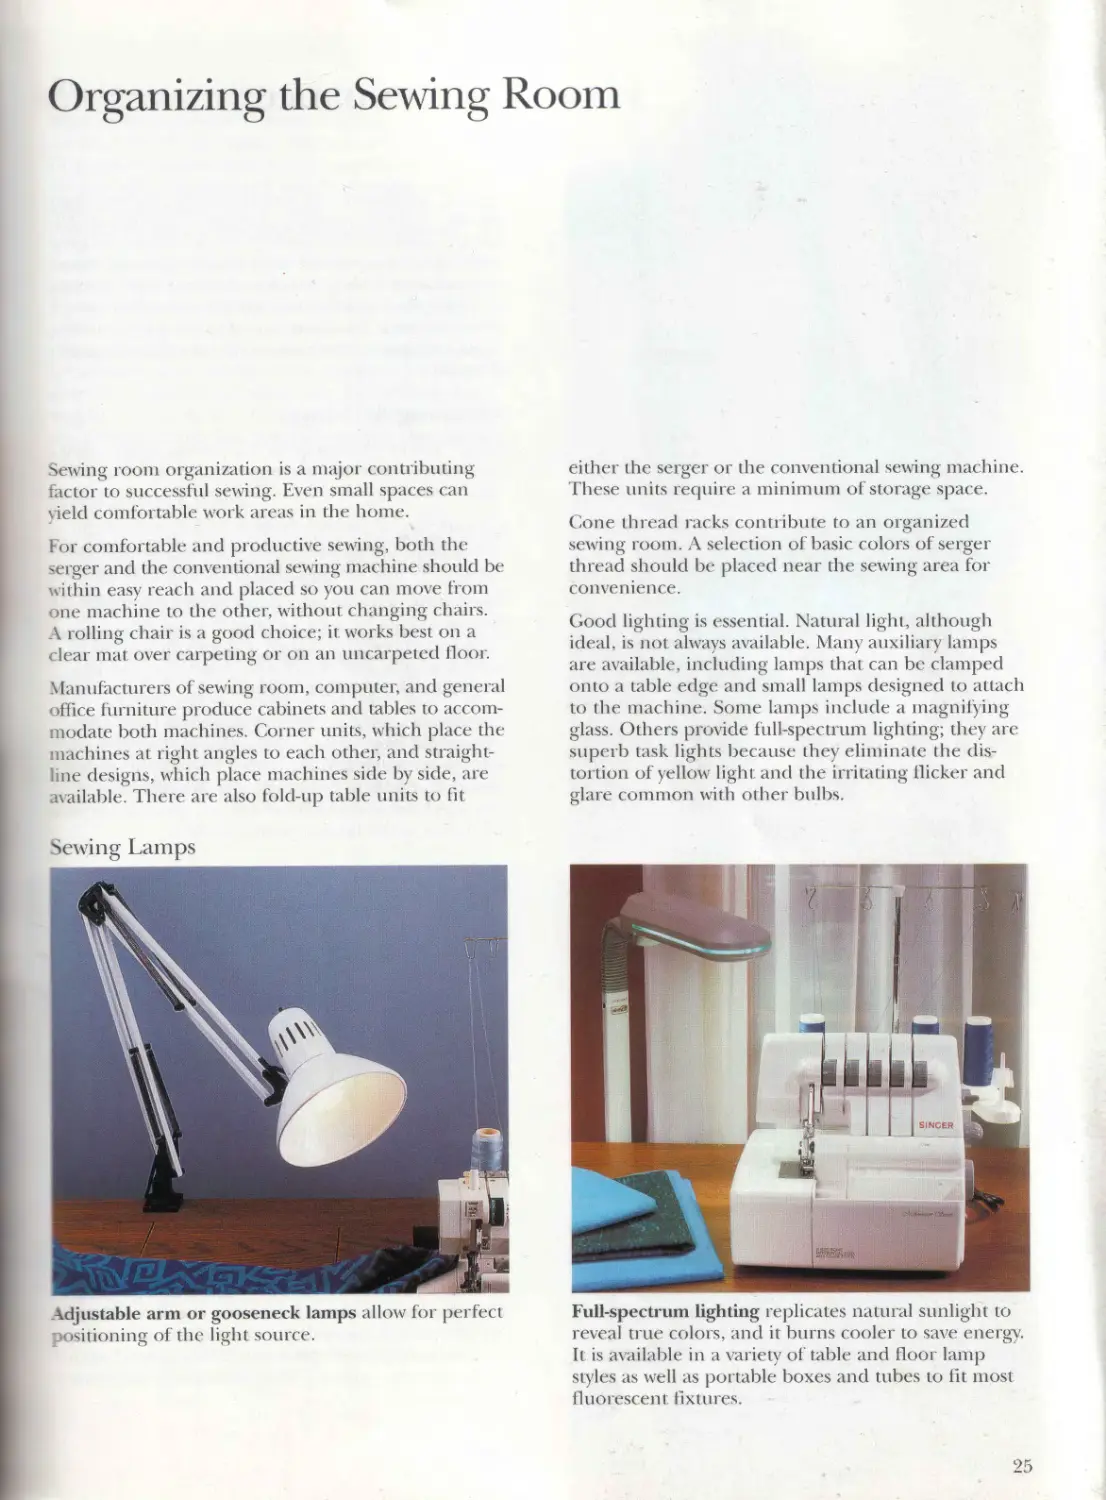
Sewing Lamps
Adjustable arm or gooseneck lamps allow for perfect
i »sitioning of the light source.
Full-spectrum lighting replicates natural sunlight to
reveal true colors, and it burns cooler to save energy.
It is available in a variety of table and floor lamp
styles as well as portable boxes and tubes to fit most
fluorescent fixtures.
Maintenance
Proper maintenance of your serger can prevent costly
repairs. A regular routine of cleaning and oiling will
ensure many years of trouble-free operation. Sergers
need to be cleaned and oiled more frequently than
conventional sewing machines because they operate
at high speed and the internal parts rotate more
often. Replace needles for good stitch quality, and
replace knives to ensure smooth, even trimming as
necessary.
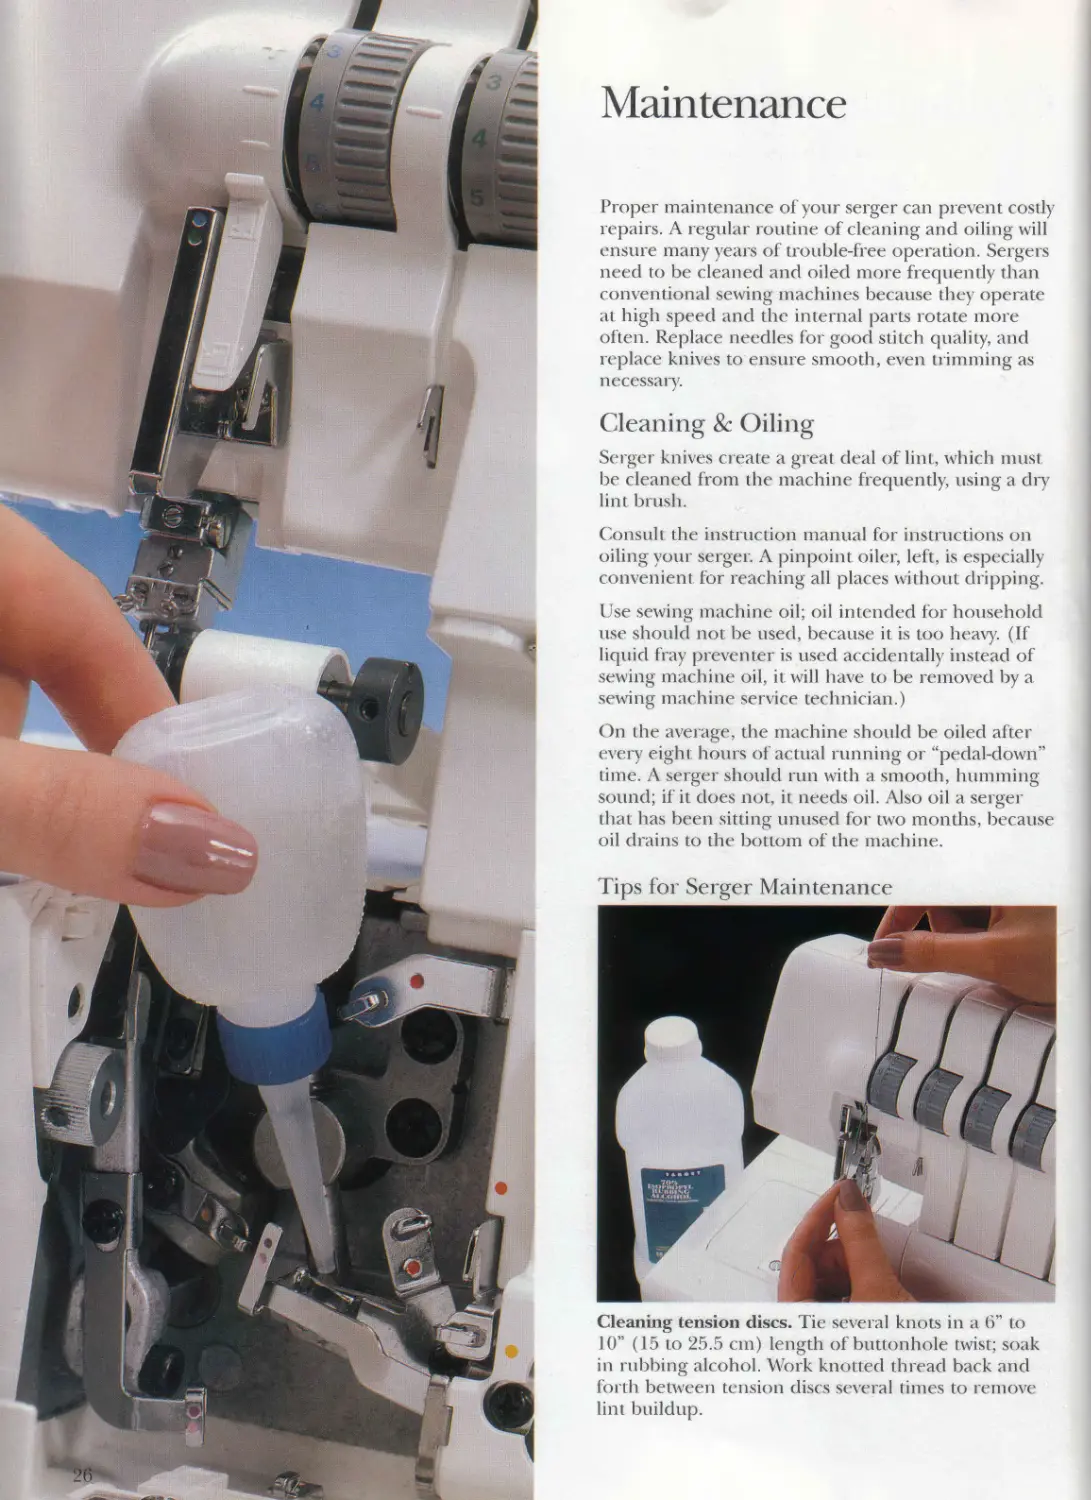
Cleaning & Oiling
Serger knives create a great deal of lint, which must
be cleaned from the machine frequently, using a dry
lint brush.
Consult the instruction manual for instructions on
oiling your serger. A pinpoint oiler, left, is especially
convenient for reaching all places without dripping.
Use sewing machine oil; oil intended for household
use should not be used, because it is too heavy. (If
liquid fray preventer is used accidentally instead of
sewing machine oil, it will have to be removed by a
sewing machine service technician.)
On the average, the machine should be oiled after
every eight hours of actual running or “pedal-down"
time. A serger should run with a smooth, humming
sound; if it does not, it needs oil. Also oil a serger
that has been sitting unused for two months, because
oil drains to the bottom of the machine.
Tips for Serger Maintenance
('.leaning tension discs. Tie several knots in a 6” to
10” (15 to 25.5 cm) length of buttonhole twist; soak
in rubbing alcohol. Work knotted thread back and
forth between tension discs several times to remove
lint buildup.
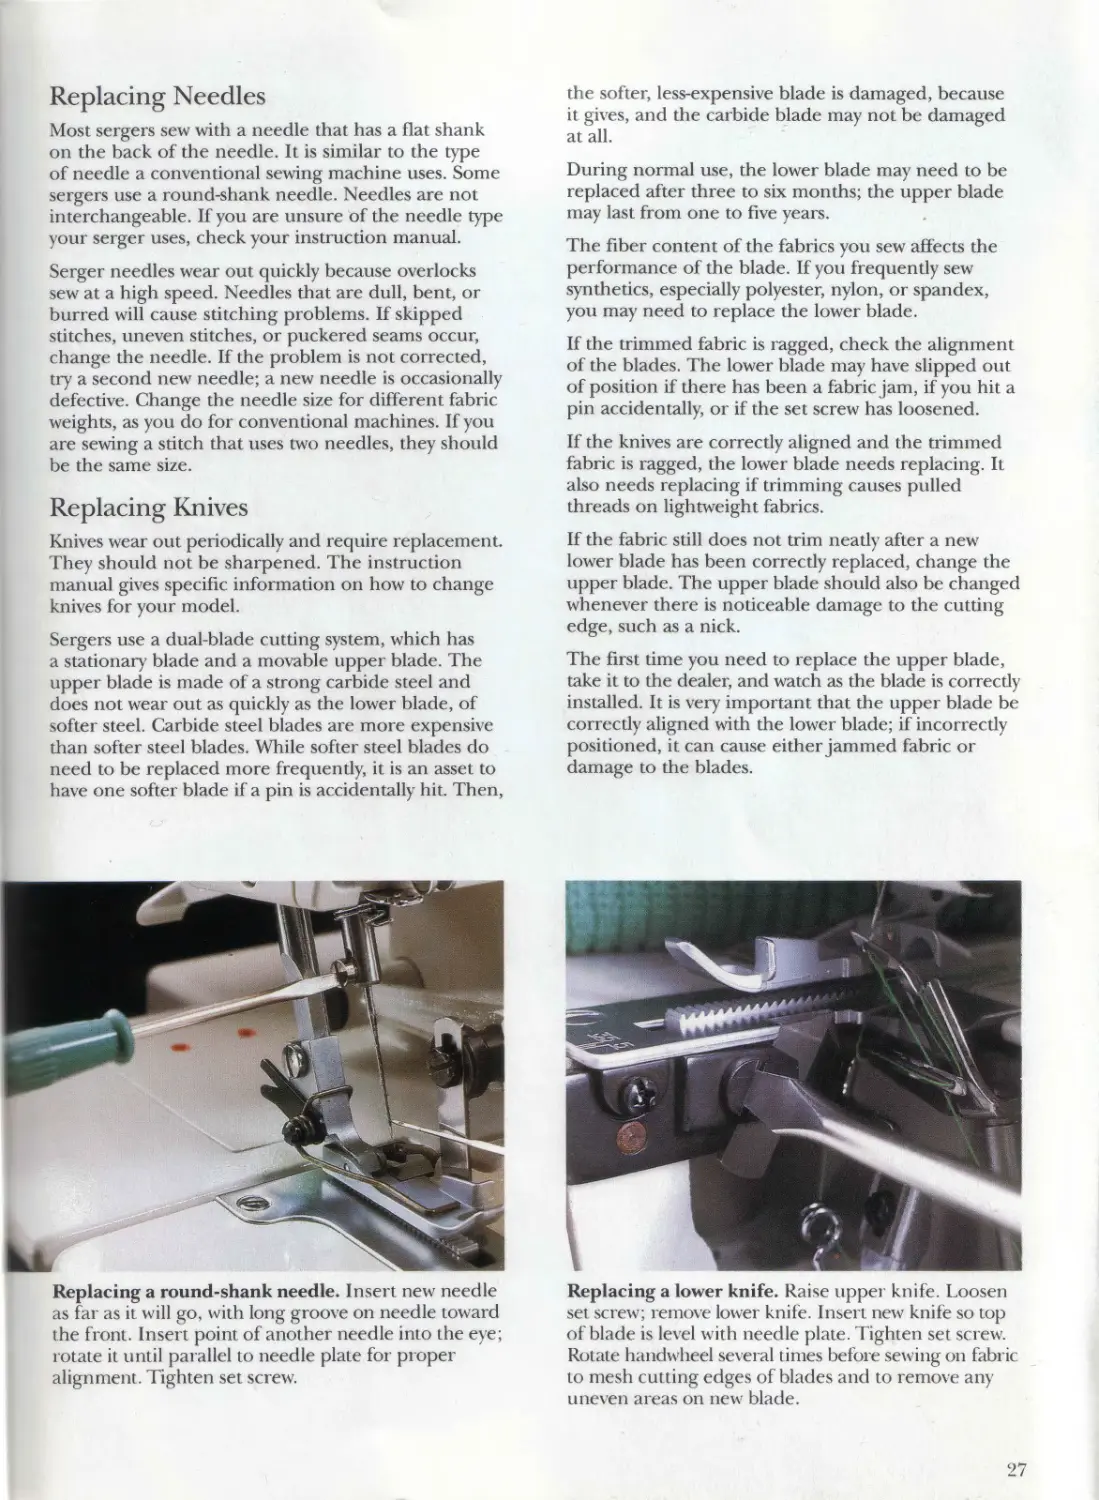
Replacing Needles
Most sergers sew with a needle that has a flat shank
on the back of the needle. It is similar to the type
of needle a conventional sewing machine uses. Some
sergers use a round-shank needle. Needles are not
interchangeable. If you are unsure of the needle type
your serger uses, check your instruction manual.
Serger needles wear out quickly because overlocks
sew at a high speed. Needles that are dull, bent, or
burred will cause stitching problems. If skipped
stitches, uneven stitches, or puckered seams occur,
change the needle. If the problem is not corrected,
try a second new needle; a new needle is occasionally
defective. Change the needle size for different fabric
weights, as you do for conventional machines. If you
are sewing a stitch that uses two needles, they should
be the same size.
Replacing Knives
Knives wear out periodically and require replacement.
They should not be sharpened. The instruction
manual gives specific information on how to change
knives for your model.
Sergers use a dual-blade cutting system, which has
a stationary blade and a movable upper blade. The
upper blade is made of a strong carbide steel and
does not wear out as quickly as the lower blade, of
softer steel. Carbide steel blades are more expensive
than softer steel blades. While softer steel blades do
need to be replaced more frequently, it is an asset to
have one softer blade if a pin is accidentally hit. Then,
the softer, less-expensive blade is damaged, because
it gives, and the carbide blade may not be damaged
at all.
During normal use, the lower blade may need to be
replaced after three to six months; the upper blade
may last from one to five years.
The fiber content of the fabrics you sew affects the
performance of the blade. If you frequently sew
synthetics, especially polyester, nylon, or spandex,
you may need to replace the lower blade.
If the trimmed fabric is ragged, check the alignment
of the blades. The lower blade may have slipped out
of position if there has been a fabric jam, if you hit a
pin accidentally, or if the set screw has loosened.
If the knives are correctly aligned and the trimmed
fabric is ragged, the lower blade needs replacing. It
also needs replacing if trimming causes pulled
threads on lightweight fabrics.
If the fabric still does not trim neatly after a new
lower blade has been correctly replaced, change the
upper blade. The upper blade should also be changed
whenever there is noticeable damage to the cutting
edge, such as a nick.
The first time you need to replace the upper blade,
take it to the dealer, and watch as the blade is correctly
installed. It is very important that the upper blade be
correctly aligned with the lower blade; if incorrectly
positioned, it can cause either jammed fabric or
damage to the blades.
Replacing a round-shank needle. Insert new needle
as far as it will go, with long groove on needle toward
the f ront. Insert point of another needle into the eye;
rotate it until parallel to needle plate for proper
alignment. I ighten set screw.
Replacing a lower knife. Raise upper knife. Loosen
set screw; remove lower knife. Insert new knife so top
of blade is level with needle plate. Tighten set screw.
Rotate handwheel several times before sewing on fabric
to mesh cutting edges of blades and to remove any
uneven areas on new blade.
27
Threading a
Serger
Threading a serger appears to
be complicated ar first, but with
practice it is not difficult. An easy
method for threading a serger is
the tying-on method. Simply cut
the old threads and tie on new
ones; then pull each new thread
through the machine, using the
tail of the old thread.
When a thread breaks, or if the
machine is run until a spool is
empty, it is necessary to thread the
serger manually. Carefully place
each thread in the proper path,
following the threading guide in
the instruction manual or on the
door of the serger. It is important
that the machine be threaded cor-
rectly, or it will not stitch correctly.
C onsult your dealer if you have
questions.
Check the threading of the serger
whenever it does not stitch cor-
rectly; a thread may not be in all
the thread guides, or threads may
be tangled. Be sure the thread
stand is completely extended and
that a thread is not caught around
the thread stand, under a spool, or
on a thread guide.
Tips for Manual Threading
Rotate handwheel until loopers are
positioned so they do not cross,
before threading lower looper. If
lower looper is threaded when it
crosses upper looper, threads will
tangle, and serger will not stitch.
О ? о
Draw threads above the needle
plate, using tweezers or seam
ripper, before stitching if needles
are threaded before loopers; this
prevents tangling.
Thread needles last. If needles are
threaded before loopers, needle
threads (blue) loop under lower
looper and become trapped
(arrow), and serger will not stitch
unless you draw threads above
needle plate, as shown at right.
30
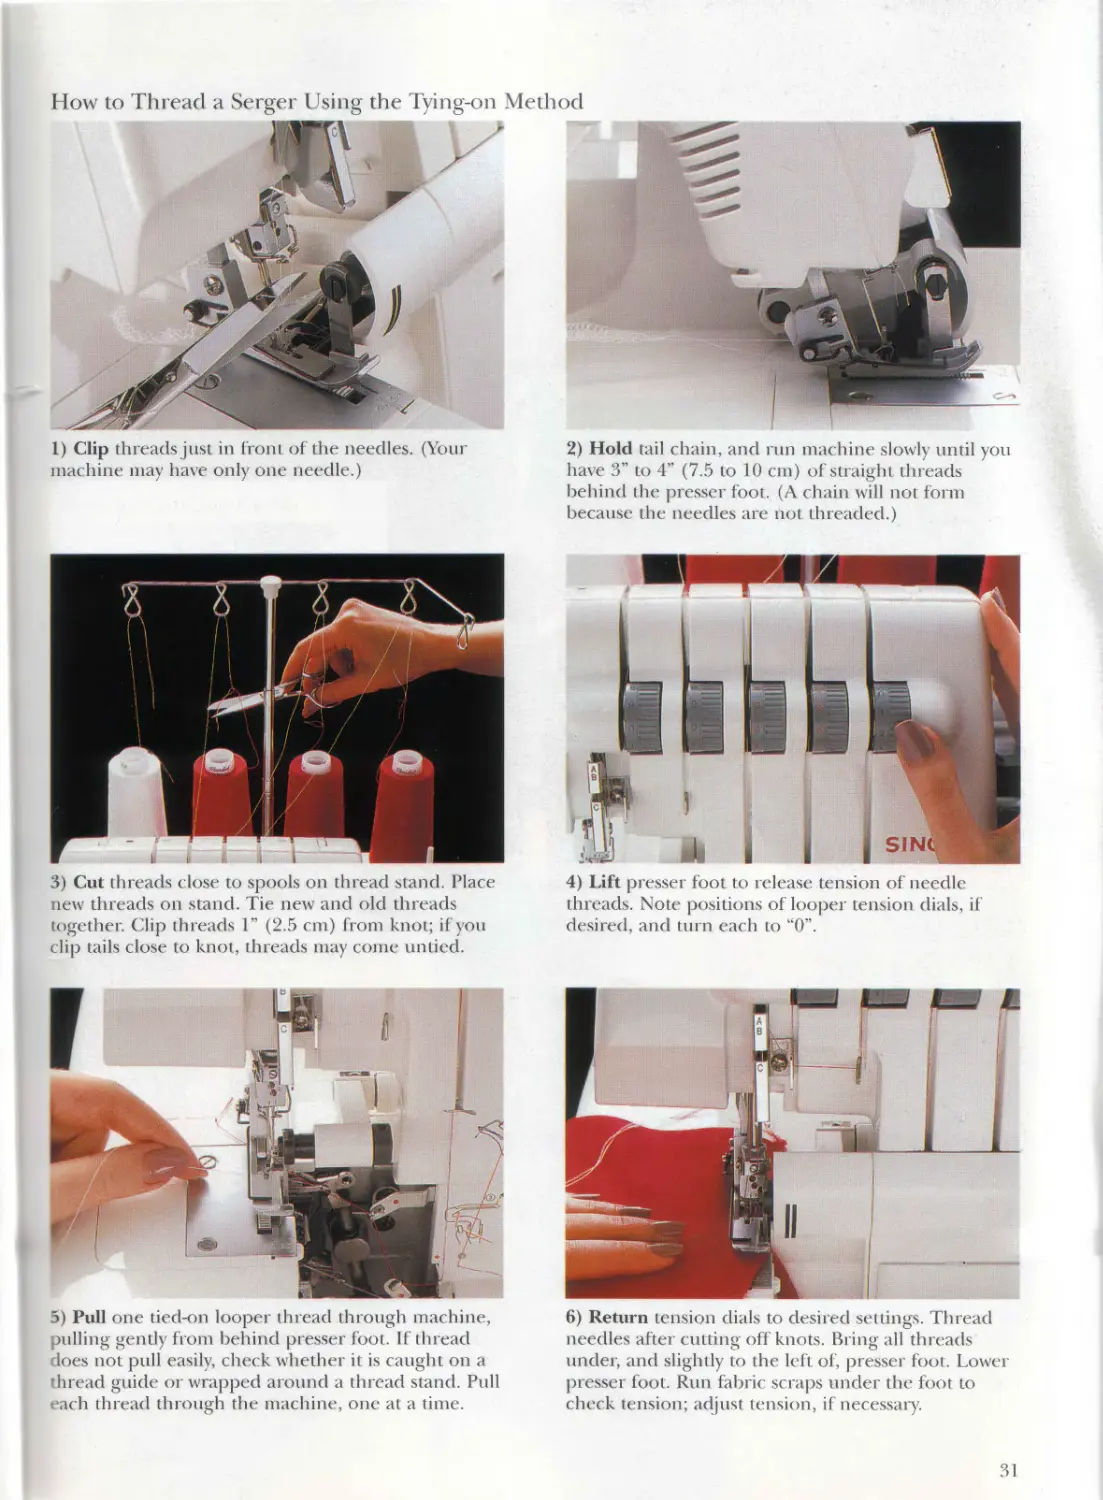
How to Thread a Serger Using the Tying-on Method
о о о
1) Clip threads just in front of the needles. (Youi
machine may have only one needle.)
2) Hold tail chain, and run machine slowly until you
have 3 to 4” (7.5 to 10 cm) of straight threads
behind rhe presser foot. (A chain will not form
because the needles are not threaded.)
3) Cut threads close to spools on thread stand. Place
aew threads on stand Pie new and old threads
together. Clip threads Г 2.5 cm from knot; if you
clip tails close to knot, threads may come untied.
4) Lift presser toot to release tension of needle
threads. Note positions of looper tension dials, if
desired, and turn each to “0‘.
’ । Pull one tied-on looper thread through mac hine,
pulling gently from behind presser foot. If thread
Loes not pull easily, check whether it is caught on a
thread guide or wrapped around a thread stand. Pull
ach thread through the machine, one at a time.
6) Return tension dials to desired settings. Thread
needles after cutting off knots. Bring all threads
under, and slightly to the left of, presser fool. Lower
presser foot. Run fabric scraps under the foot to
check tension; adjust tension, if nec essary.
31
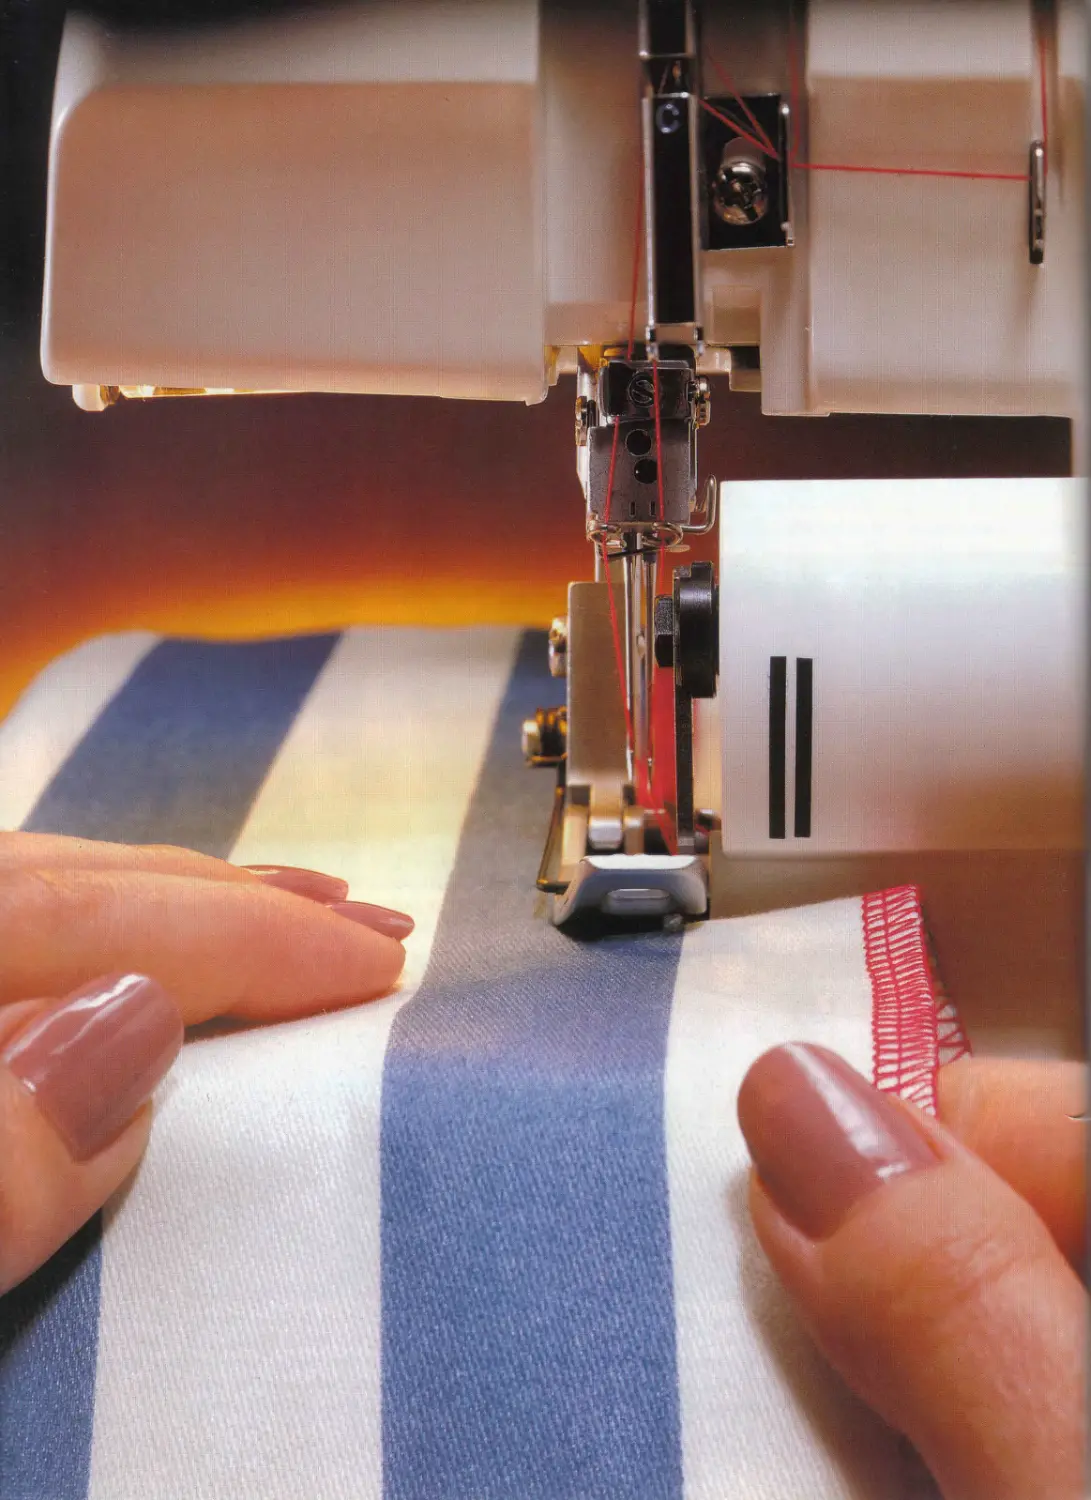
1 >asic Techniques
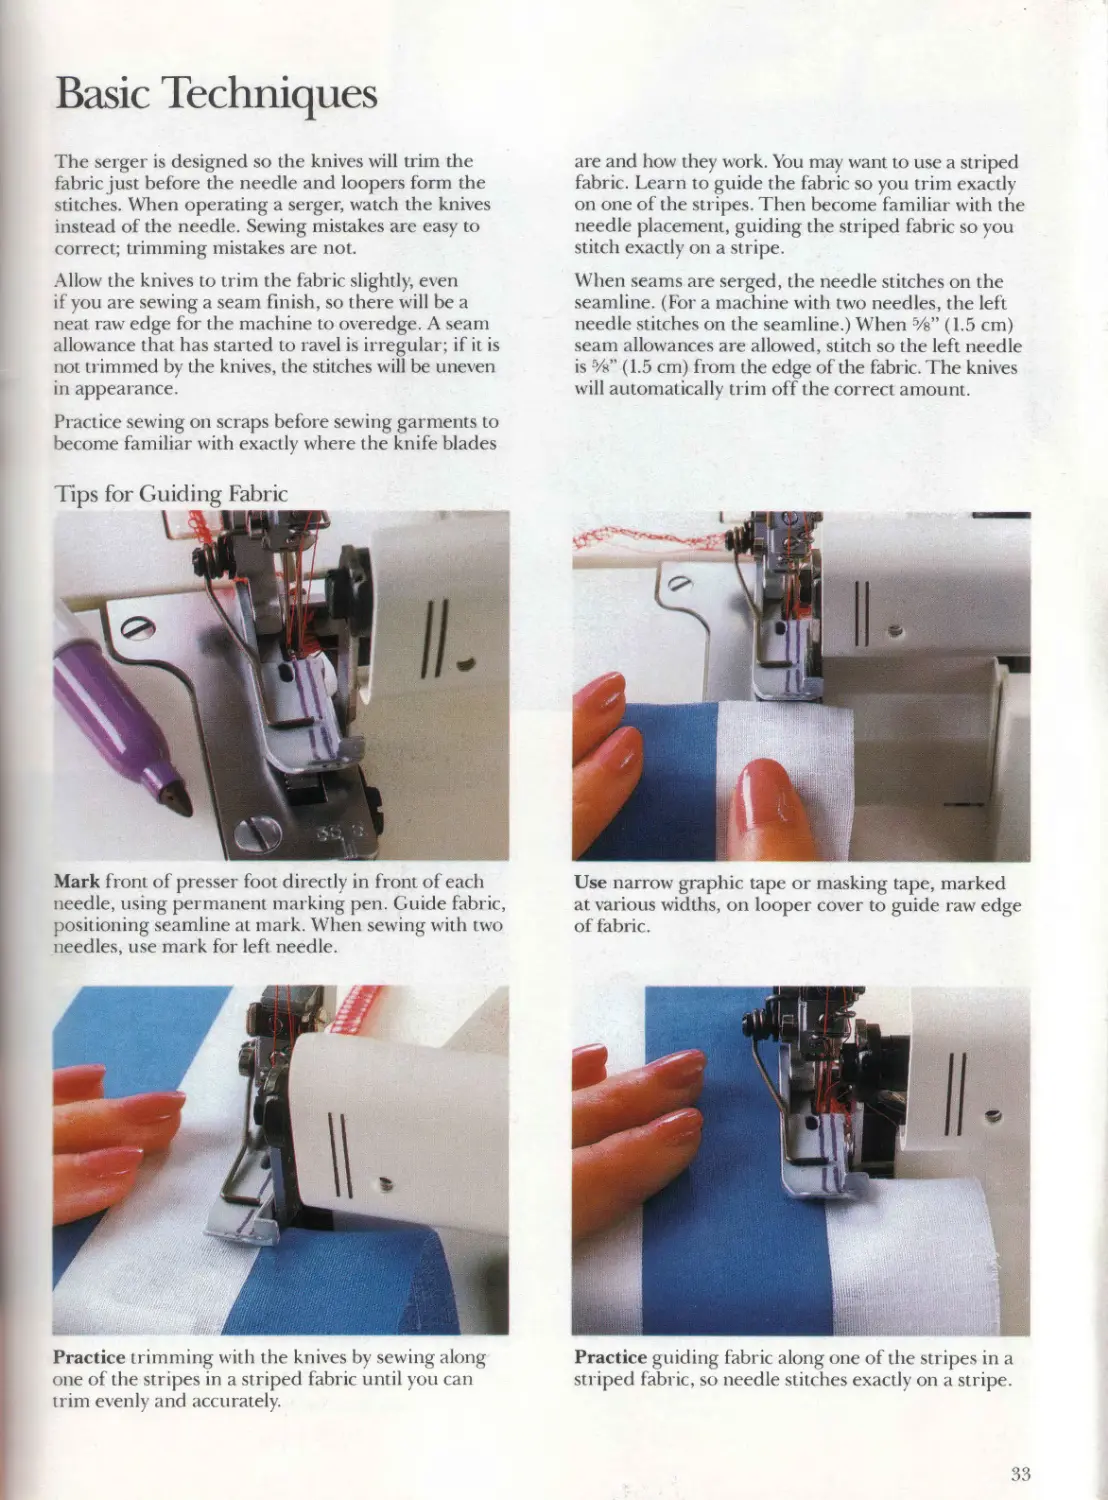
The serger is designed so the knives will trim the
fabric just before the needle and loopers form the
stitches. When operating a serger, watch the knives
instead of the needle. Sewing mistakes are easy to
correct; trimming mistakes are not.
Allow the knives to trim the fabric slightly, even
if you are sewing a seam 1 inish, so there will be a
neat raw edge lor the machine to overedge. A seam
allowance that has started to ravel is irregular; if it is
not trimmed by the knives, the stitches will be uneven
in appearance.
Practice sewing on scraps before sewing garments to
become familiar with exactly where the knife blades
are and how they work. You may want to use a striped
fabric. Learn to guide the fabric so you trim exactly
on one of the stripes. Then become familiar with the
needle placement, guiding the striped fabric so you
stitch exactly on a stripe.
When seams are serged, the needle stitches on the
seamline. (For a machine with two needles, the left
needle stitches on the seamline.) When %” (1.5 cm)
seam allowances are allowed, stitch so the left needle
is 5/s' (1.5 cm ) from the edge of the fabric. The knives
will automatically trim off the correct amount.
Tips for Guiding Fabric
Mark front of presser foot directly in front of each
needle, using permanent marking pen. Guide fabric,
positioning seamline at mark. When sewing with two
needles, use mark for left needle.
Use narrow graphic tape or masking tape, marked
at various widths, on looper cover to guide raw edge
of fabric.
Practice trimming with the knives by sewing along
one of the stripes in a striped fabric until you can
trim evenly and accurately.
Practice guiding fabric along one of the stripes in a
striped fabric, so needle stitches exactly on a stripe.
33
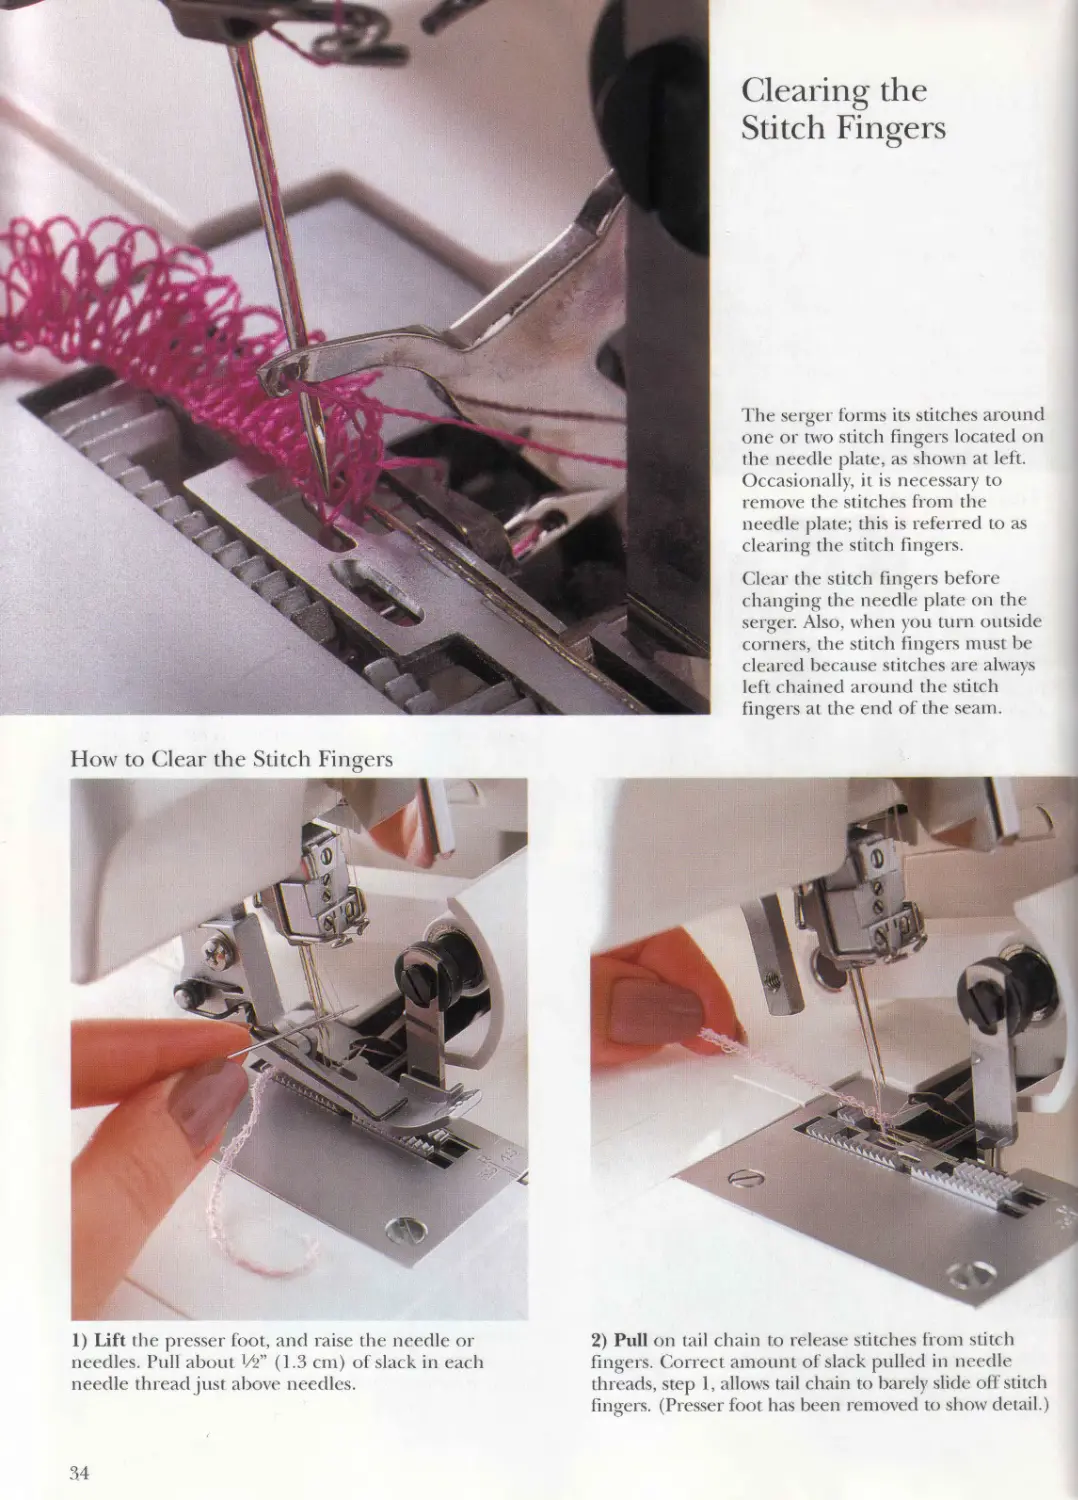
Clearing the
Stitch Fingers
The serger forms its stitches around
one or two stitch fingers located on
the needle plate, as shown at left.
Occasionally, it is necessary to
remove the stitches from the
needle plate; this is referred to as
clearing the stitch fingers.
о О
Clear the stitch fingers before
changing the needle plate on the
serger. Also, when you turn outside
corners, the stitch fingers must be
cleared because stitches are always
left chained around the stitch
fingers at the end of the seam.
How to Clear the Stitch Fingers
1) Lift the presser foot, and raise the needle or
needles. Pull about 1/2” (1.3 cm) of slack in each
needle thread just above needles.
2) Pull on tail chain to release stitches from stitch
fingers. Correct amount of slack pulled in needle
threads, step 1, allows tail chain to barely slide ofl’stitch
fingers. (Presser foot has been removed to show detail.)
34
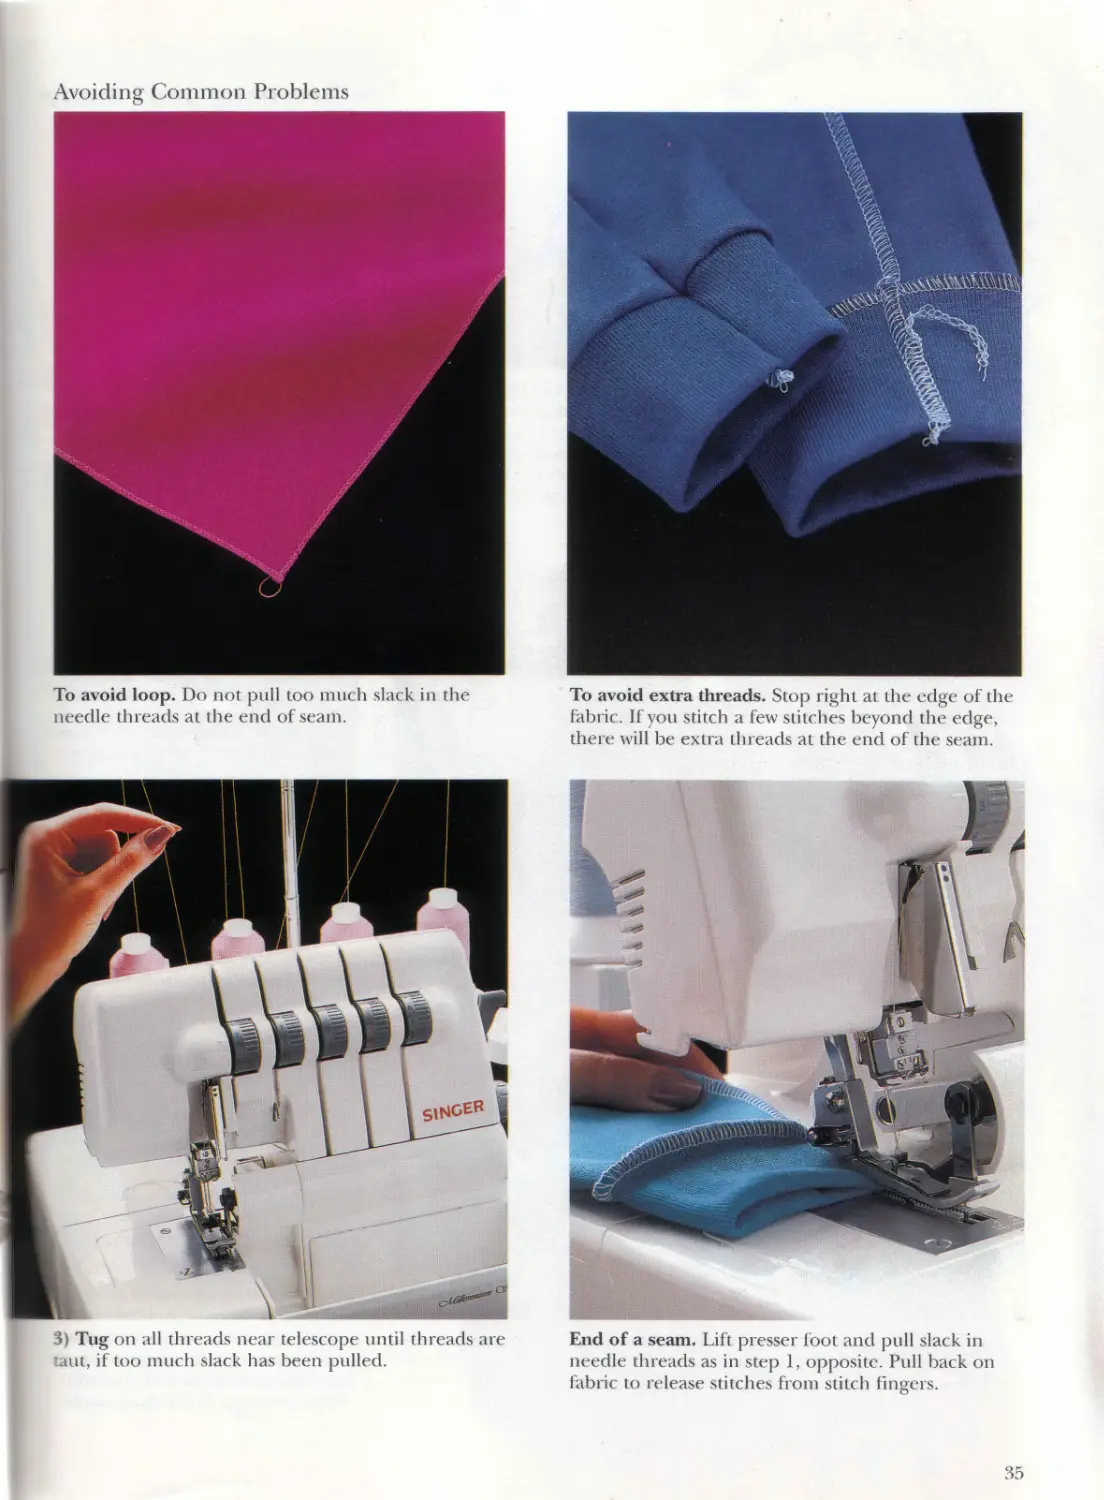
Avoiding .ommon Problems
To avoid extra threads. Stop right at the edge of the
fabric. If you stitch a lew stitches beyond the edge,
there will be extra threads at the end of the seam.
To avoid loop. Do not pull too much slack in the
needle threads at the end of seam.
3» Tug on all threads near telescope until threads are
mt, if too much slack has been pulled.
End of a seam. Lift presser loot and pull slack in
needle thi eads as in step 1. opposite. Pull back on
fabric to release stitches from stitch fingers.
о
35
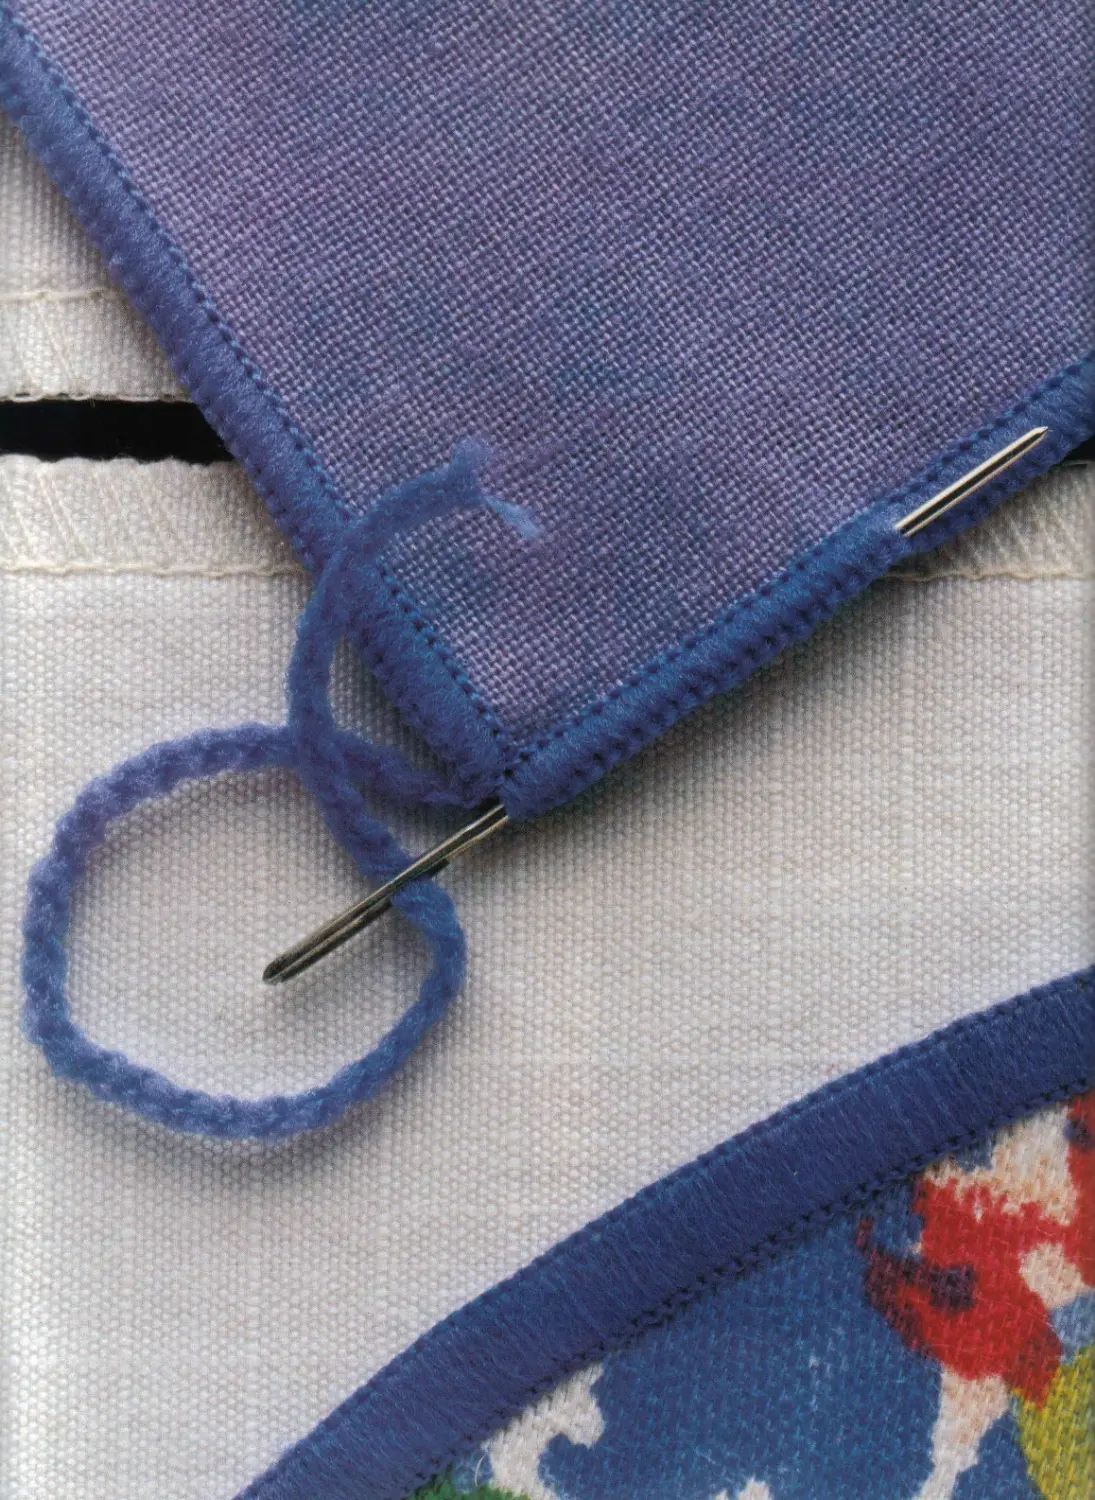
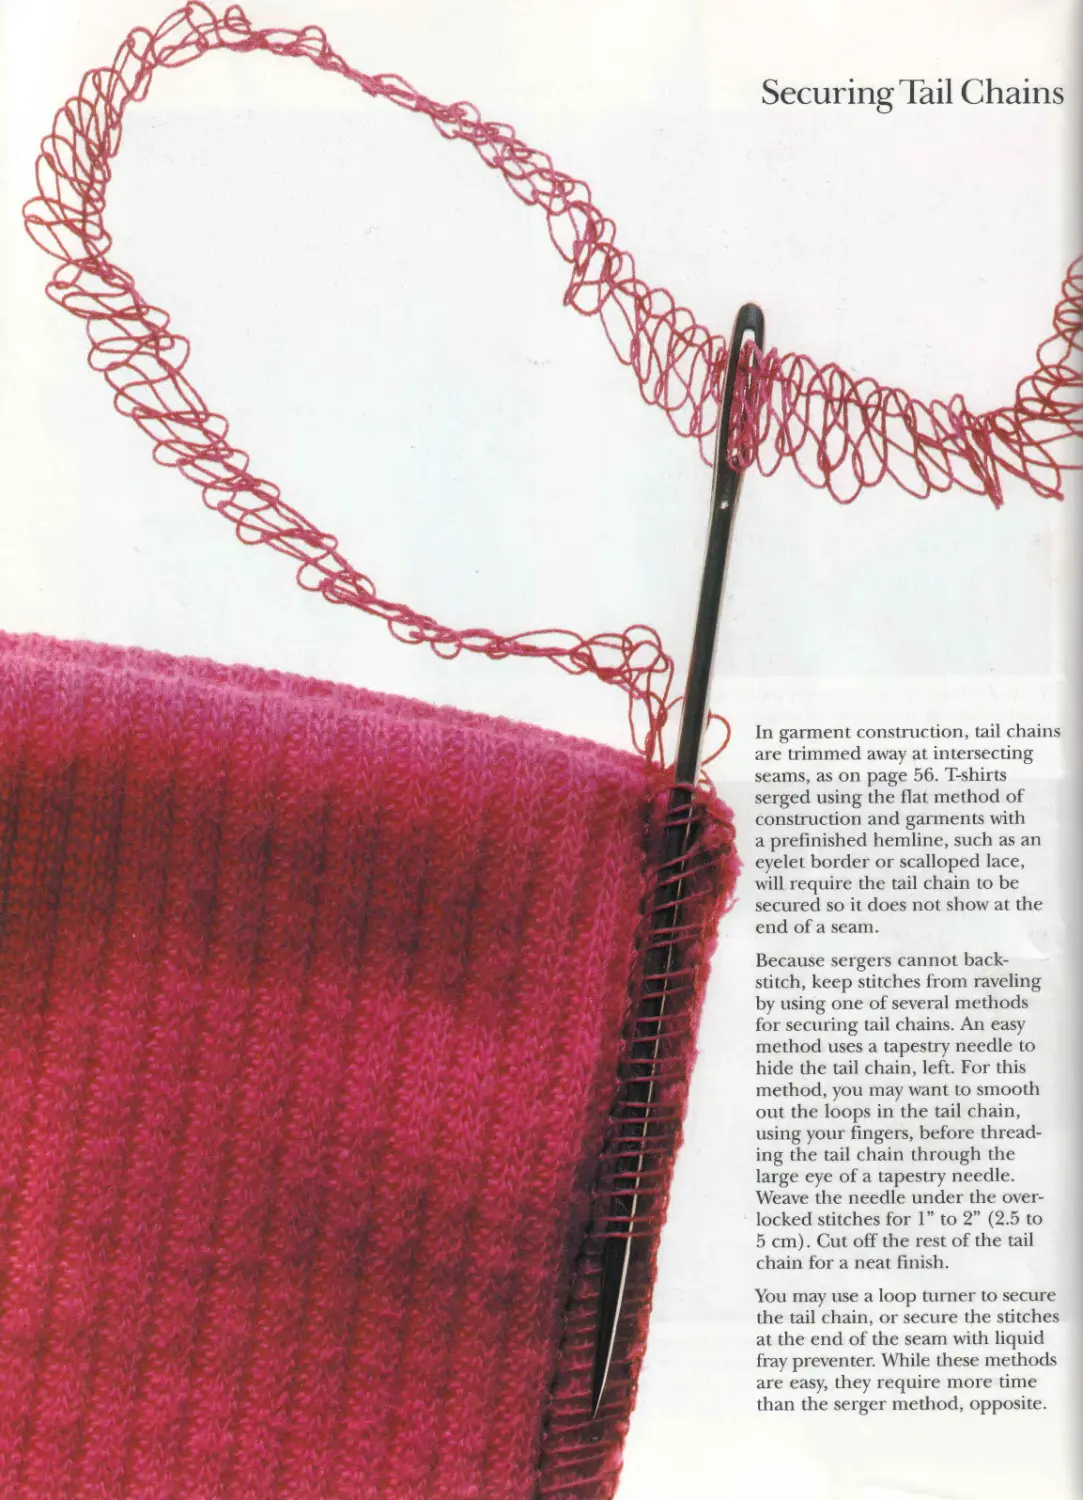
Securing Tail Chains
In garment construction, tail chains
are trimmed away at intersecting
seams, as on page 56. T-shirts
serged using the flat method of
construction and garments with
a prefinished hemline, such as an
eyelet border or scalloped lace,
will require the tail chain to be
secured so it does not show at the
end of a seam.
Because sergers cannot back-
stitch, keep stitches from raveling
by using one of several methods
for securing tail chains. An easy
method uses a tapestry needle to
hide the tail chain, left. For this
method, you may want to smooth
out the loops in the tail chain,
using your fingers, before thread-
ing the tail chain through the
large eye of a tapestry' needle.
Weave the needle under the over-
locked stitches for 1” to 2” (2.5 to
5 cm). Cut off the rest of the tail
chain for a neat finish.
You may use a loop turner to secure
the tail chain, or secure the stitches
at the end of the seam with liquid
fray preventer. While these methods
are easy, they require more time
than the serger method, opposite.
How to Secure Tail Chains Using Liquid Fray Preventer or Loop Turner
2) Pull tail chain under stitches,
using loop turner. Cut off excess
tail chain.
Liquid fray preventer. Apply
liquid fray preventer to stitches at
end of seam. Allow to dry; cut tail
chain close to stitches.
Loop turner. 1) Smooth out loops
in tail chain, using fingers. Insert
loop turner under stitches 1” or 2”
(2.5 to 5 cm) from end of seam.
Catch ends of tail chain with latch
hook of loop turner.
How to Secure Fail Chains Using the Serger
Starting a seam. 1) Stitch seam for
one or two stitches. Raise presser
foot and needle. Clear stitch fingers
(pages 34 and 35). Run fingers
along tail chain to smooth out loops.
(Presser foot has been removed to
show detail.)
2) Bring tail chain to the left,
around and under presser foot.
Place tail chain between needle
and knives. Lower presser foot,
holding tail chain in position.
3) Stitch seam over tail chain for
about 1” (2.5 cm). Then, swing tail
chain to the right, so it is trimmed
off as you continue to stitch seam.
Ending a seam. 1) Stitch past end
of seam by one stitch; stop. Raise
presser foot and needle to clear
stitch fingers (pages 34 and 35).
(Presser foot has been removed to
show detail.)
3) Stitch over previous stitching for
about 1" (2.5 cm). Stitch off edge,
leaving tail chain. Using scissors or
knives, cut tail chain close to edge
of seam.
2) Turn fabric over, and align edge
of seam with trimming edge of
knives. Lower presser foot. Turn
handwheel to insert needle at end
of seam and to the left of trimmed
edge, the width of stitch.
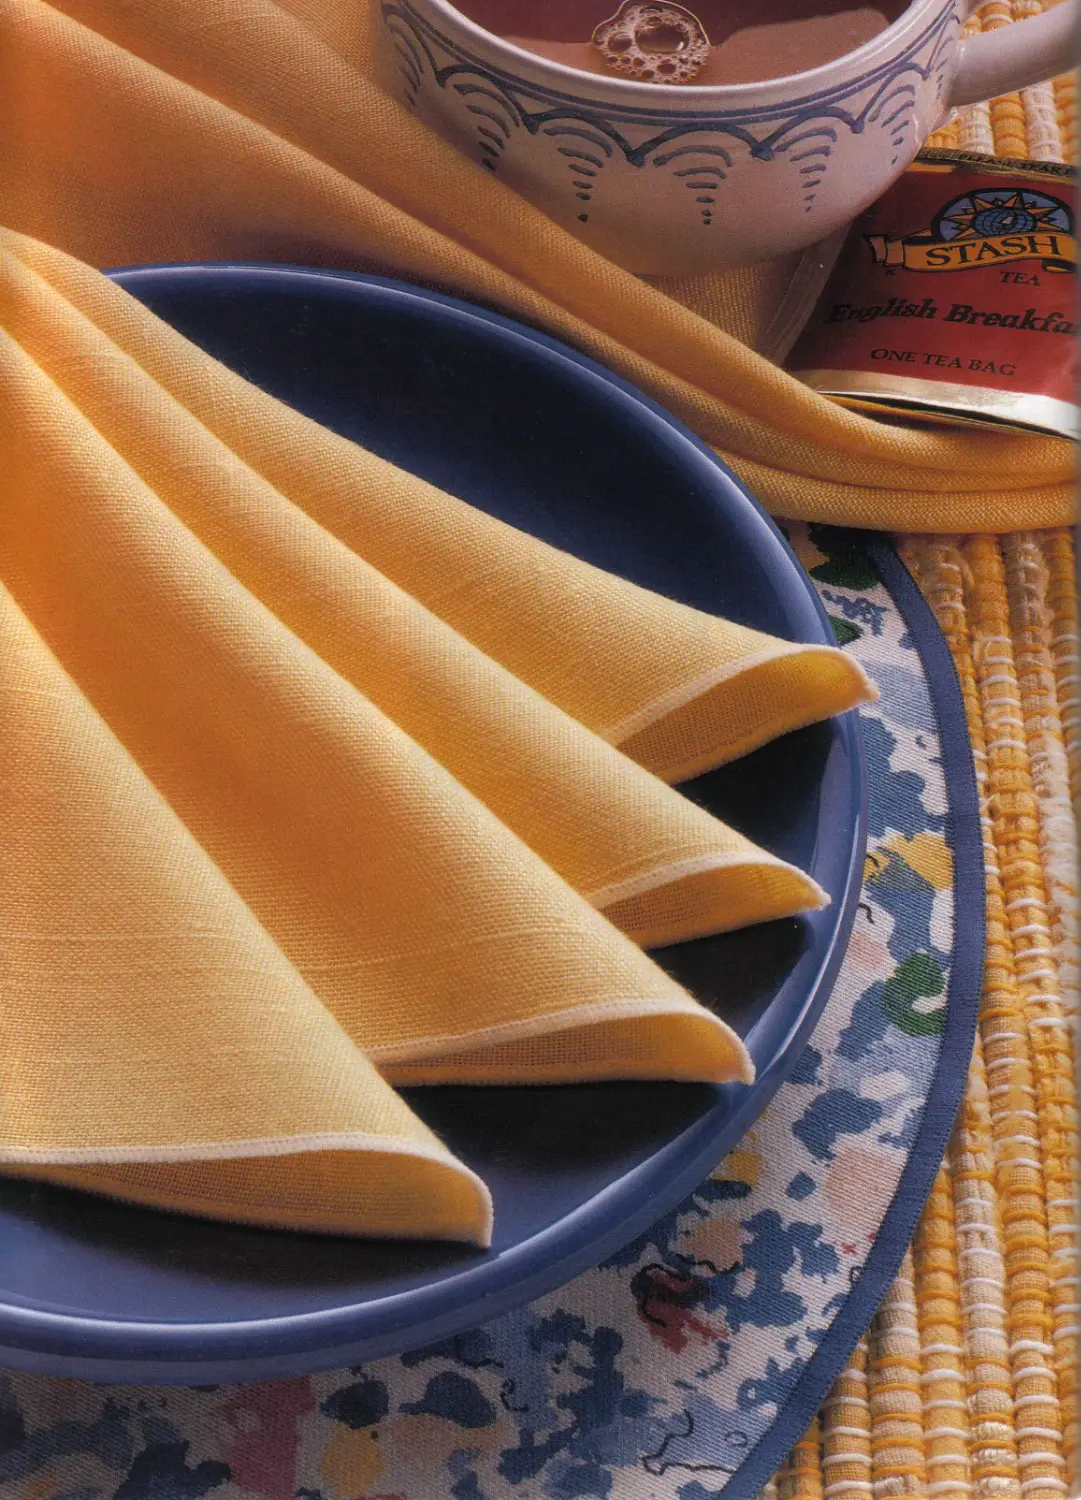
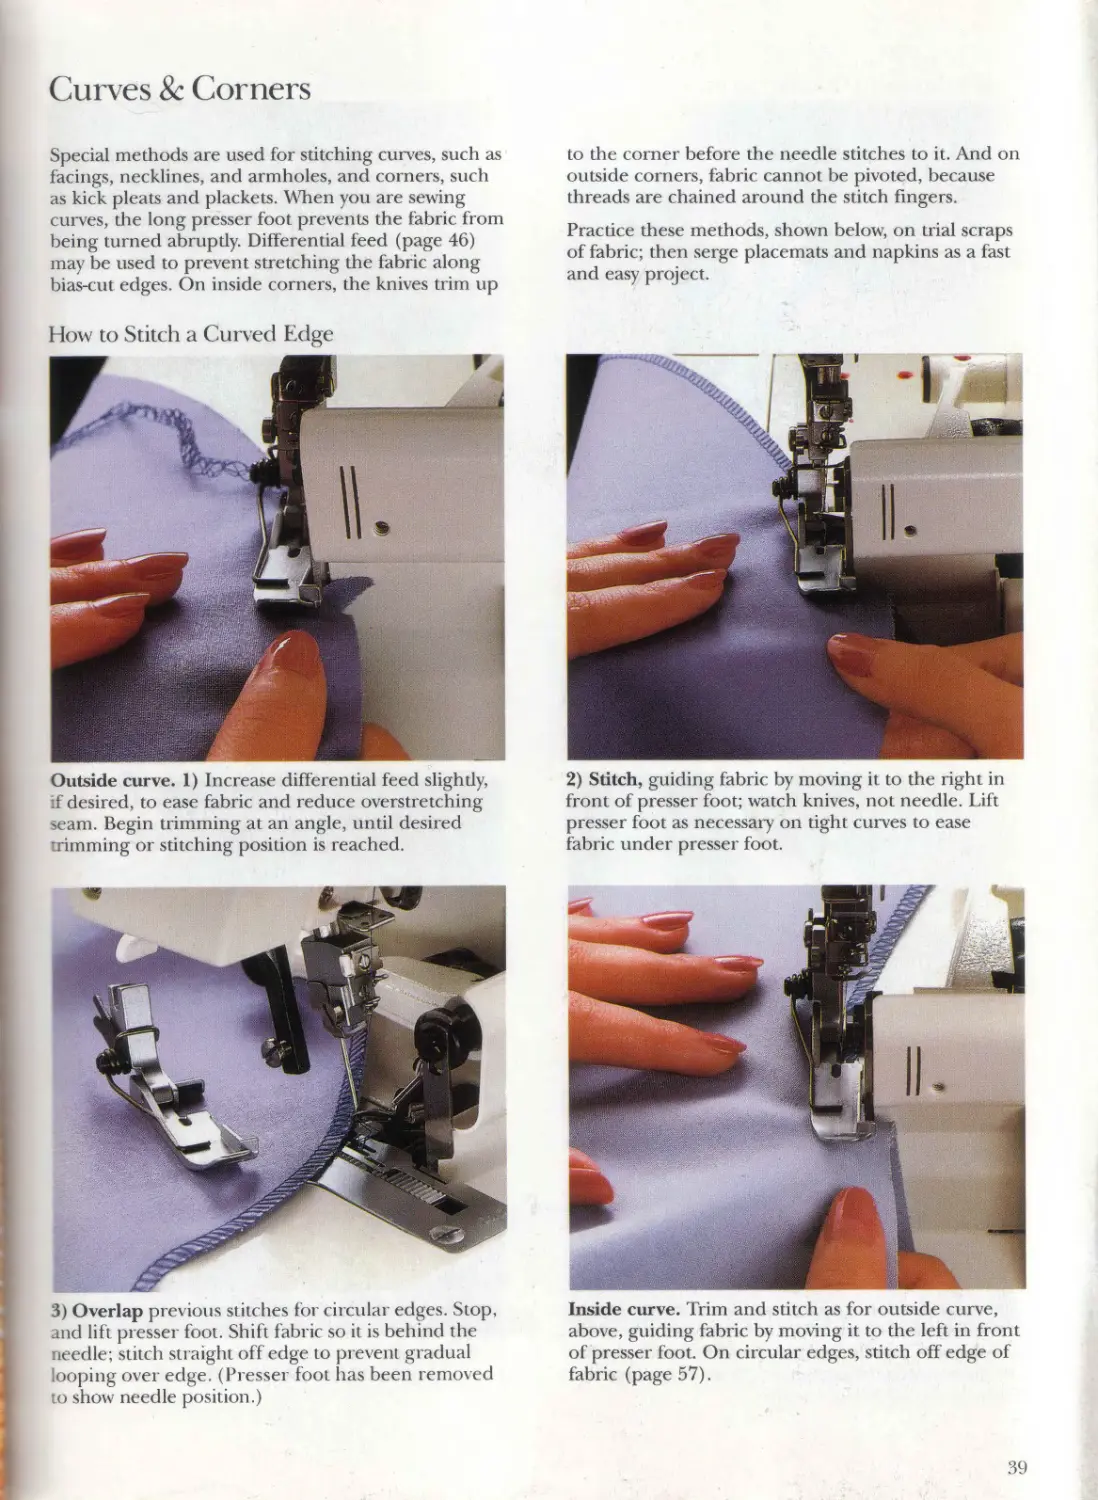
Curves & Corners
Special methods are used for stitching curves, such as
facings, necklines, and armholes, and corners, such
as kick pleats and plackets. When you are sewing
curves, the long presser foot prevents the fabric from
being turned abruptly. Differential feed (page 46)
may be used to prevent stretching the fabric along
bias-cut edges. On inside corners, the knives trim up
to the corner before the needle stitches to it. And on
outside corners, fabric cannot be pivoted, because
threads are chained around the stitch fingers.
Practice these methods, shown below, on trial scraps
of fabric; then serge placemats and napkins as a fast
and easy project.
How to Stitch a Curved Edge
Outside curve. 1) Increase differential feed slightly,
t desired, to ease fabric and reduce overstretching
>eam. Begin trimming at an angle, until desired
imming or stitching position is reached.
2) Stitch, guiding fabric by moving it to the right in
front of presser foot; watch knives, not needle. Lift
presser foot as necessary on tight curves to ease
fabric under presser foot.
3) Overlap previous stitches for circular edges. Stop,
ind lift presser foot. Shift fabric so it is behind the
needle; stitch straight of f edge to prevent gradual
< >oping over edge. (Presser foot has been removed
to show needle position.)
Inside curve. Trim and stitch as for outside curve,
above, guiding fabric by moving it to the left in front
of presser foot. On circular edges, stitch off edge of
fabric (page 57).
39
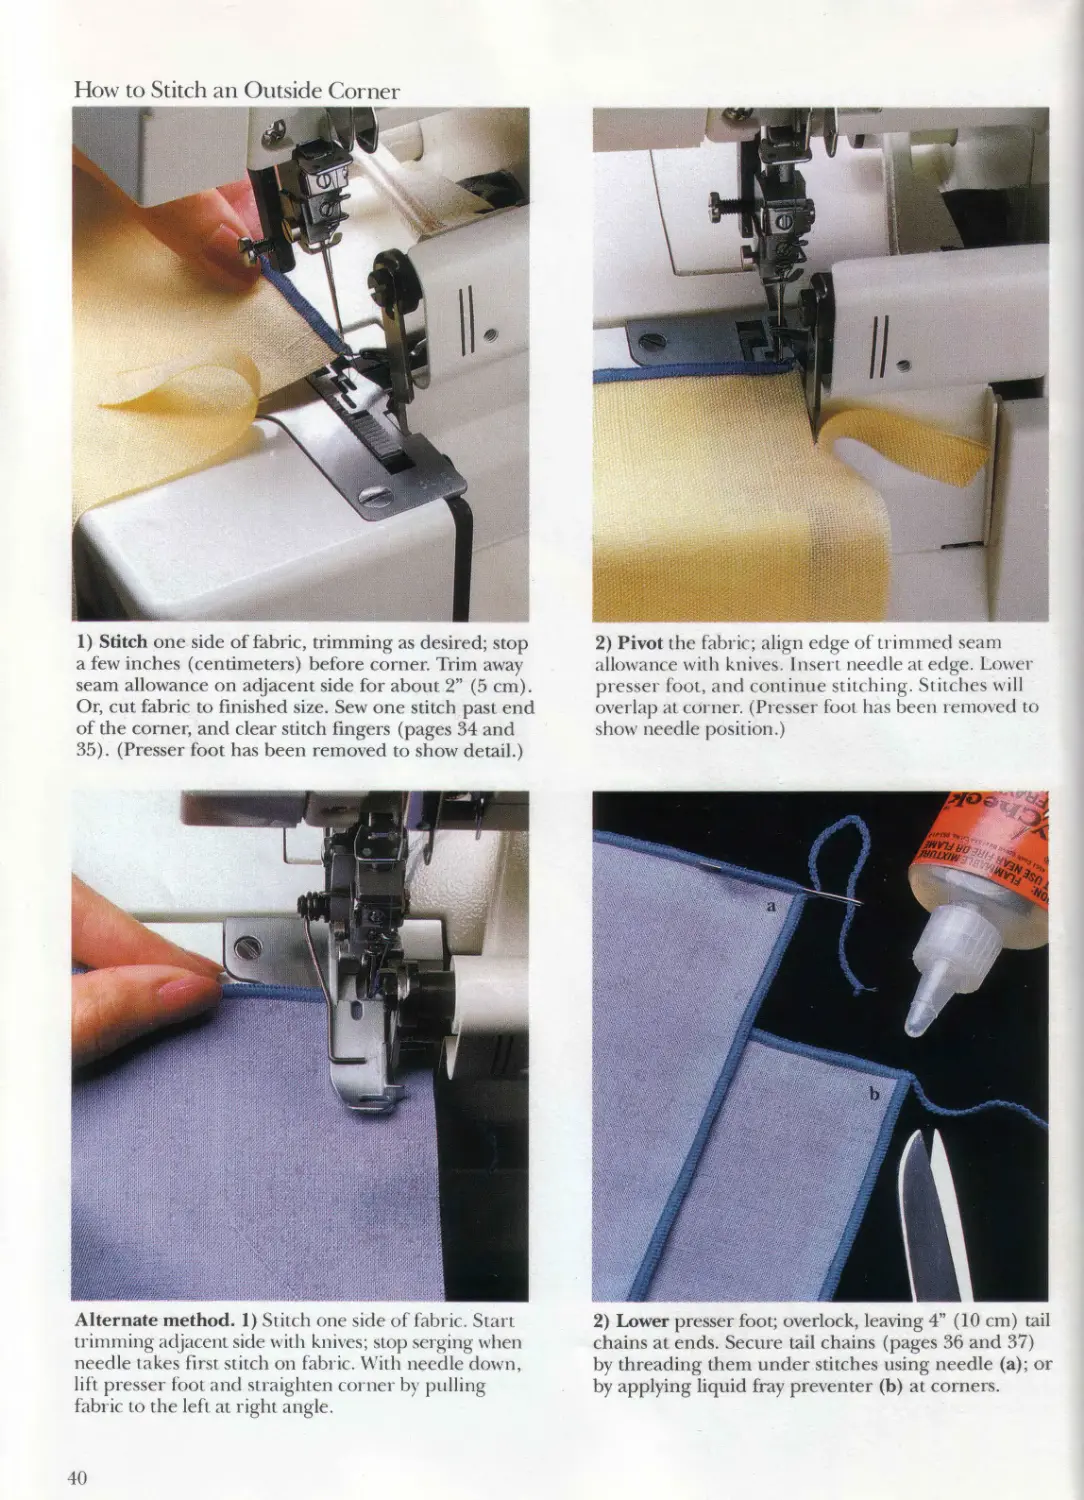
How to Stitch an Outside Corner
1) Stitch one side of fabric, trimming as desired; stop
a few inches (centimeters) before corner. Trim away
seam allowance on adjacent side for about 2” (5 cm).
Or, cut fabric to finished size. Sew one stitch past end
of the corner, and clear stitch fingers (pages 34 and
35). (Presser foot has been removed to show detail.)
2) Pivot the fabric; align edge of trimmed seam
allowance with knives. Insert needle at edge. Lower
presser foot, and continue stitching. Stitches will
overlap at corner. (Presser foot has been removed to
show needle position.)
Alternate method. 1) Stitch one side of fabric. Start
trimming adjacent side with knives; stop serging when
needle takes first stitch on fabric. With needle down,
lift presser foot and straighten corner by pulling
fabric to the left at right angle.
2) Lower presser foot; overlock, leaving 4” (10 cm) tail
chains at ends. Secure tail chains (pages 36 and 37)
by threading them under stitches using needle (a); or
by applying liquid fray preventer (b) at corners.
40
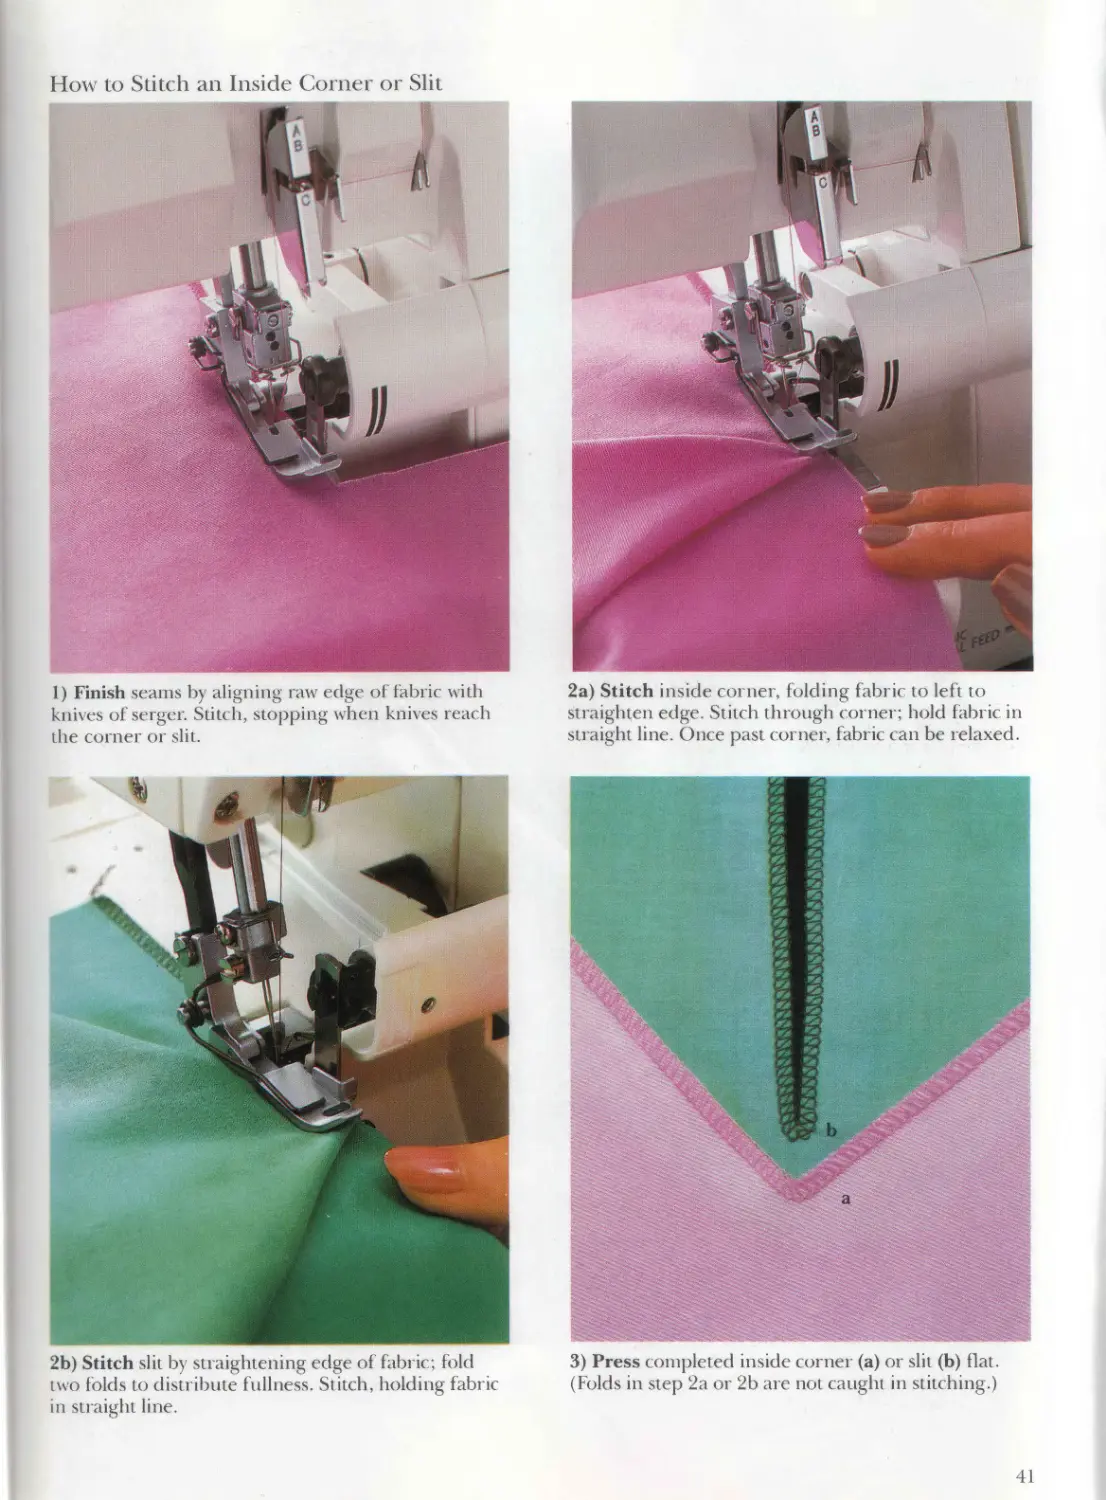
How ю Stitch an Inside Corner or Slit
1) Finish seams by aligning raw edge of fabric with
knives of serger. Stitch, stopping when knives reach
the corner or slit.
2al Stitch inside corner, folding fabric to left to
straighten edge. Stitch through corner; hold fabric in
straight line. Once past corner, fabric can be relaxed.
2b) Stitch slit by straightening edge of fabric; fold
two folds to distribute fullness. Stitch, holding fabric
in straight line.
3) Press completed inside corner (a) or slit (b) flat.
(Folds in step 2a or 2b are not caught in stitching.)
41
Removing Stitches & Jammed Fabric
Even if you arc an experienced sewer, you may have
to rip out stitches occasionally. Sergei stitches look
intricate, but they are actually easy to remote. Also,
fabric may not feed through the serger properly,
causing a fabric jam. If a fabric jam occurs, the
fabric can be removed safely from the machine
without damage.
Removing Stitches, Restitching Seams
There are times when ripping stitches is unavoidable.
After the stitches have been removed, remember that
the excess seam allowance has already been trimmed
away. When restitching the seam, guide the fabric
along the left edge of the knives.
If the seam needs to be deeper, it is not always neces-
sary to remove the stitches first. When the fabric is
lightweight and bulky seam allowances are a concern,
remove the stitches. Otherwise, sew the new seam
and trim away the original stitches in one step.
Removing Jammed Fabric
i hick fabrics that do not feed into the small opening
01 the knife blades may cause the fabric to bunch up
at the knives. The fabric can be compressed prior to
sewing with the sergei by stitching along the edge ot
the fabric on a conventional machine, using a straight
or zigzag stitch. Fabric jams also occur when the stitch
length is too short. Gradually lengthen the stitch
until fie fabric feeds through the serger as desired.
о о
When a tail chain becomes tangled in the stitching
or in the moving parts of the machine, the fabric will
jam under the presser foot This is most likely to
occur in stitches including the chainstitch. Always
bring tail chains over the presser foot to cut them
with the knives, and leave a tail chain at least 4"
(10 cm) long. Also, do not allow trimmings to fall
into the machine; they may catch on the loopers and
cause a jam.
Remove a fabric jam carefully to avoid damaging the
fabric or changing the machine’s timing. Pulling hard
or yanking on the jammed fabric can also bend the
loopers, but it does not release the jam. It is impor-
tant that you stop sewing as soon as you realize the
fabric is not feeding into your serger well and a fabric
jam is starting to occur.
here are two methods for removing fabric jams. If
it is possible to rotate the handwheel and raise the
needles, follow the instructions for the needle-up
method (page 45). In a more serious fabric jam, the
needle cannot be raised; follow the instructions for
the needle-down method *page 45).
How to Remove Chainstitches
1) Pull looper thread out of the last loop in the stitch
at the end of the seam, using a pin; work from the
underside of the fabric.
2) Bring needle thread through to upper side of
fabric; gently pull looper thread to unravel stitches.
Remove the loose needle thread.
43
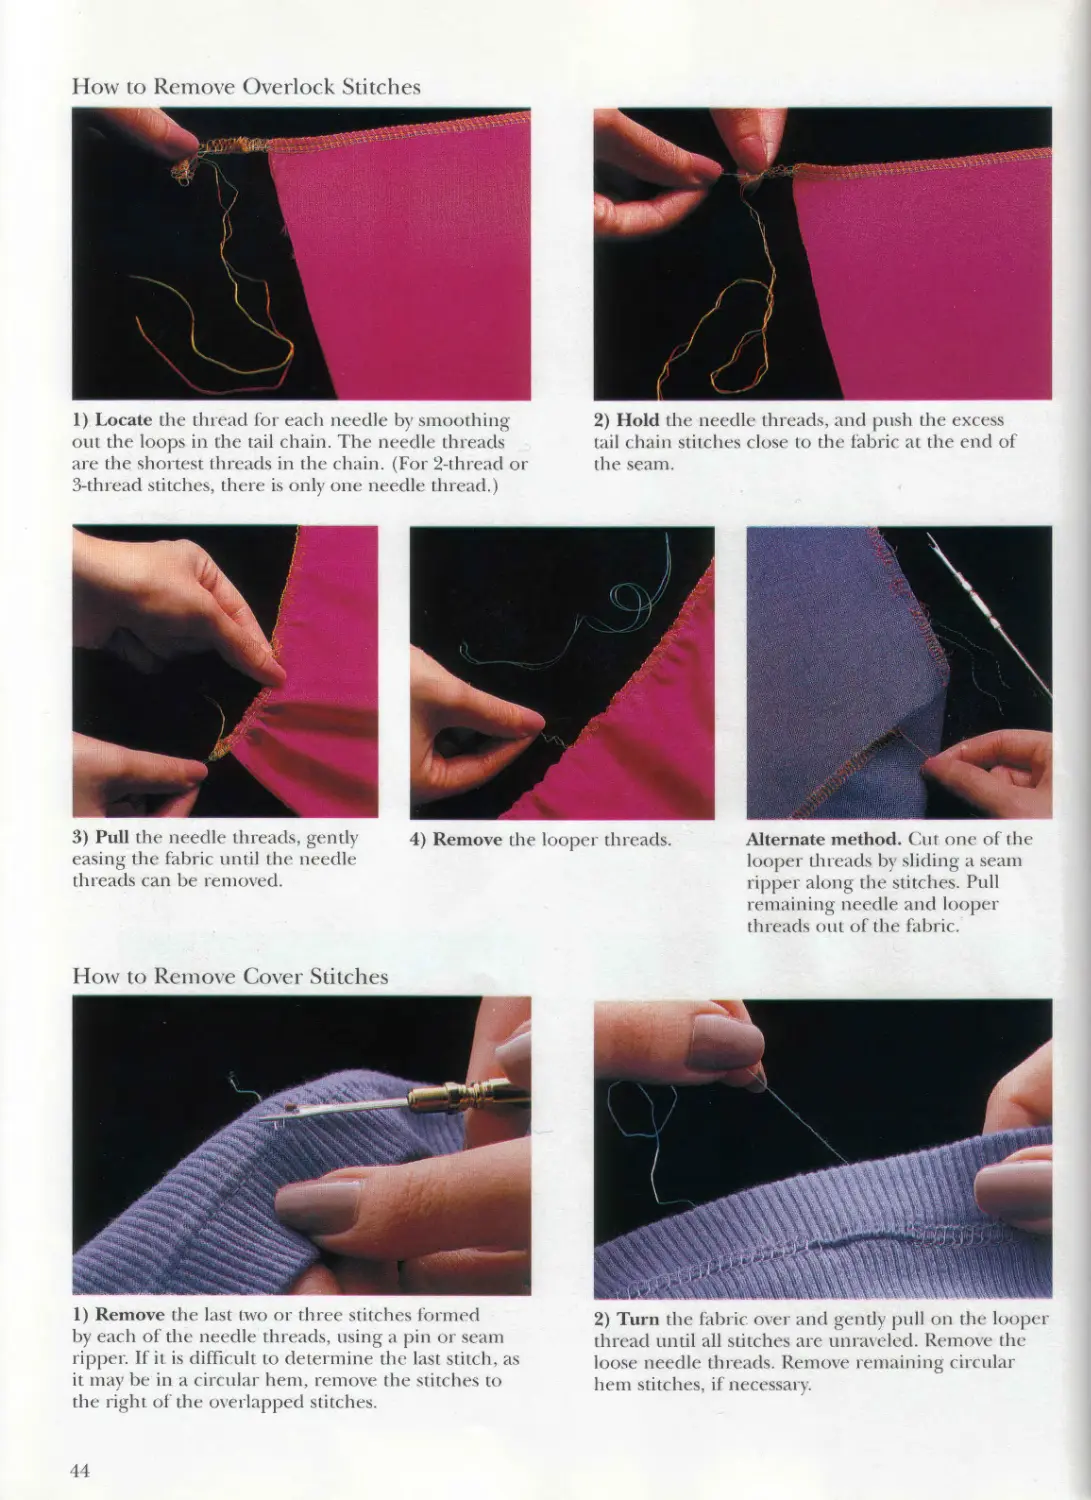
How to Remove Overlock Stitches
1) Locate the thread for ea< h needle by smoothing
out the loops in the tail chain. The needle threads
are the shortest threads in the chain. (For 2-thread or
3-thread stitches, there is only one needle thread.)
2) Hold the needle threads, and push the excess
tail chain stitches close to the fabric at the end of
the seam.
4) Remove the looper threads.
Alternate method. ( ait one of the
looper direads bv sliding a seam
ripper along the stitches. Pull
remaining needle and looper
threads out of the fabric.
3) Pull the needle threads, gently
easing the fabric until the needle
о
threads can be removed.
How to Remove Cover Stitches
1) Remove the last two or three stitches formed
by each of the needle threads, using a pin or seam
ripper. If it is difficult to determine the last stitch, as
it maybe in a circular hem, remove the stitches to
the righ t of the overlapped stitches.
2) Turn the fabric over and gently pull on the looper
thread until all stitches are unraveled. Remove the
loose needle threads. Remove remaining circular
hem stitches, if necessary.
44
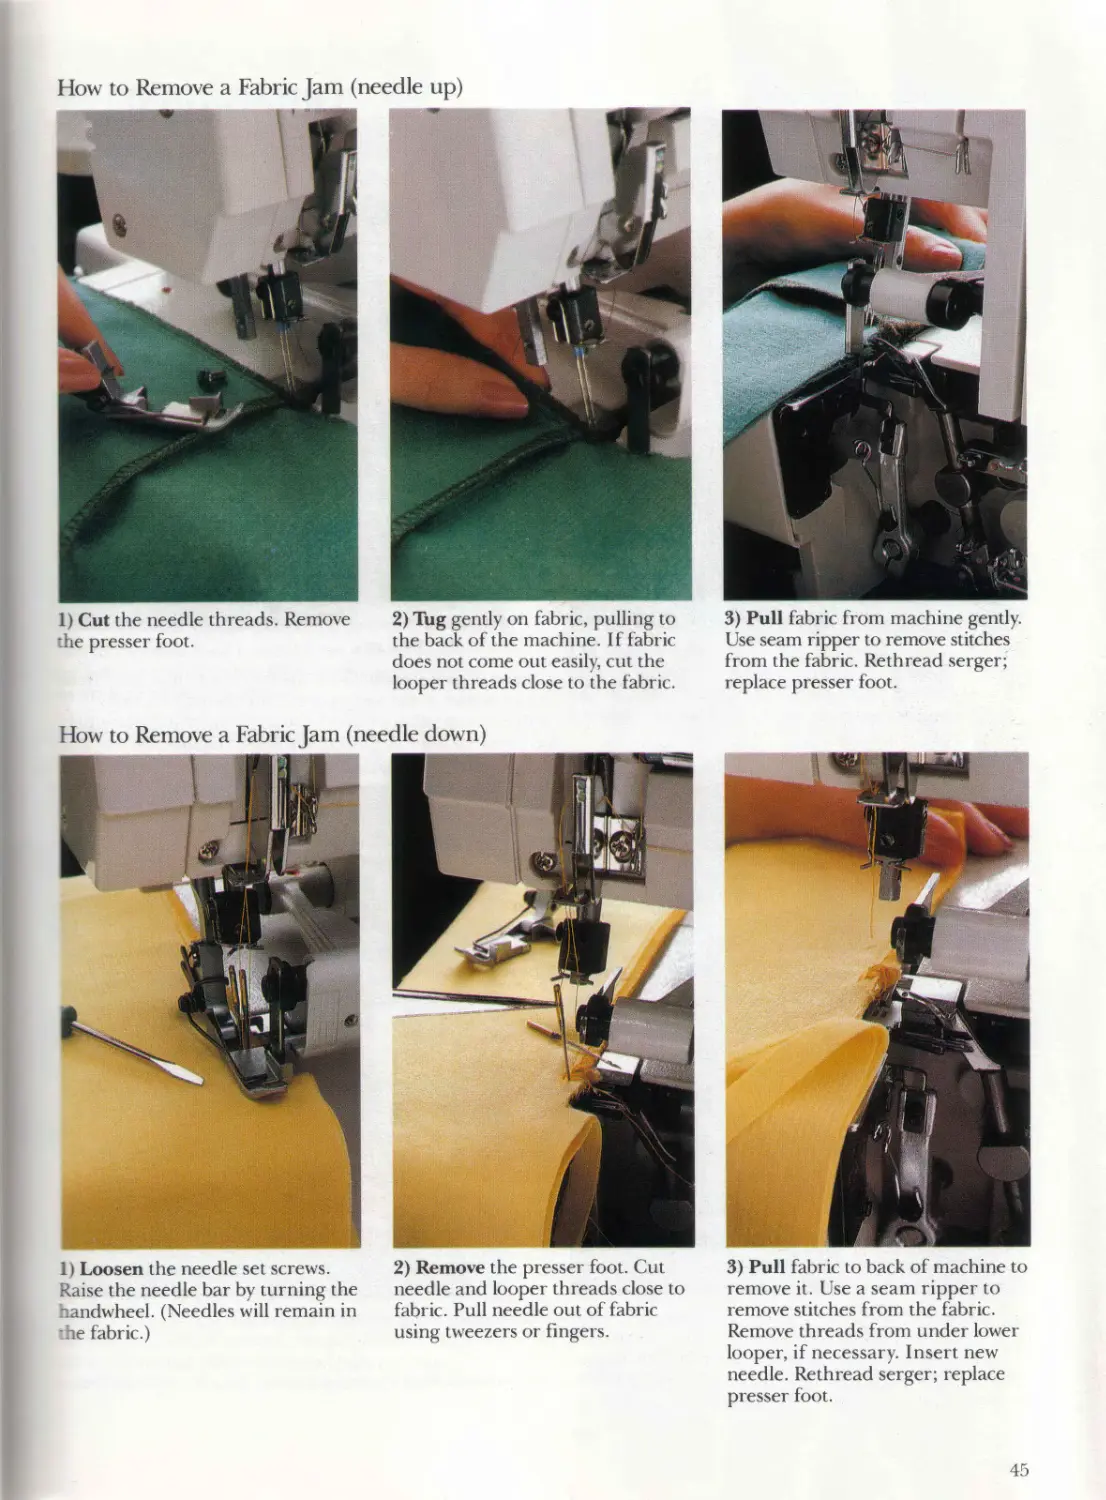
How to Remove a Fabric Jam (needle up)
1) Cut the needle threads. Remove
he presser foot.
2) Tug gently on fabric, pulling to
the back of the machine. If fabric
does not come out easily, cut the
looper threads close to the fabric.
3) Pull fabric from machine gently.
Use seam ripper to remove stitches
from the fabric. Rethread serger;
replace presser foot.
How to Remove a Fabric Jam (needle down)
11 Loosen the needle set screws.
Raise the needle bar by turning the
landwheel. (Needles will remain in
*he fabric.)
2) Remove the presser foot. Cut
needle and looper threads close to
fabric. Pull needle out of fabric
using tweezers or fingers.
3) Pull fabric to back of machine to
remove it. Use a seam ripper to
remove stitches from the fabric.
Remove threads from under lower
looper, if necessary. Insert new
needle. Rethread serger; replace
presser foot.
45
Differential
Feed
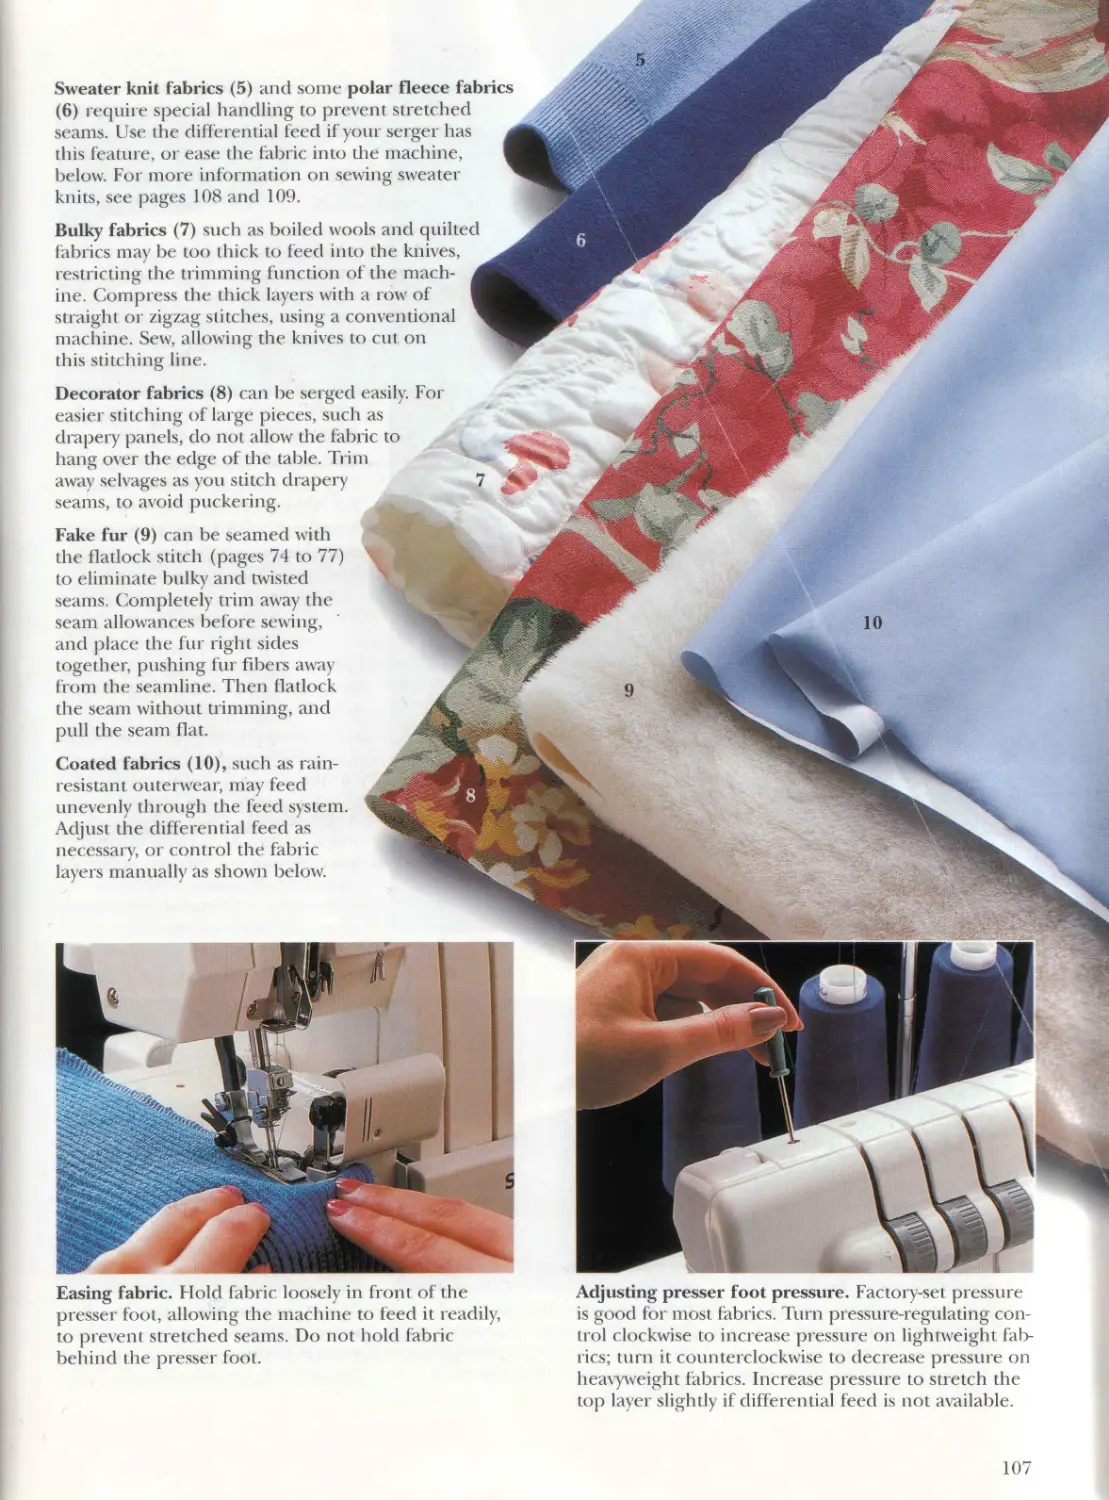
All sewing machines depend on feed dogs to
grip the fabric and move it under the presser
foot. I he differential feed system, available on
most sergers, uses two sets ol feed dogs to allow
change in fabric move ment; the front feed dogs
deliver labric to the needle, and the back teed
dogs move the fabric away after t he stitches are
formed. Differential feed can b< adjusted to
prevent both puckering and overstretching of fab-
ric. It can also be used ю gather labric. 1 he results
are more consistent than when the same things are
controlled by hand.
Feed dogs normally move the- fabric into and away from
the needles at the same pace. This normal, 1:1 ratio
setting is sometimes referred to as 1” on the differential
feed control lever. Adjusting the lever changes the way the
front feed dogs work.
When the differential feed control lever is moved to a smaller
number, or stretch, the front feed dogs push less labric toward
die needle while the back feed dogs < ontinue to carry away the
same amount. Puckers, a common problem when sewing some
slippery or very lightweight fabrics, disappear; the fabric, under
slight tension when the stitches are formed, relaxes as it comes off
the back of the serger. The smaller setting may also improve stitch
when serging rolled hems, and it may increase some stretched effects,
as the lettuce hem (page 62).
When the differential feed control lever is moved to a larger number,
or gather, the front feed dogs push more fabric toward the needle
than the back feed dogs carry away, and extra fabric is included in
each stitch. A setting slightly larger than normal will case the
fabric so wavy seams or edges, caused by stretching bias-cut edges,
loosely wovens, or knits, are eliminated, fabric layers can be eased
or gathered together; lor example, the back shoulder may be
eased to the front shoulder, or a ruffle may be gathered while
serging the seam. The largest differential feed control setting
will gadier many fabrics to about half the original length.
Test-sew before serging projects. Longer stitch length, lighter
labric weight, and softer fabric body will increase the effects.
Also, practice changing the differential feed to a larger
number as you serge around curves; practice returning to a
normal setting as the curves straighten.
D о
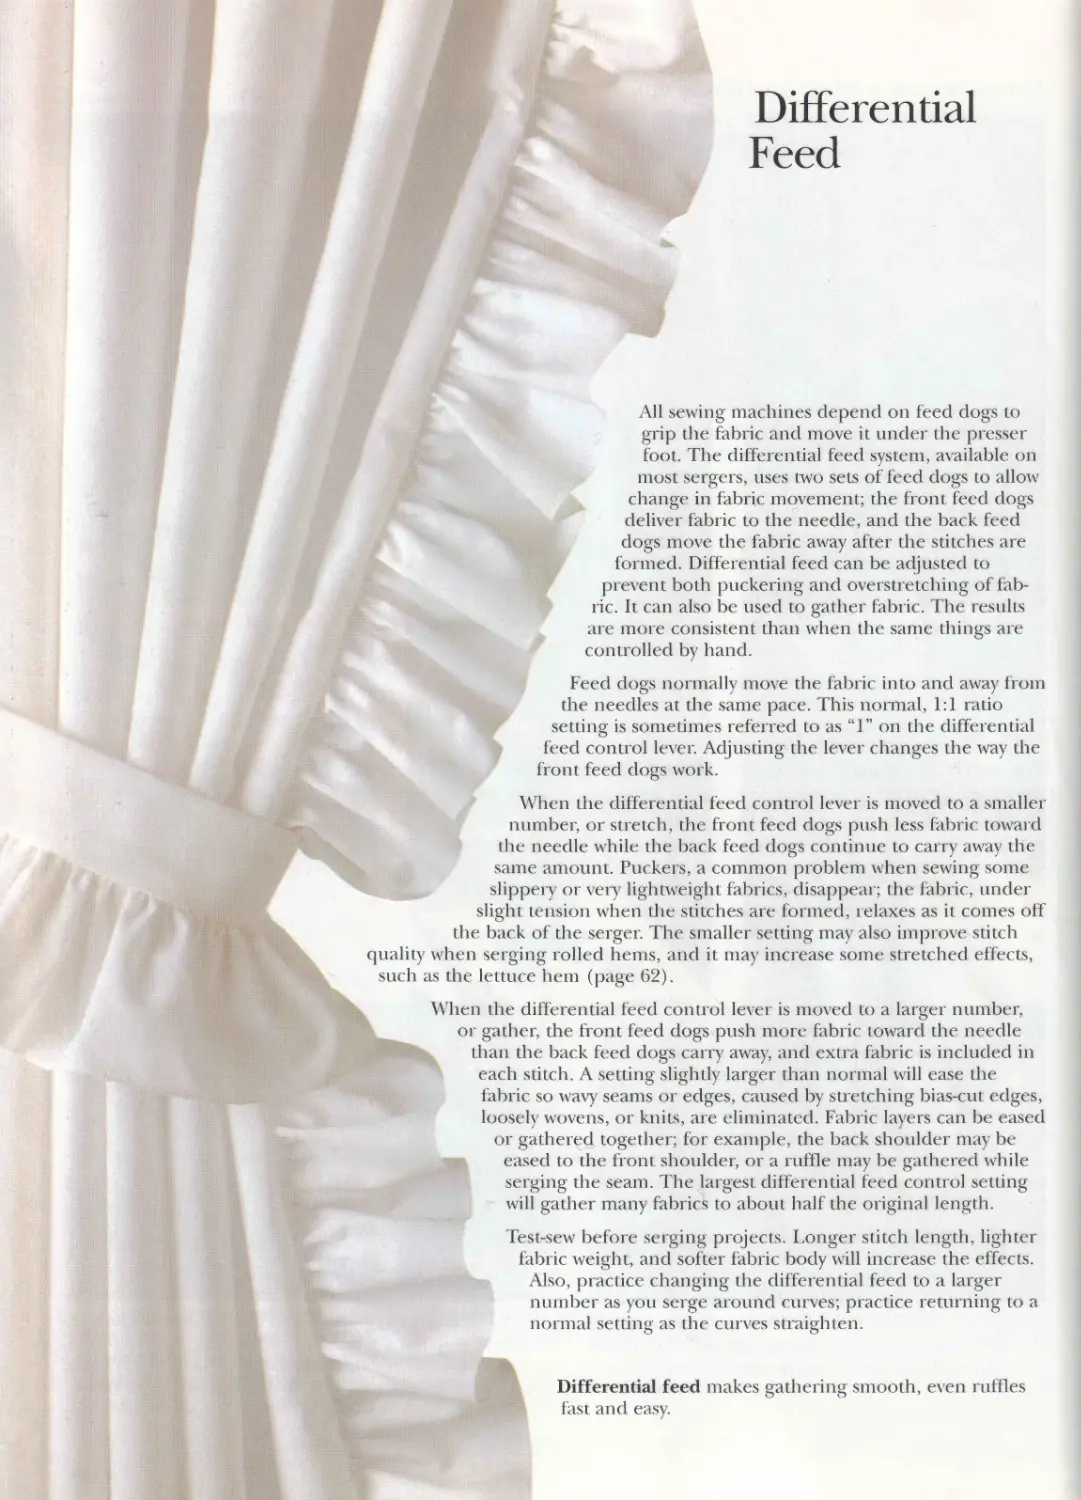
Differential feed makes gathering smooth, even ruffles
Do 7
fast and easy.
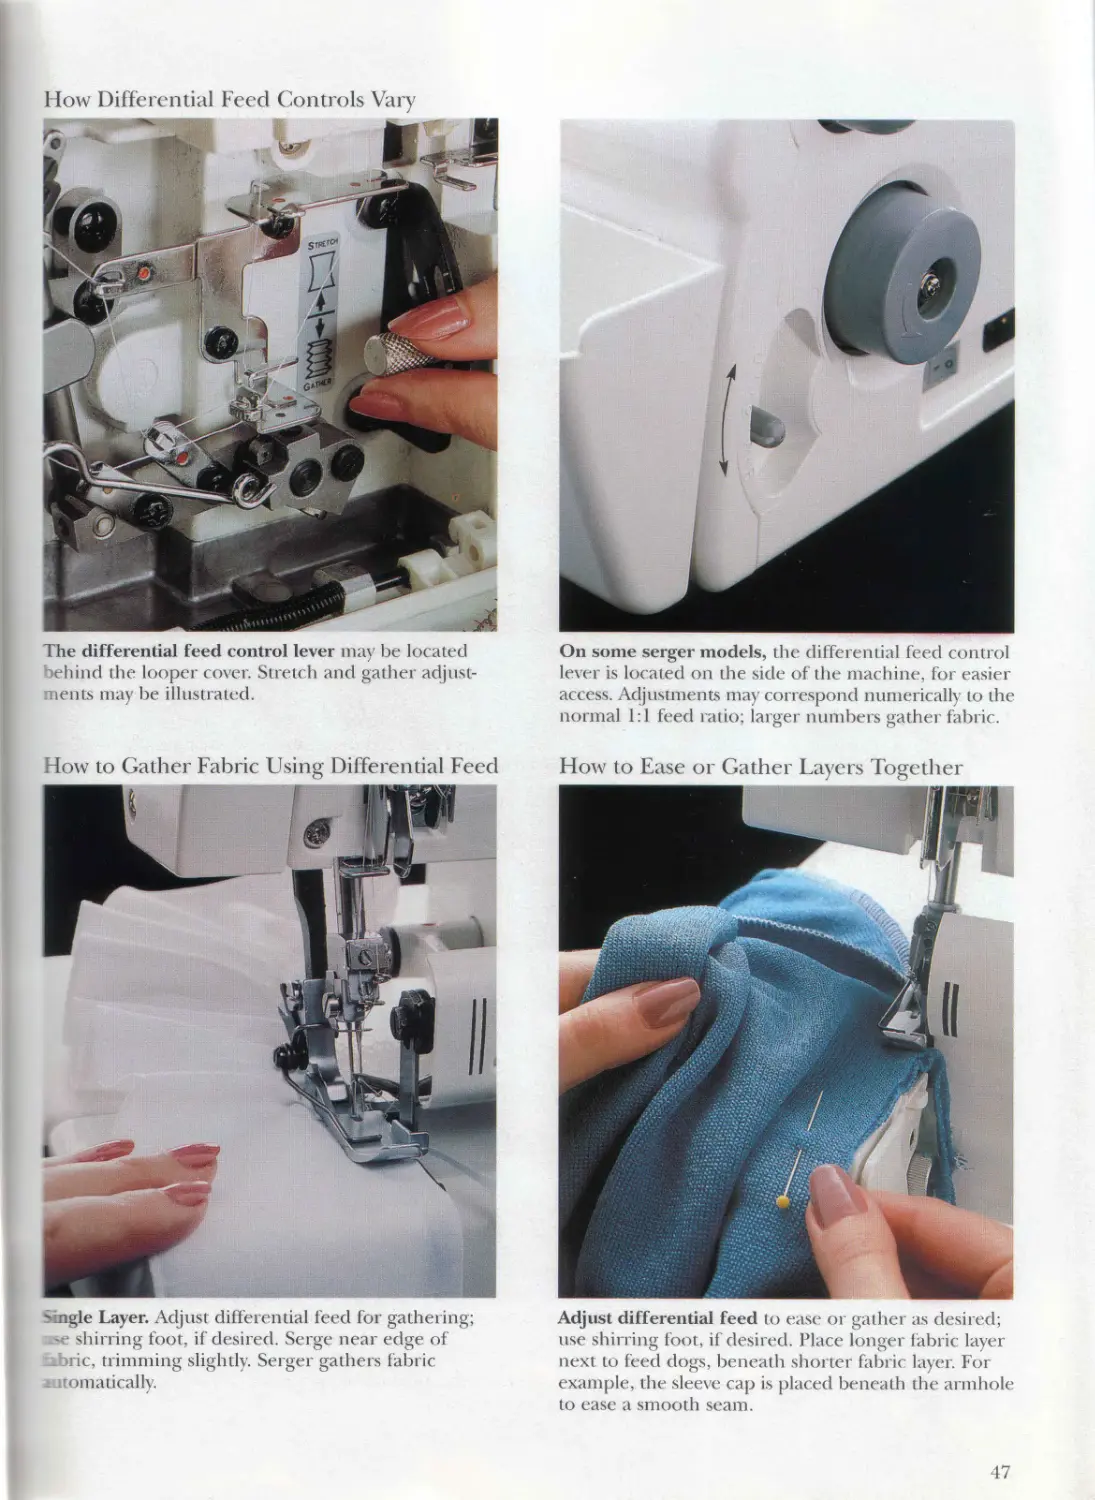
How Differential Feed Controls Vary
On some serger models, the differential feed control
lever is located on the side of the machine, for easier
access. Adjustments may correspond numerically to the
normal 1:1 feed ratio; larger numbers gather fabric.
The differential feed control lever may be located
hind the looper cover. Stretch and gather adjust-
ments may be illustrated.
How to Gather Fabric Using Differential Feed
How to Ease or Gather Lavers Together
Adjust differential feed to ease or gather as desired;
use shirring foot, if desired. Place longer fabric layer
next to feed dogs, beneath shorter fabric layer. For
example, the sleeve cap is placed beneath the armhole
to ease a smooth seam.
Si ngle Layer. Adjust differential feed for gathering;
shirring foot, i desired. Serge near edge of
nic, trimming slightly. Serger gathers fabric
о О z О о
rut* niatically.
47
Seams & Seam Finishes
Serged seams can be used on many garments. Your
instruction manual may include suggestions for
where stitches are used. Garment style, fabric
selection, and personal preference will help you
decide which seams to use. The serged seam alone
is not always suitable for garment construction.
Many seams are sewn using both the serger and the
conventional machine. For example, pants, jackets,
or garments requiring adjustable fit. or seams that
will be subjected to a great amount of stress, should
be sewn with a pressed-open conventional seam and
<iveredged seam allowances.
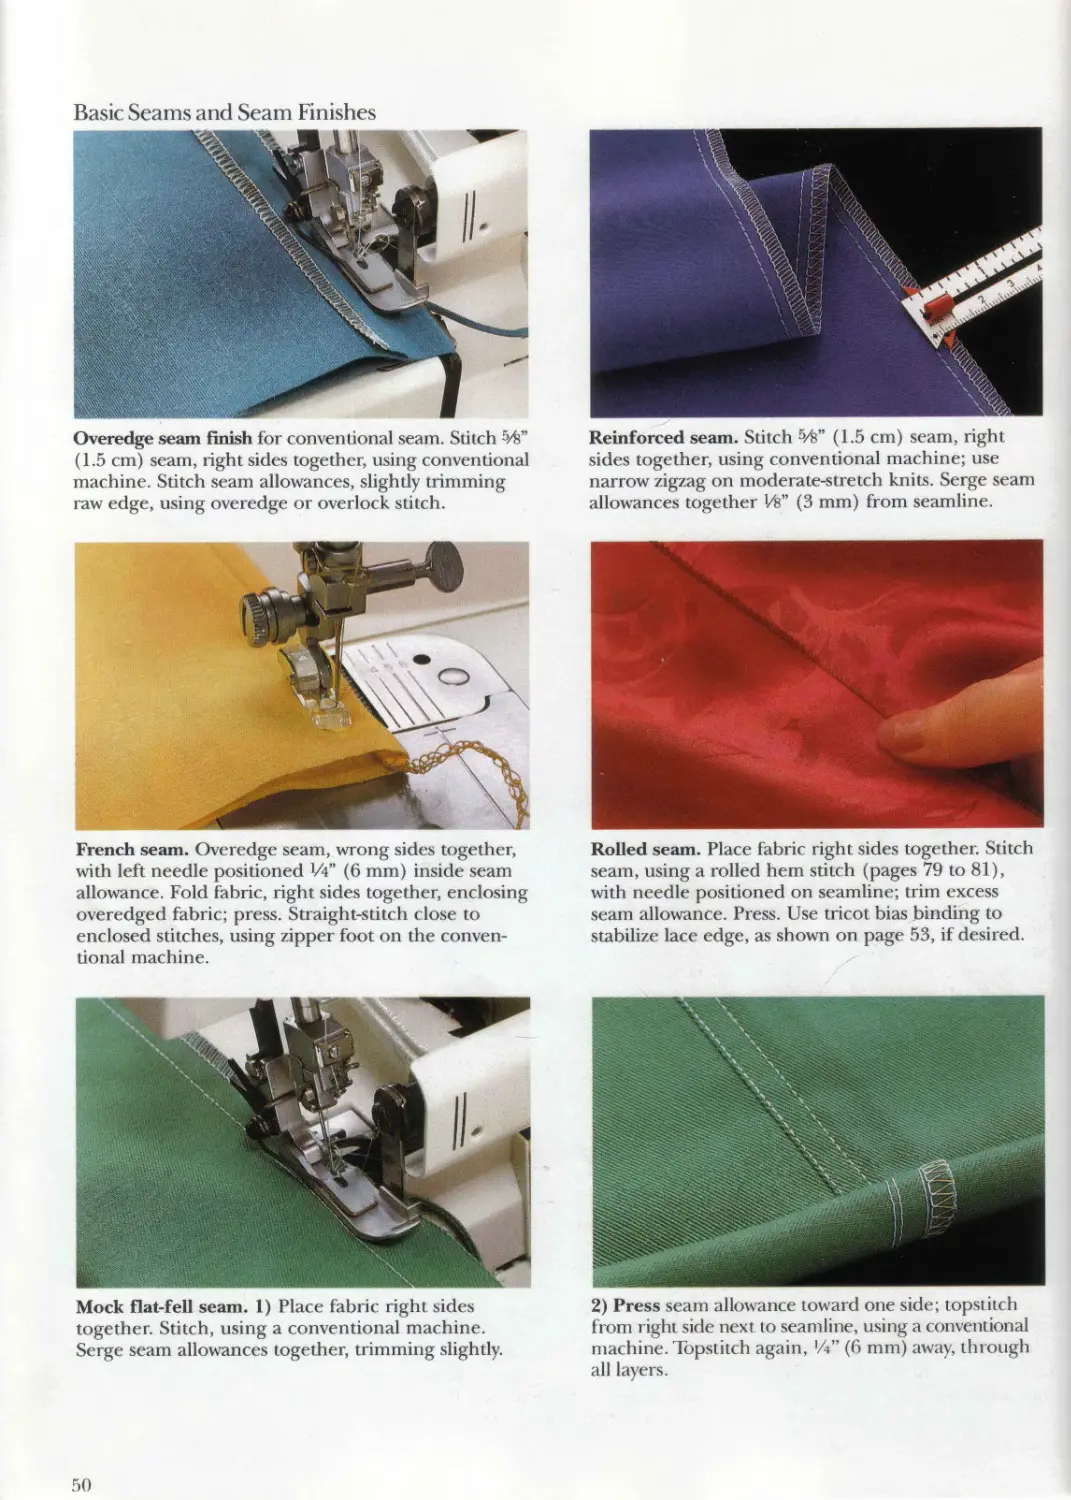
Types of Seams 8c Seam Finishes
Overlock seams (pages 16 and 17) are appropriate
for wovens and knits. Choose the 3-thread overlock
for loosely fitted or nonstressed seams. The more
secure 4-thread and 5-thread safety stitches are used
primarily for wovens because the chainstitch may
pop when stretched. The 3-thread and 4-thread
mock safety stitches, designed for durable stretch
seams, may also be used on wovens.
Overedge seam finish (page 50) for conventional
seams is used when it is desirable to keep the entire
W’ (1.5 cm) seam allowance. It is the best choice for
tailored garments sewn from wools, linens, and silk
suitings. Tt is also recommended whenever fit is
uncertain to allow for letting out seams.
Reinforced seam (page 50) is recommended for
seams that will be stressed.
French seam (page 50) is used for sheers and loosely
woven fabrics. The seam will add bulk, so it is best
used on full, gathered items like skirts and curtains.
Rolled seam (page 50) may be used instead of
French seams for sheers that are firmly woven and
for laces.
Mock flat-fell seam (page 50) is used for denim and
other heavyweight woven fabrics.
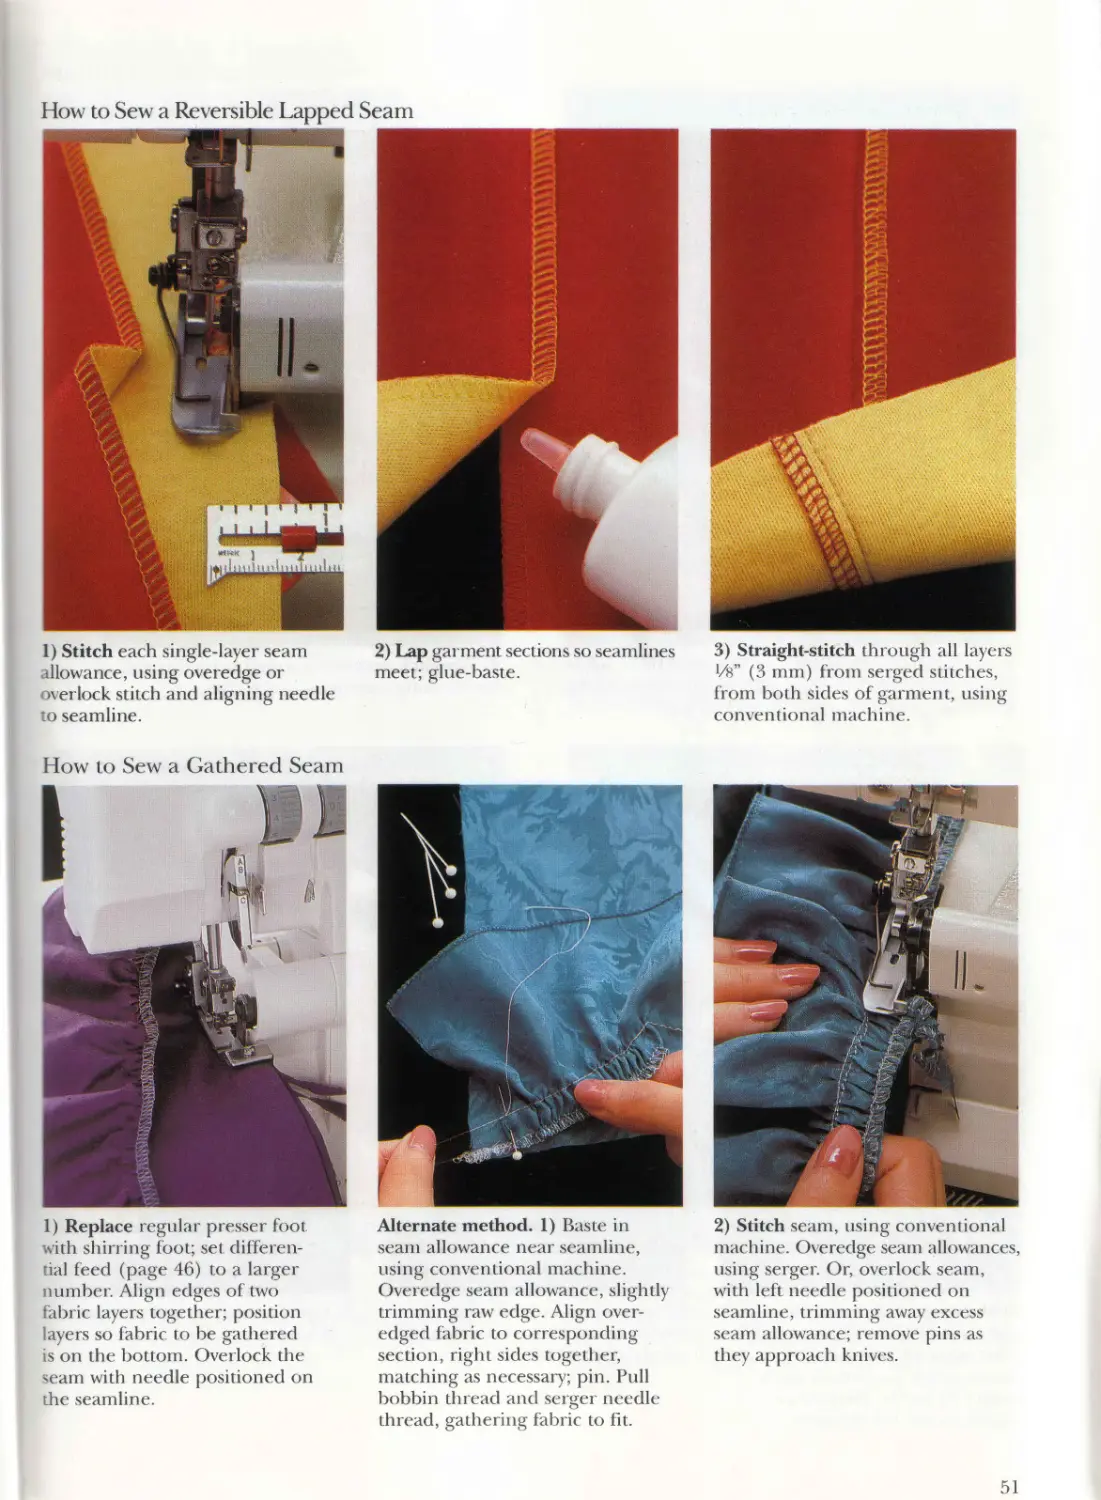
Reversible lapped seam (page 51) is used for
reversible garments or for thick, loosely woven
fabrics to provide added strength.
Gathered seam (page 51) is finished in one easy
step using differential feed and a shirring foot. An
alternate method uses the conventional machine
with the serger.
Mock flatlock seam (page 52) is used for a decorative
effect, with decorative thread used in the upper looper.
Flatlock on a fold (page 52) is used for the decora-
tive effect of a flatlock seam on fabric that has been
folded and stitched.
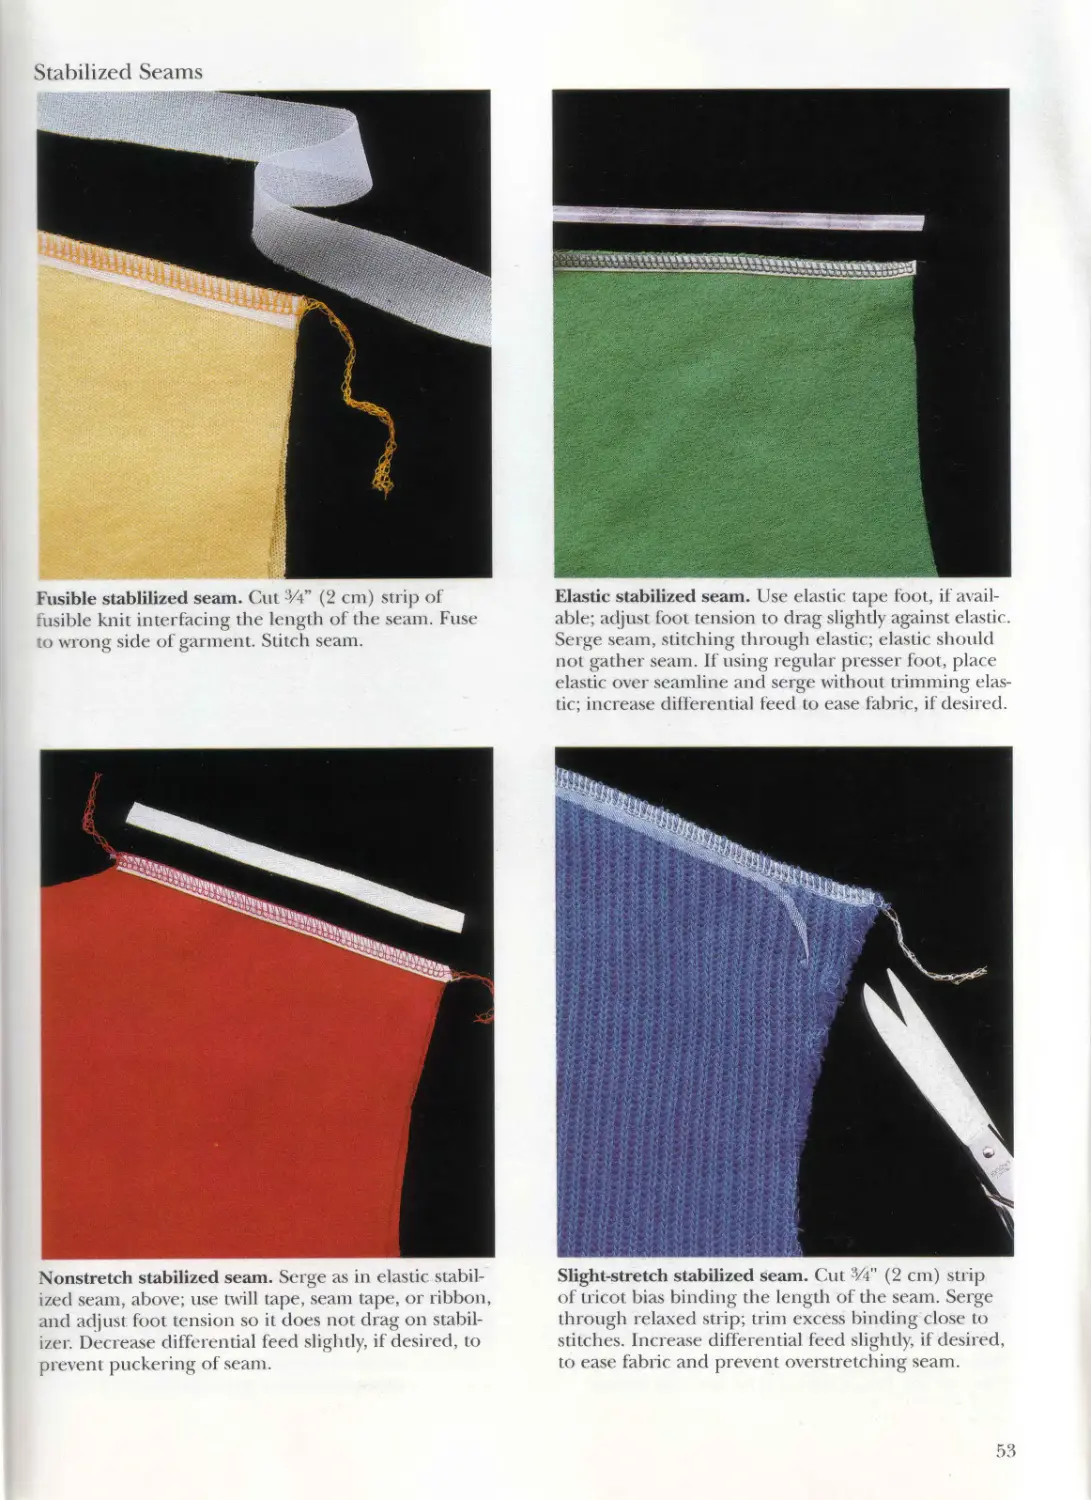
Types of Stabilized Seams
There are several methods for stabilizing seams in
serger garment construction. The type of fabric you
are sewing and the desired effect will determine
which method you choose.
Fusible stabilized seam (page 53) uses fusible
interfacing strips to stabilize seams. Interfacing can
also be used as a stable base for decorative edge
finishes on stretchy knit or bias-cut fabrics.
Elastic stabilized seam (page 53) uses transpar-
ent elastic to allow full stretch and recovery in a
serged seam, bin prevents fabric from stretching
out of shape.
Nonstretch stabilized seam (page 53) uses twill tape,
seam tape, or ribbon to prevent stretching of the
fabric at the seamline.
Slight-stretch stabilized seam (page 53) uses tricot
bias binding to reinforce and stabilize a seam where
slight stretch is desired. Use this method for stabi-
lizing seams in sweater knits and T-shirt knits, which
need support without completely restricting the
stretch of the fabric.
49
Basic Seams and Seam Finishes
Reinforced seam. Stitch 5/8” (1.5 cm) seam, right
sides together, using conventional machine; use
narrow zigzag on moderate-stretch knits. Serge seam
allowances together Ve” (3 mm) from seamline.
Overedge seam finish for conventional seam. Stitch %"
(1.5 cm) seam, right sides together, using conventional
machine. Stitch seam allowances, slightly trimming
raw edge, using overedge or overlock stitch.
Rolled seam. Place fabric right sides together. Stitch
seam, using a rolled hem stitch (pages 79 to 81),
with needle positioned on seamline; trim excess
seam allowance. Press. Use tricot bias binding to
stabilize lace edge, as shown on page 53, if desired.
French seam. Overedge seam, wrong sides together,
with left needle positioned 1/4” (6 mm) inside seam
allowance. Fold fabric, right sides together, enclosing
overedged fabric; press. Straight-stitch close to
enclosed stitches, using zipper foot on the conven-
tional machine.
Mock flat-fell seam. 1) Place fabric right sides
together. Stitch, using a conventional machine.
Serge seam allowances together, trimming slightly.
2) Press seam allowance toward one side; topstitch
from right side next to seamline, using a conventional
machine. Topstitch again, 1 4” (6 mm) away, through
all layers.
50
How to Sew a Reversible Lapped Seam
1) Stitch each single-layer seam
ilowance, using overedge or
verlock stitch and aligning needle
to seamline.
3) Straight-stitch through all layers
1«" (3 mm) from, serged stitches,
from both sides of garment, using
conventional machine.
2) Lap garment sections so seamlines
meet; glue-baste.
How to Sew a Gathered Seam
1) Replace regular presser foot
with shirring foot; set differen-
al feed (page 46) to a larger
number. Align edges of two
fabric layers together; position
layers so fabric to be gathered
is on the bottom. Overlock the
seam with needle positioned on
the seamline.
Alternate method. 1) Baste in
seam allowance near seamline,
using conventional machine.
Overedge seam allowance, slightly
trimming raw edge. Align over-
edged labric to corresponding
section, right sides together,
matching as necessary; pin. Pull
bobbin thread and serger needle
thread, gathering fabric to fit.
2) Stitch seam, using conventional
machine. Overedge seam allowances
using serger. Or, overlock seam,
with left needle positioned on
seamline, trimming away excess
seam allowance; remove pins as
they approach knives.
51
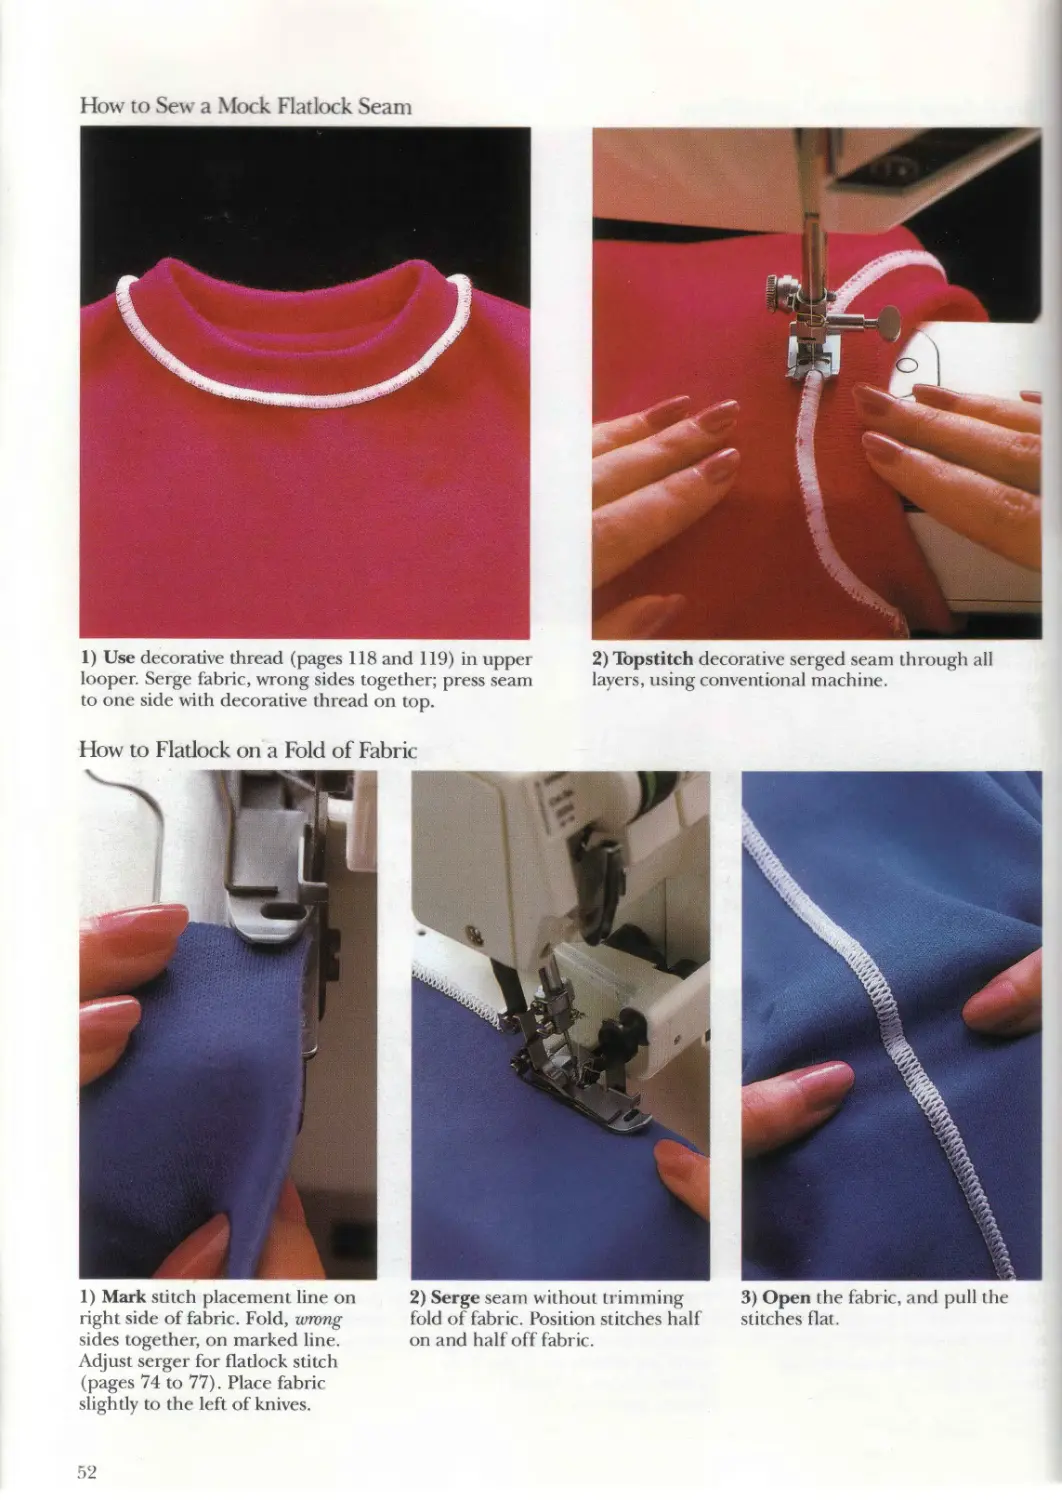
How to Sew a Mock Flatlock Seam
1) Use decorative thread (pages 118 and 119) in upper
looper. Serge fabric, wrong sides together; press seam
to one side with decorative thread on top.
2) Topstitch decorative serged seam through all
layers, using conventional machine.
How to Flatlock on a Fold of Fabric
2) Serge seam without trimming
fold of fabric. Position stitches half
on and half off fabric.
3) Open the fabric, and pull the
stitches flat.
1) Mark stitch placement line on
right side of fabric. Fold, wrong
sides together, on marked line.
Adjust serger for flatlock stitch
(pages 74 to 77). Place fabric
slightly to the left of knives.
52
Stabilized Seams
Fusible stabilized seam. Cut 3/4” (2 cm) strip of
fusible knit interfacing the length of the seam. Fuse
«> wrong side of garment. Stitch seam.
Elastic stabilized seam. Use elastic tape foot, il avail-
able; adjust foot tension to drag slightly against elastic.
Serge seam, stitching through elastic; elastic should
not gather seam. If using regular presser foot, place
elastic over seamline and serge without trimming elas-
tic; increase differential feed to ease fabric, if desired.
Nonstretch stabilized seam. Serge as in elastic stabil-
ized seam, above; use twill tape, seam tape, or ribbon,
and adjust foot tension so it does not drag on stabil-
izer. Decrease differential feed slightly, if desired, to
prevent puckering of seam.
Slight-stretch stabilized seam. Cut W (2 cm) strip
of tricot bias binding the length of the seam. Serge
through relaxed strip: trim excess binding close to
stitches. Increase differential feed slightly, if desired,
to ease fabric and prevent overstretching seam.
53
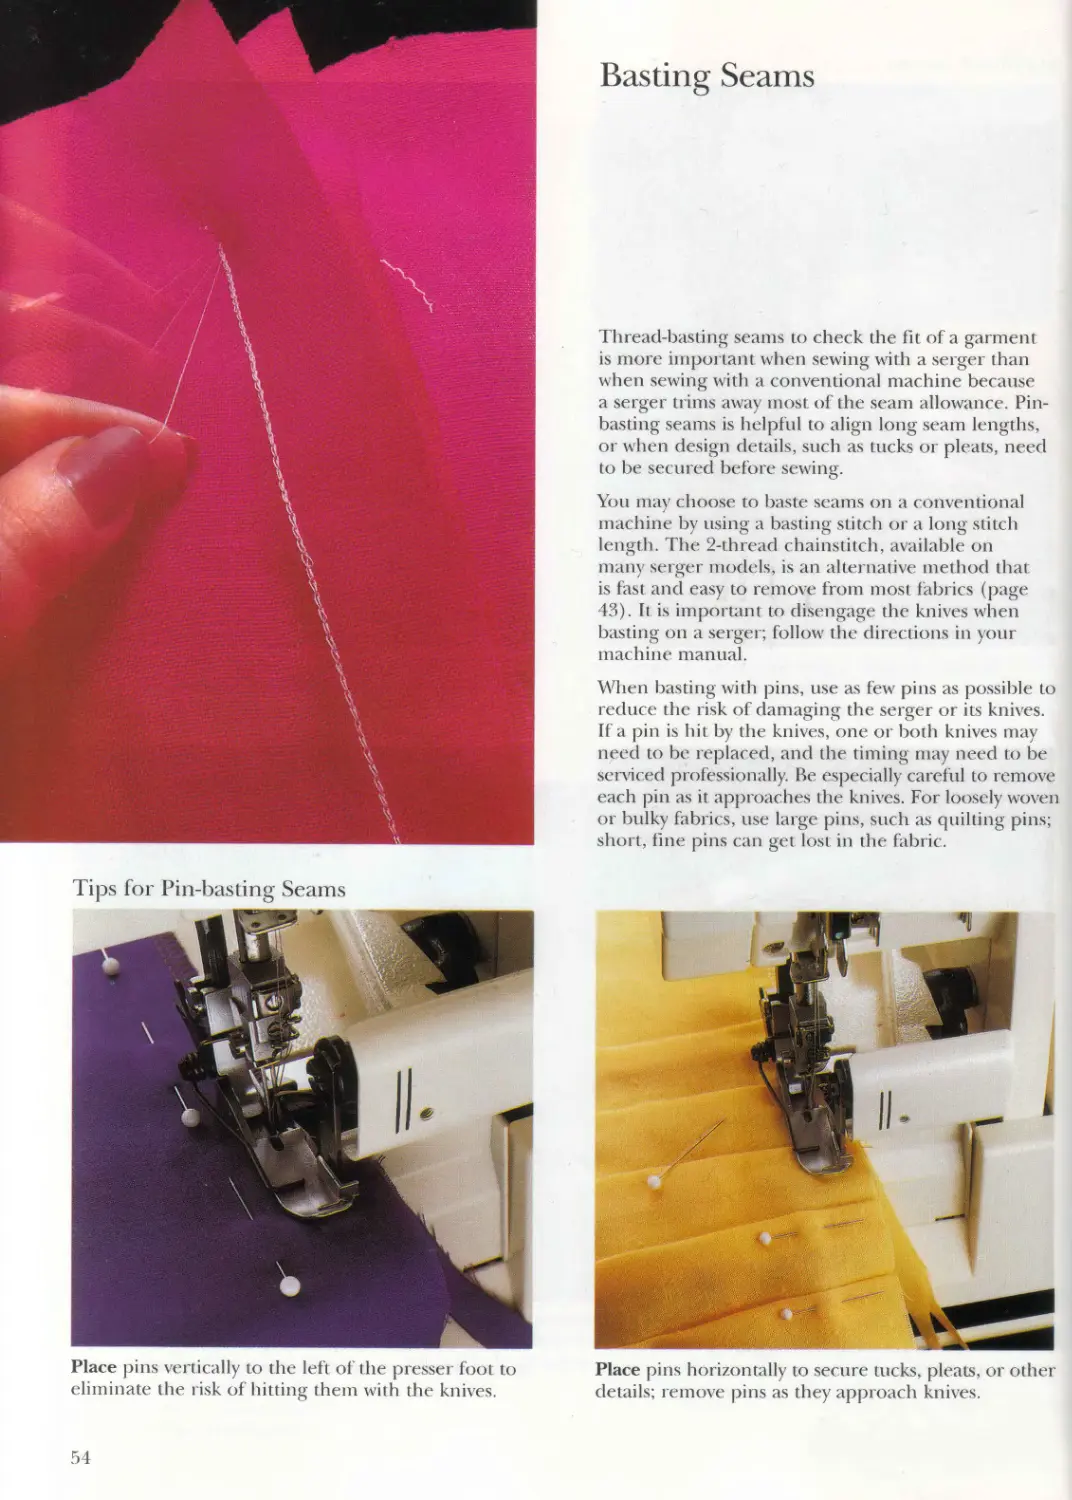
Basting Seams
Thread-basting seams to check the fit of a garment
is more important when sewing with a serger than
when sewing with a conventional machine because
a serger trims away most of the seam allowance. Pin-
basting seams is helpful to align long seam lengths,
or when design details, such as tucks or pleats, need
to be secured before sewing.
You may choose to baste seams on a conventional
machine by using a basting stitch or a long stitch
length. The 2-th read chainstitch, available on
many serger models, is an alternative method that
is fast and easy to remove from most fabrics (page
43). It is important to disengage the knives when
basting on a serger; follow the directions in your
machine manual.
When basting with pins, use as few pins as possible to
reduce the risk of damaging the serger or its knives.
If a pin is hit by the knives, one or both knives may
need to be replaced, and the timing may need to be
serviced professionally. Be especially careful to remove
each pin as it approaches the knives. For loosely woven
or bulky fabrics, use large pins, such as quilting pins;
short, fine pins can get lost in the fabric.
Tips for Pin-basting Seams
Place pins vertically to the left of the presser foot to
eliminate the risk of hitting them with the knives.
Place pins horizontally to secure tucks, pleats, or other
details; remove pins as the) approach knives.
«
№%<
ft
X**». W*1* »и*
*
нмйййймйя
К5ХЙЙЙ
»wywtMFO а
IfBWWWWOtg
W*r
*т^*Н**И^*<
WH(»W»
Ф МАЛ
V
*
ЯГИНгМг
^вЧгЧгЧА >
IAMAj
*
«ММ.МлАМ
•• АЛиАяА» 4 <№' 4;?
%»/ * # Kr < Ч<’Ч фФя^#1#’ j
• 1%м
.МЛЛШАгнЩ
1*4
I
MMu *’
i.Li, T<'A
•Лг
9^.**
ЧЧМ
*W
Isi \
t
a
«
*.
Н ¥\х
'-lu
m.. a
* *% *.
Alw
A
♦JL
<
♦ЧАД
«.
*.
14^
.' f
K^il
*
А»ЛЛ
‘ Stu*
. .«
ж
f
♦HfrArW-»
I
* 4s
>**'
-
>
*r<
♦ *.’
%
M <»A *••
I
.*,* * . 4 V*:4
Як
%»<
.K<.
«<,
A.A
•»
1 *>«+•»<
:x«
л *• V%
ъ- K4. ♦. ♦
м %
W*1-,-. :'%:A
-W"- Mb*
<
• ’ Ь«Л ifed4>.<%.
Л* **<*♦ ₽U-
Wj V* »-
*«A V4 *f* ?A,«
* r ММЬ А«,
^ч« i; г\*Ул
ч>-* V V
f*V**'*we •
'•til "W
* • V <b»MrM»
.,< Пх*-Ч
»ЛЧМ»<-АЛ,л
; > V*» *-*>, * А» A. 4. V Л» ♦» U-
$v* иМй0^^^%1
♦л*-*.*>. M
•. Л*‘ 4*r> * *' ’ * *
4 * M** • Л •1 * * ’
'AA*A t <♦« • Й^’*4 ч
и Ж.* «ххЧ«М^ а
* >• v
’2’ „ «
♦ .**
-X X *' A* *
♦
A
ч
* ” il ’ ' / '
Ь
M*
♦^V
X
*♦ J •A»*'
"• ;^<5Г^**<
О . 41* -
Ш
*
KKlU <
• • •
41J
%*
i •<
4 " *
к , *r
'4*'^-
t 71АИ1Д
Ш...Ж
i В
* * • •*
* *
ijk m*> <*<.**• *-* < vL**
. ’ >„ .. ..,»& v aw^ *
&
'
A:
?-ЖЖ:..'’
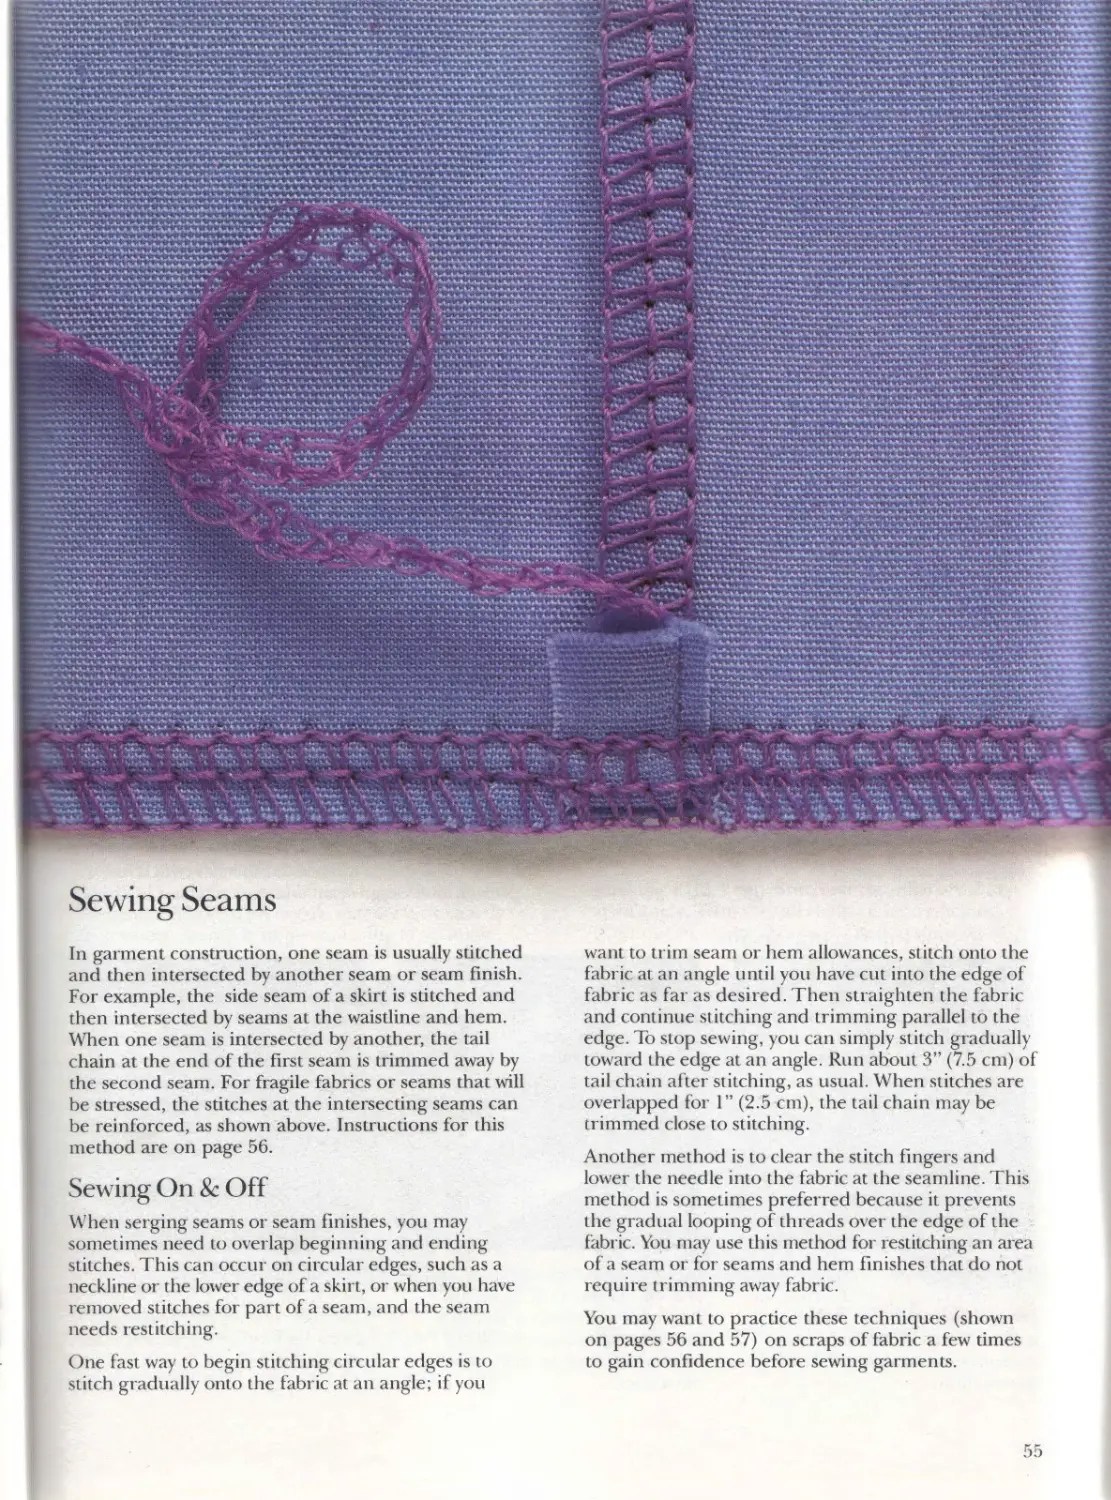
Sewing Seams
In garment construction, one seam is usually stitched
and then intersected by another seam or seam finish.
For example, the side seam of a skirt is stitched and
then intersected by seams at the waistline and hem.
When one seam is intersected by another, the tail
chain at the end of the first seam is trimmed away by
the second seam. For fragile fabrics or seams that will
be stressed, the stitches at the intersecting seams can
be reinforced, as shown above. Instructions for this
method are on page 56.
Sewing On & Off
When serging seams or seam finishes, you may
sometimes need to overlap beginning and ending
stitches. This can occur on circular edges, such as a
neckline or the lower edge of a skirt, or when you have
removed stitches for part of a seam, and the seam
needs restitching.
One fast way to begin stitching circular edges is to
stitch gradually onto the fabric at an angle; if you
want to trim seam or hem allowances, stitch onto the
fabric at an angle until you have cut into the edge of
fabric as far as desired. Then straighten the fabric
and continue stitching and trimming parallel to the
edge. To stop sewing, you can simply stitch gradually
toward the edge at an angle. Run about 3” (7.5 cm) of
tail chain after stitching, as usual. When stitches are
overlapped for 1” (2.5 cm), the tail chain may be
trimmed close to stitching.
Another method is to clear the stitch fingers and
lower the needle into the fabric at the seamline. This
method is sometimes preferred because it prevents
the gradual looping of threads over the edge of the
fabric. You may use this method for restitching an area
of a seam or for seams and hem finishes that do not
require trimming away fabric.
You may want to practice these techniques (shown
on pages 56 and 57) on scraps of fabric a few times
to gain confidence before sewing garments.
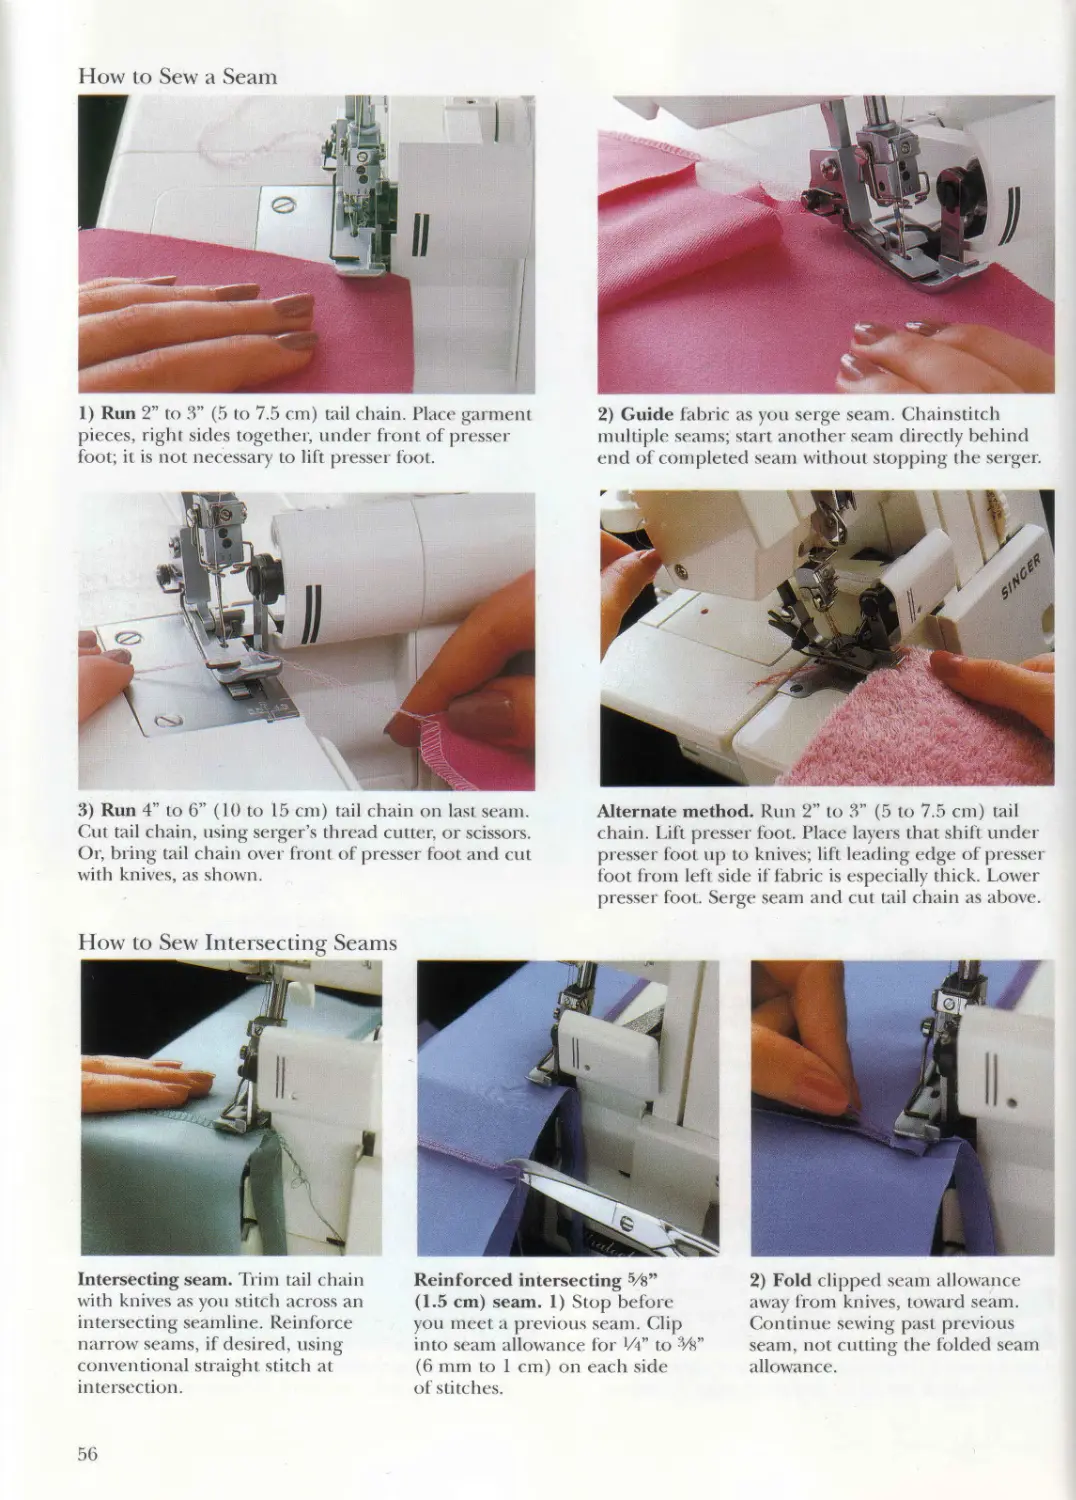
How to Sew a Seam
1) Run 2” to 3” (5 to 7.5 cm) tail chain. Place garment
pieces, right sides together, under front of presser
foot; it is not necessary to lift presser foot.
2) Guide labric as you serge seam. Chainstitch
multiple seams; start another seam directly behind
end of completed seam without stopping the serger.
3) Run 4” to 6’ (10 to 15 cm tail chain on last seam.
( ut tail chain, using serger’s thread cutter, or scissors.
Or, bring tail chain o\er front of presser foot and cut
with knives, as shown.
Alternate method. Run 2” to 3” (> to 7.5 c n) tail
chain. Lift presser foot. Place layers that shift under
presser toot up to knives; lilt leading edge of presser
foot' rom left side if fabric is especially thick. Lower
presser foot. Serge seam and cut tail chain as above.
How to Sew Intersecting Seams
I ntersecting seam. Trim tail chain
with knives as you stitch across an
intersecting seainline. Reinforce
narrow seams, if desired, using
conventional straight stitch at
intersection.
Reinforced intersecting 5/s”
(1.5 cm i seam. 1) Stop before
you meet a previous seam. Clip
into seam allowance for lA” to ‘Vs’
(6 mm to 1 cm) on each side
of stitches.
2) Fold clipped seam allowance
away from knives, toward seam.
Continue sewing past previous
seam, not cutting the folded seam
allowance.
56
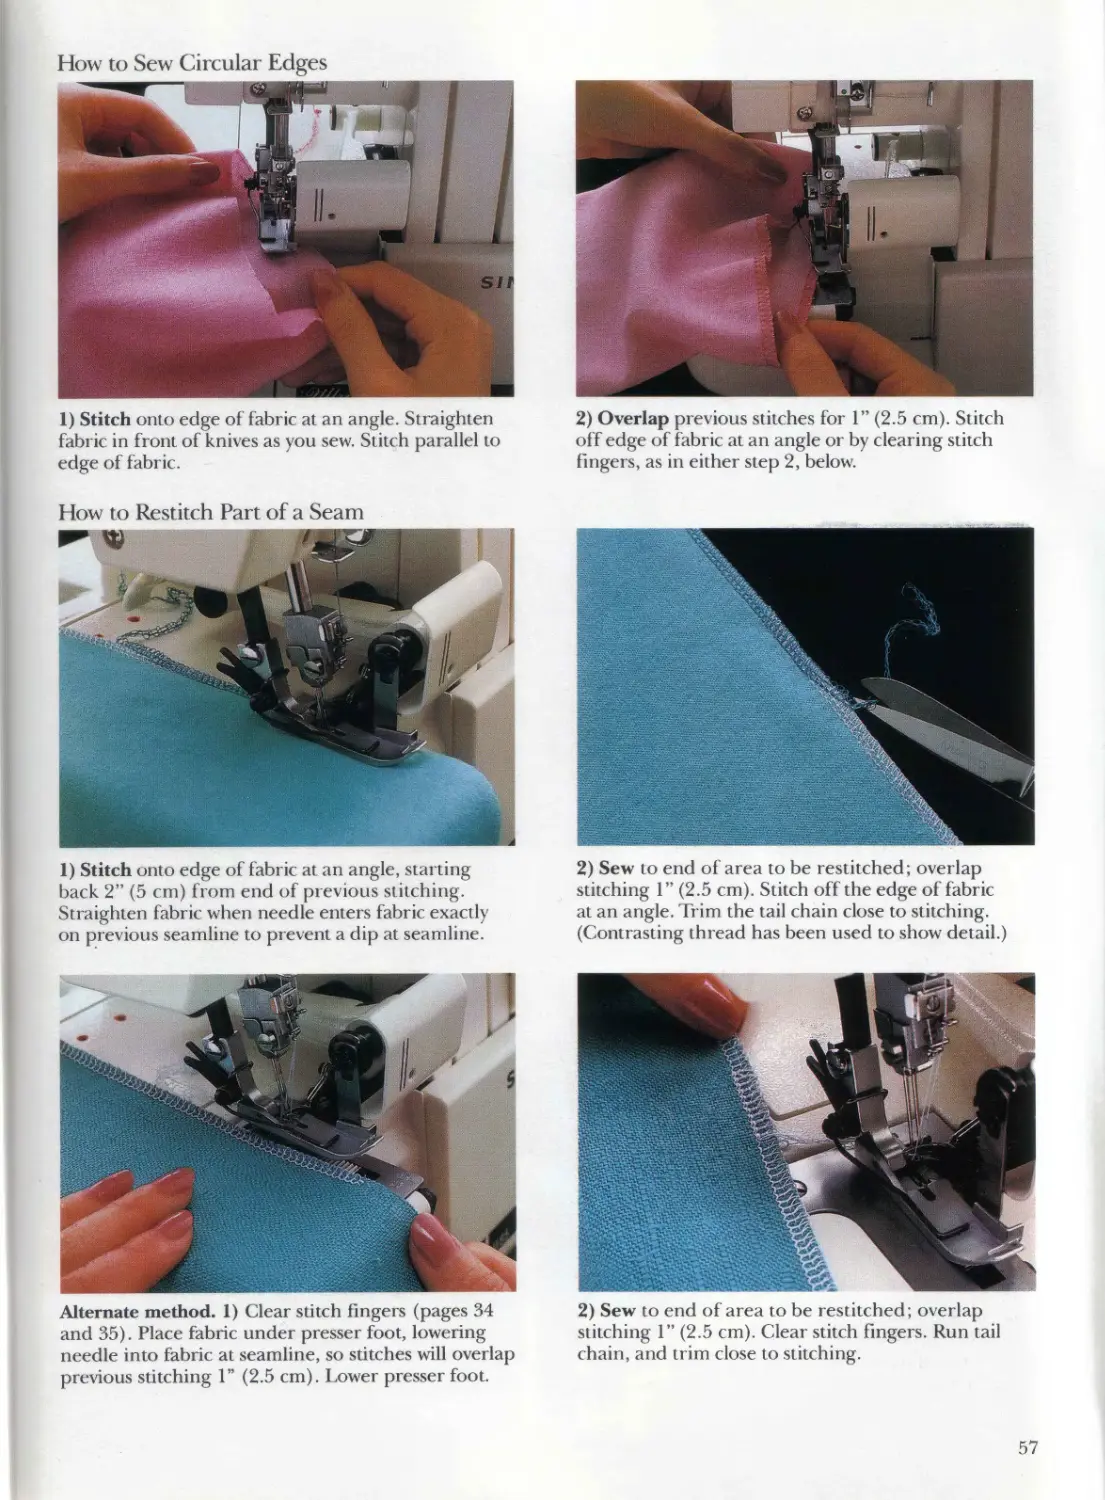
How to Sew Circular Edges
1) Stitch onto edge of fabric at an angle. Straighten
fabric in front of knives as you sew. Stitch parallel to
edge of fabric.
2) Overlap previous stitches for 1” (2.5 cm). Stitch
off edge of fabric at an angle or by clearing stitch
fingers, as in either step 2, below.
How to Restitch Part of a Seam
2) Sew to end of area to be restitched; overlap
stitching 1” (2.5 cm). Stitch off the edge of fabric
at an angle. Trim the tail chain close to stitching.
(Contrasting thread has been used to show detail.)
1 ) Stitch onto edge of fabric at an angle, starting
back 2” (5 cm) from end of previous stitching.
Straighten fabric when needle enters fabric exactly
on previous seamline to prevent a dip at seamline.
Alternate method. 1) Clear stitch fingers (pages 34
and 35). Place fabric under presser foot, lowering
needle into fabric at seamline, so stitches will overlap
previous stitching 1” (2.5 cm). Lower presser foot.
2) Sew to end of area to be restitched; overlap
stitching 1” (2.5 cm). Clear stitch fingers. Run tail
chain, and trim close to stitching.
I lems
Sergers create professional hem finishes on sheers,
knits, or wovens. A serger may be used for sewing
hems on all types ol garments, from sportswear to
evening wear. In some cases, the serge i is used with
the conventional sewing machine.
Overedged and blindstitched hern (page 60) reduces
hulk b\ using an overedged finish instead of hem
tape ora double-fold hem.
Overedged and topstitched hem (page 60) has an
overedged finish with the addition of conventional
machine topstitching to imitate the cover stitch hem.
Eased hem (page 60) is used on mediumweight to
heavyweight fabric for Hared or lull hems.
Blind hem (page 60) is used for hems on many fab-
rics; it works best on textured knits because stitches
will not show.
( overstitch hem (page 61 ) simultaneously finishes
the fabric edge and secures the hem in place with
double topsd tching.
Sport hem (p; ge 61) is used for a decorative applica-
tion on sweatshirt fleece or Г-shirt fabric.
Fringed hem (page 61) uses a decorative flatlock stitch
for detailing on scarves, shawls, and table linens.
Rolled hem (page 62) can be used to finish edges of
scarves, ruffles, table linens, and some garments. It is
suitable for lightweight to mediumweight fabrics, such
as sheers, silkies, and broadcloth.
Lettuce hem (page 62) ripples the edge of knits or
bias-cut wovens for a decorative finish with a feminine
touch. Often seen on children s and T-shirt neckline
ribbing, it is also used on swimwear, aerobic wear, and
evening wear.
Fishline hem (page 62) adds firmness and body to
lightweight fabric flounces and ruffles. Fishline, 8-
pound-test to 10-pound-test, provides supple curls, as
shown at left; 25-pound-test is more firm. This hem is
often used to embellish costumes and evening wear.
Wire hem (page 62) gives fabrics a stiff, shapable
edge. A 24-gauge floral wire is commonly used to
make decorative ribbons.
Shirt-tail hem (page 63) is used to prevent a rippled
edee on curved shirt hemlines.
Three Hems Using Serger with Conventional Machine
Overedged and blindstitched
hem. Mark hem allowance, and
grade seams in hem area. Serge
hem edge. Fold hem as for
blind hem, step 2, below. Pin
hem into position, and blindstitch,
using a conventional machine,
or by hand.
Overedged and topstitched hem.
Serge hem edge. Turn up hem;
press. Topstitch from right side
of garment, using conventional
machine. Twin needle may be used
for topstitching.
Eased hem. Ease hem fullness
by pulling up needle thread. Or
adjust differential feed, if available,
to the ease setting. Pin hem into
position; blindstitch, using a con-
ventional machine, or by hand.
How to Overlock a Blind Hem
1) Adjust machine for flatlock
stitch (page 74); use blind hem
foot, if available. Set stitch length
at 4 mm. Fold up hem; press. On
hem side of garment, place pins
with the heads toward body
of garment.
3) Open hem, and pull fabric Hat.
Ladder of stitches shows on right
side of lightweight fabrics, but
is invisible on heavier textured
fabrics.
2) Fold garment over hem allow-
ance, with hem edge extending
W (6 mm) beyond fold. Stitch on
extended hem edge, with needle
barely catching fold; remove pins
as you come to them.
60
How to Sew a Cover Stitch Hem
Split hem. Adjust machine for cover stirch (page
82). Press up hem. Place fabric under raised
presser foot, right side up, with fold aligned to
desired needle plate guide line. Holding threads,
turn handwheel until needles enter fabric at
beginning of hem. Stitch to fabric edge at end
of hem; raise needles and presser foot. Holding
stitches firmly, gently pull threads back. Cut threads,
leaving tail; knot. Secure tails, using loop turner or
needle (page 37).
Circular hem. Adjust machine and stitch hem as for
split hem, left; start at back or side seam, and lap first
stitches about 1” (2.5 cm). Raise needles and presser
foot. Hold stitches behind foot firmly; gently pull
fabric slightly back, and then to left. Cut thread tails.
Pull out loose threads; secure threads, using fray
check oi knots as desired. Remove extra needle
thread from surface of needle plate.
How to Flatlock a Sport Hem
1) Adjust machine for flatlock stitch (pages 74 to 77).
Fold up hem, and press. Fold up, and press again,
enclosing raw edge; flatlock on fold (page 52),
taking care to catch hem edge in stitches.
2) Open hem. and pull fabric flat. Lightly press.
Decorative loops are on die right side of garment.
How to Flatlock a Fringed Hem
1) Mark placement line, by pulling a thread or using a
marking pen, to indicate depth of fringe. Press a crease
on marked line. Adjust serger for flatlock stitch (pages
74 to 77). Stitch on fold, as in steps 1 to 3, page 52.
2) Cut fabric up to stitches on grain every 3” (7.5 cm).
Remove threads to create fringe. If flatlocking corners,
apply liquid fray preventer to intersecting stitches,
and use seam ripper to remove stitches in fringe area.
61
Rolled Hems
Rolled hem. Adjust machine for rolled hem stitch
(pages 79 to 81). Hold tail chain at beginning of
hem; stitch along hem edge, with right side of fabric
facing up, trimming away hem allowance. Use taut
sewing (page 106) or differential feed (page 46), if
necessary, to prevent puckering.
Lettuce hem. Adjust machine for rolled hem stitch
(pages 79 to 81). Stitch along hem edge, with right
side of fabric facing up; stretch fabric taut, and
trim edge slightly. Use differential feed (page 46),
if desired.
2) Run 4” (10 cm) tail at end. Smooth out stitches;
starting al center and working toward tails, ease
puckered fabric over fishline or wire. Apply liquid
fray preventer to end stitches; allow to dry. Trim tail
chain close.
Fishline or wire hem. 1) Adjust machine for rolled
hem stitch (pages 79 to 81). Test stitches for quality;
some inserts may resist rolling. Insert fishline or
wire through gimp foot (or under back and over
front of regular presser foot). Run 4” (10 cm) tail.
Stitch, trimming excess seam allowance; keep
insert between needle and knives, if using regular
presser foot.
62
How to Prevent Ragged Edges on Rolled Hems
1) Test-sew rolled hem. Fabrics,
such as loosely woven, metallic, or
still fabrics, may not roll under,
which causes a ragged edge.
2) Place a strip of trit ot bias bind-
ing on upper side of fabric edge to
be hemmed. Serge edge of fabric,
catching binding in stitching.
3) Trim excess tricot bias binding
close to rolled hem stitches, using
sharp embroidery scissors.
Two Ways to Sew a Shirt-tail Hem
Serge hem edge; increase differential feed, if
available, to ease curved edge slightly. Fold hem to
wrong side O1 garment1 s’ (3 mm beyond stitches;
press. From right side, topstitch scant 14” (6 mm)
from fold, using single or twin needle on conven-
tional machine.
Serge io finish front and bat к edges of shirt before
side seams are sewn; use differential feed, it available,
to ease curves. Reset differential feed to normal.
Press up hem Is (3 mm) beyond stitches. Sew side
seams, stitching through pressed hems. Secure tail
chains । pages 36 and 37). Topstitch, using single
or twin needle on conventional machine; pivot at
side seams.
63
Stitch Length 8c Width
It is important to check the stitch length and width
for each fabric you sew by testing the stitches on a
fabric scrap. The stitch length and width settings are
comparable to the zigzag settings on the conventional
machine. The same general principle of conventional
sewing applies to serging; use shorter, narrower
stitches for lightweight fabrics, and use longer, wider
stitches for heavyweight fabrics. After changing stitch
length or width on the serger, you may need to
adjust the tensions, especially if the amount of change
is significant.
Stitch Length
The stitch length is the distance in millimeters between
the needle penetrations. The stitch length can be as
short as 1 mm or as long as 5 mm. The stitch length
is changed with a regulator dial or lever, depending
on the model. (-heck the instruction manual for the
location and the method of ad justment on your serger.
If the stitch length is too long, the stitches may pucker
and the seams may not be strong enough to hold up
under the stress of wearing the garment. A stitch
length that is too short can weaken the seam in some
fabrics, such as taffeta; the needle holes are too close
together, and the needle perforates the fabric, causing
the fabric to pull away from the stitches.
Fabric jams can occur if the stitch length is too short.
Fabric does not feed properly through the machine,
and stitches build up on the stitch finger. Correct a
fabric jam as on page 45.
Stitch Width
The stitch width is the distance in millimeters
between the needle thread and the trimmed edge
of the fabric; if the serger has two needles, the stitch
width is the distance from the left needle to the
trimmed edge. The stitch width can be as narrow as
1.5 mm or as wide as 7.5 mm, depending on the
model; some models have little or no variation in
stitch width, which will limit the types of seams you
can sew. On some 4/3-thread machines you can only
adjust the stitch width by eliminating the left needle
to sew a 3-thread overlock seam that is narrower.
Follow the instruction manual to change the stitch
width. For some sergers, turn a dial to adjust the
stitch width; for others, change the needle plate.
If the stitch width is too narrow, seams are not durable,
and heavyweight fabrics do not press flat to one side.
If the stitch width is too w;de, stitches on lightweight
fabrics may pucker.
Recommended Stitch Lengths and Widths
Stitch length. Use longer stitches (4 to 5 mm) on
heavyweight fabrics (a); use shorter stitches (2 to
2.5 mm) on lightweight fabrics (b).
Stitch width. Use wider stitches (5 to 7.5 mm) for
heavyweight fabrics <a); use narrower stitches (3.5
to 5 mm) for lightweight fabrics (b).
Stitch Length Problems
Stitch length too long. Seams on lightweight fabrics
may pucker lengthwise, and stitches may show on
right side of fabric.
Stitch length too short. Seams may be weakened and
perforated on fragile fabrics, and edges may stretch
out of shape on outside curves (a). Seams may be too
bulky on heavyweight fabrics (b), so fabric does not
feed through serger easily.
Stitch Width Problems
Stitch width too narrow. Seam may not be strong
enough for heavyweight fabrics and may not press flat.
On loosely woven fabrics, seam may ravel.
Stitch width too wide. Seams on lightweight fabrics
may pucker under the stitches because wide stitches
are too heavy for the fabric.
67
Adj usting Tension
Tension should be adjusted properly when sewing
with a serger. Il the stitch is not correct, check for
proper threading before turning the tension dial.
Even if only one thread has been snagged or has
slipped out of a thread guide, it can appear that the
tension needs adjusting. If a machine that has been
sewing with correct tension has poor tension after
the thread is changed, check lhe threading before
adjusting tension dials.
When learning how to adjust the tension, thread the
machine with colors of thread that match the color
coding on the machine. This helps you to visualize
and understand each thread path and how the
threads interact with each other.
Practice Adjusting Thread Tensions
When the serger stitch has poor tension, only one
thread may need adjustment Adjust too tight threads
first as they may cause other threads t< > seem loose
even if they are not. Learning to adjust the correct
thread or threads takes practice.
Sergers have rhe tensions preset at the factory for
basic seaming. If the machine has numbered tension
dials, write down preset numbers before practicing.
Your instruction manual may also give recommended
settings for all stitch types. Although factory and
recommended settings will not give perfect tension
for all fabrics, they do provide a good point of
reference, especially for beginners.
Practice adjusting the tensions by sewing on a long
strip of fabric. Start sewing, and slowly turn the
tension dial lor one of the threads to a lower
number. As you sew, examine the stitches to see the
change in the tension. The thread that has been
adjusted will be slack or loose. Return the tension
dial to the original setting.
Continue to sew, turning the same tension dial to a
higher number. Examine the sample again to see
how the tension has changed. The fabric puckers
when one of the threads is too tight. Return the
tension to the original setting. Continue to turn
tension dials, one at a time, to see how each thread
affects the stitch.
When looper tensions are correctly adjusted for a
balanced overedge stitch, two opposing threads lock
together at the edge of the fabric. When needle
tensions are correctly adjusted, the threads rest
smoothly on the top and are slightly visible on the
underside. Looper threads, which intersect only the
needle threads, form small, relaxed loops. Compare
your stitches to the pictures on pages 70 to 83 if you
are uncertain about which tension dial needs
adjusting.
Tips for Analyzing Tension Problems
3-thread, 4-thread, and 5-thread overlock stitches
If fabric puckers lengthwise, one* or both needle threads
arc too tight.
If fabric puckers crosswise under stitches, one or both
looper threads arc loo tight.
If a looper thread ( an be moved easily or if n appears
uneven, the looper thread is too loose.
If a needle thread forms loose loops on the underside
of the fabric or if the scam pulls open, the needle
thread is too loose.
If threads lock on upper side of fabric, either the upper
looper threads are too tight, pulling to the upper side,
or die lower looper threads are too loose, spilling over
the edge.
If threads lock on untlerside ol tabric, either the lower
looper threads arc too tight, pulling to the underside,
or the upper looper threads are loo loose, spilling over
lite edge.
2-thread chainstitch
If fabrk puckers, one or both threads are too light.
Artist each dial separately to determine which thread
needs to be loosened.
If either thread can be moved easily or appears uneven,
it is too loose.
2-thread overedge stitch
If fabric puckers, one or both threads are too tight.
If either thread can be moved easily or appeals unexen,
it is too loose.
If threads lock on upper side of fabric, either the looper
thread is loo tight, pulling to the upper side, or the
needle thread is too loose, spilling over ihe edge.
If threads lock on underside of fabric, either the needl<
thread is too tight, pulling to the underside, or the
looper thread is too loose, spilling over the edge.
69
Two needle threads run
parallel on 4/3-stitches.
Lower looper thread
forms “V s ’ on underside.
Upper looper thread
forms loops on upper side.
Need le thread runs
lengthwise, locking at
seamline.
3-thread, 4-thread & 5-thread Overlock Stitches
The 3-thread overlock and the mock safety stitches
are adjusted the same way. I he overlock stitch (a) uses
one needle to secure the stitches, and the mock safety
stitches use two needles. There are two types of 4-
thread mock safety stitches; on one, the upper looper
thread locks at the left needle thread (b), and on the
other, at the right needle thread (c), depending on
the model. Both 3-thread overlock and 4-thread mock
safety stitches are suitable for seaming wovens. Because
these stitches stretch, they are also ideal for knits. The
extra needle thread in the mock safety stitch makes it
stronger than the overlock stitch.
On 5-thread sergers, the 5-thread safety stitch (d) is
made up of a 3-thread overlock stitch and a 2-thread
chainstitch. To adjust the chainstitch, refer to page 72.
Use the 5-thread safety stitch for sewing woven
fabrics or stable knits.
Tension Adjustments (3-thread overlock and 4-thread mock safety)
r • •
» *
♦ ♦'
*♦
♦ *
♦ «
ч •
*
\ ft ft ft ft ft ft ft ft ft ft ft ft , ft ft ft ft ft
Upper looper thread too tight.
Upper looper thread (orange) pulls
lower looper thread (yellow) to upper
side of fabric, causing fabric to pucker
or curl under stitches. Loosen upper
looper thread tension dial until
looper threads lock at edge.
Upper looper thread too loose.
Upper looper thread (orange) spills
over cut edge to underside ot fabric.
Upper looper threads are slack and
can be moved easily. 1 abric docs not
pucker or curl under stitches. Tighten
upper looper thread tension dial
until looper threads lock at edge.
Lower looper thread too tight.
Lower looper thread (yellow) pulls
upper looper thread (orange) to
underside of fabric, causing fabric
to pucker or curl under stitches.
Loosen lower looper thread tension
dial until looper threads lock at edge.
Lower looper thread too loose.
Lower looper thread (yellow) spills
over cut edge to upper side of fabric.
Lower looper threads are slack and
can be moved easily. Fabric does
not pucker or curl under stitches.
Tighten lower looper thread tension
dial until looper threads lock at edge.
Both looper threads too tight.
Looper threads (orange and yellow)
may lock at edge, but fabric is
puckered or bunched under stitches.
Stitches are narrower than stitch
width setting on serger. Loosen both
looper thread tension dials until
fabric is smooth under stitches.
Both looper threads too loose. Both
looper threads (orange and yellow)
extend over cut edge in loose loops.
Tighten both looper thread tension
dials until threads hug edge.
Needle threads too tight. Fabric
puckers lengthwise. Loosen one or
both needle thread (blue and green)
tension dials until fabric lies smooth
without puckers. Test stitches in knit
fabrics by stretching; loosen needle
thread tension dials, if necessary.
Needle threads too loose. Needle
threads (blue and green) form loose
loops on underside of fabric (a). Seam
pulls open on right side, exposing
stitches (b). Tighten one or both
needle thread tension dials until
seam closes without puckers.
f | f I I 1 I I I I I f I I 1 < < i I I I I I i « I > » 1 S i i t i I « . » X- '
b
b
Looper thread
loops back
and forth
on underside.
Left needle thread looks
like straight stitching on
upper side, locking with
looper thread on
underside.
'1’he 4-thread safety stitch (a) sewn
on a 4/2-thread serger is really two
rows of stitches, stitched at the same
time: the 2-thread chainstitch or
safety stitch, below, and the 2-thread
overedge, opposite.
The 5-thread safety stitch (b) sewn
on a 5-thread serger consists of
two rows of stitches: the 2-thread
chainstitch, and the 3-thread
overlock stitch, pages 69 to 71.
The chainstitch (c) may be used
alone for decorative topstitching,
or for basting. Always disengage
the upper knife in these cases;
follow the directions in your
instruction manual.
^nsion Adjustments (chainstitches)
Lower looper thread too tight.
Lower looper thread (purple) is
tight and drawn on underside of
fabric, causing puckered seam and
skipped stitches. Loosen lower looper
thread tension dial until even loops
are tor med. P problem is not solved,
check for tight needle thread tension.
Lower looper thread too loose.
Large, loose loops form in lower
looper thread (purple), causing
seam to pull open, exposing st itches
on right side oi labric. Tighten lower
looper thread tension dial until
even loops form on underside.
Left needle thread too tight. Tight
left needle thread (blue) may cause
puckered seam and skipped stitches.
Loosen left needle thread tension
dial until rabric does not pucker.
Il problem is not solved, checx tor
tight lower looper thread tension.
Left needle thread too loose. Left
needle thread (blue) forms large
loops on underside of fabric. Seam
may pull open, exposing stitches
on right, side oi fabric. Tighten left
needle thread tension dial until close,
firm loops form on underside.
2-thread
Overedge Stitches
The 2-thread overedge stitch is
formed with one needle and one
looper; depending on the model,
either the tipper or lower looper
is used. Consult the instruction
manual for specific instructions on
the 2-thread stitch. Then adjust the
tensions as shown, below.
The 2-thread overedge stitch is
used as a lightweight seam finish.
Because less thread is used for the
stitches, they do not imprint on the
right side of the fabric when pressed.
Looper thread forms
loops on upper side.
Needle thread forms “V’s
on underside.
Tension Adjustments (2-thread overedge stitch)
Looper thread too loose. Looper
thread (yellow) spills over edge to
underside of fabric. Fabric lies flat
under stitches. Tighten looper
thread tension dial until threads
lock at edge.
Needle thread too tight. Needle
thread (green) pulls looper thread
to underside of fabric, causing
fabric to pucker or curl under
stitches. Loosen needle thread
tension dial until threads lock at
edge before pulling seam open.
-
Needle thread too loose. Slack
needle thread (green) spills over
edge to upper side of fabric.
Loose threads may be uneven,
l ighten needle thread tension
dial until threads lock at edge.
Flatlock Stitches
Flatlock stitching can be used decoratively for the look of applied trim on a
garment. It may also be used to serge nonbulky seams on tricot. Decorative
threads may be used in the serger for special effects; to learn how to serge
with decorative threads, see pages 114 to 119.
Most models or brands of sergers are capable of creating flatlock stitches;
however, the tension range of some sergers may be too limited to sew
perfect flatlock stitches. Flatlock stitches are sewn with either two or three
threads, depending on the model; some have the option of both 2-thread
and 3-thread flatlocking. Refer to the instruction manual for specific
directions for each model.
The 3-thread flatlock stitch is sewn with one needle, and upper and lower
loopers. The 2-thread flatlock stitch is sewn with one needle and one looper;
depending on the model, either the upper or lower looper is used.
Го flatlock, first adjust the tension setting, as described on pages 75 to 77.
The seam is then stitched and pulled apart to Hatten the fabric layers at
the seamline. Test the tension setting before pulling the fabric flat; it is
easier to identify a stitch problem before fabric is pulled. If tension is not
adjusted correctly, fabric will not pull flat.
Decorative loop effect (a) is achieved
when flatlock seam is stitched wrong
sides together. For ladder effect (b),
stitch seam right sides together.
о о
74
Basic Tension Adjustments for Flatlock Stitches
2-thread flatlock stitch
Adjust stitch length as desired before adjusting t< nsion.
Start with a 3-thread balanced stitch (pages 69 to 71)
before adjusting tension for 2-thread flatlock; or use 2-
thread overedge stitch (pages 69 and 73), which does
not require further tension adjust incuts.
Loosen needle tension dial generously so needle
thread extends to the edge ol fabric on underside.
Loosen looper tension dial slightly, if necessary, to
allow fabric to pull open flat.
3-thread flatlock stitch
Adjust stitch length as desired before adjusting tension
Start with a 3-thread balanced stitch (pages 69 to 71)
before adjusting tension for 3-thread flatlock.
Loosen needle tension dial generously so needle
thread extends to the edge of fabric on underside.
О
Tighten lower looper tension dial generously so lower
looper thread pulls into a straight line al edge of fabric
Loosen upper looper thread slightly, if necessary, to
allow fabric to pull open flat.
How to Flatlock a Seam (knit fabric)
2) Pull crosswise on the seam, pulling stitches flat.
1) Adjust tension Гог flatlock stitch. Serge the seam,
trimming excess seam allowance.
How to Flatlock a Seam ( woven fabric)
1) Stitch seam, wrong sides together, using conven-
tional machine. Adjust tension for llatlock stitch.
Serge over seam, aligning straight stitches to center of
serged stitches.
2) Pull fabric flat, as in step 2, above. Press seam; press
lightly on wrong side, if using decorative threads.
75
2-thread
Flatlock Stitch
3-thread
Flatlock Stitch
Lower looper thread pulls
into straight line at edge.
Looper thread
forms loops
on upper side.
Fabric has been
pulled flat.
Fabric has been
pulled flat.
Upper looper thread
forms loops on upper side.
Needle thread
forms “V’s”
on underside.
Tension Adjustments (2-thread flatlock stitch)
Looper thread too tight. Looper
thread (yellow) pulls needle thread
(green) to upper side of fabric,
causing fabric to pucker or curl
under stitches. Loosen looper thread
tension dial until threads lock at edge.
Looper thread too loose. Looper
thread (yellow) spills over edge to
underside of fabric. Tighten looper
thread tension dial until threads
lock at edge.
Needle thread too tight. Needle
thread (green) pulls looper thread
to underside of fabric. Loosen needle
thread tension dial until threads lock
at edge before pulling seam open.
Needle thread too loose. Slack
needle thread (green) spills over edge
to upper side of fabric. Loose threads
may be uneven. Tighten needle
thread tension dial until threads
lock at edge.
Tension Adjustments (3-thread flatlock stitch)
Upper looper thread too tight.
Upper looper thread (orange) pulls
needle thread (green) to upper side
of fabric, causing fabric to pucker or
curl under stitches. Loosen needle
thread tension dial until threads lock
at edge.
Upper looper thread too loose.
Upper looper thread (orange) spills
over edge to underside of fabric.
Upper looper threads are slack and
can be moved easily. Fabric does not
pucker or curl under stitches. Tighten
needle thread tension dial until
threads lock at edge.
Lower looper thread too tight.
Lower looper thread (yellow) draws
into straight, pulled line, causing
fabric to pucker lengthwise. Loosen
lower looper thread tension dial
until fabric does not pucker
Lower looper thread too loose.
Lower looper thread (yellow) forms
loops between needle thread (green)
and upper looper thread (orange).
Tighten lower looper thread tension
dial until lower looper thread draws
into a straight, smooth line; try
woolly nylon thread in lower looper
if tension does not tighten enough.
Needle thread too tight. Needle
thread (green) pulls upper looper
thread (orange) to underside of
fabric, causing fabric to pucker or
curl under stitches. Loosen needle
thread tension dial until threads lock
at edge.
Needle thread too loose. Needle
thread (green) spills over edge to
upper side of fabric. Needle threads
are slack and can be moved easily.
Fabric does not pucker or curl under
stitches. Tighten needle thread
tension dial until threads lock at edge.
Rolled Hem Stitches
Most sergers can make a rolled hem stitch. Some
models require additional accessories, such as a dif-
ferent needle plate, presser foot, or auxiliary tension
dial; others have a built-in rolled hem feature.
The rolled hem stitch is sewn using either two or
three threads, depending on the set ger model: on
some models you may sew both 2-thread and 3-thread
rolled hems. Refer to the instruction manual for
specific directions for each machine.
A 3-thread t olled hem is suitable for most lightweight
to mediumweight fabrics. A 2-thread rolled hem is
preferred for fine, lightweight edge finishes on sheers
and lightweight fabrics.
. he stitch length adjustment is critical to the finished
look of t ie rolled hem stitch. If the stitch length is
too short, the stitching may fall off the edge or it
may be too heavy for lightweight fabrics, causing a
stiffer edge; if too long, the fabric may put ker. Before
sewing your project, practice stitching on fabric scraps.
Го achieve perfect rolled hem stitches, refer to the
information below and on pages 80 and 81. You may
choose to use tricot bias binding to stabilize a lace
edge; lay a narrow strip of binding on top of the
lace, as shown on page 63. You may choose to try a
bulky thread like texturized nylon to visually fill in a
longer stitch length; see pages 114 to 121 for working
with decorative threads.
Basic lension Adjustments lor Rolled Hem Stitches
2-thread rolled hem stitch
3-thread rolled hem stitch
Adjust stitch length to 1.5 or 2 mm setting for a soft
edge finish.
Start with a balanced 3-thread oveilock stitch (pages
69 to 71) or a 2-thrcad overedge stitch t pages 69 and
73) before* adjusting tension for 2-thread rolled hem.
lension adjustments may be unnecessary or slight i!
stat ting with a balanced 3-thread oxerlock stitch.
Tighten needle thread tension dial to eliminate “V’s”
formed hv needle thread on underside ol fabric,
/
Loosen looper thread tension dial so looper thread
rolls around edge to uppei side of fabric.
Adjust stitch length to under 1 mm lor a filled-in edge
finish that has body or stiffness; adjust stitch length to
2 mm for a softer edge finish that is less filled-in.
Start with a balanced overlock stitch 'pages 69 to 71)
before adjusting tension 'or 3-thread rolled hem.
1 ighten lower looper tht ead tension dial sq upper
lOOpey thread is pulled around the edge of the fabric to
the underside for a rounded tolled hem.
Loosen upper looper thread tension dial in addition to
lightening lower looper thread tension dial for a flat,
less-rounded, rolled hem.
Loosen needle thread tension dial slightly if fabric
puckers Icngthvxise. or sutch using taut sewing (page 196).
How to Sew a Rolled Hem
1) Adjust machine for rolled hem stitch, above and
on pages 80 and 81. Hold tail chain at beginning of
hem to keep it from curling into looper area.
2) Stitch along Item edge, with right side of fabric
racing up; trim away hem allowance. Use taut sewing
(page 106) or differential feed (page 46), it neces-
sary, to prevent puckering.
79
WU Wu'1 \iU^4
Upper looper thread
rolls over edge
to underside.
Needle thread
holds stitches tai
W w
a»»
7JWW$'W''
HKw
ЖМ
Needle thread
holds stitches taut
3-thread Rolled Hem Stitch
Lower looper thread
rods over edge
. ’J
to upper side.
.,.. ... ж,
2-th read Rolled Hem Stitch
Lower (c oper t hread
is straight line next
io needle thread.
rlension Adjustments (2-thread rolled hem stitch)
Lower looper thread too tight.
Stitches are narrower than the stitch
width setting on serger. Lower looper
th read (yellow) may pull on needle
thread, causing slight “Vs” on
underside of fabric. Loosen looper
thread tension dial until needle
thread relates and roiled hem is
round and even.
Lower looper thread too loose.
Lower looper thread (yellow) is
too slack. Edge of fabric does not
roll tightly. Tighten lower looper
thread tension dial until fabric
rolls under and rolled hem is
round and even.
Needle thread too tight, fabric
puckers lengthwise. Loosen needle
thread (green) tension dial until
fabric lays flat.
Needle thread too loose. Needle
thread (green) forms small “Vs' on
underside of fabric. Edge of fabric
may not roll under. “ 'ighten needle
thread tension dial until “V’s” are
eliminated.
Tension Adjustments (3-thread rolled hem stitch)
Upper looper thread too tight.
Upper looper thread (orange) pulls
lower looper thread (yellow) toward
edge. Loops of upper looper thread
are too short. Loosen upper looper
thread tension dial until upper looper
thread rolls completely around edge
to underside of fabric.
Upper looper thread too loose.
Upper looper thread (orange) is slack
and can be moved easily. Tighten
upper looper thread tension dial until
upper looper thread rolls completely
around edge to underside of fabric
without slack.
Lower looper thread too tight.
Lower looper thread (yellow) draws
into pulled, tight line, causing fabric
to pucker lengthwise. Loosen lower
looper thread tension dial until
fabric does not pucker.
Lower looper thread too loose.
Lower looper thread (yellow) forms
loops between needle thread (green)
and upper looper thread (orange).
Tighten lower looper thread tension
dial until it draws into a straight,
smooth line.
Needle thread too tight. Fabric
puckers lengthwise. Loosen needle
thread (green) tension dial until
fabric does not pucker. It may be
necessary to hold fabric taut when
serging to prevent puckering, or use
differential feed.
Needle thread too loose. Needle
thread (green) forms small “V’s” on
underside of fabric. Edge of fabric
may not roll under. Tighten needle
thread tension dial until “V’s” are
eliminated.
Cover Stitch
In the cover stitch, a single looper
thread secures parallel rows of
linear surface stitches, familial as
a common ready-to-wear stitch, it
was once available only on indus-
trial sergers. Today, some .5-th read
sergers can be converted to sew a
3-thread cover stitch. 1 he upper
knife is disengaged, and specialized
throat plates and presser feet are
attached; refer to the machine
manual for specific directions.
t he cover stitch may be used to
seam fabrics, but it is most often
used to topstitch or bind hems and
necklines. Because it has consider-
able stretch, it is popular for attach-
ing elastic and hemming low-stretch
to high-stretch knits. Since the fab-
ric can be positioned so the looper
thread encloses the cut edge, it is
also suitable for lightweight to
mediumweight wovens.
Looper thread connects, both within and between, die parallel rows of straight stitches
82
Tension Adjustments (cover stitch)
Looper thread too tight. Looper
thread (purple) draws needle
threads (blue and green) together,
causing fabric to buckle between
rows. Loosen looper thread tension
dial until fabric lies flat.
Looper thread too loose. Looper
thread (purple) is slack and can be
moved easily. Loops may extend
beyond needle threads. Tighten
looper thread tension dial until
slack is gone.
Right needle thread too tight.
Right needle thread (green) forms
narrow loops on underside and
draws fabric lengthwise, causing
left needle thread (blue) to form
small loops on underside. The
upper side may appear eased along
the left needle thread. Loosen right
needle thread tension dial until
chain formation is visible and fabric
lies flat.
-
Right needle thread too loose.
Right needle thread (green) does
not rest on the surface of the upper
side, and it forms loose loops on
the underside. 'Hie right needle
thread and looper thread (purple)
can be moved easily. Left needle
thread (blue) may have skipped
stitches, l ighten right needle thread
tension dial until it forms a chain
on the underside.
Left needle thread too tight. I ,eft
needle thread (blue) draws the
fabric lengthwise, causing right
needle thread (green) to form
small loops on the underside.
Skipped stitches may occur.
Loosen left needle thread tension
dial until a smooth, unbroken
chain forms on the underside.
Left needle thread too loose. Left
needle thread (blue) does not rest
on the surface of the upper side,
and a ladder effect shows on the
underside. Looper threads (purple)
ma) extend beyond needle threads.
Tighten left needle thread until it
forms a chain on the underside.
к
Garment Construction
WWW л.: fl
il-'f
.Л ;-.
fe<SS£S,?i
ЧШЁЭТг
i^^-7:
a-.':,.w.\\*a’
§J?y^
A
>z^
iWr.'X..<'
?Жл?^
W.V&&
4WW^\„.
nx.'*.v>-> .J’.
£O
Serged collar
(pages 93 to 95)
Serged armhole
(page 93)
Serged belt loops (page 103)
.pages 98 and 102)
a
(page 56)
Hems (pages 59, 60, and 63)
Serged cuf.s
(pages 93 and 96)
fe к
Garment Construction
Special methods have been developed for sewing many
garment derails on a serger. Depending on the style
or the fabric, some garments may be sewn entire ly
on a serger; others may also require the use of a
conventional machine.
The direction sheets of many current patterns include
instructions tor using the serger, his section exam-
ines which garment details can be serged and which
should be sewn conventionally; you may discover
additional areas where vou can use the serger for
J о
efficiency or personal design details.
Garments requiring critical Fitting adjustments are
usually sewn on the conventional machine to allow
room for adjustment in the seam allowances. When
overlocked seams are used, baste (page 54) or pin-fit
the garment before sewing the seams.
Serged stitches must not be clipped, or the) will
ravel, Curves or corners that require clipping, such
86
Serged elasticized
waistband (pages
98, 100, and 101)
Serged facing
edge (page 49)
Serged
(pages 98 and 99
Serged waistline
(pages 104
and 105)
Serged seams
(page 56)
as enclosed neckline seams, are sewn using the con-
ventional machine. Seams with a side or back slit are
also sewn using the conventional machine because
the seam allowances must be pressed open to form
the slit facing.
The serger’s elongated presser foot can make it diffi-
cult to stitch details precisely. Areas where precise
stitch placement is required, such as jacket lapels,
should be sewn using the conventional machine. To
ensure accuracy and smooth fit, darts should also be
sewn on the conventional machine. Zippers are
applied and buttonholes are sewn on the conven-
tional machine, using specialized presser feet.
When the serger’s upper knife is disengaged, the
chainstitch is appropriate for topstitching. Because
the stitch looks different on the upper and underside
of the fabric, the conventional machine is used when-
ever straight stitches are desired on both sides of
the garment.
87
а» ' :
Га”»
П1
<• v‘j
• И!
“ 41
Си
№
>*•
^’4
V>
-
z»A
’•Л
w
•.- 5jMH
ж
* 4t t -I
" \»Ui
<4
ЙМ
' лта
4Ut
ЧП
П I , '.'J
I?/
.4 <S3I
' « >' >
hkWl V* »*
'<??
• .»
о
fa_
.»№ Ж
"Wb
•••s’. ••«h,.1
•? ? •
- w*
>-’П
L> s
M
ж
Л| . - •?
’*• *? * *НйЙ^тП^!
tf??‘
bl.'”
Pullover Tops
A pullover top finished with ribbing is an ideal first
project. The basic design can be varied in many ways,
including fabric choices from basic knits to a silky
woven or challis. A dress or shell can be macle from
the same basic design, simply by changing the
finished length.
о
A cotton interlock knit is the easiest fabric to use
for the front, back, and sleeve pieces. Ribbing for
the neck edge, cuffs, and lower band is available in
several weights as well as a range of coordinating or
contrasting colors,
о
Pullover patterns are usually designed with Vs”
(1.5 cm) or •Zt” (6 mm) seams. Since the serger
automatically trims away excess seam allowances
as it stitches, patterns with either seam allowance
widt h may be used. A pattern with a loose fit and
a neckline seam measurement equal to or greater
than the head measurement is necessary if using a
woven fabric.
1 here are two methods for serging a pullover top
or T-shirt. The flat construction method is faster;
however, the seams may be noticeable at the
ribbing edges. The in-the-round method encloses
the ribbing seams for a neater, better-quality finish.
You may want to try both methods to decide which
one you prefer.
How to Sew a Pullover Top (flat method)
1) Stitch one shoulder seam. Fold neck ribbing in
half lengthwise. Divide neck edge and ribbing into
fourths; pin-mark. Pin ribbing to neckline, right sides
together, matching pins.
2) Set differential feed to a larger number, if differ-
ential feed is available. Stitch ribbing to neckline,
stretching ribbing to fit; remove pins just before they
reach the knives.
3) Apply cuff ribbings to sleeves, as for neckline rib-
bing, steps 1 and 2, above. Reset differential feed to
normal, if necessary.
4) Pin-baste shoulder seam, matching neckline seams;
turn seam allowances in opposite directions to mini-
mize bulk, if desired. Overlock seam, stitching
toward neck. Secure tail chains (pages 36 and 37).
5) Stitch sleeves into armholes. Pin-baste side seams,
matching underarm seams, cuff seams, and cuff folds.
Overlock one side and sleeve seam from lower' edge
of garment to cuff folds; remove pins as you come
lo them.
6) Apply lower edge band, as for neckline ribbing,
steps 1 and 2, above. Reset differential feed to normal,
if necessary. Pin-baste and stitch remaining side and
sleeve seam. Secure tail chains at lower band and
cuff edges.
90
How to Sew a Pullover Top (in-the-round method)
1) Stitch both shoulder seams. Sew ends of each
ribbing piece, using an overlock or conventional
machine. Fold overlocked seams in opposite directions
at seamline, or press conventional seams open. Fold
ribbing pieces in halt lengthwise, wrong sides together.
2) Divide neckline edge and ribbing into fourths;
pin-mark. Pin ribbing to neckline, right sides together,
matching markings. Place ribbing seam in center back.
3) Stitch ribbing to neckline as in step 2, opposite.
Reset differential feed to normal, if necessary. Press
seam allowances at neckline toward body of garment.
Edgestitch, if desired, using conventional machine.
4) Stitch sleeves into armholes. Sew one side and
sleeve seam, from lower edge of garment to lower
edge of sleeve, matching underarm seam. Repeat for
other side and sleeve seam.
5) Pin-mark sleeve edge and cuff ribbing into fourths.
Pin cuff to sleeve, right sides together, matching
seams. Adjust differential feed, if available. Overlock,
stretching cuff to fit and removing pins.
6) Pin-mark lower garment edge and band ribbing in-
to fourths. Pin band to garment, right sides together,
matching band seam to a side seam. Overlock, stretch-
ing band to fit. Reset differential feed to normal.
Blouses
There are many timesaving methods for sewing blouses and shirts, even
those with a convertible collar and set-in sleeves with cuffs.
Overlock seaming offers advantages beyond speedy construction. The
seams in soft or silky fabrics are less likely to pucker when sewn on a serger.
On semi-sheers, the narrow seams are less conspicuous than pressed-open
conventional seams. Serged seams also require less pressing to remain neat
and flat after laundering.
As with any project always test the stitch on scraps of the fabric before
beginning жо sew the garment itself. Adjust the stitch width and length, and
the thread tensions, until the seam is balanced and pucker-free. If you are
in doubt about whether the garment will it correctly, baste the main
garment pieces before seiging the seams (page 54).
A serger may be used almost entirely for the construction oJ a traditional
blouse that has a convertible collar and set-in cuffed sleeves. Use a
conventional machine for sewing areas with points to turn and for sewing
on buttons and making buttonholes.
Collars
Sergers may be used to sti tch collar seams with gradual curves. This is
especially helpful to prevent show-through of clipped and graded seam
allowances on lightweight or sheer fabrics. Use a 3-thread over lock stitch
for lightweight, flexible stitches and minimal bulk.
Exposed collar seams may be stitched on the serger for a decorative effect.
Use the rolled hem stitch and high-quality thread for beautiful stitches. A
heavier thread, such as buttonhole twist, pearl cotton, or texturized nylon,
can be used to create a piping effect on collars that are made from
mediumweight fabrics.
Use a conventional machine to stitch collars that require grading and
clipping. A conventional machine is always used to stitch enclosed seams
on collars with points.
Interface collars and facings according to the fabric and pattern selected.
Neck facings may be eliminated when applying collars with a serger. For
convertible collars, eliminate the back neck facing only. If facings are
desired, finish the edges of the facings with a 2-th read overedge or 3-thread
overlock stitch. A faced neckline seam may be serged unless it requires
trimming and clipping, as would a square or V neckline.
( tiffs, Plackets 8c Sleeves
A slashed placket sleeve opening may be serged, which is faster and easier
than sewing a continuous lap placket. This method may be used for a cuff
with or without an underlap extension.
If your cuff pattern piece does not have an underlap extension, the slash
opening may be eliminated; the lower edge of the sleeve is stitched to the
cuff in one quick step.
Raglan or dropped-shoulder sleeve seams can be stitched on the serger.
Standard set-in sleeves should be set in according to the pattern instruc-
tions, using the conventional machine. Overedge the armhole seam
through both layers, l/8” (3 mm) away from the conventional stitches, to
Finish the seams. The conventional machine gives you better control when
stitching the eased sleeve seam. The extra row of stitching adds strength,
which is especially desirable in fitted garments that have set-in sleeves.
93
How to Prepare a Collar
Enclosed seam. 1) Mark seamline on wrong side of
collar for accurate stitching. Adjust serger for narrow
balanced 3-thread stitch (pages 69 to 71). Adjust looper
tensions so stitches hug edge of curve. Stitch collar
pieces, light sides together, with needle on seamline.
2) Turn collar right side out. Press edge, using tip of
iron to prevent seam imprint. Serged stitches flex to
ease in fullness along curved edges, so clipping is
unnecessary.
Exposed seam. Mark seamline on right side of collar
for accurate stitching. Adjust serger for 3-thread
rolled hem stitch (pages 79 to 81). Baste collar pieces,
wrong sides together; serge, trimming away entire
seam allowance.
Exposed seam with piping effect. Use topstitching
thread or buttonhole twist in upper looper, and use
regular thread in needle and lower looper. Mark
seamline and serge, as for exposed seam, left.
94
How to Apply a Convertible Collar
1) Stitch collar pieces, right sides
together, using conventional
machine. Grade seam allowances
and collar points; clip. Turn collar
right side out; press. Staystitch
neck edge; clip to staystitching.
2) Pin collar to garment at neckline,
right sides together, matching
center back, shoulder seams, and
center fronts. Fold front facings back
on foldlines over ends of collar.
Baste neckline. Remove pins.
3) Serge neckline seam, securing
the tail chains (pages 38 and 39).
If desired, understitch back of
neckline through all layers, using
conventional machine.
How to Apply a Flat or Stand-up Collar
Flat collar. 1) Prepare collar, using serger or
conventional method. Pin collar to garment at
neckline, right sides up, matching markings; baste.
Fold facings over ends of collar, right sides together.
2) Serge neckline seam, securing tail chains (pages
38 and 39). Turn facings to inside of garment; press.
3) Lift collar ; understitch on conventional machine,
from right side, close to seamline, stitching through
garment and seam allowances.
Stand-up collar. Follow steps 1 and 2 for flat collar,
above. Press collar up.
95
How to Sew a Cuff without a Placket
1) Stitch cuff, right sides together,
using conventional machine; grade
and clip seam allowances. Turn
and press.
2) Prepare lower edge of sleeve,
including gathers or tucks; mark,
but do not slash, opening. Pin cuff
to sleeve, placing ends Vs” (1.5 cm)
from slash mark. Serge seam.
3) Fold cuff down. Press seam
toward sleeve. Hand-stitch or
topstitch opening between ends
of cuff.
How to Sew a Cuff with a Placket
3) Fold cuff down. Fold and press
edges of slit to inside. Press seam
toward sleeve. For crisp edge, fuse
’A” (6 mm) strip of fusible web
under folds of slit.
1) Stitch slash opening, as for slit
(page 41). Fold, with right sides
together and edges even. Using
conventional machine, stitch 1”
(2.5 cm) dart at end of slit. Stitch
sleeve seam, and prepare lower edge
of sleeve, including gathers or tucks.
2) Stitch cuff, using conventional
machine; grade and clip seam
allowances. Turn and press. Pin
cuff to sleeve, right sides together;
fold edges of slit opening over ends
of cuff. Serge seam, securing tail
chains (pages 36 and 37).
Cuff with underlap extension. 1) Prepare slit
opening, as in step 1, above. Using conventional
machine, stitch ends and underlap of cuff; pivot
at dot, and stitch to raw edge. Grade and clip seam
allowances. Turn and press.
2) Stitch sleeve seam, and prepare lower edge of sleeve,
including gathers or tucks. Pin cuff to sleeve, right
sides together, folding back underlap and tolding
edges of slit opening over ends of cuff. Serge seam.
Finish cuff, as in step 3, above.
96
How to Sew a Blouse Using a Serger
1) Apply interfacing. Staystitch and clip neckline.
Finish facings. Stitch shoulder seams. If garment has
raglan sleeves, stitch the sleeve seams. Press.
2) Prepare and apply collar, as on pages 93 to 95.
3) Stitch side seams. Fold facings to wrong side on
foldlines. Serge lower edge of blouse, stitching
through facings. Turn facings right side out.
4) Stitch plackets and apply cuffs to blouse, as on
pages 93 and 96.
6) । urn up hem and lopstitch in place (page 63). Tack
front facings at shoulder seams of blouse as shown.
Make buttonholes; sew on buttons. Press garment.
5) Set in sleeves using conventional machine, if
garment has standard set-in sleeves. To finish seams,
serge armhole seam, through both layers, l/s” (3 mm)
away from conventional stitching: press.
97
Skirts & Pants
The skirt or pants style and the fabric weight will help
yon decide which sewing techniques to use in con-
struction. You may be able to sew the garment com-
pletely on the serger, or you may need to use both
the serger and the conventional machine.
О
Full skirts that are made from lightweight fabrics can
be sewn almost entirely on the serger. The seams are
rarely subjected to a lot of stress, so an overlock seam
alone is sufficient. Fitted skirts, or those made from
heavier fabrics, require a 5-th read safety stitch, a mock
safety stitch, or conventional seams with overedged
finishes. Special seams shown on pages 49 to 52 may
also be considered.
Tailored pants and skirts dial have seams with a zipper
opening, vent, or kick pleat, or those that may need
to be altered after a fitting, require the use of a con-
ventional machine. Also, heavier fabrics follow body
curves better when conventional seams are sewn; you
may want to finish the seam allowances first, using
the serger, while the garment sections are still flat.
О’ о
In-seam pockets on full skirts, or on skirts or pants
made from knits, may be attached using the serger.
The conventional method, as directed in the pattern
instruction sheet, should be used to attach pockets
on tailored skirts and pants.
Zipper applications require the f ull seam allowance
and are inserted using a conventional machine. Darts
are sewn on a conventional machine for accuracy, and
to prevent dimples or puckers at the point. Serging
darts eliminates any chance ol changing the dart
position at a later time.
Waistbands
There are several methods for applying waistbands.
Elasticized waistbands are for pull-on skirts and pants.
The edge-finished waistband is for smooth, fined
skirts and pants with waistline openings. Waistbands
use both the serger and the conventional machine.
A cut-on elasticized waistband is a quick waistline
finish for straight-cut skirts or pants. The upper edge
of the garment is folded down to form a casing for
the elastic; the elastic may be inserted or attached.
The separate elasticized waistband may be cut from
self-fabric; or use a lighter-weight fabric, such as
ribbing, to eliminate bulk.
О ’
The elastic should pull easily over the hips and fit com-
fortably around die waist. Most elastics are cut 2” to 3"
(5 to 7.5 cm) less than your waist measurement; soft,
lightweight elastics may be cut even shorter, while very
firm ones should be cut equal to your waist measure-
ment. Multiple rows of topstitching may reduce the
elastic recovery; to ensure a snug fit, die elastic is cut
1” (2.5 cm) shorter than the guidelines.
The inside edge of an edge-finished waistband is
serged to reduce bulk. It encloses seams that are
conventionally sewn and graded. Flatlocked or top-
stitched belt loops may be attached at the waistline
before applying the waistband.
98
How to Sew Side Seams with Pockets
1) Cut 1/2” (1.3 cm* twill tape or -r/8” (1.5 cm) strip
oi fusible knit interfacing 1” (2.5 cm) longer than
pocket opening. Slip tape through elastic tape foot,
il using; loosen adjustment knob to prevent drag on
tape. Attach foot to serger, holding tape behind foot.
2) Apply twill tape or interfacing to seam allowance
of garment; center length along front pocket open-
ing. Serge ront pocket to garment front, and back
pocket to garment back. Press seams toward pockets.
3) Use conventional machine to stitch garment
side seam, right sides together; stitch from about 3”
(7.5 cm) below pocket opening to bottom of pocket
opening. Stitch from top of pocket opening to upper
edge of garment section.
4) Sew garment side seam from lower edge to straight
stitching at bottom ol pocket opening; then curve
stitching around pocket. Continue stitching side seam
to waistline. Press pocket and side seam toward front
of garment.
99
How to Sew a Cut-on Waistband with Attached Elastic
2) Fold elastic to wrong side of garment so fabric
encases elastic. Stitch in the ditch, across the elastic
width, at center front, center back, and side seams;
stitch from right side of garment, using conventional
machine.
1) Extend pattern above waistline two times the width
of the elastic. Cut elastic using guidelines on page 98.
Lap elastic ends W’ (1.3 cm); stitch, using zigzag.
Pin-mark elastic and garment edge into fourths. Pin
elastic to wrong side of garment, matching pins; align
edges. Serge, stretching elastic so garment lies flat;
disengage knives, if desired, to avoid cutting elastic.
Remove pins as you come to them.
3) Topstitch through all layers of waistband, stretch-
ing elastic as vou sew. Chainstitch three or more
О J
evenly spaced rows across width of elastic, using
serger with disengaged knives, for low-stretch knits
о о о ’
and wovens (a); cover-stitch over lower edge of
casing, using serger, for maximum stretch (b);
straight-stitch near lower edge of casing, using long
stitches on a conventional machine, for wovens (c);
or zigzag close to lower edge of casing, using
conventional machine, for knits (d).
How to Sew a Cut-on Waistband with Elastic Insert
2) Fold garment to wrong side an amount equal to
the width of the elastic plus '/2” (1.3 cm); pin or
baste. Fold garment back on itself, with raw edge
extending l/4” (6 mm) beyond fold.
1) Extend pattern above waistline two times the
width of the elastic plus -Vt” (2 cm). For example,
for al” (2.5 cm) elastic, add 23/4” (7 cm) above the
waistline.
100
How to Apply a Separate Elasticized Waistband
1) Cut waistband two times the width of elastic plus
Р/г” (3.8 cm) to allow for two 4 5/s” (1.5 cm) seam
allowances plus /4” (6 mm) ease. If using woven
fabric, length of waistband is the same measurement
as edge of garment. If using ribbing, length must be
long enough to pull over hips.
2) Mark seamlines for accurate stitching; this is
especially helpful when ribbing is used. Stitch short
ends of waistband, right sides together, to form a
circle. Fold in half lengthwise, wrong sides together.
3) Pin band to waistline edge as on page 91, step 2;
place band seam at side or center back. Overlock with
needle on seamline; leave 2” (5 cm) opening for elas-
tic insertion. If using ribbing, stretch ribbing to match
garment; use differential feed (page 46), if desired.
4) Cut elastic to fit waistline, using guidelines on pag<
98. Lap elastic ends 1/2" (1.3 cm); stitch, using zigzag.
Overlock opening closed. Stitch in the ditch at seam-
lines to prevent elastic from twisting, if desired.
3) Stitch along the fold so stitches catch, but do not
cut fold; trim extended seam allowance. Remove pins
as you come to them. Leave 2” (5 cm) opening for
inserting elastic.
4) Cut elastic to fit waistline; insert into waistband.
Lap elastic ends V2” (1.3 cm); stitch, using zigzag.
Overlock opening closed. Stitch in the ditch at
seamlines to prevent elastic from twisting, if desired.
101
How to Apply an Edge-finished Waistband
1) Interface waistband. Serge one long side of
waistband, trimming %” (1 cm).
2) Baste one end of each belt loop to garment at
desired position. Pin waistband to garment, matching
pattern markings; straight-stitch, keeping serged
edge of waistband tree. Grade seam allowance.
3) Press seam allowances toward waistband. Fold
waistband, right sides together. Stitch overlap end
ol waistband, folding serged seam allowance back to
waistline seam; grade.
4) । tick garment into the waistband at underlap end
of garment.
5) Stitch across end and lower edge
of underlap; continue stitching
over previous stitches through all
layers of garment and waistband;
stop stitching (arrow) V2” (1.3 cm
beyond underlap dot. Grade.
7) Fold under free end of each belt
loop; topstitch to waistband at
upper edge.
6) Turn waistband right side out, and
press; serged edge extends down
on inside of garment. Pin in place.
Stitch in the ditch of the seam
from right side, using conventional
sewing machine.
102
How to Sew Belt Loops
2) Insert pencil or knitting needle inside tube to
flatten stitches. Center stitches on underside of strip;
press. Mark cutting lines. Apply liquid fray preventer
at marks; allow to dry. Cut into belt loops.
Flatlock belt loops. 1) Cut fabric strip two times the
finished width of belt loop; length of strip equals cut
length of each belt loop times the number of loops.
Fold strip lengthwise, wrong sides together; do not
press. Serge long edges together, using flatlock stitch
(pages 74 to 77).
Tbpstitched belt loops. 1) Cut strip of fabric three
times the finished width of belt loop; length of strip
equals cut length of each belt loop times number of
loops. Serge one long edge of strip, trimming slightly.
2) Fold strip into thirds lengthwise, enclosing raw
edge, lopstitch both edges from right side Vs” (3 mm)
f rom fold. Mark cutting lines. Apply liquid trav
preventer at marks; allow to dry. Cut into belt loops.
103
Dresses
• he techniques used for serging
blouses and skirts (pages 93 to
103) are also used for the bodice
and skirt sections of dresses. The
sections are joined using one of
several waistline methods.
Dresses with gathered skirls may
be serged using either method on
page 51. Dresses with pleatt d skirts
use conventional construction
methods for the waistline seam; the
seam allowances are serged for a
neat, durable finish.
When the serger is used to add
elastic to dresses without waistline
seams, ii reduces the bulk of the
usual bias tape casing. Narrow
transparent elastic or U?” (3 mm)
oval elastic can be secured using a
flatlock stitch. This method may
also be used on gathered c uffs or
puffed sleeves, especially popular
in children s wear and sleepwear.
I wo methods are available for
serging elasticized waistline seams
on dresses. Elastic may be inserted
into a casing formed by serging the
seam allowances together as shown,
opposite. Or, the elastic may be
serged to the skirt before sewing
the waistline seam.
An elastic rape foot can be used to
make narrow elastic applications
easier; since methods vary between
models, refer to your instruction
manual. The instructions for apply-
ing elastic on the opposite page do
not require special accessories and
c an be done on any serger.
Belt loops may be added after the
waistline seam is finished. Chain
belt, loops have the look of hand-
crocheted loops and can be made
quickly using tail chains. Sturdier
chain loops can be serged over
buttonhole twist, pearl cotton, or
topstitching thread, using the
rolled hem; the special gimp
presser foot helps make these
belt loops easy.
How to Overedge Elastic at a Placement Line
1) Mark elastic placement line
on wrong side ol garment pieces.
Stitch and press seams, leaving a
side seam open. Fold garment on
placement line. Adjust machine for
flatlock stitch (pages 74 to 77).
2) Position Vs” (3 mm) elastic
under back of presser loot, bring-
ing elastic over foot at front. Stitch
along placement line, with elastic
between needle and knife; do not
stretch elastic or cut fold.
3) Pull fabric to Hatten fold. Pull
elastic to fit. Secure elastic ends
using conventional machine. Stitch
remaining side seam; trim excess
elastic. (Ladder of flatlock stitches
shows on right side of garment.)
<7 «7 /
How to Insert Elastic in a Waistline Seam Casing
1) Stitch waistline seam, using conventional machine.
Serge seam allowances together, trimming slightly;
leave 2” (5 cm) opening for inserting elastic.
2) Cut elastic, using guidelines on page 98; insert into
casing. Stitch lapped ends of elastic together, using
conventional machine. Serge opening closed. Turn
casing toward bodice; topstitch near serged edge.
How to Apply Elastic to a Waistline Seam
How to Attach a Chain Belt Loop
Cut tail chain three times the finished loop length.
Stitch chain through garment, using hand needle, so
ends are on inside. Adjust loop length on right side
of garment. Tie ends of chain together; clip excess.
Cut elastic (page 98). Lap ends V?” (1.3 cm); zigzag.
Quarter elastic and skirt, using pins. Pin elastic to
right side of skirt, just above seamline, matching
pins. Serge elastic, trimming seam allowance only;
stretch elastic so skirt lies Hat. Trim bodice seam
allowance to elastic width. Stitch skirt to bodice,
right sides together, using zipper foot. Turn seam
allowance up; topstitch, stretching elastic, to enclose
raw edge,
о
105
dewing Special Fabrics
Many fabrics require special handling for best results.
1 he weave, pattern, design, and weight ol the fabric
all affect the finished seams. 16 anticipate problems,
always test-sew on fabric scraps across both grainlines
and on the bias before constructing a garment.
Many sergers have a differential feed system (page
46), which can be used on special fabrics, ’ his
feature is helpful when sewing lightweight fabrics
that pucker, such as sheers, or fabrics that stretch
out of shape easily, such as sweater knits and bias-cut
fabrics.
Sheers (1) and silkies (2) require a new needle (size
70/10 or 75/11) and a shorter stitch length (1.5 to
2 mini. Use taut sewing, below, or differential feed
when stitching these lightweight Fabrics to prevent
puckered seams. If necessary, the needle thread ten-
sion mav also be loosened slightly to prevent
puckering, but this may cause needle thread
to show on the right side of the garment.
Laces (3) require a short stitch length
(2 mm) and a narrow stitch width (2.5 to
3.5 mm). Use taut sewing or differential feed
to prevent puckering. Uneven stitching cannot
be avoided because of thick and thin areas on lace.
Open-weave laces may not have enough surface on
which the serger can stitch. A strip of tricot bias
binding can be sewn into die seam to give a complete
surface for the serger to stitch.
fabrics with raised designs (4), such as matelasse and
eyelet, may also cause irregular stitc lies due to their
uneven textures. For this reason, do not use decora-
tive stitching on these fabrics. Plan for seamlines to
fall between eyelet embroideries, if possible; and if
using a rolled hem finish on eyelet, plan for the
stitches to fall between individual eyelel designs.
Preventing Pin kered or Stretched Seams
aut sewing. Hold fabric firmly in front of and
behind the presser foot while stitching, to prevent
puckered seams. Do not pull fabric through the
machine. Sew at an even speed lor smooth stitching.
Adjusting differential feed. Adjust the differential
feed feature, if available on ’ our serger, to prevent
puckered or stretched seams, lhe setting will differ,
depending on the fabric. Stitch without taut sewing
or easing fabric, allowing machine to feed fabric
automatically.
106
J
10
Sweater knit fabrics (5) and some polar fleece fabrics
(6) require special handling to prevent stretched
seams. Use the differential feed if your serger has
this feature, or ease the fabric into the machine
below. For more information on sewing sweater
knits, see pages 108 and 109.
Bulky fabrics (7) such as boiled wools and quilted
fabrics may be too thick to feed into the knives,
restricting the trimming function of the mach-
ine. Compress the thick layers with a row of
straight or zigzag stitches, using a conventional
machine. Sew. allowing the knives to cut on
7 о
:V."
Decorator fabrics (8) can be serged easily. For
easier stitching of large pieces, such as
drapery panels, do not allow the fabric to
hang over the edge of the table. Trim
away selvages as you stitch drapery
seams, to avoid puckering.
Fake fur (9) can be seamed with
the flatlock stitch (pages 74 to 77)
to eliminate bulky and twisted
seams. Completely trim away the
seam allowances before sewing,
together, pushing fur fibers away
from the seamline. Then flatlock
the seam without trimming, and
pull the seam flat.
Coated fabrics (10), such as rain-
resistant outerwear, may feed
unevenly through the feed system.
Adjust the differential feed as
necessary, or control the fabric
layers manually as shown below.
Easing fabric. Hold fabric loosely in front of the
presser foot, allowing the machine to feed it readily,
to prevent stretched seams. Do not hold fabric
behind the presser foot.
Adjusting presser foot pressure. Factory-set pressure
is good for most fabrics. Turn pressure-regulating con-
trol clockwise to increase pressure on lightweight fab-
rics; turn it counterclockwise to decrease pressure on
heavyweight fabrics. Increase pressure to stretch the
top layer slightly if differential feed is not available.
107
Sweaters
Sweater fabrics are available in
several forms. Sweater bodies,
panels with prefinished ribbed
edges, are available with ribbing to
match. Sweater knit yardage can be
purchased on the bolt with ribbing
yardage to match; or knit your own
sweater yardage or panels using a
knitting machine or by hand.
Cut sweater knit fabric allowing 1 ”
(2.5 cm) seam allowances, except
for ribbing seams. The serger
handles the fabric better, without
stretching it, when a larger seam
allowance is trimmed. Cut and fit
ribbing for necklines or cuffs, as
directed below, allowing 1/4” (6 mm)
seam allowances.
Sweater knit fabric may stretch out
of shape when sewn. To prevent
seams from stretching, use the
differential feed if your machine has
this feature, or ease the fabric under
the presser foot as you stitch (pages
106 and 107). To sew sweater knits,
3-thread overlock or 4/3-thread
mock safety stitches may be used,
but they may not recover well when
stretched. You may prefer the
4-thread or 5-thread safety stitches,
which are more stable.
How to Cut a Sweater Body
1) Lay sweater body on cutting
surface that can be pinned into.
Stretch ribbed edge to same size as
body of panel; pin to cutting surface.
2) Fold up hem allowance on
pattern, if included. Lay pattern
on fabric with fold at ribbed edge.
Cut, allowing 1” (2.5 cm) seam
allowances.
3) Cut neckline ribbing, using the
pattern guide. Check fit of ribbing
around neck, opposite.
108
How to Cut Ribbing
Straight edges. Fold ribbing in half lengthwise; pin-
fit around body. Ribbing should lie flat without
gaping. Do not distort ribs. Add */2” (1.3 cm) for
seam allowances.
Necklines. Cut ribbing according to pattern guide.
Stitch ribbing seam, and fold in half lengthwise.
Check fit around neck; adjust ribbing seam, if
necessary.
lips for Sweater Knit Seams
Stabilize shoulder seams with transparent elastic (a)
or tricot bias binding (b), as on page 53. Or use a
conventional seam with serged seam finishes, and
edgestitch seam on each side (c).
Sew sleeves to garment; do not stretch the armhole.
Place sleeve over armhole to ease sleeve with your
hands; place sleeve under armhole to ease sleeve
using differential feed.
How to Apply Ribbing to a Sweater
1) Stitch ends of ribbing, right sides together; fold in
half lengthwise. Divide ribbing and garment edges
into fourths; mark. Pin ribbing to garment, right
sides together, matching markings.
2) Stitch with ribbing on top. Ease garment edge to
match ribbing: do not stretch garment or ribbing.
109
Activewear
thread mock safety
fl
Needle threads should be just loose enough to
openings, such as on
swimwear, elastic is not
a tighter lit will keep the
fabric cupped under the scat.
When sewing in-the-round,
Sergers that
have stretch
stitches are
perfect for sewing
3-thread
strong, stretchy
seams that stretch
with two-way stretch
fabrics, allowing
for comfort and
unrestricted action.
Stitches should be tested on both
lengthwise ami crosswise grains of
fabric scraps before sewing the garment.
Looper thread tension dials should be
as necessary to prevent threads from showing
noticeably on the right side of the fabric.
Activewear seams have a tendency to pull open and
expose the needle threads, even when tensions are
adjusted, because of the close fit of ihe garment.
hread that closely matches the tabric makes this less
noticeable. Texturized nylon thread is also help ul.
When used in the needle, it tightens up the stitches
yet stretches with the fabric. WTien it is used in the
loopers, seams are soft, comfortable, and strong; this
is important for close-fining garments.
he in-the-round method of construction is rec om-
mended for smooth, strong elasticized edges. Elastic
is easy to apply in the round because you can si retch
the elastic in front of and behind the presser foot at
method or elastic tape tool
(centimeters) of elastic
extending behind the
о
presser foot, makes
starting the seam
о
easier.
the leg front. When using the
elastic tape foot, practice
changing the tension applied
о the clastic; apply minimal
tension at the leg front and increase
Transparent elastic or chlorine-resistant elastic is
used for sewing swimwear. Transparent elastic,
lighter in weight than chlorine-resistant elastic, gives
a smoother fit. 1 here is also less concern about
cutting into transparent elastic with the knives
because it docs not fray when trimmed.
Narrow decorative piping that stretches with the
scam can be made using decorative threads (pages
118 and f 19), wide transparent elastic, and the 3-
thread rolled hem stitch. Serge wider piping using
the wrapped overedge stitch (page 115). Soft
decorative threads, such as rayon or texturized
nylon, are recommended; swimwear piping that will
be subjected to chlorine should be made using
texturized nylon.
110
How to Apply Elastic on a Swimsuit Leg
I) Cut elastic */2” to IM»” (1.3 to 3.8 cm) shorter than
measurement of swimsuit leg opening. Lap ends l/2”
(1.3 cm); stitch on conventional machine.
2) Quarter elastic and leg opening, using pins. Pin
elastic to wrong side of swimsuit, with inside edge of
elastic on seamline; match two pins at leg front and
two pins at leg back. Shift two remaining elastic marks
about V2" (1.3 cm) toward front of remaining suit
marks; pin.
3) Stitch, using long stitches; trim seam allowance to
elastic width, if necessary. Do not cut elastic with
knives. Remove pins as they approach knives.
4) Fold elastic to inside of suit. Topstitch from the
right side, using cover stitch. Or, on conventional
machine, use long stitches, twin needle, loosened
bobbin tension, and texturized nylon thread in
the bobbin.
How to Make and Apply Decorative Elastic Piping
1) Adjust machine for rolled hem stitch (pages 79 to
81) or 3-thread wrapped overedge (page 115), and
shorten stitch length; use decorative thread in needle
and both loopers, or in upper looper as desired. Stitch
along elastic edge, trimming elastic slightly; avoid
stretching elastic.
2) Adjust machine for a stretch stitch; attach cording
foot. Stitch onto elastic until rolled edge rests under
foot groove. Position fabric, right sides together, in
front of foot to sandwich piping between layers; align
fabric edges so rolled edge follows seamline, and
elastic lies on seam allowance.
Ill
Special Decorative Stitches
The use of decorative threads on a serger or overlock
can duplicate the look of fine braids and bindings
previously found only in ready-to-wear. Decorative
threads for use in a serger can be found in fabric,
craft, needlework, and yarn stores, as well as through
sewing machine dealers.
The finished effect of the decorative thread depends
on the width and length of the stitch as well as on
the thread being used. When using decorative tech-
niques, it is important to test-sew each thread and
fabric to determine how to achieve the desired result.
Practice sewing with a variety of stitch length, width,
and tension adjustments.
Interfacing or tricot bias binding may be used to
stabilize decorative edge finishes on moderate-stretch
knits, bias-cut fabrics, or laces. Narrow strips of fusible
interfacings should be applied to the wrong side ol
the fabric. Strips of nonfusible interfacing or binding
may be placed on top of the fabric and trimmed
away as shown on page 63.
If a decorative thread is lightweight, strong, and does
not fray, it can be used in the needles and loopers.
When decorative thread is used only in a looper, it
lies on the fabric surface because the looper threads
do not penetrate the fabric. Usually, a decorative
thread is only used for the looper thread that forms
the most visible part of the stitch, and regular sewing
thread or fine monofilament nylon thread is used in
the other looper and needle.
Special effects are possible by changing the colors of
threads used, opposite. The 3-thread flatlock stitch is
shown; similar effects are possible in the rolled hem
stitch and the 2-thread flatlock stitch.
Other special effects are possible by thread-blending.
Small stands with multiple spool pins are available;
they slip onto a serger’s spool pin and allow the
threads to feed through thread guides as one thread.
You can create your own decorative thread by using
more than one color of regular thread in a looper.
You can strengthen a fragile decorative thread by
blending it with monofilament nylon, and blending
two matching threads gives fine threads more impact.
It is often easier to use decorative thread in the upper
looper than in the lower looper. There are fewer
thread guides for the upper looper thread to follow,
and decorative threads are less likely to fray or break.
For this reason, if you have a choice between using a
2-thread or a 3-thread flatlock on your serger, you
may prefer 3-thread flatlocking when using heavier
decorative threads.
Reversed Stitches
Cover Stitch. Disengage knives. Use decorative
thread in the looper, if desired. Serge, wrong side
up. Use water-soluble stabilizer, which can be
removed without distorting the looper thread
formation, if stitching on a single fabric layer.
Chainstitch. Disengage knives. Use decorative thread
in looper, and change stitch length, if desired.
Adjust thread tension dials, if necessary. Serge linear
or gently curving pattern, wrong side up. Use tear-
away or water-soluble stabilizer, if stitching on single
layer of lightweight to mediumweight fabric.
114
The Effects of Thread Placement in a 3-Thread Flatlock
Monochromatic. Use
decorative thread in
the upper looper and
matching regular
sewing thread in the
needle and lower
looper.
Enclosed or outlined.
Use decorative thread
in the upper looper
and a contrasting color
in both the needle and
lower looper.
Free or floating. Lise
decorative thread in
the upper looper and
monofilament thread in
both the needle and
lower looper.
Reversible Stitches
3-thread Wrapped Overedge Stitches. Use decorative
thread in die upper looper. Loosen upper looper
thread tension dial so thread wraps completely
around the edge; tighten lower looper thread
tension dial until lower looper thread forms a
straight line,
о
2-thread Wrapped Overedge Stitches. Use decorative
thread in the lower looper. Loosen looper thread
tension dial so thread wraps completely around the
edge; tighten needle thread tension dial to hold
stitches taut. (Upper and chainstitch loopers are not
threaded when using a 5-thread serger.)
115
Adj usting the
Decorative Stitch
The stitch width and stitch length
control not only how wide or how
far apart the stitches will be, but
also the final appearance of the
decorative stitching.
For stitch length, the general rule of
adjustment is: the finer the thread,
the shorter the stitch length. Short
stitches (1 to 2 mm) are used for
fine, lightweight threads to make
the stitching more noticeable.
Heavier threads require a longer
stitch length (4 to 5 mm) to allow
for the thickness of the thread, so it
can lie in even curves on the fabric.
Heavy threads do not curve and
bend as easily with short stitches.
When stitches are too close together,
the loops of heavy thread may pile
up, causing a fabric jam.
Varying the stitch width also changes
the appearance of the stitching.
Stitch width is mostly a matter of
personal preference, but, generally,
a narrower stitch is used with fine,
lightweight threads; a wider stitch,
with heavy threads.
How to lest-sew Decorative Thread
1) Thread serger, tying on threads (pages 30 and 31) ;
do not pull the knots through loopers when using
heavy thread.
2) Use strand of all-purpose thread to form a loop;
thread through eye of looper. Place the decorative
thread through the loop, and pull through the eye.
116
3) Use a net on thread if thread tends to slide or
spill off the spool or for any thread that feeds
unevenly. Turn top of net down to prevent net from
causing uneven feeding.
4) Test-sew slowly without fabric. Watch the area
around stitch fingers to see if stitches are forming.
5) Loosen tension if thread does not feed through
serger. It may be necessary to loosen tension completely
or skip a thread guide if it pinches the thread. (On
some sergers, you may need to bypass tension disc.)
6) Lift presser foot, and place fabric scrap under foot;
stitch slowly, checking stitch formation on fabric.
Adjust tension, stitch length, and stitch width, until
desired stitch is achieved.
Tips for Serging with Decorative Thread
Place cardboard shim under presser foot before and
after an intersecting seam, so stitch length remains
even at thick seam allowances; position shim so needle
does not stitch through it.
Feed ball, skein, and card threads directly into first
thread guide. Reel thread off by hand. Keep decora-
tive thread slack near thread guide holder; it is impor-
tant to watch for this while serging to prevent uneven
stitches. Slip a multiple spool stand on a serger spool
pin to blend threads.
Selecting Decorative Threads
Not all decorative threads will work in all sergers.
Test threads * pages 116 to 117 ) to find out which
will be most successful for you. Do not assume that,
because a certain thread works in your friend’s
machine, it will also work in yours. If your machine
does not handle a certain thread well, you may be
able to find a substitute that gives a similar effect.
When experimenting with decorative threads in the
serger, start with lightweight and smooth-textured
threads, which require fewer tension adjustments.
Avoid quilting thread; although it is lightweight, it is
too stiff to feed easily through the machine. Check
your instruction manual to see if you can use the
special embroidery needles with longer ey es.
The amount of decorative thread required varies,
depending on the size of the thread, the stitch length
and width, and the total length of decorative stitching.
Each looper, or needle with loosened tension, usually
requires 9 to 10 y ards (8.25 to 9.15 m) of decorative
thread per yard (0.95 m) of decorative stitching; a
lightweight thread will require more yardage for
complete coverage. To estimate how much thread
you will need for each looper or needle, multiply
the distance to be sewn with decorative stitches, plus
1 yard (0.95 m) for test-sewing, by at least nine.
Monofilament nylon, topstitching thread, and textur-
ized nylon are the easiest decorative threads to use
in a serger. They require minor tension adjustments
and can be used in both loopers, and in the needles.
Rne monofilament nylon (1) can be used to blend
stitches with the fabric, such as for rolled hems on
multicolored fabrics. Or use it in the needle and
lower looper when sewing a 3-thread overlock stitch,
with a heavy decorative thread in the upper looper;
the nylon thread blends into the decorative loops.
Topstitching thread (2) or buttonhole twist can be
used in loopers and needles, but is most often used
in loopers only, with regular or monofilament thread
in rhe needles. Use topstitching thread or buttonhole
twist in the upper and lower looper to sew a balanced
3-thread overlock stitch that is decorative, although
not identical, on both sides of the fabric.
Texturized nylon thread (3) is easy to use on the serger,
although it has a fuzzy appearance. It is soft, comfort-
able, and strong, and is ideal for activewear and swim-
wear. lexturized nylon adds tension, making it perfect
for use in the lower looper when sewing a 3-thread
rolled hem or 3-thread flatlock stitch. Tension can be
loosened on texturized nylon thread for a lofty, filled-in
edge finish. It is available in regular and heavy' weight.
Rayon, silk, and metallic threads require more tension
adjustment, but are not difficult to use. They are easier
to use in the upper looper than in the lower looper.
Rayon (4) and silk (5) threads are available in several
weights. Because the threads are very smooth, use
nets to prevent them from spilling off the spool and
to control them with a little extra tension on the
118
spool. Also, tighten the tension dial to prevent them
rom slipping between the tension discs.
Metallic thread (6) is available in gold, silver, and
colors. Some metallics will tray d used in the lower
looper. There are several different types of metal lie
thread, some more fragile than others. For easier
serging, select filament threads, which do not fray
or strip easily from the core.
Crochet thread, pearl cotton, ribbon, and yarn are
the heaviest or thickest decorative tlireads and require
a greater amount oi tension adjustment. 1 hey may not
feed well through the lower looper. It may be necessary
to loosen the tension dial as much as possible. To
ensure even feeding of balls or skeins, feed the thread
by hand, making sure there is always slack in the
thread as it enters the first thread guide (page 117).
Crochet thread (7) is available in cotton or acrylic
and comes wound in balls. It is tightly twisted and
can be used in both loopers.
Pearl cotton (8) also comes wound in balls and is
available in two weights, #8 and #5. The #b thread
is finer and easier to use. Pearl cotton is less twisted
than crochet cotton. It works well in the upper looper,
but may fray if used in the lower looper.
Ribbon (9) up to ’A” (6 mm) wide can be used if
it is lightweight, soft, and pliable, such as ribbons
designed for knitting. You may find knitting ribbon
on cones, spools, or cards. It is available in acrylic,
cotton, rayon, and silk. Polyester ribbon is usualh r *
pliable enough to be used in the looper, but can
laid flat and overedged with a serged stitch (page _
for a decorative effect.
Yarn 10) must be smooth and tightly twisted to fee
evenly through the machine. It also must be fine
enough to thread through the eye of the upper lot:
easily and strong enough to feed through the thre
guides. Yarn tends to stretch as it is sewn, so you n
need to loosen the tension completely.
Tips for Selecting Decorative Threads
Select thread with a smooth, tight twist. Г bread that
is spun unevenly or that has a nubby texture does not
eed smoothly.
Select thread that is strong. I bread that frays or has
weak, thin areas will break easily.
Select sott, flexible threads that slide smoothly through
tne thread guides and the eve of the looper. Thread
that is stitt or nonpliable does not feed smoothie.
Select thread that can be threaded through the eye of
the looper without resistance. I bread that is too heavy
or tint к can break the looper or disturb the timing of
the machine.
Select thread of an appropriate weight ft r the fabric.
Thread that is too heavy causes puckering.
Select th read that has the same care method as the fabric.
11<?
I deas for
Decorative
Stitches
l se fine wool thread or yarn to
overedge single layers of felted wool
(a); a 4-thread mock safety stitch is
shown. The cover stitch adds a
tailored topstitching effect at
seamlines (b).
Create smocking (a) by stitching parallel rows of chainstitch; use a tear-
away stabilizer and elastic thread in the looper. Use tricot bias binding for
sot* decorative piping (b) (page 111). Apply lace and ribbons to hems (c)
and folded edges (d), following directions at right. Use the cover stitch to
secure (6 mm) ribbons quickly (e).
How to Apply Lace at Hem
Use lace foot, if available, and right
needle. Place lace on fabric, right
sides together, so straight edge of
lace is on hemline, at least 1
(3 mm) from fabric edge. Over-
lock, trimming fabric to lace edge.
Press lace down.
How to Apply '. rims on Fold
Fold fabric, wrong sides together,
on placement line; press. Align
trim edges on fold. Use lace foot,
il available. Or use regular presser
foot, above; place lace on fabric,
right side up, and hold ribbon over
from of presser foot between knife
and needle. Serge; avoid cutting
fold or trims. Extend upper trim
over fold, and use flatlock, if
opened fold is desired.
Finish evening bag edges tvith decorative threads (a). Use
spaghetti straps (below) for a looped closure (b) and
embellishment (e); conch it on
a conventional machine. Apply
beads (below) to decorate
How to Make Spaghetti Straps
How to Apply Beading
Serge tail chain 6” (15 cm) longer than desired strap
length; use 2-thread chain for lightweight fabrics.
Center chain on right side ol fabric strip. Fold fabric
over chain; use rolled hem stitch to sew raw edges
together. Pull excess chain length to pull strap right
side out. Use bias fabric strip for flexible straps.
Set machine as desired: a rolled hem stitch lays
beads on the edge, lor a reversible finish (shown);
a 3-thread overlock lays beads at the edge; and flat-
locking on a fold couches beads across the fabric.
Use monofilament nylon thread in l ight needle and
loopers. Remove presser foot; use beading foot, if
available. Adjust length to match bead size; move
threads around beads, if necessary.
121
Decorative Ideas for
the Home
Sergers are great timesavers when you are sewing for
о о /о
the home. Trim selvages from long drapery seams as
you stitch, or neatly finish gathered seams and hems
on swags or ruffled curtains. Add finishing touches to
о о
a project with decorative stitches and threads.
Christmas Stockings. Trim a cuff with decorative top-
stitching (a) (page 114). Serge custom piping (b) and
a hanger (c), using a cording foot . Float ribbon floss
on the cuff edge (d), and add a blended-thread tassel
(e) (page 114). Use decorative thread in lower looper
and monofilament nylon in upper looper to create
fagoting with the fiatlock (f). Serge passementerie
braid, following directions at right, and couch it on
fabric using the conventional machine (g).
How to Make Passementerie Braid
Set differential feed (page 46) to ease. Use
decorative thread in upper looper. Roll-hem the
edge of wide tricot bias binding, trimming slightly;
avoid stretching binding. Change to left needle and
3-thread ox erlock; use cording foot , if available.
Change decorative thread, if desired. Serge other
side of binding, aligning needle next to rolled hem.
122
Use two colors of thread for a special effect on project edges. Use
a balanced 2-thread overedge stitch (page 73). or a balanced 3-
thread overlock stitch (shown, pages 69 to 71) with decorative
threads in the loopers.
Guest towels. Use short stitches and rayon thread lor
satin-edged hinged hems (a). Serge rows of pintucks
(b), following din ctions below. Add rows of ladder
stitches (c) by flatlocking on a fold (page 52) with
fabric folded right sides together; weave a silk ribbon
under some stitches, using a hand needle.
How to Sew a Pin tuck
Fold fabric, wrong sides together, on placement
line; press. Disengage upper knife. Serge, using
balanced 3-thread overlock stitch (pages 69 to 71);
align fabric fold to edge of needle plate. Press
pintuck to one side.
123
Troubleshooting Chart
Problem
Possible Solutions
Page Reference
fabric puckers
Check threading.
heck lor tangled or caught thread.
О о
Use high-qualitv lightweight thread.
О 1 / О о
Shorten stitch length.
Loosen thread tension.
Use differential-teed feature, if available.
Hold fabric lain in front of and behind presser foot while sewing.
Decrease presser toot pressure.
Check alignment and sharpness of knives.
pages 30 and 31
pages 30 and 31
page 22
pages 66 and 67
pages 69 to S3
pages 46 and 106
page 106
pages 106 and 107
page 27
I abric stretches
Trim l/t” (6 mm) or more while sewing; for sweater knits, trim
%” (2 cm), except when applying ribbing.
Lengthen stitch length.
Use differential-!« ed feature, if available.
Ease fabric into serger while sewing; do not stretch fabric.
Stabilize seam.
Decrease presser toot pressure;
pages 106 and 108
pages 66 and 67
pages 46 and 106
page 107
pages 49 and 53
pages 106 and 10
Fabric jams
Close looper covet before sewing.
Do not allow trimmings to fall into machine.
«Э
( heck for tangled or caught thread.
( empress thick layers of fabric with conventional stitches before
serging.
Lengthen stitch length.
Loosen looper thread tensions.
Check alignment and sharpness of knives.
page 12
page 43
pages 30 and 31
pages 43 and 106
pages 66 and 67
pages 69 to 83
page 27
1 abric does not
feed well
Lower presser foot.
Lengthen stitch length.
Use differential-feed feature, if available.
Adjust presser loot pressure.
Check alignment and sharpness of knives.
page 56
pages 66 and 67
pages 46 and 106
pages 106 and 107
page 27
Fabric layers shift at
beginning of seam
Lift pressei foot, and position fabric under it.
Pin-baste fabric layers.
page 56
page 54
Fabric edge is uneven
nin at least slightly while stitching.
Shorten stitch length.
I se tricot bias binding to eliminate ragged edges on roiled hems.
I se heavy decorative thread in looper to fill in stitches.
heck alignment and sharpness of knives.
page 33
124
Problem
Stitches skip
Possible Solutions
Check threading.
О
Use high-quality thread.
Change type of thread.
Insert needle correctly.
Tighten needle set screw.
Change a dull, damaged, or defective needle to a new needle.
Change type or size of needle; confirm that both needles are the
same size, if using two needles.
Loosen thread tension.
Allow serger to feed fabric, or hold fabric taut in front of and
behind presser fool while sewing.
Do not pull fabric through machine from behind presser loot.
Increase presser foot pressure.
Page Reference
pages 30 and 31
page 22
page 22
page 27
page 27
page 27
page 27
pages 69 to 83
page 106
page 106
pages 106 and 107
Stitches are
irregular
Check threading.
О
Thread must feed from spool smoothly.
Use high-quality, evenly twisted thread.
Adjust thread tension.
Insert needle correctly.
Change a dull, damaged, or defective needle to a new needle.
Change type or size of needle; confirm that both needles arc the
same size, if using two needles.
Use fabric that has an even texture for decorative stitching.
Check alignment and sharpness of knives.
pages 30 and 31
pages 30, 31, and 117
pages 22, 118, and 119
pages 69 to 83, and
117 to 119
page 27
page 27
page 27
page 106
page 27
Stitches form off
fabric edge
Use left needle.
Widen seam width, using stitch width regulator.
page 27
page 12
Needle breaks
Thread breaks
Check for tangled or caught thread,
о о
Insert needle correctly.
Tighten needle set screw.
Change to larger-size needle.
Do not pull fabric through machine from behind presser foot.
Check threading.
О
Check for tangled or caught thread.
Use high-quality, strong thread.
Loosen thread tension.
Insert needle correctlv.
r
Change a dull, damaged, or defective needle to a new’ needle.
pages 30 and 31
page 27
page 27
page 27
page 106
pages 30 and 31
pages 30 and 31
pages 22, 118, and 119
pages 69 to 83, and
117 to 119
page 27
page 27
125
Index
Bulky fabrics, 107
Buttonhole twist. 118
Buying a serger, 18-19
Accessories, machine, 20-21
Ac live wear, i 1. 110-111
Ad’ Listing,
stitches, 7, 66-83
tension, 69-83
Chain belt loops, 104-105
Chainstitches, 16, 18,69, 114
adjusting tension. 72-73
removing, 43
Christinas stockings. 122
Circular edges, 57
< leaning a serger, 26
Clearing the stitch fingers, 34-35
Coated fabrics, 107
Collars. 93-95
Converter, 18
Cording loot, 21
Corners, 39-41
Cover stitches. 17-18, 114
adjusting tension. 82-83
removing, 44
Cover stitch hem, 59, 61
Crochet thread, 119
Cuffs, 93, 96
1 urves, 39
( utUng system 14
Fabric,
easing, 107
guiding, 33
jammed, 43, 45, 66, 114
puckers in, 124
special, 106-107
stretches, 124
uneven edge, 124
Fake fur, 107
11 ed system 14
Feet, presser, 21
Fine monofilament nylon, 118
Fishline hem, 59, 62
5/4/3/2-thread serger, T6-17
5-thread overlock stitches. 69-71
5-thread safety stitch, 17
5-thread serger, 12-13
Flat collar, 95
Flatlock seam, 52
Matlock stitches, 10, 17-18
adiusting tension, 74-77
leece fabrics, 107
4-thread overlock stitches. 69-71
4-thread safety stitch, 16
i/З-th read serger, 12-13. 16-17
4/3/2-thread serger, 16-17
4/2-thread serger, 13. 16-17
French seam, 49-50
f ringed hem, 59. 61
Fur, hike, 107
nsible stabilized st ain. 49, 53
Balanced si itch, 18
Basic serger techniques, 7, 33
clearing die stitch fingers, 34-35
curves and corners, 39-41
differential feed, 46-47
guiding fabric. 33
hems, 59-63
removing stitches and jammed fabric,
43-45, 66, 124
seams and seam finishes, 19-57
securing tail chains, 36-37
threading, 30-31
Basting seams, 54
Beading. 121
Beading foot, 21
Belt loops, 103-105
Bite. 18
Blind hem, 59-60
Blindsutched and overedged hem, 59-60
Blindstitch foot, 21
Blouses, 934 7
Bobbins, using on a serger, 22
Broken needles, 125
Broken thread, 125
Decorative stitches, 114-117, 120-121
Decorative threads, 22, 114-117
selecting, 1 ] 8-119
Decorator fabrics, 107
Definitions ot terms, 18
Differential feed. 18, 46-47
Dresses. 104-105
D
Garment construction, 7, 86-87
activewear, 110-111
blouses, 93-97
dresses, 104-105
pullover tops, 89-91
skirts and pants, 98-193
special fabrics. 106-107
sweaters. 108-109
Gathered seam 51
Gimp or yarn application foot, 21
Guest towels, 123
Guiding fabric, 33
Eased hem, 59-60
Easing fabric, 107
Elastic,
stabilized seam, 49, 53
on swimsuits. 110-1 11
tape toot, 21
waistbands, 98, 100-101
waistline seams, 104-105
Th ins, 59-63
Hein stitch, rolled, 17-18, 79-81
Home decorating ideas. 122-123
How sergers work, 14-15
How to use this book, 7
126
N
Intersecting seams, 56
Irregular stitches, 125
о
Needles, 21
broken,125
replacing, 27
Nets, 21
Nonstretch stab <аивц. 1i. 55
Replacing needles and knives, 27
Restitching part of a seam, 57
Reversed stitches, 114
Reversible stitches, 115
Ribbing, 11, 109
Ribbon thread, 119
Rolled hem plate, 21
Rolled hems, 11, 59. 62-63
Rolled hem stitches, 17-18
adjusting tension, 79-81
Rolled seam, 49-50
Jammed fabric, 43. 45. 66. _
Knives, 18, 21
replacing, 27
Oiling a serger. _ - _ *
Overcast stitch. 1 >
Overedged and bte cfemched hem,
59-60 ‘
Overedged - bed i :i, 59-60
Overedge s' ; - •
Overedge stit > 73, 115
Overlock ni 4*1
Overlock se. * -
Overlock sti c es 11, IS
adjusting it • on • -”
removing
Lace,
fabrics, 106
foot, 21
at hem, 120
Ladder stitches, 18
Lamps, sewing, 25
Length, stitch, 18, 66-67
Lettuce hem, 59, 62
Liquid fray preventer, securing tail
chains, 36-37
Loopers, 14, 18
Looper threader, 21
Loops, belt, 103-105
Loop turner, securing tail chains, 36-37
Pants, 98-163
Parts of a sei ger. _
Passementerie braid, Г__’
Pearl cotton thread. 119
Pintuck. 123
Plackets, 93. "
Pockets, 98-99
Polar fleece fabrics, 107
Presser feet. _ 1
Problem chan. 124-125
Pucker-free seams, 10
Puckers,
in fabric. 12
in seams. 106
Pullover tops, 89-91
M
Maintenance of a serger, 26-27
Metallic thread, 119
Mot к flat-fell seam, 49-50
Mock flatlock seam, 49, 52
Mock safety stitches, 17-18
Raised-design fabrics, 106
Rayon thread. 118-119
Reinforced seam, 49-50
Removing stitches and jammed fabric,
43-45, 66, 124
Safety stitches, 16-18
adjusting tension, 72
Seams and seam finishes, 11, 49
basting, 54
pucker-free, 10
puckers in, 106
sewing, 55-57
stabilized, 49, 53
types, 49-52
waistline, 104-105
Securing tail chains, 36-37
Serged seams, 11
Serger machine,
accessories, 20-21
bobbins on, 22
buying, 18-19
cleaning and oiling, 26-27
differential feed, 18, 46-47
feed system, 14
5/4/3/2-threacl, 16-17
5-thread, 12-13
4/3-th read, 12-13, 16-17
4/3/2-th read, 16-17
4/2-thread, 13, 16-17
illustration of, 12
knives. 18, 21, 27
loopers, 14, 18
maintenance, 26-27
needles, 21, 27, 125
parts of, 12
stitch fingers, 15, 18, 34-35
techniques for using, 7, 33-57
threading, 30-31
3-thread, 13, 16-17
2 3-thread, 16-17
uses for, 10-11
vocabulary, 18
Sewing guides, 21
Sewing lamps, 25
Sewing room, organizing, 25
Sewing seams, 55-57
Sheer fabrics, 106
Shirring foot, 21
Shirt-tail hem, 59, 63
Silk thread, 118-119
Silky fabrics, 106
Skipped stitches, 125
Skirts. 98-103
Sleeves, 93
Slight-stretch stabilized seam, 49, 53
Smocking, 120
127
Spaghetti straps, 121
Special effects, 7
dec orative ideas for the home, 122-123
decorative stitches, 114-117, 120-121
decorative threads, 22, 114-119
Special fabrics, 106-107
Spool caps, 21
Sport hem, 59, 61
Spreader, 18
Stabilized seams, 49, 53
Stand-up collar, 95
Stitches,
adjusting, 7, 66-83
balanced, 18
chainstitch, 16, 18, 43, 69, 72-73, 114
cover, 17-18, 44, 82-83. 114
decorative, 114-117, 120-121
flatlock, 10, 17-18, 74-77
irregular, 125
ladder, 18
length and width, 18, 66-67
mock safety, 17-18
overcast, 18
overedge, 16, 18, 69. 73, 115
overlock, 11, 16, 18, 44, 69-71
removing, 43-44
reversed, 114
reversible, 1 15
rolled hem, 17-18, 79-81
safety, 16-18, 72
skipped, 125
uses, 16-17
wrapped overedge, 115
Stitch lingers, 15, 18
clearing, 34-35
Stitch length, 18, 66-67
Stitch width, 18, 66-6'
Stockings, Christmas, 122
Straps, spaghetti, 121
Sweater knit fabrics, If, 107
Sweaters, 108-109
Swimsuits, 11, 110-111
3-thread wrapped oxeredge stitches, 115
Tops, pullover, 89-91
Topstitched and overedged hem, 59-60
lopstitching thread, 118
Towels, guest, 123
Trims, 120
{roubleshooting chart, 124-125
T-shirts, 89-91
Tweezers, 21
2-thread chainstitch, 16, 69
2-thread flatlock stitch, 76
2-thr< ad overedge stitch, 16, 69, 73
2-thread tolled hem stitch, 79-80
2-thread wrapped overedge stitches, 115
2/3-thread serger, 16-17
U
Uneven fabric edge, 124
Uses,
for a serger, 10-11
for stitches, 16-17
Vocabulary, 18
lail chains, 18
securing, 36-37
Taut sewing, 106
‘ension, adjusting 69-83
.ension dial, 18
Tension disc, 18
cleaning, 126
Texturized nylon thread. 118
Thread,
ad listing tension, 69-83
blending colors, 23
broken,125
buying. 22-23
decorative, 22, 114-119
Threading a serger, 30-31
3-thread flatlock stitch, 76-77
3-thread overlock stitch, 16, 69-71
3-thread rolled hem stitch, 79-81
3-thread serger, 13, 16-17
W
Waistbands, 98, 100-103
Waistline seams. 104-105
Width, stitch, 18, 66-67
Wire hem, 59, 62
Wrapped overedge stitches, 115
Y
Yarn, 119
application foot, 21
Creative Publishing international, Inc.
offers a variety of how-to books. For
information write:
Creative Publishing international, Inc.
Subscriber Books
5900 (Ireen Oak Drive
Minnetonka, MN 55343
128
Stitch width
Stitch
length
Cover Stitching
90000
780865
733305
international
ISBN 0-8 65 ?£ -330-9
Serge with confidence,
save time, and get
professional results!
New Sewing with a Serger presents all the
basics, and a whole lot more . . .
what to look for when buying a serger
adjusting tension dials for perfect stitches
the latest stitches and accessories
tips and techniques for serging corners, curves,
seams, and hems
easy construction methods for your entire
wardrobe
serging specialty fabrics
new ideas for decorative serging
Decorative Edge Finishes
U.S.A.
$16.95
Priced
Higher In
Canada
и
52944
01G45