/


Теги: magazine magazine better homes and gardens
Год: 2024


Текст
Stylish surrounds.
So much more than just a physical
boundary or privacy screen, your
COLORBOND ® steel fence is another
opportunity to add a strong and
stylish design statement to your
home and landscaping.
Available in a range of colours
echoing Australia’s natural landscapes,
you can also customise your
COLORBOND® steel fence with different
panel, post and top cap designs.
Be inspired at
colorbond.com/fencing
Made by Australia
The COLORBOND® steel colour swatch and image shown have been reproduced to
represent actual product colours as accurately as possible. However, we recommend
checking your chosen colour against an actual sample of the product before purchasing
as varying light conditions and limitations of the printing process may affect colour tones.
COLORBOND®, BlueScope, the BlueScope brand mark and ® colour names are registered
trade marks of BlueScope Steel Limited. ™ colour names are trade marks of BlueScope
Steel Limited. © 2022 BlueScope Steel Limited ABN 16 000 011 058. All rights reserved.
Yes, I would like to subscribe to Better Homes and Gardens
PAYMENT OPTIONS
(Australian rates)
I WISH TO SUBSCRIBE FOR (tick one only)
Me Gift
■ ■ 6 months print only (6 issues) $40.00 SAVE 23% (BHGCD_6_40000_)
*Auto-renewal
■ I already subscribe. Please extend my subscription with the offer
selected above. For overseas rates, visit magshop.com.au/BHG244
MY DETAILS
NAME
ADDRESS
POSTCODE
TELEPHONE (
)
EMAIL
GIFT RECIPIENT DETAILS
NAME
ADDRESS
POSTCODE
TELEPHONE (
)
EMAIL
PAYMENT DETAILS
Cheque/money order for $___________ is enclosed payable to Magshop
or charge my ■ VISA ■ MASTERCARD ■ AMEX
■■■■ ■■■■ ■■■■
■■■■
CARDHOLDER’S NAME (please print)
CARDHOLDER’S SIGNATURE
EXPIRY DATE
/
Please photocopy this order form for additional subscriptions
SUBSCRIBING IS EASY
Send original or copy of this coupon (no stamp required) to:
Magshop Reply Paid 5252
SYDNEY, NSW, 2001
M244BHG
Savings based on Better Homes and Gardens cover price $8.70. Offer ends April 10, 2024. You can
cancel at any time by giving notice in writing or by phone and receive a refund for the remaining portion
of your subscription. *After the first 6 issues the subscription will renew at $40 every 6 issues thereafter.
Subscription will be renewed unless cancelled. By including your email address, Better Homes and
Gardens will keep you informed of offers and updates from our publisher, Are Media Pty Limited,
and specially selected partners. Please tick if you’d prefer to not receive offers and updates from:
■ Are Media Pty Limited ■ Our specially selected partners. Our Privacy Policy can be found at
aremedia.com.au/privacy and includes important information about our collection, use and disclosure
of your personal information (including the provision of targeted advertising based on your online
activities). It explains that if you do not provide us with information we have requested from you,
we may not be able to provide you with the goods and services you require. It also explains how
you can access or seek correction of your personal information, how you can complain about a
breach of the Australian Privacy Principles and how we will deal with a complaint of that nature.
3 OTHER
WAYS TO
ORDER
1
SCAN THE
QR CODE
TO ORDER
2
ONLINE
magshop.com.au/BHG244
3
CALL
136 116 and quote M244BHG
SUBSCRIBE
AND RECEIVE
SAVE
23%
HURRY!
OFFER ENDS
APRIL 10, 2024
FOR ONLY $40
DISCOVER ENDLESS DIY IDEAS,
MOUTHWATERING RECIPES AND
EXPERT GARDENING TIPS!
SUBSCRIBER BENEFITS
PAY JUST $40 FOR 6 ISSUES OF
BETTER HOMES AND GARDENS
VIA AUTOMATIC RENEWAL
SAVE 23%
OFF THE
RETAIL PRICE
FREE DELIVERY
OF THE MAGAZINE TO
YOUR HOME EACH MONTH
APRIL CONTENTS
122
come inside
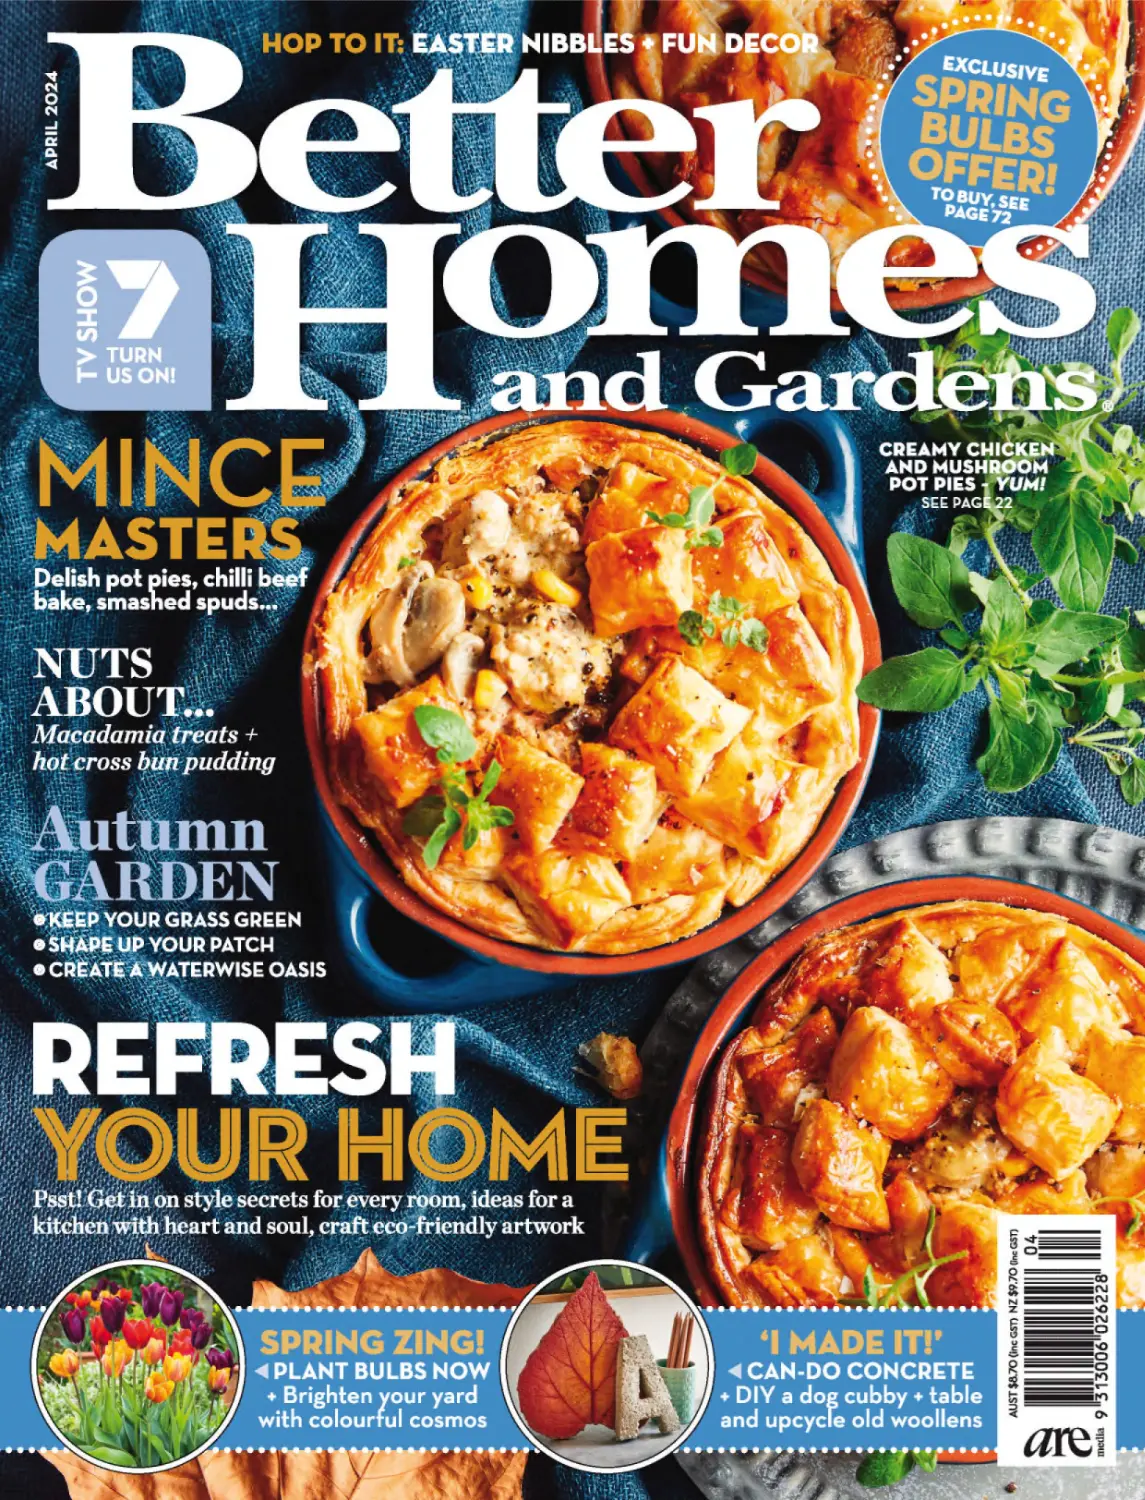
ON THE COVER
16 Mince masters Delish pot pies,
chilli beef bake, smashed spuds...
28
38 Nuts about... Macadamia
treats + hot cross bun pudding
50
50 Hop to it: Easter
nibbles + fun décor
60 Spring zing! Plant bulbs now
72 Exclusive spring bulbs offer!
78 Brighten your yard with
colourful cosmos
94 Create a waterwise oasis
98 Shape up your patch
104 Keep your grass green
114 Psst! Get in on style
secrets for every room
122 Ideas for a kitchen
with heart and soul
136 Craft eco-friendly artwork
146 DIY a dog cubby + table
150 Can-do concrete
158 Upcycle old woollens
FOOD
16 Mince master Turn this staple
into flavour-packed family dinners
26 Clarissa’s cuisine Stir-fry your
way to fab fried rice with our new
guest presenter, Clarissa Feildel
BHG APRIL
28 Colin’s kitchen Cook up mains, pud
and the coolest dessert on the block
38 Go nuts with macadamias
Make Aussie maccas the star of
a slew of sublime sweet treats
46 Eat well Designed for foodies
with diabetes, this recipe is so
tasty the whole fam will love it!
48 Better cooking
50 A hoppy occasion Whip up
an egg-cellent Easter brunch
and delightful decorations!
GARDENING
60 Put zing into spring! Plan and
plant your bulbs now for spring bling
72 Exclusive spring bulb offer Order
your bulbs now before they sell out
78 Bloom & boom Extend your sunny
summer days with colourful cosmos
82 Go wild behind the hedges
Borrowing other gardeners’ ideas
isn’t cheating – it’s a compliment!
88 Little things that go wow! Take
inspiration from MIFGS gardens
94 Green space Pack your place
with hardy, waterwise plants
98 Shape up to open up Give your
overgrown outdoors a tidy haircut
Cover photography Alan Jensen; styling Michele Cranston
16
60
104 Keeping your garden green
Fix your soil for a lush landscape
and step up to a new pathway
108 Make it a showstopper!
Transform your front yard from
nondescript to noteworthy
110 In your garden
112 Better gardening
113 Moon guide
134 Just a rough patch Render
holes in your walls like a pro
140 Cool runnings Tune up your
air-con unit – how cool is that?
144 Shelf service Secure your
wobbly wall storage with ease
146 Canine console DIY a doubleduty dog cubby and coffee table
DECORATING & CRAFT
114 Secrets to styling Tackle your
interiors with stylists’ secrets
122 Heart of the home Your
dream kitchen design is here!
136 Hello, eco-gorgeous! Try
your hand at a jute artwork
SPECIAL FEATURE
142 Grate expectations Your
bathroom reno won’t be a drain
with Stormtech’s stylish grates
BETTER YOU
158 What to do with upcycled
wool Weave new life into thrifted
174 Better health
DIY & BUILDING
132 Top drawer Fix your kitchen
drawers for super-smooth sliding
ISSUES
FOR $40
When you subscribe
Save 23%
SEE PAGE
and live your best life!
170 Body business Top tips
and tired woollen threads
164 A cut above Meet an artist
making art from plywood + paint
6
166 DIY self-esteem booster
kit Build your confidence
148 Better decorating
150 Cast in concrete Mix up your
décor with contemporary accents
94
to take care of your skin
from the neck down
REGULAR FEATURES
12 Editor’s letter
182 Better finance
190 Better stockists
192 Privacy policy
194 Better books
VISIT US ONLINE FOR ALL THE LATEST UPDATES, PROJECTS AND GREAT IDEAS
bhg.com.au
facebook.com/bhgaus
instagram.com/bhgaus
pinterest.com/bhgaus
TV CONTENTS
watch us on tv
Every issue we bring you projects and recipes from the show for you to make and cook
SPECIAL FEATURE
11 Karen Martini says ciao to BHG TV
FOOD
26 Clarissa Feildel Fried rice
28 Colin Fassnidge Hot cross bun
and butter pudding; Baked salmon
with apple and fennel salad; Sticky
pork belly strips with broccolini and
macadamia dressing; BBQ lamb
and simple potato salad; Colin’s
famous chicken bread; Frozen
peanut butter block and praline
136
82
GARDENING
82 Steal stellar ideas for your
yard from a glorious garden
in north-east Victoria
88 Be inspired by the 2023 Melbourne
International Flower and Garden
Show designs and see what’s
new this year on BHG TV
98 Spruce up your overgrown outdoor
space with a tidy trim and prune
104 Care for your soil for lovely
lawn and thriving plants, then
put in a pretty pathway
108 Use a Mediterranean planting
theme to boost your street appeal
DIY & BUILDING
132 Slide your kitchen drawers into
smooth order with a quick fix
134 Render holes in your walls like an
98
SEEN ON BHG TV
FRIDAYS 7.00
28
15 MARCH TO
5 APRIL 2024
NOTE: Television content subject to schedule changes.
Check your local program guides for viewing times.
Television enquiries (02) 9877 7652 Email tvenquiries@seven.com.au
10 BHG APRIL 2024
expert with a few basic supplies
140 Service your air-con unit for cool
savings on your energy bills
144 Fasten your wobbly shelves to
secure stable, stylish storage
146 Build a double-duty dog cubby and
side table – it’ll bow-wow you over!
DECORATING & CRAFT
136 Try your hand at textured art and
revamp a lamp with skewers!
164 Meet still-life artist Misha Harrison
CIAO
FOR NOW!
After getting us hooked on her flavourful
and richly-diverse cooking over the past 17
years, Karen Martini is packing up her knives
Interview Raffaela Pugliese
T
elevision chefs may have
rockstar aura, but it’s easy to
forget that these screen stars
also have a whole other life. The
demands of filming on Karen Martini’s
family and business ventures has
led to her difficult decision to say
goodbye to the Be er Homes and
Gardens crew. “I needed to make big
changes moving forward,” says the
award-winning restaurateur, who is
one of the longest-serving presenters
on the show. “I just opened two new
restaurants – Johnny’s Green Room
and Saint George in Melbourne – and
I’m also overseeing Thyme at Alba on
the Mornington Peninsula.”
The prolific menu curator
coordinates at least 60 different dishes
a week. “I also have lots of energy to
try new things, to try different styles
of presenting. It’s important to keep
pushing the boundaries. But, first,
I need to take a breather.”
In addition, the 52-year-old author
of multiple top-selling cookbooks is
also a mum. “My daughters are in year
12 and year 10 this year, and it’s crucial
I’m there for them at this time.”
Karen’s departure coincides with
the show’s milestone 30 years on
air. “TV has opened up the world
to home cooking, making it look
doable. It’s increased the home
cook’s confidence. And it’s been
great to be a part of this.” Social
media and today’s diverse range of
food products on the shelf have also
contributed to the rising trend of
eating in, says the culinarian.
The legacy Karen has le
behind
at BHG is undeniable, having shared
more than 700 recipes, and myriad
shortcuts and shopping tips. “I’m
deeply thankful for my time on the
show and in the magazine. BHG has
given me so much – and I’ve enjoyed
giving as much in return.”
EDITOR’S LETTER
Hello!
F
There is something comforting about the change in the seasons,
balancing the vibrant highs of summer with busier, cooler days
or many of us, the past few
months have been a whirlwind
of good times spent with
friends and family in homes curated
for summer entertaining. But, it’s
beginning to look a lot like autumn!
The morning and evening breezes
are crisp, leaves are changing
colours – think gold, russet and rich
burgundy. As I watch the drama play
out in nature, I start to feel restless.
It’s time for beginning new things.
What you do in your garden now
will set you up for months, even
years, to come. Get onto those
flowering bulbs for a spring parade
of colour and fragrance (page 60).
You’ll have the prettiest garden on
the block with our great bulb offer
(page 72). It’s also a good time to
rethink the design and structure of
your garden – you’ll find plenty of
inspo right here (from page 82).
Yes, believe it, we’re hopping
(sorry, had to!) into Easter in March
this year. If you’re unprepared, you’ll
be sorted with our gorgeous food
spread and cutest-ever crafts (page
50). And for those of you who think
you’ve done everything you can with
budget-busting mince, we’ll turn
your frown into a smile (page 16).
Seasons change to remind us that
things are always changing. Sadly,
we say a heartfelt goodbye to our
longtime TV food presenter Karen
Martini (page 11), who’s moving on.
But voids make room for the new –
meet our guest TV food presenter,
Clarissa Feildel, who’ll have you
stirring up fried rice that’ll trump
your favourite takeaway (page 26).
Embracing this time of year also
means refreshing your home with chic
décor ideas, and they don’t have to be
expensive (from page 114).
Consider this issue an
ode to autumn. Enjoy!
BUY
BULBS
NOW!
SEE PAGE 72 FO
R
MORE DETAILS
BHG APRIL
Editor
Dora Papas
Creative director
Deputy editor
Scott Cassidy
Raffaela Pugliese
Production editor Joseph Kenworthy Chief sub editor Lucie Clark
Design director Monique Larracy Senior designer Carol Tang
Decorating editor Dora Papas Garden editor Jenny Dillon Food editor Sarah Murphy
DIY editor Tiff Bancroft Beauty editor Annie Millar Stylist Vanessa Tidy, Kate Walsh
Editor’s assistant Sonya Dlugosch Enquiries (02) 9282 8000
REGULAR CONTRIBUTORS
In your garden Tony Fawcett
Moon guide Milton Black Better pets Caroline Zambrano
ADVERTISING
Commercial brand manager Jo-Ann Taylor
Brand executive Claire Ellis
Sales director NSW, Vic, SA, WA Karen Holmes
Qld head of sales Judy Taylor
Marketing manager Jess Taylor
Subscriptions campaign manager Nicolette Zorzopis
TELEVISION
Host Johanna Griggs
Presenters: Pets Dr Harry Cooper Gardening Graham Ross, Melissa King DIY Adam Dovile
Food Colin Fassnidge Landscaping Charlie Albone Decorating Juliet Love
Executive producer Russell Palmer Series producer Rani Eaton
Production manager Mollie Jones
Researchers: Gardening & Landscaping Vivien Kappos, Grahame Rowe, Joshua Culpan
Decorating Karenza Jewell, Chris Cort DIY John Rae, Greg Sparke
Food Marnie Rowe, Kim Meredith Stylist/Junior decorating researcher Erin Brikich
Construction manager Scott Marvell
Producers Cassandra Felix, Daniel Gustafson, Cameron Hartley,
Cathy Foote, Stephanie Walsh, Rhian Petch
Associate producers Sharon Field, Heidi Ahrens
Upcycle
Post
production
Jessica
Stone, Duncan Richards, Edvin Mandic, Amarnath Jones,
worn-out
Bettina Otterbeck, Markus Siegl, Kate Tanttari, Steven Levett
woollen
Production assistants Callum Domeney, Sarah Johnson
Associate producer – social media Jacqui Pix
threads into
Commercial partnerships manager Stewart Light
cosy journal
Production co-ordinator Portia Cheung
covers, gift
Senior production co-ordinator Stephanie Lee
tags and more
(page 158).
DIGITAL
bhg.com.au, bhgshop.com.au
Digital managing editor Rebecca Lowrey Boyd
Senior content producer Livia Gamble Content producer Rachel Iorfino
aRe MEDIA PTY LIMITED
(02) 9282 8000, 54 Park Street, Sydney, 2000
Chief executive officer Jane Huxley
Director of content Sally Eagle
General manager, homes Lisa Hudson
Commercial director Andrew Cook
DOTDASH MEREDITH INTERNATIONAL
Vice president, business and strategy Joy Evans
Executive director, licensing operations Paul Ordoñez
Reproduction: Printed in Australia by IVE Group, Building D, 350 Parramatta Rd, Homebush,
NSW 2140. Distributed by Are Direct. Published 13 times a year by Are Media Pty Ltd (ABN 053 273
546). For competition entries, use the address on entry forms. Title and trademark BETTER HOMES
AND GARDENS® reg US Patents Office, Canada and Australia, by Dotdash Meredith International.
Use of trademark is strictly prohibited. Recommended and maximum price $8.70 (NZ $9.70), inc GST.
All content © 2024 Are Media Pty Ltd, all rights reserved. Reproduction without permission is
prohibited. All prices and information are correct as at the time of printing. Prices quoted are
recommended retail prices and may vary. All material sent to Better Homes and Gardens (whether
solicited or not) will not be returned. Unless otherwise agreed beforehand, all rights including
copyright in such material is assigned to Are Media Pty Ltd upon receipt and Are Media Pty
Ltd may use or sell the material in all media worldwide in perpetuity without further consent or
payment. Better Homes and Gardens does not accept or assume responsibility for such material.
Television enquiries (02) 9877 7652 Email tvenquiries@seven.com.au
Magazine enquiries (02) 9282 8000 Email bhgmagenquiries@aremedia.com.au
Subscription customer service 136 116 Email magshop@magshop.com.au
Website magshop.com.au/ContactUs
EASY MEALS
CHEESEBURGER
SMASHED POTATOES
Serve up a fun spin on this classic
beef mince takeaway go-to.
What’s the secret to crispy
outside, fluffy inside potatoes?
Simply boil before roasting.
Recipe on page 22
MASTER
Twist this staple into filling and wallet-friendly dinners for your family
CREAMY CHICKEN,
FRENCH ONION AND
MUSHROOM POT PIES
Raid the freezer and turn a bag
of mixed vegies and chicken mince
into fab pies. The puff pastry
tops are a delicious reminder
that it’s hip to be square!
Recipe on page 22
APRIL 2024 BHG 17
EASY MEALS
LAMB MINCE AND
EGGPLANT GOZLEME
Create the ultimate fuss-free homemade
dough with an unexpected ingredient
– Greek yoghurt! This clever dough only
needs 15 minutes to rest so you can get
your fix of market eats at home in a flash.
Recipe on page 24
MEXICAN BEEF AND
CHARRED CORN SALAD
Turn salad into a hearty feast with
beef mince, pantry-staple taco
seasoning and chipotle in adobo
sauce (dried, smoked jalapeños
in a tangy tomato sauce).
Recipe on page 24
APRIL 2024 BHG 19
EASY MEALS
GREEN CURRY CHICKEN
AND ZUCCHINI BURGERS
Curry paste adds spice to your
burger and grated zucchini amps up
the vegies. For a milder option, swap
the sriracha for sweet chilli sauce.
Recipe on page 25
GIVE YOUR BURGER PATTIES EXTRA KICK WITH
NO-FUSS GREEN CURRY PASTE – IT’S A GENIUS
MIDWEEK SHORTCUT TO PUMP UP THE FLAVOUR
ONE-SKILLET CHILLI
BEEF AND MIXED
BEANS BAKE
A packet of microwave rice
is the hidden ace for you
to cook up this speedy,
filling beef mince dinner.
Recipe on page 25
APRIL 2024 BHG 21
EASY MEALS
CHEESEBURGER
SMASHED
POTATOES
Preparation time 20 mins
Cooking time 1 hour 30 mins
Serves 6
1kg washed baby potatoes, unpeeled
1 cup white vinegar
Sea-salt flakes and freshly ground
black pepper, to season
1/4 cup extra virgin olive oil, plus
extra 1 Tbsp
400g lean beef mince
2 tsp Worcestershire sauce
3 Tbsp barbecue sauce
2 tsp dried Italian herbs
1 cup pizza cheese
1/4 cup tomato sauce
1/4 cup American mustard
1 red onion, finely diced
5-6 small gherkins, sliced
2 cups shredded iceberg lettuce
250g cherry tomatoes, quartered
STEP 1 Preheat oven to 200°C
fan-forced (220°C conventional).
Line a large tray with baking paper.
Add potatoes, vinegar and 1 teaspoon
of sea-salt to a large saucepan on high
heat. Top with water until potatoes
are fully submerged. Bring to a simmer,
reduce to low and simmer uncovered
for 25-30 minutes or until potatoes
are just tender when pierced with
a small, sharp knife.
STEP 2 Drain potatoes in a colander,
set aside for 5 minutes or until
completely dry and moisture has
evaporated. Transfer potatoes to tray
and use back of a spoon to gently smash.
Drizzle with oil, sprinkle with salt, bake
for 40 minutes or until golden and crisp.
STEP 3 Meanwhile, heat extra oil in a
large frying pan on high heat. Add mince,
Worcestershire sauce, barbecue
sauce and Italian herbs, and cook
for 8-10 minutes, breaking up with a
wooden spoon, until browned. Season.
STEP 4 Remove tray from oven and
spoon mince over potatoes. Sprinkle
22 BHG APRIL 2024
with cheese and bake for a further 10
minutes or until cheese has melted.
STEP 5 Allow potatoes to cool slightly.
Top with tomato sauce, mustard, onion,
gherkin, lettuce and tomato. Serve.
CREAMY
CHICKEN,
FRENCH ONION
AND MUSHROOM
POT PIES
Preparation time 15 mins
Cooking time 55 mins
Serves 6
1 Tbsp extra virgin olive oil
500g chicken mince
400g cup mushrooms, sliced
40g French onion soup mix
2 tsp garlic powder
2 cups frozen pea, carrot and
corn vegetable mix
11/2 cups sour cream
2 Tbsp Worcestershire sauce
2 Tbsp cornflour
Sea-salt flakes and freshly ground
black pepper, to season
3 sheets puff pastry, thawed
1 free-range egg, lightly whisked
Mixed salad leaves, to serve
STEP 1 Preheat oven to 190°C
fan-forced (210°C conventional).
Lightly grease 6 x 11/4-cup capacity
ovenproof dishes. Heat oil in a large
frying pan on high heat. Add mince and
cook for 8-10 minutes or until browned,
breaking up with a wooden spoon.
Add mushrooms and cook for a further
5 minutes or until softened.
STEP 2 Transfer mixture to a large
bowl. Stir in French onion soup mix,
garlic powder, vegetable mix, sour
cream, Worcestershire sauce and
cornflour. Season. Divide mixture
into prepared dishes.
STEP 3 Lay pastry out onto a clean
board. Cut out 6 x 1cm-thick strips to
use as a collar. Cut remaining pastry
sheets into 3cm squares. Take one
pastry strip and push down gently
to secure around edge of each dish to
make a collar. Slightly overlap remaining
CLASSIC SAVOURY MINCE
Make your midweek dinner
effortless with this tasty fam fave.
Get ahead by cooking a double
batch, then freeze in portions for
on-hand ready-to-reheat meals.
Recipe on page 25
EASY MEALS
LAMB MINCE
AND EGGPLANT
GOZLEME
Preparation time 15 mins plus 30 mins
resting and cooling
Cooking time 50 mins
Makes 4
2 Tbsp extra virgin olive oil, plus
extra 1 Tbsp
11/2 cups diced eggplant
1 brown onion, diced
3 cloves garlic, crushed
400g lamb mince
11/2 tsp ground cumin
1 tsp sumac
2 tsp dried oregano
1 large truss tomato, chopped
100g Greek feta, crumbled
2 cups grated mozzarella cheese
4 cups silverbeet, finely shredded
Sea-salt flakes and freshly ground
black pepper, to season
DOUGH
450g self-raising flour, sifted,
plus extra, for dusting
450g plain full-fat Greek yoghurt
1 tsp baking powder
1 tsp sea-salt flakes
2 Tbsp extra virgin olive oil
GREEK SALAD
2 truss tomatoes, quartered
1 Lebanese cucumber, chopped
1/2 small red onion, sliced
100g Greek feta, cut into chunks
2 Tbsp lemon juice
1 Tbsp extra virgin olive oil
1/2 tsp dried oregano
STEP 1 To make Dough, mix all
ingredients using a spoon in a large
bowl until shaggy. Use clean hands to
24 BHG APRIL 2024
tip dough onto clean bench dusted with
flour, knead for about 1-2 minutes until
mixture just comes together. Put dough
back into bowl, cover with a plate and
allow to rest for 15 minutes. Dough
should be smooth and soft when poked.
STEP 2 Heat oil in a large frying pan
on high heat. Cook eggplant, stirring,
for 8 minutes or until soft. Add onion
and garlic, and cook for 3 minutes or
until softened. Add mince, cumin,
sumac, oregano and tomato. Cook,
stirring, for 5 minutes until cooked.
Transfer to a bowl, set aside to cool
slightly for 15 minutes. Drain any excess
liquid from mixture. Stir through feta.
STEP 3 Divide dough into 4. Roll out
each piece to a 24cm circle. Spread 1/4
of the mince mixture over half of dough.
Top with mozzarella, then silverbeet.
Fold over dough to form a half-moon
shape, use your fingers to push down
edges to seal. Transfer to a board and
cover with a clean tea towel, repeat with
remaining dough and mixture. Season.
STEP 4 Heat extra oil in a large frying
pan on medium heat. Cook gozleme in
batches for 3-4 minutes each side or
until golden and crispy. Meanwhile,
combine Greek salad ingredients in a
medium bowl. Serve gozleme with salad.
MEXICAN BEEF
AND CHARRED
CORN SALAD
Preparation time 15 mins
Cooking time 50 mins
Serves 6
4 cobs of corn, husks and silks
removed
1 Tbsp extra virgin olive oil
11/2 cups pearl couscous
11/2 cups chicken stock
2 chorizos, sliced
500g lean beef mince
40g taco seasoning
Sea-salt flakes and freshly ground
black pepper, to season
2 Tbsp chipotle in adobo sauce
1/2 cup whole-egg mayonnaise
250g cherry tomatoes, diced
6 baby cucumbers, diced
2 green onions, thinly diced
1 avocado, diced
1 cup coriander leaves
Juice of 1 lime
11/2 cups crushed corn chips, plus
whole, to serve
STEP 1 Heat a chargrill pan on high heat
and cook corn, turning, for 12-15 minutes
or until charred. Transfer to a board and
slice corn from cob.
STEP 2 Heat oil in a medium saucepan
on medium heat. Add couscous and
cook, stirring, for 3 minutes until
golden and toasted. Add stock, bring
to a simmer, covered, and cook for 12
minutes. Remove lid and cook for a
further 1-2 minutes or until liquid has
evaporated and couscous is cooked.
Fluff with a fork, set aside to cool slightly.
STEP 3 Heat a frying pan on high
heat and cook chorizo for 8 minutes,
turning halfway until golden. Transfer
to a plate. Cook mince in same pan,
stirring, for 8 minutes or until browned.
Add taco seasoning and stir to combine.
Return chorizo to pan. Season.
STEP 4 In a small bowl, stir the chipotle
sauce into mayonnaise. Scatter couscous,
mince and corn on a platter. Top with
tomato, cucumber, green onion,
avocado and coriander. Drizzle with lime
juice. Serve with chipotle mayonnaise
and crushed and whole corn chips.
Photography Alan Jensen; styling Michele Cranston; food preparation Ismat Awan; recipes Tamika O’Neill
pastry squares to cover, leaving
a small hole in middle to allow steam
to escape. Brush pastry with egg wash
and bake for 35–40 minutes or until
golden and puffed on top.
STEP 4 Serve with mixed salad leaves.
GREEN CURRY
CHICKEN AND
ZUCCHINI
BURGERS
ONE-SKILLET
CHILLI BEEF AND
MIXED BEANS
BAKE
CLASSIC
SAVOURY MINCE
Preparation time 10 mins
Cooking time 15 mins
Makes 4
Preparation time 10 mins
Cooking time 45 mins
Serves 4
Preparation time 5 mins
Cooking time 15 mins
Serves 4
1 medium zucchini
500g chicken mince
2 green onions, sliced
1 cup coriander leaves
1 Tbsp lemongrass paste
1 clove garlic, crushed
2 Tbsp green curry paste
1/4 cup panko crumbs, plus extra
2 Tbsp, if needed
1 Tbsp extra virgin olive oil
4 x burger buns, lightly toasted
1 baby gem lettuce, leaves separated
1 Lebanese cucumber, cut into ribbons
1/4 cup Japanese mayonnaise
1/4 cup sriracha sauce
2 tsp extra virgin olive oil
1 red onion, diced
500g lean beef mince
35g chilli con carne sachet spice mix
400g can diced tomatoes
310g roasted pepper strips, drained
250g pkt microwave basmati rice
400g can black beans, drained, rinsed
400g can creamed corn
11/2 cups grated Mexican-style cheese
1 avocado, sliced
1 cup coriander leaves
1 jalapeño, sliced
1 lime, cut into wedges
10 mini tortillas, warmed
1 Tbsp extra virgin olive oil
1 brown onion, finely diced
500g lean beef mince
11/2 cups frozen pea, corn, carrot mix
1 Tbsp gravy powder
1/4 cup tomato paste
2 tsp curry powder
1/2 cup water
Sea-salt flakes and freshly ground
black pepper, to season
Toasted Turkish bread and mixed salad
leaves, to serve
STEP 1 Coarsely grate zucchini, put
in a clean tea towel or paper towel
and squeeze out excess liquid.
STEP 2 Transfer zucchini to a bowl
and add mince, green onion, half of the
coriander leaves, lemongrass, garlic,
curry paste and panko crumbs. Stir until
mixture comes together, adding more
crumbs if needed to form firm patties.
Use damp, clean hands to shape into
4 burger patties.
STEP 3 Heat oil in a large frying pan
on medium heat and cook patties for
7-8 minutes each side or until cooked.
STEP 4 To assemble burgers, top buns
with lettuce, chicken patties, cucumber,
remaining coriander, mayonnaise and
sriracha sauce.
STEP 1 Preheat oven to 200°C
fan-forced (220°C conventional).
Heat oil in an 8-cup capacity flameproof
roasting dish on high. Cook onion for
3 minutes or until softened. Add mince
and cook for 8-10 minutes, breaking up
with a wooden spoon until browned.
Stir in spice mix, tomato, pepper strips,
rice and beans, and cook for a further
5 minutes or until warm.
STEP 2 Remove from heat and top
with creamed corn and sprinkle with
grated cheese. Bake for 20-25 minutes
or until golden on top.
STEP 3 Top with avocado, coriander,
jalapeño and lime wedges. Serve beef
and bean bake with warm tortillas.
STEP 1 Heat oil in a large frying pan on
medium heat. Cook onion for 5 minutes
or until softened. Add mince and cook
for 8-10 minutes until browned. Add
vegie mix, gravy powder, tomato paste,
curry powder and water, and bring to
a simmer. Simmer for 5 minutes, stirring,
until sauce has thickened. Season.
STEP 2 Serve mince mixture with
Turkish toast and salad.
FABULOUS FOOD
CLARISSA’S
CUISINE
C
larissa Feildel is the first
to admit that she never
attended culinary school.
In fact, she started out in the fine
jewellery business, worlds away
from the epicurean realm. But
born and raised in Kuala Lumpur,
Malaysia, a dazzling cultural melting
pot simmering with sub-cultures,
including Chinese, Indian, Indonesian
and Malay, this self-taught kitchen
whiz cooked her way up.
When Clarissa moved to Australia
in her 20s, she craved her mother’s
cooking. After endless calls to her
mum, she started to recreate all the
amazing dishes from her childhood.
The talented foodie’s fate was
sealed when she met celeb chef
Manu Feildel in a Sydney lift (but
didn’t know who he was). After
tasting just one of her dishes, Manu
knew he had found his ‘plus one’ –
and with his endorsement, Clarissa
had earned her cooking stripes. She
has shared her love of food with a
larger audience through her blog,
The Hungry Ulat, and the book she
co-authored with her husband,
More Please. Clarissa has also
made many appearances on a swag
of TV shows and Better Homes and
Gardens is about to be added to
the list. So keep an eye out for this
vibrant home cook as she appears on
your flat-screen and in these pages,
sharing her real-life meals.
26 BHG APRIL 2024
FRIED RICE
Preparation time 10 mins
Cooking time 25 mins
Serves 6
3 cups jasmine or long-grain rice
6 cups water
6 free-range eggs
Pinch caster sugar
Sea-salt flakes and finely ground
white pepper, to season
4-5 Tbsp peanut oil or rice bran oil
1 large brown onion, finely chopped
250g streaky bacon, cut into
1/2cm strips
10 small green prawns, shelled,
tail intact
1 Tbsp soy sauce
1 Tbsp fish sauce
3 green onions, sliced thinly on
diagonal, separate white and
green parts
20g unsalted butter
STEP 1 Wash and rinse rice well until
water runs clear. Put rice in a large
saucepan, add water (rice must be
level to ensure it cooks evenly).
Bring to boil on high, reduce heat to
medium and cook, uncovered, for
5 minutes, or until tunnels form in rice
and most of the water is absorbed.
STEP 2 Turn off heat and cover for
approximately 10 minutes. This
allows rice to be steamed through,
resulting in a fluffy texture. Remove
lid and run a pair of chopsticks
through rice.
STEP 3 Once rice is cooked, spread
rice on a tray lined with baking
paper. This will help rice cool faster
and soak up excess moisture.
STEP 4 Put eggs in a bowl. Add
sugar, and season with white
pepper. Whisk until combined.
STEP 5 Heat a large wok on high
heat. Add 1 tablespoon of the oil and
heat until smoking. Add whisked egg
mixture, as soon as egg starts to
sizzle, start stirring as if you are
making scrambled eggs. Turn off
heat when egg starts to coagulate,
but keep stirring until egg sets.
Remove egg from wok, set aside.
STEP 6 Return wok to heat. Add
remaining oil. Wait until wok is
smoking before adding brown
onion. Stir-fry until onion is slightly
translucent. Add bacon and stir-fry
for 1-2 minutes or until lightly
caramelised. Season with white
pepper and add prawns. Cook for
a further 1 minute. Add cooked
rice and season with salt.
STEP 7 Spread rice around wok.
Cook without stirring until rice
begins to become crisp. Add soy
sauce and fish sauce to taste. If rice
looks a little dry, add hot water
1 tablespoon at a time, until you
reach desired consistency.
STEP 8 Return egg to wok with
white part of green onion. Stir to
combine. Remove from heat. Stir
in butter. Serve with green part of
green onion.
Photography Alan Jensen, Seven Network (Clarissa Feildel image); words Raffaela Pugliese; styling Michele Cranston; food preparation Clare Maguire
Meet our guest TV food presenter, Clarissa Feildel, who’ll share recipes to inspire
you to cook more, enjoy your time in the kitchen and create memorable meals
SEEN ON BHG TV
FRIDAYS 7.00
Master a homemade spin on
this takeaway fave. If you don’t
have a wok, a large, flat frying
pan will also do the trick – the
secret is making sure it’s super
hot for stir-fry sizzle!
CLARISSA feildel
Join me as I show you how to
perfect fried rice on BHG TV on
Friday, April 5, at 7pm on Channel 7.
(Apologies, may be subject to change.)
For more recipes, go to
bhg.com.au.
EVERYDAY CHEF
COLIN’S
KITCHEN
Feast on easy entertainers, an Easter eat that
can’t be beat and a stunning slice of heaven
HOT CROSS BUN AND
BUTTER PUDDING
Take your classic bread and butter
pud and use hot cross buns to turn
it into an Easter treat! Spike the
custard with nutmeg, cinnamon, star
anise and ginger for fragrant flair.
Recipe on page 32
28 BHG APRIL 2024
SEEN ON BHG TV
FRIDAYS 7.00
BAKED SALMON WITH
APPLE AND FENNEL
SALAD
Top individual salmon fillets
with fennel seed and zesty
lemony salt for an effortless yet
impressive main. The fruity
salad adds lovely freshness.
Recipe on page 32
colin fassnidge
Join me as I show you how to
make delicious dishes on BHG TV,
Fridays at 7pm on Channel 7.
(Apologies, may be subject to change.)
For more recipes, go to
bhg.com.au.
STICKY PORK BELLY
STRIPS WITH
BROCCOLINI AND
MACADAMIA DRESSING
The sticky, glossy marinated pork
may be the main event of this dish,
but when you add crunchy, creamy
macadamias and cheeky chilli flakes
to the broccolini, this humble side
dish is elevated to superstar status!
Recipe on page 34
30 BHG APRIL 2024
EVERYDAY CHEF
BBQ LAMB AND SIMPLE
POTATO SALAD
Feed a crowd or your fam with
succulent, juicy lamb and tasty taters
drizzled in punchy herb sauce. For
easy entertaining, marinate the lamb
overnight and make the herb sauce
the day before. Genius!
Recipe on page 34
EVERYDAY CHEF
HOT CROSS BUN
AND BUTTER
PUDDING
Preparation time 15 mins plus
40 mins standing
Cooking time 45 mins
Serves 8
2 cinnamon sticks
3 star anise
2/3 cup caster sugar
400ml pouring cream
300ml full-cream milk
1 whole nutmeg
1 Tbsp finely grated ginger
75g salted butter, softened
10 hot cross buns, cut in half
horizontally
8 free-range egg yolks
Mixed berries, to serve
STRAWB SYRUP
To make syrup from 250g
punnet of strawberries, cut
off tops with 1cm flesh
attached. In a small saucepan
on medium heat, combine
tops, 2 Tbsp sugar and
enough water to cover.
Simmer gently for 10 minutes.
Pour over strawberries
through a sieve. Refrigerate
until cold.
32 BHG APRIL 2024
STEP 1 Put cinnamon and star anise in
saucepan on medium heat until fragrant.
Add sugar, cook for 3-4 minutes, without
stirring, until it starts to caramelise and
is a pale golden colour. Remove from
heat. Carefully add cream and milk.
STEP 2 Finely grate 1/4 of the nutmeg.
Stir into cinnamon mixture with ginger.
Heat on medium until hot. Remove
from heat. Stand for 30 minutes.
STEP 3 Meanwhile, preheat
oven to 180°C fan-forced (200°C
conventional). Butter cut sides of
buns. Arrange buns, overlapping,
in a 20 x 30cm (10-12-cup capacity)
ovenproof baking dish to fit.
STEP 4 Strain cinnamon mixture
through a sieve into a bowl, discard
spices. Add egg yolks and whisk until
well combined. Pour over buns. Allow
to stand for 10 minutes. Bake for 35
minutes, or until custard is just set.
STEP 5 Serve warm with berries or
Strawb syrup (see recipe left).
BAKED SALMON
WITH APPLE
AND FENNEL
SALAD
Preparation time 15 mins
Cooking time 10 mins
Serves 4
2 Tbsp salt flakes
11/2 tsp whole fennel seeds
11/2 tsp lemon zest
4 x 150g fillets of salmon, skin off,
pin-boned
1 Tbsp extra virgin olive oil
APPLE AND FENNEL SALAD
100ml extra virgin olive oil
Juice of 1 lemon
Juice and finely grated zest of
1 orange, plus extra 1 orange,
segmented
Sea-salt flakes and freshly ground
black pepper, to season
2 Royal Gala or Envy apples
1 medium bulb fennel
6 round red radishes
50g mixed salad leaves
STEP 1 Preheat oven to 200°C
fan-forced (220°C conventional).
STEP 2 Combine salt flakes, fennel
seeds and lemon zest in a bowl. Put
salmon on a baking tray lined with
baking paper. Brush with oil and
season generously with fennel salt
mixture to taste. Bake for 8-9 minutes,
or until cooked to your liking.
STEP 3 Meanwhile, for the Salad,
combine oil, lemon juice, orange zest
and juice in a jar with a lid. Season.
Shake well to combine. Using a
mandolin, thinly slice apples, fennel
and radishes. Combine in a bowl
with salad leaves and extra orange
segments. Drizzle with dressing.
STEP 4 Serve salmon with salad.
C O O K’ S TI P
C O O K’ S TI P
If whole fresh nutmeg is unavailable,
replace it with 1/2-1 teaspoon of
dried nutmeg.
Keep any leftover fennel salt to
sprinkle over roasted potatoes,
steak or pork before cooking.
COLIN’S FAMOUS
CHICKEN BREAD
Upgrade your Sunday night roast
with a scrummy sourdough spin.
The stale bread soaks up the
delish juices, making it the
choicest chook you’ll ever have!
Recipe on page 36
EVERYDAY CHEF
STICKY PORK
BELLY STRIPS
WITH
BROCCOLINI
AND MACADAMIA
DRESSING
Preparation time 30 mins
Cooking time 1 hour
Serves 6-8
2 cups cola
150ml barbecue sauce
150ml tomato passata
2 bird’s eye chillies (optional),
chopped, plus extra, to serve
100ml apple cider vinegar
1 Tbsp onion powder
1 Tbsp garlic powder
1 Tbsp smoked paprika
100ml soy sauce
1 Tbsp Dijon mustard
Sea-salt flakes and freshly ground
black pepper, to season
1.5kg pork belly, skin on, sliced into
2-3cm thick strips
MACADAMIA BROCCOLINI
3 bunches broccolini
200ml buttermilk
200ml extra virgin olive oil
1 teaspoon chilli flakes (optional)
Juice and grated zest of 1 lemon
100g macadamias, chopped
STEP 1 Combine cola, barbecue sauce,
passata, chilli (if using), vinegar, onion
powder, garlic powder, paprika, soy
and mustard in a saucepan on medium
heat. Bring to boil. Gently boil to
coating consistency. Season. Cool.
STEP 2 Add pork to cooled marinade.
Toss to coat.
STEP 3 Preheat oven to 220°C
fan-forced (240°C conventional).
Line a large oven tray with baking
paper and top with a wire rack.
Arrange pork on rack, leaving 3cm
34 BHG APRIL 2024
between each strip. Cook for
30-35 minutes, turning once,
or until caramelised, sticky and
tender. Cover and keep warm.
STEP 4 Meanwhile, for Broccolini,
bring a pot of lightly salted water to
boil. Blanch broccolini for 30 seconds.
Remove to a bowl of iced water. Cool.
Shake off excess water. Refrigerate.
STEP 5 Combine buttermilk, oil, chilli
(if using), juice and zest in a jar with a
lid. Season. Shake until well combined.
STEP 6 As pork rests, add broccolini
to a heated chargrill pan or heavybased pan on high heat. Cook for
5 minutes, turning regularly, or until
charred. Remove to a bowl. Toss
through dressing, scatter over nuts.
STEP 7 Serve sticky pork with
broccolini and extra chopped
chilli (optional).
BBQ LAMB AND
SIMPLE POTATO
SALAD
Preparation time 30 mins
Cooking time 40 mins
Serves 8
1kg small kipfler potatoes,
unpeeled, scrubbed
6 cloves garlic, crushed
200ml extra virgin olive oil
2 sprigs rosemary
2 sprigs marjoram, plus extra,
to serve
1.5kg butterflied lamb leg
Sea-salt flakes and freshly ground
black pepper, to season
Lemon wedges, to serve
HERB SAUCE
1 bunch mint, leaves chopped,
plus extra sprigs, to serve
1 tsp finely chopped bird’s eye chilli
2 cloves garlic, finely chopped
4 Tbsp capers
1 Tbsp Dijon mustard
300ml white wine vinegar
1 Tbsp caster sugar
STEP 1 Boil, steam or microwave
potatoes until tender. Drain and
set aside. Cool.
STEP 2 Put garlic, oil and herbs in a
large bowl. Massage herbs and garlic
through oil to allow aromas to develop.
Add lamb and massage marinade into
lamb (this can be done the day before,
or the morning before cooking).
STEP 3 Preheat a barbecue plate or
chargrill pan on medium-high heat.
STEP 4 Remove lamb from marinade,
return excess marinade to bowl for
potatoes. Season both sides of lamb.
Cook on preheated barbecue plate
or chargrill pan, skin-side down for
12 minutes or until it has a nice crust
on one side. Turn lamb. Cook for a
further 8 minutes for medium rare,
or until cooked to your liking. Remove
lamb from heat. Rest for 20 minutes
before slicing.
STEP 5 Meanwhile, to make Herb
sauce, blend ingredients in a food
processor until nearly smooth.
Season.
STEP 6 Lightly crush cooled
potatoes with the base of a
drinking glass to slightly flatten.
Add to reserved marinade. Toss
to coat. Put potatoes on same
barbecue plate or chargrill pan.
Cook potatoes (on same medium-high
heat), turning, for 3 minutes each
side, until golden. Remove to a
bowl. Stir through herb sauce.
STEP 7 Arrange sliced lamb on a
platter with herb sauce potatoes.
Serve with extra herbs and lemon.
FROZEN PEANUT
BUTTER BLOCK
AND PRALINE
Coat luscious squares of
frozen peanut butter
deliciousness in
decadent praline for an
oh-so-addictive dessert.
Recipe on page 36
COLIN’S
FAMOUS
CHICKEN BREAD
Preparation time 30 mins plus 30
mins marinating and 20 mins resting
Cooking time 1 hour
Serves 6
1 bunch basil, roughly chopped
1 bunch thyme, roughly chopped,
plus extra, to serve
2 sprigs rosemary, roughly chopped,
plus extra, to serve
1 garlic bulb, smashed
1/2 cup extra virgin olive oil, plus
extra, for drizzling
1.2kg whole chicken
1 large potato, unpeeled, scrubbed,
thickly sliced
1 stale sourdough loaf (see Cook’s
tips)
1 cup water
80g salted butter, chopped
125g cherry tomatoes
Sea-salt flakes and freshly ground
black pepper, to season
Green salad, to serve
STEP 1 Combine herbs, garlic and
oil in a large bowl. Coat chicken in
marinade, marinate in fridge for
30 minutes (see Cook’s tips).
STEP 2 Preheat oven to 200°C
fan-forced (220°C conventional). In
a roasting tray that fits the sourdough
bread and chicken, layer potato.
Slice top off bread, leave 2/3 as base.
Put bread base on top of potato.
Carefully add water to base of tray.
STEP 3 Remove chicken from
marinade. Spoon leftover marinade
evenly over bread, dot evenly with
butter. Press tomatoes into bread.
Season. Top with chicken, pressing
down firmly to stabilise.
36 BHG APRIL 2024
STEP 4 Roast for 30 minutes. Reduce
temperature to 140°C fan-forced
(160°C conventional) and cook for a
further 30 minutes, or until chicken is
cooked through. Rest for 20 minutes.
STEP 5 Arrange chicken, bread,
potato and tomatoes on a large
serving platter. Spoon over cooking
juices and drizzle with extra oil.
Serve with salad and extra herbs.
C O O K’ S TI P S
• The sourdough loaf needs to be
large enough to place a chicken on.
• For extra flavour, marinate chicken
and refrigerate it overnight.
FROZEN PEANUT
BUTTER BLOCK
AND PRALINE
Preparation time 40 mins plus
overnight freezing
Cooking time 20 mins
Makes 10
12 free-range egg yolks
185g caster sugar
1/4 cup water (approx.)
250g chunky peanut butter
800ml thickened cream
PRALINE
125g roasted peanuts
125g caster sugar
2 Tbsp water
doubled in size. This will take about
4-5 minutes.
STEP 2 Meanwhile, combine sugar
and water in a saucepan on low
heat. Cook, stirring, until sugar has
dissolved. Increase heat to high. Bring
to boil. Boil without stirring until sugar
reaches 118°C on a sugar thermometer
(known as the soft-ball stage). This will
take about 4-5 minutes.
STEP 3 Remove pan from heat,
and while stand mixer is running,
drip sugar mixture carefully into
doubled egg yolks. Beat until fully
incorporated. Slowly add peanut
butter a spoonful at a time, beat until
smooth. Remove to a large, clean bowl.
Cool to room temperature.
STEP 4 Beat cream until soft peaks
form. Fold gently through cooled
egg mixture. Pour into prepared
pan. Smooth top. Cover and freeze
overnight.
STEP 5 To make Praline, line an oven
tray with baking paper. Scatter with
peanuts. Combine sugar and water in
a saucepan on low heat. Increase heat
to high. Cook, stirring, until sugar has
dissolved. Bring to boil. Boil without
stirring for 5-7 minutes, or until golden
brown. Pour over peanuts onto
prepared tray. Cool.
STEP 6 Break praline into pieces. In a
food processor, pulse to a rough
crumb. Store in an airtight container.
STEP 7 To serve, cut block into
pieces. Toss in praline to coat.
Serve immediately.
C O O K’ S TI P
STEP 1 Grease and line a 20 x 30cm
slice pan. Using a stand mixer, whisk
egg yolks on low, gradually working
up to high speed until mixture has
You may find it easier to freeze cut
pieces for 10 minutes to firm again
before tossing in praline.
Photography Alan Jensen; styling Michele Cranston; food preparation Clare Maguire
EVERYDAY CHEF
Macadamia and Fig Cake
Macadamias make it special
Enhance your favourite autumn flavours with the buttery crunch of
Australian grown macadamias.
www.australian-macadamias.org
SWEET TREATS
GO NUTS WITH
From weaving a twist on classic apple pie to
tasty tarts and mouthwatering meringue, let
creamy, buttery Aussie macadamias be the
magnificently nutty stars
of your desserts
APPLE, BERRY AND
MACADAMIA PIE
Spike a traditional apple-pie
filling with raspberries and
Australian macadamias to take
this dessert to a new level!
Recipe on page 42
38 BHG APRIL 2024
MACADAMIA AND
VANILLA BEAN TARTS
Make Australian macadamias
the centrepiece of your sweet-as
spread with delicate individual
tartlets featuring a beautifully
buttery pastry case – dreamy!
Recipe on page 42
SWEET TREATS
BAKED PEARS WITH
MACADAMIA CRUMBLE
Load up in-season pears with a
crunchy crumble packed with
Australian macadamias and
oats. No pears? You can use
Granny Smith apples instead.
Recipe on page 44
PINEAPPLE
MERINGUE
MACADAMIA PIE
Combine pineapple, coconut
and creamy Australian
macadamias for a deliciously
simple yet impressive-looking
pie. One slice won’t be enough...
Preparation time 20 mins
Cooking time 35 mins
Serves 8
440g can crushed pineapple
1 cup desiccated coconut
4 free-range eggs, lightly beaten,
plus extra 4 egg whites
1/2 cup plain flour, sifted
1/2 cup caster sugar, plus extra 1 cup
1/2 cup Australian macadamias,
roasted, chopped
125g unsalted butter, melted
1/3 cup milk
1 lime, finely grated zest, 2 Tbsp juice
2 tsp vanilla extract
STEP 1 Preheat oven to 160°C
fan-forced (180°C conventional).
Lightly grease a 23cm round pie dish.
STEP 2 In a large bowl, use a wooden
spoon to mix pineapple, coconut, eggs,
flour, sugar, macadamias, butter, milk,
lime juice and zest and vanilla. Pour
into pie dish.
STEP 3 Bake for 25-30 minutes until
just set. Lightly rough up surface with
fork. Allow to cool. Refrigerate until
ready to serve.
STEP 4 When ready to serve, preheat
oven grill on high.
STEP 5 In a large bowl, use electric
mixer to beat extra egg whites until soft
peaks form. Gradually add extra sugar,
beat until stiff and glossy.
STEP 6 Dollop meringue over pie. Grill
for 3-5 minutes until just golden. Serve.
APRIL 2024 BHG 41
APPLE, BERRY
AND MACADAMIA
PIE
Preparation time 40 mins plus
40 mins chilling
Cooking time 1 hour 30 mins
Serves 10-12
21/2 cups plain flour, plus extra, to dust
1 tsp salt
225g unsalted butter, chilled, chopped
1/2 cup chilled water
1 cup frozen raspberries
1 Tbsp milk, for brushing
FILLING
6 medium apples, peeled, cored, cut
into 1cm-thick slices (approx. 1.2kg)
1/2 cup caster sugar, plus extra 1 Tbsp
1/4 cup plain flour
1/3 cup Australian macadamias,
roasted, chopped
3/4 tsp ground cinnamon
1/4 tsp ground nutmeg
STEP 1 Sift flour and salt together into
a bowl. Rub in butter using fingertips
until mixture resembles breadcrumbs.
Gradually add water, mixing with a fork,
until a soft dough forms.
STEP 2 Lightly knead dough, divide
into 2/3 and 1/3 pieces. Form discs. Wrap
in plastic, chill in fridge for 30 minutes.
STEP 3 On a lightly floured surface, roll
out large pastry disc to a 30cm round.
Drape pastry over rolling pin and ease
into a 22cm round pie dish, press base
and sides. Chill in fridge for 10 minutes.
Preheat oven to 180°C fan-forced
(200°C conventional).
STEP 4 For Filling, put apple in a large
bowl. In a small bowl, mix sugar, flour
and macadamias. Sprinkle spices over
apple, stir sugar mix through to coat.
STEP 5 Spoon 1/2 of the apple mix into
pastry case. Scatter raspberries over.
Top with remaining apple mix.
STEP 6 On a floured surface, roll
remaining pastry out to a 25cm round.
Cut into 1.5cm strips. Arrange over pie
in crisscross, weaving to create lattice.
42 BHG APRIL 2024
STEP 7 Trim excess pastry around rim.
Fold edge of pastry case over rim,
pressing with a fork to seal.
STEP 8 Brush top with milk, sprinkle
with extra sugar. Cover edge loosely
with a strip of foil to prevent browning.
Bake for 11/2 hours, reducing oven
temperature to 160°C fan-forced
(180°C conventional) after 20 minutes
and remove foil. Cool. Serve.
MACADAMIA
AND VANILLA
BEAN TARTS
Preparation time 30 mins plus
1 hour 30 mins chilling
Cooking time 45 mins
Makes 4
1/4 cup Australian macadamias,
roasted
11/4 cups plain flour, plus extra, to dust
1/3 cup pure icing sugar
125g cold unsalted butter, chopped
1 free-range egg yolk
Double cream, to serve
FILLING
1 cup Australian macadamias, roasted
2 Tbsp brown sugar
1 Tbsp plain flour
40g unsalted butter, melted
2 free-range eggs
1 tsp vanilla bean paste
3/4 cup pure maple syrup
STEP 1 In a food processor, pulse
macadamias until finely ground. Add
flour and sugar, pulse until combined.
Add butter until just combined. Add
egg yolk and process until ingredients
just come together. Knead dough on
floured surface until smooth. Wrap in
plastic, chill in fridge for 30 minutes.
STEP 2 Grease four 10cm round
loose-based fluted flan tins. Divide
pastry into 4 portions. Roll each
portion between baking paper until
large enough to line tins. Lift pastry into
tins, press into base and side, trim
edge. Cover, refrigerate for 1 hour.
SWEET TREATS
RHUBARB MACADAMIA
BLONDIES
Take your classic brownie and
add white choc, Australian
macadamias and tangy rhubarb.
The contrast of the rich choc and
macadamia combo offset by
tart rhubarb is irresistible!
Recipe on page 44
GOOD TO KNOW
DRY ROASTING
INTENSIFIES THE
FLAVOUR OF
MACADAMIAS,
SO GO AHEAD AND
GO NUTS WITH
YOUR ROASTING!
SWEET TREATS
BAKED PEARS
WITH
MACADAMIA
CRUMBLE
Preparation time 15 mins
Cooking time 45 mins
Serves 4
4 firm, ripe pears, halved
1 Tbsp honey, plus extra 2 Tbsp
10g unsalted bu
er, plus extra 20g
1/2 cup quinoa flakes
1/2 cup rolled oats
1/2 cup shredded coconut
2 Tbsp Australian macadamias,
chopped
Vanilla yoghurt, to serve
AUSTRALIAN
MACADAMIAS
With a moreish, bu ery flavour
and satisfying so
crunch,
Australian macadamias are a
great addition to your cooking
and snacking. Most Australian
macadamias are grown on farms
in Qld and NSW, and are sorted
with care by the grower to ensure
you get the very best nuts!
Visit australian-macadamias.
org/consumer.
BHG APRIL
STEP 1 Preheat oven to 160°C
fan-forced (180°C conventional).
Line oven tray with baking paper.
STEP 2 Using a melon baller, scoop
cores from each pear half. Arrange
pears on tray, cut-side up, trimming
underneath if required so pears
are stable.
STEP 3 Drizzle with honey and dot with
bu er. Bake for 25-30 minutes until
almost tender when pierced with fork.
STEP 4 In a medium bowl, mix quinoa,
oats, coconut and macadamias with
extra honey and bu er. Spoon mixture
evenly into recesses and over pears.
STEP 5 Bake for 10-12 minutes
until crisp and golden. Serve with
vanilla yoghurt.
C O O K ' S TI P
Add dried fruit, such as sultanas or
chopped dried apricots, in Step 4
with quinoa for added sweetness.
RHUBARB
MACADAMIA
BLONDIES
Preparation time 20 mins plus cooling
Cooking time 45 mins
Makes 12
100g unsalted bu
er, chopped
100g white chocolate, finely chopped,
plus extra 150g, chopped
1 cup firmly packed brown sugar
2 free-range eggs
3/4 cup plain flour
1/2 cup roughly chopped Australian
macadamias
3 stalks rhubarb, cut into 2cm pieces
STEP 1 Preheat oven to 160°C
fan-forced (180°C conventional).
Lightly grease and line a 20 x 30cm
lamington pan with baking paper.
STEP 2 In a medium saucepan, melt
bu er on medium until foaming and
golden. Remove from heat, add
chocolate, stir until smooth. Set
aside for 10 minutes.
STEP 3 In a small bowl of an electric
mixer, beat sugar and eggs until thick
and pale. Gradually add bu er mixture,
beating to combine. Fold flour through.
STEP 4 Add 3/4 each of the extra
chocolate, macadamias and rhubarb,
fold through. Pour mixture into pan and
smooth top. Top with remaining extra
chocolate, macadamias and rhubarb.
STEP 5 Bake for 35-40 minutes until
golden. Cool in pan for 1 hour. Cut into
squares. Store in an airtight container.
C O O K ' S TI P
Blondies will feel quite so
, but if
you insert a skewer into centre, it
will be clean and dry when removed.
Photography Alan Jensen, aremediasyndication.com.au; styling Michele Cranston; food preparation Clare Maguire
STEP 3 Preheat oven to 180°C
fan-forced (200°C conventional).
STEP 4 Put tins on oven tray, line
each pastry case with baking paper,
fill with dried beans or rice. Bake
for 10 minutes. Remove paper and
beans/rice, bake for about 7 minutes
or until browned lightly. Cool.
STEP 5 Reduce oven to 160°C
fan-forced (180°C conventional).
STEP 6 To make Filling, combine all
ingredients in medium bowl. Spoon
into pastry cases.
STEP 7 Bake tarts for about 25
minutes. Cool. Top with cream. Serve.
Subscribe to the
DIGITAL EDITION
SAVE
52%
Get 13
digital
issues
for
$24.99
2 EASY WAYS
TO ORDER
Call the hotline on
136 116
and quote X242BHG
(Lines are open from 8am to 6pm, Mon - Fri)
Order online at
MAGSHOP.COM.AU/DIGITALBHG
and follow the easy step by
step online payment
Savings based on digital edition single issue price of $3.99. Subscription auto-renews every 12 months at $24.99 unless cancelled. Offer available from 01/02/2024 to 31/01/2025. If you do not want your
information provided to any organisation not associated with this promotion, please indicate this clearly when you subscribe. For terms and conditions visit magshop.com.au and for
our Privacy Notice visit aremedia.com.au. Apple, the Apple logo and iPad are trademarks of Apple Inc., registered in the US and other countries.
DIABETIC FRIENDLY
eat well
Designed for foodies with diabetes, this
recipe is so good the whole fam will love it!
RASPBERRY CAKE
175g self-raising flour
170g (3/4 cup) caster sugar or 3/4
cup granulated sugar substitute
125ml (1/2 cup) sunflower oil
130g (1/2 cup) reducedfat Greek natural yoghurt
3 x 60g free-range eggs
1 tsp vanilla extract
Zest of 1 lemon
200g raspberries, plus extra
100g raspberries, to serve
Icing sugar, for dusting
TEATIME TREAT
Add fruity flair to your classic
tea cake with lovely raspberries
that shine like bright red rubies.
For more deliciously
healthy recipes and
expert advice, pick
up a copy of the
March/April issue of
Diabetic Living, $8.99,
at your supermarket
or newsagent.
46 BHG APRIL 2024
STEP 1 Preheat oven to 160°C
fan-forced (180°C conventional).
Spray a deep, 20cm springform
cake tin with cooking spray and line
base with baking paper. Combine
flour and sugar in a bowl. Set aside.
STEP 2 Whisk oil, yoghurt, eggs,
vanilla extract and lemon zest in
a separate bowl. Tip in the flour
mixture and fold in until smooth.
Gently fold in the raspberries.
Transfer to cake tin. Bake for 30-40
minutes or until a skewer inserted
into the middle comes out clean.
STEP 3 Set the cake aside in the
tin for 10 minutes. Turn out onto
a wire rack to cool completely.
STEP 4 To serve, dust cake
with icing sugar and top with
the extra raspberries.
N U T R ITI O N A L I N F O
N U T R ITI O N A L I N F O
Per serve (with sugar)
957kJ (229Cal), protein 4g, total fat
11g (sat. fat 1g), carbs 27g, fibre 2g,
sodium 143mg • Carb exchanges 2
• GI estimate medium
Per serve (with sugar substitute)
771kJ (184Cal), protein 4g, total fat
11g (sat. fat 1g), carbs 15g, fibre 2g,
sodium 144mg • Carb exchanges 1
• GI estimate high
Photography and recipe Immediate Media. Additional information Alison Roberts, Shannon Lavery (dietitian). Prices are approximate and a guide only.
Preparation time 10 mins
Cooking time 40 mins
Serves 12 (as occasional dessert)
EASTER GIFTS
as unique as your little bunnies!
1
2
3
4
5
6
7
8
9
SCAN TO SHOP
1. Personalised My First Easter Disc - Bunny, $20.90. 2. Personalised Easter Egg Hunt Garden Spikes, $48.90. 3. Easter Hunt Basket, $48.95.
4. Easter Bunny Puzzle, $39.95. 5. Personalised Timber Easter Hunt Basket, $52.95. 6. Personalised Children’s Picture Book - “Your Child and the
Easter Bunny”, $59.99. 7. Personalised Children’s Spring Bunny Dinner Set, $61.90. 8. Easter Egg Crayons, $31.95. 9. Easter Egg Holder, $48.73.
KITCHEN MATTERS
better cooking
[
T H E L AT E S T F O O D I E N E WS , P R O D U C T S A N D T R E N D S
]
EGG HOUSE
Get egg-stra clever with storage and
see, at a glance, how many eggs you
have with this smart three-tiered
egg storage unit! It can fit up to 30
eggs, so no more scrambling for
space. Egg Storage Container Box,
$12.95, gigiandtom.com.au.
COOK RIGHT
Pick up a cute-as Easter present
that tastes good, too! Cockatoo
Toy with Dark Mini Eggs, $24.90,
haighschocolates.com.au.
Ghee whiz
With a warm, nutty flavour, OMGhee
is ideal for sautéing, frying or simply
spreading on your toast. Choose
from Organic Ghee, $24.95, or
Biodynamic Ghee, $34.95,
both are handcrafted
in SA using grass-fed
butter, omghee.com.
BHG APRIL
A TOUCH OF
SPARKLE
Quench your thirst with a flavourful
sparkling water sans artificial flavours
or sweeteners. Try Pomegranate and
Apple, Watermelon and Cucumber,
or Green Apple and Lemon. JIVA
sparkling water 300ml, $4.99,
jivaproducts.com.au.
Prices are approximate and a guide only.
E ASTE R T WE ETS
Stanley Rogers’ revolutionary
SR-Matrix Cookware Collection
featuring a non-stick base is
100% metal-utensil safe, so you
can use your favourite utensils
when cooking. The pans are
induction-friendly, and can be
used on all cooktops, from $179,
stanleyrogers.com.au.
WE
W
SHOU
YO
HOW
WE’RE ALWAYS
AT YOUR FINGERTIPS
NEVER MISS A BHG MOMENT!
facebook.com/bhgaus
@bhgaus
pinterest.com/bhgaus
SHOP
bhgshop.com.au
bhg.com.au
HAN G D IY PAP E R EGG S ,
CUTE B E AD E D B U N N I E S
AN D MAR B LE D
B UT TE R F LI E S F RO M
PAI NTE D B R AN C H E S
AR R AN G E D I N AN
I C E - DYE D RO P E VA S E –
C LEVE R AN D C R AF T Y !
F I N D P ROJ EC T H OW-TOS
AN D TE M P L ATE S ,
I N C LU D I N G TH E PAP E R
LI LY TO P P E R (R I G HT ),
F RO M PAG E 176.
50 BHG APRIL 2024
EASTER MAKING
A
OCCASION
Our best-loved Easter classics – bunnies and
brunch – pal up with punchy decorations and
a lovely, light, crowd-pleasing menu for what
promises to be a lasting friendship
Easter
brunch
menu
Strawberrythyme shrub
•
•
Devilled egg
Carrot limeade
and pickled
vegetable salad
•
Flatbread with
whipped rico a
and all the peas
•
Potato-crusted
ham and cheese
quiche bites
•
Carrot-parsnip
mini cakes with
orange drizzle
•
Raspberry-lemon
whoopie pies
EASTER MAKING
STRAWBERRY-THYME SHRUB
AND CARROT LIMEADE
YO U ’ LL B E ALL
AF LUT TE R
OVE R B UT TE R F LYB E D EC KE D STR AWS ,
GAR L AN DS AN D
O R NAM E NTS .
52 BHG APRIL 2024
Move over, mimosas! Your Easter brunch bar is all about
garden-fresh, non-alcoholic drinks everyone can enjoy.
Pick your sip: a slightly puckery concoction of fresh
berries, sugar and red wine vinegar (that’s what makes a
‘shrub’ a shrub), or a not-too-sweet, healthful blend of
carrot juice, fresh-squeezed lime and soda water.
Recipes on page 58
EGGS AND
BUNNIES
Cut, fold and glue
cardstock in bright
hues and patterns to
make these 3-D egg
ornaments. A fluffle of
bunny ornaments sport
felt ears in vivid hues
and fabric-trim collars.
Instructions on
pages 178-179
TH R E AD T WI N E
TH RO U G H A
TR I O O F WOO D
B E ADS , U S I N G TH E
S MALLE ST B E AD FO R
TH E B U N NY TAI L .
SALT DO U G H WITH A
CO U P LE O F D RO PS O F FOO D
CO LO U R I N G G IVE S TH E S E
B U N NY NAP KI N O R NAM E NTS
SWI R L S O F CO LO U R .
54 BHG APRIL 2024
DEVILLED EGG
AND PICKLED
VEGETABLE
SALAD
This is the salad your
Easter brunch never
knew it was missing!
Devilled eggs nestle
in a bed of tender
butter lettuce along
with quick-pickled
carrots and radishes.
The vinaigrette uses
the leftover pickling
liquid for extra zing.
Recipe on page 58
FLATBREAD
WITH WHIPPED
RICOTTA AND
ALL THE PEAS
When three types of
peas, plus ricotta and
mint get together
(see opposite), it’s
just pea-fect! Spread
lemon ricotta over
storebought
flatbreads or naan
(bonus if they’re
egg-shaped), then
top with baby peas,
snow peas and snap
peas, and finish with a
flurry of mint and dill.
Recipe on page 59
EASTER MAKING
POTATO-CRUSTED
HAM AND CHEESE
QUICHE BITES
A bouquet of tulips
doesn’t have to be the
only floral attraction on
your table. Thinly sliced
potatoes line muffin cups
to create the crust and
petals of these
flower-like egg bites.
Once baked, their crispy
edges taste like chips!
Recipe on page 58
EASTER MAKING
RASPBERRYLEMON
WHOOPIE PIES
Raspberries and lemon
pair sweetly in this
nostalgic treat. Fresh
berries tint the cookies
a rosy hue (add pink
food colouring to turn
them even brighter),
and a tangy cream
cheese filling is
sandwiched between
them. Sprinkles are
optional but highly
recommended.
Recipe on page 59
USE A 25MM
M E D I U M CI RC LE
PUNCH ON
PAP E R I N T WO
TO N E S TO MAKE
TH E H E AD FO R
TH I S DAP P E R
B U N NY P I C K .
CARROT-PARSNIP
MINI CAKES WITH
ORANGE DRIZZLE
Carrots might be a go-to for
Easter cakes, but don’t
overlook their cream-hued
cousin, parsnips. What they
lack in colour, they make up for
in flavour with a nutty, earthy,
slightly sweet taste!
Recipe on page 59
APRIL 2024 BHG 57
CARROT
LIMEADE
POTATOCRUSTED HAM
AND CHEESE
QUICHE BITES
DEVILLED EGG
AND PICKLED
VEGETABLE
SALAD
Preparation time 10 mins
Cooking time nil
Serves 8
Preparation time 25 mins
Cooking time 35 mins
Makes 12
Preparation time 30 mins plus pickling
Cooking time 25 mins
Serves 8
1.5 litres storebought carrot, orange,
apple and ginger juice
1/2 cup lime juice
375ml chilled soda water
Ice cubes and lime slices, to serve
450g desiree potatoes, unpeeled
11/2 Tbsp vegetable oil
Sea-salt flakes and freshly ground
black pepper, to season
4 free-range eggs
3/4 cup light thickened cream for
cooking (or milk)
1 cup grated Gruyère or Swiss cheese
1 cup finely chopped leg ham
2 Tbsp roughly chopped chives, plus
extra, to serve
8 free-range eggs
1/2 cup mayonnaise
11/2 tsp Dijon mustard
3/4 cup white wine vinegar
2 green onions, finely chopped
Sea-salt flakes and freshly ground
black pepper, to season
2 carrots, peeled into ribbons
1 bunch radish, thinly sliced
3 tsp caster sugar
1/4 cup extra virgin olive oil
1/4 cup capers, drained
1 butter lettuce, leaves separated
STEP 1 In a jug, stir together carrot juice,
lime juice and soda water. Pour into
ice-filled glasses. Serve with lime slices.
STRAWBERRY-THYME SHRUB
Preparation time 10 mins
Cooking time 5 mins
Serves 8
1/4 cup caster sugar
1/2 cup water
11/2 x 250g punnets strawberries,
hulled, plus extra strawberries,
to serve
1/4 cup red wine vinegar
16 fresh thyme sprigs
2 cups chilled ginger ale
Ice cubes, to serve
STEP 1 In a small saucepan, combine
sugar and water. Stir over medium-high
heat until sugar has dissolved. Bring to
boil. Set aside to cool.
STEP 2 Meanwhile, put strawberries in
a blender or food processor. Blend until
very smooth. Strain through a fine sieve
over a bowl, discarding seeds. Stir
cooled sugar mixture and vinegar into
strawberry puree. (Strawberry mix can
be refrigerated for up to 2 days in an
airtight container. Stir before using.)
STEP 3 Put half of the thyme in a jug.
Using a wooden spoon, muddle thyme
to release its flavour. Add strawberry
mixture and stir to combine. Stir in
ginger ale. Pour into ice-filled glasses.
Garnish with extra strawberries and
remaining thyme sprigs.
STEP 1 Preheat oven to 210°C fanforced (230°C conventional). Grease
a 12-hole, 1/3-cup capacity muffin pan.
STEP 2 Using a mandolin, slice potatoes
very thinly into 1.5mm-thick slices.
Put in a medium, microwave-safe bowl.
Microwave on HIGH (100%) for 1 minute
or until slightly softened. Toss potato
with vegetable oil. Season. Put one
slice on bottom of each muffin hole.
Arrange remaining slices around
sides of muffin holes, overlapping
as necessary (potatoes will extend
above hole edges by 3-5cm).
STEP 3 Bake for 15 minutes. Remove
from oven. Reduce oven temperature to
140°C fan-forced (160°C conventional).
STEP 4 Meanwhile, in a large bowl,
whisk together eggs and cream (or milk).
Season. Stir in cheese, ham and chives.
Spoon mixture evenly into potato cases.
Bake for a further 17-20 minutes or until
filling is puffed and set. Cool in pan for
10 minutes. Carefully loosen quiches
around edge. Transfer to serving platter.
Serve warm, sprinkled with extra chives.
C O O K’ S TI P
For a meat-free option, omit the
bacon and add 1 cup of finely
chopped leftover roasted vegies.
STEP 1 Fill a large saucepan with enough
water to reach 2.5cm up the side of pan.
Insert a steamer basket into pan. Bring
water to the boil on high heat. Carefully
add eggs to steamer basket. Reduce
heat to medium-high to maintain a
steady boil. Cover pan and steam for
16 minutes. Using a slotted spoon,
remove eggs and transfer to a bowl of
iced water. Cool, then remove shells.
STEP 2 Halve each egg lengthways and
remove yolks. Mash yolks in a small bowl
with a fork. Stir in mayonnaise, mustard,
2 teaspoons of the vinegar and onion.
Season. Spoon yolk mix into egg halves.
Refrigerate, covered, until required.
STEP 3 Meanwhile, for pickled
vegetables, put carrot and radish in a
small heatproof bowl. In a small
saucepan, combine remaining vinegar,
1/4 cup water and sugar. Bring to a simmer
on medium heat, stirring until sugar
dissolves. Pour over vegetables. Set
aside for 1 hour to cool and pickle.
STEP 4 Drain vegetables, reserving 1/4
cup pickling liquid. In a small bowl, whisk
oil and reserved pickling liquid. Season.
STEP 5 Put devilled eggs, pickled
vegetables and capers on top of lettuce.
Serve drizzled with vinaigrette.
EASTER MAKING
FLATBREAD WITH
WHIPPED
RICOTTA AND
ALL THE PEAS
RASPBERRYLEMON
WHOOPIE PIES
CARROT-PARSNIP
MINI CAKES WITH
ORANGE DRIZZLE
Preparation time 20 mins
Cooking time 10 mins
Serves 8
Preparation time 25 mins
Cooking time 12 mins
Makes 8
Preparation time 25 mins
Cooking time 20 mins
Makes 6
4 flatbreads or naan
1/4 cup extra virgin olive oil
1 cup shelled baby peas, or thawed,
frozen baby peas
200g sugar snap peas, trimmed
200g snow peas, trimmed
450g ricotta cheese
1/4 cup thickened cream
2 tsp shredded lemon zest
Sea-salt flakes and freshly ground
black pepper, to season
1/4 cup roughly chopped mint
1/4 cup dill sprigs
1 Tbsp lemon juice
60g unsalted butter, softened
50g copha, softened
1 cup caster sugar
1/4 cup raspberries
1/2 tsp bicarbonate of soda
Few drops pink food colouring
1 free-range egg
1 tsp vanilla extract
13/4 cups plain flour
1/2 cup buttermilk
Sprinkles, to decorate
1 cup plain flour
1 tsp baking powder
1 tsp orange zest
1/2 tsp ground cinnamon
1/4 tsp ground ginger
2 free-range eggs, at room
temperature
1 cup caster sugar
1/4 cup milk
25g unsalted butter
1 tsp vanilla extract
1/2 cup finely grated carrot
1/2 cup finely grated parsnip
STEP 1 Preheat oven to 160°C
fan-forced (180°C conventional). Put
flatbreads/naan on 2 large oven trays
and brush with 2 tablespoons of the oil.
Bake for 8-10 minutes or until warmed
and starting to crisp. Cool slightly.
STEP 2 Meanwhile, bring a large
saucepan of water to the boil on
high heat. Cook peas for 1-2 minutes
or until bright green and just tender.
Refresh under cold water. Drain well
and set aside to cool.
STEP 3 Put ricotta, cream and half
of the zest in a food processor.
Season. Process until smooth
and well combined.
STEP 4 Spread ricotta mixture over
top of flatbreads/naan. Top with peas.
Sprinkle with mint, dill and remaining
zest. Whisk remaining oil and lemon
juice together, drizzle over flatbreads/
naan. Season. Cut into wedges to serve.
C O O K’ S T I P
Use ricotta from the deli as it will
be firmer and less watery – the
ricotta will hold its shape better
when you’re spreading it.
LEMON FILLING
250g cream cheese, softened
25g unsalted butter, softened
3 cups icing sugar mixture, sifted
1 tsp lemon zest
1 Tbsp lemon juice
ORANGE ICING
2/3 cup pure icing sugar, sifted
1 tsp orange zest
1 Tbsp orange juice
STEP 1 Preheat oven to 170°C
fan-forced (190°C conventional).
Line 3 oven trays with baking paper.
STEP 2 Using an electric mixer, beat
butter and copha on medium for 30
seconds. Add sugar, raspberries, bicarb
soda and colouring. Beat until well
combined. Beat in egg and vanilla.
Alternately add flour and milk, beating
after each addition until just combined.
STEP 3 Using a 21/2-tablespoon capacity
ice-cream scoop, drop 16 mounds of
dough about 5cm apart on trays. Bake
for 10-12 minutes or until edges are firm
and bases start to brown. Stand for 5
minutes, transfer to a wire rack to cool.
STEP 4 For Lemon filling, using an
electric mixer, beat all ingredients on
medium speed until smooth and
combined. Spoon mixture into a piping
bag fitted with a 1cm star-shaped nozzle.
STEP 5 Pipe filling onto half of the
cookies. Sandwich with remaining
cookies and decorate edges of filling
with sprinkles. Serve whoopie pies.
STEP 1 Preheat oven to 160°C
fan-forced (180°C conventional).
Grease 6 holes of an 8-hole
(3/4-cup capacity) mini loaf pan.
STEP 2 In a small, bowl combine flour,
baking powder, zest and spices.
STEP 3 Use electric mixer to beat eggs
for 4 minutes or until thick. Gradually
add sugar, beat on medium, for 4-5
minutes or until light and fluffy. Add flour
mixture, beat on low until just combined.
STEP 4 In a small saucepan, heat milk
and butter on medium heat, stirring
occasionally until butter is melted. Add
to batter with the vanilla. Beat until
combined. Fold in carrot and parsnip.
Divide batter among prepared pan.
STEP 5 Bake for 18-20 minutes or until
skewer inserted into centre of 1 cake
comes out clean. Cool in pan for 5
minutes, transfer cakes to wire rack.
STEP 6 For Orange icing, combine all
ingredients in a bowl, add enough juice
for drizzling consistency. Drizzle cakes
with icing. Allow to set. Serve.
APRIL 2024 BHG 59
SPRING BULBS
A
s winter approaches, and you feel the dread
rising at the prospect of the winter blues,
find joy in the fact that spring isn’t far behind.
Double that happiness by preparing your garden now
for spring flowering bulbs, so they can use the dark
winter months to stir gently in silence under
the ground – then erupt in a beautiful explosion
of vibrant colour and dynamic animation!
Order spring flowering
bulbs now to plant over
autumn – then get ready
to be enchanted by their
sparkling vitality!
60 BHG APRIL 2024
INTO SPRING!
Photography GAP Photos/Jonathan Buckley
SPECIA
L
BULB
O
FFER
SEE PA
G
MORE E 72 FOR
DETAIL
S
1 passion’s the fashion
Try a compact display of passionate
purple, red and orange-yellow
blooms, offset by gently folding
foliage. Tulip bulbs have a flatter
side that produces the earliest and
strongest foliage. Plant this side
facing the edge of a container
so the leaves fan out.
SPRING BULBS
ALL ABOUT
GROWING BULBS
When to plant
In cold regions plant bulbs
in April, and in warmer
areas leave planting until
May when the soil has
cooled down.
can be planted closer in
containers. Plant bulbs
pointy-end up, except
ranunculi and anemone
poppies. They are corms
and tubers respectively, so
they go pointy-end down.
Soil
aspect
2
3
Most flowers prefer lots of
gentle sun, so avoid areas
that get hot afternoon sun.
To brighten up shade, plant
snowdrops (Galanthus
spp.) or snowflakes
(Leucojum spp.).
Planting
How deep you plant your
bulbs depends on their
type, so check the packet
instructions before you
dig. As a general rule, plant
at a depth twice the size of
the bulb. For a mass effect
in your garden beds, plant
about 10cm apart. They
There are unlimited
colours available for
freesia fans.
Care
Water after planting. Don’t
feed until after flowering
has finished. Bulbs are
essentially food reserves
for roots to grow, foliage
to flourish and flowers
to bloom. Feed after
flowering to replenish that
lost energy. As leaves fade,
their energy is returned to
the bulb, so don’t cut away
until they are yellow.
2 it’s an uprising!
Sca er your tulip bulbs
amid a yellow sea of spring
flowering euphorbia! This
grows to about 45cm, so buy
bulbs that produce long
stems – try the Tulip Blaze
Collection on page 75.
3 power play
Plant hyacinth ‘Pink Pearl’
where you can appreciate
its intense perfume!
Photography GAP Photos/Robert Mabic, Christa Brand
Bulbs will rot if sitting in
constantly moist soil, so
ensure it is well-drained.
They also like slightly
acidic soil, so dig in organic
fertiliser before planting.
4 in the pink!
Tulips in pots make a stunning
display when bulbs are
planted close – about 2.5cm
apart. Start from the centre
and plant in a circular pa ern,
but don’t let them touch the
sides of the container.
SPECIA
L
BULB
O
FFER
SEE PA
G
MORE E 72 FOR
DETAIL
S
Mix spring flowering bulbs with low-growing,
late-winter flowering plants such as violas
APRIL
BHG
SPRING BULBS
5 royal purple
growing bulbs
IN POTS
Growing your bulbs in
containers is an option
if you don’t have much
garden space, or you want
to brighten up a sunny
porch or deck. You can
also move them around to
follow the gentle morning
sun, and avoid the hot
afternoon glare. And you
can bring them indoors for
special occasions.
Pots Bulbs appreciate
being planted in terracotta
containers because the
porous terracotta allows
excess moisture to seep
through the walls.
Always ensure pots have
good drainage holes.
To encourage healthy
roots, choose a pot
that’s 15-20cm deep.
Avoid dark plastic or metal
containers as they can heat
up the potting mix, which
the bulbs don’t like.
Growing medium Use
good-quality potting mix
that’s free-draining so the
bulbs don’t rot from too
much moisture.
Aspect Keep your bulbs
cool by putting pots in
the shade until they start
to grow, then bring them
into the sun.
mixed planting
Create a mini-garden by
planting a collection of
bulbs in one tall container.
Put potting mix in the
container to 18cm from
the top and settle in taller
growing bulbs such as
daffodils and tulips. Add
more potting mix to about
10cm from top and plant
medium-sized bulbs such
as hyacinths. Add more
mix to 5cm from top and
plant shallow-growing
bulbs such as ranunculus
and freesias, then top with
another 5cm of mix.
Grape hyacinths grow
to 10-15cm, they make
a pretty border plant.
Photography GAP Photos/Juliette Wade
The brush of gold on the
luxuriantly purple petals of
a Dutch iris ‘Discovery’
belies the fact it’s hardy and
easy to grow. Plant at the
back of a garden bed where
it will soar to 70cm!
BHG APRIL
6 ring in spring!
Spanish bells flowers
come in blue, pink or
white. Grow them
en masse on banks or
sloping sites where
it’s difficult to mow!
7 pack a punch
6
Let spring brighten
up a dull corner by
allowing tulips and
hyacinths to party
together. They’re
great companions!
7
8 go the blues!
8
Your Dutch irises,
cornflowers and lupins
can last for up to a
week when cut and
put together in a vase!
9
9 bright as a button
If you’re looking for
mass flowering in
vibrant colours and an
easy-care regime,
anemone poppies tick
all the boxes. The
flowers keep popping
up from mid-winter to
late spring.
SPECIA
L
BULB
O
FFER
SEE PA
G
MORE E 72 FOR
DETAIL
S
SPRING BULBS
tips for SUCCESS
WITH BULBS
• Choose bulbs that are
plump, firm and dry. If
they feel soft to touch
or look shrivelled, they
have lost vigour and
are past their prime.
• The bigger the bulb of
a variety, the greater
the chance of bigger,
bolder blooms.
• Cover your soil with
organic mulch to help
deter weeds.
• If your dog loves to
dig, cover the bulbs with
chicken wire until the
leaves start to emerge.
• Instead of mass or
orderly planting, try the
natural, random effect
– toss your bulbs onto
your garden bed and
plant them where
they land.
Delicate, sweet daffodil
scent has hints of
vanilla and honey.
INDOOR
DISPLAYS
The best bulbs for
indoors are hyacinths,
daffodils and tulips.
You can grow
hyacinths indoors in
an hourglass-shaped
vase so you can see the
roots grow and shoots
emerge. Fill the bo
om
half of the vase with
water and pop the bulb
on the top of the vase.
Be sure water is about
5mm below the bulb.
Keep the vase in
a dark cupboard
for several weeks
while roots and shoots
develop, then
gradually bring it into
gentle, then bright
light, but not direct
sunlight. See hyacinth
vase kits, page 77.
When cutting
daffodils and tulips
choose buds that are
about to open for a
longer display. Fill a
clean vase to a third or
half with tepid water.
Remove leaves that will
sit in water. Keep out of
direct sunlight and
away from dra
s.
Replace water daily.
Don’t put daffs and
10 best friends forever
The most exciting companion
for golden daffodils in your
garden beds is tulips in bold,
vibrant colours, such as
orange or burgundy.
BHG APRIL
other flowers in the
same vase – the sap of
cut daffs prevents
other flowers from
taking up water (see
Caption 17, page 68).
11 tangerine dreams
The elegantly curved
petals of lily tulips
make them stand out
in your garden,
especially if you
choose ‘Synaeda
Orange’ with its
tangerine petals
trimmed with a
delicate yellow.
12 reach new heights
11
13
Create layers of tulips
by popping a few bulbs
in pots that rise up
the steps to your
front door.
13 greener pastures
Abandon your spring
lawn mowing by
planting masses of
daffodil bulbs. You
can bring out the
mower once the
daffodil leaves wilt.
14 turn up the heat
The bright stars of ixia
like a warm climate
and come in tropical
colours too!
12
14
SPECIA
L
BULB
O
FFER
SEE PA
G
MORE E 72 FOR
DETAIL
S
SPRING BULBS
LANDSCAPING
WITH BULBS
16
White tulips bring
instant freshness to
any garden or room!
flowering plants can fill the gaps
when the foliage fades, such
as colourful annuals like
petunias, cosmos and zinnias.
• If you want bulbs around
established shrubs, sca
erplant those with tall stems to
rise above the foliage.
15 RAVISHING BEAUTY
Pure white ranunculi are
heavenly with their swirls of
silky petals looking like fluff y
spring clouds. Or you can go
for yellow, orange, red or
pink charmers!
16 tiny dancers
Snowdrops flower in late
winter and prefer light
shade, reflecting their
woodland origins.
17 just dreamy
White tulips and daffodils
make a beautiful cut flower
arrangement, especially at a
wedding. But before you put
them together, dunk the cut
daffs in cool water for several
hours to remove the toxic sap
released when cut before
mixing with other flowers.
Don’t cut the stems again.
Photography GAP Photos/Robert Mabic
15
• To make an impact, go
for colour-blocking – make
a bold statement by combining
two or three colours in
solid masses.
• With mass planting of one
variety and colour, bulbs are
easier to care for because they
have the same needs and
mature at the same time.
• Choose colours that suit your
home and personality – pastels
are restful, while a blaze of
bright yellow daffodils and red
and orange tulips is dynamic.
• If your space is small, plant one
variety in one colour. This makes
the area look larger, while
mixing colours and varieties
feels clu
ered and makes
the space look even smaller.
• In large spaces, you can use up
to three different varieties and
colours. You can also create
pa
erns – rows, circles, swirls...
• Think about which summer
SPECIA
L
BULB
O
FFER
SEE PA
G
MORE E 72 FOR
DETAIL
S
Power
up spring’s
magic by
including
blossoms in
displays
17
APRIL
BHG
SPRING BULBS
MINI DAFFS –
SO CUTE!
19
fellow
friends
Miniature daffodils
don’t have quite the
same impact as
standard ones when
planted en masse.
Instead, let them
stand out as part of
a colourful mix of
different plants to
create a co
agestyle look.
Pair them with other
gentle sun lovers
such as hyacinths,
primulas, sweet
alyssum, crocuses,
hellebores, winter
aconite, heucheras,
pansies, violas and
creeping phlox.
18 tiny treats
The size of mini daffs is
highlighted when they’re
grown alongside
regular-sized tulips
and primulas.
19 a whale of a time
Sca
er minnow daffs
amid heucheras as a
prelude to their summer
flowering, when they
shoot up tall stems with
tiny bell-like flowers,
just like the daffs!
The dainty ‘Hoop
Petticoat’ grows to
about 20cm and has
a sweet perfume.
Photography GAP Photos/Jonathan Buckley
18
Miniature daffodils are
your little garden
surprise packages.
They grow just 15-20cm
tall with flowers at a wee
3-4cm wide, compared
with the regular height
of 30-40cm and some
flowers that can bloom
up to 7cm wide.
They’re ideal for little
pots, or being woven
into garden nooks and
crannies, such as rockeries.
They also squeeze in
prettily under shrubs,
or can be scattered under
conifers where they’ll
brighten up the dark
green foliage.
Or you can tuck them
along the edge of paths to
provide clear directions.
And being tiny doesn’t
mean they don’t have
a dramatic impact –
especially if you use them
to create exclamation
marks when planted
randomly among
groundcovers.
SPECIA
L
BULB
O
FFER
SEE PA
G
MORE E 72 FOR
DETAIL
S
20 little charmers
Diminutive daffodils
look like standard
daffodils and are
just as endearing.
Compare the daffs
below with the
standard ‘Mon Cheri’
daffodil on the right.
‘Little Gem’
An early-blooming
yellow trumpet
daffodil.
‘Polly’s Pearl’
Pure white with an
almost flat, ruffleedged centre.
‘Tete Boucle’
Generous double
blooms with a hint
of orange.
‘Hoop Petticoat’
Dainty flared
trumpets overwhelm
the petals.
‘Spring
Sunshine’
Petals and
trumpet open
pale yellow,
then turn white.
‘Tete A Tete’
Golden petals
surround deep
yellow cups.
APRIL
BHG
SHOP
new
*Not available for
delivery to Tasmania.
DAFFODIL YELLOW
TRUMPET
Pack size 8 Price $9.40
Pack size 10 Price $10.80
60-90cm 10cm Z3-Z6
30-40cm 10-15cm Z4-Z6
ANEMONE POPPY
BICOLOUR
DUTCH IRIS
DISCOVERY
Pack size 20 Price $8.90
Pack size 5 Price $7.90
30-40cm 10-20cm Z2-Z6
50-70cm
ANEMONE POPPY
MIXED
DUTCH IRIS
MIXED
Pack size 20 Price $8.90
Pack size 10 Price $12
CHINCHERINCHEE
Pack size 5 Price $7.90
50-60cm 10-20cm Z2-Z6
15cm
Z2-Z6
50-70cm 15cm Z2-Z6
FREESIA HADECO
MIXED
Pack size 20 Price $9.90
40cm 30cm
Z1-Z6
DAFFODIL
PREMIUM MIXED
FREESIA REFRACTA
ALBA
Pack size 10 Price $12
Pack size 20 Price $9.90
30-40cm 10-15cm Z4-Z6
40cm 30cm Z1-Z6
DAFFODIL TETE
BOUCLE
GRAPE HYACINTH
BLUE
Pack size 3 Price $7.90
Pack size 15 Price $8.90
30-40cm 10-15cm Z4-Z6
BHG APRIL
GET IN QUICK AND ORDER YOUR BULBS
ALLIUM
DRUMSTICK
30-40cm 10-20cm Z2-Z6
new
OUR MOST
15cm
8-15cm
Z4-Z6
POPULAR BULBS
BUY
NOW!
HYACINTH MIXED
KEY TO SYMBOLS
BEFORE
THEY
SELL
OUT! TO BUY, GO TO BHGSHOP.COM.AU
Pack size 5 Price $13.00
20-25cm 15cm Z3-Z6
1
2
3
4
5
6
Part shade
Width
Full shade
Full sun
Good for pots
Climate zones
Cut flowers
DAFFODIL
ACCENT
RANUNCULI
PASTEL BLEND
Pack size 4 Price $9.90
Pack size 20 Price $8.90
30-40cm 10-15cm Z4-Z6
40-60cm 5-15cm Z3-Z6
IXIA MIXED
SNOWFLAKES
Pack size 15 Price $8.90
Pack size 5 Price $8.90
50-70cm 5-7cm Z3-Z6
new
Height
35cm
12cm
Z3-Z6
DAFFODIL ICE
FOLLIES
TULIP
REGULAR MIXED
Pack size 4 Price $9.40
Pack size 5 Price $10
30-40cm 10-15cm Z4-Z6
40-60cm 14cm
RANUNCULI
MIXED
new
Z4-Z6
TRITONIA PASTEL
MIXED
Pack size 20 Price $9.90
Pack size 10 Price $8.90
40-60cm 5-15cm Z3-Z6
25-50cm 10cm
SPANISH
BLUEBELLS
Pack size 5 Price $7.90
50-60cm 10-15cm Z4-Z
new
Z2-Z6
CROCUS CHRYSANTHUS
PRINS CLAUS
Pack size 5 Price $8.90
8-15cm
3-8cm Z4-Z6
SHOP
$$$ SAVER
GET IN QUICK AND ORDER YOUR BULBS
PRECIOUSLY PINK COLLECTION
• Daffodil Accent (4) • Freesia Giant Pink Devotion (10)
• Anemone Poppy Pink (20) • Ranunculi Cerise Pink (20)
• Tulip Barcelona (3)
Pack size 57 PRICE NOW $30 (was $44.50)
ANEMONE POPPY COLLECTION
• Anemone Poppy Blue (20) • Anemone Poppy Red (20)
• Anemone Poppy Pink (20) • Anemone Poppy White (20)
Pack size 80 PRICE NOW $28.40 (was $35.60)
BURST OF BLUE COLLECTION
• Spring Star Light Blue (15) • Grape Hyacinth Blue (15)
• Anemone Poppy Blue (20) • Freesia Hadeco Blue (20)
• Dutch Iris Discovery (5)
Pack size 75 PRICE NOW $30 (was $44.50)
100 DAYS OF COLOUR COLLECTION
WICKEDLY WHITE COLLECTION
• Snowflakes (5) • Freesia Refracta Alba (20)
• Ranunculi White (20) • Jonquil Erlicheer (10)
• Spring Star White (15)
• Jonquil Erlicheer (10) • Dutch Iris Mixed (10)
• Chincherinchee (5) • Freesia Hadeco Mixed (20)
• Daffodil Mixed (10) • Tulip Regular Mixed (5)
• Sparaxis Mixed (15) • Grape Hyacinth Blue (15)
Pack size 90 PRICE NOW $54 (was $78.10)
Pack size 70 PRICE NOW $30 (was $46.30)
BUBBLES OF BURGUNDY COLLECTION
• Babiana Mixed (12) • Dutch Iris Discovery Purple (5)
• Ranunculi Burgundy (20) • Hyacinth Woodstock (3)
• Tulip Saigon (3)
Pack size 43 PRICE NOW $35 (was $50.20)
74 BHG APRIL 2024
WARM CLIMATE COLLECTION
• Jonquil Soleil D’Or (10) • Ixia Mixed (15) • Babiana Mixed (6)
• Dutch Iris Discovery (10) • Freesia Hadeco Mixed (20)
• Black Pearl Lily (6) • Tritonia Pastel Mixed (10)
• Ranunculi Mixed (20)
Pack size 97 PRICE NOW $53 (was $76.90)
COLLECTIONS
BEFORE THEY SELL OUT! TO BUY, GO TO BHGSHOP.COM.AU
BUY
NOW!
RANUNCULI COLLECTION
• Ranunculi Cerise Pink (20) • Ranunculi White (20)
• Ranunculi Burgundy (20) • Ranunculi Yellow (20)
• Ranunculi Orange (20)
Pack size 100 PRICE NOW $33 (was $44.50)
DAFFODIL & TULIP BLEND
• Daffodil Red Devon (5) • Tulip Ile De France (4)
Pack size 9 PRICE NOW $13.40 (was $15.80)
DAFFODIL GARDEN COLLECTION
• Daffodil Ice Follies (4) • Daffodil Fortissimo (5)
• Daffodil Accent (4) • Daffodil Sir Winston Churchill (5)
Pack size 18 PRICE NOW $30 (was $37.90)
TULIP BLAZE COLLECTION BHG EXCLUSIVE
new DAFFODIL MINI COLLECTION
• Tulip Continental (3) • Tulip Ile De France (4)
• Tulip Denmark (3) • Tulip Strong Gold (3)
Pack size 13 PRICE NOW $30 (was $35.60)
• Daffodil Pipit (3) • Daffodil Tete Boucle (3)
• Daffodil Spring Sunshine (5) • Daffodil Tete A Tete (5)
Pack size 16 PRICE NOW $25.80 (was $34.40)
HYACINTH COLLECTION
TULIP BLUSH COLLECTION BHG EXCLUSIVE
• Hyacinth Delft Blue (3) • Hyacinth Woodstock (3)
• Hyacinth Pink Pearl (3) • Hyacinth Louvre (3)
• Tulip Tom Pouce (3) • Tulip Barcelona (3)
• Tulip Royal Ten (3) • Tulip White Liberstar (3)
Pack size 12 PRICE NOW $31 (was $38.80)
Pack size 12 PRICE NOW $31.00 (was $36.60)
SHOP
MEGA BULB
GET IN QUICK AND ORDER YOUR BULBS
JUST
$75.00
Was $129.30
MEGA GARDENER’S
FAVOURITE
COLLECTION
BHG EXCLUSIVE
• Anemone Poppy Mixed (20) • Grape Hyacinth Blue (15)
• Tulip Regular Mixed (5) • Freesia Hadeco Mixed (50)
• Dutch Iris Discovery (10) • Hyacinth Mixed (5)
• Jonquil Erlicheer (10) • Ranunculi Mixed (50)
• Daffodil Yellow Trumpet (10) • Freesia Refracta Alba (20)
Pack size 195 PRICE NOW $75.00 (was $129.30)
COLLECTIONS
BEFORE THEY SELL OUT! TO BUY, GO TO BHGSHOP.COM.AU
BUY
NOW!
JUST FRAGRANT COLLECTION
$42
BHG EXCLUSIVE
Was $53
• Jonquil Erlicheer (5) • Freesia Hadeco Mixed (20)
• Hyacinth Pink Pearl (3) • Jonquil Soleil D’Or (6)
• Freesia Refracta Alba (20) • Hyacinth Del Blue (3)
Pack size 57 PRICE NOW $42 (was $53)
JUST
$49.50
Was $62.30
PLANT & FORGET
COLLECTION BHG EXCLUSIVE
JUST
new
$30
TULIP DOUBLE
COLLECTION BHG EXCLUSIVE
Was $35
• Tulip Columbus (3) • Tulip Foxtrot (3)
• Tulip Wyndham (3) • Tulip Flashpoint (3)
Pack size 12 PRICE NOW $30 (was $35)
HYACINTH VASE KITS
Prices are approximate and a guide only.
$12.90 each
Blue
White
BURGUNDY
Pink
Includes vase and bulb
• Ixia Mixed (15) • Spanish Bluebells (5) • Sparaxis Mixed (15)
• Grape Hyacinth Blue (15) • Freesia Hadeco Mixed (20)
• Ranunculi Mixed (20) • Spring Star Light Blue (15)
Pack size 105 PRICE NOW $49.50 (was $62.30)
Offer ends 17th May, 2024, unless sold out prior. Please allow up to
14 business days for delivery. While every endeavour will be made to
deliver in the specified time frame, if your parcel does not arrive on time,
please email customerservice@bhgshop.com.au. Offer only available in
Australia. Standard shipping of $12.50 (Australia wide) and an additional
$5 quarantine inspection surcharge applies in addition to the delivery
charge for orders delivered to Tasmania, Northern Territory and
Western Australia due to quarantine inspection requirements.
APRIL
BHG
FABULOUS FLOWERS
BLOOM
BOOM
A packet of cosmos seeds will
extend your sunny summer days
right up to the start of winter!
C
osmos are summer
annuals that linger
in your garden late
until the first frosts arrive.
They’re so simple to grow,
yet produce a profusion of
delightfully sunny flowers,
waving in a so
breeze. Each
seed produces a multitude
of silky-petalled flowers in
colours that range from pure
white to so
est pink to fiery
reds and oranges.
1 WILD AND WONDERFUL
If you fancy a wildflower garden,
sca
er a seed mix featuring
different colours in your garden
patch, or sow taller cosmos
seeds at the back of a bed.
APRIL BHG
2 THE MULTIPLYING EFFECT
Help your cosmos plants flourish in your garden
by cu
ing buds for indoor flowering.
T I N Y S E E D S A R E YO U R
WAY T O H A P P I N E S S
Cosmos are annuals so the most economical way to
grow them each year is to sow seeds. They’re also
self-seeders, so your seed needs reduce each year.
it encourages leggy, green
growth rather than flowers.
Pinching out Take off
the top 10cm of the stem
just above a set of leaves
when they are 30cm tall
to encourage bushier
growth – and more flowers!
Flowers From seed
to bloom takes about
8-12 weeks.
BEING PRETTY
CAN BE NO FUSS!
The flowers may look
delicate, but the plants are
incredibly tough, tolerating
both drought and hot,
humid summers.
The plant is day-length
sensitive and blooms are at
their most plentiful in late
summer and autumn, when
days start getting shorter.
Another bonus is that they
are generally pest-free!
D I S P L AY I N G Y O U R
BLOOMS INDOORS
Cosmos are cut-and-come-again plants – the
more you cut, the more flowers appear!
Here’s how
• To prolong their
flowering time, harvest
cosmos regularly.
• The individual blooms
don’t last a long time in the
vase, about 5 to 6 days, but
each stem is loaded with
multiple buds that open
individually over a period
of a week, so your cu
ings
can last up to 2 weeks.
• The trick to ge
ing the
longest vase life is to use
clean, sharp snips to cut a
stem that has most of its
flowers at a swollen bud
stage, when they’re just
about to open.
• Over the next week,
individual flowers will
open up in the vase.
• This means you can have
flowering in the vase for
up to 12-14 days.
• For a truly dazzling
display, team them
up with autumnflowering dahlias or
chrysanthemums!
LIKE THEM TALL OR
SMALL, COSMOS’
HEIGHTS RANGE
FROM 50CM TO
MORE THAN 120CM
Photography Adobe Stock, GAP Photos/Nicola Stocken
Sowing Sow seeds directly
onto the soil about 5-8cm
apart once final frosts have
passed. In subtropical
areas, sow seeds in winter.
Water lightly. Seeds
germinate in about 10 days.
Aspect Full sun.
Soil Well-drained.
Thinning out When
seedlings are 3 weeks old,
thin them out so they’re
about 30cm apart.
Watering Once plants
are established they do
not need a lot of water.
Food Don’t fertilise, as
FABULOUS FLOWERS
3 WELCOME THE WORLD
Grow cosmos not only to
brighten your autumn
garden, but also to
a ract birds and
bu erflies – they love
their sunny open faces!
APRIL
BHG
GARDEN WALKAROUND
1 STEP INTO SOMETHING DREAMY
A moon gate – a traditional architectural
feature of Chinese gardens – is made from
local granite and takes you into another
garden world. Entrances to each garden
summon anticipation of what lies beyond!
GRAHAM ROSS
Join me as I show you around this
gorgeous garden on BHG TV, Friday,
March 15 at 7pm on Channel 7.
(Apologies, may be subject to change.)
For more gardening tips go to
bhg.com.au.
82 BHG APRIL 2024
SEEN ON BHG TV
FRIDAYS 7.00
2 SWIRLS & TWIRLS UNDER CONTROL
Hedging and topiary provide the
bones and framework of the gardens.
Use hedges to define boundaries or
provide privacy. You can shape
hedging trees into topiaries to add an
architectural element and become
a focal point in your garden.
go wild BEHIND THE
A visit to Sunnymeade Garden shows you how
your garden can be a cohesive blend of traditional
comforts and the excitement of the exotic
GARDEN WALKAROUND
riginally inspired by formal English gardens, the award-winning
Sunnymeade Garden, snuggled in the picturesque Strathbogie
Ranges in north-east Victoria, has evolved over the past 30
years to include distinctive touches influenced by gardens
in the East, Middle East and Southern Europe that also take
into account Australia’s harsh climate. On just 1ha of land, it’s broken up into
a series of character-filled garden spaces by tall, immaculately manicured
hedges, and linked by gates, steps and paths that pierce hedges and walls.
It’s like moving through a grand, green gallery where rooms burst with
colourful artistry that can inspire you in your own gardening endeavours!
3
4
3 LION DOWN ON THE JOB
Statuary in your garden draws your eye
to something special – in this case a
stone lion indicates that beyond lies
the Rose Garden. In autumn, this
garden is planted with winter and
early-spring flowering bulbs.
4 FROLICS WITHIN THE BOUNDARIES
The Sunken Garden features very
formal box parterres – you can go a
little wild and fill your parterres with
colourful seasonal flowers. Then, if you
like a solid hornbeam hedge, let light in
and offer glimpses of what lies beyond
by creating little windows, as here.
5 SUMMER SENSATIONS
Use a series of wisteria-laden iron
arbors to create canopies. Here, the
Yellow Garden glows in the shade as
it bursts with seasonal flowers.
84 BHG APRIL 2024
ALLIUMS
5
GARDEN WALKAROUND
6 RAISE THE BAR
A soothing above-ground pond
nestles inside a small box hedge in
the Sunken Garden. This is ideal
if you want a pond in your own
garden but don’t feel up to
excavating all that soil.
7
8
7 WHAT A CUTE LITTLE CASTLE!
You may have a jumping castle rather
than a solid, Gothic-style one. But
you can still create a chequerboard
of pavers and creeping thyme
leading to the entrance.
9
8 MAZES ARE AMAZING!
Photography Simon Griffiths
Your lawn won’t thrive if it’s in shade.
Try a mosaic instead, such as this
labyrinth, made from stones and
pebbles set in concrete. This one is
inspired by examples found in Spain
when it was heavily influenced by
Moorish culture.
9 SUN BLESSED!
If you want an arch in your garden, the
Islamic keyhole arch may be an option.
Known not only for its strength, it’s also
renowned for its elegance and beauty.
This one is surrounded by droughttolerant plants from the Mediterranean.
VI S IT IT!
What Sunnymeade Garden
Where 213 Boundary Hill Road,
Kithbrook, Victoria, 2 hours drive
north of the Melbourne CBD.
When 16-17 March, 23-24 March,
6-7 April, 2 sessions per day,
10am-noon and 1-3pm.
cost $22 adults, $11 children.
More info sunnymeadegarden.com.
APRIL 2024 BHG 87
GARDEN DESIGN
T
A simple, traditional
Mediterranean garden
focuses on sustainability.
Old, rustic and industrial
items are repurposed, their
hard edges softened by
plantings and earthy colours.
RECYCLING RULES
With a bit of scavenging you may
find old metal grape-drying
racks to use as a wall support for
espaliered pomegranate trees.
They draw warmth from the
rendered wall and are both
productive and ornamental, the
fruit dangling like giant jewels.
AROMA IN THE AIR
Plant a row of lush bay trees with
their deeply aromatic leaves as
the backdrop to collections of
native ground-hugging plants
that love a warm, dry climate –
correa, coastal rosemary and
ruby saltbush.
AGED TO PERFECTION
Two water tanks from the 1800s,
one of which is topped with a
copper water feature, are key
elements of this design. A lemon
tree is growing out of the second
tank, making the garden both
cultural and culinary.
A GARDEN WITH GRIT
Rock-filled gabions replicate a
rugged Mediterranean terrain.
As does crushed gravel, stepped
with old factory metal panels.
88 BHG APRIL 2024
Photography MIFGS; designer
Annabel Jane Johnston
BRING IN THE MEDITERRANEAN
he Melbourne International
Flower and Garden Show
returns 20-24 March, with
the latest outdoor lifestyle trends
on display in more than 50 exciting
gardens. They’ll range from those that
are achievable, to those that are a bit
more boutique, to balcony and border
themes for inner-urban dwellers, and
the grander landscape show gardens.
Here are inspiring examples of
innovative designs from last year!
SEEN ON BHG TV
FRIDAYS 7.00
LITTLE THINGS THAT GO
Try different colours,
textures and hardscape
elements to transform
your outdoor space
What Melbourne
International Flower
and Garden Show
Where Royal Exhibition
Building and surrounding
Carlton Gardens, 9 Nicholson
Street, Carlton, Melbourne.
When 20-24 March, 2024.
How Much Tickets start
from $38 per adult, from
$32 per concession and
$5 per child. Prices vary
for entry to special events.
Check website for details.
More Info
melbflowershow.com.au.
90 BHG APRIL 2024
Photography MIFGS; designer Bronni Skinner.
Prices are approximate and a guide only.
VI S IT IT!
GARDEN DESIGN
LOOK FOR A SILVER LINING
A silver-speckled olive tree
becomes sprawling and
contorted with age, but you
can keep it tidy by pruning it
into cloud shapes, so it still
provides shade while not
dominating the small space.
BEING PRICKLY CAN BE GOOD
Use succulents if you’re looking
for a desaturated colour palette
of olive, sage, silver grey and
muted blue. Their points of
difference are their shapes and
textures – from prickly to fuzzy
to smooth.
DOING IT NATURE’S WAY
If you want the natural look this
garden achieves, little touches
such as weathered stone skirting
against clay walls contributes to
this, as do the stone steppers,
timber door and furniture, and
terracotta wall lights.
JOIN THE MOVEMENT
Be part of the trend for
ornamental grasses in your
garden – the native tussock
grass (Poa labillardierei) is one
to try, especially as it produces
delicate plumes of feathery
flowerheads in summer. Mass
planting has a huge impact!
IT’S CRUNCH TIME
A gravel groundcover is an
intrinsic part of an arid garden
design, and shows that beauty can
be found in simplicity, especially if
you’re conscious of saving water.
DESERT DUALITY
While soft, waving blond
grasses are in contrast with
the architectural succulents,
there is still harmony – hence
the ‘duality’ of this design.
This is an option if you’re
in need of an enduring
landscape within a harsh
environment that is stunning
in its simplicity.
URBAN WILD
GARDEN DESIGN
This design meets the
growing need for climate
adaptable gardens that also
offer sanctuary for wildlife –
life in all forms erupts from
the masses of urban bitumen
and concrete, and thrives.
EXPAND YOUR WORLD
Borrow your neighbour’s – or the
nature strip’s – mature trees and
include them in your garden
design. And since they provide
sanctuary for wildlife, you’ll be
able to delight in the sounds and
visits of lots of birds.
THINGS TO KEEP SECRET
Build a screen to hide a
multitude of uglies – a compost
bin, rubbish bins, garden tools...
The gaps in the brickwork create
an open and airy atmosphere so
you don’t feel closed in. They’re
also visually appealing.
BE A ROCK STAR!
A scattering of boulders can
serve as a seating area for you
and as a sun-baking spot for
lizards and butterflies. Boulders
also build levels in your garden
with different textures and can
be used to hold garden lighting.
A pond with mosquito-eating
frogs and larvae-eating
fish is a natural deterrent to
this summer pest. If you put
a boulder or two in the water,
you’re offering the frogs and
fish protection from predators,
namely cats and the hot sun.
CHEQUERED FUTURE
Permeable or grow-through
paving is a great alternative to
heat-radiating slabs of asphalt or
concrete. Use them for driveways
and walkways.
92 BHG APRIL 2024
Photography MIFGS; designers Josie Wilson and
Suzannah Kennett Lister
NATURAL MOZZIE ZAPPERS
WATERWISE GARDEN
1 Flowers fade but a bed
of flower-like aeoniums
lasts season after season.
Like all succulents, they
store water in their leaves
and stems, an adaptation
that helps them cope
with dry conditions.
When packing your place with
plants, think about how thirsty
they can be. Plants with low water
needs will lighten your workload!
94 BHG APRIL 2024
n abundance of plants
can mean investing a
lot of time and money
in watering – unless
you choose plants that have low
water needs, even when si ing
in the sun all day. A bonus in
choosing waterwise plants is that
they have an in-built hardiness,
developed over generations of
surviving harsh, hot elements –
and still look gorgeous!
2 Empty corners are
always begging to be
filled and a container of
succulents does the job!
It also adds height, giving
an extra dimension to
an adjacent bed
of succulents.
WATERWISE GARDEN
ALLOW LOVELY
SHAFTS OF LIGHT TO
SNEAK THROUGH A
BAMBOO POLE
FENCE, AS HERE,
WHERE CLIMBERS
WERE REMOVED.
creeping fig (Ficus
pumila), jasmine,
bougainvillea and a
banana tree looks both
natural and adventurous,
and allows you to create
a nook for a small
table and chairs.
BETTER TIP
KOREAN GRASS
( ZOYSIA TENUIFOLIA )
IS A DROUGHTTOLERANT, NO-MOW
TURF IDEAL TO
SOFTEN PAVERS.
96 BHG APRIL 2024
Photography Simon Griffiths, Adobe Stock
3 A vertical garden of
WATERWISE NATIVES
PLANTS TO TRY
• Pretty flowering trees
include blueberry ash,
native frangipani and the
Illawarra flame tree.
• Quirky-looking shrubs
include banksia, grevillea,
woolly bush and correa.
• Seasonal perennials
include scaevola, fringe lily,
paper daisy and dianella.
• Add height with climbing
native wisteria and wonga
wonga vine.
5
4
6
8
7
4 Let your plants tangle in a tango – star
jasmine and climbing ivy are a cute couple!
5 Blue chalk sticks make a striking groundcover.
When mass planted, this succulent forms a
rippling carpet that weaves around and
through other plantings.
6 The perfectly symmetrical rosettes
of echeveria can be mesmerising.
7 When your garden is so lush, that’s
when you bring your living room outside!
8 Succulents are so sculptural and when you
bunch a selection together – such as aloe vera,
sedum, aeoniums, blue chalk sticks, echeverias
and flapjacks – you’re making a work of art!
9 There are about 200 species of crassula
in a wide variety of sizes, shapes and colours.
Crassula ovata ‘Red Edge’ is one of the
prettiest types.
9
GARDEN TIDY UP
1
FRESHLY PLANTED
2
A
lot of plants grow so
slowly you fail to notice
their growth is out of
control. This garden went from
non-existent, to immature to
disorderly in the space of three
years. If your garden is in need of
a good haircut (as here), proper
use of the correct tools will put
it back into tip-top shape.
1, 2, 3 evolving GARDEN
A freshly planted garden (1) is full of
promise but it over-delivers when not
kept in check (2). Proper pruning not
only improves the beauty of your garden
(3), but it also maintains the health of
your plants, allowing them to direct their
energy into flowering and fruiting.
OVERGROWN
3
SHAPE UP
Turn your urban jungle into a garden that lets in the light, gives
BHG APRIL
SEEN ON BHG TV
FRIDAYS 7.00
CHARLIE ALBONE
Join me as I take you through the steps
to tame this unruly garden on BHG TV,
Friday, April 5 at 7pm on Channel 7.
(Apologies, may be subject to change.)
For more garden tips, go to
bhg.com.au.
TO OPEN UP
you breathing space and is at the cutting edge of outdoor entertaining!
GARDEN TIDY UP
BEFORE
BEFORE
Leggy growth
shades lowergrowing plants.
AFTER
AFTER
Sun can now
shine on lowergrowing plants.
A brutal haircut
actually makes it
more stylish!
SHAPING
TIP PRUNING
The coastal rosemary and rhaphiolepis look like shaggy dogs
here, yet are ideal for shaping into simple, soft balls. Use hedging
shears to slowly work around each shrub, then secateurs to tidy
up the shape. The job is easier when the foliage is wet, so hose
water over the shrubs before you start.
This Russian olive (Elaeagnus macrophylla) has shoots
stretching to more than 2m and is looking leggy. Cutting off
the wayward shoots and selectively pruning the tips of the
remaining branches with secateurs encourages thicker
growth and turns it back into a tidy shrub.
100 BHG APRIL 2024
Photography Alan Jensen, Sue Ferris; styling Vanessa Tidy; project Grahame Rowe
Straggly shoots
make the shrub
look untidy.
BEFORE
BEFORE
Growth is going
up, out and all
over the place.
What’s lurking
behind this
growth?
AFTER
AFTER
Access to the
door is now
unhindered.
Less greenery
means more
fragrant flowers.
RESHAPING
HEDGING
This jasmine was originally planted to train along espalier wires. But it
loves the sunny spot so much it has overrun the wires and become a
bushy living wall instead. Keeping it as an espalier means lots of work
considering its healthy growth habit. Instead, it just needs an overall
trim with shears to create more space in the courtyard.
The Pittosporum ‘Silver Sheen’ screening hedge when immature
appears spindly, but it grows quite dense without needing to be
tip pruned. But it doesn’t grow evenly and clean – sharp shears
will give it a straight edge at both the top and on the sides. This
gives the silvery-green foliage extra twinkle!
GARDEN TIDY UP
BEFORE
The canopy is
straggling down
the trunk.
AFTER
A cleaner trunk
allows other plants
to be seen.
LIFTING & PRUNING
The two black ornamental plums (Prunus cerasifera ‘Nigra’) here
have shot up and their deep-red canopies now put the sun-loving
understorey plants in the shade. Using clean, sharp secateurs, a
pruning saw and loppers, selectively remove branches not just to
thin out the canopy but also to lift it. This gives more sunlight to
the understorey plants, which will encourage them to thrive.
102 BHG APRIL 2024
TI P S F O R U S I N G TO O L S
Clean and sharpen your garden tools before use. To clean: mix
1:10 bleach to water. Before moving onto other plants, wipe
tools dry. To make trimming easier, use secateurs for stems
that are up to 15mm thick, pruning saws for wood up to up
to 5cm thick and loppers for wood up to 10cm thick.
4 all spick and span!
A good all-over trim and prune of
your garden plants will transform
an area that was being taken over
by the plants into an open, sunny
outdoor entertaining area where
you can sit back and enjoy the view!
for shopping
details, see OUR
stockists page
VERY FEW PLANTS REQUIRE NO
MAINTENANCE AND THE OCCASIONAL GOOD
HAIRCUT GIVES HUGE BENEFITS!
SOIL CARE
A CO M PAC T
MAG N O LIA ‘ TE D DY
B E AR ’ I S AN I D E AL F IT
FO R S MALL S PAC E S .
T
here’s great joy after you lay new turf – it’s lush, it’s green and
it’s a perfect support act for your overall garden. Flowers,
shrubs and trees look glorious rising out of the rich, green
canvas. Three months later, though, when bits of turf turn to
straw, it may not be what you’re doing on top – it’s what’s happening
underneath. And while soil gives life to your plants, it could be killing
them if the chemistry is not right. But the solutions are so simple!
104 BHG APRIL 2024
SEEN ON BHG TV
FRIDAYS 7.00
BEFORE
W E E P I N G LI LLY
P I LLY I S A TE R R I F I C
Q U I C K- G ROWI N G
SC R E E N I N G P L ANT
KEEPING YOUR
You want your lawn so green
others are envious, but if
it’s yellow, it can make you
despair. Well, don’t, instead
start by examining your soil!
SOIL CARE
If your soil’s pH level is too acidic or too alkaline, plants’
uptake of vital nutrients is compromised and they may
die. A test done with a pH kit will tell you the state of
your soil. Once you know this, there are ways to help it.
A low pH, measuring 5.5 or
below on the test, means
your soil is acidic, or ‘sour’.
Signs your soil may
be acidic are:
• Stunted grass growth,
wilting grass blades or
yellow patches in your lawn.
• An infestation of weeds,
such as dandelions,
shepherd’s purse or moss,
that love acidic conditions.
Common causes of
acidic soil are:
• Heavy use of fertilisers
high in nitrogen.
• Heavy rainfall leaching
beneficial elements such
as calcium and magnesium
from the soil.
• Dumped organic material
that tends to acidity as
it decomposes into
organic matter.
Easiest treatment:
Apply lime, available from
your garden centre in
powder form.
A high pH, measuring more
than 7 on the test, means your
soil is alkaline, or ‘sweet’.
Signs your soil may be
alkaline are:
• Yellow spots on leaves that
start fading and turn whitish.
• Stunted or wilted leaves.
Common causes of
alkaline soil are:
• Builders working on your
property using lime in
cement mixes.
• Dry land with little rainfall.
• Soil being watered with ‘hard
water’, which contains lime.
Easiest treatment: Dig in
organic matter or compost,
or apply elemental sulphur,
which is available from your
garden centre in powder
form. Soil bacteria changes
the sulphur to sulphuric acid.
Testing your soil
The basic Manutec pH test comes with a bottle of
liquid, a bottle of white powder, a testing plate,
a mixing stick and a coloured pH chart.
Dig up a small amount of soil from a
depth of about 10cm and place it on the
testing plate. Add 3-5 drops of liquid
and mix until the soil becomes a paste.
Sprinkle on powder and wait a couple
of minutes.
When powder has
changed colour,
compare with the
colour chart to
determine your
pH level.
Manutec Soil pH
Test Kit, $33.99, is
available from
amazon.com.au.
106 BHG APRIL 2024
EASY STEPS TO BUILDING
A GARDEN PATH
Once you’ve remedied
the soil, rather than
replace the turf, why not
create a path and garden
leading to a deck!
Gather your supplies
• Landscape chalk
• Coarse sand
• Off-white cement
• Pavers 300 x 300mm
• Crushed gravel
• Selection of plants
• Organic matter
You’ll also need
Metal rake; level; tape
measure; rubber
mallet; bucket;
cement trowel
Here’s how
STEP 1 Mark out area for
plants and path with
landscape chalk, then dig in
organic matter or compost to
new garden area. Plant out.
STEP 2 Run coarse sand
along path and rake smooth.
STEP 3 Cover sand with
cement and rake into sand.
STEP 4 Measure up
spacing between pavers,
ensuring spacing is equal.
STEP 5 Set pavers into
cement-sand mix with
rubber mallet and ensure
pavers are level.
STEP 6 Mix fresh batch of
cement in bucket with
water to an even, thick
consistency and use trowel
to haunch pavers.
STEP 7 Spread crushed
gravel between pavers.
FOR SHOPPING
DETAILS AND PROJECT
SUPPLIES, SEE OUR
STOCKISTS PAGE
STEP 2
STEP 3
STEP 4
STEP 5
STEP 7
Photography Alan Jensen; styling Kate Walsh; project Grahame Rowe
SOIL CHEMISTRY
DIANELLA
WOOLLY BUSH
stepway to heaven
Tackling your soil issues can bring
about a whole new look for your
garden – one that’s practical,
beautiful and many shades of green!
BANKSIA ‘BIRTHDAY CANDLES’
GARDEN MAKEOVER
BHG APRIL
1
A
BEFORE
modest ’60s brick house doesn’t
need to be stuck with a ho-hum
’60s garden. While it looks neat and
tidy, it’s not going to inspire passers-by to
stop and admire it. It has no theme, it feels
strangled and the lawn’s visual impact is
diminished. The solution is to find a theme.
If your garden faces north-west (as here),
and gets very hot from the all-day sun, a
Mediterranean theme is most suitable –
then everything else will fall into place.
Photography Tiff Bancroft, Sue Ferris; project Grahame Rowe; styling Vanessa Tidy
MAKE IT
A S H OWSTO P P E R !
A bit of light work over a cool weekend can turn an ordinary-looking
front garden into an extraordinary yard. You’re very welcome!
SEEN ON BHG TV
FRIDAYS 7.00
WHAT’S IN,
WHAT’S OUT!
• Remove the rose bush
(the aspect is too hot),
the bushy polygala
and the crassula.
• Trim back the rosemary
to let it breathe.
• Thin out the clump
of agaves and save
the healthier ones for
replanting later.
• Widen garden bed
sizes by about 20cm
by removing turf.
• Nourish soil with
organic ma er.
• In the le
-hand bed,
plant casuarina ‘Cousin
It’, salvia ‘Mystic
Spires’, cut-leaf daisies
(Brachyscome multifida)
and the ornamental
grass, evergreen
miscanthus (Miscanthus
transmorrisonensis),
around remaining
two agaves.
• In the right-hand bed,
replant four of the agaves
taken from the le
bed,
plant salvia ‘Li le Spire’
in front of the trimmed
back rosemary, Russian
sage, cut-leaf daisy
and miscanthus, so the
two beds look like they
belong together.
• Water and mulch.
1 bring it all together
Finish the project with a
stylish bench on the porch
and a collection of plants in
pots to bring the garden
up to the house.
2 Feeling fresh!
2
FOR SHOPPING DETAILS,
SEE OUR STOCKISTS PAGE
The Russian sage and
salvia will soon grow to fill the
space, but the different sizes
of all plants still allow the
beds to breathe, while the
grey-green tones
bring uniformity.
GARDENTRENDS
In your
Jenny Dillon
Garden Editor
The soft autumn air brings relief from the heat before winter comes
SEASON
SPECIALS
KEYTOCLIMATEZONES
ZONE
Mild warm summer
Cold winter
Autumn blooms are
all colour.
ZONE
Warm summer
Cold winter
ZONE
Hot dry summer
Cold winter
ZONE
Hot dry summer
Mild winter
ZONE
Warm humid
summer
ZONE
Hot humid
summer
Sun rays
Rudbeckias extend your
summer with yellow to
orange petals springing
from black centres.
In each issue we give ideas, tips and planting advice for
cooler, warmer, we er and drier areas in each zone, so ask
at your local nursery which zone best matches your conditions.
Evolving joy
Sedum ‘Autumn Joy’
turns from pink to a
deep, rich red.
Fiery flowers
Heath banksia’s striking
yellow-red spikes glow
in the low light.
BHG APRIL
FLOWERS
VEGETABLES
ALL ZONES Cineraria,
cornflower, lupin,
pansy, poppy, primula,
statice, stock and viola.
ZONES 1-3 Alyssum,
cosmos, dianthus,
marigold, nasturtium
(top le
), petunia,
salvia, snapdragon,
sweetpea, torenia
and verbena .
ZONES 4-6 Anemone,
calendula, linaria,
nemesia, penstemon,
ranunculus (bo om
le
), Virginian stock
and wallflower.
ALL ZONES Beetroot,
broad beans, broccoli,
cabbage, cauliflower,
carrot, garlic, le uce,
onion, parsley, shallots,
radish and turnip.
ZONES 1-3 Artichoke
(globe, top le
),
asparagus, capsicum,
celery, parsnip, peas
(bo om le
), potato,
sweet corn, tomato
and zucchini.
ZONES 4-6 Artichoke
(Jerusalem), Brussels
sprouts, chives,
leek and rocket.
Photography Tony Fawcett, Getty Images, Adobe Stock, GAP Photos/Carole Drake
PLANT NOW
Autumn carries more gold in its
pocket than all the other seasons
GAZANIAS
JIM BISHOP, US JOURNALIST AND AUTHOR
HELLEBORES ARE
LIKE LITTLE FAIRIES
AT THE BOTTOM OF
YOUR GARDEN!
SCOUR TIME
COLOUR UP
If the fiery rich reds,
oranges and golds of
autumn do it for you,
then get active in the
coming weeks. Scour
your area for the most
spectacular autumn
trees and plan to
plant your own. Your
eyes are the best
judge. Pick up a leaf
for reference to take
to your local nursery
and staff will identify
it. Order bare-root
specimens that you
can plant over winter,
then anticipate your
very own autumn
extravaganza in the
coming years.
GARDEN SECRETS
How to grow the most heavenly hellebores to put a spring in your winters
1
SAVIOUR
Call them lenten or
winter roses (no, they
are not roses), these
nodding beauties are a
shady garden’s winter
saviour, and autumn is
planting time.
2
EASY CARE
3
KEY INGREDIENTS
From the so
est pinks, Grow in well-drained,
apple greens, vibrant
humus-rich soil, give
plums and magentas to them summer shade,
pure white, they need winter sun and regular
minimal care while
watering when they’re
increasing in numbers establishing and they
year by year.
will thrive.
HELLEBORE
GARDENING ADVICE
FERTILISE bougainvilleas and hibiscus. DIVIDE bearded
irises. PLANT evergreen trees while there is still some
warmth in the ground. RESOW bare patches in lawns and
fertilise existing lawns. COLLECT autumn leaves to start
a compost heap. LIFT gladioli corms and store in a cool,
dark place, until replanting in spring. GIVE hedges a final
shaping trim before winter comes. CLEAN up fruit trees
and destroy any ro
ing fruit.
GARDEN MATTERS
better gardening
[
N E WS , P R O D U C T S A N D T R E N D S
]
MEET OLLIE
PERFECT
POOCH
No need
to worry
about this
canine
cutey digging in your
garden. Ollie the King Charles
Cavalier Statue from Northcote
Pottery, $22.99, is made of highquality resin, hand-painted and
stands (or sits) at 15cm tall. From
Bunnings and various retailers,
northcotepottery.com.
AUTUMNAL
STUNNER
Topped with the whitest blooms above
lush green foliage through autumn,
Plectranthus ‘Mona White’ is a shady
garden superstar. Long flowering and
semi dry-tolerant, it’s best in a shadedappled, frost-protected spot – an ideal
understorey plant. As autumn progresses,
flowers show a hint of pink. From Plant
Growers Australia, pga.com.au.
SNEAK PEEK
Tassie’s treasures
Twenty of Tasmania’s loveliest private
gardens and the stories behind their
creation are revealed in Tasmanian
Gardens by photographer Alice Bennett
and writer Meg Bignell (Thames &
Hudson, $79.99). This hardback runs the
gamut from an enchanting flower farm to
a gorgeous city plot. One to treasure.
Valley festival
South Australia’s premier garden event, the SA Autumn Garden
Festival, is back bigger than ever on Sunday, April 21, with free
demonstrations, workshops, kids’ activities, music and speakers,
including cook and sustainable living guru Rebecca Sullivan, Sophie
Thomson and Costa Georgiadis, plus more than 100 stalls. With a
focus on sustainability, it’s at the showgrounds in the beautiful Clare
Valley. For details, visit saautumngardenfestival.com.au.
BHG APRIL
Prices are approximate and a guide only.
WHAT’S ON?
GARDEN CALENDAR
moon guide
Use the phases of the moon to your advantage by following Milton Black’s planting guide
How to use the calendar
APRIL 2024
SUN
MON
1
Moon enters
Capricorn
2.05pm
7
8
15
9
16
22
23
Moon enters
Aquarius
7:07pm
10
29
FRI
5
SAT
6
Moon enters
Pisces
9:12pm
11
12
13
19
20
Moon enters
Gemini
10:58am
17
18
Moon enters
Virgo 12:10am
24
25
Moon enters
Scorpio 1:19am
Full Moon
9:48am
Moon enters
Libra
1:08pm
28
THUR
4
First Quarter
Moon 5:13am
Moon enters
Leo 12:23pm
Moon enters
Cancer
3:44am
21
Last Quarter
Moon
1:14pm
WED
3
New Moon
in Aries 4:20am
Moon enters
Taurus 9:23pm
Moon enters
Aries 9:24pm
14
TUES
2
26
27
Moon enters
Sagittarius
11:36am
30
Moon enters
Capricorn
7:37pm
You must plant all ABOVE‑ground crops during the moon’s WAXING cycle.
You must plant all BELOW‑ground crops during the moon’s WANING cycle.
Times are in Australian Eastern Standard Time, AEST. This applies to NSW, the ACT, Qld, Vic and Tas.
For SA and NT, deduct half an hour. For WA, deduct two hours. During Daylight Saving Time, add 1 hour.
ZODIAC SIGNS
Aries
The 12 signs of the zodiac are divided into
four groups – fire, air, earth and water.
Taurus
Fire signs
Aries and Sagittarius
are in harmony with all
fruit. Leo is in harmony
with nuts and all
seed‑producing crops.
Earth signs
Capricorn and Taurus are
in harmony with all root
vegetables that produce
crops below the ground,
including garlic. Virgo is in
harmony with all herbs.
Cancer
Air signs
Libra, Aquarius and
Gemini are in harmony
with plants that produce
flowers and perfumes.
Water signs
Cancer, Scorpio and
Pisces are in harmony
with above‑ground
crops, including
trees, shrubs, lawns,
and leafy, juicy and
fleshy vegetables.
Gemini
Leo
Virgo
Libra
Scorpio
Sagittarius
Capricorn
Aquarius
Pisces
Best days
Second-best days
Best days
Second-best days
On these days, thin out seed boxes, sow all
types of seeds and plant seedlings that produce
their crop above the ground. These include all
varieties of peas, beans, corn, cabbage, cauliflower,
broccoli, Brussels sprout, eggplant, lettuce,
celery, silverbeet, spinach, endive, Chinese
cabbage, tomato, cucumber, asparagus crowns,
artichoke, marrow, pumpkin, capsicum, melon,
zucchini, chicory, sprouts, rhubarb, all herbs
(except garlic) and all agricultural crops, such as
sunflower, grains, cereals, canola and cotton.
During these days, you can also plant flowering
shrubs, annuals, flowers (not bulbs), cactus, flax,
tree ferns, passionfruit vines and kiwifruit. Plant all
fruit trees and trees that produce edible nuts, such
as almond, pecan, macadamia and walnut. Grapes
and banana can also be planted during these
times. Take cuttings from established trees and
shrubs, and propagate. This is also a good time for
planting trees and climbers and sowing new lawns.
On these days, sow all seeds and plant seedlings
of root vegetables that grow their crop below the
ground, such as carrot, parsnip, radish, beetroot,
onion, leek, swede, turnip, sweet potato, seed
potato, yam, cassava, peanut, garlic and ginger.
This is a good time to plant flowering bulbs, or
bulbs for propagation and development rather than
flowers. Also, plant bare‑rooted trees, to develop
root growth, and refurbish established lawns.
A favourable time for transplanting all types
of established trees, shrubs, ferns and bulbs.
Weed and lightly feed. Water with
seaweed‑type products only.
Destroy or spray weeds, pests and noxious
growth. Burn off, cut lawns, do heavy pruning and
clear rubbish – don’t plant or transplant anything.
Prepare soil and fertilise garden beds for future
planting; spread and make compost; feed all
established plants, shrubs and lawns, then water in.
This is the best time for dethatching or coring lawns.
Do not plant or transplant anything, as the
moon is adversely aspected with the sun.
Any questions? Email milton@miltonblack.com.au.
APRIL 2024 BHG 113
RENO SOLUTIONS
BA L A N C I N G AC T
When pulling together your living room, a stylist tip is to try and strike a balance between soft curves and sharp angles. Here,
the wavy sofa and round coffee table soften the angularity of the double-sided fire’s chimney breast, while also adding a sense of
comfort. To amp up the cosy layered look, incorporate different textures using colours that blend with your overall palette – note
how the white tongue-and-groove panelling plays off the smooth texture of the veined marble fire surround. As for the hanging chair,
it adds a boho twist to the room’s otherwise modern style – it’s this quirky touch of unpredictability that makes a room unique.
114 BHG APRIL 2024
SECRETS
TO STYLING
It takes patience to tackle an interior. Break the process
down, room by room, and let pro tips and tricks guide you
O H TH E D R A M A O F IT A LL!
In recent years, there’s been a resurgence of the classic herringbone pattern, be it as wood flooring or tiled executions. But this
ingenious feature takes it one step further – the distinctive zigzag pattern, with slightly different timber tones, pulls all eyes to the
entertainment wall. Like the idea? If you’re a skilled DIYer, give it a go and save on a bespoke installation. For greater impact, border
the central V-pattern with vertical wood panelling and moulding. Going bespoke for the wall pattern? Save with a flat-pack console
you can top with a stained pine board. Besta wall-mounted cabinet in White/Lappviken 120 x 42 x 38cm, $170 each, ikea.com.au.
F LOO D YO U R E NTRY
WITH B R I G HT LI G HT.
S E LEC T G L A S S
DOO R S O R DOO R S
WITH S I D E LI G HTS
AN D/O R TR AN SO M
WI N DOWS AB OVE !
D E LI N E ATE YO U R E NTRY F RO M
TH E ‘ HALL’ BY U S I N G TI LE S AN D
WOO D P L AN KS TO E STAB LI S H
TH E TR AN S ITI O N .
W E LCO M E , CO M E O N I N
You can create cohesion in your home simply by using the same flooring, as here, where engineered French oak hardwood planks
deliver continuity throughout the home. Opt for wide planks for a sophisticated and contemporary feel. And consider built-ins to
house all the usual paraphernalia that tends to litter entrance halls. Low-cost alternatives to custom storage are standard flat-pack
base cabinets, drawers, cubbies and Shaker-style doors you can configure to suit the available space. Trimmed with moulding,
painted black and finished with smart brass hardware – all of which you can DIY – the storage will take on a high-end appearance.
116 BHG APRIL 2024
RENO SOLUTIONS
Y
ou have just bought a new
home and it’s stripped
bare, a blank canvas for
you to decorate. Scary
thought? No, not if you tap into the
secrets stylists use. Ultimately, it
boils down to creating a home that
reflects you, your passions and
a style you’re drawn to, and a few
more tricks of the trade.
L A N D TH E D R E A M H O M E O F F I C E
T WO I S
B ET TE R THAN
O N E ! TH E
W H ITE R U G
EC H O E S TH E
MAI N WALL
CO LO U R . IT
AC TS A S A
B O R D E R FO R
TH E S MALLE R
PAT TE R N E D
R U G AN D TH U S
H I G H LI G HTS IT.
Landings have so much more to offer than a passageway to bedrooms, somewhere to quickly pass by. Take a tip from decorators
who see it as an opportunity to capitalise on this underused space for a dedicated home office – a must-have for the modern home.
Somewhere quiet to do a spot of business or homework that you can step away from after ‘work’. If the landing is on the small side,
set up a small desk and slimline bookcases, but if it’s largish, opt for a built-in desk, cubbies and drawers using materials and colours
seen elsewhere in your home. An arched feature and a DIY concrete-effect finish will ensure your office is decoratively appealing.
AD D A D ECO R ATIVE F LO U R I S H
WITH A M O D E R N PAR E D - BAC K
C HAN D E LI E R S U S P E N D E D
OVE R YO U R TAB LE .
FAN CY A R U G U N D E R
TH E TAB LE? O PT FO R
AN E A SY- C LE AN , LOWP I LE O R F L AT-W E AVE
R U G TR E ATE D WITH A
S P I LL AN D STAI N
R E P E LLE NT!
SAVO U R I N G A COSY CO R N E R
Allowing an extra metre or so for a bump-out extension in your kitchen can be the difference between gaining a practical multipurpose space or not. Luckily, it was taken advantage of here for a pleasant dining nook where kids and/or friends can gather while
meals are being prepped. While you want this nook to tie in seamlessly with your kitchen by mirroring various elements and colours,
you also want it to have its own defining identity, achieved here by lining the walls with horizontal wood cladding. PS Avoid the
fidgeting often associated with hard chairs and opt for comfort with upholstered chairs plus pads and cushions for your window seat.
118 BHG APRIL 2024
RENO SOLUTIONS
WOO D I S BAC K I N VO G U E . U S E
IT FO R C L AD D I N G WALL S O R
TH E FAC E O F YO U R I S L AN D
AN D HAVE TH E CO N F I D E N C E
TO M IX S P ECI E S .
CO M M I S S I O N A
S HAP E LY E XTR AC TO R
CAN O PY TO CO N C E AL
YO U R R AN G E H OO D I N
AN AE STH ETI CALLY
P LE A S I N G WAY.
A C U LI N A RY D E LI G HT
Kitchen reno on the agenda? Opt for an upmarket take on traditional design. Buffet-like tall white upper cabinetry and floating
shelves will draw the eye up, creating an illusion of space while providing oodles of everyday storage and curated display
opportunities. Team with a copper-veined marble splashback and waterfall island that flows down to the floor. Select flooring and
lights to complement your other surface materials. Wide wood plank flooring and industrial copper pendants demonstrate how
easily you can add depth and interest. Include mood lighting inside glazed cabinets, under overhead units and on kitchen plinths.
ANY CO M B I NATI O N O F
R U G S WI LL WO R K A S
LO N G A S TH EY HAVE AN
E LE M E NT I N CO M M O N , B E
IT CO LO U R O R ST YLE .
S E R E N E S LE E P SA N C TUA RY
A bedroom need not be a massive master suite nor cost prohibitive for it to be pleasurable. It’s about restful neutrals and how you
layer the different elements. Dissect this room and you have your master plan. Working within your palette, start with a pair of rugs
on which to rest a modern, clean-lined bed (four-poster optional) dressed with plush bedding. For character, visit a reclamation yard
for doors you can strip, stain and mount onto barn-door hardware for entry to your ensuite. Consider textured lighting and hang offthe-shelf sheers flanked by off-white curtains. Similar bed, Cytus Canopy Bed Frame QS in Black, $329, templeandwebster.com.au.
120 BHG APRIL 2024
Prices are approximate and a guide only.
E N HAN C E TH E
F E E LI N G O F S PAC E
BY M O U NTI N G DOO R S
O NTO BAR N - DOO R
HAR DWAR E .
RENO SOLUTIONS
MAKE A F E ATU R E O F
YO U R VAN IT Y WITH
STR ATEG I CALLY P L AC E D
M I R RO R S AN D E LEGANT
WALL SCO N C E S !
BATH ROO M S CAN LOO K STE R I LE . A
M IX O F CU RVE D AN D LI N E AR P I EC E S
AN D A H E LP I N G O F NATU R E ’ S
B E AUT Y WI LL CO U NTE R TH I S .
A BATH R O O M TO SWO O N OV E R
From tiles, tubs and storage solutions, these style tips will help you design a bathroom that’s the envy of your friends. To up the
luxe factor from the get-go, look to Carrara marble mosaics – diamond, cube, hexagon shapes and more. You can team these with
extra-large monochromatic floor tiles to match. As marble can be pricey, save by tiling halfway up the wall everywhere bar the
shower. And for an elegant spa-like feel, arrange a roomy soaker tub on the diagonal to make a real design splash. Don’t forget
the finer details – brass tapware, hardware, lighting and accessories will immediately elevate your bathing space.
KITCHEN IDEAS
HEART OF THE HOME
It’s natural to want to play it safe with kitchen design, but being brave with
even just one element can transform it from so-so to so spectacular!
U S E TH E SAM E MATE R IAL A S YO U R
S P L A S H BAC K O N YO U R CAP/S H E LF FO R A
STR E AM LI N E D LOO K W H I LE P ROVI D I N G
ROO M FO R KITC H E NALIA , B OO KS . . .
1 A N O P E N V I STA
Open your kitchen to the outdoors with
floor-to-ceiling (and beyond) glazing to
visually expand the space, more so if you
combine it with adjoining rooms. From sleek
countertops to warm wood accents, every
detail should foster a cohesive and inviting
atmosphere that seamlessly blends with
your garden outlook. Reinforce the indoor/
outdoor connection by incorporating
exposed brickwork and colouring cabinets
an unusual military bronze that also works
well with brass fixtures and fittings.
CO N N EC T YO U R KITC H E N
AN D TH E GAR D E N WITH
M ETAL- F R AM E D G L A S S
DOO R S WITH G L A ZI N G
AB OVE , TO E NAB LE LOVE LY
VI EWS O F TH E TR E ETO PS .
C L AD YO U R I S L AN D WITH
EYE - CATC H I N G SCAN D I - ST YLE
TI M B E R BAT TE N S . YO U ’ LL F I N D
IT A CO ST- E F F I CI E NT WAY
TO B R I N G NATU R AL WOO D
I NTO YO U R KITC H E N .
APRIL 2024 BHG 123
STATE M E NT LI G HTI N G
THAT AT TR AC TS TH E
EYE M U ST AL SO ALLOW
YO U TO R E L A X , R E AD,
WO R K AN D SOCIALI S E .
LOO K TO S U S P E N D
LI G HTS THAT AR E
B I G O N F U N C TI O N
AN D FO R M .
COME TOGETHER
Happy to knock through walls to enlarge your kitchen/diner’s
footprint? Desperate to see your garden? With these key
considerations in mind, plan and create an expansive open-plan
kitchen that flawlessly integrates adjoining rooms (here it was
three), while offering a panoramic view of your outdoors. At the
heart of this spacious design was a desire to foster connection
and functionality to create a harmonious space for cooking,
dining and relaxation. Consistent style, materials and colours
throughout will help your new kitchen/diner exude balance.
2 S E AT S A P L E N T Y
3 H A N D L E IT
If you love to entertain
a crowd in your kitchen/
diner, a banquette is a
savvy inclusion. Pair it
with a long table and
chairs, and you can host
a banquet for several
without taking up too
much floor space.
Banquettes also offer
an opportunity to
reinforce your kitchen’s
colour palette.
Don’t underestimate
the importance of your
cabinet and drawer
handles. They work like
adding jewellery to an
outfit – the finishing
touch. If budget allows,
opt for a brass design
that is aesthetically
pleasing to the eye and
to touch. Source similar
from an architectural
hardware specialist.
KITCHEN IDEAS
WALL SCO N C E S CAN B E
YO U R KITC H E N ’ S STAR
AT TR AC TI O N ! TH E TR I C K I S
TO R E P E AT, R E P E AT, R E P E AT!
YO U R BAN Q U ET TE ’ S
U P H O L STE RY I S KEY.
LE ATH E R AN D VI NYL I S
WI P E - C LE AN B UT N E E D S
TR E ATI N G TO P R EVE NT
C R AC KI N G . I F FAB R I C I S
YO U R C H O I C E , O PT FO R
A R AN G E WITH I N - B U I LT
STAI N TEC H N O LO GY SO
YO U CAN S P OT C LE AN .
U S E A LOVE LY
NATU R AL
STO N E FO R
YO U R
B E N C HTO P
TO TI E I N
WITH YO U R
O UTDOO R S - I N
TH E M E .
4
5
2
3
4 S E A M L E S S LO O K
Splash out on an
induction cooktop
with a built-in
extractor to negate
the need to have one
on the wall. Partner it
with side-by-side
ovens, out of sight
behind the island.
Photography Future Publishing
5 S TO R E S M A R T
Maximise the
practicality of your
kitchen with a
full-height larder,
customised to suit
your needs – drawers
for pots and pans,
wine and in-door spice
racks, open shelving
for brekkie-central
appliances and/or
dried goods.
APRIL 2024 BHG 125
ALLOCATE A P O RTI O N O F
YO U R R E N O B U D G ET TO
S U B STANTIAL SATI N O R
B R U S H E D B R A S S HAN D LE S
TO AM P U P TH E LUXE FAC TO R
I N YO U R KITC H E N .
6 G AT H E R ’ N ’ F E A ST
Create a comfy spot for
all to gather for brekkie,
afternoon snacks or just
to natter. A roomy,
tufted faux-leather
banquette and table,
outside of the primary
cooking zone, delivers
on function and
good looks.
7 WAT E R W I S E
Wall-mount a pot filler
above the stove to
reduce the risk of spills
or scalding as you go to
and fro from the sink.
You’ll need a plumber
to install a water line if
there isn’t an existing
one behind the stove.
6
7
LOO K TO
CO NTR A ST
W H ITE BA S E
U N ITS WITH
F U LL- H E I G HT
B L AC K WALL
CAB I N ETRY
THAT H O U S E S
A FRIDGE/
F R E E Z E R AN D
STO R AG E .
8
9
KITCHEN IDEAS
C R E ATE A D E D I CATE D N I C H E
I N YO U R I S L AN D SO YO U CAN
S LOT A ROW O F BAR STOO L S
WITH O UT SAC R I F I CI N G TOO
M U C H STO R AG E S PAC E .
TUXEDO CHIC
You can design a striking kitchen but its real success is in its
longevity. It’s imperative you incorporate trend-transcending
characteristics. Inherently stylish and high on contrast, embrace
a black and white palette. To make this graphic palette your
own, opt for gloss cabinets and lightly veined marble-look
benchtops and splashbacks. Use pops of brass in unexpected
places such as mesh to line the backs of cabinets. Include a
diamond-buttoned black vinyl banquette and white bar stools.
8 HIGH CONTRAST
9 G O L D E N AG E
A black and white palette
is popular for a reason
– it’s classic and timeless.
This sophisticated
colour combo works
equally well in modern
and traditional settings.
Worried your kitchen
might look a little too
clinical? Timber or
timber-look flooring will
add warmth and texture.
To quietly elevate your
cooking space with
understated elegance,
seek out brass accents,
scattering them
throughout in small
doses. Seek out a high
arc, vintage-inspired
satin-brass faucet,
coordinating tapware,
handles and smart
oversized pendants.
APRIL 2024 BHG 127
KITCHEN IDEAS
CU R ATE AN E A SYGO I N G
KITC H E N WITH U N F U S SY
F L AT- F RO NTE D U N ITS B UT
WITH P LE NT Y TO B EC KO N
TH E EYE S U C H A S A H I G H G LO S S , S I N G LE S L AB
P O RC E L AI N S P L A S H BAC K .
FO R A S U BTLE B E AC HY
VI B E , M IX TE XTU R E S
AN D MATE R IAL S ,
I N C LU D I N G SAN DYCO LO U R E D U N ITS
AN D S I M I L AR LY H U E D
HAR DWOO D F LOO R S .
TH E GOAL I S N 0T
TO E X AC TLY MATC H
TH E S E WOO D S , B UT TO
E N S U R E TH E I R TO N E S
WO R K TO G ETH E R .
ENSEMBLE ACT
How do you plan a hospitable kitchen that streamlines function
so when guests gather it feels like company not a crowd? It’s
the dilemma of downsizers and those who don’t wish to expand
the existing footprint. Clever solutions include a walk-in pantry
behind your range to store more, and a compact work zone so
you don’t have to travel through people to get to things as you
cook up a storm. Pots, pans, utensils, spices and oils should
all be within easy reach. Locate your fridge at the edge of the
cooking zone for guest access without getting in the cook’s way.
128 BHG APRIL 2024
10 GO THE GRAIN
1 1 C U LI N A RY H U B
If you’re seeking a warm
and durable cabinet
finish for your kitchen,
wood veneer or a
good-quality laminate
look-alike is a great
choice, especially as
wood is enjoying a
revival. Opt for a paler
species with a subtle
grain that will work with
your space and not
overpower it.
A tight cooking zone
relegates cooking
activities to one side of
the island while guests
linger on the other side.
Practicality is key – so
it’s best if your island’s
sink is little more than
a twirl away from the
range, allowing you as
the host to easily toggle
between both of these
work stations.
DO N ’ T B E AF R AI D TO M IX
YO U R M ETAL S ! SATI N O R
B R U S H E D N I C KE L HAR DWAR E
AN D B R A S S P E N DANTS
I S O N E O PTI O N .
12
PARTN E R YO U R WOO D - LOO K U N ITS
WITH S I M P LE W H ITE CAB I N ETRY FO R
AN E A SY- B R E E Z Y LOO K I N KE E P I N G
WITH TH E B E AC HY AE STH ETI C . O PT
FO R A PALE , STO R MY G R EY STO N E
O R SO LI D - S U R FAC E B E N C HTO P.
TR I M TH E
CAN O PY
WITH WOO D
TO MATC H
S H E LVI N G .
10
11
13
12 WINE AND DINE
Squeeze in a dedicated
bar, with a mini wine
cooler and a divided
drawer below the
benchtop to organise
gadgets. Here, the lower
pullout holds liquor
bottles. And for an
interesting treatment of
upper cabinets, go glam
with mirrored doors.
13 STEP INSIDE
Plan a walk-in pantry
behind your range to
stow small appliances
and eliminate the
need for wall-hung
cabinets. This allows
for decorative touches
more synonymous with
living rooms, such as
floating shelves.
14 O N T H E S I D E
Save oodles of cash by
utilising flat-pack base
units and American oak
benchtops to construct
a ‘sideboard’ with smart
display shelves above.
Here, the door profiles
mirror the kitchen’s
lower cabinets but in
Macaroon (white) to
zone the dining area,
kaboodle.com.au.
15 OPEN AND SHUT
Give your kitchen
personality. Customise
it with open cubbies.
Even everyday items
take on a sculptural
form when stored or
displayed in this way.
14
E XTR A STO R AG E , A S LE E K AE STH ETI C AN D
A P E R MAN E NT WAY TO D ITC H TH E D U ST
AR E TH R E E VE RY GOO D R E A SO N S TO TAKE
YO U R CAB I N ETS U P TO TH E C E I LI N G .
15
16
FOR KITCHEN DETAILS,
VISIT KABOODLE.COM.AU.
TO AD D C HAR AC TE R AN D WAR MTH ,
GO FO R TI M B E R O R TI M B E R - LOO K
F LOO R I N G . VAR I O U S T YP E S I N C LU D E
HAR DWOO D, E N G I N E E R E D WOO D,
L AM I NATE , BAM B OO AN D LUXU RY
VI NYL P L AN KS .
Photography Kaboodle Kitchen
17
KITCHEN IDEAS
F LOO D YO U R COO KI N G S PAC E WITH
NATU R AL LI G HT AN D TAKE I N O UTDOO R
VI STA S O R GAR D E N VI EWS CO U RTE SY
O F A WI N DOW S P L A S H BAC K .
TAP I NTO TH E TR E N D
FO R ‘ZO N I N G’
B E N C HTO PS FO R
D I F F E R E NT P U R P OS E S .
H E R E , AM E R I CAN OAK
D E LI N E ATE S TH E
B R E AKFA ST BAR F RO M
TH E TE R R A Z ZO
WO R K TO P.
FRESH OUTLOOK
Put your design skills on show drawing on affordable flat-pack
solutions offering the ideal ‘ingredients’, and even a few
customisable options so you can cook up the best kitchen
décor on time and on budget. Draw on nature with a gentle
olive and white colour scheme that exudes natural appeal and
timeless charm. Personalise your design with a mix of Shakerstyle and handleless flat-front doors. PS The elegant old-gold
handles on the olive doors tie back to the brass tapware.
1 6 G R E E N IT U P
1 7 ITA LI A N T W I S T
Ever wondered whether
you can mix cabinet
styles and colours? The
answer is an emphatic
yes! This kitchen proves
it, where Scandi-style
Alpine doors in serene
Olive Grove are paired
with flat-fronted
Modern doors in silky
white Macaroon,
kaboodle.com.au.
Laminate worktops are
a practical choice
that can mimic the
appearance of on-trend
terrazzo for a fraction
of the cost of the real
deal. Shown here is
Terrazzola, a soft-touch
matt laminate, available
in 20 or 38mm squareedge benchtops,
kaboodle.com.au.
APRIL 2024 BHG 131
QUICK REPAIR
TOP
D R AW E R
Fix your kitchen drawers
so they slide in and out like
a hot knife through butter!
With years of heavy use, it’s common
for your kitchen drawers to need a
few tweaks and repairs to reset them
so they’ll roll like new again.
SEEN ON BHG TV
FRIDAYS 7.00
EASY STEPS TO FIX
YOUR KITCHEN DRAWERS
Gather your supplies
• INOX lubricant spray
Photography Alan Jensen, Angelita Bonetti; project Greg Sparke
You’ll also need
Bucket; dish detergent;
white vinegar; cloth;
screwdriver
STEP 1A
STEP 1B
STEP 3
STEP 5
Here’s how
STEP 1 Remove contents
from drawers, then remove all
drawers from the carcass and
set aside. Inspect the inside
of the drawers and carcass
for odd screws that may have
come loose and set any you
find aside to reattach later.
STEP 2 Mix a splash of white
vinegar with hot water and
dish detergent. Clean the
carcass, tracks and wheels
to remove built-up dirt and
grime. Wipe clean and allow
to dry completely.
STEP 3 Use INOX spray to
lubricate the carcass tracks
and wheels.
STEP 4 Flip drawers to
reveal runners and rails.
Repeat Steps 2-3 for all
drawer runners and rails.
STEP 5 Reattach loose
screws as required and
tighten screws in carcass.
Install drawers onto the
carcass runners, and
tighten up all screws
on drawers.
STEP 6 Open and close
each drawer several times
to spread lubricant across
all the tracks and wheels.
FOR PROJECT
SUPPLIES, SEE OUR
STOCKISTS PAGE
APRIL 2024 BHG 133
RENDER REPAIR
JUST A
ROUGH
PATCH
ave on labour
expenses for your
next reno project
and patch up old
holes in the wall yourself.
Splash your saved cash on
décor and detail, and finish
your room with panache!
STEP 1
Gather your supplies
• Dunlop acrylic
render 20kg
You’ll also need
Masonry chisel;
hammer; old
paintbrush; bucket;
mixing rotary bit; drill;
sponge; float (metal);
hawk; scrap timber;
wooden or plastic float
Safety notes
When operating power
tools, wear safety glasses,
a mask and earmuffs, and
tie your hair back. When
appropriate, wear gloves
and protective clothing.
Project notes
Mixed render can be used
for indoor and outdoor
projects, on bricks and
concrete. It is workable for
around 1 hour (less time in
hot and dry conditions).
Apply render for cracks up
134 BHG APRIL 2024
STEP 4B
STEP 3
STEP 5
STEP 2
to 10mm deep, and apply
2 coats, if required.
Here’s how
STEP 1 Assess the area
for repair, then chisel loose
render or brick with chisel
and hammer. Remove
debris and dust with a
dry paintbrush.
STEP 2 Add 3.5 litres
of water to a bucket and
gradually mix bag of render
with drill and mixing rotary
bit until the consistency is
creamy and lump-free.
STEP 4A
STEP 3 Wipe down area to
patch with damp sponge for
a dust-free key for render.
With float, immediately load
hawk with render mix.
STEP 4 Apply render to
patch with float. Spread
evenly over patch until filled.
With the straight edge of
scrap timber, scrape away
excess render until surface
is flush with surrounding
wall. Allow to partly cure
for 10-30 minutes so the
consistency is firm but
flexible. Cure time depends
on temperature, humidity
and wall conditions.
STEP 5 Smooth and polish
render with wooden or
plastic float, and blend with
surrounding wall. Use a
sponge to smooth render
flat, and dab for a sandy or
coarse effect. Allow render
to dry thoroughly before
applying your choice of
decorative finish.
for PROJECT
SUPPLIES, see OUR
stockists page
Photography Alan Jensen, Adobe Stock; project Greg Sparke
S
Don’t crumble over an old wall that needs a bit of love. With a free afternoon
and a few basic supplies, you can repair any holes and render like a pro!
SEEN ON BHG TV
FRIDAYS 7.00
distressed beauty Your wall doesn’t need to be perfect to be
beautiful. Create a weathered look with less smoothing of the
render, and leave it unpainted. Pair with reclaimed or distressed
furniture and finish with neutral cushions and clay treasures.
SUSTAINABLE STYLE
Add a touch of organic beauty to your
home using natural tones and textures,
planet-friendly materials and repurposed
pieces that won’t cost the earth
EARTHY ARTWORK
Texturise your walls with simple art cra
ed from
plant-derived jute. Pre y as a picture, this piece
is thri
y, a breeze to build and consciously stylish.
Here’s how
STEP 1 With a hot glue gun, a ach end of twine to
the back corner edge of your canvas frame. Wrap
twine around the canvas frame to cover a 30-100mm
section of the canvas. Keep twine taut and packed
together so the canvas is entirely covered. Cut
twine to length, then glue end to back of frame.
STEP 2 Continue to cover the frame in random
sections, working horizontally and vertically across
the frame, until your canvas is completely covered
and you’re happy with your design.
STEP 1
BHG APRIL
STEP 2A
STEP2B
FO R A FA ST
P RO - LI KE F I N I S H
C H OOS E A TI M B E R
F R AM E THAT CO M E S
WITH A R E ADY-TO U S E CANVA S
R E M OVE CANVA S
F RO M F R AM E
B E FO R E W R AP P I N G
WITH T WI N E
FO R A
S I M I L AR F R AM E
TRY AN KO F R AM E D
STR ETC H E D CANVA S
X C M
TARG ET
CO M
AU
SEEN ON BHG TV
FRIDAYS 7.00
coming to light
So neutrals create a timeless interior,
so you save on constant updates. But before
you pick a paint, consider how light and colour
interplay. In a naturally bright space, use a
yellow-based taupe (here, Dulux Warm
Neutral low-sheen) for a calming effect. At
night, warm white lighting will evoke serenity.
B U ST B E I G E
B O R E DO M AN D
I N CO R P O R ATE
B OTAN I C E LE M E NTS
I N C LU D I N G VE R DANT
P L ANTS
TO AD D
LI F E AN D A P O P O F
CO LO U R TO YO U R
M UTE D PALET TE
JULIET LOVE
Join me as I show you how to
make over your interiors on BHG
TV, Fridays at 7pm on Channel 7.
(Apologies, may be subject to change.)
For more decorating, go to
bhg.com.au.
SUSTAINABLE STYLE
GET THE LOOK
Atelier candle stand
in tall, $59.95; medium,
$49.95; short, $39.95,
fewandfar.com.au.
Handcrafted
glazed terracotta
vase, 27cm, $199,
potterybarn.
com.au.
REVAMP A LAMP
Petra feather
cushion 40 x 60cm
in Black/Natural,
$129.95, ozdesign
furniture.com.au.
Anica vase,
$169, fewandfar.
com.au.
Here’s how
Trim sharp end from bamboo
skewers with snips to ensure
even lengths. With a hot glue
gun, apply glue to a skewer
and a
ach along lampshade
seam. A
ach skewers one at
a time and flush against each
other. Repeat until lampshade
is completely covered. Paint
lamp base in your choice of
colour, and allow to dry.
Norway Snow boucle ottoman,
$279.99, adairs.com.au.
Mark Tuckey
Washed White
hemp cushion,
$79.99, adairs.
com.au.
FOR SHOPPING
DETAILS AND PROJECT
SUPPLIES, see OUR
stockists page
BHG APRIL
Ravesi Pitrit cane
accent chair in Natural,
$399, jameslane.com.au.
ATTACHING SKEWERS
B E FO R E CALLI N G I N
A S PAR K Y FO R A
CO STLY LI G HTI N G
R E D E S I G N
CO N S I D E R TH I S
ANYO N E - CAN - DO
L AM P R E F R E S H
G IVE TH E BA S E A
LI C K O F MAT TW H ITE PAI NT FO R
SO F TN E S S
COVE R
TH E S HAD E WITH
BAM B OO S KEW E R S
O R C H O PSTI C KS
LE F T OVE R F RO M
YO U R LU NAR N EW
YE AR SO I R E E
AN D
SWITC H OVE R TO
A WAR M W H ITE
LI G HT B U LB
I LLU M I NATI N G !
Photography Alan Jensen, Tiff Bancroft; styling Vanessa Tidy; project Erin Brikich
If your old, dated lampshade
no longer blends in, don’t toss
it out – give it a faceli using
supplies you have on hand
and a spot of cra wizardry.
STEP
UP YOUR
Win
to spend on making sure when
people step up to your front door, they do it in style.
Enter simply by spending $40 or more on Gainsborough
door hardware and visiting WinGainsborough.com.au
*Terms and Conditions apply.
See website for more details.
© Allegion 2024
AIR-CON SERVICE
RUN N I N G S
STEP 3
STEP 5
Tune up your
air-con unit and
crank down the
heat on your
energy bills!
EASY STEPS TO SERVICE YOUR AIR-CON UNIT
Gather your supplies
• Weed mat
• Blue metal aggregate
20kg
• 2L garden pressure
sprayer
• White vinegar
• Sugar soap
• Antibacterial
eucalyptus spray
You’ll also need
Mattock; rake; hand
brush; dishwashing
liquid; hose; bucket;
sponge; vacuum and
soft brush attachment;
paintbrush
STEP 8
STEP 9
140 BHG APRIL 2024
Project notes
• Take care when cleaning
coils. To prevent damage
while cleaning the coils, use
the gentle shower setting
of your garden hose to wash
them. Never use a pressure
washer, high-pressure hose
setting or hose coils directly.
• If you don’t have a soft brush
attachment for your vacuum,
use a small, clean paintbrush
to dislodge dust, then
vacuum the debris.
• Air-purifying filters may not
be suitable to hand wash.
Refer to your user manual
for guidance on this.
Here’s how
EXTERIOR UNIT
STEP 1 Remove weeds and
debris around exterior unit
with mattock and rake.
STEP 2 Lay weed mat
around unit, cover with even
30mm layer of aggregate.
STEP 3 Locate isolating
switch (usually next to unit)
and disconnect power.
Locate compressor coils
and dislodge dust and debris
with hand brush. Use a gentle
downwards motion towards
the ground to prevent
damage to the coils.
STEP 4 In pressure sprayer,
mix 2 litres water, 1/2 cup
white vinegar and a squirt of
dishwashing liquid. Pump
spray onto compressor coils
and leave for 10 minutes. Use
hose on soft-spray setting to
rinse from the top of the unit
in a straight down direction.
STEP 5 Dilute 1 cup sugar
soap into a bucket of water.
Scrub unit exterior casing
with sugar soap solution,
sponge and hand brush.
Use hose on soft-spray
to rinse.
STEP 6 Once complete,
switch the power on and
test the unit.
INTERIOR UNIT
STEP 7 Vacuum dust from
top and sides of unit using
soft brush attachment.
STEP 8 Lift front access
panel, remove and vacuum
all filters.
STEP 9 With a soft, dry
paintbrush, clean dust from
inside wall unit and coils.
Vacuum with soft brush
attachment.
STEP 10 Spray antibacterial
spray across internal unit to
remove bacteria and freshen.
STEP 11 Prepare a warm
water and dishwashing liquid
solution in sink. Submerge
filters, wash with sponge.
Rinse with clean, warm water,
allow to dry (not in direct sun).
Insert filters, close panel.
Photography Alan Jensen, Getty Images; project Greg Sparke
STEP 2
SEEN ON BHG TV
FRIDAYS 7.00
For fresh, cool and cost-effective
home air-con, service your unit with
basic cleaning gear before the first use
of the season, and every two to four
weeks during the running season.
FOR PROJECT
SUPPLIES, SEE OUR
STOCKISTS PAGE
BETTER BATHROOM
When form meets flow, drainage is redefined!
beautiful
bathroom
grate, such
as those by
award-winning Stormtech,
can play a pivotal role in
elevating the aesthetic
and functionality of your
bathroom. Beyond a
mere utilitarian fixture,
a well-designed grate
should smoothly integrate
into your overall design
scheme, whether
incorporated into a sleek
minimalist bathroom,
a luxe spa-like retreat,
or even a period-style
bathing space.
ARCHITECTURAL
IN STYLE
Reflecting understated
modern design
sensibilities, Stormtech
offers a wide range of
linear and geometric
shapes, patterns, materials
and finishes, be it sleek
stainless steel, aluminium
matt black, warm brass
and many more. The linear
grate and drain system is
ideal for contemporary
large format tiles, while the
slimline grate allows for
walk-in showers without
a hob. And the tile insert
grates have been designed
to blend seamlessly with
tiled floors. It’s worth
noting the customisable
options as well as easyto-install modular kits.
BETTER
DRAINAGE
However, the significance
of grates extends beyond
aesthetics. They serve
as essential components
of the drainage system,
efficiently channelling
water away while
preventing unwanted
pooling and moisture
build-up. Practical
considerations, such
as ease of cleaning and
anti-slip surfaces that
ensure both convenience
and safety, underscore
the importance of good
grate design.
SUPERIOR
QUALITY
Ultimately,
Stormtech’s
architectural
grates are
underscored by
a commitment
to quality and
attention to detail.
By effortlessly blending
form and function, these
grates contribute to a
bathing space that is not
only visually appealing but
also practical, inviting and
conducive to relaxation
and rejuvenation.
BETTER BY DESIGN
Designed and made in
Australia, Stormtech’s awardwinning Wave Grate features
a unique wave profile
delivering high-flow water
removal. Easy to clean, with a
superior soft feel on the feet,
the profile also cleverly
conceals drainage channels
for perfect integration.
INSTANT
QUOTE
Stormtech’s Product
Configurator allows
you to get an instant
quote for your
preferred linear grate
style, finish and size
to suit your needs. It
couldn’t be simpler.
For more
information, call
1300 653 403 or visit
stormtech.com.au.
APRIL 2024 BHG 143
QUICK FIX
S E R V I C E
Wall storage got the wobbles? Fix it once and for all with basic tools and simple tricks
Gather your supplies
• 8G x 50mm screws
• M5 hollow
wall anchors
• Wall anchor
setting tool
BEFORE
STEP 1
STEP 2
144 BHG APRIL 2024
STEP 3
You’ll also need
Drill; screwdriver
bits; stud finder;
pencil; level; 3mm
and 9mm drill bits
STEP 4
Safety notes
When operating power tools,
wear safety glasses, earmuffs,
mask and tie hair back. When
appropriate, wear gloves and
protective clothing.
STEP 5
Here’s how
STEP 1 Remove contents of
shelf, then unscrew and
remove all hidden screws on
underside of shelf, set screws
aside. Pull floating shelf off
the bracket and set aside.
STEP 2 Remove all current
fixings. Remove bracket and
set aside.
STEP 3 With stud finder,
determine location of studs
and mark with a pencil.
Position bracket onto wall
with level, and mark new
fixing positions onto the
wall. Incorporate as many
wall studs as possible for
maximum strength (minimum
of one stud required per
shelf). Predrill into stud(s)
with drill and 3mm drill bit.
STEP 4 Where it is not
possible to attach to a stud,
use hollow wall anchors to
attach to hollow wall. Predrill
plasterboard with 9mm drill
bit. Secure wall anchor(s)
with setting tool.
STEP 5 To attach bracket to
wall, hold in position and
insert and tighten 50mm
screws to studs, and wall
anchor screws to hollow wall
anchors. To complete, slide
shelf onto bracket and
secure on underside with
screws previously set aside.
FOR PROJECT
SUPPLIES, SEE OUR
STOCKISTS PAGE
Photography Alan Jensen, Getty Images; project Greg Sparke
EASY STEPS TO REPAIRING YOUR FLOATING SHELF
SEEN ON BHG TV
FRIDAYS 7.00
pro tips
Secure with at least one wall stud for
solid, straight and level shelves. Patch old
screw holes with filler, then sand and
touch up paint if required.
ADAM DOVILE
Join me as I show you how to
create great spaces on BHG TV,
Fridays at 7pm on Channel 7.
(Apologies, may be subject to change.)
For more DIY go to
bhg.com.au.
DOG CUBBY & TABLE
STEP 3
Dress your lounge room to the ca-nines and keep your
doggo close by with a double-duty dog cubby and side table.
Your pup will be mutts about their crafty, cosy hideaway!
STEP 4
Safety notes
When operating power tools,
wear safety glasses, earmuffs,
mask, and tie hair back. When
appropriate, wear gloves and
protective clothing.
Gather your supplies
• 2400 x 1200 x 17mm
plywood pine
• Dulux Wash&Wear Low
Sheen in Dance Studio
STEP 5
STEP 6
Components (in mm)
PART
Top
Base
Back
Window
Foot
SIZE
700 x 450 x 17
700 x 450 x 17
666 x 416 x 17
416 x 450 x 17
200 x 70 x 17
146 BHG APRIL 2024
You’ll also need
Dog bed; tape measure;
combination square;
pencil; track saw; cloth;
80-grit sandpaper; scrap
timber; nail; drill hammer;
5mm drill bit; jigsaw;
clamp; PVA glue;
countersink drill bit;
50mm screws; wood
filler; scraper; nap roller;
paintbrush; 30mm
screws; water-based
satin clear coat
MATERIAL
Plywood pine
Plywood pine
Plywood pine
Plywood pine
Plywood pine
QTY
1
1
1
2
4
Here’s how
STEP 1 Measure length,
width and height of your dog
bed, adjust components list
(below left) to suit. Your dog
should be able to stand, sit
and lay within the space.
STEP 2 Measure, mark and
cut all components with
tape measure, combination
square, pencil and track saw.
STEP 3 To make circular
hole in Window, find centre
of Window by drawing
bisecting diagonal lines from
panel corners. Measure,
mark and cut thin piece of
scrap timber to 250mm
length. Mark centre of scrap
timber (125mm), hammer nail
onto mark and into centre of
Window. Put pencil on end of
scrap timber and spin to
trace circle onto Window.
Repeat for second Window.
STEP 4 Drill a 5mm hole
inside circle on Window.
Insert jigsaw blade into hole,
then cut out circle. Repeat
for second Window.
STEP 5 Clamp Back to
workbench. Apply bead of
PVA glue along short edge
of Back, then attach Window
flush with a butt joint. With
countersink drill bit, predrill
2 equally spaced holes
through edge of Window and
into Back. Insert 50mm
screws and tighten with drill.
Repeat for second Window.
STEP 6 To attach Top, lay
assembly onto side, then
apply PVA glue along top
edges of Windows and Back.
Attach Top. Predrill 7 equally
spaced holes along edge of
Top and into Windows and
Back. Insert 50mm screws
and tighten. Flip and repeat
to attach Base.
STEP 7 With scraper, apply
filler to all drill holes and
allow to dry. Sand all surfaces
and sawn edges with 80-grit
sandpaper. Wipe away dust.
STEP 8 With nap roller,
apply paint to Top outer
surface. Immediately wipe
away paint excess so grain is
visible. Repeat on all outer
surfaces and allow to dry.
STEP 9 Flip and lay Top flat.
Attach all feet to Base so
offset by 10mm on all outer
corners. Predrill 2 equally
spaced holes, insert 30mm
screws, tighten. Flip bed
upright and apply clear coat
to all surfaces. Allow to dry.
STEP 10 Insert dog bed.
FOR SHOPPING
DETAILS AND PROJECT
SUPPLIES, SEE OUR
STOCKISTS PAGE
Photography Alan Jensen; styling Vanessa Tidy; project John Rae
EASY STEPS TO A DOG BED AND SIDE TABLE
SEEN ON BHG TV
FRIDAYS 7.00
new leash on style
Plywood is an affordable
and natural option to
build a side table and den
for your furry friend.
Paint it, stain it, or keep it
simple! PS, use 120-grit
sandpaper for a smooth
finish before painting.
ADD A COSY
BED TO BLEND WITH
YOUR ROOM DECOR,
TRY KMART.COM.AU.
DESIGN MATTERS
better decorating
[
T H E L AT E S T P R O D U C T S A N D H O M E I N T E R I O R T R E N D S
]
For the love of
PANACHE
Capture the essence of a
Palm Springs poolside oasis in a
candle! Palm Springs Panache
Papaya & Agave Nectar 380g
triple-scented soy candle, $59.95,
glasshousefragrances.com.
Add sophisticated
style to your interior
with this elegant,
emerald green marble
lamp base with a fluted
glass orb. Burgeon
marble table lamp,
$329, castlery.com.
Flexible living
Renowned for their versatility, wall beds
are ideal for apartments, studios, and
cramped or multi-purpose rooms, such
as an office, that double as a guest room.
They come in different designs, sizes and
configurations, and can be integrated
with shelves, desks, even sofas, POA,
wallbedsaustralia.com.au.
BHG APRIL
GEO BEAUTY
Hand-tu ed by skilled artisans
in Mirzapur, India, this modern
geometric rug features luscious
shades of maroon, cayenne and
salmon to energise your scheme.
Lay it under your dining or coffee
table. Lusca rug, 2.4 x 1.5m, $499,
groovefurniture.com.au.
SMALL
SPACE
Shelving is shelving, right? Well,
yes but no. Elevate the aesthetic
appeal of your display shelving
with the distinctive oval-shaped
ends of this contemporary
April whitewash shelf, $699.95,
madraslinkonline.com.au.
Prices are approximate and a guide only.
TABLE
MATTERS
1800 497 046
Mix up your
décor by making
these high-style,
modern objects
in no time – and
on a dime!
IN THE MIX Make your own
upmarket accents from a concrete
mix. Benchtop mixes will give a
smooth, light texture, like the
taller vases here. Choose a regular
mix for a rough-hewn look.
BHG APRIL
DECOR PROJECTS
BETTER TIP
Ease the removal of concrete
from moulds by coating any
surface the concrete will touch
with non-stick cooking spray,
then fill it with concrete mix.
Setting time will depend on
thickness and type of mix
used, as well as the room’s
temperature and humidity.
Wait at least 24 hours for
form to set.
COOL VESSEL To make an in-vogue bowl, start by
combining packaged concrete mix and water
according to manufacturer’s instructions. Stir in
black pigment powder (from bunnings.com.au) to
achieve the desired charcoal hue. Spray inside of a large
plastic bowl with non-stick cooking spray and spoon mix
into bowl, filling about three-quarters full and tapping to
remove air bubbles as you go. Spray the outside of a smaller
plastic bowl with non-stick cooking spray and press it into the
centre of the mix, pushing the concrete toward the rim of the
large bowl. Weight the small bowl with rocks. Let set. Remove
concrete from bowls; sand any rough edges, if desired.
DECOR PROJECTS
SUCCESS
WITH CEMENT
When working with
cement-based products,
follow these tips.
• Always wear eye
protection, a face mask
and waterproof gloves.
• Do not use a quick-setting
packaged concrete mix.
It will dry too fast.
• Use disposable containers and
stirrers, and protect your work
surface. When mixing, add
water gradually until desired
consistency is reached.
Properly mixed concrete
should be a thick oatmeal
consistency.
• Plastic and cardboard forms
release from cement better than
wood, metal or glass.
• Setting time varies, but allow at
least 24 hours before removing
moulds. Whether or not you add
pigment, the surface colour will
continue to lighten as the
concrete sets and cures.
Turn a plastic bottle into a clever concrete
vase. Trim off the bottle’s top with a utility
knife, spray, fill with packaged concrete mix
and tap away bubbles as you go. Insert a
sprayed plastic test tube. When mix has
set, use a utility knife to carefully remove
plastic. Sand rough edges, if desired.
152 BHG APRIL 2024
TOP NOTCH Update
your bedside table.
Remove the original top
and build a frame to the
same size using 90 x 45mm
timber and screws. Place
the frame on a smooth,
level surface such as
melamine or acrylic. Mix
packaged countertop or
high-strength smooth
concrete according to
instructions. Add dry
powder pigments to
achieve your desired
tabletop colour. Spoon the
mix into the frame, tapping
to remove air bubbles.
Press your bedside table’s
base into the mix so it sinks
in enough to be securely
attached to the concrete
when set (see right).
Let set, then remove the
frame by unscrewing the
wood. Sand the bedside
table’s edges and top
smooth using a sanding
pad and water.
JOIN THE BAND OF
CRAFTIES ADDING
TO THEIR SKILL SET
BY WORKING
WITH CONCRETE
HANGING OUT Craft
a sweet planter from
a heavily textured
silicone swim cap
stretched inside out
over the edge of a
plastic bucket. Combine
packaged benchtop
concrete mix and water
according to the packet
instructions. Stir in dry
pigment powder to
achieve your desired
colour. Spoon mix into
the silicone until
three-quarters full,
tapping to remove air
bubbles. Press a smaller
plastic bowl into the
centre until the mix
rises to the rim; weight
the bowl. Let set.
Remove the silicone cap
from the bowl. Fill with
soil and a plant. Display
in a fun beaded or
macramé hanger.
DECOR PROJECTS
FOLIAGE FORM Bring the
outdoors in with a colourful
cast leaf. Select a real or
imitation leaf with thick veins.
Mix packaged concrete as
instructed. Place the leaf facedown on a protected work
surface. Place concrete mix
about 15mm-thick onto back
of leaf, pat down and shape.
Smooth edges with a knife.
When set, pick up leaf shape
and peel off leaf (see top right).
Paint the concrete leaf with
craft paints to suit, such as
Unicorn Spit Gel and Glaze
(unicornspit.com.au), and
finish with a clear spray sealer.
154 BHG APRIL 2024
INITIAL THIS For a cute
customised accent piece,
tear the front from a 3D
papier-mâché letter (from
spotlightstores.com). Mix
concrete mix and water, as
instructed on packaging.
Spoon mix into the letter
mould (see right), tapping to
remove air bubbles. Let set,
then tear paper way from the
concrete. Note The open side
of the papier-mâché letter
produces a rough texture, as
here. For a smooth look, tear
the back from the letter rather
than the front before filling
with concrete.
HANG OF IT
To craft a stone-look
pendant, start by drilling
a hole through the cap of
a 2-litre and a 1-litre plastic
bottle. The holes should
be the same size as the
threaded tube found in
DIY lighting kits or in a
hardware store’s lighting
section. Replace cap on
larger bottle and cut the
bottom off the bottle. To
suspend the smaller bottle
inside the larger one, fit
the threaded tube through
the unattached cap and
secure with a nut on either
side of the cap to hold in
place before screwing the
cap on the small bottle.
Insert the small bottle into
the larger one so the
threaded tube fits through
the hole in the other cap;
secure at exterior with a
nut so there are a few
centimetres between the
caps. Mix packaged
high-strength (smooth
finish) concrete mix and
water according to
instructions. Place bottles
cap-side down in a vase or
jar. Spoon mix between
bottles, tapping to remove
air bubbles. Let set. Use a
utility knife to remove
plastic bottles. Through
the opening, thread a
pendant light fixture,
following all installation,
weight and safety
instructions. Call in a
qualified electrician to
install the light fitting.
Use a heat gun
to slightly melt
the plastic bottle
to make it easier
to remove from
the dried cement –
especially the
interior one.
Use Unicorn Spit Gel Stain and
Glaze (unicornspit.com.au)
to paint the planter, but you
can experiment with concrete
stains, dyes or pigments.
Coat your planter’s interior with a
waterproof pond sealant to help
protect the plant and any surfaces
the planter sits on from leakage.
ALL THE ANGLES Go for the
geometric look for a tabletop
planter. Use small and large open
hexagon wall-display shelves in two
sizes, securing a timber back piece
to each. Mix packaged concrete mix,
according to instructions. Fill the
large hex form with a 2.5cm base
layer of mix. Centre the smaller hex
on top of the base layer and weight it
down. Scoop mix between the two
hex shapes until full, tapping to
remove air bubbles. Let set. Remove
concrete from hex forms, breaking
or dismantling the forms as needed.
Sand rough edges, if desired. Use
concrete-suitable cra paints to
apply a wide stripe around the base
of the planter; drill a drainage hole,
if desired. Hexagon wall display
shelves from bunnings.com.au
and spotlightstores.com.
DECOR PROJECTS
Infuse your space with a
delicate scent by adding
essential oil to the melted
wax before pouring it into
the prepared candle bowl.
ON DISPLAY Invite these DIY delights – a candle and trivet –
to dinner. To craft a concrete candle holder (above left), follow
instructions for the bowl on page 151; add pigment if you want a
colourant. Hot-glue the metal disk of a candle wick to the bottom
centre of your concrete bowl. Keep the wick elevated by placing a
pencil across the top of the bowl and wrapping the wick around it.
Melt wax flakes (try amazon.com.au) in a microwave in 30-second
increments until liquid, then pour into the prepared bowl and let
harden. Protect tabletop surfaces with a jumbo trivet. Mix
packaged concrete mix, according to instructions. Coat inside
of 20-litre bucket with non-stick cooking spray. Spoon the
concrete mix into the bucket until it’s 5cm thick, tapping to
remove air bubbles. Let set, then remove concrete from the
bucket. Secure several self-adhesive felt pads to the underside
of the trivet so it doesn’t scratch your tabletop surface.
APRIL 2024 BHG 157
RECYCLED CRAFT
WHAT TO DO WITH
UPCYCLED
Give new life to old threads by stitching thrifted
or beyond-repair blankets, scarves and shirts
into one of these six felted wool projects
158 BHG APRIL 2024
F I LL CU S H I O N S WITH
L AVE N D E R - SC E NTE D
G RO U N D WALN UT S H E LL S ,
STE E L WOO L , R I C E , O R
E M E RY SAN D P OW D E R .
PUT A PIN IN IT
Create tidy holders for your sewing accessories. For a needle book, layer two 11.5 x 16cm wool fabric pieces and pin in the
centre. Glue the ends of hat elastic between the two layers. When dry, sew the edges using a blanket stitch. Then stitch
together two 10 x 15cm felt pieces and the cover to form a spine for the book. Cover a self-cover button with a wool fabric
scrap and, using the elastic loop for placement, sew the button’s shank to the front cover. For the pincushion, stitch two
patchwork squares. Trace a circle onto each and cut out. With right sides of the two circles together, pin and sew edges,
leaving a 2.5cm opening. Turn right side out, then fill the pincushion. Whipstitch to close. Cover a self-cover button
with a scrap of wool, centre it on top; sew through both layers to cinch.
felted-wool BASICS
Keep these felting tips in mind
before you get started.
Launder, repeat: Fibres tighten each time
you wash and dry wool fabric. These
projects are best made with felted wool
that’s dense, so wash and dry several times
before getting started. Launder scraps
in a pillowcase to help catch the lint.
Tumble action: Agitation is a good thing.
Wash wool fabric with towels or jeans
to assist the felting process.
Texture options: Just as some wool
sweaters feel softer than others, various
types of wool will also produce different
textures and looks when felted.
S LE EVE S MAKE
G R E AT SC R APS .
B E FO R E YO U WA S H AN D
D RY A WOO L SW E ATE R O R
S H I RT, CUT IT APART U S I N G
S HAR P FAB R I C SCI S SO R S .
REST SPOT
Protect your tabletop with a teapot trivet. Using a 1cm seam, sew two 12.5 x 20cm felted wool pieces together on the long
side; press open; trim to 18 x 18cm. Cut out a second 18 x 18cm felted wool piece. To make bias tape, fold and press a 5cm x
1m fabric piece (cut on the bias) in half lengthwise. Pin the edges of felted wool pieces, wrong sides together. Using fabric
clips and with all raw edges even, clamp bias tape to felted wool pieces; sew bias in place with a 1cm seam allowance. Fold
bias tape over raw edges of felted wool; whipstitch in place. Create a loop with the fabric tail; stitch end in place, as shown.
160 BHG APRIL 2024
RECYCLED CRAFT
PAGE TURNER
Craft a cover for your journal. To wrap a 22 x 28cm book, cut felted wool into 48 x 30cm, 25 x 30cm and 6 x 13cm pieces.
Cut fabric into 70 x 30cm and 5 x 122cm pieces. Line up the edges of the large and medium felted wool pieces along the
30cm sides; stitch with a 12mm seam allowance. Place large fabric piece and sewn felted wool piece together, right sides
facing; stitch with a 12mm seam allowance around all edges, leaving a 5cm opening at the bottom. Turn right side out,
tucking in the 5cm opening to sew later. Make bias tape using the 5 x 122cm piece; stitch tape along the long edges to
create a strap. Position the large piece so fabric side is up; fold both ends in 11cm to create a pocketed area. Whipstitch all
four corners to secure. Stitch the 5cm opening closed. Hand-stitch the small felted wool piece to the inside flap, leaving
the top open, for a pencil pocket. Add a journal, close, and wrap with tape. PS Adjust measurements to suit your journal.
RECYCLED CRAFT
HEARTFELT TOPPER
Make your own memorable gift tags (that double as ornaments) by placing a 10cm square of felted wool on
a needle felting mat. Swirl a small piece of wool roving on top and press the needle felting tool up and
down across the wool to add extra colour and dimension. Cut a simple shape from the finished piece,
then use the felting tool to clean up the raw edges before attaching a simple yarn loop.
162 BHG APRIL 2024
PATCHED UP
Le over and felted wool
scraps become cosy throw
cushions with these
colour-block covers. Make the
front by arranging rectangles
and squares into a 53 x 53cm
piece. Sew the shapes
together with 6mm lapped
seams. Trim to make a
50cm square. Next, make an
envelope-style-opening back.
With wrong sides up, overlap
by 10cm a 35cm-wide piece of
wool over a 25cm-wide piece
to create a 50cm square.
Place cushion front on top
of the back, wrong sides
together, and sew along all
four edges with a 2cm seam
allowance all around. Slide a
cushion insert into cover.
AN E NVE LO P E ST YLE O P E N I N G O N
TH E BAC K O F TH E
COVE R MAKE S IT
E A SY TO S LI P I N A
CU S H I O N I N S E RT
ARTIST PROFILE
SEEN ON BHG TV
FRIDAYS 7.00
a cut ABOVE
Plywood and paintings are two words you don’t hear in a sentence every day,
but one up-and-coming creative is changing that with her fresh 3D artworks
WITH ITS BEAUTIFUL HUES AND
UNCANNY PATTERNS
FLORA IS PERFECT
TO MIMIC IN MY STILL LIFES
BHG APRIL
Interview Raffaela Pugliese
W
hen your eyes land on a
sheet of plywood, you
probably see an ordinary
building material. Misha Harrison
sees boundless potential. Born
and raised in Wollongong, NSW,
this artistic starlet transforms the
mundane into the magical.
Misha has been creating art since
she was knee-high to a grasshopper,
“I used to tell Mum and Dad that
I wanted to be an artist, and they
would just roll their eyes.”
Her 3D still lifes and portraits
comprise elaborately hand-cut,
vibrantly painted and carefully
assembled plywood, juxtaposed and
highlighted with textile inlays and
stitching, “I draw my inspiration from
nature. My work captures the
real-life look and feel of plants, and
plywood is the perfect material for
this.” The award-winning artist is
constantly testing the strength of
plywood to see “how far I can take it
in terms of intricate shapes.”
Cu ing, sawing, sanding, painting
and gluing are all part of the
painstaking process, “I enjoy making
things with my hands in a society
where so much is ready-made.”
You can see Misha’s woodblock
artwork, including Tropical Paradise
(le
), at her Echoes of Eden exhibit,
at Sydney Road Gallery, Balgowlah,
NSW, from June 27-July 14.
To purchase her artworks or
products online and for more info,
visit mishaharrison.com.au.
Help us shape a brighter future
for all with a lasting legacy gift.
When you choose to leave a gift in your Will to The Benevolent Society,
you are choosing to impact generations to come. You are helping us to
invest further into our future – making Australia a place for all people
to live their best life.
To find out more visit
www.benevolent.org.au/bequest
or contact us on 1800 236 762
The Benevolent Society acknowledges.
the Traditional Owners of Country throughout.
Australia and recognises Aboriginal & Torres.
Strait Islander continuing connection to land,
waters and community. We pay our respects.
to Elders both past and present.
J003459
DIY
B O O ST E R K I T
It’s time to
push the
boundaries
and live your
best life
Y
ou’ve no doubt
heard the term
‘self-esteem’
bandied around,
but have you ever stopped
to wonder what yours is like
or why it even ma ers?
To give you a
clearer idea, if
you’re feeling
awesome and
happy with your
life, your selfesteem is likely in
good shape. This may
show up in your level of
achievements, quality
of relationships
and your
enjoyment of
life. On the other
hand, if you have
a little voice in your
head that constantly
tells you that you’re not
good enough, you’re
stupid, you’re too old,
you’re fat etc., especially
when you need a vote
of confidence or
when you’re
facing a big
opportunity,
your selfesteem could
be in need
of a boost.
BHG APRIL
BETTER WELLBEING
What is self-esteem?
In a nutshell, it’s how you value and perceive yourself.
For example, if you feel good about who you are and are
confident about taking responsibility for your own wants
and needs, your self-esteem is healthy. But if you have
the opposite view of yourself, it could be a good time
to take a look at the beliefs that might be
underlying your lack of self-worth and
question their validity.
TOP TIP IF YOU CAN,
YOU CAN. IF YOU THINK
YOU CAN’T, YOU CAN’T
In the
beginning
Everyone forms beliefs
and opinions about
themselves as they
navigate through life
as a way to make
sense of the world
and work out how
they fit in. It’s a
completely normal
process, but what’s
important to keep in mind
is these assumptions are
not always true.
CHANGING OLD
HABITS AND
WAYS OF
THINKING
HAPPENS WITH
PRACTICE,
TIME AND
PERSISTENCE.
How it starts
Feelings of high or low
self-worth or self-esteem
often start in childhood.
In healthy family and
school environments
you may have been
encouraged, supported,
felt loved and had no
reason to doubt your
self-worth. But if it
wasn’t as ideal, you may
have been exposed
to harsh criticism and
dysfunctional behaviours
leading you to believe you
weren’t worthy of love.
How it
plays out
If you had a traumatic
experience as a
small child and your
interpretation of why
it happened was that
you thought you weren’t
good enough, it might
have set up a limiting
belief about your selfworth. Years later, this
perception of yourself
can be triggered
at sensitive times,
such as a relationship
problem, not getting a
promotion, or burning the
family’s dinner. Whereas,
if your self-esteem is
healthy, it’s easier to see
things more objectively,
pick yourself up, and use
these challenges as an
opportunity to learn
and grow.
GOOD
TO
KNOW
The bottom line
is no-one, including
you, is less worthy
and no-one is more
important than
anyone else.
Once you’ve
accepted this you’re
on the road to
becoming more
confident and
having healthier
self-esteem.
Why is it
important?
Self-esteem can influence
your decisions, attitudes
and, ultimately, your
experience of life. So if
you constantly ask yourself
things like, ‘why don’t
relationships work out for
me?’ or ‘why am I so afraid
to step up?’, maybe you
have an underlying limiting
belief lurking in your
subconscious that needs to
be uprooted and replaced.
online
resources
There are many apps and
resources to help you get
rid of limiting beliefs,
unlock your potential
and build your self-esteem.
Try the ThinkUp app (free),
or Build Confidence with
AJ ($4.99). Or, find tips
and tools at cci.health.
wa.gov.au/Resources/
Looking-After-Yourself/
Self-Esteem.
ALL NEGATIVE BELIEFS SHOULD BE
QUESTIONED SO YOU CAN CLEAR THE WAY TO
LIVING A FULFILLING AND REWARDING LIFE
sky’s the limit
Regardless of your age, it’s
never too late to improve
your self-esteem and learn
more about yourself.
Benefits include:
Feeling comfortable
in your own skin
Being able to set
personal boundaries
Feeling at ease
with new people
Believing in your
abilities
Enjoying better
self-care
Knowing you
deserve love and
happiness
Accepting your
mistakes and
moving on.
•
•
•
•
•
•
•
There’s a healthy
balance between
too little and
too much selfesteem. You’ll
know you’re in a
good place when
you have a solid
belief in your
abilities and know
your weaknesses.
BETTER WELLBEING
Self-confidence building tools
Start by doing what you’re comfortable with, but don’t be afraid to stretch yourself as it’s a great way
to learn and grow. What feels right now, will change and evolve along the way, so keep aiming higher.
3
Be kind to
yourself
1
Focus on
the positives
Illustrations Getty Images
Congratulate yourself
when you say no to
something that doesn’t
feel right for you. Don’t
compare yourself to
others, remember
everyone is different.
Accept compliments
when they’re given.
Acknowledge yourself for
your accomplishments,
big and small. When
you hear negative selftalk turn it around, for
example, ‘I am lovable,
I am worthy, I can
do this’.
2
Look after
number one
Focus on meeting
your own needs and
wants. Ask ‘what do I need
and want right now and
what can I do about it?’
Do what brings you joy
and then let it spill over
to those near and dear.
Take care of your
wellbeing mentally,
physically, emotionally
and spiritually. Spend
time in nature, feel the life
force that flows through
everything, including you.
Smile at yourself
when you look in the
mirror. When you
feel good in what
you’re wearing, own it.
Remember what other
people think is their
business. Do things that
make you feel good on the
inside as often as possible,
for example, it could be a
hobby, dancing freestyle,
singing at the top of your
voice, writing in your
journal, or sitting quietly
with a cup of tea.
4
Choose your
friends
Spend time with
people who get you, who
take the time to listen
and support you. Let
anyone who puts you
down exit your life. Be
your own cheerleader.
Step out of your comfort
zone with the attitude
of ‘nothing ventured,
nothing gained’. Join a
social group with similar
interests. If you need
professional help, go
online and see what’s
freely available.
GOOD
TO
KNOW
By making promises
to yourself and
honouring them,
you’ll start to
increase your
self-esteem and
build a stronger,
healthier relationship
with yourself.
SELFESTEEM
TOOL
Journaling is an
opportunity to be
completely open and
honest with yourself.
By writing down your
innermost thoughts,
feelings, doubts, fears,
hopes and dreams, and
anything else that comes
to mind, on a regular
basis, you’ll gain a
greater understanding
and appreciation of
where you’re at. It’s also
a powerful way to
become clearer about
what changes you need
to make and where you
really want to go.
Your inner world
Make time to explore your
thoughts and feelings, and
give yourself the love you
deserve. Insite Mind Love Thy
Self Workbook & Journal, $39,
hardtofind.com.au/bhg.
APRIL 2024 BHG 169
D
rinking water
and eating a
healthy diet are
both essential
for keeping your skin
nourished from within,
but skincare doesn’t
stop there. Having soft,
smooth skin now, and
for years to come,
involves nourishing
your skin on the
outside, and not just
your face, but also
from your neck down.
TIME WELL SPENT
The sun’s UV rays are
not the only potential
skin foes to be wary
of – heat, cold, wind,
detergents, chemicals,
pollution, toxins,
bacteria and grime can
all impact the wellbeing
of your skin, particularly
the surface, so committing
to a daily body-care regime
is a smart and worthwhile
investment of your time
and energy.
SUPERFICIAL STUFF
The outermost layer of
your epidermis, which is
the top layer of your skin,
is the stratum corneum. If
you were to look at it under
a microscope you’d see it’s
made up of layers of cells
tightly bound together by
a mortar-like substance. It
acts like a protective barrier
and plays a key role in
maintaining the health and
condition of your skin.
LOOKING AFTE R
YOUR SKIN
IS NOT ABOUT
HAVING PE RFECT
SKIN , IT’S ABOUT
BEING HAPPY IN
YOUR OWN SKIN .
Loving the skin you’re in is more
than pampering, it’s self-care
BETTER BEAUTY
TOP TIP
Always apply a body
lotion or cream after
shaving, as shaving
can take off the top
layer of skin.
INSIDE INFO
There are three types of
ingredients used in
skincare products. Each
has their own benefits
and they’re o
en used in
combination. Note: not
all suit acne-prone skin.
Humectants
increase the skin’s
hydration. They draw
water from the deeper
layers of your skin and the
environment, and deliver
it to the surface layer,
the epidermis. Examples
include hyaluronic acid,
glycerin, aloe vera,
honey and urea. Good
for all skin types.
Emollients
can help to repair the
skin’s barrier, relieve
dry, flaky skin and
help protect it
from environmental
aggressors. Examples
include jojoba oil,
coconut oil, calendula
oil, colloidal oatmeal and
squalene. Good for all
skin types, especially if
your skin type is dry.
Occlusives
create a protective layer
on the skin’s surface,
preventing moisture loss
and locking in hydration.
They can be used on skin
or hair. Examples include
beeswax, lanolin,
avocado oil and cocoa
bu
er. Good for dry
skin, but not ideal for
acne-prone skin.
IF POSSIBLE ,
TRY A PRODUCT
BE FORE YOU
BUY IT TO SE E
HOW IT FE E LS
ON YOUR SKIN .
TIME FOR ACTION
If your skin’s barrier is
damaged or compromised
for any reason, your skin
will become less tolerant
of everyday environmental
factors and eventually
it can feel dry, rough or
irritable. The good news is,
if you notice a change, take
it as a warning that it’s time
to modify a few habits,
stop using products that
are harsh or maybe you
simply need to lift your
skincare game.
EMBRACE YOU
YOUR
BODY TYPE
YOUR DRESS
SIZE
WE WERE ALL MADE
UNIQUE FOR A REASON
ANNALIESE GANN, MODEL
DOS AND DON’TS
A list of what can play havoc with your skin
and the corrective actions to take.
• Over-washing or
• Sun exposure. Wear SPF
exfoliating. Treat your
daily. In the years to come
skin like silk to help it feel
you’ll be glad you did.
like silk.
• Hot baths or showers.
• Poor diet. A balanced,
Turn down the heat to help
healthy diet will help keep
protect your skin barrier.
your skin strong and resilient.
• Harsh soaps and
• Medications such as
detergents. Switch to
steroids. If your skin is very
products that don’t dry
fragile, talk to your doctor.
or strip your skin.
• Ageing. Good skincare
• Irregular skincare. Always
apply SPF in the morning and can help you keep your skin
a nourishing product at night. looking its best for longer.
APRIL BHG
WHAT’S
BEST TO
USE?
1 Spa Coconut & Shea
Body Bu
er, $22.95, Natio.
2 Harmonising Body Lotion –
Wild Rose, $30.95, Weleda.
3 Moisturising Body Cream,
$22.95, Hydra-Oil. 4 Find
Comfort Hydrating Body
Lotion, $55, Rare Beauty.
5 The Body Oil, $66,
Nécessaire. 6 Protecting
Barrier Balm, $25, Endota.
for shopping
details, see OUR
stockists page
use what suits you and
your needs. Keep in
mind that a light lotion
in summer may not
serve you in the
colder months. For
example, in winter
the cold does have
a drying effect on
your skin, so it will
be in greater need
of a heavier cream
or bu
er for a
boost of hydration
and moisture.
GOOD
TO KNOW
Hydrator or
moisturiser?
Hydrating products
absorb water from the
air and/or your skin
and hold on to it, while
moisturisers form a
barrier and lock in
moisture. They’re
similar, but different.
3
2
1
5
6
7
4
9
10
8
12
11
Photography Getty Images. Prices are approximate and a guide only.
KNOW YOUR
TOP TIP
OPTIONS
Sunscreen will help
Lotions are
to prevent skin cancer
lighter in texture
and reduce skin damage
caused by the sun,
and easier to
which accelerates
apply due to
ageing.
a higher water
content compared
to other body products.
They’re ideal for use in
warmer weather.
Creams contain more
oils, emollients, hydrators
and occlusives. Body
creams are formulated
to target a wide range
of skin conditions and
concerns.
Oils are made with oilbased ingredients. If the
body oil is mineral oil-based,
it will sit on the surface as
a protective film, whereas
plant oils can be absorbed
into and nourish the skin.
Balms can be thick, or
solid, and are made with
hydrating oils and butters.
They’re great for helping
with dry elbows, knees and
feet, and also to soothe
irritated skin.
Butters are thick creams
made with natural butters
extracted from seeds, beans
and nuts such as cocoa
There are loads of
and shea butter. They’re
body products
catering to every skin
effective hydrators and
type and budget, so
moisturisers for the skin.
BETTER BEAUTY
WHAT
IS
CREPEY
SKIN?
Loss of bounce-back and
skin volume is a natural
part of the ageing
process, but if your skin
is also dehydrated and
unloved, it can start to
look crepey, or as the
term suggests, like ‘crepe
paper’. The other major
contributing factor
for ‘crepey skin’ is sun
damage. UV rays
accelerate the
breakdown of the skin’s
elastin and collagen.
The solution? Love
your skin and keep
up the TLC.
HOW TO SLOW THE
SKIN-AGEING CLOCK
Wear sunscreen yearround on exposed areas,
even on cloudy days.
Maintain a healthy
weight and avoid big
gains and losses.
Lower your intake of
alcohol to help reduce free
radical damage to skin cells.
Exfoliate weekly to
reduce surface dryness and
absorb products better.
Apply a body product
after bathing to help plump
and firm your skin.
7 Tonic Body
Treatment Oil, $78,
Clarins. 8 Oil-Infused
Skin Firming Lotion,
$13.49, Jergens.
9 Body Tightening
Concentrate, $100,
SkinCeuticals.
10 Cocoa Bu er
Formula Firming
Body Lotion, $13.99,
Palmer’s. 11 Bu Gloss,
$58, MUSE. 12 Magic
Body Cream, $80,
Charlo e Tilbury.
THE BEST WAY
TO E NJOY
G REAT SKIN IN
THE FUTURE IS
TO G IVE IT
DAILY
TLC NOW.
TOP TIP
As a treat for
extremely dry skin,
apply a body butter
at night before
slipping on
your PJs.
FEELING CONFIDENT
BEING
COMFORTABLE IN YOUR SKIN – THAT’S
WHAT REALLY MAKES YOU BEAUTIFUL
BOBBI BROWN, BEAUTY ENTREPRENEUR
APRIL
BHG
HEALTH MATTERS
better health
[
T H E L AT E S T N E WS , P R O D U C T S A N D T R E N D S
]
LIFT YOUR GAME
Good news for gym junkies
and athletes, the SUP High
Performance Gummies are a
sports range of ‘grab and go’
supplements to help you prime
for your workout, go harder at the
gym and optimise your gains. SUP
Pre-Workout Intensifier Gummies,
Creatine Gummies, and BCAA 2:1:1
Gummies, $27 each/bag, available
from Woolworths. For more details
go to supsupplements.com.
BRAIN MATTERS
SE IZE T H E DAY
SLEEP ON THIS
How do you start your day?
A new study by Emma, a
sleep products company, has
revealed that 6am is a good
time to wake up if you want to
be your most productive.
It also found people who wake
between 7.30-8.00am are the
happiest. As for how long,
7-9 hours is the optimal,
although age, lifestyle and
genetics can all affect the
amount of sleep you need.
BHG APRIL
How’s your brain doing? BrainTrack
is a free app that can help you
explore common cognitive concerns
and your brain health through fun,
travel-themed games. You can share
your results with your GP to support
the early identification of cognitive
changes over time that warrant
further testing. For more info,
visit dementia.org.au.
HIT THE SPOT
TIME TO
PLAY
Creativity meets
mental health in
this empowering
and playful guide
to self-care and
wellbeing. There are 50 inspiring
prescriptions for you to try, from
making a garden to drawing.
Creative First Aid by Caitlin
Marshall and Lizzie Rose
(Murdoch Books, $39.99).
Do you have any tight spots on your body?
The Therabody Wave Solo, $129, is a portable device
that delivers pinpointed pressure and vibration
to focused areas to help reduce tension and
improve movement. The three powerful vibration
frequencies and ergonomic shape can work deep
into your hard-to-reach areas, therabody.com.
Photography Adobe Stock. Source: press release from emma-sleep.com.au. Prices are approximate and a guide only.
GOOD READS
UNIQUE DUAL
ACTION
POWERFUL
ESSENTIAL OILS
ARNICA
FREE
YOUR BEST PARTNER FOR
DAILY AND SPORT ACTIVITIES
PERSKINDOL has been trusted by the people of
Switzerland for 40 years, and has expanded to
many markets across the world. Finally, it is now
available in Australia.
Powered by natural essential oils, PERSKINDOL
delivers pain relief for muscles and joints.
It delivers an immediate cooling effect on
application, and heats as you massage to
provide soothing, effective pain relief. Available
in a Gel and Spray to ease pain, promote
recovery and get you back on your feet faster.
Available at
and other leading pharmacies
perskindol.com.au
Always read the label and follow directions for use.
A HOPPY OCCASION
Paper lily
NO-SEW
ICE-DYED
COILED
ROPE
VASE
Gather your supplies
• Wire cooling rack
• Glass baking pan
• 1 skein co on rope
• Gloves
• Rit All-Purpose Dye
(powder) in three or
four colours
• Rit ColorStay Dye
Fixative
• Hot glue gun and
glue sticks
• Glass cylinder vase
• Double-sided tape
• Scissors
Here’s how
STEP 1 In a sink or on a
protected surface put the
cooling rack atop the pan.
STEP 2 Thoroughly moisten
co on rope. Crumple it and
put on wire rack. Cover
completely with ice cubes.
(For more complete dye
coverage, use crushed ice
and put rack in a warm area.)
STEP 3 Wearing gloves,
carefully distribute various
powder dyes across the ice
as if sprinkling salt. Sprinkle
sparingly. It may not seem
like enough dye, but as ice
melts, the dye will disperse.
STEP 4 When ice has
melted, follow colour fixative
directions to set the dye. Let
dry completely, then roll one
end of rope into a small coil
and gently secure to itself
with a dab of hot glue.
NO-SEW BASKET
Follow the steps for the
No-sew ice-dyed coiled rope
vase but swap the vase for a
small glass bowl to create a
basket for Easter treats.
STEP 5 Using glass vase as
your form, start with it upside
down. Using double-sided
tape, a ached coiled rope in
centre of vase bo om.
STEP 6 Carefully wrap rope
around base, hot-gluing rope
to itself as you go. Don’t glue
rope to glass vase. Continue
wrapping rope around
bo om until it’s completely
covered. Turn vase right side
up and continue to tightly
wrap rope up sides (again,
don’t glue rope to vase).
STEP 7 Once the glass vase
is covered, cut the rope,
leaving a 25mm tail. Gently
pull the glass vase out and
neatly hot-glue rope tail to
top of rope vase.
Reinsert the glass vase
if filling the coiled vase
with fresh flowers.
PAPER
LILY
Gather your supplies
• Paper lily and leaf
templates
(page 181)
• Coloured cardstock
• Scissors
• Bone folder
• Hot glue gun and
glue sticks
• White cloth florist’s
wire, wire cu ers and
florist’s tape
• Chalk-finish paint
• Green crepe paper
• Embroidery needle
and thread (optional)
Here’s how
NOTE If you wish, you can
a ach a lily to a decorative
egg carton. To do this,
stitch stem of lily to carton
top using embroidery
needle and thread.
EASTER MAKING
STEP 1 Trace Paper lily
and leaf templates onto
cardstock; cut out. Use bone
folder to fold the small tab
on flower; curl petal edges
and slightly curl the leaf.
Pull flower sides together
into a cone shape, leaving
a small hole at the base.
Secure tab to inside of
flower with hot glue.
STEP 2 For flower centre,
cut six 10 –15cm pieces of
florist’s wire. Add a dab of
hot glue in a teardrop shape
to top of each wire. Put in a
cup, glue side up, until set.
STEP 3 Dip set glue ends in
chalk-finish paint; return to
cup to dry.
STEP 4 Gather all six pieces
of wire and wrap bo
om
halves in florist’s tape. For
the stem, a
ach a longer
piece of wire to the bundle
with tape. Slide stem end
through hole in flower and
secure wire bundle at the
base with hot glue.
STEP 5 Wrap wire stem
with a strip of green crepe
paper; secure with hot glue.
Glue leaf to stem with a dab
of hot glue.
BUTTERFLIES
Gather your supplies
Marbled paper
• Kra
paper
• Parchment paper
• Printer paper 125gsm,
assorted colours
• Waxed paper
• Iron (old)
• Crayons
• Pencil sharpener
Butterfly garland
• Butterfly templates
(page 180)
• Coloured cardstock
• Cord or string
• Low-temp hot glue
gun and glue sticks
Butterfly straws
• Butterfly-shape
punch or use Butterfly
templates (page 180)
• Scissors (optional,
for templates if using)
• Coloured cardstock
• Clear fast-grab
tacky glue
• Craft knife and
cutting mat
• Paper straw
RICE-DYED EASTER EGGS
Make speckled eggs with rice and food colouring.
Fill a plastic cup with rice, add 10-15 drops of food
colouring, top with another plastic cup and shake
like a cocktail to distribute colour.
Drop a hard-boiled egg into the
rice cup and shake until
evenly covered in dye.
Here’s how
MARBLED PAPER
NOTE Use an old or
thrifted iron, not one
you use for clothes.
STEP 1 Protect your work
surface with kra
paper.
Cut a piece of parchment a
li
le more than twice the
size of printer paper. Put a
piece of printer paper on one
side of parchment and top
with waxed paper. Fold the
parchment over to cover the
papers. Gently iron on low
to adhere waxed paper to
printer paper; unfold
parchment.
STEP 2 Working with
crayons in complementary
colours, remove their paper
casings. Use a pencil
sharpener to shave crayon
wax onto waxed printer
paper. Fold parchment
over papers; iron. Let cool;
remove parchment. Repeat
with other paper pieces and
combos of crayon colours.
BUTTERFLY GARLAND
STEP 1 Use templates to
trace bu
erflies on Marbled
paper and cardstock; cut out.
To create flu
er effect, fold
bu
erflies in half lengthwise.
STEP 2 Cut a piece of cord/
string to your garland length.
STEP 3 Every 7.5–10cm,
hot-glue (on low temp) 1
marbled and 1 plain bu
erfly
back-toback along
folded
edge, with
cord/string
between them.
BUTTERFLY
STRAWS
STEP 1 Use
bu
erfly-shape
Butterflies
punch or templates
to make bu
erflies
from Marbled paper
and cardstock. Fold
bu
erflies in half
lengthwise. Glue
marbled and plain
bu
erflies
back-to-back
along folded
edges.
STEP 2 Cut an
18 x 6mm strip of
cardstock. With a
cra
knife, cut
two parallel,
12mm-long
slits about
3mm apart
on the strip.
STEP 3
Glue short
ends of the
strip to
plain-colour
bu
erfly wings; dry.
STEP 4 Carefully open the
slits and slide a straw through
the opening. Repeat for
desired number of straws.
TWO-TONED
EGGS
For multi-coloured eggs,
combine dyed rice from
different cups into one cup.
APRIL
BHG
Bunny
picks
another circle half with
glue stick. Continue to
glue circle halves together
for a half-sphere composed
of 6 circles. Repeat with
remaining 6 circles, then
glue 2 half-spheres together
to complete the head.
STEP 3 Add a dab of hot
glue to end of a toothpick;
insert pick into bo om of
head. Once glue is set and
secure, a ach ears on top
and bow tie right below
head. Repeat for desired
number of picks.
SALT DOUGH
BUNNIES
BUNNY PICKS
Gather your supplies
• Paper bunny pick
template
(page 181)
• Scissors
• Coloured cardstock
• Fiskars Circle
Medium paper
punch, 25mm dia.
• Glue stick
• Hot glue gun and
glue sticks
• Toothpicks
Here’s how
STEP 1 Use template to
trace ears and bow tie on
cardstock; cut out. Gently
fold over tip of one ear;
crease bow tie slightly in the
middle. Punch 12 cardstock
circles for each bunny; fold
circles in half.
STEP 2 With folded edges
aligned, glue a circle half to
Gather your supplies
• 2 cups plain flour
• 1 cup salt
• 1 cup warm water
• Large bowl
• Waxed paper
• Masking tape
• Gloves
• Assorted food
colouring
• Rolling pin
• Bunny-shaped
cookie cu er
• Bamboo skewer
• Cord, yarn or twine
Salt dough
bunnies
Here’s how
STEP 1 In a large bowl, mix
together flour, salt and warm
water. Knead dough until
smooth and no longer sticky.
Add a few pinches of flour,
if needed. Shape into a ball;
let rest for 20 minutes.
STEP 2 Prep work surface
with waxed paper secured at
corners with tape; sprinkle
with flour. Put dough on
waxed paper and poke
3 or 4 indentations into
dough ball with your finger.
STEP 3 Wearing gloves, add
a few drops of food colouring
into each indentation. Use
your hands to gently knead
colour into dough until it
looks marbled.
STEP 4 Sprinkle a bit more
flour over surface of dough
and on a rolling pin. Roll
dough to about 6mm thick.
STEP 5 Preheat oven to
100°C. Use cookie cu er to
cut bunny shapes. Poke a
small hole with bamboo
skewer in each for hanging.
STEP 6 Put bunnies about
12mm apart on an ungreased
cookie sheet and bake for 90
minutes; flip and bake for
90 minutes more or until firm
and dry (thicker shapes may
take a bit longer). Let cool
completely.
STEP 7 Thread cord/yarn/
twine through holes to hang
as ornaments or tie around
napkins.
FOLDED PAPER EGG
ORNAMENT
Gather your supplies
• Folded egg template
(page 181)
• Plain and pa erned
coloured cardstock
• Scissors
• Glue stick
• Co on string
• Hot glue gun and
glue sticks
Here’s how
STEP 1 For each 3D
ornament, use template to
trace 12 eggs from cardstock
MARBLE EFFECT
Knead the dough enough
to distribute the colour
well without it becoming
one colour.
EASTER MAKING
BEADED BUNNY
ORNAMENT
Folded
paper egg
ornament
(use a variety of colours
and pa erns, so you can
alternate as you like when
gluing); cut out. Fold each
egg in half lengthwise.
STEP 2 With folded edges
aligned, glue one egg half to
another egg half with glue
stick. Continue to glue egg
halves to each other but
don’t join final two halves yet.
STEP 3 Cut a 30cm piece of
string; tie ends to create a
loop. Hot-glue kno ed end
of loop into centre of egg
shape, leaving enough loop
at top for hanging.
STEP 4 To finish, glue the
final egg halves together
with the glue stick to create
the egg-shaped ornament.
Beaded
bunny
ornament
Gather your supplies
• Twine
• Wood beads (6mm,
20mm and 25mm for
each bunny)
• Hot glue gun and
glue sticks
• Bead bunny template
(page 181)
• Felt pieces in
assorted colours
• Bamboo skewer
• Ribbon or fabric trim
Here’s how
STEP 1 Cut a piece of twine
about 30cm long. Thread
6mm bead onto twine and
fold twine in half, keeping
bead at the middle fold.
STEP 2 Thread both ends of
twine through 25mm bead to
create bunny body, then
thread through 20mm bead
for the head. Add a dab of
hot glue to top of body; press
head onto glue; let dry.
STEP 3 Use template to
trace bunny ears from felt;
cut out. Dab hot glue to
bo om of each ear and pinch
together to create a tiny
pleat. Hold until glue sets.
STEP 4 Holding twine away
from hole at top of bunny
head, use bamboo skewer to
gently push centre portion of
felt ears into the hole. Secure
with a dab of hot glue.
STEP 5 Glue trim around
‘neck’ and tie twine ends
together to create a loop for
hanging. Repeat this step
with felt and trim in different
colours for desired number
of ornaments.
for PROJECT
SUPPLIES, see OUR
stockists page
Honeycomb
paper egg
ornament
HONEYCOMB PAPER
EGG ORNAMENT
Gather your supplies
• Coloured cardstock
in coordinating or
contrasting colours
• Honeycomb egg
template (page 181)
• 6mm-wide
double-sided tape
• Glue dots
• Co on string
• Hot glue gun and
glue sticks
• Bamboo skewer
Here’s how
STEP 1 For each ornament,
cut 3 strips, each 7.5 x 15cm,
from 3 different colours of
cardstock, for a total of 9
strips. Fold each strip in half
lengthwise to make a crease;
unfold and lay flat.
STEP 2 Use template to
trace 3 egg shapes from each
strip; cut out (for a total of 27
egg pieces, 9 of each colour).
STEP 3 Fold each egg piece
in half along the crease you
made in Step 1; add a piece of
double-sided tape on folded
edge and slightly unfold.
At the crease near top and
bo om of each piece, put an
adhesive dot; press paper
together, keeping middle
slightly open. Repeat until
you’ve glued tops and
bo oms of all 27 egg
pieces.
STEP 4 Create
3 groups of
9 egg pieces,
distributing each
colour randomly or
evenly among each
group. A ach egg pieces in
each group, one at a time, by
pu ing an adhesive dot in
centre of outer edge of
each egg and pressing
paper together. Repeat
for each group.
STEP 5 Glue the 3 groups
together as directed in Step
4 (with adhesive dots
at centre, outer edge),
keeping a small opening at
top of completed 3D egg.
STEP 6 Fold a 30cm piece
of string in half; tie ends
together to create a loop.
Put a dab of hot glue in the
top of the egg opening and
insert string, knot side down,
gently pushing it in with a
bamboo skewer. Let glue
set before hanging.
APRIL
BHG
dit
ere
3, M
2
0
2
B UT TE R F LY 4
B UT TE R F LY 1
BUTTERFLIES
180 BHG APRIL 2024
B UT TE R F LY 3
B UT TE R F LY 2
e
3, M
202
r
For the Butterfly garland, string the butterfly shapes in
a random order in the garland. Or create a pattern by
alternating different sizes of the four butterfly shapes.
EASTER MAKING
E N L ARG E O R R E D U C E
ALL TE M P L ATE S TO
YO U R D E S I R E D S IZE
PAPER LILY
Fold here to create a tab.
This will be used to form the
conical shape of the
Foldflower.
here to
create a tab.
This will be used
PAPE R LI LY LEAF
X 12
12
BEAD BUNNY ORNAMENT
For the ears, you can swap cardstock for the felt;
trace and cut as directed for felt. Keep these ears
connected. The centre portion will be used to
attach them inside the bead.
PAPER BUNNY
PICK
Use cardstock in
complementary colours
and textures to add more
visual interest. If you don’t
have a 25mm circle paper
punch, you can use this
template for the head.
X 12
12
X27
27
FOLDED EGG
ORNAMENT
Trace on and cut from an
assortment of solid and patterned
coloured cardstock.
HONEYCOMB EGG
ORNAMENT
We cut nine eggs from each of
three different colours of
cardstock, then alternated
colours in a repeated pattern.
MONEY MATTERS
better finance
[
A R E YO U A P E T OW N E R ? T RY T H E S E S AV V Y WAYS TO E A R N A N D S AV E C A S H
]
Save money on pet expenses
Our furry friends are adorable, but they can be costly
PET INSURANCE
When it comes to pet
illnesses and injuries,
the vet bills take many
pet owners by surprise.
Consider pet insurance
from a young age to save
money over their lifetime.
Read the fine print for
exclusions and caveats.
Stella Insurance covers
pets and makes the policy
clear on its website,
stellainsurance.com.au.
LOOK FOR SALES
Around 61% of Aussie
households own pets and
all need to buy their furry
friends food. When you
see a bargain, it makes
sense to buy dry food and
kitty litter in bulk. Sign
up to email lists for pet
suppliers such as Petbarn
and Pet Circle, and look
for discounts. You’ll save
in the long run, and get a
stack of loyalty points.
MAKE MONEY
WITH PETS
Harness these skills to
make extra cash.
Groom at home
Sometimes a little goes
a long way. Make it a
habit to regularly brush
and bathe your pet so
they don’t need to go to
the groomers, which can
be costly. Long-haired
varieties will need their
tresses tamed, you can
buy detangler sprays
and brushes, plus there
are electric clippers for
around $40 from Kmart.
PET SIT
Pet-sitting is preferred
for pet owners who know
their pets are happier at
home. Plus, you get a minibreak from your house,
trustedhousesitters.com.
BECOME A DOG
WALKER
WORDS OF WISDOM
ANIMALS ARE SUCH AGREEABLE FRIENDS – THEY
ASK NO QUESTIONS, THEY PASS NO CRITICISMS
George Eliot, author
This financial information is general in nature and does not take into consideration your personal circumstances.
If you need advice, please seek out a licensed financial adviser.
182 BHG APRIL 2024
PET PHOTOGRAPHY
Do you have a good
eye? Take shots of your
pet/s and friends’ pets,
then pop your portfolio
on etsy.com and offer
bespoke pet pics.
Photography Adobe Stock; words Andrea Black.
Prices are approximate and a guide only.
Do you love dogs? Sign
up at websites such as
madpaws.com.au to be
a dog walker. The bonus?
You’ll also get a good
workout.
THE ESSENTIALS
Online Landscaping Plants
& Advanced Trees
5%
OFF
use code
‘BETTER’
Hemp Sleep &
Calm Gummies
raphaherbals.com
Helping
you live
your
best life
Egardens.com.au <> 0411 435 314
Native Floral Gifts
bellart.com.au
Do you want to transform your living room into a functional and versatile space?
A wall bed can be the perfect solution.
It allows you to create a guest room when needed, providing guests with a comfortable bed.
It can be easily stored away when not used, freeing up the room and keeping it organised.
With a wall bed, you can maximise your living space and create a welcoming and practical home.
1300 663 660
wallbedsaustralia.com.au
Freshness Extended
Food Container
Made to Measure
Steel Water Tanks
and Raised
Garden Beds
Elevating Your
Food Storage
Experience
kingspanwatertanks.com.au
1300 826 548
miraskitchen.com.au
TO ADVERTISE CONTACT 02 9282 8303
THE ESSENTIALS
S M A RT FA R M
TOWER GARDEN BY
Solar Powered
AUTOMATED WATERING JUST
SET AND FORGET!
10%
OF F
coupon
TAKE10
OF
F
Before
After
No electricity needed • Includes 6 months nutrient
Large 210 litre capacity • Grows 60 large plants
“E asy to s et up u p a n d the g r o wt h is a ma zi n g . H ig hl y r e co mm e n d .”
( 170 re vi e ws)
S co tt Ja n ua r y 12, 2022.
BUY COMPLETE KIT NOW
0424 169 729
M R STAC K Y. C O M . AU
TO ADVERTISE CONTACT 02 9282 8303
THE ESSENTIALS
Growers & Processors
of Fine Mohair
Yarns & cords - Lace to
Aran weight
wagtailyarns.com.au
Australia’s Best Online Furniture & Home Décor Store
Premium Home Brands at Best Prices
www.livingstyles.com.au
Furniture
Home Decor
10000+
8000+
Styles
Lotus Blake
Real Technology
Really Works
It’s what lies beneath
Sports car suspension
Montana 36volt
$4,260
Smooth Ride
Four
Wheel
Independent
suspension
Stunning Performance
Durable and Reliable
Amazing Stability
Styles
Lighting
Rugs
4000+
10000+
Styles
Styles
World Leading
fr
Pensioner Terms
$30week $350deposit
2 year term charges tap
Esteem 24volt Australia-wide Shipping
$2,990 Call a phone that answers
Bricks & Mortar Service Parts
Scooter City
Free Info Pack
1-800-726-683
(
FURNITURE • HOMEWARE • LIGHTING • RUGS • KITCHENWARE
Register now to receive your
$50 coupons* to spend store wide!
Log on at www.livingstyles.com.au/hb
or scan QR code to sign up.
*Terms & conditions apply, please see sign up page for details
www.scootercity.com.au
%
10 FF
O
Earthlife makes gardening easy.
Enjoy our Simple fast acting solutions
for your everyday gardening needs.
Receive a 10% discount for online
orders over $50 using code bhg10
1800 819 003 earthlife.com.au
TO ADVERTISE CONTACT 02 9282 8303
CLOTHING • GIFTS • HOMEWARES
montyandmoo.com.au
THE ESSENTIALS
Real Wonders.
THIS IS REAL COUNTRY, COME SEE FOR YOURSELF.
Creative Spaces for
Everyday Living
Affordable
Installed or easy to DIY
Add more space to your backyard
View our range at
www.cabinlife.com.au
Sensory and
educational
products
sensorypoodle.com.au
Ebsworth
Pots
Hand thrown pottery yarn
bowls made in the Mid
North Coast, NSW. Perfect
for keeping your yarn
tangle free while creating
projects. A variety of sizes
and hand decorated
designs are available.
ebsworthpots.com
T 0403 233 309
@ebsworthpots
TO ADVERTISE CONTACT 02 9282 8303
admin@ theyarnstore.com.au
0403 162 625
T H E YA R N S T O R E.C O M.A U
THE ESSENTIALS
WE HAVE
MOVED!
CUSHIONS, APRONS, TEA TOWELS, DOOR STOPS, IBC COVERS
After 34 years in Oakleigh, Craftee Cottage has moved up to bigger and better things.
We’re bringing colour to the heart of Industrial Huntingdale!
Just 2.5 kms from our previous location, close to public transport and shops PLUS
plenty of on-site parking. We know you are going to love our new and improved store.
Create Your Own Wildflower Wonderland
with Meadow Flowers Australia:
WILDFLOWER SEEDS & SEED MIXES
meadowflowers.com.au
29A Stafford St, Huntingdale VIC 3166 | (03) 9568 3606
e: hello@crafteecottage.com | crafteecottage.com
Use special code BH&G231 for a 5% discount
SLIMLINE TANKS
ROUND TANKS
BUY NOW & USE CODE
QUALITY WATER TANKS
BHG50
SIZES FROM 1000L
FOR $50 OFF!
UP TO 46,400L
Discount also available for
larger tanks, mention this ad.
BPA
FREE
AUSTRALIAN
MADE & OWNED
FOOD GRADE
& RECYCLABLE
DELIVERED &
FITTINGS INSTALLED
13 STANDARD
COLOURS
1800 008 888
w w w. b u s h m a n t a n k s . c o m . a u
Shade & Greenhouse
Specialists
Australian Owned
& Manufactured
Sizes to suit all
0400 342 268
aussieshadehouses.com.au
TO ADVERTISE CONTACT 02 9282 8303
Designer Ironing Board Covers. All Australian made Durable/
canvas/drill with thick foam padding. Extra designs @
THE ESSENTIALS
Maid of Shade
Bulb
0
5
3
eties
i
r
a
V
ue
atalog
C
r
e
d
r
294
il O
Free Ma Chambers Rd
Laun dr y & Living
For all your kitchen, garden & outdoor needs
Nee d
g r e at
p eg s?
huntgathergrow.com.au
Boyup Brook
WA 6244
0427 673 069
lyn@wabulbs.com
www.wabulbs.com
+ p e g b a g s & m o r e at
mai dofsha de.co m.au
TO ADVERTISE CONTACT 02 9282 8303
APRIL STOCKISTS
better stockists
[
P L A N N I N G A T R I P TO T H E S H O P S? H E R E ’ S O U R R O U N D - U P O F P R O D U C T S
]
98
YOUR SHOPPING DIRECTORY
104
108
132
190 BHG APRIL 2024
Adairs adairs.com.au
Ash Block Printing ashblockprinting.com.au
Bed Bath N’ Table bedbathntable.com.au
Bunnings bunnings.com.au
Charlotte Tilbury charlottetilbury.com/au
Clarins clarins.com.au
Country Road countryroad.com.au
Endota endotaspa.com.au
Few and Far fewandfar.com.au
Freedom freedom.com.au
Hydra-Oil ozhairandbeauty.com
IKEA ikea.com/au
Inartisan inartisan.com
James Lane jameslane.com.au
Shape up to open up,
page 98
Shopping details Adairs
Belgian vintage washed
linen cushion in Misty
Rose or Pacific Blue,
$79.99 each. Belgian check
vintage washed linen
cushion in Nude Pink
& White, $89.99. Byron
Light Denim throw, $99.99.
European collection
Harlen earth throw, $139.99.
Provence Natural and
Cream carafe, $29.99.
Provence Natural and
Cream tumbler, $9.99 each.
Country Road Clive large
vase, $79.95; small, $59.95.
Edessa large vase in Snow,
$99.95; small, $59.95. Elsie
cushion in Bracken, $89.95.
Freedom Flinder Natural
handwoven pouffe, $189.
Reko lantern 36cm, $69.95;
50cm, $89.95.
Jergens chemistwarehouse.com.au
Kmart kmart.com.au
MUSE musetheskincompany.com
Natio natio.com.au
Nécessaire mecca.com
Officeworks officeworks.com.au
OZ Design ozdesignfurniture.com.au
Palmer’s cincottachemist.com.au
Pottery Barn potterybarn.com.au
Rare Beauty sephora.com.au
SkinCeuticals skinceuticals.com.au
Spotlight spotlightstores.com
Weleda weleda.com.au
Keeping your garden
green, page 104
Shopping details Adairs
Amelia drinkware tumbler in
Teal, $14.99. Belgian vintage
washed linen cushion in
Gum Leaf, $79.99. Camellia
vase in White, $59.99. Bed
Bath N’ Table Hanna dining
breakfast bowl in Green,
$14.95. Louie throw in Sage,
$89.95. Bunnings Marquee
3-piece timber folding
bistro setting, $119.
Northcote Pottery precinct
lite cylinder in White 44 x
40cm, $69.98; 36 x 33cm
$49.98; 28 x 26cm, $34.98.
Magnolia grandiflora ‘Teddy
Bear’ tree 330cm, $175.
Viburnum odoratissimum
30cm, $59. Westringia
smokey, $19.45. Kmart
Woven fedora hat in
Cream, $9. Beige marble
serving board, $10.
Project supplies Bunnings
Dy-Mark landscape chalk,
350g can, $11.20. Ki-Carma
coarse landscape sand,
20kg bag, $10.99. Australian
Builders off white cement,
20kg bag, $12.95. Brighton
Masonry 300 x 300 x 40mm
Charcoal Mypave paver,
$4.40 each. Garden Basics
25L organic compost, $4.98.
Tuscan Path 10-15mm
yellow crushed stone,
5kg bag, $11.99.
Make it a
showstopper, page 108
Shopping details Adairs
Jarvis Ice Blue side table,
$299.99. Bunnings Bayliss
Natural outdoor mat 55 x
90cm, $57.17. Tuscan Path
Gavin cylinder white pot,
$95.98. Country Road
Miranda cushion in Mineral
Blue 55 x 55cm, $89.95.
To find out more or to submit a referral
visit our website www.benevolent.org.au
or call 1800 236 762
The Benevolent Society are committed to helping you, your family
member or loved one with disability make the most of every opportunity
and live life to the fullest.
J003450
We offer a range of disability services including allied health assistance,
occupational therapy, behaviour support, physiotherapy and more.
The Benevolent Society provide privately funded payment options
and the majority of our clinical health and disability services can be
funded through the National Disability Insurance Scheme (NDIS).
APRIL STOCKISTS
Top drawer, page 132
Project supplies Bunnings
INOX 300g aerosol
lubricant can, $9.90.
Just a rough patch,
page 134
Project supplies Bunnings
Dunlop 20kg multipurpose
acrylic render, $16.89.
136
144
146
176
Hello, ecogorgeous, page 136
Shopping details Adairs
Mark Tuckey Washed
White hemp cushion,
$79.99. Norway Snow
Boucle ottoman, $279.99.
Atelier candle stand in tall,
$59.95; medium, $49.95;
short, $39.95. IKEA Lohals
flatwoven rug 200 x 300cm
in Natural, $199. Few and
Far Anica vase, $169. Atelier
candle stand in tall, $59.95;
medium, $49.95; short,
$39.95. Inartisan Yashar
rustic console small 150 x
40 x 80cm, $1690. James
Lane Ravesi Pitrit cane
accent chair in Natural, $399.
OZ Design Petra feather
cushion 40 x 60cm in Black/
Natural, $129.95. Pottery
Barn Handcrafted glazed
terracotta vase 27cm, $199.
Project supplies Bunnings
Dulux Wash&Wear Low
Sheen paint in Warm
Neutral 4L, $95.50. Grunt
300m natural sisal twine,
$10.68. Spotlight Catering
Collection natural bamboo
skewers 3mm x 30cm, 100
pack, $4.75.
Cool runnings,
page 140
Project supplies Bunnings
Pillar 0.9 x 25m black jumbo
weed control mat, $24.50.
Bastion 10mm blue metal
20kg, $9.60. Aqua Systems
2L garden pressure sprayer,
192 BHG APRIL 2024
$7.50. Glitz Green 2L
cleaning vinegar, $2.99.
Selleys 1L wall surface
cleaner super concentrate
sugar soap, $6.51. Glitz
Green 200g antibacterial
eucalyptus spray, $6.29.
Shelf service,
page 144
Project supplies Bunnings
Zenith 12G x 50mm zinc
plated countersunk head
wood screws, 12 pack, $4.80.
Ramset M5 x 9mm hollow
wall anchor, 10 pack, $16.94.
Ramset hollow wall anchor
setting tool, $28.48.
Canine Console,
page 146
Shopping details Adairs
Moma White Leaves canvas
80 x 120cm, $299.99. Malmo
French Blue linen cushion,
$79.99. Lattice Lavender
and White glass vase,
$69.99. Ash Block Printing
Gingham cushion in Mist
55 x 55cm, $175. Freedom
Hampden table lamp, $329.
Kmart Pet mat bolstered in
medium 78cm x 55cm, $15.
Pet toy fetch stick, $7.50.
Project supplies Bunnings
Ecoply 2400 x 1200mm
17mm plywood pine
structural CD grade, $96.
Dulux 1L Interior Paint
Wash&Wear in Dance
Studio, $49.90.
A hoppy occasion,
page 176
Project supplies Kmart
Raw wood beads, 20 and
25mm dia. Cardstock
in assorted colours.
Officeworks 120gsm printer
paper, assorted colours.
Parchment paper. Crayola
wax crayons. Spotlight Rit
All-Purpose Dye (powder).
Rit ColorStay Dye Fixative.
Cardstock in assorted
colours. Felt in assorted
colours. Fiskars Circle
medium paper punch,
25mm dia. Twine. Ribbon
or fabric trim.
PRIVACY NOTICE
This issue of Better Homes and
Gardens is published by Are
Media Pty Limited (Are).
Are may use and disclose your
information in accordance with
our Privacy Policy, including to
provide you with your requested
products or services and to
keep you informed of other Are
publications, products, services
and events. Our Privacy Policy is
at www.aremedia.com.au/privacy/.
It also sets out how you can
access or correct your personal
information and lodge a complaint.
We disclose your personal
information offshore to our joint
venture partners, service providers
and agents. It is not practicable
to specify all countries to which
we may disclose your personal
information. The countries your
personal information will be
disclosed to include New Zealand,
the USA and the Philippines.
In addition, this issue may
contain Reader Offers, being
offers, competitions or surveys.
Reader Offers may require you
to provide personal information
to enter or to take part. Personal
information collected for Reader
Offers may be disclosed by us to
service providers assisting Are
in the conduct of the Reader
Offer, and to other organisations
providing special prizes or offers
that are part of the Reader Offer.
An opt-out choice is provided
with a Reader Offer. Unless you
exercise that opt-out choice,
personal information collected
for Reader Offers may also
be disclosed by us to other
organisations for use by them to
inform you about other products,
services or events or to give to
other organisations that may use
this information for this purpose.
If you require further
information, please contact Are’s
Privacy Officer either by email at
privacyofficer@aremedia.com.
au or mail at Privacy Officer, Are
Media Pty Limited, 54-58 Park
Street, Sydney NSW 2000.
Prices are approximate and a guide only.
134
ADVERTISING PROMOTION
BETTER SHOPPING
PLANNING A TRIP TO THE SHOPS?
HERE’S A ROUND-UP OF PRODUCTS YOU MAY LIKE TO CHECK OUT...
CRUNCH TIME
FULL FLAVOUR
Enhance your favourite
savoury or sweet dishes
with the buttery crunch
of Australian-grown
macadamias. Available at
your local supermarket,
grocery store and health
food shop, macadamias
are filled with nutrients
to support your heart,
brain, gut and skin.
Make your cooking
convenient with
Gourmet Garden’s
Australian-grown
herbs and spices. Each
product stays fresh
for four weeks and is
available as a paste or
lightly dried. Find it
with the fresh herbs at
your local supermarket.
australianmacadamias.org
gourmetgarden.
com/en-au
DIY DESIGN
HELPING HAND
As the heart of the
home, kitchens need
to be functional for
each individual. Create
and customise your
kitchen with Kaboodle
Kitchen’s great range
of DIY-friendly, quality
products. Design
your kitchen online
or browse the range at
your local Bunnings.
One in six Australian
children and young
people grow up in
poverty, but national
and independent charity
The Smith Family
is here to help. By
sponsoring a child, you
can provide the school
essentials and support
they need to reach
their full potential.
kaboodle.com.au
thesmithfamily.com.au
A NEW WAVE
FLOWER POWER
Quality drainage has never
been sleeker. Stormtech
delivers drainage
solutions available in
a range of styles, and
luxurious colours and
finishes, including the
Wave Grate. Crafted
from highly durable,
anodised aluminium, it
was an Australian Good
Design winner for 2023.
High-quality, healthy soil
is the secret to a beautiful,
blossoming garden.
Earthlife’s Flower Blend
is the perfect all-purpose
fertiliser and is safe to use
on all flowering plants.
The organic blend can
be used before planting
or on established plants
all year round. Available
online from $29.95.
stormtech.com.au
earthlife.com.au
READING MATTERS
better books
T H E N E W E S T A N D B E S T N OV E L S A N D N O N - F I C T I O N
]
Pheasants Nest
Louise Milligan
(Allen & Unwin, $32.99)
A COMPELLING
STORY
WRITTEN WITH
TAUTNESS AND WIT
ANNABEL CRABB
Everything is
Perfect
Maxine Fawcett
(Penguin Random House,
$34.99)
Cassie lives in a beautiful beach
suburb with her husband Jon
and their children. Life is perfect.
Except, now she’s reached her
mid-forties, she wonders what
happened to the fun-loving, sexy
and accomplished woman she
used to be. Then at school dropoff she meets Chris Lancaster, a
charismatic widowed father-of-five.
Cassie starts imagining romantic
scenarios between them, and
becomes convinced that the
unsuspecting widower is
the answer to everything...
BHG APRIL
Kate Delaney has made the
biggest mistake of her life.
She picked the wrong guy to
humiliate on a girls’ night out
and now she is living every
woman’s worst nightmare.
Kate finds herself brutalised,
bound and gagged in the
back of a car being driven
by a man whose name she
doesn’t know. Kate can only
hope the police will find her
before it’s too late, but she’s
aware a random crime is the
hardest to solve. As the clock
ticks, the police establish a
major investigation. However,
the detectives know Kate’s
chances of survival diminish
with every passing hour.
MAUDE HORTON’S
GLORIOUS REVENGE
Lizzie Pook
(Penguin Random House,
$34.99)
London, 1850: Constance
Horton has disappeared.
Maude, her sister, knows only
that Constance abandoned
the apothecary they call
home and, disguised as a boy, boarded a ship
bound for the Arctic. She never returned. ‘A tragic
accident’, the Admiralty called it. But Maude knows
something isn’t right. When she finds Constance’s
journal, it’s clear the truth is being buried by sinister
forces, and Maude is determined to find answers.
RESURRECTION WALK
Michael Connelly
(Allen & Unwin, $32.99)
Defence attorney Mickey
Haller has agreed to
represent a woman who
is in prison for killing
her husband, a sheriff’s
deputy. Haller enlists his
half-brother, retired LAPD
Detective Harry Bosch,
as investigator. Reviewing the case, Bosch sees
something that doesn’t add up. For Haller and
Bosch, the path to justice is fraught with danger
from those who don’t want the case reopened
and will do anything to keep the truth hidden.
THE SILENCE IN
HER EYES
Armando Lucas Correa
(Simon & Schuster, $32.99)
For as long as she can
remember, Leah has suffered
from akinetopsia – her eyes
can’t process movement, only
images. With her white stick,
most people assume she’s
blind. But Leah can see a good deal. When beautiful,
kind Alice moves in next door, they become firm
friends. But things take a turn when Leah hears
Alice begging for help through the wall. Leah wants
to help her friend even though the situation is
extremely dangerous, possibly even deadly.
Compiled by Joseph Kenworthy. Prices are approximate and a guide only.
[
NEW
ASK FOR
BOOK 1109
TIME & AGAIN KNITS
CLASSIC STYLES IN 8 PLY YARNS WITH A CHOICE OF CONSTRUCTION METHOD,
THESE DESIGNS WILL BECOME WARDROBE STAPLES TO MAKE TIME AND AGAIN.
Featuring Patons Dreamtime Merino 8 ply, Sierra 8 ply and Totem Merino 8 ply.
Call +61 3 5442 4673 or visit patonsyarns.com.au for your nearest stockist.
/ausyarnco
@ausyarnco