/


Автор: Clay I.S.
Теги: medicine human anatomy sports human physiology
ISBN: 978-0-7440-5128-5
Год: 2022
Текст
SCIENCE of
HIIT
UNDERSTAND THE ANATOMY AND PHYSIOLOGY TO TRANSFORM YOUR BODY
HIGH INTENSITY INTERVAL TRAINING
Ingrid S Clay
Project Art Editor Amy Child
Project Editor Susan McKeever
Designer Alison Gardner
Senior Editor Alastair Laing
Senior Designer Barbara Zuniga
US Editor Kayla Dugger
Jacket Designer Amy Cox
Jacket Coordinator Jasmin Lennie
Production Editor David Almond
Senior Production Controller
Luca Bazzoli
Managing Editor Dawn Henderson
Design Manager Marianne Markham
Art Director Maxine Pedliham
Publishing Director Katie Cowan
CONTENTS
Introduction
06
PHYSIOLOGY
OF HIIT
Illustrations Arran Lewis
First American edition, 2022
Published in the United States by
DK Publishing, 1450 Broadway,
Suite 801, New York, NY 10018
Text copyright © Ingrid S Clay 2022
Copyright © 2022
Dorling Kindersley Limited
DK, a Division of Penguin
Random House LLC
19 20 21 22 23 10 9 8 7 6 5 4 3 2 1
001–326788–Jan/2022
All rights reserved.
Without limiting the rights under
the copyright reserved above, no part
of this publication may be reproduced,
stored in or introduced into a retrieval
system, or transmitted, in any form, or by
any means (electronic, mechanical,
photocopying, recording, or otherwise),
without the prior written permission
of the copyright owner.
Published in Great Britain by Dorling
Kindersley Limited.
A catalog record for this book
is available from the Library of Congress.
ISBN 978-0-7440-5128-5
Printed and bound in China
www.dk.com
The benefits of HIIT
10
40
Mountain climber
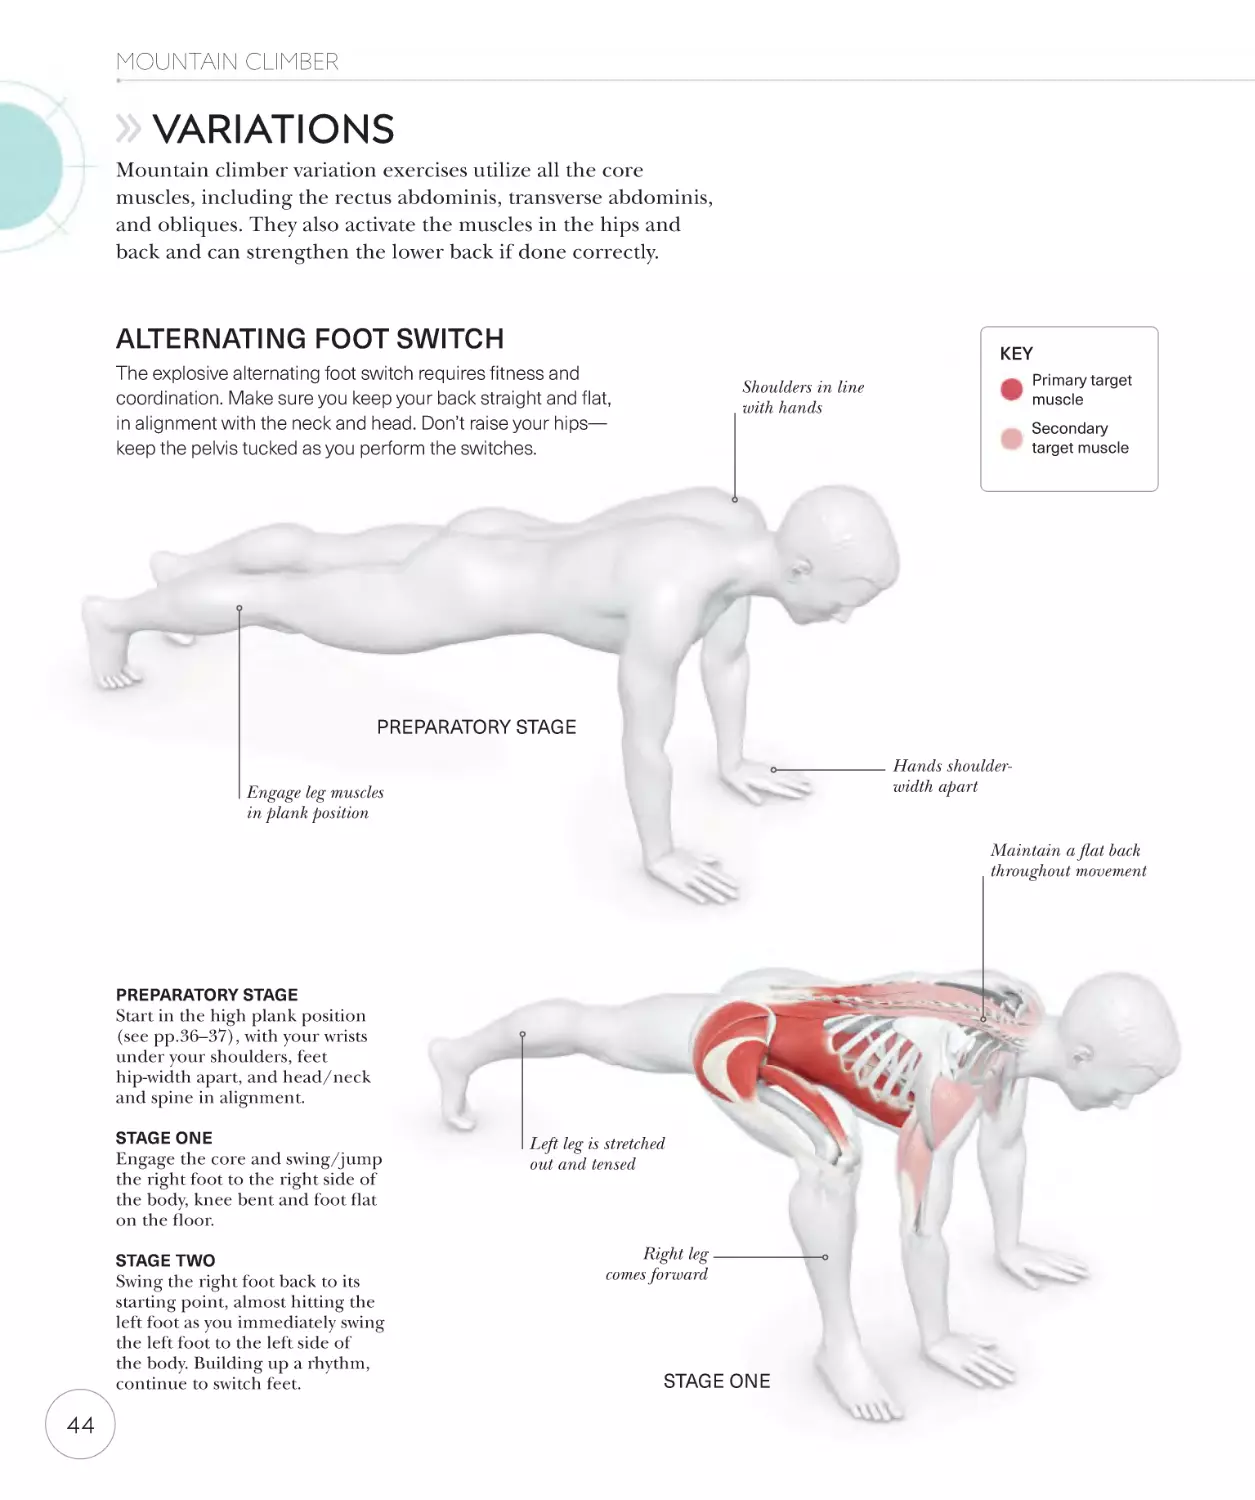
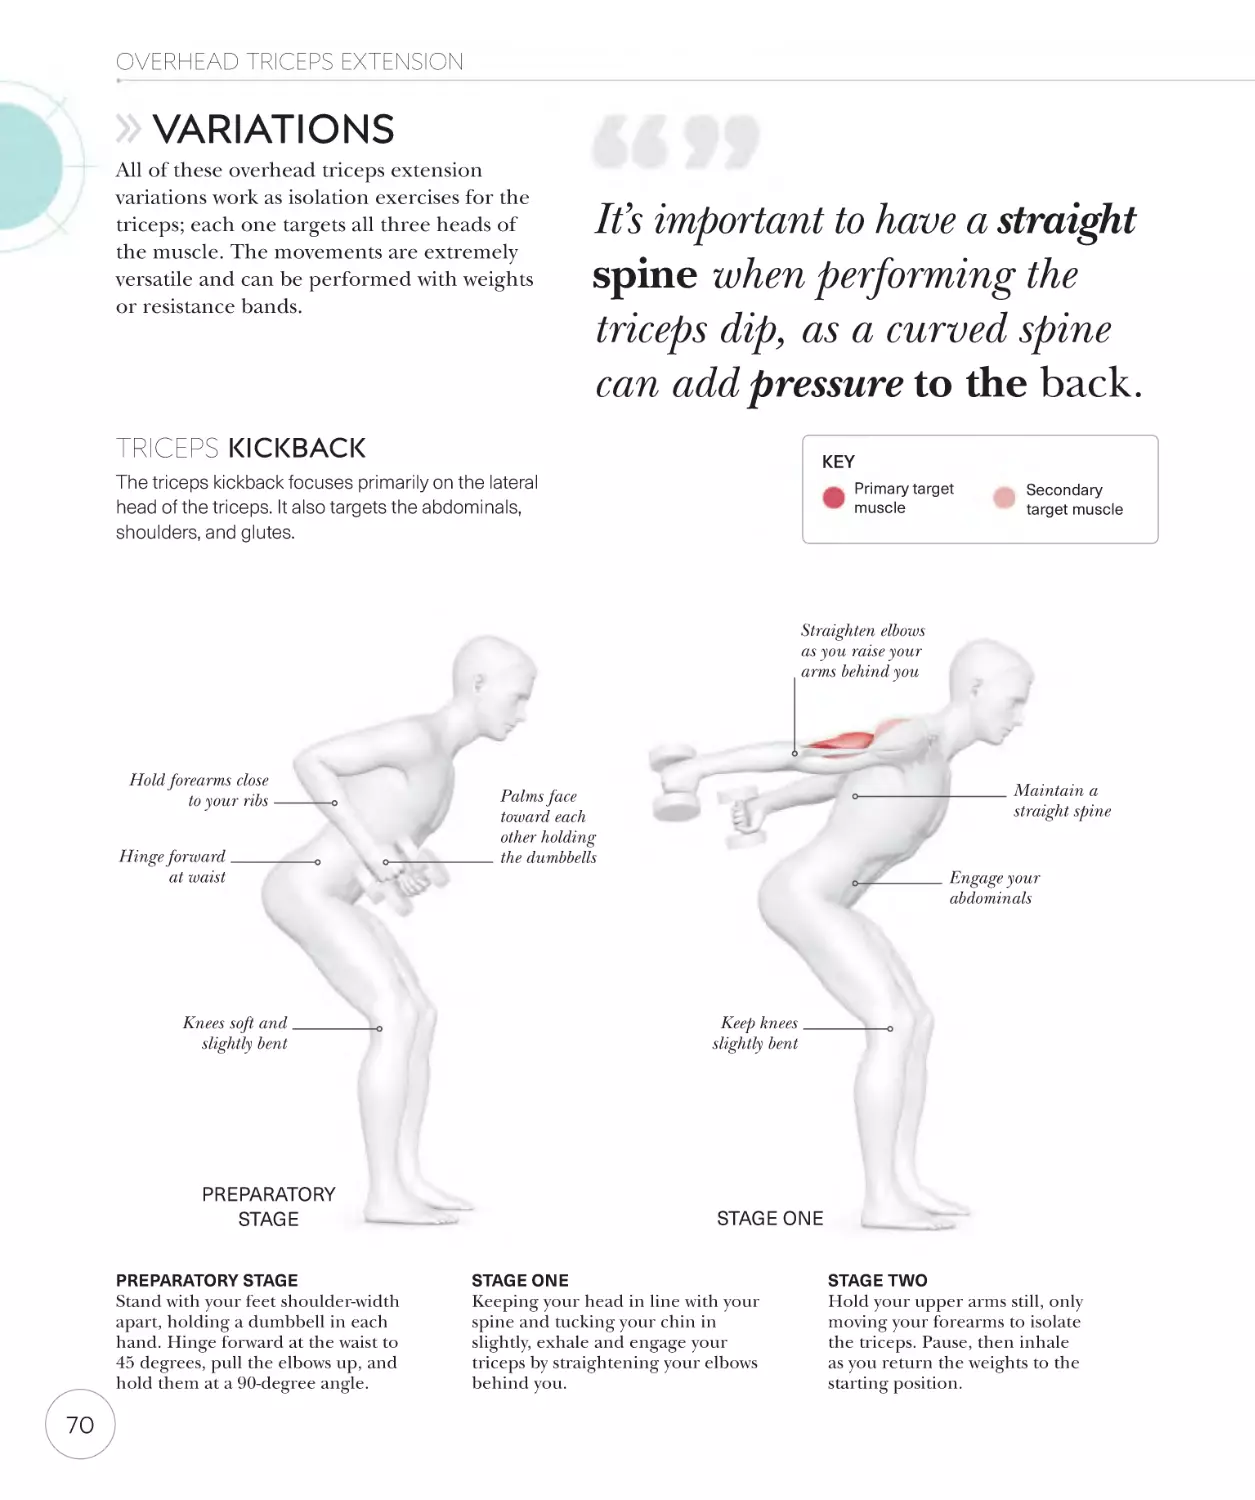
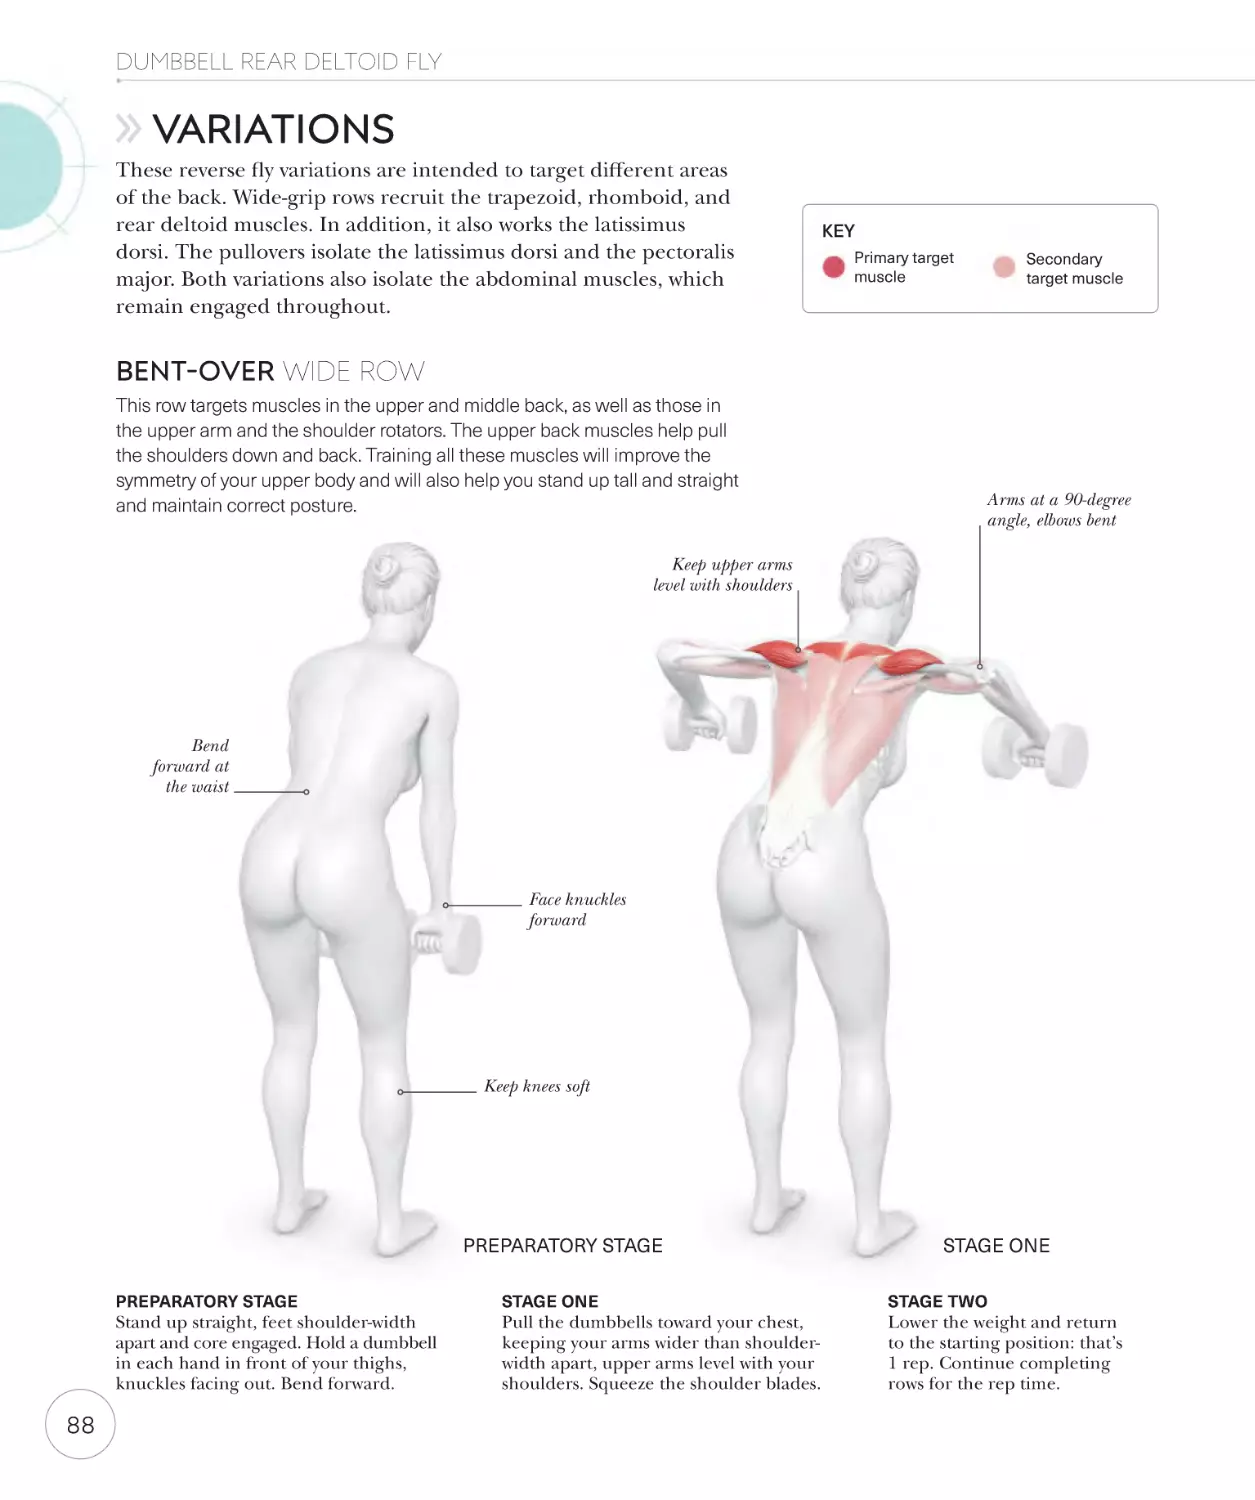
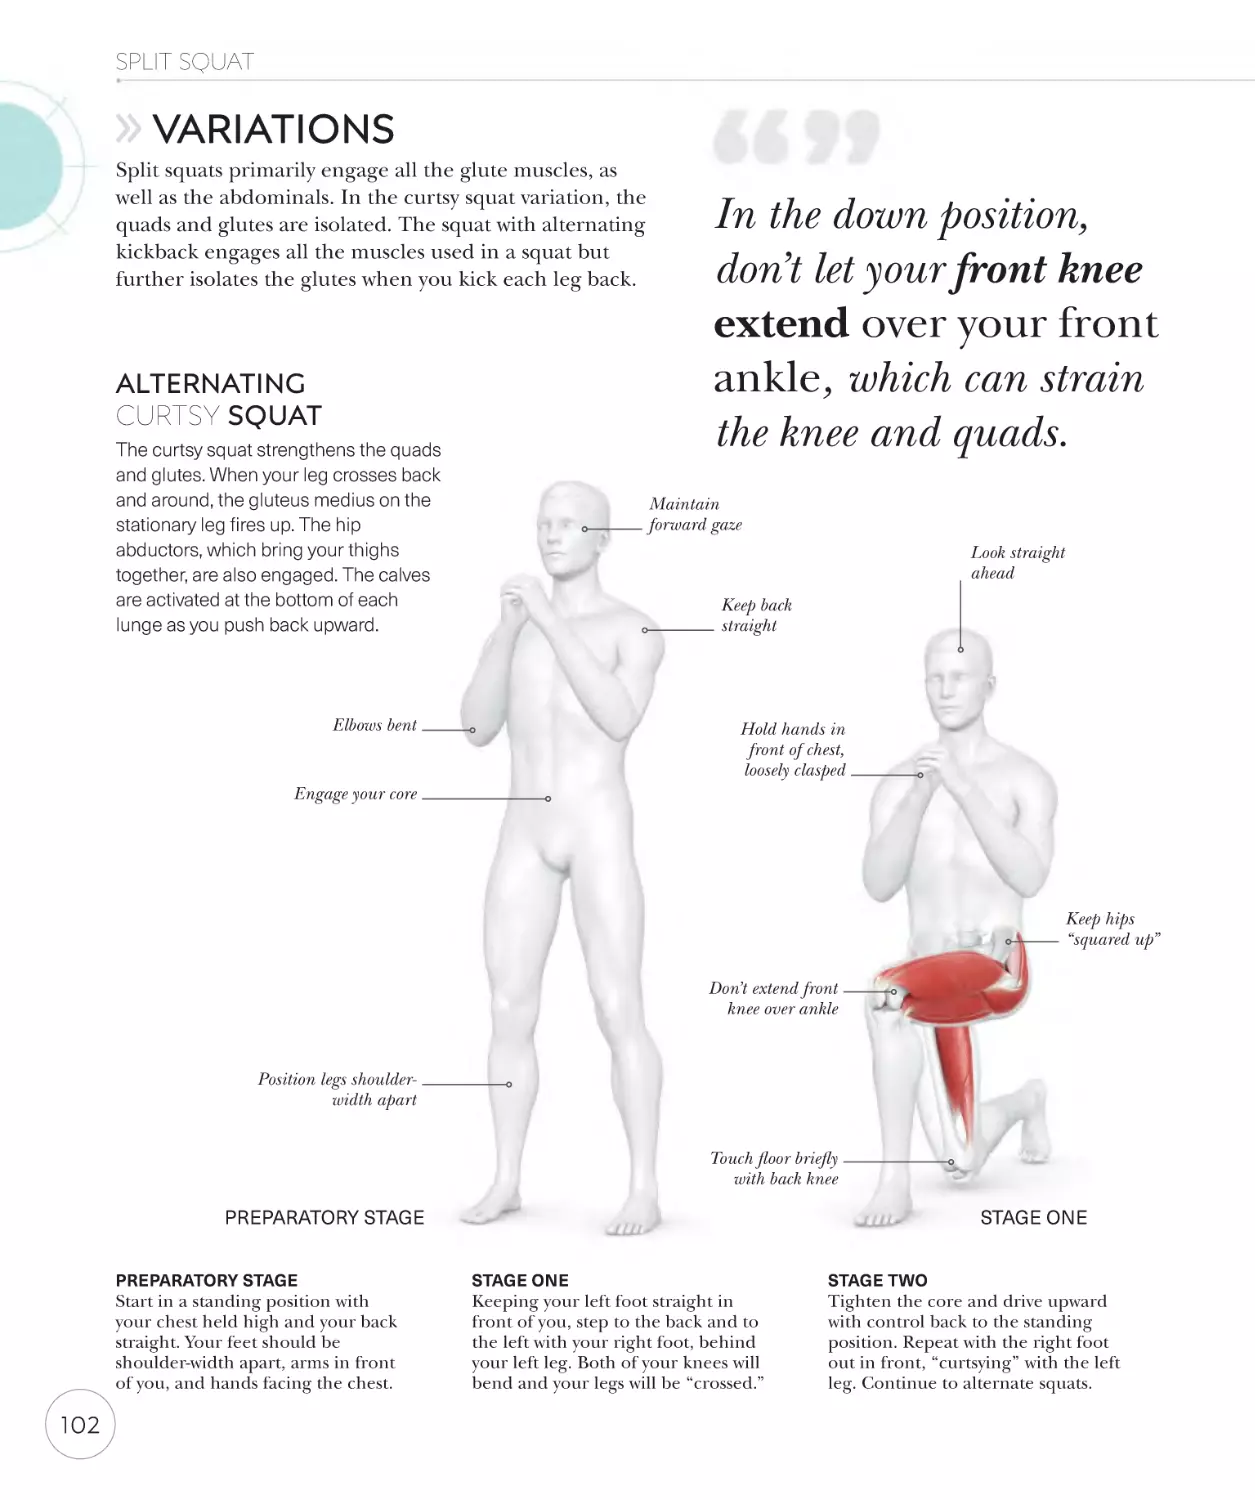
Variations
42
44
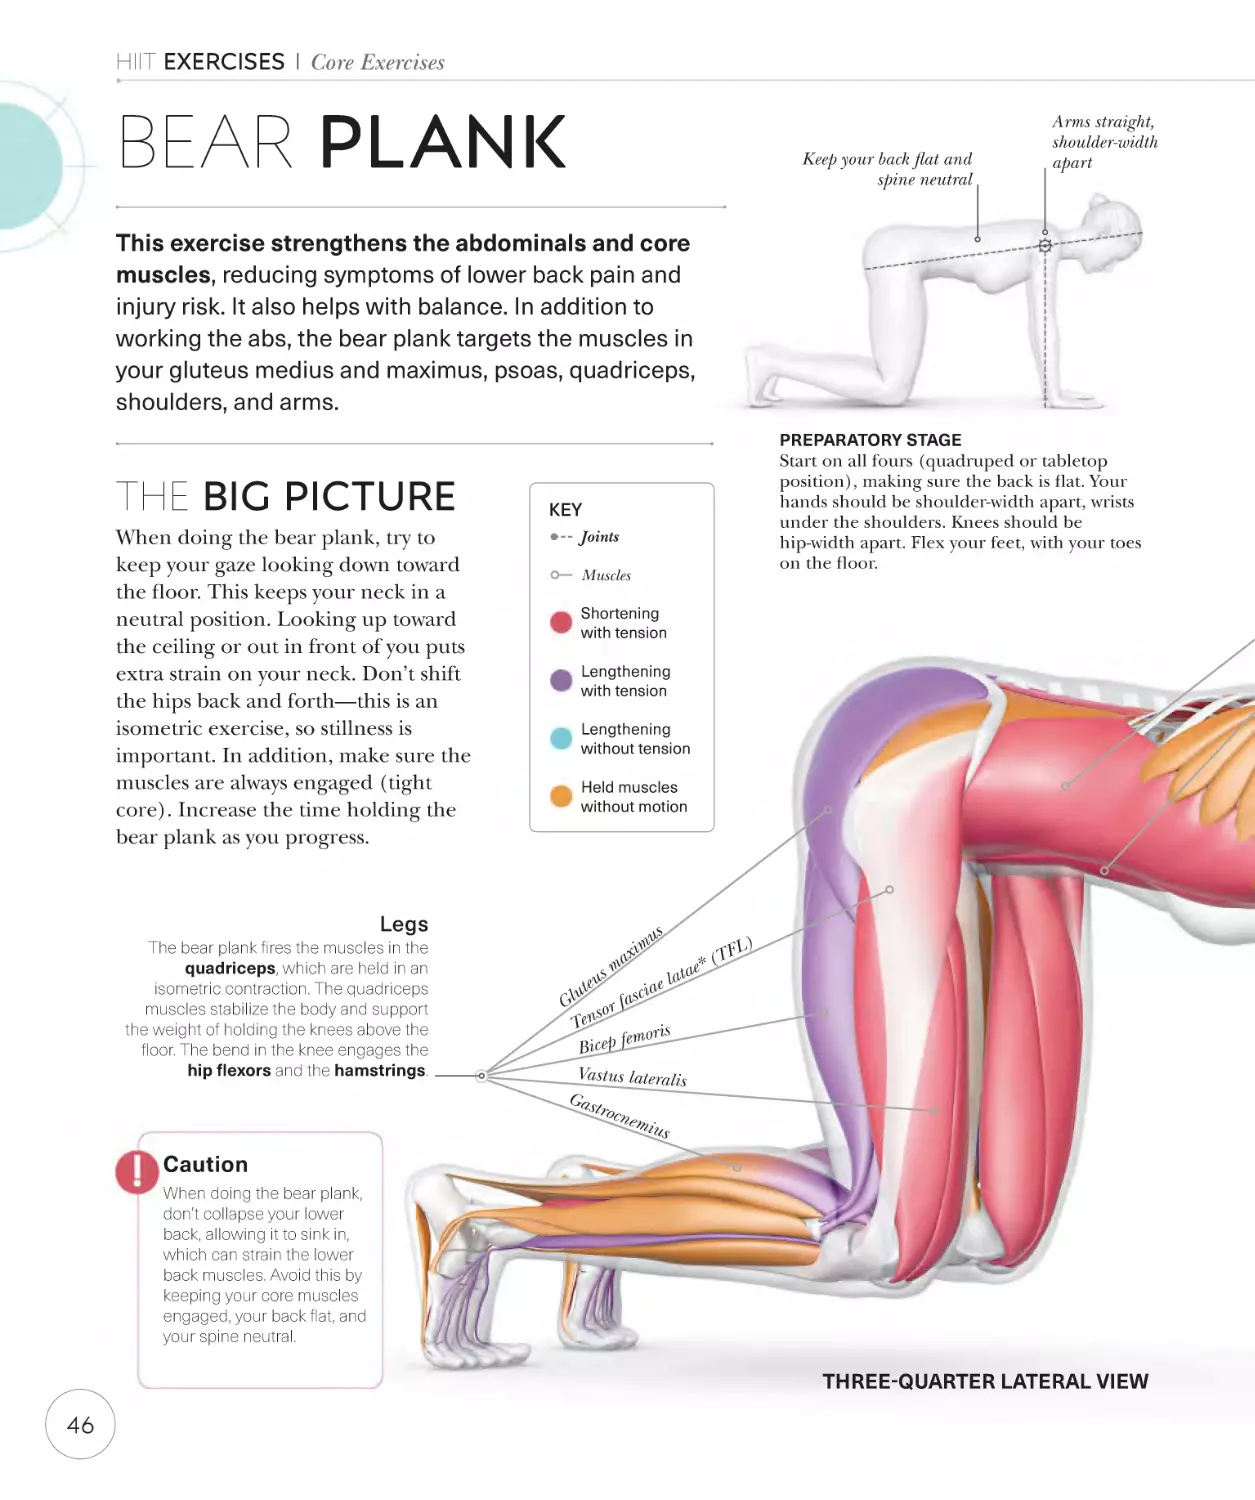
Bear plank
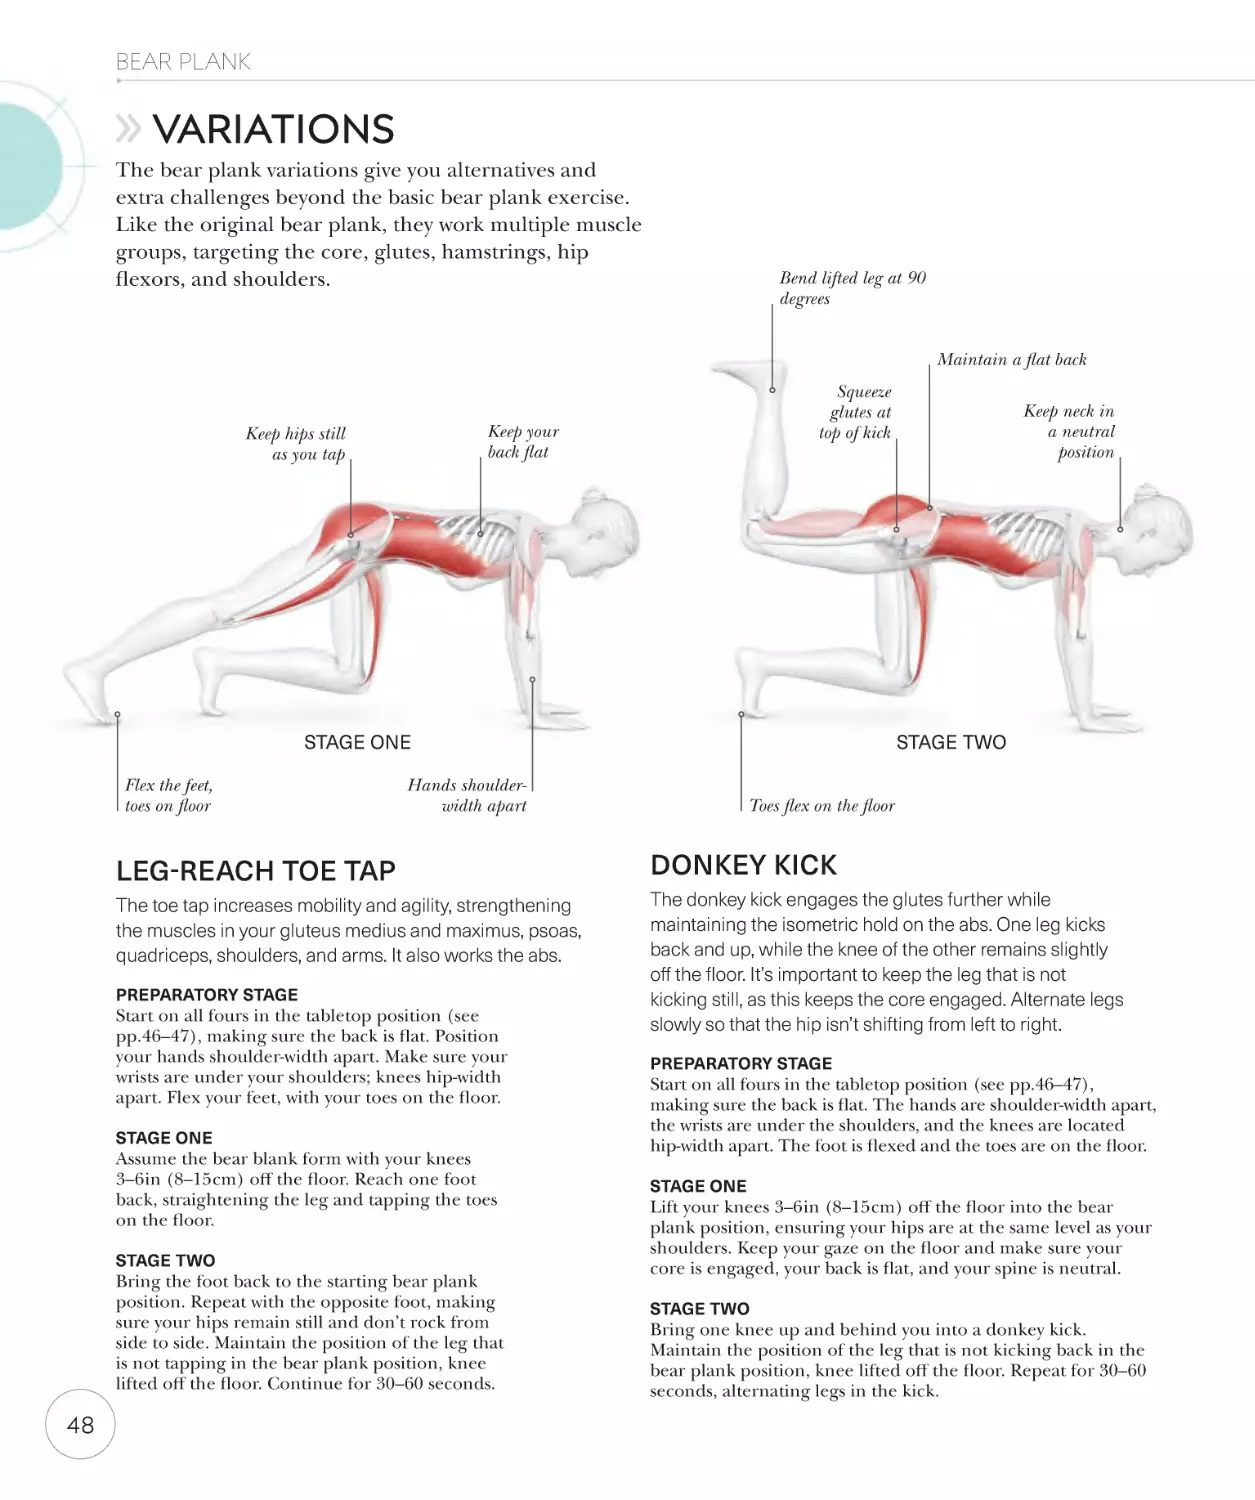
Variations
46
48
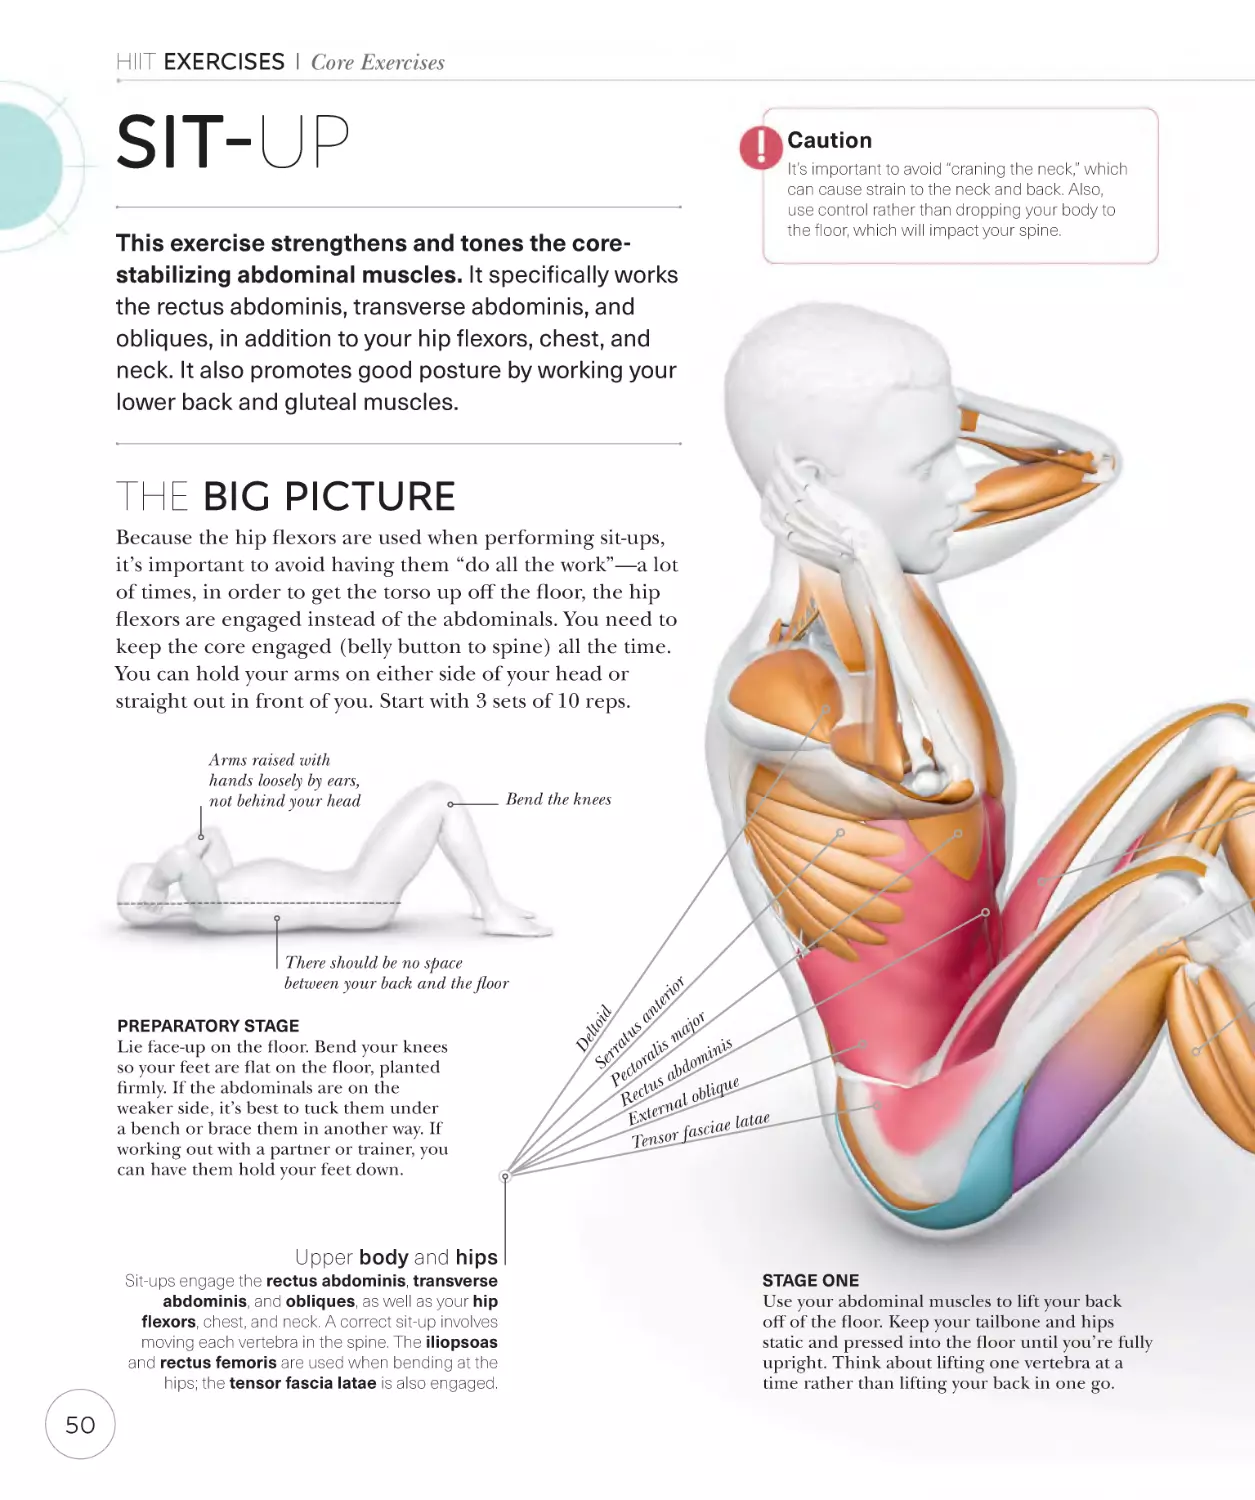
Sit-up
50
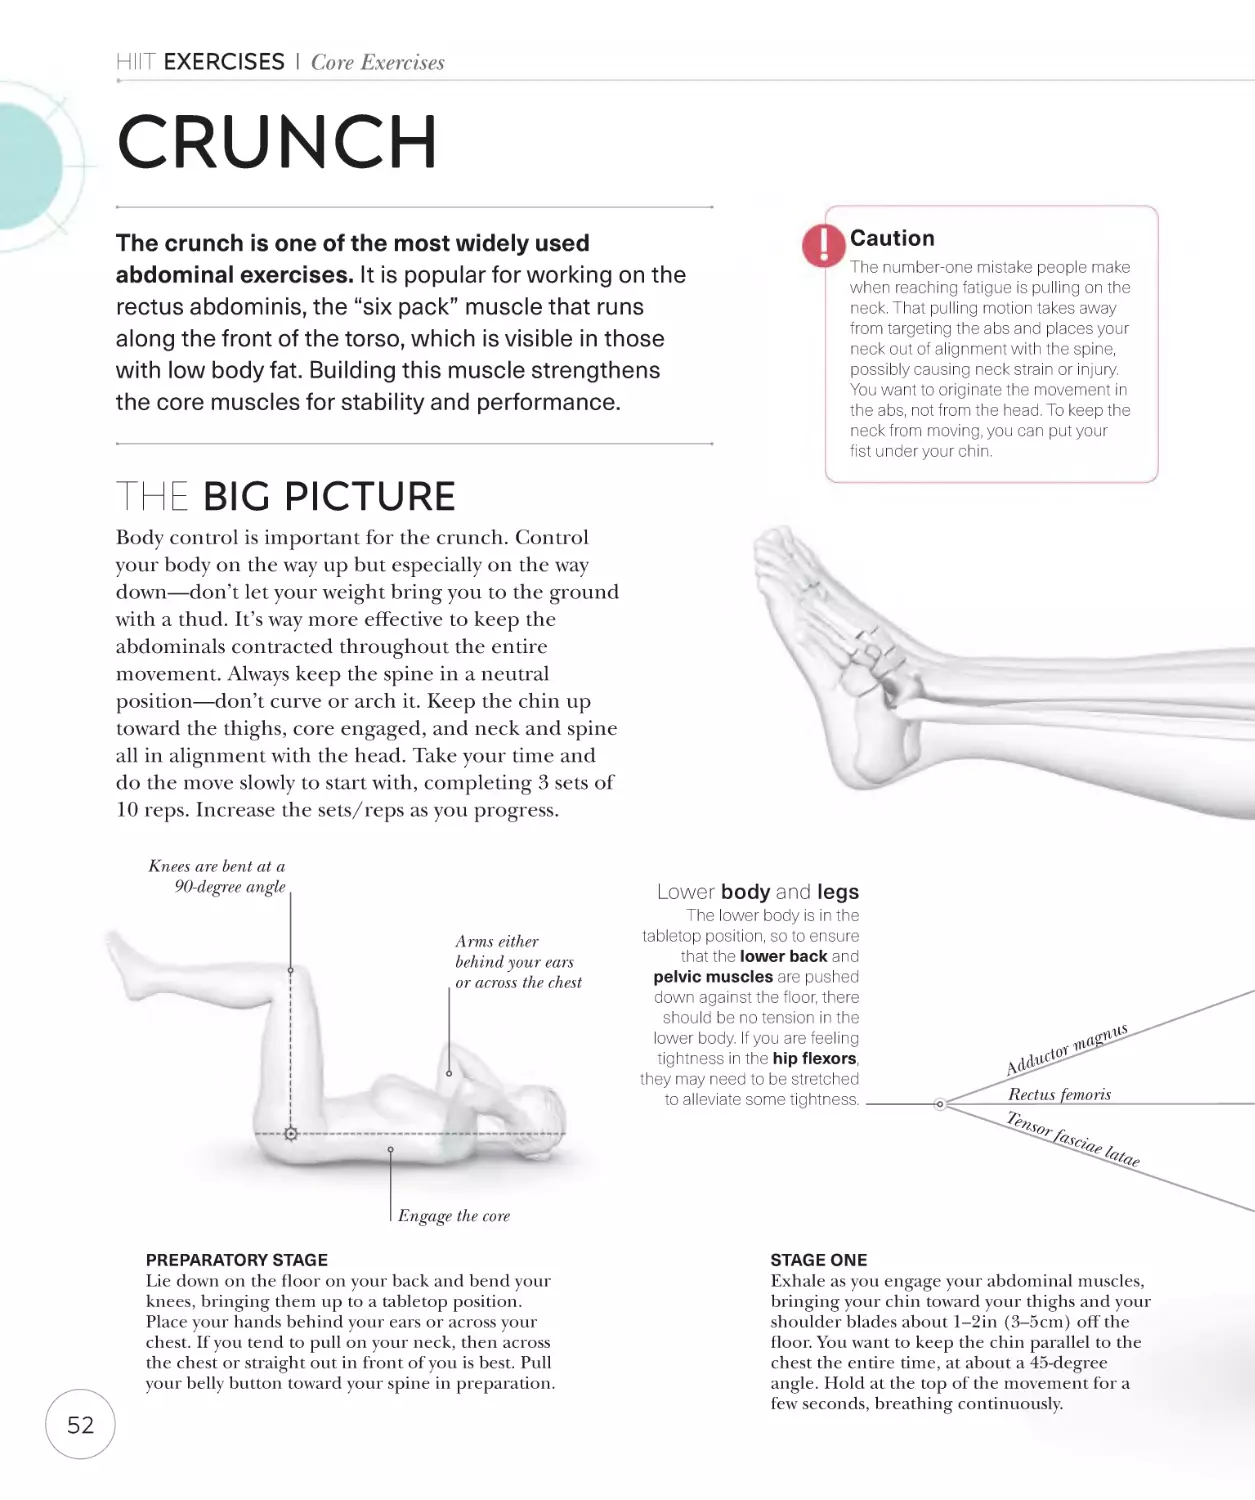
Crunch
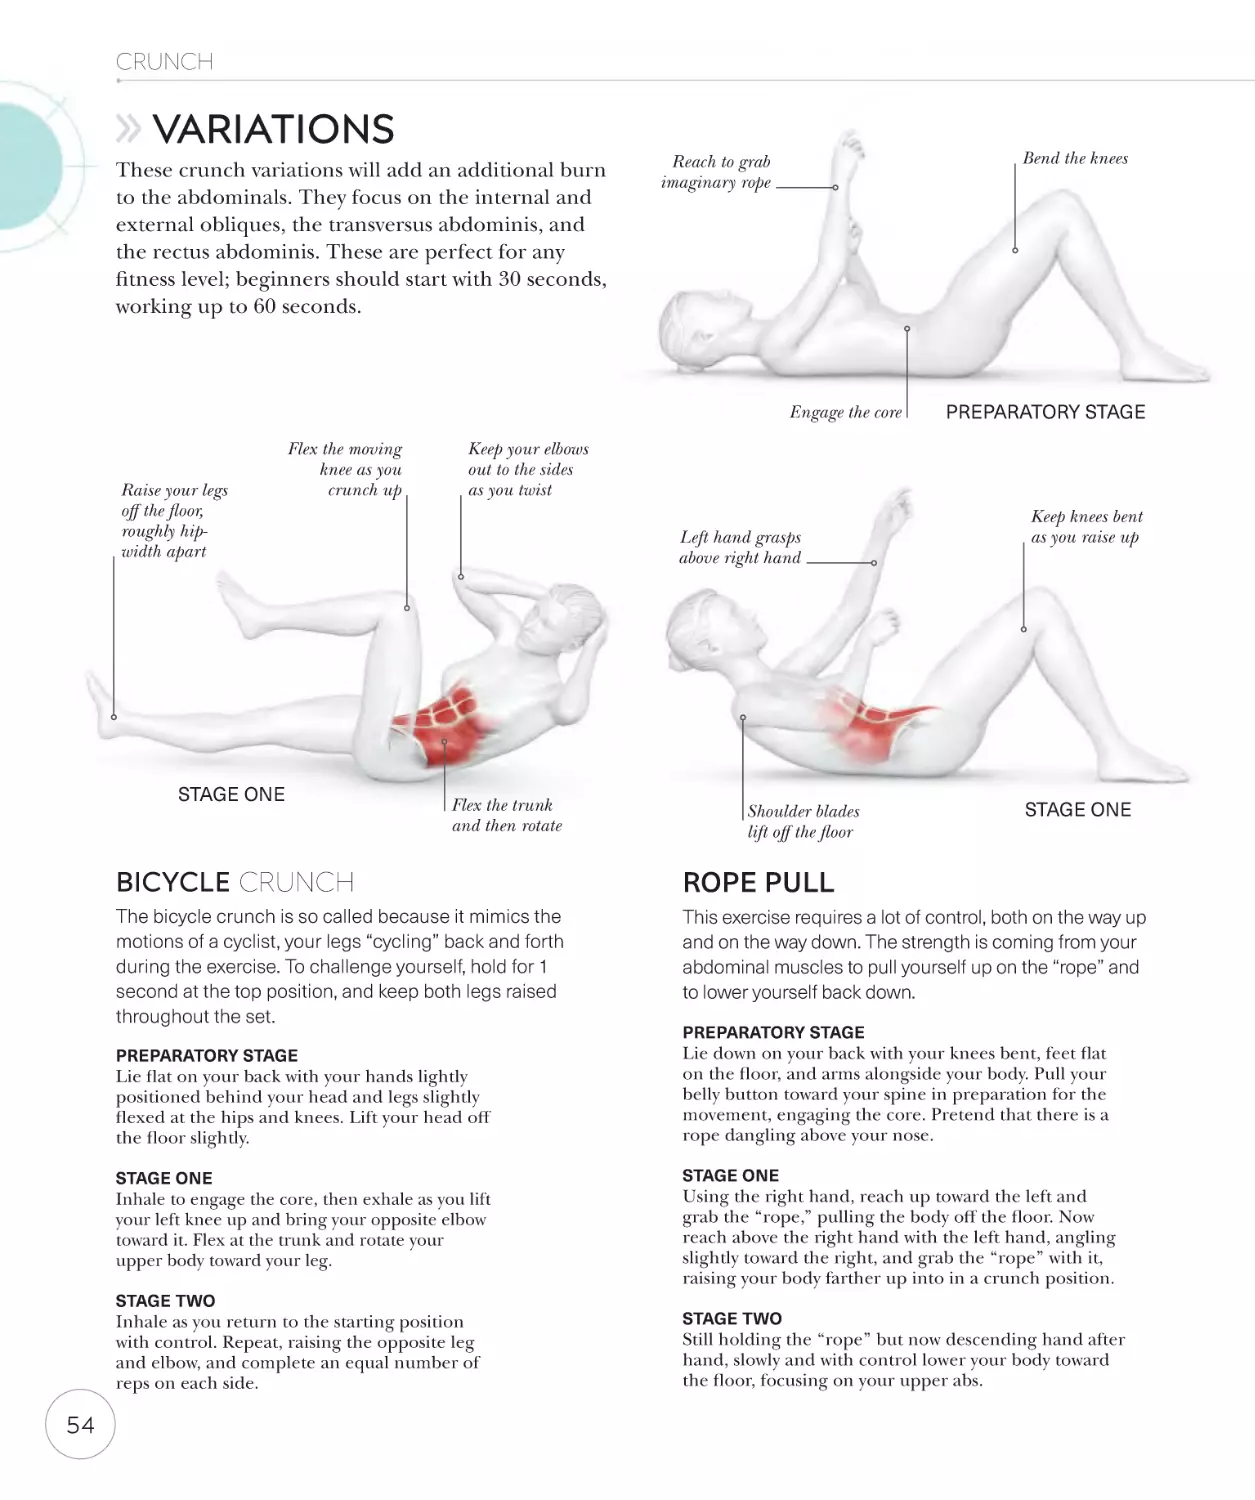
Variations
52
54
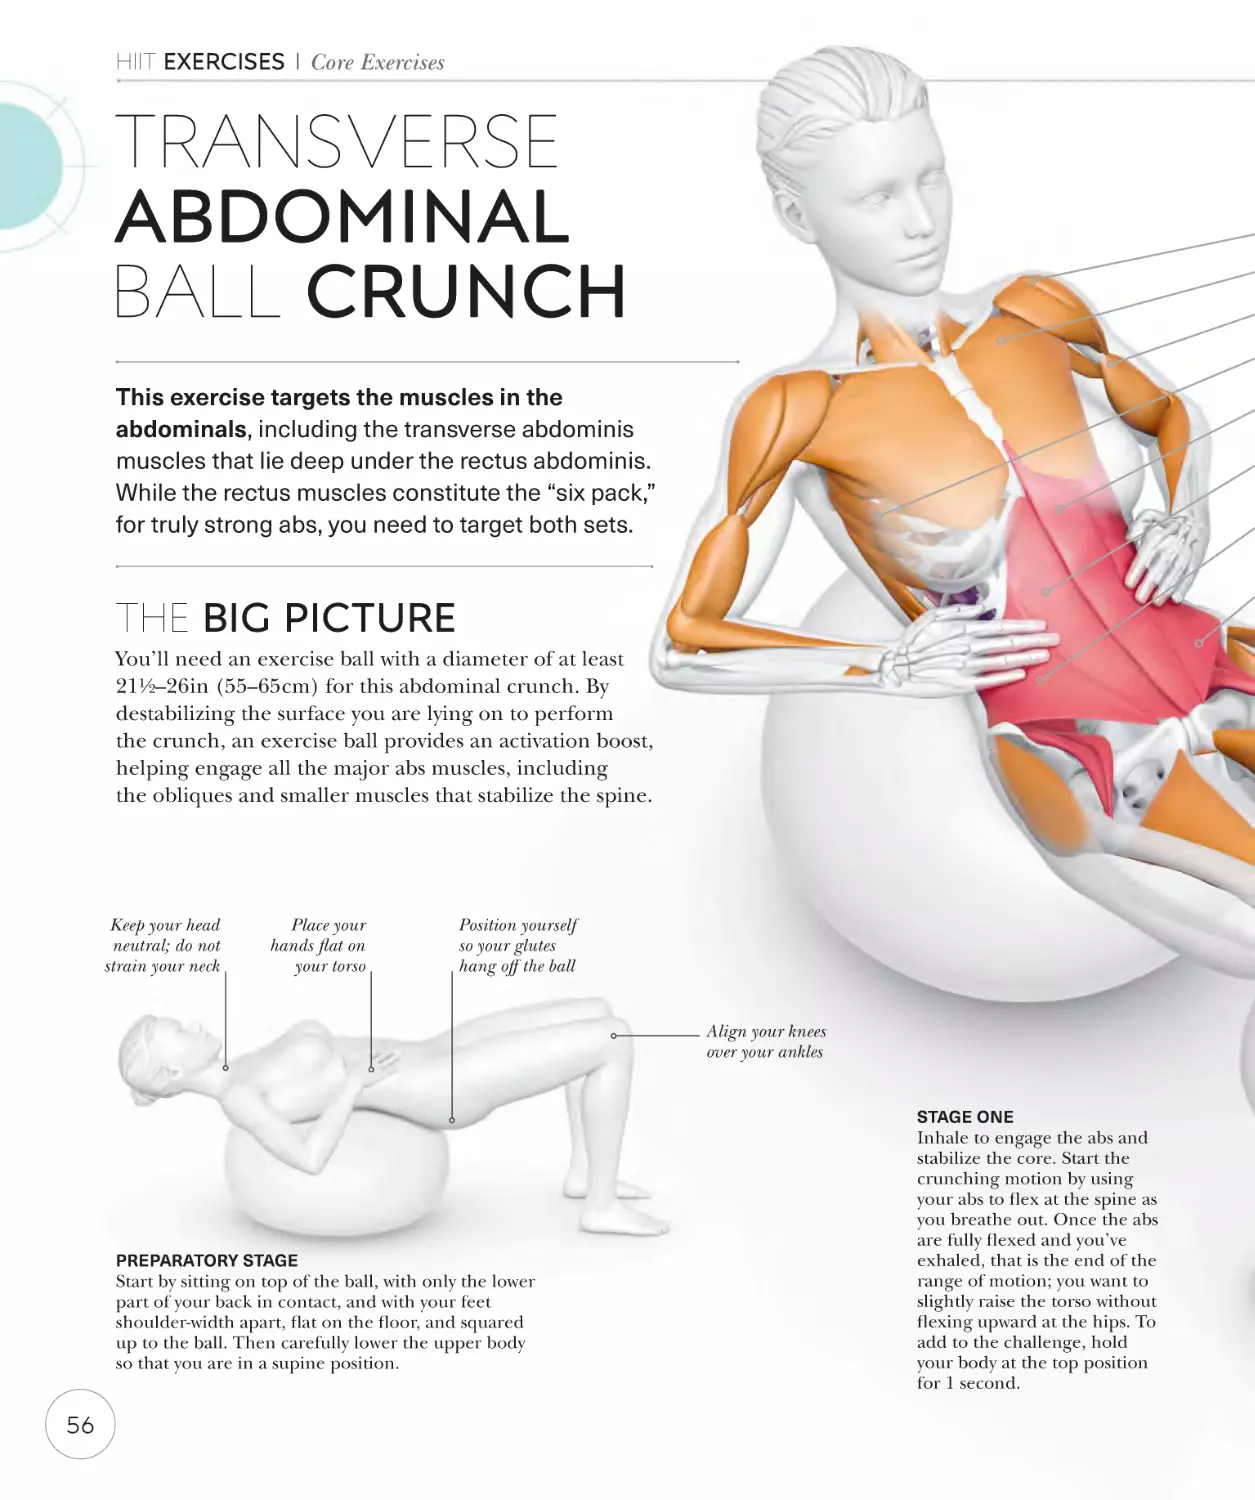
Transverse abdominal
ball crunch
56
58
60
Powering your HIIT
workout
12
Improving your cardio fitness
14
The HIIT “afterburn”
16
How muscles work
18
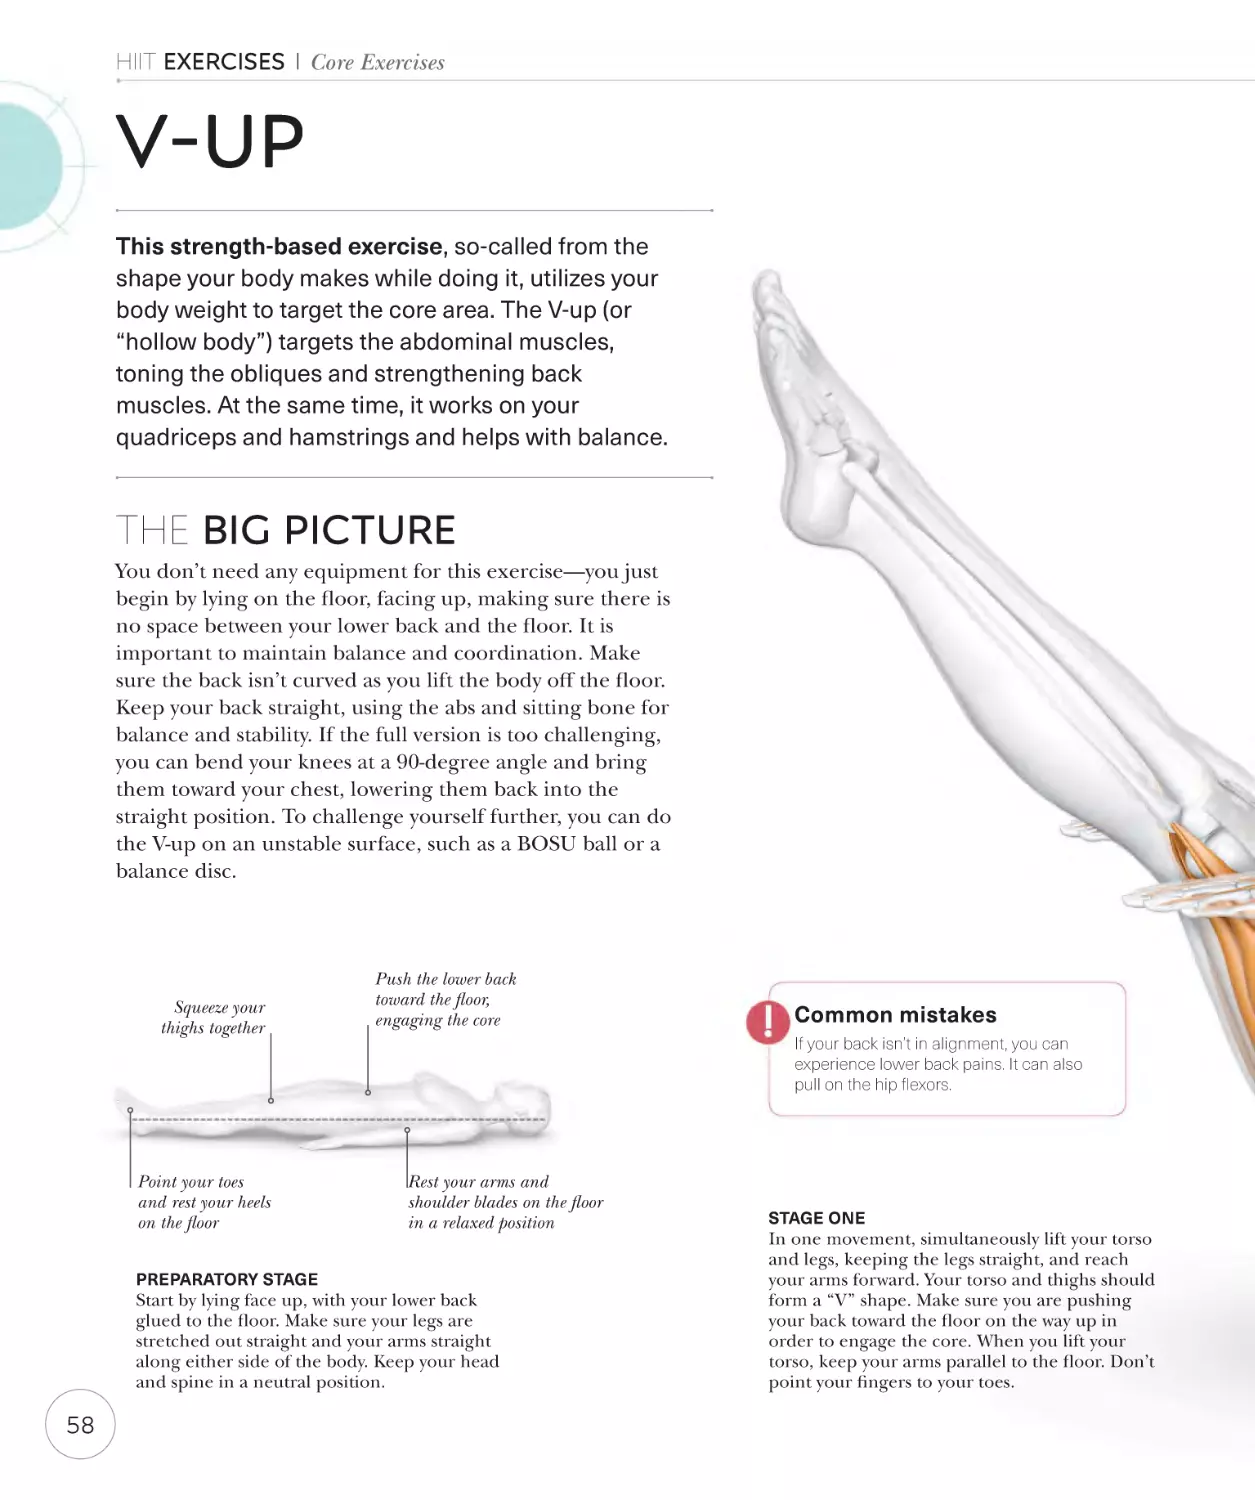
V-up
Variations
How HIIT promotes muscle
growth
20
UPPER BODY EXERCISES
Muscular anatomy
22
HIIT training and the brain
24
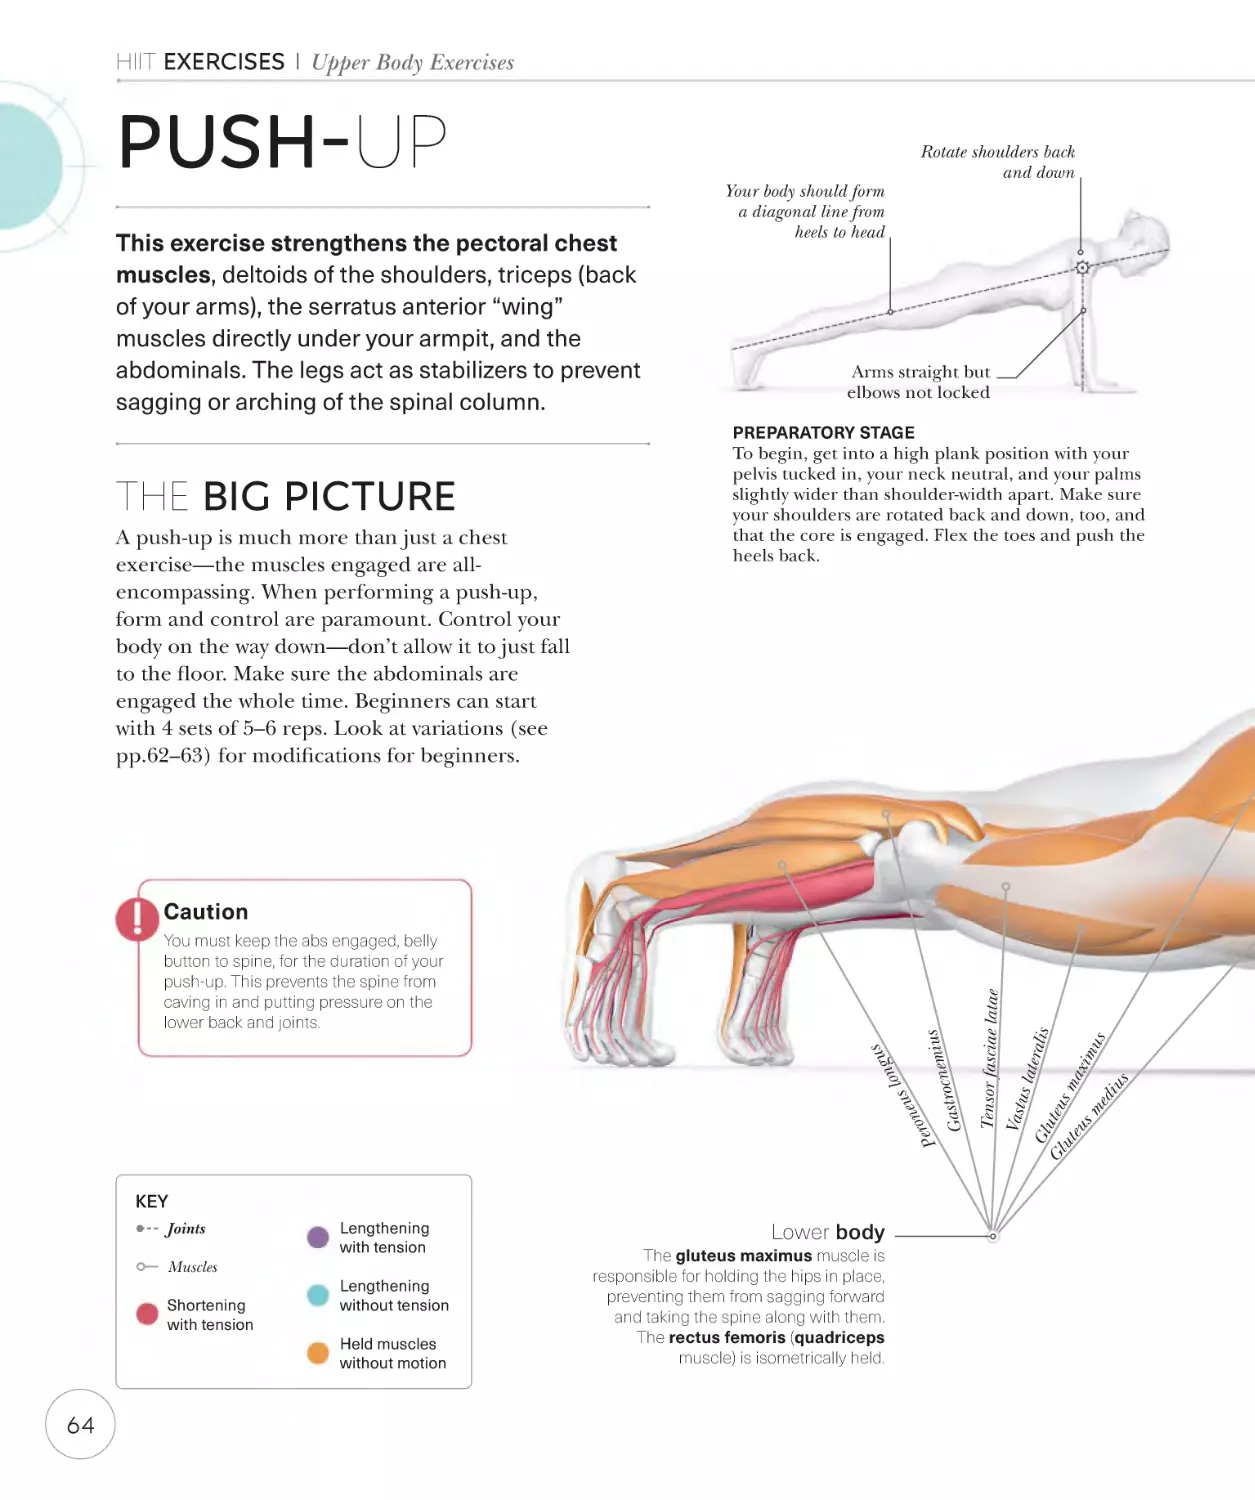
Push-up
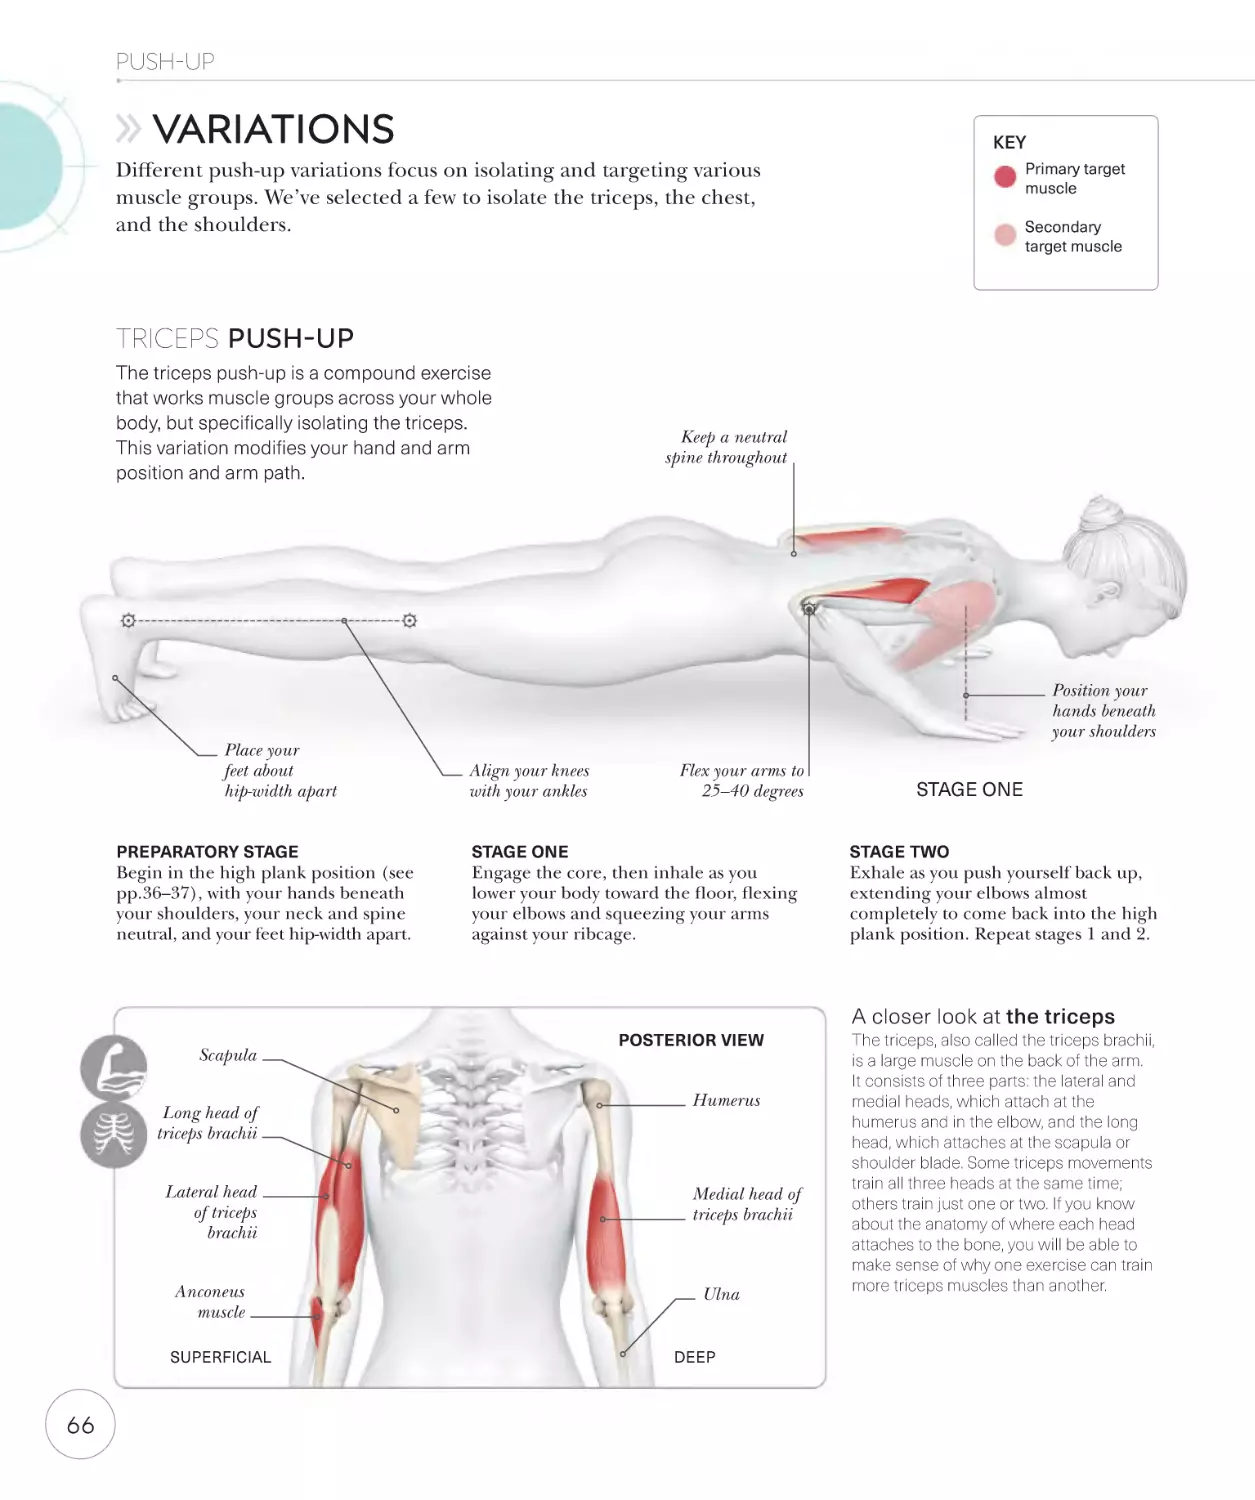
Variations
64
66
Feeding your HIIT
26
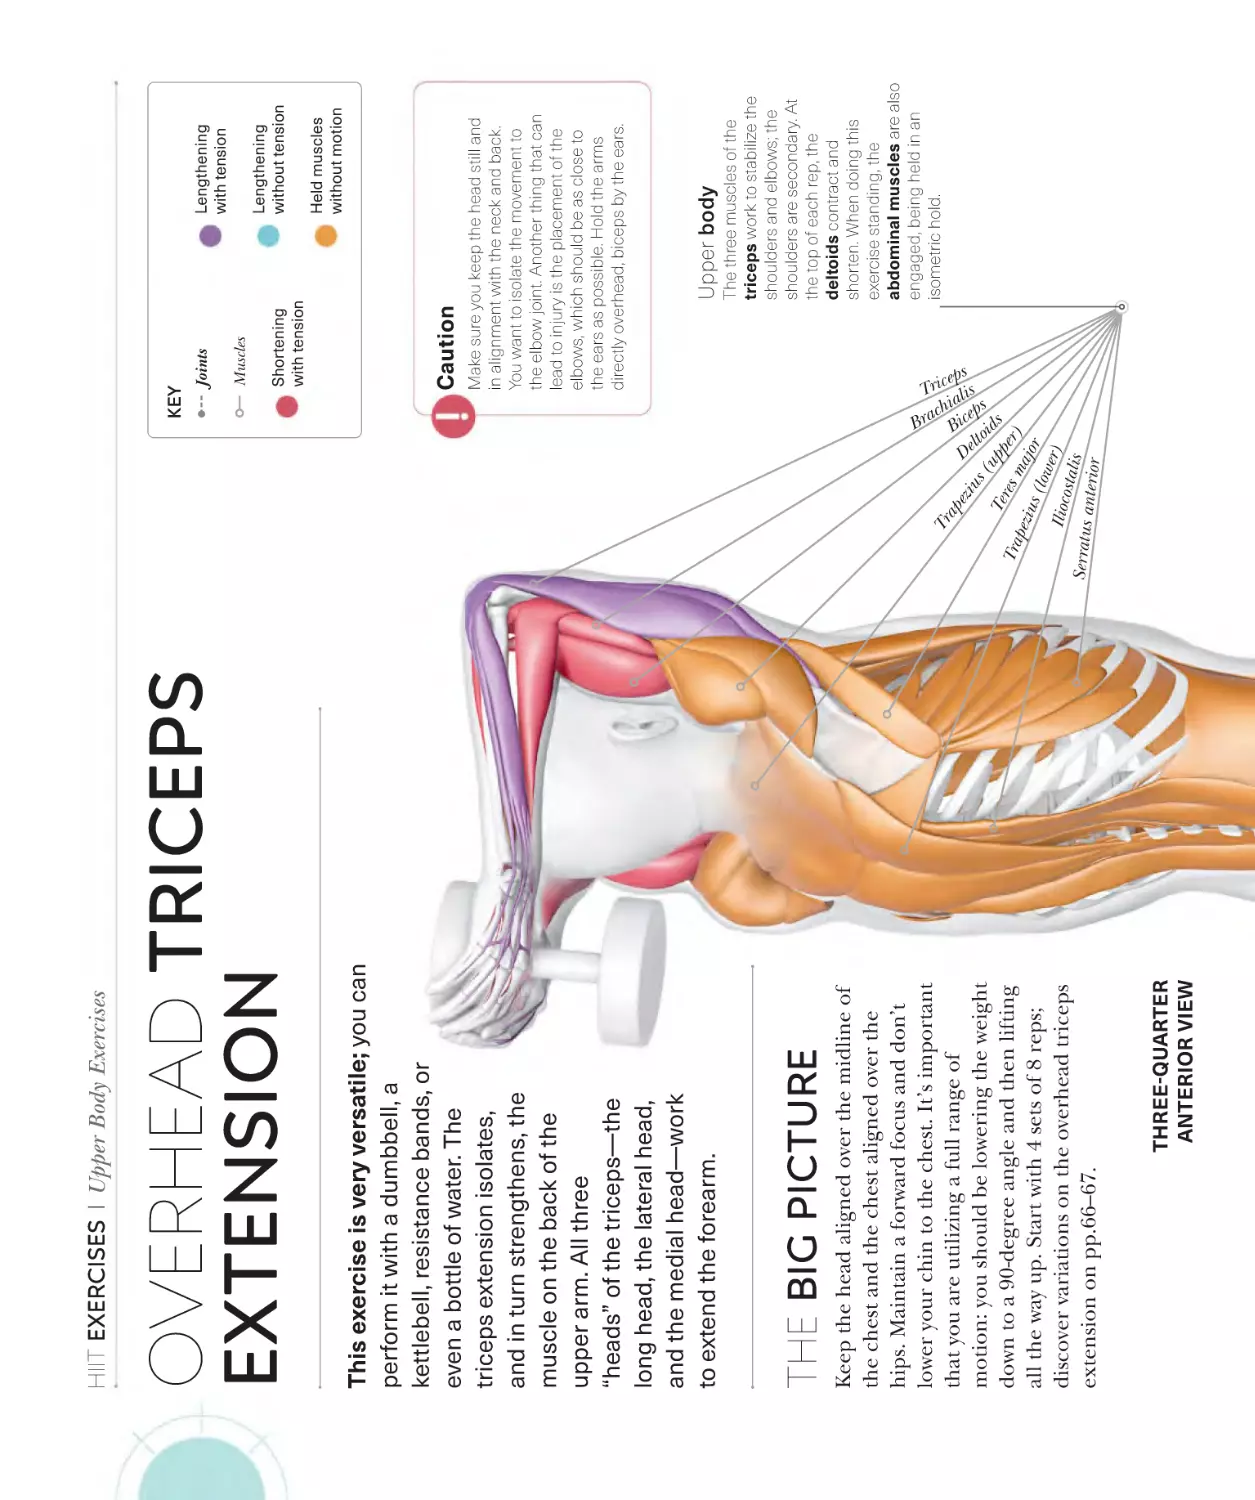
Overhead triceps extension
Variations
68
70
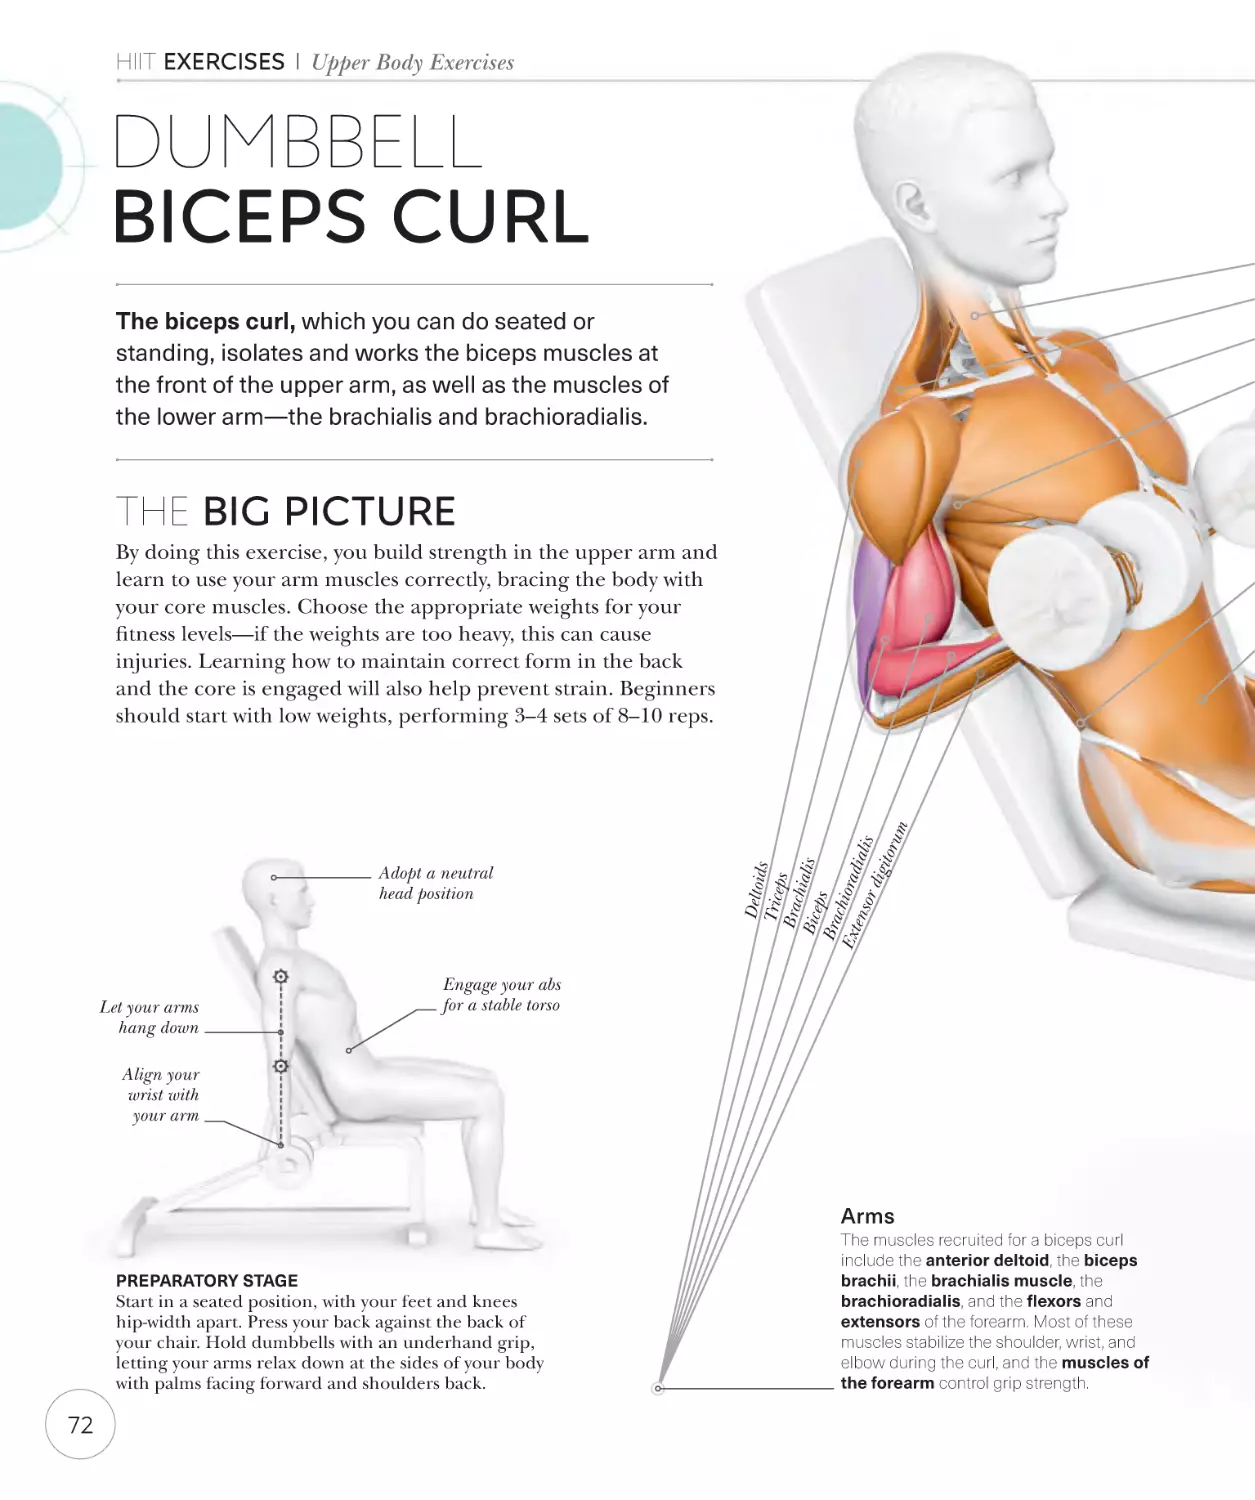
Dumbbell biceps curl
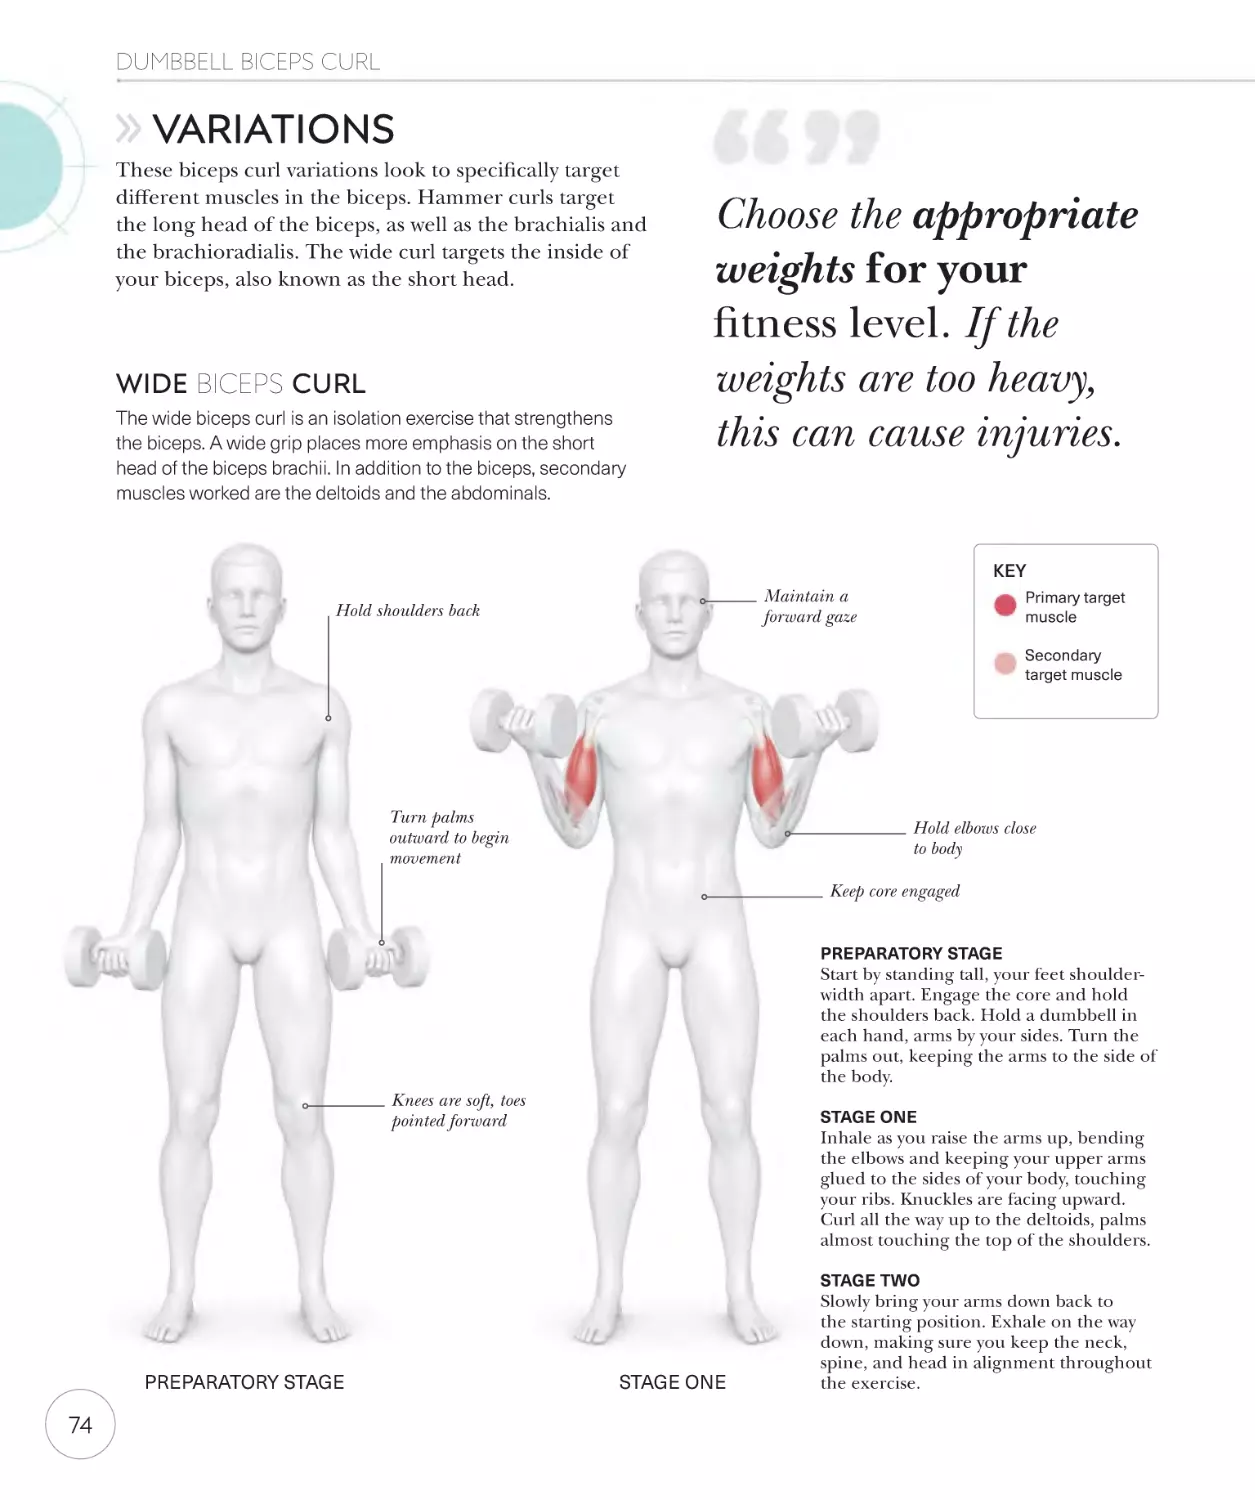
Variations
72
74
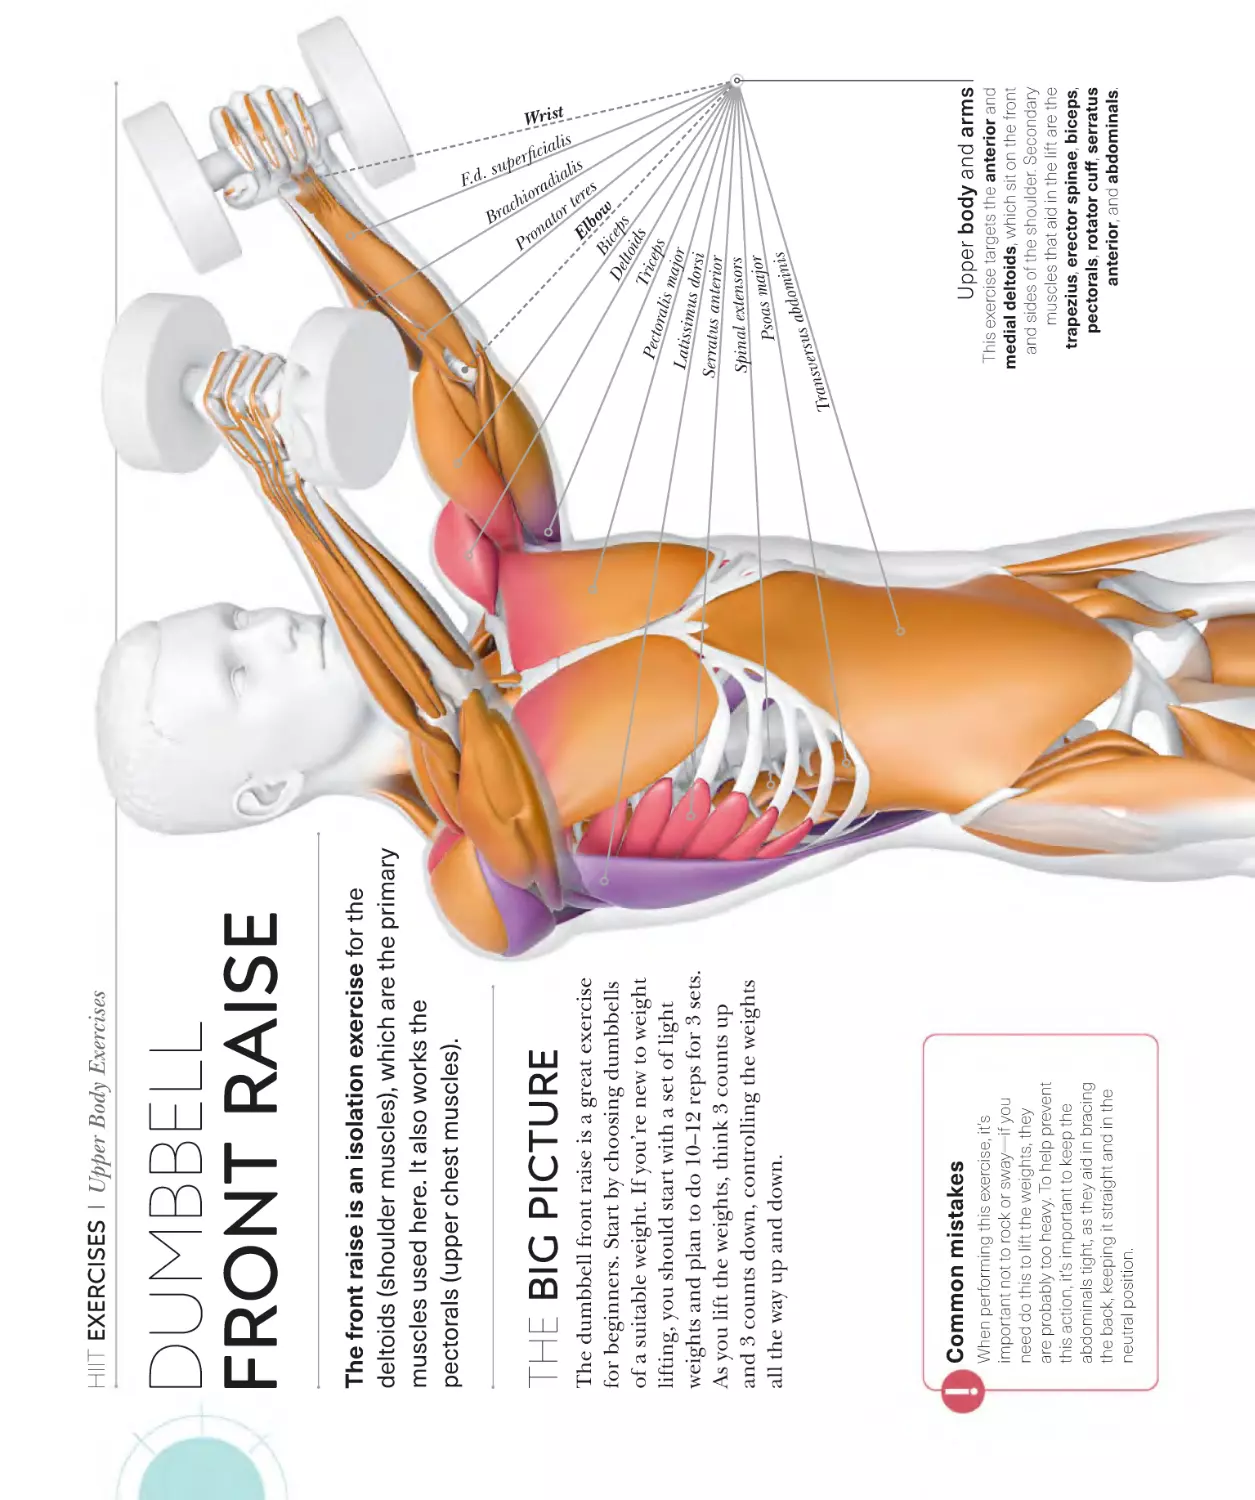
Dumbbell front raise
Variations
76
78
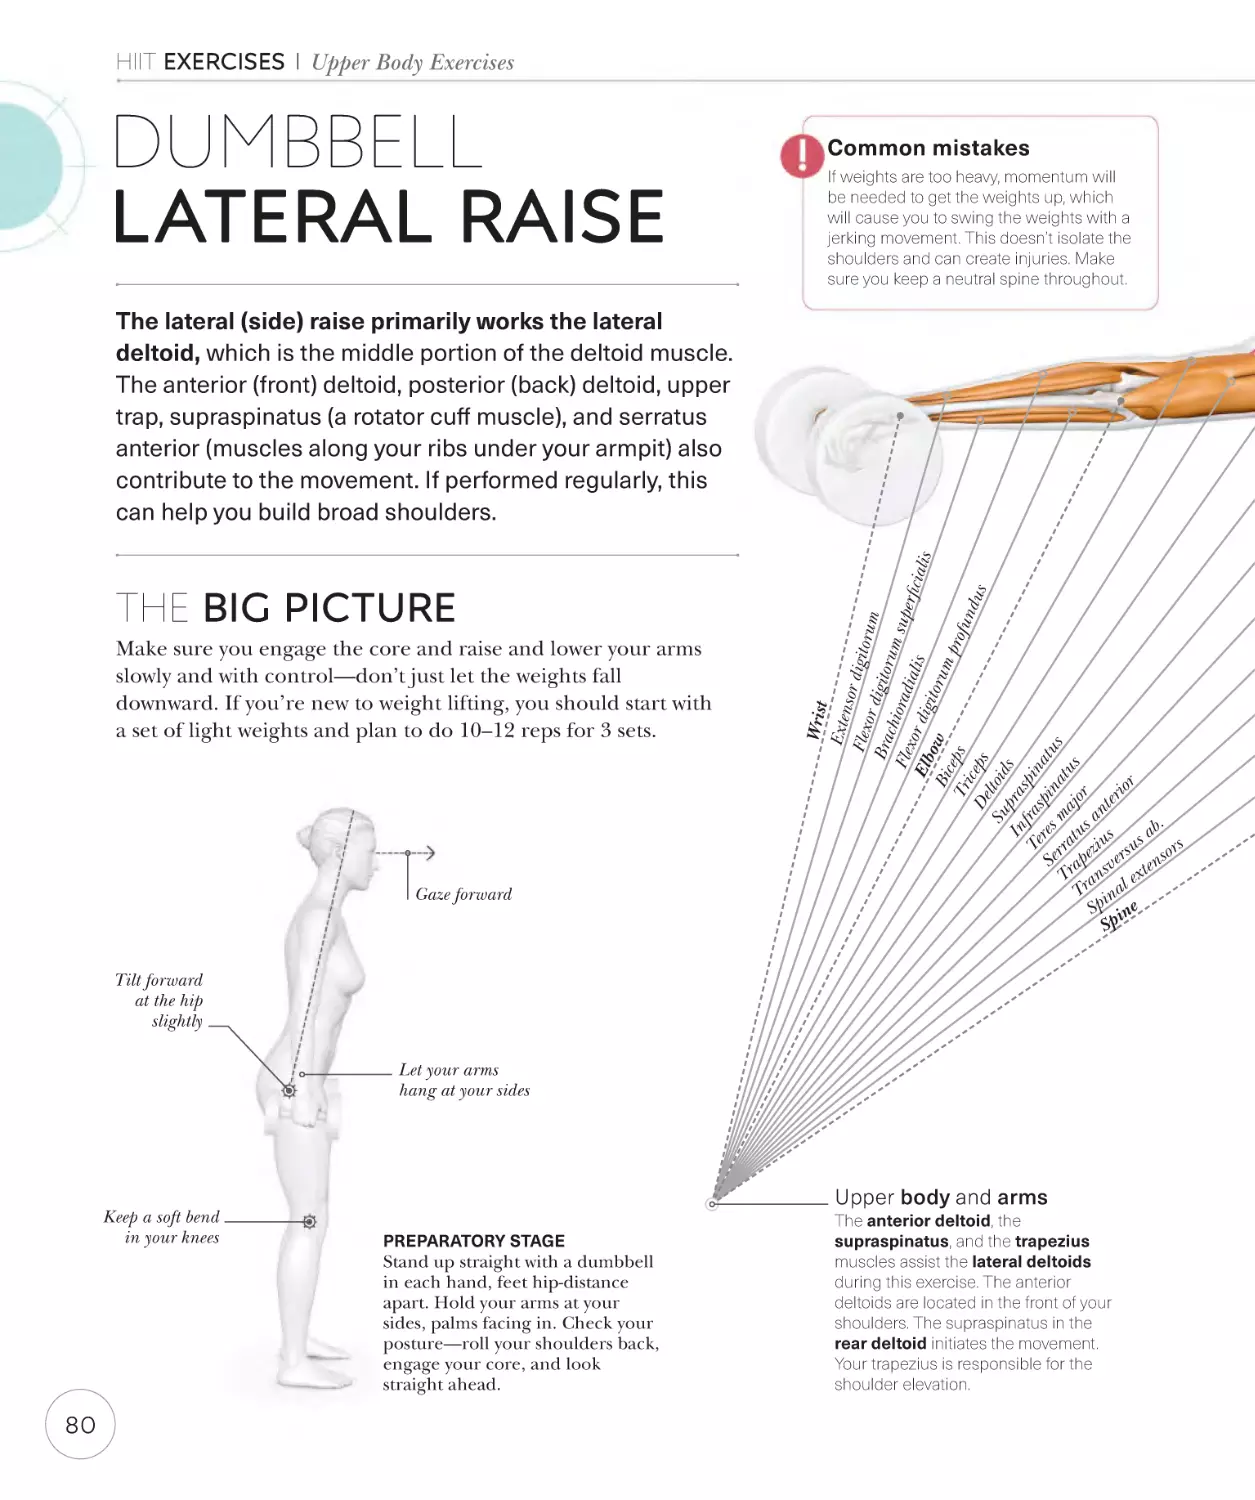
Dumbbell lateral raise
80
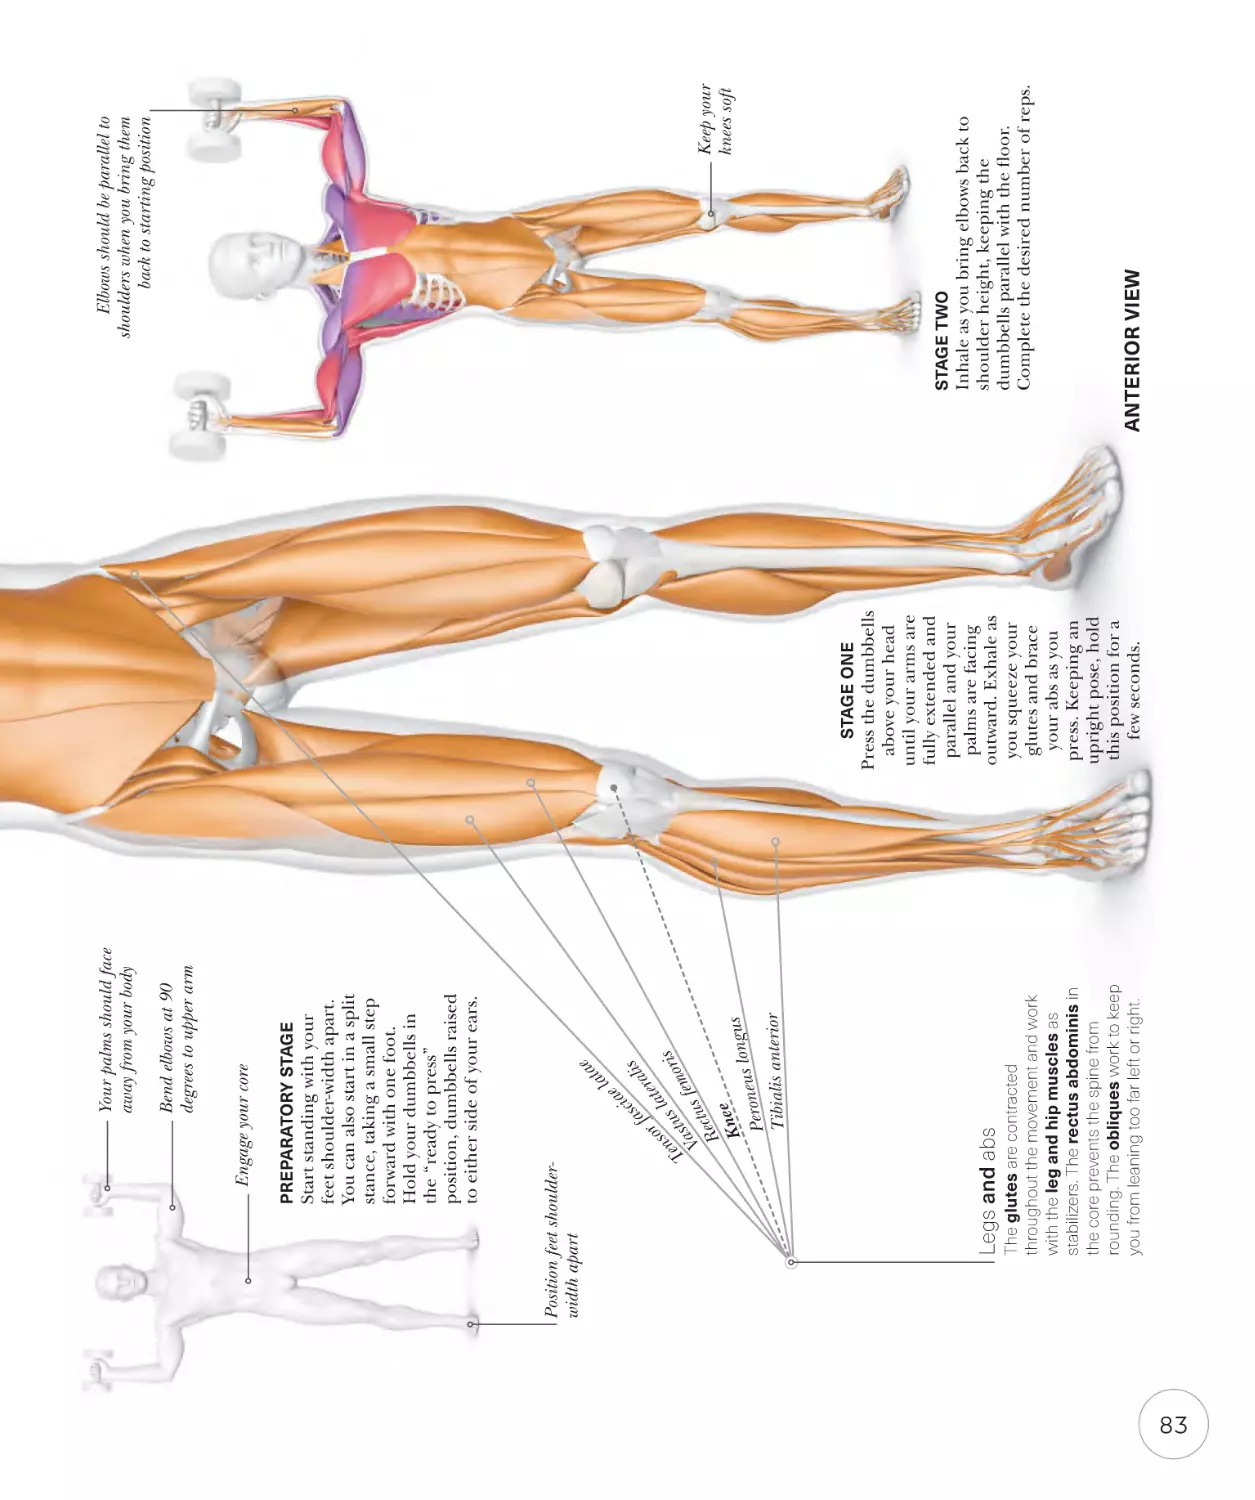
Military shoulder press
Variations
82
84
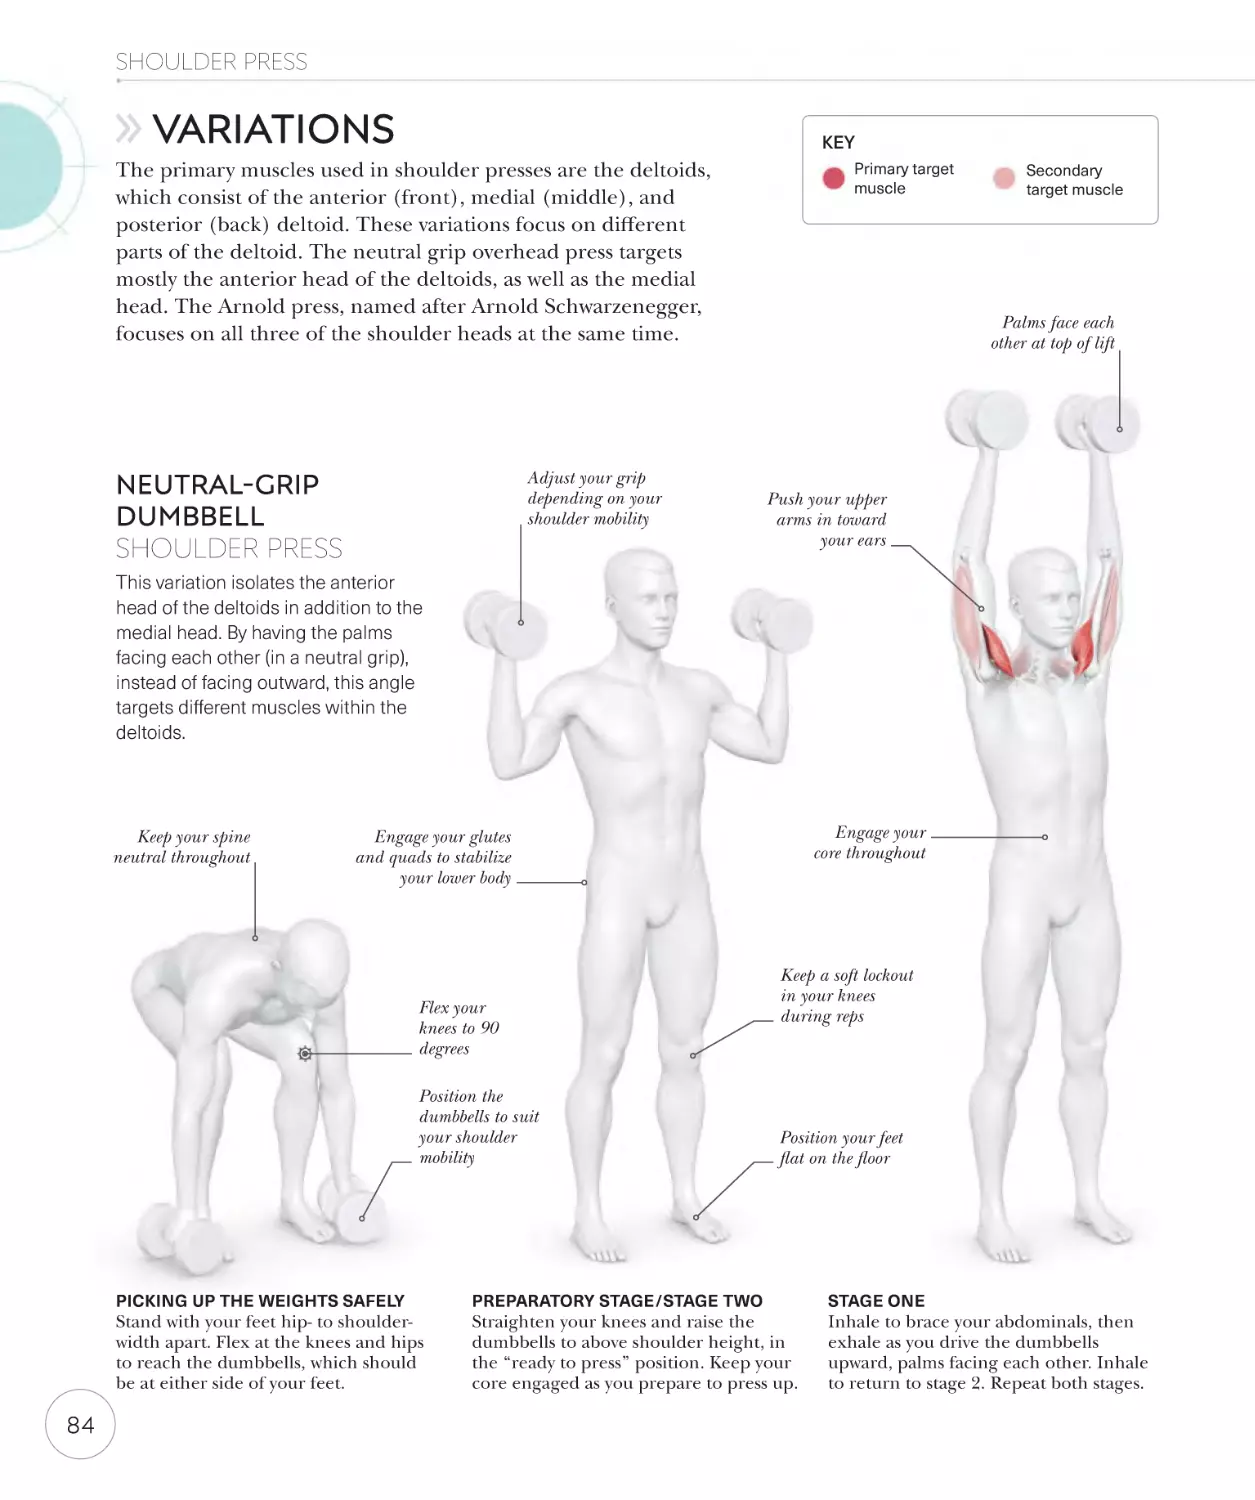
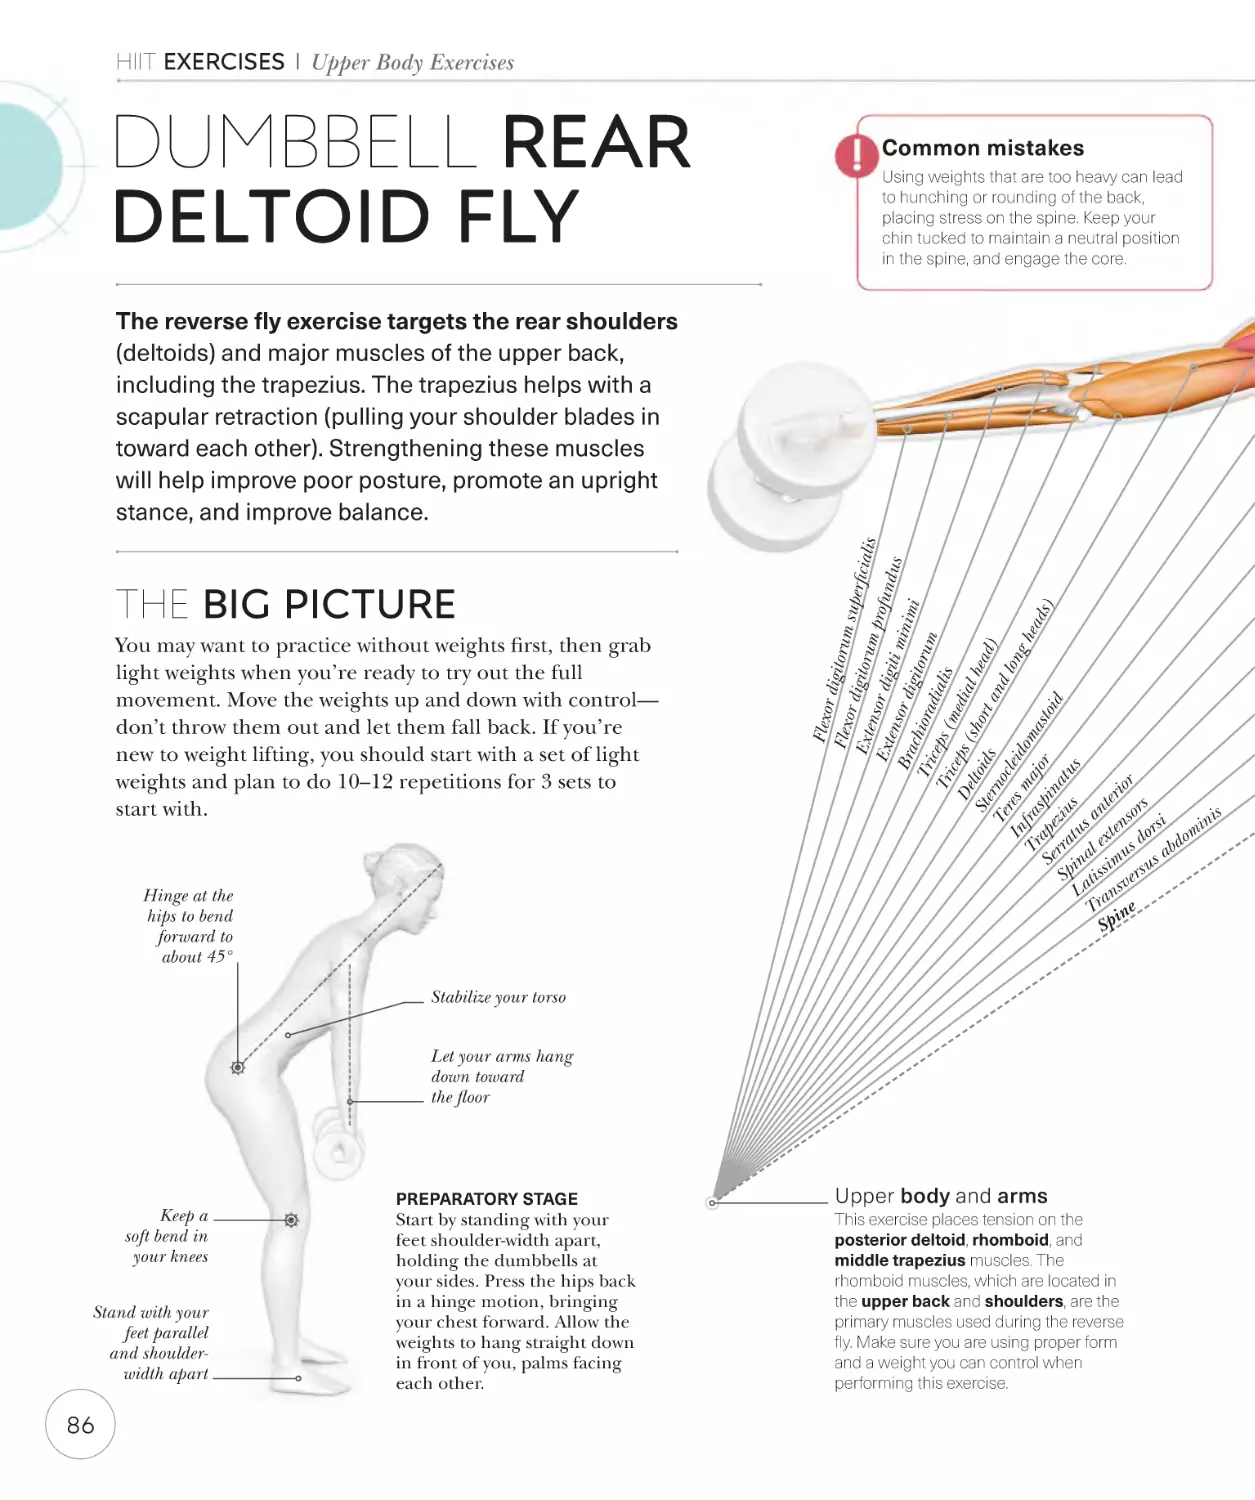
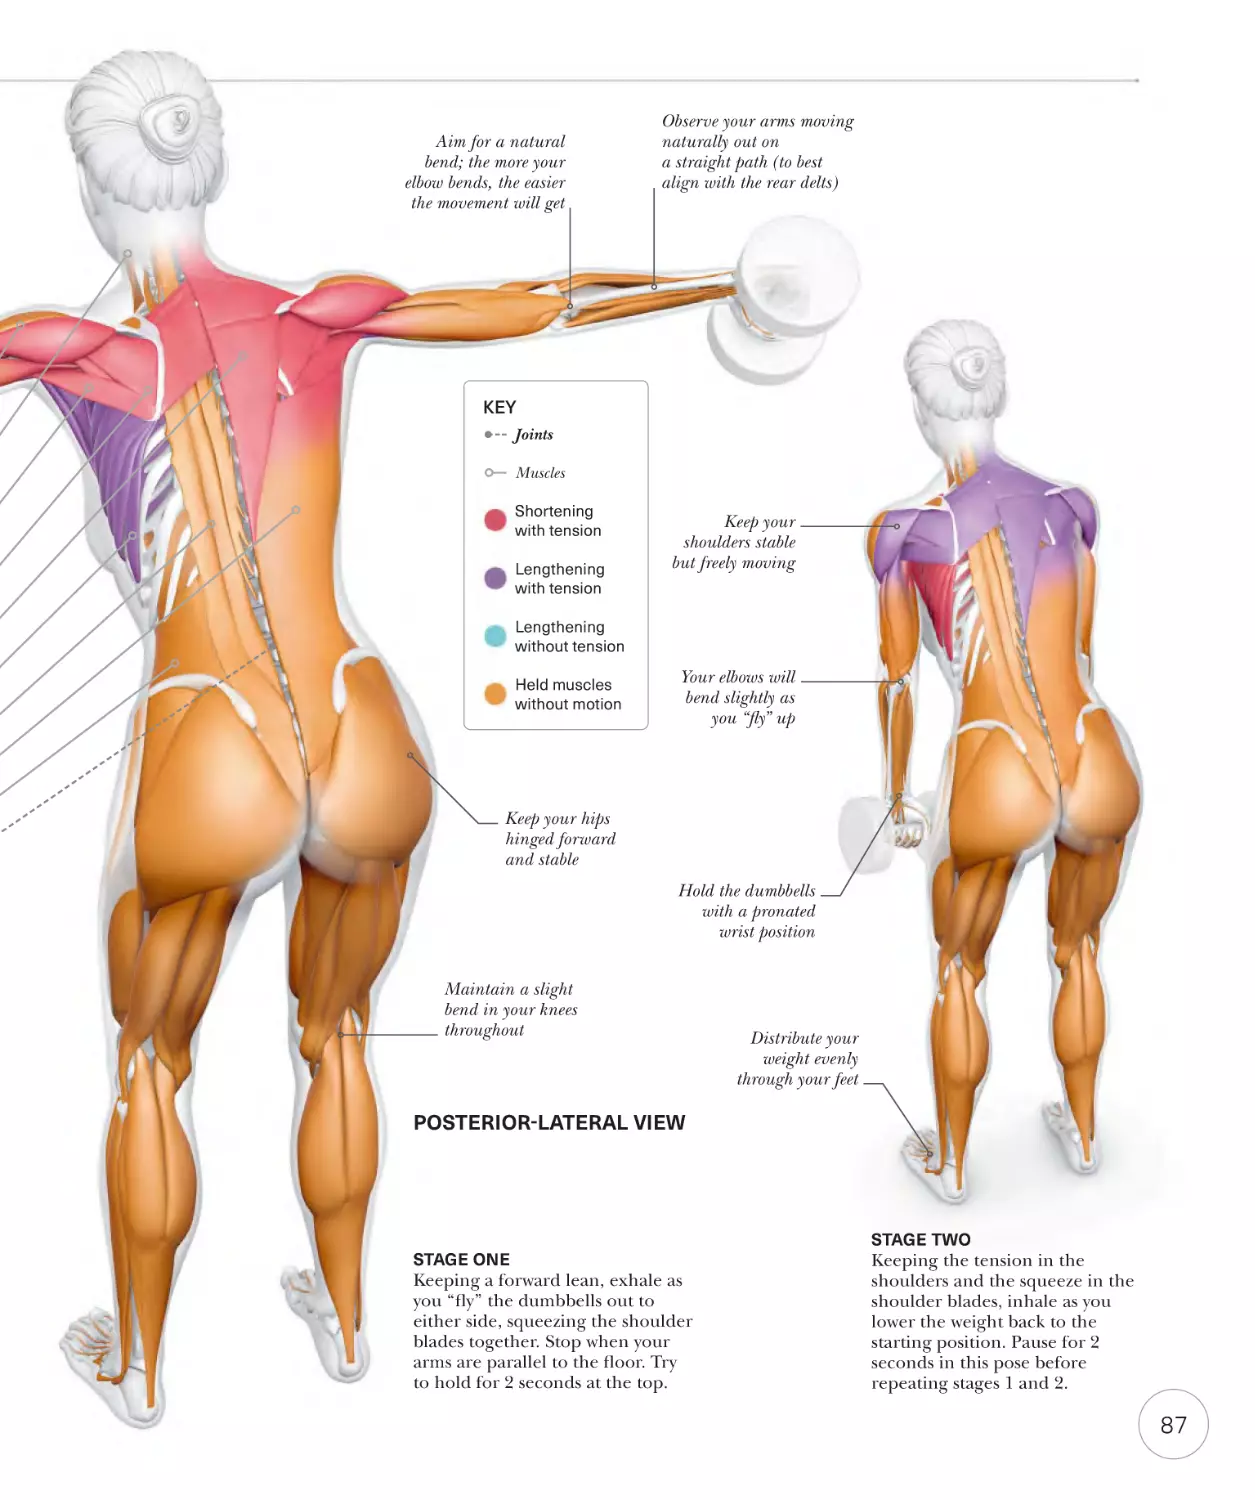
Dumbbell rear deltoid fly
Variations
86
88
HIIT
EXERCISES
Introduction to the exercises
30
Terminology guide
32
CORE EXERCISES
This book was made with Forest
Stewardship Council ™ certified
paper – one small step in DK’s
commitment to a sustainable
future. For more information go to
www.dk.com/our-green-pledge.
Swim plank
High plank to low plank
Variations
36
38
HIIT TRAINING
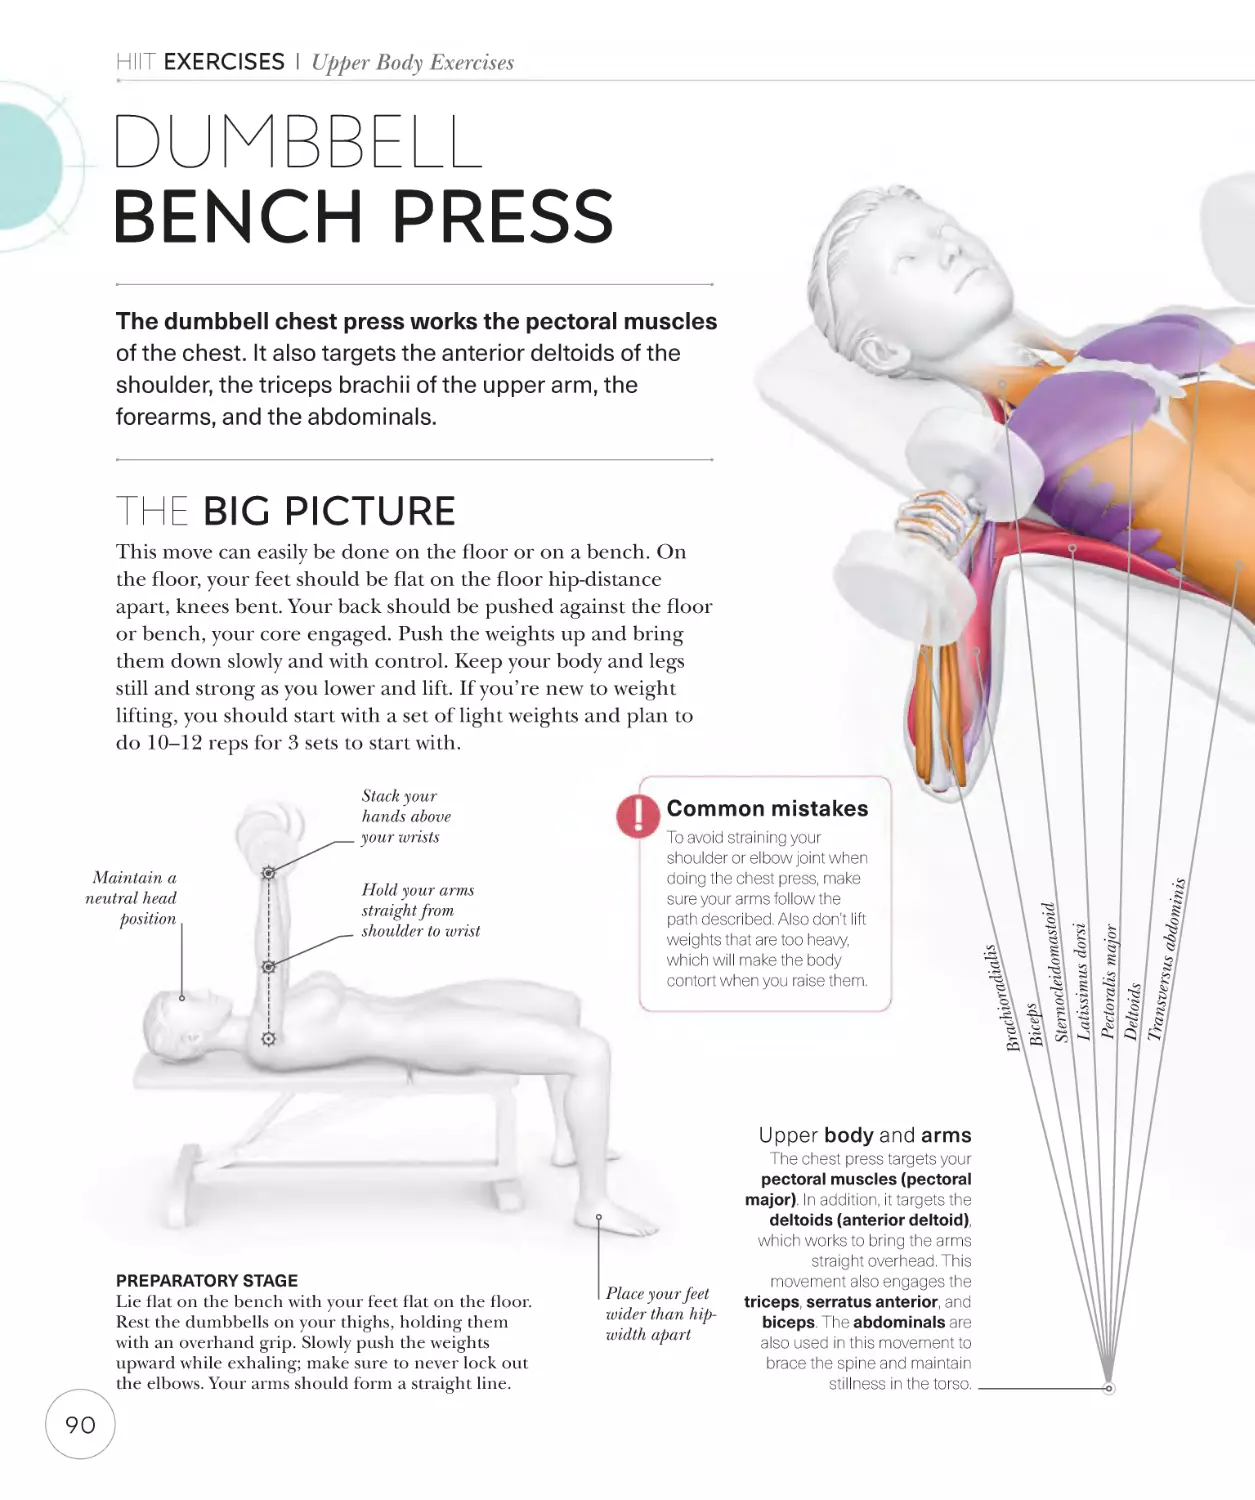
Dumbbell bench press
90
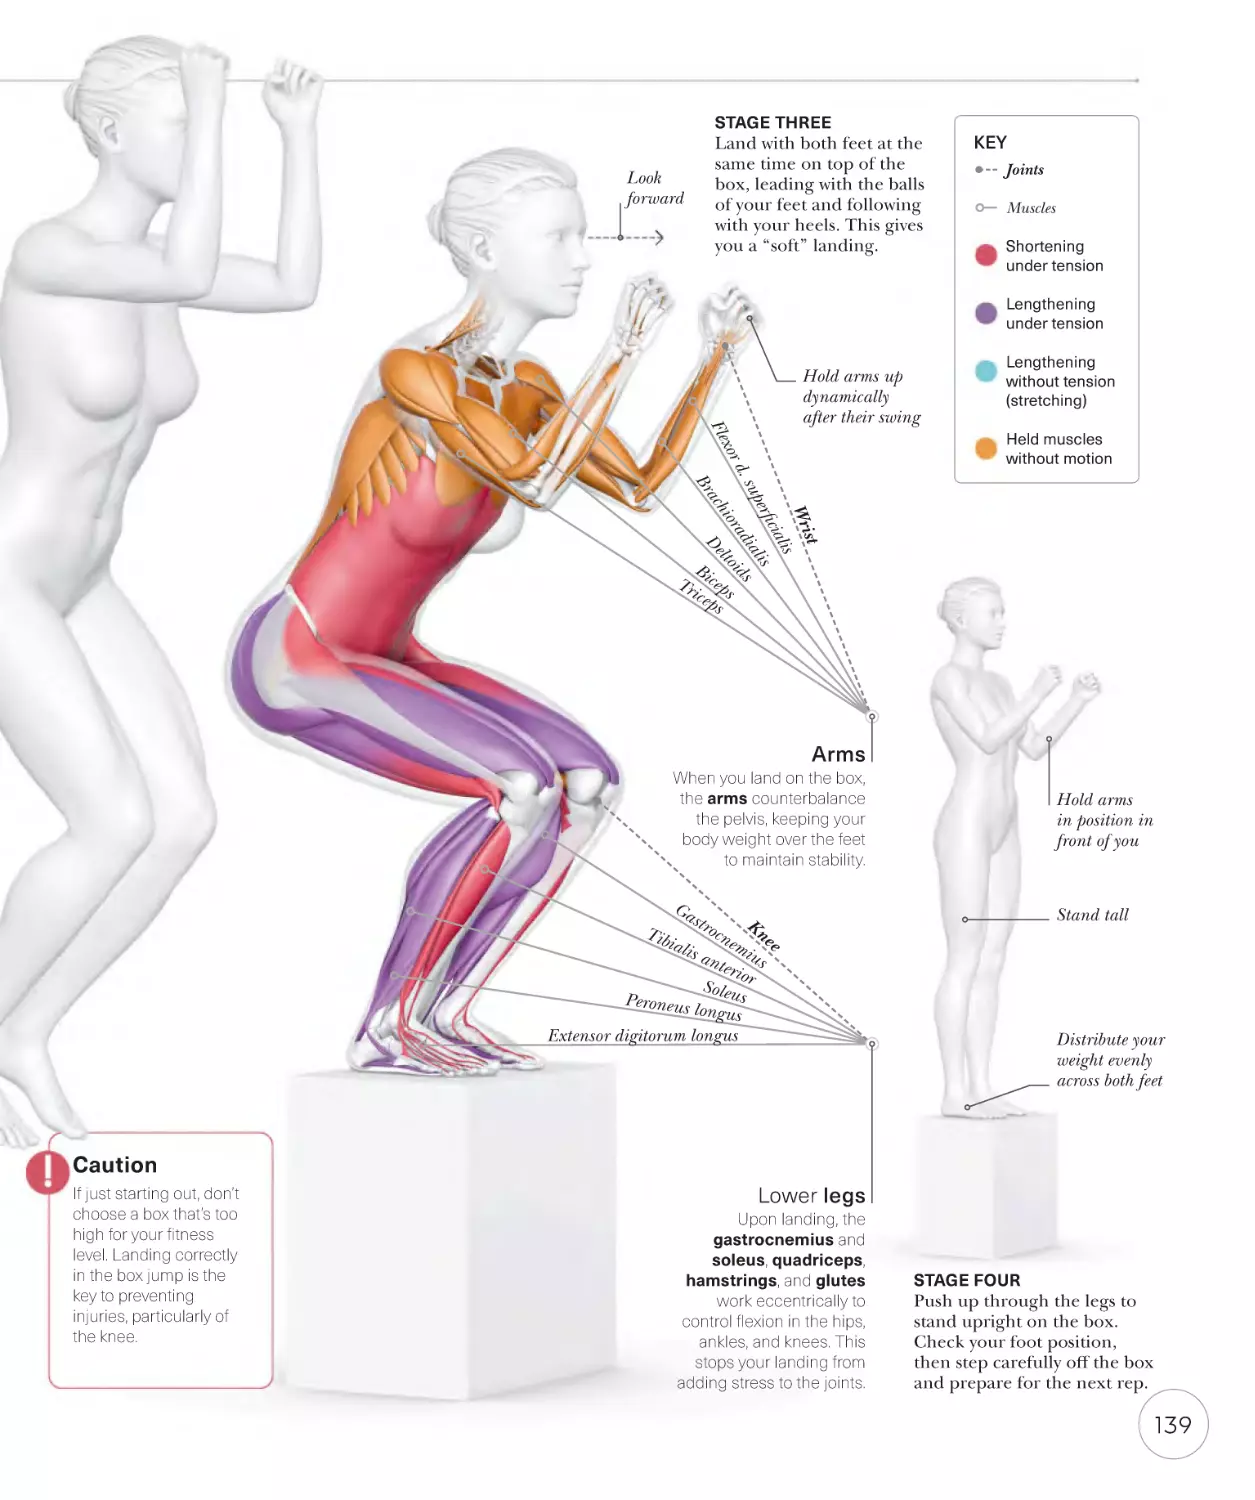
Box jump
138
Dumbbell chest fly
92
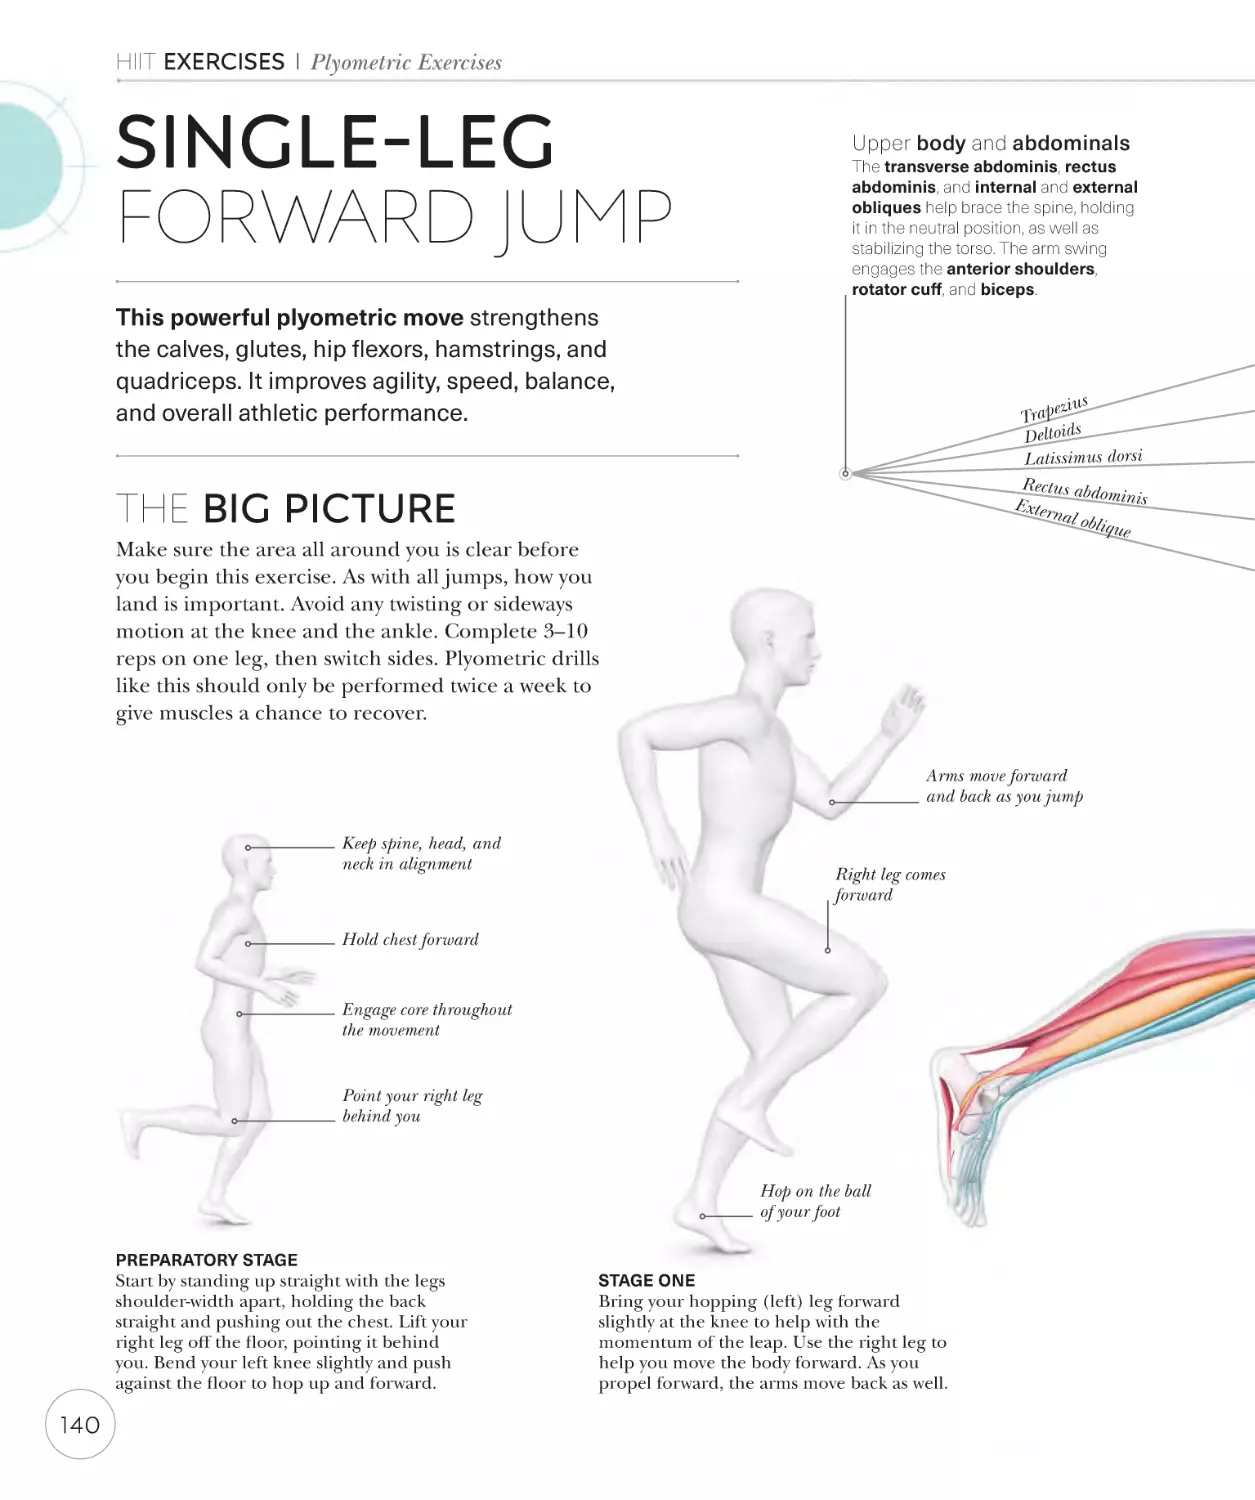
Single-leg forward jump
140
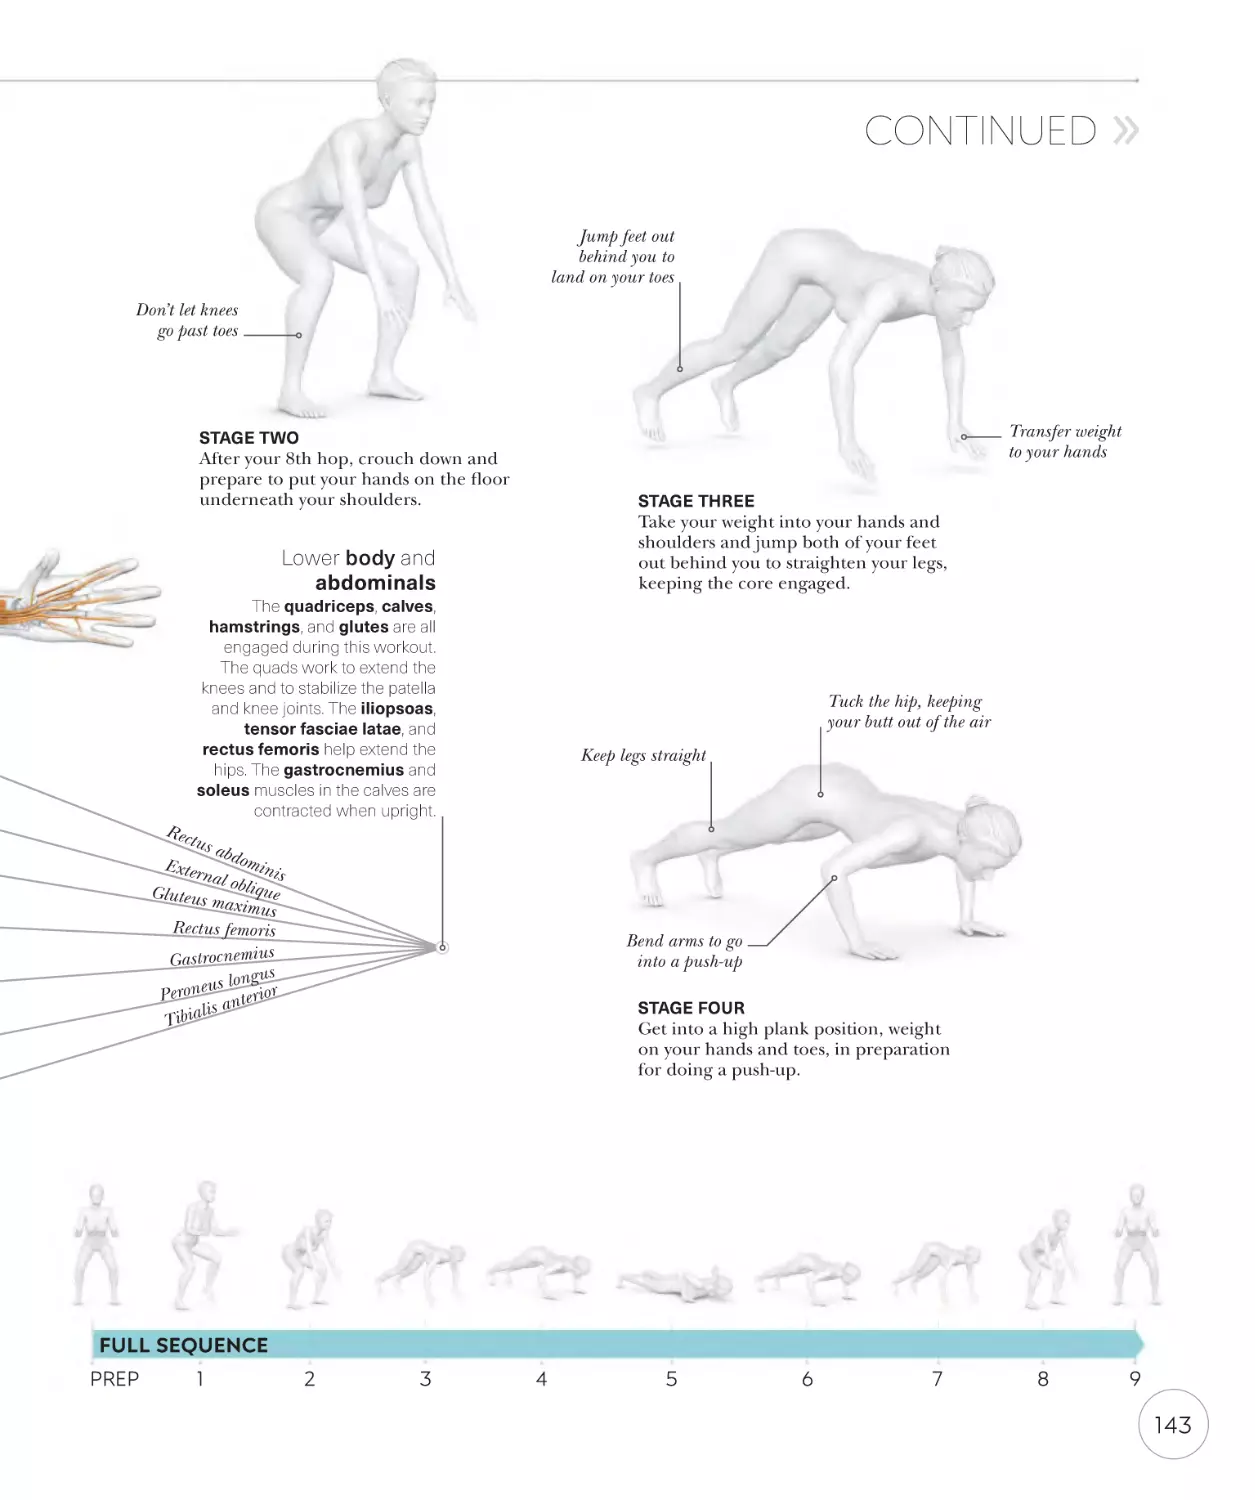
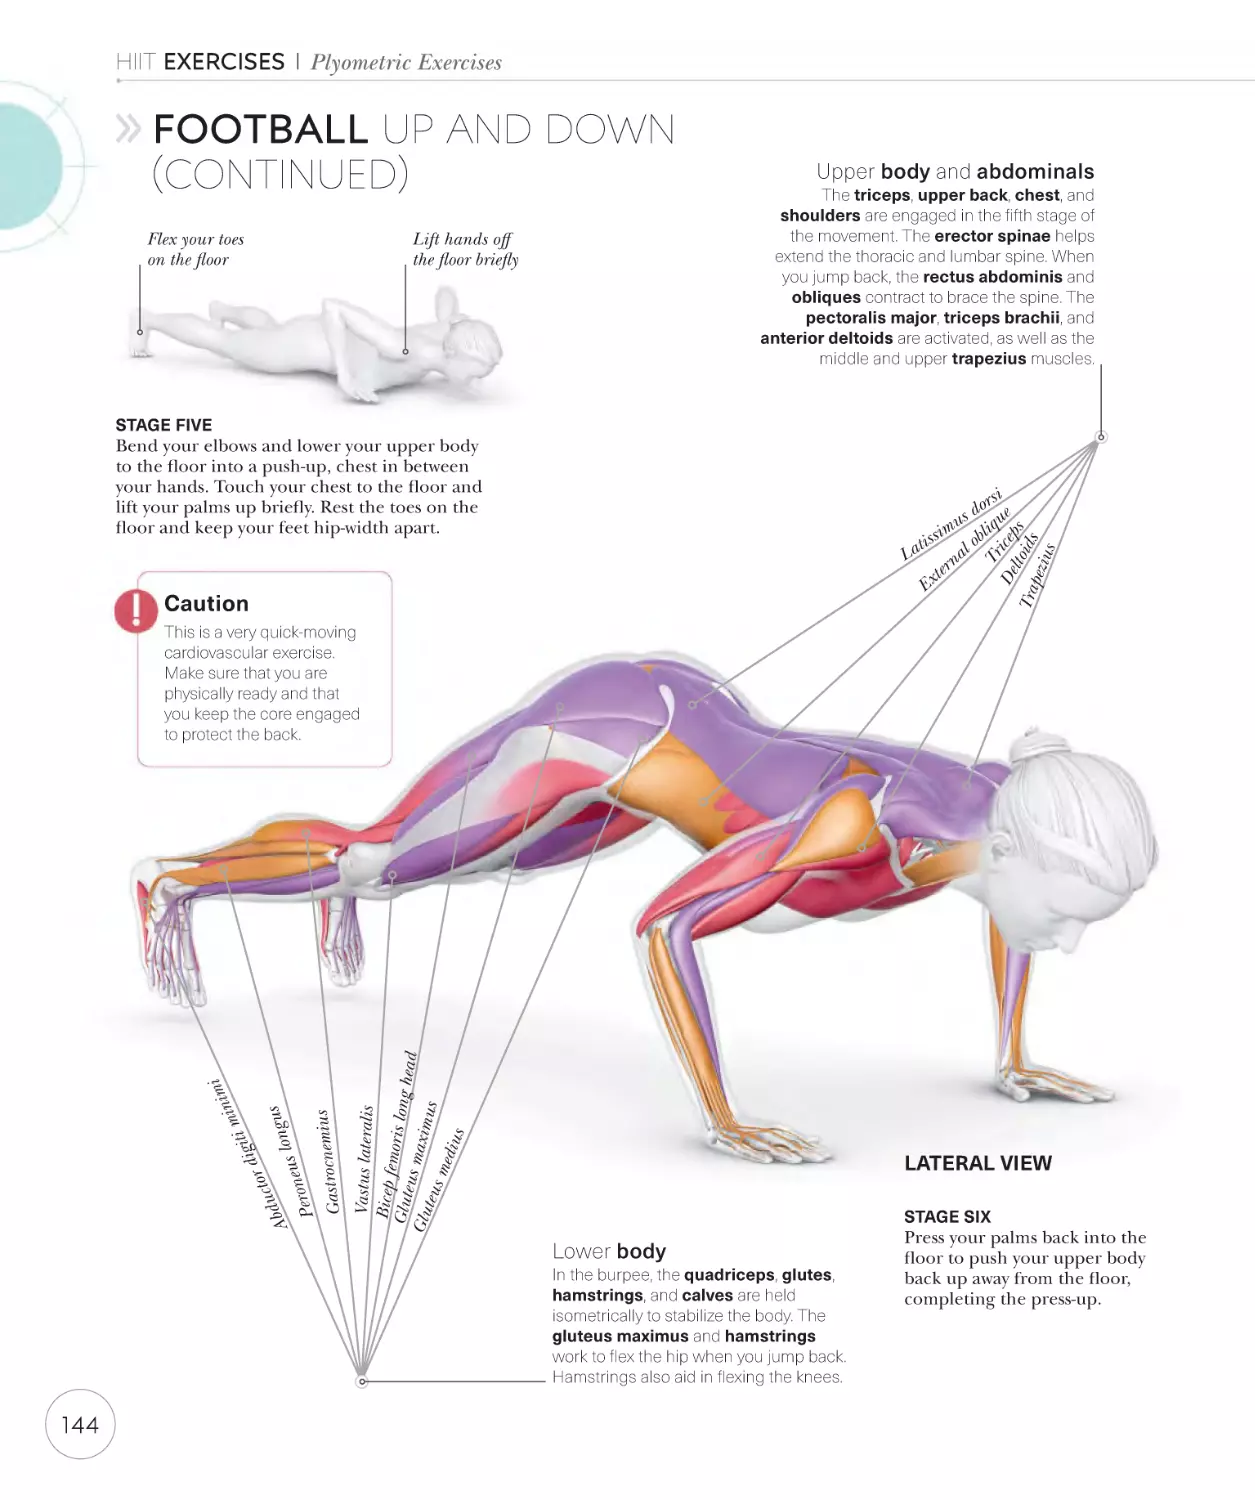
Football up and down
142
Getting started
188
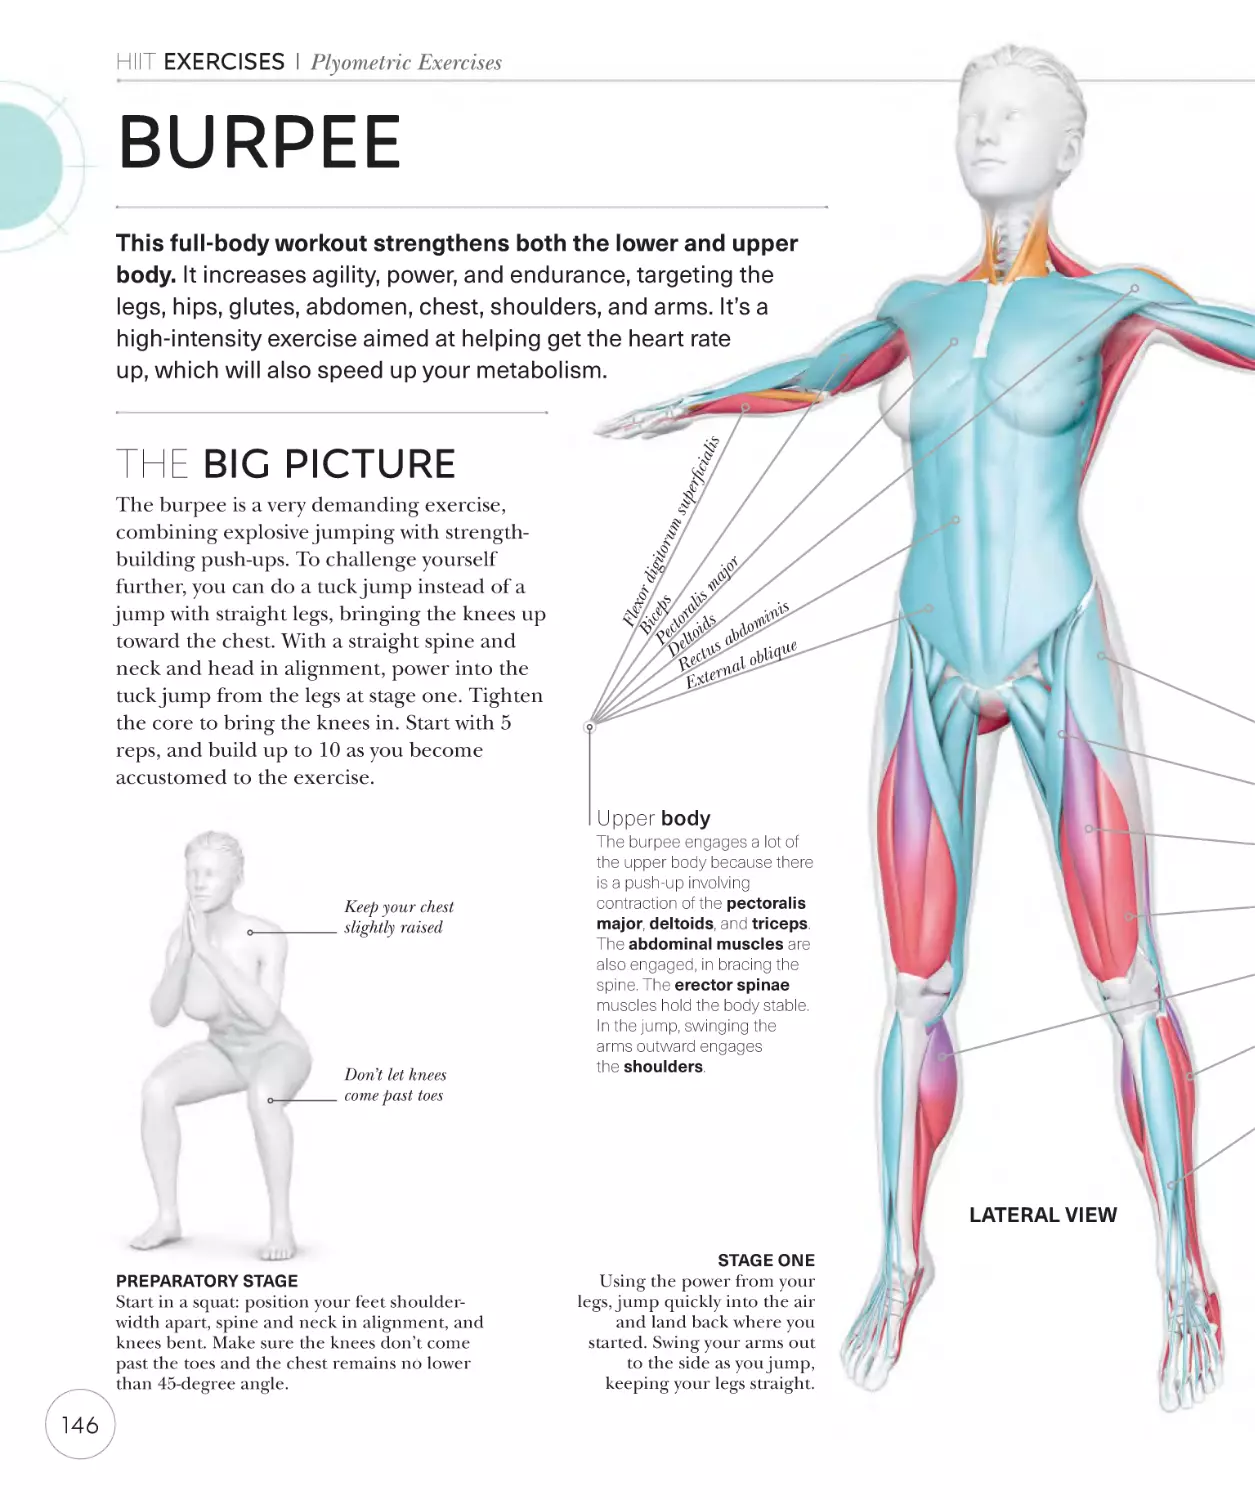
Burpee
146
Planning your training
190
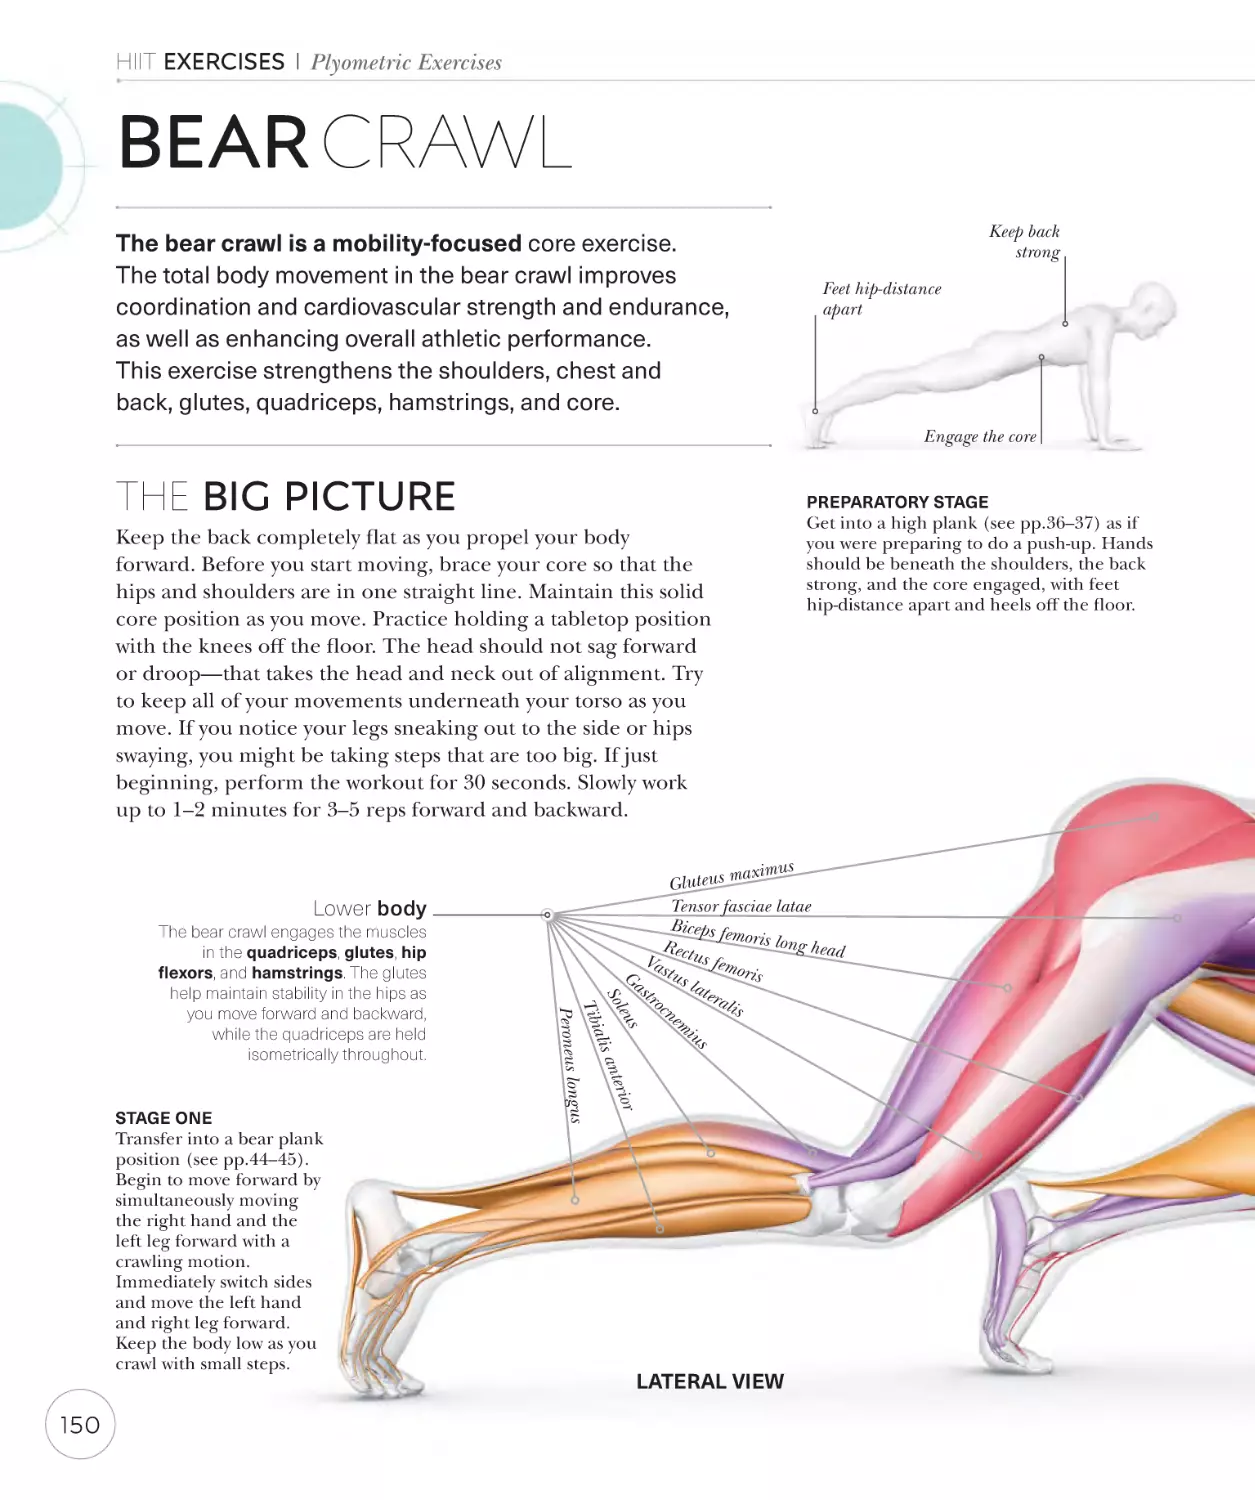
Bear crawl
150
Following and creating
your own routine
192
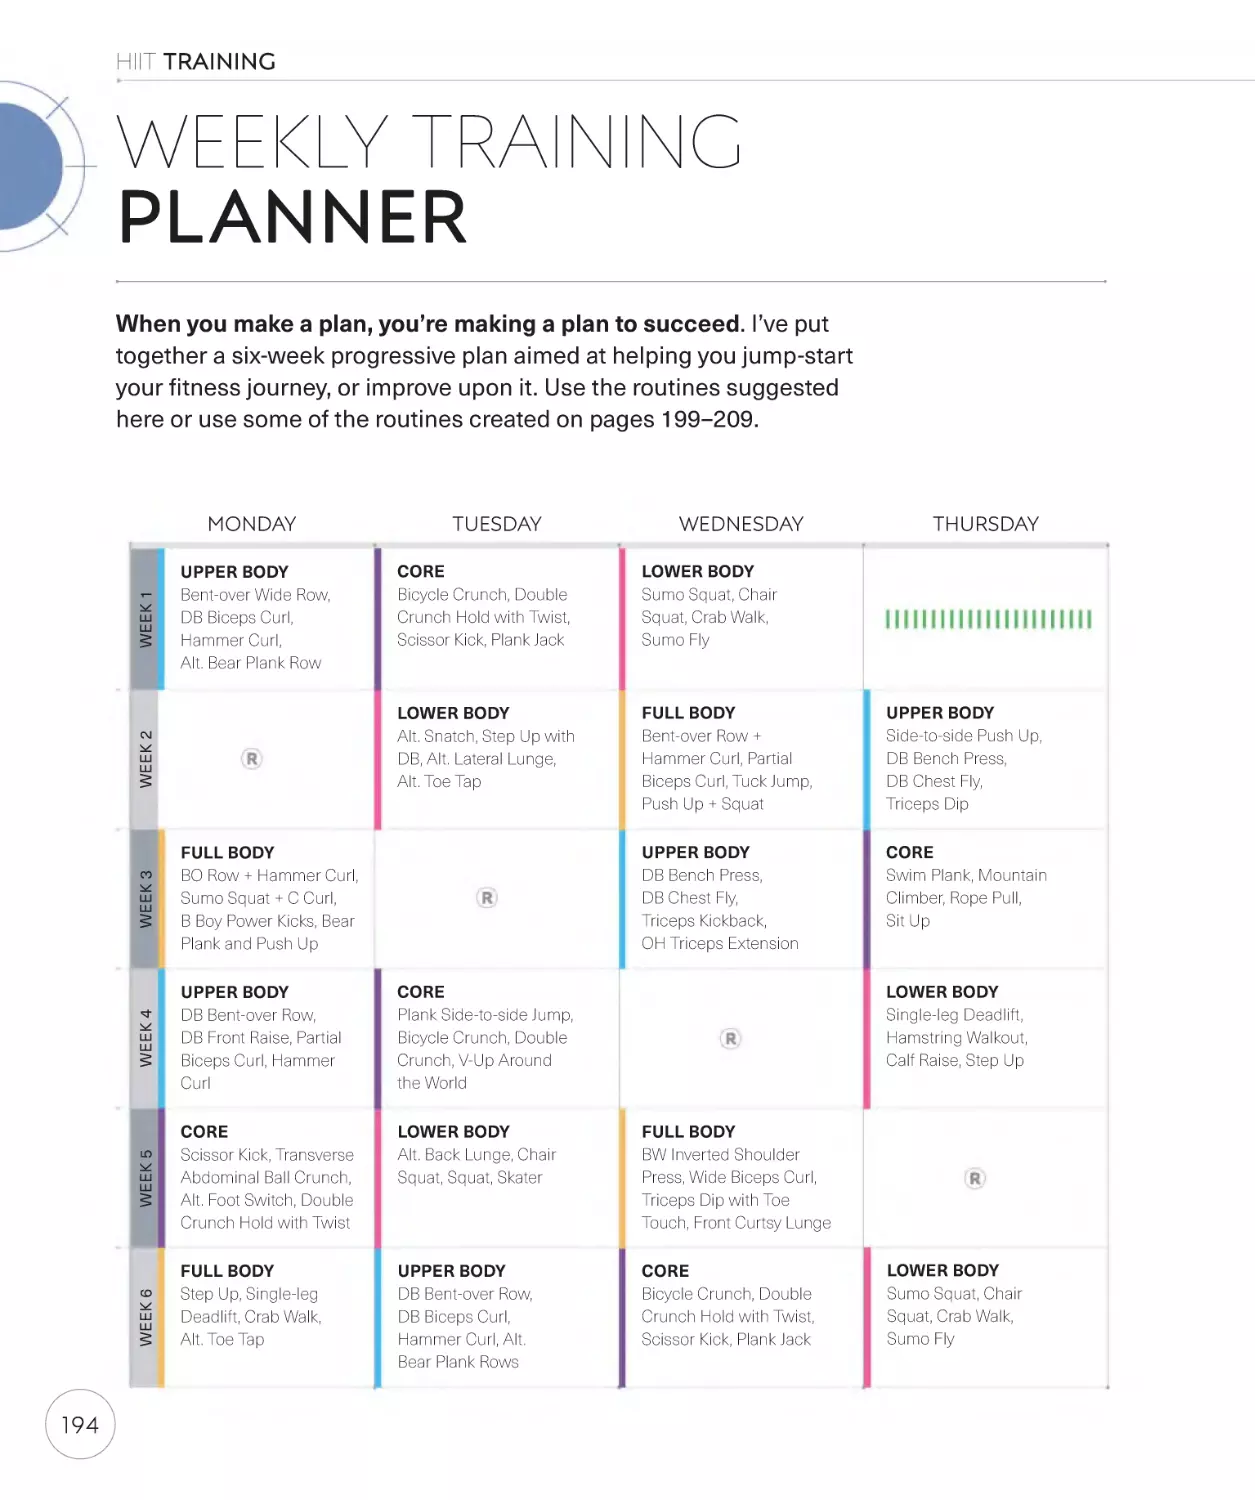
Weekly training planner
194
Warming up
and cooling down
196
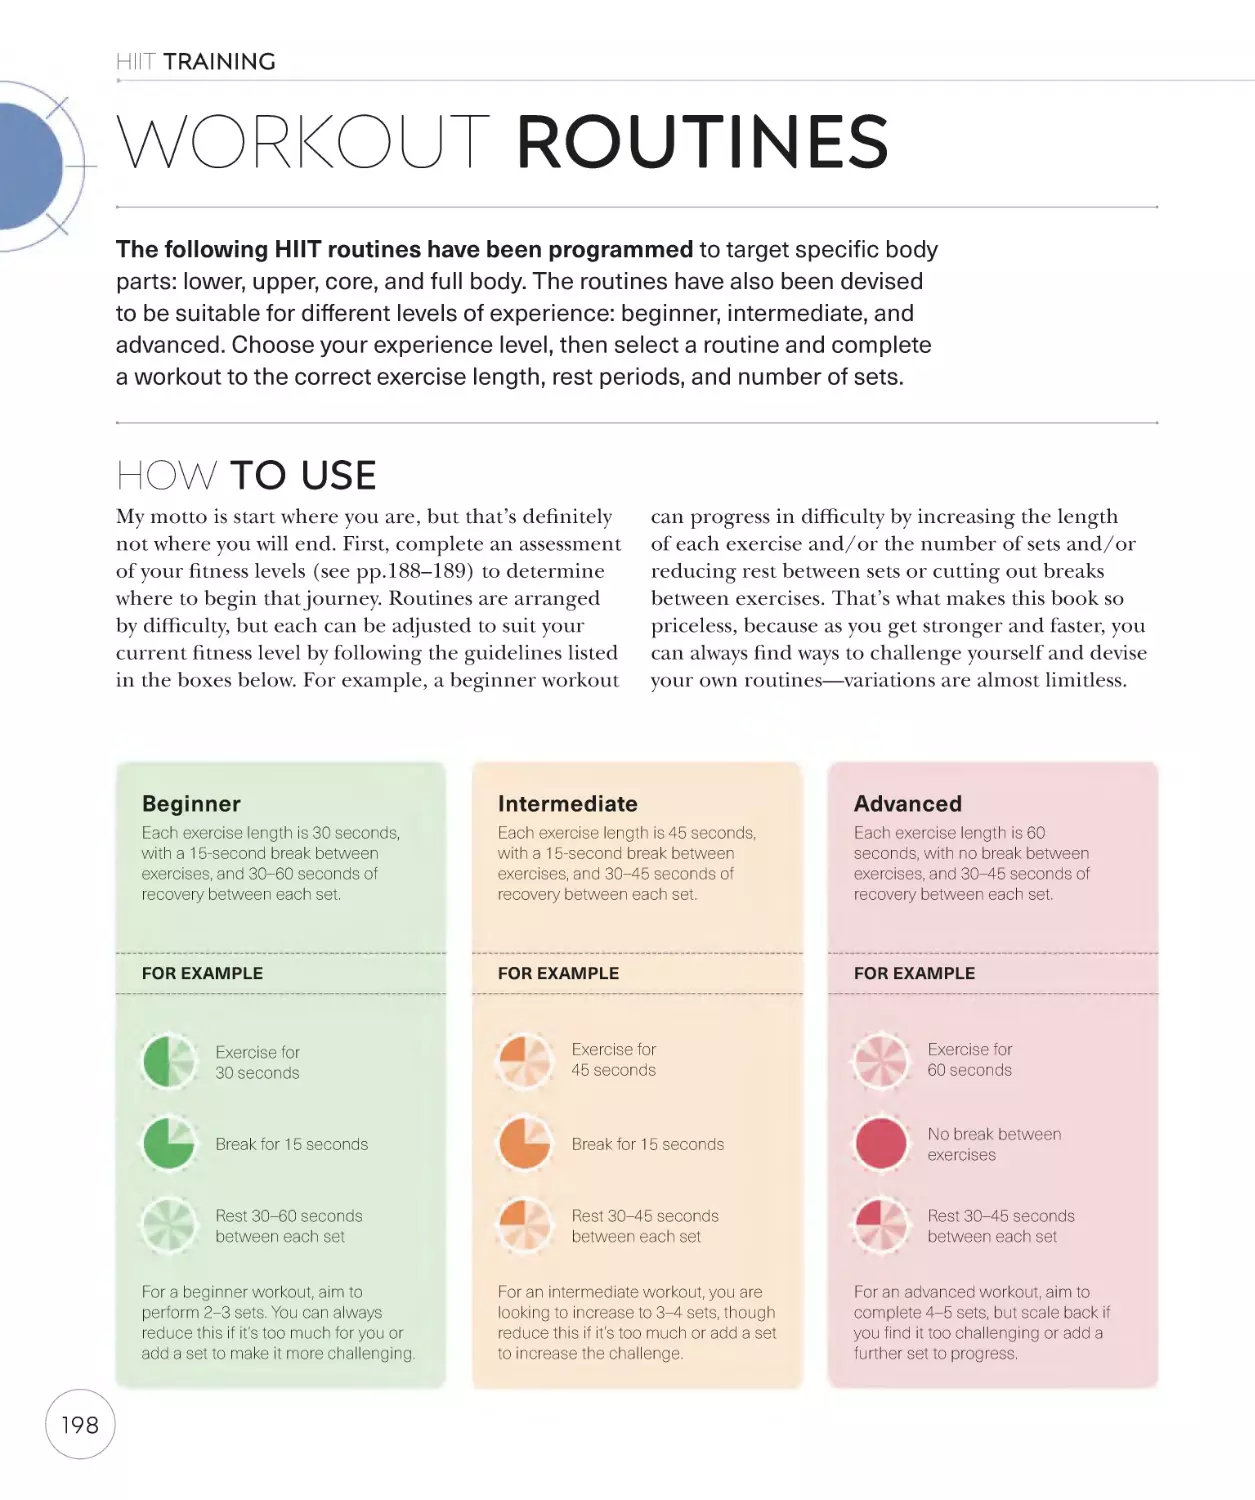
Workout routines
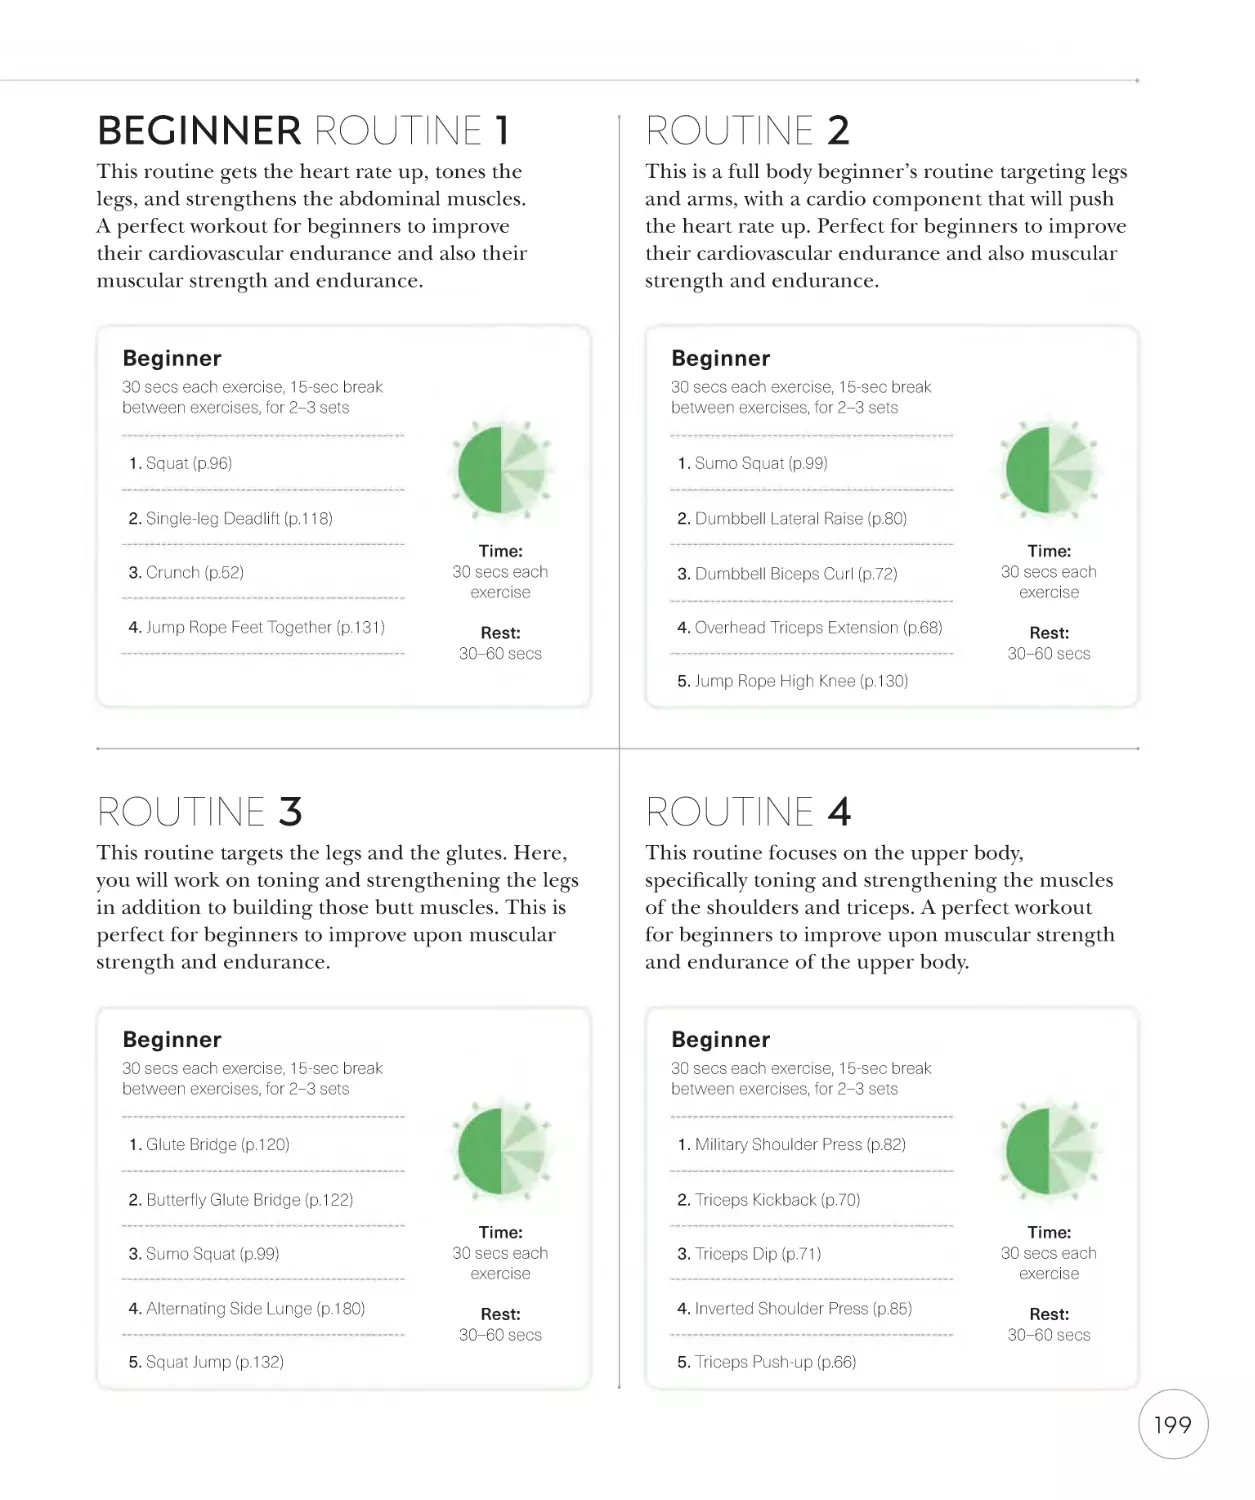
Beginner
Intermediate
Advanced
198
199
202
206
LOWER BODY EXERCISES
96
98
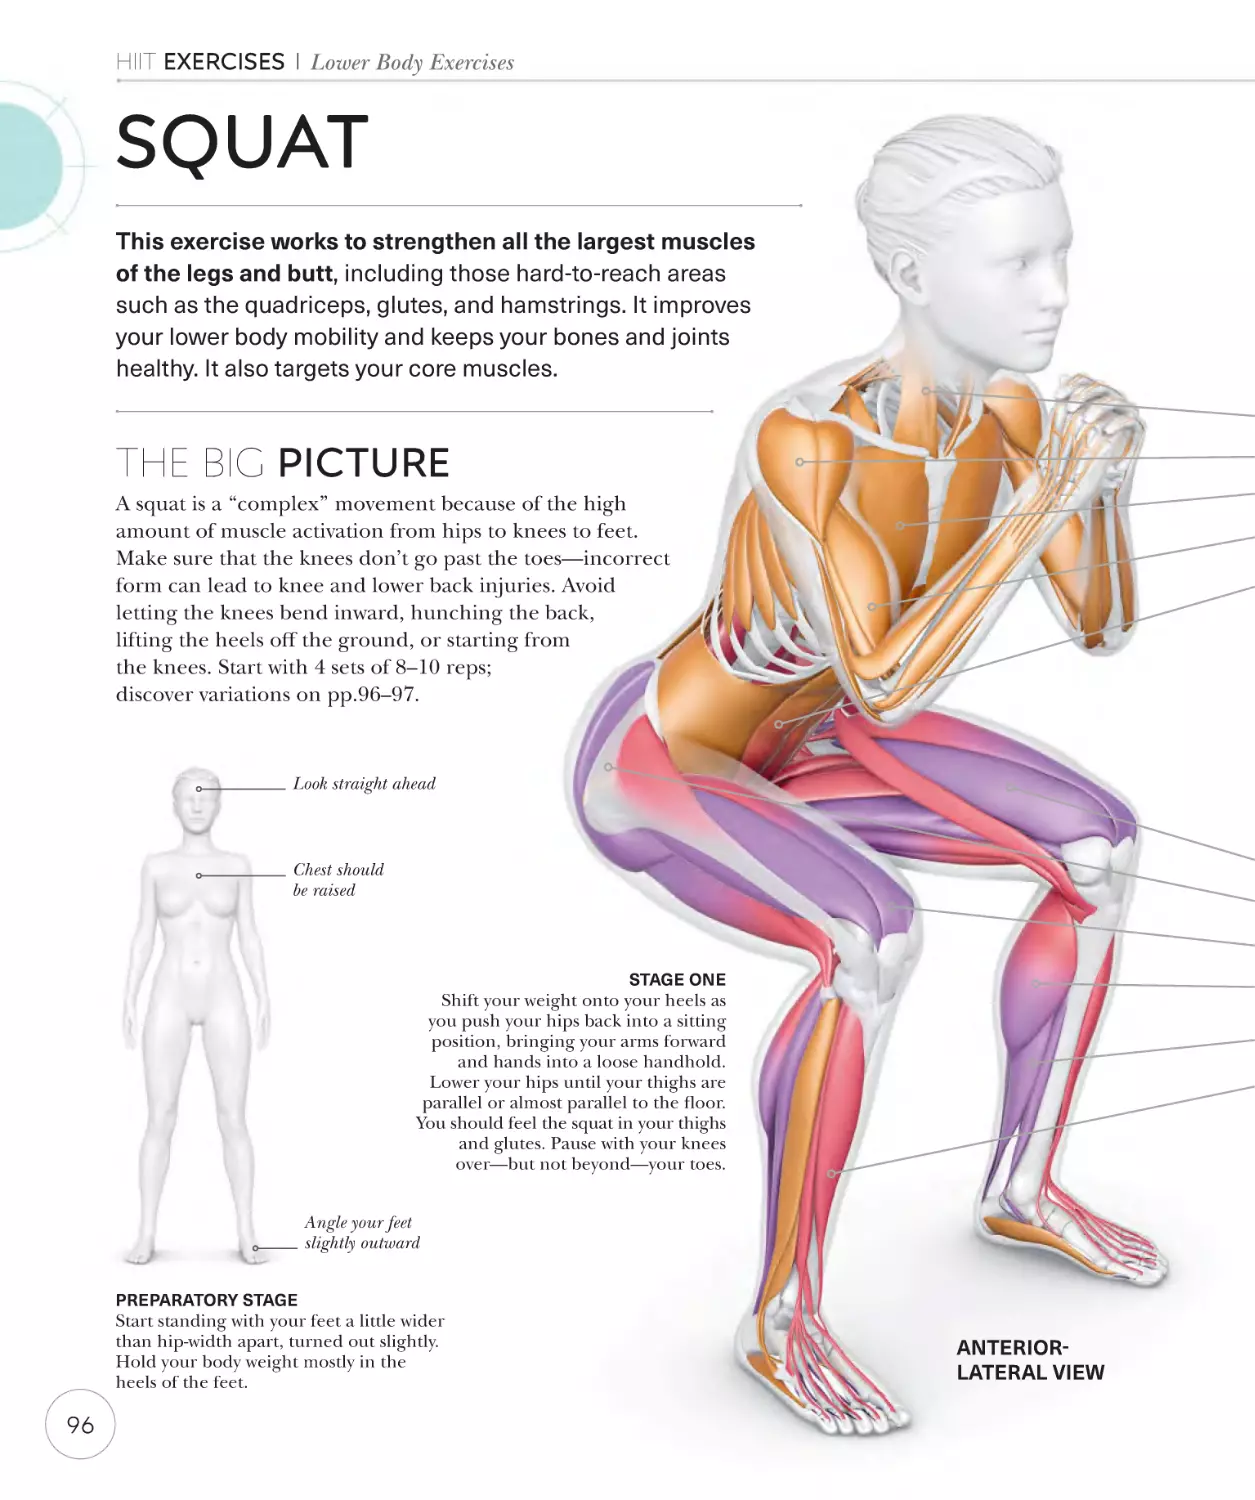
Squat
Variations
Right and left split squat
Variations
100
102
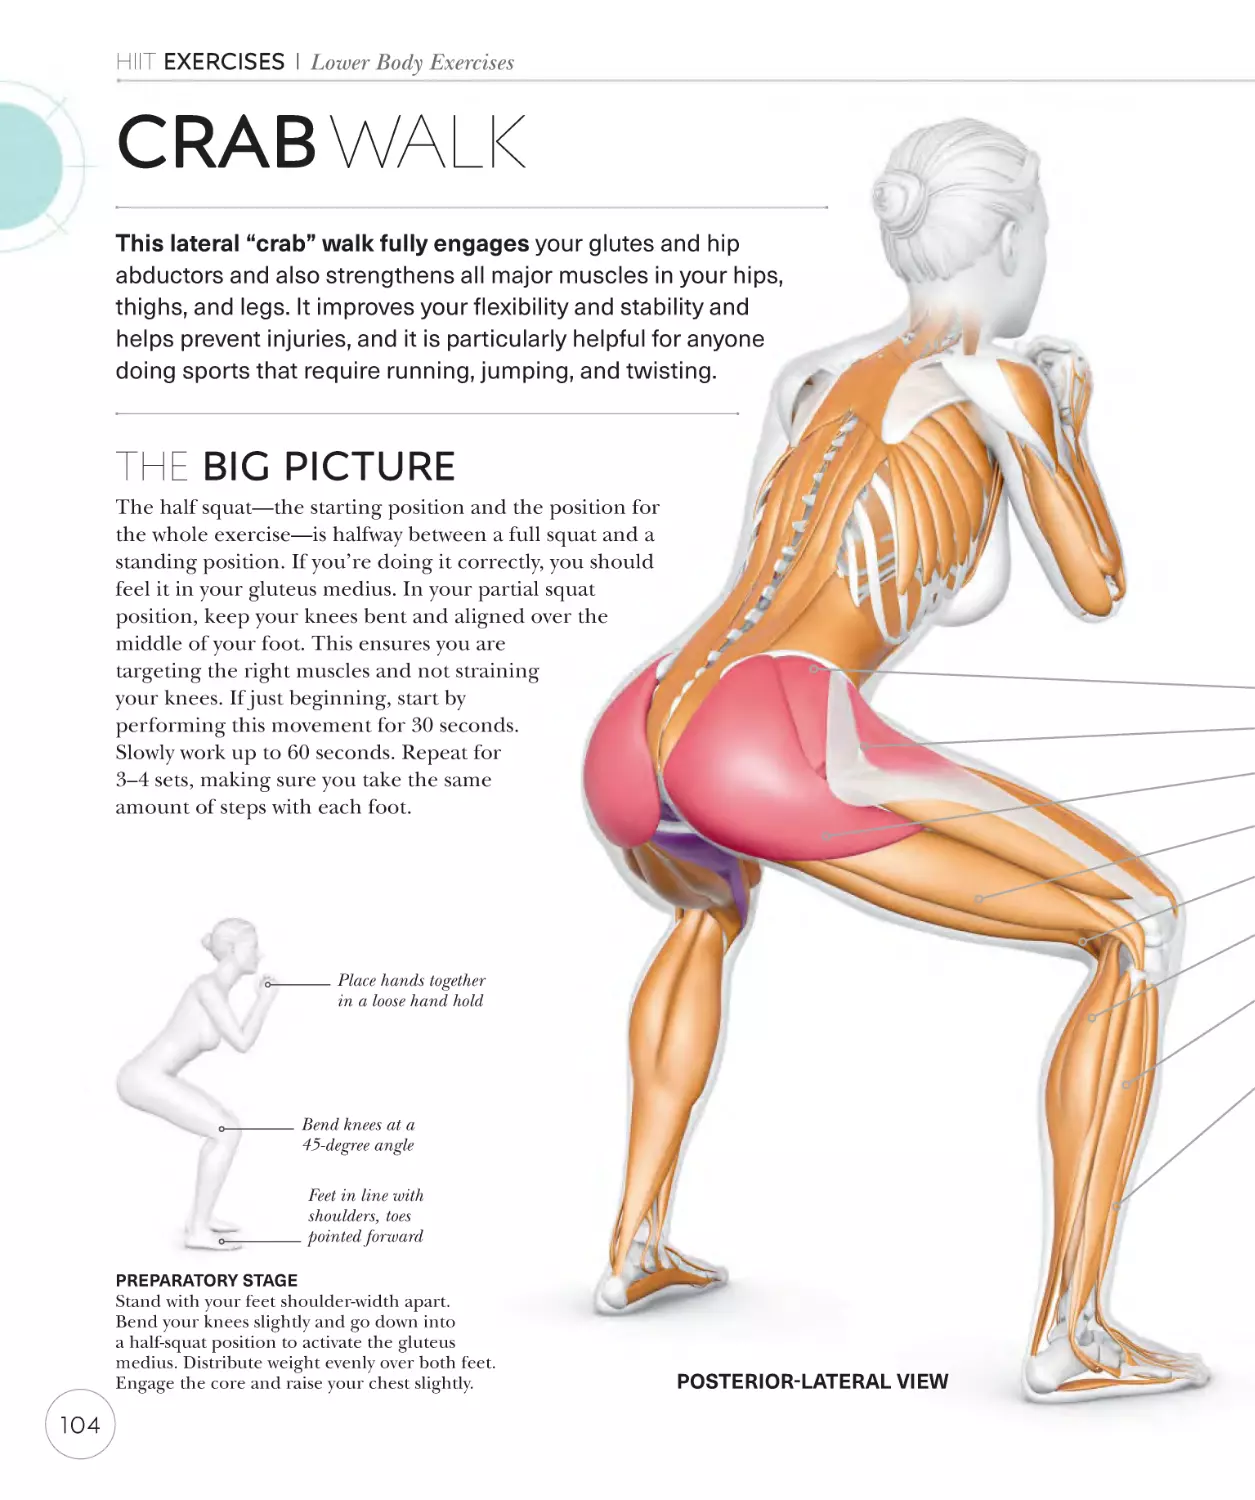
Crab walk
104
Alternating snatch
106
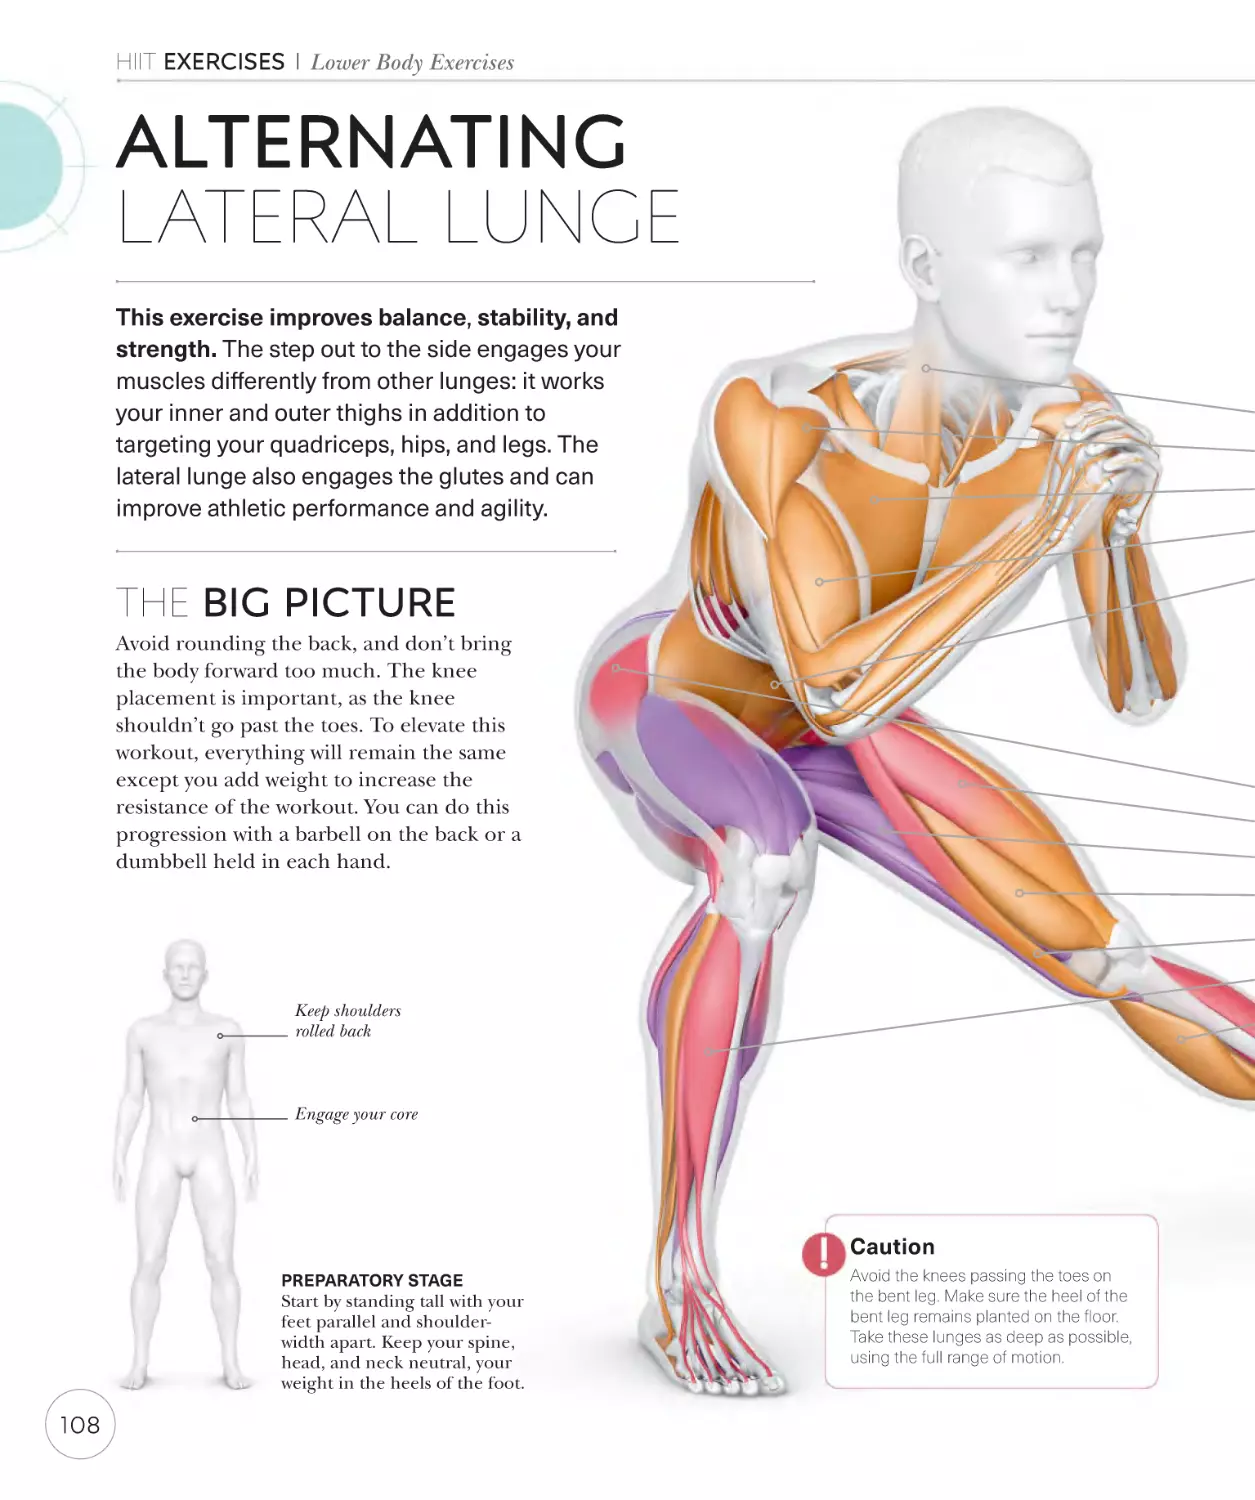
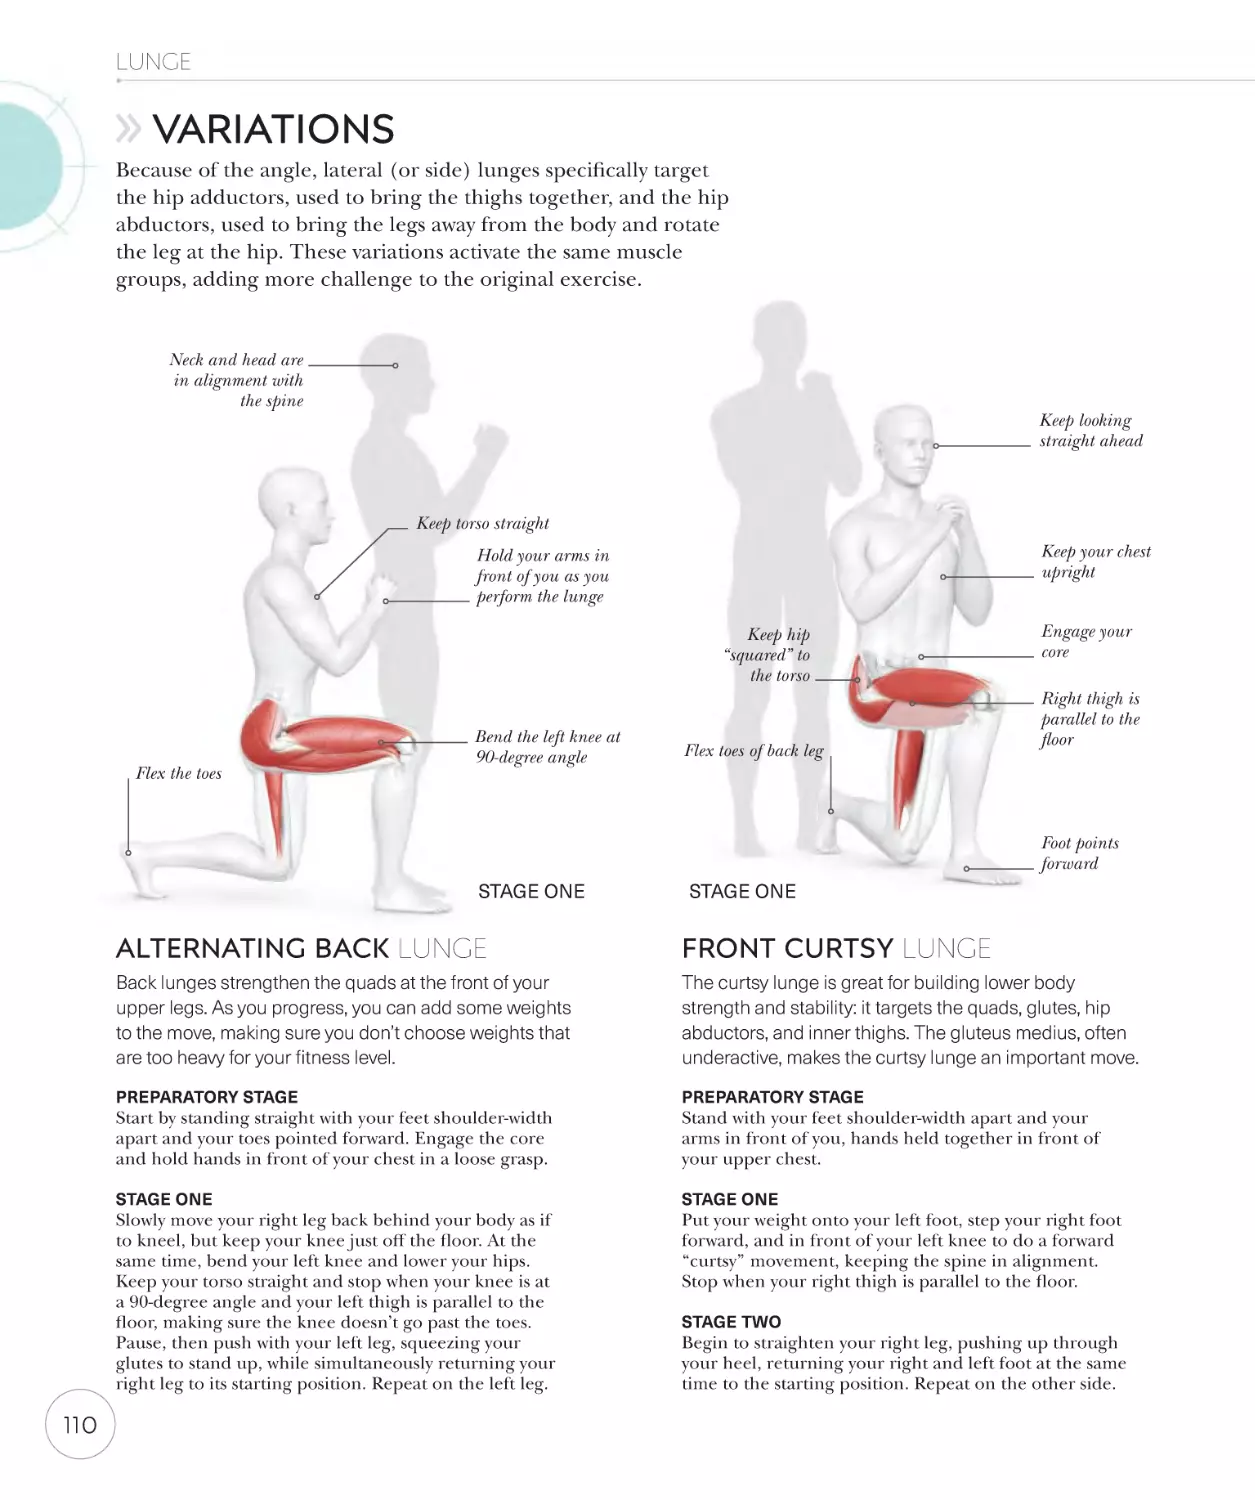
Alternating lateral lunge
Variations
108
110
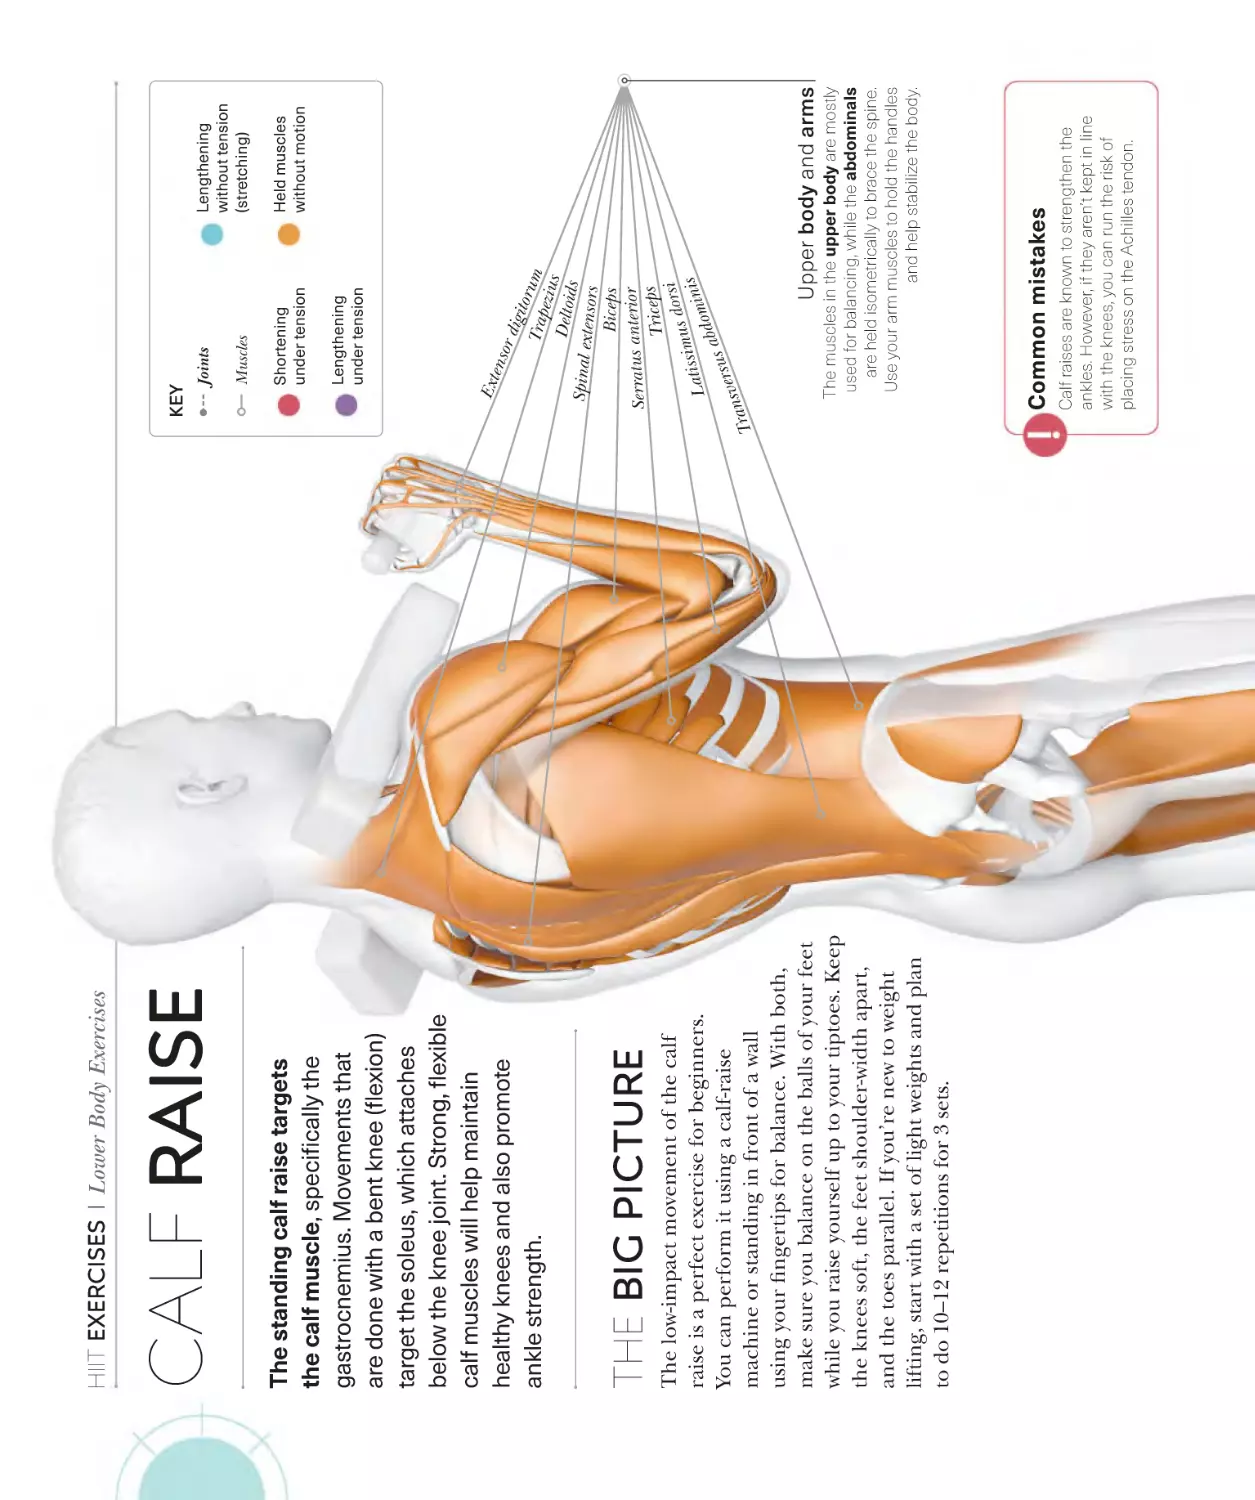
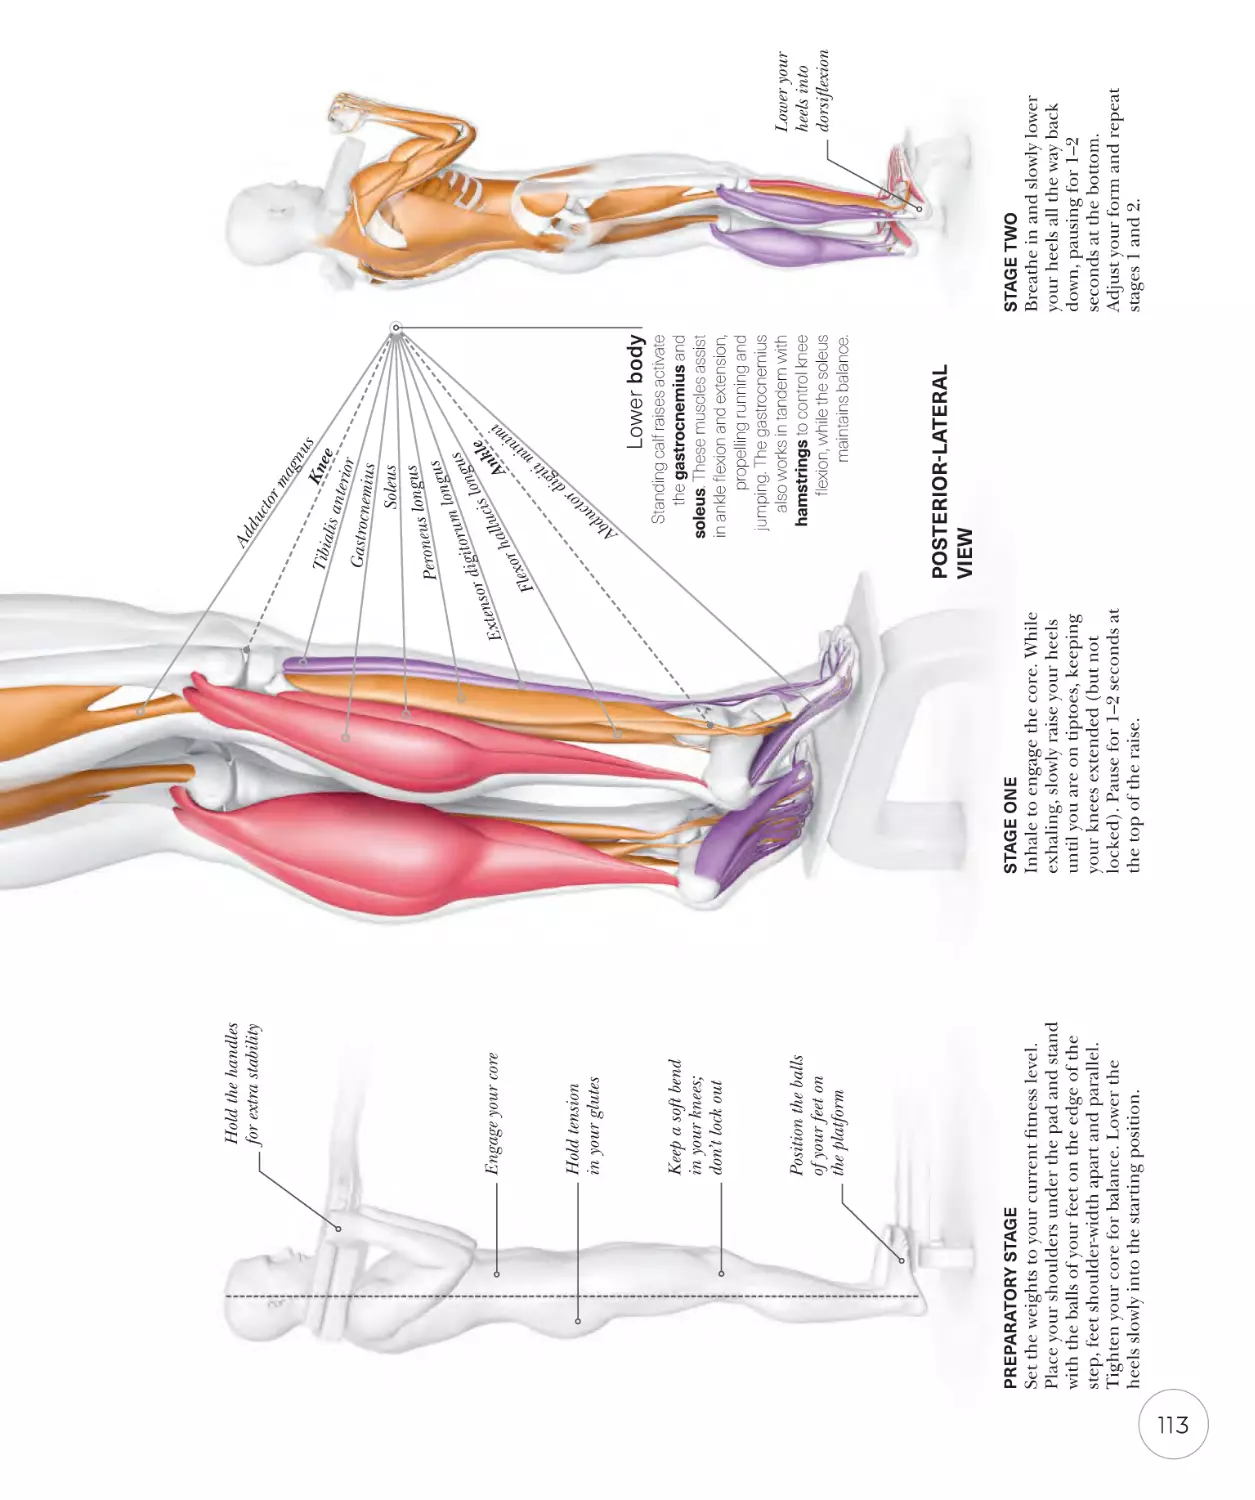
Calf raise
112
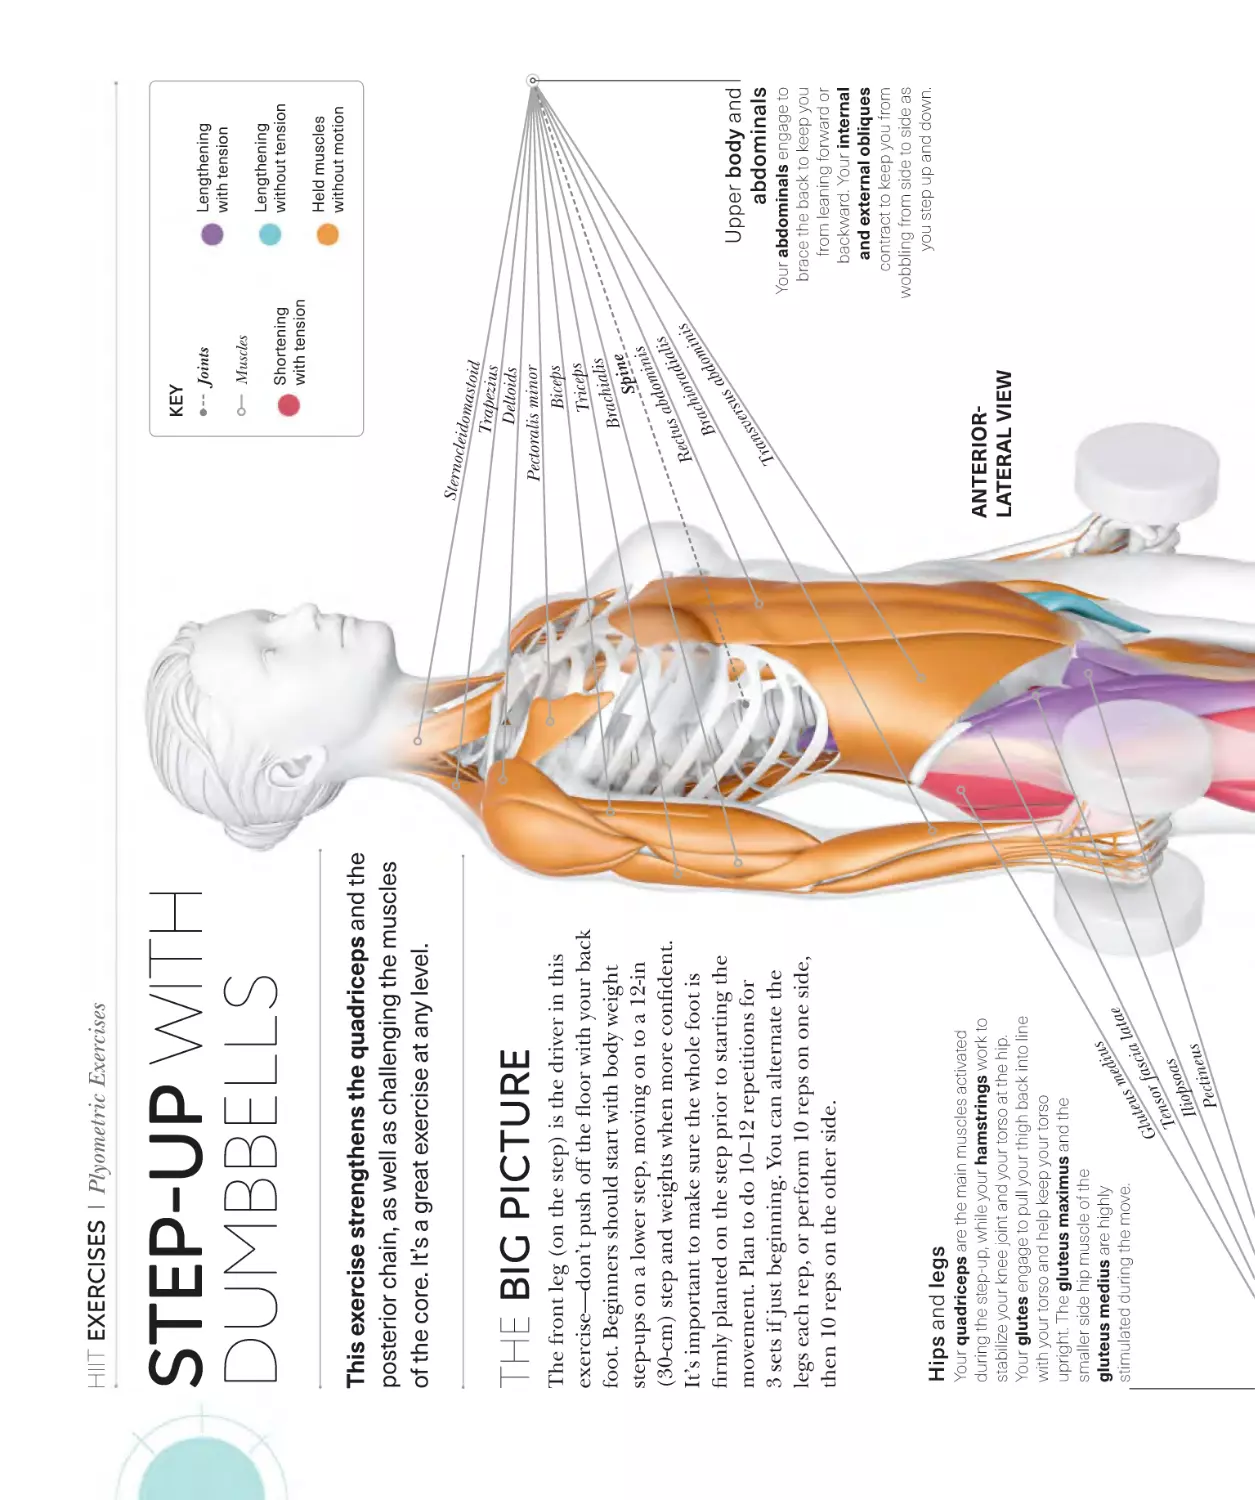
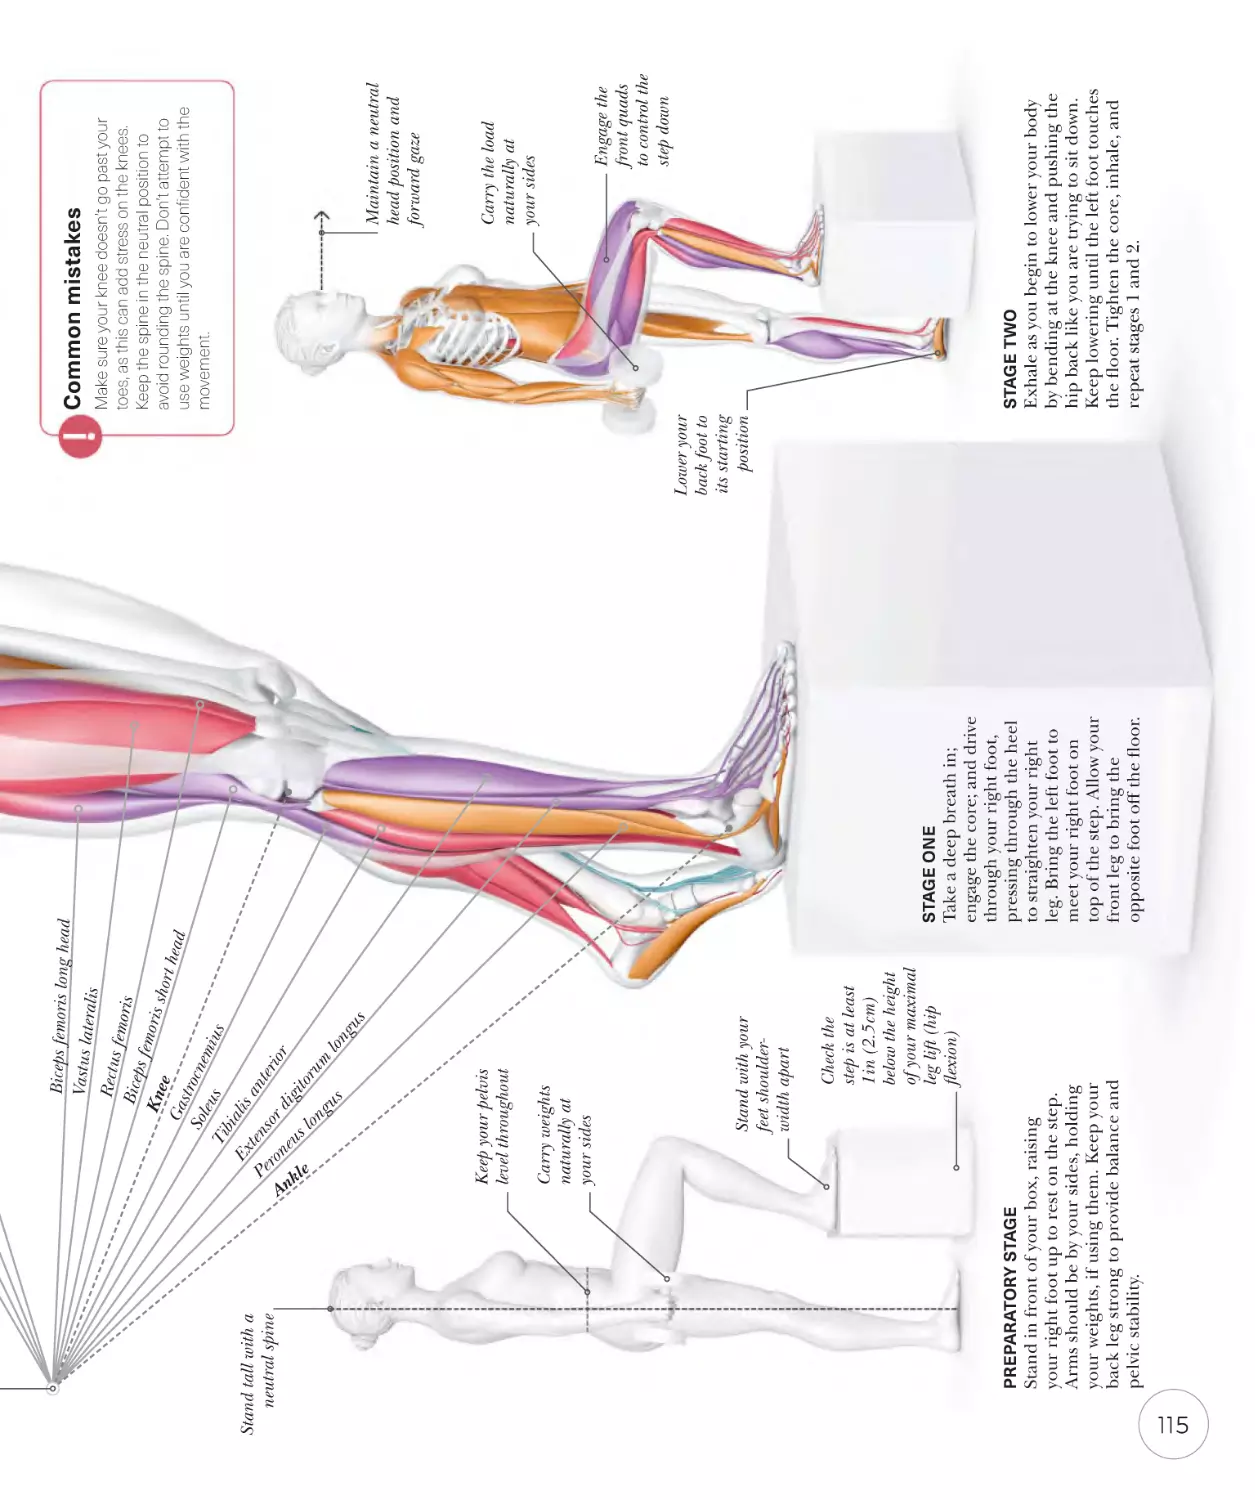
Step-up with dumbbells
114
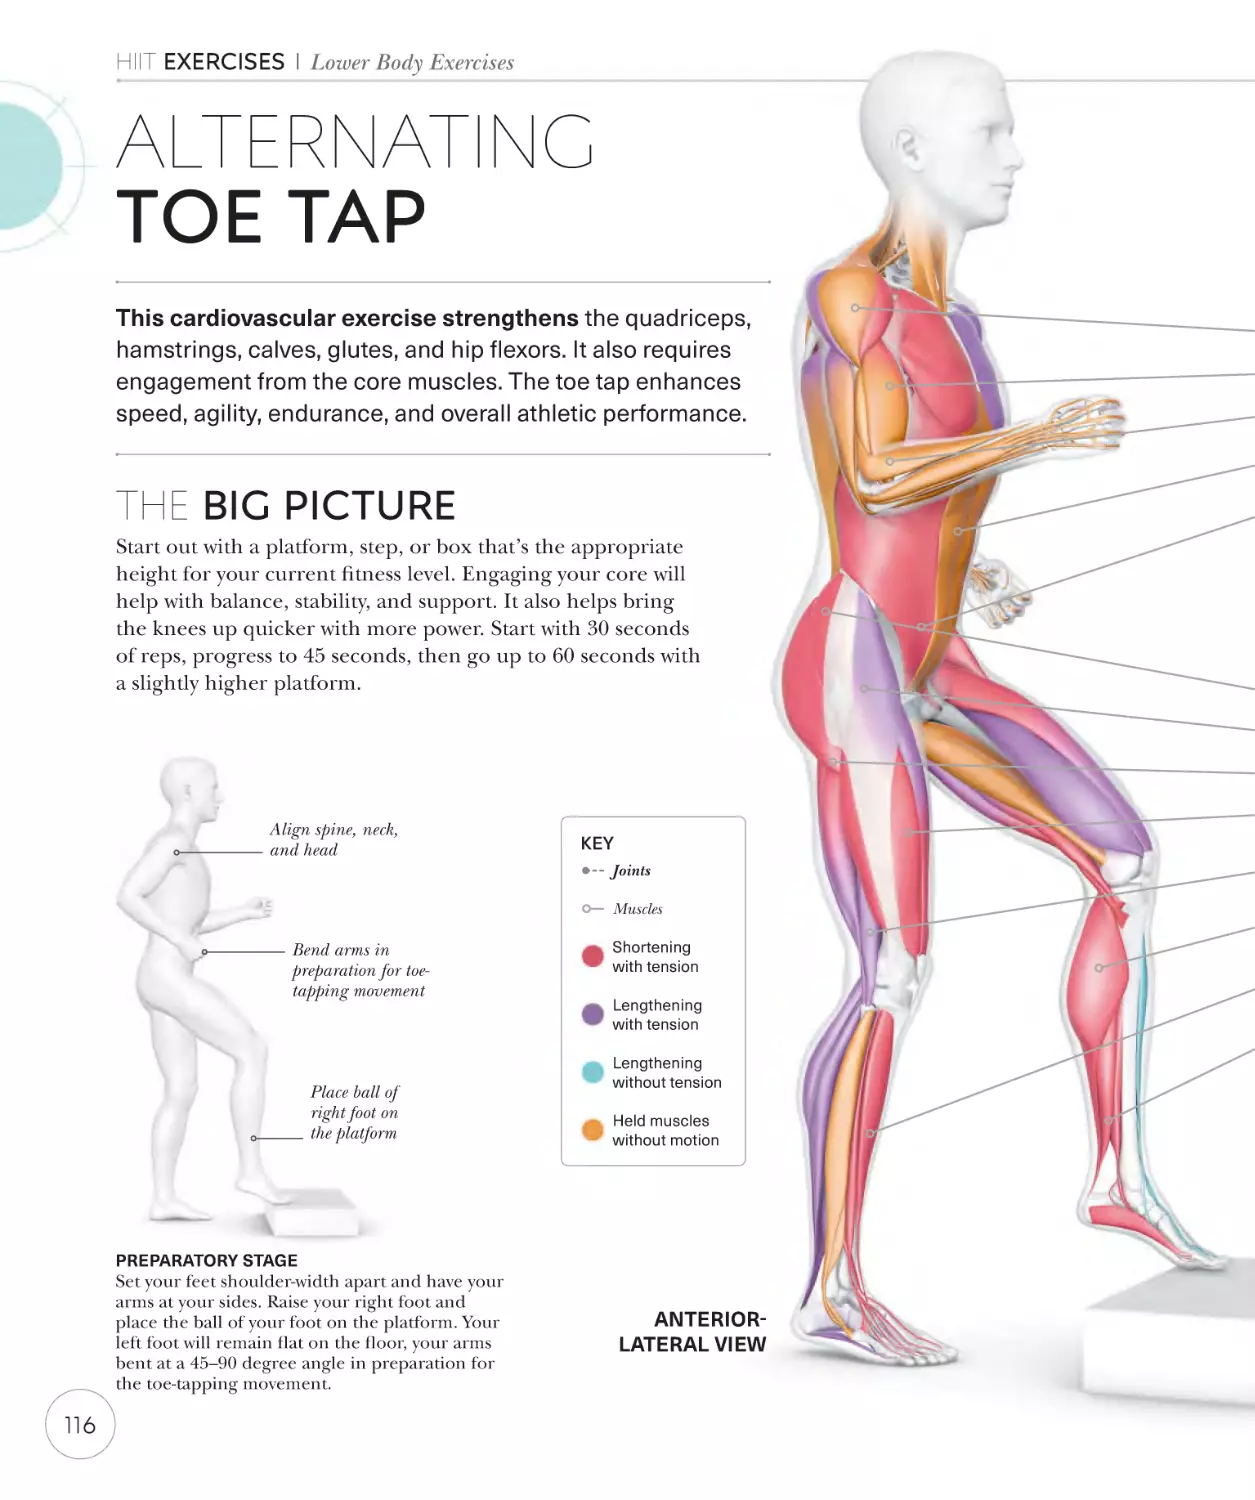
Alternating toe tap
116
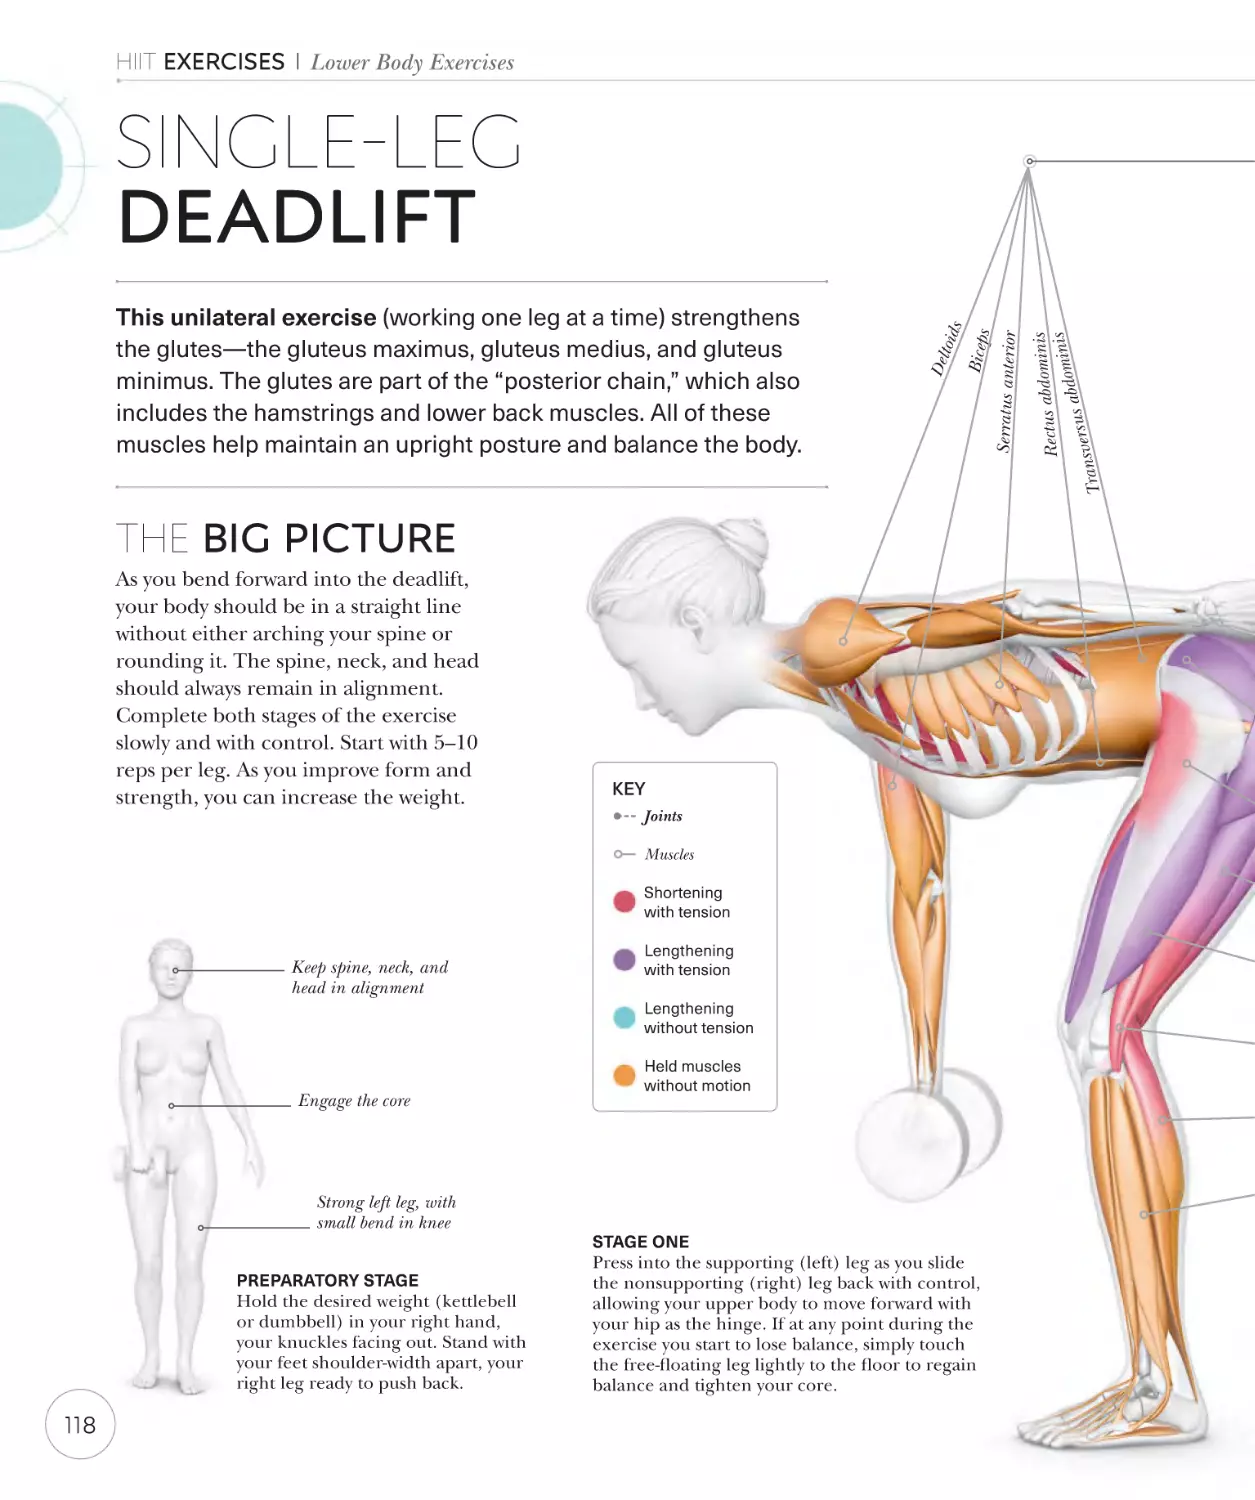
Single-leg deadlift
118
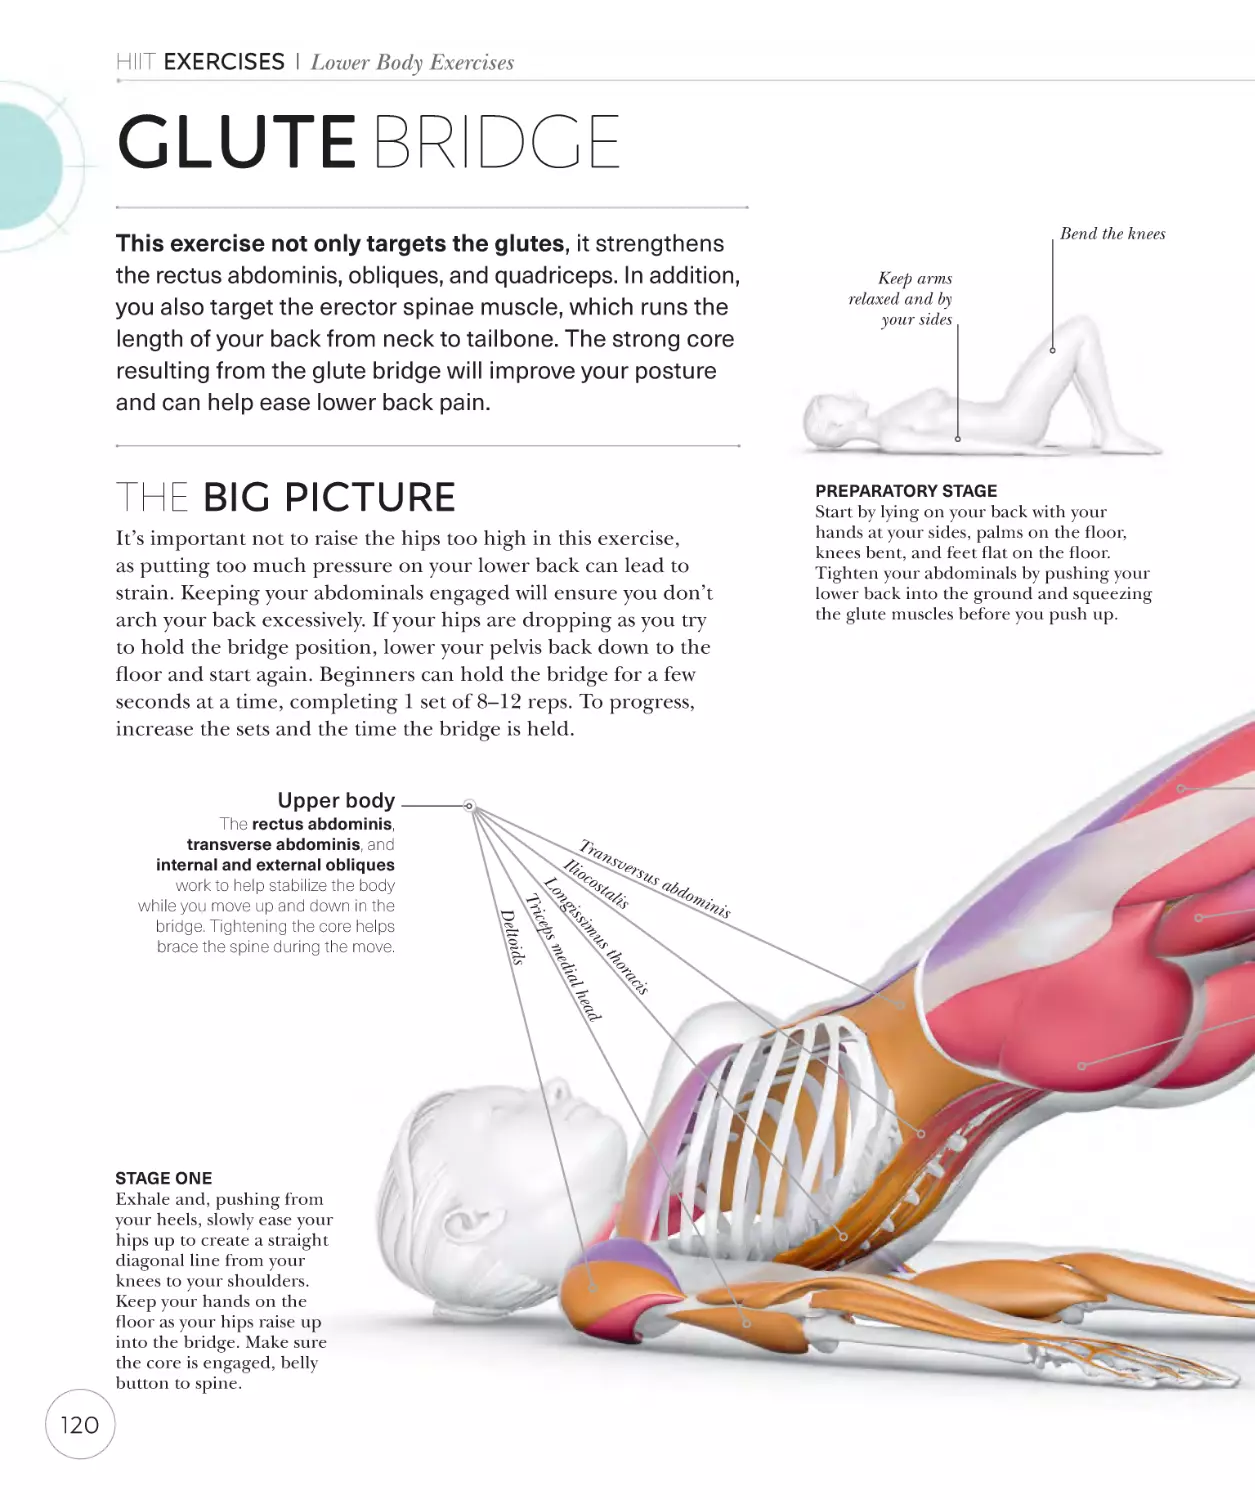
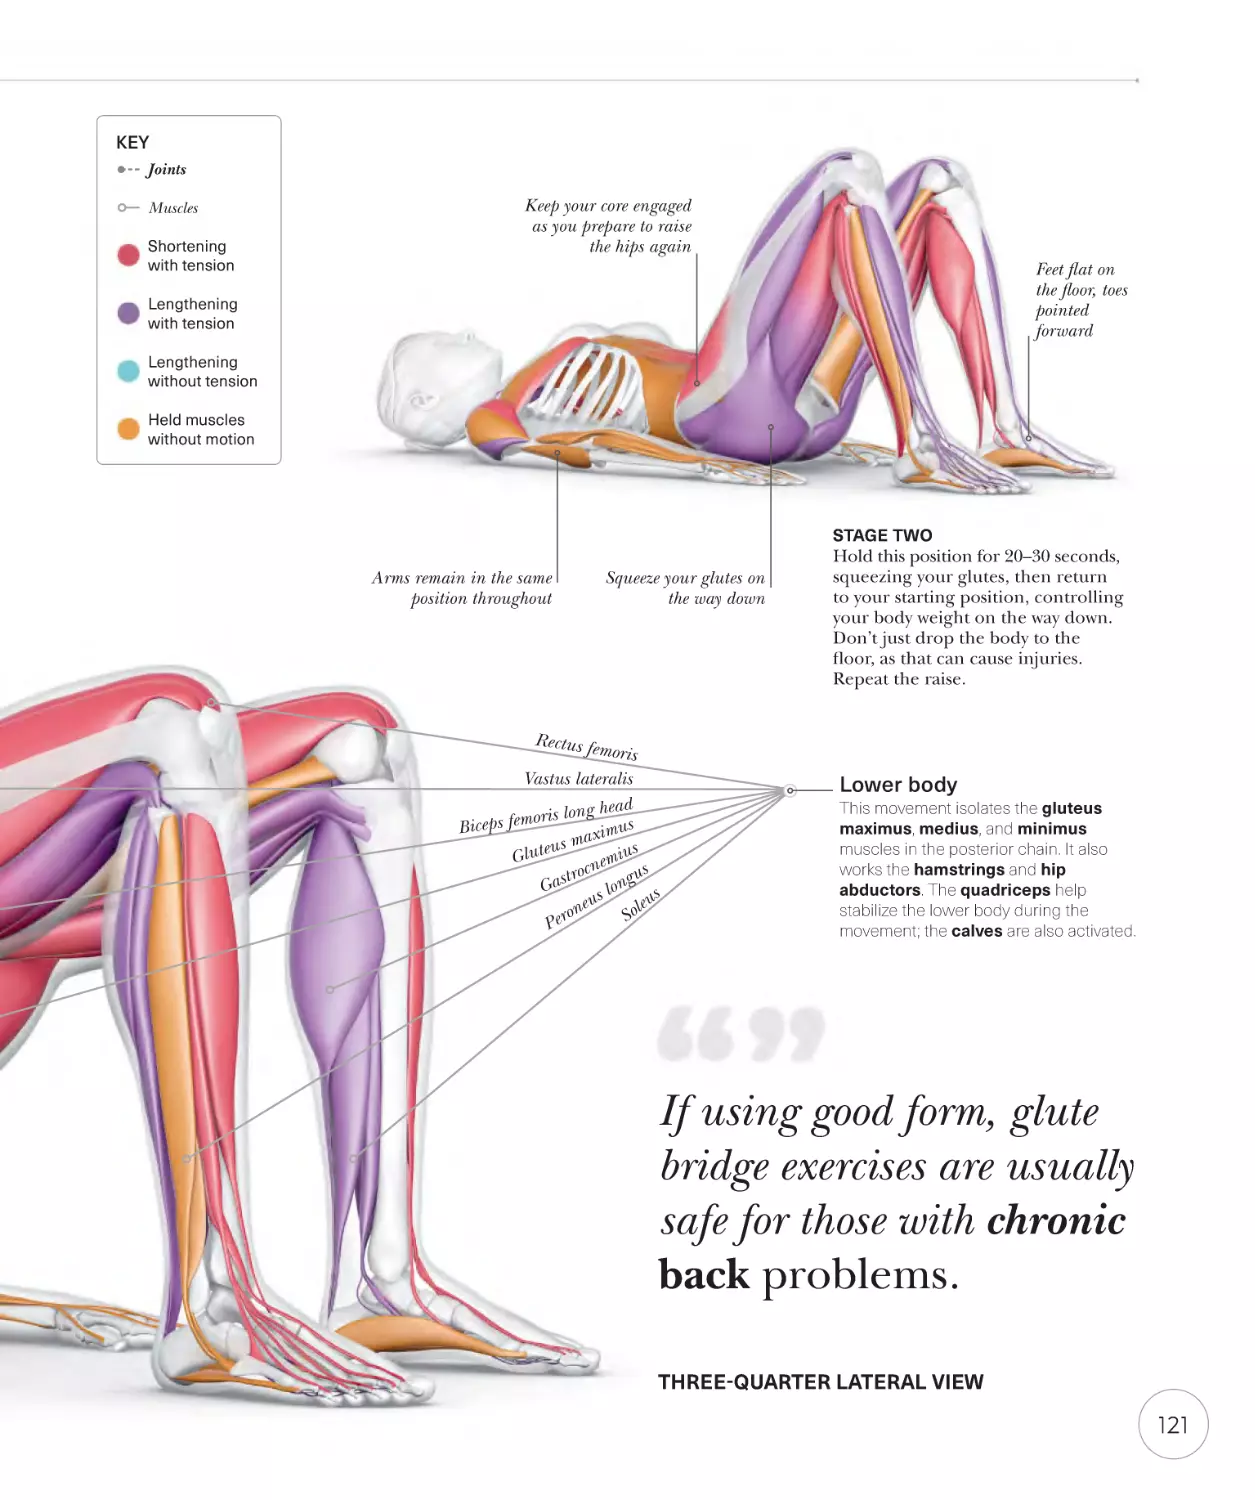
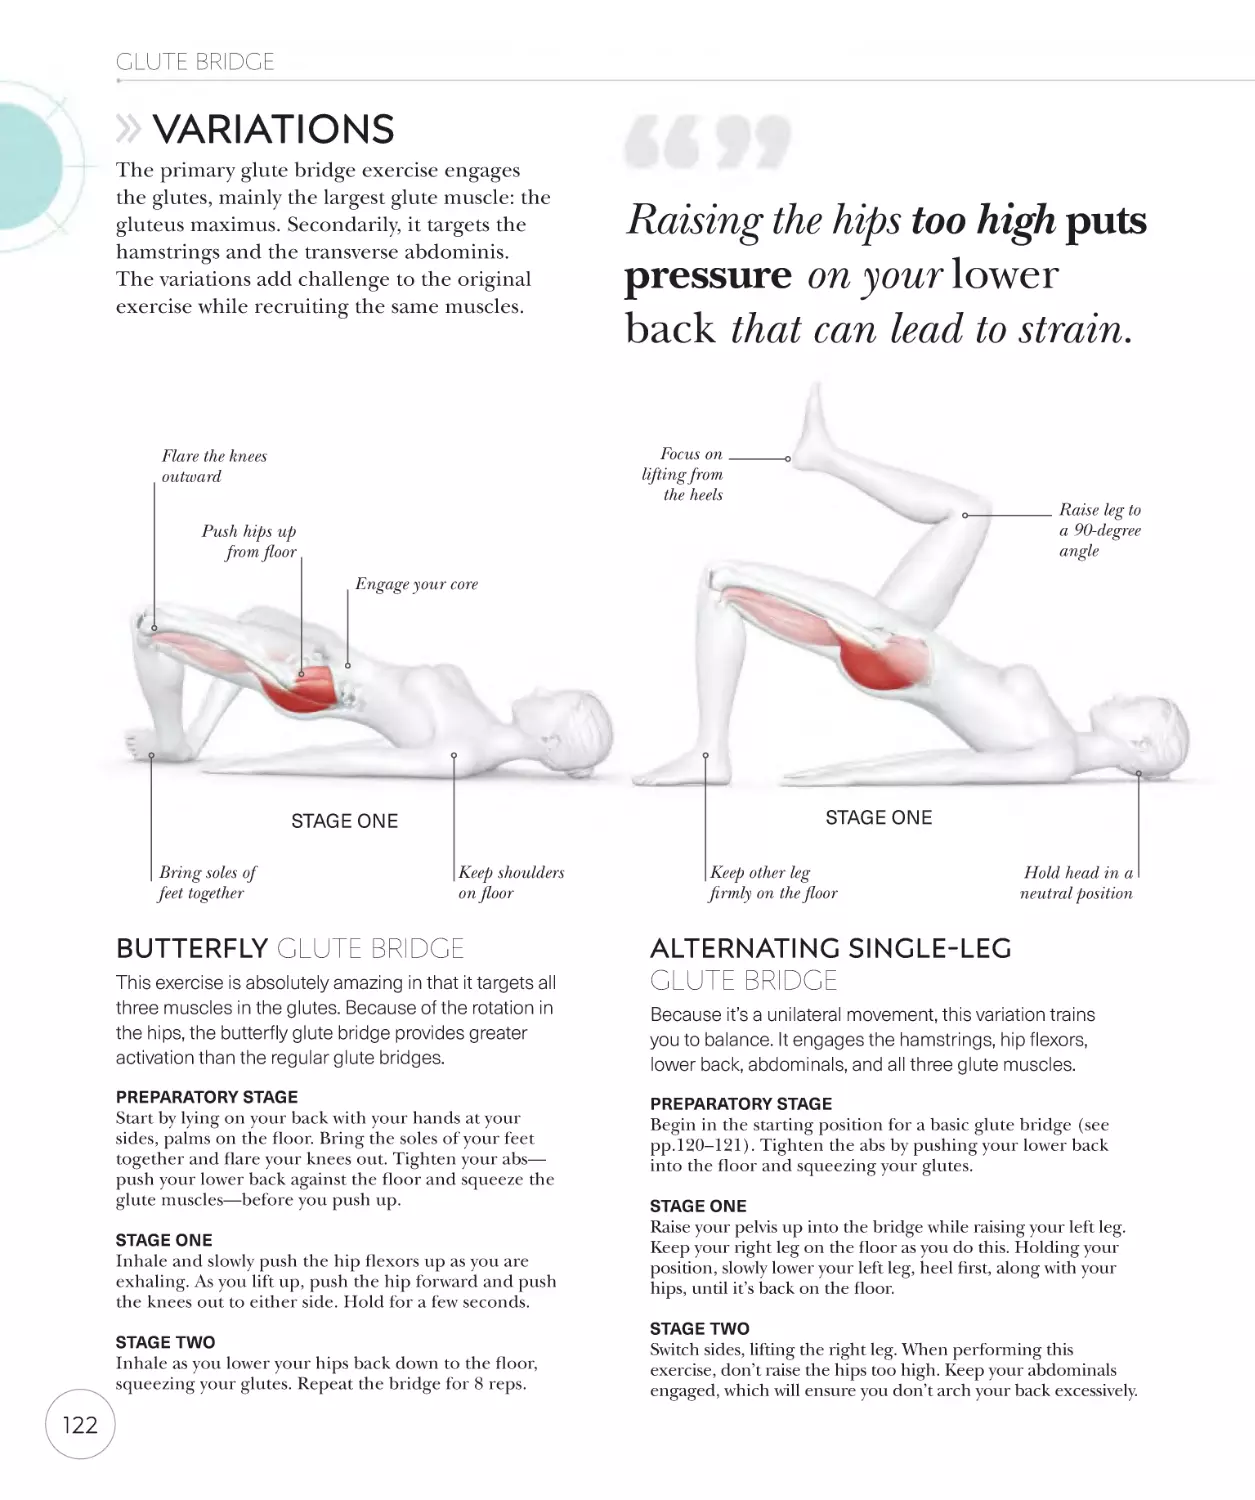
Glute bridge
Variations
120
122
PLYOMETRIC EXERCISES
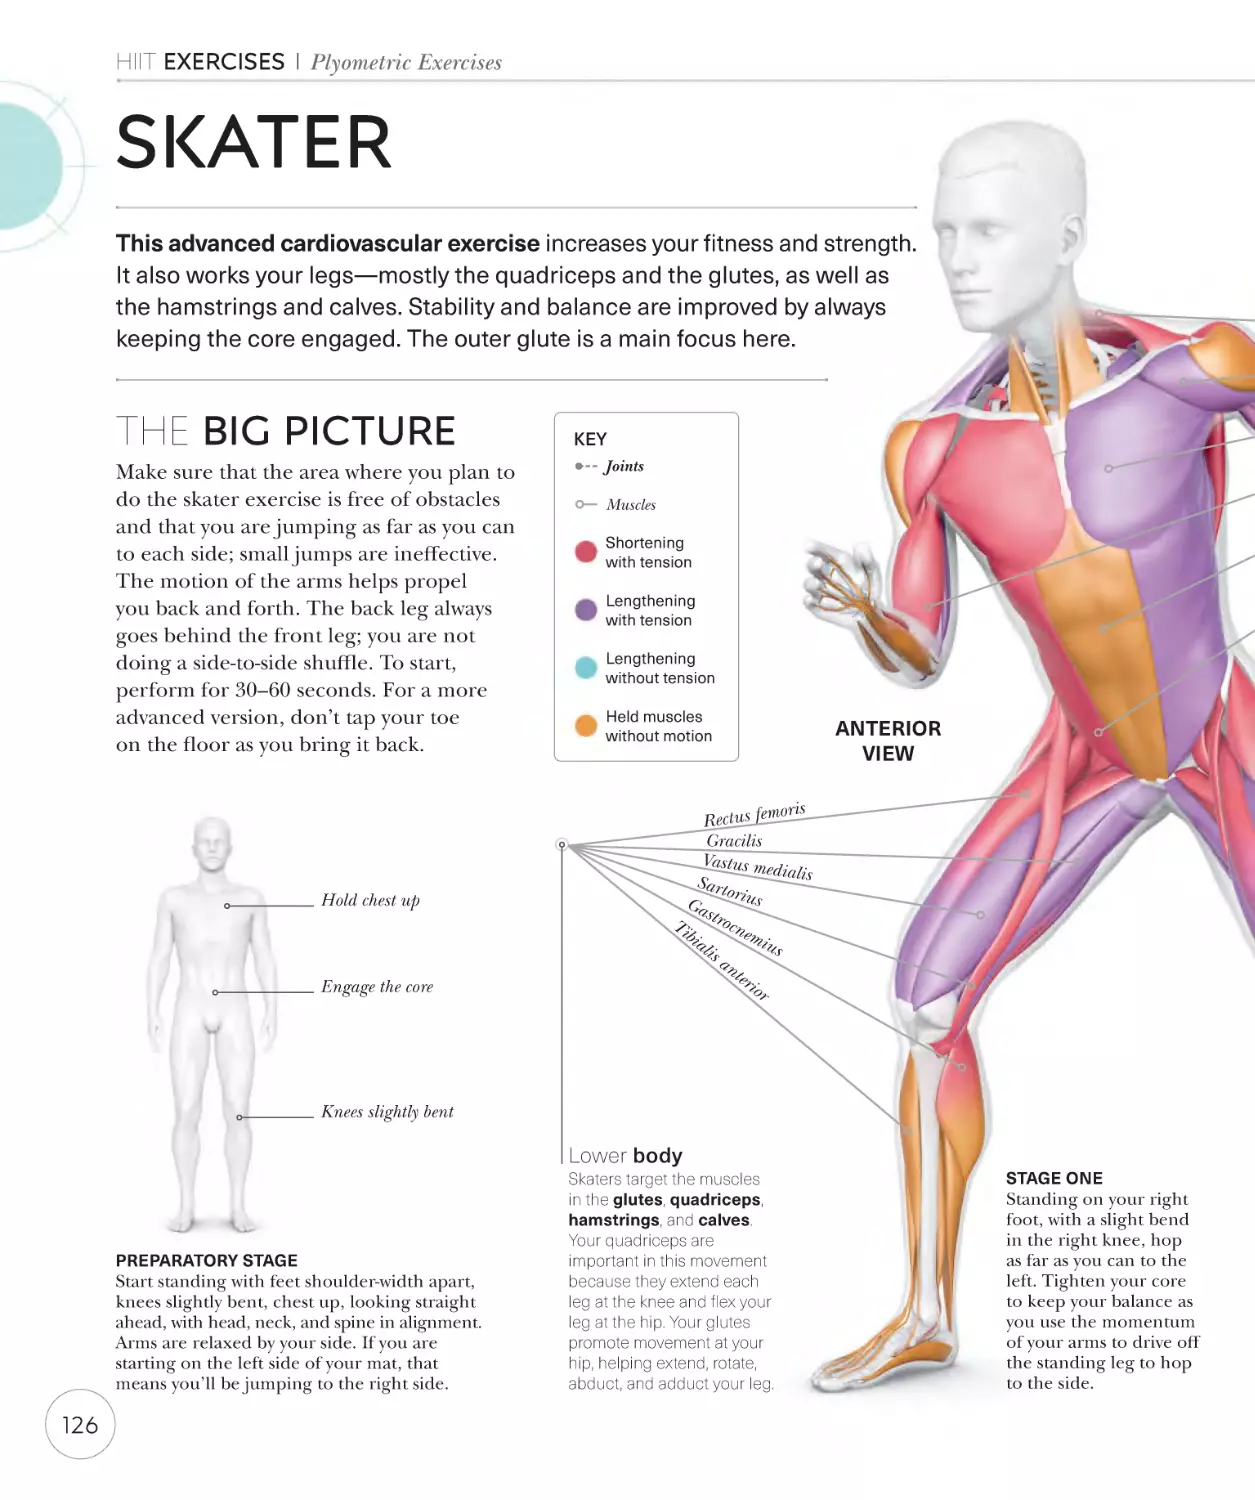
Skater
126
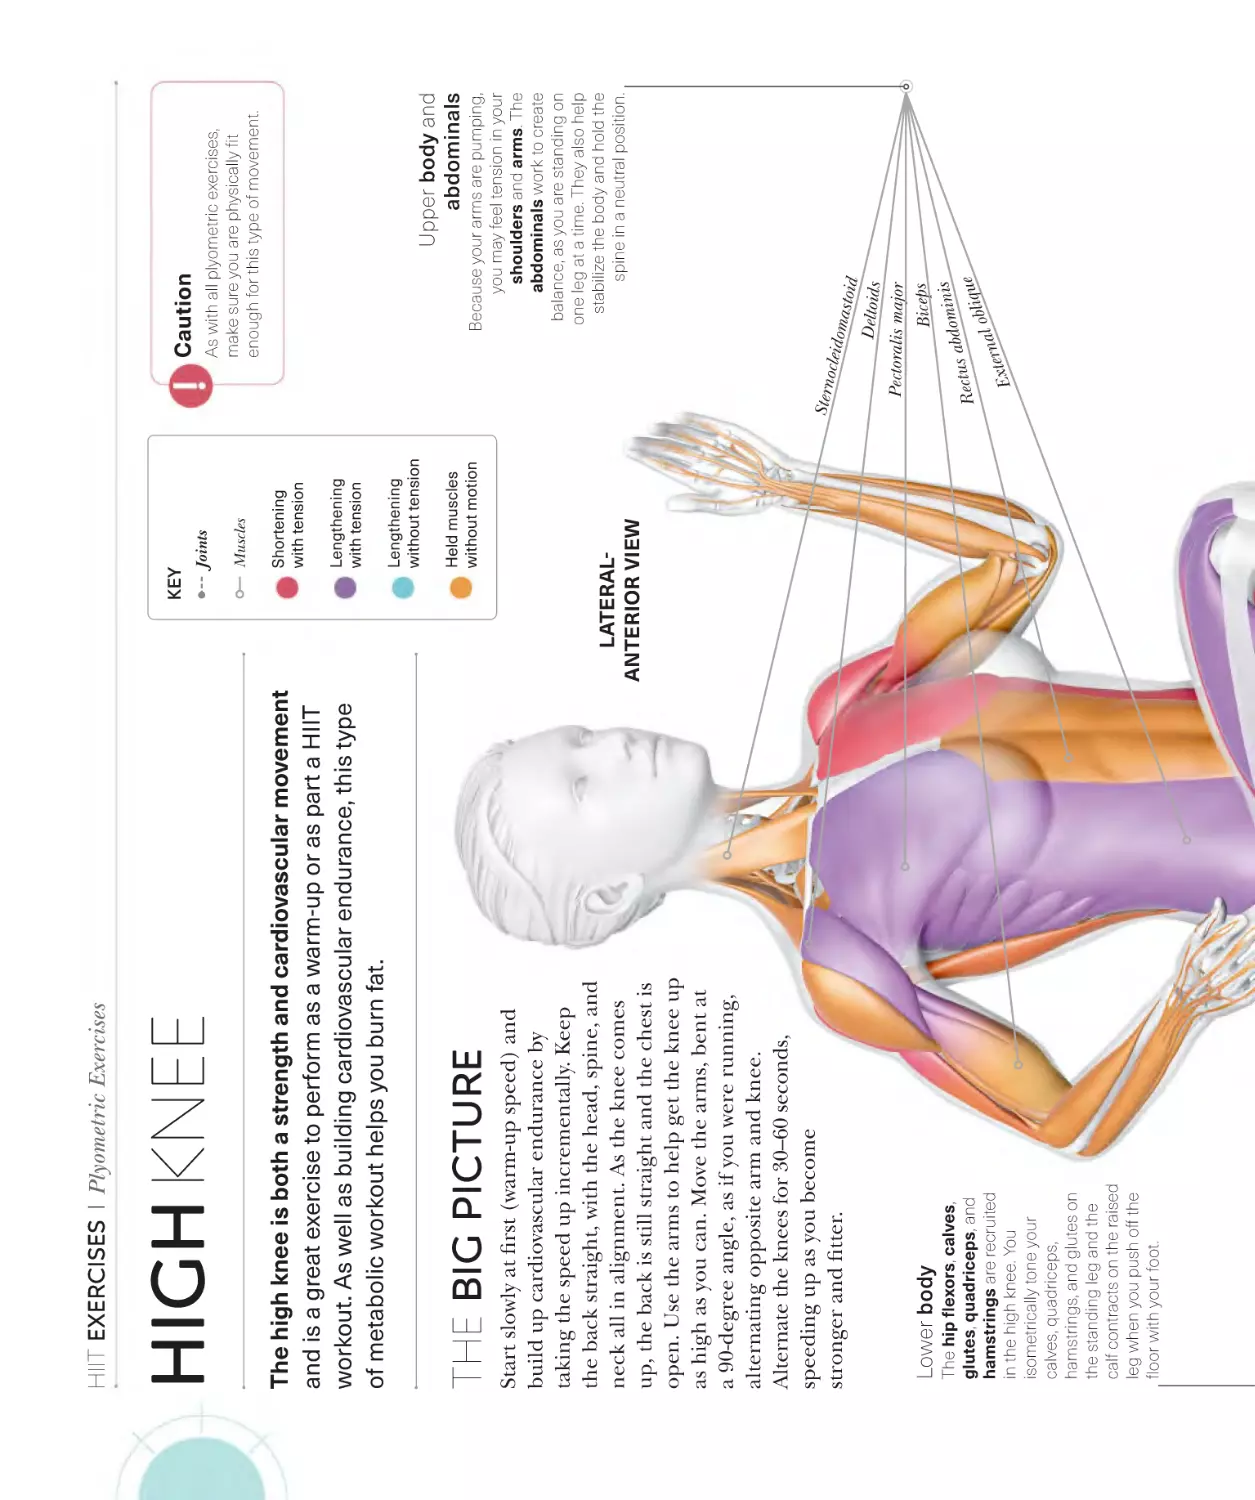
High knee
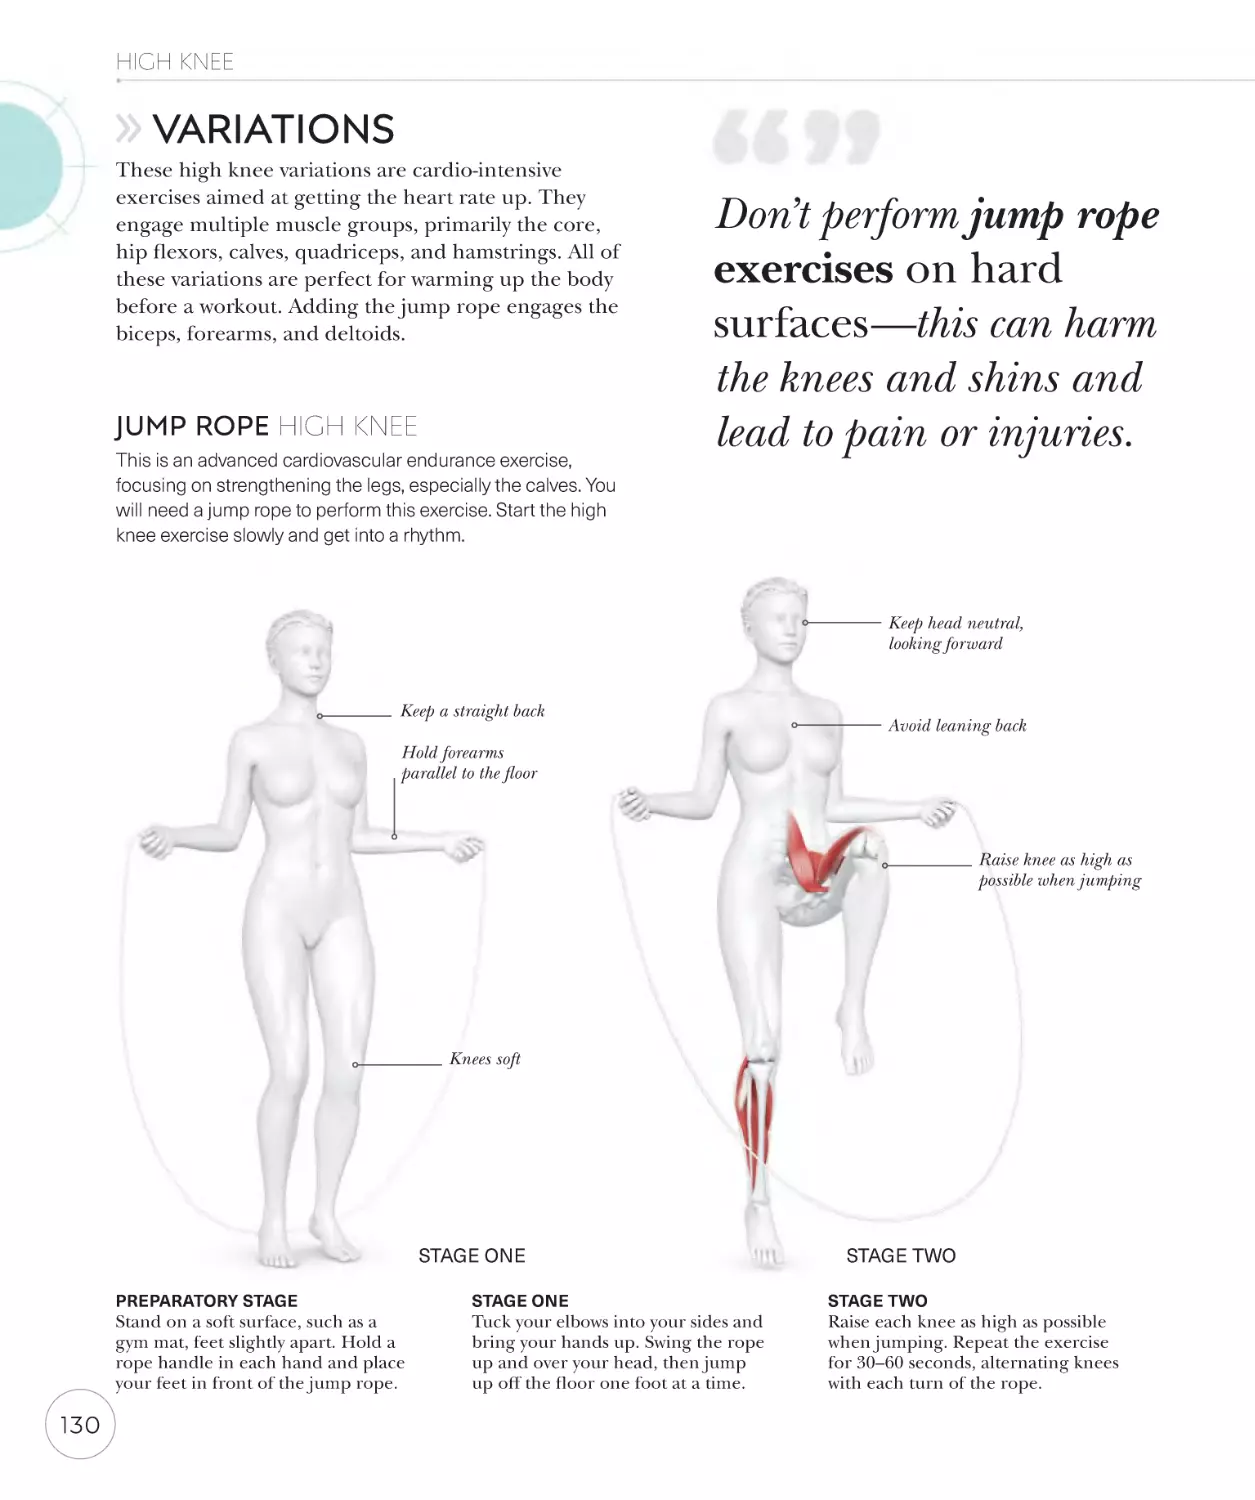
Variations
128
130
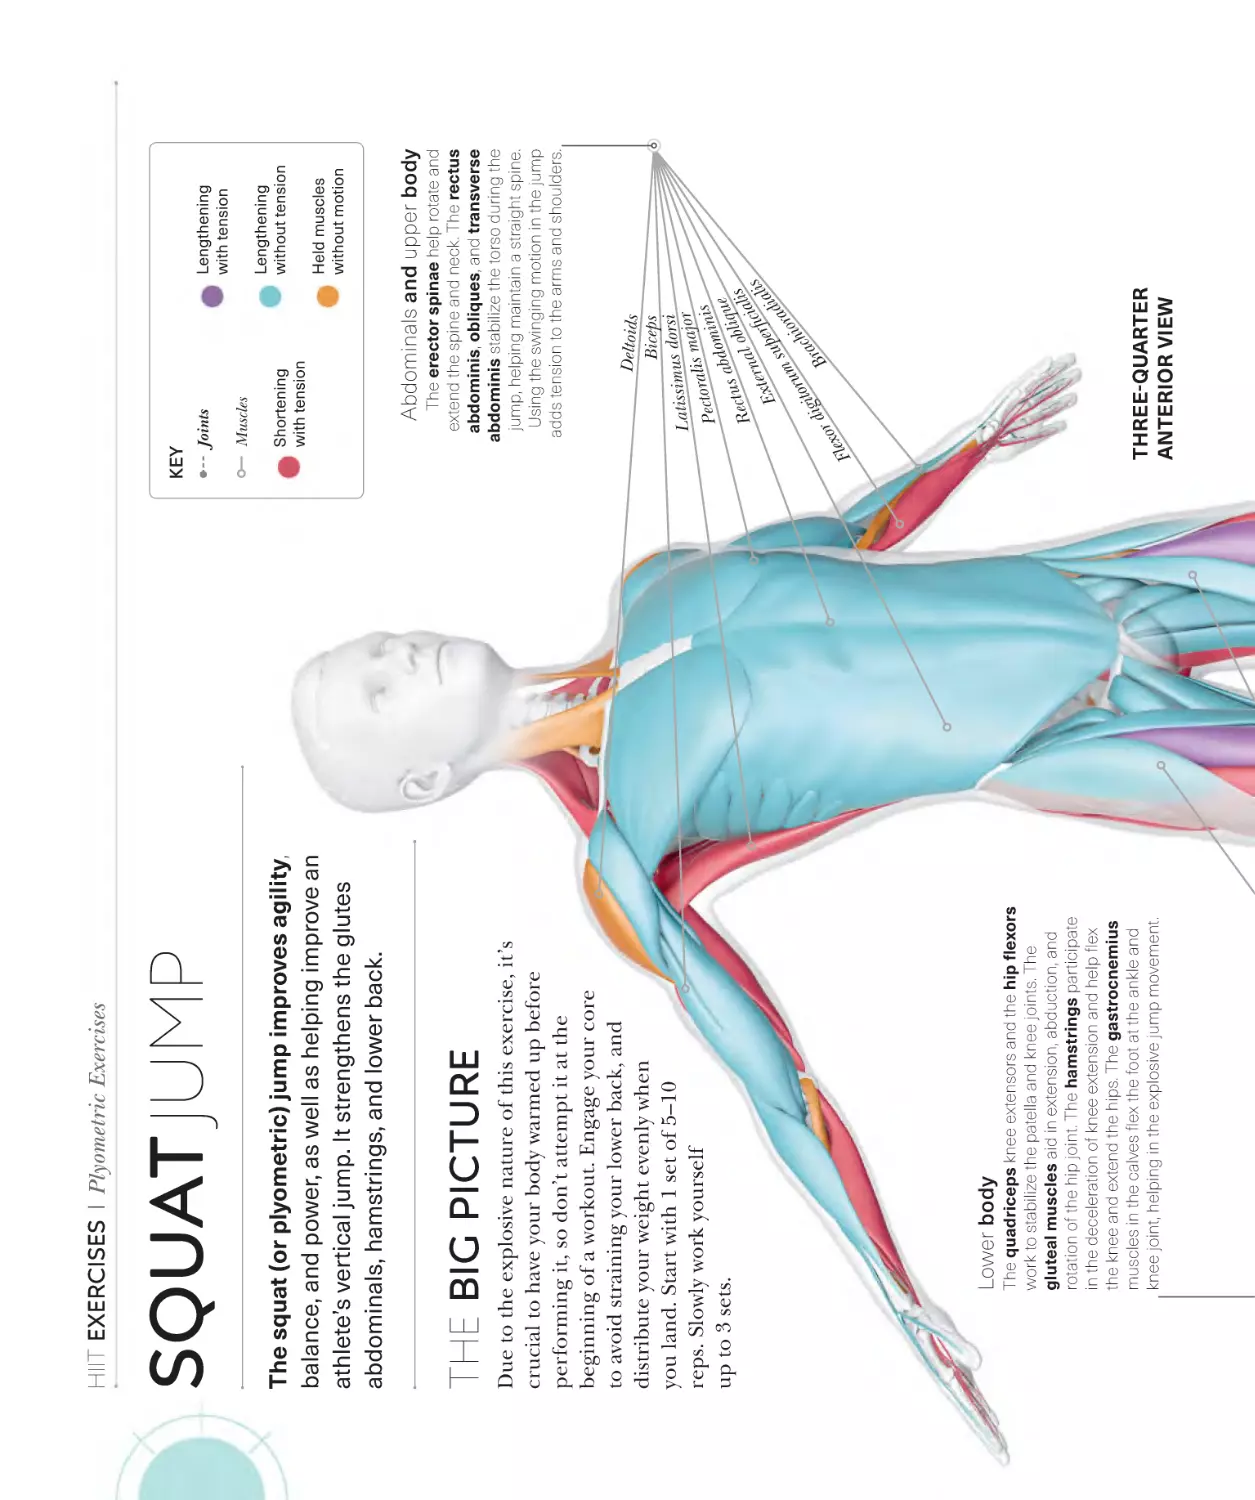
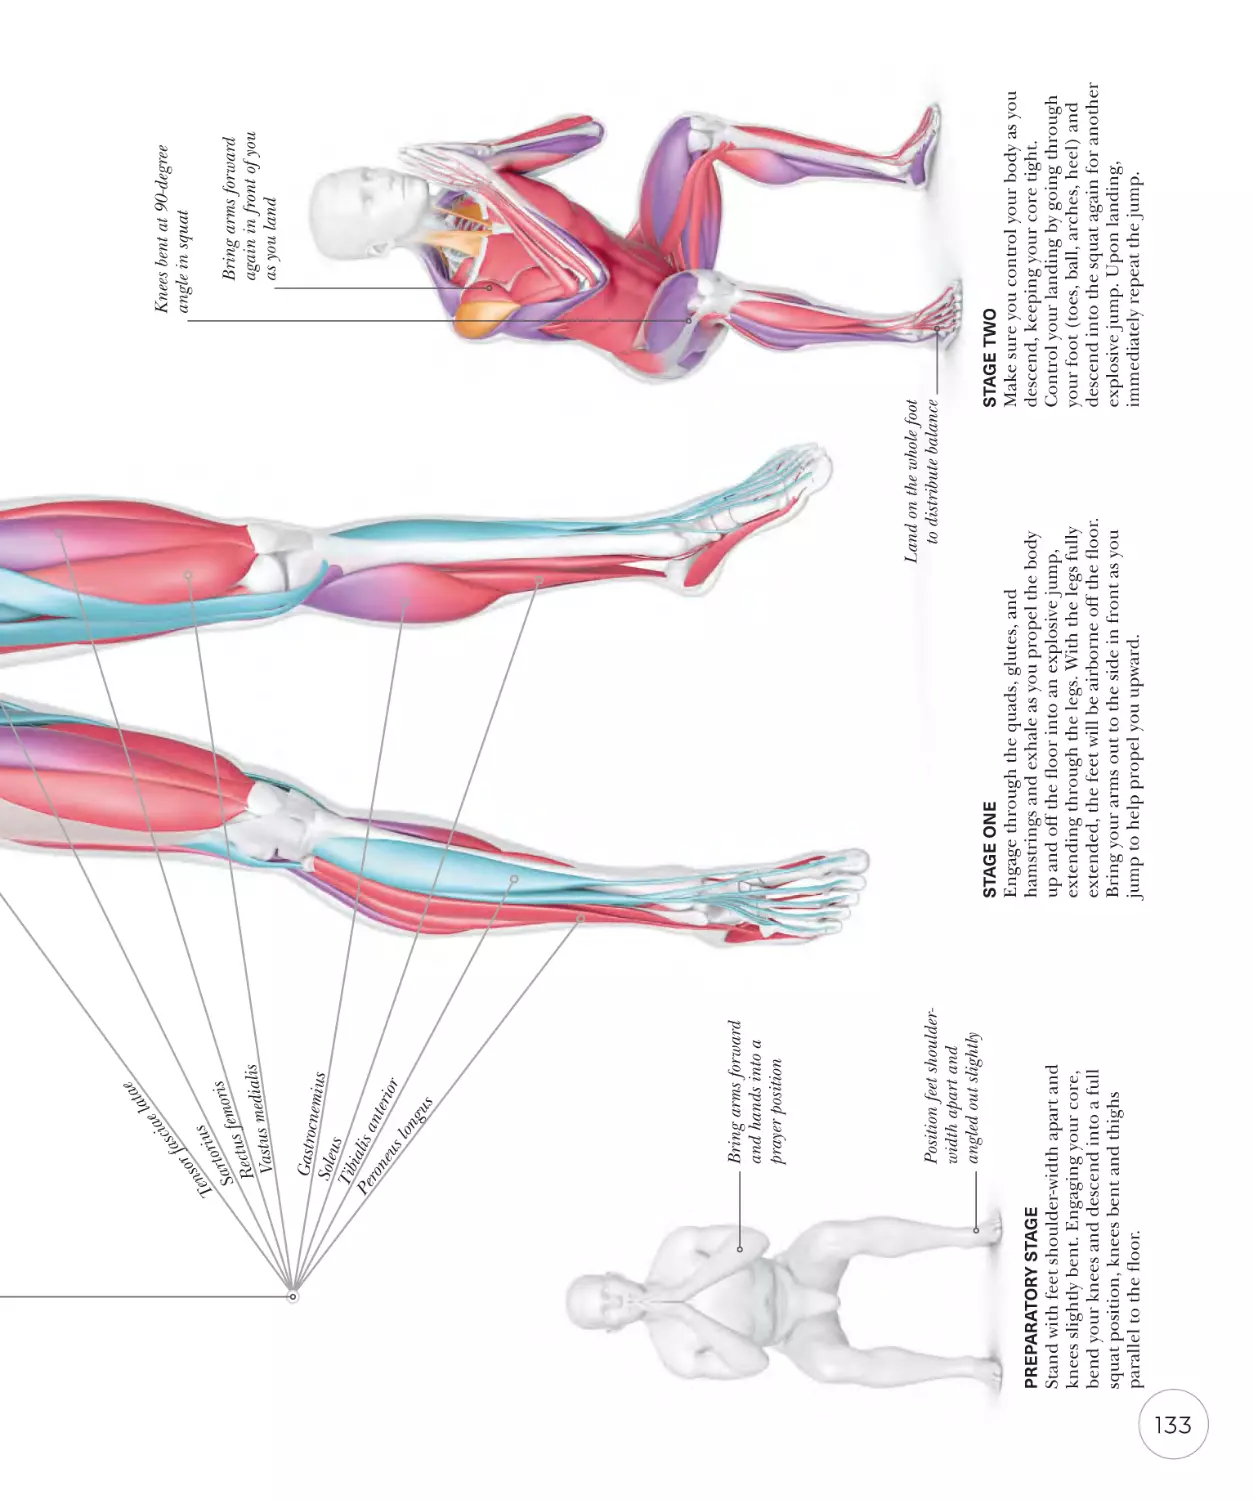
Squat jump
Variations
132
134
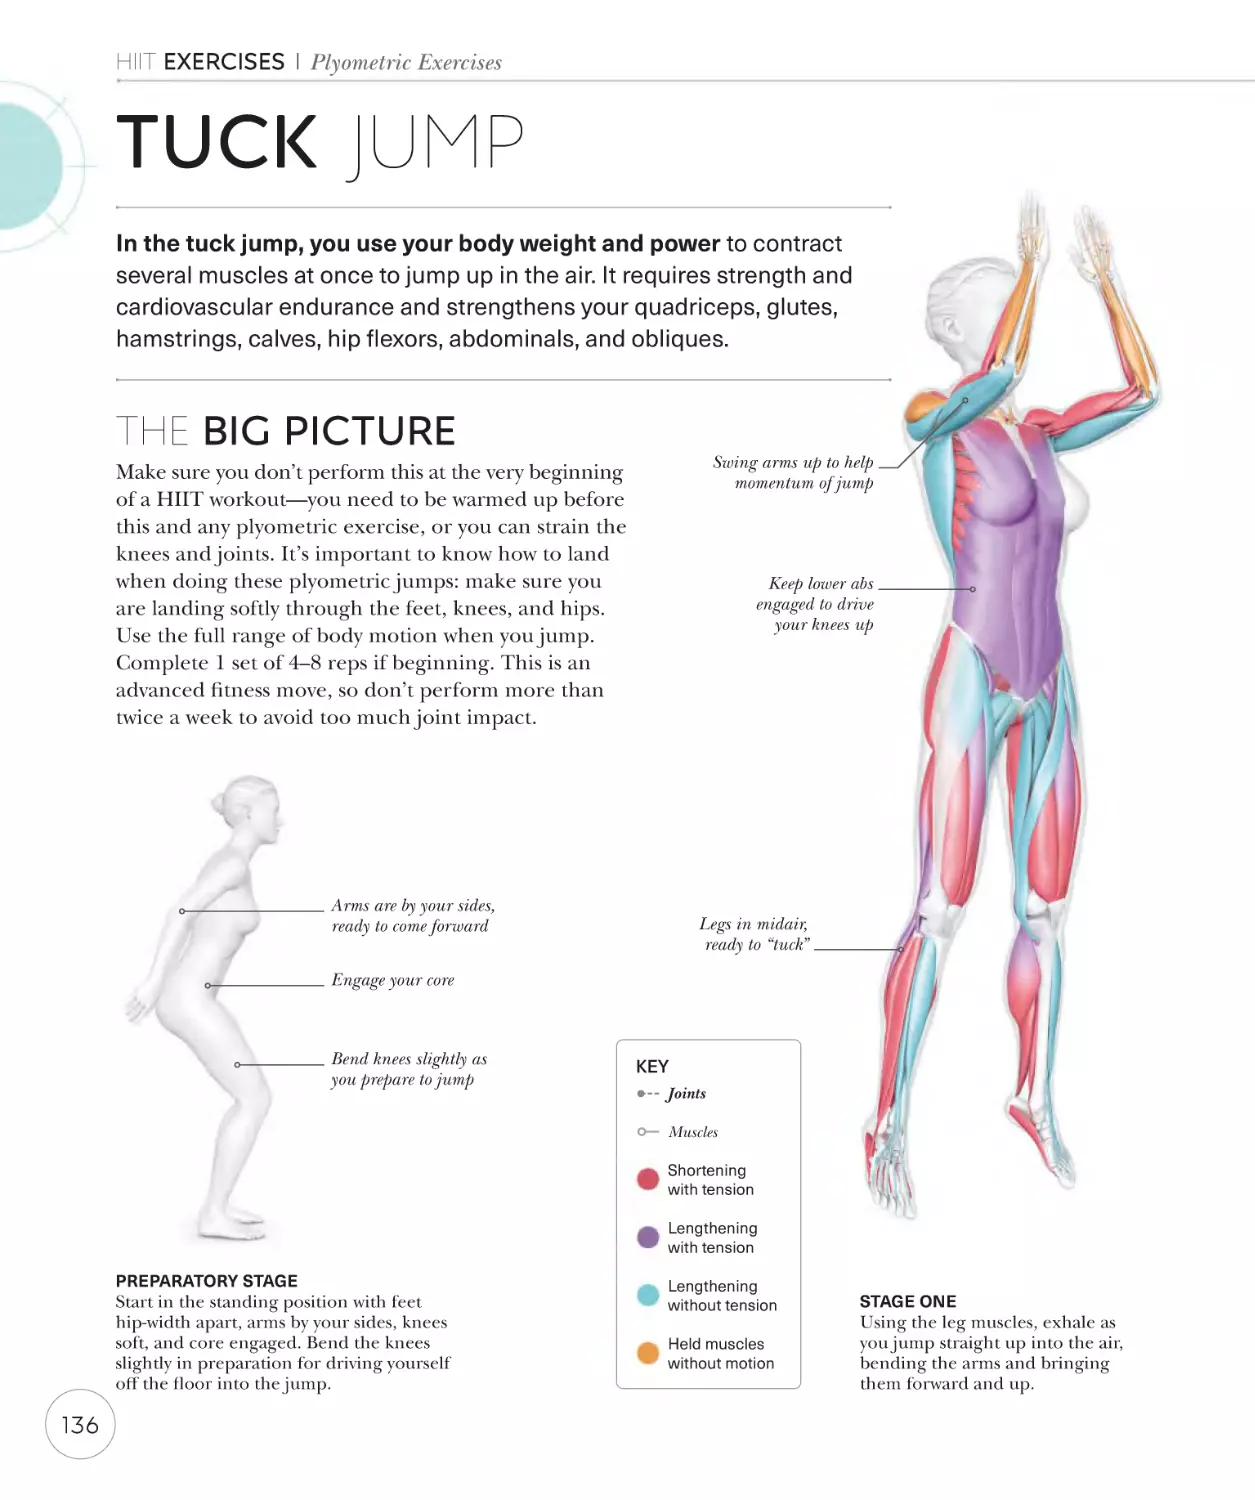
Tuck jump
136
TOTAL BODY EXERCISES
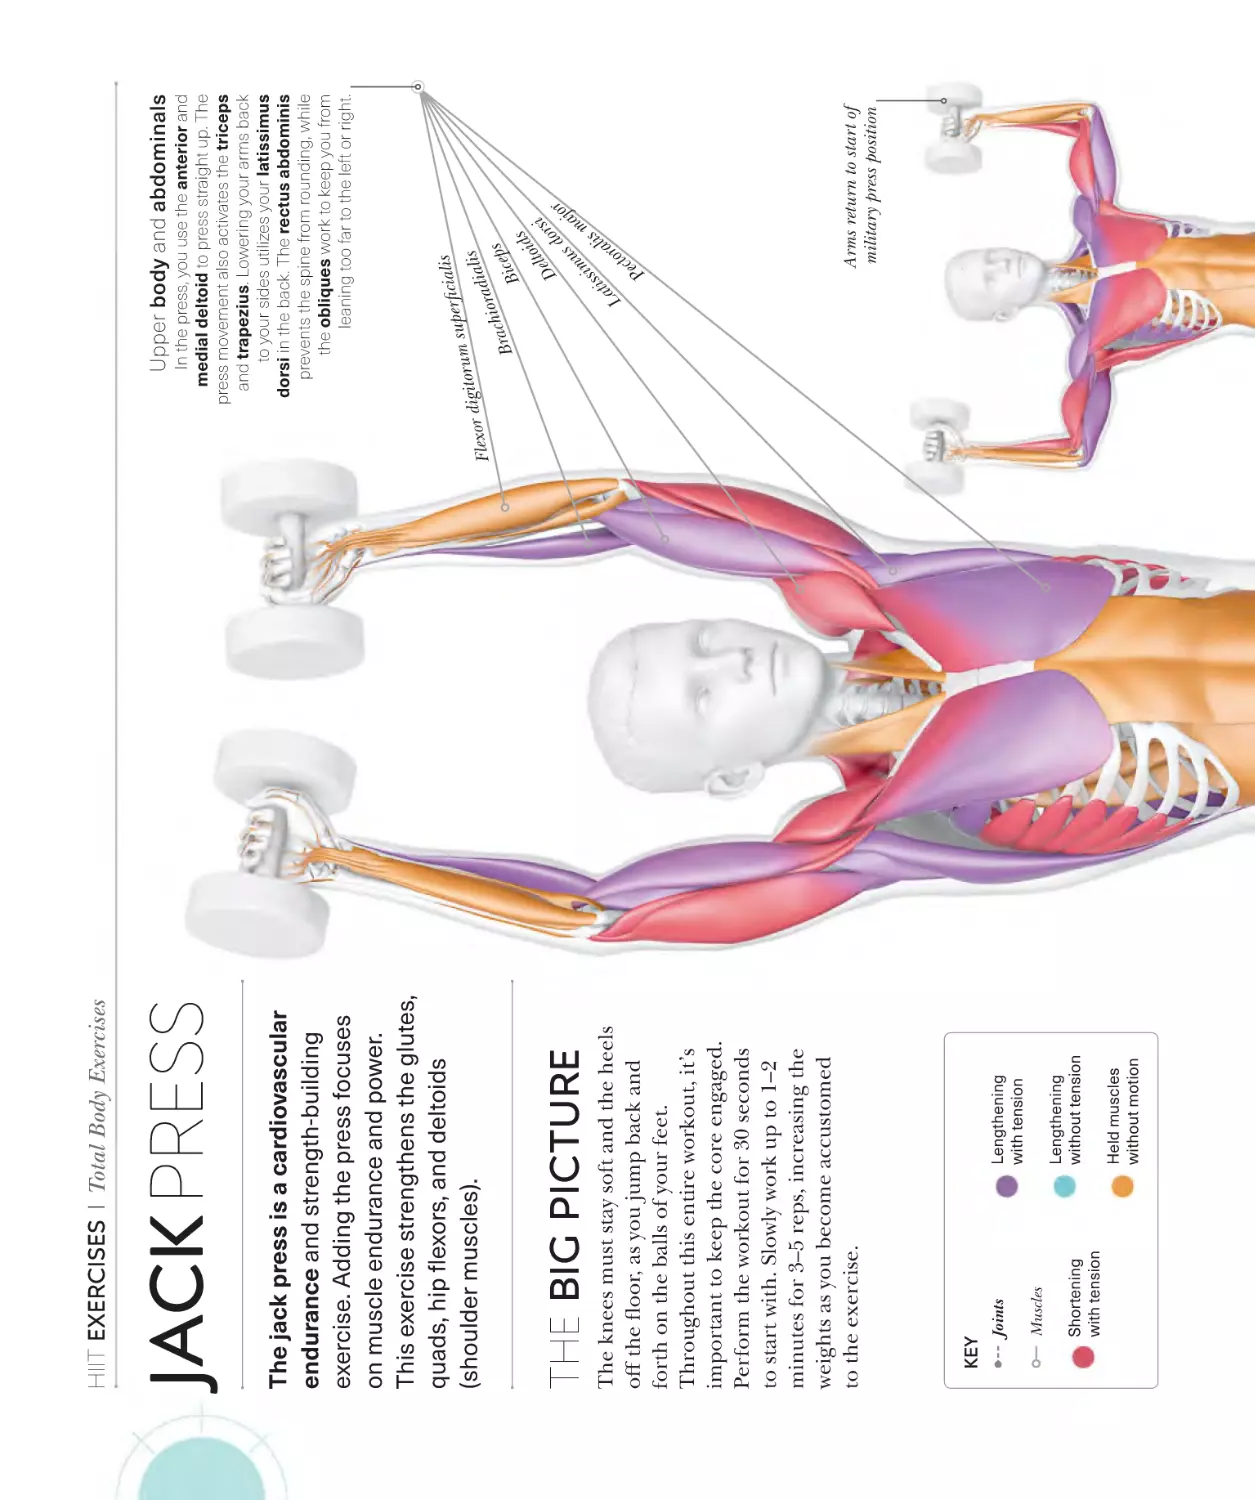
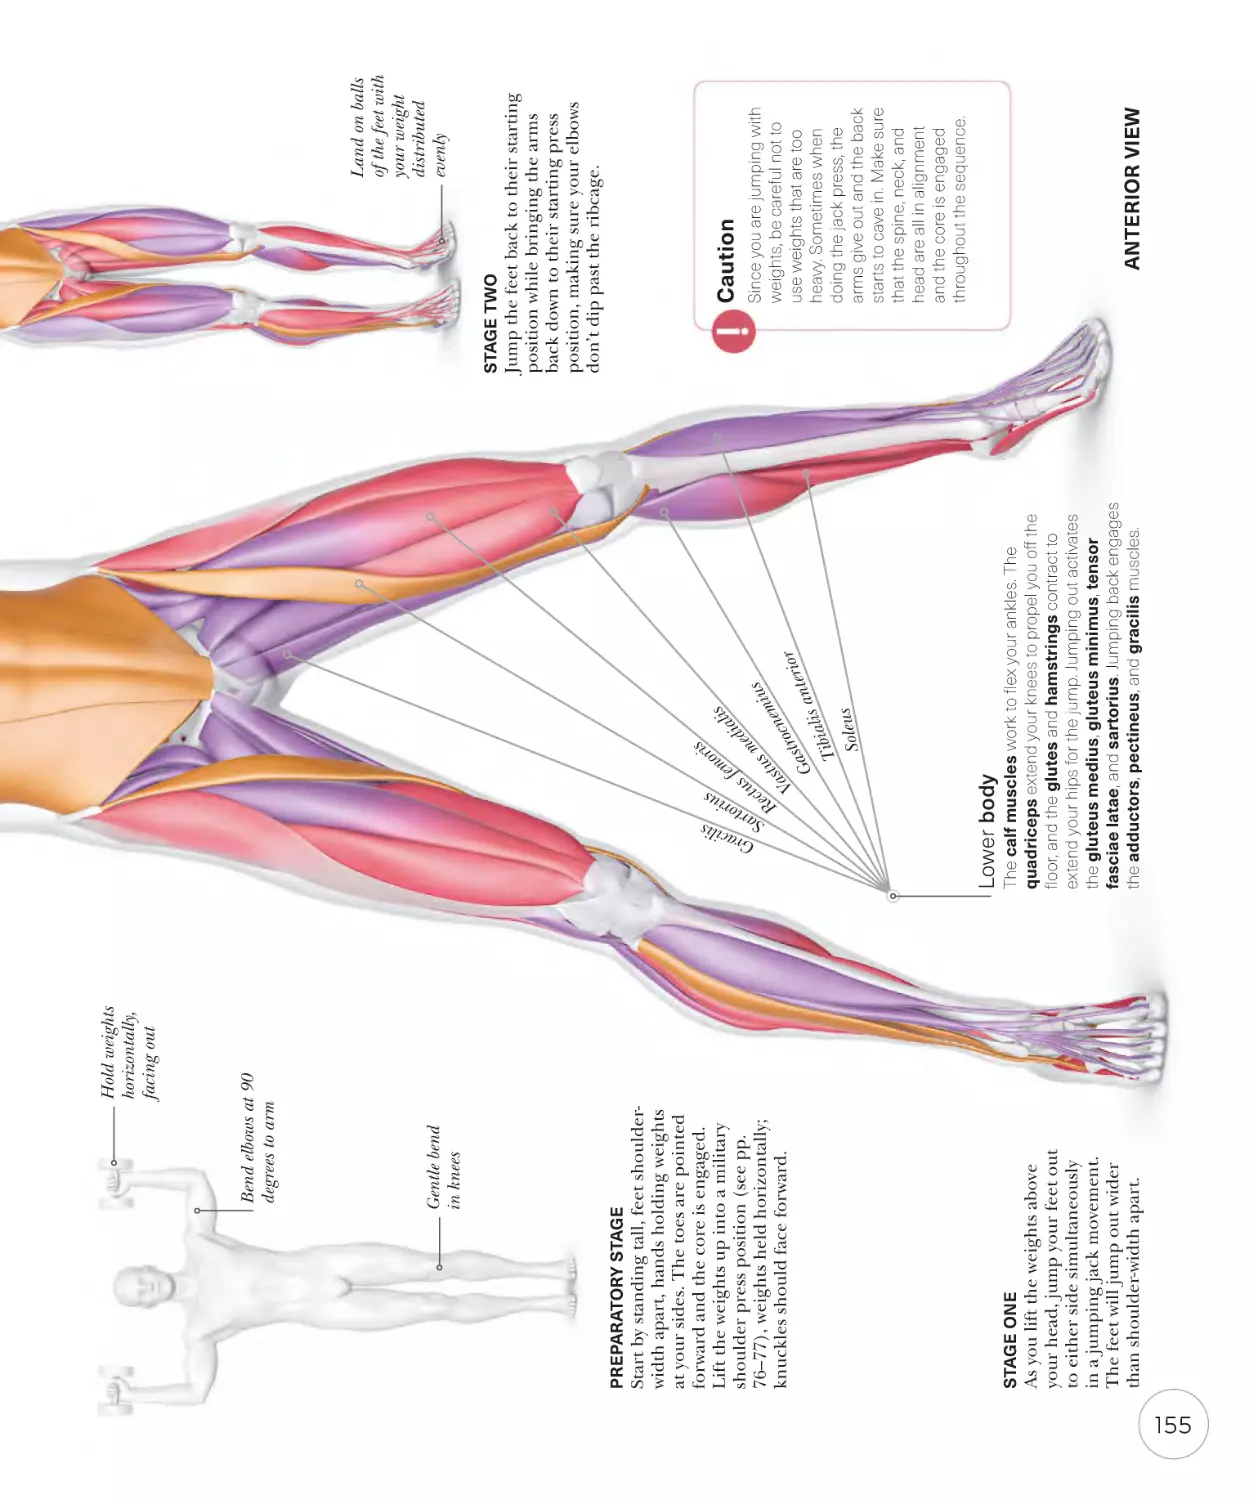
Jack press
154
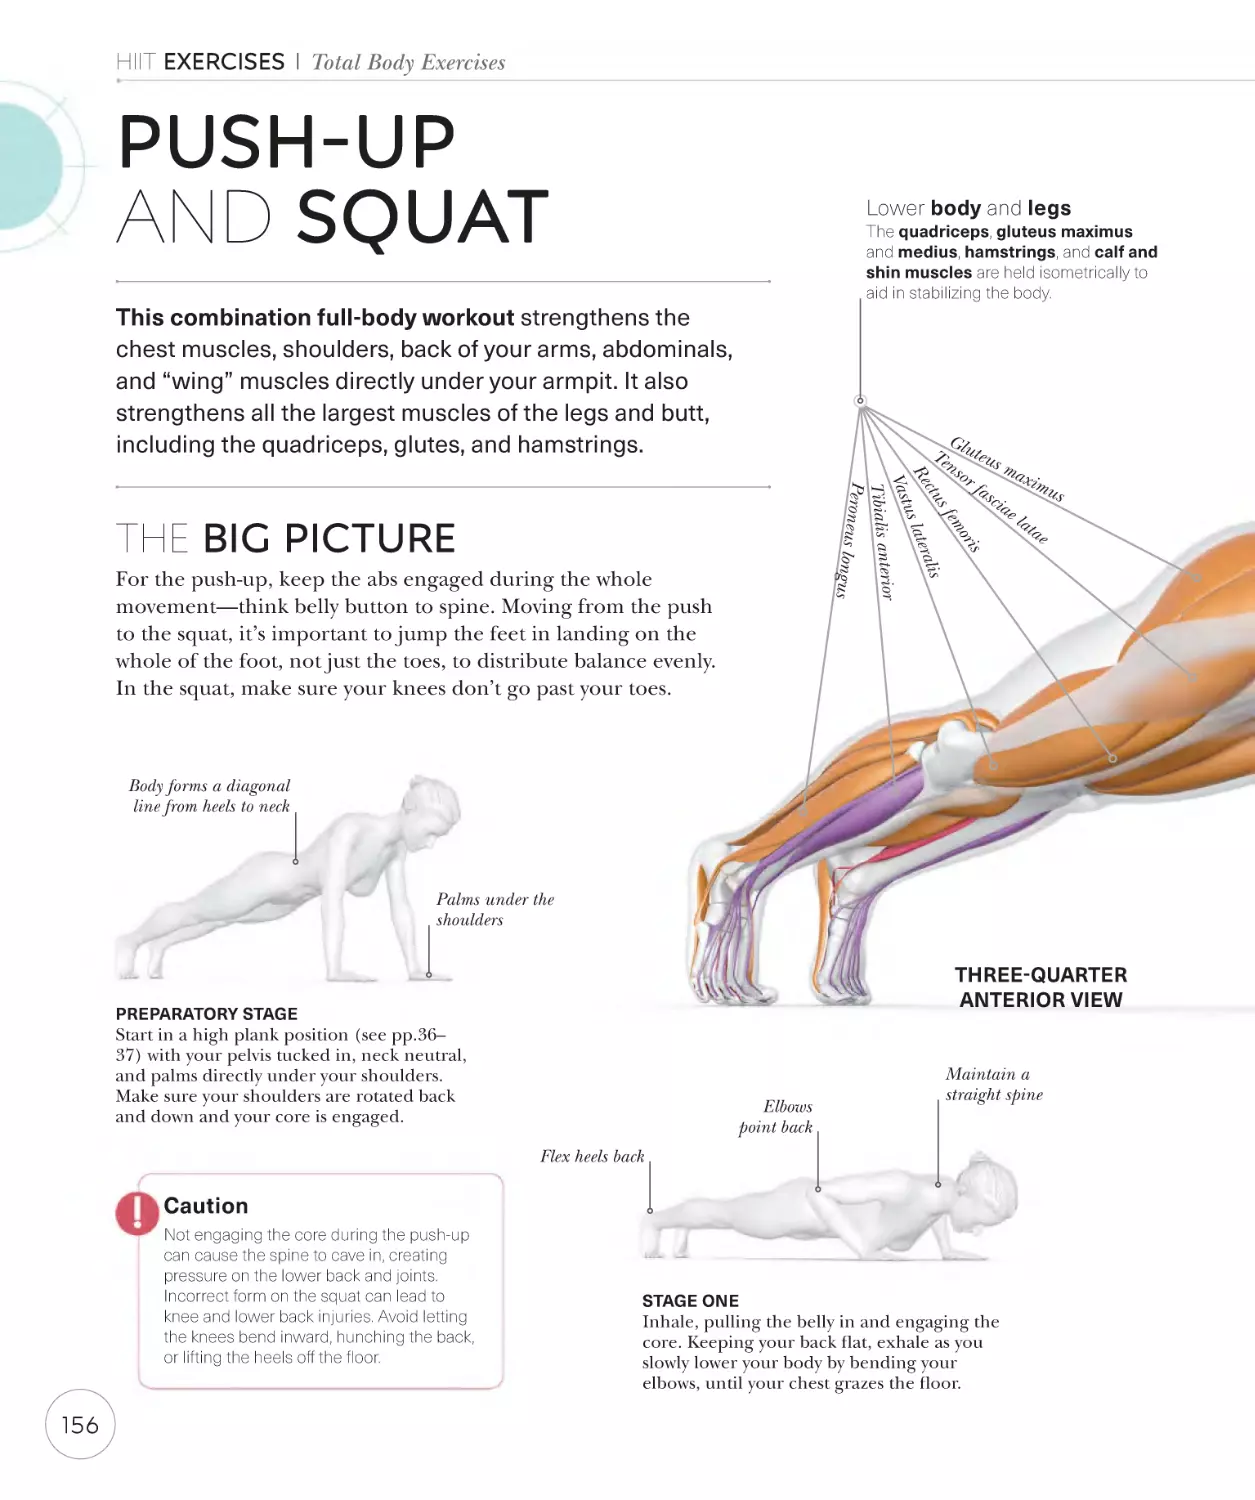
Push-up and squat
156
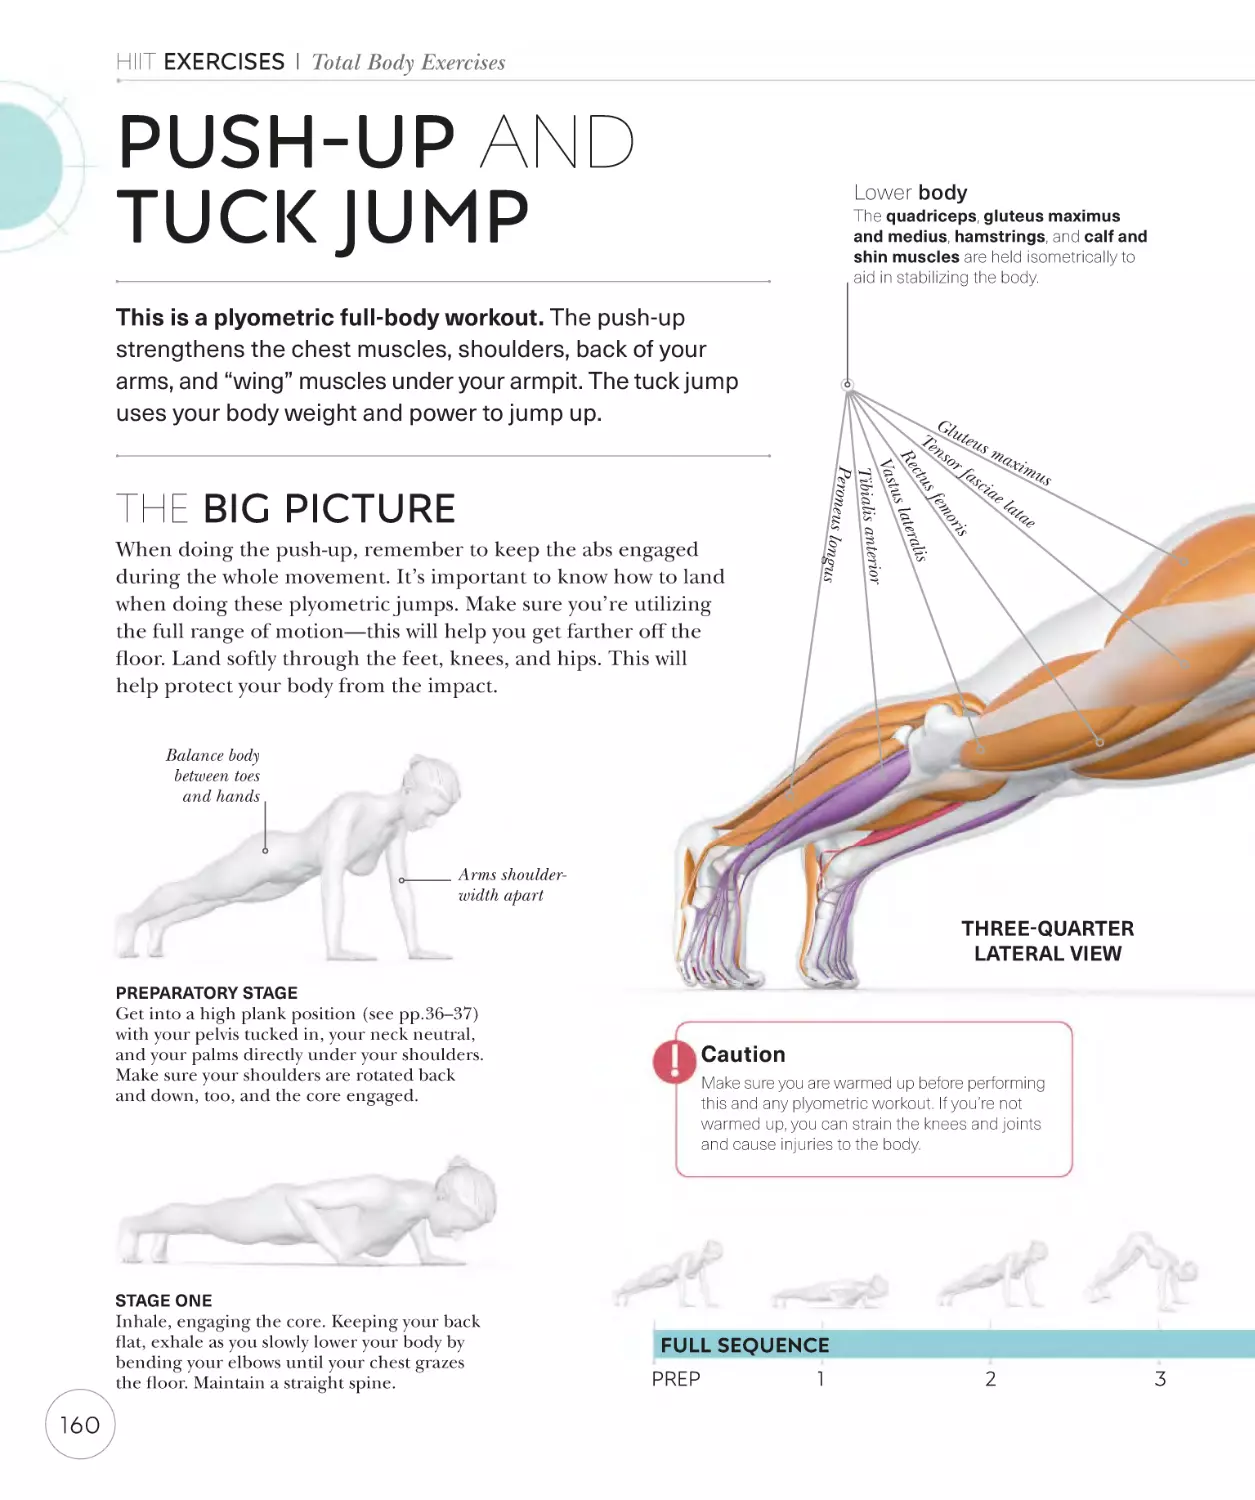
Push-up and tuck jump
160
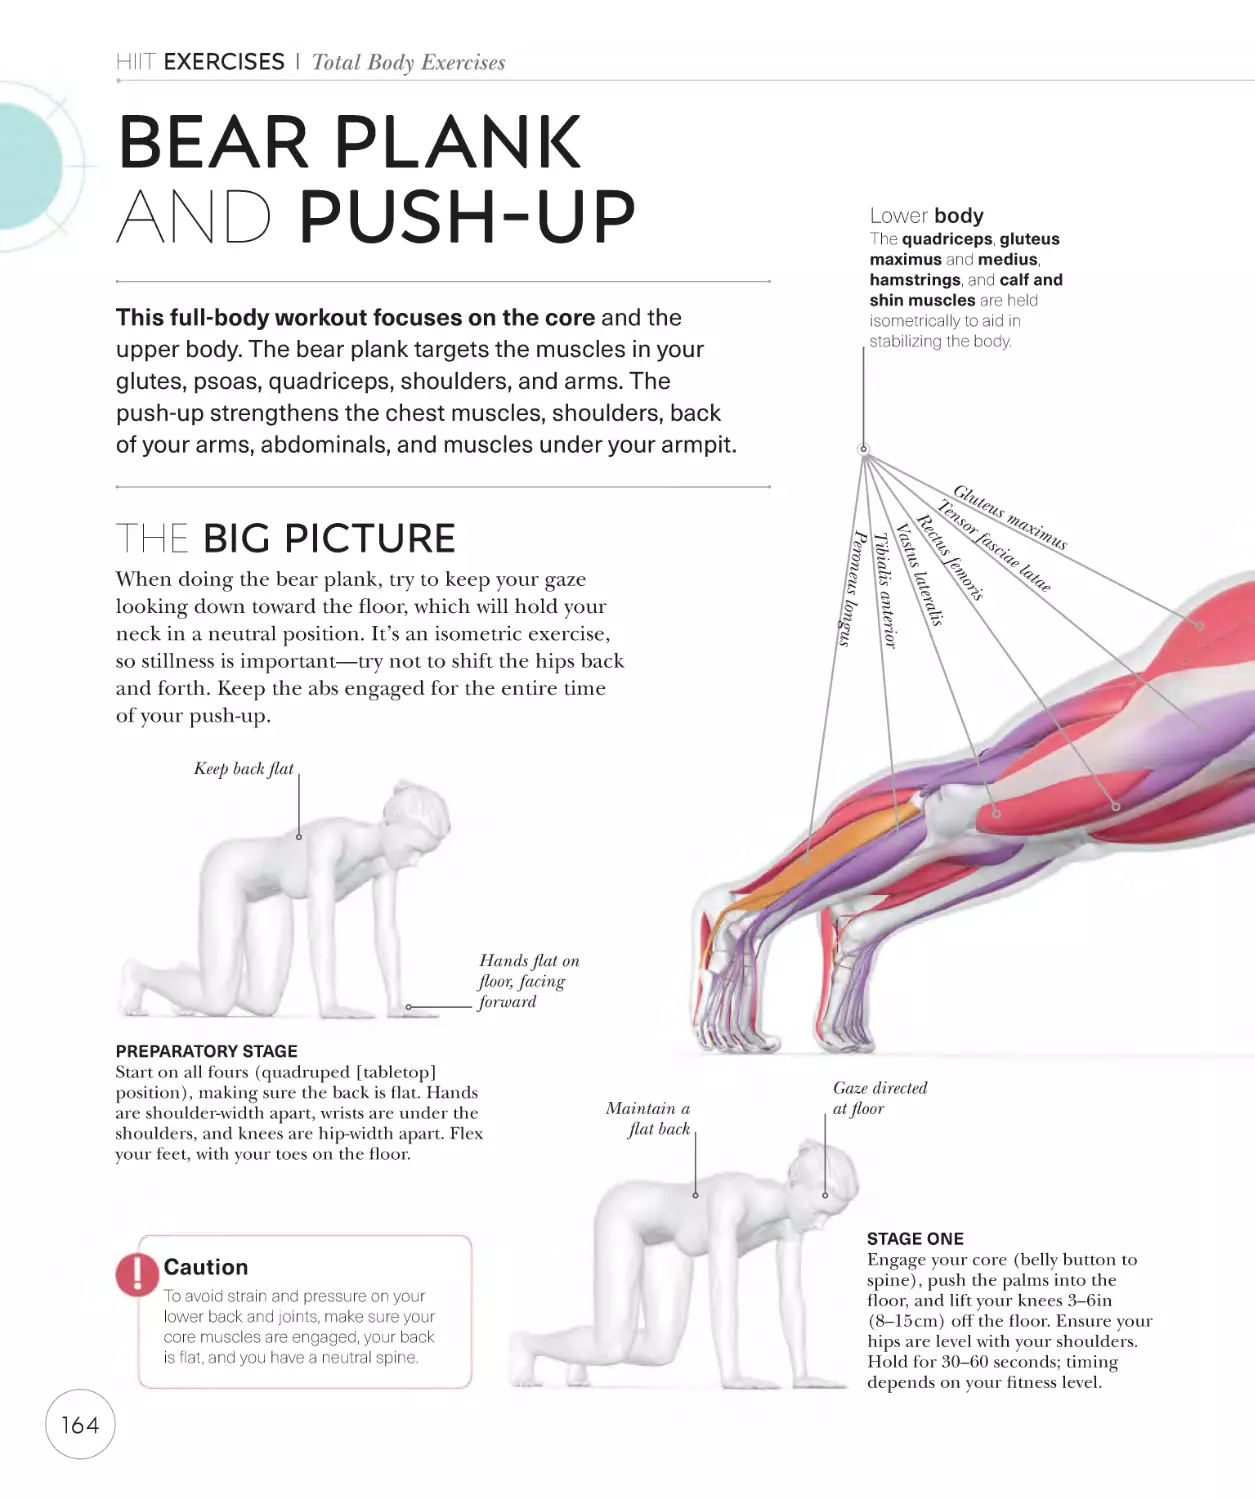
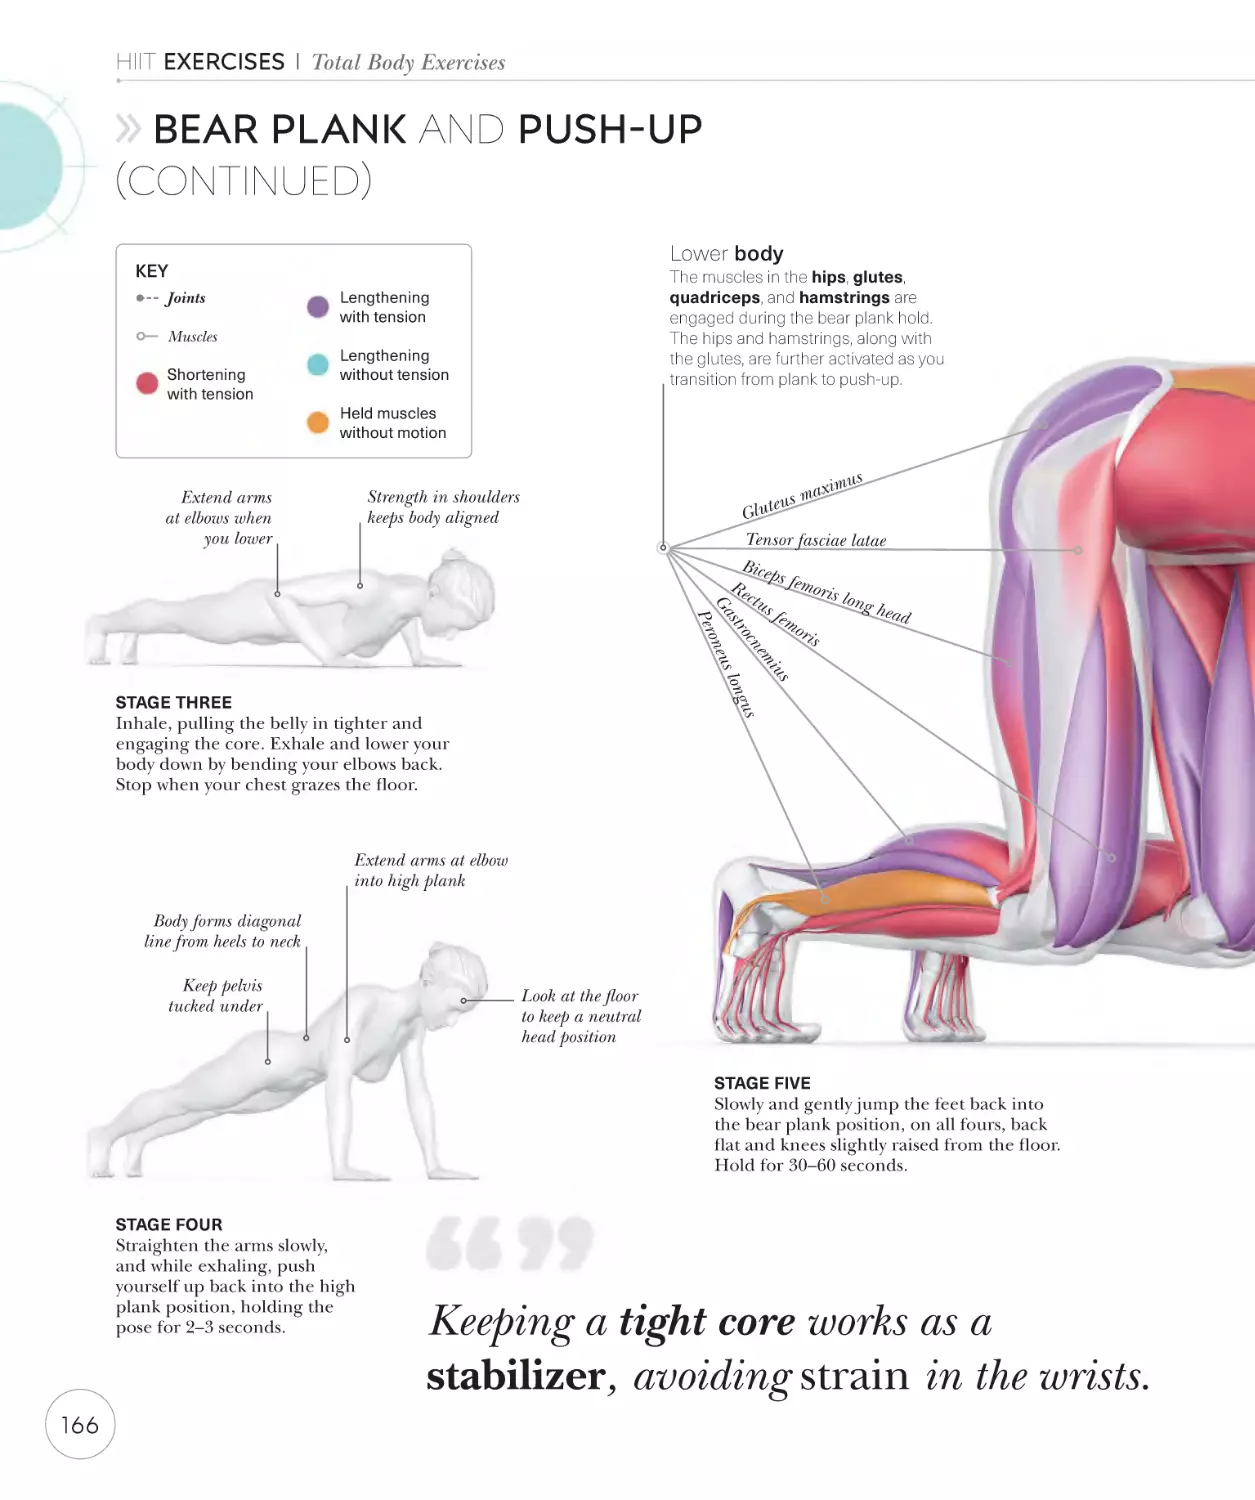
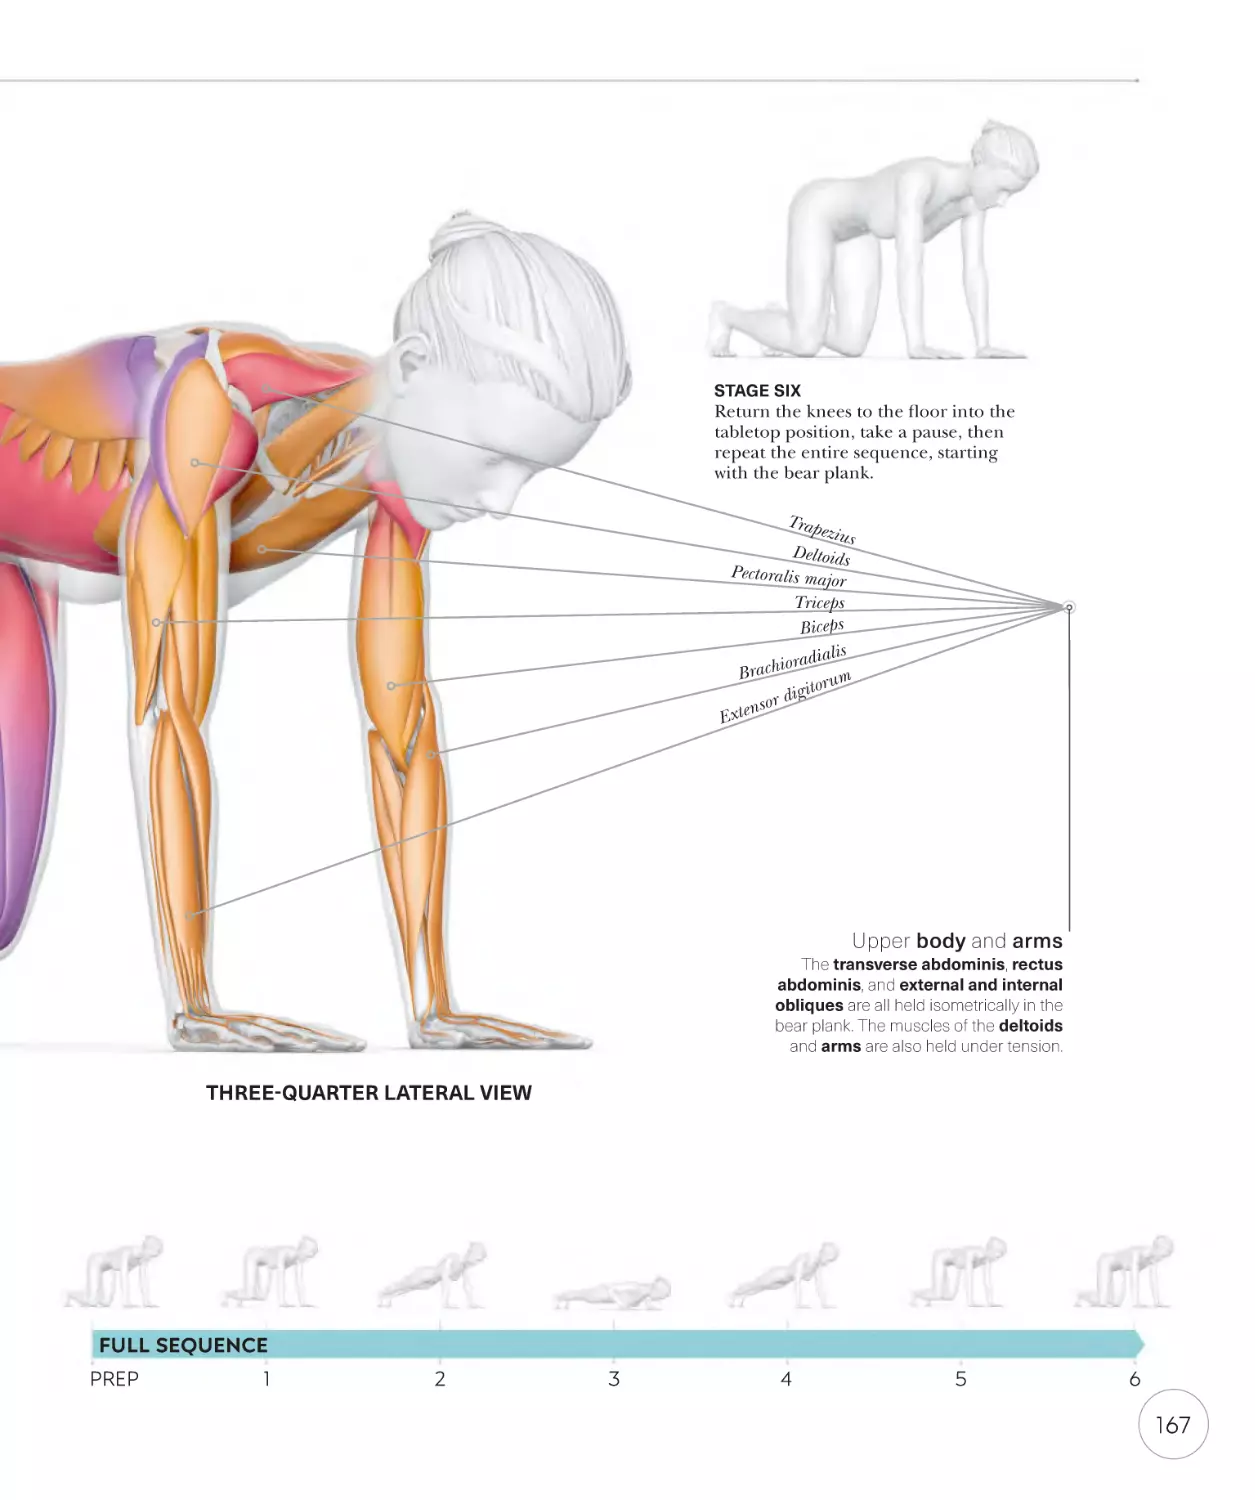
Bear plank and push-up
164
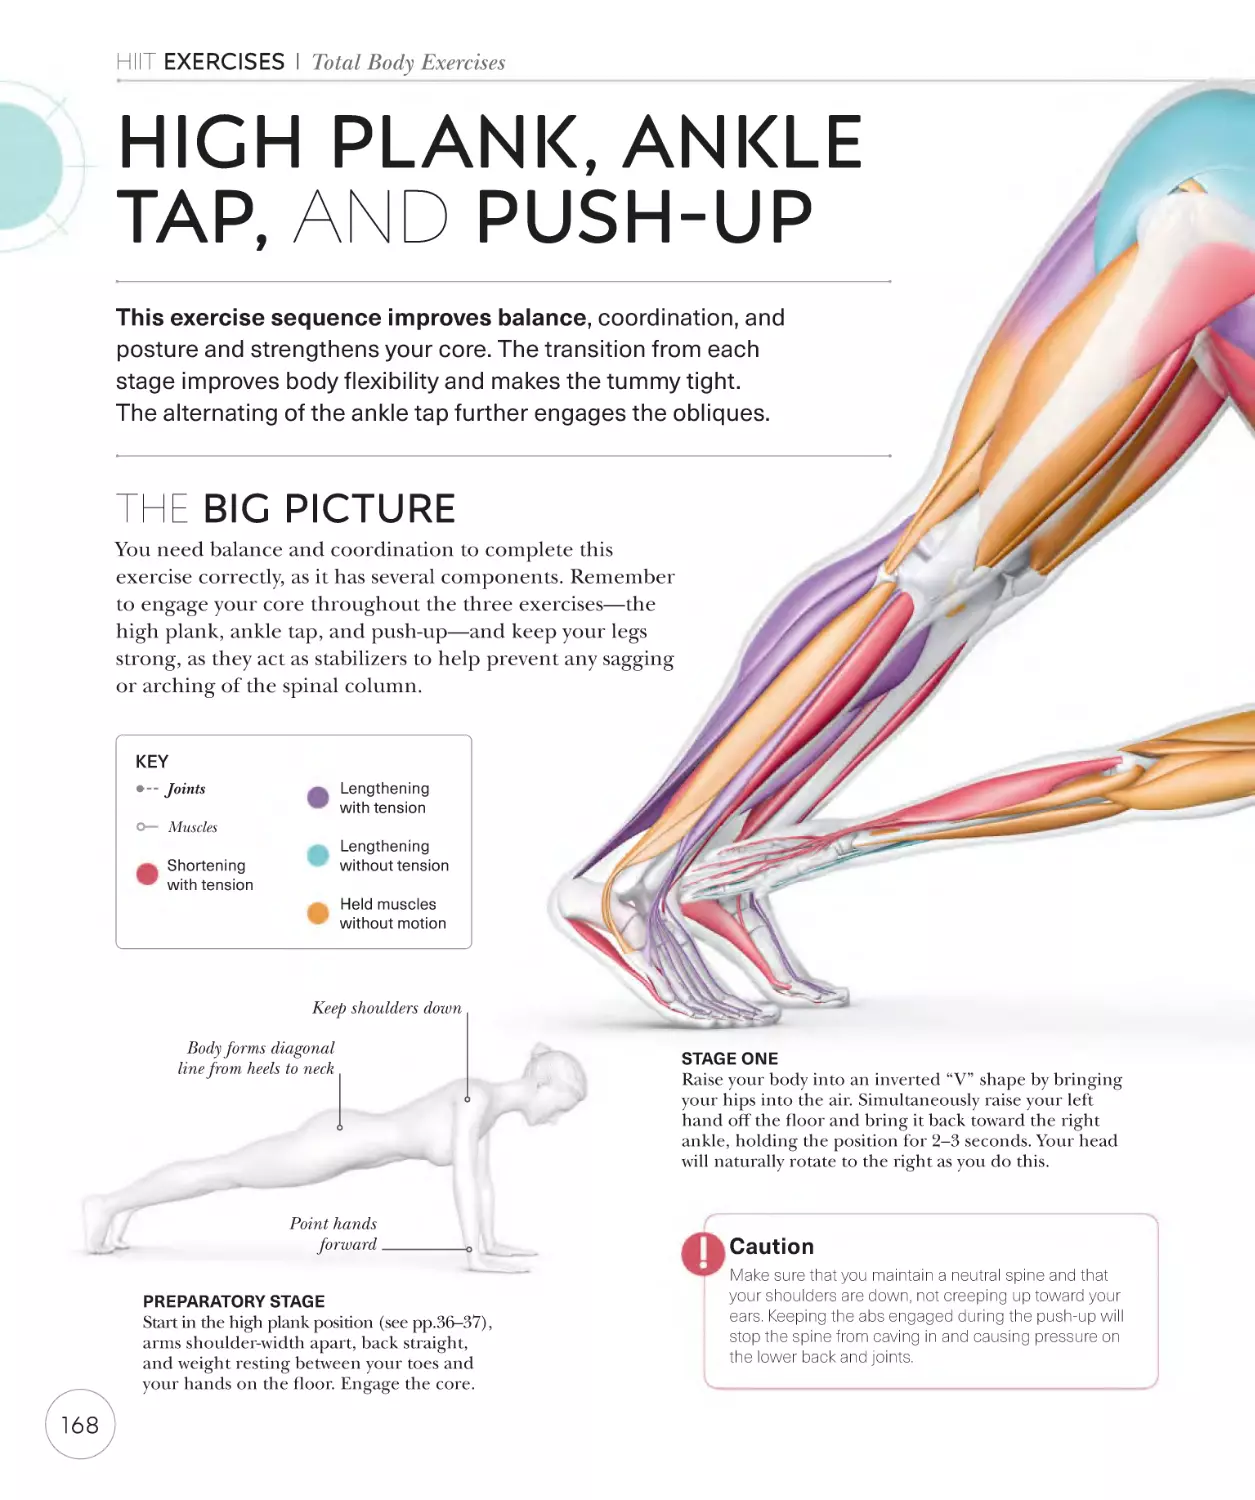
High plank, ankle tap,
and push-up
168
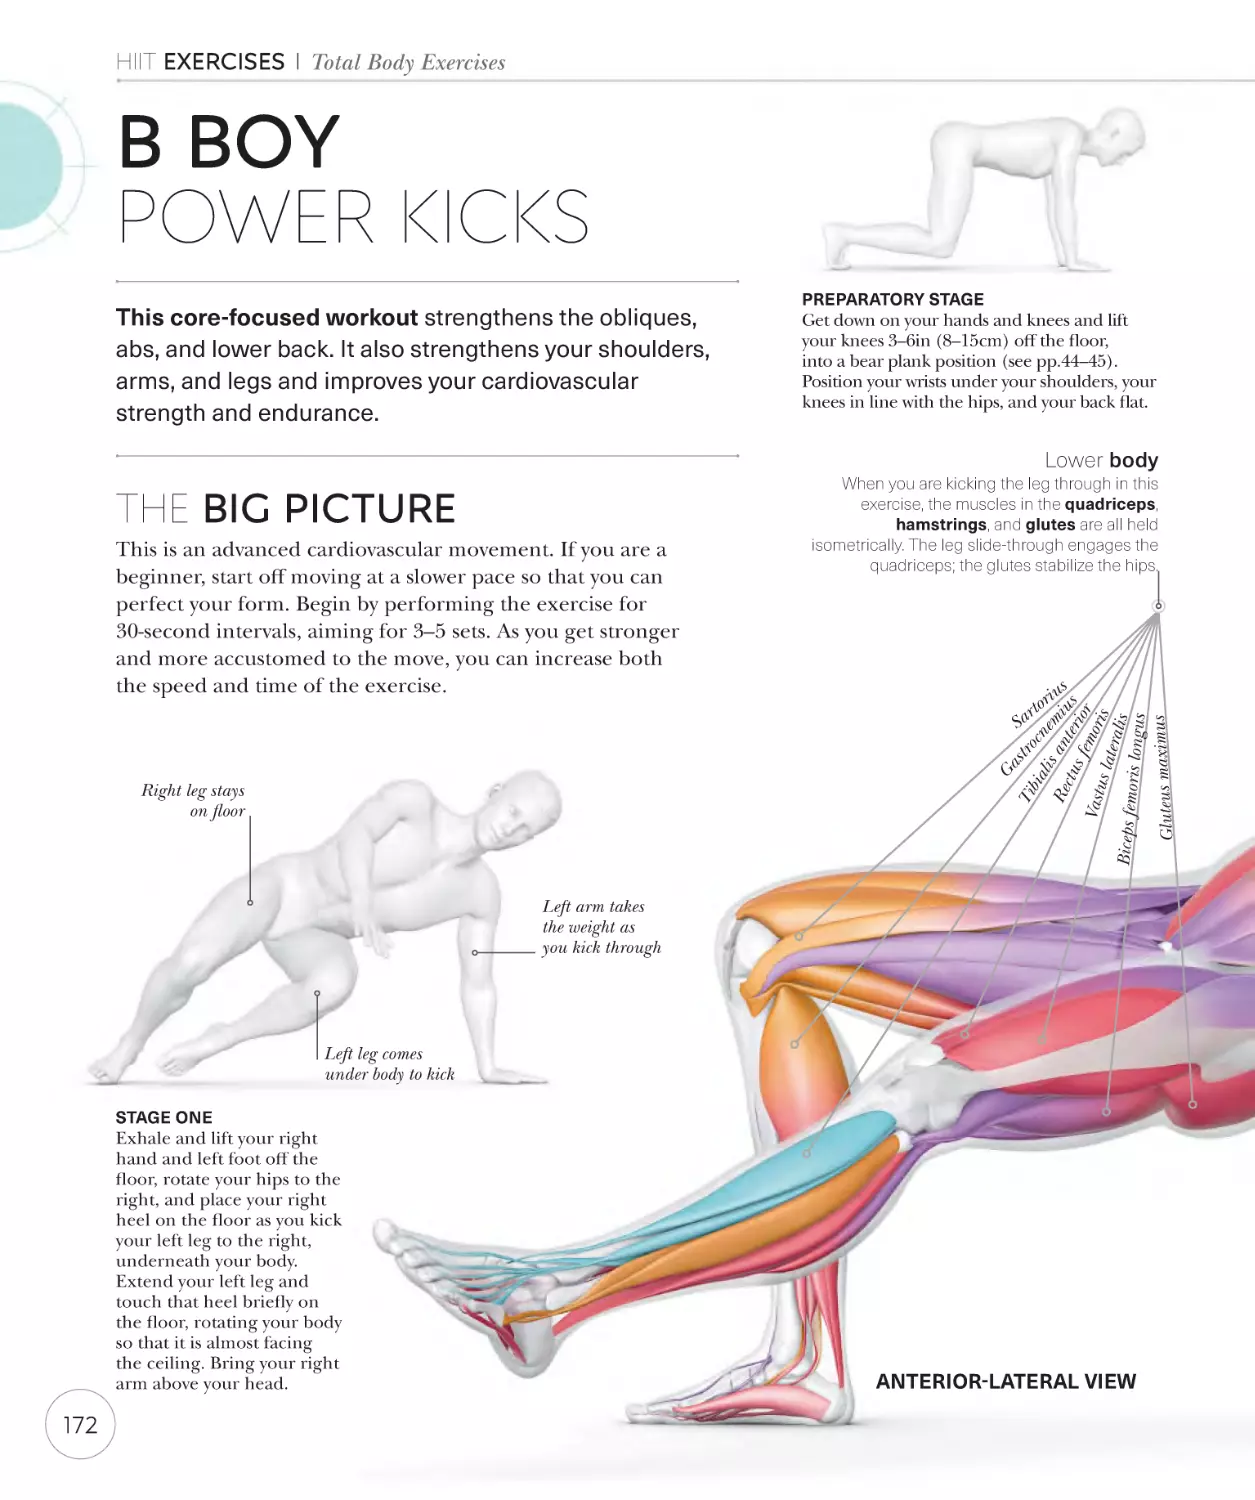
B boy power kicks
172
Glossary
210
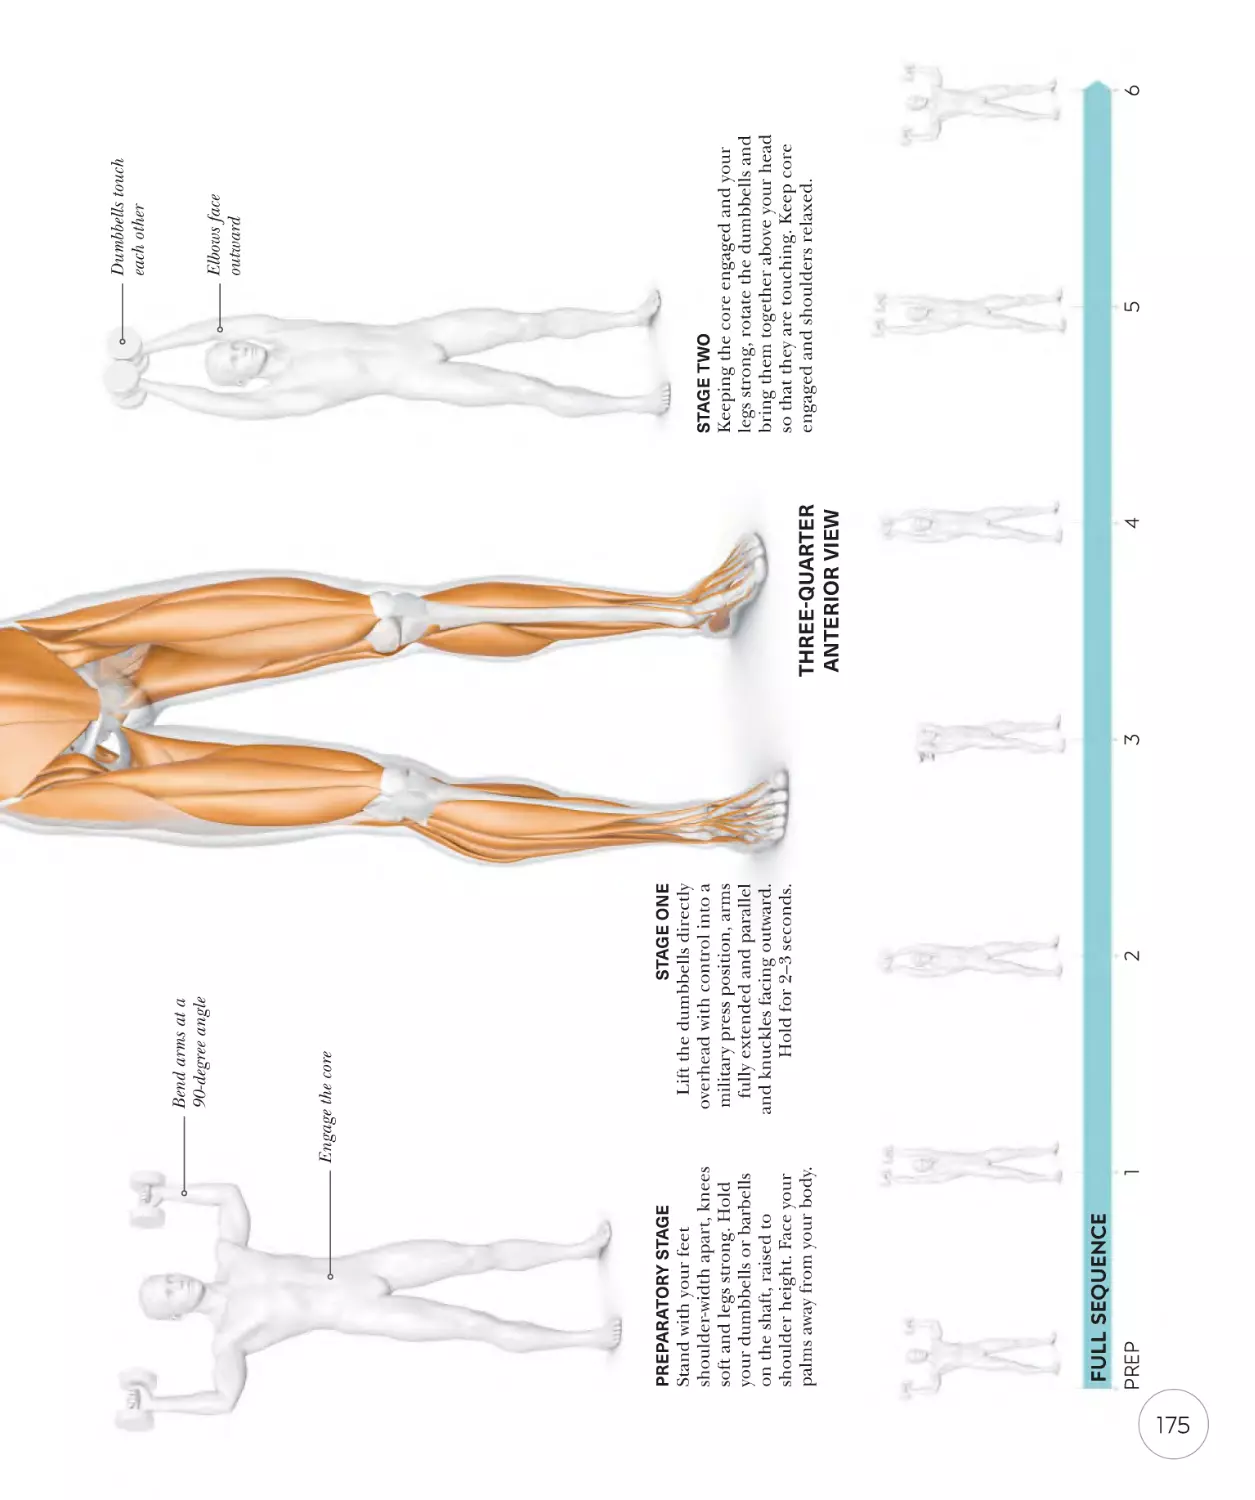
Military press and overhead
triceps extension
174
Index
214
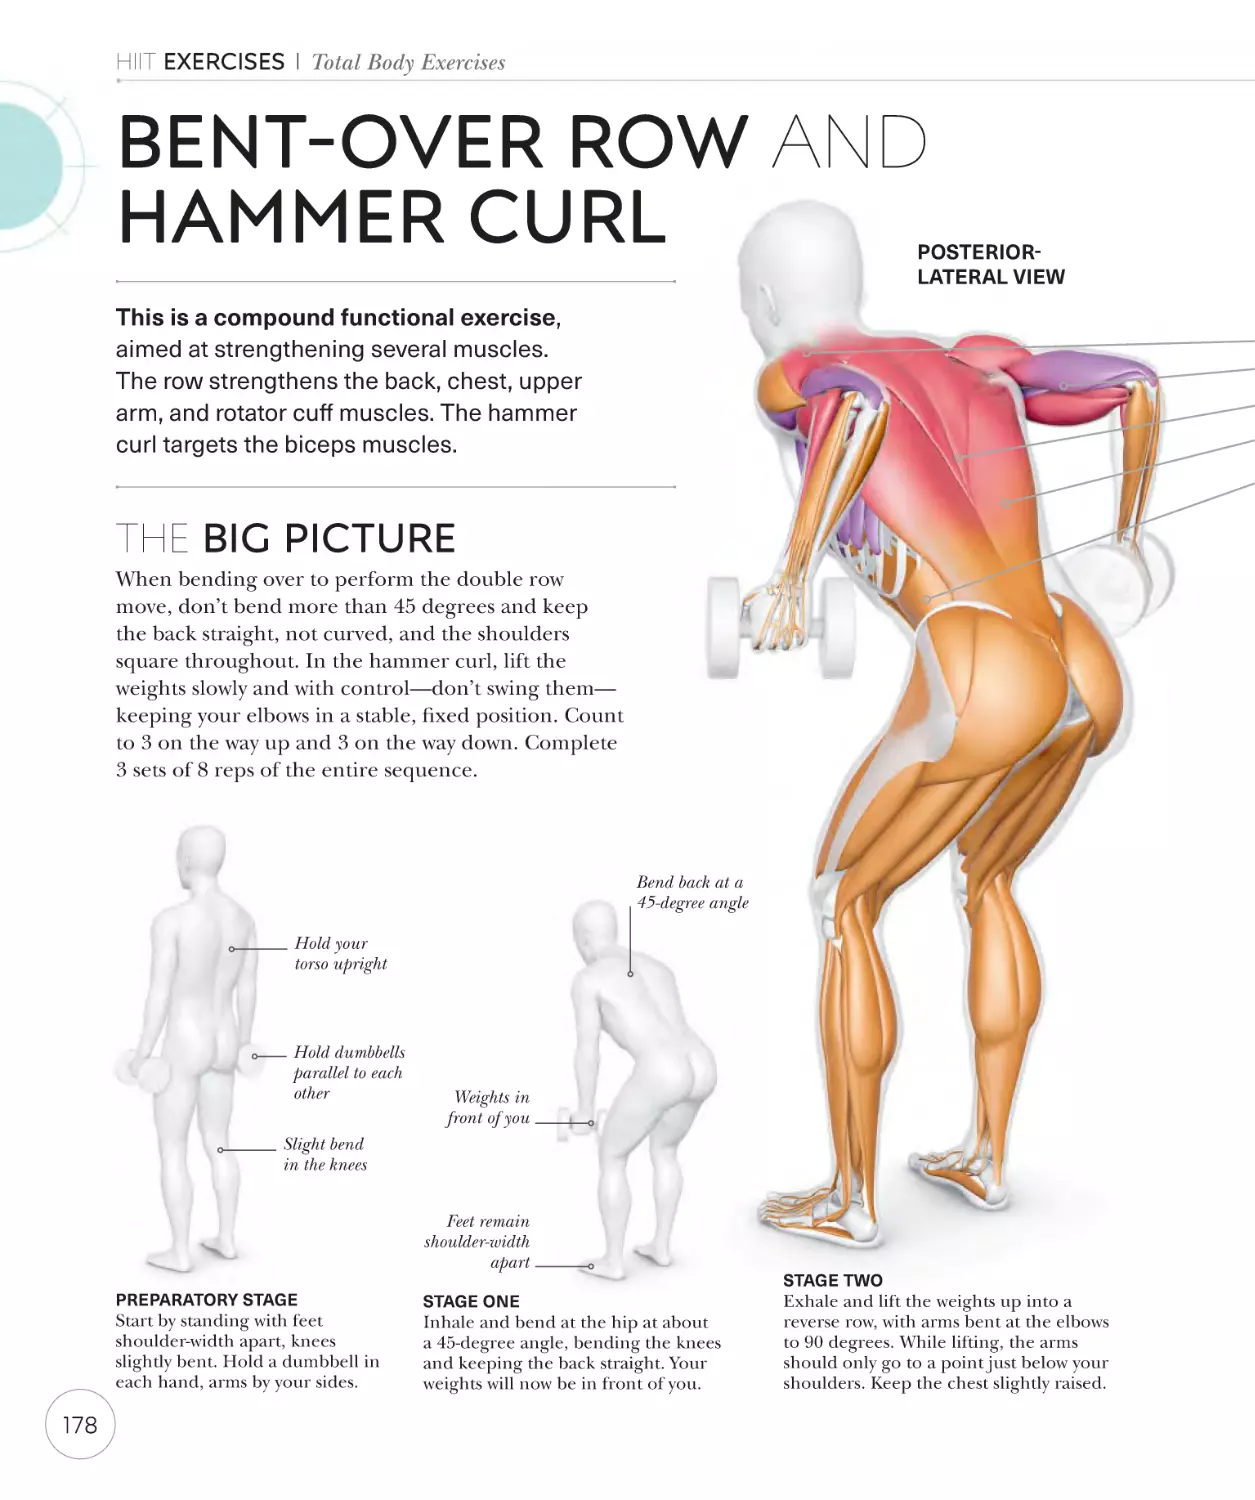
Bent-over row and
hammer curl
Bibliography
222
Acknowledgments
223
About the author
224
178
Rear deltoid fly and
triceps kickback
180
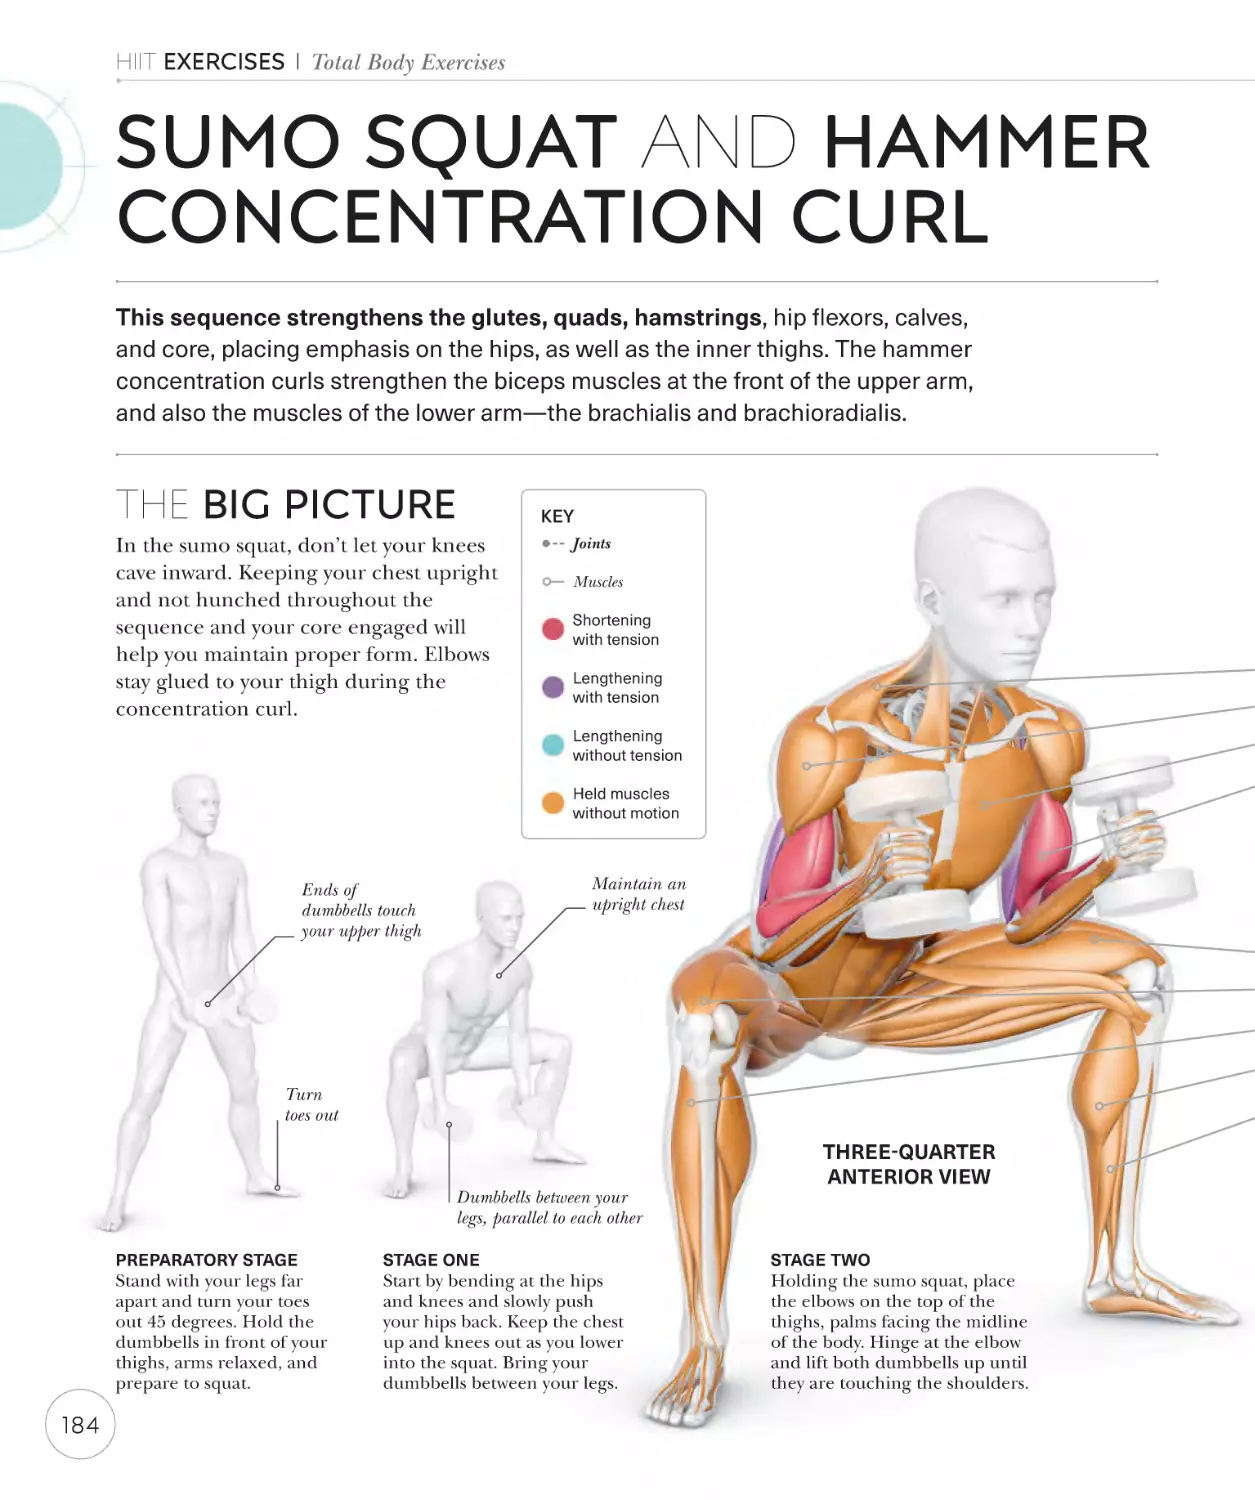
Sumo squat and hammer
concentration curl
184
INTRODUCTION
When it comes to burning fat and toning the body,
high-intensity interval training, more commonly known
as HIIT, has always been at the forefront of training
regimes. It’s easy to see why—HIIT-based exercises
combine dynamic bursts of cardiovascular activity
with resistance-based strength-building movements,
and you can be completely done with your routine
in as little as 20 minutes. HIIT exercises alternate
between short periods of intense anaerobic exercises
and a less intense recovery period. This book aims to
explain why HIIT-based training is effective by looking
at the science behind the exercises. It will also teach
you, through detailed anatomical illustrations and
instructions, how to perform these exercises
correctly—whether you are an absolute beginner or a
fitness fanatic. The beauty of HIIT is that you can add
it to your current training program, you can do it at
home or in the gym, and it doesn’t require a huge time
commitment. You’ll find that the information in this
book will help you put together an effective HIIT
workout that suits you and will build your knowledge
and confidence in order to execute it correctly.
Why HIIT?
The exercises in this book focus primarily on building
cardiovascular strength and endurance, but there are
many more benefits to HIIT-based workouts. The
nature of a HIIT workout—intense bursts of exercise
in a short time—raises your metabolic rate for up to
24 hours after your training session is finished,
essentially turning you into a fat-burning machine! We
will go into the many benefits of HIIT on pp.10–11, but
here are just a few to whet your appetite:
• Burns calories more quickly with the short, sharp
approach, compared to other types of training.
• Boosts the body’s cardiovascular health and
reduces blood pressure.
• Aids in reducing anxiety and depression.
• Improves athletic performance by raising your
anaerobic efficiency, increasing your VO2 max score,
and building and maintaining muscle (see pp.10–21).
How This Book Works
The first section of the book discusses human
physiology, explaining the science behind how HIIT
improves your cardiovascular fitness, raises your
metabolism and fat-burning rate, and builds and tones
your muscles. I will also walk you through how best
to fuel your workouts with the correct macronutrients—
protein, fats, and carbohydrates—needed not only
to effectively perform your workouts, but also to
achieve your desired goals.
The main section of this book is devoted to a
comprehensive collection of HIIT exercises that target
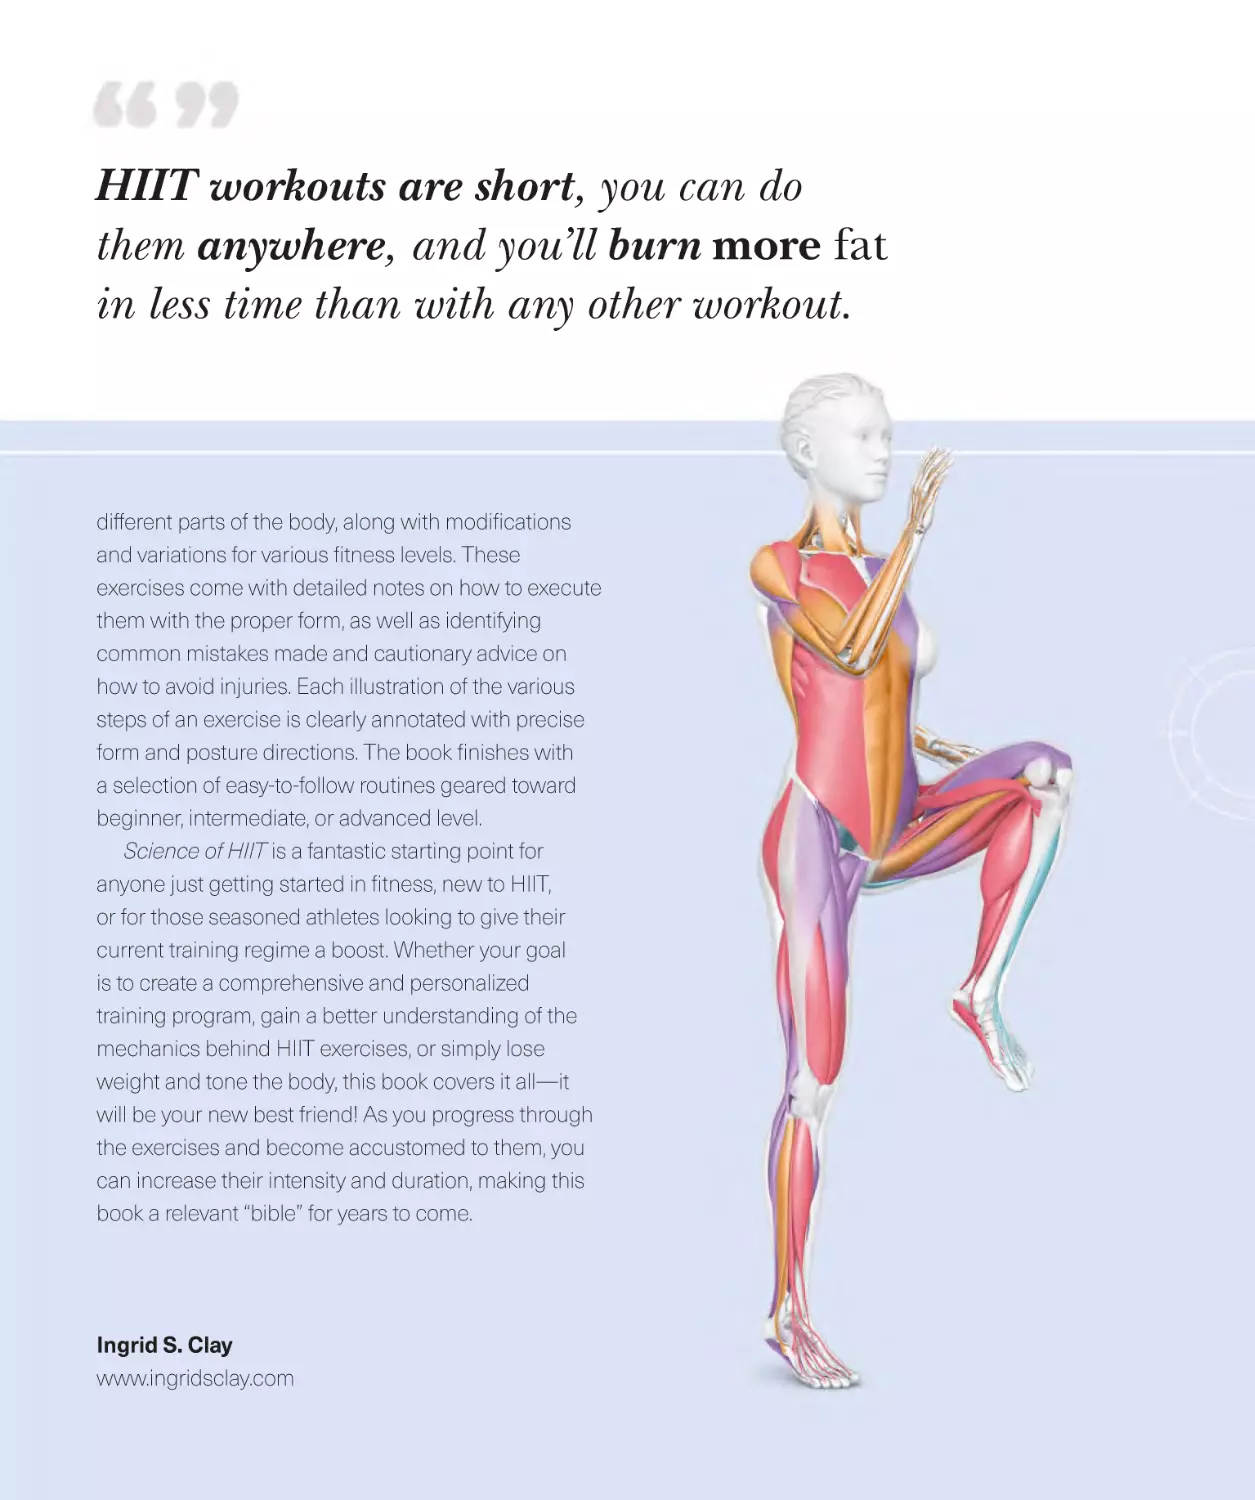
HIIT workouts are short, you can do
them anywhere, and you’ll burn more fat
in less time than with any other workout.
different parts of the body, along with modifications
and variations for various fitness levels. These
exercises come with detailed notes on how to execute
them with the proper form, as well as identifying
common mistakes made and cautionary advice on
how to avoid injuries. Each illustration of the various
steps of an exercise is clearly annotated with precise
form and posture directions. The book finishes with
a selection of easy-to-follow routines geared toward
beginner, intermediate, or advanced level.
Science of HIIT is a fantastic starting point for
anyone just getting started in fitness, new to HIIT,
or for those seasoned athletes looking to give their
current training regime a boost. Whether your goal
is to create a comprehensive and personalized
training program, gain a better understanding of the
mechanics behind HIIT exercises, or simply lose
weight and tone the body, this book covers it all—it
will be your new best friend! As you progress through
the exercises and become accustomed to them, you
can increase their intensity and duration, making this
book a relevant “bible” for years to come.
Ingrid S. Clay
www.ingridsclay.com
PHYSIOLOGY
OF HIIT
HIIT training requires you to push yourself as hard as you
can during the “working” intervals of your routine, while the
rest periods (the intervals) allow you to briefly recharge. Find
out more about how this impacts your physiology—your
muscles, your bodily systems, and how you process nutrients.
Learn also about how HIIT can benefit brain function.
PHYSIOLOGY OF HIIT
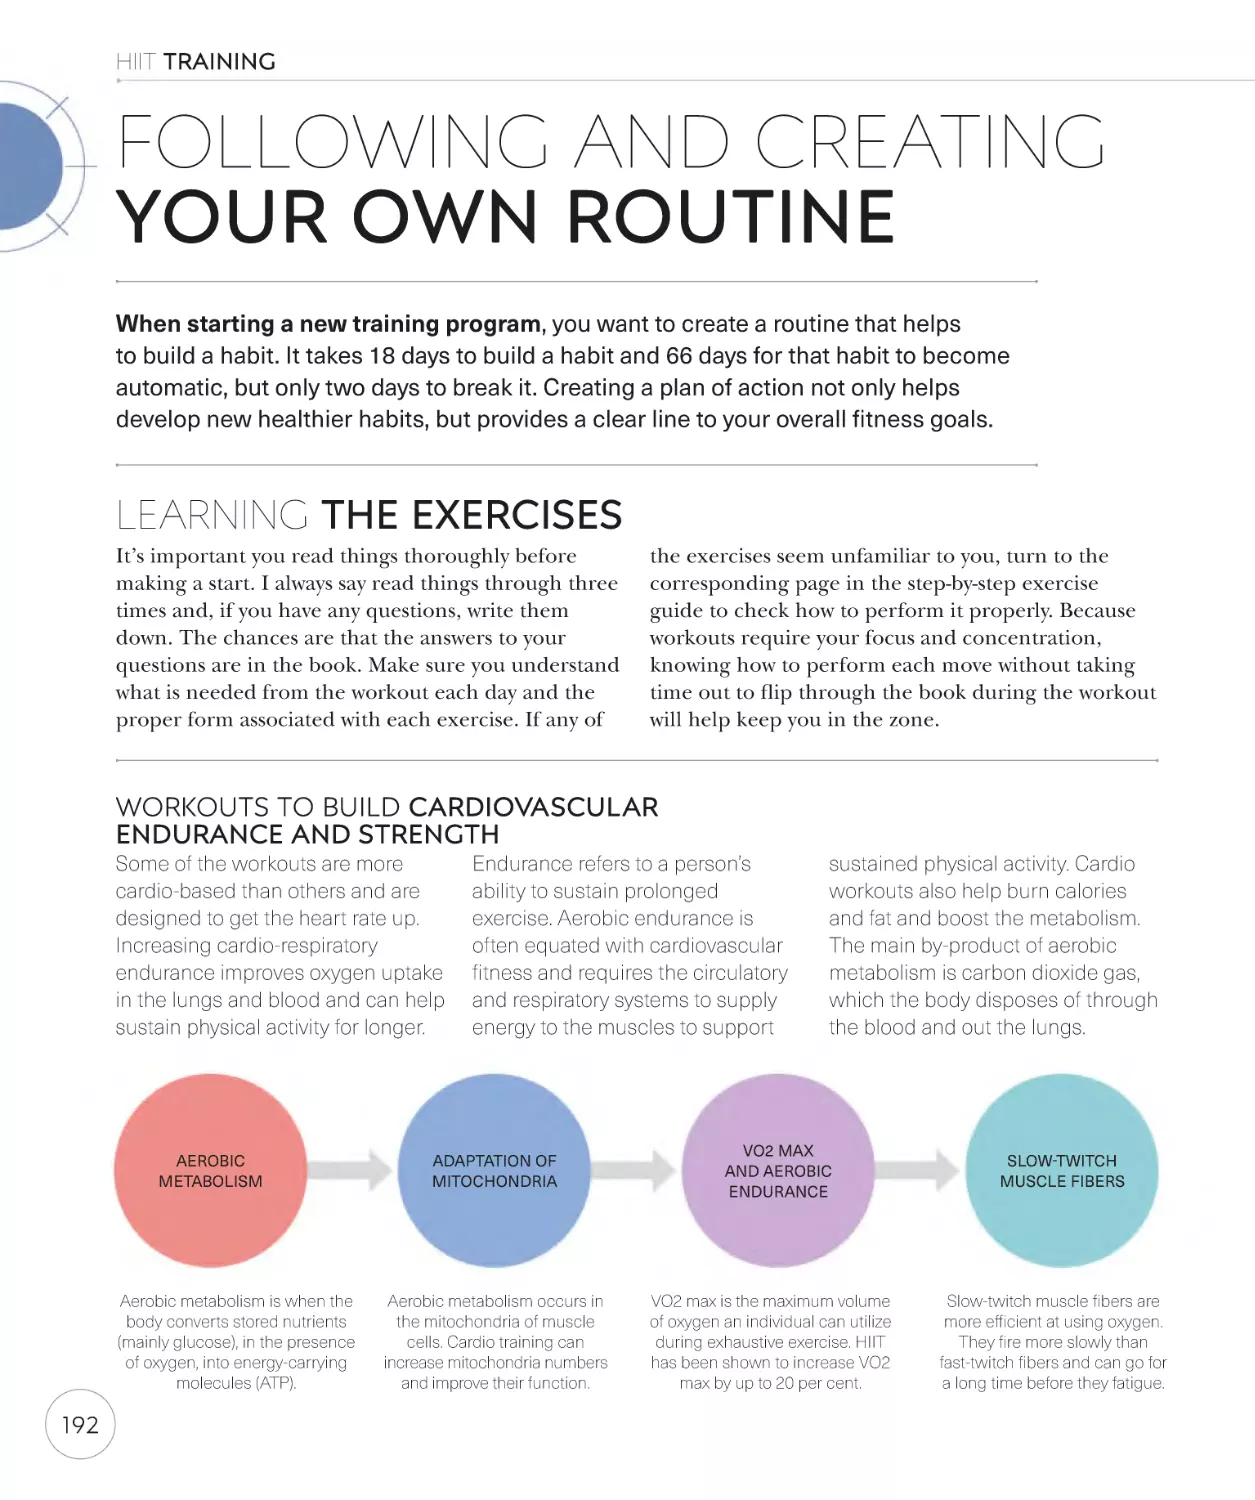
THE BENEFITS OF HIIT
During a HIIT workout, your body shifts
between bursts of intense physical activity—
comprising a mix of strength exercises
and cardio—and short periods of recovery.
What benefits does this alternating mode
of training bring to health and fitness?
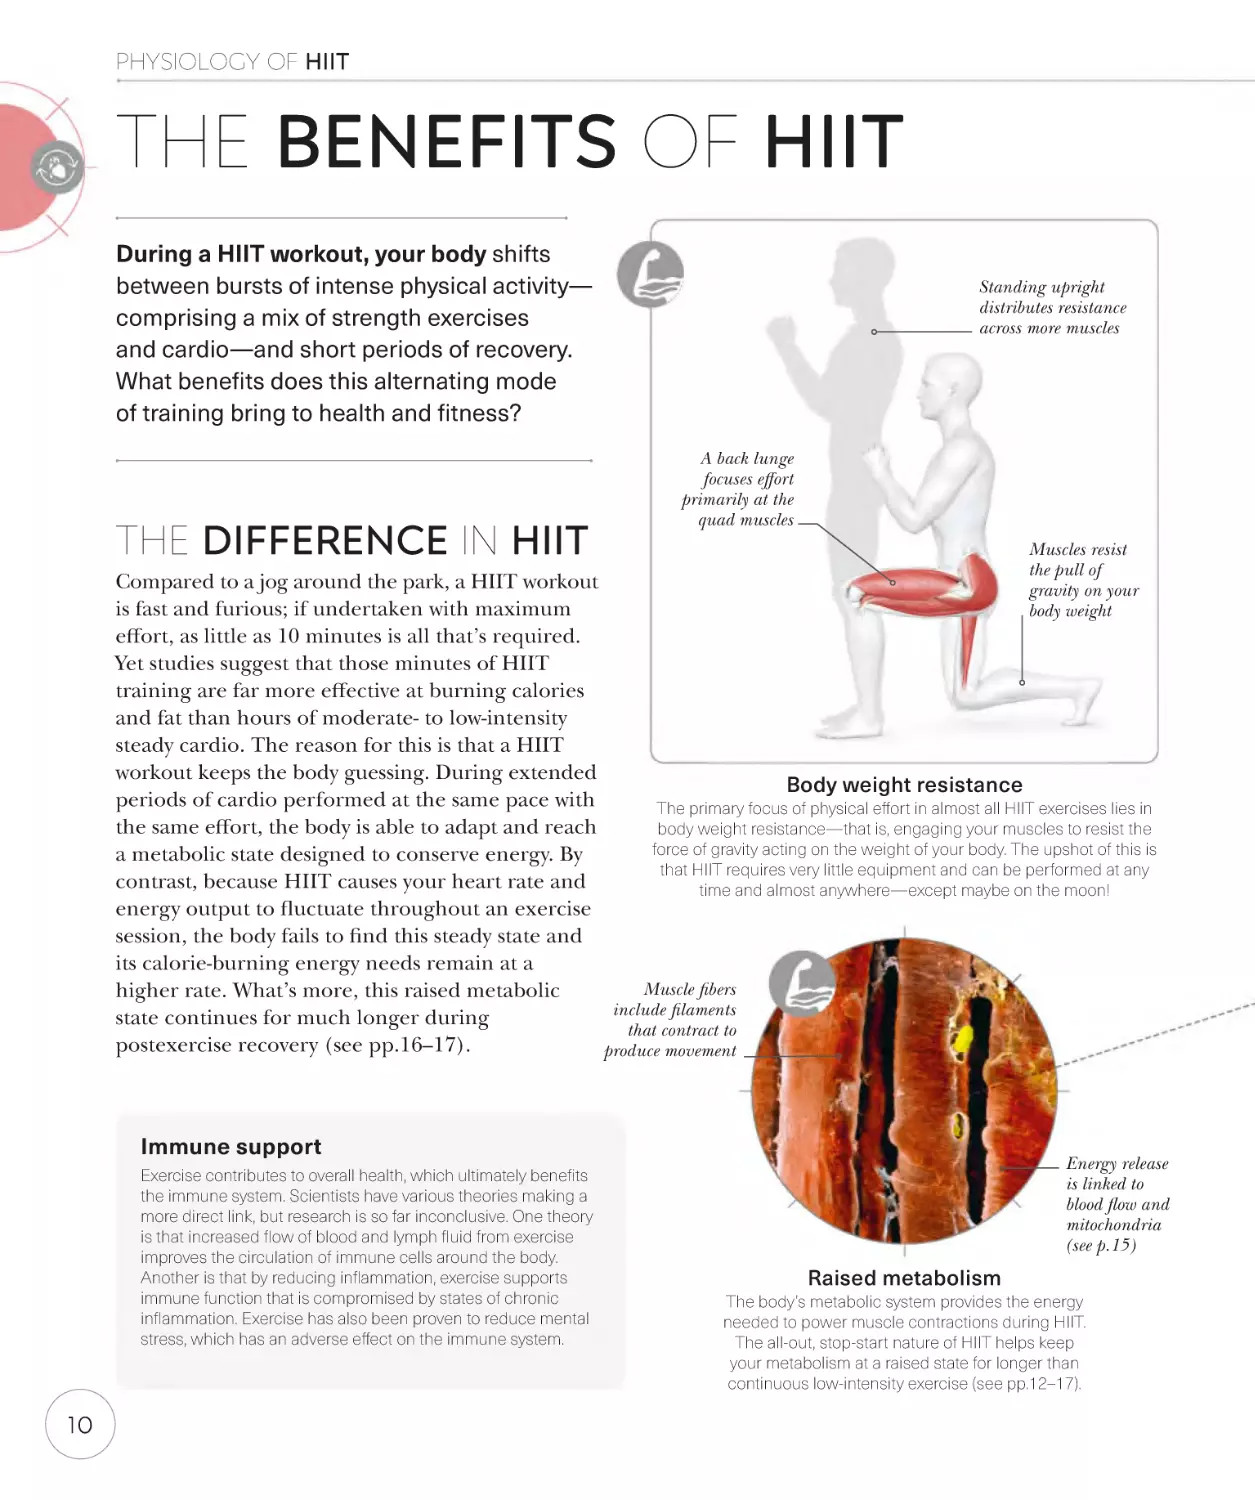
THE DIFFERENCE IN HIIT
Standing upright
distributes resistance
across more muscles
A back lunge
focuses effort
primarily at the
quad muscles
Muscles resist
the pull of
Compared to a jog around the park, a HIIT workout
gravity on your
is fast and furious; if undertaken with maximum
body weight
effort, as little as 10 minutes is all that’s required.
Yet studies suggest that those minutes of HIIT
training are far more effective at burning calories
and fat than hours of moderate- to low-intensity
steady cardio. The reason for this is that a HIIT
workout keeps the body guessing. During extended
Body weight resistance
periods of cardio performed at the same pace with
The primary focus of physical effort in almost all HIIT exercises lies in
the same effort, the body is able to adapt and reach
body weight resistance—that is, engaging your muscles to resist the
force of gravity acting on the weight of your body. The upshot of this is
a metabolic state designed to conserve energy. By
that HIIT requires very little equipment and can be performed at any
contrast, because HIIT causes your heart rate and
time and almost anywhere—except maybe on the moon!
energy output to fluctuate throughout an exercise
session, the body fails to find this steady state and
its calorie-burning energy needs remain at a
Muscle fibers
higher rate. What’s more, this raised metabolic
include filaments
state continues for much longer during
that contract to
postexercise recovery (see pp.16–17).
produce movement
Immune support
Exercise contributes to overall health, which ultimately benefits
the immune system. Scientists have various theories making a
more direct link, but research is so far inconclusive. One theory
is that increased flow of blood and lymph fluid from exercise
improves the circulation of immune cells around the body.
Another is that by reducing inflammation, exercise supports
immune function that is compromised by states of chronic
inflammation. Exercise has also been proven to reduce mental
stress, which has an adverse effect on the immune system.
10
Energy release
is linked to
blood flow and
mitochondria
(see p.15)
Raised metabolism
The body’s metabolic system provides the energy
needed to power muscle contractions during HIIT.
The all-out, stop-start nature of HIIT helps keep
your metabolism at a raised state for longer than
continuous low-intensity exercise (see pp.12–17).
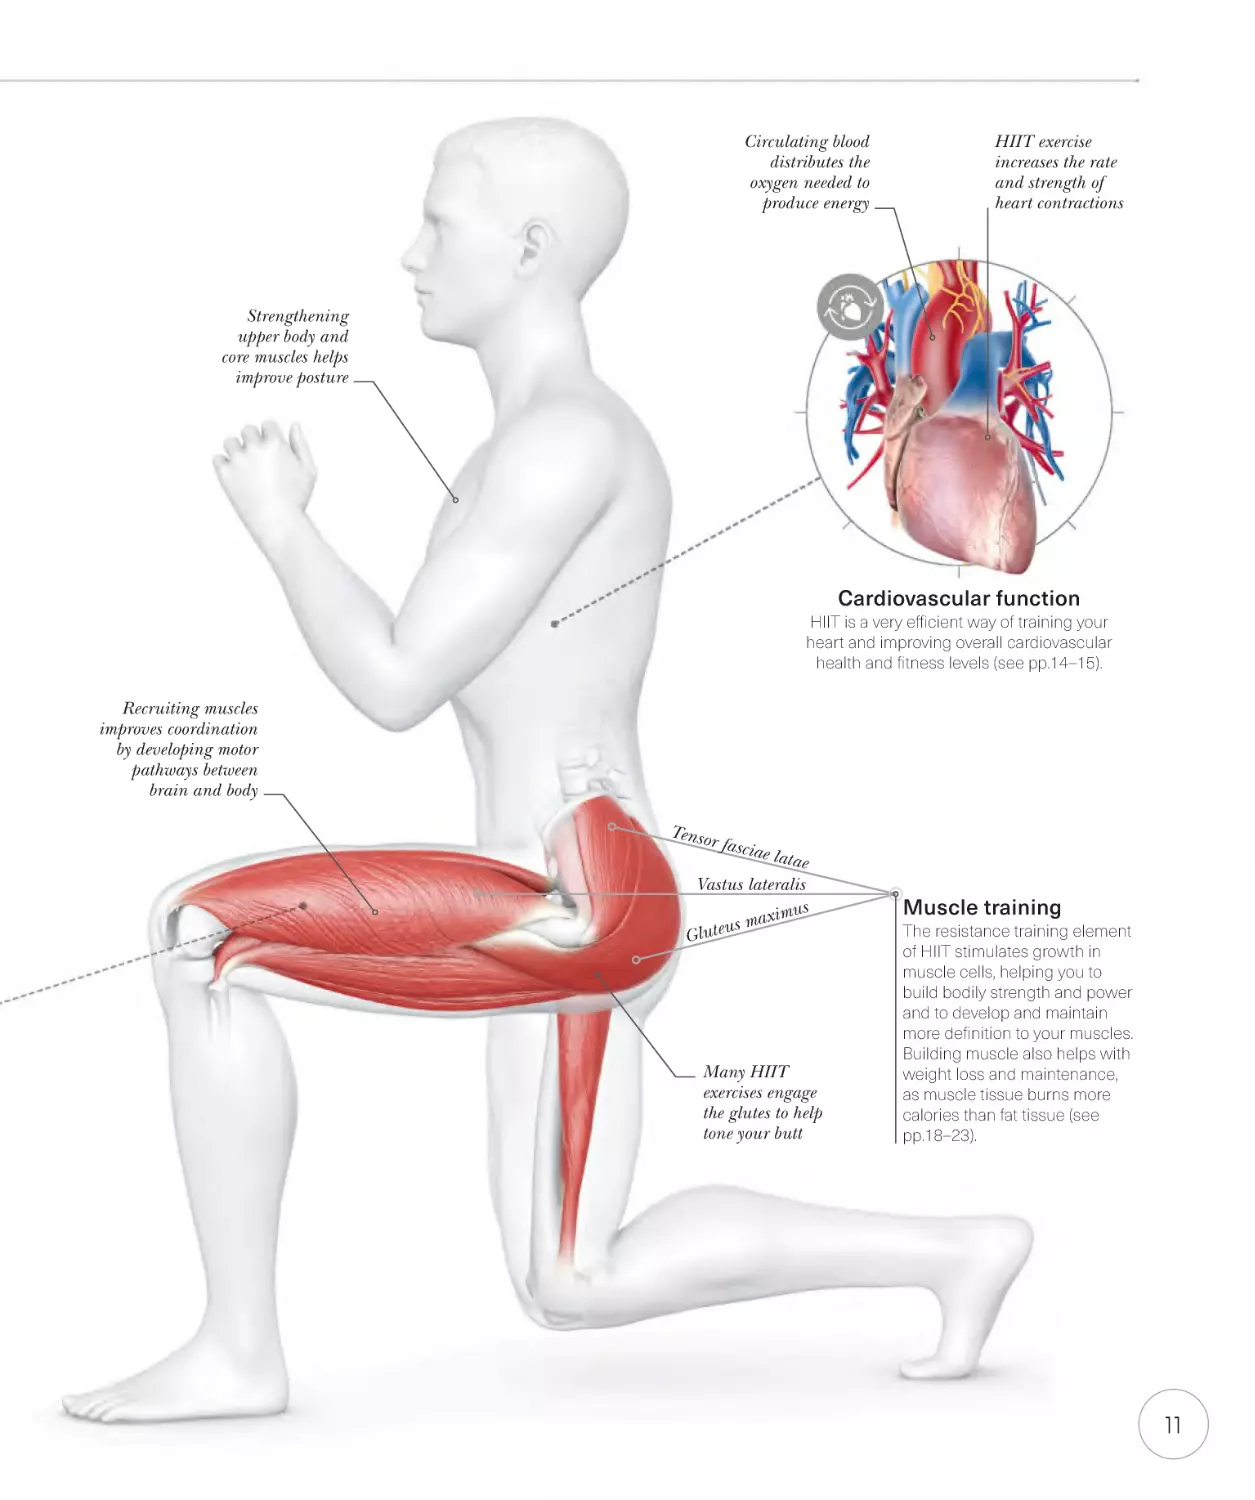
Circulating blood
distributes the
oxygen needed to
produce energy
HIIT exercise
increases the rate
and strength of
heart contractions
Strengthening
upper body and
core muscles helps
improve posture
Cardiovascular function
HIIT is a very efficient way of training your
heart and improving overall cardiovascular
health and fitness levels (see pp.14–15).
Recruiting muscles
improves coordination
by developing motor
pathways between
brain and body
Tenso
r
fascia
e lata
e
Vastus lateralis
ximus
us ma
Glute
Many HIIT
exercises engage
the glutes to help
tone your butt
Muscle training
The resistance training element
of HIIT stimulates growth in
muscle cells, helping you to
build bodily strength and power
and to develop and maintain
more definition to your muscles.
Building muscle also helps with
weight loss and maintenance,
as muscle tissue burns more
calories than fat tissue (see
pp.18–23).
11
PHYSIOLOGY OF HIIT
POWERING
YOUR HIIT
WORKOUT
Your body is beyond smart. It reacts voluntarily
and involuntarily. It allows you to run, jump, lift, cycle,
swim, and so much more. In order to be able to do all
these things efficiently the body needs energy. The
body is able to take the things we eat and without
our awareness convert this fuel into energy.
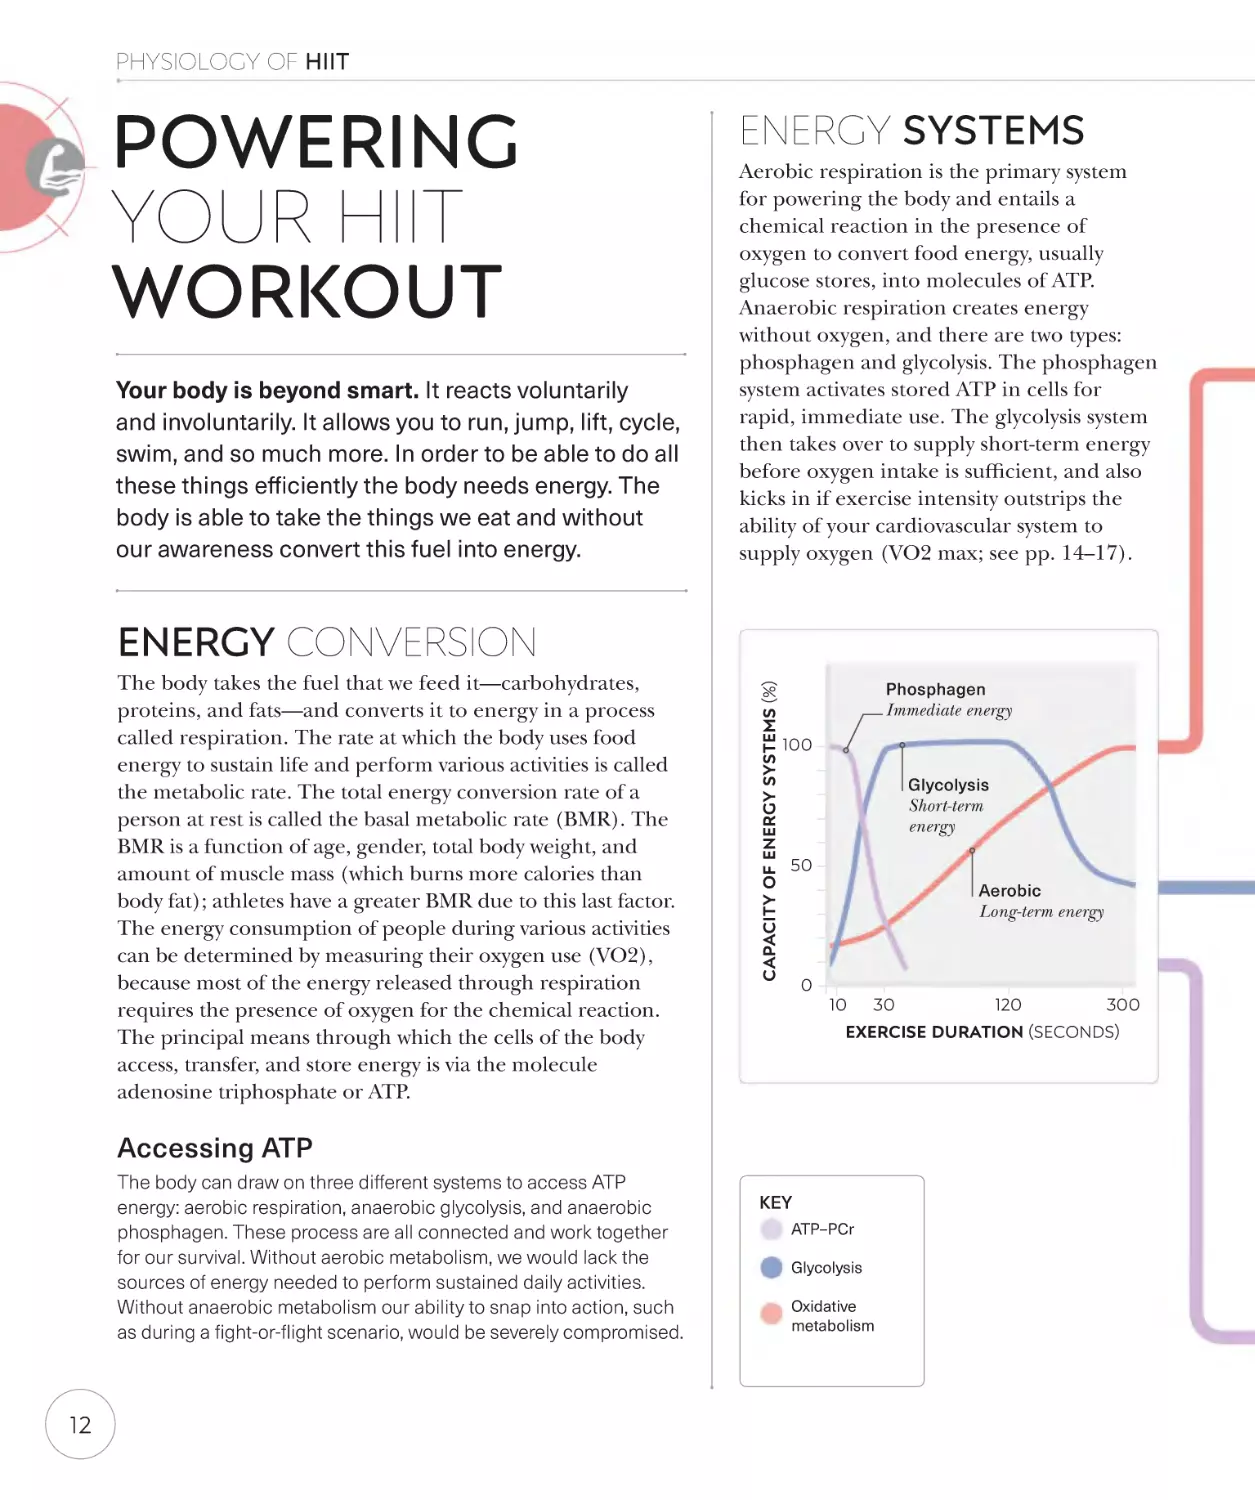
ENERGY SYSTEMS
Aerobic respiration is the primary system
for powering the body and entails a
chemical reaction in the presence of
oxygen to convert food energy, usually
glucose stores, into molecules of ATP.
Anaerobic respiration creates energy
without oxygen, and there are two types:
phosphagen and glycolysis. The phosphagen
system activates stored ATP in cells for
rapid, immediate use. The glycolysis system
then takes over to supply short-term energy
before oxygen intake is sufficient, and also
kicks in if exercise intensity outstrips the
ability of your cardiovascular system to
supply oxygen (VO2 max; see pp. 14–17).
The body takes the fuel that we feed it—carbohydrates,
proteins, and fats—and converts it to energy in a process
called respiration. The rate at which the body uses food
energy to sustain life and perform various activities is called
the metabolic rate. The total energy conversion rate of a
person at rest is called the basal metabolic rate (BMR). The
BMR is a function of age, gender, total body weight, and
amount of muscle mass (which burns more calories than
body fat); athletes have a greater BMR due to this last factor.
The energy consumption of people during various activities
can be determined by measuring their oxygen use (VO2),
because most of the energy released through respiration
requires the presence of oxygen for the chemical reaction.
The principal means through which the cells of the body
access, transfer, and store energy is via the molecule
adenosine triphosphate or ATP.
CAPACITY OF ENERGY SYSTEMS (%)
ENERGY CONVERSION
Phosphagen
Immediate energy
100
Glycolysis
Short-term
energy
50
Aerobic
Long-term energy
0
10
30
Accessing ATP
The body can draw on three different systems to access ATP
energy: aerobic respiration, anaerobic glycolysis, and anaerobic
phosphagen. These process are all connected and work together
for our survival. Without aerobic metabolism, we would lack the
sources of energy needed to perform sustained daily activities.
Without anaerobic metabolism our ability to snap into action, such
as during a fight-or-flight scenario, would be severely compromised.
12
120
300
EXERCISE DURATION (SECONDS)
KEY
ATP–PCr
Glycolysis
Oxidative
metabolism
Occurring mainly in the mitochondria
of cells (see p. 15), aerobic respiration
requires oxygen to convert glucose to
ATP, producing carbon dioxode and
water as waste. This is the slower of
the body’s energy systems, but makes
vastly more energy than anaerobic
metabolism: some 38 molecules of
ATP compared to only a maximum of
3 molecules through glycolysis. Hence
why aerobic metabolism is so essential
to our basic functioning, and is the
primary source of energy to support
low- to moderate-intensity sustained
exercise. In HIIT, aerobic respiration
powers the cardio moves and helps
the recovery of energy after
high-intensity strength moves.
CONTRIBUTION TO ATP
PRODUCTION (%)
100
Aerobic respiration
80
60
40
20
0
ACTIVITY
1-REP
SQUAT
3-REPS
SQUAT
Anaerobic respiration:
phosphagen
This process uses phosphocreatine
(PCr) and has a very rapid rate of ATP
production. The phosphocreatine is used
to restore ATP after it is broken down to
release energy. The total amount of PCr
and ATP stored in muscles is small, so
there is limited energy available for
muscular contraction. It is, however,
instantaneously available and is essential
at the onset of activity, as well as during
short-term high-intensity activities lasting
about 1 to 30 seconds in duration, such
as sprinting or HIIT exercises.
1,600-M
RUN
MARATHON
RUN
ENERGY FOR ACTIVITIES
The contribution the three energy systems supply to enable a
range of activities varies. The ATP–PCr system powers strength
training work but other systems help replenish ATP between sets.
Anaerobic respiration: glycolysis
Anaerobic glycolysis supplies energy
for high-intensity activities of moderate
duration—aka a HIIT routine!—when
the heart is pumping blood as fast as it
can, but not enough and not in time to
satisfy the oxygen needs of muscles.
Occurring in the cytoplasm of cells
without the presence of oxygen,
glycolysis converts glucose, through
a process that involves fermentation,
to release only 2 or 3 ATP molecules
and create a byproduct of lactate.
If lactate accumulates in the blood,
and cannot be cleared by aerobic
100-M
SPRINT
respiration, lactic acidosis ensues
with symptoms that include muscle
ache, burning muscles, fatigue, rapid
breathing, stomach pain, and even
nausea. If you haven’t yet felt those
symptoms from an intense HIIT
workout—you will! Thankfully, the
symptoms of lactate burn are temporary
and reversible. Once oxygen supply
meets demand again, lactate can be
metabolized back into pyruvate for
reuse in aerobic respiration.
HOW GLYCOLYSIS
MAKES ENERGY
GLYCOGEN
GLUCOSE
PYRUVATE
10-STEP
PATHWAY
2–3 ATP
MOLECULES
PHOSPHOCREATINE
(PCR)
ADP
phosphate from PCr
given to ADP
phosphate added
to remake PCr
CREATINE
LACTATE
phosphate given
up in muscle
contraction
1 ATP
MOLECULE
HOW THE PHOSPHAGEN SYSTEM MAKES ENERGY
13
PHYSIOLOGY OF HIIT
IMPROVING YOUR
CARDIO FITNESS
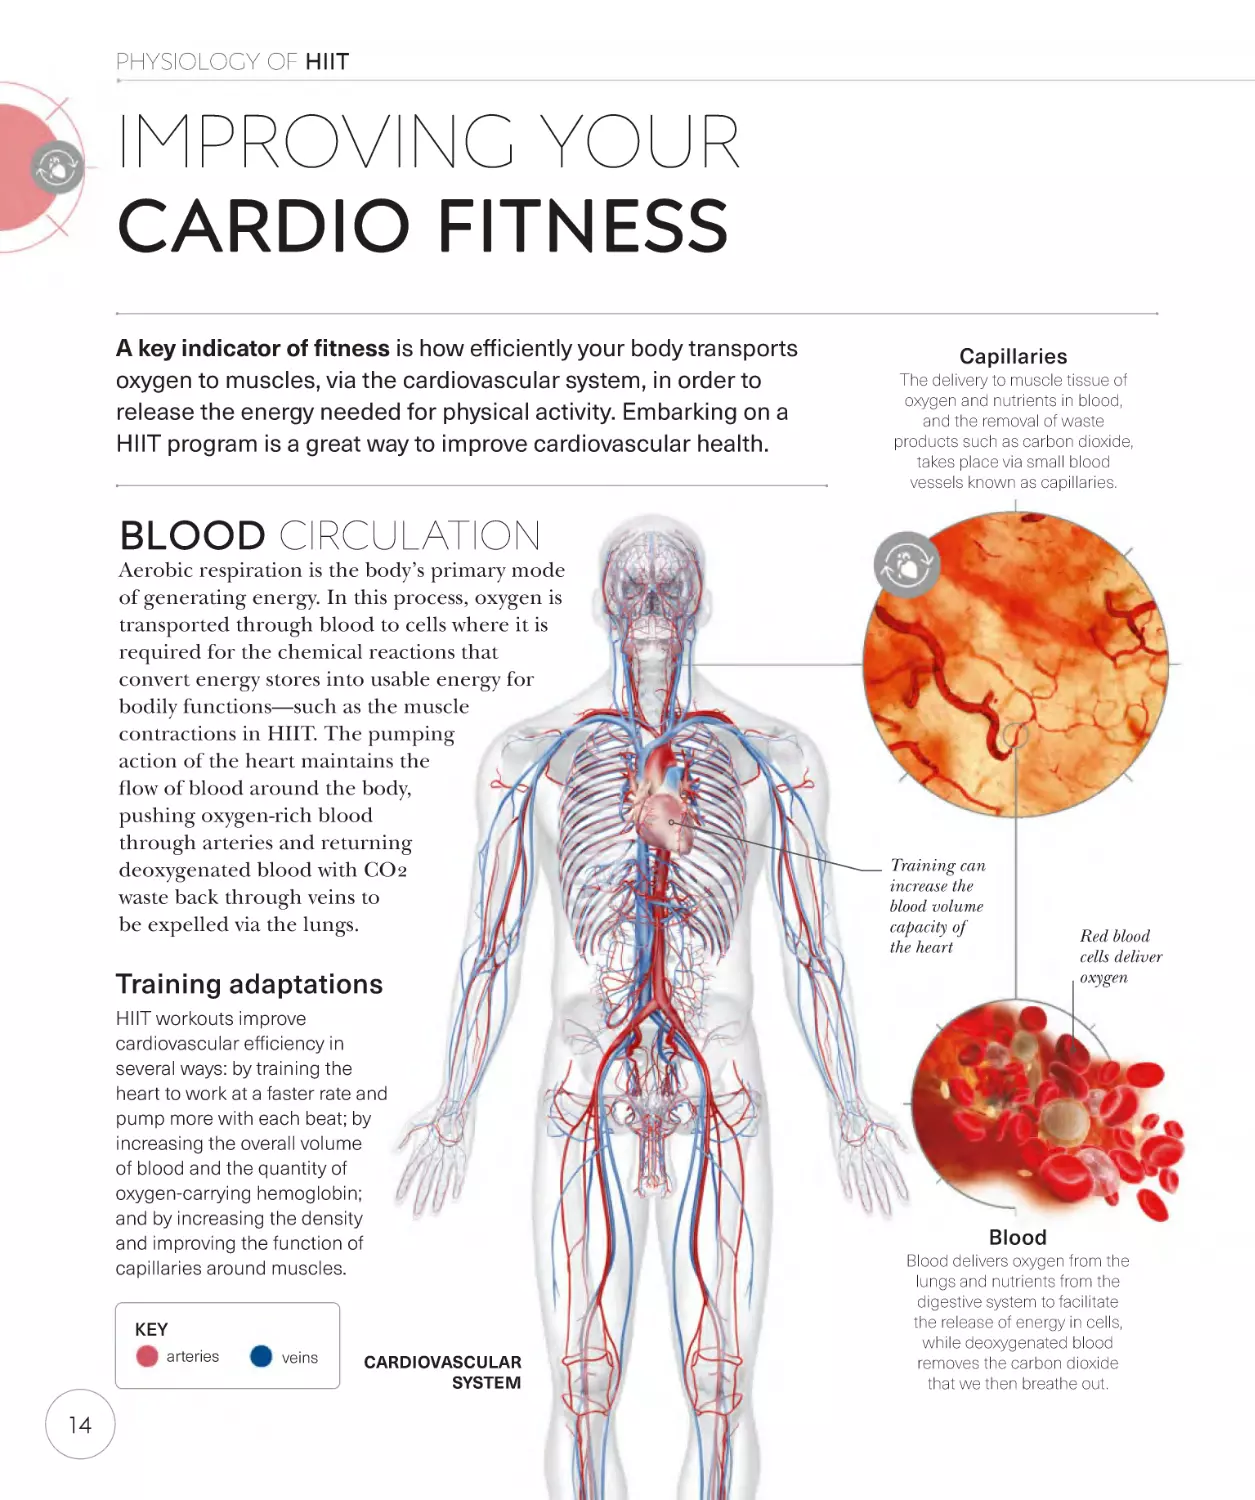
A key indicator of fitness is how efficiently your body transports
oxygen to muscles, via the cardiovascular system, in order to
release the energy needed for physical activity. Embarking on a
HIIT program is a great way to improve cardiovascular health.
Capillaries
The delivery to muscle tissue of
oxygen and nutrients in blood,
and the removal of waste
products such as carbon dioxide,
takes place via small blood
vessels known as capillaries.
BLOOD CIRCULATION
Aerobic respiration is the body’s primary mode
of generating energy. In this process, oxygen is
transported through blood to cells where it is
required for the chemical reactions that
convert energy stores into usable energy for
bodily functions—such as the muscle
contractions in HIIT. The pumping
action of the heart maintains the
flow of blood around the body,
pushing oxygen-rich blood
through arteries and returning
deoxygenated blood with CO2
waste back through veins to
be expelled via the lungs.
Training can
increase the
blood volume
capacity of
the heart
Red blood
cells deliver
oxygen
Training adaptations
HIIT workouts improve
cardiovascular efficiency in
several ways: by training the
heart to work at a faster rate and
pump more with each beat; by
increasing the overall volume
of blood and the quantity of
oxygen-carrying hemoglobin;
and by increasing the density
and improving the function of
capillaries around muscles.
KEY
arteries
14
veins
CARDIOVASCULAR
SYSTEM
Blood
Blood delivers oxygen from the
lungs and nutrients from the
digestive system to facilitate
the release of energy in cells,
while deoxygenated blood
removes the carbon dioxide
that we then breathe out.
Scoring your cardiovascular capacity
A popular way of measuring aerobic fitness is to work out
your “VO₂ max” score. This denotes the maximum (max)
volume (V) of oxygen (O₂) the body can consume—and
therefore the quantity of oxygen available in the muscles
for aerobic cell respiration—during all-out physical effort.
Assessing your VO₂ max can help you decide the level of
HIIT routines to start with. As you progress, retesting your
score provides a benchmark for tracking progress.
Take the Cooper test
Developed by Dr. Ken Cooper in 1968, the Cooper
test is a simple way to measure your VO₂ max. To
complete it, run as far as you can in 12 minutes and
use the total distance you have run to calculate your
VO₂ score, following the mathematical formula below
(using either the miles or km, as appropriate).
MITOCHONDRIAL
FUNCTION
Mitochondria are organelles within a cell that
regulate metabolic activity and generate chemical
energy; they are present in muscle fibers and
crucial to the performance of physical activity.
Multiple studies show that mitochondrial function
improves in response to endurance exercise, and
some studies indicate high-intensity exercise may
provide a greater stimulus than moderate. In short,
undertaking a HIIT program improves your
capacity to generate energy at a cellular level.
Anti-aging effect
Mitochondrial function is known to decrease with
age and is associated with diabetes, cardiovascular
disease, and Alzheimer’s. Stimulating the synthesis
of mitochondria through exercise may therefore
help support health in old age.
Sarcolemma
12
Subsarcolemmal
mitochondrion
Muscle fiber
MINUTES
( 35.96
TOTAL
DISTANCE
IN MILES
) 11.29
OR
( 22.35
TOTAL
DISTANCE
IN KM
) 11.29
VO2 MAX
PERFORMING THE TEST
For an accurate result, run on as flat and even a
surface as possible—an athletics track is ideal. Set
your timer to count down from 12 minutes, run
as far as possible, and record the total distance.
Subsarcolemmal
mitochondria sit below the
sarcolemma, the plasma
membrane that surrounds
a fiber. Intermyofibrillar
mitochondria sit between
the rodlike myofibrils that
house the contracting
filaments of muscle.
Myofibril
Intermyofibrillar
mitochondrion
Sarcoplasm
Generating energy
The first stage of energy release
takes place in the sarcoplasm,
where glucose is converted to
pyruvic acid. This acid then moves to
the mitochondria where, via chemical
reactions in the presence of oxygen,
it is turned into ATP (see p.12).
“Cristae” folds increase the surface
area for the aerobic synthesis of ATP
15
PHYSIOLOGY OF HIIT
THE HIIT “AFTERBURN”
Even though HIIT workouts are short, they are
much more effective at burning calories than,
say, a long, steady run. The main reason for this
is that the combination of bursts of maximal
effort with frequent short rests causes an
extended recovery period of what scientists
call Excess Postexercise Oxygen Consumption
(EPOC), a.k.a. “the afterburn effect.”
Fueling the recovery
With HIIT, the extended period of raised metabolism can
continue beyond EPOC for up to 24 hours after a workout. To
maintain metabolic efficiency, it is important to consider what
you eat and when. Skipping meals or eating at widely spaced
intervals, back-loaded toward the end of the day, can cause
your metabolism to slow, with a drop in blood sugar levels
leading to low energy. Poor nutrition can also impede physical
adaptations promoted by exercise, such as muscle growth and
increased glycogen stores. I would recommend eating four to
five small meals balanced with the right macronutrients (see
pp.26–27) and evenly spaced through a workout day. I like to
use the analogy of feeding a fire with a solid piece of wood
every few hours to keep it burning brightly all day.
WHAT IS EPOC?
As we have seen, to power muscle contractions
needed to perform the movements in HIIT
exercises, the body converts stored glucose to
molecules of ATP (see pp.12–15). The primary
mode of conversion requires the presence of
oxygen in the chemical reaction, which is
supplied via the cardiovascular system. Yet even
after exercise, your body has an elevated
requirement for energy—and therefore
oxygen—in order to fuel various processes that
replenish lost glycogen stores and generally
return the body to homeostatic balance. This
recovery period is when Excess Postexercise
Oxygen Consumption occurs to facilitate the
body’s raised metabolism while it adjusts down
to a state of rest. As the graphs opposite
demonstrate, the duration of EPOC after a
short HIIT workout is far longer than after an
extended session of even moderate steady-state
aerobic exercise.
KEY
Oxygen
deficit
Exercise
VO2
Recovery
VO2
PROCESSES DURING EPOC
During EPOC recovery, various physiological processes
kick in to bring the body back to a state of rest, in which the
basal metabolic rate is sufficient for energy needs. Higher
oxygen levels and raised metabolism are required to reduce
your heart rate, to bring down your breathing rate, and to
bring your core body temperature back down to a normal 99°F
(37°C). In addition, EPOC is required to restock depleted
energy stores and start the work of physiological adaptation to
the stimulus of exercise, including muscle growth and
improved respiratory efficiency.
16
ATP
MOLECULES
CP
MOLECULES
MUSCLE CELLS
ENERGY STORES IN MUSCLE CELLS
Muscle cells contain small stores of ATP and CP
molecules, which supply the chemical energy
for short bursts of physical effort, and these are
replenished during EPOC.
O2 deficit
EXCESS ENERGY NEEDS
HIIT OXYGEN CONSUMPTION
Exercise VO2
Recovery VO2
EXERCISE
EXCESS ENERGY NEEDS
The period of EPOC recovery is
more than twice as long as the
workout. This is because the body
does not have time for metabolic
adjustment during the workout,
and the anaerobic strength
training element of HIIT leaves
an oxygen deficit and lactate
accumulation beyond the ability
of VO2 max (see p.15) to clear.
VO2 max
EPOC
O2 deficit
Exercise VO2
VO2 max
Recovery VO2
EXERCISE
STEADY EXERCISE
OXYGEN CONSUMPTION
Exercising for a prolonged
period where consumption of
oxygen (VO2) meets your raised
energy needs allows the body
to adjust and achieve metabolic
efficiency during exercise. This
results in a much shorter period
of EPOC recovery.
EPOC
HEMOGLOBIN
LACTATE
PYRUVATE
GLYCOGEN
RED BLOOD
CELLS
OXYGEN
MYOGLOBIN
MUSCLES
LIVER
LACTATE CONVERTS TO GLYCOGEN
Once sufficient oxygen becomes available, lactate
produced as a result of anaerobic respiration is
converted first to pyruvate and then to granules
of glycogen stored in the liver.
REOXYGENATING THE “-GLOBINS”
During EPOC, the proteins hemoglobin
in your blood and myoglobin in muscles—
vital to the transportation and uptake of
oxygen—are resupplied with oxygen.
17
PHYSIOLOGY OF HIIT
HOW MUSCLES WORK
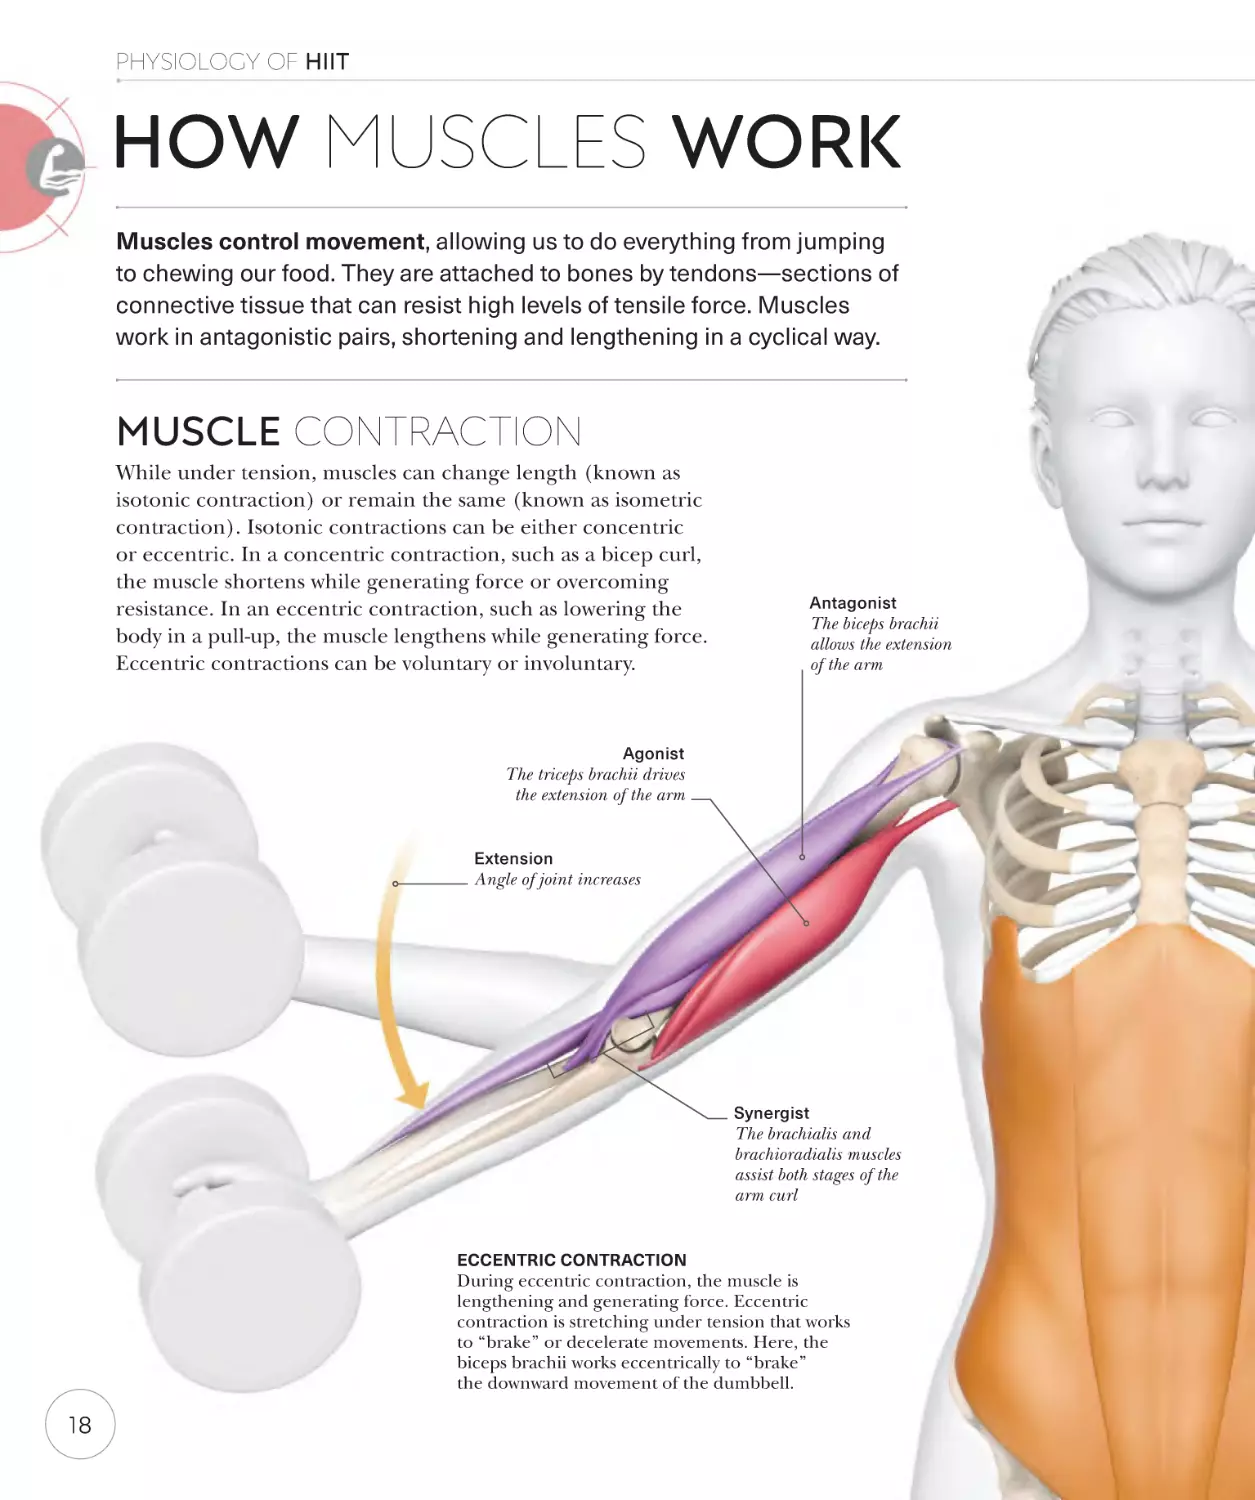
Muscles control movement, allowing us to do everything from jumping
to chewing our food. They are attached to bones by tendons—sections of
connective tissue that can resist high levels of tensile force. Muscles
work in antagonistic pairs, shortening and lengthening in a cyclical way.
MUSCLE CONTRACTION
While under tension, muscles can change length (known as
isotonic contraction) or remain the same (known as isometric
contraction). Isotonic contractions can be either concentric
or eccentric. In a concentric contraction, such as a bicep curl,
the muscle shortens while generating force or overcoming
resistance. In an eccentric contraction, such as lowering the
body in a pull-up, the muscle lengthens while generating force.
Eccentric contractions can be voluntary or involuntary.
Antagonist
The biceps brachii
allows the extension
of the arm
Agonist
The triceps brachii drives
the extension of the arm
Extension
Angle of joint increases
Synergist
The brachialis and
brachioradialis muscles
assist both stages of the
arm curl
ECCENTRIC CONTRACTION
During eccentric contraction, the muscle is
lengthening and generating force. Eccentric
contraction is stretching under tension that works
to “brake” or decelerate movements. Here, the
biceps brachii works eccentrically to “brake”
the downward movement of the dumbbell.
18
HOW MUSCLES
WORK TOGETHER
Refining movements
Muscle coactivation is a neuromuscular
response. It occurs when agonist and
antagonist muscles are activated
simultaneously. This type of coactivation
kicks in when you are new to training, as
the body tries to improve joint stability and
movement accuracy. Because of this,
your movements may not be the most
coordinated or smooth at first. With
continued practice, you can train your body
to “lift” move in a more coordinated way.
In an antagonistic muscle pair, one muscle
contracts as the other relaxes or lengthens.
The muscle that is contracting is called the
agonist and the muscle that is relaxing or
lengthening is called the antagonist. For
example, when you perform a bicep curl,
the biceps will be the agonist as it contracts
to produce the movement, while the triceps
will be the antagonist as it relaxes to allow
the movement to occur.
CONCENTRIC CONTRACTION
During concentric contraction, a
muscle creates tension while its muscle
fibers shorten. As the muscle shortens,
it generates enough force to move an
object or weight. Here, the biceps
brachii contracts concentrically to flex
the elbow and lift the dumbbell.
Agonist
The biceps brachii drives
the flexion stage
Antagonist
The triceps brachii
allows the flexion
of the elbow
ISOMETRIC
CONTRACTION
During isometric
contraction, a muscle
creates tension without
any change in its length.
Holding positions involve
such contractions. For
example, you engage
abdominal muscles to
stabilize your core so you
can focus on the target
muscles of an exercise.
Flexion
Angle of joint
decreases
Synergist
The brachialis and
brachioradialis muscles
assist both stages of the
arm curl
KEY
Shortening
under tension
(concentric)
Held muscles
without motion
(isometric)
Lengthening
under tension
(eccentric)
19
PHYSIOLOGY OF HIIT
HOW HIIT PROMOTES
MUSCLE GROWTH
HIIT workouts can build muscle, tone, and help retain lean muscle mass, as
well as increasing the proportion of fast-twitch muscle fibers over slow-twitch.
For muscle growth, choose mainly strength training rather than cardio routines.
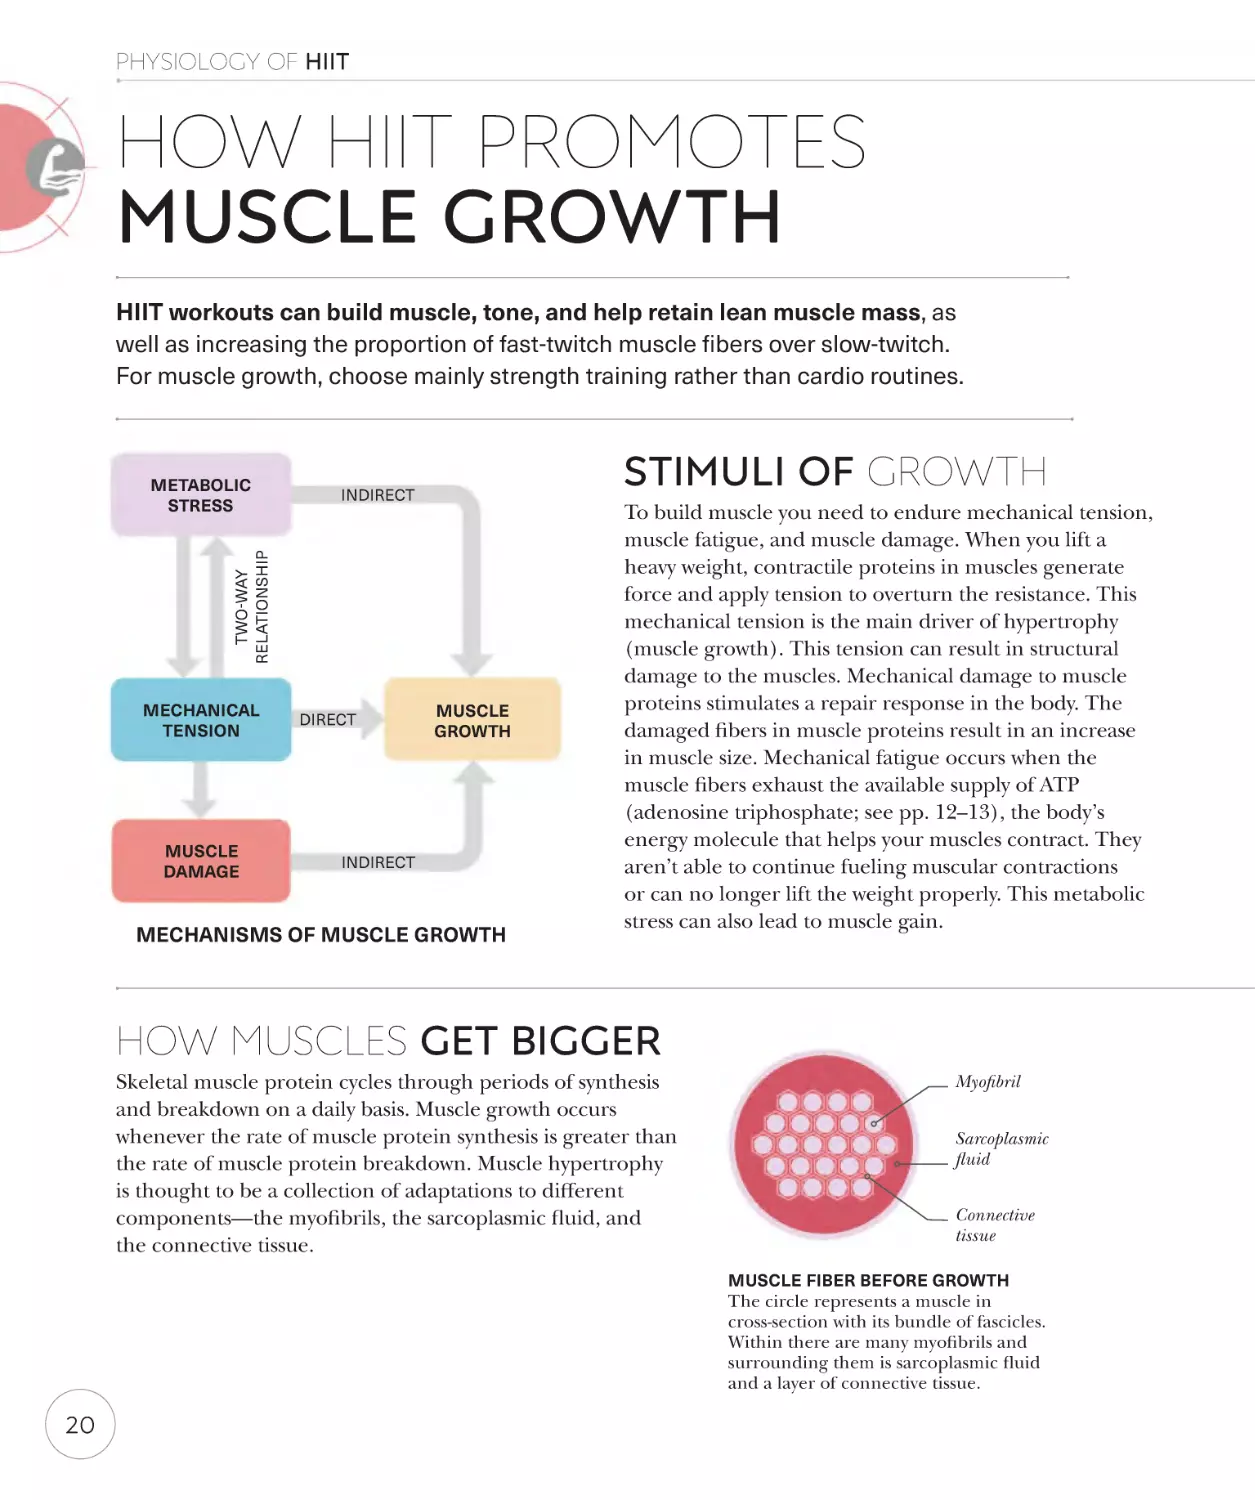
STIMULI OF GROWTH
INDIRECT
TWO-WAY
RELATIONSHIP
METABOLIC
STRESS
MECHANICAL
TENSION
MUSCLE
DAMAGE
DIRECT
MUSCLE
GROWTH
INDIRECT
MECHANISMS OF MUSCLE GROWTH
To build muscle you need to endure mechanical tension,
muscle fatigue, and muscle damage. When you lift a
heavy weight, contractile proteins in muscles generate
force and apply tension to overturn the resistance. This
mechanical tension is the main driver of hypertrophy
(muscle growth). This tension can result in structural
damage to the muscles. Mechanical damage to muscle
proteins stimulates a repair response in the body. The
damaged fibers in muscle proteins result in an increase
in muscle size. Mechanical fatigue occurs when the
muscle fibers exhaust the available supply of ATP
(adenosine triphosphate; see pp. 12–13), the body’s
energy molecule that helps your muscles contract. They
aren’t able to continue fueling muscular contractions
or can no longer lift the weight properly. This metabolic
stress can also lead to muscle gain.
HOW MUSCLES GET BIGGER
Skeletal muscle protein cycles through periods of synthesis
and breakdown on a daily basis. Muscle growth occurs
whenever the rate of muscle protein synthesis is greater than
the rate of muscle protein breakdown. Muscle hypertrophy
is thought to be a collection of adaptations to different
components—the myofibrils, the sarcoplasmic fluid, and
the connective tissue.
Myofibril
Sarcoplasmic
fluid
Connective
tissue
MUSCLE FIBER BEFORE GROWTH
The circle represents a muscle in
cross-section with its bundle of fascicles.
Within there are many myofibrils and
surrounding them is sarcoplasmic fluid
and a layer of connective tissue.
20
SATELLITE CELLS
The decline of muscle mass
with age
Skeletal muscle satellite cells are considered to play a
crucial role in muscle fiber maintenance, repair, and
remodelling. These mononucleated cells are “wedged”
between the base membrane and plasma membrane
of the muscle fiber. These act as stem cells and are
responsible for the further growth and development
of skeletal muscles. Satellite cells go into a state of
dormancy due to a sedentary lifestyle.
Muscle
fiber
Nucleus of
muscle cell
If you don’t use them, you lose them... or they
will go dormant. Our satellite cells naturally
reduce in number as we get older, but training
counteracts this decline. It’s important for
people to activate their muscles on a regular
basis once they reach the age of 30, or face
the possibility of losing the ability to regenerate
muscle mass as they age.
Dormant
satellite cell
SATELLITE CELLS
ARE ACTIVATED
INTACT MUSCLE FIBER
EXERCISE-INDUCED
MUSCLE DAMAGE
SOME CELLS
RETURN TO
THE POOL
SATELLITE CELLS
REPRODUCE
MYOTUBES MATURE
TO BECOME NEW
MUSCLE FIBERS
SATELLITE CELLS NOW
BECOME MUSCLE CELLS
(MYOCYTES)
MYOCYTES FUSE
AND BECOME
MYOTUBES
REPAIRED MUSCLE FIBER
MYOCYTES FUSE WITH
DAMAGED MUSCLE FIBER
More
myofibrils
More
sarcoplasm
Myofibril
More
connective
tissue
MYOFIBRILLAR HYPERTROPHY
Myofibrillar protein makes up 60–70
percent of the protein in a muscle cell.
Myofibrillar hypertrophy is the increase
in number and/or size of myofibrils by
the addition of sarcomeres.
SARCOPLASMIC HYPERTROPHY
A rise in the volume of the sarcoplasm
(which includes mitochondria,
sarcoplasmic reticulum, t-tubules,
enzymes and substrates, such as
glycogen) also enlarges the muscle.
CONNECTIVE TISSUE HYPERTROPHY
The extracellular matrix of the muscle
is a three-dimensional scaffolding of
connective tissue. Increases in its mineral
and protein content lead to muscles
getting bigger.
21
PHYSIOLOGY OF HIIT
MUSCULAR
ANATOMY
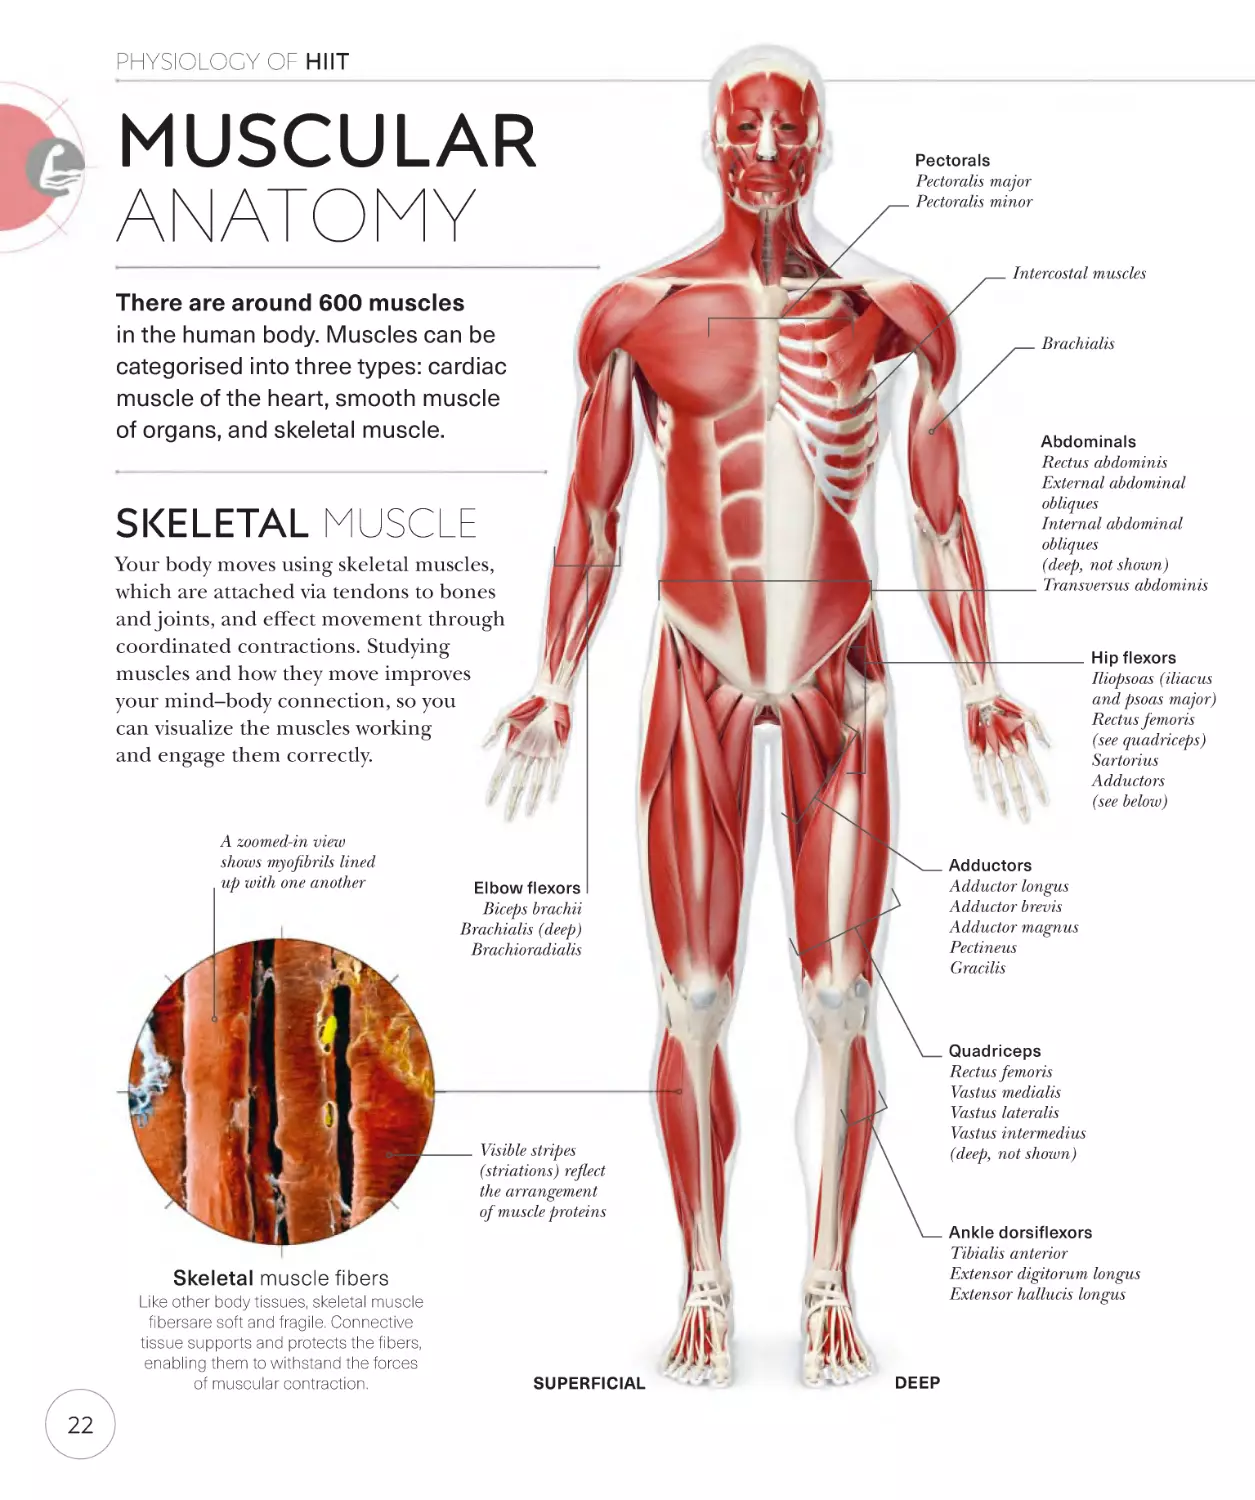
Pectorals
Pectoralis major
Pectoralis minor
Intercostal muscles
There are around 600 muscles
in the human body. Muscles can be
categorised into three types: cardiac
muscle of the heart, smooth muscle
of organs, and skeletal muscle.
Brachialis
Abdominals
Rectus abdominis
External abdominal
obliques
Internal abdominal
obliques
(deep, not shown)
Transversus abdominis
SKELETAL MUSCLE
Your body moves using skeletal muscles,
which are attached via tendons to bones
and joints, and effect movement through
coordinated contractions. Studying
muscles and how they move improves
your mind–body connection, so you
can visualize the muscles working
and engage them correctly.
A zoomed-in view
shows myofibrils lined
up with one another
Hip flexors
Iliopsoas (iliacus
and psoas major)
Rectus femoris
(see quadriceps)
Sartorius
Adductors
(see below)
Adductors
Adductor longus
Adductor brevis
Adductor magnus
Pectineus
Gracilis
Elbow flexors
Biceps brachii
Brachialis (deep)
Brachioradialis
Quadriceps
Rectus femoris
Vastus medialis
Vastus lateralis
Vastus intermedius
(deep, not shown)
Visible stripes
(striations) reflect
the arrangement
of muscle proteins
Ankle dorsiflexors
Tibialis anterior
Extensor digitorum longus
Extensor hallucis longus
Skeletal muscle fibers
Like other body tissues, skeletal muscle
fibersare soft and fragile. Connective
tissue supports and protects the fibers,
enabling them to withstand the forces
of muscular contraction.
22
SUPERFICIAL
DEEP
Cervical extensors
Splenius capitis
Splenius cervicis
Trapezius
Levator scapulae
Rhomboids
Rhomboid minor
Rhomboid major
Deltoids
Spinal extensors
Latissimus dorsi
Cervical extensors (above)
Erector spinae
Transversospinales
(small, deep muscles
along spine)
Triceps brachii
Serratus posterior
Gluteus medius
The myotendinous
junction is where
the muscle meets
the tendon
Gluteals
Gluteus maximus
Gluteus medius
Gluteus minimus
Piriformis
Adductor
magnus
Hip extensors
Gluteals
Adductor magnus
Hamstrings
Biceps femoris
Semitendinosus
Semimembranosus
Ankle plantar flexors
Collagen fibers resist
pull or tension
Tibialis posterior
Calf muscles
Gastrocnemius
Soleus
Tendons
Tendons attach each end of a muscle
to bone. They are formed of highly
organized connective tissue, resistant
to high tensile forces such as those
involved in rigorous HIIT movements.
DEEP
SUPERFICIAL
23
PHYSIOLOGY OF HIIT
HIIT TRAINING
AND THE BRAIN
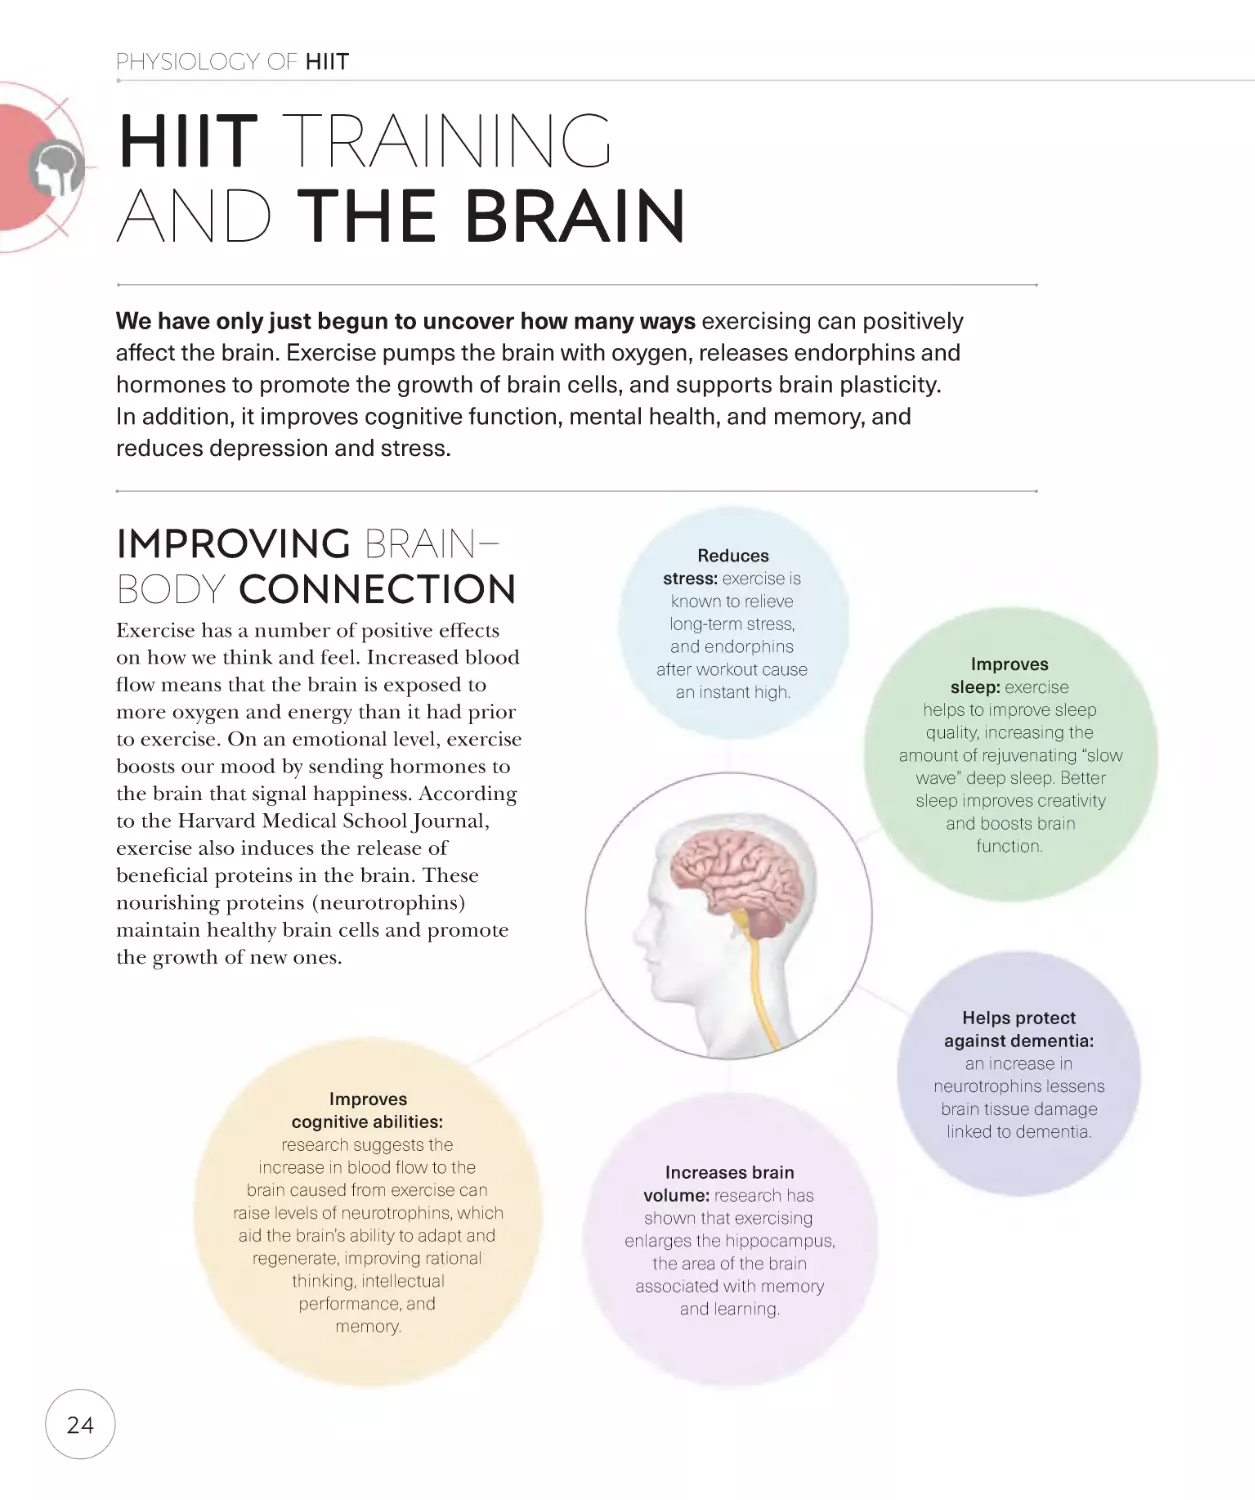
We have only just begun to uncover how many ways exercising can positively
affect the brain. Exercise pumps the brain with oxygen, releases endorphins and
hormones to promote the growth of brain cells, and supports brain plasticity.
In addition, it improves cognitive function, mental health, and memory, and
reduces depression and stress.
IMPROVING BRAIN–
BODY CONNECTION
Exercise has a number of positive effects
on how we think and feel. Increased blood
flow means that the brain is exposed to
more oxygen and energy than it had prior
to exercise. On an emotional level, exercise
boosts our mood by sending hormones to
the brain that signal happiness. According
to the Harvard Medical School Journal,
exercise also induces the release of
beneficial proteins in the brain. These
nourishing proteins (neurotrophins)
maintain healthy brain cells and promote
the growth of new ones.
Improves
cognitive abilities:
research suggests the
increase in blood flow to the
brain caused from exercise can
raise levels of neurotrophins, which
aid the brain’s ability to adapt and
regenerate, improving rational
thinking, intellectual
performance, and
memory.
24
Reduces
stress: exercise is
known to relieve
long-term stress,
and endorphins
after workout cause
an instant high.
Improves
sleep: exercise
helps to improve sleep
quality, increasing the
amount of rejuvenating “slow
wave” deep sleep. Better
sleep improves creativity
and boosts brain
function.
Helps protect
against dementia:
an increase in
neurotrophins lessens
brain tissue damage
linked to dementia.
Increases brain
volume: research has
shown that exercising
enlarges the hippocampus,
the area of the brain
associated with memory
and learning.
HIIT TRAINING BRAIN GAINS
When we exercise, we experience an increase in oxygen levels and angiogenesis
(blood vessel growth) in the brain. In particular, this occurs in areas of the brain
responsible for rational thinking and other intellectual, physical, and social
abilities. Exercise also lowers levels of the stress hormones cortisol, allowing for an
increase in the number of neurotransmitters like serotonin and norepinephrine.
Neurogenesis
Scientists once believed we had
only a fixed amount—around 86
bilion—of neurons (nerve cells)
in the brain. Research now
proves that neurogenesis (the
creation of new neurons) can
occur and in areas such as the
hippocampus, important for
learning and memory. What’s
more, exercise has the power to
stimulate levels of neurotrophins
that help promote neurogeneis
and neuroplasticity (see below).
Mind–body
connection
When training, it’s good to work
with focus and without directions.
One way to do this is by improving
the mind-to-body connection.
Mind–body connection means to
focus intently on the muscle you are
working on. See that muscle and
feel how it moves. Research shows
this boosts the strength and
growth of that specific muscle.
This is a mindful approach to
resistance training.
NEW BRAIN CELLS
Neuron cells are colored pink in this
microscopic-level image of the brain’s
hippocampus. HIIT workouts promote
the creation of new neurons.
Neuroplasticity
Neurochemistry
Exercise has been linked to increased neuroplasticity:
the brain’s ability to adapt, master new skills, and store
memories and information. Pathways within the brain
become more permanent the more you use them. The
more you train or perform a new skill the stronger the
pathways in the brain become. Training your body also
trains your mind!
Where one neuron meets another there is a gap called a
synapse. To transmit electrical signals, your brain uses
a system of chemicals called neurotransmitters, which
diffuse across the synapse and initiate the signal in the
next neuron. HIIT exercises boost levels of certain
neurotransmitters, such as dopamine and serotonin, which
is why after working out you feel happy and less stressed.
Dendrite receives
messages from
other neurons
Neuron
cell body
The axon
terminates
at a synapse
Axon of a neuron
makes a new connection
BUILDING CONNECTIONS
Neurons form new connections in
response to a stimulus. Repetition of the
stimulus reinforces how the brain is wired.
Neurotransmitter
Synapse, up close
Connections
build to create
circuits within
the brain
Molecules of neurotransmitter
prompted by the signal in one neuron
flow across the synapse in about
1 millisecond, relaying the signal to
the next connected neuron.
25
PHYSIOLOGY OF HIIT
FEEDING YOUR HIIT
Even if weight loss is your primary aim in starting a HIIT program it is vital to
eat enough and to eat well, to be properly energized for each workout and to
reap the long-term benefits of physical transformation. Take the opportunity to
embrace whole foods, variety, and a healthy balance of carbs, proteins, and fat.
THE ELEMENTS OF NUTRITION
Macronutrients are the three broad categories of nutrition: carbohydrates,
proteins, and fats. Carbohydrates supply saccharides (sugars) of differing
complexity, which are converted by the body to glucose and stored as
glycogen, our main energy source. Protein is made up of amino acids,
which are used by the body to build and repair tissues, including organs
and muscle, and maintain the functioning of bodily processes. Fats are
an important energy source and crucial to hormone production.
Getting the balance right
Although consumed in tiny amounts,
vitamins and minerals are vital to the
functioning of almost all processes in
the body, from immunity to cell renewal
and energy production. They are best
absorbed and utilized as part of whole
foods rather than in supplements.
HEALTHY FATS
Carbohydrates should constitute the bulk
of our food intake, but that doesn’t mean
nothing but donuts, fries, and sugary
drinks! Think “whole foods” that take
longer to break down for slow-release
energy, and bring fiber and micronutrients
with them: whole grains, vegetables, fruit
(though not to excess due to high sugar),
and herbs. Protein should make up around
20 percent of daily intake, whether from
plant sources such as pulses, nuts, and
soy, or meat, fish, and dairy. Don’t avoid fat
but prefer mono- and polyunsaturated.
26
Micronutrients
HEALTHY PLATE
FRUIT
Left is a representation of
the broad proportions and
mix of nutrition we should
be aiming for at each main
meal throughout the day.
LEAN
PROTEIN
VEGETABLES
WHOLE
GRAINS
MEASURING PORTIONS
Follow the guidance below
and use your hands as a
ready reckoner for the
maximum portion sizes
to aim for at main meals.
VEGETABLES
WHOLE GRAINS
FRUIT
PROTEIN
FATS
(TWO CUPPED HANDS)
(FISTFUL)
(FISTFUL)
(PALM SIZE)
(½–1 FL OZ/1–2 TBSP)
PRE- AND POST-WORKOUT NUTRITION
On workout days especially, it is important to keep your body supplied
with regular and consistent supplies of nutrition, to fuel the raised
metabolism, maximize post-workout “afterburn” (see pp. 16–17),
and promote effective recovery that locks in physical adaptations,
such as increased muscle mass and greater glycogen stores. Everyone
is different, but I would recommend avoiding eating shortly before or
during training, and a snack to boost recovery shortly after working out.
WHAT TO EAT WHEN
The debate still rages about whether it
is necessary to consume protein shortly
after a workout to avoid excess muscle
breakdown. There is, though, evidence
that such intake helps to support muscle
synthesis, and is recommended if you
have trained in a fasted state.
EATING BEFORE
FASTED WORKOUT
EATING AFTER
A meal or snack before training can help
replenish energy stocks and leave you
primed for muscle recovery. However,
a full meal should be consumed 2 or 3
hours before working out, and a snack
no sooner than 1 hour, so that digestive
processes have worked through and
don’t clash with your exercising.
Some people find that working out in a
fasted state— for example in the morning
after the natural fasting period of sleep—
helps to burn more fat as the body has
limited glycogen stores to draw on and
turns to fat stores. This is a personal
preference (I prefer it), but you may find
that you need to eat before a workout.
You need carbohydrates after a workout
to replenish energy stores, and protein to
support muscle adaptation. How soon
after is up to you, but don’t leave it too
long, and don’t let a post-workout energy
“bonk” be an excuse for eating refined,
high-sugar snacks. Go for complex carbs,
quality protein, and a healthy balance.
BEFORE TRAINING
3 HOURS
2
TRAINING
1
Avoid eating any
later than 1 hour
before a workout
AFTER TRAINING
30mins
Some swear by pre-workout
shots of apple vinegar or
coffee to boost performance
1
2
Drink a protein shake
straight after training
3
Balanced meal around
1 to 2 hours after a workout
YOUR FLUID BALANCE
Up to 60 percent of the body is water, and hydration has
numerous crucial functions that can affect athletic
performance. Water regulates body temperature
through sweating, transports nutrients, removes the
waste products of metabolism, and maintains blood flow
and volume so that muscles are supplied with oxygenrich blood for aerobic respiration (see pp. 12–15).
You should therefore take care to remain well-hydrated.
But do guard against overhydration, especially after
exercise when you’ve sweated a great deal, as this can
lead to a dangerous depletion in sodium.
110 LB
154 LB
220 LB
50–68
FL OZ
71–95
FL OZ
101–135
FL OZ
6–8
GLASSES
8–11
GLASSES
12–16
GLASSES
A DAY
A DAY
A DAY
HOW MUCH WATER TO DRINK A DAY
Current advice recommends drinking 1⁄2fl oz/lb
(30–40ml/kg) of water to bodyweight, but do also adjust
on a daily basis according to how much you tend to
sweat, your activity level, and environmental factors.
27
CORE
pp.34–61
UPPER BODY
pp.62–93
LOWER BODY
pp.94–123
PLYOMETRIC
pp.124–151
TOTAL BODY
pp.152–185
HIIT
EXERCISES
This exercise section features 95 exercises, comprising 46 main
exercises plus 49 variations that add a challenge or modification.
When performing, alternate periods between 30–60 seconds of
intense exercise with 30–60 seconds of recovery. Changing the
intensity and/or duration of exercise and recovery allows for an
infinite number of workouts. The workouts are targeted at various
muscle groups, so you can choose which to concentrate on.
HIIT EXERCISES
INTRODUCTION
TO THE EXERCISES
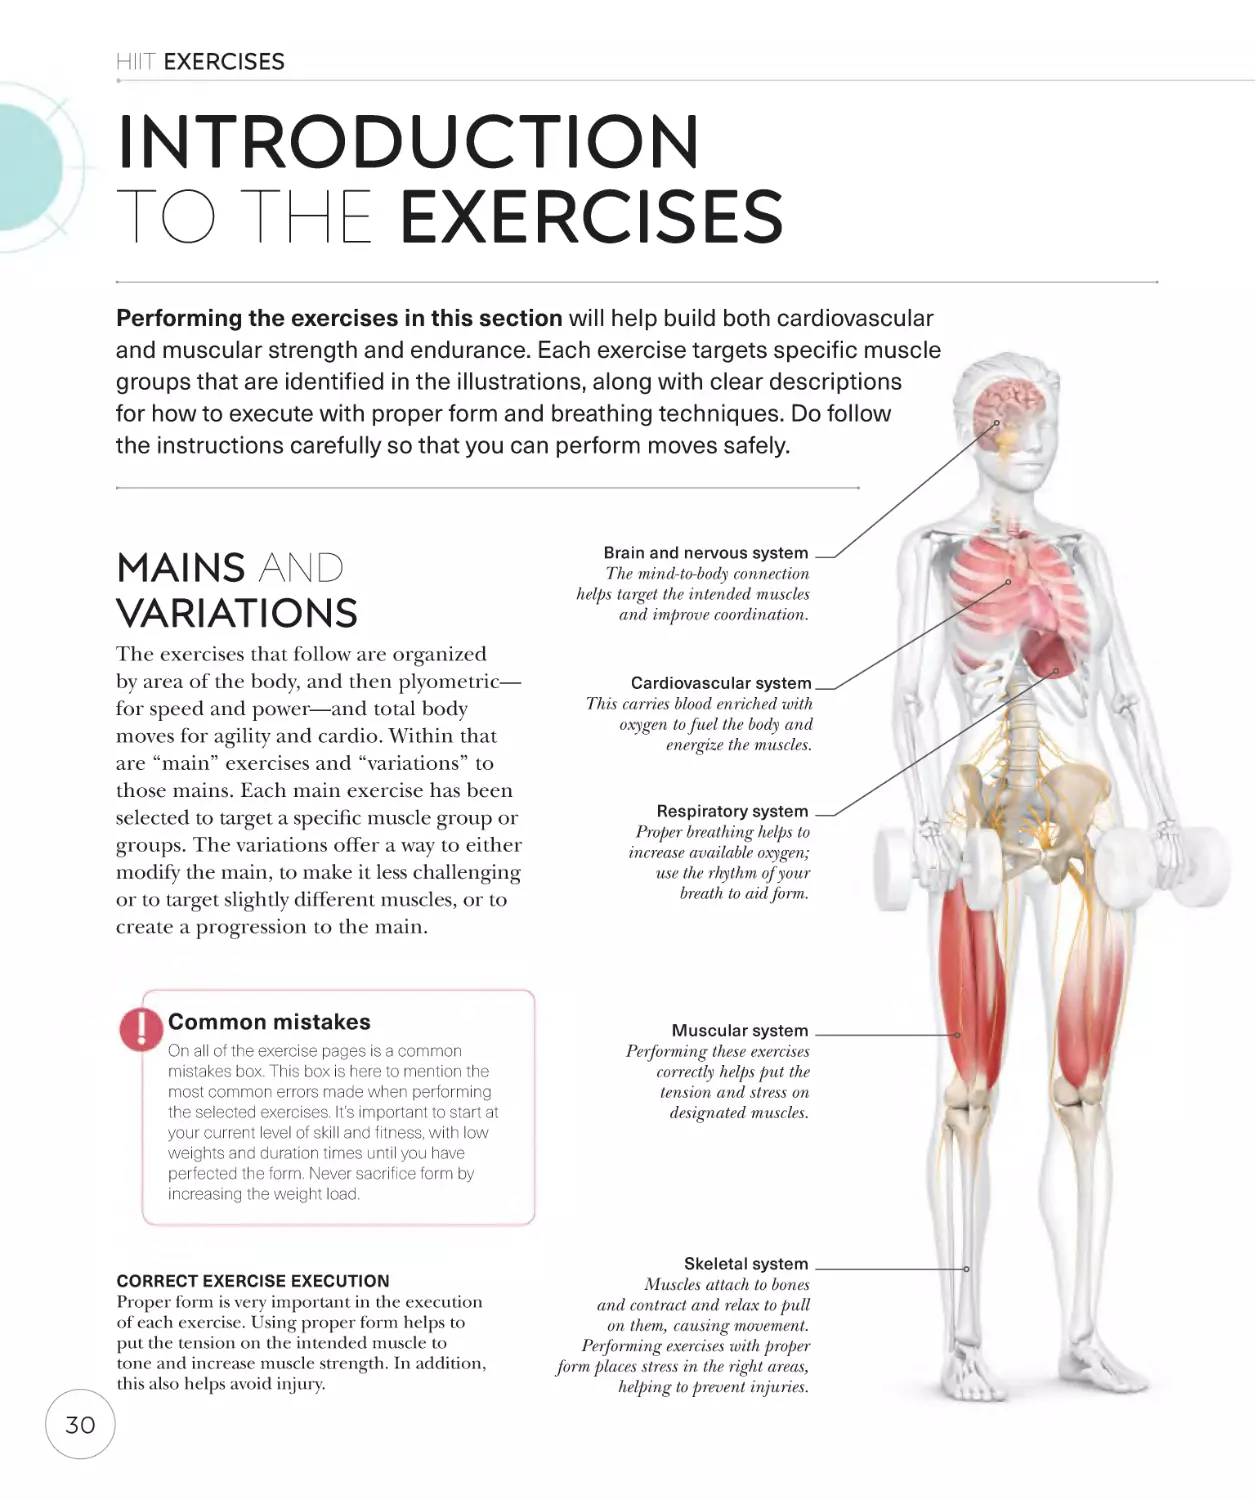
Performing the exercises in this section will help build both cardiovascular
and muscular strength and endurance. Each exercise targets specific muscle
groups that are identified in the illustrations, along with clear descriptions
for how to execute with proper form and breathing techniques. Do follow
the instructions carefully so that you can perform moves safely.
MAINS AND
VARIATIONS
The exercises that follow are organized
by area of the body, and then plyometric—
for speed and power—and total body
moves for agility and cardio. Within that
are “main” exercises and “variations” to
those mains. Each main exercise has been
selected to target a specific muscle group or
groups. The variations offer a way to either
modify the main, to make it less challenging
or to target slightly different muscles, or to
create a progression to the main.
Common mistakes
On all of the exercise pages is a common
mistakes box. This box is here to mention the
most common errors made when performing
the selected exercises. It’s important to start at
your current level of skill and fitness, with low
weights and duration times until you have
perfected the form. Never sacrifice form by
increasing the weight load.
CORRECT EXERCISE EXECUTION
Proper form is very important in the execution
of each exercise. Using proper form helps to
put the tension on the intended muscle to
tone and increase muscle strength. In addition,
this also helps avoid injury.
30
Brain and nervous system
The mind-to-body connection
helps target the intended muscles
and improve coordination.
Cardiovascular system
This carries blood enriched with
oxygen to fuel the body and
energize the muscles.
Respiratory system
Proper breathing helps to
increase available oxygen;
use the rhythm of your
breath to aid form.
Muscular system
Performing these exercises
correctly helps put the
tension and stress on
designated muscles.
Skeletal system
Muscles attach to bones
and contract and relax to pull
on them, causing movement.
Performing exercises with proper
form places stress in the right areas,
helping to prevent injuries.
Exercise terminology
These are some terms commonly
used throughout the book.
REPETITION OR REPS
A rep or repetition describes the
completion of a single exercise.
The number of reps to perform
may be specified, but more usually
this is time-based—however many
reps you can manage in 30, 45,
or 60 seconds.
THE IMPORTANCE OF BREATHING
The respiratory system supplies the body with the oxygen required for
most of its energy needs, and removes the waste carbon dioxide created
from energy conversion (see pp. 12–17). Breathing also helps provide a
rhythm for the mind–body connection to help you maintain control,
and actively engages the core muscles, especially the abdominals.
Inhaled air
via nose and/
or mouth
SET
A set consists of a group of
exercises, usually 4 or 5,
performed back-to-back, for a
specified duration and with breaks
or no breaks in between. After
you complete one set there is
usually a rest period before you
start the next set.
Exhaled air
via nose and/
or mouth
Ribcage relaxes
to resting position
Ribcage
expands
Lungs
increase
in volume;
air is
forced in
ROUTINE
A routine describes the workout
in full: the number, selection, and
order of exercises; the number of
sets to complete; the durations
of movement, breaks, and rest.
Lungs
decrease
in volume;
air is
forced out
Diaphragm
contracts
Diaphragm
returns to
resting position
Core is
engaged
throughout
Abdominal
muscles are
engaged
BREATHING IN
EQUIPMENT
Bands are color-coded
by level of resistance
Most of these exercises require no equipment, perfect for the
home as well as the gym. A mat makes floor movements more
comfortable; a ball introduces instability to engage different
muscles and make you work harder; while resistance bands
and dumbbells increase the load and effort required.
Dumbbells can be fixed
or adjustable; kettlebells
are another option
DUMBBELLS
BREATHING OUT
Choose a nonslip mat
that is easy to roll up
and store
ROLL MAT
RESISTANCE BANDS
Be sure to buy
the right size for
your height
EXERCISE
BALL
31
TERMINOLOGY
GUIDE
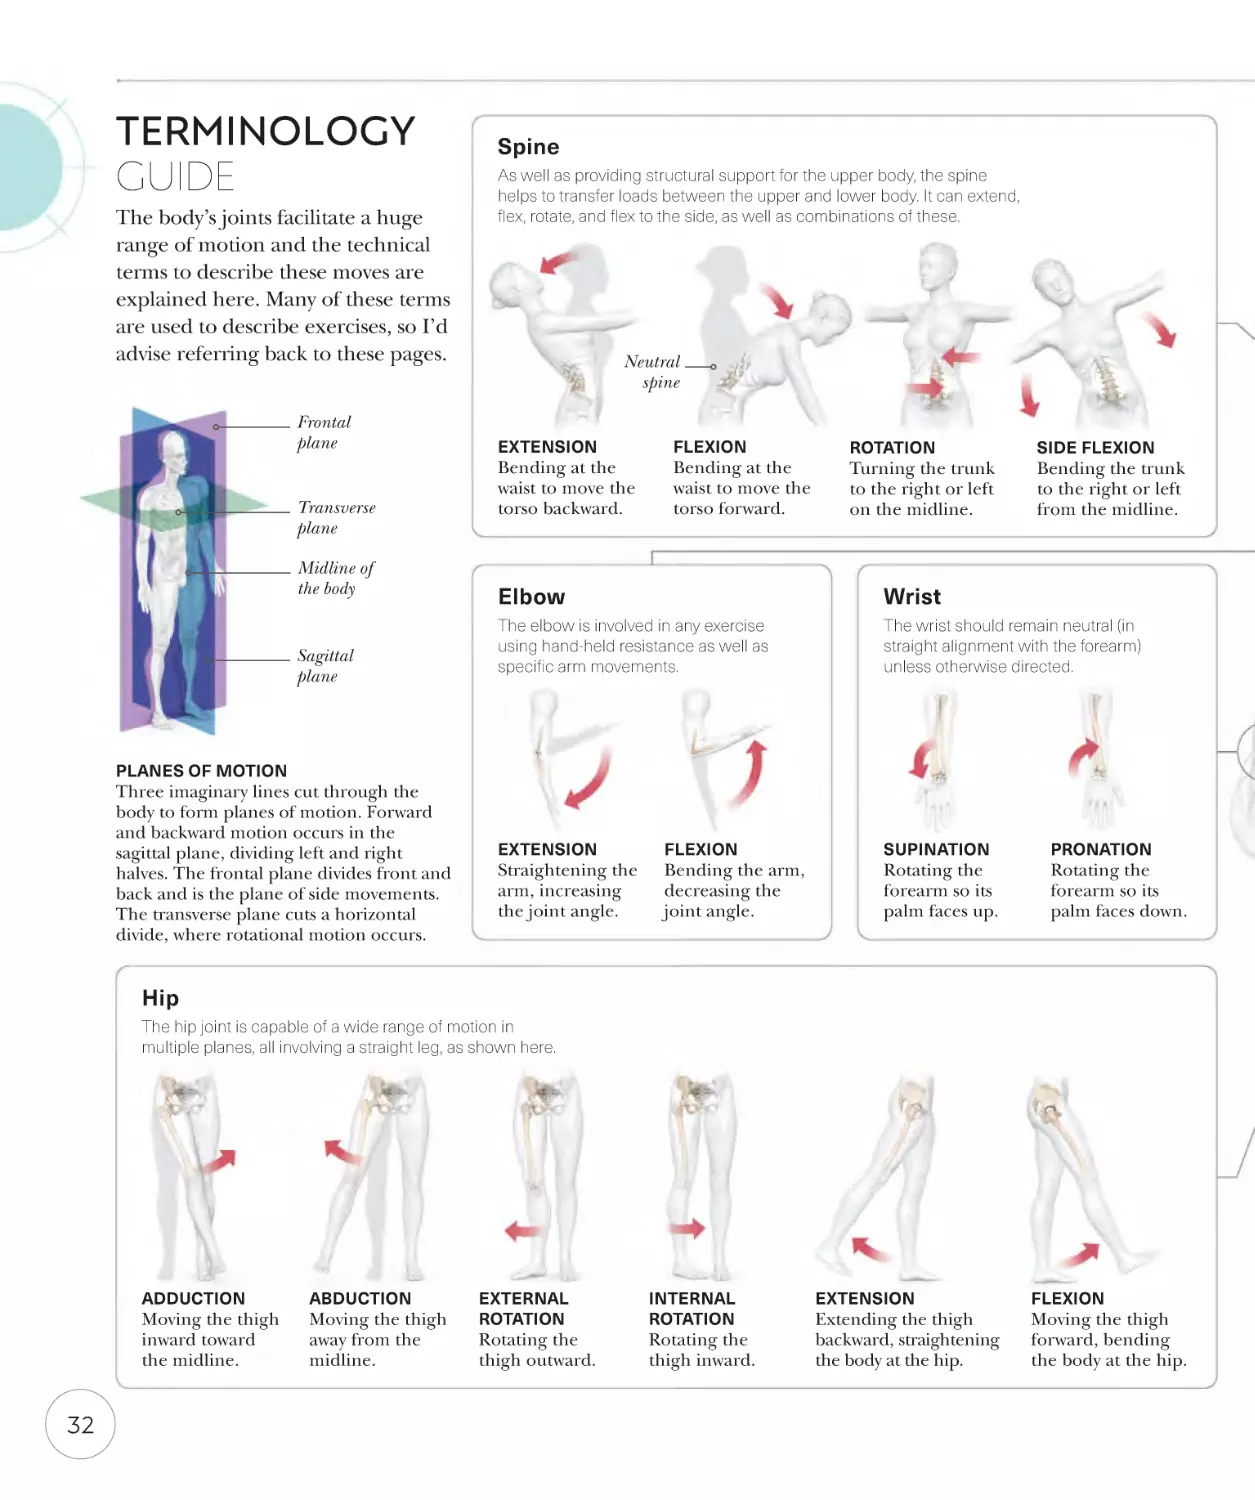
The body’s joints facilitate a huge
range of motion and the technical
terms to describe these moves are
explained here. Many of these terms
are used to describe exercises, so I’d
advise referring back to these pages.
Frontal
plane
Transverse
plane
Midline of
the body
Sagittal
plane
Spine
As well as providing structural support for the upper body, the spine
helps to transfer loads between the upper and lower body. It can extend,
flex, rotate, and flex to the side, as well as combinations of these.
Neutral
spine
EXTENSION
Bending at the
waist to move the
torso backward.
FLEXION
Bending at the
waist to move the
torso forward.
ROTATION
Turning the trunk
to the right or left
on the midline.
SIDE FLEXION
Bending the trunk
to the right or left
from the midline.
Elbow
Wrist
The elbow is involved in any exercise
using hand-held resistance as well as
specific arm movements.
The wrist should remain neutral (in
straight alignment with the forearm)
unless otherwise directed.
EXTENSION
SUPINATION
PLANES OF MOTION
Three imaginary lines cut through the
body to form planes of motion. Forward
and backward motion occurs in the
sagittal plane, dividing left and right
halves. The frontal plane divides front and
back and is the plane of side movements.
The transverse plane cuts a horizontal
divide, where rotational motion occurs.
Straightening the
arm, increasing
the joint angle.
FLEXION
Bending the arm,
decreasing the
joint angle.
Rotating the
forearm so its
palm faces up.
PRONATION
Rotating the
forearm so its
palm faces down.
Hip
The hip joint is capable of a wide range of motion in
multiple planes, all involving a straight leg, as shown here.
ADDUCTION
Moving the thigh
inward toward
the midline.
32
ABDUCTION
Moving the thigh
away from the
midline.
EXTERNAL
ROTATION
Rotating the
thigh outward.
INTERNAL
ROTATION
Rotating the
thigh inward.
EXTENSION
Extending the thigh
backward, straightening
the body at the hip.
FLEXION
Moving the thigh
forward, bending
the body at the hip.
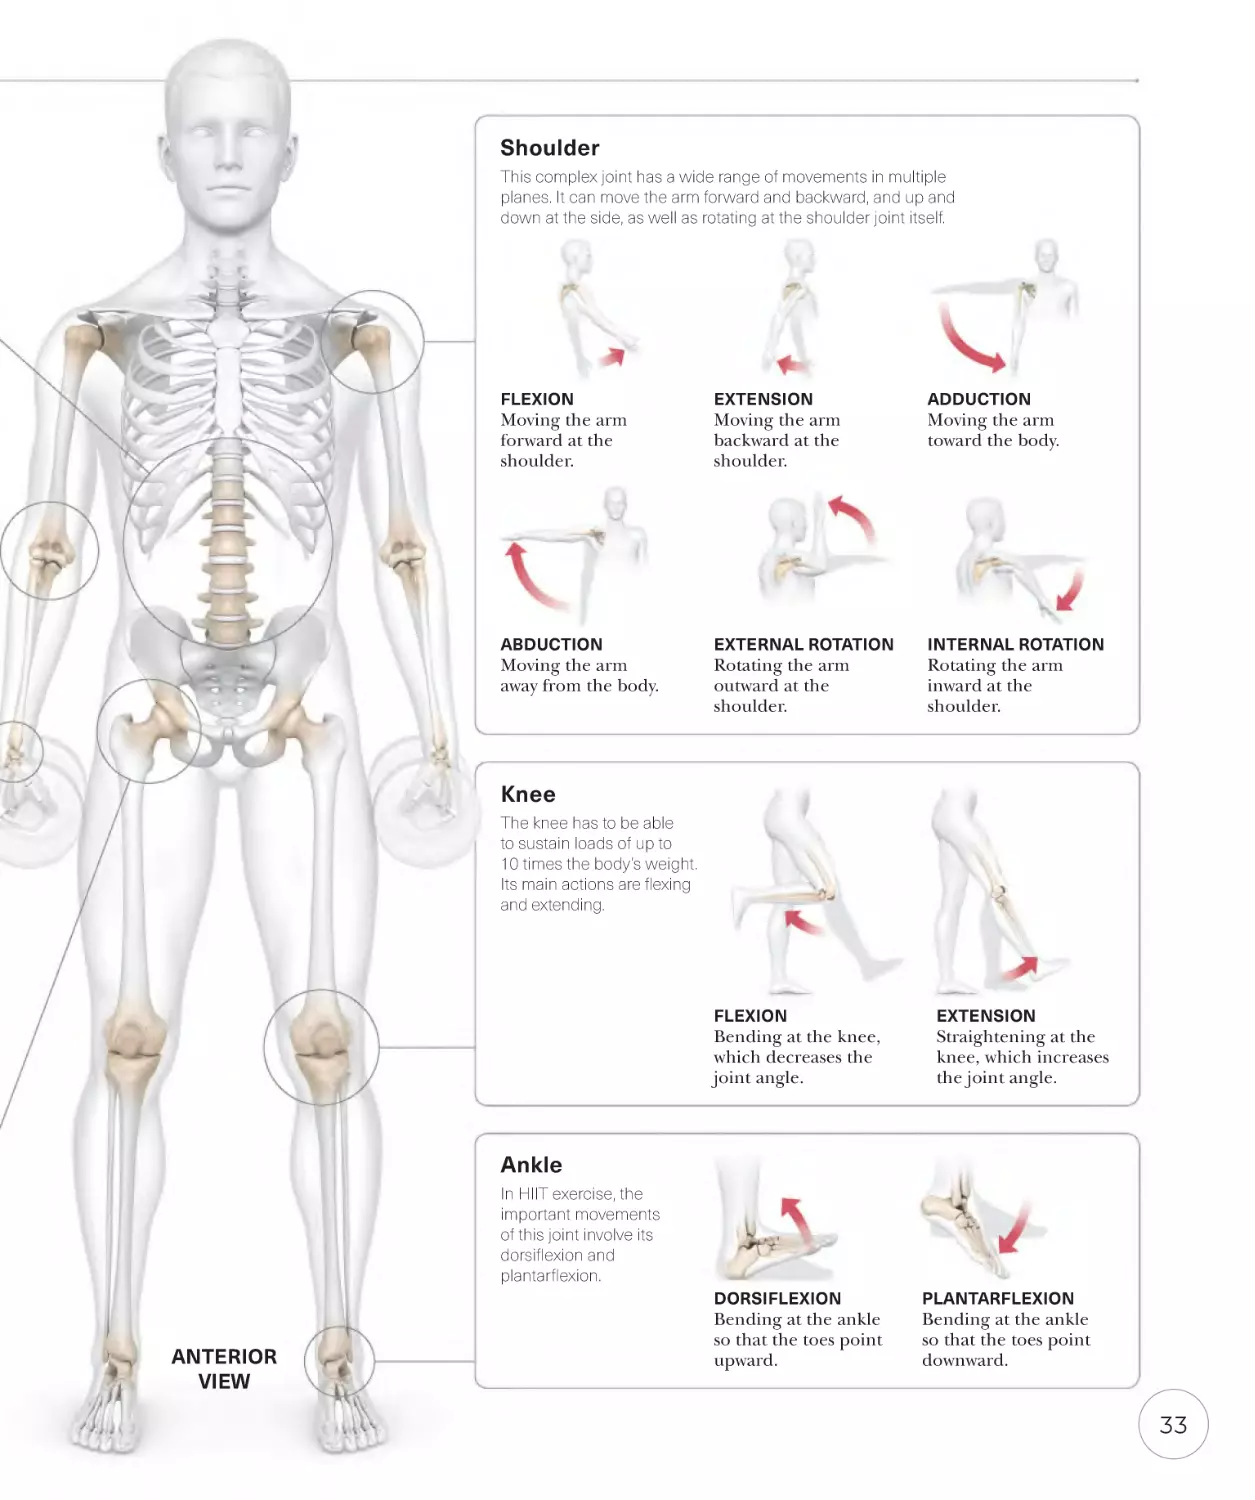
Shoulder
This complex joint has a wide range of movements in multiple
planes. It can move the arm forward and backward, and up and
down at the side, as well as rotating at the shoulder joint itself.
FLEXION
EXTENSION
ADDUCTION
ABDUCTION
EXTERNAL ROTATION
INTERNAL ROTATION
Moving the arm
forward at the
shoulder.
Moving the arm
away from the body.
Moving the arm
backward at the
shoulder.
Rotating the arm
outward at the
shoulder.
Moving the arm
toward the body.
Rotating the arm
inward at the
shoulder.
Knee
The knee has to be able
to sustain loads of up to
10 times the body’s weight.
Its main actions are flexing
and extending.
FLEXION
Bending at the knee,
which decreases the
joint angle.
EXTENSION
Straightening at the
knee, which increases
the joint angle.
Ankle
In HIIT exercise, the
important movements
of this joint involve its
dorsiflexion and
plantarflexion.
DORSIFLEXION
ANTERIOR
VIEW
Bending at the ankle
so that the toes point
upward.
PLANTARFLEXION
Bending at the ankle
so that the toes point
downward.
33
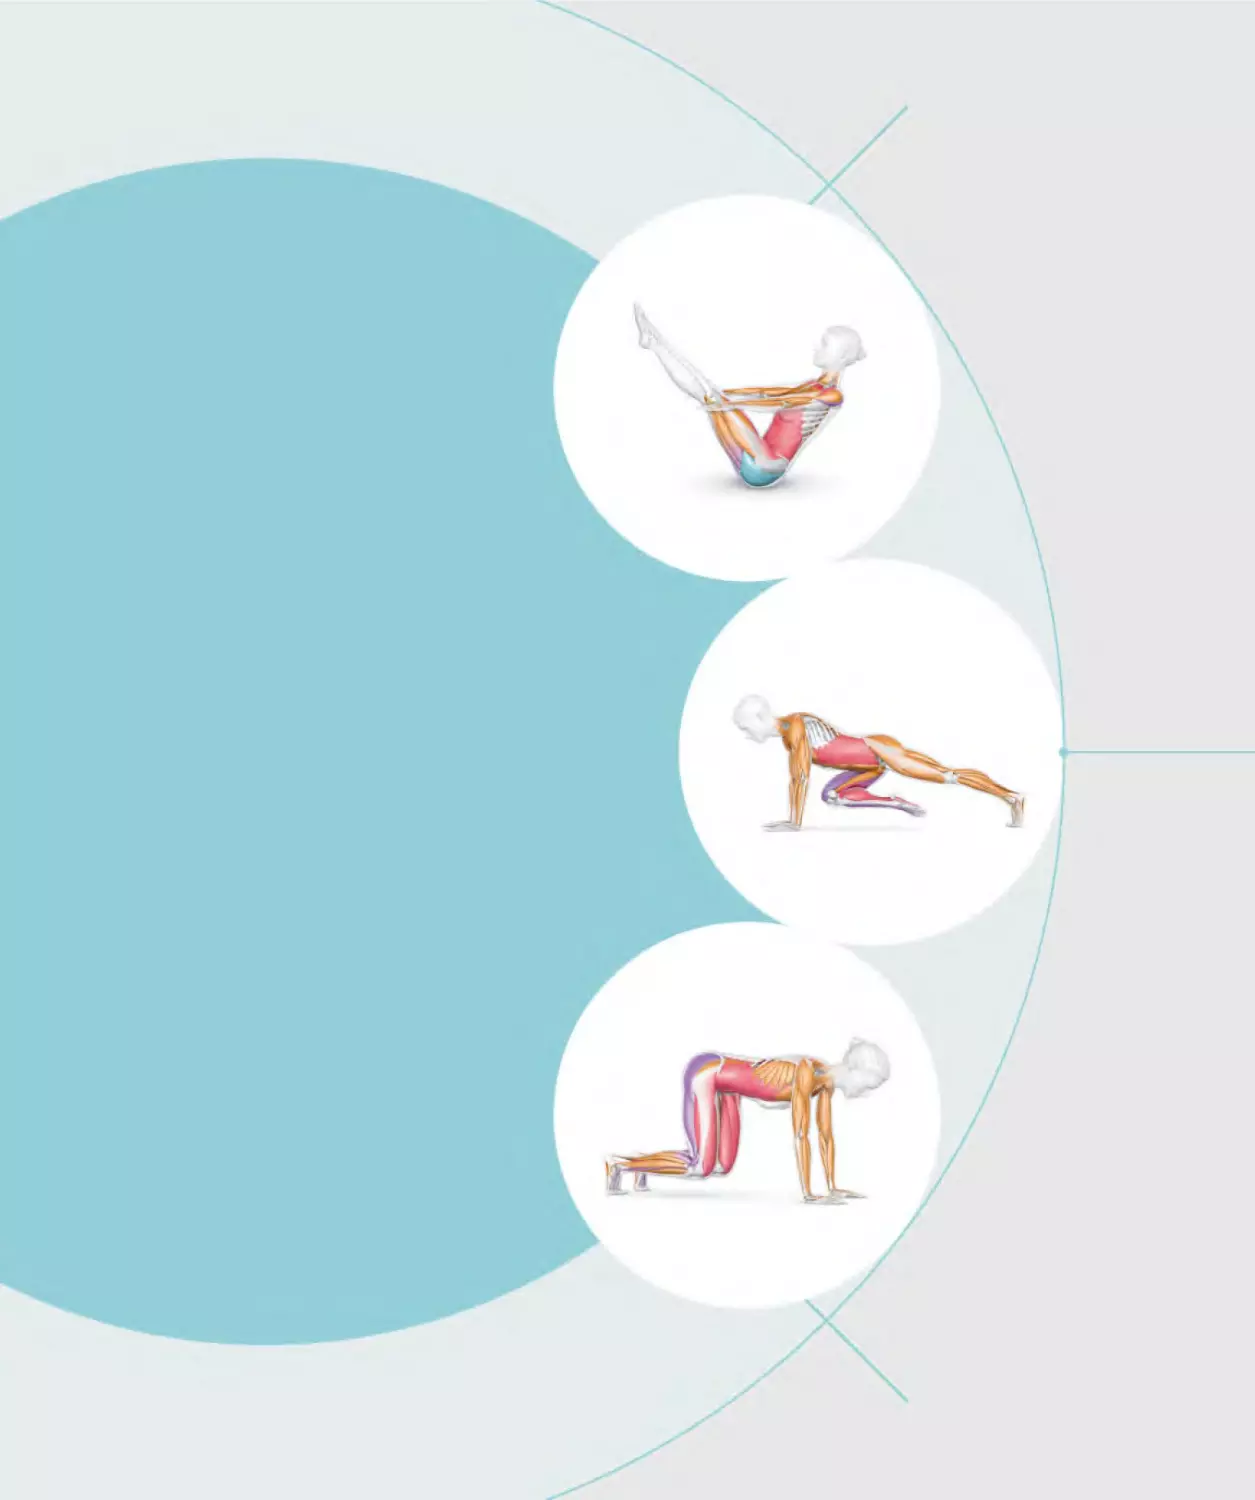
CORE
EXERCISES
Exercises in this section focus effort on abdominal muscles: the
transverse abdominis, rectus abdominis, and the internal and external
oblique muscles. As well as clear directions on how to execute each
move to maximize effectiveness and reduce injury risk, many of the
exercises include variations and modifications.
HIIT EXERCISES
Core Exercises
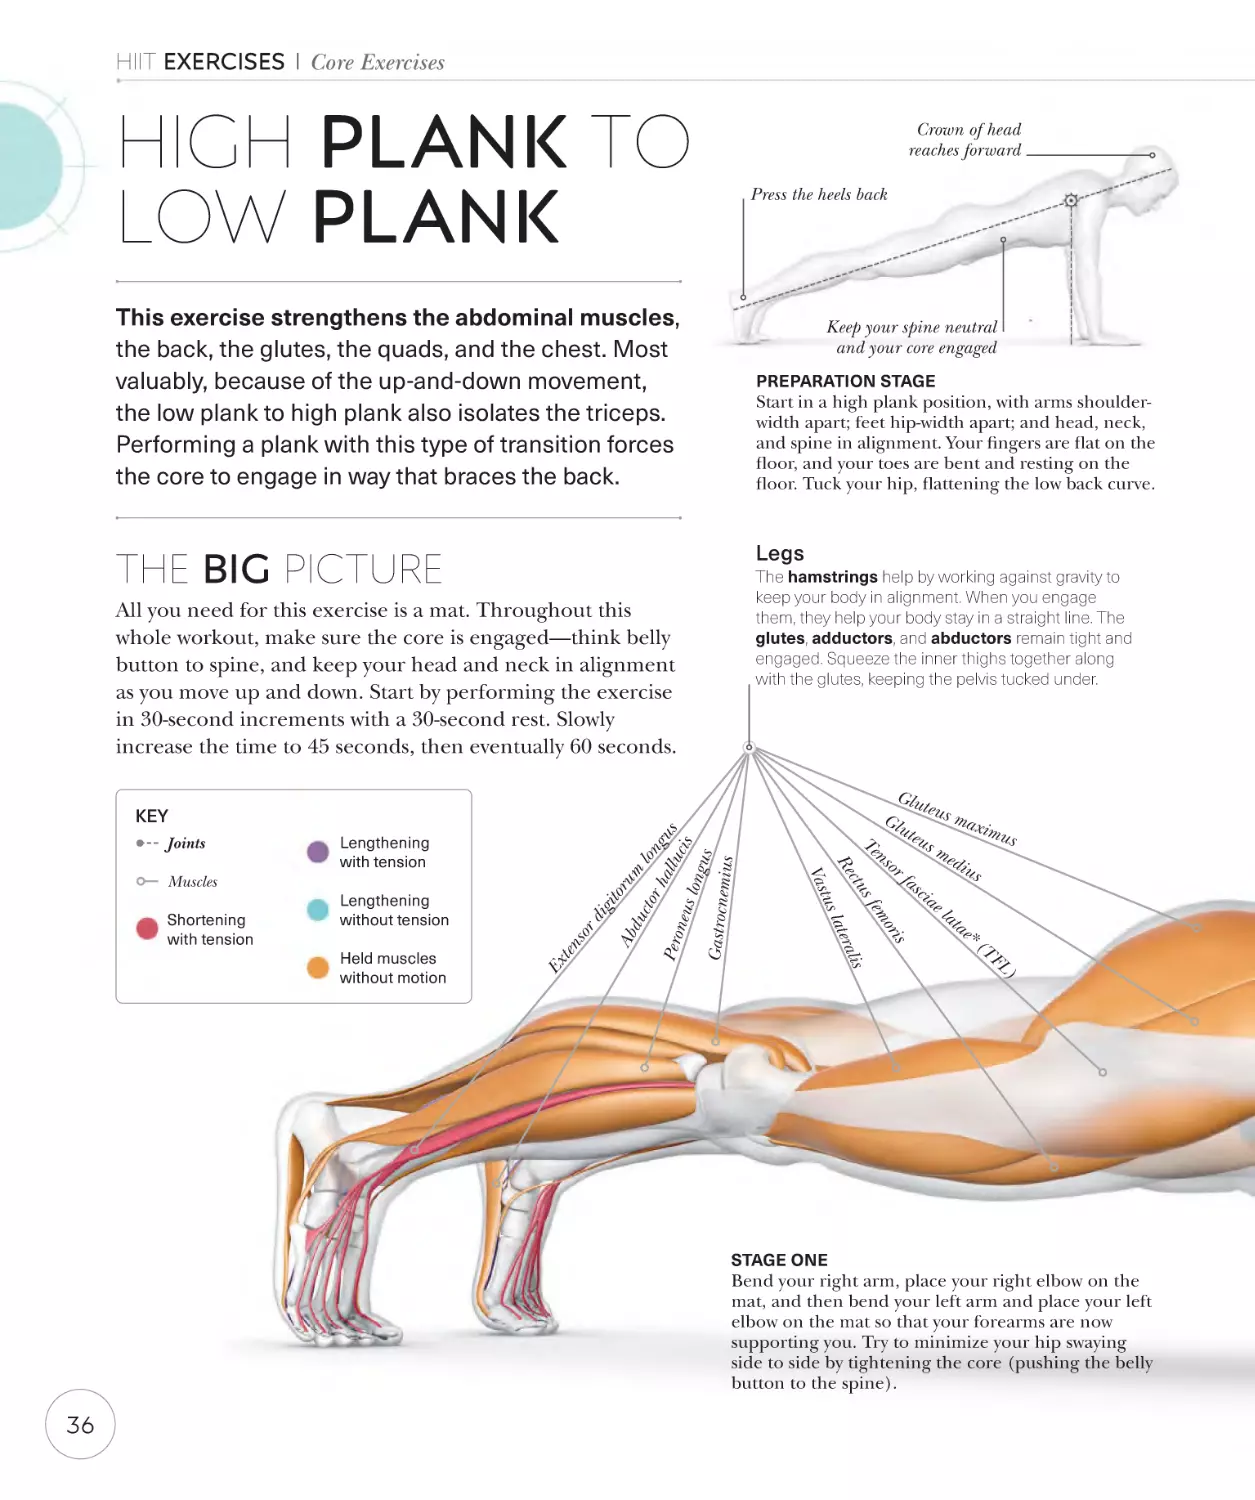
HIGH PLANK TO
LOW PLANK
Crown of head
reaches forward
Press the heels back
This exercise strengthens the abdominal muscles,
the back, the glutes, the quads, and the chest. Most
valuably, because of the up-and-down movement,
the low plank to high plank also isolates the triceps.
Performing a plank with this type of transition forces
the core to engage in way that braces the back.
Keep your spine neutral
and your core engaged
PREPARATION STAGE
Start in a high plank position, with arms shoulderwidth apart; feet hip-width apart; and head, neck,
and spine in alignment. Your fingers are flat on the
floor, and your toes are bent and resting on the
floor. Tuck your hip, flattening the low back curve.
Legs
THE BIG PICTURE
The hamstrings help by working against gravity to
keep your body in alignment. When you engage
them, they help your body stay in a straight line. The
glutes, adductors, and abductors remain tight and
engaged. Squeeze the inner thighs together along
with the glutes, keeping the pelvis tucked under.
All you need for this exercise is a mat. Throughout this
whole workout, make sure the core is engaged—think belly
button to spine, and keep your head and neck in alignment
as you move up and down. Start by performing the exercise
in 30-second increments with a 30-second rest. Slowly
increase the time to 45 seconds, then eventually 60 seconds.
um
Pero
n
or
rh
cto
du
di
git
Ab
Held muscles
without motion
sor
Lengthening
without tension
ten
Shortening
with tension
Glu
teus
max
Gl
ute
imu
u
s
Te
s
me
ns
diu
or
s
fa
sci
ae
la
ta
e*
(T
FL
)
s
ori
em
sf
s
ctu
rali
Re
late
tus
Vas
Muscles
Lengthening
with tension
Ex
Joints
lon
all gus
uci
eus
long s
us
Gastrocnem
ius
KEY
STAGE ONE
Bend your right arm, place your right elbow on the
mat, and then bend your left arm and place your left
elbow on the mat so that your forearms are now
supporting you. Try to minimize your hip swaying
side to side by tightening the core (pushing the belly
button to the spine).
36
Caution
If not using the proper form, this could lead
to lower back and wrist injuries. Make sure
your core is engaged throughout.
Hips engage to
stabilize your
thighs and hips
Feet are hip-distance
apart, toes flexed
Upper body
This isometric abdominal exercise also
engages the trapezius, rhomboid
major and minor, pectorals, serratus
anterior, deltoids, biceps, and triceps.
Your inner and outer obliques, along
with the spinal erectors, remain
engaged to stabilize the hips.
Arms are straight
but elbows are soft
STAGE TWO
Extend the right elbow to prop the body
onto the palm, then extend the left arm to
return to the high plank position, core
engaged and back flat. Repeat the exercise.
or
aj
m
es
Tr ltoid
s
De ep
iali m
rad
ic
u
Tr achio igitor
Br nsor d
si
e
Ext
s dor
simu
Latis
is
abdomin
Rectus
External oblique
Ste
Tr rnocl
a
eid
Pe pez
om
ius
cto
ast
oid
ra
lis
ma
jor
LATERAL VIEW
37
PLANK
VARIATIONS
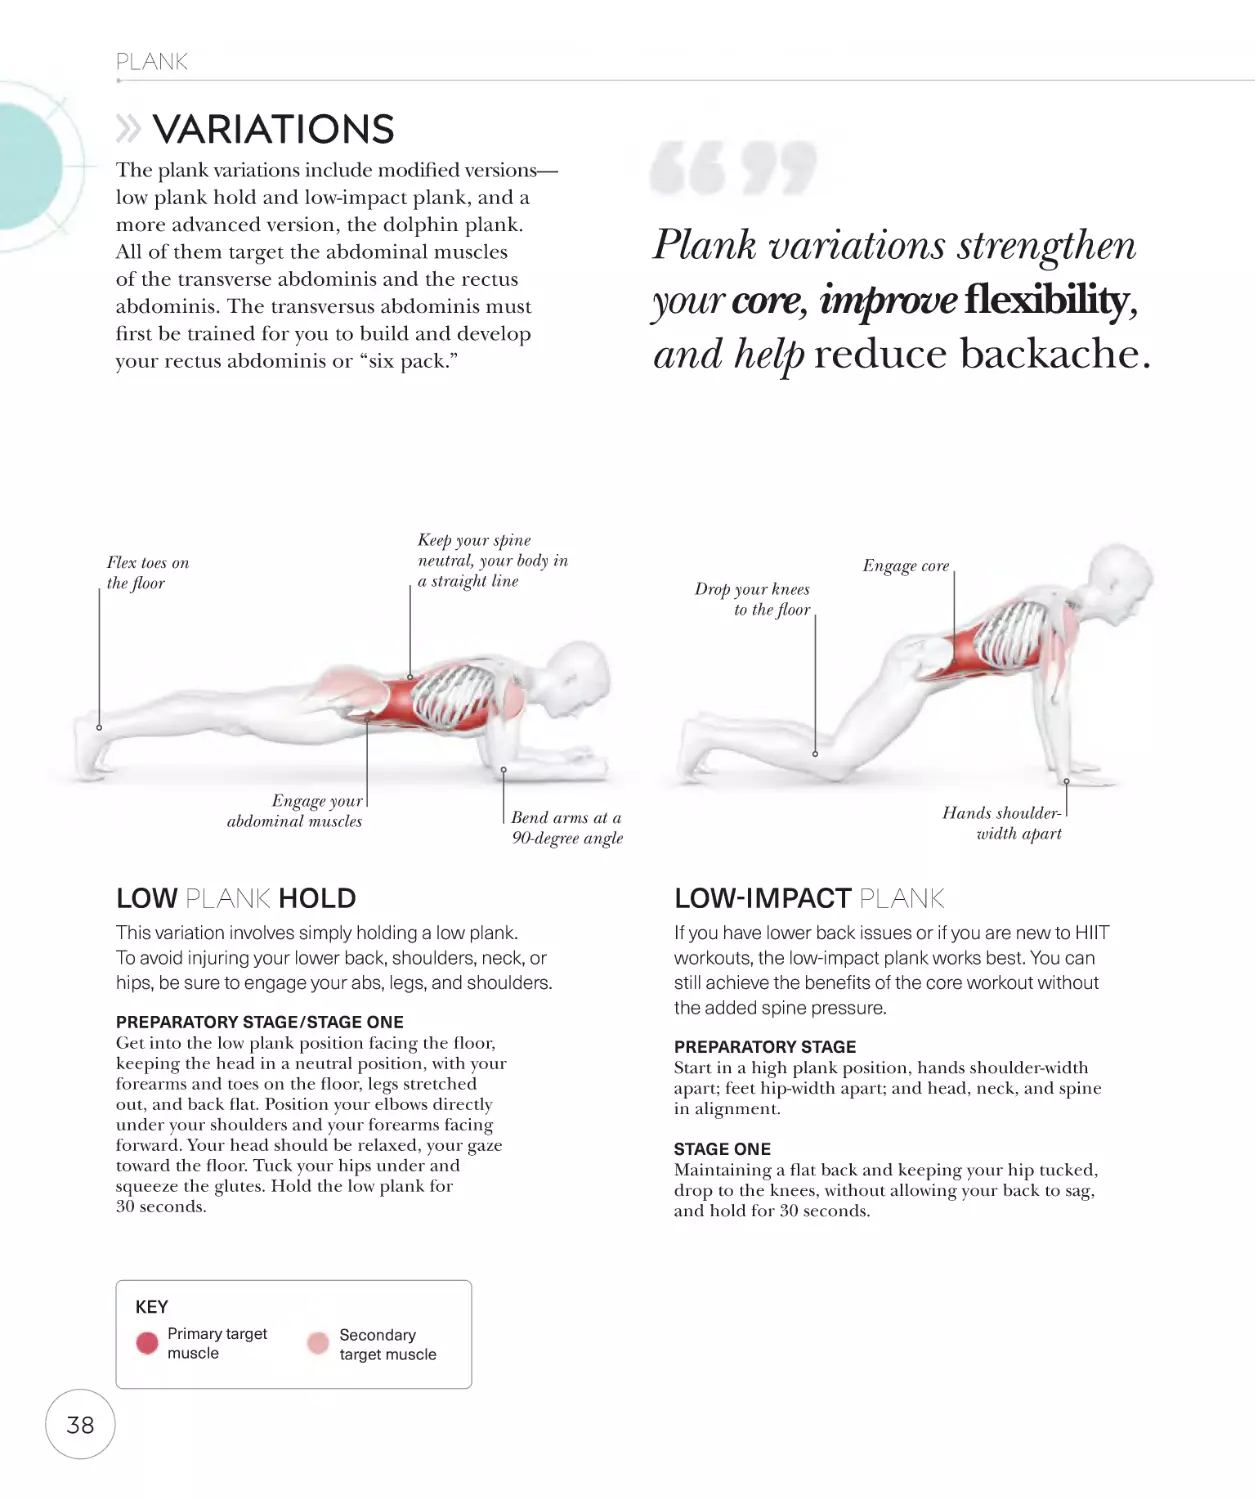
The plank variations include modified versions—
low plank hold and low-impact plank, and a
more advanced version, the dolphin plank.
All of them target the abdominal muscles
of the transverse abdominis and the rectus
abdominis. The transversus abdominis must
first be trained for you to build and develop
your rectus abdominis or “six pack.”
Keep your spine
neutral, your body in
a straight line
Flex toes on
the floor
Engage your
abdominal muscles
Engage core
Drop your knees
to the floor
Hands shoulderwidth apart
Bend arms at a
90-degree angle
LOW PLANK HOLD
LOW-IMPACT PLANK
This variation involves simply holding a low plank.
To avoid injuring your lower back, shoulders, neck, or
hips, be sure to engage your abs, legs, and shoulders.
If you have lower back issues or if you are new to HIIT
workouts, the low-impact plank works best. You can
still achieve the benefits of the core workout without
the added spine pressure.
PREPARATORY STAGE/STAGE ONE
Get into the low plank position facing the floor,
keeping the head in a neutral position, with your
forearms and toes on the floor, legs stretched
out, and back flat. Position your elbows directly
under your shoulders and your forearms facing
forward. Your head should be relaxed, your gaze
toward the floor. Tuck your hips under and
squeeze the glutes. Hold the low plank for
30 seconds.
KEY
Primary target
muscle
38
Plank variations strengthen
your core, improve flexibility,
and help reduce backache.
Secondary
target muscle
PREPARATORY STAGE
Start in a high plank position, hands shoulder-width
apart; feet hip-width apart; and head, neck, and spine
in alignment.
STAGE ONE
Maintaining a flat back and keeping your hip tucked,
drop to the knees, without allowing your back to sag,
and hold for 30 seconds.
HIIT EXERCISES
Core Exercises
Ribcage
Rectus
abdominis
External
obliques
Muscles of the core
Pelvis
ANTERIOR VIEW
When performing a sit-up, you are using a
concentric contraction. The abdominal muscles
are shortening, causing the distance between
the ribcage and the pelvis to decrease. However,
at the top of the sit-up, when you start to lower
your body to the floor, your abdominals are in an
eccentric contraction, contracting under tension
but not lengthening.
DOLPHIN PLANK
This is a full-body exercise. It strengthens your arms and shoulders,
and you use your abs and core muscles to stabilize your torso. The
hamstrings and calves get a good stretch without tension. Remember
to keep your back straight, especially when you jump back.
Body forms inverted
“V” shape
Tuck hips under
Squeeze and engage
your glutes
PREPARATORY STAGE
STAGE ONE
Forearms face forward
on the floor
PREPARATORY STAGE
Begin in the low plank position, your head
neutral and facing the floor and your
forearms and toes on the floor. Ensure
your elbows are under your shoulders and
your forearms are facing forward.
STAGE ONE
Jump back and
forth on your toes
Exhale and jump your feet forward,
staying on your toes while lifting your
hips and bringing your body into an
inverted “V” position. Maintain the
position of your forearms on the floor.
Face looks at legs
through your arms
STAGE TWO
Squeeze the glutes and gently jump the
feet back (still on your toes) to resume
the plank position on the inhale. This is
the basic back-and-forth motion of the
dolphin plank.
39
HIIT EXERCISES
Core Exercises
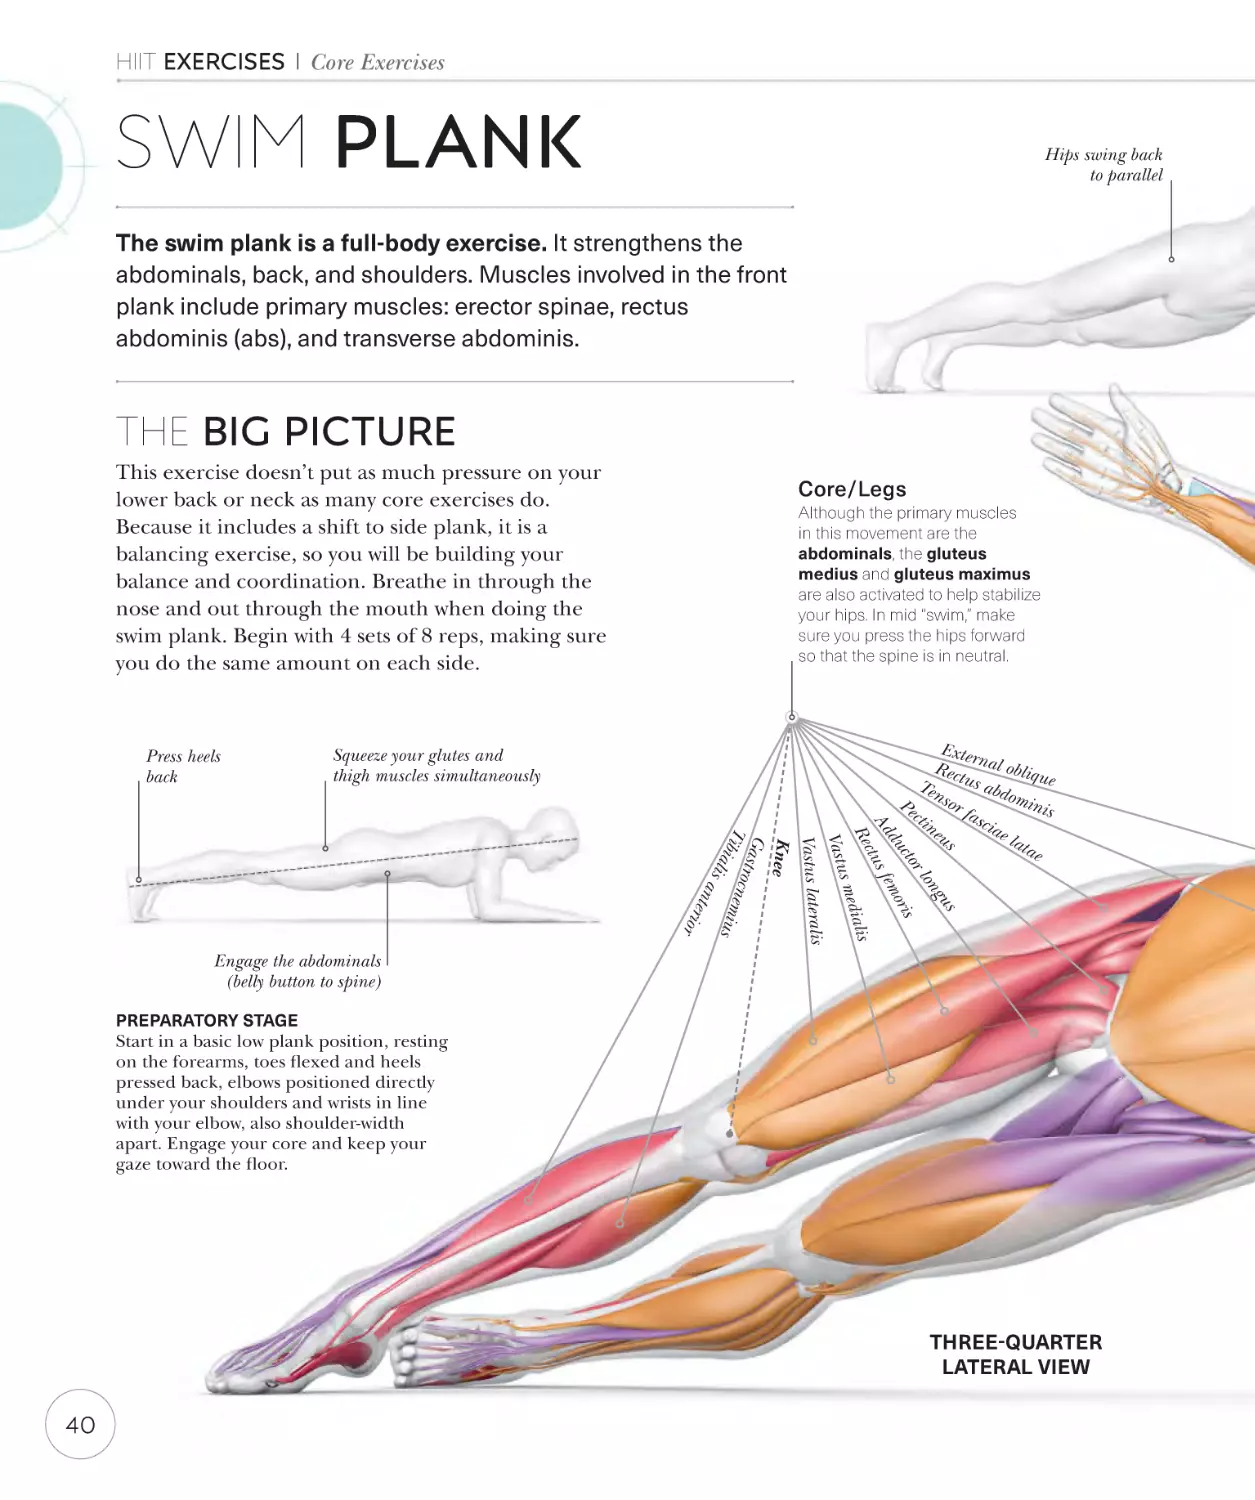
SWIM PLANK
Hips swing back
to parallel
The swim plank is a full-body exercise. It strengthens the
abdominals, back, and shoulders. Muscles involved in the front
plank include primary muscles: erector spinae, rectus
abdominis (abs), and transverse abdominis.
THE BIG PICTURE
This exercise doesn’t put as much pressure on your
lower back or neck as many core exercises do.
Because it includes a shift to side plank, it is a
balancing exercise, so you will be building your
balance and coordination. Breathe in through the
nose and out through the mouth when doing the
swim plank. Begin with 4 sets of 8 reps, making sure
you do the same amount on each side.
Press heels
back
Core/Legs
Although the primary muscles
in this movement are the
abdominals, the gluteus
medius and gluteus maximus
are also activated to help stabilize
your hips. In mid “swim,” make
sure you press the hips forward
so that the spine is in neutral.
Squeeze your glutes and
thigh muscles simultaneously
s
gu
on
rl
cto
ris
du
mo
s fe
Ad
ctu
Re
ialis
s med
Vastu
Vastus lateralis
Knee
G
a
s
t
Tib rocnemi
us
ial
i
s
ant
erio
r
Exter
Rec nal obliqu
e
Te tus abd
omi
Pe nsor
n
i
s
f
cti
asc
ne
iae
us
lat
ae
Engage the abdominals
(belly button to spine)
PREPARATORY STAGE
Start in a basic low plank position, resting
on the forearms, toes flexed and heels
pressed back, elbows positioned directly
under your shoulders and wrists in line
with your elbow, also shoulder-width
apart. Engage your core and keep your
gaze toward the floor.
THREE-QUARTER
LATERAL VIEW
40
Arm hinges as it
returns forward
Calf muscles stretch
as heels press back
Left arm remains
flat on the ground
Arm reaches
out, hand in
“blade” form
Keep hip tucked
and core engaged
Thigh muscles keep leg
in extended position
STAGE TWO (A)
STAGE TWO (B)
STAGE TWO
After the 45-degree angle break of the right arm,
twist the body, bringing the hip parallel to the floor,
back into the standard plank position. Reach the
right arm in front of the body, keeping the left
forearm on the floor. Hold for 2 seconds before
pulling the right arm back and taking the forearm
back to the ground. Repeat with the left arm.
KEY
Joints
Muscles
Shortening
with tension
Lengthening
with tension
Lengthening
without tension
Tra
pe
Pector
i
STAGE ONE
Start your “swim” movement by
lifting the right forearm off the
floor. Straighten the arm, with your
hand in “blade” form. As you are
bringing the arm back as if doing a
front crawl, the body opens up the
chest to the right. The right foot
twists slightly in front of the left.
Bring the arm back to a 45-degree
angle at the ear.
ziu
s (u
ppe
r)
alis m
ajor
Latissimus dorsi
r deltoid
Anterio
eps
Tric s
ep
Bic
Held muscles
without motion
Upper body
The deltoids help stabilize the
body and keep you in alignment.
You will feel tension through the
shoulders and the arm that is
mimicking the “swim” motion,
lengthening without tension.
41
HIIT EXERCISES
Core Exercises
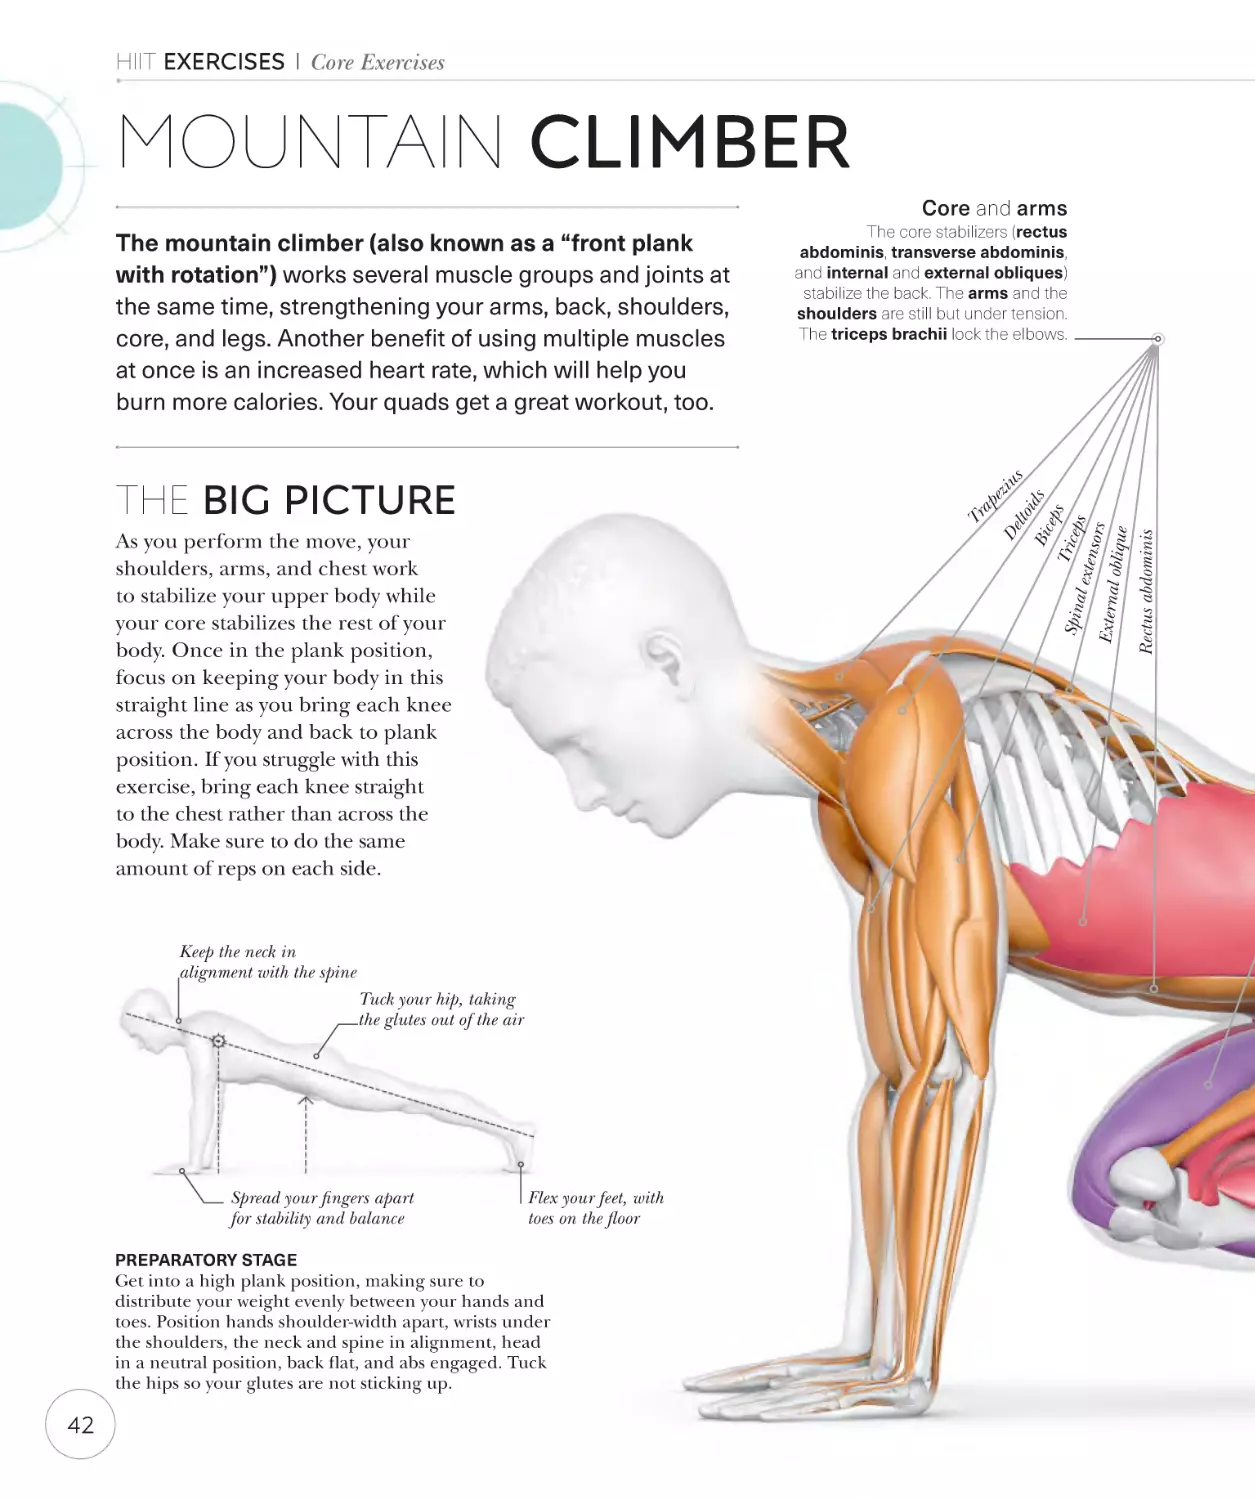
MOUNTAIN CLIMBER
Core and arms
The mountain climber (also known as a “front plank
with rotation”) works several muscle groups and joints at
the same time, strengthening your arms, back, shoulders,
core, and legs. Another benefit of using multiple muscles
at once is an increased heart rate, which will help you
burn more calories. Your quads get a great workout, too.
Tuck your hip, taking
the glutes out of the air
Flex your feet, with
toes on the floor
Get into a high plank position, making sure to
distribute your weight evenly between your hands and
toes. Position hands shoulder-width apart, wrists under
the shoulders, the neck and spine in alignment, head
in a neutral position, back flat, and abs engaged. Tuck
the hips so your glutes are not sticking up.
42
Rectus abdominis
ep
Tric s
l exte eps
nsors
External
oblique
ids
Spina
Keep the neck in
alignment with the spine
PREPARATORY STAGE
Bic
As you perform the move, your
shoulders, arms, and chest work
to stabilize your upper body while
your core stabilizes the rest of your
body. Once in the plank position,
focus on keeping your body in this
straight line as you bring each knee
across the body and back to plank
position. If you struggle with this
exercise, bring each knee straight
to the chest rather than across the
body. Make sure to do the same
amount of reps on each side.
Spread your fingers apart
for stability and balance
lto
De
Tr
ap
ez
iu
s
THE BIG PICTURE
The core stabilizers (rectus
abdominis, transverse abdominis,
and internal and external obliques)
stabilize the back. The arms and the
shoulders are still but under tension.
The triceps brachii lock the elbows.
Keep your hip tucked under
when moving leg across
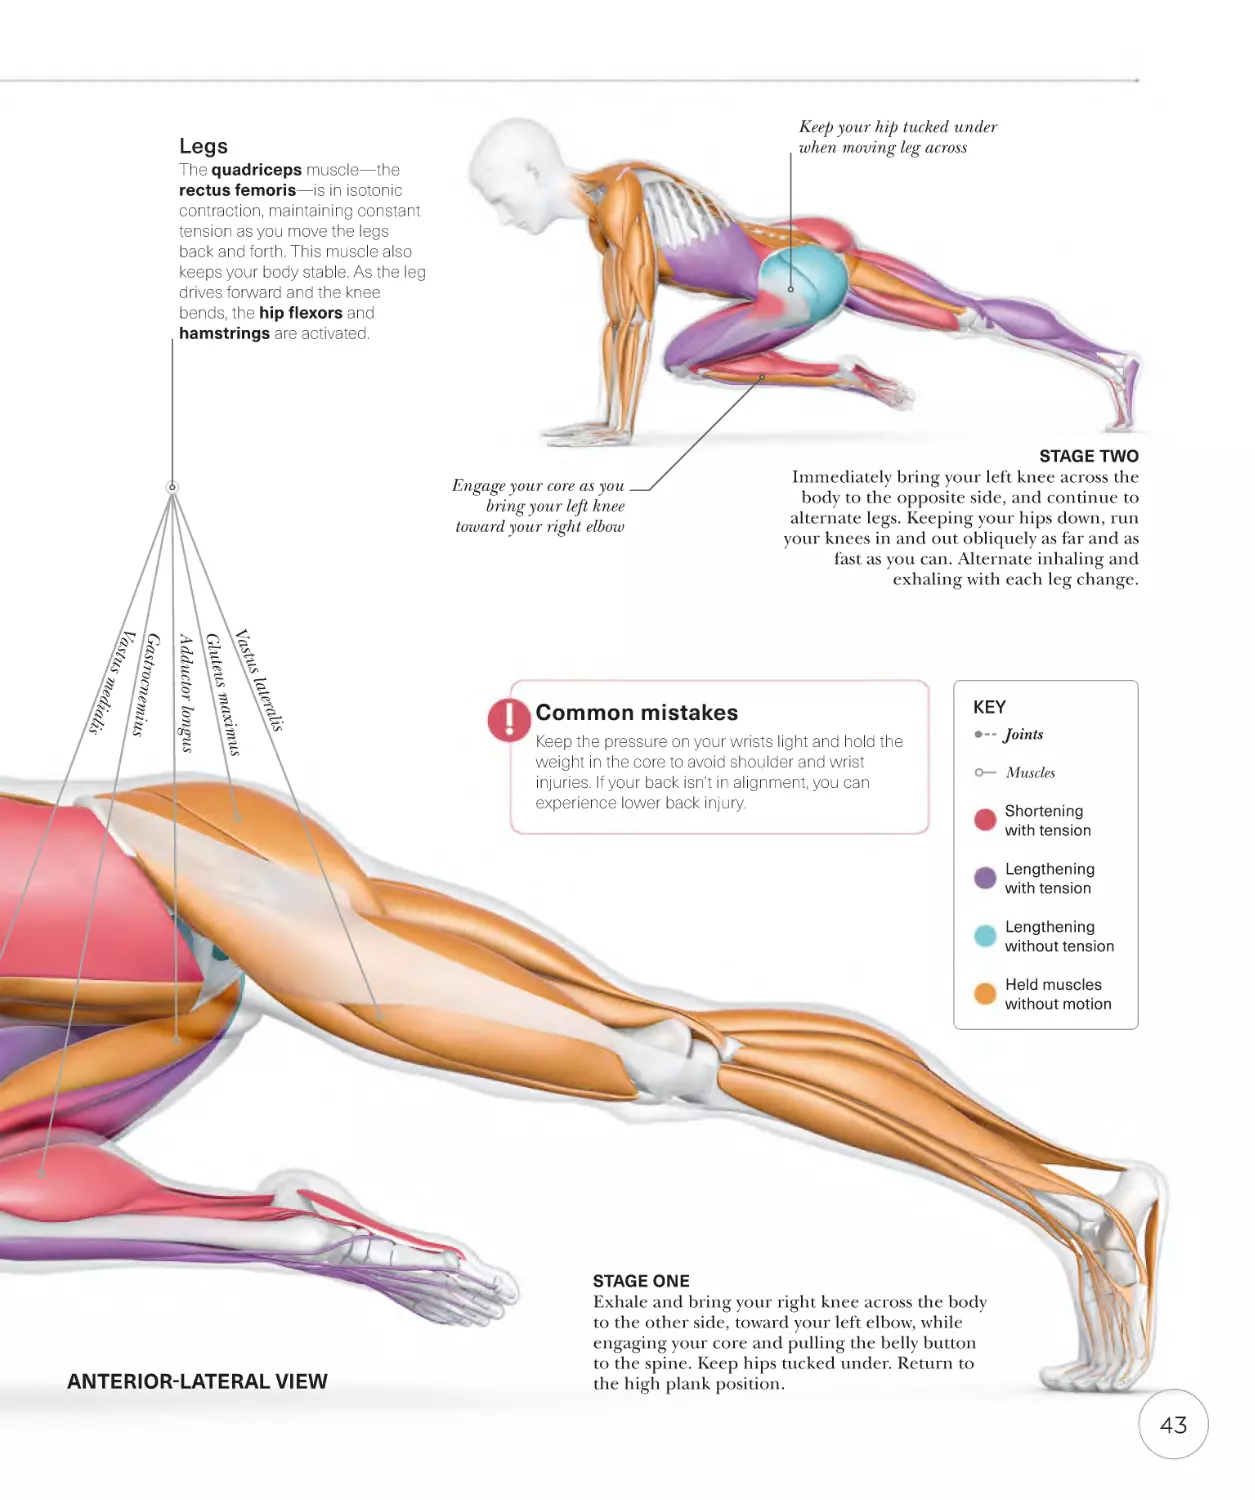
Legs
The quadriceps muscle—the
rectus femoris—is in isotonic
contraction, maintaining constant
tension as you move the legs
back and forth. This muscle also
keeps your body stable. As the leg
drives forward and the knee
bends, the hip flexors and
hamstrings are activated.
STAGE TWO
Engage your core as you
bring your left knee
toward your right elbow
Immediately bring your left knee across the
body to the opposite side, and continue to
alternate legs. Keeping your hips down, run
your knees in and out obliquely as far and as
fast as you can. Alternate inhaling and
exhaling with each leg change.
s
rali
late
tus
Vas
us
s maxim
Gluteu
Adductor longus
Gastrocn
emius
Vast
us m
edia
lis
Common mistakes
KEY
Keep the pressure on your wrists light and hold the
weight in the core to avoid shoulder and wrist
injuries. If your back isn’t in alignment, you can
experience lower back injury.
Joints
Muscles
Shortening
with tension
Lengthening
with tension
Lengthening
without tension
Held muscles
without motion
STAGE ONE
ANTERIOR-LATERAL VIEW
Exhale and bring your right knee across the body
to the other side, toward your left elbow, while
engaging your core and pulling the belly button
to the spine. Keep hips tucked under. Return to
the high plank position.
43
MOUNTAIN CLIMBER
VARIATIONS
Mountain climber variation exercises utilize all the core
muscles, including the rectus abdominis, transverse abdominis,
and obliques. They also activate the muscles in the hips and
back and can strengthen the lower back if done correctly.
ALTERNATING FOOT SWITCH
KEY
The explosive alternating foot switch requires fitness and
coordination. Make sure you keep your back straight and flat,
in alignment with the neck and head. Don’t raise your hips—
keep the pelvis tucked as you perform the switches.
Primary target
muscle
Shoulders in line
with hands
Secondary
target muscle
PREPARATORY STAGE
Hands shoulderwidth apart
Engage leg muscles
in plank position
Maintain a flat back
throughout movement
PREPARATORY STAGE
Start in the high plank position
(see pp.36–37), with your wrists
under your shoulders, feet
hip-width apart, and head/neck
and spine in alignment.
STAGE ONE
Engage the core and swing/jump
the right foot to the right side of
the body, knee bent and foot flat
on the floor.
STAGE TWO
Swing the right foot back to its
starting point, almost hitting the
left foot as you immediately swing
the left foot to the left side of
the body. Building up a rhythm,
continue to switch feet.
44
Left leg is stretched
out and tensed
Right leg
comes forward
STAGE ONE
HIIT EXERCISES
Core Exercises
Pay attention to the wrists and back when
you perform the mountain climber variations.
Legs are straight
in preparatory
plank position
Keep shoulders
stable throughout
exercise
Bend knees as you jump to
the side of the body
Keep gaze
toward
the floor
STAGE ONE
Feet come closer together
when jumping in
Jump feet out wide
to each side
Keep arms steady
throughout movement
STAGE ONE
PLANK SIDE-TO-SIDE JUMPS
PLANK JACKS
This side-to-side exercise is a great cardiovascular
variation on the mountain climber. As well as
strengthening the upper and lower abdominals
and the left and right obliques, it can also improve
stability, burn calories, and reduce fat.
This exercise, so called because it is like jumping jacks
in plank form, helps strengthen the chest, back, arms, and
shoulders. Plank jacks also strengthen effectively the
muscles of the core. If you have wrist pain, you can modify
the exercise by resting on your forearms.
PREPARATORY STAGE
PREPARATORY STAGE
STAGE ONE
STAGE ONE
STAGE TWO
STAGE TWO
Start in a high plank position (see pp.36–
37), with your wrists under your shoulders;
feet hip-width apart; and head, neck, and
spine in alignment.
Bend the knees and bring them forward,
jumping them to the right side of the body
in a dynamic movement.
Jump the feet back to the starting position.
Bend the knees and bring them forward,
jumping them to the left side of the body.
Repeat for 30–60 seconds, completing the
same number of jumps on each side.
Start in high plank position (see pp.36–37) with your
arms extended and hands under your shoulders, feet
together. Your body should be in a straight line from
your head to your heels.
Jump both feet out wide to each side as if you were doing
a horizontal jumping jack. Maintain the plank form from
the preparatory stage.
Stay in the plank position as you quickly jump your feet
back together, tightening your core when you jump back
in. Continue to jump out and in. Keep your back flat and
don’t let your hips drop. Your arms should remain steady.
Perform for 10–20 seconds to begin with, progressing to
60 seconds or jumping at a faster speed to add challenge.
45
HIIT EXERCISES
Core Exercises
BEAR PLANK
Keep your back flat and
spine neutral
Arms straight,
shoulder-width
apart
This exercise strengthens the abdominals and core
muscles, reducing symptoms of lower back pain and
injury risk. It also helps with balance. In addition to
working the abs, the bear plank targets the muscles in
your gluteus medius and maximus, psoas, quadriceps,
shoulders, and arms.
PREPARATORY STAGE
THE BIG PICTURE
When doing the bear plank, try to
keep your gaze looking down toward
the floor. This keeps your neck in a
neutral position. Looking up toward
the ceiling or out in front of you puts
extra strain on your neck. Don’t shift
the hips back and forth—this is an
isometric exercise, so stillness is
important. In addition, make sure the
muscles are always engaged (tight
core). Increase the time holding the
bear plank as you progress.
KEY
Joints
Muscles
Shortening
with tension
Lengthening
with tension
Lengthening
without tension
Held muscles
without motion
Legs
The bear plank fires the muscles in the
quadriceps, which are held in an
isometric contraction. The quadriceps
muscles stabilize the body and support
the weight of holding the knees above the
floor. The bend in the knee engages the
hip flexors and the hamstrings.
Start on all fours (quadruped or tabletop
position), making sure the back is flat. Your
hands should be shoulder-width apart, wrists
under the shoulders. Knees should be
hip-width apart. Flex your feet, with your toes
on the floor.
us
x
ma
im
us
T
e* (
lata
FL)
e
ut
ciae
Gl or fas
s
n
e
T
moris
Bicep fe
Vastus lateralis
Gas
trocn
emiu
s
Caution
When doing the bear plank,
don’t collapse your lower
back, allowing it to sink in,
which can strain the lower
back muscles. Avoid this by
keeping your core muscles
engaged, your back flat, and
your spine neutral.
THREE-QUARTER LATERAL VIEW
46
Upper body
To retain the neutral spine needed, the
abdominal muscles—transverse
abdominis, rectus abdominis, and
internal and external obliques—are
engaged. In addition, the erector
spinae in the back and psoas major
at the hips aid in this isometric hold.
is
alis capit
Semispin
Bicep
sa
bd
om
nte inis
rali
r
s m ior
ajor
Delto
id
ue
rat
u
Ser
Re
liq
Pec
to
a
sa
rn
ctu
te
Ex
b
lo
The bear plank
is an isometric
exercise, meaning
it engages muscles
without movement.
STAGE ONE
Engage your core (belly button to spine) to
keep the back flat. Exhale and push the palms
into the floor, lifting your knees 3–6 in
(8–15 cm) off the floor. Keep your toes flexed
and resting on the floor. Your hips will be
level with the shoulders. Hold for 30–60
seconds, depending on your fitness level.
Your gaze should
be on the floor
Keep your toes flexed,
heels pressing back
STAGE TWO
Drop the knees back to the floor,
returning to the preparatory stage.
47
BEAR PLANK
VARIATIONS
The bear plank variations give you alternatives and
extra challenges beyond the basic bear plank exercise.
Like the original bear plank, they work multiple muscle
groups, targeting the core, glutes, hamstrings, hip
flexors, and shoulders.
Bend lifted leg at 90
degrees
Maintain a flat back
Squeeze
glutes at
top of kick
Keep your
back flat
Keep hips still
as you tap
STAGE ONE
Flex the feet,
toes on floor
The toe tap increases mobility and agility, strengthening
the muscles in your gluteus medius and maximus, psoas,
quadriceps, shoulders, and arms. It also works the abs.
PREPARATORY STAGE
Start on all fours in the tabletop position (see
pp.46–47), making sure the back is flat. Position
your hands shoulder-width apart. Make sure your
wrists are under your shoulders; knees hip-width
apart. Flex your feet, with your toes on the floor.
STAGE ONE
Assume the bear blank form with your knees
3–6 in (8–15 cm) off the floor. Reach one foot
back, straightening the leg and tapping the toes
on the floor.
STAGE TWO
Bring the foot back to the starting bear plank
position. Repeat with the opposite foot, making
sure your hips remain still and don’t rock from
side to side. Maintain the position of the leg that
is not tapping in the bear plank position, knee
lifted off the floor. Continue for 30–60 seconds.
48
STAGE TWO
Hands shoulderwidth apart
LEG-REACH TOE TAP
Keep neck in
a neutral
position
Toes flex on the floor
DONKEY KICK
The donkey kick engages the glutes further while
maintaining the isometric hold on the abs. One leg kicks
back and up, while the knee of the other remains slightly
off the floor. It’s important to keep the leg that is not
kicking still, as this keeps the core engaged. Alternate legs
slowly so that the hip isn’t shifting from left to right.
PREPARATORY STAGE
Start on all fours in the tabletop position (see pp.46–47),
making sure the back is flat. The hands are shoulder-width apart,
the wrists are under the shoulders, and the knees are located
hip-width apart. The foot is flexed and the toes are on the floor.
STAGE ONE
Lift your knees 3–6 in (8–15 cm) off the floor into the bear
plank position, ensuring your hips are at the same level as your
shoulders. Keep your gaze on the floor and make sure your
core is engaged, your back is flat, and your spine is neutral.
STAGE TWO
Bring one knee up and behind you into a donkey kick.
Maintain the position of the leg that is not kicking back in the
bear plank position, knee lifted off the floor. Repeat for 30–60
seconds, alternating legs in the kick.
HIIT EXERCISES
Core Exercises
KEY
Primary target
muscle
Secondary target
muscle
As you “row” your hand or weight up,
make sure the hip doesn’t sway from side
to side, but remains as still as possible.
ALTERNATING ROW
The alternating row exercise works to increase mobility, agility, and focus
on the back while maintaining an isometric hold and engaging the abs.
You can add weights to this exercise; however, if you are a beginner, start
without weight or with super-light weights. Repeat for 30–60 seconds.
Keep your gaze toward
the floor
Raise one hand,
keeping palm flat
Don’t let your hip move
around during the row
Toes flexed, heels facing
upward
Keep knees in
line with feet
PREPARATORY STAGE
Start on all fours in the tabletop position
(see pp.46–47), making sure the back is
flat. Position your hands shoulder-width
apart, palms flat on the floor; if using
weights, your hands will be on the
dumbbells. The wrists are under the
shoulders; knees are hip-width apart. The
foot is flexed and the toes are on the floor.
STAGE ONE
Lift your knees 3–6 in (8–15 cm) off the
floor into the bear plank position,
making sure your hips are level with your
shoulders. Make sure your core muscles
are engaged, your back is flat, and your
spine is neutral, which will keep your
neck neutral. Keep your hips still, with
your knees hovering above the floor.
Wrist of supporting
arm under shoulder,
palm flat
STAGE TWO
Inhale; tighten your core; then exhale
and row the right hand (or dumbbell)
toward your ribcage, squeezing your
shoulder blade. Keep the hips and
shoulders square to the ground and
don’t let the hips move around. Return
your hand (or dumbbell) to the floor,
then repeat with the left hand.
49
HIIT EXERCISES
Core Exercises
SIT-UP
Caution
It’s important to avoid “craning the neck,” which
can cause strain to the neck and back. Also,
use control rather than dropping your body to
the floor, which will impact your spine.
This exercise strengthens and tones the corestabilizing abdominal muscles. It specifically works
the rectus abdominis, transverse abdominis, and
obliques, in addition to your hip flexors, chest, and
neck. It also promotes good posture by working your
lower back and gluteal muscles.
THE BIG PICTURE
Because the hip flexors are used when performing sit-ups,
it’s important to avoid having them “do all the work”—a lot
of times, in order to get the torso up off the floor, the hip
flexors are engaged instead of the abdominals. You need to
keep the core engaged (belly button to spine) all the time.
You can hold your arms on either side of your head or
straight out in front of you. Start with 3 sets of 10 reps.
Arms raised with
hands loosely by ears,
not behind your head
Bend the knees
er
ior
There should be no space
between your back and the floor
Upper body and hips
Sit-ups engage the rectus abdominis, transverse
abdominis, and obliques, as well as your hip
flexors, chest, and neck. A correct sit-up involves
moving each vertebra in the spine. The iliopsoas
and rectus femoris are used when bending at the
hips; the tensor fascia latae is also engaged.
50
jor
ma
s
s
li
ini
ora bdom
t
c
e
Pe tus a
liqu
c
Re rnal ob
Exte
latae
fasciae
Tensor
De
lto
rr id
at
us
an
t
Lie face-up on the floor. Bend your knees
so your feet are flat on the floor, planted
firmly. If the abdominals are on the
weaker side, it’s best to tuck them under
a bench or brace them in another way. If
working out with a partner or trainer, you
can have them hold your feet down.
Se
PREPARATORY STAGE
STAGE ONE
Use your abdominal muscles to lift your back
off of the floor. Keep your tailbone and hips
static and pressed into the floor until you’re fully
upright. Think about lifting one vertebra at a
time rather than lifting your back in one go.
KEY
Lengthening
with tension
Joints
Muscles
Ribcage
Lengthening
without tension
Shortening
with tension
External oblique
Held muscles
without motion
Flat, superficial
muscle whose
fibers run
downward toward
the midline
Internal
oblique
Deep muscle
that is broad
and thin; its
fibers slant
toward the hip
Obliques muscles
With their muscle fibers running
perpendicular to one another, the
internal and external obliques
work synergistically across the
torso to generate rotation. The
Mountain Climber exercise (see
pages 42–43) in particular draws
on this rotational movement.
Pelvis
ANTERIOR VIEW
DEEP
SUPERFICIAL
Legs
Because your hip flexors are engaged, the
rectus femoris muscle in the quadriceps
and the sartorius are also activated. The
anterior tibialis, a muscle located near the
shin which acts to point and flex the foot,
helps stabilize the lower body.
Per
o
neu
s lo
So
leu
ngu s
s
s
mori
us fe
t)
r
Rect
o
(sh us
s
i
i
or
em
fem
cn
ep
o
c
i
r
B
st
Ga
Engage core all the
way back to the
starting position
Spine/back and neck
in alignment
Plant feet on floor
STAGE TWO
LATERAL AND
THREE-QUARTER
ANTERIOR VIEW
With immense control, slowly lower yourself
back to the starting position, uncurling one
vertebra at a time, starting with your lower
back. Do not let your body weight go and hit
hard onto the floor.
51
HIIT EXERCISES
Core Exercises
CRUNCH
The crunch is one of the most widely used
abdominal exercises. It is popular for working on the
rectus abdominis, the “six pack” muscle that runs
along the front of the torso, which is visible in those
with low body fat. Building this muscle strengthens
the core muscles for stability and performance.
Caution
The number-one mistake people make
when reaching fatigue is pulling on the
neck. That pulling motion takes away
from targeting the abs and places your
neck out of alignment with the spine,
possibly causing neck strain or injury.
You want to originate the movement in
the abs, not from the head. To keep the
neck from moving, you can put your
fist under your chin.
THE BIG PICTURE
Body control is important for the crunch. Control
your body on the way up but especially on the way
down—don’t let your weight bring you to the ground
with a thud. It’s way more effective to keep the
abdominals contracted throughout the entire
movement. Always keep the spine in a neutral
position—don’t curve or arch it. Keep the chin up
toward the thighs, core engaged, and neck and spine
all in alignment with the head. Take your time and
do the move slowly to start with, completing 3 sets of
10 reps. Increase the sets/reps as you progress.
Knees are bent at a
90-degree angle
Lower body and legs
Arms either
behind your ears
or across the chest
The lower body is in the
tabletop position, so to ensure
that the lower back and
pelvic muscles are pushed
down against the floor, there
should be no tension in the
lower body. If you are feeling
tightness in the hip flexors,
they may need to be stretched
to alleviate some tightness.
or
duct
mag
nus
Ad
Rectus femoris
Tens
or fa
sciae
lat
ae
Engage the core
PREPARATORY STAGE
Lie down on the floor on your back and bend your
knees, bringing them up to a tabletop position.
Place your hands behind your ears or across your
chest. If you tend to pull on your neck, then across
the chest or straight out in front of you is best. Pull
your belly button toward your spine in preparation.
52
STAGE ONE
Exhale as you engage your abdominal muscles,
bringing your chin toward your thighs and your
shoulder blades about 1–2 in (3–5 cm) off the
floor. You want to keep the chin parallel to the
chest the entire time, at about a 45-degree
angle. Hold at the top of the movement for a
few seconds, breathing continuously.
STAGE TWO
KEY
Slowly lower the shoulders back down with
control, keeping the abdominals contracted
the entire time. Only relax once the whole
body is on the floor.
Joints
Muscles
Shortening
with tension
Lengthening
with tension
Lengthening
without tension
Don’t move legs—keep
at a 90-degree angle
Held muscles
without motion
Keep core engaged
as you lower shoulders
Lower the shoulders
with control
Core and upper body
ajor
m
Pectoralis
Serratus anterior
tus
Rec
Inter
abd
omi
nis
nal o
bliqu
e
External
oblique
When performing this isotonic contraction,
you are essentially flexing your muscles.
The rectus abdominis is contracted, along
with the transverse abdominis (the
deepest of the lateral abdominal muscles).
Both the internal and external oblique
muscles are also engaged.
THREE-QUARTER
ANTERIOR VIEW
53
CRUNCH
VARIATIONS
These crunch variations will add an additional burn
to the abdominals. They focus on the internal and
external obliques, the transversus abdominis, and
the rectus abdominis. These are perfect for any
fitness level; beginners should start with 30 seconds,
working up to 60 seconds.
Bend the knees
Reach to grab
imaginary rope
Engage the core
Raise your legs
off the floor,
roughly hipwidth apart
Flex the moving
knee as you
crunch up
STAGE ONE
Keep your elbows
out to the sides
as you twist
Left hand grasps
above right hand
Flex the trunk
and then rotate
Shoulder blades
lift off the floor
Keep knees bent
as you raise up
STAGE ONE
BICYCLE CRUNCH
ROPE PULL
The bicycle crunch is so called because it mimics the
motions of a cyclist, your legs “cycling” back and forth
during the exercise. To challenge yourself, hold for 1
second at the top position, and keep both legs raised
throughout the set.
This exercise requires a lot of control, both on the way up
and on the way down. The strength is coming from your
abdominal muscles to pull yourself up on the “rope” and
to lower yourself back down.
PREPARATORY STAGE
Lie flat on your back with your hands lightly
positioned behind your head and legs slightly
flexed at the hips and knees. Lift your head off
the floor slightly.
Lie down on your back with your knees bent, feet flat
on the floor, and arms alongside your body. Pull your
belly button toward your spine in preparation for the
movement, engaging the core. Pretend that there is a
rope dangling above your nose.
STAGE ONE
STAGE ONE
Inhale to engage the core, then exhale as you lift
your left knee up and bring your opposite elbow
toward it. Flex at the trunk and rotate your
upper body toward your leg.
STAGE TWO
Inhale as you return to the starting position
with control. Repeat, raising the opposite leg
and elbow, and complete an equal number of
reps on each side.
54
PREPARATORY STAGE
PREPARATORY STAGE
Using the right hand, reach up toward the left and
grab the “rope,” pulling the body off the floor. Now
reach above the right hand with the left hand, angling
slightly toward the right, and grab the “rope” with it,
raising your body farther up into in a crunch position.
STAGE TWO
Still holding the “rope” but now descending hand after
hand, slowly and with control lower your body toward
the floor, focusing on your upper abs.
HIIT EXERCISES
Core Exercises
DOUBLE CRUNCH
The double crunch is the joint movement
of the legs and the chest. It targets a range of
musculature in your core, including the rectus
abdominis, rectus femoris, and obliques.
Bring knees up
toward elbows
PREPARATORY STAGE
Elbows come forward
to touch knees
Lie on your back with your knees bent and your feet
flat and hip-distance apart on the floor. Gently place
your fingertips on the sides of your head.
STAGE ONE
Brace your core by engaging your abdominals.
Slowly raise your knees until your thighs are just
past 90 degrees with the floor. At the same time,
lift your head and shoulders off the floor and raise
your chest toward your knees. At the top of the
rep, your forehead should be located around
6 in (15 cm) from your knees.
Don’t
support head
with hands
Keep lower
back glued
to floor
PREPARATORY STAGE/
STAGE ONE
STAGE TWO
Reverse the movement to return shoulders, back, and
feet to prep stage. Reset and repeat the exercise.
DOUBLE CRUNCH HOLD WITH TWIST
KEY
The double crunch hold targets the rectus abdominis
and rectus femoris, while the twist works the external
and internal obliques.
Primary target
muscle
Maintain neutral
head position when
you twist
Keep hands relaxed
Secondary
target muscle
Bring left elbow to
right midthigh
Flex the feet
STAGE
TWO
STAGE ONE
Keep elbows stuck to
midthigh in hold
PREPARATORY STAGE
Keep lower back
glued to floor
Lie on your back with your knees bent
at a 90-degree angle in the tabletop
position, toes pointed toward the ceiling.
Hold your forearms toward the face,
arms bent at the elbows.
STAGE ONE
Bend both arms
Raise your head and shoulders off the
floor and bring the legs forward at the
same time so your elbows are touching
your midthigh. Hold this position for as
long as possible, ideally up to 60 seconds.
Keep core engaged
STAGE TWO
Keeping the shoulder blades off the floor,
slowly twist the body to the left and to the
right, brushing the elbows toward the
thighs. Left elbow touches right midthigh;
right elbow touches left midthigh.
55
HIIT EXERCISES
Core Exercises
TRANSVERSE
ABDOMINAL
BALL CRUNCH
This exercise targets the muscles in the
abdominals, including the transverse abdominis
muscles that lie deep under the rectus abdominis.
While the rectus muscles constitute the “six pack,”
for truly strong abs, you need to target both sets.
THE BIG PICTURE
You’ll need an exercise ball with a diameter of at least
21½–26 in (55–65 cm) for this abdominal crunch. By
destabilizing the surface you are lying on to perform
the crunch, an exercise ball provides an activation boost,
helping engage all the major abs muscles, including
the obliques and smaller muscles that stabilize the spine.
Keep your head
neutral; do not
strain your neck
Place your
hands flat on
your torso
Position yourself
so your glutes
hang off the ball
Align your knees
over your ankles
STAGE ONE
PREPARATORY STAGE
Start by sitting on top of the ball, with only the lower
part of your back in contact, and with your feet
shoulder-width apart, flat on the floor, and squared
up to the ball. Then carefully lower the upper body
so that you are in a supine position.
56
Inhale to engage the abs and
stabilize the core. Start the
crunching motion by using
your abs to flex at the spine as
you breathe out. Once the abs
are fully flexed and you’ve
exhaled, that is the end of the
range of motion; you want to
slightly raise the torso without
flexing upward at the hips. To
add to the challenge, hold
your body at the top position
for 1 second.
s
Deltoid
jor
a
m
s
rali
is
Pecto
hial
Brac erior
t
s an inis
atu
r
r
om is
e
d
S
ab
in
tus bdom ue
c
e
R
iq
a
obl ue
us
ers
al bliq
v
n
s
n
ter al o
Tra
In
n
ter
Ex
Caution
Not following the breathing correctly
during this exercise can limit the
effectiveness of the movement in
challenging the core and shift tension
elsewhere. To prevent injury and to get
the most out of the movement, control
your breathing.
Upper body and
abdominals
In this exercise, the abdominal
muscles do all the work. Even before
you crunch, the deepest abdominal
muscle, the transverse abdominis—
which rests around the inside of your
abdomen like a corset—is already
engaged and tightens further as you
pull your navel toward your back, as
do the rectus abdominis and
internal and external obliques,
when you shorten the distance
between ribs and pelvis.
Open up
your chest
Engage your abs
for a stable torso
KEY
Joints
Muscles
Check your shins
are perpendicular
to the floor
Shortening
with tension
Lengthening
with tension
Lengthening
without tension
SUPERIOR-ANTERIORLATERAL VIEW
Held muscles
without motion
STAGE TWO
While keeping the core isometrically
held, breathe in as you start to slowly
lower the body back to the starting
position. Repeat stages 1 and 2.
57
HIIT EXERCISES
Core Exercises
V-UP
This strength-based exercise, so-called from the
shape your body makes while doing it, utilizes your
body weight to target the core area. The V-up (or
“hollow body”) targets the abdominal muscles,
toning the obliques and strengthening back
muscles. At the same time, it works on your
quadriceps and hamstrings and helps with balance.
THE BIG PICTURE
You don’t need any equipment for this exercise—you just
begin by lying on the floor, facing up, making sure there is
no space between your lower back and the floor. It is
important to maintain balance and coordination. Make
sure the back isn’t curved as you lift the body off the floor.
Keep your back straight, using the abs and sitting bone for
balance and stability. If the full version is too challenging,
you can bend your knees at a 90-degree angle and bring
them toward your chest, lowering them back into the
straight position. To challenge yourself further, you can do
the V-up on an unstable surface, such as a BOSU ball or a
balance disc.
Squeeze your
thighs together
Point your toes
and rest your heels
on the floor
PREPARATORY STAGE
Push the lower back
toward the floor,
engaging the core
If your back isn’t in alignment, you can
experience lower back pains. It can also
pull on the hip flexors.
Rest your arms and
shoulder blades on the floor
in a relaxed position
Start by lying face up, with your lower back
glued to the floor. Make sure your legs are
stretched out straight and your arms straight
along either side of the body. Keep your head
and spine in a neutral position.
58
Common mistakes
STAGE ONE
In one movement, simultaneously lift your torso
and legs, keeping the legs straight, and reach
your arms forward. Your torso and thighs should
form a “V” shape. Make sure you are pushing
your back toward the floor on the way up in
order to engage the core. When you lift your
torso, keep your arms parallel to the floor. Don’t
point your fingers to your toes.
Legs
In the V-up, you are utilizing
all the muscles in the hip
flexors. The quadriceps
muscles are all activated
when lifting the legs off the
floor to the top of the V-up.
Engage the core
throughout the
movement
STAGE TWO
Gently and with control,
return your body back to
the preparatory stage, your
head and spine in a
neutral position and lower
back pushed to the floor,
with no space between the
floor and your back.
ong
KEY
ris (l
Joints
Muscles
femo
Vas
tu
s la
tera
lis
head
)
Gluteus m
aximus
Lengthen and stretch
your hamstrings, but
don’t contract them
Bicep
Shortening
with tension
Lengthening with
tension
Lengthening
without tension
Held muscles
without motion
Upper body
id
elto
or d
id
o
t
s
ali
hi
or
sm
na
ed
lo
ia
bli
lh
ea
qu
omi e
Tens
nis
or fa
sciae
latae
abd
d
del
ter
tus
teri
ep
ac
Br
Rec
eri
Ex
An
st
Po
Tr
ic
The rectus abdominis,
external obliques, and
internal obliques are all
isotonically contracted.
Maintain core engagement
by pulling the belly button
in toward the spine in an
isometric hold at the top of
the V-up.
LATERAL VIEW
59
V-UP
VARIATIONS
The side V-up is a targeted exercise that focuses on
the abdominal muscles. The primary muscles
recruited include the external obliques, internal
obliques, and rectus abdominis. Scissor kicks help
strengthen the core, as well as other muscle groups
in your torso and hips. The around-the-world V-up
combines the basic V-up with the side V-ups. These
variations are the perfect addition to an ab HIIT day
or to a lower or upper body–focused HIIT workout.
V-up variations are a
great addition to an ab
HIIT workout, and you
don’t need any equipment.
Flare your left elbow out,
left palm behind head
Hold the side V-up
for a few seconds at
the top of the exercise,
squeezing the core
The quadriceps are
engaged here to aid in
the raising of the leg
STAGE ONE
SIDE V-UP
SCISSOR KICK
This strength-based exercise utilizes your body weight to
target your core area. Performing V-ups from right to left
targets the abdominal muscles, specifically the
corresponding obliques. It also works on your quadriceps
and hamstrings, as well as helping with balance and
flexibility in the hips and spine.
The scissor kick exercise works to strengthen your
core, glutes, quads, and adductors. Engaging your
core muscles is what allows you to “flutter” your
legs up and down. The core muscles include the
rectus abdominis, obliques, transverse abdominis,
and hip flexors.
PREPARATORY STAGE
PREPARATORY STAGE
Start by lying on your right side, on the right hip. Your
right elbow should be on the floor, under the right
shoulder. Keep your hips tucked under (pelvic tilt) and legs
straight, with one foot on top of the other. Bring your left
arm above your head in an upside-down “V” shape.
STAGE ONE
Lie flat on your back with your legs extended out on
the floor in front of you. Place your arms by your sides,
palms down. Glue your lower back to the floor. You can
modify the exercise by placing your hands under your
glutes below the small of your back, palms pressing into
the floor.
In one movement, simultaneously lift your hips off the
floor with the legs and bring your left arm alongside the
legs as they lift. Your torso and thighs should form a side
letter “V.” Keep the back straight and use the “grounded”
arm to maintain stability.
STAGE ONE
STAGE TWO
Repeat the movement with the other leg, and continue
the scissoring motion, keeping your head, neck, and
spine in alignment and the lower back pressed against
the floor. Minimize the “flutters” if you find this difficult.
Return your legs to the starting position, lying on your side
on your hip. Repeat the sequence, starting on the left side
with your left elbow on the floor.
60
STAGE ONE
Exhale as you lift both legs off the floor at about a 45degree angle. With a tight core and relaxed neck, lower
one leg toward the floor as you lift the other leg up.
STAGE TWO
HIIT EXERCISES
Core Exercises
V-UP AROUND THE WORLD
Squeeze the quadriceps
together to improve
stability as you kick
This exercise combines left and right side V-ups
with a basic V-up to create an intense exercise of
continual motion. You need good hip mobility and
spine alignment for each around the world
exercise, with the head, neck, and spine in a
neutral position and the pelvic bone tucked
under. The core is tight and the feet are touching.
Perform the sequence of stages 1, 2, and 3, doing
2 reps at each stage.
PREPARATORY STAGE/STAGE ONE
Lie on your right side, your right elbow on the
floor, under the right shoulder. Keep your hips
tucked under and legs straight. Bring your left
arm above your head in an upside-down “V”
shape. Lift your legs and torso up into the side
V-up. Repeat, then move to stage 2.
Make sure the elbow of
the supporting arm is
under the shoulder
Point the toes
Bring the resting arm
off the floor in the
middle V-up
STAGE TWO
Roll over to your back to perform the basic
“middle” V-up, lifting up torso and legs and
stretching your arms in front of you. Your torso
and thighs should form a “V” shape. Keep your
arms parallel to the floor when you are in this
position. Repeat, then move to stage 3.
Focus on the
upper abdominals
Shifting to the opposite
side, support yourself
on your left arm
Keep the legs
straight, pointing
to the left
STAGE THREE
Roll to the left side to perform
the V-up on the other side.
After 2 reps, return to the right
V-up and repeat the sequence.
Tighten the glutes here
in addition to the abs
to prevent the hips from
being overworked
KEY
Primary target
muscle
Secondary
target muscle
61
UPPER BODY
EXERCISES
Exercises in this section focus on the upper half of the body.
The moves are designed to tone and ignite the muscles in the
shoulders, biceps, triceps, back, and chest. Most of the exercises
include variations and modifications for every fitness level. The
upper body section will walk you through how to execute each
movement to maximize effectiveness and minimize risk.
HIIT EXERCISES
Upper Body Exercises
PUSH-UP
This exercise strengthens the pectoral chest
muscles, deltoids of the shoulders, triceps (back
of your arms), the serratus anterior “wing”
muscles directly under your armpit, and the
abdominals. The legs act as stabilizers to prevent
sagging or arching of the spinal column.
Your body should form
a diagonal line from
heels to head
Rotate shoulders back
and down
Arms straight but
elbows not locked
PREPARATORY STAGE
THE BIG PICTURE
A push-up is much more than just a chest
exercise—the muscles engaged are allencompassing. When performing a push-up,
form and control are paramount. Control your
body on the way down—don’t allow it to just fall
to the floor. Make sure the abdominals are
engaged the whole time. Beginners can start
with 4 sets of 5–6 reps. Look at variations (see
pp.62–63) for modifications for beginners.
To begin, get into a high plank position with your
pelvis tucked in, your neck neutral, and your palms
slightly wider than shoulder-width apart. Make sure
your shoulders are rotated back and down, too, and
that the core is engaged. Flex the toes and push the
heels back.
KEY
Joints
Muscles
Shortening
with tension
64
Lengthening
with tension
Lengthening
without tension
Held muscles
without motion
Lower body
The gluteus maximus muscle is
responsible for holding the hips in place,
preventing them from sagging forward
and taking the spine along with them.
The rectus femoris (quadriceps
muscle) is isometrically held.
Tensor fasciae latae
Vastu
s late
ralis
G
Gl luteu
ut
sm
eu
s m axim
us
ed
iu
s
You must keep the abs engaged, belly
button to spine, for the duration of your
push-up. This prevents the spine from
caving in and putting pressure on the
lower back and joints.
us
ng
s lo
u
e
on
Per
ius
ocnem
Gastr
Caution
STAGE TWO
Exhale, and slowly extend your
elbows back to straight arms. Push
your body back up to the starting
position. Make sure the core remains
engaged throughout.
Maintain alignment with
spine, neck, and head
Arms return to straight
starting position
Keep core engaged
ten
so
Sternocleidomastoid
r
Teres majo
id
Delto
ajor
is m ps
e
oral
Bic ps
Pect
ice
Tr rum
ito
ig
Ex
rd
STAGE ONE
Inhale deeply, pulling the belly in tighter and
engaging the core. Shift your weight forward
onto your hands and, keeping your back flat,
slowly begin to lower your body by bending
your elbows while keeping them pointed
slightly back. Lower down until your chest
grazes the floor. Exhale on the way down, then
inhale. Maintain a straight spine.
THREEQUARTER
ANTERIOR
VIEW
Upper body
A push-up targets the pectoralis major
muscle, serratus anterior muscle, and
the deltoids. In addition, a correct
push-up also engages the triceps
brachii as a secondary muscle, as it’s
solely responsible for straightening and
bending the elbow joint. The core
muscles work to brace the spine by
holding it in a neutral position.
65
PUSH-UP
VARIATIONS
KEY
Different push-up variations focus on isolating and targeting various
muscle groups. We’ve selected a few to isolate the triceps, the chest,
and the shoulders.
Primary target
muscle
Secondary
target muscle
TRICEPS PUSH-UP
The triceps push-up is a compound exercise
that works muscle groups across your whole
body, but specifically isolating the triceps.
This variation modifies your hand and arm
position and arm path.
Place your
feet about
hip-width apart
PREPARATORY STAGE
Begin in the high plank position (see
pp.36–37), with your hands beneath
your shoulders, your neck and spine
neutral, and your feet hip-width apart.
Scapula
Long head of
triceps brachii
Lateral head
of triceps
brachii
Anconeus
muscle
SUPERFICIAL
66
Keep a neutral
spine throughout
Position your
hands beneath
your shoulders
Align your knees
with your ankles
Flex your arms to
25–40 degrees
STAGE ONE
Engage the core, then inhale as you
lower your body toward the floor, flexing
your elbows and squeezing your arms
against your ribcage.
POSTERIOR VIEW
Humerus
Medial head of
triceps brachii
Ulna
DEEP
STAGE ONE
STAGE TWO
Exhale as you push yourself back up,
extending your elbows almost
completely to come back into the high
plank position. Repeat stages 1 and 2.
A closer look at the triceps
The triceps, also called the triceps brachii,
is a large muscle on the back of the arm.
It consists of three parts: the lateral and
medial heads, which attach at the
humerus and in the elbow, and the long
head, which attaches at the scapula or
shoulder blade. Some triceps movements
train all three heads at the same time;
others train just one or two. If you know
about the anatomy of where each head
attaches to the bone, you will be able to
make sense of why one exercise can train
more triceps muscles than another.
HIIT EXERCISES
Upper Body Exercises
SIDE-TO-SIDE PUSH-UP
Because you alternate sides in this variation, one side
at any given point is supporting your entire body. It’s
important to keep the body tight and controlled. This
movement primarily targets the pectoralis major in the
chest, while the abdominal muscles act as stabilizers.
Legs stay strong
throughout movement
Arms wider than
shoulder-width
apart
Keep the back flat
Bend the
right elbow
Flex the toes
Hands turned
out to side
STAGE ONE
PREPARATORY
STAGE
PREPARATORY STAGE
Start in the high plank position (see
pp.36–37) but with arms wider than
shoulder-width apart, fingertips turned
away from the body. Keep the body straight.
Chest touches
floor briefly
STAGE ONE
STAGE TWO
Lower down on the right side by bending
the right elbow and straightening the left
arm out to the left, bringing your chest to
the floor briefly. Return to starting point.
Lower the body on the left side
by bending the left elbow and
straightening the right arm out
to the right side.
DIAMOND PUSH-UP
This push-up is named from the diamond shape you
form with your hands as you complete the exercise.
It focuses the weight on the triceps.
Keep a flat back
Feet shoulderwidth apart
Bring elbows out
to the side
Align arms with
shoulders
PREPARATORY
STAGE
Hands form
a diamond
shape on
the floor
Feet flexed
at the toes
PREPARATORY STAGE
Start in the high plank position (see
pp.36–37) with your pelvis tucked in and
head and neck neutral. Form a diamond
with your hands, under the chest.
STAGE ONE
STAGE ONE
Engaging the core, slowly bend the
elbows so they come out to either side of
your body in line with the shoulders.
Lower your body to hit the “diamond.”
STAGE TWO
Hold for 2 seconds and exhale as you
straighten the arms, returning to the
starting position. Keep your hands in the
diamond shape throughout. Repeat.
67
Upper Body Exercises
THREE-QUARTER
ANTERIOR VIEW
Keep the head aligned over the midline of
the chest and the chest aligned over the
hips. Maintain a forward focus and don’t
lower your chin to the chest. It’s important
that you are utilizing a full range of
motion: you should be lowering the weight
down to a 90-degree angle and then lifting
all the way up. Start with 4 sets of 8 reps;
discover variations on the overhead triceps
extension on pp.66–67.
THE BIG PICTURE
This exercise is very versatile; you can
perform it with a dumbbell, a
kettlebell, resistance bands, or
even a bottle of water. The
triceps extension isolates,
and in turn strengthens, the
muscle on the back of the
upper arm. All three
“heads” of the triceps—the
long head, the lateral head,
and the medial head—work
to extend the forearm.
OVERHEAD TRICEPS
EXTENSION
HIIT EXERCISES
ezi
us
(
Ter upp
es m er)
Tra
pezi
us ( ajor
low
Ilioco er)
sta
Serratus an lis
terior
Tr
ap
Held muscles
without motion
Lengthening
without tension
Lengthening
with tension
The three muscles of the
triceps work to stabilize the
shoulders and elbows; the
shoulders are secondary. At
the top of each rep, the
deltoids contract and
shorten. When doing this
exercise standing, the
abdominal muscles are also
engaged, being held in an
isometric hold.
Upper body
Make sure you keep the head still and
in alignment with the neck and back.
You want to isolate the movement to
the elbow joint. Another thing that can
lead to injury is the placement of the
elbows, which should be as close to
the ears as possible. Hold the arms
directly overhead, biceps by the ears.
Caution
Shortening
with tension
Muscles
Joints
KEY
s
cep
Tri lis
a
i
ch eps
Bra Bic ids
lto
De
Exhale and slowly lower the weight down,
bringing it behind the head by bending at the
elbows. Bend the elbows until you’ve reached
a 90-degree angle or slightly farther. The
weight should not touch the back of the head
when it is in its lowest position.
us
s
Inhale and reverse the movement as you
exhale, lifting the weight back to the
starting position. Keep the upper arms
parallel and close to the sides of the
head as you lift the dumbbell back up.
STAGE TWO
Distribute weight evenly
between both feet
s long
s
osu
us
STAGE ONE
Stand with your feet shoulder-width apart or in a
slight split stance, with the left foot just slightly
behind the right. Hold the dumbbell directly
overhead, arms fully extended, cupping one end
so the palms face the ceiling and the weight
hangs vertically toward the back of your head.
PREPARATORY STAGE
Peron
eu
ra
n
s
im
miu
mb
teu
x
ma
cne
me
u
Gl
L)
stro
mi
f
TF
Ga
Se
Lower body
Make sure the back
doesn’t arch
Although they are not
under tension, the leg
muscles are used to
brace the back and
support the movement.
It’s important to keep the
knees soft and feet
shoulder-width apart.
or
e la
Keep knees soft,
not locked
Engage the core to
retain good posture
throughout move
Hold the
dumbbell
at one end
s
Ten
ia
asc
*(
tae
69
OVERHEAD TRICEPS EXTENSION
VARIATIONS
All of these overhead triceps extension
variations work as isolation exercises for the
triceps; each one targets all three heads of
the muscle. The movements are extremely
versatile and can be performed with weights
or resistance bands.
It’s important to have a straight
spine when performing the
triceps dip, as a curved spine
can add pressure to the back.
TRICEPS KICKBACK
KEY
The triceps kickback focuses primarily on the lateral
head of the triceps. It also targets the abdominals,
shoulders, and glutes.
Primary target
muscle
Secondary
target muscle
Straighten elbows
as you raise your
arms behind you
Hold forearms close
to your ribs
Hinge forward
at waist
Knees soft and
slightly bent
Stand with your feet shoulder-width
apart, holding a dumbbell in each
hand. Hinge forward at the waist to
45 degrees, pull the elbows up, and
hold them at a 90-degree angle.
70
Engage your
abdominals
Keep knees
slightly bent
PREPARATORY
STAGE
PREPARATORY STAGE
Maintain a
straight spine
Palms face
toward each
other holding
the dumbbells
STAGE ONE
STAGE ONE
Keeping your head in line with your
spine and tucking your chin in
slightly, exhale and engage your
triceps by straightening your elbows
behind you.
STAGE TWO
Hold your upper arms still, only
moving your forearms to isolate
the triceps. Pause, then inhale
as you return the weights to the
starting position.
HIIT EXERCISES
Upper Body Exercises
TRICEPS DIP
The triceps dip works all three heads of the triceps muscles. When
you are accustomed to the movement, you can progress to sitting on
the edge of a chair, step, or bench, your hands gripping the edge next
to your hips, then slide forward to begin the dips.
Keep hips off
the floor
Heels touch
the floor
Elbows slightly
bent
Hands face
forward
PREPARATORY STAGE
PREPARATORY STAGE
Sit on the floor, knees bent and
hip-width apart, toes pointed
forward, heels on the floor, and palms
planted behind you facing the heels.
Keep spine
straight
STAGE ONE
Press into your palms to lift your
hips off the floor, using your arms to
power the movement. Your elbows
will be slightly bent.
TRICEPS DIP WITH TOE TOUCH
(A.K.A. CRAB TOUCH)
The is a full-body exercise targeting the glutes, hamstrings, quads, and
core. It trains balance, core strength, and many muscle groups, making
it work well in a time-efficient body weight circuit workout.
Don’t lock out
the elbows at top
of movement
STAGE ONE
STAGE TWO
Slowly lower yourself back down, but
don’t rest your butt on the floor; go
straight back up again. Repeat the
movement, using control.
Reach out to touch
the opposite toes
Maintain spine alignment
when touching toes
Bend knees
Arms slightly bent
As you touch
toes, your
other arm
supports you
PREPARATORY STAGE
PREPARATORY STAGE
Sit on the floor in the same
position as the triceps dip
preparatory pose, knees bent and
hands on the floor behind you.
Lift hips
STAGE ONE
Lift your hips, kick your left leg
upward, and tap the toes with
your right hand, keeping your
left hand on the floor.
STAGE ONE
STAGE TWO
Return the left leg to the floor, go
down into a triceps dip, then raise
your hips again and repeat the
movement on the other side.
71
HIIT EXERCISES
Upper Body Exercises
DUMBBELL
BICEPS CURL
The biceps curl, which you can do seated or
standing, isolates and works the biceps muscles at
the front of the upper arm, as well as the muscles of
the lower arm—the brachialis and brachioradialis.
THE BIG PICTURE
Adopt a neutral
head position
Let your arms
hang down
Deltoid
Tricep s
Brac s
h
Bice ialis
p
Bra s
Ext chiorad
ens
or d ialis
igit
oru
m
By doing this exercise, you build strength in the upper arm and
learn to use your arm muscles correctly, bracing the body with
your core muscles. Choose the appropriate weights for your
fitness levels—if the weights are too heavy, this can cause
injuries. Learning how to maintain correct form in the back
and the core is engaged will also help prevent strain. Beginners
should start with low weights, performing 3–4 sets of 8–10 reps.
Engage your abs
for a stable torso
Align your
wrist with
your arm
Arms
PREPARATORY STAGE
Start in a seated position, with your feet and knees
hip-width apart. Press your back against the back of
your chair. Hold dumbbells with an underhand grip,
letting your arms relax down at the sides of your body
with palms facing forward and shoulders back.
72
The muscles recruited for a biceps curl
include the anterior deltoid, the biceps
brachii, the brachialis muscle, the
brachioradialis, and the flexors and
extensors of the forearm. Most of these
muscles stabilize the shoulder, wrist, and
elbow during the curl, and the muscles of
the forearm control grip strength.
Stabilize your
shoulder blades
by activating your
upper back muscles
stoid
leidoma zius
p
a
Tr e jor
ma r
ralis
io
Pecto s anter
tu
a
r
r
Se
Sternoc
Press your
back against
the seat pad
si
or
s d inis
u
sim om
tis abd
a
L us
rs
ve
Upper body
ns
a
Tr
The muscles in the abdominals
brace the back, creating stability
while lifting. The upper back works
to hold the abdominals but also hold
the spine, neck, and head in neutral.
Always keep the core engaged to
keep your back in contact with the
chair or bench.
Keep your hips
and lower back
still at all times
ANTERIORLATERAL VIEW
Distribute your
weight evenly
through your feet
KEY
Joints
Muscles
Shortening
with tension
STAGE TWO
At the top of the curl, hold the
tension in the arm for 2 seconds,
then slowly and with control lower
your weight back to the starting
position. Don’t swing the weight
when lowering. Reset, and repeat
stages 1 and 2.
Lengthening
with tension
Lengthening
without tension
Held muscles
without motion
Common mistakes
STAGE ONE
Keeping your upper arms stable
and shoulders relaxed, exhale,
bend at the elbow, and lift the
weights so that the dumbbells
approach your shoulders. Your
elbows should stay tucked in
close to your ribs.
Make sure, when lifting, you
choose appropriate weights for
your fitness level. If the weights
are too heavy, the body will
contort to push the weights up.
Make sure you aren’t lifting the
weights up too fast, as that can
add stress to the elbows.
73
DUMBBELL BICEPS CURL
VARIATIONS
These biceps curl variations look to specifically target
different muscles in the biceps. Hammer curls target
the long head of the biceps, as well as the brachialis and
the brachioradialis. The wide curl targets the inside of
your biceps, also known as the short head.
WIDE BICEPS CURL
The wide biceps curl is an isolation exercise that strengthens
the biceps. A wide grip places more emphasis on the short
head of the biceps brachii. In addition to the biceps, secondary
muscles worked are the deltoids and the abdominals.
Choose the appropriate
weights for your
fitness level. If the
weights are too heavy,
this can cause injuries.
KEY
Maintain a
forward gaze
Hold shoulders back
Primary target
muscle
Secondary
target muscle
Turn palms
outward to begin
movement
Hold elbows close
to body
Keep core engaged
PREPARATORY STAGE
Start by standing tall, your feet shoulderwidth apart. Engage the core and hold
the shoulders back. Hold a dumbbell in
each hand, arms by your sides. Turn the
palms out, keeping the arms to the side of
the body.
Knees are soft, toes
pointed forward
STAGE ONE
Inhale as you raise the arms up, bending
the elbows and keeping your upper arms
glued to the sides of your body, touching
your ribs. Knuckles are facing upward.
Curl all the way up to the deltoids, palms
almost touching the top of the shoulders.
STAGE TWO
PREPARATORY STAGE
74
STAGE ONE
Slowly bring your arms down back to
the starting position. Exhale on the way
down, making sure you keep the neck,
spine, and head in alignment throughout
the exercise.
HIIT EXERCISES
Upper Body Exercises
Maintain a
forward gaze
Bend the
elbows at 90
degrees in the
partial curl
Maintain a
forward-facing
gaze
Curl arms up
toward the chest
in top-half curl
Engage the core
Keep core
engaged
Aim to touch
your forearm to
your upper arm
Feet shoulderwidth apart
PREPARATORY
STAGE
Hold dumbbells
with a neutral grip
Position feet
hip-width apart
STAGE TWO
STAGE ONE
PARTIAL BICEPS CURL
HAMMER CURL
This is a biceps isolation exercise. You can either do
partial curls at the bottom half, or at the top half of a full
biceps curl. Both moves strengthen the biceps muscles at
the front of the upper arm and the lower back muscles.
As well as the biceps, this variation also challenges other
elbow flexors—the brachioradialis and brachialis. You can
perform it using one arm at a time (as above) or both arms
together. Hold for 1–2 seconds at the top position.
PREPARATORY STAGE
PREPARATORY STAGE
Start by holding a dumbbell in each hand in front of you,
knuckles facing out, feet shoulder-width apart. Keep your
knees soft, shoulders back, and head and spine neutral.
STAGE ONE
Bend at the elbow and lift the weights to a 90-degree angle.
Tuck in your elbows close to your ribs. Pause here.
STAGE TWO
Slowly lower your arms back to the starting position. To
vary the exercise, begin with the arms at the 90-degree
angle, then curl up to the shoulders and return the weights
back to the midway point.
Hold a dumbbell in each hand and stand tall with
your arms hanging at your sides. Keep your wrists
relaxed when holding the weights.
STAGE ONE
Inhale and engage your core, then exhale as you
curl up (either with one arm or both), flexing your
elbow to the top position.
STAGE TWO
Inhale as you lower your arm(s). Repeat stages 1
and 2, being sure to do the same reps on either arm
if lifting one arm at a time.
75
Upper Body Exercises
When performing this exercise, it’s
important not to rock or sway—if you
need do this to lift the weights, they
are probably too heavy. To help prevent
this action, it’s important to keep the
abdominals tight, as they aid in bracing
the back, keeping it straight and in the
neutral position.
Common mistakes
The dumbbell front raise is a great exercise
for beginners. Start by choosing dumbbells
of a suitable weight. If you’re new to weight
lifting, you should start with a set of light
weights and plan to do 10–12 reps for 3 sets.
As you lift the weights, think 3 counts up
and 3 counts down, controlling the weights
all the way up and down.
THE BIG PICTURE
The front raise is an isolation exercise for the
deltoids (shoulder muscles), which are the primary
muscles used here. It also works the
pectorals (upper chest muscles).
DUMBBELL
FRONT RAISE
HIIT EXERCISES
Upper body and arms
This exercise targets the anterior and
medial deltoids, which sit on the front
and sides of the shoulder. Secondary
muscles that aid in the lift are the
trapezius, erector spinae, biceps,
pectorals, rotator cuff, serratus
anterior, and abdominals.
El
bo
cep w
ltoi s
Tric ds
Pecto
eps
ralis
majo
r
Latissim
us dorsi
Serratus anterior
Spinal extensors
ajor
Psoas m
is
omin
s abd
u
s
r
e
sv
Tran
De
Bi
Wrist
alis
rfici
upe
s
lis
.
F.d
dia es
a
r
o
er
chi
rt
Bra
ato
n
o
Pr
77
Distribute weight
evenly through
your feet
Stand with your feet
parallel and
shoulder-width
apart
Hold the
dumbbells with
your wrists in a
neutral position
Engage your
abs to stabilize
your torso
Stand tall
Held muscles
without motion
Lengthening
without tension
Lengthening
with tension
Start by standing with your feet shoulderwidth apart. Keep the back straight and
feet planted flat on the floor. Hold the
dumbbells by the sides of your thighs
horizontally, palms facing toward the
thighs. Engage the core.
PREPARATORY STAGE
Shortening
with tension
Muscles
Joints
KEY
Inhale and slowly lift the weights upward, arms
directly in front of you. Keep a slight bend in the
elbows to reduce the impact on the joints. Pause when
the arms are approximately horizontal to the floor—
don’t raise the weights past the brows. Give a 2-second
hold at the top of the lift.
STAGE ONE
ANTERIORLATERAL VIEW
Exhale while you slowly return
the dumbbells to the starting
position by the thighs, keeping
the core engaged the whole time.
STAGE TWO
Keep a soft bend
in your knee
Maintain the
same orientation
of the dumbbells
throughout
Relax your arms
by your side
Look
forward
DUMBBELL FRONT RAISE
VARIATIONS
Exercises that employ the rowing movement primarily target the muscles
on your back, but also improve core stability, while engaging muscles on
your shoulders and arms. The main muscles worked are: latissimus dorsi,
rhomboids, trapezius, rear deltoids, erector spinae, and the biceps.
DUMBBELL BENT-OVER ROW
Bring your
shoulder blades
toward the midline
When using the dumbbells, you can row
unilaterally, performing the move with one leg
supported on a bench, or bilaterally, with both
feet planted shoulder-width apart and hips
flexed at a 90-degree angle. Hold for 2 seconds
at the top of the lift to take it up a notch.
PREPARATORY STAGE
Place your opposite knee on the bench and
position the other leg under your hip. Make sure
the hips are squared up to the floor and one side
isn’t lifted. Your back should be flat, head in
alignment with the spine and neck. Breathe
deeply to activate the core, bracing the back.
Adopt a neutral
head position
Keep your torso
stable and engaged
Rest your
opposite leg on
the bench, knee
beneath your hip
Support
yourself with
your opposite
hand on the
bench
STAGE ONE
Breathe out as you retract the shoulder blades
and raise the arm. Flex the elbow between 30
and 75 degrees to change muscle bias.
STAGE TWO
Breathe in as you lower the dumbbell in a
controlled movement. Make sure you keep the
core engaged. Repeat stages 1 and 2.
STAGE ONE
Slightly bend your
supporting leg
Lower the weight
in stage 2
Spinal extensors
SUPERFICIAL
DEEP
Semispinalis
capitis
Spinalis
thoracis
Longissimus
thoracis
Iliocostalis
SPINAL ROTATORES
Semispinalis thoracis
Quadratus lumborum
POSTERIOR
VIEW
78
Multifidus
The extensor muscles are
attached to the back of the spine
and enable standing and lifting.
These include the outer large
paired muscles extending the
vertebral column, collectively
known as erector spinae, which
help hold up the spine. Deeper
muscles, including the rotatores,
support the work of the erectors,
also stabilizing the pelvis.
Strengthening these muscles
aids in supporting the body,
improves posture, and can help
alleviate lower back pain.
HIIT EXERCISES
Upper Body Exercises
KEY
Primary target
muscle
Secondary
target muscle
Working the upper traps
The upper traps (trapezius
muscles) support your arms and
raise your shoulder blades, while
mid and lower traps are essential
for scapular retraction, depression,
and rotation. Shrugging your
shoulders, raising your arms, and
other movements use your traps;
it’s important not to neglect them.
BANDED UPRIGHT ROW
This variation uses a band for resistance. Bands
come in a variety of resistance sizes; choose the
best for your current fitness level. Hold for 2
seconds at the top of the lift.
Upper
trapezius
Medial
deltoid
LATERAL VIEW
Allow shoulders
to rotate freely
Keep your head in
a neutral position
Flex elbows to bring
arms parallel to
the ground
PREPARATORY STAGE/
STAGE TWO
Keep your hands
shoulder-width apart
STAGE ONE
Keep your
core engaged
for stability
Hold the band with
a pronated grip
Keep a slight bend
in your knees
Place your
feet shoulderwidth apart
PREPARATORY STAGE
Place the resistance band beneath the feet
and stand straight up. Hold the band just
below the hips, feet and hands shoulderwidth apart, with a soft bend in the knees.
STAGE ONE
Inhale to activate the abdominals.
As you exhale, raise your shoulders
up toward the ceiling, bringing your
hands upward and flexing the elbows.
STAGE 2
Inhale as you slowly lower your
shoulders and extend your arms
back to the starting position.
Repeat stages 1 and 2.
79
HIIT EXERCISES
Upper Body Exercises
DUMBBELL
LATERAL RAISE
Common mistakes
If weights are too heavy, momentum will
be needed to get the weights up, which
will cause you to swing the weights with a
jerking movement. This doesn’t isolate the
shoulders and can create injuries. Make
sure you keep a neutral spine throughout.
THE BIG PICTURE
Make sure you engage the core and raise and lower your arms
slowly and with control—don’t just let the weights fall
downward. If you’re new to weight lifting, you should start with
a set of light weights and plan to do 10–12 reps for 3 sets.
Gaze forward
Wrist
Exten
s
Flex or digitor
or d
um
igito
Bra
rum
c
supe
Flex hioradi
rfici
alis
Elb or dig alis
i
o
toru
Bic w
m
pro
Tr eps
fun
i
dus
De ceps
Su ltoid
In pra s
Te fras spin
res pi
at
ma nat us
u
jor s
The lateral (side) raise primarily works the lateral
deltoid, which is the middle portion of the deltoid muscle.
The anterior (front) deltoid, posterior (back) deltoid, upper
trap, supraspinatus (a rotator cuff muscle), and serratus
anterior (muscles along your ribs under your armpit) also
contribute to the movement. If performed regularly, this
can help you build broad shoulders.
ior
ter
n
a
b.
us
at zius sus a rs
r
r pe er
e
so
S ra sv
en
T ran l ext
T ina
Sp ine
Sp
Tilt forward
at the hip
slightly
Let your arms
hang at your sides
Keep a soft bend
in your knees
Upper body and arms
PREPARATORY STAGE
Stand up straight with a dumbbell
in each hand, feet hip-distance
apart. Hold your arms at your
sides, palms facing in. Check your
posture—roll your shoulders back,
engage your core, and look
straight ahead.
80
The anterior deltoid, the
supraspinatus, and the trapezius
muscles assist the lateral deltoids
during this exercise. The anterior
deltoids are located in the front of your
shoulders. The supraspinatus in the
rear deltoid initiates the movement.
Your trapezius is responsible for the
shoulder elevation.
Keep your hands
aligned with your
shoulders
Feel the medial
division of your
shoulder muscles
working
Exhale as you raise the
dumbbells; inhale as you
return to the starting
position
KEY
Joints
Muscles
Engage your abs to
stabilize your torso
Shortening
with tension
Lengthening
with tension
Lengthening
without tension
Held muscles
without motion
Hold the dumbbells
with a neutral
wrist position
Stand with your
feet parallel and
shoulder-width
apart
POSTERIOR-LATERAL
VIEW
STAGE ONE
Slowly raise your arms together just slightly
out to each side and pause. Now lift the
dumbbells up and out to each side, keeping
your arms almost completely straight,
stopping when your elbows reach shoulderheight and your body is forming a “T”
shape. Breathe in as you lift. Pause and hold
for 2 seconds at the top of the movement.
Distribute your
weight evenly
through your feet
STAGE TWO
Exhale and slowly lower the
weights, taking longer to
lower than to raise, bringing
your arms back to your sides.
Make sure the core remains
engaged the whole time,
bracing the back.
81
Upper Body Exercises
If the load is too heavy, it can cause your lower
back to arch and create lower back pain. Also
take care when picking up your weights—flex
at the knees and waist to reach for them.
Caution
When raising dumbbells overhead, keep
your elbows either directly underneath your
wrists or slightly more inward. Avoid locking
the elbows out. Tightening the core and
glutes helps stabilize the spine when lifting
weights above your head. If you’re a
beginner, start with 1 set of 8–10 reps.
THE BIG PICTURE
This exercise strengthens the
pectorals (chest), deltoids (shoulders),
triceps (arms), and trapezius (upper
back). Standing upright requires
balance, so you also use your core
muscles and lower back muscles.
You can also try this exercise seated.
MILITARY
SHOULDER
PRESS
HIIT EXERCISES
superficialis
Bicep
cep
Tri
id
lto
De jor
a
sm
ali
r
cto
Pe
Shortening
with tension
Muscles
Joints
KEY
Flexor digitorum
Upper body
You use the anterior and medial
deltoids to press straight up in this
exercise, as well as the lower part of
the pectoralis major chest
muscle. It also activates the triceps
at the back of the arm and the
trapezius in the back.
sim
tis
La
si
or
Held muscles
without motion
Lengthening
without tension
Lengthening
with tension
us
d
83
lis
ra
ate
l
s
ris
mo
stu
Va tus fe
c
Re
e
Kne
gus
us lon
r
e
P one
Tibialis anterior
as
rf
The glutes are contracted
throughout the movement and work
with the leg and hip muscles as
stabilizers. The rectus abdominis in
the core prevents the spine from
rounding. The obliques work to keep
you from leaning too far left or right.
Legs and abs
Te
ns
o
Position feet shoulderwidth apart
Start standing with your
feet shoulder-width apart.
You can also start in a split
stance, taking a small step
forward with one foot.
Hold your dumbbells in
the “ready to press”
position, dumbbells raised
to either side of your ears.
PREPARATORY STAGE
Engage your core
Bend elbows at 90
degrees to upper arm
Your palms should face
away from your body
e
ta
la
cia
e
STAGE ONE
Press the dumbbells
above your head
until your arms are
fully extended and
parallel and your
palms are facing
outward. Exhale as
you squeeze your
glutes and brace
your abs as you
press. Keeping an
upright pose, hold
this position for a
few seconds.
ANTERIOR VIEW
Inhale as you bring elbows back to
shoulder height, keeping the
dumbbells parallel with the floor.
Complete the desired number of reps.
STAGE TWO
Keep your
knees soft
Elbows should be parallel to
shoulders when you bring them
back to starting position
SHOULDER PRESS
VARIATIONS
KEY
The primary muscles used in shoulder presses are the deltoids,
which consist of the anterior (front), medial (middle), and
posterior (back) deltoid. These variations focus on different
parts of the deltoid. The neutral grip overhead press targets
mostly the anterior head of the deltoids, as well as the medial
head. The Arnold press, named after Arnold Schwarzenegger,
focuses on all three of the shoulder heads at the same time.
NEUTRAL-GRIP
DUMBBELL
SHOULDER PRESS
Adjust your grip
depending on your
shoulder mobility
Primary target
muscle
Secondary
target muscle
Palms face each
other at top of lift
Push your upper
arms in toward
your ears
This variation isolates the anterior
head of the deltoids in addition to the
medial head. By having the palms
facing each other (in a neutral grip),
instead of facing outward, this angle
targets different muscles within the
deltoids.
Keep your spine
neutral throughout
Flex your
knees to 90
degrees
Position the
dumbbells to suit
your shoulder
mobility
PICKING UP THE WEIGHTS SAFELY
Stand with your feet hip- to shoulderwidth apart. Flex at the knees and hips
to reach the dumbbells, which should
be at either side of your feet.
84
Engage your
core throughout
Engage your glutes
and quads to stabilize
your lower body
PREPARATORY STAGE/STAGE TWO
Keep a soft lockout
in your knees
during reps
Position your feet
flat on the floor
Straighten your knees and raise the
dumbbells to above shoulder height, in
the “ready to press” position. Keep your
core engaged as you prepare to press up.
STAGE ONE
Inhale to brace your abdominals, then
exhale as you drive the dumbbells
upward, palms facing each other. Inhale
to return to stage 2. Repeat both stages.
HIIT EXERCISES
Upper Body Exercises
Press upward to extend
the arms
Palms face the
body
ARNOLD PRESS
Engage the
core
This press hits all three sections of the
deltoid, the round-looking muscle that caps
the top of your upper arm—the front deltoid,
medial deltoid, and back deltoid. It’s a good
exercise to strengthen shoulders.
Arms twist on
way up to top
of press
PREPARATORY STAGE
Hold a pair of dumbbells at shoulder
height, palms facing your body, and stand
straight with your feet around shoulderwidth apart and your knees soft.
STAGE ONE
Raise the dumbbells to just above shoulder
height on each side, twisting so that your
palms are parallel to your body. Slowly raise
the dumbbells above your head while
turning your wrists so that your palms face
forward, until your arms are fully extended.
Keep a slight
bend in the
knees
STAGE TWO
PREPARATORY STAGE
STAGE ONE (A)
STAGE ONE (B)
Do not pause at the top of the movement.
Lower the dumbbells back to the starting
position, twisting until your palms are facing
your body once again. Repeat as desired.
BODY WEIGHT INVERTED SHOULDER PRESS
The floor/bench inverted shoulder press is a variation to the basic push-up
that increases strength in the chest, shoulders, and triceps. The inverted
angle places more emphasis on the shoulders and triceps and less
emphasis on the chest.
Hips remain in air for
duration of press
Body forms diagonal
line from hips to hands
Bend elbows
at a 90-degree
angle
Look through your
arms toward your legs
Arms more than
shoulder-width apart
Rest your weight on
the toes
PREPARATORY STAGE
Place your hands far apart on the
floor and raise your hips up so your
body forms an inverted “V.”
PREPARATORY STAGE
STAGE ONE
Toes remain on floor
during press
Bend your elbows to 90 degrees and
lower your upper body until your
head nearly touches the floor.
STAGE ONE
STAGE TWO
Exhale and press back up to the
starting position. Keep the crown
of your head facing the floor.
85
HIIT EXERCISES
Upper Body Exercises
DUMBBELL REAR
DELTOID FLY
Common mistakes
Using weights that are too heavy can lead
to hunching or rounding of the back,
placing stress on the spine. Keep your
chin tucked to maintain a neutral position
in the spine, and engage the core.
THE BIG PICTURE
You may want to practice without weights first, then grab
light weights when you’re ready to try out the full
movement. Move the weights up and down with control—
don’t throw them out and let them fall back. If you’re
new to weight lifting, you should start with a set of light
weights and plan to do 10–12 repetitions for 3 sets to
start with.
Hinge at the
hips to bend
forward to
about 45°
Flexo
r
Flexo digitorum
super
r dig
ficiali
itoru
Exte
s
m pr
n
ofun
Ext sor dig
dus
enso
iti m
r di
inim
Bra
g
i
Tri chiora itorum
Tri ceps ( dialis
m
c
De eps ( edia
Ste ltoid shor t l head
)
an
Te rno s
dl
ong
In res m cleid
om
hea
Tr fra
ap spi ajor asto
ds)
ezi na
id
us tu
s
The reverse fly exercise targets the rear shoulders
(deltoids) and major muscles of the upper back,
including the trapezius. The trapezius helps with a
scapular retraction (pulling your shoulder blades in
toward each other). Strengthening these muscles
will help improve poor posture, promote an upright
stance, and improve balance.
ior
ter rs
n
is
a
so i
in
us ten rs
at l ex s do bdom
r
r
Se ina simu sus a
Sp atis ver
L ans
Tr ine
Sp
Stabilize your torso
Let your arms hang
down toward
the floor
Keep a
soft bend in
your knees
Stand with your
feet parallel
and shoulderwidth apart
86
PREPARATORY STAGE
Start by standing with your
feet shoulder-width apart,
holding the dumbbells at
your sides. Press the hips back
in a hinge motion, bringing
your chest forward. Allow the
weights to hang straight down
in front of you, palms facing
each other.
Upper body and arms
This exercise places tension on the
posterior deltoid, rhomboid, and
middle trapezius muscles. The
rhomboid muscles, which are located in
the upper back and shoulders, are the
primary muscles used during the reverse
fly. Make sure you are using proper form
and a weight you can control when
performing this exercise.
Aim for a natural
bend; the more your
elbow bends, the easier
the movement will get
Observe your arms moving
naturally out on
a straight path (to best
align with the rear delts)
KEY
Joints
Muscles
Shortening
with tension
Lengthening
with tension
Keep your
shoulders stable
but freely moving
Lengthening
without tension
Held muscles
without motion
Your elbows will
bend slightly as
you “fly” up
Keep your hips
hinged forward
and stable
Hold the dumbbells
with a pronated
wrist position
Maintain a slight
bend in your knees
throughout
Distribute your
weight evenly
through your feet
POSTERIOR-LATERAL VIEW
STAGE ONE
Keeping a forward lean, exhale as
you “fly” the dumbbells out to
either side, squeezing the shoulder
blades together. Stop when your
arms are parallel to the floor. Try
to hold for 2 seconds at the top.
STAGE TWO
Keeping the tension in the
shoulders and the squeeze in the
shoulder blades, inhale as you
lower the weight back to the
starting position. Pause for 2
seconds in this pose before
repeating stages 1 and 2.
87
DUMBBELL REAR DELTOID FLY
VARIATIONS
These reverse fly variations are intended to target different areas
of the back. Wide-grip rows recruit the trapezoid, rhomboid, and
rear deltoid muscles. In addition, it also works the latissimus
dorsi. The pullovers isolate the latissimus dorsi and the pectoralis
major. Both variations also isolate the abdominal muscles, which
remain engaged throughout.
KEY
Primary target
muscle
Secondary
target muscle
BENT-OVER WIDE ROW
This row targets muscles in the upper and middle back, as well as those in
the upper arm and the shoulder rotators. The upper back muscles help pull
the shoulders down and back. Training all these muscles will improve the
symmetry of your upper body and will also help you stand up tall and straight
and maintain correct posture.
Arms at a 90-degree
angle, elbows bent
Keep upper arms
level with shoulders
Bend
forward at
the waist
Face knuckles
forward
Keep knees soft
PREPARATORY STAGE
PREPARATORY STAGE
Stand up straight, feet shoulder-width
apart and core engaged. Hold a dumbbell
in each hand in front of your thighs,
knuckles facing out. Bend forward.
88
STAGE ONE
Pull the dumbbells toward your chest,
keeping your arms wider than shoulderwidth apart, upper arms level with your
shoulders. Squeeze the shoulder blades.
STAGE ONE
STAGE TWO
Lower the weight and return
to the starting position: that’s
1 rep. Continue completing
rows for the rep time.
HIIT EXERCISES
Upper Body Exercises
DUMBBELL PULLOVERS
The basic dumbbell pullover strengthens the muscles in the
chest (pectoralis major) and your “wing” muscles in the back
(latissimus dorsi). By making variations to the movement, you
can also engage the core muscles and the back of the upper
arm (triceps). This is a great exercise because it simultaneously
trains both the anterior and posterior of the body.
Palms face
each other
Bend the knees
Core stability helps
protect your back from
injury. If you struggle
to keep the core engaged,
you may be lifting too
much weight.
Elbows slightly bent
Plant feet firmly
on the floor
Push your back
against the floor
Keep knees bent
Extend arms behind
your head
Maintain
strong wrists
Keep palms
facing each other
Engage core throughout
movement
PREPARATORY STAGE
Lie on the floor, feet hip-width apart
and knees bent. Press your lower
back against the floor and hold a
pair of dumbbells above your chest.
STAGE ONE
Keep a strong back and core while
you inhale and extend the weights
back and over your head, until they
are on the floor behind your head.
Elbows soft, not locked
STAGE TWO
Once you reach full range of
motion, exhale slowly and return
your arms to the starting position.
Repeat for 30–60 seconds.
89
HIIT EXERCISES
Upper Body Exercises
DUMBBELL
BENCH PRESS
The dumbbell chest press works the pectoral muscles
of the chest. It also targets the anterior deltoids of the
shoulder, the triceps brachii of the upper arm, the
forearms, and the abdominals.
THE BIG PICTURE
This move can easily be done on the floor or on a bench. On
the floor, your feet should be flat on the floor hip-distance
apart, knees bent. Your back should be pushed against the floor
or bench, your core engaged. Push the weights up and bring
them down slowly and with control. Keep your body and legs
still and strong as you lower and lift. If you’re new to weight
lifting, you should start with a set of light weights and plan to
do 10–12 reps for 3 sets to start with.
Hold your arms
straight from
shoulder to wrist
To avoid straining your
shoulder or elbow joint when
doing the chest press, make
sure your arms follow the
path described. Also don’t lift
weights that are too heavy,
which will make the body
contort when you raise them.
Upper body and arms
PREPARATORY STAGE
Lie flat on the bench with your feet flat on the floor.
Rest the dumbbells on your thighs, holding them
with an overhand grip. Slowly push the weights
upward while exhaling; make sure to never lock out
the elbows. Your arms should form a straight line.
90
Place your feet
wider than hipwidth apart
The chest press targets your
pectoral muscles (pectoral
major). In addition, it targets the
deltoids (anterior deltoid),
which works to bring the arms
straight overhead. This
movement also engages the
triceps, serratus anterior, and
biceps. The abdominals are
also used in this movement to
brace the spine and maintain
stillness in the torso.
Pectoralis major
Deltoids
Transver
sus abdo
minis
Maintain a
neutral head
position
Common mistakes
alis
ioradi
Brach
Biceps
astoid
Sternocleidom
Latissimus dorsi
Stack your
hands above
your wrists
STAGE ONE
Keeping the core engaged,
exhale as you slowly lower
the weights, keeping the
muscles contracted. Bend
at the elbows, allowing the
dumbbells to touch your
chest briefly. Take a
2-second pause here.
Press the dumbbells up,
driving your upper arms
toward the midline
Engage your
abdominals
for stability
Stabilize your
shoulder blades
by activating the
upper back muscles
Keep your hips
and glutes on
the bench
STAGE TWO
Engage the core and exhale while
you raise the dumbbells back up to
the starting position, extending the
arms fully. Hold the position for 2
seconds and reset your breathing.
Repeat stages 1 and 2.
SUPERIORANTERIORLATERAL VIEW
KEY
Ad
Joints
du
cto
Muscles
rm
long
eus
us
Ankle
ee
ip
eus
Kn
s
Held muscles
without motion
Pero
n
Sol
H
Lengthening
without tension
nu
Lengthening
with tension
ag
Shortening
with tension
Legs
Plant your feet firmly on the floor
when lifting. The legs in this lift
work to maintain stability,
keeping the torso stable.
Although there is tension in the
legs, they aren’t contracting—
the glutes, quadriceps, and
calves are isometrically held.
91
HIIT EXERCISES
Upper Body Exercises
DUMBBELL
CHEST FLY
STAGE ONE
Maintain an engaged core. Inhale and,
while keeping your elbows slightly bent,
exhale and slowly lower the dumbbells
directly out to your sides until you feel a
deep stretch in your chest. Hold at the
bottom for about 2 seconds.
This single-joint movement exercise isolates the chest
muscles and secondarily works the deltoids, triceps, and
the biceps. The movement opens up the chest muscles,
which may aid in alleviating chest tightness and can
improve posture.
THE BIG PICTURE
Look up at the
ceiling with
your head fully
on the bench
Hold dumbbells
parallel to your
torso
Hold your arms
perpendicular
to the floor
ficia
super
torum
i
g
i
d
Flexor
radialis
Brachio
s
Bicep
Triceps
Deltoids
Sternocleidomas
toid
Pectorali
s major
Serrat
u
Latis s anterior
s
Tra imus dor
n
si
Spi sversu
n
s ab
Spi al ext
dom
inis
ens
ne
ors
Keep a neutral
wrist position
lis
It’s very important when performing a chest fly to practice the
correct technique. You should maintain a slow, controlled lift
and lower the weights slowly to avoid muscle and joint sprain.
If you’re new to working with weights, you should start with a
set of light weights and plan to do 10–12 reps for 3 sets.
Upper body and arms
PREPARATORY STAGE
Start by lying back on a flat bench. (You can also do this
lying on the floor.) Plant your feet firmly on the floor,
feet shoulder-width apart. Hold a pair of dumbbells at
arm’s length over your chest, palms facing each other.
Keep your head, neck, and spine in a neutral position.
92
The tension in this movement
is mainly on the chest
muscles. The pec major
has two heads: the sternal,
or lower head, works
hardest when you perform
the flat-bench chest fly. The
anterior heads of your
shoulder muscles assist
your pectorals in this
movement. The biceps
contract isometrically during
flys, stabilizing your shoulder
joint and forearm as you
lower the weights.
Keep the dumbbells
parallel to your
torso
SUPERIORANTERIORLATERAL VIEW
Drive your upper
arm toward the
midline
Common
mistakes
Avoid arching the back,
and don’t lock out the
elbows, which can cause
injuries. Be careful not to
let your elbows drop too
far in the starting position—
overstretching in this part
can injure your shoulders.
Maintain a flat
back (neutral
spine) with stable
shoulder blades
Distribute your
weight evenly
through your feet
STAGE TWO
Maintaining a tight core, exhale
while using your pectoral muscles
to reverse the movement back to
your starting position. Although
your arms will straighten, keep a
slight bend in your elbows
throughout the movement and
keep your back glued to the bench.
KEY
Joints
Add
Muscles
ucto
so
rf
Held muscles
without motion
cia
Lengthening
without tension
as
Lengthening
with tension
us
agn
rm
p
Hi e
ta
la
n
Te
Shortening
with tension
Pero
n
Kn
eus
Sol ee
e
long us
us
Ankle
Legs
The muscles in the legs are
used to stabilize the torso
during the lift. They are being
held with tension but are not
contracting. Strong legs allow
you to create more tension in
the target areas—the chest
and front deltoids.
93
LOWER BODY
EXERCISES
Exercises in this section engage muscles in the lower body:
the quadriceps, hamstrings, calves, glutes, adductors, and abductors.
Many of the main exercises include variations and modifications;
they all instruct you how to execute each movement to maximize
effectiveness and minimize risk of injury.
HIIT EXERCISES
Lower Body Exercises
SQUAT
This exercise works to strengthen all the largest muscles
of the legs and butt, including those hard-to-reach areas
such as the quadriceps, glutes, and hamstrings. It improves
your lower body mobility and keeps your bones and joints
healthy. It also targets your core muscles.
THE BIG PICTURE
A squat is a “complex” movement because of the high
amount of muscle activation from hips to knees to feet.
Make sure that the knees don’t go past the toes—incorrect
form can lead to knee and lower back injuries. Avoid
letting the knees bend inward, hunching the back,
lifting the heels off the ground, or starting from
the knees. Start with 4 sets of 8–10 reps;
discover variations on pp.96–97.
Look straight ahead
Chest should
be raised
STAGE ONE
Shift your weight onto your heels as
you push your hips back into a sitting
position, bringing your arms forward
and hands into a loose handhold.
Lower your hips until your thighs are
parallel or almost parallel to the floor.
You should feel the squat in your thighs
and glutes. Pause with your knees
over—but not beyond—your toes.
Angle your feet
slightly outward
PREPARATORY STAGE
Start standing with your feet a little wider
than hip-width apart, turned out slightly.
Hold your body weight mostly in the
heels of the feet.
96
ANTERIORLATERAL VIEW
Upper body
The abdominal muscles—the rectus
abdominis, transverse abdominis, and
serratus anterior—should be engaged
the whole time. Activating the abdominal
muscles helps brace your back, holding
the spine in a neutral position. Maintain
spinal tension when lowering the body.
Maintain a forward gaze
at the top of the exercise
You can bring your
arms back by your sides
when you come back to
standing or keep them
in front of you, hands
together
Sternocleidomas
toid
Deltoid
Pectoralis major
Biceps
minis
s abdo
Rectu
Engage the core to
avoid rounding
your back
Lower body
The quadriceps and adductors are the
primary muscle movers, while the
hamstrings and calf muscles help
stabilize the pelvis and knee. Lowering the
body down into the squat position is an
eccentric movement. Maintain proper
form, as the squat can place a lot of
tension on the lower body joints.
Don’t let your knees
bend in as you push up
Va
Tenso
r fasci stus medi
ae lata
a
e* (TF lis
Rectus fem L)
oris
Gastrocnemius
Soleus
ior
s anter
Tibiali
KEY
Joints
Muscles
Shortening
with tension
Lengthening
with tension
Lengthening
without tension
Held muscles
without motion
STAGE TWO
Exhale, tighten the core, and push your feet
against the floor and back up to the starting
position, chest raised and neck and head
both in alignment with spine. Avoid the
knees coming inward while pushing up.
97
SQUAT
VARIATIONS
These squat variations target different areas of the legs. The
chair squat primarily uses all the muscles of the quadriceps,
hamstrings, and glutes. The sumo squat with fly recruits the
glutes (medius and maximus), as well as the hips, adductors,
quadriceps, hamstrings, and calves. The goblet squat targets
all the lower body muscles.
Hands come in front of
you as you squat
The knees can curve inward
in a squat if you have weak
glutes or tight hips.
Maintain a neutral
spine and engaged core
to brace the back
ANTERIOR VIEW
Pelvis
Femur
Rectus femoris
Position hips
as if sitting
on a chair
Vastus intermedius
(not visible)
Vastus lateralis
Vastus medialis
Patella
KEY
Line of force
The quadriceps explained
The quadriceps is a group of four muscles at the
front of the thigh, each with different lines of force.
The vastus lateralis runs down the outside of your
thigh, connecting your femur to your patella, or
kneecap. The vastus medialis runs along the inner
part of your thigh, between the femur and kneecap.
The vastus intermedius, the deepest muscle, lies
between the other two vastus muscles. The rectus
femoris runs from the hip bone to the kneecap.
98
Feet are close together
STAGE ONE
CHAIR SQUAT
This exercise strengthens the quads, gluteus maximus, and
adductor magnus and builds muscular strength in the
hamstrings, abdominals, and obliques. The spinal erector
muscles keep the spine extended in the narrow squat.
PREPARATORY STAGE
Start by standing up straight, with your feet less than
shoulder-width apart (unlike in the main squat,
where your feet are wider). Relax your arms. Inhale.
STAGE ONE
Squat as if you are sitting on a chair: slowly break
at the hips and knees to squat as low as you can,
dropping your hip lower than parallel to the floor.
STAGE TWO
Slowly stand up by pulling in the hips and
straightening the knees. Exhale to pull yourself
up until your knees and hips are fully locked out.
HIIT EXERCISES
Lower Body Exercises
KEY
Primary target
muscle
Secondary
target muscle
Grasp hands in front
of you as you prepare
to squat
Look straight
ahead
Keep chest forward
Hold the dumbbell
or kettlebell
vertically
Don’t allow knees
to turn inward
Position your
thighs parallel
to the floor
STAGE ONE
Squat deeper if
you are able
Angle feet
outward
slightly
STAGE ONE
SUMO SQUAT AND SUMO FLY
DUMBBELL GOBLET SQUAT
This exercise strengthens the glutes, quads, hamstrings, hip
flexors, calves, and core. The “flapping” motion of the thighs
in the sumo fly places greater emphasis on the hips, as well
as the adductor muscles of the inner thighs.
The goblet squat is a total body exercise: it works all the
major muscle groups of the lower body, including the quads,
glutes, and hamstrings. Holding the weight in front of the
body engages the quads in particular.
PREPARATORY STAGE
PREPARATORY STAGE
STAGE ONE
STAGE ONE
STAGE TWO
STAGE TWO
Stand with your feet wide and turn your toes out to 45
degrees. Make sure your head and neck are in a neutral
position, spine in alignment, and weight evenly balanced.
Start bending at the hips and knees, slowly pushing the butt
back. Lower your body down until your thighs are parallel to
the floor, then “flap” your knees in and out.
Stand back up to the starting position, making sure
the knees don’t turn inward. Also keep the spine
and neck in a neutral position.
Stand with your feet slightly wider than hip-distance apart,
your toes angled slightly outward. Hold your dumbbell in
both hands, gripping its head as if cupping a goblet.
Inhale, press your hips back and begin bending your knees
to perform the squat, keeping your chest upright as you
lower. Distribute your weight evenly between both feet.
Exhale, press through your heels, and drive out of the
squat to return to the starting position. Press your hips
forward at the top of the squat to engage your glutes.
99
HIIT EXERCISES
Lower Body Exercises
RIGHT AND LEFT
SPLIT SQUAT
Upper body
The split squat is a unilateral leg exercise—working one leg
at a time. It strengthens your lower body and improves balance,
stability, and hip mobility. The hamstrings, quadriceps, glutes,
and core are all strengthened, too. The hamstrings offer
balance, stability, and strength in the lowering phase of the split,
which can boost the strength and size of these muscles.
The abdominals are the primary
activator in the upper body. The
obliques and rectus abdominis
stabilize the core and brace the spine
to allow the hips to function in the
squat, while the core works to resist
rotational forces caused by inadequate
balance and stability. Using dumbbells
creates tension in the arms.
St
lat
ciae
r fas
o
s
n
Te
s
mediali
Vastus
Semitendinosus
Gastrocnem
ius
Rect
us fe
Pe
mori
ron
s
eu
s lo
ng
us
ten
sor
dig
ito
ru
m
lon
gu
s
STAGE ONE
PREPARATORY STAGE
Stand tall with your feet under your hips (shoulderwidth apart), toes facing forward. Hold your hands
lightly grasped in front of your chest. Take a step
forward with one leg. Once you are comfortable
and well balanced in the stance, engage the core.
100
id
The glutes are responsible for hip
extension and stabilizing the pelvis
during the split position. The
quadriceps muscles extend the knee,
working together to initiate the split
squat. The hamstrings engage to
balance, stabilize, and aid in the
lowering phase of the exercise. The
calf muscles are also activated.
Ex
Bring one foot forward
asto
Lower body
Bring arms to front,
preparing for squat
Engage the core
dom
Deltoids
Biceps
Rect
us a
bdom
Ex
ter
inis
na
l ob
liqu
es
THE BIG PICTURE
When you are focusing on one leg at a time, it’s easier to strengthen
that leg and avoid injury. Stance placement is important here; make
sure the legs aren’t too close or too far apart. Keep your shoulders back,
not hunched over. Always make sure the core is engaged and that the
front knee doesn’t go beyond the toe. If you are a beginner, start with
1 set of 8–12 reps, then repeat for the other leg. Build up to 3 sets as
you become used to the exercise. Holding a dumbbell in each hand
while doing the split squat increases the challenge of this exercise.
clei
erno
Inhale and lowly squat down, keeping your
chest slightly raised, until your back knee
almost touches the floor. Your back heel
should lift off the floor to balance on the
toes. Go as deep as you can, maintaining
core engagement throughout the movement.
Keep the front knee at a 90-degree angle.
Hold for a couple of seconds here.
ae
Keep spine, back, and
head in alignment
KEY
Joints
Muscles
Shortening
with tension
Lengthening
with tension
Lengthening
without tension
Held muscles
without motion
Keep arms in
front, hands
loosely grasped,
as you prepare
to squat again
Back heel remains off
the floor for the
duration of the reps
Front leg
takes most of
your weight
STAGE TWO
Make sure that you feel most of the weight in
your front leg. Tighten your arms, core, and
back, and then exhale as you slowly straighten
the legs back to the starting position,
maintaining a split stance, back heel off the
floor and back foot balancing on toes.
ANTERIOR-LATERAL VIEW
Keeping the toes
pointed forward can
prevent your hip from
turning inward.
101
SPLIT SQUAT
VARIATIONS
Split squats primarily engage all the glute muscles, as
well as the abdominals. In the curtsy squat variation, the
quads and glutes are isolated. The squat with alternating
kickback engages all the muscles used in a squat but
further isolates the glutes when you kick each leg back.
ALTERNATING
CURTSY SQUAT
The curtsy squat strengthens the quads
and glutes. When your leg crosses back
and around, the gluteus medius on the
stationary leg fires up. The hip
abductors, which bring your thighs
together, are also engaged. The calves
are activated at the bottom of each
lunge as you push back upward.
In the down position,
don’t let your front knee
extend over your front
ankle, which can strain
the knee and quads.
Maintain
forward gaze
Look straight
ahead
Keep back
straight
Elbows bent
Hold hands in
front of chest,
loosely clasped
Engage your core
Keep hips
“squared up”
Don’t extend front
knee over ankle
Position legs shoulderwidth apart
Touch floor briefly
with back knee
PREPARATORY STAGE
PREPARATORY STAGE
Start in a standing position with
your chest held high and your back
straight. Your feet should be
shoulder-width apart, arms in front
of you, and hands facing the chest.
102
STAGE ONE
STAGE ONE
Keeping your left foot straight in
front of you, step to the back and to
the left with your right foot, behind
your left leg. Both of your knees will
bend and your legs will be “crossed.”
STAGE TWO
Tighten the core and drive upward
with control back to the standing
position. Repeat with the right foot
out in front, “curtsying” with the left
leg. Continue to alternate squats.
HIIT EXERCISES
SQUAT AND ALTERNATING KICKBACK
Lower Body Exercises
KEY
This movement, which combines a squat and a kickback of one
leg at a time, engages the hamstrings and the glutes. Repeat the
squat and kickback sequence for 30–60 seconds.
Primary target
muscle
Secondary
target muscle
Hold hands in
front of chest
Maintain
forward gaze
Keep spine, head, and
neck in alignment
Engage your
core
Squeeze glutes
as you kick back
Keep kicking
leg straight
Thighs parallel
to floor at bottom
of squat
Feet slightly
wider than
shoulderwidth apart
PREPARATORY STAGE
Start with your feet slightly wider
than shoulder-width apart, arms
in front of you and hands loosely
grasped together in front of your
upper chest.
Foot on floor
faces forward
STAGE ONE
Tighten the core, inhale, and slowly
bend the knees into a squat, keeping
the chest slightly raised and the
spine, neck, and head in alignment.
Don’t let the knees go past the toes.
STAGE TWO
Raise up to standing and exhale as
you shift your weight to the right
leg. Kick the left leg behind you,
pause for 2 seconds, then return to
the squat, alternating the kickbacks.
103
HIIT EXERCISES
Lower Body Exercises
CRAB WALK
This lateral “crab” walk fully engages your glutes and hip
abductors and also strengthens all major muscles in your hips,
thighs, and legs. It improves your flexibility and stability and
helps prevent injuries, and it is particularly helpful for anyone
doing sports that require running, jumping, and twisting.
THE BIG PICTURE
The half squat—the starting position and the position for
the whole exercise—is halfway between a full squat and a
standing position. If you’re doing it correctly, you should
feel it in your gluteus medius. In your partial squat
position, keep your knees bent and aligned over the
middle of your foot. This ensures you are
targeting the right muscles and not straining
your knees. If just beginning, start by
performing this movement for 30 seconds.
Slowly work up to 60 seconds. Repeat for
3–4 sets, making sure you take the same
amount of steps with each foot.
Place hands together
in a loose hand hold
Bend knees at a
45-degree angle
Feet in line with
shoulders, toes
pointed forward
PREPARATORY STAGE
Stand with your feet shoulder-width apart.
Bend your knees slightly and go down into
a half-squat position to activate the gluteus
medius. Distribute weight evenly over both feet.
Engage the core and raise your chest slightly.
104
POSTERIOR-LATERAL VIEW
KEY
Caution
To avoid straining your knees in the partial squat
position, keep them bent and aligned over the middle of
your foot, which will ensure you are targeting the right
muscles. Try to move smoothly without swaying or
bouncing—that would remove the focus from the right
muscles and could put added pressure on the hips.
Joints
Muscles
Shortening
with tension
Lengthening
with tension
Lengthening
without tension
Held muscles
without motion
Lower body
All the quadriceps muscles are engaged
to extend the knee. The abductors work
with the gluteus medius and maximus
to lift your legs laterally. They include the
tensor fasciae latae, superior and
inferior gemellus, and piriformis.
Gluteus medius
Tensor fasciae latae
aximus
Gluteus m
ad
ng he
oris lo nosus
m
e
f
p
i
d
Bice
iten mius
Sem
cne gus
o
str
n
Ga
s lo gus
eu
n
lon
ro
Pe
um
r
o
git
di
r
o
s
ten
Ex
Keep spine, neck, and
back in alignment
Do not let your knees
go past your toes
STAGE TWO
Return to the starting position,
slowly shift your weight, and switch
legs. Do another 2–4 side steps in
the opposite direction.
STAGE ONE
Once in the half-squat position, step one
leg to the right and follow it by taking a step
sideways in the same direction with the other
leg. Continue this sideways movement for 2–4
reps, keeping your hips level. Maintain a low,
forward-facing posture and a straight back.
A strong gluteus medius
stabilizes the hip and reduces
lateral stress on the knees.
105
Lower Body Exercises
Shortening
with tension
Muscles
Joints
KEY
Held muscles
without motion
Lengthening
without tension
Lengthening
with tension
In addition to activating your
muscles, the dumbbell or
kettlebell snatch may help increase
cardiorespiratory fitness. When lowering
your body to transfer the weight to the
other hand, hinge at your hips and bend
your knees without rounding your back
or looking down. Focus on using the
momentum from your lower body to
transfer the weight rather than relying
on your shoulder and arms. If beginning,
start with 1 set of 8–12 reps.
THE BIG
PICTURE
Also known as the single-arm dumbbell snatch,
this is a powerful compound movement that works the
whole body. It improves your speed and agility while
strengthening the quadriceps, hamstrings, and glutes.
It also targets your back and shoulder muscles.
The latissimus dorsi muscles in the back engage to
lift the dumbbell from the floor, while the spinal
erectors maintain stability of the spine during the hip
extension through the top of the movement. The
rotator cuff and deltoid shoulder muscles assist in
raising the dumbbell overhead. Your core muscles are
active throughout to stabilize the body.
Triceps
si
us dor
Latissim
ajor
sm
rali
o
t
es
c
Pe
iqu
obl nis
l
i
na
ter
om
Ex
bd
a
s
ctu
Re
Biceps
Point toes
forward
Engage
your core
Keep your shoulders back,
chest slightly raised, and
eyes facing straight ahead.
With your weight in your
heels, stand up explosively,
lifting the weight toward
your right shoulder.
STAGE ONE
Upper body and core
Stand with feet shoulder-width
apart, a dumbbell on the floor
between your feet. Bend the knees,
hinge your hips, and lower into a
squat position. Grab the dumbbell, rotating your elbow and
shoulder externally before rising.
PREPARATORY STAGE
Push weight of
body into heels
Gently bent arm
Chest slightly raised
ALTERNATING SNATCH
HIIT EXERCISES
ng
e la
tae
Using the momentum of your lower
body, press upward with the dumbbell,
punching it into the air so that it’s
above your head with a straight arm,
knuckles facing toward the ceiling.
Your right palm should now be facing
outward, at the top of the movement.
us
STAGE TWO
scia
Ten
Vastus lateralis
Rectu
s femo
ris
Ti
bia
lis
an
ter
ior
fa
sor
Although it’s a full-body workout, the
lower body has the most involvement.
Muscles recruited include the glutes,
which help in the hip extension; the
quadriceps, which help raise your
body upward; and the hamstrings.
Lower body
on
Per
lo
eus
107
THREE-QUARTER
ANTERIOR VIEW
To lower the weight, slowly bend your elbow
outward in a slightly inverted “V” and down.
Squat while you slowly lower the weight back
down. Immediately pick up the weight with
the left hand and repeat the movement.
STAGE THREE
Lower the
weight with
control
Hinge at the hips
to lower the body
Release right hand
from dumbbell and
grab with left hand
This exercise is very technical and has a
lot of moving parts. If you’re a beginner,
it’s important to start with a light
weight—or no weights—to establish the
form and rhythm of the exercise. Your
core remains tight throughout the entire
movement to stabilize your body.
Swinging the dumbbell down too quickly
can cause rotator cuff injuries over time.
Caution
HIIT EXERCISES
Lower Body Exercises
ALTERNATING
LATERAL LUNGE
This exercise improves balance, stability, and
strength. The step out to the side engages your
muscles differently from other lunges: it works
your inner and outer thighs in addition to
targeting your quadriceps, hips, and legs. The
lateral lunge also engages the glutes and can
improve athletic performance and agility.
THE BIG PICTURE
Avoid rounding the back, and don’t bring
the body forward too much. The knee
placement is important, as the knee
shouldn’t go past the toes. To elevate this
workout, everything will remain the same
except you add weight to increase the
resistance of the workout. You can do this
progression with a barbell on the back or a
dumbbell held in each hand.
Keep shoulders
rolled back
Engage your core
Caution
PREPARATORY STAGE
Start by standing tall with your
feet parallel and shoulderwidth apart. Keep your spine,
head, and neck neutral, your
weight in the heels of the foot.
108
Avoid the knees passing the toes on
the bent leg. Make sure the heel of the
bent leg remains planted on the floor.
Take these lunges as deep as possible,
using the full range of motion.
Upper body
KEY
Make sure that the abdominals are
engaged, as they help aid in bracing
the spine so it remains in the neutral
position. The chest is held upright
(nothing past a 45-degree angle),
protecting the lower back.
Lengthening
with tension
Joints
Muscles
Shortening
with tension
Lengthening
without tension
Held muscles
without motion
Sternocleid
omastoid
Deltoid
Pectoralis major
Biceps
is
abdomin
Rectus
Clasp hands loosely
in front of you
Lower body
This targets the gluteus maximus muscle,
as well as the smaller glute muscles. The
hamstring muscles help control the hip on
the bent leg, while adductors on this leg
work with the quadriceps and hamstrings
to control the knee and hip movement. The
quadriceps work as you shift your weight to
lower and push back up to standing.
Tensor
fa
Hold spine in a
neutral position
sciae la
tae* (T
Rectus fem FL)
oris
Adductor longus
Vastus medialis
Sartorius
s anterior
li
ia
ib
T
s
cnemiu
Gastro
Keep the knees soft;
they shouldn’t go
past the toes
Hold feet shoulderwidth part
STAGE ONE
Take a big step to the right, ensuring you keep your
torso as upright as possible. Lower the body toward the
right, pushing the hip back and bending only the right
knee. Descend until the knee is bent at around 90
degrees, keeping your opposite leg straight out to the
other side. As you bend, bring your arms to the front.
STAGE TWO
Push back up, shifting the weight off the
right leg and back to the center. Return to
the starting position and repeat the exercise
on the left side, keeping the same form.
109
LUNGE
VARIATIONS
Because of the angle, lateral (or side) lunges specifically target
the hip adductors, used to bring the thighs together, and the hip
abductors, used to bring the legs away from the body and rotate
the leg at the hip. These variations activate the same muscle
groups, adding more challenge to the original exercise.
Neck and head are
in alignment with
the spine
Keep looking
straight ahead
Keep torso straight
Keep your chest
upright
Hold your arms in
front of you as you
perform the lunge
Keep hip
“squared” to
the torso
Flex the toes
Bend the left knee at
90-degree angle
Flex toes of back leg
Engage your
core
Right thigh is
parallel to the
floor
Foot points
forward
STAGE ONE
ALTERNATING BACK LUNGE
FRONT CURTSY LUNGE
Back lunges strengthen the quads at the front of your
upper legs. As you progress, you can add some weights
to the move, making sure you don’t choose weights that
are too heavy for your fitness level.
The curtsy lunge is great for building lower body
strength and stability: it targets the quads, glutes, hip
abductors, and inner thighs. The gluteus medius, often
underactive, makes the curtsy lunge an important move.
PREPARATORY STAGE
PREPARATORY STAGE
STAGE ONE
STAGE ONE
Start by standing straight with your feet shoulder-width
apart and your toes pointed forward. Engage the core
and hold hands in front of your chest in a loose grasp.
Slowly move your right leg back behind your body as if
to kneel, but keep your knee just off the floor. At the
same time, bend your left knee and lower your hips.
Keep your torso straight and stop when your knee is at
a 90-degree angle and your left thigh is parallel to the
floor, making sure the knee doesn’t go past the toes.
Pause, then push with your left leg, squeezing your
glutes to stand up, while simultaneously returning your
right leg to its starting position. Repeat on the left leg.
110
STAGE ONE
Stand with your feet shoulder-width apart and your
arms in front of you, hands held together in front of
your upper chest.
Put your weight onto your left foot, step your right foot
forward, and in front of your left knee to do a forward
“curtsy” movement, keeping the spine in alignment.
Stop when your right thigh is parallel to the floor.
STAGE TWO
Begin to straighten your right leg, pushing up through
your heel, returning your right and left foot at the same
time to the starting position. Repeat on the other side.
HIIT EXERCISES
WALKING LUNGE
WITH DUMBBELLS
Lower Body Exercises
KEY
Primary target
muscle
This walking lunge variation adds challenge
and coordination to the stationary lunge.
Begin using just body weight until you can
remain balanced and coordinated as you get
used to this movement. Once you are
confident, you can add in some dumbbells.
Maintain a
neutral head
position
Arms hang at
your sides,
holding weight
Keep your
torso upright
when you
lunge
PREPARATORY STAGE
Begin standing with your feet shoulderwidth apart. Breathe in and stride forward
into the lunge position, bending your
back knee so that it is just off the floor.
Secondary
target muscle
Flex your front
knee so your
femur is parallel
to the floor
Engage your
quads to drive
out of the lunge
STAGE ONE
Exhale to power upright from the lunge
and immediately take a stride forward with
your other leg. Stand tall and keep your
abs engaged throughout.
STAGE TWO
Breathe in as you drive your hip down
and your front knee forward, allowing
your back knee to flex, as before. Repeat,
alternating legs as you move along.
Knee alignment
Even load
on joint
structures
Knee drops
inward to
align past
the big toe
Meniscus
ALIGNED KNEE
Knee is aligned
over the second toe
Foot arch
and stability
are lost
When performing lunges, the
knee should be over the foot
with the kneecap in line with
the outside two toes. Both knees
should be at a 90-degree angle.
A very common misalignment
is for the knee to fall inward,
toward the midline of the body,
known as valgus collapse. This
collapse puts uneven stress on
the joint, which over time can
lead to pain and injuries.
MISALIGNED KNEE
111
Lower Body Exercises
The low-impact movement of the calf
raise is a perfect exercise for beginners.
You can perform it using a calf-raise
machine or standing in front of a wall
using your fingertips for balance. With both,
make sure you balance on the balls of your feet
while you raise yourself up to your tiptoes. Keep
the knees soft, the feet shoulder-width apart,
and the toes parallel. If you’re new to weight
lifting, start with a set of light weights and plan
to do 10–12 repetitions for 3 sets.
THE BIG PICTURE
The standing calf raise targets
the calf muscle, specifically the
gastrocnemius. Movements that
are done with a bent knee (flexion)
target the soleus, which attaches
below the knee joint. Strong, flexible
calf muscles will help maintain
healthy knees and also promote
ankle strength.
CALF RAISE
HIIT EXERCISES
enso
r di
Held muscles
without motion
Lengthening
without tension
(stretching)
Calf raises are known to strengthen the
ankles. However, if they aren’t kept in line
with the knees, you can run the risk of
placing stress on the Achilles tendon.
Common mistakes
The muscles in the upper body are mostly
used for balancing, while the abdominals
are held isometrically to brace the spine.
Use your arm muscles to hold the handles
and help stabilize the body.
Upper body and arms
gito
Trap rum
eziu
Deltoid s
Spinal exten s
sors
Biceps
Serratus anterior
Triceps
dorsi
simus inis
Latis
bdom
us a
s
r
e
nsv
Tra
Ext
Lengthening
under tension
Shortening
under tension
Muscles
Joints
KEY
113
Set the weights to your current fitness level.
Place your shoulders under the pad and stand
with the balls of your feet on the edge of the
step, feet shoulder-width apart and parallel.
Tighten your core for balance. Lower the
heels slowly into the starting position.
PREPARATORY STAGE
Position the balls
of your feet on
the platform
Keep a soft bend
in your knees;
don’t lock out
Hold tension
in your glutes
Engage your core
Inhale to engage the core. While
exhaling, slowly raise your heels
until you are on tiptoes, keeping
your knees extended (but not
locked). Pause for 1–2 seconds at
the top of the raise.
STAGE ONE
du
cto
rm
ag
nu
s
K
nee
Tibia
lis an
terior
Gastrocnem
ius
Soleus
s
s longu
Peroneu
s
u
long s
um
r
u
o
t
g
i
dig
on le
is l
nsor
k
luc
Exte
l
An
a
rh
o
x
Fle
Ad
c
du
Lower body
POSTERIOR-LATERAL
VIEW
Standing calf raises activate
the gastrocnemius and
soleus. These muscles assist
in ankle flexion and extension,
propelling running and
jumping. The gastrocnemius
also works in tandem with
hamstrings to control knee
flexion, while the soleus
maintains balance.
Ab
it
ig
tor
d
Hold the handles
for extra stability
mi
ni
im
i
Breathe in and slowly lower
your heels all the way back
down, pausing for 1–2
seconds at the bottom.
Adjust your form and repeat
stages 1 and 2.
STAGE TWO
Lower your
heels into
dorsiflexion
Plyometric Exercises
te
scia
Glu sor fa
n
Te soas
Iliop eus
n
Pecti
Your quadriceps are the main muscles activated
during the step-up, while your hamstrings work to
stabilize your knee joint and your torso at the hip.
Your glutes engage to pull your thigh back into line
with your torso and help keep your torso
upright. The gluteus maximus and the
smaller side hip muscle of the
s
gluteus medius are highly
diu ae
me
stimulated during the move.
s
lat
u
Hips and legs
The front leg (on the step) is the driver in this
exercise—don’t push off the floor with your back
foot. Beginners should start with body weight
step-ups on a lower step, moving on to a 12-in
(30-cm) step and weights when more confident.
It’s important to make sure the whole foot is
firmly planted on the step prior to starting the
movement. Plan to do 10–12 repetitions for
3 sets if just beginning. You can alternate the
legs each rep, or perform 10 reps on one side,
then 10 reps on the other side.
THE BIG PICTURE
This exercise strengthens the quadriceps and the
posterior chain, as well as challenging the muscles
of the core. It’s a great exercise at any level.
STEP-UP WITH
DUMBBELLS
HIIT EXERCISES
ANTERIORLATERAL VIEW
leidoma
stoid
Trapezius
Deltoids
Pectoralis minor
Biceps
Triceps
ialis
Brach ne
Spi
nis
omi
abd ialis
s
u
d
t
Rec
ora inis
chi
m
Bra
do
ab
s
rsu
sve
an
r
T
Sternoc
Shortening
with tension
Muscles
Joints
KEY
Your abdominals engage to
brace the back to keep you
from leaning forward or
backward. Your internal
and external obliques
contract to keep you from
wobbling from side to side as
you step up and down.
Upper body and
abdominals
Held muscles
without motion
Lengthening
without tension
Lengthening
with tension
s
Stand in front of your box, raising
your right foot up to rest on the step.
Arms should be by your sides, holding
your weights, if using them. Keep your
back leg strong to provide balance and
pelvic stability.
Check the
step is at least
1 in (2.5 cm)
below the height
of your maximal
leg lift (hip
flexion)
Stand with your
feet shoulderwidth apart
Carry weights
naturally at
your sides
Keep your pelvis
level throughout
u
ne
ro
Pe kle
An
gu
PREPARATORY STAGE
Stand tall with a
neutral spine
Take a deep breath in;
engage the core; and drive
through your right foot,
pressing through the heel
to straighten your right
leg. Bring the left foot to
meet your right foot on
top of the step. Allow your
front leg to bring the
opposite foot off the floor.
STAGE ONE
Biceps femoris long head
Vastus late
ralis
Rectus
femoris
Bicep
s
Kne femoris sh
e
or t h
Ga
ead
s
Sol trocne
miu
e
Ti us
s
b
Ex ialis
ten
an
t
so
r d erior
igi
tor
um
lon
gu
s
on
sl
115
Lower your
back foot to
its starting
position
Exhale as you begin to lower your body
by bending at the knee and pushing the
hip back like you are trying to sit down.
Keep lowering until the left foot touches
the floor. Tighten the core, inhale, and
repeat stages 1 and 2.
STAGE TWO
Engage the
front quads
to control the
step down
Carry the load
naturally at
your sides
Maintain a neutral
head position and
forward gaze
Make sure your knee doesn’t go past your
toes, as this can add stress on the knees.
Keep the spine in the neutral position to
avoid rounding the spine. Don’t attempt to
use weights until you are confident with the
movement.
Common mistakes
HIIT EXERCISES
Lower Body Exercises
ALTERNATING
TOE TAP
This cardiovascular exercise strengthens the quadriceps,
hamstrings, calves, glutes, and hip flexors. It also requires
engagement from the core muscles. The toe tap enhances
speed, agility, endurance, and overall athletic performance.
THE BIG PICTURE
Start out with a platform, step, or box that’s the appropriate
height for your current fitness level. Engaging your core will
help with balance, stability, and support. It also helps bring
the knees up quicker with more power. Start with 30 seconds
of reps, progress to 45 seconds, then go up to 60 seconds with
a slightly higher platform.
Align spine, neck,
and head
KEY
Joints
Muscles
Bend arms in
preparation for toetapping movement
Place ball of
right foot on
the platform
Shortening
with tension
Lengthening
with tension
Lengthening
without tension
Held muscles
without motion
PREPARATORY STAGE
Set your feet shoulder-width apart and have your
arms at your sides. Raise your right foot and
place the ball of your foot on the platform. Your
left foot will remain flat on the floor, your arms
bent at a 45–90 degree angle in preparation for
the toe-tapping movement.
116
ANTERIORLATERAL VIEW
Abdominals and
cardiovascular endurance
The alternating toe tap provides you with a
fantastic cardio workout, increasing your
cardiovascular endurance. The abdominals,
particularly the rectus abdominis, work to
stabilize and hold the body upright by bracing
the spine and keeping it in neutral.
Deltoids
Biceps
dialis
ra
io
Brach
minis
o
d
b
sa
ue
Rectu
obliq
rnal
Exte
Keep chest upright
Left arm forward
Keep core engaged
Gluteus
medius
Tensor fascia
e latae
Gluteus maximus
Vastus lateralis
is short head
Bicep femor
ius
ocnem
Gastr
ior
nter
lis a
a
i
eus
b
Ti
Sol
Right leg on platform
Lower body
Toe taps target the muscles of your
lower body—the quadriceps, which
aid in bringing the knee up for the toe
tap; the hamstrings, which work with
the glutes to help stabilize the hip
muscles; the glutes; the hip flexors,
which prevent rotation; and the calves.
Point toes forward
STAGE ONE
Push off the floor with your left foot and
switch legs in midair, with your left foot
now touching the platform and your right
foot on the floor. Keep your arms bent and
alternate bringing them forward and back,
as if you were running on the spot. This
movement should be quite quick.
STAGE TWO
Practice repeating alternating toe taps slowly
until you feel comfortable with the movement
and your form is correct. By increasing speed,
time, and the height of your step, you can
increase the amount of calories burned.
117
HIIT EXERCISES
Lower Body Exercises
THE BIG PICTURE
As you bend forward into the deadlift,
your body should be in a straight line
without either arching your spine or
rounding it. The spine, neck, and head
should always remain in alignment.
Complete both stages of the exercise
slowly and with control. Start with 5–10
reps per leg. As you improve form and
strength, you can increase the weight.
KEY
Joints
Muscles
Shortening
with tension
Keep spine, neck, and
head in alignment
Lengthening
with tension
Lengthening
without tension
Engage the core
Strong left leg, with
small bend in knee
PREPARATORY STAGE
Hold the desired weight (kettlebell
or dumbbell) in your right hand,
your knuckles facing out. Stand with
your feet shoulder-width apart, your
right leg ready to push back.
118
Held muscles
without motion
STAGE ONE
Press into the supporting (left) leg as you slide
the nonsupporting (right) leg back with control,
allowing your upper body to move forward with
your hip as the hinge. If at any point during the
exercise you start to lose balance, simply touch
the free-floating leg lightly to the floor to regain
balance and tighten your core.
Tran
inis
Rectus abdom is
min
o
d
b
a
s
sversu
Serratus anterior
Delt
This unilateral exercise (working one leg at a time) strengthens
the glutes—the gluteus maximus, gluteus medius, and gluteus
minimus. The glutes are part of the “posterior chain,” which also
includes the hamstrings and lower back muscles. All of these
muscles help maintain an upright posture and balance the body.
oids
Biceps
SINGLE-LEG
DEADLIFT
Upper body and abdominals
The spinal erectors, which help support your
spine and provide flexibility when bending in
multiple directions, are targeted in this exercise. The
trapezius, forearms, and mid/lower back contract to
control the weight. The abdominals and obliques
contract isometrically to stabilize your body and
brace the spine, holding it in a neutral position.
Caution
Rounding the back could lead to injuries and/or
back pain. Your back leg should be kept straight,
in line with your spine, with your body forming one
straight line from the neck to the heel. Bending
the back leg takes the spine out of alignment.
A unilateral exercise like the singleleg deadlift can help reduce injuries
and strengthen your lower back.
Push hips
forward
at top of
movement
LATERAL VIEW
Sem
im
p fe
mor
fas
cia
ax
sm
ed
i
e
lat us
is lo
ae
ng
he
Vastu
s late ad
ralis
Biceps femor
is short head
Bice
on
sm
rl
eu
eu
cto
ut
us
nos s
bra
u
g
us
im
du
Gl
ut
or
em
Ad
Gl
Ten
s
Weight
returns to
starting
position
Hamstring and
glute muscles work
to pull you back up
Right leg ready
to hinge back
Gastrocnemius
s
s longu
Peroneu
Lower body
The primary focus in this exercise is on the
posterior chain of the body—the glutes and
hamstrings. The hamstrings provide the
muscular force we need to pull, push, and
move in the deadlift. Of the glutes, which form
the central part of the posterior chain, the
gluteus maximus muscle is targeted the most.
STAGE TWO
Complete the movement by pulling the weight
upward and bringing the elevated leg back to
the starting position. Keep coming up until the
leg is back on the floor and the planted leg is
straight. Complete the reps, then switch legs.
119
HIIT EXERCISES
Lower Body Exercises
GLUTE BRIDGE
This exercise not only targets the glutes, it strengthens
the rectus abdominis, obliques, and quadriceps. In addition,
you also target the erector spinae muscle, which runs the
length of your back from neck to tailbone. The strong core
resulting from the glute bridge will improve your posture
and can help ease lower back pain.
THE BIG PICTURE
Start by lying on your back with your
hands at your sides, palms on the floor,
knees bent, and feet flat on the floor.
Tighten your abdominals by pushing your
lower back into the ground and squeezing
the glute muscles before you push up.
Upper body
Exhale and, pushing from
your heels, slowly ease your
hips up to create a straight
diagonal line from your
knees to your shoulders.
Keep your hands on the
floor as your hips raise up
into the bridge. Make sure
the core is engaged, belly
button to spine.
120
Ili
Tra
nsv
ersu
oco
s ab
sta
dom
lis
ini
is
ac
or
th
us
im
ead
iss
al h
edi
ng
Lo ceps m
Tri
ds
Deltoi
STAGE ONE
Keep arms
relaxed and by
your sides
PREPARATORY STAGE
It’s important not to raise the hips too high in this exercise,
as putting too much pressure on your lower back can lead to
strain. Keeping your abdominals engaged will ensure you don’t
arch your back excessively. If your hips are dropping as you try
to hold the bridge position, lower your pelvis back down to the
floor and start again. Beginners can hold the bridge for a few
seconds at a time, completing 1 set of 8–12 reps. To progress,
increase the sets and the time the bridge is held.
The rectus abdominis,
transverse abdominis, and
internal and external obliques
work to help stabilize the body
while you move up and down in the
bridge. Tightening the core helps
brace the spine during the move.
Bend the knees
s
KEY
Joints
Muscles
Shortening
with tension
Keep your core engaged
as you prepare to raise
the hips again
Feet flat on
the floor, toes
pointed
forward
Lengthening
with tension
Lengthening
without tension
Held muscles
without motion
STAGE TWO
Arms remain in the same
position throughout
Squeeze your glutes on
the way down
Hold this position for 20–30 seconds,
squeezing your glutes, then return
to your starting position, controlling
your body weight on the way down.
Don’t just drop the body to the
floor, as that can cause injuries.
Repeat the raise.
Rectus fe
moris
Vastus lateralis
head
oris long
Biceps fem
imus
x
a
us m
e
t
u
l
ius
G
nem us
troc
g
s
a
n
G
lo
us
us
e
n
ole
o
r
S
e
P
Lower body
This movement isolates the gluteus
maximus, medius, and minimus
muscles in the posterior chain. It also
works the hamstrings and hip
abductors. The quadriceps help
stabilize the lower body during the
movement; the calves are also activated.
If using good form, glute
bridge exercises are usually
safe for those with chronic
back problems.
THREE-QUARTER LATERAL VIEW
121
GLUTE BRIDGE
VARIATIONS
The primary glute bridge exercise engages
the glutes, mainly the largest glute muscle: the
gluteus maximus. Secondarily, it targets the
hamstrings and the transverse abdominis.
The variations add challenge to the original
exercise while recruiting the same muscles.
Raising the hips too high puts
pressure on your lower
back that can lead to strain.
Focus on
lifting from
the heels
Flare the knees
outward
Raise leg to
a 90-degree
angle
Push hips up
from floor
Engage your core
STAGE ONE
STAGE ONE
Bring soles of
feet together
Keep shoulders
on floor
BUTTERFLY GLUTE BRIDGE
This exercise is absolutely amazing in that it targets all
three muscles in the glutes. Because of the rotation in
the hips, the butterfly glute bridge provides greater
activation than the regular glute bridges.
PREPARATORY STAGE
Start by lying on your back with your hands at your
sides, palms on the floor. Bring the soles of your feet
together and flare your knees out. Tighten your abs—
push your lower back against the floor and squeeze the
glute muscles—before you push up.
STAGE ONE
Inhale and slowly push the hip flexors up as you are
exhaling. As you lift up, push the hip forward and push
the knees out to either side. Hold for a few seconds.
STAGE TWO
Inhale as you lower your hips back down to the floor,
squeezing your glutes. Repeat the bridge for 8 reps.
122
Keep other leg
firmly on the floor
Hold head in a
neutral position
ALTERNATING SINGLE-LEG
GLUTE BRIDGE
Because it’s a unilateral movement, this variation trains
you to balance. It engages the hamstrings, hip flexors,
lower back, abdominals, and all three glute muscles.
PREPARATORY STAGE
Begin in the starting position for a basic glute bridge (see
pp.120–121). Tighten the abs by pushing your lower back
into the floor and squeezing your glutes.
STAGE ONE
Raise your pelvis up into the bridge while raising your left leg.
Keep your right leg on the floor as you do this. Holding your
position, slowly lower your left leg, heel first, along with your
hips, until it’s back on the floor.
STAGE TWO
Switch sides, lifting the right leg. When performing this
exercise, don’t raise the hips too high. Keep your abdominals
engaged, which will ensure you don’t arch your back excessively.
HIIT EXERCISES
HAMSTRING WALKOUT
Lower Body Exercises
KEY
This movement targets the posterior chain muscles at
the back of the body. The walkout motion particularly
engages the hamstrings and the glutes.
Primary target
muscle
Secondary
target muscle
Don’t raise the
hips too high
Toes face upward
during walkout
Engage your core
Take small steps
on your heels
PREPARATORY STAGE
Keep arms by
your sides
Begin in the starting position for a basic
glute bridge (see pp.120–121). Tighten your
abs by pushing your lower back into the
floor and squeezing the glute muscles
before you push up.
STAGE ONE
Exhale and raise up into
an isometric glute bridge,
squeezing the glutes and
fully engaging the core.
The fan-shaped
gluteus medius
lies between the
gluteus maximus
and minimus
STAGE TWO
STAGE TWO
Lift the toes off the floor, then take
small, deliberate steps as you walk on
the heels of your feet back and forth.
Maintain the bridge as you walk. Take
2–4 steps out and 2–4 steps back in.
The gluteus
minimus is the
smallest and
deepest of the
gluteal muscles
The gluteus
maximus is the
largest and most
superficial of the
gluteal muscles
GLUTEUS MAXIMUS
This muscle works to
extend the hip behind you
and to rotate the leg.
GLUTEUS MEDIUS
This supports g. maximus
in extending the hip to the
side and rotating the leg.
The three gluteal
muscles
Three muscles make up
your glutes—the gluteus
maximus, medius, and
minimus. Strengthening
all three muscles works
to help prevent injuries
by stabilizing the body.
Strong glutes also assist
in building greater hip
mobility. If you have weak
glutes, you may experience
knee issues, hip issues,
and lower back pain.
GLUTEUS MINIMUS
This muscle supports
g. maximus in extending
the hip farther to the side.
123
PLYOMETRIC
EXERCISES
Plyometric exercises are explosive, powerful, quick movements
that exert maximum effort in a short amount of time. These exercises are
aimed at increasing the heart rate, as well as improving stability, muscular
strength, agility, cardiovascular strength and endurance, flexibility, and
athletic performance. It’s very important to warm up prior to performing
plyometric moves—without an adequate warm-up, you could cause
injury. Plan on doing these in the middle or at the end of a HIIT workout.
HIIT EXERCISES
Plyometric Exercises
SKATER
This advanced cardiovascular exercise increases your fitness and strength.
It also works your legs—mostly the quadriceps and the glutes, as well as
the hamstrings and calves. Stability and balance are improved by always
keeping the core engaged. The outer glute is a main focus here.
THE BIG PICTURE
Make sure that the area where you plan to
do the skater exercise is free of obstacles
and that you are jumping as far as you can
to each side; small jumps are ineffective.
The motion of the arms helps propel
you back and forth. The back leg always
goes behind the front leg; you are not
doing a side-to-side shuffle. To start,
perform for 30–60 seconds. For a more
advanced version, don’t tap your toe
on the floor as you bring it back.
Hold chest up
Engage the core
KEY
Joints
Muscles
Shortening
with tension
Lengthening
with tension
Lengthening
without tension
Held muscles
without motion
ANTERIOR
VIEW
oris
Rectus fem
Gracilis
Vastus med
ialis
Sar to
rius
Ga
s
Ti trocn
em
bia
ius
lis
an
ter
ior
Knees slightly bent
Lower body
PREPARATORY STAGE
Start standing with feet shoulder-width apart,
knees slightly bent, chest up, looking straight
ahead, with head, neck, and spine in alignment.
Arms are relaxed by your side. If you are
starting on the left side of your mat, that
means you’ll be jumping to the right side.
126
Skaters target the muscles
in the glutes, quadriceps,
hamstrings, and calves.
Your quadriceps are
important in this movement
because they extend each
leg at the knee and flex your
leg at the hip. Your glutes
promote movement at your
hip, helping extend, rotate,
abduct, and adduct your leg.
STAGE ONE
Standing on your right
foot, with a slight bend
in the right knee, hop
as far as you can to the
left. Tighten your core
to keep your balance as
you use the momentum
of your arms to drive off
the standing leg to hop
to the side.
Upper body and abdominals
Your abs help you maintain an efficient
stride by stabilizing the body and bracing
the spine. The swinging movement of your
arms engages the rotator cuff.
Trapezius
Deltoids
r
s majo
li
Pectora Biceps
inis
dom que
b
a
bli
tus
lo
Rec
na
r
e
t
Ex
Keep low—maintaining your
center of gravity is important
in these types of movements.
Left arm
moves back
Maintain
forward gaze
Slight forward lean
Left arm goes
farther back
Right arm
moves forward
Bend the right knee to
prepare to “curtsy” back
Right arm comes
farther forward
Keep knees
soft
Weight is
transferred
to left leg
STAGE TWO
Transfer your weight to your left
foot (the landing foot), making sure
the left foot is facing straight ahead
as you land. Bend the crossing
(right) leg as you prepare to bring it
behind the left leg, which should be
stable and bearing your weight.
STAGE THREE
Bring the right leg completely behind the left
leg, descending into a “curtsy” pose and tapping
your right foot briefly on the floor. Your body
will lean farther forward at the bottom of the
movement. Immediately hop to the right,
bringing the left leg behind you. Alternate arms
as you switch sides, as if you were speed skating.
127
Plyometric Exercises
The hip flexors, calves,
glutes, quadriceps, and
hamstrings are recruited
in the high knee. You
isometrically tone your
calves, quadriceps,
hamstrings, and glutes on
the standing leg and the
calf contracts on the raised
leg when you push off the
floor with your foot.
Lower body
Start slowly at first (warm-up speed) and
build up cardiovascular endurance by
taking the speed up incrementally. Keep
the back straight, with the head, spine, and
neck all in alignment. As the knee comes
up, the back is still straight and the chest is
open. Use the arms to help get the knee up
as high as you can. Move the arms, bent at
a 90-degree angle, as if you were running,
alternating opposite arm and knee.
Alternate the knees for 30–60 seconds,
speeding up as you become
stronger and fitter.
THE BIG PICTURE
The high knee is both a strength and cardiovascular movement
and is a great exercise to perform as a warm-up or as part a HIIT
workout. As well as building cardiovascular endurance, this type
of metabolic workout helps you burn fat.
HIGH KNEE
HIIT EXERCISES
LATERALANTERIOR VIEW
Held muscles
without motion
Lengthening
without tension
Lengthening
with tension
Shortening
with tension
Muscles
Joints
KEY
astoid
Deltoids
cleidom
Pectoralis major
Biceps
inis
abdom
Rectus
ue
obliq
rnal
e
t
x
E
Sterno
Because your arms are pumping,
you may feel tension in your
shoulders and arms. The
abdominals work to create
balance, as you are standing on
one leg at a time. They also help
stabilize the body and hold the
spine in a neutral position.
Upper body and
abdominals
As with all plyometric exercises,
make sure you are physically fit
enough for this type of movement.
Caution
latae
sciae
a
f
r
o
Tens
s
maximu
Gluteus
head
long
Biceps femoris
Adductor mag
nus
Sar to
rius
Vas
tus
med
Ga
iali
str
s
ocn
em
iu
s
So
leu
Start by standing with feet shoulder-width
apart, arms by your side and knees soft. Ensure
that your chest is open and facing forward,
along with your head. Engage the core.
PREPARATORY STAGE
Point toes
forward
Keep knees soft
Relax arms by
your side
Maintain a
forward gaze
s
129
Jump your right knee up
toward your chest as far as
hip/waist height and, at
the same time, bring the
left arm up, bent at
a 90-degree angle. As
you bring the right knee
up, raise your left heel
slightly, with the toe still
resting on the floor.
STAGE ONE
Don’t lock knee
of supporting leg
Engage your core
Swing opposite
arm up as
if running
Bring the right foot down on the ball of the
foot and almost simultaneously jump the
left knee up, bringing the right arm up at
the same time. Breathe deeply and naturally
as you bring the knees up and down.
STAGE TWO
Bring knee
up as high
as you can
toward hip
HIGH KNEE
VARIATIONS
These high knee variations are cardio-intensive
exercises aimed at getting the heart rate up. They
engage multiple muscle groups, primarily the core,
hip flexors, calves, quadriceps, and hamstrings. All of
these variations are perfect for warming up the body
before a workout. Adding the jump rope engages the
biceps, forearms, and deltoids.
JUMP ROPE HIGH KNEE
This is an advanced cardiovascular endurance exercise,
focusing on strengthening the legs, especially the calves. You
will need a jump rope to perform this exercise. Start the high
knee exercise slowly and get into a rhythm.
Don’t perform jump rope
exercises on hard
surfaces—this can harm
the knees and shins and
lead to pain or injuries.
Keep head neutral,
looking forward
Keep a straight back
Avoid leaning back
Hold forearms
parallel to the floor
Raise knee as high as
possible when jumping
Knees soft
STAGE ONE
PREPARATORY STAGE
Stand on a soft surface, such as a
gym mat, feet slightly apart. Hold a
rope handle in each hand and place
your feet in front of the jump rope.
130
STAGE ONE
Tuck your elbows into your sides and
bring your hands up. Swing the rope
up and over your head, then jump
up off the floor one foot at a time.
STAGE TWO
STAGE TWO
Raise each knee as high as possible
when jumping. Repeat the exercise
for 30–60 seconds, alternating knees
with each turn of the rope.
HIIT EXERCISES
Plyometric Exercises
KEY
Primary target
muscle
Keep head neutral and
gaze forward
Secondary
target muscle
Forearms are parallel
to the floor as you
jump over the rope
Raise one heel to
kick your butt
Keep knees soft
Jump simultaneously
with both feet
STAGE ONE
Land on the balls
of your feet
STAGE ONE
JUMP ROPE FEET TOGETHER
JUMP ROPE BUTT KICK
This is similar to the jump rope high knee, but this
time you are jumping over the rope with both feet
at the same time.
Butt kicks increase the speed of hamstring contractions,
which can help you run faster. Adding the jump rope
increases the calf muscle engagement.
PREPARATORY STAGE
PREPARATORY STAGE
Stand on a soft surface, such as a gym mat, feet
slightly apart. Hold a rope handle in each hand
and place your feet in front of the jump rope so that
the rope is resting on the floor behind your heels.
STAGE ONE
Tuck your elbows into your sides and bring your
hands up so that your forearms are parallel to
the floor. Swing the rope up and over your head,
then jump up off the ground with both your feet
together just before the rope reaches your feet.
STAGE TWO
Repeat the exercise for 30–60 seconds.
Stand on a soft surface, feet slightly apart. Hold a rope
handle in each hand and place feet in front of the
jump rope so that it is on the floor behind your heels.
STAGE ONE
Tuck your elbows into your sides and bring your hands
up so that your forearms are parallel to the floor. Swing
the rope up and over your head, then jump over the
rope one foot at a time, raising the heel to kick your
butt as the rope comes to meet them.
STAGE TWO
Try to touch the butt each time. Repeat for
30–60 seconds.
131
Plyometric Exercises
The quadriceps knee extensors and the hip flexors
work to stabilize the patella and knee joints. The
gluteal muscles aid in extension, abduction, and
rotation of the hip joint. The hamstrings participate
in the deceleration of knee extension and help flex
the knee and extend the hips. The gastrocnemius
muscles in the calves flex the foot at the ankle and
knee joint, helping in the explosive jump movement.
Lower body
Due to the explosive nature of this exercise, it’s
crucial to have your body warmed up before
performing it, so don’t attempt it at the
beginning of a workout. Engage your core
to avoid straining your lower back, and
distribute your weight evenly when
you land. Start with 1 set of 5–10
reps. Slowly work yourself
up to 3 sets.
THE BIG PICTURE
The squat (or plyometric) jump improves agility,
balance, and power, as well as helping improve an
athlete’s vertical jump. It strengthens the glutes
abdominals, hamstrings, and lower back.
SQUAT JUMP
HIIT EXERCISES
Held muscles
without motion
Lengthening
without tension
Lengthening
with tension
THREE-QUARTER
ANTERIOR VIEW
Deltoids
Biceps
dorsi
Latissimus ajor
m
s
li
a
r
Pecto
inis
dom e
s ab bliqu s
u
t
c
Re
al o ali
ern erfici alis
i
Ext
sup ad
um hior
r
o
it
ac
dig
Br
or
x
e
Fl
The erector spinae help rotate and
extend the spine and neck. The rectus
abdominis, obliques, and transverse
abdominis stabilize the torso during the
jump, helping maintain a straight spine.
Using the swinging motion in the jump
adds tension to the arms and shoulders.
Abdominals and upper body
Shortening
with tension
Muscles
Joints
KEY
133
ae
Position feet shoulderwidth apart and
angled out slightly
Bring arms forward
and hands into a
prayer position
Gastrocn
emius
Soleu
Tib s
Pe ialis
ant
ron
erio
eu
r
sl
on
gu
s
Stand with feet shoulder-width apart and
knees slightly bent. Engaging your core,
bend your knees and descend into a full
squat position, knees bent and thighs
parallel to the floor.
PREPARATORY STAGE
lat
fas
or
ns ius
e
T tor
s
Sar s femori
u
Rect
edialis
Vastus m
e
cia
Engage through the quads, glutes, and
hamstrings and exhale as you propel the body
up and off the floor into an explosive jump,
extending through the legs. With the legs fully
extended, the feet will be airborne off the floor.
Bring your arms out to the side in front as you
jump to help propel you upward.
STAGE ONE
Make sure you control your body as you
descend, keeping your core tight.
Control your landing by going through
your foot (toes, ball, arches, heel) and
descend into the squat again for another
explosive jump. Upon landing,
immediately repeat the jump.
STAGE TWO
Land on the whole foot
to distribute balance
Bring arms forward
again in front of you
as you land
Knees bent at 90-degree
angle in squat
SQUAT JUMP
VARIATIONS
These squat jump variations are plyometric
(explosive power) movements that increase
cardiovascular and muscular endurance.
Your abdominals, glutes, hamstrings, and
lower back muscles are all engaged here.
You shouldn’t do these every day—allow
your body 48–72 hours to recover.
In the frog and sumo jumps,
don’t let your knees cave
inward when jumping from
the wider starting point.
KEY
Primary target
muscle
Secondary
target muscle
FROG JUMP
The frog jump strengthens the quadriceps, glutes,
calves, hamstrings, inner thighs, and hip flexors.
It’s a plyometric exercise geared toward improving
muscle mass, speed, and agility.
Reach your arms
behind you as you
prepare to jump
Bend over
at hips
Move arms forward as
you jump
Jump as high and as
far forward as possible
Keep core
engaged
Bend
knees
Don’t allow
knees to cave
inward
Land softly, using
balls of feet to
cushion impact
PREPARATORY STAGE
Stand on one side of your mat
with legs wide and toes
pointed forward, ensuring
there is space in front of you.
Descend into a wide squat.
134
STAGE ONE
Tightening your core,
prepare to jump up and
forward. Make sure you’re low
at the start of the jump, in a
“froglike” position.
STAGE TWO
Jump up and forward,
propelling yourself as far as
possible, moving your arms
forward to help your
momentum.
STAGE THREE
Land on your toes and then
the balls of your feet in a low
squat resembling that of a
frog. Turn around and jump
back in the same way.
HIIT EXERCISES
Plyometric Exercises
IN-AND-OUT SQUAT JUMP
This squat jump variation really focuses on
speed, agility, and power. It works the abs,
glutes, hamstrings, and lower back muscles.
Additionally, it targets the calves, adductors,
and abductors.
Chest comes
upright
as you jump
Try to jump as
high as possible
Alternate hand
touching the floor
Chest slightly
forward
Use balls of
the feet to
cushion the
impact of
landing
Thighs parallel
to floor
Separate your
feet in midair
Feet face
forward
PREPARATORY STAGE
Stand with feet together, knees slightly
bent, with your hands in front of you
resting on your thighs. Inhale as you
descend into a chair squat (see p.98).
STAGE ONE
Explosively jump, and as you are coming
down, separate your feet in midair. Land
with feet wide apart, lowering into a squat
and touching one hand on the floor.
STAGE TWO
Land softly, passing the jump through
your toes, the balls of the feet, then to
the heels. Jump up out of the squat and
land back in the starting position.
SUMO SQUAT JUMP
This plyometric jump sculpts the legs and the
posterior. It engages the glutes and inner and
outer thighs, as well as the abdominals,
quadriceps, hamstrings, and lower back.
Hold arms in front
of you, hands in a
soft grasp
Look straight
ahead
Engage
your core
Thighs parallel
to floor
PREPARATORY STAGE
Start in a wide stance, legs wide and feet pointed
outward. Slowly bend at the hips and knees into
a deep sumo squat (see p.99).
STAGE ONE
Exhale, and using the glutes, hamstrings,
quadriceps, and core, propel your body up into
the air. Straighten both your legs and your hips
in midair before you come back to the floor.
Knees face
outward
Point feet
outward
PREPARATORY STAGE
Straighten
legs as you
jump
STAGE TWO
Land back into the sumo squat position. When
landing, ensure that you maintain soft knees to
prevent injury, and use the balls of your feet to
cushion the impact. Repeat for 30–60 seconds.
STAGE ONE
135
HIIT EXERCISES
Plyometric Exercises
TUCK JUMP
In the tuck jump, you use your body weight and power to contract
several muscles at once to jump up in the air. It requires strength and
cardiovascular endurance and strengthens your quadriceps, glutes,
hamstrings, calves, hip flexors, abdominals, and obliques.
THE BIG PICTURE
Swing arms up to help
momentum of jump
Make sure you don’t perform this at the very beginning
of a HIIT workout—you need to be warmed up before
this and any plyometric exercise, or you can strain the
knees and joints. It’s important to know how to land
when doing these plyometric jumps: make sure you
are landing softly through the feet, knees, and hips.
Use the full range of body motion when you jump.
Complete 1 set of 4–8 reps if beginning. This is an
advanced fitness move, so don’t perform more than
twice a week to avoid too much joint impact.
Keep lower abs
engaged to drive
your knees up
Arms are by your sides,
ready to come forward
Legs in midair,
ready to “tuck”
Engage your core
Bend knees slightly as
you prepare to jump
KEY
Joints
Muscles
Shortening
with tension
Lengthening
with tension
PREPARATORY STAGE
Start in the standing position with feet
hip-width apart, arms by your sides, knees
soft, and core engaged. Bend the knees
slightly in preparation for driving yourself
off the floor into the jump.
136
Lengthening
without tension
Held muscles
without motion
STAGE ONE
Using the leg muscles, exhale as
you jump straight up into the air,
bending the arms and bringing
them forward and up.
Sternocleidomastoid
Deltoids
Bicepsi
s
s dor
simu blique
s
i
t
a
L
al o
ern
Ext
Upper body and
abdominals
The abs and the erector
spinae in the lower
back work to brace the
spine as you lower into the
prejump position, as well as
when you tuck the knees
and land back on the floor.
The abdominals should be
engaged throughout the
entire movement. The arm
swing engages the
anterior shoulder and
biceps muscles.
Gluteus maximus
Vastus
Bicep lateralis
Tib s femoris
long
Sar ialis an
head
tor
t
e
r
i
ius
or
Keep back, neck,
and spine in
alignment
Maintain core
engagement
Lower body
The glutes and hamstrings have an eccentric
contraction as you lower your hips toward the
floor, shortening when you explode upward to
drive the hips forward and power the jump. The
quadriceps contract on the way up and down;
in midjump, the rectus femoris and hip flexor
muscles create that “tuck” motion.
STAGE TWO
Lift or “tuck” the knees up to hip level, making
sure your heels don’t go toward the butt. Move
your bent arms down to shoulder height, elbows
pointed toward the knees. As the knees come
up, bring the elbows down to meet them.
Keep knees soft
when you land
STAGE THREE
Land softly with knees
bent, bringing arms
back down. Repeat the
tuck jump.
137
HIIT EXERCISES
Plyometric Exercises
BOX JUMP
STAGE TWO
Jump straight up into
the air, exploding
through the balls of
your feet. Swing your
arms up and forward as
you fully extend your
knees and hips to get as
much height as you can.
At the top of the jump,
bend your knees and
hips to draw them
upward as you land on
top of the box.
The box jump is a plyometric workout that targets all
of the muscle groups of your lower body, including your
glutes, hamstrings, quadriceps, and calves. Because
you also engage the core and use the arms in a
swinging motion, it’s really a full-body workout.
THE BIG PICTURE
Bi
Tr
De icep
l
to s
rali
s ma ids
Latiss
jor
imus
d
Serratus a orsi
nterior
External oblique
ominis
Rectus abd
ce
The key to mastering the box jump is to make sure
you start with a box appropriate for your current
fitness level. If you are a beginner, you’ll want to
start with a low box 12 in (30 cm) high so you can get
accustomed to the movement. You can progress to
a higher box as you gain confidence. Plan to do
10–12 reps for 3 sets if just beginning.
ps
Pect
o
Upper body and arms
n
Te
The movement of the arms assists
in bringing the body off the floor,
creating the momentum needed to
propel the body upward. The
rectus abdominis and obliques
come into play as the body
elongates when you jump.
so
Start by standing facing the box. Your feet
should be about hip-distance apart, your knees
and hips slightly bent in an athletic stance.
Bend your knees and press your hips back as
you swing your arms behind you.
138
ae
STAGE ONE
uct
at
Face feet
forward
el
Bend the knees
over the toes
sf
em
or
Hi is
Bice
p
ag
ps fe
mori nus
s (l.h
.)
Vastus
mediali
s
Knee
ius
nem
troc
Gas
or
ri
te
n
a
s
Tibiali
s
g
on u
eus l
le
k
n
Peron
A
i
nim
mi gus
i
t
on
igi
r d um l
cto
r
u
o
d
it
Ab
Legs
dig
or
The quadriceps muscles
s
n
te
work together to extend your
Ex
Add
Keep the upper body
straight as you bend
ctu
cia
Re
as
Look
forward
rf
Swing the arms
back together
or m
knees. The calf muscles, the
gastrocnemius and soleus,
create the spring motion in the
jump. Hamstring muscles
work together to flex your knee
and extend your hip. The
glutes help in hip extension.
STAGE THREE
Look
forward
Land with both feet at the
same time on top of the
box, leading with the balls
of your feet and following
with your heels. This gives
you a “soft” landing.
KEY
Joints
Muscles
Shortening
under tension
Lengthening
under tension
st
Wri
lis
cia
erfi alis
sup
s
di
d.
ra oid
xor
hio elt
Fle
ac
D
Br
Hold arms up
dynamically
after their swing
Lengthening
without tension
(stretching)
Held muscles
without motion
B
Tr iceps
ice
ps
Arms
When you land on the box,
the arms counterbalance
the pelvis, keeping your
body weight over the feet
to maintain stability.
Hold arms
in position in
front of you
Ga
str
ocn Kn
Tib
ee
e
iali
s an mius
teri
o
Soleu r
s
Peroneus
longus
Extensor digitorum longus
Stand tall
Distribute your
weight evenly
across both feet
Caution
If just starting out, don’t
choose a box that’s too
high for your fitness
level. Landing correctly
in the box jump is the
key to preventing
injuries, particularly of
the knee.
Lower legs
Upon landing, the
gastrocnemius and
soleus, quadriceps,
hamstrings, and glutes
work eccentrically to
control flexion in the hips,
ankles, and knees. This
stops your landing from
adding stress to the joints.
STAGE FOUR
Push up through the legs to
stand upright on the box.
Check your foot position,
then step carefully off the box
and prepare for the next rep.
139
HIIT EXERCISES
Plyometric Exercises
SINGLE-LEG
FORWARD JUMP
Upper body and abdominals
The transverse abdominis, rectus
abdominis, and internal and external
obliques help brace the spine, holding
it in the neutral position, as well as
stabilizing the torso. The arm swing
engages the anterior shoulders,
rotator cuff, and biceps.
This powerful plyometric move strengthens
the calves, glutes, hip flexors, hamstrings, and
quadriceps. It improves agility, speed, balance,
and overall athletic performance.
ezius
Trap
Deltoids
Latissimus dorsi
Rectus abdo
minis
Exter
nal ob
lique
THE BIG PICTURE
Make sure the area all around you is clear before
you begin this exercise. As with all jumps, how you
land is important. Avoid any twisting or sideways
motion at the knee and the ankle. Complete 3–10
reps on one leg, then switch sides. Plyometric drills
like this should only be performed twice a week to
give muscles a chance to recover.
Arms move forward
and back as you jump
Keep spine, head, and
neck in alignment
Right leg comes
forward
Hold chest forward
Engage core throughout
the movement
Point your right leg
behind you
Hop on the ball
of your foot
PREPARATORY STAGE
Start by standing up straight with the legs
shoulder-width apart, holding the back
straight and pushing out the chest. Lift your
right leg off the floor, pointing it behind
you. Bend your left knee slightly and push
against the floor to hop up and forward.
140
STAGE ONE
Bring your hopping (left) leg forward
slightly at the knee to help with the
momentum of the leap. Use the right leg to
help you move the body forward. As you
propel forward, the arms move back as well.
HEAD
Caution
It’s important to ensure you’re physically
ready for this type of exercise. Warm up
properly beforehand. Attempting jumping
movements like the single-leg forward
jump on hard surfaces can cause sprain
or injuries, so make sure you use a mat.
Joints
Muscles
Shortening
with tension
Lengthening
with tension
Lengthening
without tension
Held muscles
without motion
Lower body
The muscles in the calves, hamstrings,
quadriceps, and hip flexors are
engaged here. The quads contract
eccentrically on the way down from the
hop and then concentrically to extend the
knees as you jump. While hopping, the
rectus femoris and the hip flexor
muscles help propel the body forward.
Right arm comes back to
help with leap momentum
Gluteus m
cis
So
Ab
du
cto
rh
allu
leu
s
edius
Gluteus maximus
is long head
s
Bicep femor
agnu
tor m oris
c
u
d
Ad
fem lis
tus
Rec
dia s
u
me
s
u
mi
st
ne
c
Va
o
str
Ga
Bring right leg
forward to complete
another jump
THREE-QUARTER
LATERAL VIEW
Land on the balls
of your feet
STAGE THREE
STAGE TWO
Kick your right leg back as you
leap forward, moving your bent
arms back and forward as you
hop to help with the movement.
Land softly on the toes and roll to the heels,
which helps absorb the force of impact.
Bring your right leg back to the front and
hop forward again on the left leg, kicking
your right leg out behind you. Repeat the
movement, then switch legs.
141
HIIT EXERCISES
Plyometric Exercises
FOOTBALL
UP AND DOWN
This cardiovascular and strength-building exercise is a
combination of running in place and a burpee. It strengthens
the abs, triceps, upper back, chest, shoulders, calves, and
quadriceps. It also improves coordination and agility.
THE BIG
PICTURE
KEY
Joints
Check that your surface is level
before starting this exercise. It
begins by keeping low with knees
bent, but don’t let the knees go
past the toes as you jump down
to the floor into the push-up.
If you are a beginner, start with
running in one spot 8 times
before dropping down to the
floor; repeat for 30 seconds.
Muscles
Shortening
with tension
Lengthening
with tension
Lengthening
without tension
Held muscles
without motion
Maintain alignment in
head, neck, and spine
Engage the core
STAGE ONE
Point toes
forward
PREPARATORY STAGE
Stand with feet shoulder-width
apart, crouched down slightly in
a half-squat position. Bend your
elbows to 90 degrees and keep
them at this angle for stage 1.
142
Begin to run on the spot,
quickly hopping from one
foot to the other,
remaining on the balls of
your feet. Keep your arms
static as you do this fast,
explosive movement.
Complete 8 quick, low
hops without stopping.
ANTERIOR-LATERAL VIEW
CONTINUED
Jump feet out
behind you to
land on your toes
Don’t let knees
go past toes
Transfer weight
to your hands
STAGE TWO
After your 8th hop, crouch down and
prepare to put your hands on the floor
underneath your shoulders.
STAGE THREE
Take your weight into your hands and
shoulders and jump both of your feet
out behind you to straighten your legs,
keeping the core engaged.
Lower body and
abdominals
Rec
The quadriceps, calves,
hamstrings, and glutes are all
engaged during this workout.
The quads work to extend the
knees and to stabilize the patella
and knee joints. The iliopsoas,
tensor fasciae latae, and
rectus femoris help extend the
hips. The gastrocnemius and
soleus muscles in the calves are
contracted when upright.
Tuck the hip, keeping
your butt out of the air
Keep legs straight
tus
abd
om
Exter
nal o inis
bliqu
Gluteus
maximu e
s
Rectus femoris
Gastrocnemius
gus
us lon
Perone nterior
lis a
Tibia
Bend arms to go
into a push-up
STAGE FOUR
Get into a high plank position, weight
on your hands and toes, in preparation
for doing a push-up.
FULL SEQUENCE
PREP
1
2
3
4
5
6
7
8
9
143
HIIT EXERCISES
Plyometric Exercises
FOOTBALL UP AND DOWN
(CONTINUED)
Flex your toes
on the floor
Lift hands off
the floor briefly
Upper body and abdominals
The triceps, upper back, chest, and
shoulders are engaged in the fifth stage of
the movement. The erector spinae helps
extend the thoracic and lumbar spine. When
you jump back, the rectus abdominis and
obliques contract to brace the spine. The
pectoralis major, triceps brachii, and
anterior deltoids are activated, as well as the
middle and upper trapezius muscles.
STAGE FIVE
Bend your elbows and lower your upper body
to the floor into a push-up, chest in between
your hands. Touch your chest to the floor and
lift your palms up briefly. Rest the toes on the
floor and keep your feet hip-width apart.
Tr
De icep
lto s
i
Tra
pezi ds
us
rsi
do e
us iqu
m
l
i
tiss l ob
a
La
n
r
te
Ex
Caution
Vastus lateralis
Bicep fe
Glute moris long he
ad
Glu us maxim
us
teus
med
ius
or
uct
s
Abd
ongu
eus l
n
o
r
Pe
ius
Gastrocnem
iti
dig
min
imi
This is a very quick-moving
cardiovascular exercise.
Make sure that you are
physically ready and that
you keep the core engaged
to protect the back.
LATERAL VIEW
STAGE SIX
Lower body
In the burpee, the quadriceps, glutes,
hamstrings, and calves are held
isometrically to stabilize the body. The
gluteus maximus and hamstrings
work to flex the hip when you jump back.
Hamstrings also aid in flexing the knees.
144
Press your palms back into the
floor to push your upper body
back up away from the floor,
completing the press-up.
KEY
Joints
Muscles
Shortening
with tension
Maintaining a low center of gravity
will help you move quickly and retain
balance by keeping your weight
evenly distributed.
Lengthening
with tension
Lengthening
without tension
Held muscles
without motion
Maintain an
upright chest
while running
on the spot
Keep body in a low,
crouched position
Legs jump back
underneath you
STAGE EIGHT
STAGE SEVEN
STAGE NINE
Land with your feet shoulder-width
apart. Transfer your body weight back
onto your legs and bend your elbows
into the preparatory stage position.
Jump your legs underneath you,
preparing to come back to standing
in the half-squat position, knees
bent but soft.
Run on the spot rapidly for
8 hops before jumping
down again and repeating
the sequence.
FULL SEQUENCE
PREP
1
2
3
4
5
6
7
8
9
145
HIIT EXERCISES
Plyometric Exercises
BURPEE
THE BIG PICTURE
The burpee is a very demanding exercise,
combining explosive jumping with strengthbuilding push-ups. To challenge yourself
further, you can do a tuck jump instead of a
jump with straight legs, bringing the knees up
toward the chest. With a straight spine and
neck and head in alignment, power into the
tuck jump from the legs at stage one. Tighten
the core to bring the knees in. Start with 5
reps, and build up to 10 as you become
accustomed to the exercise.
Fle
B xor d
Pe iceps igitor
um
cto
sup
ra
erfi
lis
cial
ma
is
jor
This full-body workout strengthens both the lower and upper
body. It increases agility, power, and endurance, targeting the
legs, hips, glutes, abdomen, chest, shoulders, and arms. It’s a
high-intensity exercise aimed at helping get the heart rate
up, which will also speed up your metabolism.
s
ini
ids bdom
o
t
l
a
e
De ectus
liqu
R ernal ob
Ext
Upper body
Keep your chest
slightly raised
Don’t let knees
come past toes
The burpee engages a lot of
the upper body because there
is a push-up involving
contraction of the pectoralis
major, deltoids, and triceps.
The abdominal muscles are
also engaged, in bracing the
spine. The erector spinae
muscles hold the body stable.
In the jump, swinging the
arms outward engages
the shoulders.
LATERAL VIEW
PREPARATORY STAGE
Start in a squat: position your feet shoulderwidth apart, spine and neck in alignment, and
knees bent. Make sure the knees don’t come
past the toes and the chest remains no lower
than 45-degree angle.
146
STAGE ONE
Using the power from your
legs, jump quickly into the air
and land back where you
started. Swing your arms out
to the side as you jump,
keeping your legs straight.
CONTINUED
Keep head, neck, and
spine in alignment
Prepare to jump
feet back
Keep your knees soft
when you land
Arms should be
straight but
elbows not locked
Caution
Excessive back
curving and folding
forward can cause
wrist and lower
back injuries.
Ten
so
r fa
scia
e la
STAGE TWO
STAGE THREE
As soon as you land with knees bent,
get back into a squat position and
prepare for the push-up position.
Bend over and lower your hands to
the floor in front of you so they’re
just inside your feet. Your body will
be in an inverted “V” shape.
tae*
(TF
L)
Sar to
rius
Rectus femoris
Vastus lateralis
ius
ocnem
Gastr
us
Sole
r
rio
nte
a
lis
bia
Ti
Lower body
The squat position of the burpee relies
on the quadriceps, hamstrings, and
glutes. When thrusting the legs back,
you continue to engage your glutes
and hamstrings. Your hip flexor
muscles and quadriceps are engaged
during most of the movement. As you
jump into the air, your quadriceps,
glutes, and hamstrings all contract.
KEY
Joints
Muscles
Shortening
with tension
Lengthening
with tension
Lengthening
without tension
Held muscles
without motion
FULL SEQUENCE
PREP
1
2
3
4
5
6
7
147
HIIT EXERCISES
Plyometric Exercises
BURPEE
(CONTINUED)
KEY
Lengthening
with tension
Joints
Muscles
Shortening
with tension
Keep your neck, spine,
and head in alignment
Lengthening
without tension
Held muscles
without motion
Rest weight
on your toes
STAGE FOUR
With your weight on your hands, jump
your feet back so you’re on your hands
and toes and in a high plank position
(see pp.34–35). To modify this, you can
just step one foot back at a time.
Engage your core
ito
ru
Latissimus dors
i
External oblique
Tricep
p
Bice
d
ltoi r
jo
ma
ig
De
rd
lis
so
ora
ten
ct
Pe
Ex
m
STAGE FIVE
Core and upper body
When performing the push-up, it’s important
to make sure the hip is tucked, the abdominals
are engaged, and the elbows are slightly back
when lowering so as to protect the deltoids.
148
Keeping your body straight and
core tight, do one push-up.
Elbows come out toward the
ceiling, chest to floor. Squeeze
the thighs and don’t let your
back sag or stick your butt in
the air when pushing up.
Before the next jump, make
sure your head, neck, and
back are all in alignment
Hold arms in
front of you
Land softly on
your feet
Thighs are parallel
with the floor
Arms come off the floor
STAGE SIX
Jump both your feet back to
their starting position, feet
planted firmly on the floor.
STAGE SEVEN
As soon as you land with knees
bent, get into a squat position
and do another repetition.
The burpee speeds up
your metabolism, so you’ll
continue to burn calories
throughout the day.
FULL SEQUENCE
PREP
1
2
3
4
5
6
7
149
HIIT EXERCISES
Plyometric Exercises
BEAR CRAWL
The bear crawl is a mobility-focused core exercise.
The total body movement in the bear crawl improves
coordination and cardiovascular strength and endurance,
as well as enhancing overall athletic performance.
This exercise strengthens the shoulders, chest and
back, glutes, quadriceps, hamstrings, and core.
Keep back
strong
Feet hip-distance
apart
Engage the core
THE BIG PICTURE
PREPARATORY STAGE
Keep the back completely flat as you propel your body
forward. Before you start moving, brace your core so that the
hips and shoulders are in one straight line. Maintain this solid
core position as you move. Practice holding a tabletop position
with the knees off the floor. The head should not sag forward
or droop—that takes the head and neck out of alignment. Try
to keep all of your movements underneath your torso as you
move. If you notice your legs sneaking out to the side or hips
swaying, you might be taking steps that are too big. If just
beginning, perform the workout for 30 seconds. Slowly work
up to 1–2 minutes for 3–5 reps forward and backward.
Lower body
STAGE ONE
Transfer into a bear plank
position (see pp.44–45).
Begin to move forward by
simultaneously moving
the right hand and the
left leg forward with a
crawling motion.
Immediately switch sides
and move the left hand
and right leg forward.
Keep the body low as you
crawl with small steps.
150
s
maximu
Gluteus
Tensor fasciae latae
Biceps fe
moris lon
g head
Rect
us fe
Va
m
oris
Ga stus
lat
str
era
oc
lis
ne
mi
us
s
leu
rior
So
ante
alis
Tibi
us
Peroneus long
The bear crawl engages the muscles
in the quadriceps, glutes, hip
flexors, and hamstrings. The glutes
help maintain stability in the hips as
you move forward and backward,
while the quadriceps are held
isometrically throughout.
Get into a high plank (see pp.36–37) as if
you were preparing to do a push-up. Hands
should be beneath the shoulders, the back
strong, and the core engaged, with feet
hip-distance apart and heels off the floor.
LATERAL VIEW
Keep palms flat on
floor as you crawl
Keep heels off the floor
and crawl on your toes
Knees at a 90-degree
angle hovering off floor
STAGE TWO
Keeping your back straight and your knees bent,
hovering about 2 in (5 cm) off the floor, repeat
the crawling movement in reverse for the same
amount of steps. Reset to the high plank position
before you go into another cycle of reps.
Upper body and abdominals
This movement strengthens the
deltoid muscles in the shoulders, as
well as muscles in the chest, back,
and abdominals. The abdominals are
held isometrically, and the erector
spinae is used to balance the spine.
Tr
ap
e
De zius
lt
Pecto
ralis oids
majo
r
Biceps
Triceps
ialis
iorad
m
Brach
oru
igit
d
r
o
ens
Ext
KEY
Joints
Muscles
Shortening
with tension
Lengthening
with tension
Lengthening
without tension
Held muscles
without motion
151
TOTAL BODY
EXERCISES
Exercises in this section engage both the upper and lower body.
Each is an aerobic, resistance, and body weight compound exercise
aimed to cut time and burn more calories. Most of the exercises are
built by combining two main parts, making up a sequence that
will challenge the whole body. There are detailed instructions on
achieving proper form and minimizing risk.
Total Body Exercises
Shortening
with tension
Muscles
Joints
KEY
Held muscles
without motion
Lengthening
without tension
Lengthening
with tension
The knees must stay soft and the heels
off the floor, as you jump back and
forth on the balls of your feet.
Throughout this entire workout, it’s
important to keep the core engaged.
Perform the workout for 30 seconds
to start with. Slowly work up to 1–2
minutes for 3–5 reps, increasing the
weights as you become accustomed
to the exercise.
THE BIG PICTURE
The jack press is a cardiovascular
endurance and strength-building
exercise. Adding the press focuses
on muscle endurance and power.
This exercise strengthens the glutes,
quads, hip flexors, and deltoids
(shoulder muscles).
JACK PRESS
HIIT EXERCISES
F
igitor
lexor d
um sup
s
erficiali
is
l
dia
iora
h
c
a
eps
Br
Bic s
id
lto i
De dors
us
im
iss
t
La
In the press, you use the anterior and
medial deltoid to press straight up. The
press movement also activates the triceps
and trapezius. Lowering your arms back
to your sides utilizes your latissimus
dorsi in the back. The rectus abdominis
prevents the spine from rounding, while
the obliques work to keep you from
leaning too far to the left or right.
Upper body and abdominals
ora
Arms return to start of
military press position
Pe
ct
r
ajo
lis
m
155
As you lift the weights above
your head, jump your feet out
to either side simultaneously
in a jumping jack movement.
The feet will jump out wider
than shoulder-width apart.
STAGE ONE
Start by standing tall, feet shoulderwidth apart, hands holding weights
at your sides. The toes are pointed
forward and the core is engaged.
Lift the weights up into a military
shoulder press position (see pp.
76–77), weights held horizontally;
knuckles should face forward.
PREPARATORY STAGE
Gentle bend
in knees
Bend elbows at 90
degrees to arm
Hold weights
horizontally,
facing out
ia
lis
ius
The calf muscles work to flex your ankles. The
quadriceps extend your knees to propel you off the
floor, and the glutes and hamstrings contract to
extend your hips for the jump. Jumping out activates
the gluteus medius, gluteus minimus, tensor
fasciae latae, and sartorius. Jumping back engages
the adductors, pectineus, and gracilis muscles.
Lower body
s
em
stu
Va strocn
r
terio
a
G
s an
i
l
a
i
Tib
Soleus
d
me
Gra
c
Sa ilis
Re r toriu
ctu
s
s
f
em
or
is
ANTERIOR VIEW
Since you are jumping with
weights, be careful not to
use weights that are too
heavy. Sometimes when
doing the jack press, the
arms give out and the back
starts to cave in. Make sure
that the spine, neck, and
head are all in alignment
and the core is engaged
throughout the sequence.
Caution
Jump the feet back to their starting
position while bringing the arms
back down to their starting press
position, making sure your elbows
don’t dip past the ribcage.
STAGE TWO
Land on balls
of the feet with
your weight
distributed
evenly
HIIT EXERCISES
Total Body Exercises
PUSH-UP
AND SQUAT
Lower body and legs
The quadriceps, gluteus maximus
and medius, hamstrings, and calf and
shin muscles are held isometrically to
aid in stabilizing the body.
This combination full-body workout strengthens the
chest muscles, shoulders, back of your arms, abdominals,
and “wing” muscles directly under your armpit. It also
strengthens all the largest muscles of the legs and butt,
including the quadriceps, glutes, and hamstrings.
s
ori
em
sf
ctu
alis
Re
ater
us l
Vast
rior
Tibialis ante
Peroneus
longus
G
Te luteu
sm
ns
axi
or
mu
fas
s
cia
el
ata
e
THE BIG PICTURE
For the push-up, keep the abs engaged during the whole
movement—think belly button to spine. Moving from the push
to the squat, it’s important to jump the feet in landing on the
whole of the foot, not just the toes, to distribute balance evenly.
In the squat, make sure your knees don’t go past your toes.
Body forms a diagonal
line from heels to neck
Palms under the
shoulders
THREE-QUARTER
ANTERIOR VIEW
PREPARATORY STAGE
Start in a high plank position (see pp.36–
37) with your pelvis tucked in, neck neutral,
and palms directly under your shoulders.
Make sure your shoulders are rotated back
and down and your core is engaged.
Elbows
point back
Maintain a
straight spine
Flex heels back
Caution
Not engaging the core during the push-up
can cause the spine to cave in, creating
pressure on the lower back and joints.
Incorrect form on the squat can lead to
knee and lower back injuries. Avoid letting
the knees bend inward, hunching the back,
or lifting the heels off the floor.
156
STAGE ONE
Inhale, pulling the belly in and engaging the
core. Keeping your back flat, exhale as you
slowly lower your body by bending your
elbows, until your chest grazes the floor.
CONTINUED
KEY
Lengthening
with tension
Joints
Muscles
Upper body and arms
Lengthening
without tension
Shortening
with tension
The upper body contracts as it lowers
and raises the pectoralis major and
minor, deltoids, latissimus dorsi,
rhomboids, trapezius, biceps, triceps,
and serratus anterior all work together
to slowly bring the body down and up.
Held muscles
without motion
Trapezius
Deltoids
Triceps
r
lis majo
Pectora
s
p
Bice
s
iali
rad
o
i
ch
Bra
Body in upside-down
“V” shape
Jump both
feet in
Arms remain on
floor, shoulderwidth apart
STAGE TWO
STAGE THREE
Slowly extend your elbows and push your
body back up to the starting position.
Make sure the core remains engaged.
Tighten the core at the top of your
push-up. Jump both feet in at the same
time, landing on the balls of your feet.
FULL SEQUENCE
PREP
1
2
3
4
5
6
7
157
HIIT EXERCISES
Total Body Exercises
PUSH-UP AND SQUAT
(CONTINUED)
Begin to
raise up
THREE-QUARTER
ANTERIOR VIEW
Lift hands
from floor
STAGE FOUR
As you land, slowly raise your chest
and head, lifting your hands from
the floor and keeping the legs stable.
A squat is a “complex movement”
because of the high amount of
muscle activation. It improves
your lower body mobility and
keeps bones and joints healthy.
STAGE FIVE
Position yourself in a low squat position,
arms in front of you, hands loosely grasped
in front of your chest, and thighs parallel to
the floor. Hold that position for 2–3 seconds.
158
Upper body and abdominals
As you squat, your upper body is held in
tension. Your core muscles, specifically
the erectors, are activated throughout the
movement to stop you from falling forward.
They also help brace the spine.
Arms reach
down to floor
Jump feet back to
starting position
Sternocleidomas
Rectu
s
toid
Deltoid
Biceps
Triceps
inis
abdom
STAGE SIX
Place your palms onto the floor
in between your knees and jump
your feet back into the starting
position, high plank.
Don’t allow the
back to sag
Lower body and legs
Engage the core
The lower body works the most in the
squat. As you lower, the quadriceps
muscle kicks in as your knees are bending.
The glutes and adductor magnus work
to extend the hips.
Arms straight, hands
facing forward
Vastu
sm
Tenso
r fasci edialis
ae la
Patellar ten tae
don
Gastrocnemius
Soleus
ior
n
a
s ter
Tibiali
STAGE SEVEN
Back in the high plank position,
check your form, then descend
once more into the push-up,
repeating the entire sequence.
FULL SEQUENCE
PREP
1
2
3
4
5
6
7
159
HIIT EXERCISES
Total Body Exercises
PUSH-UP AND
TUCK JUMP
Lower body
The quadriceps, gluteus maximus
and medius, hamstrings, and calf and
shin muscles are held isometrically to
aid in stabilizing the body.
This is a plyometric full-body workout. The push-up
strengthens the chest muscles, shoulders, back of your
arms, and “wing” muscles under your armpit. The tuck jump
uses your body weight and power to jump up.
When doing the push-up, remember to keep the abs engaged
during the whole movement. It’s important to know how to land
when doing these plyometric jumps. Make sure you’re utilizing
the full range of motion—this will help you get farther off the
floor. Land softly through the feet, knees, and hips. This will
help protect your body from the impact.
s
ori
em
sf
lis
ctu
tera
Re
a
us l
Vast
rior
Tibialis ante
Peroneus
longus
THE BIG PICTURE
G
Te luteu
sm
ns
axi
or
mu
fas
s
cia
el
ata
e
Balance body
between toes
and hands
Arms shoulderwidth apart
THREE-QUARTER
LATERAL VIEW
PREPARATORY STAGE
Get into a high plank position (see pp.36–37)
with your pelvis tucked in, your neck neutral,
and your palms directly under your shoulders.
Make sure your shoulders are rotated back
and down, too, and the core engaged.
Caution
Make sure you are warmed up before performing
this and any plyometric workout. If you’re not
warmed up, you can strain the knees and joints
and cause injuries to the body.
STAGE ONE
Inhale, engaging the core. Keeping your back
flat, exhale as you slowly lower your body by
bending your elbows until your chest grazes
the floor. Maintain a straight spine.
160
FULL SEQUENCE
PREP
1
2
3
CONTINUED
KEY
Lengthening
with tension
Joints
Muscles
Upper body
Lengthening
without tension
Shortening
with tension
The upper body contracts as it lowers the
body and brings it back up. The
pectoralis major and minor, deltoids,
latissimus dorsi, rhomboids, trapezius,
biceps, triceps, and serratus anterior
work together in the movement.
Held muscles
without motion
Trapezius
Deltoids
Triceps
major
s
li
a
r
Pecto
ps
Bice
s
iali
rad
o
i
ch
Bra
Body forms upsidedown “V” shape
Prepare to
lift arms
Jump both
feet in
STAGE TWO
STAGE THREE
Slowly extend your elbows and
push your body back up to the
starting position. Make sure
the core remains engaged.
4
5
Tighten the core at the top of your
push-up. Jump both feet in at the same
time, landing on the balls of your feet.
6
7
8
9
10
161
HIIT EXERCISES
Total Body Exercises
PUSH-UP AND TUCK JUMP
(CONTINUED)
Upper body and abdominals
The abs and the lower back muscles
(erector spinae) work to brace the
spine as you lower, as well as when
you tuck the knees and land back on
the floor. The arm swing engages the
anterior shoulders and biceps.
To bring those knees into
the tuck jump, engage
your lower abs to help
drive them upward.
Deltoids
Triceps
La
Ex tissimu
ter
s do
rsi
na
lo
bli
qu
es
Keep chest up
Legs straight before you
tuck them into jump
Knees bent in
preparation
for jump
THREE-QUARTER
LATERAL VIEW
STAGE SEVEN
STAGE FOUR
As you land, slowly raise your
chest and head, lifting your
hands off the floor and keeping
your legs strong.
In midair, lift the knees to hip level into a
tuck jump, making sure your heels don’t
go back toward the butt. Extend the arms
out at shoulder height, elbows pointed
toward the knees. As the knees come up,
bring the elbows down to meet them.
STAGES FIVE AND SIX
Assume the low squat
position, knees bent, then
using the leg muscles, jump
straight up into the air.
KEY
Joints
Muscles
Shortening
with tension
162
Lengthening
with tension
Lengthening
without tension
Held muscles
without motion
FULL SEQUENCE
PREP
1
2
3
Face chest
outward
Body forms
upside-down
“V” shape
Keep core engaged
Straight
back
Jump feet
back
Knees
slightly
bent
Palms face
forward
on floor
STAGE EIGHT
STAGE NINE
Land softly on the balls of
your feet with knees bent
in a half-squat position.
Vastus media
Immediately bend to place your
palms onto the floor, in between
your knees, and jump your feet
back into the starting position.
Body in diagonal line
from heels to neck
lis
Gracilis
Semitendinosus
nemius
Gastroc erior
ant
alis
Tibi
Lower body
The glutes and hamstrings contract
when you prepare to jump, shortening
when you explode upward. In midjump, the
rectus femoris and hip flexors work to
create that “tuck” motion. The calves
extend the ankles, assisting the glutes,
hamstrings, and quads to get your feet off
the floor into the tuck jump.
4
5
6
7
Hands facing
forward
STAGE TEN
Back in the high plank position, arms
shoulder-width apart and balanced
on your toes and hands, check your
form, then repeat the sequence,
starting with another push-up.
8
9
10
163
HIIT EXERCISES
Total Body Exercises
BEAR PLANK
AND PUSH-UP
This full-body workout focuses on the core and the
upper body. The bear plank targets the muscles in your
glutes, psoas, quadriceps, shoulders, and arms. The
push-up strengthens the chest muscles, shoulders, back
of your arms, abdominals, and muscles under your armpit.
When doing the bear plank, try to keep your gaze
looking down toward the floor, which will hold your
neck in a neutral position. It’s an isometric exercise,
so stillness is important—try not to shift the hips back
and forth. Keep the abs engaged for the entire time
of your push-up.
The quadriceps, gluteus
maximus and medius,
hamstrings, and calf and
shin muscles are held
isometrically to aid in
stabilizing the body.
G
Te luteu
sm
ns
axi
or
mu
fas
s
cia
el
ata
e
s
ori
em
sf
ctu
alis
Re
ater
us l
Vast
rior
Tibialis ante
Peroneus
longus
THE BIG PICTURE
Lower body
Keep back flat
Hands flat on
floor, facing
forward
PREPARATORY STAGE
Start on all fours (quadruped [tabletop]
position), making sure the back is flat. Hands
are shoulder-width apart, wrists are under the
shoulders, and knees are hip-width apart. Flex
your feet, with your toes on the floor.
Maintain a
flat back
Gaze directed
at floor
STAGE ONE
Caution
To avoid strain and pressure on your
lower back and joints, make sure your
core muscles are engaged, your back
is flat, and you have a neutral spine.
164
Engage your core (belly button to
spine), push the palms into the
floor, and lift your knees 3–6 in
(8–15 cm) off the floor. Ensure your
hips are level with your shoulders.
Hold for 30–60 seconds; timing
depends on your fitness level.
CONTINUED
KEY
Lengthening
with tension
Joints
Muscles
Upper body
Lengthening
without tension
Shortening
with tension
The upper body contracts as it
lowers the body and brings it
back up. The pectoralis major
and minor, deltoids,
latissimus dorsi, rhomboids,
trapezius, biceps, triceps, and
serratus anterior all work to
raise and lower the body.
Held muscles
without motion
Trapezius
Deltoids
Triceps
major
s
li
a
r
Pecto
ps
Bice
s
iali
rad
o
i
ch
Bra
STAGE TWO
Keeping your hands on the
floor, jump your feet back to
place your body in a high plank
position (see pp.36–37). This is
an explosive move, requiring the
tightening of the core muscles.
Prepare to do a push-up.
THREE-QUARTER LATERAL VIEW
FULL SEQUENCE
PREP
1
2
3
4
5
6
165
HIIT EXERCISES
Total Body Exercises
BEAR PLANK AND PUSH-UP
(CONTINUED)
Lower body
KEY
Joints
Muscles
Shortening
with tension
The muscles in the hips, glutes,
quadriceps, and hamstrings are
engaged during the bear plank hold.
The hips and hamstrings, along with
the glutes, are further activated as you
transition from plank to push-up.
Lengthening
with tension
Lengthening
without tension
Held muscles
without motion
Strength in shoulders
keeps body aligned
Extend arms
at elbows when
you lower
eu
Glut
s ma
ximu
s
us
mi
ne
oc
gus
str
lon
Ga oneus
Per
Tensor fasciae latae
Bice
ps fe
mori
Re
s lon
ctu
g hea
sf
em
d
ori
s
STAGE THREE
Inhale, pulling the belly in tighter and
engaging the core. Exhale and lower your
body down by bending your elbows back.
Stop when your chest grazes the floor.
Extend arms at elbow
into high plank
Body forms diagonal
line from heels to neck
Keep pelvis
tucked under
Look at the floor
to keep a neutral
head position
STAGE FIVE
Slowly and gently jump the feet back into
the bear plank position, on all fours, back
flat and knees slightly raised from the floor.
Hold for 30–60 seconds.
STAGE FOUR
Straighten the arms slowly,
and while exhaling, push
yourself up back into the high
plank position, holding the
pose for 2–3 seconds.
166
Keeping a tight core works as a
stabilizer, avoiding strain in the wrists.
STAGE SIX
Return the knees to the floor into the
tabletop position, take a pause, then
repeat the entire sequence, starting
with the bear plank.
Trap
ezius
Deltoids
Pectoralis major
Triceps
Biceps
alis
ioradi
Brach
rum
igito
or d
s
n
e
Ext
Upper body and arms
The transverse abdominis, rectus
abdominis, and external and internal
obliques are all held isometrically in the
bear plank. The muscles of the deltoids
and arms are also held under tension.
THREE-QUARTER LATERAL VIEW
FULL SEQUENCE
PREP
1
2
3
4
5
6
167
HIIT EXERCISES
Total Body Exercises
HIGH PLANK, ANKLE
TAP, AND PUSH-UP
This exercise sequence improves balance, coordination, and
posture and strengthens your core. The transition from each
stage improves body flexibility and makes the tummy tight.
The alternating of the ankle tap further engages the obliques.
THE BIG PICTURE
You need balance and coordination to complete this
exercise correctly, as it has several components. Remember
to engage your core throughout the three exercises—the
high plank, ankle tap, and push-up—and keep your legs
strong, as they act as stabilizers to help prevent any sagging
or arching of the spinal column.
KEY
Lengthening
with tension
Joints
Muscles
Lengthening
without tension
Shortening
with tension
Held muscles
without motion
Keep shoulders down
Body forms diagonal
line from heels to neck
Point hands
forward
PREPARATORY STAGE
Start in the high plank position (see pp.36–37),
arms shoulder-width apart, back straight,
and weight resting between your toes and
your hands on the floor. Engage the core.
168
STAGE ONE
Raise your body into an inverted “V” shape by bringing
your hips into the air. Simultaneously raise your left
hand off the floor and bring it back toward the right
ankle, holding the position for 2–3 seconds. Your head
will naturally rotate to the right as you do this.
Caution
Make sure that you maintain a neutral spine and that
your shoulders are down, not creeping up toward your
ears. Keeping the abs engaged during the push-up will
stop the spine from caving in and causing pressure on
the lower back and joints.
CONTINUED
Gluteus
maximu
s
Gluteus medius
ues
is
min
bdo
a
r
s
tu
rio
Rec
nte
a
us
rat
r
e
S
Abdominals and hips
The transverse abdominis and the neck
flexors are worked in this movement. The
core braces the back, supporting the
spine. The hip flexors, adductors,
quadriceps, glutes, hamstrings, and
lower back are also engaged.
si
m
is
tiss
im
us
tor
al
Pe
c
dor
aj
or
l obliq
Externa
La
Arms and shoulders
The triceps and the deltoids are the
primary muscles engaged in this
sequence. As you bring one hand back to
tap the ankle, you support your weight
with both muscle groups.
Deltoids
s
Tricep
ps
e
c
i
B
s
iali
rfic
e
m
p
su
ru
um
ito
r
g
o
i
t
i
d
dig
sor
xor
ten
Fle
x
E
LATERAL VIEW
FULL SEQUENCE
PREP
1
2
3
4
5
169
HIIT EXERCISES
Total Body Exercises
HIGH PLANK, ANKLE
TAP, AND PUSH-UP
(CONTINUED)
Maintain
a flat back
Spine neutral,
core engaged
Reach right
hand toward the
left ankle
Press heels back
Left hand provides
support on the floor
STAGE THREE
Elbows soft,
not locked
Raise up into the inverted “V” again and repeat
the ankle tap on the other side, your right hand
reaching toward the left ankle.
STAGE TWO
Keeping the core engaged, slowly lower your
hips while also moving your left hand back to
its starting position on the floor. You are now
back in the high plank position.
ad
long he
ead
or t h
us
gu
s
Lower body
The quadriceps, gluteus
maximus and medius,
hamstrings, and calf and
shin muscles are held
isometrically to aid in
stabilizing the body.
is sh
mi
170
Held muscles
without motion
lon
Shortening
with tension
Lengthening
without tension
Vastus lateralis
mor
cne
us
Muscles
Lengthening
with tension
femoris
ps fe
stro
ne
Joints
G
l
u
teus
med
Tenso
ius
r fasc
iae la
tae
Gluteus max
imus
Biceps
Bice
Ga
ro
Pe
KEY
Upper body
rn
ocl
us
ezi
ap
Tr ltoids
De eps
Tric
us dorsi
Latissim
Rectus abdominis
Externa
l obliqu
es
Ste
eid
om
as
toi
The upper body contracts as it lowers the
body and brings it back up. The pectoralis
major and minor, deltoids, latissimus
dorsi, rhomboids, trapezius, biceps,
triceps, and serratus anterior all work
to slowly bring the body down and up.
d
STAGE FOUR
After tapping each ankle, inhale
deeply, pull the belly in tighter, and
engage the core as you resume the
high plank position, back flat and
hands and feet shoulder-width apart.
Keep head in a
neutral position and
look at the floor
Bend the elbows
Feet stay on the
floor, toes flexed,
throughout sequence
STAGE FIVE
Exhale and slowly begin to lower your body
by bending your elbows while keeping them
pointed slightly back. Lower down until your
chest grazes the floor and maintain a straight
spine. Exhale as you push back up into the
high plank, and repeat the sequence.
LATERAL VIEW
FULL SEQUENCE
PREP
1
2
3
4
5
171
HIIT EXERCISES
Total Body Exercises
B BOY
POWER KICKS
This core-focused workout strengthens the obliques,
abs, and lower back. It also strengthens your shoulders,
arms, and legs and improves your cardiovascular
strength and endurance.
PREPARATORY STAGE
Get down on your hands and knees and lift
your knees 3–6in (8–15cm) off the floor,
into a bear plank position (see pp.44–45).
Position your wrists under your shoulders, your
knees in line with the hips, and your back flat.
Lower body
THE BIG PICTURE
tor
iu
s
str
oc
ne
Rec s ant miu
tus eri s
fem or
Vastu
o
s late ris
ralis
Biceps femor
is longus
ximus
ma
us
ute
Gl
This is an advanced cardiovascular movement. If you are a
beginner, start off moving at a slower pace so that you can
perfect your form. Begin by performing the exercise for
30-second intervals, aiming for 3–5 sets. As you get stronger
and more accustomed to the move, you can increase both
the speed and time of the exercise.
When you are kicking the leg through in this
exercise, the muscles in the quadriceps,
hamstrings, and glutes are all held
isometrically. The leg slide-through engages the
quadriceps; the glutes stabilize the hips.
Ti
bi
Right leg stays
on floor
ali
Ga
r
Sa
Left arm takes
the weight as
you kick through
Left leg comes
under body to kick
STAGE ONE
Exhale and lift your right
hand and left foot off the
floor, rotate your hips to the
right, and place your right
heel on the floor as you kick
your left leg to the right,
underneath your body.
Extend your left leg and
touch that heel briefly on
the floor, rotating your body
so that it is almost facing
the ceiling. Bring your right
arm above your head.
172
ANTERIOR-LATERAL VIEW
KEY
While you are on all fours, the triceps
brachii, deltoids, pectorals, latissimus
dorsi, and abdominal muscles are all
engaged. The deltoids, triceps, and
internal and external obliques contract
in the leg slide-through.
Held muscles
without motion
s
Triceps
s
Bicep r
o
j
a
lis m inis
tora
Pec abdom ique
s
si
bl
ctu al o dor
Re
n
s
u
ter
Ex ssim
i
t
La
id
Shortening
with tension
Upper body and abdominals
Lengthening
without tension
lto
Muscles
Lengthening
with tension
De
Joints
Keep spine, neck, and
back in alignment
Position wrists
under shoulders
Engage
your core
Feet flexed
at toes
STAGE TWO
Rotate your hips back toward the left and
return to the starting bear plank position.
Switch sides and repeat, doing an equal
number of reps on each side.
Caution
The b boy power kick involves lots of twisting and
weight on the wrists and rotator cuff, so to avoid
injury here, make sure you practice control by
engaging the core throughout the movement.
173
Total Body Exercises
Shortening
with tension
Muscles
Joints
KEY
Held muscles
without motion
Lengthening
without tension
Lengthening
with tension
Use an overhand grip on the dumbbells,
fingers facing out. Make sure you choose
a weight that allows you to maintain the
correct form. It’s important to watch
your elbows—keep them either directly
underneath your wrists or slightly more
inward. Beginners can start with 3 sets of
8–10 reps, progressing the weight as you
become accustomed to the exercise.
THE BIG PICTURE
The military press movement
strengthens the chest, shoulders,
arms, and upper back muscles, as
well as the muscles in your core.
The triceps extension isolates and
strengthens the triceps muscles.
CONTINUED
Biceps
Triceps
Deltoids
i
us dors
Latissim major
is
is
oral
Pect
min
bdo
a
s
tu
Rec
Besides the deltoids, military presses
activate a few other muscles, including the
triceps and trapezius. The rectus
abdominis in the core works to prevent
the spine from rounding, while the
obliques work very hard to keep you from
leaning too far to the left or right.
Upper body and abdominals
For the overhead triceps extension, make sure
you maintain stillness in the neck and don’t let
your head move around. This can happen if you
don’t have a lot of mobility in your upper back.
Caution
MILITARY PRESS AND OVERHEAD
TRICEPS EXTENSION
HIIT EXERCISES
175
PREP
FULL SEQUENCE
1
Stand with your feet
shoulder-width apart, knees
soft and legs strong. Hold
your dumbbells or barbells
on the shaft, raised to
shoulder height. Face your
palms away from your body.
PREPARATORY STAGE
STAGE ONE
2
Lift the dumbbells directly
overhead with control into a
military press position, arms
fully extended and parallel
and knuckles facing outward.
Hold for 2–3 seconds.
Engage the core
Bend arms at a
90-degree angle
3
4
THREE-QUARTER
ANTERIOR VIEW
5
Keeping the core engaged and your
legs strong, rotate the dumbbells and
bring them together above your head
so that they are touching. Keep core
engaged and shoulders relaxed.
STAGE TWO
Elbows face
outward
Dumbbells touch
each other
6
Total Body Exercises
Once you reach a 90-degree bend at the
elbow or slightly farther, inhale and reverse
the movement, bringing the weights back
above your head, still facing each other.
STAGE FOUR
Maintain a
strong stance
Keep core
engaged
Arms straight,
dumbbells
touching
You want to isolate the triceps extension
movement only at the elbow joint—keep
everything else engaged and still.
Exhale and bend the elbows to slowly
lower the weights down, bringing them
behind the head into a triceps extension.
The weights should not touch the back
of the head when they are in their lowest
position. Keep the chest aligned over the
hips and don’t arch the back.
STAGE THREE
Triceps
Deltoids
i
Latissimus dors
ajor
m
s
li
a
Pector
inis
bdom
s
u a
t
c
e
R
The triceps are isolated in this move, the
three heads working together to extend
the forearm at the elbow joint. The core
remains engaged throughout.
Upper body and abdominals
MILITARY PRESS AND OVERHEAD TRICEPS
EXTENSION (CONTINUED)
HIIT EXERCISES
177
PREP
FULL SEQUENCE
Shortening
with tension
Muscles
Joints
KEY
1
THREE-QUARTER
ANTERIOR VIEW
Held muscles
without motion
Lengthening
without tension
Lengthening
with tension
2
Engage core to
provide stability
3
Separate and rotate the weights back
to the top of the military press
position, the arms straight, holding
the weights above you, palms facing
outward and knuckles facing upward.
STAGE FIVE
Maintain a
straight spine
Don’t let
elbows
flare out
4
5
Bend the elbows to lower the
weights slowly until your elbows
are back at shoulder height, in
the preparatory stage position.
Repeat the entire sequence.
STAGE SIX
Keep your knees
soft but strong
Maintain a
straight back
Elbows
should be
parallel to
shoulders
6
HIIT EXERCISES
Total Body Exercises
BENT-OVER ROW AND
HAMMER CURL
POSTERIORLATERAL VIEW
This is a compound functional exercise,
aimed at strengthening several muscles.
The row strengthens the back, chest, upper
arm, and rotator cuff muscles. The hammer
curl targets the biceps muscles.
THE BIG PICTURE
When bending over to perform the double row
move, don’t bend more than 45 degrees and keep
the back straight, not curved, and the shoulders
square throughout. In the hammer curl, lift the
weights slowly and with control—don’t swing them—
keeping your elbows in a stable, fixed position. Count
to 3 on the way up and 3 on the way down. Complete
3 sets of 8 reps of the entire sequence.
Bend back at a
45-degree angle
Hold your
torso upright
Hold dumbbells
parallel to each
other
Weights in
front of you
Slight bend
in the knees
Feet remain
shoulder-width
apart
PREPARATORY STAGE
Start by standing with feet
shoulder-width apart, knees
slightly bent. Hold a dumbbell in
each hand, arms by your sides.
178
STAGE ONE
Inhale and bend at the hip at about
a 45-degree angle, bending the knees
and keeping the back straight. Your
weights will now be in front of you.
STAGE TWO
Exhale and lift the weights up into a
reverse row, with arms bent at the elbows
to 90 degrees. While lifting, the arms
should only go to a point just below your
shoulders. Keep the chest slightly raised.
Upper body and abdominals
Arms
The latissimus dorsi, rhomboids, spinal
erectors, and trapezius muscles are
engaged. Secondarily are the biceps,
forearm muscles, and rear deltoids. The
core is engaged throughout to stabilize the
body and stop the back from rounding.
Tra
The hammer curl isolates the muscles in
the biceps, which work to stabilize the
joints of the shoulder, wrists, and elbow
during the curl. The rectus abdominis
and external and internal obliques
work to brace the spine. The core is
engaged throughout the exercise.
Deltoids
Triceps
s
Trapeziu si
r
o
d
s
imu
inis
Latiss
bdom
a
s
rsu
nsve
Trapez
ius
Deltoids
Pectoralis major
Biceps
ANTERIORLATERAL VIEW
KEY
Joints
Muscles
Shortening
with tension
Dumbbells in front
of your thighs as
you prepare to do
second row
Lengthening
with tension
Lengthening
without tension
Held muscles
without motion
Legs strong with
soft bend in knee
STAGE THREE
Keep grip on
dumbbells firm
Maintaining the bent-over pose,
lower the weights in a controlled
manner while inhaling. Exhale to
repeat the row one more time.
Feet remain in
the same place
throughout
STAGE FOUR
Slowly stand up straight, back to the
starting position. Keeping the elbows in a
fixed position, bend your arms at the
elbow and lift the weights toward the
shoulders in a hammer curl. The weights
should be parallel to each other, the
knuckles facing out.
STAGE FIVE
Bring the dumbbells back to the starting
position, hanging by your sides with a firm
grip. Inhale and prepare to bend at the hip,
then exhale to repeat the reverse double
row, followed by another hammer curl.
179
HIIT EXERCISES
Total Body Exercises
REAR DELTOID FLY AND
TRICEPS KICKBACK
This compound exercise works several muscle
groups at once. It targets the deltoids at the back
of the shoulders and the major
muscles of the upper back,
including the trapezius,
as well as working the
triceps and abdominals.
THE BIG
PICTURE
POSTERIORLATERAL VIEW
You will begin with the rear deltoid fly,
in which scapular retraction occurs, causing
the shoulder blades to pull in toward each
other. Remaining in the bent-over position,
you then perform the triceps kickback.
Choose a weight that is appropriate for
your fitness level. Practice without weight
first until you get comfortable with the
movement. Try 1–3 sets of 8–12 reps to start,
slowly increasing weight as you get stronger.
Spine in neutral
position
KEY
Joints
Muscles
Shortening
with tension
Dumbbells hang
straight down with
palms facing you
Legs shoulder-width
apart, slight bend
in knees
Lengthening
with tension
Lengthening
without tension
Held muscles
without motion
180
PREPARATORY STAGE
Stand with feet shoulder-width apart
holding the dumbbells hanging
down in front of you. Press the hips
back in a hinge motion, bringing
your chest forward.
CONTINUED
STAGE ONE
Exhale and raise both arms to the side,
squeezing the shoulder blades together.
Keep a soft bend in your elbows as you
pull your shoulder blades toward the
spine. Try to hold for 2 seconds.
Engage core throughout
movement
Ex
ten
sor
m
ru
ito lis
dig adia
or
hi
ac
Br
Tr
ice
Tra
p
p
eziu s
Infr
s
aspi
natu
s
Tricep
s
Serratus
anterior
Iliocostalis
Transversus abdominis
Return weights to
starting position,
hanging in front of you
Keep knees soft
STAGE TWO
Inhale as you lower the weight back to
the starting position. Avoid rounding
your back and hunching the shoulders
forward. Tuck your chin to maintain a
neutral spine and breathe normally.
Upper body
Caution
The reverse fly targets several
muscles in the upper back and
deltoids. The posterior deltoids
are the main muscles recruited, in
addition to the middle and lower
trapezius, rhomboids,
infraspinatus, and teres minor.
Avoid rounding the back, as that puts strain on
the spine. When the weights are too heavy, this
can lead to rounding the back and swinging of
the weights, which uses momentum to lift the
weights instead of using the intended muscle.
FULL SEQUENCE
PREP
1
2
3
4
5
6
181
HIIT EXERCISES
Total Body Exercises
REAR DELTOID FLY AND
TRICEPS KICKBACK
(CONTINUED)
KEY
Joints
Muscles
Shortening
with tension
Lengthening
with tension
Lengthening
without tension
Held muscles
without motion
ids
lto ius
e
D pez
Tra ps
e
Tric s
Bicep
dorsi
Latissimus
POSTERIORLATERAL VIEW
Chest position is
almost parallel
to the floor
Elbows bent
at 90-degree
angle
Maintain a
soft bend in
the knees
Upper body and abdominals
The triceps are the primary movers
during the kickback portion. The
muscles of the back, including the
rear shoulders, trapezius muscles,
latissimus dorsi, and rhomboids,
stabilize the torso as you bring your
arms behind you. The abdominals
also remain engaged throughout the
exercise to support the back.
STAGE FOUR
STAGE THREE
Bend your elbows behind you and
begin raising the weight. Keep the
forward hinge at your hips, with your
chest almost parallel to the floor.
182
Extend the weight up and
behind you, creating a
straight line of the arms away
from the body, exhaling at
the moment of greatest
extension. If you are feeling
strong, hold for 2 seconds at
the top of the movement.
Caution
Avoid rounding the
back to maintain a
neutral spine
Use the lowest weight
available while you work
on learning proper form
and technique. Make sure
you’re able to maintain
smooth, natural breathing
throughout your routine.
Keep back straight,
not rounded
Elbows return to a
90-degree angle
Hold dumbbells with
palms facing inward
Distribute weight
evenly between
your feet
Feet remain in same
position throughout
movement
STAGE SIX
STAGE FIVE
Straighten the arms and drop the
dumbbells back to the preparatory stage
position. Reset, then perform the reverse
deltoid fly again to complete one rep.
Inhale as you slowly bring the weights
back toward the body. Don’t swing the
weights: stop them for a split second to
reduce momentum.
Glut
eus m
axim
us
Adducto
r magn
us
Semitendinosus
us
Semimembranos
us
i
m
e
cn
Gastro
gus
s lon
u
e
n
Pero
Lower body
The lower body works as a stabilizer
in this exercise. The glutes are held
isometrically throughout. Squeezing
the glutes holds the hips in place and
works to keep the spine neutral.
FULL SEQUENCE
PREP
1
2
3
4
5
6
183
HIIT EXERCISES
Total Body Exercises
SUMO SQUAT AND HAMMER
CONCENTRATION CURL
This sequence strengthens the glutes, quads, hamstrings, hip flexors, calves,
and core, placing emphasis on the hips, as well as the inner thighs. The hammer
concentration curls strengthen the biceps muscles at the front of the upper arm,
and also the muscles of the lower arm—the brachialis and brachioradialis.
THE BIG PICTURE
In the sumo squat, don’t let your knees
cave inward. Keeping your chest upright
and not hunched throughout the
sequence and your core engaged will
help you maintain proper form. Elbows
stay glued to your thigh during the
concentration curl.
KEY
Joints
Muscles
Shortening
with tension
Lengthening
with tension
Lengthening
without tension
Held muscles
without motion
Maintain an
upright chest
Ends of
dumbbells touch
your upper thigh
Turn
toes out
Dumbbells between your
legs, parallel to each other
PREPARATORY STAGE
Stand with your legs far
apart and turn your toes
out 45 degrees. Hold the
dumbbells in front of your
thighs, arms relaxed, and
prepare to squat.
184
STAGE ONE
Start by bending at the hips
and knees and slowly push
your hips back. Keep the chest
up and knees out as you lower
into the squat. Bring your
dumbbells between your legs.
THREE-QUARTER
ANTERIOR VIEW
STAGE TWO
Holding the sumo squat, place
the elbows on the top of the
thighs, palms facing the midline
of the body. Hinge at the elbow
and lift both dumbbells up until
they are touching the shoulders.
Upper body and abdominals
The arms lengthen under tension while
holding the dumbbells. The spine is
stabilized by the abdominal muscles.
Arms touch the
inner thighs
Trapezius
Deltoids
s major
li
ra
to
ec
P
ps
Trice s
ni
i
dom eps
b
a
tus
Bic alis
Rec
i
ad
ior
h
ac
Br
su
pe
rfi
cia
lis
Hold weights parallel
to each other
um
STAGE THREE
Fl
ex
or
di
git
or
Maintaining the sumo squat position,
lower the weights to their starting
position, between your legs, chest
facing forward.
Lower body
The sumo squat
strengthens the
quadriceps, glutes
muscles, hips,
hamstrings, and
calves, with a specific
focus on the inner
thighs and abductors.
Trapezius
Deltoids
r
s majo
li
a
ps
Pector
Bice
Upper body
The biceps brachii, brachialis,
triceps brachii, flexor digitorum,
pectorals, and serratus anterior
are all targeted. The rectus
abdominis braces the spine.
Vastus latera
lis
Vastus medialis
moris
Rectus fe rior
ante us
i
alis
i
b
i
T
nem s
roc oleu
t
s
S
Ga
Vastus medialis
Rectus femoris
nterior
Tibialis a ius
n
c
o em s
Gastr
u
Sole
THREE-QUARTER
ANTERIOR VIEW
Lower body
The muscles in the hamstrings,
quadriceps, adductors, abductors,
and glutes are held isometrically at
the bottom of the sumo squat.
STAGE FOUR
Straighten the legs and slowly
stand back up to resume the
starting position, dumbbells
pressed against your upper
thighs. Reset and prepare to
repeat stages 2 and 3.
185
HIIT
TRAINING
This section contains 42 HIIT workout routines aimed at
beginner, intermediate, and advanced levels and focusing on
total body, upper body, or lower body. You perform each exercise
for a certain amount of time based on your fitness and complete
5 rounds. Routines can also be stacked for a longer workout. You
will also find advice on warming up and cooling down, how to
plan your training, and how to create your own workouts.
HIIT TRAINING
GETTING STARTED
Before performing any exercises, find the workouts that are right for you.
There are training plans in this book designed for beginner, intermediate, and
advanced users. To get the most out of them, it’s important to start where you
are and build up the muscular and cardiovascular strength to progress. Use
the fitness test below to determine where you should begin.
ASSESS YOUR FITNESS
Before you get
into HIIT, you
need to assess
your current
fitness level.
This simple
assessment will let
you know where
to start and gives
a baseline for
measuring your
progress.
Before beginning this program, use this bodyweight resistance
test to determine your current fitness level. The results will
indicate where you are in your fitness journey.
Take the test
The assessment entails performing these five typical HIIT
exercises: push ups, squats, squat jumps, sit ups, and
burpees. Before you begin, review the instructions.
Push Up: pp. 64–65
1. Do each exercise for 30 seconds.
2. Rest for 30 seconds after each exercise.
Squat: pp. 96–97
3. During each 30-second interval, record the number of
reps you were able to do of each exercise.
4. When you’ve done all five exercises, add up the total
number of reps completed to get your total score.
IF YOU SCORED
Squat Jump:
pp. 132–133
Sit Up: pp. 50–51
Up to 80 total reps
Start with level 1: Beginner level
81–104 total reps
Start with level 2: Intermediate level
105 or higher
Start with level 3: Advanced level
Burpee: pp. 146–149
188
WHAT’S THE RIGHT
LEVEL FOR YOU?
BODY FAT
COMPOSITION
After completing the fitness assessment, identify
whether you are a beginner, intermediate, or
advanced user. Start your training at that level.
HIIT is known to burn fat even after your
workout is complete (see pp. 16–17). Before
you begin this journey, it may be advantageous
to start by seeing where your body currently
sits. Body fat composition describes different
components that make up total body weight:
muscles, bones, and fat. There are several
ways to calculate body fat: through body mass
index (BMI); skinfold measurements using
calipers; or with a tape measure. There are
also several online body fat calculators you
can use to help you.
Level 1
Beginner level: for those new to HIIT
If you scored up to 80 reps, you are starting at the beginner
level. Starting here creates a good solid foundation, so you
can eventually progress to more advanced HIIT workouts.
Use this time to focus on your form and proper breathing
techniques. Start with just bodyweight and little to no weight.
Duration per exercise: 30 seconds
Breaks between exercises: 15 seconds
Number of sets: 2–3
Duration of rest between sets: 30–60 seconds
Level 2
Intermediate
Starting here means you currently have a strong foundation.
However, it is still always better to ease into this type of
workout with lighter resistance. You can challenge yourself
here with longer rep times and shorter rest times, and then
with heavier weights as your body becomes conditioned.
Duration per exercise: 45 seconds
Breaks between exercises: 15 seconds
Number of sets: 3–4
Duration of rest between sets: 30–45 seconds
Calculating YOUR BODY FAT
Use the following calculation for a broad assessment
of your body fat percentage determined by BMI.
FORMULAE
Standard: weight (lb) ÷ height2 (in) x 703
Metric: weight (kg) ÷ height2 (m)
Examples
160 lb ÷ 65 in2 x 703 = BMI 26.62 (overweight)
65 kg ÷ 1.8 m2 = BMI 20.06 (normal)
BMI MEASUREMENT
Below 18.5: Underweight
Level 3
Advanced
18.6–24.9: Normal
A score of 105+ means you are already well conditioned, but
it may be time to push yourself and take it to the next level.
Improve upon your cardiovascular and muscular endurance
and strength by challenging yourself with heavier weights,
shorter rest times, and longer durations of work time.
25–29.9: Overweight
Duration per exercise: 60 seconds
Breaks between exercises: None
Number of sets: 4–5
Duration of rest between sets: 30–45 seconds
30 or above: Obese
189
HIIT TRAINING
PLANNING YOUR
TRAINING
When I was preparing for bodybuilding competitions, I planned everything: my
workout, meal plan, and diet for 13 weeks. A clear plan creates a pathway to our
goals. Training is important, but beware of overtraining, and use proper recovery
techniques, along with a nutrition plan geared towards fueling your body.
HOW OFTEN SHOULD I TRAIN?
HIIT training isn’t meant to be
done every day. These super-quick
routines were designed so you
could perform them at maximum
effort. We all want to get in shape
and lose weight fast, so it’s no
wonder that HIIT training is such
a good idea. It’s a shorter exercise
aimed at maximizing the heart
rate, to boost the metabolism and
burn fat. HIIT workouts eliminate
the need to spend exhausting
hours on the treadmill. The
fat-burning phenomenon that
occurs after a HIIT workout is
known as EPOC (excess postexercise oxygen consumption,
see pp. 16–17)), which equates to
more calories burned, a boost to
the metabolism, and burning fat.
Because of the intensity
involved in HIIT training, it’s
best to ease into it. The fitness
assessment test (see p. 188) will
tell you which level to start with.
It’s recommended you start
training three to four times a
week. If you are new to HIIT,
perhaps start with once a week,
until your body is conditioned.
As your body gets used to the
190
workouts, you can increase the
number of days, but give yourself
24 hours in between sessions.
Overtraining your muscles is
one reason to avoid training too
much. When you do too much
physical activity, in combination
with too little rest and no recovery
periods, it can place stress on
joints and muscles. And when your
muscles are sore and overworked,
this can affect your physical
performance and lead to injuries.
Weekly program
When planning your weekly workouts,
it’s important to incorporate different
muscle groups. For instance, you don’t
want to do back-to-back lower body
workouts and risk overworking your
leg muscles. It’s also vital you space
your sessions out, to allow for proper
recovery in between.
FOR EXAMPLE
If you choose to work out four times
a week, start with an upper body
focused workout on day one, a
lower body workout on day two,
abs-focused workout on day three,
and full-body workout on day four.
Training for your level
After taking the fitness assessment
test, you will have a better
understanding of where you
should start your fitness journey.
Level 1: Beginner
If you’re starting here, ease into HIIT
training with just one or two training days
a week. In addition, make sure you stick to
the number of sets, duration of exercises,
and duration of rests recommended in the
fitness assessment test.
Level 2: Intermediate
If the fitness assessment test identifies
you as an intermediate user, start HIIT
training with two to three training days a
week. In addition, make sure you stick to
the number of sets, duration of exercises,
and duration of rests recommended in
the fitness assessment test.
Level 3: Advanced
If you are starting here, aim to have three
to four days training a week. In addition,
make sure you stick to the number of sets,
duration of exercises, and duration of rests
recommended in the assessment test.
HOW DO YOU PROGRESS
YOUR TRAINING?
One of my favourite sayings is “you can always take it up a notch.”
If you feel you are plateauing, there are several ways you can
intensify your workout. Here are your options.
Adding sets
One way of taking your workouts to
the next level is to increase the
number of sets, which means you’ll
also be spending more time doing the
series of exercises. Increasing the
number of sets like this will certainly
push your body.
Progressive reps in
reserve (RIR)
Reps in reserve (RIR) is the number of
reps you have left in the “tank” after
completing a set—in other words,
how many more reps you could have
done before reaching failure on a set.
Aim to train to within 4–5 reps of
failure to maximize stimulus.
Adding reps and load
Increasing the duration of your
exercises, in addition to the amount of
resistance you use, is a surefire way
of building muscle size (hypertrophy).
As a consequence, you’ll also find the
workouts more challenging.
Recovery
As important as the workout—if not
more important—is recovery. It may
be that you are overtraining and not
giving your body the opportunity it
needs to properly recover and lock
in the gains to be had from training.
There are several recovery tools you
can use. I go into more detail below.
RECOVERY
Another of my favourite sayings is “you should recover just as hard as you train.” Over
the age of 30, you should be recovering at a 1:1 ratio; so, for every hour of training,
an hour is needed for recovery. Clients almost always think that means stretching for an
hour, but recovery comes in many forms. Here are some others.
HYDRATION AND NUTRITION
Water helps carry oxygen to our
body cells, which results in a
properly functioning system. It also
helps remove toxins from the body.
When we sweat, we need to
compensate for that water loss.
The rule of thumb I always give my
clients is: if you are thirsty, you are
already dehydrated (see p. 27).
When it comes to diet, use our
nutrition guide (see pp. 26–27) to
find out how best to fuel your
workouts, which can make all the
difference. Many people don’t
realize that 80 percent of our
immune system lies within our gut,
so when it’s healthy, we tend to be
able to fight off infections faster
and more efficiently.
STRETCHING
Stretching helps alleviate tightness
and improve flexibility. When
performing HIIT exercises, your
muscles contract, so it’s important
to lengthen them by stretching
them or they can become
unbalanced. Muscle imbalances
can lead to stress on the joints and
injuries. Also, when muscles are
looser, they allow a greater range of
motion, which means you’ll be
carrying out the exercises properly.
The types of stretches include
standing quad stretch, lunge with
spinal twist, triceps stretch, figurefour stretch, cat stretch, 90/90
stretch, happy baby stretch,
lungeing hip flexor stretch, frog
stretch, and butterfly stretch.
USING A FOAM ROLLER
Foam rolling is a self-myofascial
release (SMR) technique that can
help relieve muscle tightness,
soreness, and inflammation. In
addition, it can also increase your
range of motion. So it’s well worth
including a foam rolling routine in
your warm up or cool down.
When foam rolling, start with
light pressure. You may find that
your muscles are tight and it may
be painful to foam roll. Adjust the
pressure you apply by reducing the
amount of body weight you place
on the roller. Roll for about 10
seconds to start with, then work up
to 30–60 seconds. If you’re new to
it, you could ask a professional for
help or search online.
191
HIIT TRAINING
FOLLOWING AND CREATING
YOUR OWN ROUTINE
When starting a new training program, you want to create a routine that helps
to build a habit. It takes 18 days to build a habit and 66 days for that habit to become
automatic, but only two days to break it. Creating a plan of action not only helps
develop new healthier habits, but provides a clear line to your overall fitness goals.
LEARNING THE EXERCISES
It’s important you read things thoroughly before
making a start. I always say read things through three
times and, if you have any questions, write them
down. The chances are that the answers to your
questions are in the book. Make sure you understand
what is needed from the workout each day and the
proper form associated with each exercise. If any of
the exercises seem unfamiliar to you, turn to the
corresponding page in the step-by-step exercise
guide to check how to perform it properly. Because
workouts require your focus and concentration,
knowing how to perform each move without taking
time out to flip through the book during the workout
will help keep you in the zone.
Workouts to build Cardiovascular
Endurance and strength
Some of the workouts are more
cardio-based than others and are
designed to get the heart rate up.
Increasing cardio-respiratory
endurance improves oxygen uptake
in the lungs and blood and can help
sustain physical activity for longer.
AEROBIC
METABOLISM
Aerobic metabolism is when the
body converts stored nutrients
(mainly glucose), in the presence
of oxygen, into energy-carrying
molecules (ATP).
192
Endurance refers to a person’s
ability to sustain prolonged
exercise. Aerobic endurance is
often equated with cardiovascular
fitness and requires the circulatory
and respiratory systems to supply
energy to the muscles to support
ADAPTATION OF
MITOCHONDRIA
Aerobic metabolism occurs in
the mitochondria of muscle
cells. Cardio training can
increase mitochondria numbers
and improve their function.
sustained physical activity. Cardio
workouts also help burn calories
and fat and boost the metabolism.
The main by-product of aerobic
metabolism is carbon dioxide gas,
which the body disposes of through
the blood and out the lungs.
VO2 MAX
AND AEROBIC
ENDURANCE
VO2 max is the maximum volume
of oxygen an individual can utilize
during exhaustive exercise. HIIT
has been shown to increase VO2
max by up to 20 per cent.
SLOW-TWITCH
MUSCLE FIBERS
Slow-twitch muscle fibers are
more efficient at using oxygen.
They fire more slowly than
fast-twitch fibers and can go for
a long time before they fatigue.
CHOOSING WEIGHTS
It’s important to start where you are. Make sure you find balance,
especially if you’re new to HIIT, and choose a weight that will give
you a challenge without being too heavy. Understanding how to
choose weights (load selection) to fit your structure correctly can
impact on the safety and efficacy of your lifting. Start each exercise
with a light weight that you know you can lift easily, then
progress the weight based on assessment
Hex fixed
and the desired rep range.
Mid-palm,
thumb over
Gripping the weight
You have to grip a weight in a certain
way to hold it securely in position and
limit soreness in your hands. Common
grips are supinated, neutral, and
pronated; semi-supinated is halfway
between supinated and neutral. Never
grip the weight too tightly—this can
cause undue stress on your forearms.
dumbbell
FREE Weights
Free weights include dumbbells,
barbells, and kettlebells. The size of
the dumbbells, whether hex, round,
or adjustable, is stamped on the
weight. Dumbbells are typically found
in pairs. Start with a weight that’s
manageable, one that you can lift
with increased reps. As you condition
yourself, slowly begin to take the load
up to challenge yourself.
Supinated
grip
Adjustable
dumbbell
Lifting safely
HIIT exercises require focus and
constant attention to the body.
Focusing on each movement keeps
you safe and ensures you can
maintain your planned program.
Fixed round
dumbbell
DUMBBELLS
workouts to tone and build strength
Exercises that tone and strengthen
require resistance from weights,
kettlebells, or resistance bands.
These types of exercise focus on
building muscle mass as well.
Anaerobic (meaning without
oxygen) exercises include lifting
weights or activities that require
ANAEROBIC ENERGY
PATHWAYS
Anaerobic metabolism occurs
without oxygen and is faster, but
far less efficient than aerobic
metabolism. It’s used for short
bursts of energy.
short bursts of energy. They can be
beneficial if you are looking to push
through an exercise plateau and
meet a new goal, and can also help
you maintain muscle mass as you
age. Most HIIT training is anaerobic.
Anaerobic metabolism produces
lactic acid buildup (that’s when you
LACTIC ACID
Lactic acid is a by-product of
anaerobic glycolysis. A buildup
of lactic acid causes rapid decline
in performance. With rest, it is
converted back to glucose.
feel soreness). Fast-twitch muscles
are mostly used. They help you
move faster, but for shorter periods.
“Twitch” refers to the contraction, or
how quickly and often the muscle
moves. The body relies more on
stored energy to fuel itself for these
types of exercise.
FAST-TWITCH
MUSCLE FIBERS
Fast-twitch muscle fibers help
you move faster, but for shorter
periods. This type of movement
doesn’t require as much ATP as
slow-twitch. Good for sprinters.
VO2 MAX AND
ANAEROBIC
ENDURANCE
Intense intervals at up to 115
percent VO2 max will raise
the level of anaerobic power
you can sustain, know as the
lactate threshold.
193
HIIT TRAINING
WEEKLY TRAINING
PLANNER
When you make a plan, you’re making a plan to succeed. I’ve put
together a six-week progressive plan aimed at helping you jump-start
your fitness journey, or improve upon it. Use the routines suggested
here or use some of the routines created on pages 199–209.
UPPER BODY
Bent-over Wide Row,
DB Biceps Curl,
Hammer Curl,
Alt. Bear Plank Row
WEDNESDAY
THURSDAY
LOWER BODY
Alt. Snatch, Step Up with
DB, Alt. Lateral Lunge,
Alt. Toe Tap
FULL BODY
Bent-over Row +
Hammer Curl, Partial
Biceps Curl, Tuck Jump,
Push Up + Squat
UPPER BODY
Side-to-side Push Up,
DB Bench Press,
DB Chest Fly,
Triceps Dip
UPPER BODY
DB Bench Press,
DB Chest Fly,
Triceps Kickback,
OH Triceps Extension
CORE
Swim Plank, Mountain
Climber, Rope Pull,
Sit Up
WEEK 3
LOWER BODY
Sumo Squat, Chair
Squat, Crab Walk,
Sumo Fly
WEEK 4
CORE
Bicycle Crunch, Double
Crunch Hold with Twist,
Scissor Kick, Plank Jack
FULL BODY
BO Row + Hammer Curl,
Sumo Squat + C Curl,
B Boy Power Kicks, Bear
Plank and Push Up
UPPER BODY
DB Bent-over Row,
DB Front Raise, Partial
Biceps Curl, Hammer
Curl
CORE
Plank Side-to-side Jump,
Bicycle Crunch, Double
Crunch, V-Up Around
the World
CORE
Scissor Kick, Transverse
Abdominal Ball Crunch,
Alt. Foot Switch, Double
Crunch Hold with Twist
LOWER BODY
Alt. Back Lunge, Chair
Squat, Squat, Skater
FULL BODY
BW Inverted Shoulder
Press, Wide Biceps Curl,
Triceps Dip with Toe
Touch, Front Curtsy Lunge
FULL BODY
Step Up, Single-leg
Deadlift, Crab Walk,
Alt. Toe Tap
UPPER BODY
DB Bent-over Row,
DB Biceps Curl,
Hammer Curl, Alt.
Bear Plank Rows
CORE
Bicycle Crunch, Double
Crunch Hold with Twist,
Scissor Kick, Plank Jack
WEEK 6
194
TUESDAY
WEEK 5
WEEK 2
WEEK 1
MONDAY
LOWER BODY
Single-leg Deadlift,
Hamstring Walkout,
Calf Raise, Step Up
LOWER BODY
Sumo Squat, Chair
Squat, Crab Walk,
Sumo Fly
Tracking your progress
Importance of rest
There is something very rewarding about
crossing out the days you’ve completed your
workouts. It takes about two to three weeks
to create a habit, and two days to break one.
The way to succeed is to set a time that
you know you can make. Be realistic. If you
haven’t been working out, then creating
a plan where you train every day isn’t very
realistic. Start with perhaps one day a week,
then if you do more, you have exceeded your
goal. Decide whether you’re more likely to
FRIDAY
FULL BODY
Football Up and Down,
Box Jump, Sumo Squat +
Hammer Concentration
Curl, Alt. Snatch
stick with it in the morning, at lunchtime, or in
the evening, and be consistent with that time.
To track your progress, you can also take
pictures of yourself before you start—front,
back, and side. I always say photos don’t lie.
Take new pictures every two weeks, so you
can compare them side-by-side, to see and
monitor the changes.
SATURDAY
UPPER BODY
Military Press + OH Triceps
Extension, DB Lateral
Raise, Triceps Kickback,
High Plank to Low Plank
CORE
Dolphin Plank,
Low Plank Hold,
Leg-reach Alt. Toe Tap,
Mountain Climber
CORE
V Up, Crunch, Sit Up,
Bear Plank
LOWER BODY
Glute Bridge, Butterfly
Glute Bridge, Hamstring
Walkout, Jump Rope
High Knees
Core
FULL BODY
Transverse Abdominal
Ball Crunch, Jack Press,
Burpee, High Plank,
Ankle Tap + Push Up
Rest
LOWER BODY
Squat, Single-leg
Deadlift, Alt. Curtsy
Squat, Squat Jump
FULL BODY
Squats + Alt. Kickback,
Arnold Press, DB Front
Raise, In-and-out Squat
Jump
SUNDAY
Rest days are an important
part of any exercise routine.
Rest days allow the muscles
to regenerate tissue and
replenish glycogen stores,
thereby reducing muscle
fatigue and preparing the
muscles for the next workout.
Rest days also help reduce
injuries: overexercising puts
repetitive stress and strain on
muscles, increasing the risk
of injury. Rest days improve
performance too. When
muscles are allowed to rest,
you are better able to perform
the next day. Your body
needs time to repair and
refuel, especially between
HIIT workouts.
KEY
Upper body
Lower body
Full body
Stretch/Foam roll
UPPER BODY
Arnold Press, Banded
Upright Row, Hammer
Curl, Triceps Push Up
LOWER BODY
Jump Rope High Knee,
Glute Bridge, Frog Jump,
Single-leg Deadlift
UPPER BODY
Neutral-grip DB
Shoulder Press, DB Rear
Deltoid Fly, Bear Crawl,
Push Up
FULL BODY
Football Up and Down,
Box Jump, Sumo Squat +
Hammer Concentration
Curl, Alt. Snatch
195
HIIT TRAINING
WARMING UP AND
COOLING DOWN
To prevent injuries, an adequate warm up and cool down must be a part
of your workout. Performing any type of resistance or aerobic training on
cold muscles can lead to stress and injuries, so it’s vital you get into the habit
of warming up the predominant muscles before you start exercising.
WARMING UP
Performing any type
of resistance on
cold muscles can
lead to stress on
the joints and,
potentially, injuries.
A warm up before a HIIT
workout activates the muscles,
getting them ready to perform
and limiting injuries.
The warm up focuses on
warming up the cardiovascular
system, by raising the body’s
temperature and increasing
blood flow to your muscles.
A good solid warm up lasting
5–10 minutes also gets your
heart rate up. Depending on
the workout ahead, you may
sometimes have to lengthen the
warm up to get the muscles fully
ready to perform. Plyometric
movements, for instance, such
as box jumps, squat jumps, and
burpees, require additional
warming up, because this type
of movement places a lot of
stress on the body. So it’s vital
that you make thoroughly sure
all your muscle groups are ready
for that type of strain.
COOLING DOWN
Mobility
According to Webster’s Dictionary, the
definition of “mobility” is “the ability to
move your body freely across all planes”.
Mobility encompasses muscular strength,
range of motion, and endurance. Mobility
movements are good to add to the
beginning of your workout as part of your
warm up. They can also serve as a short
workout on a rest day. Because mobility
increases your range of motion, it
incorporates both flexibility and strength,
which will help you execute movements
more thoroughly and allow you to push
harder and jump higher.
196
Cooling down after a workout
allows for recovery, giving you
a chance to reduce your heart
rate and blood pressure.
The cool down usually takes
place after the workout and lasts
5–7 minutes. More often than
not, though, the cool down is
neglected, rushed through or
done haphazardly. I see it all the
time, especially in the groupfitness areas of working out.
Most people rush out without
giving it a second thought. But
the truth is, the muscles will
remain contracted if you don’t
lengthen them, keeping them
in a continuous state of tension.
Think of a rubber band: if you
keep pulling and pulling on it
without giving it a break,
eventually it will snap. It’s
important to release the tension
and return the muscles to a
state of relaxation after each
workout. Cooling down also
helps regulate blood flow.
IMPORTANCE OF
STRETCHING
Flexibility is one of the five components of fitness,
which is why stretching should be an integral part of
every workout program. I always say that anyone over
the age of 30 should be operating on a 1:1 ratio; so,
for every hour of training, that’s one hour of recovery.
Stretching is a huge part of that.
Stretching aims to:
• Decrease muscle stiffness
and increase range of
motion. By improving your
range of motion, stretching
may also ease degeneration
in the joints.
• Reduce risk of injuries.
When muscles are flexible
and you make a sudden move,
you are less likely to become
injured. By increasing the
range of motion in a particular
joint through stretching, you
can decrease the resistance
on your body’s muscles
during various activities.
• Help relieve post-workout
soreness and aches. When
working out, we contract
(shorten) the muscles.
Stretching after a workout will
help lengthen the muscles
and alleviate tightness.
• Improve posture.
Stretching your muscles—
especially in the shoulders,
lower back, and chest—helps
keep the spine in alignment
and improves your posture.
• Help reduce and manage
stress. Well-stretched
muscles hold less tension.
As a consequence, you feel
less stressed.
• Reduce muscular tension
and enhance muscular
relaxation. When muscles
spend too much time in a
contracted state, they cut off
their own circulation, resulting
in a limited flow of oxygen
and other essential nutrients.
Stretching allows muscles to
relax by increasing blood flow.
• Improve overall functional
performance and
mechanical efficiency.
Flexible joints require less
energy to move, so a flexible
body improves overall
performance by creating
energy-efficient movements.
• Prepare the body for
exercise. When you loosen
up the muscles prior to
exercising, they are better
able to withstand the impact
of the movements you do.
• Promote circulation.
When you relieve tension by
stretching the muscles, this
increases the blood flow
throughout the body, from
muscles through to joints.
Improved circulation allows
more nutrients to be
distributed around the body.
• Decrease the risk of
lower-back pain. If you are
having lower-back issues, the
chances are the root cause is
below it. Tightness in the
hamstrings, hip flexors, and
several other muscles in the
pelvis can pull on the lower
back because they are
holding tension. Alleviating
the tension through stretching
can eliminate that pressure.
TRAINING ROUTINE
Your training routine has to include a warm up
and a cool down. Your warm up should start with
larger muscle groups, then move to more specific
body parts. Your warm up should elevate the heart
rate, warm the body, and make you sweat.
Warming up
Your options for warming up include:
• A light jog or brisk walk
• High knees, butt kicks, burpees, walkouts
• Push ups
• Swimming
• Jumping jacks
Try a combination of any of the options listed to
create a warm up that lasts 5–10 minutes.
Stretching
After your body is warmed up is a good time to add
a few stretches, to alleviate tightness and improve
flexibility. Doing HIIT exercises, the muscles contract
(shorten). It’s important to lengthen them by stretching
them or they can become unbalanced. Muscle
imbalances can lead to stress on the joints and
injuries. When the muscles are looser, this allows
for greater range of motion, which in turn allows for
proper execution of movements.
Types of stretches include:
• Standing quad stretch
• Lunge with spinal twist
• Triceps stretch
• Cat stretch
• Figure four stretch
• 90/90 stretch
• Happy baby stretch
• Frog stretch
• Butterfly stretch
• Lungeing hip flexor stretch
• Lying pectoral stretch
Cooling down
Your cool down could consist of a walk with lower
intensity, but it’s also the perfect time to add a
stretching routine, with some of the exercises above.
197
HIIT TRAINING
WORKOUT ROUTINES
The following HIIT routines have been programmed to target specific body
parts: lower, upper, core, and full body. The routines have also been devised
to be suitable for different levels of experience: beginner, intermediate, and
advanced. Choose your experience level, then select a routine and complete
a workout to the correct exercise length, rest periods, and number of sets.
HOW TO USE
My motto is start where you are, but that’s definitely
not where you will end. First, complete an assessment
of your fitness levels (see pp.188–189) to determine
where to begin that journey. Routines are arranged
by difficulty, but each can be adjusted to suit your
current fitness level by following the guidelines listed
in the boxes below. For example, a beginner workout
Beginner
Intermediate
Advanced
Each exercise length is 30 seconds,
with a 15-second break between
exercises, and 30–60 seconds of
recovery between each set.
Each exercise length is 45 seconds,
with a 15-second break between
exercises, and 30–45 seconds of
recovery between each set.
Each exercise length is 60
seconds, with no break between
exercises, and 30–45 seconds of
recovery between each set.
FOR EXAMPLE
FOR EXAMPLE
FOR EXAMPLE
Exercise for
30 seconds
Exercise for
45 seconds
Exercise for
60 seconds
Break for 15 seconds
Break for 15 seconds
No break between
exercises
Rest 30–60 seconds
between each set
Rest 30–45 seconds
between each set
Rest 30–45 seconds
between each set
For a beginner workout, aim to
perform 2–3 sets. You can always
reduce this if it’s too much for you or
add a set to make it more challenging.
198
can progress in difficulty by increasing the length
of each exercise and/or the number of sets and/or
reducing rest between sets or cutting out breaks
between exercises. That’s what makes this book so
priceless, because as you get stronger and faster, you
can always find ways to challenge yourself and devise
your own routines—variations are almost limitless.
For an intermediate workout, you are
looking to increase to 3–4 sets, though
reduce this if it’s too much or add a set
to increase the challenge.
For an advanced workout, aim to
complete 4–5 sets, but scale back if
you find it too challenging or add a
further set to progress.
BEGINNER ROUTINE 1
ROUTINE 2
This routine gets the heart rate up, tones the
legs, and strengthens the abdominal muscles.
A perfect workout for beginners to improve
their cardiovascular endurance and also their
muscular strength and endurance.
This is a full body beginner’s routine targeting legs
and arms, with a cardio component that will push
the heart rate up. Perfect for beginners to improve
their cardiovascular endurance and also muscular
strength and endurance.
Beginner
Beginner
30 secs each exercise, 15-sec break
between exercises, for 2–3 sets
30 secs each exercise, 15-sec break
between exercises, for 2–3 sets
1. Squat (p.96)
1. Sumo Squat (p.99)
2. Single-leg Deadlift (p.118)
2. Dumbbell Lateral Raise (p.80)
3. Crunch (p.52)
4. Jump Rope Feet Together (p.131)
Time:
30 secs each
exercise
Rest:
30–60 secs
3. Dumbbell Biceps Curl (p.72)
4. Overhead Triceps Extension (p.68)
Time:
30 secs each
exercise
Rest:
30–60 secs
5. Jump Rope High Knee (p.130)
ROUTINE 3
ROUTINE 4
This routine targets the legs and the glutes. Here,
you will work on toning and strengthening the legs
in addition to building those butt muscles. This is
perfect for beginners to improve upon muscular
strength and endurance.
This routine focuses on the upper body,
specifically toning and strengthening the muscles
of the shoulders and triceps. A perfect workout
for beginners to improve upon muscular strength
and endurance of the upper body.
Beginner
Beginner
30 secs each exercise, 15-sec break
between exercises, for 2–3 sets
30 secs each exercise, 15-sec break
between exercises, for 2–3 sets
1. Glute Bridge (p.120)
1. Military Shoulder Press (p.82)
2. Butterfly Glute Bridge (p.122)
2. Triceps Kickback (p.70)
3. Sumo Squat (p.99)
4. Alternating Side Lunge (p.180)
5. Squat Jump (p.132)
Time:
30 secs each
exercise
Rest:
30–60 secs
3. Triceps Dip (p.71)
4. Inverted Shoulder Press (p.85)
Time:
30 secs each
exercise
Rest:
30–60 secs
5. Triceps Push-up (p.66)
199
HIIT TRAINING
ROUTINE 5
ROUTINE 6
This routine targets the abdominal muscles.
Here, you will tone and strengthen the transversus
abdominis, rectus abdominis, and external and
internal obliques. Perfect for beginners to improve
upon your muscular strength and endurance.
This routine targets the workout on the upper
body, in particular toning and strengthening
muscles of the chest and triceps. A perfect routine
for beginners to improve upon their muscular
strength and endurance.
Beginner
Beginner
30 secs each exercise, 15-sec break
between exercises, for 2–3 sets
30 secs each exercise, 15-sec break
between exercises, for 2–3 sets
1. Sit-up (p.50)
1. Overhead Triceps Extension (p.68)
2. Crunch (p.52)
2. Triceps Kickback (p.70)
3. Low Plank Hold (p.38)
4. Double Crunch (p.55)
Time:
30 secs each
exercise
Rest:
30–60 secs
5. Bicycle Crunch (p.54)
4. Dumbbell Chest Fly (p.92)
Time:
30 secs each
exercise
Rest:
30–60 secs
5. Side-to-side Push-up (p.67)
ROUTINE 7
ROUTINE 8
This routine targets the legs and the deltoids
(shoulders). Here, you will work on toning and
strengthening the legs in addition to building those
shoulders. This is perfect for beginners to improve
upon your muscular strength and endurance.
This routine is focused on the upper body, targeting
the biceps and abs muscles, with a cardio component
to get your heart rate up. Perfect for beginners to
improve cardiovascular endurance and also
muscular strength and endurance.
Beginner
Beginner
30 secs each exercise, 15-sec break
between exercises, for 2–3 sets
30 secs each exercise, 15-sec break
between exercises, for 2–3 sets
1. Dumbbell Goblet Squat (p.99)
1. Bicycle Crunch (p.54)
2. Alternating Back Lunge (p.110)
2. Hammer Curl (p.75)
3. Military Shoulder Press (p.82)
4. Dumbbell Lateral Raise (p.80)
5. Jump Rope (any; pp.130–131)
200
3. Dumbbell Bench Press (p.90)
Time:
30 secs each
exercise
Rest:
30–60 secs
3. Wide Biceps Curl (p.74)
4. Partial Biceps Curl (p.75)
5. Alternating Toe Taps (p.116)
Time:
30 secs each
exercise
Rest:
30–60 secs
ROUTINE 9
ROUTINE 10
This routine targets the shoulders and abdominal
muscles and has a cardio component to it as well in
order to get the heart rate up. Perfect for beginners
to improve their cardiovascular endurance and also
muscular strength and endurance.
This is an upper body routine targeting the chest
and triceps. Here, you will work on toning and
strengthening the chest and the triceps. This is
perfect for beginners to improve upon your
muscular strength and endurance.
Beginner
Beginner
30 secs each exercise, 15-sec break
between exercises, for 2–3 sets
30 secs each exercise, 15-sec break
between exercises, for 2–3 sets
1. Jack Press (p.154)
1. Dumbbell Bench Press (p.90)
2. Dumbbell Front Raise (p.76)
2. Overhead Triceps Extension (p.68)
3. Plank Side-to-side Jumps (p.45)
4. Plank Jacks (p.45)
Time:
30 secs each
exercise
Rest:
30–60 secs
5. Double Crunch (p.55)
3. Triceps Kickback (p.70)
4. Triceps Dip (p.71)
Time:
30 secs each
exercise
Rest:
30–60 secs
5. Push-up (p.64)
ROUTINE 11
ROUTINE 12
This routine works the lower body, targeting the
legs and glutes, and has a cardio component to get
the heart rate up. Perfect for beginners to improve
their cardiovascular endurance, as well as muscular
strength and endurance.
This routine targets the legs and has a cardio
component to it as well in order to get the heart
rate up. A great workout for beginners to improve
their cardiovascular endurance, as well as muscular
strength and endurance in the legs.
Beginner
Beginner
30 secs each exercise, 15-sec break
between exercises, for 2–3 sets
30 secs each exercise, 15-sec break
between exercises, for 2–3 sets
1. Sumo Squat (p.99)
1. Dumbbell Goblet Squat (p.99)
2. Glute Bridge (p.120)
2. Alternating Curtsy Squat (p.102)
3. Calf Raise (p.112)
4. Squat (p.96)
5. Squat Jump (p.132)
Time:
30 secs each
exercise
Rest:
30–60 secs
3. Squat (p.96)
4. Single-leg Deadlift (p.118)
Time:
30 secs each
exercise
Rest:
30–60 secs
5. In-and-out Squat Jump (p.135)
201
HIIT TRAINING
ROUTINE 13
ROUTINE 14
This routine is a workout for both the upper and
lower body, targeting muscles of the legs and the
biceps. This is perfect for beginners to improve
their muscular strength and endurance.
This routine targets the legs and biceps, providing
a workout for both the upper and lower body.
Perfect for beginners to improve their muscular
strength and endurance.
Beginner
Beginner
30 secs each exercise, 15-sec break
between exercises, for 2–3 sets
30 secs each exercise, 15-sec break
between exercises, for 2–3 sets
1. Alternating Back Lunge (p.110)
1. Alternating Lateral Lunge (p.108)
2. Dumbbell Biceps Curl (p.72)
2. Squat (p.96)
3. Hammer Curl (p.75)
4. Sumo Squat and Hammer
Concentration Curl (p.184)
Time:
30 secs each
exercise
Rest:
30–60 secs
5. Crunch (p.52)
4. Military Shoulder Press (p.82)
Time:
30 secs each
exercise
Rest:
30–60 secs
5. Squat Jump (p.132)
INTERMEDIATE ROUTINE 1
ROUTINE 2
This routine targets the abs: here, you will tone
and strengthen the transversus abdominis, rectus
abdominis, and external and internal obliques.
This is a perfect intermediate workout to improve
upon your muscular strength and endurance.
This routine is an upper body “push-pull” workout
that tones and strengthens the muscles of the back
and biceps. A perfect intermediate workout to
improve your muscular strength and endurance.
Intermediate
Intermediate
45 secs each exercise, 15-sec break
between exercises, for 3–4 sets
45 secs each exercise, 15-sec break
between exercises, for 3–4 sets
1. Transverse Abdominal
Ball Crunch (p.56)
1. Bent-over Row and Hammer Curl
(p.178)
2. V-up Around the World (p.61)
2. Rear Deltoid Fly and Triceps
Kickback (p.180)
3. Double Crunch Hold with Twist
(p.55)
4. Rope Pull (p.54)
5. Scissor Kick (p.60)
202
3. Hammer Curl (p.75)
Time:
45 secs each
exercise
Rest:
30–45 secs
3. Partial Biceps Curl (p.75)
4. Alternating Row (p.49)
5. Push-up (p.64)
Time:
45 secs each
exercise
Rest:
30–45 secs
ROUTINE 3
ROUTINE 4
This routine is another upper body “push-pull”
workout, this time toning and strengthening the
muscles of the chest and the three muscles that
make up the triceps. A perfect intermediate
workout to improve upon muscular strength.
This routine is an upper body workout targeting
the triceps and shoulders. Here, you will work on
toning, strengthening, and testing the endurance
of your shoulder deltoids and the three muscles
that make up the triceps.
Intermediate
Intermediate
45 secs each exercise, 15-sec break
between exercises, for 3–4 sets
45 secs each exercise, 15-sec break
between exercises, for 3–4 sets
1. Dumbbell Bench Press (p.90)
1. Military Press + Overhead
Triceps Extension (p.174)
2. Dumbbell Chest Fly (p.92)
2. Dumbbell Lateral Raise (p.80)
3. Overhead Triceps Extension (p.68)
4. Triceps Kickback (p.70)
Time:
45 secs each
exercise
Rest:
30–45 secs
5. Triceps Push-up (p.66)
3. Arnold Press (p.85)
4. Triceps Dip (p.71)
Time:
45 secs each
exercise
Rest:
30–45 secs
5. Inverted Shoulder Press (p.85)
ROUTINE 5
ROUTINE 6
This is an upper body and core routine that
works to tone and strengthen the deltoid muscles
and the abdominal muscles. This is a perfect
intermediate workout to improve upon your
muscular strength and endurance.
This routine concentrates on the lower body,
working to tone and strengthen all the primary
muscles of the leg: quadriceps, hamstrings, and
glutes. This routine also has a cardio component
to get the heart rate up.
Intermediate
Intermediate
45 secs each exercise, 15-sec break
between exercises, for 3–4 sets
45 secs each exercise, 15-sec break
between exercises, for 3–4 sets
1. Dumbbell Rear Deltoid Fly (p.86)
1. Squat (p.96)
2. Banded Upright Row (p.79)
2. Single-leg Deadlift (p.118)
3. Arnold Press (p.85)
4. V-up Around the World (p.61)
5. Bear Crawl (p.150)
Time:
45 secs each
exercise
Rest:
30–45 secs
3. Glute Bridge (p.120)
4. Hamstring Walkout (p.123)
Time:
45 secs each
exercise
Rest:
30–45 secs
5. Tuck Jump (p.136)
203
HIIT TRAINING
ROUTINE 7
ROUTINE 8
This routine targets the lower body, working to tone
and strengthen all the primary muscles of the leg:
quadriceps, hamstrings, and glutes. There is also a
cardio component that will raise your heart rate.
Perfect for muscular and cardiovascular endurance.
This routine is focused on upper body and
arms, toning and strengthening muscles of the
biceps, shoulders, and triceps. This is a perfect
intermediate workout to improve upon your
muscular strength and endurance.
Intermediate
Intermediate
45 secs each exercise, 15-sec break
between exercises, for 3–4 sets
45 secs each exercise, 15-sec break
between exercises, for 3–4 sets
1. Alternating Back Lunge (p.110)
1. Hammer Curl (p.75)
2. Alternating Curtsy Squat (p.102)
2. Military Shoulder Press (p.82)
3. Walking Lunge with Dumbbells
(p.111)
4. Alternating Lateral Lunge (p.108)
Time:
45 secs each
exercise
Rest:
30–45 secs
5. In-and-out Squat Jump (p.135)
4. Dumbbell Biceps Curl (p.72)
Time:
45 secs each
exercise
Rest:
30–45 secs
5. Triceps Dip (p.71)
ROUTINE 9
ROUTINE 10
This routine works on toning and strengthening
the muscles in the leg (quadriceps, hamstrings, and
glutes), as well as the shoulders (medial, lateral,
rear deltoids). A perfect intermediate workout to
improve your muscular strength and endurance.
This routine targets the abs. Here, you will tone
and strengthen the transversus abdominis, rectus
abdominis, and external and internal obliques.
This is a perfect intermediate workout to improve
upon your muscular strength and endurance.
Intermediate
Intermediate
45 secs each exercise, 15-sec break
between exercises, for 3–4 sets
45 secs each exercise, 15-sec break
between exercises, for 3–4 sets
1. Chair Squat (p.98)
1. Double Crunch Hold with Twist
(p.55)
2. Squat (p.96)
2. Bear Plank (p.46)
3. Dumbbell Front Raise (p.76)
4. Dumbbell Lateral Raise (p.80)
5. Inverted Shoulder Press (p.85)
204
3. Overhead Triceps Extension (p.68)
Time:
45 secs each
exercise
Rest:
30–45 secs
3. Mountain Climber (p.42)
4. Low Plank Hold (p.38)
5. Plank Jacks (p.45)
Time:
45 secs each
exercise
Rest:
30–45 secs
ROUTINE 11
ROUTINE 12
This routine works to tone and strengthen the
muscles of the glutes (maximus and minimus)
and abdominals. This is a perfect intermediate
workout to improve upon muscular strength
and endurance.
This lower body routine works to tone and
strengthen all the primary muscles of the leg:
quadriceps, hamstrings, and glutes. This routine
also includes a cardio component designed to
raise your heart rate.
Intermediate
Intermediate
45 secs each exercise, 15-sec break
between exercises, for 3–4 sets
45 secs each exercise, 15-sec break
between exercises, for 3–4 sets
1. Leg Reach Toe Tap (p.48)
1. Squat (p.96)
2. Hamstring Walkout (p.123)
2. Single-leg Deadlift (p.118)
3. Glute Bridge (p.120)
4. Butterfly Glute Bridge (p.122)
Time:
45 secs each
exercise
Rest:
30–45 secs
5. Double Crunch (p.55)
3. Sumo Squat (p.99)
4. Jump Rope Butt Kick (p.131)
Time:
45 secs each
exercise
Rest:
30–45 secs
5. In-and-out Squat Jump (p.135)
ROUTINE 13
ROUTINE 14
This routine is a focused on the lower body.
Here, you will work on toning and strengthening
all the primary muscles of the leg: quadriceps,
hamstrings, and glutes. The routine also has a
cardio component.
This routine targets the lower body, especially the
main leg muscles—quadriceps, hamstrings, and
glutes—which it aims to tone and strengthen. It
also has a cardio component and is a perfect for
improving muscular and cardiovascular endurance.
Intermediate
Intermediate
45 secs each exercise, 15-sec break
between exercises, for 3–4 sets
45 secs each exercise, 15-sec break
between exercises, for 3–4 sets
1. Sumo Squat (p.99)
1. Chair Squat (p.98)
2. Squat (p.96)
2. Squat (p.96)
3. Single-leg Deadlift (p.118)
4. Crab Walk (p.104)
5. Frog Jump (p.134)
Time:
45 secs each
exercise
Rest:
30–45 secs
3. Crab Walk (p.104)
4. Alternating Curtsy Squat (p.102)
Time:
45 secs each
exercise
Rest:
30–45 secs
5. Squat Jump (p.132)
205
HIIT TRAINING
ADVANCED ROUTINE 1
ROUTINE 2
This routine is an upper body “push-pull” workout
to tone and strengthen the back and biceps, with an
added power component to get the heart rate up.
This is a challenging advanced workout to improve
upon your strength, endurance, and agility.
This full body plyometric routine tones and
strengthens the muscles of the back (latissimus
dorsi), deltoids (medial, lateral, rear), and legs
(quadriceps). A challenging advanced workout
to improve strength, endurance, and agility.
Advanced
Advanced
60 secs each exercise, NO break between
exercises, for 4–5 sets
60 secs each exercise, NO break between
exercises, for 4–5 sets
1. Push-up and Tuck Jump (p.160)
1. Dumbbell Rear Deltoid Fly (p.86)
2. Push-up and Squat (p.156)
2. Arnold Press (p.85)
3. Dumbbell Bent-over Row (p.78)
4. Bent-over Wide Row (p.88)
5. Bent-over Row and Hammer Curl
(p.178)
Rest:
30–45 secs
3. Dumbbell Bent-over Row (p.78)
4. Dumbbell Goblet Squat (p.99)
Time:
60 secs each
exercise
Rest:
30–45 secs
5. Tuck Jump (p.136)
ROUTINE 3
ROUTINE 4
This is a leg- and back-focused routine that will tone
and strengthen the quadriceps, hamstrings, glutes,
and back. A challenging workout to improve
muscular strength and endurance, which also
includes a cardio component.
This routine is an upper body workout targeting
mainly the chest. Here, you will work on toning and
strengthening the pectoralis major and minor. This
is a challenging advanced workout to improve upon
your muscular strength and endurance.
Advanced
Advanced
60 secs each exercise, NO break between
exercises, for 4–5 sets
60 secs each exercise, NO break between
exercises, for 4–5 sets
1. Squat (p.96)
1. Dumbbell Bench Press (p.90)
2. Single-leg Deadlift (p.118)
2. Dumbbell Chest Fly (p.92)
3. Dumbbell Pullover (p.89)
4. Banded Upright Row (p.79)
5. In-and-out Squat Jump (p.135)
206
Time:
60 secs each
exercise
Time:
60 secs each
exercise
Rest:
30–45 secs
3. Diamond Push-up (p.67)
4. Dumbbell Bench Press (p.90)
5. Bear Plank and Push-up (p.164)
Time:
60 secs each
exercise
Rest:
30–45 secs
ROUTINE 5
ROUTINE 6
This routine is an upper body workout focusing
primarily on the arms. Here, you will work on toning
and strengthening the muscles of the biceps and
triceps. This is a challenging workout to improve
upon your muscular strength and endurance.
This lower body routine targets all the primary
muscles of the leg: quadriceps, hamstrings, and
glutes. This routine has a plyometric (power)
component to it as well in order to get the heart
rate up and improve agility.
Advanced
Advanced
60 secs each exercise, NO break between
exercises, for 4–5 sets
60 secs each exercise, NO break between
exercises, for 4–5 sets
1. Triceps Kickback (p.70)
1. Alternating Toe Tap (p.116)
2. Overhead Triceps Extension (p.68)
2. Alternating Curtsy Squat (p.102)
3. Dumbbell Biceps Curl (p.72)
4. Hammer Curl (p.75)
Time:
60 secs each
exercise
Rest:
30–45 secs
5. Triceps Dip with Toe Touch (p.71)
3. Alternating Lateral Lunge (p.108)
4. Squat (p.96)
Time:
60 secs each
exercise
Rest:
30–45 secs
5. Box Jump (p.138)
ROUTINE 7
ROUTINE 8
This routine is focused on the lower body,
specifically targeting the glutes and hamstrings to
tone and strengthen these muscles. This routine
also has a plyometric (power) component to get
the heart rate up and improve agility.
This upper body routine works on toning and
strengthening primarily the back muscles:
rhomboid minor, rhomboid major, trapezius, and
latissimus dorsi. It also has a plyometric component
for cardiovascular endurance and improved agility.
Advanced
Advanced
60 secs each exercise, NO break between
exercises, for 4–5 sets
60 secs each exercise, NO break between
exercises, for 4–5 sets
1. Glute Bridge (p.120)
1. Push-up and Tuck Jump (p.160)
2. Hamstring Walkout (p.123)
2. Dumbbell Bent-over Row (p.78)
3. Single-leg Deadlift (p.118)
4. Step-up with Dumbbells (p.114)
5. Tuck Jump (p.136)
Time:
60 secs each
exercise
Rest:
30–45 secs
3. Dumbbell Rear Deltoid Fly (p.86)
4. Bent-over Wide Row (p.88)
Time:
60 secs each
exercise
Rest:
30–45 secs
5. Push-up (p.64)
207
HIIT TRAINING
ROUTINE 9
ROUTINE 10
This routine strengthens muscles of the lower body
and shoulders: quadriceps, hamstrings, and deltoids.
There is also a plyometric component to get the
heart rate up and improve agility. A workout to
improve strength and athletic performance.
This routine targets the core and secondarily
the shoulders. Here, you will work on toning and
strengthening the muscles in the deltoids and
the abdominal muscles. A challenging workout
to improve strength, endurance, and mobility.
Advanced
Advanced
60 secs each exercise, NO break between
exercises, for 4–5 sets
60 secs each exercise, NO break between
exercises, for 4–5 sets
1. Alternating Snatch (p.106)
1. B Boy Power Kicks (p.172)
2. Military Shoulder Press (p.82)
2. High Plank, Ankle Tap, and
Push-up (p.168)
3. Arnold Press (p.85)
4. Crab Walk (p.104)
Time:
60 secs each
exercise
Rest:
30–45 secs
4. Swim Plank (p.40)
Time:
60 secs each
exercise
Rest:
30–45 secs
5. Bear Plank (p.46)
5. Box Jump (p.138)
ROUTINE 11
ROUTINE 12
Here, you will work on toning and strengthening
the muscles in the chest—pectoralis major and
minor—and also the triceps. This is a challenging
workout to improve muscular strength and
endurance, cardiovascular endurance and agility.
This routine works on toning and strengthening
the primary muscles of the glutes, and also has a
plyometric component to get the heart rate up and
improve agility. A challenging workout to improve
strength, endurance, and athletic performance.
Advanced
Advanced
60 secs each exercise, NO break between
exercises, for 4–5 sets
60 secs each exercise, NO break between
exercises, for 4–5 sets
1. Dumbbell Bench Press (p.90)
1. Glute Bridge (p.120)
2. Dumbbell Chest Fly (p.92)
2. Butterfly Glute Bridge (p.122)
3. Overhead Triceps Extension (p.68)
4. Triceps Kickback (p.70)
5. Triceps Push-up and Tuck Jump
(p.160 with variation p. 66)
208
3. Plank Side-to-side Jumps (p.45)
Time:
60 secs each
exercise
Rest:
30–45 secs
3. Jump Rope Butt Kick (p.131)
4. Donkey Kick (p.48)
5. Frog Jump (p.134)
Time:
60 secs each
exercise
Rest:
30–45 secs
ROUTINE 13
ROUTINE 14
A core routine to tone and strengthen the muscles
of the abdominals. This is a challenging advanced
workout to improve upon your muscular strength
and endurance, cardiovascular endurance, mobility,
and athletic performance.
A full body workout targeting the back, biceps,
shoulders, triceps, legs, and chest, with a plyometric
component to get the heart rate up and improve
agility. A challenging workout to improve strength,
endurance, and athletic performance.
Advanced
Advanced
60 secs each exercise, NO break between
exercises, for 4–5 sets
60 secs each exercise, NO break between
exercises, for 4–5 sets
1. Jump Rope High Knee (p.130)
1. Bent-over Row and Hammer Curl
(p.178)
2. V-up Around the World (p.61)
2. Bent Over Wide Row and Wide
Biceps Curl (pp.88 and 74)
3. V-up (p.58)
4. Double Crunch Hold with Twist
(p.55)
5. Leg Reach Toe Tap (p.48)
Time:
60 secs each
exercise
Rest:
30–45 secs
3. Military Press and Overhead
Triceps Extension (p.174)
4. Sumo Squat and Hammer
Concentration Curl (p.184)
Time:
60 secs each
exercise
Rest:
30–45 secs
5. Burpee (p.146)
Everyone’s body responds differently to training.
Focus within on your own effort and intensity
and follow each routine closely. The more
you put into your workouts, the faster you will
see results and a change in your body.
209
GLOSSARY
Adductors A group of muscles that are
used to draw the thighs toward the
midline, consisting of the adductor
longus, the adductor brevis, the
adductor magnus, the pectineus, and
the gracilis.
ANTERIOR
Lateral
Medial
Lateral
POSTERIOR
SUPERIOR VIEW
ORIENTATIONS
Aerobic Relating to, or being, activity
that increases the body’s demand for
oxygen, resulting in a temporary
increase in breathing and heart rate.
Aerobic respiration The way your body
creates energy through conversion in
the presence of oxygen of glucose into
adenosine triphosphate (ATP).
Abdominals A group of muscles in the
torso consisting of the rectus abdominis,
the external abdominal obliques, the
internal abdominal obliques, and the
transverse abdominis; commonly know
as “the abs.”
Anaerobic Relating to, or being,
activity that breaks down glucose in the
body without using oxygen; anaerobic
means “without oxygen.” Anaerobic
exercise is more intense but shorter in
duration than aerobic exercise.
Anaerobic respiration The creation
of energy through the conversion of
glucose in the absence of oxygen.
Antagonist The muscle in an
antagonistic muscle pair that
relaxes or lengthens as the other
muscle contracts.
Anterior Situated at the front.
Abduction The action of moving a limb
away from the midline of the body.
ATP (adenosine triphosphate) An
organic compound and hydrotrope that
provides energy to drive many processes
in living cells, such as muscle contraction,
nerve impulse propagation, condensate
dissolution, and chemical synthesis.
Actin A protein that interacts with
myosin to cause muscle contraction.
Bilateral On both sides of the body
simultaneously.
Adduction The action of moving a limb
towards the midline of the body.
210
Agonist The muscle in an antagonistic
muscle pair that contracts as the other
one relaxes or lengthens.
BMI (body mass index) A value
derived by dividing a person’s body
mass by the square of their body height,
expressed in units of kg/m².
Body fat composition A way of
describing the percentages of fat, bone,
water, and muscle in human bodies.
Because muscular tissue takes up less
space in the body than fat tissue, body
composition, as well as weight,
determines leanness.
Carbohydrates Naturally occurring
chemical substances that contain
carbon, hydrogen, and oxygen; they are
the primary source of energy when
stored in the body.
Cardiovascular system The biological
system that permits blood to circulate
and transport nutrients (such as amino
acids and electrolytes), oxygen, carbon
dioxide, hormones, and blood cells to
and from the cells in the body to
provide nourishment, fight diseases,
stabilize temperature and pH, and
maintain homeostasis. Also called the
vascular system.
Coactivation When multiple muscles
activate simultaneously.
Compound movements Any
movement in which you’re using more
than one muscle group at a time.
Concentric contractions A type of
muscle activation that causes tension
on your muscle as it shortens.
Deadlift An exercise that involves
extending at the knees and/or hips to
lift a weight from the ground.
Deltoid A muscle of the shoulder.
Fitness assessment A series of tests
that measure and monitor your physical
fitness level by assessing the five
components of physical fitness:
cardiovascular endurance, muscular
strength, muscular endurance, flexibility,
and body composition.
Hypertrophy The enlargement of an
organ or tissue from the increase in size
of its cells; used especially in relation to
muscle growth.
Flexion A movement that decreases
the angle of a joint.
Isometric contractions A type of
muscle activation that involves the
static contraction of a muscle without
any visible movement in the angle of
the joint.
Eccentric contractions A type
of muscle activation in which a
force applied to the muscle exceeds
the momentary force produced
by the muscle itself, causing the
muscle-tendon system to lenghen
while contracting.
Frontal plane Any vertical plane (or
imaginary line) that divides the body
into ventral (front) and dorsal (back)
sections. It is one of the three main
planes of the body used to describe the
location of body parts in relation to each
other axis. Also called the coronal plane.
Isotonic muscle contractions A type
of muscle activation where tension
remains the same while the muscle’s
length changes. Isotonic contractions
differ from isokinetic contractions in that
in isokinetic contractions the muscle
speed remains constant.
Endurance The ability of an organism
to exert itself and remain active for a
long period of time, as well as its ability
to resist, withstand, recover from, and
have immunity to trauma, wounds, or
fatigue. It is usually used in aerobic
or anaerobic exercise.
Glucose A simple sugar that is the
body’s preferred energy source.
Lactic acid A colorless, syrupy organic
acid formed in sour milk and also
produced in the muscle tissues during
strenuous anaerobic exercise.
EPOC (excess post-exercise oxygen
consumption) A measurable increased
rate of oxygen intake following
strenuous activity.
Glycogen A substance deposited in
bodily tissues as a store of
carbohydrates. It is a polysaccharide
which forms glucose on hydrolysis.
Extension A movement that increases
the angle of a joint.
Glycolysis A process in which glucose
(sugar) is partially broken down by cells
in enzyme reactions that do not need
oxygen. Glycolysis is one method that
cells use to produce energy.
Dumbbell A type of exercise
equipment consisting of a short bar
with weights at either end; usually used
in a pair.
Fast-twitch muscle fibers Muscle
fibers that support short, quick bursts
of energy, such as sprinting or
weightlifting. These muscles operate
anaerobically, so have few blood
vessels and mitochondria (unlike
slow-twitch muscles).
Fat A nutrient with several necessary
functions in the body, including
protecting internal organs and nerves
and assisting the absorption of vitamins.
Glutes A group of muscles in the
buttocks consisting of the gluteus
maximus, the gluteus medius, and the
gluteus minimus.
HIIT (high-intensity interval training):
A cardiovascular exercise strategy
alternating short periods of intense
anaerobic strength exercise and aerobic
cardio with recovery periods, until
you are too exhausted to continue.
Lateral Situated at the side(s).
Mechanical stress The mechanism
of converting mechanical energy into
chemical signals; also known as
mechanotransduction.
Mechanical tension A type of
force that tries to stretch a material.
During strength training, muscles
experience stretching forces when
they try to shorten, but are resisted
when they do so.
Medial Situated in the middle.
Median plane A vertical plane (or
imaginary line) that bisects the body
vertically through the midline marked by
the navel, dividing the body exactly into
the left and right sides. Also called the
mid-sagittal plane.
211
Metabolic rate Metabolism per unit of
time, especially as estimated by food
consumption, energy released as heat,
or oxygen used in metabolic processes.
spinal cord are the central nervous
system. The nerves that go through the
whole body make up the peripheral
nervous system.
Plyometric Exercises in which muscles
exert maximum force in short intervals of
time, with the goal of increasing power.
Also known as jump training or plyos.
Metabolic stress A physiological
process that occurs during exercise in
response to low energy; it leads to
metabolite accumulation (lactate,
phosphate inorganic [Pi] and ions of
hydrogen [H+]) in muscle cells.
Neutral grip A way of holding a weight,
cable, etc., where the wrists are not
rotated, so the palms face each other.
Posterior Situated at the back.
Metabolism The chemical reactions
in the body’s cells that change food into
energy. Our bodies need this energy to
do everything from moving to thinking
to growing. Specific proteins in the
body control the chemical reactions
of metabolism.
Mitochondria An organelle found
in large numbers in most cells, in
which the biochemical processes
of respiration and energy production
occur. It has a double membrane,
the inner layer being folded inward
to form layers (cristae).
Mobility The ability of a joint to move
through a range of motion.
Muscular system The biological
system responsible for movement of
the body, posture, and blood circulation.
The muscular systems in vertebrates
are controlled through the nervous
system, although some muscles can
be completely autonomous.
Myosin-A A protein that interacts with
actin to cause muscle contraction.
Nervous system The biological system
responsible for sensation and
movement. It is made up of the central
nervous system and the peripheral
nervous system: The brain and the
212
Neutral spine The position of optimal
load distribution for the spine; maintains
the natural curves of the spine.
Neurochemistry The study of chemicals
that control and influence the physiology
of the nervous system, including
neurotransmitters and other molecules
such as psychopharmaceuticals
and neuropeptides.
Neurogenesis The process in which
neurons are generated from neural stem
cells in adults. This process differs from
prenatal neurogenesis.
Neuroplasticity The ability of neural
networks in the brain to change through
growth and reorganization. These
changes range from individual neuron
pathways making new connections,
to systematic adjustments like cortical
remapping. Also known as neural
plasticity or brain plasticity.
Pronated Of a hand, foot, or limb:
turned or held so that the palm or sole
is facing downwards or inwards.
Prone Lying on your front.
Protein A molecule made up of amino
acids; dietary protein is necessary for
life and bodily maintenance.
Quadriceps (quads) A group of
muscles in the thigh consisting of the
rectus femoris, the vastus medialis,
the vastus lateralis, and the vastus
intermedius.
Range of motion The extent of
possible movement of a joint.
Repetitions (reps) The number of
times you complete a single exercise
before taking a rest or a break.
Resistance An external force against
which muscles contract, such as weight.
Pectorals (pecs) A group of muscles
in the chest consisting of the pectoralis
major and the pectoralis minor.
Respiratory system The biological
system consisting of specific organs
and structures used for gas exchange
in animals and plants. The anatomy and
physiology that make this happen vary
depending on the size of the organism,
the environment in which it lives, and its
evolutionary history.
Physiology The branch of biology that
deals with the normal functions of living
organisms and their parts.
Rhomboids A group of muscles in the
upper back consisting of the rhomboid
minor and the rhomboid major.
Parasagittal plane Any plane (or
imaginary line) parallel to the sagittal
and median planes.
RIR (reps in reserve) A measure of
the difficulty of a set that refers to the
number of further reps that the person
could have performed before giving
way to fatigue.
Sagittal plane Any plane (or imaginary
line) that divides the body into right and
left parts. The plane may be in the
center of the body and split it into two
halves, or away from the midline and
split it into unequal parts. Also known
as the longitudinal plane.
Satellite cells A type of body cell within
muscle fibers (between the sarcolemma
and basal lamina) that is typically in a
quiescent state. Following exercise,
satellite cells become activated, and
start to proliferate.
Sets Several reps of different exercises
completed in a row. It is a common
workout strategy to do a planned
number of sets of each exercise, with
time built in for a short rest between
these sets.
Skeletal muscles Muscles which are
connected to the skeleton to form part
of the mechanical system that moves
the limbs and other parts of the body.
Skeletal muscle fibers Cylindrical
muscle cells. An individual skeletal
muscle may be made up of hundreds,
or even thousands, of muscle fibers
bundled together and wrapped in a
connective tissue covering.
Skeletal system The body’s central
framework. It consists of bones and
connective tissue, including cartilage,
tendons, and ligaments.
Slow-twitch muscle fibers Muscle
fibers that contract slowly, but keep
going for a long time. These muscles are
good for endurance activities like longdistance running or cycling, as they can
work for a long time without getting tired.
Strength The amount of force a muscle
or muscle group can produce.
Strength endurance The ability of
muscles to support load continuously
over time. Also known as muscular
endurance.
Stress Mechanical, metabolic, or
psychological demands placed on
the body.
Tendon A flexible but inelastic cord of
strong fibrous collagen tissue attaching
a muscle to a bone.
Transverse plane A plane (or imaginary
line) that divides the body into superior
(upper) and inferior (lower) parts. It is
perpendicular to the coronal plane and
sagittal plane. It is one of the planes of
the body used to describe the location
of body parts in relation to each other.
Unilateral One side of the body.
VO2 max The maximum rate of oxygen
consumption measured during
incremental exercise (that is, exercise
of increasing intensity).
Striated muscle Muscle tissue in
which the contractile fibrils in the cells
are aligned in parallel bundles, so that
their different regions form stripes
visible in a microscope. Muscles of this
type are attached to the skeleton by
tendons and are under voluntary control.
Superficial (of muscles) Closer to
the skin.
Supersets Two exercises performed
back-to-back, optionally followed by a
short rest. This effectively doubles the
amount of work you are doing, whilst
keeping the recovery periods the same
as they are when you complete
individual exercises.
Supinated Of a hand, foot, or limb:
turned or held so that the palm or sole
is facing upwards or outwards.
Supine Lying on your back.
Tempo The rhythm in which exercises
are performed during sets.
213
INDEX
A
abdominals (abs) 22, 36,
38, 39, 40, 46, 50, 58, 64,
88, 90, 102, 132
external abdominal
obliques 22, 39, 50, 51,
54, 60
internal abdominal
obliques 22, 50, 51, 54,
60
rectus abdominis 22, 38,
39, 40, 50, 52, 54, 56,
117, 120
transversus abdominis
22, 38, 40, 50, 54, 56,
122
see also core exercises
abduction 32, 33
adduction 32, 33
adductors 22
adductor brevis 22
adductor longus 22
adductor magnus 22, 23
gracilis 22
pectineus 22
adenosine triphosphate
see ATP
aerobic endurance 192
aerobic respiration 12, 13,
14, 27
“afterburn effect” see
EPOC (Excess Postexercise Oxygen
Consumption)
agonist muscles 18, 19
alternating back lunge
214
110
alternating curtsy squat
102
alternating foot switch 44
alternating lateral lunge
108–111
alternating row 49
alternating single-leg
glute bridge 122
alternating snatch 106–
107
alternating toe tap 116–
117
Alzheimer’s 15
amino acids 26
anaerobic efficiency 6
anaerobic glycolysis 12,
13, 193
anaerobic phosphagen
12, 13
anaerobic respiration 12,
13, 17
anconeus 66
angiogenesis 25
ankle
dorsiflexion 33
plantarflexion 33
ankle dorsiflexors 22
extensor digitorum
longus 22
extensor hallucis longus
22
tibialis anterior 22
ankle plantor flexors 23
calf muscles 23
tibialis posterior 23
antagonist muscles 18, 19
anxiety 6
Arnold press 84, 85
ATP (adenosine
triphosphate) 12, 13, 15,
16, 20, 192
accessing 12, 13
aerobic synthesis of 15
B
B boy power kicks 172–
173
banded upright row 79
basal metabolic rate
(BMR) 12, 16
bear crawl 150–151
bear plank 46–49
alternating row 49
bear plank and push-up
164–167
donkey kick 48
leg-reach toe tap 48
bench press: dumbbell
bench press 90–91
bent-over row and
hammer curl 178–179
bent-over wide row 88
biceps brachii 18, 19, 22,
72, 78, 92
see also upper body
exercises
biceps curl
dumbbell biceps curl
18–19, 72–75
hammer curl 75
partial biceps curl 75
wide biceps curl 74
biceps femoris 23
bicycle crunch 54
blood
blood flow 10, 24, 27
circulation 11, 14, 30,
197
deoxygenated blood 14
hemoglobin 14, 17
blood sugar levels 16
blood vessel growth 25
BMI see body mass index
BMR see basal metabolic
rate
body fat composition:
calculation 189
body mass index (BMI)
189
body temperature
core 16
regulation 27
bodyweight inverted
shoulder press 85
bodyweight resistance 10
box jump 138–139
brachialis 18, 22, 72, 74
brachioradialis 18, 22, 72,
74
brain cells 24, 25
brain chemistry 24–25
brain–body connection
24, 25, 30, 31
neurochemistry 25
neurogenesis 25
neuroplasticity 25
breathing 30, 31
bridge
alternating single-leg
glute bridge 122
butterfly glute bridge
122
glute bridge 120–123
hamstring walkout 123
burpee 146–149
football up and down
142–145
butterfly glute bridge 122
C
calf muscles 23
gastrocnemius 23
soleus 23
calf raise 112–113
calorie burning 6, 10, 11,
16, 149
capillaries 14
carbohydrates 12, 26, 27
carbon dioxide 13, 14, 31,
192
cardiac muscle 22
cardiovascular disease 15
cardiovascular fitness 6,
11, 14–15
blood circulation 11, 14,
30, 197
mitochondrial function
15
scoring 15
workouts for 192
see also plyometric
exercises; total body
exercises
cardiovascular system
14, 30, 196
cells
brain cells 24, 25
cytoplasm 13
mitochondria 10, 13,
15, 21, 192
myocytes 21
red blood cells 17
satellite cells 21
cervical extensors 23
splenius capitis 23
splenius cervicis 23
chair squat 98
cognitive function 24
see also brain
chemistry
collagen 23
concentric muscle
contractions 18, 19, 39
connective tissue 18, 20,
22, 23
hypertrophy 21
cooling down 196, 197
Cooper, Dr Ken 15
Cooper test 15
coordination 11
core exercises 34–61
alternating foot switch
44
alternating row 49
B boy power kicks
172–173
bear crawl 150–151
bear plank 46–49
bicycle crunch 54
crunch 52–55
dolphin plank 39
donkey kick 48
double crunch 55
double crunch hold with
twist 55
high plank to low plank
36–39
leg-reach toe tap 48
low plank hold 38
low-impact plank 38
mountain climber 42–45
plank jacks 45
plank side-to-side jumps
45
rope pull 54
scissor kick 60
side V-up 60
sit-up 50–51
swim plank 40–41
transverse abdominal
ball crunch 56–57
V-up 58–61
V-up around the world
61
see also total body
exercises
cortisol 25
crab touch see triceps dip
with toe touch
crab walk 104–105
crunch 52–55
bicycle crunch 54
double crunch 55
double crunch hold with
twist 55
rope pull 54
transverse abdominal
ball crunch 56–57
cytoplasm 13
D
deoxygenated blood 14
deadlift, single-leg 118–
119
deltoids 23, 64, 76, 78, 79,
80, 82, 84, 85, 86, 88, 90,
92
see also upper body
exercises
dementia 15, 24
depression 6, 24
diabetes 15
diamond push-up 67
dolphin plank 39
donkey kick 48
dopamine 25
dorsiflexion 33
double crunch 55
double crunch hold with
twist 55
dumbbells 31, 193
alternating snatch
106–107
Arnold press 84, 85
banded upright row 79
bent-over row and
hammer curl 178–179
bent-over wide row 88
dumbbell bench press
90–91
dumbbell bent-over row
78
215
dumbbell biceps curl
18–19, 72–75
dumbbell chest fly
92–93
dumbbell front raise
76–79
dumbbell goblet squat
99
dumbbell lateral raise
80–81
dumbbell pullovers 89
dumbbell rear deltoid fly
86–89
hammer curl 75
jack press 154–155
military press and
overhead triceps
extension 174–177
military shoulder press
82–85
neutral-grip dumbbell
shoulder press 84
overhead triceps
extension 68–71
partial biceps curl 75
single-leg deadlift
118–119
step-up with dumbbells
114–115
sumo squat and
hammer concentration
curl 184–185
triceps kickback 70
walking lunge with
dumbbells 111
wide biceps curl 74
E
eccentric muscle
216
contractions 18
elbow
extension 32
flexion 32
elbow flexors 22
biceps brachii see
biceps brachii
brachialis 18, 22, 72, 74
brachioradialis 18, 22,
72, 74
endorphins 24
endurance 192
energy conversion 12–17
energy release 15
EPOC (Excess Postexercise Oxygen
Consumption) 16–17, 27,
190
EPOC recovery time 17
equipment 31
erector spinae 23, 40, 78,
120
Excess Post-exercise
Oxygen Consumption
see EPOC
exercise balls 31
transverse abdominal
ball crunch 56–57
exercise terminology 31,
32–33
see also Glossary
pp. 210–213
extension 32, 33
extensor digitorum longus
22
extensor hallucis longus
22
external abdominal
obliques 22, 39, 50, 51,
54, 60
F
fast-twitch muscle fibers
20, 193
fats 12, 26
femur 98
fight-or-flight scenario 12
fitness assessment 188
flexibility 197
see also stretching
flexion 32, 33
foam-rolling 191
football up and down
142–145
frog jump 134
front curtsy lunge 110
front plank with rotation
see mountain climber
frontal plane 32
G
gastrocnemius 23, 112
glucose 12, 13, 15, 16, 26,
192, 193
gluteals (glutes) 11, 23, 36,
50, 96, 102, 104, 106,
108, 118, 120, 132
gluteus maximus 11, 23,
46, 122, 123
gluteus medius 23, 46,
123
gluteus minimus 23, 123
see also lower body
exercises
glycogen 16, 17, 21, 26, 27
glycolysis 12, 13, 193
gracilis 22
H
hemoglobin 14, 17
hammer curl 75
bent-over row and
hammer curl 178–179
sumo squat and
hammer concentration
curl 184–185
hamstring walkout 123
hamstrings 23, 58, 96,
100, 106, 122, 132
biceps femoris 23
semimembranosus 23
semitendinosus 23
see also lower body
exercises
heart rate 11, 12, 125
high knee 128–131
jump rope butt kick 131
jump rope feet together
131
jump rope high knee
130
high plank to low plank
36–39
HIIT (high-intensity
interval training)
benefits of 6, 10–11
brain gains 24–25
cardiovascular fitness,
improving 14–15
energy systems 12–13
Excess Post-exercise
Oxygen Consumption
(EPOC) 16–17, 27, 190
and muscle growth
20–21
muscular anatomy
22–23
nutrition 26–27
physiology of 8–27
hip
abduction 32
adduction 32
extension 32
external rotation 32
flexion 32
internal rotation 32
hip extensors 23
adductor magnus 23
gluteals see gluteals
hamstrings see
hamstrings
hip flexors 22, 50
adductors 22
iliacus 22
iliopsoas 22
psoas major 22, 46
rectus femoris 22, 98
sartorius 22
hippocampus 24, 25
homeostatic balance 16
hormones 24–25, 26
humerus 66
hydration 27, 191
hypertrophy see muscle
growth
I
iliacus 22
iliocostalis 78
iliopsoas 22
immune support 10
in-and-out squat jump
135
inflammation 10
injuries 196, 197
intercostal muscles 22
intermyofibrillar
mitochondria 15
internal abdominal
obliques 22, 50, 51, 54,
60
isometric contractions
18, 19
isometric exercises 46,
47, 164
isotonic contractions 18
concentric contractions
18, 19, 39
eccentric contractions
18
J
jack press 154–155
jumps
box jump 138–139
frog jump 134
in-and-out squat jump
135
jump rope butt kick 131
jump rope feet together
131
jump rope high knee
130
plank jacks 45
plank side-to-side
jumps 45
push-up and tuck jump
160–163
single-leg forward jump
140–141
squat jump 132–135
sumo squat jump 135
tuck jump 136–137
K
kettlebells 31
overhead triceps
extension 68–71
see also dumbbells
kicks
B boy power kicks
172–173
donkey kick 48
scissor kick 60
squat and alternating
kickback 103
knee
alignment 111
extension 33
flexion 33
L
lactate 13, 17
lactate threshold 193
lactic acid 193
lactic acidosis 13, 193
latissimus dorsi 23, 78, 88,
89
leg-reach toe tap 48
levator scapulae 23
longissimus thoracis 78
low plank hold 38
low-impact plank 38
lower body exercises
94–123
alternating back lunge
110
alternating curtsy squat
102
alternating lateral lunge
108–111
alternating single-leg
glute bridge 122
alternating snatch
106–107
alternating toe tap
116–117
butterfly glute bridge
122
calf raise 112–113
chair squat 98
crab walk 104–105
dumbbell goblet squat
99
front curtsy lunge 110
glute bridge 120–123
hamstring walkout 123
right and left split squat
100–103
single-leg deadlift
118–119
squat 96–99
squat and alternating
kickback 103
step-up with dumbbells
114–115
sumo squat and sumo
fly 99
walking lunge with
dumbbells 111
see also total body
exercises
lower-back pain 120, 197
lunge
alternating back lunge
110
alternating lateral lunge
108–111
front curtsy lunge 110
walking lunge with
dumbbells 111
217
M
macronutrients 16, 26
meals, skipping 16
mechanical fatigue 20
mechanical tension 20
metabolic rate 6, 12, 16
basal metabolic rate
(BMR) 12, 16
metabolism 10
aerobic metabolism 12,
13, 192
anaerobic metabolism
12, 13, 193
metabolic efficiency 16
metabolic stress 20
micronutrients 26
military press and
overhead triceps
extension 174–177
military shoulder press
82–85
mind–body connection
24, 25, 30, 31
mitochondria 10, 13, 15,
21, 192
intermyofibrillar
mitochondria 15
mitochondrial function
15
subsarcolemmal
mitochondria 15
mobility 196
mood, boosting 24, 25
mountain climber 42–45
alternating foot switch
44
plank jacks 45
plank side-to-side jumps
45
multifidus 78
218
muscle ache 13
muscle coactivation 19
muscle contractions 14,
16, 18–19, 22
concentric contractions
18, 19, 39
eccentric contractions
18
isometric contraction 18,
19
isotonic contraction 18
voluntary/involuntary 18
muscle damage 20, 21
muscle fibers 10, 15, 21,
22
fast-twitch muscle fibers
20, 193
slow-twitch muscle
fibers 20, 192
muscle growth 11, 20–21,
193
growth stimuli 20
muscle hypertrophy see
muscle growth
muscle mass decline 21
muscle protein 20, 21, 22
muscle protein synthesis
20, 27
muscular anatomy 22–23
myocytes 21
myofibrillar hypertrophy
21
myofibrils 15, 20, 22
myoglobin 17
myotendinous junction 23
myotubes 21
N
nausea 13
nervous system 30
neurochemistry 25
neurogenesis 25
neurons 25
neuroplasticity 25
neurotransmitters 25
neurotrophins 24, 25
neutral spine 32
neutral-grip dumbbell
shoulder press 84
norepinephrine 25
nutrition 26–27, 191
balanced diet 26
hydration 27
macronutrients 16, 26
micronutrients 26
pre- and post-workout
nutrition 27
skipping meals 16
O
obliques see external
abdominal obliques;
internal abdominal
obliques
overhead triceps
extension 68–71
triceps kickback 70
overhydration 27
overtraining 190
oxygen 12, 13, 14, 31, 192
brain function and 24, 25
Excess Post-exercise
Oxygen Consumption
(EPOC) 16–17, 27, 190
oxygen deficit 17
VO2 max 6, 15, 17, 192
P
partial biceps curl 75
patella 98
PCr see phosphocreatine
pectineus 22
pectoral muscles (pecs)
64, 76, 82, 90
pectoralis major 22, 88,
89
pectoralis minor 22
phosphagen 12, 13
phosphocreatine (PCr) 13
piriformis 23
planes of motion 32
plank
alternating foot switch
44
bear plank 46–49
bear plank and push-up
164–167
dolphin plank 39
front plant with rotation
see mountain climber
high plank, ankle tap,
and push-up 168–171
high plank to low plank
36–39
low plank hold 38
low-impact plank 38
plank jacks 45
plank side-to-side jumps
45
swim plank 40–41
plantarflexion 33
plyometric exercises
124–151, 196
bear crawl 150–151
box jump 138–139
burpee 146–149
football up and down
142–145
frog jump 134
high knee 128–131
in-and-out squat jump
135
jump rope butt kick 131
jump rope feet together
131
jump rope high knee
130
push-up and tuck jump
160–163
single-leg forward jump
140–141
skater 126–127
squat jump 132–135
sumo squat jump 135
tuck jump 136–137
posture 11, 197
pronation 32
protein (muscle) 20, 21, 22
protein (nutrient) 12, 26,
27
psoas major 22, 46
push-up 64–67
bear plank and push-up
164–167
diamond push-up 67
high plank, ankle tap,
and push-up 168–171
push-up and squat
156–159
push-up and tuck jump
160–163
side-to-side push-up 67
triceps push-up 66
pyruvate 13
pyruvic acid 15
Q
quadratus lumborum 78
quadriceps (quads) 22,
36, 42, 46, 58, 96, 98,
106, 108, 114
rectus femoris 22
vastus intermedius 22
vastus lateralis 22
vastus medialis 22
see also lower body
exercises
R
range of motion 32–33
ankle 33
elbow 32
hip 32
knee 33
shoulder 33
spine 32
wrist 32
rear deltoid fly and
triceps kickback
180–183
rectus abdominis 22, 38,
39, 40, 50, 52, 54, 56,
117, 120
rectus femoris 22, 98
red blood cells 17
repetition (reps) 31
reps in reserve (RIR)
191
resistance bands 31
banded upright row 79
overhead triceps
extension 68–71
resistance training
benefits 11
respiration 12, 30, 31
aerobic respiration 12,
13, 14, 27
anaerobic respiration 12,
13, 17
rest days 195
rhomboids 23, 78, 88
rhomboid major 23
rhomboid minor 23
right and left split squat
100–103
roll mats 31
rope pull 54
rotation 32, 33
rotatores 78
routines 31, 198–209
see also training
programs
rowing
alternating row 49
banded upright row 79
bent-over row and
hammer curl 178–179
bent-over wide row 88
dumbbell bent-over row
78
S
saccharides 26
sagittal plane 32
sarcolemma 15
sarcomeres 21
sarcoplasm 15
sarcoplasmic fluid 20
sarcoplasmic hypertrophy
21
sarcoplasmic reticulum
21
sartorius 22
satellite cells 21
scapular retraction 79, 86,
180
scissor kick 60
sedentary lifestyle 21
self-myofascial release
(SMR) 191
semimembranosus 23
semispinalis capitis 78
semispinalis thoracis 78
semitendinosus 23
serotonin 25
serratus anterior 64, 80
serratus posterior 23
sets 31
adding 191
shoulder
abduction 33
adduction 33
extension 33
external rotation 33
flexion 33
internal rotation 33
shoulder press
Arnold press 84, 85
bodyweight inverted
shoulder press 85
military shoulder press
82–85
neutral-grip dumbbell
shoulder press 84
side flexion 32
side V-up 60
side-to-side push-up 67
single-arm dumbbell
snatch see alternating
snatch
single-leg deadlift 118–
119
single-leg forward jump
140–141
219
sit-up 50–51
“six pack” 38, 52, 56
skater 126–127
skeletal muscle 20, 21,
22–23
sleep quality 24
slow-twitch muscle fibers
20, 192
smooth muscle 22
sodium depletion 27
soleus 23
spinal extensors 23, 78
cervical extensors 23
erector spinae 23, 119
transversospinales 23
spinalis thoracis 78
spine
extension 32
flexion 32
rotation 32
side flexion 32
splenius capitis 23
splenius cervicis 23
squats 96–99
alternating curtsy squat
102
alternating snatch
106–107
burpee 146–149
chair squat 98
crab walk 104–105
dumbbell goblet squat
99
frog jump 134
in-and-out squat jump
135
push-up and squat
156–159
right and left split squat
100–103
squat and alternating
220
kickback 103
squat jump 132–135
sumo squat and
hammer concentration
curl 184–185
sumo squat jump 135
sumo squat and sumo
fly 99
step-up with dumbbells
114–115
stomach pain 13
stress, mental 10
stress reduction 24
stretching 191, 197
aims of 197
types of stretches 197
striated muscle 22
sumo squat and hammer
concentration curl
184–185
sumo squat jump 135
sumo squat and sumo fly
99
supination 32
supraspinatus 80
sweating 27, 191
swim plank 40–41
synapses 25
synergist muscles 18, 19
T
t-tubules 21
tendons 18, 22, 23
tensor fasciae latae 11
tibialis anterior 22
tibialis posterior 23
toe taps
alternating toe tap
116–117
leg-reach toe tap 48
total body exercises
152–185
alternating snatch
106–107
B boy power kicks
172–173
bear plank and push-up
164–167
bent-over row and
hammer curl 178–179
box jump 138–139
burpee 146–149
dolphin plank 39
dumbbell goblet squat
99
high plank, ankle tap,
and push-up 168–171
jack press 154–155
military press and
overhead triceps
extension 174–177
push-up and squat
156–159
push-up and tuck jump
160–163
rear deltoid fly and
triceps kickback
180–183
sumo squat and
hammer concentration
curl 184–185
swim plank 40–41
triceps dip with toe
touch 71
training programs 186–
209
advanced programs
189, 190, 198, 206–209
beginner programs
189, 190, 198, 199–202
for cardiovascular
endurance and
strength 192
common mistakes 30
cooling down 196, 197
correct exercise
execution 30
creating a routine
192–193
equipment 31
exercise terminology 31,
32–33
fitness assessment 188
intermediate
programs 189, 190,
198, 202–205
learning the exercises
192
“main” exercises and
“variations” 30
overtraining 190
progress, tracking 15,
195
progressing training 191
recovery 191
rest days 195
routines 198–209
for tone and strength
building 193
training frequency 190
warming up 196, 197
weekly training planner
194–195
weights, choosing 193
transverse abdominal ball
crunch 56–57
transverse plane 32
transversospinales 23
transversus abdominis 22,
38, 40, 50, 54, 56, 122
trapezius 23, 78, 82, 86, 88
upper trapezius 79
triceps (triceps brachii) 18,
19, 23, 36, 64, 66, 82, 90,
92
see also upper body
exercises
triceps dip 71
triceps dip with toe touch
71
triceps kickback 70
triceps push-up 66
tuck jump 136–137
U
ulna 66
upper body exercises
62–93
Arnold press 84, 85
banded upright row 79
bent-over wide row 88
bodyweight inverted
shoulder press 85
diamond push-up 67
dumbbell bench press
90–91
dumbbell bent-over row
78
dumbbell biceps curl
72–75
dumbbell chest fly
92–93
dumbbell front raise
76–79
dumbbell lateral raise
80–81
dumbbell pullovers 89
dumbbell rear deltoid fly
86–89
hammer curl 75
military shoulder press
82–85
neutral-grip dumbbell
shoulder press 84
overhead triceps
extension 68–71
partial biceps curl 75
push-up 64–67
side-to-side push-up 67
triceps dip 71
triceps dip with toe
touch 71
triceps kickback 70
triceps push-up 66
wide biceps curl 74
see also total body
exercises
waste products 14, 27
see also carbon dioxide
weekly training planner
194–195
weight loss 11
weights
choosing 193
free weights 193
gripping 193
lifting safely 193
see also dumbbells
wide biceps curl 74
workouts see training
programs
wrist
pronation 32
supination 32
V
V-up 58–61
scissor kick 60
side V-up 60
V-up around the world
61
vastus intermedius 22,
98
vastus lateralis 11, 22, 98
vastus medialis 22, 98
vitamins and minerals 26
VO2 12, 17, 193
Cooper test 15
VO2 max 6, 15, 17, 192
W
walking lunge with
dumbbells 111
warming up 196, 197
221
BIBLIOGRAPHY
http://www.unm.edu/~lkravitz/Article%20folder/Metabolism.pdf
http://www.biobreeders.com/images/Nutrition_and_Metabolism.pdf
Kirkendall DT, Garrett WE. Function and biomechanics of tendons.
Scand J Med Sci Sports. 1997 Apr;7(2):62-6.
https://www.registerednursing.org/teas/musculoskeletal-muscularsystem/
El-Sayes J, Harasym D, Turco CV, Locke MB, Nelson AJ. ExerciseInduced Neuroplasticity: A Mechanistic Model and Prospects for
Promoting Plasticity. Neuroscientist. 2019 Feb
Schoenfeld, Brad J The Mechanisms of Muscle Hypertrophy and
Their Application to Resistance Training, Journal of Strength and
Conditioning Research: October 2010 - Volume 24 - Issue 10 p 2857-2872
https://health.gov/dietaryguidelines/2015/guidelines/appendix-7/
National Science Teaching Association: “How Does the Human
Body Turn Food Into Useful Energy?”
American Council on Exercise: “Muscle Fiber Types: Fast-Twitch vs.
Slow-Twitch”
International Sports Sciences Association: “Aerobic vs. Anaerobic:
How Do Workouts Change the Body?”
World Journal of Cardiology: “Aerobic vs Anaerobic Exercise
Training Effects on the Cardiovascular System”
Health.gov: “Dietary Guidelines for Americans, 2015-2020:
Appendix 7. Nutritional Goals for Age-Sex Groups Based on Dietary
Reference Intakes and Dietary Guidelines Recommendations”
https://www.sciencedirect.com/topics/biochemistry-genetics-andmolecular-biology/phosphagen
https://www.sciencedirect.com/topics/medicine-and-dentistry/
creatine-phosphate
PubMed: Effects of Plyometric Training on Muscle-Activation
Strategies and Performance in Female Athletes
PubMed: The Efficacy and Safety of Lower-Limb Plyometric
Training in Older Adults: A Systematic Review
Boyle, M. New Functional Training for Sports, 2nd ed. Champaign,
IL. Human Kinetics; 2016.
Clark, MA, et al. NASM Essentials of Personal Fitness Training 6th
ed. Burlington, MA. Jones & Bartlett Learning; 2018.
McGill, EA, Montel, I. NASM Essentials of Sports Performance
Training, 2nd Edition. Burlington, MA. Jones & Bartlett Learning; 2019.
Chu, DA. Jumping Into Plyometrics 2nd ed. Champaign, IL: Human
Kinetics; 1998.
Chu, D and Myers, GD. Plyometrics: Dynamic Strength and
Explosive Power. Champaign, IL. Human Kinetics (2013).
222
EXOS Phase 3 Performance Mentorship manual. San Diego. July
27-30, 2015
Fleck, SJ, Kraemer, WJ. Designing Resistance Training Programs
2nd ed. Champaign, IL: Human Kinetics; 1997.
Rose, DJ. Fall Proof! A Comprehensive Balance and Mobility
Training Program. Champaign, IL: Human Kinetics; 2003.
Yessis, M. Explosive Running: Using the Science of Kinesiology to
Improve Your Performance (1st Edition). Columbus, OH. McGrawHill Companies. (2000).
American College of Sports Medicine. ACSM’s Guidelines for
Exercise Testing and Prescription. 9th ed. Philadelphia (PA):
Lippincott Williams and Wilkins; 2013. pp. 19–38.
https://journals.lww.com/acsm-healthfitness/fulltext/2014/09000/
high_intensity_interval_training__a_review_of.5.aspx#O20-5-2
Gibala MJ, Little JP, Macdonald MJ, Hawley JA. Physiological
adaptations to low-volume, high-intensity interval training in health
and disease. J Physiol. 2012; 590: 1077–84.
Gibala MJ, McGee SL. Metabolic adaptations to short-term
high-intensity interval training: a little pain for a lot of gain? Exerc
Sport Sci Rev. 2008; 36: 58–63.
Guiraud T, Nigam A, Gremeaux V, Meyer P, Juneau M, Bosquet L.
High-intensity interval training in cardiac rehabilitation. Sports Med.
2012; 42: 587–605.
Hegerud J, Hoydal K, Wang E, et al Aerobic high-intensity intervals
improve V˙O2 max more than moderate training. Med Sci Sports
Exerc. 2007; 39: 665–71
Jung M, Little J. Taking a HIIT for physical activity: is interval training
viable for improving health. In: Paper presented at the American
College of Sports Medicine Annual Meeting: Indianapolis (IN).
American College of Sports Medicine; 2013.
Wewege M, van den Berg R, Ward RE, Keech A. The effects of
high-intensity interval training vs. moderate-intensity continuous
training on body composition in overweight and obese adults: a
systematic review and meta-analysis. Obes Rev. 2017 Jun;18(6):635
Nicolò A, Girardi M. The physiology of interval training: a new target
to HIIT. J Physiol. 2016;594(24):7169-7170
Milioni F, Zagatto A, Barbieri R, et al. Energy Systems Contribution in
the Running-based Anaerobic Sprint Test. International Journal of
Sports Medicine. 2017;38(03):226-232
Abe T, Loenneke JP, Fahs CA, Rossow LM, Thiebaud RS, Bemben
MG. Exercise intensity and muscle hypertrophy in blood flowrestricted limbs and non-restricted muscles: a brief review. Clin
Physiol Funct Imaging 32: 247–252, 2012.
Aebersold R, Mann M. Mass-spectrometric exploration of proteome
structure and function. Nature 537: 347–355, 2016.
Agergaard J, Bülow J, Jensen JK, Reitelseder S, Drummond MJ,
Schjerling P, Scheike T, Serena A, Holm L. Light-load resistance
exercise increases muscle protein synthesis and hypertrophy
signaling in elderly men. Am J Physiol Endocrinol Metab 312
Allen DG, Lamb GD, Westerblad H. Skeletal muscle fatigue: cellular
mechanisms. Physiol Rev88: 287–332, 2008
American College of Sports Medicine. American College of Sports
Medicine position stand. Progression models in resistance training
for healthy adults. Med Sci Sports Exerc 41: 687–708, 2009
Callahan MJ, Parr EB, Hawley JA, Camera DM. Can High-Intensity
Interval Training Promote Skeletal Muscle Anabolism? Sports Med.
2021 Mar;51(3):405-421
Børsheim E, Bahr R. Effect of exercise intensity, duration and mode
on post-exercise oxygen consumption. Sports Med. 2003; 33(14):
1037-60
LaForgia J, Withers RT, Gore CJ. Effects of exercise intensity and
duration on the excess post-exercise oxygen consumption. J Sports
Sci. 2006 Dec;24(12):1247-64
Baker, J. S., McCormick, M. C., & Robergs, R. A. (2010). Interaction
among Skeletal Muscle Metabolic Energy Systems during Intense
Exercise. Journal of nutrition and metabolism, 2010
Mukund K, Subramaniam S. Skeletal muscle: A review of molecular
structure and function, in health and disease. Wiley Interdiscip Rev
Syst Biol Med. 2020;12(1)
Hasan, Tabinda. (2019). Science of Muscle Growth: Making muscle.
McNeill Alexander R. Energetics and optimization of human
walking and running: the 2000 Raymond Pearl memorial lecture.
Am J Hum Biol. 2002 Sep-Oct;14(5):641-8.
Arias P, Espinosa N, Robles-García V, Cao R, Cudeiro J. Antagonist
muscle co-activation during straight walking and its relation to
kinematics: insight from young, elderly and Parkinson’s disease.
Brain Res. 2012 May 21;1455:124-31
Scott, Christopher. “Misconceptions about Aerobic and Anaerobic
Energy Expenditure.” Journal of the International Society of Sports
Nutrition vol. 2,2 32-7. 9 Dec. 2005
Alberts B, Johnson A, Lewis J, et al. Molecular Biology of the Cell.
4th edition. New York: Garland Science; 2002. How Cells Obtain
Energy from Food.
de Freitas MC, Gerosa-Neto J, Zanchi NE, Lira FS, Rossi FE. Role of
metabolic stress for enhancing muscle adaptations: Practical
applications. World J Methodol. 2017 Jun 26;7(2):46-54.
Van Horren B, et al. Do we need a cool-down after exercise? A
narrative review of the psychophysiological effects and the effects
on performance, injuries and the long-term adaptive response.
Sports Medicine. 2018;48:1575.
https://www.ncbi.nlm.nih.gov/pmc/articles/PMC6548056/
https://www.ncbi.nlm.nih.gov/pmc/articles/PMC4180747/
https://www.ncbi.nlm.nih.gov/pmc/articles/PMC5554572/
https://www.ncbi.nlm.nih.gov/pubmed/2150579
https://pubmed.ncbi.nlm.nih.gov/21997449/
https://pubmed.ncbi.nlm.nih.gov/28394829/
https://pubmed.ncbi.nlm.nih.gov/29781941/
https://pubmed.ncbi.nlm.nih.gov/26102260/
https://pubmed.ncbi.nlm.nih.gov/18438258/
https://pubmed.ncbi.nlm.nih.gov/14599232/
https://pubmed.ncbi.nlm.nih.gov/17101527/
223
ABOUT THE AUTHOR
Ingrid S Clay, is a Celebrity Personal Trainer, Master HIIT Group
Fitness Instructor, Competitive Bodybuilder, and a Plant-Based
Chef with over a decade of professional experience in fitness and
wellness. She deeply understands the direct impact fitness has
on individual success and happiness.
From Lafayette Louisiana, Ingrid graduated with a degree in
Physics from Xavier University of LA; a degree in Electrical
Engineering from North Carolina A&T University; and received
her MBA in International Marketing from Simmons School of
Management. Her science background influences the way she
views fitness and wellness as a whole.
After putting on weight while working full-time and attending night
school, Ingrid went back to the food and fitness basics and what
she knew best: science. She created her own diet and exercise
regime, incorporating mostly HIIT-based weighted workouts. She
enrolled in Simmons School of Management’s Entrepreneurial
Program, left her corporate job, and began building her own
wellness company full-time. She started working in fitness, working
on accreditations, and studying from trainers who had been in the
industry for years. And ISC Wellness was born.
Ingrid has traveled the world training, coaching, and cooking. She
has been featured in Well + Good, Essence, Livestrong, Fabletics,
and PopSugar Fit. Ingrid owns and operates ISC Wellness and has
an App that features both live and pre-recorded workouts. Ingrid is
a Lululemon Brand Ambassador and currently Director of Fitness
at CAMP in Los Angeles, California. In addition, Ingrid volunteers
weekly with the Watts Empowerment Center, providing health and
wellness to kids in the underserved Watts Community.
“Writing this book has been a dream come true. I truly hope you
enjoy it and reach your goals! Best of luck! My passion for inspiring
others and helping others be their best selves is my purpose; there
is no ending to what we are becoming.”
For more information on Ingrid:
www.ingridsclay.com
To donate to the Watts Empowerment Center:
www.youthmentor.org/givehope
224
ACKNOWLEDGMENTS
Author’s acknowledgments
I’d like to first thank my family for always supporting me. Especially
my mom. You have always been my number one cheerleader and
fan. It’s because of your support I am able to fly so high!
I’d also like to thank my clients, from personal training to everyone
I’ve met in studios where I’ve coached. I’ve learned so much from
you and I am constantly inspired by you. Thank you for letting me
be a part of your journeys.
Thanks to Chuck Norman, for teaching me the ropes and for
helping me always find the fun in Fitness.
Lastly I’d like to also thank Fitness. It was a form of meditation for
me when I needed it the most. It brought me back in so many
ways, and it made me stronger from the inside out.
Publisher’s acknowledgments
Dorling Kindersley would like to thank Myriam Megharbi for
picture research, Marie Lorimer for indexing, Guy Leopold
for proofreading, and Holly Kyte for editorial assistance.
Picture credits
The publisher would like to thank the following for their kind
permission to reproduce their photographs:
(Key: a-above; b-below/bottom; c-center; f-far; l-left; r-right; t-top)
10 Science Photo Library: Professors P.M. Motta, P.M. Andrews,
K.R. Porter & J. Vial (br). 14 Science Photo Library: Ikelos GmbH /
Dr. Christopher B. Jackson (cra). 15 Science Photo Library: CNRI
(br). 22 Science Photo Library: Professors P.M. Motta, P.M.
Andrews, K.R. Porter & J. Vial (bl). 25 Science Photo Library:
Thomas Deerinck, NCMIR (ca).
All other images © Dorling Kindersley
For further information see: www.dkimages.com