/


Текст
and tips
from the
professionals
N«*w techniques!
Stamping Mr n
on acetate I -»•*.
- we show । ।
you how ; | J/S
Hrty-s’ep ipmg Guide I
X What’s hot,
SPR1N<j J л, whereto
Jr buyit,
what to pay
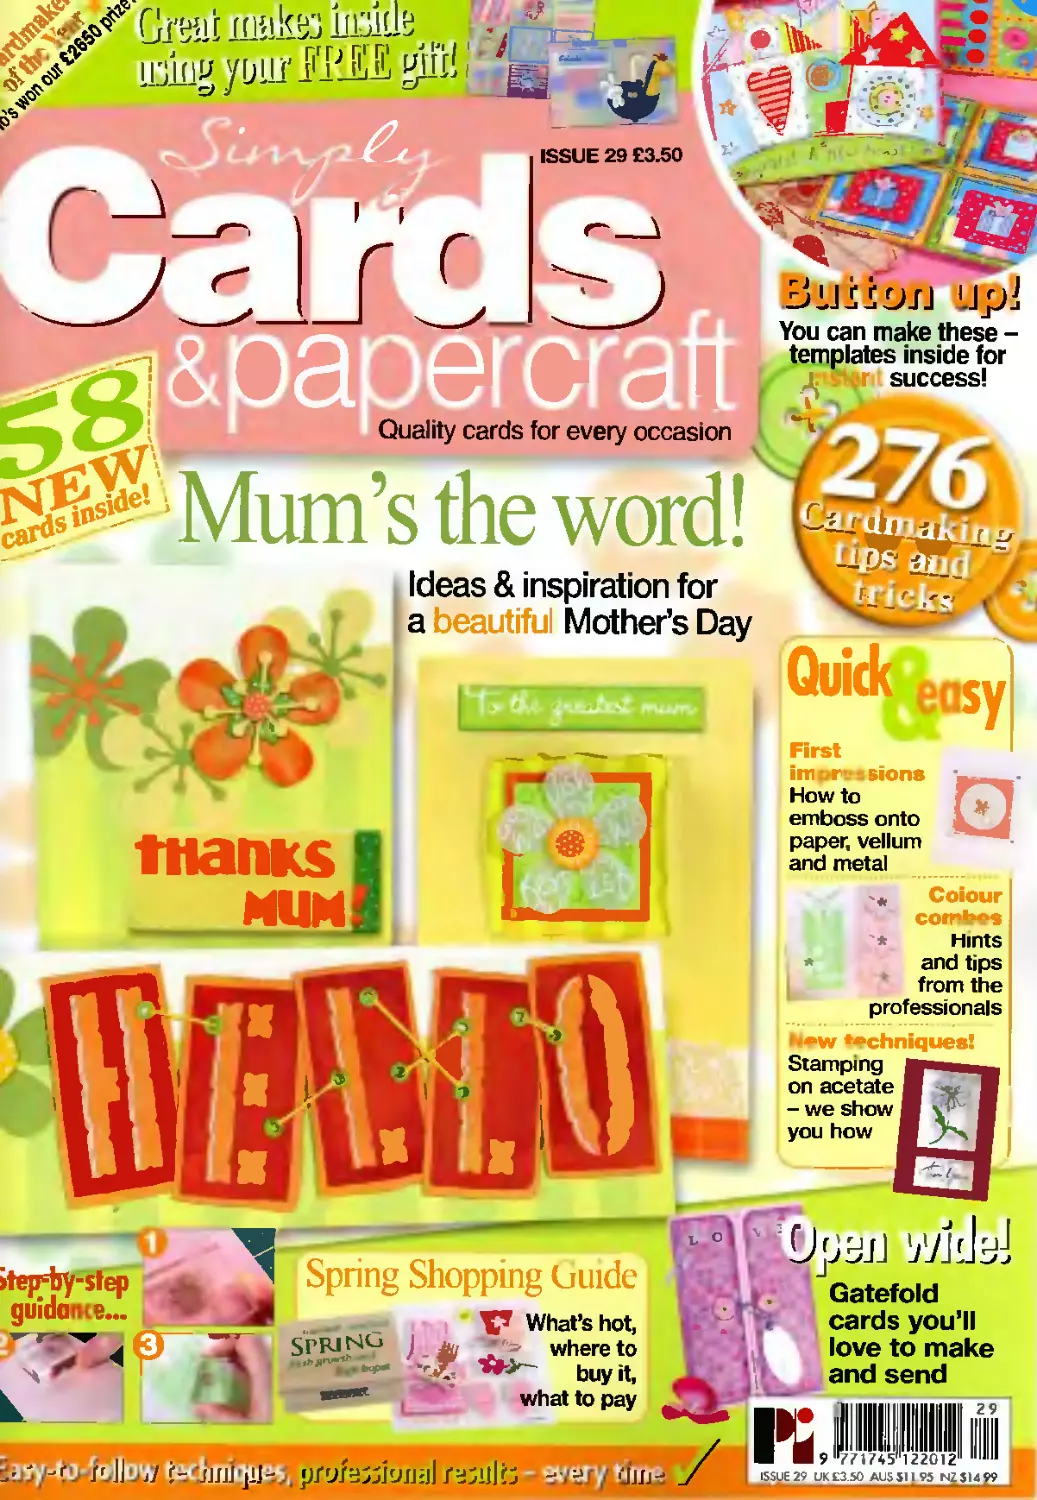
Gatefold
cards you’ll
love to make
and send
r. EJEj t-z'JjjJ'jU-.,. rasulb -nij Juu
KJllIiii
| ISSUE 29 UK £3 50 AUS Sil 95 NZ$14 99
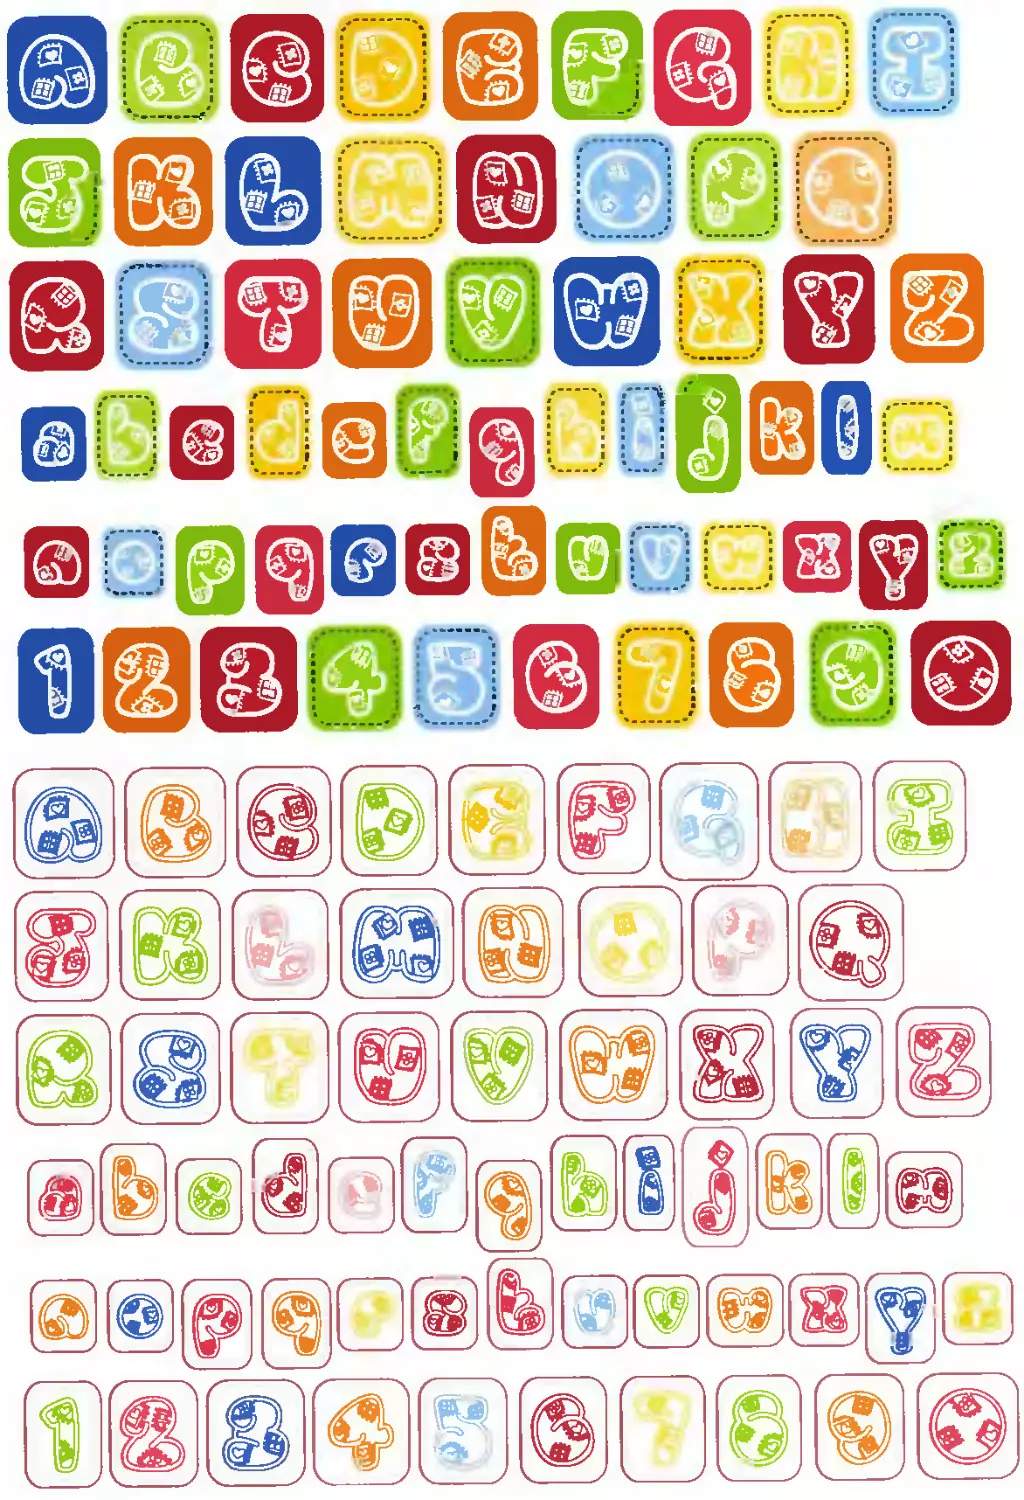
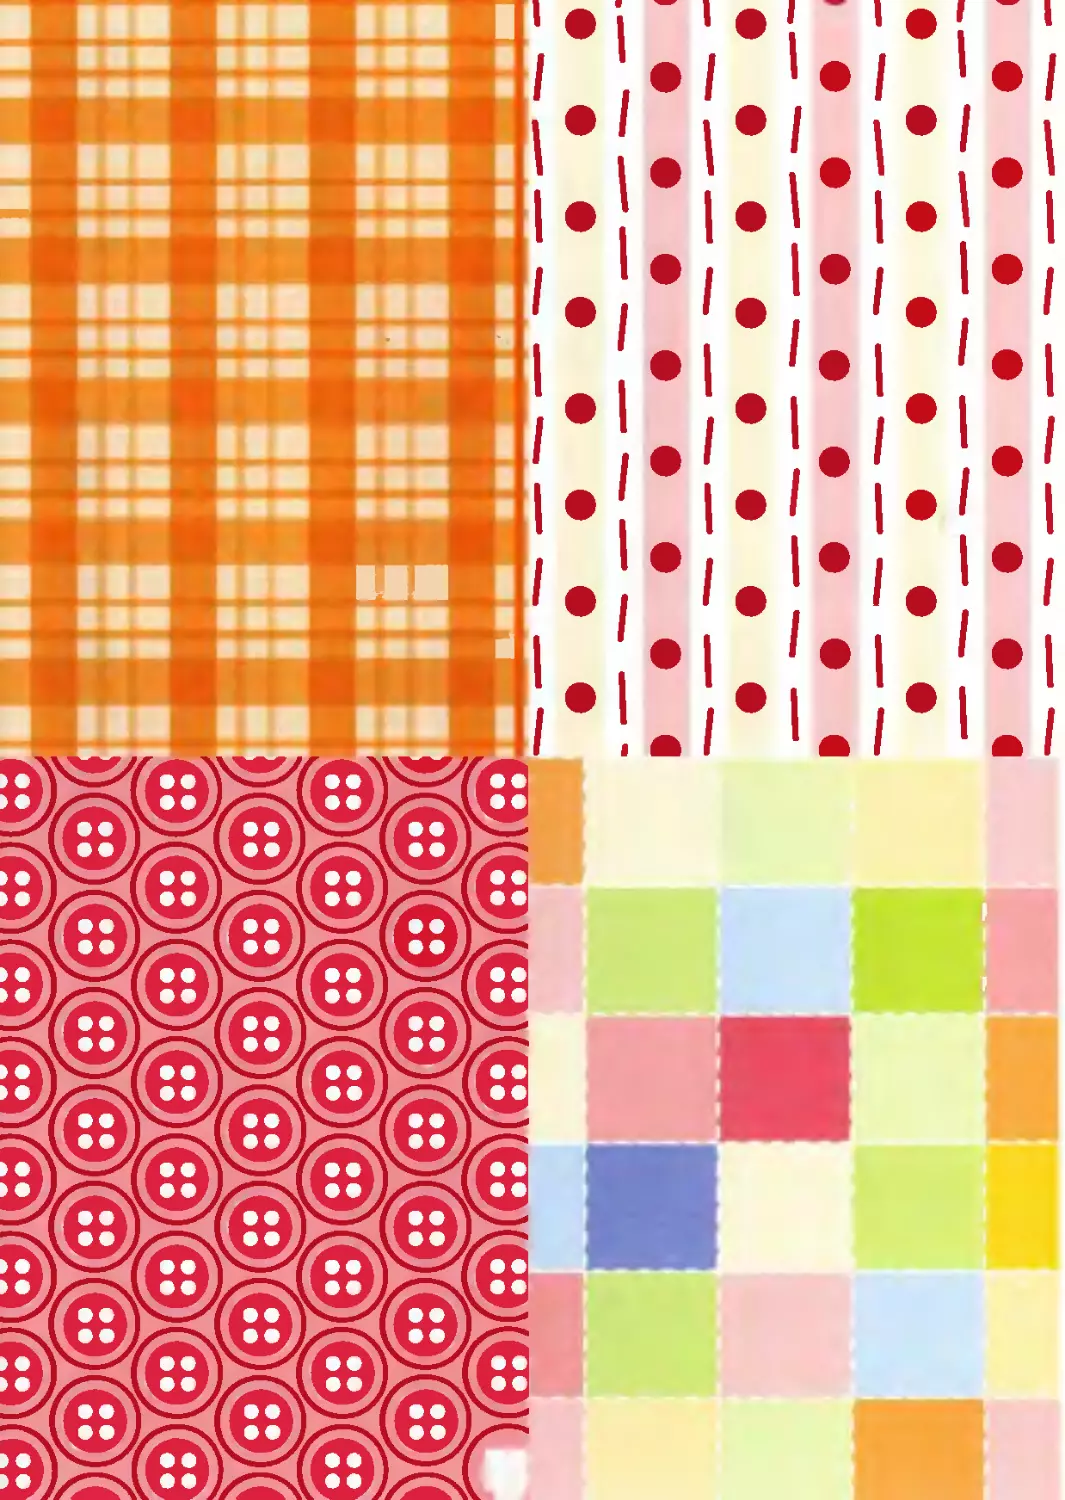
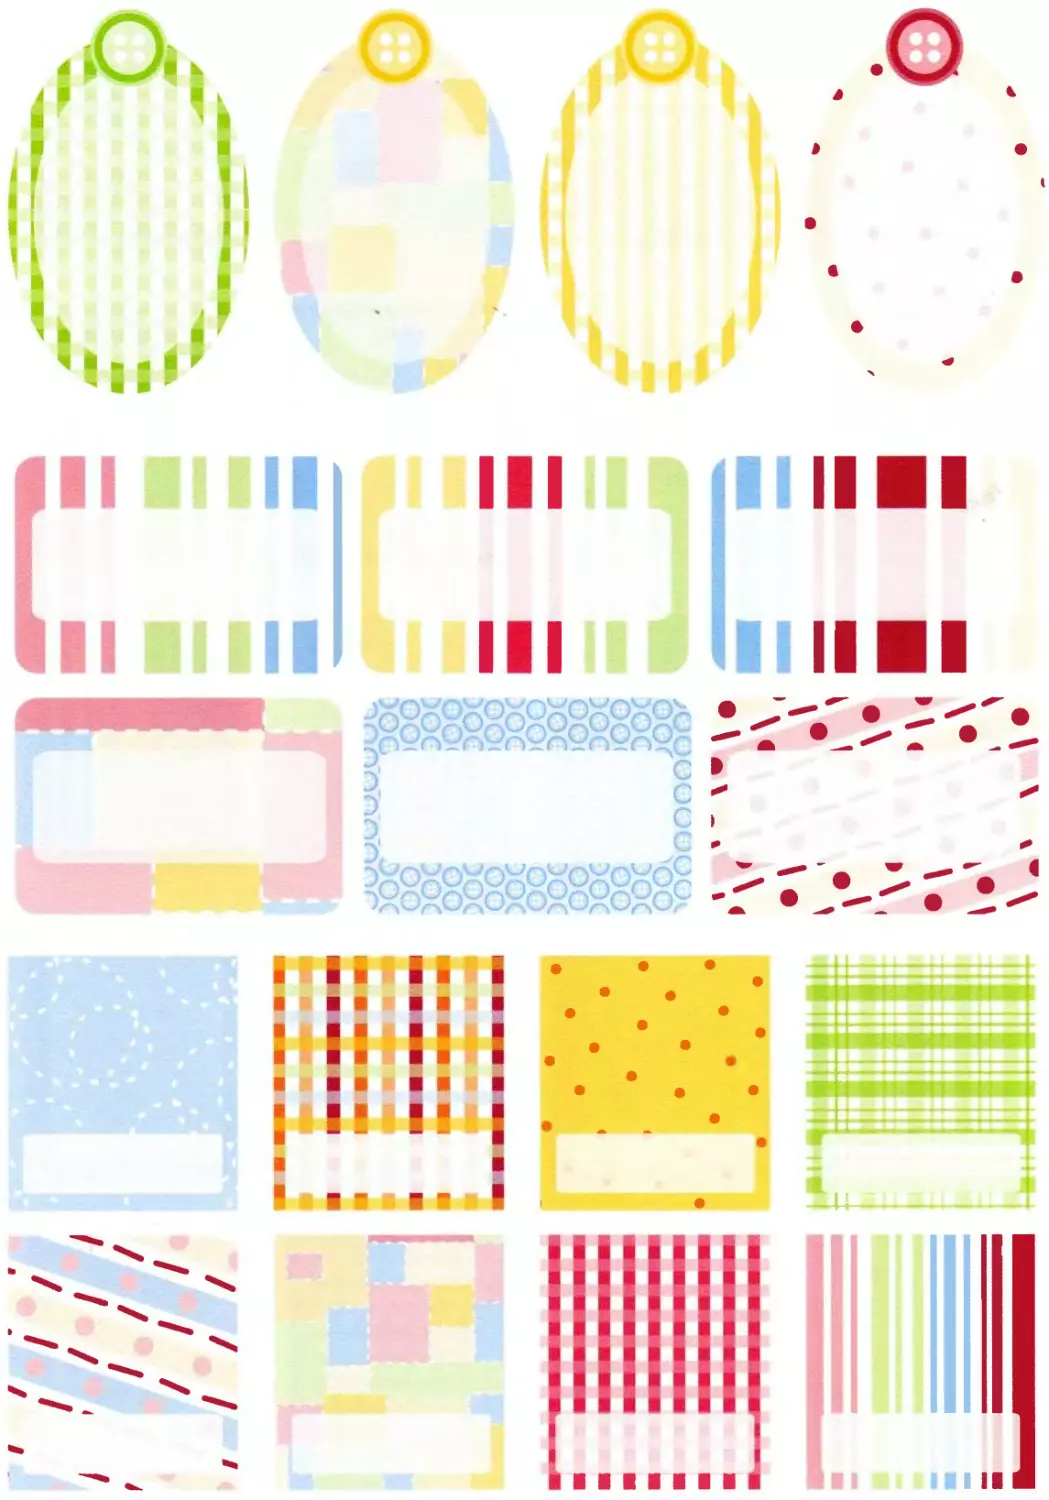
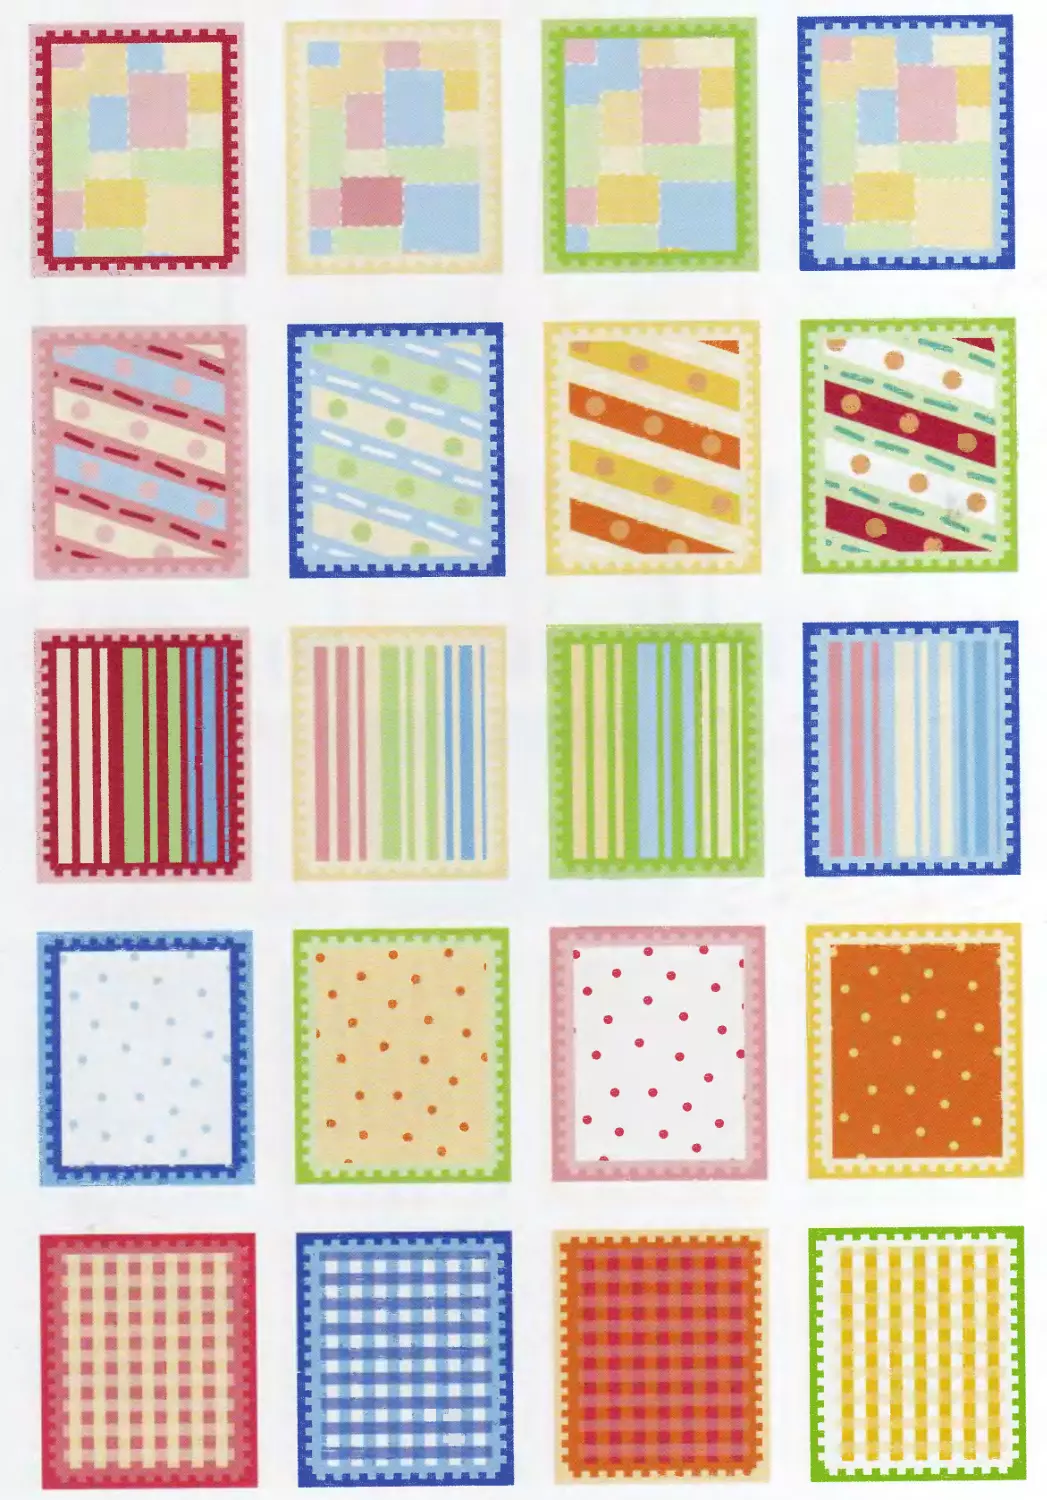
| cardmaking kit
r Using your,r
free gift
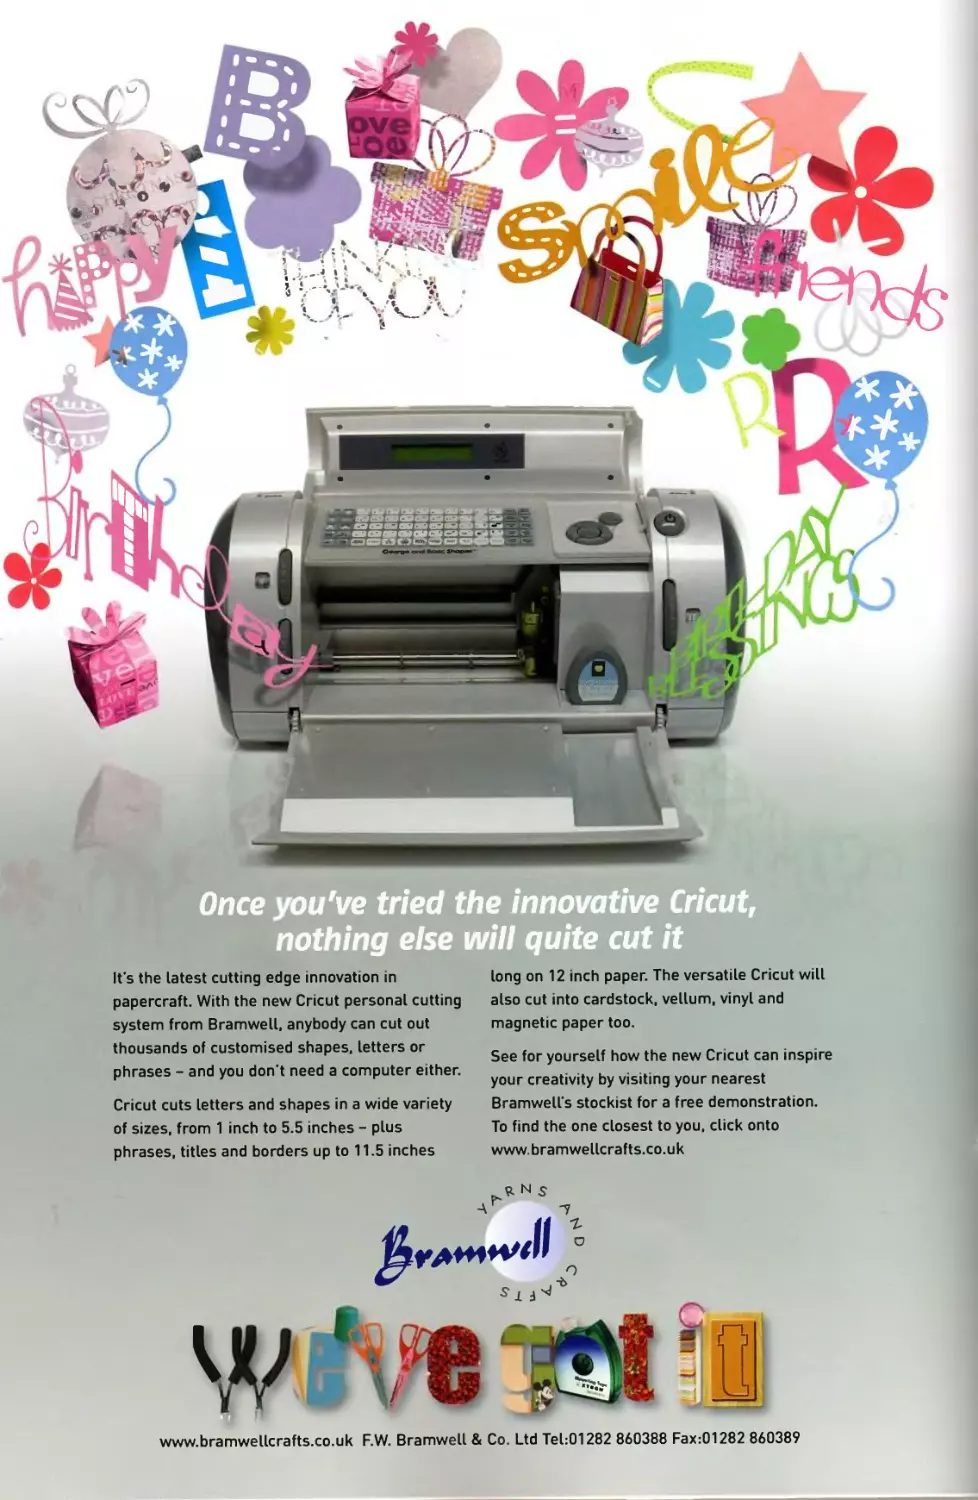
h's issue we re really spoiling you w th a stunning co lection
of papers, letters, numbers, stamps and tags. Diane
Grimshaw came up with these gorgeous creations to inspire
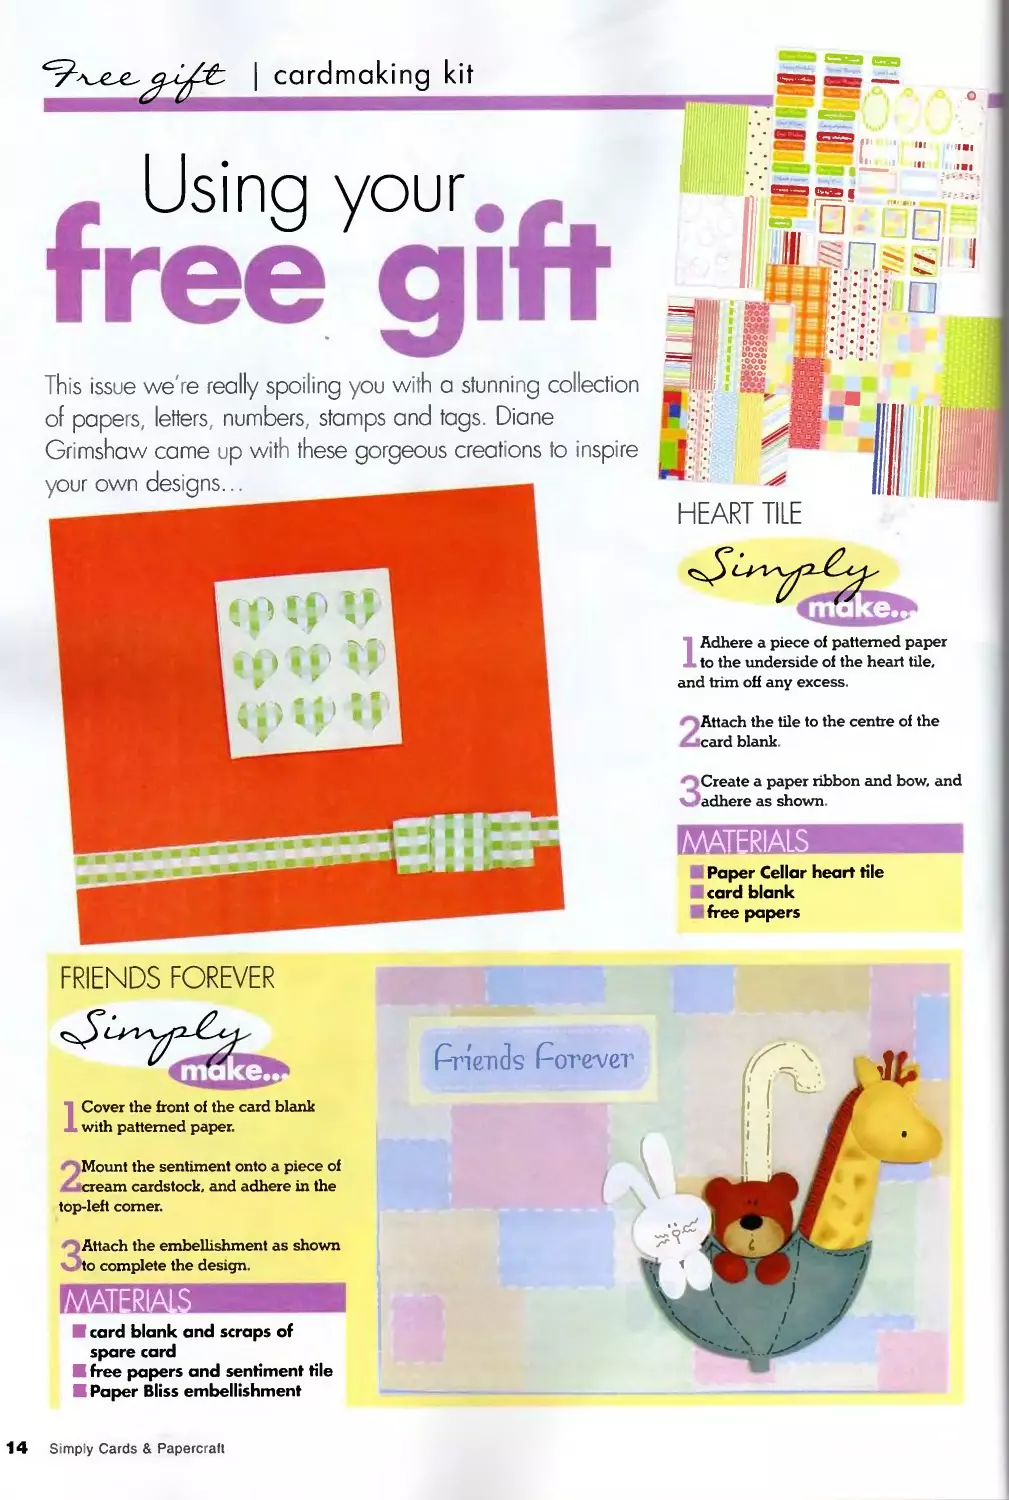
HEART TILE
1 Adhere a piece of patterned paper
to the underside of the heart tile.
and tnm off any excess.
Attach the tile to the centre of the
card blank
3Create a paper nbbon and bow, and
adhere as shown.
MATERIALS
Paper Cellar heart tile
card blank
free papers
FRIENDS FOREVER
1 Cover the front of the card blank
with patterned paper.
Mount the sentiment onto a piece of
cream cardstock, and adhere in the
top-left comer.
3Attach the embellishment as shown
to complete the design.
card blank and scraps of
spare card
free papers and sentiment tile
Paper Bliss embellishment
14 Simply Cards & Papercraft
GINGHAM FLOWER
NEW ARRIVAL
Highlight the paper with Icicle
Stickles and leave to dry.
card blank
IFix the Freeze Frames to the card as
shown.
Cover the remaining area of the
card blank with patterned paper.
□ free papers
Ranger Icicle Stickles
Magic Scraps Clearly Creative
Baby Boy Freeze Frames
PATCHWORK
PERFECTION
ICut nine patchwork squares from
the free papers, and arrange them
in a pattern to fit the front of the card
blank.
^‘ Create four punched flowers from
co-ordinating patterned paper and
fix to the card as shown.
Place a button in the centre of each
flower, and highlight the flower
edges with a fine-line black pen.
free papers
flower punch
P buttons
black pen
card blank
Why not send in pictures of the cards
you've made using your free gift this
issue? Send jpeg images by email to:
or by
snail mail to:
°] Cover both front pieces of the
gatefold card with patterned
paper.
Cover the die-cut bloom with
patterned paper, and run a line
of red hand-drawn stitches around
the petal edges.
QCurl the edges of the flower
petals to add definition.
Place the bloom and the
sentiment centrally on the card,
with the gatefold closed. Apply
glue, but only to the areas of the
bloom and sentiment which will sit
on the left side of the gatefold
(otherwise, the gatefold won't open).
Paper Cellar gatefold card
blank
free papers and sentiment
tile
button
spare piece of cardstock
Craftwork Cards die-cut
bloom
Simply Cards & Papercretl 15
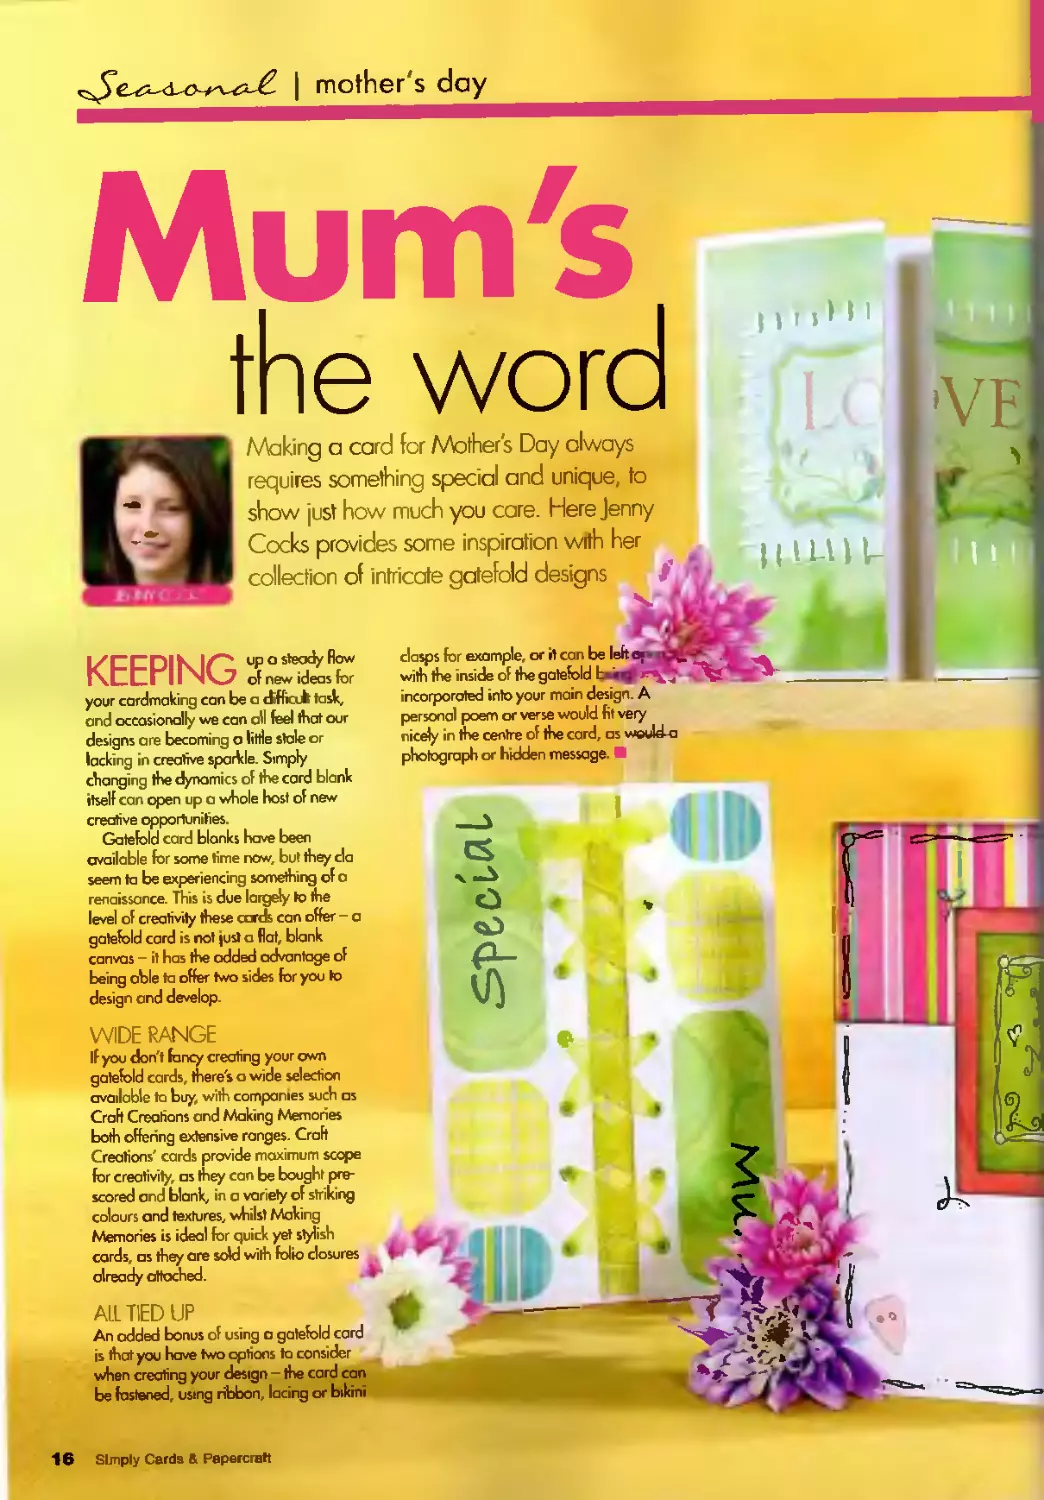
Mum's
the word
Making a card for Mother's Day always
requires something special and unique, to
show just how much you care. Here Jenny
Cocks provides some inspiration with her
collection of intricate gatefold designs
IIILUU
KEEPING
your cardmaking can be a diffecfc task,
end occasionally we can oil feel that our
designs are becoming о little stale or
lacking in creative sparkle. Simply
changing the dynamics of the card blank
itself can open up a whole host of new
creative opportunities.
Gatefold card blanks have been
available for some time now, but they cla
seem ta be experiencing something of о
renaissance. This is due largely to the
level of creativity these cords can offer - a
gatefold card is not just a flat, blank
canvas - it has the added advantage of
being able ta offer two sides for you to
design ond develop.
WIDE RANGE
If you don't fancy creating your own
gatefold cards, there's a wide selection
available ta buy, with companies such as
Craft Creations ond Making Memories
both offering extensive ranges. Craft
Creations’ cards provide maximum scope
for creativity, as they can be bought pre-
scored ond blank, in a variety of striking
colours and textures, whilst Making
Memories is ideal for quick yet stylish
cards, as they are sold with folio closures
already attached.
ALL TIED UP
An added bonus of using a gatefold card
is that you have two options to consider
when creating your design - the card can
be fastened, using ribbon, lacing or bikini
-Il i
clasps for example, or it can be
with the inside of the gatefold
incorporated into your main design. A
personal poem or verse would fit very
nicely in the centre of the card, os would-a
photograph or hidden message.
16 Simply Cards a Papercratt
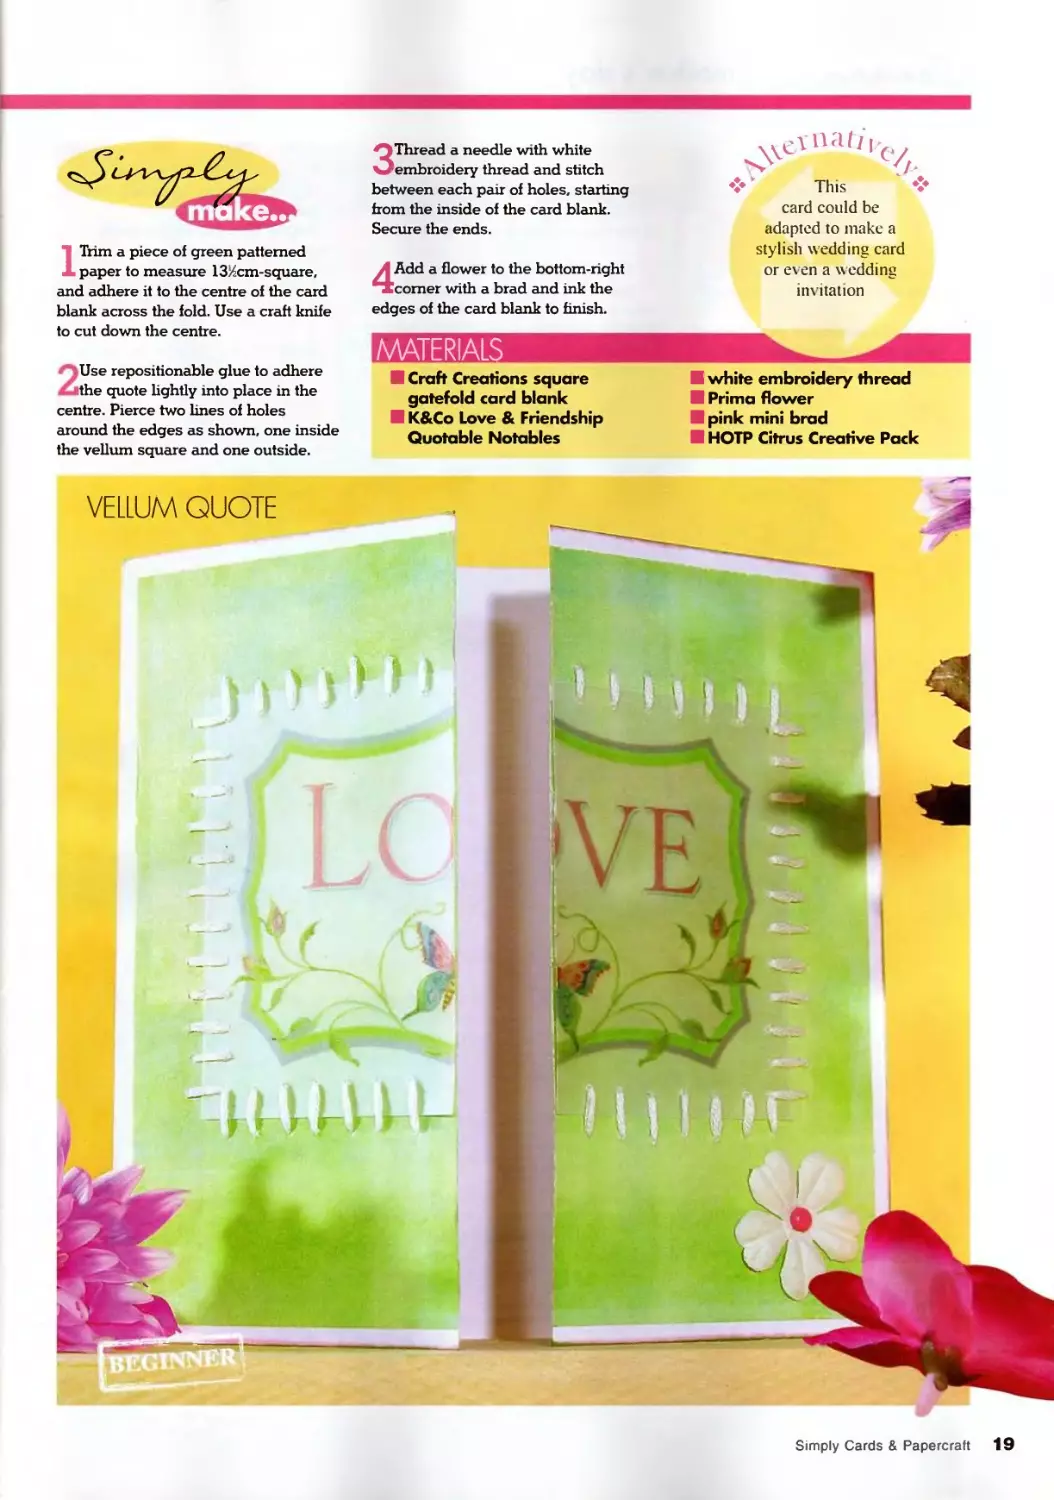
ITrim a piece of green patterned
paper to measure 13Hcm-square,
and adhere it to the centre of the card
blank across the fold. Use a craft knife
to cut down the centre.
2Use repositionable glue to adhere
the quote lightly into place in the
centre Pierce two lines of holes
around the edges as shown, one inside
the vellum square and one outside.
3Thread a needle with white
embroidery thread and stitch
between each pair of holes, starting
from the inside of the card blank.
Secure the ends.
4Add a flower to the bottom-right
comer with a brad and ink the
edges of the card blank to finish.
card could be
adapted to make a
stylish wedding card
or even a wedding
invitation
MATERIALS
Craft Creations square
gatefold card blank
K&Co Love & Friendship
Quotable Notables
white embroidery thread
H Prima flower
H pink mini brad
И HOTP Citrus Creative Pack
Simply Cards & Papercraft 19
| mother's day
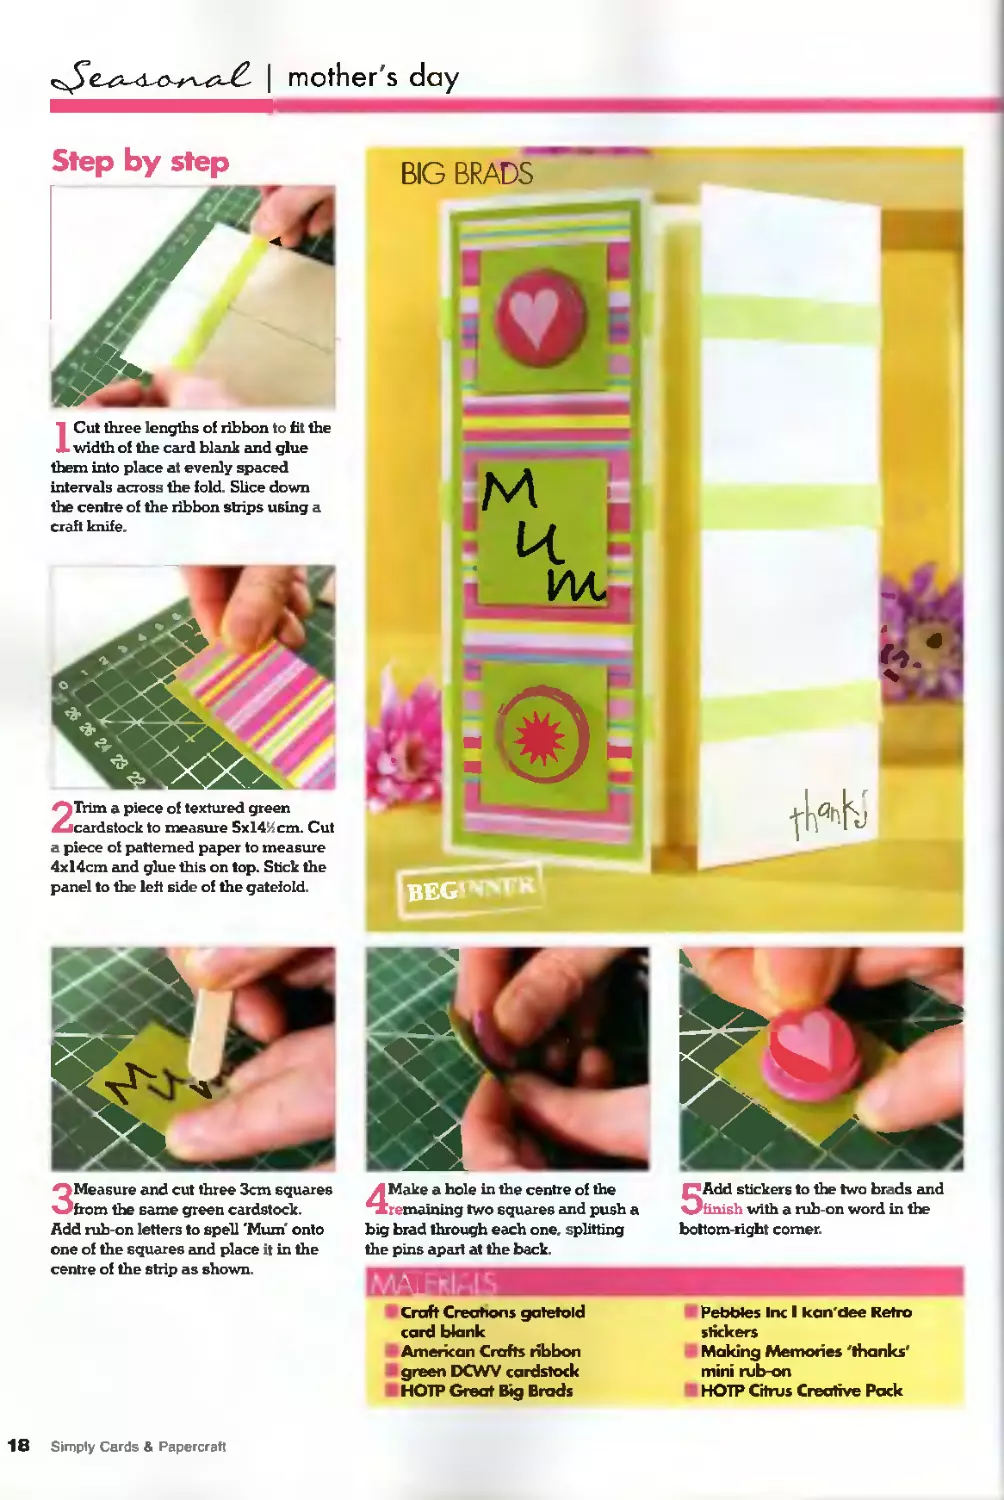
Step by step
ICut three lengths of ribbon to fit the
width of the card blank and glue
them into place at evenly spaced
intervals across the fold. Slice down
the centre of the ribbon strips using a
craft knife.
2Trim a piece of textured green
cardstock to measure Sxl4/icm. Cut
a piece of patterned paper to measure
4x14cm and glue this on top. Stick the
panel to the left side of the gatefold.
3Measure and cut three 3cm squares
from the same green cardstock.
Add rub-on letters to spell 'Mum' onto
one of the squares and place it in the
centre of the strip as shown.
4Make a hole in the centre of the
remaining two squares and push a
big brad through each one, splitting
the pins apart at the back.
5Add stickers to the two brads and
finish with a rub-on word in the
bottom-right comer.
Croft Creations gatefold
card blank
American Crafts ribbon
green DCWV cardstock
HOTP Great Big Brads
Pebbles Inc I kan'dee Retro
stickers
Making Memories 'thanks'
mini rub-on
HOTP Citrus Creative Pack
18 Simply Cards & Papercraf!
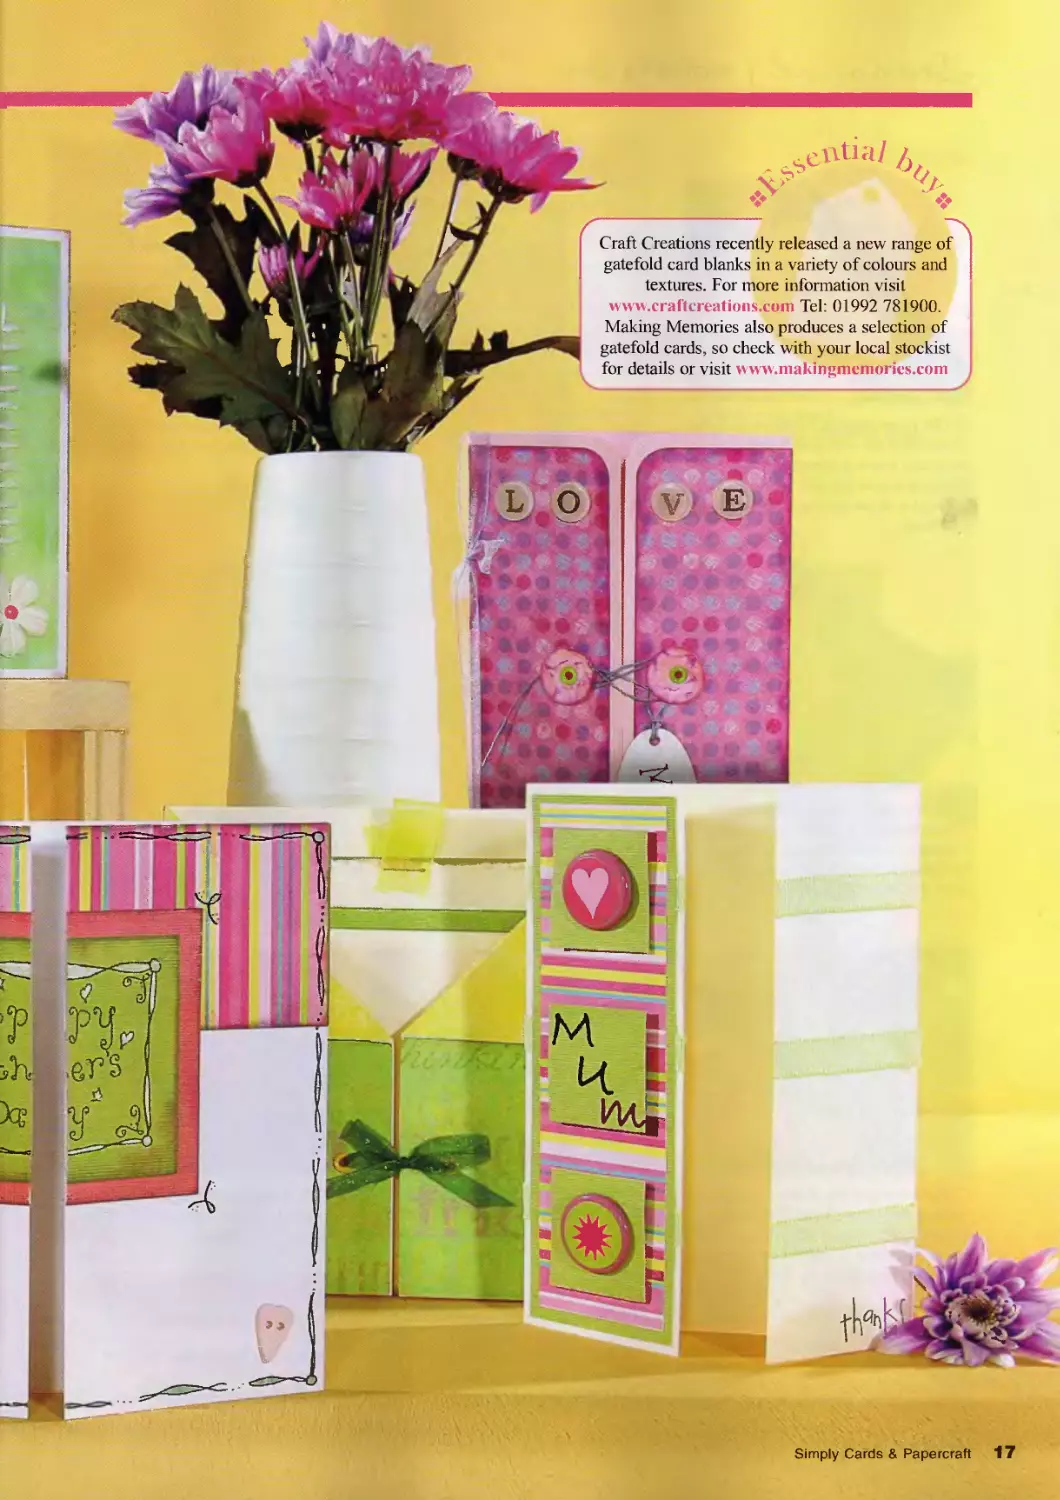
Craft Creations recently released a new range of
gatefold card blanks in a variety of colours and
textures. For more information visit
wvvw.craftcreations.com Tel: 01992 781900.
Making Memories also produces a selection of
gatefold cards, so check with your local stockist
for details or visit www.makingmemories.com
Simply Cards & Papercraft 17
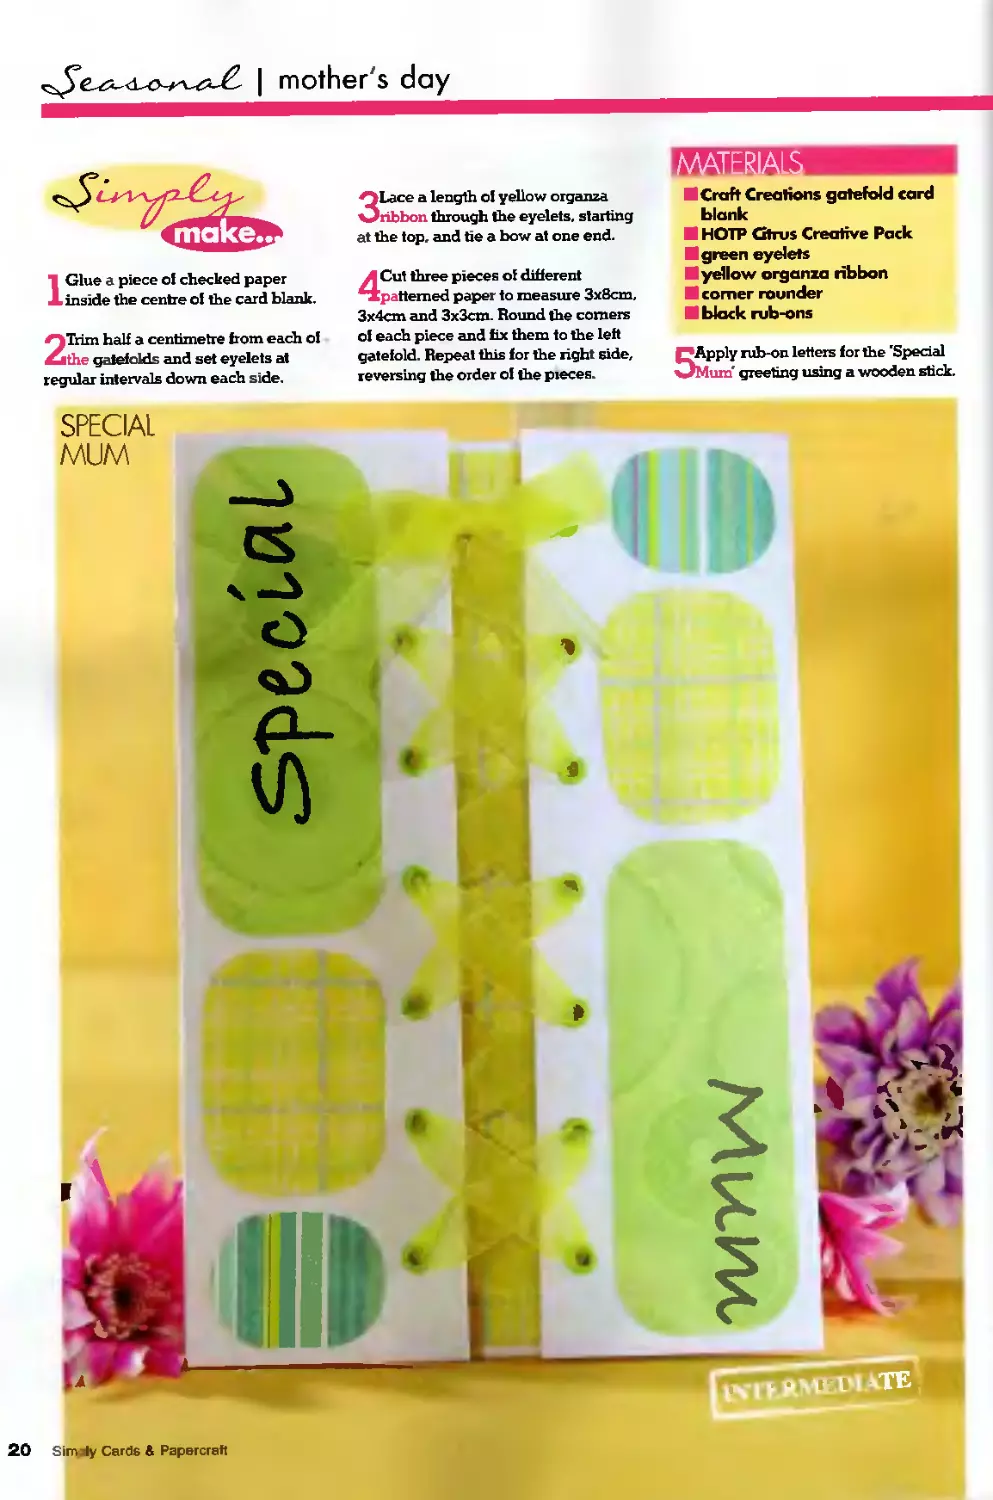
| mother's day
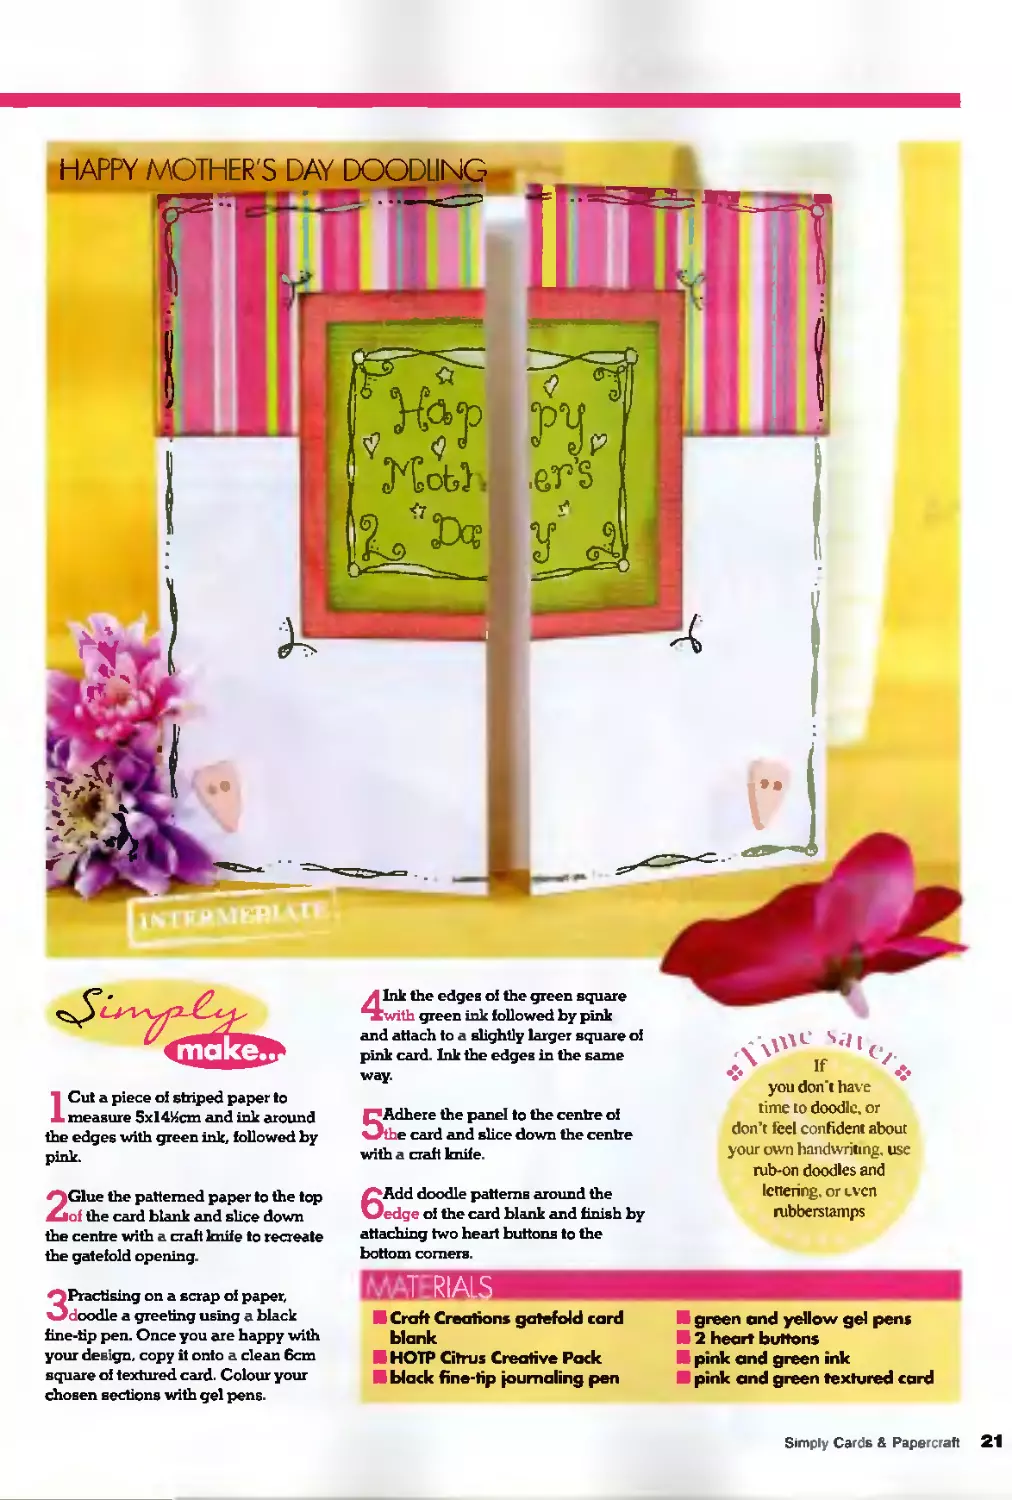
IGlue a piece of checked paper
inside the centre of the card blank.
2Trim half a centimetre from each of
the gatefolds and set eyelets at
regular intervals down each side.
3Lace a length of yellow organza
ribbon through the eyelets, starting
at the top, and tie a bow at one end.
4Cut three pieces of different
patterned paper to measure 3x8cm,
3x4cm and 3x3cm. Round the comers
of each piece and fix them to the left
gatefold. Repeat this for the right side,
reversing the order of the pieces.
Craft Creations gatefold card
blank
И HOTP Citrus Creative Pack
□ green eyelets
□ yellow organza ribbon
И comer rounder
И black rub-ons
FApply rub-on letters for the 'Special
vMmn greeting using a wooden stick.
20 Simjiy Cards & Papercraft
2Glue the patterned paper to the top
of the card blank and slice down
the centre with a craft knife to recreate
the gatefold opening.
6Add doodle patterns around the
edge of the card blank and finish by
attaching two heart buttons to the
bottom comers.
lettering, or uven
nibberstamps
3Practising on a scrap of paper,
doodle a greeting using a black
fine-tip pen. Once you are happy with
your design, copy it onto a clean 6cm
square of textured card. Colour your
chosen sections with gel pens.
□ Craft Creations gatefold card
blank
HOTP Citrus Creative Pack
□ black fine-tip journaling pen
green and yellow gel pens
2 heart buttons
pink and green ink
□ pink and green textured card
Simply Cards & Papercraft 21
| mother's day
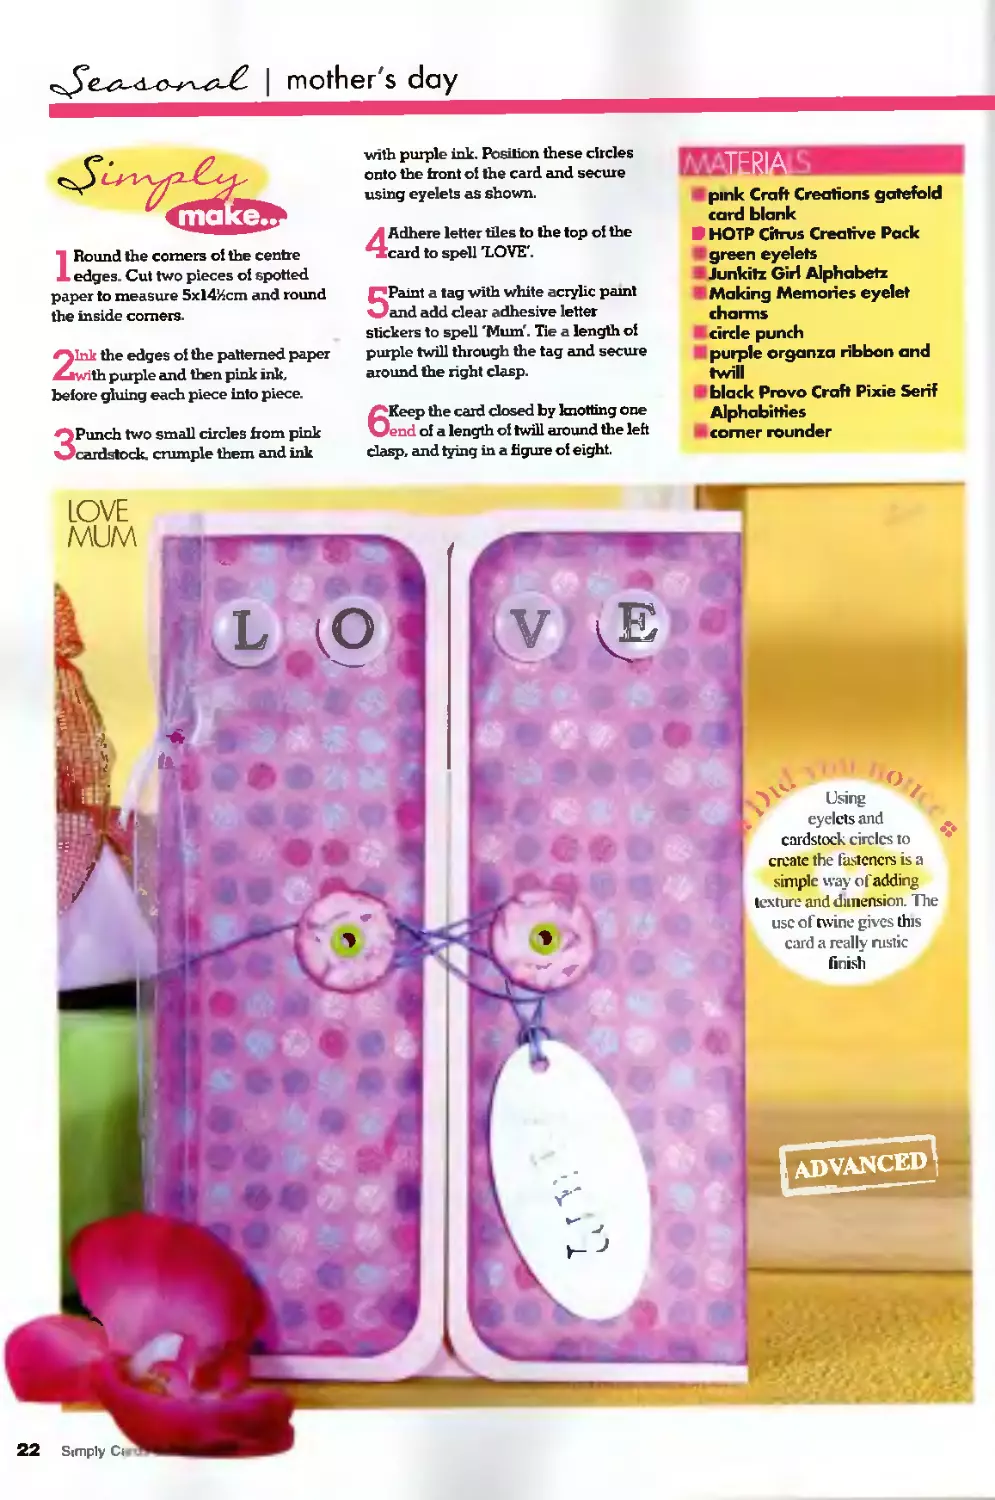
1 Round the comers of the centre
edges. Cut two pieces of spotted
paper to measure 5xl4’Zcm and round
the inside comers.
2Ini the edges of the patterned paper
with purple and then pink ink,
before gluing each piece into piece.
3Punch two small circles from pink
cardstock, crumple them and ink
with purple ink. Position these circles
onto the front of the card and secure
using eyelets as shown,
4Adhere letter tiles to the top of the
card to spell "LOVE'.
5Paint a tag with white acrylic paint
and add clear adhesive letter
stickers to spell 'Mum'. Tie a length ot
purple twill through the tag and secure
around the right clasp.
/^Keep the card closed by knotting one
Vend of a length of twill around the left
clasp, and tying in a figure of eight.
pink Craft erections gatefold
card blank
HOTP Citrus Creative Pack
green eyelets
Junkitz Girl Alphabet*
Making Memories eyelet
charms
circle punch
purple organza ribbon and
twill
black Provo Craft Pixie Serif
Alphabitties
comer rounder
Step by step
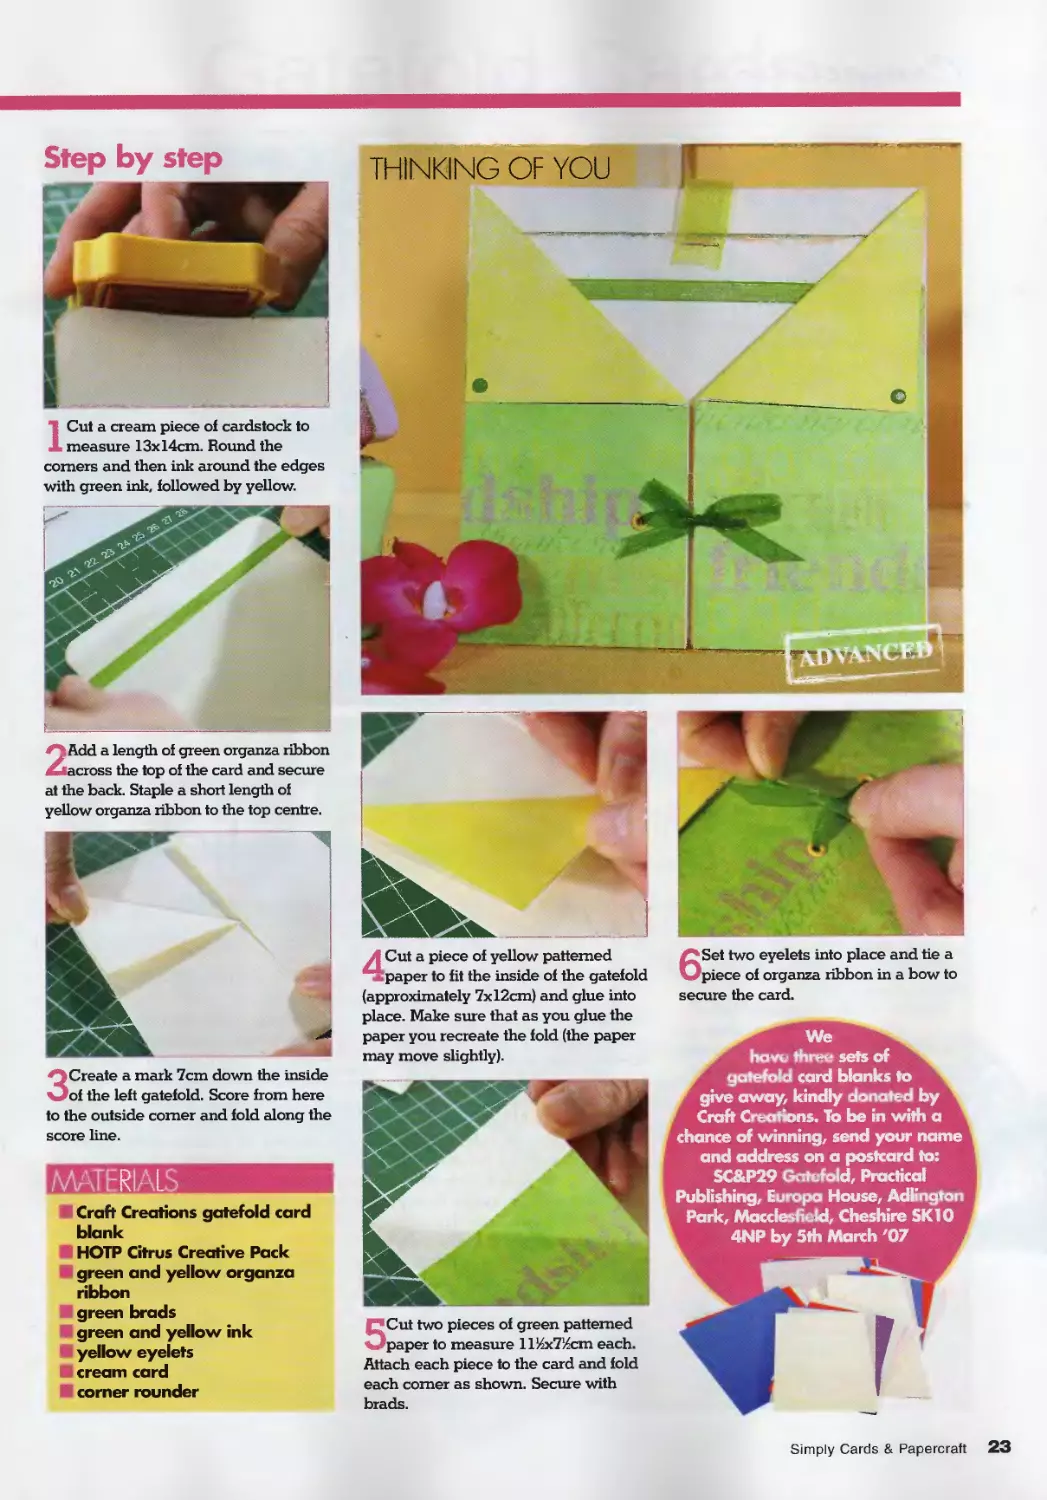
ICut a cream piece of cardstock to
measure 13x14cm. Round the
comers and then ink around the edges
with green ink, followed by yellow.
2 Add a length of green organza ribbon
across the top of the card and secure
at the back. Staple a short length of
yellow organza ribbon to the top centre.
J Cut a piece of yellow patterned
paper to fit the inside of the gatefold
(approximately 7x12cm) and glue into
place. Make sure that as you glue the
paper you recreate the fold (the paper
may move slightly).
3Create a mark 7cm down the inside
of the left gatefold. Score from here
to the outside comer and fold along the
score line.
MATERIALS
Craft Creations gatefold card
blank
HOTP Citrus Creative Pack
green and yellow organza
ribbon
green brads
green and yellow ink
yellow eyelets
cream card
corner rounder
THINKING OF YOU
5Cut two pieces of green patterned
paper to measure ll'ZxT’Zcm each.
Attach each piece to the card and fold
each comer as shown. Secure with
brads.
6Set two eyelets into place and tie a
piece of organza ribbon in a bow to
secure the card.
We
have three sets of
' gatefold card blanks to
r give away, kindly donated by ,
Craft Creations. To be in with a
chance of winning, send your name
and address on a postcard to:
SC&P29 Gatefold, Practical
Publishing, Europa House, AdKngton i
Park, Macclesfield, Cheshire SK1O
4NP by 5th March '07
Simply Cards & Papercraft 23
| dry embossing
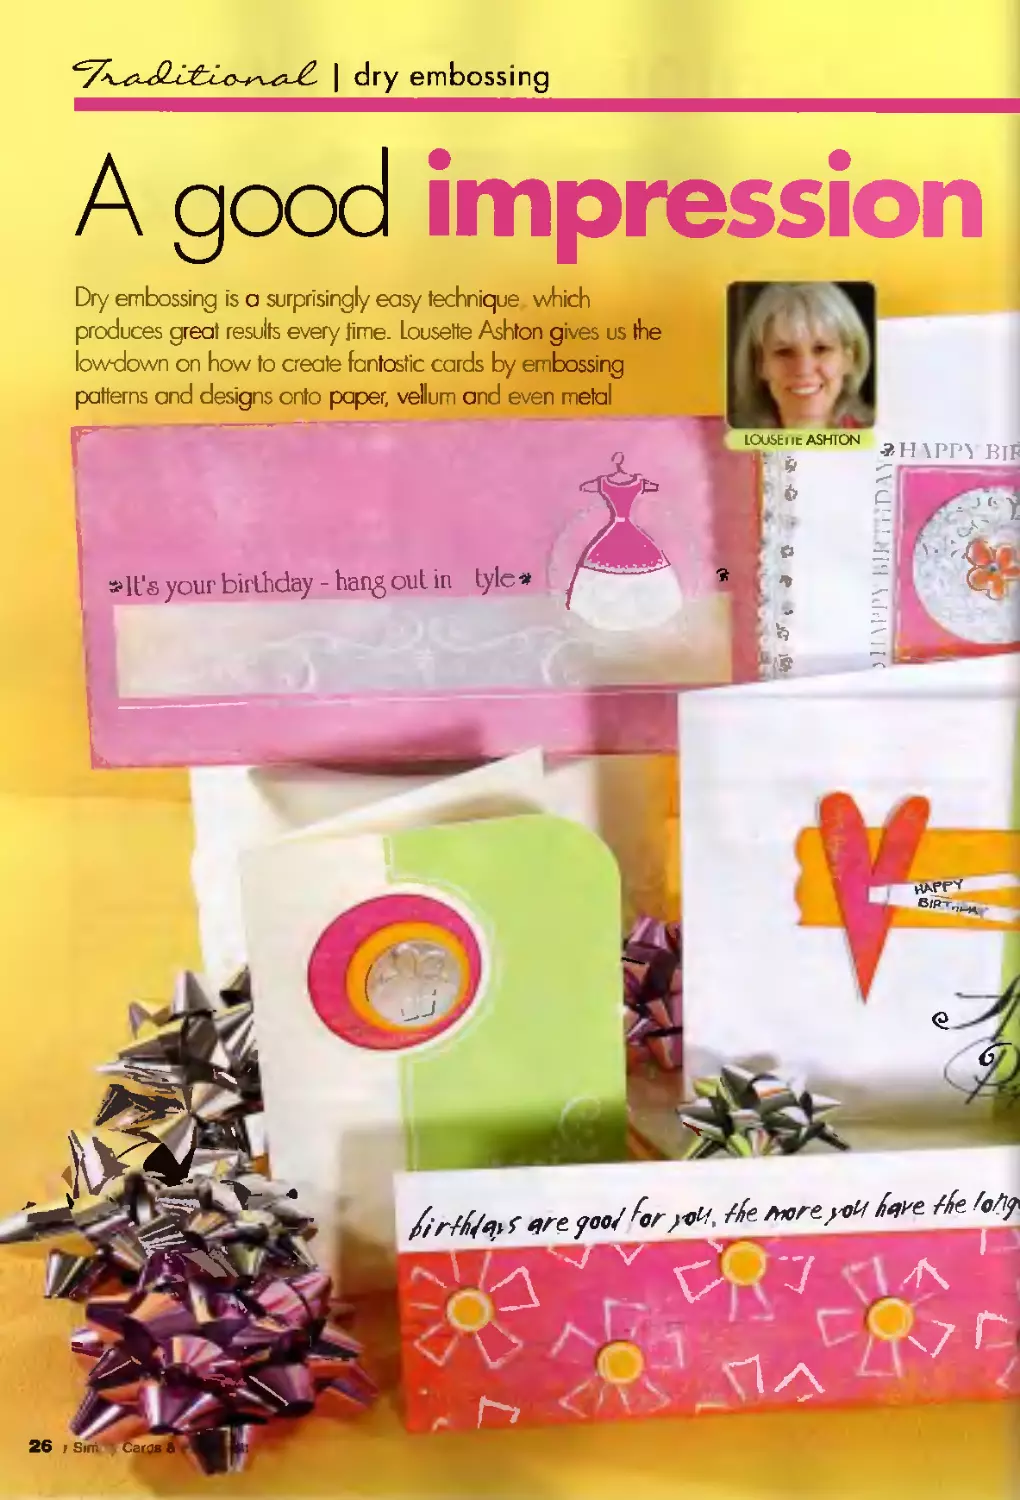
A good impression
Dry embossing is a surprisingly easy technique which
produces great results every time. Lousette Ashton gives us the
lowdown on how to create fantastic cards by embossing
patterns and designs onto paper, vellum and even melal
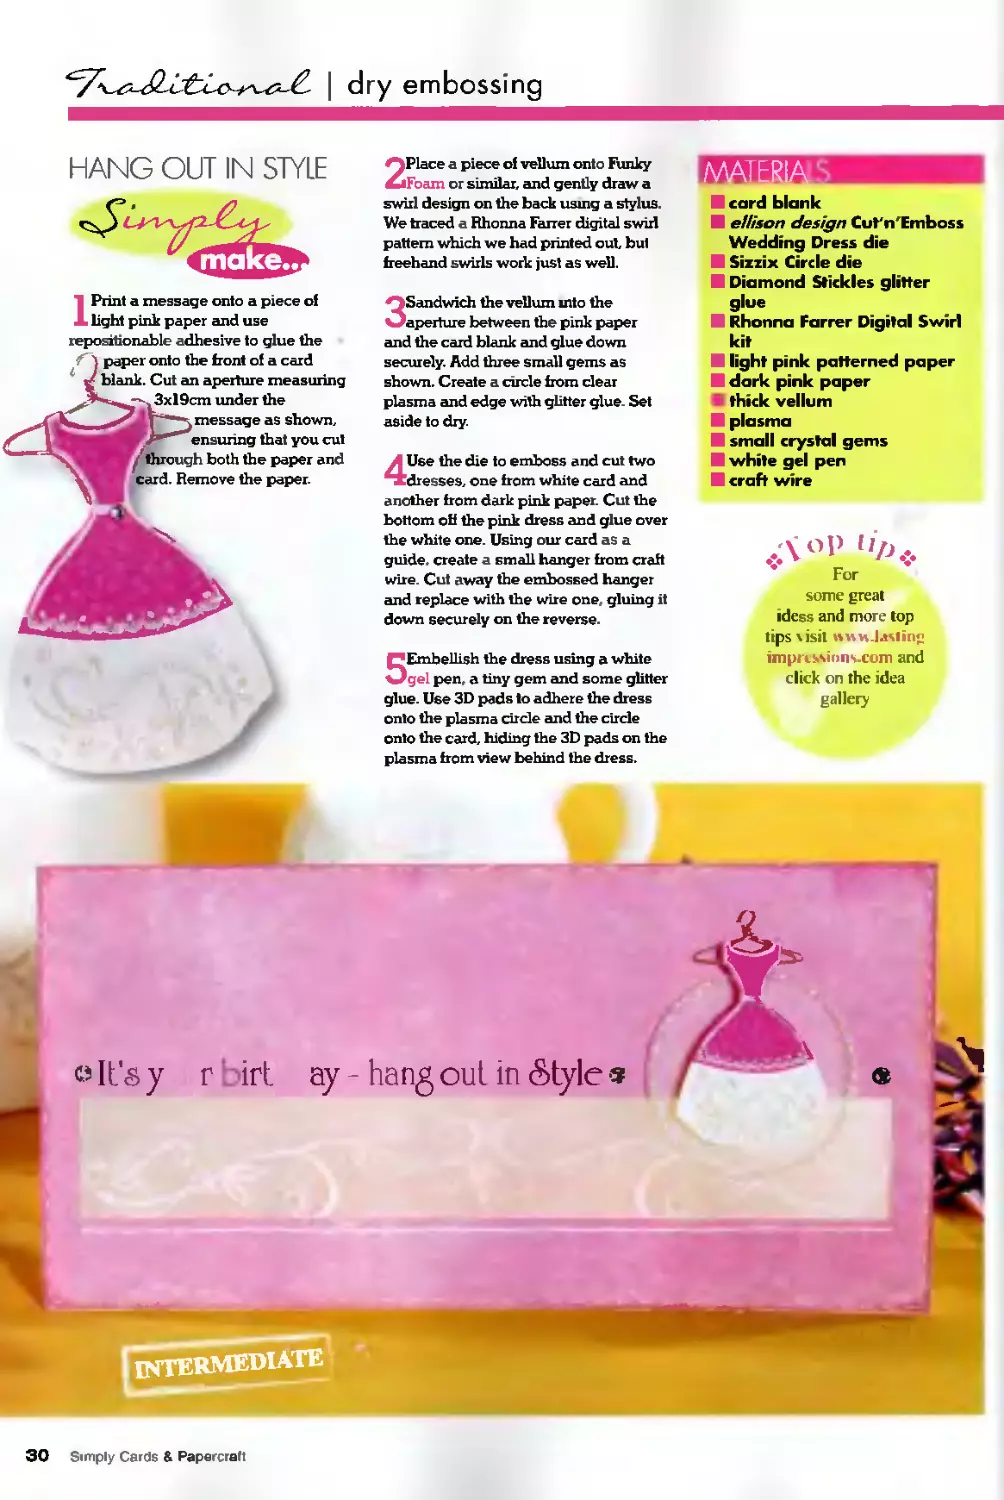
»It's your birthday - hang out in tyle«
26 j Sim
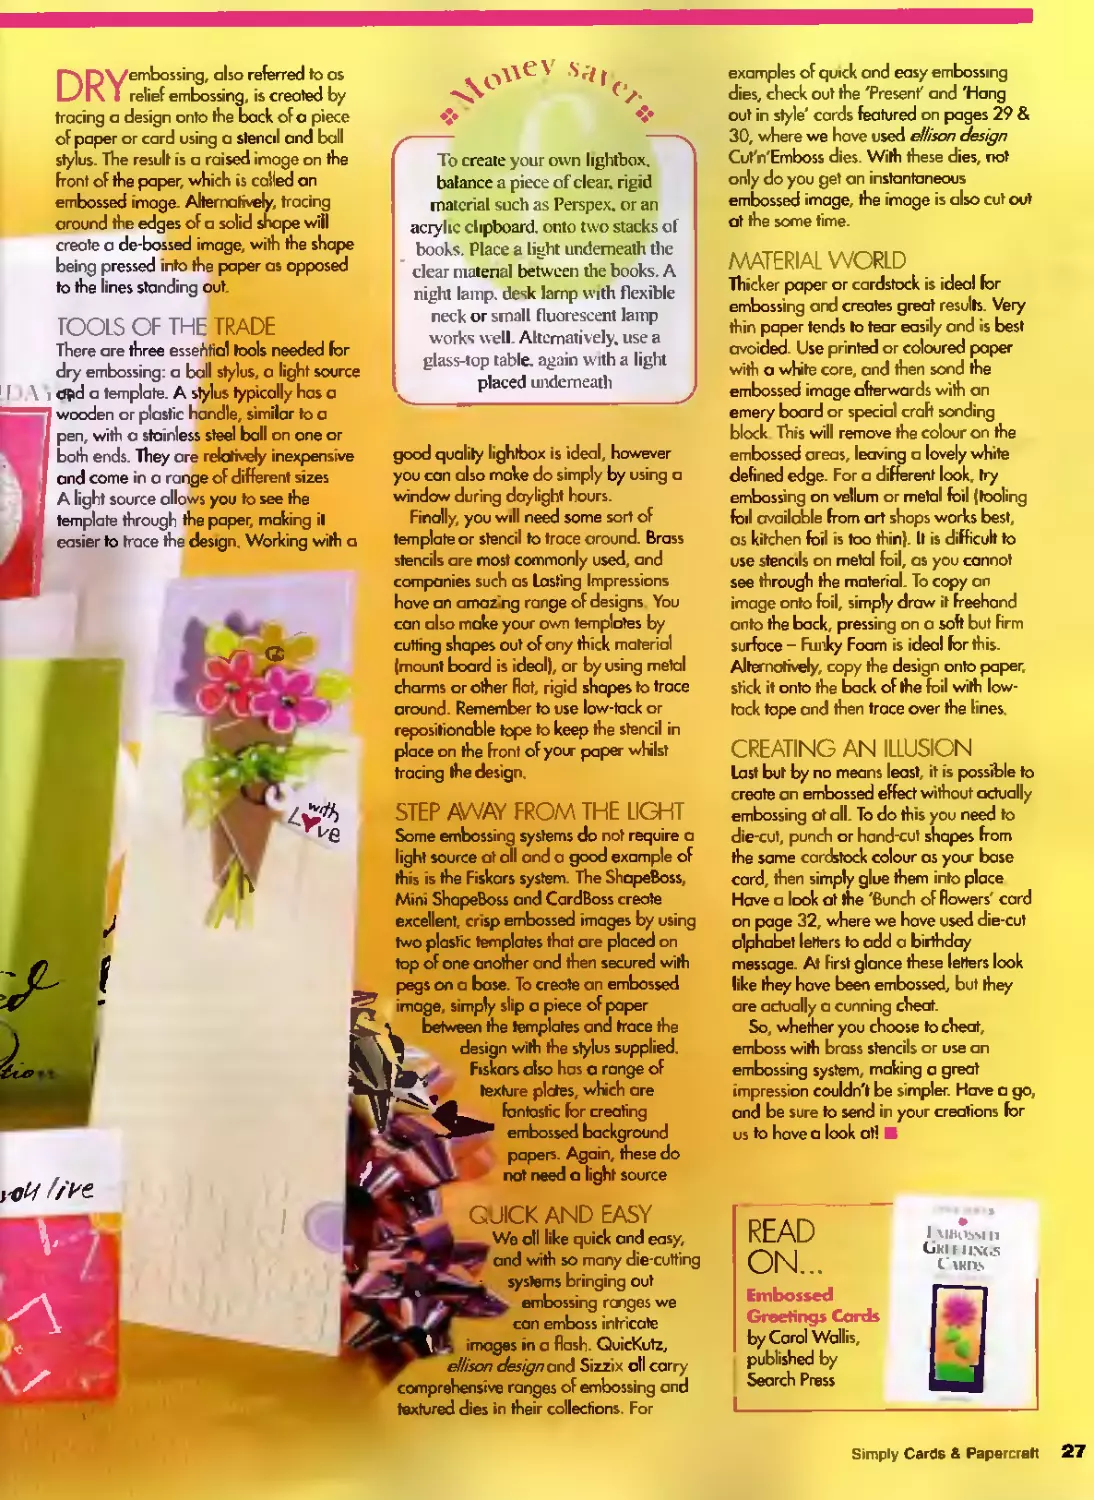
Г> QWembossing, also referred to os
L/lx I relief embossing, is created by
tracing a design onto the back of о piece
of paper or card using a stencil and ball
stylus. The result is a raised image on the
front of the paper, which is called an
embossed image. Alternatively, tracing
around the edges of a solid shape will
create a de-bossed image, with the shape
being pressed into the paper as opposed
to the lines standing out.
FOOLS OF THE TRADE
There are three essential tools needed for
dry embossing: a ball stylus, о light source
I \ i a₽d a template. A stylus typically has a
wooden or plastic handle, similar to a
pen, with a stainless steel ball on one or
both ends. They ore relatively inexpensive
and come in о range of different sizes
A light source allows you to see the
template through the paper, making it
easier to trace the design Working with a
vcU five.
To create your own lightbox,
balance a piece of clear, rigid
material such as Perspex, or an
acrylic clipboard, onto two stacks of
books. Place a light underneath the
clear material between the books. A
night lamp, desk lamp with flexible
neck or small fluorescent lamp
works well. Alternatively, use a
glass-top table, again with a light
placed underneath
good quality lightbox is ideal, however
you can also make do simply by using a
window during daylight hours.
Finally, you will need some sort of
template or Stencil to trace around. Brass
stencils are most commonly used, and
companies such as lasting Impressions
have an amazing range of designs You
can also make your own templates by
cutting shapes out of any thick material
(mount board is ideal), or by using metal
charms or other Rat, rigid shapes to trace
around. Remember to use low-tack or
repositionable tope to keep the stencil in
place on the front of yotr paper whilst
tracing the design
STEP AWAY FROM THE LIGHT
Some embossing systems do not require a
light source at all and a good example of
this is the Fiskars system. The ShapeBoss,
Mini ShapeBoss and CardBoss create
excellent, crisp embossed images by using
two plastic templates that are placed on
top of one another and then secured with
pegs on a base. To create an embossed
image, simply slip a piece of paper
between the templates and trace the
design with the stylus supplied.
Fiskars also has о range of
texture pities, which are
fantastic for creating
embossed background
papers. Again, these do
not need a light source
QUICK AND EASY
We oil like quick and easy,
and with so many die-cutting
systems bringing out
embossing ranges we
can emboss intricate
images in a flash. QuicKutz,
ellison design and Sizzix oil carry
comprehensive ranges of embossing and
textured dies in their collections. For
examples of quick and easy embossing
dies, check out the 'Present' and 'Hang
out in style' cards featured on pages 29 &
30, where we have used ellison design
Cut'n'Emboss dies. With these dies, not
only do you get an instantaneous
embossed image, the image is also cut out
ot the some time.
MATERIAL WORLD
Thicker paper or cardstock is ideal for
embossing and creates great results. Very
thin paper tends to tear easily and is best
avoided. Use printed or coloured paper
with a white core, and then sond the
embossed image afterwards with an
emery board or special craft sending
block This will remove the colour on the
embossed areas, leaving a lovely white
defined edge. For a different look, try
embossing on vellum or metal foil (tooling
foil available from art shops works best,
os kitchen foil is too thin). It is difficult to
use stencils on metal foil, as you cannot
see through the material. To copy on
image onto foil, simply draw it freehand
onto the back, pressing on a soft but firm
surface - Funky Foam is idea! for this.
Alternatively, copy the design onto paper
stick it onto the back of the foil with low-
tack tape and then trace over the lines.
CREATING AN ILLUSION
Last but by no means least, it is possible to
create an embossed effect without actually
embossing at all. To do this you need to
die-cut, punch or hand-cut shapes from
the same cardstock colour os your base
card, then simply glue them into place
Have a look at the 'Bunch of flowers' card
on page 32, where we have used die-cut
alphabet letters to add a birthday
message. At first glance these letters look
like they hove been embossed, but they
are actually a cunning cheat.
So, whether you choose to cheat,
emboss with brass stencils or use an
embossing system, making a great
impression couldn't be simpler. Have a go,
and be sure to send in your creations for
us to have a look ot!
READ
ON...
Embossed
Greetings Cards
by Carol Wallis,
published by
Search Press
I MHOSMIl
Gjofiixgs
I Mtns
Simply Cards & Papercratt 27
| dry embossing
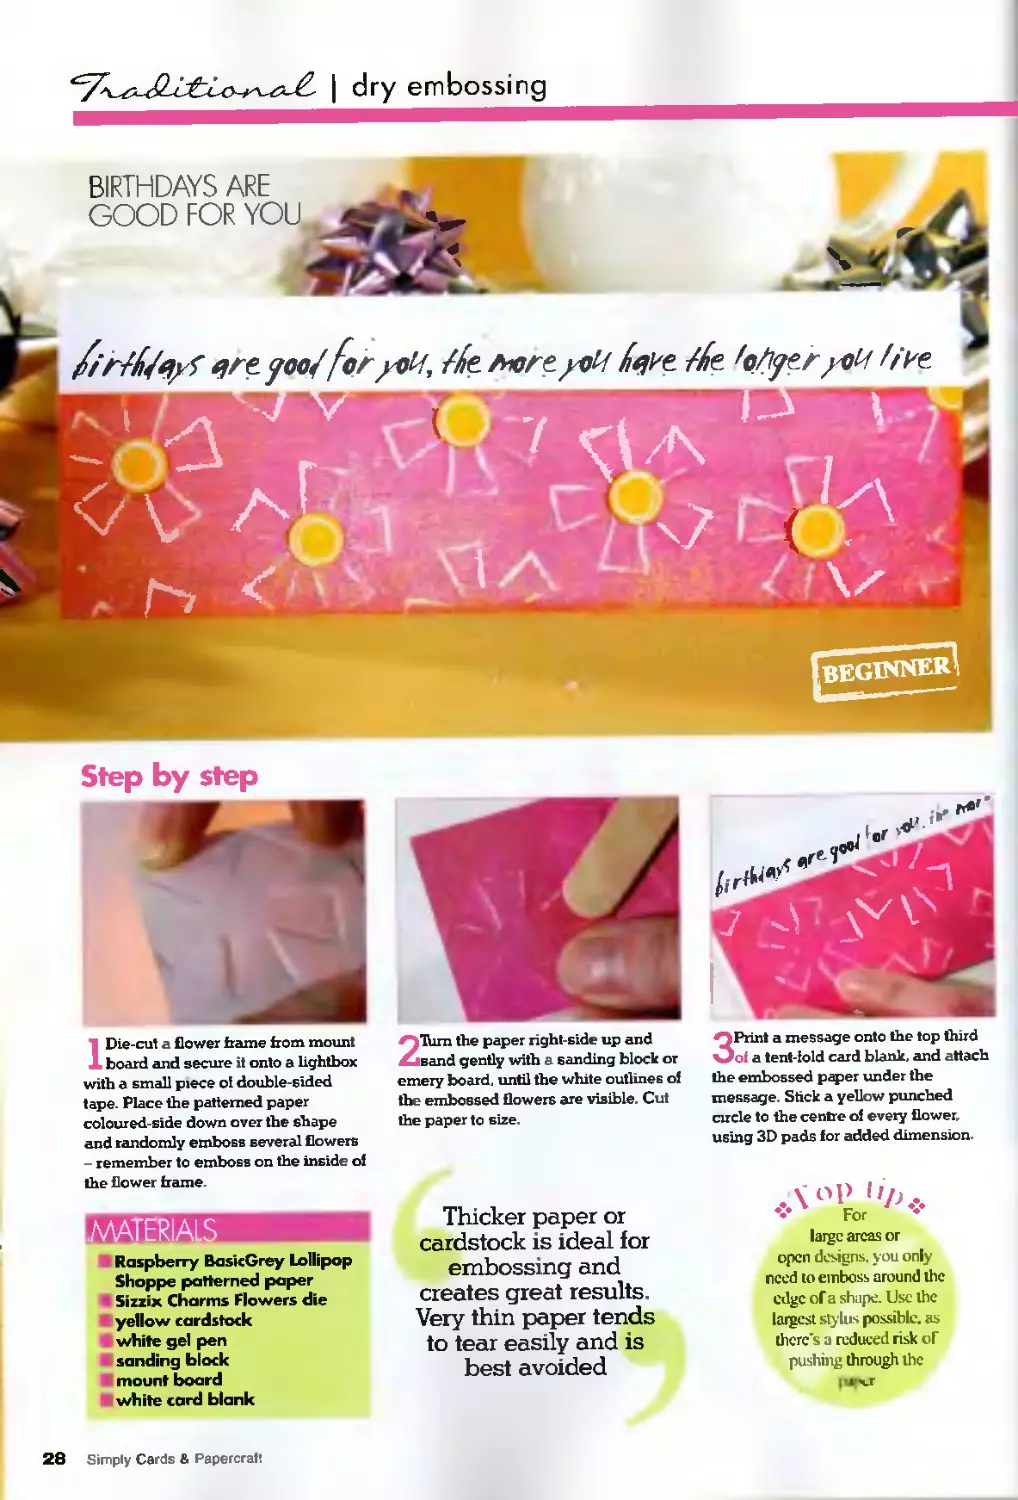
Step by step
1 Die-cut a flower frame from mount
board and secure it onto a lightbox
with a small piece of double-sided
tape. Place the patterned paper
coloured-side down over the shape
and randomly emboss several flowers
- remember to emboss on the inside of
the flower frame.
Raspberry BasicGrey Lollipop
Shoppe patterned paper
5izzix Charms Flowers die
yellow cardstock
white gel pen
sanding block
mount board
white card blank
2 Him the paper right-side up and
sand gently with a sanding block or
emery board, until the white outlines of
the embossed flowers are visible. Cut
the paper to size.
Thicker paper or
cardstock is ideal for
embossing and
creates great results.
Very thin paper tends
to tear easily and is
best avoided
3Print a message onto the top third
of a tent-fold card blank, and attach
the embossed paper under the
message. Stick a yellow punched
circle to the centre of every flower,
using 3D pads for added dimension.
.\of> 4/)...
For *
large areas or
open designs, you only
need to einboss around the
edge of a shape. Use the
largest stylus possible, as
there’s a reduced risk оГ
pushing through the
28 Simply Cards A Papercraft
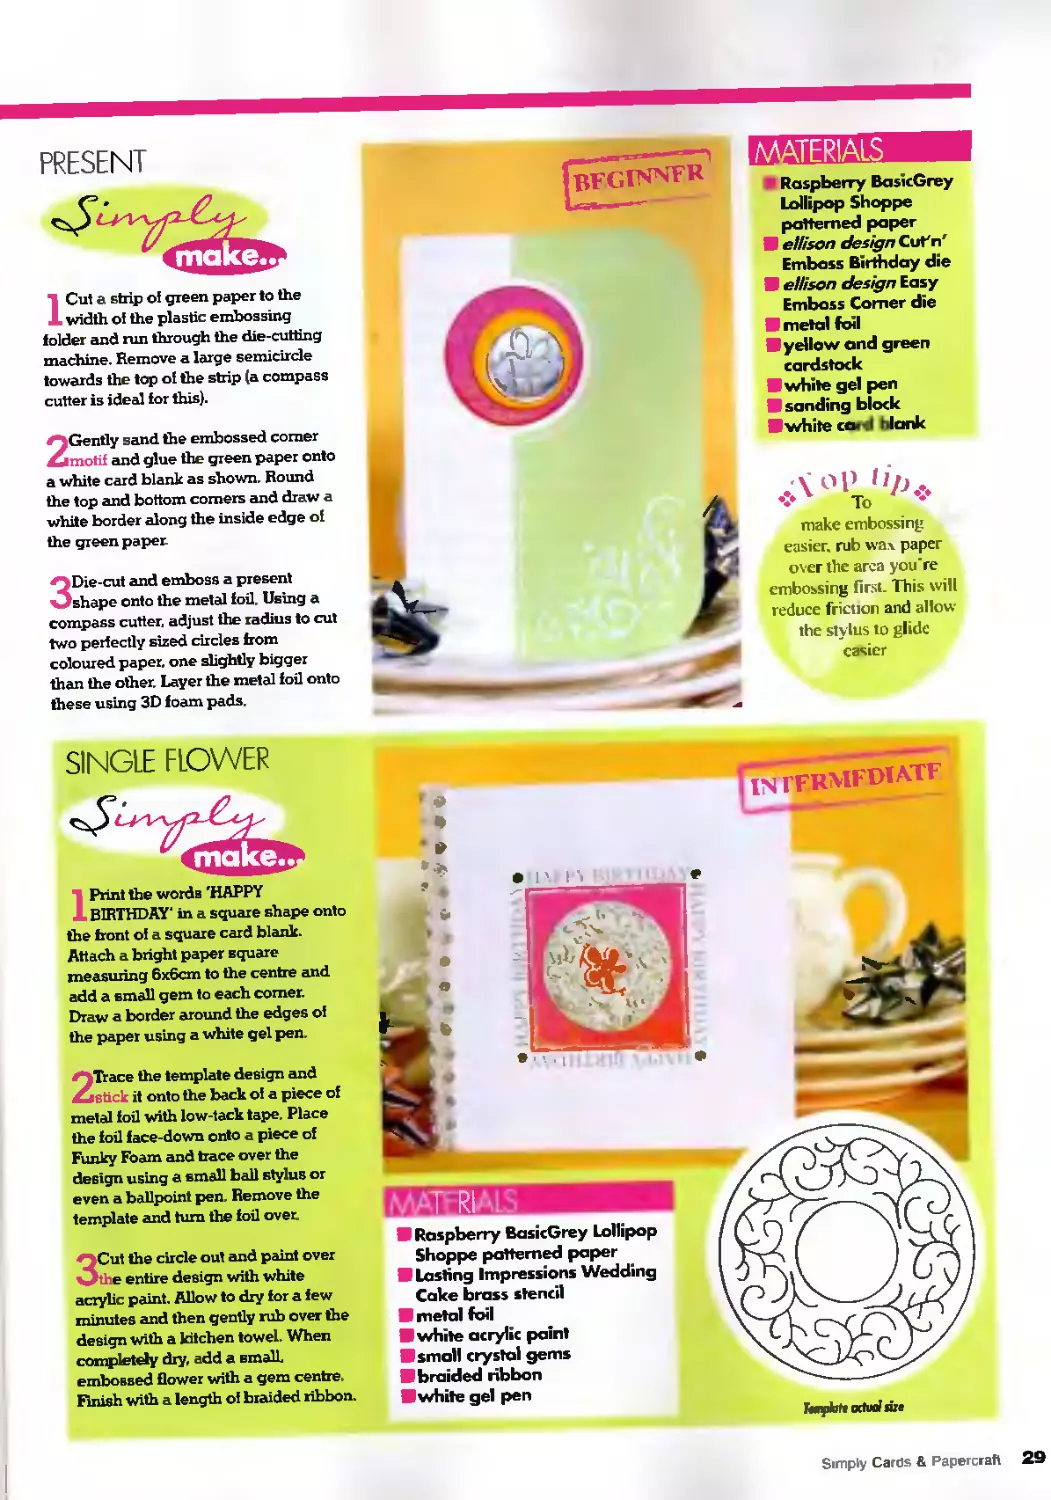
PRESENT
ICut a strip of green paper to the
width of the plastic embossing
folder and run through the die-cutting
machine. Remove a large semicircle
towards the top of the strip (a compass
cutter is ideal for this).
2Gently sand the embossed comer
motif and glue the green paper onto
a white card blank as shown. Round
the top and bottom comers and draw a
white border along the inside edge of
the green paper.
3Die-cut and emboss a present
shape onto the metal foil. Using a
compass cutter, adjust the radius to cut
two perfectly sized circles from
coloured paper, one slightly bigger
than the other. Layer the metal foil onto
these using 3D foam pads.
XTERIALS
Raspberry BasicGrey
Lollipop Shoppe
patterned paper
□ ellison design CuFn'
Emboss Birthday die
□ ellison design Easy
Emboss Corner die
□ metal foil
□ yellow and green
cardstock
□ white gel pen
□ sanding block
□white card blank
To ♦
make embossing
easier, rub wax paper
over the area you're
embossing first. This will
reduce friction and allow
the stylus to glide
easier
SINGLE FLOWER
1 Print the words 'HAPPY
BIRTHDAY' in a square shape onto
the front of a square card blank.
Attach a bright paper square
measuring 6x6cm to the centre and
add a small gem to each comer.
Draw a border around the edges of
the paper using a white gel pen.
2Trace the template design and
stick it onto the back of a piece of
metal foil with low-tack tape. Place
the foil face-down onto a piece of
Funky Foam and trace over the
design using a small ball stylus or
even a ballpoint pen. Remove the
template and turn the foil over.
3Cut the circle out and paint over
the entire design with white
acrylic paint. Allow to dry for a few
minutes and then gently rub over the
design with a kitchen towel. When
completely dry, add a small,
embossed flower with a gem centre.
Finish with a length of braided ribbon.
□ Raspberry BasicGrey Lollipop
Shoppe patterned paper
Lasting Impressions Wedding
Cake brass stencil
□ metal foil
while acrylic paint
□ small crystal gems
□ braided ribbon
white gel pen
| IN rFRMFDl atf
bmpfatrotfuolrue
Simply Cards & Papercraft 29
| dry embossing
HANG OUT IN STYLE
1 Print a message onto a piece of
light pink paper and use
repositionable adhesive to glue the
under the
shown,
ensuring that you cut
Remove the paper.
2Place a piece of vellum onto Funky
Foam or similar, and gently draw a
swirl design on the hack using a stylus.
We traced a Rhonna Fairer digital swirl
pattern which we had printed out, but
freehand swirls work just as well.
3Sandwich the vellum into the
aperture between the pink paper
and the card blank and glue down
securely. Add three small gems as
shown. Create a circle from clear
plasma and edge with glitter glue. Set
aside to dry.
4Use the die to emboss and cut two
dresses, One from white card and
another from dark pink paper. Cut the
bottom oH the pink dress and glue over
the white one. Using our card as a
guide create a small hanger from craft
wire. Cut away the embossed hanger
and replace with the wire one gluing it
down securely on the reverse.
5Embellish the dress using a white
gel pen, a tiny gem and some glitter
glue. Use 3D pads to adhere the dress
onto the plasma circle and the circle
onto the card, hiding the 3D pads on the
plasma from view behind the dress.
card blank
ellison design Cut*n Emboss
Wedding Dress die
Sizzix Circle die
Diamond Stickles glitter
glue
Rhonna Farrer Digital Swirl
kit
light pink patterned paper
□ dark pink paper
thick vellum
plasma
small crystal gems
□ white gel pen
□ craft wire
•;\°1’ ''A*
For
some great
idess and more top
tips visit »swwJas1in£
imprissirins.com and
click on the idea
gallery
30 Simply Cards & Papercraft
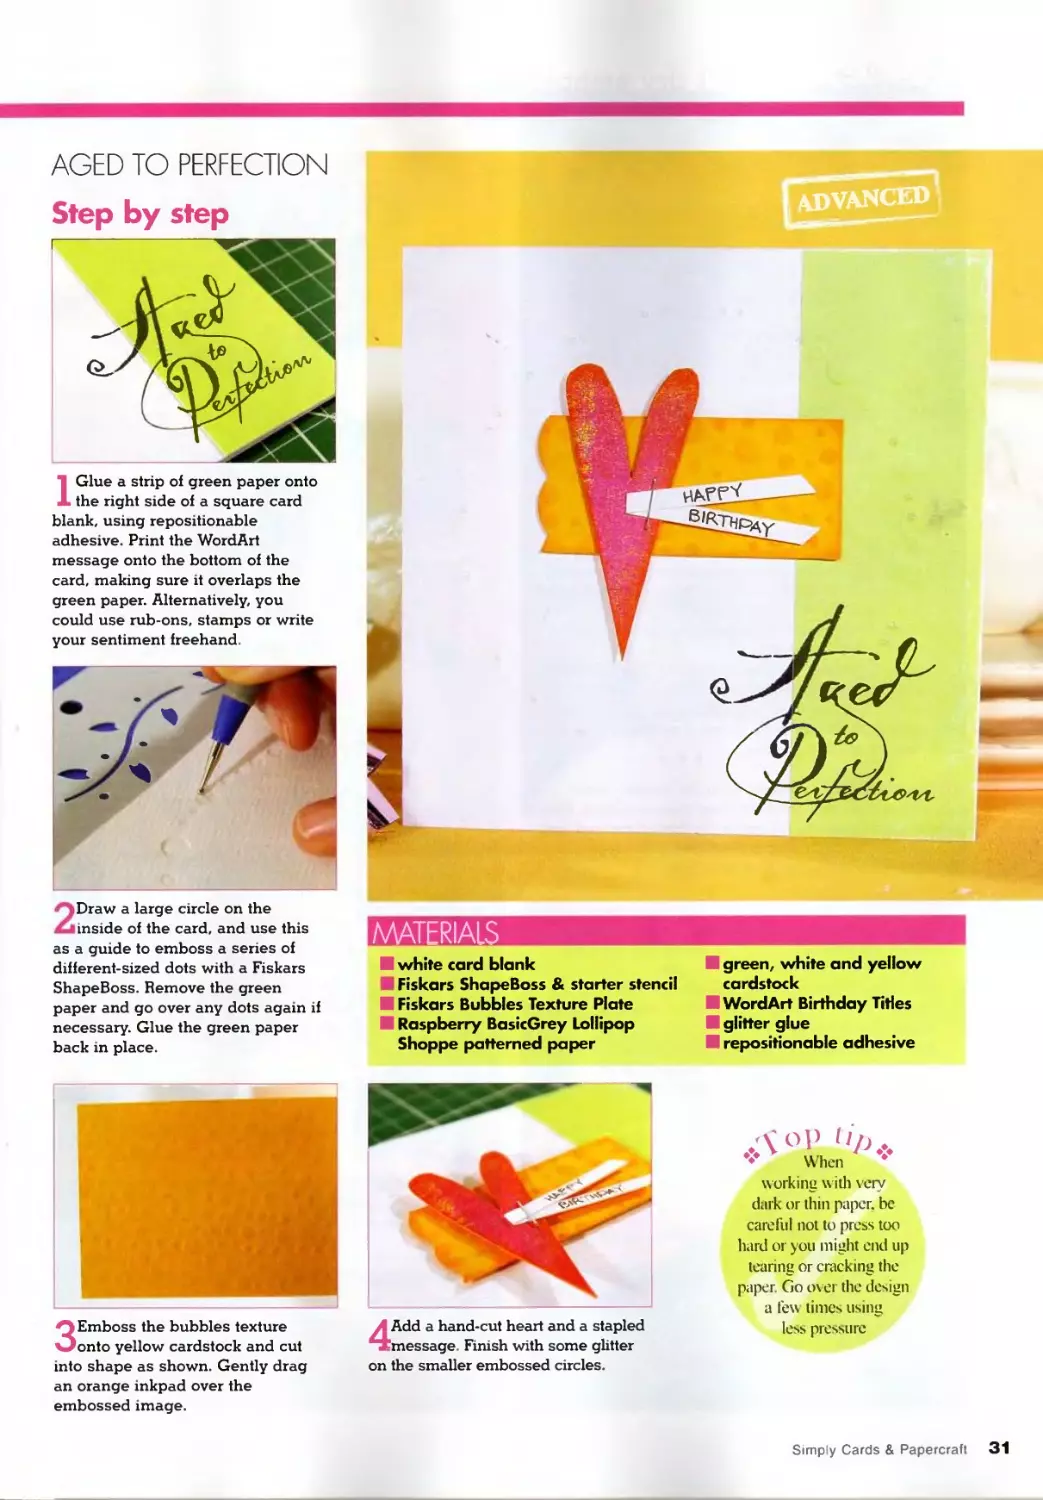
AGED TO PERFECTION
Step by step
IGlue a strip of green paper onto
the right side of a square card
blank, using repositionable
adhesive. Print the WordArt
message onto the bottom of the
card, making sure it overlaps the
green paper. Alternatively, you
could use rub-ons, stamps or write
your sentiment freehand.
>^Draw a large circle on the
Zj inside of the card, and use this
as a guide to emboss a series of
different-sized dots with a Fiskars
ShapeBoss. Remove the green
paper and go over any dots again if
necessary. Glue the green paper
back in place.
3Emboss the bubbles texture
onto yellow cardstock and cut
into shape as shown. Gently drag
an orange inkpad over the
embossed image.
green, white and yellow
cardstock
WordArt Birthday Titles
glitter glue
repositionable adhesive
white card blank
Fiskars ShapeBoss & starter stencil
Fiskars Bubbles Texture Plate
Raspberry BasicGrey Lollipop
Shoppe patterned paper
working with very
dark or thin paper, be
careful not to press too
hard or you might end up
tearing or cracking the
paper. Go o\ er the design
a few times usint»
less pressure
4Add a hand-cut heart and a stapled
message. Finish with some glitter
on the smaller embossed circles.
Simply Cards & Papercraft 31
| dry embossing
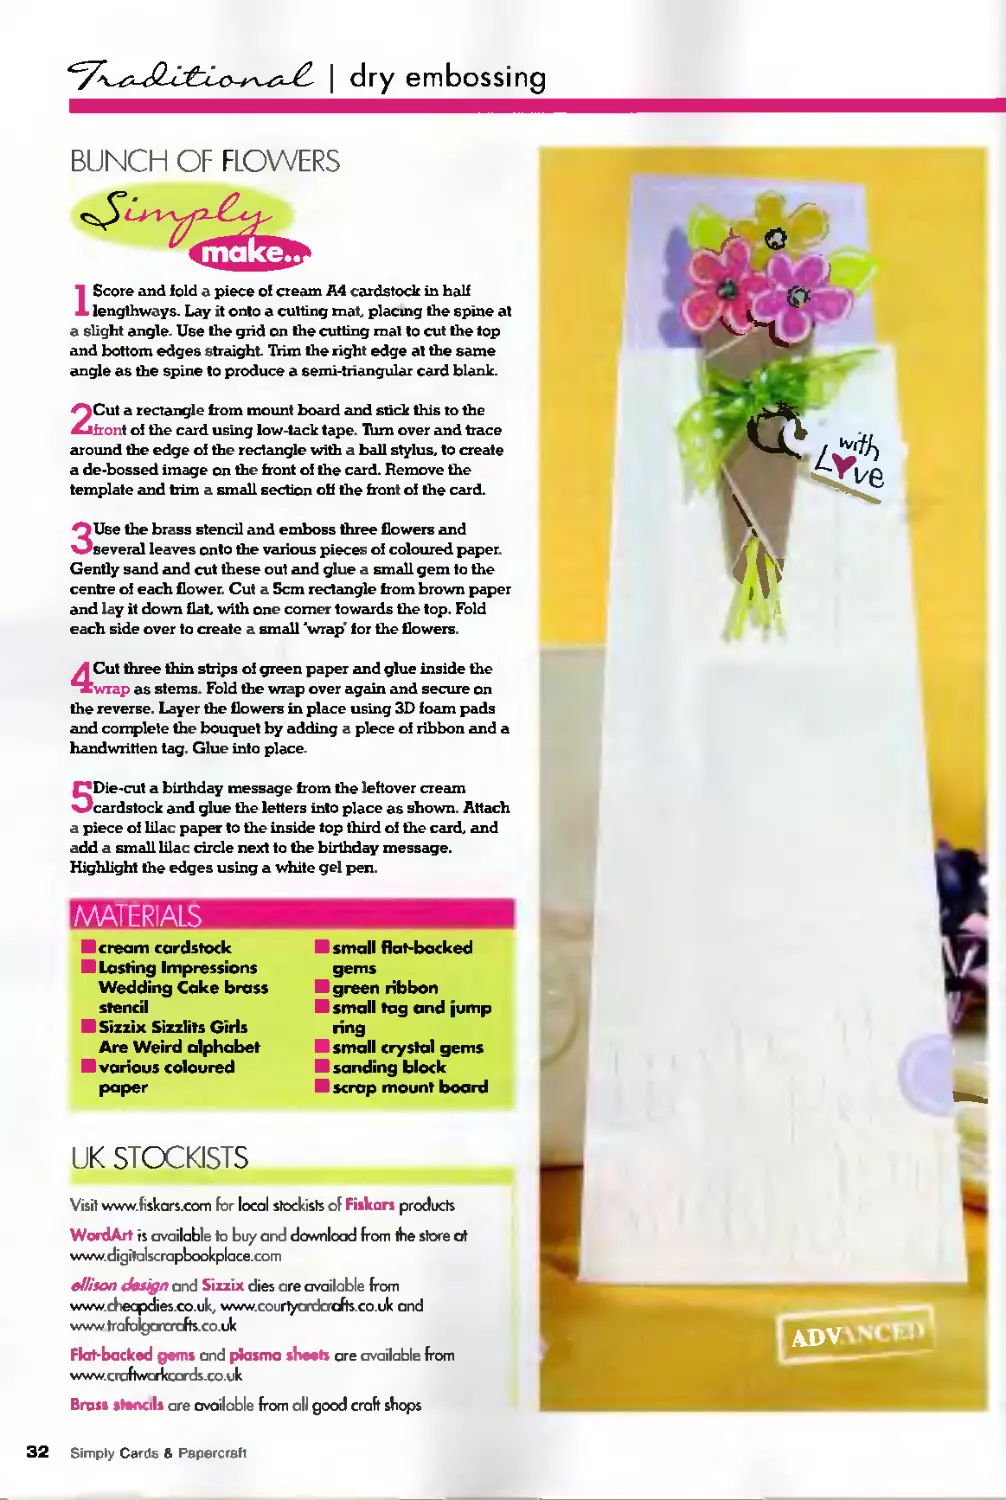
BUNCH OF FLOWERS
1 Score and fold a piece of cream A4 cardstock in half
lengthways. Lay it onto a cutting mat placmg the spine at
a slight angle. Use the grid on the cutting mat to cut the top
and bottom edges straight Trim the right edge at the same
angle as the spine to produce a semi-triangular card blank.
2Cut a rectangle from mount board and stick this to the
front of the card using low-tack tape. Him over and trace
around the edge of the rectangle with a ball stylus, to create
a de-bossed image on the front of the card. Remove the
template and trim a small section off the front of the card.
3Use the brass stencil and emboss three flowers and
several leaves onto the various pieces of coloured paper.
Gently sand and cut these out and glue a small gem to the
centre of each flower. Cut a 5cm rectangle from brown paper
and lay it down flat, with one comer towards the top. Fold
each side over to create a small 'wrap' for the flowers.
4Cut three thin strips of green paper and glue inside the
wrap as stems. Fold the wrap over again and secure on
the reverse. Layer the flowers in place using 3D foam pads
and complete the bouquet by adding a piece of ribbon and a
handwritten tag. Glue into place.
5Die-cut a birthday message from the leftover cream
cardstock and glue the letters into place as shown. Attach
a piece of lilac paper to the inside top third of the card, and
add a small lilac circle next to the birthday message.
Highlight the edges using a white gel pen.
MATERIALS
cream cardstock
□ Lasting Impressions
Wedding Cake brass
stencil
Sizzix Sizzlits Girls
Are Weird alphabet
□ various coloured
paper
□ small flat-backed
gems
green ribbon
□ small tag and jump
ring
small crystal gems
sanding block
□ scrap mount board
UK STOCKISTS
Visit www.fiskars.com for local stockists of Fiskars products
WordArt is available to buy and download from the store at
www.digifalscrapbookplace.com
eflison design and Sizzix dies are available from
www.cheapdies.co.uk,www.courtyordcrafts.co.uk and
www trafalgarcrafts.co.uk
Flat-backed gems and plasma sheets are available from
www.croftworkcards.co.uk
Brass stencils are available from oil good craft shops
32 Simply Cards 8 Papercraft
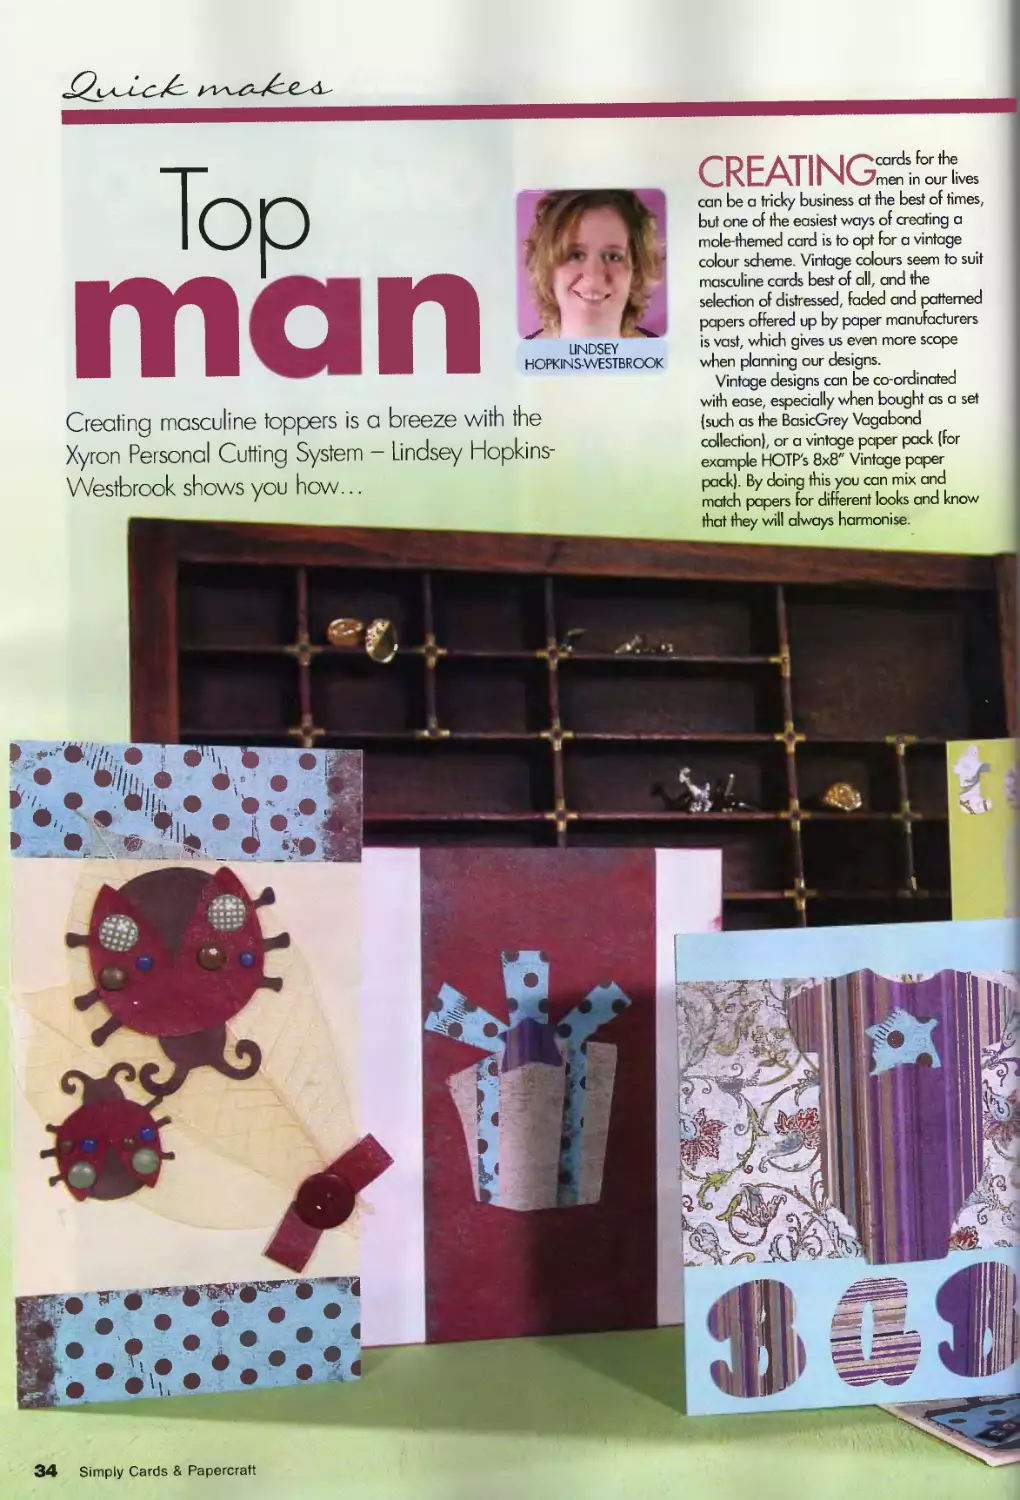
Top
man
LINDSEY
HOPKINS-WESTBROOK
CREATINGWX
can be a tricky business at the best of times,
but one of the easiest ways of creating a
mole-themed card is to opt for a vintage
colour scheme Vintage colours seem to suit
masculine cards best of all, and the
selection of distressed, faded and patterned
papers offered up by paper manufacturers
is vast, which gives us even more scope
when planning our designs.
Vintage designs can be co-ordinated
Creating masculine toppers is a breeze with the
Xyron Personal Cutting System - Lindsey Hopkins-
Westbrook shows you how...
with ease, especially when bought as a set
(such as the BasicGrey Vagabond
collection), or a vintage paper pack (for
example HOTP's 8x8" Vintage paper
pack). By doing this you can mix and
match papers for different looks and know
34 Simply Cards & Papercratt
Materials aside, when producing a male
adult card consider the subject you'll use os
your theme. This can be anything From
hobbies (gardening. Football etc) to о
standard gift-wrapped present-effect
embellishment
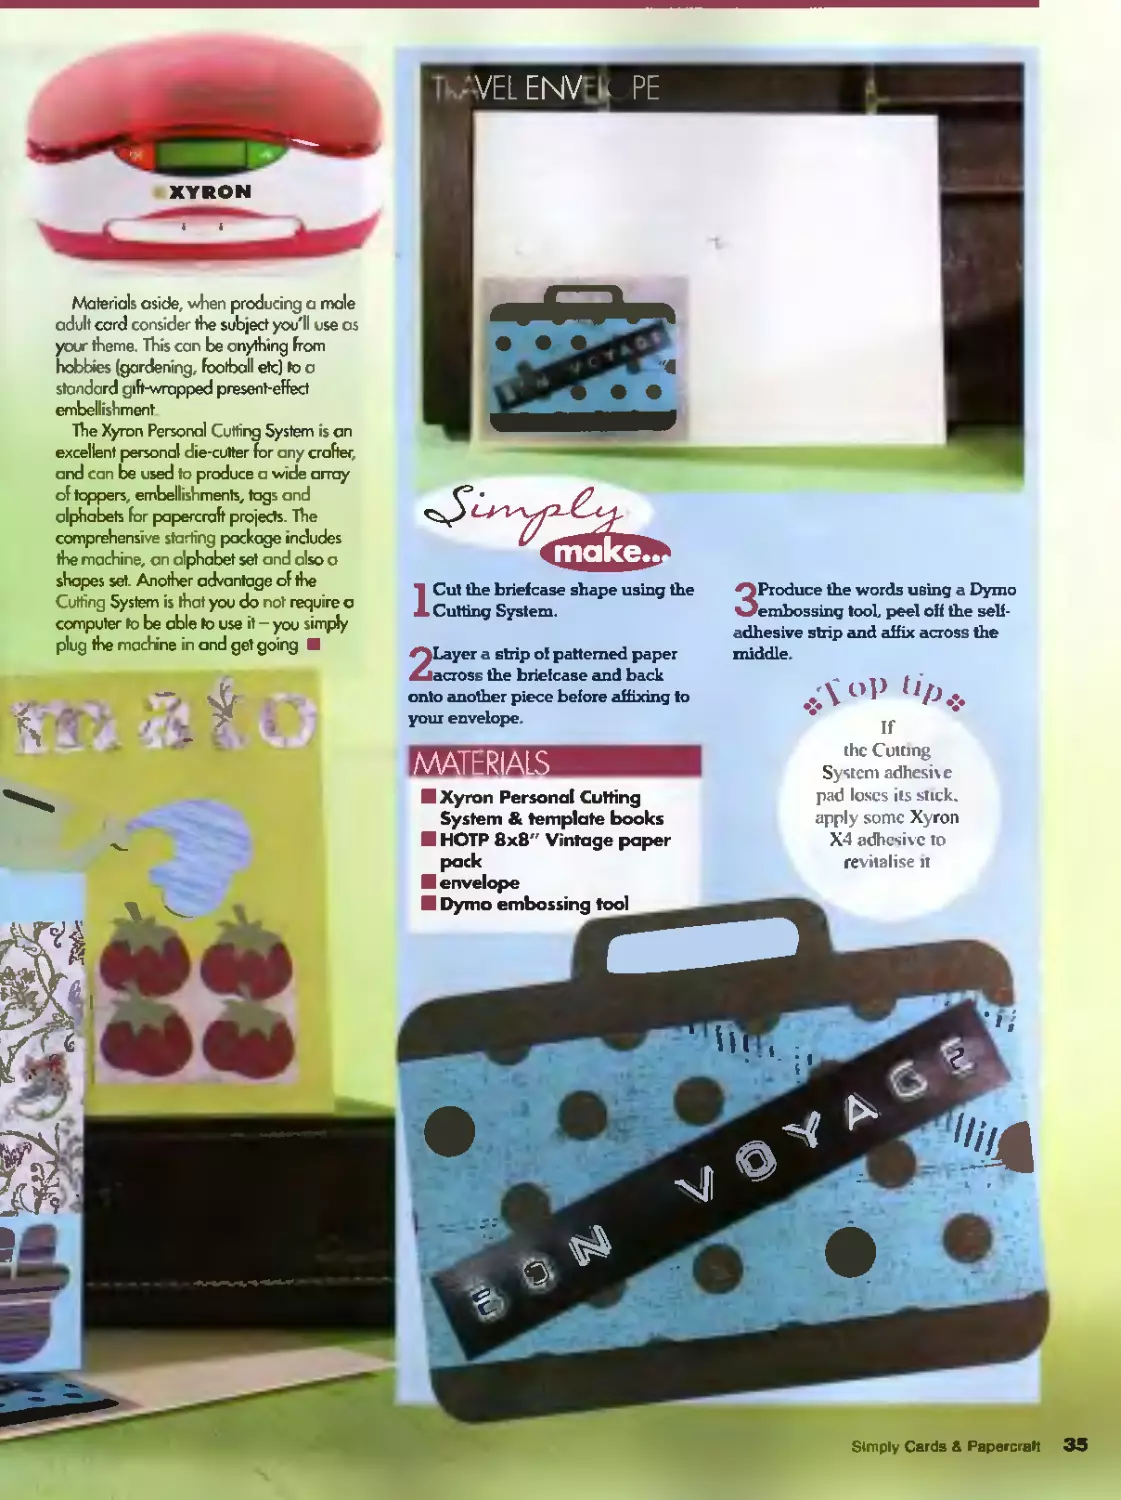
The Xyron Personal Cutting System is an
excellent personal die-cutter for any crafter,
and can be used to produce a wide array
of toppers, embellishments, tags and
alphabets for papercraft projects. The
comprehensive starting package indudes
the machine, an alphabet set and also a
shapes set. Another advantage of the
Cutting System is that you do not require a
computer Io be able to use it - you simply
plug the machine in and get going
{Як •-
ICut the briefcase shape using the
Cutting System.
2Layer a strip of patterned paper
across the briefcase and back
onto another piece before affixing to
MATERIALS
3Produce the words using a Dymo
embossing tool, peel off the self-
adhesive strip and affix across the
middle.
,<\°P °/A:.
if
the Cutting
System adhesive
Simply Cards & Papercraft 35
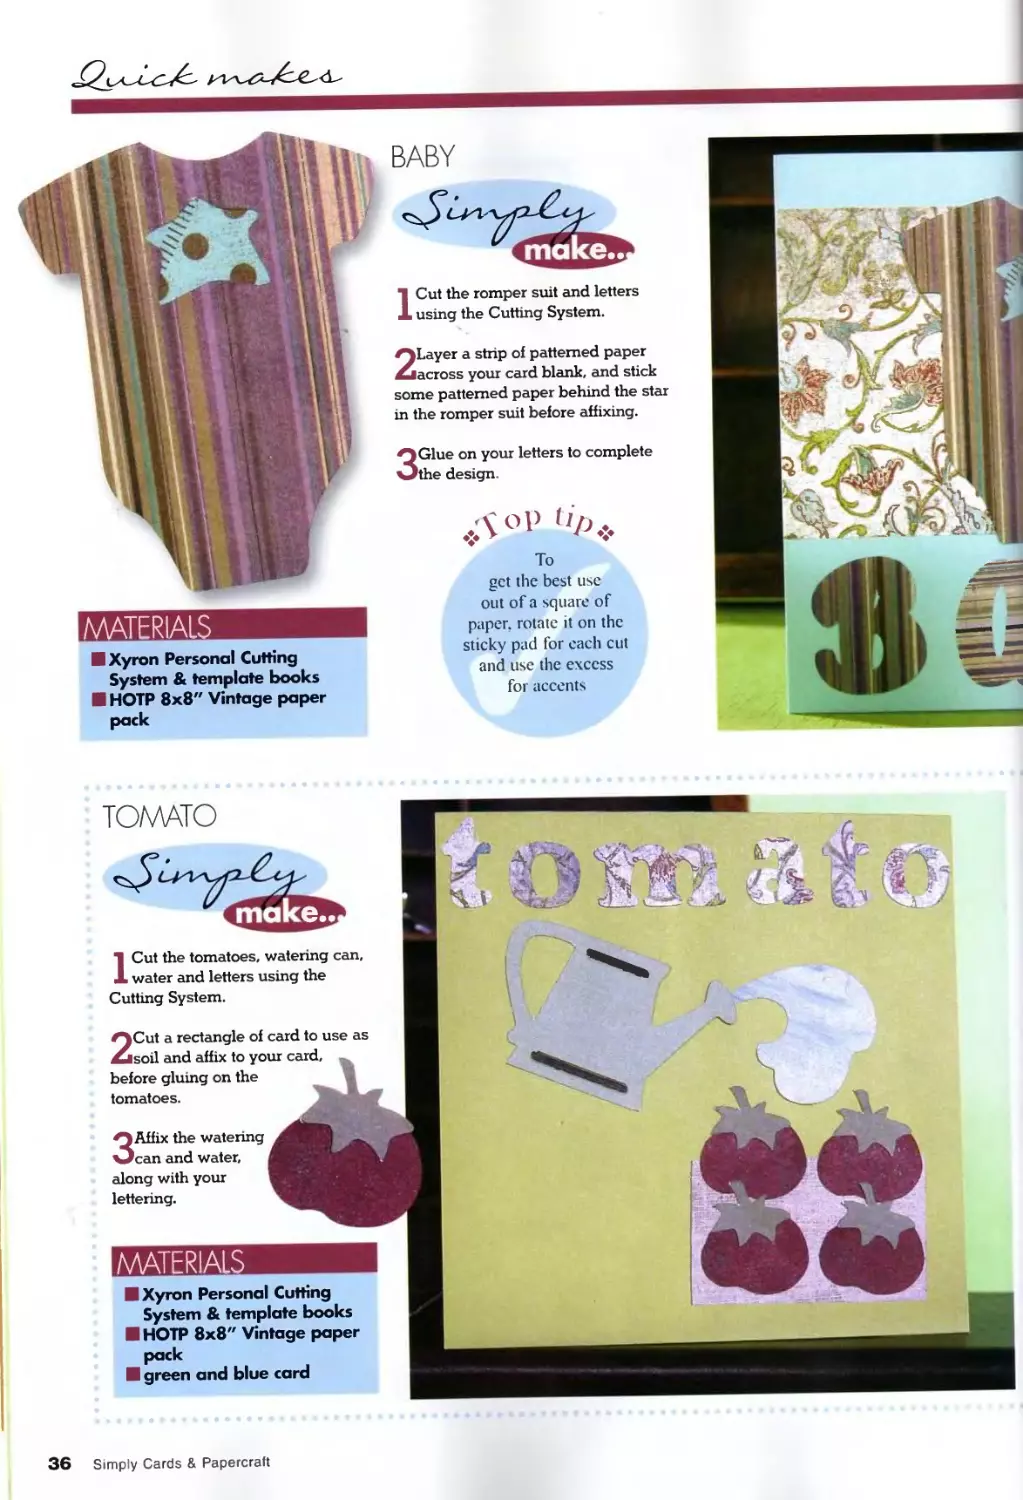
BABY
ICut the romper suit and letters
using the Cutting System.
2Layer a stnp of patterned paper
across your card blank, and stick
some patterned paper behind the star
in the romper suit before affixing.
3Glue on your letters to complete
the design
MATERIALS
To
get the best use
out of a square of
paper, rotate it on the
sticky pad for each cut
and use the excess
for accents
Xyron Personal Cutting
System & template books
HOTP 8x8" Vintage paper
pack
TOMATO
Xyron Personal Cutting
System & template books
HOTP 8x8" Vintage paper
pack
green and blue card
ICut the tomatoes, watering can,
water and letters using the
Cuttmg System.
3Affix the watering
can and water,
along with your
lettering.
2Cut a rectangle of card to use as
soil and affix to your card,
before gluing on the
tomatoes.
make
MATERIA
36 Simply Cards & Papercraft
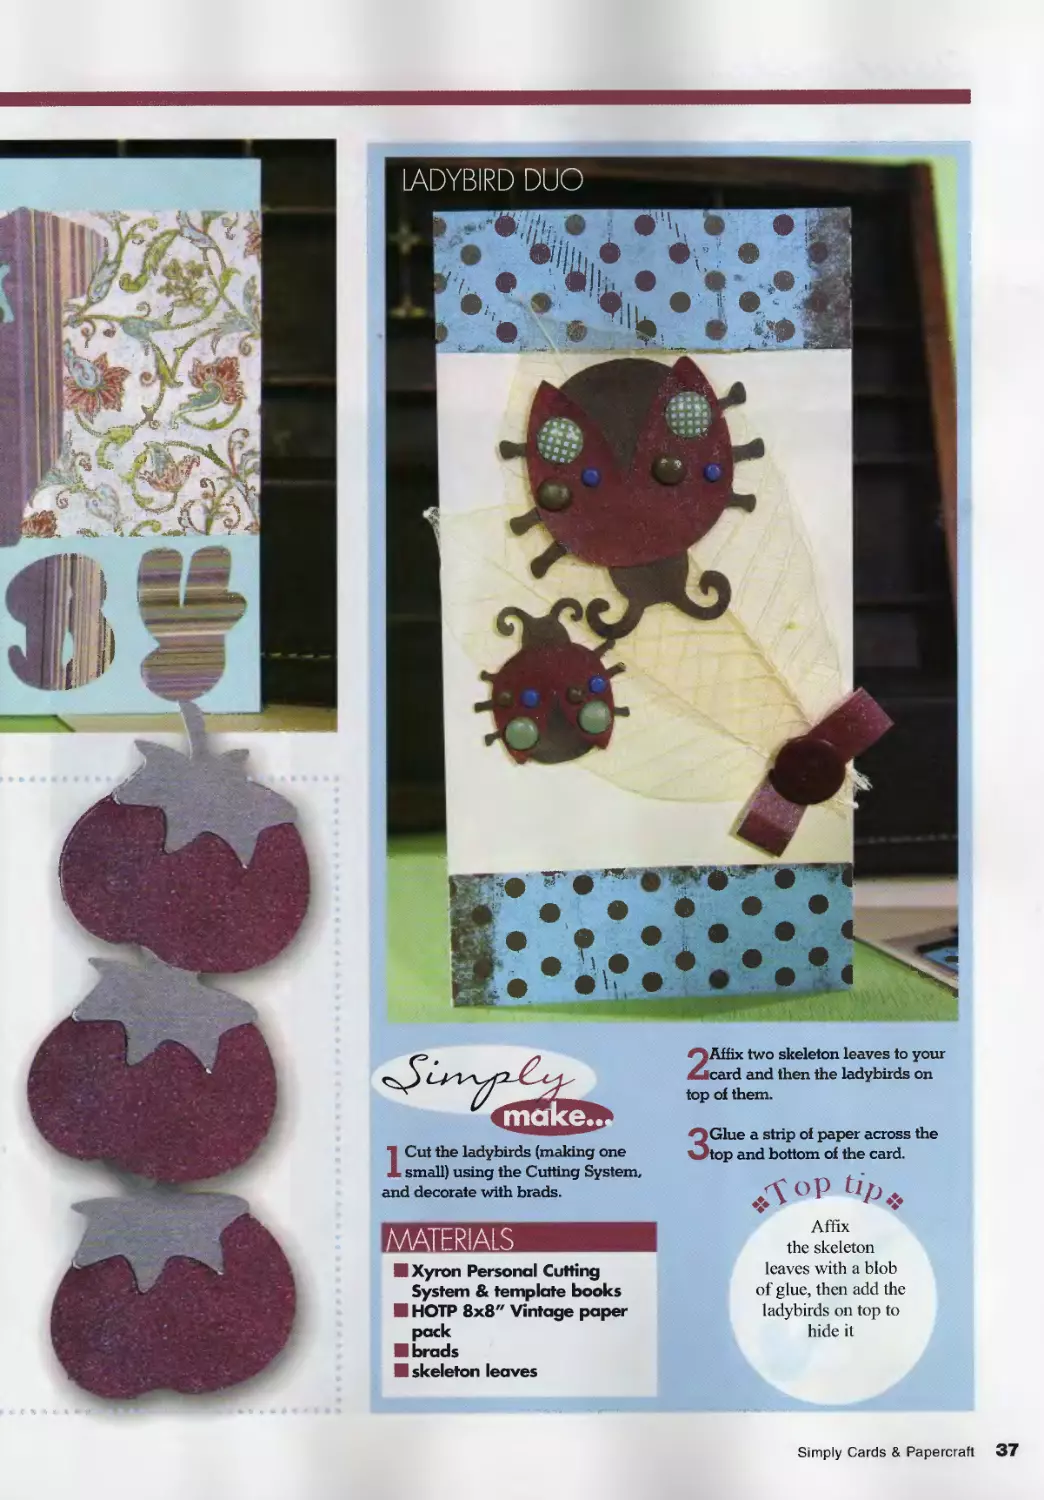
ICut the ladybirds (making one
small) using the Cutting System,
and decorate with brads.
\TERIALS
Xyron Personal Cutting
System & template books
HOTP 8x8" Vintage paper
pack
brads
skeleton leaves
2Affix two skeleton leaves to your
card and then the ladybirds on
top of them.
3Glue a strip of paper across the
top and bottom of the card.
^OP tip*
Affix
the skeleton
leaves with a blob
of glue, then add the
ladybirds on top to
hide it
Simply Cards & Papercraft 37
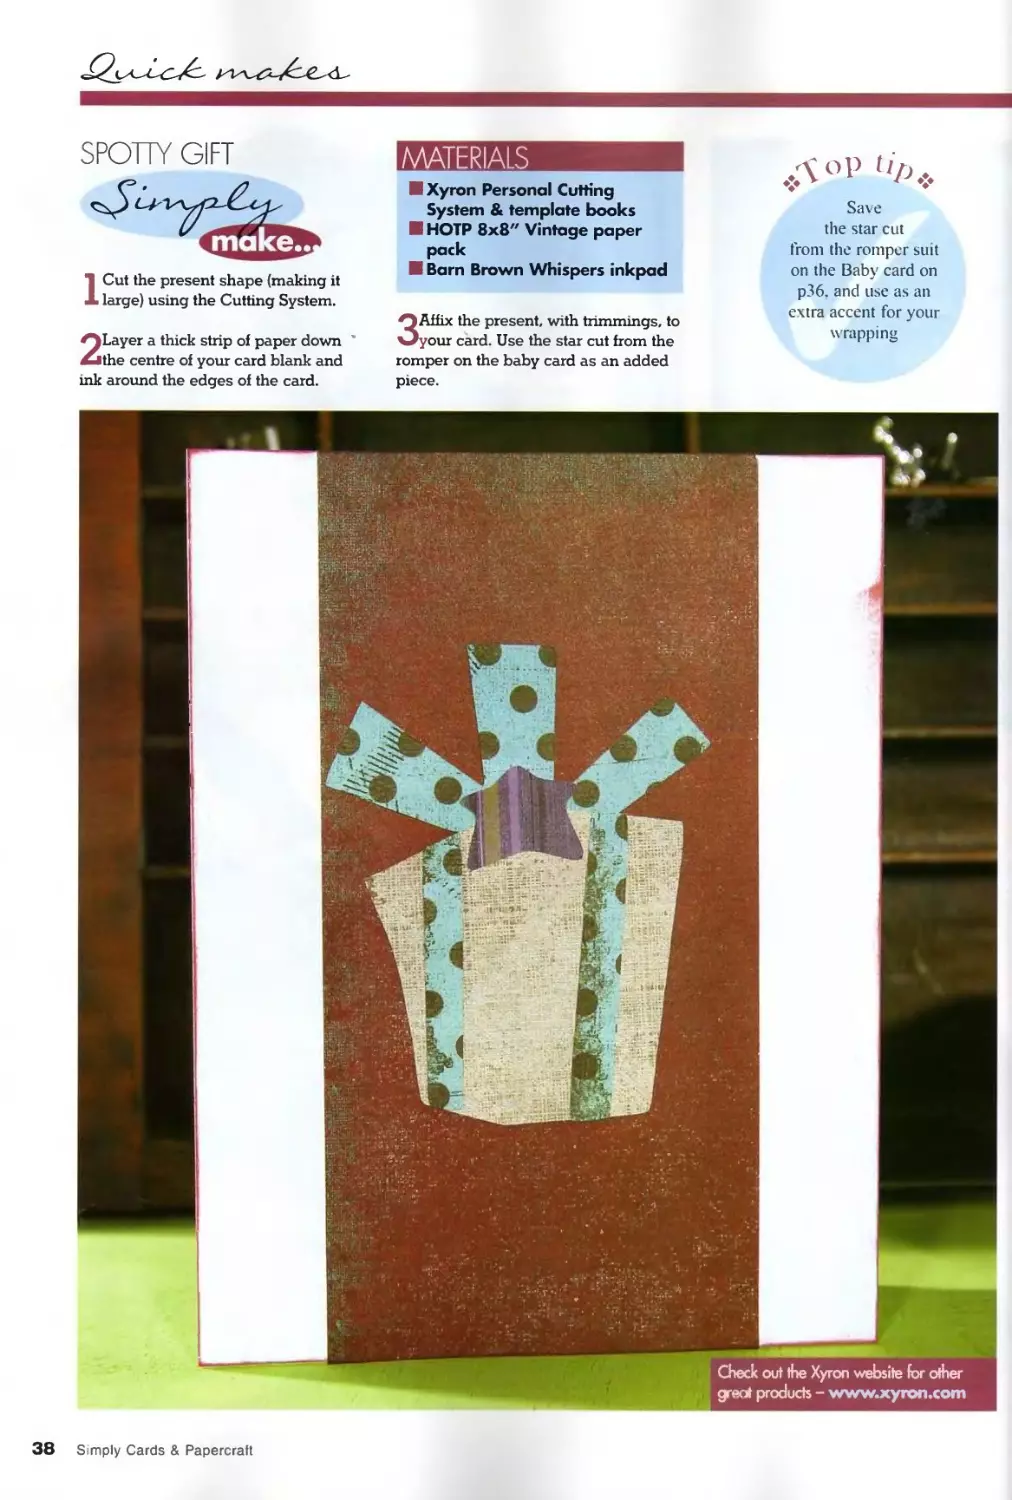
SPOTTY GIFT
ICut the present shape (making it
large) using the Cutting System.
Layer a thick strip of paper down
the centre of your card blank and
around the edges of the card.
MATERIALS
H Xyron Personal Cutting
System & template books
HOTP 8x8" Vintage paper
pack
Barn Brown Whispers inkpad
Sax :
the star cut
from the romper suit
on the Baby card on
p36. and use as an
extra accent for your
wrapping
3Affix the present, with trimmings, to
your card. Use the star cut from the
romper on the baby card as an added
piece.
38 Simply Cards & Papercraft
When designing cards we
often find ourselves using
the same colours. Instead
of going for the safe
option, try embracing the
colour wheel concept and
inject new
hues into
your paper-
crafting
creations
JUUE HICKEY
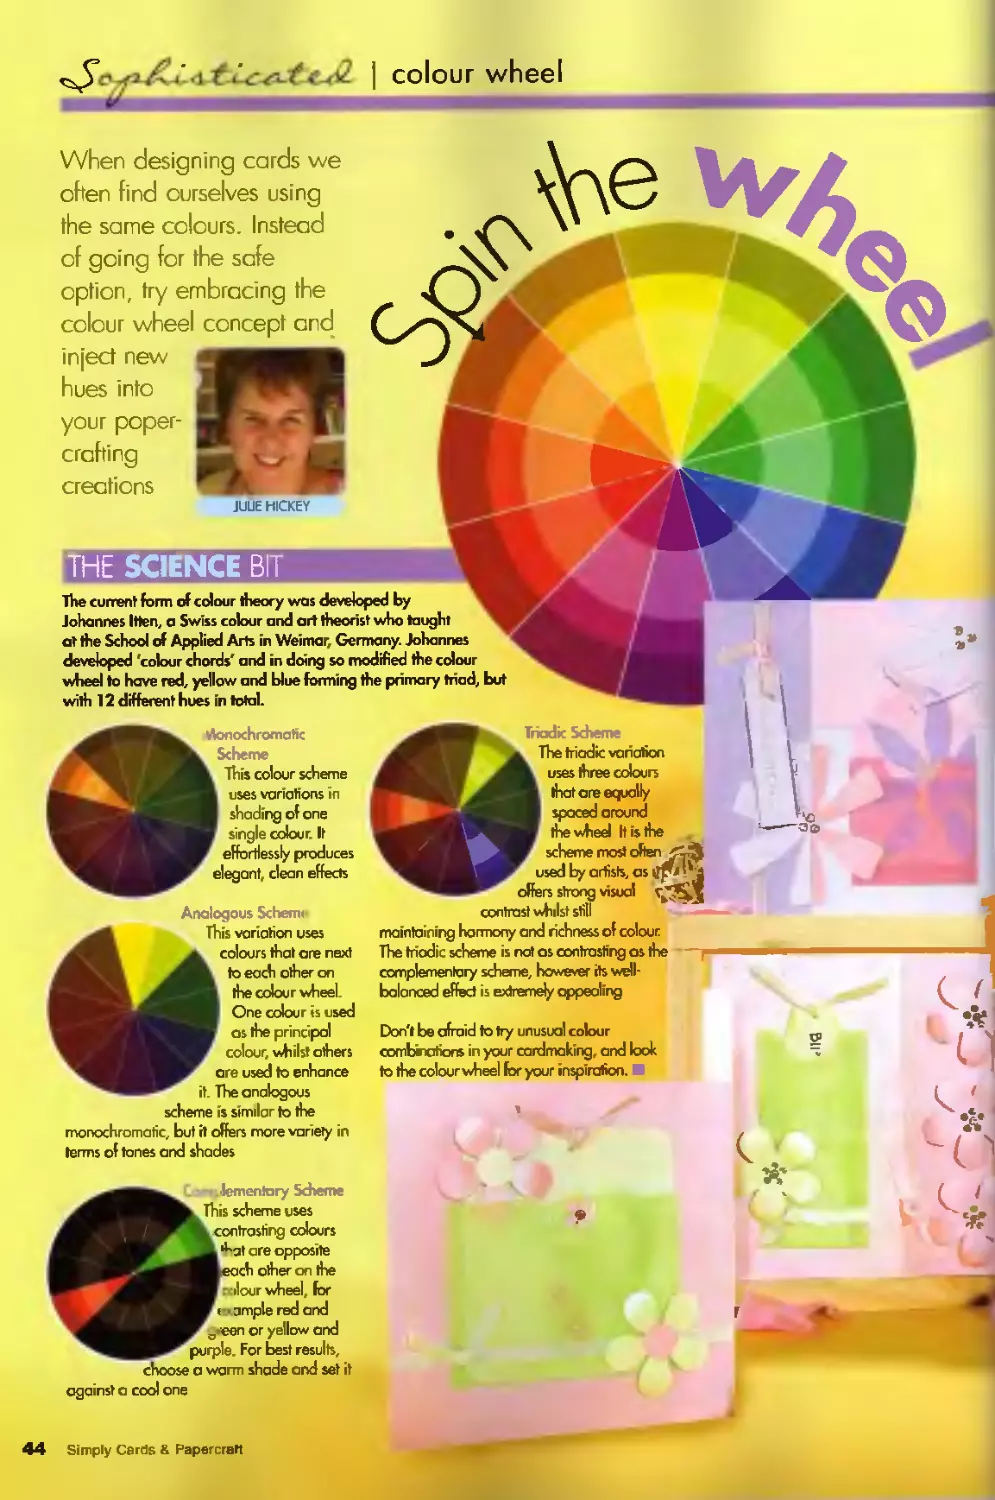
SCIENCE BIT
The current form of colour theory was developed by
Johannes Itten, a Swiss colour and ort theorist who taught
ot the School of Applied Arts in Weimar, Germany. Johannes
developed 'colour chords' and in doing so modified the colour
wheel to have red, yellow and blue forming the primary triod, but
with 12 different hues in total.
Monochromatic
Scheme
к This colour scheme
В uses variations in
В shading of one
В single colour. It
f effortlessly produces
elegant, clean effects
Analogous Schemi-
This variation uses
^fl^B colours that are next
AB ^^^k to each other on
BA the colour wheel
H One colou sed
as the pal
wh others
ore used to enhance
it. The analogous
scheme is similar to the
monochromatic, but it offers more variety in
terms of tones and shades
Triadic Scheme
The triadic variation
uses three colours
that are equally
spaced around
the wheel It is the
scheme mod often
used by artists, as tfpt rj
offers strong visual
contrast whilst still
maintaining harmony and richness of colour
The triadic scheme is not as contrasting as the —?
complementary scheme, however its well-
balanced effect is extremely appealing
Don't be afraid to try unusual colour
combmations in your cardmaking, and look
to the colour wheel lor your inspiration. □
lementary Scheme
This scheme uses
contrasting colours
are opposite
each other on the
wheel lor
I ample red and
eon or ye low and
purple. For best results,
choose о warm shade and set it
against a cool one
44 Simply Cerds & Papercratt
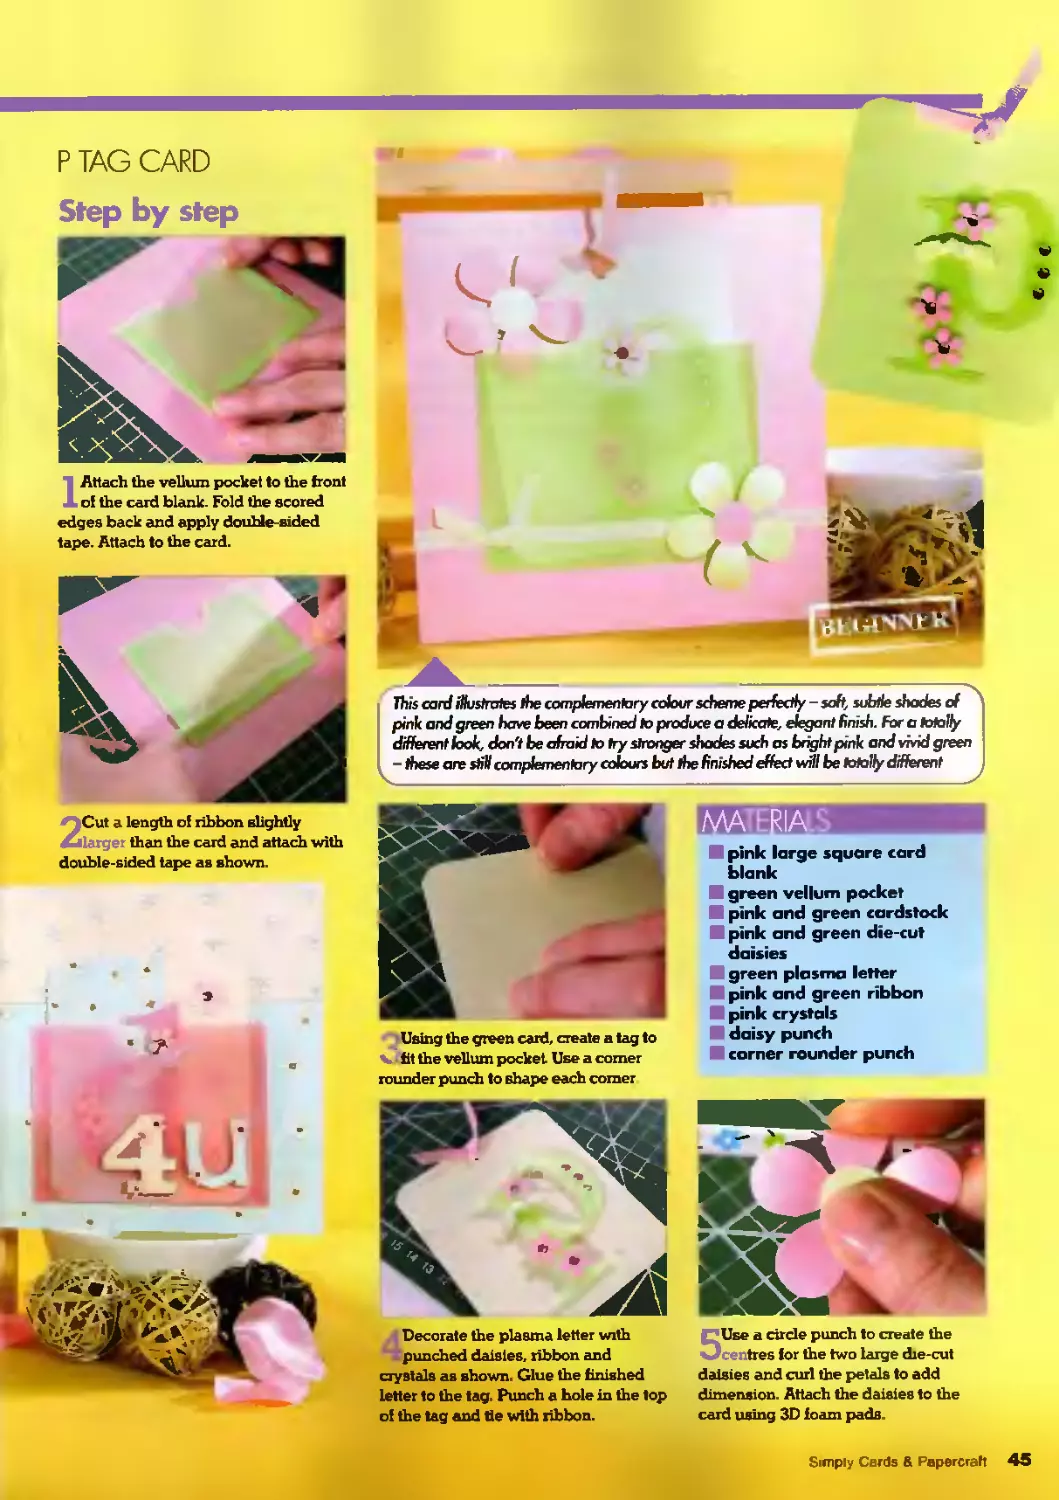
P TAG CARD
Simply Cards & Papercraft 45
| colour wheel
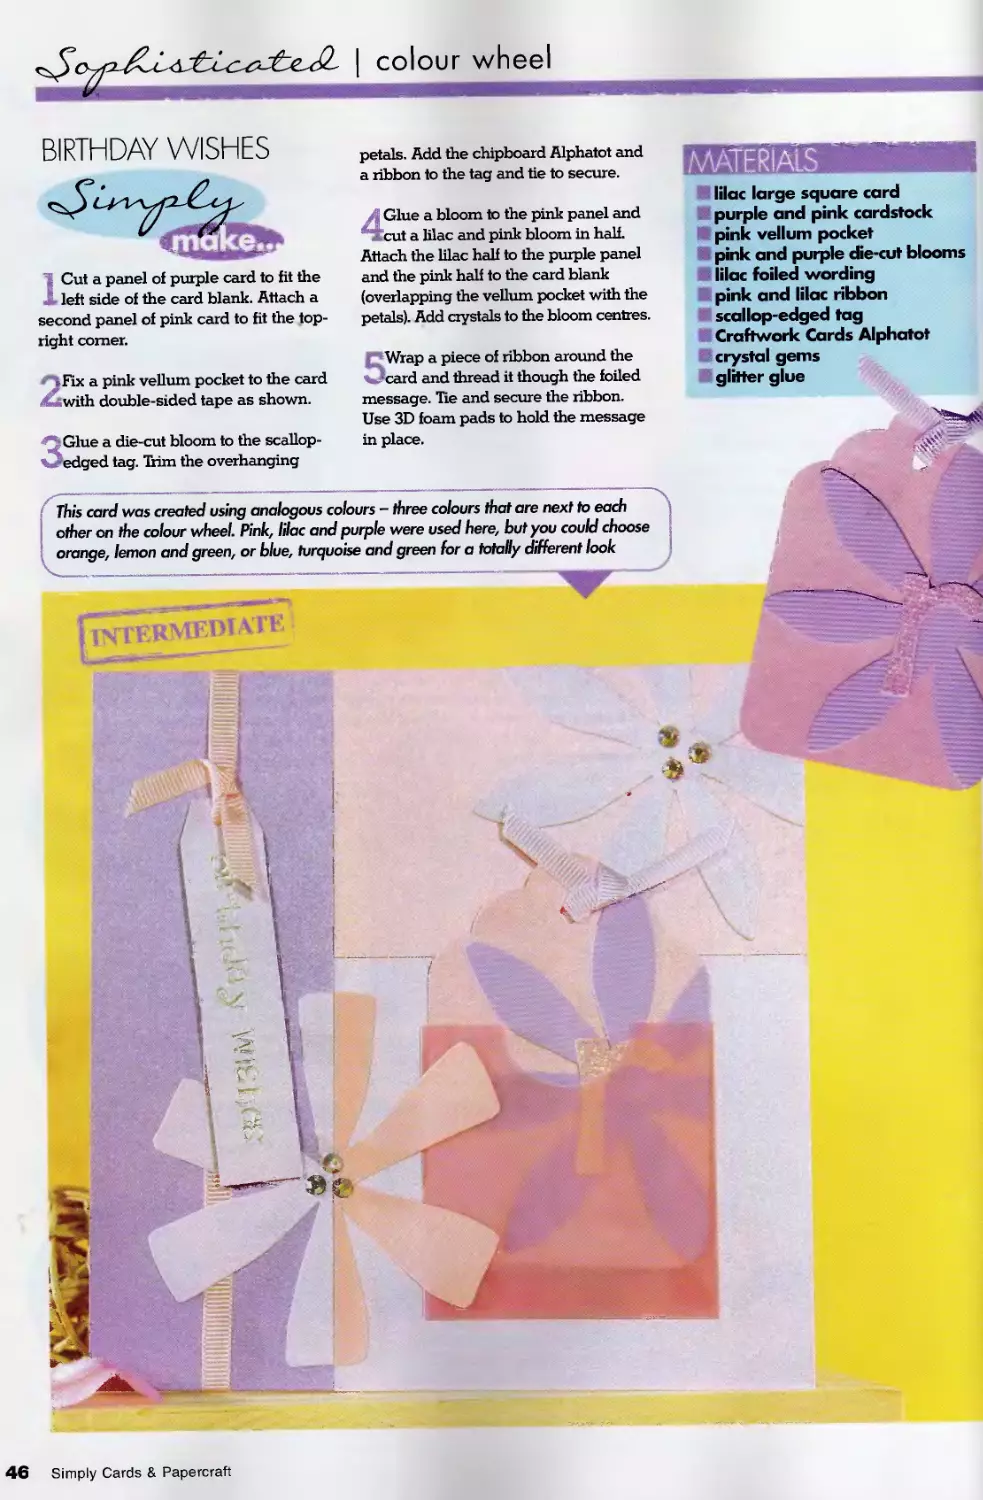
BIRTHDAY WISHES
ICut a panel of purple card to fit the
left side of the card blank. Attach a
second panel of pink card to fit the top-
right comer.
GJaERMEDIATE
Fix a pink vellum pocket to the card
with double-sided tape as shown.
This card was created using analogous colours - three colours that are next to each
other on the colour wheel. Pink, lilac and purple were used here, but you could choose
orange, lemon and green, or blue, turquoise and green for a totally different look
Wrap a piece of ribbon around the
% card and thread it though the foiled
message. Tie and secure the ribbon.
Use 3D foam pads to hold the message
in place.
Glue a die-cut bloom to the scallop-
wedged tag. Trim the overhanging
petals. Add the chipboard Alphatot and
a ribbon to the tag and tie to secure.
4Glue a bloom to the pink panel and
cut a lilac and pink bloom in hall.
Attach the lilac half to the purple panel
and the pink half to the card blank
(overlapping the vellum pocket with the
petals). Add crystals to the bloom centres.
lilac large square card
purple and pink cardstock
pink vellum pocket
pink and purple die-cut blooms
lilac foiled wording
pink and lilac ribbon
scallop-edged tag
Craftwork Cards Alphatot
crystal gems
glitter glue
*
Simply Cards & Papercraft
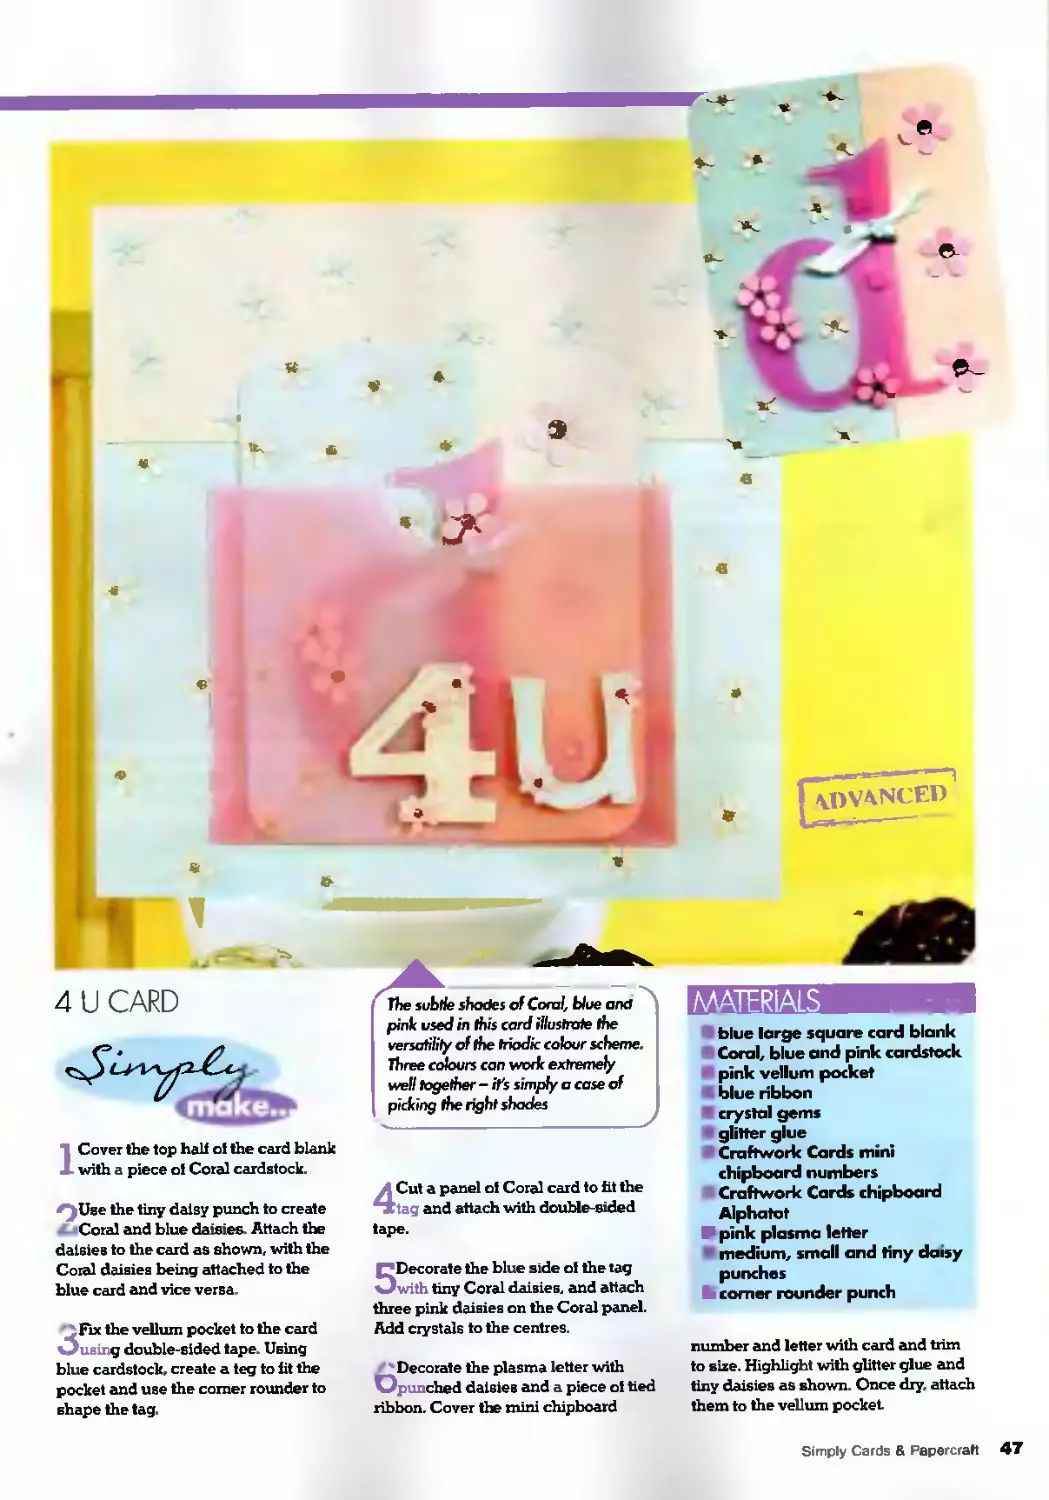
1 Cover the top halt of the card blank
with a piece of Coral cardstock.
Use the tiny daisy punch to create
Coral and blue daisies. Attach the
daisies to the card as shown, with the
Coral daisies being attached to the
blue card and vice versa.
'Fix the vellum pocket to the card
Oueing double-sided tape. Using
blue cardstock, create a teg to fit the
pocket and use the comer rounder to
shape the tag.
4Cut a panel of Coral card to fit the
tag and attach with double-sided
tape.
5Decorate the blue side of the tag
with tiny Coral daisies, and attach
three pink daisies on the Coral panel.
Add crystals to the centres.
Decorate the plasma letter with
Opunched daisies and a piece of tied
ribbon. Cover the mini chipboard
blue large square card blank
Coral, blue and pink cardstock
pink vellum pocket
blue ribbon
crystal gems
glitter glue
Craftwork Cards mini
chipboard numbers
Craftwork Cards chipboard
Alpha tot
V pink plasma letter
medium, small and tiny daisy
punches
к comer rounder punch
number and letter with card and trim
to size. Highlight with glitter glue and
tiny daisies as shown. Once dry. attach
them to the vellum pocket
Simply Cards R Papercratt 47
| colour wheel
s
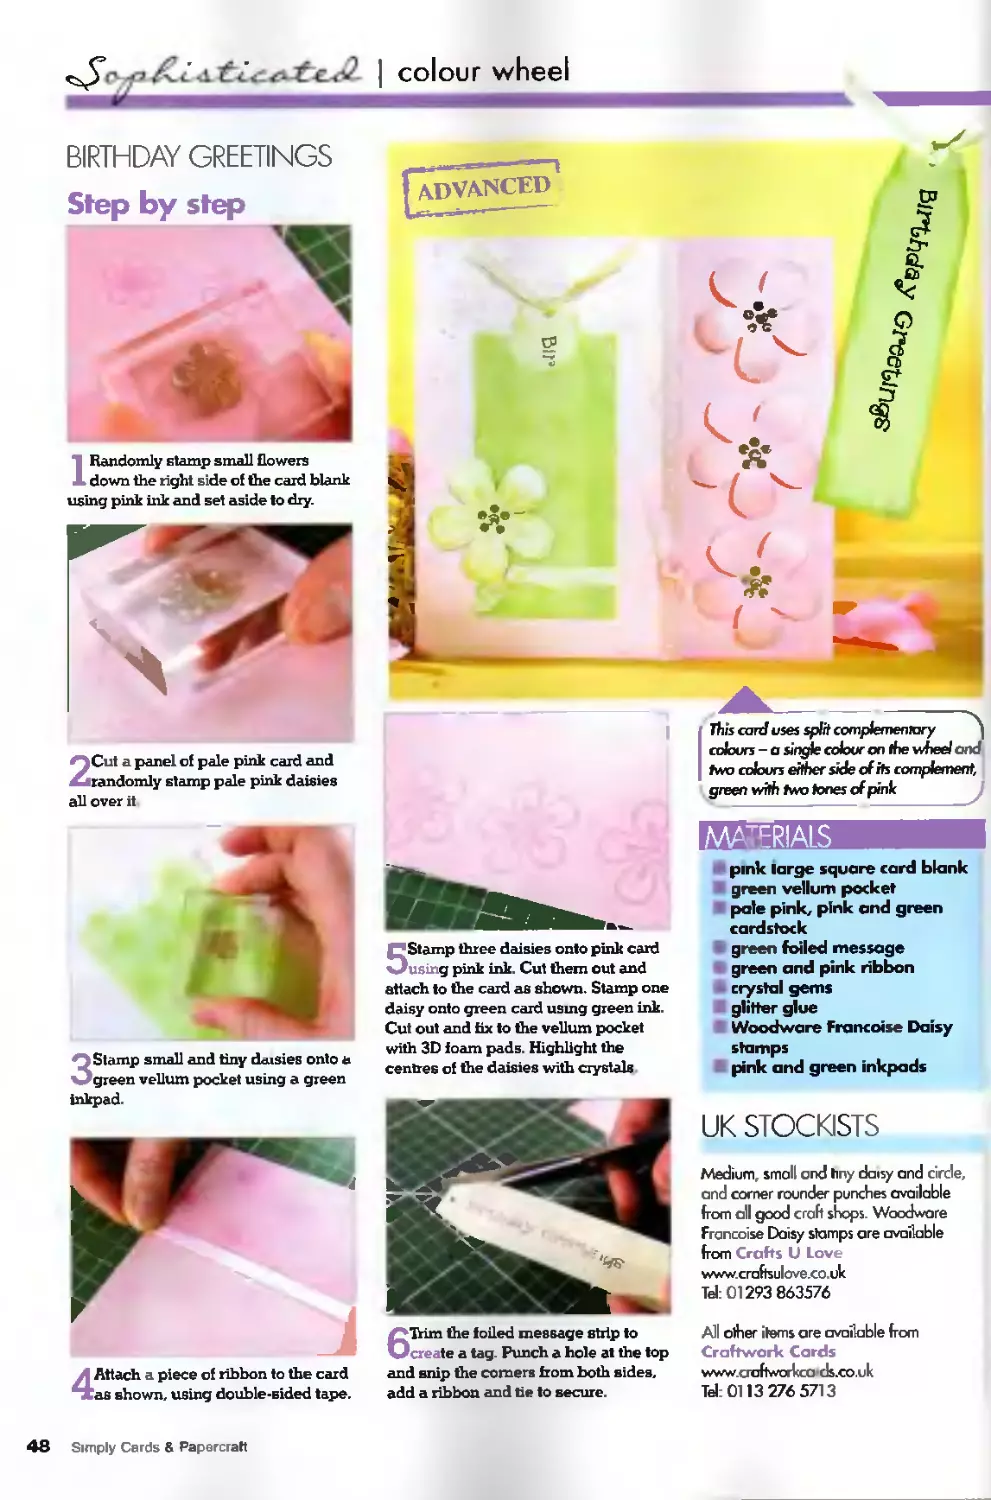
3Stamp small and tiny daisies onto a
green vellum pocket using a green
5Stamp three daisies onto pink card
using pink ink. Cut them out and
attach to the card as shown. Stamp one
daisy onto green card usmg green ink.
Cut out and fix to the vellum pocket
with 3D foam pads. Highlight the
centres of the daisies with crystals
pink large square card blank
green vellum pocket
pale pink, pink and green
cardstock
green foiled message
green and pink ribbon
crystal gems
glitter glue
Woodware Francois Daisy
stamps
pink and green inkpads
UK STOCKISTS
Medium, small and tiny daisy and circle
and comer rounder punches available
from all good craft shops. Woodwore
Francoise Daisy stamps are available
from Crafts U Love
www.craftsulove.co.uk
Id: 01293 863576
All other items are available from
Craftwork Cards
www.cruftworkcods.CO.uk
Id 0113 276 5713
48 Simply Cards & Papercratt
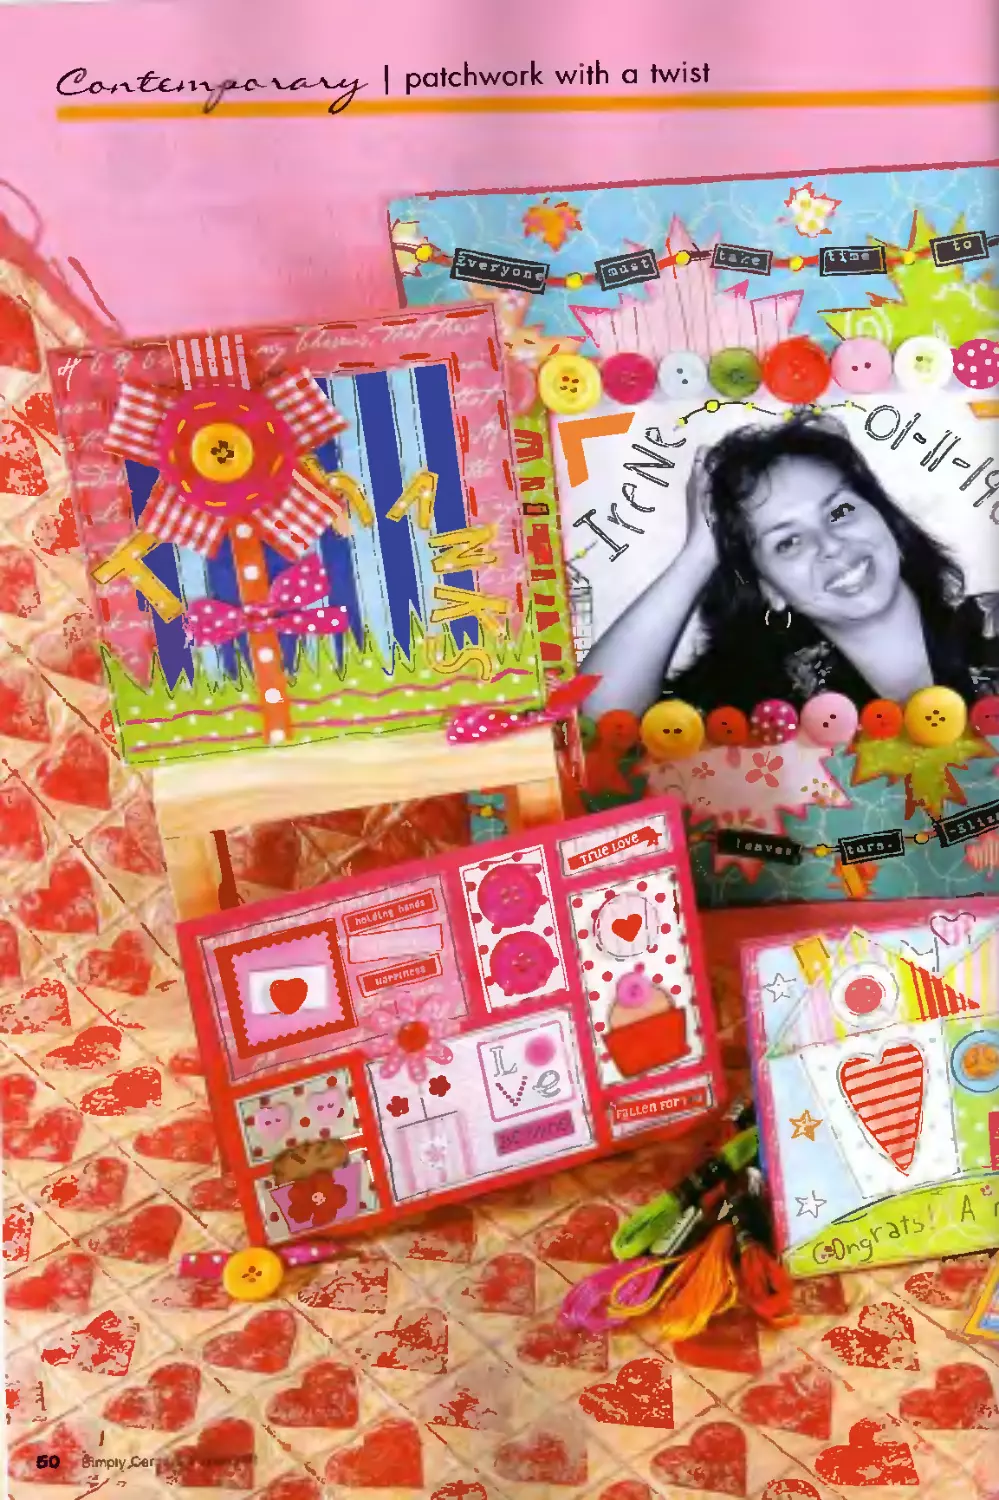
| patchwork with a twist
MARIEKE
VERMEULEN
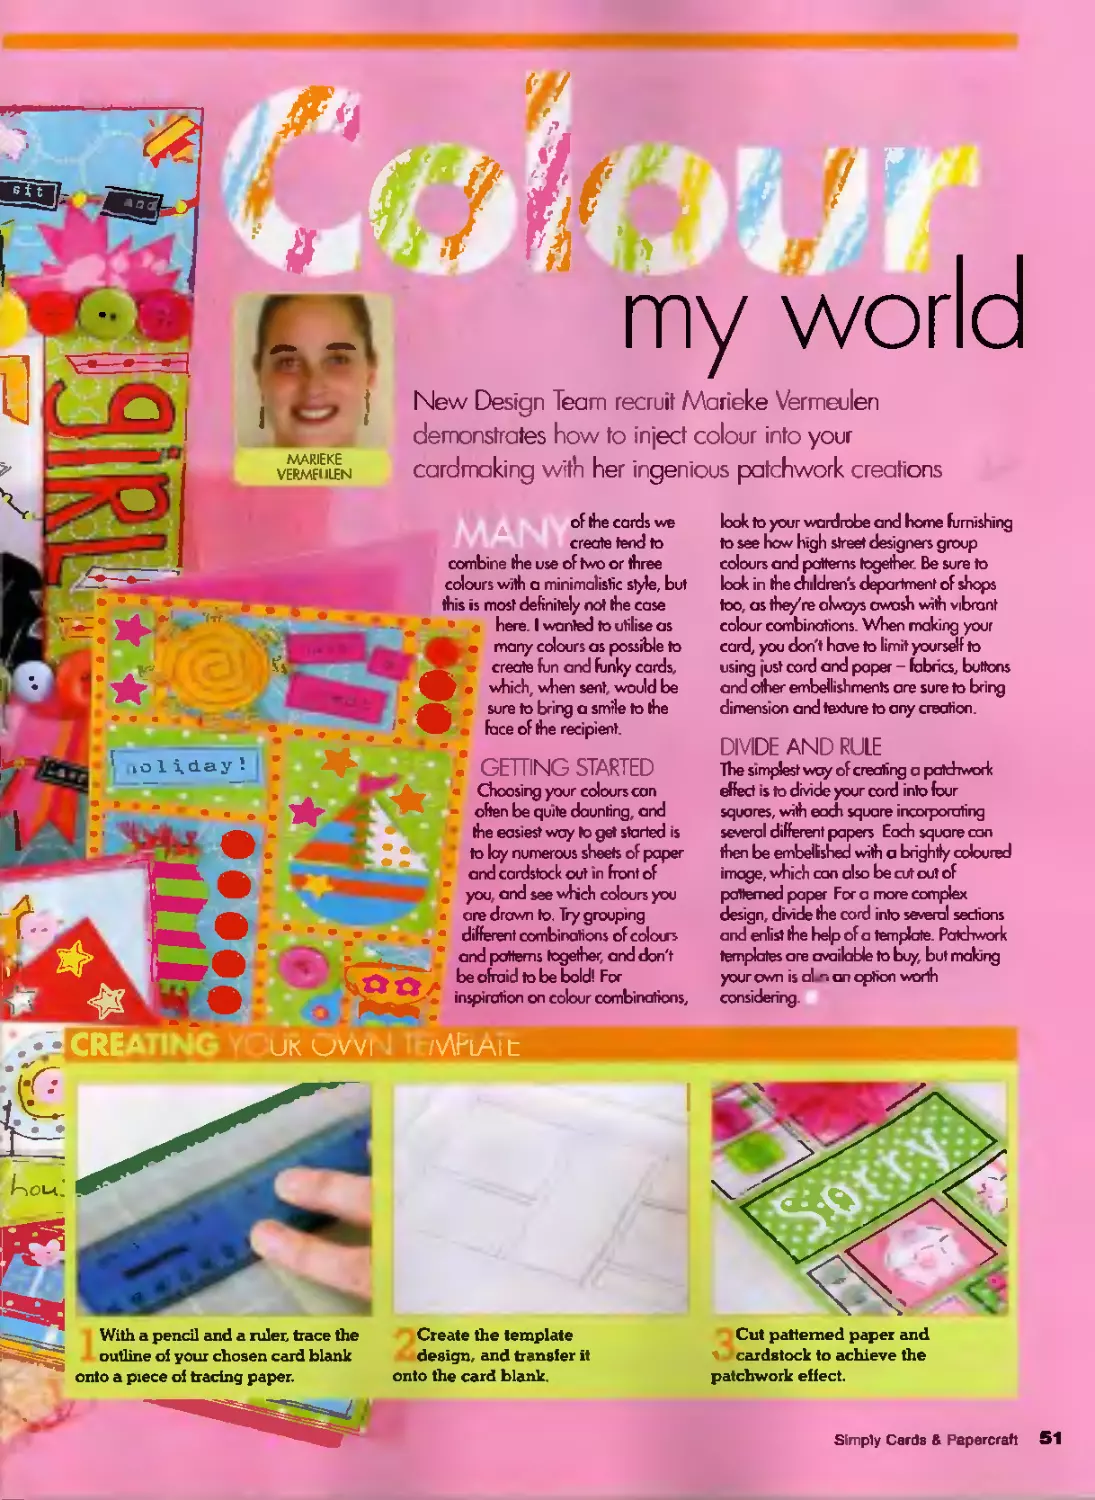
With a pencil and a ruler, trace the
outline of your chosen card blank
onto a piece of tracing paper.
Create the template
design, and transfer it
onto the card blank.
Cut patterned paper and
cardstock to achieve the
patchwork effect.
my world
New Design Team recruit Marieke Vermeulen
demonstrates how to inject colour into your
cardmoking with her ingenious patchwork creations
of the cards we
create tend to
combine the use of two or three
colours with a minimalisfic style, but
this is most definitely not the case
here. I wanted to utilise as
many colours as possible to
create fun and fonky cards,
which, when sent would be
sure to bring a smile to the
face of the recipient.
GETTING STARTED
Choosing your colourscan
often be quite daunting, and
the easiest way to get started is
to lay numerous sheets of paper
and cardstock out in front of
you, and see which colours you
ore drawn to. Try grouping
different combinations of colour,
and patterns together and don't
be afraid to be bold! For
inspiration on colour combinations.
look to your wardrobe and home furnishing
to see hew high street designers group
colours and patterns together Be sure to
look in the children's department of shops
too, as they're always awash with vibrant
colour combinations. When making your
card, you don't have to limit yourself to
using just cord and paper - fabrics, buttons
and other embellishments are sure to bring
dimension and texture to any creation.
DIVIDE AND RULE
The simplest way of creating a patchwork
effect is to divide your cord into four
squares, with each square incorporating
several different papers Each square can
then be embeitshed with a brightly coloured
image, which can also be cut out of
patterned paper For a more complex
design, divide the cord into several sections
and enlist the help of a template. Patchwork
templates are available to buy, but making
your awn is al л an option worth
considering.
Simply Cards 8 Papercratt 51
| patchwork with a twist
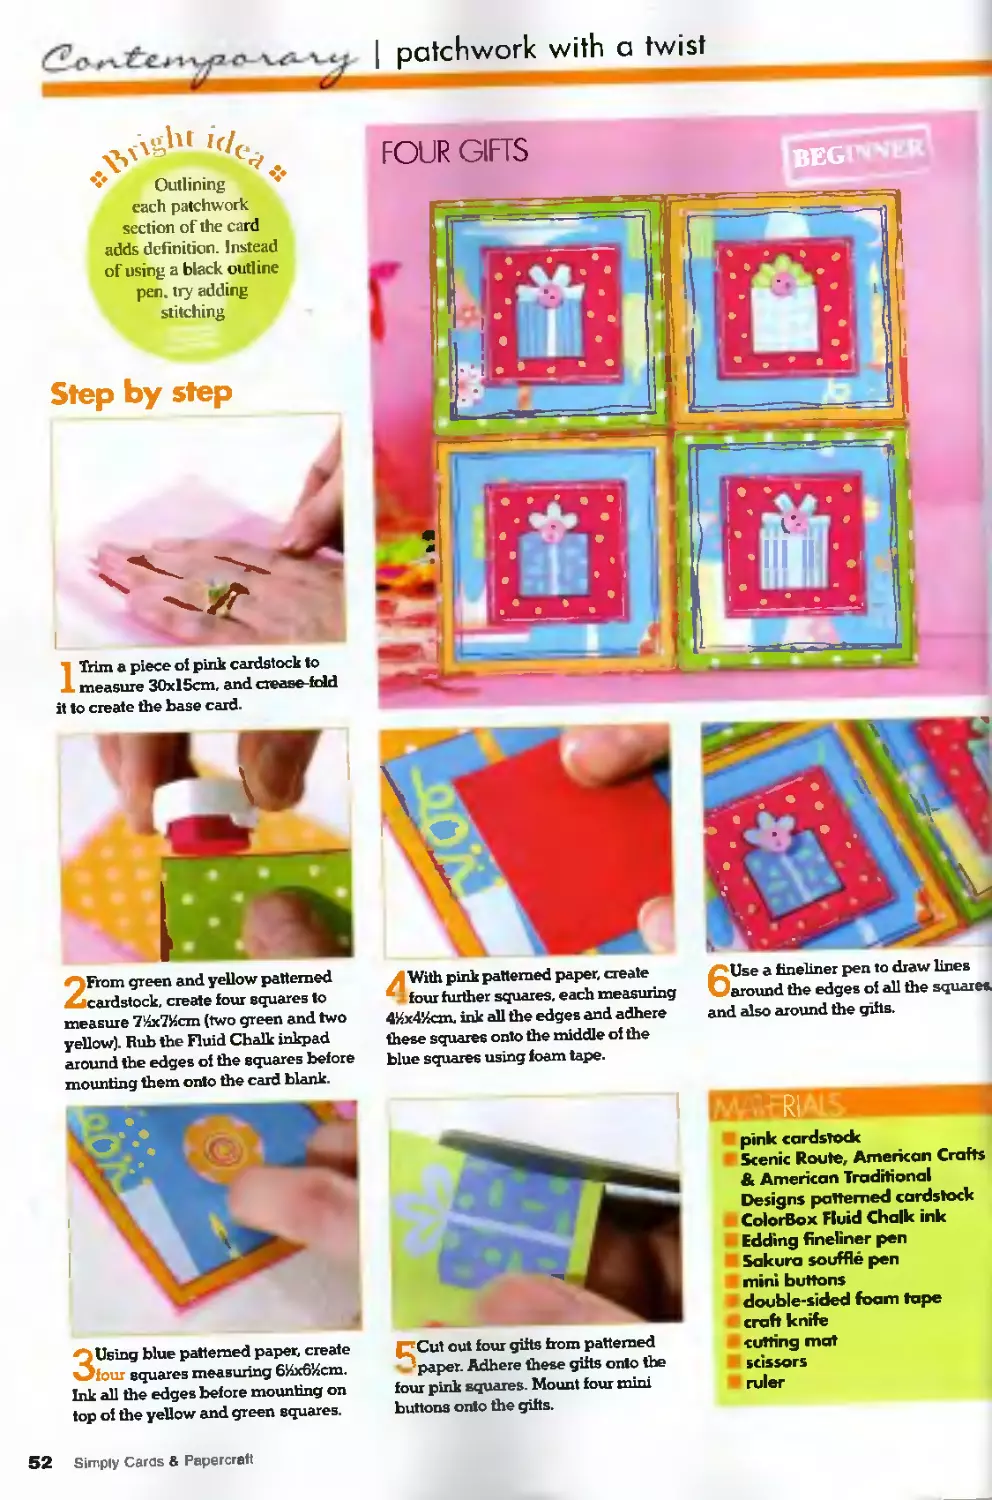
,^ht '4.
*♦* Outlining *
each patchwork
section of the card
adds definition. Instead
of using a black outline
pen. try adding
stitching
Step by step
ITrim a piece of pink cardstock to
measure 30xl5ctn, and crease-fold
it to create the base card.
2From green and yellow patterned
cardstock, create four squares to
measure 7!4х7Ист (two green and two
yellow). Rub the Fluid Chalk inkpad
around the edges of the squares before
mounting them onto the card blank.
’ With pink patterned paper, create
four further squares, each measuring
4Hx4%cm, ink all the edges and adhere
these squares onto the middle of the
blue squares using foam tape.
6Use a fineliner pen to draw lines
around the edges of all the squares.
and also around the gifts.
3Using blue patterned paper, create
four squares measuring 6%x6%cm.
Ink all the edges before mounting on
top of the yellow and green squares.
CCut out four gifts from patterned
'paper. Adhere these gifts onto the
four pink squares. Mount four mini
buttons onto the gifts.
pink cardstock
Scenic Route, American Crafts
& American Traditional
Designs patterned cardstock
ColorBox Fluid Chalk ink
Edding fineliner pen
Sakura souffle pen
mini buttons
double-sided foam tape
craft knife
cutting mat
scissors
ruler
52 Simply Caras & Papercratt
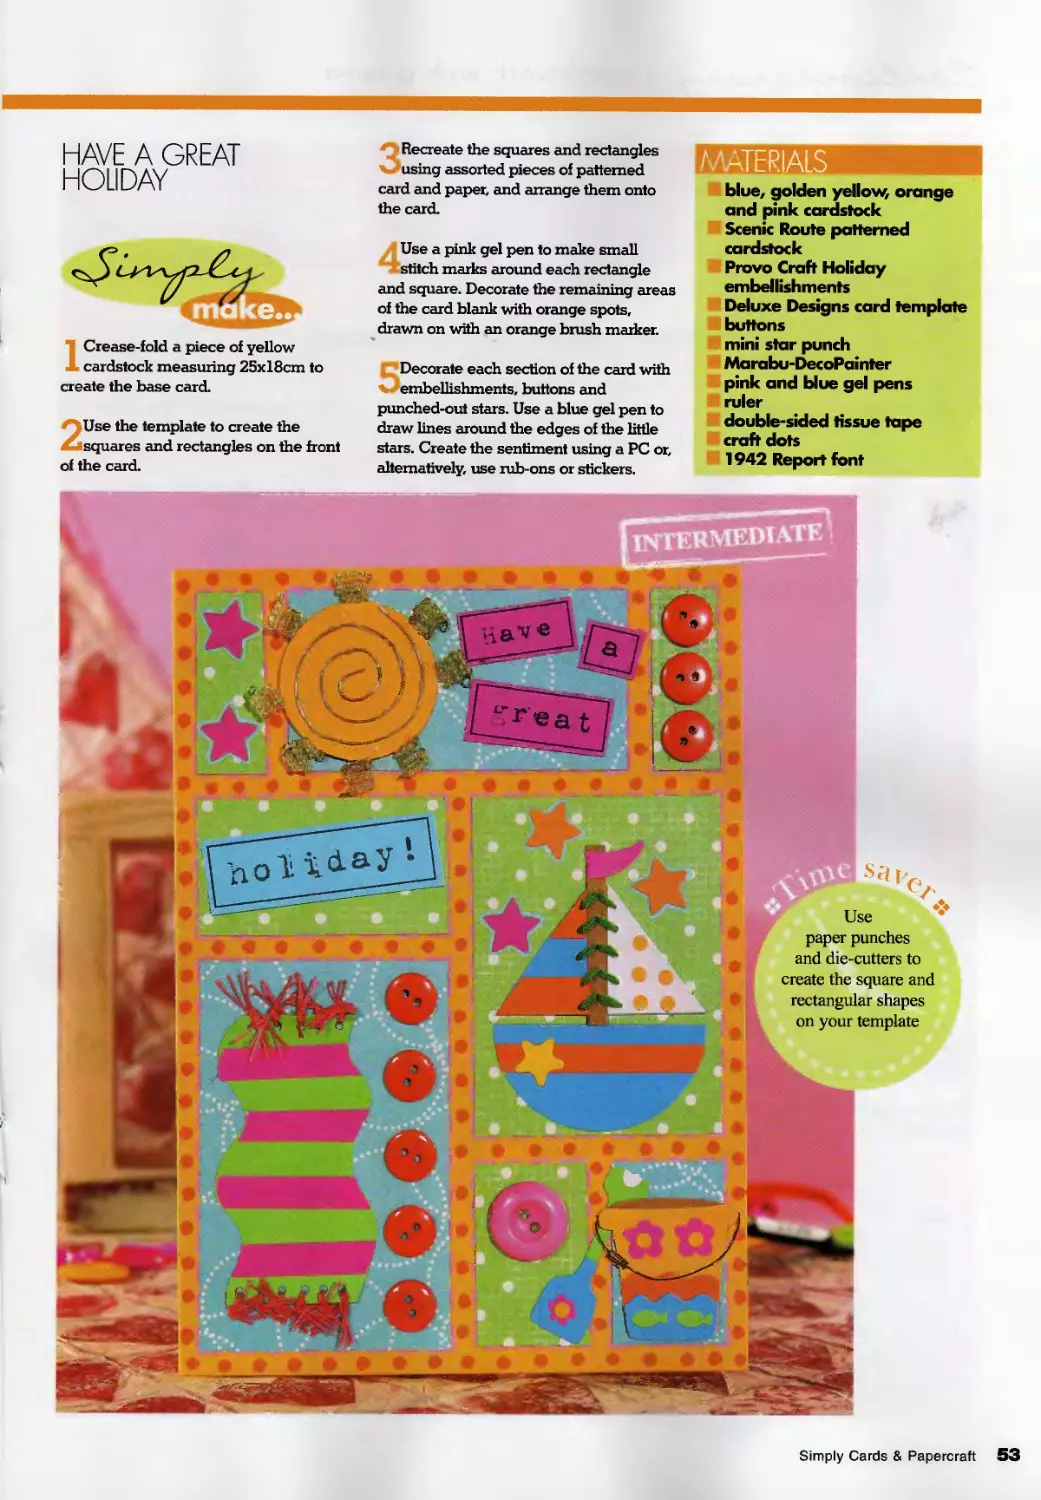
HAVE A GREAT
HOLIDAY
1 Crease-fold a piece of yellow
cardstock measuring 25x18cm to
create the base card.
2Use the template to create the
squares and rectangles on the front
of the card.
3 Recreate the squares and rectangles
using assorted pieces of patterned
card and paper, and arrange them onto
the card.
Use a pink gel pen to make small
stitch marks around each rectangle
and square. Decorate the remaining areas
of the card blank with orange spots,
drawn on with an orange brush marker.
Decorate each section of the card with
s embellishments, buttons and
punched-out stars. Use a blue gel pen to
draw lines around the edges of the little
stars. Create the sentiment using a PC or,
alternatively, use rub-ons or stickers.
AWERIALS
blue, golden yellow, orange
and pink cardstock
Scenic Route patterned
cardstock
Provo Craft Holiday
embellishments
Deluxe Designs card template
buttons
mini star punch
Marabu-DecoPainter
pink and blue gel pens
ruler
double-sided tissue tape
craft dots
1942 Report font
Have
Use
paper punches
and die-cutters to
create the square and
rectangular shapes
on your template
Simply Cards & Papercraft 53
| patchwork with a twist
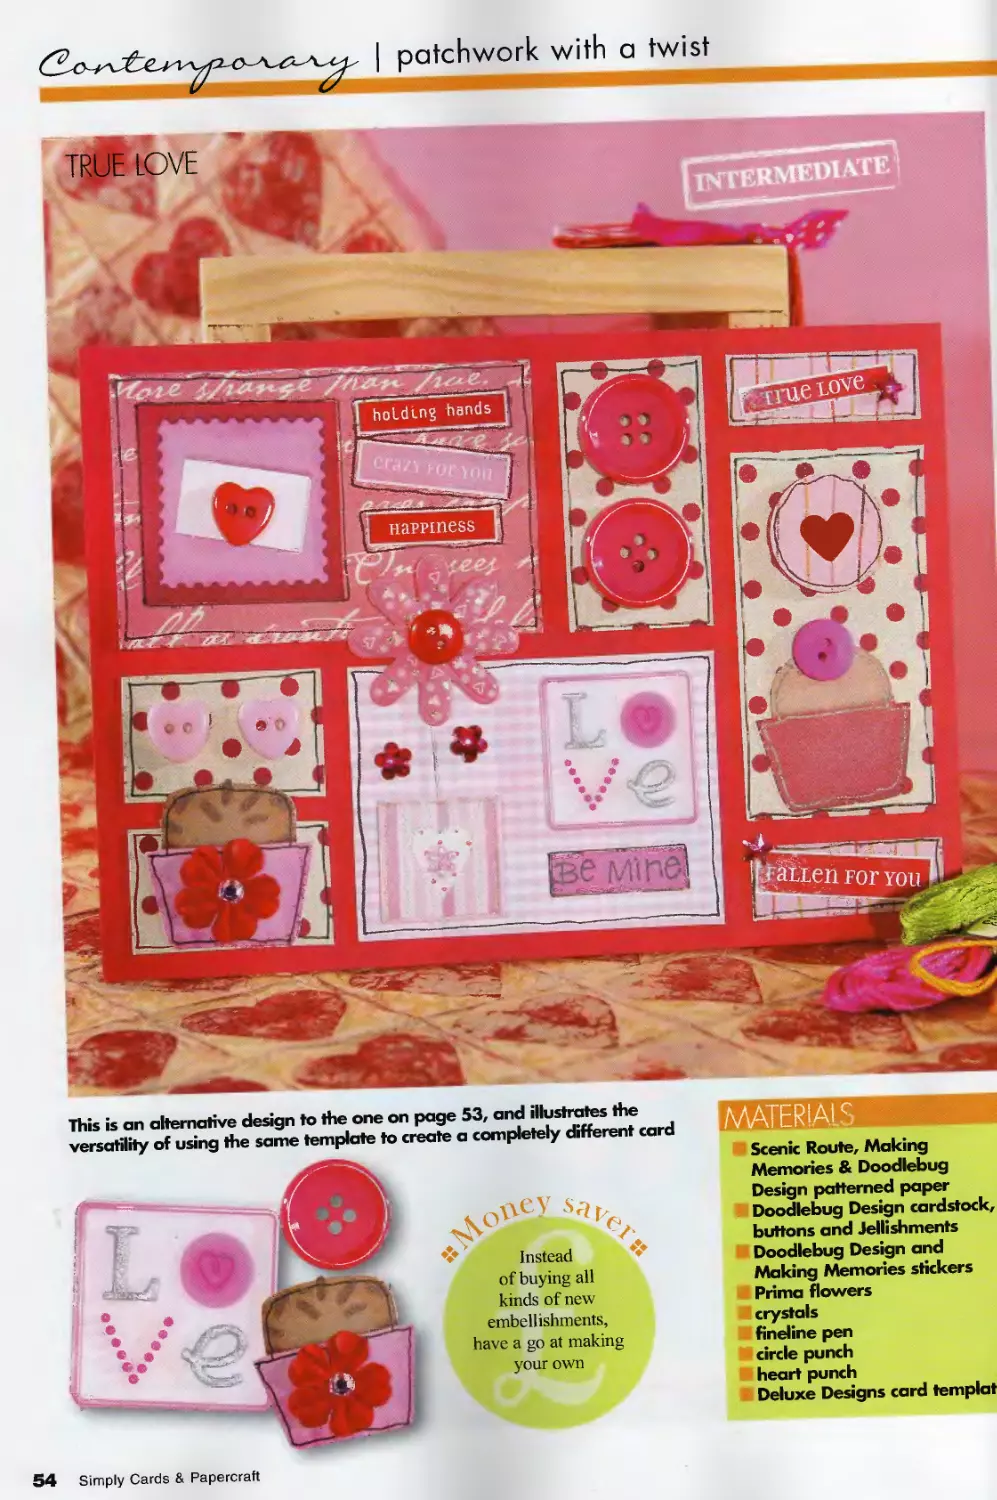
This is an alternative design to the one on page 53, and illustrates the
versatility of using the same template to create a completely different card
Instead
of buying all
kinds of new
embellishments,
have a go at making
your own
Scenic Route, Making
Memories & Doodlebug
Design patterned paper
Doodlebug Design cardstock,
buttons and Jellishments
Doodlebug Design and
Making Memories stickers
Prima flowers
crystals
fineline pen
circle punch
heart punch
Deluxe Designs card templat
54 Simply Cards & Papercraft
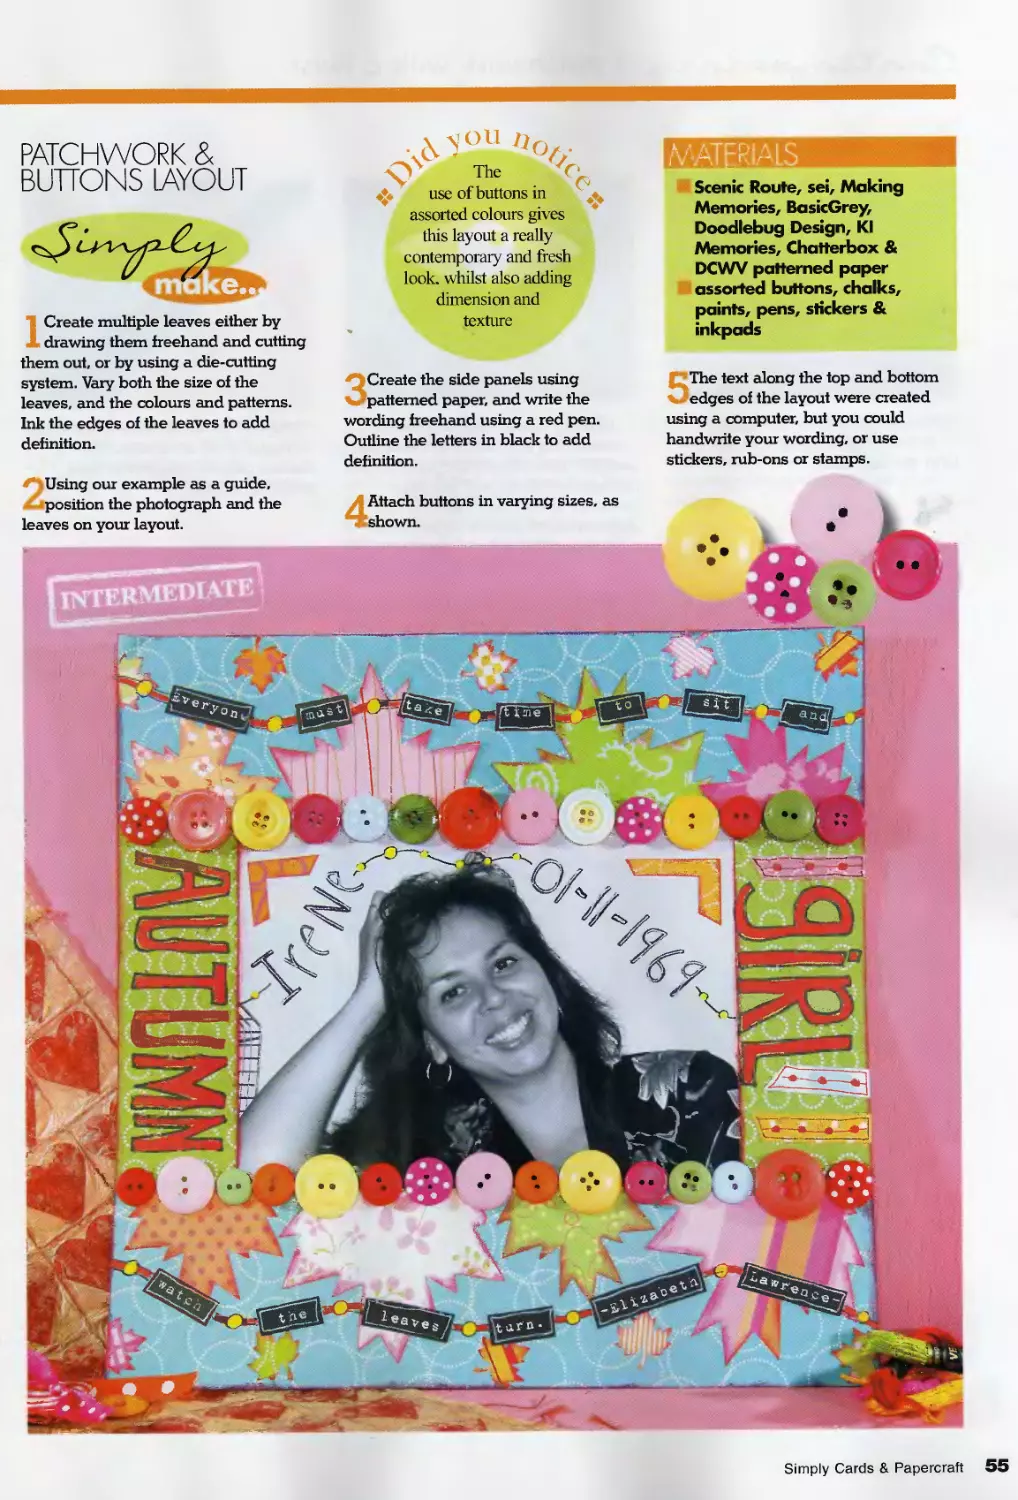
PATCHWORK &
BUTTONS LAYOUT
1 Create multiple leaves either by
drawing them freehand and cutting
them out, or by using a die-cutting
system. Vary both the size of the
leaves, and the colours and patterns.
Ink the edges of the leaves to add
definition.
Ajou д
The ZC‘
/N
use of buttons in
assorted colours gives
this layout a really
contemporary and fresh
look, whilst also adding
dimension and
texture
3Create the side panels using
patterned paper, and write the
wording freehand using a red pen.
Outline the letters in black to add
definition.
MATERIALS
Scenic Route, sei. Making
Memories, BasicGrey,
Doodlebug Design, KI
Memories, Chatterbox &
DCWV patterned paper
assorted buttons, chalks,
paints, pens, stickers &
inkpads
The text along the top and bottom
edges of the layout were created
using a computer, but you could
handwrite your wording, or use
stickers, rub-ons or stamps.
< Using our example as a guide,
position the photograph and the
leaves on your layout.
4Attach buttons in varying sizes, as
shown.
Simply Cards & Papercratt 55
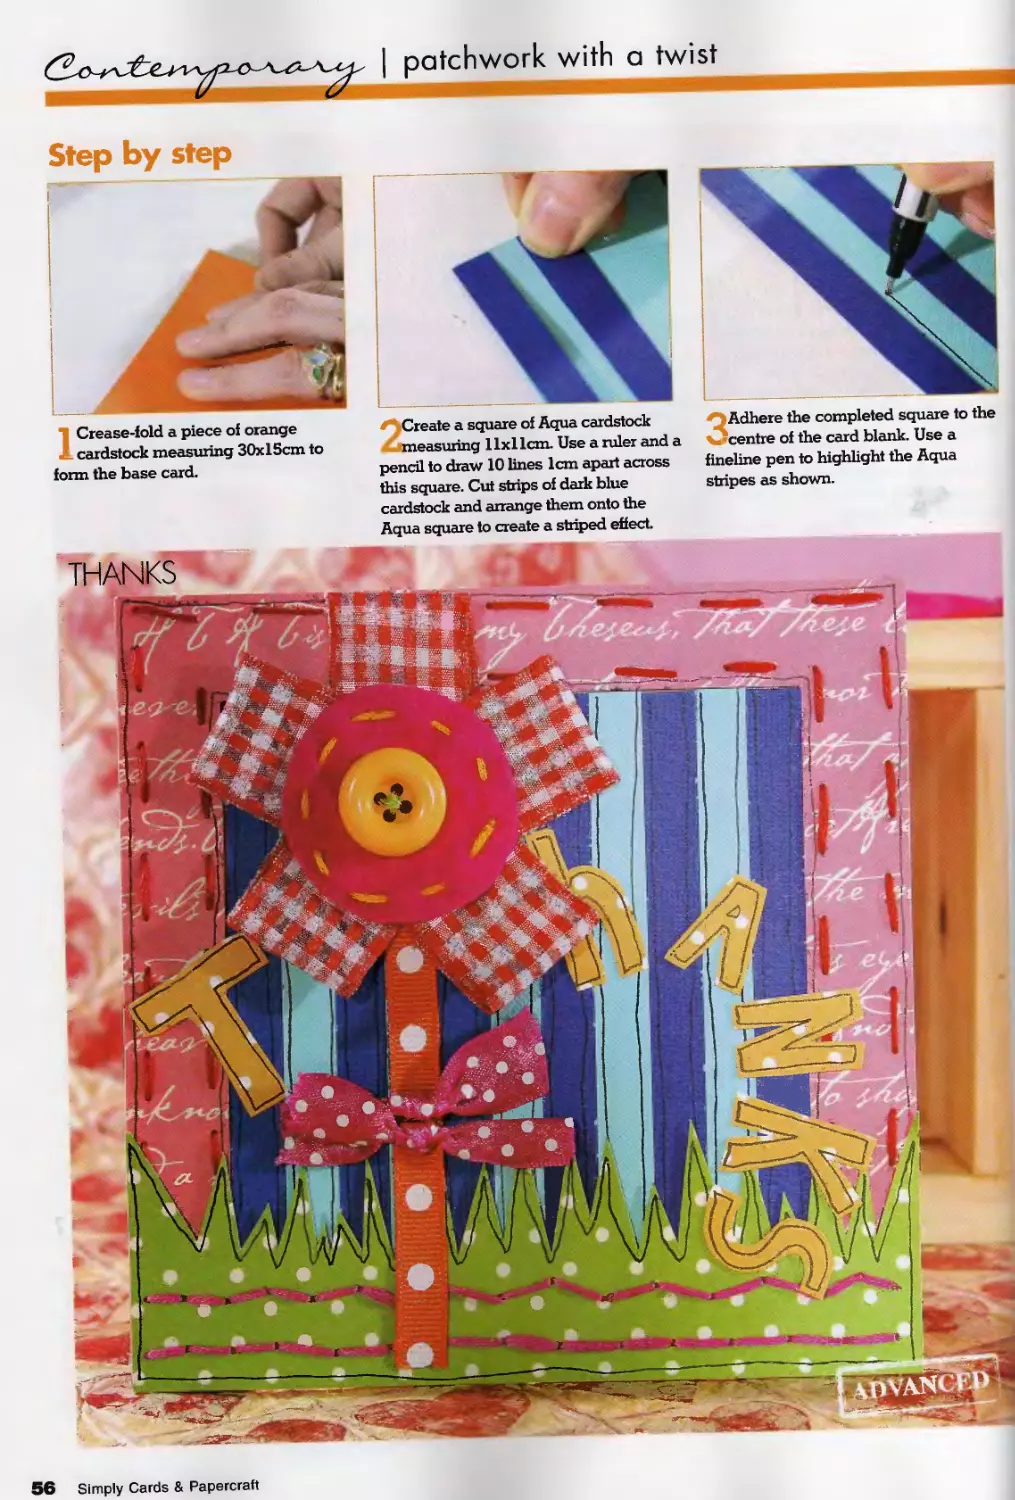
1 Crease-fold a piece of orange
cardstock measuring 30x15cm to
form the base card.
/' Create a square of Aqua cardstock
measuring llxl 1cm. Use a ruler and a
pencil to draw 10 lines 1cm apart across
this square. Cut strips of dark blue
cardstock and arrange them onto the
Aqua square to create a striped effect.
Adhere the completed square to the
\ centre of the card blank. Use a
fineline pen to highlight the Aqua
stripes as shown.
56 Simply Cards & Papercraft
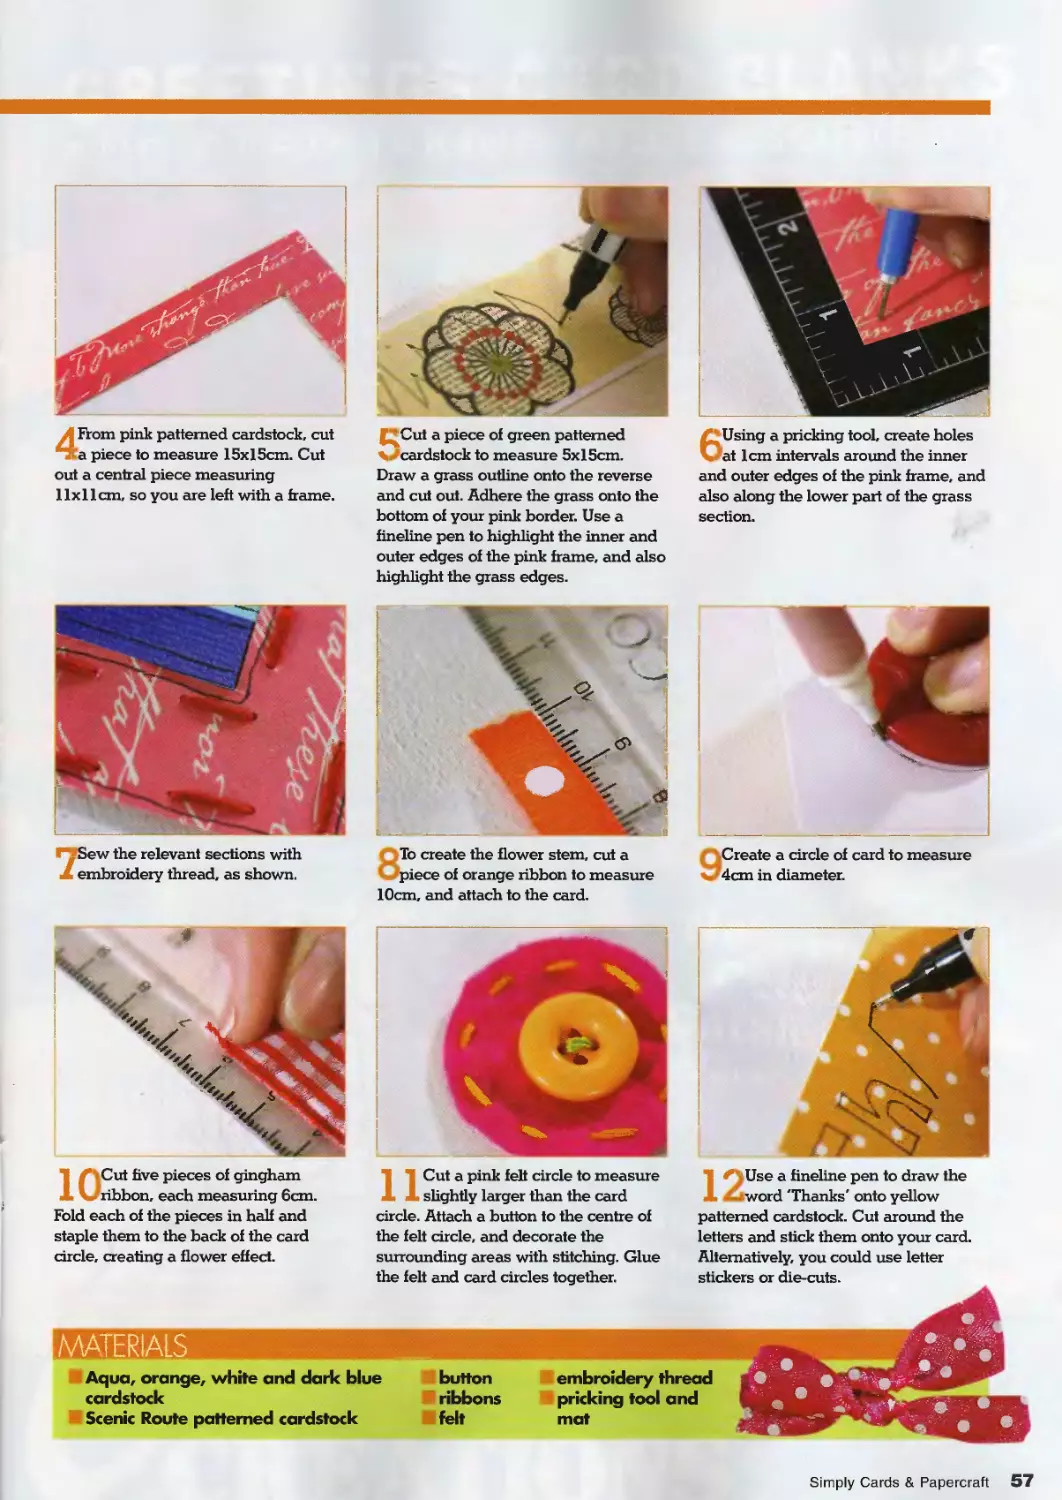
4From pink patterned cardstock, cut
a piece to measure 15x15cm. Cut
out a central piece measuring
llxl 1cm, so you are left with a frame.
Cut a piece of green patterned
V cardstock to measure 5x15cm.
Draw a grass outline onto the reverse
and cut out. Adhere the grass onto the
bottom of your pink border. Use a
fineline pen to highlight the inner and
outer edges of the pink frame, and also
highlight the grass edges.
6Using a pricking tool, create holes
at 1cm intervals around the inner
and outer edges of the pink frame, and
also along the lower part of the grass
section.
Г Sew the relevant sections with
embroidery thread, as shown.
8To create the flower stem, cut a
piece of orange ribbon to measure
10cm, and attach to the card.
9Create a circle of card to measure
4cm in diameter.
К Cut five pieces of gingham
' ribbon, each measuring 6cm.
Fold each of the pieces in half and
staple them to the back of the card
circle, creating a flower effect.
nCut a pink felt circle to measure
slightly larger than the card
circle. Attach a button to the centre of
the felt circle, and decorate the
surrounding areas with stitching. Glue
the felt and card circles together.
1 ^\Use a fineline pen to draw the
word 'Thanks' onto yellow
patterned cardstock. Cut around the
letters and stick them onto your card.
Alternatively, you could use letter
stickers or die-cuts.
Aqua, orange, white and dark blue
cardstock
Scenic Route patterned cardstock
button
ribbons
embroidery thread
pricking tool and
mat
Simply Cards & Papercraft 57
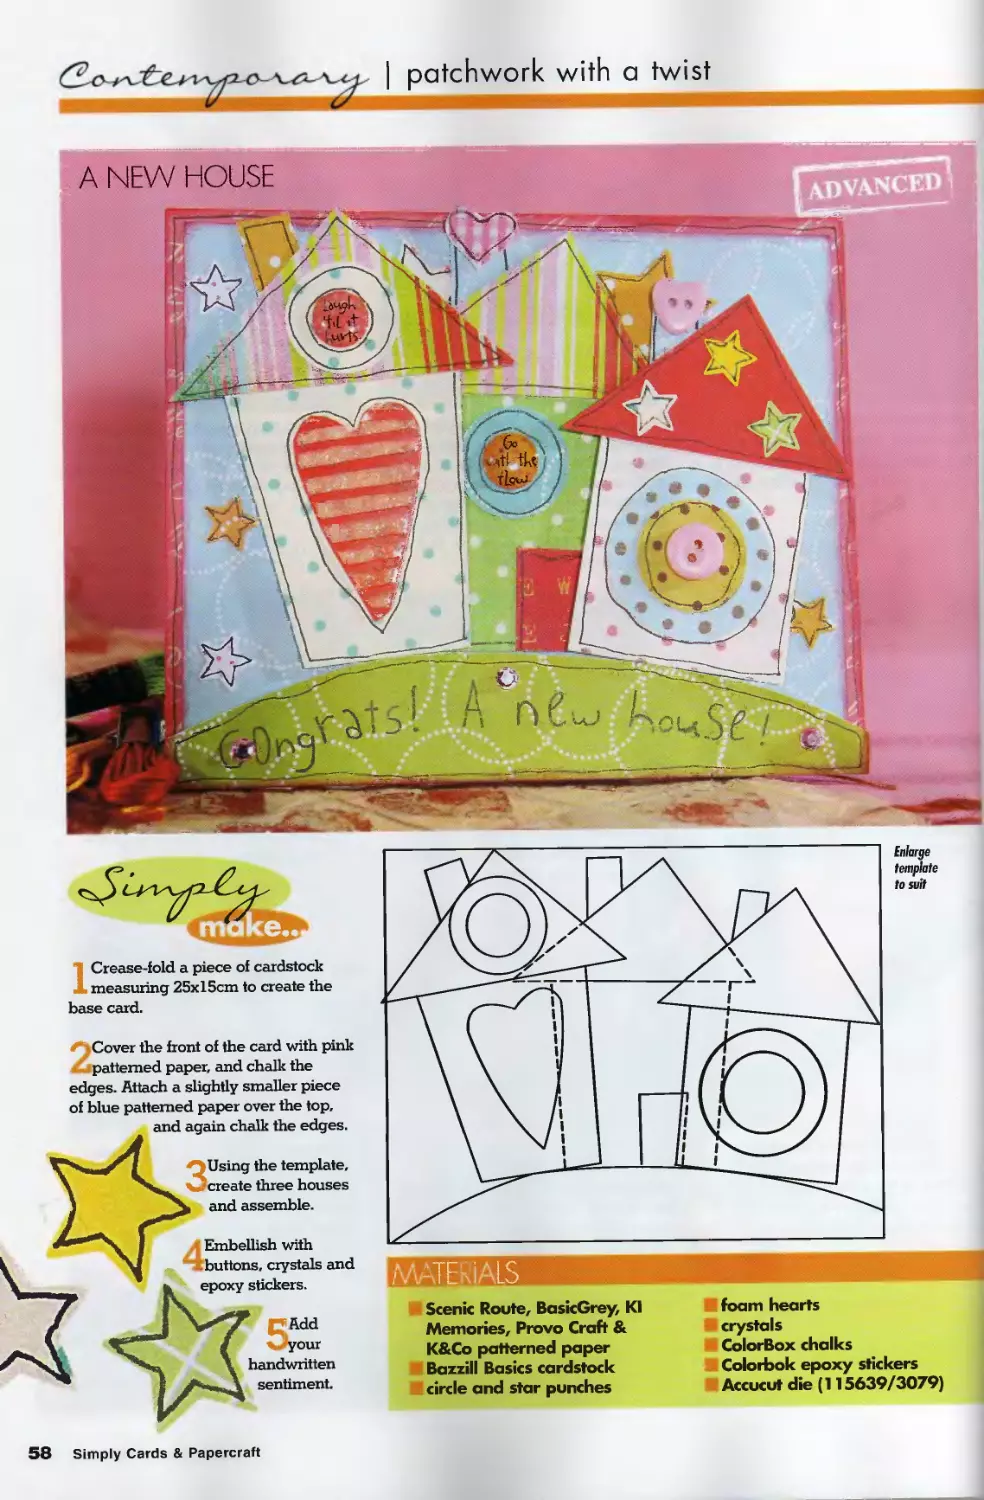
| patchwork with a twist
1 Crease-fold a piece of cardstock
measuring 25x15cm to create the
base card.
< Cover the front of the card with pink
Z patterned paper, and chalk the
edges. Attach a slightly smaller piece
of blue patterned paper over the top.
and again chalk the edges.
Embellish with
.buttons, crystals and
epoxy stickers.
CAdd
< .-your
handwritten
sentiment.
3Using the template,
create three houses
and assemble.
Scenic Route, BasicGrey, KI
Memories, Provo Craft &
K&Co patterned paper
Bazzill Basics cardstock
circle and star punches
foam hearts
crystals
ColorBox chalks
Colorbok epoxy stickers
Accucut die (115639/3079)
58 Simply Cards & Papercraft
| stamping on acetate
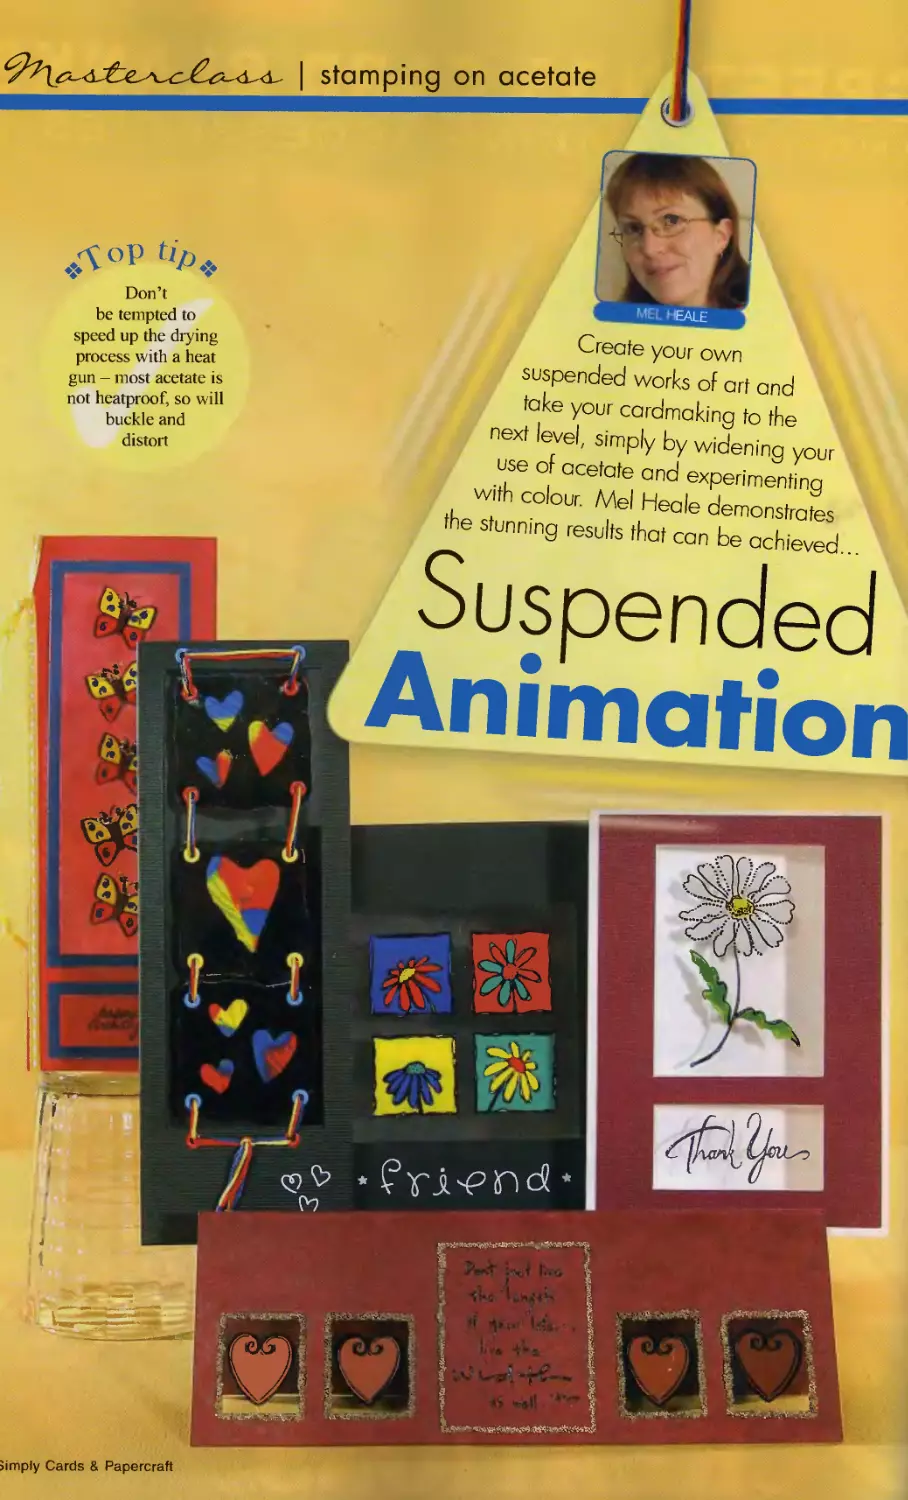
Don’t
be tempted to
speed up the drying
process with a heat
gun - most acetate is
not heatproof, so will
buckle and
distort
Create your own
suspended works of art and
take your cardmaking to the
next level, simply by widening your
use of acetate and experimenting
with colour. Mel Heale demonstrates
the stunning results that can be achieved...
pimply Cards & Papercraft
ПГ| I (^simple technique of stamping onto a
I III—piece of acetate and painting the
back with acrylic paint provides an instantly
effective mini masterpiece, which you can then
mount in a card aperture. The possibilities for
this technique are vast - simply vary the
colours and designs to suit any occasion and
age group, from pastel baby cards through to
the bold designs shown here, to delicate
pieces for a wedding or milestone birthday.
GETTING STARTED
Stamping on acetate is very similar to
stamping on glossy card - you will need to
use a solvent-based inkpad, such as StazOn,
or the design will not dry. There's also the
same tendency for the stamp to slip. To
minimise this risk, lower the stamp straight
down onto the acetate, apply even pressure,
then lift up using the other hand to hold the
acetate in place. However, if you do end up
with a blurry outline, or part of the image is
missing, simply wipe over with some StazOn
cleaner and start again! Once stamped, the
image will need to dry thoroughly or it will
smudge; ideally it would be best to leave it for
at least 24 hours.
COLOUR ME HAPPY
Having stamped the outline, yau now need to
choose your paint. Acrylic paints work
particularly well with acetate, plus they come
in a wide range of colours and are fairly
inexpensive. If you buy a basic selection of
colours such as primary colours and maybe
add black and white, you can mix the shade
you want for a particular project - a spare
scrap of acetate makes a good palette for
mixing. Be sure to rinse your brush thoroughly
between colours, and as the paint dries (and
becomes waterproof) relatively quickly, you
will need to wash the brush with warm soapy
water promptly once you've finished or you
will be unable to remove the paint.
It is possible to create several different
effects with acrylic paints, as shown in the
projects featured here. However, it is worth
remembering that unless you're intentionally
blending colours together, you will need to
allow drying time when painting adjacent
дор Ups.
Polish the acetate with a soft cloth
before mounting, to remove any
fingerprints
Remember that any message inside
the card can show through the
acetate window, so you will need to
choose carefully where to write!
sections of your design or the colours may
merge and contaminate each other.
WINDOW ON THE WORLD
Having stamped and painted your design,
you now need to think about fixing the
acetate to your card. To allow the light to
shine through the empty space around your
image, cut an aperture in the front of your
card and stick the acetate behind it. Don't
worry if the adhesive you used shows
through the acetote, as there are numerous
ways af hiding it. Try sandwiching the
acetate between two apertures, either by
adding a frame to the front of the card and
incorporating it into the design, or by
sticking the frame inside the card for a
cleaner look. Using strips of co-ordinating
cardstock inside the card blank works
equally well and is a great time saver.
UK STOCKISTS
All cardstock and Whispers stamps are
available from The Paper Mill Shop
www.thepapermillshop.co.uk
All other stamps are available from
www.artstampsdirect.com and the Rye
Art Stamping Studia,
www.simplystampsfriends.com/
ryeshop.php Tel: 01797 229060
Making Memories ribbon is available
from www.craftgenie.co.uk
Tel: 020 8397 4634
Doodlebug Design rub-ons are available
from www.capturethemagic.biz
Tel: 01353 720105
Sizzlits dies and Provo Craft Eyeletz are
available from
www.courtyardcrafts.co.uk
Tel: 0151 342 4216
Acetate and acrylic paints are available
from your local craft store
Stamp a variety of images in
advance so that you can paint them
when you need them
Try using peel-off stickers instead
of a stamped image, to save on
drying time
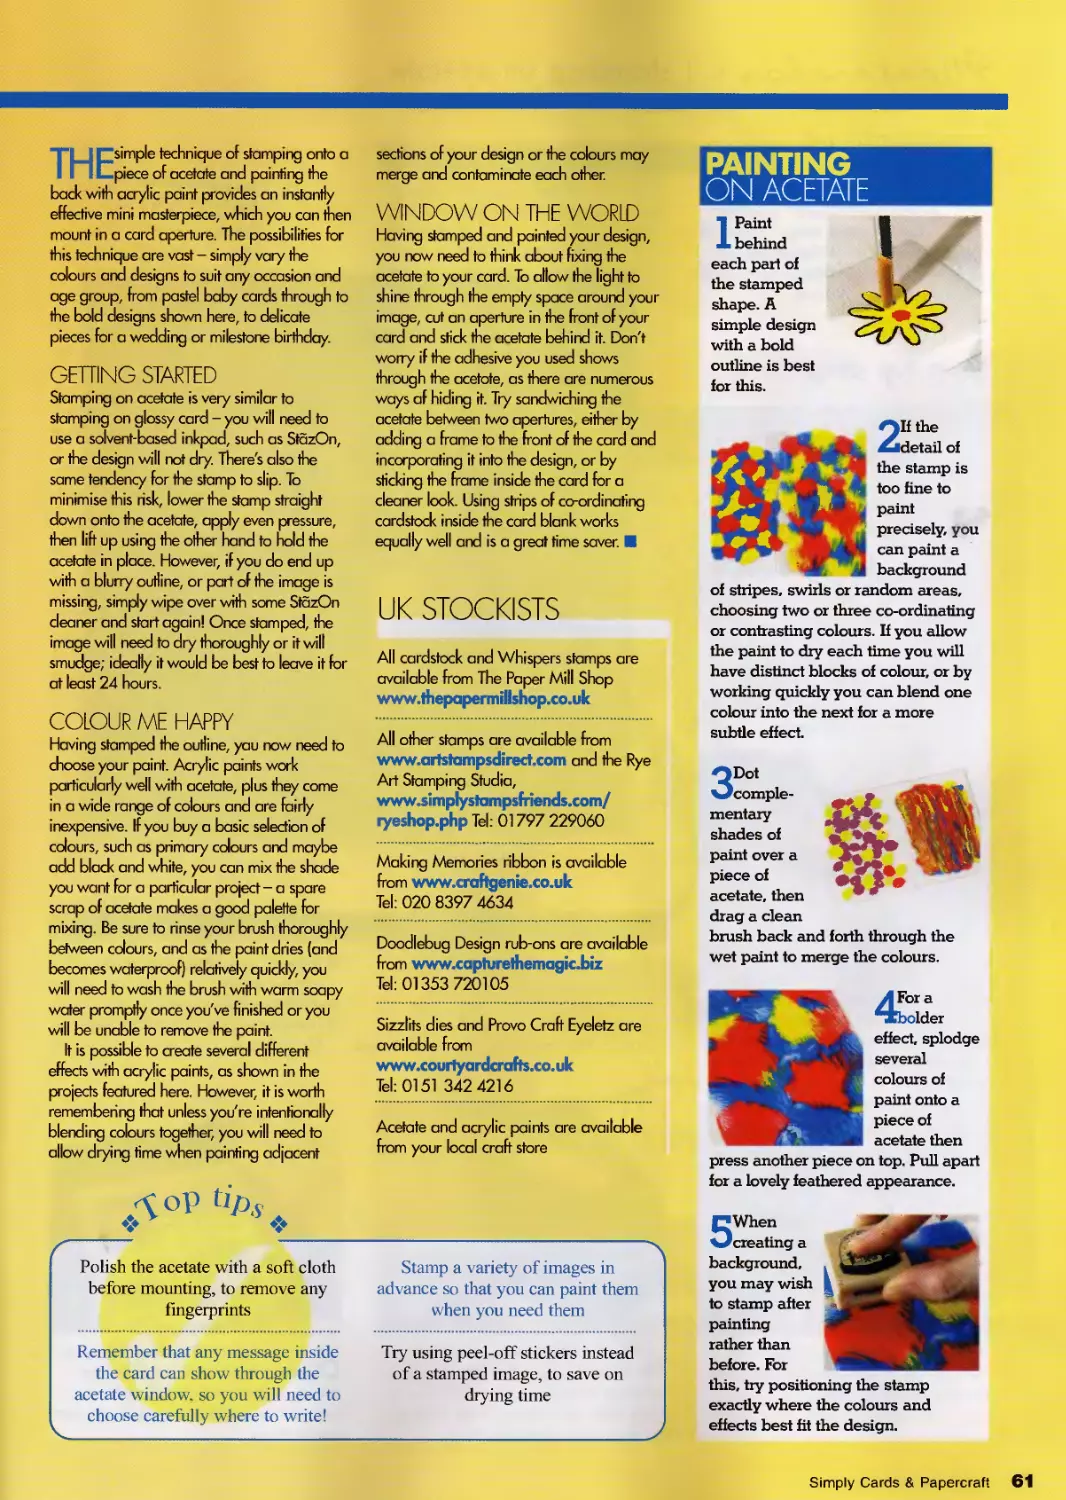
PAINTING
ON ACETATE
1 Paint
behind
each part of
the stamped
shape. A
simple design
with a bold
outline is best
for this.
2If the
detail of
the stamp is
too fine to
paint
precisely, you
can paint a
background
of stripes, swirls or random areas,
choosing two or three co-ordinating
or contrasting colours. If you allow
the paint to dry each time you will
have distinct blocks of colour, or by
working quickly you can blend one
colour into the next for a more
subtle effect.
3Dot
comple-
mentary
shades of
paint over a
piece of
acetate, then
drag a clean
brush back and forth through the
wet paint to merge the colours.
Fora
bolder
effect, splodge
several
colours of
paint onto a
piece of
acetate then
press another piece on top. Pull apart
for a lovely feathered appearance.
5 When
creating a
background,
you may wish
to stamp after
painting
rather than
before. For
this, try positioning the stamp
exactly where the colours and
effects best fit the design.
Simply Cards & Papercraft 61
| stamping on acetate
•:♦ If r/ ♦:
you don't have
this stamp or one
like it. you can
replicate the design by
usine one small
stamp four times
DAISY SQUARES
BEGINNER.
Step by step
1 Stamp the daisies onto a piece of
acetate using a StazOn inkpad and
set aside to dry. Tnm the acetate to
create a lOZcm square, with the
stamped design in the centre.
MATERIALS
2Turn the acetate over and paint the
petals of one flower, the middle of
another, the stem of the third and
background of the fourth in yellow, as
shown Allow to dry.
black cardstock
4 black cardstock strips
acetate
black StazOn inkpad
Inca Stamps Daisy Squares stamp
yellow, red, blue and green
acrylic paint
double-sided tape
Doodlebug Design All Mixed
Up rub-ons
3Repeat with red paint, then with
blue and green, allowing the paint
to dry between colours.
4Tnm the black card to measure
14!4x29cm and fold it in half. Cut an
aperture 8 -.cm-square centrally into the
front. Mitre the comers of the strips so
5Stick the painted acetate behind tl
aperture with double-sided tape.
Attach strips measuring HZxlZcm
behind this, inside the card. Apply ru
the inner side measures 8/cm.
ons to finish
62 Simply Cards & Papercraft
THANK
YOU
MATERIALS
white textured card
□ burgundy DCWV textured card
□ acetate
□ black StazOn inkpad
Karen Neuburger Sangria
Blossom stamp
All Night Media Say It With
Stamps Thank You' stamp
green white and yellow
acrylic paint
□ double-sided tape
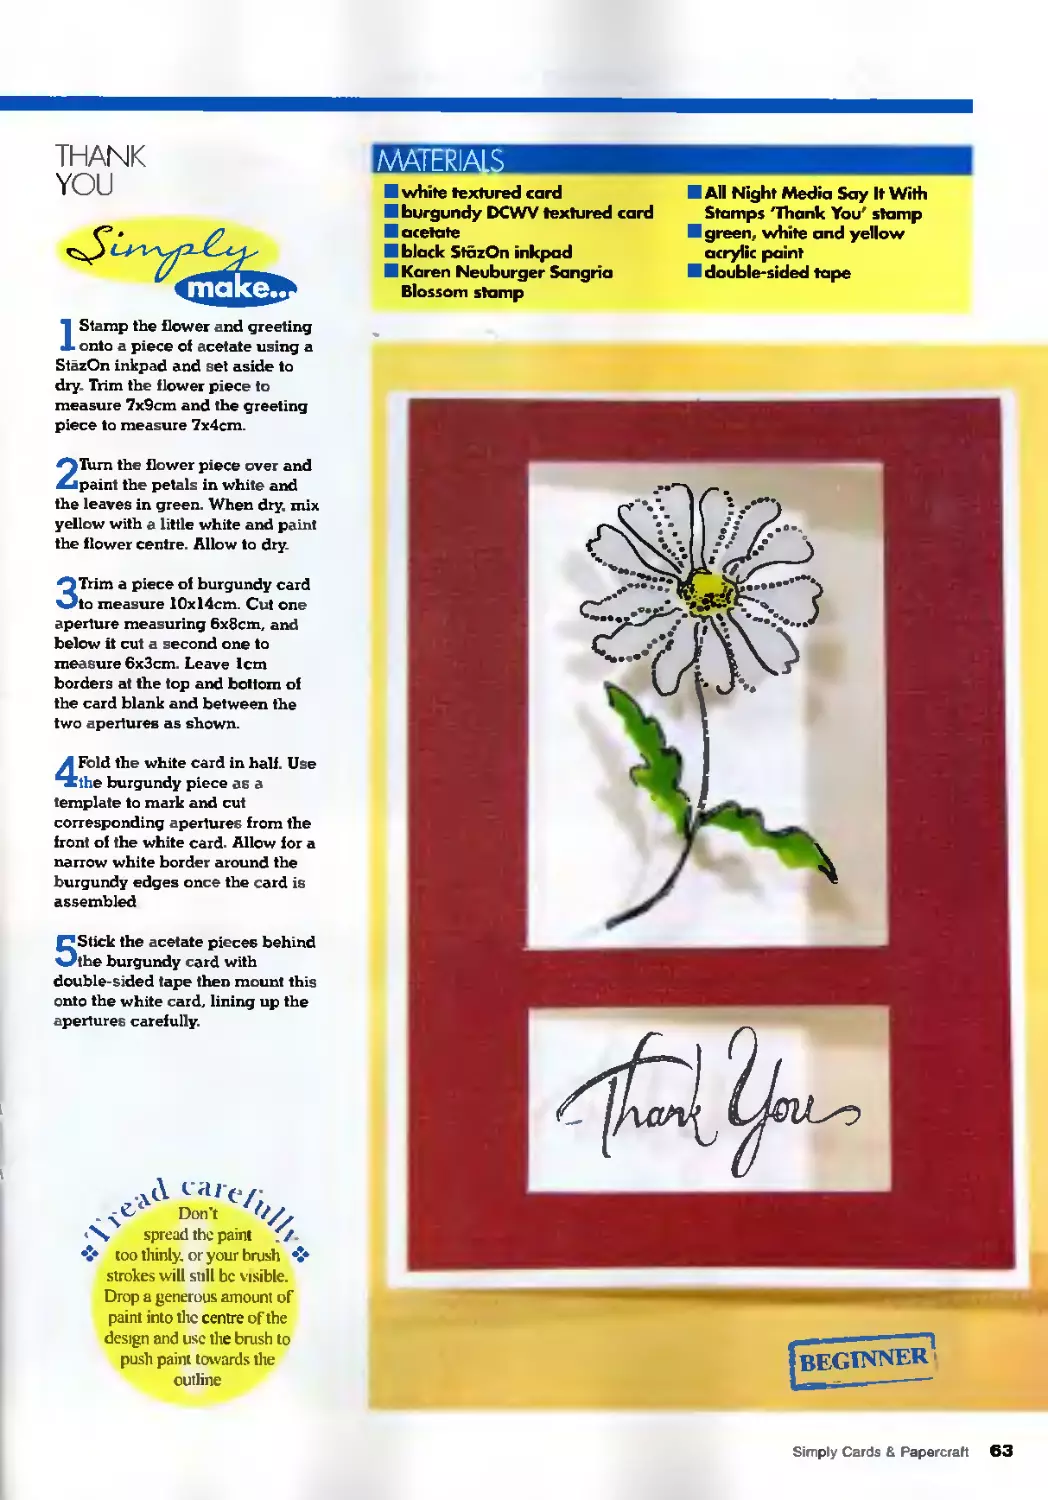
1 Stamp the flower and greeting
onto a piece of acetate using a
StazOn inkpad and set aside to
dry. Trim the flower piece to
measure 7x9cm and the greeting
piece to measure 7x4cm.
2Turn the flower piece over and
paint the petals in white and
the leaves in green. When dry. mix
yellow with a little white and paint
the flower centre. Allow to dry.
3Trim a piece of burgundy card
to measure 10x14cm. Cut one
aperture measuring 6x8cm, and
below it cut a second one to
measure 6x3cm. Leave Icrn
borders at the top and bottom of
the card blank and between the
two apertures as shown.
4Fold the white card in half. Use
the burgundy piece as a
template to mark and cut
corresponding apertures from the
front of the white card. Allow for a
narrow white border around the
burgundy edges once the card is
assembled
5Stick the acetate pieces behind
the burgundy card with
double-sided tape then mount this
onto the white card, lining up the
apertures carefully.
,x<\ car(y.
. Don’t
s spread the paint ./
too thinly, or your brush
strokeswill still be visible.
Drop a generous amount of
paint into the centre of the
design and use the brush to
push paint towards the
outline
Simply Cards & Papercratt 63
| stamping on acetate
AUTUMN АТС
1 Stamp the tree onto a piece of
acetate using a StazOn inkpad
and set aside to dry. Trim the acetate
to measure 6Их9сш.
2On the reverse oi the acetate, dab
orange, yellow and red brown
acrylic paint randomly behind the
ink. Drag a clean, dry paintbrush
lightly back and forth through the
paint to slightly merge the colours.
Allow to dry.
3Carefully punch three holes next
to the stamped design and set the
eyelets in place as shown.
4Cut two pieces of card to measure
6’Zx9cm and round the comers.
Cut an aperture measuring 5x7i^cm
centrally into one, and use this as a
template to cut a corresponding
aperture from the other.
5Mount the acetate between the
two frames with double-sided
tape and trim off any overlapping
acetate. Lightly sand the front of the
card.
6Thread ribbons and fibres through
the eyelets and stapie to secure.
Apply rub-ons to finish.
I MATERIALS
□ burgundy DCWV textured
card
acetate
□ black StazOn inkpad
□ Whispers Tree In Autumn
stamp
□ orange, yellow and red-
brown acrylic paint
□ orange, yellow and brown
Provo Craft Eyeletz
□ comer rounder punch
□ sandpaper or emery board
□ scraps of orange, yellow and
red-brown fibres and ribbon
□ staples
□ Doodlebug Design All Mixed
Up rub-ons
□ double-sided tape
Why
not try making
a Tour seasons set
of ATCs. or mount
the designs onto a
card?
64 Simply Cards в Papercratt
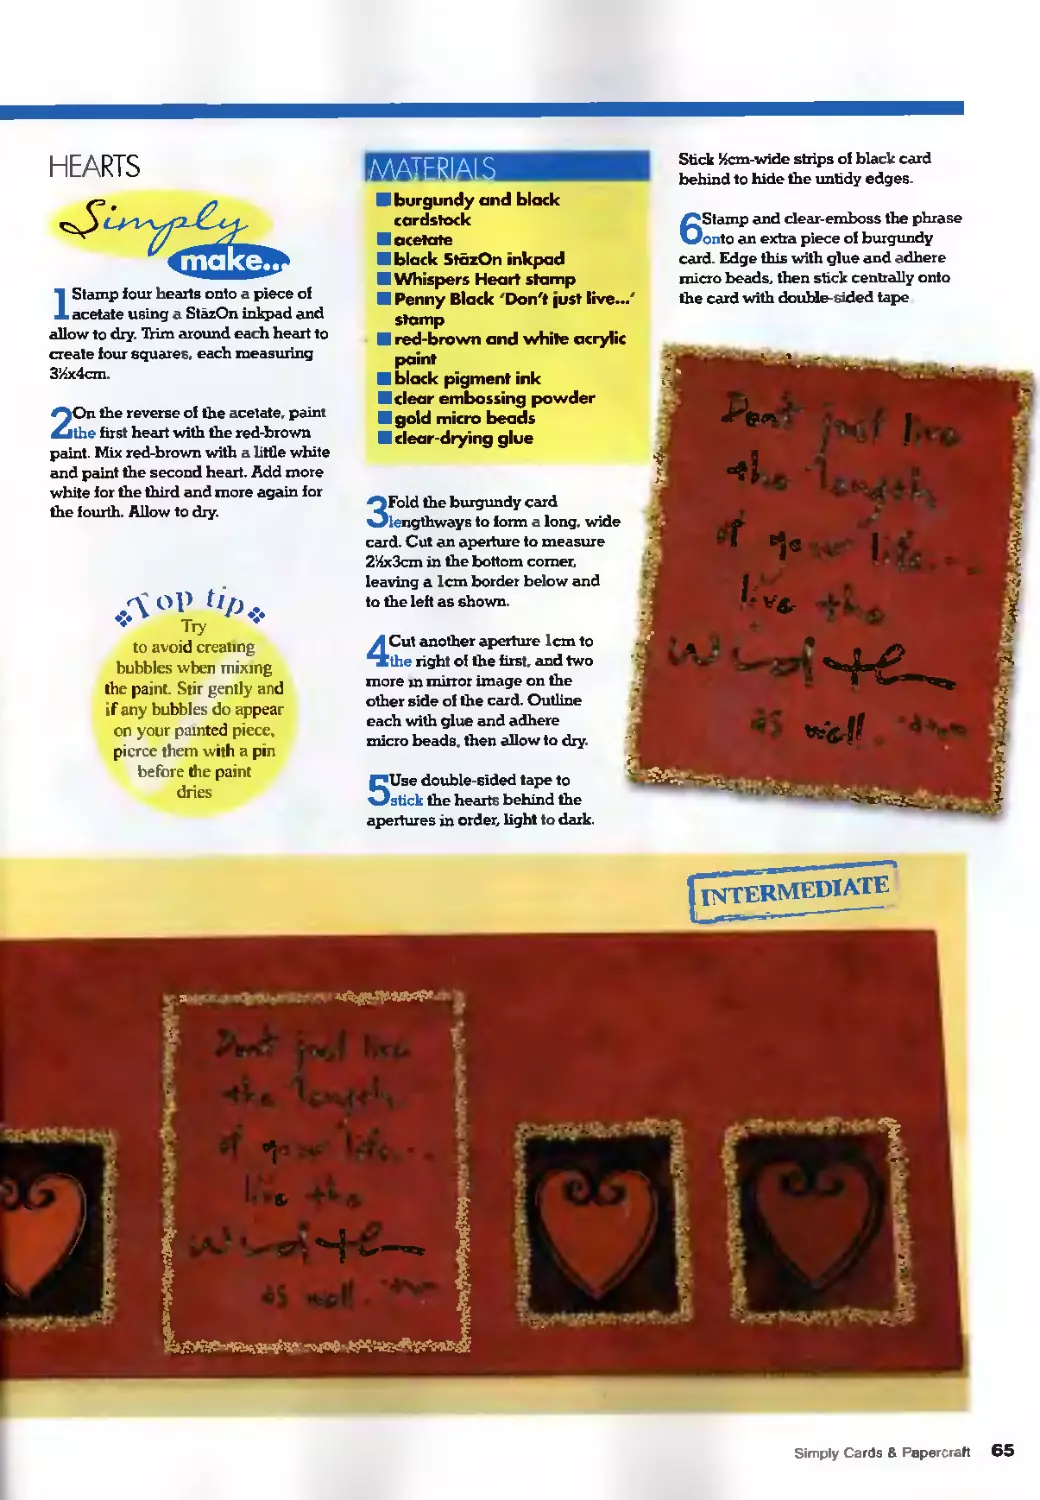
HEARTS
1 Stamp four hearts onto a piece of
acetate using a StazOn inkpad and
allow to dry. Trim around each heart to
create four squares, each measuring
3/4х4стп.
2On the reverse of the acetate, paint
the first heart with the red-brown
paint. Mix red-brown with a little white
and paint the second heart. Add more
white for the third and more again for
the fourth. Allow to dry.
Дор 0/j
Try *
to avoid creating
bubbles wben mixing
the paint. Stir gently and
if any bubbles do appear
on your painted piece,
pierce them with a pin
before the paint
dries
burgundy and black
cardstock
acetate
black StazOn inkpad
Whispers Heart stamp
Penny Black 'Don't just live...
stamp
red-brown and white acrylic
paint
black pigment ink
I clear embossing powder
gold micro beads
clear-drying glue
3Fold the burgundy card
lengthways to form a long, wide
card. Cut an aperture to measure
2‘ЛхЗст in the bottom comer,
leaving a 1cm border below and
to the left as shown.
4Cut another aperture 1cm to
the right of the first, and two
more in minor image on the
other side of the card. Outline
each with glue and adhere
micro beads, then allow to dry.
5Use double-sided tape to
stick the hearts behind the
apertures in order, light to dark,
Stick l^cm-wide strips of black card
behind to hide the untidy edges.
6Stamp and dear-emboss the phrase
onto an extra piece of burgundy
card. Edge this with glue and adhere
micro beads, then stick centrally onto
the card with double-sided tape
Simply Cards 8 Papercratt 65
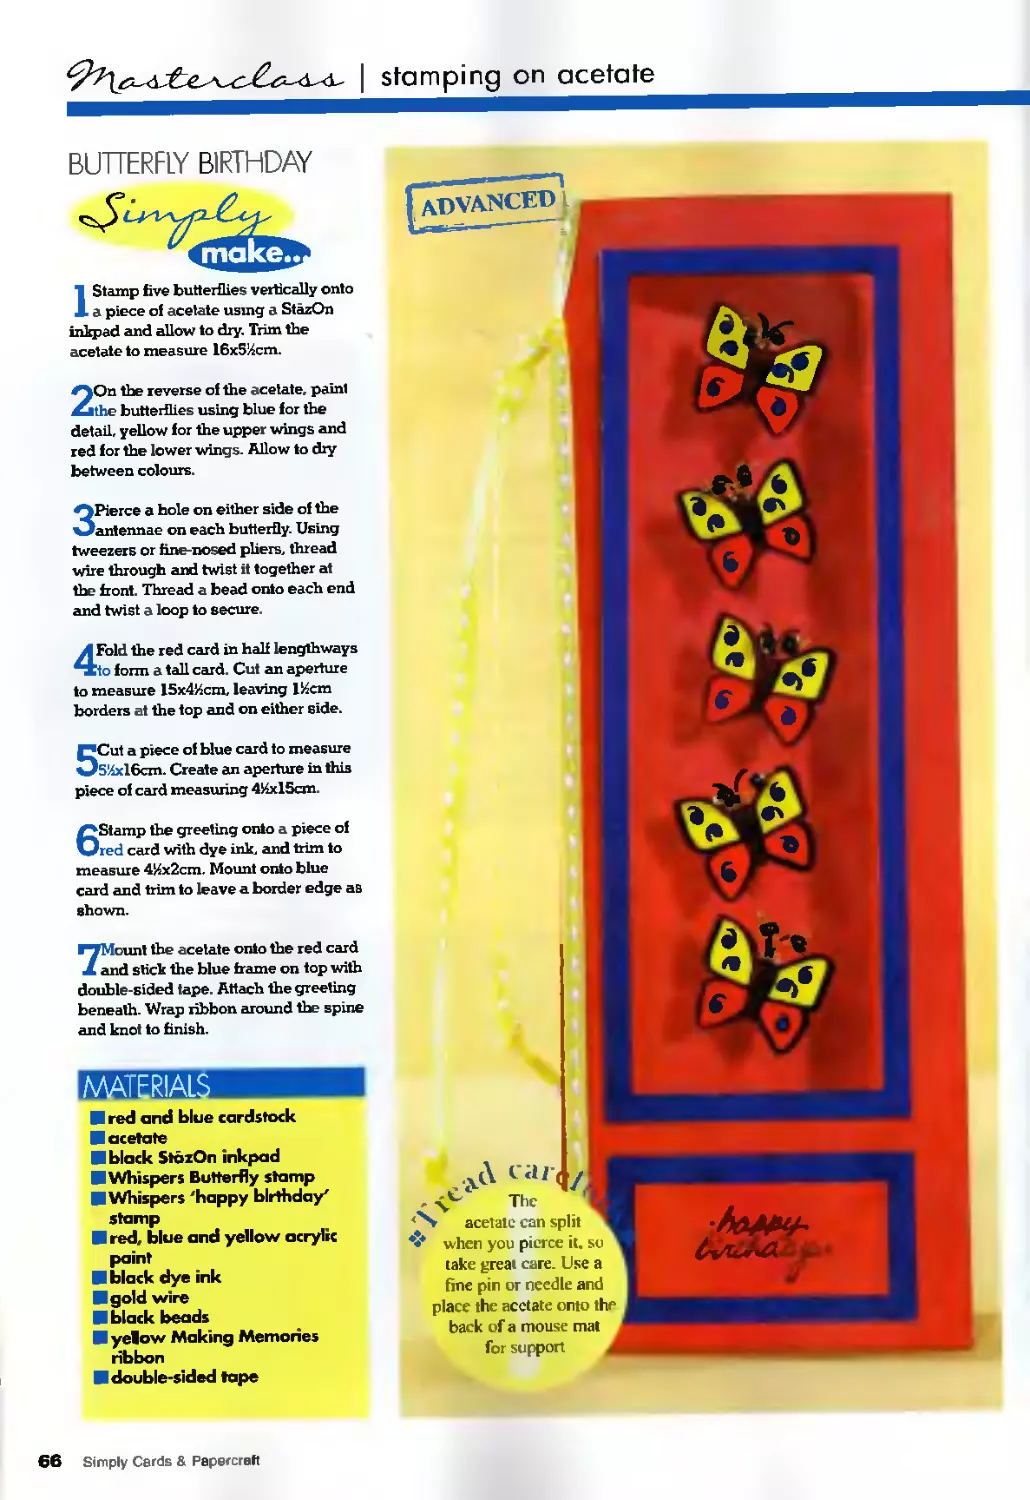
the reverse of the acetate, paint
butterflies using blue for the
detail, yellow for the upper wings and
red for the lower wings. Allow to dry
between colours.
BUTTERFLY BIRTHDAY
гач
\terial;
1 Stamp five butterflies vertically onto
a piece of acetate using a StazOn
inkpad and allow to dry. Trim the
acetate to measure 16x5%cm.
3Pierce a hole on either side of the
antennae on each butterfly. Using
tweezers or fine-nosed pliers, thread
wire through and twist it together at
the front. Thread a bead onto each end
and twist a loop to secure.
4Fold the red card in half lengthways
to form a tall card. Cut an aperture
to measure 15x4‘Zcm, leaving IHcra
borders at the top and on either side.
5Cut a piece of blue card to measure
5!4xl6cm. Create an aperture in this
piece of card measuring 4Их15ст.
6Stamp the greeting onto a piece of
red card with dye ink, and trim to
measure 4Hx2cm. Mount onio blue
card and trim to leave a border edge as
shown.
FTMount the acetate onto the red card
Л and stick the blue frame on top with
double-sided tape. Attach the greeting
beneath. Wrap ribbon around the spine
and knot to finish.
1 red end blue cardstock
I acetate
] black StazOn inkpad
J Whispers Butterfly stamp
I Whispers 'happy birthday'
stamp
] red, blue and yellow acrylic
paint
] black dye ink
gold wire
I black beads
I yelow Making Memories
ribbon
] double-sided tape
Ciir4/
The '
acetate can split
when you pierce it. so
take great care. Use a
fine pin or needle and
place the acetate onto the
back of a mouse mat
for support
66 Simply Cards 8 Papercratt
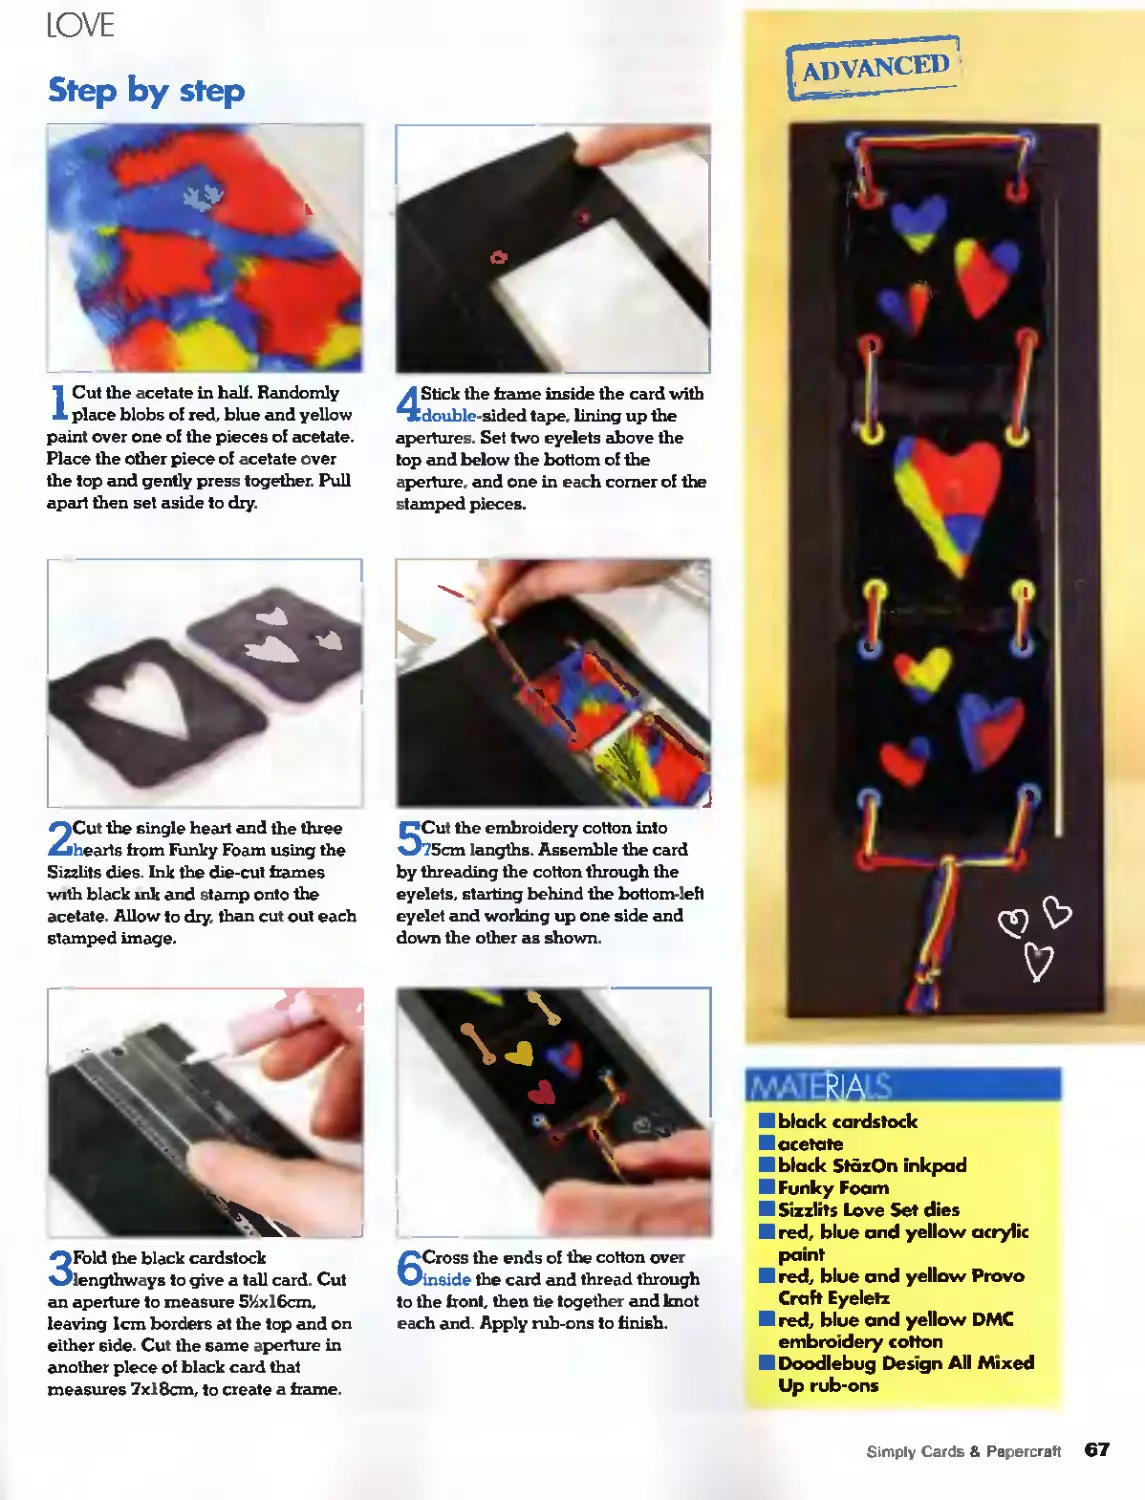
LOVE
Step by step
ICut the acetate in half. Randomly
place blobs of red, blue and yellow
paint over one of the pieces of acetate.
Place the other piece of acetate over
the top and gently press together. Pull
apart then set aside to dry.
2Cut the single heart and the three
hearts from Funky Foam using the
Sizzlits dies. Ink the die-cut frames
with black ink and stamp onto the
acetate. Allow to dry than cut out each
stamped image.
3Fold the black cardstock
lengthways to give a tall card. Cut
an aperture to measure 5!4xl6cm,
leaving 1cm borders at the top and on
either side. Cut the same aperture in
another piece of black card that
measures 7x18cm, to create a frame.
4Stick the frame inside the card with
double-sided tape, lining up the
apertures. Set two eyelets above the
top and below the bottom of the
aperture, and one in each comer of the
stamped pieces.
5Cut the embroidery cotton into
75cm lengths. Assemble the card
by threading the cotton through the
eyelets, starting behind the bottom-left
eyelet and working up one side and
down the other as shown.
6Cross the ends of the cotton over
inside the card and thread through
to the front, then tie together and knot
each and. Apply ruh-ons to finish.
RIA
black cardstock
acetate
black StazOn inkpad
Funky Foam
Sizzlits Love Set dies
red, blue and yellow acrylic
paint
red, blue and yellow Provo
Craft Eyeletz
red, blue and yellow DMC
embroidery cotton
□ Doodlebug Design All Mixed
Up rub-ons
Simply Cards & Papercratt 67
7e£. I thinking of you
A °’’
• Foam
stamps are great
for creating big and bold
ond die-cut letters just waiting to odorn
your crafting projects. Chipboard letters
ore another fabulous option — these
substantial items can odd a real WOW
Individual letter stamps are a great idea
if you're on a tight budget, but it's worth
bearing in mind that they can be difficult
to use - perfect placing is not necessarily
an easy task1 For best results, choose
clear stamps and use them on on acrylic
block, if you do decide to use wood-
based stomps, it's worth going for a
wacky hand-stamped look instead.
HIGH-TECH GREETINGS
Computers are a fantastic way of
creating lettering for your cards, and
most basic programs will allow you to
type in your own message, change the
colour, font style and size, then print onto
any coloured paper. Remember that
computer inks are dye-based, so you
can't print a light colour or white onto a
docker poper. To achieve a white lettering
effect, create a coloured background,
change the letters to white and print out
onto white poper.
HANDWRITING
If your handwriting is beautifully neat
and you're proficient at calligraphy,
handwritten sentiments can look
spectacular. Use о gold, silver or white
pen on docker cardstock, as this can
create a stylish and sophisticated finish.
Try writing your message on a separate
piece of card before clipping off the
edges slightly for a trendy plaque, or
why not create a vellum becking poper
covered in text [as used for the Best
Wishes Bloom card on page В5)г
DESIGNER STYLE
Craft stores are full of rub-ons, stickers
factor to your cards ond certainly make
them stand out from the crowd. If you
feel like splashing out, о new personal
die-cutter can be a fabulous investment.
These innovative pieces of kit allow you
far mare flexibility with your projects.
Whatever technique you choose, taking
the time to match the style of your
lettering to the other elements an your
card will ensure a fabulous finish.
STOCKISTS
K&Co Life's Journey rubberstamps are
available from
www.diwamcrattstore.co.uk
Tel: 0208873 2893
Hero Arts Brushstrokes lowercase letters
are available from
www.thestampbog.co uk
Tel. 01285750308“
Chatterbox Olive chipboard letters are
available from
www.scrapbookersparadise.com
Li'l Davis Curbside foam stamps
K&Co Brendo Walton Neapolitan
patterned paper pad
Limeade Doodlebug Design All Mixed Up
rub-ons
Cricut Personal Cutter ond Beyond
Birthdays cartridge are all available from
www.paperarts.co.uk
Tel: 01453 886038
EK Success Power punch available from
www.thestampman.co.uk
Tel 01756 797048
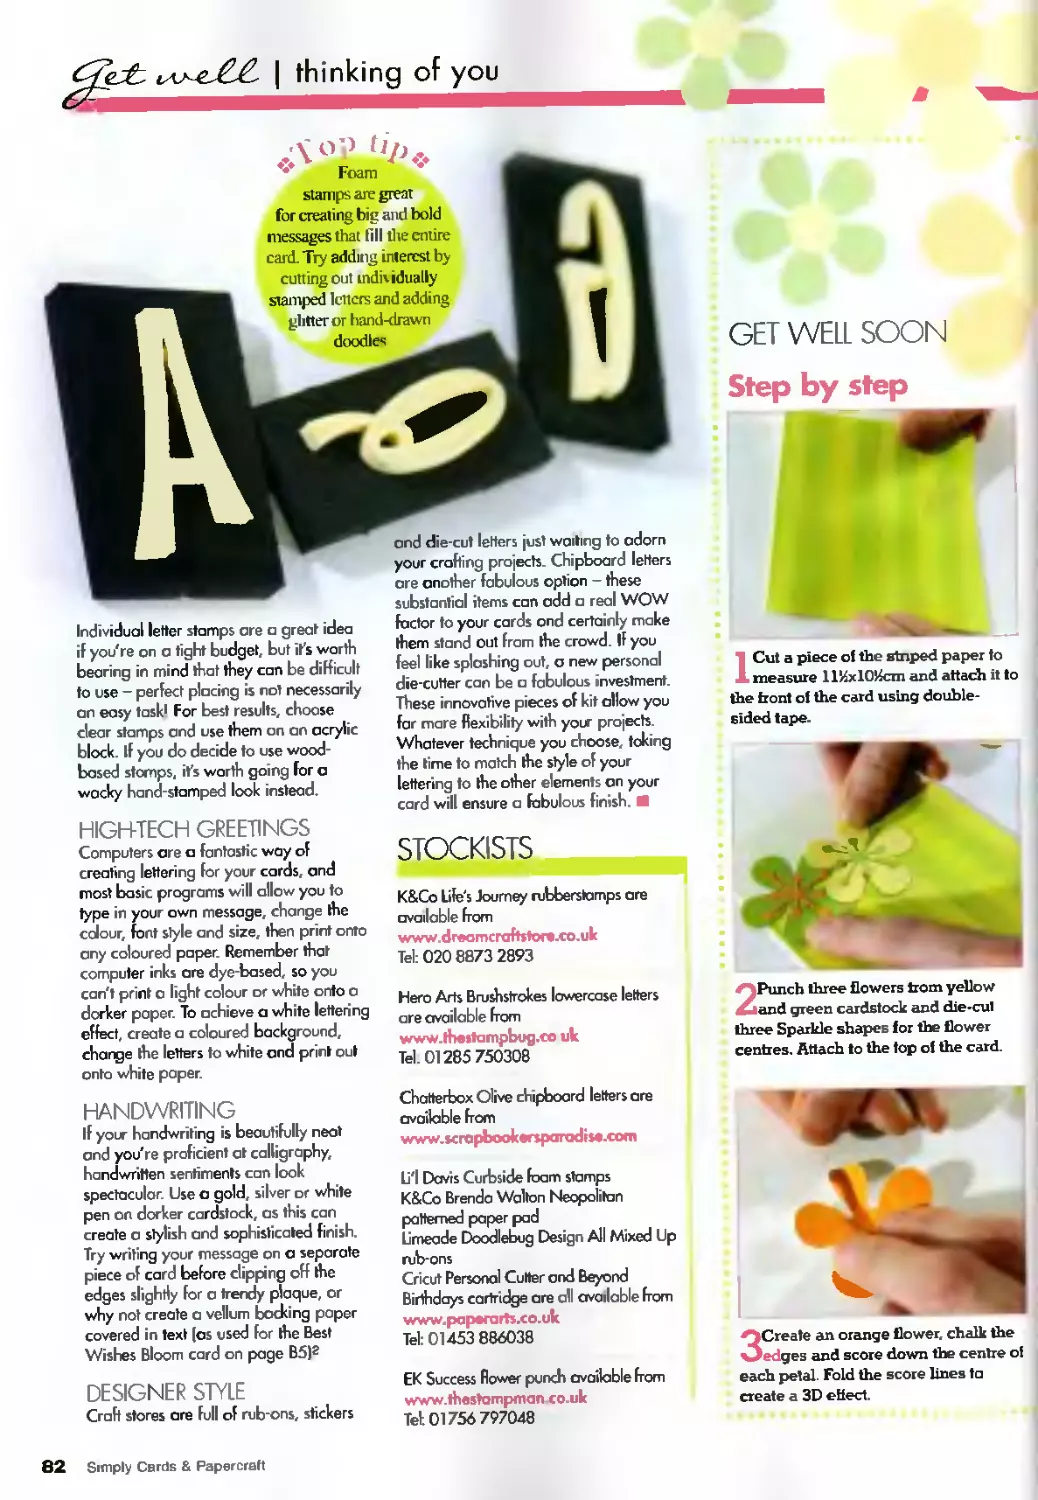
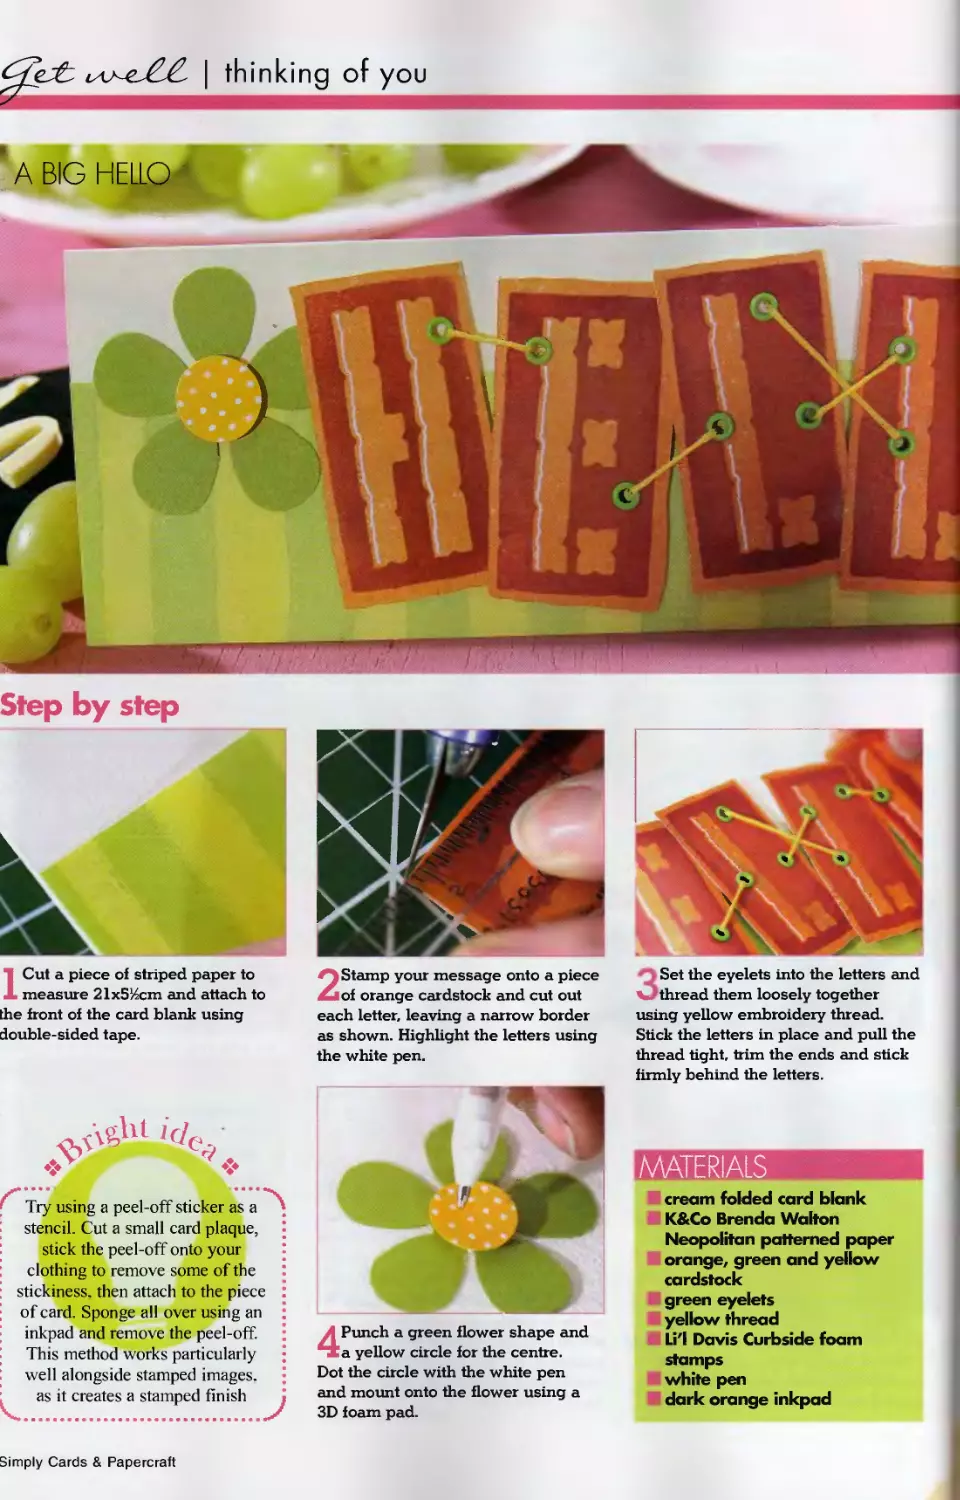
GET WELL SOON
Step by step
ICut a piece otthe stuped paper to
measure НИхЮИсш and attach it to
the front of the card using double-
sided tape.
2Punch three flowers from yellow
and green cardstock and die-cut
three Sparkle shapes for the flower
centres. Attach to the top of the card.
3Create an orange flower, chalk the
edges and score down the centre of
each petal. Fold the score lines ta
create a 3D effect.
82 Simply Cards & Papercraft
MATERIALS
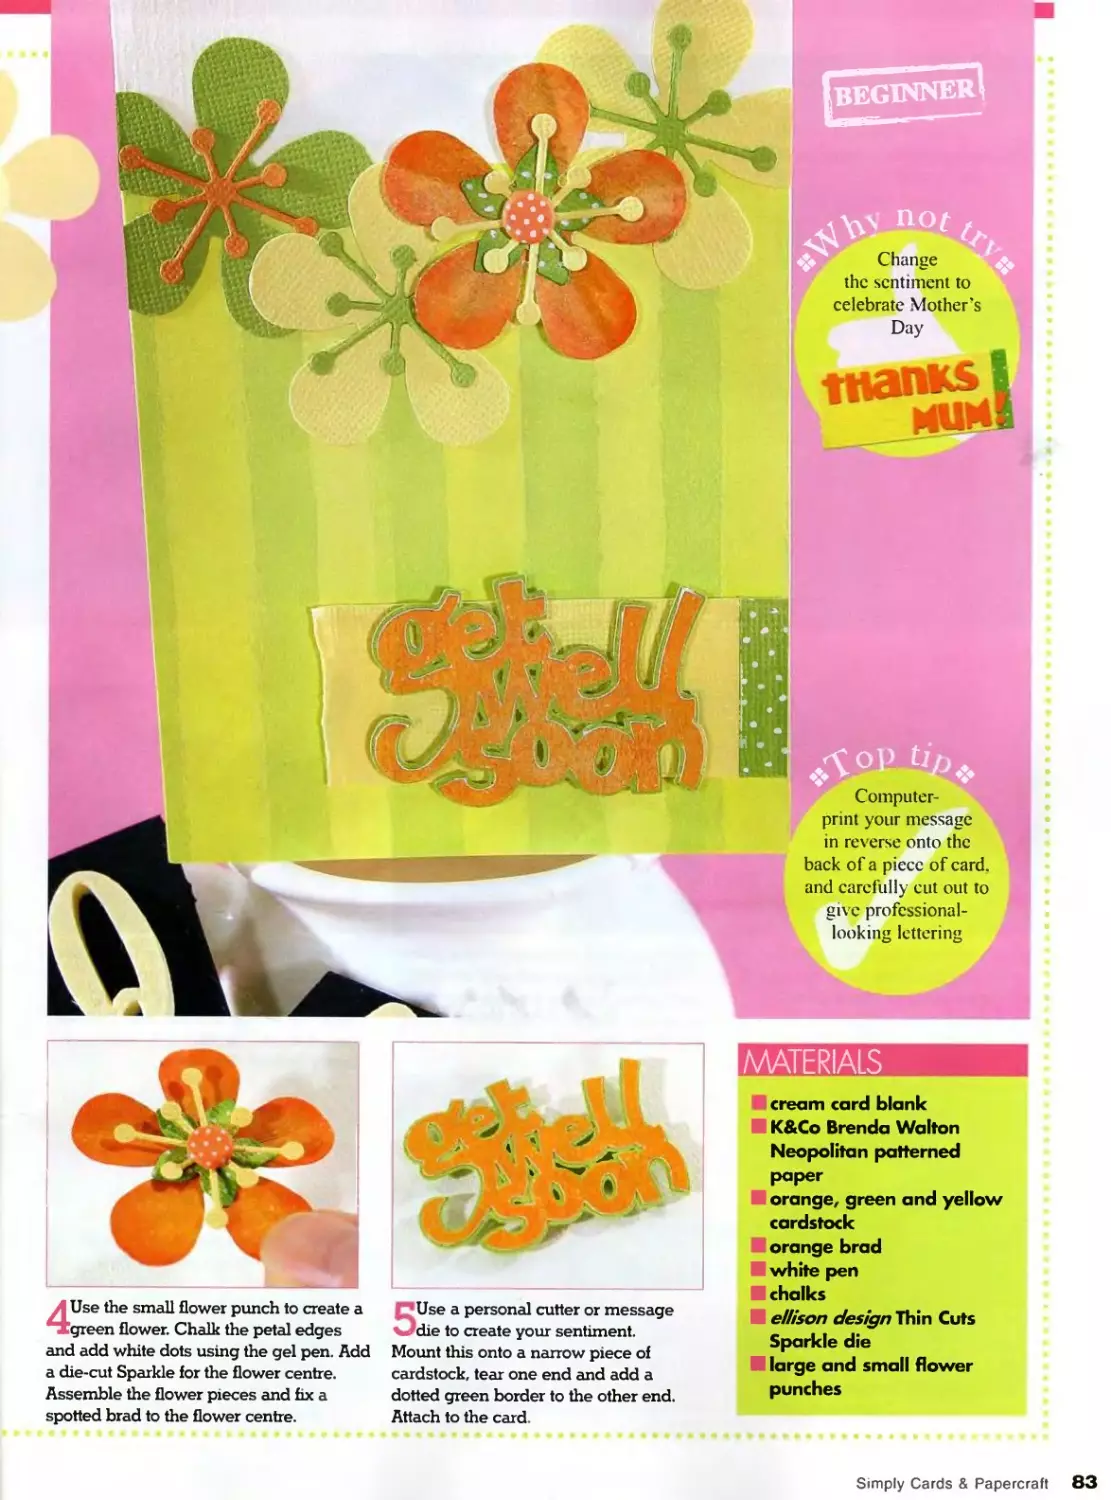
4Use the small flower punch to create a
green flower. Chalk the petal edges
and add white dots usmg the gel pen. Add
a die-cut Sparkle for the flower centre.
Assemble the flower pieces and fix a
spotted brad to the flower centre.
5Use a personal cutter or message
die to create your sentiment.
Mount this onto a narrow piece of
cardstock, tear one end and add a
dotted green border to the other end.
Attach to the card
cream card blank
K&Co Brenda Walton
Neapolitan patterned
paper
orange, green and yellow
cardstock
orange brad
white pen
chalks
ellison design Thin Cuts
Sparkle die
large and small flower
punches
Simply Cards & Papercraft 83
Step by step
ICut a piece of striped paper to
measure 21x51Zcm and attach to
the front of the card blank using
double-sided tape.
id
Try using a peel-off sticker as a
stencil. Cut a small card plaque,
stick the peel-off onto your
clothing to remove some of the
stickiness, then attach to the piece
of card. Sponge all over using an
inkpad and remove the peel-off.
This method works particularly
well alongside stamped images.
as it creates a stamped finish
2 Stamp your message onto a piece
of orange cardstock and cut out
each letter, leaving a narrow border
as shown. Highlight the letters using
the white pen.
4 Punch a green flower shape and
a yellow circle for the centre.
Dot the circle with the white pen
and mount onto the flower using a
3D foam pad.
Set the eyelets into the letters and
4 thread them loosely together
using yellow embroidery thread.
Stick the letters in place and pull the
thread tight, trim the ends and stick
firmly behind the letters.
MATERIALS
cream folded card blank
K&Co Brenda Walton
Neapolitan patterned paper
orange, green and yellow
cardstock
green eyelets
yellow thread
Li'l Davis Curbside foam
stamps
white pen
dark orange inkpad
Simply Cards & Papercraft
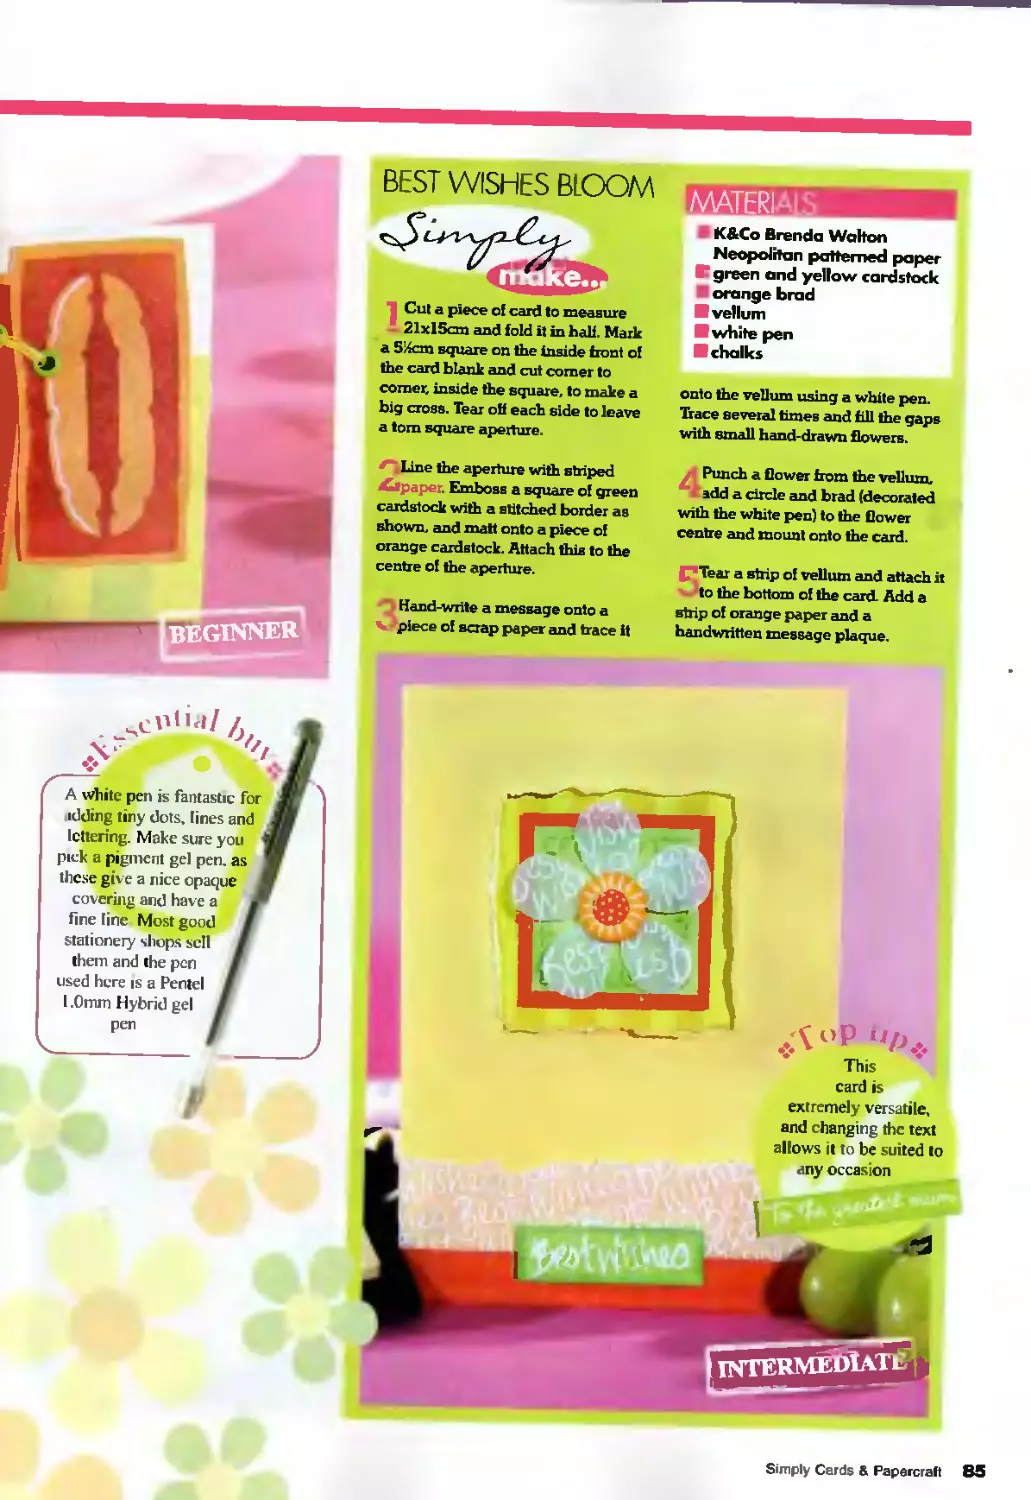
BEST WISHES BLOOM
Cut a piece of card to measure
21x15cm and fold it in half. Mark
a 514cm square on the inside front of
the card blank and cut comer to
comer, inside the square, to make a
big cross. Tear off each side to leave
a tom square aperture.
Line the aperture with striped
<Opap. Emboss a square of green
cardstock with a stitched border as
shown, and matt onto a piece of
orange cardstock. Attach this to the
centre of the aperture.
Hand-write a message onto a
piece of scrap paper and trace it
yiATER
K&Co Brenda Walton
Neapolitan patterned paper
В green and yellow cardstock
orange brad
I 1 vellum
№ white pen
chalks
onto the vellum using a white pen.
Trace several tunes and fill the gaps
with small hand-drawn flowers.
Punch a flower from the vellum,
add a circle and brad (decorated
with the white pen) to the flower
centre and mount onto the card.
plear a strip of vellum and attach it
to the bottom of the card. Add a
strip of orange paper and a
handwritten message plaque.
Simply Cards & Papercraft 85
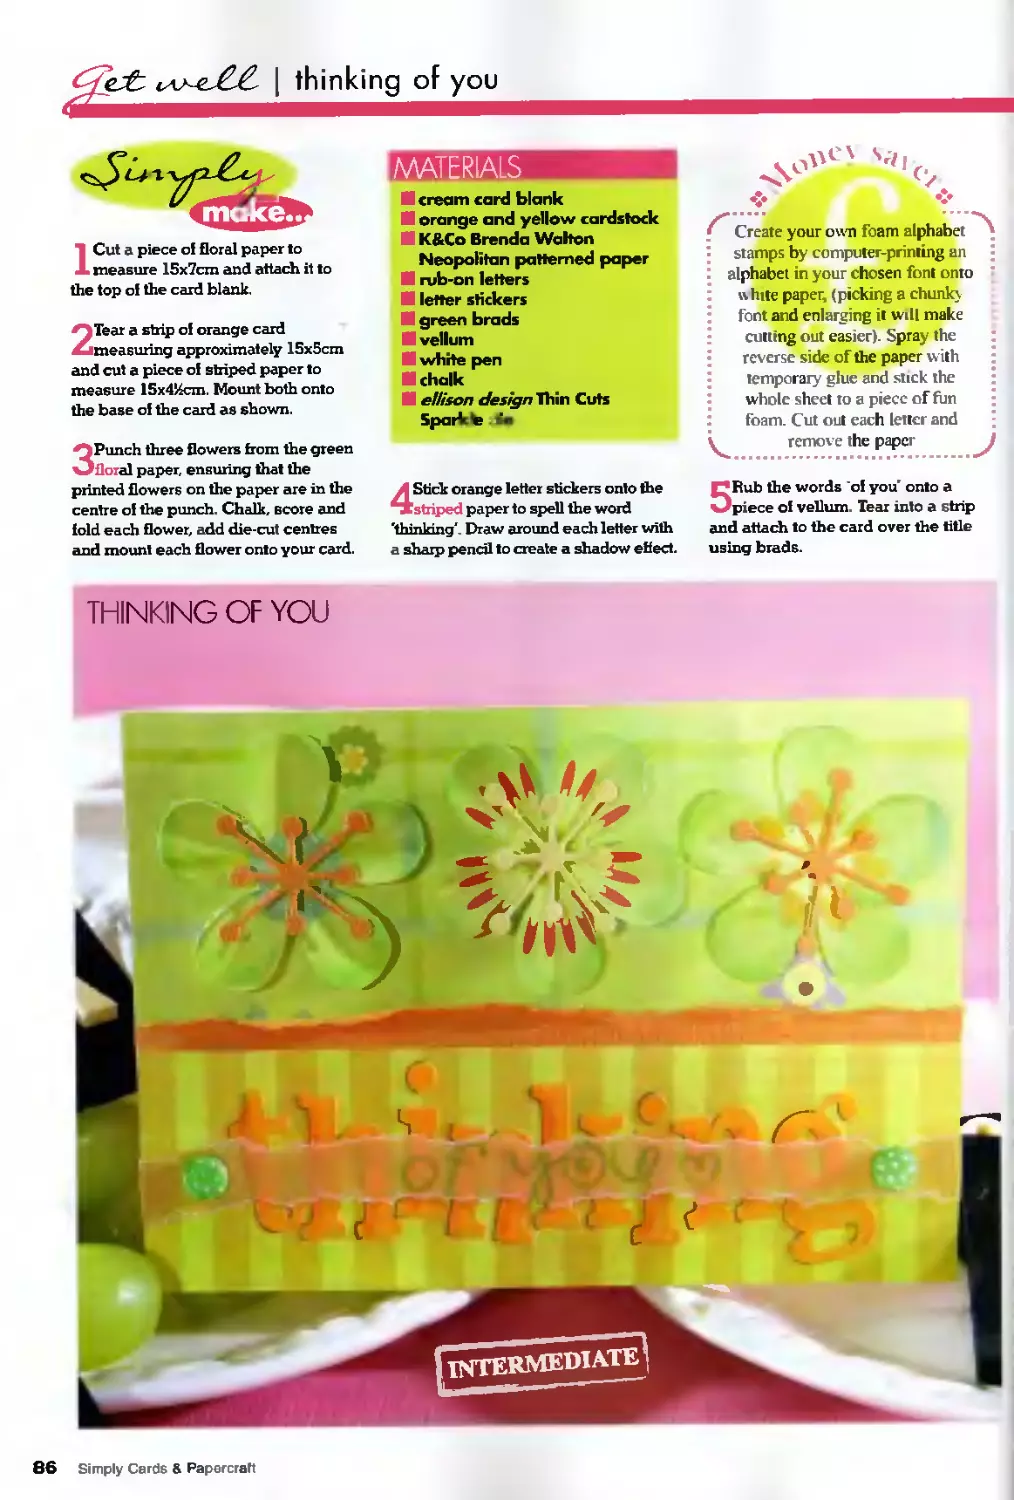
еГТ | thinking of you
ICut a piece of floral paper to
measure 15x7cm and attach it to
the top of the card blank.
2 Tear a strip of orange card
measuring approximately 15x5cm
and cut a piece of striped paper to
measure 15x4J4cm. Mount both onto
the base of the card as shown.
3Punch three flowers from the green
floral paper, ensuring that the
printed flowers on the paper are in the
centre of the punch. Chalk, score and
fold each flower, add die-cut centres
and mount each flower onto your card.
4Stick orange letter stickers onto the
striped paper to spell the word
'thinking'. Draw around eachletter with
a sharp pencil to create a shadow effect.
...5: *...
Create your own foam alphabet
stamps by computer-printing an
alphabet in your chosen font onto
white paper, (picking a chunky
font and enlarging it will make
cutting out easier). Spray the
• reverse side of the paper with
• temporary glue and stick the
whole sheet to a piece of fun
foam. Cut out each letter and
i remove the paper
5Rub the words of you onto a
piece of vellum. Tear into a strip
and attach to the card over the title
using brads.
THINKING OF YOU
86 Simply Cards & Papercratt
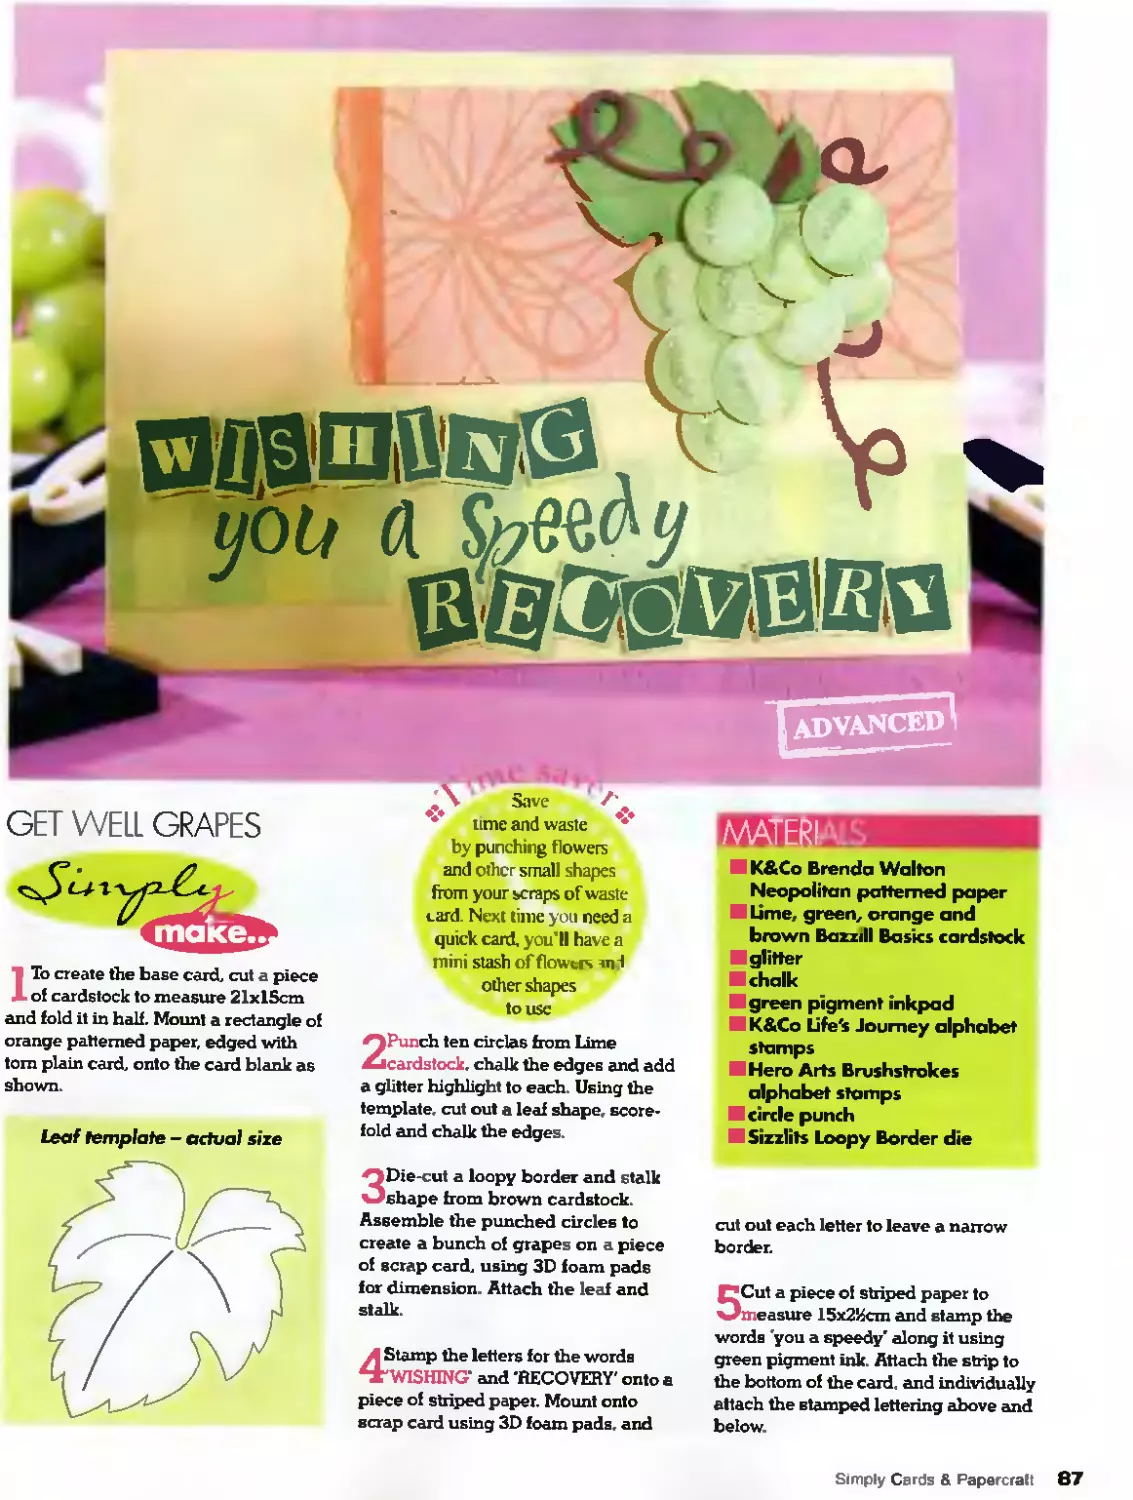
GET WELL GRAPES
make..
►
ITo create the base card, cut a piece
of cardstock to measure 2 lx 15cm
and fold it in half. Mount a rectangle of
orange patterned paper, edged with
tom plain card, onto the card blank as
shown.
Leaf template - actual size
ADVANCED'
lime and waste **
by punching flowers
and other small shapes
from your scraps of waste
card. Next time you need a
quick card, you'll have a
mini stash of flowers rnl
other shapes
2Punch ten circles from Lime
cardstock, chalk the edges and add
a glitter highlight to each. Using the
template, cut out a leaf shape, score-
fold and chalk the edges.
3Die-cut a loopy border and stalk
shape from brown cardstock.
Assemble the punched circles to
create a bunch of grapes on a piece
of scrap card, using 3D foam pads
for dimension. Attach the leaf and
stalk.
Z] Stamp the letters for the words
^WISHING' and -RECOVERY' onto a
piece of striped paper. Mount onto
scrap card using 3D foam pads, and
K&Co Brenda Walton
Neapolitan patterned paper
Lime, green, orange and
brown Bazzdl Basics cardstock
glitter
chalk
green pigment inkpad
K&Co Life's Journey alphabet
stamps
Hero Arts Brushstrokes
alphabet stamps
circle punch
Sizzlits Loopy Border die
cut out each letter to leave a narrow
border.
(?Cut a piece of striped paper to
^measure 15х2Истп and stamp the
words 'you a speedy’ along it using
green pigment ink. Attach the strip to
the bottom of the card, and individually
attach the stamped lettering above and
below.
Simply Cards & Papercratt 87
| thinking of you
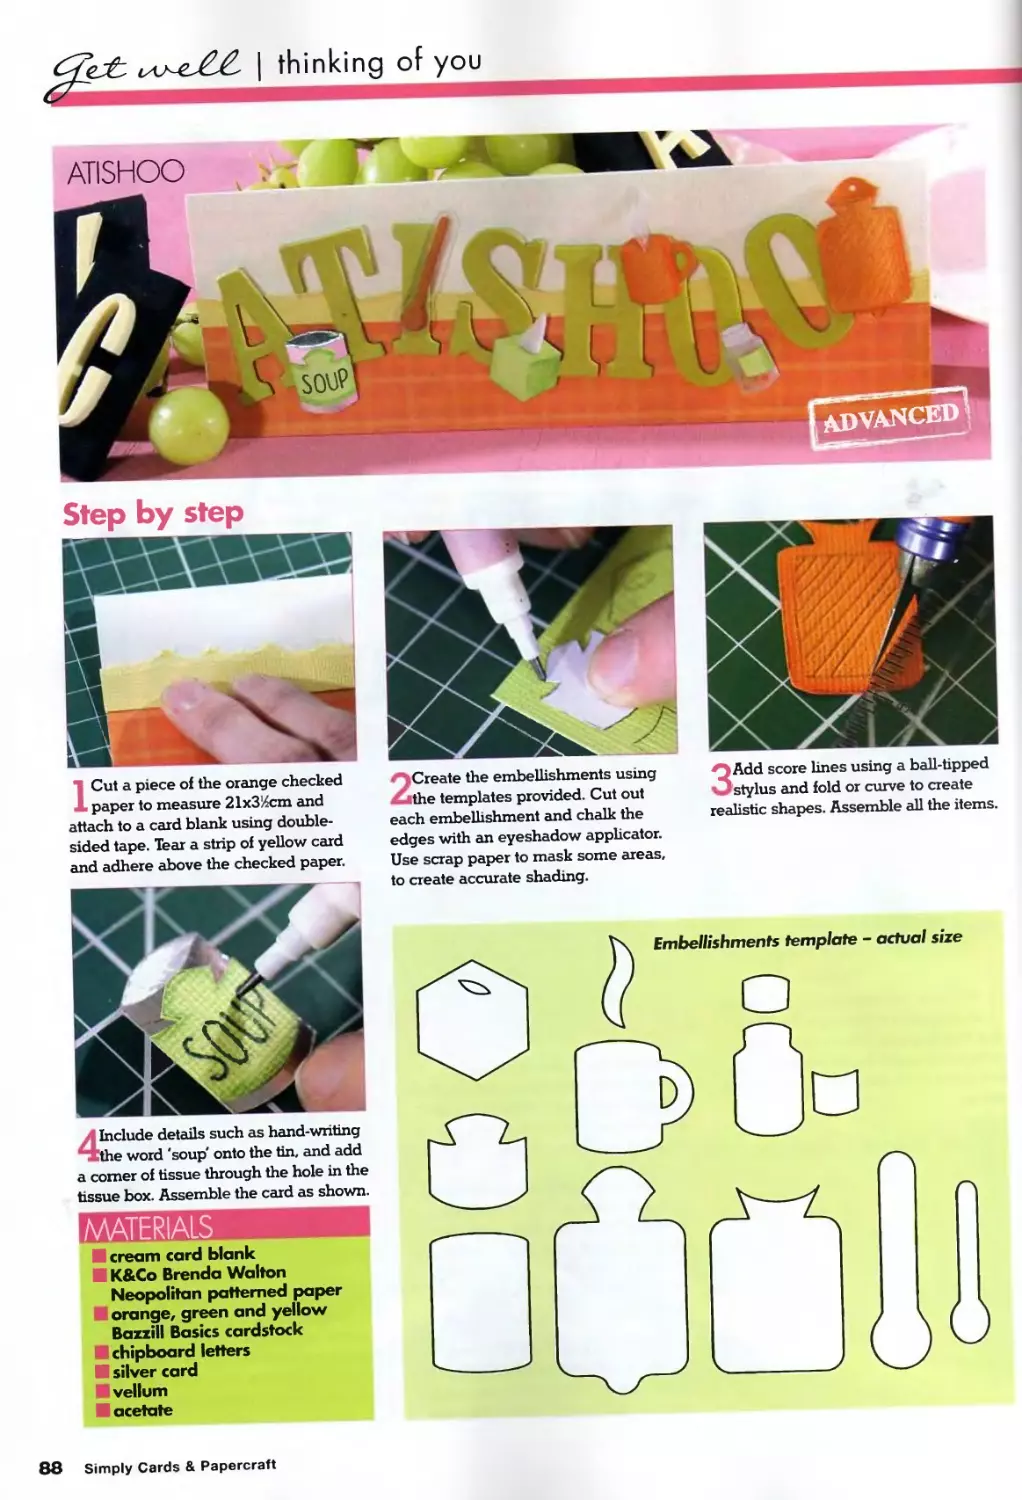
Step by step
ICut a piece of the orange checked
paper to measure 21x3%cm and
attach to a card blank using double-
sided tape. Tear a strip of yellow card
and adhere above the checked paper.
Include details such as hand-wnting
Tithe word 'soup' onto the tin, and add
a comer of tissue through the hole in the
tissue box. Assemble the card as shown.
MATERIALS
cream card blank
K&Co Brenda Walton
Neapolitan patterned paper
orange, green and yellow
Bazzill Basics cardstock
chipboard letters
silver card
vellum
acetate
2Create the embellishments using
the templates provided. Cut out
each embellishment and chalk the
edges with an eyeshadow applicator.
Use scrap paper to mask some areas,
to create accurate shading.
3Add score lines using a ball-tipped
stylus and fold or curve to create
realistic shapes. Assemble all the items.
88 Simply Cards & Papercraft
i Uappi| 6i'rflidai|;
: Special Thoughts
; Good Luck
I
P-appp Btrfhdap
Good Luck
Best Wishes
Best Wkxs
Best Wishes
Best Wishes :
Best Wishes
Prieuds Porever i
Prieuds Porever
i Prieuds Porever i
Prieuds Porever j
Prieuds Porever j
Celebrate:
V_________...-'J
P-appp Birthdap :
P-appp Birthdap:
appp Birthdap ;
Special Thoughts
i Cougratulatious :
Cougratulatious
Cougratulatious ;
Cougratulatious j
: Cougratulatious ;
Partq Time
Partq "dime
'artq "dime
'artq ^Tiiue
Partq Якте
Celebrate i
Good Luck
Good Luck
Good Luck
Special Prieud
Special Prieud
Special Prieud
Special Prieud
i P-ave G Great Dag i
Й-ave G Great Dap
Р-ал/е G Great Dap =
P-ave G Great Dap
A J..
Р-ал/е G Great Dap
i Celebrate; I! Celebrate
iJ i.1!
11 I
?O°O°C I. I.
!=Ь-:ЮСЮ^1 J | J
ЭООО|’ •
•I '•!
ЭООО1 |
®® g>@l'
I®
в®
мм
Ill
n
hi
9МММЯШ1ЖЯ1
ШЫМЪйМиШЬЫв
* »4*
Once you've tried the innovative Cricut,
nothing else will quite cut it
It’s the latest cutting edge innovation in
papercraft. With the new Cricut personal cutting
system from Bramwell, anybody can cut out
thousands of customised shapes, letters or
phrases - and you don’t need a computer either.
Cricut cuts letters and shapes in a wide variety
of sizes, from 1 inch to 5.5 inches - plus
phrases, titles and borders up to 11.5 inches
long on 12 inch paper. The versatile Cricut will
also cut into cardstock, vellum, vinyl and
magnetic paper too.
See for yourself how the new Cricut can inspire
your creativity by visiting your nearest
Bramwell’s stockist for a free demonstration.
To find the one closest to you, click onto
www.bramwellcrafts.co.uk
www.bramwellcrafts.co.uk F.W. Bramwell & Co. Ltd Tel:01282 860388 Fax:01282 860389