/


Теги: weapons machine gun carbine sten
Год: 1942

Текст
NOT TO BE PUBLISHED
Г-hr information given in this documrn<
i* r»”< to be communicated, either directly
vr indirectly, to the Press or to any person
not holding an otfkMf position j in Hi-
Majesty’s Service.
Small Arms Training
Volume I, Pamphlet No. 22
Slen Machine Carbine
1942
Crown. CopyrjgUt h'esei-J cd
By Command of the .Irmy Council’.
The War iiffice,
22nd .higusi, 1942
1’nntffl игиИ the Authority of HIS MAJESTY'S STATIONERY Oi I- ICE
by K' liber,-Hudson & Kearns, Ltd., London, S.E.i. .
b
DISTRIBUTION
Arms concerned ... ... ... ... ' ... Scale I>
S.A.S. Hythc Wing ... ... ... .... ... 500
CONTEXTS
Page
General ... ... ... ... ... ... ... !
Lesson 1.—Introduction, loading and unloading ...
Lesson 2.—Holding and firing ... ... .... ... 5
Lesson 3.—Stripping and cleaning ... ... ..i 8
Appendix ... ... .. ...... ... 11
GENERAL
1. Preliminary arrangements and safety precautions. At
the start of every lesson the instructor will inspect the machine
carbine and pouches. When live ammunition is used for
practice in magazine filling it must be carefully chocked both
before and after the lesson and must not be used for any other
purpose.
2. Instructors must appreciate that, while the lessons are
designed to be taught in one period, more time will be neces-
sary in order to permit of sufficient practice to obtain
proficiency.
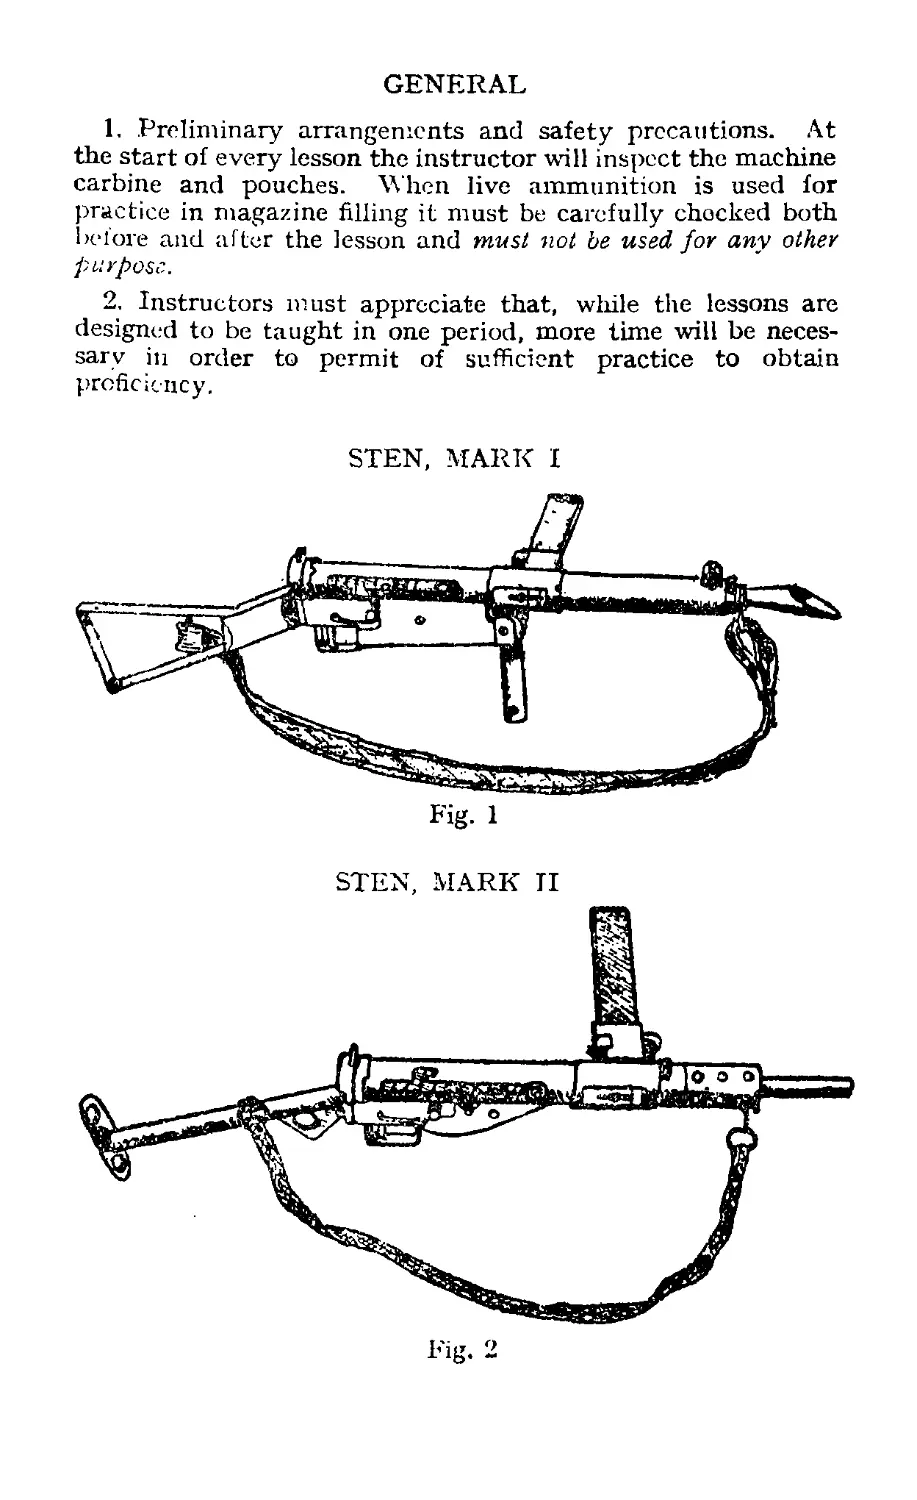
STEN, MARK II
Fig. 2
2
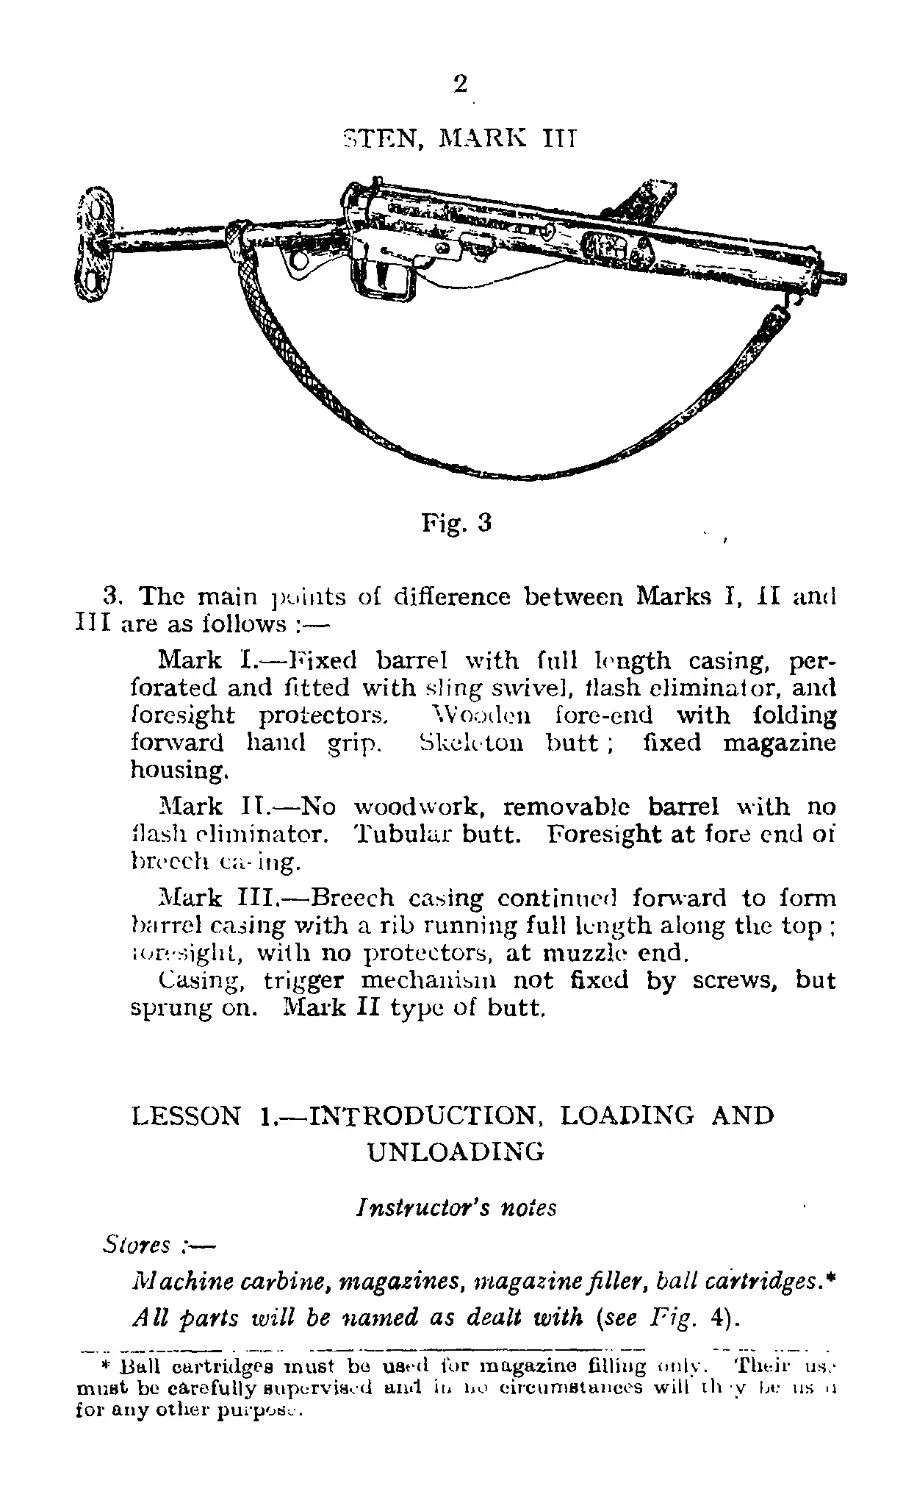
STEN, MARK ITT
Fig. 3
3. The main poults o[ difference between Marks I, II and
III are as follows :—
Mark I.—Fixed barrel with full length casing, per-
forated and fitted with sling swivel, Hash eliminator, and
foresight protectors. Wooden fore-end with folding
forward hand grip. Skeleton butt ; fixed magazine
housing.
Mark IT.—No woodwork, removable barrel with no
flash eliminator. Tubular butt. Foresight at fore end of
breech ca- ing.
Mark III.—Breech casing continued forward to form
barrel casing with a rib running full length along the top ;
ion-sight, with no protectors, at muzzle end.
Casing, trigger mechanism not fixed by screws, but
sprung on. Mark II type of butt.
LESSON 1.—INTRODUCTION, LOADING AND
UNLOADING
Instructor’s notes
Stores :—
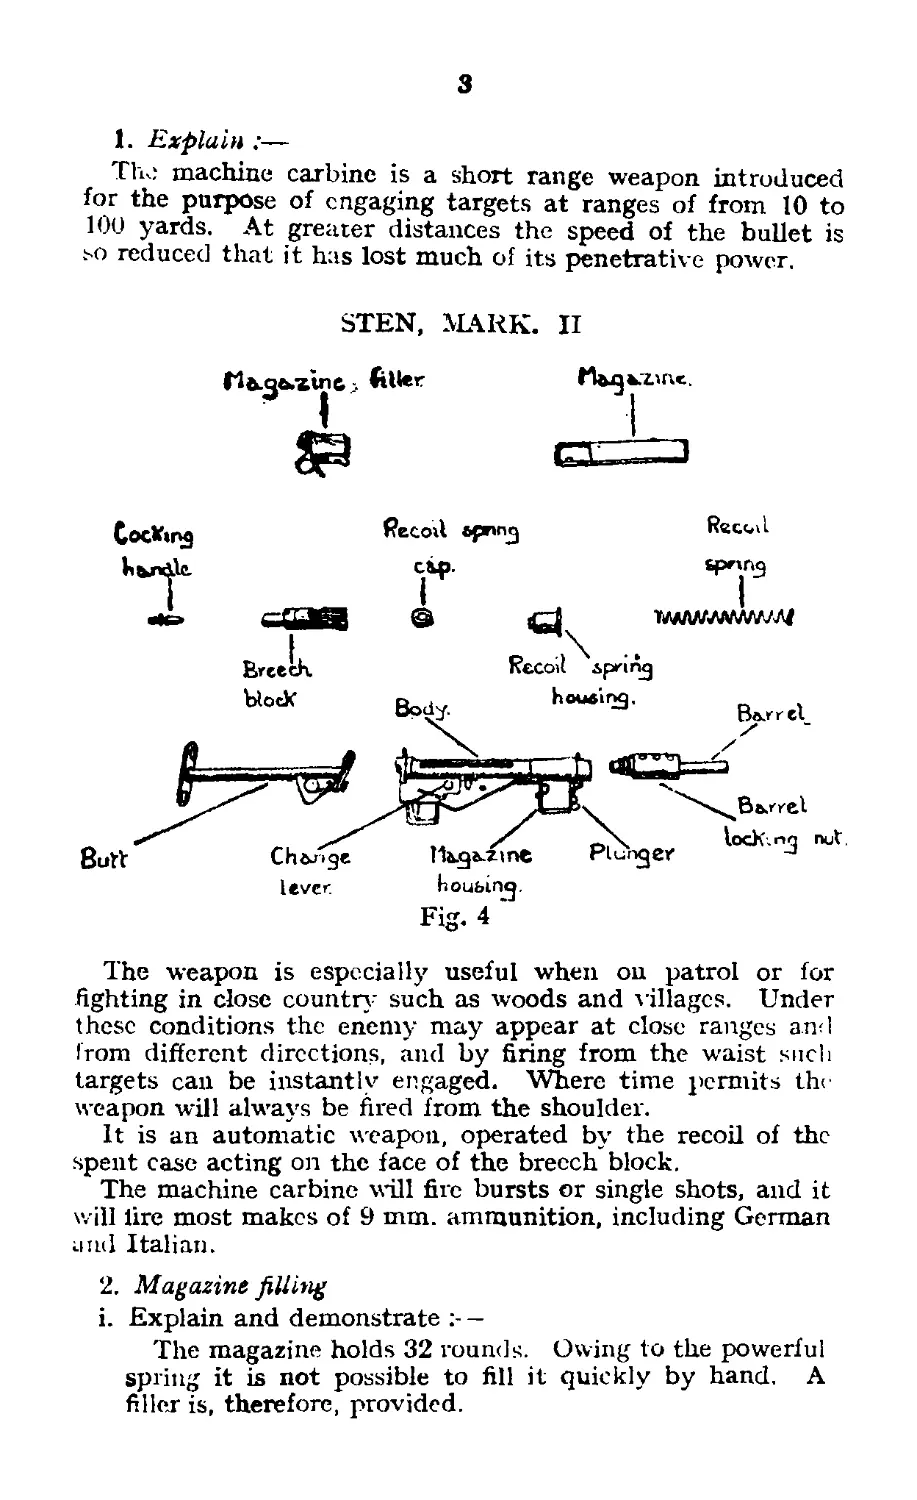
Machine carbine, magazines, magazine filler, ball cartridges.*
All parts will be named as dealt with (see Fig. 4).
* Ball cartridges must be used for magazine tilling only. Their use
must be carefully supervised and in no circumstances will th у m.- us .1
tor any other purpose.
3
1. Explain :—
The machine carbine is a short range weapon introduced
for the purpose of engaging targets at ranges of from 10 to
100 yards. At greater distances the speed of the bullet is
so reduced that it has lost much of its penetrative power.
STEN, MARK. II
. filler
PbcoiI ариле) Rec<M
Fig. 4
The weapon is especially useful when on patrol or for
fighting in close country such as woods and villages. Under
these conditions the enemy may appear at close ranges and
from different directions, and by firing from the waist sncli
targets can be instantly engaged. Where time permits the
weapon will always be fired from the shoulder.
It is an automatic weapon, operated by the recoil of the
spent case acting on the face of the breech block.
The machine carbine will fire bursts or single shots, and it
will lire most makes of 9 mm. ammunition, including German
and Italian.
2. Magazine filling
i. Explain and demonstrate —
The magazine holds 32 rounds. Owing to the powerful
spring it is not possible to fill it quickly by hand. A
filler is, therefore, provided.
4
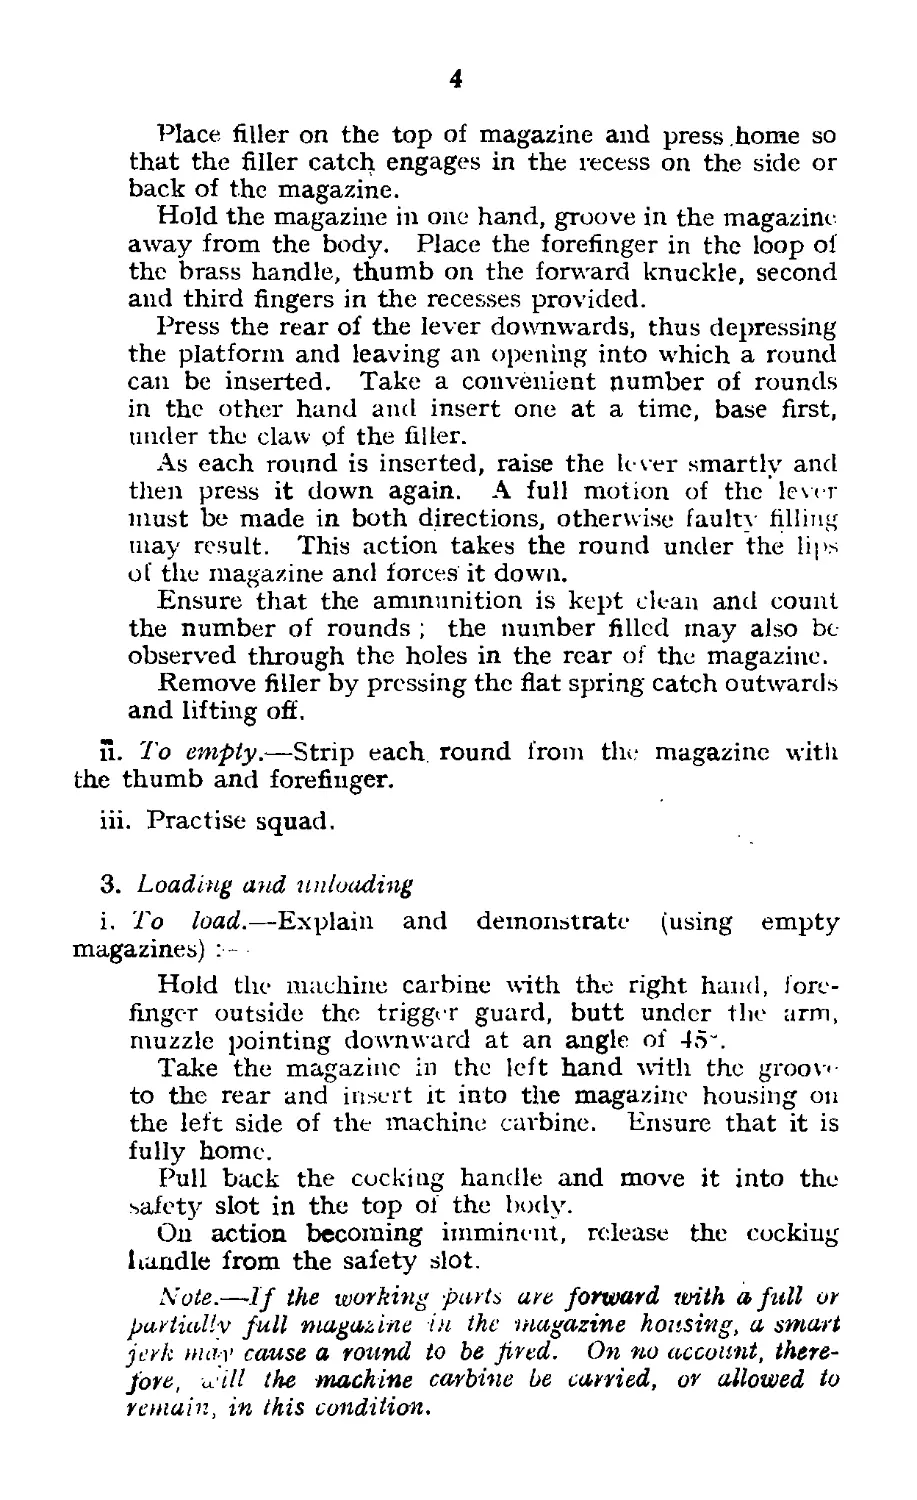
Place filler on the top of magazine and press home so
that the filler catch engages in the recess on the side or
back of the magazine.
Hold the magazine in one hand, groove in the magazine
away from the body. Place the forefinger in the loop of
the brass handle, thumb on the forward knuckle, second
and third fingers in the recesses provided.
Press the rear of the lever downwards, thus depressing
the platform and leaving an opening into which a round
can be inserted. Take a convenient number of rounds
in the other hand and insert one at a time, base first,
under the claw of the filler.
As each round is inserted, raise the lever smartly and
then press it down again. A full motion of the lever
must be made in both directions, otherwise faultv filling
may result. This action takes the round under the lips
of the magazine and forces it down.
Ensure that the ammunition is kept clean and count
the number of rounds ; the number filled may also be
observed through the holes in the rear of the magazine.
Remove filler by pressing the flat spring catch outwards
and lifting off.
ii. To empty.—Strip each round from the magazine with
the thumb and forefinger.
iii. Practise squad.
3. Loading and unloading
i. To load.—Explain and demonstrate (using empty
magazines)
Hold the machine carbine with the right hand, fore-
finger outside the trigger guard, butt under the arm,
muzzle pointing downward at an angle of 45".
Take the magazine in the left hand with the groove
to the rear and insert it into the magazine housing on
the left side of the machine carbine. Ensure that it is
fully home.
Pull back the cocking handle and move it into the
safety slot in the top of the body.
On action becoming imminent, release the cocking
handle from the safety slot.
Note.—If the working parts are forward with a full or
partiallv full magazine in the magazine housing, a smart
jerk mav cause a round to be fired. On no account, there-
fore, will the machine carbine be carried, or allowed to
remain, in this condition.
5
ii. To unload
Press down the catch on the magazine housing with
the thumb and remove the magazine with the fingers
of the left hand. Hold the cocking handle with the
left hand, press the trigger and allow the working parts
to go forward under control. Repeat this action.
iii. Practise squad. Words of command : " Load ”—
' Action imminent Unload ”.
4. Sights
Explain
I’he weapon is fitted with a simple fixed aperture battle
ight, sighted for use at 100 vards. Rules of aiming as for
1..M.G.
LESSON 2,- -HOLDING AND FIRING
Instructor’s notes
Stores :—
.Machine carbine ; magazines ; Fig, 2 target.
.In empty magazine should be on the machine carbine when
teaching holding.
Dress :—
I tattle order.
1. Holding
i. Explain : —
Holding is of the first importance, especiallv when firing
in bursts. Correct holding can be gained only by experience
in firing ball ammunition.
ii. There are two positions for holding the machine carbine,
viz. :—
(<«) At the waist.
(&) In the shoulder.
2. i. Explain and demonstrate :—
Holding at the waist.—The left foot is advanced
with the knee bent, the weight of the body being balanced
on the left foot. The right hand is on the butt with the
forefinger on the trigger, the left hand on the barrel
locking nut with the wrist under the magazine,* the
butt of the weapon is pressed tightly against the side
by the right arm. The left elbow is pulled well back
* Mark I machine carbine- -left hand on fore grip.
в
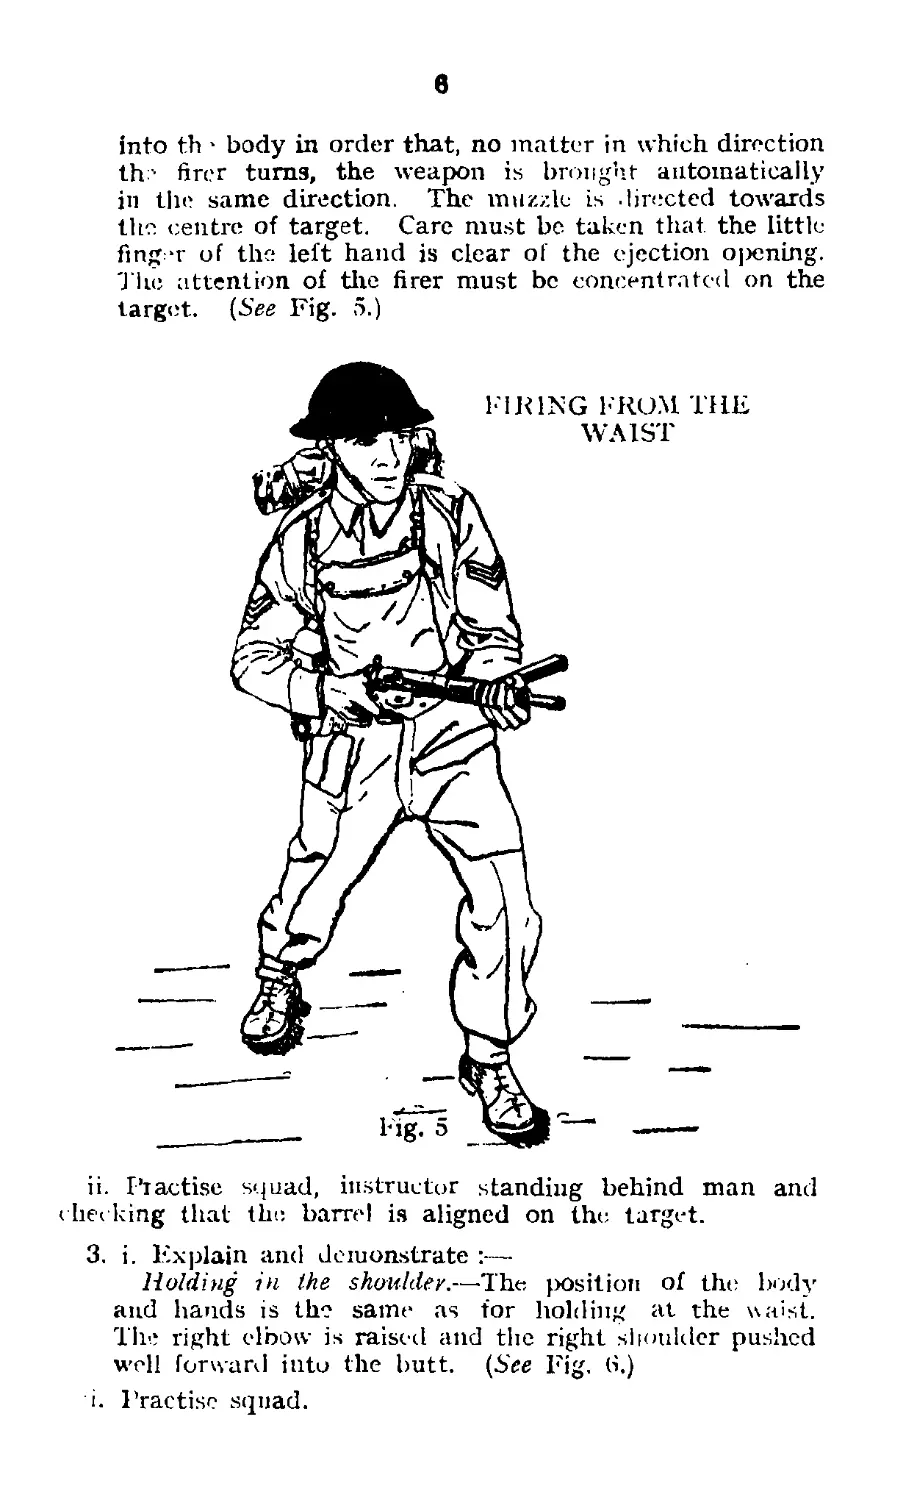
into th - body in order that, no matter in which direction
th? firer turns, the weapon is brought automatically
in the same direction. The muzzle is directed towards
the centre of target. Care must be taken that the little
finger of the left hand is clear of the ejection o|xmtng.
The attention of the firer must be concentrated on the
target. (See Fig. 5.)
ii. Practise squad, instructor standing behind man and
( becking that the barrel is aligned on the target.
3. i. Explain and demonstrate :—
Holding in the shoulder.—-The position of the body
and hands is the same as for holding at the waist.
The right elbow is raised and the right shoulder pushed
well forward into the butt. (See Fig. 6.)
i. Practise squad.
I-1 RING EROM THE SHOULDER
4. l-'inng
i. Explain and demonstrate, where necessary :—
The machine carbine will fire single rounds or
bursts. A stud passes through the body of the machine
carbine ; this is marked “ К ” on the left side and " A ”
on the right side. It is only necessary to press on the
stud from the side1 marked " R ” for single rounds and
“ A ” for bursts. With experience, single rounds can
be fired with the change lever at automatic, thus enabling
it to be kept permanently in this position. Owing to
the speed with which single rounds can be fired, the
greater accuracy obtained by this method and the need
for economy of ammuniti>m, single round firing will be
8
employed whenever possible. Bursts should be reserved
for extreme emergencies, and, when used, should be of
2 or 3 rounds only.
ij. The machine carbine can be carried in any convenient
position, but when expecting to meet the enemy it should
be held at the waist. From this position it can be instantly
cocked and fired, or, time permitting, it will be fired from the
shoulder. (See Fig. 6.) Although the weapon can be fired
whilst on the move, greater accuracy is obtained by halting
momentarily to do so.
iii. For targets at about 25 yards the w eapon may be fired
from the waist by sense of direction. For ranges between
25 and 100 yards, and if time permits, aim will be taken
using the battle sight. Whichever method is used an attempt
should be made to observe the strike of the shots, as this is
the only quick method of making necessary corrections.
iv. Having disposed of the target the weapon will be
placed at safety by placing the cocking handle into the safety
slot. И necessary change the magazine.
5. Immediate action
Explain and demonstrate, using an empty magazine :—
i. When the magazine is empty, the machine carbine
will stop with the working parts forward. It is
onlv necessary to change the magazine, cock the
machine carbine, and continue firing.
ii. Should the machine carbine stop whilst firing, cock it,
examine the ejection opening, and if nothing is
there, continue firing. If one live round or empty
case is there, vigorously shake the machine carbine
to the right; if it falls out, continue firing.
iii. If it does not fall out, or if there is a live round and an
empty case there, remove the magazine, shake out
the case, fire the round, replace the magazine (or
a full one) and continue firing.
iv. Practise squad, varying the order of stoppages as
progress is made. When practising, the working
parts must always be eased forward under control.
LESSON 3.—STRIPPING AND CLEANING
Stores :—
Machine carbine, magazines, pnllthrongh flannelette, wire
gauze and oil
9
Instructor's notes
Before any part is stripped, and again after assembly, the
machine carbine will always be cocked and the working parts
eased forward under control.
1. Stripping
Mention names of main parts as they are stripped (see
Fig. 4). Explain and demonstrate :—
i. Butt.—Press in the stud on the recoil spring housing
and slide the butt off downwards.
Breech block.—Press the cap (or ring), round the
stud, inwards and turn anti-clockwise, thus releasing
the cap from its engagement in the body. Withdraw
the cap, spring housing and spring. Draw cocking
handle to the rear, rotate it half-way into the safety
slot and, in this position, withdraw cocking handle.
Slide the breech block out of the body.
Barrel (Mark II only}.— Pull out the plunger on
the side of the magazine housing and rotate the
housing downwards. Unscrew the barrel locking nut
(the front hand grip) and pull out the locking nut
and barrel together.
The machine carbine will NOT be stripped further
than this.
ii. Assembly
Barrel.—Push barrel on to its seating and screw
home the barrel locking nut. Rotate the magazine
housing into the firing position. Mark II carbines re-
quire the barrel to be positioned rotationally to ensure
accurate shooting. These weapons have the last three
figures of the number stamped on the barrel or a line
scribed on the barrel ; on assembly, this number or
line should be roughly aligned with the foresight.
Breech block.—Hold the machine carbine in a
horizontal position, place the breech block in the
body ; and, keeping the trigger pressed, push the
block forward until the cocking handle hole is
opposite the safety slot. With one end of the cocking
handle as a pilot, bring the hole into the correct
position and insert the cocking handle. Keeping
the trigger pressed, slide the breech block forward.
Insert the spring and its housing, replace the cap,
press it into the slots, and rotate clockwise until it
engages.
10
Note.—Do NOT drop the breech block into the
body, as this may cause damage to the ejector.
ВгШ.—Press the stud on the return spring housing
inwards with the top of the butt. Hook the butt
catch into its slide and push home until locked.
iii. Practise squad.
2. Magazine
To strip.—Press in the stud on the bottom plate and slide
it off, controlling the spring as it comes out. Lift out the
spring and platform.
To assemble.- -Replace the platform and spring, and slide
on the bottom plate until the stud engages in the hole in the
plate. A tap with the hand will assist it to engage.
3. Cleaning
i. Explain and demonstrate :—
Strip the machine carbine completely. Clean the bore
using pullthrough and flannelette, size 4 inches by 3inches,
in the manner taught for the rifle. A gauze is provided,
but should be used only when absolutely necessary.
When satisfied that the bore is clean, oil it, using
flannelette 4 inches bv 2 inches.
ii. Clean and oil the chamber using the pullthrough weight
or a piece of stick with flannelette round it.
iii. Clean and oil thorough»;; the remaining parts of the
machine carbine, paying special attention to the following :—
f ace of the breech block.
Inside the body and ejector.
iv Before firing, it is preferable to dry all parts of the
weapon. I’nlikc the Thompson Machine Carbine, the Sten
will fire whether dry or oily; but in hot drv climates all
working parts must be perfectly dry and free front oil for firing.
v. Clean the. magazines with an oily rag. Ensure that all
will fit the magazine housing ; if is possible for one or the
other to become damaged.
vi. Practise squad.
4. Decontamination
i. Lixplain :—
Should the tnaclune carbine be subjected to gas, it will
be cleaned in the manner laid down for the rifle (see
Pamphlet No. 3, Lesson 1).
ii. Question squad.
11
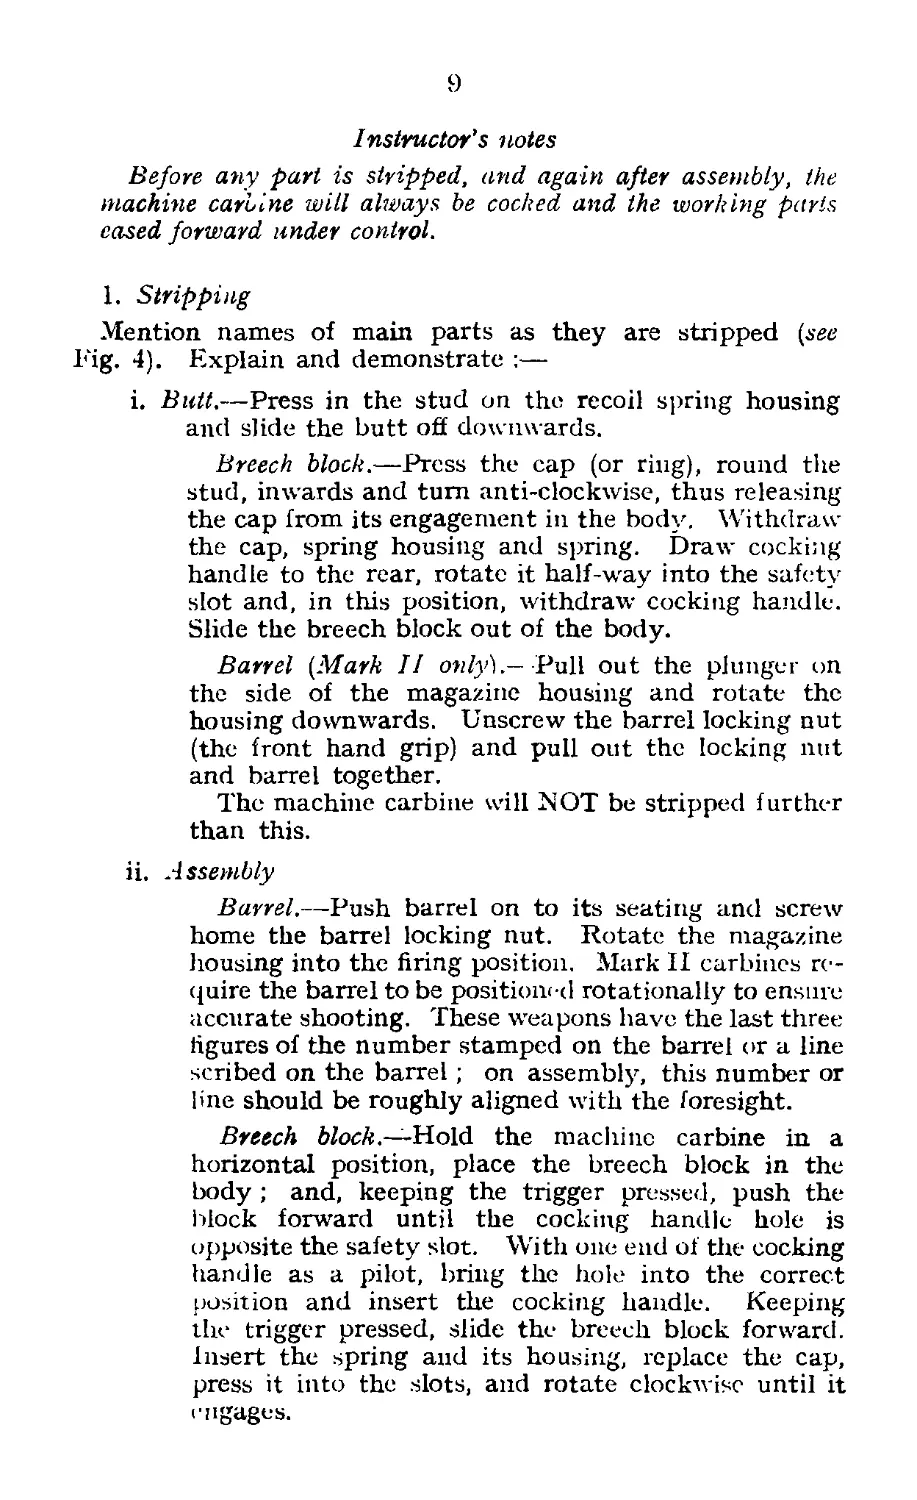
APPENDIX
1. The spotlight projector can be used with the Sten
Machine Carbine, Mark II.
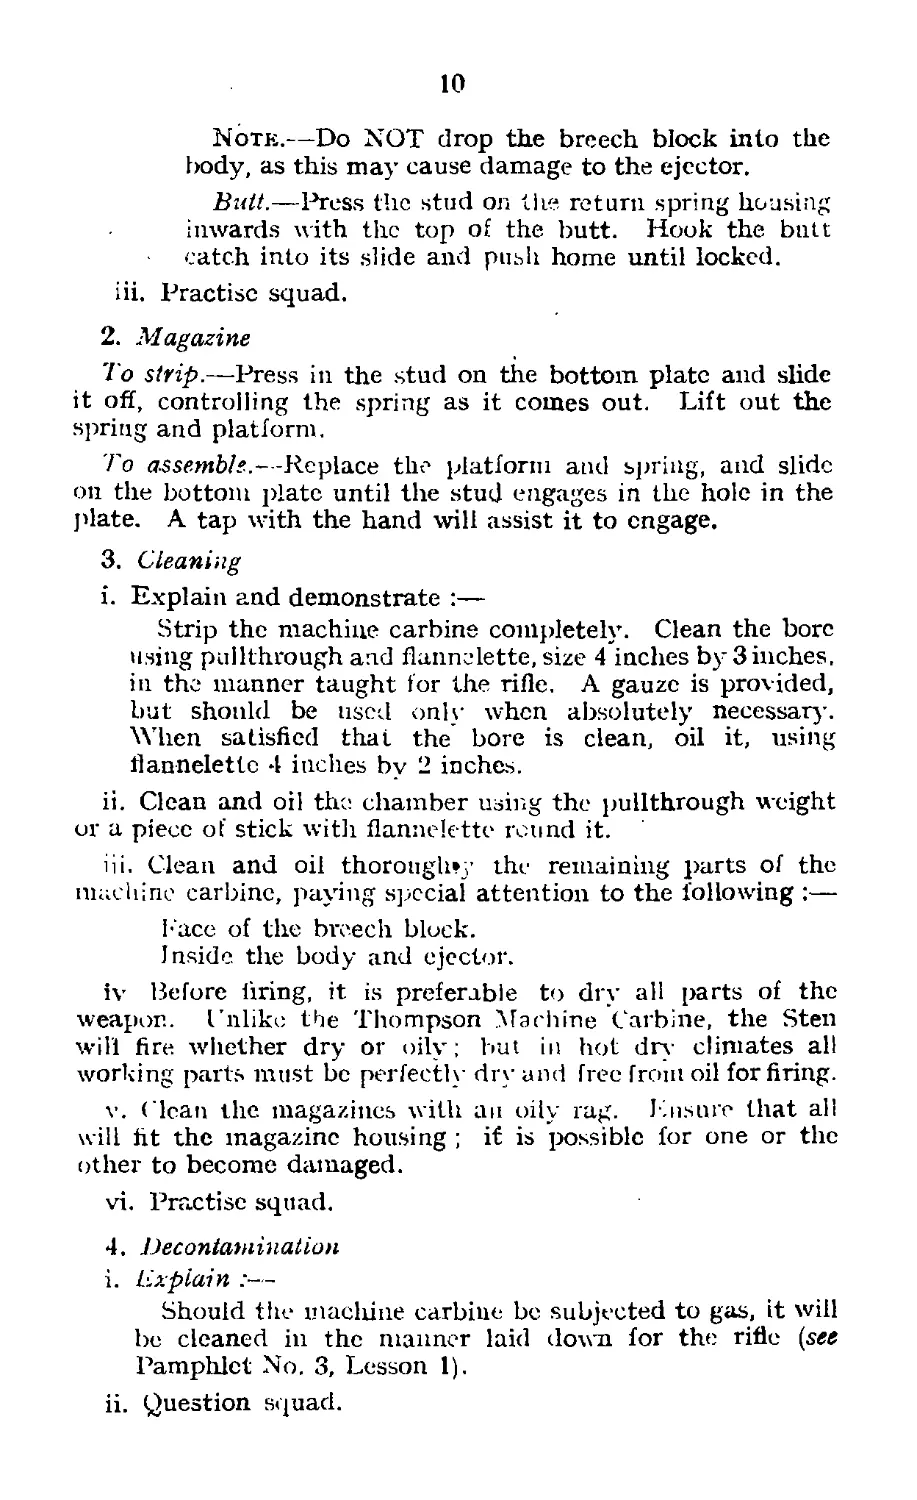
The following additional items are required:—
i. Spotlight bracket.
ii. Terminal block with spring clip.
Terminal BlocK
with cup
12
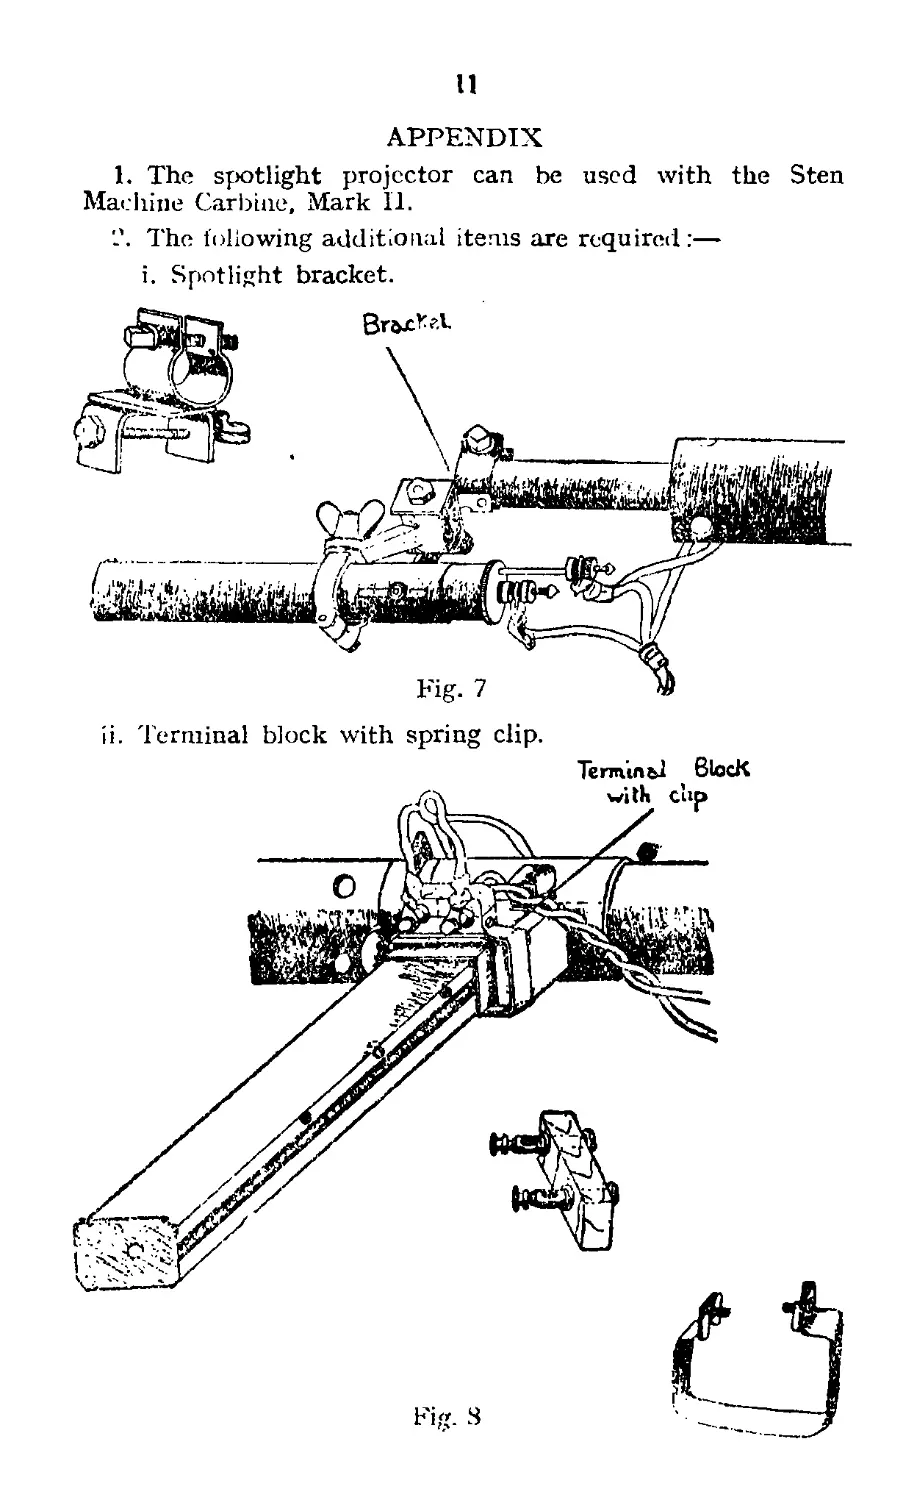
iii. Clip trigger guard.
Fig. 9
8/42 .'1/510 27384 9298 250.000 9 42 K.H.K Gp. 8/9