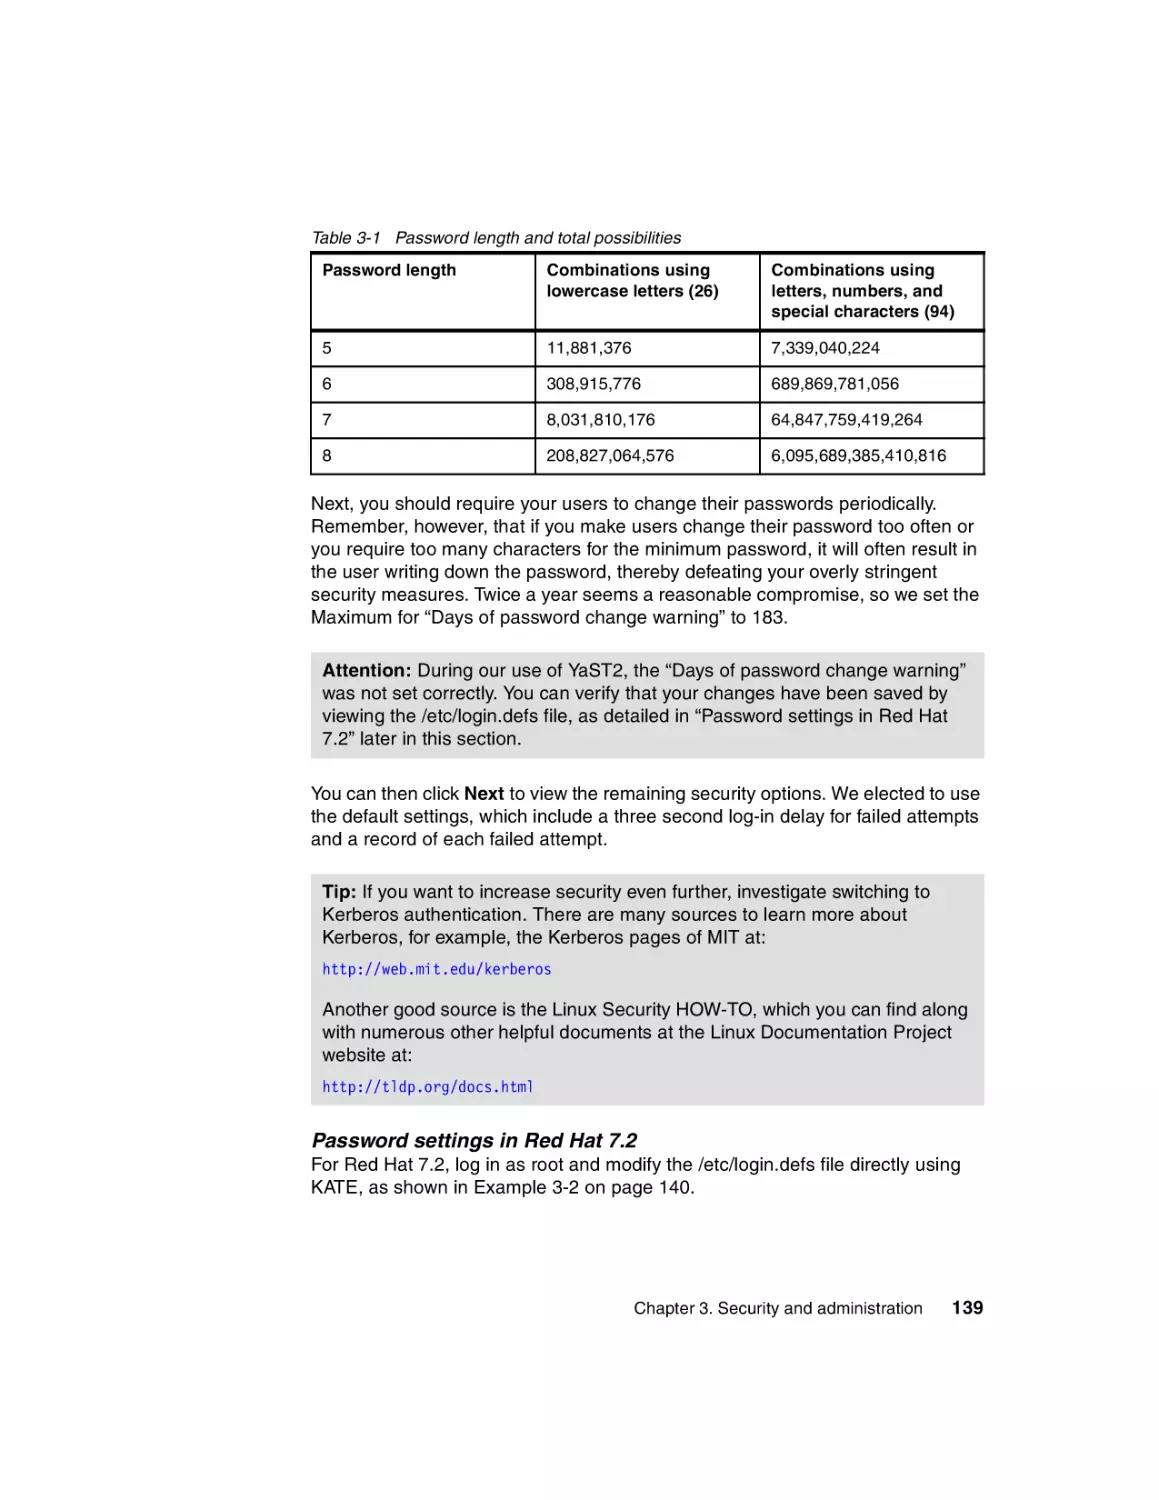
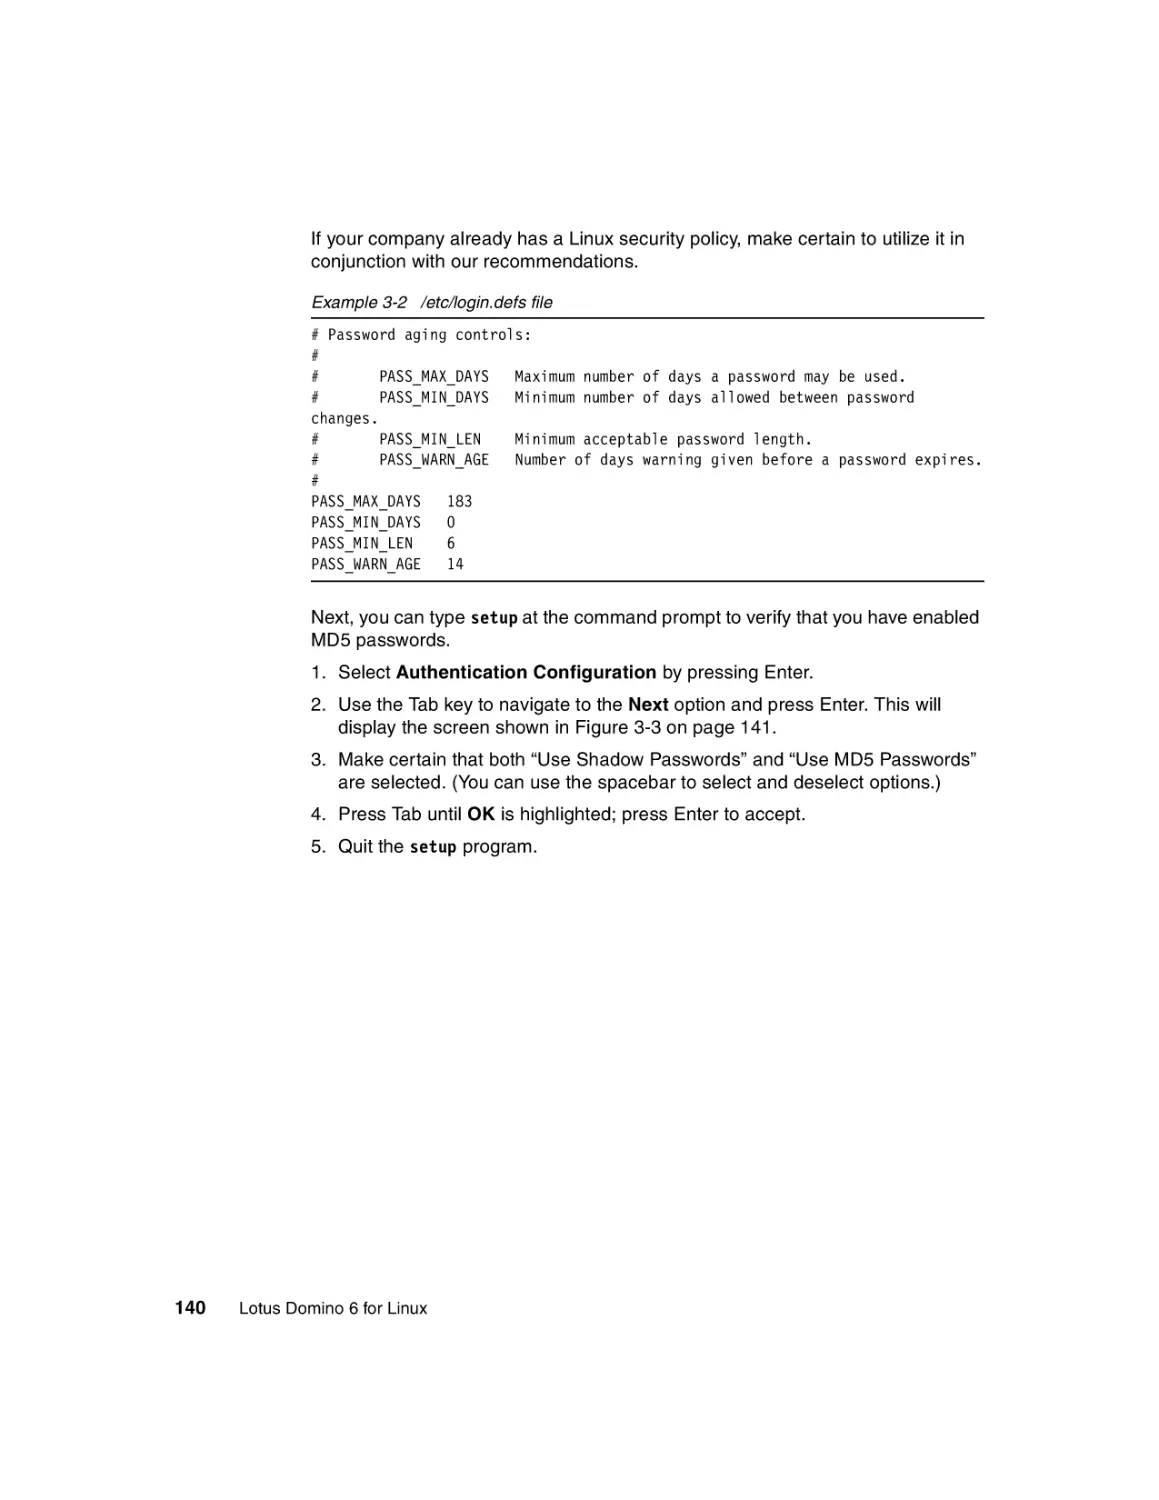
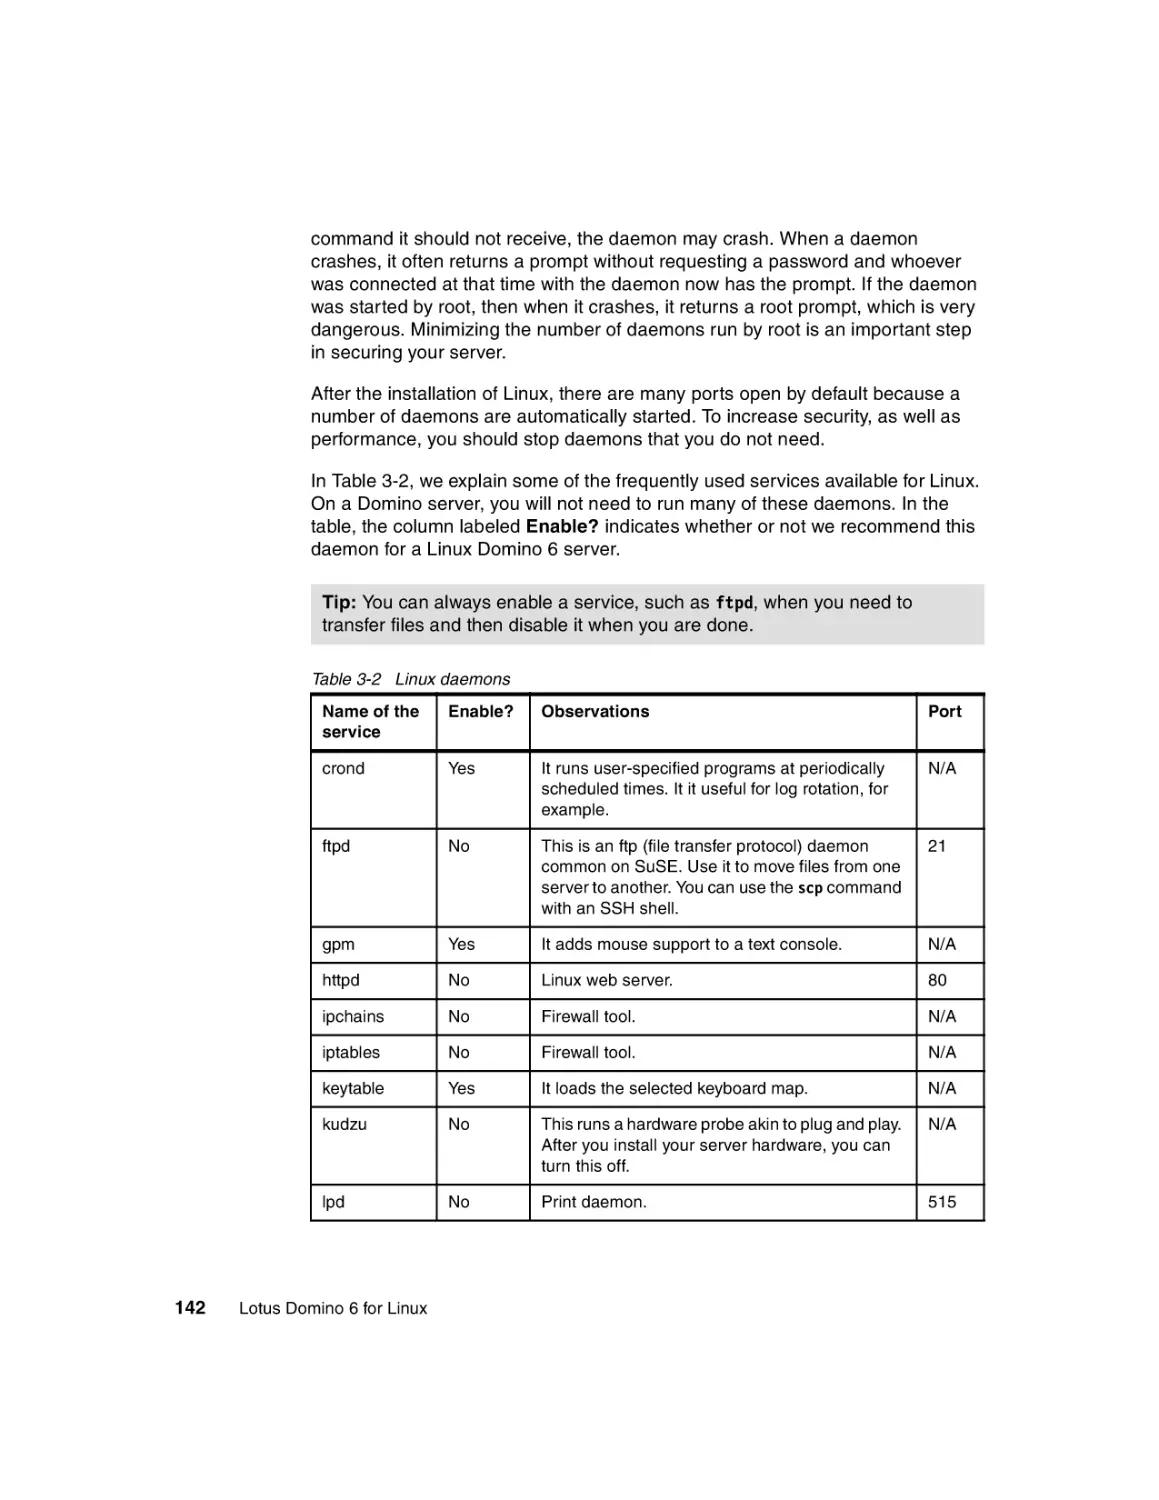
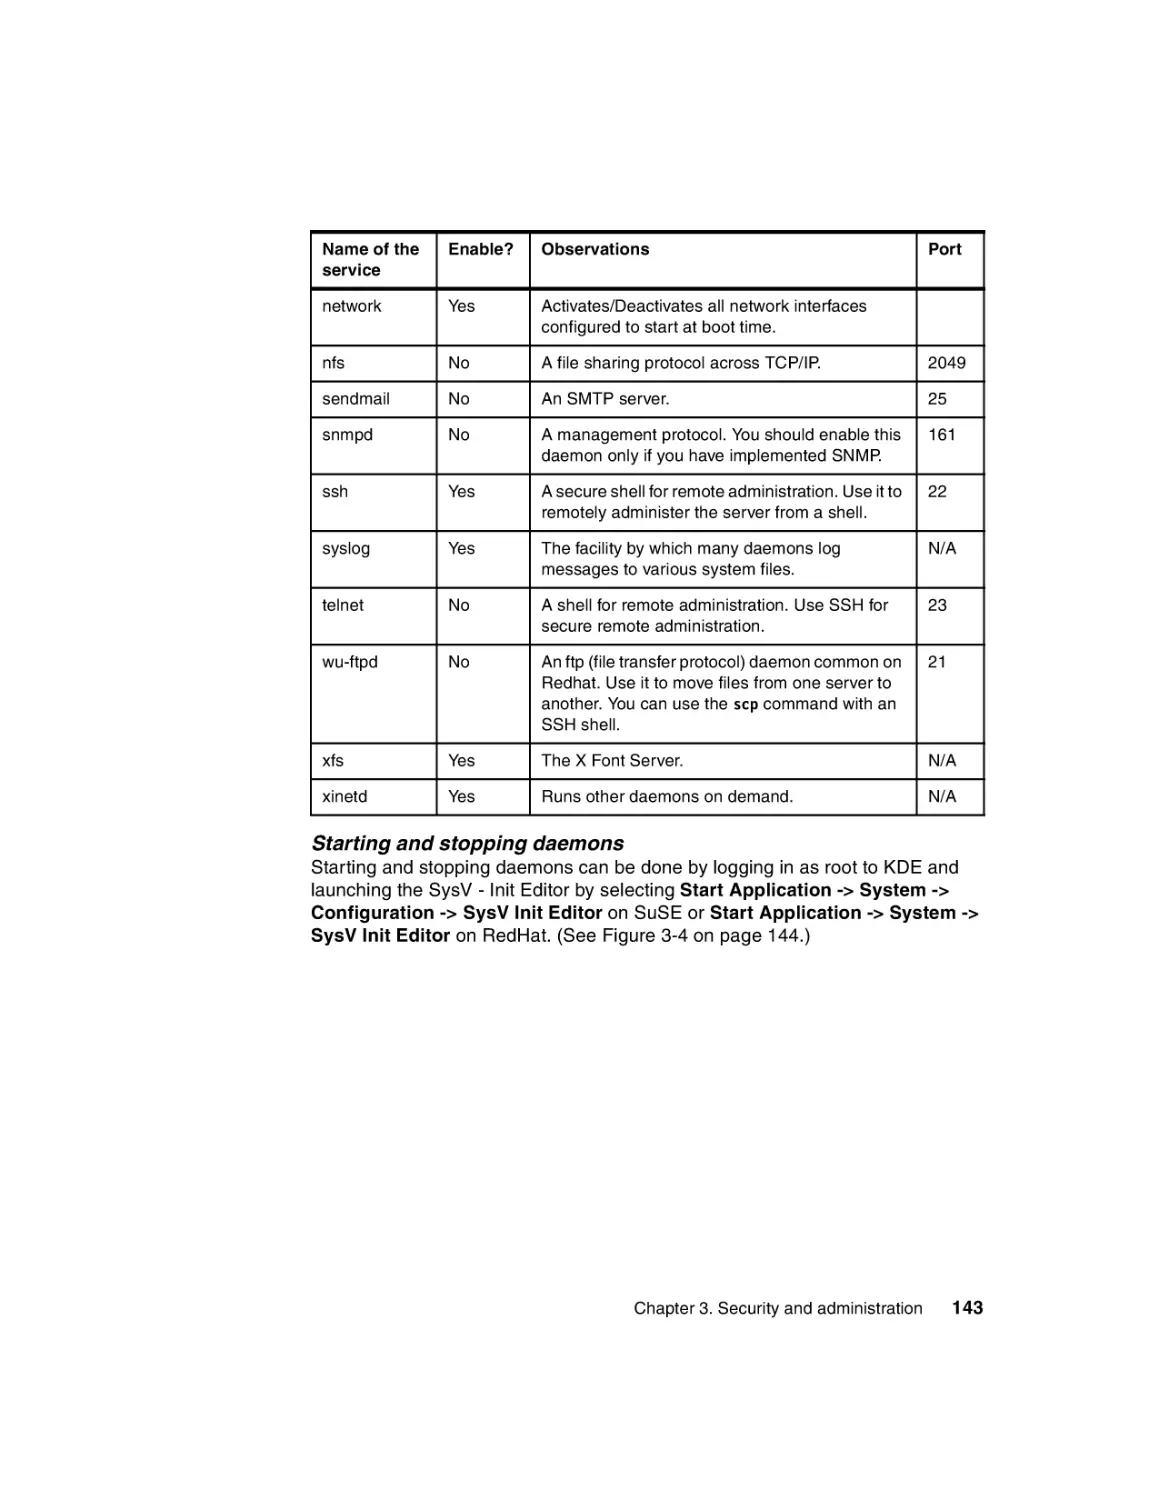
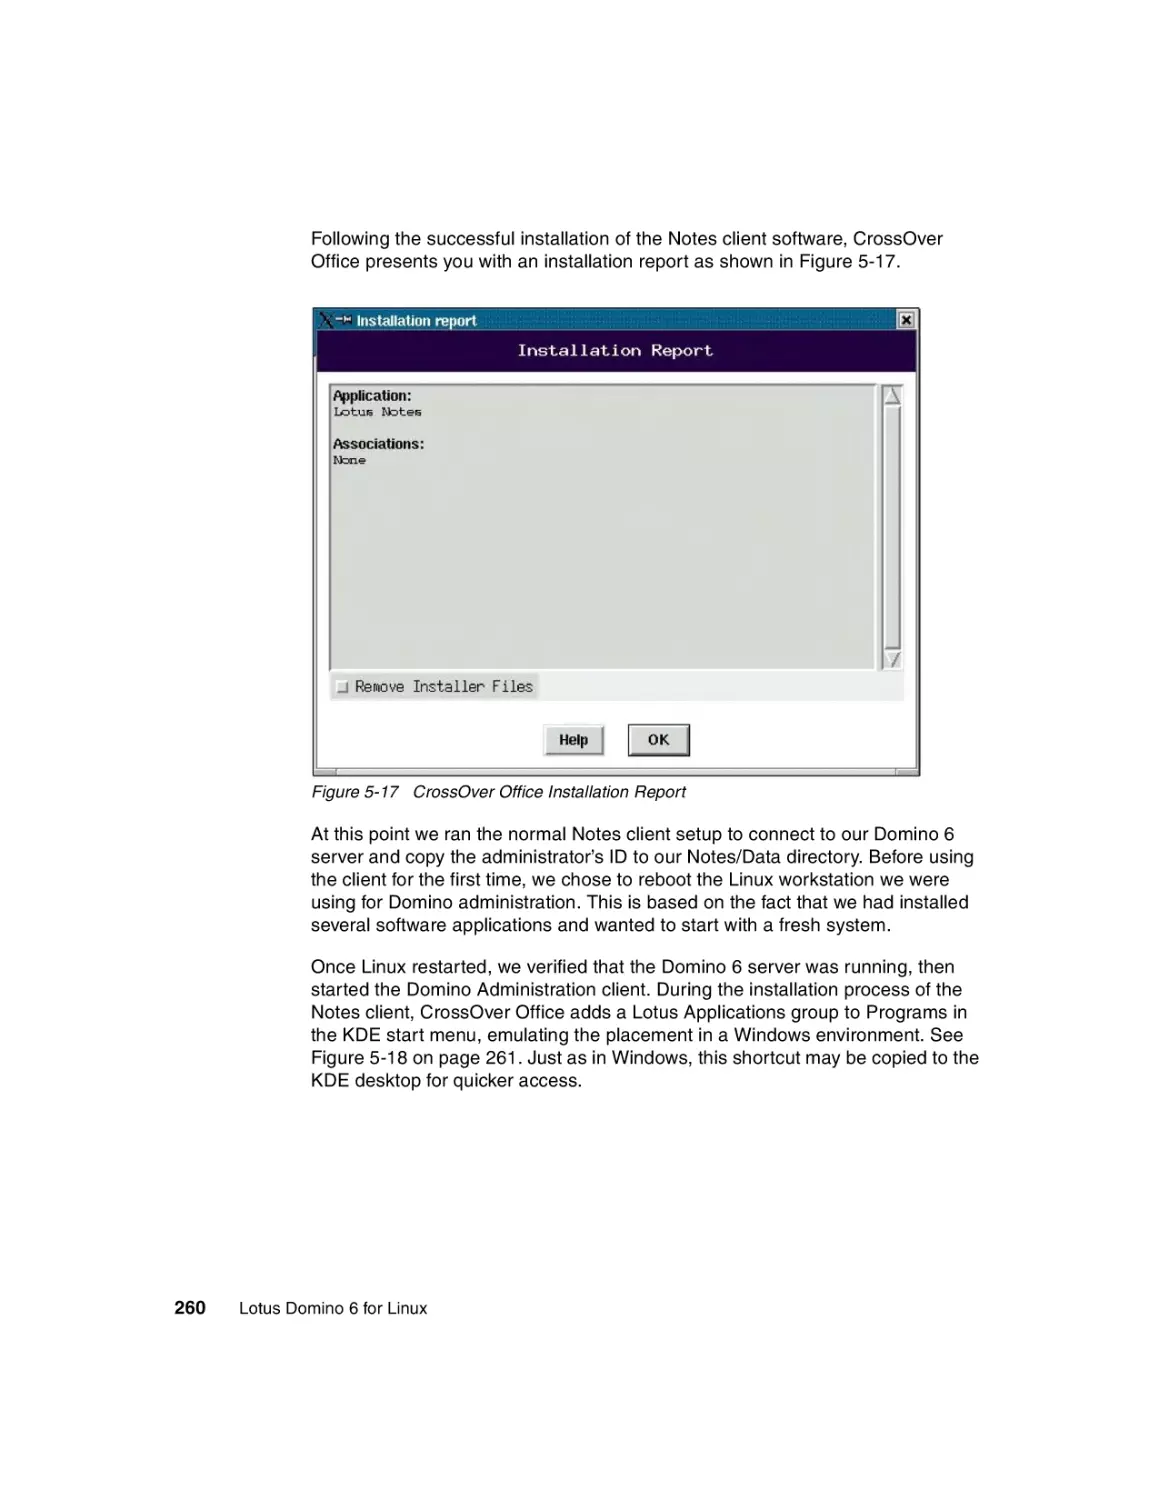
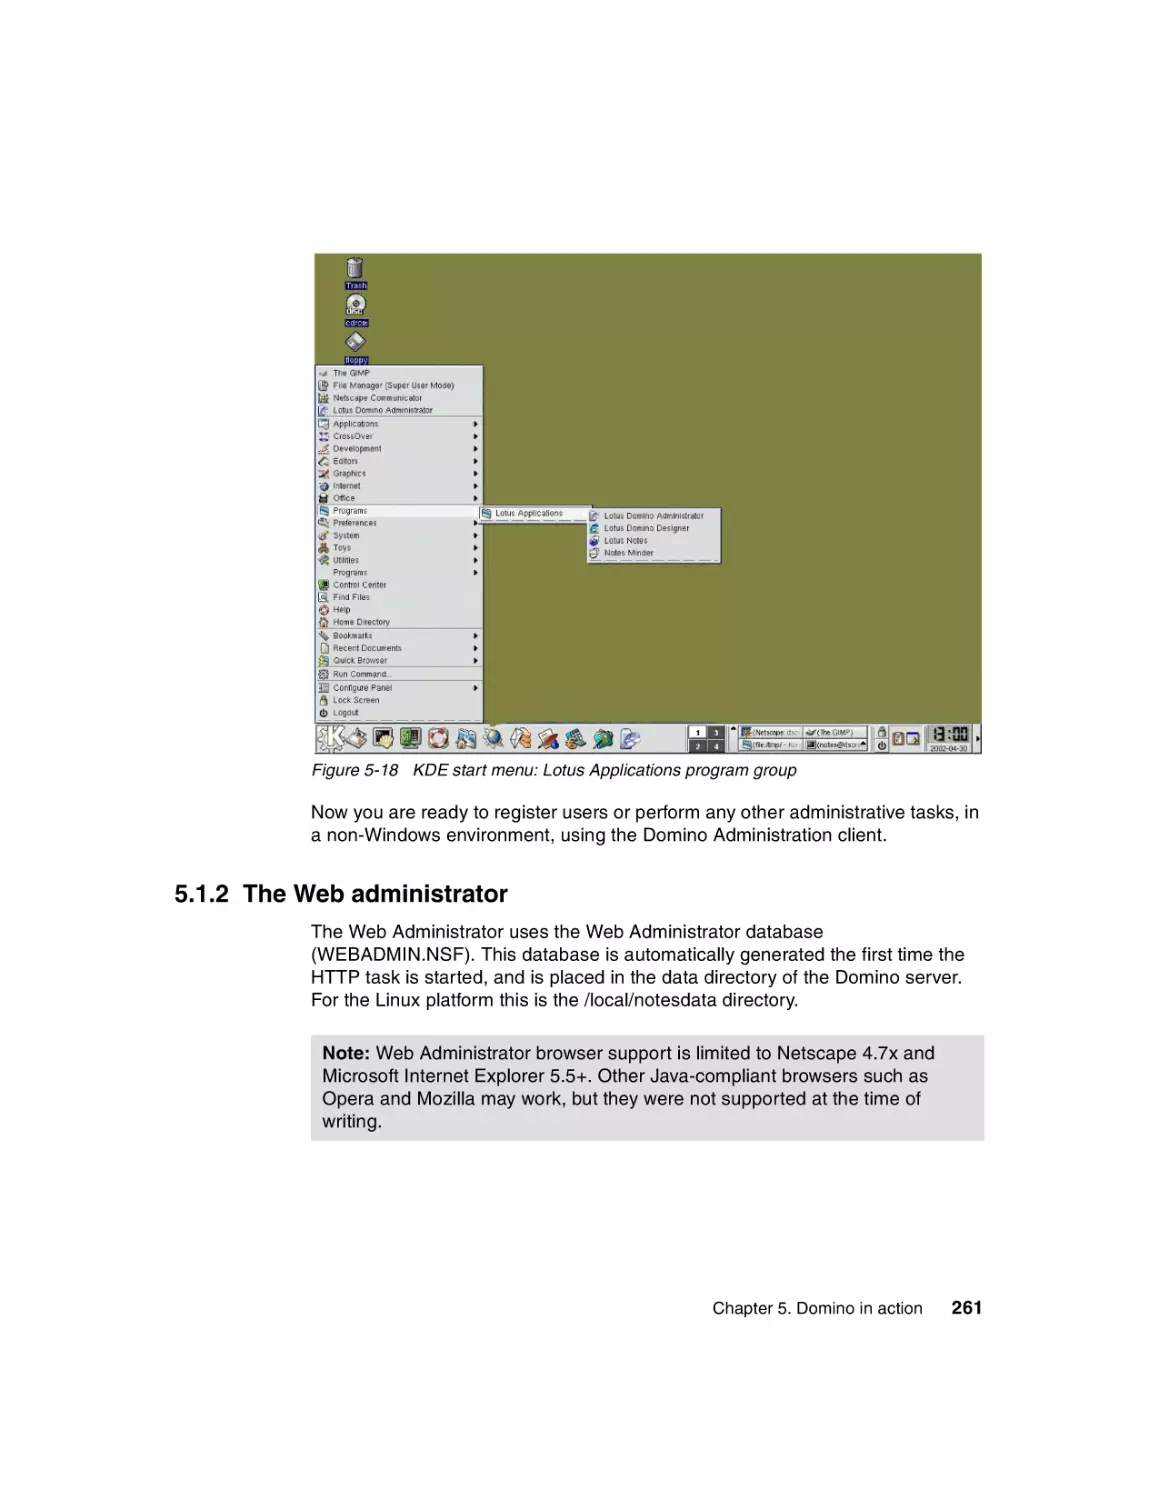
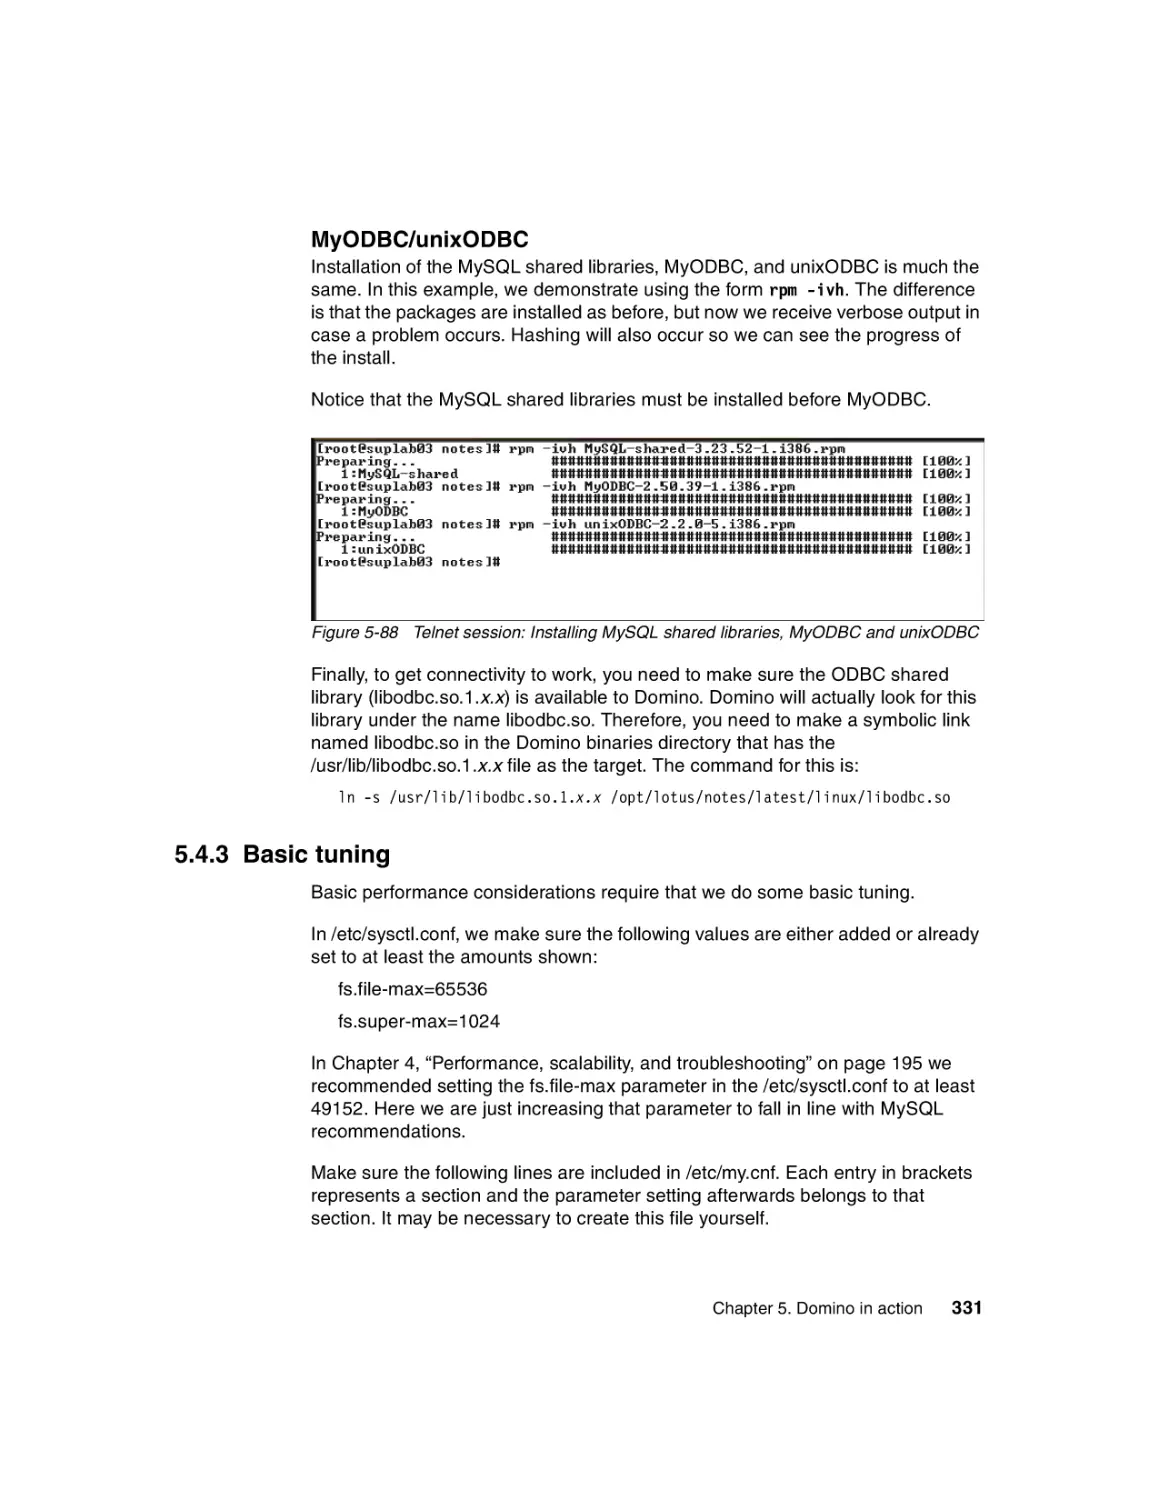
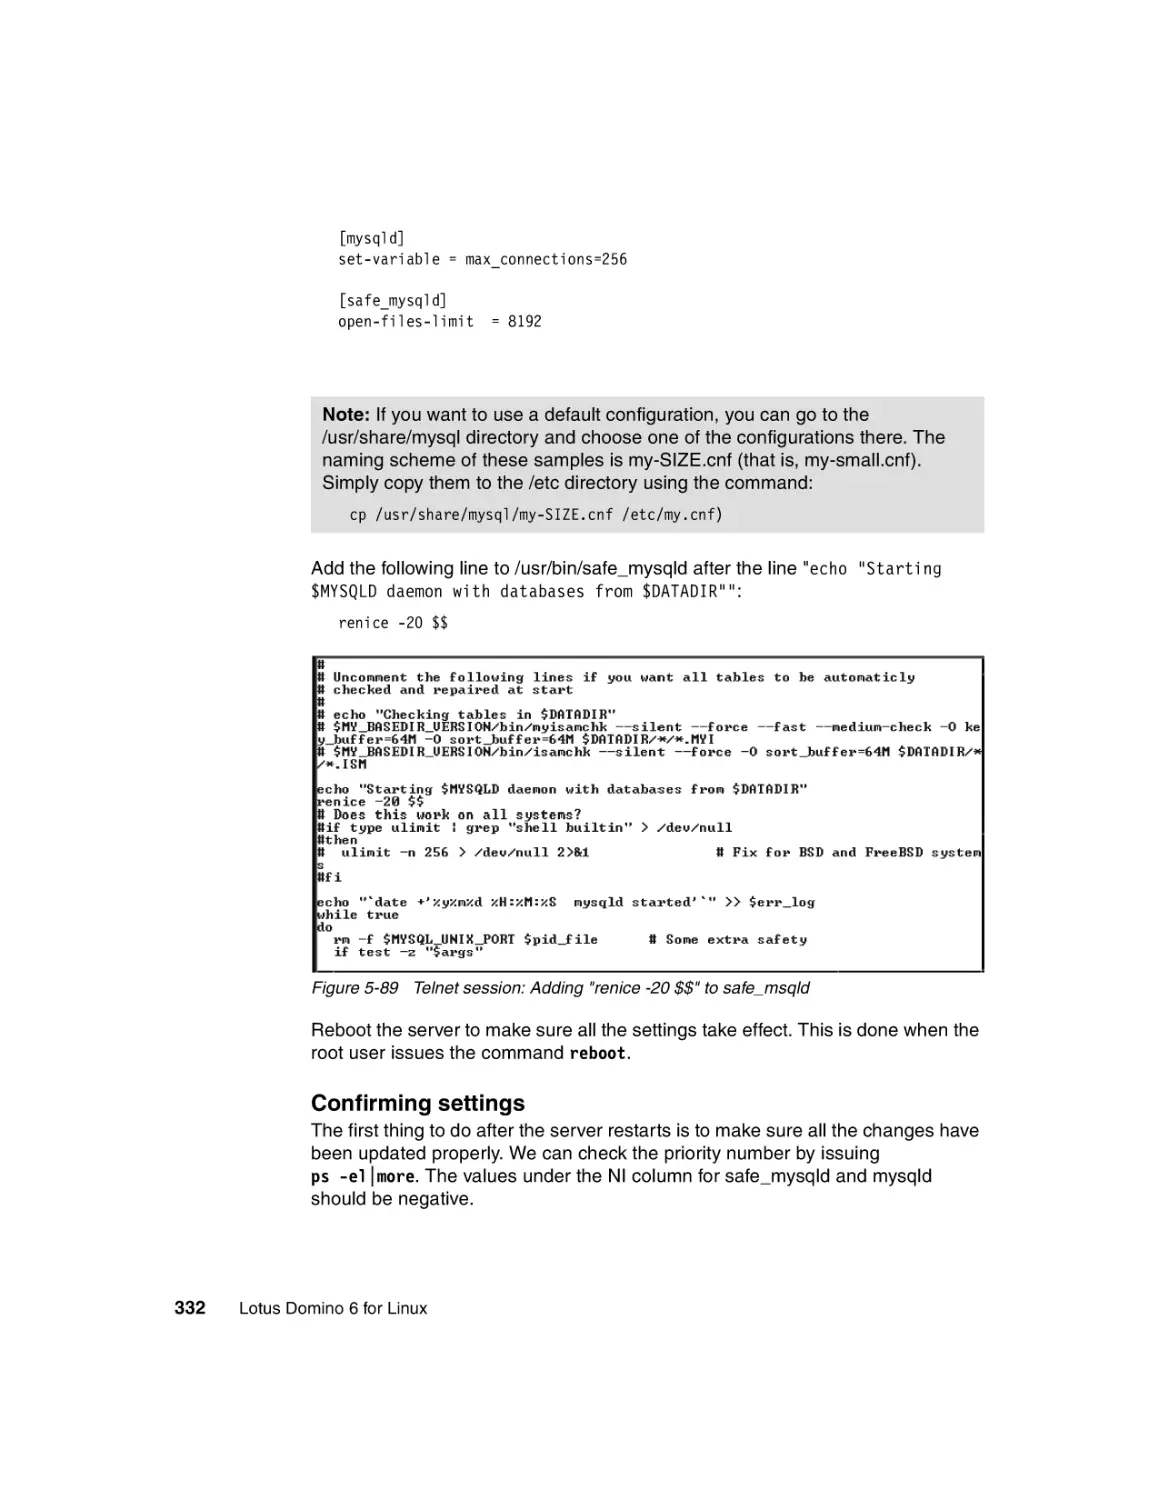
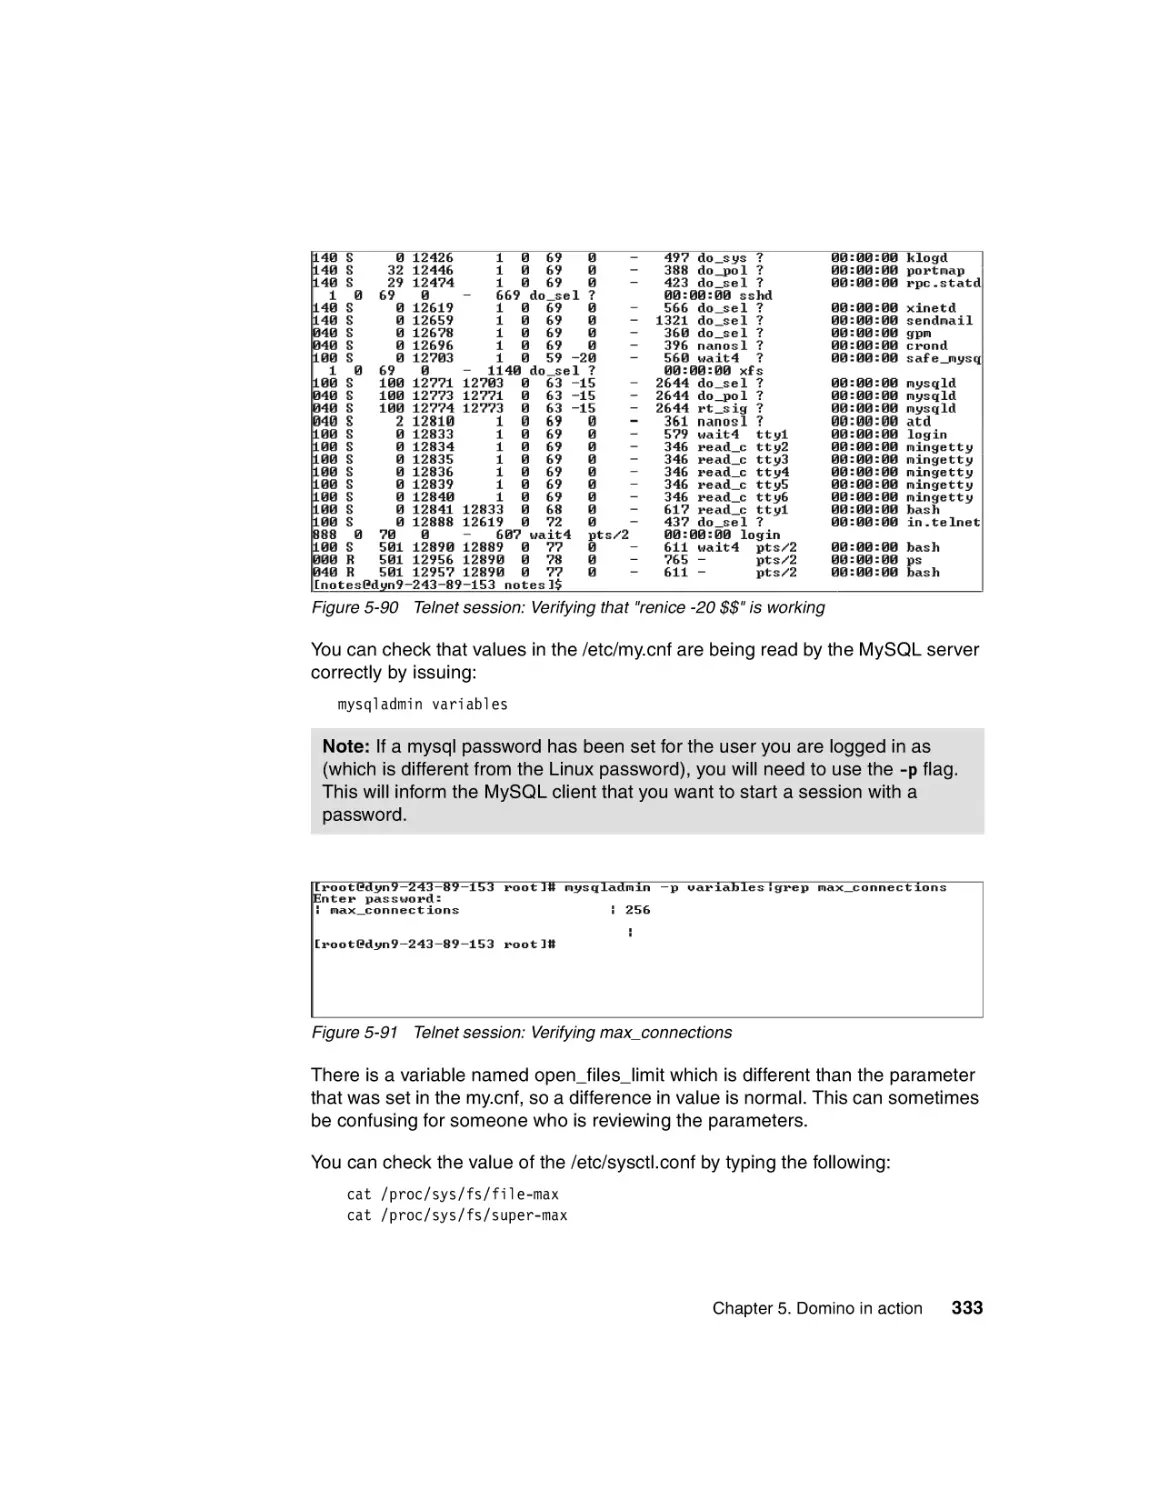
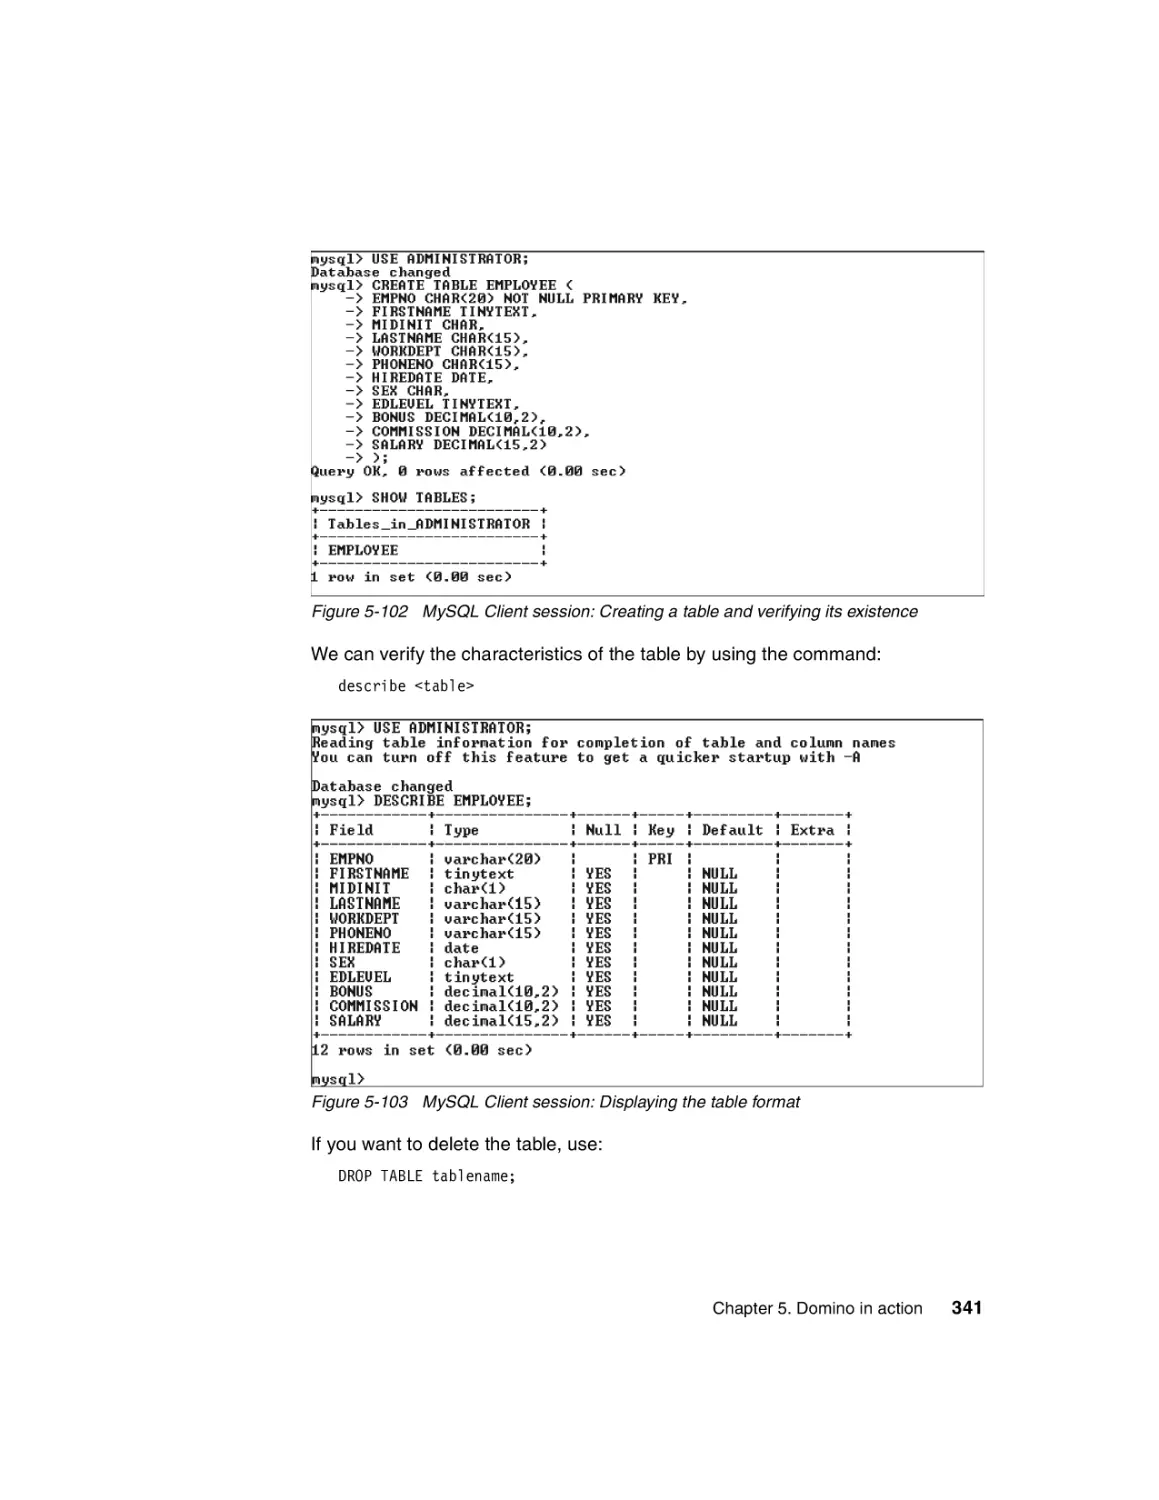
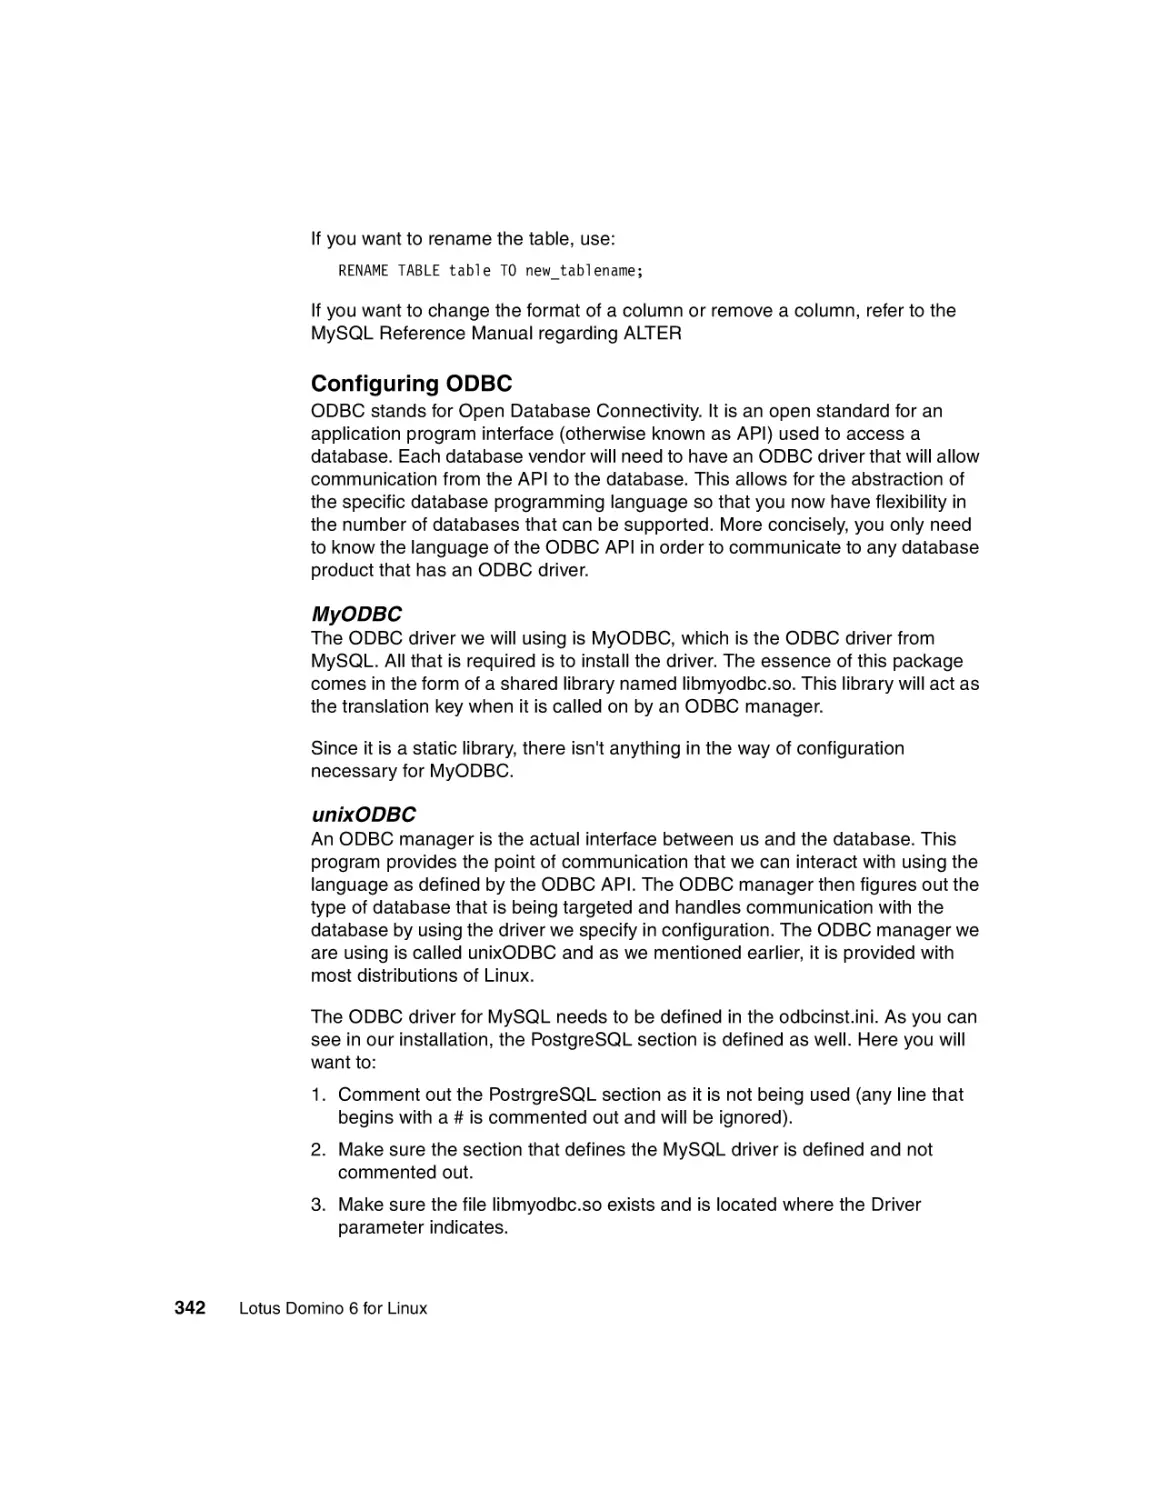
/


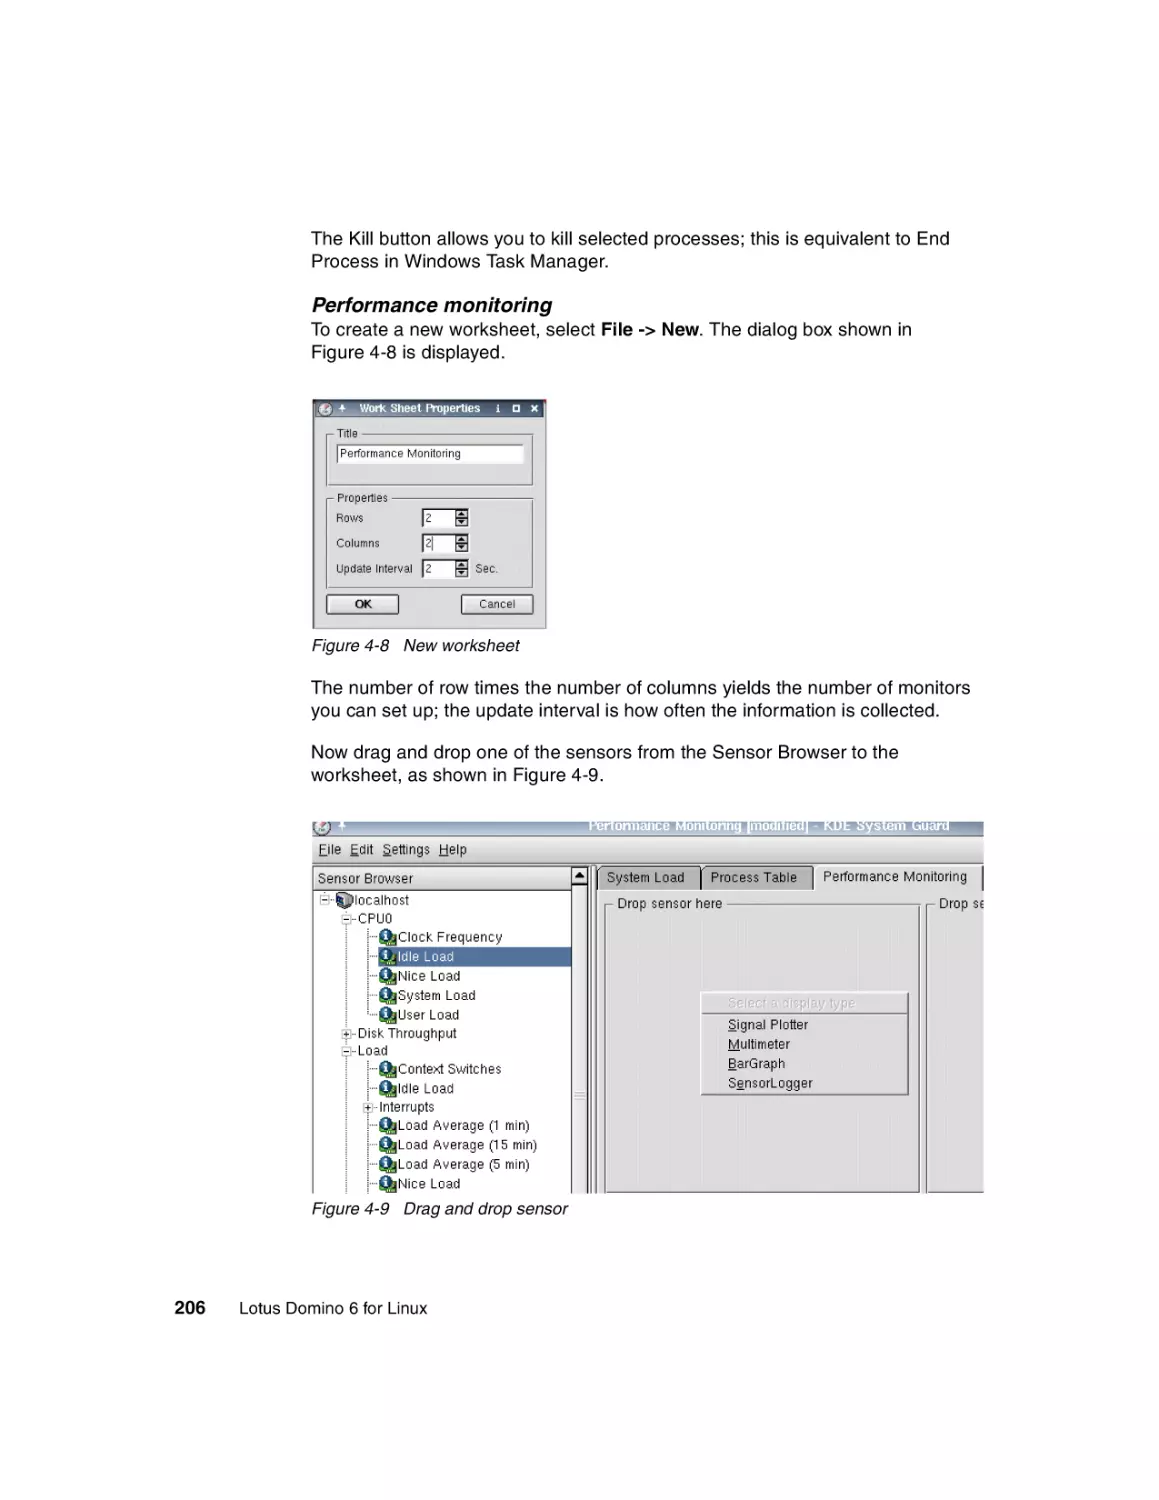
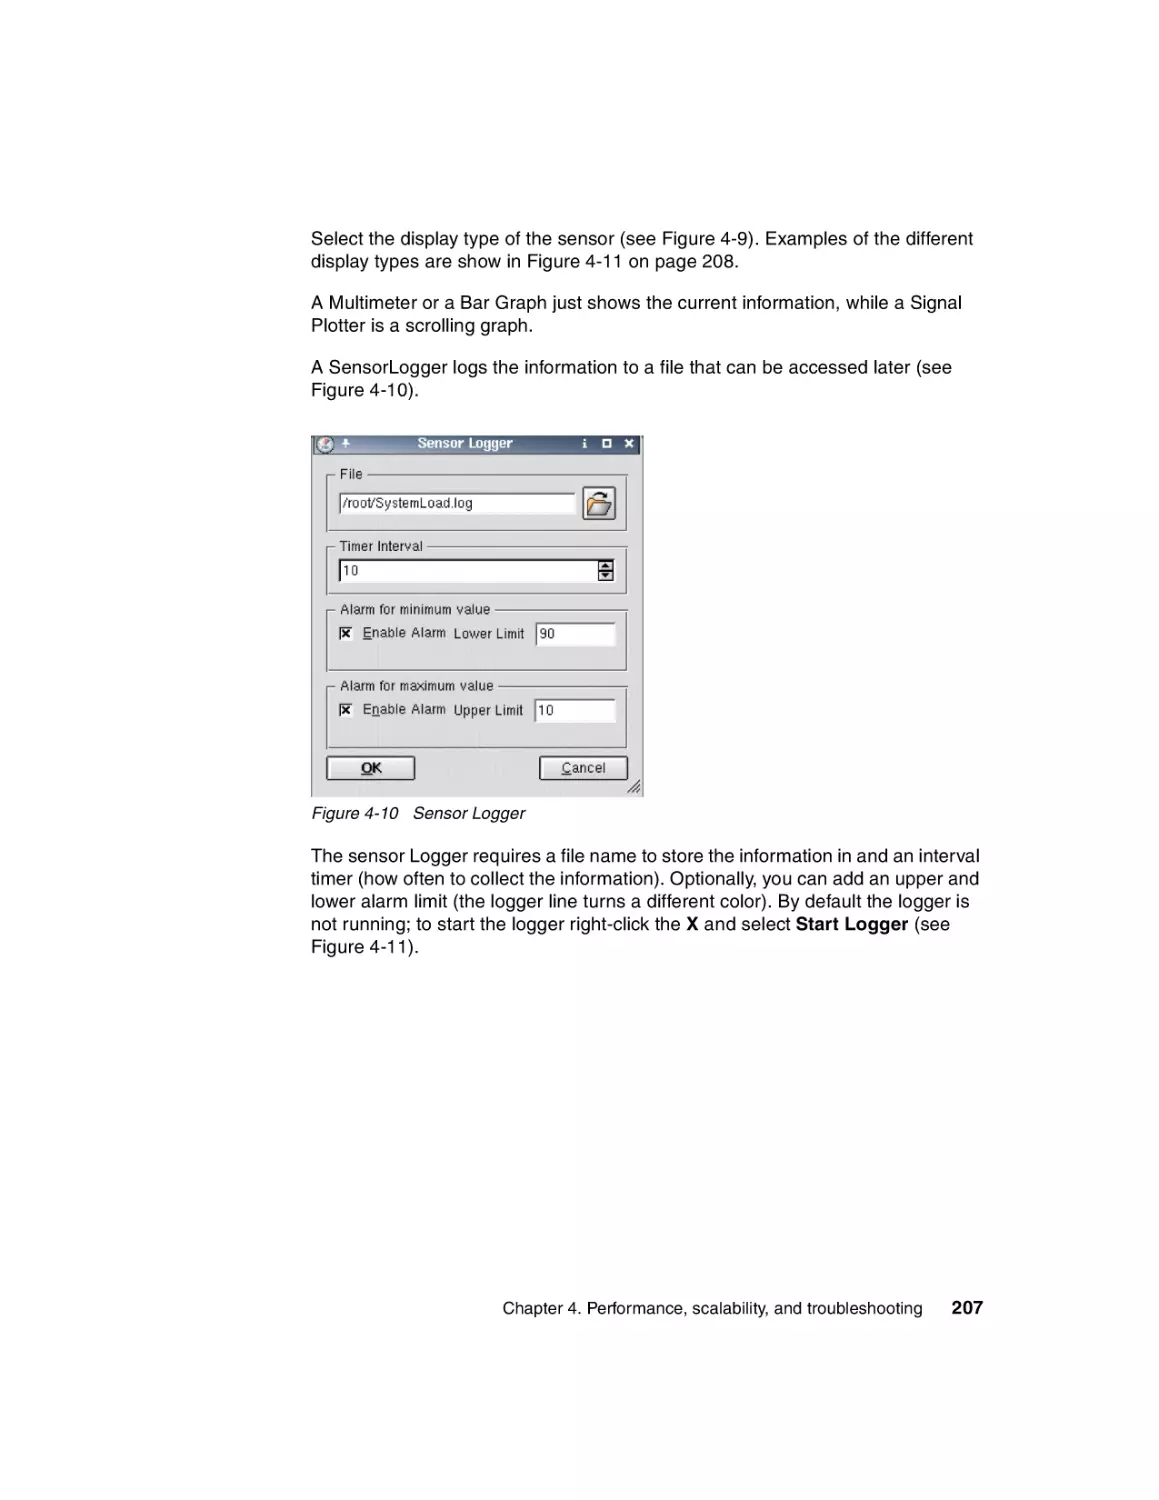
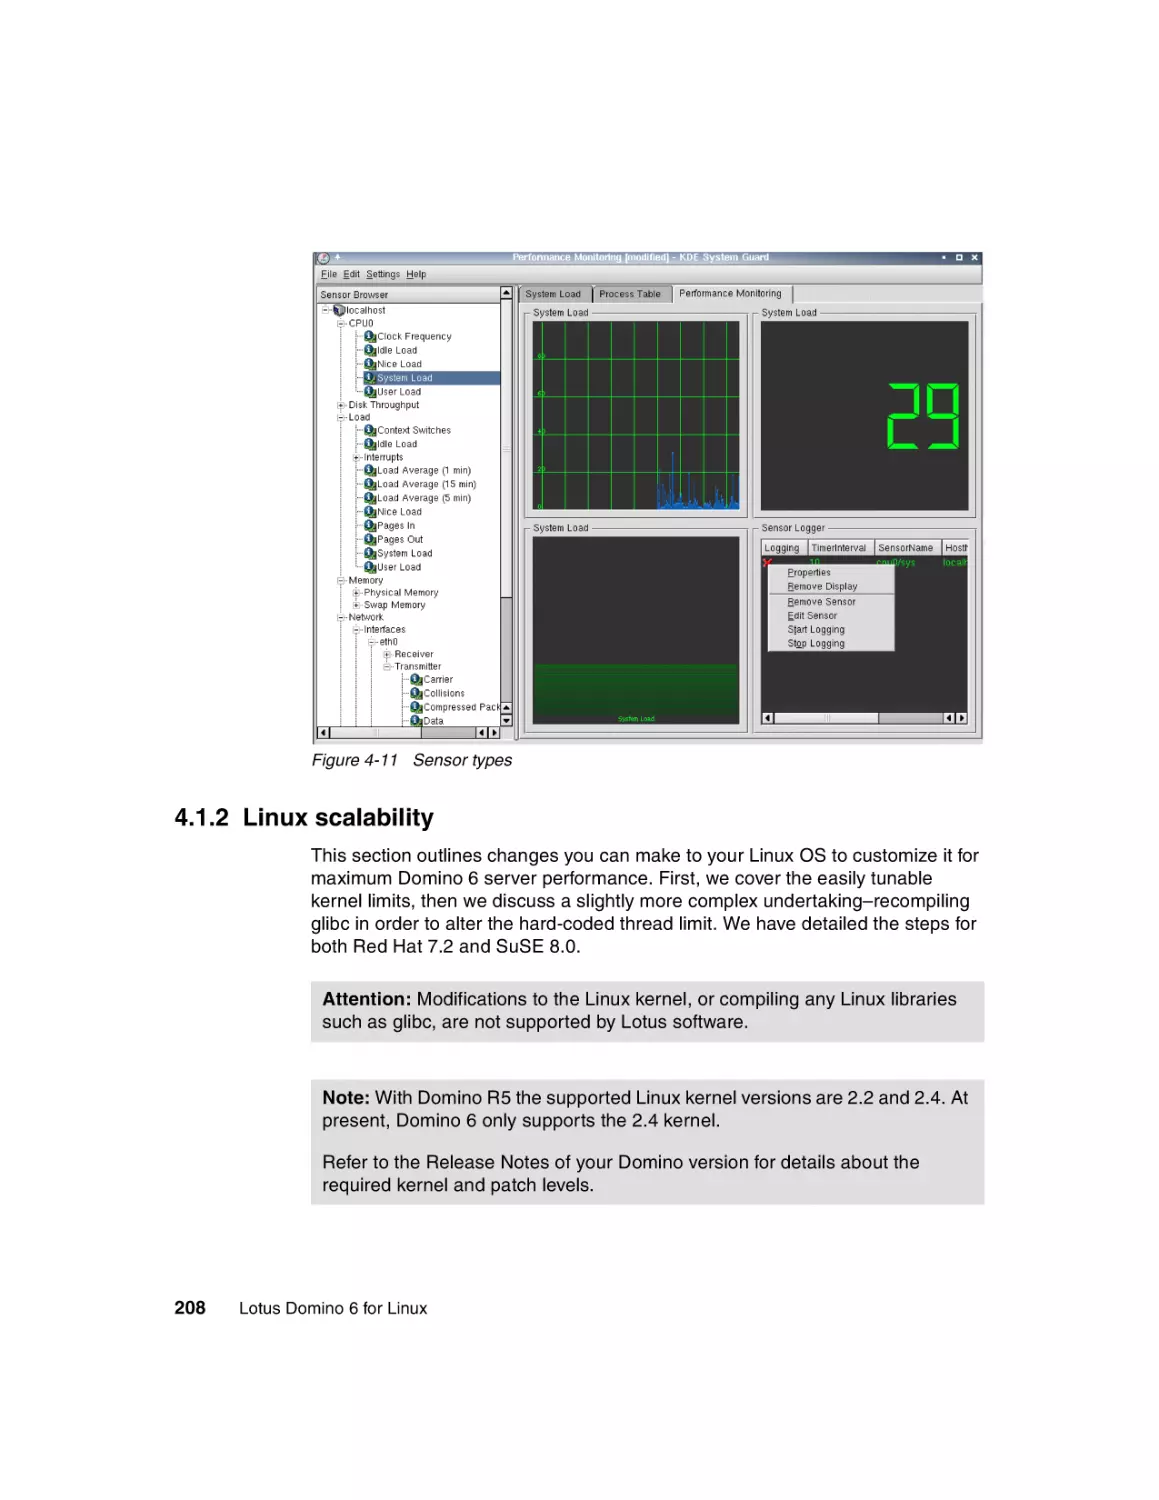
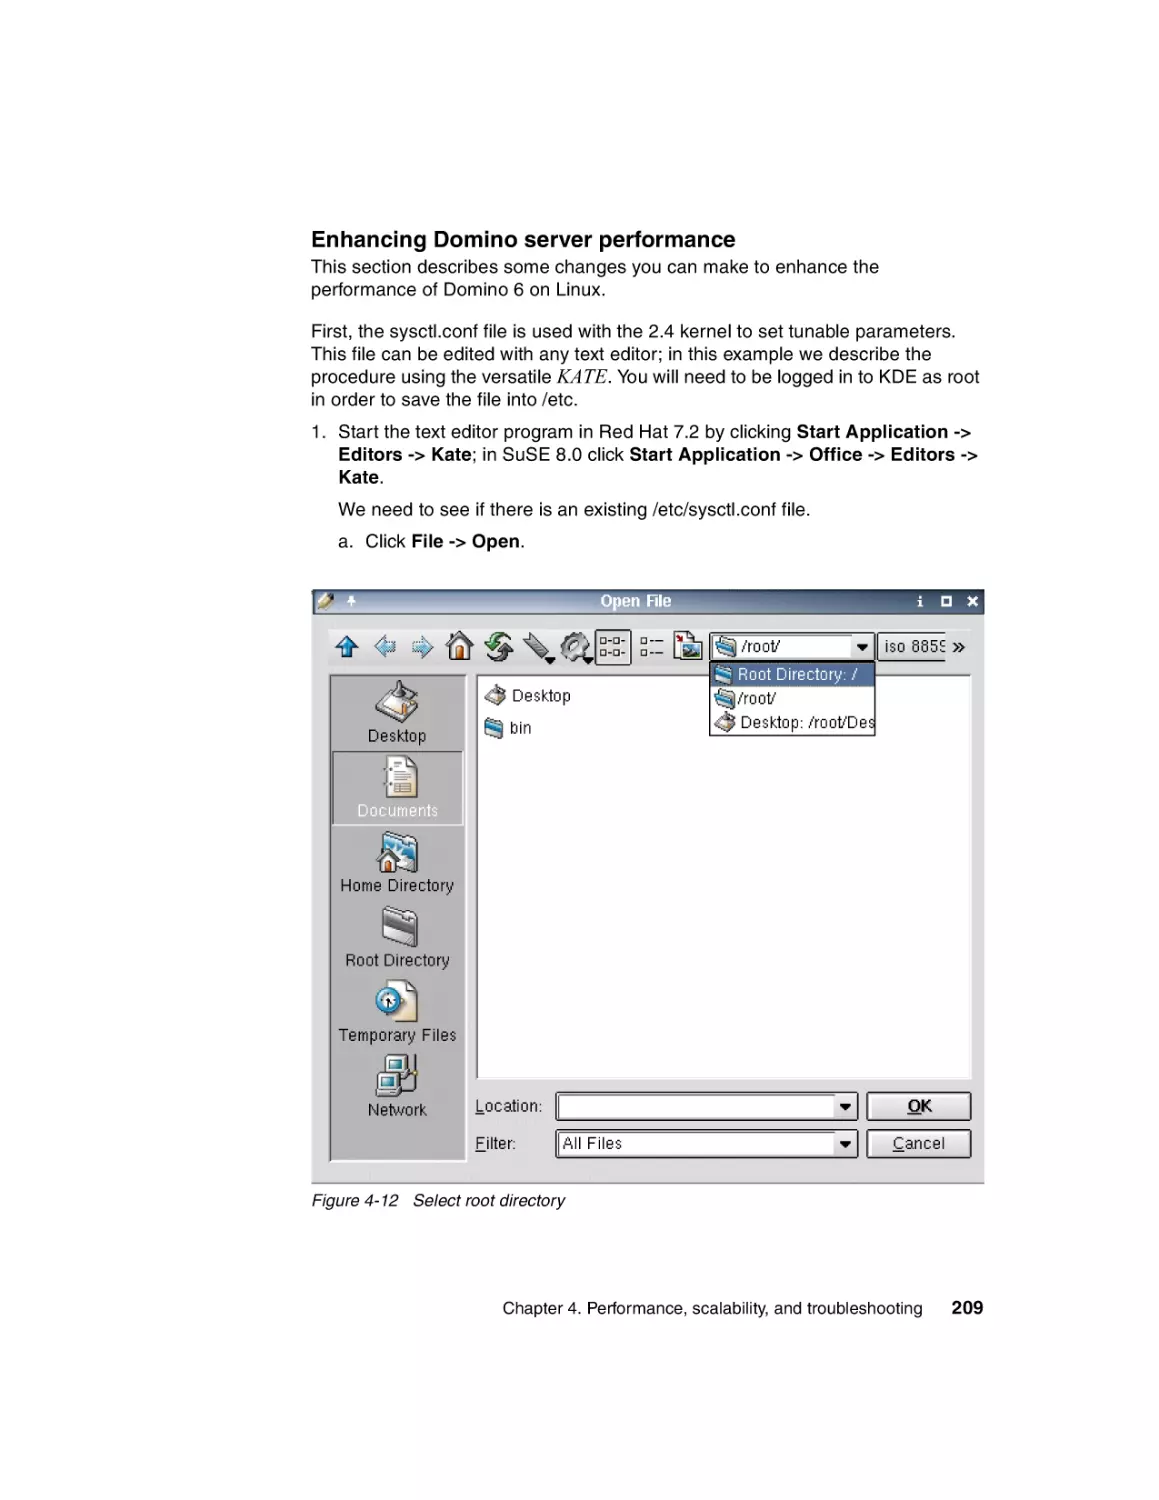


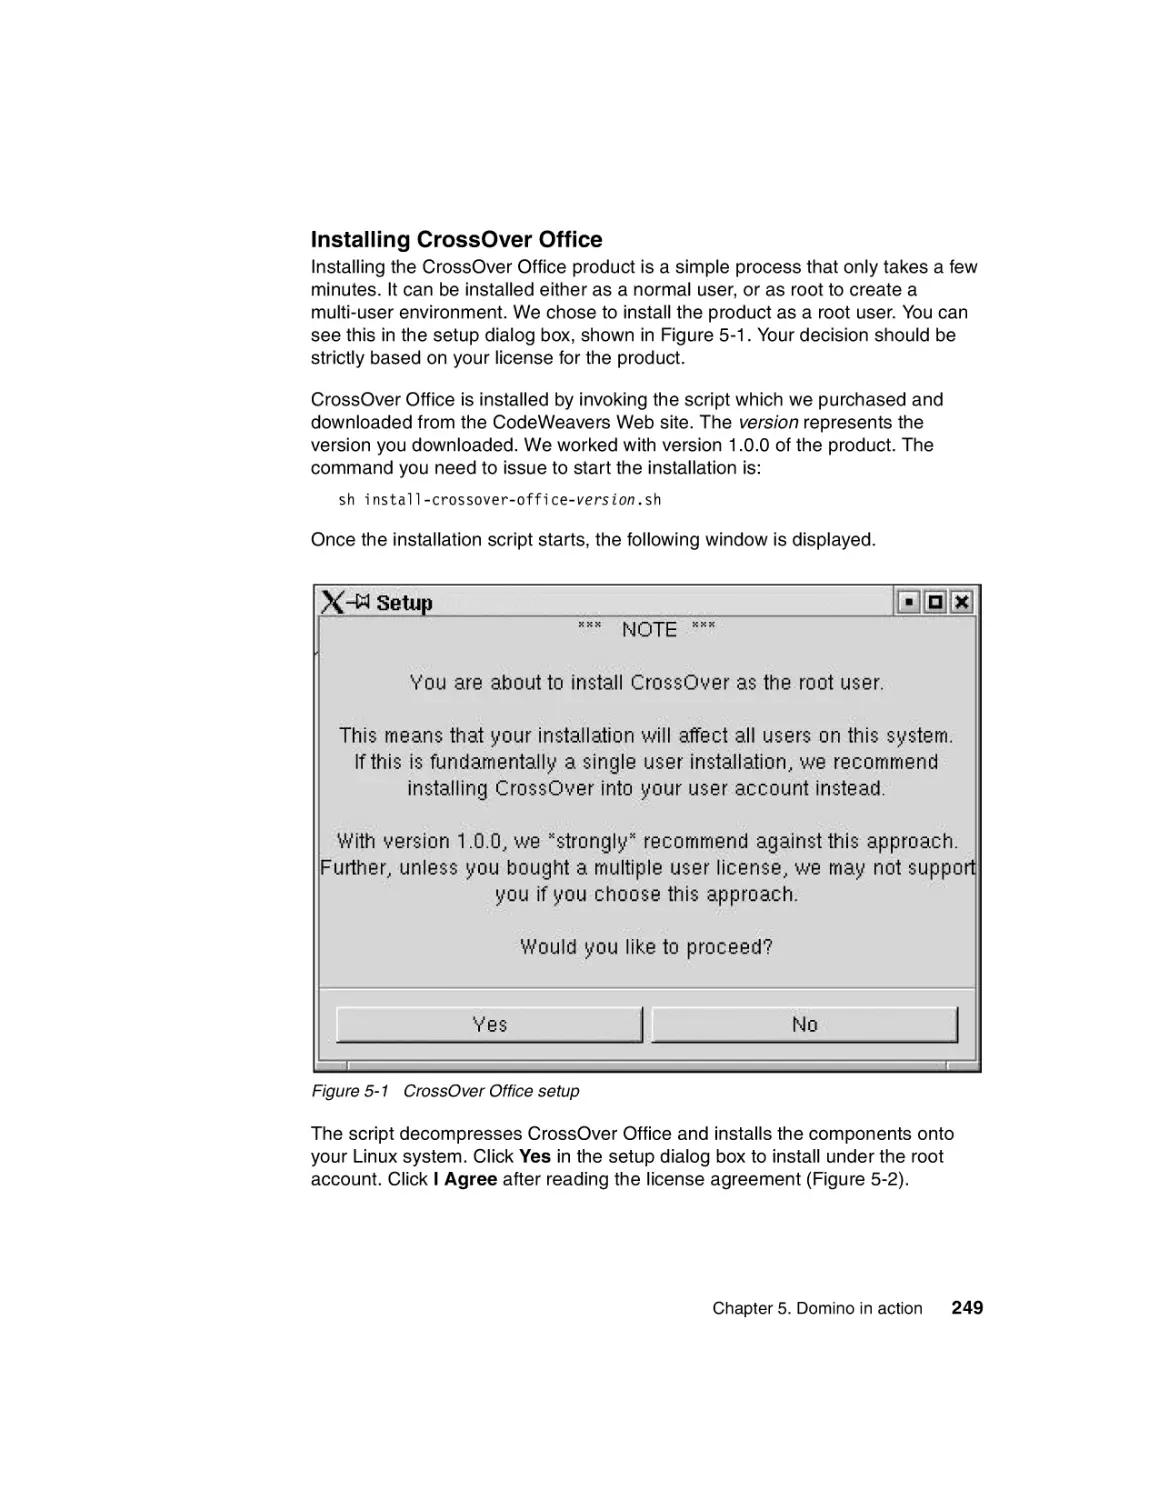

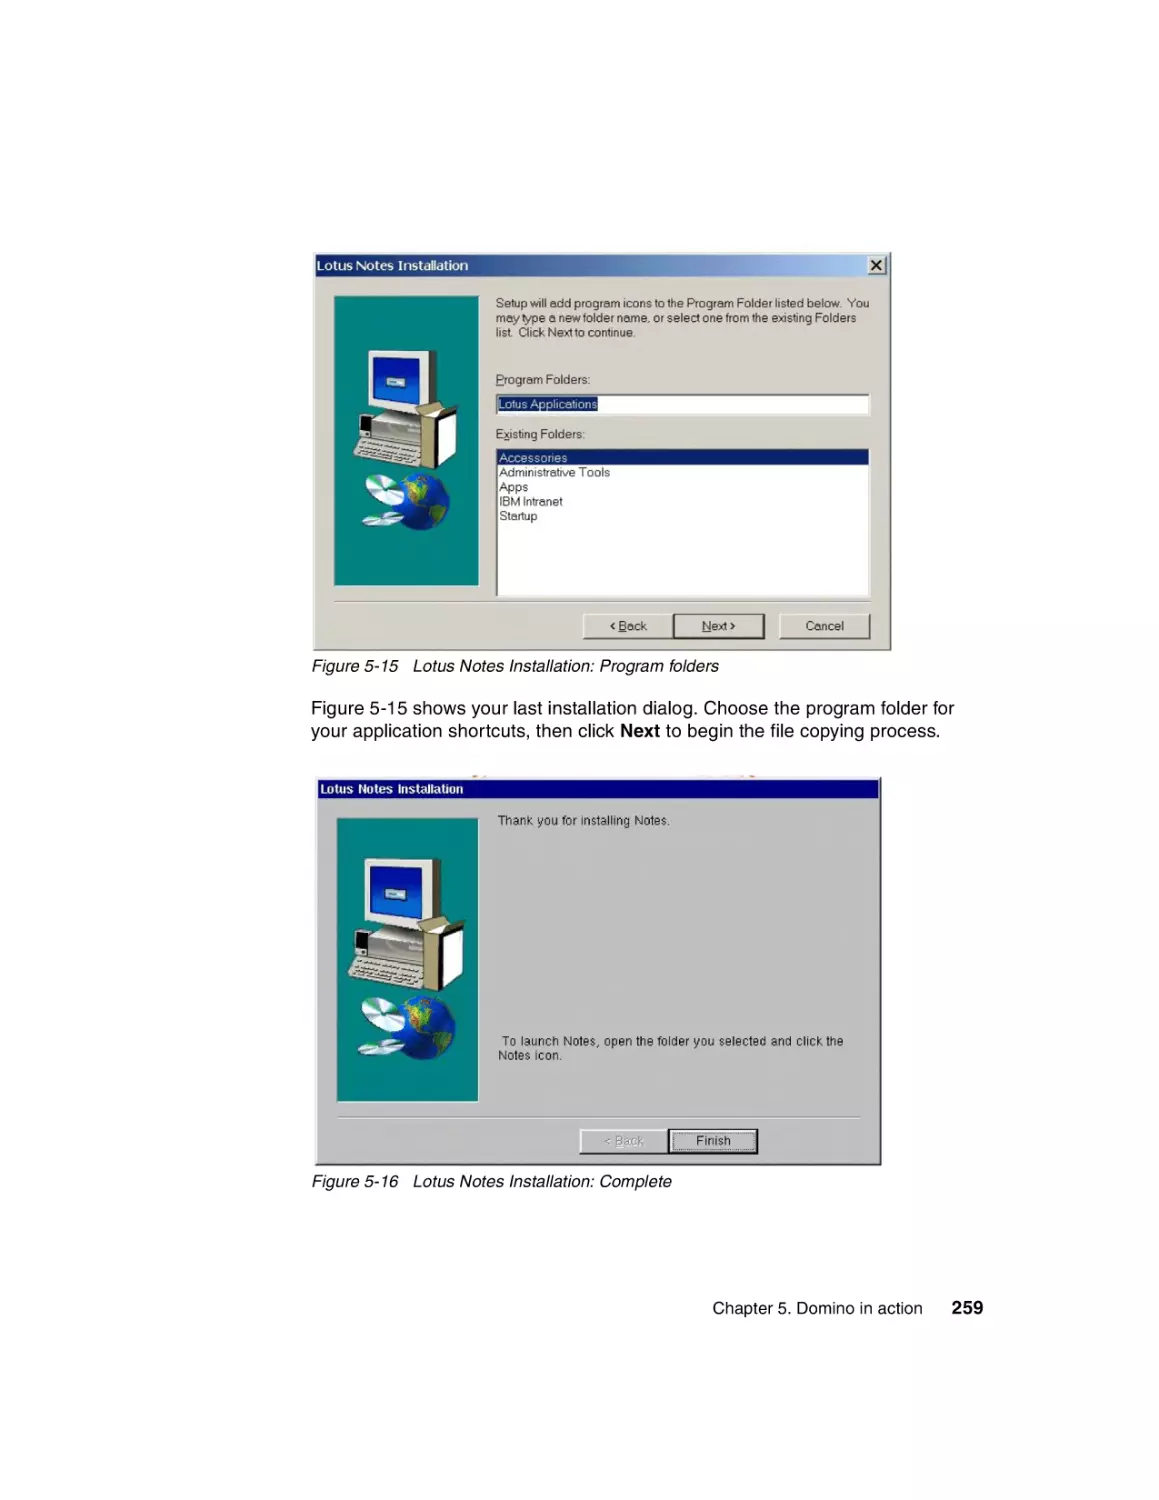


Текст
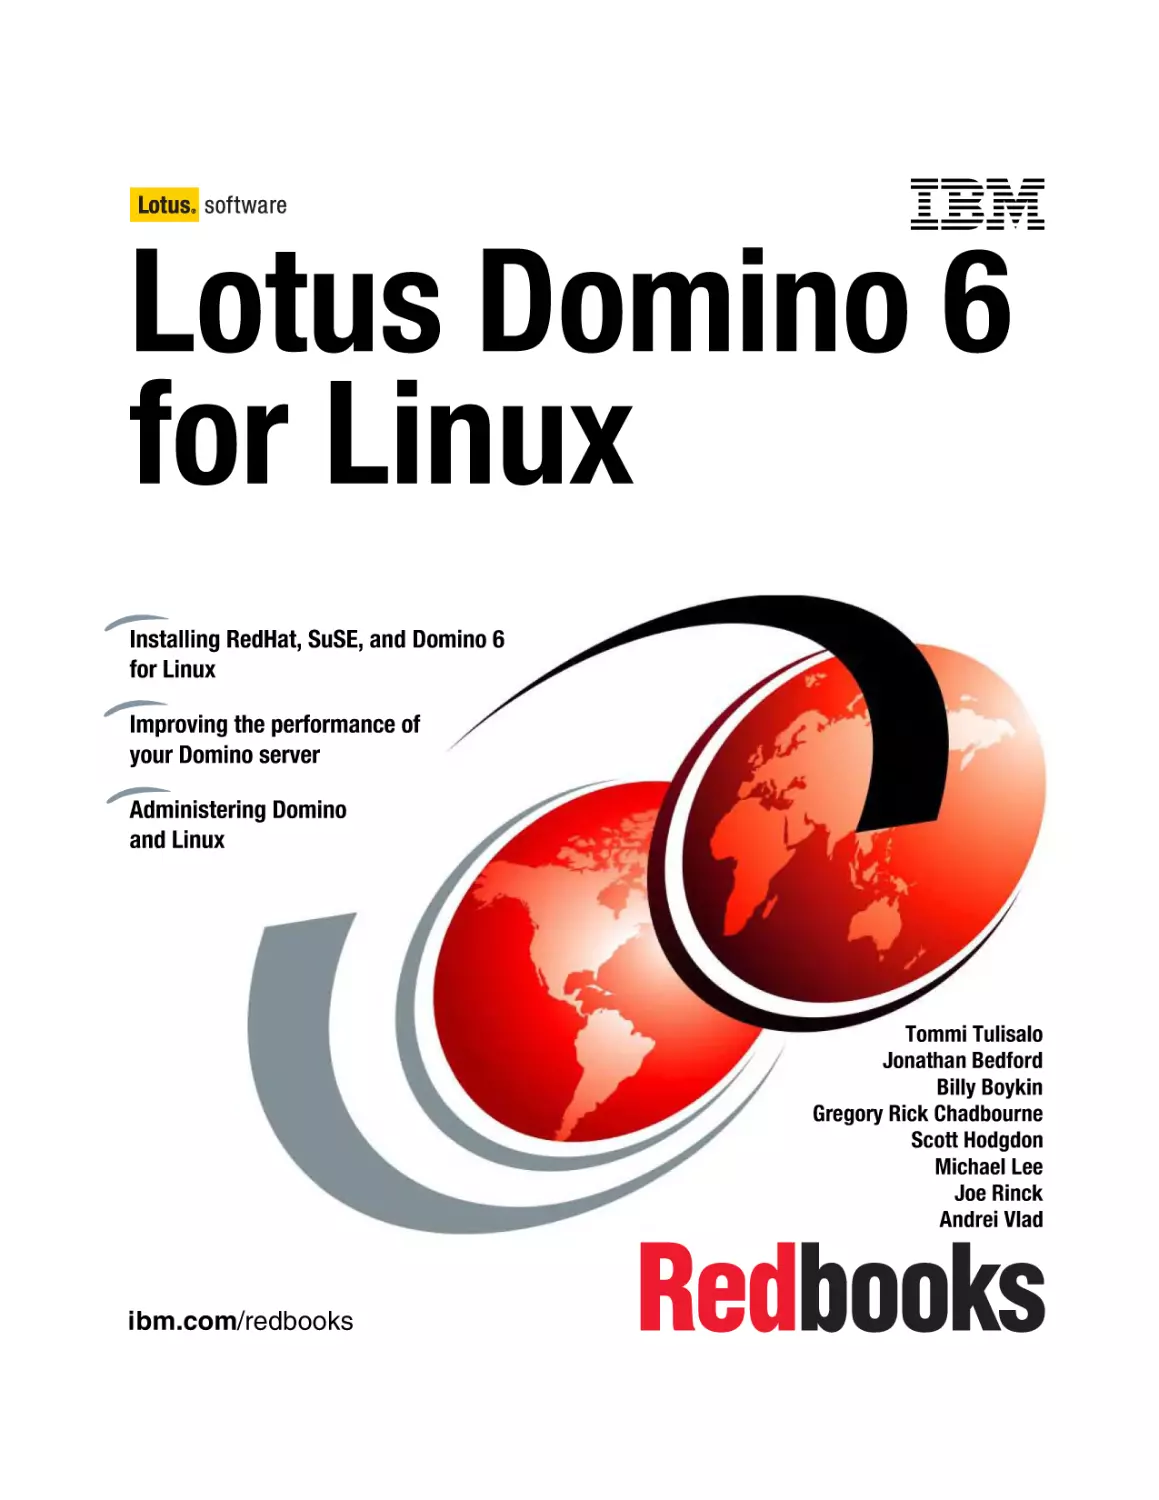
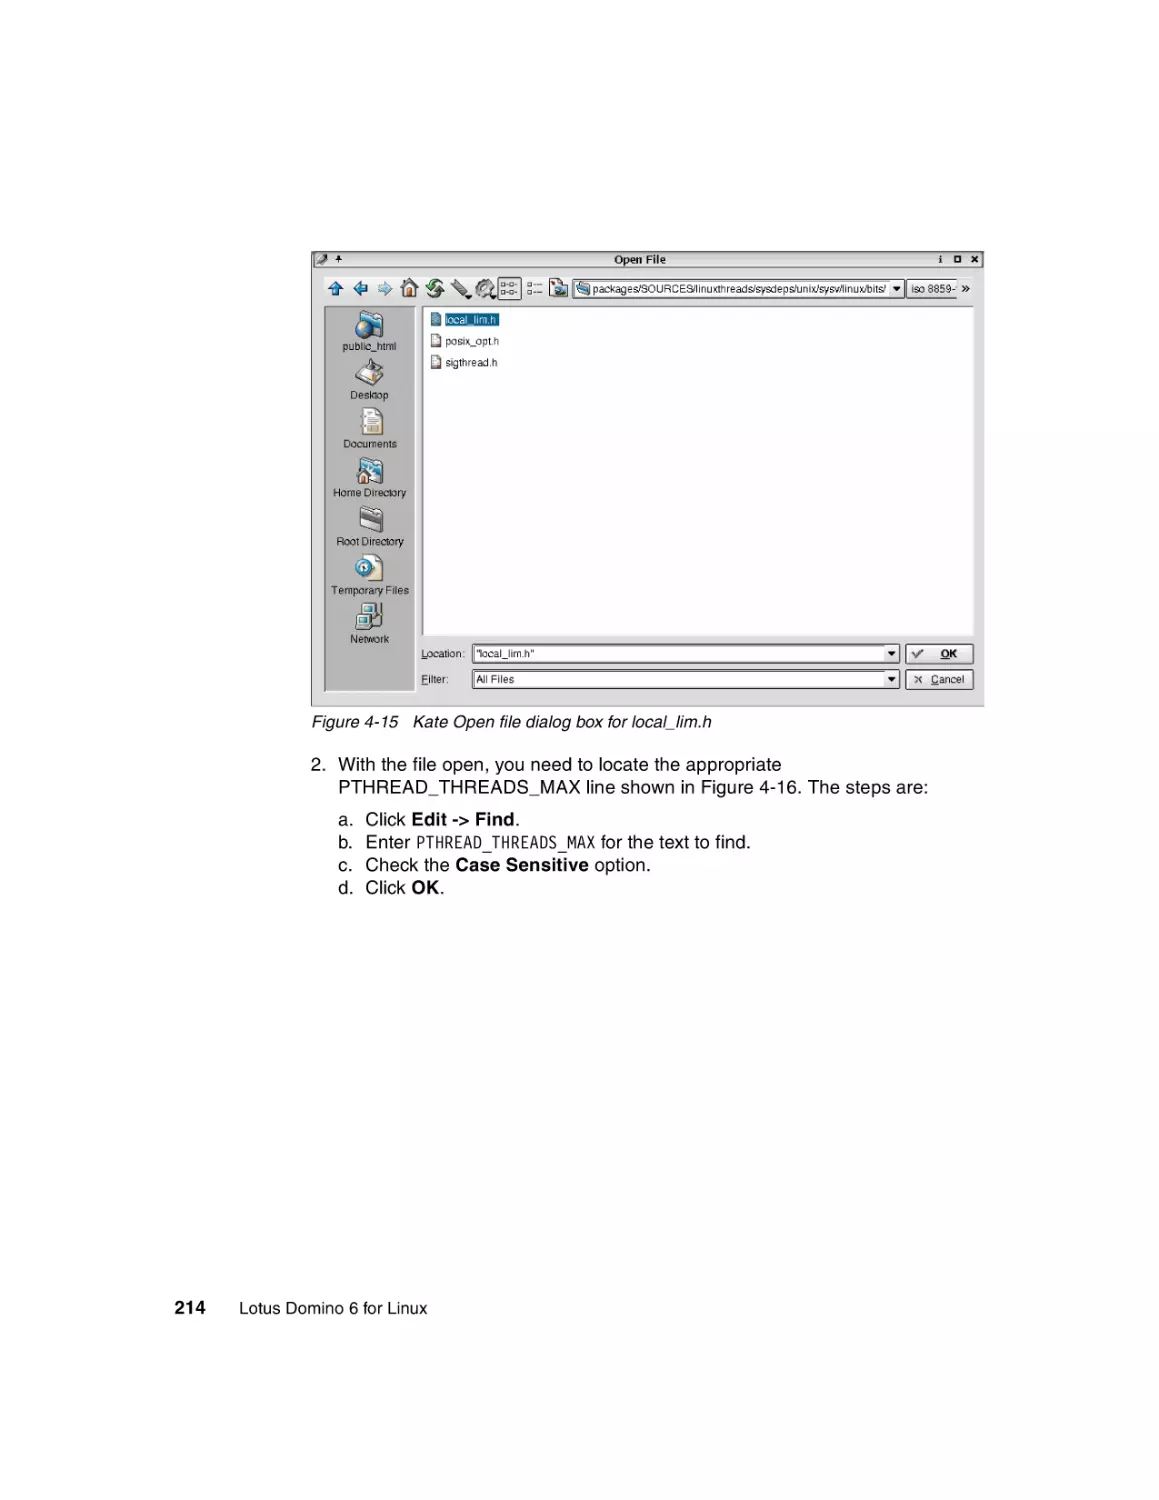
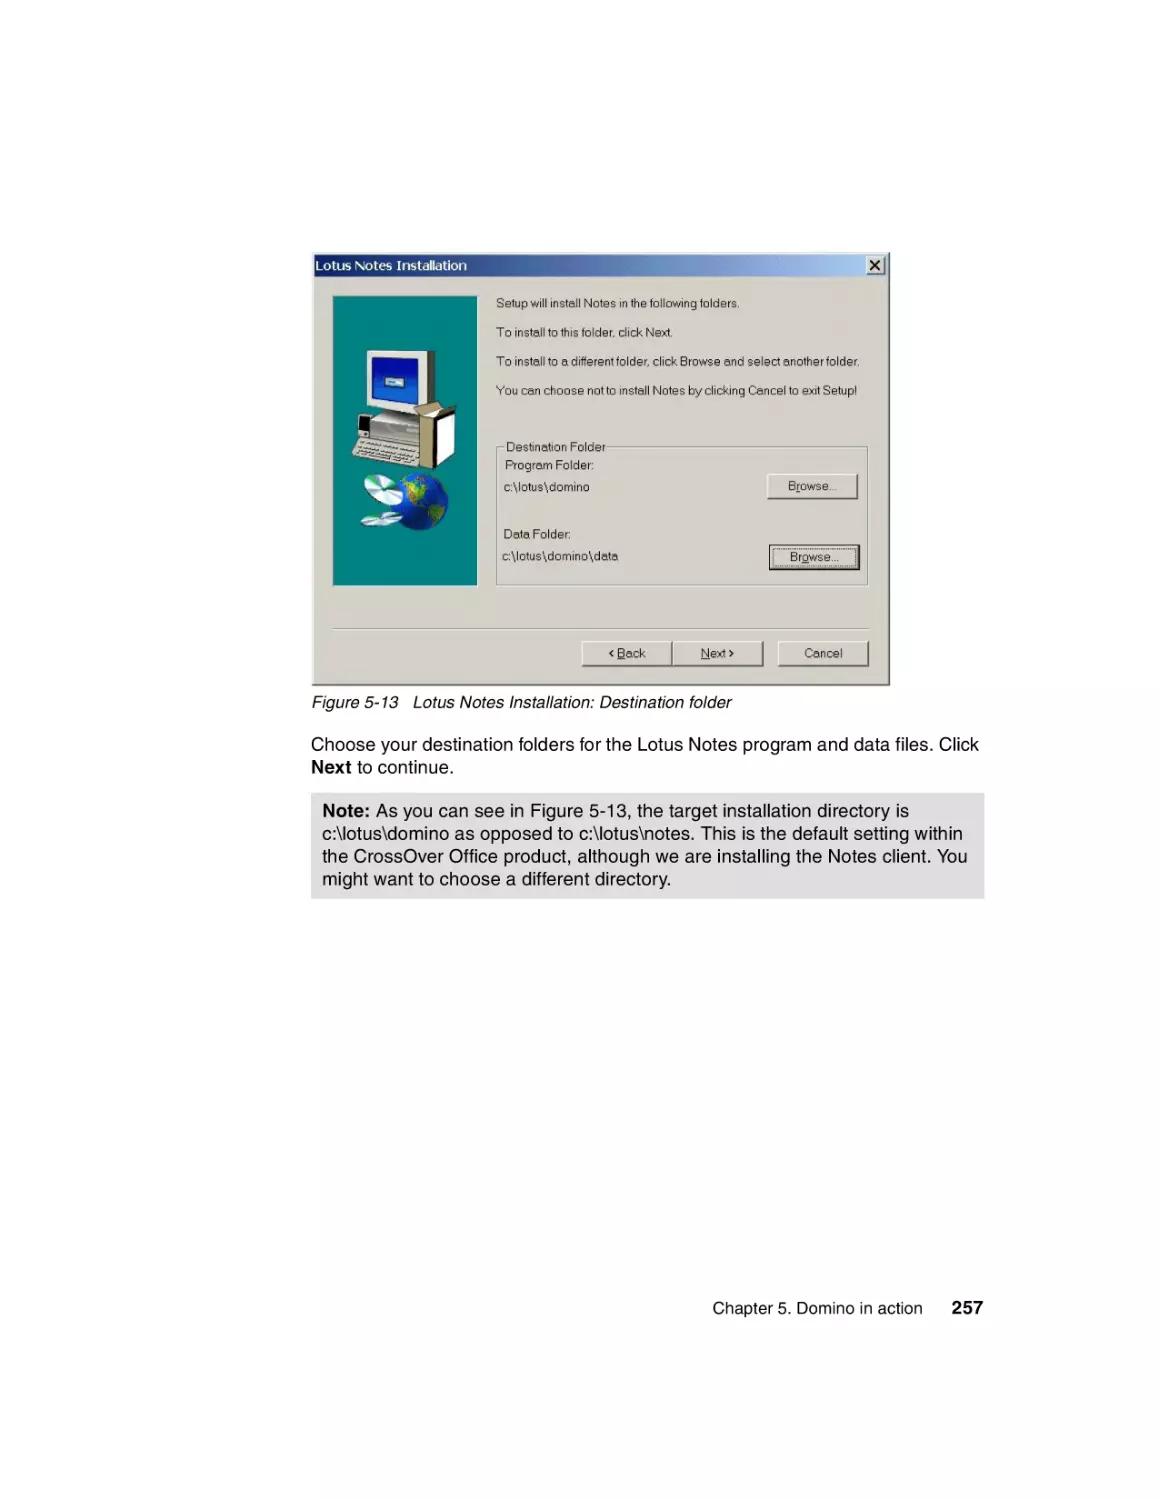
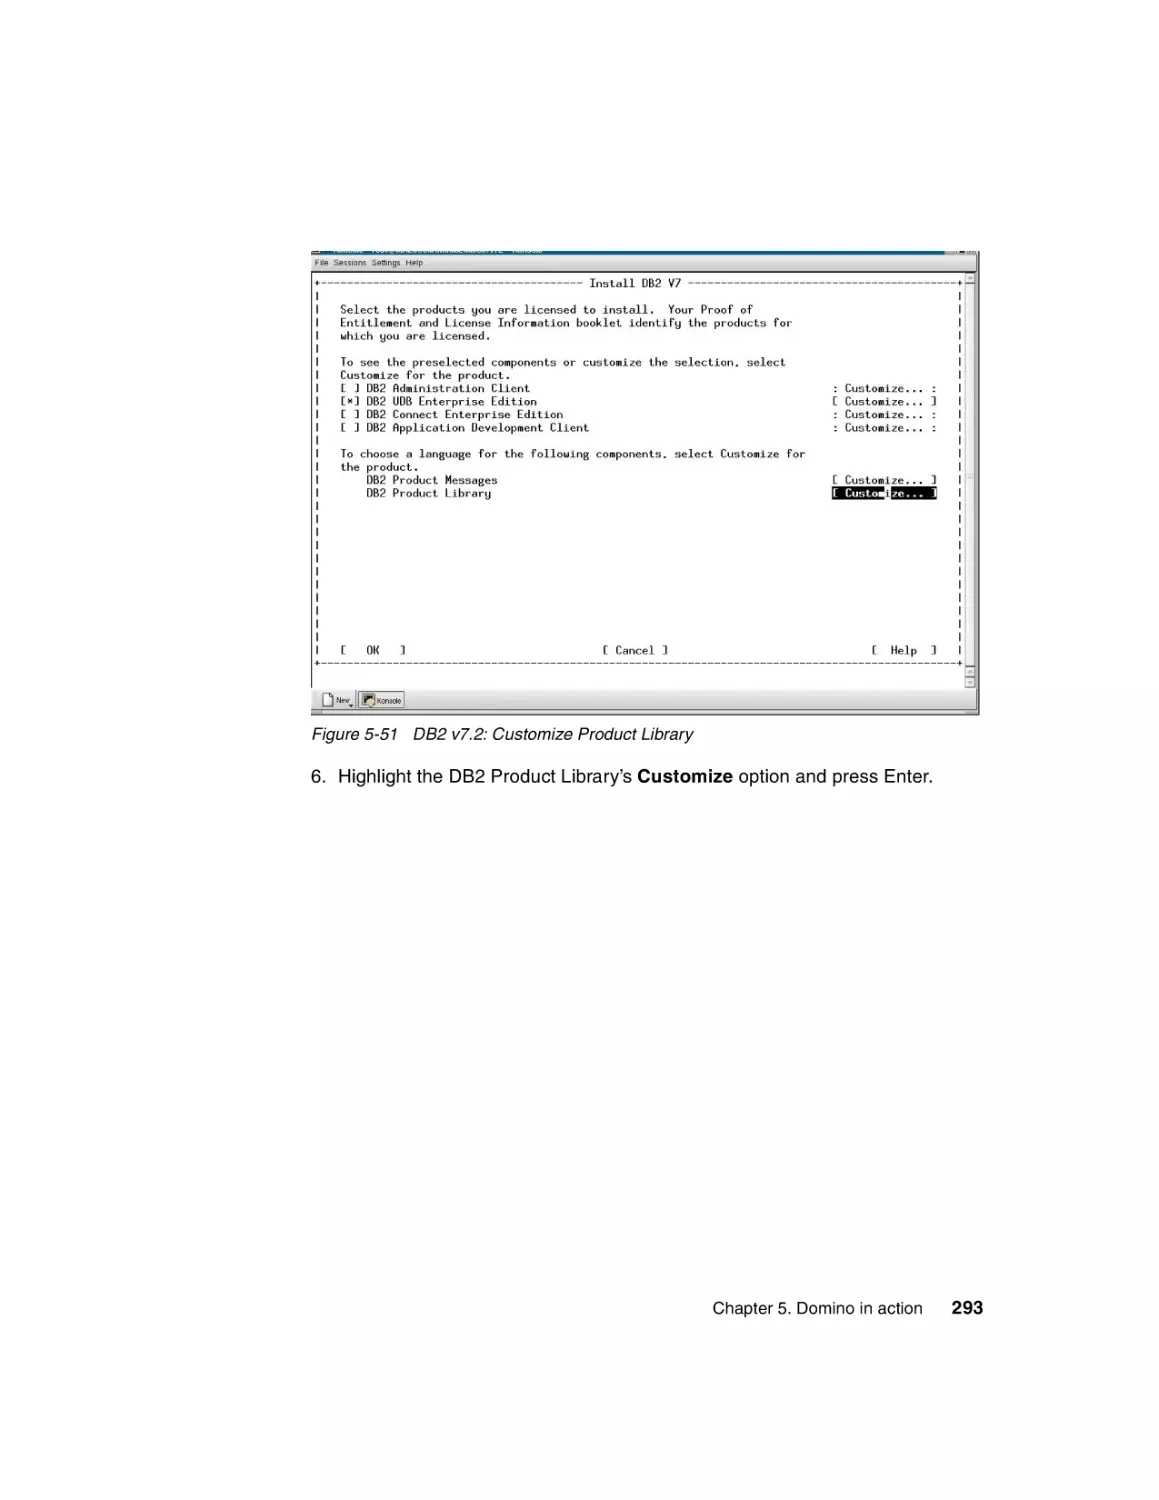
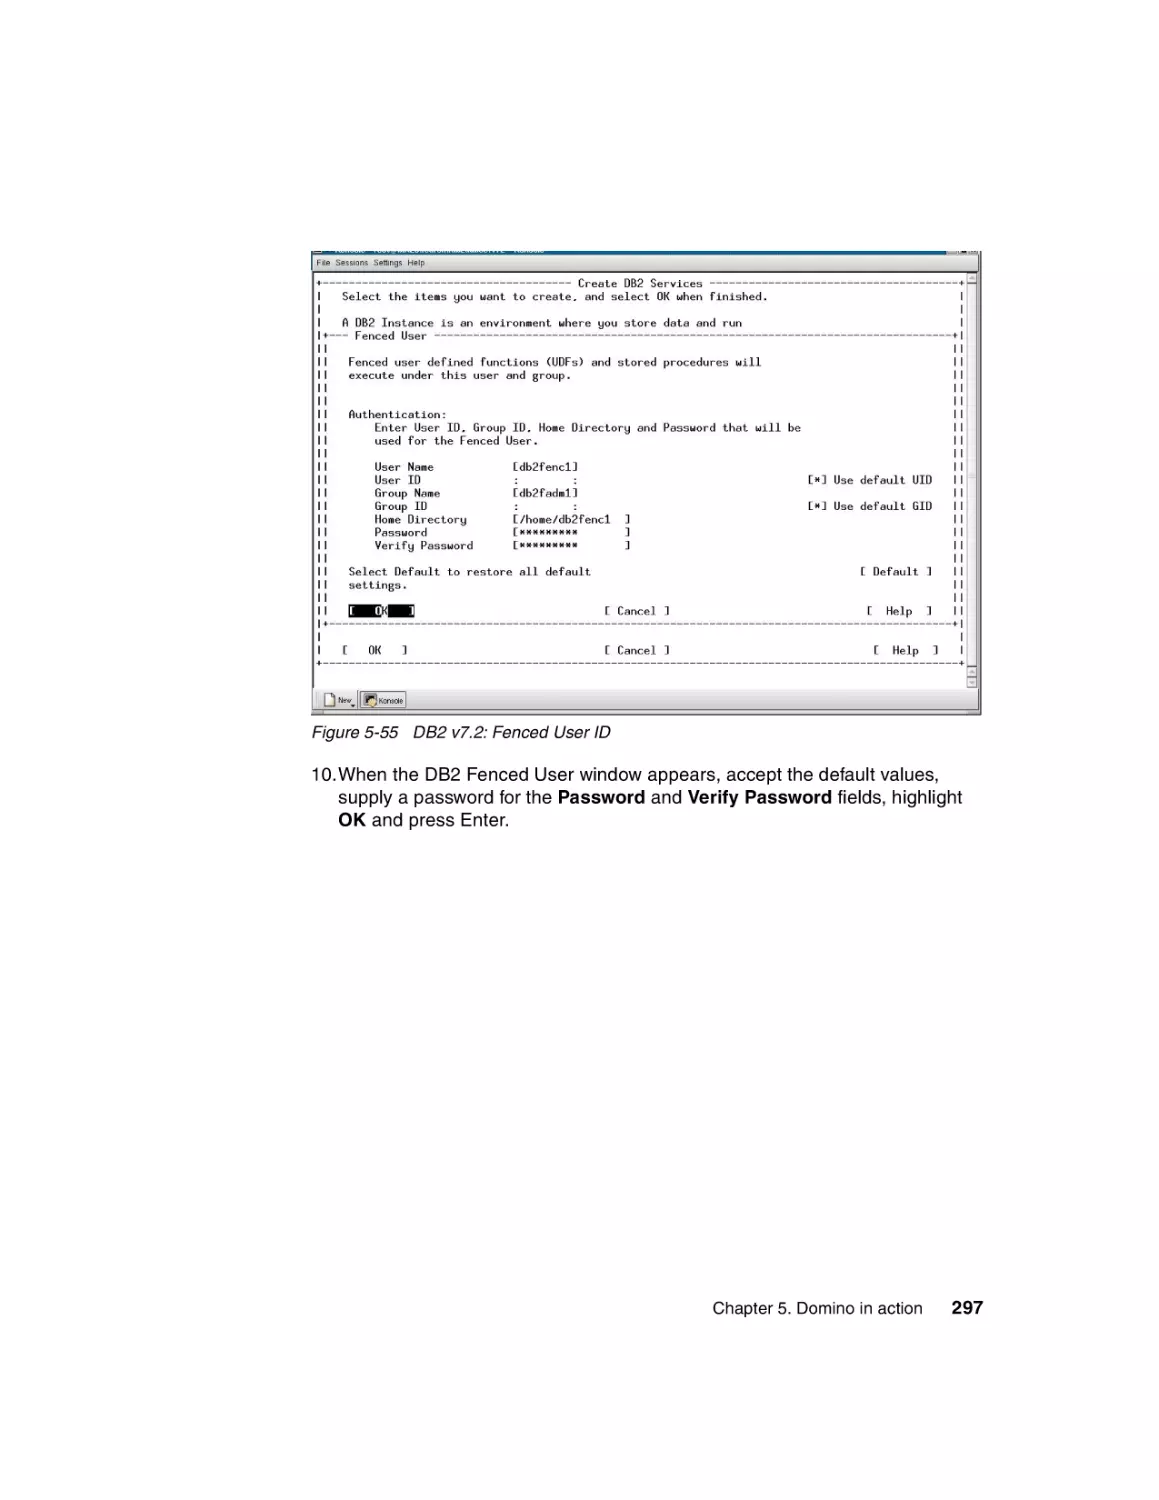
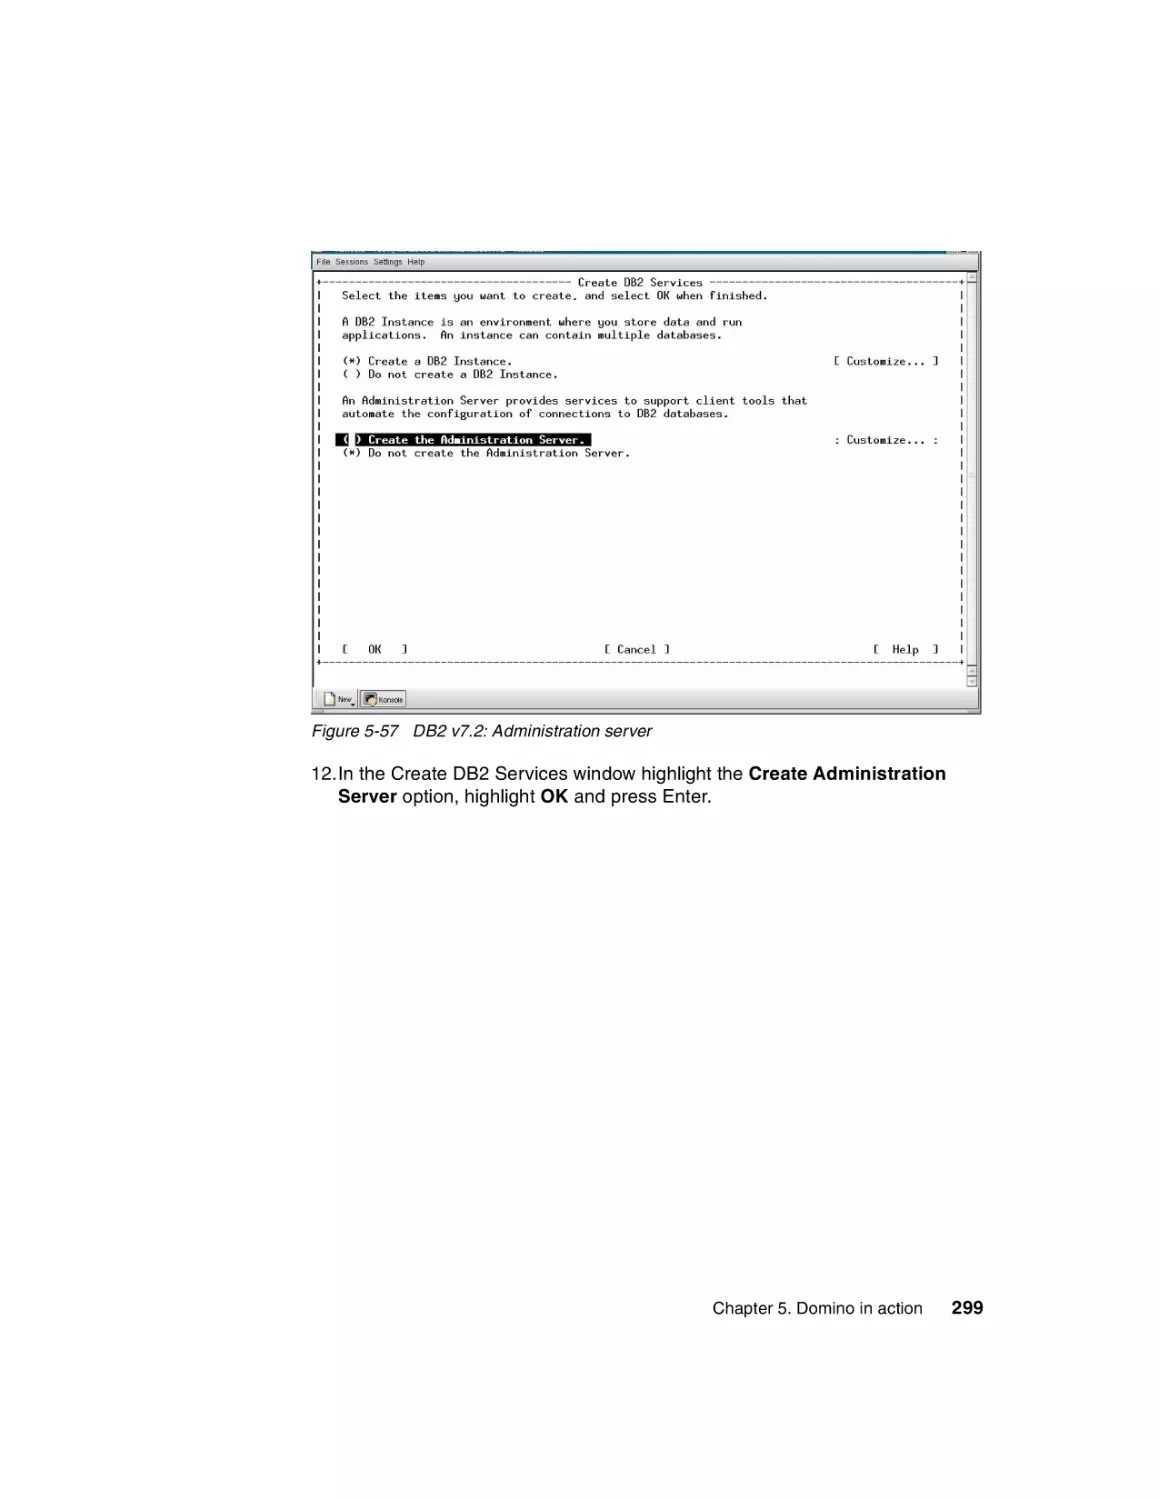
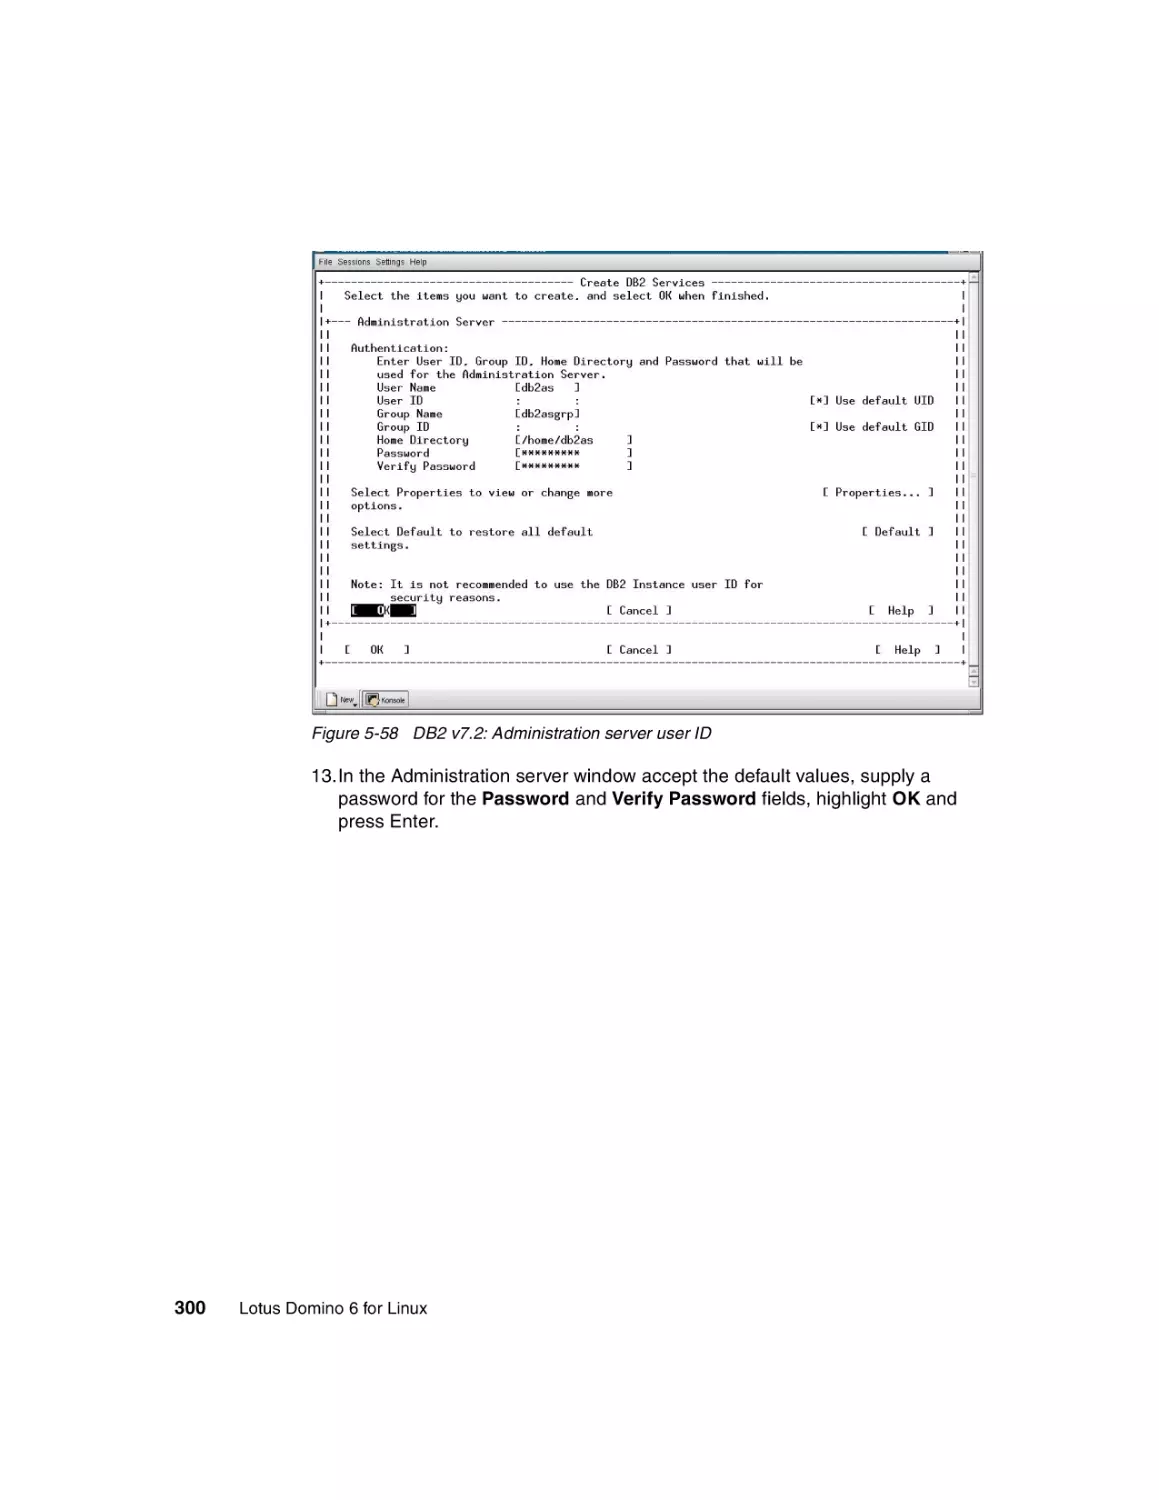
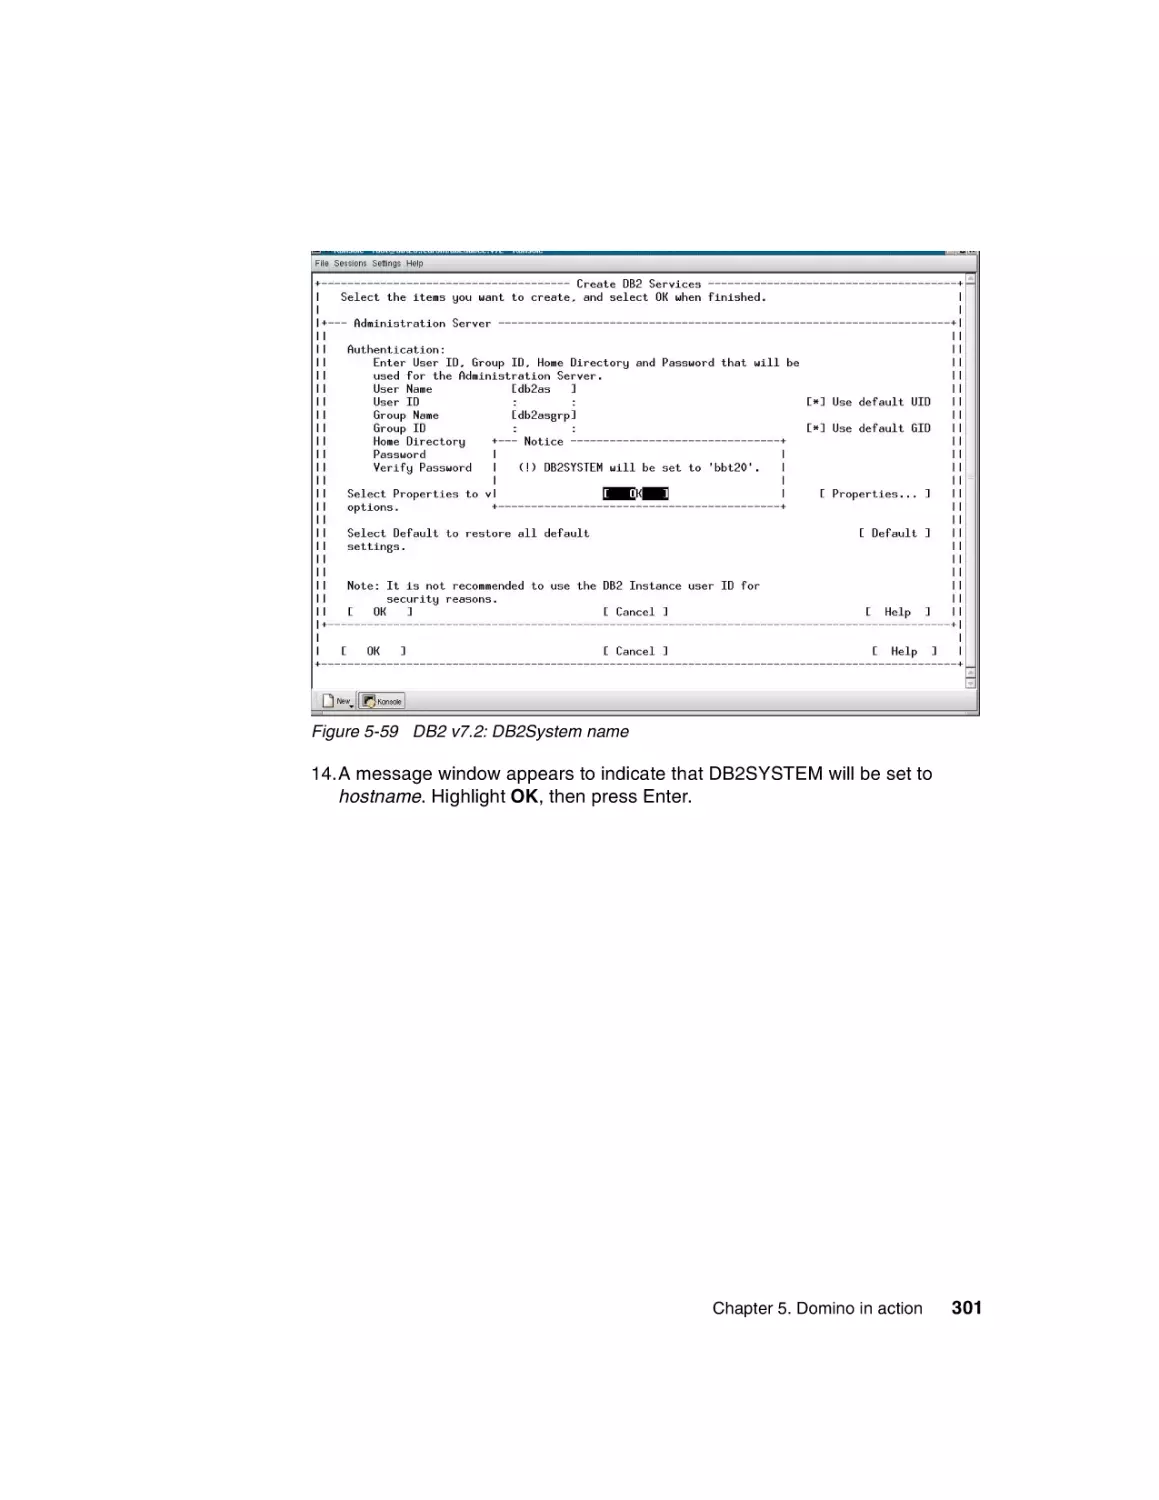
Front cover
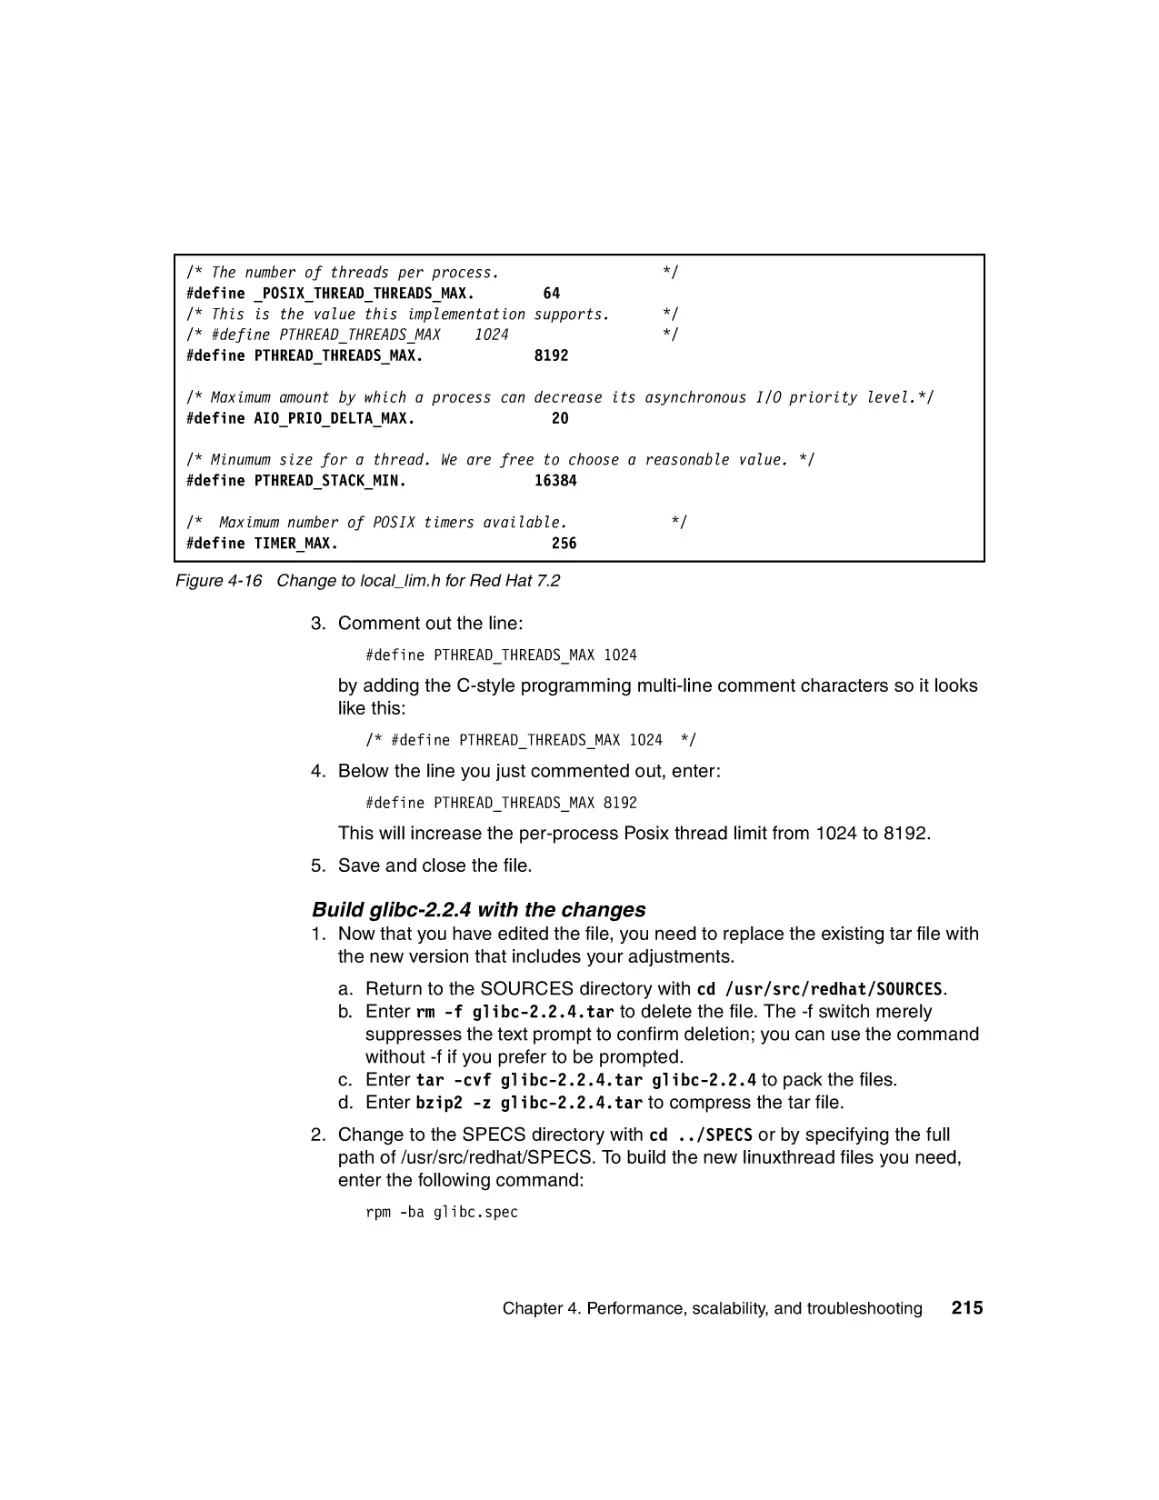
Lotus Domino 6
for Linux
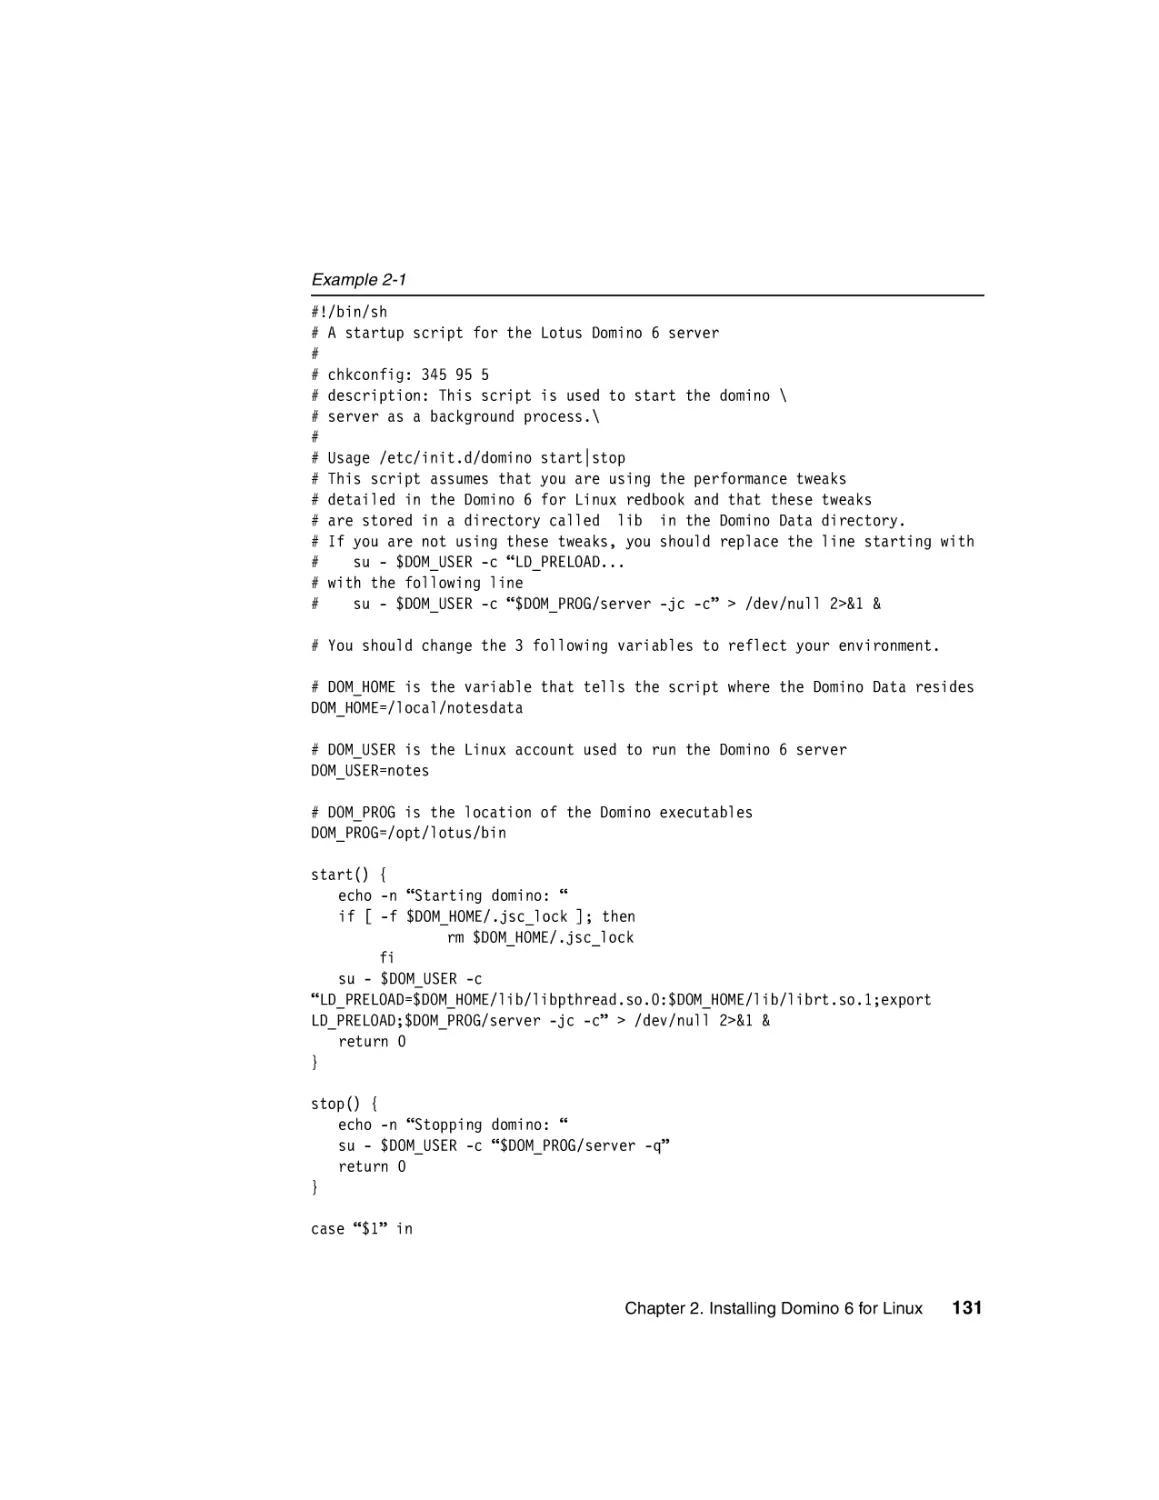
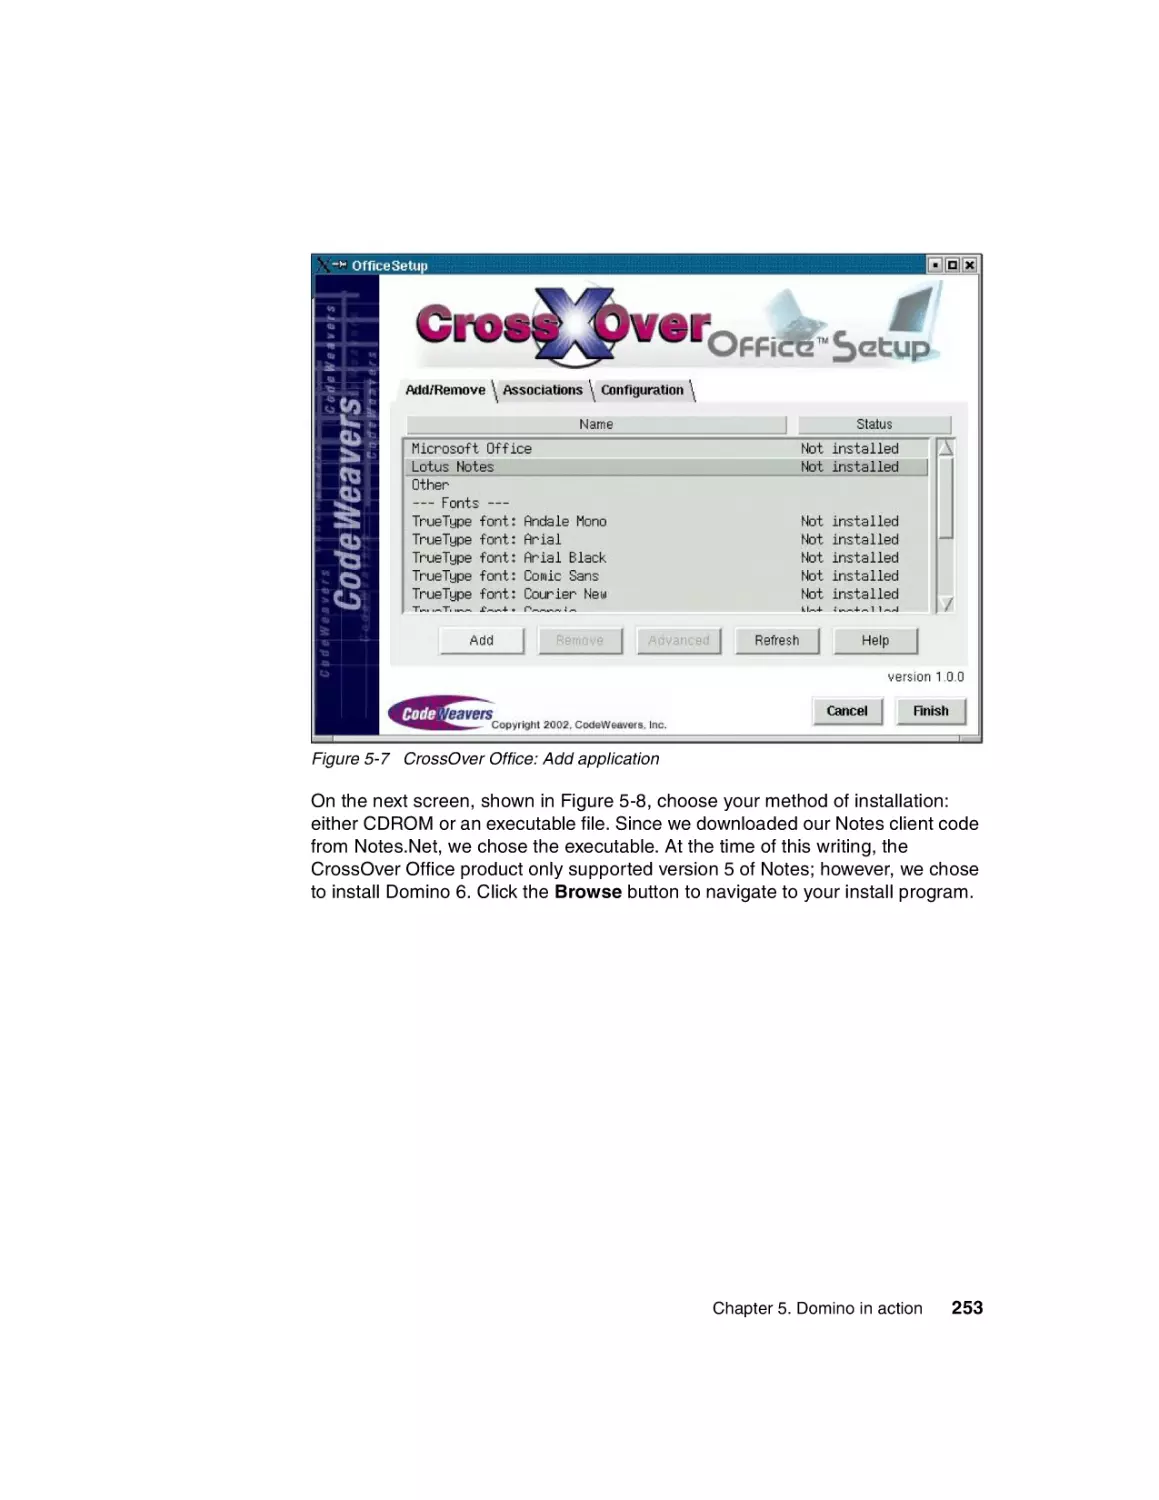
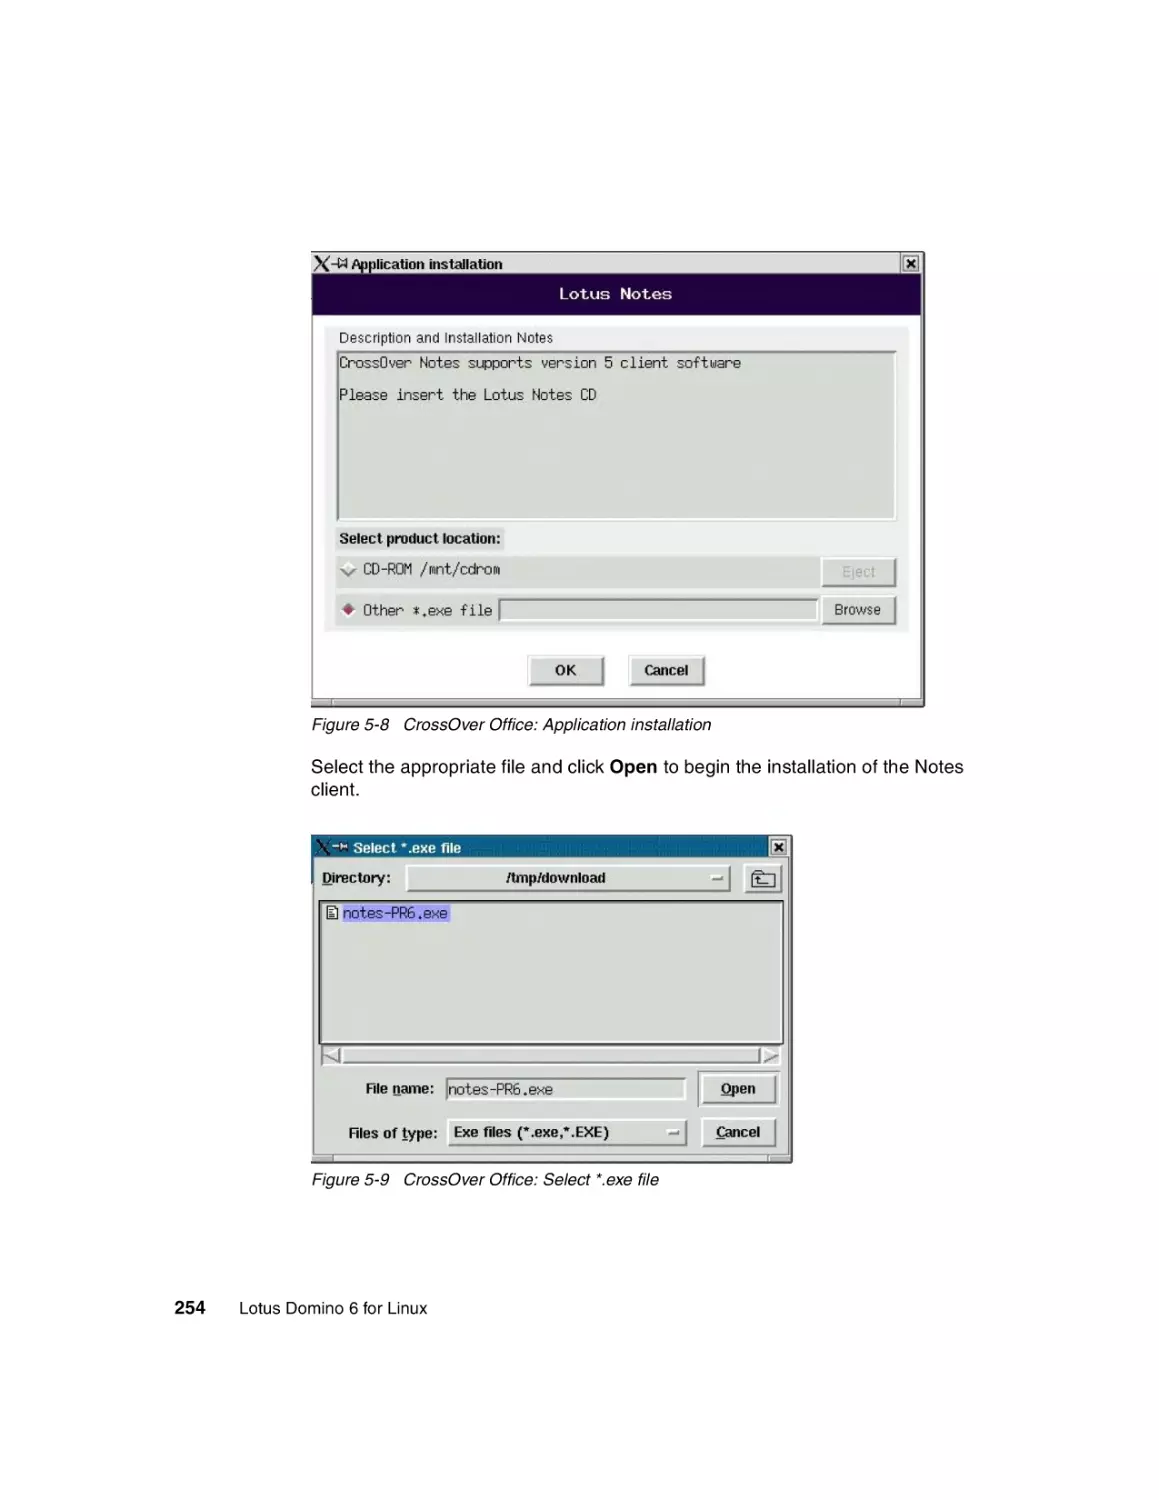
Installing RedHat, SuSE, and Domino 6
for Linux
Improving the performance of
your Domino server
Administering Domino
and Linux
Tommi Tulisalo
Jonathan Bedford
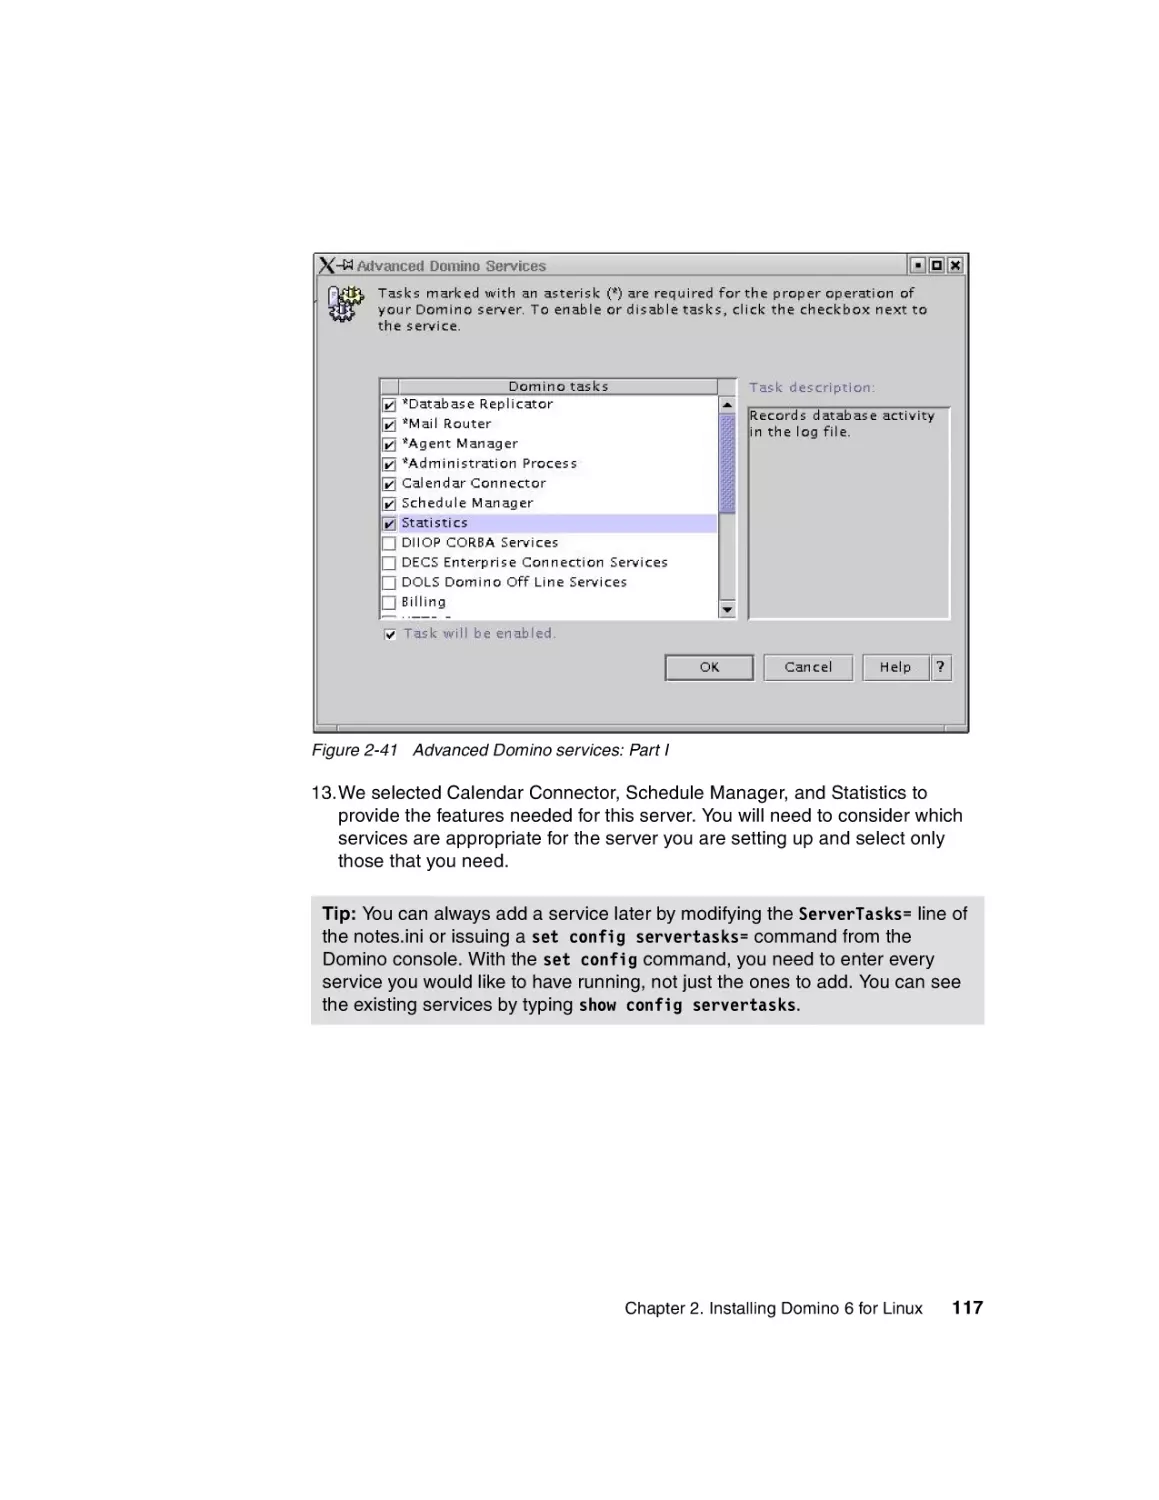
Billy Boykin
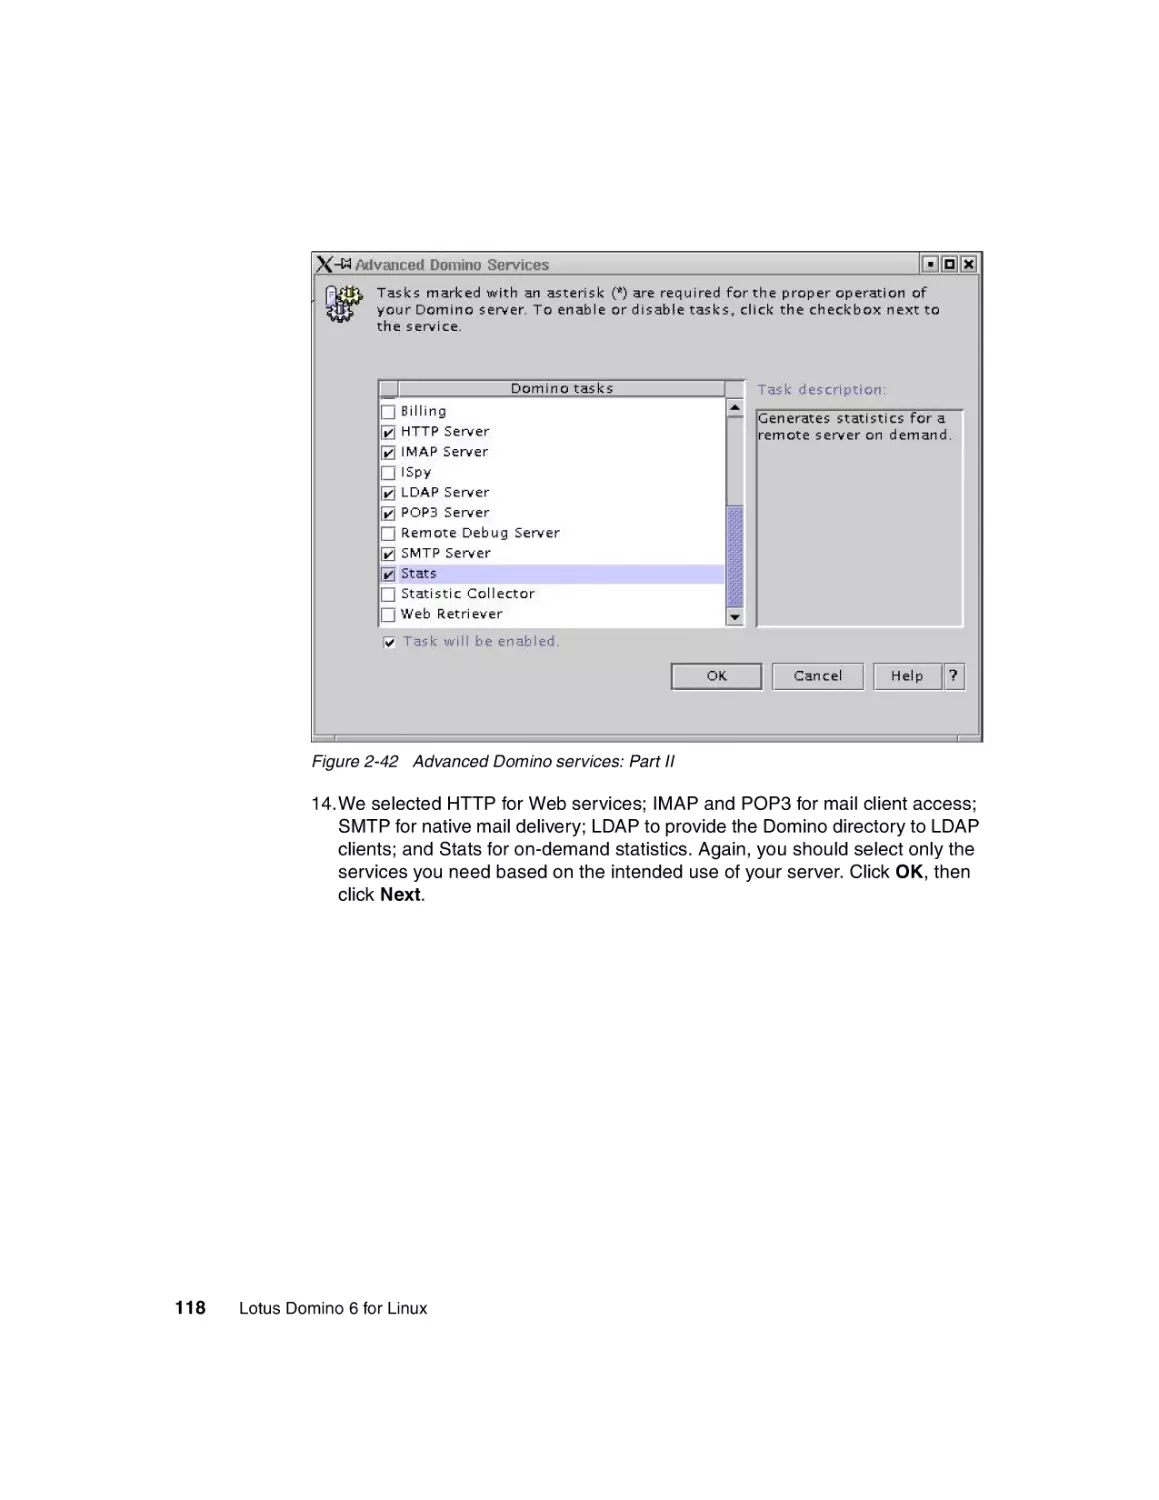
Gregory Rick Chadbourne
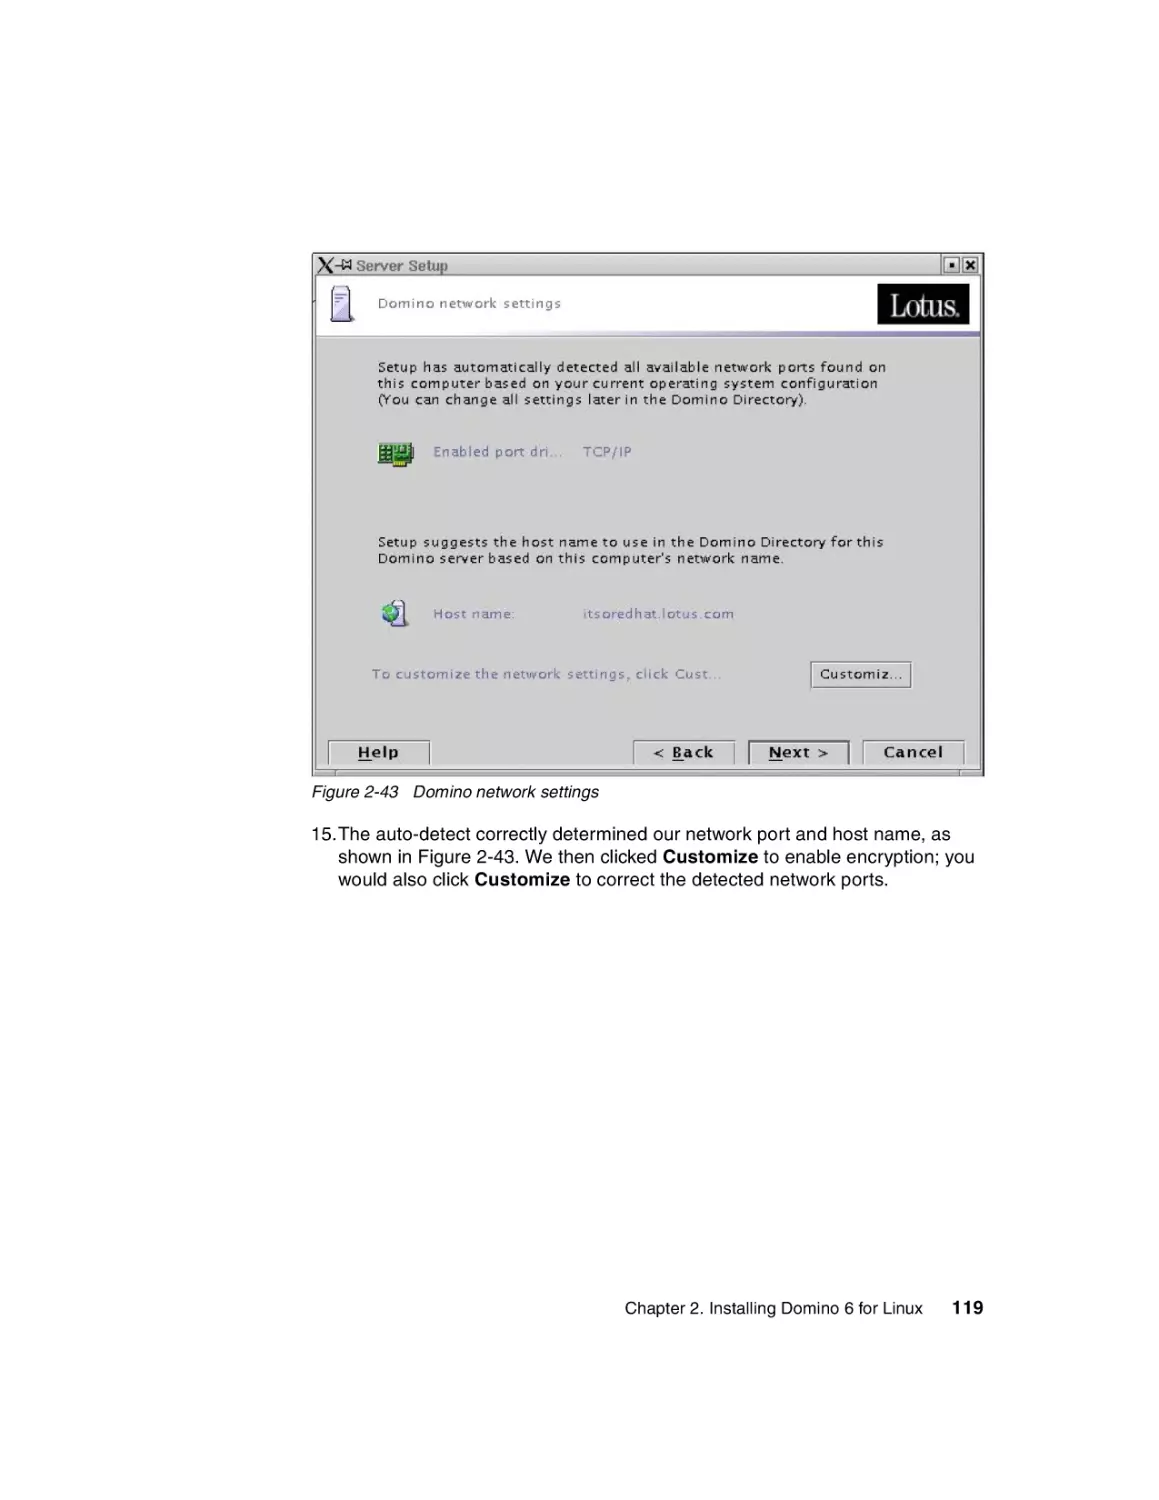
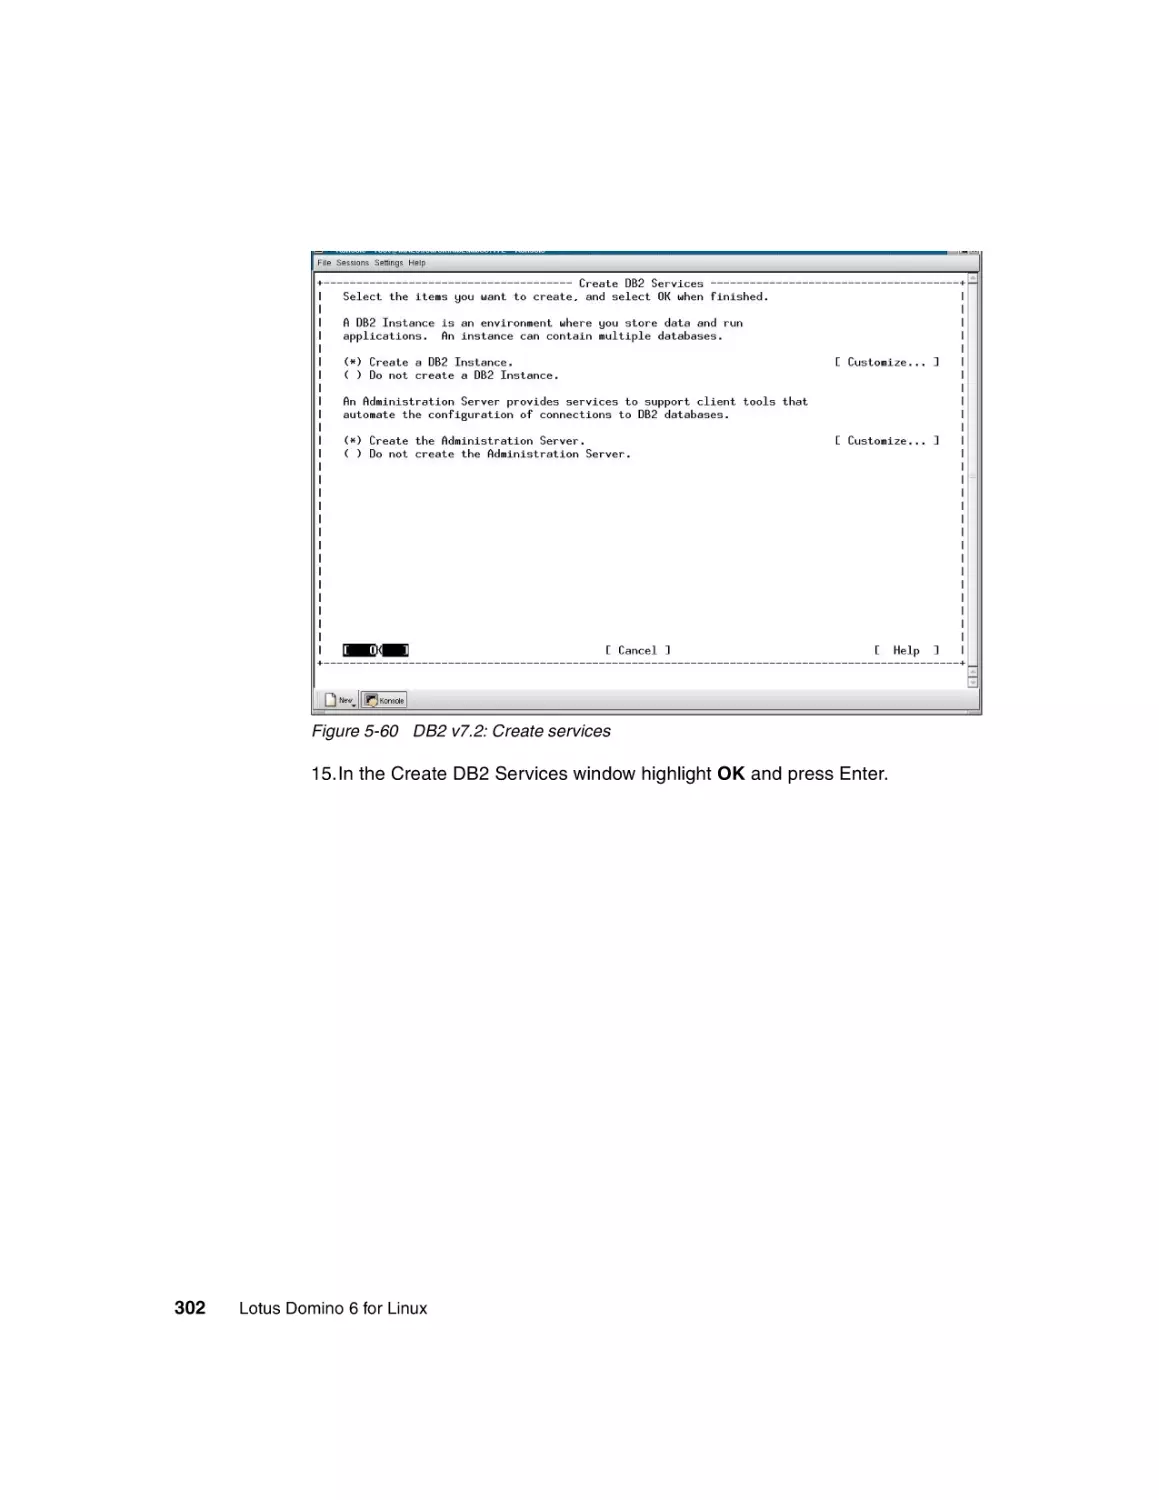
Scott Hodgdon
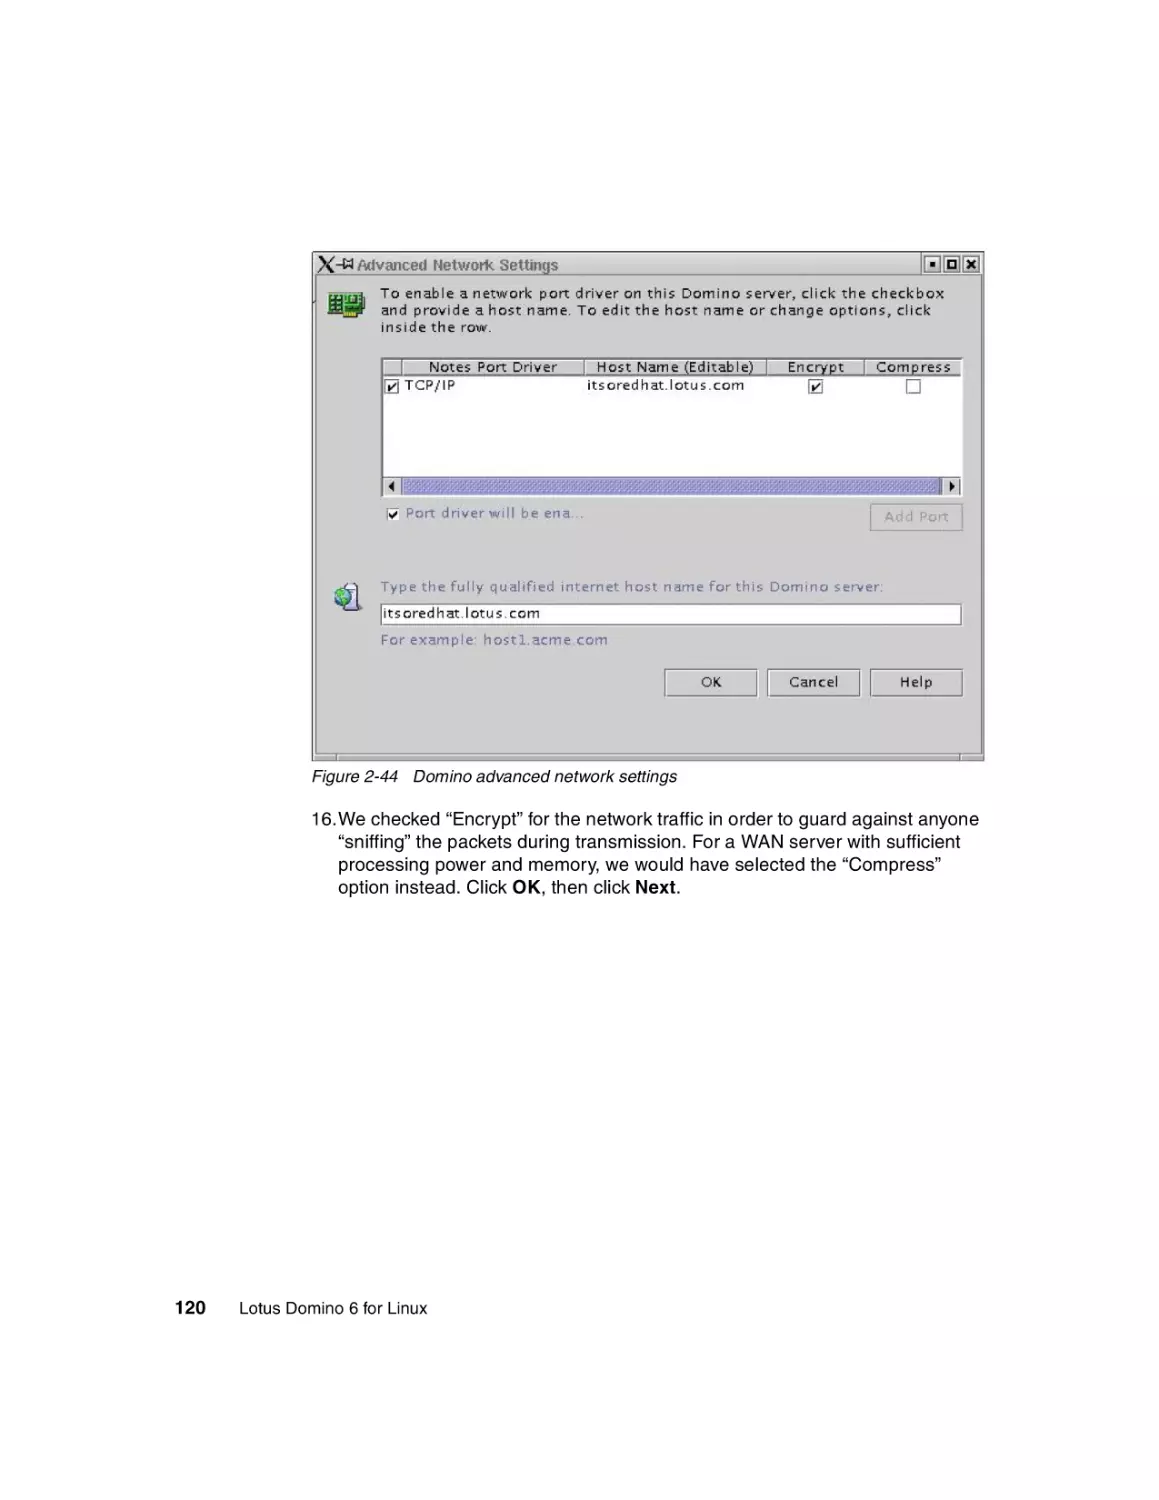
Michael Lee
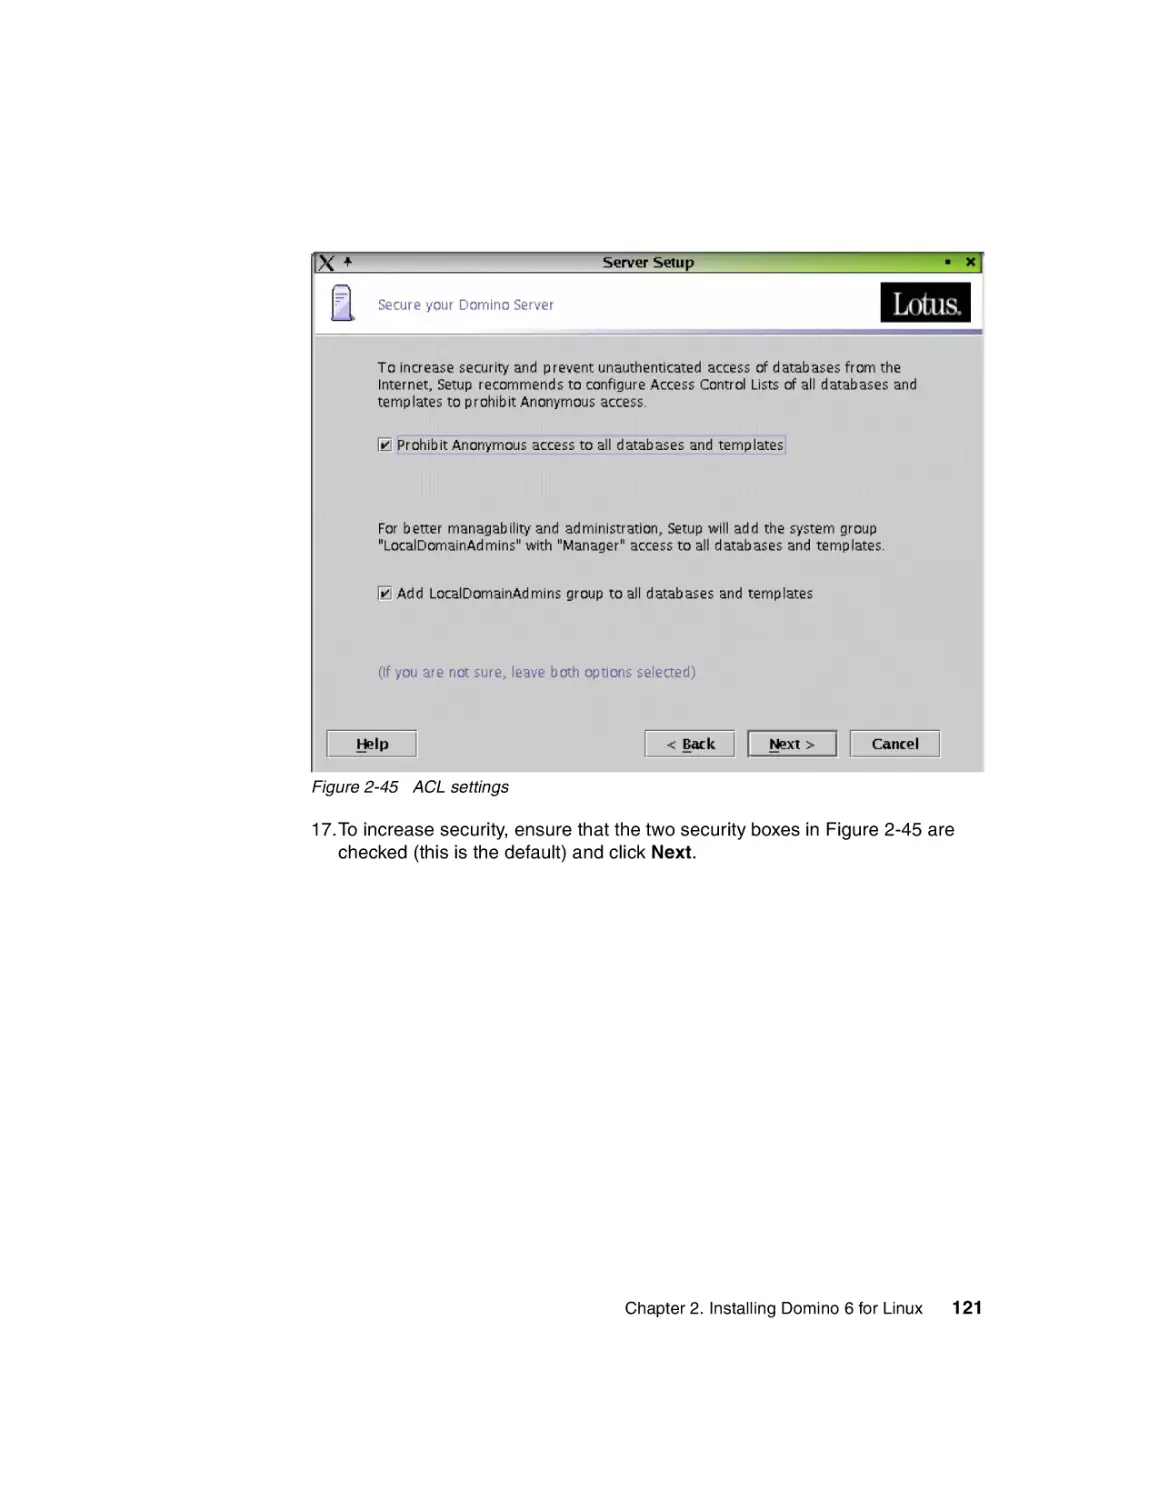
Joe Rinck
Andrei Vlad
ibm.com/redbooks
International Technical Support Organization
Lotus Domino 6 for Linux
November 2002
SG24-6835-00
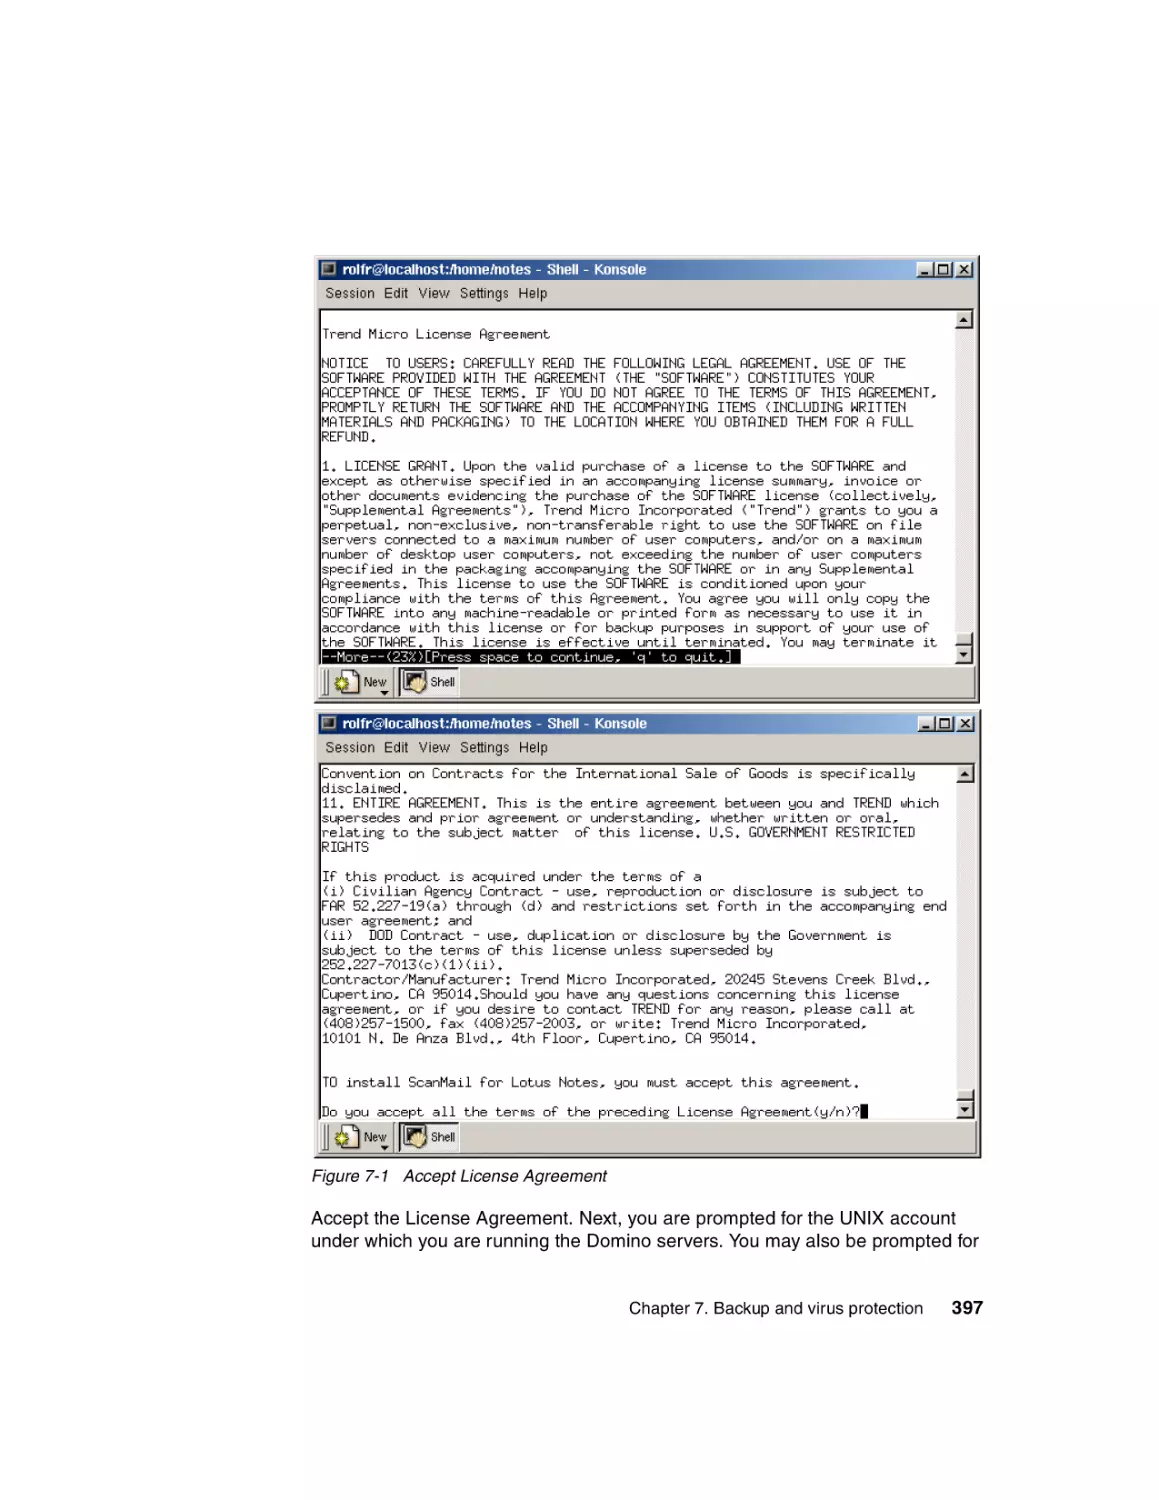
Take Note! Before using this information and the product it supports, be sure to read the
general information in “Notices” on page vii.
First Edition (November 2002)
This edition applies to Lotus Domino Server Pre-Release 2 for Linux, RedHat Linux operating
system 7.2 and SuSE Linux operating sytem 8.0.
Comments may be addressed to:
IBM Corporation, International Technical Support Organization
Dept. TQH, P009
2455 South Road
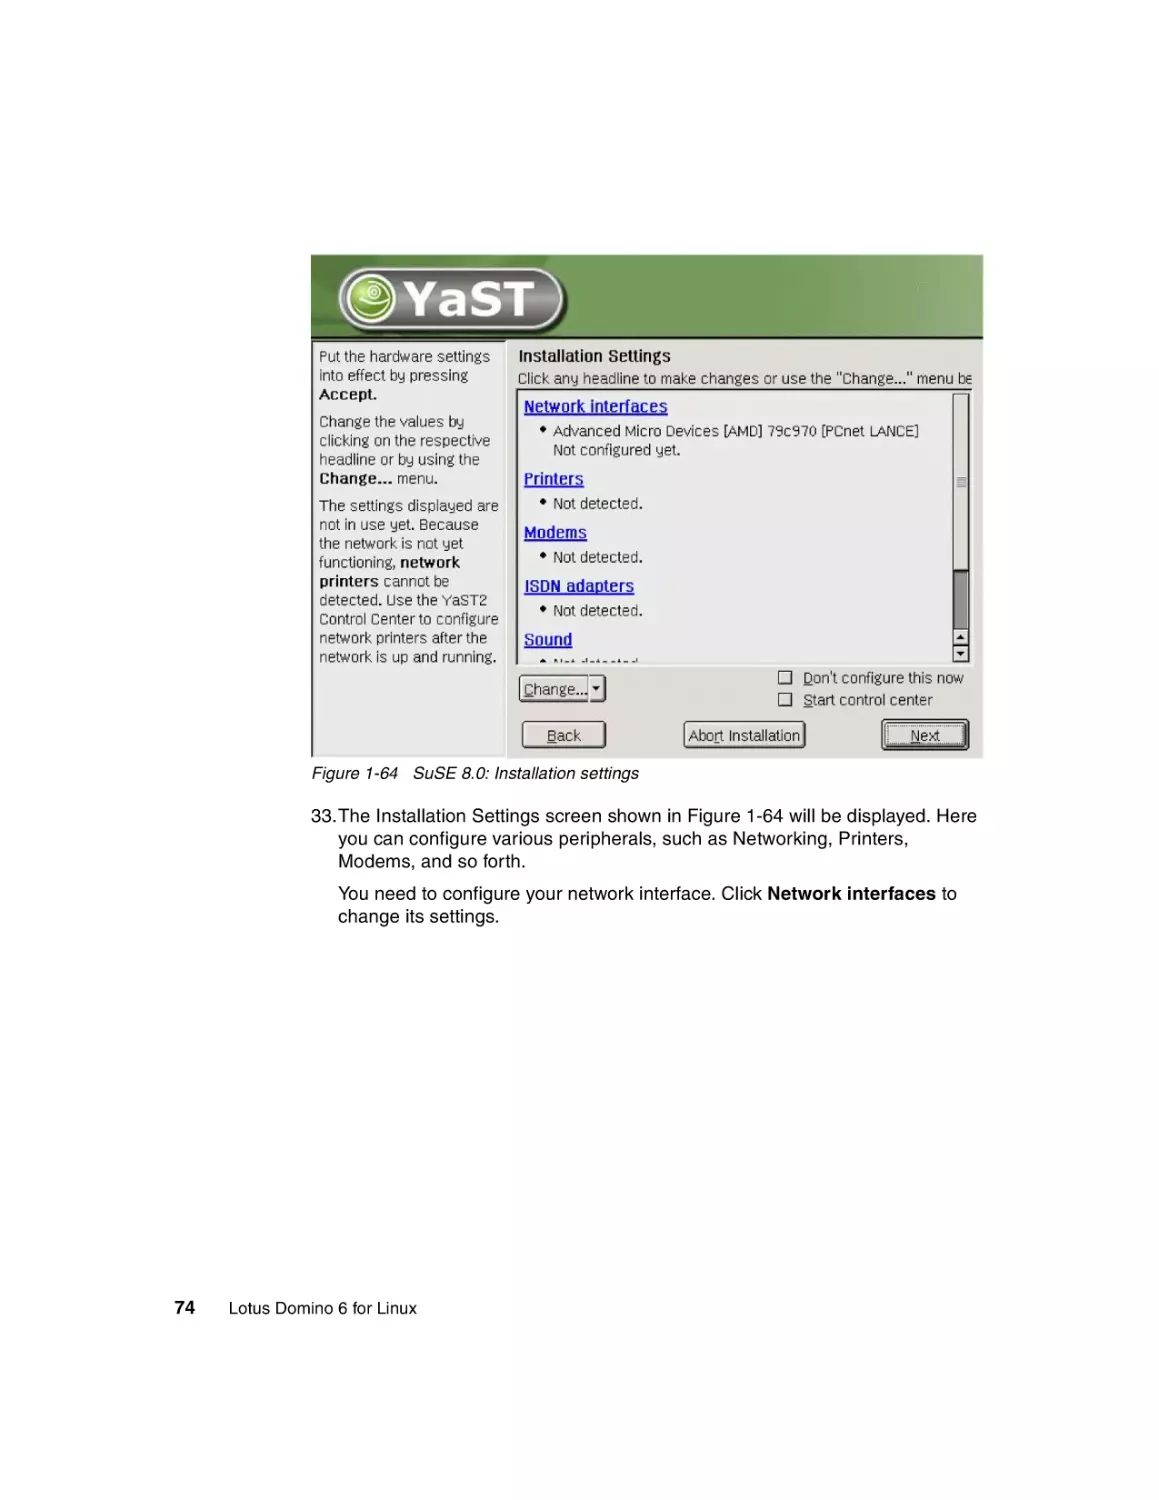
Poughkeepsie, New York 12601- 5400 USA
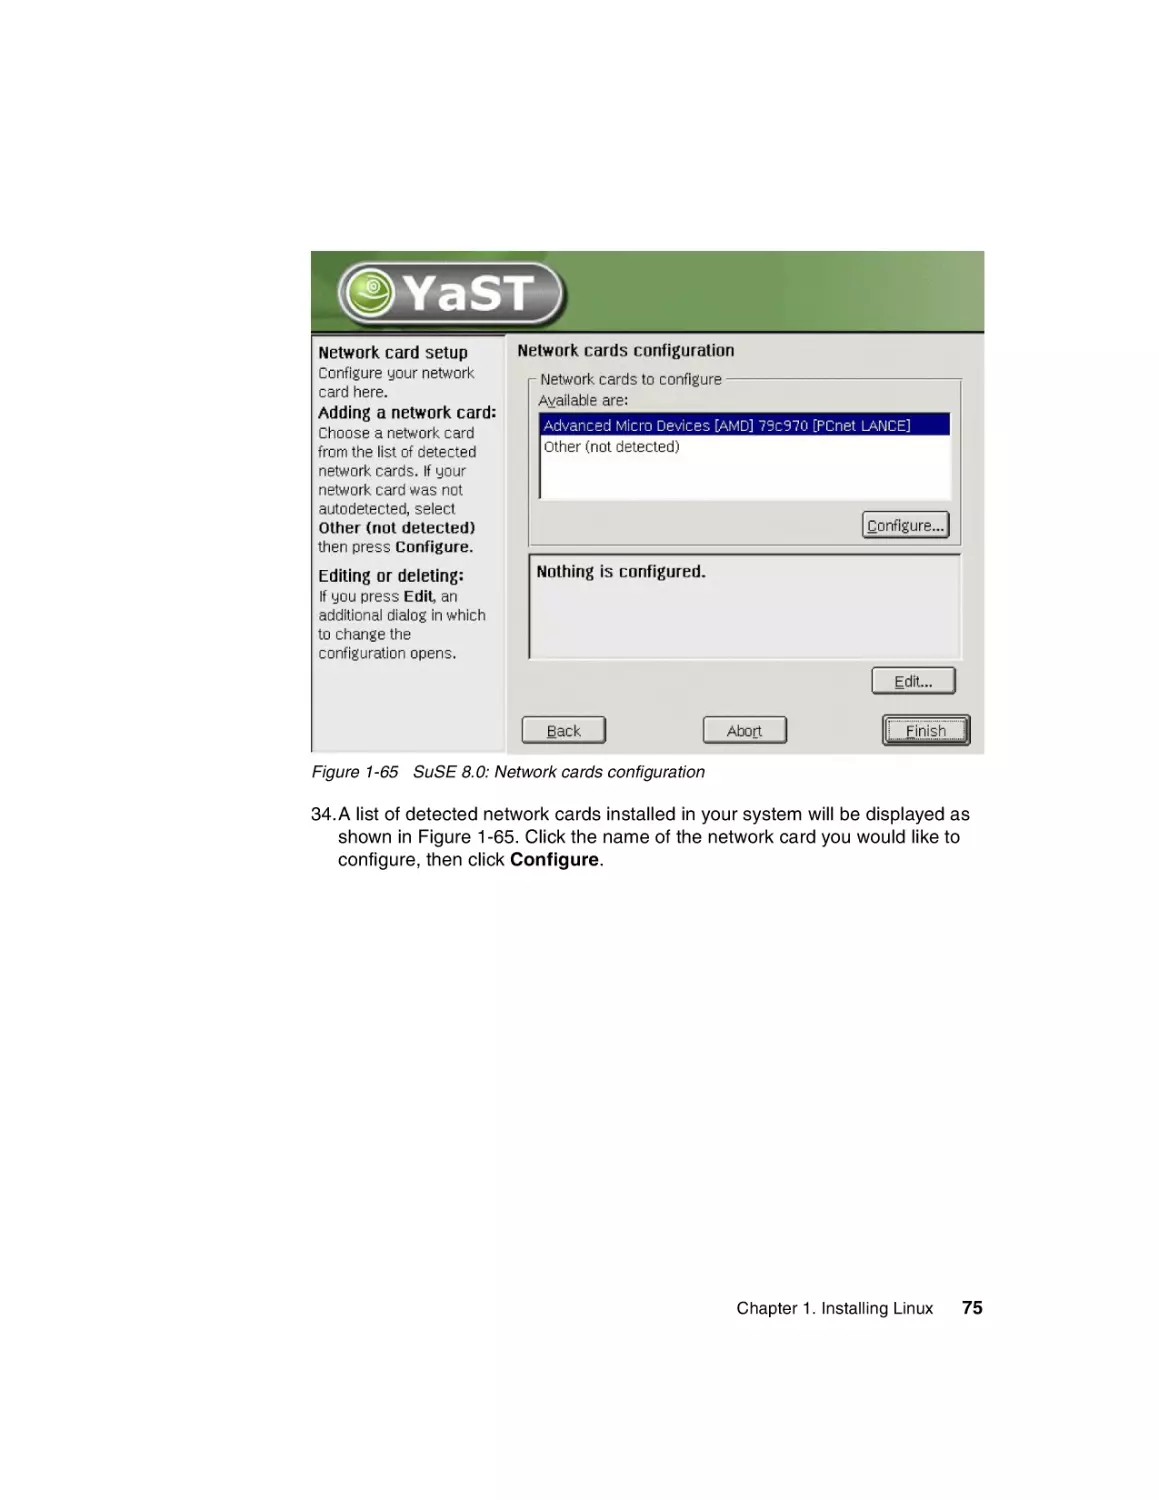
When you send information to IBM, you grant IBM a non-exclusive right to use or distribute the
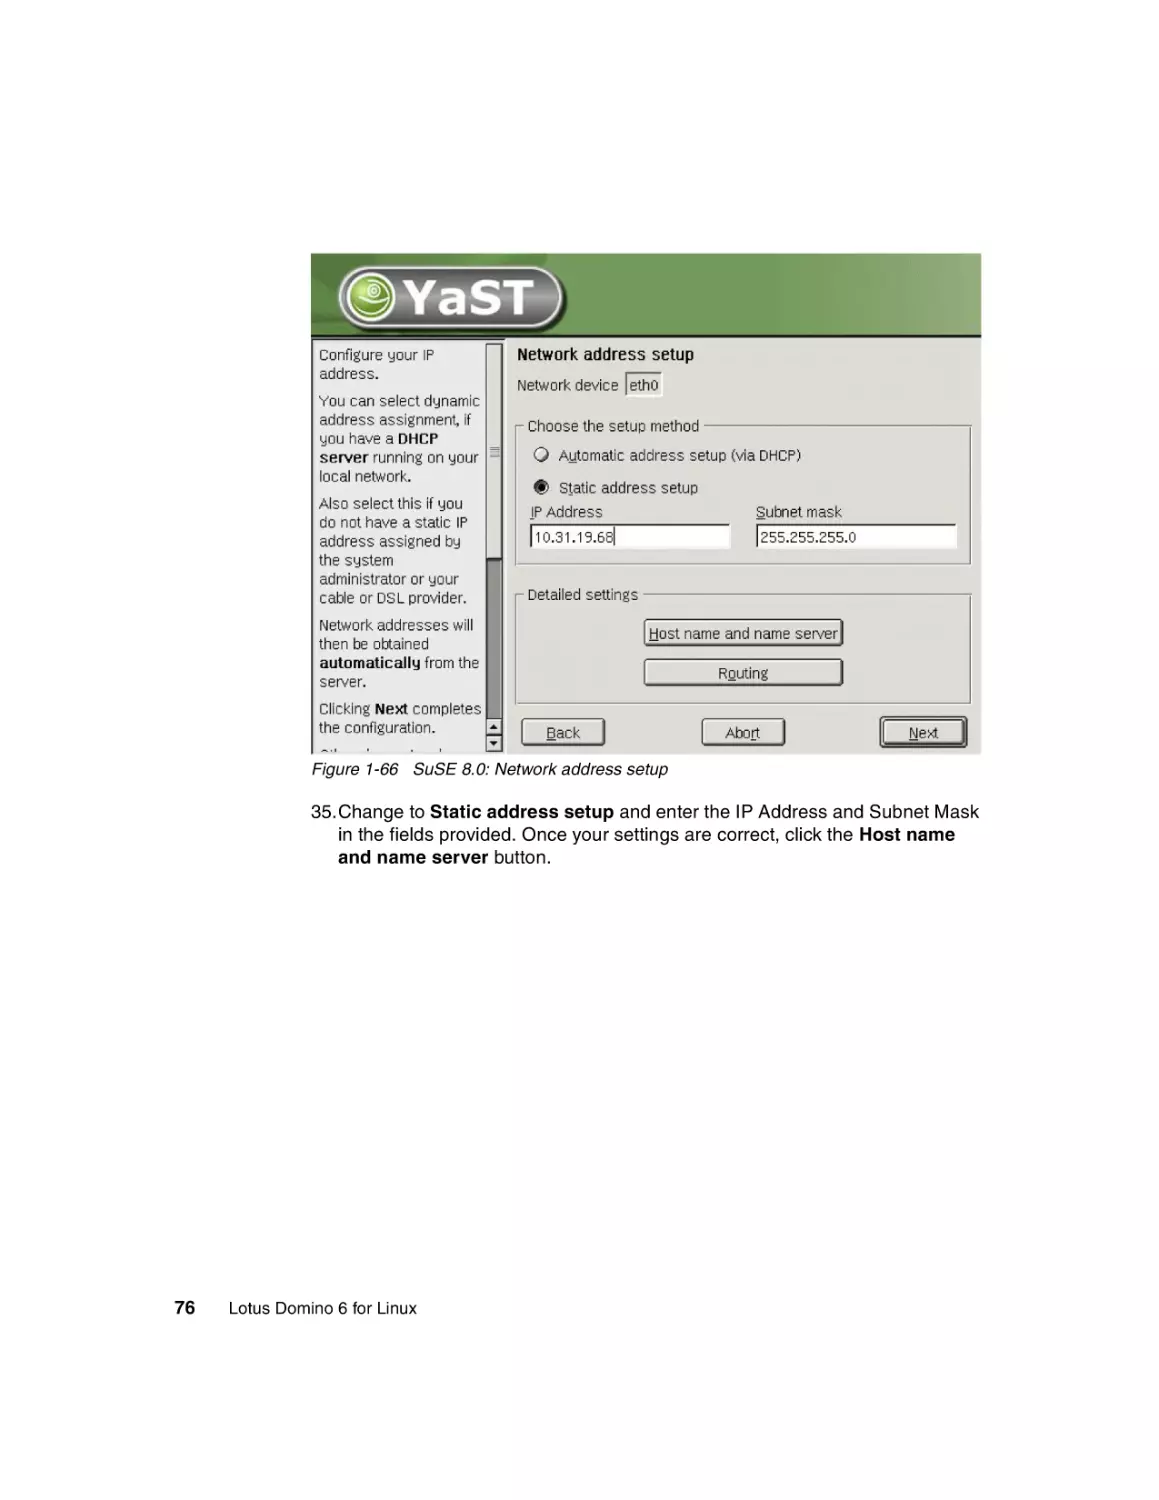
information in any way it believes appropriate without incurring any obligation to you.
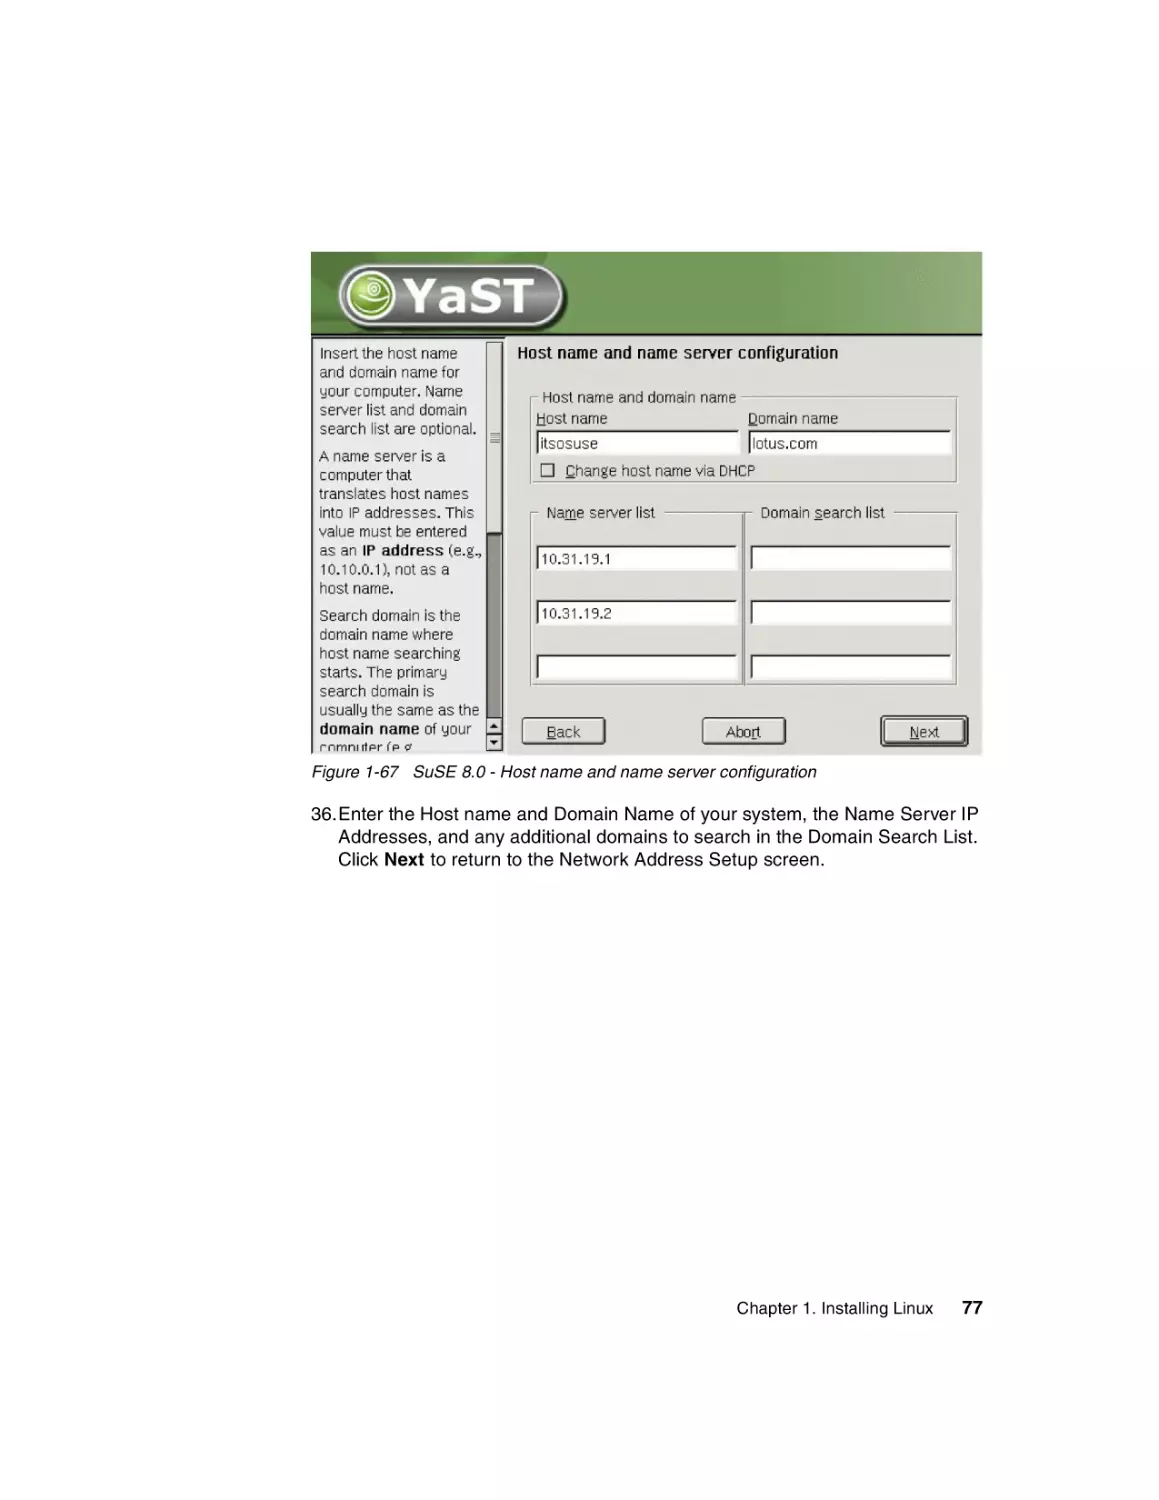
© Copyright International Business Machines Corporation 2002. All rights reserved.
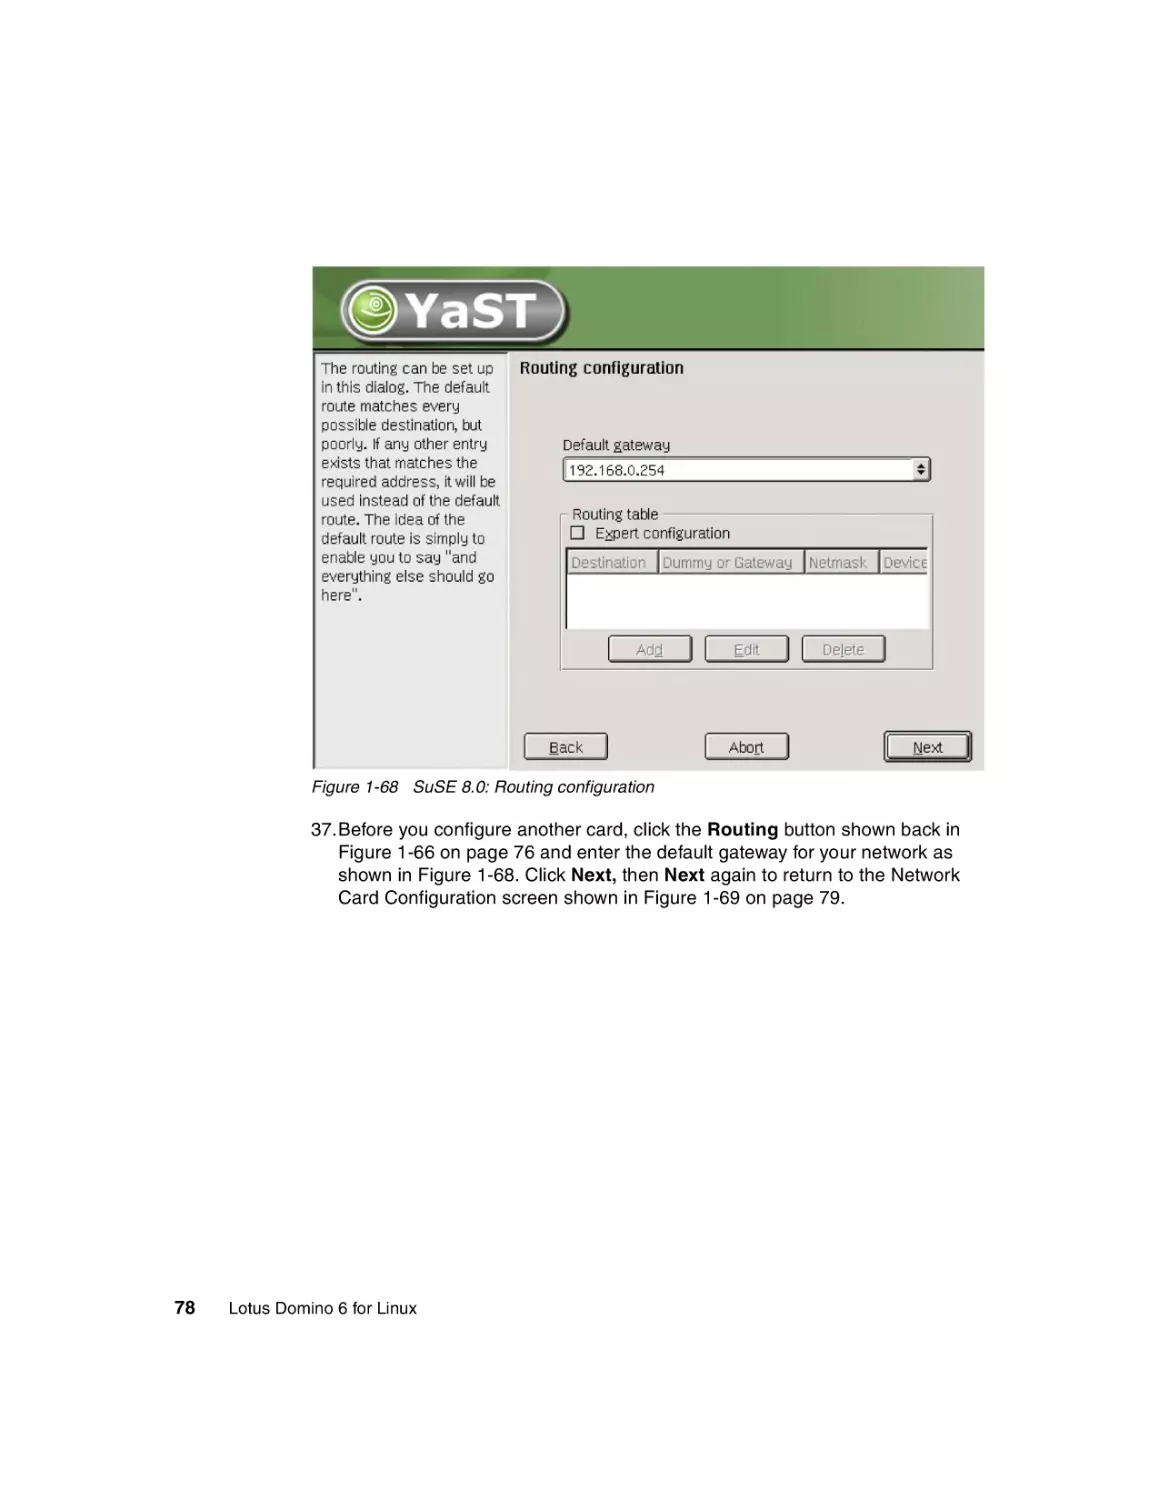
Note to U.S Government Users – Documentation related to restricted rights – Use, duplication or disclosure is subject to
restrictions set forth in GSA ADP Schedule Contract with IBM Corp.
Contents
Notices . . . . . . . . . . . . . . . . . . . . . . . . . . . . . . . . . . . . . . . . . . . . . . . . . . . . . . vii
Trademarks . . . . . . . . . . . . . . . . . . . . . . . . . . . . . . . . . . . . . . . . . . . . . . . . . . . viii
Preface . . . . . . . . . . . . . . . . . . . . . . . . . . . . . . . . . . . . . . . . . . . . . . . . . . . . . . . ix
The team that wrote this redbook . . . . . . . . . . . . . . . . . . . . . . . . . . . . . . . . . . . . ix
Notice . . . . . . . . . . . . . . . . . . . . . . . . . . . . . . . . . . . . . . . . . . . . . . . . . . . . . . . . xii
Comments welcome . . . . . . . . . . . . . . . . . . . . . . . . . . . . . . . . . . . . . . . . . . . . . xii
Chapter 1. Installing Linux . . . . . . . . . . . . . . . . . . . . . . . . . . . . . . . . . . . . . . . 1
1.1 Before you begin . . . . . . . . . . . . . . . . . . . . . . . . . . . . . . . . . . . . . . . . . . . . . 2
1.1.1 Making the CD-ROM/DVD drive bootable. . . . . . . . . . . . . . . . . . . . . . 2
1.1.2 RAID configuration . . . . . . . . . . . . . . . . . . . . . . . . . . . . . . . . . . . . . . . 4
1.1.3 Partitions . . . . . . . . . . . . . . . . . . . . . . . . . . . . . . . . . . . . . . . . . . . . . . . 4
1.1.4 Time configuration. . . . . . . . . . . . . . . . . . . . . . . . . . . . . . . . . . . . . . . . 5
1.1.5 Video card and monitor . . . . . . . . . . . . . . . . . . . . . . . . . . . . . . . . . . . . 5
1.1.6 File systems in Linux . . . . . . . . . . . . . . . . . . . . . . . . . . . . . . . . . . . . . . 5
1.1.7 Different Linux distributions . . . . . . . . . . . . . . . . . . . . . . . . . . . . . . . . . 7
1.2 Installing Red Hat 7.2 . . . . . . . . . . . . . . . . . . . . . . . . . . . . . . . . . . . . . . . . . 8
1.3 Installing SuSE Linux 8.0 . . . . . . . . . . . . . . . . . . . . . . . . . . . . . . . . . . . . . 40
Chapter 2. Installing Domino 6 for Linux . . . . . . . . . . . . . . . . . . . . . . . . . . 83
2.1 Before you begin: Pre-installation tasks . . . . . . . . . . . . . . . . . . . . . . . . . . 84
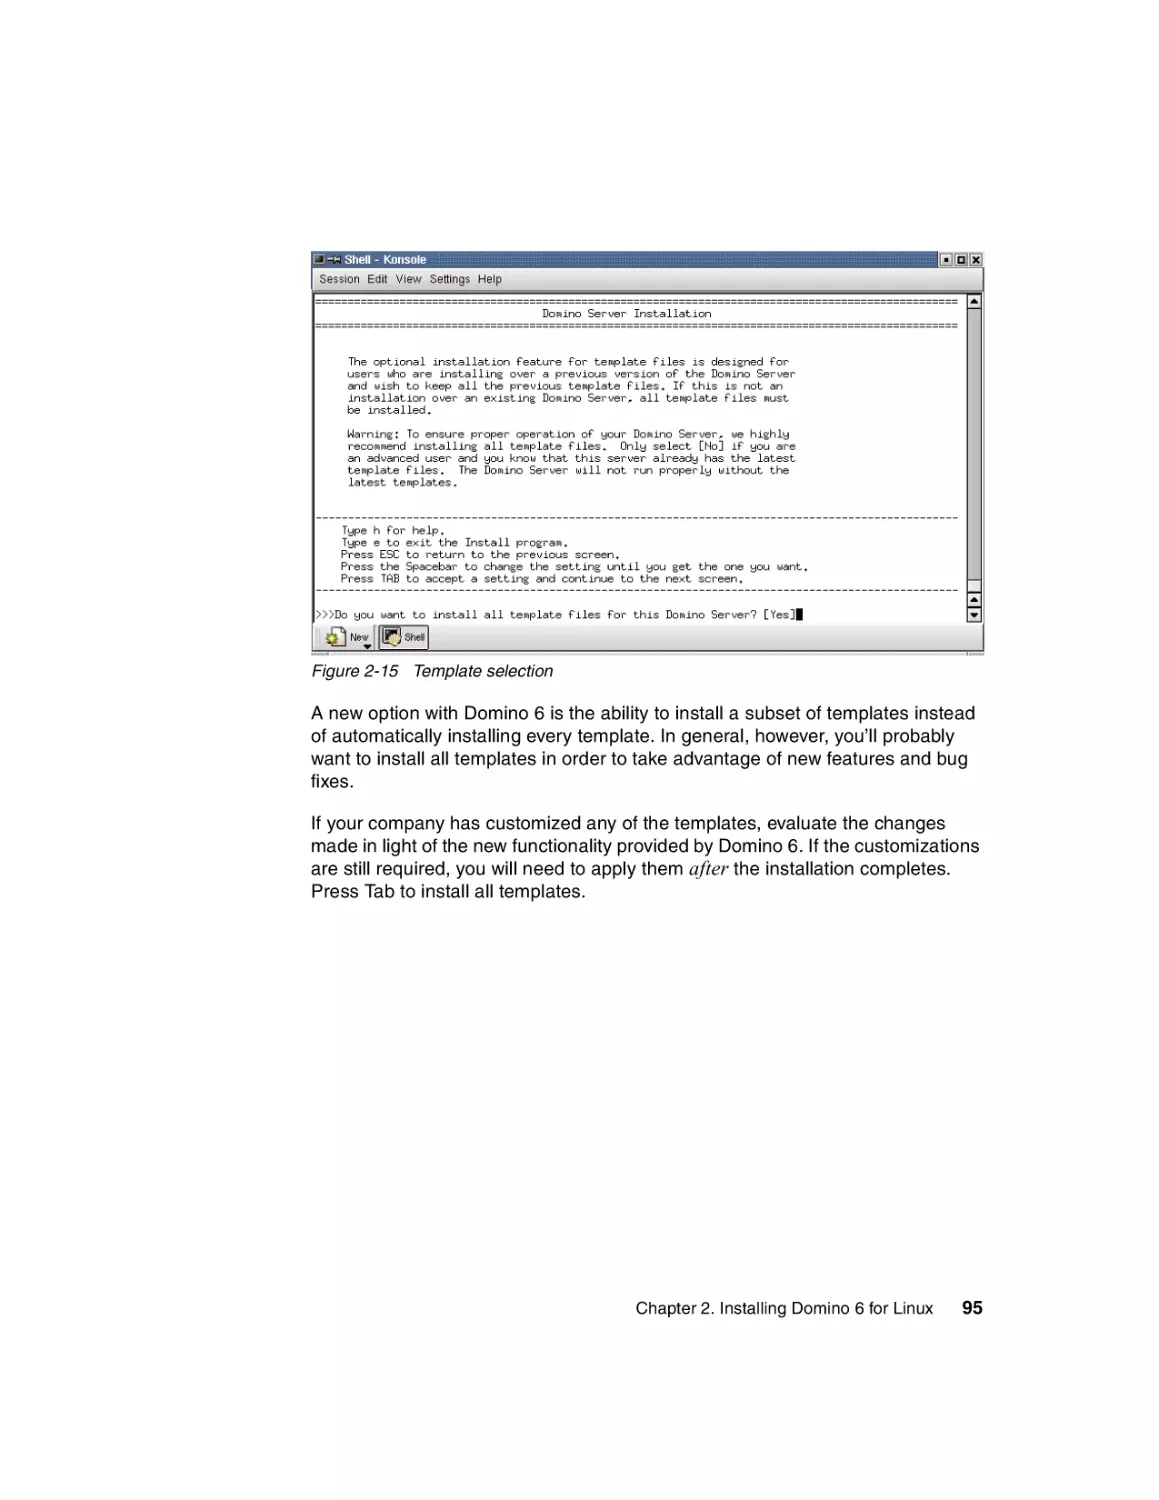
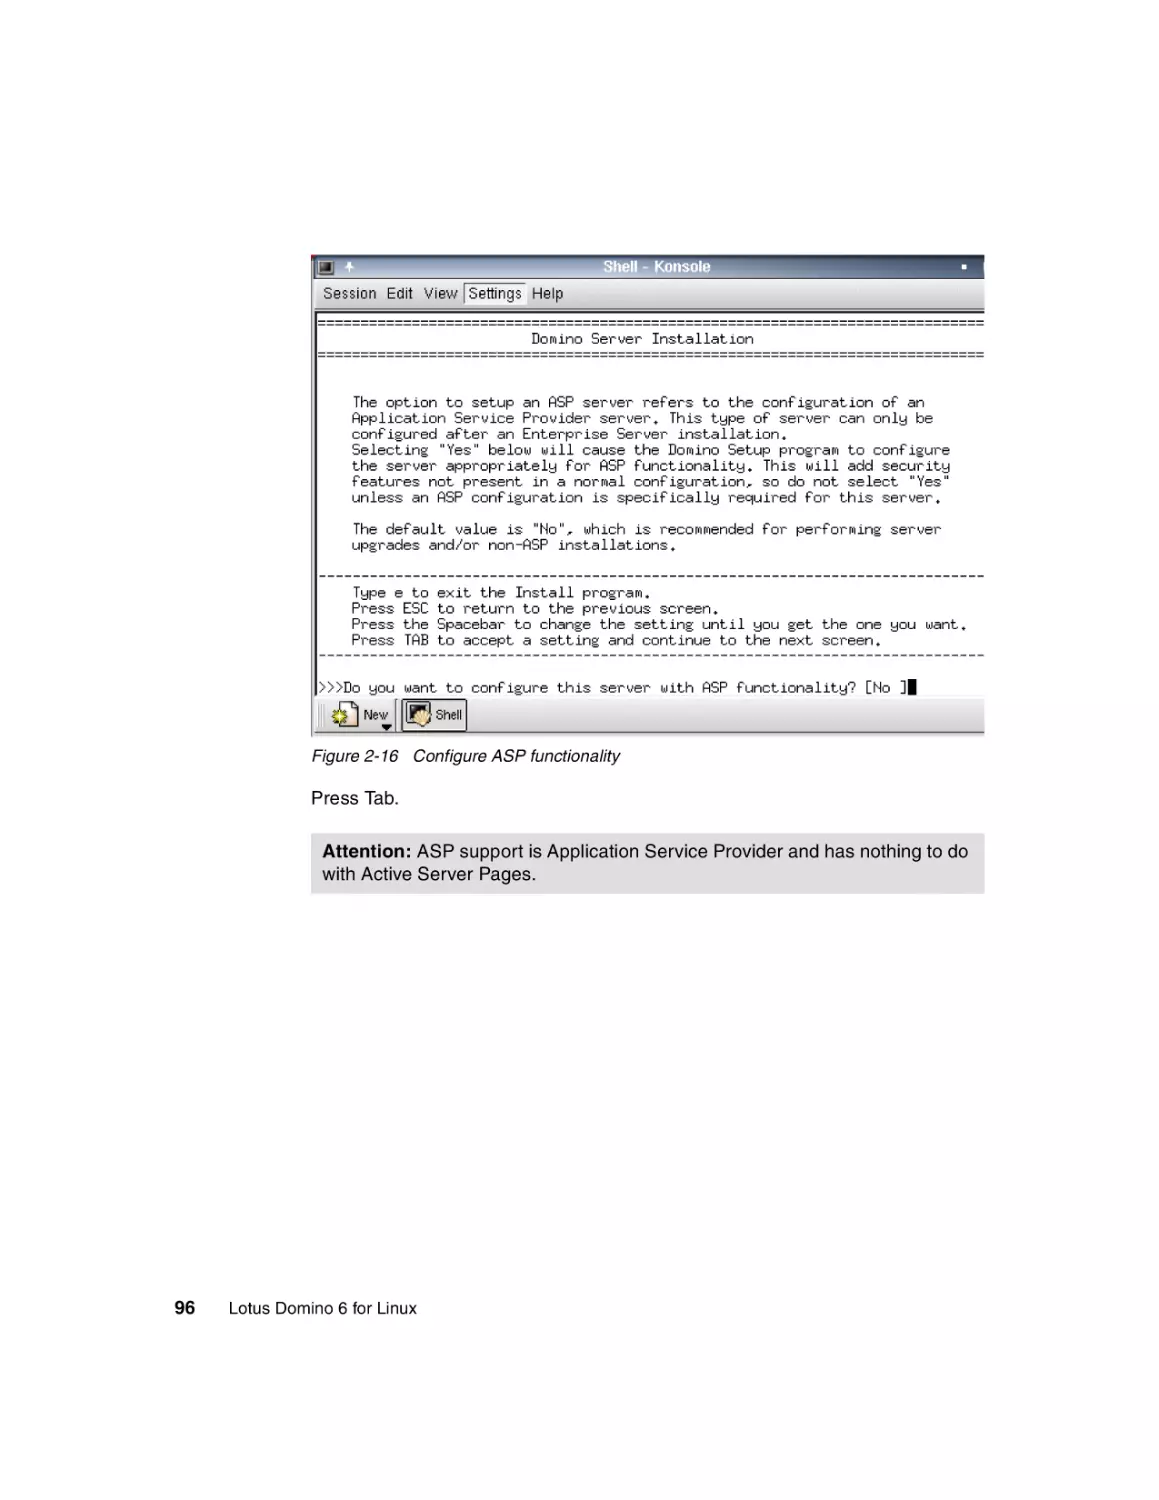
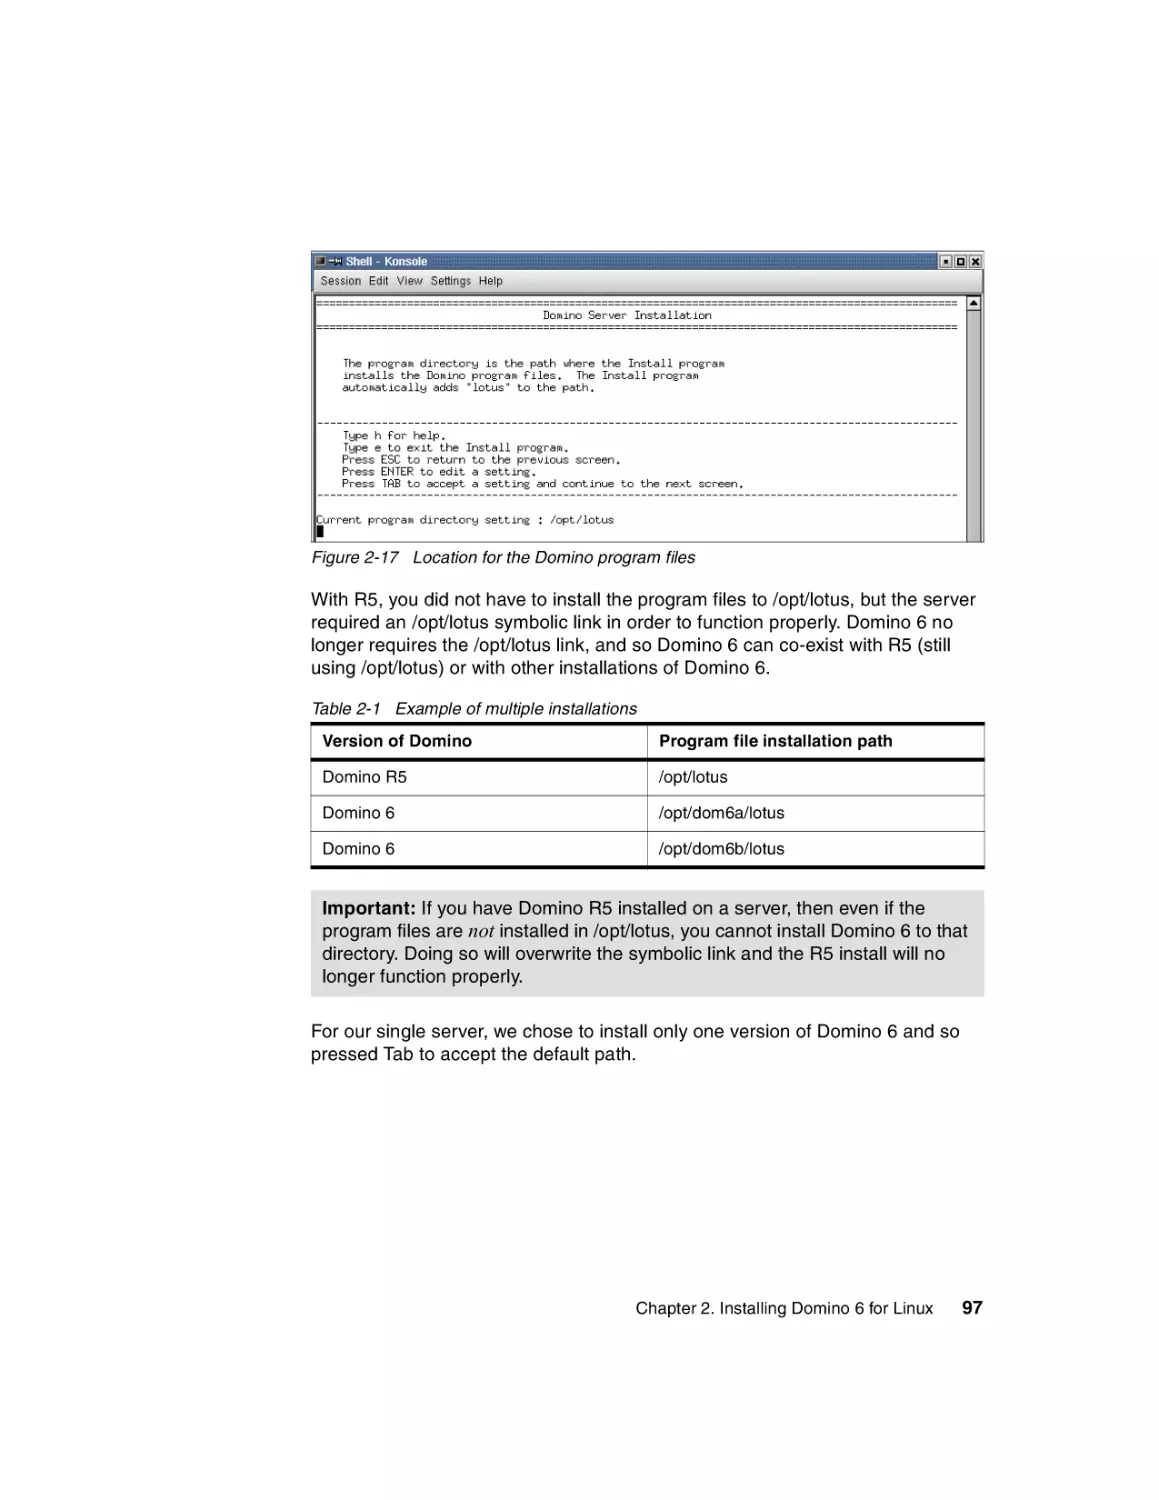
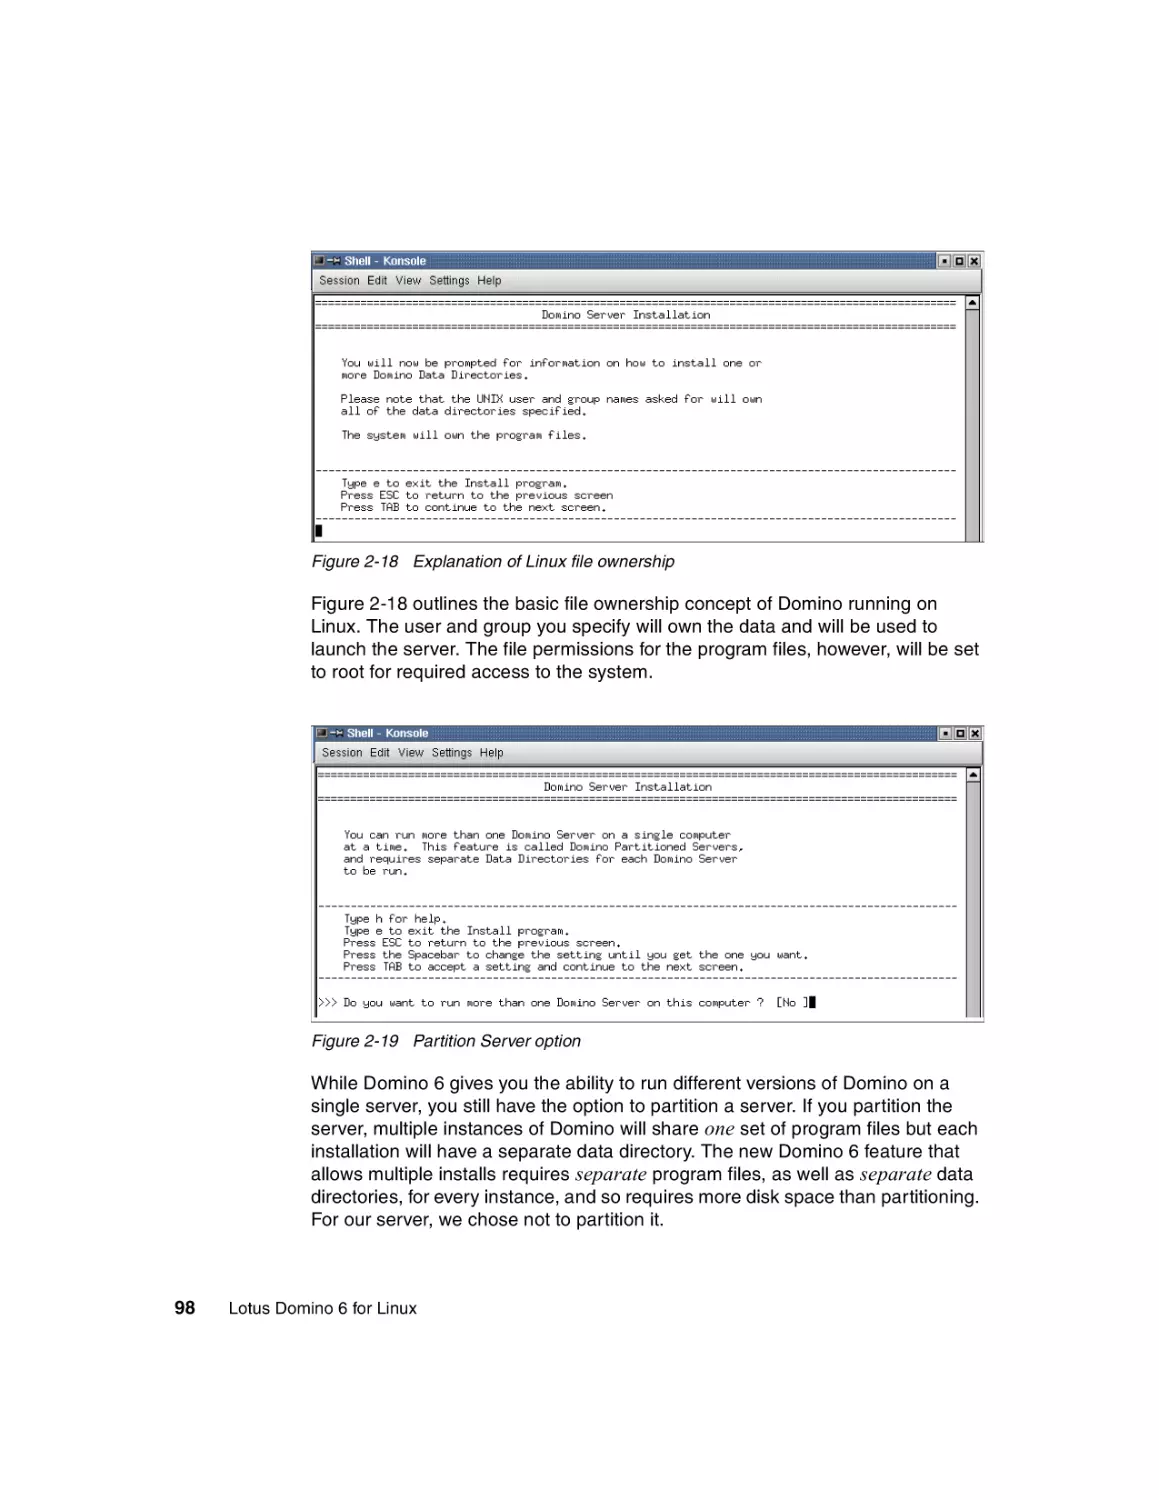
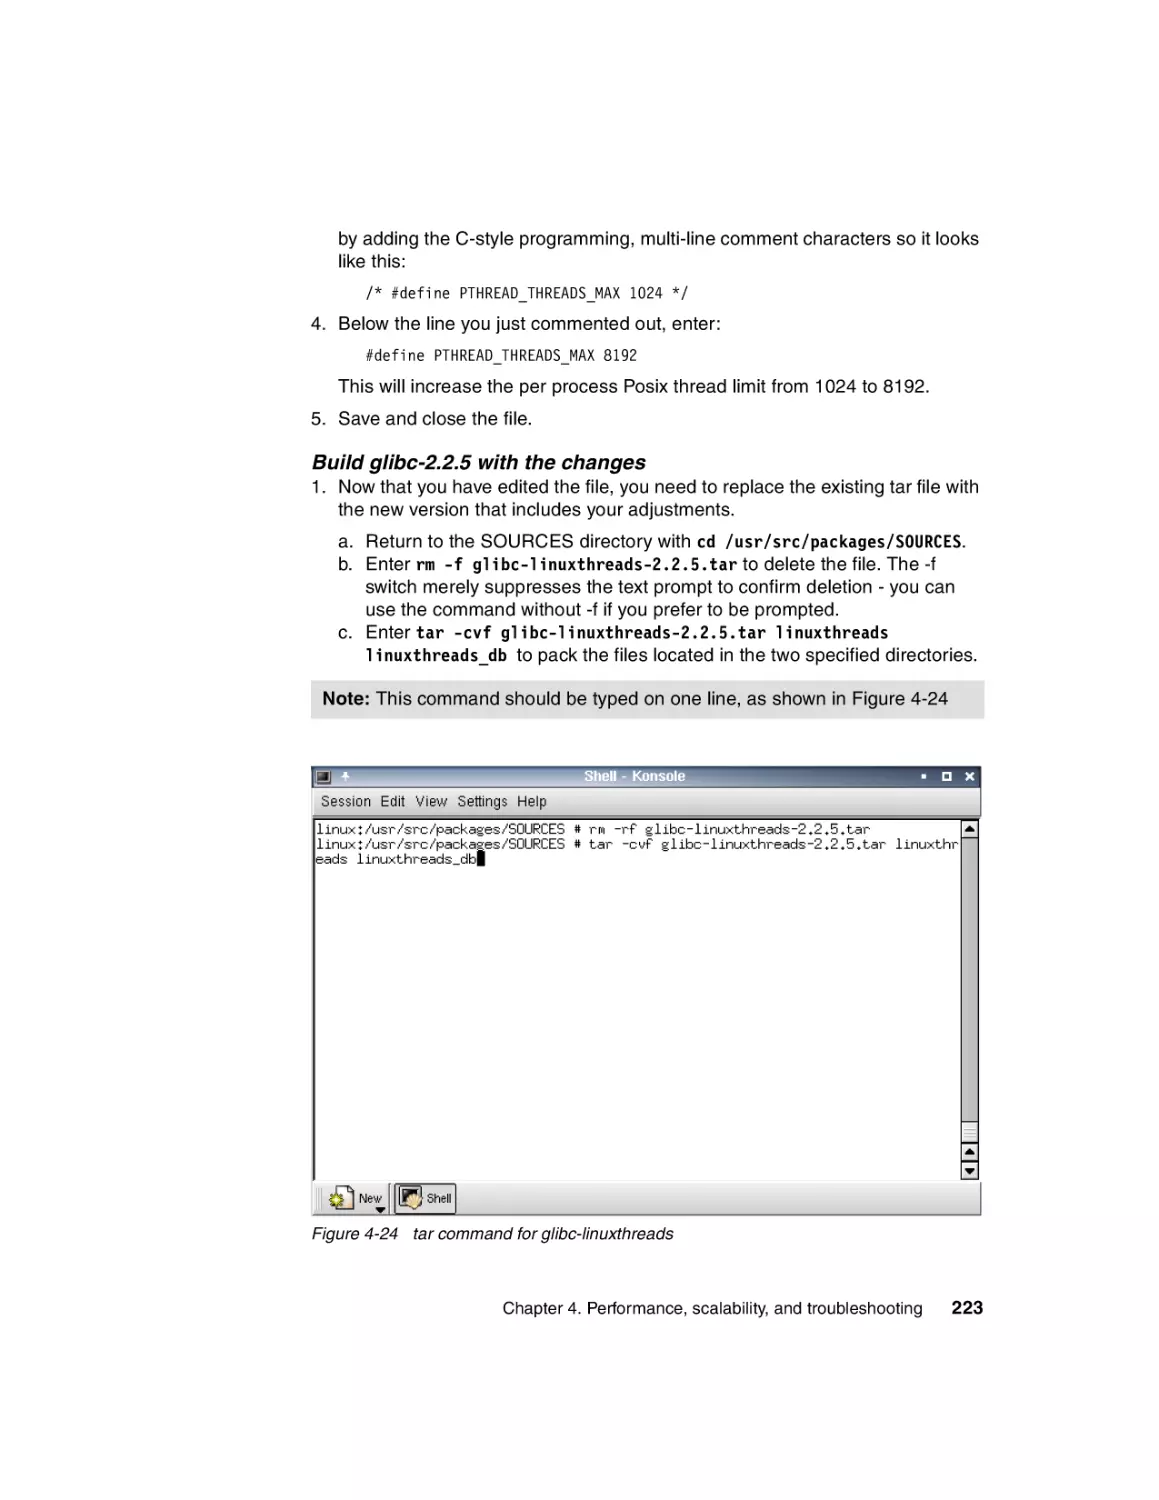
2.2 Domino 6 server install . . . . . . . . . . . . . . . . . . . . . . . . . . . . . . . . . . . . . . . 90
2.2.1 Installation . . . . . . . . . . . . . . . . . . . . . . . . . . . . . . . . . . . . . . . . . . . . . 90
2.2.2 Starting the Domino server installation . . . . . . . . . . . . . . . . . . . . . . . 91
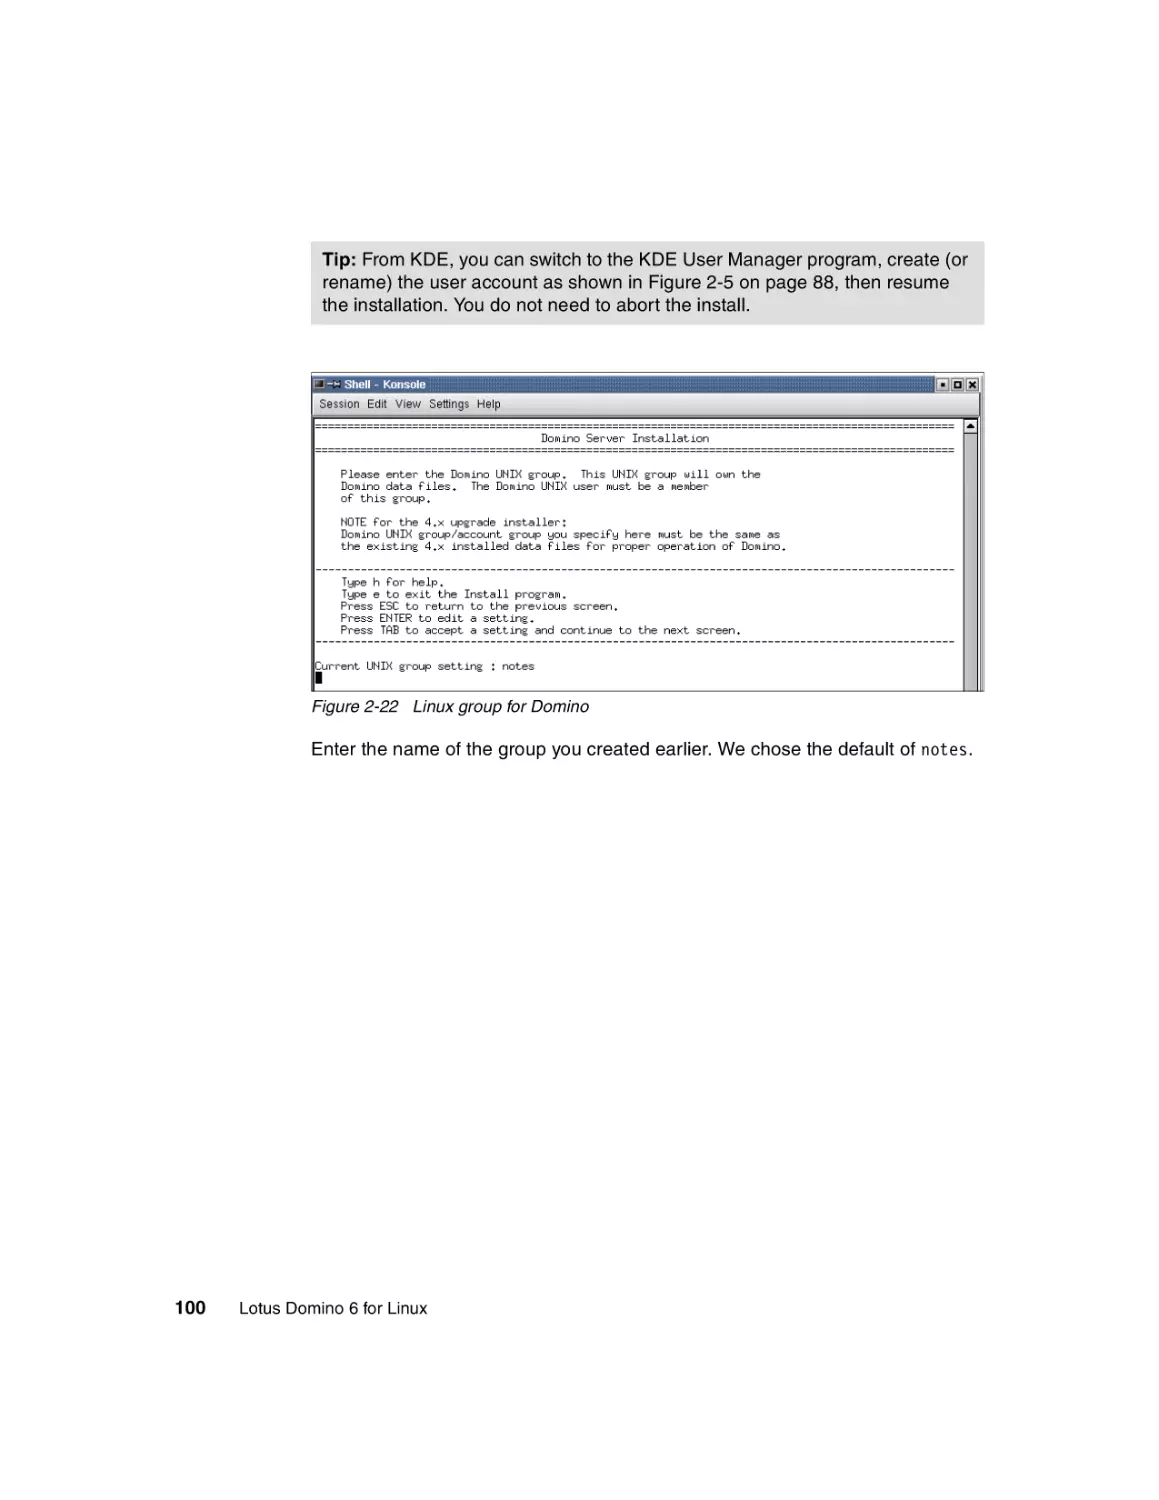
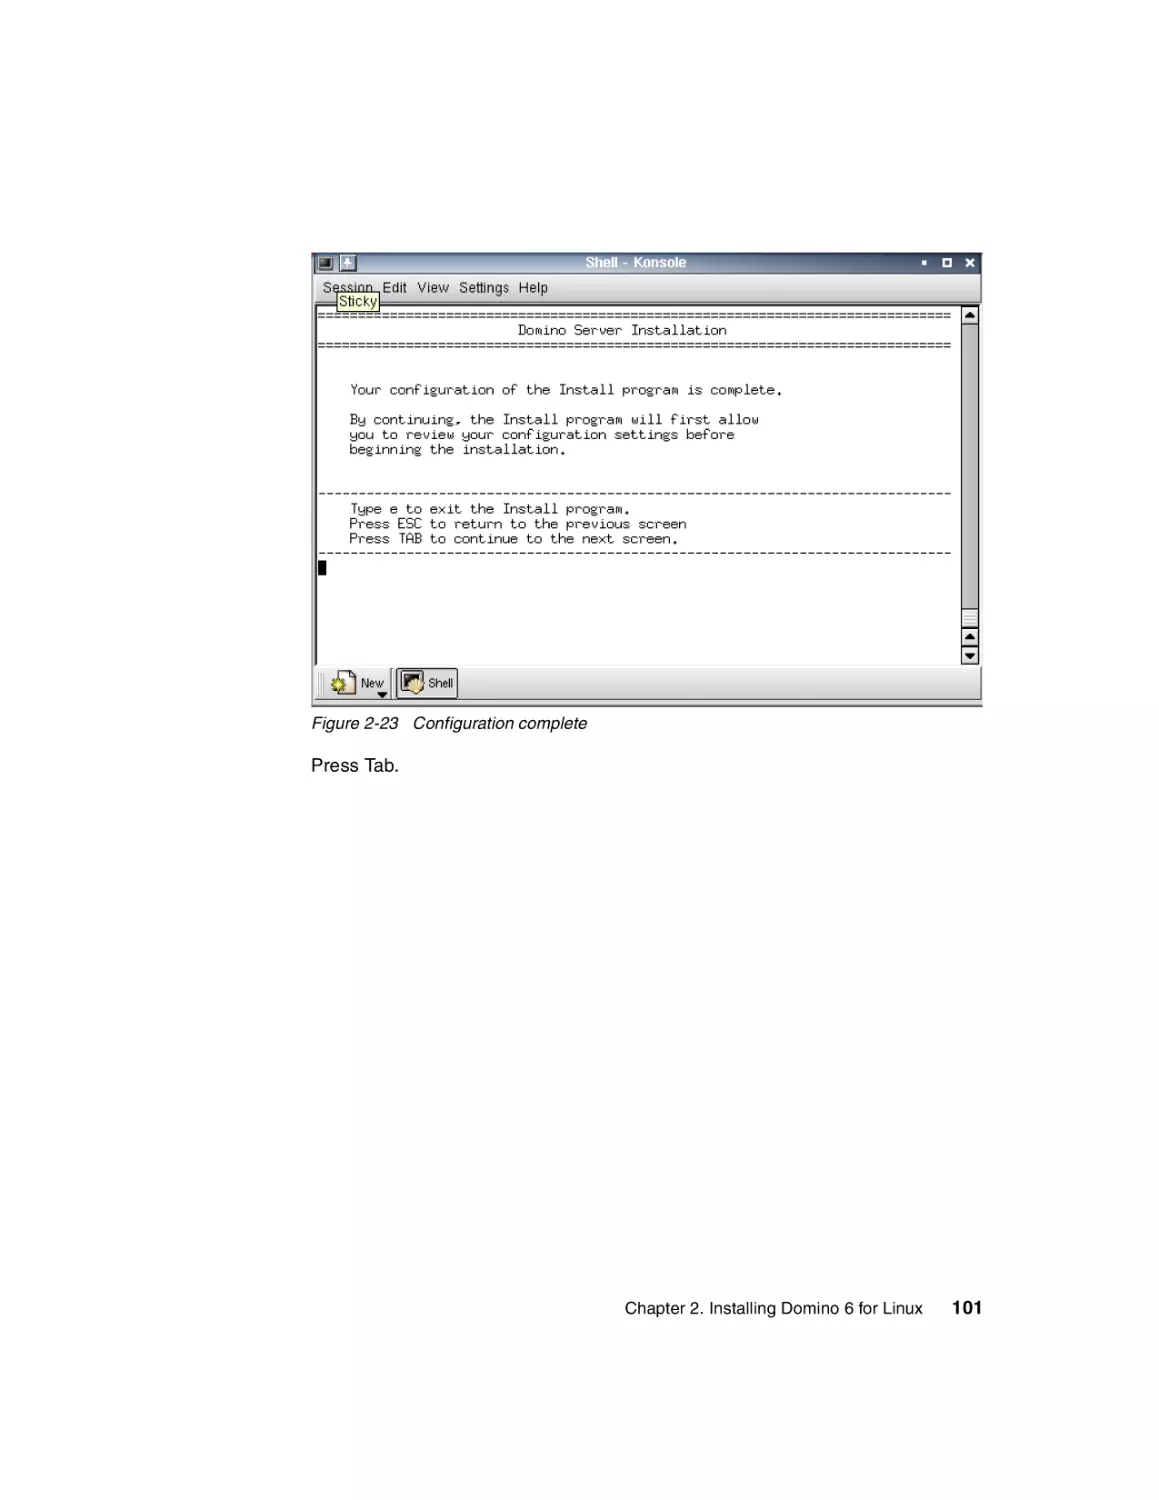
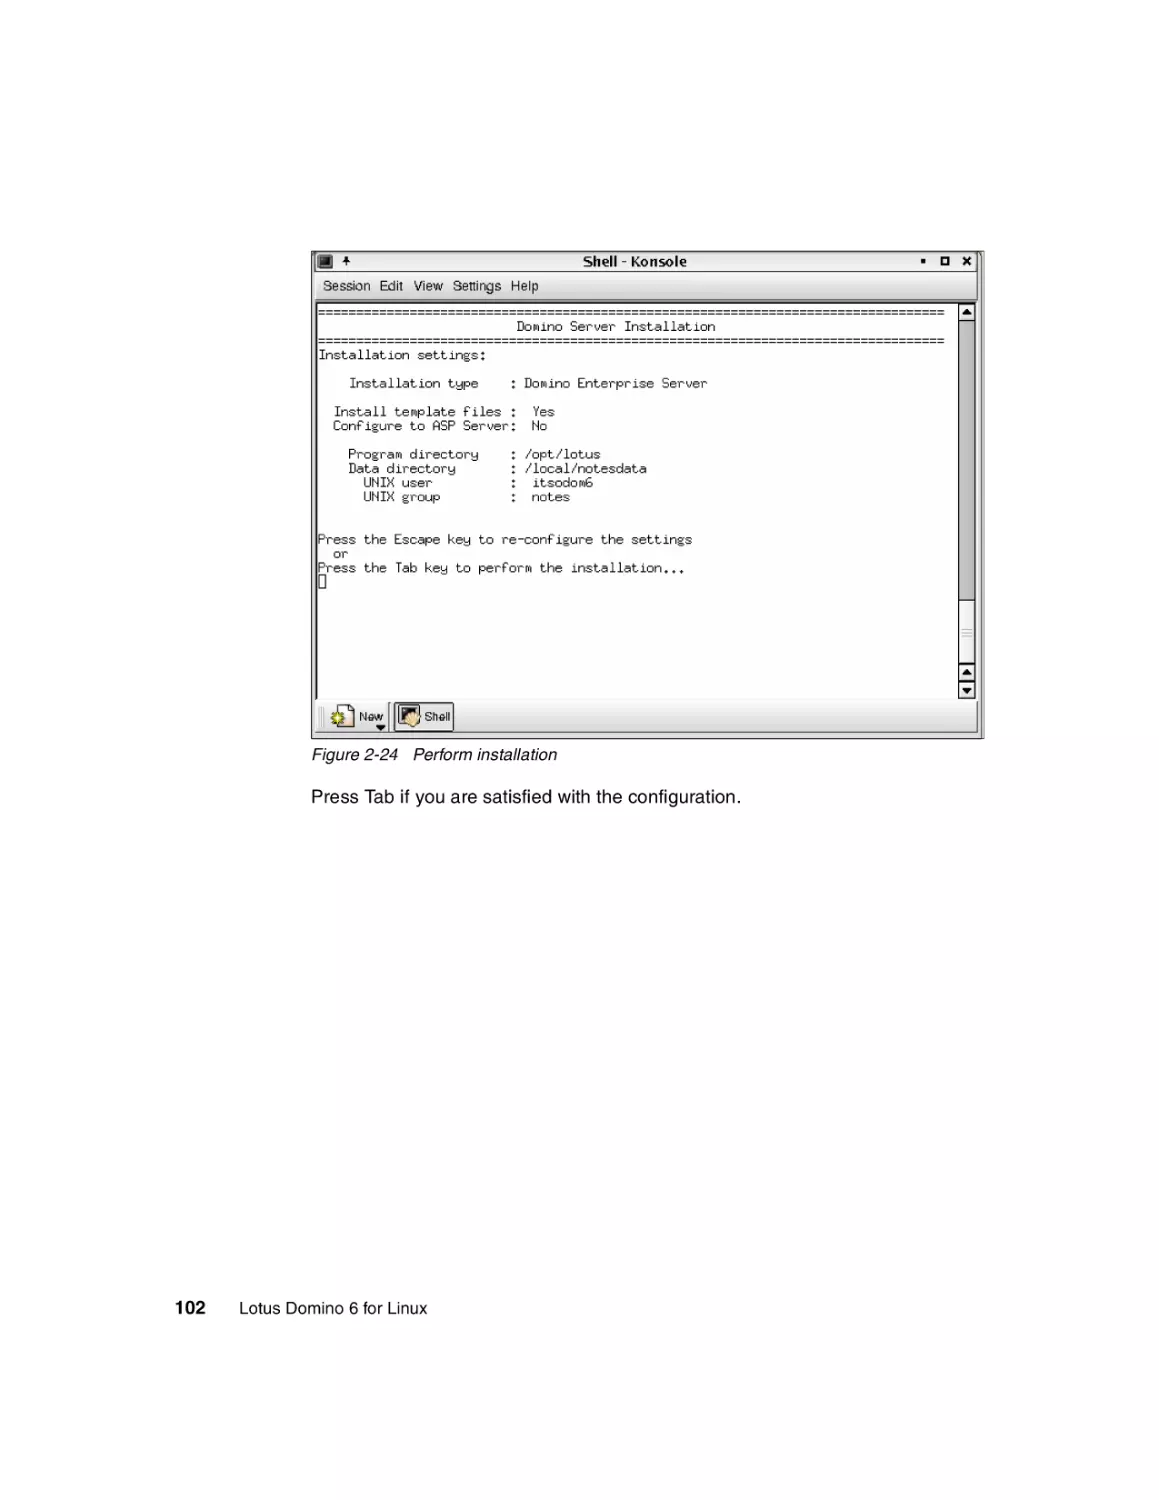
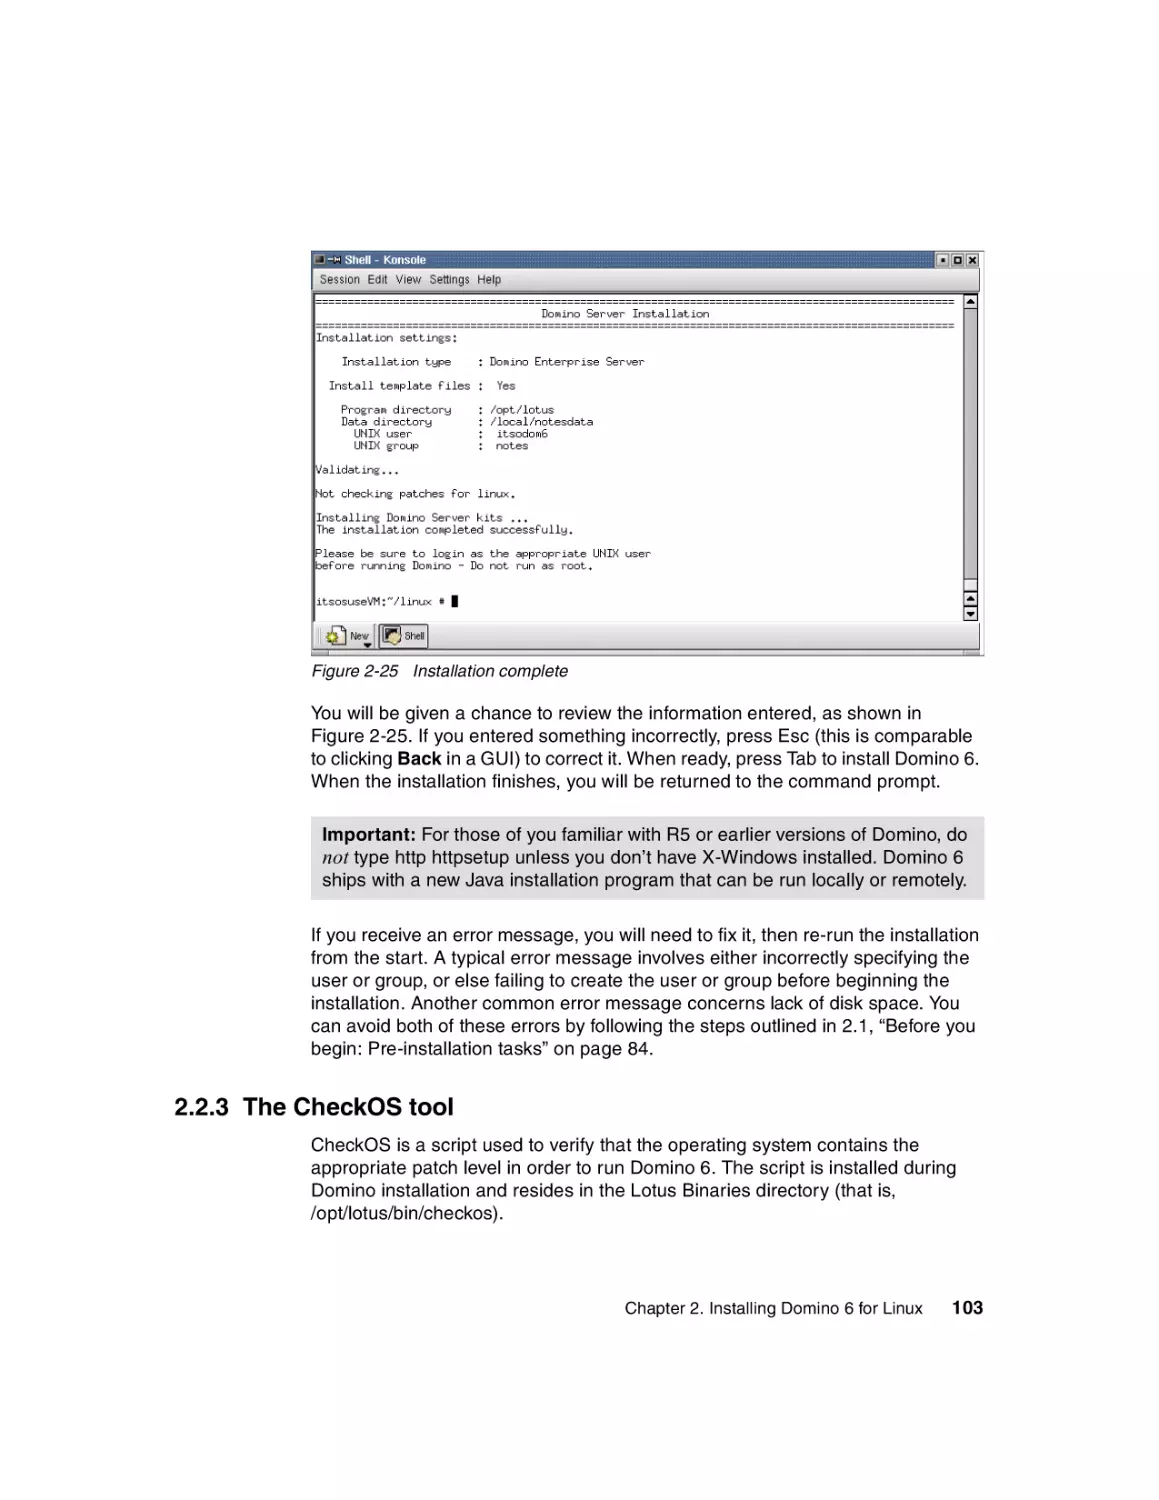
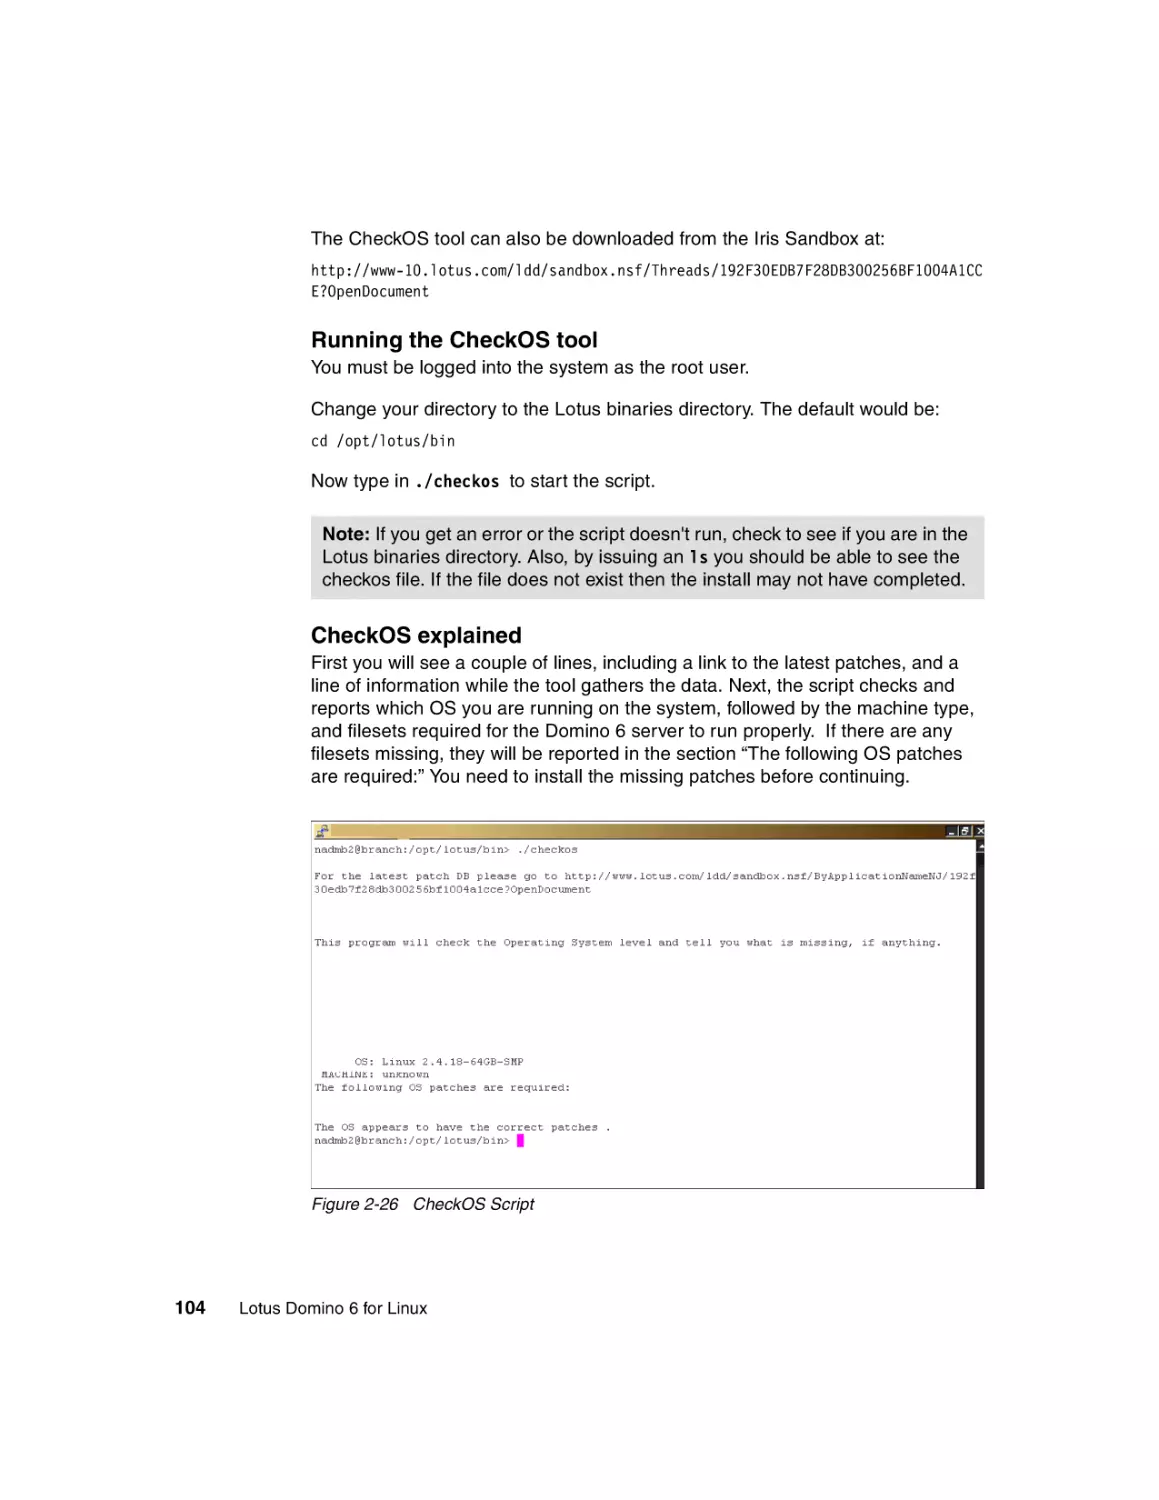
2.2.3 The CheckOS tool. . . . . . . . . . . . . . . . . . . . . . . . . . . . . . . . . . . . . . 103
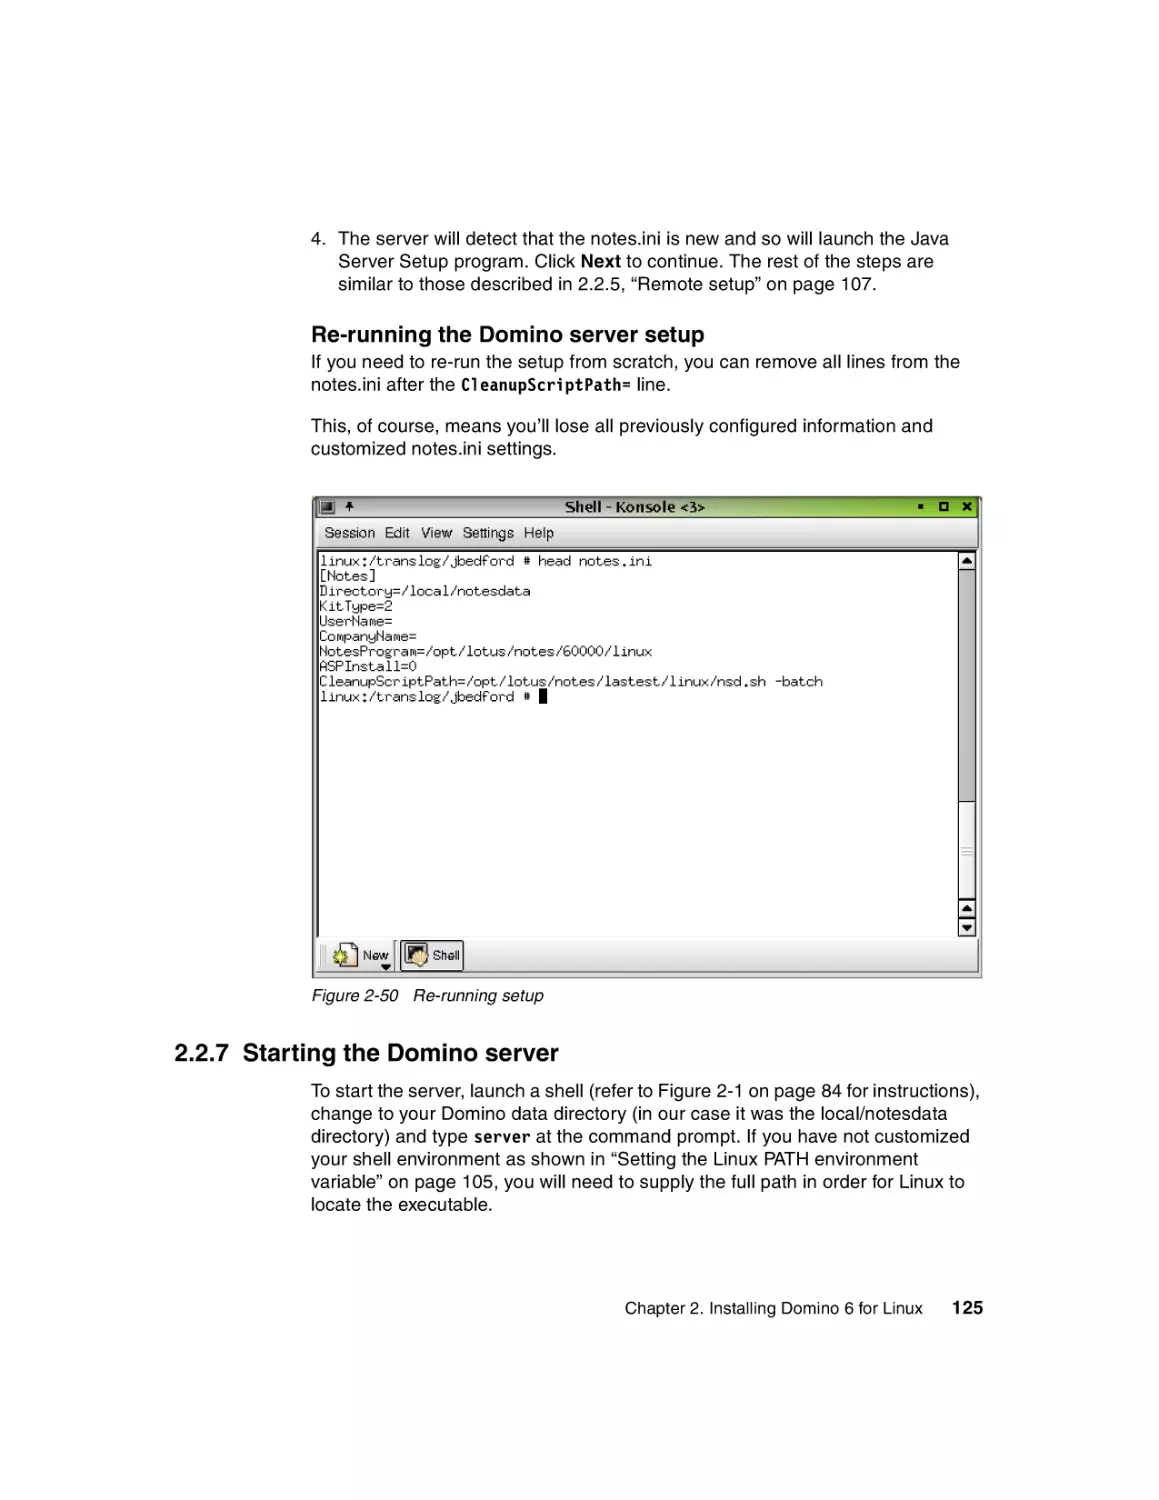
2.2.4 Setup . . . . . . . . . . . . . . . . . . . . . . . . . . . . . . . . . . . . . . . . . . . . . . . . 105
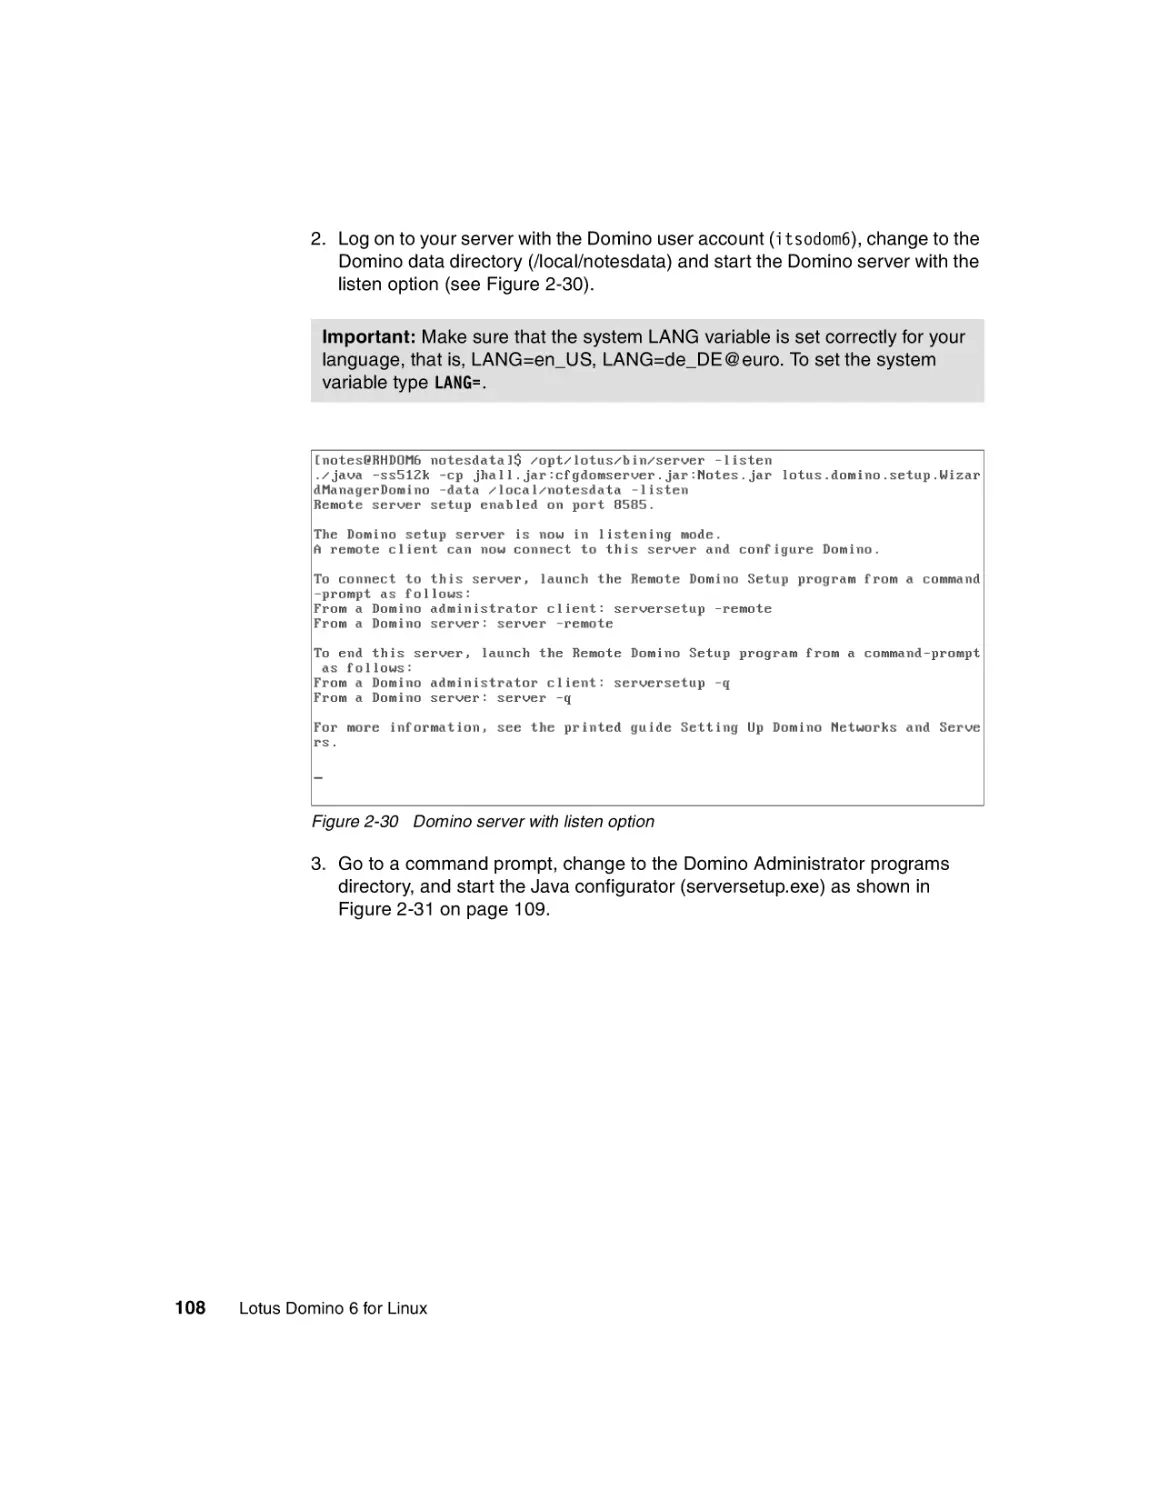
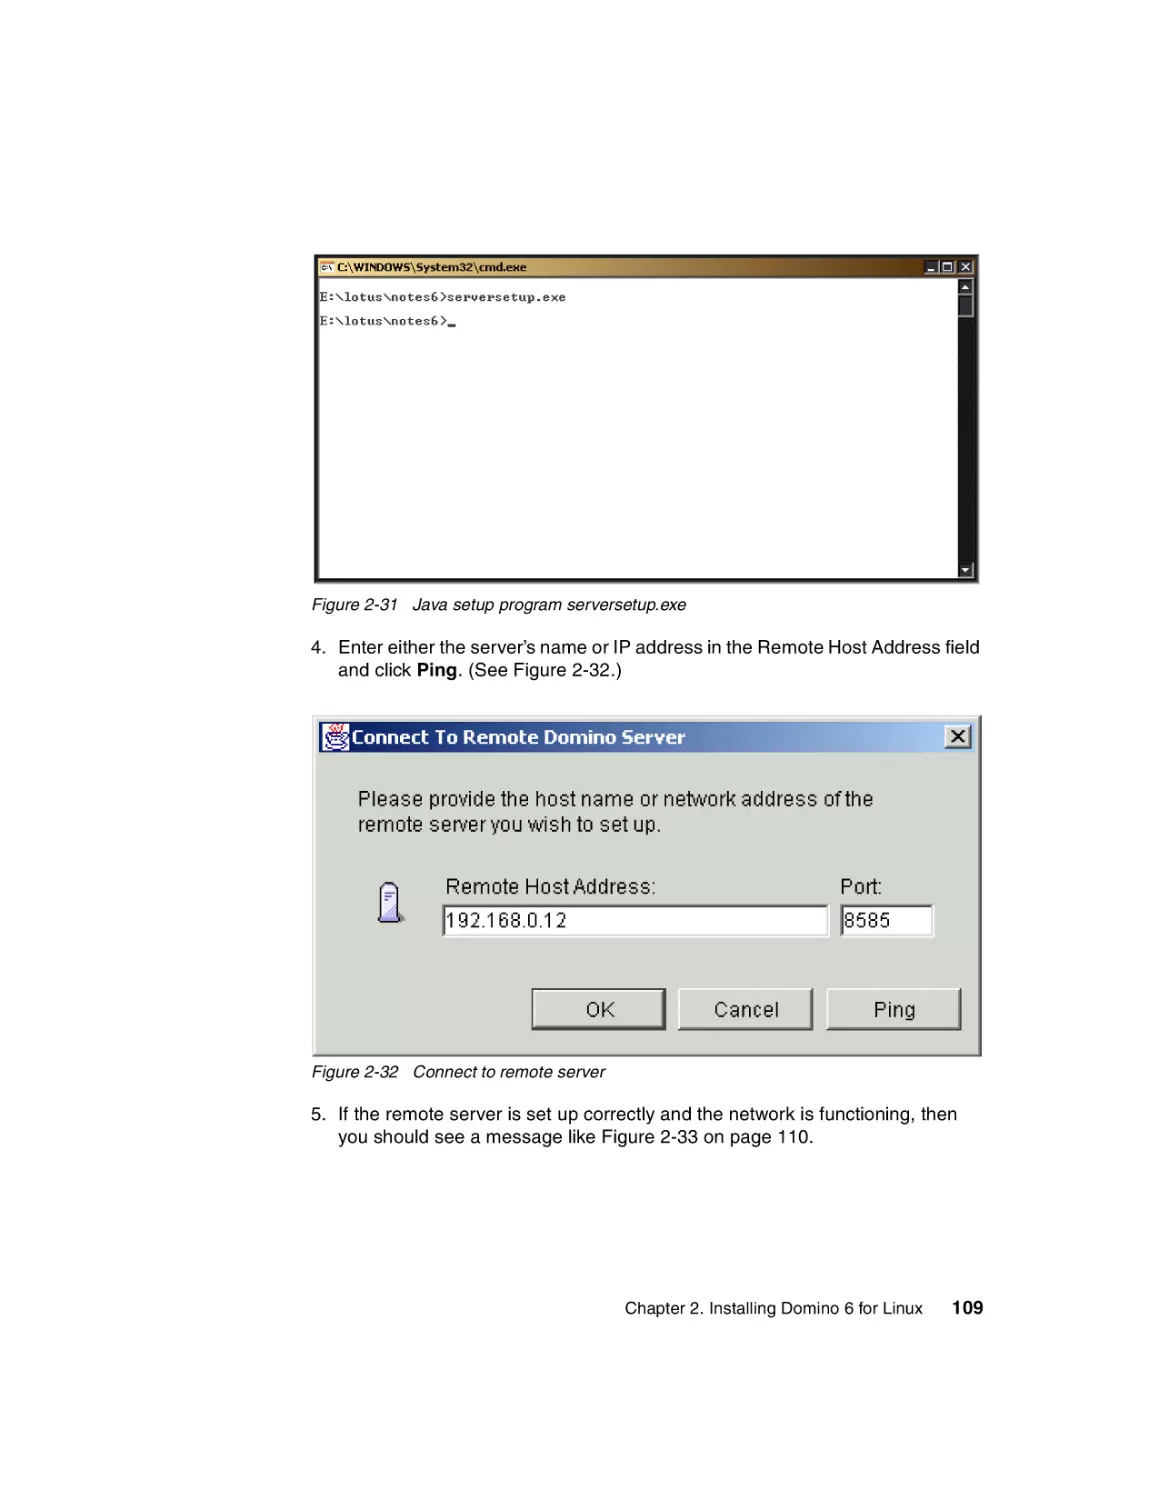
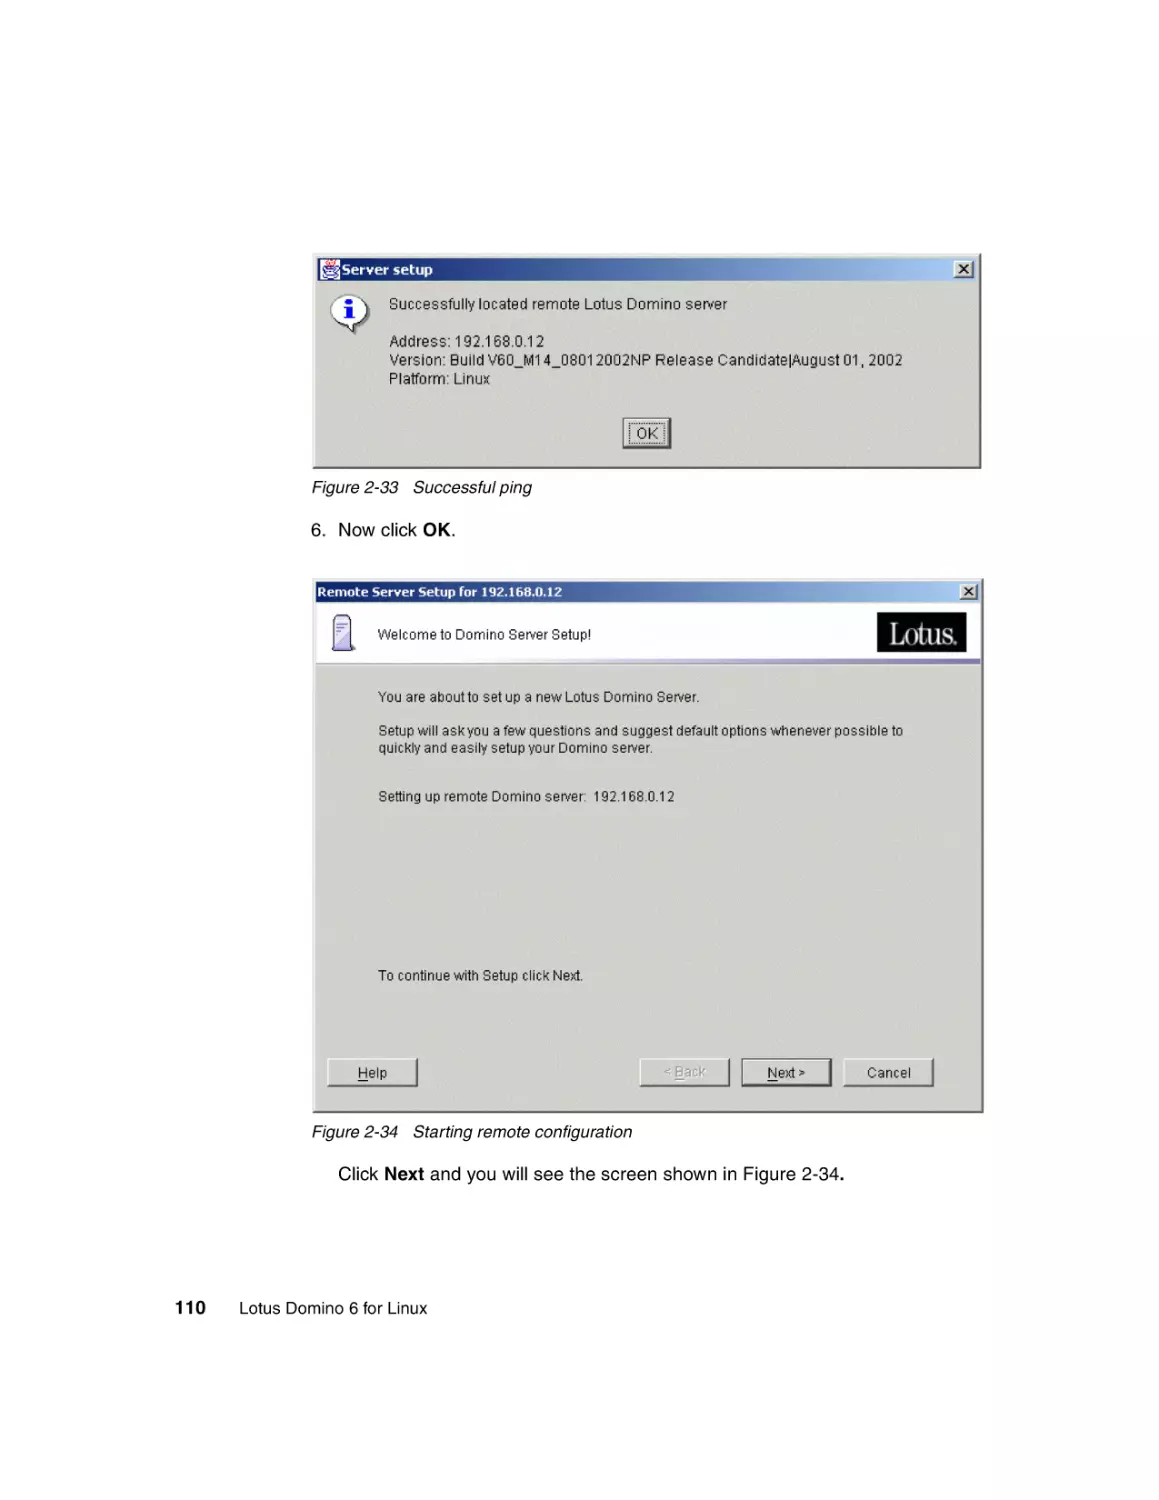
2.2.5 Remote setup . . . . . . . . . . . . . . . . . . . . . . . . . . . . . . . . . . . . . . . . . 107
2.2.6 Local setup . . . . . . . . . . . . . . . . . . . . . . . . . . . . . . . . . . . . . . . . . . . 124
2.2.7 Starting the Domino server . . . . . . . . . . . . . . . . . . . . . . . . . . . . . . . 125
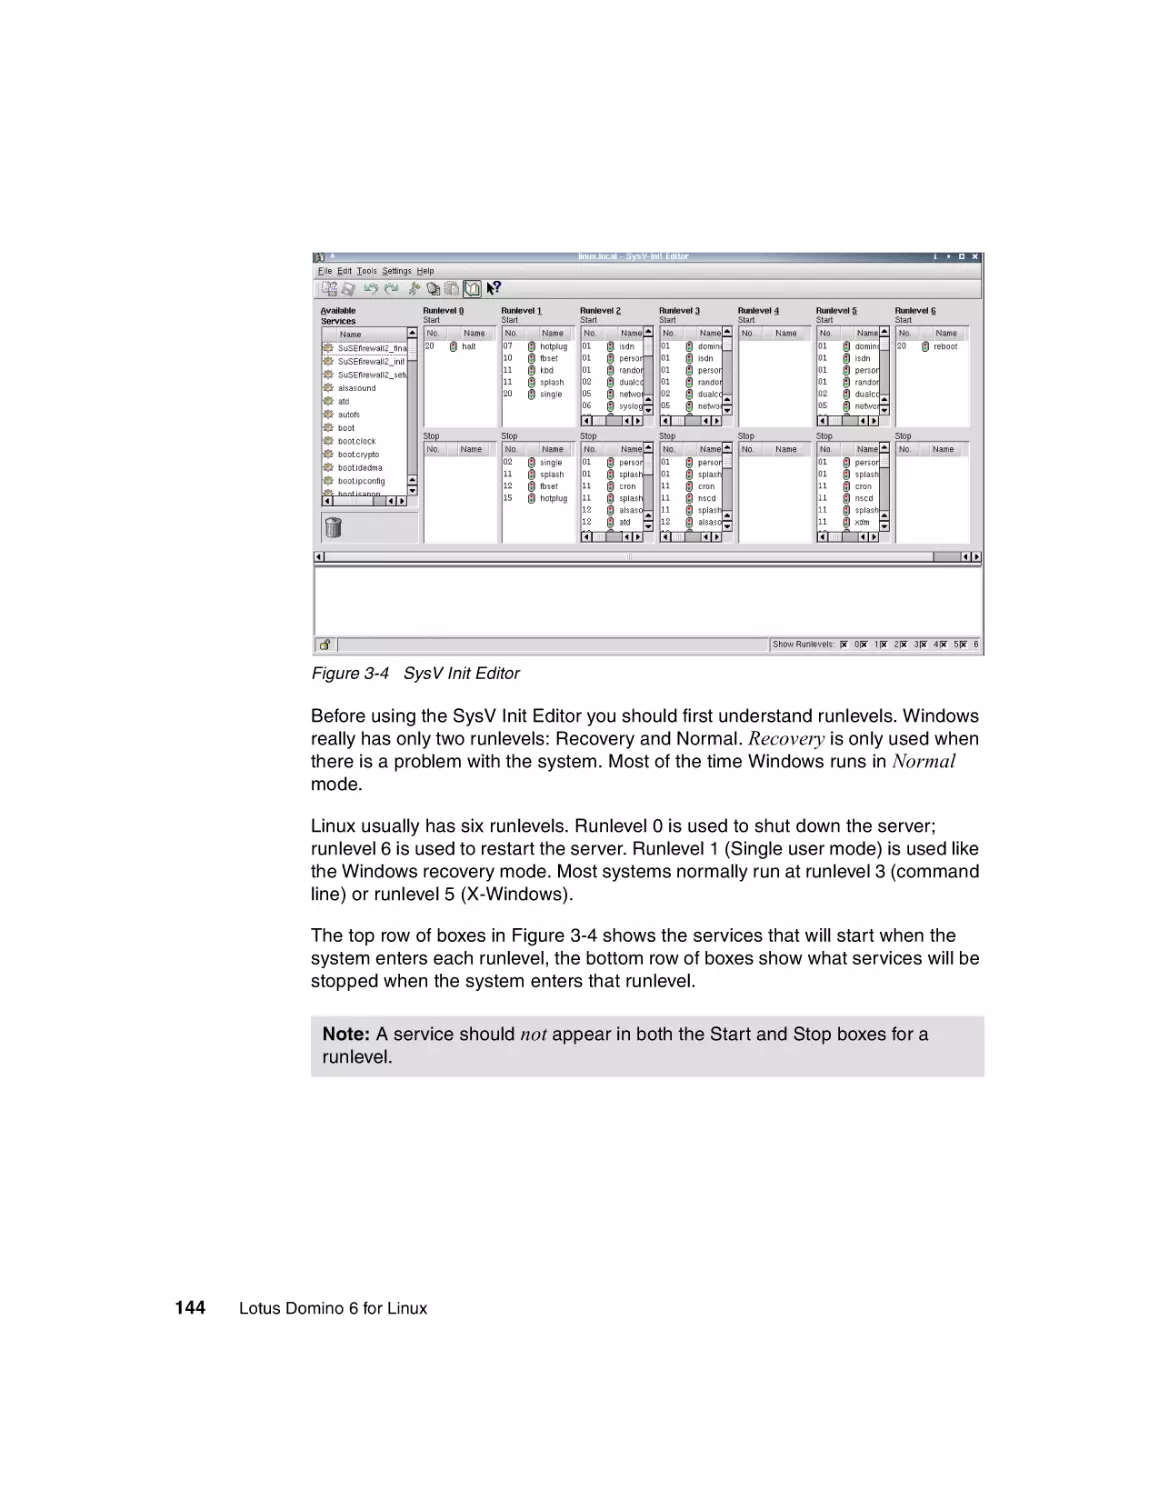
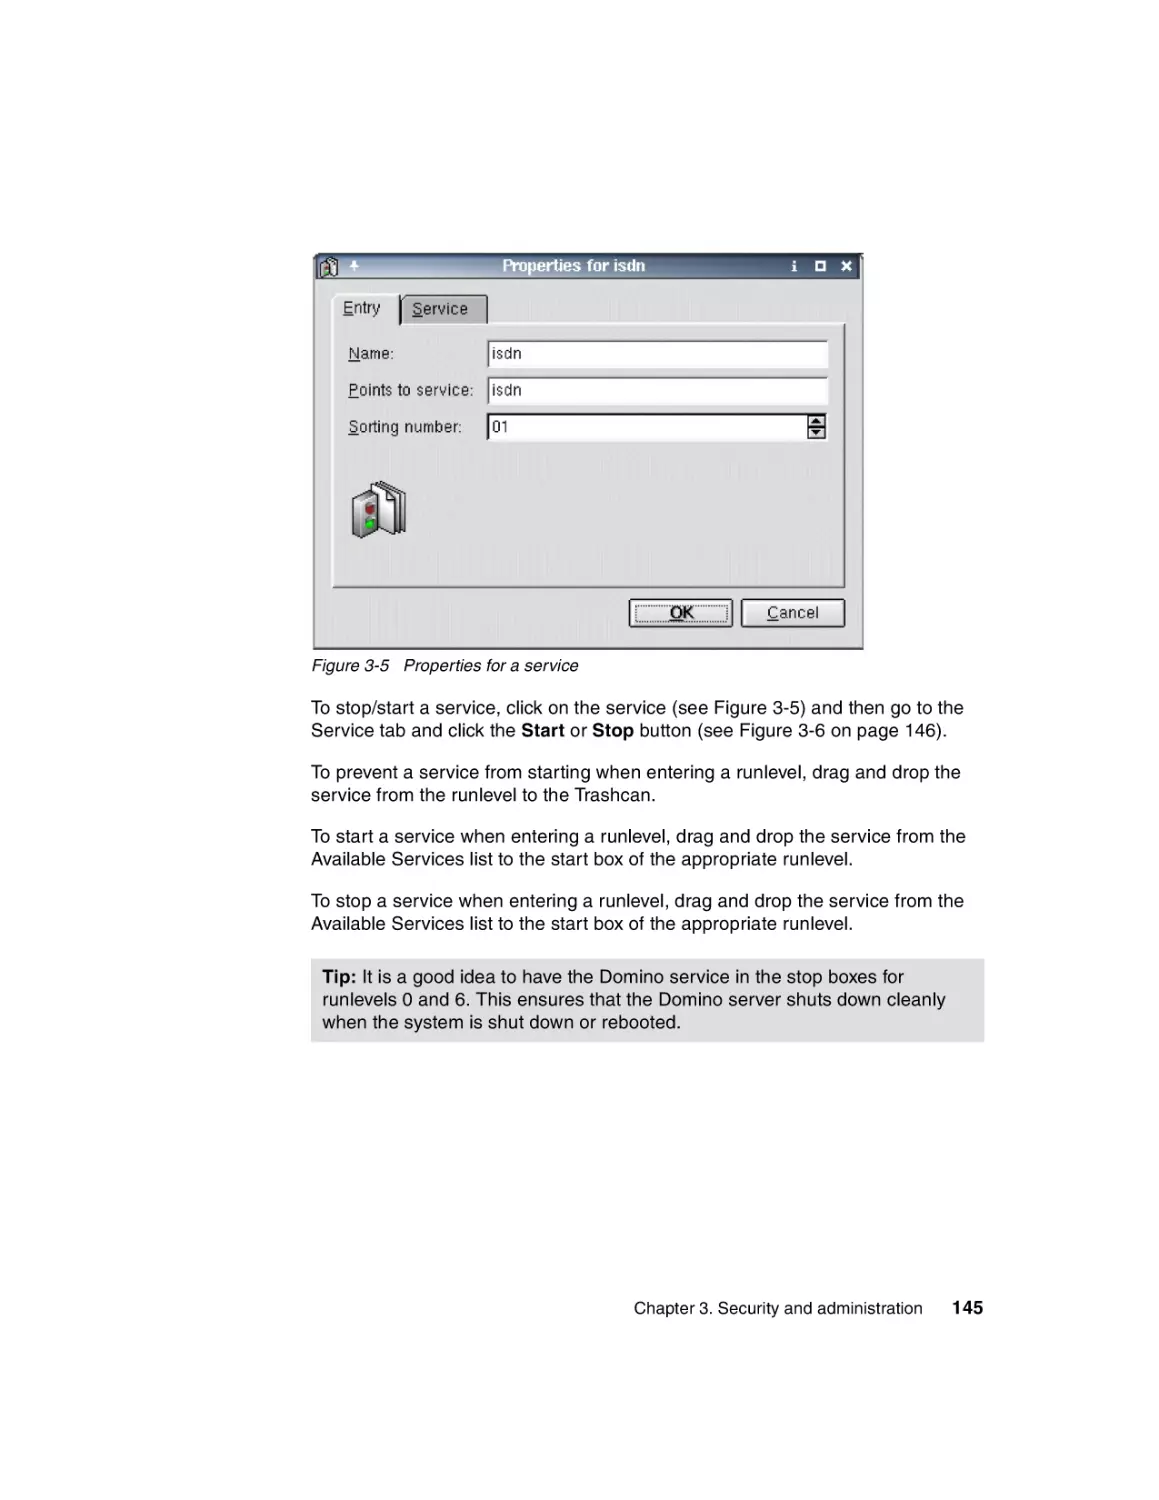
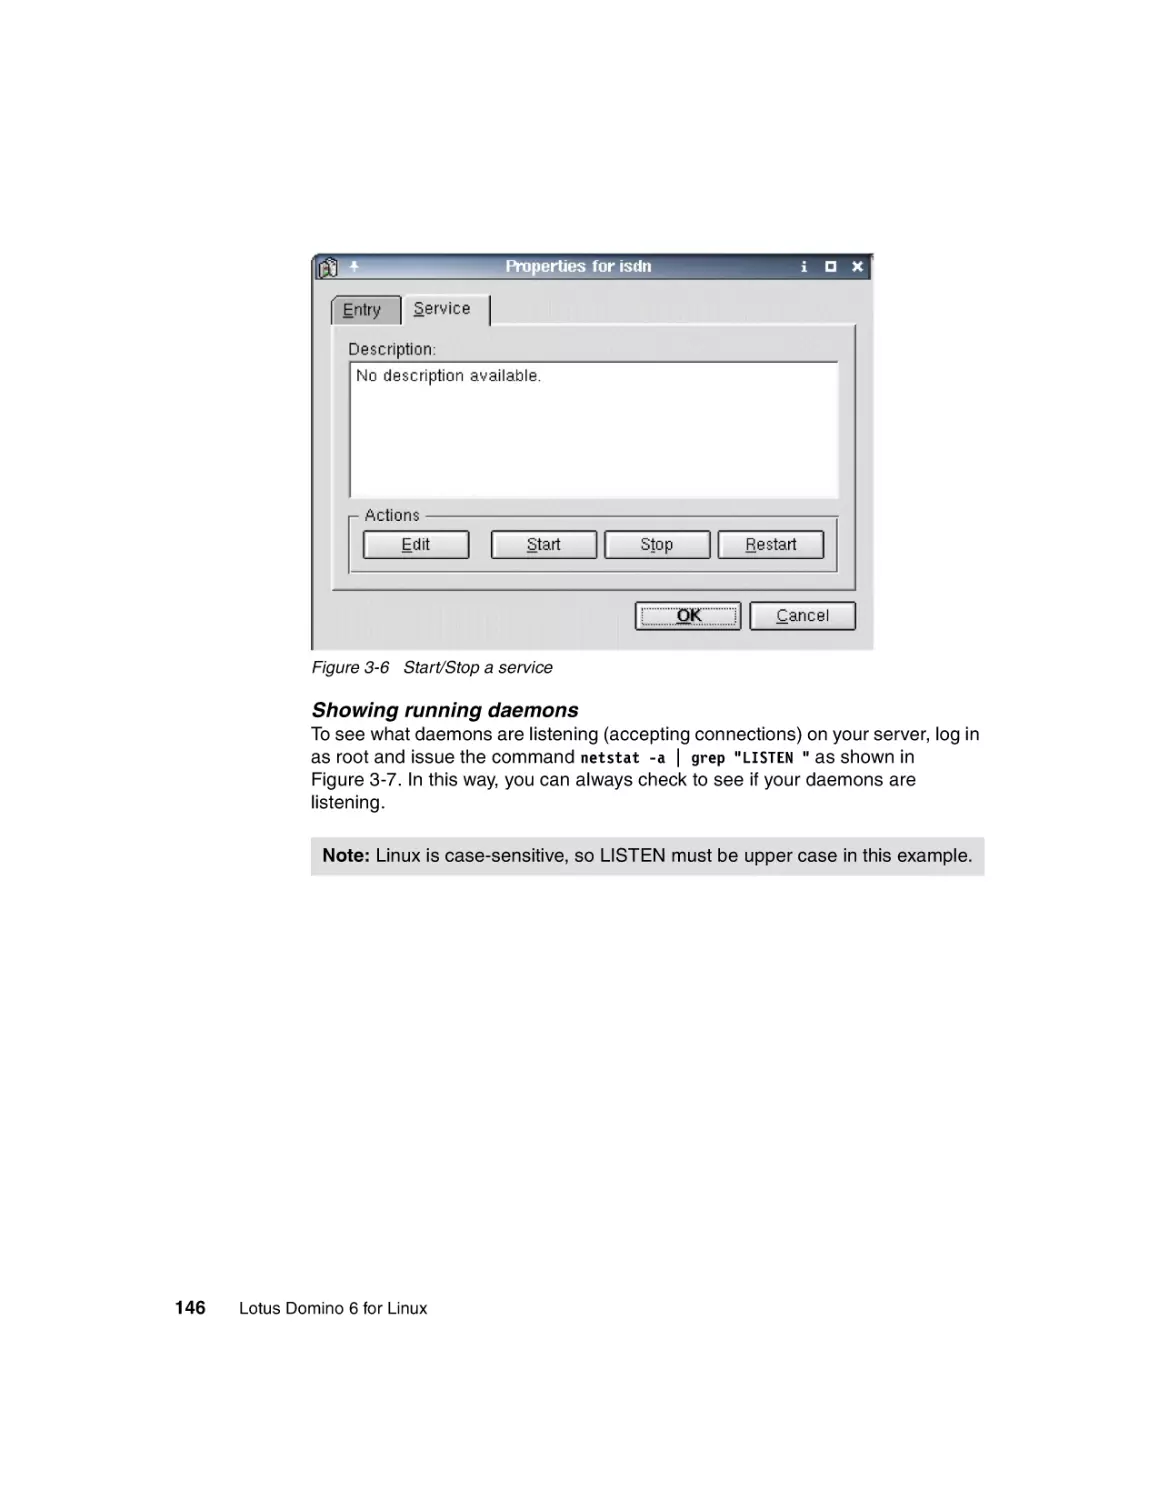
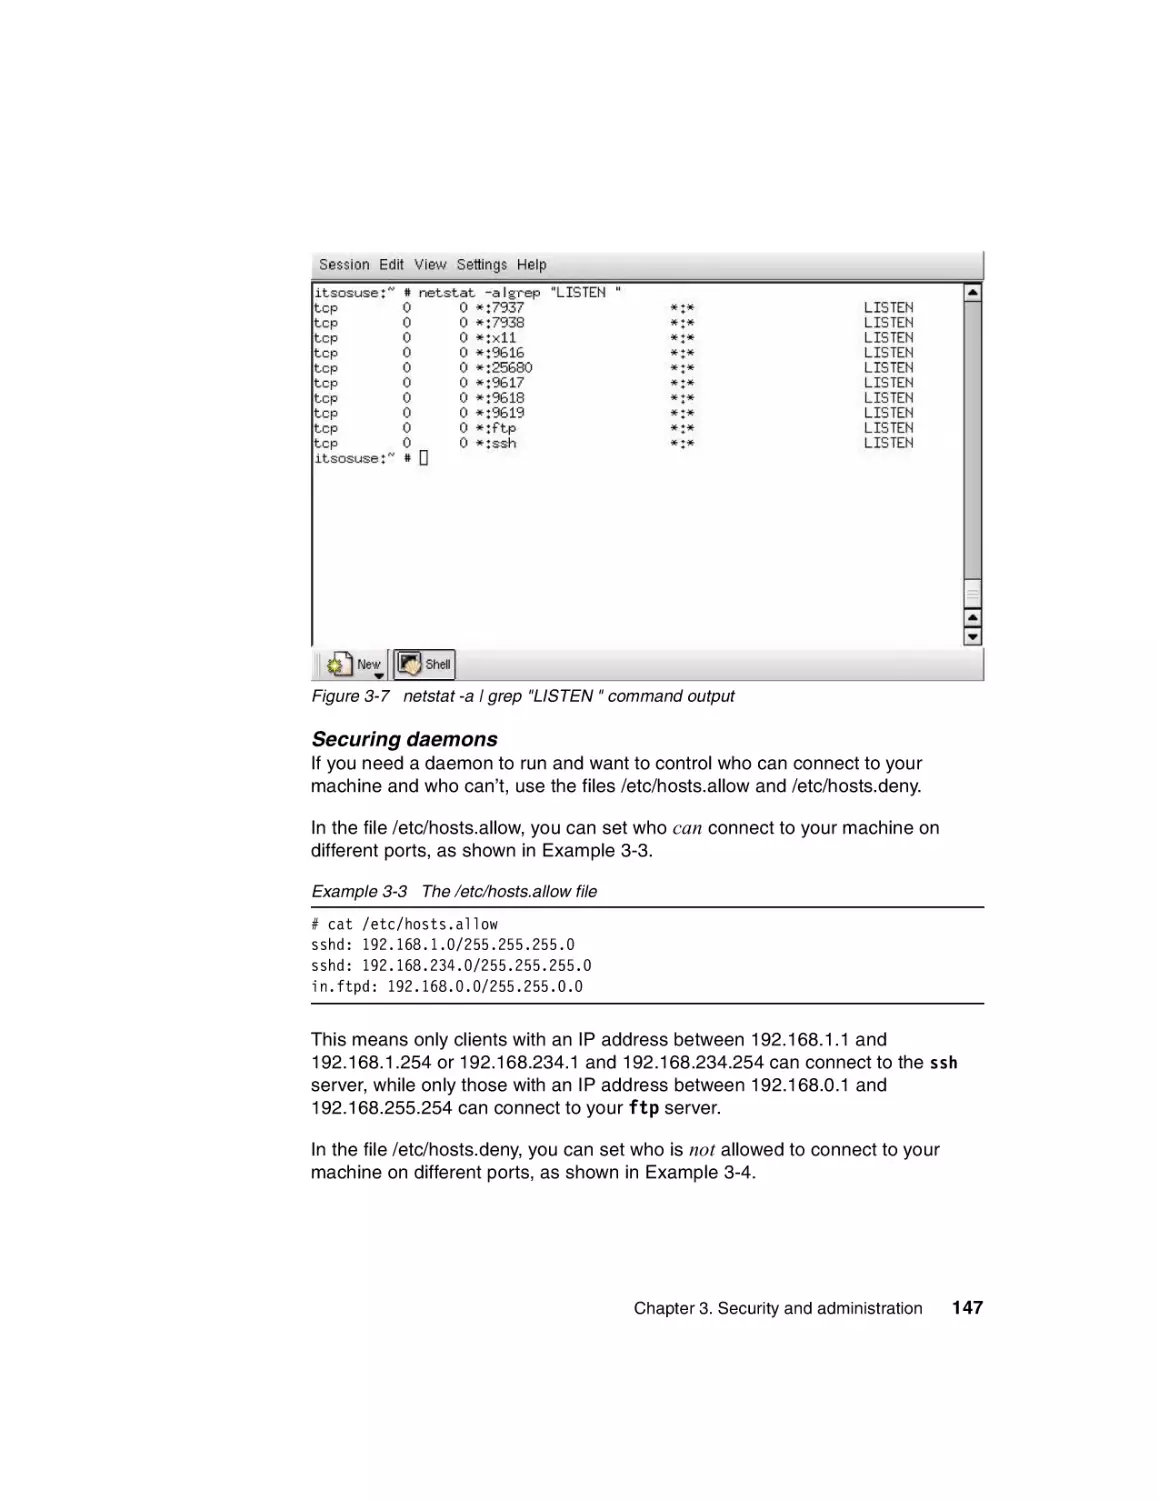
Chapter 3. Security and administration . . . . . . . . . . . . . . . . . . . . . . . . . . 133
3.1 Linux security . . . . . . . . . . . . . . . . . . . . . . . . . . . . . . . . . . . . . . . . . . . . . 134
3.1.1 Physical security . . . . . . . . . . . . . . . . . . . . . . . . . . . . . . . . . . . . . . . 134
3.1.2 System security . . . . . . . . . . . . . . . . . . . . . . . . . . . . . . . . . . . . . . . . 134
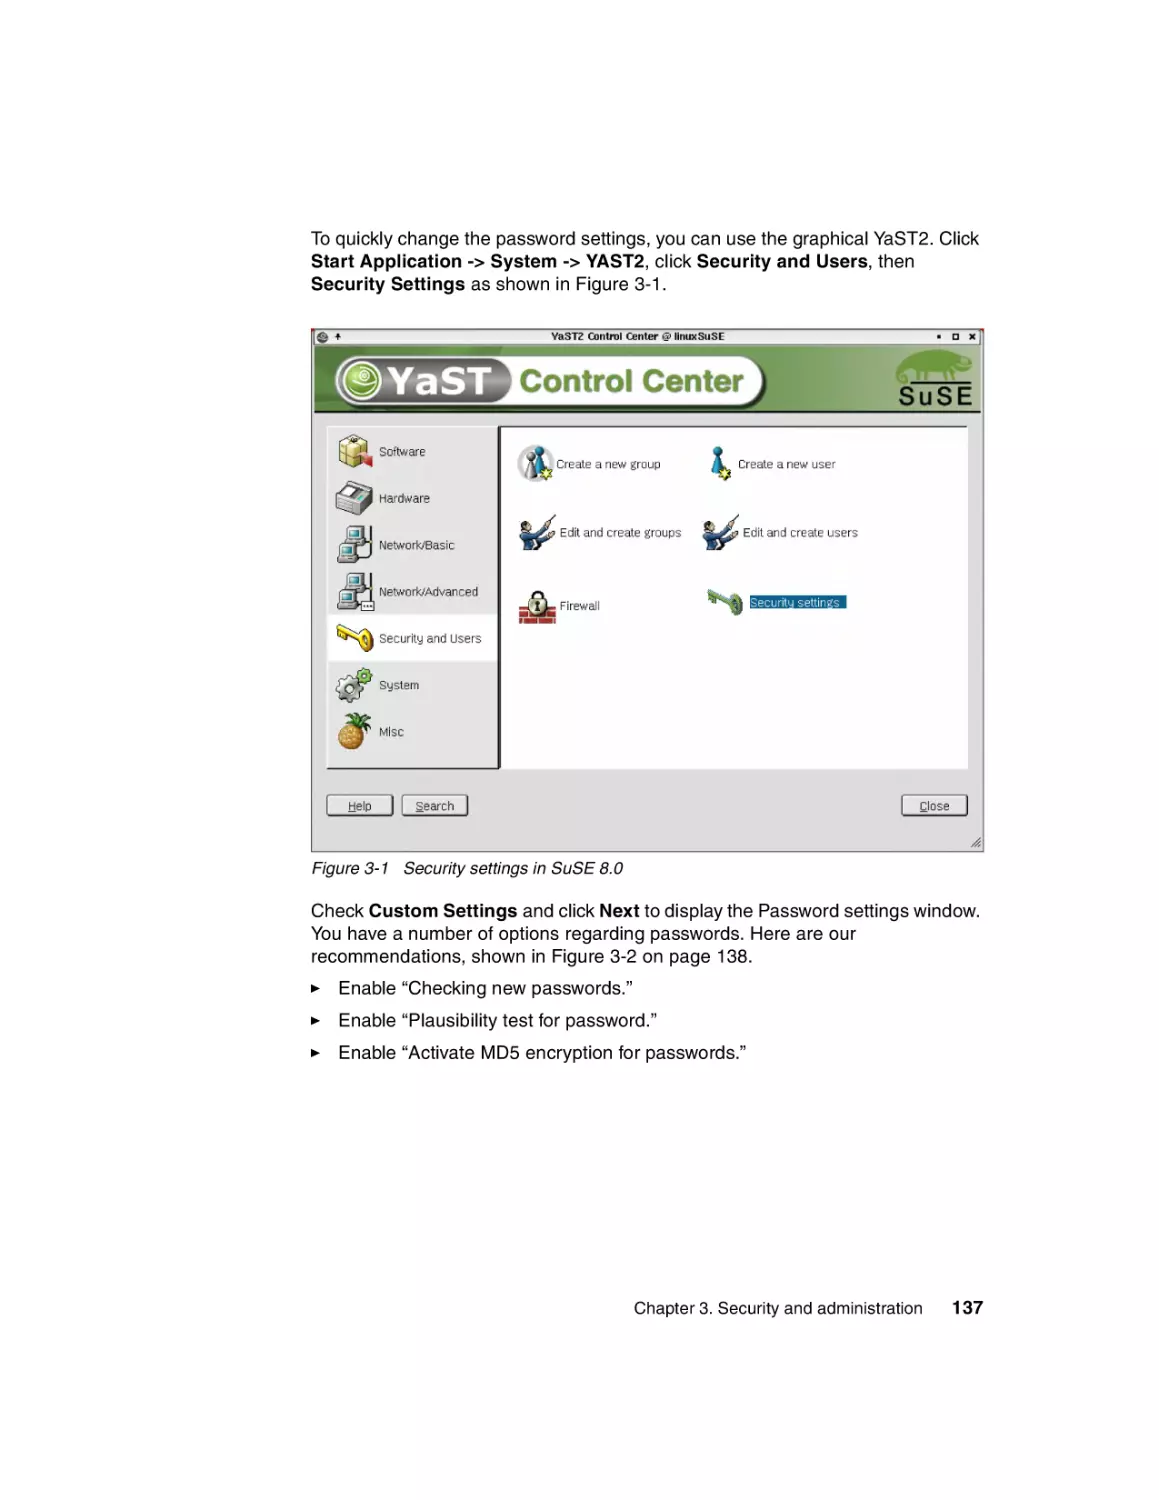
3.2 Linux administration . . . . . . . . . . . . . . . . . . . . . . . . . . . . . . . . . . . . . . . . 150
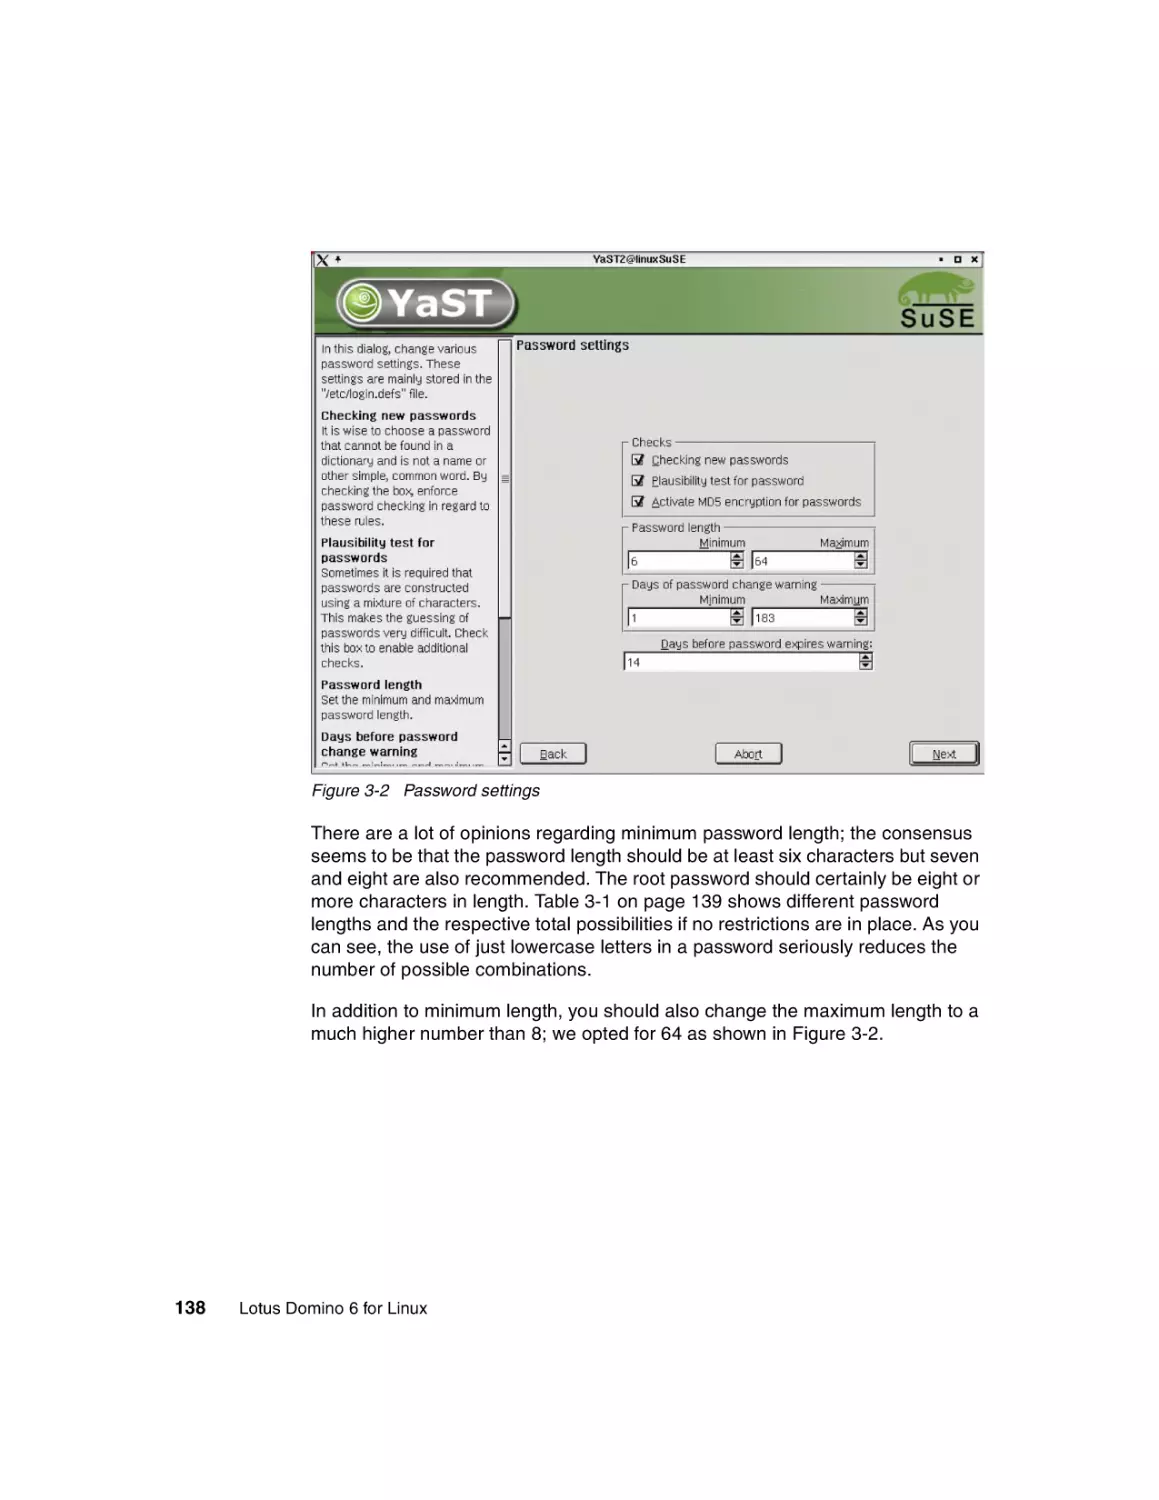
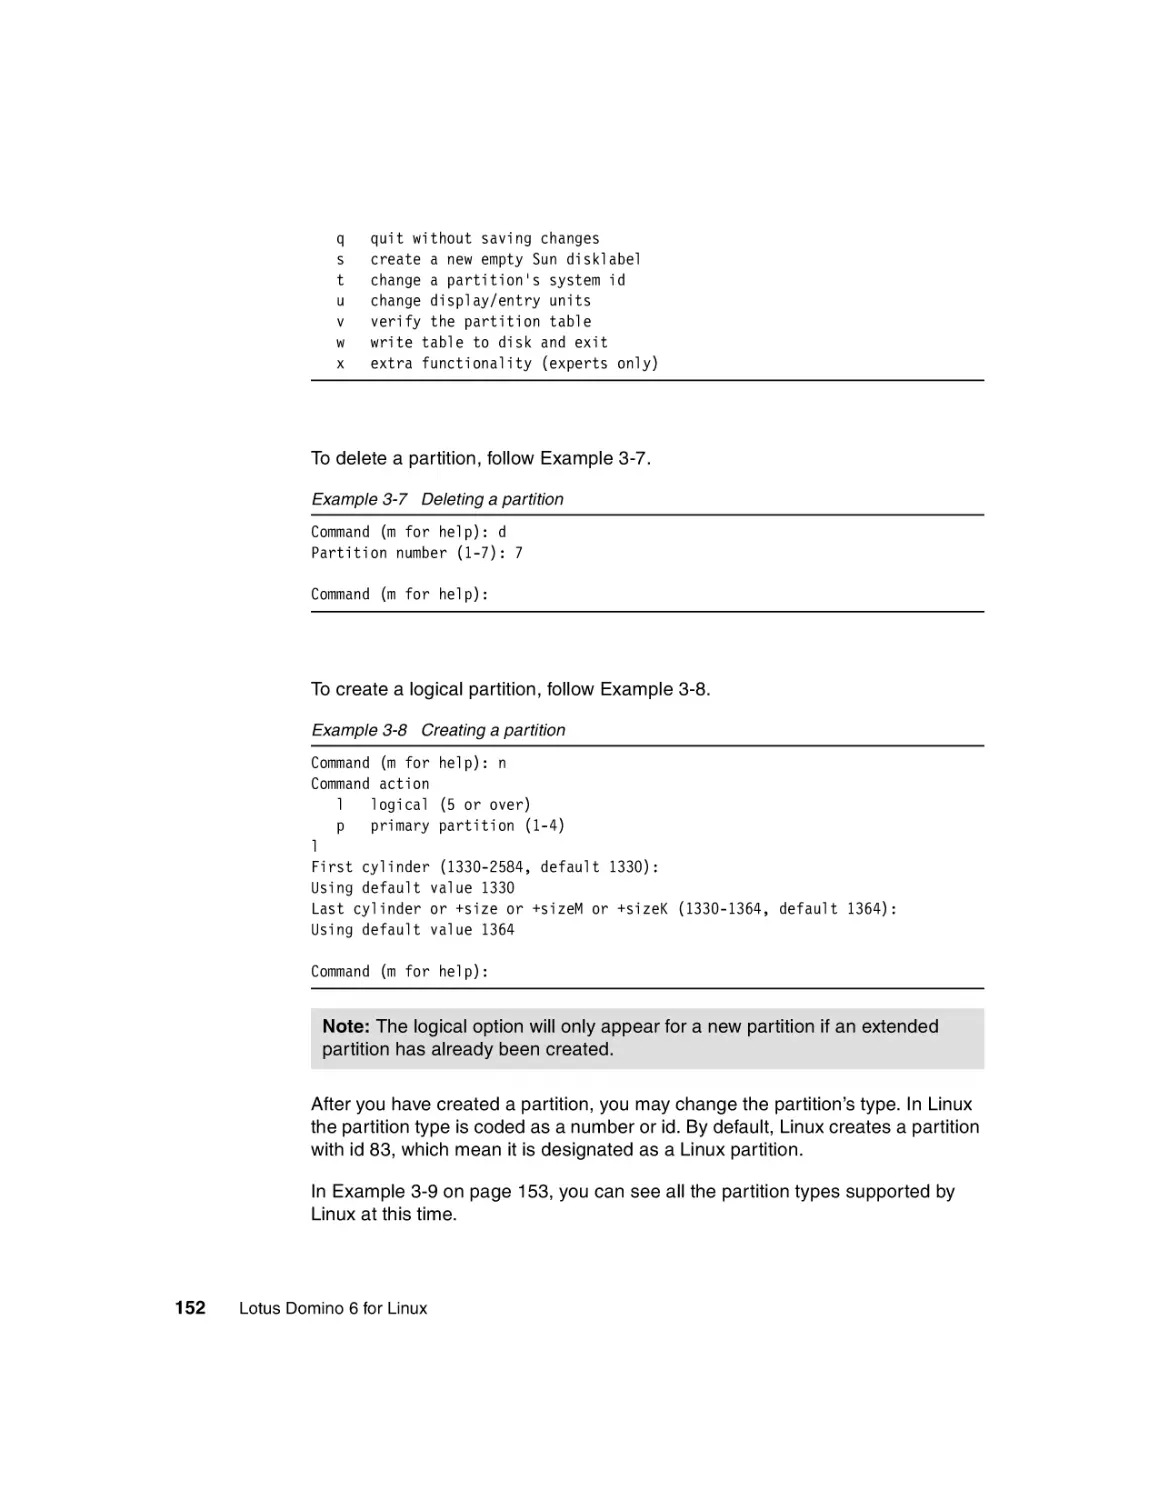
3.2.1 Partitions . . . . . . . . . . . . . . . . . . . . . . . . . . . . . . . . . . . . . . . . . . . . . 151
3.2.2 File systems . . . . . . . . . . . . . . . . . . . . . . . . . . . . . . . . . . . . . . . . . . 153
3.2.3 Scripts . . . . . . . . . . . . . . . . . . . . . . . . . . . . . . . . . . . . . . . . . . . . . . . 154
© Copyright IBM Corp. 2002. All rights reserved.
iii
3.2.4 Crontab . . . . . . . . . . . . . . . . . . . . . . . . . . . . . . . . . . . . . . . . . . . . . . 156
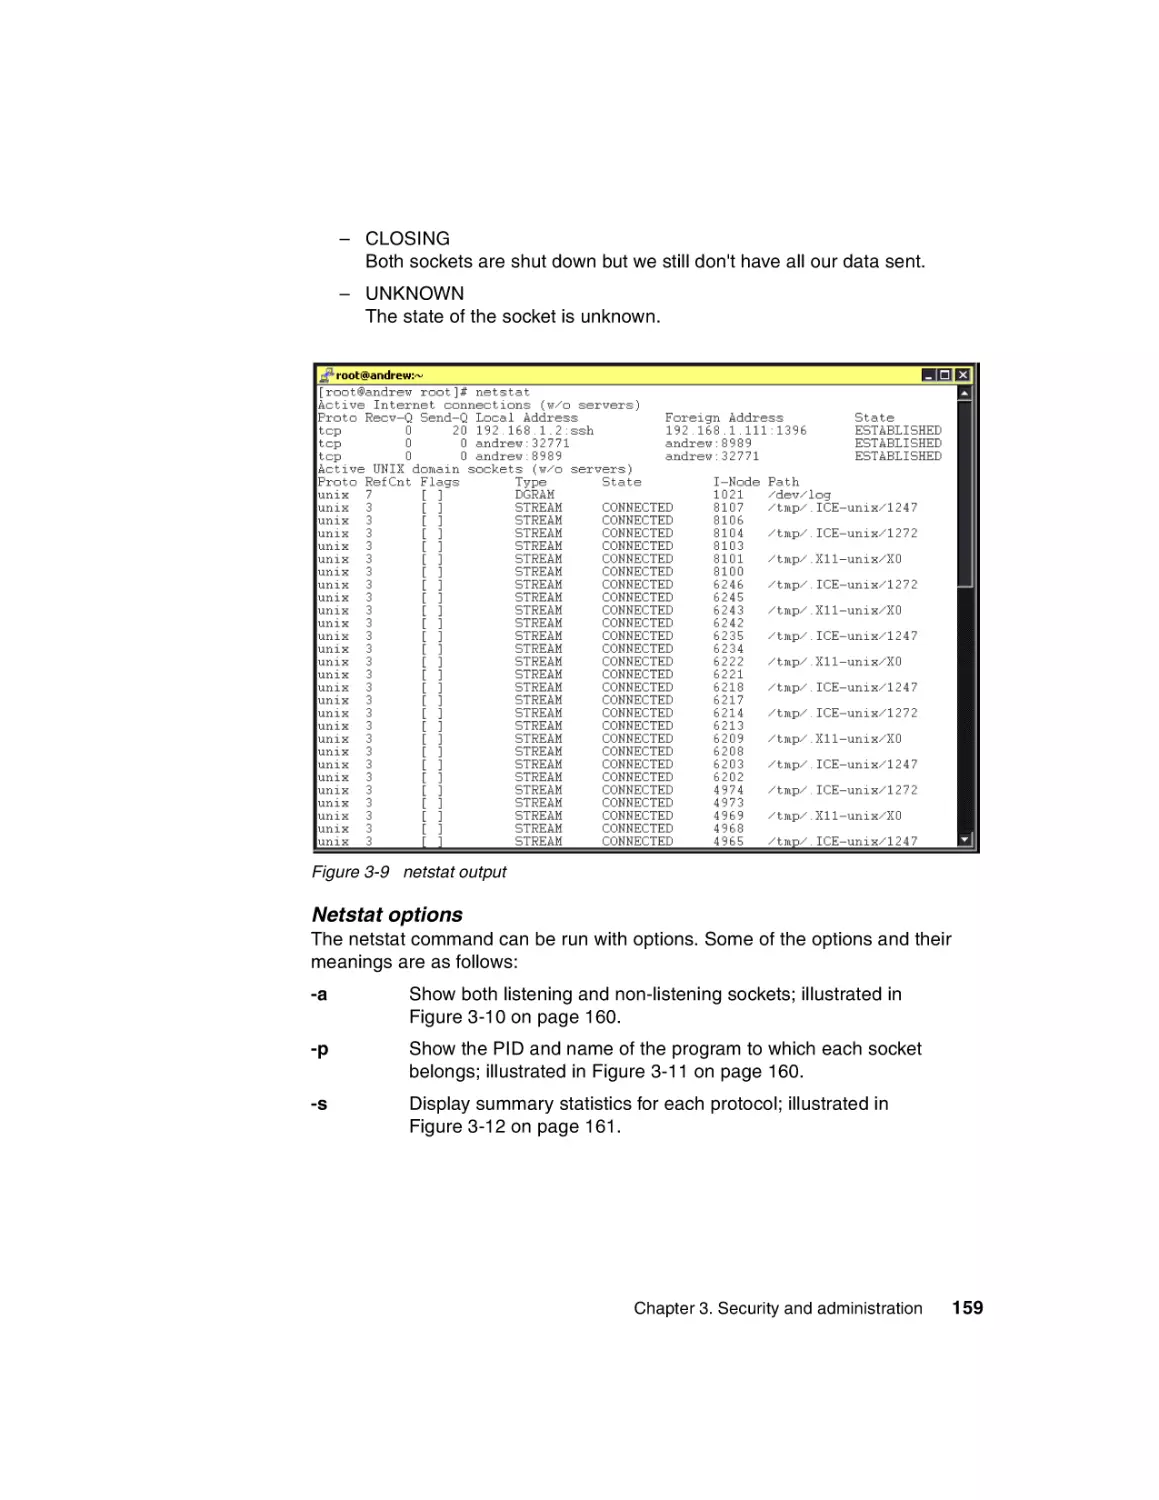
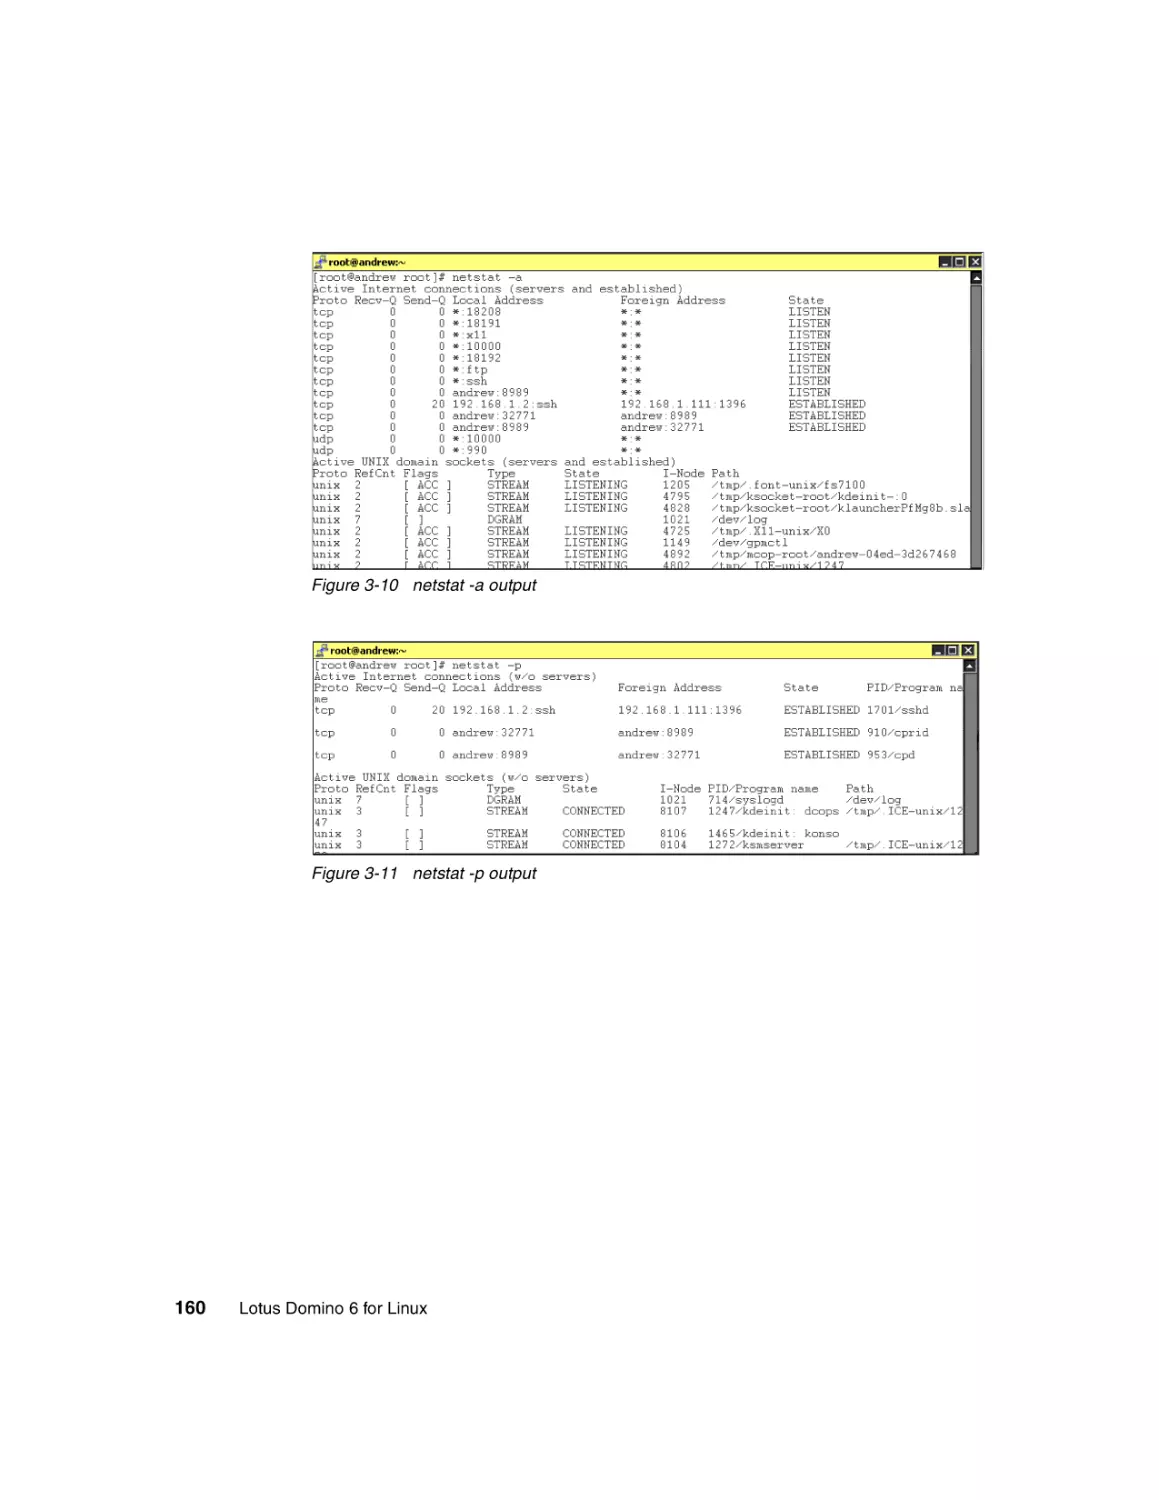
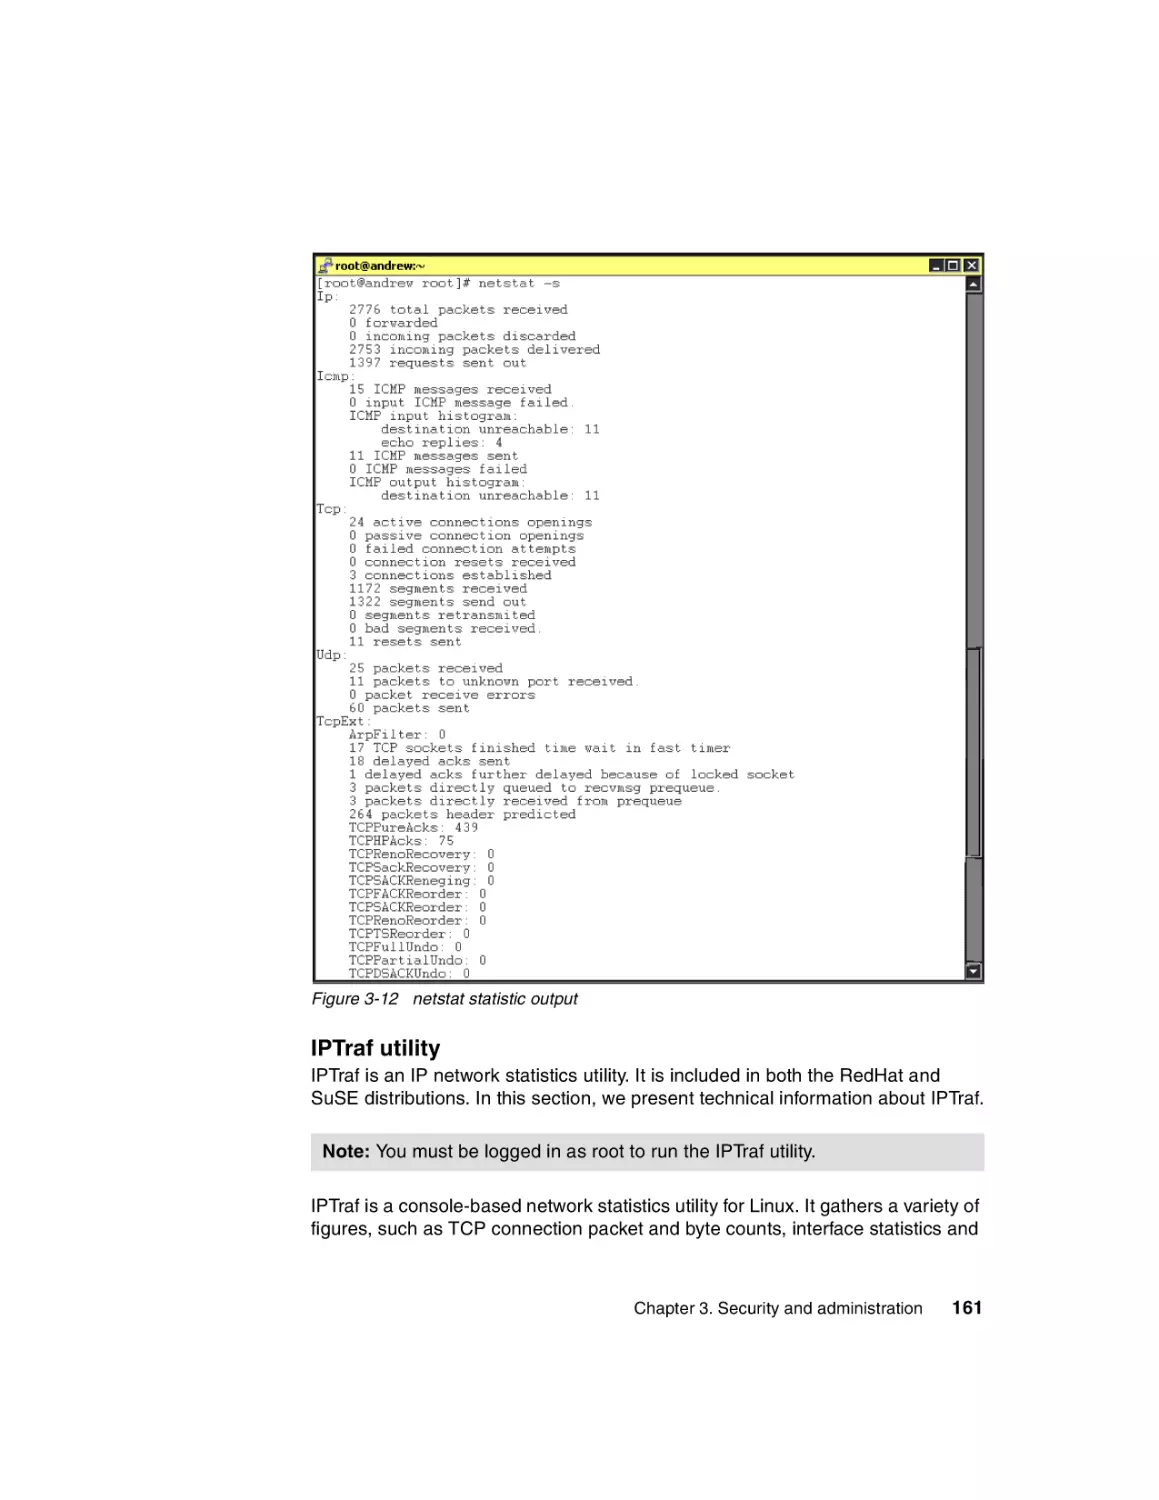
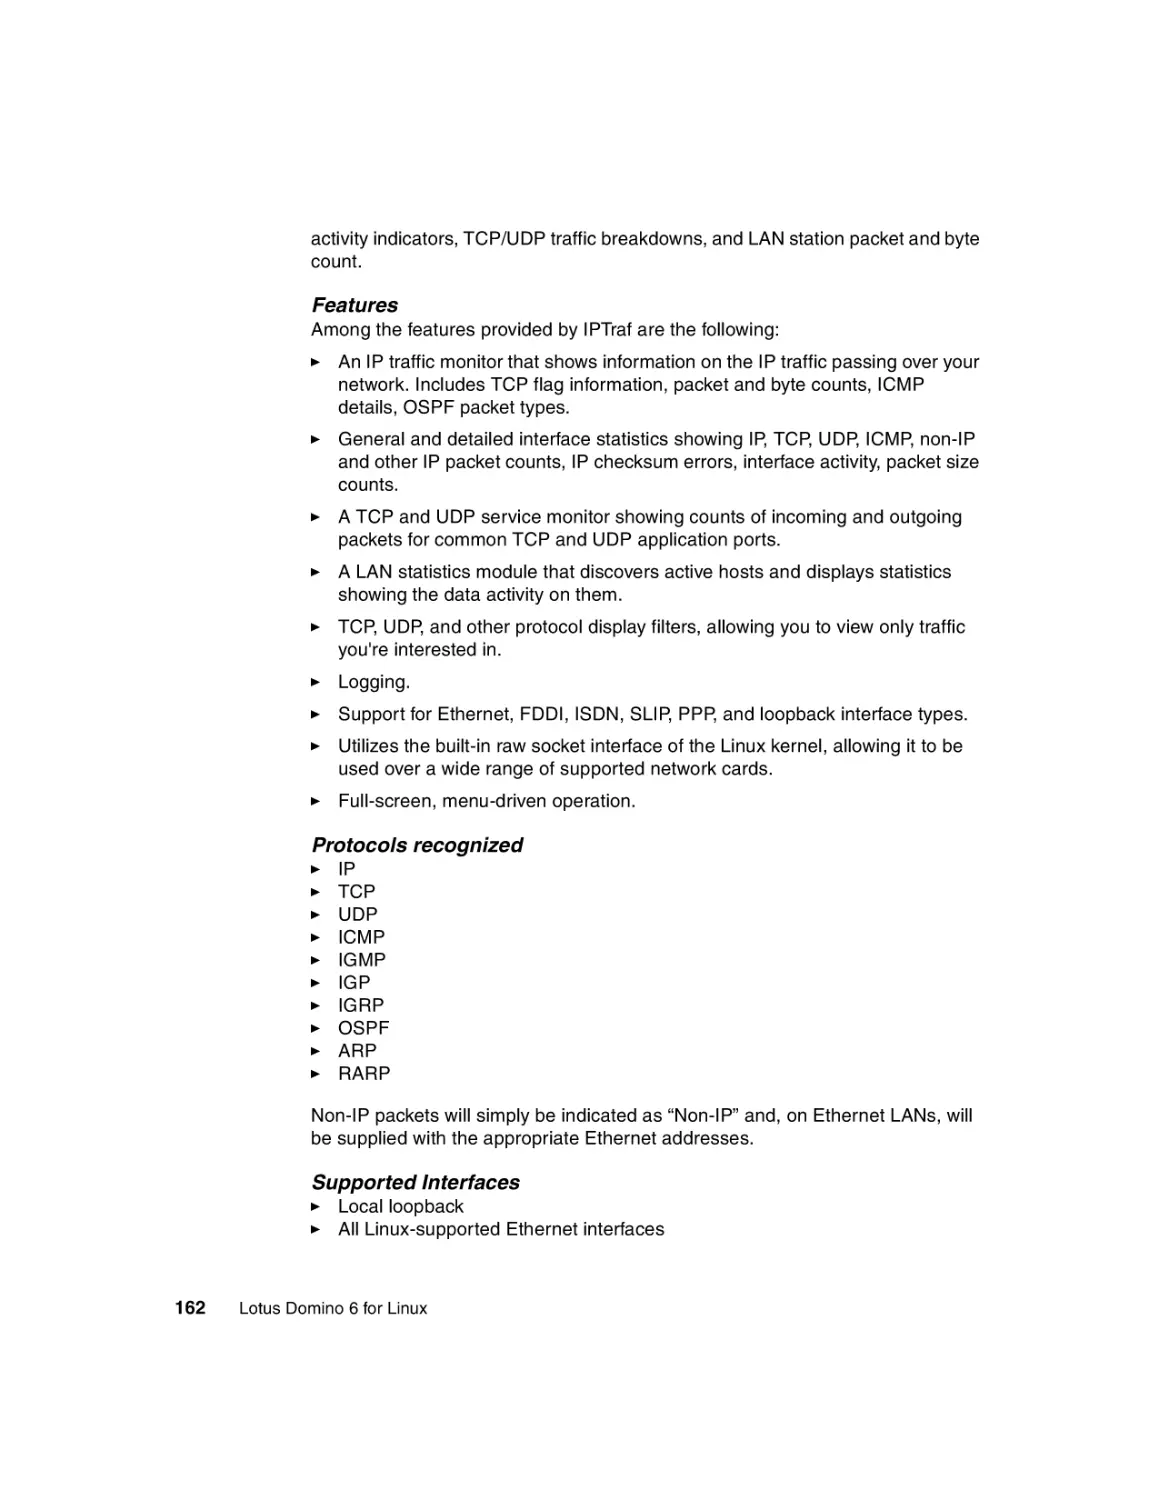
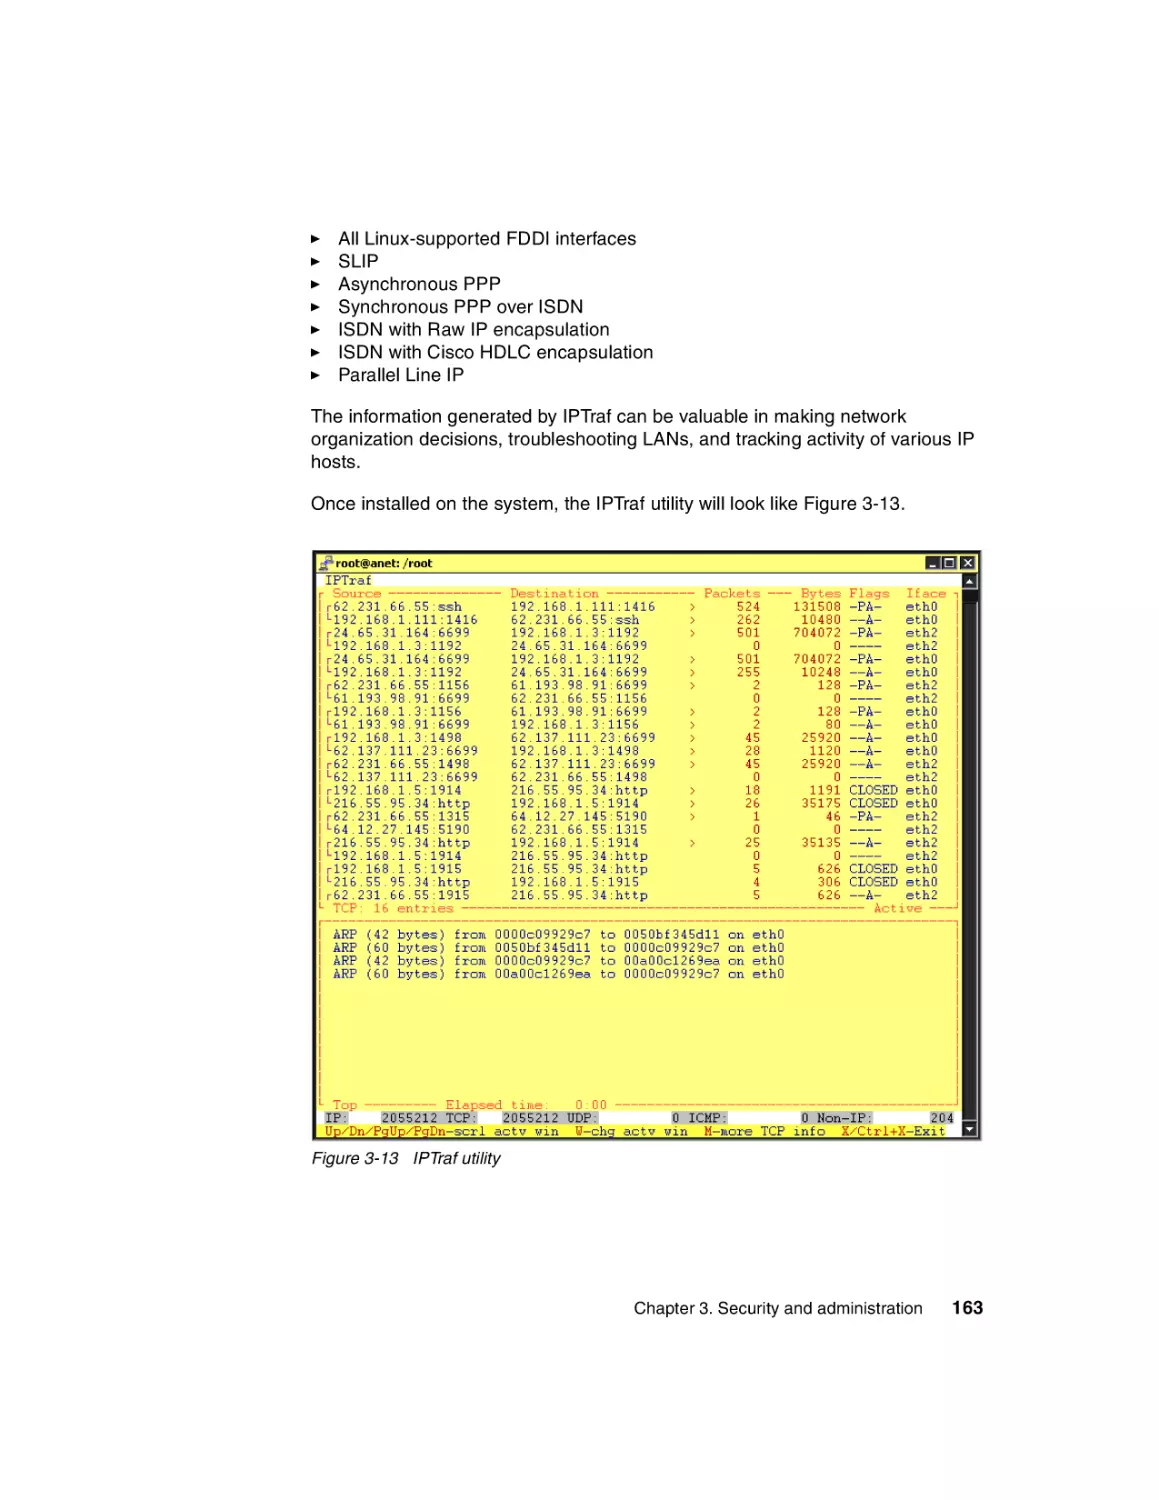
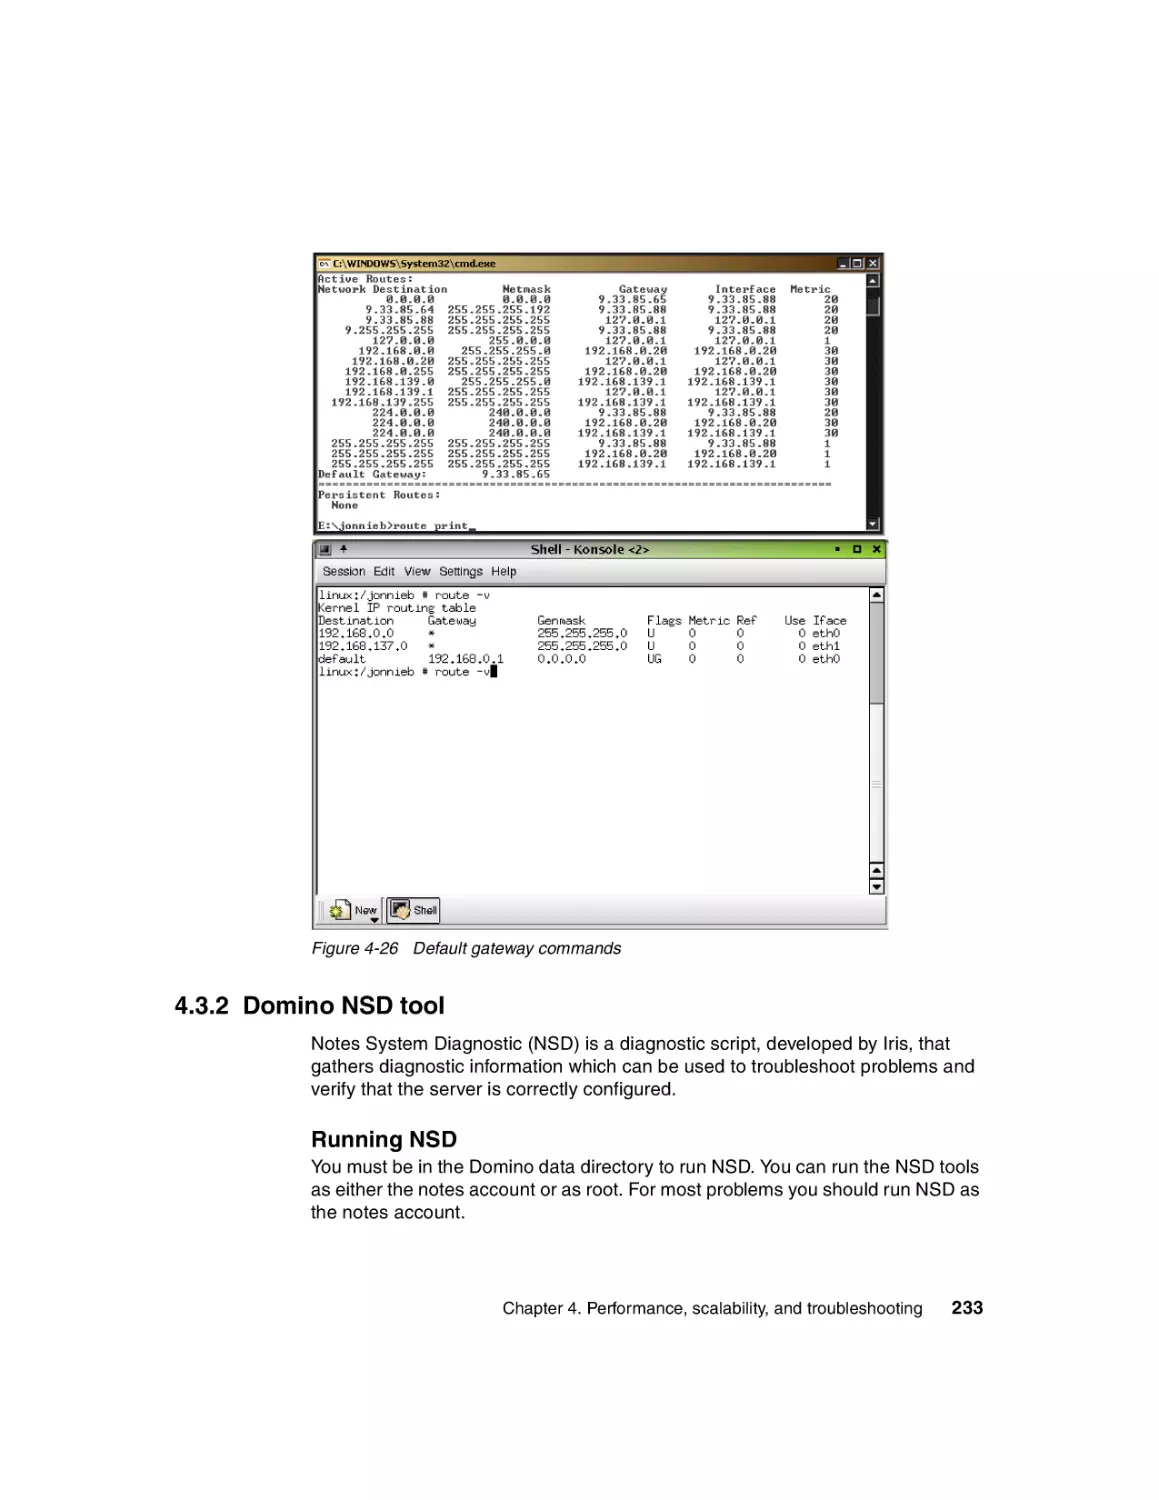
3.2.5 Network status . . . . . . . . . . . . . . . . . . . . . . . . . . . . . . . . . . . . . . . . 157
3.2.6 Multiple network cards (Private LAN) . . . . . . . . . . . . . . . . . . . . . . . 164
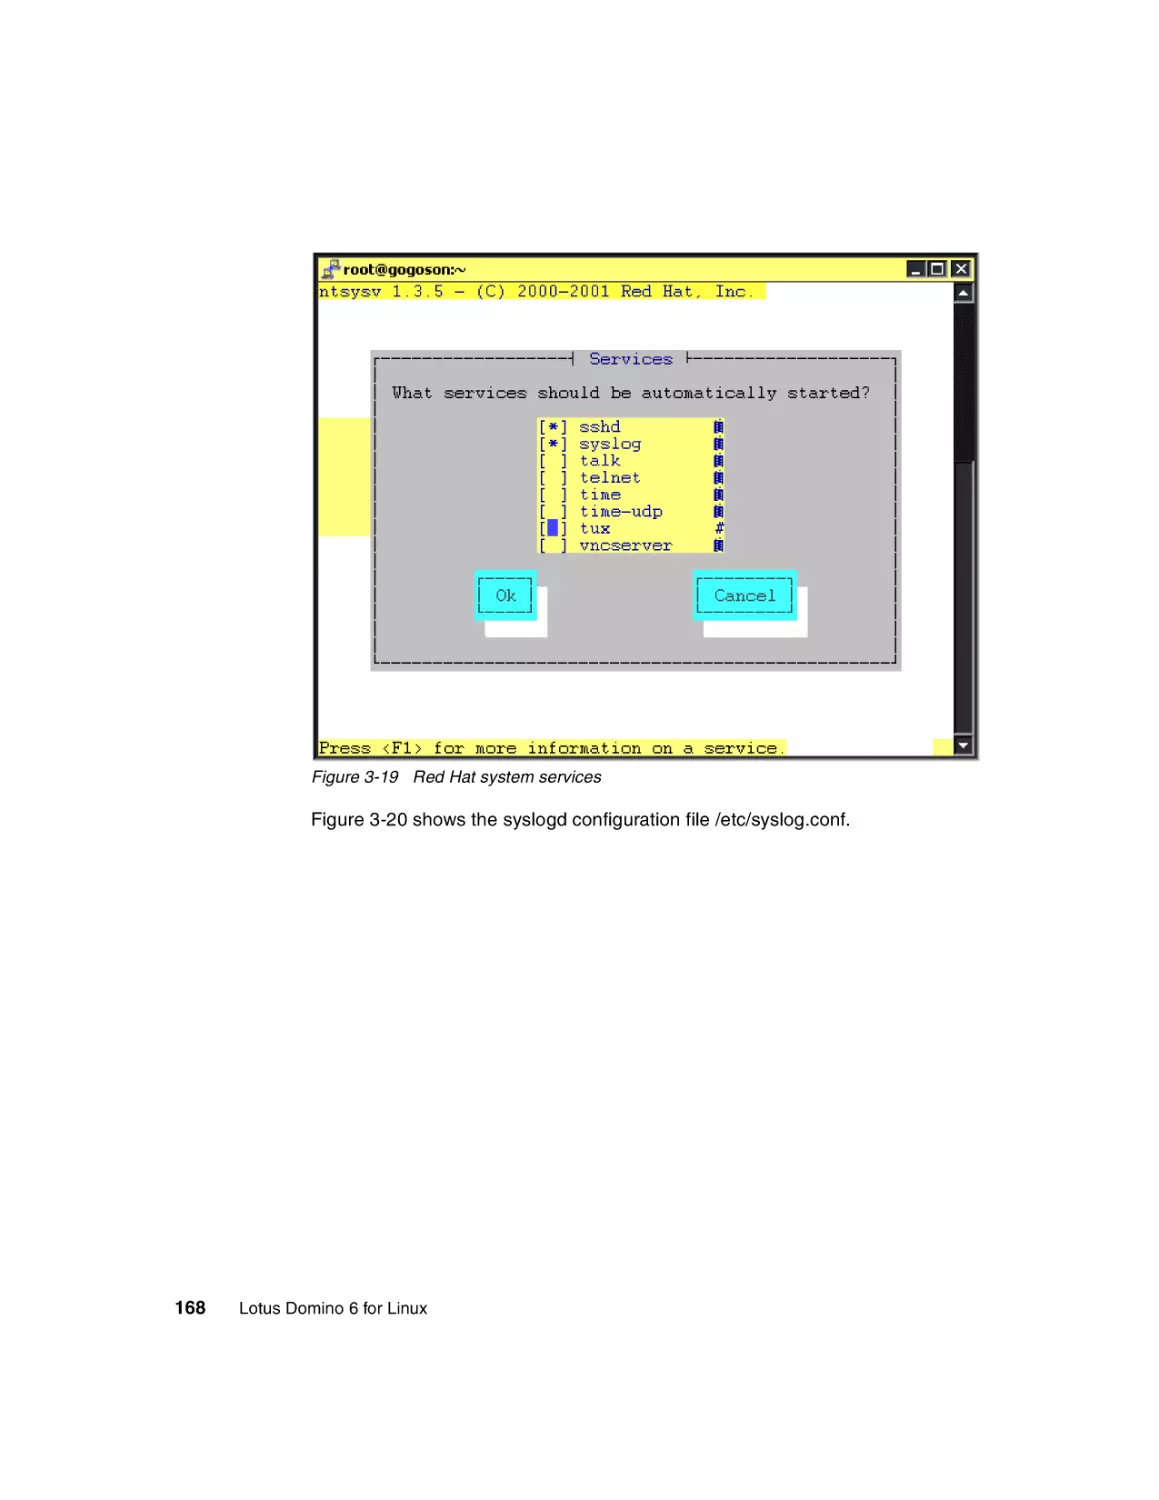
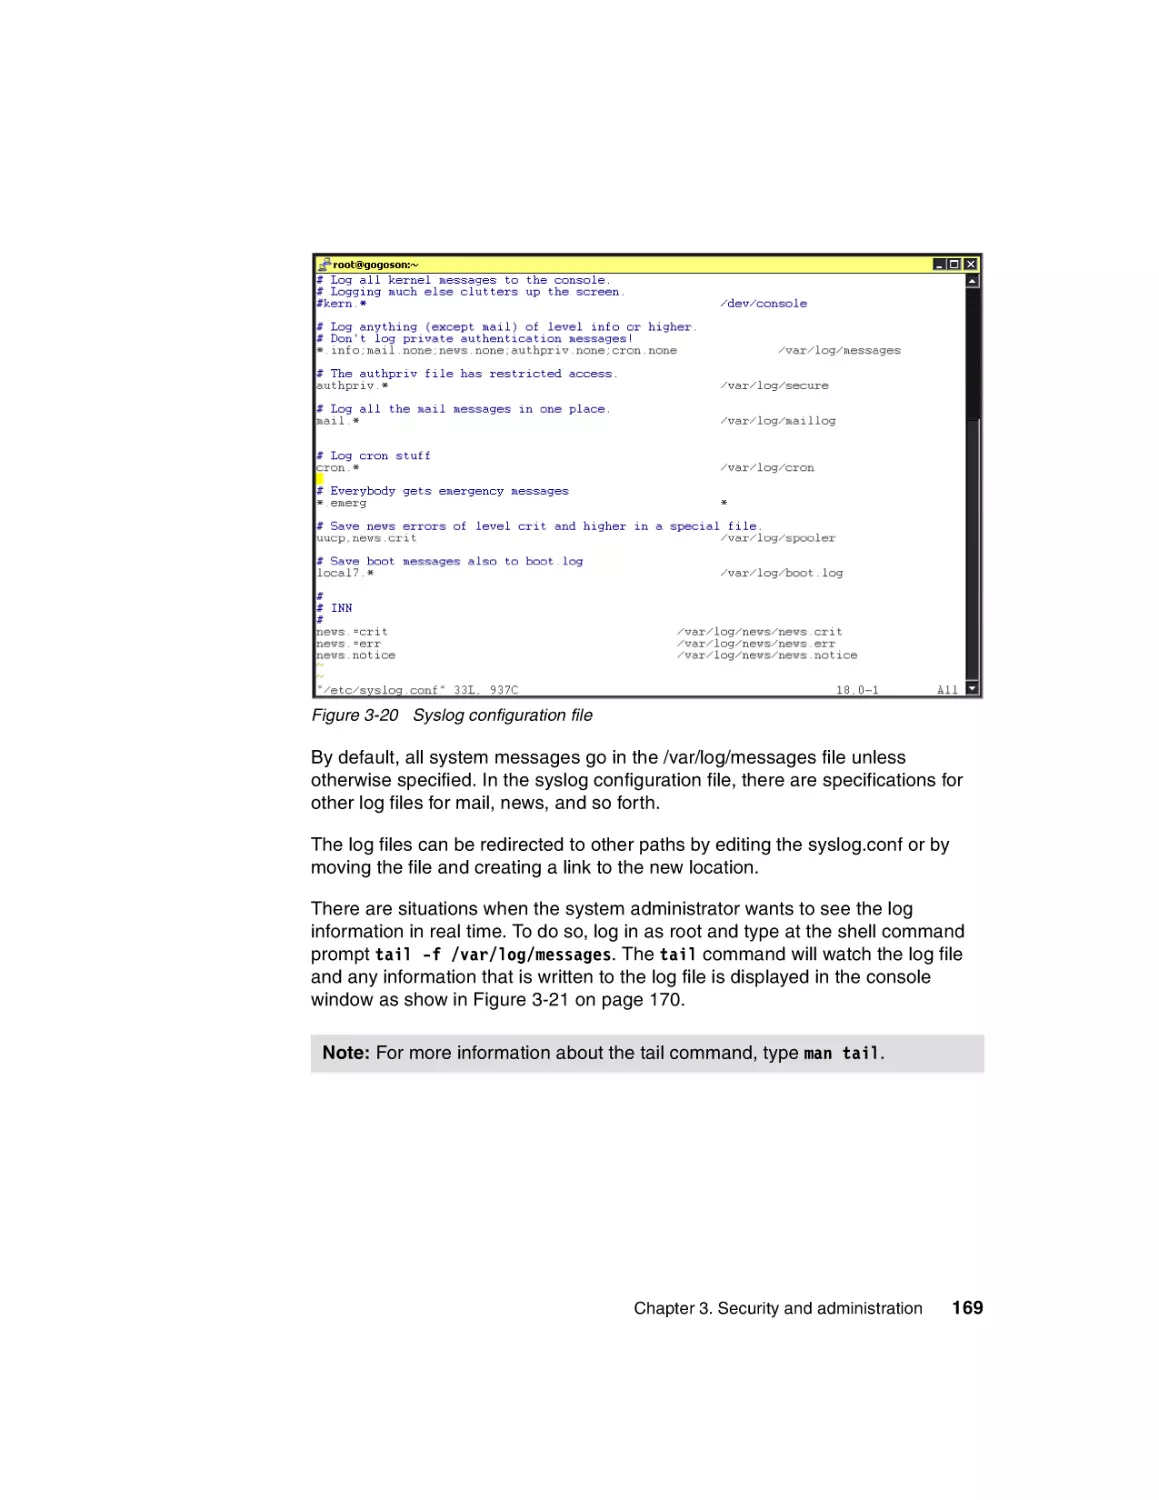
3.2.7 System logs. . . . . . . . . . . . . . . . . . . . . . . . . . . . . . . . . . . . . . . . . . . 167
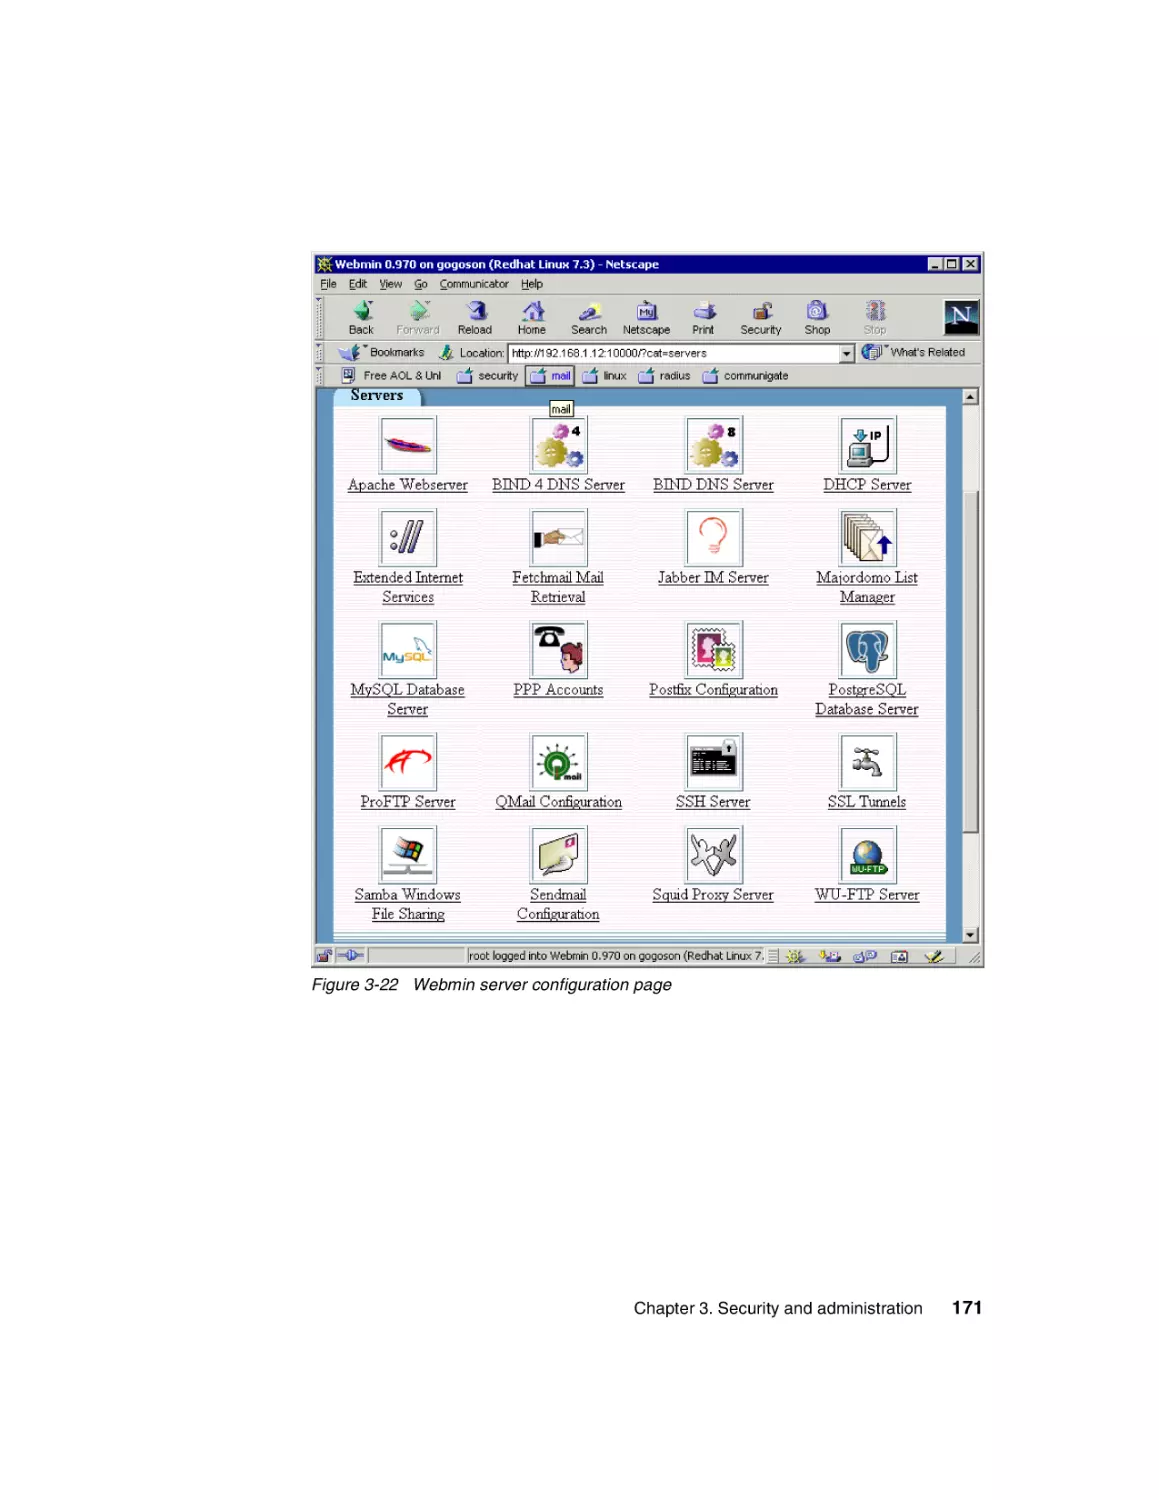
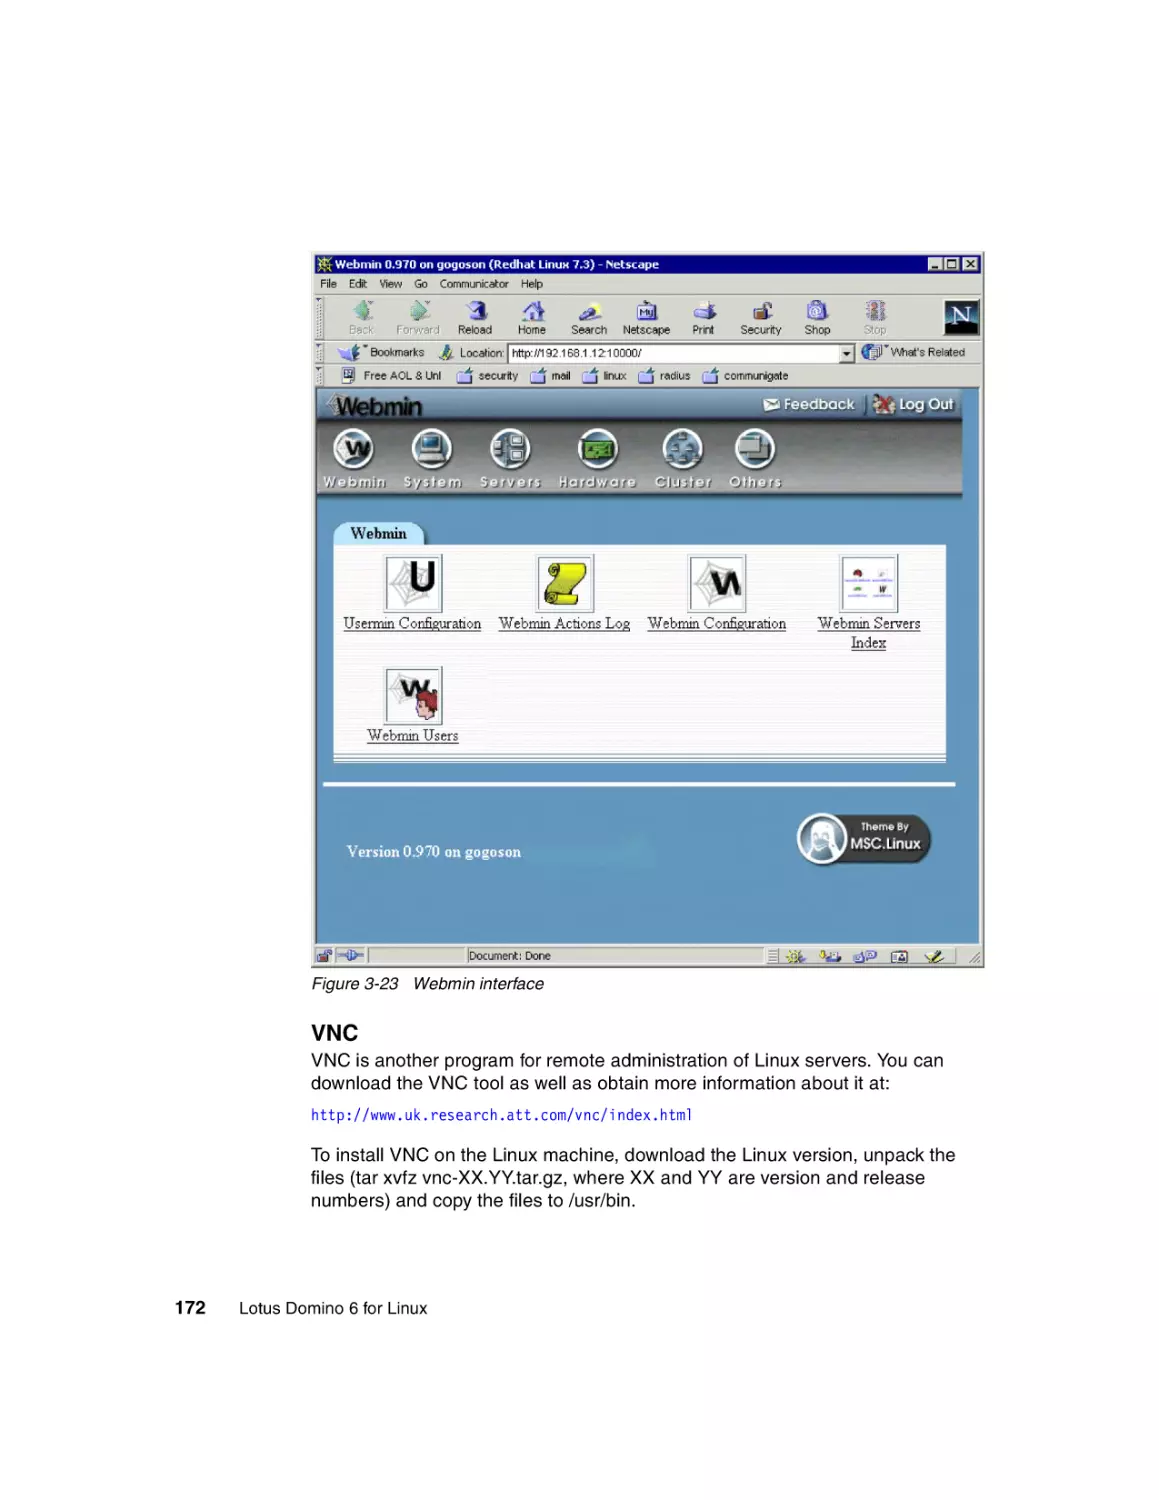
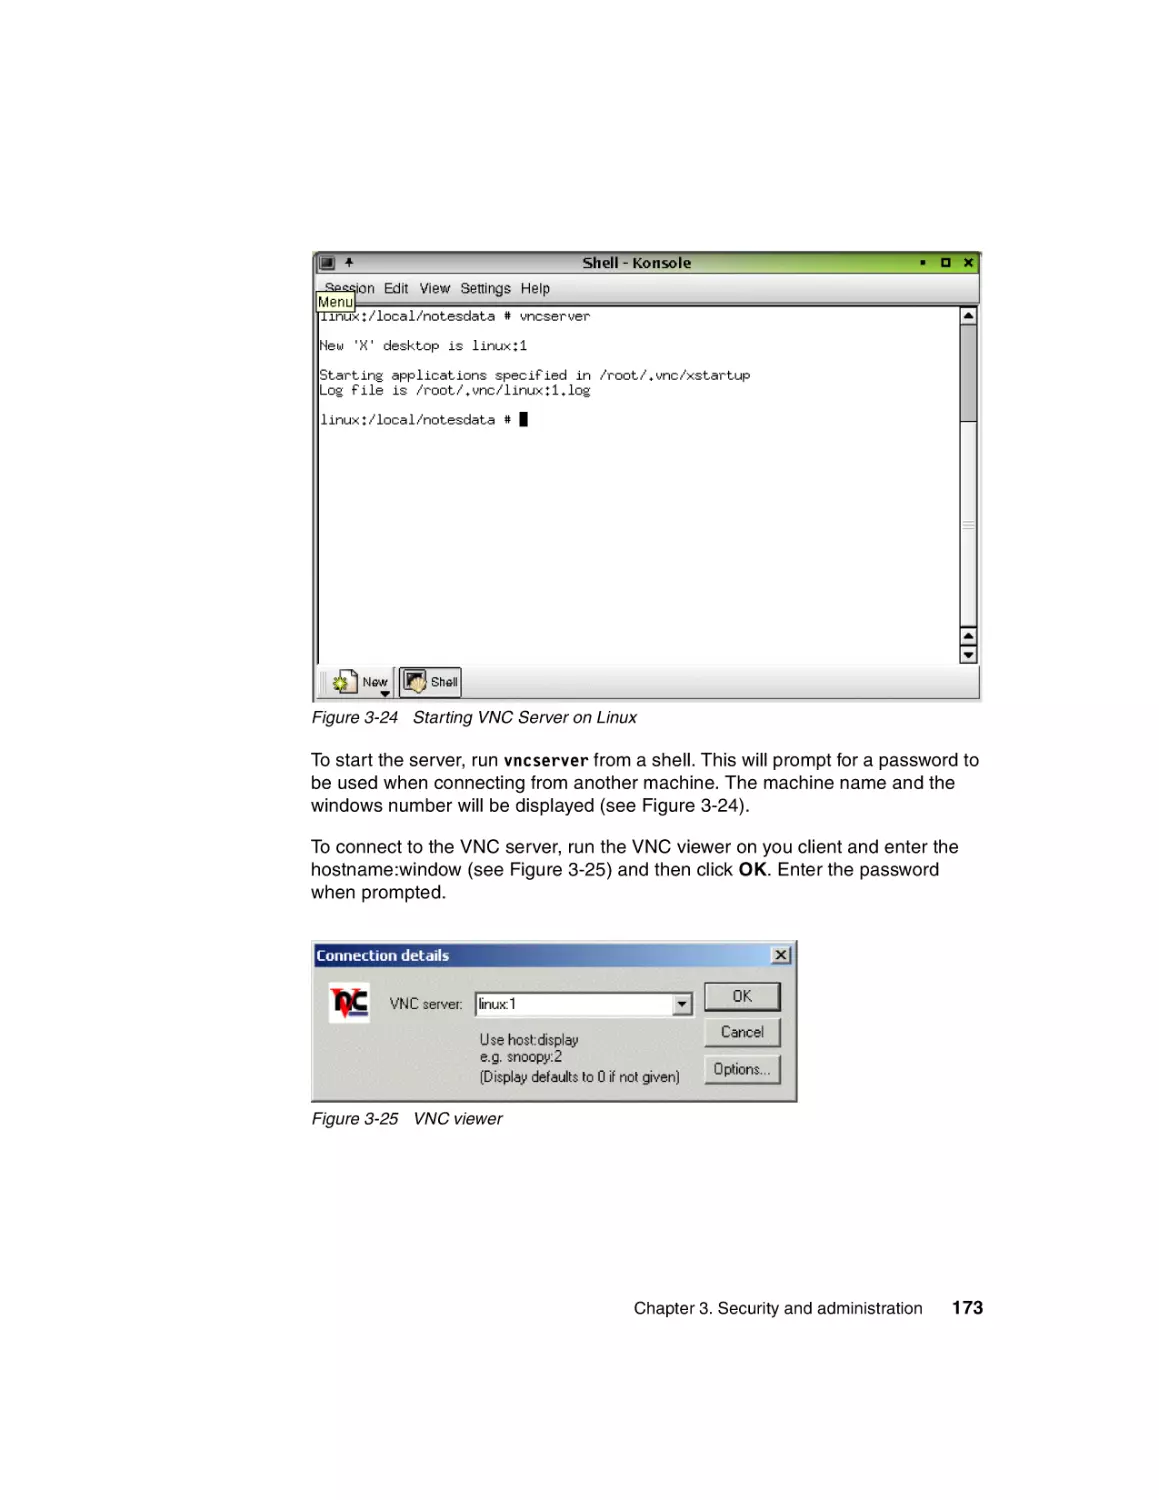
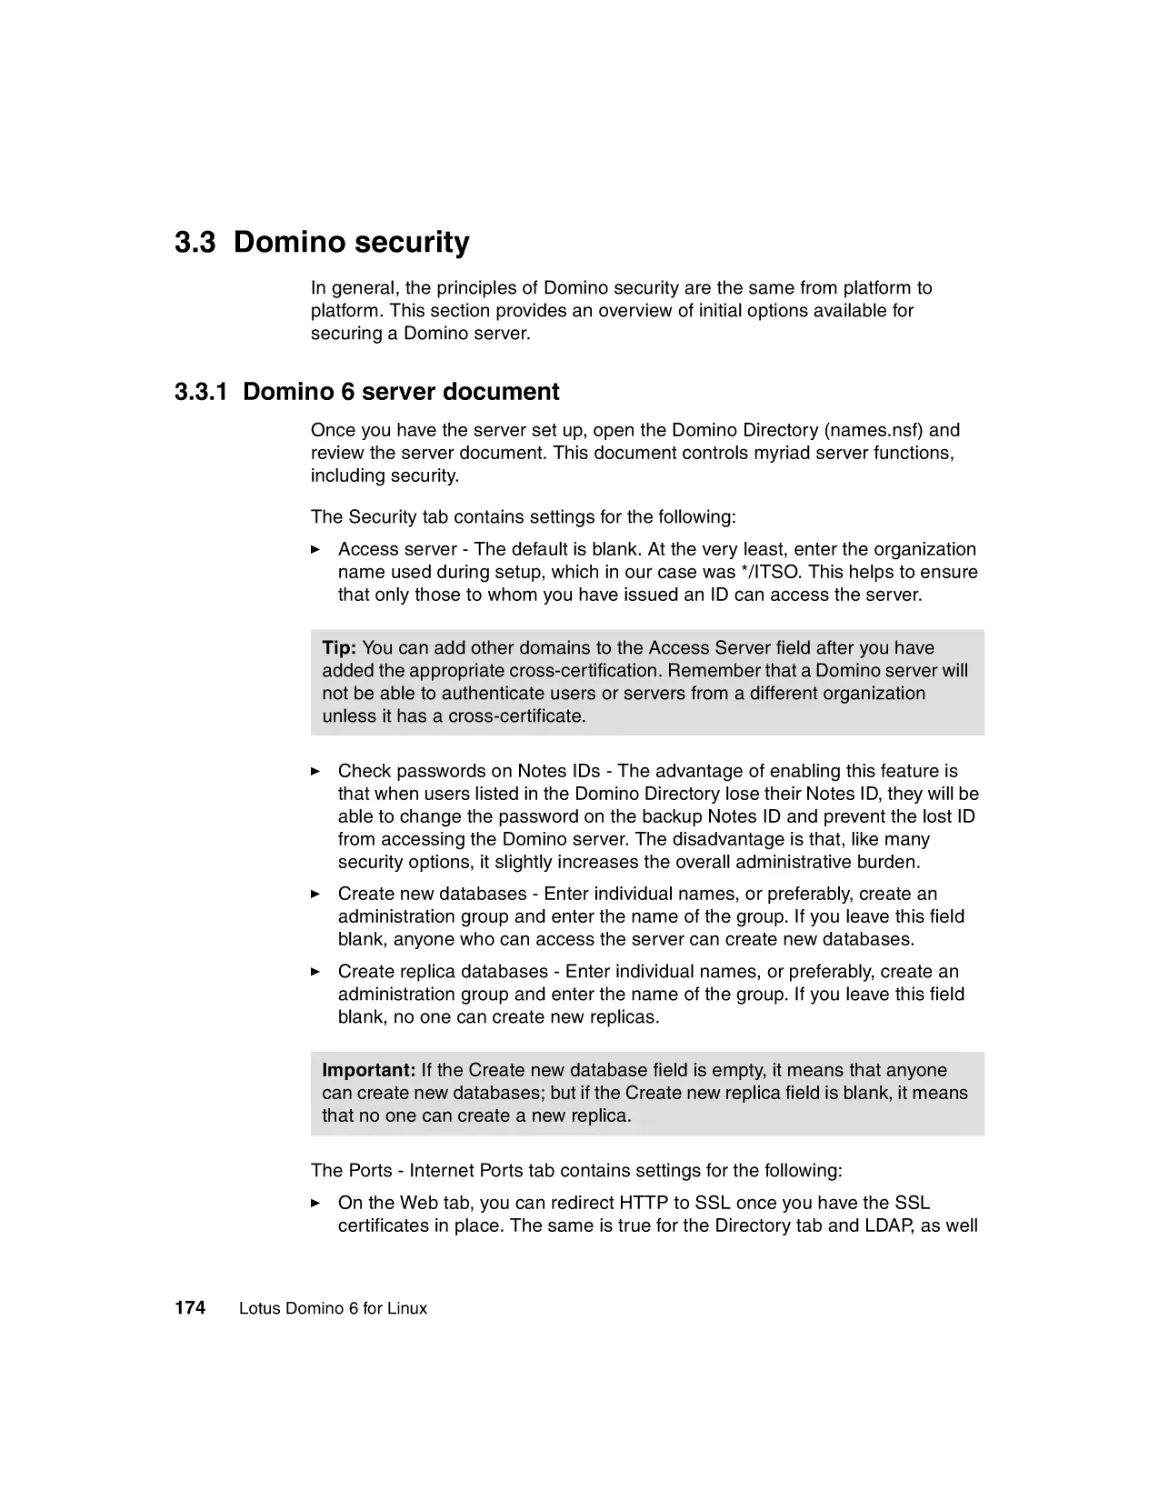
3.2.8 Remote administration . . . . . . . . . . . . . . . . . . . . . . . . . . . . . . . . . . 170
3.3 Domino security. . . . . . . . . . . . . . . . . . . . . . . . . . . . . . . . . . . . . . . . . . . . 174
3.3.1 Domino 6 server document . . . . . . . . . . . . . . . . . . . . . . . . . . . . . . . 174
3.3.2 Database ACLs . . . . . . . . . . . . . . . . . . . . . . . . . . . . . . . . . . . . . . . . 175
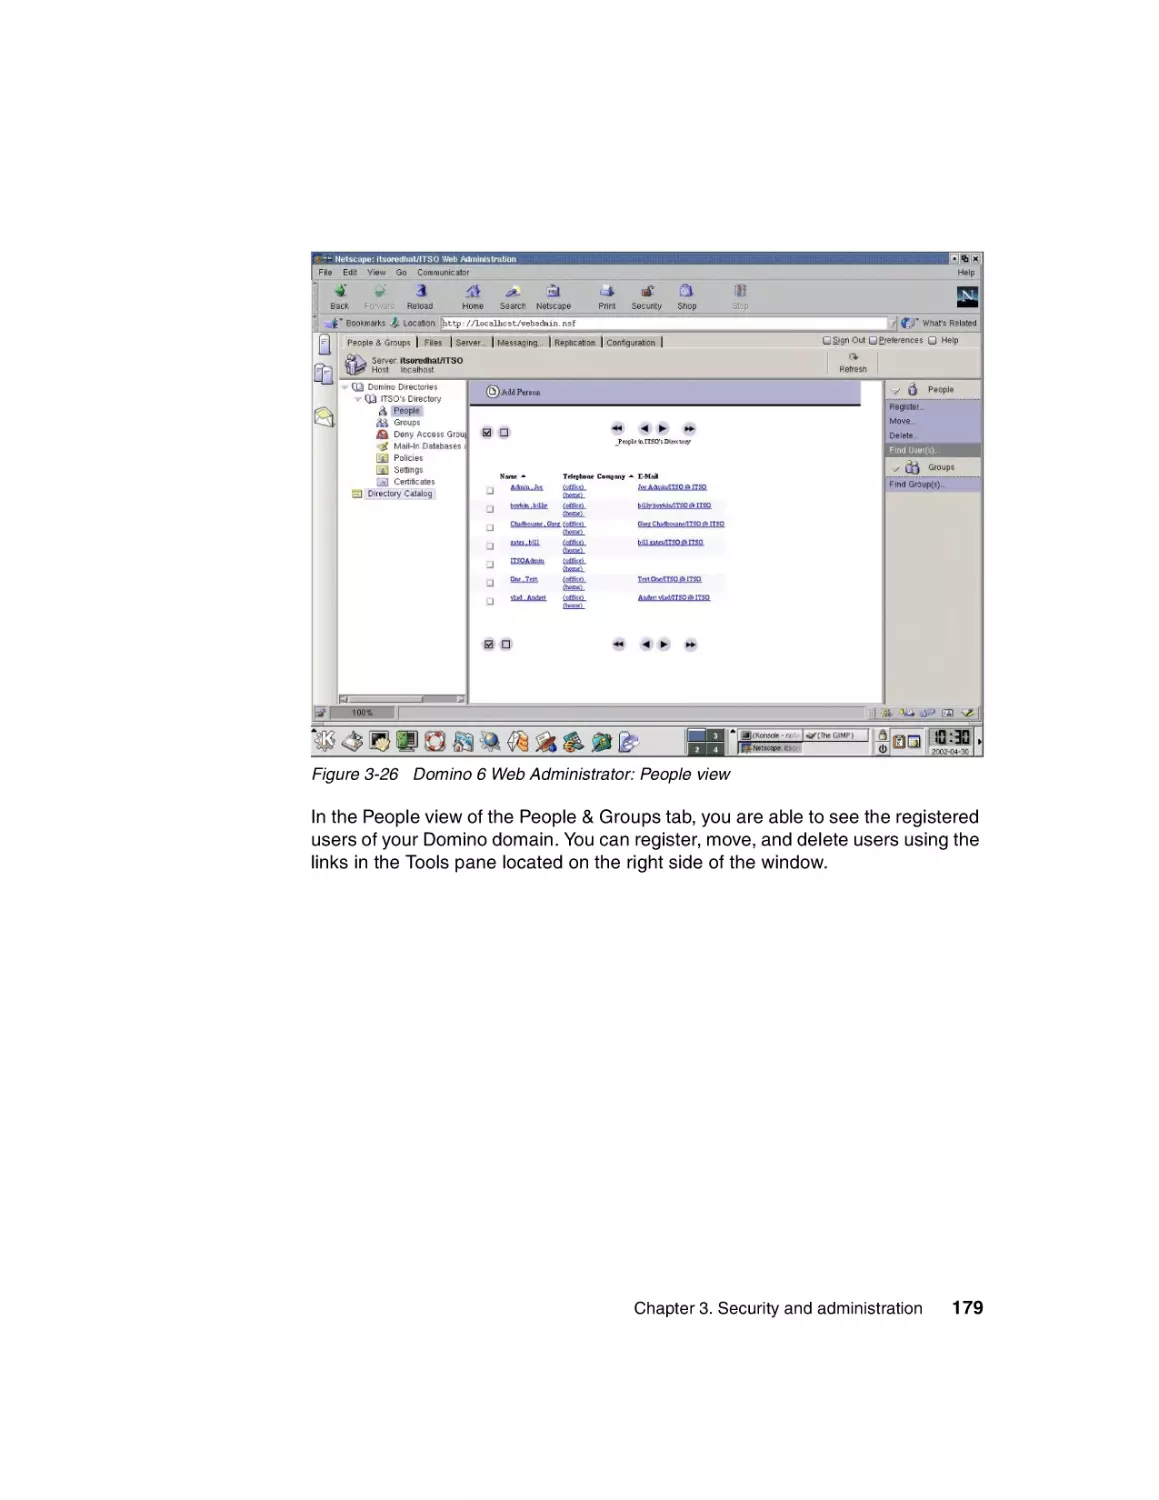
3.4 Domino 6 administration . . . . . . . . . . . . . . . . . . . . . . . . . . . . . . . . . . . . . 177
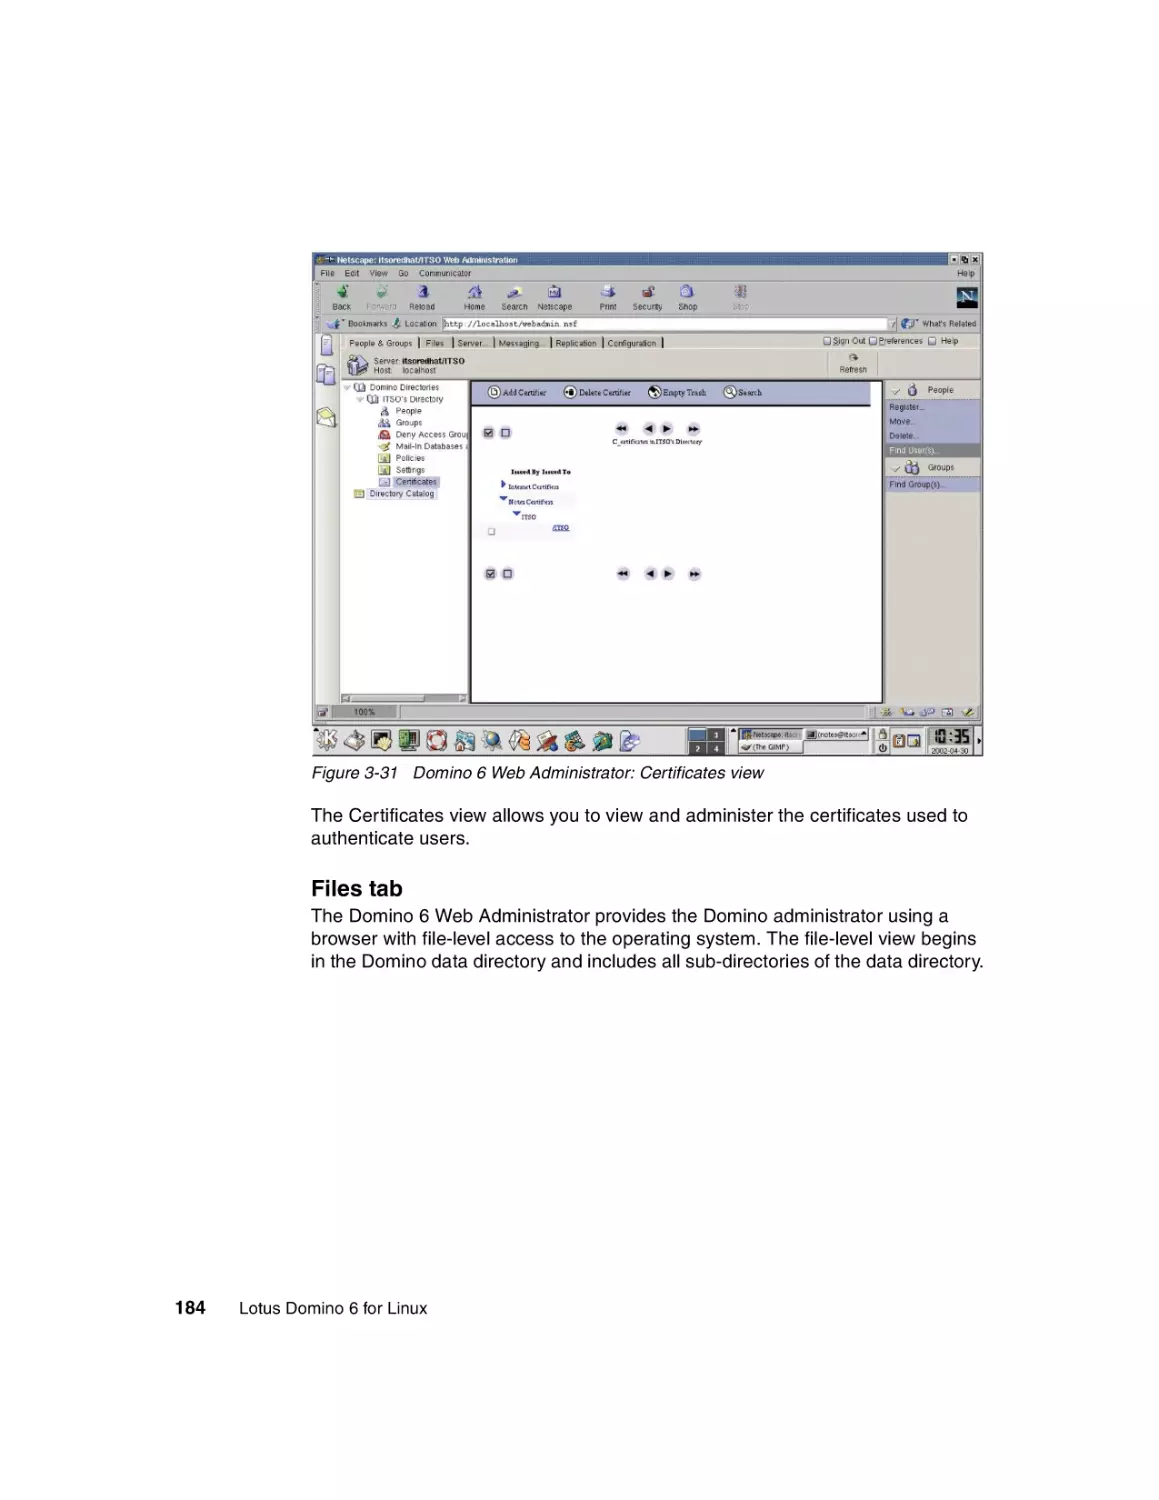
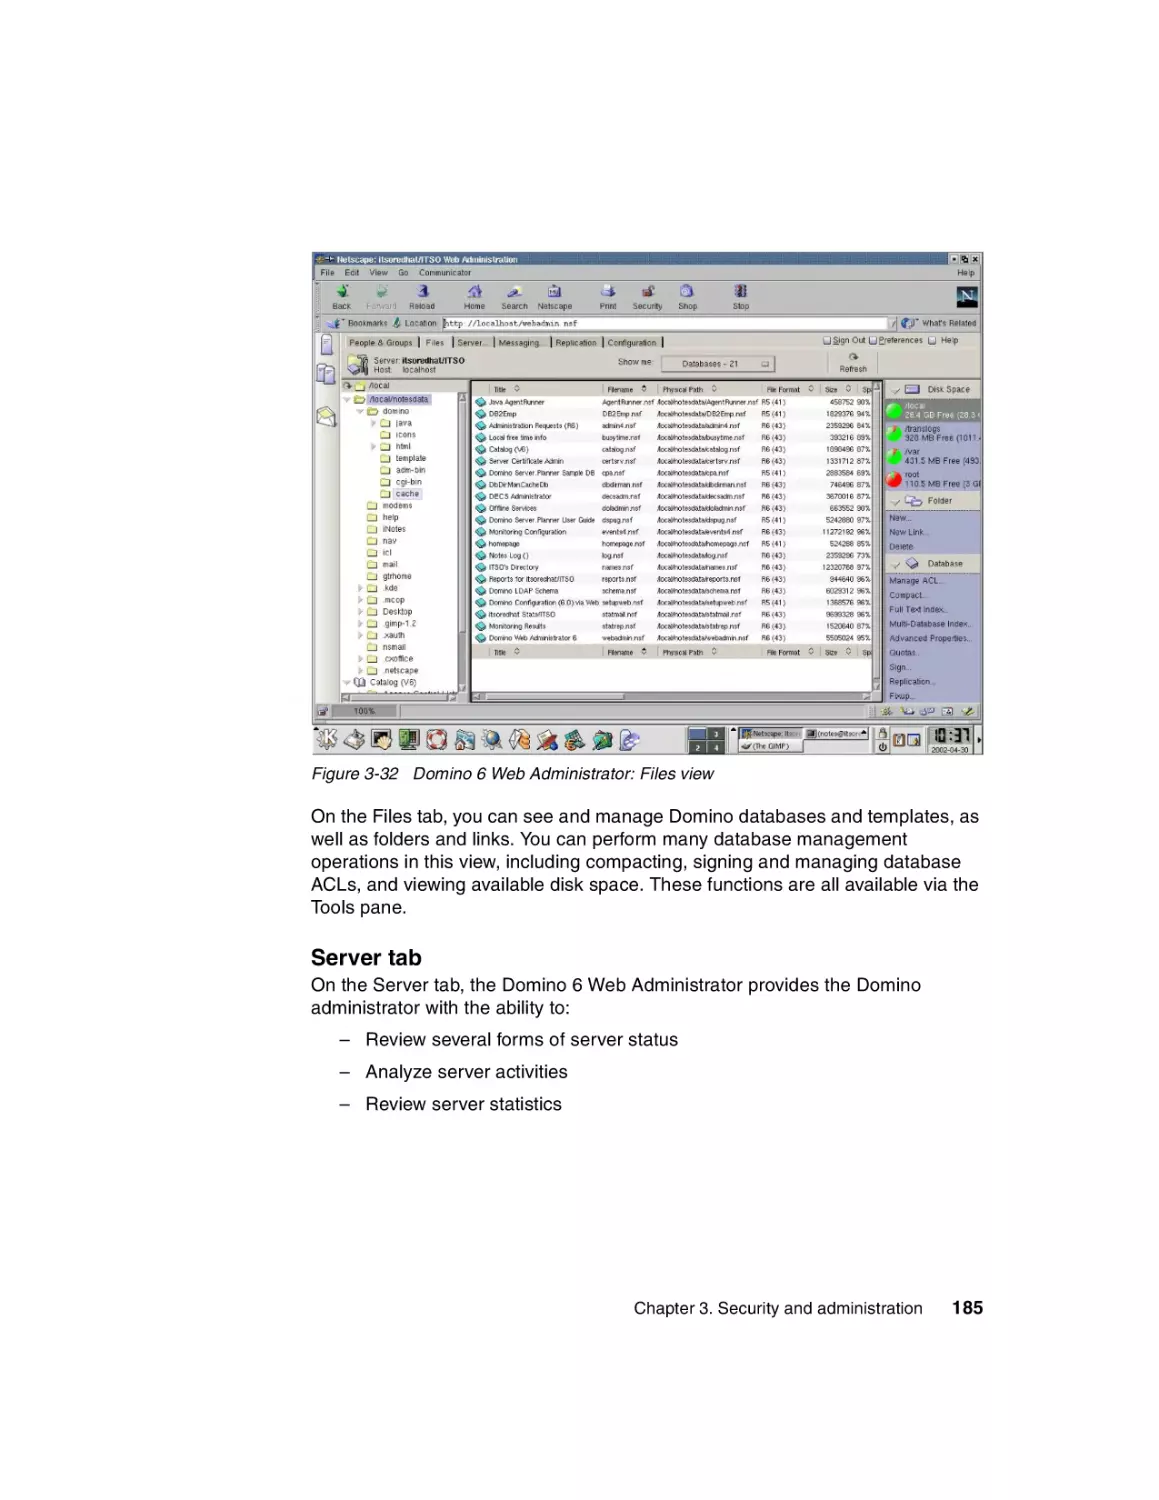
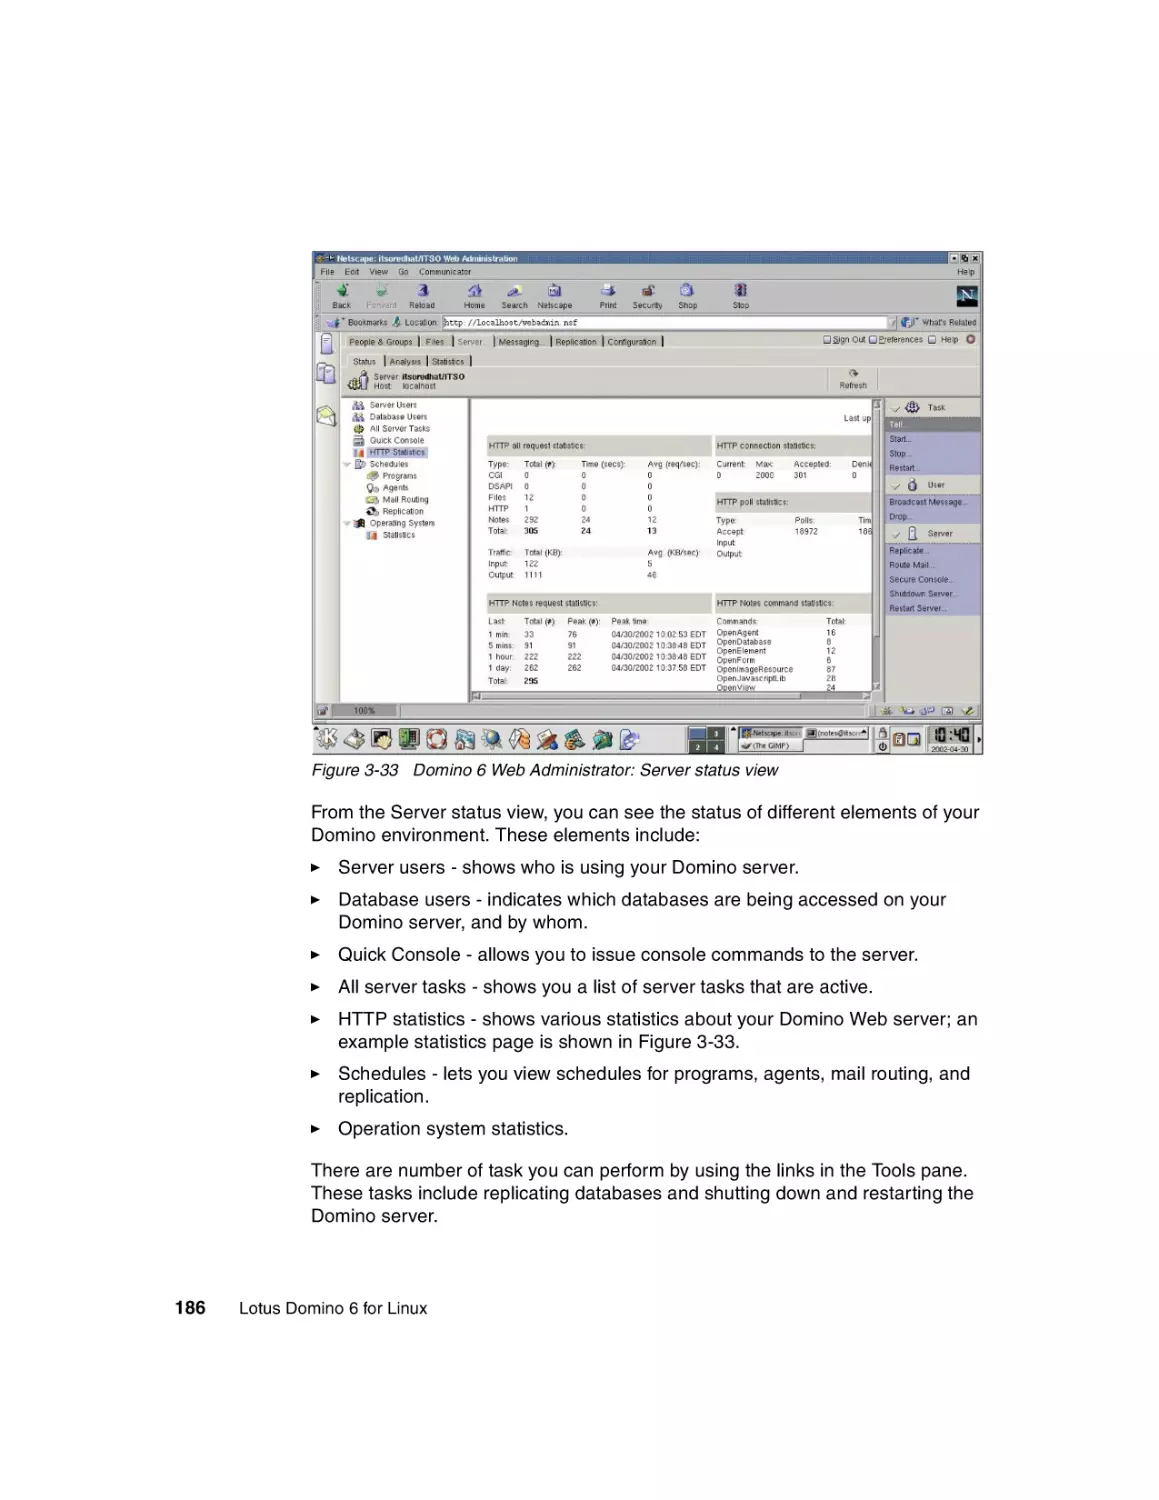
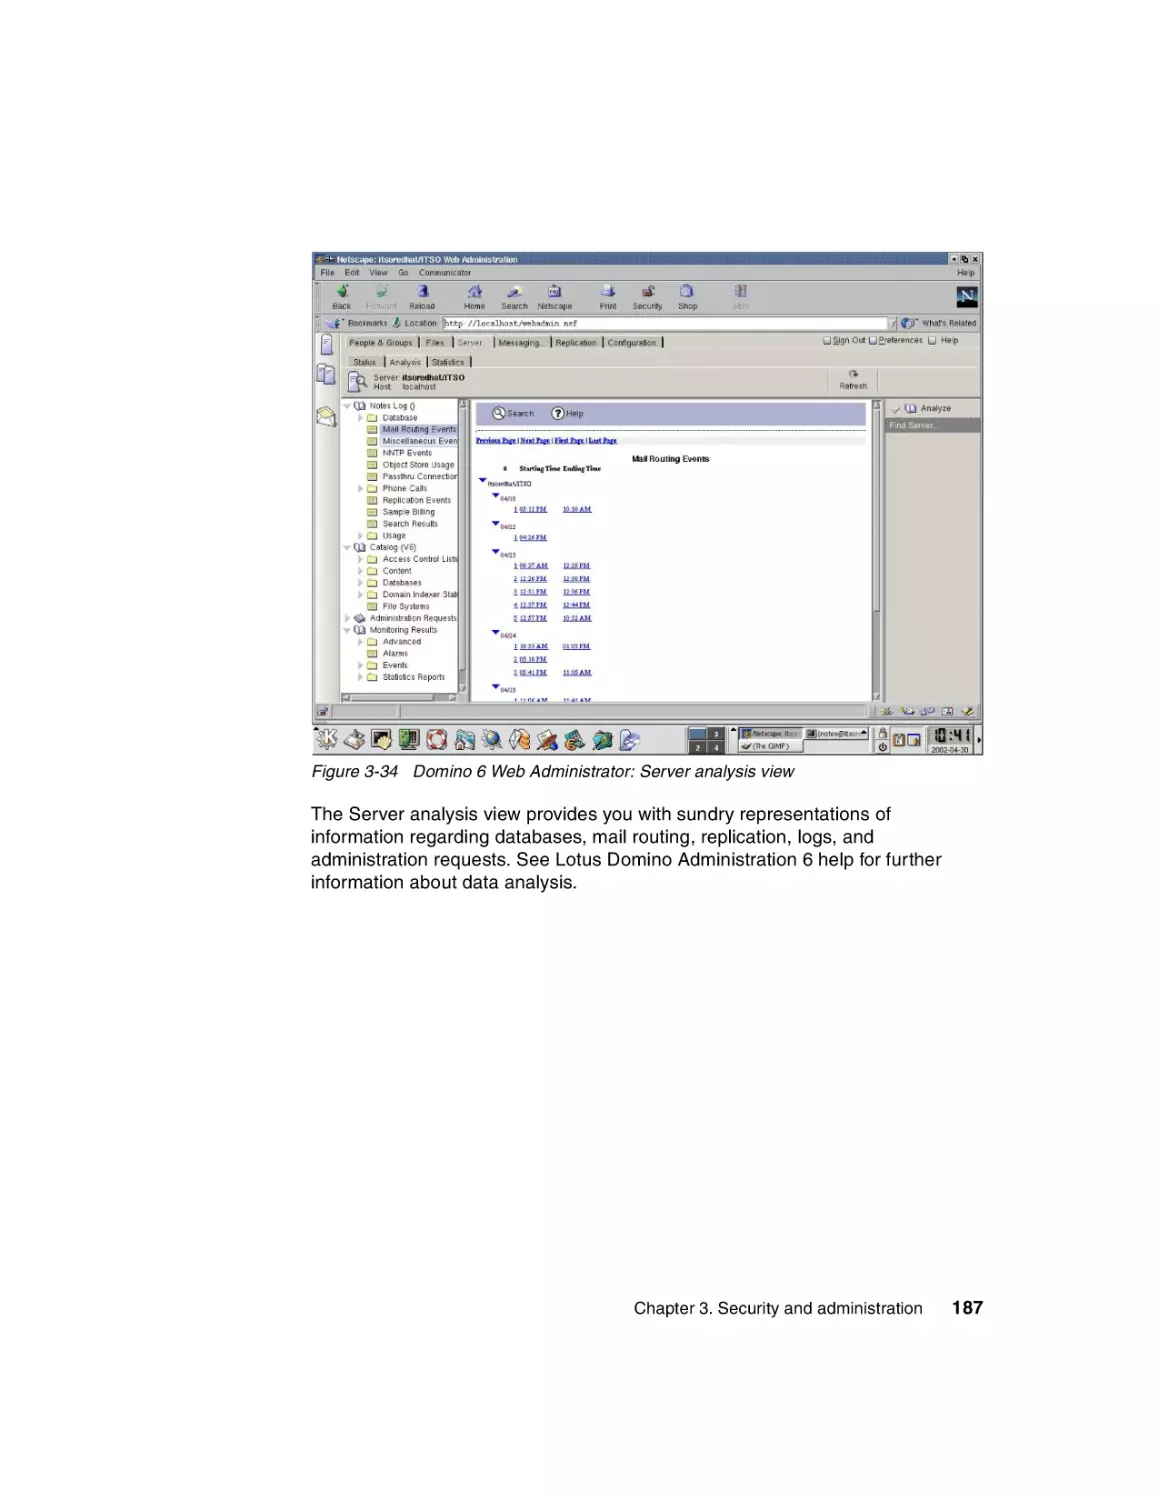
3.4.1 Domino 6 Web Administrator . . . . . . . . . . . . . . . . . . . . . . . . . . . . . 177
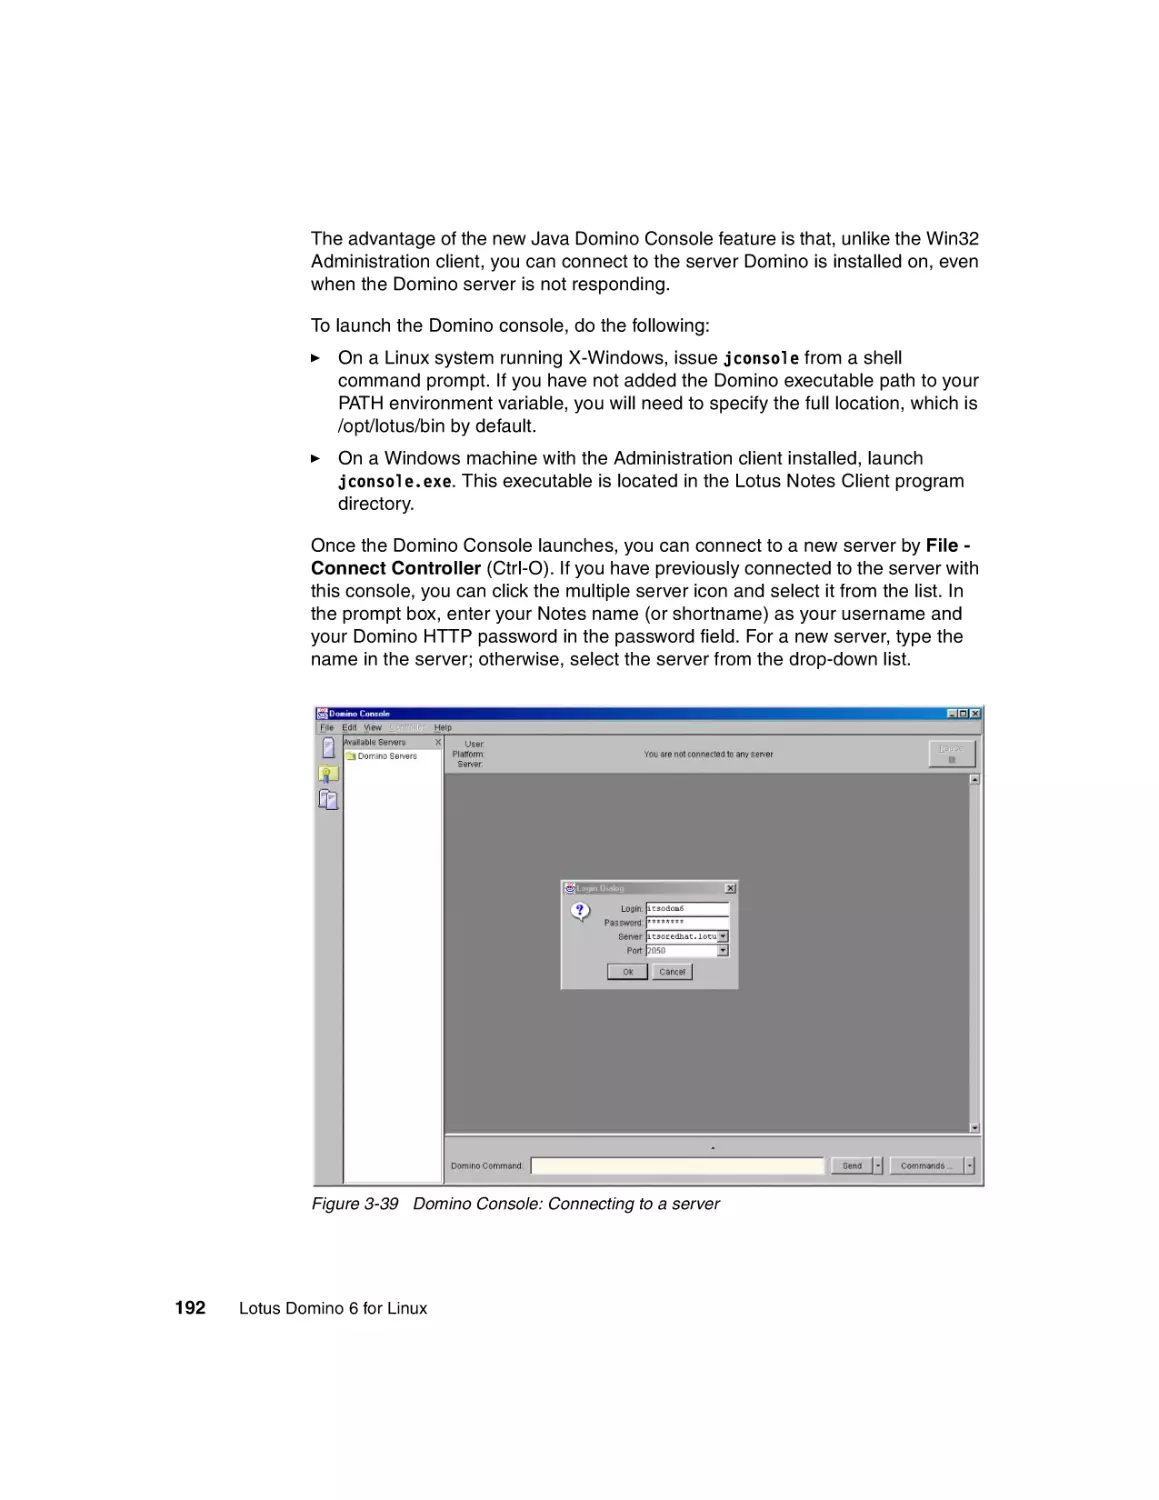
3.4.2 Domino Java Console . . . . . . . . . . . . . . . . . . . . . . . . . . . . . . . . . . . 191
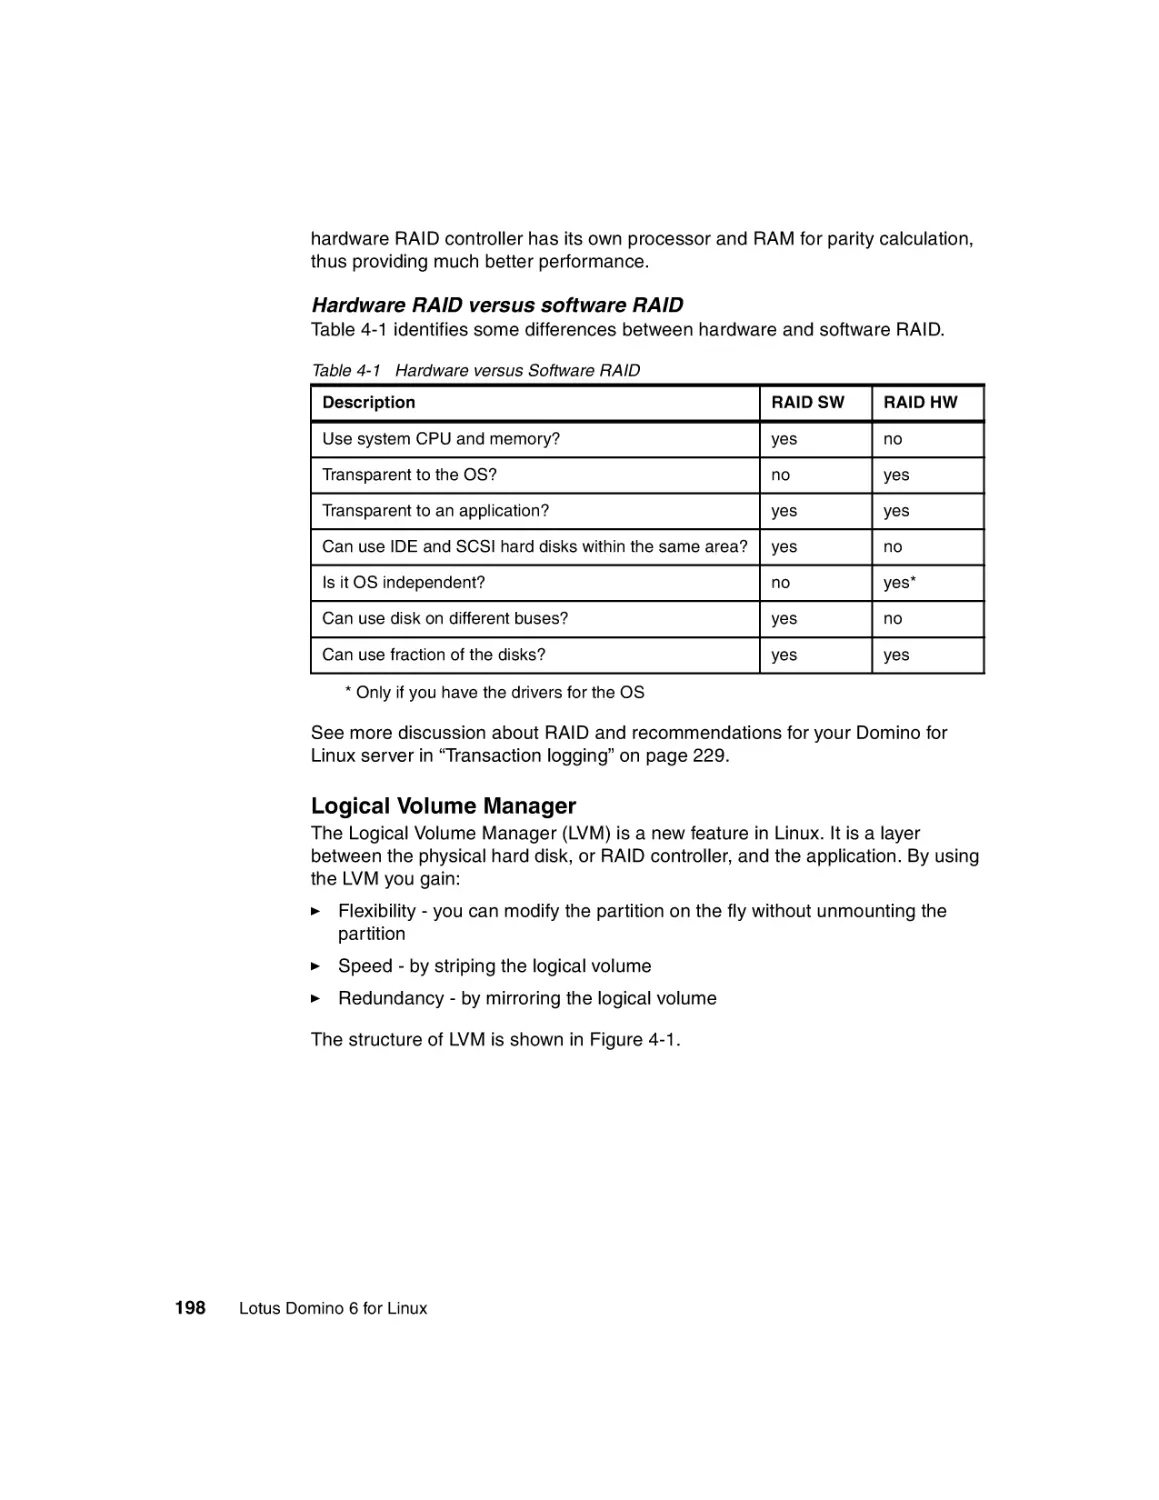
Chapter 4. Performance, scalability, and troubleshooting . . . . . . . . . . . 195
4.1 Linux performance and scalability . . . . . . . . . . . . . . . . . . . . . . . . . . . . . . 196
4.1.1 Linux performance . . . . . . . . . . . . . . . . . . . . . . . . . . . . . . . . . . . . . 196
4.1.2 Linux scalability . . . . . . . . . . . . . . . . . . . . . . . . . . . . . . . . . . . . . . . . 208
4.2 Domino performance and scalability . . . . . . . . . . . . . . . . . . . . . . . . . . . . 226
4.2.1 Domino performance. . . . . . . . . . . . . . . . . . . . . . . . . . . . . . . . . . . . 226
4.2.2 Domino scalability . . . . . . . . . . . . . . . . . . . . . . . . . . . . . . . . . . . . . . 231
4.3 Troubleshooting. . . . . . . . . . . . . . . . . . . . . . . . . . . . . . . . . . . . . . . . . . . . 232
4.3.1 Basic network troubleshooting . . . . . . . . . . . . . . . . . . . . . . . . . . . . 232
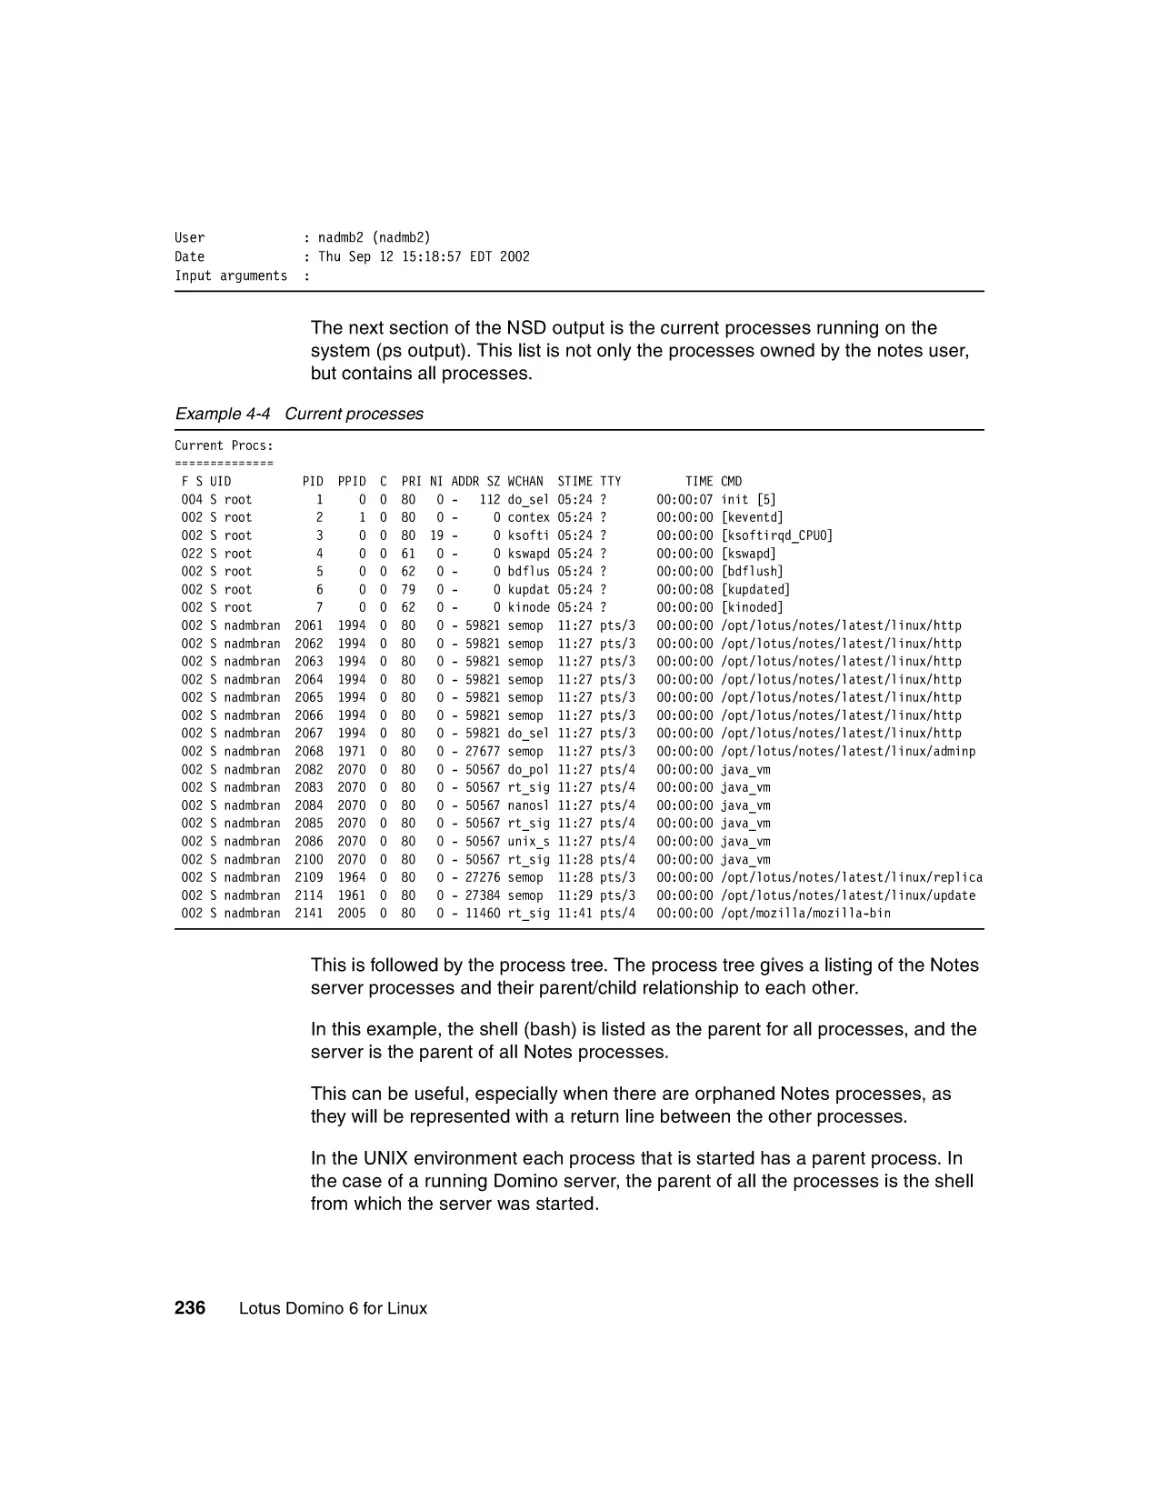
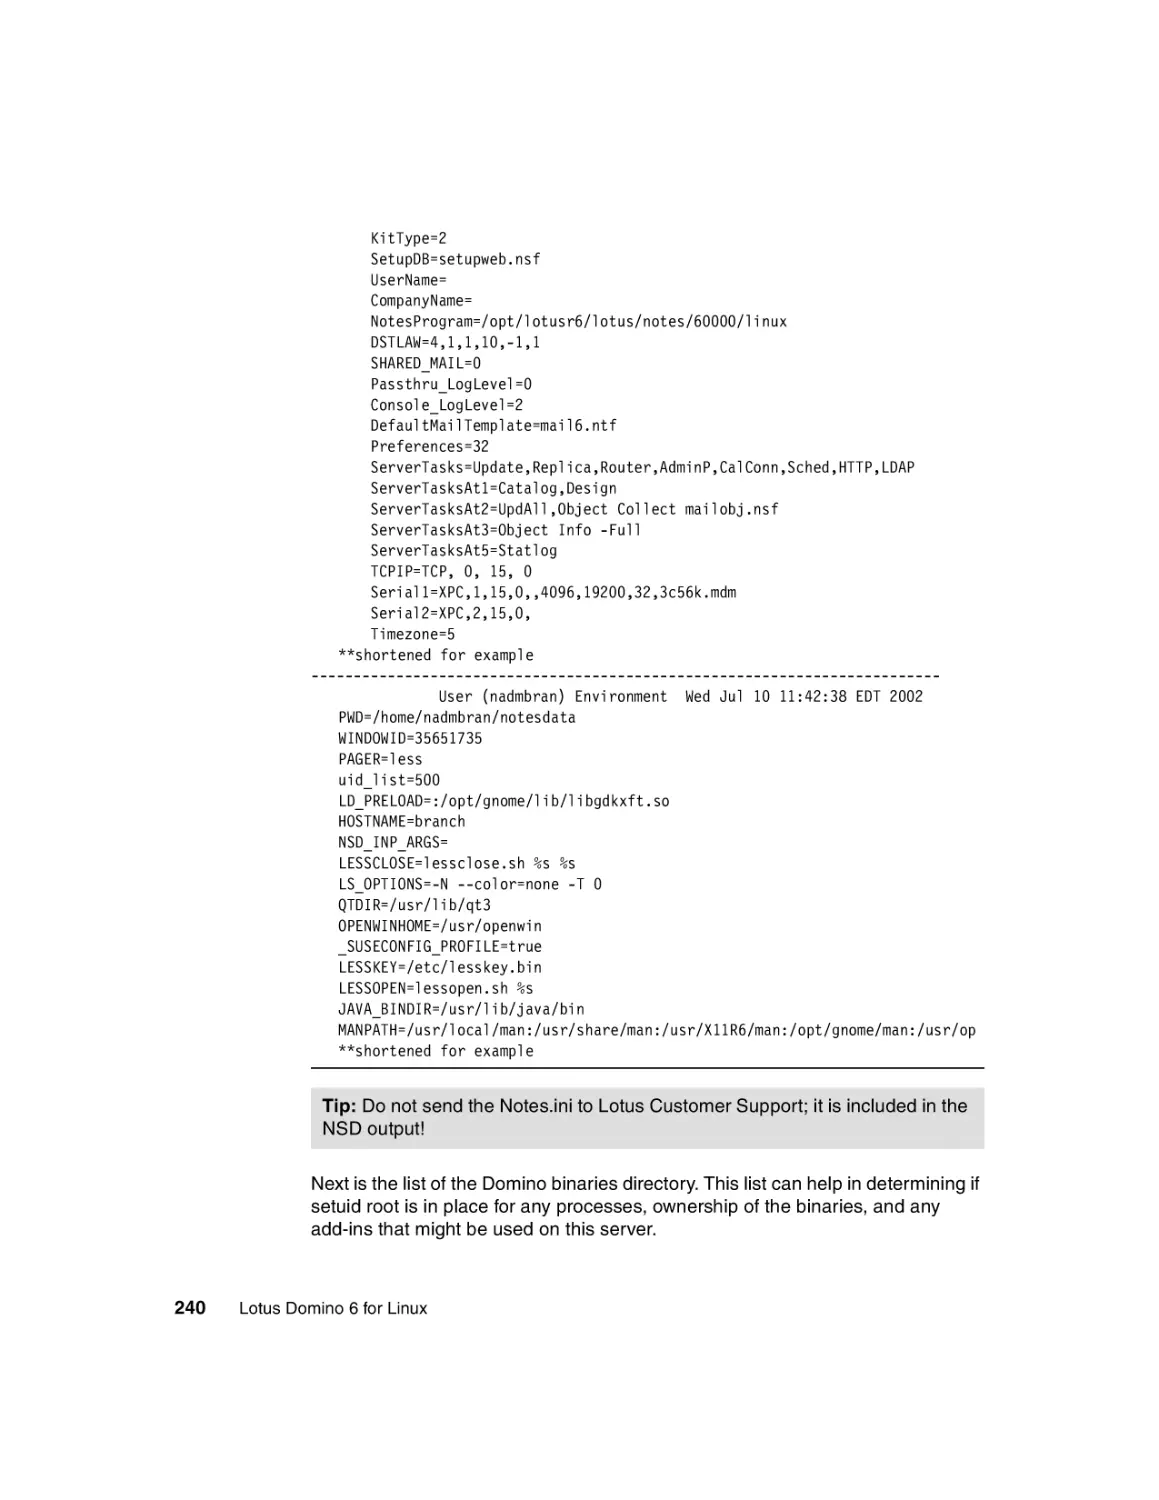
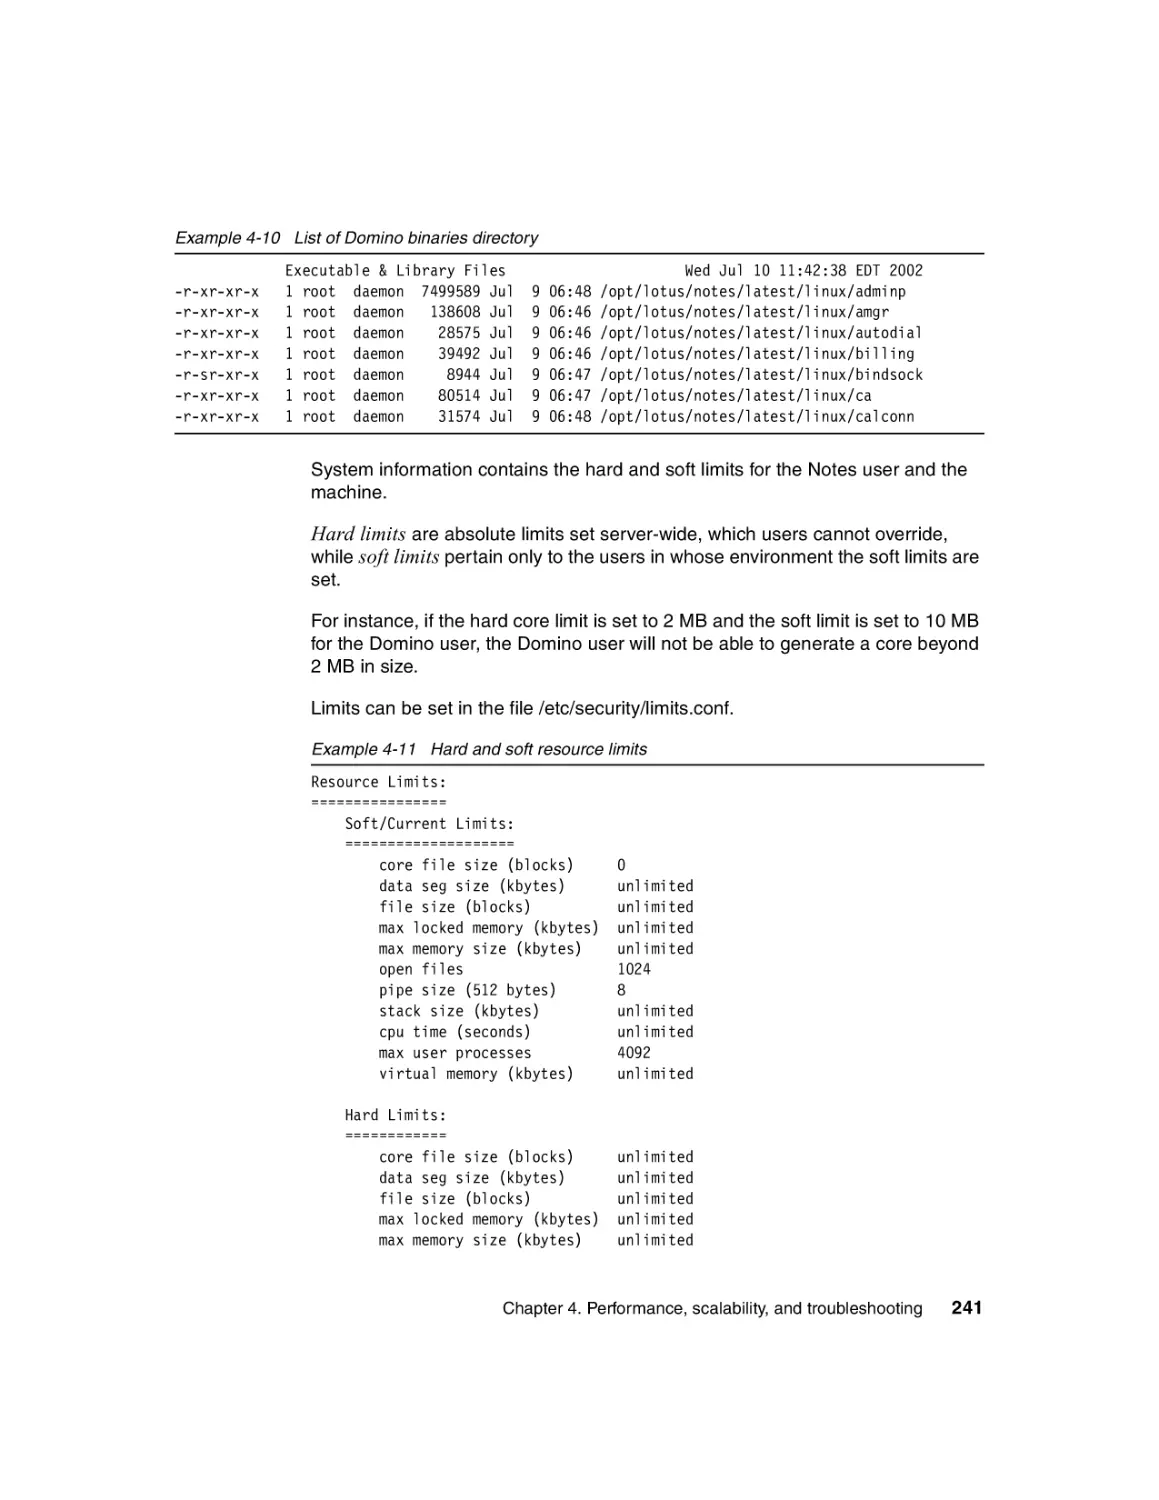
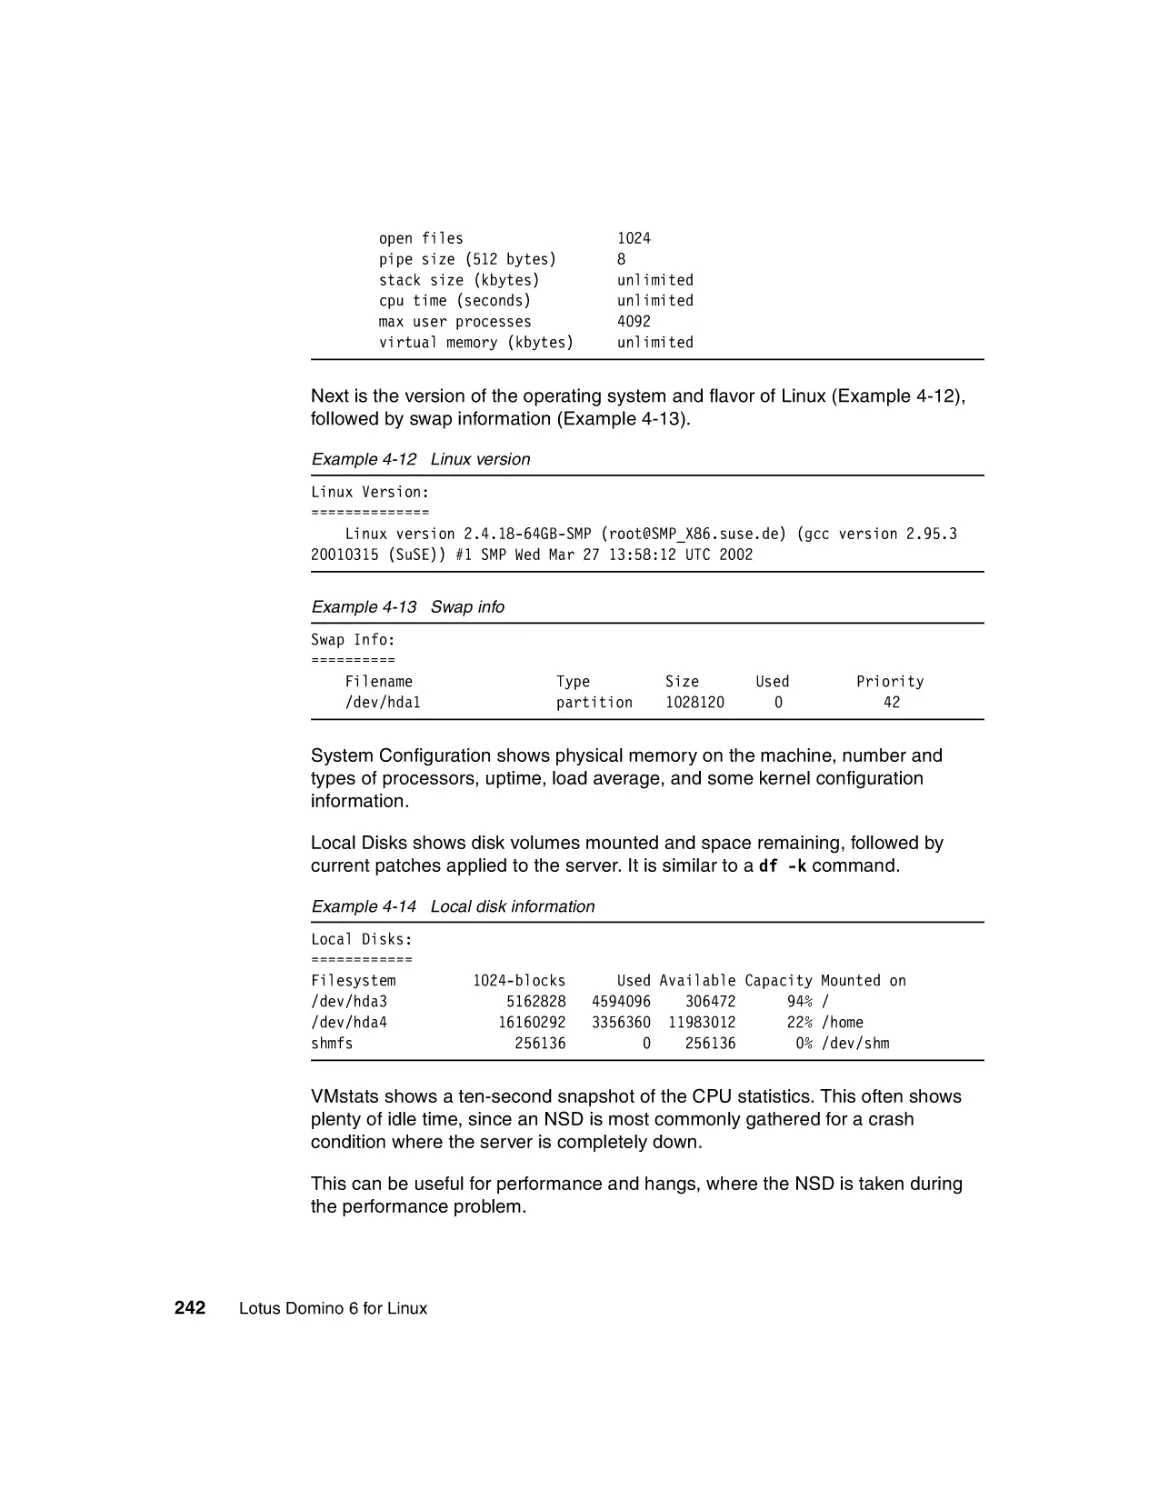
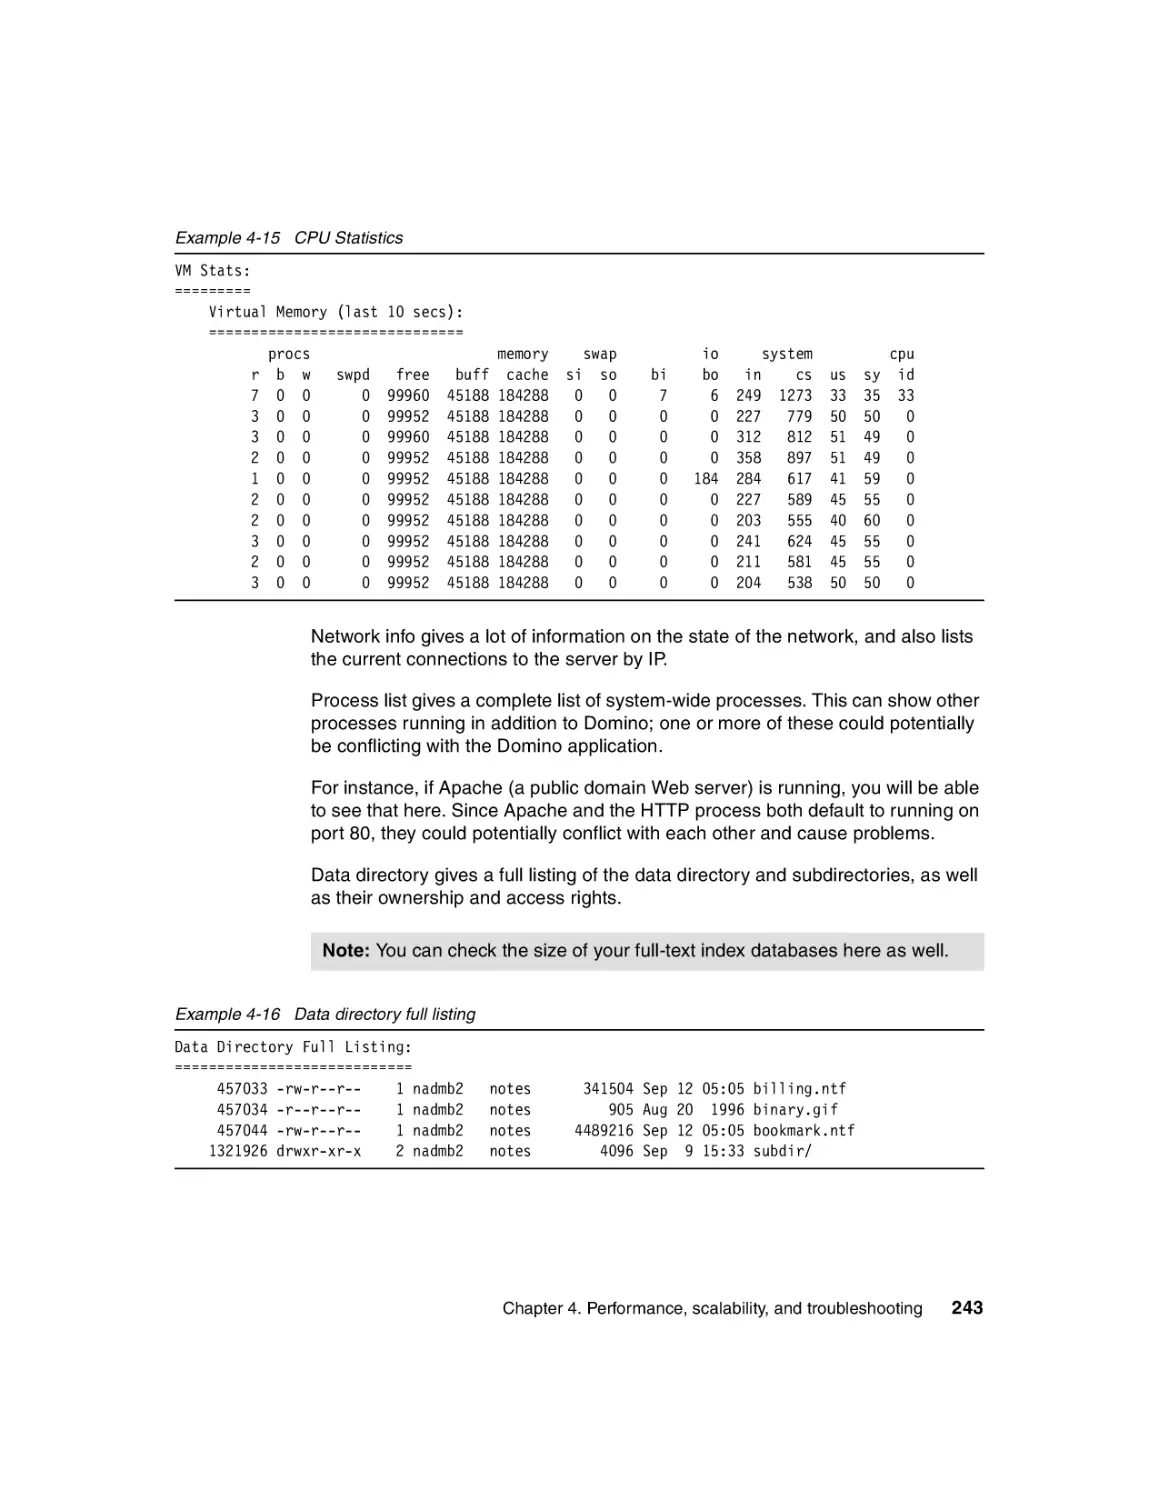
4.3.2 Domino NSD tool . . . . . . . . . . . . . . . . . . . . . . . . . . . . . . . . . . . . . . 233
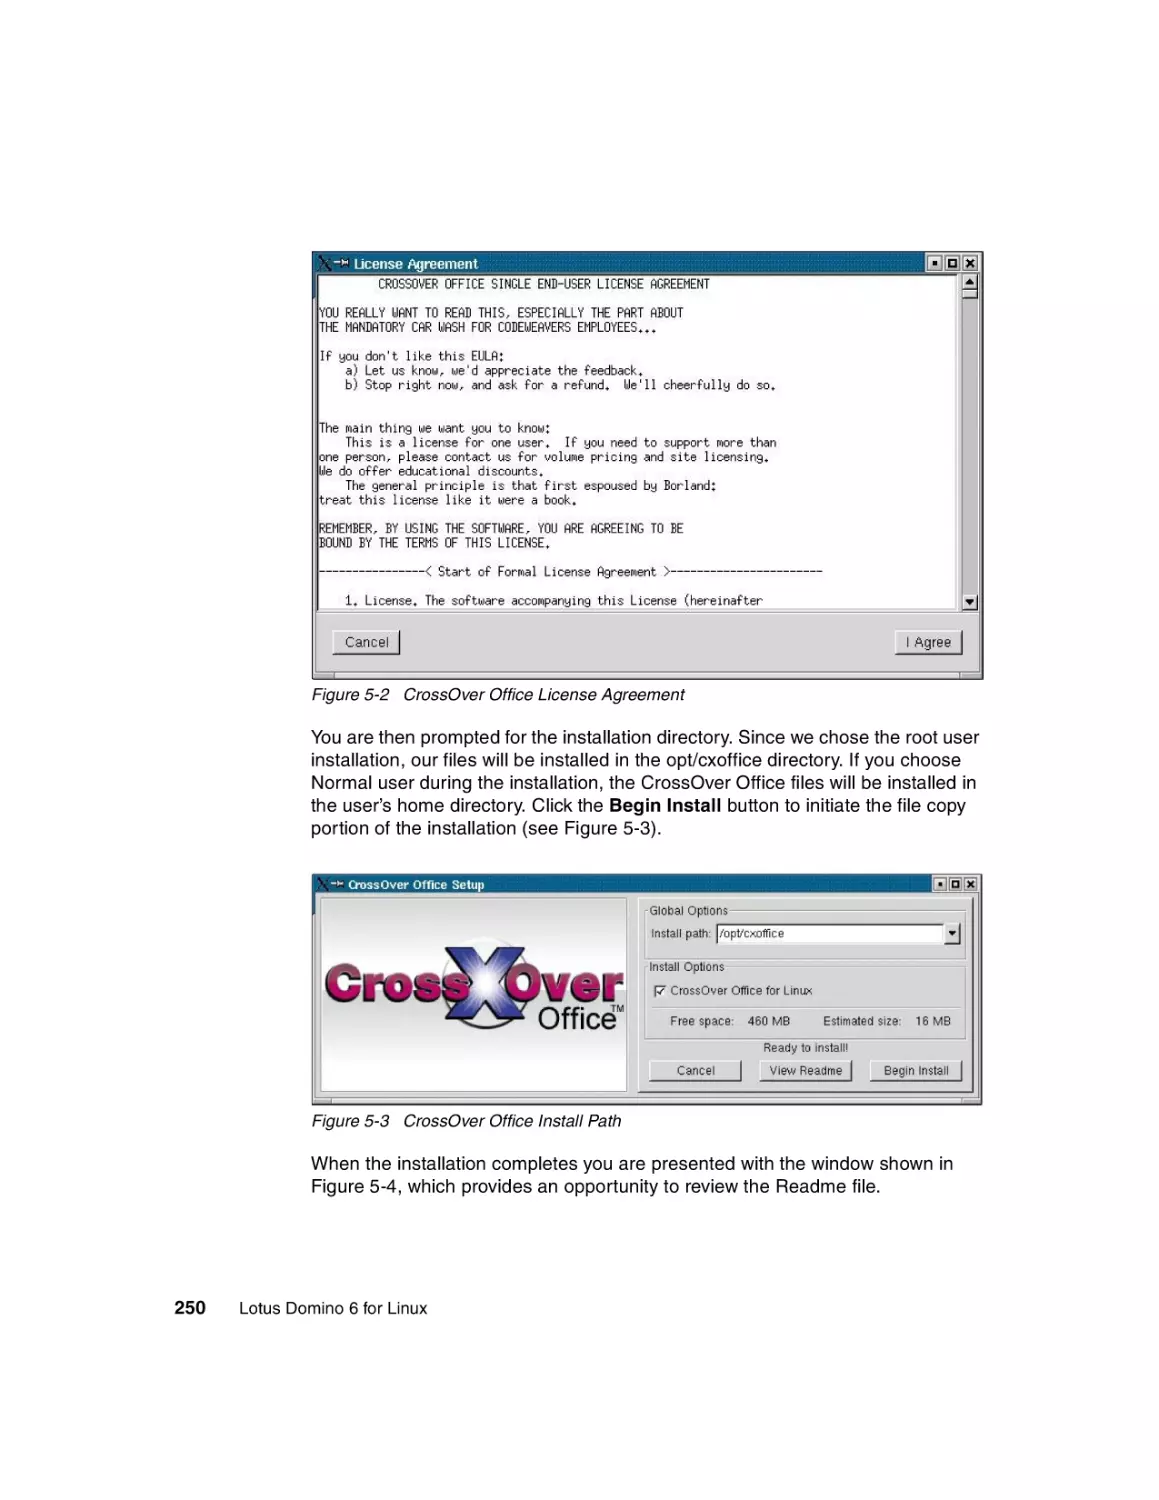
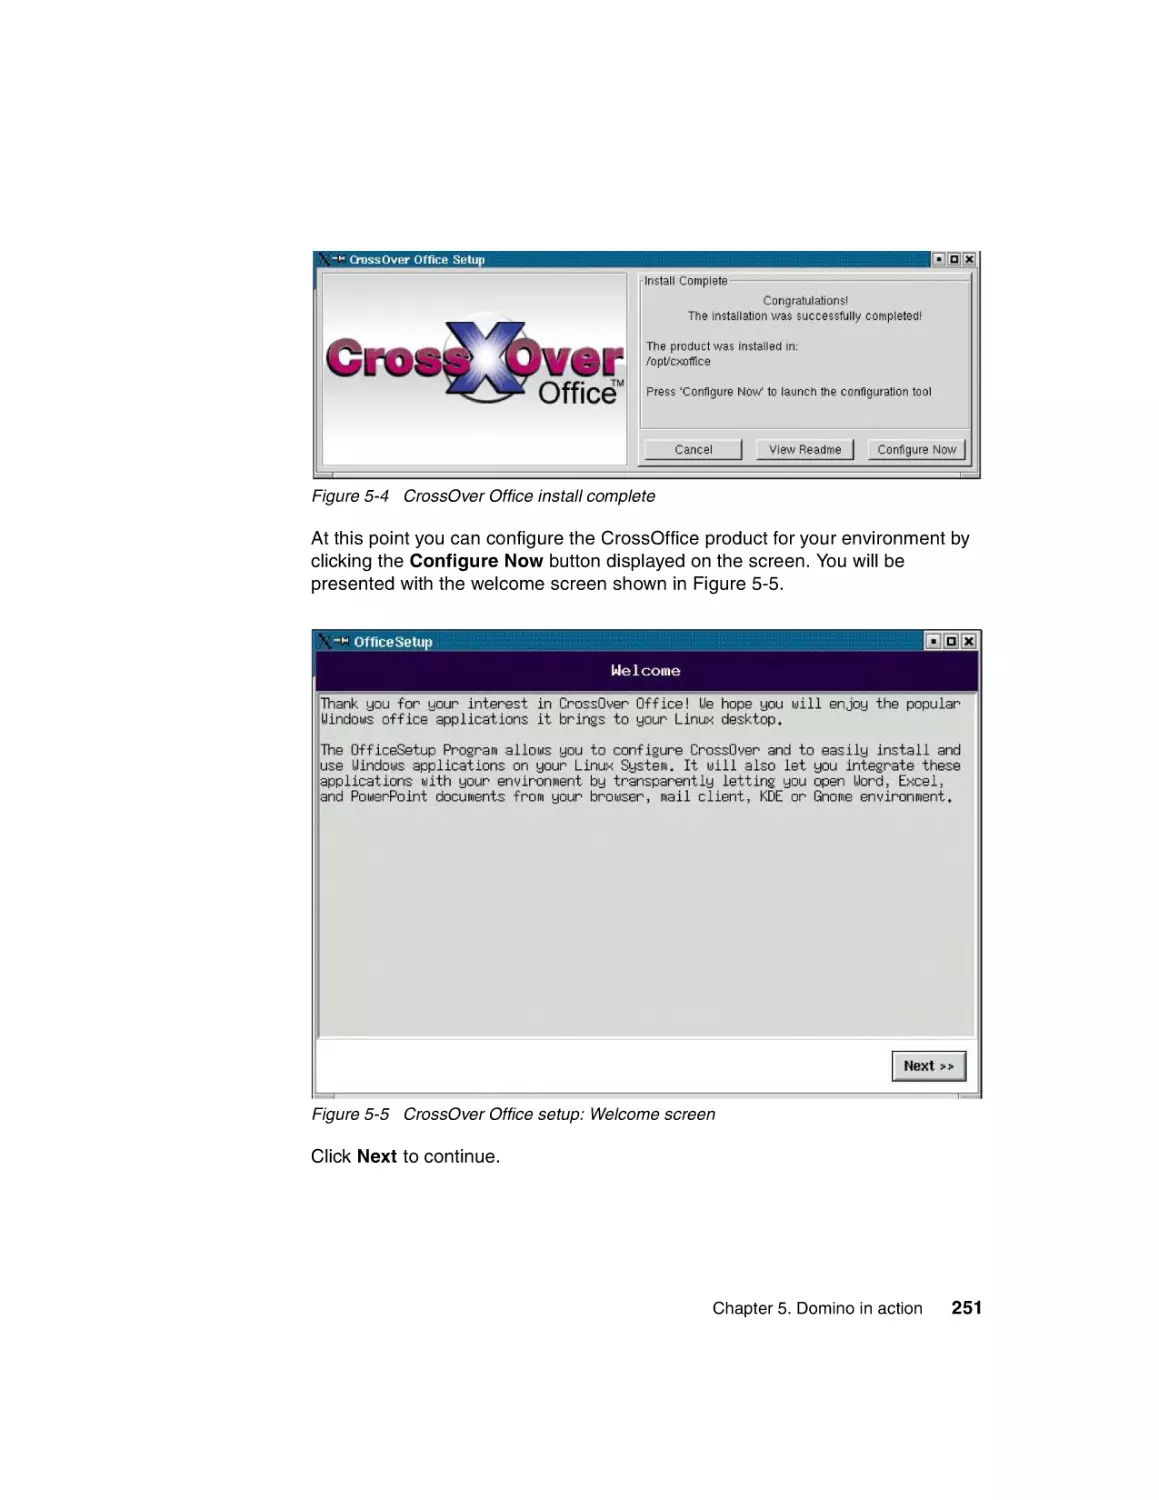
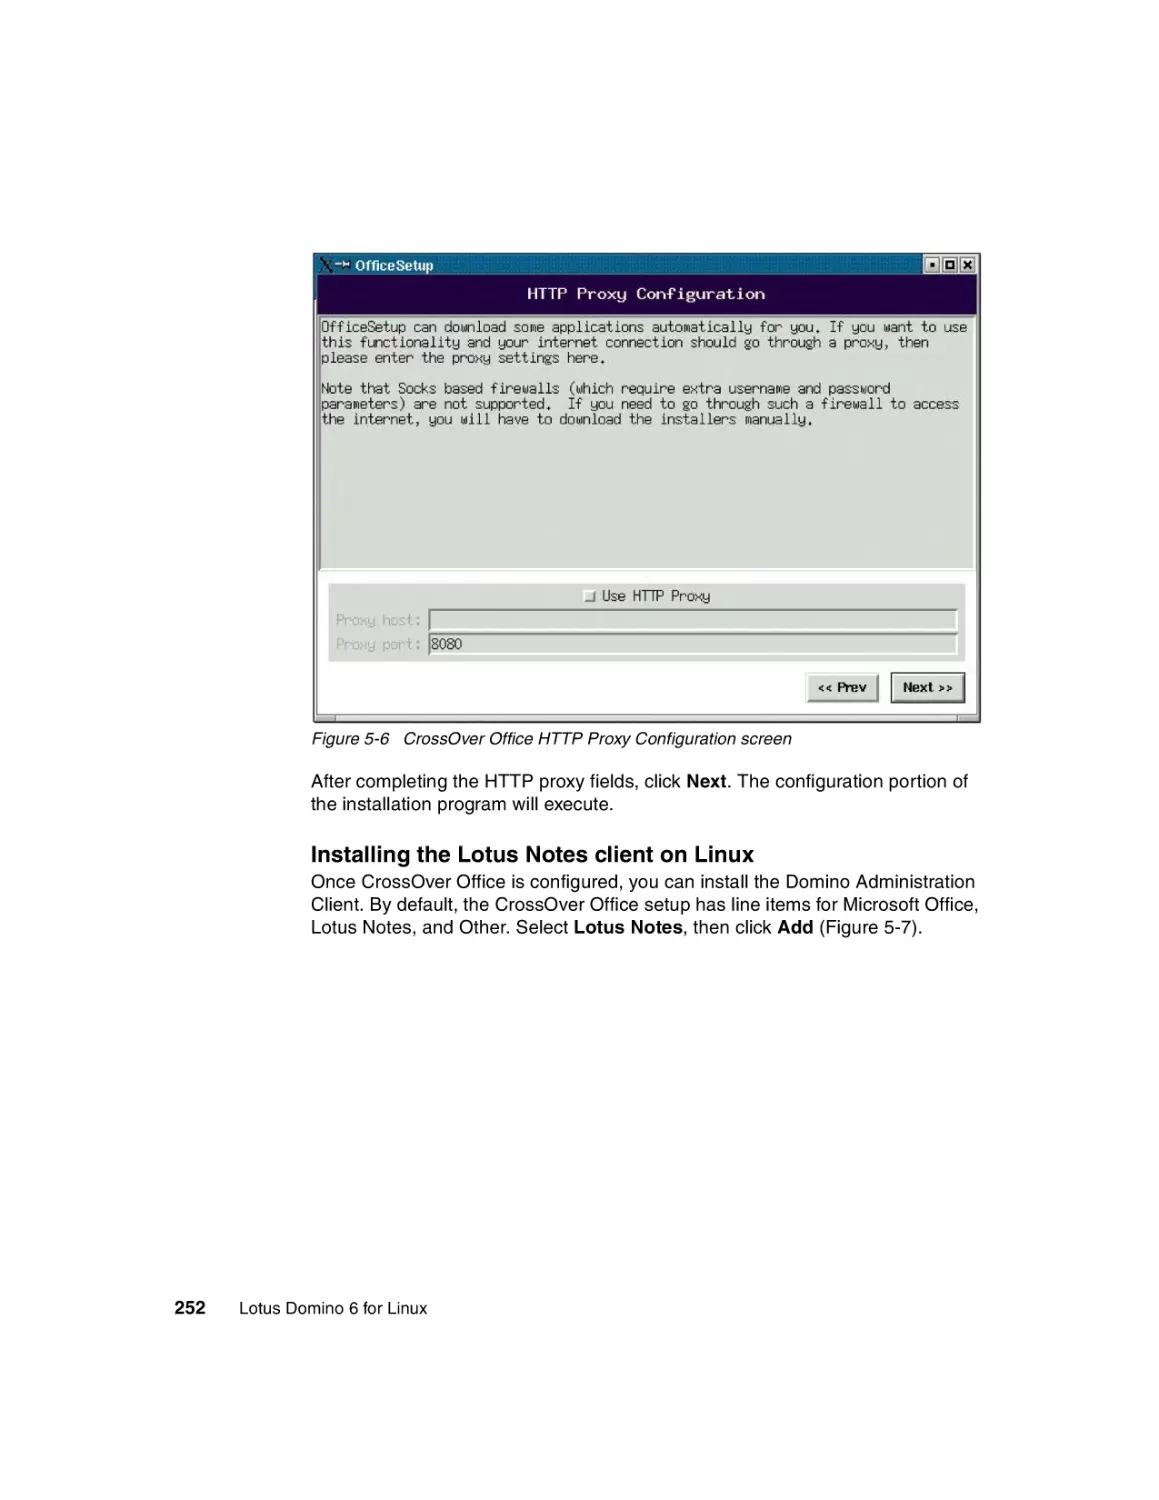
Chapter 5. Domino in action. . . . . . . . . . . . . . . . . . . . . . . . . . . . . . . . . . . . 247
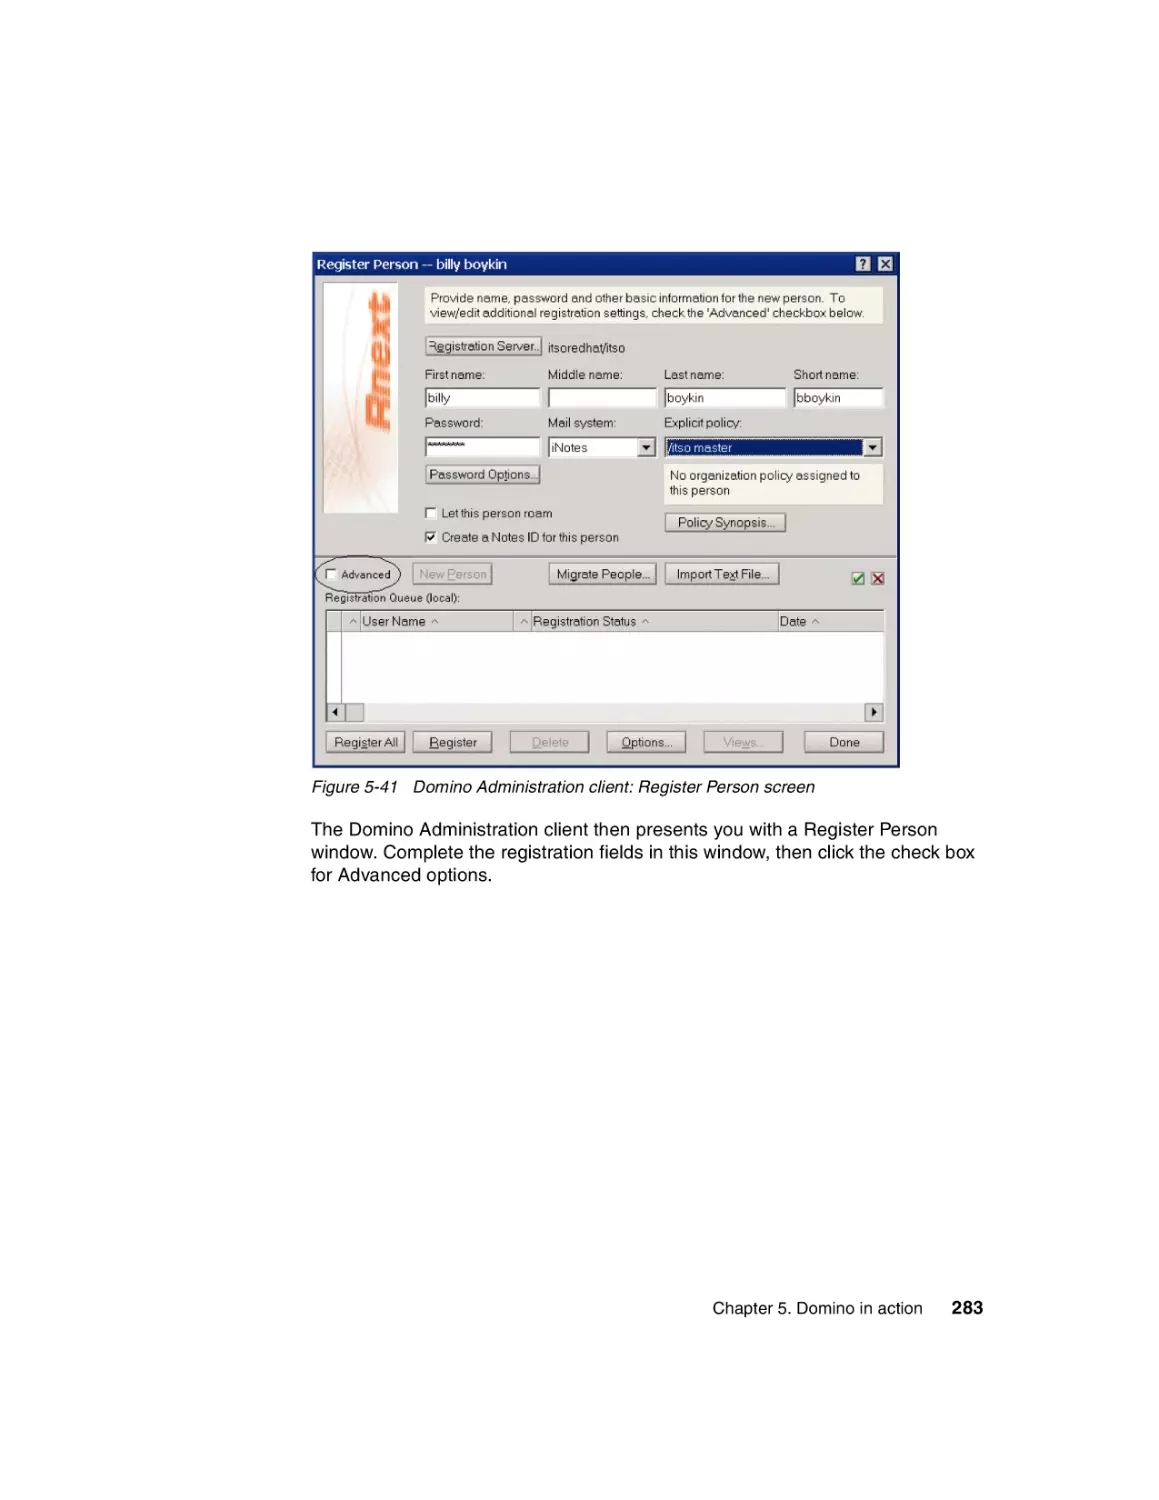
5.1 Domino user registration . . . . . . . . . . . . . . . . . . . . . . . . . . . . . . . . . . . . . 248
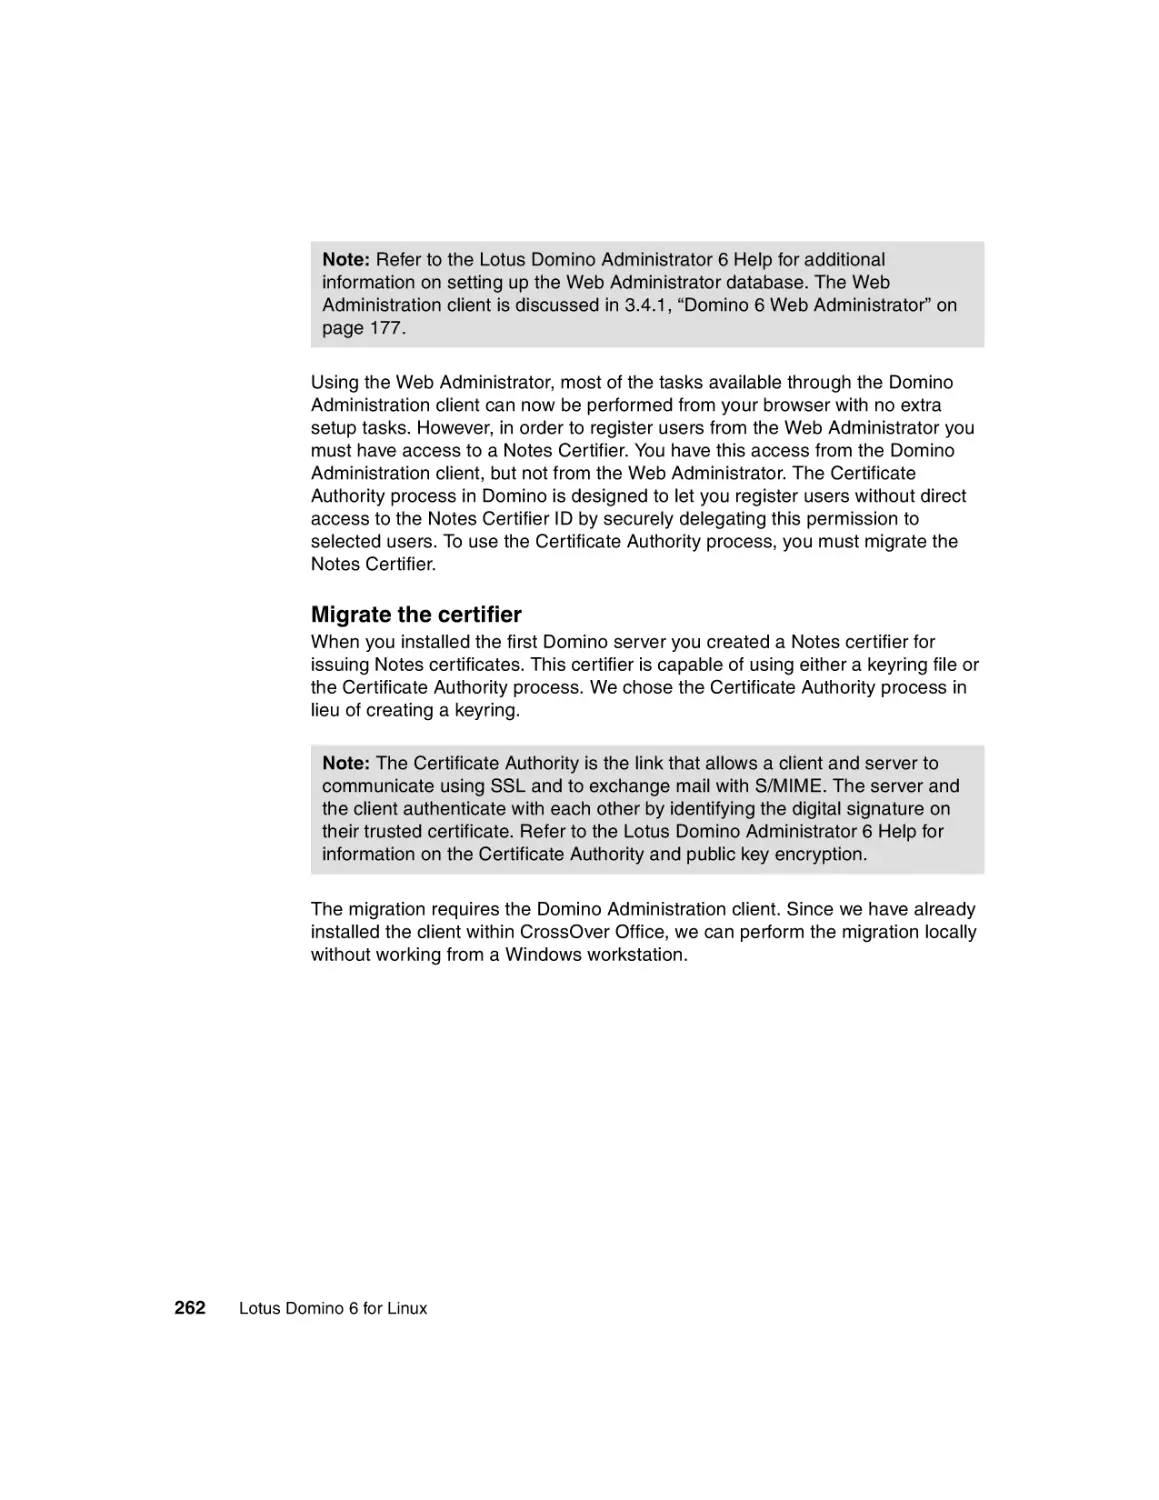
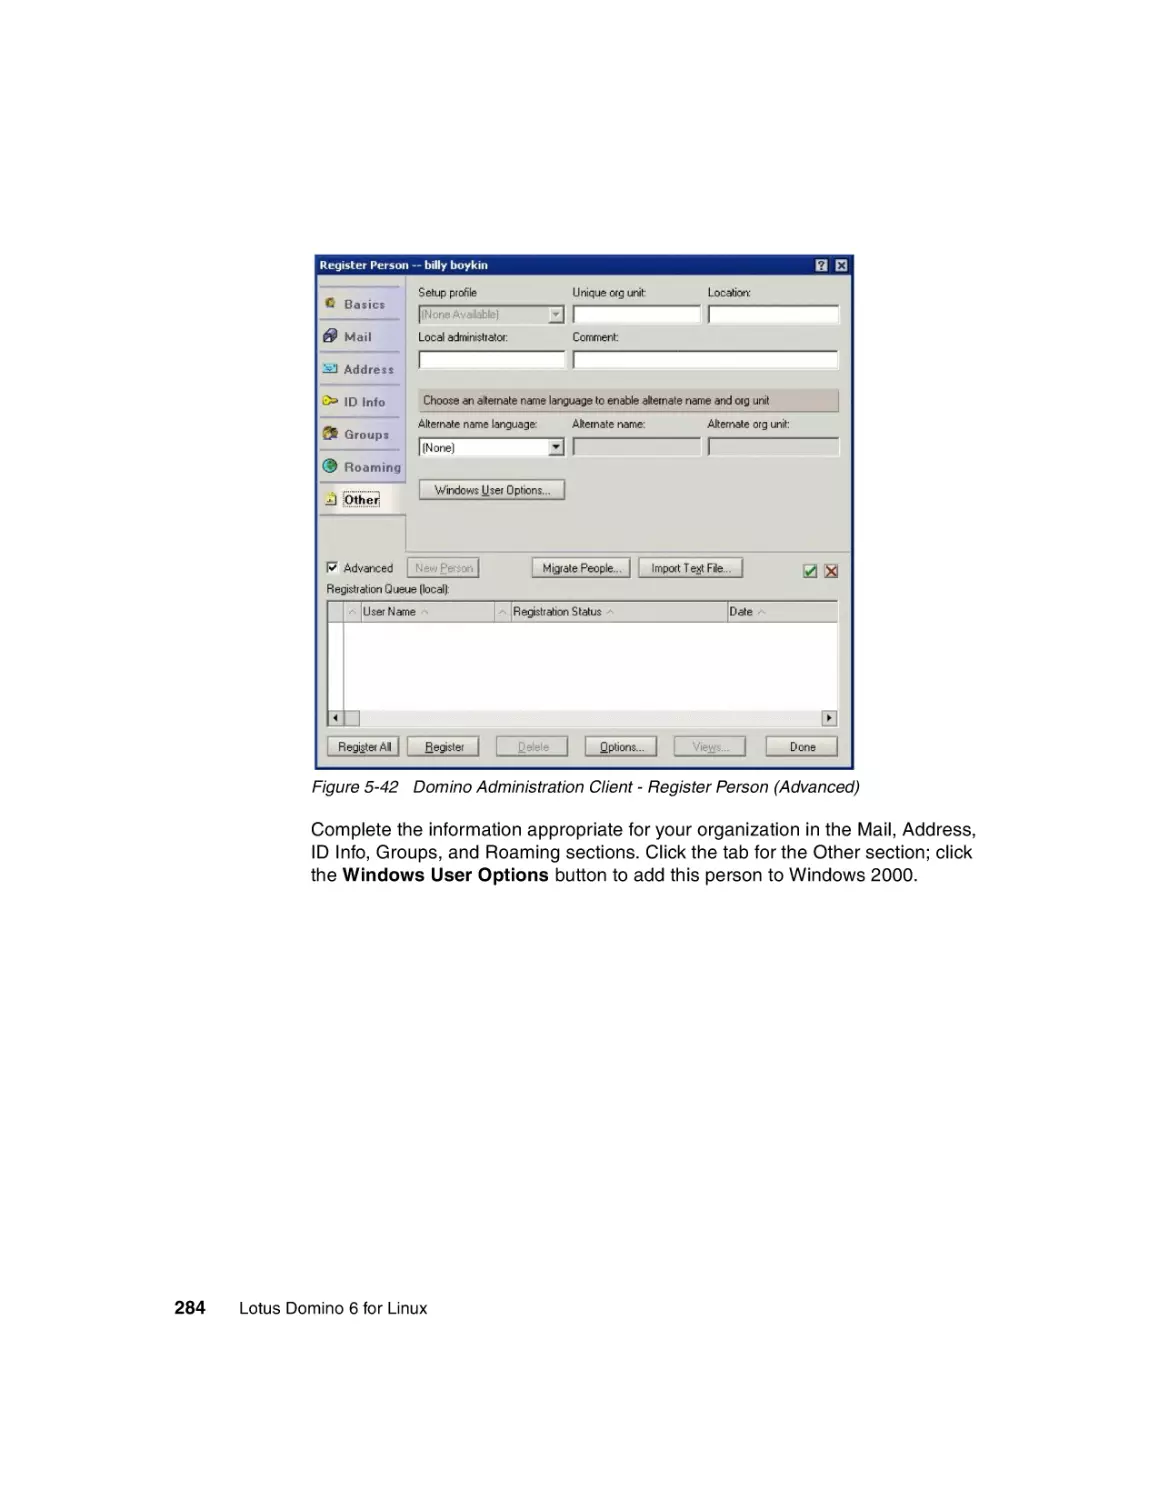
5.1.1 Domino Administration client. . . . . . . . . . . . . . . . . . . . . . . . . . . . . . 248
5.1.2 The Web administrator . . . . . . . . . . . . . . . . . . . . . . . . . . . . . . . . . . 261
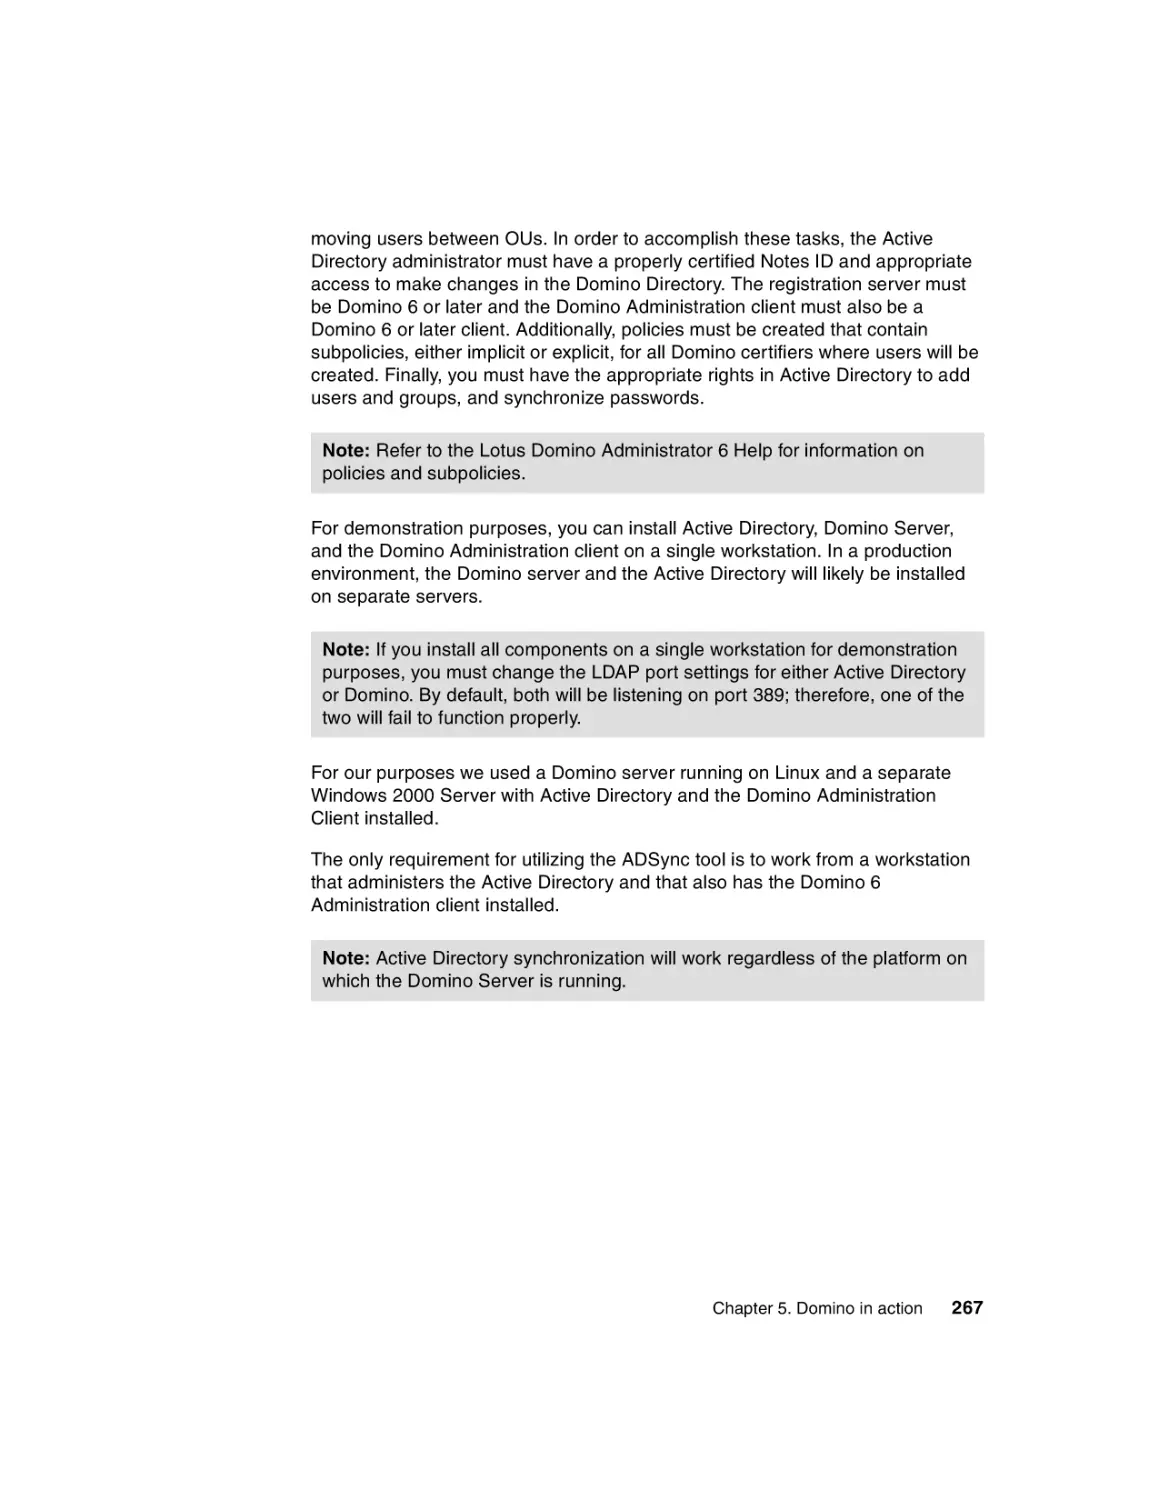
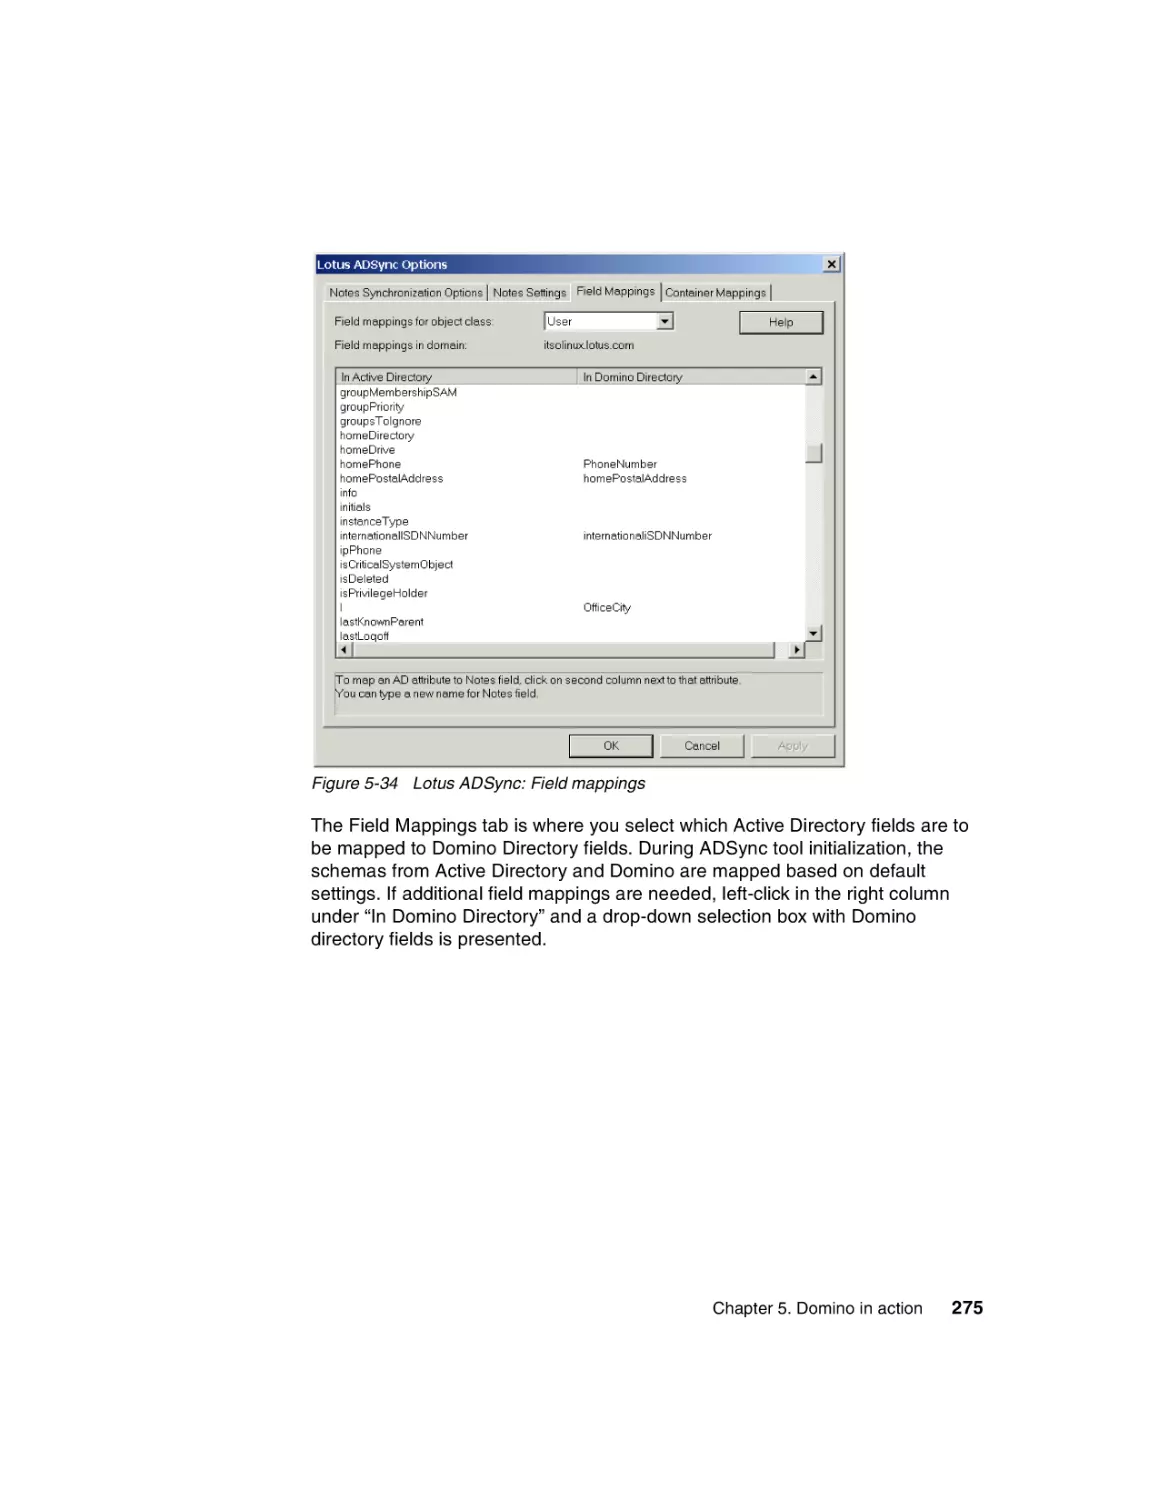
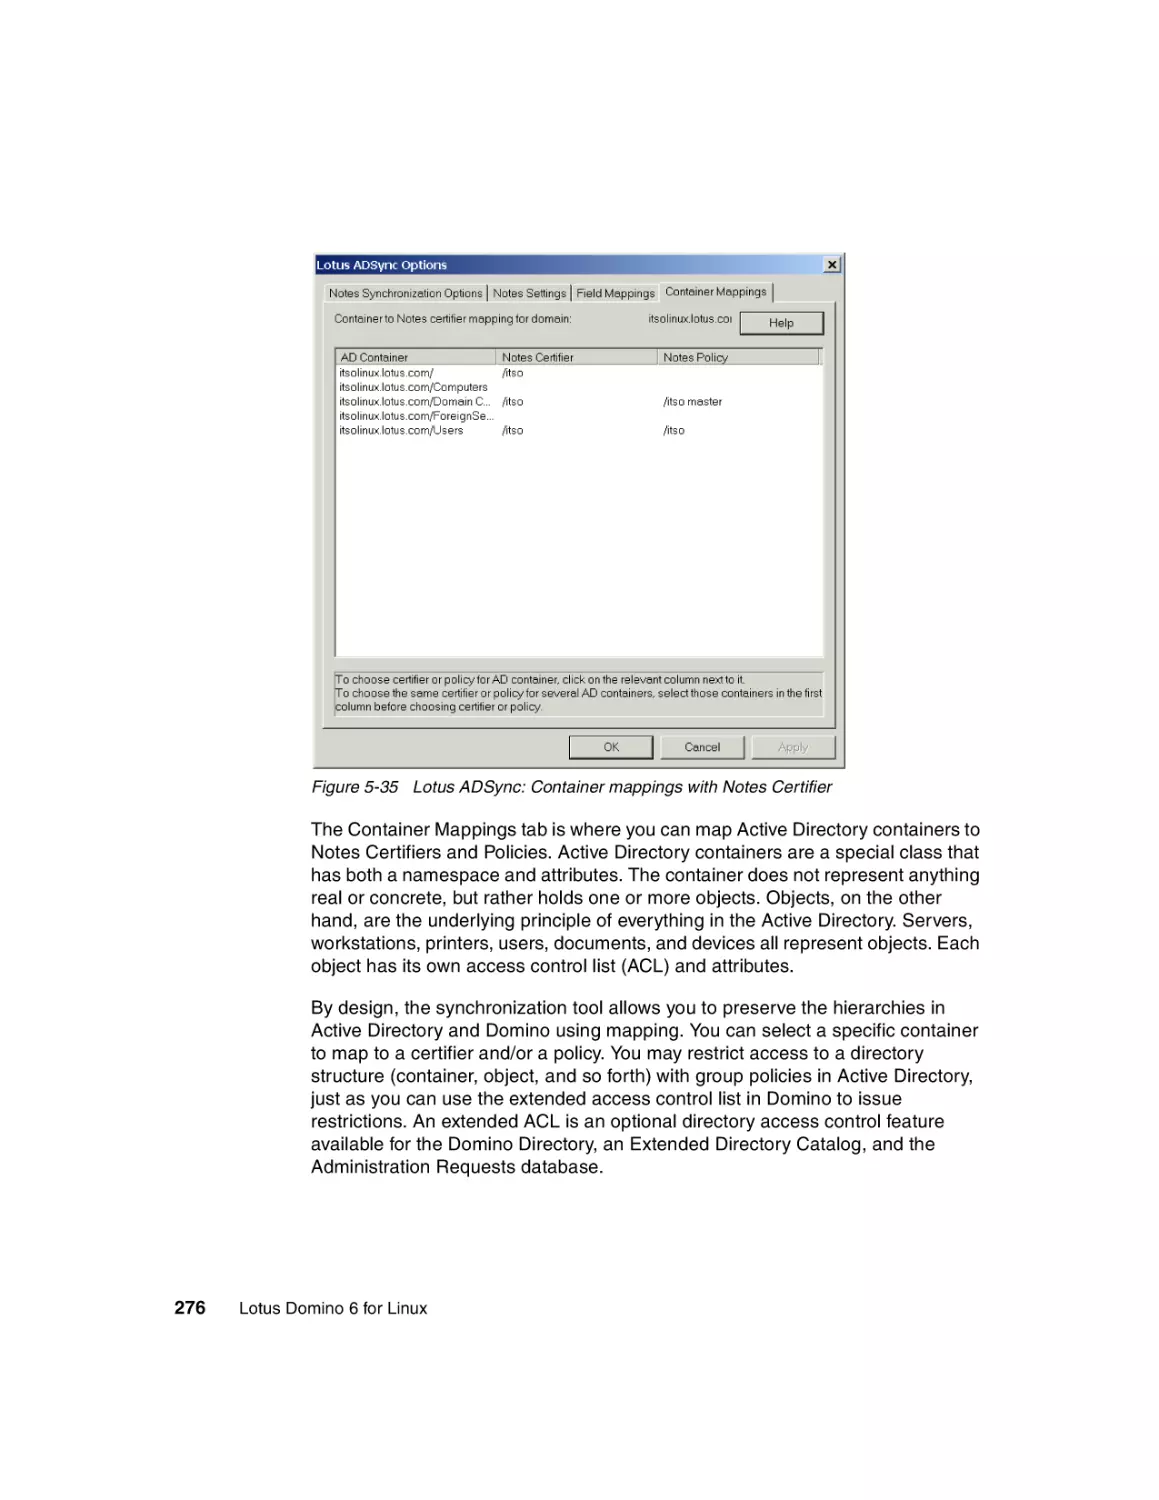
5.2 Active Directory synchronization . . . . . . . . . . . . . . . . . . . . . . . . . . . . . . . 266
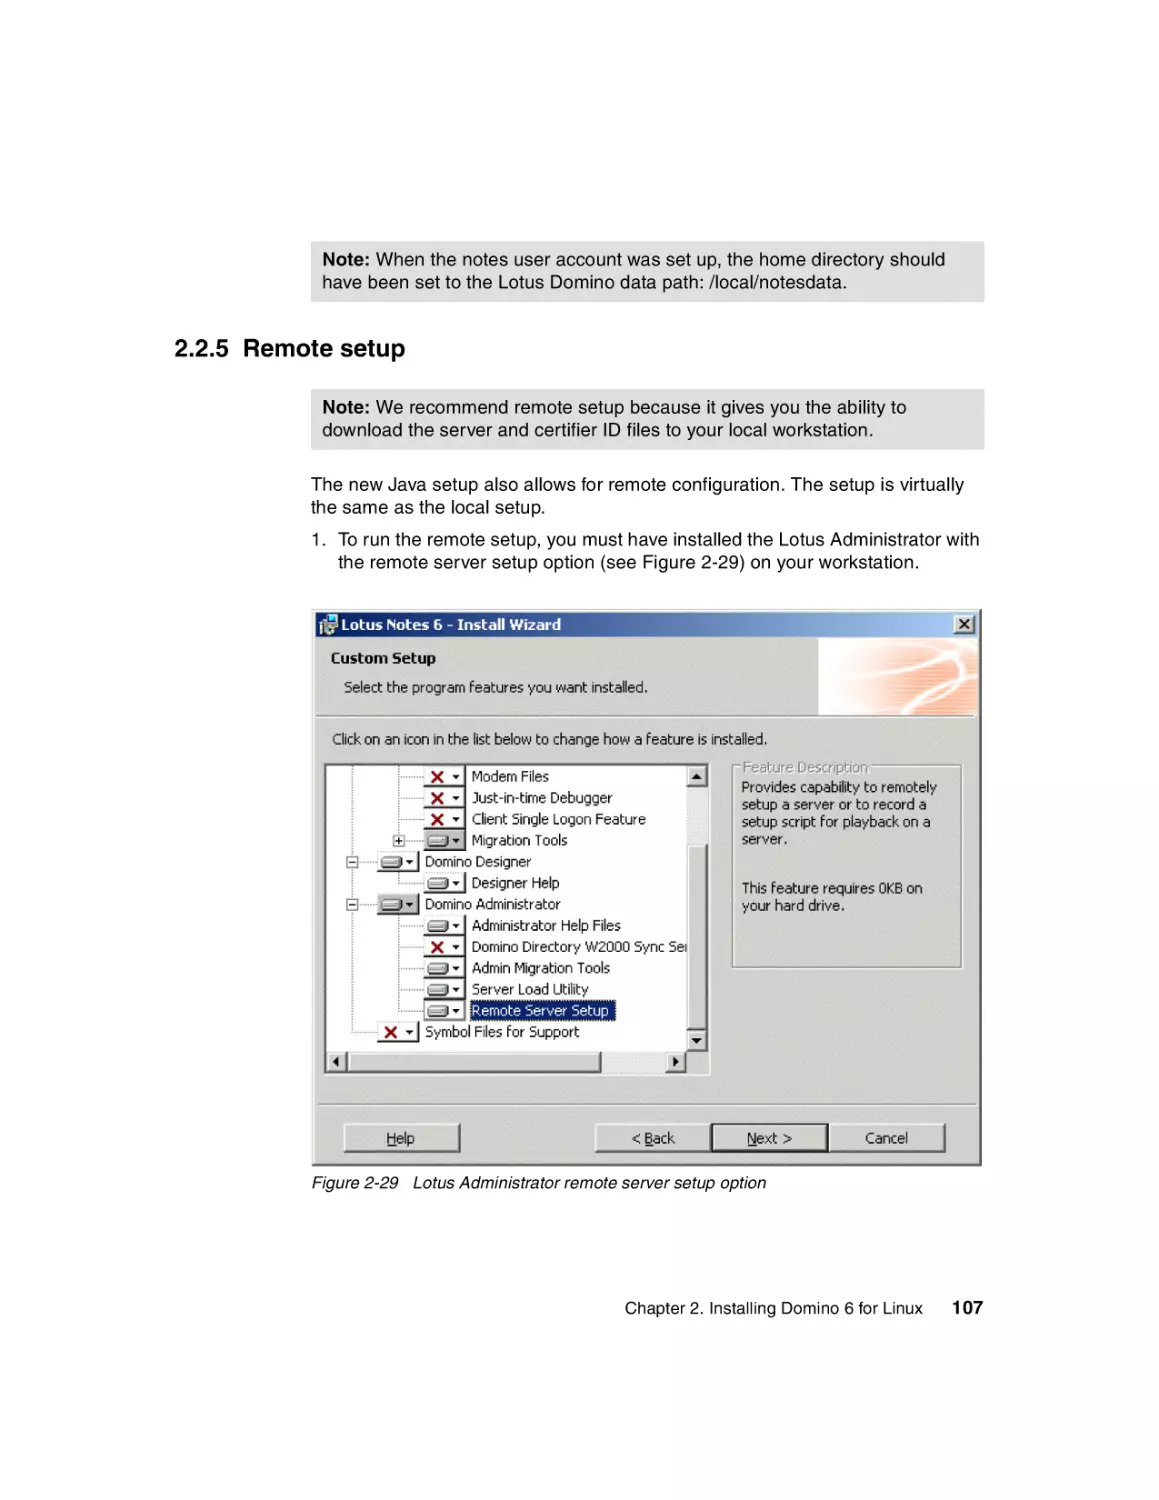
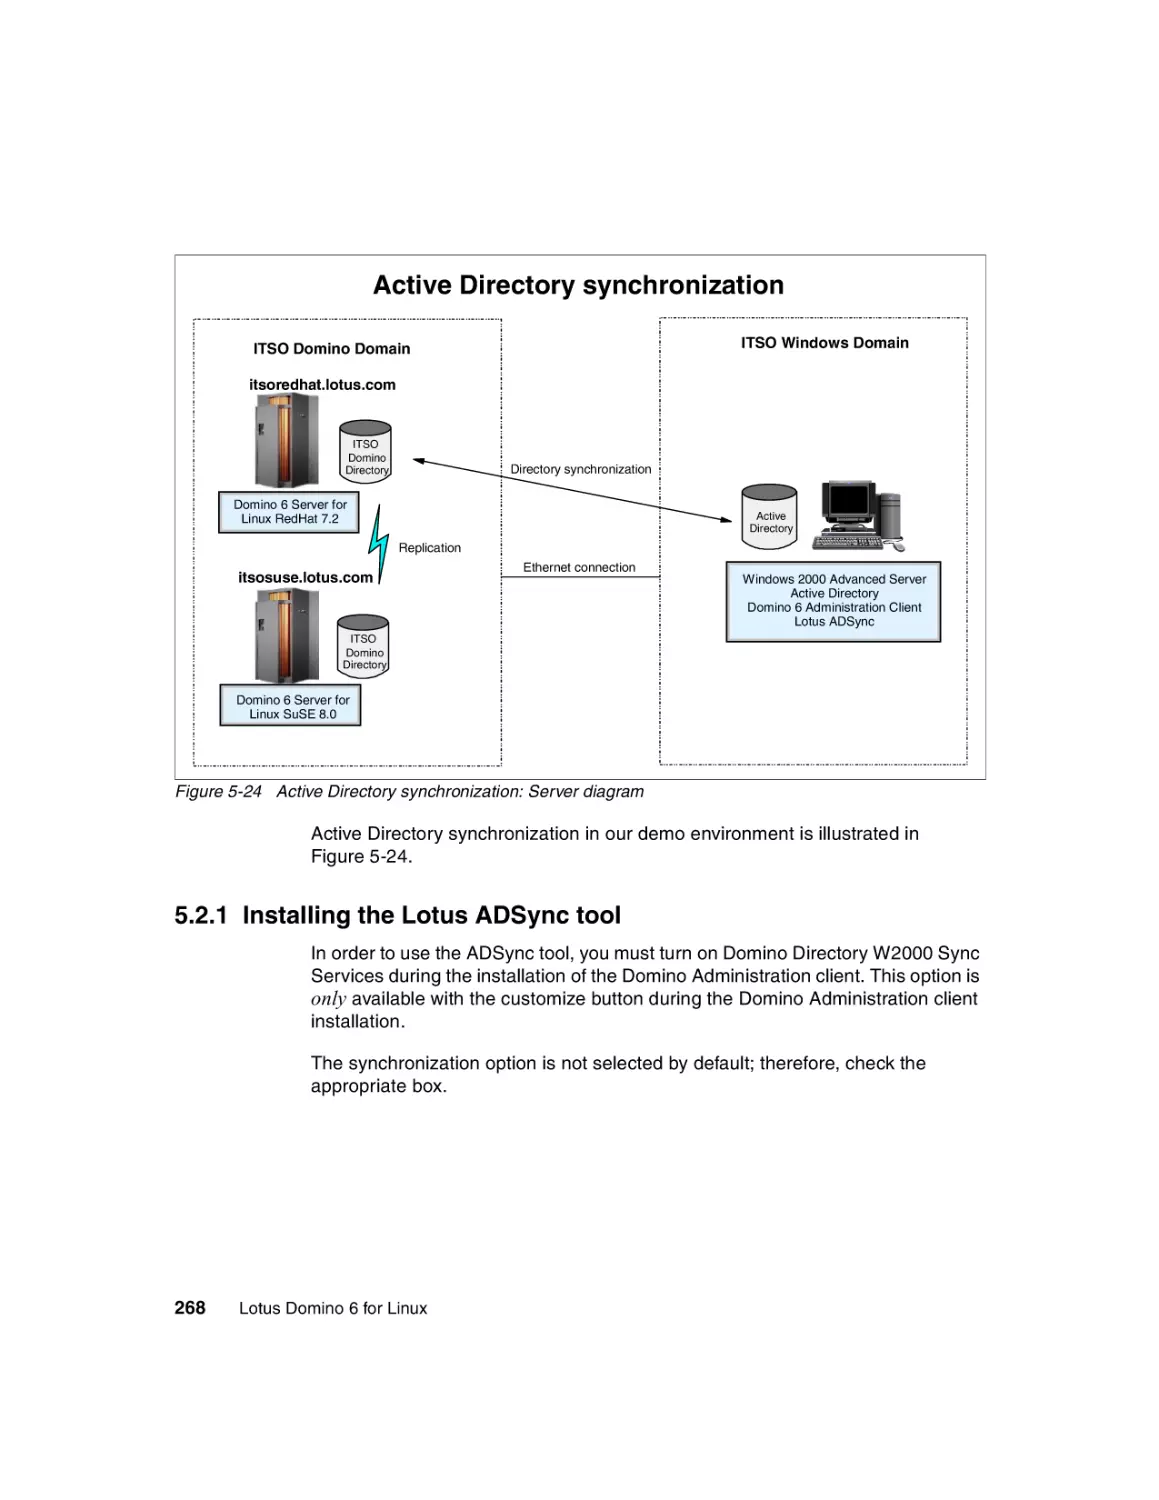
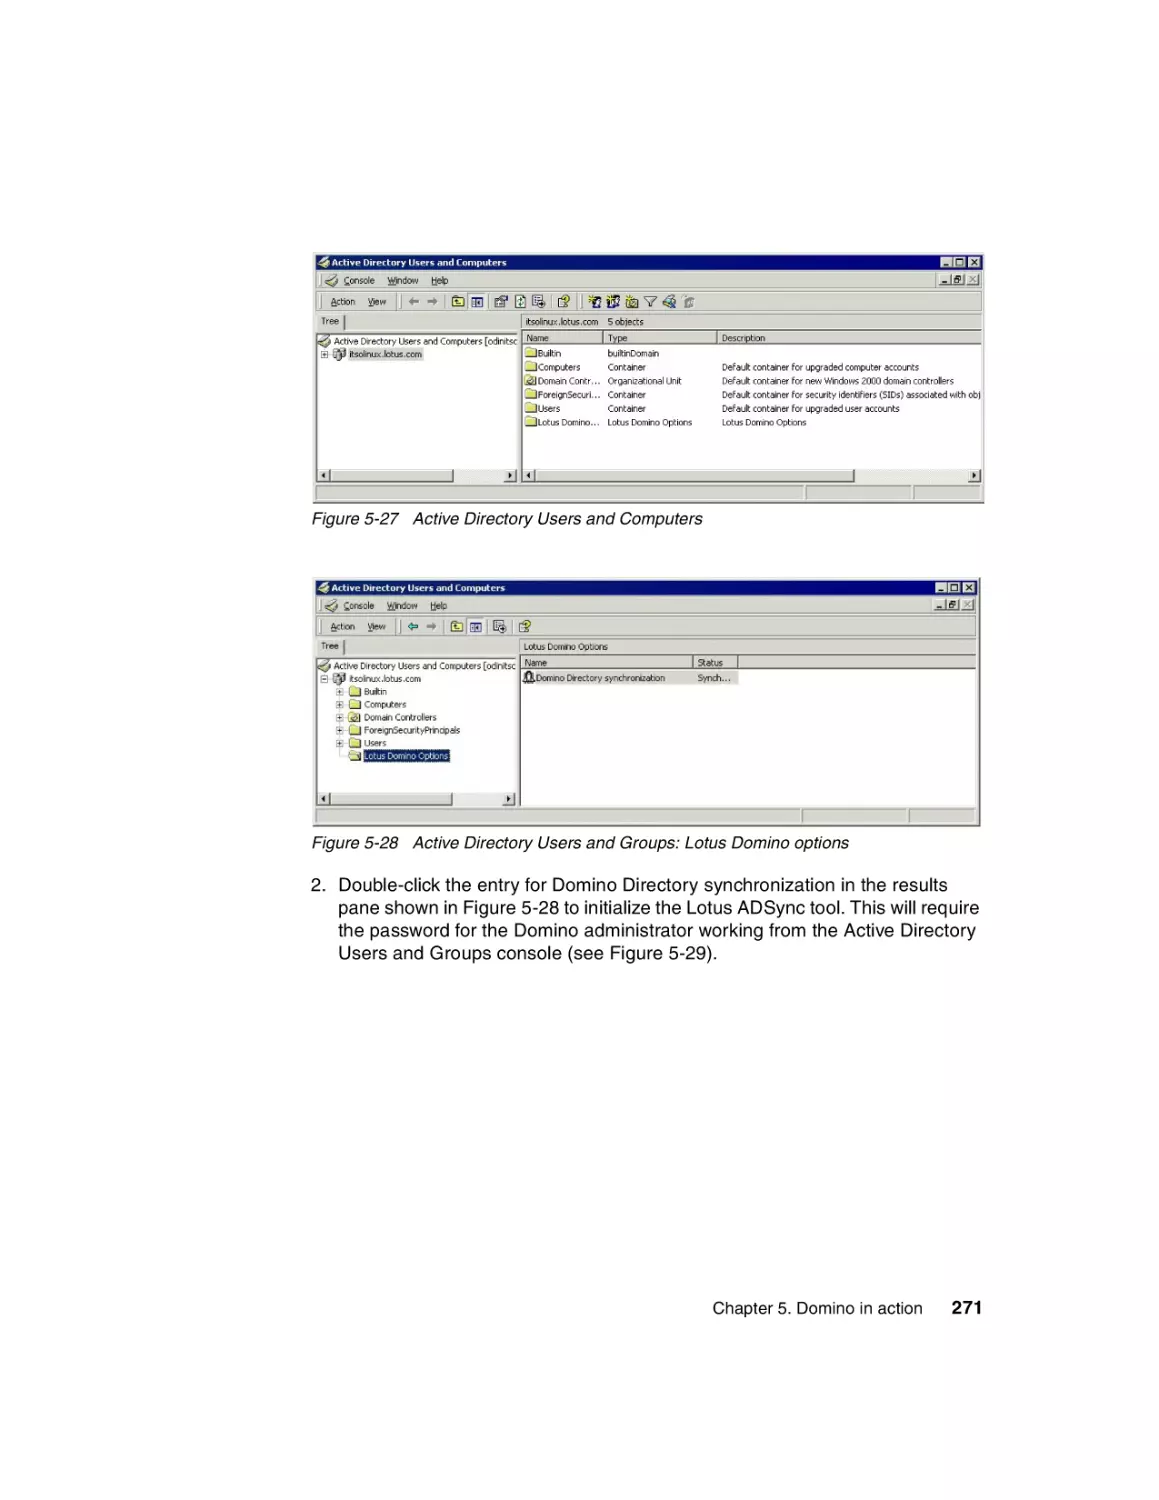
5.2.1 Installing the Lotus ADSync tool . . . . . . . . . . . . . . . . . . . . . . . . . . . 268
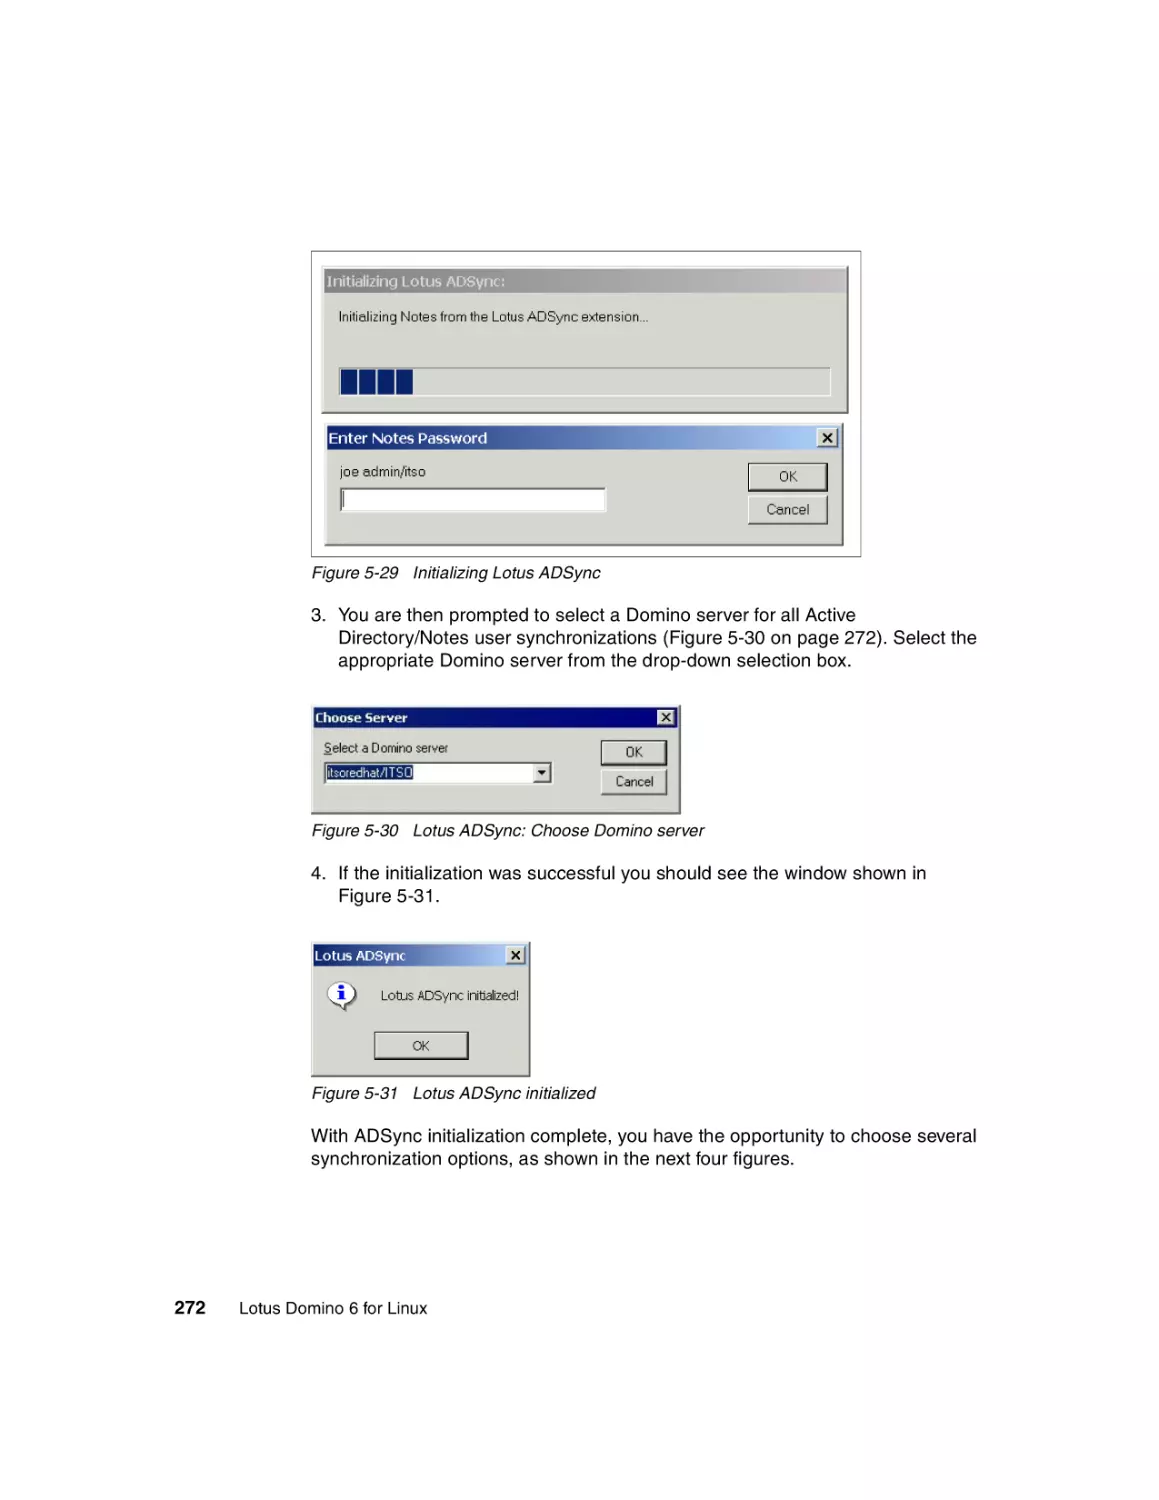
5.2.2 Creating users and groups in Active Directory . . . . . . . . . . . . . . . . 270
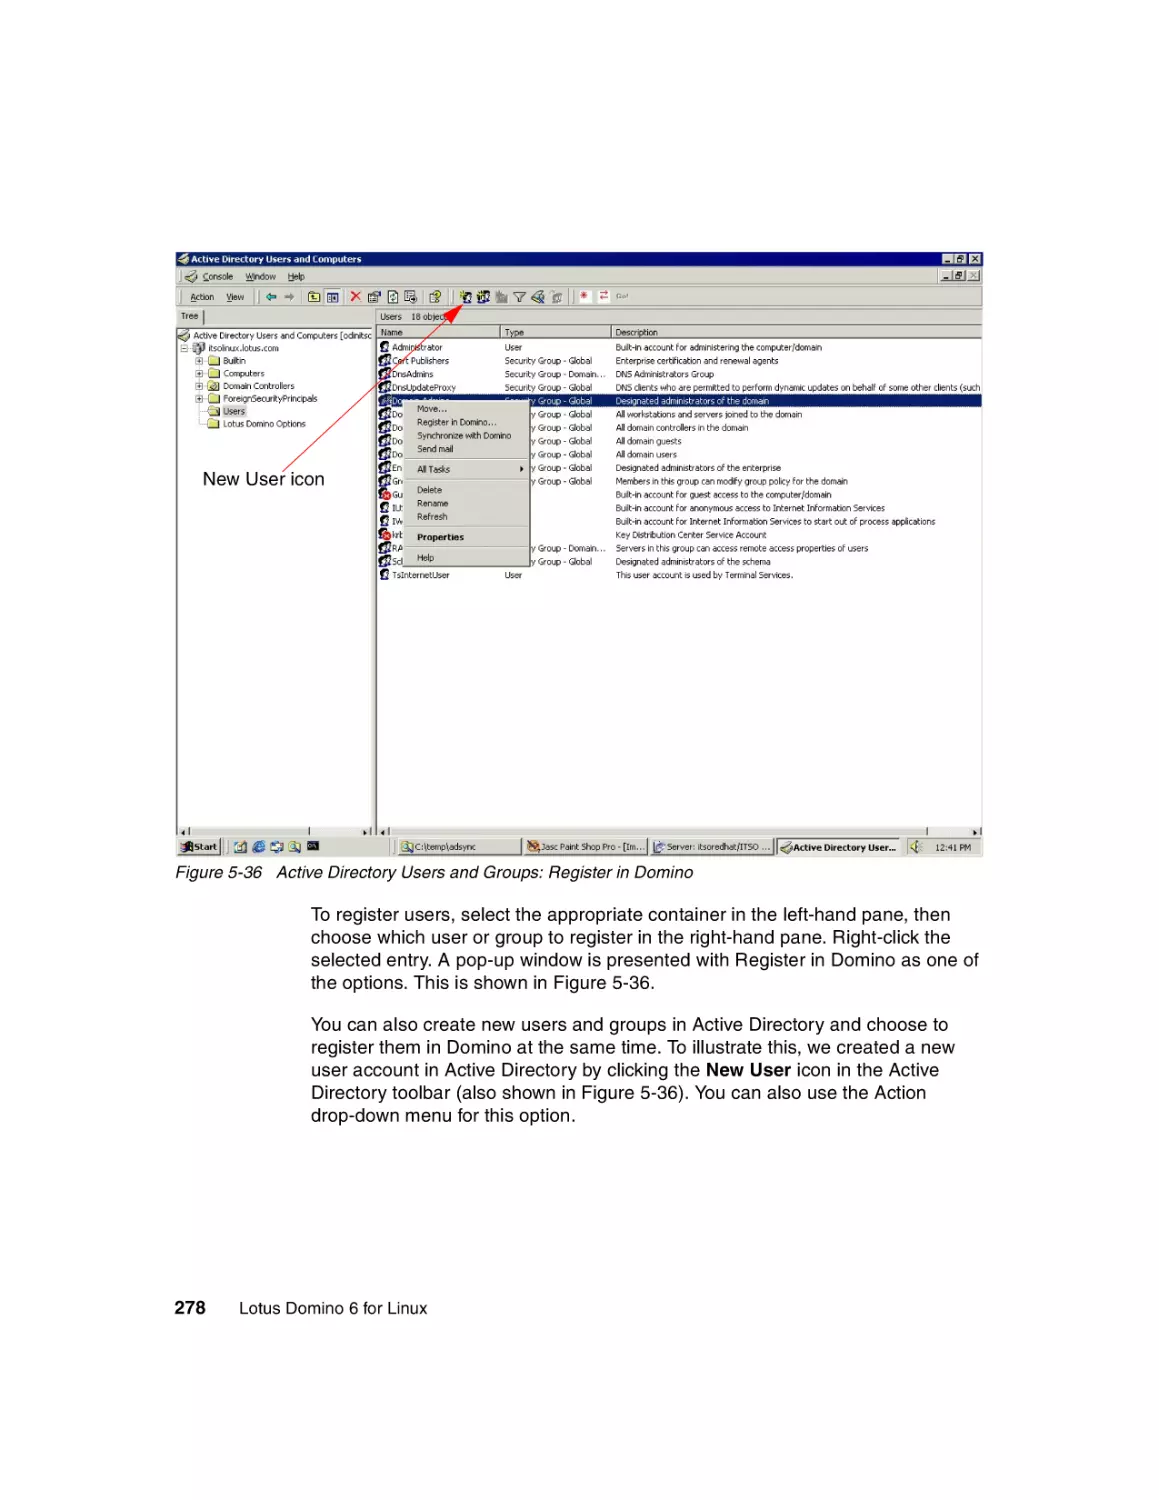
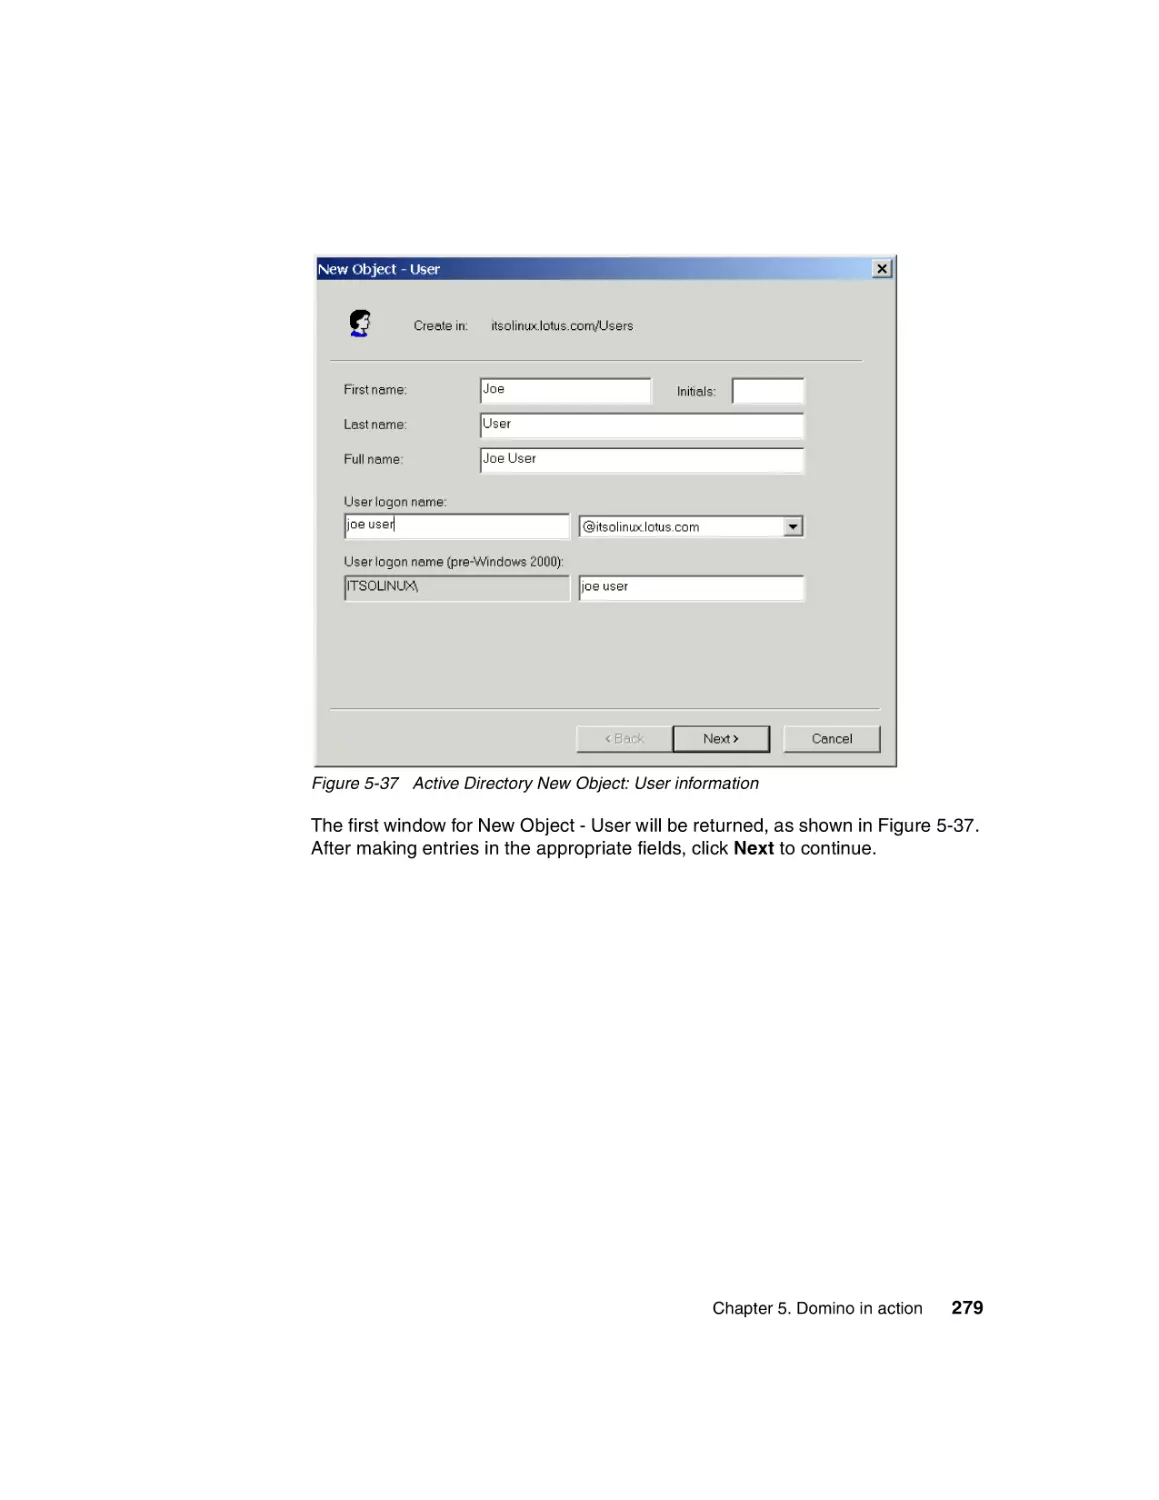
5.2.3 Registering users in Domino from Active Directory. . . . . . . . . . . . . 277
5.2.4 Registering users to Active Directory from Domino . . . . . . . . . . . . 282
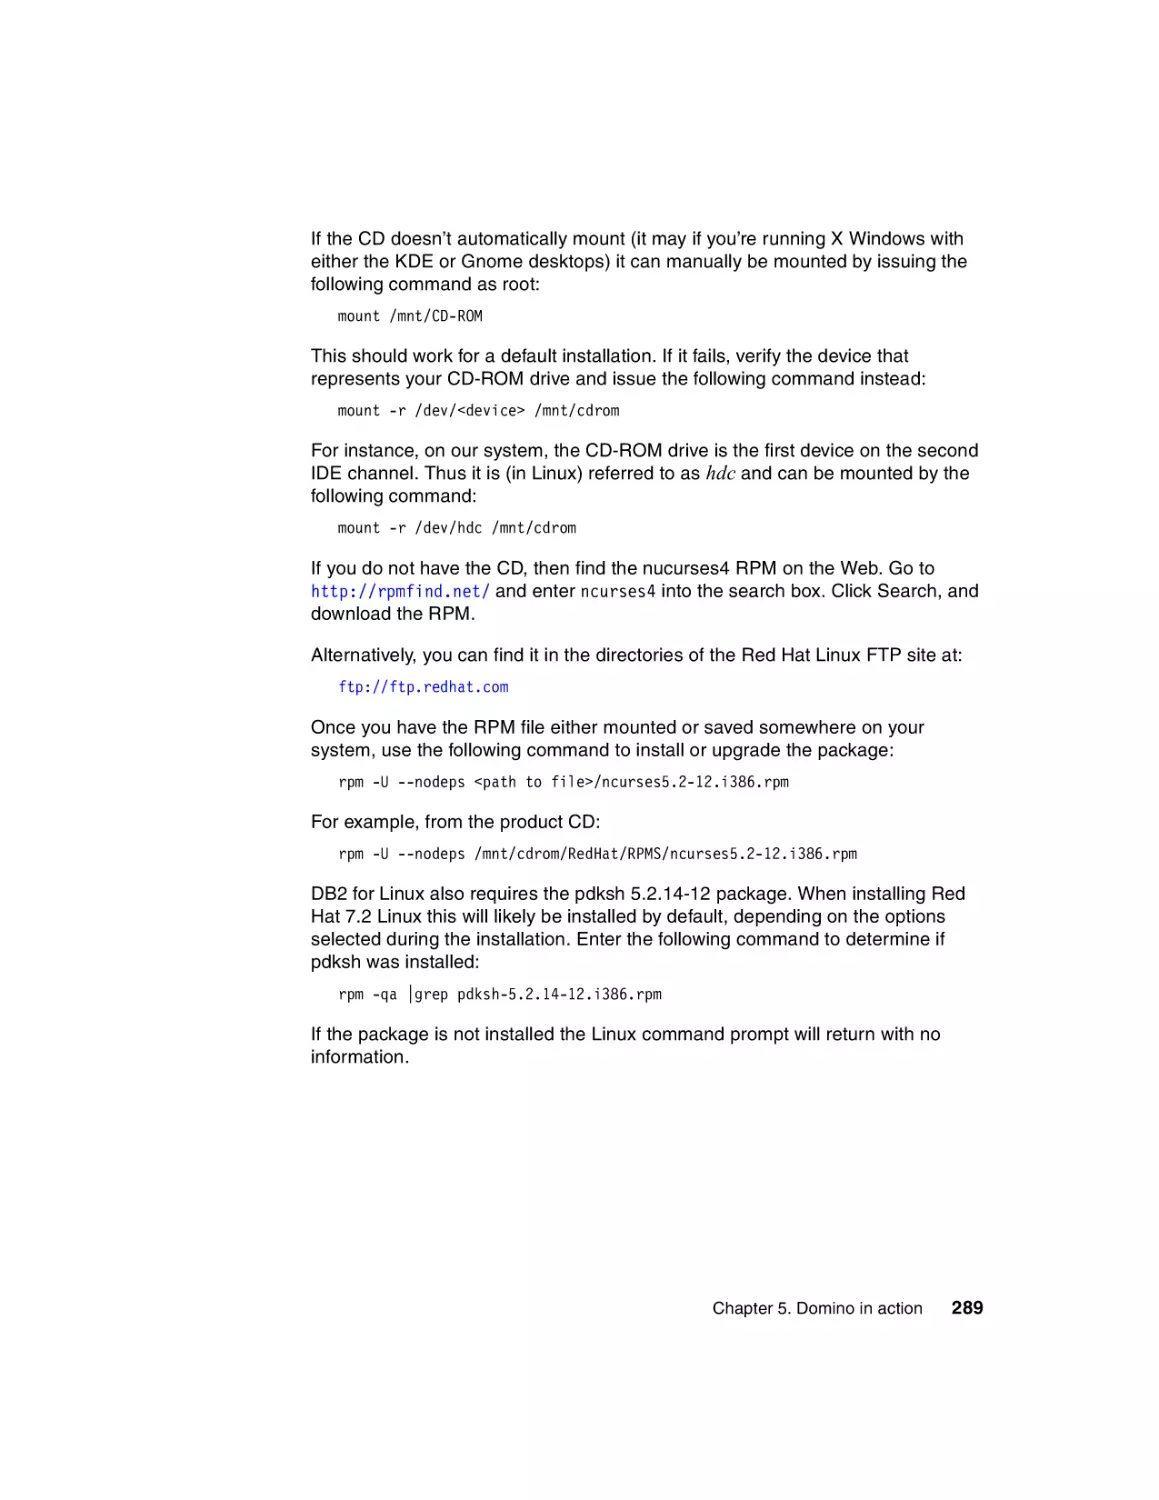
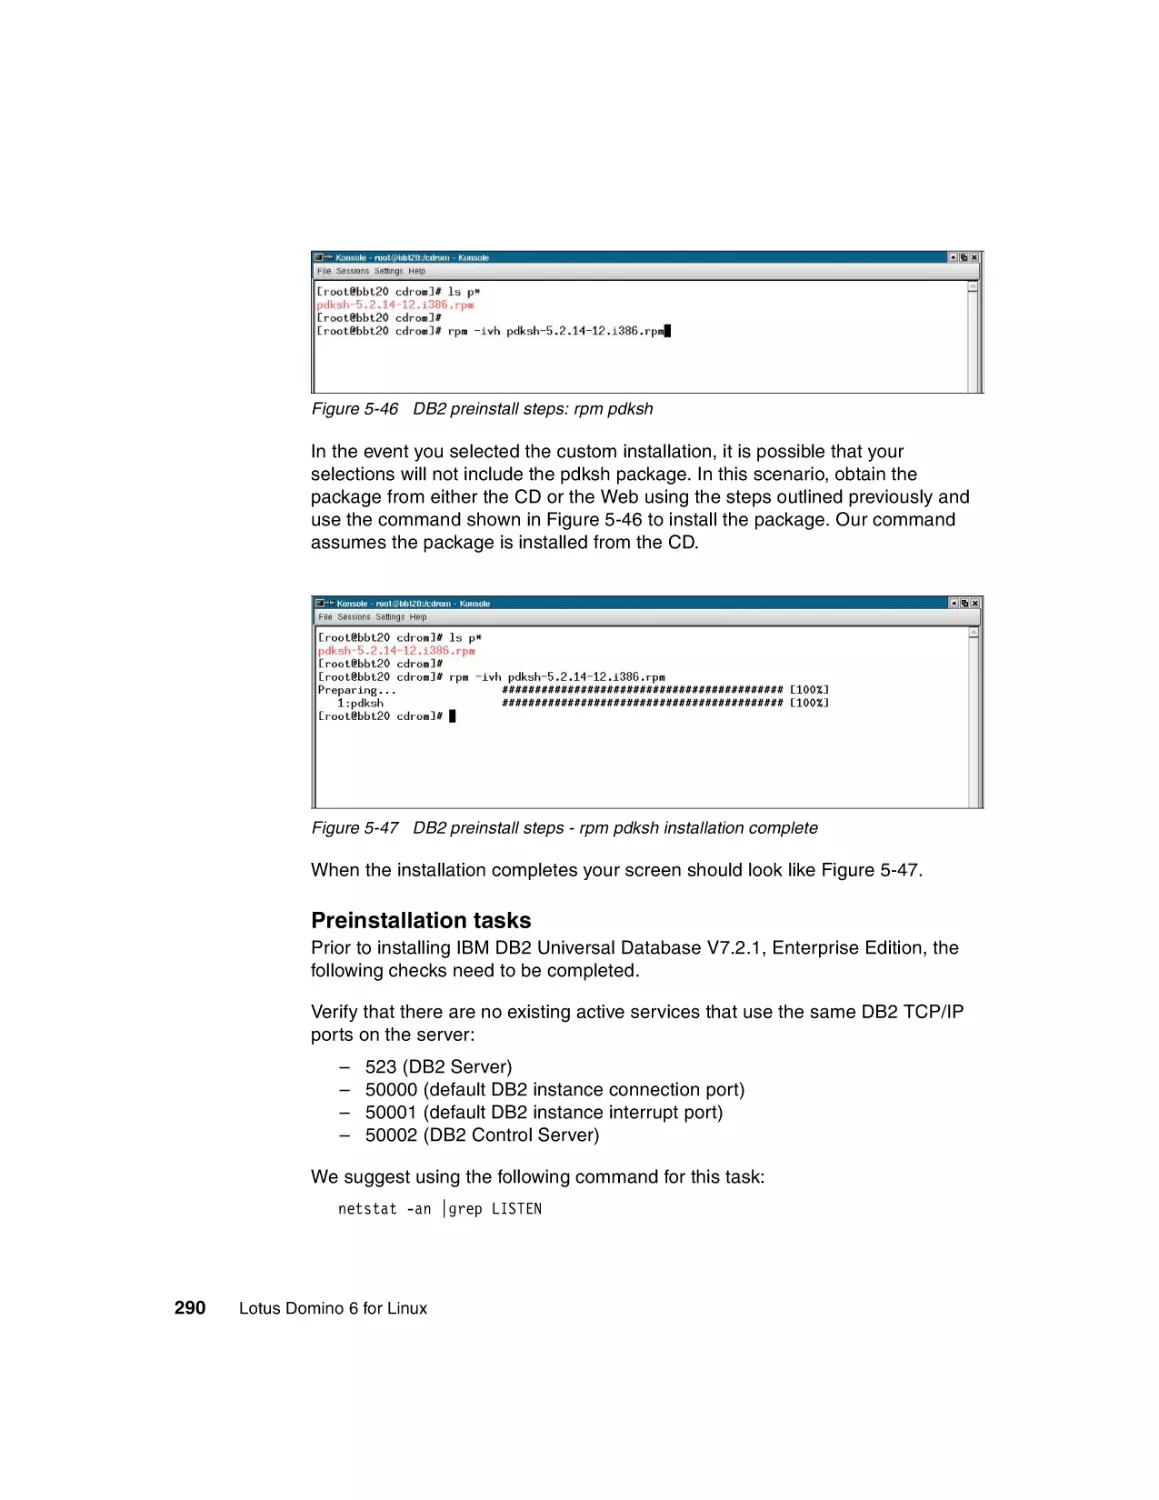
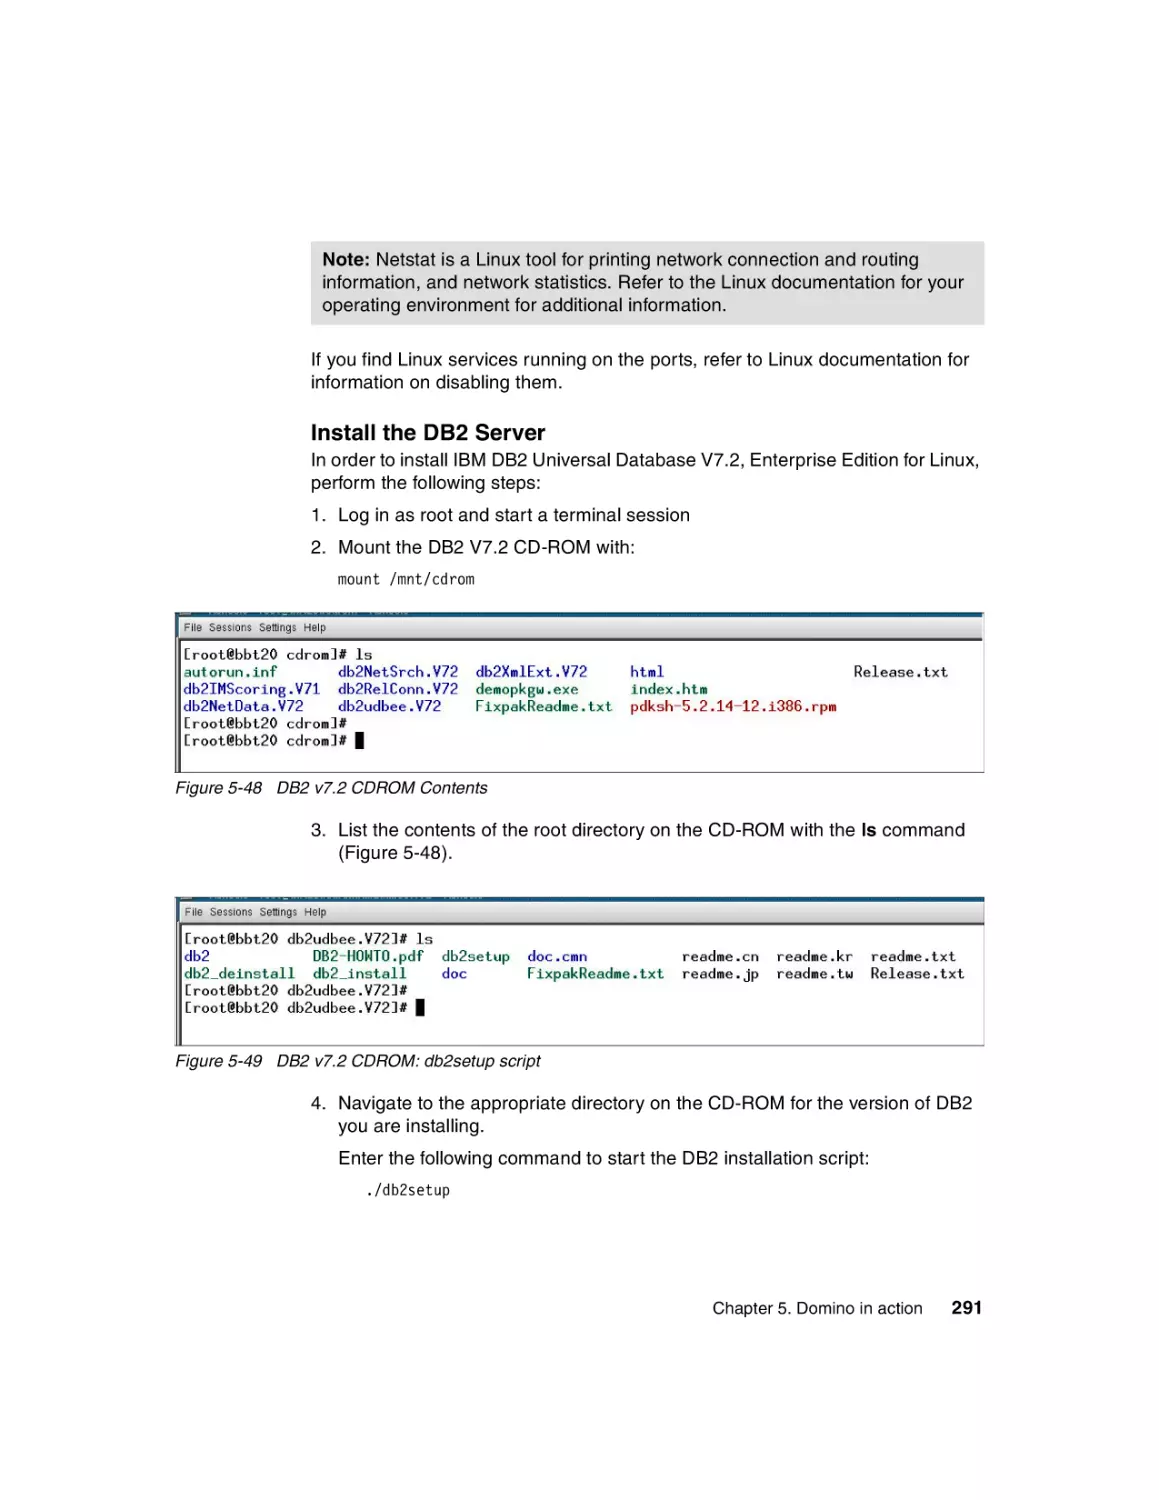
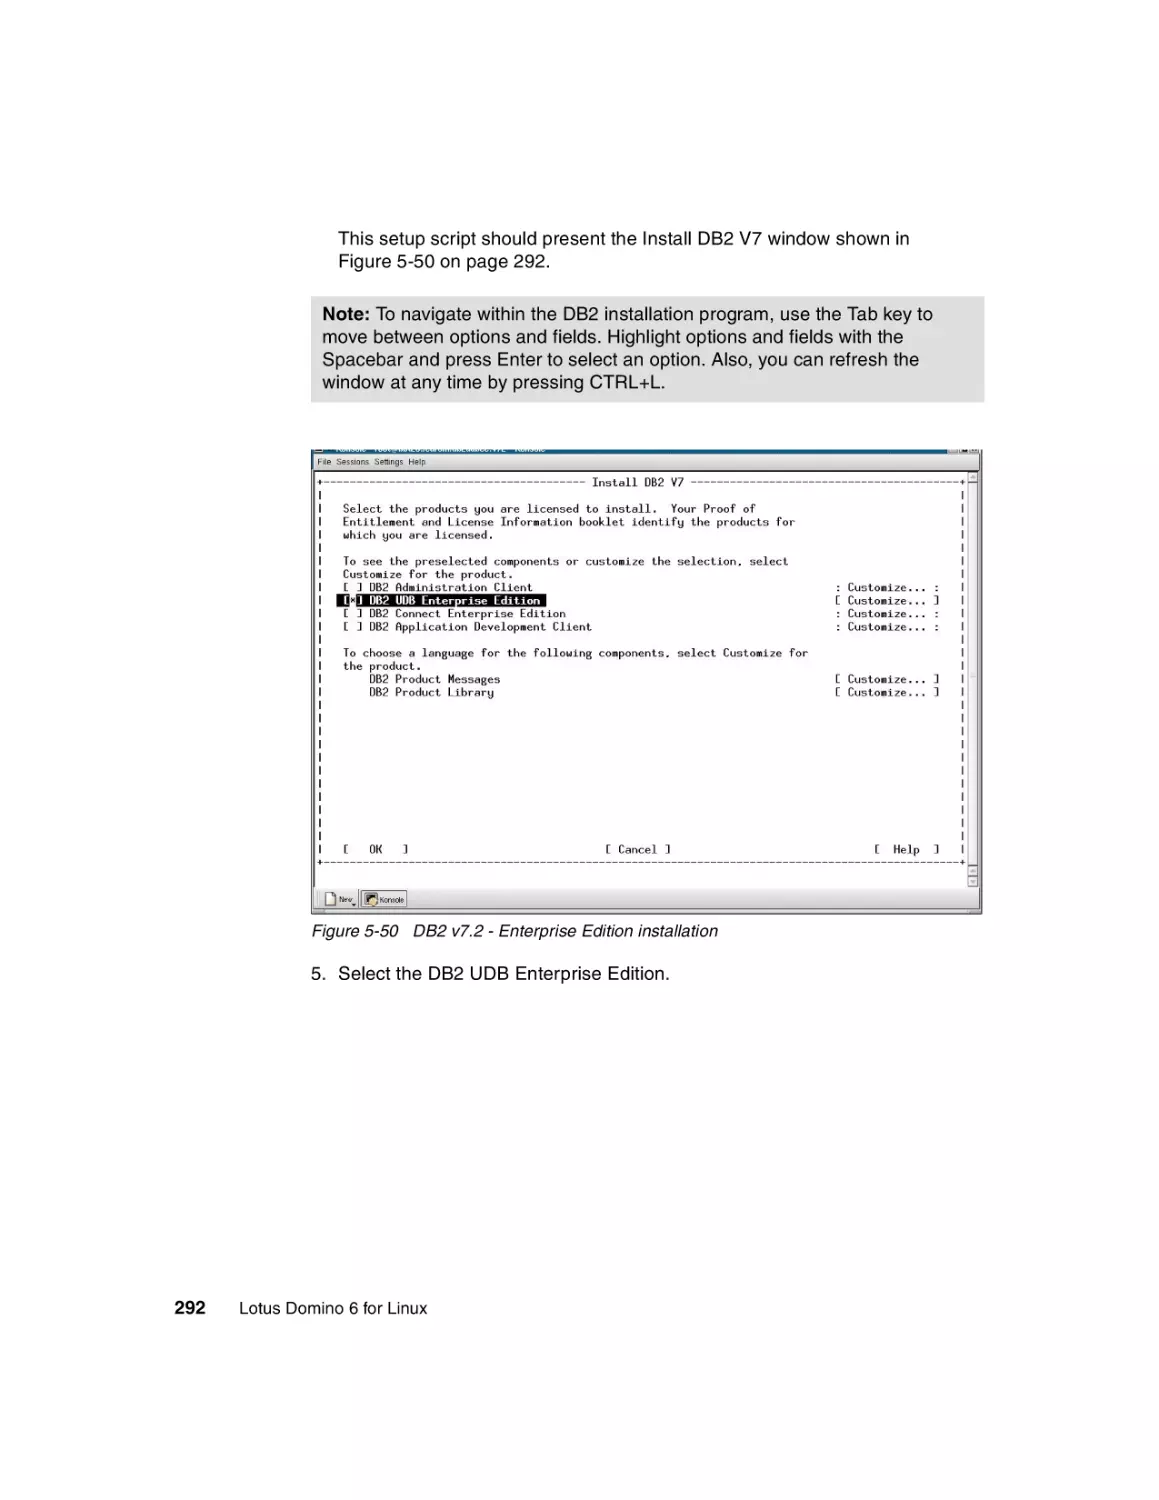
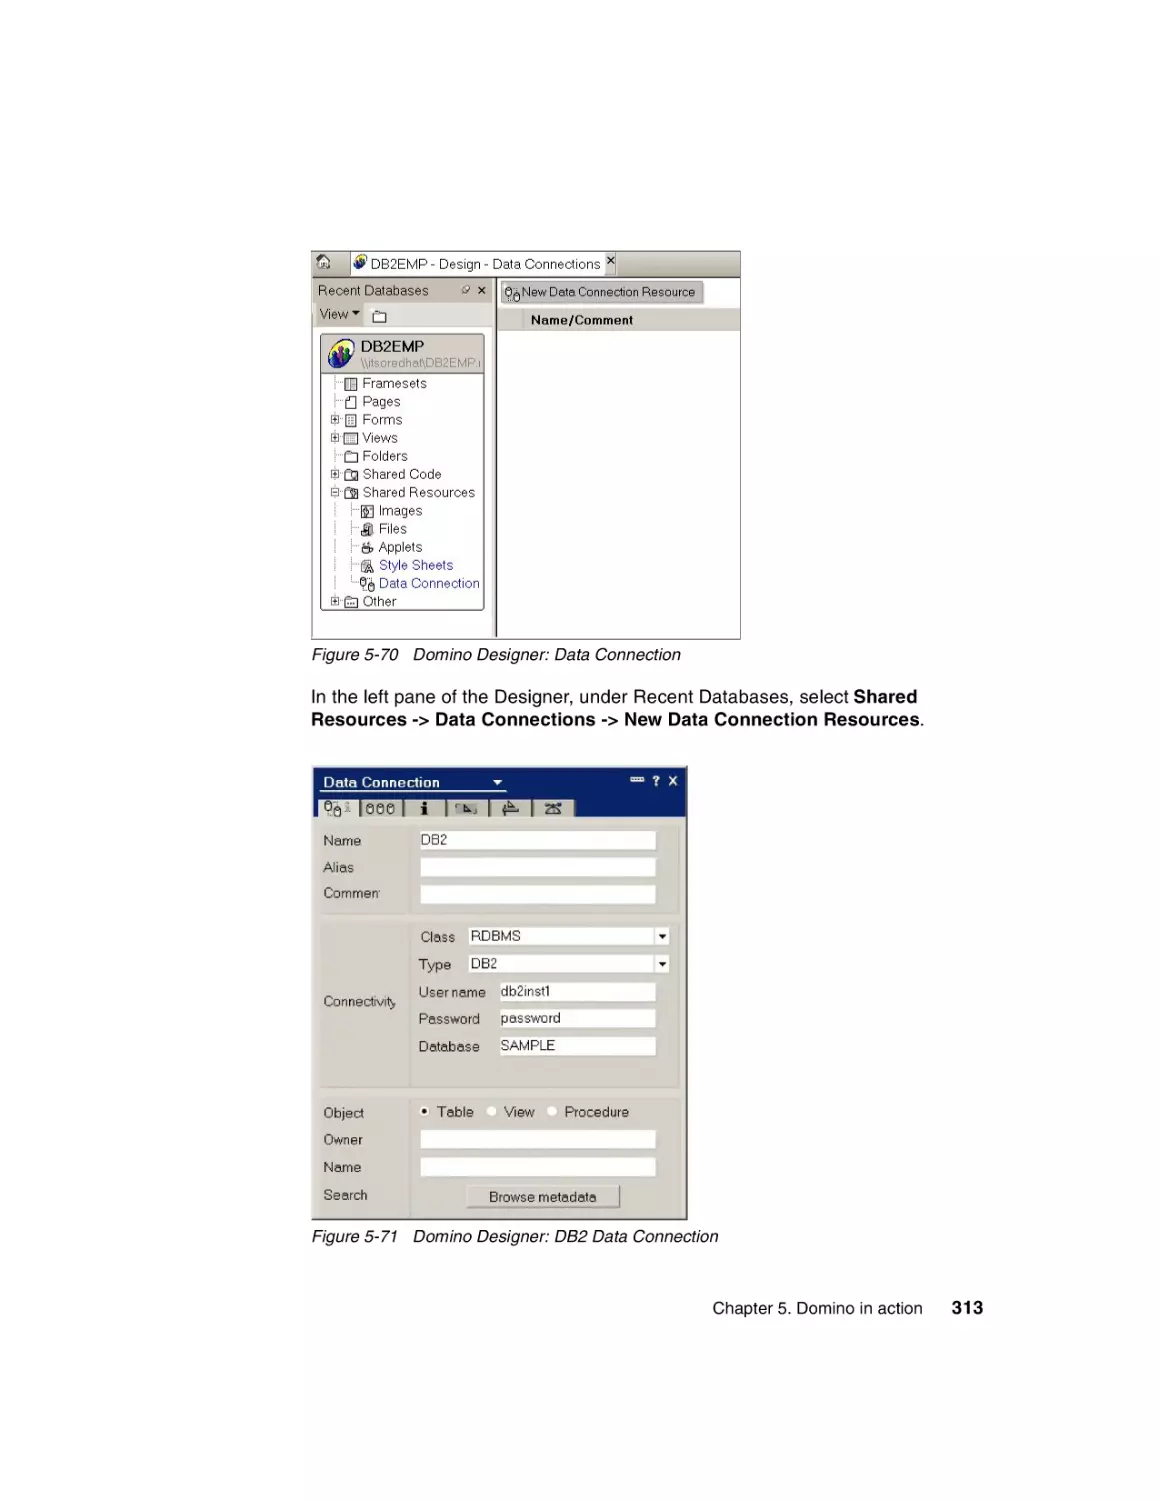
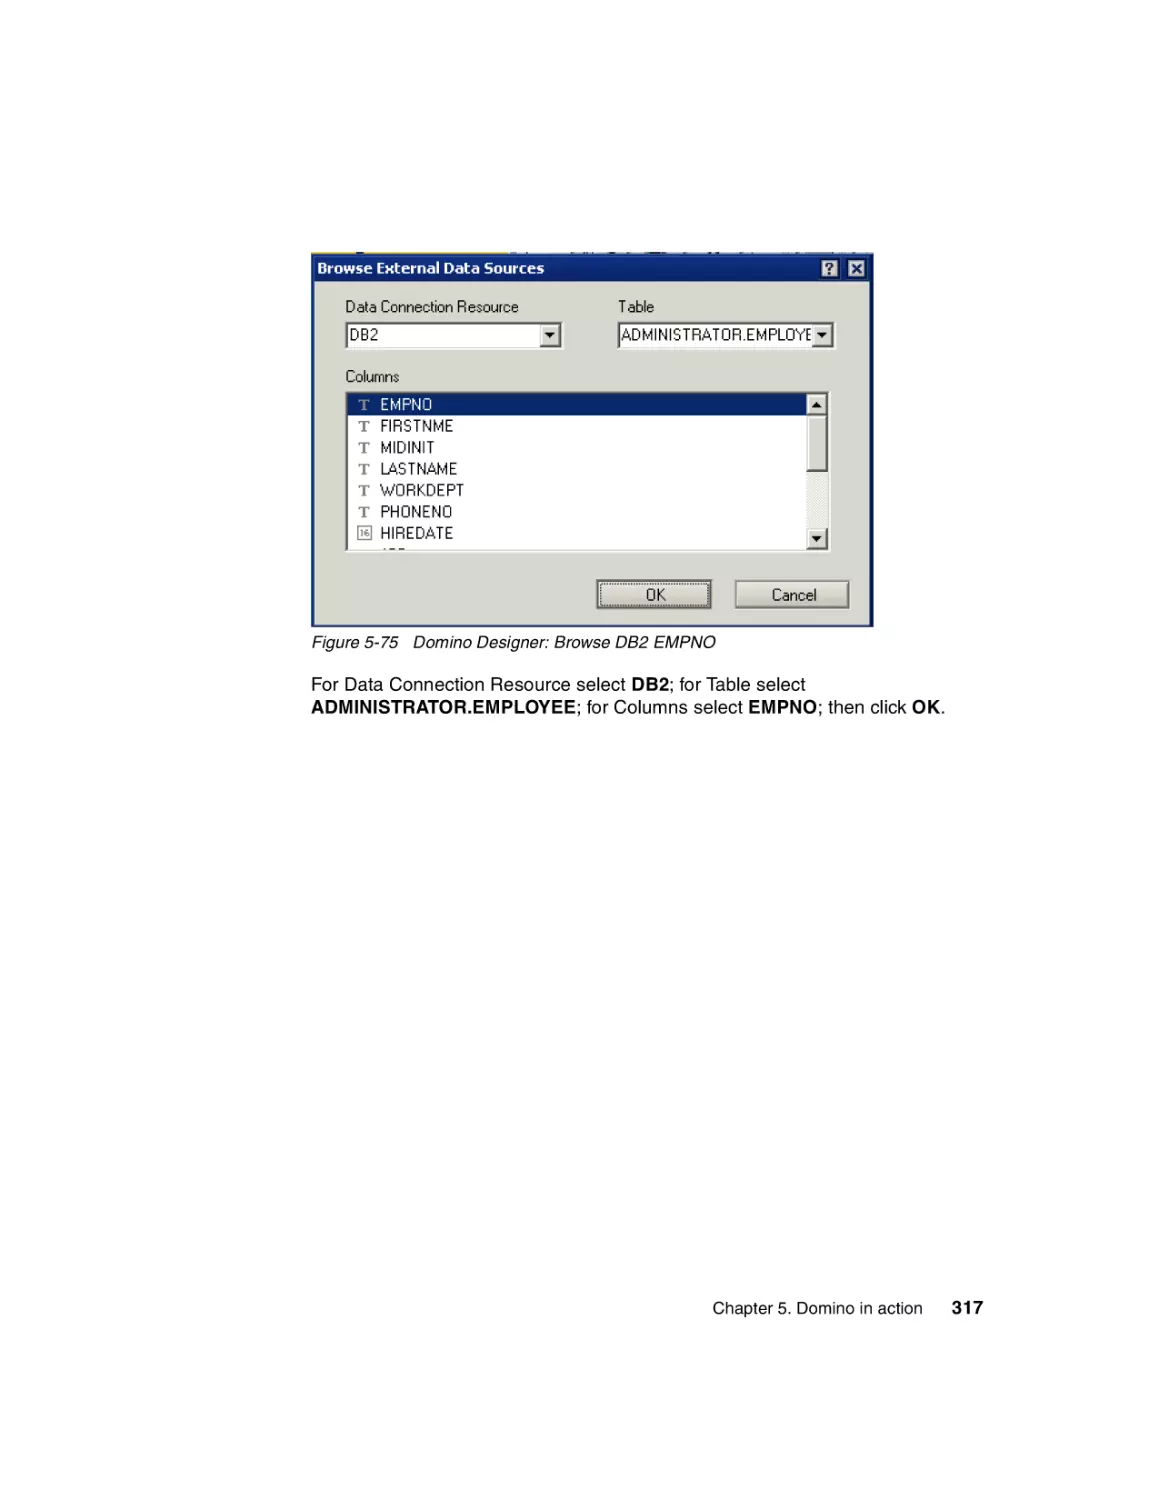
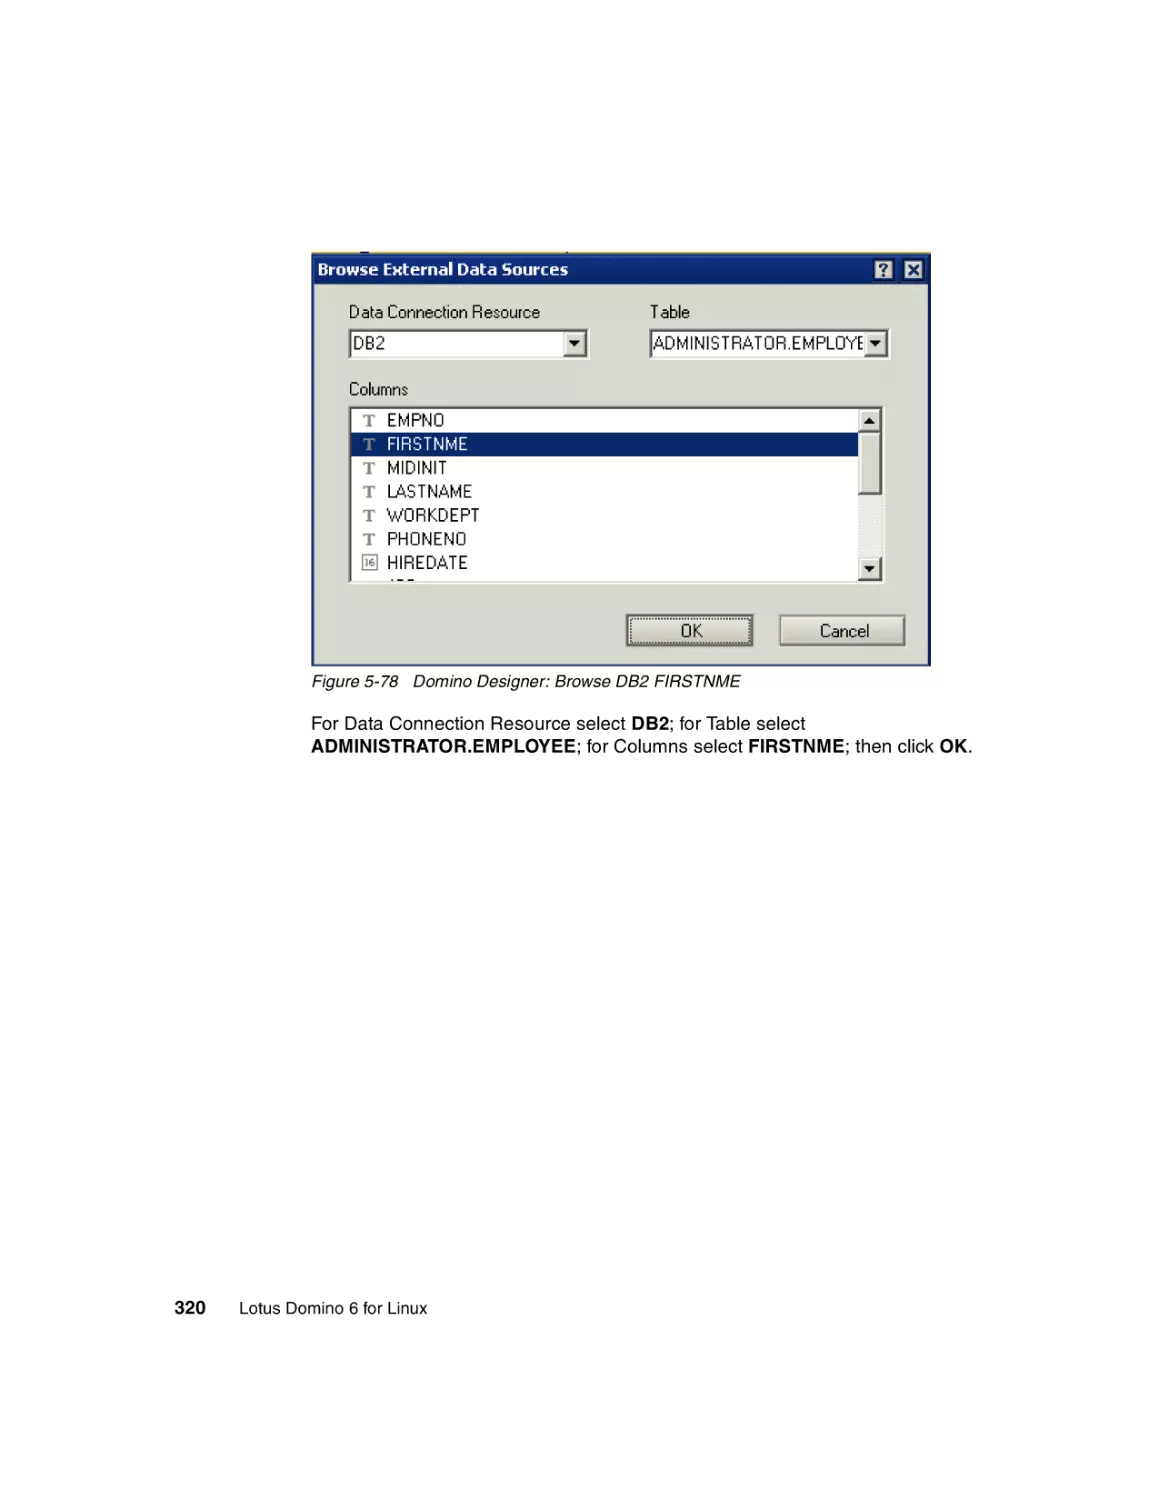
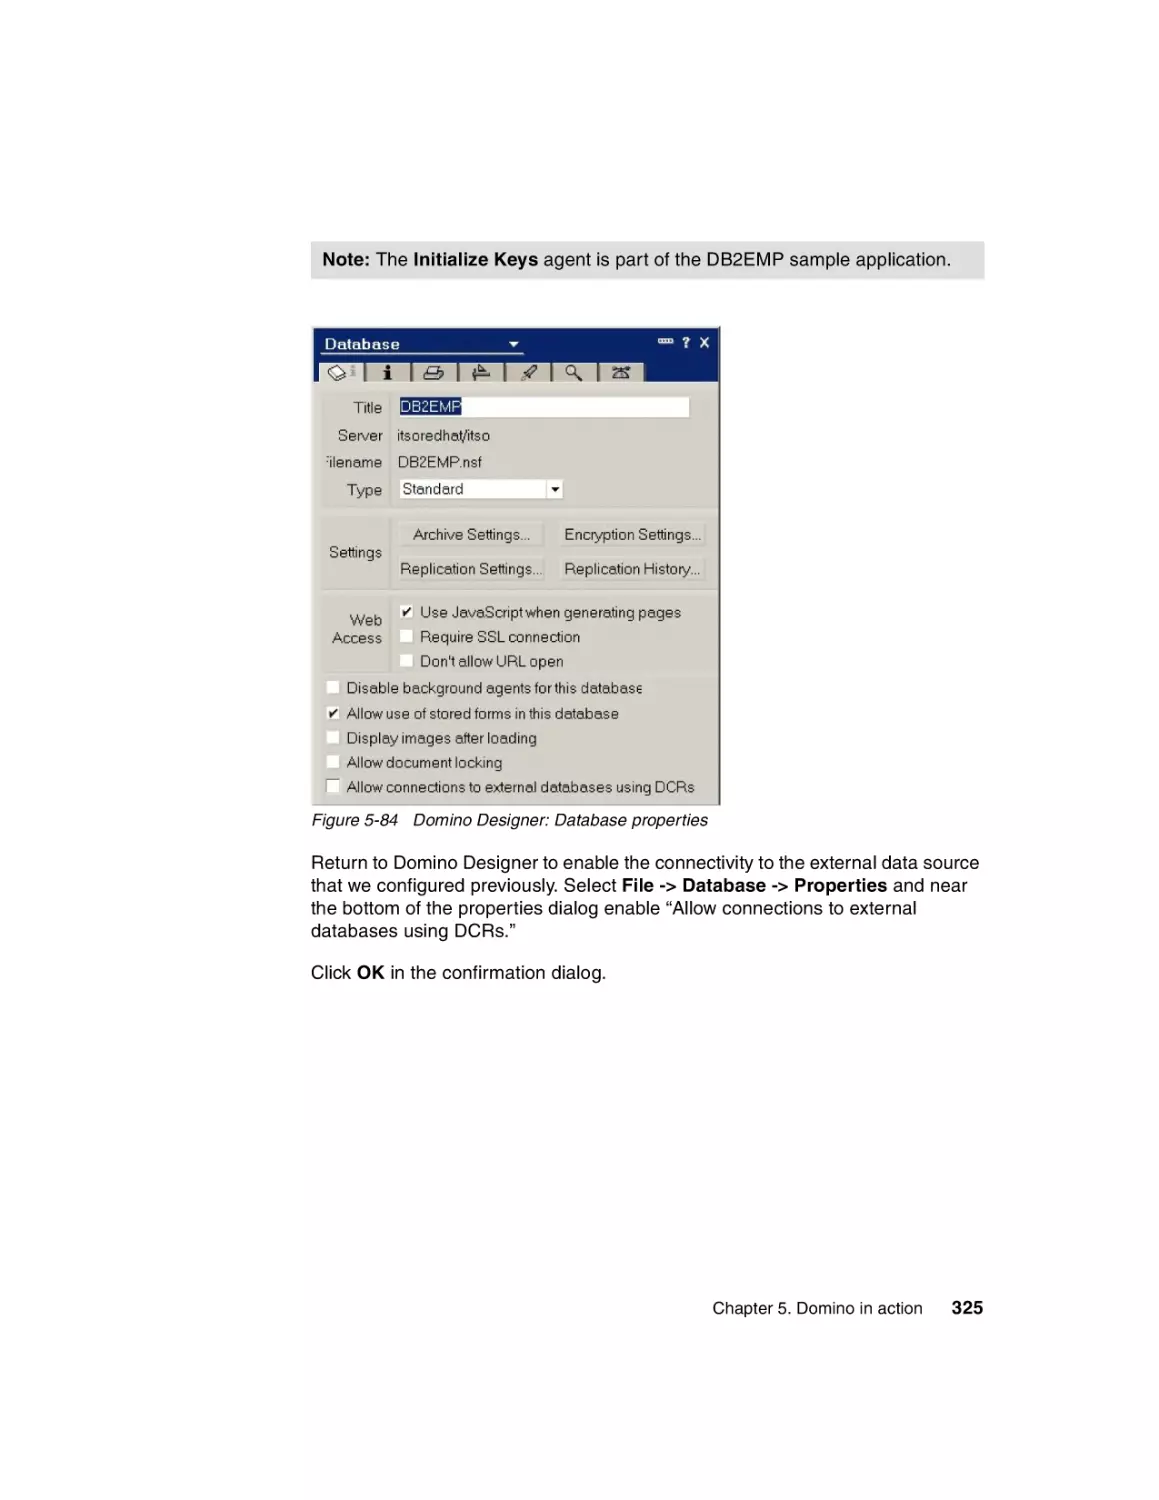
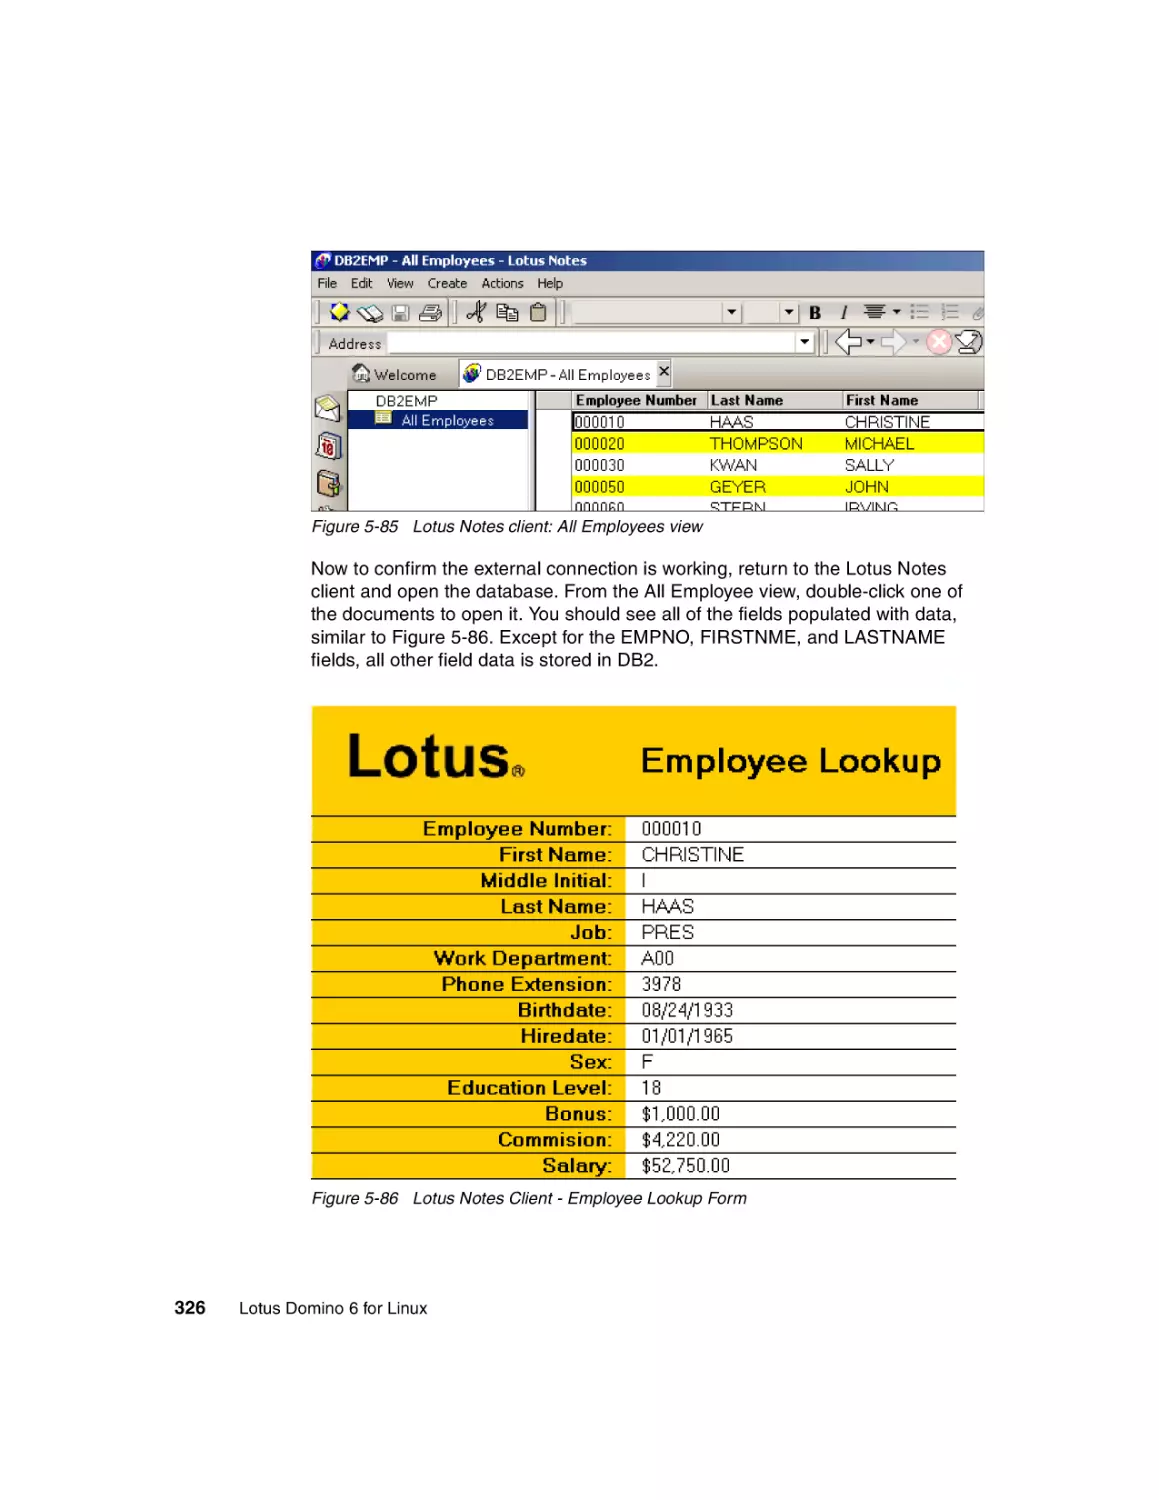
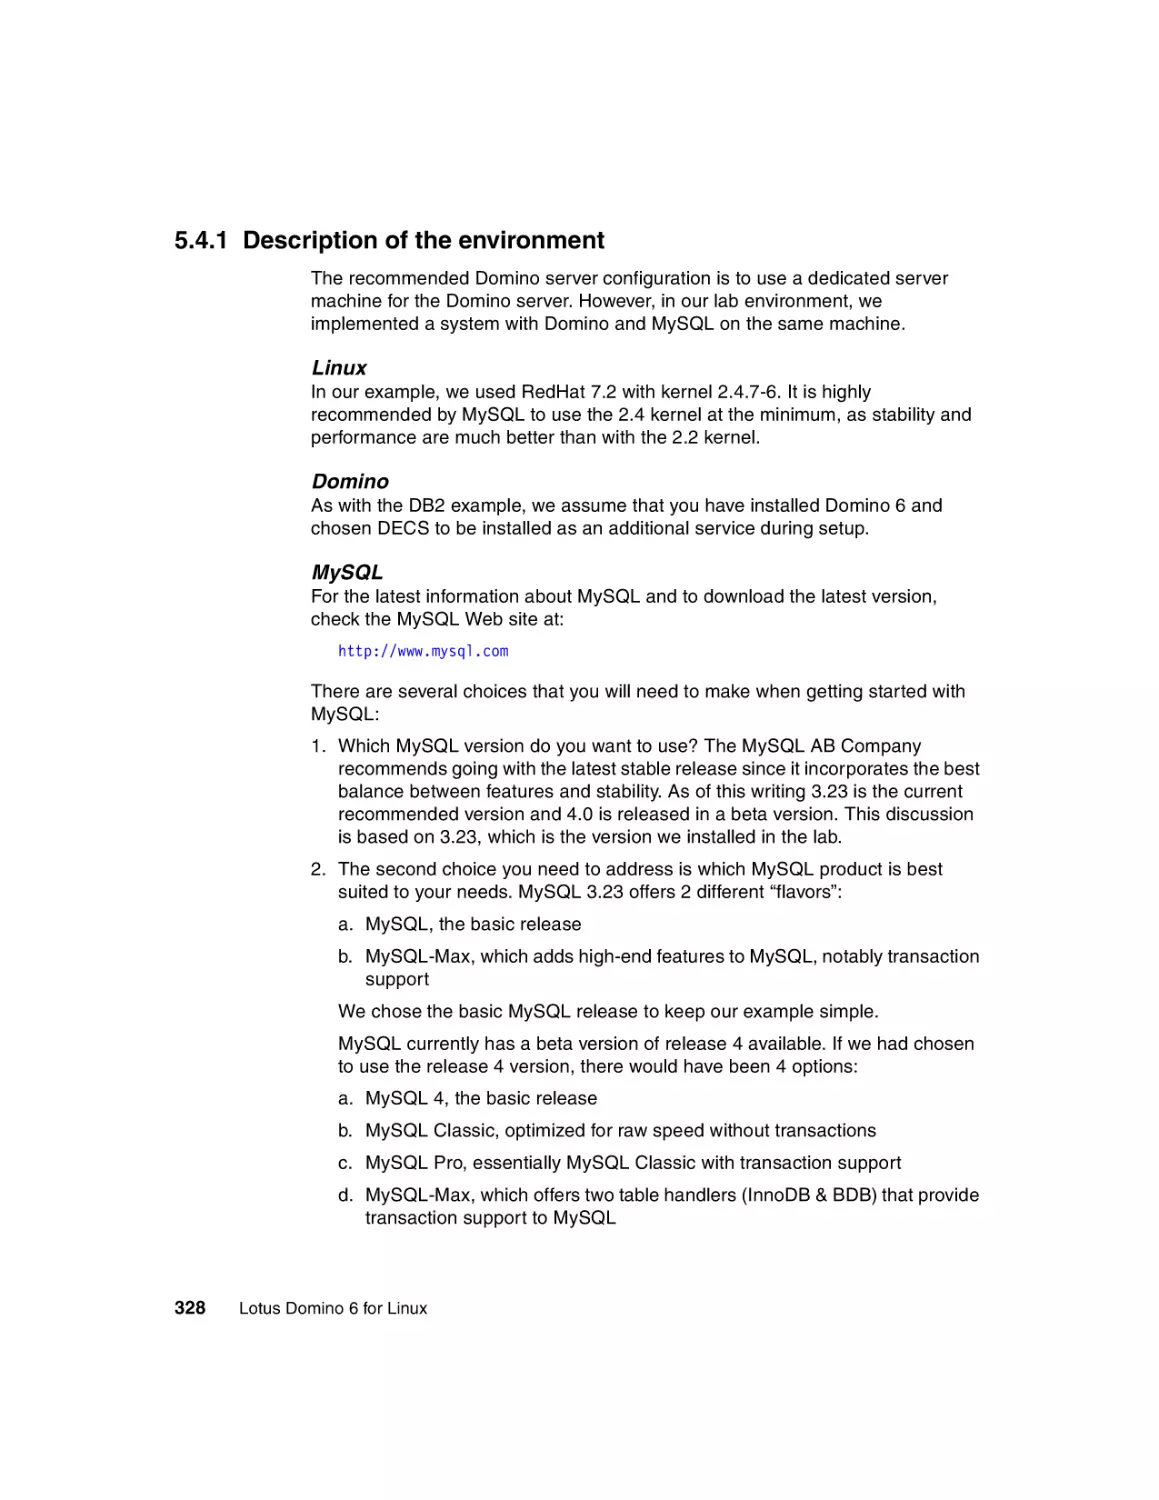
5.3 Accessing external data from Domino: DB2 example . . . . . . . . . . . . . . . 288
5.3.1 Installing DB2 for Linux . . . . . . . . . . . . . . . . . . . . . . . . . . . . . . . . . . 288
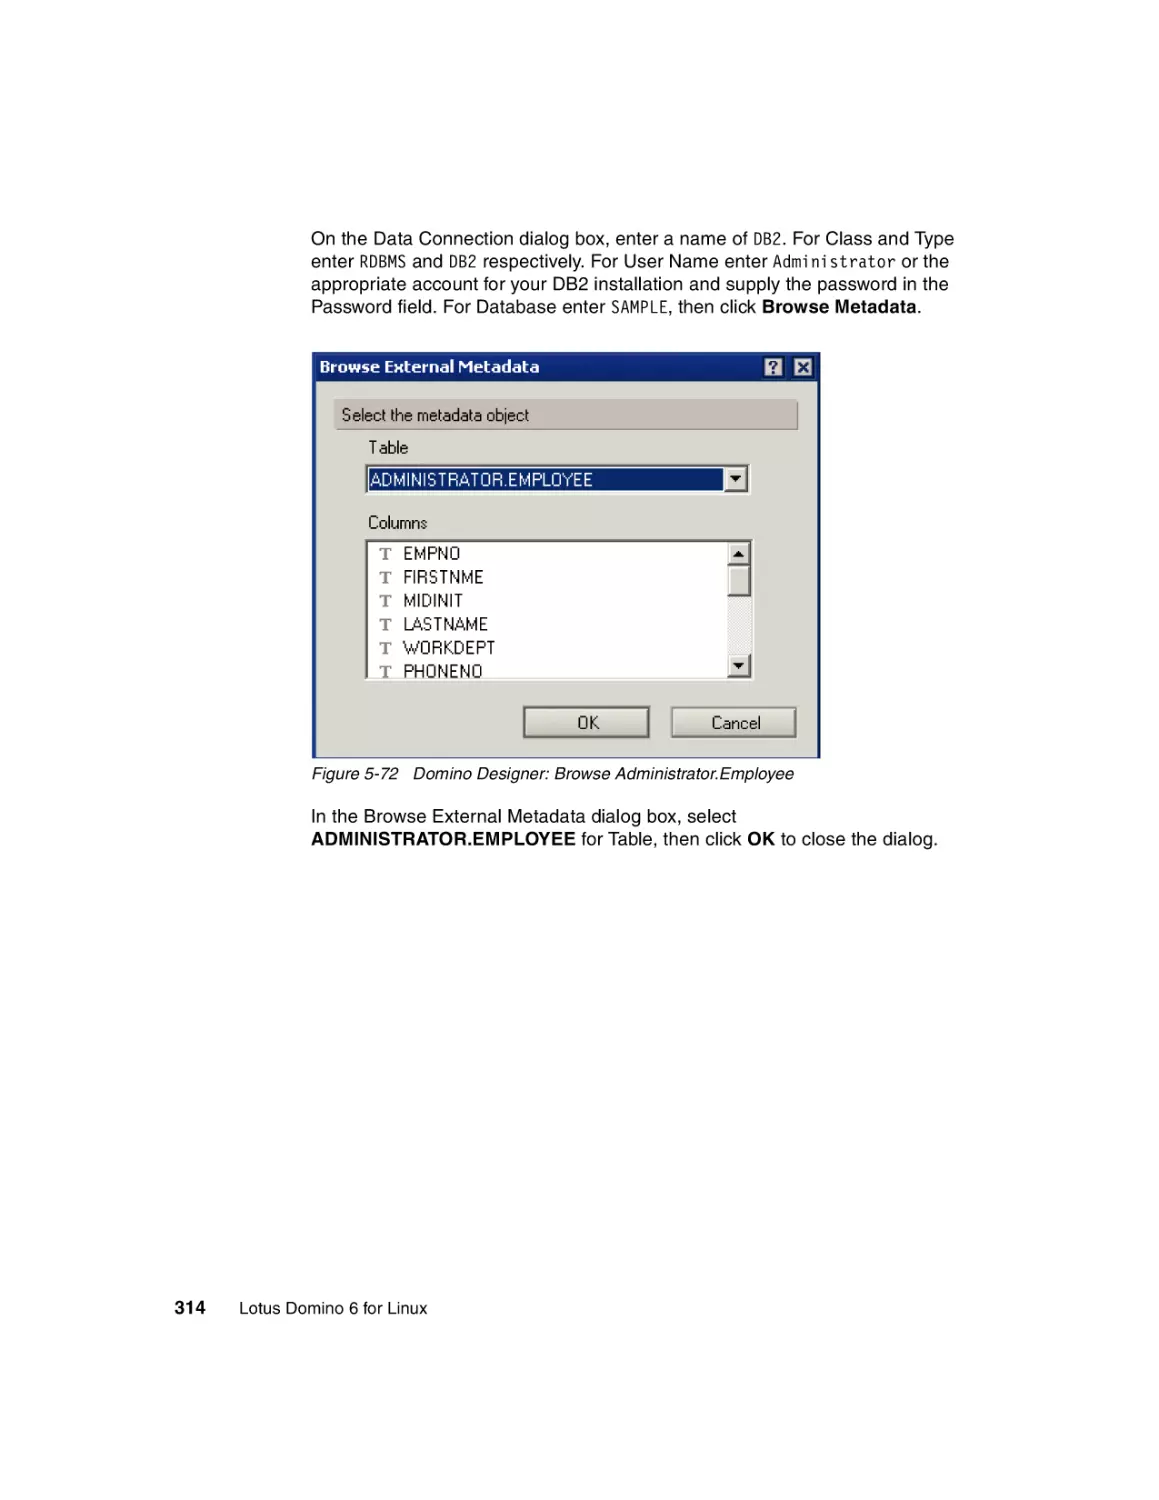
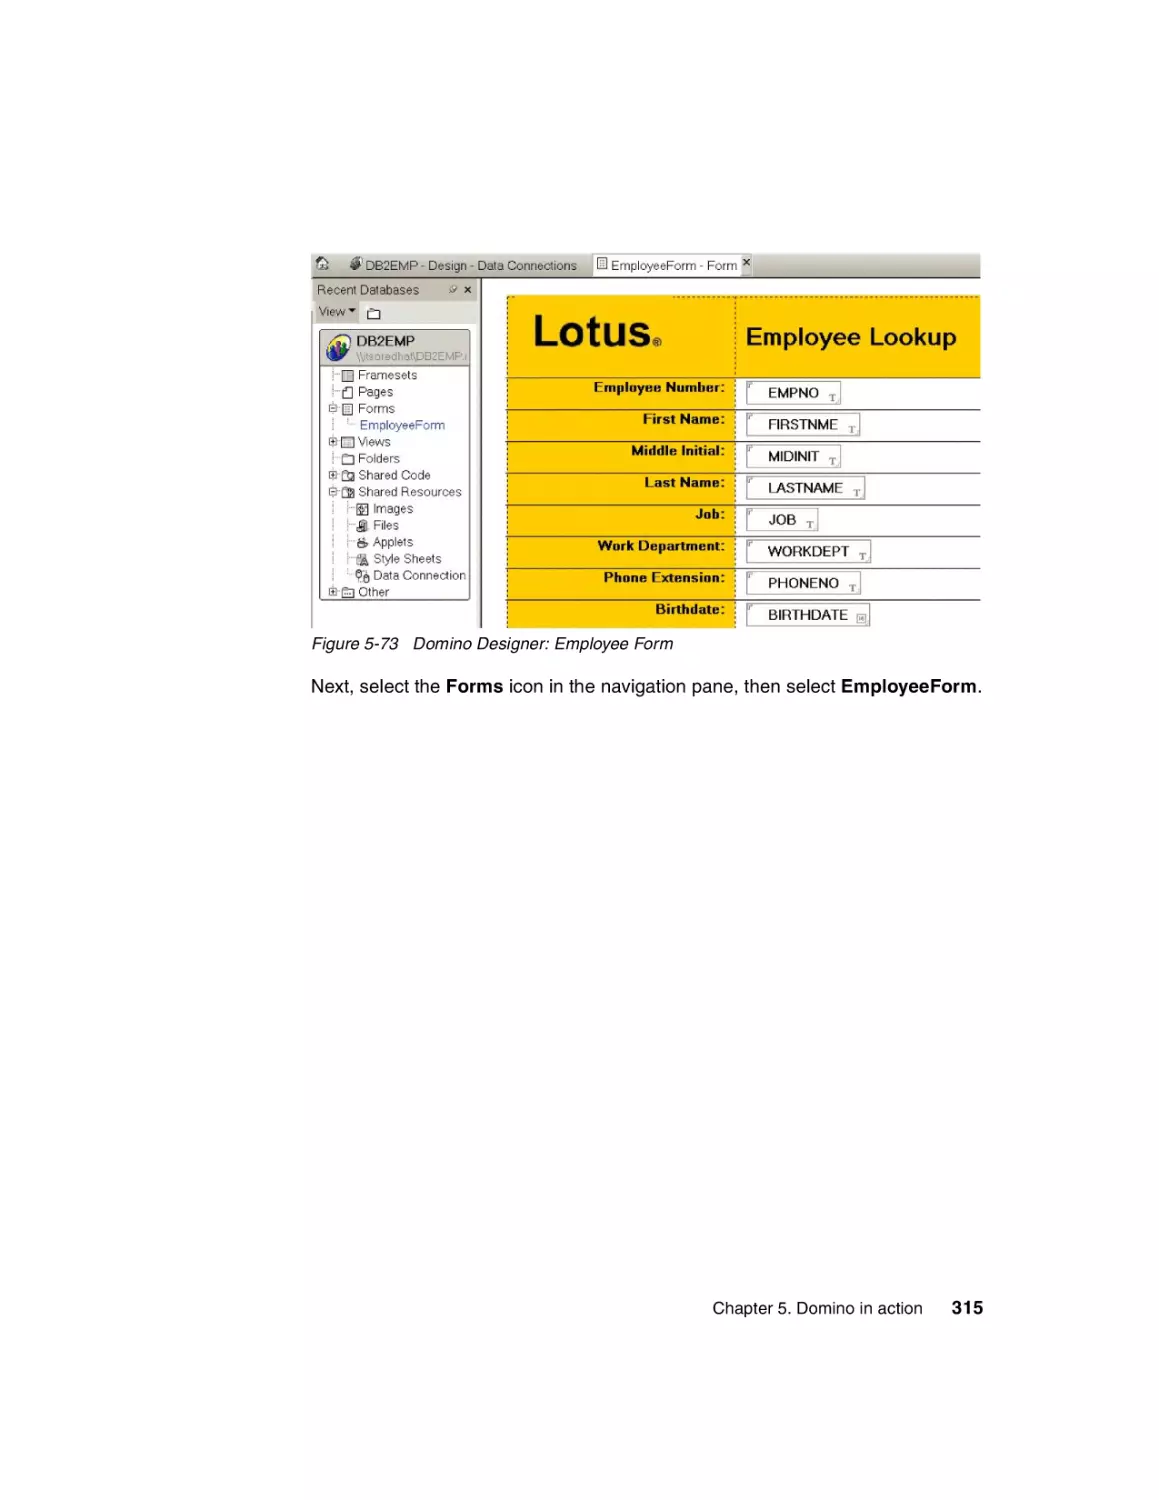
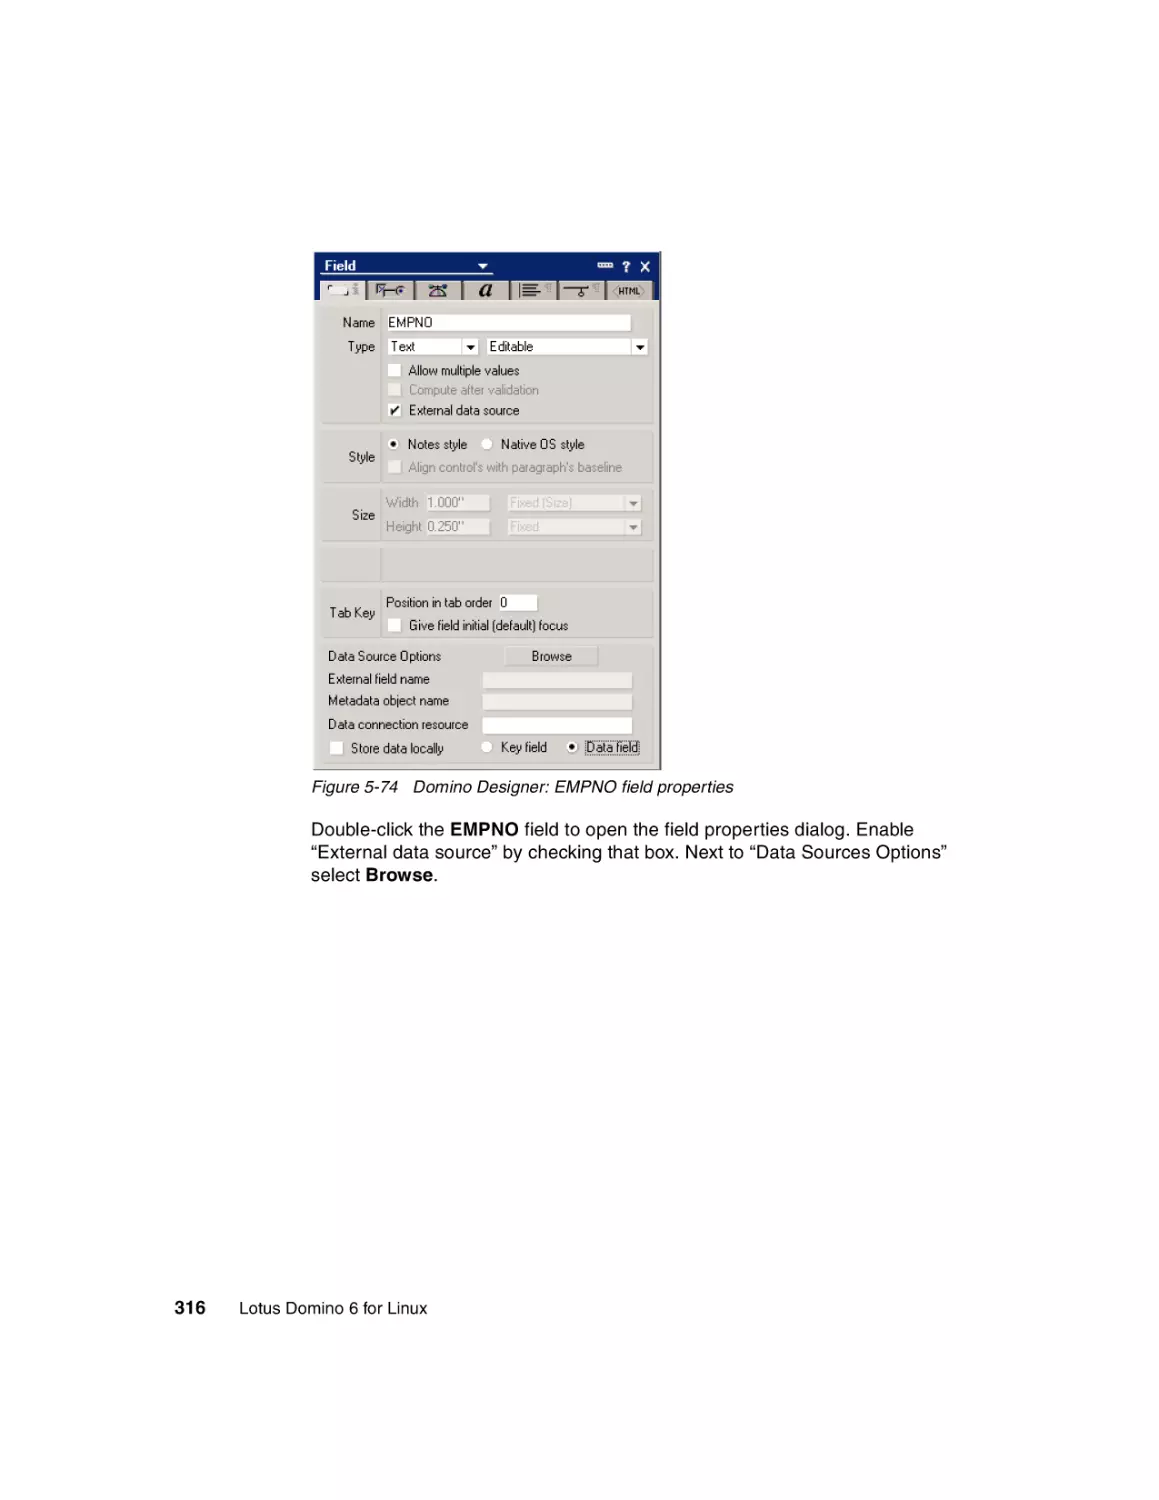
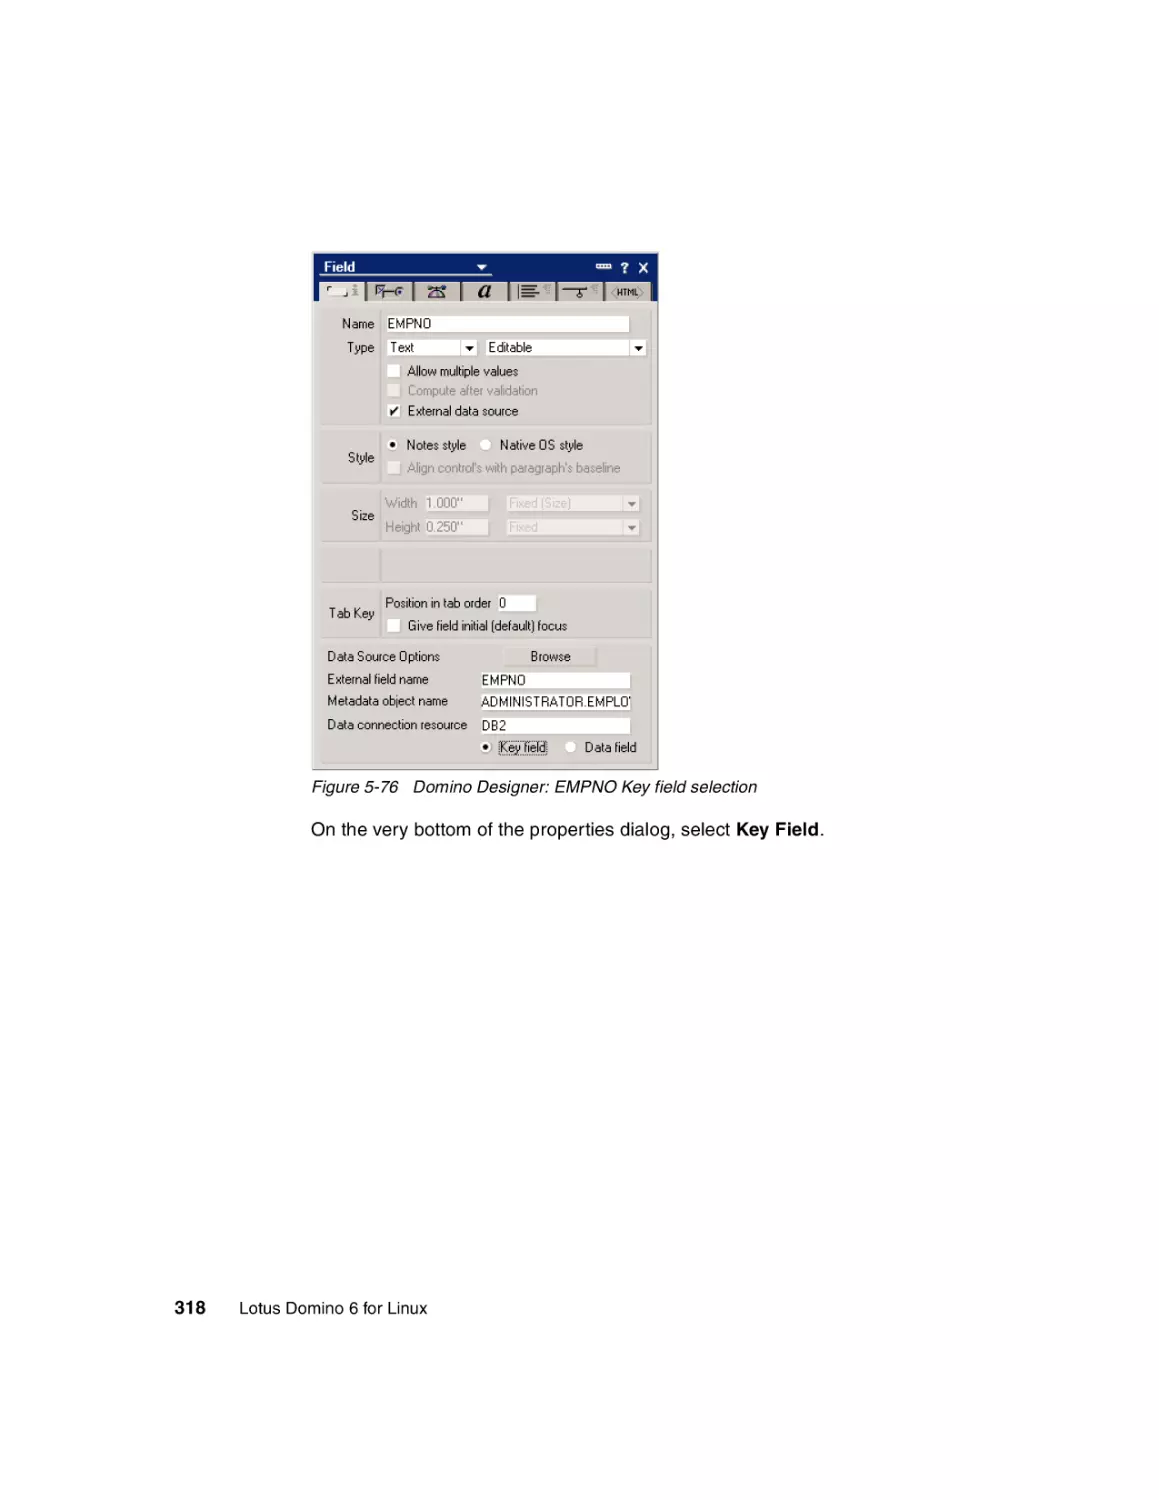
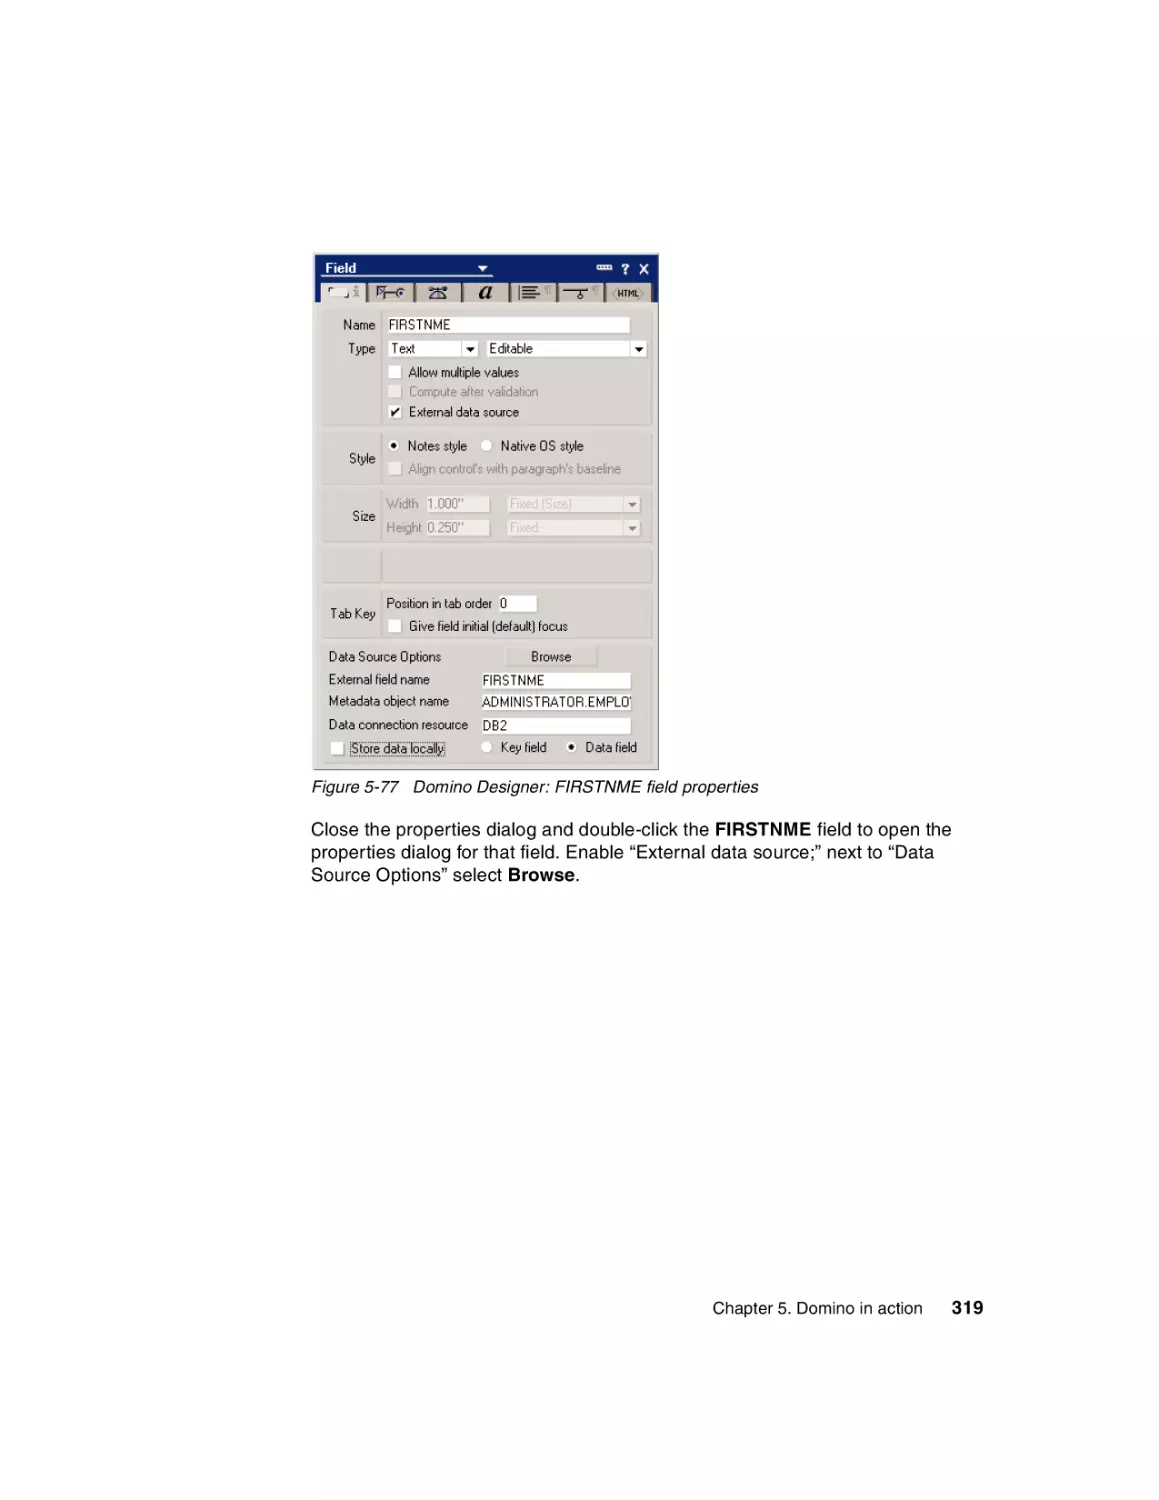
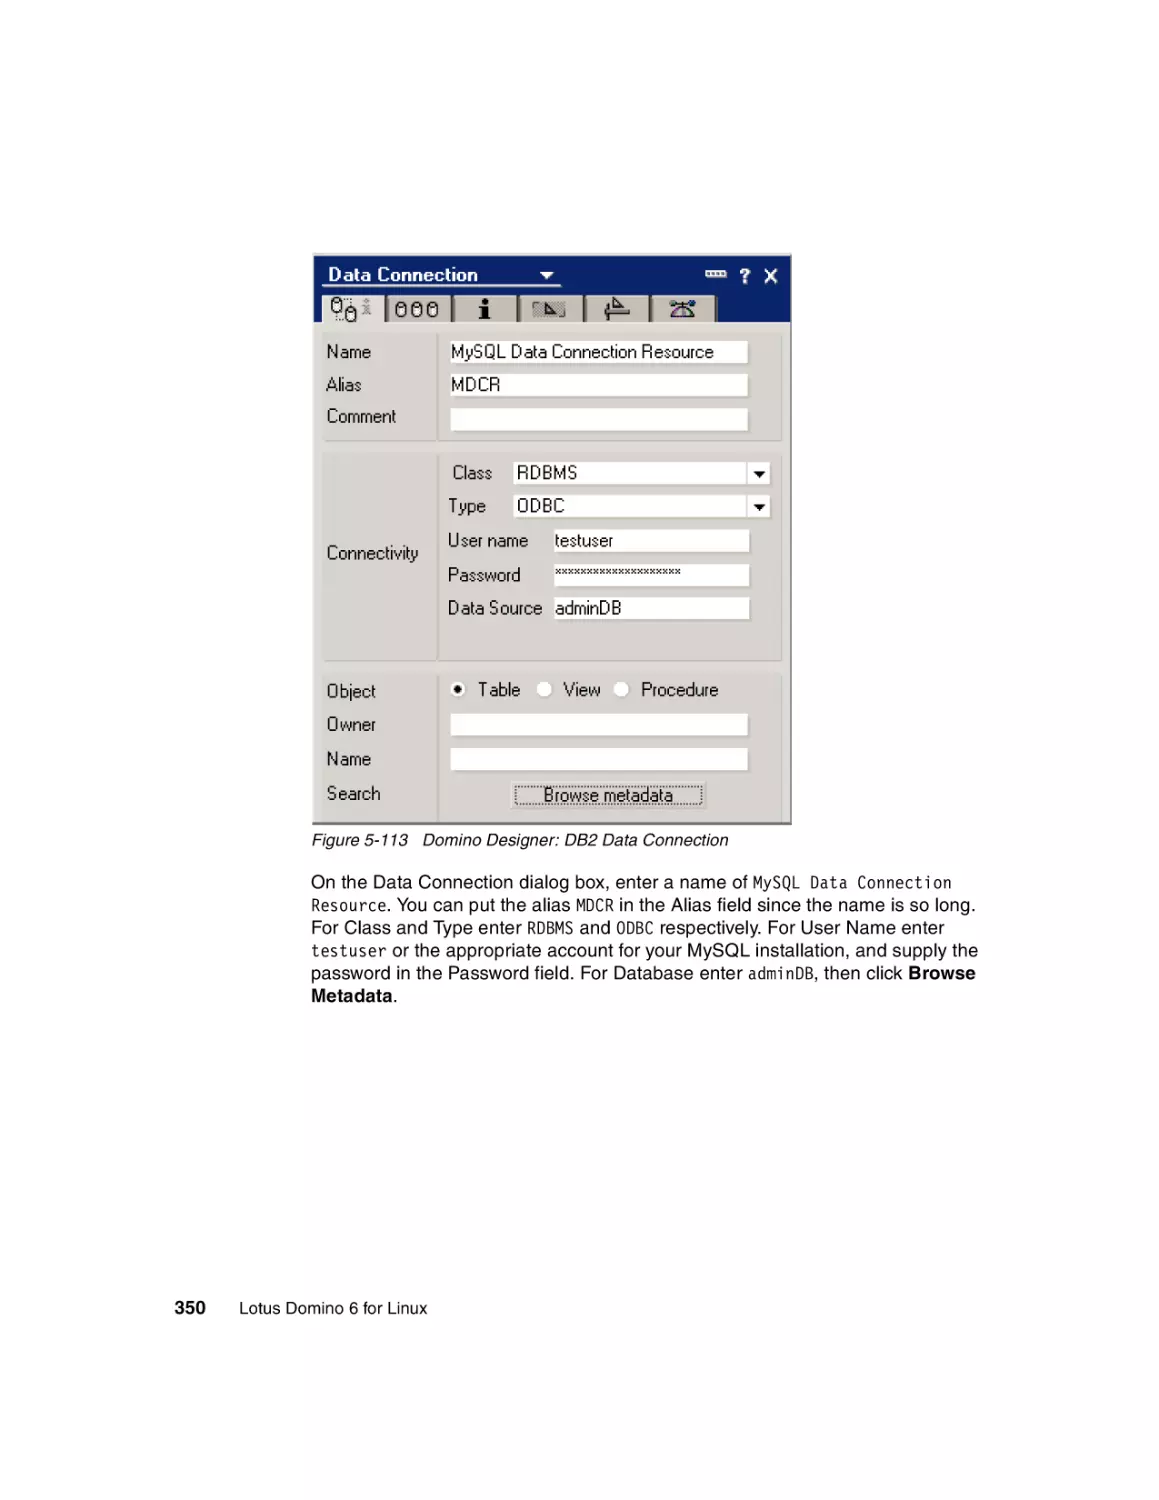
5.3.2 Accessing external data from a Domino application . . . . . . . . . . . . 310
5.3.3 Virtual Fields Activity . . . . . . . . . . . . . . . . . . . . . . . . . . . . . . . . . . . . 310
5.3.4 Creating the Domino application . . . . . . . . . . . . . . . . . . . . . . . . . . . 311
5.4 Accessing external data from Domino: MySQL example . . . . . . . . . . . . 327
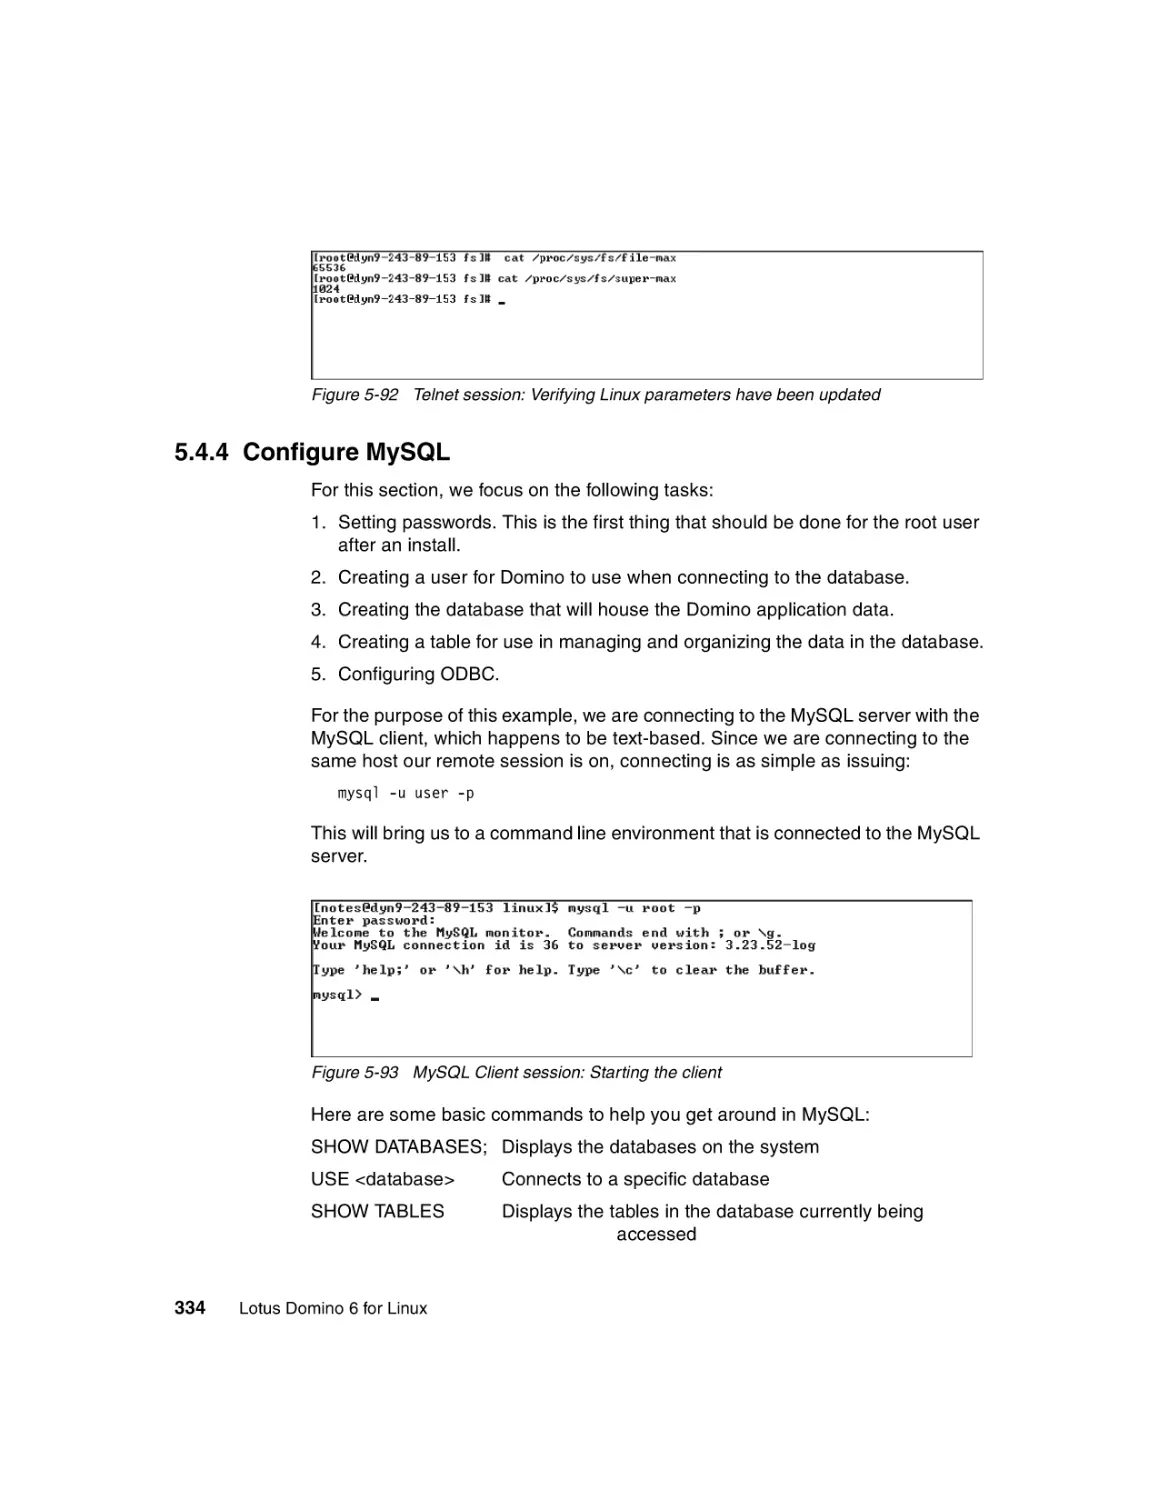
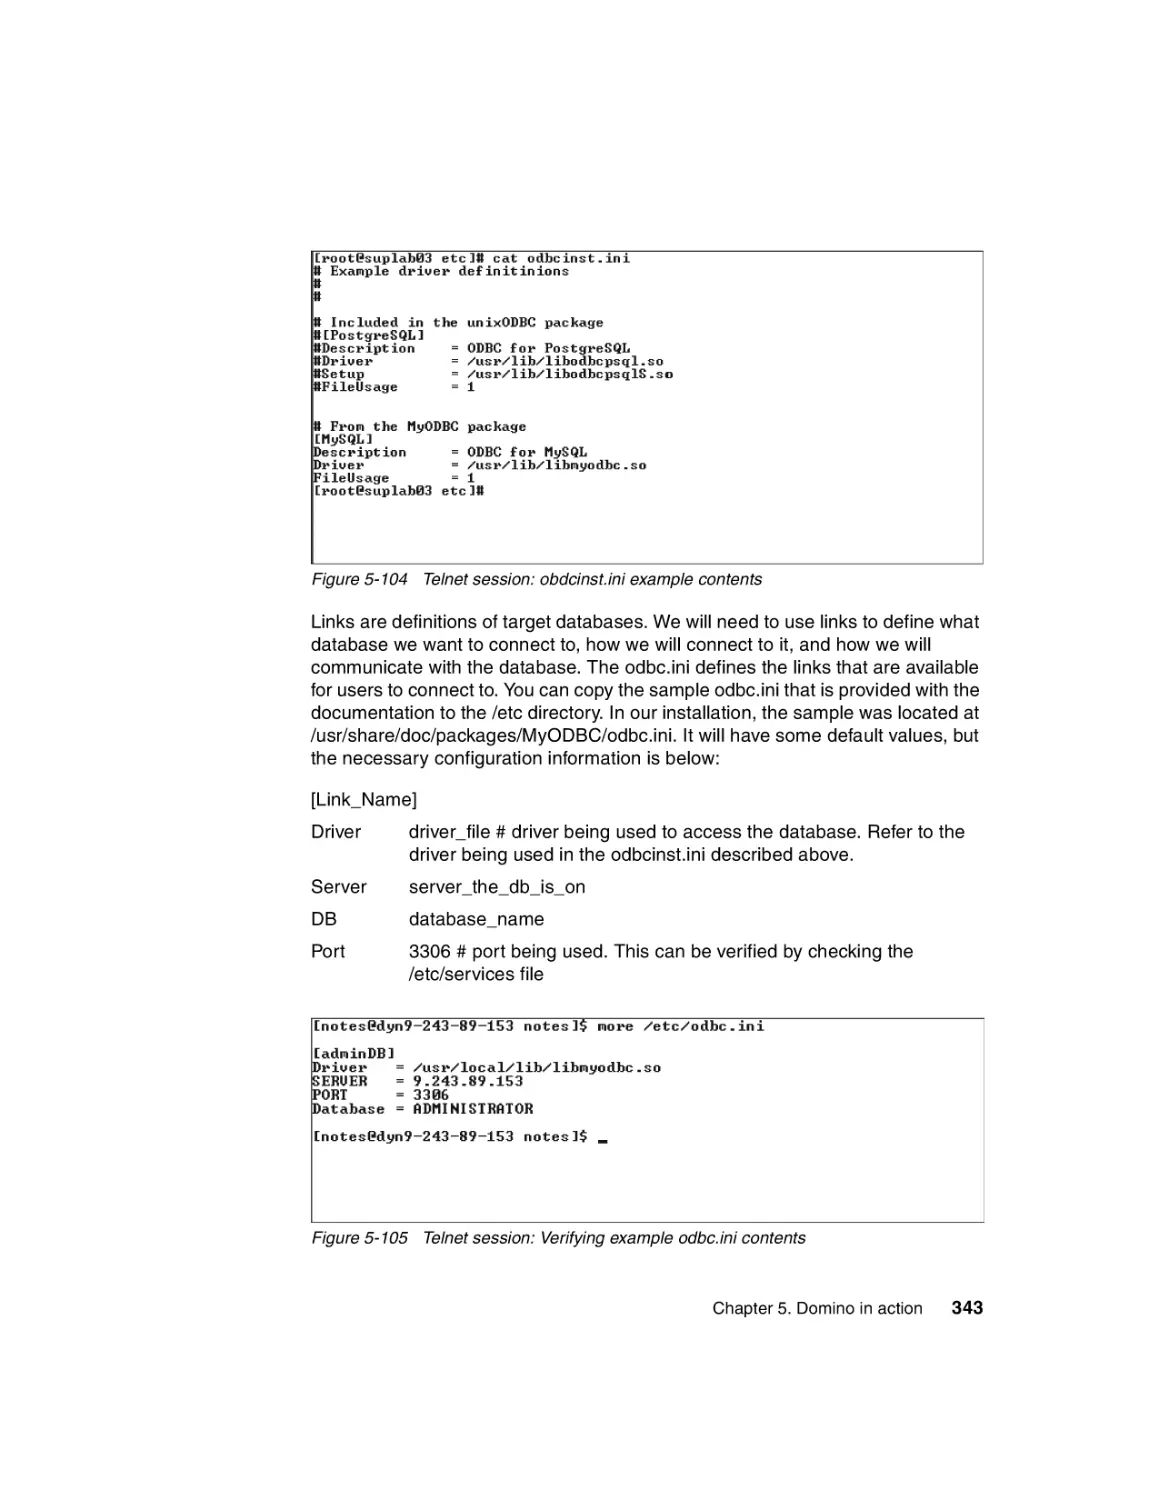
5.4.1 Description of the environment . . . . . . . . . . . . . . . . . . . . . . . . . . . . 328
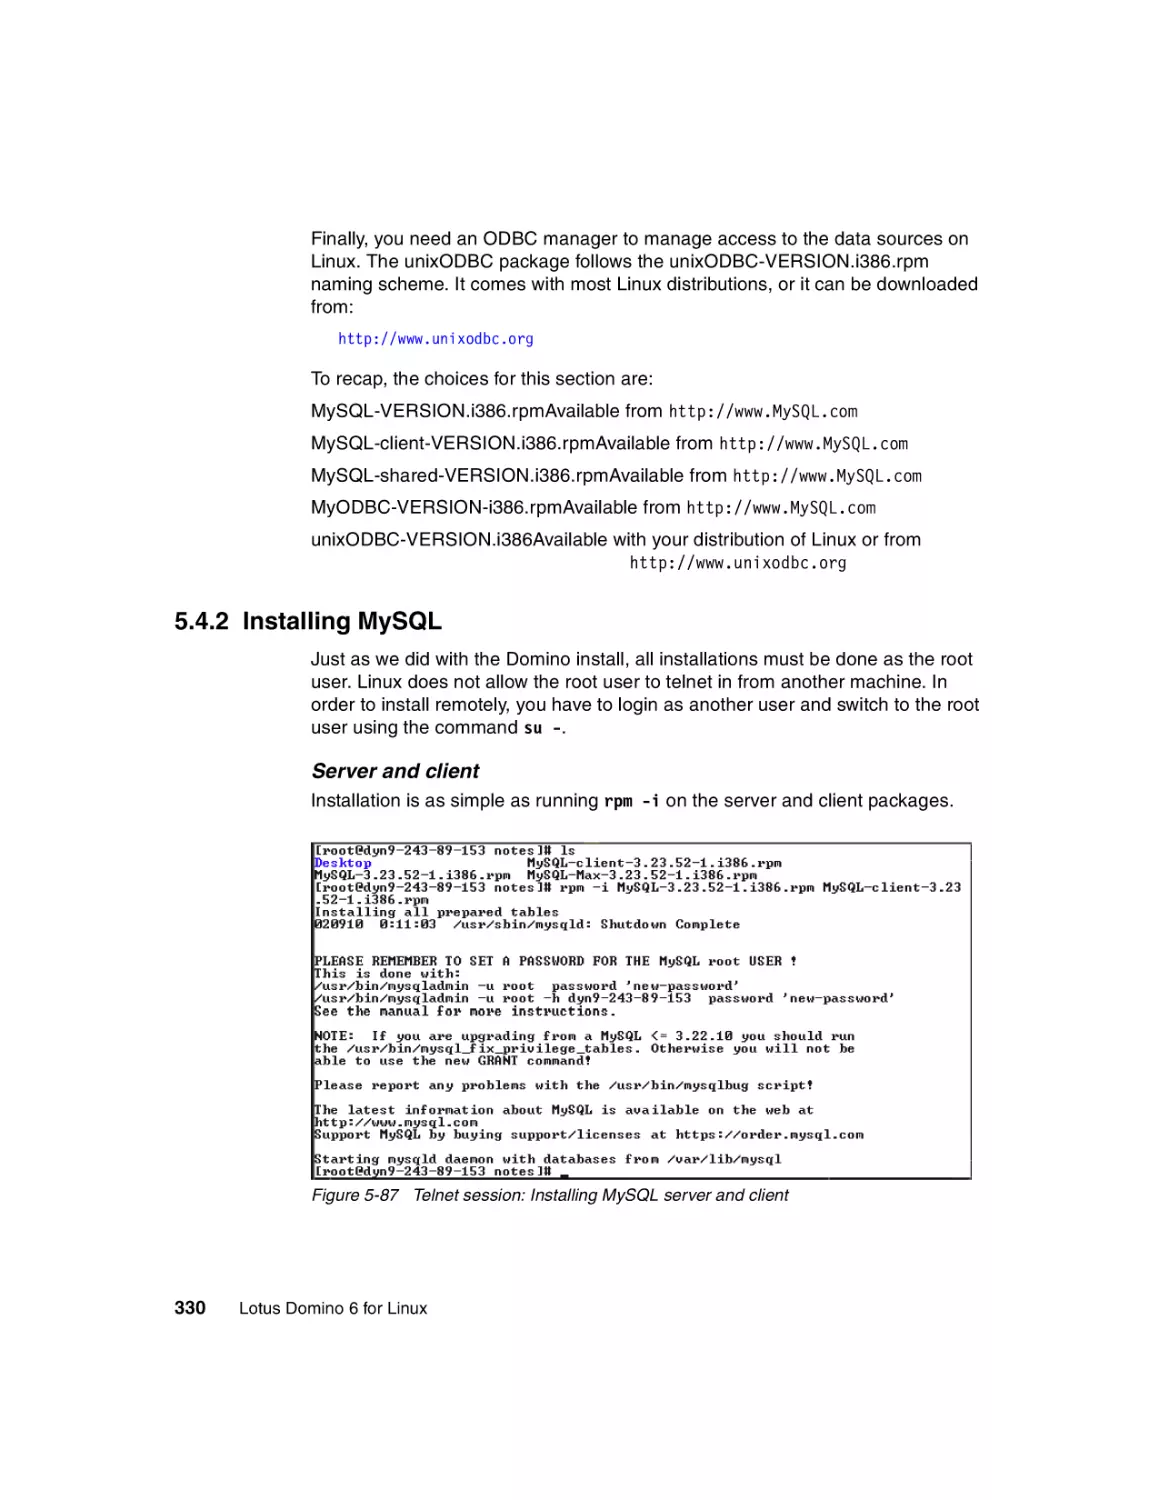
5.4.2 Installing MySQL . . . . . . . . . . . . . . . . . . . . . . . . . . . . . . . . . . . . . . . 330
5.4.3 Basic tuning. . . . . . . . . . . . . . . . . . . . . . . . . . . . . . . . . . . . . . . . . . . 331
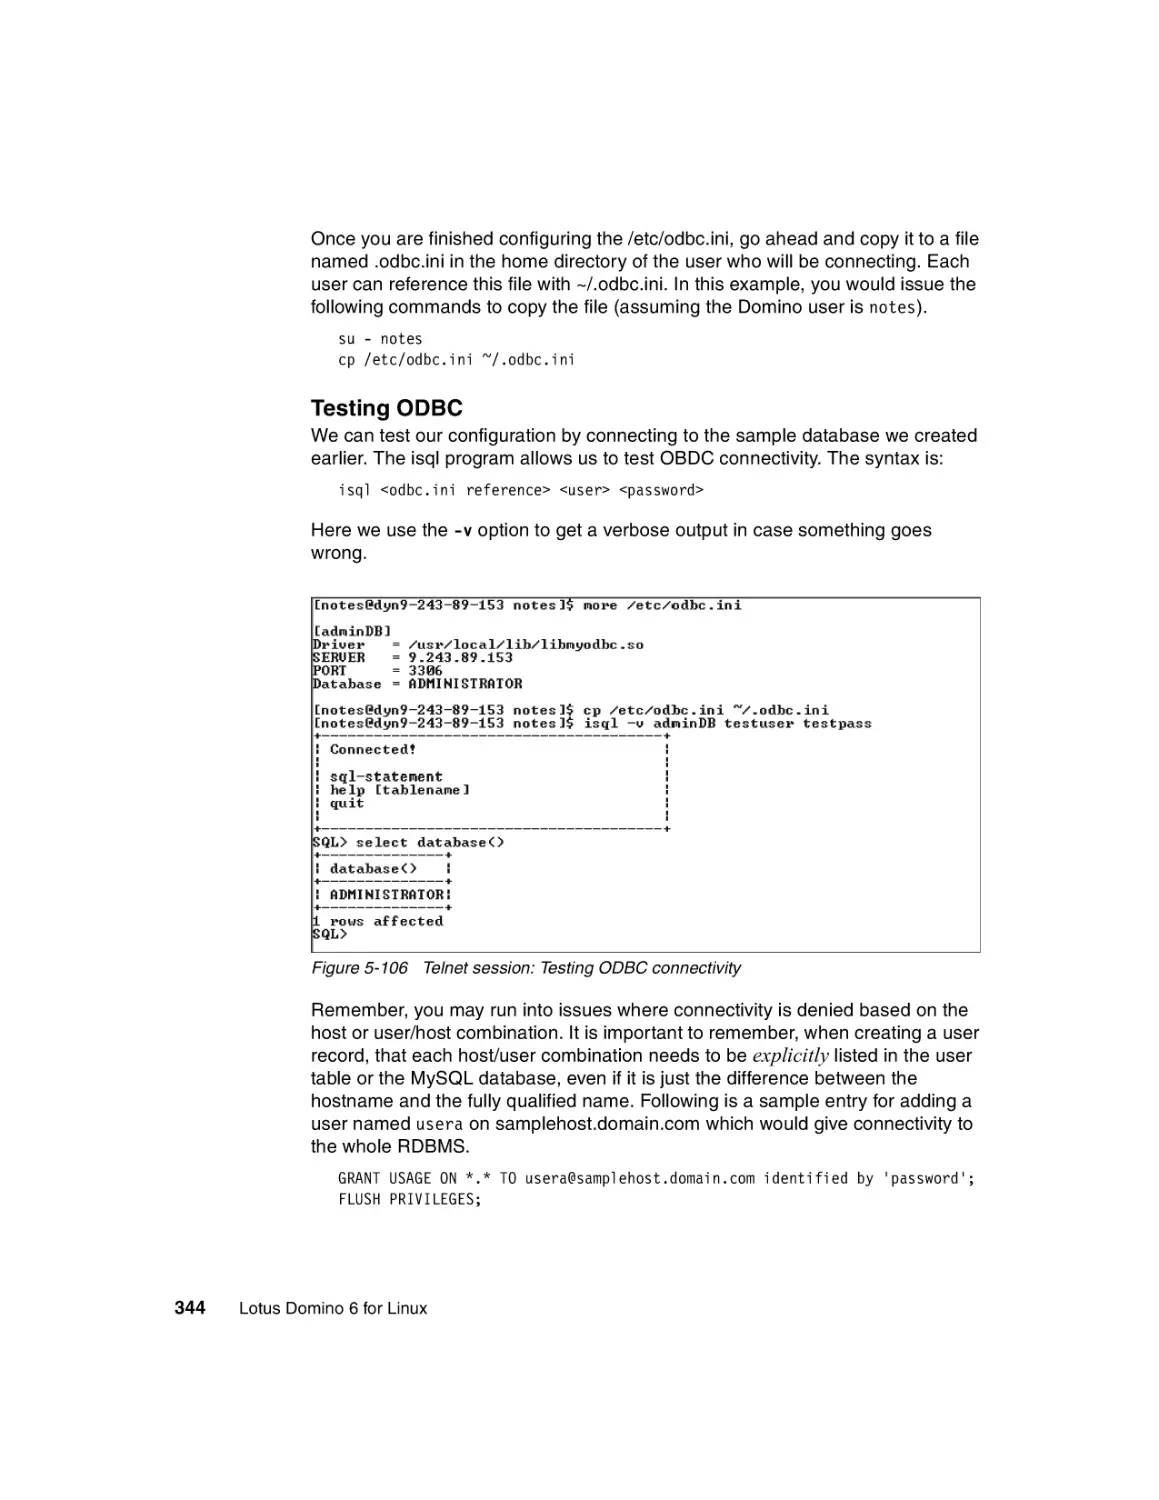
5.4.4 Configure MySQL . . . . . . . . . . . . . . . . . . . . . . . . . . . . . . . . . . . . . . 334
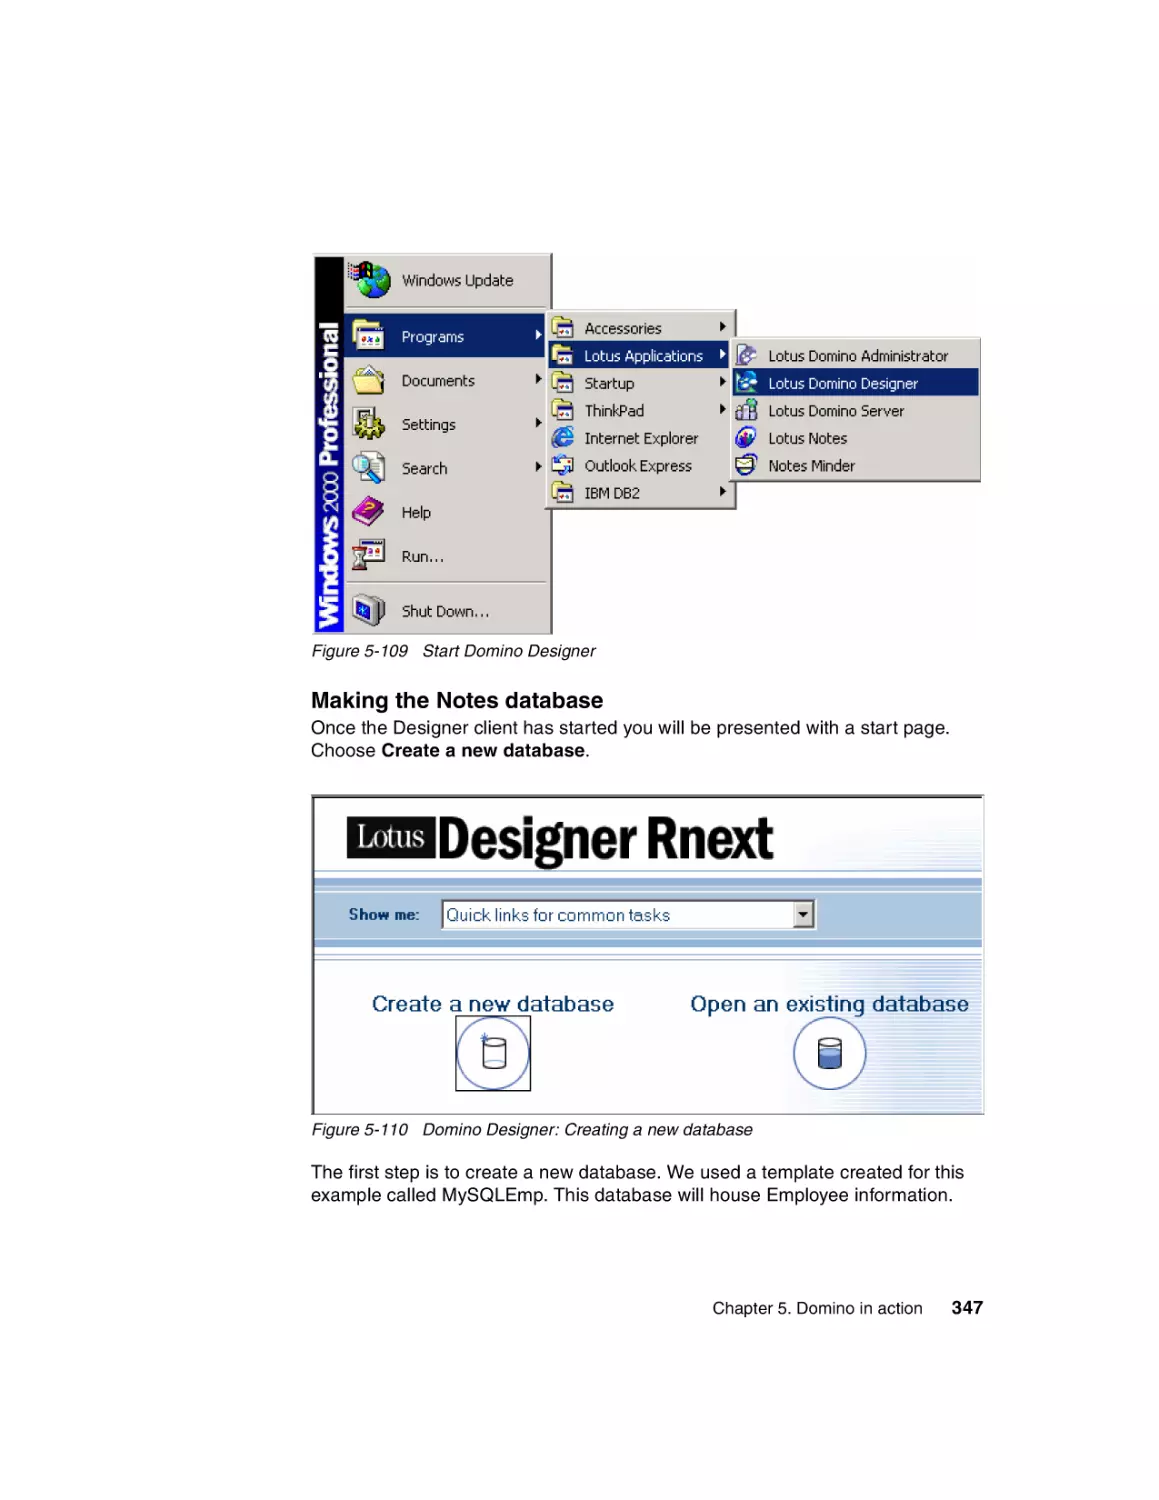
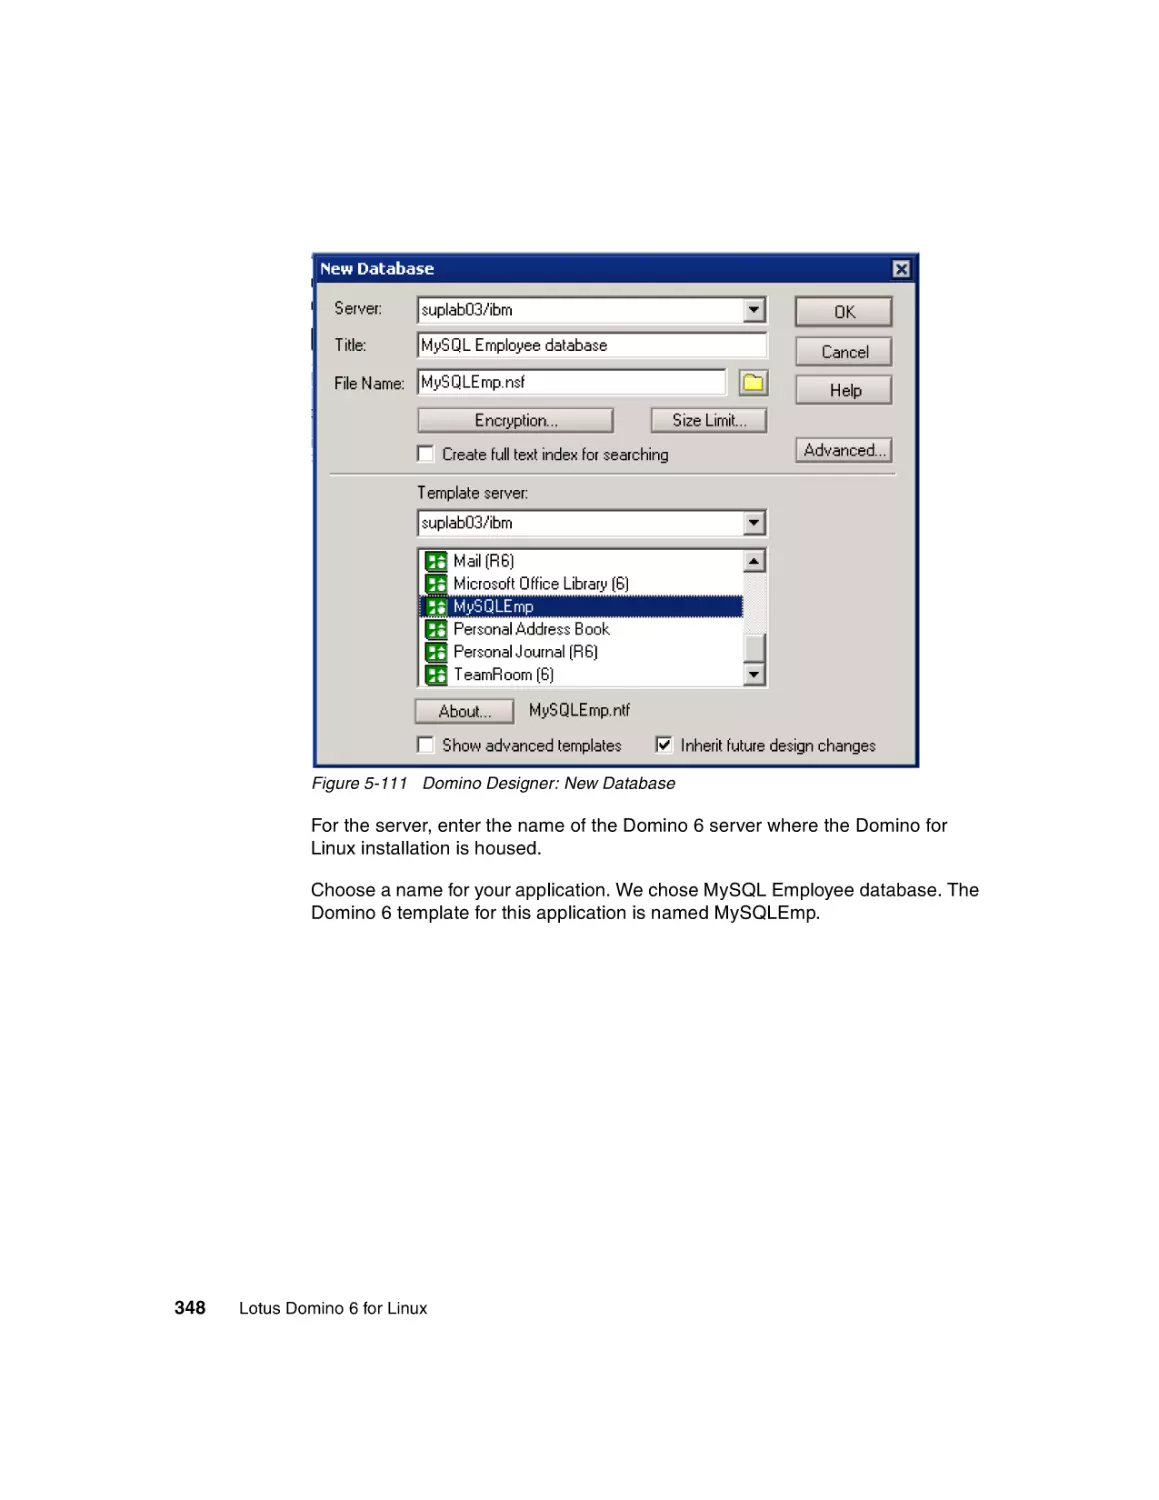
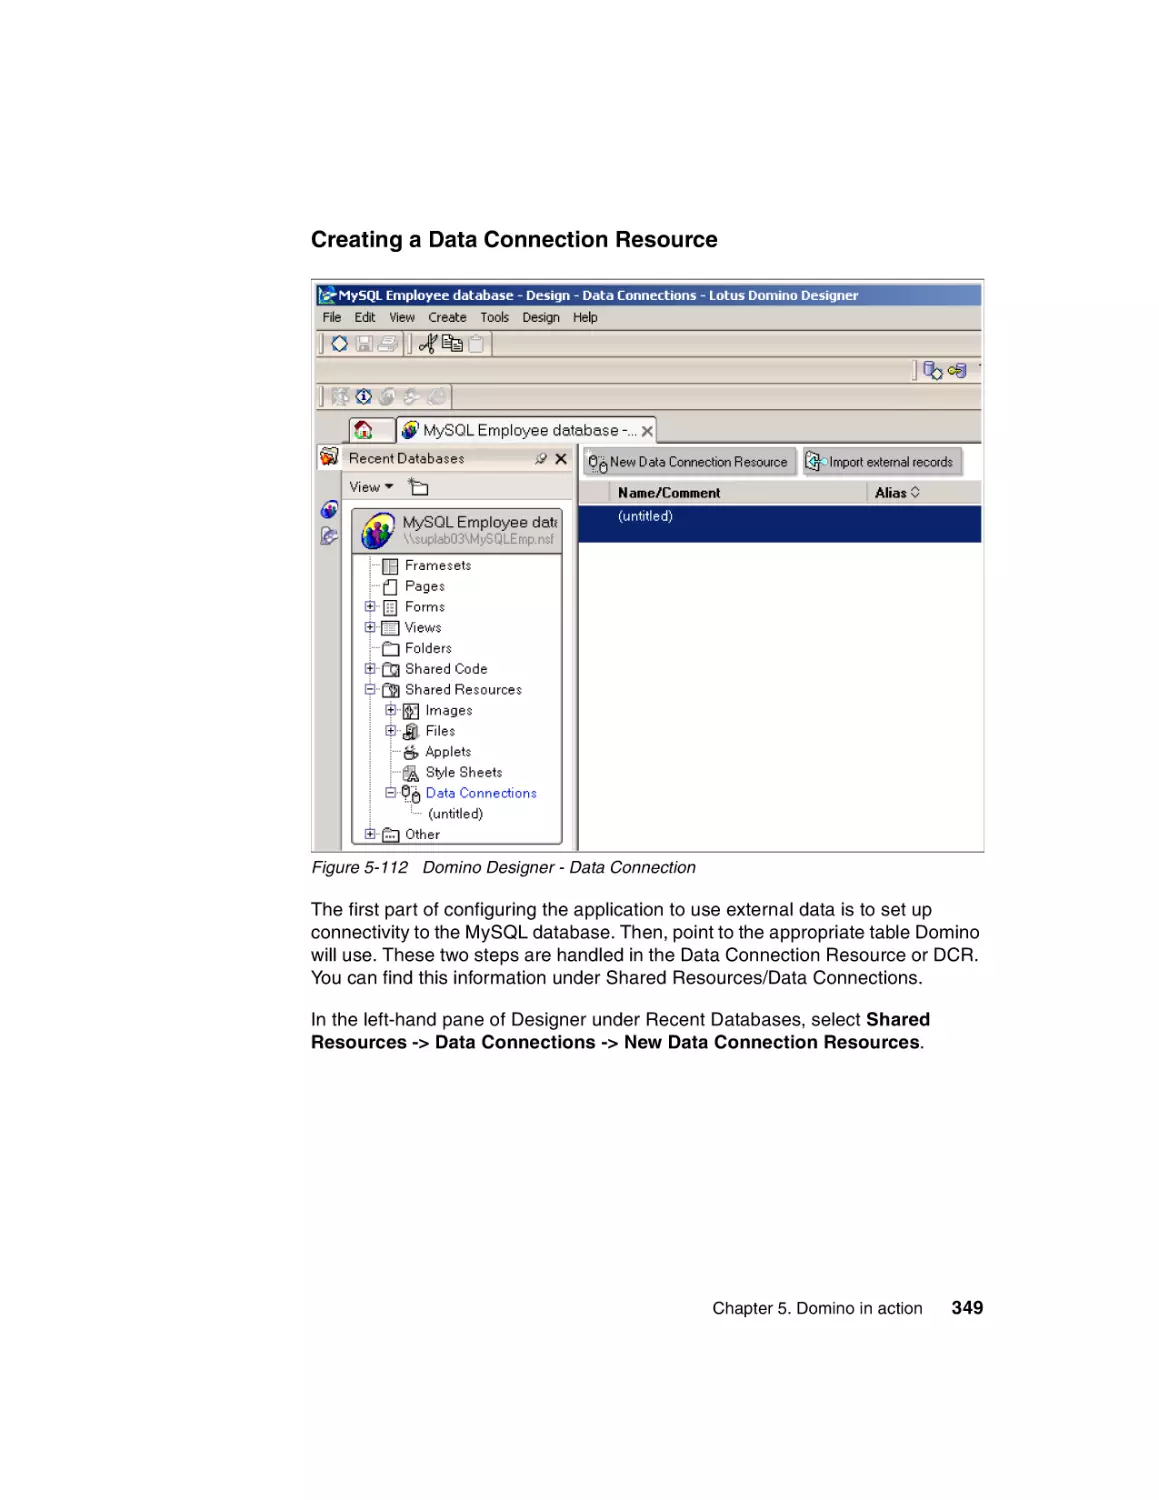
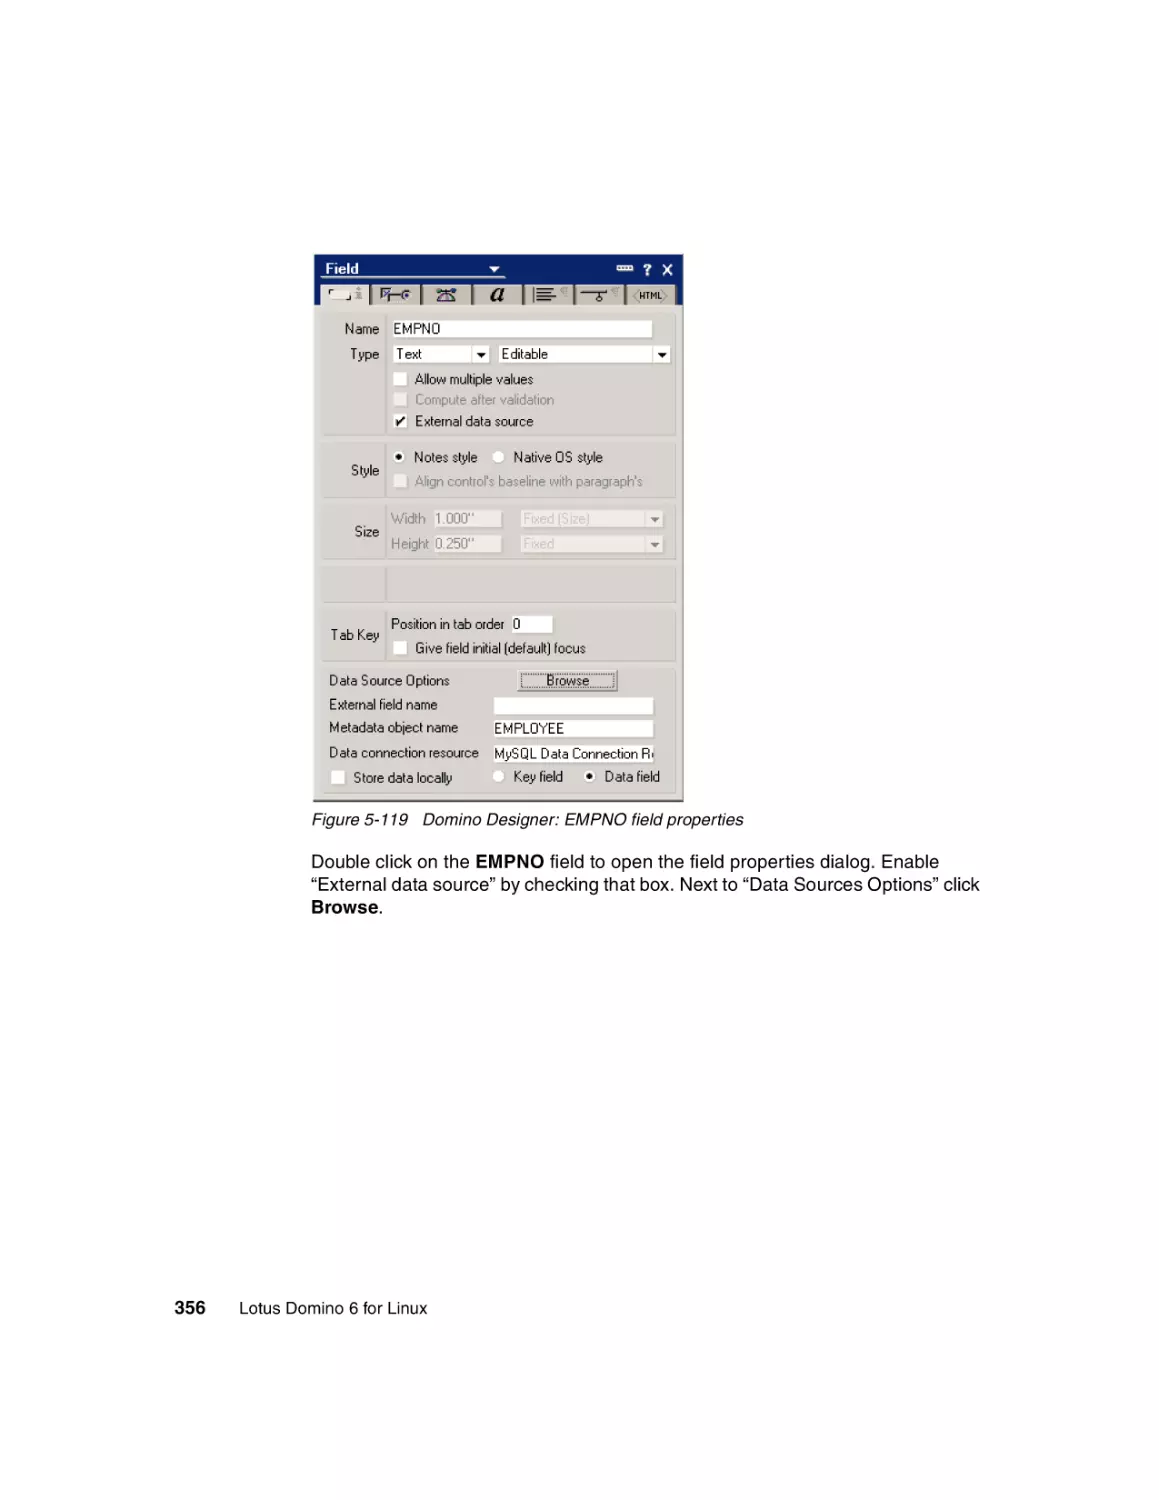
5.4.5 Setup and configuration of the Notes/Domino application . . . . . . . 346
iv
Lotus Domino 6 for Linux
Chapter 6. Domino as a Web server . . . . . . . . . . . . . . . . . . . . . . . . . . . . . 365
6.1 Linux Operating System configuration . . . . . . . . . . . . . . . . . . . . . . . . . . 366
6.1.1 Basic recommendation . . . . . . . . . . . . . . . . . . . . . . . . . . . . . . . . . . 366
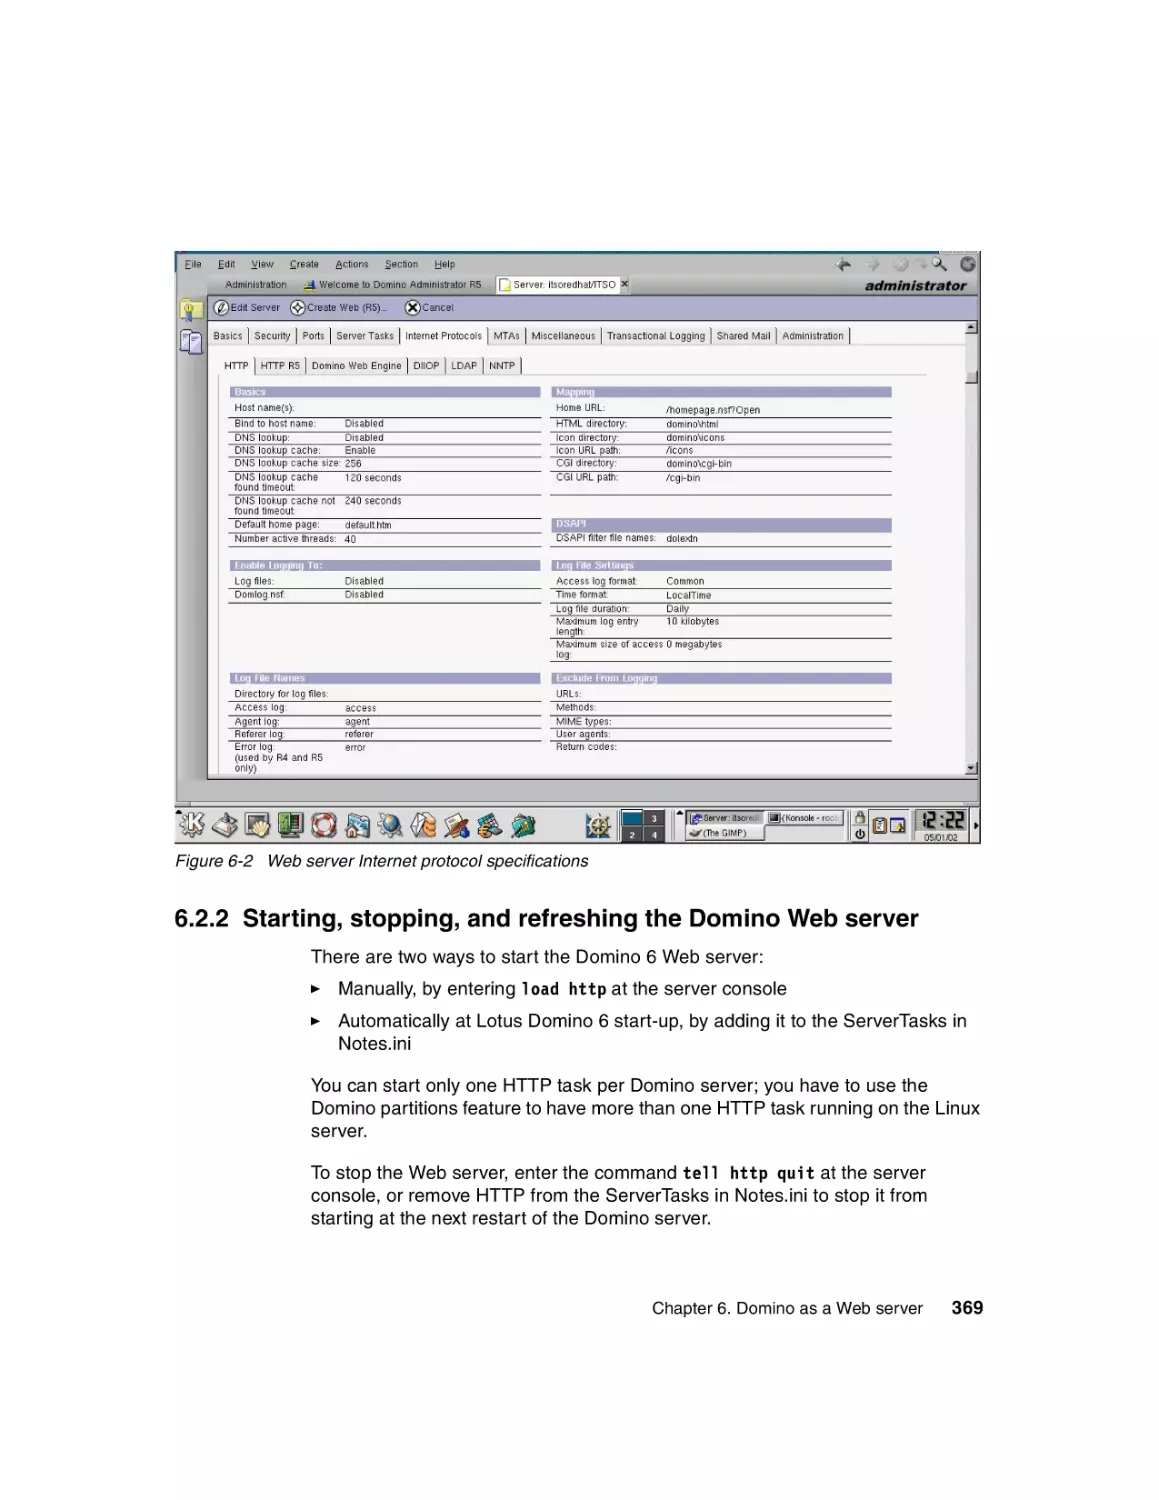
6.2 Domino Web server configuration . . . . . . . . . . . . . . . . . . . . . . . . . . . . . . 366
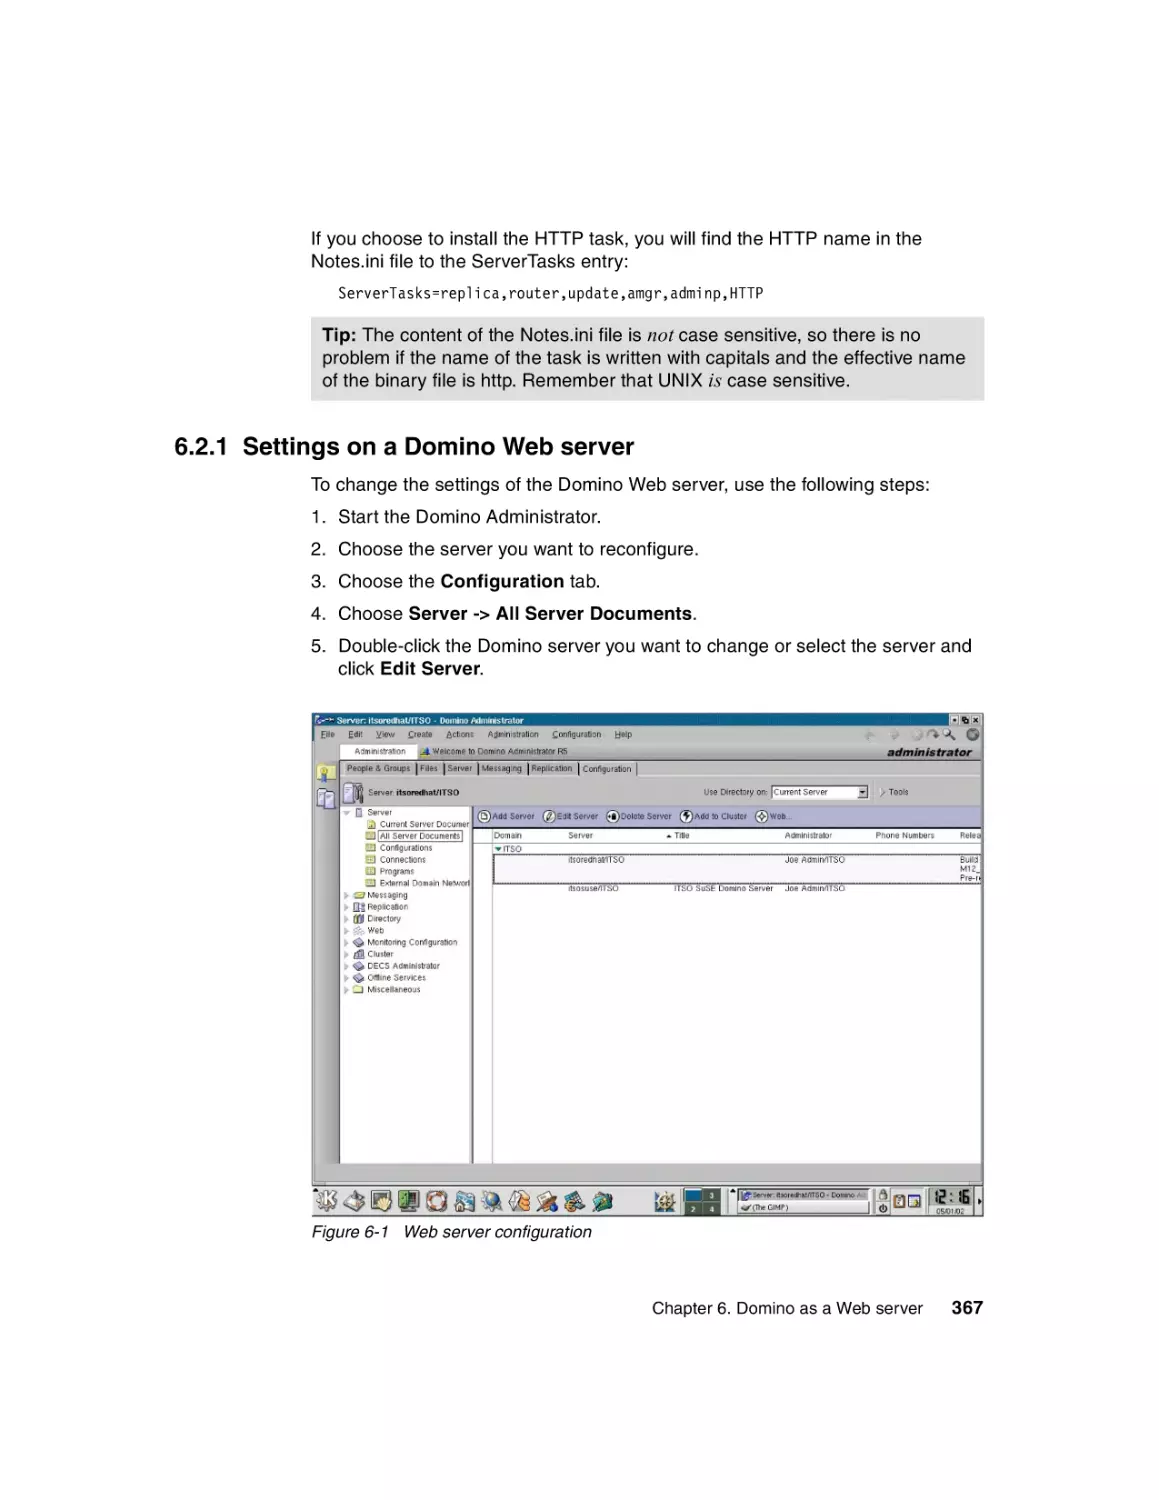
6.2.1 Settings on a Domino Web server . . . . . . . . . . . . . . . . . . . . . . . . . 367
6.2.2 Starting, stopping, and refreshing the Domino Web server . . . . . . 369
6.3 Security on the Web server . . . . . . . . . . . . . . . . . . . . . . . . . . . . . . . . . . . 370
6.3.1 Internet certificates . . . . . . . . . . . . . . . . . . . . . . . . . . . . . . . . . . . . . 370
6.3.2 Browsing Domino databases via the Internet . . . . . . . . . . . . . . . . . 370
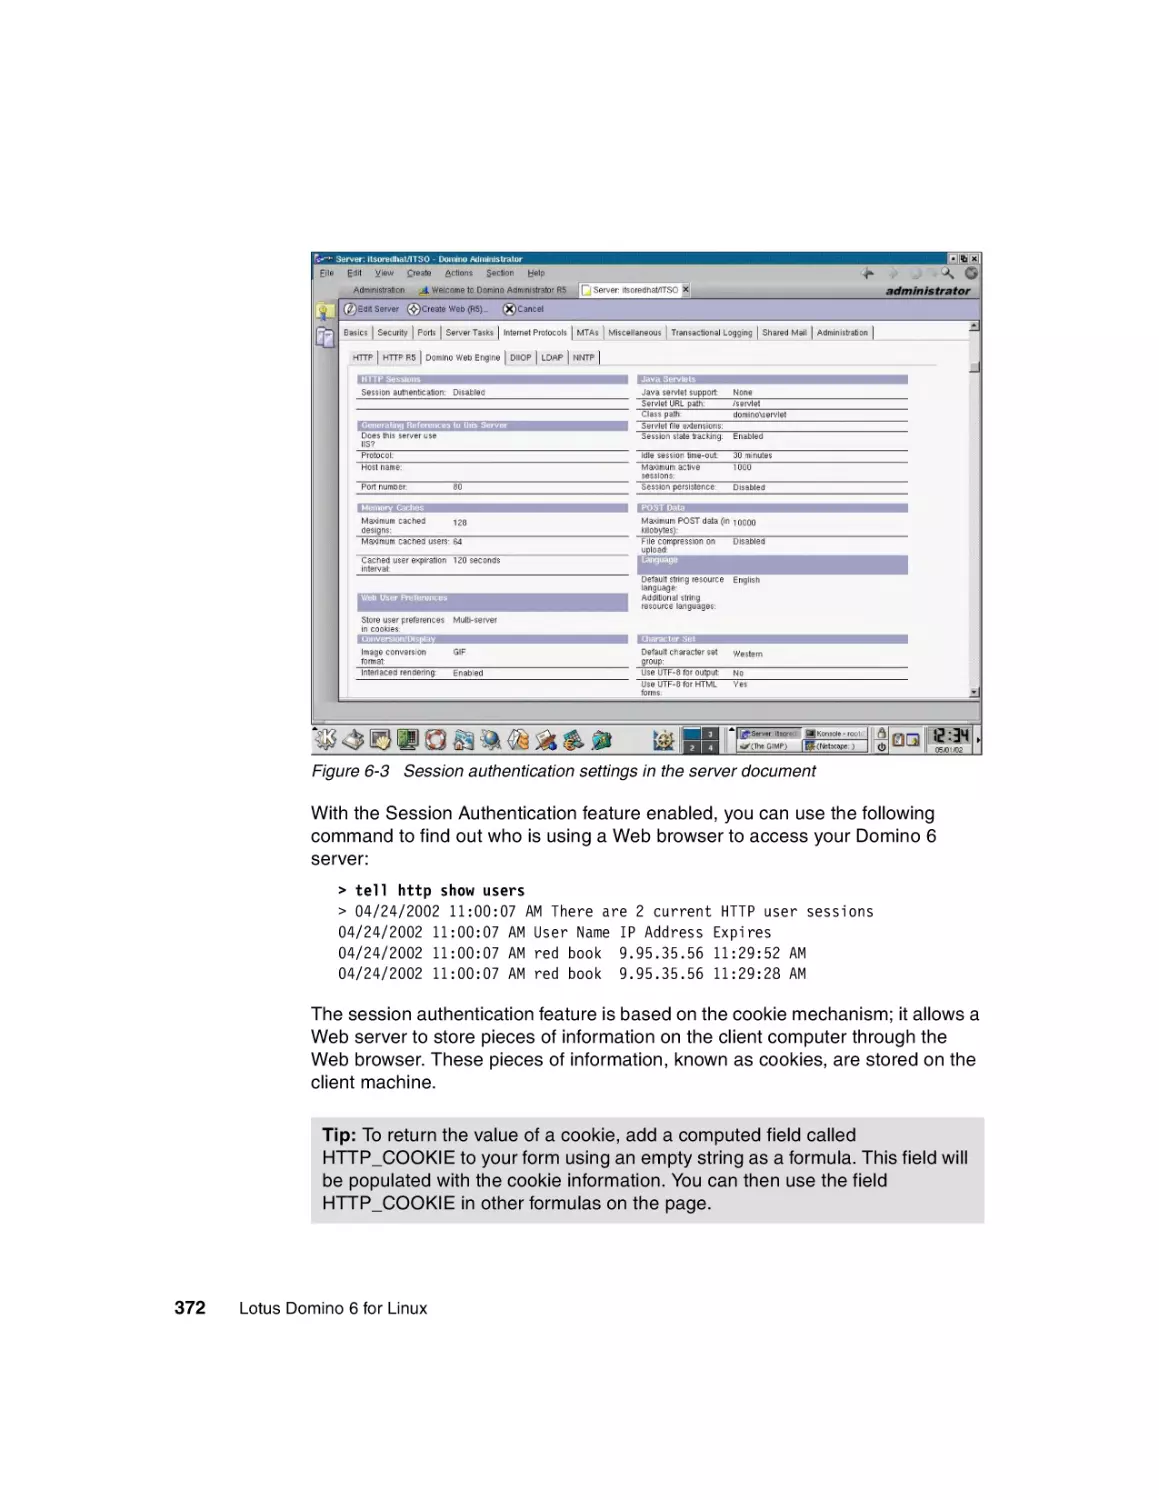
6.3.3 Session authentication . . . . . . . . . . . . . . . . . . . . . . . . . . . . . . . . . . 371
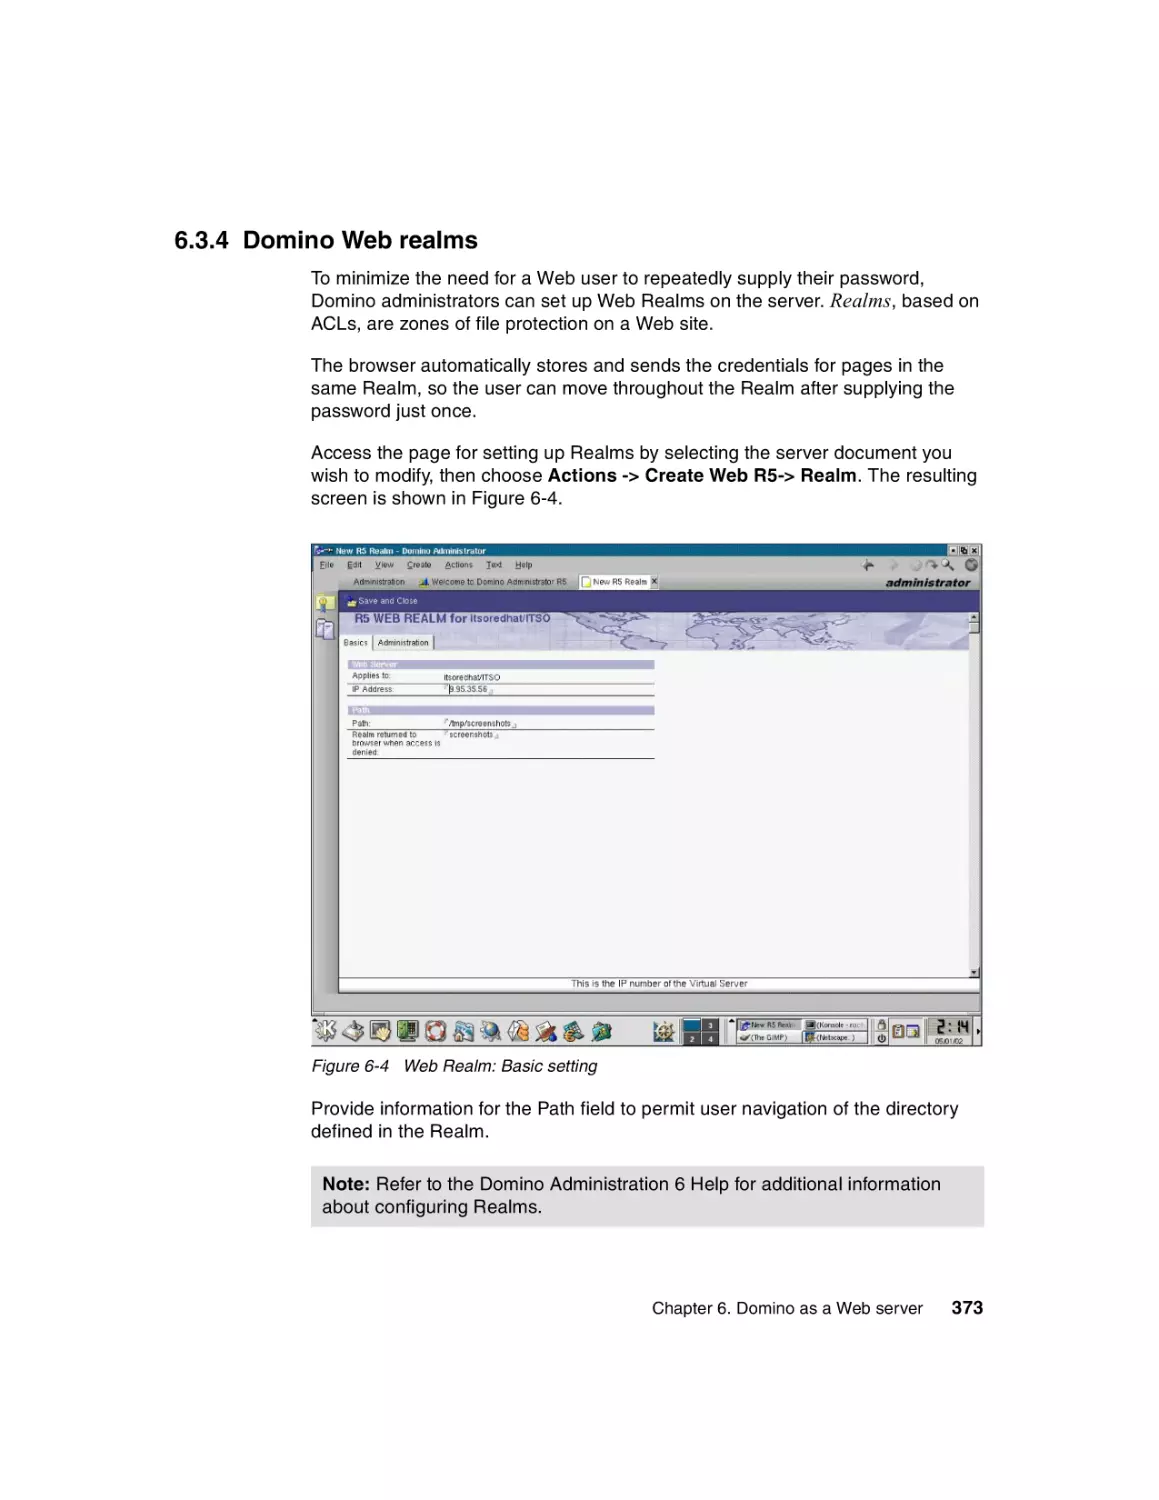
6.3.4 Domino Web realms . . . . . . . . . . . . . . . . . . . . . . . . . . . . . . . . . . . . 373
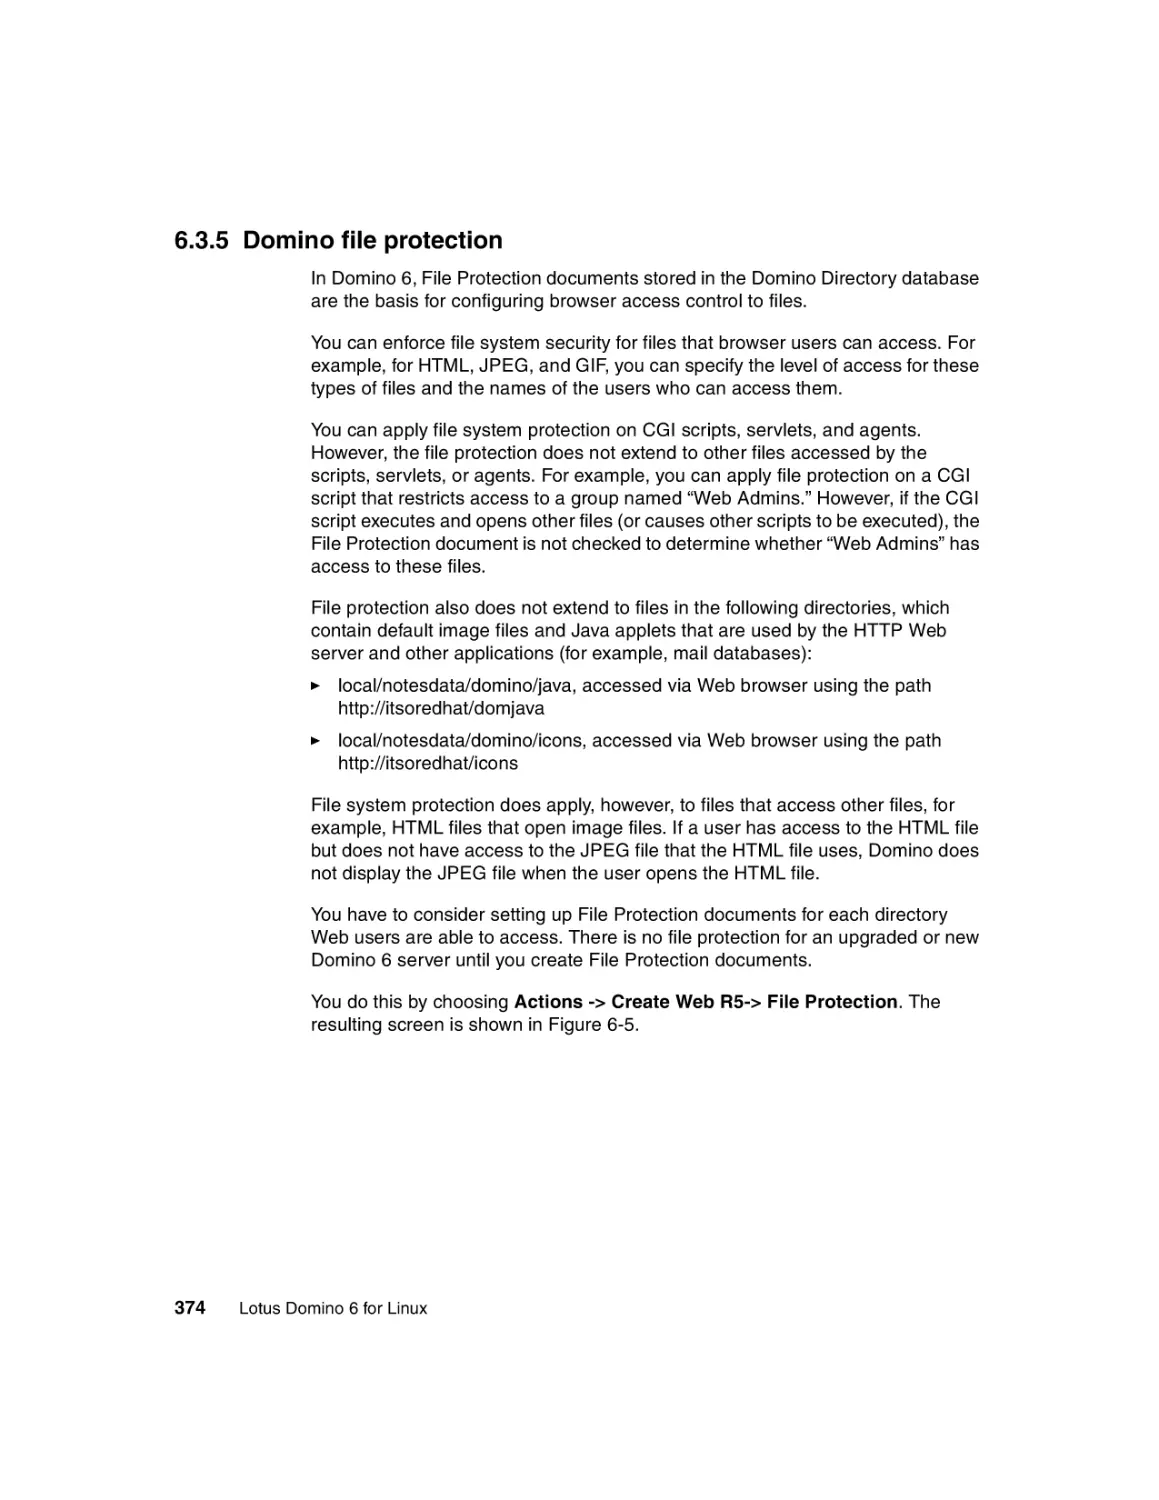
6.3.5 Domino file protection . . . . . . . . . . . . . . . . . . . . . . . . . . . . . . . . . . . 374
6.3.6 HTTP protocol security . . . . . . . . . . . . . . . . . . . . . . . . . . . . . . . . . . 377
6.4 Troubleshooting. . . . . . . . . . . . . . . . . . . . . . . . . . . . . . . . . . . . . . . . . . . . 378
6.4.1 HTTP does not respond . . . . . . . . . . . . . . . . . . . . . . . . . . . . . . . . . 378
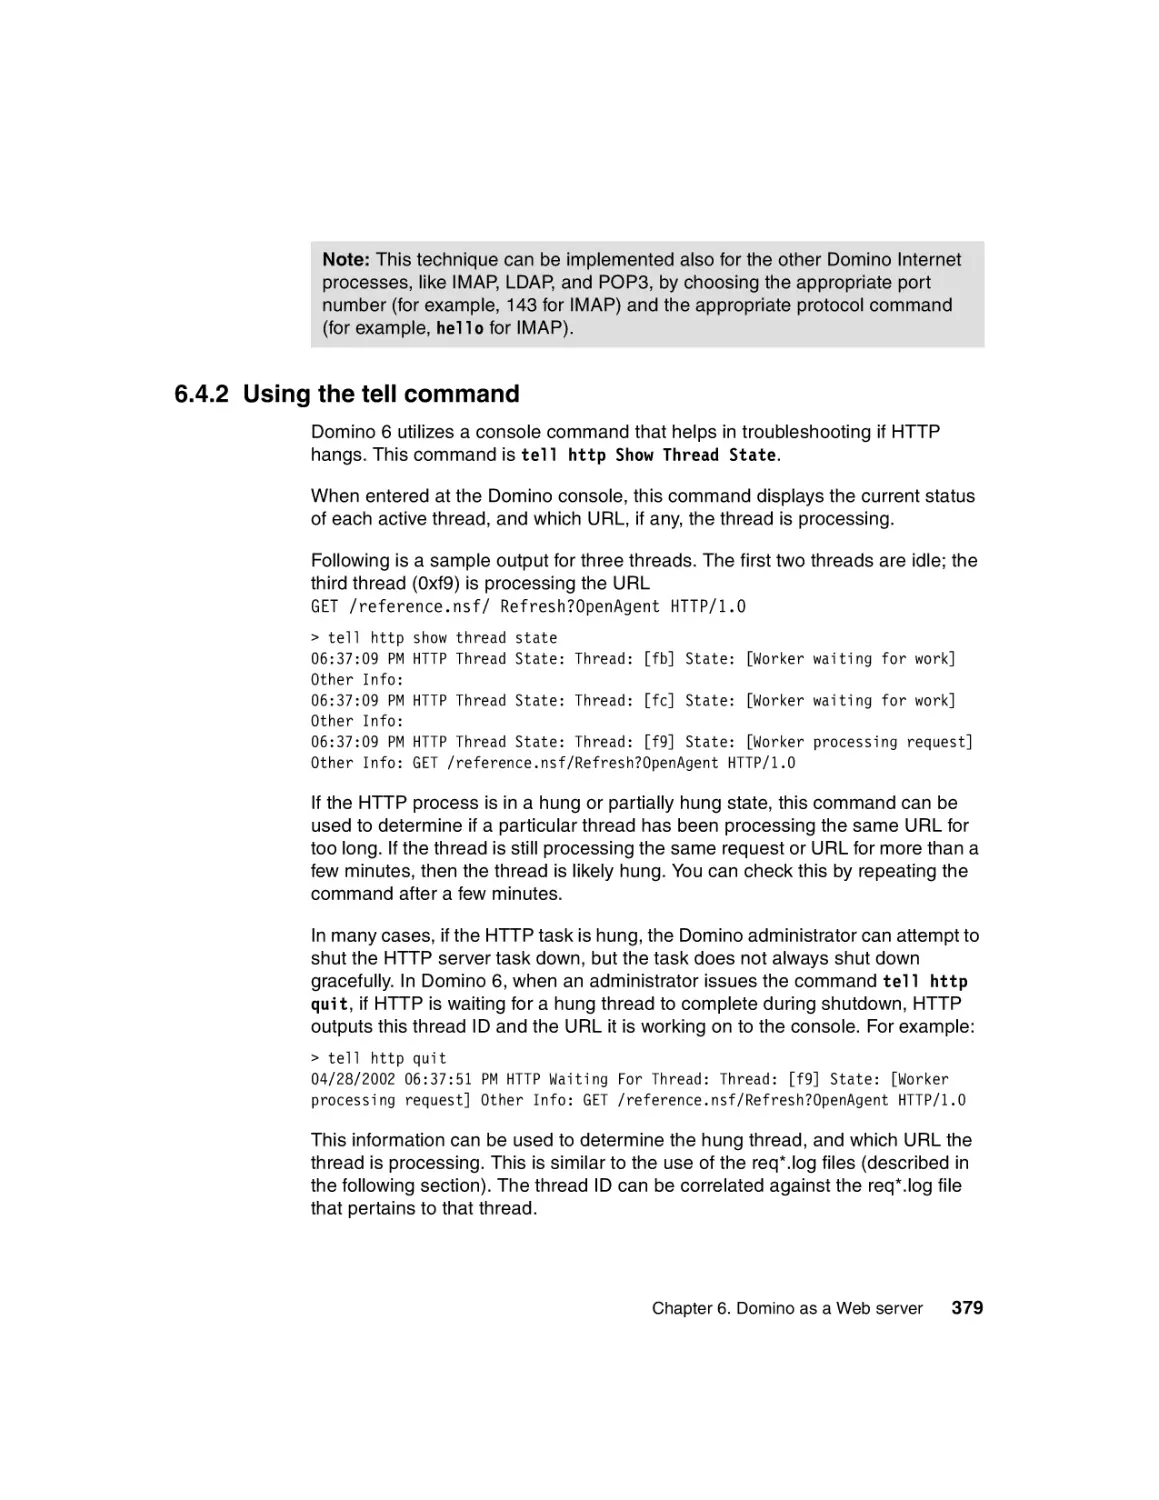
6.4.2 Using the tell command. . . . . . . . . . . . . . . . . . . . . . . . . . . . . . . . . . 379
6.4.3 HTTP thread debugging . . . . . . . . . . . . . . . . . . . . . . . . . . . . . . . . . 380
6.5 Domino 6 console tell commands . . . . . . . . . . . . . . . . . . . . . . . . . . . . . . 380
6.6 Virtual servers and host. . . . . . . . . . . . . . . . . . . . . . . . . . . . . . . . . . . . . . 381
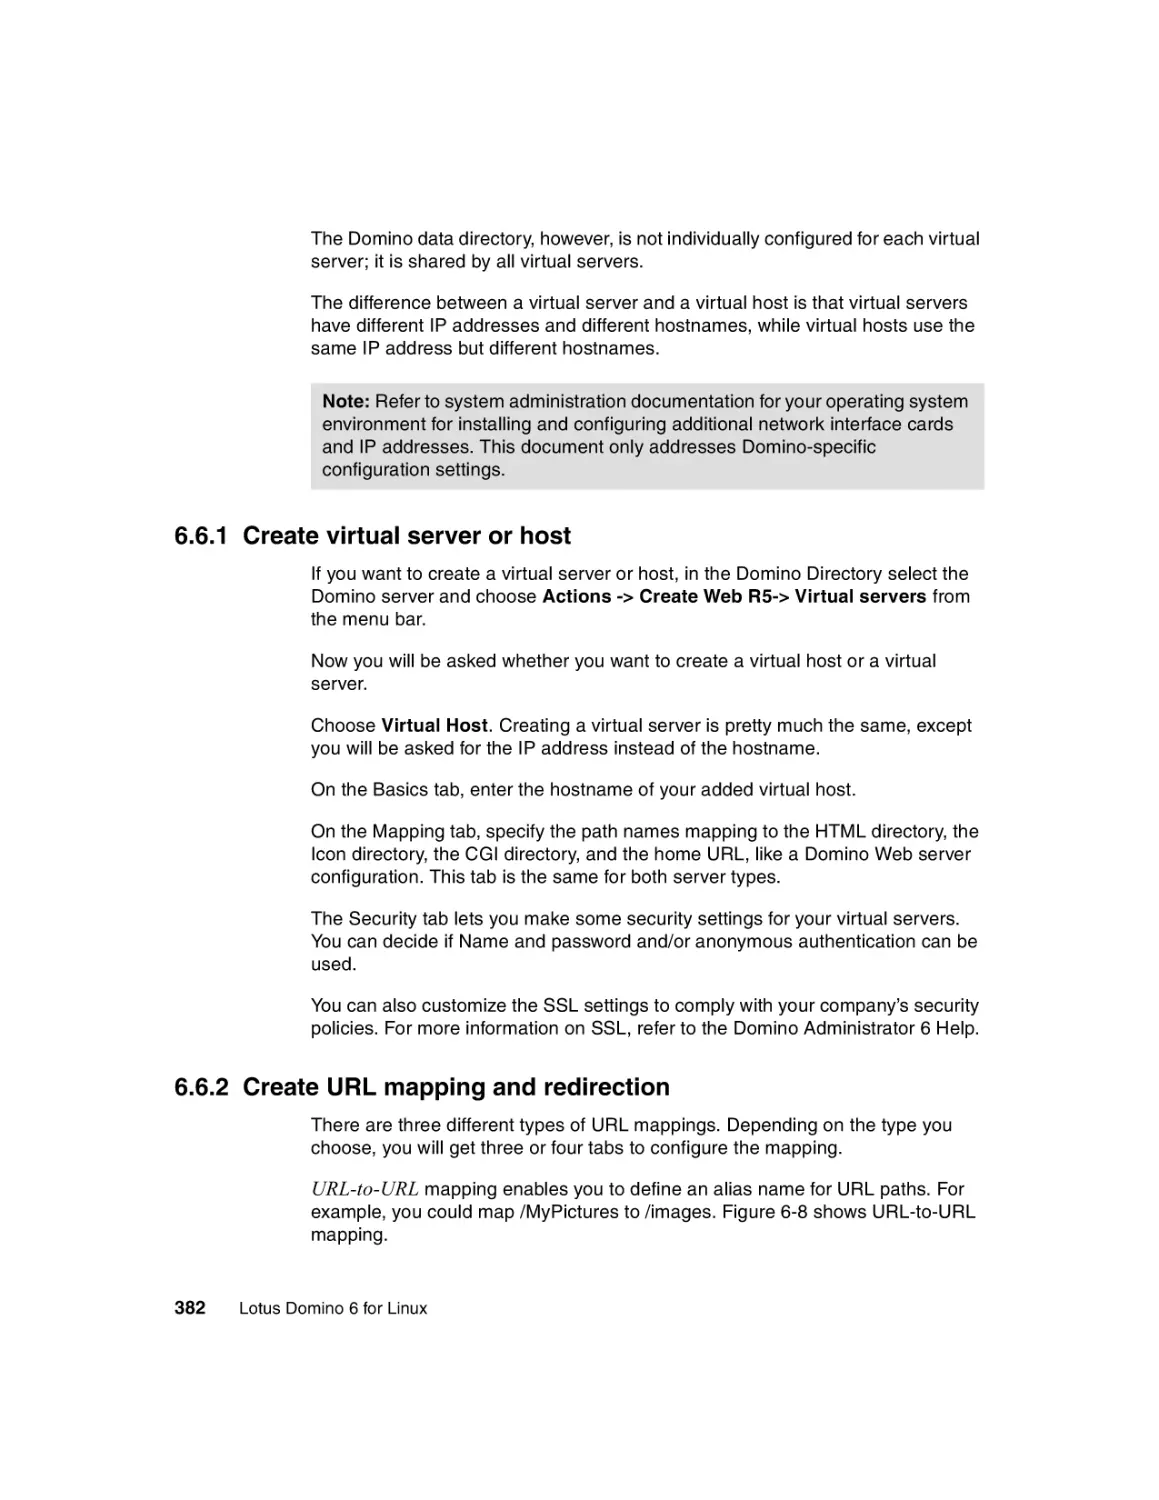
6.6.1 Create virtual server or host . . . . . . . . . . . . . . . . . . . . . . . . . . . . . . 382
6.6.2 Create URL mapping and redirection . . . . . . . . . . . . . . . . . . . . . . . 382
6.7 Domino and Java . . . . . . . . . . . . . . . . . . . . . . . . . . . . . . . . . . . . . . . . . . 385
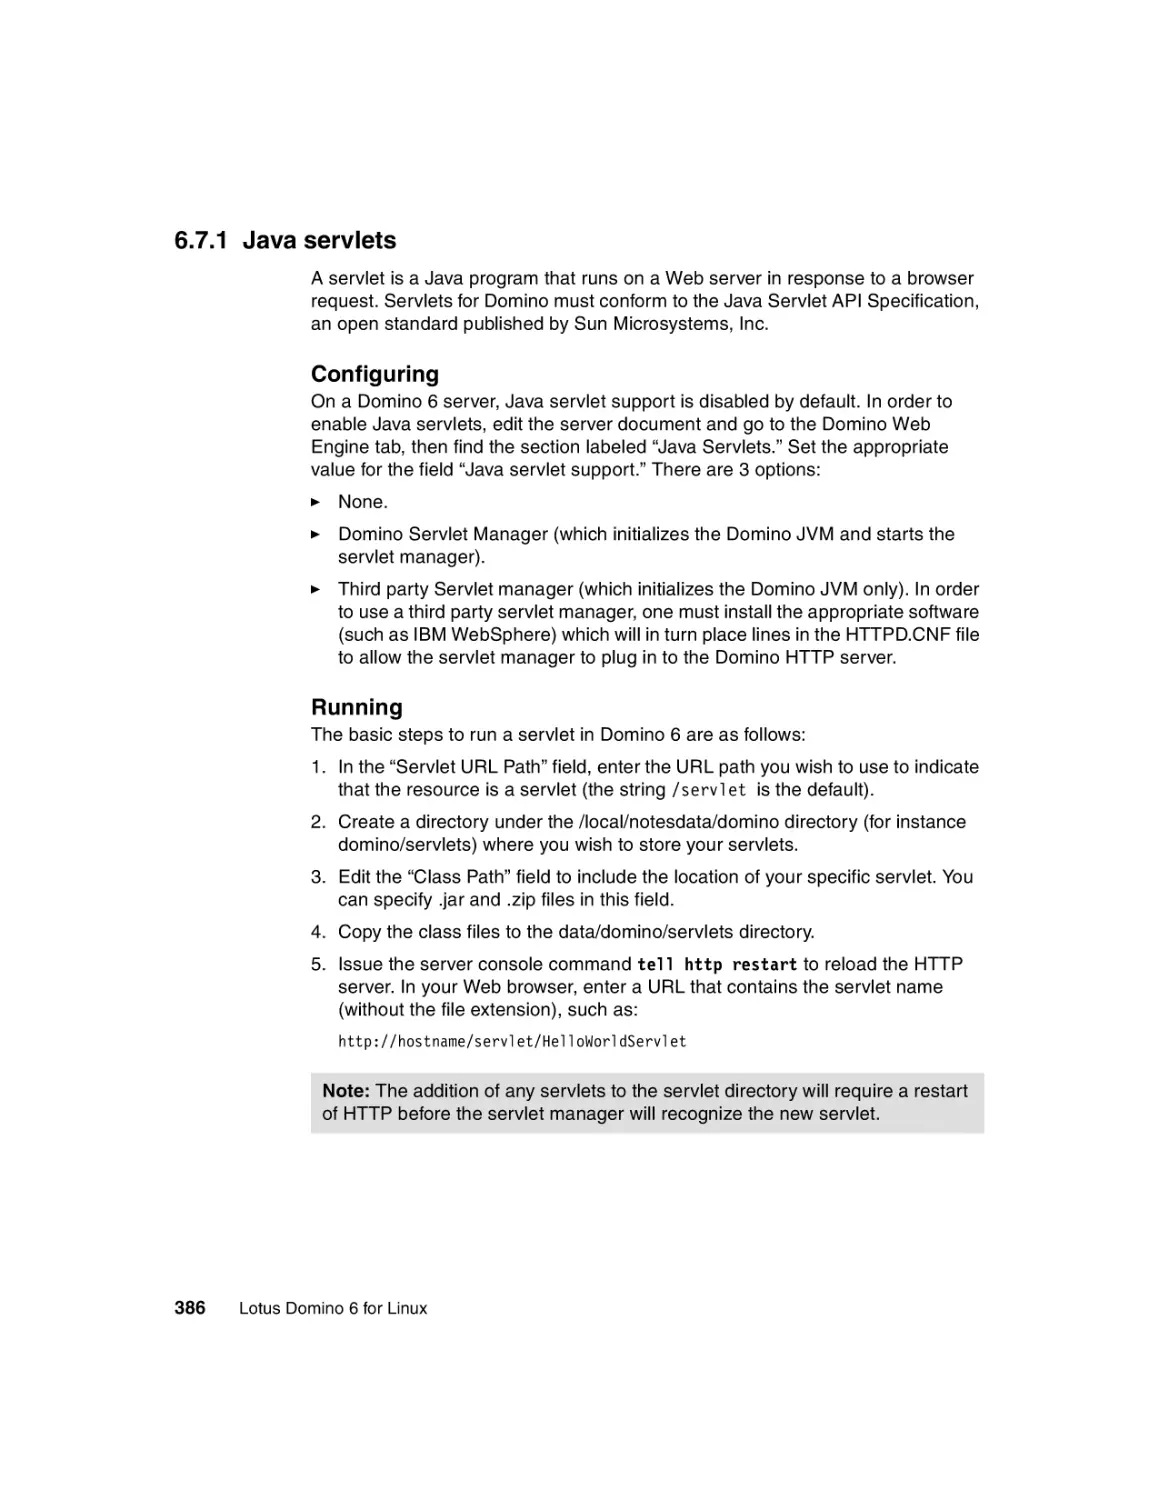
6.7.1 Java servlets . . . . . . . . . . . . . . . . . . . . . . . . . . . . . . . . . . . . . . . . . . 386
6.8 Domino log and analysis tools. . . . . . . . . . . . . . . . . . . . . . . . . . . . . . . . . 387
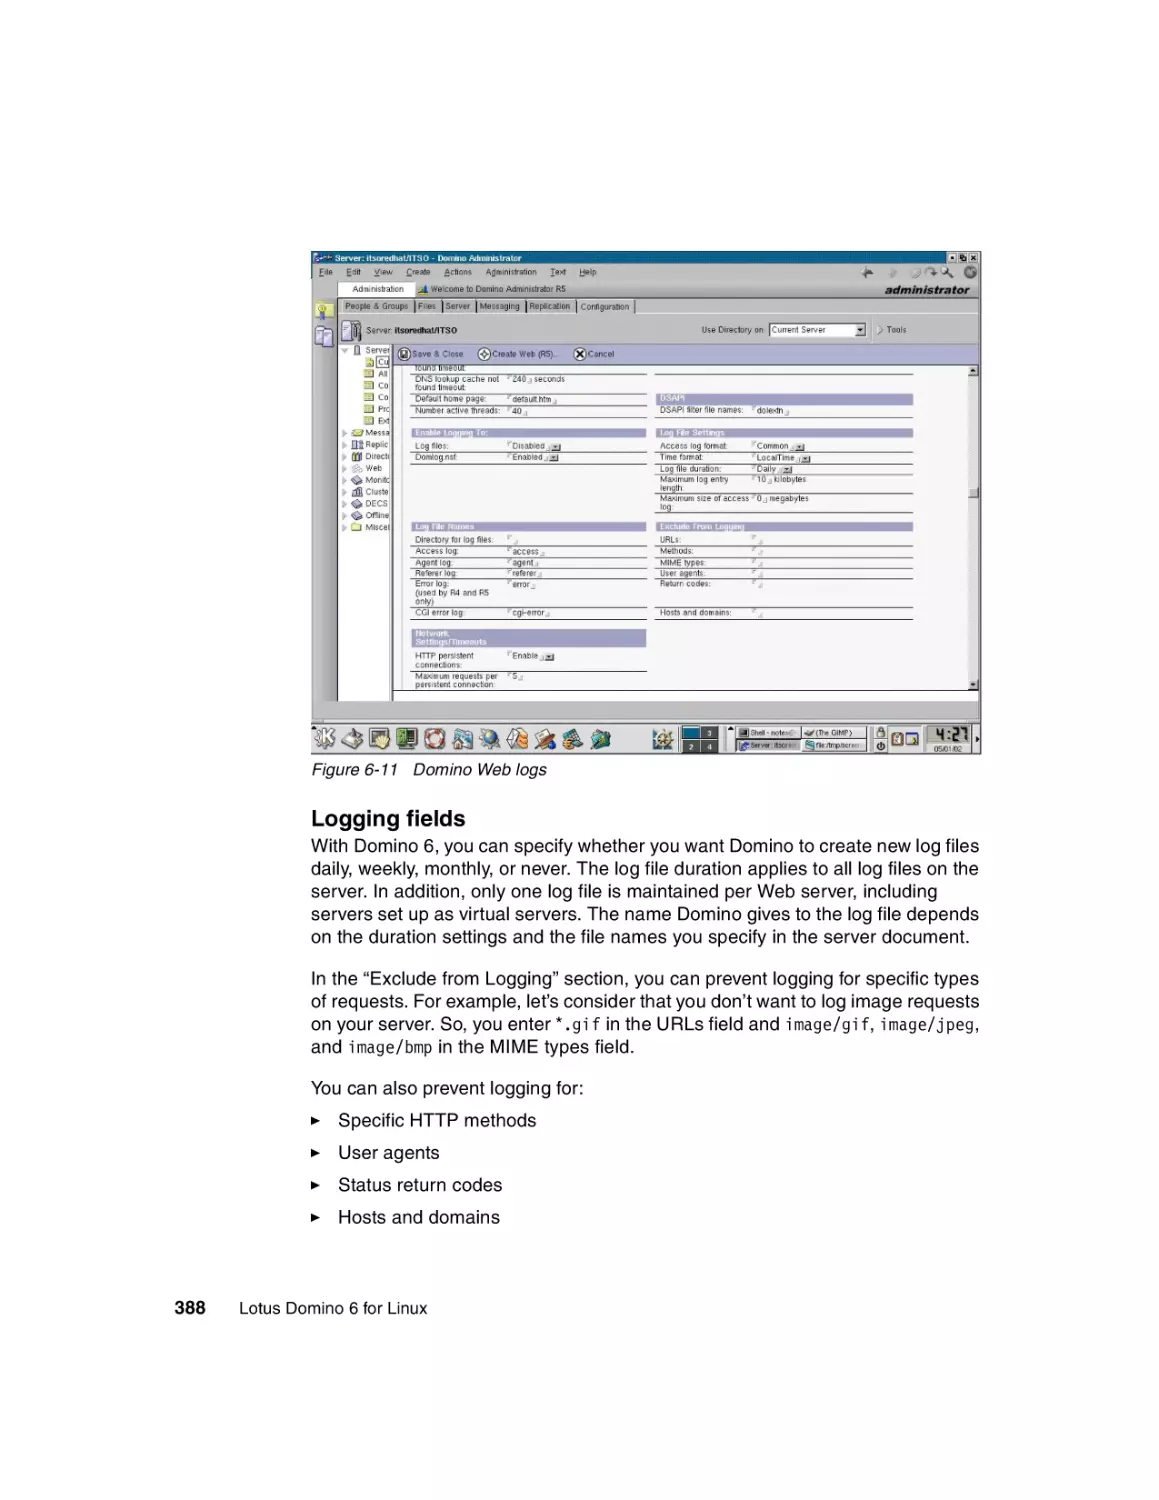
6.8.1 Domino Web log . . . . . . . . . . . . . . . . . . . . . . . . . . . . . . . . . . . . . . . 387
6.8.2 Domino Log database analysis . . . . . . . . . . . . . . . . . . . . . . . . . . . . 389
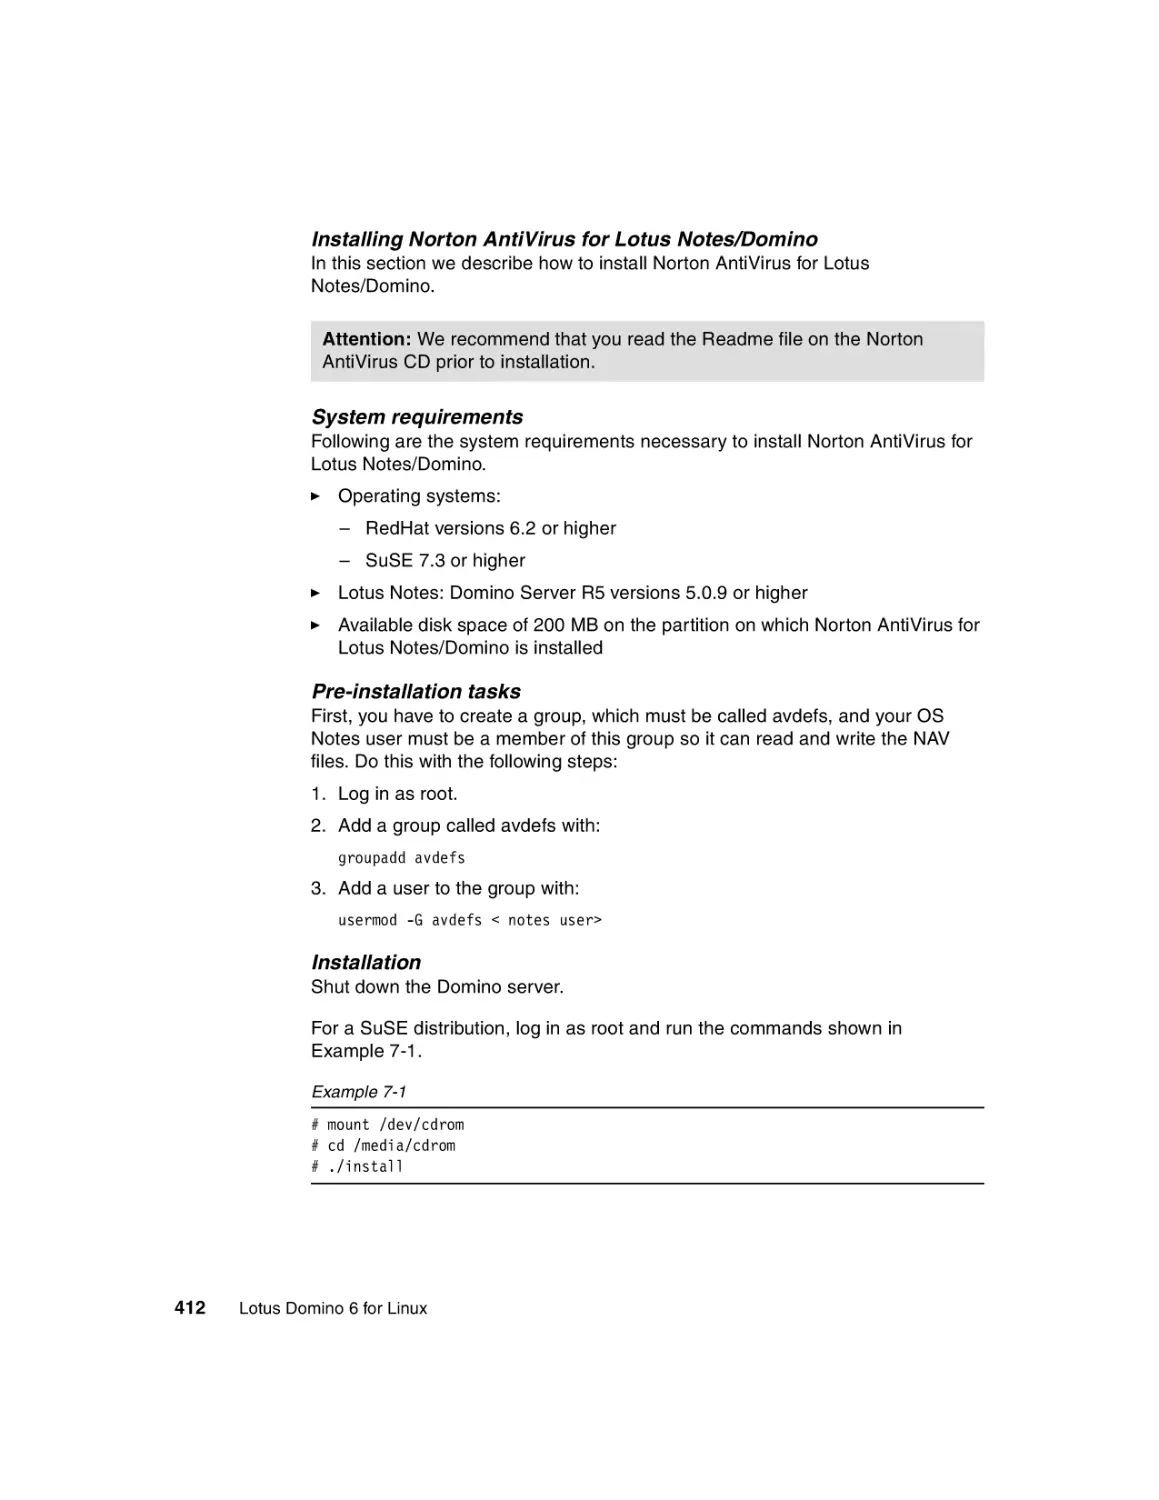
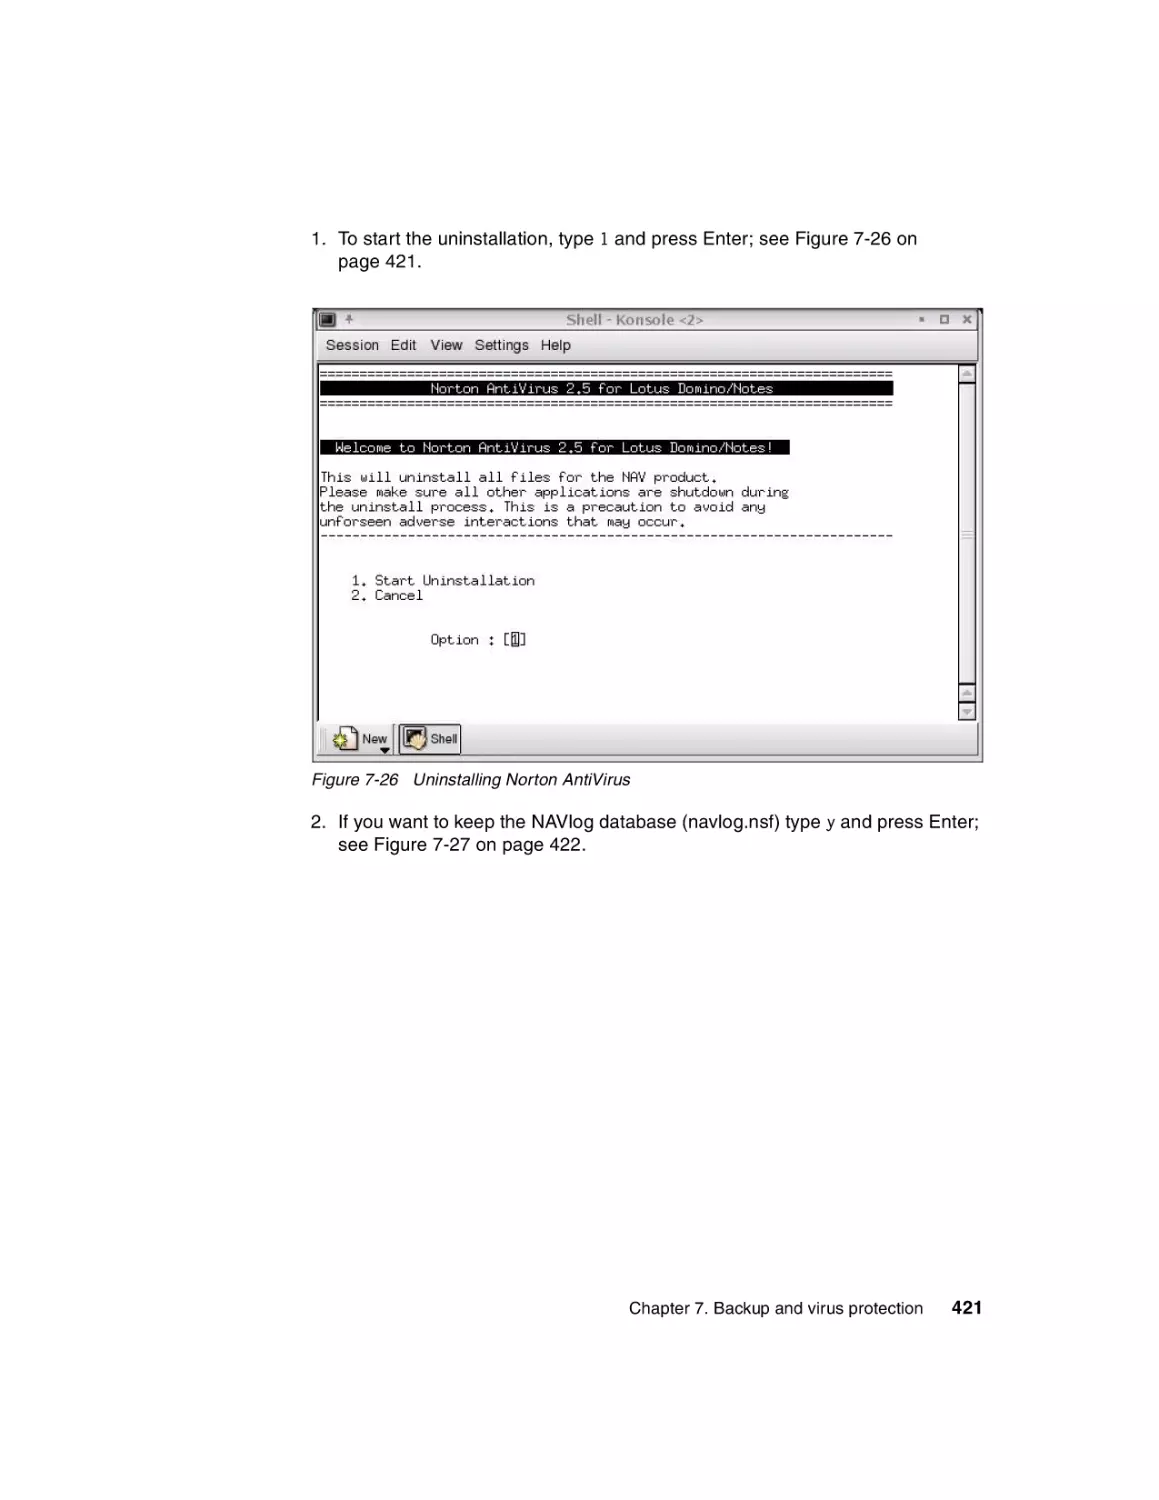
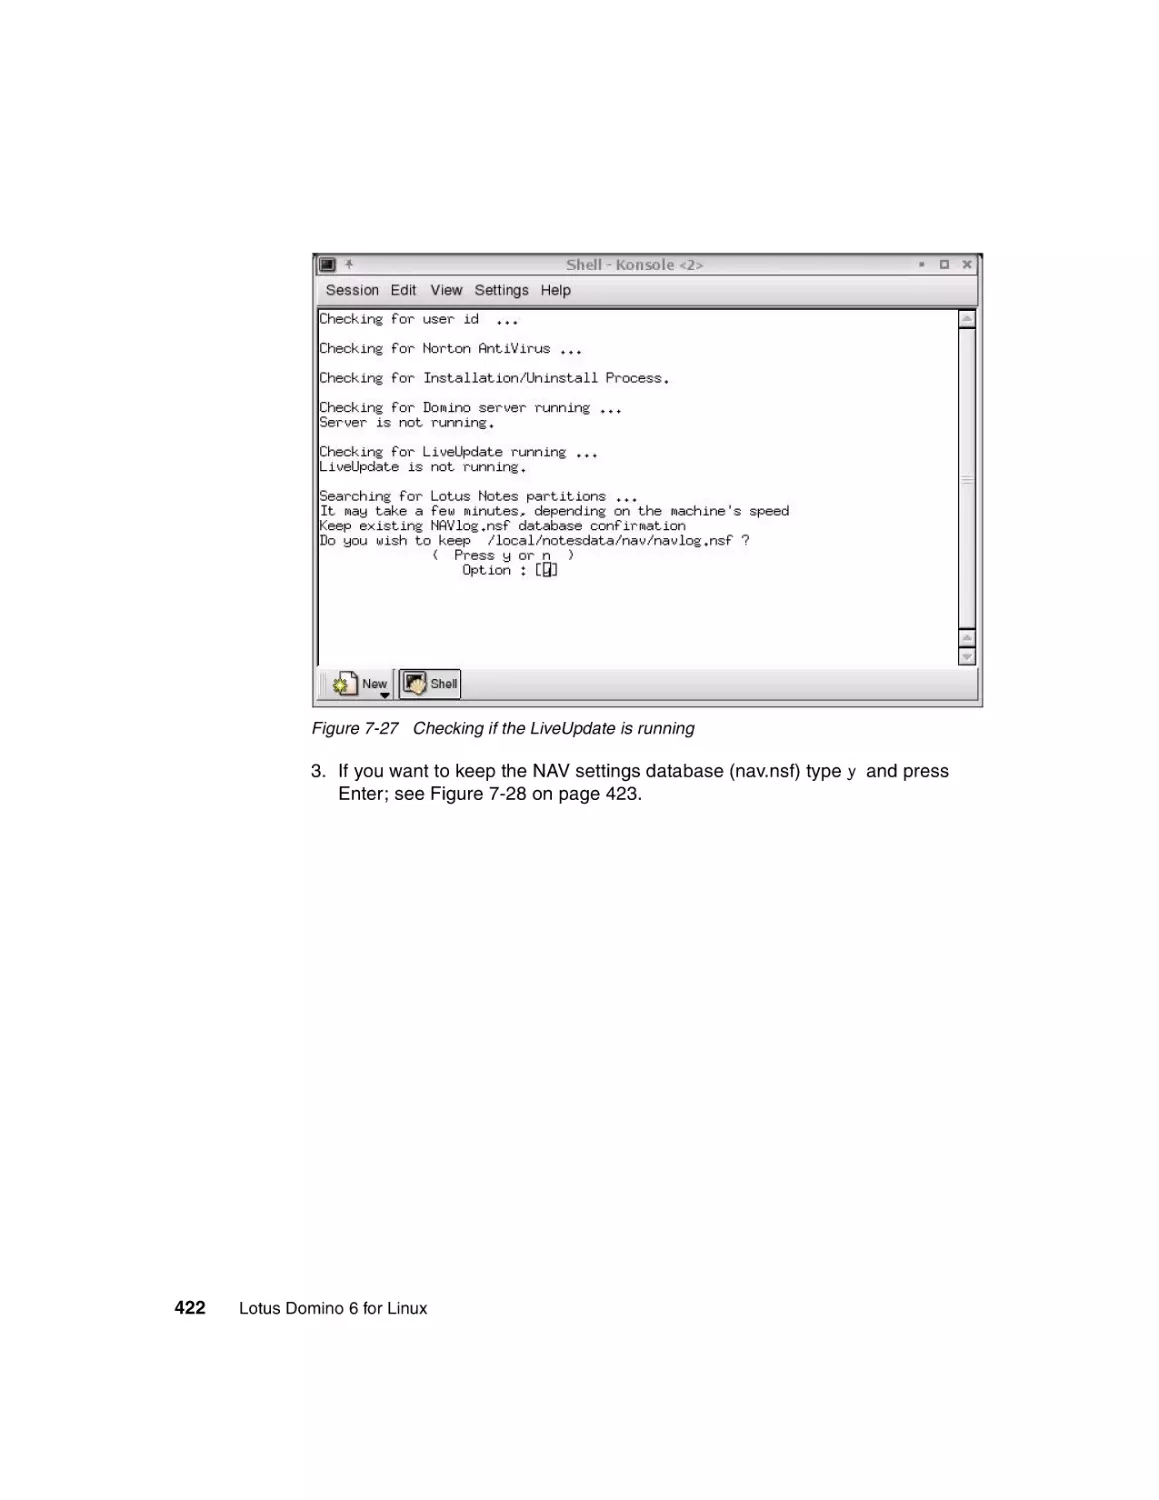
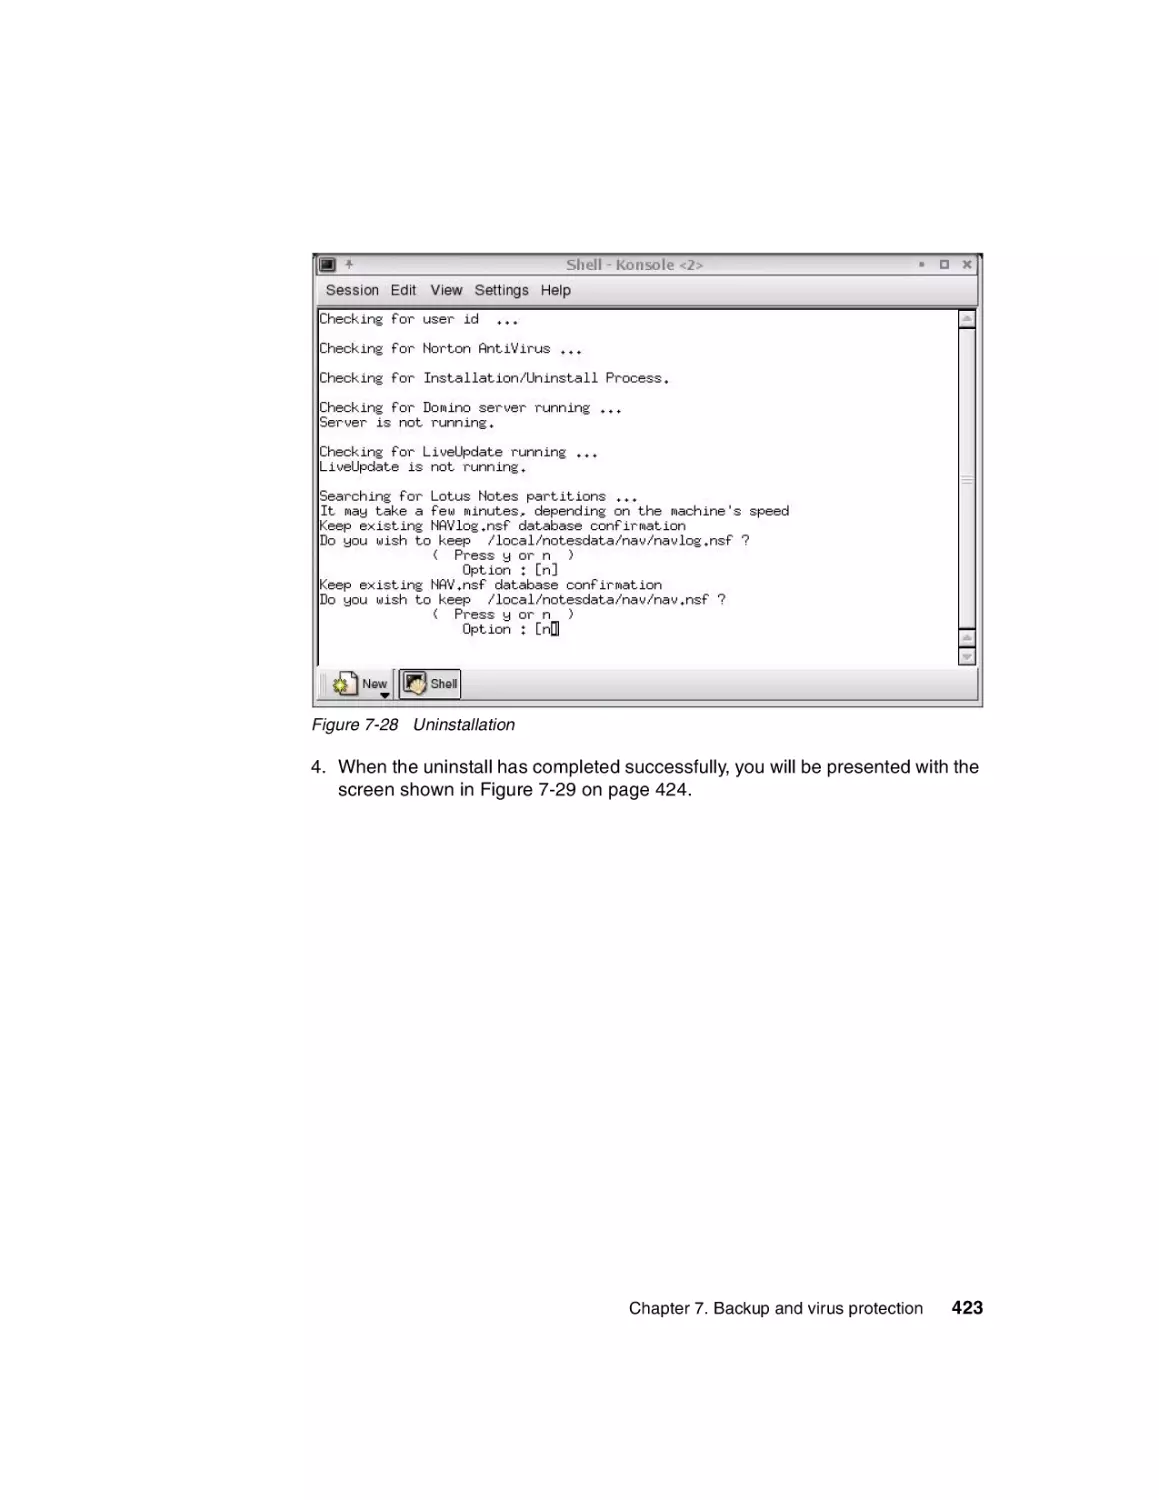
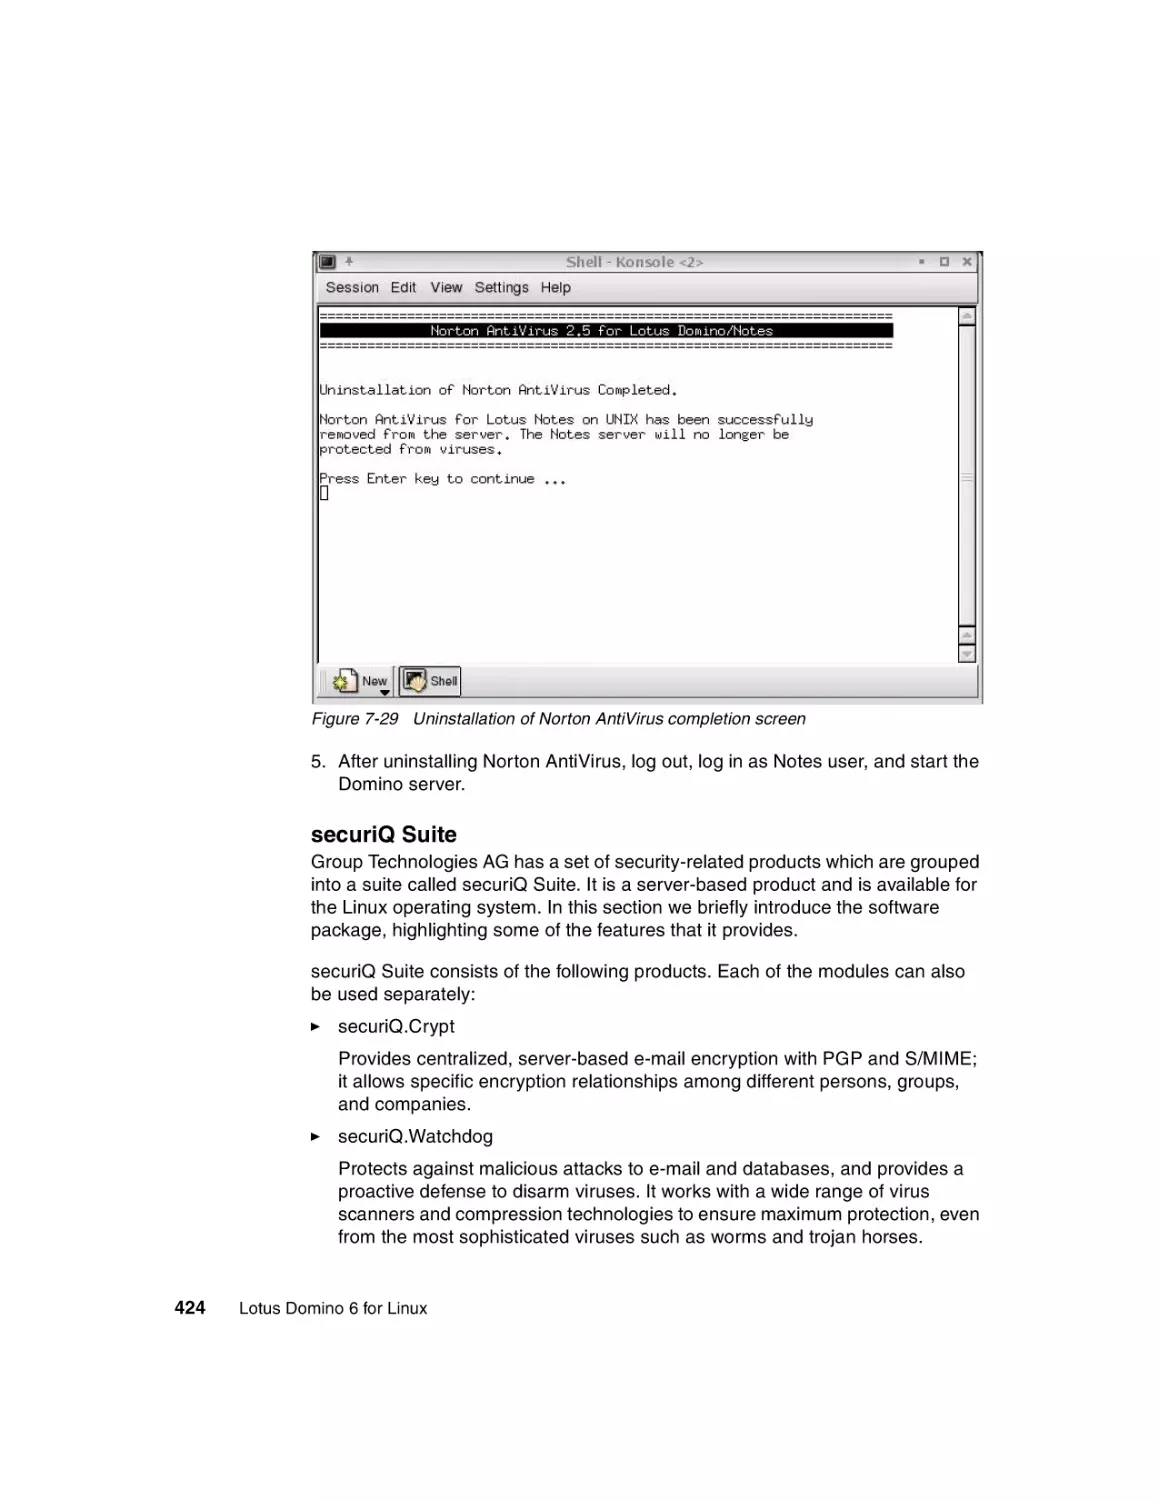
Chapter 7. Backup and virus protection . . . . . . . . . . . . . . . . . . . . . . . . . . 391
7.1 Antivirus software . . . . . . . . . . . . . . . . . . . . . . . . . . . . . . . . . . . . . . . . . . 392
7.1.1 Operating system level antivirus software. . . . . . . . . . . . . . . . . . . . 392
7.1.2 Application level antivirus solutions for Domino Server . . . . . . . . . 393
7.2 Backup . . . . . . . . . . . . . . . . . . . . . . . . . . . . . . . . . . . . . . . . . . . . . . . . . . 425
7.2.1 Backup strategy . . . . . . . . . . . . . . . . . . . . . . . . . . . . . . . . . . . . . . . 426
7.2.2 Backup management . . . . . . . . . . . . . . . . . . . . . . . . . . . . . . . . . . . 428
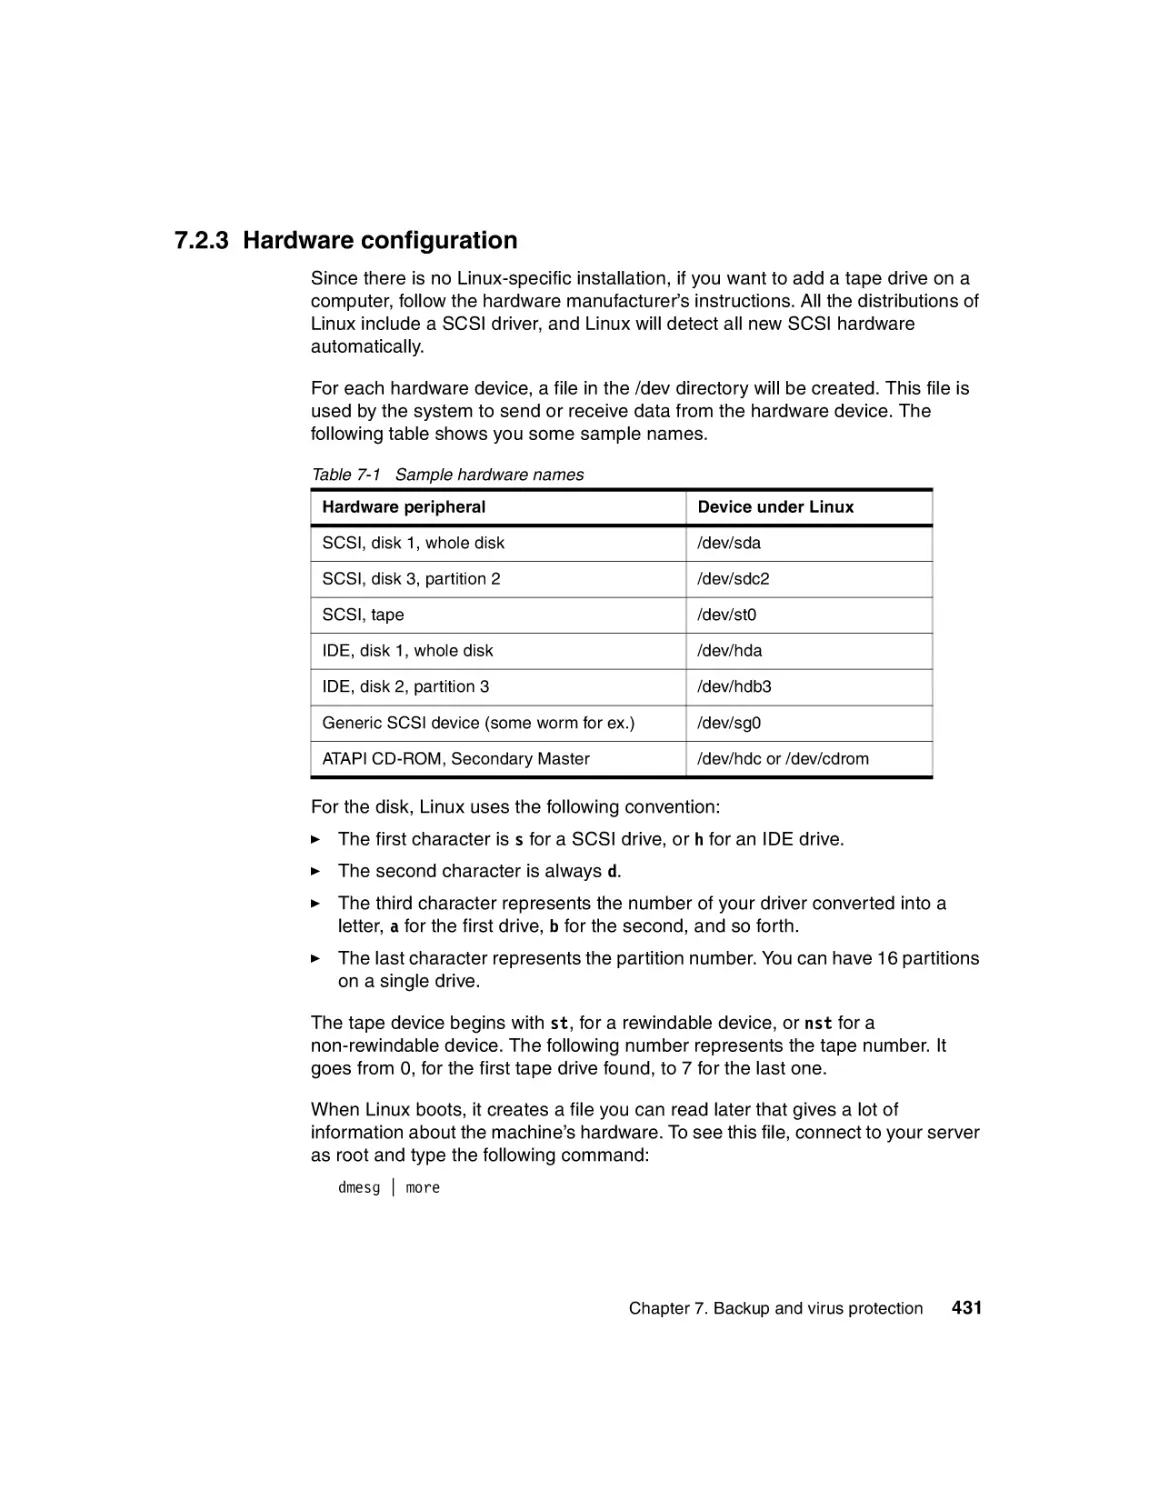
7.2.3 Hardware configuration . . . . . . . . . . . . . . . . . . . . . . . . . . . . . . . . . . 431
7.2.4 Operating system backup tools . . . . . . . . . . . . . . . . . . . . . . . . . . . . 433
7.2.5 Backup software from third party vendors. . . . . . . . . . . . . . . . . . . . 436
Appendix A. Migrating from Domino for Windows to Domino for Linux 439
Moving from Windows to Linux . . . . . . . . . . . . . . . . . . . . . . . . . . . . . . . . . . . 440
Upgrade the current server . . . . . . . . . . . . . . . . . . . . . . . . . . . . . . . . . . . . 440
Build the Linux for Domino server . . . . . . . . . . . . . . . . . . . . . . . . . . . . . . . 440
Move your applications from Windows NT or Windows 2000 to Linux . . . 440
Contents
v
Moving the application to the Linux server . . . . . . . . . . . . . . . . . . . . . . . . 441
Appendix B. Additional material . . . . . . . . . . . . . . . . . . . . . . . . . . . . . . . . 445
Locating the Web material . . . . . . . . . . . . . . . . . . . . . . . . . . . . . . . . . . . . . . . 445
Using the Web material . . . . . . . . . . . . . . . . . . . . . . . . . . . . . . . . . . . . . . . . . 446
System requirements for downloading the Web material . . . . . . . . . . . . . 446
How to use the Web material . . . . . . . . . . . . . . . . . . . . . . . . . . . . . . . . . . 446
Related publications . . . . . . . . . . . . . . . . . . . . . .
IBM Redbooks and Redpapers . . . . . . . . . . . . . . .
Other resources . . . . . . . . . . . . . . . . . . . . . . . .
Referenced Web sites . . . . . . . . . . . . . . . . . . . . . .
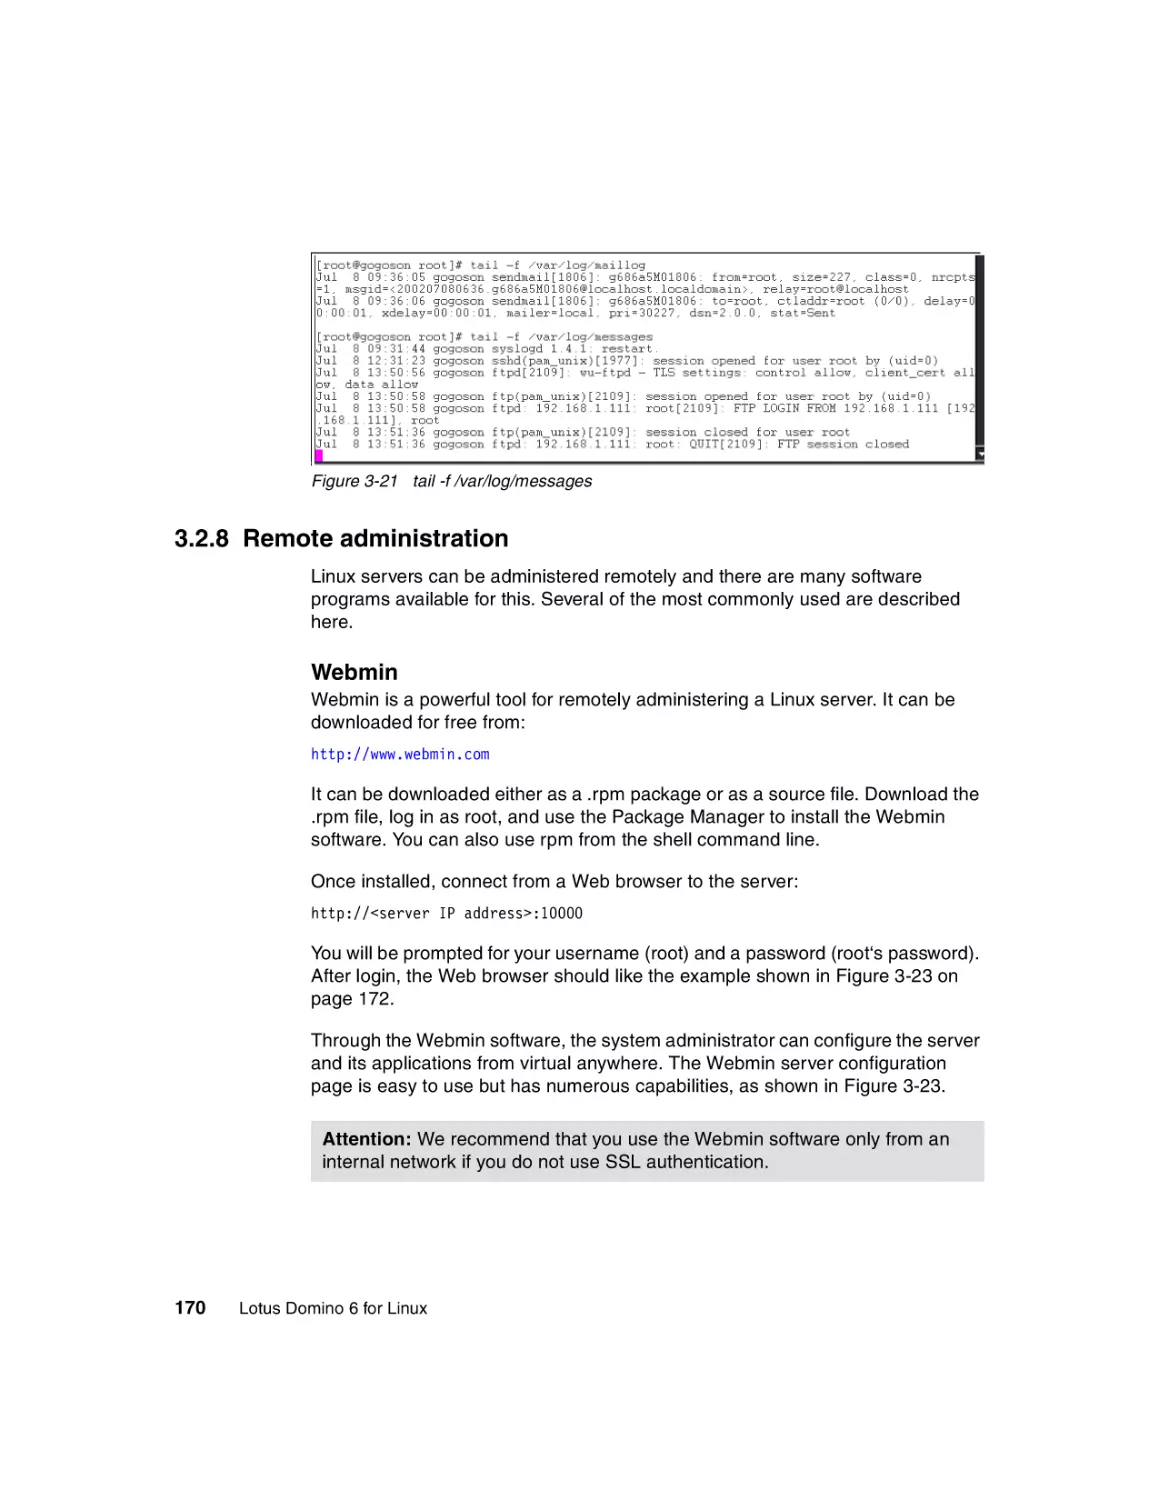
How to get IBM Redbooks . . . . . . . . . . . . . . . . . . .
IBM Redbooks collections . . . . . . . . . . . . . . . . .
......
......
......
......
......
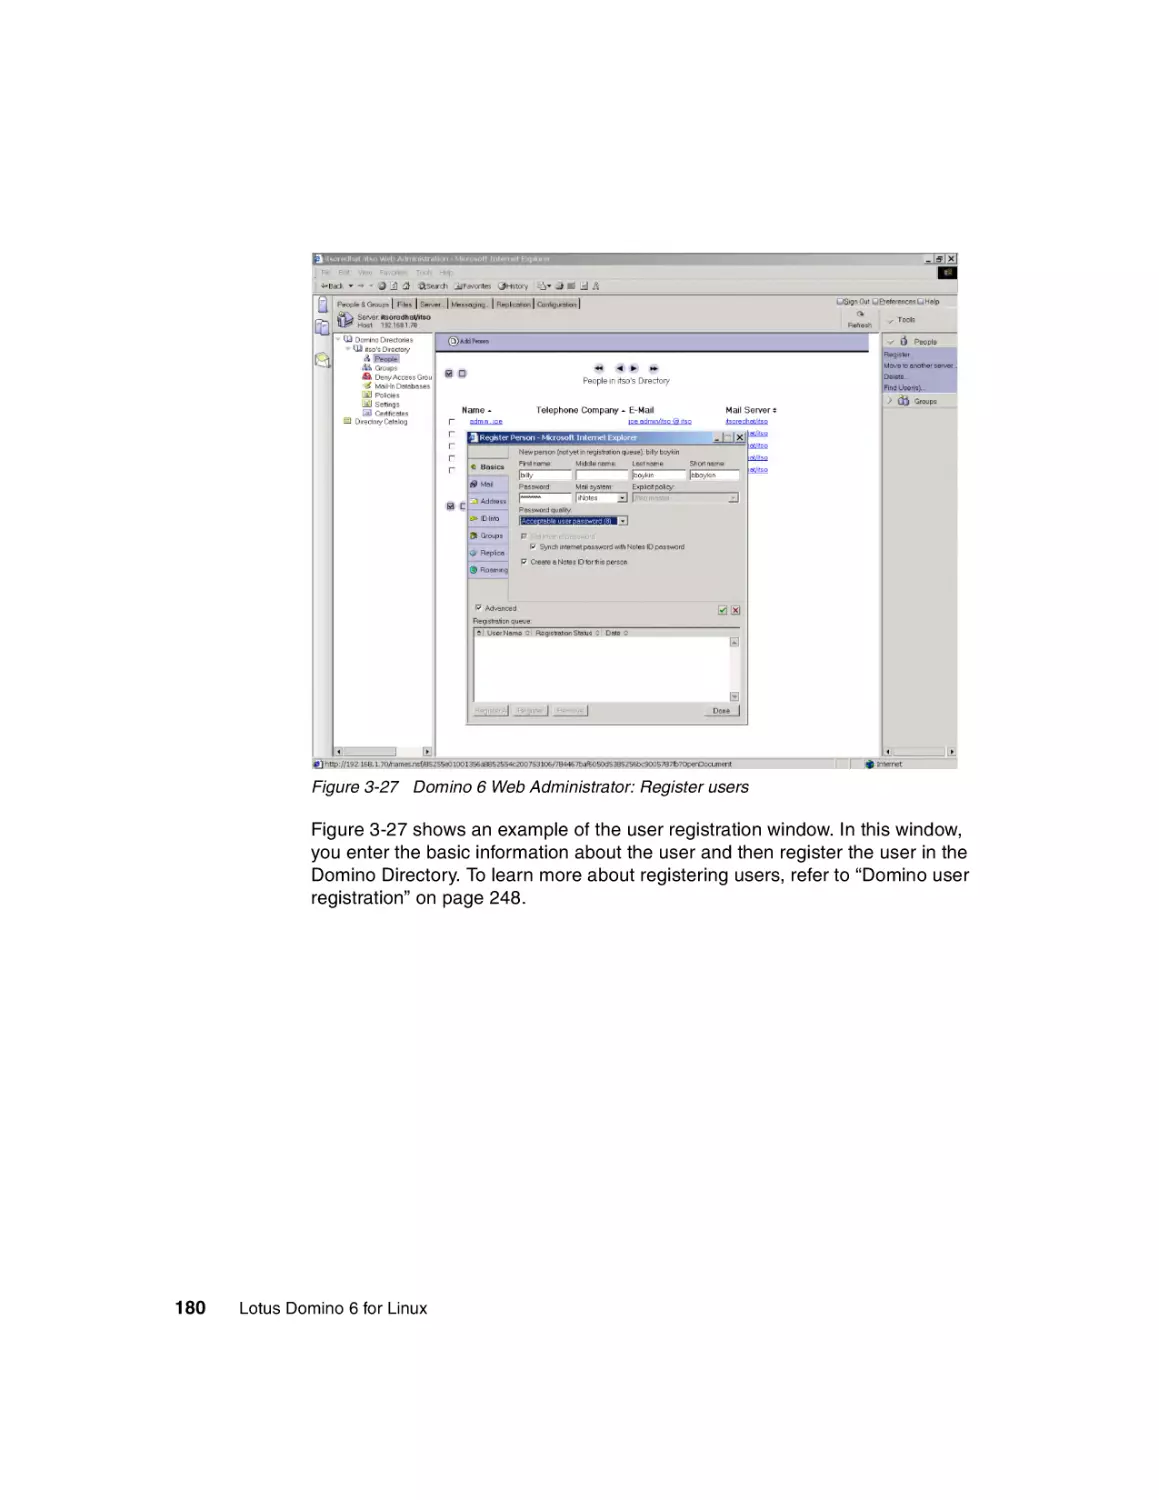
......
.......
.......
.......
.......
.......
.......
......
......
......
......
......
......
.
.
.
.
.
.
447
447
447
448
448
449
Index . . . . . . . . . . . . . . . . . . . . . . . . . . . . . . . . . . . . . . . . . . . . . . . . . . . . . . . 451
vi
Lotus Domino 6 for Linux
Notices
This information was developed for products and services offered in the U.S.A.
IBM may not offer the products, services, or features discussed in this document in other countries. Consult
your local IBM representative for information on the products and services currently available in your area.
Any reference to an IBM product, program, or service is not intended to state or imply that only that IBM
product, program, or service may be used. Any functionally equivalent product, program, or service that
does not infringe any IBM intellectual property right may be used instead. However, it is the user's
responsibility to evaluate and verify the operation of any non-IBM product, program, or service.
IBM may have patents or pending patent applications covering subject matter described in this document.
The furnishing of this document does not give you any license to these patents. You can send license
inquiries, in writing, to:
IBM Director of Licensing, IBM Corporation, North Castle Drive Armonk, NY 10504-1785 U.S.A.
The following paragraph does not apply to the United Kingdom or any other country where such
provisions are inconsistent with local law: INTERNATIONAL BUSINESS MACHINES CORPORATION
PROVIDES THIS PUBLICATION "AS IS" WITHOUT WARRANTY OF ANY KIND, EITHER EXPRESS OR
IMPLIED, INCLUDING, BUT NOT LIMITED TO, THE IMPLIED WARRANTIES OF NON-INFRINGEMENT,
MERCHANTABILITY OR FITNESS FOR A PARTICULAR PURPOSE. Some states do not allow disclaimer
of express or implied warranties in certain transactions, therefore, this statement may not apply to you.
This information could include technical inaccuracies or typographical errors. Changes are periodically made
to the information herein; these changes will be incorporated in new editions of the publication. IBM may
make improvements and/or changes in the product(s) and/or the program(s) described in this publication at
any time without notice.
Any references in this information to non-IBM Web sites are provided for convenience only and do not in any
manner serve as an endorsement of those Web sites. The materials at those Web sites are not part of the
materials for this IBM product and use of those Web sites is at your own risk.
IBM may use or distribute any of the information you supply in any way it believes appropriate without
incurring any obligation to you.
Information concerning non-IBM products was obtained from the suppliers of those products, their published
announcements or other publicly available sources. IBM has not tested those products and cannot confirm
the accuracy of performance, compatibility or any other claims related to non-IBM products. Questions on
the capabilities of non-IBM products should be addressed to the suppliers of those products.
This information contains examples of data and reports used in daily business operations. To illustrate them
as completely as possible, the examples include the names of individuals, companies, brands, and products.
All of these names are fictitious and any similarity to the names and addresses used by an actual business
enterprise is entirely coincidental.
COPYRIGHT LICENSE:
This information contains sample application programs in source language, which illustrates programming
techniques on various operating platforms. You may copy, modify, and distribute these sample programs in
any form without payment to IBM, for the purposes of developing, using, marketing or distributing application
programs conforming to the application programming interface for the operating platform for which the
sample programs are written. These examples have not been thoroughly tested under all conditions. IBM,
therefore, cannot guarantee or imply reliability, serviceability, or function of these programs. You may copy,
modify, and distribute these sample programs in any form without payment to IBM for the purposes of
developing, using, marketing, or distributing application programs conforming to IBM's application
programming interfaces.
© Copyright IBM Corp. 2002. All rights reserved.
vii
Trademarks
The following terms are trademarks of the International Business Machines Corporation in the United States,
other countries, or both:
IBM eServer™
Redbooks (logo)™
AIX®
AS/400®
Balance®
DB2®
DB2 Universal Database™
IBM®
iSeries™
Netfinity®
OS/2®
Perform™
PS/2®
Sequent®
SP™
Tivoli®
WebSphere®
xSeries™
z/OS™
The following terms are trademarks of International Business Machines Corporation and Lotus Development
Corporation in the United States, other countries, or both:
Domino Designer®
Domino™
Lotus®
Notes®
Lotus Notes®
Sametime®
Word Pro®
The following terms are trademarks of other companies:
ActionMedia, LANDesk, MMX, Pentium and ProShare are trademarks of Intel Corporation in the United
States, other countries, or both.
Microsoft, Windows, Windows NT, and the Windows logo are trademarks of Microsoft Corporation in the
United States, other countries, or both.
Java and all Java-based trademarks and logos are trademarks or registered trademarks of Sun
Microsystems, Inc. in the United States, other countries, or both.
C-bus is a trademark of Corollary, Inc. in the United States, other countries, or both.
UNIX is a registered trademark of The Open Group in the United States and other countries.
SET, SET Secure Electronic Transaction, and the SET Logo are trademarks owned by SET Secure
Electronic Transaction LLC.
Other company, product, and service names may be trademarks or service marks of others.
viii
Lotus Domino 6 for Linux
Preface
This IBM Redbook describes how to run the IBM Lotus Domino 6 server on the
Linux platform. While Lotus Domino 6 is platform-independent, some specific
knowledge about the platform and configuration is required to ensure that the
Domino 6 server is running most efficiently.
The book provides detailed instructions for installing Linux and Domino 6 for
Linux, and describes how to achieve maximum performance of your system.
System administration and security techniques are explained and tools for
managing and troubleshooting are discussed as well.
Detailed scenarios illustrate some of the features of Domino 6 on Linux, in
particular user registration, directory synchronization, creating a Domino
application, and accessing external data using DB2 and MySQL. We describe
how to configure Domino as a Web server, including the new security options
specific to the HTTP protocol in Domino 6. Strategies and techniques for virus
protection and data backups are presented, along with details about some of the
third-party software packages available to help you with these management
tasks.
This redbook is written for administrators with strong Domino and Windows
operating system skills, but who are not experts on Linux. Therefore, we show in
detail how to install and configure a Linux operating system on your server, but
don’t spend too much time explaining basic Domino features. Instead, we focus
on demonstrating that Linux is an excellent platform on which to run Domino 6.
The team that wrote this redbook
This redbook was produced by a team of specialists from around the world
working at the International Technical Support Organization, Cambridge Center.
Tommi Tulisalo is a project leader for the International Technical Support
Organization at Cambridge, Massachusetts. He manages projects whose
objective is to produce redbooks on all areas of Lotus Software products. Before
joining the ITSO in 2001, he was an IT Architect for IBM Global Services in
Finland, designing solutions for customers, often based on Lotus software.
© Copyright IBM Corp. 2002
ix
Jonathan Bedford is an IT consultant for an IBM Business Partner (H2 Group)
in the United Kingdom. His areas of expertise are Domino on Linux platforms,
security and IT infrastructures. He is a RedHat Certified engineer and has
worked with Lotus Notes/Domino since version 3.
Billy Boykin is a Senior Technology Advocate with IBM Software Group,
Americas Technical Sales in Richmond, Virginia. His primary role is the
development and delivery of technical enablement to the Lotus Field Sales
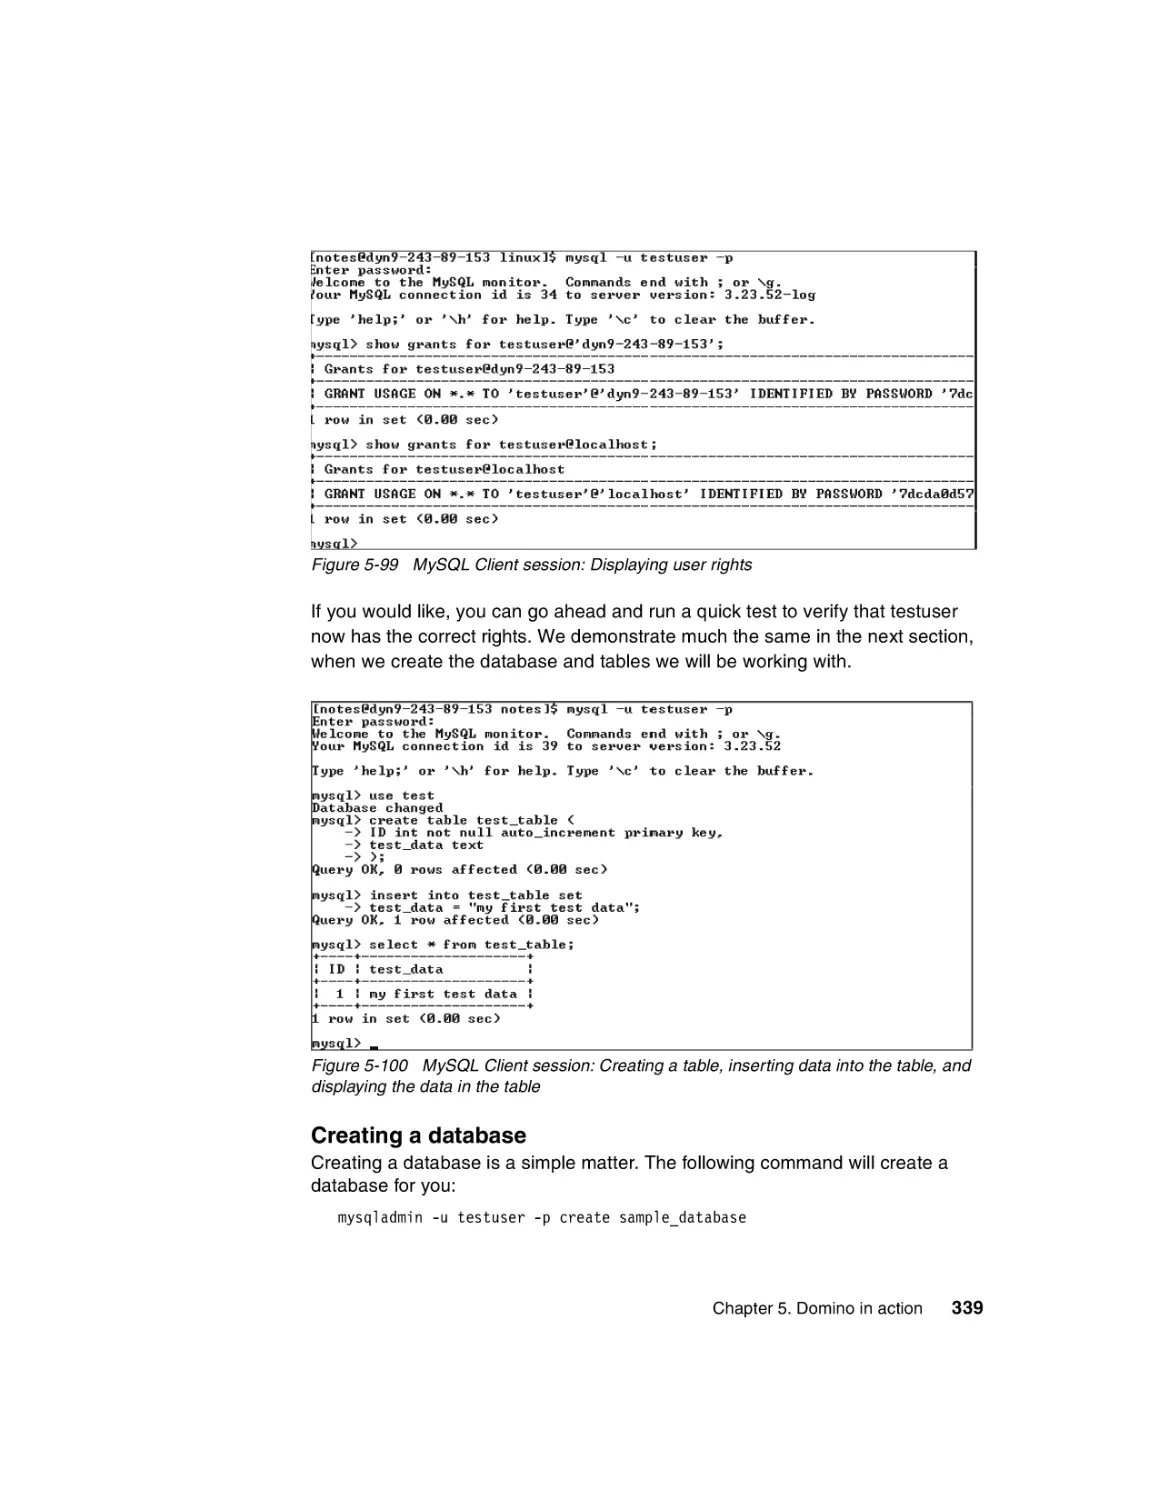
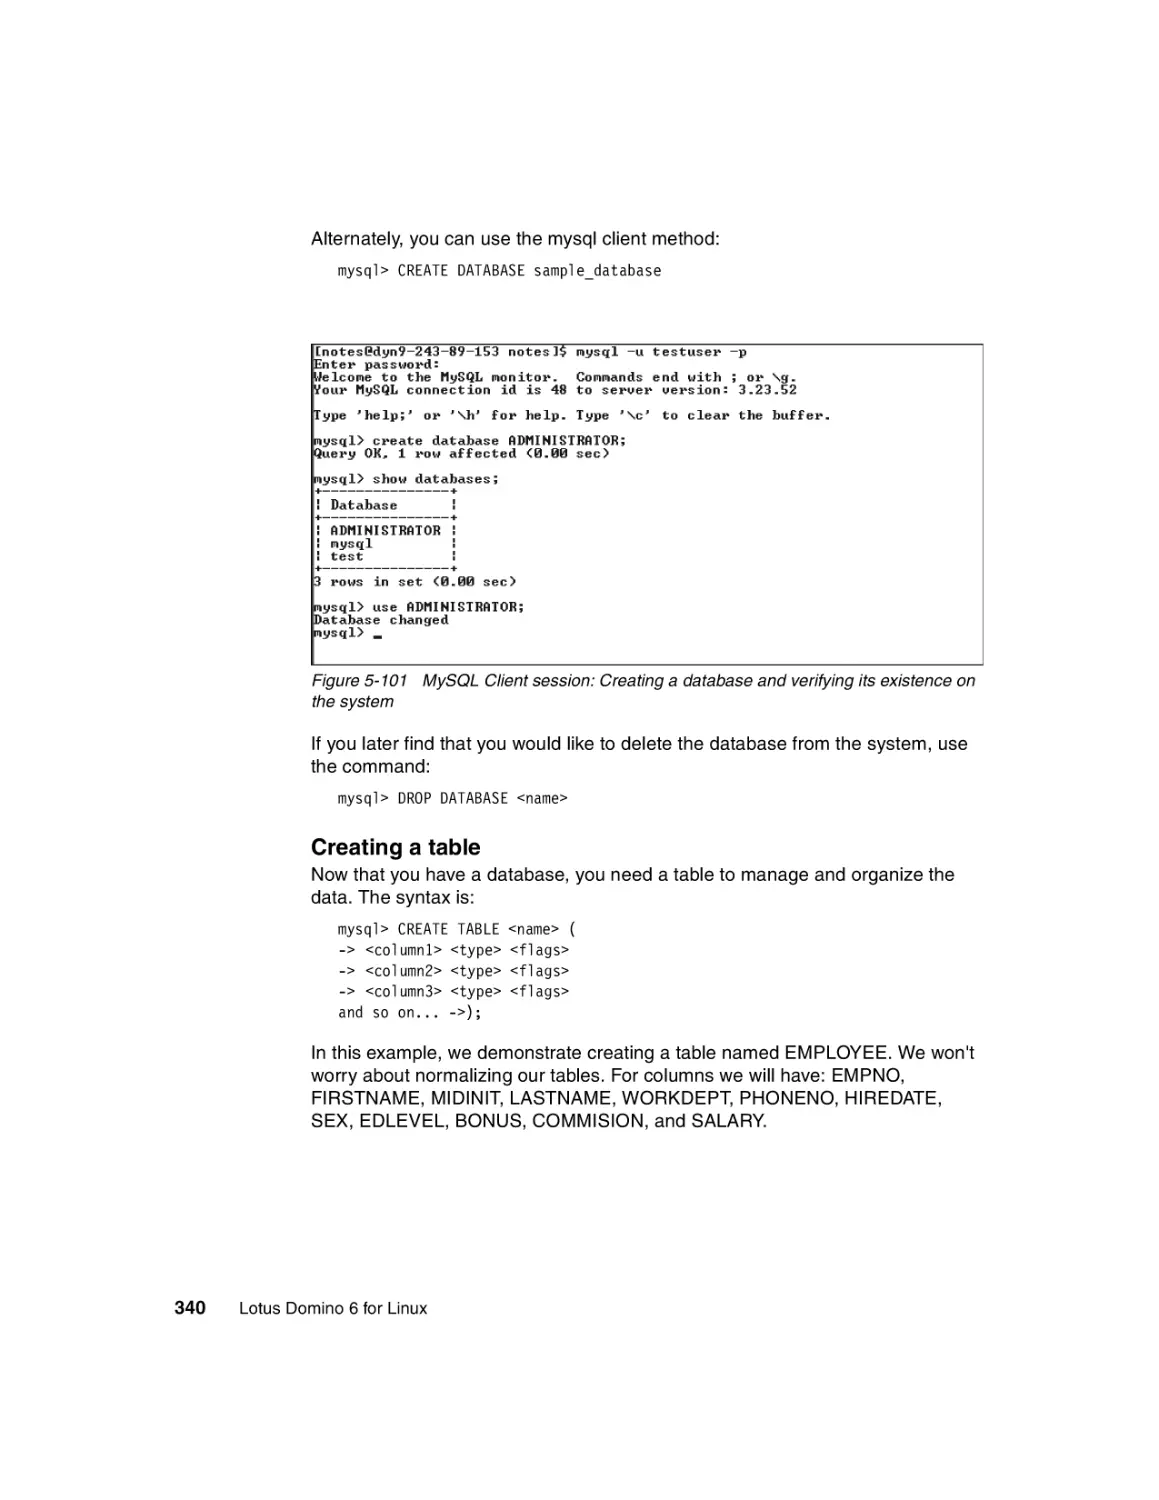
community. Billy has worked with Domino since version 3 and with Linux
since 1994.
Gregory Rick Chadbourne is an IT Architect for Lotus Software. He is an R4.6
and R5 Principal CLP in both Application Development and System
Administration. Along with Domino administration and design work, he maintains
a Web site and builds Linux servers. Greg can be reached at grc@us.ibm.com.
Scott Hodgdon is a Software Engineer specializing in crash and performance
analysis on UNIX platforms. He has worked in the UNIX environment for over 10
years, the last five years as a member of the Domino UNIX support team. Scott
has been an enterprise-dedicated engineer and has worked on many projects,
including the current Domino 6 Enablement team.
Michael Lee is a Software Engineer specializing in issues on UNIX platforms.
With over 10 years of experience with UNIX systems, he originally joined Lotus in
Atlanta as a technical analyst supporting the full range of Lotus products for the
Asia Pacific geography. Currently, Michael is part of the worldwide escalation
team for Notes/Domino support; his latest project is working on the enablement
team for the newest release of Notes/Domino.
Joe Rinck is a Technical Support Specialist for an IBM Business Partner in Cape
Town, South Africa. His areas of expertise are installation, configuration, and
administration of Linux, Windows NT, and 2000 on IBM eServer xSeries;
configuration of IBM 2210 Routers; and installation and configuration of IBM
eServer iSeries. He has been involved with the Internet since 1994 and started
using Linux in 1995. Joe is an IBM eServer Certified Specialist for xSeries and
IBM Certified Specialist for AS/400 Technical Solutions. He was a co-author of
Lotus Domino R5 for Linux on IBM Netfinity Servers, SG24-5968. Joe can be
reached at joe@magnum.alt.za.
Andrei Vlad is an IT specialist in IBM Global Services Romania. He is an AIX
Certified Engineer and a Linux expert. He has four years of UNIX experience,
and has been involved in the design and implementation of several large
Linux-based projects, including support and special customizations for a variety
of applications. His areas of expertise include AIX, Linux, TCP/IP, firewalls, and
clustering.
x
Lotus Domino 6 for Linux
A number of people have provided support and guidance. In particular we would
like to thank Greg Kelleher, Lotus Linux Product Manager, for all the help and
support he gave to the team.
Thanks to Telford Knox and Brian Twitchell from the IBM Austin System
Performance team and Andrew Nolet from the IBM Westford Performance team
for sharing their experiences and results about Domino for Linux performance
tuning.
Two IBM Redbooks have been of special help and we have adapted some of the
contents of them: Lotus Domino R5 for Linux on IBM Netfinity Servers,
SG24-5968 and Lotus Domino R5 for Sun Solaris 8, SG24-5909. We would like
to thank the authors of those books.
Thanks to the following people for their contributions to this project:
Kevin Baringer, Eddy Bell, Ken Brunsen, Thomas Gumz, Mallareddy Karra,
Shane Kilmon, John Woods - IBM Westford Lab
George Brichacek, John Dore, John Goegel, Vicki Laine, Ted Niblett, Susan
Taipalus, Chris Wilkes - Lotus software
Jacob Carstensen, IBM
Anthony Barker, XM Technologies
Bruce Beadle, David Kerr, Doc Shankar, IBM Linux Integration Center
Red Fisher, Symantec
Rolf Rennemo, Cathy Reed Weber, Trend Micro
Heiko Brenn, GROUP Technologies AG
Michael Robinson, Innovative computer solutions
William Tworek, ITSO Cambridge
Alison Chandler, ITSO Poughkeepsie
Preface
xi
Notice
This publication is intended to help Domino and network administrators install,
configure and run Lotus Domino 6 on the Linux platform. The information in this
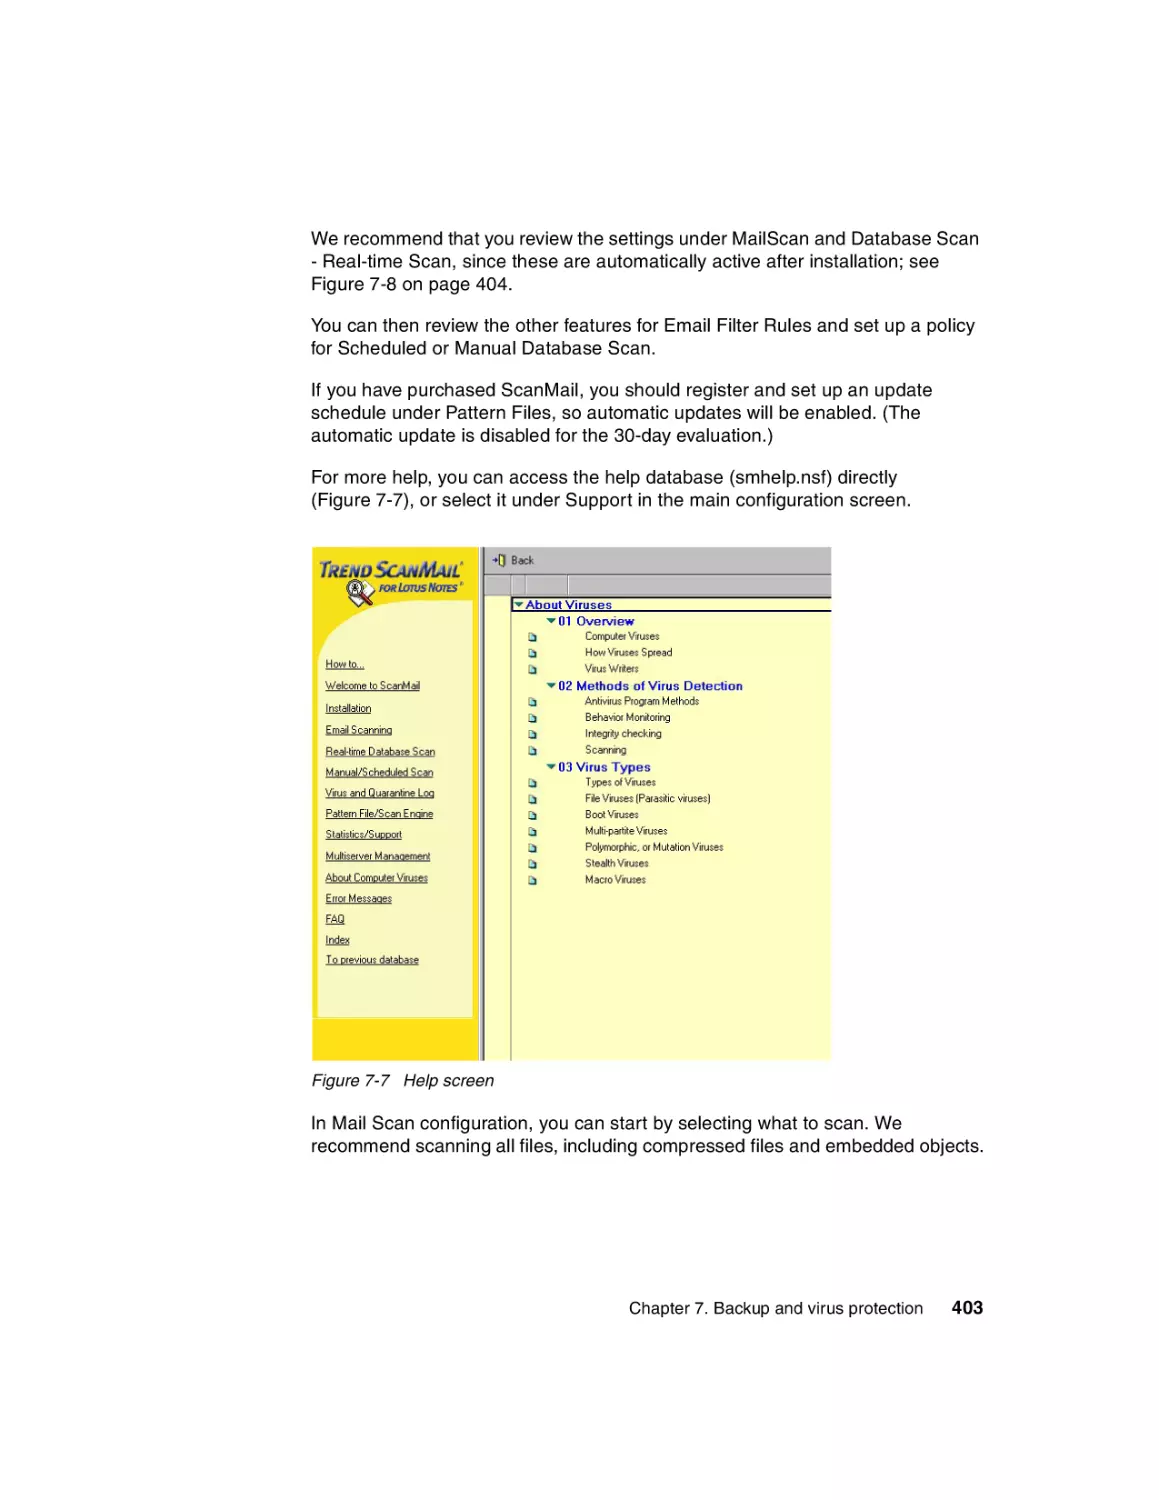
publication is not intended as the specification of any programming interfaces
that are provided by Domino. See the PUBLICATIONS section of the IBM
Programming Announcement for Domino for more information about what
publications are considered to be product documentation.
Comments welcome
Your comments are important to us!
We want our Redbooks to be as helpful as possible. Send us your comments
about this or other Redbooks in one of the following ways:
Use the online Contact us review redbook form found at:
ibm.com/redbooks
Send your comments in an Internet note to:
redbook@us.ibm.com
Mail your comments to the address on page ii.
xii
Lotus Domino 6 for Linux
1
Chapter 1.
Installing Linux
In this chapter we describe how to install Red Hat and SuSE Linux on your
server. The chapter is divided into two parts, with each part giving detailed
instructions for the particular distribution of Linux.
© Copyright IBM Corp. 2002. All rights reserved.
1
1.1 Before you begin
Read the following section before performing the installation of Linux. There are
several things you need to do or should be aware of to make the installation
process easier. In addition, make note of the following information about your
system, which will be useful when you perform the installation:
Network card type
Network information
– IP address
– Gateway information
– DNS servers
Video card type
Number and types of hard drives
Monitor information
1.1.1 Making the CD-ROM/DVD drive bootable
The recommended way of installing Linux is to boot from the installation
CD-ROM. If you plan to boot your system directly from the CD-ROM, ensure that
the CD-ROM is the initial boot device. Do this by following these steps:
1. Power on your server.
2. Enter the BIOS setup utility.
3. Make sure that your CD-ROM is the initial boot device.
4. Save the settings.
5. Exit the setup utility.
The alternative is to make boot diskettes from the Distribution CDs and use those
to boot the system. Do this by following these steps for Red Hat:
1. Insert Red Hat Installation CD 1 into a Windows machine.
2. Use RAWRITE from the DOSUTILS directory to write the disk image to a
Floppy disk. The disk images are stored in the IMAGES directory on the Red
Hat Install CD. The files in this directory are raw disk images. Some are boot
disks for booting the Red Hat Linux installation program. Others are driver
disks supporting less common hardware. Follow the instructions in the Red
Hat Linux Installation Guide to create the disks.
For an example of this command, see “RAWRITE utility” on page 3.
2
Lotus Domino 6 for Linux
Follow these steps to create the boot disks for SuSE:
1. Insert SuSE Installation CD 1 into a Windows machine.
2. Use RAWRITE from the DOSUTILS\RAWRITE directory to write the disk
image to a Floppy disk. The disk images are stored in the DISKS directory on
the SuSE Install CD. The files in this directory are raw disk images. The
following files are boot images: bootdisk, i386, and rescue. Only a few
modules fit on the boot disk. Therefore, three modules floppy disks exist. You
will need these diskettes if you cannot find the driver for your hardware on the
normal disk. The modules disks contain the following files:
– Modules1: USB and file system modules
– Modules2: SCSI/RAID/IDE modules and old (non-ATAPI) CD-ROM drivers
– Modules3: Network, PCMCIA and FireWire (IEEE1394) modules
RAWRITE utility
RAWRITE is a utility usually shipped with the Linux distribution; it is used to write
the prepared diskette images to diskettes, enabling them to be used in the
installation process.
To create a diskette from one of these prepared images use the following steps.
1. Load the Linux CD on a Windows machine.
2. Open an MS-DOS prompt.
3. Change the default directory to the directory where the diskette images are
stored (this varies according to the distribution of Linux used).
4. Run the following command by pre-pending the directory where the
RAWRITE program is stored.
\path\rawrite image a:
For Red Hat, replace x with your CD-ROM driver letter and run:
x:
cd \images
\dosutils\rawrite -f boot.img -d a
For SuSE, replace x with your CD-ROM driver letter and run:
x:
cd \disks
\dosutils\rawrite\rawrite
bootdisk
a
There is a version of RawWrite for Windows. This is available from:
http://uranus.it.swin.edu.au/~jn/linux
Chapter 1. Installing Linux
3
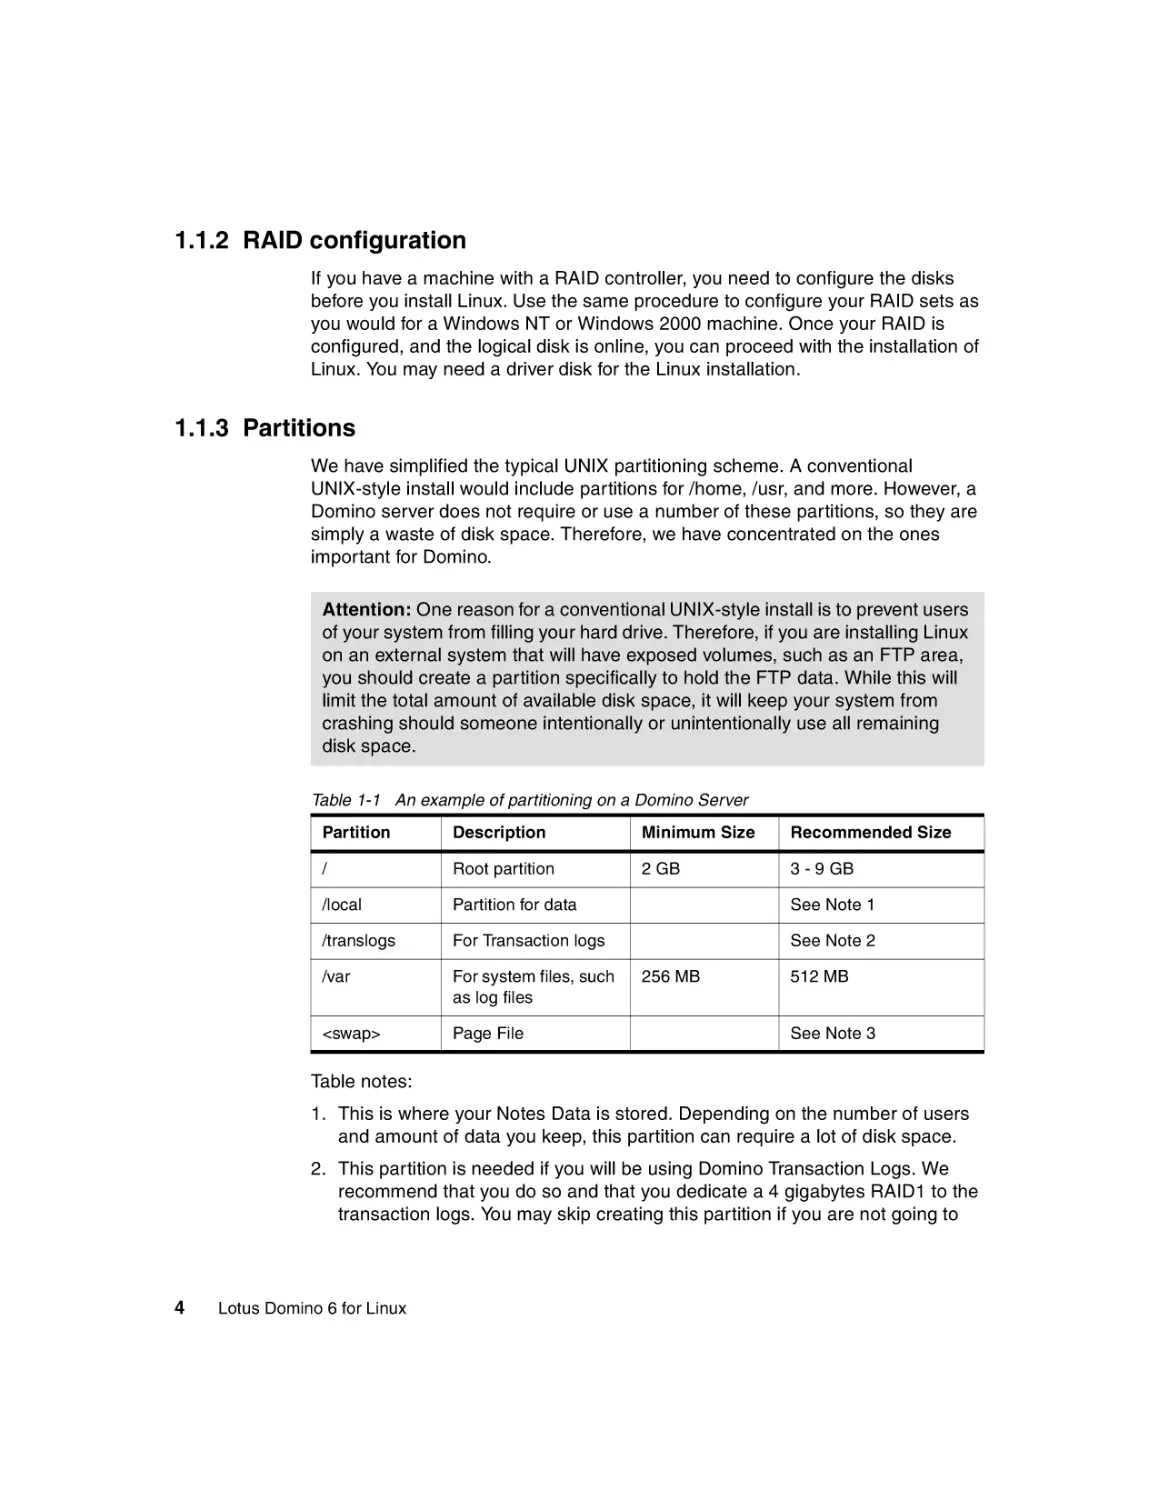
1.1.2 RAID configuration
If you have a machine with a RAID controller, you need to configure the disks
before you install Linux. Use the same procedure to configure your RAID sets as
you would for a Windows NT or Windows 2000 machine. Once your RAID is
configured, and the logical disk is online, you can proceed with the installation of
Linux. You may need a driver disk for the Linux installation.
1.1.3 Partitions
We have simplified the typical UNIX partitioning scheme. A conventional
UNIX-style install would include partitions for /home, /usr, and more. However, a
Domino server does not require or use a number of these partitions, so they are
simply a waste of disk space. Therefore, we have concentrated on the ones
important for Domino.
Attention: One reason for a conventional UNIX-style install is to prevent users
of your system from filling your hard drive. Therefore, if you are installing Linux
on an external system that will have exposed volumes, such as an FTP area,
you should create a partition specifically to hold the FTP data. While this will
limit the total amount of available disk space, it will keep your system from
crashing should someone intentionally or unintentionally use all remaining
disk space.
Table 1-1 An example of partitioning on a Domino Server
Partition
Description
Minimum Size
Recommended Size
/
Root partition
2 GB
3 - 9 GB
/local
Partition for data
See Note 1
/translogs
For Transaction logs
See Note 2
/var
For system files, such
as log files
<swap>
Page File
256 MB
512 MB
See Note 3
Table notes:
1. This is where your Notes Data is stored. Depending on the number of users
and amount of data you keep, this partition can require a lot of disk space.
2. This partition is needed if you will be using Domino Transaction Logs. We
recommend that you do so and that you dedicate a 4 gigabytes RAID1 to the
transaction logs. You may skip creating this partition if you are not going to
4
Lotus Domino 6 for Linux
make use of transaction logs. See “Transaction logging” on page 229 for more
information.
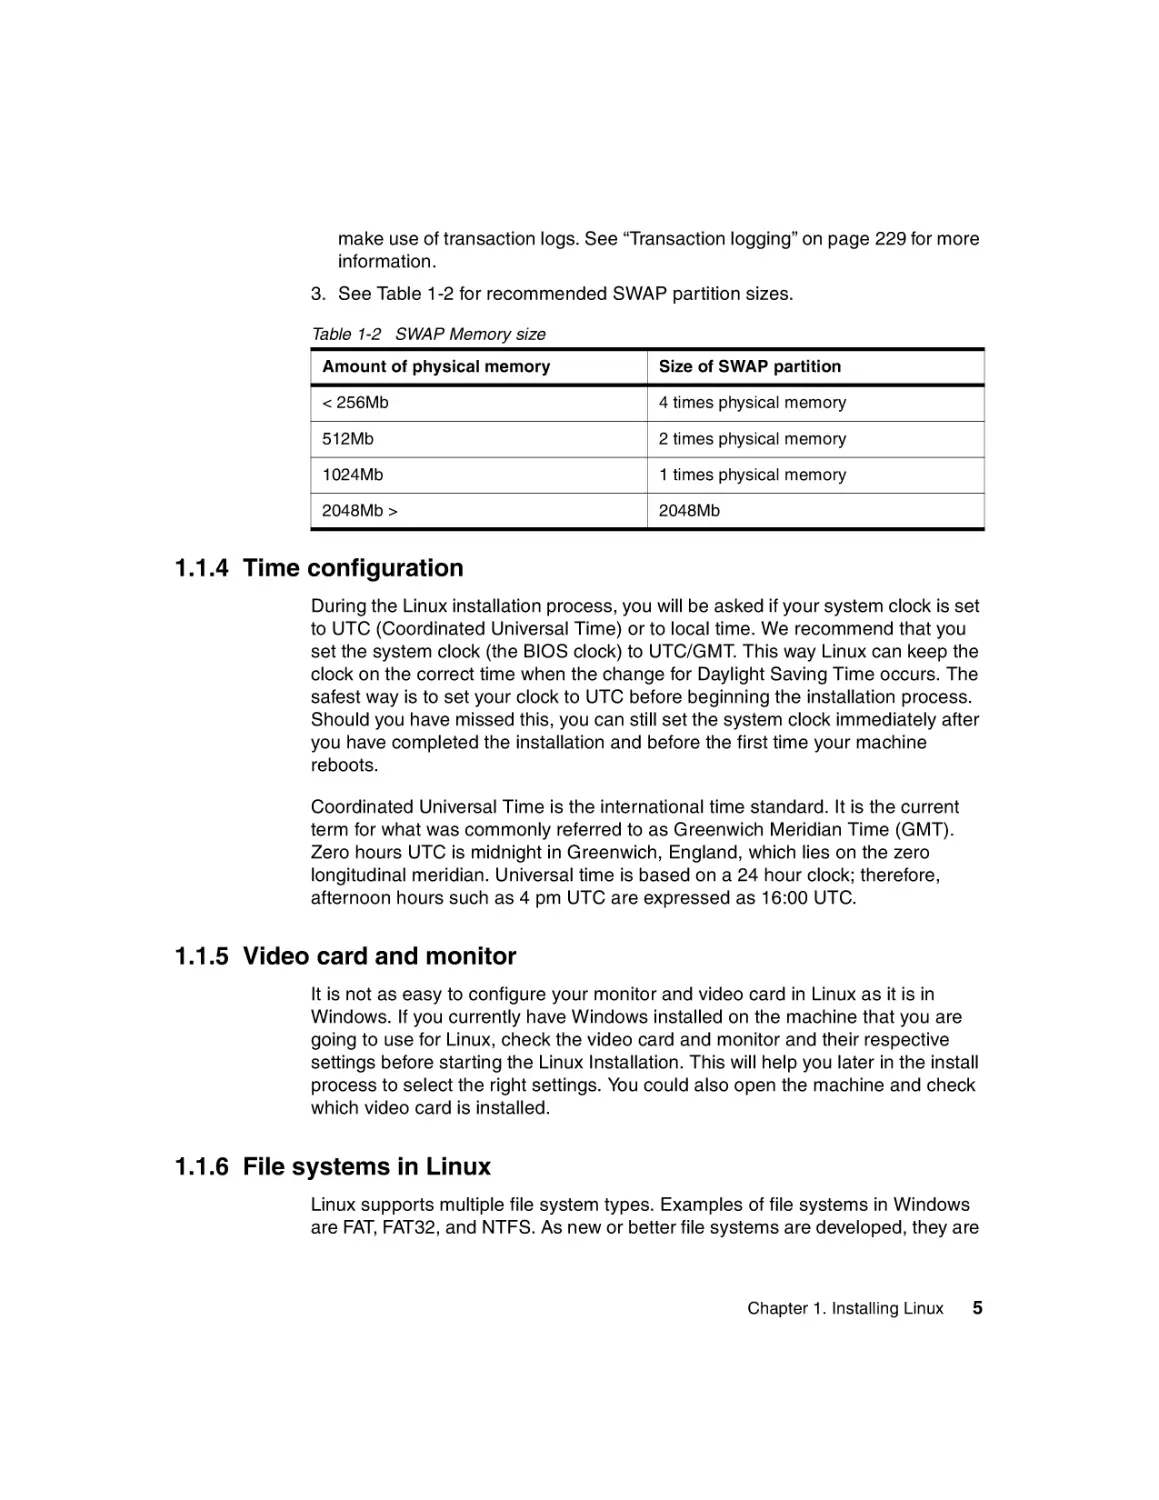
3. See Table 1-2 for recommended SWAP partition sizes.
Table 1-2 SWAP Memory size
Amount of physical memory
Size of SWAP partition
< 256Mb
4 times physical memory
512Mb
2 times physical memory
1024Mb
1 times physical memory
2048Mb >
2048Mb
1.1.4 Time configuration
During the Linux installation process, you will be asked if your system clock is set
to UTC (Coordinated Universal Time) or to local time. We recommend that you
set the system clock (the BIOS clock) to UTC/GMT. This way Linux can keep the
clock on the correct time when the change for Daylight Saving Time occurs. The
safest way is to set your clock to UTC before beginning the installation process.
Should you have missed this, you can still set the system clock immediately after
you have completed the installation and before the first time your machine
reboots.
Coordinated Universal Time is the international time standard. It is the current
term for what was commonly referred to as Greenwich Meridian Time (GMT).
Zero hours UTC is midnight in Greenwich, England, which lies on the zero
longitudinal meridian. Universal time is based on a 24 hour clock; therefore,
afternoon hours such as 4 pm UTC are expressed as 16:00 UTC.
1.1.5 Video card and monitor
It is not as easy to configure your monitor and video card in Linux as it is in
Windows. If you currently have Windows installed on the machine that you are
going to use for Linux, check the video card and monitor and their respective
settings before starting the Linux Installation. This will help you later in the install
process to select the right settings. You could also open the machine and check
which video card is installed.
1.1.6 File systems in Linux
Linux supports multiple file system types. Examples of file systems in Windows
are FAT, FAT32, and NTFS. As new or better file systems are developed, they are
Chapter 1. Installing Linux
5
incorporated into the kernel. In Linux, as in other UNIX derivatives, the separate
file systems that are available for use by the system are combined into a single
hierarchical tree structure rather than being addressed by drive names. Each
new file system is added into this single tree structure by mounting the file
system onto a specified directory. This directory is known as the mount point.
The files and directories in the mounted directory are then accessible through
this directory. If a file system is mounted onto a directory which already contains
files, these files are masked by the new file system and so are unavailable. Once
the file system covering them up is unmounted, the files become visible again.
Initially, Linux used the minix file system. This had restrictions and performance
problems, which were solved in April 1992 by the introduction of the Extended
File System (ext). The ext file system was developed as an expandable and
powerful file system for Linux. In January 1993, the Second Extended File System
(ext2) was released. It has become the most successful file system for Linux and
is the standard file system for most Linux distributions. While being a very solid,
stable file system with good performance, it is quite slow to run a file system
check (similar to CHKDSK). This occurs when the system fails and is being
brought back up, or every twentieth time the file system is mounted. On a system
with big partitions, this check can take a while, and the system is inaccessible
during the check.
To solve these problems, new journaled file systems were introduced with the 2.4
Linux kernel; we briefly discuss them in the following paragraphs.
Journaling ensures consistency of the file system. This means that you do not
have to run the file system check if the system should go down unexpectedly. In
order to minimize file system inconsistencies and restart time, journaling file
systems keep track of changes that they are about to make to the file system.
These records are stored in a separate area of the file system, which is known as
the journal or log. Once the journal records have been successfully written, the
changes to the file system will be applied and the journal entries purged. If the
system should go down unexpectedly, this process ensures that the file system is
consistent without the need for a lengthy check.
1. ext3 - ext3 extends the ext2 file system by adding journaling. This means that
it shares ext2’s robustness and performance. One major advantage of ext3
compared to other journaled file systems is that it is forward and backward
compatible with ext2. You may freely switch between ext2 and ext3 as long as
the file system has been cleanly unmounted or a file system check has been
run.
2. ReiserFS - ReiserFS stores not just the file names, but also the files in a
balanced tree. Balanced trees have a sophisticated algorithmic foundation
and are more robust in their performance. Storing small files in large partitions
is very efficient. Being more efficient at small files, however, does not mean it
6
Lotus Domino 6 for Linux
is inefficient at storing larger files. ReiserFS is considered a truly multipurpose
file system.
We have opted to use the ext3 file system for the Linux servers used in writing
this book.
Note: The ext2 is a faster filesystem due to the fact it is not journalling
everything, but it takes a lot longer to recover from a system failure than a
journalling filesystem.
An excellent source of information about file systems is the File Systems
HOW-TO. You can find this HOW-TO document, as well as numerous others, on
The Linux Documentation Project Web site at:
http://tldp.org/docs
Additional information about the ext3 file system can be found on:
http://www.redhat.com/support/wpapers/redhat/ext3
http://www.linuxplanet.com/linuxplanet/reports/4136/1/
The home page for ReiserFS is located at:
http://www.reiserfs.org
1.1.7 Different Linux distributions
Domino 6 for Linux supports two different Linux distributions, identified in
Table 1-3.
Table 1-3 Supported Linux distributions
Distributions
Kernel
version
Home page
Red Hat 7.2 or newer or
Red Hat Advanced Server 2.1
2.4.18
www.redhat.com
SuSE 8.0 or newer or
SuSE Groupware Server 7 with Lotus Domino
2.4.18
www.suse.com
Note: We recommend using the enterprise/groupware versions of the Red Hat
or SuSE Linux instead of the personal or professional version. The
enterprise/groupware versions have an extended release cycle. The
enterprise server versions have also been certified by the top ISVs, such as
IBM.
Chapter 1. Installing Linux
7
UnitedLinux
In May 2002, four companies, Caldera, Conectiva, SuSE, and Turbolinux,
announced that they had formed a consortium to develop a single distribution of
the Linux operating system. This distribution is called UnitedLinux. Previously,
each of these companies had their own Linux distributions.
By developing a unified distribution, UnitedLinux is attempting to help Linux
vendors, ISVs, and OEMs to support a single Linux offering, instead of many
different versions. By combining their skills and resources, the four companies
are trying to make a better, standards-based business version of the Linux
operating system.
The consortium has announced that a public beta of UnitedLinux will be available
in Q3’2002 and the first release version will still be available in Q4’2002.
IBM plans to add support for UnitedLinux to Domino 6 for Linux, once
UnitedLinux version 1 has been released.
1.2 Installing Red Hat 7.2
In this section we show you how to install Red Hat 7.2 Professional on your
server.
Note: At the time of writing, 7.2 was the newest version of the Red Hat Linux
and it was used to create the installation instructions. Version 7.3 of the Red
Hat Linux operating system was released later in May 2002. The redbook
team did some limited testing with version 7.3, and all the installation
instructions seemed to apply also to this version.
Note: We recommend using Red Hat Advanced Server version 2.1 or newer
instead of the RH Personal or RH Professional version. The RH Advanced
Server version has an extended release cycle . The RH Advanced Server has
also been certified by the top ISVs, such as IBM. The installation of the RH
Advanced Server is similar to the installation of the RH Professional version,
which we detail here.
To capture the screens shown in this book, we have installed and configured
Linux in a VMware window. VMware is a product by VMware, Inc.
(http://www.vmware.com). It allows you to run one operating system as a guest of
another. This means that some of the screens might look slightly different from
what you would see on your system. These differences are hardware-related, as
VMware emulates different hardware devices for the guest operating system.
8
Lotus Domino 6 for Linux
Be sure to read “Before you begin” on page 2 to make the installation easier. To
start the installation, insert the Red Hat 7.2 CD-ROM and turn on or reboot the
server.
Attention: The installation process will destroy any existing data stored on
your hard disk drives.
Figure 1-1 Red Hat 7.2: Initial boot screen
1. Once the screen shown in Figure 1-1 is displayed, you are ready to start the
Linux installation. Press Enter to begin installation immediately or wait for it to
start automatically after a short pause.
2. The system will begin to probe (detect) the hardware installed on your system
and load the appropriate drivers for it. The Welcome to Red Hat Linux window
is displayed while this is happening.
Once the drivers are loaded, the Red Hat Install Program will start. We used
the graphical setup program, so this is what is described here. If the graphical
installation fails to start, consult your RedHat Installation Guide.
Chapter 1. Installing Linux
9
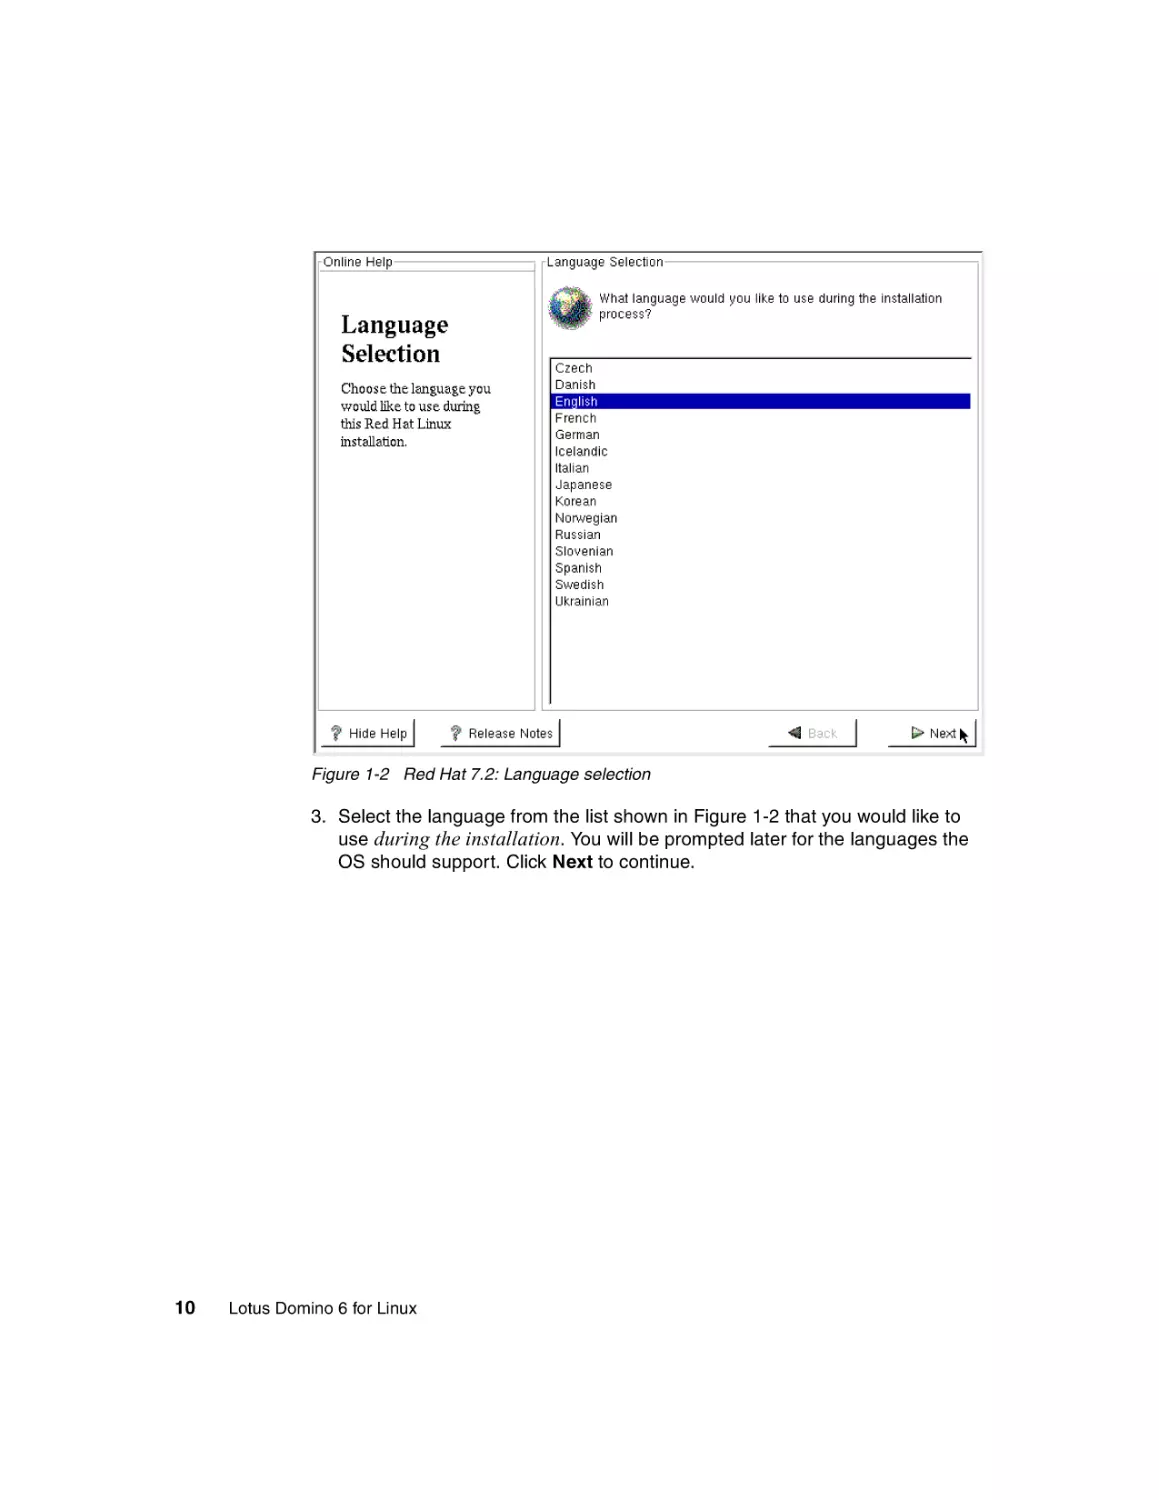
Figure 1-2 Red Hat 7.2: Language selection
3. Select the language from the list shown in Figure 1-2 that you would like to
use during the installation. You will be prompted later for the languages the
OS should support. Click Next to continue.
10
Lotus Domino 6 for Linux
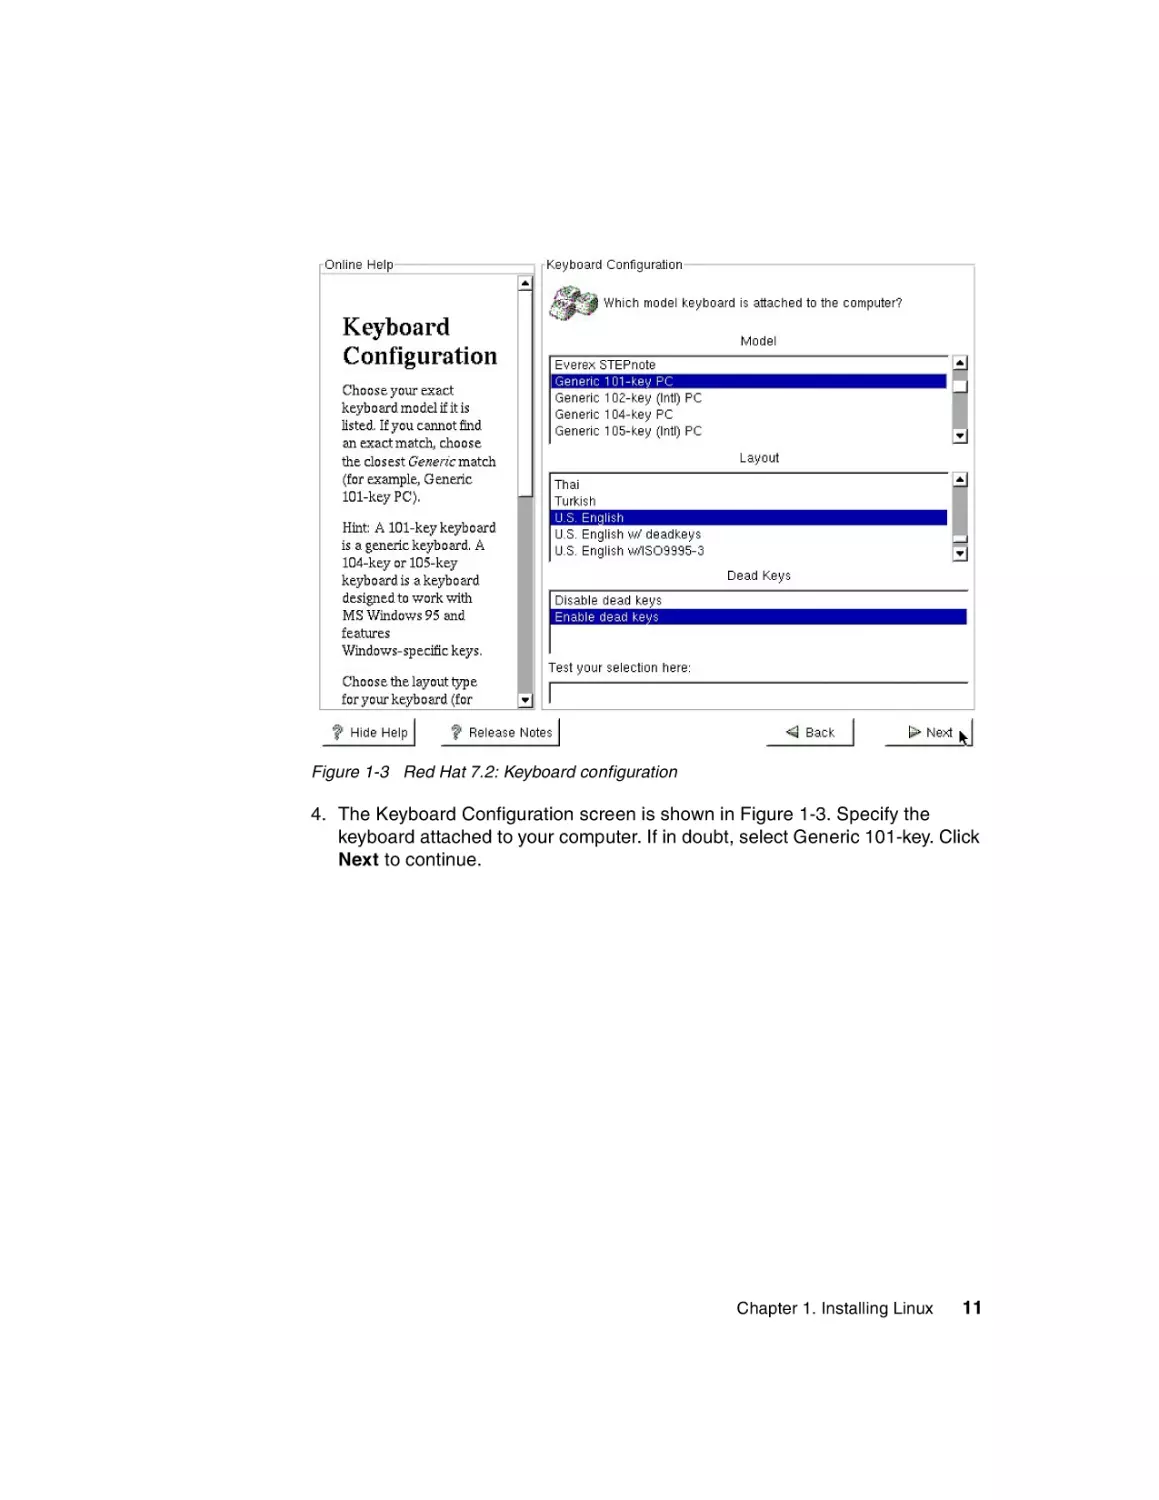
Figure 1-3 Red Hat 7.2: Keyboard configuration
4. The Keyboard Configuration screen is shown in Figure 1-3. Specify the
keyboard attached to your computer. If in doubt, select Generic 101-key. Click
Next to continue.
Chapter 1. Installing Linux
11
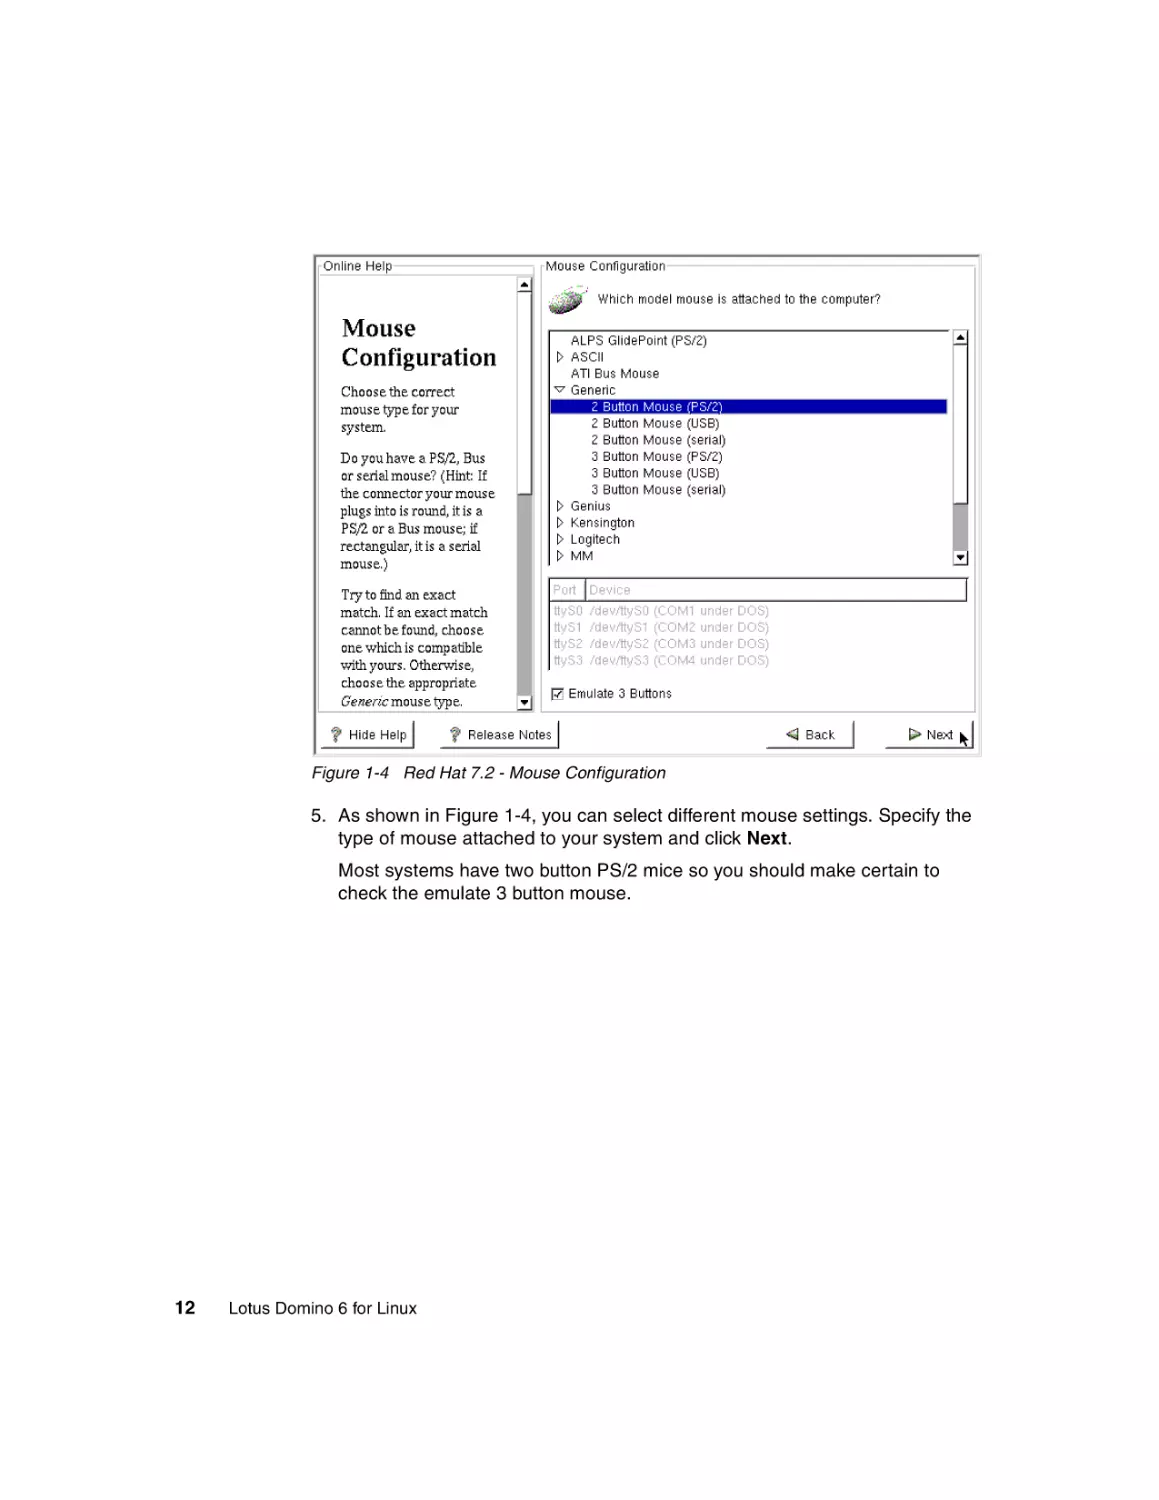
Figure 1-4 Red Hat 7.2 - Mouse Configuration
5. As shown in Figure 1-4, you can select different mouse settings. Specify the
type of mouse attached to your system and click Next.
Most systems have two button PS/2 mice so you should make certain to
check the emulate 3 button mouse.
12
Lotus Domino 6 for Linux
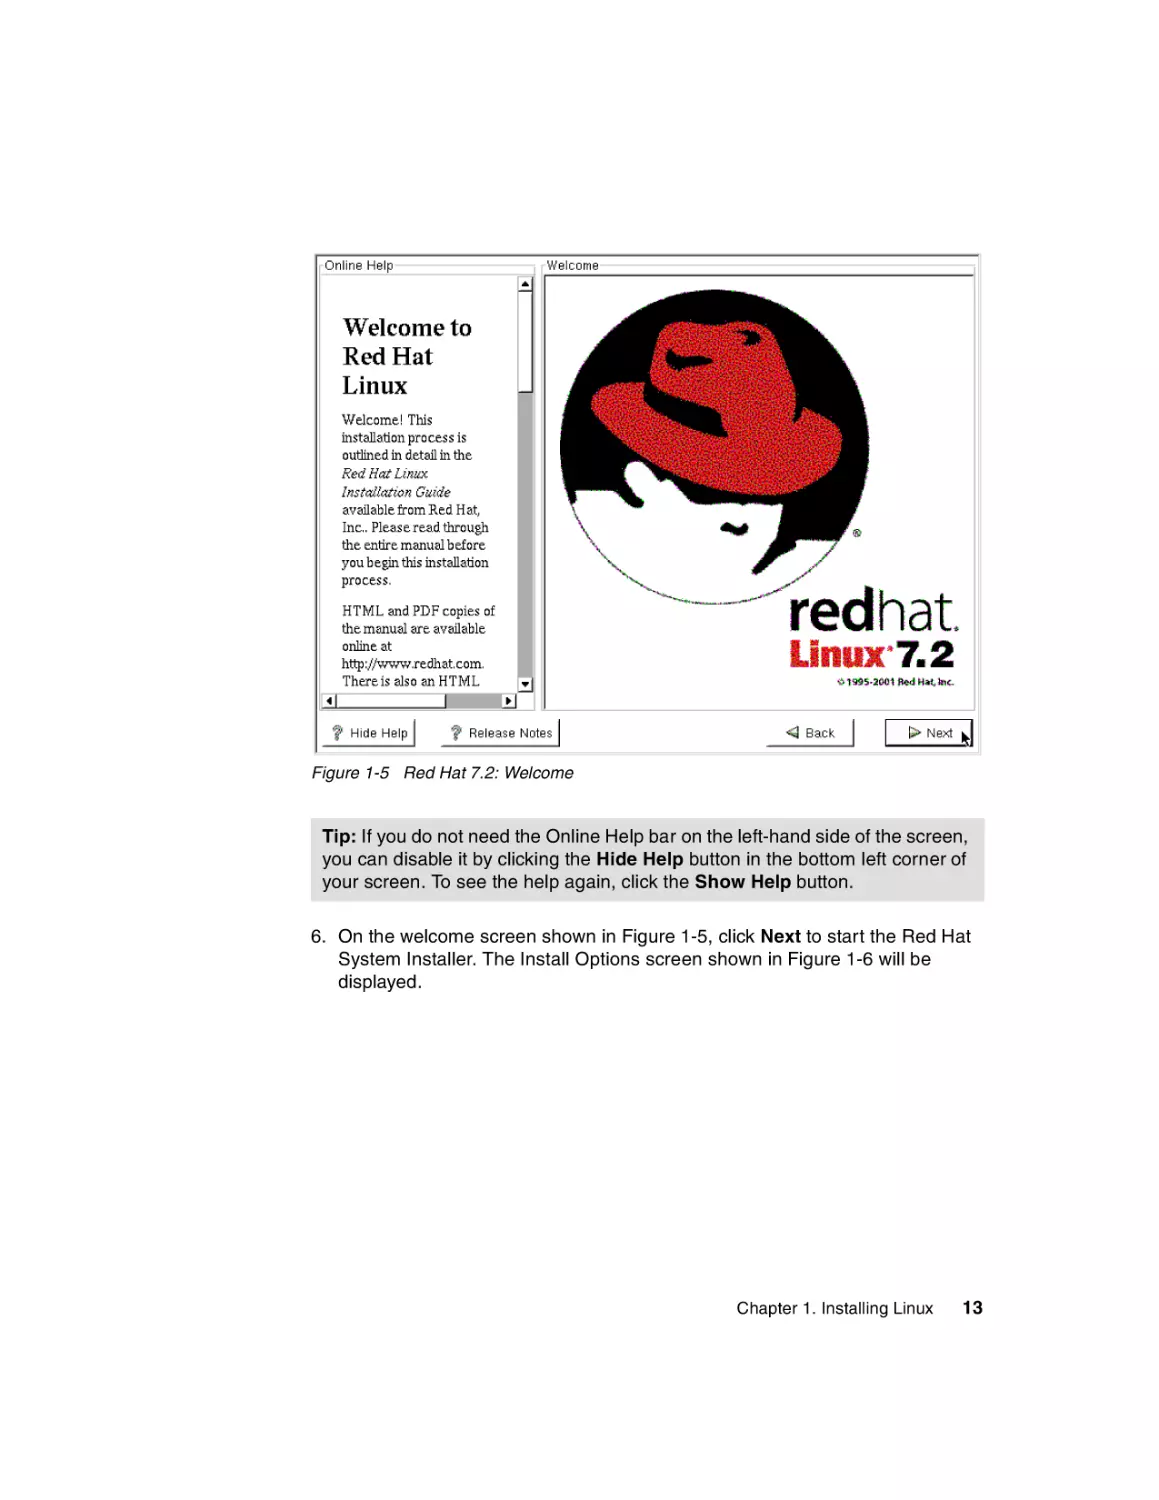
Figure 1-5 Red Hat 7.2: Welcome
Tip: If you do not need the Online Help bar on the left-hand side of the screen,
you can disable it by clicking the Hide Help button in the bottom left corner of
your screen. To see the help again, click the Show Help button.
6. On the welcome screen shown in Figure 1-5, click Next to start the Red Hat
System Installer. The Install Options screen shown in Figure 1-6 will be
displayed.
Chapter 1. Installing Linux
13
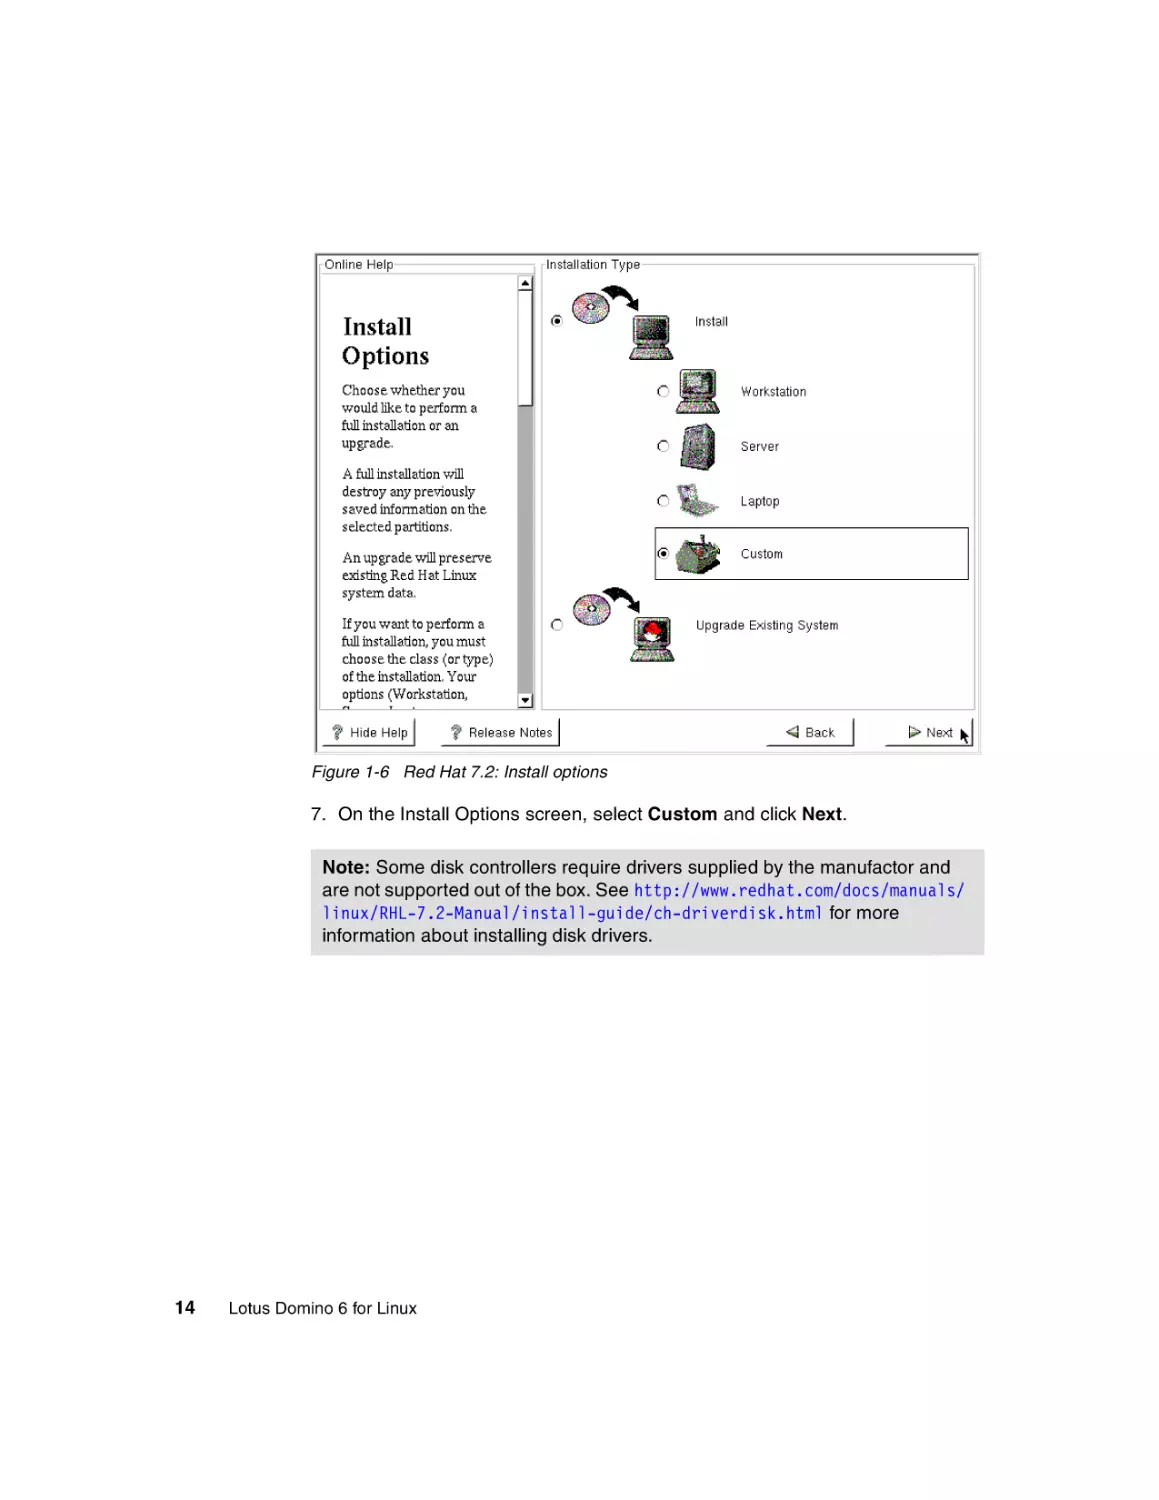
Figure 1-6 Red Hat 7.2: Install options
7. On the Install Options screen, select Custom and click Next.
Note: Some disk controllers require drivers supplied by the manufactor and
are not supported out of the box. See http://www.redhat.com/docs/manuals/
linux/RHL-7.2-Manual/install-guide/ch-driverdisk.html for more
information about installing disk drivers.
14
Lotus Domino 6 for Linux
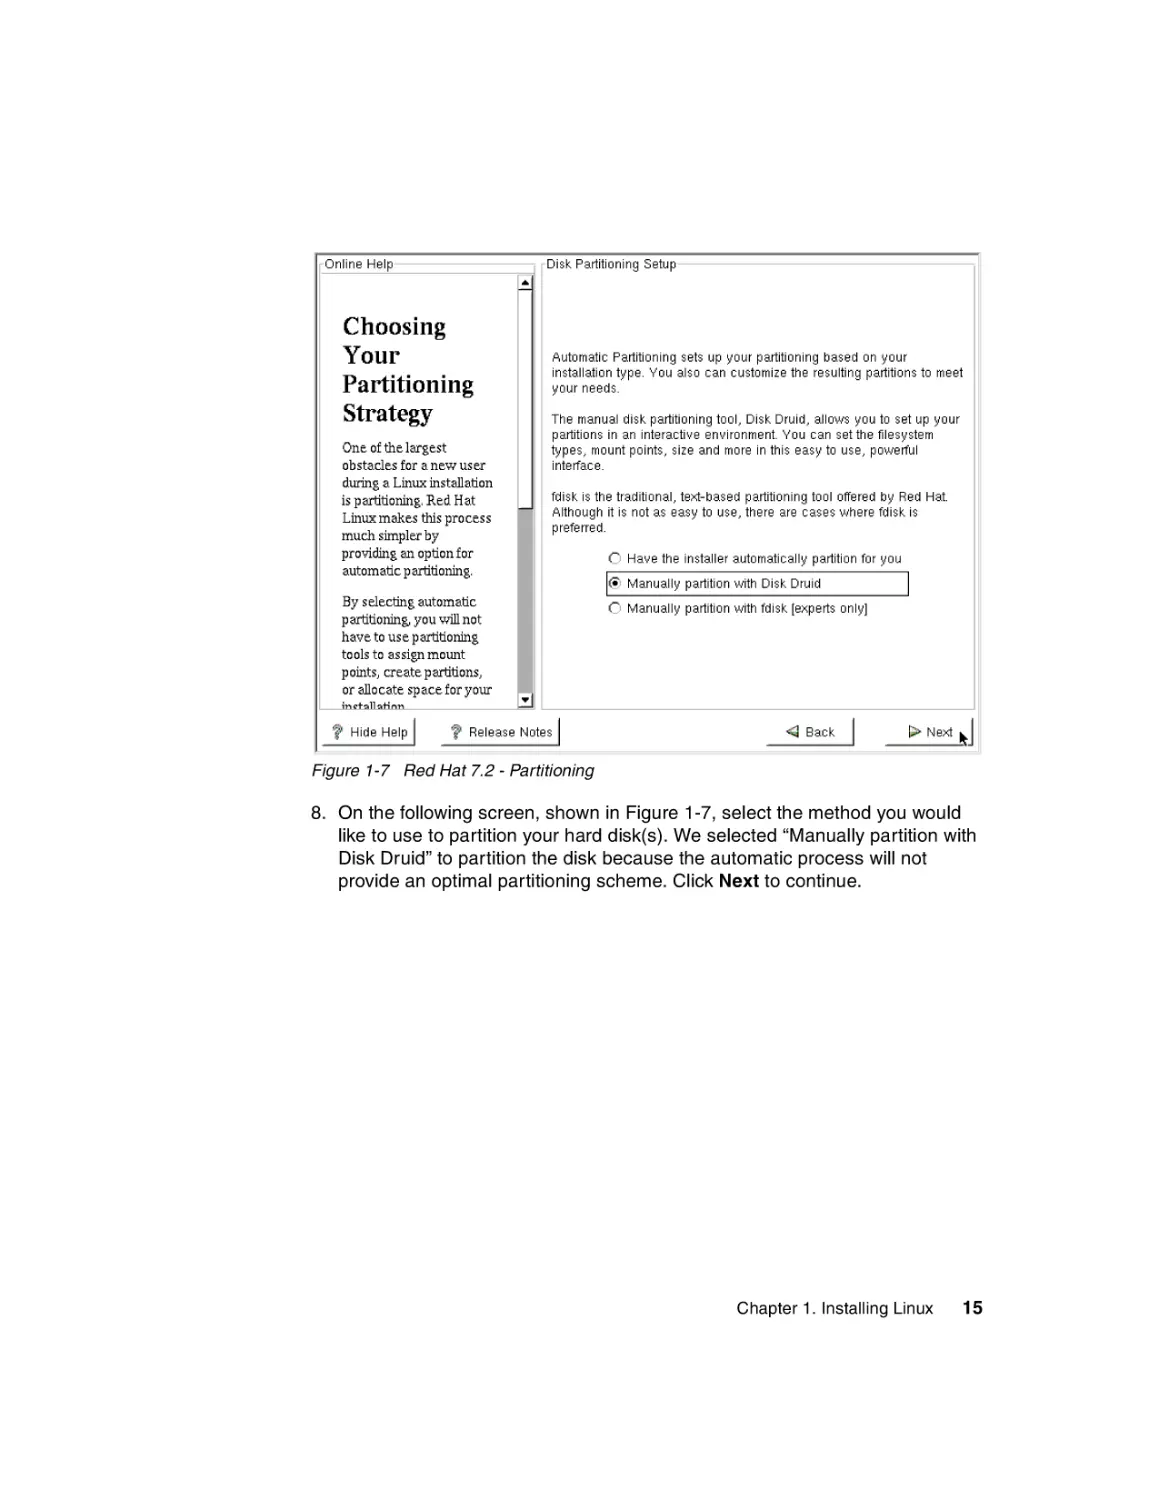
Figure 1-7 Red Hat 7.2 - Partitioning
8. On the following screen, shown in Figure 1-7, select the method you would
like to use to partition your hard disk(s). We selected “Manually partition with
Disk Druid” to partition the disk because the automatic process will not
provide an optimal partitioning scheme. Click Next to continue.
Chapter 1. Installing Linux
15
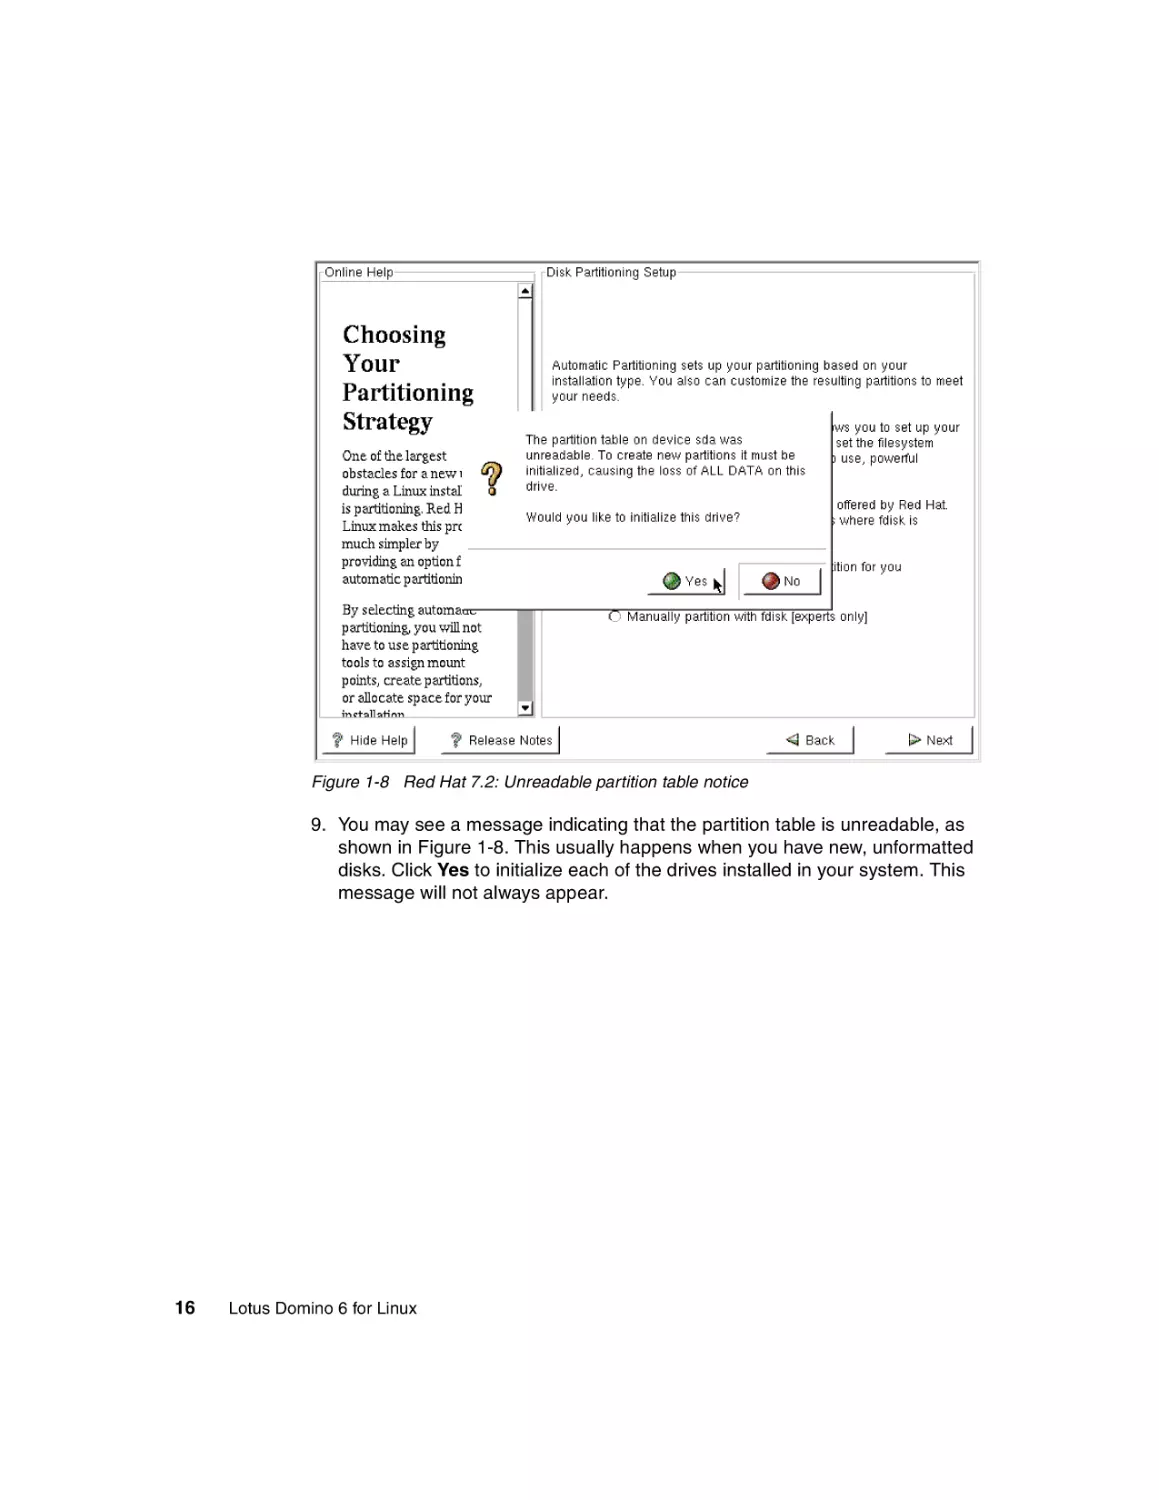
Figure 1-8 Red Hat 7.2: Unreadable partition table notice
9. You may see a message indicating that the partition table is unreadable, as
shown in Figure 1-8. This usually happens when you have new, unformatted
disks. Click Yes to initialize each of the drives installed in your system. This
message will not always appear.
16
Lotus Domino 6 for Linux
Figure 1-9 Red Hat 7.2: Drive geometry
10.We are now ready to partition our disks. Have a look at section 1.1.3,
“Partitions” on page 4 for the recommended partitions and their respective
sizes. You might also want to review “Linux performance” on page 196 for
alternate configurations using software RAID and Logical Volume Manager
(LVM).
Important: If you have existing partitions from another operating system on
your machine, you must delete them before you can create the Linux
partitions. Once the old partitions are deleted, proceed with the next step.
11.As shown in Figure 1-9, click New to create your partitions.
Important: You can only have four primary partitions for each hard disk drive.
If you need to create more than four partitions, create three primary partitions
and one extended partition that uses all the remaining disk space. You can
then create all subsequent partitions in this extended partition.
Chapter 1. Installing Linux
17
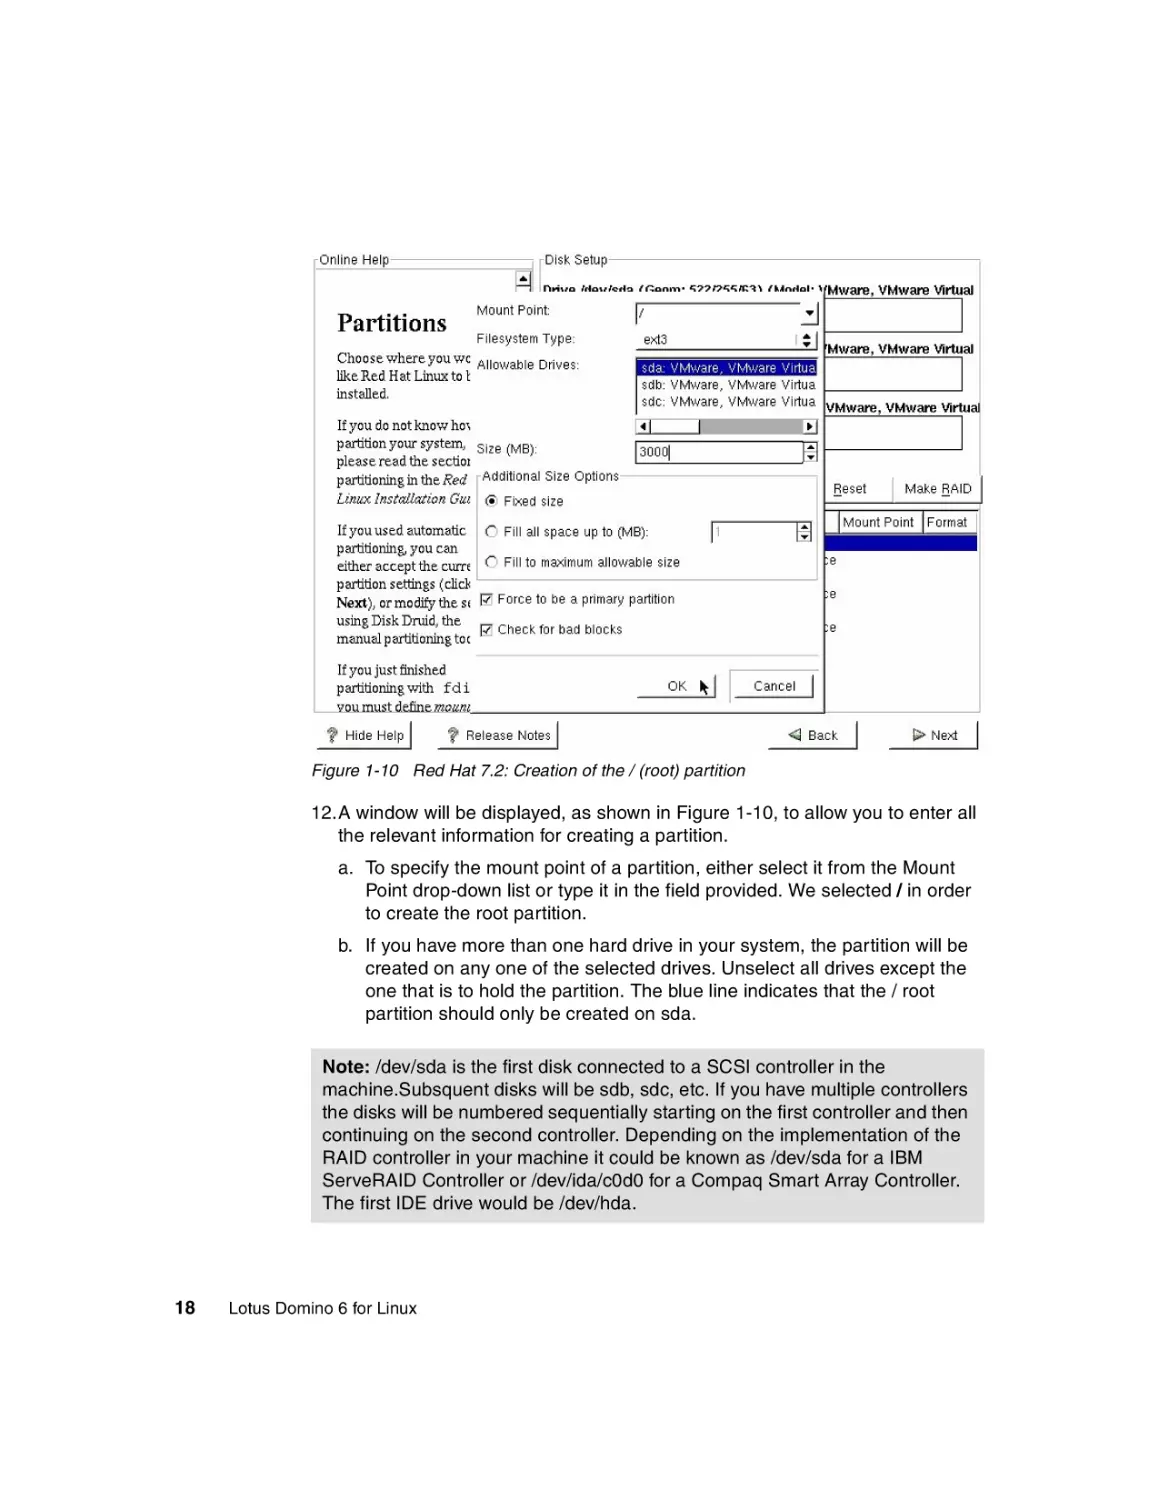
Figure 1-10 Red Hat 7.2: Creation of the / (root) partition
12.A window will be displayed, as shown in Figure 1-10, to allow you to enter all
the relevant information for creating a partition.
a. To specify the mount point of a partition, either select it from the Mount
Point drop-down list or type it in the field provided. We selected / in order
to create the root partition.
b. If you have more than one hard drive in your system, the partition will be
created on any one of the selected drives. Unselect all drives except the
one that is to hold the partition. The blue line indicates that the / root
partition should only be created on sda.
Note: /dev/sda is the first disk connected to a SCSI controller in the
machine.Subsquent disks will be sdb, sdc, etc. If you have multiple controllers
the disks will be numbered sequentially starting on the first controller and then
continuing on the second controller. Depending on the implementation of the
RAID controller in your machine it could be known as /dev/sda for a IBM
ServeRAID Controller or /dev/ida/c0d0 for a Compaq Smart Array Controller.
The first IDE drive would be /dev/hda.
18
Lotus Domino 6 for Linux
c. Enter the size of the partition. Since we have a 4 GB (4000 MB) drive and
need 512 MB for swap and roughly 500 MB for /var, we allocated 3 GB to
the root partition. Refer to Table 1-2 on page 5 to determine the
appropriate size of swap partition for your system.
d. In the Additional Size Options box, you have several options. We selected
Fixed size since we wish to specify a 3 GB partition size.
e. Since it is safer to boot off a primary partition, we recommend that you
select Force to be a primary partition for the boot partition (the partition
that contains your root file system).
f. Select Check for bad blocks to be confident your drives are in good
shape; this will take quite a bit of time for large drives.
Tip: To be safe, you should always select Check for bad blocks for all
partitions you create.
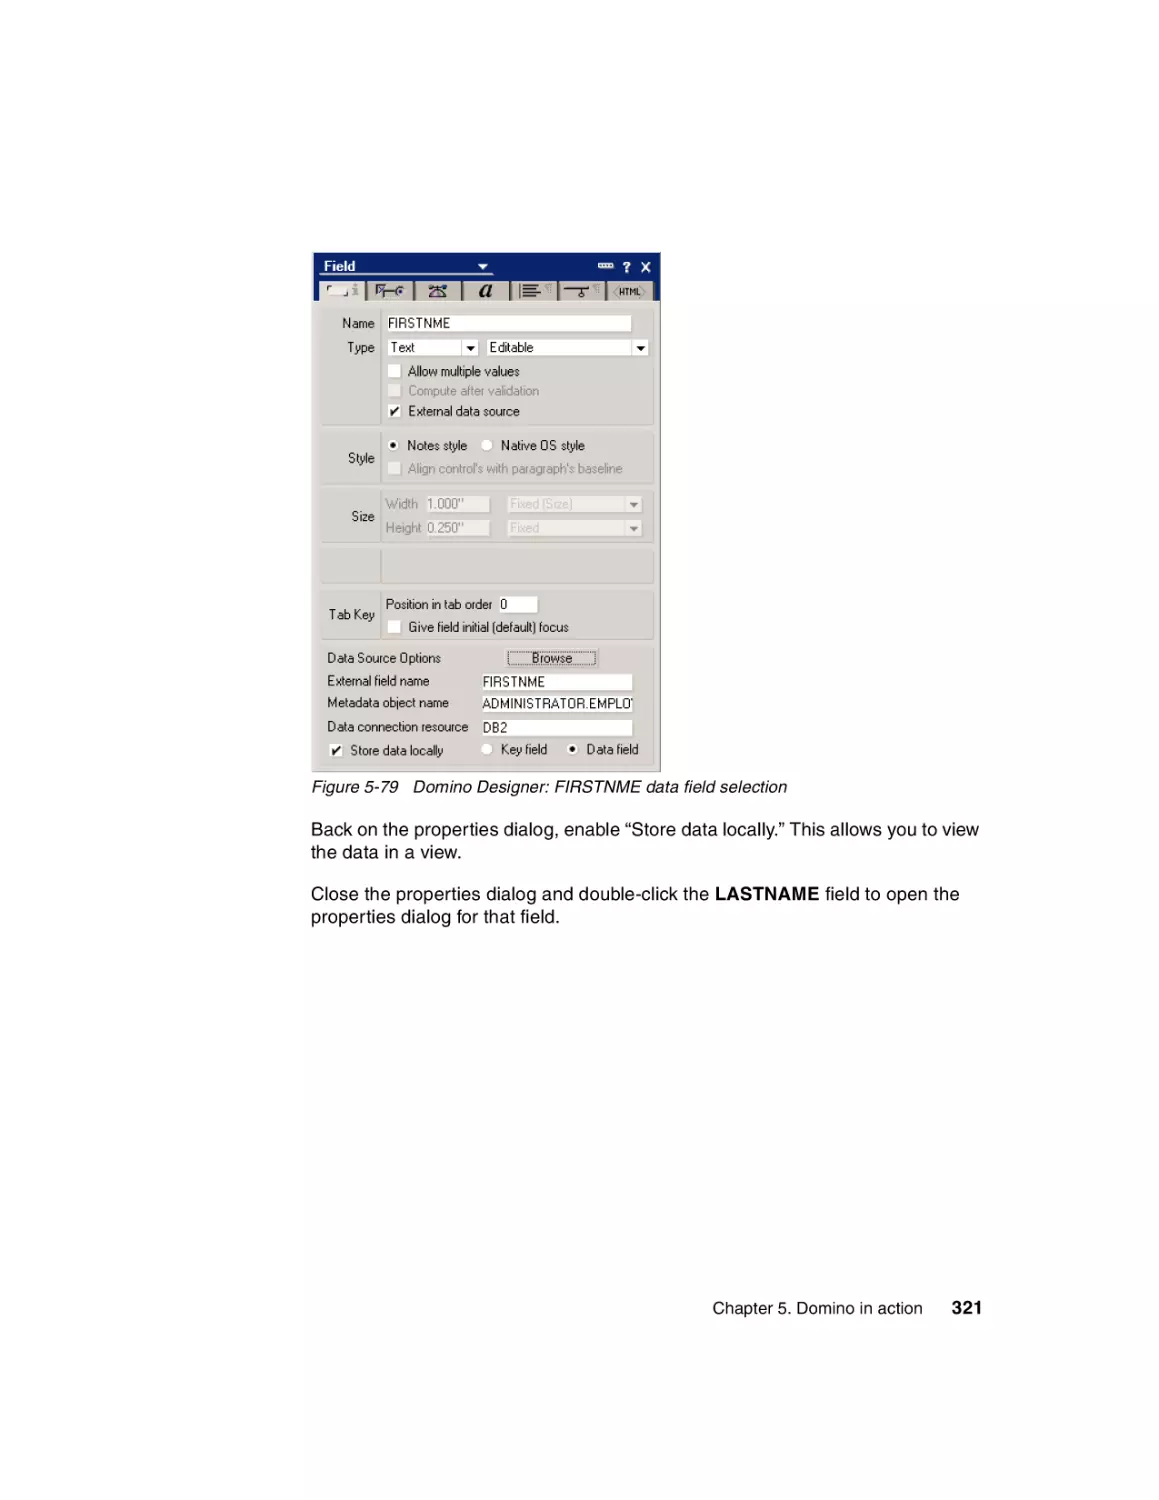
g. Click OK once all information is entered correctly to create the partition.
13.To create the Swap partition, click New on the Disk Setup Screen. (The same
step was illustrated in Figure 1-9.)
Chapter 1. Installing Linux
19
Figure 1-11 Red Hat 7.2: Selecting swap as the filesystem type
14.Click the Filesystem Type drop-down and select swap, as shown in
Figure 1-11.
20
Lotus Domino 6 for Linux
Figure 1-12 Red Hat 7.2: Creation of the swap partition
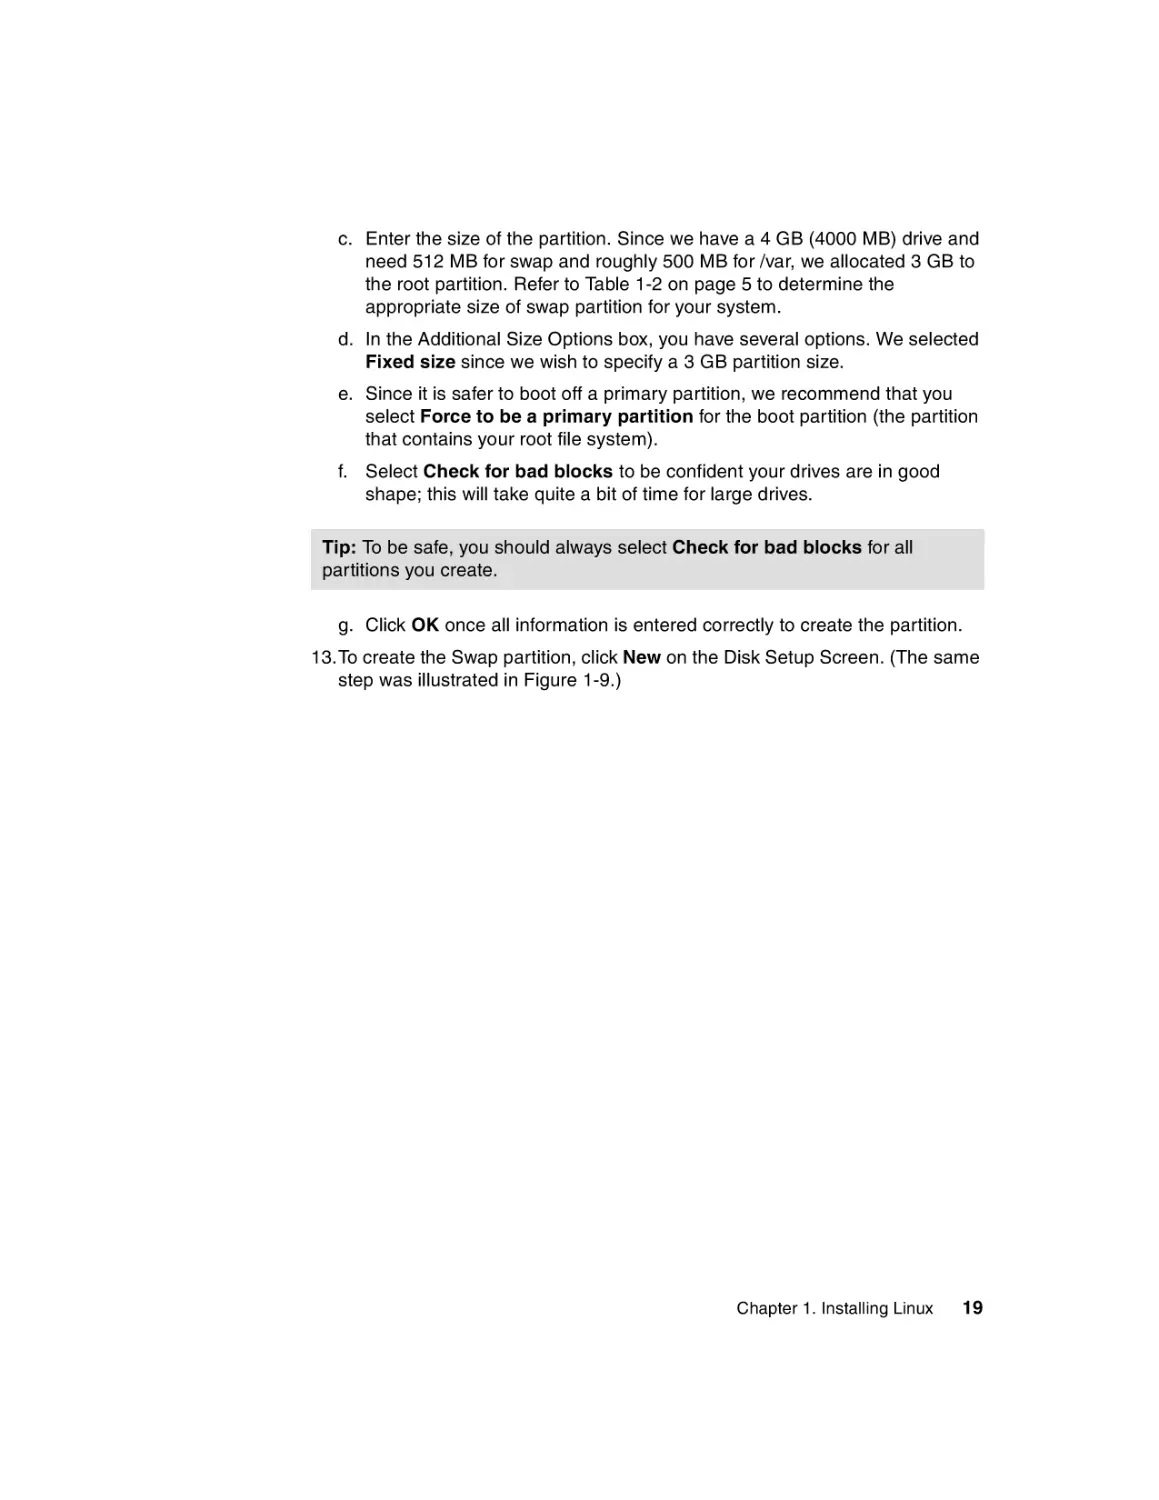
15.Select the appropriate disk array (sda in our case) from the Allowable Drives
list, enter the size of the swap partition, and select Fixed Size. Click OK to
create the swap partition. Our choices are shown in Figure 1-12.
Chapter 1. Installing Linux
21
Figure 1-13 Red Hat 7.2: Creation of the /var partition
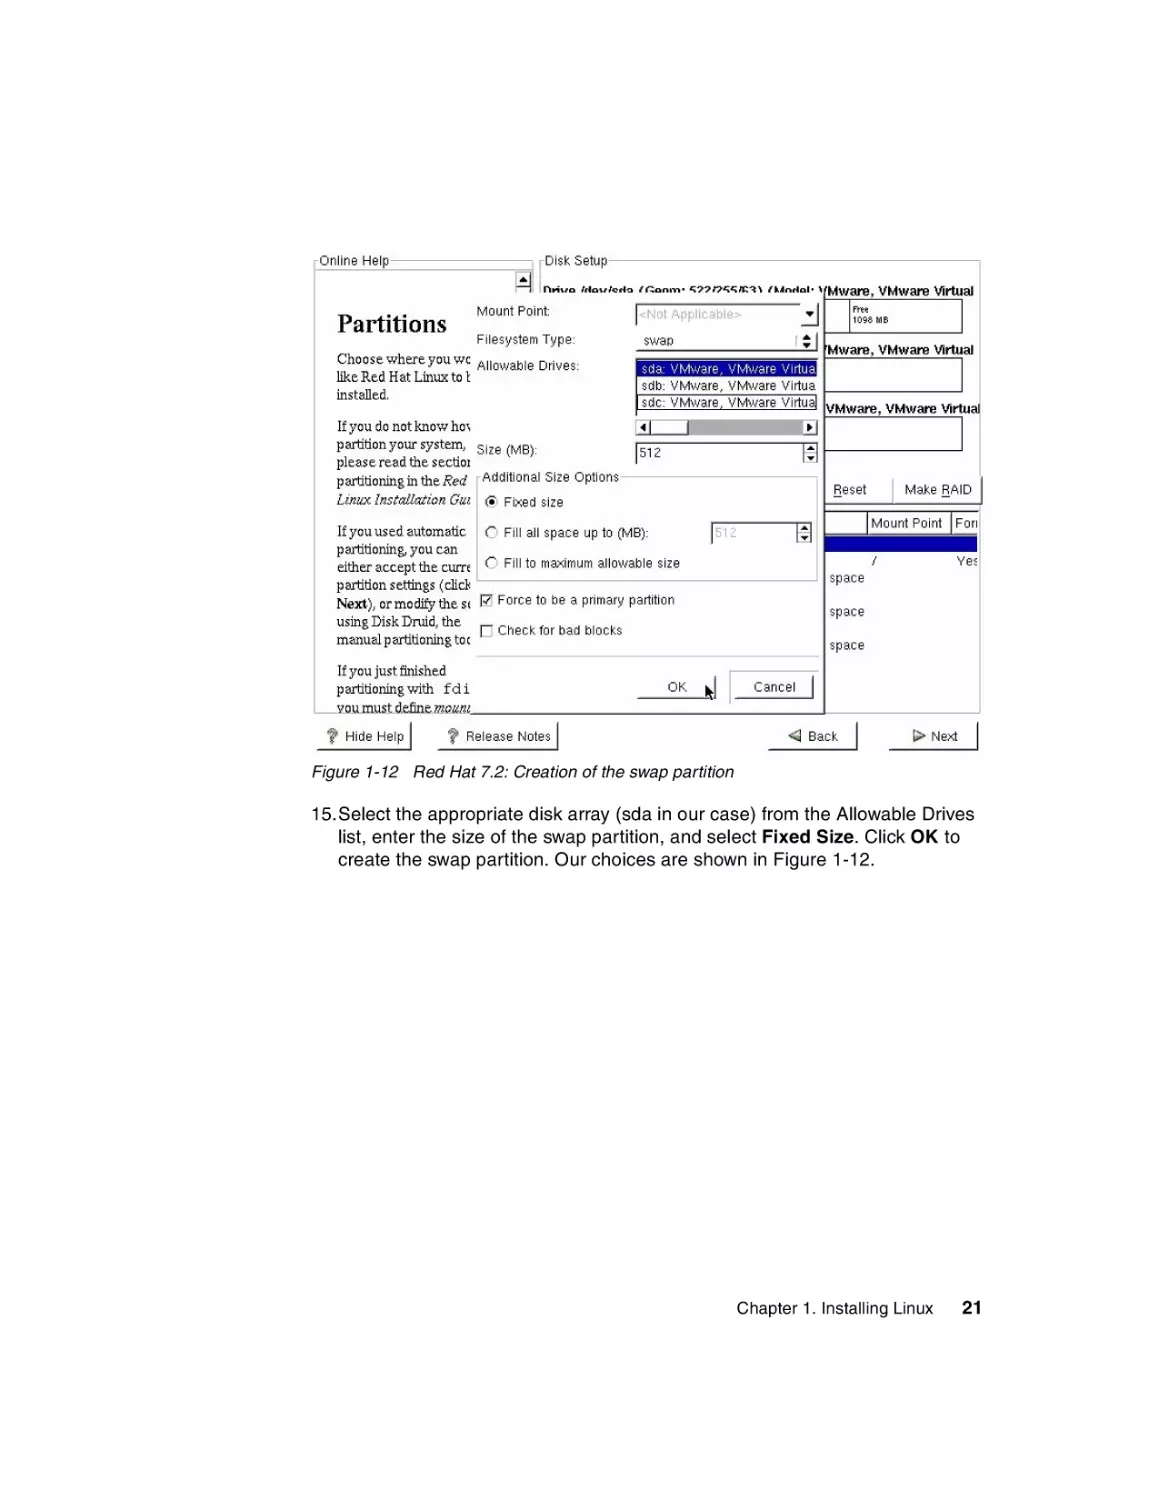
16.Create the /var partition in the same manner described previously for the
other partitions on sda. Since this is the last partition you are going to create
on sda, you can select Fill to maximum allowable size to use all remaining
space. We left about 500 MB for the /var partition, which is plenty for our
logging purposes. The results of our selections are shown in Figure 1-13.
22
Lotus Domino 6 for Linux
Figure 1-14 Red Hat 7.2: Creation of the /translogs partition
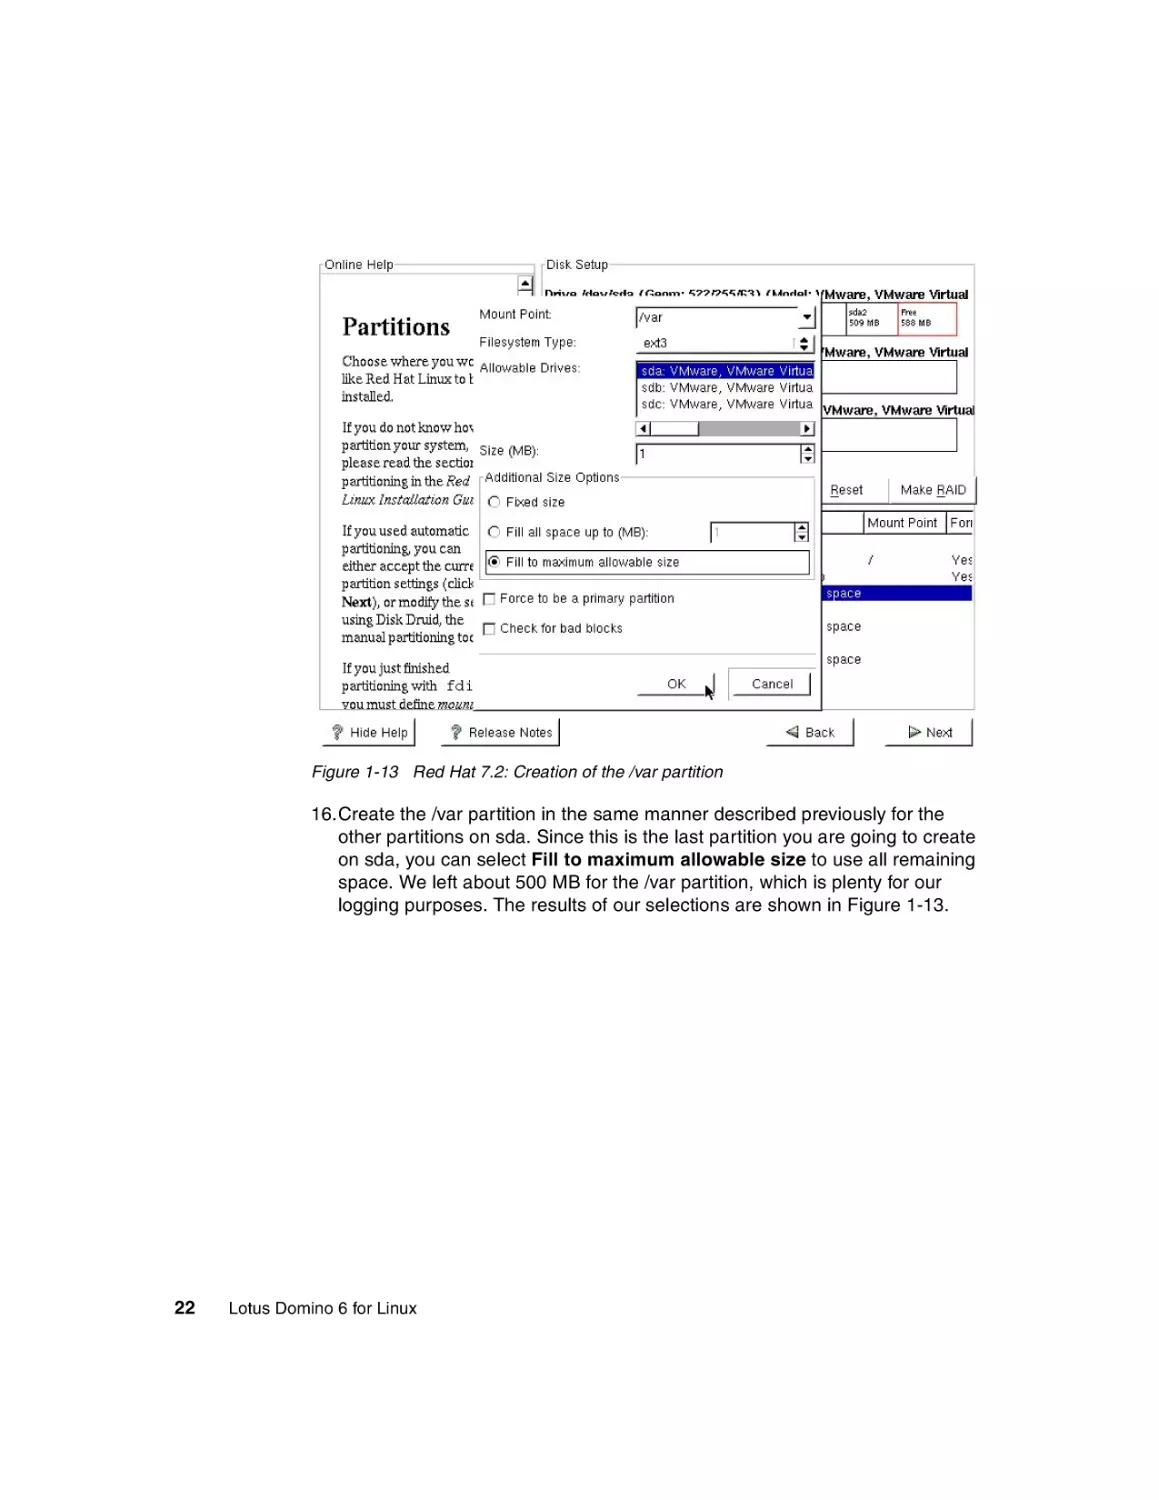
17.The next partition you need to create is /translogs for the Domino Transaction
Logs. Type /translogs into the Mount Point field; this is how you enter a
mount point not available in the drop-down list. Since /translogs will utilize the
entire disk, specify disk array sdb in the Allowable Drives section, then select
Fill to maximum allowable size as shown in Figure 1-14. This is the easiest
way to utilize the entire disk. Click OK to create the partition.
Chapter 1. Installing Linux
23
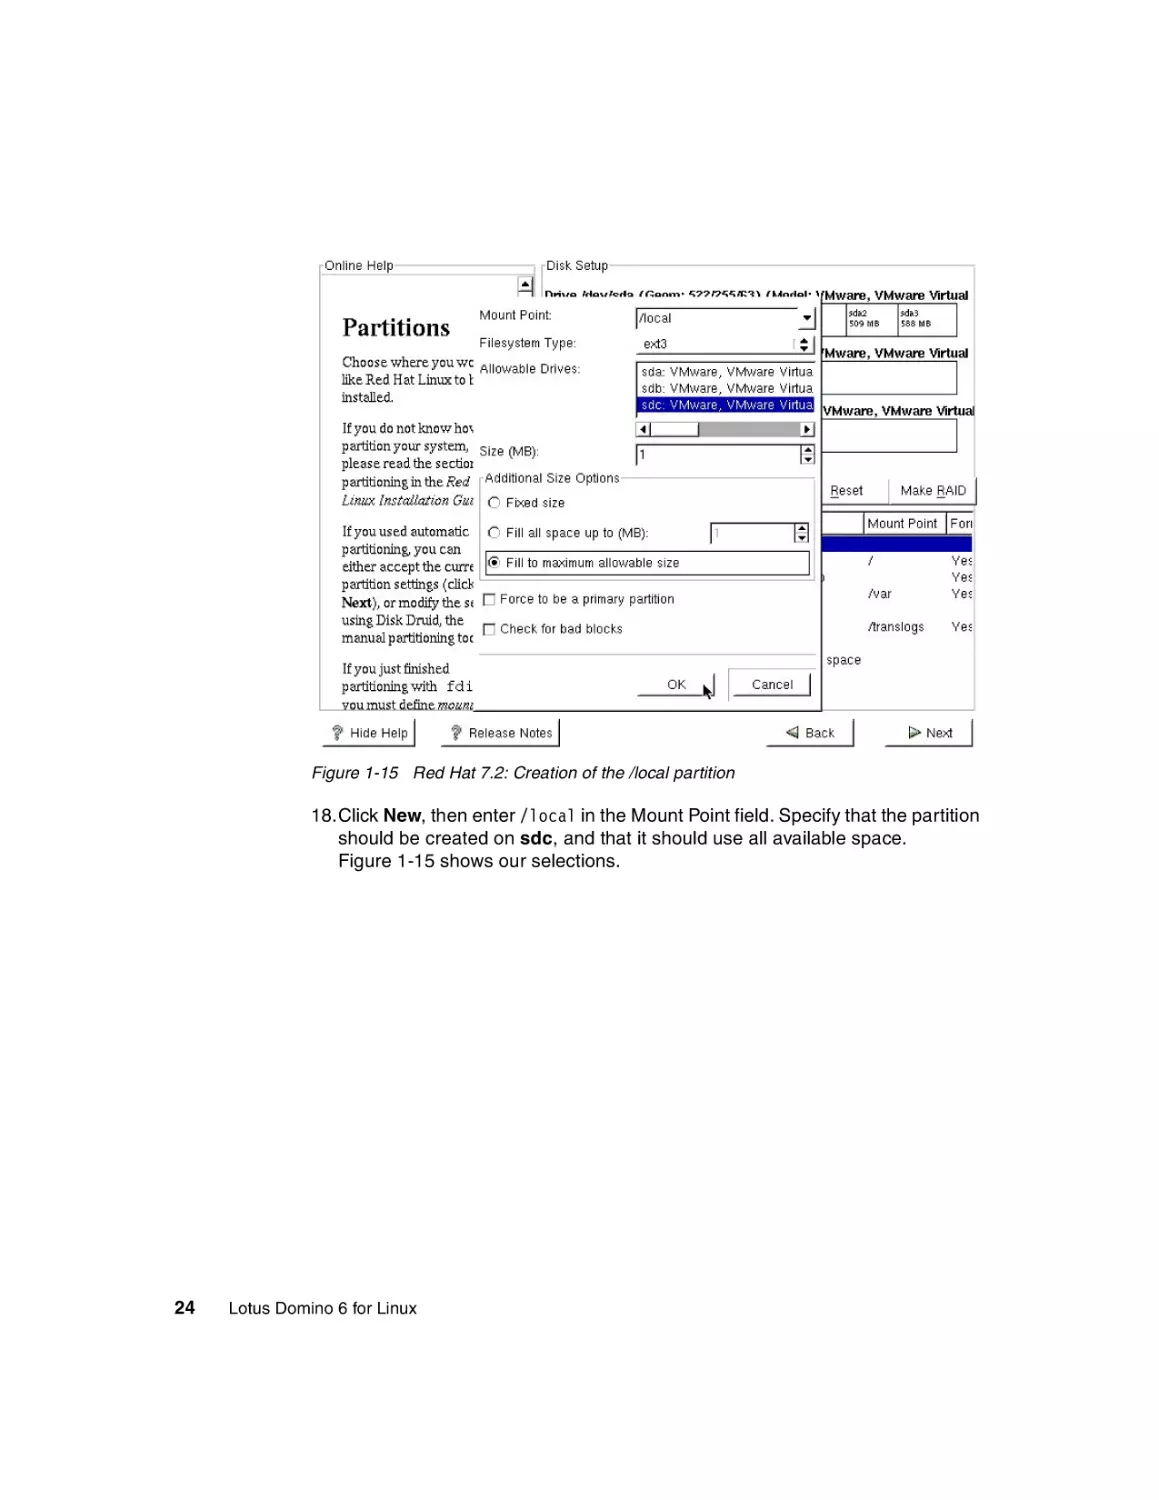
Figure 1-15 Red Hat 7.2: Creation of the /local partition
18.Click New, then enter /local in the Mount Point field. Specify that the partition
should be created on sdc, and that it should use all available space.
Figure 1-15 shows our selections.
24
Lotus Domino 6 for Linux
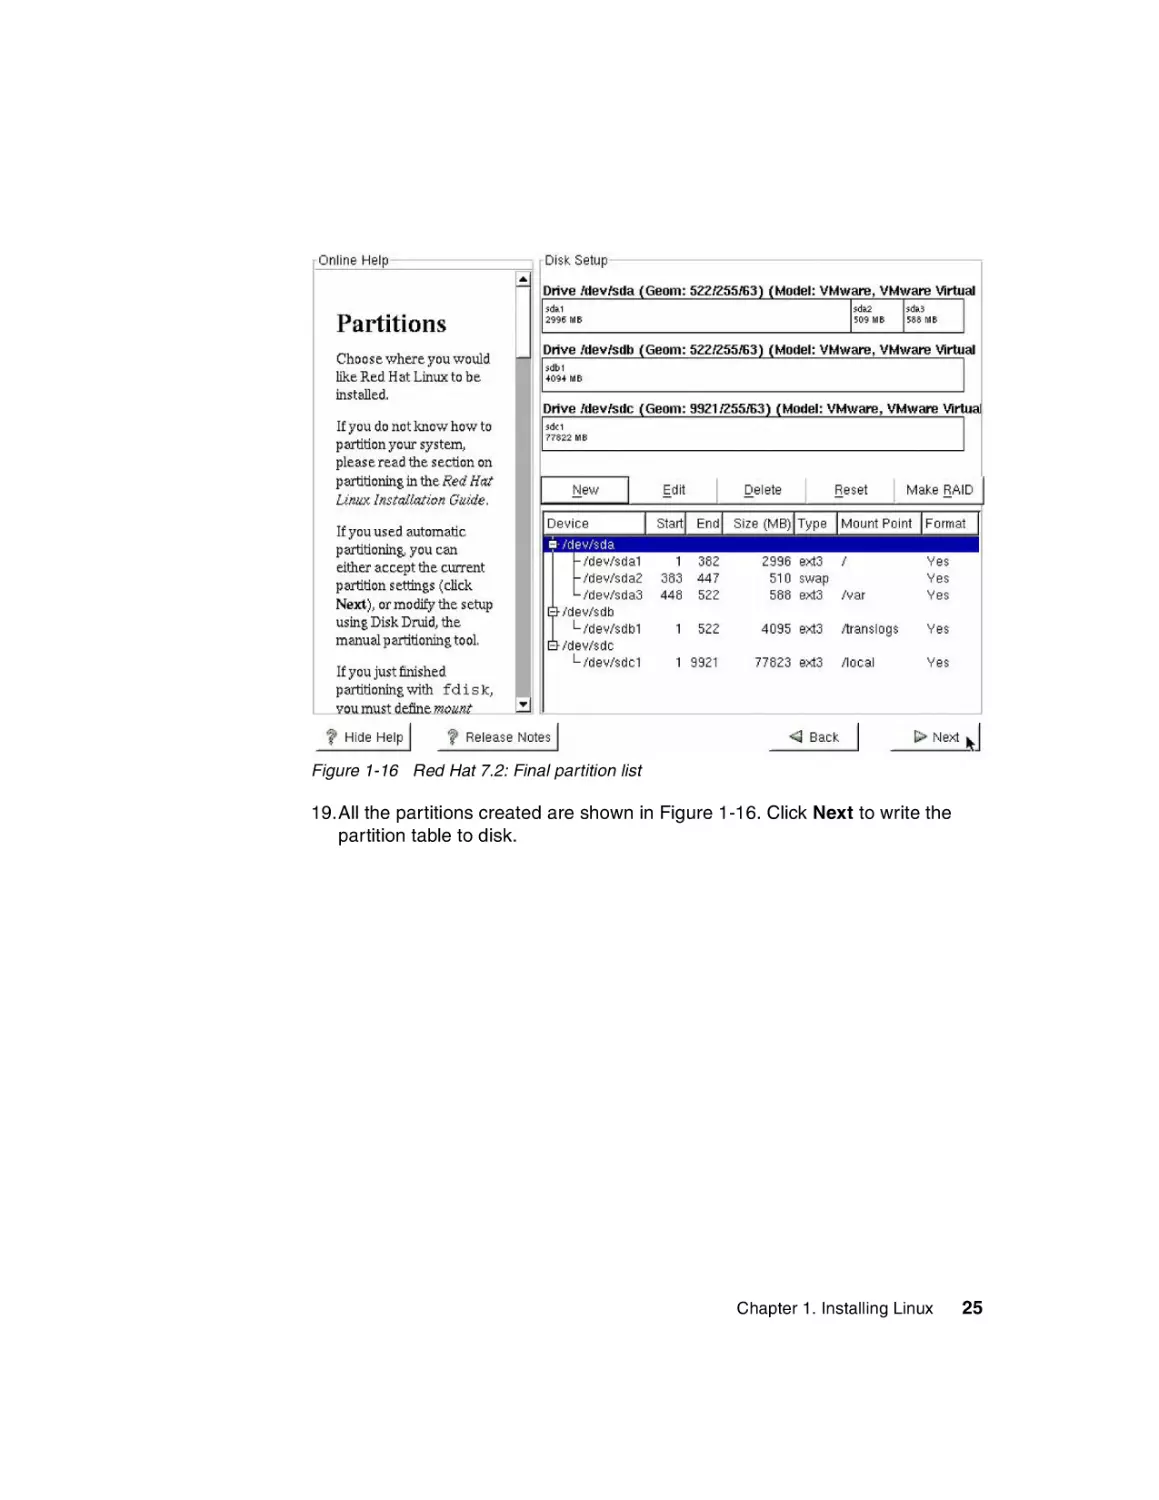
Figure 1-16 Red Hat 7.2: Final partition list
19.All the partitions created are shown in Figure 1-16. Click Next to write the
partition table to disk.
Chapter 1. Installing Linux
25
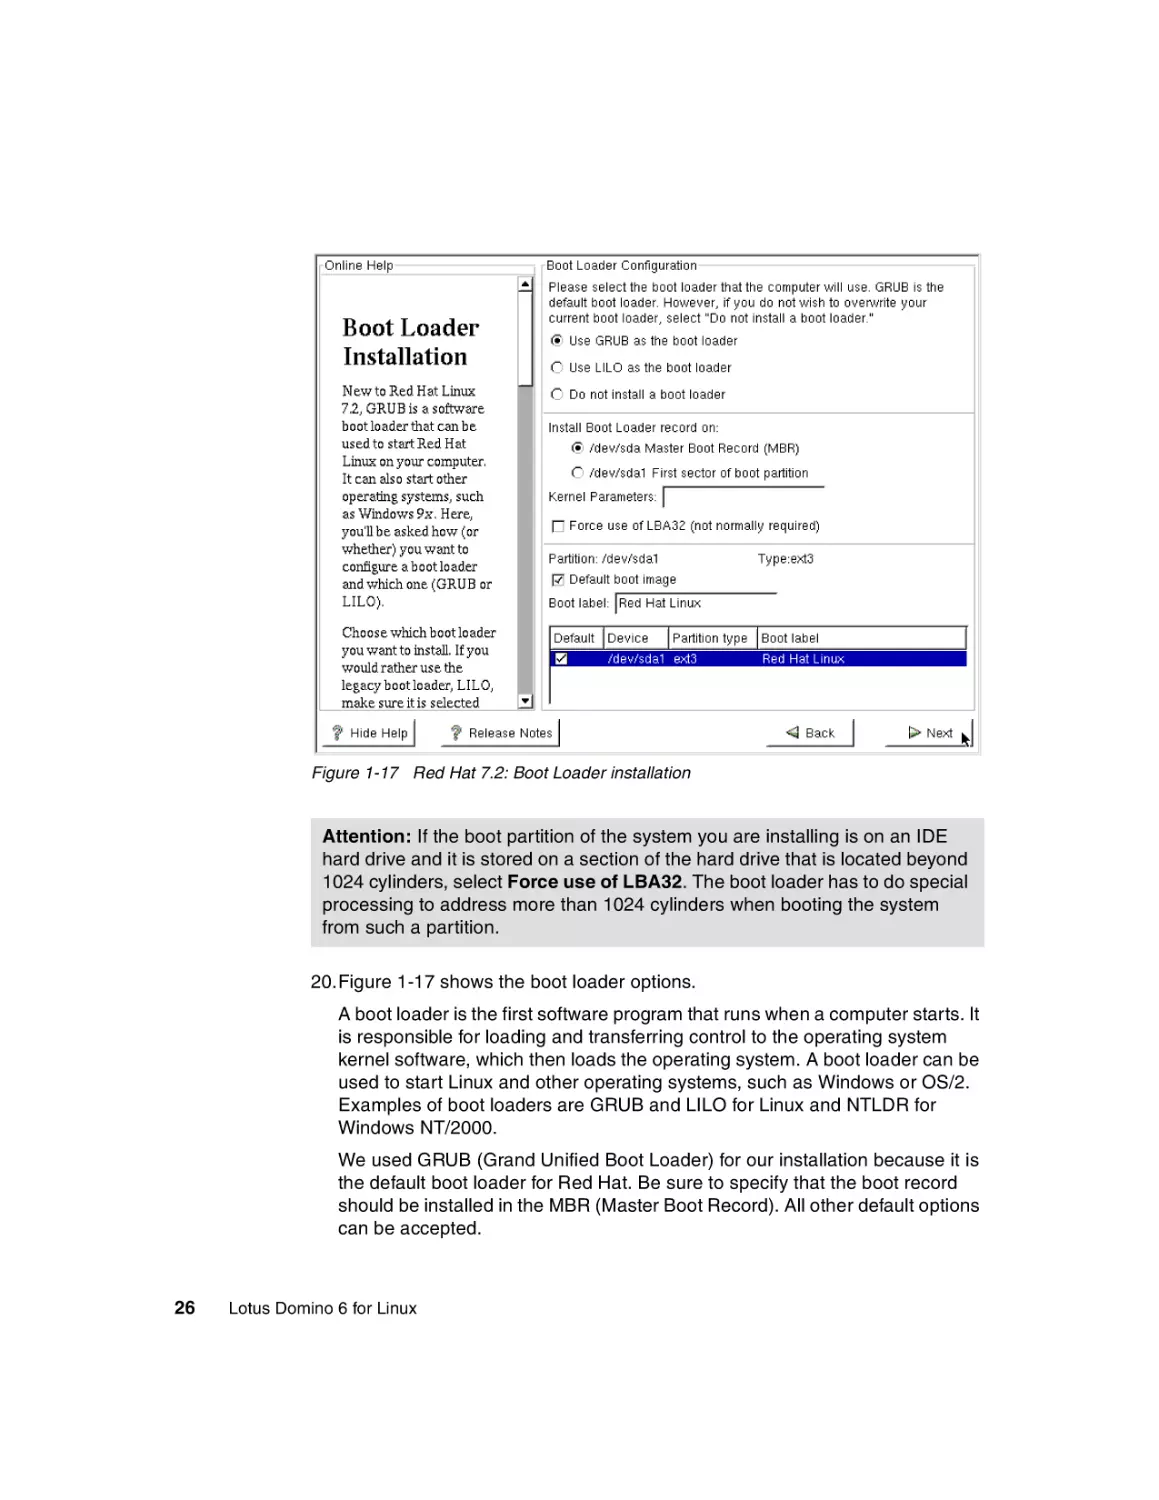
Figure 1-17 Red Hat 7.2: Boot Loader installation
Attention: If the boot partition of the system you are installing is on an IDE
hard drive and it is stored on a section of the hard drive that is located beyond
1024 cylinders, select Force use of LBA32. The boot loader has to do special
processing to address more than 1024 cylinders when booting the system
from such a partition.
20.Figure 1-17 shows the boot loader options.
A boot loader is the first software program that runs when a computer starts. It
is responsible for loading and transferring control to the operating system
kernel software, which then loads the operating system. A boot loader can be
used to start Linux and other operating systems, such as Windows or OS/2.
Examples of boot loaders are GRUB and LILO for Linux and NTLDR for
Windows NT/2000.
We used GRUB (Grand Unified Boot Loader) for our installation because it is
the default boot loader for Red Hat. Be sure to specify that the boot record
should be installed in the MBR (Master Boot Record). All other default options
can be accepted.
26
Lotus Domino 6 for Linux
Tip: If you are removing Linux from a machine and re-installing another
operating system, you need to first clear the Master Boot Record. Otherwise,
the system will try and boot Linux, which was just overwritten with the
re-installed operating system.
To clear the MBR, first boot up with a Windows 98 diskette, and run the
following command:
FDISK /MBR
Now you can reboot the system and start the installation of your new OS.
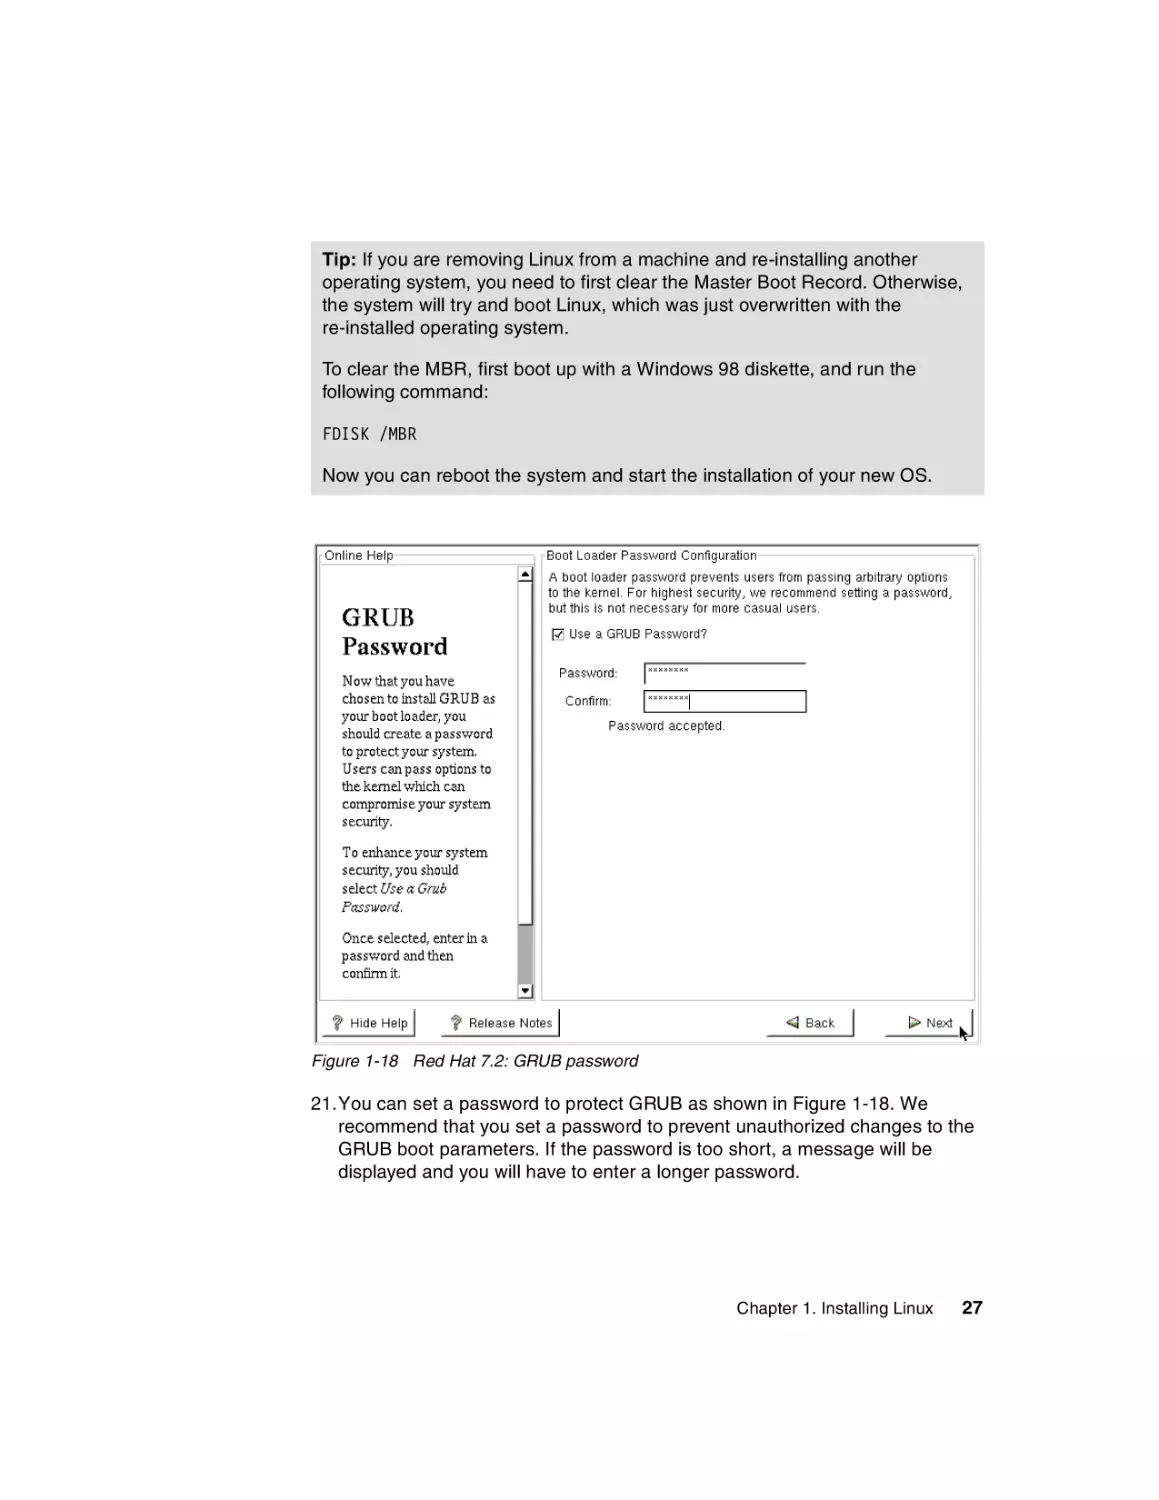
Figure 1-18 Red Hat 7.2: GRUB password
21.You can set a password to protect GRUB as shown in Figure 1-18. We
recommend that you set a password to prevent unauthorized changes to the
GRUB boot parameters. If the password is too short, a message will be
displayed and you will have to enter a longer password.
Chapter 1. Installing Linux
27
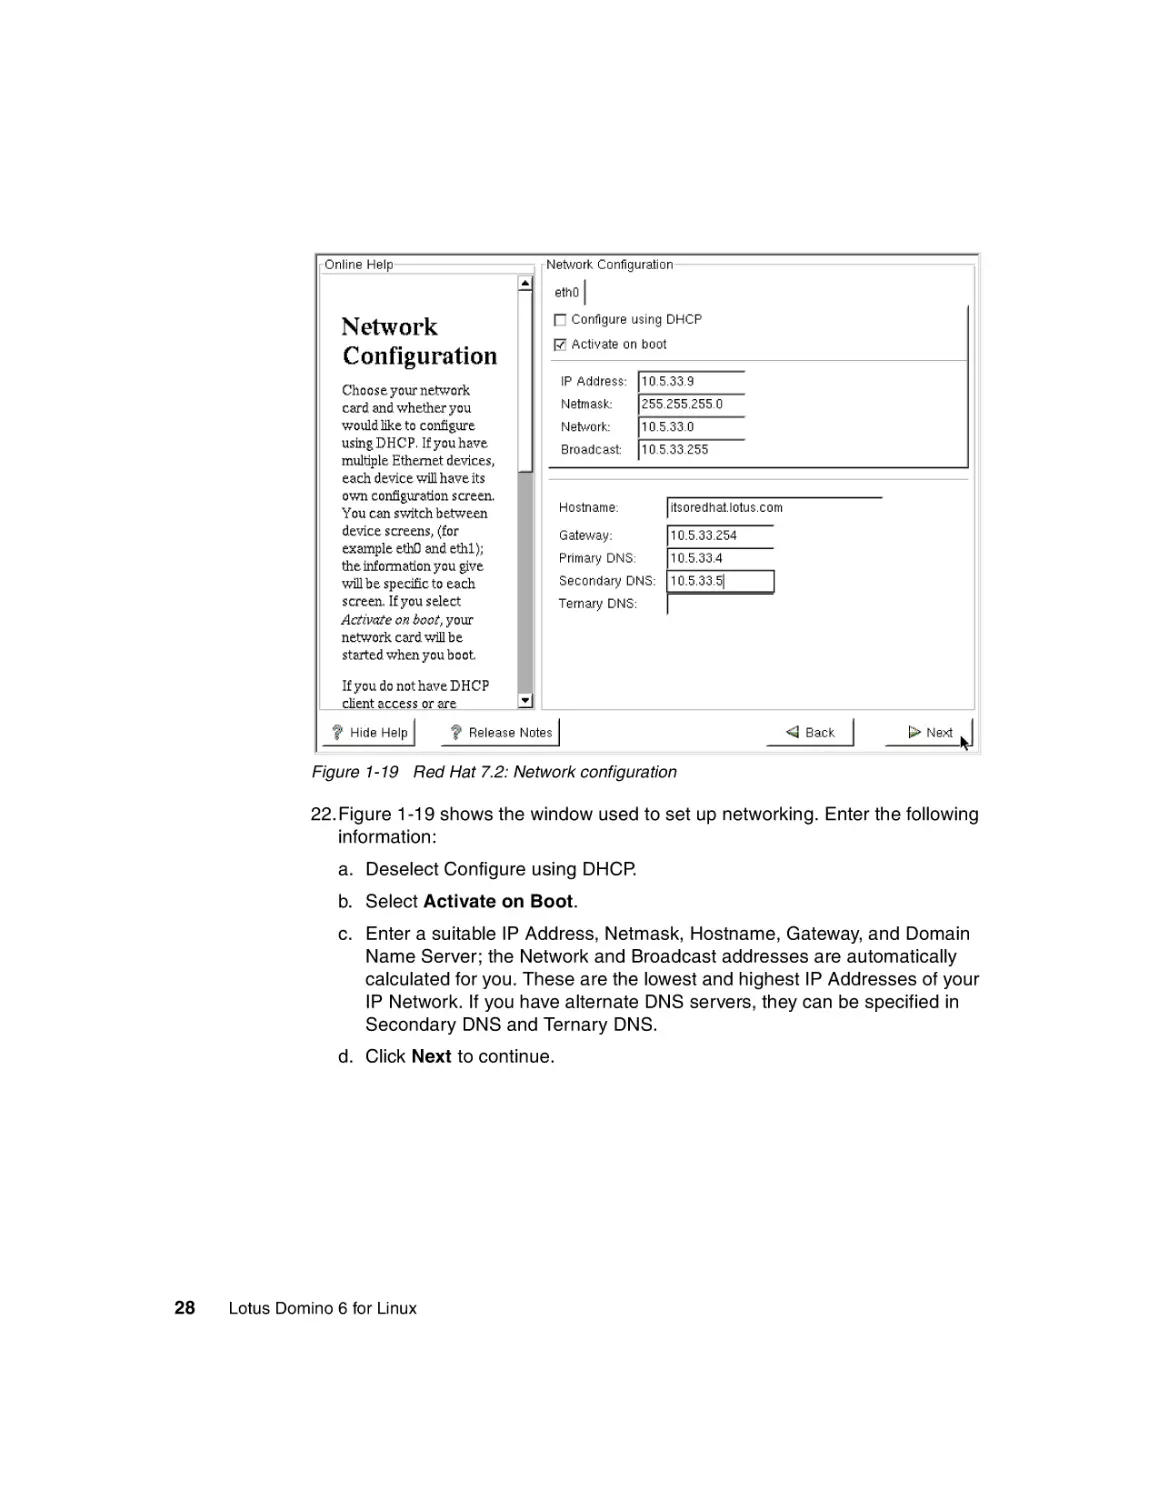
Figure 1-19 Red Hat 7.2: Network configuration
22.Figure 1-19 shows the window used to set up networking. Enter the following
information:
a. Deselect Configure using DHCP.
b. Select Activate on Boot.
c. Enter a suitable IP Address, Netmask, Hostname, Gateway, and Domain
Name Server; the Network and Broadcast addresses are automatically
calculated for you. These are the lowest and highest IP Addresses of your
IP Network. If you have alternate DNS servers, they can be specified in
Secondary DNS and Ternary DNS.
d. Click Next to continue.
28
Lotus Domino 6 for Linux
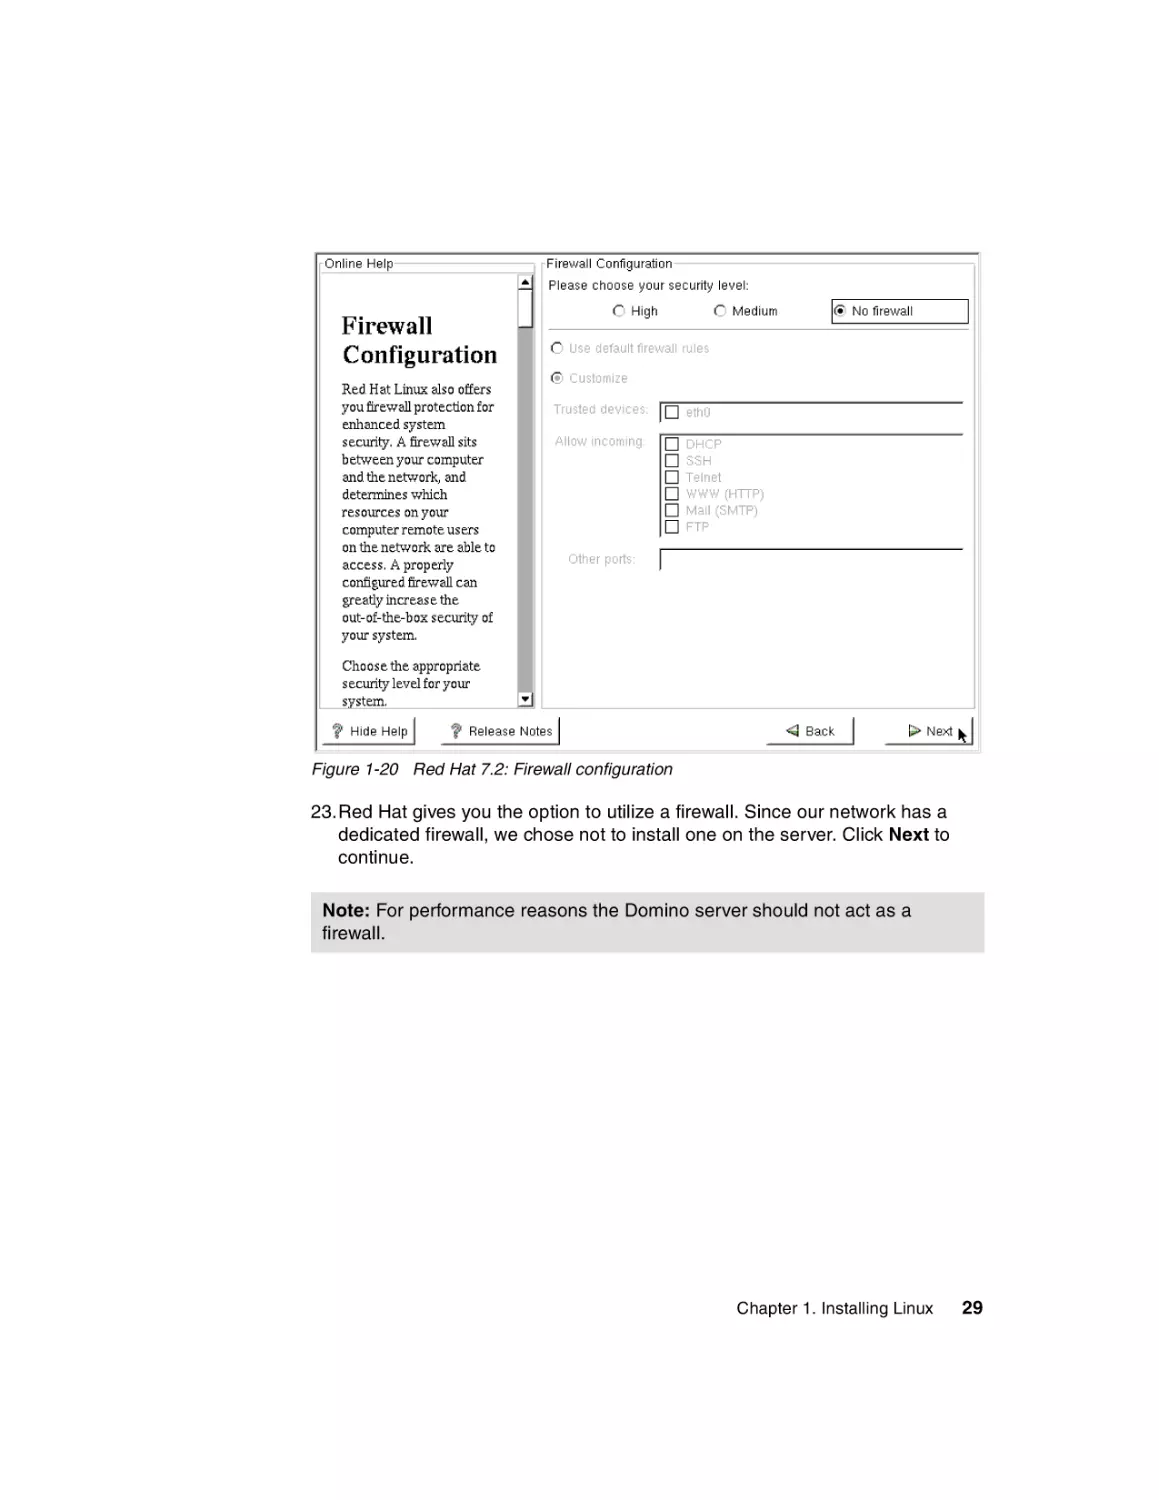
Figure 1-20 Red Hat 7.2: Firewall configuration
23.Red Hat gives you the option to utilize a firewall. Since our network has a
dedicated firewall, we chose not to install one on the server. Click Next to
continue.
Note: For performance reasons the Domino server should not act as a
firewall.
Chapter 1. Installing Linux
29
Figure 1-21 Red Hat 7.2: Language support selection
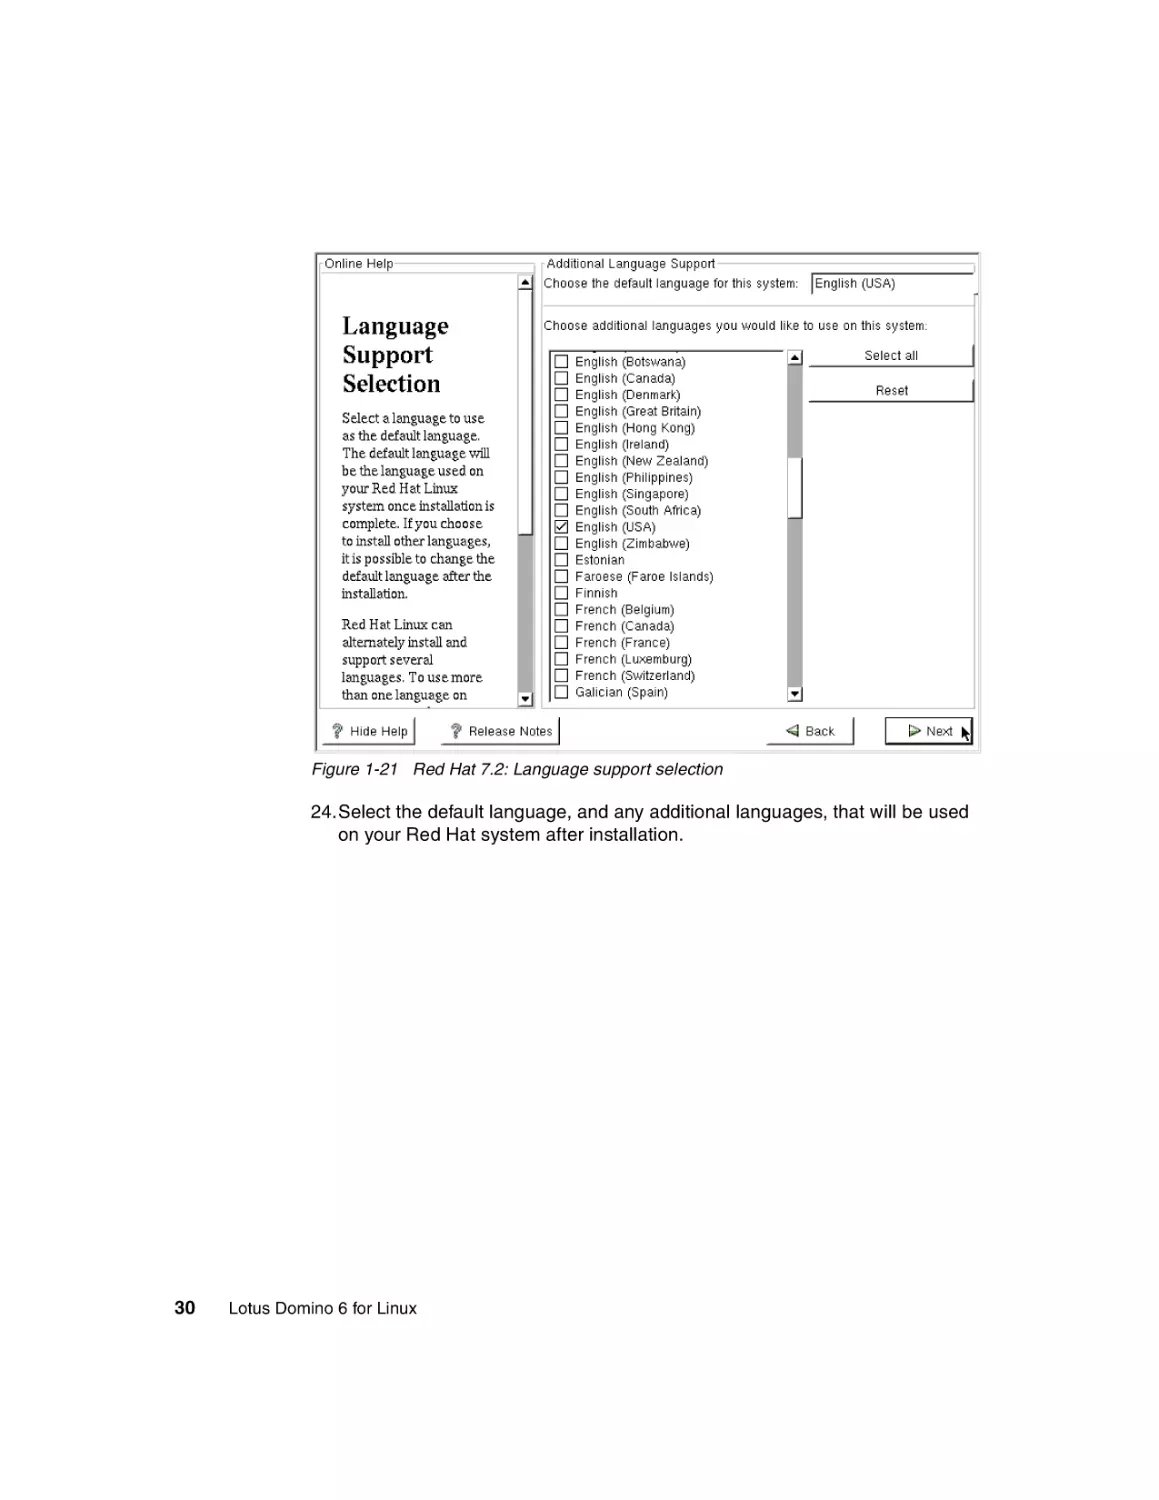
24.Select the default language, and any additional languages, that will be used
on your Red Hat system after installation.
30
Lotus Domino 6 for Linux
Figure 1-22 Red Hat 7.2: Time zone selection
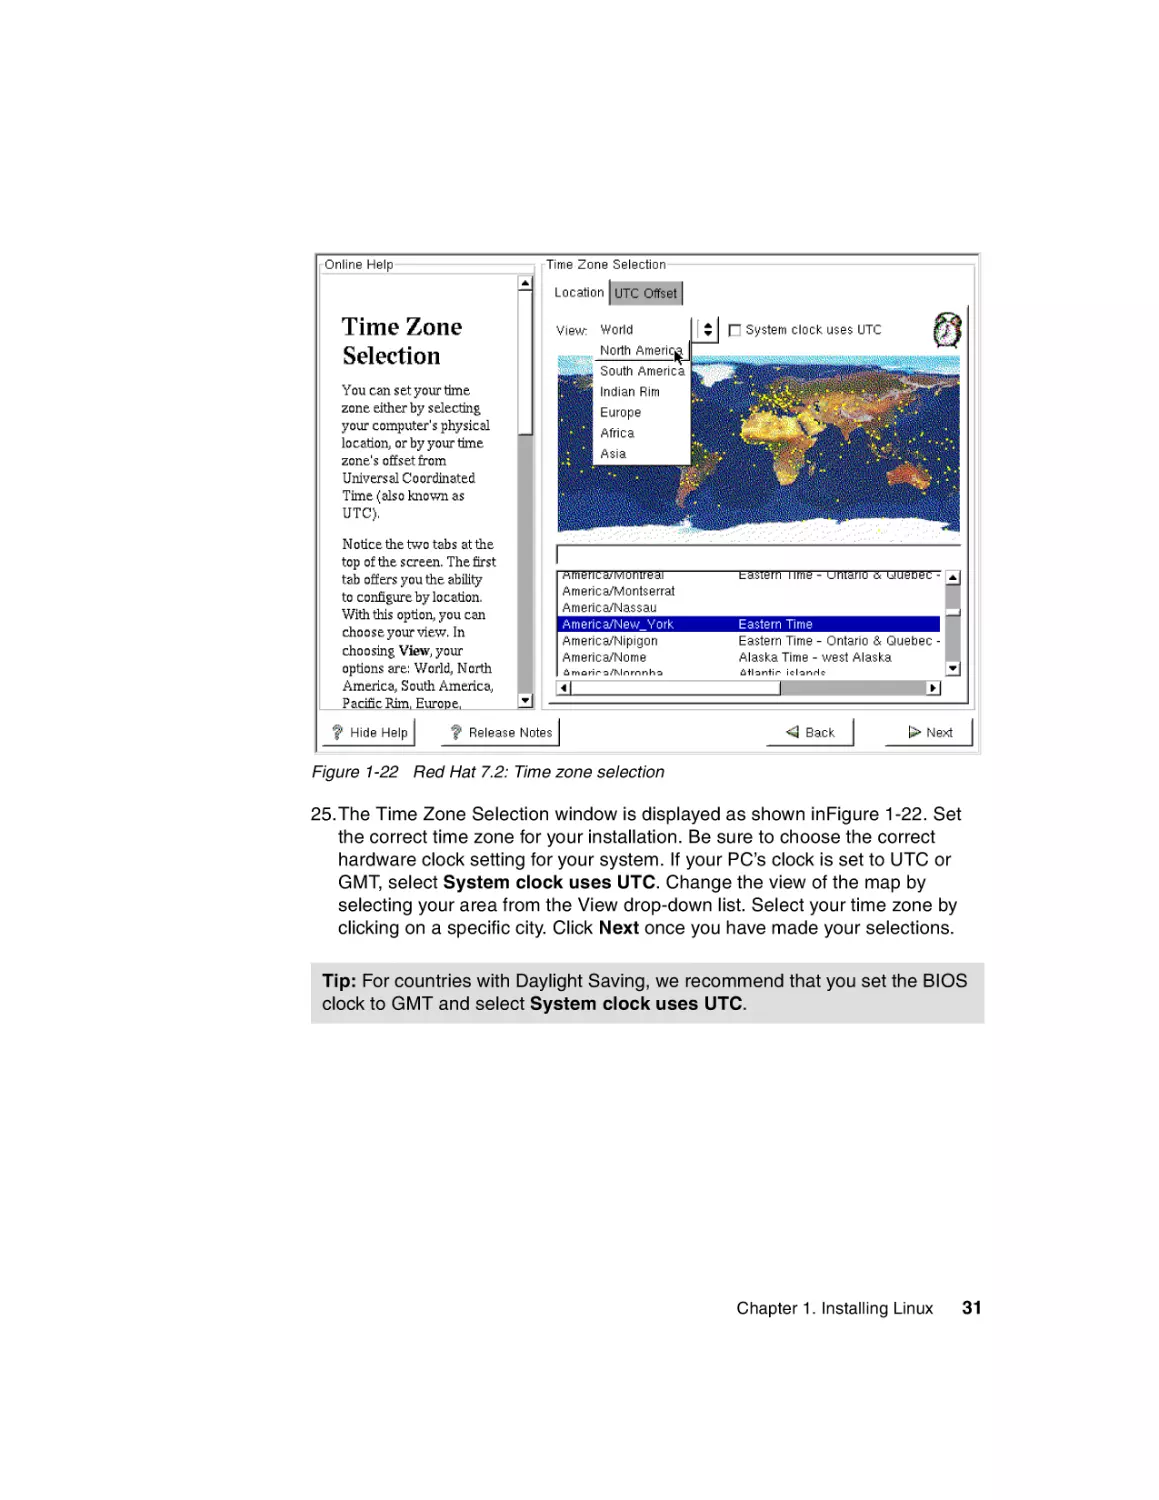
25.The Time Zone Selection window is displayed as shown inFigure 1-22. Set
the correct time zone for your installation. Be sure to choose the correct
hardware clock setting for your system. If your PC’s clock is set to UTC or
GMT, select System clock uses UTC. Change the view of the map by
selecting your area from the View drop-down list. Select your time zone by
clicking on a specific city. Click Next once you have made your selections.
Tip: For countries with Daylight Saving, we recommend that you set the BIOS
clock to GMT and select System clock uses UTC.
Chapter 1. Installing Linux
31
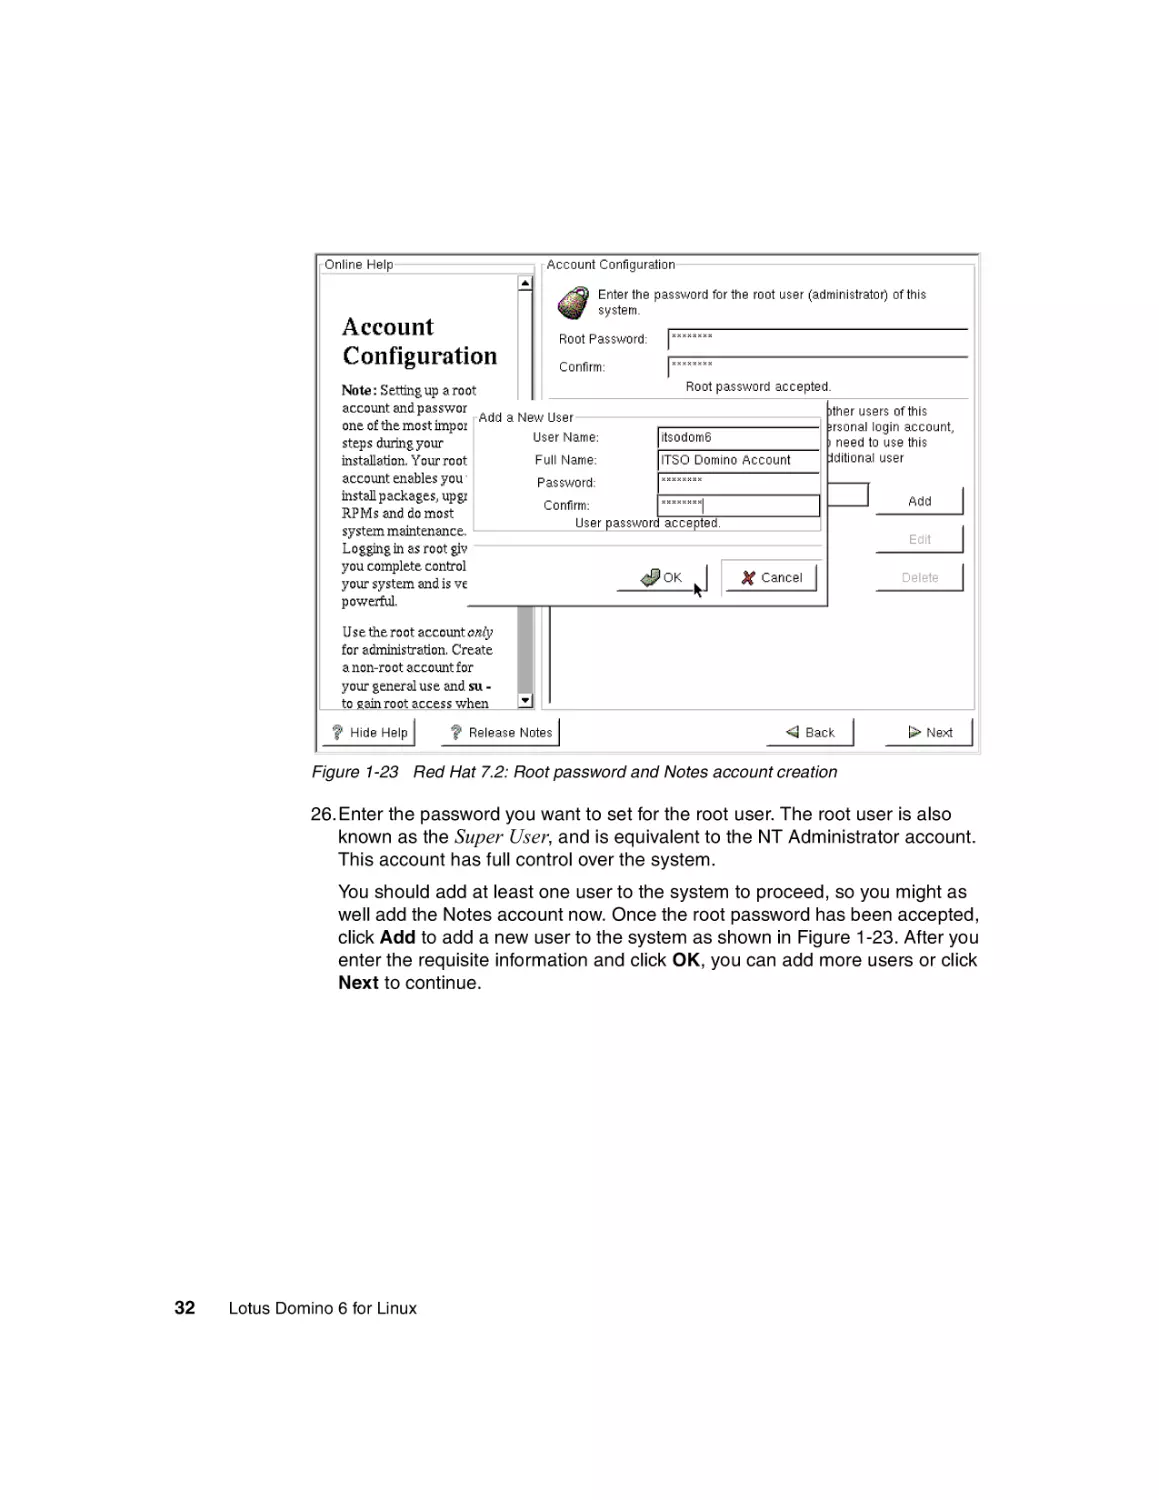
Figure 1-23 Red Hat 7.2: Root password and Notes account creation
26.Enter the password you want to set for the root user. The root user is also
known as the Super User, and is equivalent to the NT Administrator account.
This account has full control over the system.
You should add at least one user to the system to proceed, so you might as
well add the Notes account now. Once the root password has been accepted,
click Add to add a new user to the system as shown in Figure 1-23. After you
enter the requisite information and click OK, you can add more users or click
Next to continue.
32
Lotus Domino 6 for Linux
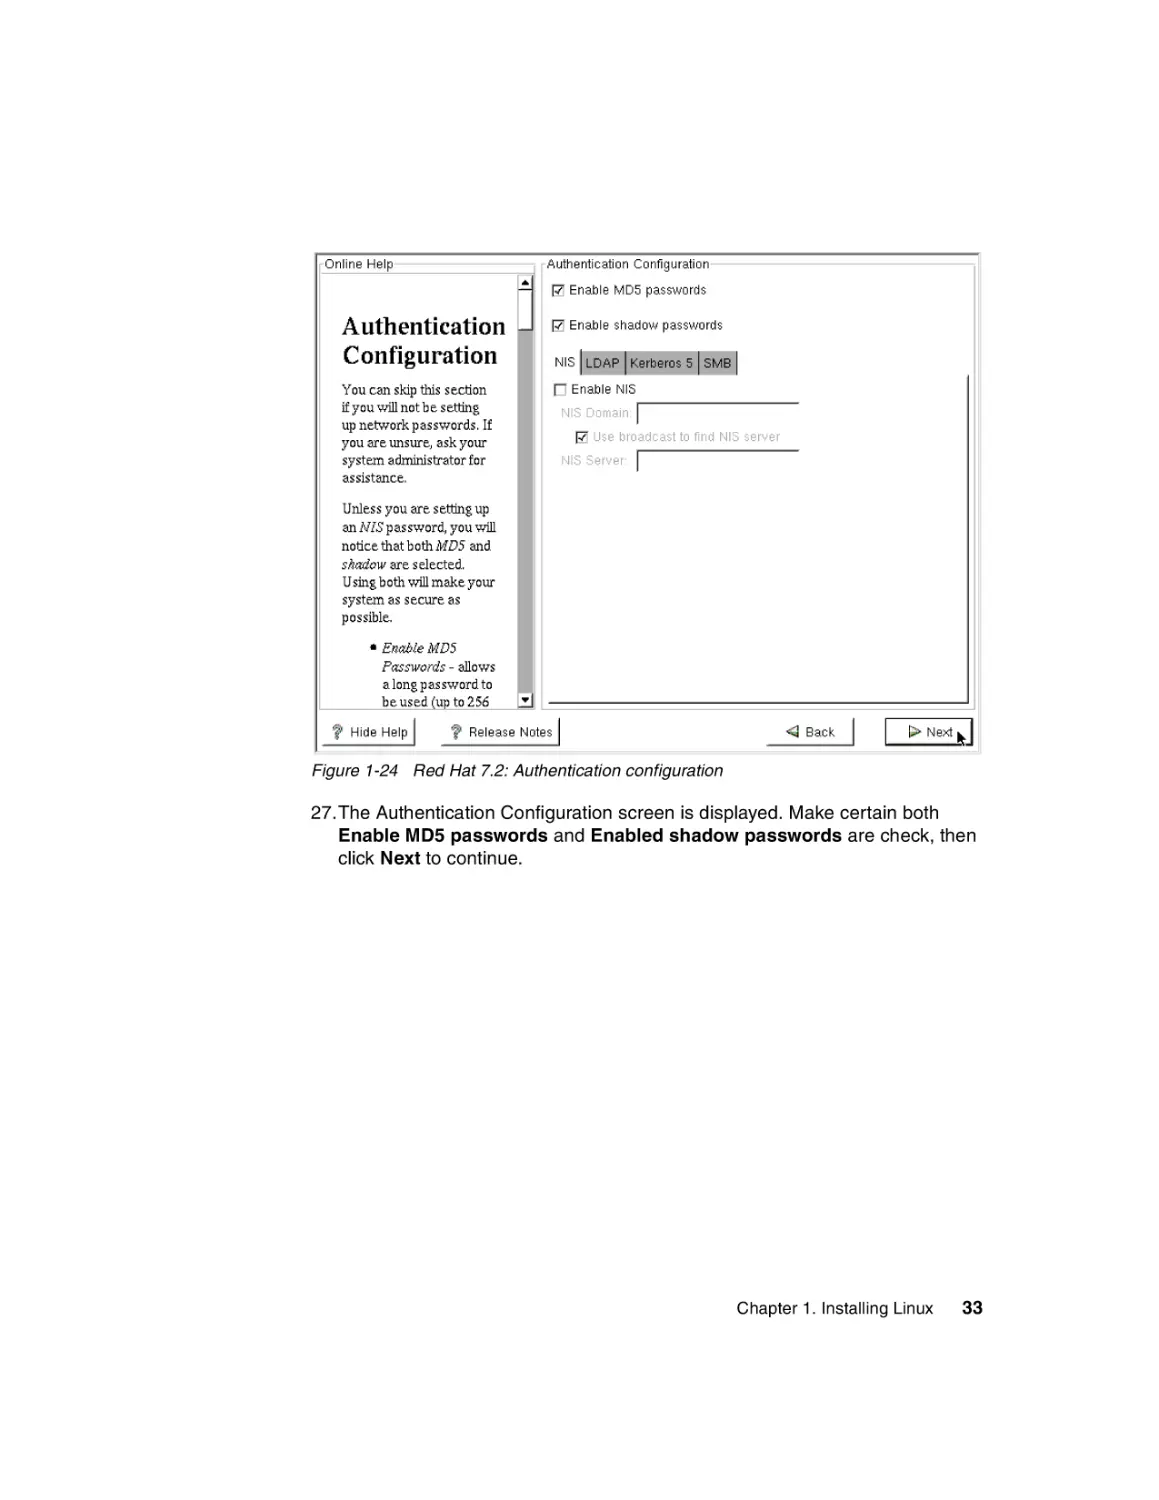
Figure 1-24 Red Hat 7.2: Authentication configuration
27.The Authentication Configuration screen is displayed. Make certain both
Enable MD5 passwords and Enabled shadow passwords are check, then
click Next to continue.
Chapter 1. Installing Linux
33
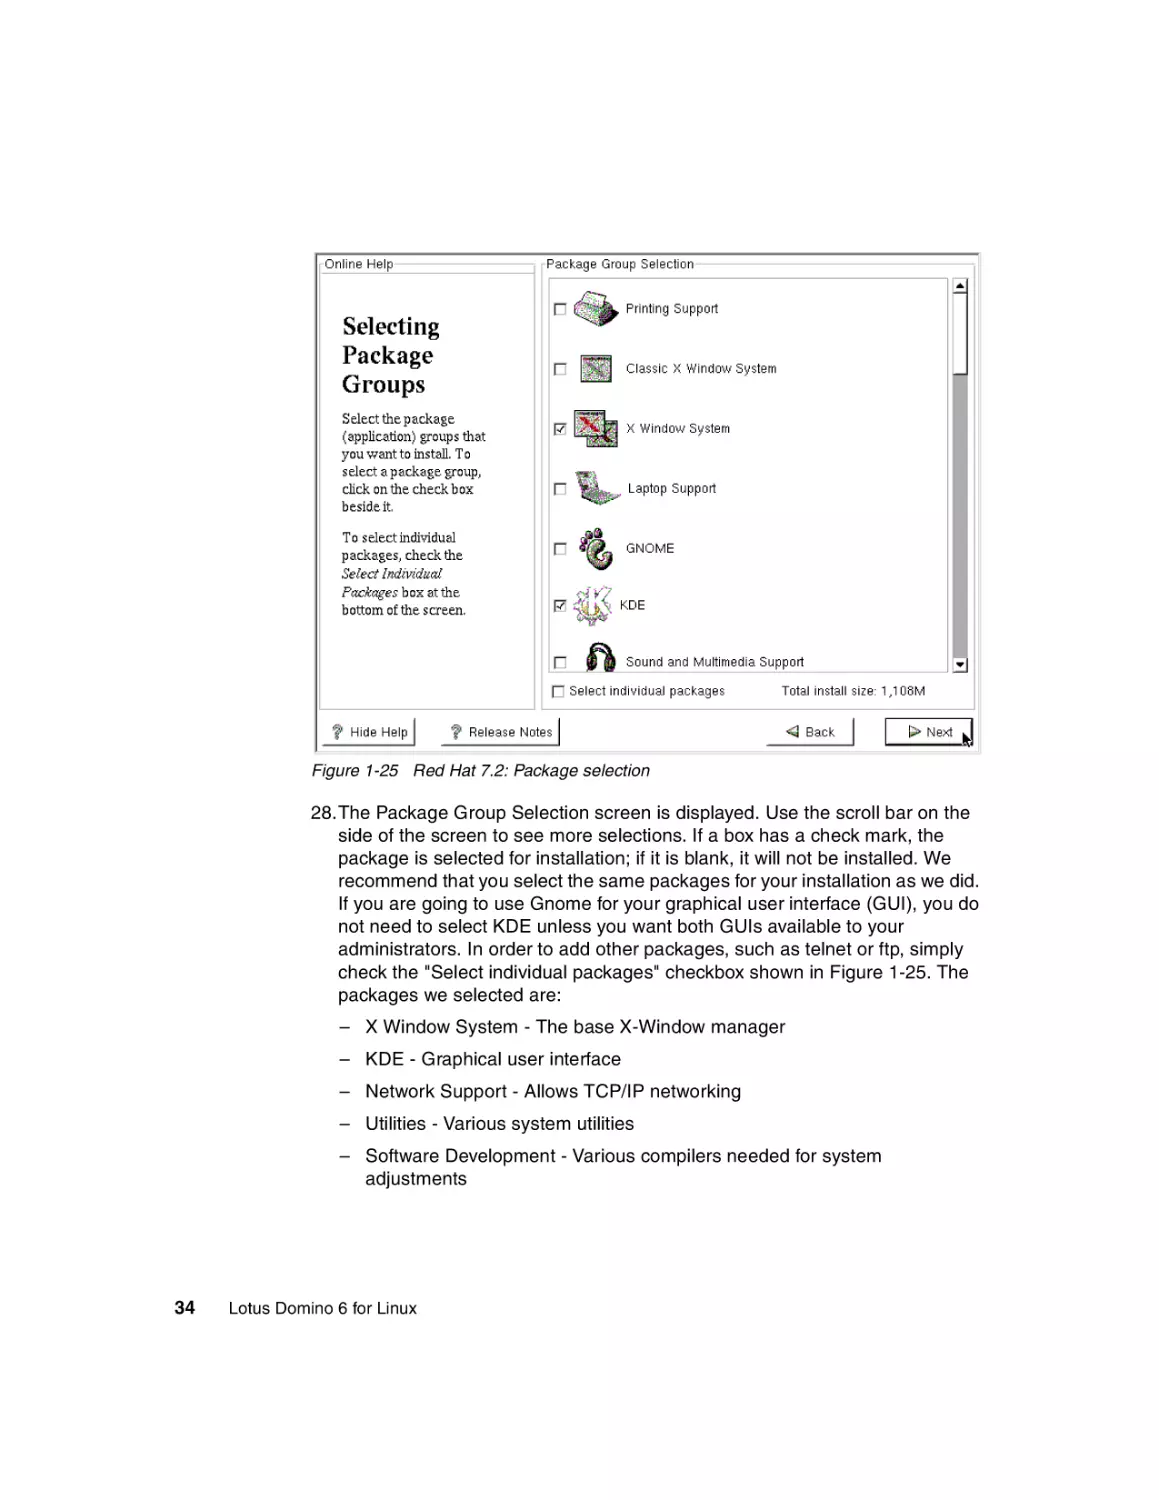
Figure 1-25 Red Hat 7.2: Package selection
28.The Package Group Selection screen is displayed. Use the scroll bar on the
side of the screen to see more selections. If a box has a check mark, the
package is selected for installation; if it is blank, it will not be installed. We
recommend that you select the same packages for your installation as we did.
If you are going to use Gnome for your graphical user interface (GUI), you do
not need to select KDE unless you want both GUIs available to your
administrators. In order to add other packages, such as telnet or ftp, simply
check the "Select individual packages" checkbox shown in Figure 1-25. The
packages we selected are:
– X Window System - The base X-Window manager
– KDE - Graphical user interface
– Network Support - Allows TCP/IP networking
– Utilities - Various system utilities
– Software Development - Various compilers needed for system
adjustments
34
Lotus Domino 6 for Linux
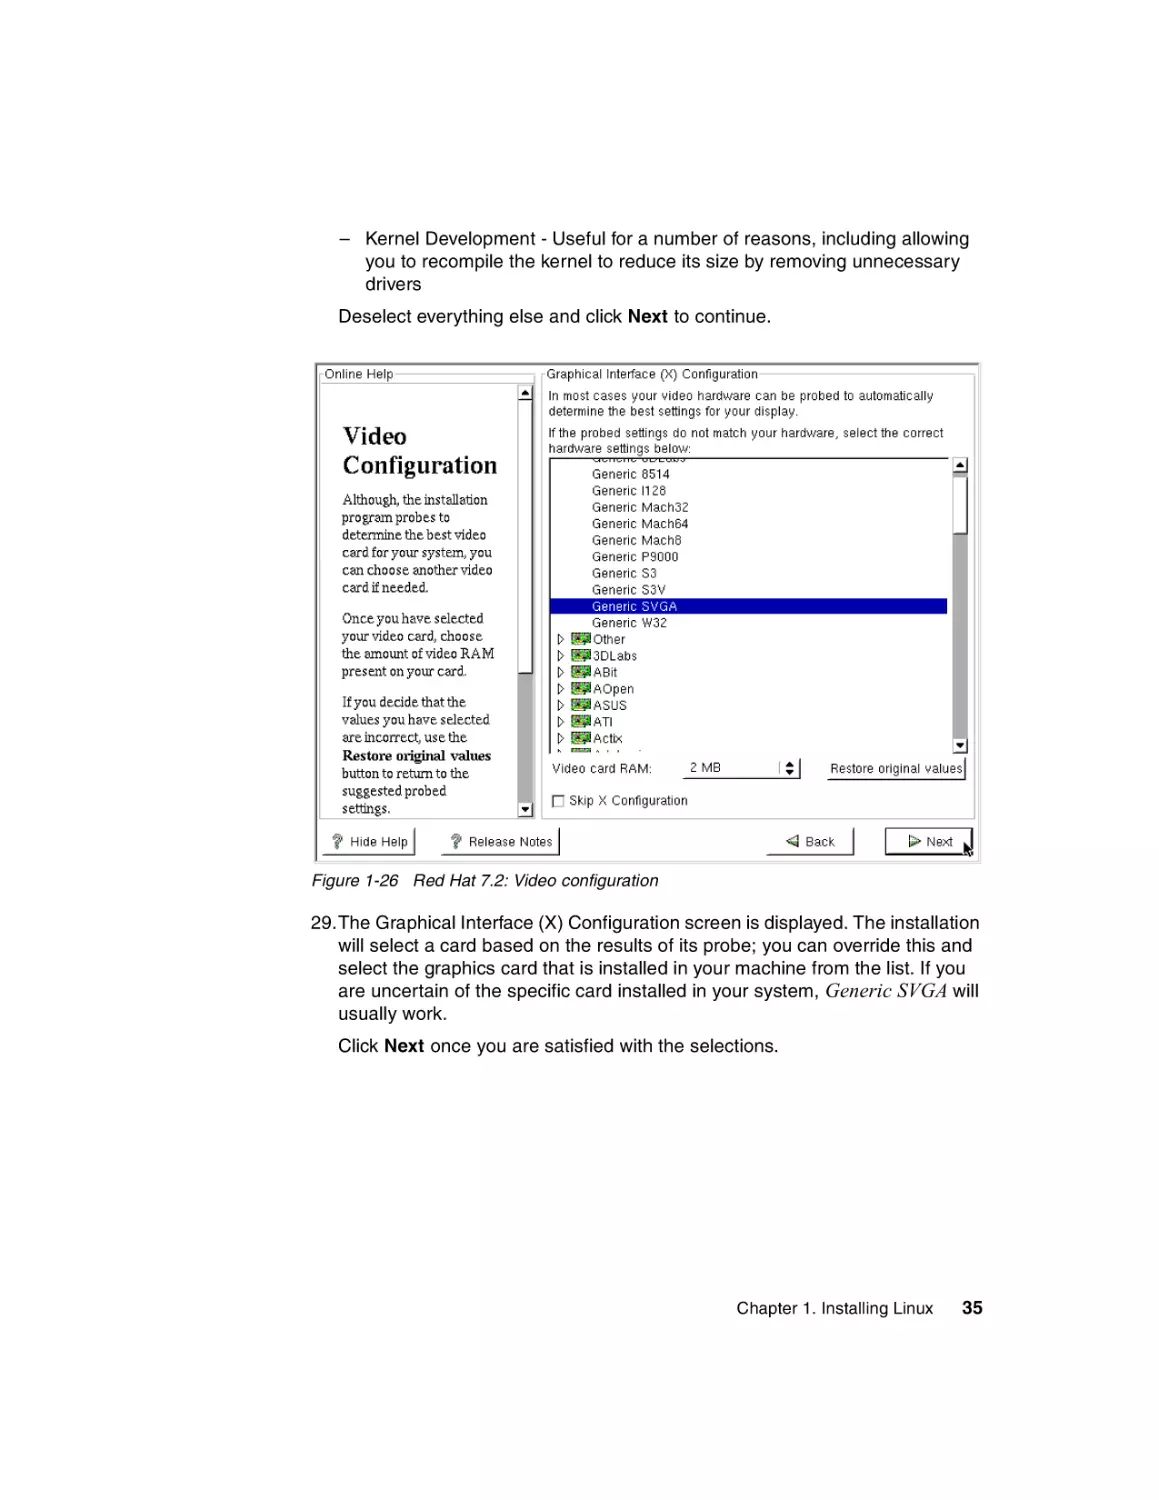
– Kernel Development - Useful for a number of reasons, including allowing
you to recompile the kernel to reduce its size by removing unnecessary
drivers
Deselect everything else and click Next to continue.
Figure 1-26 Red Hat 7.2: Video configuration
29.The Graphical Interface (X) Configuration screen is displayed. The installation
will select a card based on the results of its probe; you can override this and
select the graphics card that is installed in your machine from the list. If you
are uncertain of the specific card installed in your system, Generic SVGA will
usually work.
Click Next once you are satisfied with the selections.
Chapter 1. Installing Linux
35
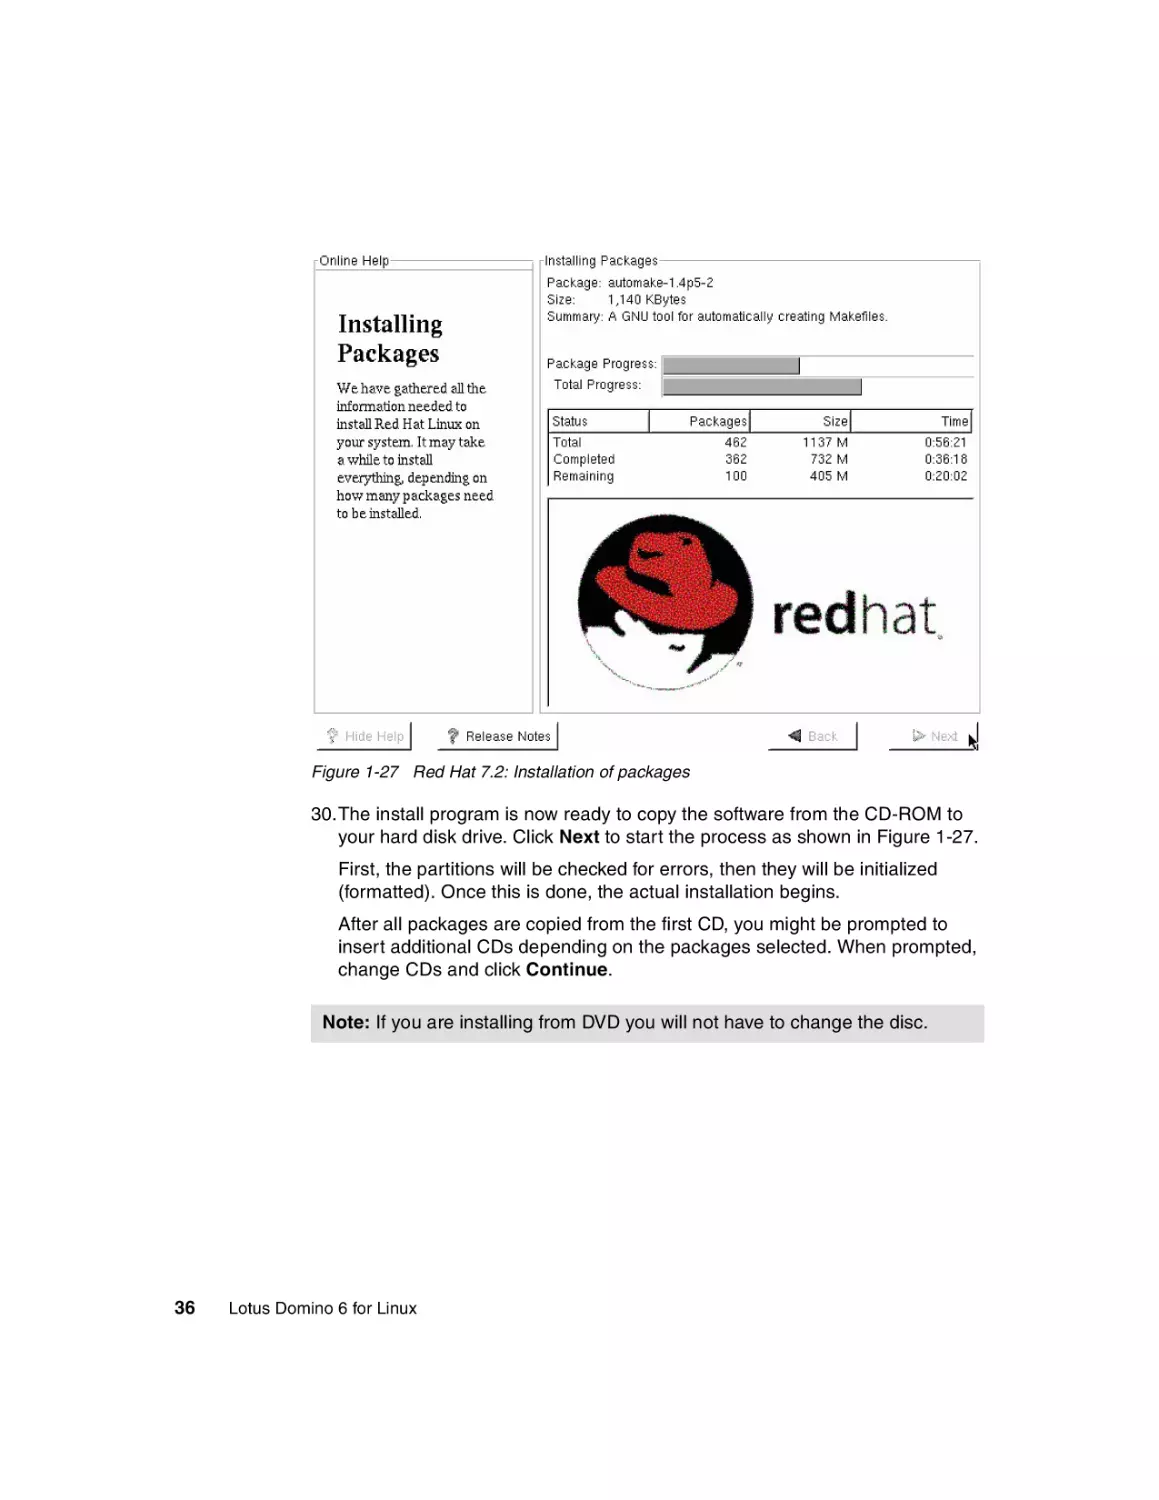
Figure 1-27 Red Hat 7.2: Installation of packages
30.The install program is now ready to copy the software from the CD-ROM to
your hard disk drive. Click Next to start the process as shown in Figure 1-27.
First, the partitions will be checked for errors, then they will be initialized
(formatted). Once this is done, the actual installation begins.
After all packages are copied from the first CD, you might be prompted to
insert additional CDs depending on the packages selected. When prompted,
change CDs and click Continue.
Note: If you are installing from DVD you will not have to change the disc.
36
Lotus Domino 6 for Linux
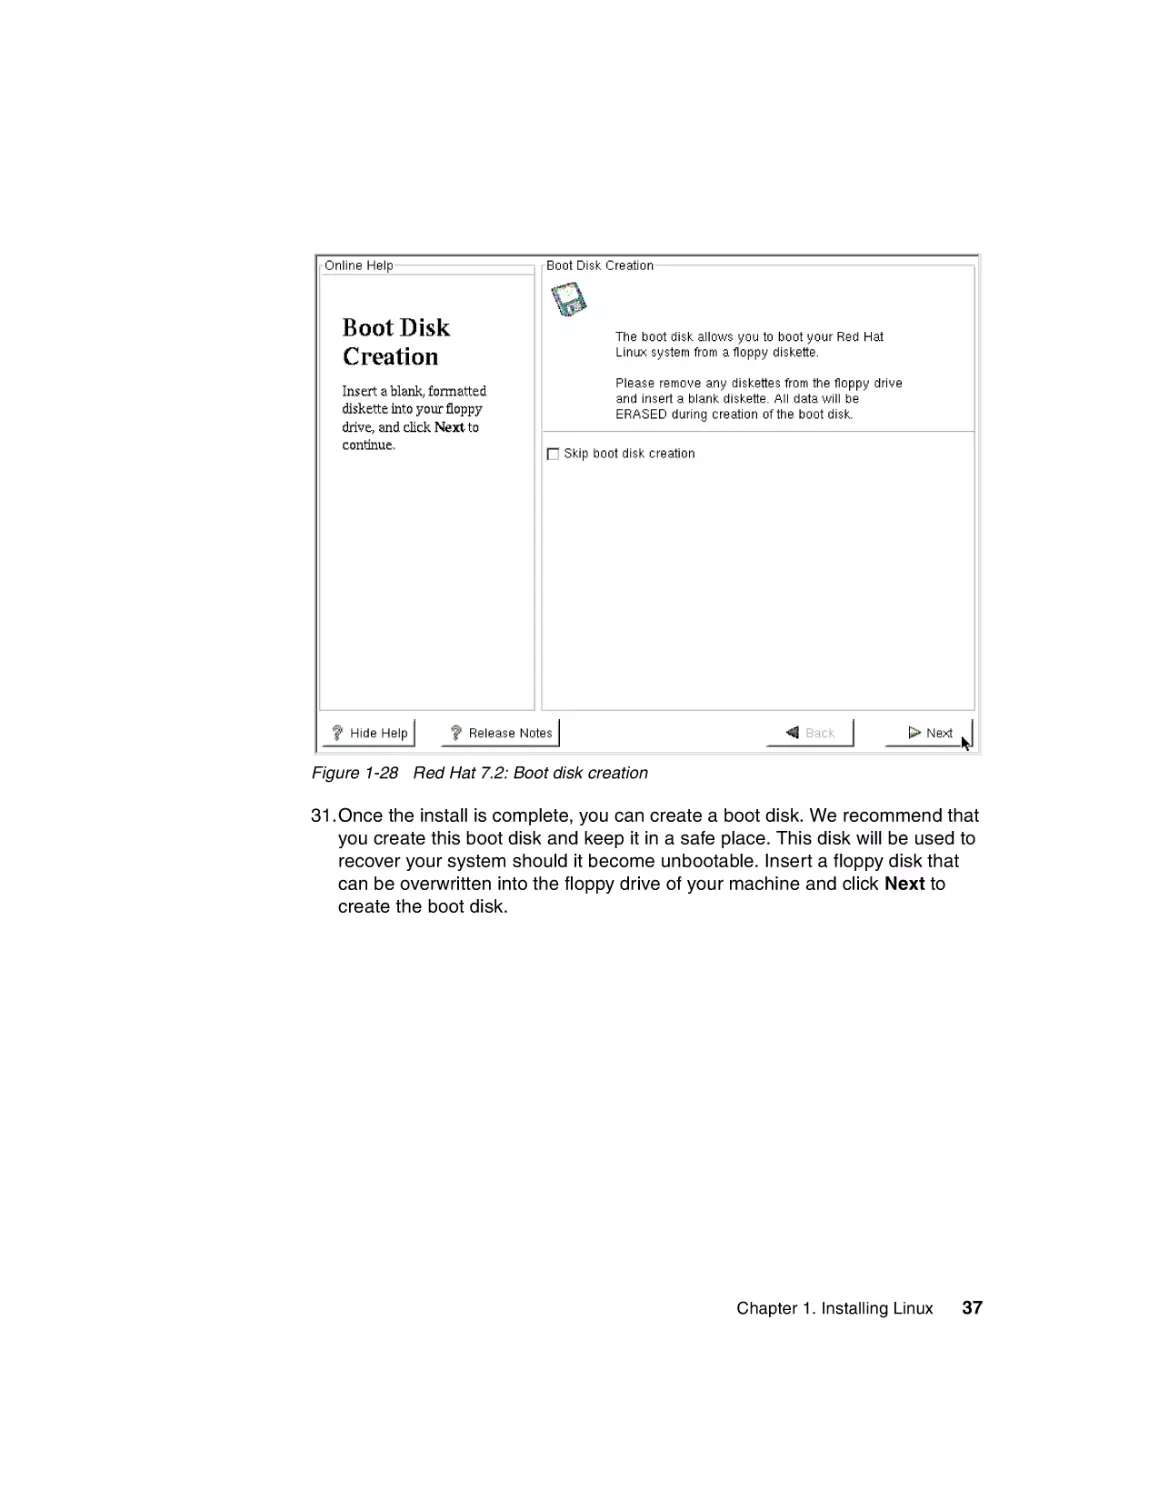
Figure 1-28 Red Hat 7.2: Boot disk creation
31.Once the install is complete, you can create a boot disk. We recommend that
you create this boot disk and keep it in a safe place. This disk will be used to
recover your system should it become unbootable. Insert a floppy disk that
can be overwritten into the floppy drive of your machine and click Next to
create the boot disk.
Chapter 1. Installing Linux
37
Figure 1-29 Red Hat 7.2: Monitor selection
32.On the Monitor Configuration screen, specify the Monitor that is attached to
your machine.
We selected a Generic Monitor with a 1024x768 resolution since it will
generally work on all monitors. If your monitor is not listed, and you know the
capabilities of your monitor, specify the Horizontal and Vertical refresh rates
that your monitor supports. Click Next to continue.
38
Lotus Domino 6 for Linux
Figure 1-30 Red Hat 7.2: Custom X configuration
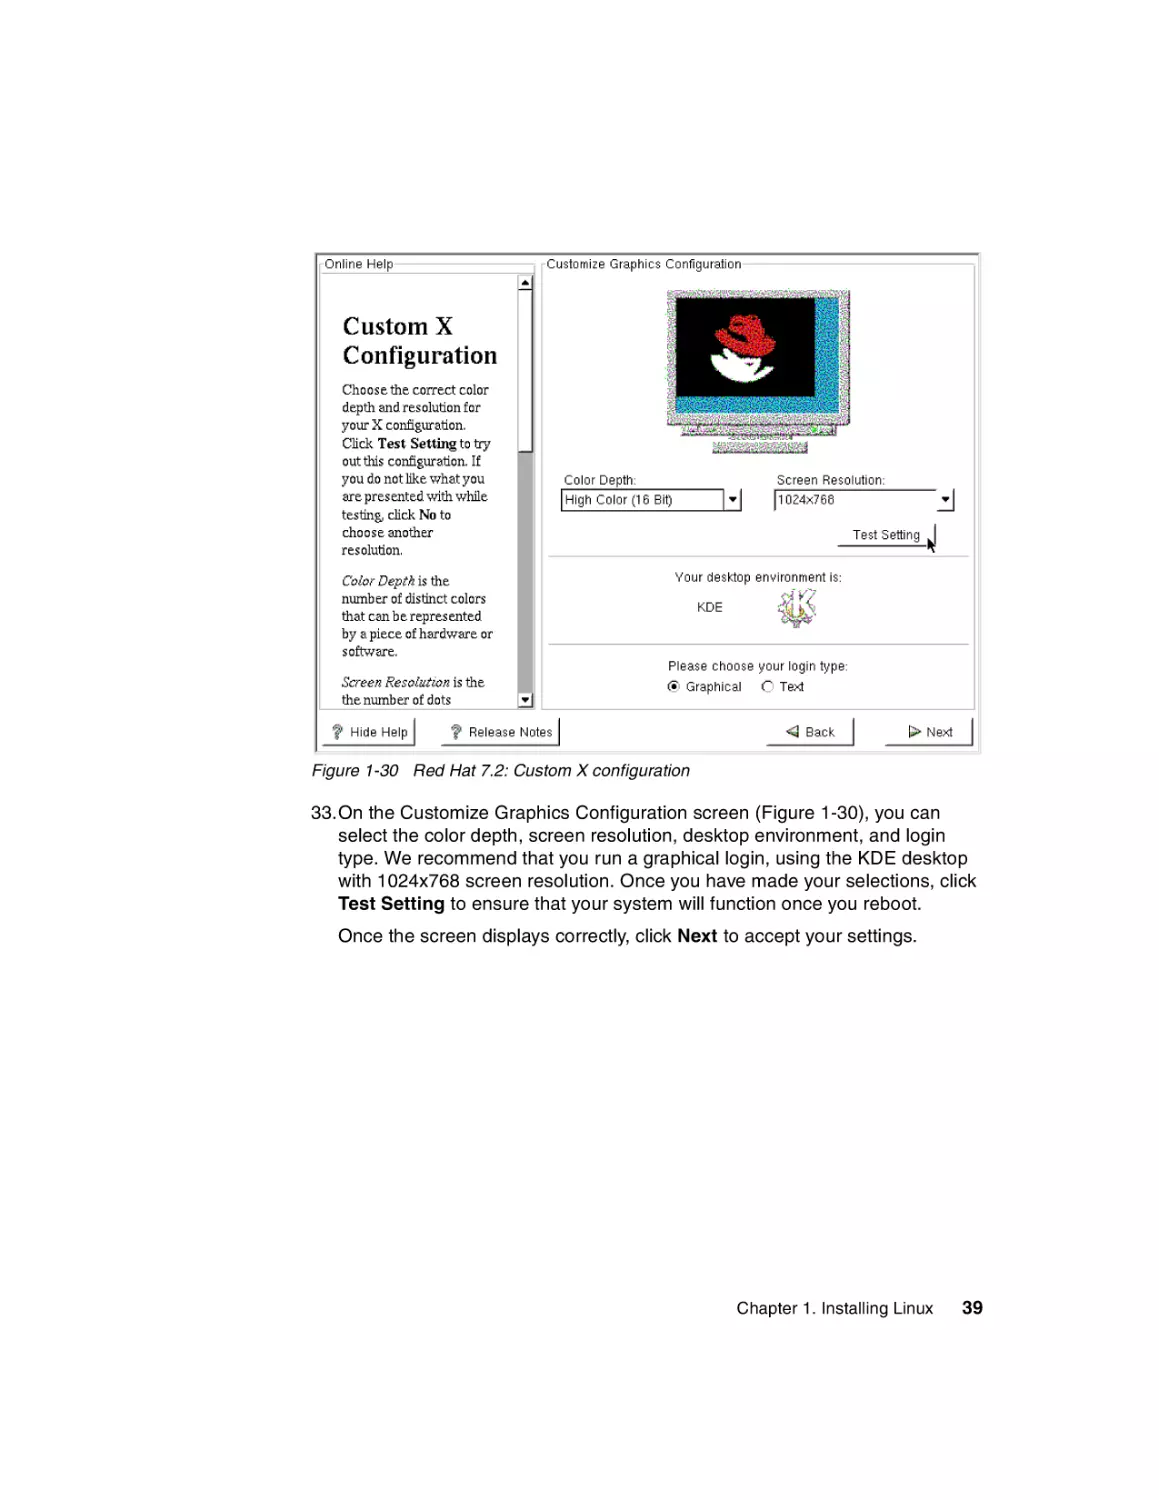
33.On the Customize Graphics Configuration screen (Figure 1-30), you can
select the color depth, screen resolution, desktop environment, and login
type. We recommend that you run a graphical login, using the KDE desktop
with 1024x768 screen resolution. Once you have made your selections, click
Test Setting to ensure that your system will function once you reboot.
Once the screen displays correctly, click Next to accept your settings.
Chapter 1. Installing Linux
39
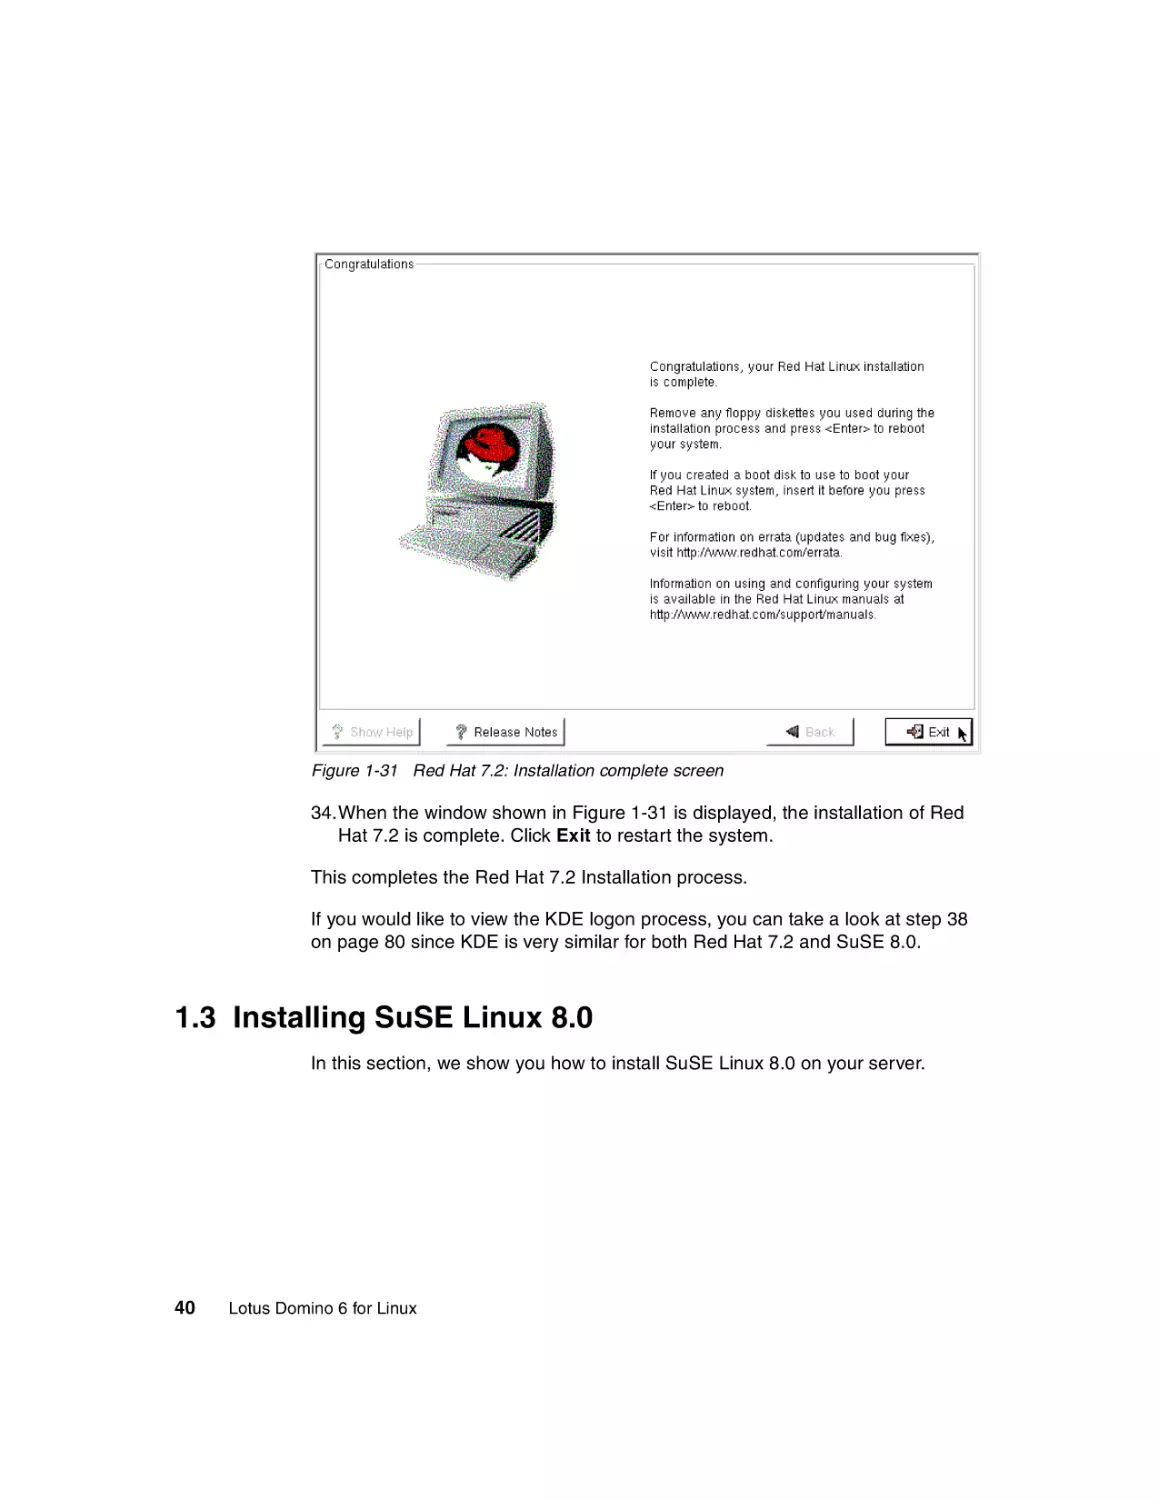
Figure 1-31 Red Hat 7.2: Installation complete screen
34.When the window shown in Figure 1-31 is displayed, the installation of Red
Hat 7.2 is complete. Click Exit to restart the system.
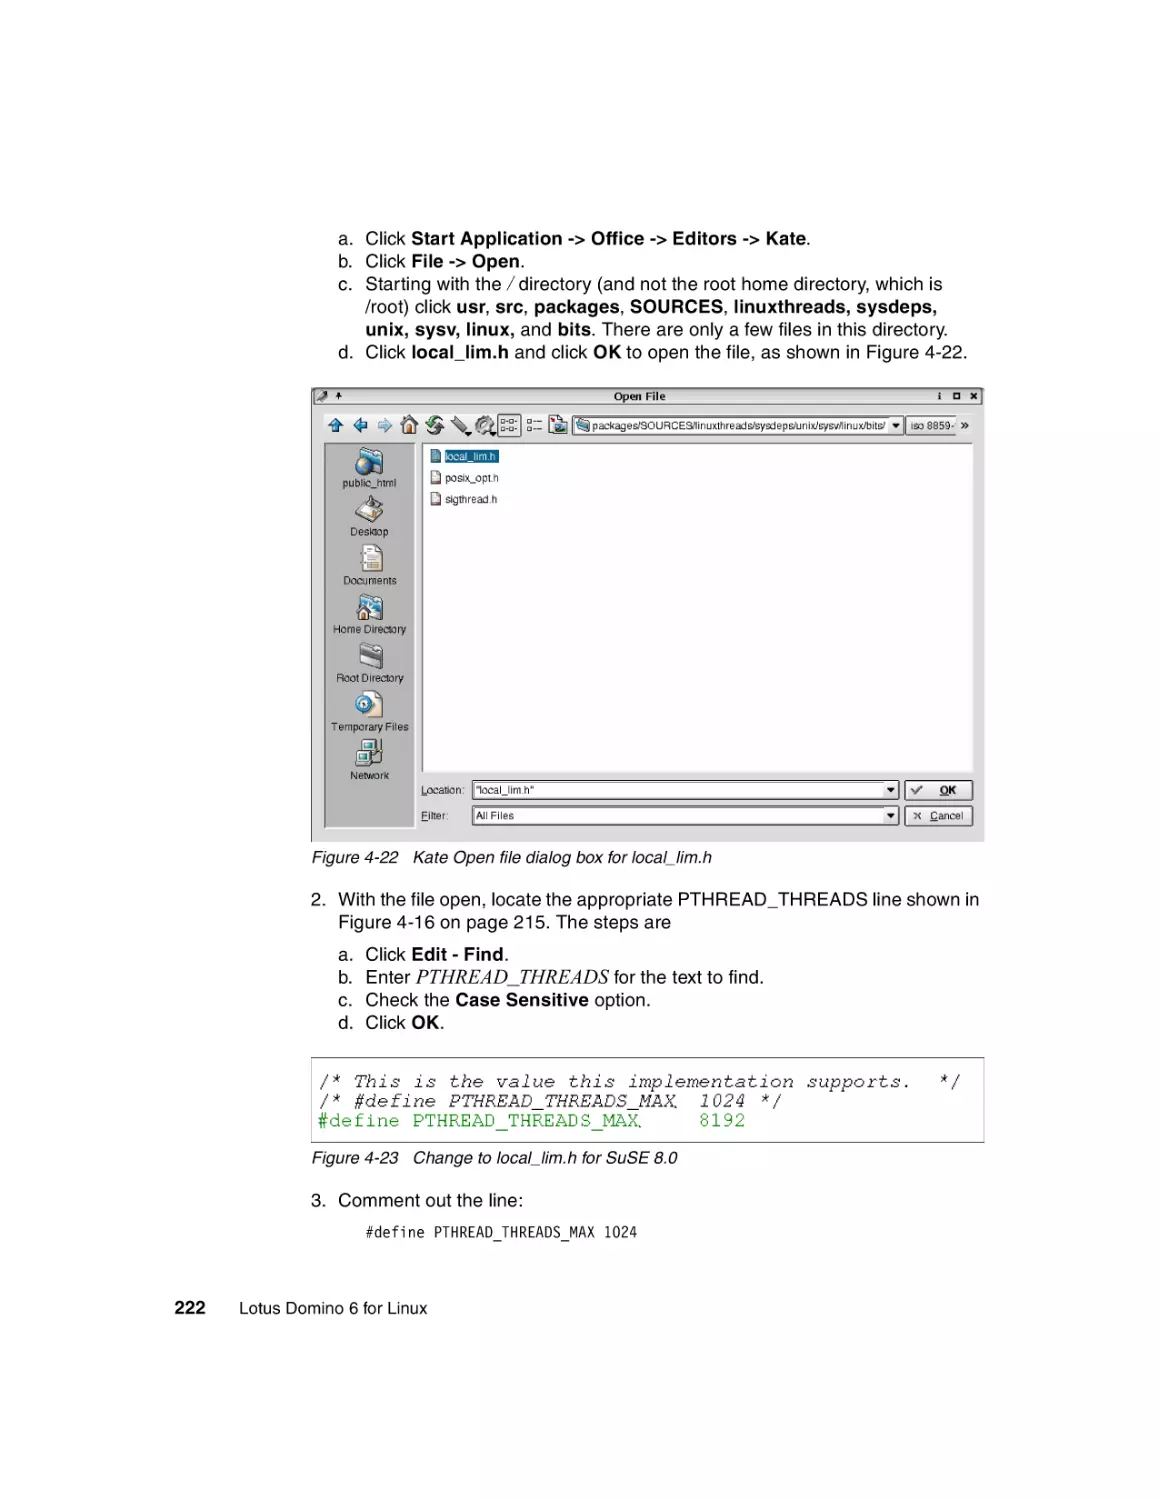
This completes the Red Hat 7.2 Installation process.
If you would like to view the KDE logon process, you can take a look at step 38
on page 80 since KDE is very similar for both Red Hat 7.2 and SuSE 8.0.
1.3 Installing SuSE Linux 8.0
In this section, we show you how to install SuSE Linux 8.0 on your server.
40
Lotus Domino 6 for Linux
Note: We recommend using SuSE Linux Groupware Server 7 with Lotus
Domino or newer—instead of the SuSE Linux 8.0 Personal or SuSE Linux 8.0
Professional version. SuSE Linux Groupware Server contains SuSE
Entreprise Server 7 and Lotus Domino Server. The SuSE Enterprise Server
version has an extended release cycle. The SuSE Enterprise Server has also
been certified by the top ISVs, such as IBM. The installation of the SuSE
Groupware Server is similar to the installation of the SuSE Professional
version, which we detail here.
To capture the screens you see in this book, we installed and configured Linux in
a VMware window. VMware allows you to run one operating system as a guest of
another. This means that some of the screens might look sightly different from
what you would see on your system. These differences are hardware-related, as
VMware emulates different hardware devices for the guest operating system.
Additional information about VMware is available on the VMware, Inc. website at:
http://www.vmware.com
Be sure to read “Before you begin” on page 2 in order to make the installation
easier.
To start the installation, insert the SuSE 8.0 CD-ROM/DVD and turn on or reboot
the server.
Attention: The installation process will destroy any existing data stored on
your hard disk drives.
Chapter 1. Installing Linux
41
Figure 1-32 SuSE 8.0: Welcome screen
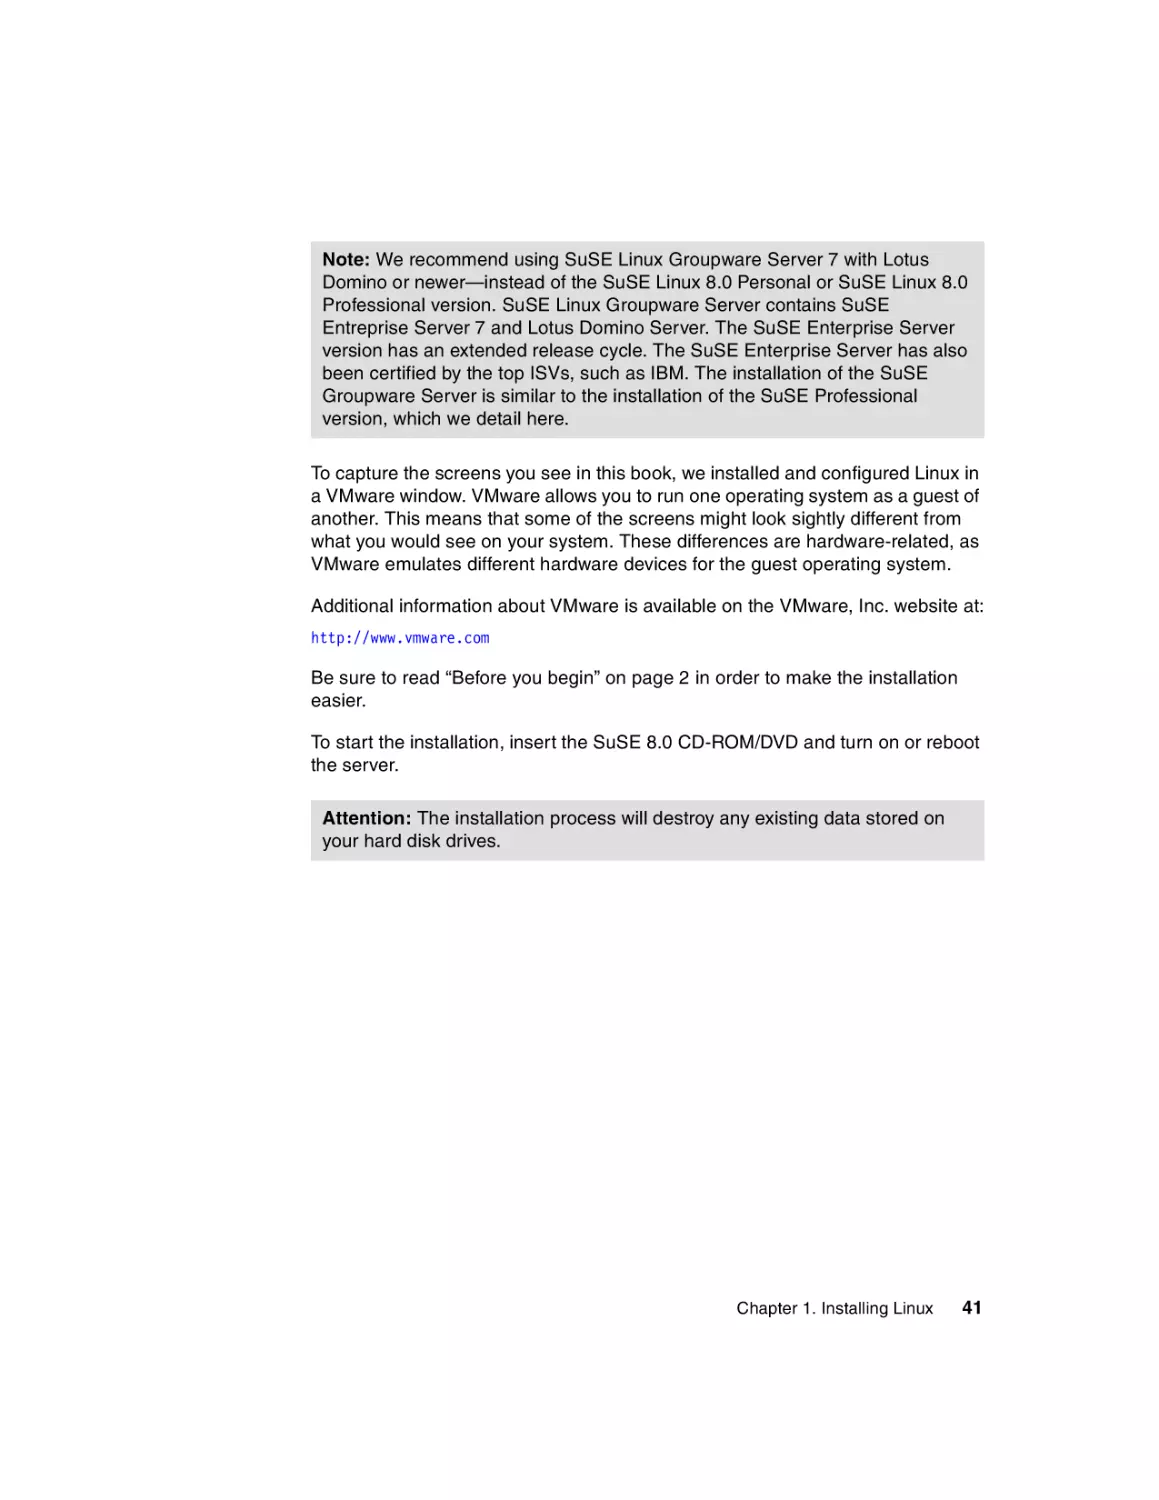
1. When the screen shown in Figure 1-32 is displayed, you are ready to start the
Linux installation. Ensure that F3=640x480 is highlighted and press Enter to
begin the installation, or wait for it to start automatically after a short pause.
Once the kernel is booted and all device drivers are loaded, the SuSE
installation process is ready to install the operating system. If the graphical
installation fails to start, see the SuSE installation manual.
42
Lotus Domino 6 for Linux
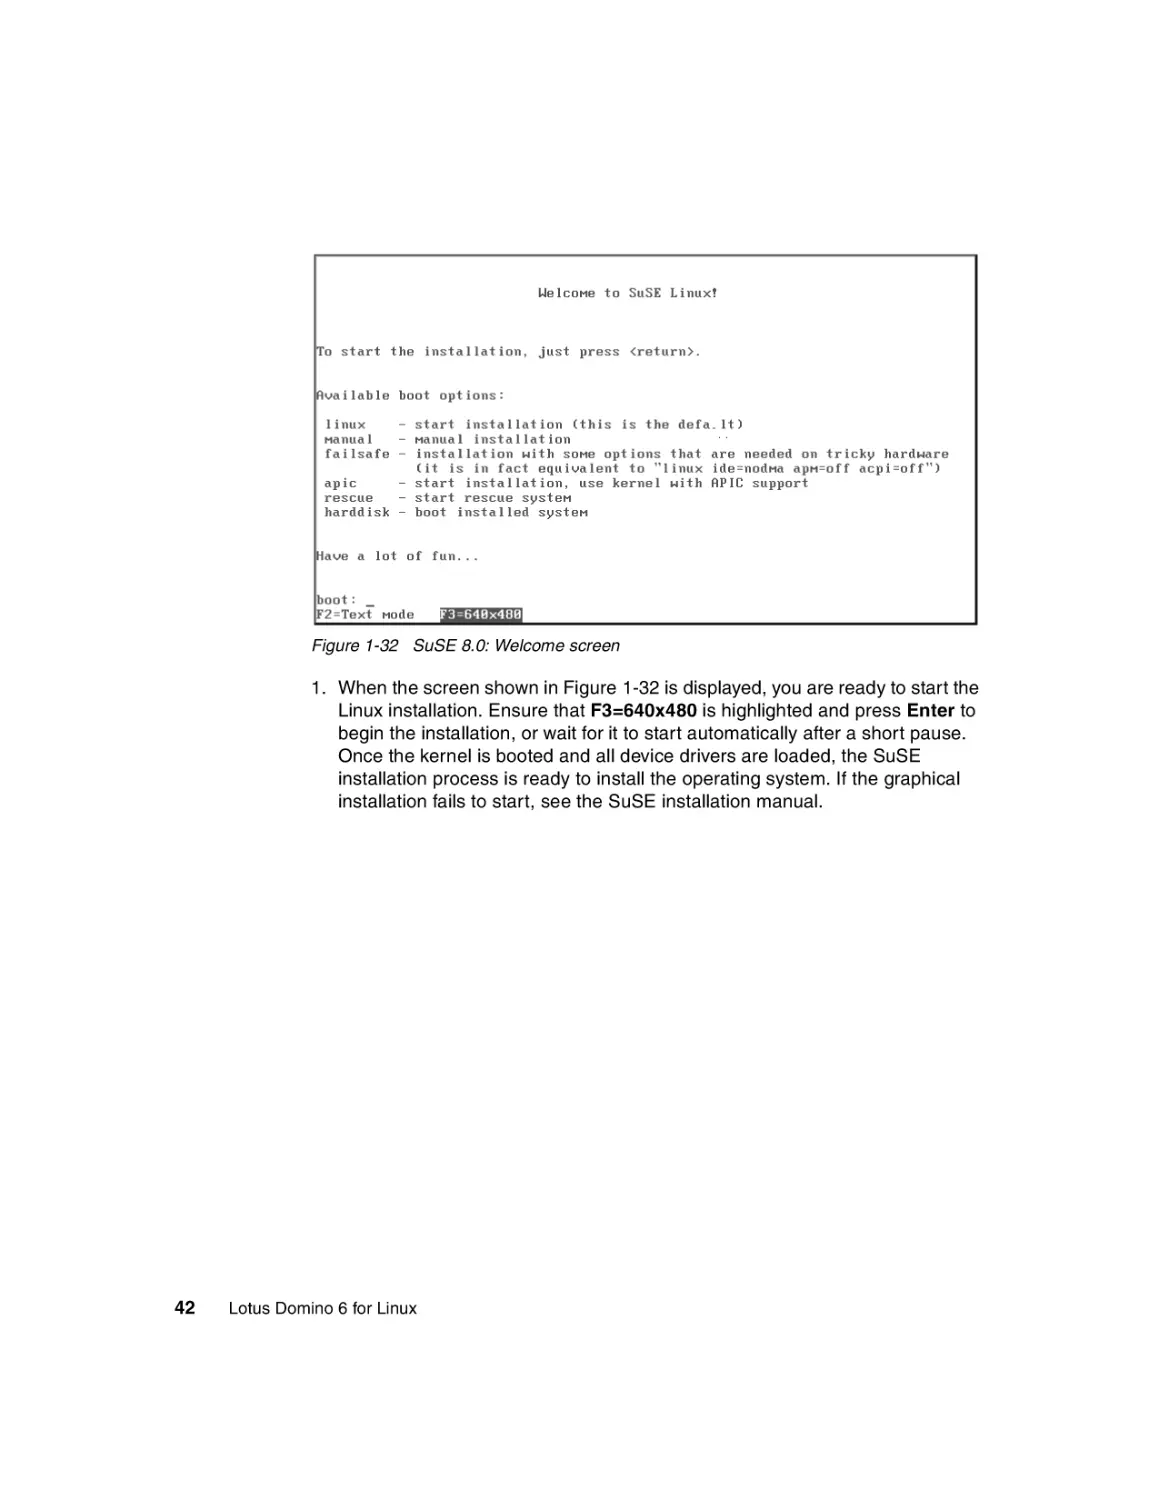
Figure 1-33 SuSE 8.0: Language selection
2. As shown in Figure 1-33, you can select the language you would like to use
on your system. Specify the appropriate language and click Accept.
Chapter 1. Installing Linux
43
Figure 1-34 SuSE 8.0: Analyzing system
3. The system will begin to probe (detect) the hardware installed in your system
and load the appropriate drivers for it. While this is happening, the screen
shown in Figure 1-34 is displayed.
Note: Some disk controllers require drivers supplied by the manufactor and
are not supported out of the box. See http://sdb.suse.de/en/sdb/html/ for
more information about installing disk drivers.
44
Lotus Domino 6 for Linux
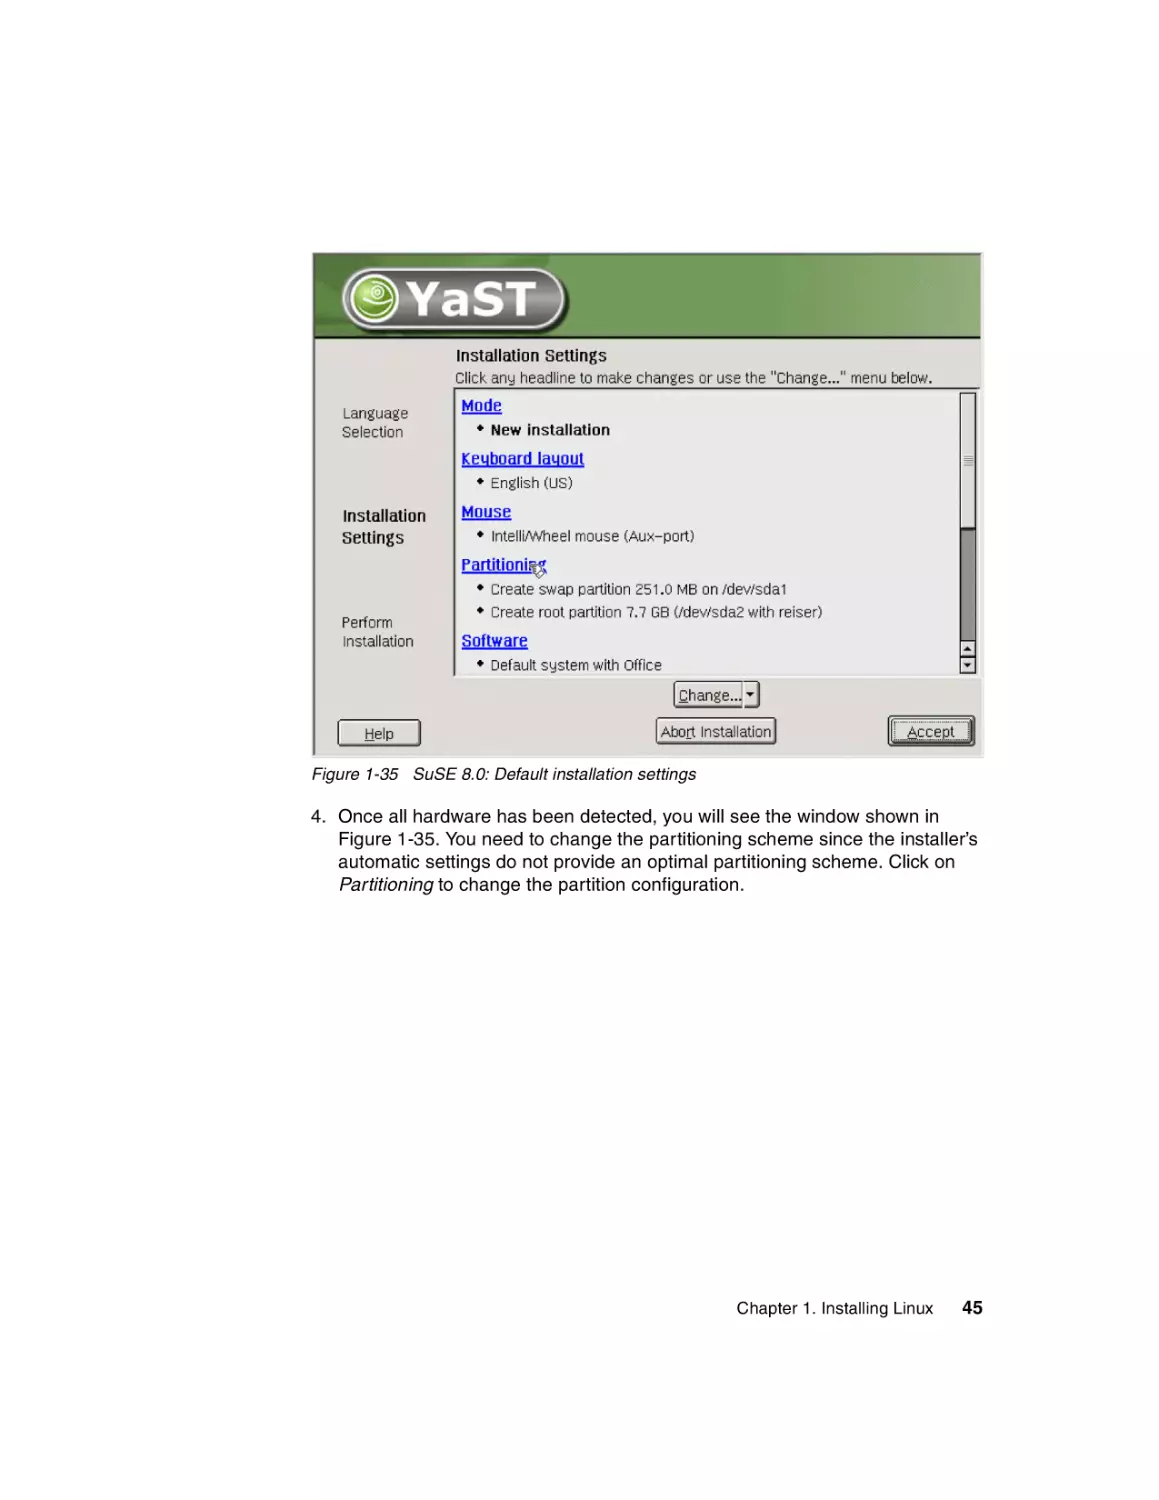
Figure 1-35 SuSE 8.0: Default installation settings
4. Once all hardware has been detected, you will see the window shown in
Figure 1-35. You need to change the partitioning scheme since the installer’s
automatic settings do not provide an optimal partitioning scheme. Click on
Partitioning to change the partition configuration.
Chapter 1. Installing Linux
45
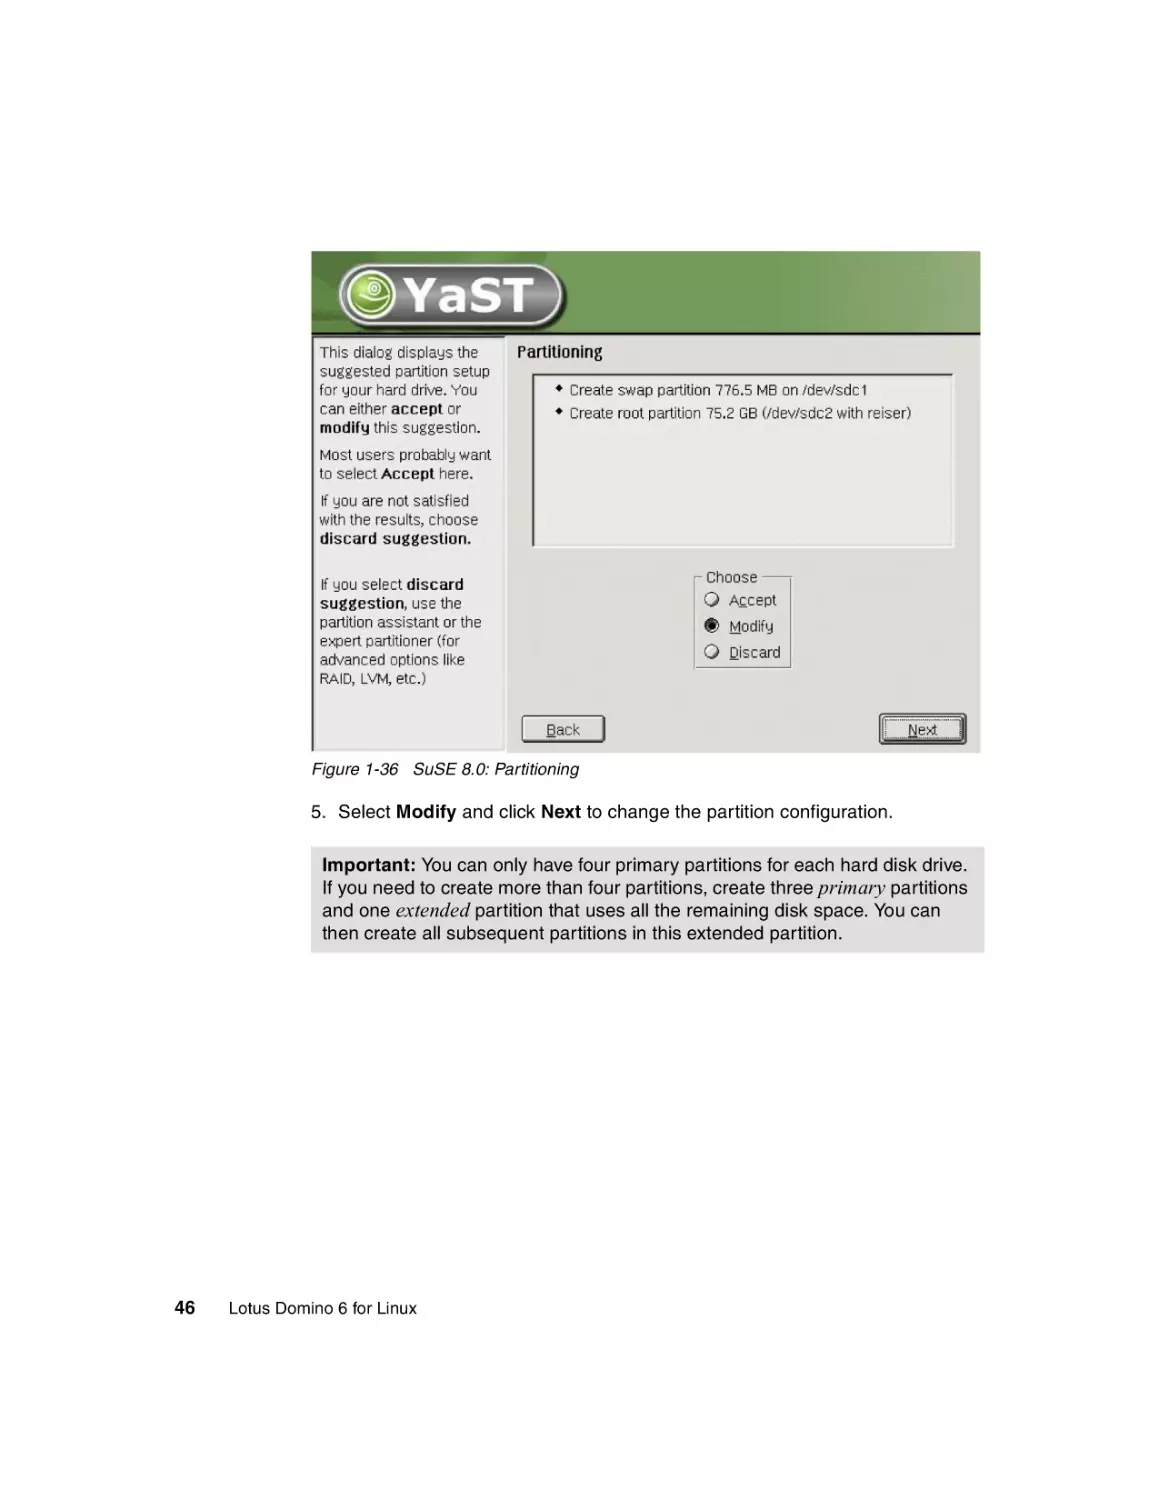
Figure 1-36 SuSE 8.0: Partitioning
5. Select Modify and click Next to change the partition configuration.
Important: You can only have four primary partitions for each hard disk drive.
If you need to create more than four partitions, create three primary partitions
and one extended partition that uses all the remaining disk space. You can
then create all subsequent partitions in this extended partition.
46
Lotus Domino 6 for Linux
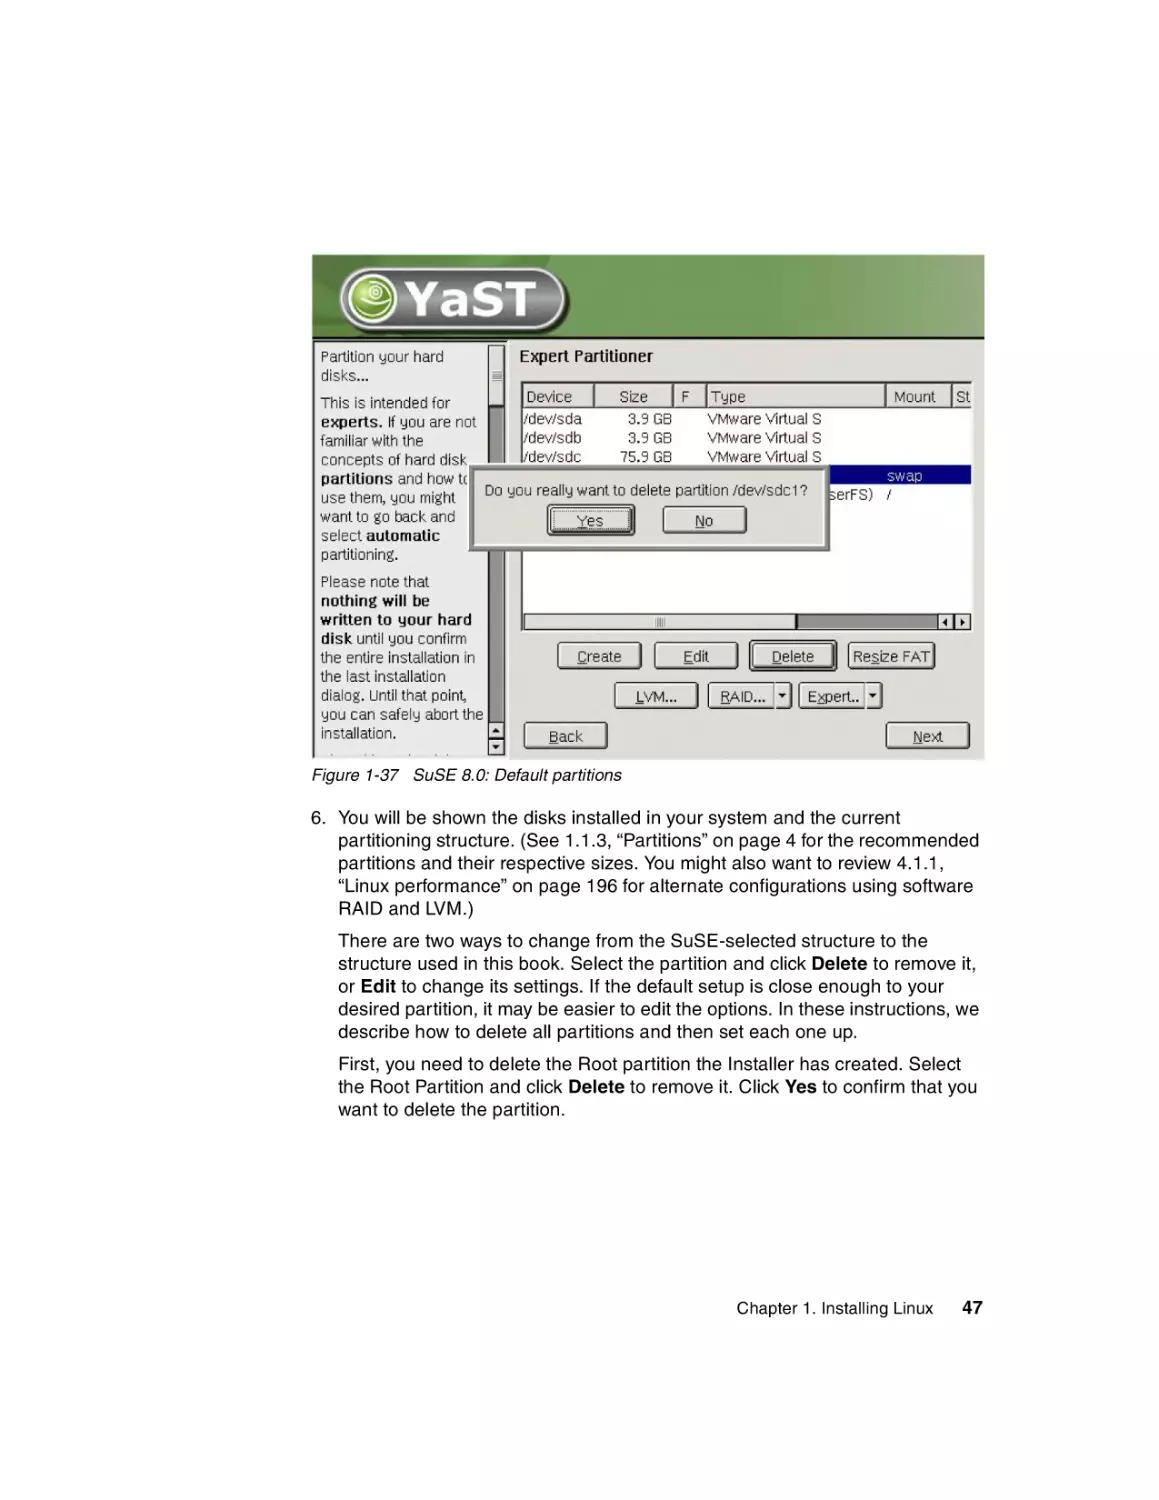
Figure 1-37 SuSE 8.0: Default partitions
6. You will be shown the disks installed in your system and the current
partitioning structure. (See 1.1.3, “Partitions” on page 4 for the recommended
partitions and their respective sizes. You might also want to review 4.1.1,
“Linux performance” on page 196 for alternate configurations using software
RAID and LVM.)
There are two ways to change from the SuSE-selected structure to the
structure used in this book. Select the partition and click Delete to remove it,
or Edit to change its settings. If the default setup is close enough to your
desired partition, it may be easier to edit the options. In these instructions, we
describe how to delete all partitions and then set each one up.
First, you need to delete the Root partition the Installer has created. Select
the Root Partition and click Delete to remove it. Click Yes to confirm that you
want to delete the partition.
Chapter 1. Installing Linux
47
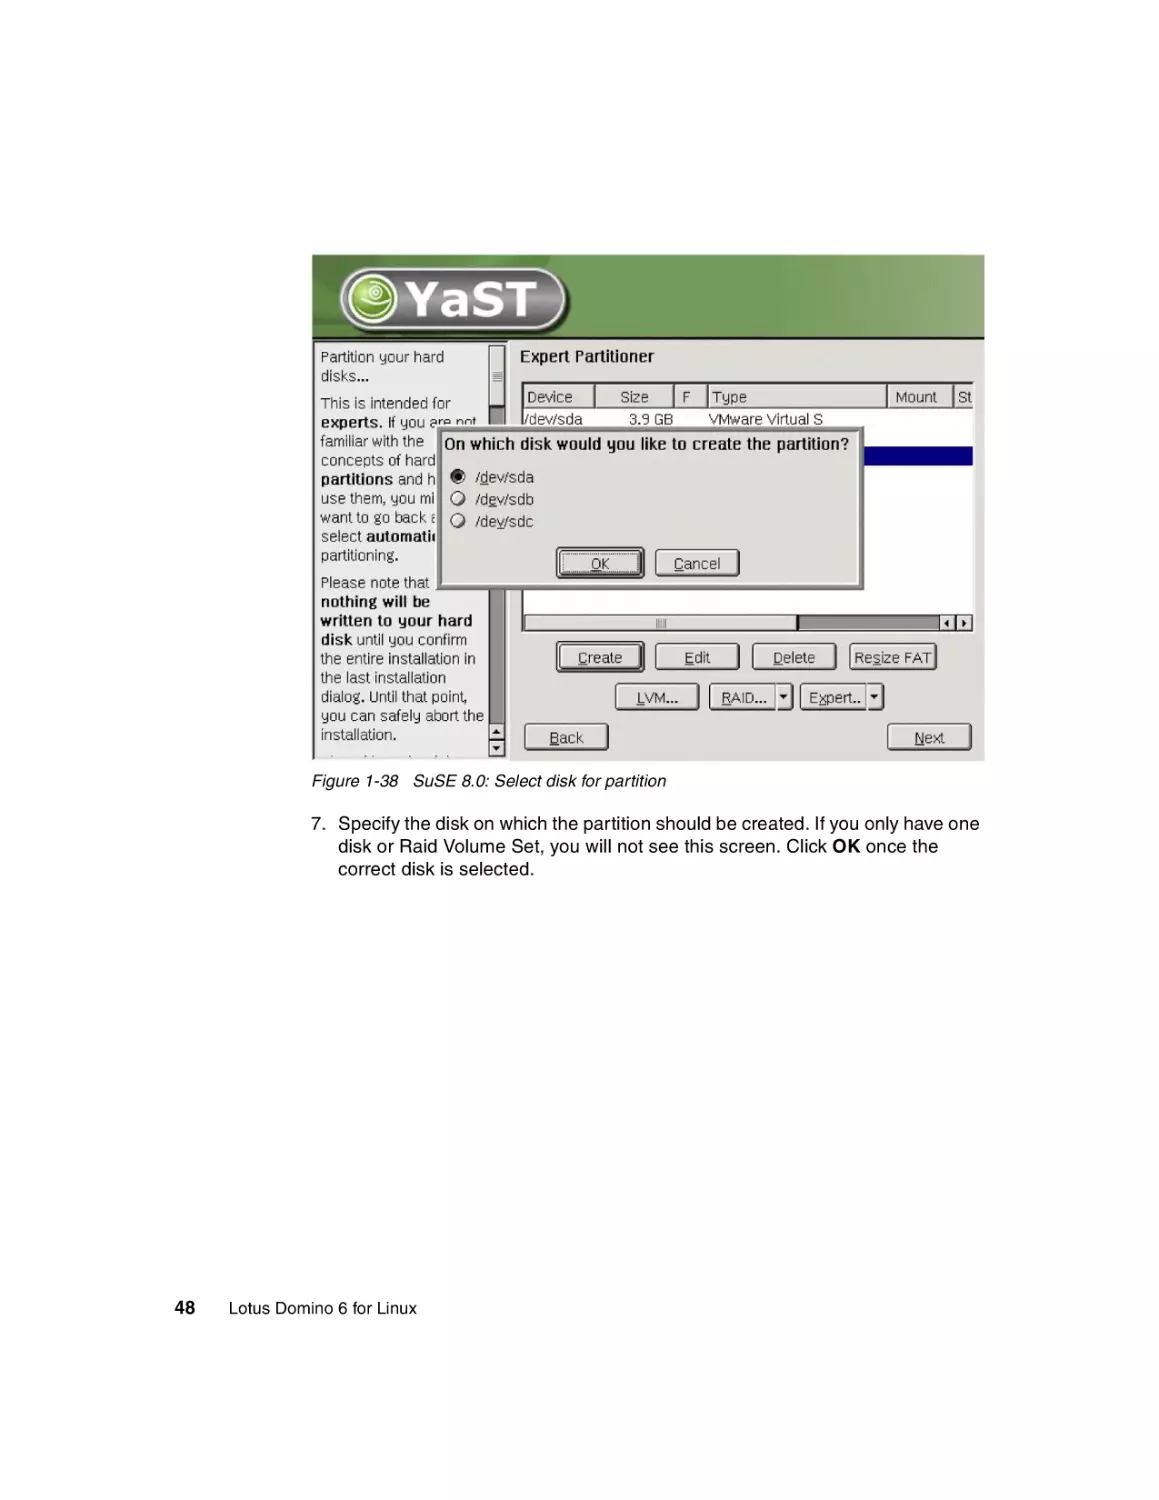
Figure 1-38 SuSE 8.0: Select disk for partition
7. Specify the disk on which the partition should be created. If you only have one
disk or Raid Volume Set, you will not see this screen. Click OK once the
correct disk is selected.
48
Lotus Domino 6 for Linux
Figure 1-39 SuSE 8.0: Primary partition
8. Figure 1-39 shows the options to create either a Primary or Extended
partition. For the root partition, select Primary and click OK.
Chapter 1. Installing Linux
49
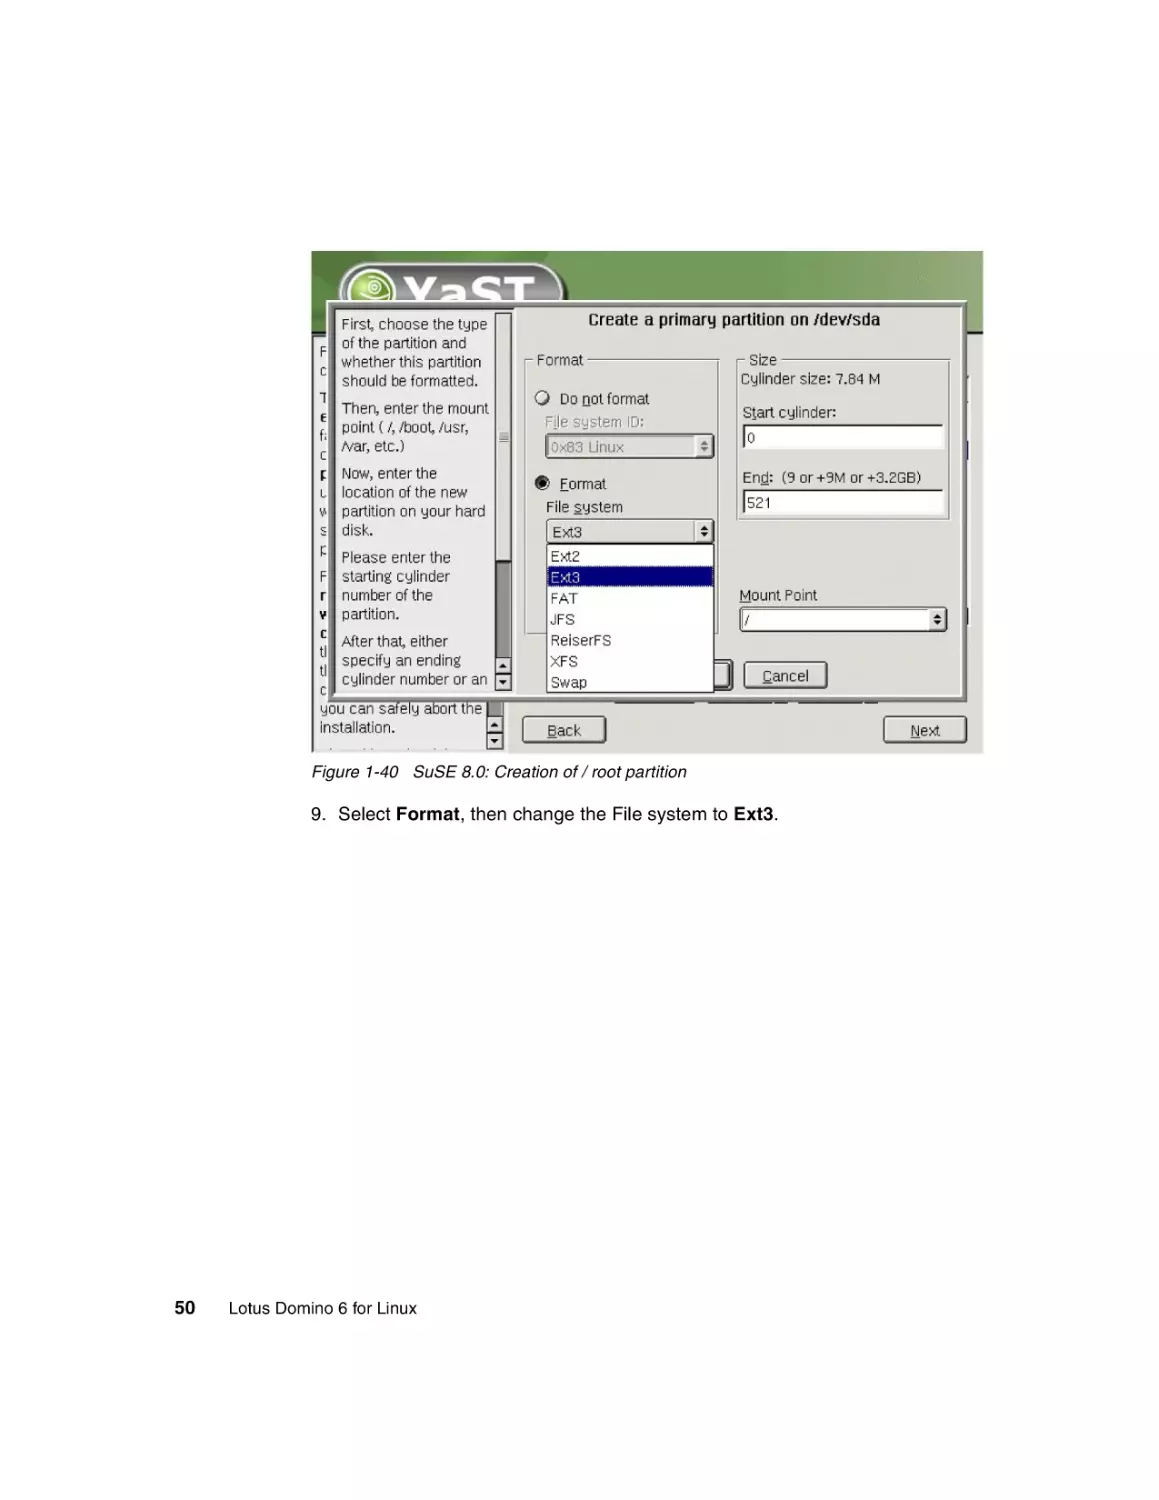
Figure 1-40 SuSE 8.0: Creation of / root partition
9. Select Format, then change the File system to Ext3.
50
Lotus Domino 6 for Linux
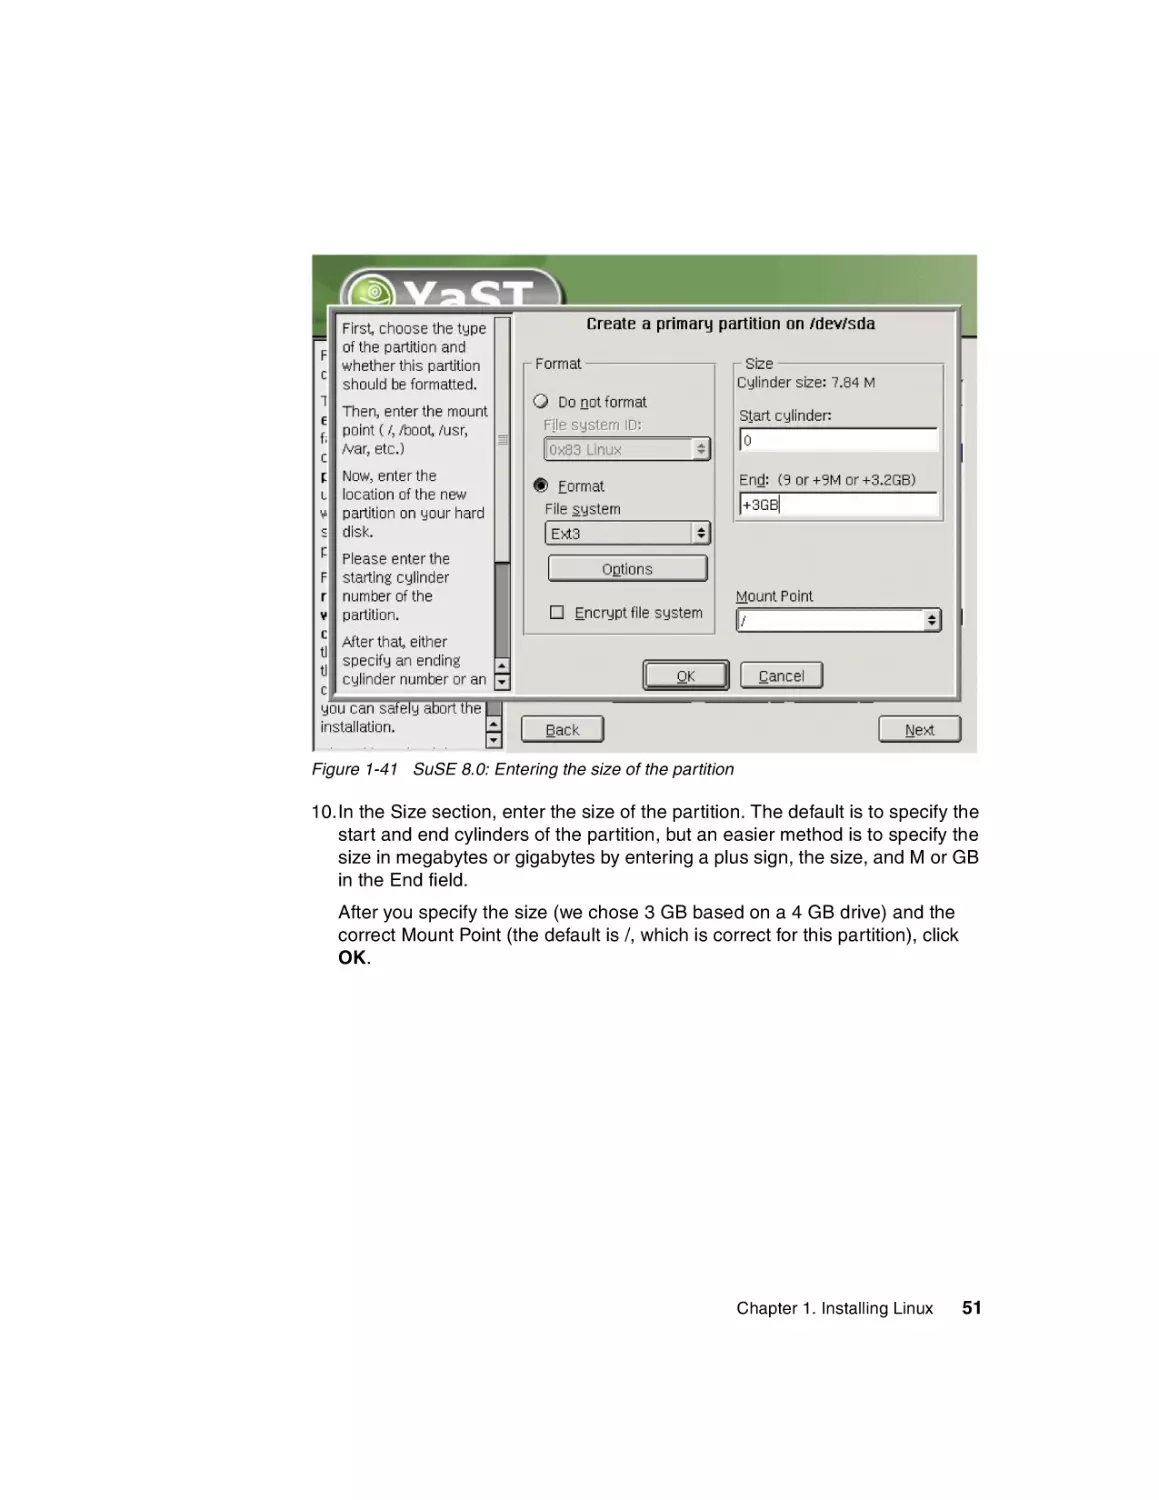
Figure 1-41 SuSE 8.0: Entering the size of the partition
10.In the Size section, enter the size of the partition. The default is to specify the
start and end cylinders of the partition, but an easier method is to specify the
size in megabytes or gigabytes by entering a plus sign, the size, and M or GB
in the End field.
After you specify the size (we chose 3 GB based on a 4 GB drive) and the
correct Mount Point (the default is /, which is correct for this partition), click
OK.
Chapter 1. Installing Linux
51
Figure 1-42 SuSE 8.0: Changing to Swap for the file system
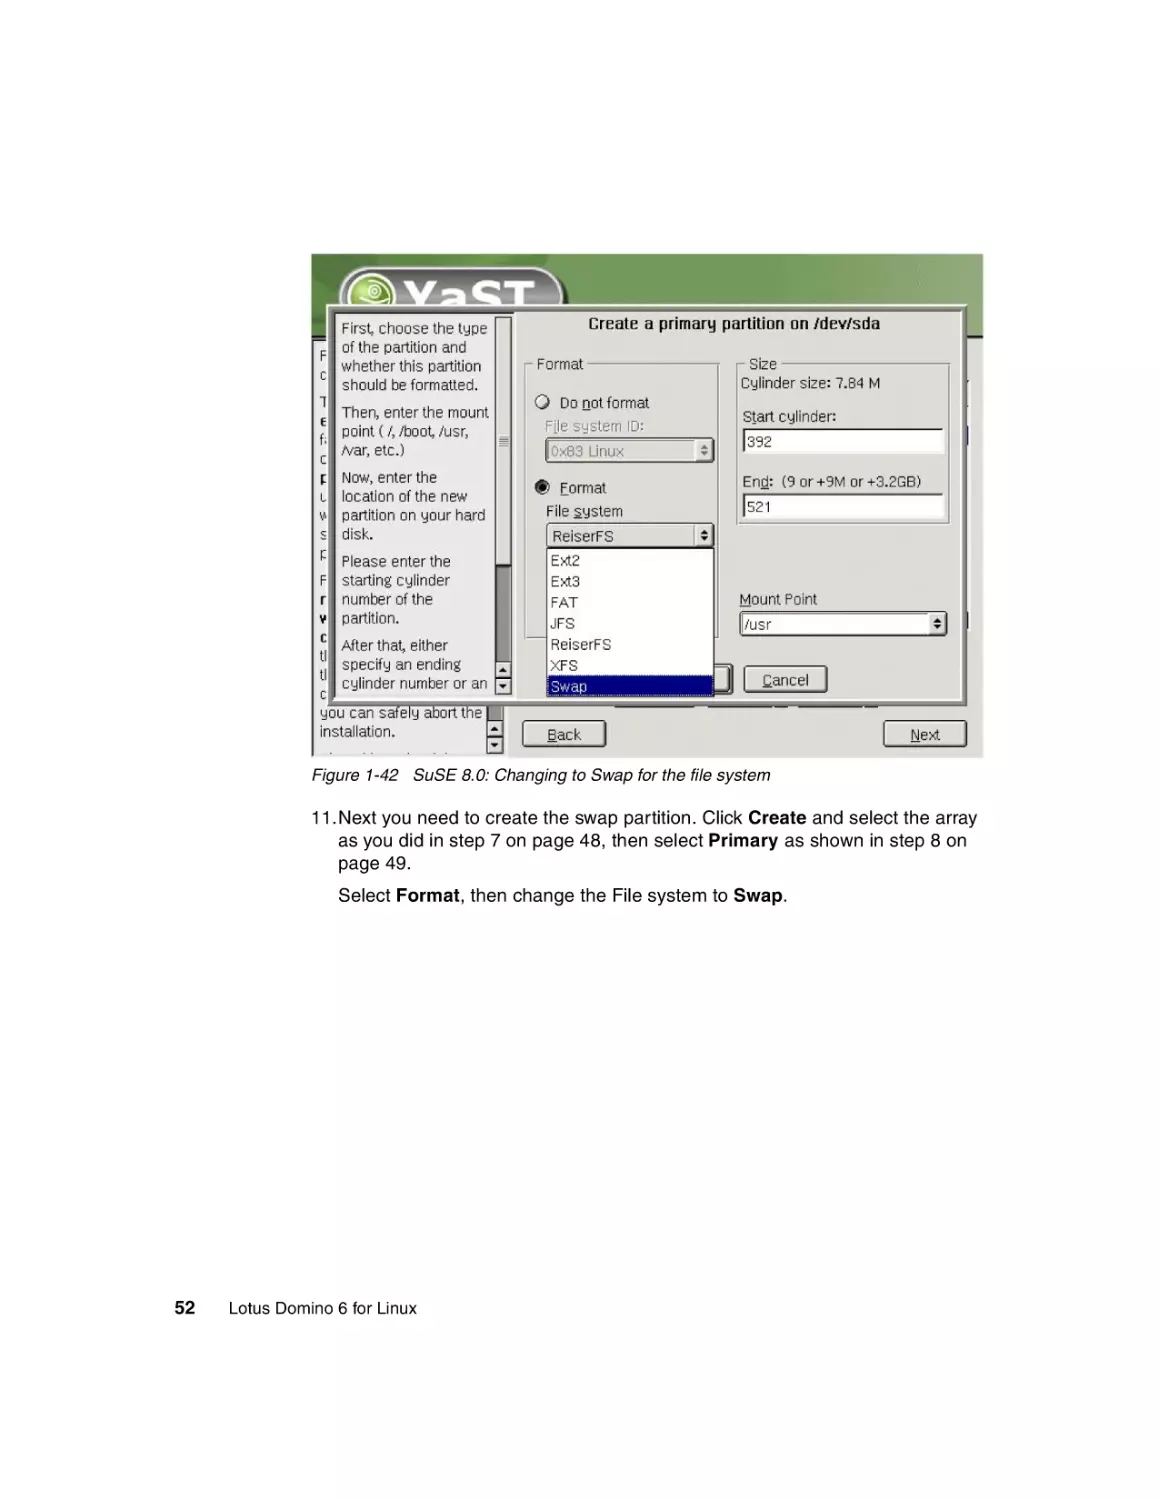
11.Next you need to create the swap partition. Click Create and select the array
as you did in step 7 on page 48, then select Primary as shown in step 8 on
page 49.
Select Format, then change the File system to Swap.
52
Lotus Domino 6 for Linux
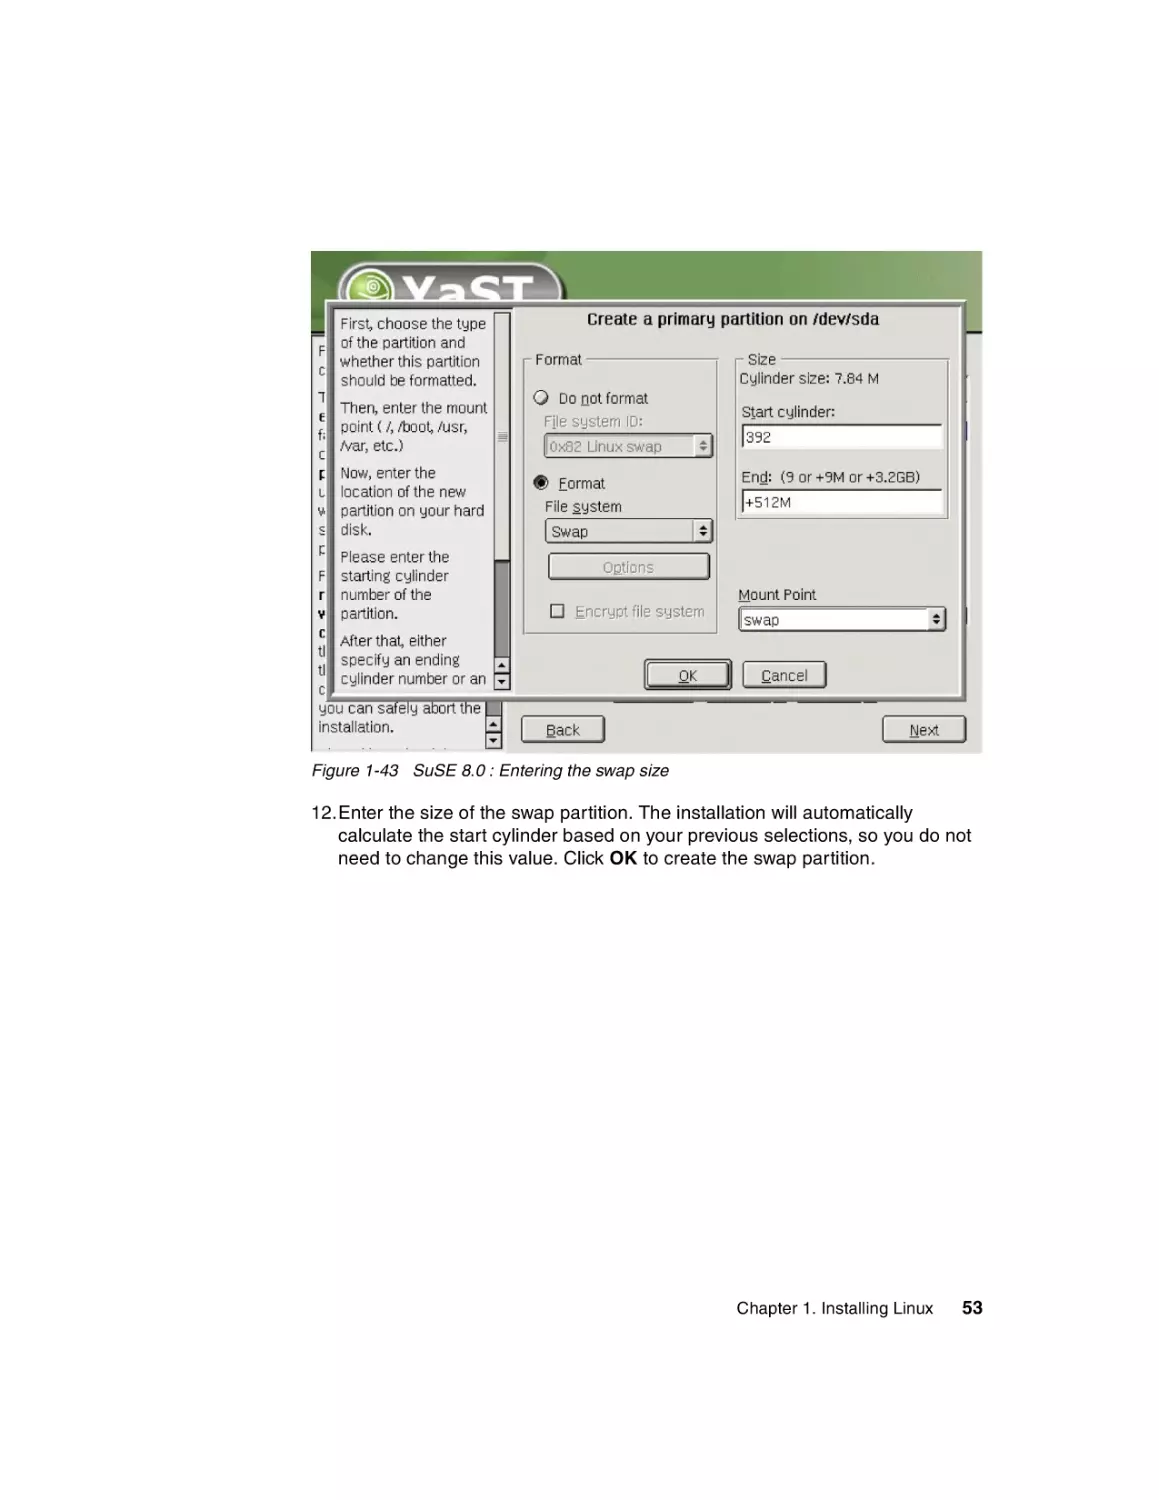
Figure 1-43 SuSE 8.0 : Entering the swap size
12.Enter the size of the swap partition. The installation will automatically
calculate the start cylinder based on your previous selections, so you do not
need to change this value. Click OK to create the swap partition.
Chapter 1. Installing Linux
53
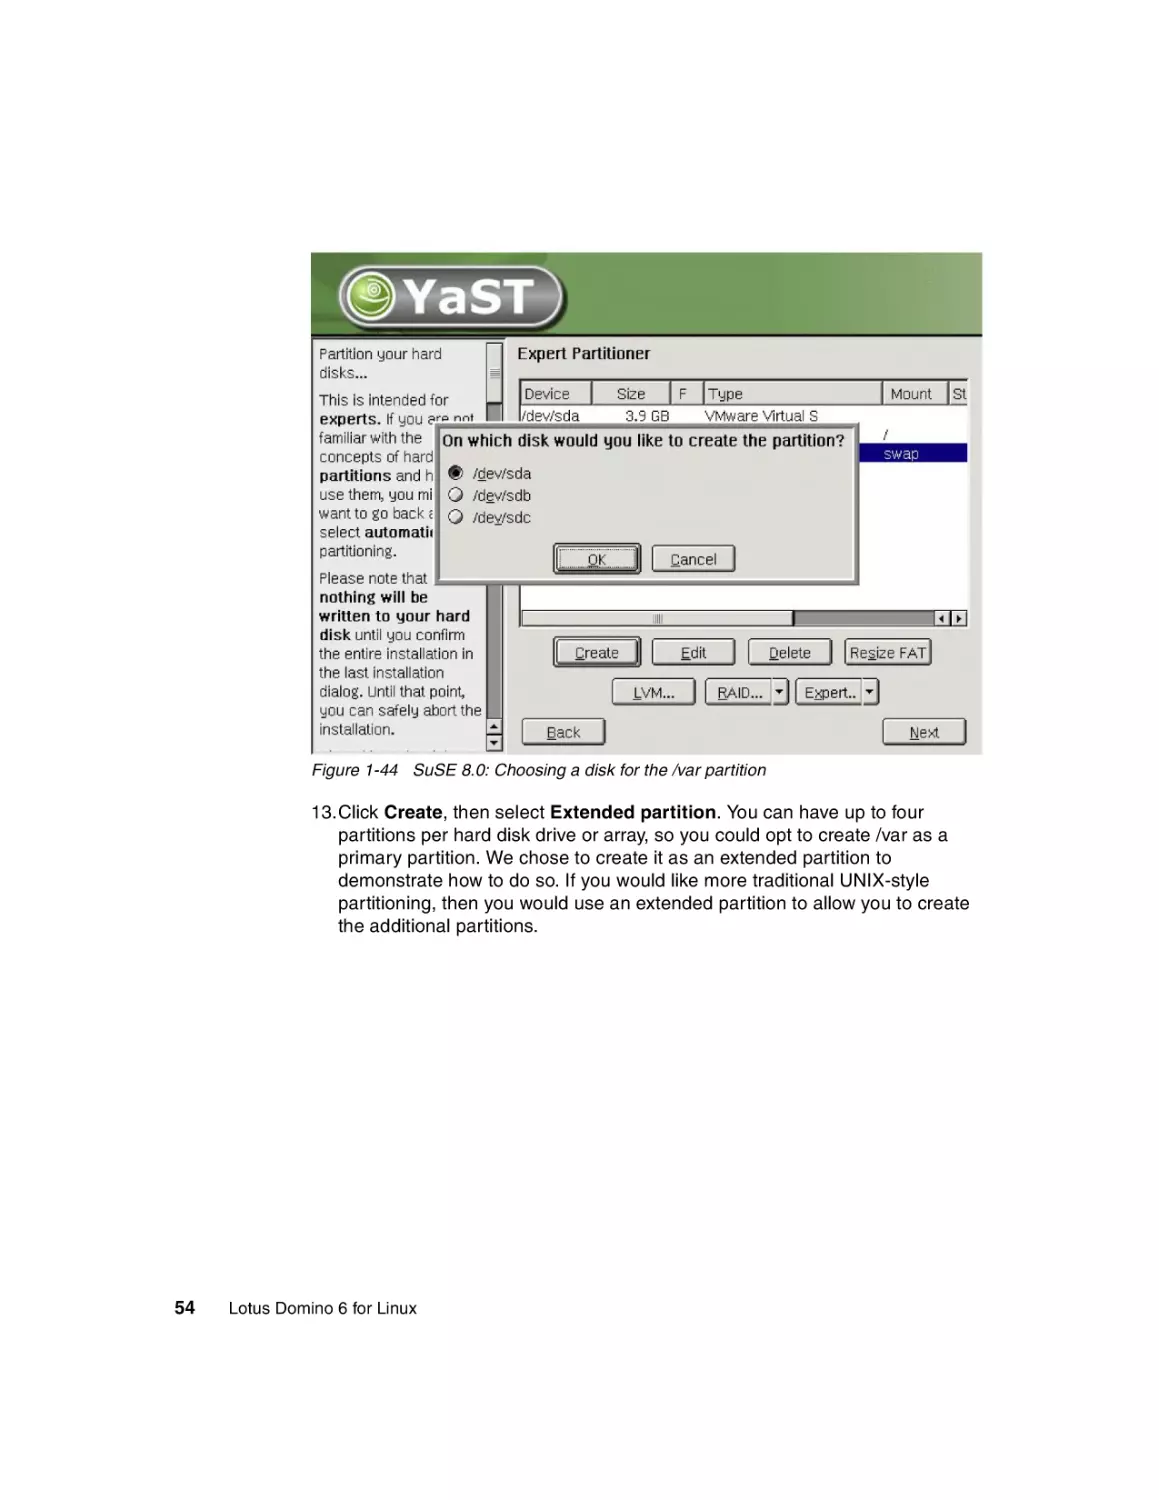
Figure 1-44 SuSE 8.0: Choosing a disk for the /var partition
13.Click Create, then select Extended partition. You can have up to four
partitions per hard disk drive or array, so you could opt to create /var as a
primary partition. We chose to create it as an extended partition to
demonstrate how to do so. If you would like more traditional UNIX-style
partitioning, then you would use an extended partition to allow you to create
the additional partitions.
54
Lotus Domino 6 for Linux
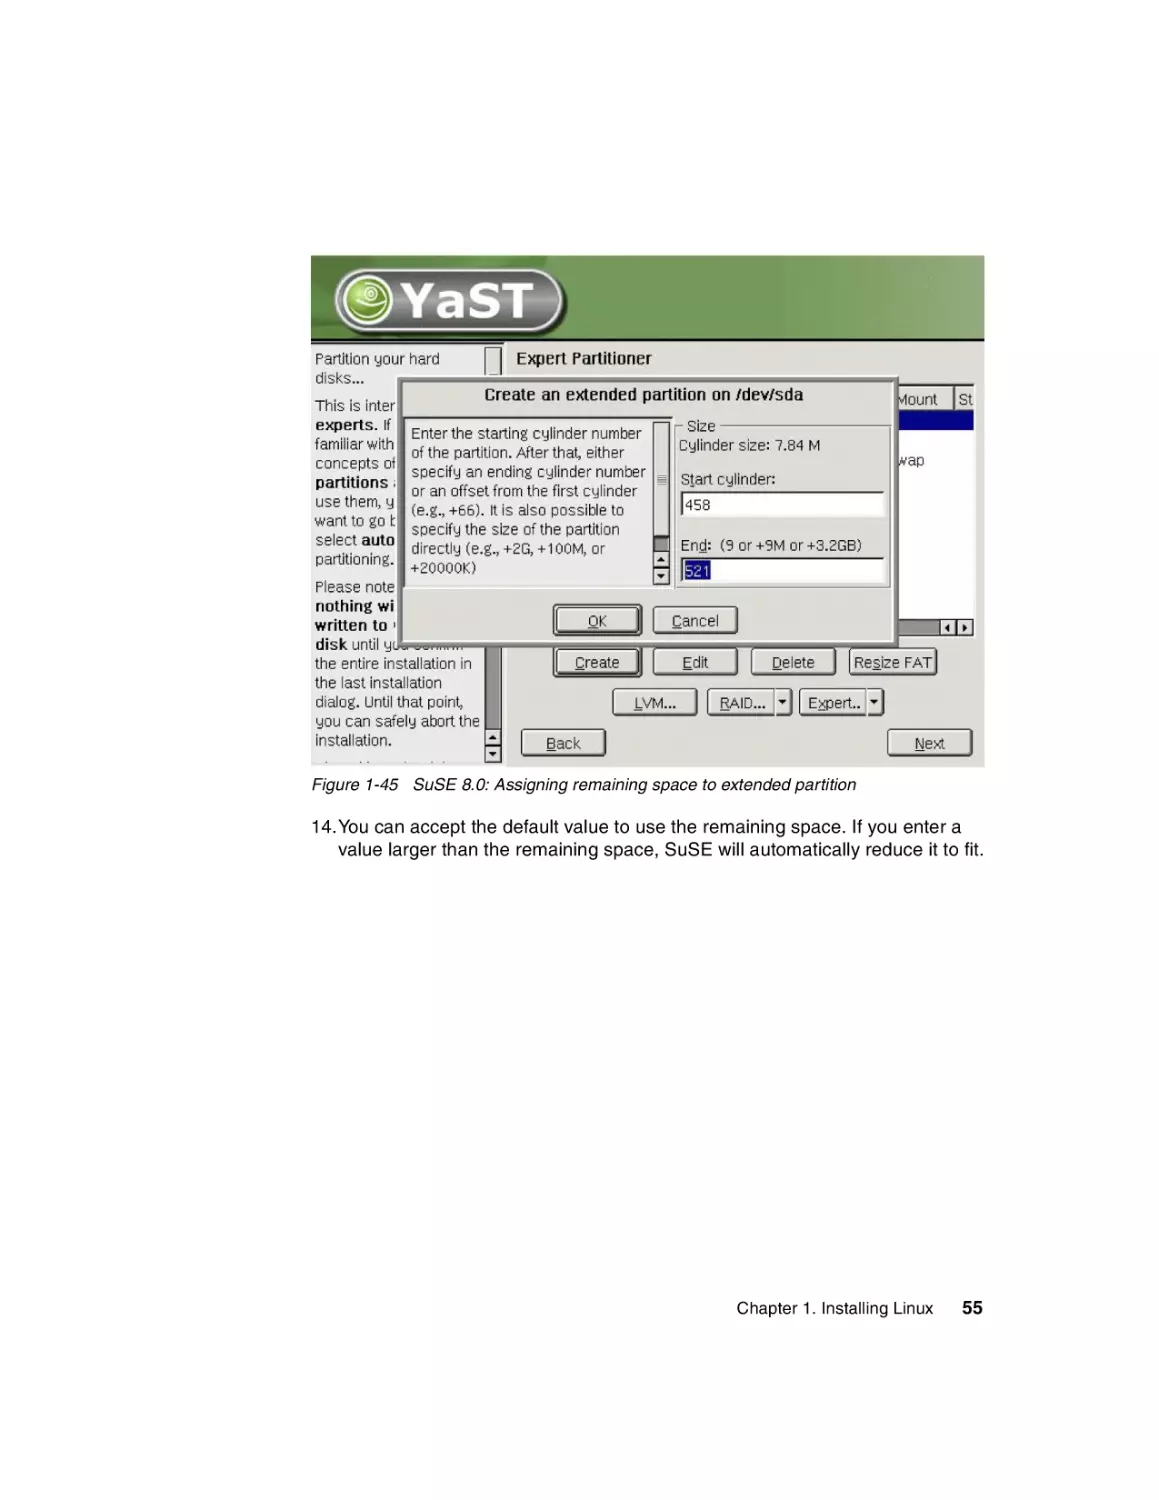
Figure 1-45 SuSE 8.0: Assigning remaining space to extended partition
14.You can accept the default value to use the remaining space. If you enter a
value larger than the remaining space, SuSE will automatically reduce it to fit.
Chapter 1. Installing Linux
55
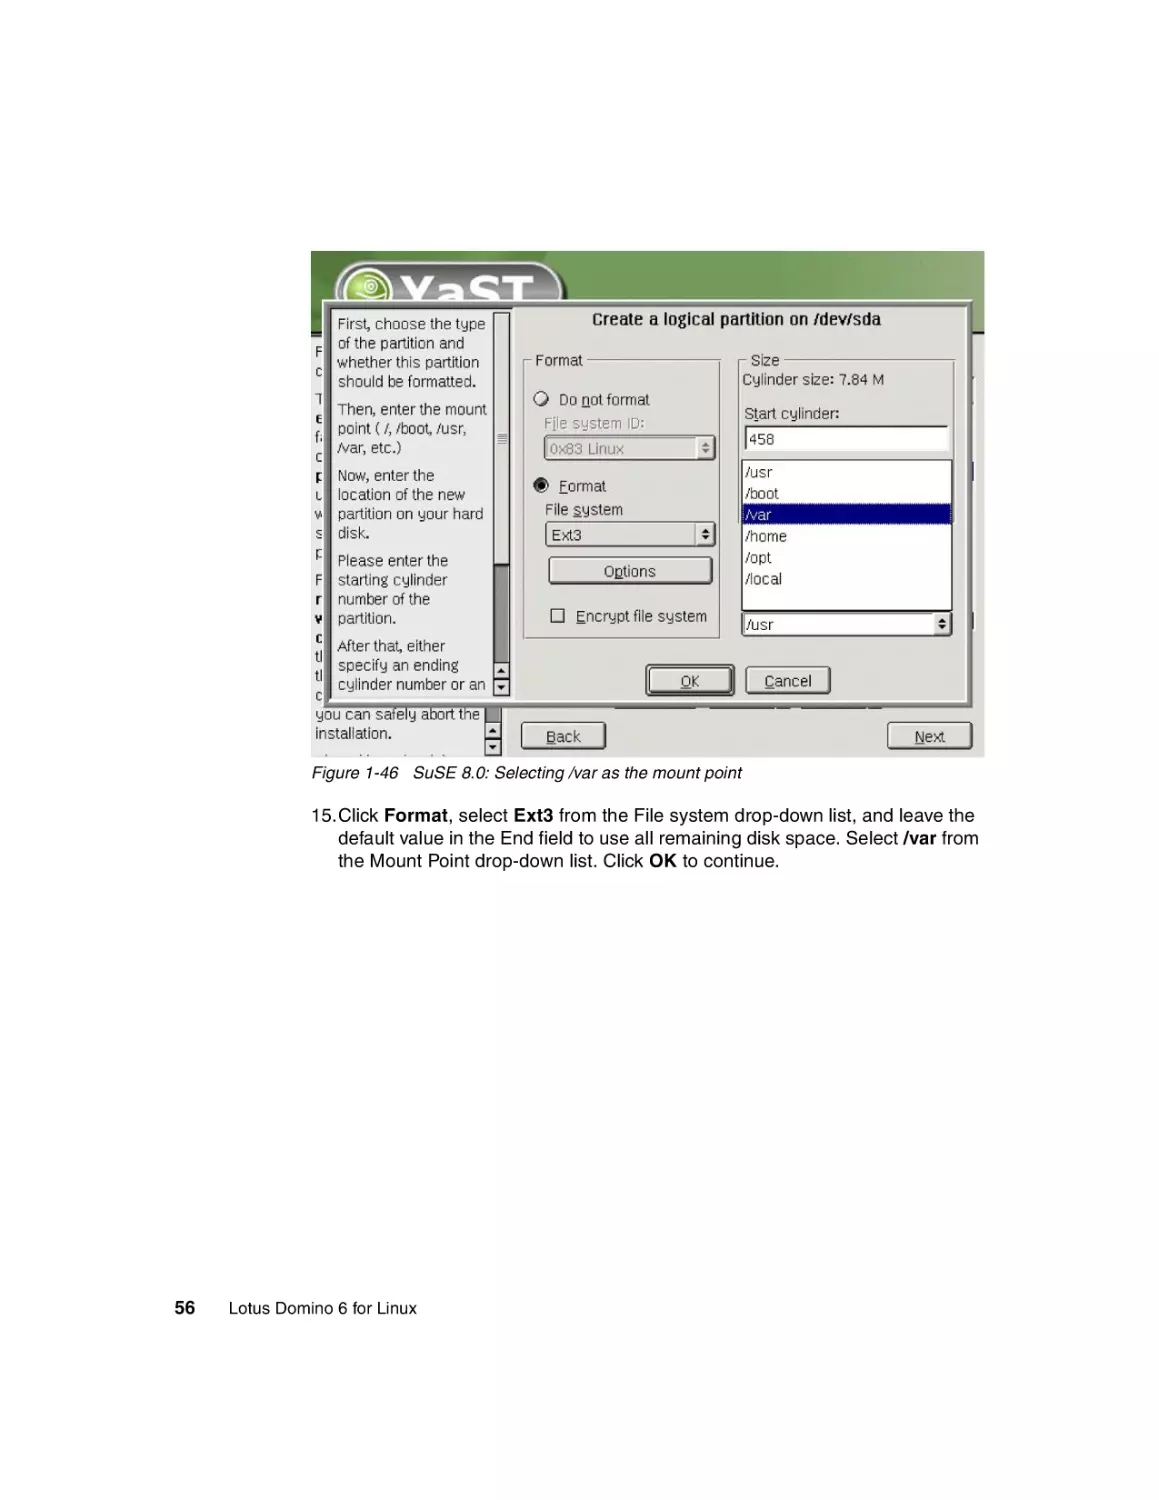
Figure 1-46 SuSE 8.0: Selecting /var as the mount point
15.Click Format, select Ext3 from the File system drop-down list, and leave the
default value in the End field to use all remaining disk space. Select /var from
the Mount Point drop-down list. Click OK to continue.
56
Lotus Domino 6 for Linux
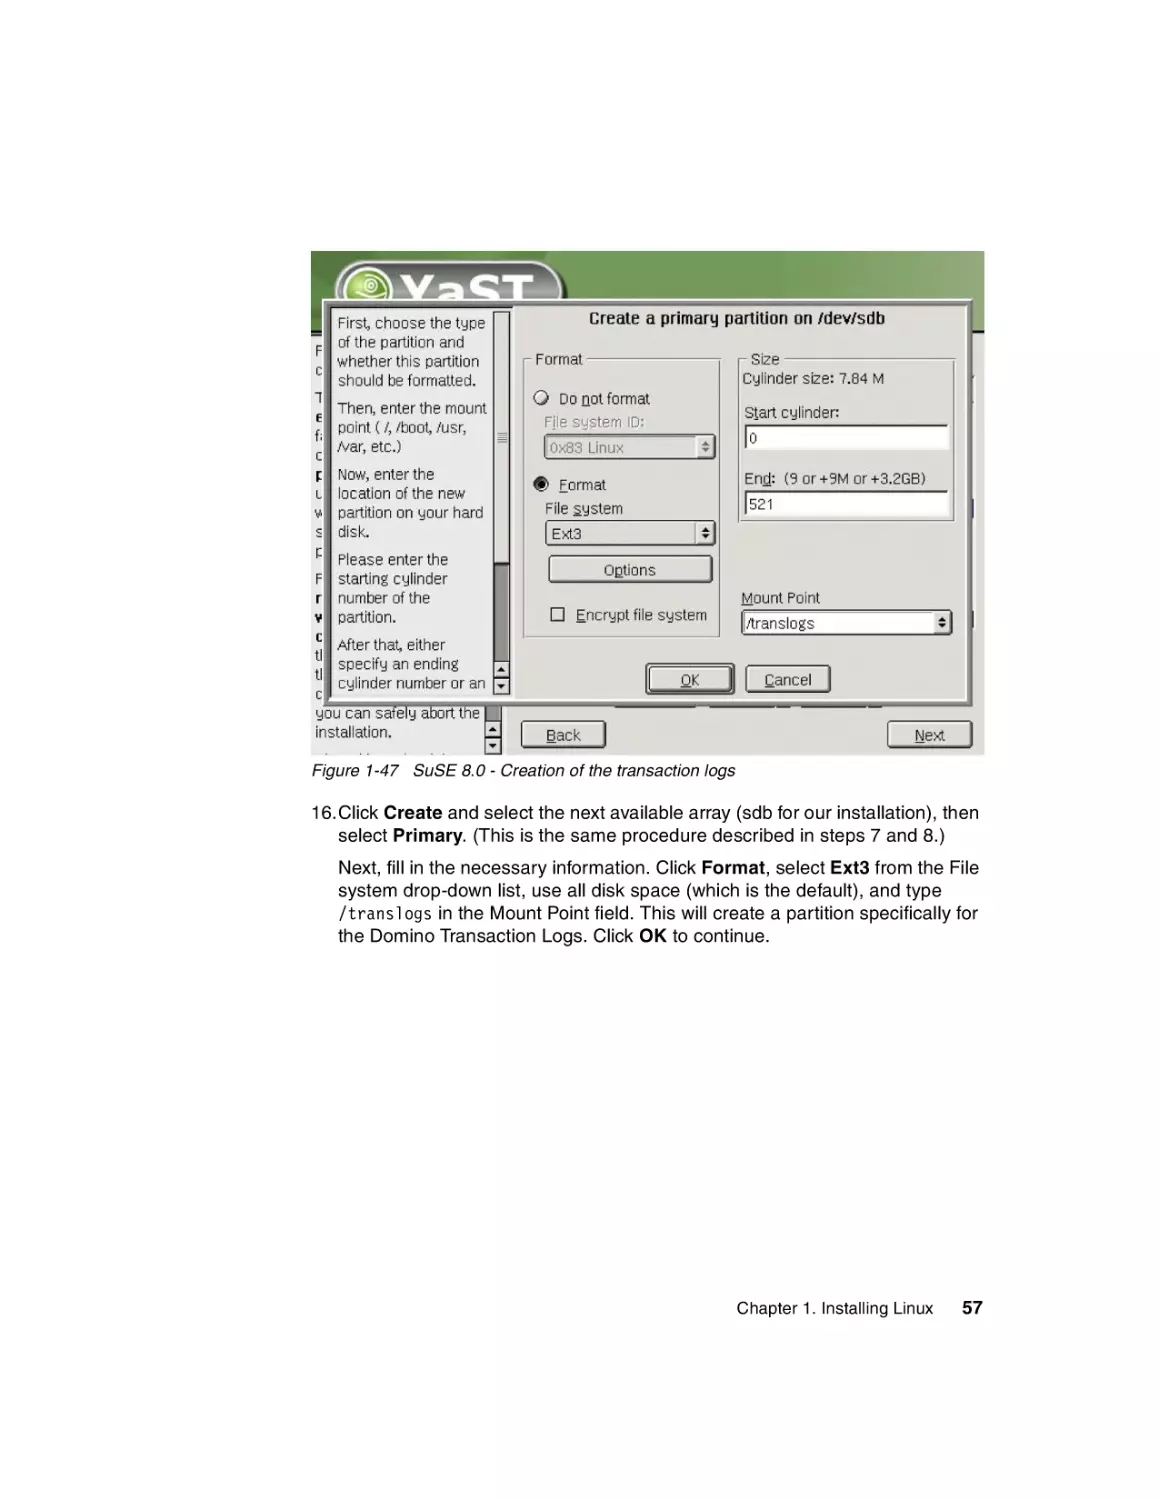
Figure 1-47 SuSE 8.0 - Creation of the transaction logs
16.Click Create and select the next available array (sdb for our installation), then
select Primary. (This is the same procedure described in steps 7 and 8.)
Next, fill in the necessary information. Click Format, select Ext3 from the File
system drop-down list, use all disk space (which is the default), and type
/translogs in the Mount Point field. This will create a partition specifically for
the Domino Transaction Logs. Click OK to continue.
Chapter 1. Installing Linux
57
Figure 1-48 SuSE 8.0:- Creation of the /local partition
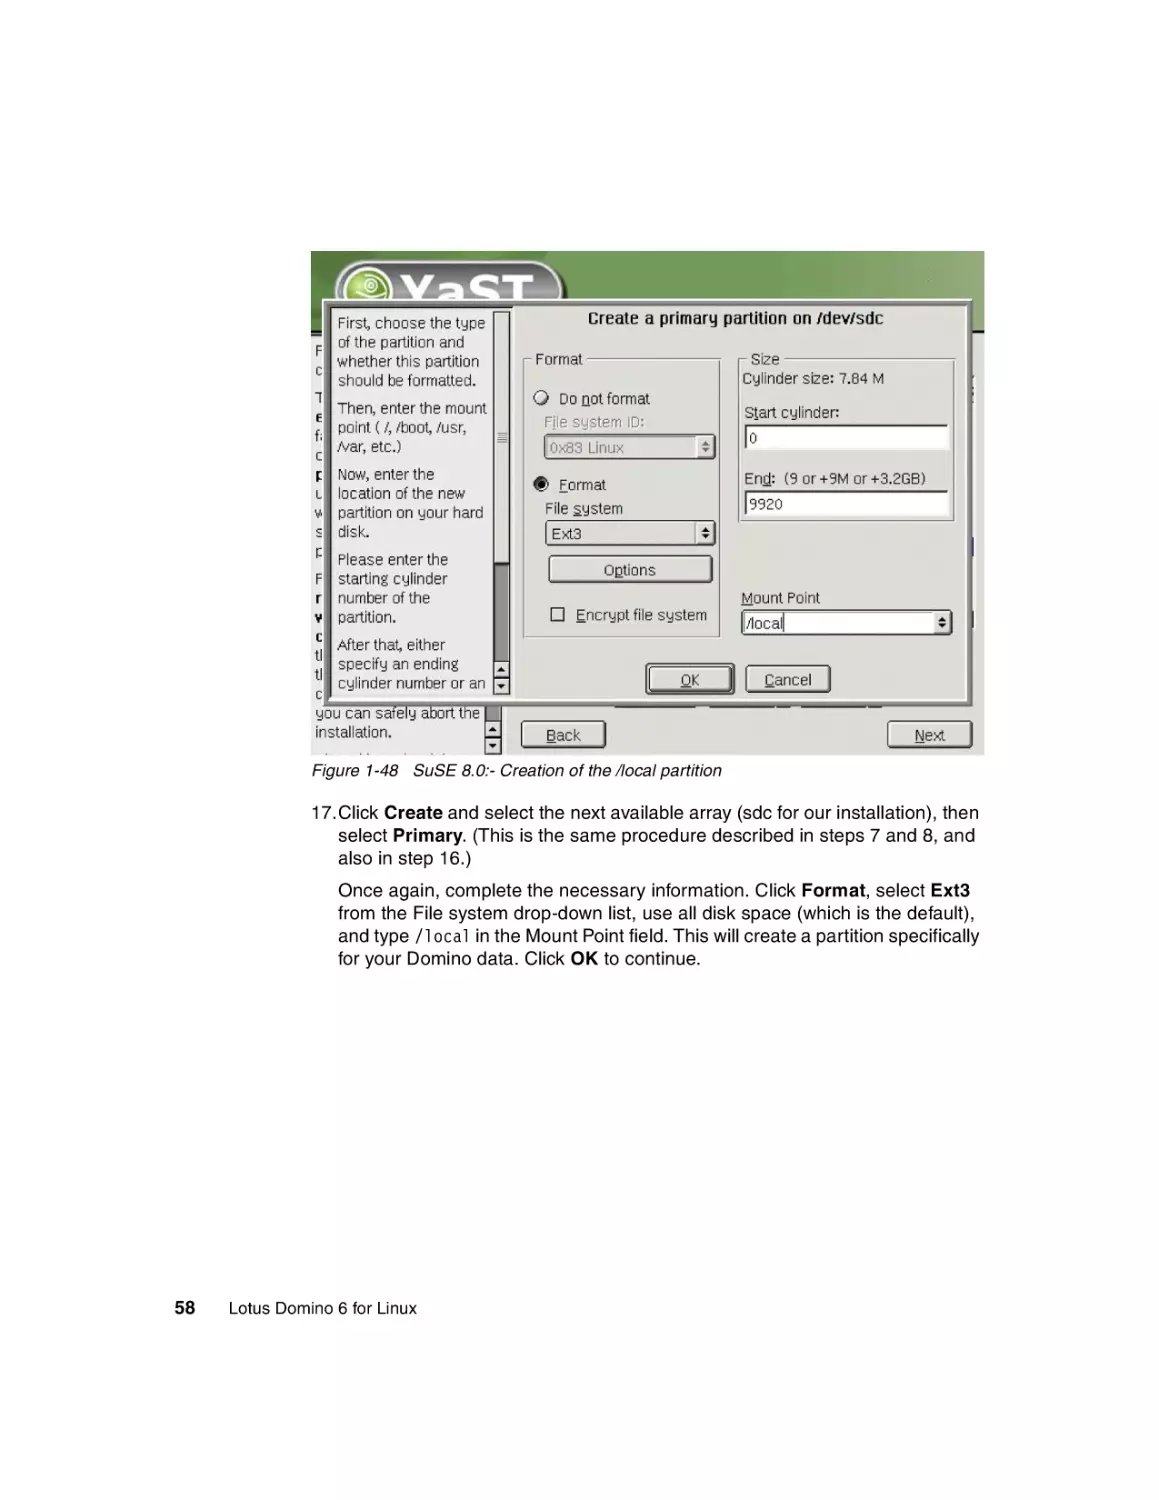
17.Click Create and select the next available array (sdc for our installation), then
select Primary. (This is the same procedure described in steps 7 and 8, and
also in step 16.)
Once again, complete the necessary information. Click Format, select Ext3
from the File system drop-down list, use all disk space (which is the default),
and type /local in the Mount Point field. This will create a partition specifically
for your Domino data. Click OK to continue.
58
Lotus Domino 6 for Linux
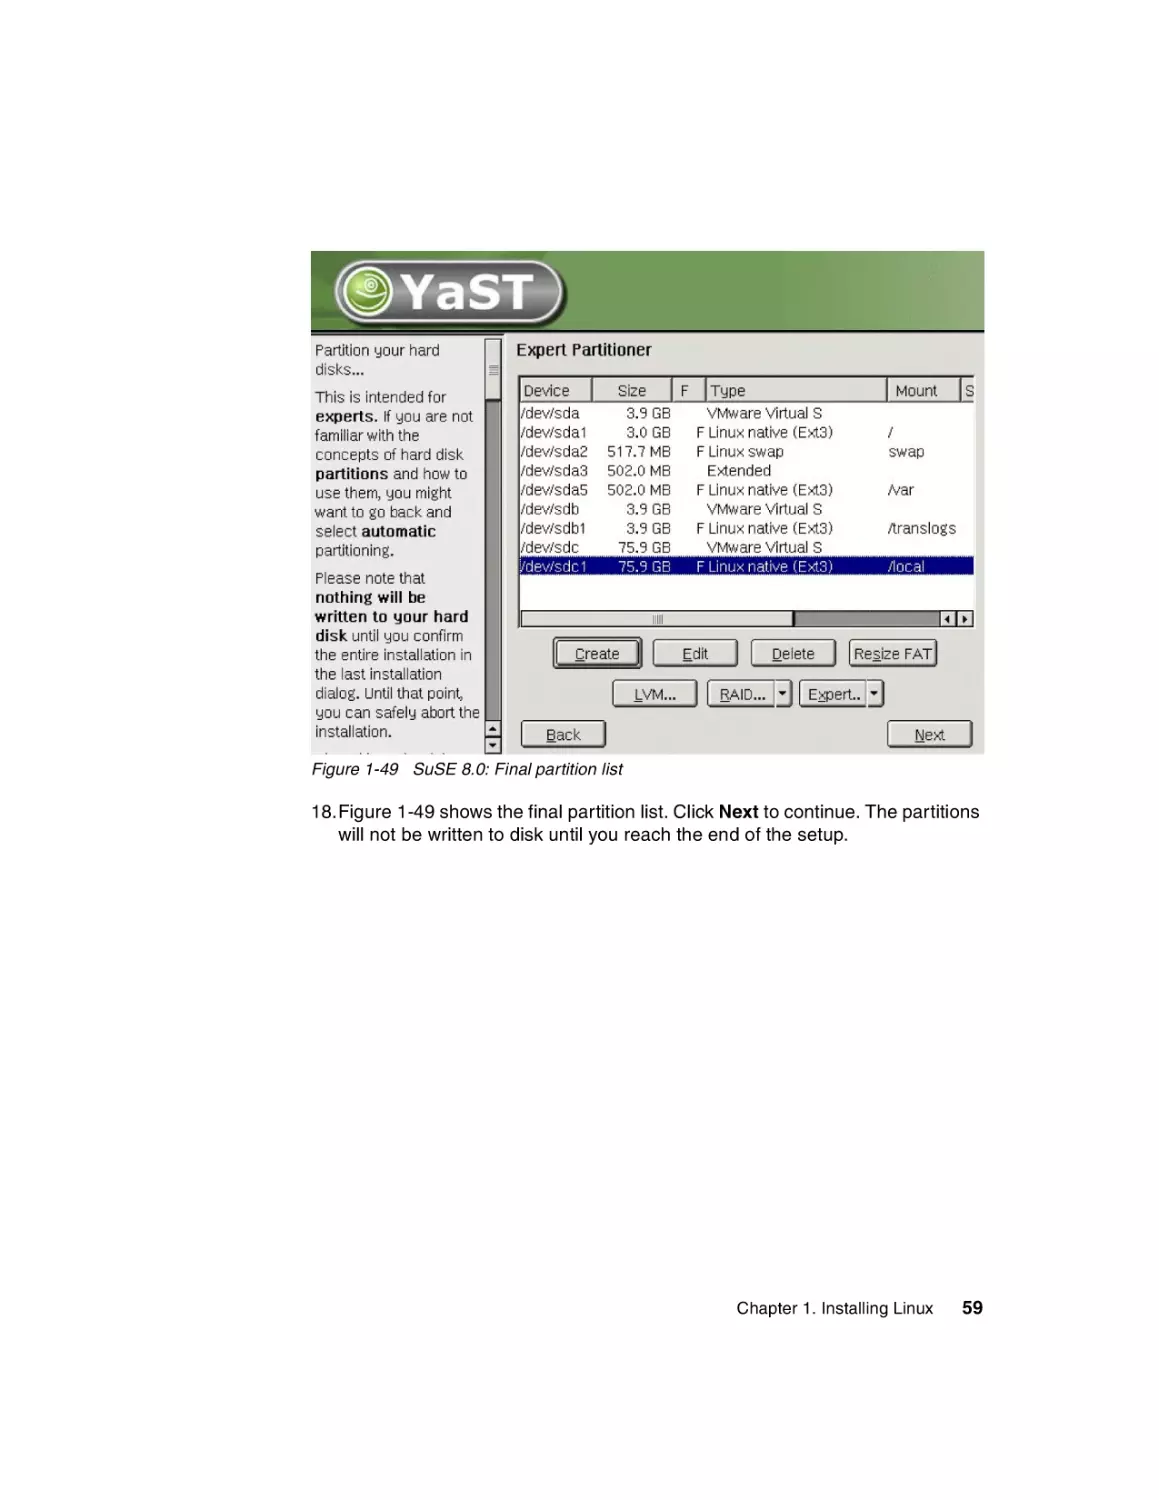
Figure 1-49 SuSE 8.0: Final partition list
18.Figure 1-49 shows the final partition list. Click Next to continue. The partitions
will not be written to disk until you reach the end of the setup.
Chapter 1. Installing Linux
59
Figure 1-50 SuSE 8.0: Software selection
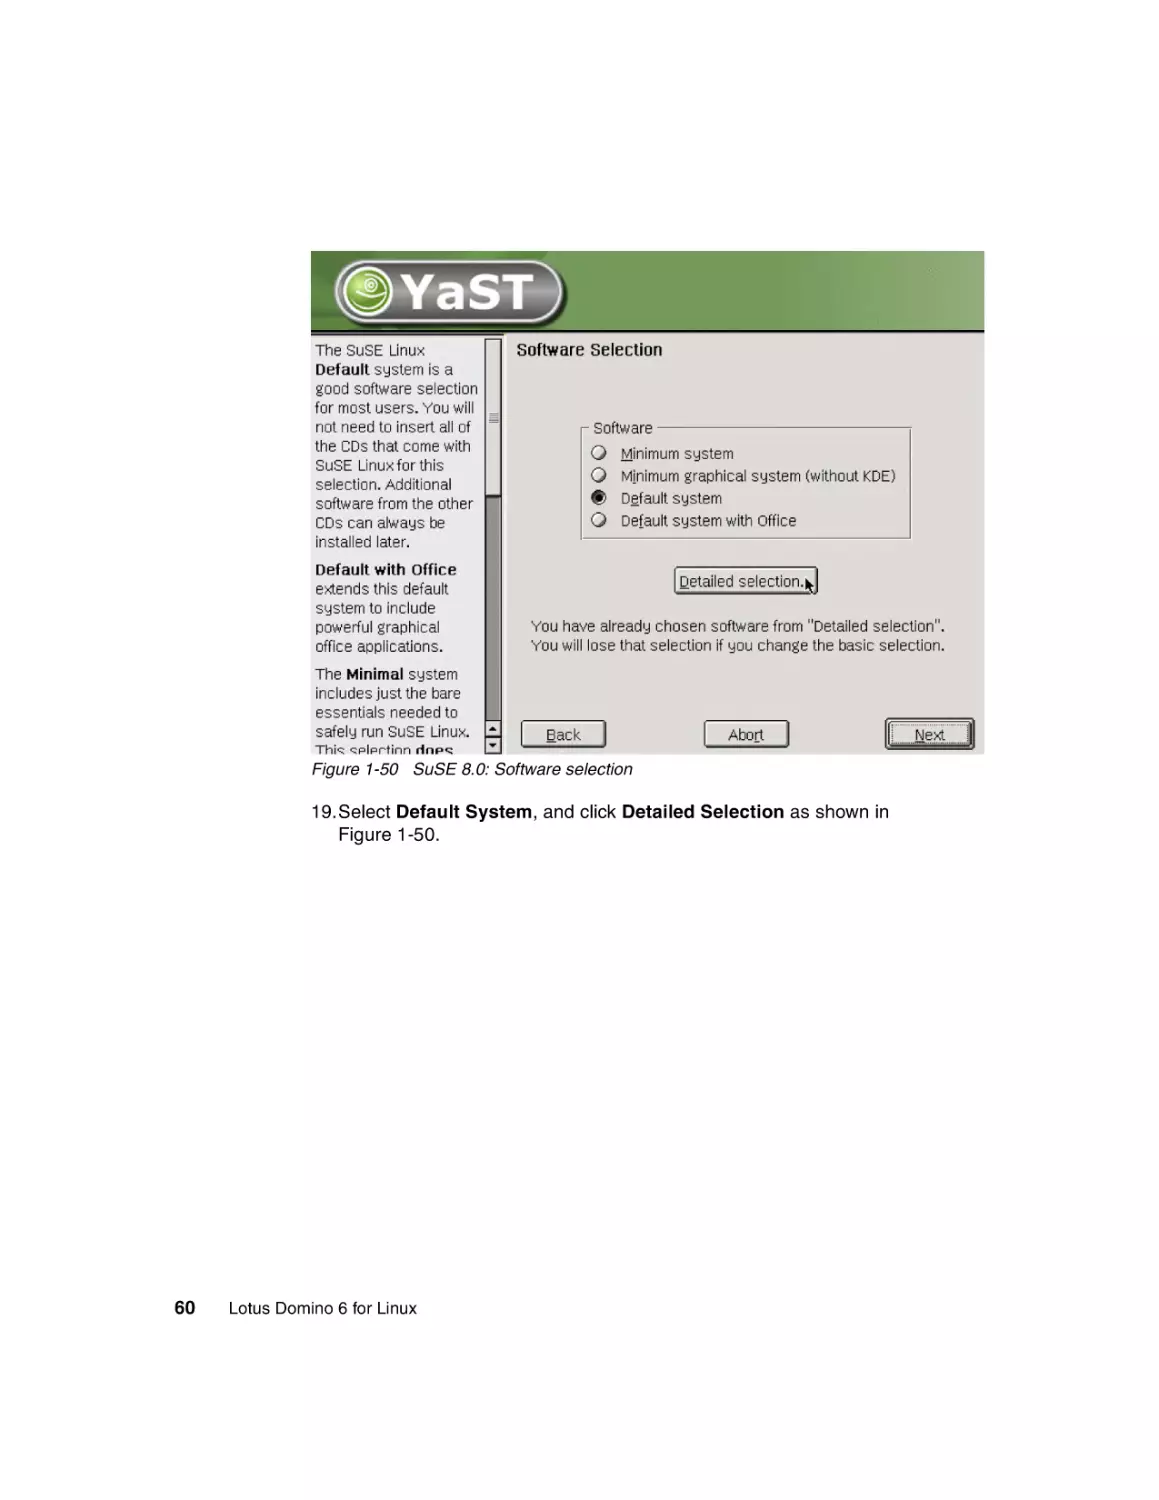
19.Select Default System, and click Detailed Selection as shown in
Figure 1-50.
60
Lotus Domino 6 for Linux
Figure 1-51 SuSE 8.0: Detailed software selection
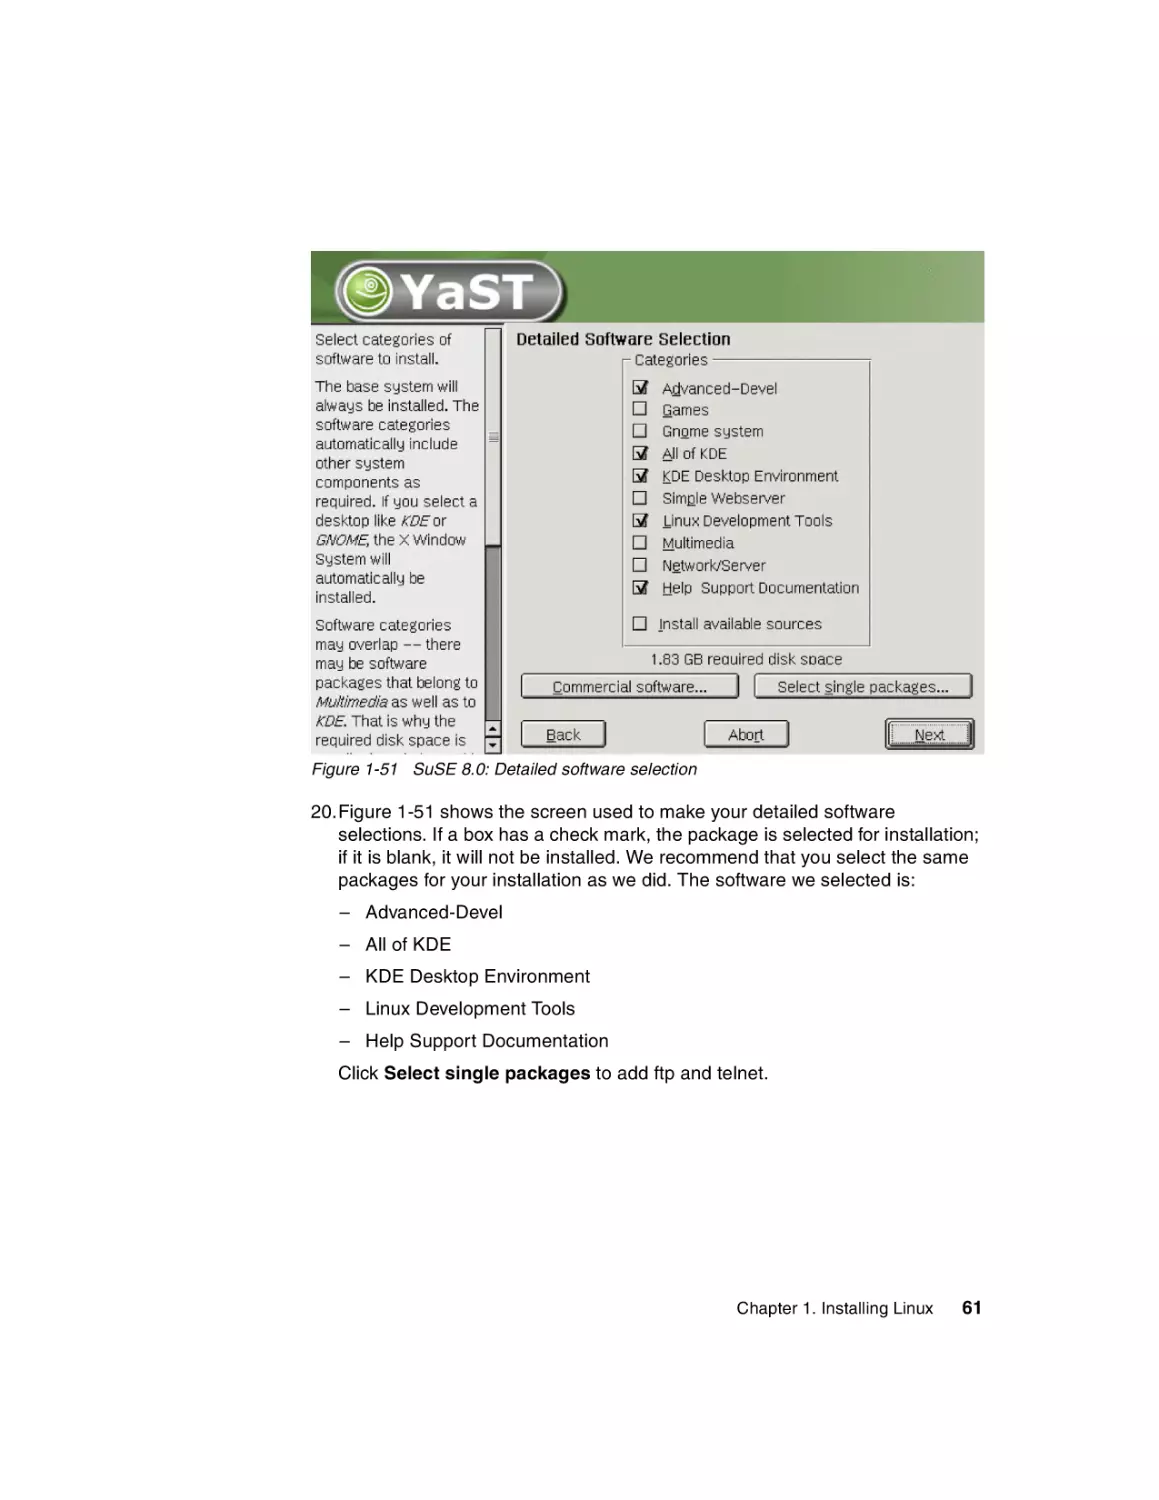
20.Figure 1-51 shows the screen used to make your detailed software
selections. If a box has a check mark, the package is selected for installation;
if it is blank, it will not be installed. We recommend that you select the same
packages for your installation as we did. The software we selected is:
– Advanced-Devel
– All of KDE
– KDE Desktop Environment
– Linux Development Tools
– Help Support Documentation
Click Select single packages to add ftp and telnet.
Chapter 1. Installing Linux
61
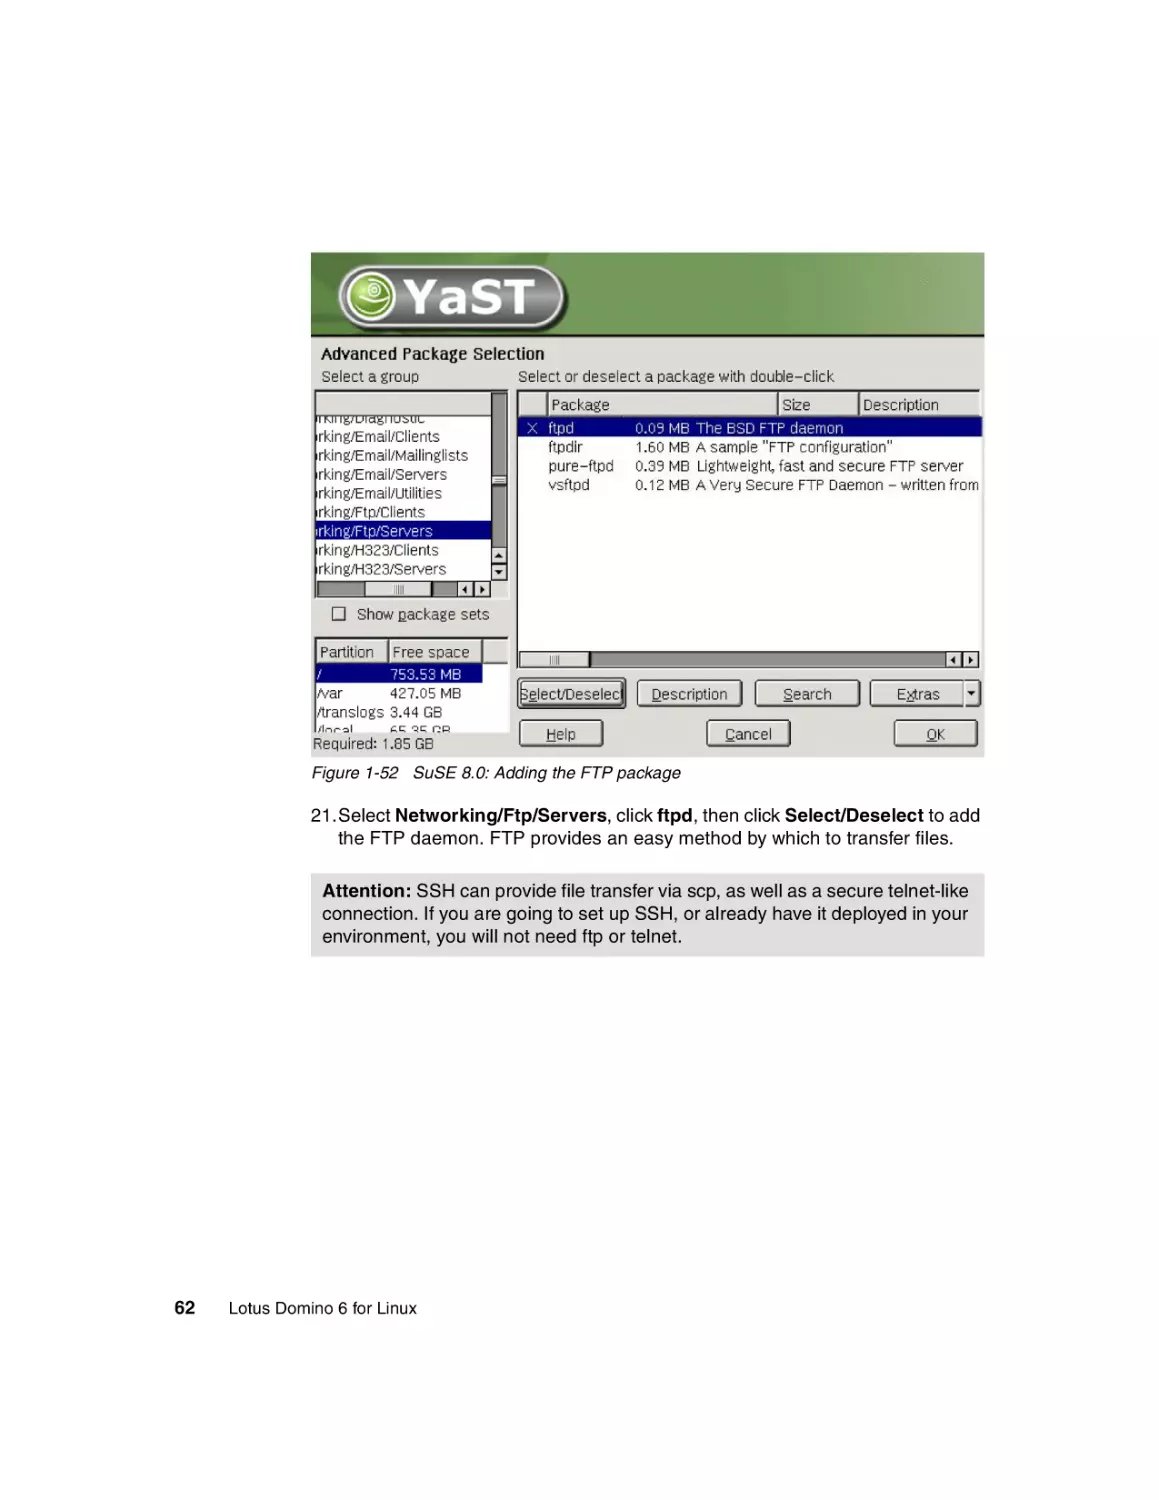
Figure 1-52 SuSE 8.0: Adding the FTP package
21.Select Networking/Ftp/Servers, click ftpd, then click Select/Deselect to add
the FTP daemon. FTP provides an easy method by which to transfer files.
Attention: SSH can provide file transfer via scp, as well as a secure telnet-like
connection. If you are going to set up SSH, or already have it deployed in your
environment, you will not need ftp or telnet.
62
Lotus Domino 6 for Linux
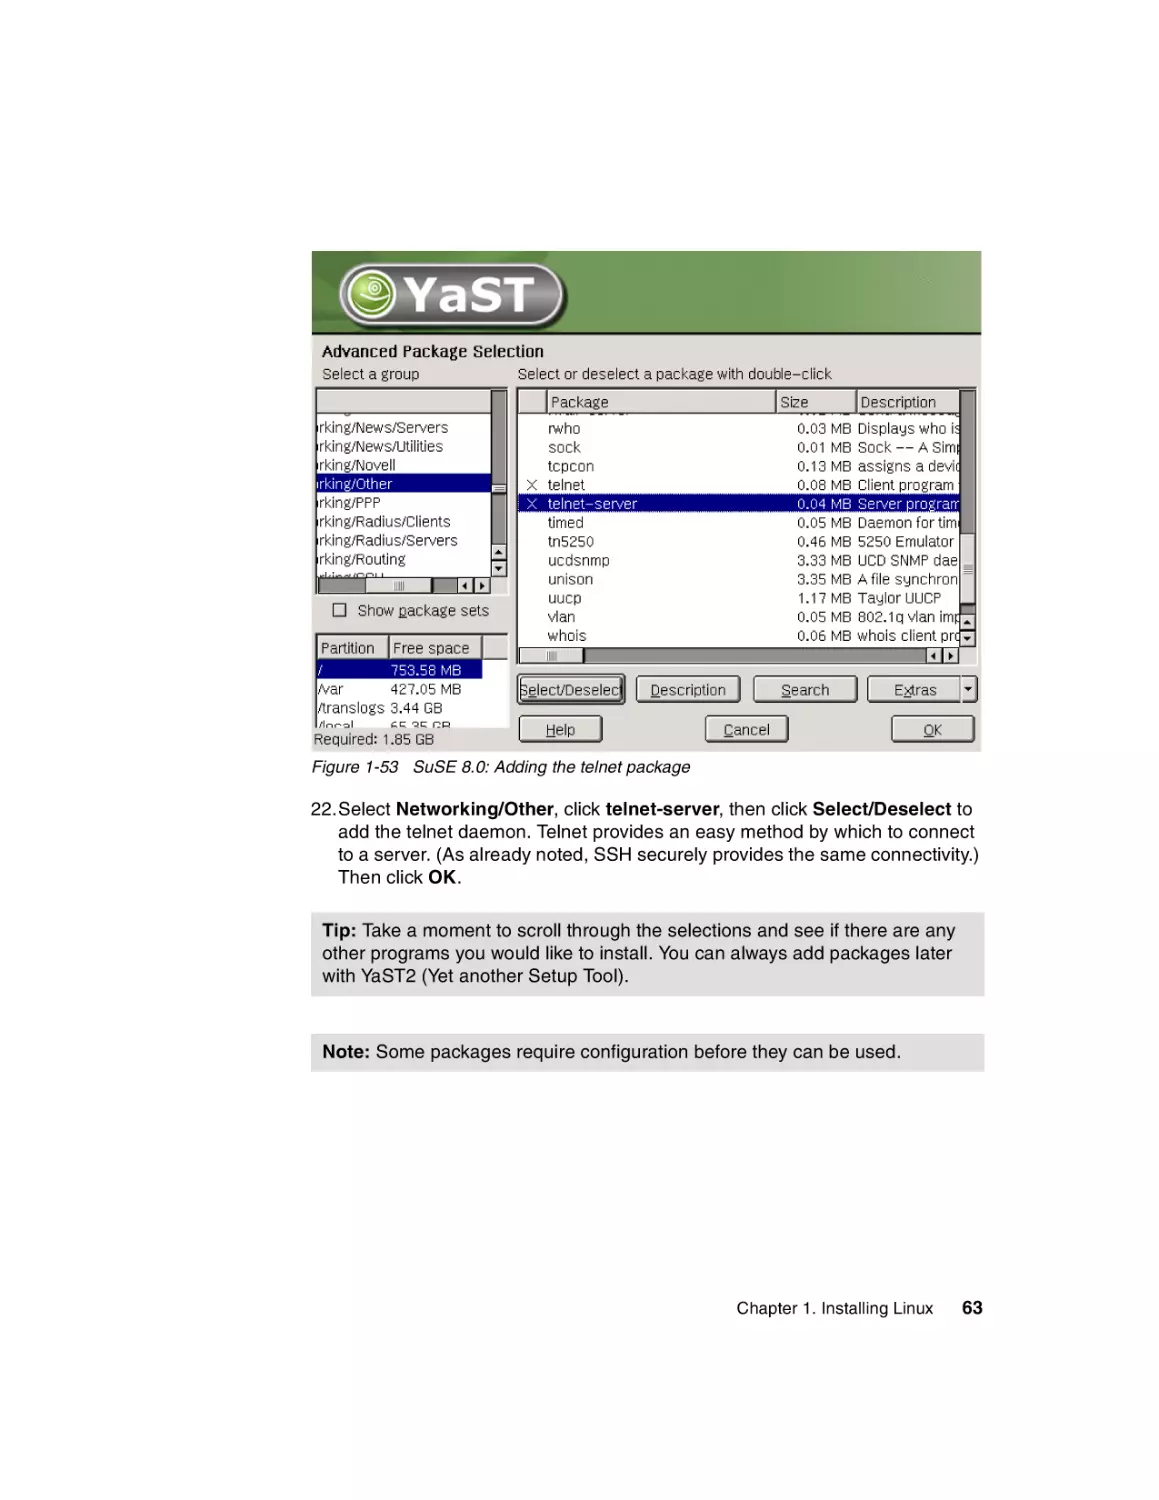
Figure 1-53 SuSE 8.0: Adding the telnet package
22.Select Networking/Other, click telnet-server, then click Select/Deselect to
add the telnet daemon. Telnet provides an easy method by which to connect
to a server. (As already noted, SSH securely provides the same connectivity.)
Then click OK.
Tip: Take a moment to scroll through the selections and see if there are any
other programs you would like to install. You can always add packages later
with YaST2 (Yet another Setup Tool).
Note: Some packages require configuration before they can be used.
Chapter 1. Installing Linux
63
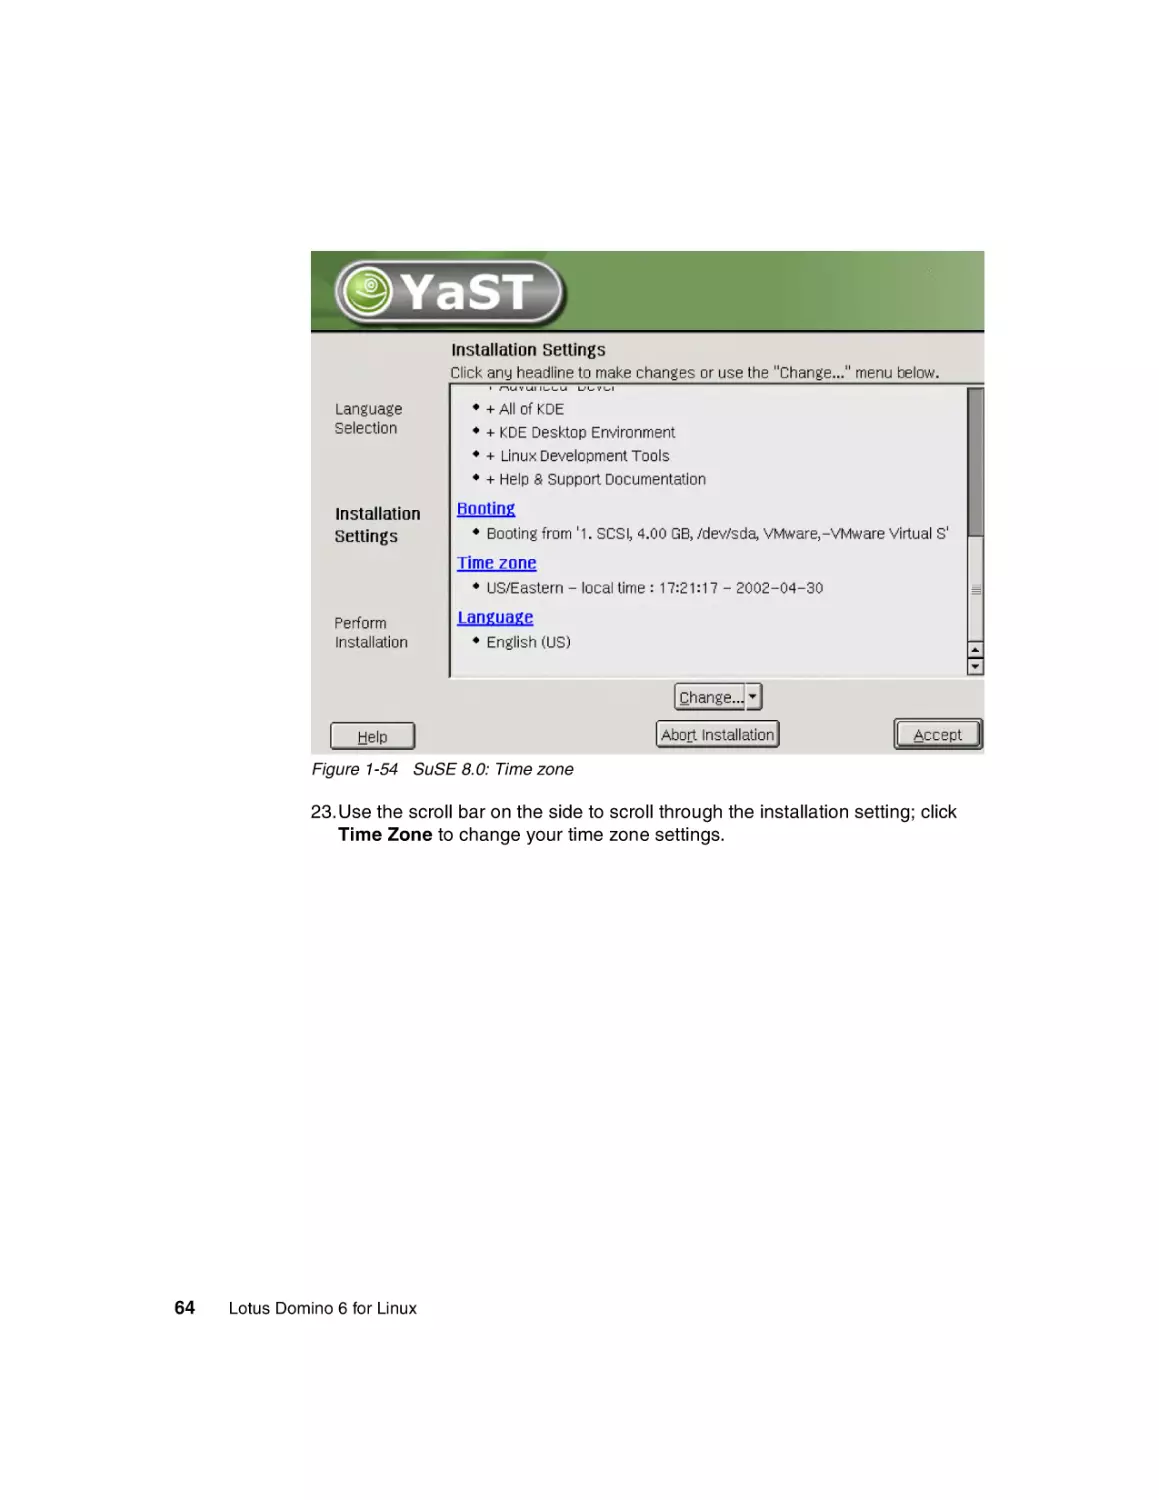
Figure 1-54 SuSE 8.0: Time zone
23.Use the scroll bar on the side to scroll through the installation setting; click
Time Zone to change your time zone settings.
64
Lotus Domino 6 for Linux
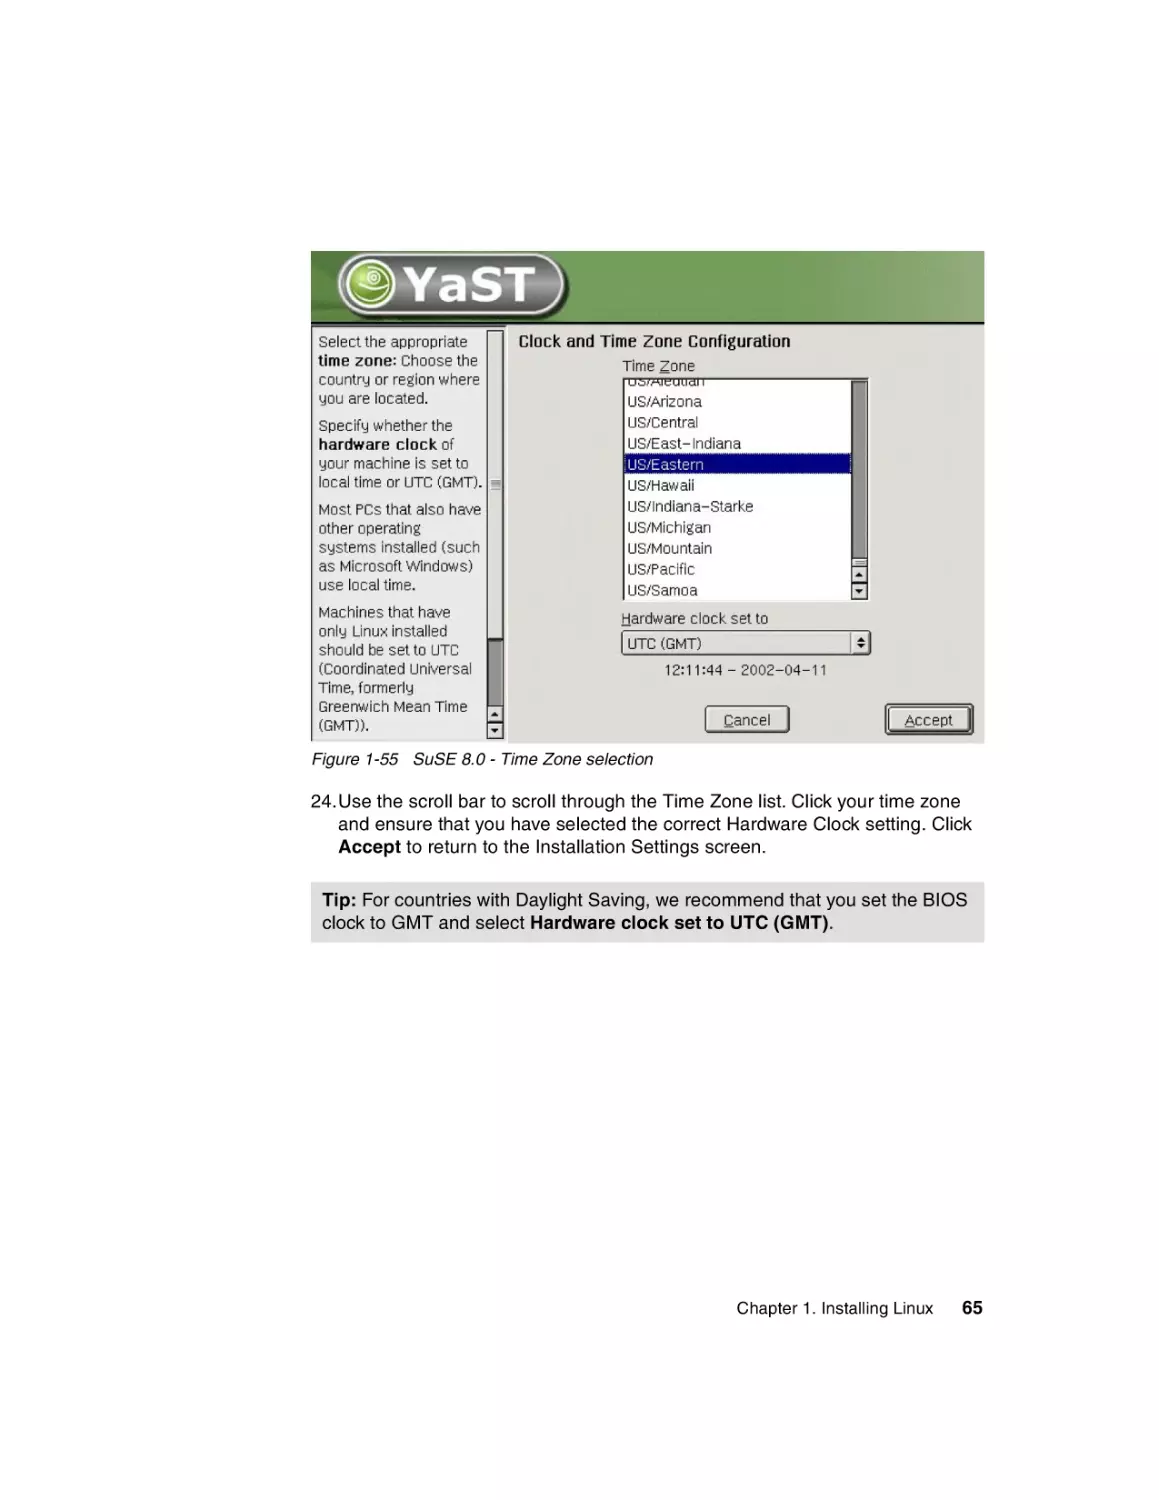
Figure 1-55 SuSE 8.0 - Time Zone selection
24.Use the scroll bar to scroll through the Time Zone list. Click your time zone
and ensure that you have selected the correct Hardware Clock setting. Click
Accept to return to the Installation Settings screen.
Tip: For countries with Daylight Saving, we recommend that you set the BIOS
clock to GMT and select Hardware clock set to UTC (GMT).
Chapter 1. Installing Linux
65
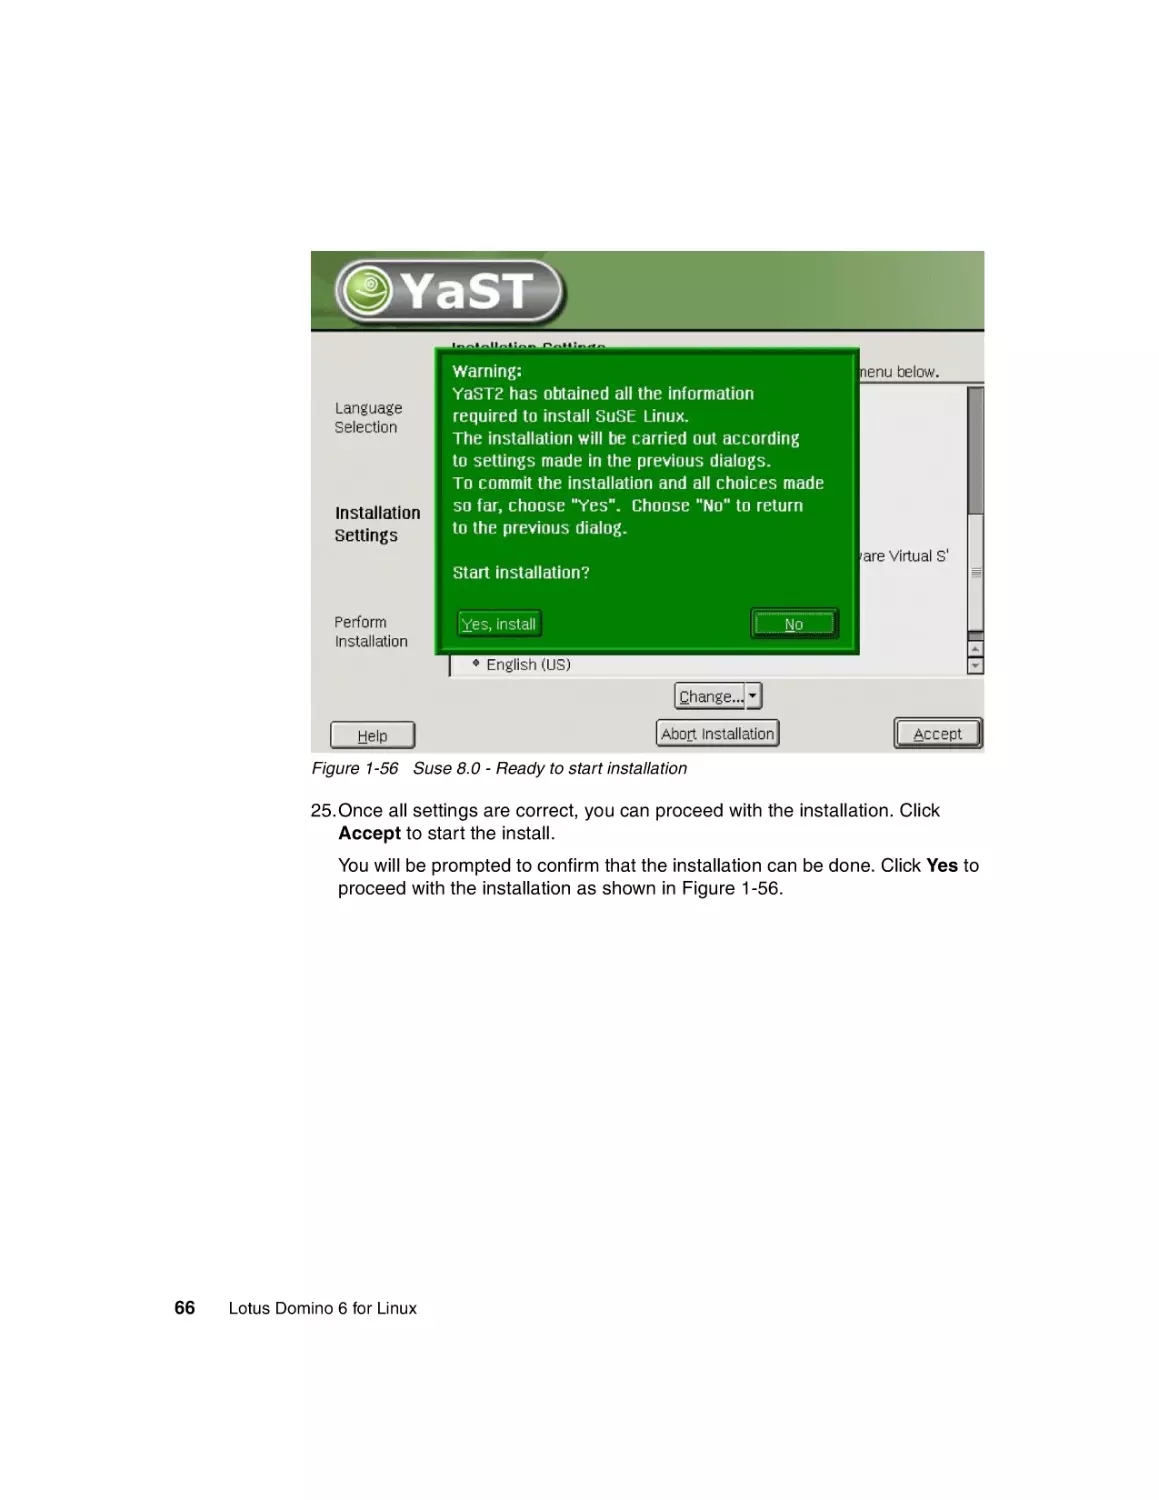
Figure 1-56 Suse 8.0 - Ready to start installation
25.Once all settings are correct, you can proceed with the installation. Click
Accept to start the install.
You will be prompted to confirm that the installation can be done. Click Yes to
proceed with the installation as shown in Figure 1-56.
66
Lotus Domino 6 for Linux
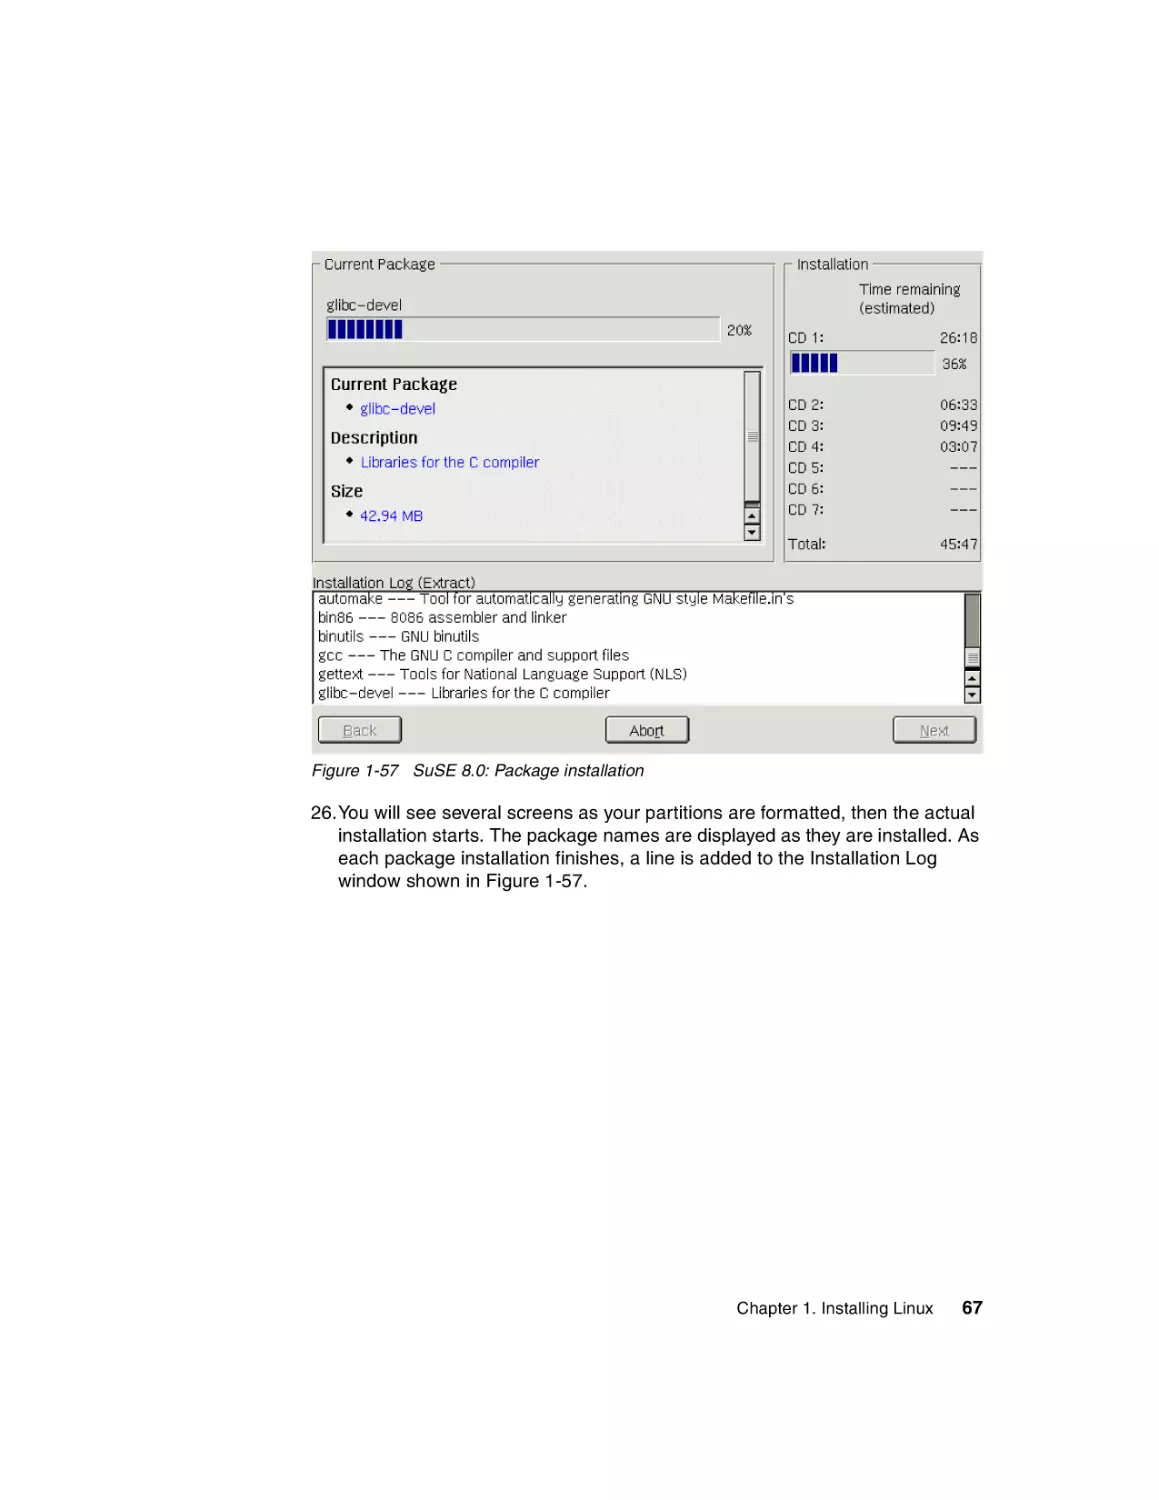
Figure 1-57 SuSE 8.0: Package installation
26.You will see several screens as your partitions are formatted, then the actual
installation starts. The package names are displayed as they are installed. As
each package installation finishes, a line is added to the Installation Log
window shown in Figure 1-57.
Chapter 1. Installing Linux
67
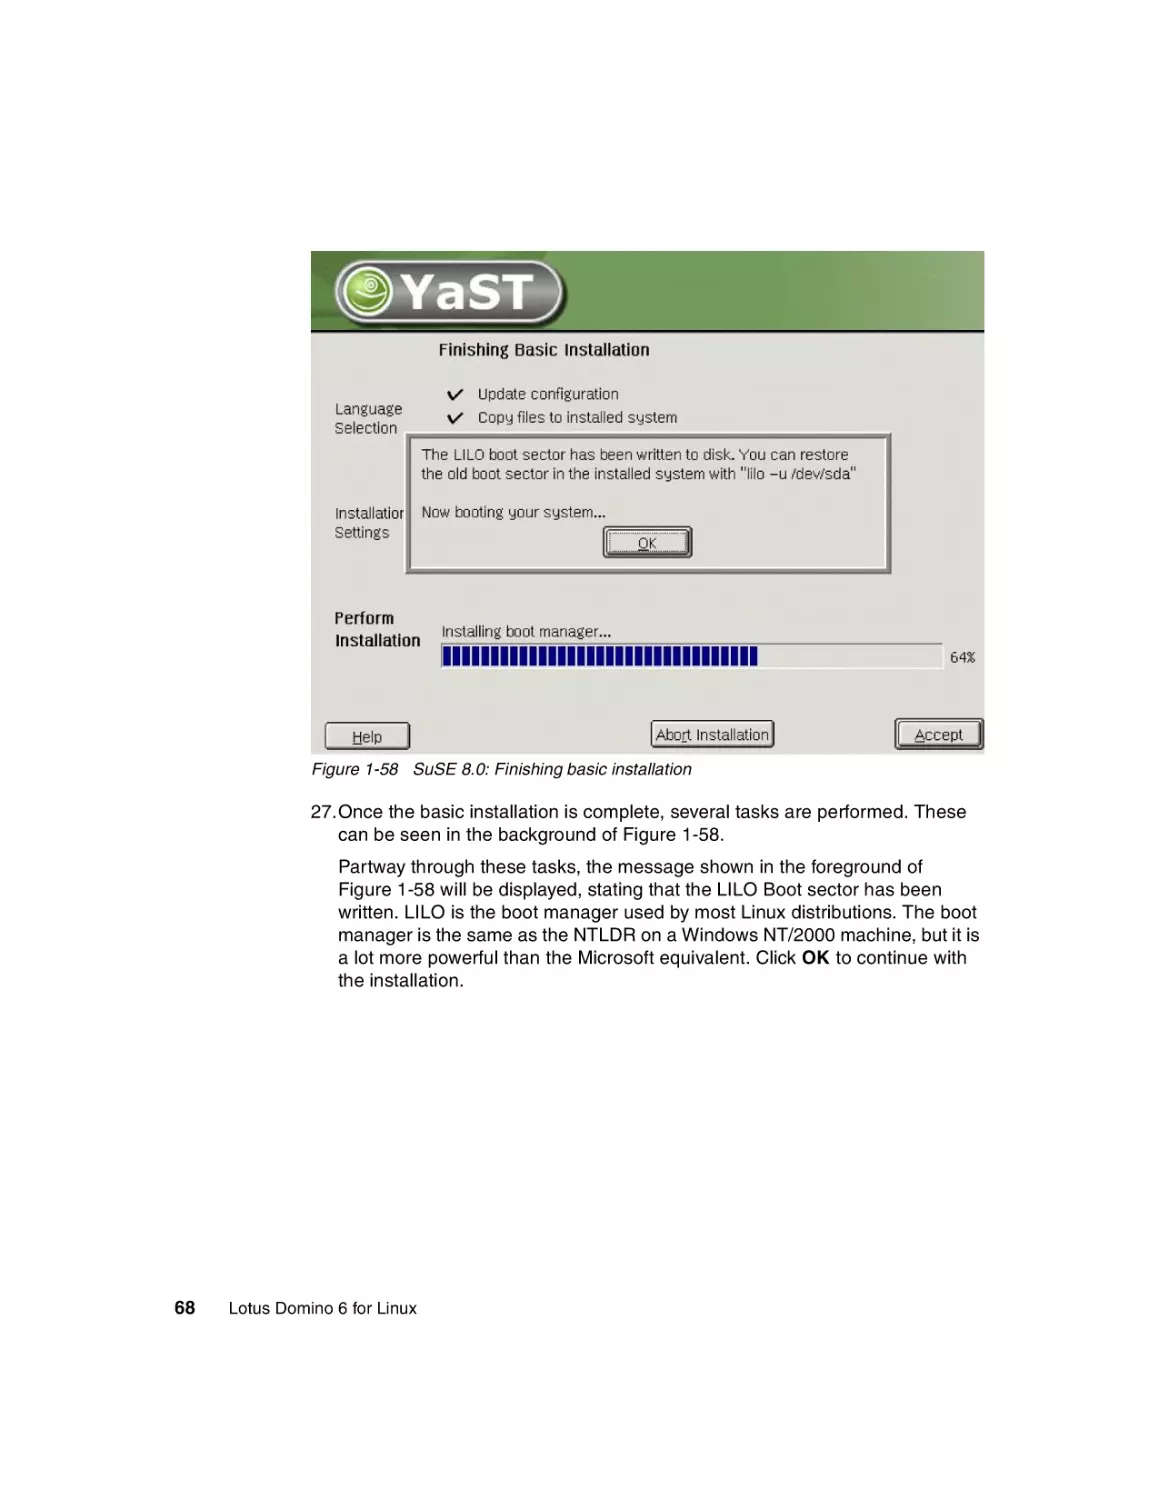
Figure 1-58 SuSE 8.0: Finishing basic installation
27.Once the basic installation is complete, several tasks are performed. These
can be seen in the background of Figure 1-58.
Partway through these tasks, the message shown in the foreground of
Figure 1-58 will be displayed, stating that the LILO Boot sector has been
written. LILO is the boot manager used by most Linux distributions. The boot
manager is the same as the NTLDR on a Windows NT/2000 machine, but it is
a lot more powerful than the Microsoft equivalent. Click OK to continue with
the installation.
68
Lotus Domino 6 for Linux
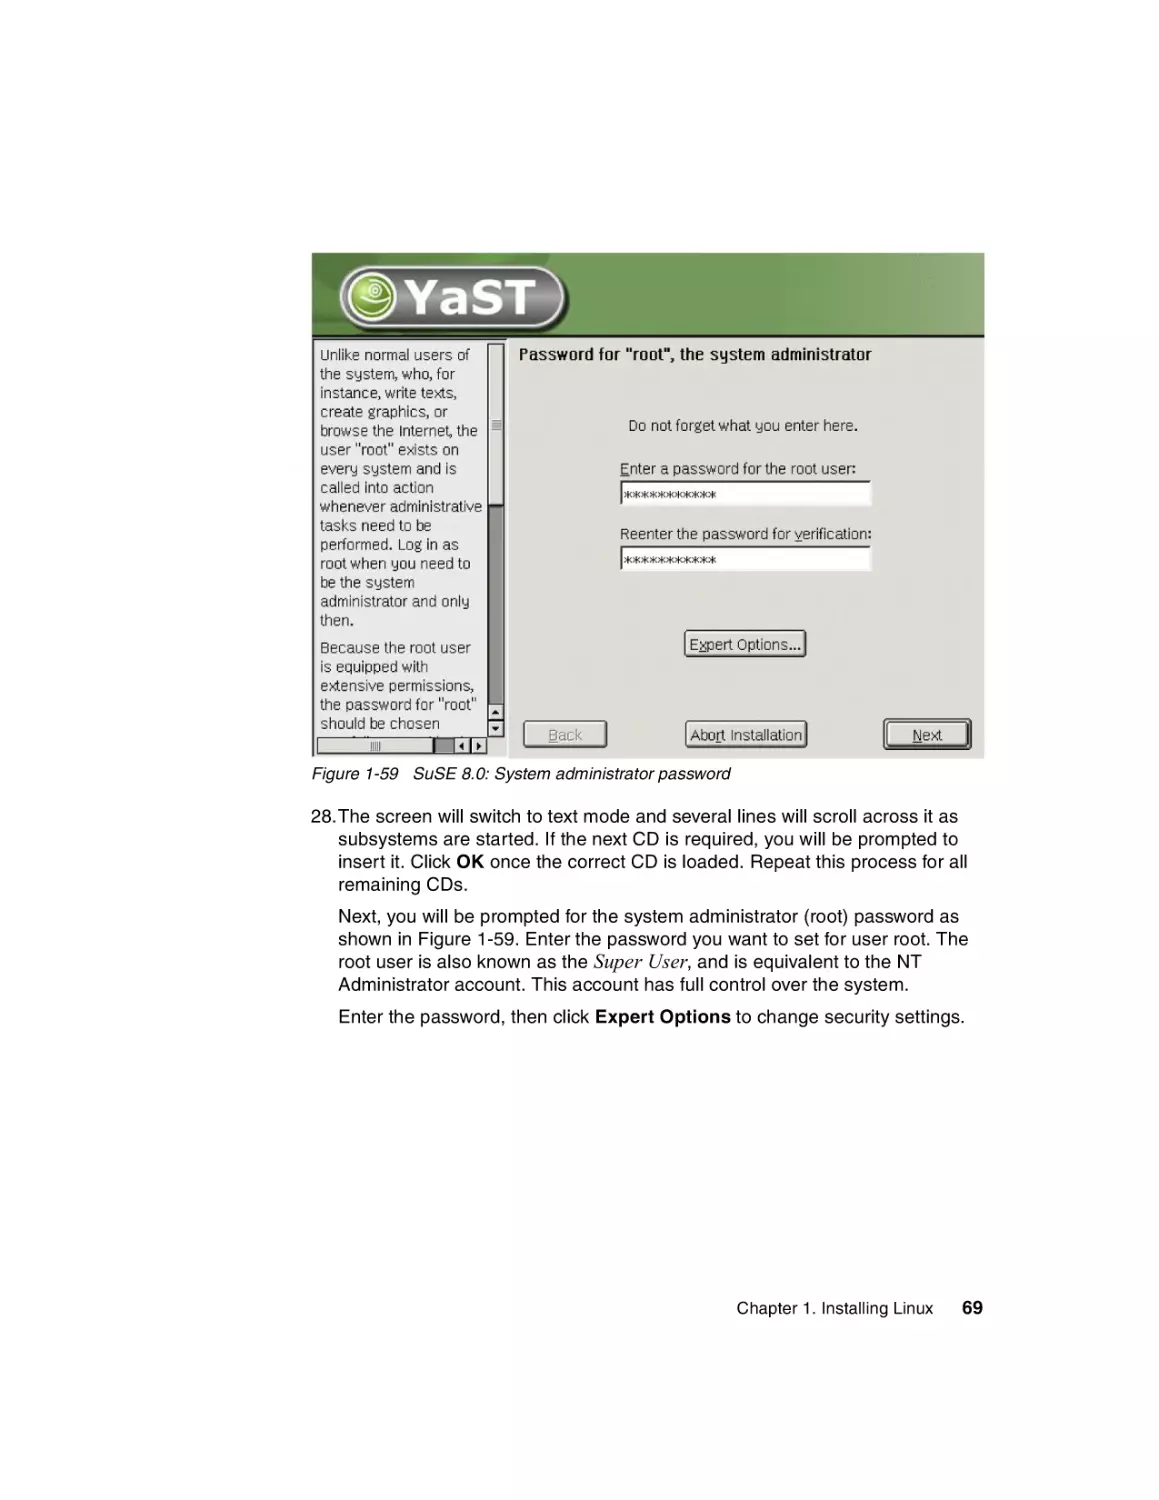
Figure 1-59 SuSE 8.0: System administrator password
28.The screen will switch to text mode and several lines will scroll across it as
subsystems are started. If the next CD is required, you will be prompted to
insert it. Click OK once the correct CD is loaded. Repeat this process for all
remaining CDs.
Next, you will be prompted for the system administrator (root) password as
shown in Figure 1-59. Enter the password you want to set for user root. The
root user is also known as the Super User, and is equivalent to the NT
Administrator account. This account has full control over the system.
Enter the password, then click Expert Options to change security settings.
Chapter 1. Installing Linux
69
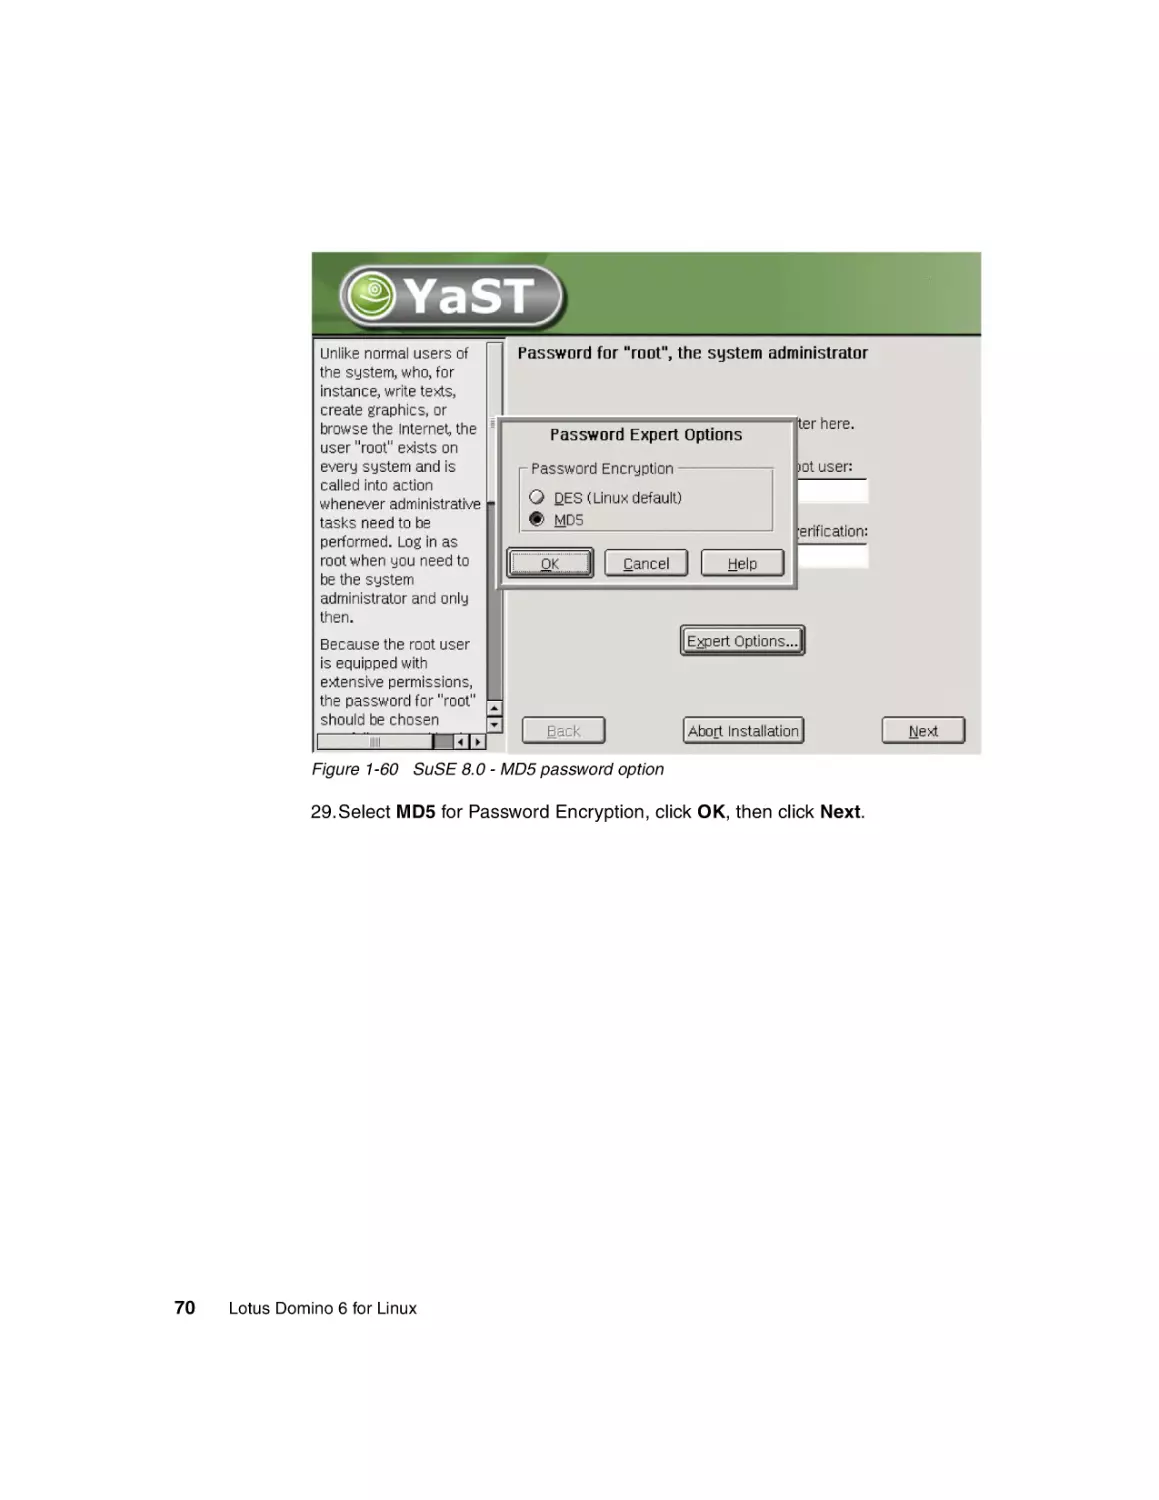
Figure 1-60 SuSE 8.0 - MD5 password option
29.Select MD5 for Password Encryption, click OK, then click Next.
70
Lotus Domino 6 for Linux
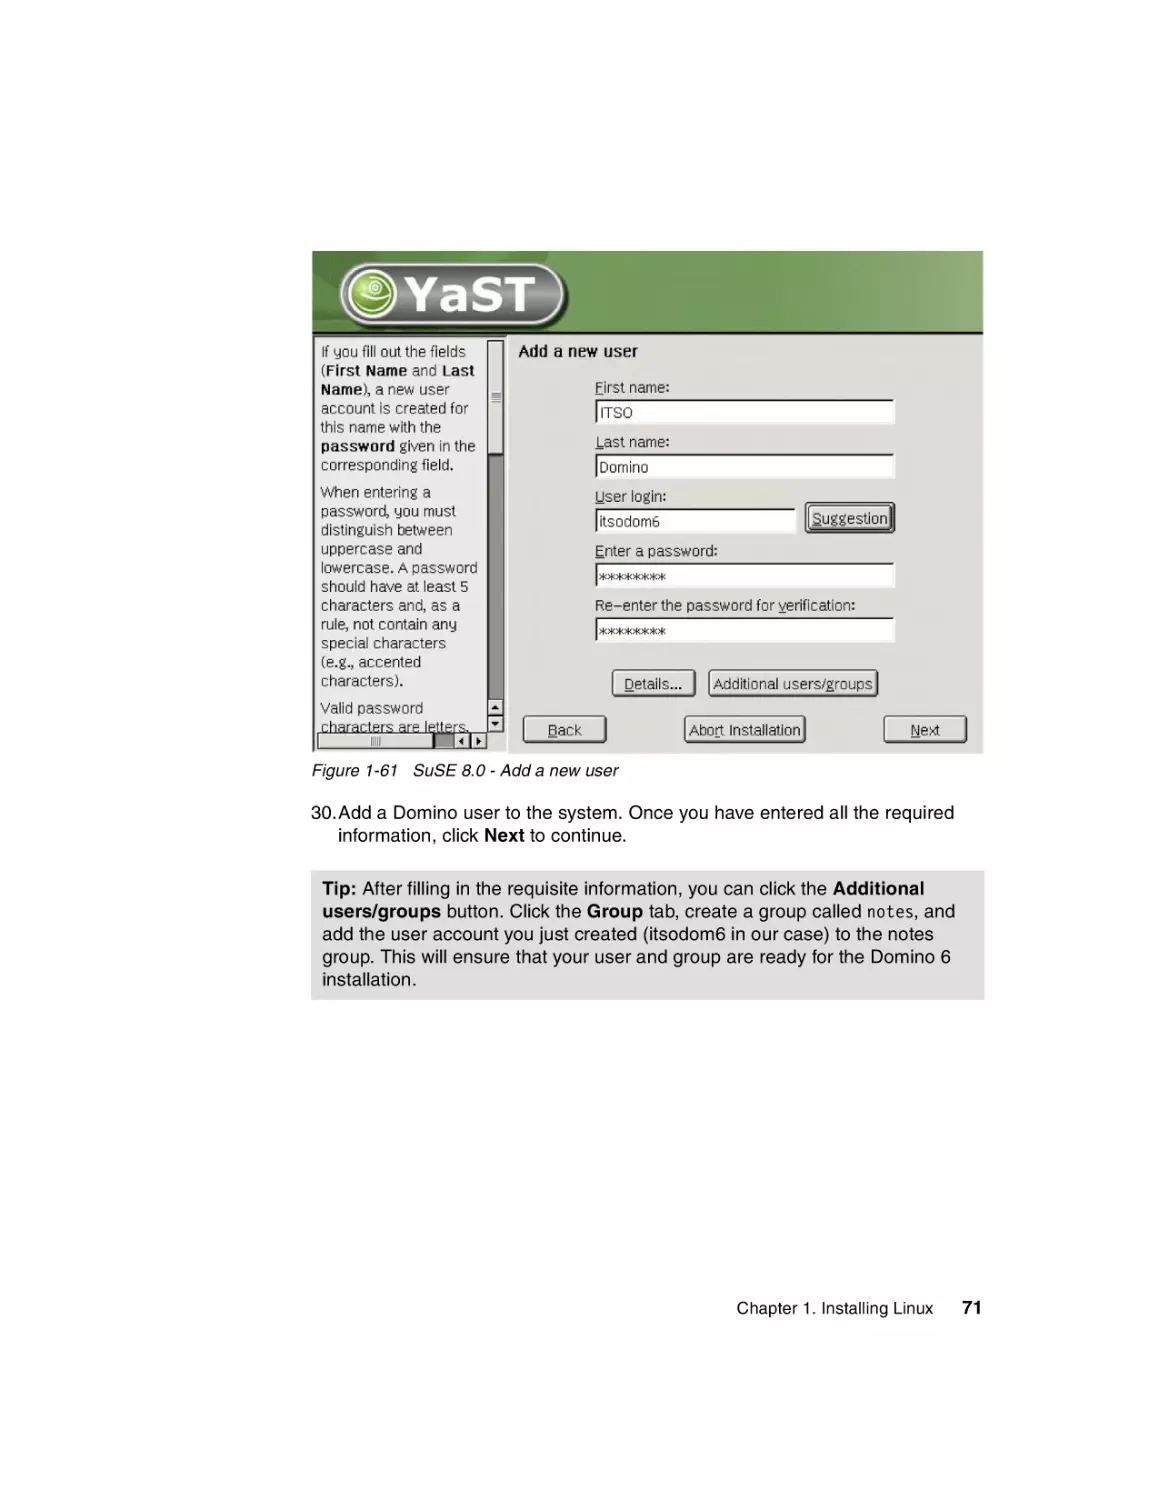
Figure 1-61 SuSE 8.0 - Add a new user
30.Add a Domino user to the system. Once you have entered all the required
information, click Next to continue.
Tip: After filling in the requisite information, you can click the Additional
users/groups button. Click the Group tab, create a group called notes, and
add the user account you just created (itsodom6 in our case) to the notes
group. This will ensure that your user and group are ready for the Domino 6
installation.
Chapter 1. Installing Linux
71
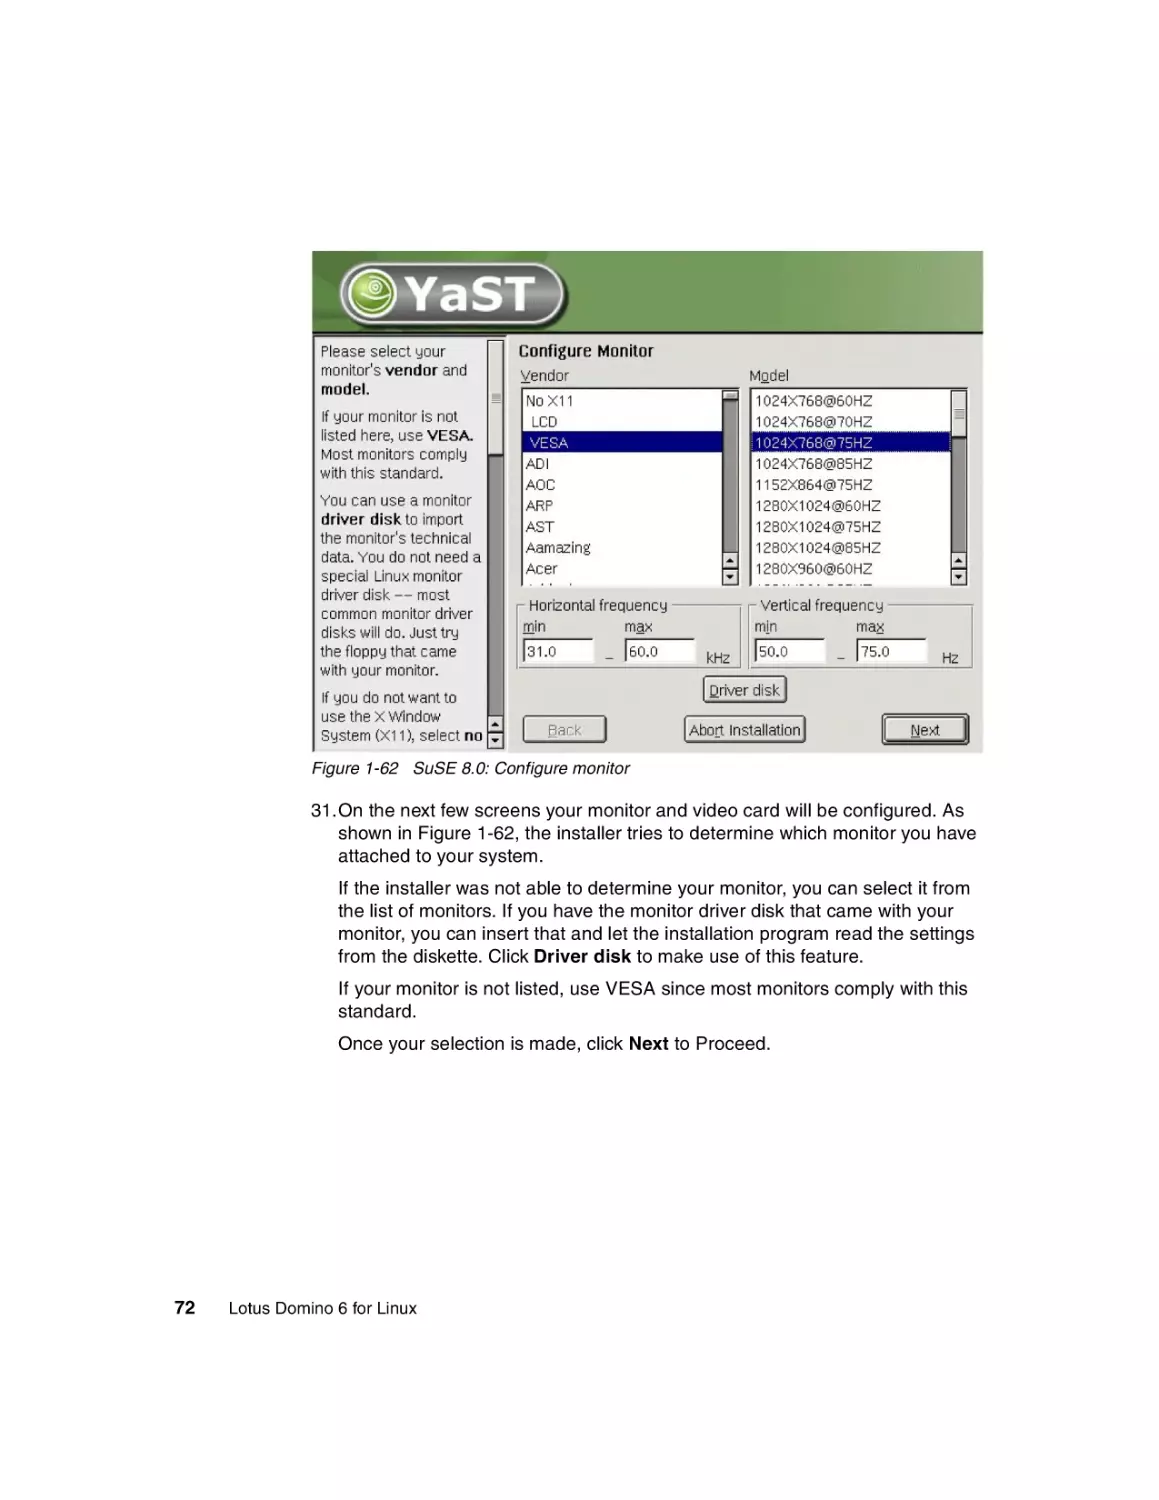
Figure 1-62 SuSE 8.0: Configure monitor
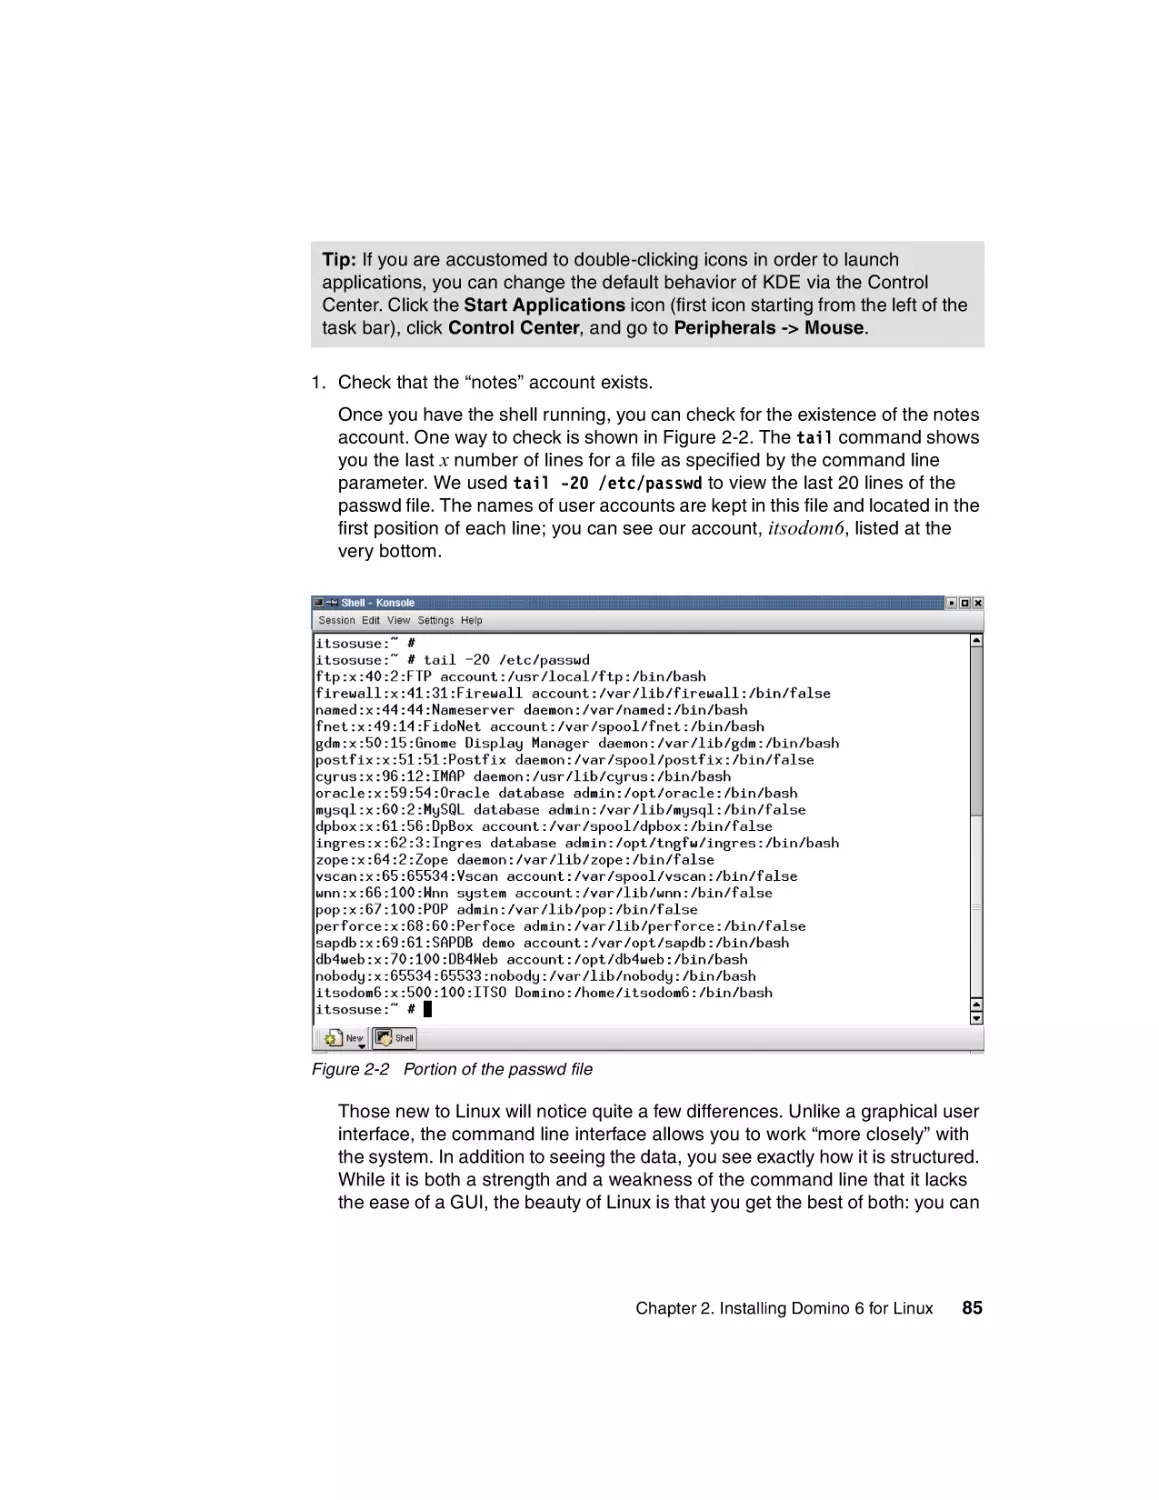
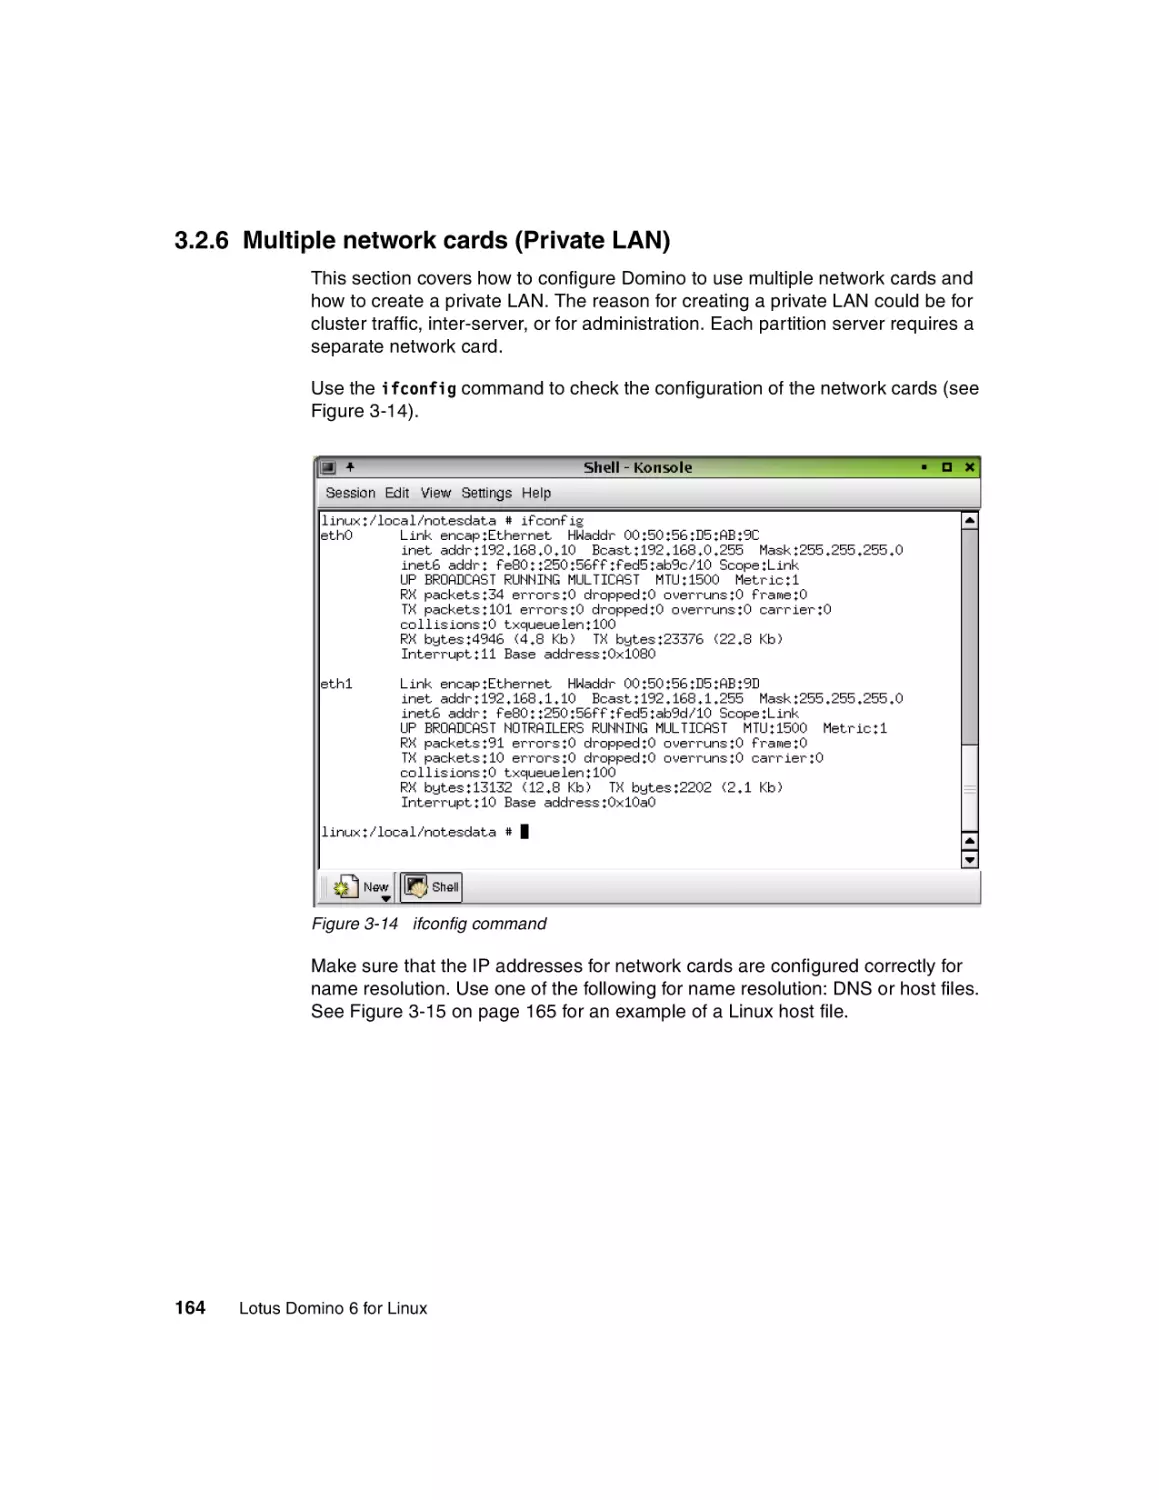
31.On the next few screens your monitor and video card will be configured. As
shown in Figure 1-62, the installer tries to determine which monitor you have
attached to your system.
If the installer was not able to determine your monitor, you can select it from
the list of monitors. If you have the monitor driver disk that came with your
monitor, you can insert that and let the installation program read the settings
from the diskette. Click Driver disk to make use of this feature.
If your monitor is not listed, use VESA since most monitors comply with this
standard.
Once your selection is made, click Next to Proceed.
72
Lotus Domino 6 for Linux
Figure 1-63 SuSE 8.0: Desktop settings
32.The screen shown in Figure 1-63 is displayed if the video card in your
machine and its capabilities could be determined. If the settings are incorrect,
click Change. Pick a resolution that is as high as your monitor can display or
that is comfortable for you. Linux displays are quite big and so work better at
1024x768 or higher resolutions.
Click Next to continue. This will automatically test your settings.
Chapter 1. Installing Linux
73
Figure 1-64 SuSE 8.0: Installation settings
33.The Installation Settings screen shown in Figure 1-64 will be displayed. Here
you can configure various peripherals, such as Networking, Printers,
Modems, and so forth.
You need to configure your network interface. Click Network interfaces to
change its settings.
74
Lotus Domino 6 for Linux
Figure 1-65 SuSE 8.0: Network cards configuration
34.A list of detected network cards installed in your system will be displayed as
shown in Figure 1-65. Click the name of the network card you would like to
configure, then click Configure.
Chapter 1. Installing Linux
75
Figure 1-66 SuSE 8.0: Network address setup
35.Change to Static address setup and enter the IP Address and Subnet Mask
in the fields provided. Once your settings are correct, click the Host name
and name server button.
76
Lotus Domino 6 for Linux
Figure 1-67 SuSE 8.0 - Host name and name server configuration
36.Enter the Host name and Domain Name of your system, the Name Server IP
Addresses, and any additional domains to search in the Domain Search List.
Click Next to return to the Network Address Setup screen.
Chapter 1. Installing Linux
77
Figure 1-68 SuSE 8.0: Routing configuration
37.Before you configure another card, click the Routing button shown back in
Figure 1-66 on page 76 and enter the default gateway for your network as
shown in Figure 1-68. Click Next, then Next again to return to the Network
Card Configuration screen shown in Figure 1-69 on page 79.
78
Lotus Domino 6 for Linux
Figure 1-69 SuSE 8.0: Network card configured
You can repeat these steps to configure additional network cards installed in
your system. Click Finish to return to the Installation Settings.
You can configure the other peripherals listed in Figure 1-64 on page 74.
For the purpose of these instructions we continue with the installation by
clicking Next.
Chapter 1. Installing Linux
79
Figure 1-70 SuSE 8.0: Graphical log in
38.The configuration of your system is written to disk. A window will appear to
inform you that the configuration has been saved successfully. Let it time out
to start up the system. Several lines of text will scroll across your monitor as
the system is started.
Once the system has loaded, you are ready to log in with the account you
created during installation, as shown in Figure 1-70.
80
Lotus Domino 6 for Linux
Figure 1-71 SuSE 8.0: Welcome screen
39.KDE will load, and then you will see the desktop settings wizard shown in
Figure 1-71. Click Next to accept the default settings, then click Finish to
close the wizard.
This completes the SuSE 8.0 installation process.
Chapter 1. Installing Linux
81
82
Lotus Domino 6 for Linux
2
Chapter 2.
Installing Domino 6 for Linux
In this chapter, we show how to check that your Linux system is properly
configured for Domino, then we describe how to install, set up, and launch the
Domino server. Along the way, we provide tips for how to make your environment
more user-friendly. For a discussion of security, see Chapter 3, “Security and
administration” on page 133; for performance, see Chapter 4, “Performance,
scalability, and troubleshooting” on page 195.
© Copyright IBM Corp. 2002. All rights reserved.
83
2.1 Before you begin: Pre-installation tasks
First off, you need to make certain you have a Linux user account, as well as a
group, under which to run Domino. After booting the system, enter root for the
username, then the root password you entered during installation. Depending on
whether you elected to have X-Windows launch automatically, you will be at the
command line prompt or an X-Windows prompt. From the command line, log in
as root then type startx to begin an X-Windows session. Otherwise, log in as
root and the graphical desktop environment of your choice will load—ours is
KDE.
The bottom of a typical KDE or GNOME desktop has a task bar. Locate the shell
icon, which in KDE is a monitor with a sea shell superimposed, and click the icon
once.
Figure 2-1 The Shell Konsole in KDE
84
Lotus Domino 6 for Linux
Tip: If you are accustomed to double-clicking icons in order to launch
applications, you can change the default behavior of KDE via the Control
Center. Click the Start Applications icon (first icon starting from the left of the
task bar), click Control Center, and go to Peripherals -> Mouse.
1. Check that the “notes” account exists.
Once you have the shell running, you can check for the existence of the notes
account. One way to check is shown in Figure 2-2. The tail command shows
you the last x number of lines for a file as specified by the command line
parameter. We used tail -20 /etc/passwd to view the last 20 lines of the
passwd file. The names of user accounts are kept in this file and located in the
first position of each line; you can see our account, itsodom6, listed at the
very bottom.
Figure 2-2 Portion of the passwd file
Those new to Linux will notice quite a few differences. Unlike a graphical user
interface, the command line interface allows you to work “more closely” with
the system. In addition to seeing the data, you see exactly how it is structured.
While it is both a strength and a weakness of the command line that it lacks
the ease of a GUI, the beauty of Linux is that you get the best of both: you can
Chapter 2. Installing Domino 6 for Linux
85
use the command line when you wish and otherwise use the numerous GUI
programs available in a graphical desktop environment, such as KDE.
2. Check that the user group for Domino exists.
Next, we need to ensure that we created a user group for Domino and that our
account, itsodom6, is a member of that group. Those familiar with Lotus
Notes will understand the use of users and groups. The main difference is
that in Linux you cannot nest a group within another group.
To check for the group, we launch KATE by navigating to Start Application ->
Office -> Editors -> KATE (SuSE) or Start Application -> Editors -> KATE
(RedHat). KATE is a simple GUI text editor suitable for use in viewing the
/etc/group file. You can see that the group, notes, is listed at the bottom and
that our itsodom6 account is a member.
Figure 2-3 The contents of the /etc/group file.
If you look at the user file, you will notice the number 500 on the itsodom6 line
and again on the notes group line. Just as DNS is a human-friendly version of
numerical IPs, Linux associates the names of users and groups with unique
numbers so we can refer to them by name instead of number.
86
Lotus Domino 6 for Linux
In our example, we created the appropriate user account and group during
installation. If you did so as well, you can skip ahead to Step 6 on page 89.
3. Create the Linux user group to run Domino.
If the user and group do not exist, you need to launch a user manager
program. From the command line, you can run useradd, userdel, or usermod
and groupadd, groupdel, or groupmod, depending on whether you want to add,
delete, or modify a user or group. With a graphical desktop environment, you
have the use Red Hat User Manager and SuSE’s YAST2, as well as KDE
User Manager.
We used KDE User Manager because it is easy to use and is common to
both distributions. From KDE for Red Hat 7.2, navigate to Start
Application -> System -> User Manager; from SuSE 8.0 navigate to Start
Application -> System -> Configuration -> KUser. The Start Application
button is the far left button on the KDE task bar (refer to Figure 2-1 on
page 84 for a view of the KDE desktop).
First, create the notes group before adding the user. This makes the notes
group an available selection for the user account you will create next.
a. Click the Groups
tab.
b. Click the second
ADD button.
c. Enter the Group
name, in this case
notes.
d. Accept the default
Group number.
Figure 2-4 Add Group with KDE User Manager
4. Create a Linux user account to run Domino.
Now that you have created the group, you can switch back to the Users tab to
create the account that will run the Domino server. When you click the first
ADD button, you will be prompted to enter the Username.
Chapter 2. Installing Domino 6 for Linux
87
a. Click the Users tab.
b. Click the first ADD
button.
c. Enter a user name
with which to run the
Domino 6 Server. For
security reasons, you
might want to enter a
name other than
notes. See
Figure 2-21 on
page 99 for further
discussion.
Figure 2-5 Add User with KDE User Manager
Click OK to submit the name; this will bring up the User Properties window
shown in Figure 2-6.
a. Click Set Password
to enter a password.
b. Enter a descriptive
name.
c. Select the default
BASH shell.
d. Enter the directory in
which you will install
the Domino Data
files. While not
required, it simplifies
administration.
Figure 2-6 User Properties
If you take a look at the Login Shell drop-down list in step c, you will see a lot
of options. The shell you select is a matter of personal preference. Common
shells are BASH, tcsh, and ksh. For the instructions and tips in this chapter,
we assume you selected the default BASH shell as your login shell.
88
Lotus Domino 6 for Linux
5. Make the user part of the group.
When you are finished with this tab, click the Groups tab. Scroll down the list
of groups until you see the notes group we created earlier. Click the check box
to make the new user a member of that group, then click OK to save your
changes and exit the KDE User Manager.
6. Check the available diskspace.
After checking that both the user and group exist and that they are correctly
associated, the next step is to double-check the available disk space. The
command df -k, and the human-readable df -h, shows the devices on the
system and usage statistics. As you can see in Figure 2-7, we have enough
space to install Domino into /opt/lotus since the / mount point has nearly 1 GB
free. Since you are going to install the Domino 6 program files to the same
mount point as the rest of the OS (this is equivalent to installing to the c: drive
on an NT system), you should have at least 500 MB free. Refer to the Lotus
Domino 6 documentation for the exact disk space requirements. If you do not
have enough disk space, the Domino installation program will detect this
condition and abort with an error message.
Figure 2-7 Two different ways to display disk usage
KDiskFree is a graphic tool to show free disk space. Invoke it by clicking
Start -> System -> File System Tools -> KDiskFree on SuSE, or Start ->
System - KDiskFree (View Disk Usage) on RedHat. The resulting display is
shown in Figure 2-8 on page 90.
Chapter 2. Installing Domino 6 for Linux
89
Figure 2-8 KDiskFree, Graphical disk usage tool
2.2 Domino 6 server install
Once you have verified that the OS is ready, it is time to install the Domino
program files, configure the server and set up the initial databases, then launch
the server.
Important: If you are running a multi processor machine, you must be running
the 2.4.18 or above kernel.
2.2.1 Installation
You can install from a tar file, where the files and directory information have been
gathered into one file, or from a CD. This section assumes you are installing from
a CD. If you have a tar file, follow the directions that came from the download site.
Generally, you will issue the command tar -xvf to unpack the files, cd to change
to the appropriate directory, and ./install to begin. If the file ends with .gz or
another symbol denoting compression, you will need to unzip it first with gzip -d
or another appropriate program before using the tar command.
Mounting the CD-ROM drive
With the CD in the drive, you need to mount the CD-ROM device in order to alert
the system that it is in use. If you are using KDE, you can click the CD-ROM icon;
the device will automatically be mounted and the files displayed. From the
command line, it is a bit trickier. Issue mount /dev/cdrom to incorporate the
90
Lotus Domino 6 for Linux
CD-ROM in the file structure. To check where it will be mounted, type more
/etc/fstab. More, its counterpart less, and cat are all simple programs that can
be used to view files. Those new to Linux will quickly learn that there are
numerous programs for each task—pick the one that suits your style.
Figure 2-9 Display of the fstab file contents
The next entry after /dev/cdrom is /media/cdrom, so we know that the CD-ROM is
now available by changing to the /media/cdrom directory. This is the default for
SuSE 8.0. For Red Hat 7.2, the default mount point is /mnt/cdrom. The same
process is used for the floppy drive: insert a floppy and type mount /dev/floppy.
Again, KDE provides automatic mounting and file display by simply clicking the
Floppy icon.
2.2.2 Starting the Domino server installation
Use the following steps to start the installation.
Figure 2-10 Launching the install program
1. Change to the CD-ROM with cd /media/cdrom (SuSE) or cd /mnt/cdrom
(RedHat).
Chapter 2. Installing Domino 6 for Linux
91
2. Change to the Linux folder with cd linux
3. Type ls to view the directory contents (same as DOS dir).
4. Type ./install to launch it.
The ./ in step 4 tells the OS to look in the current directory for the executable
named install. For security reasons, ./ is not added to the root PATH
environment variable since you could be tricked into launching a malicious
program from a current directory, such as the /tmp folder. The PATH environment
variable is the same as the PATH variable in DOS and NT.
Domino server installation steps
The Domino server installation program will launch, and you will first see the
Welcome screen.
Figure 2-11 Domino Install Welcome and New Feature Alert
Throughout the installation, you will press the Tab key to move on. (This is
comparable to clicking Next in a standard GUI). Press Tab and you will see the
second screen shown in Figure 2-11, which is simply an alert regarding the new
features available in Domino 6. Press Tab to continue.
92
Lotus Domino 6 for Linux
Figure 2-12 Domino License Agreement
After you have read and accepted the license shown in Figure 2-12, press Tab.
Chapter 2. Installing Domino 6 for Linux
93
Figure 2-13 Install Data directories only
You will need to select the type of server you wish to install: Utility, Messaging, or
Enterprise. To cycle through the available choices, press the spacebar until the
option you want is displayed. Since we will be using clustering, which is an
advanced service available only with Enterprise, we selected Domino Enterprise
Server as shown in Figure 2-14.
Figure 2-14 Type of Domino server to install
94
Lotus Domino 6 for Linux
Figure 2-15 Template selection
A new option with Domino 6 is the ability to install a subset of templates instead
of automatically installing every template. In general, however, you’ll probably
want to install all templates in order to take advantage of new features and bug
fixes.
If your company has customized any of the templates, evaluate the changes
made in light of the new functionality provided by Domino 6. If the customizations
are still required, you will need to apply them after the installation completes.
Press Tab to install all templates.
Chapter 2. Installing Domino 6 for Linux
95
Figure 2-16 Configure ASP functionality
Press Tab.
Attention: ASP support is Application Service Provider and has nothing to do
with Active Server Pages.
96
Lotus Domino 6 for Linux
Figure 2-17 Location for the Domino program files
With R5, you did not have to install the program files to /opt/lotus, but the server
required an /opt/lotus symbolic link in order to function properly. Domino 6 no
longer requires the /opt/lotus link, and so Domino 6 can co-exist with R5 (still
using /opt/lotus) or with other installations of Domino 6.
Table 2-1 Example of multiple installations
Version of Domino
Program file installation path
Domino R5
/opt/lotus
Domino 6
/opt/dom6a/lotus
Domino 6
/opt/dom6b/lotus
Important: If you have Domino R5 installed on a server, then even if the
program files are not installed in /opt/lotus, you cannot install Domino 6 to that
directory. Doing so will overwrite the symbolic link and the R5 install will no
longer function properly.
For our single server, we chose to install only one version of Domino 6 and so
pressed Tab to accept the default path.
Chapter 2. Installing Domino 6 for Linux
97
Figure 2-18 Explanation of Linux file ownership
Figure 2-18 outlines the basic file ownership concept of Domino running on
Linux. The user and group you specify will own the data and will be used to
launch the server. The file permissions for the program files, however, will be set
to root for required access to the system.
Figure 2-19 Partition Server option
While Domino 6 gives you the ability to run different versions of Domino on a
single server, you still have the option to partition a server. If you partition the
server, multiple instances of Domino will share one set of program files but each
installation will have a separate data directory. The new Domino 6 feature that
allows multiple installs requires separate program files, as well as separate data
directories, for every instance, and so requires more disk space than partitioning.
For our server, we chose not to partition it.
98
Lotus Domino 6 for Linux
Figure 2-20 Location for the Domino Data Directory
Press Tab to accept the default directory shown in Figure 2-20.
Figure 2-21 Linux user account for Domino
Since it makes it easier for hackers to break into your system if they can readily
guess an account name, you might not wish to use the default username of
notes. We opted to name our account itsodom6 since it reflects our group and the
version of Domino about which we are writing. Note that simply changing the
name of the account does not, by itself, make your installation secure.
To change the account name, press Enter, type in the user name, press Enter
again, then Tab.
Chapter 2. Installing Domino 6 for Linux
99
Tip: From KDE, you can switch to the KDE User Manager program, create (or
rename) the user account as shown in Figure 2-5 on page 88, then resume
the installation. You do not need to abort the install.
Figure 2-22 Linux group for Domino
Enter the name of the group you created earlier. We chose the default of notes.
100
Lotus Domino 6 for Linux
Figure 2-23 Configuration complete
Press Tab.
Chapter 2. Installing Domino 6 for Linux
101
Figure 2-24 Perform installation
Press Tab if you are satisfied with the configuration.
102
Lotus Domino 6 for Linux
Figure 2-25 Installation complete
You will be given a chance to review the information entered, as shown in
Figure 2-25. If you entered something incorrectly, press Esc (this is comparable
to clicking Back in a GUI) to correct it. When ready, press Tab to install Domino 6.
When the installation finishes, you will be returned to the command prompt.
Important: For those of you familiar with R5 or earlier versions of Domino, do
not type http httpsetup unless you don’t have X-Windows installed. Domino 6
ships with a new Java installation program that can be run locally or remotely.
If you receive an error message, you will need to fix it, then re-run the installation
from the start. A typical error message involves either incorrectly specifying the
user or group, or else failing to create the user or group before beginning the
installation. Another common error message concerns lack of disk space. You
can avoid both of these errors by following the steps outlined in 2.1, “Before you
begin: Pre-installation tasks” on page 84.
2.2.3 The CheckOS tool
CheckOS is a script used to verify that the operating system contains the
appropriate patch level in order to run Domino 6. The script is installed during
Domino installation and resides in the Lotus Binaries directory (that is,
/opt/lotus/bin/checkos).
Chapter 2. Installing Domino 6 for Linux
103
The CheckOS tool can also be downloaded from the Iris Sandbox at:
http://www-10.lotus.com/ldd/sandbox.nsf/Threads/192F30EDB7F28DB300256BF1004A1CC
E?OpenDocument
Running the CheckOS tool
You must be logged into the system as the root user.
Change your directory to the Lotus binaries directory. The default would be:
cd /opt/lotus/bin
Now type in ./checkos to start the script.
Note: If you get an error or the script doesn't run, check to see if you are in the
Lotus binaries directory. Also, by issuing an ls you should be able to see the
checkos file. If the file does not exist then the install may not have completed.
CheckOS explained
First you will see a couple of lines, including a link to the latest patches, and a
line of information while the tool gathers the data. Next, the script checks and
reports which OS you are running on the system, followed by the machine type,
and filesets required for the Domino 6 server to run properly. If there are any
filesets missing, they will be reported in the section “The following OS patches
are required:” You need to install the missing patches before continuing.
Figure 2-26 CheckOS Script
104
Lotus Domino 6 for Linux
2.2.4 Setup
Now that you have successfully installed Domino 6, it is time to configure and set
up the server. Log out as root and back in under the notes user account so that it,
and not root, owns the X-Windows session.
Setting the Linux PATH environment variable
Before you begin, you are going to make a quick change to your shell
environment to make it more user friendly. If you installed Domino 6 to a different
directory than the default, you will need to replace /opt/lotus/bin with the path you
chose.
Normally, commands are given with the full path, for example
/opt/lotus/bin/server for the server executable. Linux searches your PATH
environment variable for executables, so you are going to add /opt/lotus/bin, as
well as the current directory, to your PATH. Make certain you are logged in with
the Domino user account and not as root. You can check this by issuing the
command whoami or id.
Start the KATE editor. The program automatically begins with a new file (file
needs to be called .bash_profile, as shown later) so all you need to do is enter
the following line:
export PATH=$PATH:/opt/lotus/bin:./
Note: Linux is case-sensitive, and PATH must be upper case.
This preserves the existing path and simply appends our additions.
Click File -> Save to open the Save File dialog box.
Chapter 2. Installing Domino 6 for Linux
105
1. Click the Home
Directory folder.
2. Type the new file
name: .bash_profile.
The . in front of the file
name makes it a
hidden file;
.bash_profile is a
hidden file read when
you launch a new
BASH shell.
3. Click Save to write the
file to disk.
Figure 2-27 KWrite Save File dialog box
Log out and log back in for the changes to take effect.
Note: If you started X-Windows from the startx command, make sure that
you log out and not just restart X-Windows. To log out, use the exit command
or ctrl-d.
You can check that the PATH variable was set correctly by launching a shell and
typing echo $PATH at the command prompt. To verify that you are using the
Domino server executable, type which server and check the path.
Figure 2-28 echo and which commands
Change to your Domino data directory (in our case it was the /local/notesdata
directory) before starting the Domino Server setup. You must be in the Domino
data directory when you start the server.
106
Lotus Domino 6 for Linux
Note: When the notes user account was set up, the home directory should
have been set to the Lotus Domino data path: /local/notesdata.
2.2.5 Remote setup
Note: We recommend remote setup because it gives you the ability to
download the server and certifier ID files to your local workstation.
The new Java setup also allows for remote configuration. The setup is virtually
the same as the local setup.
1. To run the remote setup, you must have installed the Lotus Administrator with
the remote server setup option (see Figure 2-29) on your workstation.
Figure 2-29 Lotus Administrator remote server setup option
Chapter 2. Installing Domino 6 for Linux
107
2. Log on to your server with the Domino user account (itsodom6), change to the
Domino data directory (/local/notesdata) and start the Domino server with the
listen option (see Figure 2-30).
Important: Make sure that the system LANG variable is set correctly for your
language, that is, LANG=en_US, LANG=de_DE@euro. To set the system
variable type LANG=.
Figure 2-30 Domino server with listen option
3. Go to a command prompt, change to the Domino Administrator programs
directory, and start the Java configurator (serversetup.exe) as shown in
Figure 2-31 on page 109.
108
Lotus Domino 6 for Linux
Figure 2-31 Java setup program serversetup.exe
4. Enter either the server’s name or IP address in the Remote Host Address field
and click Ping. (See Figure 2-32.)
Figure 2-32 Connect to remote server
5. If the remote server is set up correctly and the network is functioning, then
you should see a message like Figure 2-33 on page 110.
Chapter 2. Installing Domino 6 for Linux
109
Figure 2-33 Successful ping
6. Now click OK.
Figure 2-34 Starting remote configuration
Click Next and you will see the screen shown in Figure 2-34.
110
Lotus Domino 6 for Linux
Figure 2-35 First or additional Domino server
7. You are setting up the first server in what will be your new ITSO domain. If you
are setting up an additional server, you will be prompted to specify the
location of your server ID and the hierarchical name of the additional server.
Once you have done so, you can skip ahead to Step 12 on page 116. Click
Next to continue.
Chapter 2. Installing Domino 6 for Linux
111
Figure 2-36 Domino server name and title
8. We have set the server name to be the same as the host name. This is a good
idea for a number of reasons, one being that when a Lotus Notes client
attempts to locate a server, it will query DNS using the common name of the
server. If the common name matches the host name, the client will be able to
locate it even if the server resides in a different domain from the user’s home
server.
The title gives you an opportunity to provide a terse description of the server’s
main function or the organization to which it belongs.
Click Next to continue with the installation.
112
Lotus Domino 6 for Linux
Figure 2-37 Domino organization name
9. Set a meaningful Organization name, and make certain to enter a secure
password for your Certifier ID, then click Next to proceed.
If you are rebuilding your Domino domain, you can check the “I want to use an
existing certifier ID file” to do so.
Important: The Certifier ID is the key to all user and server authentication; it
should be removed from the server immediately after you have finished the
setup and stored in a secure location. You should also rename the file (it will
be named cert.id by default) to include the Domino domain name, especially if
you manage or intend to manage multiple domains. Do not forget, however,
that you will need the Certifier ID in order to create subsequent Organizational
Units (OUs). Additional OUs are useful for distinguishing people from servers,
as well as distinguishing departments or regions. You should settle on a
scheme that minimizes the number of OUs but provides sufficient detail. See
Domino 6 Administration Help for further details.
Chapter 2. Installing Domino 6 for Linux
113
Figure 2-38 Domino domain jname
10.For ease of administration and use, we made the Domino domain name the
same as the Organization name.
Tip: If you intend to have multiple domains, you should decide on a naming
scheme now and make certain the first domain conforms to the scheme you
will use for all subsequent domains.
Type the name you would like to use and click Next.
114
Lotus Domino 6 for Linux
Figure 2-39 Domino Administrator name and password
11.Enter an administrator name and password, then click Next.
We opted to create a generic Administrator ID and download it to our client via
a Web browser. If you intend to use the ID locally, check the “Also save a local
copy of the ID file” option so that you will have easy access to the ID. Since
the Administrator ID will have full access to the Domino Directory, we
removed the ID from the Person document after we downloaded it.
Important: Don’t select “Also save a local copy of the ID file” if you are
running a remote installation because it will try to access the local file system
on the server which you don’t have access to. There is an option later in the
remote setup to copy the ID files to your local workstation.
Chapter 2. Installing Domino 6 for Linux
115
Figure 2-40 Internet Services provided by Domino
12.Select all three options shown in Figure 2-40, then clicked Customize to
further refine your selections.
116
Lotus Domino 6 for Linux
Figure 2-41 Advanced Domino services: Part I
13.We selected Calendar Connector, Schedule Manager, and Statistics to
provide the features needed for this server. You will need to consider which
services are appropriate for the server you are setting up and select only
those that you need.
Tip: You can always add a service later by modifying the ServerTasks= line of
the notes.ini or issuing a set config servertasks= command from the
Domino console. With the set config command, you need to enter every
service you would like to have running, not just the ones to add. You can see
the existing services by typing show config servertasks.
Chapter 2. Installing Domino 6 for Linux
117
Figure 2-42 Advanced Domino services: Part II
14.We selected HTTP for Web services; IMAP and POP3 for mail client access;
SMTP for native mail delivery; LDAP to provide the Domino directory to LDAP
clients; and Stats for on-demand statistics. Again, you should select only the
services you need based on the intended use of your server. Click OK, then
click Next.
118
Lotus Domino 6 for Linux
Figure 2-43 Domino network settings
15.The auto-detect correctly determined our network port and host name, as
shown in Figure 2-43. We then clicked Customize to enable encryption; you
would also click Customize to correct the detected network ports.
Chapter 2. Installing Domino 6 for Linux
119
Figure 2-44 Domino advanced network settings
16.We checked “Encrypt” for the network traffic in order to guard against anyone
“sniffing” the packets during transmission. For a WAN server with sufficient
processing power and memory, we would have selected the “Compress”
option instead. Click OK, then click Next.
120
Lotus Domino 6 for Linux
Figure 2-45 ACL settings
17.To increase security, ensure that the two security boxes in Figure 2-45 are
checked (this is the default) and click Next.
Chapter 2. Installing Domino 6 for Linux
121
Figure 2-46 Copy ID files
18.The remote setup allows the server and certifier ID files to be copied to the
local workstation.
122
Lotus Domino 6 for Linux
Figure 2-47 Remote server setup
19.When you are satisfied the information is correct, click Setup to finish the
process.
Click Yes to stop the Domino server command in the listen mode (see
Figure 2-48).
Figure 2-48 Stop the Domino server
Chapter 2. Installing Domino 6 for Linux
123
2.2.6 Local setup
Running the setup locally on the server is slightly different than running the
server remotely. The difference lies in the steps necessary to start the setup
program. But once setup is running, the process is identical to the remote setup.
1. Log in as root to the graphical desktop environment of your choice. Most
people use KDE or Gnome. Then add your server to the access control list of
xhost. This will give permission to your server to send a display to your
screen.
/usr/X11R6/bin/xhost <hostname>
2. Switch to the user account for Domino and set the DISPLAY environment
variable to your local screen.
su - <Domino user>
export DISPLAY=<hostname>:0
3. Make sure that you are located in the data directory and launch the server:
pwd
/opt/lotus/bin/server
Figure 2-49 Domino 6 Welcome screen
124
Lotus Domino 6 for Linux
4. The server will detect that the notes.ini is new and so will launch the Java
Server Setup program. Click Next to continue. The rest of the steps are
similar to those described in 2.2.5, “Remote setup” on page 107.
Re-running the Domino server setup
If you need to re-run the setup from scratch, you can remove all lines from the
notes.ini after the CleanupScriptPath= line.
This, of course, means you’ll lose all previously configured information and
customized notes.ini settings.
Figure 2-50 Re-running setup
2.2.7 Starting the Domino server
To start the server, launch a shell (refer to Figure 2-1 on page 84 for instructions),
change to your Domino data directory (in our case it was the local/notesdata
directory) and type server at the command prompt. If you have not customized
your shell environment as shown in “Setting the Linux PATH environment
variable” on page 105, you will need to supply the full path in order for Linux to
locate the executable.
Chapter 2. Installing Domino 6 for Linux
125
This will start the server in the foreground, and Domino will create the initial
databases required for operation and for the enabled services. As with any Linux
program running in the foreground, you will need to leave the shell window open
until the program is complete. Normally, we append & to the command line to run
the server in the background so that we can exit the shell and log off. The idea of
a service in NT is a mirror of the UNIX concept of running a task in the
background.
Once the initial tasks are finished and you have verified that there are no errors,
type quit to exit the server so you can take a look at the new Java console.
Java Domino console
To start the server with the new Java console, issue the following command:
server -jc &
This command will launch all three components: the Domino Server itself, the
Domino Controller, and the Domino Console. For those of you familiar with the
Win32 Domino Administration client, you will recognize the interface.
Note: Java Domino Console is new to Domino 6 and it replaces the cconsole
that was the built in console program in Domino R5. The cconsole command
is still available if you don’t have access to a GUI system. See the Lotus
Domino R5 for Sun Solaris 8 redbook for more information on the cconsole
command.
126
Lotus Domino 6 for Linux
Figure 2-51 The new Domino console
Essentially, the Controller runs on the server and listens for connection requests
from the Console. When it receives a connection request, it authenticates the
connection using information that it has cached from the Domino Directory then
allows access to the server and the Linux environment according to the rights
granted in that particular server document.
In this case, we launched the Java console as part of the initial server startup
and so were granted rights as a local administrator. However, you can start the
Domino Console at any time, and it can be run locally or remotely.
To see how this works, go to File -> Disconnect Controller and disconnect from
the server. Next, select File -> Exit to exit the Domino Console. Remember, if
you type exit or quit at the Domino Console prompt, you will instead cause the
Domino server to exit.
Chapter 2. Installing Domino 6 for Linux
127
At this point, the Domino Console has quit, but the Domino Server and Controller
are still running. If you would like to verify that the server is up, you can type ps
-A | grep server (you can replace server with another Domino task, such as
replica) at the shell command prompt. To see if the Domino Controller is still
listening, type netstat -a | grep 2050. If you have changed the default port,
you’ll need to substitute the port you are using for 2050.
Figure 2-52 ps and netstat output
Tip: When in doubt about what a Linux command does, for example ps, you
can type man ps to view an on-line manual page. If you are uncertain what the
command you need is, you can try man -k <keyword>. This will search the
manual page descriptions for the keyword you specified.
From a shell, type jconsole to launch the Domino Console.
128
Lotus Domino 6 for Linux
Figure 2-53 Connecting to the Domino server
Enter your Domino user name, password, and the name of the server to which
you would like to connect. We connected to the same server, but you can use the
Domino Console to connect to any Domino server for which you have
administrator privileges.
The Administrator field located in the Domino Directory server document grants
you the right to issue all Domino console commands, including quit and restart
server, but does not allow the use of shell commands. This will allow you to carry
out all normal Domino server administration, but should you desire additional
rights, you could consider adding your username to the Full Access
Administrators field in the Domino Directory. However, this field grants extensive
rights and is not required for most administrative tasks. In general, only a single
ID with multiple passwords should be entered into the Full Access Administrators
field to protect the integrity of your domain.
Chapter 2. Installing Domino 6 for Linux
129
Even when the Domino server has been shut down, you can start it again, as
long as the Domino controller is still running. All the data between the jconsole
and the controller is encrypted using SSL.
Starting Domino from a script
We recommend that you start Domino from a script. This will ensure that the
server is always started when the system is rebooted. Starting Domino via a
script is akin to the service feature available with Windows NT. The advantage of
a script over a pre-defined GUI is that you can configure the script to carry out
specialized tasks, as well as start Domino in the manner best suited to your
operating environment.
The startup script included here can be downloaded from the redbook website.
See more information on how to acquire the script in Appendix B, “Additional
material” on page 445.
To install this script on your Linux system:
1. Log in to the system as root.
2. From a shell command line, navigate to /etc/init.d (issue the command cd
/etc/init.d)
3. Copy the Domino file from the website into this directory via ftp or ssh, or else
create a new file with your favorite editor and paste the text of the script into it.
4. Once you have copied or saved the file—it should be named domino—you
need to set the permissions and the owner. These should be the same as the
other files in the /etc/init.d directory. This is usually root:root for the owner and
group and -rwxr-xr-x for file permissions.
You can learn more about file permissions and ownership in “File
permissions” on page 135.
5. Issue the command chkconfig --add domino to register the script with the
Linux startup process.
Here is the startup script for Domino 6. Remember that this script assumes you
will be using the performance enhancements described in 4.1.2, “Linux
scalability” on page 208.
The domino startup script is meant to be run automatically during system
startup. If you need to restart Domino without rebooting the entire system, use
the startserver script, instructions how to obtain the script are included in the
Appendix B, “Additional material” on page 445. The startserver script should be
placed in the Domino data directory and given execute permissions as outlined in
Step 4. However, the owner should be the Linux account used to run Domino
and the script should be started by that account as well.
130
Lotus Domino 6 for Linux
Example 2-1
#!/bin/sh
# A startup script for the Lotus Domino 6 server
#
# chkconfig: 345 95 5
# description: This script is used to start the domino \
# server as a background process.\
#
# Usage /etc/init.d/domino start|stop
# This script assumes that you are using the performance tweaks
# detailed in the Domino 6 for Linux redbook and that these tweaks
# are stored in a directory called lib in the Domino Data directory.
# If you are not using these tweaks, you should replace the line starting with
#
su - $DOM_USER -c “LD_PRELOAD...
# with the following line
#
su - $DOM_USER -c “$DOM_PROG/server -jc -c” > /dev/null 2>&1 &
# You should change the 3 following variables to reflect your environment.
# DOM_HOME is the variable that tells the script where the Domino Data resides
DOM_HOME=/local/notesdata
# DOM_USER is the Linux account used to run the Domino 6 server
DOM_USER=notes
# DOM_PROG is the location of the Domino executables
DOM_PROG=/opt/lotus/bin
start() {
echo -n “Starting domino: “
if [ -f $DOM_HOME/.jsc_lock ]; then
rm $DOM_HOME/.jsc_lock
fi
su - $DOM_USER -c
“LD_PRELOAD=$DOM_HOME/lib/libpthread.so.0:$DOM_HOME/lib/librt.so.1;export
LD_PRELOAD;$DOM_PROG/server -jc -c” > /dev/null 2>&1 &
return 0
}
stop() {
echo -n “Stopping domino: “
su - $DOM_USER -c “$DOM_PROG/server -q”
return 0
}
case “$1” in
Chapter 2. Installing Domino 6 for Linux
131
start)
start
;;
stop)
stop
;;
*)
echo “Usage: domino {start|stop}”
exit 1
esac
132
Lotus Domino 6 for Linux
3
Chapter 3.
Security and administration
In this chapter, we describe the basics of Linux and Domino security and what
you can do to achieve an appropriate level of security. We touch on physical,
system, and network security for Linux, then discuss partitions, scripts, and
scheduling jobs. For Domino, we review steps you should take to secure your
new server, then discuss the enhanced Web administration client and the new
Domino Controller available with Domino 6.
© Copyright IBM Corp. 2002. All rights reserved.
133
3.1 Linux security
In this section, we focus on security at the OS level. After you install the OS, the
first step is to secure your server so you will not install subsequent applications
on an already compromised server.
Because of expanding global communications and internet connectivity, more
and more people have access to your servers, and not all of these people have
good intentions. Therefore, you need to protect your servers from attacks and at
the same time grant access to those who need it. Keep in mind that no server,
regardless of the OS, is completely secure; all you can do is make it increasingly
difficult for someone to compromise your servers.
The levels of security that we discus in this chapter are:
Physical security
System security
Network security
Backup security
3.1.1 Physical security
The first step in securing your server is limiting physical access to the machine.
Consider all of the following:
Lock the server in a special room to which only administrators have access.
Lock the server console with a password.
Lock your case. This way no one has easy access to the inside of your
computer. Otherwise, someone could insert another hard drive, boot from it,
and potentially gain access to the other drives in the system.
Secure the floppy and CD-ROM. After you install all the software, consider
removing the floppy and CD-ROM from the BIOS boot list.
Lock the BIOS setup utility with a password.
Attention: If you enable a power-on password in BIOS, then your system will
no longer reboot automatically in the event of a power failure.
3.1.2 System security
Not every user on the system needs root access. Though it is easier to work as
root, you should grant root access only to those administering the server. If a
user does not need access to a resource, you are better off not granting access.
134
Lotus Domino 6 for Linux
File permissions
In Linux almost every resource (files, directories, symbolic links, disks, modems,
and so forth) is considered a file, and file permissions give access to the
resource. From a shell, you can view the permissions of a file if you issue the
command ls -l at the command line, as shown in Example 3-1.
Example 3-1 Example of file permissions for /etc/passwd
# ls -l /etc/passwd
-rw-r--r-- 1 root root
873 Apr
4 15:27 /etc/passwd
This command gives the long listing format of the file /etc/passwd. In addition to
the name of each file, it prints the file type, permissions, number of hard links,
owner name, group name, size in bytes, and time stamp (by default this is the
modification time). The type and the permission is the cryptic string of letters and
dashes at the beginning of the line. The first character of the 10 character long
code is the type of the file; in this case it is a dash which means this is a plain file.
The possible file types are:
-
Plain file
d
Directory
l
Symbolic link (like a Windows shortcut)
b
Block device (drives)
c
Character device (terminals, modems)
The next nine characters describe the permissions on the file. They are
organized in groups of three. The first group gives the permissions of the owner
of the file (in this case the user root), the second the permissions of the group (in
this case the group root), and the last three characters give the permissions for
any other user on the system.
A group of three characters is built as follows:
First character is an r which means permission to read the file.
Second is a w which stands for write permission.
The last character is x for execute rights on a program or list rights if the file is
actually a directory. Also s, S, t, and T are possible values for this character,
but these permission are less frequent and beyond the scope of this book.
In our example, the permissions -rw-r--r-- root root mean read and write
access for the user root, read rights for anyone who is a member of the group
root, and read rights for any other user on the system.
Chapter 3. Security and administration
135
On a Linux system, ordinary users only have write access to their $HOME
directory (also known as ~) and the /tmp directory. This is different than on
Windows NT systems, where every user has access to all the disks except where
access has been specifically denied. Since the Domino server runs as an
ordinary user under Linux, you have to be sure that ownership of files and
directories is set correctly.
For example, if you want to enable transaction logging, you have to make sure
that the directory where the logs are stored is owned by the user who runs the
Domino server. Let’s say the disk that will contain the transaction log files is
mounted under the directory /translogs. The ownership of this file, if created
during installation, is root.root, so we have to change it. Log in as root, go to the
top level directory (the / directory), and change the ownership as follows with the
chown command:
# chown itsodom6.notes translogs
The user itsodom6, which is the user who runs the Domino server in our
example, is now the owner of the directory /translogs. This makes it is possible to
enable transaction logging for Domino.
Passwords
Passwords are an ubiquitous means of security, and every company should
determine and set password rules based on their security requirements.
Each password has to be chosen with care. There are two components of
password strength:
Quantity - This is simply a minimum number of characters required before a
password is acceptable.
Quality - This is a more complex requirement that dictates the password must
contain a combination of lower and uppercase letters, numbers, or other
symbols.
In Linux, the default password length is five, but there is also a maximum length
of eight. However, this can and should be changed. Linux offers a range of
options to guard against weak passwords and we detail a number of them in this
section. There are also many printed references, as well as Linux websites.
Password settings in SuSE 8.0
SuSE 8.0 has a tool for system administration that is like the Control Panel in
Windows: Yet another Setup Tool (YaST2). This tool can be used either in text
mode or in graphical user mode.
Note: You have to be logged in as root to have access to all areas of YaST2.
136
Lotus Domino 6 for Linux
To quickly change the password settings, you can use the graphical YaST2. Click
Start Application -> System -> YAST2, click Security and Users, then
Security Settings as shown in Figure 3-1.
Figure 3-1 Security settings in SuSE 8.0
Check Custom Settings and click Next to display the Password settings window.
You have a number of options regarding passwords. Here are our
recommendations, shown in Figure 3-2 on page 138.
Enable “Checking new passwords.”
Enable “Plausibility test for password.”
Enable “Activate MD5 encryption for passwords.”
Chapter 3. Security and administration
137
Figure 3-2 Password settings
There are a lot of opinions regarding minimum password length; the consensus
seems to be that the password length should be at least six characters but seven
and eight are also recommended. The root password should certainly be eight or
more characters in length. Table 3-1 on page 139 shows different password
lengths and the respective total possibilities if no restrictions are in place. As you
can see, the use of just lowercase letters in a password seriously reduces the
number of possible combinations.
In addition to minimum length, you should also change the maximum length to a
much higher number than 8; we opted for 64 as shown in Figure 3-2.
138
Lotus Domino 6 for Linux
Table 3-1 Password length and total possibilities
Password length
Combinations using
lowercase letters (26)
Combinations using
letters, numbers, and
special characters (94)
5
11,881,376
7,339,040,224
6
308,915,776
689,869,781,056
7
8,031,810,176
64,847,759,419,264
8
208,827,064,576
6,095,689,385,410,816
Next, you should require your users to change their passwords periodically.
Remember, however, that if you make users change their password too often or
you require too many characters for the minimum password, it will often result in
the user writing down the password, thereby defeating your overly stringent
security measures. Twice a year seems a reasonable compromise, so we set the
Maximum for “Days of password change warning” to 183.
Attention: During our use of YaST2, the “Days of password change warning”
was not set correctly. You can verify that your changes have been saved by
viewing the /etc/login.defs file, as detailed in “Password settings in Red Hat
7.2” later in this section.
You can then click Next to view the remaining security options. We elected to use
the default settings, which include a three second log-in delay for failed attempts
and a record of each failed attempt.
Tip: If you want to increase security even further, investigate switching to
Kerberos authentication. There are many sources to learn more about
Kerberos, for example, the Kerberos pages of MIT at:
http://web.mit.edu/kerberos
Another good source is the Linux Security HOW-TO, which you can find along
with numerous other helpful documents at the Linux Documentation Project
website at:
http://tldp.org/docs.html
Password settings in Red Hat 7.2
For Red Hat 7.2, log in as root and modify the /etc/login.defs file directly using
KATE, as shown in Example 3-2 on page 140.
Chapter 3. Security and administration
139
If your company already has a Linux security policy, make certain to utilize it in
conjunction with our recommendations.
Example 3-2 /etc/login.defs file
# Password aging controls:
#
#
PASS_MAX_DAYS
Maximum number of days a password may be used.
#
PASS_MIN_DAYS
Minimum number of days allowed between password
changes.
#
PASS_MIN_LEN
Minimum acceptable password length.
#
PASS_WARN_AGE
Number of days warning given before a password expires.
#
PASS_MAX_DAYS
183
PASS_MIN_DAYS
0
PASS_MIN_LEN
6
PASS_WARN_AGE
14
Next, you can type setup at the command prompt to verify that you have enabled
MD5 passwords.
1. Select Authentication Configuration by pressing Enter.
2. Use the Tab key to navigate to the Next option and press Enter. This will
display the screen shown in Figure 3-3 on page 141.
3. Make certain that both “Use Shadow Passwords” and “Use MD5 Passwords”
are selected. (You can use the spacebar to select and deselect options.)
4. Press Tab until OK is highlighted; press Enter to accept.
5. Quit the setup program.
140
Lotus Domino 6 for Linux
Figure 3-3 Authentication Configuration for Red Hat 7.2
Network security
In this section, we cover both basic and advanced network security. For more
information, visit the following Web site:
http://www.linuxsecurity.com
Basic network security
In the UNIX system world, software that is able to connect to (exchange
information with) other software on the same system or another system is called
a daemon. Usually, the daemon listens on a specified IP and port; the Domino
server listens on port 1352. A server normally has many daemons running at the
same time, such as the ftp daemon, telnet daemon, and so forth. Through these
daemons, another system can connect to the server and exchange information.
Daemons are divided into two categories: those started by root user; and the
rest, started by other users. The daemons started by root listen on ports below
1024.
If a daemon has a programming “bug” or there is an unusual circumstance, such
as information coming too fast for the daemon to handle or reception of a
Chapter 3. Security and administration
141
command it should not receive, the daemon may crash. When a daemon
crashes, it often returns a prompt without requesting a password and whoever
was connected at that time with the daemon now has the prompt. If the daemon
was started by root, then when it crashes, it returns a root prompt, which is very
dangerous. Minimizing the number of daemons run by root is an important step
in securing your server.
After the installation of Linux, there are many ports open by default because a
number of daemons are automatically started. To increase security, as well as
performance, you should stop daemons that you do not need.
In Table 3-2, we explain some of the frequently used services available for Linux.
On a Domino server, you will not need to run many of these daemons. In the
table, the column labeled Enable? indicates whether or not we recommend this
daemon for a Linux Domino 6 server.
Tip: You can always enable a service, such as ftpd, when you need to
transfer files and then disable it when you are done.
Table 3-2 Linux daemons
142
Name of the
service
Enable?
Observations
Port
crond
Yes
It runs user-specified programs at periodically
scheduled times. It it useful for log rotation, for
example.
N/A
ftpd
No
This is an ftp (file transfer protocol) daemon
common on SuSE. Use it to move files from one
server to another. You can use the scp command
with an SSH shell.
21
gpm
Yes
It adds mouse support to a text console.
N/A
httpd
No
Linux web server.
80
ipchains
No
Firewall tool.
N/A
iptables
No
Firewall tool.
N/A
keytable
Yes
It loads the selected keyboard map.
N/A
kudzu
No
This runs a hardware probe akin to plug and play.
After you install your server hardware, you can
turn this off.
N/A
lpd
No
Print daemon.
515
Lotus Domino 6 for Linux
Name of the
service
Enable?
Observations
Port
network
Yes
Activates/Deactivates all network interfaces
configured to start at boot time.
nfs
No
A file sharing protocol across TCP/IP.
2049
sendmail
No
An SMTP server.
25
snmpd
No
A management protocol. You should enable this
daemon only if you have implemented SNMP.
161
ssh
Yes
A secure shell for remote administration. Use it to
remotely administer the server from a shell.
22
syslog
Yes
The facility by which many daemons log
messages to various system files.
N/A
telnet
No
A shell for remote administration. Use SSH for
secure remote administration.
23
wu-ftpd
No
An ftp (file transfer protocol) daemon common on
Redhat. Use it to move files from one server to
another. You can use the scp command with an
SSH shell.
21
xfs
Yes
The X Font Server.
N/A
xinetd
Yes
Runs other daemons on demand.
N/A
Starting and stopping daemons
Starting and stopping daemons can be done by logging in as root to KDE and
launching the SysV - Init Editor by selecting Start Application -> System ->
Configuration -> SysV Init Editor on SuSE or Start Application -> System ->
SysV Init Editor on RedHat. (See Figure 3-4 on page 144.)
Chapter 3. Security and administration
143
Figure 3-4 SysV Init Editor
Before using the SysV Init Editor you should first understand runlevels. Windows
really has only two runlevels: Recovery and Normal. Recovery is only used when
there is a problem with the system. Most of the time Windows runs in Normal
mode.
Linux usually has six runlevels. Runlevel 0 is used to shut down the server;
runlevel 6 is used to restart the server. Runlevel 1 (Single user mode) is used like
the Windows recovery mode. Most systems normally run at runlevel 3 (command
line) or runlevel 5 (X-Windows).
The top row of boxes in Figure 3-4 shows the services that will start when the
system enters each runlevel, the bottom row of boxes show what services will be
stopped when the system enters that runlevel.
Note: A service should not appear in both the Start and Stop boxes for a
runlevel.
144
Lotus Domino 6 for Linux
Figure 3-5 Properties for a service
To stop/start a service, click on the service (see Figure 3-5) and then go to the
Service tab and click the Start or Stop button (see Figure 3-6 on page 146).
To prevent a service from starting when entering a runlevel, drag and drop the
service from the runlevel to the Trashcan.
To start a service when entering a runlevel, drag and drop the service from the
Available Services list to the start box of the appropriate runlevel.
To stop a service when entering a runlevel, drag and drop the service from the
Available Services list to the start box of the appropriate runlevel.
Tip: It is a good idea to have the Domino service in the stop boxes for
runlevels 0 and 6. This ensures that the Domino server shuts down cleanly
when the system is shut down or rebooted.
Chapter 3. Security and administration
145
Figure 3-6 Start/Stop a service
Showing running daemons
To see what daemons are listening (accepting connections) on your server, log in
as root and issue the command netstat -a | grep "LISTEN " as shown in
Figure 3-7. In this way, you can always check to see if your daemons are
listening.
Note: Linux is case-sensitive, so LISTEN must be upper case in this example.
146
Lotus Domino 6 for Linux
Figure 3-7 netstat -a | grep "LISTEN " command output
Securing daemons
If you need a daemon to run and want to control who can connect to your
machine and who can’t, use the files /etc/hosts.allow and /etc/hosts.deny.
In the file /etc/hosts.allow, you can set who can connect to your machine on
different ports, as shown in Example 3-3.
Example 3-3 The /etc/hosts.allow file
# cat /etc/hosts.allow
sshd: 192.168.1.0/255.255.255.0
sshd: 192.168.234.0/255.255.255.0
in.ftpd: 192.168.0.0/255.255.0.0
This means only clients with an IP address between 192.168.1.1 and
192.168.1.254 or 192.168.234.1 and 192.168.234.254 can connect to the ssh
server, while only those with an IP address between 192.168.0.1 and
192.168.255.254 can connect to your ftp server.
In the file /etc/hosts.deny, you can set who is not allowed to connect to your
machine on different ports, as shown in Example 3-4.
Chapter 3. Security and administration
147
Example 3-4 The hosts.deny file
# cat /etc/hosts.deny
sshd: 10.10.10.0/255.255.255.0
in.ftpd: 10.10.99.0/255.255.255.0
This means clients between 10.10.10.1and 10.10.10.254 cannot connect to the
ssh server, while clients between 10.10.99.1 and 10.10.99.254 cannot connect to
the ftp server.
Tip: For best security practices the /etc/hosts.deny should contain all: all deny.
This means that nobody can connect to the daemons protected by tcpd (see
man tcpd) unless they are in the /etc/hosts.allow.
Tip: Use the ssh daemon instead of the telnet daemon because SSH
encrypts all the data between your client and server. You will need an SSH
client if working from a Windows machine; you can find one free, such as the
versatile PuTTY and its companion product PSCP (PuTTY Secure Copy), on
the Internet. A good use of PSCP is to copy the cert.id file from the Domino
server to a workstation. For more information, see:
http://www.chiark.greenend.org.uk/~sgtatham/putty
Advanced network security
If you want to remotely administer servers in a very secure manner, use a
different physical network if possible. In other words, use different network
adapters and different switches.
Note: The administrative network does not have to be a high speed network.
You can use older hubs or switches.
If you create a separate network for administration, you will have the following
advantages:
You don’t have to worry about someone stealing your password.
You can update your software through the administration network so your
client will not notice a performance decrease.
In case your high speed network fails, you can use the administrator network
for a short period of time.
148
Lotus Domino 6 for Linux
Firewalls
To increase the security of the internal network and to protect servers from
anyone who tries to steal or destroy your data, we recommend that the network
and the servers be connected to the Internet through a firewall system. Firewall
software is a network filter between your network and the Internet. All traffic to
and from the Internet should pass through at least one firewall. For example, the
firewall software is responsible for stopping all the requests coming in to your
servers that are not addressed to the servers, and to stop some of the requests if
the server cannot handle all the requests (also called flooding).
We recommend that you implement a firewall system in your network to protect
your data. Figure 3-8 is a simple illustration, where the network is separated in
two. One segment, typically referred to as a DMZ, has servers that need special
access to the Internet. The second network is the internal LAN, where the most
important data resides.
Internet
DMZ
Firewall 1
DNS
Domino HTTP
Domino SMTP
Domino App
Firewall 2
Internal LAN
Figure 3-8 Firewall system
Chapter 3. Security and administration
149
There are commercial firewall solutions and open source firewall solutions. Linux
has a firewall solution that is very secure and very fast: iptables/netfilter. Some of
its features are the following:
Packet filtering
Content filtering
MAC address filtering
NAT (Network Address Translation)
Anti-flooding procedures
Many, many other features
Note: For more information about netfilter, refer to the following website:
http://netfilter.samba.org
Backup security
Another method to gain access to your information is by stealing your backup
tapes. In this way, it is possible for someone to read your information, but not to
modify it.
There are two ways to back up your server:
A tape or a library directly attached to your server
A backup server with a tape or library attached to it
Make certain to lock your tapes in a safe place, and if you are using a backup
server, be sure to use a username and a password to back up or restore your
files. See “Backup” on page 425 for more information about backing up your data
and about different backup solutions.
Operating system patches
Both SuSE and RedHat provide easy ways to keep you system up-to-date with
the latest security patches. See YaST2 for SuSE and RHN (RedHat Network)
RedHat for more information.
3.2 Linux administration
It is not difficult to administer a Linux server. In this section, we discuss basic
administrative tasks, such as creating a partition, creating a file system, creating
scripts, and modifying crontab.
150
Lotus Domino 6 for Linux
3.2.1 Partitions
The tool to create, erase, or modify a partition is fdisk. To be able to use it, log in
as root to a shell and type fdisk /dev/sda, where sda is the first SCSI hard disk.
If you are not using SCSI, then the first hard disk will be hda. To list the partitions
on a SCSI hard disk, type fdisk /dev/sda -l as shown in Example 3-5.
Example 3-5 The partition list
# fdisk /dev/sda -l
Disk /dev/sda: 240 heads, 63 sectors, 2584 cylinders
Units = cylinders of 15120 * 512 bytes
Device Boot
/dev/sda1 *
/dev/sda2
/dev/sda5
/dev/sda6
/dev/sda7
Start
1
822
1365
822
1330
End
821
2584
2584
1329
1364
Blocks
6206728+
13328280
9223168+
3840417
264568+
Id
7
f
b
83
82
System
HPFS/NTFS
Win95 Ext'd (LBA)
Win95 FAT32
Linux
Linux swap
Partition table entries are not in disk order
Important: Your disk partitions will likely be different from the example.
Linux has the following partition numbering system:
From 1 to 4 are primary partitions
From 5 to 16 are logical partitions
To view all fdisk commands, start fdisk interactively with fdisk /dev/sda, then
type m as shown in Example 3-6.
Example 3-6 List of commands
Command (m for help): m
Command action
a
toggle a bootable flag
b
edit bsd disklabel
c
toggle the dos compatibility flag
d
delete a partition
l
list known partition types
m
print this menu
n
add a new partition
o
create a new empty DOS partition table
p
print the partition table
Chapter 3. Security and administration
151
q
s
t
u
v
w
x
quit without saving changes
create a new empty Sun disklabel
change a partition's system id
change display/entry units
verify the partition table
write table to disk and exit
extra functionality (experts only)
To delete a partition, follow Example 3-7.
Example 3-7 Deleting a partition
Command (m for help): d
Partition number (1-7): 7
Command (m for help):
To create a logical partition, follow Example 3-8.
Example 3-8 Creating a partition
Command (m for help): n
Command action
l
logical (5 or over)
p
primary partition (1-4)
l
First cylinder (1330-2584, default 1330):
Using default value 1330
Last cylinder or +size or +sizeM or +sizeK (1330-1364, default 1364):
Using default value 1364
Command (m for help):
Note: The logical option will only appear for a new partition if an extended
partition has already been created.
After you have created a partition, you may change the partition’s type. In Linux
the partition type is coded as a number or id. By default, Linux creates a partition
with id 83, which mean it is designated as a Linux partition.
In Example 3-9 on page 153, you can see all the partition types supported by
Linux at this time.
152
Lotus Domino 6 for Linux
Example 3-9 All partition types supported by Linux
Command (m for help): t
Partition number (1-7): 6
Hex code (type L to list codes): l
0
1
2
3
4
5
6
7
8
9
a
b
c
e
f
10
11
12
14
16
17
18
Hex
Empty
1b Hidden Win95 FA
FAT12
1c Hidden Win95 FA
XENIX root
1e Hidden Win95 FA
XENIX usr
24 NEC DOS
FAT16 <32M
39 Plan 9
Extended
3c PartitionMagic
FAT16
40 Venix 80286
HPFS/NTFS
41 PPC PReP Boot
AIX
42 SFS
AIX bootable
4d QNX4.x
OS/2 Boot Manag
4e QNX4.x 2nd part
Win95 FAT32
4f QNX4.x 3rd part
Win95 FAT32 (LB
50 OnTrack DM
Win95 FAT16 (LB
51 OnTrack DM6 Aux
Win95 Ext'd (LB
52 CP/M
OPUS
53 OnTrack DM6 Aux
Hidden FAT12
54 OnTrackDM6
Compaq diagnost
55 EZ-Drive
Hidden FAT16 <3
56 Golden Bow
Hidden FAT16
5c Priam Edisk
Hidden HPFS/NTF
61 SpeedStor
AST SmartSleep
63 GNU HURD or Sys
code (type L to list codes):
64
65
70
75
80
81
82
83
84
85
86
87
8e
93
94
9f
a0
a5
a6
a7
b7
b8
Novell Netware
Novell Netware
DiskSecure Mult
PC/IX
Old Minix
Minix / old Lin
Linux swap
Linux
OS/2 hidden C:
Linux extended
NTFS volume set
NTFS volume set
Linux LVM
Amoeba
Amoeba BBT
BSD/OS
IBM Thinkpad hi
BSD/386
OpenBSD
NeXTSTEP
BSDI fs
BSDI swap
bb
c1
c4
c6
c7
da
db
de
df
e1
e3
e4
eb
ee
ef
f1
f4
f2
fd
fe
ff
Boot Wizard hid
DRDOS/sec (FATDRDOS/sec (FATDRDOS/sec (FATSyrinx
Non-FS data
CP/M / CTOS / .
Dell Utility
BootIt
DOS access
DOS R/O
SpeedStor
BeOS fs
EFI GPT
EFI (FAT-12/16/
SpeedStor
SpeedStor
DOS secondary
Linux raid auto
LANstep
BBT
After you create a partition and set its type, press w to commit the changes to the
hard disk drive.
Attention: The changes you make to partitions are not committed until you
press w, so in case of a mistake, press q to exit without saving your changes.
3.2.2 File systems
With the partition created, you can format it and create a file system for it. To do
so, you have to chose how you will format it. For a Linux partition, you can chose
to format it as ext2, ext3, or reiserfs. More information about file systems is in
1.1.6, “File systems in Linux” on page 5. In Example 3-10 on page 154, we
create an ext2 file system via the shell command line.
Chapter 3. Security and administration
153
Example 3-10 Formatting a Linux partition
mkfs.ext2 /dev/sdb1
mke2fs 1.23, 15-Aug-2001 for EXT2 FS 0.5b, 95/08/09
Filesystem label=
OS type: Linux
Block size=4096 (log=2)
Fragment size=4096 (log=2)
384768 inodes, 769104 blocks
38455 blocks (5.00%) reserved for the super user
First data block=0
24 block groups
32768 blocks per group, 32768 fragments per group
16032 inodes per group
Superblock backups stored on blocks:
32768, 98304, 163840, 229376, 294912
Writing inode tables: done
Writing superblocks and filesystem accounting information: done
In Example 3-11, we format a swap partition.
Example 3-11 Formatting a swap partition
#mkswap /dev/sdb2
Setting up swapspace version 1, size = 1036378112 bytes
Note: Do not create a swap partition more than twice the size of your RAM
memory.
Next, create a directory where the formatted partition will be mounted, for
example type mkdir /data, then modify the file /etc/fstab by adding the lines
shown in Example 3-12 so the partition will be mounted at boot time.
Example 3-12 Adding the partition in file /etc/fstab
/dev/sdb1
/dev/sdb2
/data
swap
ext2
swap
defaults
defaults
1 1
0 0
When you reboot the server, your new file system will be mounted.
3.2.3 Scripts
In this section we describe how to create a shell script. Shell scripts are a
powerful method by which to customize your Linux server. As an example, we will
create a simple script. This script will erase the log files that are more than 2
months old. Example 3-13 gives the actual code.
154
Lotus Domino 6 for Linux
Note: Each shell has its own syntax for scripts. The scripts we created are
made for the BASH shell.
Example 3-13 Log eraser
#!/bin/bash
## Log eraser ##
LPATH=/var/log
NR_OF_DAYS=60
for i in 'find $LPATH -atime +$NR_OF_DAYS'
do
rm -f $i
done
The first line #!/bin/bash tells the environment that the script will run. This
line is to be treated as is and should not be modified.
The sixth line sets the variable LPATH to equal /var/log and the seventh line
sets the variable NR_OF_DAYS to 60. We recommend that you use variables
because it makes it easier to debug your script.
$LPATH and $NR_OF_DAYS indicate that you wish to use the value of the
specified variable.
find $LPATH -atime +$NR_OF_DAYS will search in the /var/log directory for files
older that 60 days.
Note: For more information about find consult the man page: man find.
Next is a for loop. For every value of i, we will run the command rm -f $i
which will remove every file specified by the value of i.
Lines that start with a # are comments but there are special cases, such as
the first line or the comments utilized by the chkconfig command.
Save the file as log_erase.sh. We recommend that you create a directory, such
as /scripts, in order to keep your scripts in a single location. To be able to execute
the script, you have to modify the rights of the file. Run the command chmod 700
/scripts/log_eraser.sh. You will be the only one who can read, write, and
execute the file. In case you were wondering, the 7 in the chmod command
comes from adding the numerical values of the read(4), write(2), and execute(1)
permissions together: 4+2+1 = 7. The two zeros in the chmod command indicate
that the group and the world (all other users) have no rights to the file. This
Chapter 3. Security and administration
155
parallels the division of file permissions described in “File permissions” on
page 135.
To run the script, you would type /scripts/log_eraser.sh if you placed the file in
the /scripts directory.
Attention: This script is intended primarily as an example that can be adapted
to other situations. Although it works, you might want to consider a more
sophisticated algorithm for the management of your log files, or use the built-in
logrotate daemon.
3.2.4 Crontab
In everyday life, you may have several scripts for maintaining your server.
Crontab is a scheduler in Linux that automates the process of running these
scripts. To list the scheduled programs in crontab, log in as root and type
crontab -l. On a fresh Linux installation, you will not see anything or else will
receive a message “no crontab for root.”
Example 3-14 Crontab example
20 * * * * /scipts/script1
20 0 03 08 * /scripts/script2
0 0,6,12,18 * * * /scripts/script3
30 2 * * 6 /scripts/script4
0 0 * * 6 /scripts/log_eraser.sh
*/10 * * * * /scripts/script5
Following is an explanation of the crontab syntax. The six fields are:
Minutes | Hour | Day of the month | Month | Day of the week | Path
The lines in the crontab example have the following meanings:
At 20 minutes past each hour run /scripts/script1.
At 20 minutes, at midnight, on 03 august, run /scripts/script2.
On 12 Am, 6 Am, 12 PM and 6 PM, on every day, run /scripts/script3.
At 30 minutes, at 2 AM, on every Saturday, run /scripts/script4.
At midnight, on every Saturday run /scripts/log_eraser.sh.
Every 10 minutes run /scripts/script5.
156
Lotus Domino 6 for Linux
Tips:
Be sure the date is set correctly on the server.
A week starts on Sunday. Thus, to run a job on a Sunday, enter 0, not 7.
To create a schedule:
Log in as root and at the command prompt type crontab -e.
Press i to insert data.
Enter a value for all six entries. Use * when an entry is not applicable.
After you finish, press the Escape key and :wq (which means write and quit).
Notes:
The crontab uses vi as the default text editor. The commands described
here assume the use of vi.
There is a graphical front end to cron called KCron.
3.2.5 Network status
Sometimes it is very useful to know who is connected to your server and what is
happening. In this section, we describe the functions of the netstat command
and the iptraf utility.
Important: The information in this section requires some TCP/IP protocol
knowledge. Explaining all details in the screen captures is beyond the scope
of this book, but enough information is provided to explain the common use of
these network status tools. To learn more about TCP/IP, see the IBM Redbook
TCP/IP Tutorial and Technical Overview, GG24-3376.
Netstat command
Log in as root and type netstat and you will see a screen similar to the one
shown in Figure 3-9 on page 159.
From left to right, the columns have the following meanings.
Proto
The protocol used by sockets (TCP, UDP, raw)
Recv-Q
The count of bytes not copied by the user program connected to this socket
Chapter 3. Security and administration
157
Send-Q
The count of bytes not acknowledged by the remote host
Local Address
Address and port number of the local end of the socket
Foreign Address
Address and port number of the remote end of the socket
State
The state of the socket. Since there are no states in raw mode and usually no
states used in UDP, this column may be blank, but it can be one of several
values:
– ESTABLISHED
The socket has an established connection.
– SYN_SENT
The socket is actively attempting to establish a connection.
– SYN_RECV
A connection request has been received from the network.
– FIN_WAIT1
The socket is closed and the connection is shutting down.
– FIN_WAIT2
Connection is closed and the socket is waiting for a shutdown from the
remote end.
– TIME_WAIT
The socket is waiting after close to handle packets still in the network.
– CLOSED
The socket is not being used.
– CLOSE_WAIT
The remote end has shut down and is waiting for the socket to close.
– LAST_ACK
The remote end has shut down and the socket is closed but still waiting for
acknowledgement.
– LISTEN
The socket is listening for incoming connections. Such sockets are not
included in the output unless you specify the --listening (-l) or --all (-a)
option.
158
Lotus Domino 6 for Linux
– CLOSING
Both sockets are shut down but we still don't have all our data sent.
– UNKNOWN
The state of the socket is unknown.
Figure 3-9 netstat output
Netstat options
The netstat command can be run with options. Some of the options and their
meanings are as follows:
-a
Show both listening and non-listening sockets; illustrated in
Figure 3-10 on page 160.
-p
Show the PID and name of the program to which each socket
belongs; illustrated in Figure 3-11 on page 160.
-s
Display summary statistics for each protocol; illustrated in
Figure 3-12 on page 161.
Chapter 3. Security and administration
159
Figure 3-10 netstat -a output
Figure 3-11 netstat -p output
160
Lotus Domino 6 for Linux
Figure 3-12 netstat statistic output
IPTraf utility
IPTraf is an IP network statistics utility. It is included in both the RedHat and
SuSE distributions. In this section, we present technical information about IPTraf.
Note: You must be logged in as root to run the IPTraf utility.
IPTraf is a console-based network statistics utility for Linux. It gathers a variety of
figures, such as TCP connection packet and byte counts, interface statistics and
Chapter 3. Security and administration
161
activity indicators, TCP/UDP traffic breakdowns, and LAN station packet and byte
count.
Features
Among the features provided by IPTraf are the following:
An IP traffic monitor that shows information on the IP traffic passing over your
network. Includes TCP flag information, packet and byte counts, ICMP
details, OSPF packet types.
General and detailed interface statistics showing IP, TCP, UDP, ICMP, non-IP
and other IP packet counts, IP checksum errors, interface activity, packet size
counts.
A TCP and UDP service monitor showing counts of incoming and outgoing
packets for common TCP and UDP application ports.
A LAN statistics module that discovers active hosts and displays statistics
showing the data activity on them.
TCP, UDP, and other protocol display filters, allowing you to view only traffic
you're interested in.
Logging.
Support for Ethernet, FDDI, ISDN, SLIP, PPP, and loopback interface types.
Utilizes the built-in raw socket interface of the Linux kernel, allowing it to be
used over a wide range of supported network cards.
Full-screen, menu-driven operation.
Protocols recognized
IP
TCP
UDP
ICMP
IGMP
IGP
IGRP
OSPF
ARP
RARP
Non-IP packets will simply be indicated as “Non-IP” and, on Ethernet LANs, will
be supplied with the appropriate Ethernet addresses.
Supported Interfaces
Local loopback
All Linux-supported Ethernet interfaces
162
Lotus Domino 6 for Linux
All Linux-supported FDDI interfaces
SLIP
Asynchronous PPP
Synchronous PPP over ISDN
ISDN with Raw IP encapsulation
ISDN with Cisco HDLC encapsulation
Parallel Line IP
The information generated by IPTraf can be valuable in making network
organization decisions, troubleshooting LANs, and tracking activity of various IP
hosts.
Once installed on the system, the IPTraf utility will look like Figure 3-13.
Figure 3-13 IPTraf utility
Chapter 3. Security and administration
163
3.2.6 Multiple network cards (Private LAN)
This section covers how to configure Domino to use multiple network cards and
how to create a private LAN. The reason for creating a private LAN could be for
cluster traffic, inter-server, or for administration. Each partition server requires a
separate network card.
Use the ifconfig command to check the configuration of the network cards (see
Figure 3-14).
Figure 3-14 ifconfig command
Make sure that the IP addresses for network cards are configured correctly for
name resolution. Use one of the following for name resolution: DNS or host files.
See Figure 3-15 on page 165 for an example of a Linux host file.
164
Lotus Domino 6 for Linux
Figure 3-15 /etc/hosts
The host file contains IP addresses, hostname (a host can only have one
hostname) and aliases (a host can have many aliases). In Figure 3-15 the host
linux.local has two IP address and two aliases.
Edit the server’s notes.ini file, as shown in Figure 3-16 on page 166.
Chapter 3. Security and administration
165
Figure 3-16 notes.ini setting for multiple network cards
The lines TCPIP=TCP, 0, 15, 0 and CLUSTER=TCP, 0, 15, 0 define the port
names TCPIP and Cluster to be TCP ports.
The PORTS= line defines which ports are enabled at startup.
The TCPIP_TcpAddress= and CLUSTER_TcpAddress= lines define which IP address
and IP port are bound to which Domino ports.
Server_Cluster_Default_Port tells the Domino cluster task which port to use for
cluster data.
Edit the HTTP tab on the Internet Protocols section of the server document to
include the hostname and bind to host name (see Figure 3-17).
Note: If you have installed a partition server you must use the hostname and
bind to host option.
166
Lotus Domino 6 for Linux
Figure 3-17 Bind to host
Configure the Notes Network port on the Ports tab of the server document (see
Figure 3-18).
Figure 3-18 Notes Network Ports
3.2.7 System logs
The Linux log system is both flexible and powerful, and in many situations, the
log information will be very useful.
Logs can be generated by the system or by applications. Linux keeps logs in
/var/log unless the administrator changes the path. The program (daemon)
responsible for generating the logs is syslogd; log entries are caused by events.
Almost every application can send information (events) to the syslogd. The
syslogd daemon can be set to start at system boot or not, but we recommend
you set syslogd to start when the system boots (this is the default), as shown in
Figure 3-19 on page 168.
Chapter 3. Security and administration
167
Figure 3-19 Red Hat system services
Figure 3-20 shows the syslogd configuration file /etc/syslog.conf.
168
Lotus Domino 6 for Linux
Figure 3-20 Syslog configuration file
By default, all system messages go in the /var/log/messages file unless
otherwise specified. In the syslog configuration file, there are specifications for
other log files for mail, news, and so forth.
The log files can be redirected to other paths by editing the syslog.conf or by
moving the file and creating a link to the new location.
There are situations when the system administrator wants to see the log
information in real time. To do so, log in as root and type at the shell command
prompt tail -f /var/log/messages. The tail command will watch the log file
and any information that is written to the log file is displayed in the console
window as show in Figure 3-21 on page 170.
Note: For more information about the tail command, type man tail.
Chapter 3. Security and administration
169
Figure 3-21 tail -f /var/log/messages
3.2.8 Remote administration
Linux servers can be administered remotely and there are many software
programs available for this. Several of the most commonly used are described
here.
Webmin
Webmin is a powerful tool for remotely administering a Linux server. It can be
downloaded for free from:
http://www.webmin.com
It can be downloaded either as a .rpm package or as a source file. Download the
.rpm file, log in as root, and use the Package Manager to install the Webmin
software. You can also use rpm from the shell command line.
Once installed, connect from a Web browser to the server:
http://<server IP address>:10000
You will be prompted for your username (root) and a password (root‘s password).
After login, the Web browser should like the example shown in Figure 3-23 on
page 172.
Through the Webmin software, the system administrator can configure the server
and its applications from virtual anywhere. The Webmin server configuration
page is easy to use but has numerous capabilities, as shown in Figure 3-23.
Attention: We recommend that you use the Webmin software only from an
internal network if you do not use SSL authentication.
170
Lotus Domino 6 for Linux
Figure 3-22 Webmin server configuration page
Chapter 3. Security and administration
171
Figure 3-23 Webmin interface
VNC
VNC is another program for remote administration of Linux servers. You can
download the VNC tool as well as obtain more information about it at:
http://www.uk.research.att.com/vnc/index.html
To install VNC on the Linux machine, download the Linux version, unpack the
files (tar xvfz vnc-XX.YY.tar.gz, where XX and YY are version and release
numbers) and copy the files to /usr/bin.
172
Lotus Domino 6 for Linux
Figure 3-24 Starting VNC Server on Linux
To start the server, run vncserver from a shell. This will prompt for a password to
be used when connecting from another machine. The machine name and the
windows number will be displayed (see Figure 3-24).
To connect to the VNC server, run the VNC viewer on you client and enter the
hostname:window (see Figure 3-25) and then click OK. Enter the password
when prompted.
Figure 3-25 VNC viewer
Chapter 3. Security and administration
173
3.3 Domino security
In general, the principles of Domino security are the same from platform to
platform. This section provides an overview of initial options available for
securing a Domino server.
3.3.1 Domino 6 server document
Once you have the server set up, open the Domino Directory (names.nsf) and
review the server document. This document controls myriad server functions,
including security.
The Security tab contains settings for the following:
Access server - The default is blank. At the very least, enter the organization
name used during setup, which in our case was */ITSO. This helps to ensure
that only those to whom you have issued an ID can access the server.
Tip: You can add other domains to the Access Server field after you have
added the appropriate cross-certification. Remember that a Domino server will
not be able to authenticate users or servers from a different organization
unless it has a cross-certificate.
Check passwords on Notes IDs - The advantage of enabling this feature is
that when users listed in the Domino Directory lose their Notes ID, they will be
able to change the password on the backup Notes ID and prevent the lost ID
from accessing the Domino server. The disadvantage is that, like many
security options, it slightly increases the overall administrative burden.
Create new databases - Enter individual names, or preferably, create an
administration group and enter the name of the group. If you leave this field
blank, anyone who can access the server can create new databases.
Create replica databases - Enter individual names, or preferably, create an
administration group and enter the name of the group. If you leave this field
blank, no one can create new replicas.
Important: If the Create new database field is empty, it means that anyone
can create new databases; but if the Create new replica field is blank, it means
that no one can create a new replica.
The Ports - Internet Ports tab contains settings for the following:
On the Web tab, you can redirect HTTP to SSL once you have the SSL
certificates in place. The same is true for the Directory tab and LDAP, as well
174
Lotus Domino 6 for Linux
as the other listed services. All of these services can be redirected to SSL
once you have the SSL certificates in place.
The Internet Protocols tab contains numerous options for Web access; consult
the appropriate Lotus documentation for details.
Tip: If you are using the Lotus Notes 6 client via CrossOver Office or a
Windows machine, you can click and hold the mouse to view pop-up help on
many items in the server document.
3.3.2 Database ACLs
You should review the ACLs of at least the following databases: names.nsf,
admin4.nsf, and certlog.nsf.
Set the Default entry to No Access. By doing so, you will force both Notes and
Web clients to authenticate. With Default set to No Access, you do not need to
add an Anonymous entry.
Attention: For databases where Default is not set to No Access, you should
make certain that there is an Anonymous entry set to No Access unless you
specifically wish to allow anonymous access, such as with a Web home page
or a Web registration database.
Assign an appropriate User Type to each entry. Make certain to differentiate
Person and Server, as well as single (Person or Server) and group entries
(Person Group or Server Group). A wildcard entry should be treated as a
group.
Consider using “Enforce a consistent ACL” for the Domino Directory
(names.nsf) and Administration Requests database (admin4.nsf). This will
help ensure that only the appropriate administrators make changes to these
databases. Enforce a consistent ACL across all replicas also applies to
databases which users replicate to their local machines. Therefore users
cannot access locally data that they could not access on the server.
You must be careful with this option because if you accidentally omit the rights
to access the database, it cannot be bypassed by accessing the database
locally.
See the Lotus Domino Administration 6 help database for more information
about using this option and about its limitations.
Further Domino system control over databases can be managed through the
Security tab of the Server document. From there one can assign additional
administrative privileges over databases. The added database access these
Chapter 3. Security and administration
175
settings can have should be taken into account when configuring database
security. Special attention should be given to the field “Full Access
administrator” if Full Access Administration is being used because it can
bypass all ACL settings, including Enforce consistent ACL.
In order to delegate administrative access to a database based on
pubnames.ntf, an administrator will want to look at implementing the
Extended ACL (also known as the xACL). This allows you to further restrict
access to a database down to the field level. See the Lotus Domino
Administration 6 help database for more information about xACL.
You should also consider the ACL of log.nsf since quite a bit of information can
be gathered from the logs. However, you should balance the need to secure the
log.nsf database with the need for Domino administrators and developers to view
it. One solution is to set the Default entry to No Access, add a group with
Manager access for administrators, and either add your organizational unit, for
example */ITSO, with Reader access or else add a second group for developers
and others. Whether the additional overhead of maintaining a second group for
developers and others is worth the hassle depends on the location of the server
(Internet, Intranet, or internal) and the level of logging. Any server not located
behind one or more firewalls blocking internet traffic should be held to much more
stringent ACL settings than internal servers.
There are a number of notes.ini variables that help with security as well as
administration. While setting these will generate useful information in the log.nsf
database, remember that all logging comes with a performance price. Only use
the level of logging required for the server.
log_replication - As with all notes.ini settings, you can add this directly to the
notes.ini by adding the line:
log_replication=1
or else by issuing the following command from the Domino console:
set config log_replication=1
A value of 1 will provide a summary of the replication once it finishes. A log
level of 2 is useful when you prefer to know the specific types of changes that
were replicated (data, ACL, view design, and so forth).
log_console - This is set to either 0 or 1. A value of 1 will record commands
entered at the console.
log_sessions - This is set to either 0 or 1. A value of 1 will record each user
session and so will generate a lot of log entries.
log_agentmanager - This is set to either 0 or 1. A value of 1 will record the
start of agents in the log, which is quite useful for troubleshooting.
176
Lotus Domino 6 for Linux
log_mailrouting - A value of 20 is normal, though 10 can be used to record
minimal information. A value of 30 or 40 should only be used temporarily
while troubleshooting a specific mail routing problem.
Important: The notes.ini file must have a blank line at the bottom.
Note: More details about Domino security are in Lotus Notes and Domino
R5.0 Security Infrastructure Revealed, SG24-5341.
3.4 Domino 6 administration
In this section, we highlight the use of the Domino 6 Web Administrator Client.
The Domino 6 Web Administrator closely parallels the Domino 6 Administrator
available for the Windows 32 client. This new feature provides Domino
administrators using a Web browser with much, if not all, of the functionality
available with the Windows Administrator client.
We then discuss the new Domino 6 Java Console, which is a separate
console-controller pair that allows an administrator to work with a server even
when the Domino Server is not responding.
3.4.1 Domino 6 Web Administrator
The Domino 6 Web Administrator is managed by the HTTP task. The first time
this task starts it will automatically create the webadmin.nsf database if it does
not already exist. Default access to this database is permitted to all Server
Administrators and Full Server Administrators as defined in the Domino 6 server
document under the Security tab. In Pre-release 1, any administrators added to
the server document are updated to the webadmin.nsf Access Control List by the
HTTP task.
Note: Refer to the Domino 6 Administration Help for detailed instructions on
administering the Domino server.
Domino 6 Web Administrator requirements
The requirements for using the Domino 6 Web Administrator are listed below.
Software requirements
In order to access the features of the Domino 6 Web Administrator, you need to
have the following:
Chapter 3. Security and administration
177
Web browser
– MS Internet Explorer 5.5 or 6.0 on Windows 98/NT4/W2K/XP
– Netscape 4.7x on Windows 98/NT4/W2K/XP or Linux (RedHat 7.2 or
SuSE 7.2)
Domino 6 Server
Domino tasks
The Domino 6 Server must be running the following tasks to support the Domino
6 Web Administrator:
– The Administration Process (AdminP) on the same server
– The Certificate Authority (CA) on the same server or another Domino 6
server in order to register users
– Web server (HTTP)
Note: The process of registering users also requires the migration of the
Notes certifier to the Certificate Authority process. This migration and other
aspects of Domino 6 user registration are covered in detail in “Domino user
registration” on page 248.
People & Groups tab
Figure 3-26 illustrates the administration functions available to the Domino 6
administrator from a browser, including the Tools drop-down for user registration
and group creation.
178
Lotus Domino 6 for Linux
Figure 3-26 Domino 6 Web Administrator: People view
In the People view of the People & Groups tab, you are able to see the registered
users of your Domino domain. You can register, move, and delete users using the
links in the Tools pane located on the right side of the window.
Chapter 3. Security and administration
179
Figure 3-27 Domino 6 Web Administrator: Register users
Figure 3-27 shows an example of the user registration window. In this window,
you enter the basic information about the user and then register the user in the
Domino Directory. To learn more about registering users, refer to “Domino user
registration” on page 248.
180
Lotus Domino 6 for Linux
Figure 3-28 Domino 6 Web Administrator: Group view
In the Groups view of the People & Groups tab, you can see all the groups in your
Domino Directory. Each group has a type; this type can be mail, access-control,
deny list, server only, or else multi-purpose group. You can administer groups
using the view buttons and the links in the Tools pane.
Chapter 3. Security and administration
181
Figure 3-29 Domino 6 Web Administrator: Policies view
The Domino 6 Web Administrator allows a Domino administrator to work with
Mail-In Databases, Policies (both explicit and organizational), Settings and
Certificates.
Domino Administrators can create policies then, using an established hierarchy,
automatically distribute those policies across a group, a department, or an entire
organization. The use of policies makes it easy for administrators to establish
and maintain standard settings and configurations; it also automates redundant
administrative tasks.
182
Lotus Domino 6 for Linux
Figure 3-30 Domino 6 Web Administrator: Settings view
Policy setting documents organize settings by administrative function. The
settings in these documents determine defaults, configuration, and rules that are
applied to users or groups using Policy documents. Although policy setting
documents define the default settings for users, there is no vehicle for assigning
policy settings, except by using a Policy document. Policy setting documents are
also where you control inheritance or enforcement of parent settings.
Chapter 3. Security and administration
183
Figure 3-31 Domino 6 Web Administrator: Certificates view
The Certificates view allows you to view and administer the certificates used to
authenticate users.
Files tab
The Domino 6 Web Administrator provides the Domino administrator using a
browser with file-level access to the operating system. The file-level view begins
in the Domino data directory and includes all sub-directories of the data directory.
184
Lotus Domino 6 for Linux
Figure 3-32 Domino 6 Web Administrator: Files view
On the Files tab, you can see and manage Domino databases and templates, as
well as folders and links. You can perform many database management
operations in this view, including compacting, signing and managing database
ACLs, and viewing available disk space. These functions are all available via the
Tools pane.
Server tab
On the Server tab, the Domino 6 Web Administrator provides the Domino
administrator with the ability to:
– Review several forms of server status
– Analyze server activities
– Review server statistics
Chapter 3. Security and administration
185
Figure 3-33 Domino 6 Web Administrator: Server status view
From the Server status view, you can see the status of different elements of your
Domino environment. These elements include:
Server users - shows who is using your Domino server.
Database users - indicates which databases are being accessed on your
Domino server, and by whom.
Quick Console - allows you to issue console commands to the server.
All server tasks - shows you a list of server tasks that are active.
HTTP statistics - shows various statistics about your Domino Web server; an
example statistics page is shown in Figure 3-33.
Schedules - lets you view schedules for programs, agents, mail routing, and
replication.
Operation system statistics.
There are number of task you can perform by using the links in the Tools pane.
These tasks include replicating databases and shutting down and restarting the
Domino server.
186
Lotus Domino 6 for Linux
Figure 3-34 Domino 6 Web Administrator: Server analysis view
The Server analysis view provides you with sundry representations of
information regarding databases, mail routing, replication, logs, and
administration requests. See Lotus Domino Administration 6 help for further
information about data analysis.
Chapter 3. Security and administration
187
Figure 3-35 Domino 6 Web Administrator: Server statistics view
The final sub-tab of the Server tab is the Statistics tab, which shows you
voluminous statistics about processes running on your system. These statistics
include information about agents, databases, http, mail, and the server in
general.
Messaging tab
The Domino 6 Web Administrator provides the Domino administrator with the
ability to manage every aspect of enterprise mail management from a Web
browser. These tasks include:
– Mail server tasks
– Mail routing activities and events
– Mail reports
188
Lotus Domino 6 for Linux
Figure 3-36 Domino 6 Web Administrator: Messaging mail view
Within the Messaging tab, you are able to manage the mailboxes on your server,
check mail routing, monitor the logfile, run reports on various messaging usage
criteria, and use the Tracking Center tab to track messages. In the window shown
in Figure 3-36, you can see the Mail server tasks and the status of our Domino
server.
Replication
The Domino 6 Web Administrator enables the Web browser-based Domino
administrator to control and manage the following replication activities:
Replication tasks
Replication schedules
Replication events
Replication statistics
Chapter 3. Security and administration
189
Figure 3-37 Domino 6 Web Administrator: Replication view
Configuration
The Domino 6 Web Administrator provides the ability to control and modify
several Domino server configuration options from a Web browser. The following
configurations are available:
– Server documents, configurations, and connections
– Directory functions
– Web configuration
– Server monitoring
– Cluster management
– Miscellaneous
190
Lotus Domino 6 for Linux
Figure 3-38 Domino 6 Web Administrator: Configuration view
One of the views available through the Configuration tab is the Current Server
Document, which is shown in Figure 3-38. It provides access to your Domino
server document, which contains many of the settings that define how your
server operates. These settings include:
Basic information, such as the server name and the host name of your server
Security settings
Internet protocols, such as settings for the HTTP task and Domino Web
Engine
Mail routing
Transaction logging
3.4.2 Domino Java Console
The Domino Java Console provides real-time interaction with the Domino Server
and is often the fastest way to see what is happening with a server. In Domino 6,
the Domino Console is available through a new, powerful Java application. We
covered the basics of enabling this tool in “Java Domino console” on page 126.
Chapter 3. Security and administration
191
The advantage of the new Java Domino Console feature is that, unlike the Win32
Administration client, you can connect to the server Domino is installed on, even
when the Domino server is not responding.
To launch the Domino console, do the following:
On a Linux system running X-Windows, issue jconsole from a shell
command prompt. If you have not added the Domino executable path to your
PATH environment variable, you will need to specify the full location, which is
/opt/lotus/bin by default.
On a Windows machine with the Administration client installed, launch
jconsole.exe. This executable is located in the Lotus Notes Client program
directory.
Once the Domino Console launches, you can connect to a new server by File Connect Controller (Ctrl-O). If you have previously connected to the server with
this console, you can click the multiple server icon and select it from the list. In
the prompt box, enter your Notes name (or shortname) as your username and
your Domino HTTP password in the password field. For a new server, type the
name in the server; otherwise, select the server from the drop-down list.
Figure 3-39 Domino Console: Connecting to a server
192
Lotus Domino 6 for Linux
Table 3-3 identifies some of the common commands you can use from the
console; these commands will also work from the Web admin quick console.
Table 3-3 Common Domino Console commands
Domino Console command
(abbreviation)
Description of the command results
show users (sh us)
Shows the users connected to the Domino
server
show tasks (sh ta)
Shows the tasks currently running
show cluster (sh cl)
Shows how the cluster is performing and
current connectivity to cluster members
show config servertasks
Shows the current value of the servertasks
notes.ini entry. You can use show config to
display any notes.ini entry.
set config servertasks=
Replaces the existing server tasks notes.ini
entry with the values you specify after the
equals sign. The values you specify replace
the existing ones (they are not appended).
load replica
Loads an instance of the replicator that
remains until you reboot the server. Any load
command without options loads another
permanent instance of the task while a load
command with options (see the next
example) runs, then quits.
replicate itsoredhat/ITSO names.nsf
(rep itsoredhat/ITSO names)
This causes the current server,
itsosuse/ITSO in our case, to replicate the
specified database, names.nsf, with the
specified server, itsoredhat/ITSO. You must
use the full hierarchical name of the server.
Once replication finishes, the replicator will
quit.
show stat server.users
Show stat displays the specified Domino
statistic. There are hundreds of statistics;
consult the event4.nsf database for a
description of each statistic.
restart server (res s)
This will restart the Domino server. If issued
from the Web admin quick console, you
won’t be able to view the restart. If issued
from a client connected via the new
controller, you can monitor the restart
process.
Chapter 3. Security and administration
193
Commands are entered into the Domino Command area at the bottom of the
Domino console. For frequently used commands, you can click the Command
button and select from a pre-defined list. Optionally, you can click the arrow to the
right of the Command button and create a customize command list.
Here are the steps to record a customized command:
1. Click the arrow to the right of the Command button and select Customize.
2. In the Make a Custom Command dialog box, enter the desired command.
3. Click Add to add the command to your list.
4. Repeat Steps 2 and 3 until you have entered the commands for your list.
5. If you make a mistake or later desire to remove a command, highlight the
command in the Make a Custom Command display and click Remove to
remove it from your list.
6. Click Save to save and exit the dialog box.
You can now use your custom commands by clicking the arrow to the right of the
Command button and picking the desired command from the list.
In addition to Domino commands, you can also send Shell commands as long as
you have the appropriate access. Refer to Help -> Help Topics available with the
Domino Console, or the Lotus Domino Administrator 6 help, for more information.
194
Lotus Domino 6 for Linux
4
Chapter 4.
Performance, scalability,
and troubleshooting
This chapter discusses the performance and scalability of the Linux operating
system and Domino 6. We describe how to measure CPU and memory with
standard monitoring tools for Linux, such as top, vmstat, and ksysguard, as well
as monitoring disk arrays. Next, we discuss altering the maximum number of
threads available in Linux in order to provide high-end scalability. Finally, we
present options for increasing the performance of your Domino 6 server.
© Copyright IBM Corp. 2002. All rights reserved.
195
4.1 Linux performance and scalability
Linux is a powerful operating system that can be molded to fit your needs. In this
section we discuss hard disk drive arrays, CPU and memory monitoring, then
give detailed instructions for significantly increasing the scalability of Linux
supporting Domino.
4.1.1 Linux performance
There are a number of ways to tweak your server to gain more scalability and
more flexibility.
IDE versus SCSI
The IDE bus is designed for normal PCs because it is simple to use, easy to
implement in the PC, and inexpensive. SCSI bus is designed for professional use
because it is faster than IDE, and you can attach more devices on the bus, such
as hard disks, CD-ROMs, and so forth.
Note: We recommend you use SCSI hard disks for your servers.
Buses
Generally, your server will have two buses. You should split your heavily utilized
cards, such as a primary network card and a RAID controller, so that they are
installed in slots on different buses. In a typical IBM server, for example, you will
see the buses designated as:
Bus A, Bus B, and Bus C
PCI and PCI/ISA
Bus 0 and Bus 1
If you have a server with a 66 MHz (64 bit) bus and a 33 MHz (32 bit) bus, you
will have better performance splitting your cards, even though one bus is slower.
With significant I/O, the cards will benefit from working separately. If you put
them all on the 66 MHz (64 bit) bus, they will compete and so necessarily
diminish the overall throughput of that bus.
Distributing I/O
If you are running a program that is disk I/O intensive, such as a Domino server,
we recommend that you use separate, physical disks for the OS, Domino data
directory, and the Domino 6 transaction logs. If possible, use separate buses for
disks as well. Example 4-1 shows a possible configuration for distributing I/O
using three separate disks (sda, sdb, and sdc). The numbers on the end of the
196
Lotus Domino 6 for Linux
disks (sda1, sda2) represent the partitions of that disk. For example, sda2 is the
second partition of the first SCSI disk.
Example 4-1 Distributing I/O
/ -> /dev/sda1
swap -> /dev/sda2
/translogs -> /dev/sdb1
/local/notesdata -> /dev/sdc1
RAID configurations
The main advantage of RAID is the redundancy. If one disk fails (for any reason),
you will not lose your data. Another advantage is that you can stripe your data
over multiple disks and gain speed for your applications. Striping will also
balance the data across the disks. There are multiple RAID configurations:
RAID 0 stripes your data over multiple disks; you gain speed, but you do not
have redundancy.
RAID 1 is called mirror because it writes the same data on two disks or more
(with Enhanced RAID1 or RAID0+1). You have redundancy and the best
reading speed because the system reads the data from the less busy disk.
RAID 5 stripes the disks and writes the parity at the same time. This is the
most used RAID configuration because it is a suitable compromise between
speed and redundancy, with only a small cost in performance.
There are two types of RAID: software and hardware.
Software RAID
Software RAID is done at the OS level. It is a layer between the physical disks
and applications. Since software RAID uses the main processor and the main
memory for calculation of the parity, these resources are not available to
Domino.
Note: For more information about how to build a software RAID in Linux, read
the “Software RAID” HOW-TO document. You can find this HOW-TO
document, as well as numerous others, on The Linux Documentation Project
Web site at:
http://tldp.org/docs.html
Hardware RAID
Hardware RAID is provided by a SCSI or IDE controller. The disks are connected
directly to the RAID controller. This is transparent even to the OS. The OS “sees”
only one drive. Before you install the OS, you need to create the RAID array. The
Chapter 4. Performance, scalability, and troubleshooting
197
hardware RAID controller has its own processor and RAM for parity calculation,
thus providing much better performance.
Hardware RAID versus software RAID
Table 4-1 identifies some differences between hardware and software RAID.
Table 4-1 Hardware versus Software RAID
Description
RAID SW
RAID HW
Use system CPU and memory?
yes
no
Transparent to the OS?
no
yes
Transparent to an application?
yes
yes
Can use IDE and SCSI hard disks within the same area?
yes
no
Is it OS independent?
no
yes*
Can use disk on different buses?
yes
no
Can use fraction of the disks?
yes
yes
* Only if you have the drivers for the OS
See more discussion about RAID and recommendations for your Domino for
Linux server in “Transaction logging” on page 229.
Logical Volume Manager
The Logical Volume Manager (LVM) is a new feature in Linux. It is a layer
between the physical hard disk, or RAID controller, and the application. By using
the LVM you gain:
Flexibility - you can modify the partition on the fly without unmounting the
partition
Speed - by striping the logical volume
Redundancy - by mirroring the logical volume
The structure of LVM is shown in Figure 4-1.
198
Lotus Domino 6 for Linux
Figure 4-1 LVM structure
Note: For more information about LVM and how to install it on Linux, read the
LVM HOW-TO. You can find this HOW-TO document, as well as numerous
others, on The Linux Documentation Project Web site at:
http://tldp.org/docs.html
CPU utilization
You can monitor the CPU utilization with the top tool from the command line; if
you prefer a graphical tool use KDE System Guard described on page 202. It is
very useful if you have more than one processor. The results of the top command
are shown in Figure 4-2 on page 200.
Chapter 4. Performance, scalability, and troubleshooting
199
Figure 4-2 Top view
We recommend that you monitor the CPU utilization regularly. If the average
value is between 60 and 80 percent, you have reached the warning zone. If
average usage exceeds 80 percent, we recommend that you add a new
processor or upgrade the old one.
Memory usage
Memory is arguably the most important hardware in a system. We recommend
you use ECC (Error Checking and Correcting) memory or newer technology
when possible.
Linux uses memory efficiently. If you see the swap constantly in use, this
indicates a lack of physical memory and your server performance will suffer.
Linux has a tool, called vmstat, to monitor memory and CPU usage; you can
also use KDE System Guard. With the help of this tool, you can monitor the
server performance over a long period of time. Figure 4-3 on page 201 shows the
information vmstat produces. Note that the CPU usage statistics are averaged
across all CPUs in the server.
200
Lotus Domino 6 for Linux
Figure 4-3 vmstat output
The columns in the vmstat output have the following meanings:
r
The number of processes waiting for run time.
b
The number of processes in uninterruptable sleep.
w
The number of processes swapped out but otherwise runable. This
field is calculated, but Linux never desperation swaps.
swpd
The amount of virtual memory used (kB).
free
The amount of idle memory (kB).
buff
The amount of memory used as buffers (kB).
si
Amount of memory swapped in from disk (kB/sec).
so
Amount of memory swapped to disk (kB/sec).
bi
Blocks sent to a block device (blocks/sec).
bo
Blocks received from a block device (blocks/sec).
in
The number of interrupts per second, including the clock.
cs
The number of context switches per second.
us
User time.
sy
System time.
Chapter 4. Performance, scalability, and troubleshooting
201
id
Idle time.
Example 4-2 is a sample script that runs the vmstat command to gather usage
information and save it in a file. In this way, administrators can utilize the statistics
about memory usage and CPU usage to gauge if the server is heavily utilized. To
use this script, create and save the script, then set it to run periodically using
crontab. (Find more details about how to do this in 3.2.4, “Crontab” on page 156,
and “Scripts” on page 154.)
Example 4-2 vmstat.sh
#!/bin/bash
FILE_NAME=/var/log/vmstat.log
NR_OF_SEC=2 # Time between reading
WAIT_TIME=10 # The number is in sec.
echo "##################################################" >> $FILE_NAME
echo "##################################################" >> $FILE_NAME
echo "" >> $FILE_NAME
date >> $FILE_NAME
echo "--------------------------------------------------" >> $FILE_NAME
vmstat $NR_OF_SEC >> $FILE_NAME &
echo "" >> $FILE_NAME
sleep $WAIT_TIME
for i in `ps ax|grep vmstat | awk '{print $1}'`
do
kill -9 $i > /dev/null
done
KDE System Guard
KDE System Guard is equivalent to Windows Task Manager and Windows
Performance Monitor in one tool. The Windows Task Manager Performance and
Networking tabs are similar to the System Guard System Load and Process
Tables. (see Figure 4-5 on page 204 and Figure 4-6 on page 205). The Windows
Performance Monitor is similar to System Sensors (see Figure 4-11 on
page 208).
To start KDE System Guard, click Start -> System -> Info -> KDE System
Guard on SuSE, or Start -> System -> KDE System Guard on Red Hat; see
Figure 4-4 on page 203.
202
Lotus Domino 6 for Linux
Figure 4-4 Starting KDE System Guard
System load
The System Load tab of the KDE System Guard tool provides a lot of different
statistics and information about the utilization of system resources, such as CPU,
memory, and swap. Figure 4-5 on page 204 shows you some of the statistics
available in the system load tab.
Chapter 4. Performance, scalability, and troubleshooting
203
Figure 4-5 System load
Process table
Click the Process Table tab to see a list of running processes, as shown in
Figure 4-6.
204
Lotus Domino 6 for Linux
Figure 4-6 Process table
The process table shows you the tasks on your Linux server and various details
about the services, such as the status, memory usage, who started the process,
and so forth.
The Tree check box at the bottom of the screen shows what processes have
been started as child processes, and which therefore may fail if you kill a parent
process. (This function is not available in Windows Task Manager.) The
“Processes” drop-down list, also at the bottom of the screen, lets you choose to
see all process, the processes that belong to the system, processes that belong
to users, or just your own processes (see Figure 4-7).
Figure 4-7 Processes
Chapter 4. Performance, scalability, and troubleshooting
205
The Kill button allows you to kill selected processes; this is equivalent to End
Process in Windows Task Manager.
Performance monitoring
To create a new worksheet, select File -> New. The dialog box shown in
Figure 4-8 is displayed.
Figure 4-8 New worksheet
The number of row times the number of columns yields the number of monitors
you can set up; the update interval is how often the information is collected.
Now drag and drop one of the sensors from the Sensor Browser to the
worksheet, as shown in Figure 4-9.
Figure 4-9 Drag and drop sensor
206
Lotus Domino 6 for Linux
Select the display type of the sensor (see Figure 4-9). Examples of the different
display types are show in Figure 4-11 on page 208.
A Multimeter or a Bar Graph just shows the current information, while a Signal
Plotter is a scrolling graph.
A SensorLogger logs the information to a file that can be accessed later (see
Figure 4-10).
Figure 4-10 Sensor Logger
The sensor Logger requires a file name to store the information in and an interval
timer (how often to collect the information). Optionally, you can add an upper and
lower alarm limit (the logger line turns a different color). By default the logger is
not running; to start the logger right-click the X and select Start Logger (see
Figure 4-11).
Chapter 4. Performance, scalability, and troubleshooting
207
Figure 4-11 Sensor types
4.1.2 Linux scalability
This section outlines changes you can make to your Linux OS to customize it for
maximum Domino 6 server performance. First, we cover the easily tunable
kernel limits, then we discuss a slightly more complex undertaking–recompiling
glibc in order to alter the hard-coded thread limit. We have detailed the steps for
both Red Hat 7.2 and SuSE 8.0.
Attention: Modifications to the Linux kernel, or compiling any Linux libraries
such as glibc, are not supported by Lotus software.
Note: With Domino R5 the supported Linux kernel versions are 2.2 and 2.4. At
present, Domino 6 only supports the 2.4 kernel.
Refer to the Release Notes of your Domino version for details about the
required kernel and patch levels.
208
Lotus Domino 6 for Linux
Enhancing Domino server performance
This section describes some changes you can make to enhance the
performance of Domino 6 on Linux.
First, the sysctl.conf file is used with the 2.4 kernel to set tunable parameters.
This file can be edited with any text editor; in this example we describe the
procedure using the versatile KATE. You will need to be logged in to KDE as root
in order to save the file into /etc.
1. Start the text editor program in Red Hat 7.2 by clicking Start Application ->
Editors -> Kate; in SuSE 8.0 click Start Application -> Office -> Editors ->
Kate.
We need to see if there is an existing /etc/sysctl.conf file.
a. Click File -> Open.
Figure 4-12 Select root directory
Chapter 4. Performance, scalability, and troubleshooting
209
b. Click Root Directory from the drop-down box shown in Figure 4-12.
c. Click etc.
d. If you see the sysctl.conf file listed, click it, then click OK to open it.
Otherwise, use the new file that KATE opens by default.
2. Determine the current file-max, found in /proc/sys/fs/file-max; it is typically set
to a value of 49152 or higher. You can open the file with KATE or from a shell
prompt with more /proc/sys/fs/file-max. We used this value to set an upper
file limit in Steps 3 and 5, and then allowed Domino to use up to the maximum
value.
Note: Sometimes the warning message “File has changed on disk” appears.
Just click to cancel it.
3. Here are the lines that need to be included in the sysctl.conf:
fs.file-max=49152
kernel.shmmni=8192
For the fs.file-max line, use the value from Step 2 or 49152, whichever is
greater.
For Red Hat 7.2, you need to add an additional line:
kernel.sem=250 18432 32 1024
As with the file-max parameter, you can view the existing value with more
/proc/sys/fs/kernel.sem. If any of the existing values are greater than the
ones specified here, use the higher value.
4. Verify that if the file /proc/sys/kernel/threads-max exists, it is set to a value of
8192 or higher. You can open the file using KATE or from a shell prompt with
more /proc/sys/kernel/threads-max. If the number is not greater than 8192,
your system will be limited by the given value. This number is determined
dynamically by the OS and is typically 8192 or higher. You can override it by
setting a new value (kernel.threads-max=8192 in the sysctl.conf file), but
doing so could have an adverse affect on your system’s stability.
5. Next, edit /etc/security/limits.conf and add the following four lines for the notes
account used to run Domino, which in our case is itsodom6.
itsodom6
itsodom6
itsodom6
itsodom6
soft
hard
soft
hard
nofile
nofile
nproc
nproc
49152
49152
8192
8192
Again, you should use the value from Step 2 or 49152, whichever is greater,
for the hard nofile limit.
210
Lotus Domino 6 for Linux
Repeat these four lines for each Domino partition you have. For example, if
you have 2 partitions – the first partition run by npar1 and the second by
npar2 – then your limits.conf file would look like this:
npar1
npar1
npar1
npar1
npar2
npar2
npar2
npar2
soft
hard
soft
hard
soft
hard
soft
hard
nofile
nofile
nproc
nproc
nofile
nofile
nproc
nproc
49152
49152
8192
8192
49152
49152
8192
8192
These limits are applied only to the Linux account used to run Domino and do
not apply to any other account on the system. The two flags increase the
maximum number of open files (nofile) and the maximum number of
processes/threads (nproc) allowed for the user(s).
6. Check that /etc/pam.d/login has the following line:
session required /lib/security/pam_limits.so
7. Edit the file /etc/fstab and add the noatime parameter to the options of the file
system(s) on which your Domino data directories reside; in this example we
use the /local file system. This disables tracking of the access time, which is a
value that Domino never uses, and will increase performance.
/dev/sdc1
/local
ext3
defaults,noatime
1
2
In this example, we added a comma and the noatime parameter after the
existing defaults parameter.
Once these settings have been made, reboot your system to put them to work for
you.
Red Hat 7.2 - glibc-2.2.4-13
With the existing Domino architecture on Linux, in order to truly scale Linux to
thousands of concurrent users, we need to alter and recompile the linuxthreads
portion of glibc on this version of Red Hat. Following are the steps to alter the
pthread limit for Red Hat 7.2 or 7.3; you will need to be root in order to carry out
these steps. Unlike Domino R5 for Linux, Domino 6 takes advantage of the
variable stack size provided by glibc, and so you do not need to alter the stack
size of glibc. Though there are quite a few steps, we have detailed them carefully
so that even those relatively new to Linux should be able to make this alteration.
Chapter 4. Performance, scalability, and troubleshooting
211
Note: Once you recompile glibc, you will be using a separate version stored
locally and any glibc patches subsequently applied to the operating system
will not be in effect for the version loaded with Domino. In order to get those
patches to be included in the version load for Domino, you need to alter the
PTHREAD setting and recompile. In general, this only needs to be done either
when you upgrade the operating system from one major version to the next,
such as RedHat 7.2 to 7.3, install a patch from RedHat with a newer version of
glibc, or when Domino fails to start with the customized library but starts fine
without it.
Install the glibc-2.2.4 source files
1. Check for the version of glibc on your Linux system by issuing the command:
rpm -qa | grep glibc
This queries all packages and sends the output to the grep program, which
searches for the value specified, in this case glibc. You should see output
similar to that shown at the top of Figure 4-13.
Figure 4-13 RPM query output for Red Hat 7.2
2. While glibc is installed with Linux, the source code is not installed by default.
Therefore, we need to install the source files so that we can adjust the
definitions. You can install the source files from the third Red Hat 7.2 CD, or
you can download the appropriate glibc source code from the Internet. The
source code you download should match the installed version, which is
2.2.4-13 for the standard Red Hat 7.2 distribution.
Attention: If you do not use the version of source from the same origination
as your original glibc, then you may miss any patches which the vendor has
made, and therefore you may run the risk of destabilizing your system.
212
Lotus Domino 6 for Linux
3. To install the files, you need to cd to the appropriate location and type:
rpm -ivh glibc-2.2.4-13.src.rpm
If you are upgrading a different version of glibc, make certain to replace
2.2.4-13 with the correct version number.
4. Change directories with cd /usr/src/redhat/SOURCES/ and you should now
see the file glibc-2.2.4-13.tar.bz2 located in this directory. Since the file ends
with .bz2, it has been compressed with bzip2 and can be decompressed with
bunzip2 glibc-2.2.4.tar.bz2
Figure 4-14 Decompress and unpack files
5. After decompressing the file, you need to unpack it. You can do this with the
tar command tar -xvf glibc-2.2.4.tar shown in Figure 4-14.
Change one glibc-2.2.4 header file
1. The tar command creates a new directory, glibc-2.2.4 in the SOURCES
directory. We need to edit one file in this directory, and since we are running
X-Windows and using KDE on Red Hat 7.2, we are going to use the Kate
editor.
a. Click Start Application -> Editors -> Kate.
b. Click File -> Open.
c. Starting with the / directory (and not the root home directory, which is
/root) click usr, src, redhat, SOURCES, glibc-2.2.4, linuxthreads,
sysdeps, unix, sysv, linux, and bits. There are only a few files in this
directory.
d. Click local_lim.h and click OK to open the file, as shown in Figure 4-15.
Chapter 4. Performance, scalability, and troubleshooting
213
Figure 4-15 Kate Open file dialog box for local_lim.h
2. With the file open, you need to locate the appropriate
PTHREAD_THREADS_MAX line shown in Figure 4-16. The steps are:
a.
b.
c.
d.
214
Click Edit -> Find.
Enter PTHREAD_THREADS_MAX for the text to find.
Check the Case Sensitive option.
Click OK.
Lotus Domino 6 for Linux
/* The number of threads per process.
#define _POSIX_THREAD_THREADS_MAX.
64
/* This is the value this implementation supports.
/* #define PTHREAD_THREADS_MAX
1024
#define PTHREAD_THREADS_MAX.
8192
*/
*/
*/
/* Maximum amount by which a process can decrease its asynchronous I/O priority level.*/
#define AIO_PRIO_DELTA_MAX.
20
/* Minumum size for a thread. We are free to choose a reasonable value. */
#define PTHREAD_STACK_MIN.
16384
/* Maximum number of POSIX timers available.
#define TIMER_MAX.
256
*/
Figure 4-16 Change to local_lim.h for Red Hat 7.2
3. Comment out the line:
#define PTHREAD_THREADS_MAX 1024
by adding the C-style programming multi-line comment characters so it looks
like this:
/* #define PTHREAD_THREADS_MAX 1024
*/
4. Below the line you just commented out, enter:
#define PTHREAD_THREADS_MAX 8192
This will increase the per-process Posix thread limit from 1024 to 8192.
5. Save and close the file.
Build glibc-2.2.4 with the changes
1. Now that you have edited the file, you need to replace the existing tar file with
the new version that includes your adjustments.
a. Return to the SOURCES directory with cd /usr/src/redhat/SOURCES.
b. Enter rm -f glibc-2.2.4.tar to delete the file. The -f switch merely
suppresses the text prompt to confirm deletion; you can use the command
without -f if you prefer to be prompted.
c. Enter tar -cvf glibc-2.2.4.tar glibc-2.2.4 to pack the files.
d. Enter bzip2 -z glibc-2.2.4.tar to compress the tar file.
2. Change to the SPECS directory with cd ../SPECS or by specifying the full
path of /usr/src/redhat/SPECS. To build the new linuxthread files you need,
enter the following command:
rpm -ba glibc.spec
Chapter 4. Performance, scalability, and troubleshooting
215
Tip: This took approximately one hour on the test servers in our lab. You can
preface the command with time to measure how long it takes.
Figure 4-17 Building glibc-2.2.4
3. The two new share object files (Linux equivalent to Windows dll files) will be
located in the /usr/src/redhat/BUILD/glibc-2.2.4 directory in the following
sub-directories:
build-i386-linux/linuxthreads/libpthread.so
build-i386-linux/rt/librt.so
Figure 4-18 Location of two required files
216
Lotus Domino 6 for Linux
Tip: The find command locates files anywhere in the directory tree. In the
example shown in Figure 4-18, the . tells the program to start with the current
directory and descend into all subdirectories. The -name switch tells find to
look for a filename matching the specified name. If you did not know the file’s
location or full name, you could issue the command find / -name lib* to
have find search every directory for files beginning with lib. This, along with its
other abilities, makes find a powerful administration tool.
Load the new thread library
1. Change to your Domino data directory. The default is cd /local/notesdata.
2. Issue the command mkdir lib to create a directory for the new files and
cd lib to change to the newly created directory.
3. Copy the new libpthread.so and librt.so from the BUILD directory.
cp /usr/src/redhat/BUILD/glibc-2.2.4/build-i386-linux/linuxthreads
libpthread.so ./libpthread.so.Domino
cp /usr/src/redhat/BUILD/glibc-2.2.4/build-i386-linux/rt librt.so
./librt.so.Domino
Important: After building glibc-2.2.4, you now have two versions of
libpthread.so and librt.so. Make certain you copy the files from the
/usr/src/redhat/BUILD directory and not from the standard directory.
4. Create symbolic links in order to correctly load the files.
ln -s libpthread.so.Domino libpthread.so.0
ln -s librt.so.Domino librt.so.1
5. Return to the Domino data directory with cd .. or by using the full path.
6. Grant the notes user and group ownership. Our Linux user account for
Domino is itsodom6 and our group is notes, so we issue:
chown -R itsodom6:notes lib
in order to change the ownership of the lib directory and the files within it.
7. If you are not using the startup script described in “Starting Domino from a
script” on page 130, then you will need to create a Domino 6 Server startup
script to be launched by the Linux user account for Domino. Before the
Domino 6 Server is started, we need to preload the new libraries and then
load the Domino server. Make certain that your script includes the following
lines emphasized in this sample script.
LD_PRELOAD_SAV=$LD_PRELOAD
LD_PRELOAD=$HOME/lib/libpthread.so.0:$HOME/lib/librt.so.1:$LD_PRELOAD
export LD_PRELOAD
Chapter 4. Performance, scalability, and troubleshooting
217
nohup /opt/lotus/bin/server -jc -c > /dev/null 2>&1 &
sleep 3
LD_PRELOAD=$LD_PRELOAD_SAV
export LD_PRELOAD
This script takes the current system variable LD_PRELOAD and saves it in a
new variable LD_PRELOAD_SAV. It then sets the system variable
LD_PRELOAD to $HOME/lib/libpthread.so.0:$HOME/lib/librt.so.1: plus the
value of the original LD_PRELOAD; the export command makes the
LD_PRELOAD available to the whole system. The nohup command starts the
Lotus Domino server and sends all the output to null (null is used to stop
messages from being displayed to the screen); the sleep command tells the
system to wait for 3 seconds before handing back control to the system. The
last two commands set the LD_PRELOAD back to its original setting.
8. Change to the Domino user account and execute the startup script. You can
then verify that the new files are in use by checking the libraries used by the
server process.
a. Issue ps -A | grep server | more to find the process ID of one of the
server processes. The process ID is the number in the first column.
3333 ?
00:00:01 server
b. Type more /proc/3333/maps but replace 3333 with the process ID of the
server process running on your machine. The output of the maps file
should contain a reference to the new .Domino libraries.
40018000-40027000 r-xp 00000000 08:21 1357219
/local/notesdata/lib/libpthread.so.Domino
40027000-4004b000 rw-p 0000e000 08:21 1357219
/local/notesdata/lib/libpthread.so.Domino
4004b000-40051000 r-xp 00000000 08:21 1357220
/local/notesdata/lib/librt.so.Domino
40051000-40052000 rw-p 00005000 08:21 1357220
/local/notesdata/lib/librt.so.Domino
SuSE 8.0 - glibc-2.2.5-38
With the existing Domino architecture on Linux, in order to truly scale SuSE Linux
to thousands of concurrent users, we need to alter and recompile the
linuxthreads portion of glibc on this version of SuSE. This section describes the
steps to alter the pthread limit for SuSE 8.0 Professional; you will need to be root
in order to carry out these steps. Unlike Domino R5 for Linux, Domino 6 takes
advantage of the variable stack size provided by glibc, so you do not need to
alter the stack size of glibc. Though there are quite a few steps, we have detailed
them carefully so that even those relatively new to Linux should be able to make
this alteration.
218
Lotus Domino 6 for Linux
Note: We recommend using SuSE Linux Groupware Server 7 with Lotus
Domino or newer, instead of the SuSE Linux 8.0 Personal or SuSE Linux 8.0
Professional version. The SuSE Enterprise Server already has the glibc
changes detailed here.
Install the glibc-2.2.5 source files
1. Check for the version of glibc on your Linux system by issuing the command:
rpm -qa | grep glibc
This queries all packages and sends the output to the grep program, which
searches for the value specified, in this case glibc. You should see output
similar to that shown at the top of Figure 4-19.
Figure 4-19 RPM Query Output, for SuSE 8.0
2. While glibc is installed with Linux, the source code is not installed by default.
Therefore, we need to install the source files so that we can adjust the
definitions. You can install the source files from the sixth SuSE 8.0 CD or else
download the appropriate glibc source code from the Internet. The source
code you download should match the installed version, which is 2.2.5-38 for
the standard SuSE 8.0 distribution.
Chapter 4. Performance, scalability, and troubleshooting
219
Attention: If you do not use the version of source from the same origination
as your original glibc, then you may miss any patches which the vendor has
made, and therefore you run the risk of destabilizing your system.
3. To install the files, follow these steps:
a. Click the CD-ROM icon on the KDE desktop. This mounts the CD-ROM
and displays the contents with the KDE file explorer, Konqueror.
b. Click suse, then click zq2 to display the rpm source packages as shown in
Figure 4-20.
Note: If you have installed from the DVD, all the source files are in zq1.
Figure 4-20 SuSE 8.0 list of source packages
c. Scroll until you see glibc-2.2.5-38.src.rpm, click it to launch KPackage.
d. Click the Install button to install the source package as shown in
Figure 4-21.
220
Lotus Domino 6 for Linux
Figure 4-21 KPackage program for RPM package installation
If you are upgrading a different version of glibc, then make certain to replace
2.2.5-38 with the correct version number.
4. Start a shell and change directories with:
cd /usr/src/packages/SOURCES/
You should now see the file glibc-linuxthreads-2.2.5.tar.bz2 located in this
directory. Since the file ends with .bz2, it has been compressed with bzip2
and can be decompressed with:
bunzip2 glibc-linuxthreads-2.2.5.tar.bz2
Tip: Linuxthreads is an add-on to glibc in the SuSE distribution and has been
stored separately in this RPM. Therefore, we can modify just the linuxthread
file and leave the main glibc file alone.
5. After decompressing the file, you need to unpack it. You can do this with the
tar command:
tar -xvf glibc-linuxthreads-2.2.5.tar
Change one glibc-2.2.5 header file
1. The tar command creates a new directory, linuxthreads, in the SOURCES
directory. We need to edit one file in this directory, and since we are running
X-Windows and using KDE on SuSE 8.0, we are going to use the Kate editor.
Chapter 4. Performance, scalability, and troubleshooting
221
a. Click Start Application -> Office -> Editors -> Kate.
b. Click File -> Open.
c. Starting with the / directory (and not the root home directory, which is
/root) click usr, src, packages, SOURCES, linuxthreads, sysdeps,
unix, sysv, linux, and bits. There are only a few files in this directory.
d. Click local_lim.h and click OK to open the file, as shown in Figure 4-22.
Figure 4-22 Kate Open file dialog box for local_lim.h
2. With the file open, locate the appropriate PTHREAD_THREADS line shown in
Figure 4-16 on page 215. The steps are
a.
b.
c.
d.
Click Edit - Find.
Enter PTHREAD_THREADS for the text to find.
Check the Case Sensitive option.
Click OK.
Figure 4-23 Change to local_lim.h for SuSE 8.0
3. Comment out the line:
#define PTHREAD_THREADS_MAX 1024
222
Lotus Domino 6 for Linux
by adding the C-style programming, multi-line comment characters so it looks
like this:
/* #define PTHREAD_THREADS_MAX 1024 */
4. Below the line you just commented out, enter:
#define PTHREAD_THREADS_MAX 8192
This will increase the per process Posix thread limit from 1024 to 8192.
5. Save and close the file.
Build glibc-2.2.5 with the changes
1. Now that you have edited the file, you need to replace the existing tar file with
the new version that includes your adjustments.
a. Return to the SOURCES directory with cd /usr/src/packages/SOURCES.
b. Enter rm -f glibc-linuxthreads-2.2.5.tar to delete the file. The -f
switch merely suppresses the text prompt to confirm deletion - you can
use the command without -f if you prefer to be prompted.
c. Enter tar -cvf glibc-linuxthreads-2.2.5.tar linuxthreads
linuxthreads_db to pack the files located in the two specified directories.
Note: This command should be typed on one line, as shown in Figure 4-24
Figure 4-24 tar command for glibc-linuxthreads
Chapter 4. Performance, scalability, and troubleshooting
223
d. Enter bzip2 -z glibc-linuxthreads-2.2.5.tar to compress the tar file.
2. Change to the SPECS directory with cd ../SPECS or by specifying the full
path of /usr/src/packages/SPECS. To build the new linuxthread files you
need, enter the following command:
rpm -ba glibc.spec
Tip: This took approximately one hour on the test servers in our lab. You can
preface the command with time to measure how long it takes.
Figure 4-25 Building glibc-2.2.5
3. The two new share object files (the Linux equivalent to Windows dll files) will
be located in the /usr/src/packages/BUILD/glibc-2.2.5 directory in the
following sub-directories:
cc/linuxthreads/libpthread.so
cc/rt/librt.so
Load the new thread library
1. Change to your Domino data directory. The default is cd /local/notesdata.
2. Issue the command mkdir lib to create a directory for the new files and
cd lib to change to the newly created directory.
224
Lotus Domino 6 for Linux
3. Copy the new libpthread.so and librt.so from the BUILD directory.
cp /usr/src/packages/BUILD/glibc-2.2.5/cc/linuxthreads/libpthread.so
./libpthread.so.Domino
cp /usr/src/packages/BUILD/glibc-2.2.5/cc/rt/librt.so ./librt.so.Domino
Important: After building glibc-2.2.5, you now have two versions of
libpthread.so and librt.so. Make certain you copy the files from the
/usr/src/packages/BUILD directory and not from the standard directory.
4. Create symbolic links i to correctly load the files:
ln -s libpthread.so.Domino libpthread.so.0
ln -s librt.so.Domino librt.so.1
5. Return to the Domino data directory with cd .. or by using the full path.
6. Grant the notes user and group ownership. Our Linux user account for
Domino is itsodom6 and our group is notes, so we issue:
chown -R itsodom6:notes lib
to change the ownership of the lib directory and the files within it.
7. If you are not using the startup script described in “Starting Domino from a
script” on page 130, then you will need to create a Domino 6 Server startup
script to be launched by the Linux user account for Domino. Before the
Domino 6 Server is started, we need to preload the new libraries and then
start the Domino server. Make certain that your script includes the following
lines emphasized in this sample script.
LD_PRELOAD_SAV=$LD_PRELOAD
LD_PRELOAD=$HOME/lib/libpthread.so.0:$HOME/lib/librt.so.1:$LD_PRELOAD
export LD_PRELOAD
nohup /opt/lotus/bin/server -jc -c > /dev/null 2>&1 &
sleep 3
LD_PRELOAD=$LD_PRELOAD_SAV
export LD_PRELOAD
This script take the current system variable LD_PRELOAD and saves it in a
new variable LD_PRELOAD_SAV. It then sets the system variable
LD_PRELOAD and to $HOME/lib/libpthread.so.0:$HOME/lib/librt.so.1: plus
the value of the original LD_PRELOAD; the export command makes the
LD_PRELOAD available to the whole system. The nohup command starts the
Lotus Domino server and sends all the output to null (null is used to stop
messages displaying to the screen); the sleep command tells the system to
wait for 3 seconds before handing back control to the system. The last two
commands set the LD_PRELOAD back to its original setting.
Chapter 4. Performance, scalability, and troubleshooting
225
8. Change to the Domino user account and execute the startup script. You can
then verify that the new files are in use by checking the libraries used by the
server process.
a. Issue ps -A | grep server | more to find the process ID of one of the
server processes. The process ID is the number in the first column.
3333 ?
00:00:01 server
b. Type more /proc/3333/maps but replace 3333 with the process ID of the
server process running on your machine. The output of the maps file
should contain a reference to the new .Domino libraries.
40018000-40027000 r-xp 00000000 08:21 1357219
/local/notesdata/lib/libpthread.so.Domino
40027000-4004b000 rw-p 0000e000 08:21 1357219
/local/notesdata/lib/libpthread.so.Domino
4004b000-40051000 r-xp 00000000 08:21 1357220
/local/notesdata/lib/librt.so.Domino
40051000-40052000 rw-p 00005000 08:21 1357220
/local/notesdata/lib/librt.so.Domino
4.2 Domino performance and scalability
This section describes some of the general features and functions related to
Domino server performance, scalability, and reliability.
4.2.1 Domino performance
Domino Enterprise Server offers clustering, which provides superior performance
by increasing the availability of your databases and answering client requests in
the best fashion determined by dynamic analysis of the cluster members’ current
performance. Transaction logging is available with every installation of Domino; it
improves long-term reliability by keeping data from being deleted during
consistency checks caused by the failure of a server. In addition, multiple
mailboxes are a simple change that will help with mail delivery performance.
Clustering
As the Beowulf Project amply demonstrates (http://www.beowulf.org), Linux is
well-suited to clustering, and this is true of Linux Domino 6 clustering as well. The
benefits of Domino clusters are primarily due to two factors:
Availability
Workload balancing
In essence, Domino clusters appear to Notes clients as a single server. When a
server fails, the other server or servers in the cluster handle client requests
226
Lotus Domino 6 for Linux
seamlessly. When a server in the cluster is overburdened, workload balancing
shunts the request to another cluster member, thereby providing better service.
There are secondary benefits as well, though these indirect benefits were not
specifically designed as part of clustering. Should one database become corrupt,
it is possible to delete that replica and create a new one from a replica located on
another cluster member. This would be a risky proposition with a replica on a
standard replication schedule since it could be out-of-date and so result in data
loss. Domino clusters, on the other hand, are kept up-to-date through
event-driven replication provided by the Cluster Replicator task. Differences are
measured in seconds, instead of hours or days.
Note: Domino 6 provided clustering for Web clients via ICM (Internet Cluster
Manager) For more information see Applying the Patterns for e-business to
Domino and WebSphere Scenarios, SG24-6255. For business-critical
applications you should investigate the use of specialized load balancing
equipment like IBM WebSphere Edge Server or Cisco LocalDirector.
Once you have the Enterprise edition of Domino installed, you can add servers to
a cluster by clicking the Add to Cluster button in the Domino Directory. Some
points to keep in mind when you set up a Domino cluster:
Use all servers in the cluster instead of designating a standby server. This will
provide better service to your customers and will utilize your resources more
effectively. Keep in mind, however, that you should not allow the average
usage (number of client requests, databases, and so forth) to exceed the
capabilities of the cluster minus one server.
You should use two cluster replicators to prevent backlogs. In your notes.ini,
add the line cluster_replicators=2. When an agent begins updating a large
number of documents in a database, this will require the cluster replicator to
work almost exclusively on that database. A second replicator will allow quick
updates in other databases to be replicated immediately. Do not enable more
than two cluster replicators until statistical analysis indicates that you would
benefit from additional replicators. You can measure the load on your cluster
replicators by issuing show stat combined with one of these four statistics at
the Domino console:
– Replica.Cluster.SecondsOnQueue.Avg shows the average amount of time
a database spent replicating.
– Replica.Cluster.SecondsOnQueue.Max shows the maximum amount of
time a database spent replicating.
– Replica.Cluster.WorkQueueDepth.Avg shows the average number of
databases waiting to be replicated.
Chapter 4. Performance, scalability, and troubleshooting
227
– Replica.Cluster.WorkQueueDepth.Max shows the maximum number of
databases waiting to be replicated.
The SecondsOnQueue.Avg will tell you how long it is taking to replicate data.
A private LAN will likely reduce this number. The SecondsOnQueue.Max will
tell you the longest amount of time a single database tied up the cluster
replicator. If this number is high, it indicates that you have at least one
database that demands intense cluster replication.
The WorkQueueDepth.Avg is probably the best indicator of whether multiple
replicators will be of any benefit. If this number is 0, databases are not
normally vying for the cluster replicator’s attention. The statistic
WorkQueueDepth.Max indicates the worst backlog the server has
experienced. If both this and the SecondsOnQueue.Max are high, then you
have at least one database tying up a replicator and causing a backlog.
However, if the SecondsOnQueue.Avg is low, then it indicates a temporary
burst that is probably not a major problem.
You need to consider all four statistics in context before determining if
additional cluster replicators will be of use. In any event, make certain your
server can handle the additional load before you enable 3 or more cluster
replicators.
Set up a private LAN for intra-cluster communication. With two servers, you
can use a simple cross-over cable to connect the servers. With three or more,
you need to set up a small network. The extra effort is well worth it because
you remove the network load for clustering from the main LAN used by
clients, and at the same time ensure that client traffic will not interfere with the
high-speed cluster replication necessary for transparent failover.
Important: Cluster replication is the single most important aspect of a Domino
cluster. You should monitor cluster replication closely to ensure the health of
your Domino 6 cluster.
With clusters of three or more servers, take the time to consider a strategy for
deploying replicas. The simplest approach is to deploy replicas on every
server. But if you have a three server cluster, can a single server handle the
full load if two servers fail? It is unlikely if you are utilizing your resources and
so having a replica of every database does not provide added reliability. On
the other hand, if two servers in a three server cluster are busy, then having a
replica on the third server will allow workload balancing. This suggests that
you should normally distribute databases on two out of three servers, with
only critical applications replicated to all three servers. The same logic can be
extended to four or more servers.
Distribute databases according to measured, or expected, utilization. For
instance, if you have a 3 server cluster and decide all databases with a
228
Lotus Domino 6 for Linux
filename beginning with a-p will be placed on the Artemis server, i-z on Odin,
and the rest on the last server, you will have devised an orderly administrative
scheme. If the company’s major databases all end up on the Artemis server,
however, you will cause needless workload balancing, and should that server
fail, the bulk of your users will be switched to a single server instead of being
distributed across the remaining two. Conversely, if you are constantly
analyzing every database, you will waste precious administrative time placing
and shifting databases among cluster members. Since critical databases
should probably go on every server in the cluster, focus on identifying the
major databases and use an easily administered scheme for the rest.
Transaction logging
The main benefit of transaction logging is reliability. Any administrator who has
waited a long time for a system that crashed to restart will immediately
appreciate transaction logging. Just as journaling improves the integrity of the
Linux ext3 file system, Domino transaction logging improves the integrity of
Domino databases.
Transaction logging comes in three flavors: archive, circular, and linear. Archive is
intended for coupling your transaction logs with a Domino-aware backup system,
while circular and linear are for non-Domino-aware backup system use. (See
“Domino 6 transaction logs and backups” on page 429.)
If you are not going to use your transaction logs in conjunction with a
Domino-aware backup system, all you need is a pair of 4 Gb hard disk drives
configured for RAID1. You need to dedicate these drives to the Domino
Transaction Log to avoid a performance degradation.
Note: The maximum size for circular transaction logging is 4Gb. It can be set
to less. The linear option has been added to Domino 6 in case you would like
to utilize more than 4 GB for your transaction logs. Otherwise, it is comparable
to the circular option.
Ideally, everything, from the OS to Swap to Domino, would have its own hard
disk drives utilizing multiple RAID controllers, but this is an unlikely scenario for
all but very high-end servers. When possible, use hardware-based RAID1 for the
OS and Swap, another RAID1 for the transaction logs, and RAID5 for the
Domino data directory.
Given the advantages of transaction logs in achieving data integrity and the
substantially faster restarts of your server, we recommend enabling transaction
logging even if you only have a single, hardware-based RAID1 for OS, Swap,
and the transaction logs, and a RAID5 for the data directory. This is admittedly
not an ideal scenario since the Swap and transaction logs will be competing for
Chapter 4. Performance, scalability, and troubleshooting
229
I/O resources. Unlike NT, however, Linux does not rely as heavily on Swap. As
long as your server has enough memory, this should be a suitable configuration.
Be certain to test this scenario, however, in order to make certain that you are
content with the resulting performance.
How about using a RAID5 configuration for the entire server? While RAID5 is an
appealing option for getting the most out of your hard disk drives, it is not suitable
for the entire server, especially with transaction logging enabled. Remember that
when writing to disk, RAID5 will need to read data from the disk in order to
recalculate the parity, except when performing a full-stripe-write in which the
data is already in the cache. The additional I/O overhead from
partial-stripe-write and read-modify-write operations results in RAID5 exhibiting
slower write performance than RAID1. Read performance is typically slower as
well since RAID1 offers two drives from which data may be read. Though RAID5
offers more drives for simultaneous reads, the requests would have to be ideally
broken up so that no two requests ever needed information on the same drive.
This is because in RAID5 the data is not mirrored – redundancy is provided by
the parity stripe – and so there is only one location from which data can be read.
RAID5, preferably through hardware not software, should be utilized only for the
Domino data directory. If you have to use RAID5 for the entire server, you should
not enable transaction logging.
Note: Transaction logging is set up via the Task tab on the server document;
see the Lotus Administrator Guide for more information.
Multiple mailboxes
Since server processes require exclusive access to mail.box, it is possible for
several servers to contend for the mail.box, especially while the router task is
working on a large message. Therefore, you should set the number of mailboxes
equal to two in the default configuration document for your domain.
1. Open the Domino Directory.
2. Go to Server -> Configuration.
3. Open the appropriate Configuration document: * - [All Servers]
4. Go to the Router/SMTP -> Basics tab.
5. Edit the document and set the number of mailboxes to 2.
You can set the number higher than two, but you should do so only after you
determine that there is still contention with two mail.boxes. Refer to the Lotus
Domino Administrator 6 Help for more information.
230
Lotus Domino 6 for Linux
Note: If you have older, 3rd-party software that is unable to work with two
mail.boxes, create a configuration document for the server on which the
software is running until you can upgrade it.
4.2.2 Domino scalability
Domino 6 has been designed, like its predecessors, to run on a variety of
platforms and to take full advantage of any platform’s capabilities. The Domino 6
Linux code has been specifically written to run well on Linux.
So what can you do to increase Domino 6 scalability?
Simple. Domino 6 is capable of providing a large number of services, everything
from mail routing to applications to Web sites. In order to allow your server to
scale, identify all unnecessary tasks and remove them.
The first place to start is the servertasks= line in the notes.ini. You can access
the file directly at the OS level or by the NOTES.INI file option on the
Configuration tab under Server in the webadmin.nsf database.
The basic tasks are Replica, Router, Update, Stats, AMgr, and Adminp. Other
tasks, such as HTTP, should only be enabled if you intend to utilize them. For
example, if your server does not need to provide Calendaring and Scheduling,
you can remove Calconn and Sched from the servertasks= line.
Network encryption and compression
Network encryption is another area to consider. Domino offers port encryption to
ensure that all data is securely transferred over the network, and it is enabled
simply by checking the encrypt option for the port. However, encryption
necessarily causes overhead and so results in slower performance. Typically,
the security of port encryption results in a performance trade-off of roughly 5 to
10 percent, as long as overall CPU utilization is not excessively high.
Network compression compresses the data before it is transmitted across the
network. Network compression results in an average of 50 percent less volume
of data being transmitted across the network, but it does put extra load on the
client and server to uncompress/compress the data. The best time to use
compression is when data is being transmitted across a Wide Area Network
(WAN).
Important: Encryption and compression can be used together: first the data is
compressed and then it is encrypted. Using both options together puts even
more load on the CPUs at both ends of the connection.
Chapter 4. Performance, scalability, and troubleshooting
231
NSF Buffer Pool size
Domino normally manages the NSF Buffer Pool and sets the value to
approximately 1/4 to 1/3 of the available physical memory. On servers with more
than 2 GB of memory, this can squeeze the mmap region where the memory is
allocated. Therefore, a Domino 6 server running on Linux should not have an
NSF_Buffer_Pool_Size_MB notes.ini setting of greater than 256. This setting
does have a noticeable effect on opening large views, however, so you should
not set it too low. Add the line NSF_Buffer_Pool_Size_MB= to your notes.ini with
a value of 256 MB or 1/4 of your physical memory, whichever is lower.
4.3 Troubleshooting
This section covers basic network troubleshooting and the Notes Diagnostic tool,
NSD.
4.3.1 Basic network troubleshooting
Linux network troubleshooting is very similar to Windows troubleshooting. The
main differences are the name of the trace route tool – in Linux it is tracertroute
and the Windows version is tracert – and the syntax of the route command.
The first things to check if you are unable to access the server are:
Can you ping the server/client by name?
Can you ping the server/client by IP address?
Can you ping the default gateway from both a client and the server?
If you can ping the server/client by IP address but not by name there is a problem
with your name resolution. Linux does not support WINS so you have to use
DNS or host files.
If you can’t ping the server/client, can they ping any other network devices like
the default gateway. If they are unable to ping anything ask the network
administrator to check the network devices.
If some clients can ping the server but others can’t, check the netmask of the
clients/server with the ifconfig command on Linux or with ipconfig or winipcfg
on Windows machines. To make sure that all the machines have the correct
default gateway use route -v on Linux or route print on Windows machines
(see Figure 4-26).
Note: If there is a firewall between your server and client, the ping and
traceroute commands may be blocked, which makes troubleshooting harder.
232
Lotus Domino 6 for Linux
Figure 4-26 Default gateway commands
4.3.2 Domino NSD tool
Notes System Diagnostic (NSD) is a diagnostic script, developed by Iris, that
gathers diagnostic information which can be used to troubleshoot problems and
verify that the server is correctly configured.
Running NSD
You must be in the Domino data directory to run NSD. You can run the NSD tools
as either the notes account or as root. For most problems you should run NSD as
the notes account.
Chapter 4. Performance, scalability, and troubleshooting
233
Options for NSD
There are a number of options that can be used with the NSD tool depending on
the level of detail required. Following is a summary of the options.
The NSD tool is constantly evolving and changing, and new options may be
added in the future. The -help option will show a complete list for the version of
NSD you have installed.
-batch
Run in batch mode - don’t write to tty
-info
Just report system info
-noinfo
Don’t report system info
-nolog
Don’t log output to log file
--nodbx
Don’t collect process debug info
-ver*sion
Just show version header
-ps
Show process tree
-kill
Kill all/user Notes processes and cleanup IPCs
-memcheck
Run the Notes memory checker only
-nomemcheck
Don’t run the Notes memory checker by default
-dumpmem
Generate shared memory dump
-lsof
Run lsof only - list Notes open files
-nolsof
Don’t run lsof by default
-user <user_id>
Operate only on Notes process run by ’user_id’
-exec_path <dir[:dir]*Add additional directories to the search path
-filter <log_file>
Filter stack output of log_file
-help
Show this help list
-help -<option>
Where option is any one of the above
-help gen*eral
General information about the script and how it works
-help lim*itations
General information on script limitations
-help update
List script version update information
The most notable options are:
-kill
-info
-nomemcheck
234
Lotus Domino 6 for Linux
Issuing nsd -kill will kill all Notes processes and clean up IPC resources
related to those processes.
Any time the server is not able to be shut down with a graceful quit from the
console or a server -q from the command line, nsd -kill should be run to
ensure that the environment is clean for a server restart.
The command nsd -info will skip attaching to the processes with a debugger
and obtaining a trace. This is useful when you are only gathering system
information and do not need any process-level information for diagnosis.
Lotus Support will often ask for the results from running nsd -info so they can do
an initial assessment of the server environment.
Issuing nsd -nomemcheck will skip running memcheck against the application.
Memcheck is a utility, developed by Iris, that obtains information on the current
state of the Domino memory pools. Memcheck information may not be needed,
and by using the -nomemcheck option you can reduce the total running time of the
NSD script.
The output of the NSD tool can be sent to Lotus Support to help diagnose
problems.
NSD explained
The NSD tool is constantly evolving. Additional data may be gathered and
placement of the NSD sections may be altered, but the information is roughly the
same across different versions of NSD.
NSD output is in plain text and can be viewed with any text file viewer.
The first section (shown in Example Figure 4-3) contains a header with some
basic information about the configuration of the machine
Example 4-3 NSD Output
INFO: Generating
INFO: Generating
Invalid PID 0
Script Version
Notes Version
Notes Base
Data Dir
Notes Exec Dir
Search Path
Debugger
Debugger Version
MEMCHECK Version
Script Dir
Host Info
binary list file ./nsd.nadmb2/nsd_V60_09082002_cache.ins.lst
cache file ./nsd.nadmb2/nsd_V60_09082002_cache.ins
:
:
:
:
:
:
:
/opt/lotus/notes/latest/linux/nsd.sh V60_09082002
Build V60_09082002 September 08, 2002
Release 6
/home/nadmb2/notesdata
/opt/lotus/notes/latest/linux
/opt/lotus/notes/latest/linux /opt/lotus/notesapi
/opt/lotus/notes/latest/linux/pstack
:
: MEMCHECK Version (4.20) for Lotus Notes Build V60_09082002 (September 08, 2002)
: /opt/lotus/notes/latest/linux
: Linux branch 2.4.18-64GB-SMP #1 SMP Wed Mar 27 13:58:12 UTC 2002 i686 unknown
Chapter 4. Performance, scalability, and troubleshooting
235
User
Date
Input arguments
: nadmb2 (nadmb2)
: Thu Sep 12 15:18:57 EDT 2002
:
The next section of the NSD output is the current processes running on the
system (ps output). This list is not only the processes owned by the notes user,
but contains all processes.
Example 4-4 Current processes
Current Procs:
==============
F S UID
004 S root
002 S root
002 S root
022 S root
002 S root
002 S root
002 S root
002 S nadmbran
002 S nadmbran
002 S nadmbran
002 S nadmbran
002 S nadmbran
002 S nadmbran
002 S nadmbran
002 S nadmbran
002 S nadmbran
002 S nadmbran
002 S nadmbran
002 S nadmbran
002 S nadmbran
002 S nadmbran
002 S nadmbran
002 S nadmbran
002 S nadmbran
PID
1
2
3
4
5
6
7
2061
2062
2063
2064
2065
2066
2067
2068
2082
2083
2084
2085
2086
2100
2109
2114
2141
PPID
0
1
0
0
0
0
0
1994
1994
1994
1994
1994
1994
1994
1971
2070
2070
2070
2070
2070
2070
1964
1961
2005
C
0
0
0
0
0
0
0
0
0
0
0
0
0
0
0
0
0
0
0
0
0
0
0
0
PRI NI ADDR SZ WCHAN
80
0 112 do_sel
80
0 0 contex
80 19 0 ksofti
61
0 0 kswapd
62
0 0 bdflus
79
0 0 kupdat
62
0 0 kinode
80
0 - 59821 semop
80
0 - 59821 semop
80
0 - 59821 semop
80
0 - 59821 semop
80
0 - 59821 semop
80
0 - 59821 semop
80
0 - 59821 do_sel
80
0 - 27677 semop
80
0 - 50567 do_pol
80
0 - 50567 rt_sig
80
0 - 50567 nanosl
80
0 - 50567 rt_sig
80
0 - 50567 unix_s
80
0 - 50567 rt_sig
80
0 - 27276 semop
80
0 - 27384 semop
80
0 - 11460 rt_sig
STIME
05:24
05:24
05:24
05:24
05:24
05:24
05:24
11:27
11:27
11:27
11:27
11:27
11:27
11:27
11:27
11:27
11:27
11:27
11:27
11:27
11:28
11:28
11:29
11:41
TTY
?
?
?
?
?
?
?
pts/3
pts/3
pts/3
pts/3
pts/3
pts/3
pts/3
pts/3
pts/4
pts/4
pts/4
pts/4
pts/4
pts/4
pts/3
pts/3
pts/4
TIME
00:00:07
00:00:00
00:00:00
00:00:00
00:00:00
00:00:08
00:00:00
00:00:00
00:00:00
00:00:00
00:00:00
00:00:00
00:00:00
00:00:00
00:00:00
00:00:00
00:00:00
00:00:00
00:00:00
00:00:00
00:00:00
00:00:00
00:00:00
00:00:00
CMD
init [5]
[keventd]
[ksoftirqd_CPU0]
[kswapd]
[bdflush]
[kupdated]
[kinoded]
/opt/lotus/notes/latest/linux/http
/opt/lotus/notes/latest/linux/http
/opt/lotus/notes/latest/linux/http
/opt/lotus/notes/latest/linux/http
/opt/lotus/notes/latest/linux/http
/opt/lotus/notes/latest/linux/http
/opt/lotus/notes/latest/linux/http
/opt/lotus/notes/latest/linux/adminp
java_vm
java_vm
java_vm
java_vm
java_vm
java_vm
/opt/lotus/notes/latest/linux/replica
/opt/lotus/notes/latest/linux/update
/opt/mozilla/mozilla-bin
This is followed by the process tree. The process tree gives a listing of the Notes
server processes and their parent/child relationship to each other.
In this example, the shell (bash) is listed as the parent for all processes, and the
server is the parent of all Notes processes.
This can be useful, especially when there are orphaned Notes processes, as
they will be represented with a return line between the other processes.
In the UNIX environment each process that is started has a parent process. In
the case of a running Domino server, the parent of all the processes is the shell
from which the server was started.
236
Lotus Domino 6 for Linux
The first instance of the server process would be its child, and the server process
would call other processes, such as event or update. These processes would be
called the child processes of the server.
When one process exits, the child process for that process becomes “orphaned,”
which means that the parent process has exited and the operating system
reverts the parent to init, which is the first process started in a UNIX operating
system. Init is responsible for loading all other processes and always has the
process ID of 1.
This information can sometimes lead us to which process has crashed when a
crash does occur and sufficient crash information is not captured (such as when
the core file is truncated).
Example 4-5 is the process tree for a normally running server.
Example 4-5 NSD process tree
PROCESS TREE
Status is:
R
D
T/status
S/signal
?
------
username status
root
R
nadmb2
nadmb2
nadmb2
nadmb2
nadmb2
nadmb2
nadmb2
nadmb2
nadmb2
nadmb2
nadmb2
nadmb2
nadmb2
nadmb2
R
R
R
R
R
R
R
R
R
R
R
R
R
R
process
process
process
process
Unknown
1
is running
is dead
terminated with exit status
killed with signal
status
pid program
0 init
... 1200
1097 su - nadmb2
.... 1201
1200 -bash
..... 2117
2046 /opt/lotus/notes/latest/linux/server
...... 2286
2127 /opt/lotus/notes/latest/linux/http
...... 2240
2127 /opt/lotus/notes/latest/linux/http
...... 2150
2127 /opt/lotus/notes/latest/linux/sched
...... 2149
2127 /opt/lotus/notes/latest/linux/calconn
...... 2142
2127 /opt/lotus/notes/latest/linux/adminp
...... 2141
2127 /opt/lotus/notes/latest/linux/amgr
....... 2173
2141 /opt/lotus/notes/latest/linux/amgr -e
...... 2140
2127 /opt/lotus/notes/latest/linux/router
...... 2135
2127 /opt/lotus/notes/latest/linux/replica
...... 2134
2127 /opt/lotus/notes/latest/linux/update
...... 2121
2117 /opt/lotus/notes/latest/linux/event
The R in the second column shows the process is active, running.
Example 4-6 on page 238 is another process tree, this time for a server where
the server process has exited without a trace.
Chapter 4. Performance, scalability, and troubleshooting
237
Notice that none of these processes are shown as a parent/child to each other
with one exception. Amgr is shown as being a parent for another amgr process.
This is because the server loads amgr and the initial amgr process, then loads
subsequent amgr tasks. Each of the other processes was loaded as a child of the
server process.
Example 4-6 NSD child process
nadmb2
R
......
2286
2127 /opt/lotus/notes/latest/linux/http
nadmb2
R
......
2240
2127 /opt/lotus/notes/latest/linux/http
nadmb2
R
......
2150
2127 /opt/lotus/notes/latest/linux/sched
nadmb2
R
......
2149
2127 /opt/lotus/notes/latest/linux/calconn
nadmb2
R
......
2142
2127 /opt/lotus/notes/latest/linux/adminp
The next section contains the stack traces obtained from the debugger. These
will probably not make much sense to anyone other than support and
development specialists.
The one thing you can check for is that one of the threads contains the word
“fatal” or “panic.”
If the problem is a server crash and there is not a thread listed with either of
those keywords, then it is likely that there was a problem during data collection
and the crash information was not collected in time.
Note: There are exceptions to that rule, so always forward all available data to
support, even if it appears to be of limited value.
For example, the following stack (Example 4-7) shows a fatal error on HTTP.
Example 4-7 HTTP fatal error
###################################
## thread 19/100 :: http pid=12634, k-id= 23495 , pthr-id=537117116
## stack
:: k-state=running, stk max-size=331772, cur-size=116812
###################################
fatal_error(??) at 0xd10e7ac8
pthread_kill(??, ??) at 0xd0e7ad14
signal.raise(??) at 0xd0e7a94c
abort.abort() at 0xd0d79ca0
terminate.terminate__Fv() at 0xd0e8f2e0
invokedtr.__Invoke__Destructor(0x2000ea8c, 0x209501fc) at 0x1000cb58
238
Lotus Domino 6 for Linux
Note: You should always see a fatal_error() call on the stack trace of the failing
thread. This is the function that prints out the “Freezing all server threads...”
message.
The next section contains Inter Process Communication Facilities Status (IPCS)
information. IPCS details the shared memory, message queues and semaphore
information for the machine.
Shared memory has one control segment and several data segments. The data
segments will be of uniform size, while the control segment is usually smaller
than the data segments.
There is no need to manually remove these files on a successful shutdown of the
server. If the server crashes, an nsd -kill will clean these files up.
You can also manually check for the existence of these files by issuing the
command at the OS:
ipcs
Note: Each partitioned server will have its own set of shared memory. The
owner of these files will be the user starting the different partitioned servers.
Example 4-8 shows a sample view of shared memory.
Example 4-8 Viewing shared memory
T
m
m
m
m
m
m
m
IPC STATS
shmid key owner perms bytes nattch status
27459594 0xf8c03000 nadmb2 660 4629980 12
27492363 0xf8c03001 nadmb2 660 8388608 12
27820071 0xf8c0300b nadmb2 660 8388608 12
27852840 0xf8c0300c nadmb2 660 8388608 12
27885609 0xf8c0300d nadmb2 660 8388608 12
27918378 0xf8c0300e nadmb2 660 8388608 12
27951147 0xf8c0300f nadmb2 660 8388608 12
Thu Sep 12 15:19:15 EDT 2002
The next two sections, shown in Example 4-9, are the Notes.ini followed by the
Notes user’s environment. If you have run the NSD as root then it will instead
reflect the root user’s environment.
Example 4-9 Notes.ini and info about Notes user’s environment
notes.ini
[Notes]
Directory=/home/nadmbran/notesdata
Wed Jul 10 11:42:38 EDT 2002
Chapter 4. Performance, scalability, and troubleshooting
239
KitType=2
SetupDB=setupweb.nsf
UserName=
CompanyName=
NotesProgram=/opt/lotusr6/lotus/notes/60000/linux
DSTLAW=4,1,1,10,-1,1
SHARED_MAIL=0
Passthru_LogLevel=0
Console_LogLevel=2
DefaultMailTemplate=mail6.ntf
Preferences=32
ServerTasks=Update,Replica,Router,AdminP,CalConn,Sched,HTTP,LDAP
ServerTasksAt1=Catalog,Design
ServerTasksAt2=UpdAll,Object Collect mailobj.nsf
ServerTasksAt3=Object Info -Full
ServerTasksAt5=Statlog
TCPIP=TCP, 0, 15, 0
Serial1=XPC,1,15,0,,4096,19200,32,3c56k.mdm
Serial2=XPC,2,15,0,
Timezone=5
**shortened for example
-------------------------------------------------------------------------User (nadmbran) Environment Wed Jul 10 11:42:38 EDT 2002
PWD=/home/nadmbran/notesdata
WINDOWID=35651735
PAGER=less
uid_list=500
LD_PRELOAD=:/opt/gnome/lib/libgdkxft.so
HOSTNAME=branch
NSD_INP_ARGS=
LESSCLOSE=lessclose.sh %s %s
LS_OPTIONS=-N --color=none -T 0
QTDIR=/usr/lib/qt3
OPENWINHOME=/usr/openwin
_SUSECONFIG_PROFILE=true
LESSKEY=/etc/lesskey.bin
LESSOPEN=lessopen.sh %s
JAVA_BINDIR=/usr/lib/java/bin
MANPATH=/usr/local/man:/usr/share/man:/usr/X11R6/man:/opt/gnome/man:/usr/op
**shortened for example
Tip: Do not send the Notes.ini to Lotus Customer Support; it is included in the
NSD output!
Next is the list of the Domino binaries directory. This list can help in determining if
setuid root is in place for any processes, ownership of the binaries, and any
add-ins that might be used on this server.
240
Lotus Domino 6 for Linux
Example 4-10 List of Domino binaries directory
-r-xr-xr-x
-r-xr-xr-x
-r-xr-xr-x
-r-xr-xr-x
-r-sr-xr-x
-r-xr-xr-x
-r-xr-xr-x
Executable & Library Files
1 root daemon 7499589 Jul
1 root daemon
138608 Jul
1 root daemon
28575 Jul
1 root daemon
39492 Jul
1 root daemon
8944 Jul
1 root daemon
80514 Jul
1 root daemon
31574 Jul
9
9
9
9
9
9
9
06:48
06:46
06:46
06:46
06:47
06:47
06:48
Wed Jul 10 11:42:38 EDT 2002
/opt/lotus/notes/latest/linux/adminp
/opt/lotus/notes/latest/linux/amgr
/opt/lotus/notes/latest/linux/autodial
/opt/lotus/notes/latest/linux/billing
/opt/lotus/notes/latest/linux/bindsock
/opt/lotus/notes/latest/linux/ca
/opt/lotus/notes/latest/linux/calconn
System information contains the hard and soft limits for the Notes user and the
machine.
Hard limits are absolute limits set server-wide, which users cannot override,
while soft limits pertain only to the users in whose environment the soft limits are
set.
For instance, if the hard core limit is set to 2 MB and the soft limit is set to 10 MB
for the Domino user, the Domino user will not be able to generate a core beyond
2 MB in size.
Limits can be set in the file /etc/security/limits.conf.
Example 4-11 Hard and soft resource limits
Resource Limits:
================
Soft/Current Limits:
====================
core file size (blocks)
data seg size (kbytes)
file size (blocks)
max locked memory (kbytes)
max memory size (kbytes)
open files
pipe size (512 bytes)
stack size (kbytes)
cpu time (seconds)
max user processes
virtual memory (kbytes)
0
unlimited
unlimited
unlimited
unlimited
1024
8
unlimited
unlimited
4092
unlimited
Hard Limits:
============
core file size (blocks)
data seg size (kbytes)
file size (blocks)
max locked memory (kbytes)
max memory size (kbytes)
unlimited
unlimited
unlimited
unlimited
unlimited
Chapter 4. Performance, scalability, and troubleshooting
241
open files
pipe size (512 bytes)
stack size (kbytes)
cpu time (seconds)
max user processes
virtual memory (kbytes)
1024
8
unlimited
unlimited
4092
unlimited
Next is the version of the operating system and flavor of Linux (Example 4-12),
followed by swap information (Example 4-13).
Example 4-12 Linux version
Linux Version:
==============
Linux version 2.4.18-64GB-SMP (root@SMP_X86.suse.de) (gcc version 2.95.3
20010315 (SuSE)) #1 SMP Wed Mar 27 13:58:12 UTC 2002
Example 4-13 Swap info
Swap Info:
==========
Filename
/dev/hda1
Type
partition
Size
1028120
Used
0
Priority
42
System Configuration shows physical memory on the machine, number and
types of processors, uptime, load average, and some kernel configuration
information.
Local Disks shows disk volumes mounted and space remaining, followed by
current patches applied to the server. It is similar to a df -k command.
Example 4-14 Local disk information
Local Disks:
============
Filesystem
/dev/hda3
/dev/hda4
shmfs
1024-blocks
5162828
16160292
256136
Used Available Capacity Mounted on
4594096
306472
94% /
3356360 11983012
22% /home
0
256136
0% /dev/shm
VMstats shows a ten-second snapshot of the CPU statistics. This often shows
plenty of idle time, since an NSD is most commonly gathered for a crash
condition where the server is completely down.
This can be useful for performance and hangs, where the NSD is taken during
the performance problem.
242
Lotus Domino 6 for Linux
Example 4-15 CPU Statistics
VM Stats:
=========
Virtual Memory (last 10 secs):
==============================
procs
r b w
swpd
free
buff
7 0 0
0 99960 45188
3 0 0
0 99952 45188
3 0 0
0 99960 45188
2 0 0
0 99952 45188
1 0 0
0 99952 45188
2 0 0
0 99952 45188
2 0 0
0 99952 45188
3 0 0
0 99952 45188
2 0 0
0 99952 45188
3 0 0
0 99952 45188
memory
cache
184288
184288
184288
184288
184288
184288
184288
184288
184288
184288
si
0
0
0
0
0
0
0
0
0
0
swap
so
0
0
0
0
0
0
0
0
0
0
bi
7
0
0
0
0
0
0
0
0
0
io
bo
6
0
0
0
184
0
0
0
0
0
in
249
227
312
358
284
227
203
241
211
204
system
cs
1273
779
812
897
617
589
555
624
581
538
us
33
50
51
51
41
45
40
45
45
50
sy
35
50
49
49
59
55
60
55
55
50
cpu
id
33
0
0
0
0
0
0
0
0
0
Network info gives a lot of information on the state of the network, and also lists
the current connections to the server by IP.
Process list gives a complete list of system-wide processes. This can show other
processes running in addition to Domino; one or more of these could potentially
be conflicting with the Domino application.
For instance, if Apache (a public domain Web server) is running, you will be able
to see that here. Since Apache and the HTTP process both default to running on
port 80, they could potentially conflict with each other and cause problems.
Data directory gives a full listing of the data directory and subdirectories, as well
as their ownership and access rights.
Note: You can check the size of your full-text index databases here as well.
Example 4-16 Data directory full listing
Data Directory Full Listing:
============================
457033 -rw-r--r-1 nadmb2
457034 -r--r--r-1 nadmb2
457044 -rw-r--r-1 nadmb2
1321926 drwxr-xr-x
2 nadmb2
notes
notes
notes
notes
341504
905
4489216
4096
Sep 12 05:05 billing.ntf
Aug 20 1996 binary.gif
Sep 12 05:05 bookmark.ntf
Sep 9 15:33 subdir/
Chapter 4. Performance, scalability, and troubleshooting
243
Memcheck
Next we have the memcheck portion of the NSD. Memcheck is a tool that is
installed by default in Domino 6 and is called by the NSD script, but it can also be
run manually. For details about the memcheck options run <memcheck -h>. This
will yield information about usage of the command and available options.
Open databases in memcheck
One of the best features of the memcheck output is to show, for each Domino
process/thread, which Domino databases are being used.
You have to search for the string "Open Databases" in the NSD output file; you
can see some lines in Example 4-17.
Example 4-17 Open databases
------ Open Databases ------/home/nadmb2/notesdata/busytime.nsf
Version
= 43.0
SizeLimit = 0, WarningThreshold = 0
ReplicaID = 85256c30:0071e6f8
bContQueue = NSFPool [ 2: 15364]
FDGHandle = 0xf01c0139, RefCnt = 1, Dirty = N
DB Sem
= (FRWSEM:0x0244) state=0, waiters=0, refcnt=0, nlrdrs=0 Writer=[]
SemContQueue ( RWSEM:#0:0x029d) rdcnt=-1, refcnt=0 Writer=[] n=0, wcnt=-1, Users=-1,
By: [
sched: 2150:
2] DBH=
59, User=CN=bark/O=tree
Owner=[]
The example shows that the busytime.nsf database is opened by
sched process 2150 thread 2.
This information can be matched with an eventual stack trace of the faulting
thread to produce a preliminary diagnosis on an eventual corrupted database
that generated the server crash.
Note: This is a possible starting point to troubleshoot the problem; a
confirmation from Lotus Customer Support must also be done.
The last section contains any errors that may have been generated by NSD
during its execution. Some of these errors are really informational and not
necessarily indicative of a problem, even if they are listed as a warning.
Generated Info/Warnings/Errors are shown in Example 4-18 on page 245.
244
Lotus Domino 6 for Linux
Example 4-18 Viewing messages
Generated Info/Warnings/Errors:
(1) INFO: Generating binary list file
./nsd.nadmb2/nsd_V60_09082002_cache.ins.lst
(2) INFO: Generating cache file ./nsd.nadmb2/nsd_V60_09082002_cache.ins
(3) INFO: The Maximum core file size is 0 blocks
Chapter 4. Performance, scalability, and troubleshooting
245
246
Lotus Domino 6 for Linux
5
Chapter 5.
Domino in action
In this chapter, we describe some of the capabilities of the Domino server and
the strengths of Domino 6. We selected several features to demonstrate from
among the many that are part of Domino 6. The features presented in detail are:
Domino user registration
– The Domino Administration client within Linux
– The Web Administration interface
– Active Directory synchronization with the Lotus ADSync tool
Accessing external data from a Domino application
– Using a sample application to connect to DB2
– Using a sample application to connect to MySQL
© Copyright IBM Corp. 2002. All rights reserved.
247
5.1 Domino user registration
Once your Domino server is installed and configured, you must register users
before they can set up their Notes client. User registration creates the following
for each user:
– A Person document in the Domino Directory
– A User ID containing the appropriate certificates
– A mail file
The process of registering users can be performed using any of the following
methods:
– Domino Administration client
– Java-compliant browser with the Web Administrator interface
– Active Directory Users and Groups Console utilizing a new Domino 6
feature for Active Directory Synchronization.
We do not discuss here the various planning and management aspects of user
registration (for example, policy creation, roaming users, and so forth). Instead
we are addressing only the methods for performing user registration.
5.1.1 Domino Administration client
We chose to use the Domino Administration client within the Linux server running
Domino to demonstrate user registration without using a Windows workstation.
You can accomplish the same thing using the Domino Administration client on a
Windows machine.
The Domino Administrator client does not run natively on the Linux platform;
therefore, we must emulate a Windows environment. There are numerous
products on the market to accomplish this. We chose CrossOver Office (the
commercial version of Wine, www.winehq.org) from CodeWeavers, Inc. which
does not require a Windows workstation. The CrossOver Office package can be
obtained directly from the CodeWeavers Web site at:
http://www.codeweavers.com
Attention: CrossOver office only runs under X-Windows on an IA32-based
system. We installed Pre-Release 1 of Domino Administration client since that
was the most current version available at the time of writing. Furthermore,
minimal testing with the Release Candidate version was done, but it did not
seem to work with CrossOver office or Wine. This is probably due to a change
of installer program. Hopefully CodeWeavers will address this issue in future
releases of CrossOver office.
248
Lotus Domino 6 for Linux
Installing CrossOver Office
Installing the CrossOver Office product is a simple process that only takes a few
minutes. It can be installed either as a normal user, or as root to create a
multi-user environment. We chose to install the product as a root user. You can
see this in the setup dialog box, shown in Figure 5-1. Your decision should be
strictly based on your license for the product.
CrossOver Office is installed by invoking the script which we purchased and
downloaded from the CodeWeavers Web site. The version represents the
version you downloaded. We worked with version 1.0.0 of the product. The
command you need to issue to start the installation is:
sh install-crossover-office-version.sh
Once the installation script starts, the following window is displayed.
Figure 5-1 CrossOver Office setup
The script decompresses CrossOver Office and installs the components onto
your Linux system. Click Yes in the setup dialog box to install under the root
account. Click I Agree after reading the license agreement (Figure 5-2).
Chapter 5. Domino in action
249
Figure 5-2 CrossOver Office License Agreement
You are then prompted for the installation directory. Since we chose the root user
installation, our files will be installed in the opt/cxoffice directory. If you choose
Normal user during the installation, the CrossOver Office files will be installed in
the user’s home directory. Click the Begin Install button to initiate the file copy
portion of the installation (see Figure 5-3).
Figure 5-3 CrossOver Office Install Path
When the installation completes you are presented with the window shown in
Figure 5-4, which provides an opportunity to review the Readme file.
250
Lotus Domino 6 for Linux
Figure 5-4 CrossOver Office install complete
At this point you can configure the CrossOffice product for your environment by
clicking the Configure Now button displayed on the screen. You will be
presented with the welcome screen shown in Figure 5-5.
Figure 5-5 CrossOver Office setup: Welcome screen
Click Next to continue.
Chapter 5. Domino in action
251
Figure 5-6 CrossOver Office HTTP Proxy Configuration screen
After completing the HTTP proxy fields, click Next. The configuration portion of
the installation program will execute.
Installing the Lotus Notes client on Linux
Once CrossOver Office is configured, you can install the Domino Administration
Client. By default, the CrossOver Office setup has line items for Microsoft Office,
Lotus Notes, and Other. Select Lotus Notes, then click Add (Figure 5-7).
252
Lotus Domino 6 for Linux
Figure 5-7 CrossOver Office: Add application
On the next screen, shown in Figure 5-8, choose your method of installation:
either CDROM or an executable file. Since we downloaded our Notes client code
from Notes.Net, we chose the executable. At the time of this writing, the
CrossOver Office product only supported version 5 of Notes; however, we chose
to install Domino 6. Click the Browse button to navigate to your install program.
Chapter 5. Domino in action
253
Figure 5-8 CrossOver Office: Application installation
Select the appropriate file and click Open to begin the installation of the Notes
client.
Figure 5-9 CrossOver Office: Select *.exe file
254
Lotus Domino 6 for Linux
At this point you are presented with the Lotus Notes installation screens.
Figure 5-10 Lotus Notes Installation: Welcome
Click Next to review the software license agreement. After reviewing the
agreement, click Yes continue or No to exit the installation.
Chapter 5. Domino in action
255
Figure 5-11 Lotus Notes Installation: License Agreement
Figure 5-12 Lotus Notes Installation: Single/multiple user install
Enter the user name and the name of your company. See the Release notes of
Lotus Notes/Domino for further discussion about what to use as a user name.
256
Lotus Domino 6 for Linux
Figure 5-13 Lotus Notes Installation: Destination folder
Choose your destination folders for the Lotus Notes program and data files. Click
Next to continue.
Note: As you can see in Figure 5-13, the target installation directory is
c:\lotus\domino as opposed to c:\lotus\notes. This is the default setting within
the CrossOver Office product, although we are installing the Notes client. You
might want to choose a different directory.
Chapter 5. Domino in action
257
Figure 5-14 Lotus Notes Installation: Client selection
Select which client you would like to install and click Customize to modify the
default installation settings for your client selection. By default, the Notes Client is
chosen. For our purposes, we chose All Clients.
Click Next to continue.
258
Lotus Domino 6 for Linux
Figure 5-15 Lotus Notes Installation: Program folders
Figure 5-15 shows your last installation dialog. Choose the program folder for
your application shortcuts, then click Next to begin the file copying process.
Figure 5-16 Lotus Notes Installation: Complete
Chapter 5. Domino in action
259
Following the successful installation of the Notes client software, CrossOver
Office presents you with an installation report as shown in Figure 5-17.
Figure 5-17 CrossOver Office Installation Report
At this point we ran the normal Notes client setup to connect to our Domino 6
server and copy the administrator’s ID to our Notes/Data directory. Before using
the client for the first time, we chose to reboot the Linux workstation we were
using for Domino administration. This is based on the fact that we had installed
several software applications and wanted to start with a fresh system.
Once Linux restarted, we verified that the Domino 6 server was running, then
started the Domino Administration client. During the installation process of the
Notes client, CrossOver Office adds a Lotus Applications group to Programs in
the KDE start menu, emulating the placement in a Windows environment. See
Figure 5-18 on page 261. Just as in Windows, this shortcut may be copied to the
KDE desktop for quicker access.
260
Lotus Domino 6 for Linux
Figure 5-18 KDE start menu: Lotus Applications program group
Now you are ready to register users or perform any other administrative tasks, in
a non-Windows environment, using the Domino Administration client.
5.1.2 The Web administrator
The Web Administrator uses the Web Administrator database
(WEBADMIN.NSF). This database is automatically generated the first time the
HTTP task is started, and is placed in the data directory of the Domino server.
For the Linux platform this is the /local/notesdata directory.
Note: Web Administrator browser support is limited to Netscape 4.7x and
Microsoft Internet Explorer 5.5+. Other Java-compliant browsers such as
Opera and Mozilla may work, but they were not supported at the time of
writing.
Chapter 5. Domino in action
261
Note: Refer to the Lotus Domino Administrator 6 Help for additional
information on setting up the Web Administrator database. The Web
Administration client is discussed in 3.4.1, “Domino 6 Web Administrator” on
page 177.
Using the Web Administrator, most of the tasks available through the Domino
Administration client can now be performed from your browser with no extra
setup tasks. However, in order to register users from the Web Administrator you
must have access to a Notes Certifier. You have this access from the Domino
Administration client, but not from the Web Administrator. The Certificate
Authority process in Domino is designed to let you register users without direct
access to the Notes Certifier ID by securely delegating this permission to
selected users. To use the Certificate Authority process, you must migrate the
Notes Certifier.
Migrate the certifier
When you installed the first Domino server you created a Notes certifier for
issuing Notes certificates. This certifier is capable of using either a keyring file or
the Certificate Authority process. We chose the Certificate Authority process in
lieu of creating a keyring.
Note: The Certificate Authority is the link that allows a client and server to
communicate using SSL and to exchange mail with S/MIME. The server and
the client authenticate with each other by identifying the digital signature on
their trusted certificate. Refer to the Lotus Domino Administrator 6 Help for
information on the Certificate Authority and public key encryption.
The migration requires the Domino Administration client. Since we have already
installed the client within CrossOver Office, we can perform the migration locally
without working from a Windows workstation.
262
Lotus Domino 6 for Linux
Figure 5-19 Domino Administration client: Migrate certifier
Using the Domino Administration client, select the server and click the
Configuration tab. Using the Tools pane, select Certification -> Migrate
Certifier. You will be presented with a dialog box as shown in Figure 5-19 asking
you to select the certifier/keyring to be migrated. Click the Choose id/keyring
file button.
Chapter 5. Domino in action
263
.
Figure 5-20 Domino Administration client: Choose certifier
Navigate to a correct directory and select your certifier ID file (see Figure 5-20).
Click Select.
Figure 5-21 Domino Administration Client: Certifier file confirmation
Click OK once the appropriate ID file has been chosen.
You are then prompted for the certifier password. Enter the password and click
OK to continue.
You can then choose an encryption option suitable for your company’s security
requirements.
Table 5-1 Encryption options
Option
Security Level
Password Required
Action Required
Encrypt ID with Server ID
Lowest
None
None
Encrypt ID with Server ID
Medium
Server ID password
Activate certifier with tell ca
<param> <password> command
Encrypt ID with Lock ID
Highest
Registered user(s)
ID and password
Lock Certifier with tell ca lock
<idfile> command
264
Lotus Domino 6 for Linux
Note: Refer to the Lotus Domino Administrator 6 Help for additional
information, security options, and certificate duration information for migrating
a Notes Certifier to the CA process.
Once these selections are made, click OK and the certifier migration is complete.
For our demonstration environment, we chose to use the Domino administrator’s
ID file.
Figure 5-22 Domino Administration client: Migrate certifier basics
At this point you are ready to register users in a non-Windows environment using
a browser and the Web Administrator. Begin by pointing your browser to:
http://servername/webadmin.nsf
Figure 5-23 on page 266 shows the Web Administrator with the People view
open. You can start registering users by clicking the Register link under People
in the Tools pane. For more information refer to “Registering users” in the Domino
6 Administration Help database.
Chapter 5. Domino in action
265
We demonstrate alternative ways to register users for Domino in “Registering
users in Domino from Active Directory” on page 277 and “Registering users to
Active Directory from Domino” on page 282.
Figure 5-23 Web Administrator: People view
5.2 Active Directory synchronization
Domino administrators working in a Windows 2000 environment with Active
Directory can now administer users and groups from a single administrative
interface of their choice: the Domino Administration client or Windows 2000
Active Directory Users and Computers. This new feature of the Domino 6 server,
ADSync lets you keep both the Domino Directory and Active Directory current
without having to manually update both with changes. This synchronization
feature allows a Domino administrator to securely and precisely delegate the
responsibility for Domino user and group management to the network
administrators who manage these details in Active Directory.
You can create new users and groups in Active Directory and have those
changes reflected in the Domino Directory, including the creation of person or
group documents, Notes IDs, passwords, and mail files for the users, as well as
266
Lotus Domino 6 for Linux
moving users between OUs. In order to accomplish these tasks, the Active
Directory administrator must have a properly certified Notes ID and appropriate
access to make changes in the Domino Directory. The registration server must
be Domino 6 or later and the Domino Administration client must also be a
Domino 6 or later client. Additionally, policies must be created that contain
subpolicies, either implicit or explicit, for all Domino certifiers where users will be
created. Finally, you must have the appropriate rights in Active Directory to add
users and groups, and synchronize passwords.
Note: Refer to the Lotus Domino Administrator 6 Help for information on
policies and subpolicies.
For demonstration purposes, you can install Active Directory, Domino Server,
and the Domino Administration client on a single workstation. In a production
environment, the Domino server and the Active Directory will likely be installed
on separate servers.
Note: If you install all components on a single workstation for demonstration
purposes, you must change the LDAP port settings for either Active Directory
or Domino. By default, both will be listening on port 389; therefore, one of the
two will fail to function properly.
For our purposes we used a Domino server running on Linux and a separate
Windows 2000 Server with Active Directory and the Domino Administration
Client installed.
The only requirement for utilizing the ADSync tool is to work from a workstation
that administers the Active Directory and that also has the Domino 6
Administration client installed.
Note: Active Directory synchronization will work regardless of the platform on
which the Domino Server is running.
Chapter 5. Domino in action
267
Active Directory synchronization
ITSO Windows Domain
ITSO Domino Domain
itsoredhat.lotus.com
ITSO
Domino
Directory
Directory synchronization
Domino 6 Server for
Linux RedHat 7.2
Active
Directory
Replication
itsosuse.lotus.com
Ethernet connection
Windows 2000 Advanced Server
Active Directory
Domino 6 Administration Client
Lotus ADSync
ITSO
Domino
Directory
Domino 6 Server for
Linux SuSE 8.0
Figure 5-24 Active Directory synchronization: Server diagram
Active Directory synchronization in our demo environment is illustrated in
Figure 5-24.
5.2.1 Installing the Lotus ADSync tool
In order to use the ADSync tool, you must turn on Domino Directory W2000 Sync
Services during the installation of the Domino Administration client. This option is
only available with the customize button during the Domino Administration client
installation.
The synchronization option is not selected by default; therefore, check the
appropriate box.
268
Lotus Domino 6 for Linux
Figure 5-25 Domino Administration client installation: Customize
Note: You need to be logged into Windows as an administrator user with full
rights to the root domain of the Active Directory forest. Trying to perform the
install while logged on as a user without these rights may cause problems and
result in an error message.
After installing the Domino Administration client, open a DOS window and
navigate to the directory where you installed the client. Enter the following
command and press Enter:
c:\Program Files\Lotus\Notes> regsvr32 nadsync.dll
The command adds a container entry for Lotus Domino Options to the Active
Directory Users and Computers management screen and returns the
confirmation shown in Figure 5-26.
Chapter 5. Domino in action
269
Figure 5-26 ADSync: RegSvr32
You are now ready to administer users and groups in Active Directory.
5.2.2 Creating users and groups in Active Directory
To access Active Directory Users and Computers from your Windows workstation
click Start -> Programs -> Administrative Tools -> Active Directory Users
and Computers. You can initiate Active Directory “actions” in the right-hand
results pane, or in the left-hand navigation pane. Domino users and groups are
created by either of two methods:
In the left pane, right-click an entry and choose your action from the pop-up
menu.
In the results pane, select one or more users and groups, then select
Register in Domino from either the context menu, the toolbar, or by
right-clicking the entry and using the pop-up menu.
Note: Refer to your Windows 2000 documentation for more information about
working with Active Directory Users and Computers.
Before you start registering users and groups from Active Directory, you must
enable the Lotus Domino Options. Use the following steps to do this.
1. From the Active Directory Container shown in Figure 5-27, double-click the
Lotus Domino entry.
270
Lotus Domino 6 for Linux
Figure 5-27 Active Directory Users and Computers
Figure 5-28 Active Directory Users and Groups: Lotus Domino options
2. Double-click the entry for Domino Directory synchronization in the results
pane shown in Figure 5-28 to initialize the Lotus ADSync tool. This will require
the password for the Domino administrator working from the Active Directory
Users and Groups console (see Figure 5-29).
Chapter 5. Domino in action
271
Figure 5-29 Initializing Lotus ADSync
3. You are then prompted to select a Domino server for all Active
Directory/Notes user synchronizations (Figure 5-30 on page 272). Select the
appropriate Domino server from the drop-down selection box.
Figure 5-30 Lotus ADSync: Choose Domino server
4. If the initialization was successful you should see the window shown in
Figure 5-31.
Figure 5-31 Lotus ADSync initialized
With ADSync initialization complete, you have the opportunity to choose several
synchronization options, as shown in the next four figures.
272
Lotus Domino 6 for Linux
Note: Refer to the Help files available from the Lotus ADSync Options window
shown in Figure 5-32. This window is accessible by right-clicking the Domino
Directory Synchronization entry and choosing Options.
Figure 5-32 Lotus ADSync: Notes synchronization options
From the Notes synchronization options tab you can:
– Enable or disable all synchronization operations
– Customize synchronization options with “Select synchronization
operations to enable”
– Configure prompting options from the drop-down selection box
– Choose to use the CA process for user registration
Important: The “Use the CA process for user registration” must be selected.
Chapter 5. Domino in action
273
Figure 5-33 Lotus ADSync: Notes settings
On the Notes Settings tab you can specify:
– Registration server (which Domino server will be used for registration)
– Administration ID (which user ID will have administrative privileges)
– User deletion options (From the drop-down selection box, choose which
actions should take place when a user is deleted.)
– Default certifier and policy
– Group type mappings
274
Lotus Domino 6 for Linux
Figure 5-34 Lotus ADSync: Field mappings
The Field Mappings tab is where you select which Active Directory fields are to
be mapped to Domino Directory fields. During ADSync tool initialization, the
schemas from Active Directory and Domino are mapped based on default
settings. If additional field mappings are needed, left-click in the right column
under “In Domino Directory” and a drop-down selection box with Domino
directory fields is presented.
Chapter 5. Domino in action
275
Figure 5-35 Lotus ADSync: Container mappings with Notes Certifier
The Container Mappings tab is where you can map Active Directory containers to
Notes Certifiers and Policies. Active Directory containers are a special class that
has both a namespace and attributes. The container does not represent anything
real or concrete, but rather holds one or more objects. Objects, on the other
hand, are the underlying principle of everything in the Active Directory. Servers,
workstations, printers, users, documents, and devices all represent objects. Each
object has its own access control list (ACL) and attributes.
By design, the synchronization tool allows you to preserve the hierarchies in
Active Directory and Domino using mapping. You can select a specific container
to map to a certifier and/or a policy. You may restrict access to a directory
structure (container, object, and so forth) with group policies in Active Directory,
just as you can use the extended access control list in Domino to issue
restrictions. An extended ACL is an optional directory access control feature
available for the Domino Directory, an Extended Directory Catalog, and the
Administration Requests database.
276
Lotus Domino 6 for Linux
Note: Refer to the Domino Administrator 6 Help document for additional
information on setting up and managing extended access control lists.
The main point here is that a user can have certain rights in either directory and
not the other. ADSync does not ensure that Active Directory group policies and
Domino extended access control lists are synchronized. Therefore, the
administrator is responsible for ensuring no security settings are bypassed in
either directory.
In the lab, we selected the container root, the domain controllers, and the Users
container. Beside the container you wish to associate with a certifier, double-click
in the Notes Certifier column to see your selection choices. Select the
appropriate certifier and click OK to continue.
5.2.3 Registering users in Domino from Active Directory
Now that your certifiers have been associated to your Active Directory
containers, you can register users and groups. You have the ability to register
existing Active Directory users and groups in Domino.
Chapter 5. Domino in action
277
New User icon
Figure 5-36 Active Directory Users and Groups: Register in Domino
To register users, select the appropriate container in the left-hand pane, then
choose which user or group to register in the right-hand pane. Right-click the
selected entry. A pop-up window is presented with Register in Domino as one of
the options. This is shown in Figure 5-36.
You can also create new users and groups in Active Directory and choose to
register them in Domino at the same time. To illustrate this, we created a new
user account in Active Directory by clicking the New User icon in the Active
Directory toolbar (also shown in Figure 5-36). You can also use the Action
drop-down menu for this option.
278
Lotus Domino 6 for Linux
Figure 5-37 Active Directory New Object: User information
The first window for New Object - User will be returned, as shown in Figure 5-37.
After making entries in the appropriate fields, click Next to continue.
Chapter 5. Domino in action
279
Figure 5-38 Active Directory New Object: User password
Enter the information for the password fields and click Next to continue. Base
your choices for password expiration and modification, as well as disabled
accounts, on your company’s security policies.
280
Lotus Domino 6 for Linux
Figure 5-39 Active Directory New Object - Domino information
In the window shown in Figure 5-39 you will notice an option to register this user
or group in the Domino Directory. This window also provides fields for choosing
the certifier context, an explicit policy, password fields for Domino, Notes short
name, Internet address, and the ability to enable the use of common passwords.
Once you have supplied the necessary information, click Next to continue.
The new user creation process then presents you with a summary of the user
object you are about to create. Click Finish and the system will generate the
Active Directory object, the new person document in the Domino Directory, a
Lotus Notes ID file, and a user mail file.
That’s it! You have successfully created a new user from within Active Directory
and in doing so, you generated new objects for that person in both Domino and
Windows 2000.
Chapter 5. Domino in action
281
5.2.4 Registering users to Active Directory from Domino
In addition to registering users and groups from the Active Directory Users and
Groups console for both the Windows 2000 and the Domino environments, you
can register them from the Domino Administrator client.
Figure 5-40 Domino Administration client: Choose certifier
Using the Domino Administration client, select the server to be used for
registration and select the Configuration tab. On the right side of the screen,
select Tools -> Registration -> Person. The Administration client then prompts
you for the Notes Certifier ID file. Select the appropriate certifier file to be used,
supply the certifier password and click OK.
282
Lotus Domino 6 for Linux
Figure 5-41 Domino Administration client: Register Person screen
The Domino Administration client then presents you with a Register Person
window. Complete the registration fields in this window, then click the check box
for Advanced options.
Chapter 5. Domino in action
283
Figure 5-42 Domino Administration Client - Register Person (Advanced)
Complete the information appropriate for your organization in the Mail, Address,
ID Info, Groups, and Roaming sections. Click the tab for the Other section; click
the Windows User Options button to add this person to Windows 2000.
284
Lotus Domino 6 for Linux
Figure 5-43 Domino: Add Person to Windows 2000
In this window, select the Active Directory container and Windows 2000 groups to
add this person to, then click OK when finished. This particular account was
placed in the Users container. We could have placed the user in any container
appropriate for that account’s security rights.
Chapter 5. Domino in action
285
Figure 5-44 Domino Administration client: Confirm person registration
Click the check mark box in the Register Person window to confirm you have
finished entering all necessary data for this person. This box is located on the
right-hand side of the Register Person window and is circled in Figure 5-44.
286
Lotus Domino 6 for Linux
Figure 5-45 Domino Administration client: Register person
The entry will then be added to the Registration Queue window at the bottom of
the screen. Click Register to initiate the registration process.
Once the registration process completes, this person will exist in both the
Domino Directory and Active Directory.
Chapter 5. Domino in action
287
5.3 Accessing external data from Domino: DB2 example
This section describes how to use Domino Enterprise Connection Services
(DECS) to enable a Domino application to access data from the DB2 sample
database. It includes the following topics:
Installing DB2 for Linux
Domino Enterprise Connection Services
Virtual field activities
Creating the Domino application
Testing the Domino application
5.3.1 Installing DB2 for Linux
This section provides detailed instructions for installing, configuring, and verifying
IBM DB2 Universal Database V7.2.1, Enterprise Edition for Linux.
Prerequisite Linux packages for DB2
The DB2 product documentation should be consulted for the official list of
prerequisite software. After installing Red Hat Linux V7.2 we found that the only
missing package needed was ncurses4. Depending on the Linux options chosen,
the latest version of this package may be installed when initially installing Linux.
You may also install ncursesvX later using one of the RPM package tools. Our
search for this package resulted in a later version of ncurses, v5, which we
installed. Version 4 is a minimum requirement for the release of DB2 we used.
To see if you have ncurses5 on your system, you can do the following:
1. Verify whether the package is installed on the system using:
rpm --verify ncurses5.2-12
2. If no output is generated, the package is installed correctly; otherwise, the
rpm package manager will return an error similar to the following:
Package ncurses5.2-12 is not installed
If the package is not installed, you must locate and install it before proceeding
with the DB2 installation. There are a number of ways to do this. The easiest way
to install the package is from the original Red Hat Linux V7.2 CD; otherwise, you
can locate and download it from the Web.
Insert the second Red Hat Linux 7.2 CD into the CD-ROM drive (the ncurses4
package exists on that CD).
288
Lotus Domino 6 for Linux
If the CD doesn’t automatically mount (it may if you’re running X Windows with
either the KDE or Gnome desktops) it can manually be mounted by issuing the
following command as root:
mount /mnt/CD-ROM
This should work for a default installation. If it fails, verify the device that
represents your CD-ROM drive and issue the following command instead:
mount -r /dev/<device> /mnt/cdrom
For instance, on our system, the CD-ROM drive is the first device on the second
IDE channel. Thus it is (in Linux) referred to as hdc and can be mounted by the
following command:
mount -r /dev/hdc /mnt/cdrom
If you do not have the CD, then find the nucurses4 RPM on the Web. Go to
http://rpmfind.net/ and enter ncurses4 into the search box. Click Search, and
download the RPM.
Alternatively, you can find it in the directories of the Red Hat Linux FTP site at:
ftp://ftp.redhat.com
Once you have the RPM file either mounted or saved somewhere on your
system, use the following command to install or upgrade the package:
rpm -U --nodeps <path to file>/ncurses5.2-12.i386.rpm
For example, from the product CD:
rpm -U --nodeps /mnt/cdrom/RedHat/RPMS/ncurses5.2-12.i386.rpm
DB2 for Linux also requires the pdksh 5.2.14-12 package. When installing Red
Hat 7.2 Linux this will likely be installed by default, depending on the options
selected during the installation. Enter the following command to determine if
pdksh was installed:
rpm -qa |grep pdksh-5.2.14-12.i386.rpm
If the package is not installed the Linux command prompt will return with no
information.
Chapter 5. Domino in action
289
Figure 5-46 DB2 preinstall steps: rpm pdksh
In the event you selected the custom installation, it is possible that your
selections will not include the pdksh package. In this scenario, obtain the
package from either the CD or the Web using the steps outlined previously and
use the command shown in Figure 5-46 to install the package. Our command
assumes the package is installed from the CD.
Figure 5-47 DB2 preinstall steps - rpm pdksh installation complete
When the installation completes your screen should look like Figure 5-47.
Preinstallation tasks
Prior to installing IBM DB2 Universal Database V7.2.1, Enterprise Edition, the
following checks need to be completed.
Verify that there are no existing active services that use the same DB2 TCP/IP
ports on the server:
–
–
–
–
523 (DB2 Server)
50000 (default DB2 instance connection port)
50001 (default DB2 instance interrupt port)
50002 (DB2 Control Server)
We suggest using the following command for this task:
netstat -an |grep LISTEN
290
Lotus Domino 6 for Linux
Note: Netstat is a Linux tool for printing network connection and routing
information, and network statistics. Refer to the Linux documentation for your
operating environment for additional information.
If you find Linux services running on the ports, refer to Linux documentation for
information on disabling them.
Install the DB2 Server
In order to install IBM DB2 Universal Database V7.2, Enterprise Edition for Linux,
perform the following steps:
1. Log in as root and start a terminal session
2. Mount the DB2 V7.2 CD-ROM with:
mount /mnt/cdrom
Figure 5-48 DB2 v7.2 CDROM Contents
3. List the contents of the root directory on the CD-ROM with the ls command
(Figure 5-48).
Figure 5-49 DB2 v7.2 CDROM: db2setup script
4. Navigate to the appropriate directory on the CD-ROM for the version of DB2
you are installing.
Enter the following command to start the DB2 installation script:
./db2setup
Chapter 5. Domino in action
291
This setup script should present the Install DB2 V7 window shown in
Figure 5-50 on page 292.
Note: To navigate within the DB2 installation program, use the Tab key to
move between options and fields. Highlight options and fields with the
Spacebar and press Enter to select an option. Also, you can refresh the
window at any time by pressing CTRL+L.
Figure 5-50 DB2 v7.2 - Enterprise Edition installation
5. Select the DB2 UDB Enterprise Edition.
292
Lotus Domino 6 for Linux
Figure 5-51 DB2 v7.2: Customize Product Library
6. Highlight the DB2 Product Library’s Customize option and press Enter.
Chapter 5. Domino in action
293
Figure 5-52 DB2 v7.2: Language selection
7. In the DB2 Product Library window, highlight the appropriate option for locale
under the HTML section, then highlight OK and press Enter.
294
Lotus Domino 6 for Linux
Figure 5-53 DB2 v7.2: Create DB2 instance
8. In the Create DB2 Services window select the Create a DB2 Instance option,
highlight OK and press Enter.
Chapter 5. Domino in action
295
Figure 5-54 DB2 v7.2: DB2 instance owner ID
9. When the DB2 instance authentication window appears, accept the default
values, supply a password for the Password and Verify Password fields,
highlight OK, and press Enter.
296
Lotus Domino 6 for Linux
Figure 5-55 DB2 v7.2: Fenced User ID
10.When the DB2 Fenced User window appears, accept the default values,
supply a password for the Password and Verify Password fields, highlight
OK and press Enter.
Chapter 5. Domino in action
297
Figure 5-56 DB2 v7.2: Warehouse control database
11.In the DB2 Warehouse Control Database window, deselect the Setup DB2
Warehouse Control Database option, highlight OK and press Enter.
298
Lotus Domino 6 for Linux
Figure 5-57 DB2 v7.2: Administration server
12.In the Create DB2 Services window highlight the Create Administration
Server option, highlight OK and press Enter.
Chapter 5. Domino in action
299
Figure 5-58 DB2 v7.2: Administration server user ID
13.In the Administration server window accept the default values, supply a
password for the Password and Verify Password fields, highlight OK and
press Enter.
300
Lotus Domino 6 for Linux
Figure 5-59 DB2 v7.2: DB2System name
14.A message window appears to indicate that DB2SYSTEM will be set to
hostname. Highlight OK, then press Enter.
Chapter 5. Domino in action
301
Figure 5-60 DB2 v7.2: Create services
15.In the Create DB2 Services window highlight OK and press Enter.
302
Lotus Domino 6 for Linux
Figure 5-61 DB2 v7.2: Setup summary
16.At this point the DB2 V7 installation displays a summary report listing the
product components you selected to be installed. Highlight Continue and
press Enter.
Chapter 5. Domino in action
303
Figure 5-62 DB2 v7.2: Setup confirmation
17.Next a warning window appears stating “This is your last chance to stop.”
Highlight OK to continue, and press Enter.
18.The DB2 setup program installs the selected components. Depending on the
speed of your computer, this may take up to 15 minutes. You may be
prompted to register the product. If so, complete the registration information
then exit back to the installation window. When the installation is complete, a
window informs you if the installation was successful. Highlight OK and press
Enter.
19.A Status Report of the installation is then displayed. Review the report to
ensure all of your selected components were installed, highlight OK and
press Enter.
20.The DB2 V7 installation windows appears. Highlight Close and press Enter.
21.A window appears prompting “Do you want to exit the DB2 Installer?”
Highlight OK and press Enter.
22.Unmount the CD-ROM with the following commands:
cd /
umount /mnt/cdrom
The DB2 installation is now complete.
304
Lotus Domino 6 for Linux
Verify the DB2 Server installation
To verify the DB2 Server installation, complete the following tasks:
Verify home directory permissions
Verify the DB2 instance owner profile
Verify the DB2 instance symbolic links
Verify the DB2 release level
Verify the DB2 service name
Verify the database manager configuration
Create the DB2 sample database
Verify home directory permissions
Check that the home directory ownership has been correctly set up by the DB2
installation program. Using Table 5-2 for reference, log in as root, start a terminal
session and navigate to /home directory. Use the following command to confirm
directory ownership and permissions.
ls -la
Table 5-2 Home directory permissions
Home directory path
Owner
Group
Permissions
/home/db2inst1
db2inst1
db2iadm1
drwxr-xr-x
/home/db2fenc1
db2fenc1
db2fadm1
drwxr-xr-x
/home/db2as
db2as
db2asgrp
drwxr-xr-r
Permissions needed so that the DB2 instance owner can read, write,
and execute files and directories within the path. Group members’ and
other users’ access rights are determined by your company’s security
policies and business requirements.
If one of the DB2 home directories is not configured properly, issue the following
command in the appropriate directory. You should be logged in as root.
Substitute values from Table 5-2 as appropriate.
chown -fR owner:group home-directory-path
Verify the DB2 instance owner profile
The DB2 server installation should modify the .bashrc environment file of the
instance owner so that environment will be set up when the DB2 instance user
logs in. The .bashrc file is located in the home directory. If you accepted the
default field values during the installation, that directory will be /home/db2inst1
Chapter 5. Domino in action
305
Since this file is hidden, use the following command to confirm its existence in the
directory:
ls -la
Use the more .bashrc command to display the contents of the .bashrc and
confirm the following lines have been added. If the following lines are not present,
use your favorite text editor to manually add them.
if [ -f /home/db2inst1/sqllib/db2profile ] ; then
. /home/db2inst1/sqllib/db2profile
fi
Verify the DB2 instance symbolic links
The DB2 Server installation automatically creates a DB2 instance (db2inst1)
under the /home/db2inst1 directory. Included in the instance creation process,
the DB2 installation program creates symbolic links in the /home/db2inst1/sqllib
directory to files under /usr/IBMdb2/V7.1.
Note: Although the DB2 installation CDROM, documentation, and installation
screens refer to the version as 7.2, we found the actual directory created by
the setup script was named V7.1
To confirm their existence, log in as root and start a terminal session. Navigate to
the /home/db2inst1/sqllib directory and issue the following command:
ls -la
If the symbolic links have been created, your output from this command should
resemble the screen shown in Figure 5-63.
306
Lotus Domino 6 for Linux
Figure 5-63 DB2 v7.2 - Display symbolic links
If for some reason these links do not appear, navigate to the /usr/IBMdb2/V7.1
directory and issue the following script to generate the symbolic links:
./db2ln
Verify the DB2 release level
Check the release level of the DB2 Server program you just installed with the
following commands:
su - db2inst1
db2level
This should generate output similar to the screen shown in Figure 5-64.
Figure 5-64 DB2 v7.2 - DB2level
Chapter 5. Domino in action
307
Verify the DB2 service name
Log in as root and view the /etc/services file. This can be accomplished by either
navigating to the /etc directory and issuing more services or from the root login
prompt issuing the following command:
more /etc/services
Locate the service name in the first column that corresponds to the port numbers
used by DB2. Specifically, the lower port (50000) represents the service name.
These recent additions to the services file should be located near the bottom and
look like this:
db2cdb2inst1 50000/tcp #Connection port for DB2 instance db2inst1
db2idb2inst1 50001/tcp #Connection port for DB2 instance db2inst1
Record this service name (db2cdb2inst1) for use later.
Verify the database manager configuration
Check the service name recorded in the database manager configuration by
performing the following commands:
su - db2inst1
db2 get dbm cfg | grep SVCENAME
The service name value should match the service name recorded in the
/etc/services file noted previously. The results of the grep command should
resemble Figure 5-65.
Figure 5-65 DB2 v7.2 - DB2 Service Name
If the service name values do not match, issue the following commands to
update the database manager configuration where svcename represent the
value found in the /etc/services file.
db2 update dbm cfg using svcename db2cd
db2stop
db2start
308
Lotus Domino 6 for Linux
Create the DB2 sample database
The DB2 installation can be tested by creating and connecting to the sample
database supplied with the product specifically for this purpose. This can be
done with following commands.
su - db2inst1
db2sampl
db2 list db directory
The results of the list db command should resemble Figure 5-66.
Figure 5-66 DB2 v7.2 - DB2 db directory
To ensure access to the database, issue the following commands to test
connectivity. If you do not receive error messages, you have successfully created
the sample database.
db2 connect to sample
db2 disconnect current
Starting and stopping the DB2 server
After DB2 server installation, the DB2 server should be running and configured to
restart itself at boot time. You can use the following commands to manually stop
and start the DB2 server. If the server is already running when you enter a start
command, the system will display a message indicating the DB2 server is
already running.
su
su
su
su
- db2inst1 "-c db2stop"
-db2as "-c db2stop"
-db2as "-c db2start"
-db2inst1 "-c db2start"
Chapter 5. Domino in action
309
5.3.2 Accessing external data from a Domino application
The release of DECS that ships with Domino 6 Enterprise Server replaces
RealTime Activities with Virtual Fields Activities. Virtual Fields Activities include
all the functionality available in the earlier DECS RealTime activity, along with a
number of new features, including:
– Support for computed subforms
– Options for new line delimiters
– An additional logging option
– Support for procedure return parameters following insert and update
operations
Output from write operations allows results to be returned to fields in the Notes
document being monitored following insert and update operations.
Note: Refer to the Domino Enterprise Connection Services User Guide for
additional information about DECS and Virtual Fields.
5.3.3 Virtual Fields Activity
Virtual Fields Activities (previously known as DECS RealTime Activities)
enhance Lotus Notes applications by enabling them to retrieve external data,
such as data from DB2, and to integrate this external data with native Notes data
on a single Notes document form. DECS, running on the Domino Server that is
hosting the Domino application, intercepts and handles the Domino database
events. For example, when Notes or Web client users open, create, update, or
save Notes documents, these events are acted upon, obtaining immediate
access from the Notes form to external data sources supported by DECS. You
get the data immediately (dependent, of course, on network bandwidth and other
factors that affect system resources).
Once a system administrator has created a Virtual Fields Activity, Domino users
can open, create, update or delete external system data directly and
transparently through their Notes client. By extension, Web clients may open the
same Notes form that the activity monitors by accessing a Domino 6 server and
obtaining access to supported external source data.
For example, if the external database to be queried or updated from the Notes
form is a DB2 database, Notes end-users may work with DB2 data as if it were in
Notes. DB2 connectivity software is not required on the client system; however, it
must be installed on the Domino server machine. Network access to the external
data source is handled by the Domino server machine, which contains DECS
connectivity software for the external data source, such as DB2.
310
Lotus Domino 6 for Linux
Note: Refer to the Domino Enterprise Connection Services User Guide for
additional information on configuring DECS and developing Domino
applications with virtual fields.
5.3.4 Creating the Domino application
For the purposes of this redbook, we chose a simple Domino 6 application and
DB2 for Linux. The Domino application pulls data from the SAMPLE database
created by DB2. The EMPNO, FIRSTNAME and LASTNAME fields were
populated with an agent at the creation of the Domino application, but all
remaining fields pull data dynamically from DB2.
Figure 5-67 Start Domino Designer
We begin by starting the Domino 6 Designer from a Windows 2000 workstation.
Although we installed the Domino 6 Administrator client with CrossOver Office
earlier, we are using a Windows environment for application development.
Note: You can download the database template we are using from the
Redbooks Web site. More information about using the additional material is in
Appendix B, “Additional material” on page 445.
Chapter 5. Domino in action
311
Figure 5-68 Domino Designer: Creating a new database
Within Domino Designer, select Create a new database.
Figure 5-69 Domino Designer: New Database
For the server, enter the name of the Domino 6 server where you just completed
the Domino for Linux installation and the DB2 for Linux installation. If this were a
production application the Domino and DB2 servers probably would not be on
the same machine.
Choose a name for your application. We chose DB2EMP. The Domino 6 template
for this application is identically named.
312
Lotus Domino 6 for Linux
Figure 5-70 Domino Designer: Data Connection
In the left pane of the Designer, under Recent Databases, select Shared
Resources -> Data Connections -> New Data Connection Resources.
Figure 5-71 Domino Designer: DB2 Data Connection
Chapter 5. Domino in action
313
On the Data Connection dialog box, enter a name of DB2. For Class and Type
enter RDBMS and DB2 respectively. For User Name enter Administrator or the
appropriate account for your DB2 installation and supply the password in the
Password field. For Database enter SAMPLE, then click Browse Metadata.
Figure 5-72 Domino Designer: Browse Administrator.Employee
In the Browse External Metadata dialog box, select
ADMINISTRATOR.EMPLOYEE for Table, then click OK to close the dialog.
314
Lotus Domino 6 for Linux
Figure 5-73 Domino Designer: Employee Form
Next, select the Forms icon in the navigation pane, then select EmployeeForm.
Chapter 5. Domino in action
315
Figure 5-74 Domino Designer: EMPNO field properties
Double-click the EMPNO field to open the field properties dialog. Enable
“External data source” by checking that box. Next to “Data Sources Options”
select Browse.
316
Lotus Domino 6 for Linux
Figure 5-75 Domino Designer: Browse DB2 EMPNO
For Data Connection Resource select DB2; for Table select
ADMINISTRATOR.EMPLOYEE; for Columns select EMPNO; then click OK.
Chapter 5. Domino in action
317
Figure 5-76 Domino Designer: EMPNO Key field selection
On the very bottom of the properties dialog, select Key Field.
318
Lotus Domino 6 for Linux
Figure 5-77 Domino Designer: FIRSTNME field properties
Close the properties dialog and double-click the FIRSTNME field to open the
properties dialog for that field. Enable “External data source;” next to “Data
Source Options” select Browse.
Chapter 5. Domino in action
319
Figure 5-78 Domino Designer: Browse DB2 FIRSTNME
For Data Connection Resource select DB2; for Table select
ADMINISTRATOR.EMPLOYEE; for Columns select FIRSTNME; then click OK.
320
Lotus Domino 6 for Linux
Figure 5-79 Domino Designer: FIRSTNME data field selection
Back on the properties dialog, enable “Store data locally.” This allows you to view
the data in a view.
Close the properties dialog and double-click the LASTNAME field to open the
properties dialog for that field.
Chapter 5. Domino in action
321
Figure 5-80 Domino Designer: LASTNAME field properties
Enable “External data source;” next to “Data Source Options,” select Browse.
322
Lotus Domino 6 for Linux
Figure 5-81 Domino Designer - LASTNAME Data Field Selection
For Data Connection Resource select DB2; for Table select
ADMINISTRATOR.EMPLOYEE; for Columns select LASTNAME; then click OK.
Back on the properties dialog, enable “Store data locally.” This allows you to view
the data in a view.
For all remaining fields in the EmployeeForm, repeat these steps to enable
“External data source” and browse the “Data source options” to ensure you
select the correct DB2 column for the field you are working with. Do not enable
“Store data locally” for any additional fields.
Once you’ve completed the modifications for each field, press Esc to close the
form and select Yes to save it.
Chapter 5. Domino in action
323
Figure 5-82 Lotus Notes Client: Database Open DB2EMP
The new database is empty at this point. To populate the fields for which we
chose to store data locally (EMPNO, FIRSTNME, LASTNAME) we need to
initialize the keys (using the agent in the example database) by creating a
document with the above reference fields. To do this, start the Lotus Notes client
and open the new database.
Figure 5-83 Lotus Notes Client: Initialize keys
Once the database is open you will notice the default view (All Employees) is
empty. From the menu bar select Action, then select Initialize Keys. When the
agent finishes you should see documents in the view.
324
Lotus Domino 6 for Linux
Note: The Initialize Keys agent is part of the DB2EMP sample application.
Figure 5-84 Domino Designer: Database properties
Return to Domino Designer to enable the connectivity to the external data source
that we configured previously. Select File -> Database -> Properties and near
the bottom of the properties dialog enable “Allow connections to external
databases using DCRs.”
Click OK in the confirmation dialog.
Chapter 5. Domino in action
325
Figure 5-85 Lotus Notes client: All Employees view
Now to confirm the external connection is working, return to the Lotus Notes
client and open the database. From the All Employee view, double-click one of
the documents to open it. You should see all of the fields populated with data,
similar to Figure 5-86. Except for the EMPNO, FIRSTNME, and LASTNAME
fields, all other field data is stored in DB2.
Figure 5-86 Lotus Notes Client - Employee Lookup Form
326
Lotus Domino 6 for Linux
That’s it! You have successfully used a Domino application to access employee
data in a DB2 database. This process can easily be modified to work with
production data in a production application.
5.4 Accessing external data from Domino: MySQL
example
You can gain a number of benefits when a relational database management
system (RDBMS) and Domino are combined. This effectively allows you to
bypass the constraints of the flat database architecture that Domino uses
natively. A Domino database can now be mostly used for configuration, design,
and security issues, while leaving storage issues to the RDBMS. Also, an
RDBMS housed on a Linux server takes advantage of the performance and
scalability both of these technologies are well known for. Organizations utilizing a
separate backend database now have more control over their architecture and
system performance of Domino mail and applications as well. For example, you
can house the RDBMS on a separate server that can focus on managing data
while another machine can work on security, management, and presentation.
MySQL represents a solid backend that when combined with Domino and Linux,
leverages the inherent and complementary strengths of UNIX and RDBMS
systems. And since MySQL is available under the GNU General Public License,
it is available for anybody to use and download.
Noted for its speed and reliability, MySQL has been accepted as a viable solution
for a broad range of needs. MySQL is billed as “the world's most popular open
source database.” All these factors add up to MySQL being a low cost, powerful,
and effective counterpart to the Notes/Domino system.
This section provides instructions for setting up MySQL to work as the Domino
backend. It demonstrates the simplicity of integrating an RDBMS. A high-level
view of the steps involved includes:
1. Determining the environment in which you want to work. This requires making
some choices about what products and versions to use.
2. Installing MySQL.
3. Basic tuning.
4. Setup and configuration of MySQL.
5. Setup and configuration of the Notes/Domino Application.
Chapter 5. Domino in action
327
5.4.1 Description of the environment
The recommended Domino server configuration is to use a dedicated server
machine for the Domino server. However, in our lab environment, we
implemented a system with Domino and MySQL on the same machine.
Linux
In our example, we used RedHat 7.2 with kernel 2.4.7-6. It is highly
recommended by MySQL to use the 2.4 kernel at the minimum, as stability and
performance are much better than with the 2.2 kernel.
Domino
As with the DB2 example, we assume that you have installed Domino 6 and
chosen DECS to be installed as an additional service during setup.
MySQL
For the latest information about MySQL and to download the latest version,
check the MySQL Web site at:
http://www.mysql.com
There are several choices that you will need to make when getting started with
MySQL:
1. Which MySQL version do you want to use? The MySQL AB Company
recommends going with the latest stable release since it incorporates the best
balance between features and stability. As of this writing 3.23 is the current
recommended version and 4.0 is released in a beta version. This discussion
is based on 3.23, which is the version we installed in the lab.
2. The second choice you need to address is which MySQL product is best
suited to your needs. MySQL 3.23 offers 2 different “flavors”:
a. MySQL, the basic release
b. MySQL-Max, which adds high-end features to MySQL, notably transaction
support
We chose the basic MySQL release to keep our example simple.
MySQL currently has a beta version of release 4 available. If we had chosen
to use the release 4 version, there would have been 4 options:
a. MySQL 4, the basic release
b. MySQL Classic, optimized for raw speed without transactions
c. MySQL Pro, essentially MySQL Classic with transaction support
d. MySQL-Max, which offers two table handlers (InnoDB & BDB) that provide
transaction support to MySQL
328
Lotus Domino 6 for Linux
3. Next, choose the architecture of your Domino system. In some cases, it may
prove useful to house the MySQL server on a different machine. For the sake
of simplicity both the Domino server and the MySQL server were housed on
the same machine in our lab, so this is what our discussion is based upon.
4. The last choice to make is how you wish to install MySQL. For Linux there are
three options:
a. A source installation, which will necessitate compiling the code on your
machine. This offers the most flexibility but carries the highest level of
complexity.
b. A binary installation in which all the necessary files are compiled and
organized in a tar file.
c. An rpm file, which is the simplest installation and even starts the daemon
for you. It also happens to be the method recommended by MySQL for
Linux installations.
Because we are aiming for simplicity in this demonstration, we chose the rpm
method of installation. This method of installation has an rpm package for
each logical bundle of files. Here is the listing from the MySQL manual:
•
•
•
•
•
MySQL-VERSION.i386.rpm
The MySQL server.
MySQL-client-VERSION.i386.rpm
The standard MySQL client programs.
MySQL-bench-VERSION.i386.rpm
Tests and benchmarks. Requires Perl and msql-mysql-module rpms.
MySQL-devel-VERSION.i386.rpm
Libraries and include files needed if you want to compile other MySQL
clients, such as the Perl modules.
MySQL-VERSION.src.rpm
The source code for all of the previous packages.
We want to install the server and the client.
MyODBC/unixODBC
Domino doesn't support MySQL directly, but it does support ODBC. You can use
MyODBC to provide you with a driver. The current stable version of MyODBC is
2.50; it can be downloaded from:
http://www.mysql.com
MyODBC requires the client shared libraries, so you need to install this as a
prerequisite to MyODBC. This comes as the package
MySQL-shared-VERSION.i386.rpm or MySQL-devel-VERSION.i386.rpm.
Chapter 5. Domino in action
329
Finally, you need an ODBC manager to manage access to the data sources on
Linux. The unixODBC package follows the unixODBC-VERSION.i386.rpm
naming scheme. It comes with most Linux distributions, or it can be downloaded
from:
http://www.unixodbc.org
To recap, the choices for this section are:
MySQL-VERSION.i386.rpmAvailable from http://www.MySQL.com
MySQL-client-VERSION.i386.rpmAvailable from http://www.MySQL.com
MySQL-shared-VERSION.i386.rpmAvailable from http://www.MySQL.com
MyODBC-VERSION-i386.rpmAvailable from http://www.MySQL.com
unixODBC-VERSION.i386Available with your distribution of Linux or from
http://www.unixodbc.org
5.4.2 Installing MySQL
Just as we did with the Domino install, all installations must be done as the root
user. Linux does not allow the root user to telnet in from another machine. In
order to install remotely, you have to login as another user and switch to the root
user using the command su -.
Server and client
Installation is as simple as running rpm -i on the server and client packages.
Figure 5-87 Telnet session: Installing MySQL server and client
330
Lotus Domino 6 for Linux
MyODBC/unixODBC
Installation of the MySQL shared libraries, MyODBC, and unixODBC is much the
same. In this example, we demonstrate using the form rpm -ivh. The difference
is that the packages are installed as before, but now we receive verbose output in
case a problem occurs. Hashing will also occur so we can see the progress of
the install.
Notice that the MySQL shared libraries must be installed before MyODBC.
Figure 5-88 Telnet session: Installing MySQL shared libraries, MyODBC and unixODBC
Finally, to get connectivity to work, you need to make sure the ODBC shared
library (libodbc.so.1.x.x) is available to Domino. Domino will actually look for this
library under the name libodbc.so. Therefore, you need to make a symbolic link
named libodbc.so in the Domino binaries directory that has the
/usr/lib/libodbc.so.1.x.x file as the target. The command for this is:
ln -s /usr/lib/libodbc.so.1.x.x /opt/lotus/notes/latest/linux/libodbc.so
5.4.3 Basic tuning
Basic performance considerations require that we do some basic tuning.
In /etc/sysctl.conf, we make sure the following values are either added or already
set to at least the amounts shown:
fs.file-max=65536
fs.super-max=1024
In Chapter 4, “Performance, scalability, and troubleshooting” on page 195 we
recommended setting the fs.file-max parameter in the /etc/sysctl.conf to at least
49152. Here we are just increasing that parameter to fall in line with MySQL
recommendations.
Make sure the following lines are included in /etc/my.cnf. Each entry in brackets
represents a section and the parameter setting afterwards belongs to that
section. It may be necessary to create this file yourself.
Chapter 5. Domino in action
331
[mysqld]
set-variable = max_connections=256
[safe_mysqld]
open-files-limit
= 8192
Note: If you want to use a default configuration, you can go to the
/usr/share/mysql directory and choose one of the configurations there. The
naming scheme of these samples is my-SIZE.cnf (that is, my-small.cnf).
Simply copy them to the /etc directory using the command:
cp /usr/share/mysql/my-SIZE.cnf /etc/my.cnf)
Add the following line to /usr/bin/safe_mysqld after the line "echo "Starting
$MYSQLD daemon with databases from $DATADIR"":
renice -20 $$
Figure 5-89 Telnet session: Adding "renice -20 $$" to safe_msqld
Reboot the server to make sure all the settings take effect. This is done when the
root user issues the command reboot.
Confirming settings
The first thing to do after the server restarts is to make sure all the changes have
been updated properly. We can check the priority number by issuing
ps -el|more. The values under the NI column for safe_mysqld and mysqld
should be negative.
332
Lotus Domino 6 for Linux
Figure 5-90 Telnet session: Verifying that "renice -20 $$" is working
You can check that values in the /etc/my.cnf are being read by the MySQL server
correctly by issuing:
mysqladmin variables
Note: If a mysql password has been set for the user you are logged in as
(which is different from the Linux password), you will need to use the -p flag.
This will inform the MySQL client that you want to start a session with a
password.
Figure 5-91 Telnet session: Verifying max_connections
There is a variable named open_files_limit which is different than the parameter
that was set in the my.cnf, so a difference in value is normal. This can sometimes
be confusing for someone who is reviewing the parameters.
You can check the value of the /etc/sysctl.conf by typing the following:
cat /proc/sys/fs/file-max
cat /proc/sys/fs/super-max
Chapter 5. Domino in action
333
Figure 5-92 Telnet session: Verifying Linux parameters have been updated
5.4.4 Configure MySQL
For this section, we focus on the following tasks:
1. Setting passwords. This is the first thing that should be done for the root user
after an install.
2. Creating a user for Domino to use when connecting to the database.
3. Creating the database that will house the Domino application data.
4. Creating a table for use in managing and organizing the data in the database.
5. Configuring ODBC.
For the purpose of this example, we are connecting to the MySQL server with the
MySQL client, which happens to be text-based. Since we are connecting to the
same host our remote session is on, connecting is as simple as issuing:
mysql -u user -p
This will bring us to a command line environment that is connected to the MySQL
server.
Figure 5-93 MySQL Client session: Starting the client
Here are some basic commands to help you get around in MySQL:
SHOW DATABASES; Displays the databases on the system
334
USE <database>
Connects to a specific database
SHOW TABLES
Displays the tables in the database currently being
accessed
Lotus Domino 6 for Linux
SELECT DATABASE();Displays the database currently being accessed.
SELECT <column> FROM <table>;Gets the column data from the table
We will also be using the MySQL administration tool, which conveniently
happens to be named “mysqladmin.” We use this to send certain administrative
commands to the MySQL server, for example:
mysqladmin -u user -p <command>
Setting passwords
Once the tuning parameters are in place, we need to configure the MySQL
server itself. The first place to start is by setting the root password:
mysqladmin -u root password 'your_password'
You can test that the password is set correctly by typing mysql -u root -p. The
client should ask for your password. Given the correct password, it should start
up a session with the MySQL server.
In Figure 5-94, the first line shows setting the password; the next two lines show
the user attempting to access the server without the password; and the last six
lines are the result of starting a session with the password.
Figure 5-94 MySQL client: Verifying that the root password is instantiated
Creating users
You should also create a new user so that Domino doesn't have to connect as
root. Do this with the following steps:
1. Start the mysql command line environment with the command:
mysql -u root -p
2. Next, as root, create the user using the command line template:
mysql>GRANT usage on database.table TO username@localhost
->IDENTIFIED BY 'password';
Chapter 5. Domino in action
335
Figure 5-95 MySQL client: Creating users on the MySQL system with "usage" rights
Note that a host may go by many names. The host may be referred to as
localhost, the ip address, the host name, or the fully qualified name. But the
rights assigned to a user/host combination are unique. So if a user was being
recognized as user@host.com and user@host.ibm.com, the user table would
need to have entries for both. In this example, we created a user where the
machine the user is connecting from is identified as both the host name and
localhost. Both of these are possible names for this machine.
This command set will create a user entry in the mysql database in the user
table. This user will be given usage privileges and set the password to password.
The next example:
1. Creates a user named testuser on the operating system.
2. Grants the privilege type usage to connect to all tables.Usage will only provide
connectivity rights. You will have to apply further privileges later, in order to
actually work with the tables.
3. Sets the MySQL password to testpass.
If you later need to remove the user, you can just revoke all the privileges of the
user. For example:
mysql> REVOKE ALL PRIVILEGES ON *.*
-> FROM username@localhost;
mysql> flush privileges;
Although this removes all the rights of the user, the user will still be listed in the
mysql.user table. The only way to remove the user completely is to remove him
from the user table with:
mysql> DELETE FROM user WHERE user = 'username';
mysql> flush privileges;
336
Lotus Domino 6 for Linux
You can verify that the user has been created by connecting to the mysql
database and displaying the users in the user table.
Figure 5-96 MySQL client: Displaying the mysql tables and verifying users have been
created
You can also verify that privileges have been properly assigned by testing the
connectivity of testuser on the database server, as shown in Figure 5-97.
Chapter 5. Domino in action
337
Figure 5-97 MySQL client: Verifying that our testuser can connect to the system
Finally, you can assign privileges to the user you have created. For the sake of
simplicity, we demonstrate assigning all rights to all the databases and tables on
the database server.
Figure 5-98 MySQL Client session: Assigning user rights
You can check that the privileges have been assigned by using the command:
SHOW GRANTS for user
338
Lotus Domino 6 for Linux
Figure 5-99 MySQL Client session: Displaying user rights
If you would like, you can go ahead and run a quick test to verify that testuser
now has the correct rights. We demonstrate much the same in the next section,
when we create the database and tables we will be working with.
Figure 5-100 MySQL Client session: Creating a table, inserting data into the table, and
displaying the data in the table
Creating a database
Creating a database is a simple matter. The following command will create a
database for you:
mysqladmin -u testuser -p create sample_database
Chapter 5. Domino in action
339
Alternately, you can use the mysql client method:
mysql> CREATE DATABASE sample_database
Figure 5-101 MySQL Client session: Creating a database and verifying its existence on
the system
If you later find that you would like to delete the database from the system, use
the command:
mysql> DROP DATABASE <name>
Creating a table
Now that you have a database, you need a table to manage and organize the
data. The syntax is:
mysql> CREATE TABLE
-> <column1> <type>
-> <column2> <type>
-> <column3> <type>
and so on... ->);
<name> (
<flags>
<flags>
<flags>
In this example, we demonstrate creating a table named EMPLOYEE. We won't
worry about normalizing our tables. For columns we will have: EMPNO,
FIRSTNAME, MIDINIT, LASTNAME, WORKDEPT, PHONENO, HIREDATE,
SEX, EDLEVEL, BONUS, COMMISION, and SALARY.
340
Lotus Domino 6 for Linux
Figure 5-102 MySQL Client session: Creating a table and verifying its existence
We can verify the characteristics of the table by using the command:
describe <table>
Figure 5-103 MySQL Client session: Displaying the table format
If you want to delete the table, use:
DROP TABLE tablename;
Chapter 5. Domino in action
341
If you want to rename the table, use:
RENAME TABLE table TO new_tablename;
If you want to change the format of a column or remove a column, refer to the
MySQL Reference Manual regarding ALTER
Configuring ODBC
ODBC stands for Open Database Connectivity. It is an open standard for an
application program interface (otherwise known as API) used to access a
database. Each database vendor will need to have an ODBC driver that will allow
communication from the API to the database. This allows for the abstraction of
the specific database programming language so that you now have flexibility in
the number of databases that can be supported. More concisely, you only need
to know the language of the ODBC API in order to communicate to any database
product that has an ODBC driver.
MyODBC
The ODBC driver we will using is MyODBC, which is the ODBC driver from
MySQL. All that is required is to install the driver. The essence of this package
comes in the form of a shared library named libmyodbc.so. This library will act as
the translation key when it is called on by an ODBC manager.
Since it is a static library, there isn't anything in the way of configuration
necessary for MyODBC.
unixODBC
An ODBC manager is the actual interface between us and the database. This
program provides the point of communication that we can interact with using the
language as defined by the ODBC API. The ODBC manager then figures out the
type of database that is being targeted and handles communication with the
database by using the driver we specify in configuration. The ODBC manager we
are using is called unixODBC and as we mentioned earlier, it is provided with
most distributions of Linux.
The ODBC driver for MySQL needs to be defined in the odbcinst.ini. As you can
see in our installation, the PostgreSQL section is defined as well. Here you will
want to:
1. Comment out the PostrgreSQL section as it is not being used (any line that
begins with a # is commented out and will be ignored).
2. Make sure the section that defines the MySQL driver is defined and not
commented out.
3. Make sure the file libmyodbc.so exists and is located where the Driver
parameter indicates.
342
Lotus Domino 6 for Linux
Figure 5-104 Telnet session: obdcinst.ini example contents
Links are definitions of target databases. We will need to use links to define what
database we want to connect to, how we will connect to it, and how we will
communicate with the database. The odbc.ini defines the links that are available
for users to connect to. You can copy the sample odbc.ini that is provided with the
documentation to the /etc directory. In our installation, the sample was located at
/usr/share/doc/packages/MyODBC/odbc.ini. It will have some default values, but
the necessary configuration information is below:
[Link_Name]
Driver
driver_file # driver being used to access the database. Refer to the
driver being used in the odbcinst.ini described above.
Server
server_the_db_is_on
DB
database_name
Port
3306 # port being used. This can be verified by checking the
/etc/services file
Figure 5-105 Telnet session: Verifying example odbc.ini contents
Chapter 5. Domino in action
343
Once you are finished configuring the /etc/odbc.ini, go ahead and copy it to a file
named .odbc.ini in the home directory of the user who will be connecting. Each
user can reference this file with ~/.odbc.ini. In this example, you would issue the
following commands to copy the file (assuming the Domino user is notes).
su - notes
cp /etc/odbc.ini ~/.odbc.ini
Testing ODBC
We can test our configuration by connecting to the sample database we created
earlier. The isql program allows us to test OBDC connectivity. The syntax is:
isql <odbc.ini reference> <user> <password>
Here we use the -v option to get a verbose output in case something goes
wrong.
Figure 5-106 Telnet session: Testing ODBC connectivity
Remember, you may run into issues where connectivity is denied based on the
host or user/host combination. It is important to remember, when creating a user
record, that each host/user combination needs to be explicitly listed in the user
table or the MySQL database, even if it is just the difference between the
hostname and the fully qualified name. Following is a sample entry for adding a
user named usera on samplehost.domain.com which would give connectivity to
the whole RDBMS.
GRANT USAGE ON *.* TO usera@samplehost.domain.com identified by 'password';
FLUSH PRIVILEGES;
344
Lotus Domino 6 for Linux
Testing Domino connectivity to the database
Now that we know ODBC works, we can test Domino connectivity by running
dctest. This binary is located in the binaries directory. By default it will be installed
in the /opt/lotus/notes/latest/linux directory. Make sure that you are running this
test as the notes user.
As mentioned earlier, dctest will require the library libodbc.so. The unixODBC
install puts a libodbc.so.1.x.x file in the /usr/lib directory. Make sure there is a
symbolic link named libodbc.so in the Domino binaries directory that has the
/usr/lib/libodbc.so.1.x.x file as the target. The command for this is:
ln -s /usr/lib/libodbc.so.1.x.x /opt/lotus/notes/latest/linux/libodbc.so
After this is installed, run dctest. The command is ./dctest if you are presently in
the binary directory. When the menu appears, select Option 3 for ODBC.
Figure 5-107 Telnet session: Testing Domino to ODBC connectivity with dctest
Enter the same data that we had used when we tested the ODBC data source
with isql. The dctest should indicate a successful connection.
Chapter 5. Domino in action
345
Figure 5-108 Telnet session: Results of dctest
5.4.5 Setup and configuration of the Notes/Domino application
Notes/Domino now allows you to integrate backend data with much less effort
than in previous versions. In Domino 6, configuration is done within the database
itself. The steps are:
1. Configure connectivity with a Data Connection Resource and the database
properties.
2. Link the data to fields in the database.
And you're done. As you can tell, linking your Domino database to an external
source is a pretty simple affair.
Configure connectivity with a Data Connection Resource and
the database properties
In this section we describe how to:
1. Make the Notes database
2. Create a Data Connection Resource
3. Allow the Notes database to use an external database
First we will need to create a database to serve as our sample. We begin by
starting the Domino 6 Designer from a Windows 2000 workstation.
346
Lotus Domino 6 for Linux
Figure 5-109 Start Domino Designer
Making the Notes database
Once the Designer client has started you will be presented with a start page.
Choose Create a new database.
Figure 5-110 Domino Designer: Creating a new database
The first step is to create a new database. We used a template created for this
example called MySQLEmp. This database will house Employee information.
Chapter 5. Domino in action
347
Figure 5-111 Domino Designer: New Database
For the server, enter the name of the Domino 6 server where the Domino for
Linux installation is housed.
Choose a name for your application. We chose MySQL Employee database. The
Domino 6 template for this application is named MySQLEmp.
348
Lotus Domino 6 for Linux
Creating a Data Connection Resource
Figure 5-112 Domino Designer - Data Connection
The first part of configuring the application to use external data is to set up
connectivity to the MySQL database. Then, point to the appropriate table Domino
will use. These two steps are handled in the Data Connection Resource or DCR.
You can find this information under Shared Resources/Data Connections.
In the left-hand pane of Designer under Recent Databases, select Shared
Resources -> Data Connections -> New Data Connection Resources.
Chapter 5. Domino in action
349
Figure 5-113 Domino Designer: DB2 Data Connection
On the Data Connection dialog box, enter a name of MySQL Data Connection
Resource. You can put the alias MDCR in the Alias field since the name is so long.
For Class and Type enter RDBMS and ODBC respectively. For User Name enter
testuser or the appropriate account for your MySQL installation, and supply the
password in the Password field. For Database enter adminDB, then click Browse
Metadata.
350
Lotus Domino 6 for Linux
Figure 5-114 Domino Designer: Choosing possible tables to use in our Data Connection
In the Browse External Metadata dialog box, select EMPLOYEE for Table, then
choose OK to close the dialog.
Chapter 5. Domino in action
351
Figure 5-115 Domino Designer: Completed Data Connection
Figure 5-115 is an example of what your data connection should look like.
352
Lotus Domino 6 for Linux
Allowing the Notes database to use an external database
Figure 5-116 Database Properties: Allowing the use of external databases
Open the Database properties dialog box (from the main menu, select File ->
Database -> Properties). On the first tab, select the “Allow connections to
external databases using DCRs” checkbox.
Chapter 5. Domino in action
353
Link the data to fields in the database
Figure 5-117 Domino Designer: Employee Form
Next, select the icon for Forms in the left-hand navigation pane, then select
EmployeeForm.
Set the default Data Connection on the Form properties. This is on the defaults
tab (the second tab). When you configure a field to use an external data source,
the default information for the data connection is supplied automatically. You can
later select another Data Connection Resource if you want to.
354
Lotus Domino 6 for Linux
Figure 5-118 Domino Designer: EmployeeForm form properties
Set the default Data Connection on the form properties dialog. This is on the
defaults tab (the second tab). When you configure a field to use an external data
source, the default information for the data connection is supplied automatically.
You can later select another Data Connection Resource if you want to.
Chapter 5. Domino in action
355
Figure 5-119 Domino Designer: EMPNO field properties
Double click on the EMPNO field to open the field properties dialog. Enable
“External data source” by checking that box. Next to “Data Sources Options” click
Browse.
356
Lotus Domino 6 for Linux
Figure 5-120 Domino Designer: Browse MySQL EMPNO
For “Data Connection Resource” select MySQL Data Connection Resource.
For “Table” select EMPLOYEE. For “Columns” select EMPNO, then click OK.
Chapter 5. Domino in action
357
Figure 5-121 Domino Designer: EMPNO field properties
On the very bottom of the properties dialog, select Key Field. Notice the Store
Locally checkbox has disappeared. This is because Key fields must be stored
locally.
358
Lotus Domino 6 for Linux
Figure 5-122 Domino Designer: FIRSTNME field properties
Close the properties dialog and double-click the FIRSTNME field to open the
properties dialog for that field. Enable “External data source;” next to “Data
Source Options,” select Browse.
Almost exactly as we did before, for “Data Connection Resource” select MySQL
Data Connection Resource. For “Table” select EMPLOYEE. For “Columns”
select FIRSTNAME, then click OK.
We leave the Data field radio button selected. This will store this information
solely in the MySQL database.
Chapter 5. Domino in action
359
Figure 5-123 Domino Designer: LASTNAME field properties
Close the properties dialog and double click the LASTNAME field to open the
properties dialog for that field. Enable “External data source;” next to “Data
Source Options,” select Browse.
Browse for the appropriate field, as you have done previously. Back on the
properties dialog, enable “Store data locally.” This information will now be stored
on the MySQL database and Notes database.This allows us to see the data in a
view.
For all remaining fields in the EmployeeForm, repeat the steps to enable
“External data source” and browse the “Data source options,” to ensure you
select the correct MySQL column for the field you are working with. Do not
enable “Store data locally” for any additional fields.
360
Lotus Domino 6 for Linux
Once you’ve completed the modifications for each field, press Esc to close the
form and select Yes to save the form.
Testing
Open the database and you can see the database has no documents.
Figure 5-124 Lotus Notes Client: Database Open DB2EMP
Notice there is no data in the database. The new database is empty at this point.
Note: If you want to import data see the Lotus Domino Designer 6 help
database, document “Importing data from an external database into an
application,” for more information
Figure 5-125 MySQL client session: Verifying no data in the EMPLOYEE table
We can check to make sure that there is no data in the EMPLOYEE table by
issuing a simple select statement.
Next we will create a form and put some data in the database.
Chapter 5. Domino in action
361
Figure 5-126 Notes client: Creating a form in MySQL Employee DB
From the menu bar choose Create -> EmployeeForm.
Figure 5-127 Notes Client: Filling out the EmployeeForm
Fill out the form and save it. At the very minimum, the Employee Number field will
have to have a value since it was configured to not allow a null value.
Save and close the form.
362
Lotus Domino 6 for Linux
Figure 5-128 Notes Client: Verifying data in the All Employees view
Switch to the All employees view. Notice the view only displays the LASTNAME
and the EMPNO fields. This is because they are the only fields stored locally.
Go back to the database and you will notice that the table has been updated.
Figure 5-129 MySQL Client session: Verifying Domino inserted the form data
The following SQL command verifies that the information is now stored in the
database:
select * from EMPLOYEE
If you delete the document, you can go back to the database and see that it is
deleted from there as well.
Chapter 5. Domino in action
363
Figure 5-130 MySQL Client session: Verifying Domino removed the form data
As you can see, when we ran the select statement, the form data is no longer in
the database.
That’s it! You have successfully used a Domino application to access employee
data in a MySQL database. This process can easily be modified to work with
production data in a production application.
364
Lotus Domino 6 for Linux
6
Chapter 6.
Domino as a Web server
In this chapter we describe how to configure a Domino 6 server to work as a Web
server.
We discuss in detail several aspects of implementing the HTTP task for Domino
6, which improves the performance and scalability over previous releases. The
most beneficial enhancement to the Domino 6 HTTP task is the addition of
several security options specific to the HTTP protocol.
© Copyright IBM Corp. 2002. All rights reserved.
365
6.1 Linux Operating System configuration
Considering the temporary nature of connections under the HTTP protocol (each
request opens a connection, sends the message, returns the response, and
closes the connection), particular care must be taken in configuring the TCPIP
part of the Linux Operating System.
6.1.1 Basic recommendation
It is possible that some other HTTP server could be running on your system, like
Netscape or Apache. The only precaution is to check if other HTTP daemons are
running on the Linux system using the default port 80.
Use the ps -ef command and pipe the output to the grep command to check
this:
# ps -ef | grep http
Note: The UNIX grep command searches a file for a pattern. It also reads
from the standard input so it can be used in a pipeline command.
You should not see any HTTP-related task running on your system.
Use the netstat command to see if any daemons are using port 80:
# netstat -an | grep ":80"
In this case the command should not have any output. If there are some
daemons listening on port 80 you may have output like this:
tcp 0 0.0.0.0:80 0.0.0.0:* LISTEN
Generally you can have other HTTP processes running on your system, listening
on different ports. Running other HTTP systems on the same Linux server is not
recommended if you want to have a high performance Domino Web server.
6.2 Domino Web server configuration
The configuration of the HTTP server in Domino 6 is a very easy task. Most of
the work is done at Domino installation time if you check the options to install the
HTTP task.
Note: Refer to Chapter 2, “Installing Domino 6 for Linux” on page 83 for
information about installing Domino.
366
Lotus Domino 6 for Linux
If you choose to install the HTTP task, you will find the HTTP name in the
Notes.ini file to the ServerTasks entry:
ServerTasks=replica,router,update,amgr,adminp,HTTP
Tip: The content of the Notes.ini file is not case sensitive, so there is no
problem if the name of the task is written with capitals and the effective name
of the binary file is http. Remember that UNIX is case sensitive.
6.2.1 Settings on a Domino Web server
To change the settings of the Domino Web server, use the following steps:
1. Start the Domino Administrator.
2. Choose the server you want to reconfigure.
3. Choose the Configuration tab.
4. Choose Server -> All Server Documents.
5. Double-click the Domino server you want to change or select the server and
click Edit Server.
Figure 6-1 Web server configuration
Chapter 6. Domino as a Web server
367
To change the Domino Web server port, click Ports -> Internet Ports in the
server document. The Web tab should be selected by default.
It is best to use the default port 80 for a non-secure Web server and port 443 for
a secure Web server.
Note: The secure server will not run until you create a server certificate. See
“Setting up SSL on a Domino server” in the Domino 6 Administration online
help.
Here you can also choose if you want to allow name and password
authentication for clients connecting over TCP/IP; the default is Yes. Also specify
whether you will allow anonymous connection over TCP/IP; again, the default is
Yes. The same is true for the SSL protocol.
Next, select Internet Protocols -> HTTP (see Figure 6-2). In this section, you
should make at least the following changes:
In the Basic section enter a hostname and enable the “Bind to host name”
option if you use a Domino partitioned environment. The parameters
“Maximum request over a single connection” and “Number of active threads,”
which are discussed later in this chapter, should be set.
In the Enable Logging section, enable either log files or Domlog.nsf if you
want to create statistics about access to your Web server (for example, by
whom, how much, and which pages were accessed). Enabling either type of
logging will affect server performance.
In the Mapping section, customize the Home URL. It should be either a Notes
database or an HTML file.
368
Lotus Domino 6 for Linux
Figure 6-2 Web server Internet protocol specifications
6.2.2 Starting, stopping, and refreshing the Domino Web server
There are two ways to start the Domino 6 Web server:
Manually, by entering load http at the server console
Automatically at Lotus Domino 6 start-up, by adding it to the ServerTasks in
Notes.ini
You can start only one HTTP task per Domino server; you have to use the
Domino partitions feature to have more than one HTTP task running on the Linux
server.
To stop the Web server, enter the command tell http quit at the server
console, or remove HTTP from the ServerTasks in Notes.ini to stop it from
starting at the next restart of the Domino server.
Chapter 6. Domino as a Web server
369
Type the command tell http restart at the server console to refresh the Web
server, and if you made changes in the Domino Directory related to the HTTP
configuration.
Tip: You can use the server -c Domino command to send a Domino console
command from a UNIX prompt. Type server -c "tell http quit" to stop the
HTTP task from a UNIX prompt.
6.3 Security on the Web server
In this section we describe the Web security features in Domino 6. Some new
security features were added to Domino 6, including HTTP protocol security
options.
6.3.1 Internet certificates
Domino certificate authorities can also issue Internet certificates to Notes users,
Internet clients, and Internet servers. The Domino certificate authority issues
signed X.509 format certificates that uniquely identify the requesting client or
server. Internet certificates are required when sending encrypted or
electronically signed S/MIME mail messages and when using SSL to
authenticate a client or server.
S/MIME is a protocol used by clients to sign mail messages and send encrypted
mail messages over the Internet to users of mail applications that also support
the S/MIME protocol.
Domino 6 provides native X.509 V3 support along with the Notes certificate.
6.3.2 Browsing Domino databases via the Internet
A common security issue is accessing the log.nsf database via a Web browser,
for example:
http://www.itsoredhat.com/log.nsf
Although the log.nsf database does not contain critical information, a Domino
system that allows access to the system log is not secure.
To avoid this you have to change the ACL of the database to either:
Default No Access
or
Anonymous No Access
370
Lotus Domino 6 for Linux
You have to do one or the other in each Domino database in your data directory
that must be kept inaccessible to Internet users.
6.3.3 Session authentication
A session is the time during which a Web client is actively logged on to a server.
Session-based name-and-password security includes additional functionality that
is not available with basic name-and-password security.
Session-based authentication creates a temporary cookie that stores the user
name and password on the browser client. As the user traverses the site,
responses for name and password are provided by the cookie.
This cookie passes the user credentials for every database within the Domino
site, thus alleviating concerns of realm-based authentication.
Tip: If you wish to retain realm-specific logins, session-based authentication
cannot be used.
Once a user logs in to the Web site, the credentials are passed to every database
hosted by the server. The user login information, however, is not shared across
virtual hosts or virtual servers; it is based on the host name of the URL request.
You can configure session authentication on the Domino Web Engine tab of the
server document, in the HTTP Sessions section. This section is shown in
Figure 6-3.
Chapter 6. Domino as a Web server
371
Figure 6-3 Session authentication settings in the server document
With the Session Authentication feature enabled, you can use the following
command to find out who is using a Web browser to access your Domino 6
server:
> tell http show users
> 04/24/2002 11:00:07 AM There are 2 current HTTP user sessions
04/24/2002 11:00:07 AM User Name IP Address Expires
04/24/2002 11:00:07 AM red book 9.95.35.56 11:29:52 AM
04/24/2002 11:00:07 AM red book 9.95.35.56 11:29:28 AM
The session authentication feature is based on the cookie mechanism; it allows a
Web server to store pieces of information on the client computer through the
Web browser. These pieces of information, known as cookies, are stored on the
client machine.
Tip: To return the value of a cookie, add a computed field called
HTTP_COOKIE to your form using an empty string as a formula. This field will
be populated with the cookie information. You can then use the field
HTTP_COOKIE in other formulas on the page.
372
Lotus Domino 6 for Linux
6.3.4 Domino Web realms
To minimize the need for a Web user to repeatedly supply their password,
Domino administrators can set up Web Realms on the server. Realms, based on
ACLs, are zones of file protection on a Web site.
The browser automatically stores and sends the credentials for pages in the
same Realm, so the user can move throughout the Realm after supplying the
password just once.
Access the page for setting up Realms by selecting the server document you
wish to modify, then choose Actions -> Create Web R5-> Realm. The resulting
screen is shown in Figure 6-4.
Figure 6-4 Web Realm: Basic setting
Provide information for the Path field to permit user navigation of the directory
defined in the Realm.
Note: Refer to the Domino Administration 6 Help for additional information
about configuring Realms.
Chapter 6. Domino as a Web server
373
6.3.5 Domino file protection
In Domino 6, File Protection documents stored in the Domino Directory database
are the basis for configuring browser access control to files.
You can enforce file system security for files that browser users can access. For
example, for HTML, JPEG, and GIF, you can specify the level of access for these
types of files and the names of the users who can access them.
You can apply file system protection on CGI scripts, servlets, and agents.
However, the file protection does not extend to other files accessed by the
scripts, servlets, or agents. For example, you can apply file protection on a CGI
script that restricts access to a group named “Web Admins.” However, if the CGI
script executes and opens other files (or causes other scripts to be executed), the
File Protection document is not checked to determine whether “Web Admins” has
access to these files.
File protection also does not extend to files in the following directories, which
contain default image files and Java applets that are used by the HTTP Web
server and other applications (for example, mail databases):
local/notesdata/domino/java, accessed via Web browser using the path
http://itsoredhat/domjava
local/notesdata/domino/icons, accessed via Web browser using the path
http://itsoredhat/icons
File system protection does apply, however, to files that access other files, for
example, HTML files that open image files. If a user has access to the HTML file
but does not have access to the JPEG file that the HTML file uses, Domino does
not display the JPEG file when the user opens the HTML file.
You have to consider setting up File Protection documents for each directory
Web users are able to access. There is no file protection for an upgraded or new
Domino 6 server until you create File Protection documents.
You do this by choosing Actions -> Create Web R5-> File Protection. The
resulting screen is shown in Figure 6-5.
374
Lotus Domino 6 for Linux
Figure 6-5 File Protection: Basic setting
The ability to set file protection might be needed in mixed environments, where
you have some data in the Notes databases and other data in text files. These
protection settings apply to all Web servers on a Lotus Domino 6 server.
Chapter 6. Domino as a Web server
375
Y
Figure 6-6 Access control for file permissions
You can only grant access to users specified in the server’s Domino Directory,
even if you are allowed to enter any user. You assign these permissions by
clicking Set/Modify Access Control List in the Access Control tab.
Figure 6-7 Access Control List for file protection
376
Lotus Domino 6 for Linux
There are three access levels you can assign to a user:
Read/Execute access (GET method)
Write/Read/Execute access (POST and GET method)
No Access
In the Name field, specify the user name by typing or by using the Domino
Directory lookup. After assigning the appropriate access permission, click OK to
apply this user to the Access Control List. To remove a user, click the name and
click Clear.
6.3.6 HTTP protocol security
Domino 6 is better equipped to fend off cyber attacks than Domino R5. Several
new protocol-related security settings have been added to the Server document
under the Internet Protocols -> HTTP tab. These new settings are designed to
discourage attacks that probe for buffer overflows or request parsing errors.
The new settings for HTTP protocol security are:
– Maximum URL Length
– Maximum Number of URL Path Segments
– Maximum Number of Request Headers
– Maximum Size of Request Headers
– Mazimum Size of Request Content
Maximum URL length is the URL length allowed to be received from HTTP
clients such as Internet browsers. This length includes the query string which
defaults to 4 kilobytes. We do not recommend increasing this limit unless your
applications require extremely long query strings.
Maximum number of URL path segments limits the number of segments allowed.
For example:
http://www.itsoredhat.com/a/b/c/d/e/f/g/h/i/j/k/l/m/n/o/.........etc.
The default value for this setting is 64.
Maximum number of request headers helps to protect against buffer overflow
probes. By default, the Domino 6 HTTP task allows only 48 headers.
Maximum size of request headers limits the actual size or total length of the
header in the request. The default setting is 16 kilobytes.
Chapter 6. Domino as a Web server
377
Maximum size of request content restricts the amount of data that can be
contained in a request such as a form. The default value is 10 megabytes. The
“Maximum Post data” setting from Domino R5 is supported in Pre-release 1.
Note: Refer to the Domino Administration 6 Help for additional configuration
information about these new HTTP security settings.
6.4 Troubleshooting
The HTTP process usually operates without incident. However, there are a few
issues that are specific to HTTP process troubleshooting described in this
section.
6.4.1 HTTP does not respond
To check if the HTTP process has hung or simply is overloaded by a lot of client
requests, a good basic test you can do is telnet to the process in the right port, by
default port 80.
For example, if your Domino server is running on a host named itsoredhat and
listening on the default port 80, you have to run the command:
# telnet itsoredhat 80
The command output is as below:
# telnet itsoredhat 80
Trying 9.95.35.56...
Connected to itsoredhat.
Escape character is ’^]’.
Now you can issue an HTTP command, for example get:
Trying 9.95.35.56...
Connected to iena.
Escape character is ’^]’.
get
Note: The get command should return the HTML header information from
your default homepage. This header should include references to Domino and
your operating system.
In this case the get command receives an answer from the HTTP process; if
HTTP was hanging, the get command would not receive any responses.
378
Lotus Domino 6 for Linux
Note: This technique can be implemented also for the other Domino Internet
processes, like IMAP, LDAP, and POP3, by choosing the appropriate port
number (for example, 143 for IMAP) and the appropriate protocol command
(for example, hello for IMAP).
6.4.2 Using the tell command
Domino 6 utilizes a console command that helps in troubleshooting if HTTP
hangs. This command is tell http Show Thread State.
When entered at the Domino console, this command displays the current status
of each active thread, and which URL, if any, the thread is processing.
Following is a sample output for three threads. The first two threads are idle; the
third thread (0xf9) is processing the URL
GET /reference.nsf/ Refresh?OpenAgent HTTP/1.0
> tell http
06:37:09 PM
Other Info:
06:37:09 PM
Other Info:
06:37:09 PM
Other Info:
show thread state
HTTP Thread State: Thread: [fb] State: [Worker waiting for work]
HTTP Thread State: Thread: [fc] State: [Worker waiting for work]
HTTP Thread State: Thread: [f9] State: [Worker processing request]
GET /reference.nsf/Refresh?OpenAgent HTTP/1.0
If the HTTP process is in a hung or partially hung state, this command can be
used to determine if a particular thread has been processing the same URL for
too long. If the thread is still processing the same request or URL for more than a
few minutes, then the thread is likely hung. You can check this by repeating the
command after a few minutes.
In many cases, if the HTTP task is hung, the Domino administrator can attempt to
shut the HTTP server task down, but the task does not always shut down
gracefully. In Domino 6, when an administrator issues the command tell http
quit, if HTTP is waiting for a hung thread to complete during shutdown, HTTP
outputs this thread ID and the URL it is working on to the console. For example:
> tell http quit
04/28/2002 06:37:51 PM HTTP Waiting For Thread: Thread: [f9] State: [Worker
processing request] Other Info: GET /reference.nsf/Refresh?OpenAgent HTTP/1.0
This information can be used to determine the hung thread, and which URL the
thread is processing. This is similar to the use of the req*.log files (described in
the following section). The thread ID can be correlated against the req*.log file
that pertains to that thread.
Chapter 6. Domino as a Web server
379
6.4.3 HTTP thread debugging
Additional diagnostics for the Domino HTTP process are available, and can be
enabled when troubleshooting HTTP problems.
A request log file can be created for each worker thread by placing the parameter
"debugthreadlogging on" in the httpd.cnf configuration file. When this is
enabled, a file is created for each active thread, with information about each
request processed appended to the file as requests are made to the server
(roughly 10-15 lines per request). These files can be extremely useful to pinpoint
causes of HTTP crashes or hangs.
As an alternative to placing "debugthreadlogging on" in the httpd.cnf,
administrators can enter the following command at the server console:
>tell http debug thread on
This dynamically sets the thread logging debug flag, and the server begins to
create thread logs immediately. However, this debug flag remains in effect only
until the HTTP server is restarted. This method of turning on debug does not
place the parameter in the httpd.cnf file.
The created files are named req###.log , where ### is the thread ID for the active
thread, and they are written to the Domino data directory. For example,
req111.log corresponds to the lwp-id 111 from the nsd.
These req*.log files do not contain a date/time stamp, so they must be used in
conjunction with Domino logging (DOMLOG.NSF or Access logs). However,
each line of the logged request displays the number of milliseconds since the
HTTP process last started (the bold number in “Start Request” line). This allows
you to determine the amount of time that each phase of the request process
takes.
Note: Use these variables for debugging only. They have a significant impact
on Domino server performance when they are enabled.
6.5 Domino 6 console tell commands
Lotus Domino 6 has tell commands that can be used for the HTTP process.
These commands are issued on the server console. Some of the commands are:
380
tell
tell
tell
tell
http
http
http
http
Lotus Domino 6 for Linux
show users
show thread state
restart
show security
tell http show virtual servers
tell http quit
tell http show users
This command can only be used if the server is configured to use session-based
tracking for the Web. Session tracking is a feature of session-based
authentication. To enable it, edit the server document in the Domino Directory. In
the Internet Protocols section, select Domino Web Engine. By default, the entry
for “Session authentication” is disabled. Select Enabled to allow the HTTP task
to report on authenticated users. This command will show the User Name, IP
address and the time of expiration (which is 30 minutes by default). This will only
reflect users who are authenticated, and cannot be used to track anonymous
users.
tell http show thread state
This command will list the current state of each active thread (as well as the
accept thread and logger thread). If the thread is processing a request, the
output of this command will indicate the URL being processed.
tell http restart
This will cause the HTTP task to shut down and reload. This is the equivalent of
tell http quit followed by load http. This command is valid for the other
Domino processes, too.
tell http show security
This outputs current status on the use of SSL for the server and each virtual
server.
tell http show virtual servers
This outputs the current configuration for virtual servers.
tell http quit
This will cause the HTTP task to shut down.
6.6 Virtual servers and host
If you are a corporate intranet administrator who provides services to multiple
customers, you can set up virtual servers on a single Domino Web server. A
single Domino Web server can then host several Web sites. Using virtual servers
allows you to maintain separate sites without incurring the expense of additional
hardware and software.
You can configure each site in Domino with its own IP address, default home
page, customized Web server messages, and HTML, CGI, and icons directories.
Chapter 6. Domino as a Web server
381
The Domino data directory, however, is not individually configured for each virtual
server; it is shared by all virtual servers.
The difference between a virtual server and a virtual host is that virtual servers
have different IP addresses and different hostnames, while virtual hosts use the
same IP address but different hostnames.
Note: Refer to system administration documentation for your operating system
environment for installing and configuring additional network interface cards
and IP addresses. This document only addresses Domino-specific
configuration settings.
6.6.1 Create virtual server or host
If you want to create a virtual server or host, in the Domino Directory select the
Domino server and choose Actions -> Create Web R5-> Virtual servers from
the menu bar.
Now you will be asked whether you want to create a virtual host or a virtual
server.
Choose Virtual Host. Creating a virtual server is pretty much the same, except
you will be asked for the IP address instead of the hostname.
On the Basics tab, enter the hostname of your added virtual host.
On the Mapping tab, specify the path names mapping to the HTML directory, the
Icon directory, the CGI directory, and the home URL, like a Domino Web server
configuration. This tab is the same for both server types.
The Security tab lets you make some security settings for your virtual servers.
You can decide if Name and password and/or anonymous authentication can be
used.
You can also customize the SSL settings to comply with your company’s security
policies. For more information on SSL, refer to the Domino Administrator 6 Help.
6.6.2 Create URL mapping and redirection
There are three different types of URL mappings. Depending on the type you
choose, you will get three or four tabs to configure the mapping.
URL-to-URL mapping enables you to define an alias name for URL paths. For
example, you could map /MyPictures to /images. Figure 6-8 shows URL-to-URL
mapping.
382
Lotus Domino 6 for Linux
URL-to-Directory mapping enables you to specify which URL path should be
mapped to which real directory on your server. For example, if you have all the
images you are using in your Web pages in a directory /web/images, you have to
create a directory mapping /web/images to /YourPictureDirectory to be able to
access these pictures through the Internet. If you have defined a
URL-to-directory mapping, you will also have to specify if your data can only be
read or if it should be executable.
Redirection URL-to-URL. Using this, you can move pages to a different server
without making the old URL invalid.
Figure 6-8 shows the options for the Basics tab.
Figure 6-8 URL mapping/redirection document: Basics
Chapter 6. Domino as a Web server
383
Figure 6-9 shows the Site Information tab. For each choice, specify in the Site
Information tab which virtual server is affected by this mapping.
.
Figure 6-9 URL mapping/redirection: Site Information
384
Lotus Domino 6 for Linux
Figure 6-10 shows the options available under the Mapping tab. On the Mapping
tab, specify the actual mapping.
.
Figure 6-10 URL/Mapping redirection: Mapping
6.7 Domino and Java
At the time of this writing Lotus Domino 6 includes a Java Virtual Machine (JVM)
based on Sun Microsystem’s JDK. The JVM is automatically installed in the
Domino program directory.
If you have configured the HTTP server task to support Java servlets, the task
will load the JVM when the HTTP task is started. This configuration is available in
the Server document under the Internet Protocols tab, Domino Web Engine
sub-tab.
Chapter 6. Domino as a Web server
385
6.7.1 Java servlets
A servlet is a Java program that runs on a Web server in response to a browser
request. Servlets for Domino must conform to the Java Servlet API Specification,
an open standard published by Sun Microsystems, Inc.
Configuring
On a Domino 6 server, Java servlet support is disabled by default. In order to
enable Java servlets, edit the server document and go to the Domino Web
Engine tab, then find the section labeled “Java Servlets.” Set the appropriate
value for the field “Java servlet support.” There are 3 options:
None.
Domino Servlet Manager (which initializes the Domino JVM and starts the
servlet manager).
Third party Servlet manager (which initializes the Domino JVM only). In order
to use a third party servlet manager, one must install the appropriate software
(such as IBM WebSphere) which will in turn place lines in the HTTPD.CNF file
to allow the servlet manager to plug in to the Domino HTTP server.
Running
The basic steps to run a servlet in Domino 6 are as follows:
1. In the “Servlet URL Path” field, enter the URL path you wish to use to indicate
that the resource is a servlet (the string /servlet is the default).
2. Create a directory under the /local/notesdata/domino directory (for instance
domino/servlets) where you wish to store your servlets.
3. Edit the “Class Path” field to include the location of your specific servlet. You
can specify .jar and .zip files in this field.
4. Copy the class files to the data/domino/servlets directory.
5. Issue the server console command tell http restart to reload the HTTP
server. In your Web browser, enter a URL that contains the servlet name
(without the file extension), such as:
http://hostname/servlet/HelloWorldServlet
Note: The addition of any servlets to the servlet directory will require a restart
of HTTP before the servlet manager will recognize the new servlet.
386
Lotus Domino 6 for Linux
6.8 Domino log and analysis tools
Domino 6 makes logging even easier for Internet service providers (ISPs), as
well as the rest of us. Domino 6 can now create text files that include the IP
address or host name of the server that the user requests. This way, you can
more easily use the logs to create statistics for virtual servers. To use this feature,
you must enable the “Extended log format” for the access log file in the server
document.
To create separate statistics for virtual servers, analysis tools still need to sort the
entries in the log file according to the different virtual servers’ IP addresses or
host names.
6.8.1 Domino Web log
To set up logging on your Domino server, you simply enable one of the logging
methods in the HTTP section of the server document in the Domino Directory.
(Because logging is very server-intensive, it is disabled by default.)
If you enable logging to domlog.nsf, the database is automatically created the
next time you start the server. If you enable logging to text files and specify a
directory for the files, Domino automatically creates the access log and error log
files.
Notice that you can select the format for the access log files (Common or
Extended Common) and the time format (LocalTime or GMT). Remember that
the Common format records only access information, and the Extended format
tracks access, agent, and referred information in the access log file. You can then
specify different names for the log files.
Figure 6-11 on page 388 shows the logging fields in the server document.
Chapter 6. Domino as a Web server
387
Figure 6-11 Domino Web logs
Logging fields
With Domino 6, you can specify whether you want Domino to create new log files
daily, weekly, monthly, or never. The log file duration applies to all log files on the
server. In addition, only one log file is maintained per Web server, including
servers set up as virtual servers. The name Domino gives to the log file depends
on the duration settings and the file names you specify in the server document.
In the “Exclude from Logging” section, you can prevent logging for specific types
of requests. For example, let’s consider that you don’t want to log image requests
on your server. So, you enter *.gif in the URLs field and image/gif, image/jpeg,
and image/bmp in the MIME types field.
You can also prevent logging for:
Specific HTTP methods
User agents
Status return codes
Hosts and domains
388
Lotus Domino 6 for Linux
6.8.2 Domino Log database analysis
When you enable logging to the Domino Log database, Domino automatically
creates the database using the template domlog.ntf. The basic design of the
database includes one form for log entries and one view for displaying them,
called Requests. The Requests view shows all records in the order that they
were created. To analyze the entries in your Domino Log database, you can
either use a Notes tool or one of several solutions from Lotus Business Partners.
You can customize the database with additional views, create agents to notify
you when specific events occur (such as, when a certain number of unsuccessful
login attempts occur), or modify the database to generate reports.
Chapter 6. Domino as a Web server
389
390
Lotus Domino 6 for Linux
7
Chapter 7.
Backup and virus protection
In this chapter we discuss different ways of protecting your Domino server in
case of hardware failure, or if your server is attacked by a virus.
You‘ll get an overview of:
Antivirus software for the Linux operating system level and for the Domino
server.
Operating system backup tools. Linux has its own backup tools that are easy
to use and work like those on most other UNIX operating systems.
Operating system backup tools from third-party vendors, which are more
complex, have a client-server architecture, and are compatible with other
platforms.
Domino backup tools from different vendors. While Domino server does not
have a built-in backup tool, there are some backup tools available from
third-party vendors.
© Copyright IBM Corp. 2002. All rights reserved.
391
7.1 Antivirus software
Why do you need antivirus software? Because it protects your data from viruses,
scans e-mail for viruses, tells you when you have a virus, and rids your system of
viruses.
Antivirus software works on Linux like it does on any other OS. It is uploaded into
memory and it scans open files, incoming data, and e-mail for different types of
viruses.
There are two types of antivirus software:
Operating system level antivirus software, which scans the files on the
computer for known viruses.
Application level antivirus software, which is written for a specific application,
such as the Domino server.
An operating system level antivirus product can be scheduled to run daily or
weekly at certain times (such as at midnight, at night, at the end of the work
hours, or the end of the week). We recommend that you schedule the antivirus
software to run outside work hours because it is a “heavy” task, demanding a lot
of CPU power, memory, and disk access.
7.1.1 Operating system level antivirus software
Antivirus software for Linux is a program that scans the files in the computer for
known viruses. It may also scan the memory or incoming data. When it finds a
virus, it shows a message and acts on the virus (for example, it can erase the
virus or put the virus in quarantine).
Following is a list of some of the companies that offer operating system level
antivirus software for Linux. For more information, visit their Web pages:
Norton AntiVirus, by Symantec http://www.symantec.com
ServerProtect for Linux, by Trend Micro http://www.trendmicro.com
eTrust InoculateIT for Linux and eTrust Antivirus, by CA http://www.ca.com
RAV AntiVirus Desktop, by GeCAD http://www.rav.ro
Kaspersky Anti-Virus for Linux Servers http://www.kaspersky.com
392
Lotus Domino 6 for Linux
7.1.2 Application level antivirus solutions for Domino Server
Antivirus software for the Domino server works at the application level, in this
case at the Domino level. It can scan for viruses in Domino databases and in files
attached to e-mail messages.
At the time of writing there are a few companies that offer antivirus products for
Domino for Linux. Following is a list of some of the companies that offer this type
of product. For more information, visit their Web sites:
Kaspersky Anti-Virus Business Optimal for Lotus Notes/Domino, by
Kaspersky. This was the first product of its kind released.
http://www.kaspersky.com
ScanMail for Lotus Notes, from Trend Micro, now includes Linux support. This
complements the offerings Trend Micro already has for Windows, AIX,
Solaris, OS400, and z/OS. http://www.trendmicro.com
Norton AntiVirus for Lotus Notes/Domino, by Symantec.
http://www.symantec.com
In the following sections, we describe these solutions in more detail.
Kaspersky Anti-Virus Business Optimal for Lotus
Notes/Domino
This product is a centralized anti-virus system for Lotus Notes/Domino for Linux.
The program integrates itself into the mail server as a supplemental module and
centrally checks for viruses in the incoming and outgoing e-mail traffic in
real-time.
Software requirements are as follows:
Linux Red Hat 6.0 (or higher)
Lotus Domino R5.02 (or higher) for Linux
ScanMail for Lotus Notes/Domino
Trend Micro ScanMail for Lotus Notes Linux is designed to provide a single,
comprehensive antivirus strategy for all current Lotus Domino messaging and
collaboration environments, with limited performance impact and management
cost. In addition, it offers Domino administrators one of the easiest antivirus
products on the market to use. ScanMail for Lotus Notes Linux provides an
intelligent antivirus and content security strategy to meet the increasing market
demand for a protected corporate messaging environment.
Chapter 7. Backup and virus protection
393
Some of the features of ScanMail for Lotus Notes 2.52 Linux are:
Virus Reduction
Uses multithreaded scan engine architecture to provide scanning with
minimal server overhead across a wide range of Lotus Notes server
platforms.
Provides the capability to scan e-mail, databases, and replication activity in
real time without sacrificing server performance.
Sends a customized alert message to the administrator upon detection of a
virus, sender, and receiver. Infected files can be automatically cleaned and
sent to recipients, with no disruption in message delivery.
Database and Replication Scanning
Monitors new or modified documents within Lotus Notes databases, and
scans files prior to closing.
Administrators can specify the databases to be scanned from either the Lotus
Notes console or the ScanMail for Lotus Notes interface. All modified data
can be scanned during replication.
Cleans existing database infections using on-demand and scheduled
scanning. Separate settings are available for scanning options and
notifications.
High-performance Scanning
Provides diskless scanning to maximize scanning efficiency and minimize
overhead impact on Lotus Notes servers.
Cleans existing database infections using on-demand scanning.
Provides broad platform support and scalability to meet the virus protection
needs of growing enterprises.
Using Trend Micro SmartScan™ technology, administrators can define trusted
servers within their Notes environment, allowing servers to skip redundant
scanning and improve overall scanning efficiency.
Incremental scanning allows administrators to scan only those documents
that have been modified since the previous scan.
Assists secure message delivery with policy-based e-mail filtering.
Flexible, Native Configuration and Management
Provides access to the ScanMail intuitive Lotus Notes interface from any
Lotus Notes workstation (including full integration in the Lotus Domino
administration Client) or Web browser.
394
Lotus Domino 6 for Linux
Support of Lotus Domino Enhancements
ScanMail for Lotus Notes supports the Lotus Domino cluster and partition
technology on all platforms, including the supported Linux distributions.
ScanMail for Lotus Notes supports the Lotus Domino-based unified
messaging solutions, such as Lotus Quickplace and Lotus Sametime (if
available from Lotus on the required OS).
Installing Trend Micro ScanMail for Lotus Notes/Domino
In this section we describe how to install Trend Micro ScanMail for Lotus Domino.
The system requirements are:
Operating systems:
– RedHat versions 6.2 or higher
– SuSE versions 6.4 or higher
Lotus Domino:
– Domino Server versions 5.0.3 or higher
40 MB available free disk space for program files, and 100 MB free disk space
for swap files
Note: We recommend that you consult the readme file for the latest
information before you install. This file is included in the package with the
program.
Pre-installation tasks
No special setup is required for the Domino installation or OS before you install
Trend Micro ScanMail for Lotus Domino. However, during the installation you may
be asked for information about your existing installation, so, for your convenience,
ensure you have this available before you start.
You should know the following:
What UNIX account you use to run the Domino server
What data directory you want to install on (or data directories in the case of a
partitioned server)
If you are not installing an evaluation license, you should have the ScanMail
serial number available.
Decide where you want your temporary files to reside
Installation
1. Stop the Domino server before installing ScanMail.
Chapter 7. Backup and virus protection
395
2. You must be logged in to the Linux server as root to install ScanMail. (For
partitioned servers, install a copy of ScanMail on each partition.)
3. Depending on whether you get the program package from a CD or download
it from the Web, expand the archive to an area on your machine.
You should now see the vlotus.tz file, the install script sminst, the readme file
readme.txt. and the License Agreement file.
4. Next, change to that directory and enter the following:
./sminst install
If the file sminst is not executable, change it to executable; for example, chmod
+rx sminst.
You are now requested to read and accept the License Agreement; see
Figure 7-1 on page 397.
396
Lotus Domino 6 for Linux
Figure 7-1 Accept License Agreement
Accept the License Agreement. Next, you are prompted for the UNIX account
under which you are running the Domino servers. You may also be prompted for
Chapter 7. Backup and virus protection
397
the data directory in case the install script can't fully qualify the notes.ini file; see
Figure 7-2.
Figure 7-2 Path to Domino Data Directory
If multiple Notes partitions are detected, you are prompted to identify which
partition you want ScanMail installed on.
Note: Install a separate instance of ScanMail for each partition you want to
protect, but do not use the same /temp directory for all instances.
Next, you will be prompted for a serial number. If you are installing an evaluation
of ScanMail, you may leave this blank and you will install a 30-day trial version.
If you have a full license, you should enter the ScanMail serial number; see
Figure 7-3 on page 399. The serial number can be found in the package provided
to you, or enclosed in the License Agreement. You may also have received the
serial number by fax or email.
398
Lotus Domino 6 for Linux
Figure 7-3 Enter Serial Number
Next, you are prompted for the ScanMail temporary directories.
Press Enter to accept the default, or enter the path that you want ScanMail to
use.
Chapter 7. Backup and virus protection
399
Figure 7-4 Location of temporary files
Note: When installing ScanMail on multiple partitions, use a different temp
directory for each installation of ScanMail; do not use the same directory for all
partitions.
400
Lotus Domino 6 for Linux
Figure 7-5 Installation complete screen
After the installation finishes, you should start the Domino server before
configuring ScanMail to your preferences.
Note: By default, all the real-time ScanMail scanning functions are enabled
when the Domino server is started to ensure your protection. Individual
services can be configured from their individual configuration documents.
Post-installation tasks
After installing ScanMail, we recommend that you add the ScanMail program
icons to your workspace for convenience, sign the ScanMail databases using the
administrator ID (an ID allowed to execute unrestricted agents), and set up
access control restrictions.
For more information, see the Getting Started Guide, available at:
http://www.trendmicro.com/download/documentation/emailgroup/smln.htm
Configuration of Trend Micro ScanMail for Lotus Notes/Domino
After starting the server, ScanMail begins operating and you are not required to
perform any actions. However, we recommend that you go through the
Chapter 7. Backup and virus protection
401
configuration and familiarize yourself with the default settings, and change them
as needed to match your security requirements.
ScanMail provides several ways to do administration. In addition to supporting
the Notes interface for administration, you can also opt to configure and control
the ScanMail tasks from a Web browser or the Admin Console. To use the Web
interface, just access:
http://<your_server>/smconf.nsf
If you want to make Web access safer, see the discussion about setting
Database Flags on page 410. To enable the Admin Console, you have to open
the database smadmR5.nsf and run the agent provided.
ScanMail also supports replication of the configuration database, for easy control
of a large number of servers or a distributed environment.
When you open up the ScanMail configuration database, smconf.nsf, you will see
the following screen.
Figure 7-6 Main configuration screen
402
Lotus Domino 6 for Linux
We recommend that you review the settings under MailScan and Database Scan
- Real-time Scan, since these are automatically active after installation; see
Figure 7-8 on page 404.
You can then review the other features for Email Filter Rules and set up a policy
for Scheduled or Manual Database Scan.
If you have purchased ScanMail, you should register and set up an update
schedule under Pattern Files, so automatic updates will be enabled. (The
automatic update is disabled for the 30-day evaluation.)
For more help, you can access the help database (smhelp.nsf) directly
(Figure 7-7), or select it under Support in the main configuration screen.
Figure 7-7 Help screen
In Mail Scan configuration, you can start by selecting what to scan. We
recommend scanning all files, including compressed files and embedded objects.
Chapter 7. Backup and virus protection
403
Figure 7-8 Scan options
Proceed to the selection of actions to take upon detecting a virus, and select
what matches your security policy (Figure 7-9 on page 405).
404
Lotus Domino 6 for Linux
Figure 7-9 More options
After this, you should review what levels of notifications are desirable and change
the texts for these to fit your policies and needs; see Figure 7-10 on page 406.
Chapter 7. Backup and virus protection
405
Figure 7-10 Notification screen
Similar settings should be done for the Real-time database scan and for the
Scheduled and Manual database scan.
A number of other options will be presented. One of the most widely used is the
ability to block attachments or e-mail based on the real file type of an attachment,
rather than on the filename/extension; see Figure 7-11 on page 407.
406
Lotus Domino 6 for Linux
Figure 7-11 Attachment Blocking
If you configure Attachment Blocking within the scan configuration page, you can
block individual attachments of the mail. In Mail Filter Rules, you can create a
policy to block an entire e-mail based on attachments or other properties; see
Figure 7-12 on page 408.
Chapter 7. Backup and virus protection
407
Figure 7-12 Filter rules
You should also familiarize yourself with the Log and Quarantine section. Here
you can easily select views to find the information you are seeking. Virus Log
Statistics provide you with reports of virus activity.
ScanMail lets you set up replication of the virus log and have a central view of
your entire organization. This is especially important if you have a large number
of servers or a central call/support center.
408
Lotus Domino 6 for Linux
Figure 7-13 Statistics screen
You can develop powerful Top Ten pie charts to show the most frequent viruses,
databases affected, or users in detected incidents; see Figure 7-14 on page 410.
This is useful for high level views for inclusion in reports.
Chapter 7. Backup and virus protection
409
Figure 7-14 Virus charting
Under Database Flag configuration, shown in Figure 7-15 on page 411, you can
select how you want the ScanMail databases to be viewable for users. This is to
assist you in tailoring the environment, in addition to setting the ACLs. In the
same screen, you can also determine if you require SSL to be used for
Web-based administration.
All settings can be applied to one or more servers at the same time, using the
Name and Address Book to select the servers.
410
Lotus Domino 6 for Linux
Figure 7-15 Database flags
Norton AntiVirus for Lotus Notes/Domino
In addition to OS-level antivirus software, Symantec has a specific antivirus
product for Domino server. At the time of writing, the current version of Norton
AntiVirus for Lotus/Notes Domino (NAV) is 2.5.
Among the features of Norton AntiVirus are:
It eliminates viruses automatically.
It quarantines infected documents and sends an e-mail to the administrator
for review and actions.
It runs as an add-in Domino task and its name is NNTASK. You can find it in the
ServerTasks= line of the notes.ini file.
LiveUpdate software lets administrators automatically download the latest
virus definitions and deploy them throughout the Domino environment from
one location.
Chapter 7. Backup and virus protection
411
Installing Norton AntiVirus for Lotus Notes/Domino
In this section we describe how to install Norton AntiVirus for Lotus
Notes/Domino.
Attention: We recommend that you read the Readme file on the Norton
AntiVirus CD prior to installation.
System requirements
Following are the system requirements necessary to install Norton AntiVirus for
Lotus Notes/Domino.
Operating systems:
– RedHat versions 6.2 or higher
– SuSE 7.3 or higher
Lotus Notes: Domino Server R5 versions 5.0.9 or higher
Available disk space of 200 MB on the partition on which Norton AntiVirus for
Lotus Notes/Domino is installed
Pre-installation tasks
First, you have to create a group, which must be called avdefs, and your OS
Notes user must be a member of this group so it can read and write the NAV
files. Do this with the following steps:
1. Log in as root.
2. Add a group called avdefs with:
groupadd avdefs
3. Add a user to the group with:
usermod -G avdefs < notes user>
Installation
Shut down the Domino server.
For a SuSE distribution, log in as root and run the commands shown in
Example 7-1.
Example 7-1
# mount /dev/cdrom
# cd /media/cdrom
# ./install
412
Lotus Domino 6 for Linux
For a RedHat distribution, log in as root and run the commands shown in
Example 7-2.
Example 7-2
# mount /dev/cdrom
# cd /mnt/cdrom
# ./install
This starts the installation, and you will see the Welcome screen shown in
Figure 7-16.
The installation of NAV on both the SuSE and RedHat distributions is the same.
Screen captures in this section were made with RedHat, but they should look
almost the same in SuSE. Follow these steps to finish the installation.
Figure 7-16 Norton AntiVirus welcome screen
1. Enter 1 and press Enter to start the installation.
2. You will be presented with the License Agreement screen; see Figure 7-17 on
page 414.
Chapter 7. Backup and virus protection
413
Figure 7-17 License Agreement
3. After you have read the License Agreement, accept the agreement by
selecting option 2.
Figure 7-18 Replication Instructions
414
Lotus Domino 6 for Linux
4. Review the Replication Instructions, then go to the next screen by selecting
option 2.
Figure 7-19 Destination path
5. The installation program suggests /opt for the path of the installation. If you
want to modify this, key in the new path and press Enter. Otherwise, accept
the default by pressing Enter; see Figure 7-19.
6. If you have more than one Domino server running on the same server
machine, you need to add the <notesdata directory path > for each Domino
server so the NAV can scan all data directories of your Domino servers.
If you have only one Domino server, make sure the path is correct, then type C
and press Enter to continue; see Figure 7-20 on page 416.
Chapter 7. Backup and virus protection
415
Figure 7-20 Listing of Domino partitions
Figure 7-21 Confirming the directories and starting the install
7. To confirm the directory locations and start the installation process, type y
and press Enter; see Figure 7-21.
416
Lotus Domino 6 for Linux
Figure 7-22 LiveUpdate
8. If you want to update the virus definitions now select 1; otherwise select 2.
Press Enter to go to the next screen.
Chapter 7. Backup and virus protection
417
Figure 7-23 Completed installation
9. When the installation is completed successfully you will be presented with a
screen as shown in Figure 7-23.
Attention: For further information, and to learn about advanced features and
customizing, refer to the Norton AntiVirus documentation provided on the
Norton AntiVirus for Linux CD.
After you install the NAV, log out and then log in as Notes user, and start the
Domino server.
Configuring Norton AntiVirus
The NAV task starts automatically when the Domino server starts. You can shut
down the task directly from the Domino server console by entering:
tell nntask quit
You can start the task by entering:
load nntask
To configure settings for NAV you need to open the NAV Settings database
(nav.nsf) which is located in the NAV subdirectory of your Notes subdirectory (in
our case, /local/notesdata/nav/nav.nsf).
418
Lotus Domino 6 for Linux
Follow these steps:
1. Log in to Linux as Notes user and start the Domino server (unless you have
already done so).
2. On your Windows or Linux workstation, connect to the Domino server with
Lotus Notes client and open the NAV setting database.
The NAV settings are in this database, as shown in Figure 7-24.
Figure 7-24 The NAV settings
To maintain antivirus security in your Lotus Notes environment, restrict access to
the NAV settings (nav.nsf), the NAV log (navlog.nsf), and the NAV definitions
(navdefs.nsf) databases to antivirus administrators or Domino administrators
only.
Attention: Be sure to always keep Manager access for the server group
LocalDomainServer so that NAV works properly.
LiveUpdate
To update the virus definitions, open the NAV Setting database and click
LiveUpdate. This opens the settings document. In this document you can
choose to update the virus definitions manually by clicking Run LiveUpdate
Chapter 7. Backup and virus protection
419
Now or you can schedule it. As shown in Figure 7-25, we selected Live Update to
run automatically and scheduled it to run at 3 AM daily.
Figure 7-25 LiveUpdate Document
Uninstalling Norton AntiVirus
To uninstall Norton AntiVirus for Lotus Notes, follow these steps:
1. Shut down the Lotus Notes server.
2. Log out the Notes user.
3. Log in as root.
4. At the command prompt, type the following to navigate to the folder where
uninstall is started:
cd /opt/Symantec/NavNotes/uninstall
5. Type:
./uninstall
This starts the uninstallation. Use the following steps to complete the
uninstallation.
420
Lotus Domino 6 for Linux
1. To start the uninstallation, type 1 and press Enter; see Figure 7-26 on
page 421.
Figure 7-26 Uninstalling Norton AntiVirus
2. If you want to keep the NAVlog database (navlog.nsf) type y and press Enter;
see Figure 7-27 on page 422.
Chapter 7. Backup and virus protection
421
Figure 7-27 Checking if the LiveUpdate is running
3. If you want to keep the NAV settings database (nav.nsf) type y and press
Enter; see Figure 7-28 on page 423.
422
Lotus Domino 6 for Linux
Figure 7-28 Uninstallation
4. When the uninstall has completed successfully, you will be presented with the
screen shown in Figure 7-29 on page 424.
Chapter 7. Backup and virus protection
423
Figure 7-29 Uninstallation of Norton AntiVirus completion screen
5. After uninstalling Norton AntiVirus, log out, log in as Notes user, and start the
Domino server.
securiQ Suite
Group Technologies AG has a set of security-related products which are grouped
into a suite called securiQ Suite. It is a server-based product and is available for
the Linux operating system. In this section we briefly introduce the software
package, highlighting some of the features that it provides.
securiQ Suite consists of the following products. Each of the modules can also
be used separately:
securiQ.Crypt
Provides centralized, server-based e-mail encryption with PGP and S/MIME;
it allows specific encryption relationships among different persons, groups,
and companies.
securiQ.Watchdog
Protects against malicious attacks to e-mail and databases, and provides a
proactive defense to disarm viruses. It works with a wide range of virus
scanners and compression technologies to ensure maximum protection, even
from the most sophisticated viruses such as worms and trojan horses.
424
Lotus Domino 6 for Linux
securiQ.Wall
Scans e-mail content and databases to protect against breaches in
confidentiality, spam, and junk mail, thereby ensuring compliance with
corporate communication policies.
securiQ.Xblock
Prevent confidential graphical documents from falling into the wrong hands
via e-mail. It analyses images of all possible formats in e-mail attachments
based on visual characteristics and a number of highly complex criteria (form,
color, text, etc.)
securiQ.Trailer
Provides centralized, parameter-driven e-mail signatures. It can be used, for
example, to add a legal disclaimer to all outgoing e-mails.
securiQ.Safe
Archives selected e-mail traffic, even encrypted files, for quality assurance
and to meet legal requirements for secure storage. Security is provided for
reviewing and verifying of e-mail, and it allows only authorized personnel to
have access to stored data.
System requirements:
Lotus Domino 5.x and higher
SuSE Linux 7.x and higher
RedHat Linux 7.x and higher
For more information please visit the web page of Group Technologies at:
http://www.group-technologies.com
7.2 Backup
Today, data is becoming increasingly important for all companies. Domino
manages more and more of these needs, and is not simply used for messaging.
Workflow software uses Domino databases to generate enterprise activity, and
the loss of one database could mean disaster. Even though Linux is a reliable
platform, backing up your data is mandatory to prevent possible trouble.
This section describes general principals of backup management and strategy,
and provides details about the backup tools provided by the Linux operating
system. We discuss some of the considerations for backing up a Domino server
and databases, and introduce some of the commercially available third-party
products for backing up Domino Server for Linux.
Chapter 7. Backup and virus protection
425
7.2.1 Backup strategy
To implement a complete backup strategy, you have to follow a strict process
which allows you to define backup rules. These rules can be very different from
one company to another. Creating a backup strategy is not within the scope of
this book, so we don’t go into exhaustive detail about it here. Instead, we have
made choices which may or may not be used in a real environment. We will use
these choices to show you how to install and configure some backup software on
a Linux platform.
We recommend that you create a company backup policy, if you do not have one
already, and follow that policy; a good backup policy will save you a lot of trouble.
A typical backup is performed by using a backup server to back up all your
Domino servers through your LAN or a dedicated backup network. Figure 7-30
on page 427 shows an example of backing up the Domino servers using an
existing TCP/IP network.
For a smaller installation, you could attach a backup device directly into a
Domino server; this would reduce the number servers needed. However, this is
not necessarily an adequate solution because if you lose the server for some
reason, you will lose both the server and the current backup.
426
Lotus Domino 6 for Linux
Figure 7-30 Domino backup scenario
There are two basic methods of backing up Domino: offline backup and online
backup.
Offline backup
This method is the most reliable and inexpensive type of backup procedure. The
downside to this is that it cannot be done on critical systems that require
non-stop operation.
To perform an offline backup, first shut down the server, back up your files, and
restart the server.
Online backup
Online backup provides a way to back up your data and still have your system in
production. This option becomes more and more important with the requirement
of non-stop operation.There are different options to perform an online backup.
We recommend that you use a backup software product that utilizes the features
provided by the backup/recovery APIs in Domino.
Chapter 7. Backup and virus protection
427
7.2.2 Backup management
In this section we discuss the management issues related to backing up files,
such as why you still need backups even if you are replicating your databases,
how to establish backup cycles, and how to implement incremental backups with
the transaction logging enabled in Domino 6.
Backup versus replication
Your Domino implementation may include clustering of your Domino servers so
that you can replicate your databases to another system or disk. What we want to
point out in this section is that replication does not replace the need to have
reliable backups of your databases.
It is true that in the event of disk failure or disaster recovery, a replica of a
database is a quick way to recover the information that was lost, but in some
cases you need to recover from a previous day or week. Listed below are some
cases when you would need to restore from a backup.
Information in a database was changed, and this was discovered at a later
date. Replication has already overwritten the changed information on the
cluster pair.
A database has become corrupted on the server; this was not discovered
prior to that corruption replicating to the cluster or other replicas.
An Adminp request was issued and approved to perform deletion of databases
through your servers. This was discovered but could not be stopped prior to
user databases being deleted.
A user has inadvertently deleted all mail in their database and did not inform
the administrator in time to stop replication.
These are just a few examples of why a reliable backup to your databases is an
important part of your Domino implementation planning.
Backup cycles
When planning for your backup, it is a good idea to develop a backup cycle that
will work for your organization. You should consider the following issues when
determining a good backup cycle for your office:
Budget allocation for tapes and life cycle of tape usage
Company policy on mail retention and archiving
Amount of data to be backed up per server
Time available for backup
428
Lotus Domino 6 for Linux
Domino 6 transaction logs and backups
In this section, we discuss the ways in which transaction log backups and full
backups can be used to back up your Domino databases. You should review the
documentation on transaction logging found in the Administration Guide to get a
full understanding of the operation of transaction logs. Also see “Transaction
logging” on page 229.
Domino 6, like its predecessor, provides transaction logging. With transaction
logging enabled, Domino captures database changes and writes them to a
transaction log. A single transaction is a series of changes made to a database
on a server. An example of a transaction might include opening a new document,
adding text, and saving the document. This transaction is recorded in a log file.
Then, if a system or media failure occurs, you can use the transaction log and
Domino aware backup systems to recover your databases.
How are the transaction logs used with backups? Let’s say that in the past you
made a full backup of your Domino databases once a week and then performed
incremental backups throughout the week. With transaction logging enabled, you
incrementally back up only the transaction logs during the week, instead of every
Domino database. When you need to recover a database, you restore the
database from the last full backup and then restore the transaction logs to the
restored database. The Domino-aware backup system then replays every
transaction that took place and so brings the database up-to-date. The backup
utility you choose must use the backup and recovery methods of the Domino C
API toolkit (Release 5 or later).
Important: You can lose data if the backup procedure is not monitored
appropriately – for example, you run out of disk space or do not back up the
logs before deleting them. The backup process should be monitored,
especially in heavily loaded environments.
The next issue to be aware of when setting up transaction logging is the way in
which the database instance IDs are created and maintained.
When you enable transaction logging, Domino assigns a database instance ID
(DBIID) to each Domino database. When Domino records a transaction in the
log, it includes the DBIID. During recovery, Domino uses the DBIID to match
transactions to databases. Some database maintenance activities, such as
compaction with options, cause Domino to assign a new DBIID to a database.
From that point forward, all new transactions recorded in the log use the new
DBIID. Since the previous transactions have a different DBIID, you would not be
able to restore any data from the old logs. When these situations occur, you will
need to perform a full backup of the affected databases.
Chapter 7. Backup and virus protection
429
Important: When the Domino server is installed, compaction of databases is
performed daily by default. Change the compact task to a weekly
housekeeping procedure and create a full backup of your databases after the
compaction is complete.
Following are some of the cases when Domino assigns a new DBIID to the
transaction logs, requiring a new full backup:
Transaction logging is enabled for the first time or the logging style is
changed.
The compact server task is run with options.
A fixup server task is run with the -J option.
A Domino database is moved from one logged server to another logged
server, or from an unlogged server to a logged server.
Considerations for backup software
When you select third-party software, there are some features that relate to your
Domino server that should be considered. Your evaluation of the software should
determine whether it provides the following capabilities:
Utilization of the native Domino backup/restore APIs.
On-line full and incremental backup of Notes databases.
Off-line full and incremental backup of Notes databases.
On-line full and incremental restores of Notes databases.
Off-line full and incremental restores of Notes databases.
Selective network port addressing for backup across a LAN. This is valuable if
you have installed a private network for your clustering. You can back up your
servers without using the bandwidth necessary for the Domino server
functions.
Automatic discovery of new Notes databases.
Software determines which transaction logs are aged (obsolete) and informs
you or deletes logs.
On-line recovery of entire Notes databases.
Off-line recovery of single or multiple Notes databases.
Automated backup scheduling for Domino server.
Automated backup scheduling by Domino databases.
Centralized administration of distributed Notes environment.
430
Lotus Domino 6 for Linux
7.2.3 Hardware configuration
Since there is no Linux-specific installation, if you want to add a tape drive on a
computer, follow the hardware manufacturer’s instructions. All the distributions of
Linux include a SCSI driver, and Linux will detect all new SCSI hardware
automatically.
For each hardware device, a file in the /dev directory will be created. This file is
used by the system to send or receive data from the hardware device. The
following table shows you some sample names.
Table 7-1 Sample hardware names
Hardware peripheral
Device under Linux
SCSI, disk 1, whole disk
/dev/sda
SCSI, disk 3, partition 2
/dev/sdc2
SCSI, tape
/dev/st0
IDE, disk 1, whole disk
/dev/hda
IDE, disk 2, partition 3
/dev/hdb3
Generic SCSI device (some worm for ex.)
/dev/sg0
ATAPI CD-ROM, Secondary Master
/dev/hdc or /dev/cdrom
For the disk, Linux uses the following convention:
The first character is s for a SCSI drive, or h for an IDE drive.
The second character is always d.
The third character represents the number of your driver converted into a
letter, a for the first drive, b for the second, and so forth.
The last character represents the partition number. You can have 16 partitions
on a single drive.
The tape device begins with st, for a rewindable device, or nst for a
non-rewindable device. The following number represents the tape number. It
goes from 0, for the first tape drive found, to 7 for the last one.
When Linux boots, it creates a file you can read later that gives a lot of
information about the machine’s hardware. To see this file, connect to your server
as root and type the following command:
dmesg | more
Chapter 7. Backup and virus protection
431
You will see all the hardware that has been detected by Linux during the boot
process. Press the Space bar to go forward. On our server, the SCSI detection,
hard disk drive detection, and tape detection are shown in Figure 7-31.
Figure 7-31 A easy way to see if the system has detected your tape drive
In the highlighted zone the Vendor is the name of the tape manufacturer and the
model. The Type zone is the device type; for a tape you would see
Sequential-Access. If you do not see this kind of message it is possible that Linux
did not detect your tape, so you should check your hardware configuration (cable
and SCSI ID).
432
Lotus Domino 6 for Linux
7.2.4 Operating system backup tools
There are a number of utilities provided by the Linux operating system that can
be used to used to back up a Linux server machine. This section gives you an
overview of these utilities. Many of these utilities are common among the
different versions of UNIX operating systems.
CPIO - This utility is a UNIX system backup procedure that has been in
existence since the early implementation of the UNIX operating system. Files
can be backed up and restored from disk or tape.
TAR - This utility is a UNIX system file archive procedure that has gained
popularity on all UNIX platforms because:
– It has built-in compression algorithms.
– It has the possibility to create incremental backups.
DD - This is very powerful tool that is used on a UNIX system to write files to
disk or tape.
Tar is the most simple command to use for a backup. If you are familiar with
PKZIP file compression, tar is very similar. Although it can be used to back up a
networked machine, tar is most commonly used to back up a standalone server.
This command can be found on all UNIX platforms; this gives you the ability to
read your backup files even on servers that are running different versions of
UNIX (SCO, AIX, HP-UX, and so forth).
The tar command has a lot of parameters. Obtain more information about all of
these parameters by typing the following:
man tar
Table 7-2shows the most commonly used tar options.
Table 7-2
Tar options
Parameter
Action
Samples
-c
Create a new tar file
tar -c myfile1 myfile2
-f
Specify a filename for the tar file
tar -cf tarfile.tar myfile1 myfile2
-v
List the files processed
tar -cvf tarfile.tar myfile1 myfile2
-r
Append file to an existing archive
tar -rvf tarfile.tar myfile3
-x
Restore files
tar -xvf tarfile.tar
-u
Update an archive file
tar -uvf tarfile.tar myfile1 myfile2
-t
Show the content of an archive file
tar -tf tarfile.tar
Chapter 7. Backup and virus protection
433
Important: The -c command creates a tar archive on the default output, which
is probably your screen (you can change that). If you want to do a backup into
a file, add the -f parameter and specify a directory and a file name.
The following command backs up all the files included in the /local directory
onto a tape drive (/dev/st0):
tar -cvf /dev/st0 /local
If you want to back up your data into a file on a disk, type the following
command:
tar -cvf /backup/file.tar /local
This command will back up everything in the directory /local and put the
archive file (file.tar) into the /backup directory.
You can also add some new files at the end of a backup file. To do this, type
the following:
tar -rvf /dev/st0 /newdirectory
This command will append to the tape the directory /newdirectory.
If you want to update an archive file, type the following command:
tar -uvf /dev/st0 /local
This command will add all the new or modified files included in the /local
directory at the end of your tape.
It could be interesting to look at the content of an archive file. To do this, type
the following command:
tar -tf /dev/st0
This shows you the tape content.
Tar backup
The last sample shows you how to back up the data we chose in our backup
strategy. As there is nothing included in tar to manage your cartridge, you will
have to do that yourself.
Type the following command, and change your cartridge each day:
tar -cvf /dev/st0 /root /etc /home /local /opt /var
Note: The entire command must be typed on the same line.
434
Lotus Domino 6 for Linux
Important: To back up and restore Domino data with the tar command you
need to shut down the Domino server.
Tar restore
To restore your data from an archive, log in on your system as root (you need to
be able to write in the directory you want to restore) and type one of the following
commands.
If you want to restore the entire backup:
cd /
tar -xvf /dev/st0
This command will restore all the files you have on your tape in the / directory.
If you want to restore your data in another directory to be sure that your
backup is good, type the following:
cd /tmp
tar -xvf /dev/st0
All the data in this sample is restored in the /tmp directory.
If you need to restore only one file from the archive, just type the following:
cd /
tar -xvf /dev/st0 etc/fstab etc/ftpaccess
In this sample, we restore two files (fstab and ftpaccess in the /etc directory).
Remember that you can view the archive content by typing the following:
tar -tf /dev/st0 > listfile.txt
This command will create a file called listfile.txt in the current directory that
contains a description of all the files, with their full path, included on the tape.
Important: If you want to add some data to an archive tape, use the append
command (-r), which will not erase the tape content. If the create parameter
is used, the tape content will be erased by the new data.
The tar command can be used in scripts, in association with the cron table, to
automate your backups.
Note: For the tape drive and the cartridge, the MT command allows you to do
some basic operations, like rewind or erase a cartridge. Type mt -h (or man
mt) to obtain this list.
Chapter 7. Backup and virus protection
435
7.2.5 Backup software from third party vendors
This section introduces some of the numerous backup software products
provided by third party vendors. Many vendors offer backup software for the
Linux operating system, as well as for the Domino Server. However, at the time of
writing, there was only one product available for Domino Server for Linux.
Backup software for Linux OS
Although performing a backup with backup software on a Domino Server is
possible, the major drawback is that you have to shut down the Domino server for
the duration of the backup. If your systems do not require non-stop operation,
you could consider using one of the third-party backup products.
Among the third-party backup software solutions available for the Linux operating
system are:
IBM Tivoli Storage Manager
IBM Tivoli Storage Manager is a scalable client/server software for backing
up any data. Both the server software and the client software are available for
Linux platform. With the administration client you can easily retrieve and
access the backed up data.
To learn more about the software and availability, check the IBM Tivoli Web
site at:
http://www.ibm.com/tivoli
VERITAS NetBackup BusinesServer
NetBackup 4.5 is also client/server software. Both the client and the server
are available for Red Hat; only the client is available for SuSE.
Check the VERITAS Web site to learn more about the software at:
http://www.veritas.com
BrightStor ARCserve Backup for Linux
CA has created backup software specifically for Linux. It has a Web
browser-based user interface, there is a built-in virus scanner, and it provides
disaster recovery services. The current version of the product, BrightStor
ARCserve Backup for Linux 7 Advanced Edition, supports Red Hat Linux 6.x,
7.0, 7.1 and SuSE 7.2 and 7.3 according to CA’s Web site at:
http://www.ca.com
Galaxy iDataAgent for RedHat Linux
This is backup software for RedHat Linux from Commvault. See more
information at:
http://www.commvault.com
436
Lotus Domino 6 for Linux
Backup software for Domino Server for Linux
Since most Domino servers are expected provide non-stop service, you cannot
shut down the server in order to perform a backup. The only option is to perform
an online backup. This is possible because Domino provides backup/recovery
APIs and there are third/party products which utilize these APIs, providing the
possibility to perform an online backup of a Domino server.
NetWorker Module for Lotus Notes
At the time of writing we were aware of only one backup product for Domino on
Linux: NetWorker Module for Lotus for Linux, by Legato. You can find details at
the Legato Web site at:
http://www.legato.com
At the time or writing the Legato software works only with older versions of Linux
distributions and older versions of Domino for Linux. For Linux, the supported
platforms are:
RedHat 6.1, 6.2, 7.0,7.1
SuSE 6.4, 7.0, 7.1
Supported Domino versions are:
Domino Server 5.04 or 5.06
NetWorker Module for Lotus Notes is installed on the Lotus Domino Server and
has the ability to search out all the Notes databases on that server, using one of
three user-specified search methods: the explicit filename, the standard notes
directory, and a search of the whole machine. It reads the database files, formats
them into a NetWorker savestream using XOpen's Backup Services API (XBSA),
and passes the data to the NetWorker server. The NetWorker server may be
either on the same machine, or on another machine on the network. The
NetWorker Module can also be installed on the Notes Client to back up any
databases that reside on that machine.
SAmong the key features provided by NetWorker are:
On-line, non-disruptive backups
Full or incremental backups
Document-level backup and restore (phase2)
Point-in-time restore and directed (to another directory) restore
Autochanger support
Media management (tape tracking, labeling, and bar code support)
User notification by e-mail and log files
Chapter 7. Backup and virus protection
437
Graphical scheduling interface
Seamless integration of Notes backup with file system backup for
enterprise-wide storage management
Local or remote backup and restore
Optional data compression and encryption
Note: Check the Legato Web site for newer releases.
Other solutions
There are numerous backup products from third-party vendors for Domino
servers, but at the time of this writing they don’t support the Linux operating
system.
Some of the products are listed here; check their Web sites to see whether
support has been added:
IBM Tivoli Storage Manager for Mail (former name IBM Tivoli Data Protection
for Lotus Domino)
http://www.ibm.com/tivoli
VERITAS Netbackup http://www.veritas.com
CA Brightstor http://www.ca.com
Commvault Galaxy for Notes R5 http://www.commvault.com
438
Lotus Domino 6 for Linux
A
Appendix A.
Migrating from Domino for
Windows to Domino for
Linux
This appendix describes how to migrate from a Domino Server on a Windows
Intel platform to a Domino Server on a Linux Intel platform.
© Copyright IBM Corp. 2002. All rights reserved.
439
Moving from Windows to Linux
In this scenario we assume that you are working with two physical machines, one
with the current Domino server and one for the new Domino for Linux server.
Upgrade the current server
The current Windows server should be first upgraded to the version of Domino
that you will be running on the Domino for Linux server.
Build the Linux for Domino server
Build the Domino for Linux server as described in this redbook. Add the server to
the existing Domino Domain and replicate all the data from the current server.
Move your applications from Windows NT or Windows 2000 to Linux
If your applications function today on Domino server running Windows NT or
Windows 2000, they will also work on a Domino for Linux server.
Domino databases are platform independent, meaning that you can copy files
from NT to UNIX and open the database without any kind of change to the file
format. However, there are a few considerations to bear in mind due to the
differences in the environment.
To ensure that your application will be compatible, consider the following
questions before moving an application from Windows NT or Windows 2000 to
Linux.
Is your Domino application “self contained?”
Did you use CASE (Computer Aided Software Engineering) tools?
Does it use OS platform exploitation?
Is your Domino application “self-contained?”
A self-contained application runs entirely inside the Domino server, without any
explicit references to files, without external calls, and without importing or
exporting data. An explicit reference to a file, such as
c:\domino\data\NAMES.NSF, will not work on Linux and needs to be replaced
with /domino/data/names.nsf. Linux does not support the ‘\’ character for
specifying paths and uses the ‘/’ character. Linux is case-sensitive when
specifying paths and filenames, while NT is not. Case sensitivity can also be a
problem anywhere an external script call, link, or hotspot is used; be sure to
check that the correct case is used.
440
Lotus Domino 6 for Linux
Did you use CASE tools?
While CASE tools may be helpful, many of these tools were created with
non-UNIX operating systems in mind and their output code may not be
compatible with Linux. Be sure to check with the manufacturer for compatibility
before using these tools.
Does your application use OS platform exploitation?
Anything in the application that might be platform-specific could fail in the Linux
environment. NT-specific services, NT Registry Sync for user registrations,
Active-X controls, or compilers that rely on platform-specific libraries to compile
the application will cause problems when the application is moved to Linux.
Moving the application to the Linux server
Transferring the files from Windows NT or Windows 2000 to UNIX can be done
using many methods. FTP, transfer via CDRW, Iomega Jazz drives, or other
media and PCNFS are all good ways of getting the data moved over. For this
example we used FTP, since it is the most common tool used in the field.
Since FTP servers are installed by default on the UNIX side and not on the NT
side, it is usually easier to open an FTP session from the NT box and connect to
the UNIX box. Here we are using NT 4.0.
1. From the NT box, open an MSDOS command prompt by selecting Start ->
Programs -> MSDOS.
a. Change directory to the server’s data directory with the command:
cd \lotus\notes\data
b. Start an FTP session with the command:
ftp servername
2. Change directory on the UNIX box to the data directory with the command:
cd /local/notesdata
3. Switch to binary transfer mode by issuing the command:
bin
4. Transfer the databases by issuing the command:
put names.nsf
or, transfer multiple files at once using wildcards with the mput command:
mput *.nsf
Appendix A. Migrating from Domino for Windows to Domino for Linux
441
Important: Never add or remove databases from the OS level while the
Domino server is up and running. Domino caches the data directory listing
and unpredictable behavior can occur if you modify the data directory while
the server is running. This could result in a server crash or hang.
Ensuring permissions are correct
After the transfer is complete, make certain that permissions are correct on the
UNIX machine. Log in to the UNIX machine and change to the data directory (cd
/local/notesdata) and check the permissions on the transferred file with:
ls -l *.nsf
An example of the permissions line is:
-rwxrwxrwx
1 nadmsup notes
1589248 Feb 22 09:34 log.nsf
Interpret this record as follows:
The first column shows the permissions. The leftmost letter indicates whether
this is a directory or a file. A dash (-) in the left position indicates it is a file; a
directory is designated by the letter d. The next nine letters indicate the access
rights to the file for the owner, group, and world, given in 3 character segments.
From left to right the permissions in each segment are read access, write access,
and execute access. Therefore an entry of rwx means that read, write, and
execute access is granted. If any of the letters have a - in their place, then that
permission is not allowed. For example, r-x means that read and execute access
is given, but write access is not.
The owner is the user ID that owns the file, which is indicated by the third column
in a ls -l. In this case it is “nadmsup.” The owner’s permissions are read from the
first three permission characters in column 1 (following the file or directory
indicator).
The group is identified in the fourth column. In this case it is the “notes” group.
The group’s permissions are identified in the next three characters in column 1.
The world is anyone else who has login access to this system. Their permissions
are specified in the last three characters of column 1.
Since the Domino server is the only one that should be changing or directly
reading the databases, and databases are not executable programs, the
permissions for databases should be:
-rw———-
442
1 nadmsup notes
Lotus Domino 6 for Linux
1589248 Feb 22 09:34 log.nsf
If the permissions are not correct you can issue the command:
chmod 600 filename
where filename is the name of the file on which you wish to change the
permissions. This will give read and write access to the database for the Notes
user, but will not allow anyone else to view it. Since the Domino server runs
under the Notes user account and makes all of the read and write calls on behalf
of the clients, most organizations will want to keep the access to the files
restricted to the Notes user account.
Checking for case sensitivity
In NT, filenames are not case sensitive, but in UNIX they are. If your scripts call
for the file log.nsf and the file is listed as LOG.NSF at the OS, the file will not be
found when the script runs. After the FTP completes, check to ensure that the
filenames are in lowercase unless your application is specifying otherwise.
ls -l
-rw———- 1 nadmsup notes
mv LOG.NSF log.nsf
ls -l
-rw———- 1 nadmsup notes
1589248 Feb 22 09:34 LOG.NSF
1589248 Feb 22 09:34 log.nsf
Important: There are two modes of file transfer in FTP: binary and ASCII.
Binary transfers are an exact copy and no reformatting of the file is done by
FTP. ASCII transfer assumes the file you are transferring is a text file and,
when transferring between platforms, will attempt to reformat the file to the
native text format of the destination machine. If you are in ASCII mode when
transferring a database, the database will be unreadable by Domino on the
destination machine. Some versions of FTP start in ASCII mode. Therefore
you should always type bin on the FTP command line to ensure that you are
in binary mode before transferring any databases or templates.
Appendix A. Migrating from Domino for Windows to Domino for Linux
443
444
Lotus Domino 6 for Linux
B
Appendix B.
Additional material
This redbook refers to additional material that can be downloaded from the
Internet as described below.
Locating the Web material
The Web material associated with this redbook is available in softcopy on the
Internet from the IBM Redbooks Web server. Point your Web browser to:
ftp://www.redbooks.ibm.com/redbooks/SG246835
Alternatively, you can go to the IBM Redbooks Web site at:
ibm.com/redbooks
Select the Additional materials and open the directory that corresponds with
the redbook form number, SG246835.
© Copyright IBM Corp. 2002. All rights reserved.
445
Using the Web material
The additional Web material that accompanies this redbook includes the
following files:
File name
domino
Description
Domino 6 for Linux startup script, used during system
startup
startserver
Domino 6 for Linux startup script, used to restart just the
Domino server
db2emptemplate.zip Zipped DB2 database template
DB2emp.zip
Zipped DB2 database, with employee data documents
DB2empNODATA.zip Zipped DB2 database, empty database, with no data
MySQLemp.zip
Zipped database, with employee data documents for
MySQL example
MySQLempNTF.zip Zipped database template
System requirements for downloading the Web material
The following system configuration is recommended:
Hard disk space:
Operating System:
10 MB minimum for the files
Red Hat 7.2 or SuSE 8.0 Linux
How to use the Web material
Create a subdirectory (folder) on your workstation, and unzip the contents of the
Web material zip file into this folder.
See “Starting Domino from a script” on page 130 for a detailed description of how
to use the Domino startup scripts.
Section 5.3.4, “Creating the Domino application” on page 311 discusses the use
of the DB2 employee application.
446
Lotus Domino 6 for Linux
Related publications
The publications listed in this section are considered particularly suitable for a
more detailed discussion of the topics covered in this redbook.
IBM Redbooks and Redpapers
For information on ordering these publications, see “How to get IBM Redbooks”
on page 448.
Lotus Domino R5 for Sun Solaris 8, SG24-5969
Lotus Domino R5 for Linux on IBM Netfinity Servers, SG24-5968
Lotus Notes and Domino R5.0 Security Infrastructure Revealed , SG24-5341
Backing Up Lotus Domino R5 Using Tivoli Storage Management, SG24-5247
WebSphere Application Server V4 for Linux, Implementation and Deployment
Guide, REDP0405
Linux System Administration and Backup Tools for IBM eServer xSeries and
Netfinity, SG24-6228
Red Hat Linux Integration Guide for IBM eServer xSeries and Netfinity,
SG24-5853
SuSE Linux Integration Guide for IBM eServer xSeries and Netfinity,
SG24-5863
Linux on IBM Netfinity Servers: A Collection of Papers, SG24-5994
TCP/IP Tutorial and Technical Overview, GG24-3376
Applying the Patterns for e-business to Domino and WebSphere Scenarios,
SG24-6255
Other resources
These publications are also relevant as further information sources:
LINUX in a Nutshell, Hekman, O'Reilly & Associates, Inc., ISBN 0596000251
Essential System Administration, 2nd Edition, Frish, O'Reilly & Associates,
Inc., ISBN 0596003439
Linux Network Administrator's Guide, 2nd Edition, Kirch - Dawson, O'Reilly &
Associates, Inc., ISBN 1565924002
© Copyright IBM Corp. 2002. All rights reserved.
447
Running Linux, 3rd Edition, Welsh et al, O'Reilly & Associates, Inc.,
ISBN 156592469X
Linux Administration Handbook, Nemeth et al, Prentice Hall,
ISBN 0130084662
Referenced Web sites
These Web sites are also relevant as further information sources:
IBM Linux
http://www.ibm.com/linux
Red Hat
http://www.redhat.com
SuSE
http://www.suse.com
UnitedLinux
http://www.unitedlinux.com
Linux Documentation Project
http://www.tldp.org
O’Reilly & Associates, Inc.
http://www.oreilly.com
Guardian Digital, Inc. (Linux security Web site with Linux security-related
documents, articles, tools, resources)
http://www.linuxsecurity.com
CodeWeavers (the company that created CrossOver Office, which allows
running Windows applications on Linux [IA32])
http://www.codeweavers.com
Wine (a Windows compatibility layer for Linux that runs on Intel-compatible
machines)
http://www.winehq.org/
How to get IBM Redbooks
You can order hardcopy Redbooks, as well as view, download, or search for
Redbooks at the following Web site:
ibm.com/redbooks
448
Lotus Domino 6 for Linux
You can also download additional materials (code samples or diskette/CD-ROM
images) from that site.
IBM Redbooks collections
Redbooks are also available on CD-ROMs. Click the CD-ROMs button on the
Redbooks Web site for information about all the CD-ROMs offered, as well as
updates and formats.
Related publications
449
450
Lotus Domino 6 for Linux
Index
Symbols
.bashrc environment file 305
A
Access control 373
Accessing external data 288
Active 266
Active Directory 266
containers 276, 285
User container 285
Active Directory synchronization
See ADSync
Adding new Linux users 32
Administer users and groups from Windows 2000
266
Administering a Domino server remotely 192
Administration 133, 262
policies 267
Administrator client
See Domino Administration client
AdminP 178
ADSync 266
access control list 276
Active Directory Container 270
administration ID 274
administrator password 271
container mappings 276
creating Domino users 270
creating new groups 266
creating new users 266
creating users 278–281
creating users and groups in AD 270
customizing synchronization options 273
Domino information 281
enabling the Lotus Domino Options 270
enabling the synchronizing operations 273
existing AD users 278
extended access control list 276
field mappings tab 275
group type mappings 274
initializing the ADSync tool 271–272
installing 268
mapping fields 275
© Copyright IBM Corp. 2002. All rights reserved.
Notes settings tab 274
Notes synchronization options 273
registering AD users from Domino 282
registering Domino users 277
registration server 274
requirements 267
security settings 277
server diagram 268
user deletion options 274
user registration 270
Analysis tools 387
Antivirus 391
for Domino server 392
Norton Antivirus 393
OS level 392
ScanMail for Lotus Notes/Domino 393
scanning databases 392
scanning E-mail 392
sequriQ.Watchdog 424
Authentication
See Security
authentication
B
Backup 391, 425
backup vs replication 428
backup/recovery APIs 427
clustering 428
CPIO 433
cycles 428
DD 433
diagram 426
hardware failure 428
Legato Networker 437
Linux backup tools 433
offline 427
online 427
requirements for software 430
scenario 426
software for Domino for Linux 437
software for Linux 436
strategy 426
TAR 433–435
451
transaction logs 429
BASH shell 88, 155
Boot diskettes 3
Boot loader 26
Booting from CD-ROM drive 2
C
Certificate Authority 262, 370
Certifier ID 113, 262, 264
Checking existence of the group for Domino 86
Checking that an account exists 85
Checking the available diskspace 89
Clustering 226
availability 226
benefits 226
cluster replicators 227
connecting servers 228
definition 226
deployment strategies 228
workload balancing 226
Command line interface 85
Commands
cat 91
chkconfig 130
chmod 155
df 89
echo 106
fdisk 27, 151
find 155, 217
grep 212, 366
groupadd 87
groupdel 87
groupmod 87
gzip 90
id 105
jconsole 128, 192
less 91
ls 92, 135, 291
man 128
mkdir 217
more 91
mount 90
netstat 128, 146, 157, 290
ps 128
rpm 212
server 125
startx 84
tail 85
452
Lotus Domino 6 for Linux
tar 90
tell 379
time 216
top 195, 199
useradd 87
userdel 87
usermod 87
vmstat 195
which 106
whoami 105
Configuring
disks 4
monitor 5
partititions 4
video card 5
Configuring Domino 105
Connecting to databases 310
Connecting to the Domino server 129
Connectivity 247
Console commands 192
Controlling access 373
Cookie 371
HTTP_COOKIE 372
CPU usage 203
Creating a Domino application 288
Creating a Linux user
group membership 88
setting the password 88
user properties 88
Creating a Linux user account to run Domino 87
Creating a virtual server or host 382
Creating an icon 85
Creating boot diskettes 37
Creating the Linux user group 87
Creating the Notes user account 32, 71
Creating URL mapping and redirection 382
Crontab 156
CrossOver office 175, 249
configuration 251
Domino administration client 249
HTTP proxy 252
installation 249
installing applications 252
installing Notes 253–256, 258, 260
installing Notes client 252
Notes client 249
path 250
Customizing the Linux server 154
D
Daylight Saving Time 5
DB2 288
setting permissions 305
DECS 288, 310
Denying users to connect to your server 147
DHCP 28
Disk array 23
DNS 112
Domino 6 administration 177
Domino 6 Web administrator
See Web administrator
Domino Administration client 126, 248, 263, 267
Domino advanced services 226
Domino console 126, 191
Domino console commands 193, 380
Domino Controller 126
Domino data directory 184
Domino Designer 311
Domino Directory 248, 276, 282, 371, 374,
385–386
full access administrators rights 129
server document 129, 174
Domino Enterprise Connection Services
See DECS
Domino Java Console
See Java Domino console
Domino log 387
database analysis 389
Domino web log 387
Domino security
See Security
Domino Server 247, 267
ADSync 282
analysis tools 387
backup/recovery APIs 427
file protection 374
installation 83, 90
log 387
registering users 282
starting automatically 130, 145
startup script 130
stopping automatically 145
Transaction logs 429
Web log 387
Domino setup
additional server 111
administration process 117
administrator 115
adminp 117
advanced services 117
beginning the setup 125
calendar connector 117
certifier 113
customizing network settings 119
directory services 116
DOLS 117
domain 114
encryption 120
first server 111
host name 119–120
HTTP services 116
IMAP 116, 118
Internet services 116
LDAP 116, 118
mail router 117
multiple domains 114
network settings 120
organization 113
OUs 113
password 113
POP3 116, 118
ports 119
re-running 125
SMTP 116, 118
starting the server 125
TCP/IP port 119
Web browsers 116
Domino user account 105
Domino user registration 248, 262
Domino Web Server 178
domlog.nsf 387
E
ECC memory 200
Employee sample application 311
browsing a DB2 table 317
browsing metadata 314
creating a data connection 313
creating a new data connection 313
creating the database 311
data connection 313
defining a field 316, 319
defining a key field 318
defining the data connection 314
employee form 314
employee record 326
Index
453
initializing the keys 324
metadata object 314
naming the database 312
populating the database 323
Emulating Windows 248
Emulator 248
Enabling logging 387
Encryption 264
Ending tasks 206
Enhancing the Domino server perfomance 209
Extended ACL 176
Extended partition 17
F
Fdisk 151
File sharing protocol 143
File system type 20
File systems 5, 20, 153
ext 6
ext2 6
ext3 6
journaling 6
performance 6
ReiserFS 6
Firewall 150
Firewall tool 142
Ftp 142
FTP area 4
G
Glibc 212, 218
GMT 5
GNOME 34, 61, 84
Graphical log in 80
Group 86
Group number 86
GRUB 26
H
Home directory 136
HOW-TO 7
HTTP 367
HTTP daemons 366
HTTP server 366
HTTP task 261, 365
454
Lotus Domino 6 for Linux
I
IDE 196
Installing 288
Installing DB2 for Linux 288
administration server 295, 299
authentication 300
creating DB2 instance 295
DB2 UDB Enterprise Edition 292
fenced user 297
host name 301
installation script 291
installing the server 291
language selection 294
ports 290
pre installation tasks 290
product library 293
services 302
starting the server 309
stopping the server 309
verifying installed packages 288
warehouse control database 298
Installing Domino 83
Application server 93
beginning the installation 92
coexistence of mixed versions 97
customized templates 95
Domino data directory 99
Enterprise server 93
from a CD 90
from a tar file 90
httpsetup 103
installation completed 100
installation steps 92–93, 95, 97–100, 103
Java installation program 103
Linux file ownership 98
Linux group for Domino 100
Linux user account for Domino 99
location for the Domino program files 97
mail server 93
multiple installations 97
partitioning a Domino server 98
running multiple instances 98
server type 93
setup 105
template selection 95
Installing Norton AntiVirus for Lotus Notes/Domino
411–414, 416–417
Installing Red Hat 1, 8
authentication onfiguration 33
beginning 8
Boot Loader Installation 26
creating boot diskettes 37
creating the Notes user account 32
creating the partitions 17
creating the root partition 18
detecting hardware 9
Disk druid 15
Domain Name Server 28
drive geometry 17
final partition list 25
firewall 29
gateway 28
GNOME 34
GRUB 26
hostname 28
install options 14
IP address 28
KDE 34
Kerberos 5 33
kernel development 34
keyboard Configuration 11
language selection 10
language support selection 30
LDAP 33
LVM 17
making boot diskettes 2
Master Boot Record 26
MD5 passwords 33
monitor selection 38
mouse configuration 12
netmask 28
network configuration 28
network support 34
NIS 33
notes account 32
package selection 34
partition for Notes data 23
partitioning 15
pre installation steps 2
printing support 34
RAID 4, 17
root password 32
shadow passwords 33
SMB 33
software development 34
time zone 31
video card 35
video configuration 35
X window system 34
Installing source code 212
Installing source files 219
Installing SuSE 1, 40
adding a partition 47
adding single software packages 62
analyzing system 44
beginning 40
changing the partitions 47
creating the root partition 49
creating the swap partition 52
creating the transaction logs 57
deleting a partition 47
detecting the hardware 44
development tools 61
DHCP 76
domain name 77
domain name server 77
extended partition 49
final partition list 59
ftp 61
GNOME 61
host name 76–77
IP address 76
KDE 61
keyboard selection 45
language selection 43
LILO boot sector 68
log in 80
making boot diskettes 2
MD5 passwords 70
monitor 72
mouse selection 45
network address setup 76
network card 75
partitioning 45–46
password encryption 70
pre installation steps 2
primary partition 49
RAID 4
root password 69
selecting a disk for a partition 48
setting the BIOS clock 65
software selection 60
SSH 62
system administrator password 69
telnet 61, 63
time zone 64
video card 73
Index
455
Installing the Lotus ADSync tool 268–269
Installing the Lotus Notes client on Linux 252
Integration 247
Internet protocols 175
IPTraf Utility 161
IPTraf utility 157
Issuing console commands 192
J
Java 385
servlets 386
Java Domino Console 126, 177, 191
jconsole 192
Journaling 6
JVM 385
K
KDE 34, 61, 84, 86, 90, 100, 209, 260
KDE system guard 202
KDE User Manager 87, 100
Kerberos 139
Kerberos 5 33
Kernel limits 209
Keyring file 262
Killing processes 206
L
Launching the Java setup program 124
LDAP 33, 174
LDAP port settings 267
Linux administration 150, 170
partitions 151
tasks 205
Linux daemons 142
ftpd 142
httpd 142
lpd 142
nfs 143
sendmail 143
snmpd 143
ssh 143
syslog 143
telnet 143
wu-ftpd 143
xfs 143
linux daemons
xinetd 143
456
Lotus Domino 6 for Linux
Linux group 84, 86
Linux kernel 6
Linux security 134
Linux user account 84
Linux web server 142
Listing active connections 159
Listing partitions 151
Listing scheduled tasks 156
Logging 167
configuration file 169
directory 167
events 167
excluding events 388
into domlog.nsf 387
into text files 387
log files 169
log information in real time 169
logging fields 388
starting automatically 167
system messages 169
Logical disk 4
Lotus ADSync 266
Lotus Notes client 175
LVM 199
M
Making a user part of a group 88
Making the CD-ROM drive bootable 2
Management protocol 143
Memory 5
Memory usage 203
Microsoft Internet Explorer 261
Migrating the certifier 262
Monitor 5
Monitoring
CPU 196
IP traffic 161
memory 196
network traffic 157
server performance 200
Monitoring performacce 206
Monitoring system resources 203
Monitoring tasks 203
Mounting
a directory 6
a partition 154
the CD-ROM drive 90
Mozilla 261
N
nadsync.dll 269
Netscape 261
Netstat command 157
Network card 196
Network statistics 161
Network status 157
Network tuning 366
NIS 33
Norton AntiVirus
configuring 418–419
uninstalling 420
Notes client 249
notes.ini 367
ServerTasks 367
O
Opening a database 323
Opera 261
P
Package Manager 170
Partitioning 4, 15, 369
Partitions
creating 152
deleting 152
formatting 153
listing 151
mounting 154
swap 154
types 152
Passwd file 85
Perfomance monitoring 206
Performance 195, 226
building glibc 215
buses 196
CPU utilization 200
distributing I/O 196
glibc 218
linuxthreads 211, 218
memory usage 200
multiple mail boxes 226
noatime 211
pthread 211
threads-max 210
Planning for the certificate structure 113
Policies 267
Policy administration 182
Primary partitions 17
Printing 142
Q
Quitting the Domino server 129
R
RAID 4, 197
configurations 197
configure the disks 4
harware 197
mirroring 197
redundancy 197
software level 197
RAID controller 4, 196
RAM 5
Rawrite 2–3
RawWrite for Windows 3
Recompiling glibc 208
Red Hat 1
authentication configuration 140
daemons 146
ftp 143
KDE system guard 202
services 146
setting password length 139
system services 168
Red Hat User Manager 87
Redbooks Web site 448
Contact us xii
Register a script 130
Registering users 248, 262, 277, 282
Active Directory users 285
Windows 2000 groups 285
Windows user options 284
Registering users in Domino from Active Directory
277
Registering users to Active Directory from Domino
282
Reinstalling the installation 103
Remote administration 192
Renaming a file 130
Resources 135
Restarting the Domino server 129
Root 69
Root user 32, 84
Runlevels 144
Running daemons on demand 143
Index
457
Running multiple HTTP servers 366, 369
Running the Domino Server in the background 126
Running the Domino Server in the foreground 126
S
S/MIME 262
Scalability 195, 226
Scheduled tasks 156
Scheduler 156
Scheduling a script 157
Scheduling a task 157
SCSI 196
Secure shell for remote administration 143
Securing the Domino Server 136
Securing the Domino Server. 174
Security 4, 27, 99, 129, 133, 368, 370
access 174
access control list 175
access to the file system 184
ACL 175, 370
ACL for logs 176
active connections 159
Active Directory 277
advanced network security 148
agents 374
anonymous access 175
authentication 33, 113, 262, 371
backup security 150
basic network security 141
browsing Domino databases 370
certifier ID 113
CGI scripts 374
creating new databases 174
creating replica databases 174
daemon 141
default access 175
demilitarized zone 149
denying users to connect 147
disk access 136
DMZ 149
Domino 174
encrypted mail 370
enforce consistent ACL 175
Extended ACL 176
file permissions 98, 130, 135
file protection 374
firewalls 29, 149–150
GRUB password 27
458
Lotus Domino 6 for Linux
internal network 149
Internet certificates 370
Java applets 374
Kerberos authentication 139
limiting physical access 134
limiting the size and the number of the requests
377
MD5 passwords 33, 70, 140
network example 149
network security 141
notes.ini 176
open ports 142
passwords 134, 136, 174
physical security 134
ports 142, 174
power-on password 134
realms 371
rights to issue console commands 129
root access 134
root password 32, 69
running daemon as root 141
running Domino Server in Linux 136
S/MIME 370
securing your backups 150
server access 174
server document 174
servlets 374
setting password length 138–139
setting permissions 155
shadow passwords 33, 140
SSL 174
system security 134
URL length 377
user access 136
username 99
X.509 certificate 370
Server 370
Server document
configuration tab 367
Domino Web Engine tab 371, 386
HTTP tab 377
logging fields 387
Services 126, 156, 247
Servlets 385
configuring 386
directory 386
enabling 386
running 386
using Domino Servlet Manager 386
using IBM WebSphere Application Server 386
using third party servlet manager 386
Session authentication 371
Setting permissions 130
Setting the Linux PATH environment variable 105
Setting the time zone 31
Setting up Domino 105
Shell 84, 125
bash 155
Shell environment 105
Shell for remote administration 143
Shells 88
Shortcut 260
Showing active connections 159
SMB 33
SMTP server 143
SSH 147
SSL 262, 368
Starting daemons 143
Starting Domino from a script 130
Starting the DB2 Server 309
Starting the Domino server 125
Startup script 130, 217
Stopping daemons 143
Stopping the DB2 Server 309
Super user 32
SuSE 1
creating a new group 137
creating a user 137
ftp daemon 142
installing 40
KDE system guard 202
MD5 encryption 137
password settings 136
setting password length 138
starting daemons 143
stopping daemons 143
Swap partition 5
Swap usage 203
System clock 5
System logs 167
SysV Init Editor 144
T
TCP/IP protocol 157
Telnet command 378
The Linux Documentation Project 7
Time configuration 5
Transaction logging 226, 229
Transaction logs 4, 136, 429
Troubleshooting 103, 125, 163, 366, 378
debugthreadlogging 380
HTTP thread debugging 380
network 163
req###.log 380
threads 380
Web server 378
Web server hanging 379
Web server performance 366
U
Uninstalling Linux 27
UTC 5
V
Verify the DB2 Server installation
home directory permissions 305
instance owner profile 305
instance symbolic links 306
Verifying the DB2 Server installation
creating the DB2 sample database 309
database manager configuration 308
DB2 release level 307
DB2 Service Name 308
DB2 service name 308
generate the symbolic links 307
Video card 5
View 319
Virtual field activities 288
Virtual Fields Activities 310
Virtual hosts 371
Virtual servers 371
Virus protection 391
Vmstat 200
VMware 8
W
Web administrator 247, 261
access control 177
analyzing server activities 185
certificates 184
cluster management 190
configuration 190
database management operations 185
HTTP statistisc 186
Index
459
mail routing activities 188
mail server tasks 188
mail-in databases 182
managing Domino databases 185
messaging tab 188
monitoring OS statistics 186
monitoring server status 185
monitoring server tasks 186
monitoring users 186
People & Groups tab 178
people view 179
policies 182
Policy setting documents 183
Quick console 186
registering groups 179, 181
registering users 179–180
replication 189
required Domino tasks 178
requirements 177
server activities 185
server analysis 187
server document 190
server monitoring 190
server tab 185
settings and certificates 182
web configuration 190
Web server 365, 368
browsing Domino databases 370
domlog.nsf 368
Enable Logging section 368
file permissios 376
file protection 374
hanging 379
HTTP protocol security 377
HTTP settings 369
httpd.cnf 380
login information 371
mapping to a different server 383
maximum request over a single connection 368
number of active threads 368
ports 368
refreshing 369
request log file 380
security features 370
servlets 385
session 371
settings 367
starting 369
stopping 369
460
Lotus Domino 6 for Linux
tell commands 379
tell HTTP commands 380
URL mapping 382
URL mappings 382
URL redirection 382–383
virtual host 381
virtual server 381
Web realms 373
Webmin utility 170
Why 392
Windows 175, 248, 260
Windows 2000 266, 285
Windows 2000 groups 285
WMware 40
X
X-Windows 84, 192
Y
YAST2 87, 136
Lotus Domino 6 for Linux
(1.0” spine)
0.875”<->1.498”
460 <-> 788 pages
Back cover
®
Lotus Domino 6
for Linux
Installing RedHat,
SuSE, and Domino 6
for Linux
Improving the
performance of your
Domino server
Administering
Domino and Linux
This IBM Redbook describes how to run the IBM Lotus Domino 6
server on the Linux platform. While Lotus Domino 6 is
platform-independent, some specific knowledge about the
platform and configuration is required to ensure that the Domino
6 server is running most efficiently.
The book provides detailed instructions for installing Linux and
Domino 6 for Linux, and describes how to achieve maximum
performance of your system. System administration and security
techniques are explained and tools for managing and
troubleshooting are discussed as well.
Detailed scenarios illustrate some of the features of Domino 6 on
Linux, in particular user registration, directory synchronization,
creating a Domino application, and accessing external data using
DB2 and MySQL. We describe how to configure Domino as a Web
server, including the new security options specific to the HTTP
protocol in Domino 6. Strategies and techniques for virus
protection and data backups are presented, along with details
about some of the third-party software packages available to
help you with these management tasks.
This redbook is written for administrators with strong Domino
and Windows operating system skills, but who are not experts on
Linux. Therefore, we show in detail how to install and configure
a Linux operating system on your server, but don’t spend too
much time explaining basic Domino features. Instead, we focus
on demonstrating that Linux is an excellent platform on which to
run Domino 6.
SG24-6835-00
ISBN 0738426334
INTERNATIONAL
TECHNICAL
SUPPORT
ORGANIZATION
BUILDING TECHNICAL
INFORMATION BASED ON
PRACTICAL EXPERIENCE
IBM Redbooks are developed by
the IBM International Technical
Support Organization. Experts
from IBM, Customers and
Partners from around the world
create timely technical
information based on realistic
scenarios. Specific
recommendations are provided
to help you implement IT
solutions more effectively in
your environment.
For more information:
ibm.com/redbooks