/


Теги: weapons military affairs
Год: 1914

Текст
TflADEMARk
WAFFENFABRIK MAUSER A.-G.
Oberndorf a. N.j Wlirttembcrj, Germany,
Tile MUSED ЙИТ0НДТ1С DISTOLS
Cal. 6.35m m(. 25) New Model, Cal. 7.65’mm (.32)
The MAUSER AUTOMATIC PISTOLS
Cal. 6.35 mm (.25) New Model. Cal. 7.65 mm (.32)
Introductory.
Encouraged by the extraordinary acceptance with which the public has
favoured our 6.35 mm Automatic Pistol, and desirous of meeting a frequently
reiterated demand for a heavier and more powerful self-loading pocket weapon,
the well-known inventor, our Managing Director Paul voh Mauser, has also
designed an automatic pocket pistol for the 7.65 mm auto^cartridge. In size
this weapon ranges between the above mentioned 6.35 mm pistol and the new
9 mm military model 191^/14 which is intended to be followed Inter on by an
ll'inm (.45) automatic pistoVfo
At the same time we have introduced in the 6 35 uinpand in the 7.65 mm
automatics various important improvements which were realized while cairying
out practical experiments on a large scale with our 9 mm military pattern
automatic pistol, model 1912/14. Details of these improvements will be found
on pages 3 and 4.
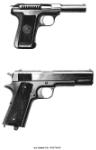
The 7.65 mm and the new model 6.35 mm pistols arc entirely alike in
their construction except for their sizes which are stated on page 5. The
following description and instructions therefore apply equally to both patterns.
January 1914. Waffenfabrik Mauser Akiien-Gesellschaft.
*) Whereas the new 6 35 mm pistol is now being placed on U10 IWluH, the Cal. 7.65 mtn
automatic will be available in July 1914 and the 9 mm military nibdel ill tllQ llllor part of 1914, our
present production being entirely taken up by large Government contouHlh
Note. Mauser Automatic Pistols Cal, 6.35 mm numbered from 1 (О Ш Ш10 are of the
old pattern and the present instructions do not apply to them.
2
Advantages of the Mauser Automatic Pistols
Cal. 6.35 mm (. 25) New Model -and Cal. 7.65 mm (.32).
Magazine Capacity. As th£ magazine of the 6.35 mm pistol holds
nine and that of the 7.65 mm eight cartridges, the pistol can be made to hold
ten and nine shots respectively. (See page 13.)
Security in Handling. The shooter is in a position to recognize without
fail at any time, when aiming or in the dark by touch, whether the pistol is cocked
or not cocked, as, when cocked, the rear end of the striker is visible at the back
of the breech. This is a most valuable feature, as the absence, in other pistols,
of devices clearly showing the state of the weapon, has led to fatal accidents.
The pistol cannot be fired when the magazine is wholly or partly with-
drawn, Accidents owing to the presumption that there in no cartridge in the
barrel after withdrawing the magazine are thus made impossible.
The fact that the breech remains open after firing the last cartridge and
closes automatically as long as there are cartridges in the magazine contributes
naturally to the security in handling.
The safety, which can be operated with ease by the thumb of the right
hand when aiming, allows the weapon to be made safe when cocked or not
cocked, loaded or not loaded, and, as the breech cannot be opened when
the pistol is safe, danger in carrying is obviated, nor can those unacquainted with
its mechanism, such as servants or, children, make the pistol ready for fire.
The system employed for unlocking- i. e. releasing the safety prevents
the safety from being unlocked wtlile carrying the pistol in or drawing it
out of the pocket.
The
3
The involuntary firing of more shots than intended, common I v known as
“maximing” is absolutely prevented by th£ interceptor (see illustration page 9,
part 7) which disconnects the trigger from the sear while the breech is in
motion and makes it a condition that for every shot the trigger must be pulled.
No firing can take place unless the breech is entirely closed even if the shooter
should forget to release the trigger after firing.
The pistol is
Perfectly balanced, and its substantial and comfortable grip contributes
greatly to the
Accuracy of Shooting which is further increased by the comparatively great
length of barrel and line of sight. (See table of ballistic data page 5.)
Ease of Stripping and Assembling. For cleaning purposes the pistol can
be taken to pieces and put together again in a few seconds, no tools
whatever being necessary. (See instructions page 14 to 24.)
The pistol has a flat shape, without any sharp edges or projections and,
consequently, does not bulge the pocket.
The Recoil is scarcely perceptible.
Solidity and Simplicity of Construction and Workmanship. The com-
ponent parts of the pistol are simple and strong and only the highest
quality of materials and best workmanship ai^ used in their manufacture
which is based on the same methods and principles to which Mauser
constructions owe their world-wide reputation.
4
Measurements. -
Caliber 6.35 mm (.25) 7.65 mm (. 32)
Magazine capacity Cartridges 9 8
Length of pistol . Inch. 5.4 6.1
Height of pistol Inch. 4 4.5
Thickness of pistol Inch. . 85 1.1
Length of line of sight Inch. 4.6 5.0
Weight of pistol, magazine empty . . Ounces 15 21
Weight of pistol, magazine full . . . Ounces 17 23
Weight of empty magazine . . . . Ounces 1.25 1.75
Ammunition.
Weight of bullet . Grains 49 74
Charge of nitro powder . Grains 1.23 3.08
Ballistic Data.
Muzzle velocity F. s. 750 1142
Muzzle energy . F. lb. 61 148
f Spread at 10 yds . Inch. 1.37 Ik 1.37 1.37 & 1.37
Target results: < Spread at 25 yds . Inch. 5.75 Ik 4.5 4 Ik 2.7
1 Spread at 50 yds . Inch. 7.5 Ik 5 5 6.5 Ik 5
( 10 yds . . Inch. 2.75 4.5
Penetration on pine at < 25 yds . . Inch, 2 25 4.4
( 50 yds . . Inch. 2.1 4.25
Illustration of cartridge (natural size) . . . . раце 10 J page 10
5
1. Barrel.
2. Barrel-hold er.
3. Barrel-holder catch.
4. Striker.
5. Striker spring.
6. Barrel-holder guide.
7. Interceptor.
8. Rear Sight.
9. Extractor.
10. Breech.
11. Recoil spring.
12. Ejector.
13. Double action spring.
14. Grip cover plate.
15. "
Mauser Automatic Pistol
Cal. 6.35 mm (.25) New Model & Cal. 7.65 mm (.32).
Index of Component Parts.
16. Magazine.
’•17. Trigger.
18. Trigger spring.
19. Grip cover plate screw.
20. Grip cover plate screw.
21. Safety locking spring.
22. Trigger catch spring.
23. Trigger catch pin.
24. Trigger catch.
25. Magazine platform.
26. Safety.
27. Sear.
28. Magazine bottom plate.
, 29. Magazine holder.
30. Magazine spring.
Frame.
31. Side plate.
6
7
The Working of the Pistol and its Mechanisinus.
See illustration page 9.
The pressure of the powder gases developed in firing a cartridge drives the
breech (10) backward and with it the striker (4). By this rearward movement
the ejector (12) expels the empty cartridge case through an opening in the
breech after being previously extracted from the barrel by the extractor visible
on the exterior surface of the breech. The striker (4) slides back over the
nose of the sear (27), the forward edge of which is sloped to allow it to do
so, compressing simultaneously the striker spring (5). At the same time the
breech compresses the recoil spring (11) which being guided on a tubular
guide (6) bears at one end against the frame and at the other against the
front projection of the recoiling breech. After the energy of the recoil has
been used up, the breech is flung forward by the expansion of the recoil
spring. In this movement the nose (b) of the striker engages the nose (a)
of the sear (27) The striker is thereby detained and its spring compressed.
The uppermost cartridge raised by the platform of the magazine (25) into
the path of the breech is seized by the face (c) of the breech and thus led
into the chamber of the barrel which is fixed.
The pistol is now loaded and cocked. Pulling the trigger (17) the rear
end of the sear (27) drops and releases the striker which is thrown forward
by the expanding striker spring (5) and fires the cartridge.
Continued page 10.
8
9
The Working of the Pistol and its Mechanisms.
Continued from page 8,
The locking of the breech is effected by its weight muilsled by the
pressure of two springs: the striker spring and the recoil spring, the weight
of the breech being so proportioned to the rearward pressure of the powder
gases that the bullet must have left the barrel before the breech has measurably
commmenced its rearward movement whereby the connection between the
barrel and the breech is severed. GasSght closing of the chamber is thus
ensured, so that accidents caused through.premature separation of barrel and
breech are absolutely impossible.
The above described process is repeated automatically, subject to the
trigger being pulled for each shot, until the last cartridge is fired, when, by
the particular disposition of the magazine platform (25), the breech remains
open. When the empty magazine is withdrawn, one of the arms of the ejector
(12) enters into a recess in the breech ahd holds this open. Upon introducing
a loaded or empty magazine the ejector returns to its former position releasing
the breech which then close automatically.
Cal. 6.35 mm (.25).
Illustration of Cartridges.
Cal. 7.65 mm (.32).
Loading the Magazine. (Sec insln.eiions page I'.!.)
11
Instructions for Loading and Unloading.
for locking and unlocking the safety, and for stripping, assembling and
cleaning the pistol.
To take out the Magazine press backward on the roughened knob
of the magazine holder (page 14 Fig. la) and draw magazine downward by
its projecting rim (see also Fig. 6 page 21).
To load the Magazine take the magazine in the left hand, press
down the platform with the butt end of the cartridge, which, ’for the purpose,
is held by the bullet in the right-hand and push the cartridge under the bent
lips of the magazine so that the cartridge lies with its base against the wall
of the magazine. Then, with the base of the next cartridge press against
the middle of the top cartridge in the magazine and so on until the magazine
is filled (see illustration page 11).
The loaded magazine is then introduced into the grip or handle of the
pistol (points of bullets to the front!).
The breech, assuming that it was open from the last firing, then closes
automatically.
If the breech had previously been closed, draw it back and then introduce
the loaded magazine,1 which, when completely introduced will close the breech
automatically loading the first cartridge into the barrel.
The pistol is now ready for fire and the necessary precaution should
be taken.
12
Loading ten and nine Shots respectively. When it is desired that
the 6.35 mm pistol should hold ten and the 7.65 mm nine shots, after filling
the magazine^ open the breech, load one cartridge into the barrel by introducing
the magazine into the pistol, then make the loaded and cocked pistol safe,
take out the magazine and re-fill it.
To Unload the Pistol, first-remove the magazine. Then, should there
be a live cartridge in the barrel, remove it by pulling back the breech.
To Unload the Magazine, hold the magazine in the closed palm
of either hand and push the cartridges forward over the platform with
the thumb.
To Make Safe and to Release Safety. The pistol can be made safe
and the safety can be unlocked, i. e. released, when the pistol is loaded, un-
loaded, cocked or not cocked.
The pistol is made safe by pressing down the safety lever (part 26,
page 9) which locks the sear (27) and the breech. It is now neither possible
to fire nor to move the breech.
The safety is unlocked, i. e. released, by pressing on the knob of the
safety locking spring (21) which lies under the handle cover plate.
The locking as well as the releasing of the safety is accompanied by
an audible click.
The pistol can be made safe and the safety can be released with the
thumb of the right hand while aiming.
13
Stripping and Assembling.
For ordinary cleaning purposes stripping A is quite sufficient and further
taking to pieces should be avoided.
Fig. 1 a.
Stripping A.
1. Take out magazine by
pressing backward on
the roughened knob of
the magazine holder
with the thumb of the
left hand while holding
the pistol in the right.
With the index finger
of the left hand draw
out the magazine by
the projecting magazine
bottom plate. (Fig. la.)
14
Stripping A (continued).
2. Empty the magazine (see instructions page 13).
Pull back the breech, (Fig. lb.)
15-
Fig. 2a-
16
Fig. 2 b.
Stripping A (continued).
3. With the thumb of the right hand press inward the roughened barrel
holder catch, Fig. 2<% and with the thumb of the left turn head of barrel
holder clear of projection in front of holder catch on frame (Fig. 2 b).
Draw out barrel holder.
17
Fig 4.
^Stripping A (continued)
5. Introduce the empty magazine wlwonpon the breech will slide forward.
IQ
Stripping A (continued).
6. Let breech slide forward until its ends are exactly flush with the frame.
Then releasethe striker by pullingthe trigger,holding pistol as shown inFig.5.
20
Stripping A (continued).
7. Withdraw magazine (Fig. 6) whereupon the breech will slide further
forward as shown in Fig. 7. The breech СЛП now be from the frame.
21
Fig. 7.
Assembling A.
1. Place striker with spring info tlieir
seating within the, breech and put
recoil spring, with its tubular guide
inside, into its place in the frame,
the collar of the guide directed to-
wards the rear of the fiame.
22
Fig. 8.
Assembling A (continued).
2. After seeing that the for-
ward end of the recoil spring
fits well into the hollow
projection on the lower
front part <of the breech
(see Fig. 7), push back the
breech until it engages itself.
Fig. 8.
23
Assembling A (continued).
3. Place barrel into its seating (Fig. 3, page 18).
4. Introduce barrel holder and turn its head over projection in front
of holder catch until the barrel holder catch locks it with a click.
(Fig. 2^ and 2b, page 16 and 17.)
5. Introduce the magazine whereupon the breech will close.
Release the striker by pulling trigger.
24
Stripping В, Continuation of Stripping A
(should be avoided unless absolutely necessary).
Push upwards and lift out
side plate.
Lift out interceptor.
Take double action spring out
of its seating.
Lift out the sear.
Unscrew handle cover plate screws
Draw handle cover plate backwards.
Take out safety pushing forward.
Take out safety locking spring.
Draw out magazine holder from frame.
Take out ejector.
Assembling B.
Place ejector into its seating.
Introduce magazine holder.
Place safety locking spring into its seating.
Put in safety. In doing1 so, see that its undercut fore end engages in
the recess in the frame, pressing simultaneously on the knob of the
safety locking spring and entering the trunnion into its hole in the frame'.
Slide on handle cover plate holding safety in its place.
Screw down grip cover plate.
Put trigger with its nose into its place.
Place sear in its seating.
Put double action spring into its place taking care that its longer arm
is placed under the sear.
Insert interceptor.
Slide on side plate.
25
Cleaning and Preservation of Pistol.
As smokeless powders favour the formation of inst, the barrel and,
if possible also the breech, must be cleaned immediately after shooting,
taking the pistol to pieces as described under the heading “Stripping A”.
If little time is available, it will generally suffice to take off, clean and
oil the barrel only.
Should the weapon not be used for a considerable space of time, it
should be cleaned thoroughly and well oiled.
About 24 hours after the first cleaning, which is ,necessary even if a
single shot be fired, a slight coat of rust is generally to be expected, which
can be easily removed by applying good rifle oil preferably »Basicol«, obtainable
from any gun-smith.
Further stripping than described under A page 14—21 will rarely be
necessary and should be avoided.
When the pistol is not being used, it is convenient to have the striker
released, which is the case when the end of the striker is not visible at the
rear of the breech.
26
Diagrams of Targets.
Cal. 6.35 mm (.25)
Range 10 yards.
(Natural size.)
Cal. 7.65 mm (.32)
Range 10 yards
(Natural size)
27
Penetrative Power.
Pistol Cal. 7.65 mm Range lOJyards.
Block of clay
Depth of penetration 21 inch.
Pine boards 1 inch thick.