/


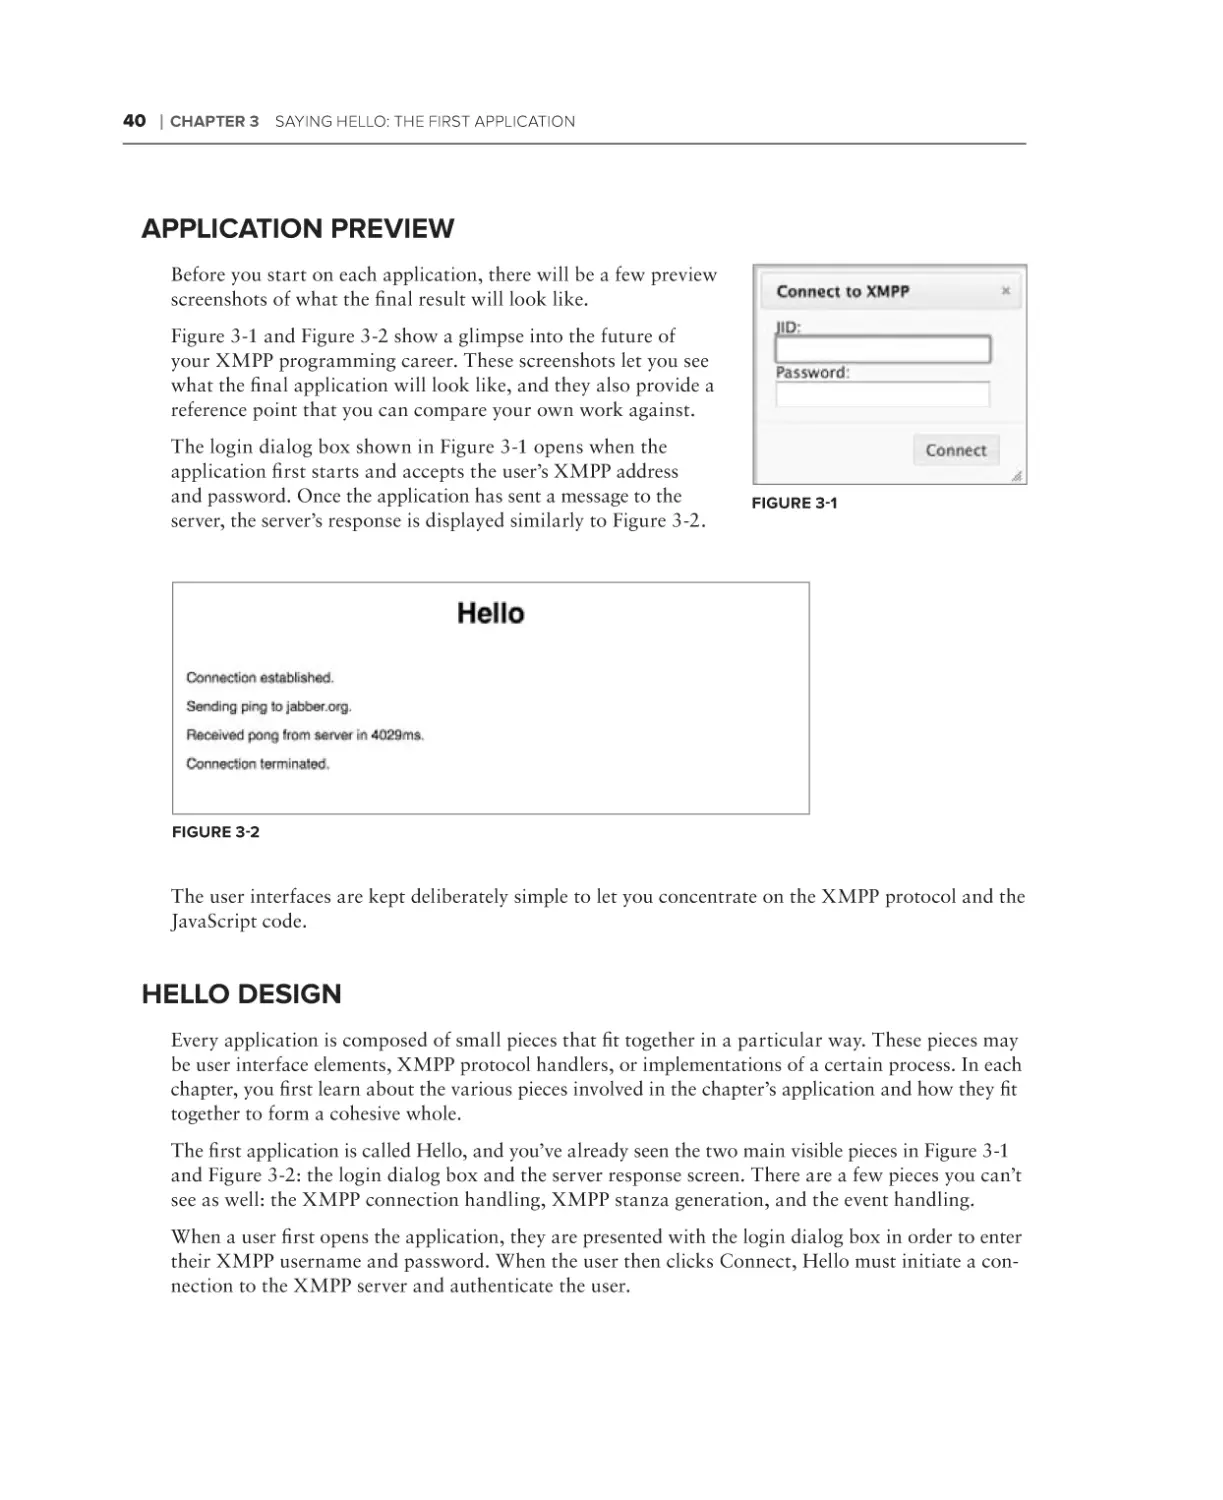


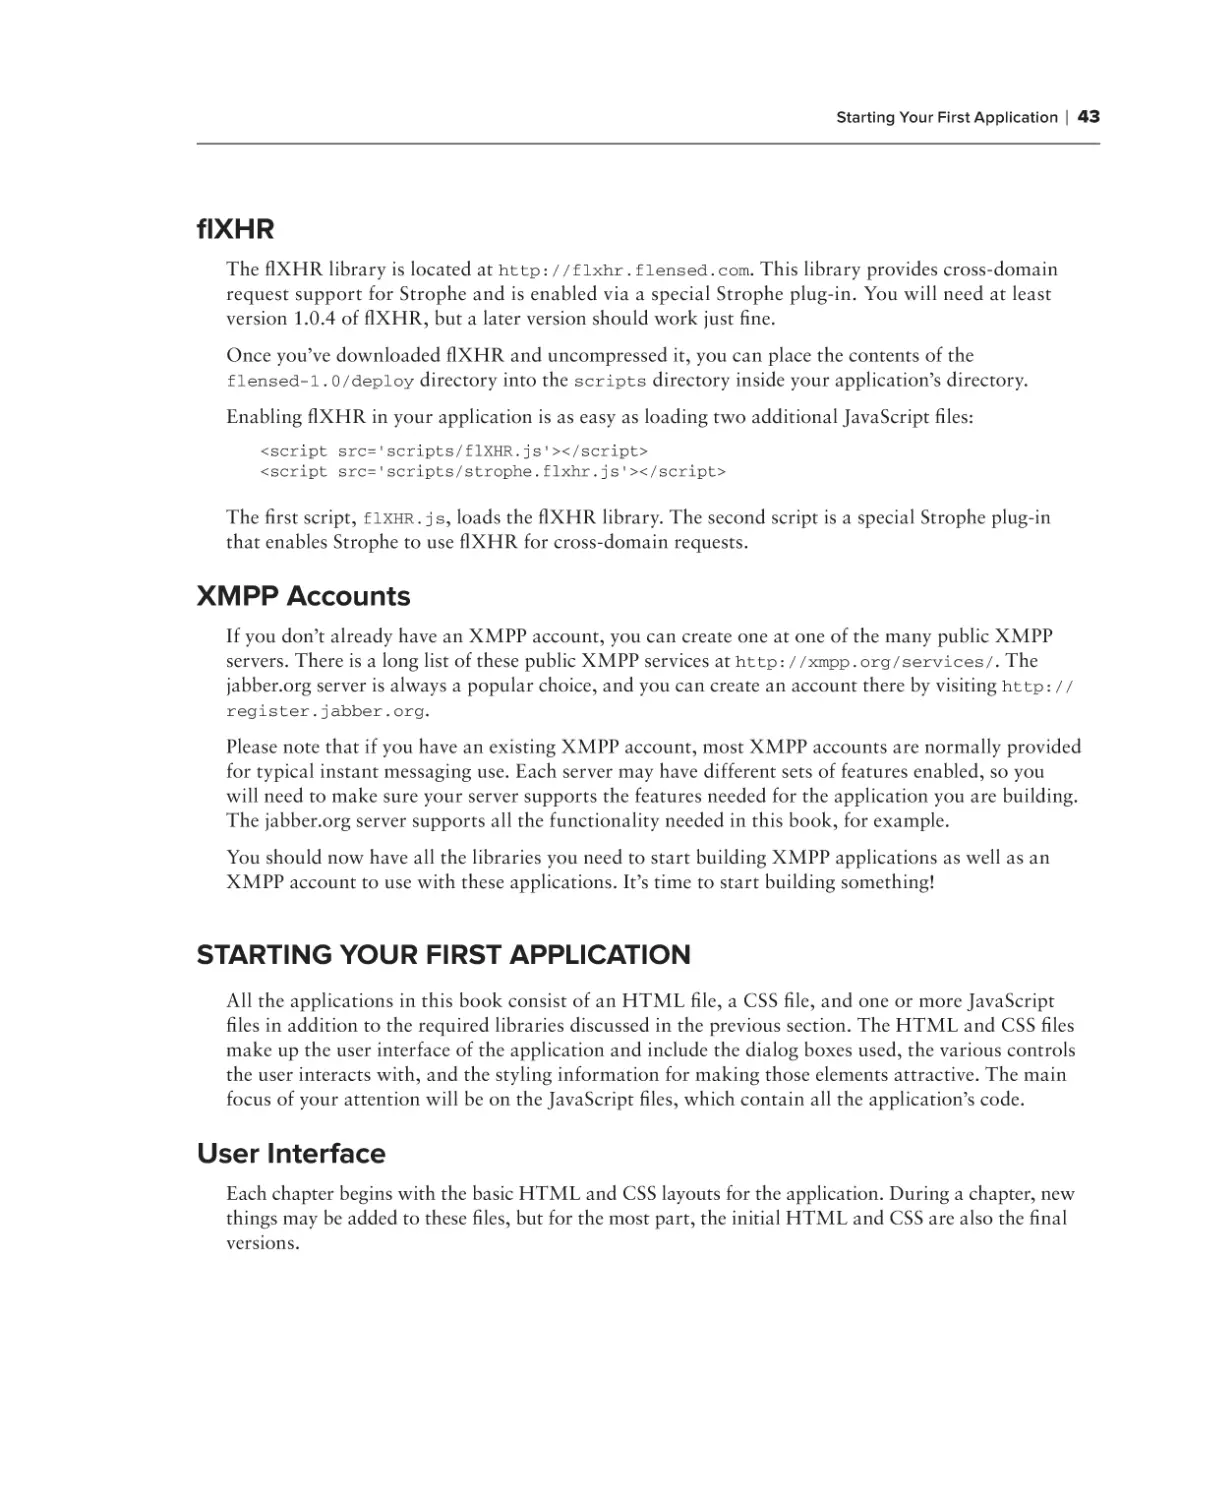


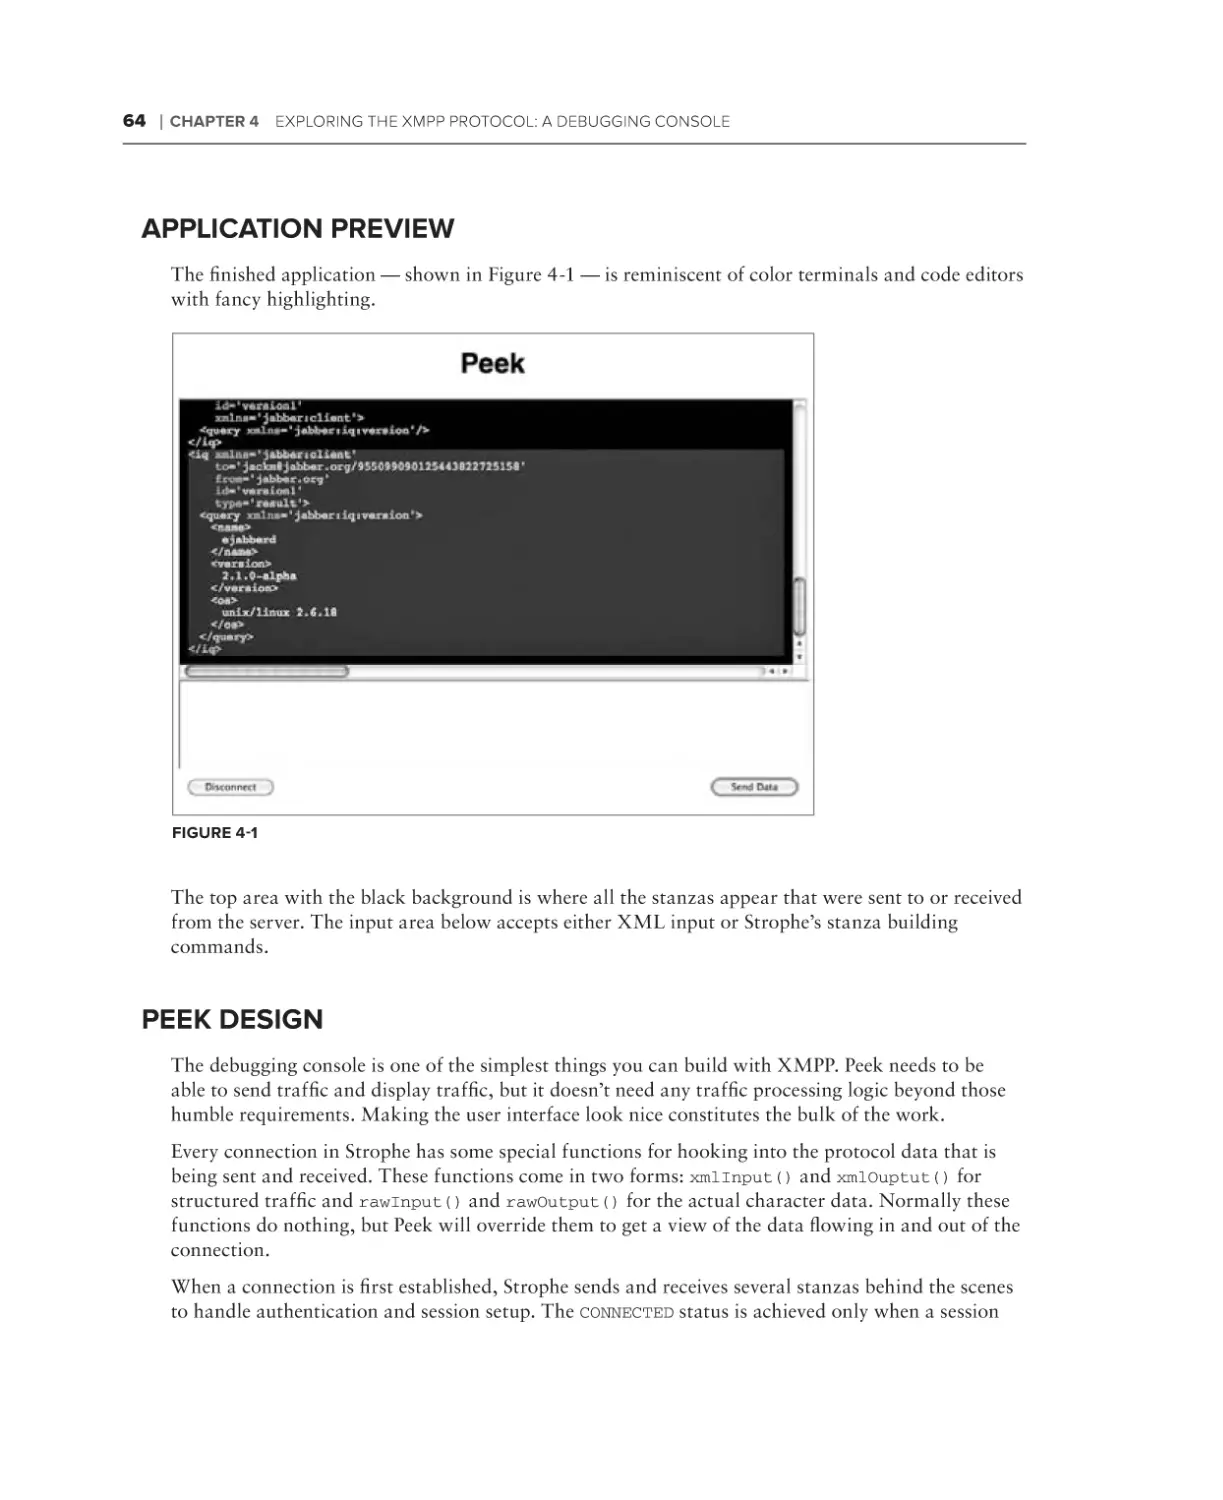


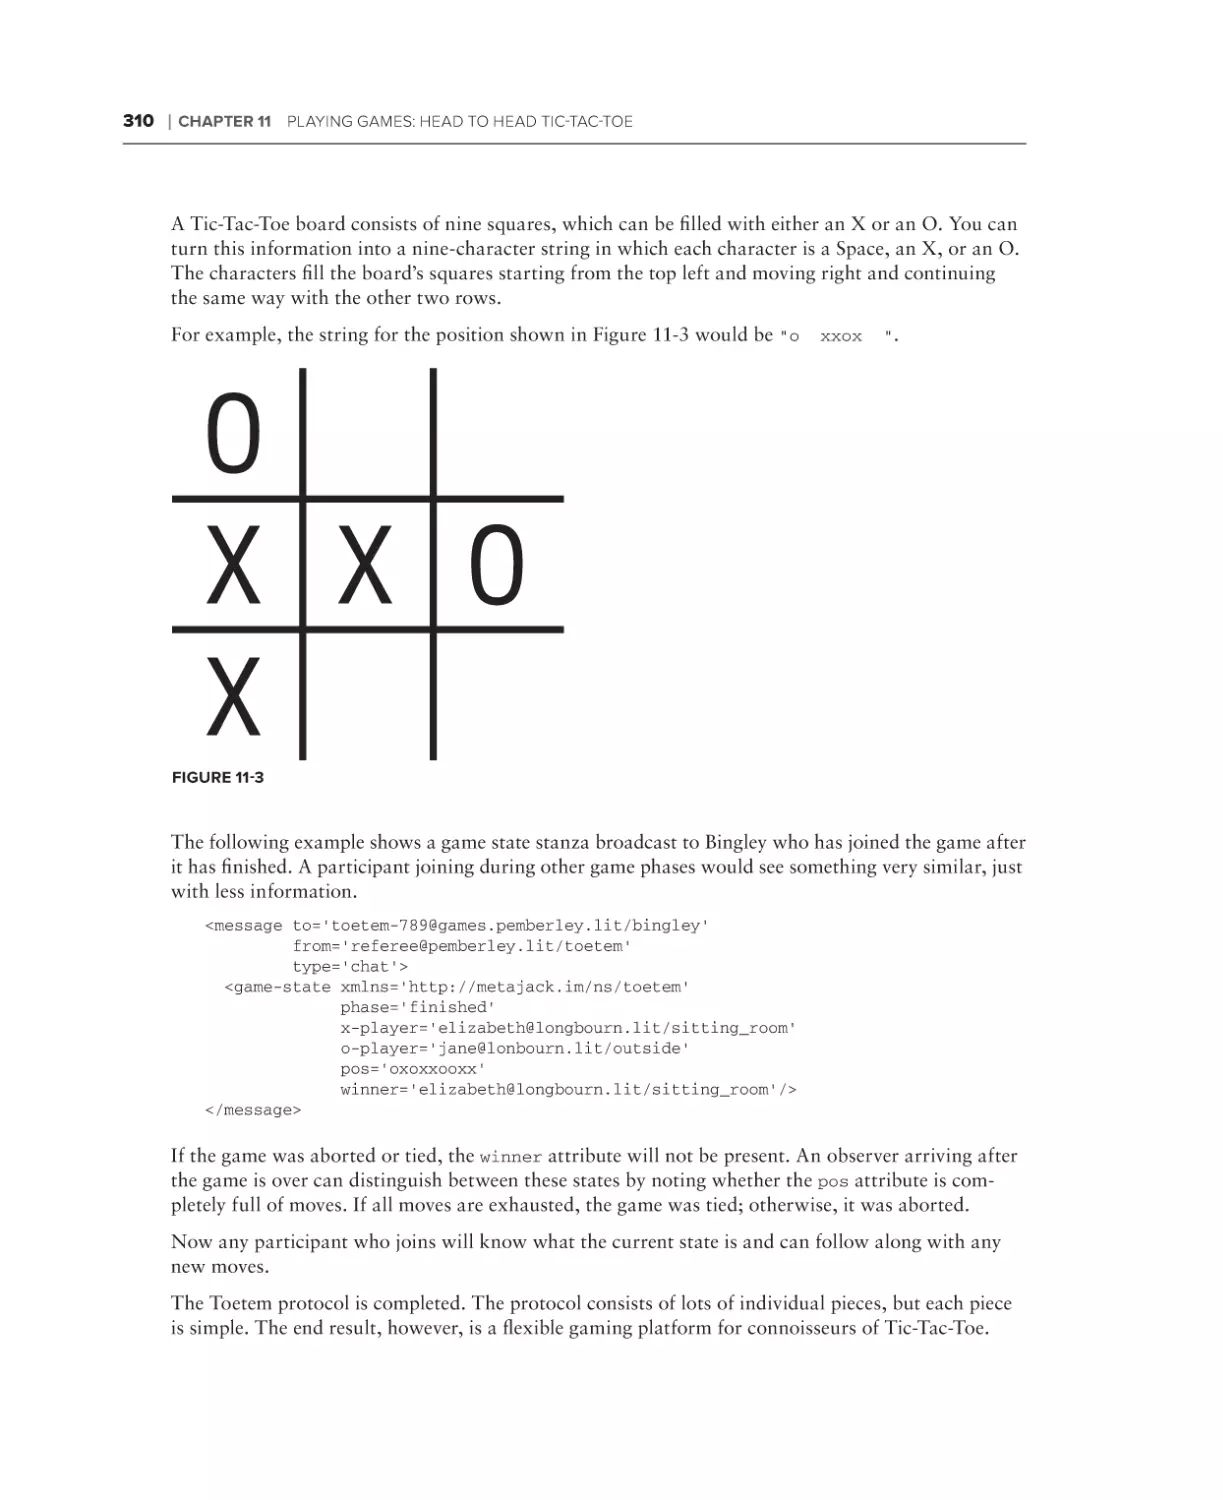


Текст
Moffitt
Create real-time, highly interactive apps
quickly with the powerful XMPP protocol
•
Learn about XMPP’s instant messaging features, such as rosters,
presence and subscriptions, and private chats
Covers XMPP stanzas, stanza errors, and client protocol syntax
and semantics
•
Discusses service discovery, data forms, and publish-subscribe
•
Addresses XMPP programming-related topics such as application
design, event handling, and combining existing protocols
•
Details the best ways to deploy XMPP-based applications
•
Explains how to use Strophe’s plugin system and how to create
your own plugins
Jack Moffitt is CTO of Collecta, where he leads a team that produces several
XMPP-related projects including Strophe (a family of libraries for XMPP
communication), Palaver (a group chat server), Punjab (an HTTP to XMPP
gateway service), and Speeqe (a simple web-based group chat client). He also
served several terms on the Board of Directors and Council of the XMPP
Standards Foundation.
Wrox Professional guides are planned and written by working programmers
to meet the real-world needs of programmers, developers, and IT professionals.
Focused and relevant, they address the issues technology professionals face
every day. They provide examples, practical solutions, and expert education
in new technologies, all designed to help programmers do a better job.
Programming / General
$49.99 USA
$59.99 CAN
wrox.com
Programmer
Forums
Join our Programmer to
Programmer forums to ask
and answer programming
questions about this book,
join discussions on the
hottest topics in the industry,
and connect with fellow
programmers from around
the world.
Code Downloads
Take advantage of free code
samples from this book, as
well as code samples from
hundreds of other books, all
ready to use.
XMPP
•
Wrox Programmer to Programmer™
Professional
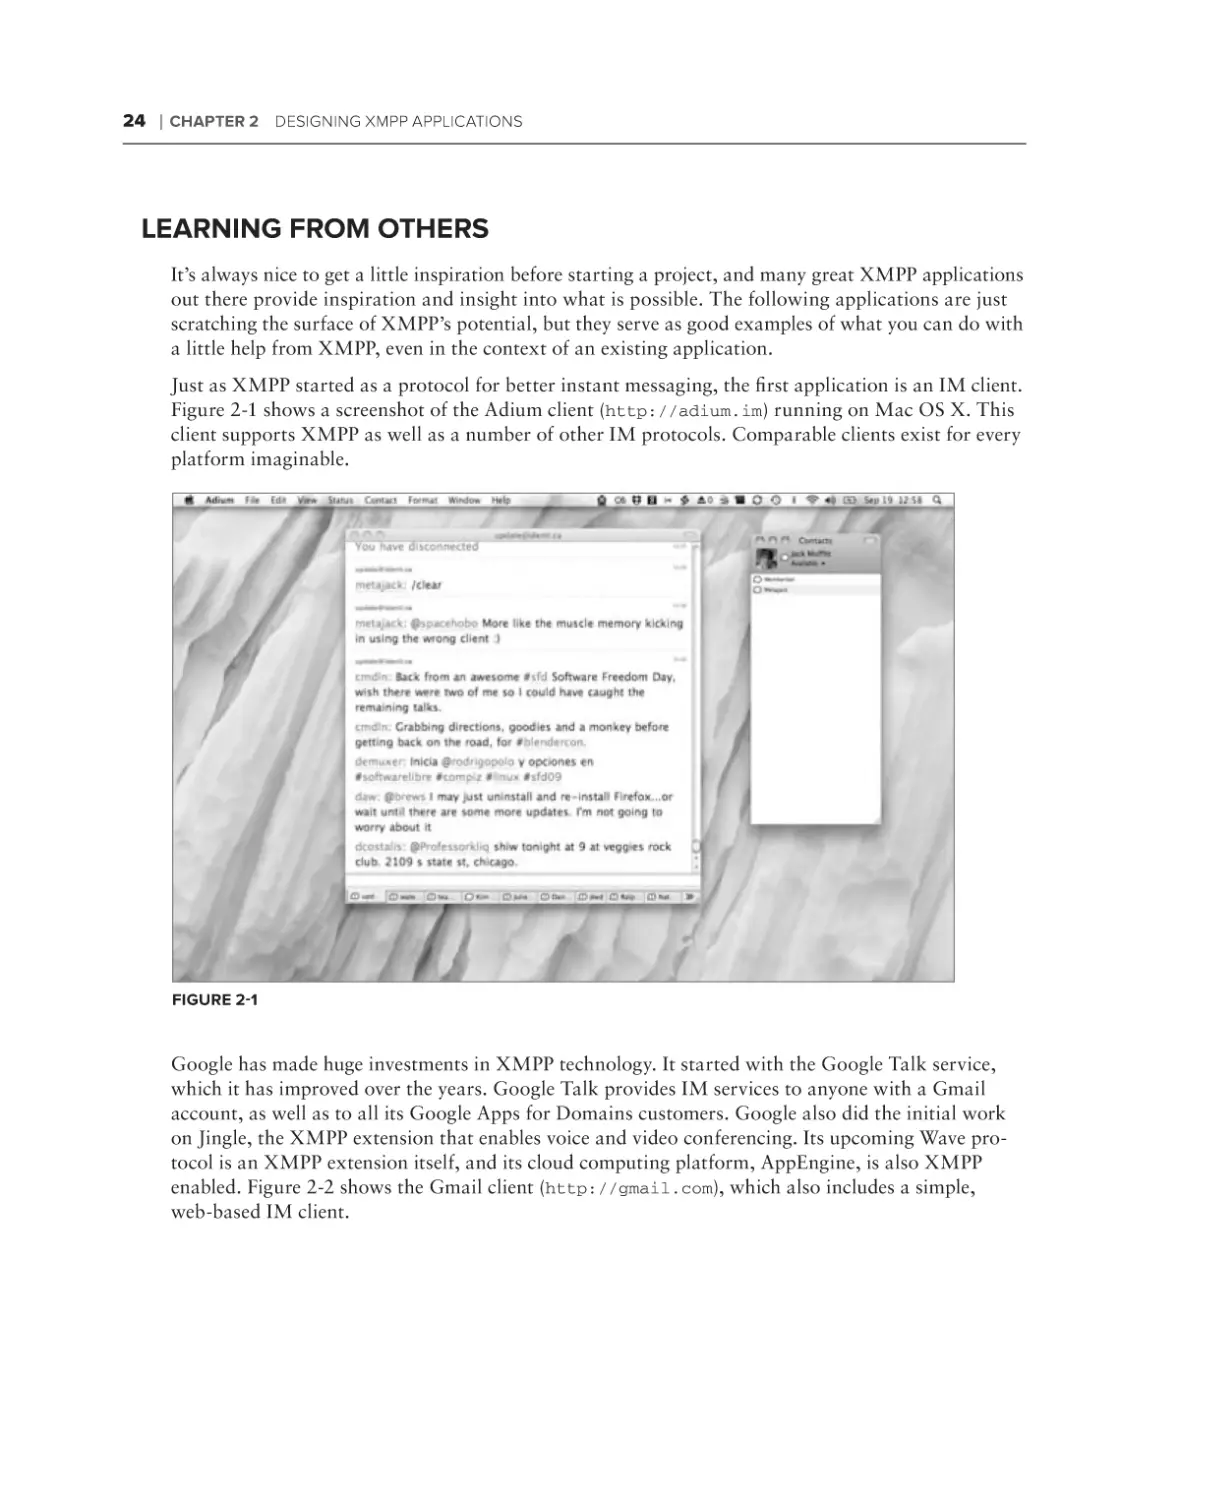
XMPP is a robust protocol used for a wide range of applications,
including instant messaging, multi-user chat, voice and video
conferencing, collaborative spaces, real-time gaming, data
synchronization, and search. This book teaches you how to harness
the power of XMPP in your own apps and presents you with all the
tools you need to build the next generation of apps using XMPP
or add new features to your current apps. Featuring the JavaScript
language throughout and making use of the jQuery library, the book
contains several XMPP apps of increasing complexity that serve as
ideal learning tools.
Join the discussion @ p2p.wrox.com
Read More
Find articles, ebooks, sample
chapters and tables of contents
for hundreds of books, and
more reference resources on
programming topics that matter
to you.
Programming
with
JavaScript ®
and jQuery
Professional
XMPP
Programming with JavaScript and jQuery
®
Jack Moffitt
Related Wrox Books
Beginning JavaScript, 4th Edition
Programmer to Programmer™
Get more out of
wrox.com
Interact
Join the Community
Take an active role online by participating in our
P2P forums @ p2p.wrox.com
Sign up for our free monthly newsletter at
newsletter.wrox.com
Wrox Online Library
Browse
Hundreds of our books are available online
through Books24x7.com
Ready for more Wrox? We have books and
e-books available on .NET, SQL Server, Java,
XML, Visual Basic, C#/ C++, and much more!
Wrox Blox
Download short informational pieces and code
to keep you up to date and out of trouble!
Contact Us.
We always like to get feedback from our readers. Have a book idea?
Need community support? Let us know by e-mailing wrox-partnerwithus@wrox.com
ISBN: 978-0-470-52593-7
Serving as a great introduction to JavaScript, this book offers all you need to start using JavaScript on your web pages right away. It’s
fully updated and covers utilizing JavaScript with the latest versions of the Internet Explorer, Firefox, and Safari browsers and walks you
through the basics of JavaScript: what it is, how it works, and what you can do with it.
Beginning JavaScript and CSS Development with jQuery
ISBN: 978-0-470-22779-4
With this unique, project-oriented book, author Richard York teaches even the most novice of JavaScript users how to quickly get started
utilizing the JavaScript jQuery Library to decrease the amount of code that needs to be written and tested. A four-color code syntax
highlighting system provides a visual reinforcement and allows you to see the nuts and bolts that comprise each line and section of code.
With this helpful guide and hands-on exercises, you’ll be able to put jQuery to work for you and avoid having to write code from scratch.
Beginning XML, 4th Edition
ISBN: 978-0-470-11487-2
The perfect resource for beginning XML programmers, this guidebook clearly shows you what XML is, how to use it, and what technologies surround it. The authors build on the strengths of previous editions while covering the latest changes in the XML landscape such as
XQuery, RSS and Atom, and Ajax. The most recent specifications are presented along with best practices to follow when developing XML
solutions. You’ll delve into the state of the art for XML and databases, discover how to query XML information, retrieve data, and create
new XML documents. In addition, you’ll learn how to publish information on the web, design dynamic interactive graphics, and make
interactive forms.
Professional JavaScript for Web Developers, 2nd Edition
ISBN: 978-0-470-22780-0
This book covers JavaScript from its very beginning to the present-day incarnations that include support for the DOM and Ajax. It also
shows you how to extend this powerful language to meet specific needs and create seamless client-server communication without intermediaries such as Java or hidden frames. You’ll explore the components that make up a JavaScript implementation, with specific focus on
standards such as ECMAScript and DOM. You’ll also learn how to utilize regular expressions and build dynamic user interfaces. This valuable insight will help you apply JavaScript solutions to the business problems faced by Web developers everywhere.
Professional XML
ISBN: 978-0-471-77777-9
From document type definitions and XQuery to Web services and form development, this book takes you through all of the XML capabilities that companies want to implement today. It not only covers the basics of XML and the XML specification, but also shows you the
XML-based applications that are driving the tech industry forward, such as blogging and alerts.
B
a
P
a
B
a
Professional
XMPP Programming
with JavaScript and jQuery
INtroduction. . . . . . . . . . . . . . . . . . . . . . . . . . . . . . . . . . . . . . . . . . . . . . . . . . . . . . . . . . . . . . xix
⊲⊲ Part I
XMPP Protocol and Architecture
Chapter 1
Getting to Know XMPP. . . . . . . . . . . . . . . . . . . . . . . . . . . . . . . . . . . . . . . . . . . 3
Chapter 2
Designing XMPP Applications. . . . . . . . . . . . . . . . . . . . . . . . . . . . . . . . . . . . 23
⊲⊲ Part II
The Applications
Chapter 3
Saying Hello: The First Application. . . . . . . . . . . . . . . . . . . . . . . . . . . . . . . . 39
Chapter 4
Exploring the XMPP Protocol: A Debugging Console. . . . . . . . . . . . . . . . 63
Chapter 5
Microblogging in Real Time: An Identica Client. . . . . . . . . . . . . . . . . . . . . 87
Chapter 6
Talking with Friends: One‑on‑One Chat . . . . . . . . . . . . . . . . . . . . . . . . . . 103
Chapter 7
Exploring Services: Service Discovery and Browsing. . . . . . . . . . . . . . . 145
Chapter 8
Group Chatting: A Multi‑User Chat Client. . . . . . . . . . . . . . . . . . . . . . . . . 165
Chapter 9
Publishing and Subscribing: A Shared Sketch Pad Introduction. . . . . 203
Chapter 10
Writing with Friends: A Collaborative Text Editor. . . . . . . . . . . . . . . . . . . 251
Chapter 11
Playing Games: Head to Head Tic-Tac-Toe. . . . . . . . . . . . . . . . . . . . . . . 299
⊲⊲ Part III
Advanced Topics
Chapter 12
Getting Attached: Bootstrapping BOSH. . . . . . . . . . . . . . . . . . . . . . . . . . 377
Chapter 13
Deploying XMPP Applications. . . . . . . . . . . . . . . . . . . . . . . . . . . . . . . . . . 387
Chapter 14
Writing Strophe Plug-ins. . . . . . . . . . . . . . . . . . . . . . . . . . . . . . . . . . . . . . . . 401
Appendix A Getting Started with jQuery. . . . . . . . . . . . . . . . . . . . . . . . . . . . . . . . . . . . . 419
Appendix B
Setting Up a BOSH Connection Manager. . . . . . . . . . . . . . . . . . . . . . . . 429
Index. . . . . . . . . . . . . . . . . . . . . . . . . . . . . . . . . . . . . . . . . . . . . . . . . . . . . . . . . . . . . . . . . . . . . . 441
40718ffirs.indd 1
12/1/09 11:12:57 AM
40718ffirs.indd 2
12/1/09 11:12:57 AM
Professional
XMPP Programming with
JavaScript® and jQuery
40718ffirs.indd 3
12/1/09 11:12:57 AM
40718ffirs.indd 4
12/1/09 11:12:57 AM
Professional
XMPP Programming with
JavaScript® and jQuery
Jack Moffitt
40718ffirs.indd 5
12/1/09 11:12:58 AM
Professional XMPP Programming with JavaScript® and jQuery
Published by
Wiley Publishing, Inc.
10475 Crosspoint Boulevard
Indianapolis, IN 46256
www.wiley.com
Copyright © 2010 by Wiley Publishing, Inc., Indianapolis, Indiana
Published simultaneously in Canada
ISBN: 978-0-470-54071-8
Manufactured in the United States of America
10 9 8 7 6 5 4 3 2 1
No part of this publication may be reproduced, stored in a retrieval system or transmitted in any form or by any means,
electronic, mechanical, photocopying, recording, scanning or otherwise, except as permitted under Sections 107 or 108
of the 1976 United States Copyright Act, without either the prior written permission of the Publisher, or authorization
through payment of the appropriate per-copy fee to the Copyright Clearance Center, 222 Rosewood Drive, Danvers,
MA 01923, (978) 750-8400, fax (978) 646-8600. Requests to the Publisher for permission should be addressed to the
Permissions Department, John Wiley & Sons, Inc., 111 River Street, Hoboken, NJ 07030, (201) 748-6011, fax (201)
748-6008, or online at http://www.wiley.com/go/permissions.
Limit of Liability/Disclaimer of Warranty: The publisher and the author make no representations or warranties with
respect to the accuracy or completeness of the contents of this work and specifically disclaim all warranties, including
without limitation warranties of fitness for a particular purpose. No warranty may be created or extended by sales or promotional materials. The advice and strategies contained herein may not be suitable for every situation. This work is sold
with the understanding that the publisher is not engaged in rendering legal, accounting, or other professional services.
If professional assistance is required, the services of a competent professional person should be sought. Neither the publisher nor the author shall be liable for damages arising herefrom. The fact that an organization or Web site is referred to
in this work as a citation and/or a potential source of further information does not mean that the author or the publisher
endorses the information the organization or Web site may provide or recommendations it may make. Further, readers
should be aware that Internet Web sites listed in this work may have changed or disappeared between when this work was
written and when it is read.
For general information on our other products and services please contact our Customer Care Department within the
United States at (877) 762-2974, outside the United States at (317) 572-3993 or fax (317) 572-4002.
Wiley also publishes its books in a variety of electronic formats. Some content that appears in print may not be available
in electronic books.
Library of Congress Control Number: 2009900000
Trademarks: Wiley, the Wiley logo, Wrox, the Wrox logo, Wrox Programmer to Programmer, and related trade dress are
trademarks or registered trademarks of John Wiley & Sons, Inc. and/or its affiliates, in the United States and other countries, and may not be used without written permission. JavaScript is a registered trademark of Sun Microsystems, Inc. All
other trademarks are the property of their respective owners. Wiley Publishing, Inc. is not associated with any product or
vendor mentioned in this book.
40718ffirs.indd 6
12/1/09 11:12:58 AM
Dedicated to my wife Kimberly and our son
Jasper, whose loves, hugs, and smiles make
every day the best day ever.
40718ffirs.indd 7
12/1/09 11:12:58 AM
Credits
Executive Editor
Carol Long
Vice President and
Executive Group Publisher
Richard Swadley
Project Editor
Ed Connor
Vice President and Executive Publisher
Barry Pruett
Technical Editor
Dave Cridland
Associate Publisher
Jim Minatel
Production Editor
Kathleen Wisor
Project Coordinator, Cover
Lynsey Stanford
Copy Editor
Kim Cofer
Compositor
Craig Johnson, Happenstance Type-O-Rama
Editorial Director
Robyn B. Siesky
Proofreader
Carrie Hunter, Word One
Editorial Manager
Mary Beth Wakefield
Indexer
Robert Swanson
Marketing Manager
David Mayhew
Cover Designer
Michael E. Trent
Production Manager
Tim Tate
Cover Image
© Punchstock/Glowimages
40718ffirs.indd 8
12/1/09 11:12:58 AM
About the Author
Jack Moffitt is a hacker and entrepreneur based in Albuquerque, New
Mexico. He has founded several startups built on XMPP technology including Chesspark, a real-time, multi-user gaming platform, and Collecta, a
real-time search engine for the Web. He has started and contributed to
numerous XMPP related open source and free software projects including the
Strophe XMPP client libraries, the Punjab XMPP connection manager, the
Palaver multi-user chat component, the Speeqe group chat application. He
also has served several terms on both the XSF Board of Directors and the
XSF Council. Previous to his XMPP work, he created the Icecast streaming media server, managed
the Ogg, Vorbis, and Theora codec projects, and co-founded the Xiph.org Foundation, a standards
organization for royalty-free multimedia technologies for the Internet. He is passionate about free
software and open source, open standards, and Internet technology. His favorite programming languages include JavaScript, Erlang, and Python. You can find him at http://metajack.im, blogging
about start-ups and code, as @metajack on Twitter and Identica, or often spreading the word of
XMPP at technology conferences.
40718ffirs.indd 9
12/1/09 11:12:58 AM
Acknowledgments
We all stand on the shoulders of giants, and I am fortunate to have stood on many friendly
ones throughout my career and while writing this book. Thanks to Carol Long and Ed Connor for
the encouragement, handholding, reminders, and patience that every author needs. Thanks also to
Jason Salas who not only encouraged me on this project but made the appropriate introductions.
Thanks also to Dave Cridland for his work ensuring the technical quality of this book and his tireless humor. I’m hugely indebted to Peter Saint-Andre, patron saint of XMPP, and the rest of the
XMPP Standards Foundation members for their advice, criticism, and friendship over the years.
Finally, the biggest thanks of all to my wife; not only did she encourage me in this project and put up
with my long hours and absence, she also worked hard as my first reader and made many helpful
suggestions to the text.
40718ffirs.indd 10
12/1/09 11:12:58 AM
Contents
Introduction
xIx
Part I: XMPP Protocol and Architecture
Chapter 1: Getting to Know XMPP
What Is XMPP?
A Brief History of XMPP
The XMPP Network
Servers
Clients
Components
Plug-ins
XMPP Addressing
XMPP Stanzas
Common Attributes
Presence Stanzas
Message Stanzas
IQ Stanzas
Error Stanzas
The Connection Life Cycle
Connection
Stream Set Up
Authentication
Disconnection
Summary
Chapter 2: Designing XMPP Applications
Learning from Others
XMPP versus HTTP
Advantages of XMPP
Disadvantages of XMPP
Bridging XMPP and the Web
Long Polling
Managing the Connection
Making JavaScript Speak XMPP
40718ftoc.indd 11
3
4
5
6
6
7
7
8
8
9
10
1 1
13
15
17
18
18
19
20
20
20
23
24
27
28
29
30
30
31
32
12/1/09 11:14:22 AM
CONTENTS
Making XMPP Applications
The Browser Platform
Basic Infrastructure
Protocol Design
Summary
33
33
33
34
36
Part II: The Applications
Chapter 3: Saying Hello: The First Application
Application Preview
Hello Design
Preparing the Way
jQuery and jQuery UI
Strophe
flXHR
XMPP Accounts
Starting Your First Application
39
40
40
41
42
42
43
43
43
User Interface
Application Code
43
45
Making Connections
47
The Connection Life Cycle
Creating a Connection
Connecting Hello
Running the Application
47
48
49
53
Creating Stanzas
53
Strophe Builders
Saying Hello
54
56
Handling Events
Adding and Removing Handlers
Stanza Matching
Stanza Handler Functions
Handling Responses in Hello
More Hellos
Summary
Chapter 4: Exploring the XMPP Protocol:
A Debugging Console
Application Preview
Peek Design
57
57
57
58
59
62
62
63
64
64
xii
40718ftoc.indd 12
12/1/09 11:14:22 AM
CONTENTS
Building the Console
User Interface
Displaying Traffic
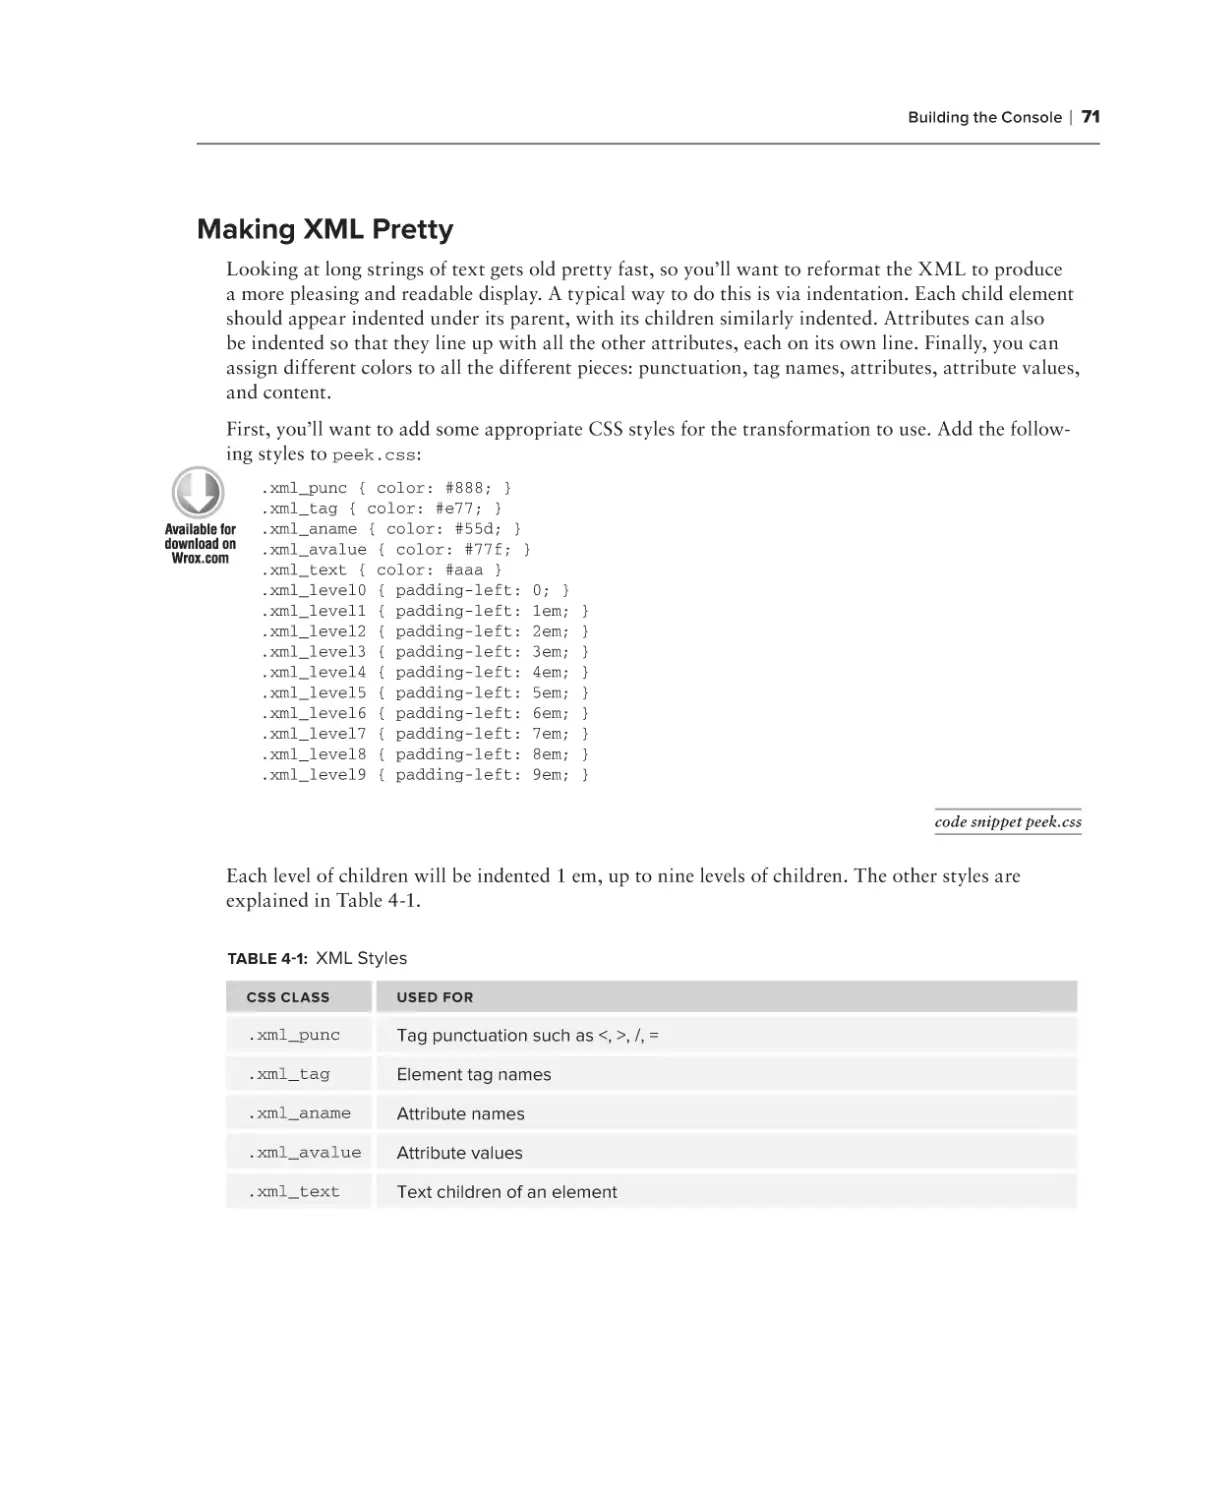
Making XML Pretty
Dealing with XML Input
Making Input Easier
Exploring XMPP
Controlling Presence
Probing Versions
Dealing with Errors
Better Debugging
Summary
Chapter 5: Microblogging in Real Time: An Identica Client
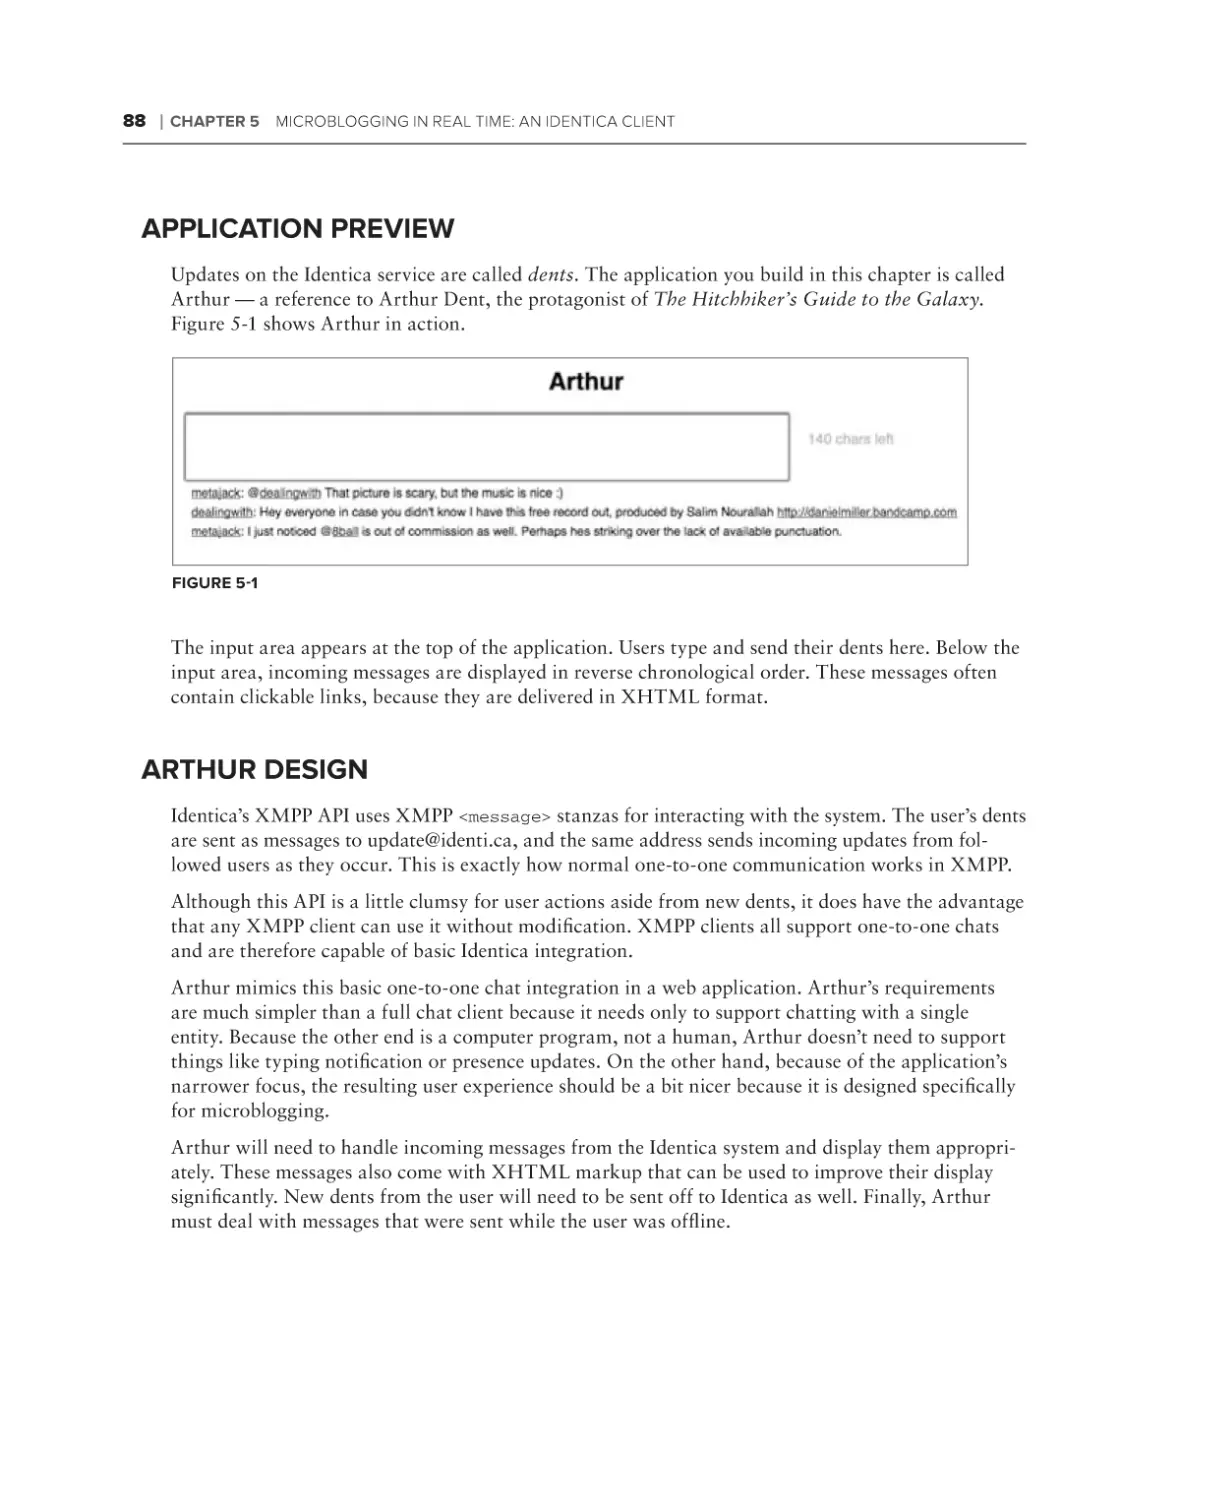
Application Preview
Arthur Design
Microblogging with Identica
Creating Your Account
Turning on XMPP
Building Arthur
Getting Started
Receiving Messages
XHTML-IM
Adding XHTML-IM to Arthur
Sending Messages
Offline Messages
Creating a Better Microblogger
Summary
Chapter 6: Talking with Friends: One‑on‑One Chat
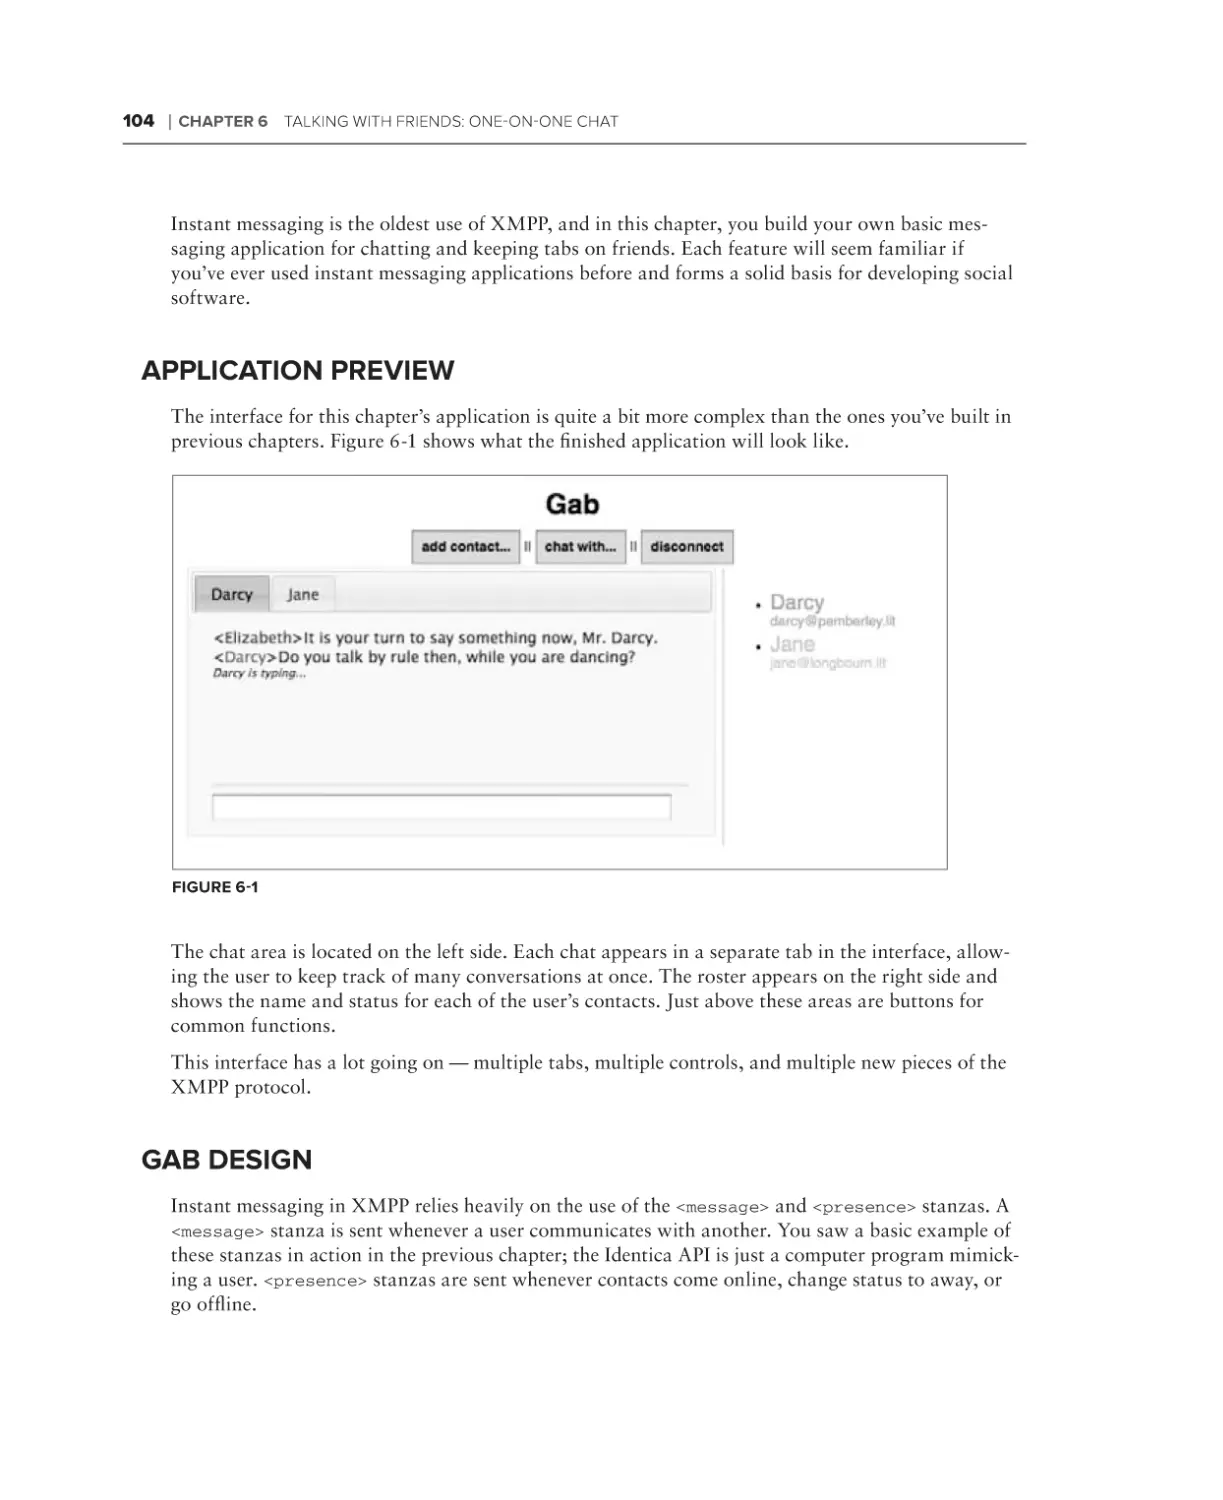
Application Preview
Gab Design
Presence
Messages
Chat Area
Roster Area
Making the Interface
65
66
68
71
74
76
81
81
81
82
85
85
87
88
88
89
90
90
90
91
93
94
95
96
97
101
102
103
104
104
105
105
105
106
106
xiii
40718ftoc.indd 13
12/1/09 11:14:22 AM
CONTENTS
Building the Roster
Requesting Rosters
Handling IQs
Updating Presence Status
Adding New Contacts
Responding to Roster Changes
Dealing with Subscription Requests
Building the Chats
Working with Tabs
Creating New Chats
Sending Messages
Best Practices for Instant Messaging
Understanding Message Routing
Addressing Messages Better
109
111
113
114
116
117
119
122
122
123
124
127
127
127
Adding Activity Notifications
130
Understanding Chat States
Sending Notifications
Receiving Notifications
130
131
132
Final Touches
Gabbing More
Summary
Chapter 7: Exploring Services: Service Discovery
and Browsing
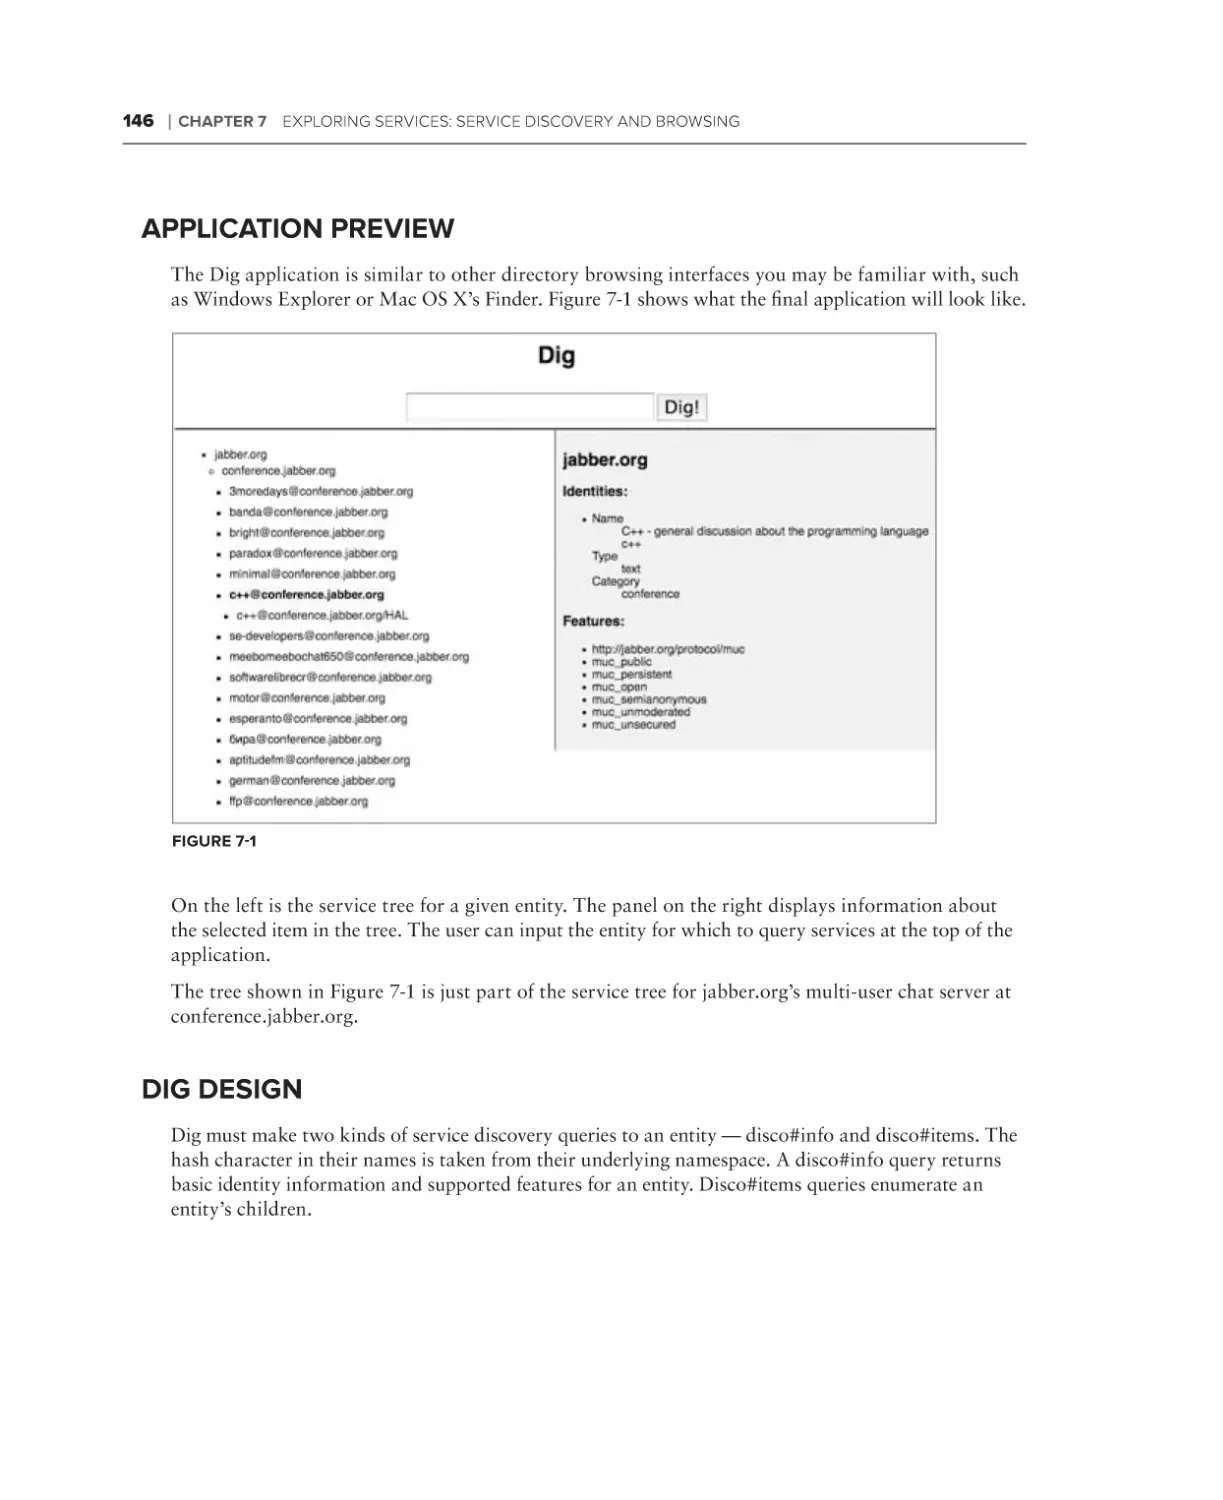
Application Preview
Dig Design
Finding Information
Disco#info Queries
Disco#items Queries
Disco Nodes
Creating Dig
Initial Disco Queries
Browsing the Disco Tree
Digging into Services
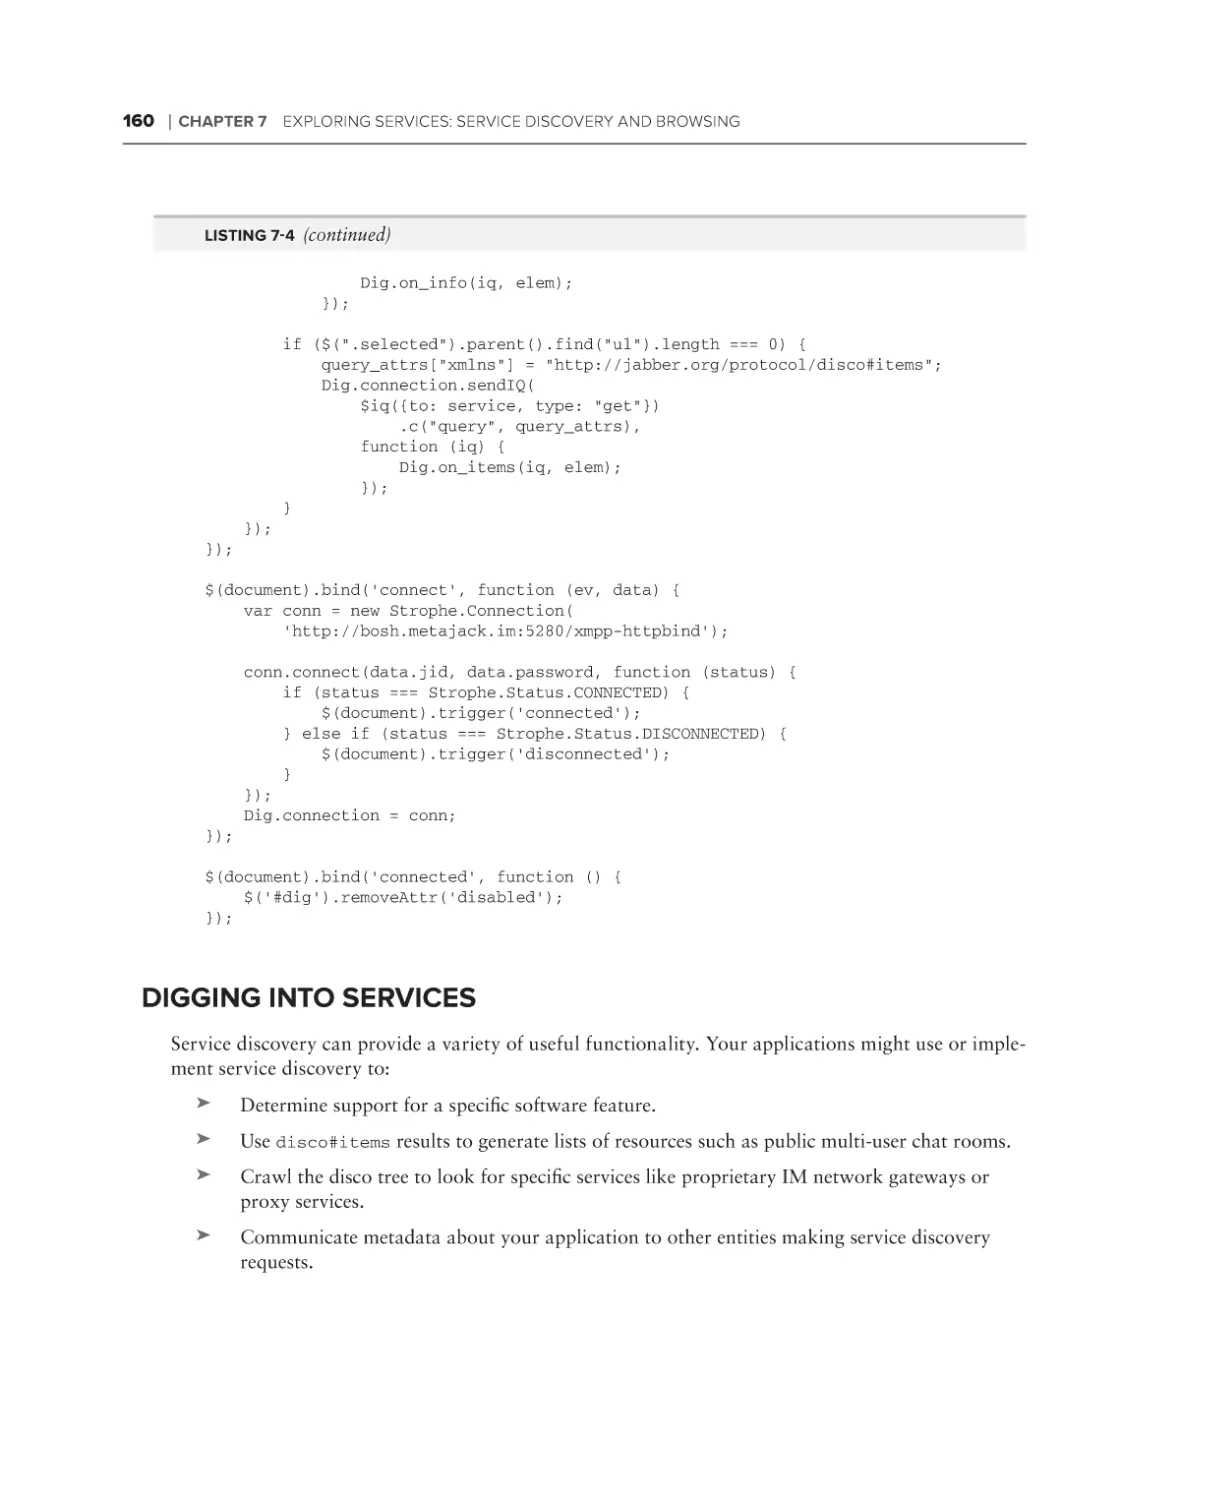
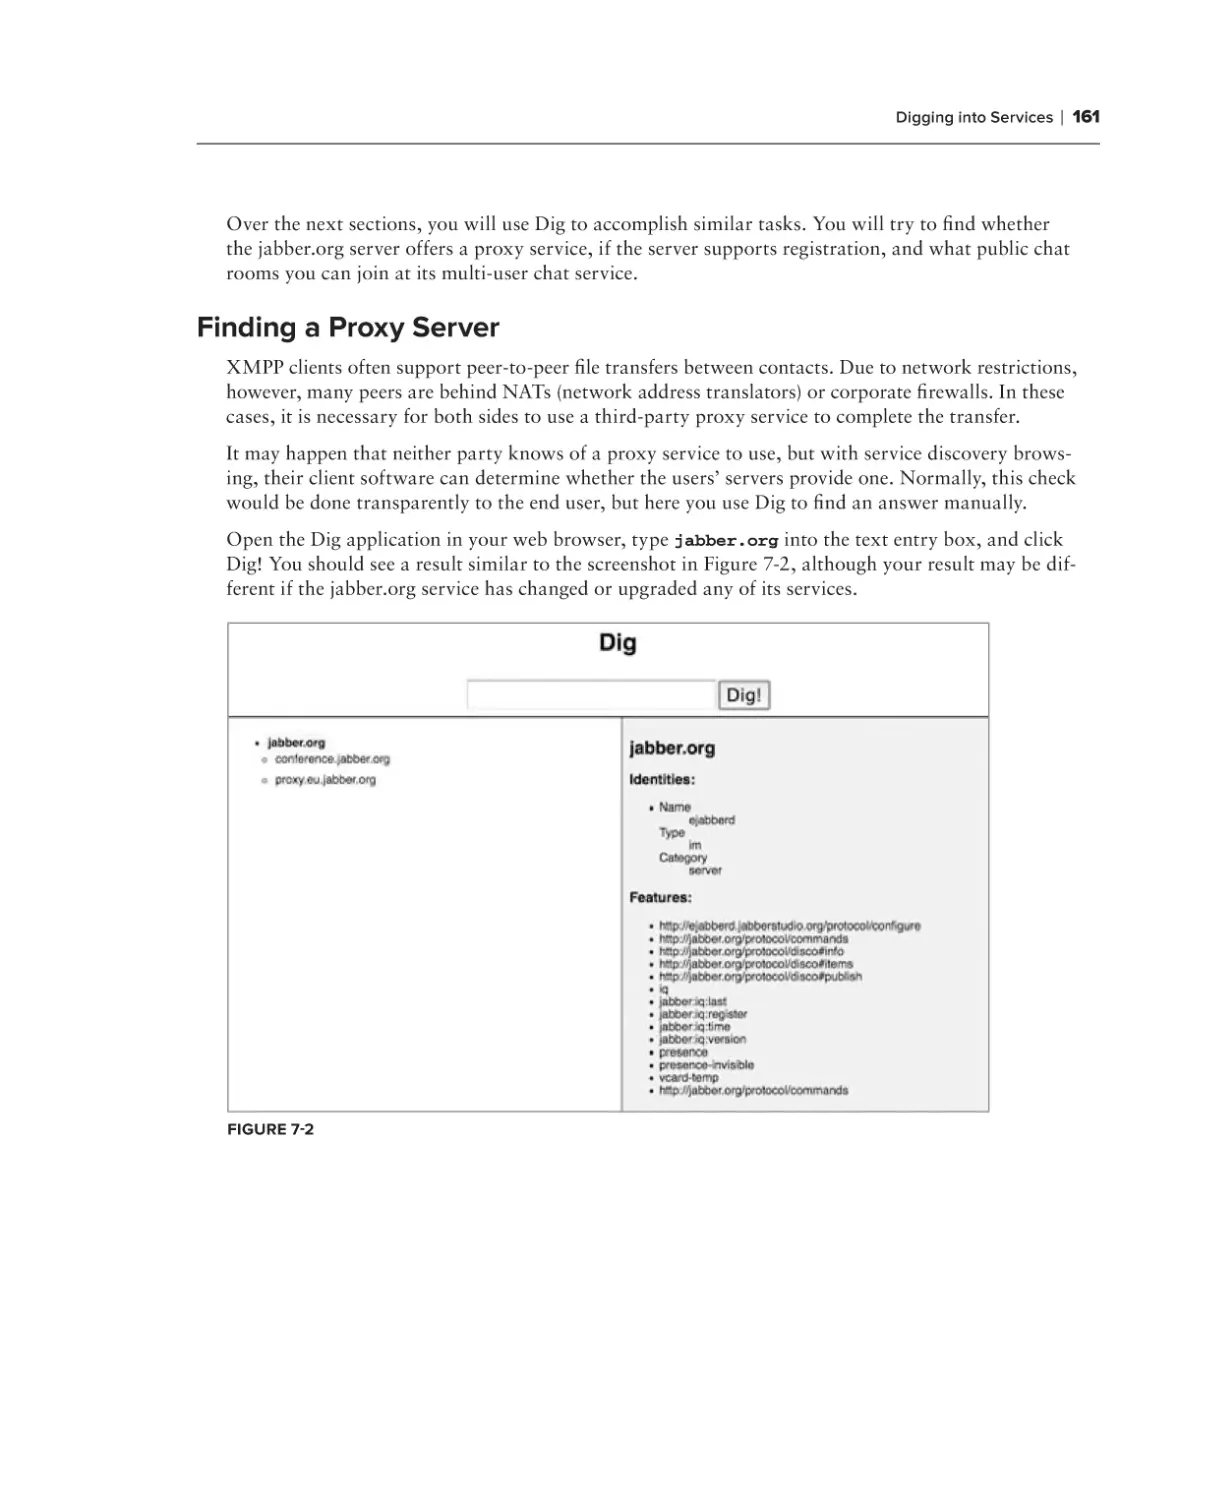
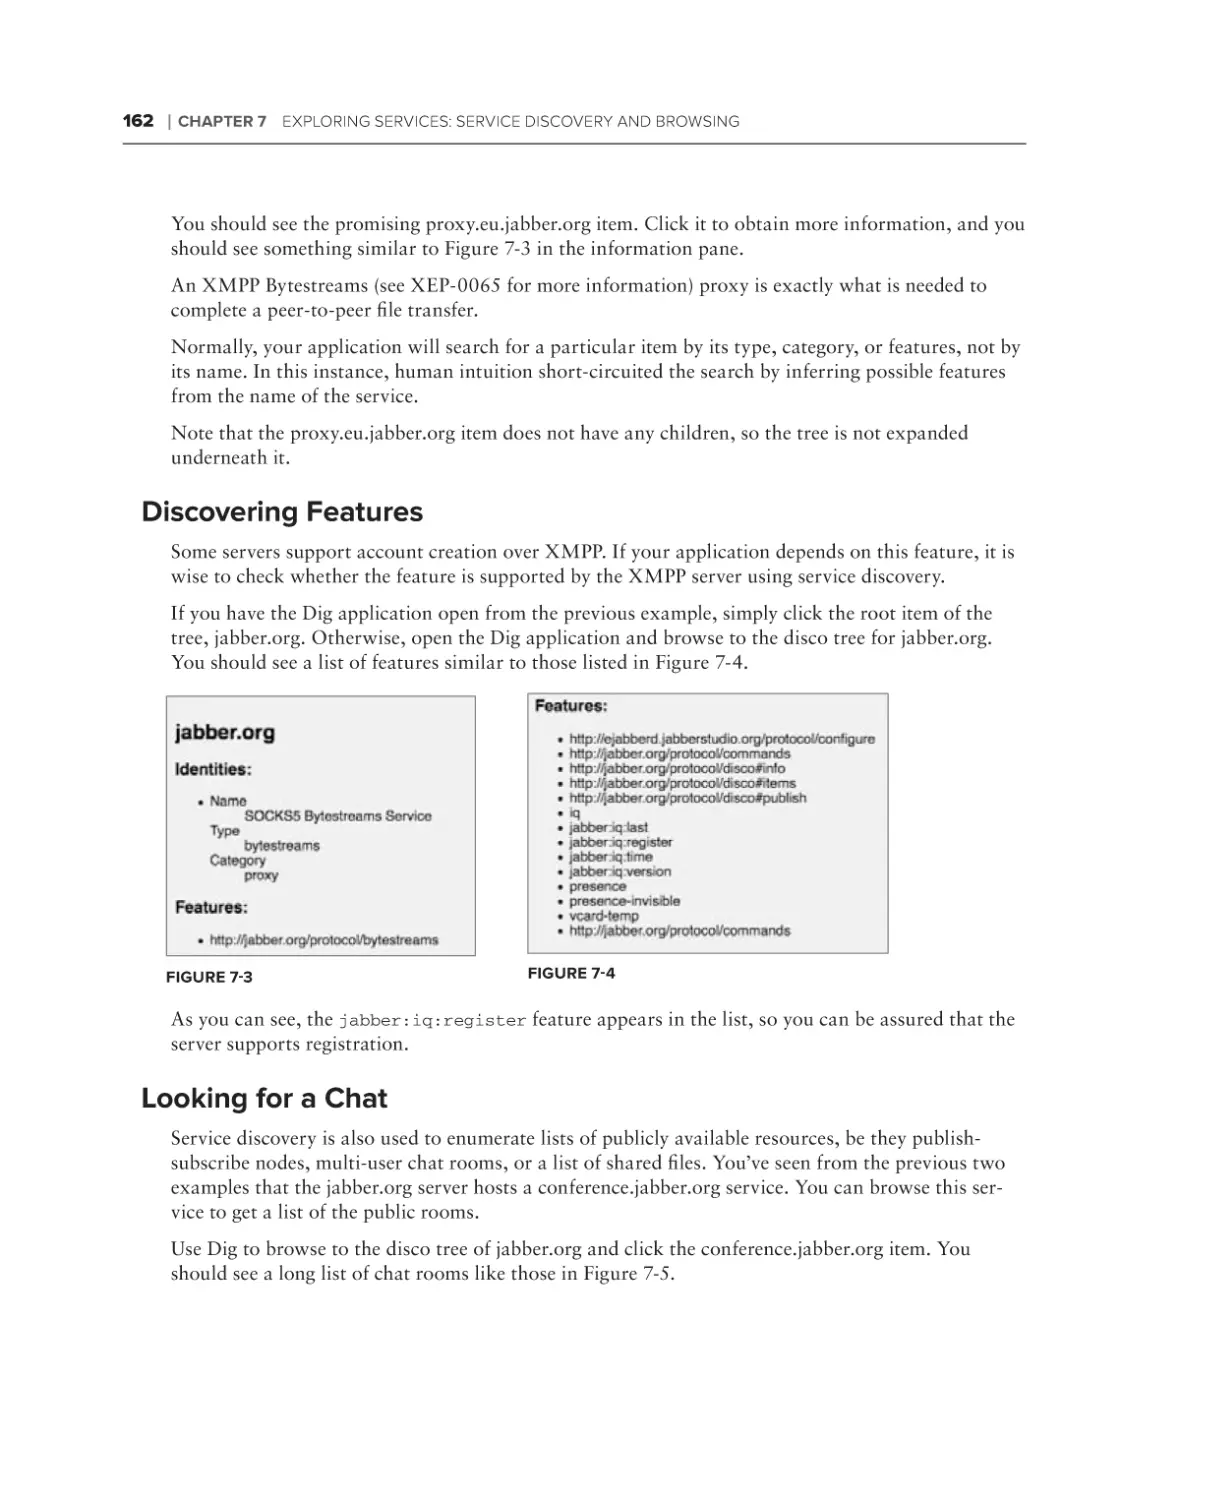
Finding a Proxy Server
Discovering Features
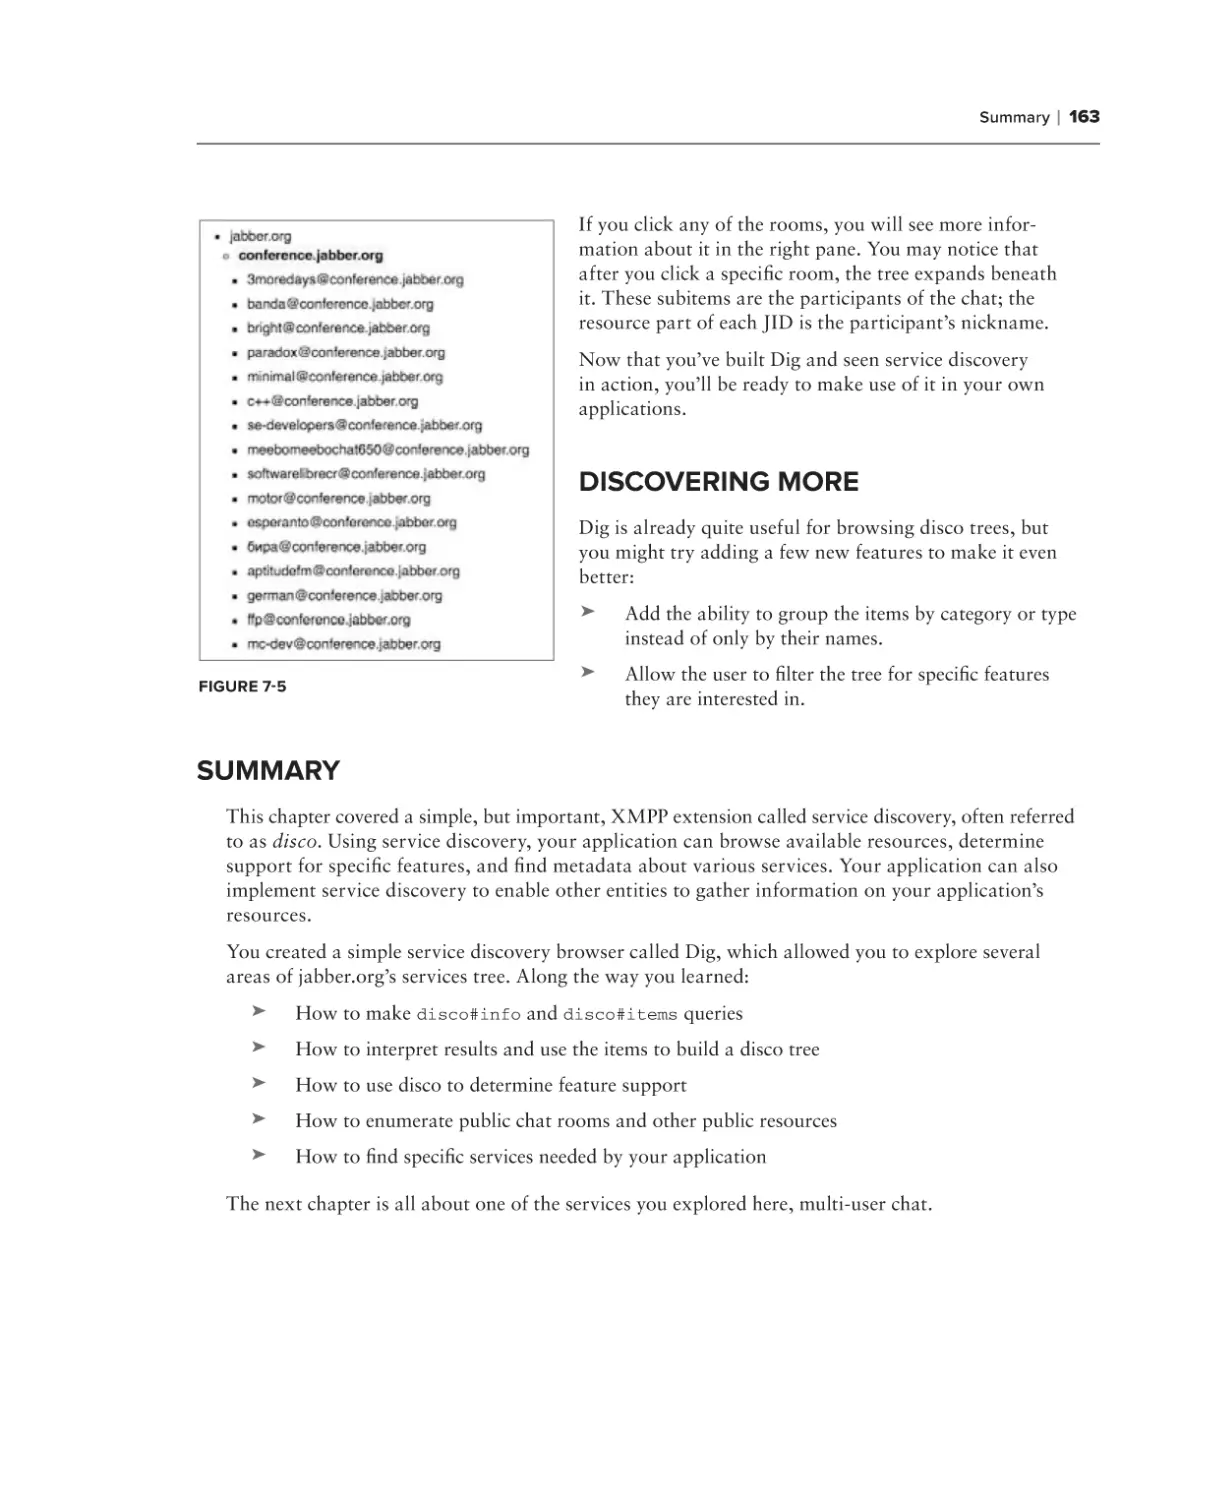
Looking for a Chat
Discovering More
Summary
133
143
143
145
146
146
147
147
148
149
149
153
155
160
161
162
162
163
163
xiv
40718ftoc.indd 14
12/1/09 11:14:22 AM
CONTENTS
Chapter 8: Group Chatting: A Multi‑User Chat Client
Application Preview
Groupie Design
Public Speaking
165
166
167
167
Group Chat Services
Entering and Leaving a Room
Sending and Receiving Messages
Anonymity
Creating Rooms
Understanding Roles and Affiliations
167
168
1 71
1 71
172
173
Building the Interface
Joining the Room
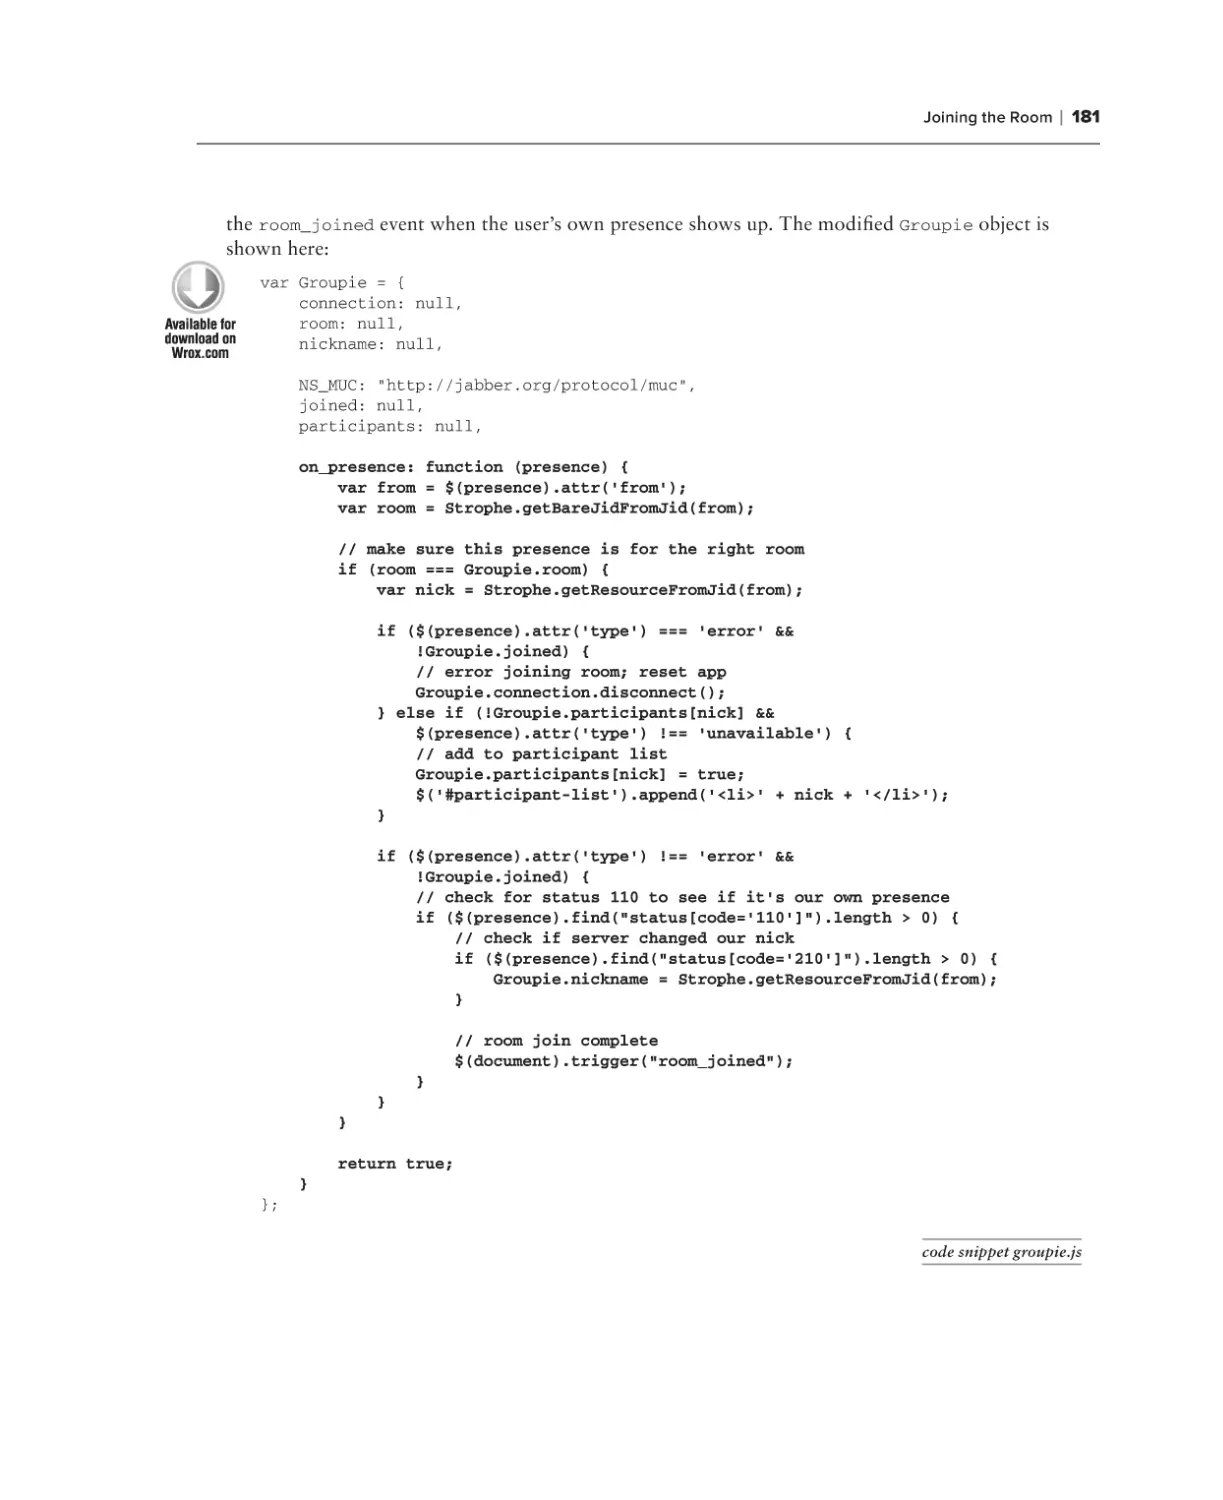
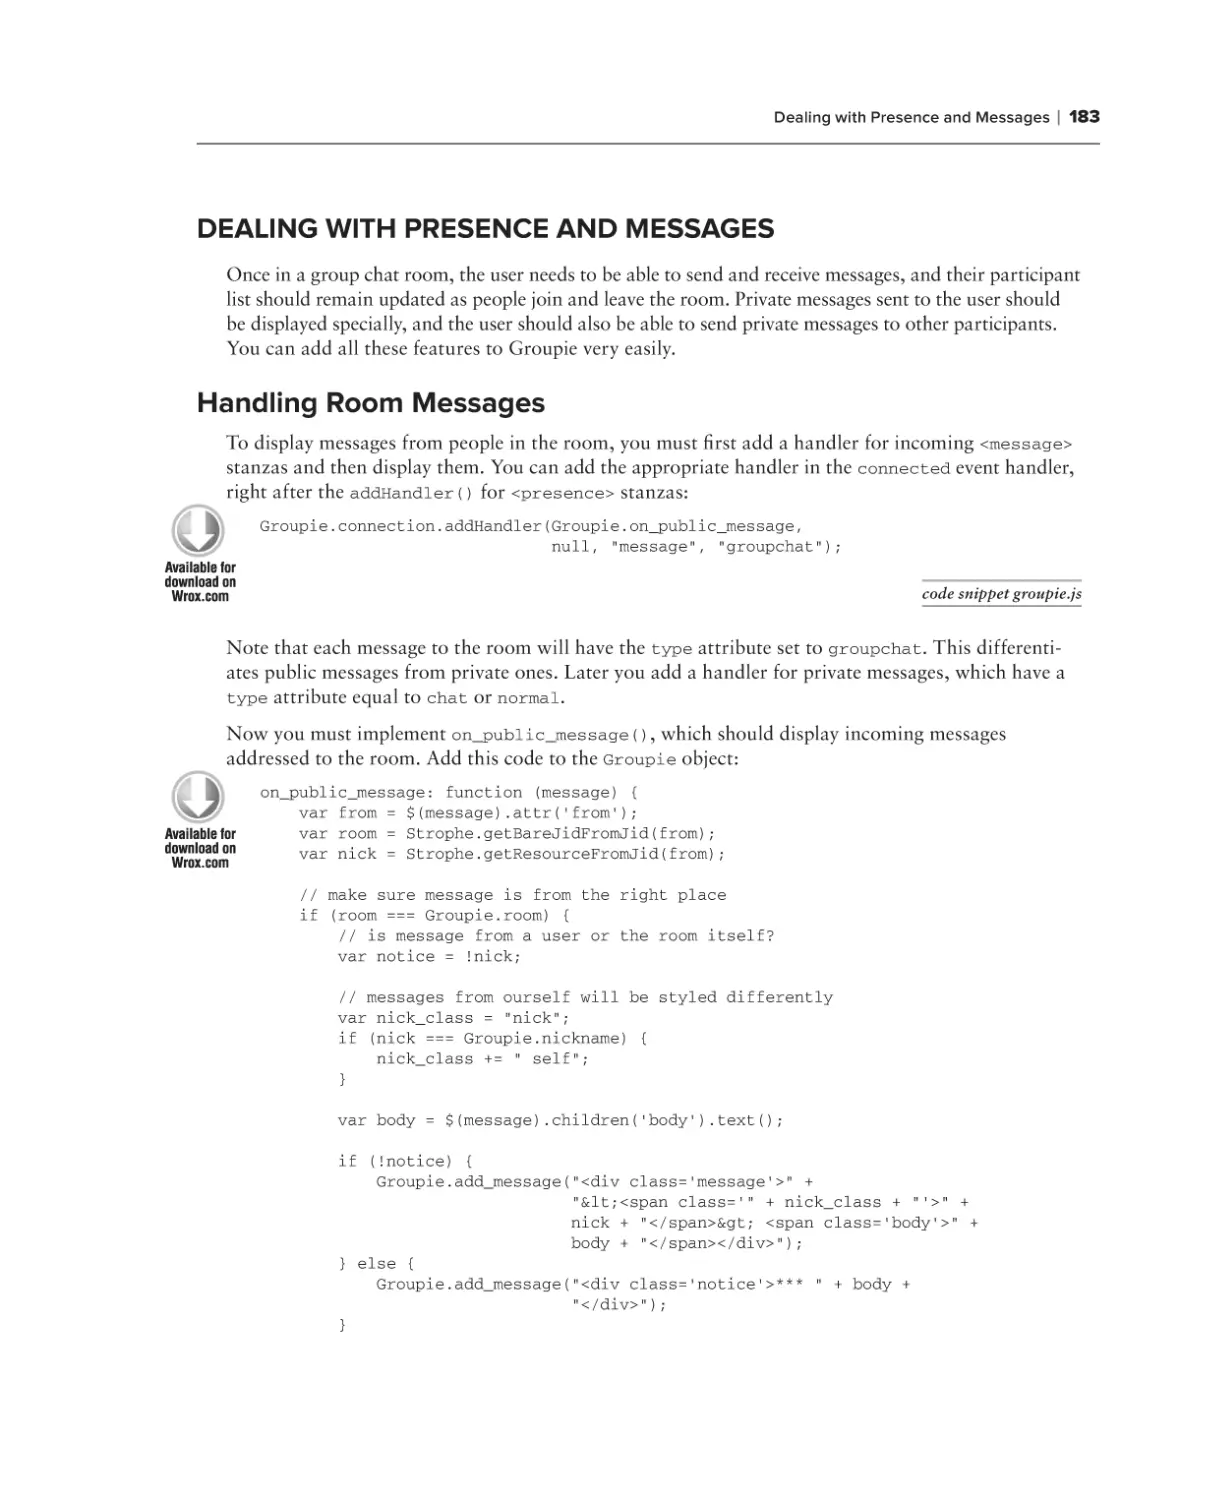
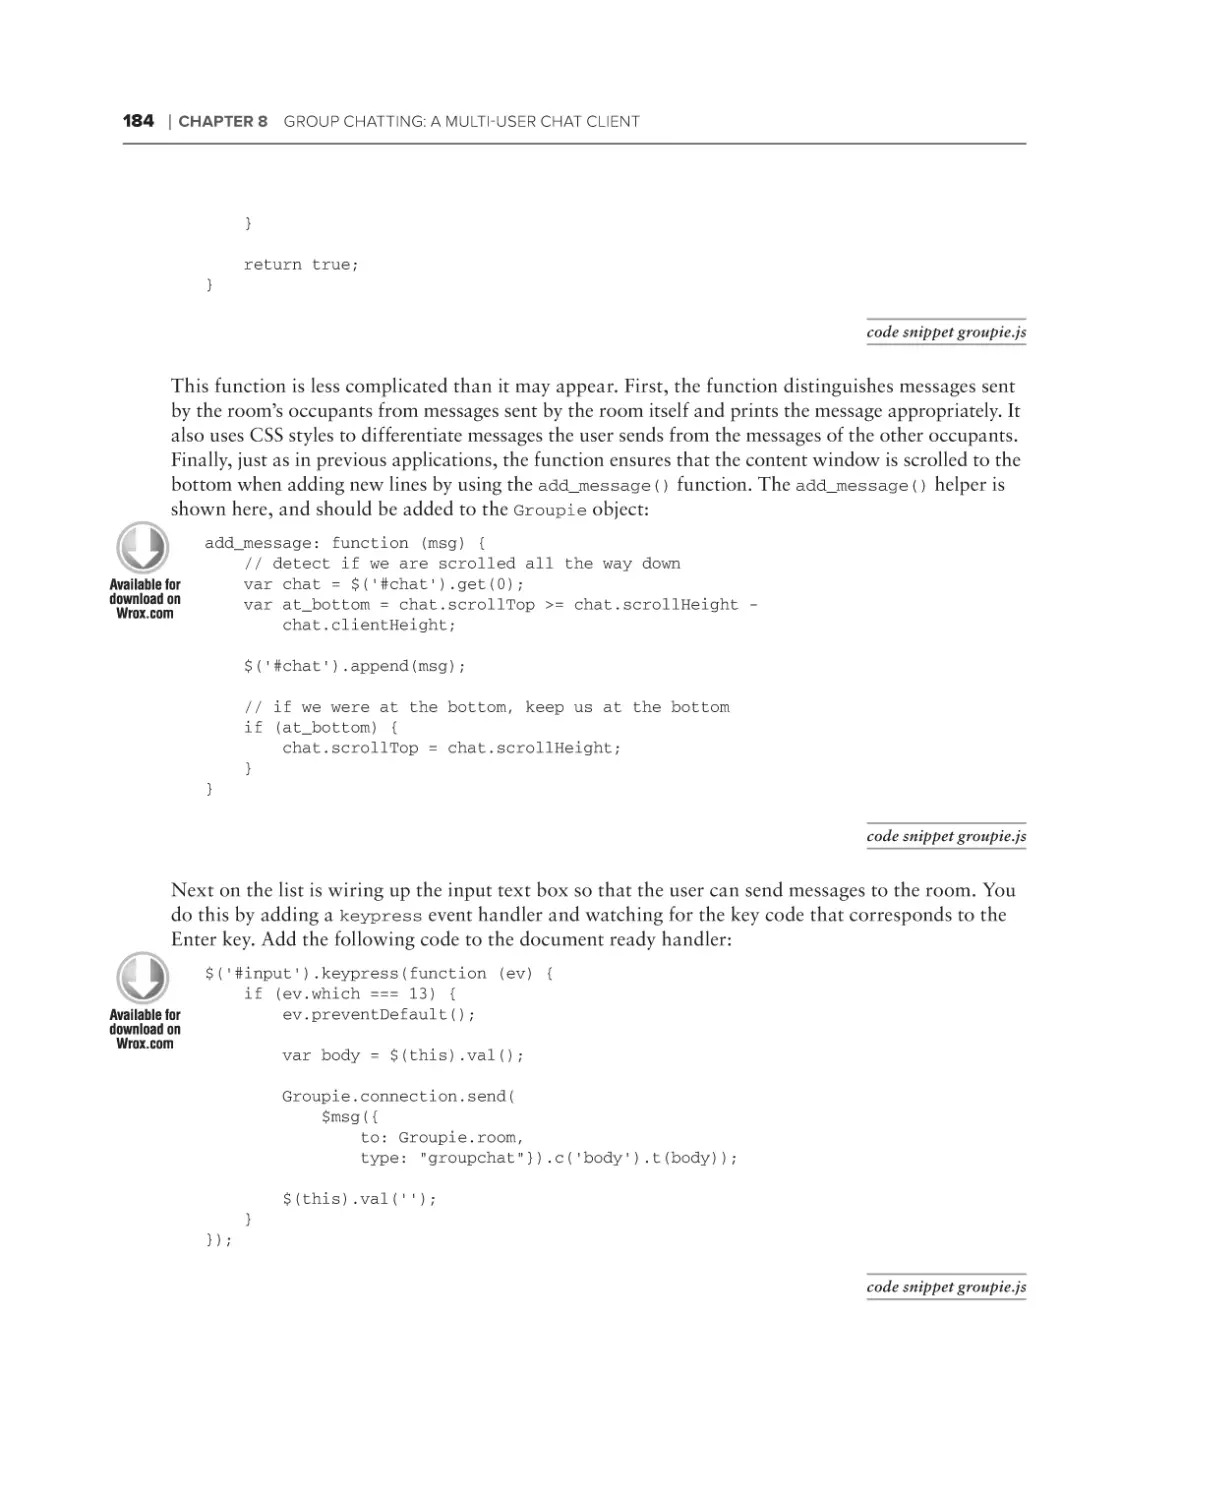
Dealing with Presence and Messages
175
179
183
Handling Room Messages
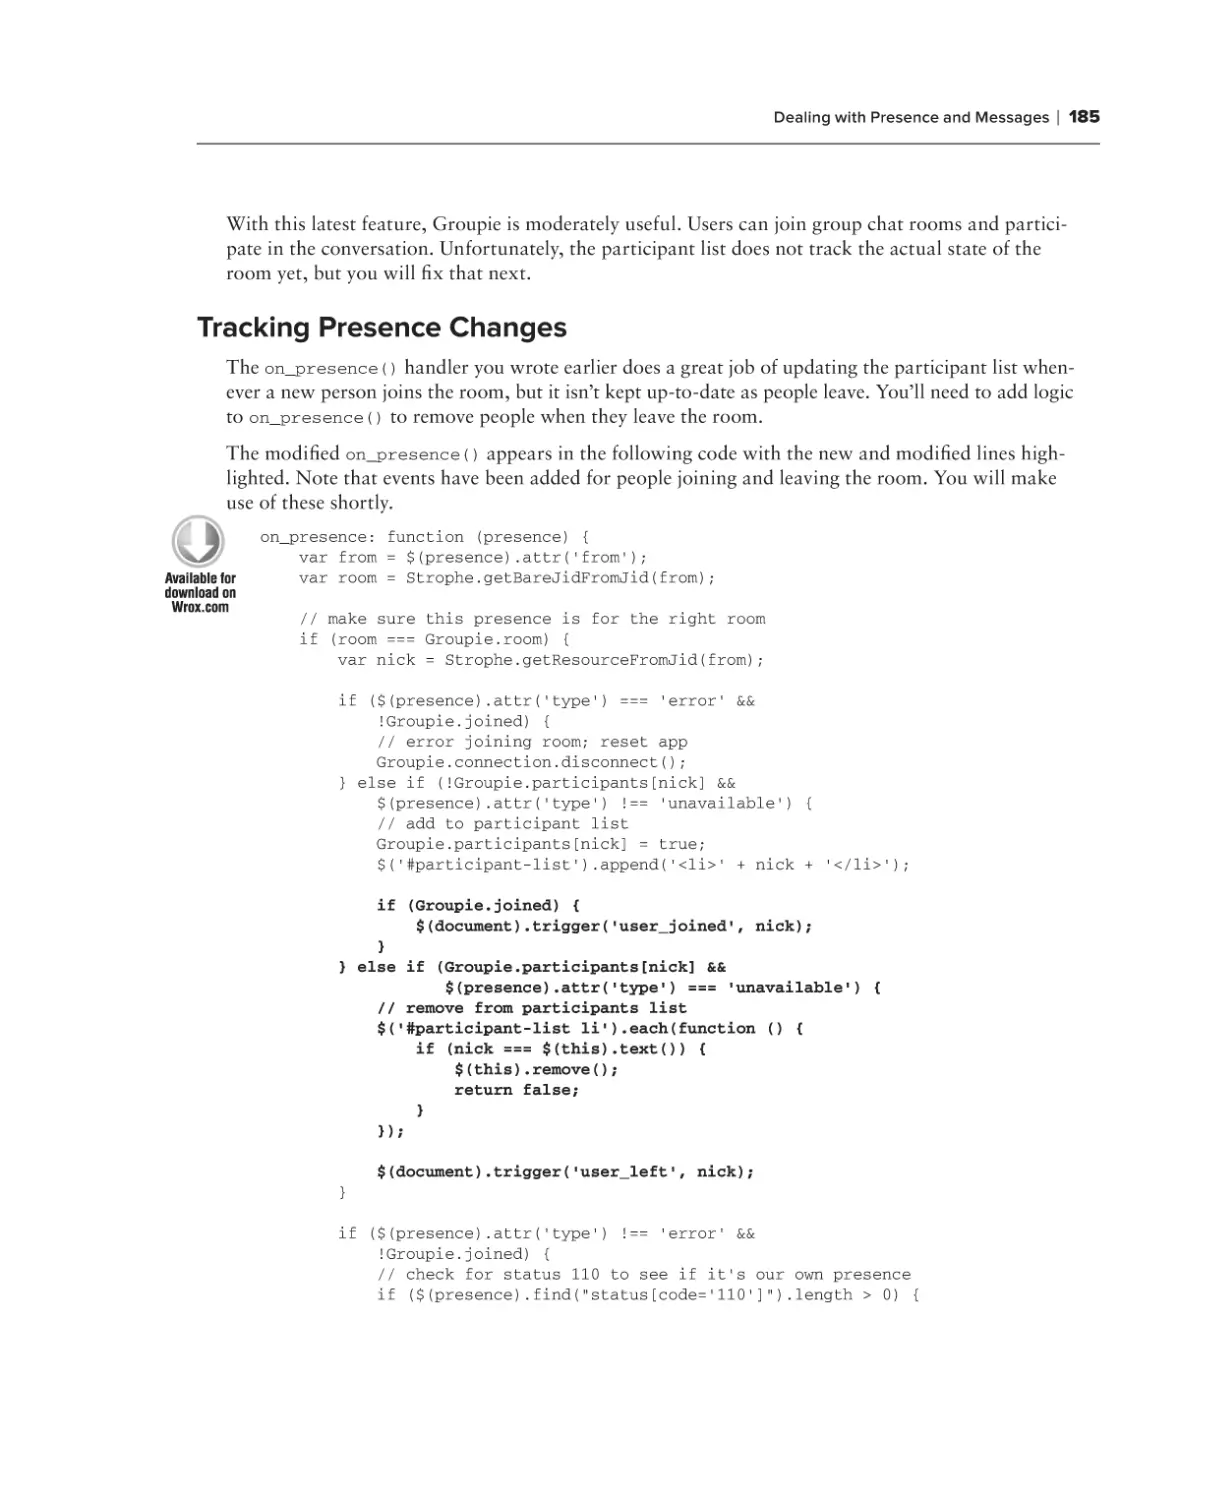
Tracking Presence Changes
Chat History
Keeping It Private
Describing Actions
Managing the Room
Changing Topics
Dealing with Troublemakers
Recruiting Help
Improving Groupie
Summary
Chapter 9: Publishing and Subscribing:
A Shared Sketch Pad Introduction
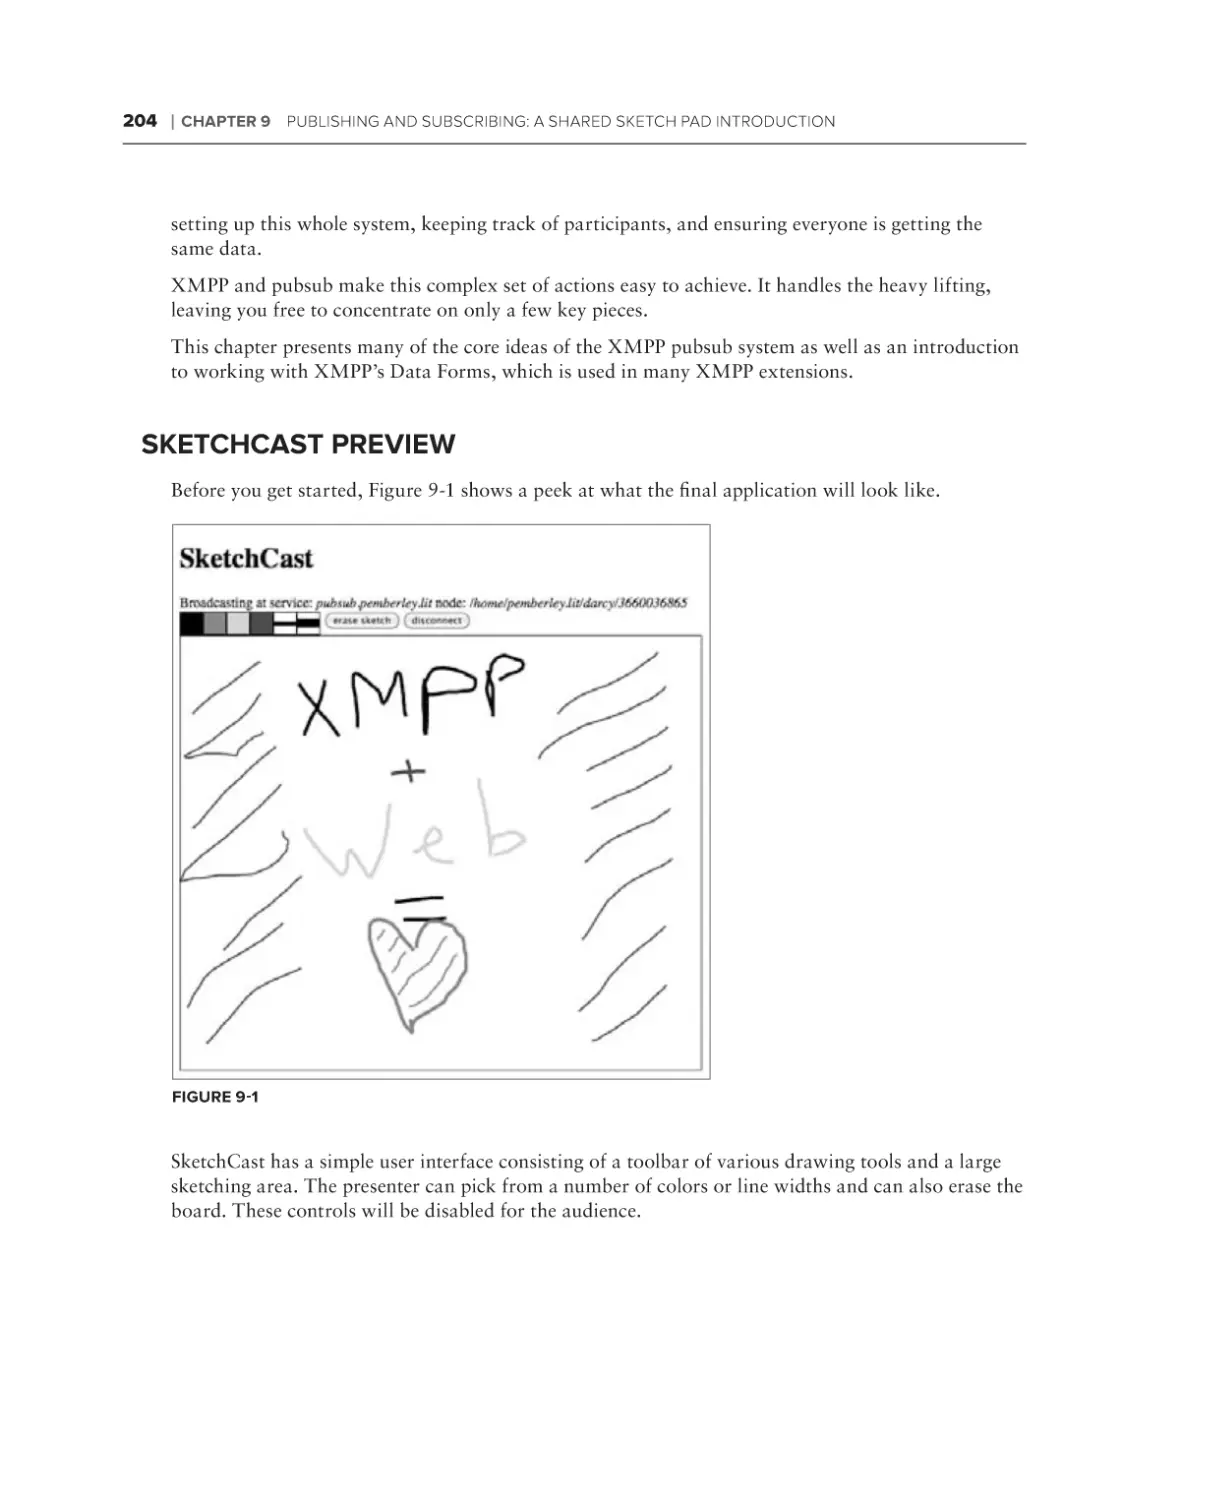
SketchCast Preview
SketchCast Design
Everything Is Pubsub
Presenter’s Flow
Audience’s Flow
Filling Out Forms
What Is The Data Forms Extension?
Form Elements, Fields, and Types
Standardized Form Fields
183
185
186
187
190
191
191
192
194
201
201
203
204
205
205
205
206
206
206
207
210
xv
40718ftoc.indd 15
12/1/09 11:14:22 AM
CONTENTS
Working with Pubsub Nodes
Creating Nodes
Configuring Nodes
Pubsub Events
Publishing to a Node
Subscribing and Unsubscribing
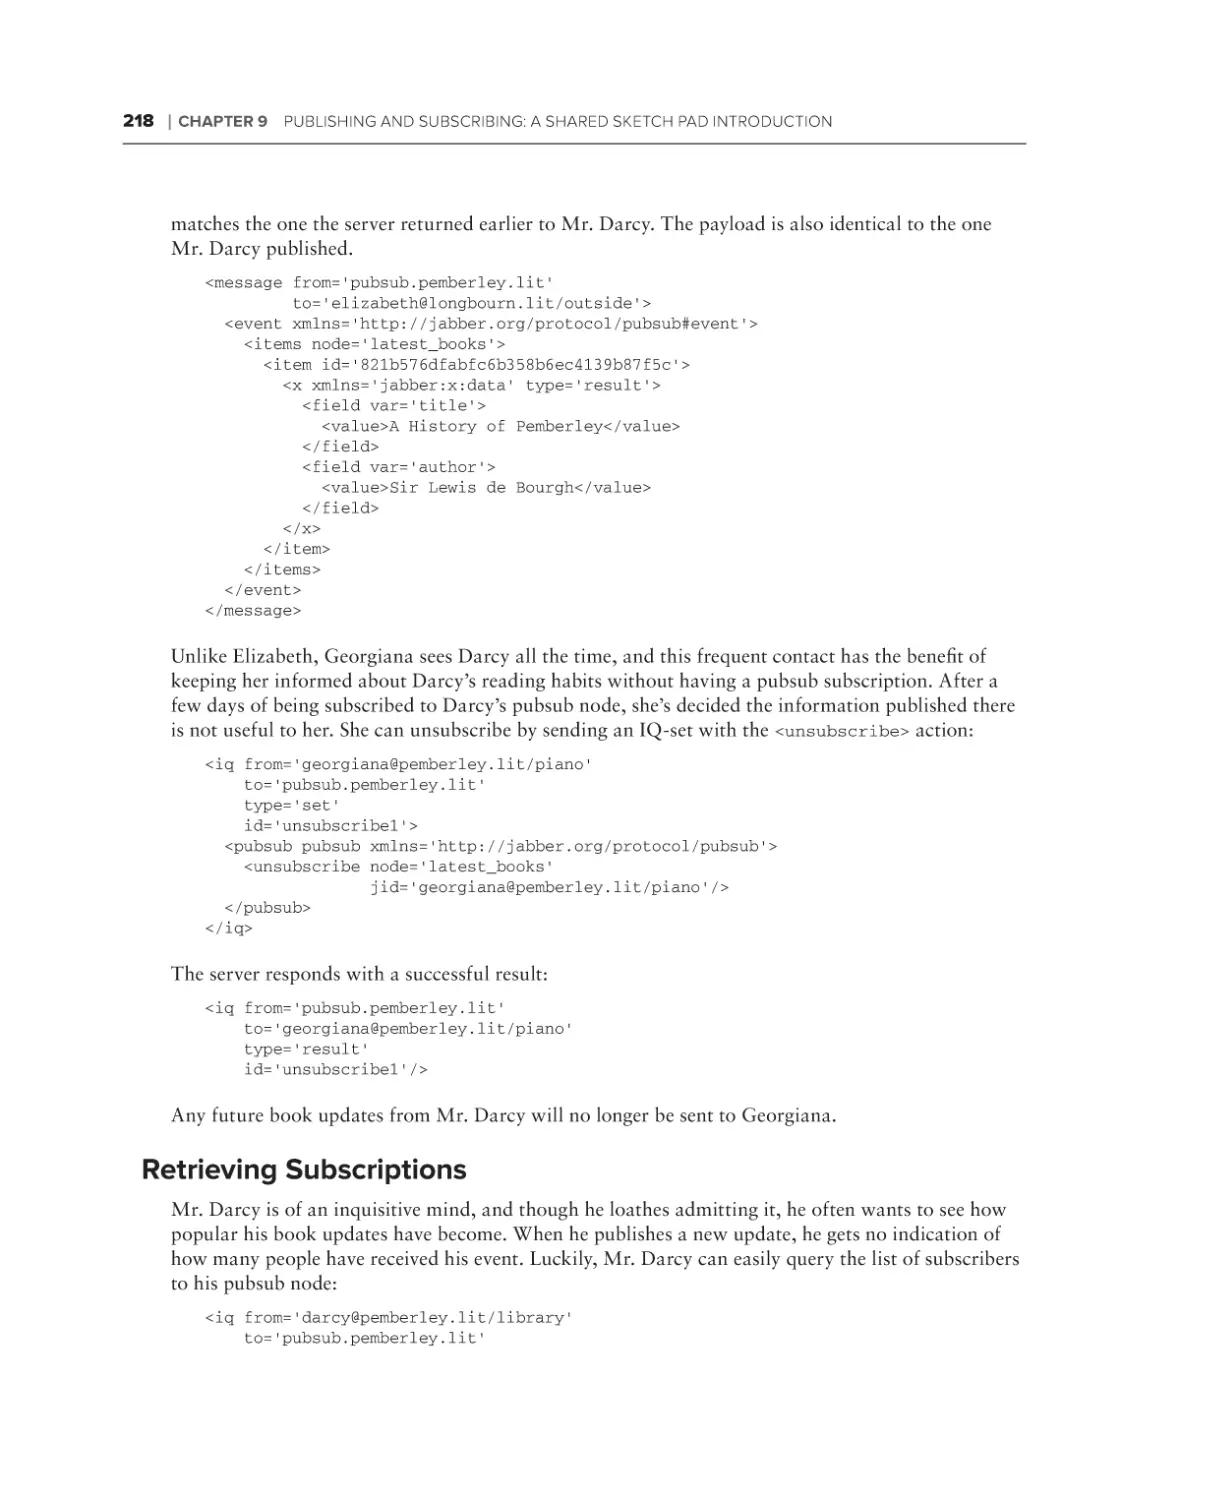
Retrieving Subscriptions
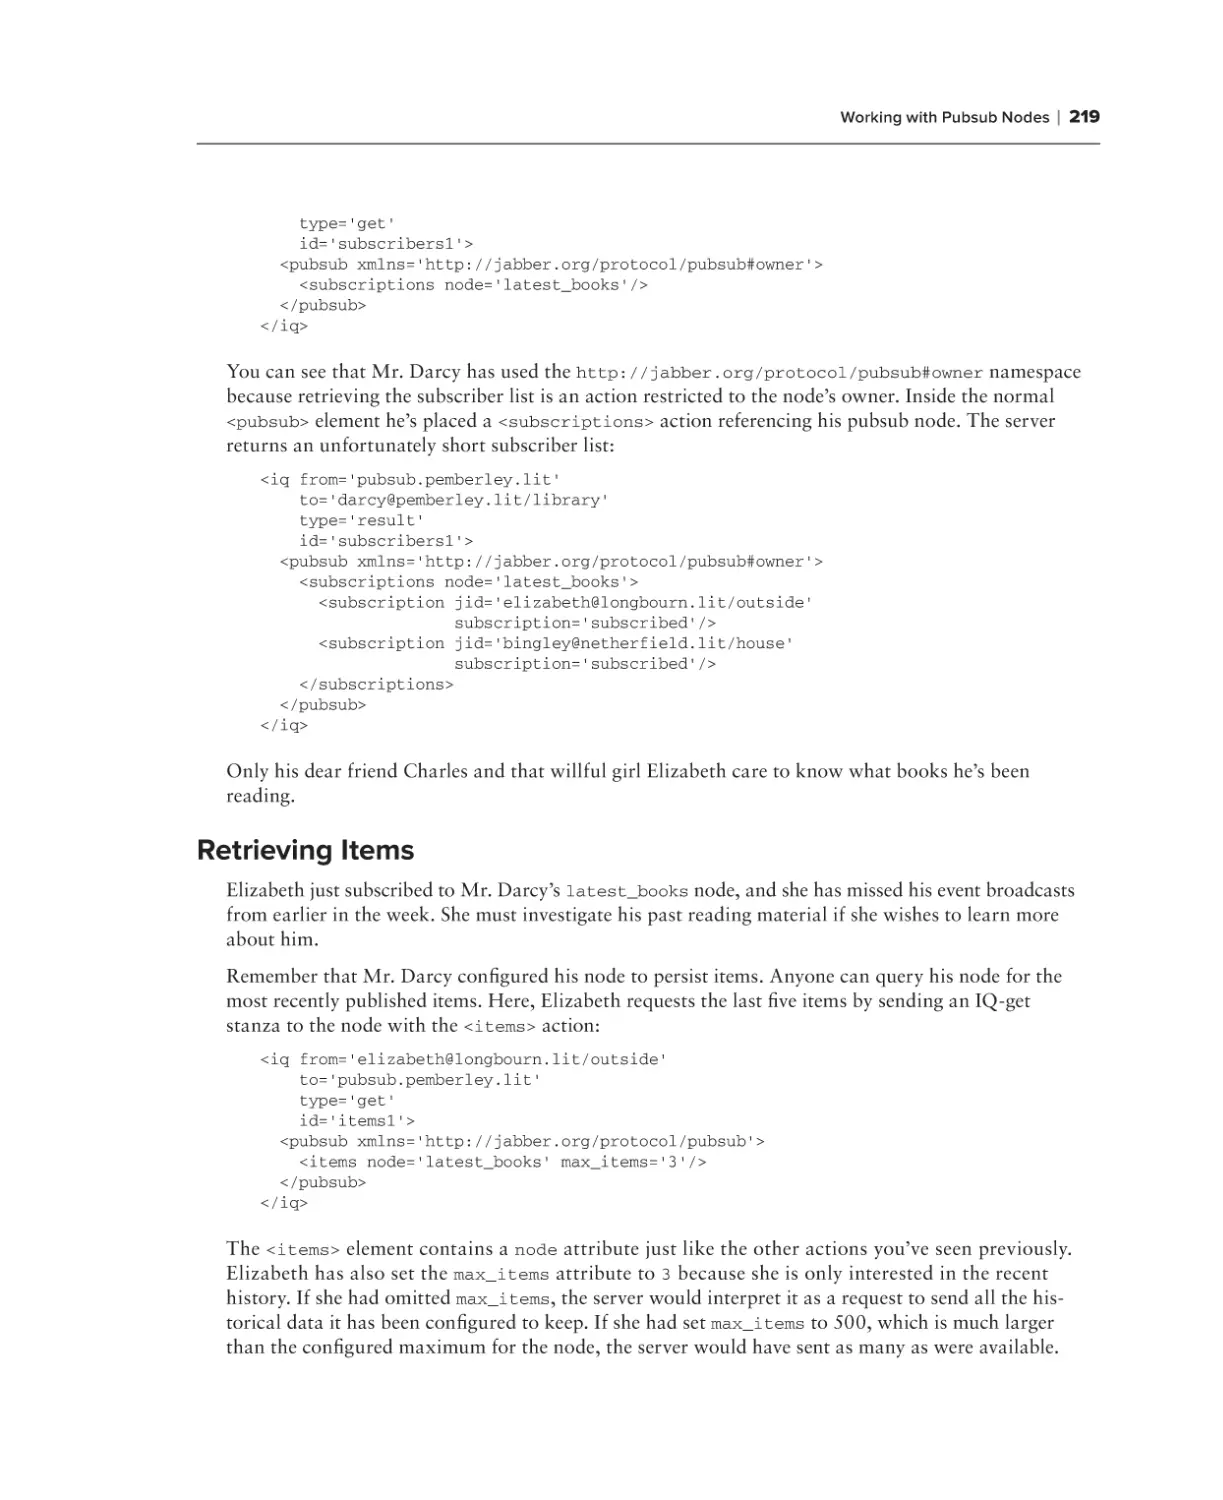
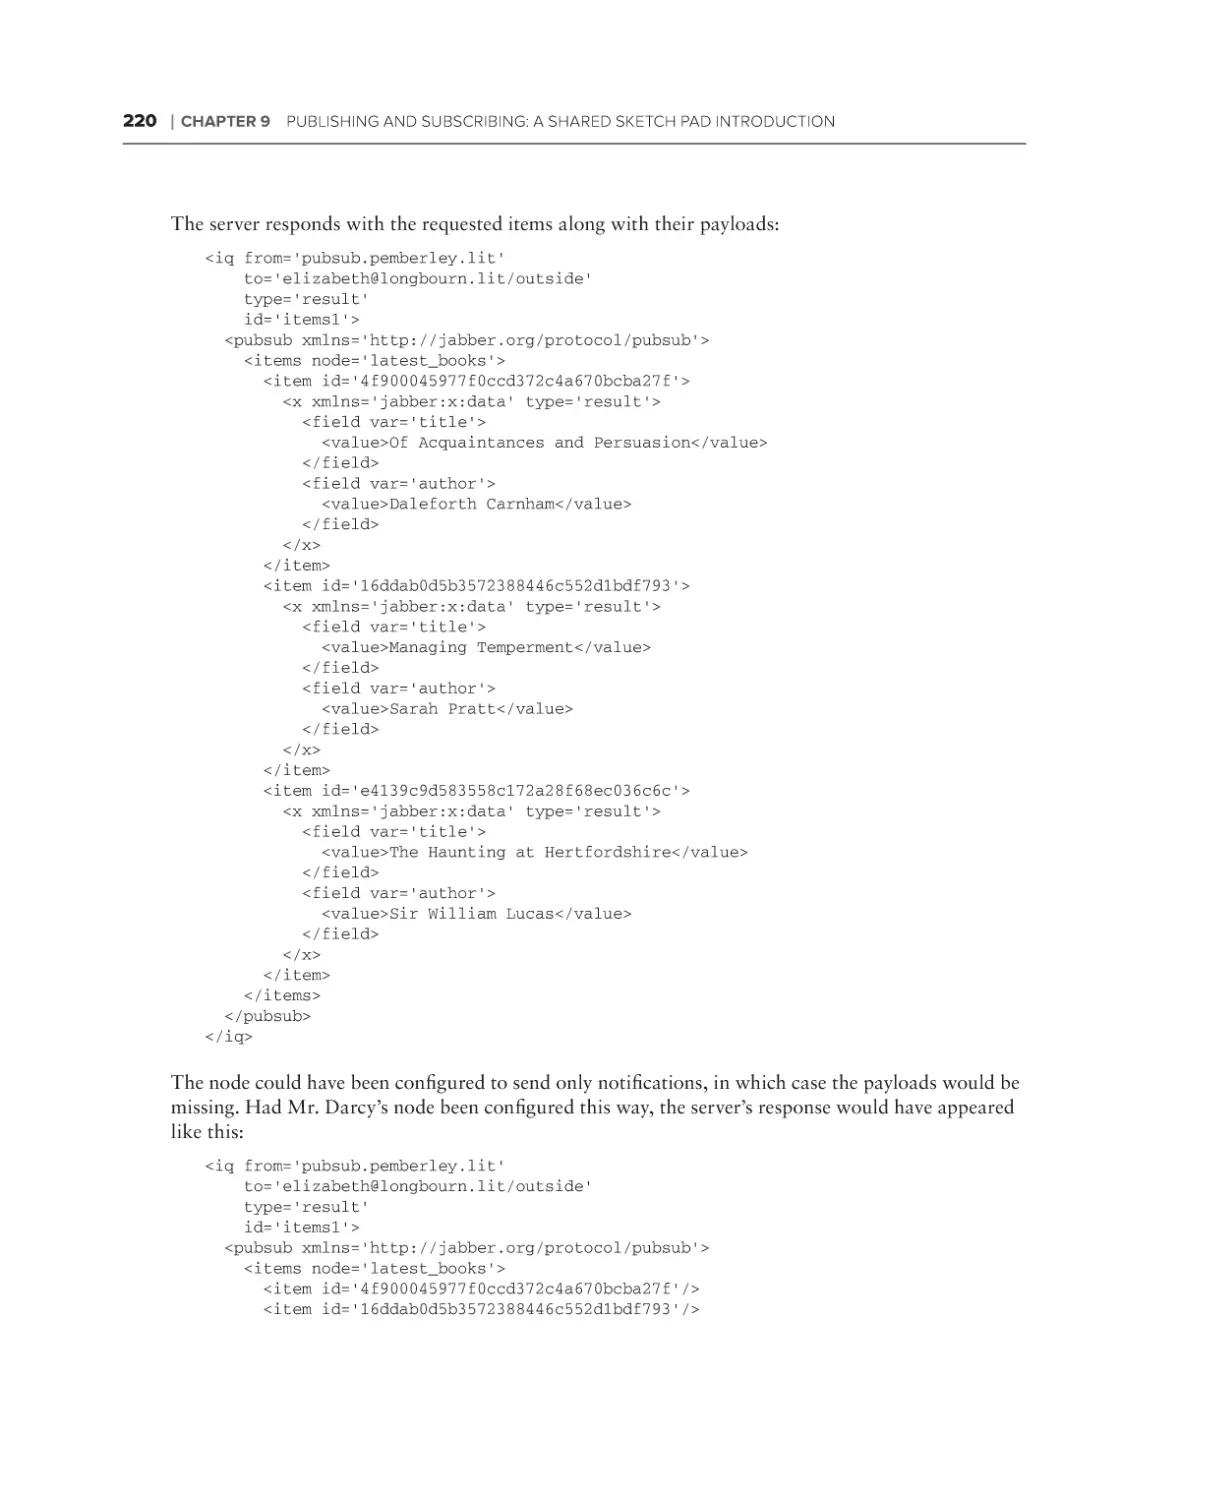
Retrieving Items
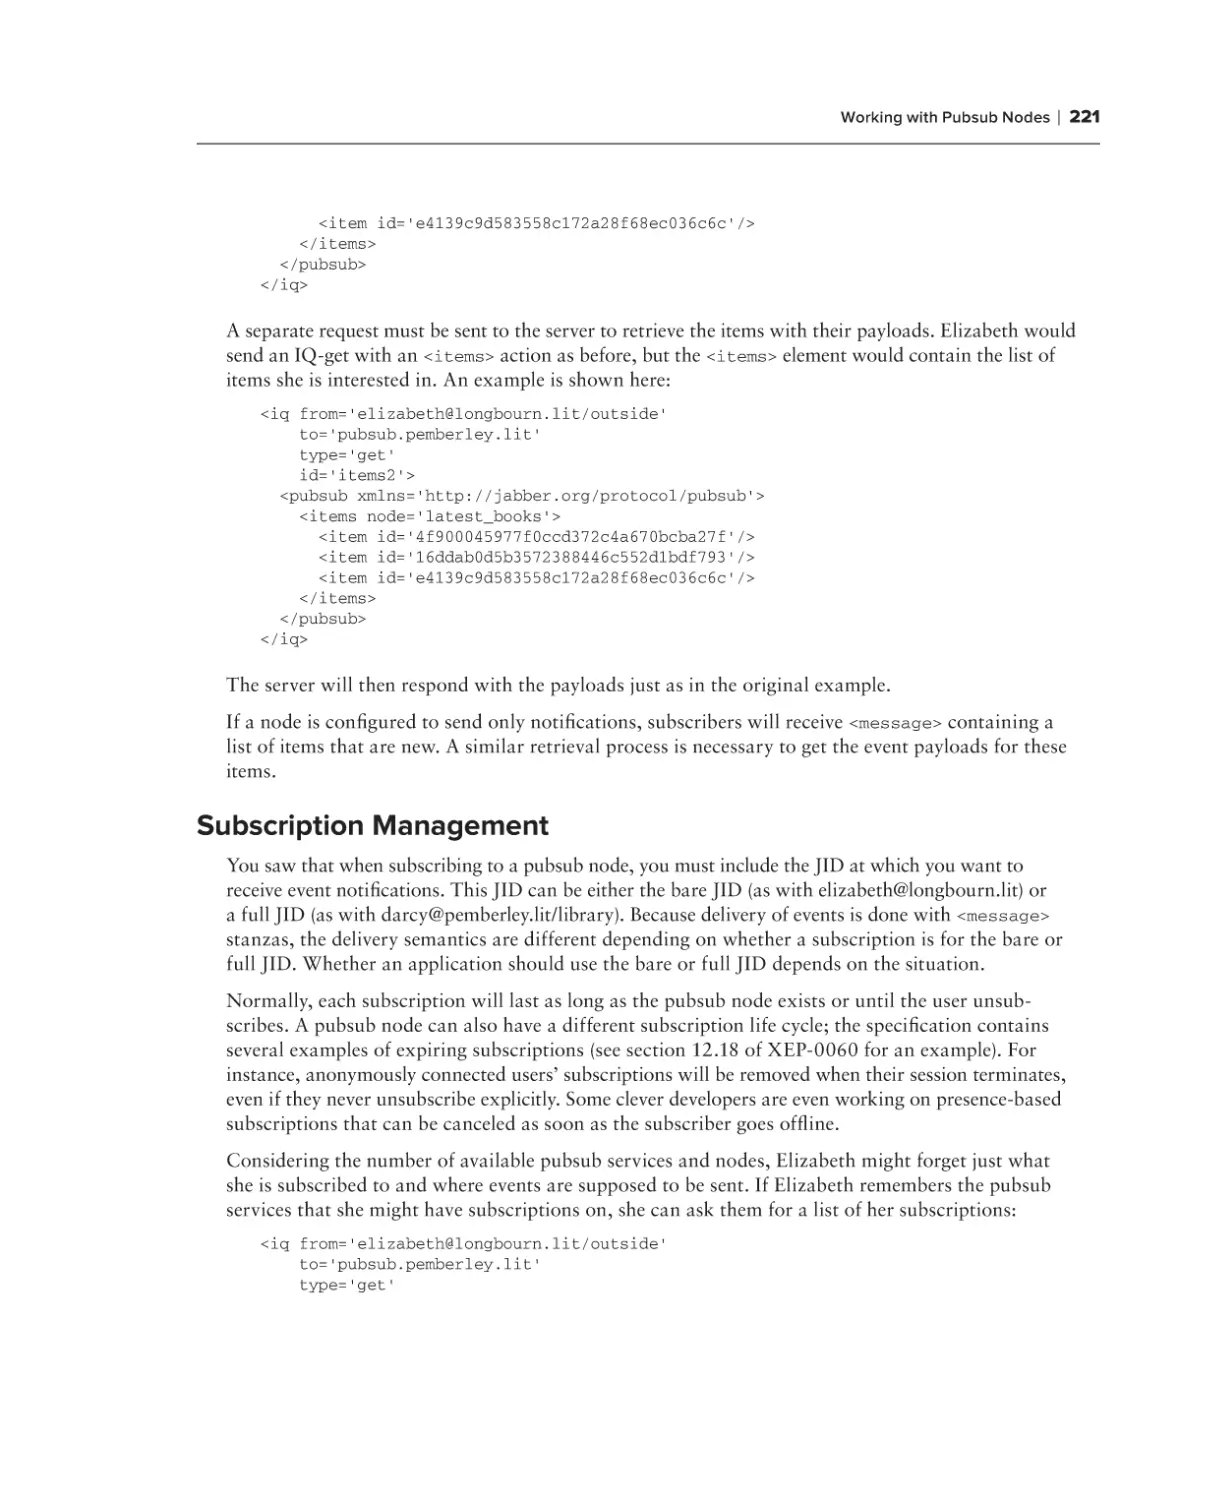
Subscription Management
Broadcasting Sketches Using Pubsub
Building the Interface
Sketching with Canvas
Logging In and Making Nodes
Publishing and Receiving Sketch Events
Summary
Chapter 10: Writing with Friends:
A Collaborative Text Editor
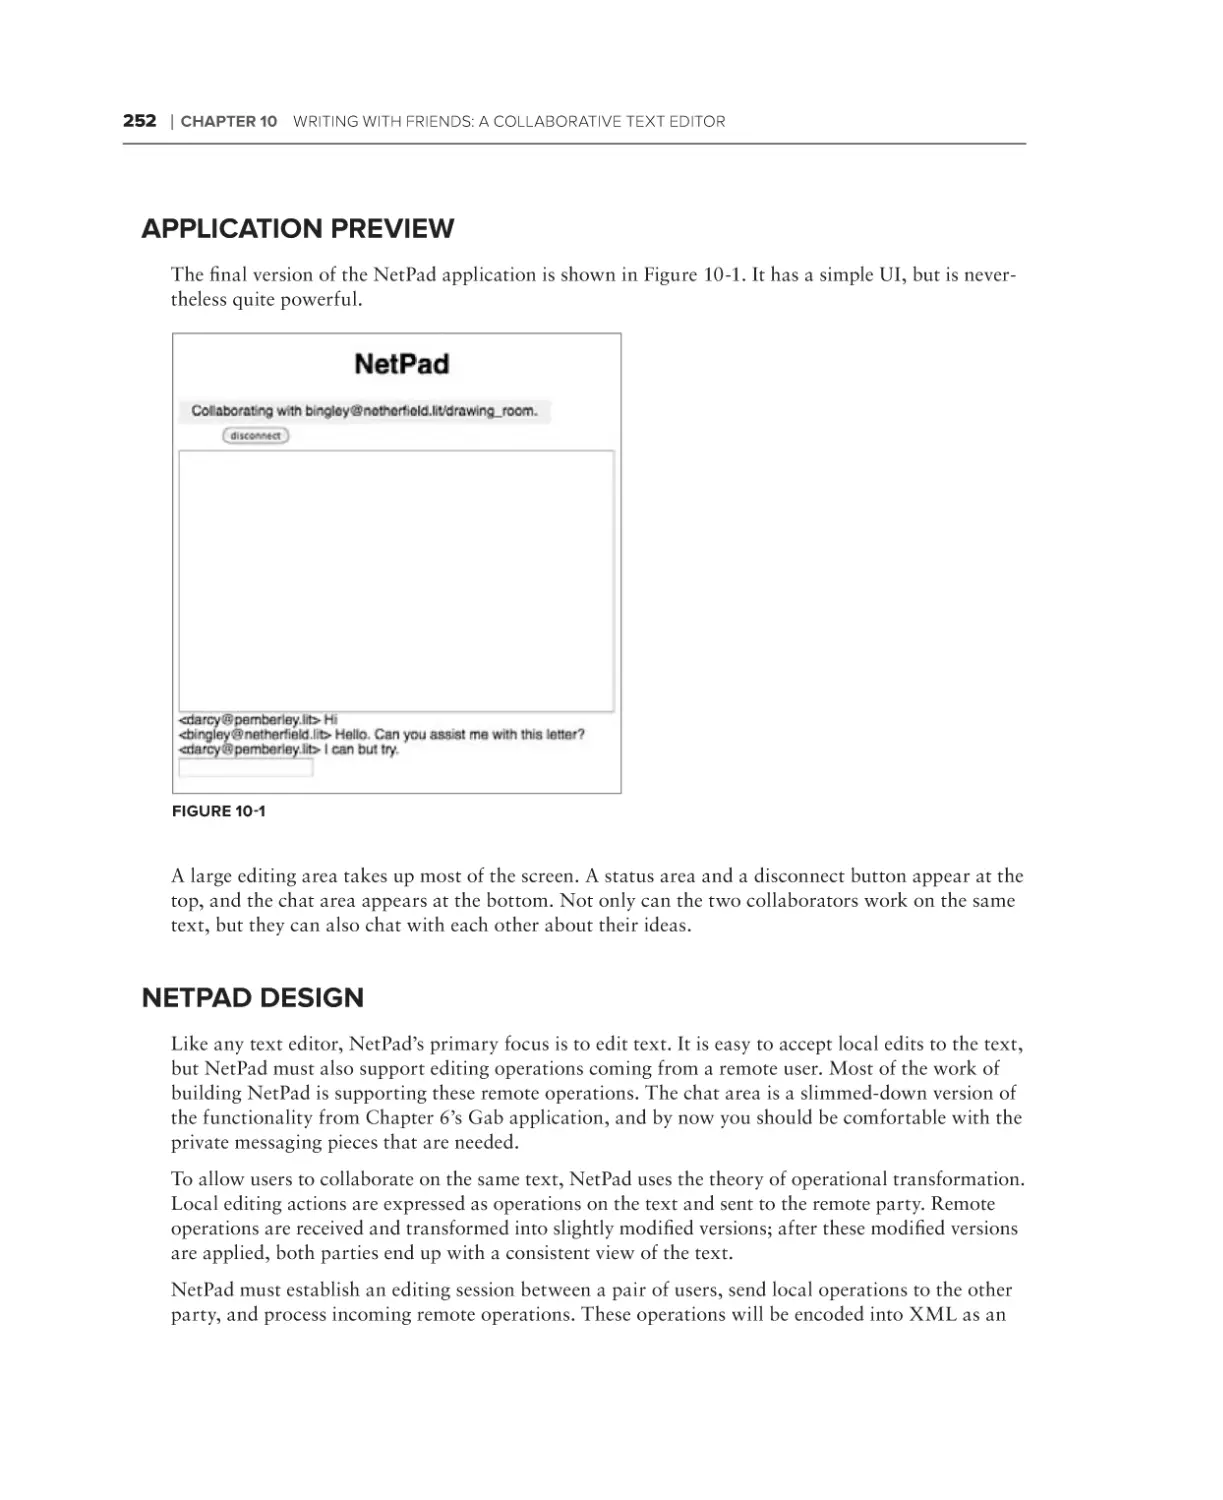
Application Preview
NetPad Design
Operational Transformation
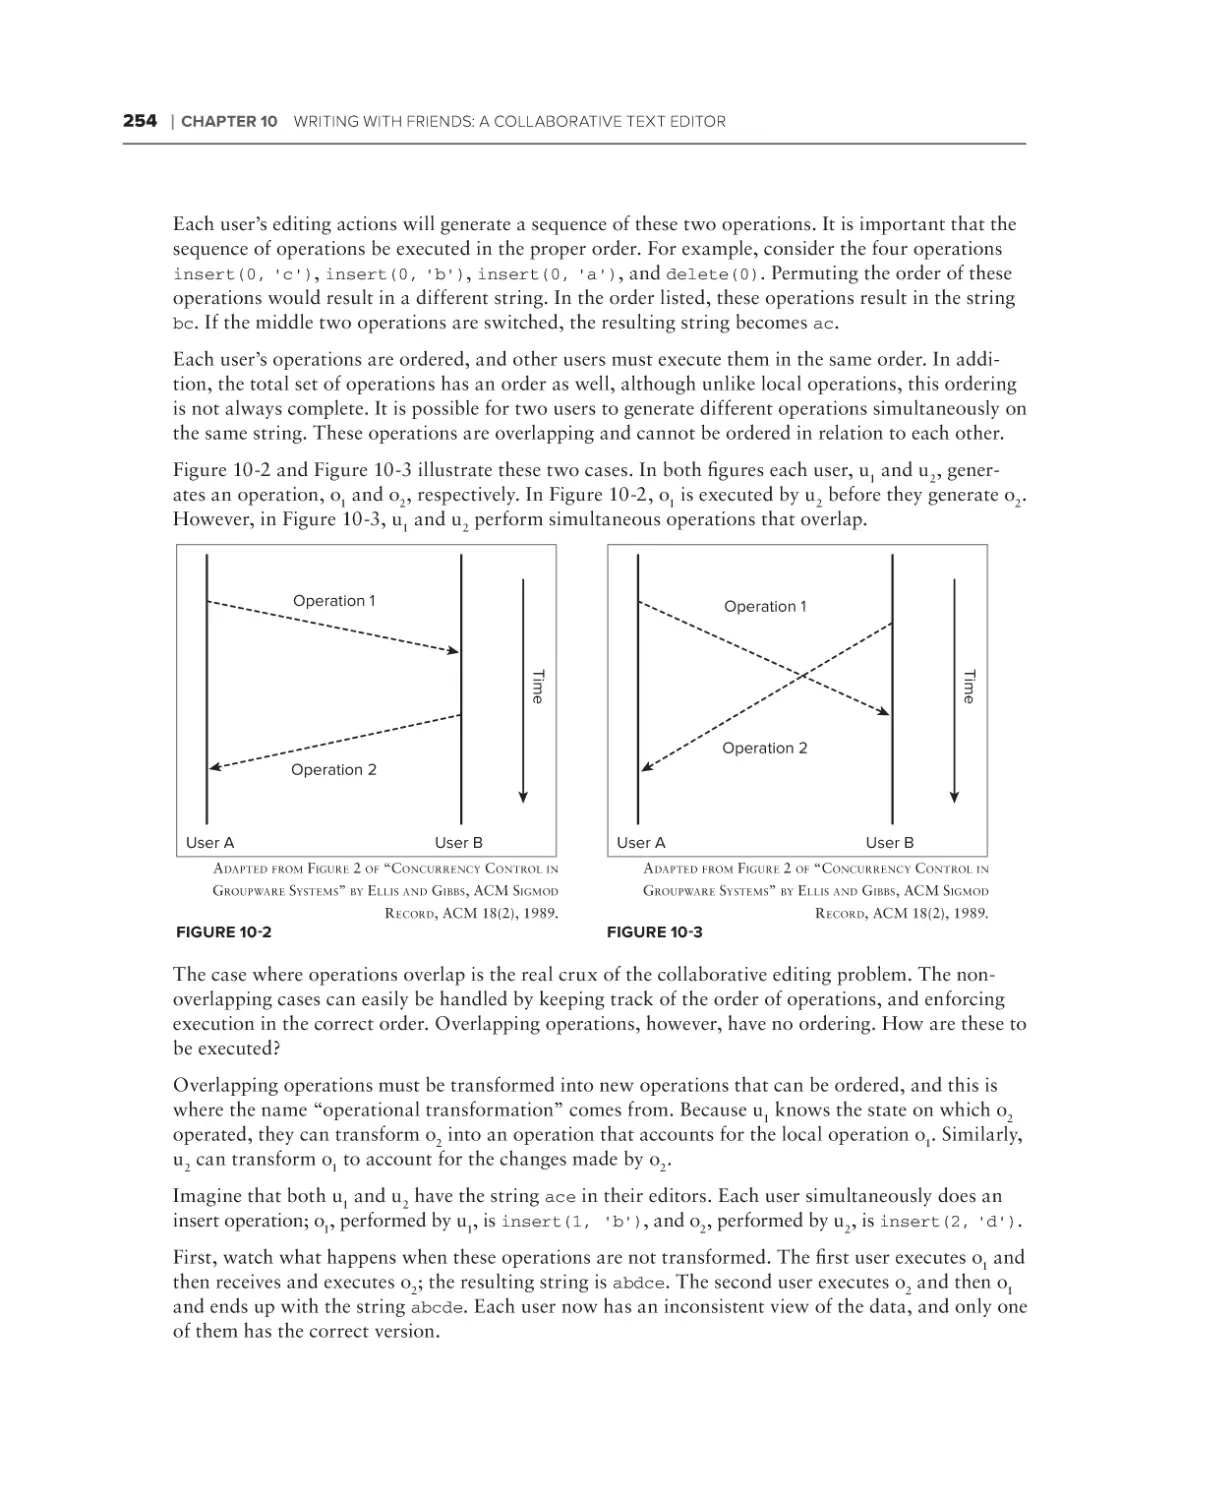
Basic Principles
Details of the Algorithm
Implementation
Extending the XMPP Protocol
Ignoring the Unknown
XML Namespaces
Extended Elements
Extended Attributes
Contributing Extensions
Designing the Protocol
Testing for Support
Requesting and Controlling Sessions
Editing Operations
Building the Editor
The Initial Skeleton
Starting Editing Sessions
Chatting About Work
Making Edits
Expanding NetPad
Summary
211
211
213
215
215
216
218
219
221
222
222
225
228
234
249
251
252
252
253
253
255
256
267
267
268
268
270
271
271
272
272
273
274
274
278
284
287
298
298
xvi
40718ftoc.indd 16
12/1/09 11:14:22 AM
CONTENTS
Chapter 11: Playing Games: Head to Head Tic-Tac-Toe
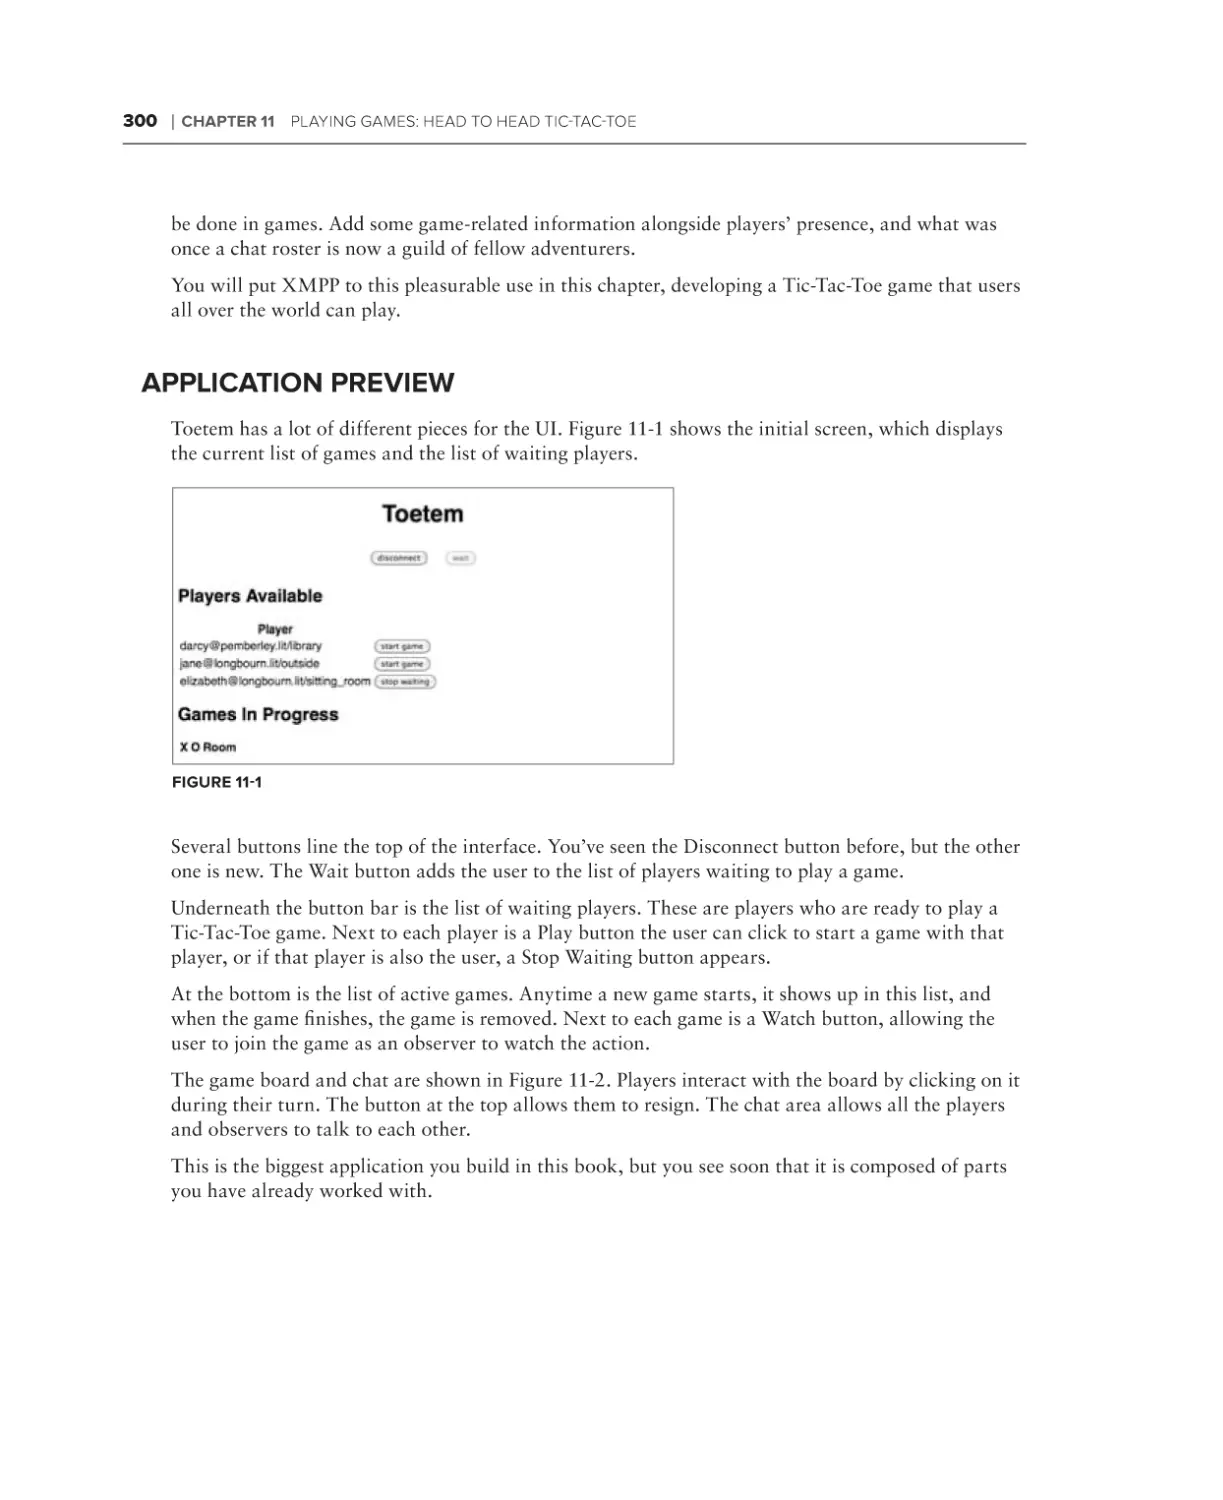
Application Preview
Toetem Design
Designing the Game Protocol
Keeping Track of Users
Managing Players
Managing Games
Playing and Watching the Game
Getting Started on Toetem
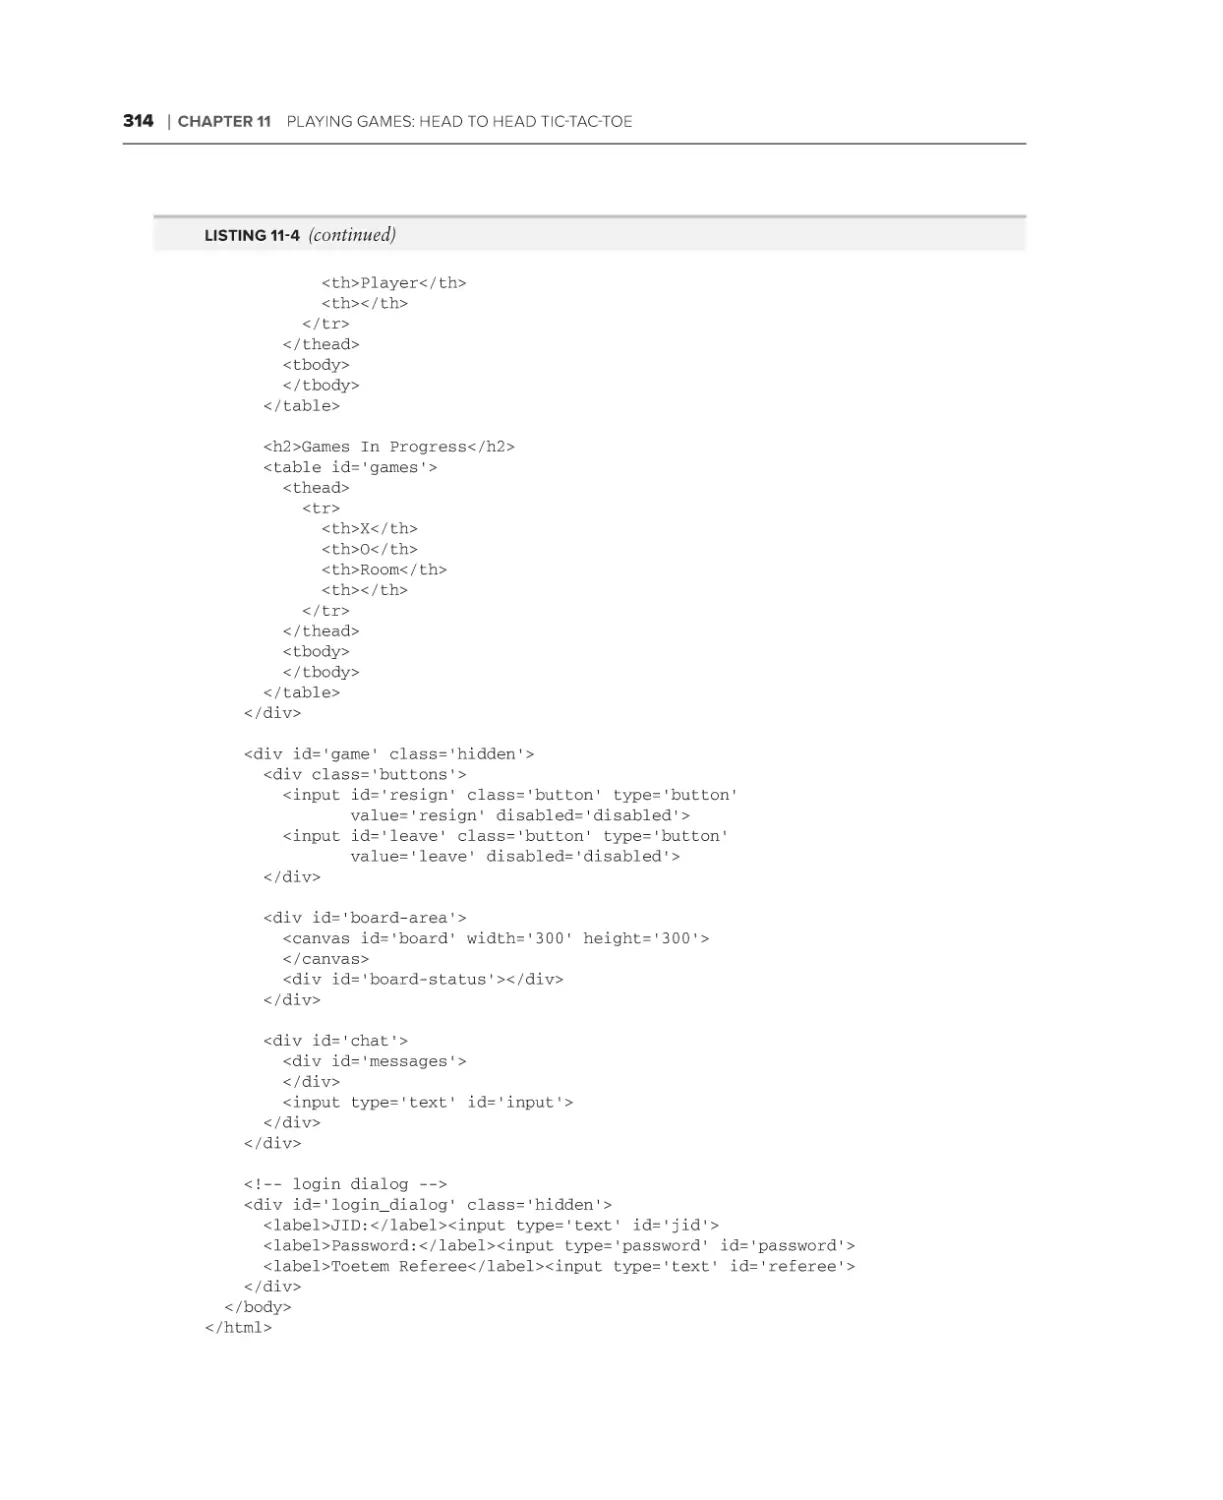
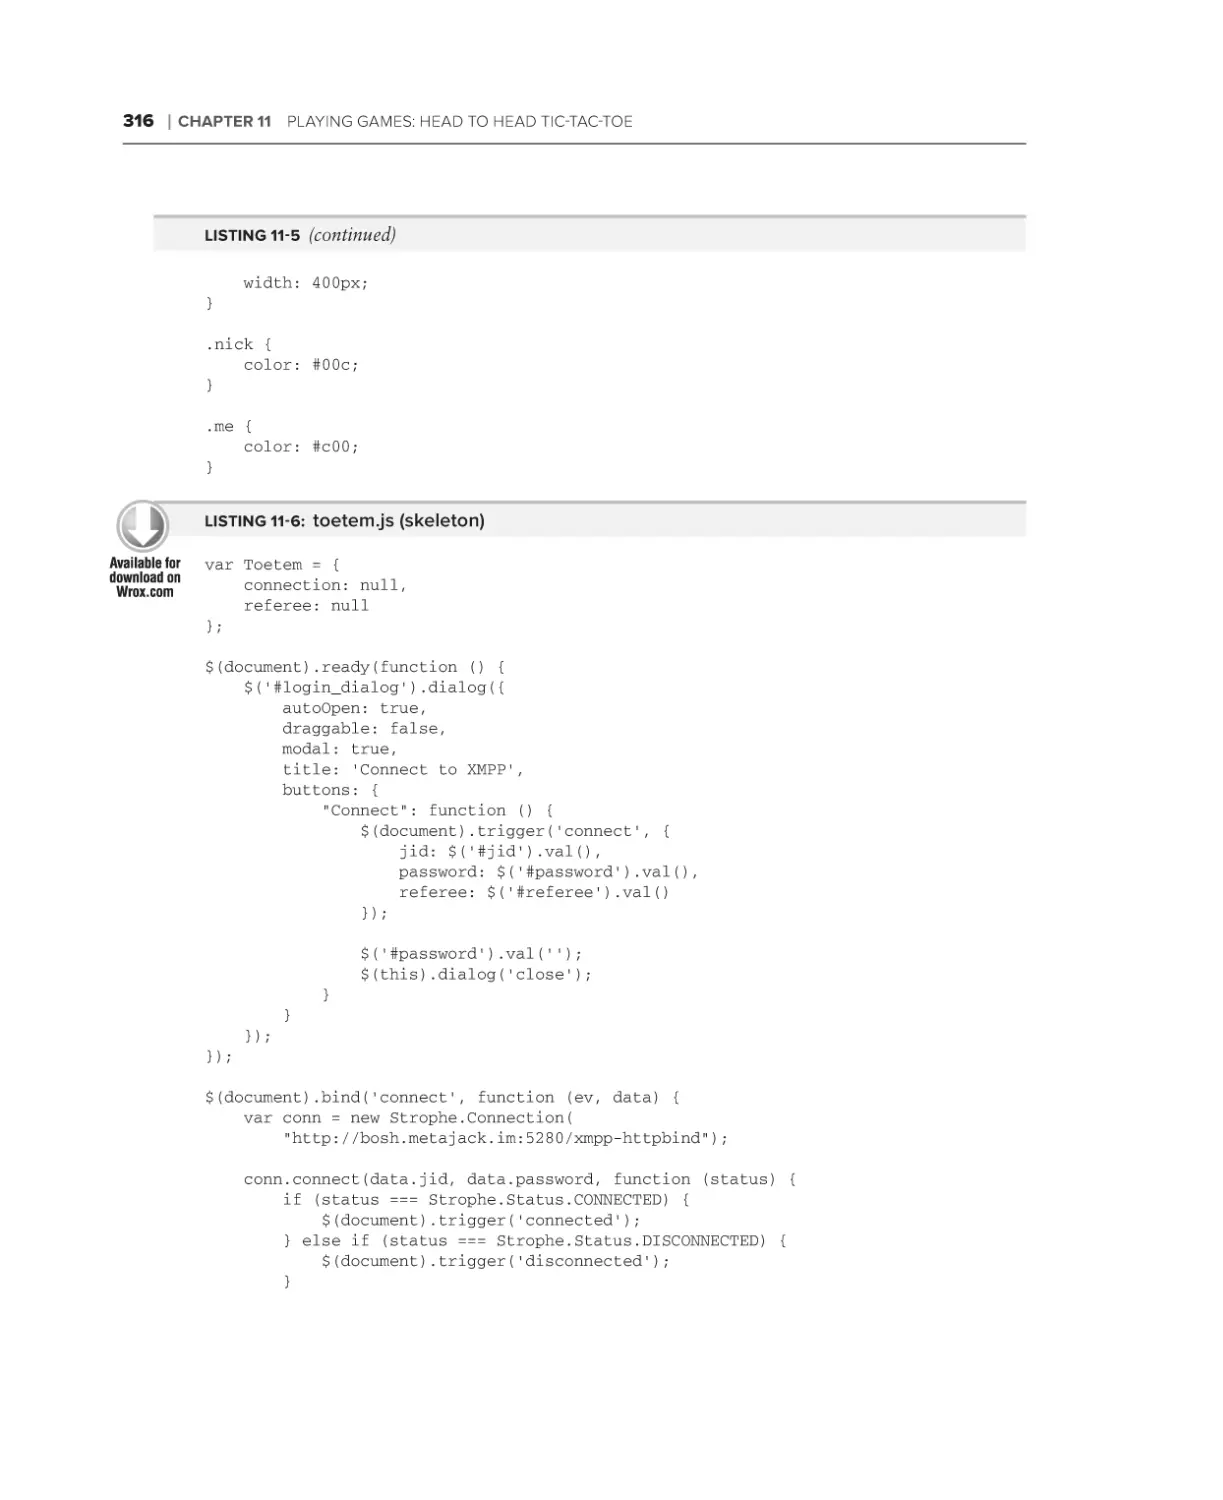
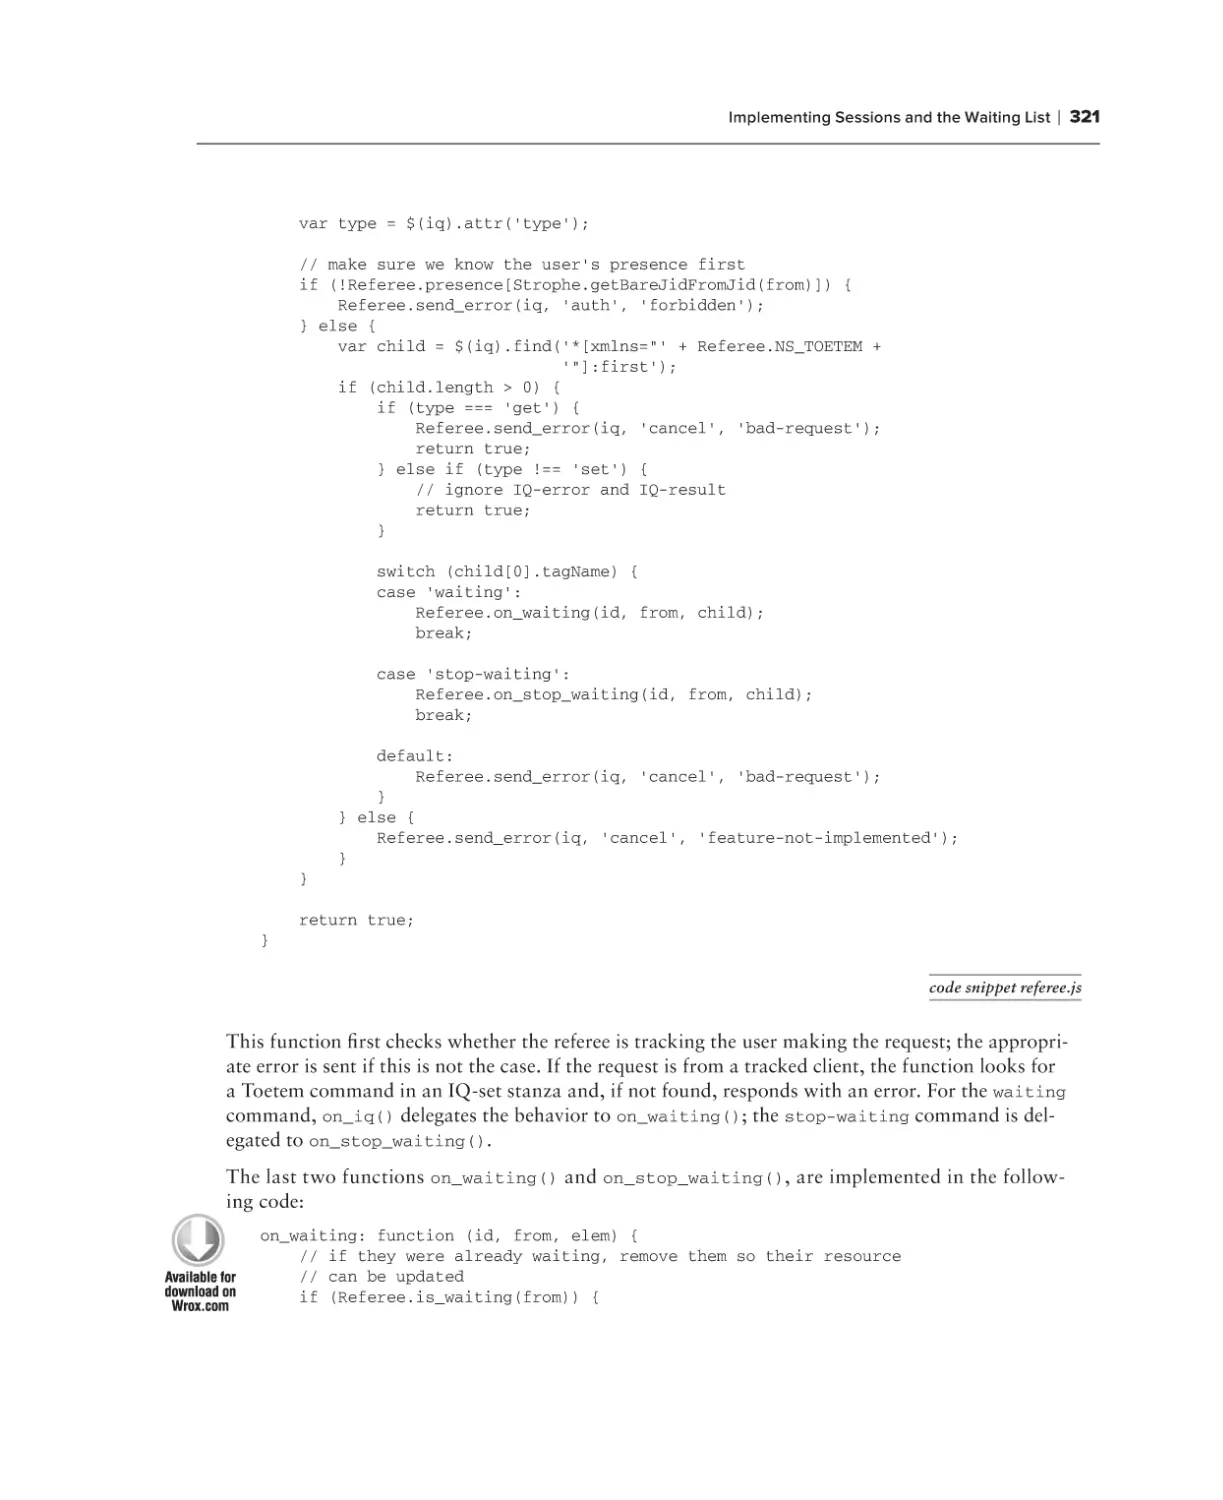
Implementing Sessions and the Waiting List
Referee Version One
Toetem Client Version One
Implementing Game Management
299
300
301
302
303
304
305
308
311
317
317
322
325
Referee Version Two
Toetem Client Version Two
325
334
Implementing the Game Logic
338
The Tic-Tac-Toe Library
Referee Version Three
Toetem Client Version Three
338
343
345
Making the Game More Fun
Summary
372
373
Part III: Advanced Topics
Chapter 12: Getting Attached: Bootstrapping BOSH
Session Attachment
The Mechanics of Sessions
Use Cases
Automatic Logins with Session Attachment
Creating the Django Project
Summary
Chapter 13: Deploying XMPP Applications
Growing Horizontally
Multiple Connection Managers
Clustering XMPP Servers
Spreading Out Components
Federating Internally
Becoming a Server
37 7
378
378
379
380
381
385
387
387
388
391
392
393
393
xvii
40718ftoc.indd 17
12/1/09 11:14:23 AM
CONTENTS
Growing Vertically
Reducing Latency
Minimizing XML Serialization
Optimizing DOM Operations
Summary
Chapter 14: Writing Strophe Plug-ins
Using Plug-ins
Loading Plug-ins
Accessing Plug-in Functionality
Building Plug-ins
Creating a Roster Plug-in
Storing Contacts
Getting and Maintaining the Roster
Manipulating the Roster
Taking the Plug-in for a Spin
Improving the Roster Plug-in
394
394
397
398
399
40 1
402
402
402
403
404
405
407
411
412
417
Summary
417
Appendix A: Getting Started with jQuery
Appendix B: Setting Up a BOSH Connection Manager
419
429
Index
441
xviii
40718ftoc.indd 18
12/1/09 11:14:23 AM
Introduction
XMPP powers a wide range of applications including instant messaging, multi-user chat, voice
and video conferencing, collaborative spaces, real-time gaming, data synchronization, and even
search. Although XMPP started its life as an open, standardized alternative to proprietary instant
messaging systems like ICQ and AOL Instant Messenger, it has matured into an extremely robust
protocol for all kinds of exciting creations.
Facebook uses XMPP technology as part of its chat system. Google uses XMPP to power Google
Talk and its exciting new Google Wave protocol. Collecta has built a real-time search engine
based extensively on XMPP’s publish-subscribe system. Several web browsers are experimenting
with XMPP as the basis of their synchronization and sharing systems. Dozens of other companies
have XMPP-enabled their web applications to provide enhanced user experiences and real-time
interaction.
The core of XMPP is the exchange of small, structured chunks of information. Like HTTP, XMPP
is a client-server protocol, but it differs from HTTP by allowing either side to send data to the other
asynchronously. XMPP connections are long lived, and data is pushed instead of pulled.
Because of XMPP’s differences, it provides an excellent companion protocol to HTTP. XMPP-powered
web applications are to AJAX what AJAX was to the static web site; they are the next level of interactivity and dynamism. Where JavaScript and dynamic HTML have brought desktop application features to
the web browser, XMPP brings new communications possibilities to the Web.
XMPP has many common social web features built in, due to its instant messaging heritage.
Contact lists and subscriptions create social graphs, presence updates help users keep track of who
is doing what, and private messaging makes communication among users trivial. XMPP also has
nearly 300 extensions, providing a broad and useful range of tools on which to build sophisticated
applications. With only a handful of these, along with the core protocol, amazing things can be built
This book teaches you to harness the promise of XMPP in your own applications, enabling you to
build applications that are social, collaborative, real time, or all of the above. You will develop a
series of increasingly sophisticated XMPP applications, starting from “Hello, World!” and finishing
with a collaborative text editor, a shared sketch pad, and a real-time, multi-player game. By the end,
you will have all the tools you need to build the next generation of applications using XMPP or to
add new real-time, push, or social features to your current applications.
Who This Book Is For
This book is written for developers interested in making XMPP applications. You need not have
any previous experience with XMPP, although it will certainly be helpful if you do. The book starts
from the assumption that you’ve heard great things about XMPP and are looking to dive right in.
40718flast.indd 19
11/30/09 4:03:01 PM
introduction
The JavaScript language is used to develop all the applications in the book because it is an easy language to understand, is familiar to a large number of programmers, and comes on every computer
with a web browser. Even though this book uses JavaScript, all the concepts and applications could
be developed in any language; most of the “hard parts” are not related to the programming language,
the libraries used, or the web browser. You do not need to be a JavaScript expert to understand and
work with the code in this book.
It is assumed that you understand the basic front-end web technologies, CSS and HTML. If you’ve
ever written a little HTML from scratch and changed a few CSS styling properties, you should be
fine.
This book also makes use of two libraries, jQuery and Strophe. It is helpful if you have used
jQuery before, but if you haven’t, a short primer is included in Appendix A. The Strophe library is
explained fully as the applications are developed.
What This Book Covers
The XMPP protocol and its extensions cover a lot of ground. This book focuses on the pieces of
XMPP in wide use. The following topics receive much attention:
➤➤
XMPP’s instant messaging features like rosters, presence and subscriptions, and private chats
➤➤
XMPP stanzas, stanza errors, and client protocol syntax and semantics
➤➤
Extending XMPP stanzas
➤➤
Service discovery (XEP-0030)
➤➤
Data Forms (XEP-0004)
➤➤
Multi-User Chat (XEP-0045)
➤➤
Publish-Subscribe (XEP-0060)
Although these topics are all approached from the client side, almost all of it is equally applicable to
XMPP bots or server components and plug-ins.
The book also covers XMPP programming related topics such as application design, event handling,
and combining simple protocol elements into a greater whole. Along the way, a few web programming
topics are also discussed such as the Canvas API.
XMPP is now more than 10 years old and quite mature. This book covers the 1.0 version of the core
protocol. The XMPP protocol parts of this book should work unchanged in future versions of the protocol, just as HTTP 1.0 clients can easily communicate with HTTP 1.1 servers.
XMPP has many extensions and several of these are also covered. For the most part, the book concentrates on extensions that are in a stable, mature state. For each extension used, the document
number is always given, and if in doubt, you can always check the latest version of the extension to
see if it has been changed or superseded.
xx
40718flast.indd 20
11/30/09 4:03:01 PM
introduction
The book was written with the 1.3 series versions of jQuery and the 1.7 series versions of jQuery UI.
These libraries generally remain backward compatible to a large degree. Version 1.0 of the Strophe
library is used, but future 1.X versions should also work fine.
How This Book Is Structured
This book is primarily organized as a walkthrough tutorial of a series of example XMPP applications. Each application increases in difficulty and teaches you one or more useful parts of the XMPP
protocol and its extensions. These applications are stripped down for clarity, but they are examples
of the kinds of applications XMPP developers create every day.
This book is divided into three parts.
The first part is an introduction to the XMPP protocol, its uses, and XMPP application design.
Chapter 1 covers the use cases for XMPP, the history of the protocol, and its component parts. Chapter 2
explains when XMPP is a good choice for the job and goes into detail about how XMPP applications work, particularly for the Web.
The second part is the meat of the book and contains nine XMPP applications that solve a variety of
problems. Each application is more complex than the last and builds on the concepts of the previous
ones. Chapter 3 starts with a simple “Hello, World!” type example, and by Chapter 11 you build a
real-time, multi-player game.
The last part covers a few advanced but important topics. Chapter 12 discusses attached sessions, a
useful trick for security, optimization, and persistence. Chapter 13 goes into detail about how best
to deploy and scale XMPP-based applications. Chapter 14 explains how to use Strophe’s plug-in system and how to create your own plug-ins.
What You Need to Use This Book
This book makes use of web technologies and therefore requires almost no special tools. You can
use, build, and run the applications in this book on virtually any platform. The libraries needed for
the applications are explained in Chapter 3, and most can be used without downloading any code.
You will need some way to serve web pages such as a local web server or a hosting account somewhere. If you don’t have these readily available, you can use the Tape program to serve the files; Tape
is a simple web server and is explained in Appendix B. It is an unfortunate requirement of browser
security policy that you can’t easily run these applications directly from your local file system.
You will need an XMPP account (or multiple accounts in some cases if you want to test the code
by yourself) to run the applications. You can avail yourself of any of the public XMPP servers for
this purpose, although you will need to ensure that the server has support for publish-subscribe and
multi-user chat; most do. You can also download and run your own XMPP server instead, although
this is not covered in the book.
xxi
40718flast.indd 21
11/30/09 4:03:01 PM
introduction
Chapter 12 requires some server-side assistance. The example uses the Python programming language along with the Django framework to provide this. This chapter is an advanced topic and is
not needed for the normal applications in the book.
Conventions
To help you get the most from the text and keep track of what’s happening, we’ve used a number of
conventions throughout the book.
Boxes like this one hold important, not-to-be forgotten information that is
directly relevant to the surrounding text.
Notes, tips, hints, tricks, and asides to the current discussion are offset and
placed in italics like this.
As for styles in the text:
➤➤
We highlight new terms and important words when we introduce them.
➤➤
We show keyboard strokes like this: Ctrl+A.
➤➤
We show file names, URLs, and code within the text like so: persistence.properties.
➤➤
We present code in two different ways:
We use a monofont type with no highlighting for most code examples.
We use boldface highlighting to emphasize code that is of particularly
importance in the present context.
Source Code
As you work through the examples in this book, you may choose either to type in all the code
manually or to use the source code files that accompany the book. All of the source code used in this
book is available for download at http://www.wrox.com. Once at the site, simply locate the book’s
title (either by using the Search box or by using one of the title lists) and click the Download Code
link on the book’s detail page to obtain all the source code for the book.
xxii
40718flast.indd 22
11/30/09 4:03:03 PM
introduction
Because many books have similar titles, you may find it easiest to search by
ISBN; this book’s ISBN is 978-0-470-54071-8.
Once you download the code, just decompress it with your favorite compression tool. Alternatively,
you can go to the main Wrox code download page at http://www.wrox.com/dynamic/books/
download.aspx to see the code available for this book and all other Wrox books.
Errata
We make every effort to ensure that there are no errors in the text or in the code. However, no one
is perfect, and mistakes do occur. If you find an error in one of our books, like a spelling mistake
or faulty piece of code, we would be very grateful for your feedback. By sending in errata, you may
save another reader hours of frustration and at the same time you will be helping us provide even
higher quality information.
To find the errata page for this book, go to http://www.wrox.com and locate the title using the Search
box or one of the title lists. Then, on the book details page, click the Book Errata link. On this page
you can view all errata that has been submitted for this book and posted by Wrox editors. A complete book list including links to each book’s errata is also available at www.wrox.com/misc-pages/
booklist.shtml.
If you don’t spot “your” error on the Book Errata page, go to www.wrox.com/contact/techsupport
.shtml and complete the form there to send us the error you have found. We’ll check the information
and, if appropriate, post a message to the book’s errata page and fix the problem in subsequent
editions of the book.
p2p.wrox.com
For author and peer discussion, join the P2P forums at p2p.wrox.com. The forums are a web-based
system for you to post messages relating to Wrox books and related technologies and interact with
other readers and technology users. The forums offer a subscription feature to e‑mail you topics
of interest of your choosing when new posts are made to the forums. Wrox authors, editors, other
industry experts, and your fellow readers are present on these forums.
At http://p2p.wrox.com you will find a number of different forums that will help you not only as
you read this book, but also as you develop your own applications. To join the forums, just follow
these steps:
1.
2.
Go to p2p.wrox.com and click the Register link.
Read the terms of use and click Agree.
xxiii
40718flast.indd 23
11/30/09 4:03:03 PM
introduction
3.
Complete the required information to join as well as any optional information you wish to
provide and click Submit.
4.
You will receive an e‑mail with information describing how to verify your account and complete the joining process.
You can read messages in the forums without joining P2P but in order to post
your own messages, you must join.
Once you join, you can post new messages and respond to messages other users post. You can read
messages at any time on the Web. If you would like to have new messages from a particular forum
e‑mailed to you, click the Subscribe to this Forum icon by the forum name in the forum listing.
For more information about how to use the Wrox P2P, be sure to read the P2P FAQs for answers to
questions about how the forum software works as well as many common questions specific to P2P
and Wrox books. To read the FAQs, click the FAQ link on any P2P page.
xxiv
40718flast.indd 24
11/30/09 4:03:03 PM
Part I
XMPP Protocol and Architecture
⊲⊲ Chapter 1: Getting to Know XMPP
⊲⊲ Chapter 2: Designing XMPP Applications
40718c01.indd 1
11/30/09 8:23:46 PM
40718c01.indd 2
11/30/09 8:23:48 PM
1
Getting to Know XMPP
What’s in This Chapter?
➤➤
The history of XMPP
➤➤
XMPP networks and connections
➤➤
XMPP’s three building block stanzas
The eXtensible Messaging and Presence Protocol (XMPP) is, at its most basic level, a protocol
for moving small, structured pieces of data between two places. From this humble basis, it has
been used to build large-scale instant messaging systems, Internet gaming platforms, search
engines, collaboration spaces, and voice and video conferencing systems. More unique applications appear every day, further demonstrating how versatile and powerful XMPP can be.
XMPP is made of a few small building blocks, and on top of these primitives many larger
constructions have been made. Within XMPP are systems for building publish-subscribe services, multi-user chat, form retrieval and processing, service discovery, real-time data transfer,
privacy control, and remote procedure calls. Often, XMPP programmers create their own,
unique constructions that are fitted exactly for the problem at hand.
Most social media constructs that have propelled web sites like Facebook, MySpace, and
Twitter into the forefront are also baked into XMPP. Within XMPP, you’ll find rosters full of
contacts that create a social graph with directed or undirected edges. Presence notifications are
sent automatically when contacts come online and go offline, and private and public messages
are the bread and butter application of XMPP systems. Developers will sometimes choose
XMPP as the underlying technology layer simply because it gives them many social features
for free, leaving them to concentrate on the unique pieces of their application.
The possibilities are vast, but before you can begin, you need to know about XMPP’s different
pieces and how they fit together into a cohesive whole.
40718c01.indd 3
11/30/09 8:23:48 PM
4
❘
Chapter 1 Getting to Know XMPP
What Is XMPP?
XMPP, like all protocols, defines a format for moving data between two or more communicating
entities. In XMPP’s case, the entities are normally a client and a server, although it also allows for
peer-to-peer communication between two servers or two clients. Many XMPP servers exist on the
Internet, accessible to all, and form a federated network of interconnected systems.
Data exchanged over XMPP is in XML, giving the communication a rich, extensible structure.
Many modern protocols forgo the bandwidth savings of a binary encoding for the more practical
feature of being human readable and therefore easily debugged. XMPP’s choice to piggyback on
XML means that it can take advantage of the large amount of knowledge and supporting software
for dealing with XML.
One major feature XMPP gets by using XML is XML’s extensibility. It is extremely easy to add new
features to the protocol that are both backward and forward compatible. This extensibility is put to
great use in the more than 200 protocol extensions registered with the XMPP Standards Foundation
and has provided developers with a rich and practically unlimited set of tools.
XML is known primarily as a document format, but in XMPP, XML data is organized as a pair
of streams, one stream for each direction of communication. Each XML stream consists of an
opening element, followed by XMPP stanzas and other top-level elements, and then a closing element. Each XMPP stanza is a first-level child element of the stream with all its descendent elements
and attributes. At the end of an XMPP connection, the two streams form a pair of valid XML
documents.
XMPP stanzas make up the core part of the protocol, and XMPP applications are concerned with
sending and responding to various kinds of stanzas. Stanzas may contain information about other
entities’ availability on the network, personal messages similar to e‑mail, or structured communication intended for computer processing. An example stanza is shown here:
<message to=’elizabeth@longbourn.lit’
from=’darcy@pemberley.lit/dance’
type=’chat’>
<body>What think you of books?</body>
</message>
In a typical client-server XMPP session, a stanza such as this one from Elizabeth to Mr. Darcy will
travel from Elizabeth’s client to her server. Her server will notice that it is addressed to an entity on a
remote server and will establish an XMPP connection with the remote server and forward the message
there. This communication between servers resembles the e‑mail network, but unlike e‑mail servers,
XMPP servers always communicate directly with each other and not through intermediate servers.
This direct communication eliminates some common vectors for spam and unauthorized messages.
This is just one of the many ways in which XMPP is designed for security. It also supports encrypted
communications between endpoints through use of Transport Layer Security (TLS) and strong
authentication mechanisms via Simple Authentication and Security Layers (SASL).
XMPP is designed for the exchange of small bits of information, not large blobs of binary data. XMPP
can, however, be used to negotiate and set up out-of-band or in-band transports, which can move
large blocks from point to point. For these kinds of transfers, XMPP functions as a signaling layer.
40718c01.indd 4
11/30/09 8:23:48 PM
A Brief History of XMPP
❘5
The focus on small, structured bits of data gives the XMPP protocol extremely low latency and
makes it extremely useful for real-time applications. These applications, which include collaborative
spaces, games, and synchronization, are driving XMPP’s growth in popularity as developers experiment with the real-time Web.
You will see how easy it is to make real-time web applications through this book’s examples. By the
end of the book you should have a thorough understanding of why so many people are excited about
XMPP’s power and promise.
A Brief History of XMPP
The XMPP protocol is now more than 10 years old, and it has come a long way from its humble beginnings. Much of XMPP’s design is due to the environment in which XMPP was created, and the history
of XMPP provides an interesting case study in how open protocols foster adoption and innovation.
In 1996, Mirabilis released ICQ, which popularized rapid, personal communication among Internet
users. Its use spread rapidly, and before long other companies were releasing similar products. In
1997, AOL launched AOL Instant Messenger. Yahoo followed suit in 1998 with Yahoo Pager (eventually renamed Yahoo Messenger), and in 1999 Microsoft finally joined the competition with MSN
Messenger (now Windows Live Messenger).
Each of these instant messaging applications was tied to a proprietary protocol and network run
by the companies that made them. Users of ICQ could not talk to Yahoo users and vice versa. It
became common for users to run more than one of these applications to be able to talk to all of their
contacts because no single vendor claimed 100% market share.
It didn’t take long before developers desired to write their own clients for these proprietary IM networks. Some wished to make multiprotocol clients that could unite two or more of the IM networks,
and others wanted to bring these applications to operating systems other than Microsoft Windows
and Apple’s Mac OS. These developers ran into many roadblocks; they had to reverse-engineer
undocumented protocols, and the IM networks aggressively changed the protocol to thwart thirdparty developers.
It was in this climate that the idea for an open, decentralized IM network and protocol was born.
Jeremie Miller announced the Jabber project in January of 1999. Jabber was a decentralized instant
messaging protocol based on XML and a server implementation called jabberd. A community
immediately formed around the protocol and implementations spawning more clients and more
ideas. By May of 2000, the core protocols were stabilized and jabberd reached a production release.
The Jabber Software Foundation (JSF) was founded in 2001 to coordinate the efforts around the
Jabber protocol and its implementations. By late 2002, the JSF had submitted the core protocol specifications to the IETF process, and an IETF working group was formed. In October 2004, this standards process produced improved versions of the Jabber protocols, renamed XMPP, documented as
RFCs 3920, 3921, 3922, and 3923.
During the protocol’s early life, developers continued to expand its possibilities by submitting
protocol extensions to the JSF. These extensions were called Jabber Extension Proposals (JEPs).
40718c01.indd 5
11/30/09 8:23:48 PM
6
❘
Chapter 1 Getting to Know XMPP
Eventually the JSF and the extensions followed the naming change from Jabber to XMPP and
became the XMPP Standards Foundation (XSF) and XMPP Extension Proposals (XEPs).
By 2005, large-scale deployments of XMPP technology were well underway, highlighted by the
launch of Google Talk, Google’s own XMPP-based IM service.
Today, the XMPP ecosystem is quite large. Nearly 300 extensions have been accepted as XEPs, and
dozens of client and server implementations have been created — both commercial and open source.
Software developers of virtually any programming language can find a library to speed their XMPP
application development efforts.
XMPP applications started out very IM-centric, reflecting its origins, but developers have found XMPP
to be quite capable for a number of applications that weren’t originally foreseen including search
engines and synchronization software. This utility is a testament to the power of an open system and
open standardization process.
Most recently, the IETF has formed a new XMPP working group to prepare the next versions of
the XMPP specifications, incorporating all the knowledge gained since the original RFCs were published. XMPP continues to be refined and extended so that application developers and Internet users
will always have an open, decentralized communications protocol.
The XMPP Network
Any XMPP network is composed of a number of actors. These actors can be categorized as servers,
clients, components, and server plug-ins. An XMPP developer will write code to create or modify
one of these types of actors. Each actor has its place on the XMPP network’s stage.
Servers
XMPP servers, or more accurately, XMPP entities speaking the server-to-server protocol or the server
end of the client-to-server protocol, are the circulatory system of any XMPP network. A server’s job
is to route stanzas, whether they are internal from one user to another or from a local user to a user
on a remote server.
The set of XMPP servers that can mutually communicate forms an XMPP network. The set of public
XMPP servers forms the global, federated XMPP network. If a server does not speak the server-toserver protocol, it becomes an island, unable to communicate with external servers.
An XMPP server will usually allow users to connect to it. It is, however, also possible to write applications or services that speak the server-to-server protocol directly in order to improve efficiency by
eliminating routing overhead.
Anyone can run an XMPP server, and full-featured servers are available for nearly every platform.
Ejabberd, Openfire, and Tigase are three popular open source choices that will work on Windows,
Mac OS X, or Linux systems. Several commercial XMPP servers are available as well, including
M-Link and Jabber XCP.
40718c01.indd 6
11/30/09 8:23:49 PM
The XMPP Network
❘7
Clients
The majority of XMPP entities are clients, which connect to XMPP servers via the client-to-server
protocol. Many of these entities are human-driven, traditional IM users, but there are also automated services running as bots.
Clients must authenticate to an XMPP server somewhere. The server routes all stanzas the client
sends to the appropriate destination. The server also manages several aspects of the clients’ sessions,
including their roster and their bare address, which you see more of shortly.
All of the applications in this book are written as client applications. This is typically the starting
point of most XMPP development. For applications without a user focus or with demanding needs,
it is often preferable to create a different kind of entity, such as a server component.
Components
Clients are not the only things that may connect to XMPP servers; most servers also support external server components. These components augment the behavior of the server by adding some new
service. These components have their own identity and address within the server, but run externally
and communicate over a component protocol.
The component protocol (defined in XEP-0114) enables developers to create server extensions
in a server-agnostic way. Any component using the protocol can run on any server that speaks
the component protocol (assuming it doesn’t use some special feature specific to a particular
server). A multi-user chat service is a typical example of something that is often implemented as a
component.
Components also authenticate to the server, but this authentication is simpler than the full SASL
authentication for clients. Typically authentication is done with a simple password.
Each component becomes a separately addressable entity within the server and appears to the outside world as a sub-server. XMPP servers do not manage anything beyond basic stanza routing on
behalf of connected components. This allows great freedom to component developers to do things
exactly as they want, but places greater responsibility on them when they need functionality such as
rosters and presence management.
The server also allows a component to internally route or manage stanzas for itself. A component
can therefore create separately addressable pieces to be used as rooms, users, or whatever the developer requires. This is something that a client session cannot do and can be used to create really
elegant services.
Finally, because components do not have resources managed for them, services that operate with
many users or with a high amount of traffic can manage their own resources in a way that makes
sense for their purpose. Developers often create services as client bots, only to discover later that the
server’s roster management capabilities often do not scale well to thousands upon thousands of contacts. Components can manage rosters, if they have them at all, in whichever way makes sense for
the task and scale required.
40718c01.indd 7
11/30/09 8:23:49 PM
8
❘
Chapter 1 Getting to Know XMPP
Plug-ins
Many XMPP servers can also be extended via plug-ins. These plug-ins are usually written in the
same programming language as the server itself and run inside the server’s processes. Their purpose
overlaps to a large degree with external components, but plug-ins may also access internal server
data structures and change core server behavior.
The virtually limitless abilities afforded to server plug-ins come with a cost; plug-ins are not portable
between different servers. A different server may be written in a completely different language, and
its internal data structures may differ radically. This cost aside, plug-ins are sometimes the only way
to get a particular job done.
Plug-ins have reduced overhead compared to components because they do not need to communicate
over a network socket. They also need not parse or serialize XML and can, instead, work directly
with internal server representations of stanzas. This can lead to much needed performance improvements when the application must scale.
XMPP Addressing
Every entity on an XMPP network will have one or more addresses, or JIDs. JIDs (short for jabber
identifiers) can take a variety of forms, but they normally look just like e‑mail addresses. darcy@
pemberley.lit and elizabeth@longbourn.lit are two examples of JIDs.
Each JID is made up of up to three pieces, the local part, the domain, and the resource. The domain
portion is always required, but the other two pieces are optional, depending on their context.
The domain is the resolvable DNS name of the entity — a server, component, or plug-in. A JID consisting of just a domain is valid and addresses a server. Stanzas addressed to a domain are handled
by the server itself and potentially routed to a component or plug-in.
The local part usually identifies a particular user at a domain. It appears at the beginning of a JID,
before the domain, and it is separated from the rest of the JID by the @ character, just like the local
part of an e‑mail address. The local part can also be used to identify other objects; a multi-user chat
service will expose each room as a JID where the local part references the room.
A JID’s resource part most often identifies a particular XMPP connection of a client. For XMPP
clients, each connection is assigned a resource. If Mr. Darcy, whose JID is darcy@pemberley.lit,
is connected both from his study and his library, his connections will be addressable as darcy@
pemberley.lit/study and darcy@pemberley.lit/library. Like the local part, a resource can
be used to identify other things; on a multi-user chat service, the resource part of the JID is used to
identify a particular user of a chat room.
JIDs are divided into two categories, bare JIDs and full JIDs. The full JID is always the most specific address for a particular entity, and the bare JID is simply the full JID with any resource part
removed. For example, if a client’s full JID is darcy@pemberley.lit/library, its bare JID would
be darcy@pemberley.lit. In some cases, the bare JID and the full JID are the same, such as when
addressing a server or a specific multi-user chat room.
40718c01.indd 8
11/30/09 8:23:49 PM
XMPP Stanzas
❘9
Bare JIDs for clients are somewhat special, because the server itself will handle stanzas addressed
to a client’s bare JID. For example, a message sent to a client’s bare JID will be forwarded to one or
more connected resources of the user, or if the user is offline, stored for later delivery. Stanzas sent
to full JIDs, however, are usually routed directly to the client’s connection for that resource. You
can think of bare JIDs as addressing the user’s account as opposed to addressing one of the user’s
connected clients.
XMPP Stanzas
Work is accomplished in XMPP by the sending and receiving of XMPP stanzas over an XMPP stream.
Three basic stanzas make up the core XMPP toolset. These stanzas are <presence>, <message>, and
<iq>. Each type of stanza has its place and purpose, and by composing the right kinds of quantities
of these stanzas, sophisticated behaviors can be achieved.
Remember that an XMPP stream is a set of two XML documents, one for each direction of
communication. These documents have a root <stream:stream> element. The children of this
<stream:stream> element consist of routable stanzas and stream related top-level children.
Each stanza is an XML element, including its children. The end points of XMPP communication
process input and generate output on a stanza-by-stanza basis. The following example shows a
simplified and short XMPP session:
<stream:stream>
<iq type=’get’>
<query xmlns=’jabber:iq:roster’/>
</iq>
<presence/>
<message to=’darcy@pemberley.lit’
from=’elizabaeth@longbourn.lit/ballroom’
type=’chat’>
<body>I cannot talk of books in a ball-room; my head is always full of
something else.</body>
</message>
<presence type=’unavailable’/>
</stream:stream>
In this example, Elizabeth created an XMPP stream by sending the opening <stream:stream>
tag. With the stream open, she sent her first stanza, an <iq> element. This <iq> element requested
Elizabeth’s roster, the list of all her stored contacts. Next, she notified the server that she was online
and available with a <presence> stanza. After noticing that Mr. Darcy was online, she sent him
a short <message> stanza, thwarting his attempt at small talk. Finally, Elizabeth sent another
<presence> stanza to inform the server she was unavailable and closed the <stream:stream> element, ending the session.
You have now seen an example of each kind of XMPP stanza in action. Each of these is explained in
more detail, but first, you should learn about what properties they all share.
40718c01.indd 9
11/30/09 8:23:49 PM
10
❘
Chapter 1 Getting to Know XMPP
Common Attributes
All three stanzas support a set of common attributes. Whether they are attributes of <presence>,
<message>, or <iq> elements, the following attributes all mean the same thing.
from
Stanzas almost always have a from attribute. This attribute identifies the JID of the stanza’s origin.
Setting the from attribute on outgoing stanzas is not recommended; the server adds the correct from
attribute to all stanzas as they pass through, and if you set the from attribute incorrectly, the server
may reject your stanza altogether.
If the from attribute is missing on a received stanza in a client-to-server stream, this is interpreted
to mean that the stanza originated from the server itself. In the server-to-server protocol, a missing
from attribute is an error.
Note that the example stanzas in this book often include the from attribute. This is done for clarity
and disambiguation.
to
XMPP servers route your stanzas to the JID supplied in the to attribute. Similarly to the from attribute, if the to attribute is missing in a client-to-server stream, the server assumes it is a message
intended for the server itself. It is recommended that you omit the to attribute when you address the
server itself.
If the JID specified in the to attribute is a user, the server potentially handles the stanza on the user’s
behalf. If the destination is a bare JID, the server handles the stanza. This behavior is different for the
three stanza types, and is explained alongside each type. If a full JID is specified as the destination,
the server routes the stanza directly to the user.
type
The type attribute specifies the specific kind of <presence>, <message>, or <iq> stanza. Each of
the three basic stanzas has several possible values for the type attribute, and these are explained
when each stanza is covered in detail.
All three stanzas may have their type attribute set to a value of error. This indicates that the stanza
is an error response to a received stanza of the same kind. You must not respond to a stanza with an
error type, to avoid feedback loops on the network.
id
Stanzas may be given an id attribute to aid in identifying responses. For <iq> stanzas, this attribute
is required, but for the other two it is optional. If a stanza is generated in reply to a stanza with an
id attribute, the reply stanza must contain an id attribute with the same value.
The id attribute needs to be unique enough that the stanza’s sender can use it to disambiguate
responses. Often, it is easiest just to make these unique in a given stream to avoid any ambiguity.
Reply stanzas for <message> and <presence> stanzas are generally limited to reporting errors. Reply
stanzas for <iq> can signal successful operations, acknowledge a command, or return requested
40718c01.indd 10
11/30/09 8:23:49 PM
XMPP Stanzas
❘ 11
data. In all these cases, the client uses the id attribute of the reply stanza to identify which request
stanza it is associated with. In cases where many stanzas of the same type are sent in a short time
frame, this capability is essential because the replies may be delivered out of order.
Presence Stanzas
The <presence> stanza controls and reports the availability of an entity. This availability can range
from simple online and offline to the more complex away and do not disturb. In addition, <presence>
stanzas are used to establish and terminate presence subscriptions to other entities.
In traditional instant messaging systems, presence notifications are the main source of traffic. To
enable instant communication, it is necessary to know when the other party is available to communicate. When you send an e‑mail, you have no idea if the recipient is currently checking and responding
to e‑mail, but with instant messages and presence notifications, you know before the message is sent
if the recipient is around.
For applications in other domains, presence notifications can be used to signal similar kinds of information. For example, some developers have written bots that set their presence to do not disturb
when they are too busy to accept more work. The basic online and offline states can let applications
know whether a service is currently functioning or down for maintenance.
Normal Presence Stanzas
A normal <presence> stanza contains no type attribute or a type attribute that has the value
unavailable or error. These stanzas set or indicate an entity’s presence or availability for
communication.
There is no available value for the type attribute because this is indicated instead by the lack of a
type attribute.
Users manipulate their own presence status by sending <presence> stanzas without a to attribute,
addressing the server directly. You’ve seen two short examples of this already, and these are included
along with some longer examples here:
<presence/>
<presence type=’unavailable’/>
<presence>
<show>away</show>
<status>at the ball</status>
</presence>
<presence>
<status>touring the countryside</status>
<priority>10</priority>
</presence>
<presence>
<priority>10</priority>
</presence>
40718c01.indd 11
11/30/09 8:23:49 PM
12
❘
Chapter 1 Getting to Know XMPP
The first two stanzas set a user’s presence status to online or offline, respectively. These are also
typically the first and last presence stanzas sent during an XMPP session.
The next two examples both show extra presence information in the form of <show>, <status>,
and <priority> children.
The <show> element is used to communicate the nature of the user’s availability. The element is
named “show” because it requests that the recipient’s client use this information to update a visual
indicator of the sender’s presence. Only one <show> child is allowed in a <presence> stanza, and
this element may only contain the following possible values: away, chat, dnd, and xa. These values
communicate that a user is away, is interested in chatting, does not wish to be disturbed, or is away
for an extended period.
A <status> element is a human-readable string that the user can set to any value in order to communicate presence information. This string is generally displayed next to the contact’s name in the
recipient’s chat client.
Each connected resource of a user has a priority between –128 and 127. This priority is set to zero
by default, but can be manipulated by including a <priority> element in <presence> stanzas.
Users with multiple simultaneous connections may use this to indicate which resource should receive
chat messages addressed to their bare JID. The server will deliver such messages to the resource with
the highest priority. A negative priority has a special meaning; resources with a negative priority will
never have messages delivered to them that were addressed to the bare JID. Negative priorities are
extremely useful for automated applications that run on the same JID as a human is using for regular chat.
Extending Presence Stanzas
It is tempting for developers to want to extend <presence> stanzas to include more detailed information such as the song the user is currently listening to or the person’s mood. Because <presence>
stanzas are broadcast to all contacts (even those that may not have an interest in the information)
and constitute a large share of the network traffic in the XMPP network, this practice is discouraged.
These kinds of extensions are handled by protocols that more tightly focus delivery of this extra
information.
Presence Subscriptions
The user’s server automatically broadcasts presence information to contacts that have a presence
subscription to the user. Similarly, users receive presence updates from all contacts for which they
have a presence subscription. Presence subscriptions are established and controlled by use of <presence> stanzas.
Unlike some social network and IM systems, presence subscriptions in XMPP are directional. If
Elizabeth has a subscription to Mr. Darcy’s presence information, this does not imply that Mr.
Darcy has a subscription to Elizabeth. If a bidirectional subscription is desired, a subscription must
be separately established in both directions. Bidirectional subscriptions are often the norm for
human communicators, but many services (and even some users) are interested in only one of the
directions.
40718c01.indd 12
11/30/09 8:23:49 PM
XMPP Stanzas
❘ 13
Presence subscription stanzas can be identified by a type attribute that has a value of subscribe,
unsubscribe, subscribed, or unsubscribed. The first two values request that a new presence subscription be established or an existing subscription be removed, and the other two are the answers
to such requests.
The following example shows Elizabeth and Mr. Darcy establishing a mutual presence subscription:
<presence from=’elizabeth@longbourn.lit/outside’
to=’darcy@pemberley.lit’
type=’subscribe’/>
<presence from=’darcy@pemberley.lit/library’
to=’elizabeth@longbourn.lit/outside’
type=’subscribed’/>
<presence from=’darcy@pemberley.lit/library’
to=’elizabeth@longbourn.lit’
type=’subscribe’/>
<presence from=’elizabeth@longbourn.lit/outside’
to=’darcy@pemberley.lit/library’
type=’subscribed’/>
After this exchange of stanzas, both Elizabeth and Mr. Darcy will find each other in their rosters
and be notified of each other’s presence updates.
Chapter 6 explores a fairly traditional IM application with the ability to establish and remove subscriptions as well as showing contacts’ presence statuses.
Directed Presence
The final kind of <presence> stanza is directed presence. A directed presence stanza is a normal
<presence> stanza addressed directly to another user or some other entity. These can be used to
communicate presence to entities that do not have a presence subscription, usually because the presence information is needed only temporarily.
One important feature of directed presence is that the recipient of the presence information is
automatically notified when the sender becomes unavailable even if the sender forgets to notify the
recipient explicitly. Services can use directed presence to establish temporary knowledge of a user’s
availability that won’t accidentally get out of date.
You see directed presence in action in Chapter 8 because it is quite important for multi-user chat.
Message Stanzas
As their name implies, <message> stanzas are used to send messages from one entity to another.
These messages may be simple chat messages that you are familiar with from other IM systems, but
they can also be used to transport any kind of structured information. For example, the SketchCast
application in Chapter 9 uses <message> stanzas to transport drawing instructions, and in Chapter 11
<message> stanzas are used to communicate game state and new game moves.
40718c01.indd 13
11/30/09 8:23:49 PM
14
❘
Chapter 1 Getting to Know XMPP
A <message> stanza is fire and forget; there is no built in reliability, similar to e‑mail messages.
Once the message has been sent, the sender has no information on whether it was delivered or when
it was received. In some cases, such as when sending to a non-existent server, the sender may receive
an error stanza alerting them to the problem. Reliable delivery can be achieved by layering acknowledgments into your application’s protocol (see Message Receipts in XEP-0184 for an example of this).
Here are some example <message> stanzas:
<message from=’bingley@netherfield.lit/drawing_room’
to=’darcy@pemberley.lit’
type=’chat’>
<body>Come, Darcy, I must have you dance.</body>
<thread>4fd61b376fbc4950b9433f031a5595ab</thread>
</message>
<message from=’bennets@chat.meryton.lit/mrs.bennet’
to=’mr.bennet@longbourn.lit/study’
type=’groupchat’>
<body>We have had a most delightful evening, a most excellent ball.</body>
</message>
The first example shows a typical <message> stanza for a private chat, including a thread identifier. The
second example is a multi-user chat message that Mrs. Bennet has sent to the bennets@chat.meryton.lit
room, received by Mr. Bennet.
Message Types
Several different types of <message> stanzas exist. These types are indicated with the type attribute,
and this attribute can have the value chat, error, normal, groupchat, or headline. Sometimes the
message’s type is used to inform a user’s client how best to present the message, but some XMPP
extensions, multi-user chat being a prime example, use the type attribute to disambiguate context.
The type attribute of a <message> stanza is optional, but it is recommended that applications provide one. Also, any reply <message> stanza should mirror the type attribute received. If no type
attribute is specified, the <message> stanza is interpreted as if it had a type attribute set to normal.
Messages of type chat are sent in the context of a one-to-one chat conversation. This type is
the most common in IM applications, which are primarily concerned with private, one-to-one
communication.
The error type is used in reply to a message that generated an error. These are commonly seen in
response to malformed addressing; sending a <message> stanza to a non-existent domain or user
results in a reply stanza with the type attribute set to error.
A <message> stanza with a type of normal has been sent outside the context of a one-to-one chat.
This type is rarely used in practice.
The groupchat type is used for messages sent from multi-user chats. It is used to disambiguate direct,
private messages from a multi-user chat participant from the broadcast messages that participant
sends to everyone in the room. A private message has the type attribute set to chat, whereas a message sent to everyone in the room contains a type attribute set to groupchat.
40718c01.indd 14
11/30/09 8:23:50 PM
XMPP Stanzas
❘ 15
The last <message> stanza type is headline. These types of messages are used mostly by automated
services that do not expect or support replies. If automatically generated e‑mail had a type attribute, it would use a value of headline.
Message Contents
Though <message> stanzas are allowed to contain arbitrary extension elements, the <body> and
<thread> elements are the normal mechanisms provided for adding content to messages. Both of
these child elements are optional.
The <body> element contains the human-readable contents of the message. More than one <body>
element can be included as long as each of them contains a distinct xml:lang attribute, and this
allows for <message> stanzas to be sent with content in multiple languages.
Conversations, like e‑mail, can form threads, where each message in a thread is related to the same
conversation. Threads are created by adding a <thread> element to a <message> stanza. The content of the <thread> element is some unique identifier that distinguishes the thread. A reply stanza
should contain the same <thread> element as the one it is a reply to.
In IM contexts, among others, there are a few commonly used extensions to the message contents.
XHTML-IM, defined in XEP-0071, is used to provide formatting, hyperlinking, and rich media in
messages. Chapter 5’s microblogging client, Arthur, uses XHTML-IM to provide enhanced message
bodies. Another extension, Chat State Notifications (XEP-0085), allows users to notify each other
of when they are composing a message or have gone idle. The Gab application in Chapter 6 uses
these notifications to provide a nice user experience when one party is typing for a long time; the
recipient will have some indication that the other party is still actively engaged in the conversation.
IQ Stanzas
The <iq> stanza stands for Info/Query and provides a request and response mechanism for XMPP
communication. It is very similar to the basic workings of the HTTP protocol, allowing both get
and set queries, similar to the GET and POST actions of HTTP.
Each <iq> stanza is required to have a response, and, as mentioned previously, the stanza’s required
id attribute is used to associate a response with the request that caused it. The <iq> stanza comes
in four flavors differentiated by the stanza’s type attribute. There are two types of <iq> stanza
requests, get and set, and two types of responses, result and error. Throughout the book these
are often abbreviated as IQ-get, IQ-set, IQ-result, and IQ-error.
Every IQ-get or IQ-set must receive a response IQ-result or IQ-error. The following examples show
some common <iq> stanzas and their possible responses. Note that unlike <message> and <presence>
stanzas, which have defined children elements, <iq> stanzas typically contain only extension elements
relating to their function. Also, each pair of <iq> stanzas has a matching id attribute.
<iq from=’jane@longbourn.lit/garden’
type=’get’
id=’roster1’>
<query xmlns=’jabber:iq:roster’/>
</iq>
<iq to=’jane@longbourn.lit/garden’
40718c01.indd 15
11/30/09 8:23:50 PM
16
❘
Chapter 1 Getting to Know XMPP
type=’error’
id=’roster1’>
<query xmlns=’jabber:iq:roster’/>
<error type=’cancel’>
<feature-not-implemented xmlns=’urn:ietf:params:xml:ns:xmpp-stanzas’/>
</error>
</iq>
Jane sent a malformed roster retrieval request to her server. The server replied with an error. Error
stanzas are covered in detail later.
<iq from=’jane@longbourn.lit/garden’
type=’get’
id=’roster2’>
<query xmlns=’jabber:iq:roster’/>
</iq>
<iq to=’jane@longbourn.lit/garden’
type=’result’
id=’roster2’>
<query xmlns=’jabber:iq:roster’>
<item jid=’elizabeth@longbourn.lit’ name=’Elizabeth’/>
<item jid=’bingley@netherfield.lit’ name=’Bingley’/>
</query>
</iq>
After resending a corrected request, the server replied to Jane with her small roster. You can see that
Elizabeth and Bingley are both in Jane’s contact list.
<iq from=’jane@longbourn.lit/garden’
type=’set’
id=’roster3’>
<query xmlns=’jabber:iq:roster’>
<item jid=’darcy@pemberley.lit’ name=’Mr. Darcy’/>
</query>
</iq>
<iq to=’jane@longbourn.lit/garden’
type=’result’
id=’roster3’/>
Jane attempts to add Mr. Darcy to her roster, and the server indicates success with a blank
IQ-result. In the cases where the response is simply an acknowledgment of success, the IQ-result
stanza will often be empty.
The <iq> stanza is quite useful in any case where result data or simple acknowledgment is required.
Most XMPP extension protocols use a mix of <iq> and <message> stanzas to accomplish their goals.
The <iq> stanzas are used for things like configuration and state changes, whereas <message> stanzas are used for regular communication. In some cases <iq> stanzas are used for communication
because stanza acknowledgment can be used for rate limiting.
40718c01.indd 16
11/30/09 8:23:50 PM
XMPP Stanzas
❘ 17
Error Stanzas
All three of the XMPP stanzas have an error type, and the contents of each type of error stanza
are arranged in the same pattern. Error stanzas have a well-defined structure, often including the
contents of the original, offending stanza, the generic error information, and, optionally, an application-specific error condition and information.
All error stanzas must have a type attribute set to error and one <error> child element. Many
error stanzas also include the original stanza’s contents, but this is not required and, in some cases,
not desirable.
The <error> child has a required type attribute of its own, which can be one of cancel, continue,
modify, auth, or wait. The cancel value signifies that the action should not be retried, because it
will always fail. A value of continue generally indicates a warning and is not frequently encountered. An error type of modify communicates that the data sent needs some change in order to be
accepted. An auth error informs the entity that the action should be retried after authenticating in
some way. Finally, the wait value reports that the server is temporarily having some problem, and
the original stanza should be resent unmodified after a short time.
An <error> child is also required to contain an error condition from a list of defined conditions
as a child element. It may also contain a <text> element giving further details about the error. An
application-specific error condition can also be specified in a child element of the <error> element
under its own namespace.
Table 1-1 lists the most common defined error conditions. For more information on these, please
refer to Section 3.9.2 of RFC 3920. Note that each of these condition elements must be under the
urn:ietf:params:xml:ns:xmpp-stanzas namespace.
Table 1-1: Common Defined Error Conditions
40718c01.indd 17
Condition Element
Description
<bad-request/>
The request was malformed or includes unexpected data.
<conflict/>
Another resource or session exists with the same name.
<feature-not-implemented/>
The feature requested is not implemented by the service.
<forbidden/>
The client does not have authorization to make the request.
<internal-server-error/>
The server had an undefined internal error that prevented it
from processing the request.
<item-not-found/>
The item involved in the request does not exist. This error is
equivalent to the HTTP 404 error.
<recipient-unavailable/>
The intended recipient is temporarily unavailable.
<remote-server-not-found/>
The remote server does not exist or could not be reached.
<remote-server-timeout/>
Communication with the remote server has been interrupted.
<service-unavailable/>
The requested service is not provided.
11/30/09 8:23:50 PM
18
❘
Chapter 1 Getting to Know XMPP
The following example IQ-error stanza shows a fully constructed error response to a publish-subscribe
related <iq> stanza:
<iq from=’pubsub.pemberley.lit’
to=’elizabeth@longbourn.lit/sitting_room’
type=’error’
id=’subscribe1’>
<pubsub xmlns=’http://jabber.org/protocol/pubsub’>
<subscribe node=’latest_books’
jid=’elizabeth@longbourn.lit’/>
</pubsub>
<error type=’cancel’>
<not-allowed xmlns=’urn:ietf:params:xml:ns:xmpp-stanzas’/>
<closed-node xmlns=’http://jabber.org/protocol/pubsub#errors’/>
<text xmlns=’urn:ietf:params:xml:ns:xmpp-stanzas’>
You must be on the whitelist to subscribe to this node.
</text>
</error>
</iq>
The error’s type is cancel, indicating that this action should not be retried and the condition
<not-allowed/> indicates the general failure. The <text/> child contains a description of the problem. Finally, the application condition element, <closed-node/>, gives the exact application error.
The Connection Life Cycle
The three stanzas you’ve learned about can accomplish virtually any task in XMPP when combined
properly. However, sending stanzas usually requires an authenticated XMPP session be established.
This section describes the other portions of an XMPP connection’s life cycle — connection, stream
set up, authentication, and disconnection.
Connection
Before any stanzas are sent, an XMPP stream is necessary. Before an XMPP stream can exist, a connection must be made to an XMPP server. XMPP includes some sophisticated support for establishing connections to the right servers.
Typically clients and servers utilize the domain name system (DNS) to resolve a server’s domain name
into an address they can connect to. E‑mail services in particular use mail exchange (MX) records to
provide a list of servers that handle mail for a given domain so that one well-known server address
does not have to handle every service. E‑mail, being an early Internet application, got special treatment in DNS. These days, service records (SRV) are used to provide a similar function for arbitrary
services.
The first thing an XMPP client or server does when connecting to another XMPP server is to query
the appropriate SRV record at the server’s domain. The response may include multiple SRV records,
which can be used to load balance connections across multiple servers.
If an appropriate SRV record cannot be found, the application tries to connect to the given domain
directly as a fallback. Most libraries also allow you to specify a server to connect to explicitly.
40718c01.indd 18
11/30/09 8:23:50 PM
The Connection Life Cycle
❘ 19
Stream Set Up
Once a connection is established to a given XMPP server, an XMPP stream is started. An XMPP
stream is opened by sending the opening <stream:stream> element to the server. The server responds
by sending the response stream’s opening <stream:stream> tag.
Once XMPP streams are open in both directions, elements can be sent back and forth. At this stage
of the connection life cycle, these elements will be related to the stream and the stream’s features.
The server first sends a <stream:features> element, which details all the supported features on
the XMPP stream. These mostly relate to encryption and authentication options that are available.
For example, the server will specify if encryption (TLS) is available and whether or not anonymous
logins are allowed.
You don’t normally need to know much detail about this stage of an XMPP connection as the many
libraries for XMPP development handle this work for you, but the following example shows a typical
exchange of <stream:stream> elements as well as the server’s feature list.
First, the client sends the opening element to the server:
<?xml version=’1.0’?>
<stream:stream xmlns=’jabber:client’
xmlns:stream=’http://etherx.jabber.org/streams’
version=’1.0’
to=’pemberley.lit’>
The server replies:
<?xml version=’1.0’?>
<stream:stream xmlns=’jabber:client’
xmlns:stream=’http://etherx.jabber.org/streams’
version=’1.0’
from=’pemberley.lit’
id=’893ca401f5ff2ec29499984e9b7e8afc’
xml:lang=’en’>
<stream:features>
<stream:features>
<starttls xmlns=’urn:ietf:params:xml:ns:xmpp-tls’/>
<compression xmlns=’http://jabber.org/features/compress’>
<method>zlib</method>
</compression>
<mechanisms xmlns=’urn:ietf:params:xml:ns:xmpp-sasl’>
<mechanism>DIGEST-MD5</mechanism>
<mechanism>PLAIN</mechanism>
</mechanisms>
</stream:features>
From this exchange, you know that the pemberley.org server supports TLS, stream compression via
zlib, and several authentication mechanisms.
The XMPP streams set up between two servers look identical except that the top-level namespace is
jabber:server instead of jabber:client.
40718c01.indd 19
11/30/09 8:23:50 PM
20
❘
Chapter 1 Getting to Know XMPP
Authentication
XMPP allows for Transport Layer Security (TLS) encryption, and most clients use this by default.
Once TLS support is advertised by the server, the client starts the TLS connection and upgrades the
current socket to an encrypted one without disconnecting. Once TLS encryption is established, a
new pair of XMPP streams is created.
Authentication in XMPP uses the Simple Authentication and Security Layers (SASL) protocol, and
depending on the server involved, can support a number of authentication mechanisms. Normally
servers provide plain text authentication and MD5 digest-based authentication, but some servers
support authenticating via Kerberos or special tokens.
These same encryption and authentication technologies are also used in many other protocols —
e‑mail and LDAP are two examples — and common libraries exist for supporting TLS and SASL that
can be used equally well for XMPP.
Once authentication is complete, a client must bind a resource for the connection and start a session.
If you are watching XMPP traffic on the wire, you will see <bind> and <session> elements — inside
<iq> stanzas — being sent to do these jobs. If the client does not provide a resource to bind, the
server chooses one for it, usually randomly. Also, the server may alter the user’s chosen resource
even if the client provides one.
When two servers connect to each other, the authentication steps are slightly different. The servers
exchange and verify TLS certificates, or the recipient server uses a dialback protocol to verify the
sender’s identity via DNS.
Disconnection
When users are done with their XMPP sessions, they terminate the sessions and disconnect. The
most polite way to terminate a session is to first send unavailable presence and then close the
<stream:stream> element.
By sending a final unavailable presence, the user’s contacts can be informed about the reasons for
the user’s departure. Closing the stream explicitly allows any in-flight stanzas to arrive safely.
A polite disconnection would look like this:
<presence type=’unavailable’/>
</stream:stream>
The server then terminates its stream to the client.
Summary
In this chapter, you met the XMPP protocol and learned about its history, use cases, addressing,
vocabulary, and the connection life cycle. You’ve also seen several example XMPP stanzas and
learned about the different entities composing an XMPP network.
40718c01.indd 20
11/30/09 8:23:50 PM
Summary
❘ 21
You should now understand:
➤➤
XMPP is an open, standardized protocol, originally developed to replace proprietary IM
networks.
➤➤
The XMPP protocol is more than a decade old and quite mature.
➤➤
XMPP is great for writing IM applications, but it also excels at any task that benefits from
exchanging structured messages.
➤➤
Servers, clients, components, and plug-ins are all parts of XMPP networks and have their
special uses.
➤➤
XMPP addresses, called JIDs, resemble e‑mail addresses and decompose into three parts: the
local part, the domain, and the resource.
➤➤
Full JIDs are the most specific addresses for an entity; for example, darcy@pemberley.lit/
library.
➤➤
Bare JIDs are the same as full JIDs without the resource; for example, darcy@pemberley.lit.
➤➤
Servers will handle stanzas to a client’s bare JID, potentially routing them to one or more
connected resources.
➤➤
Stanzas addressed to a full JID are delivered directly to the given resource.
➤➤
There are three stanzas in the main XMPP vocabulary: <message>, <presence>, and <iq>.
➤➤
The <message> stanza is used for fire-and-forget messages between two entities.
➤➤
<presence> stanzas communicate presence status changes and are used to manipulate pres-
ence subscriptions.
➤➤
The <iq> stanza provides request-response semantics very similar to the GET and POST
operations of the HTTP protocol.
➤➤
Every XMPP session has a life cycle consisting of several phases: connection, stream set up,
authentication, the session body, and disconnection.
The basic concepts and protocol syntax of XMPP are only once piece of the puzzle. You learn about
how to use these ideas to design XMPP applications in the next chapter.
40718c01.indd 21
11/30/09 8:23:50 PM
40718c01.indd 22
11/30/09 8:23:50 PM
2
Designing XMPP Applications
What’s in This Chapter?
➤➤
Differences between HTTP and XMPP
➤➤
Using BOSH to bridge XMPP and HTTP
➤➤
Application architecture and protocol design
No matter how wonderful any protocol appears, it can never be the best solution for every
problem. Many problems can be solved with XMPP that would be difficult in other protocols, but even XMPP has its sweet spot, outside of which it often makes sense to use other
technologies. To make the best XMPP applications possible, you must first understand what
problems XMPP is good at, and how you can design your application to leverage XMPP to
its fullest.
XMPP’s sweet spot is real-time communication, collaboration, and data exchange. Where
other protocols pull data, XMPP pushes it, allowing more efficient notification and faster
responses to new information. XMPP has native support for social features found in many
of today’s most popular applications, making it easy for developers to add and build upon
people’s relationships and communication. The rich, extensible vocabulary of XML stanzas
provides a robust and varied set of tools for building many common patterns or composing
into your own protocols.
Although XMPP applications can be developed in many contexts, both on the backend and
the front-end, this book’s applications use the web browser as their environment and web
technologies as their implementation. Because web browsers don’t speak XMPP natively, only
HTTP, you will also discover how XMPP and HTTP be made to work together to create
amazing, interactive applications.
40718c02.indd 23
11/30/09 8:26:01 PM
24
❘
Chapter 2 Designing XMPP Applications
Learning from Others
It’s always nice to get a little inspiration before starting a project, and many great XMPP applications
out there provide inspiration and insight into what is possible. The following applications are just
scratching the surface of XMPP’s potential, but they serve as good examples of what you can do with
a little help from XMPP, even in the context of an existing application.
Just as XMPP started as a protocol for better instant messaging, the first application is an IM client.
Figure 2-1 shows a screenshot of the Adium client (http://adium.im) running on Mac OS X. This
client supports XMPP as well as a number of other IM protocols. Comparable clients exist for every
platform imaginable.
Figure 2-1
Google has made huge investments in XMPP technology. It started with the Google Talk service,
which it has improved over the years. Google Talk provides IM services to anyone with a Gmail
account, as well as to all its Google Apps for Domains customers. Google also did the initial work
on Jingle, the XMPP extension that enables voice and video conferencing. Its upcoming Wave protocol is an XMPP extension itself, and its cloud computing platform, AppEngine, is also XMPP
enabled. Figure 2-2 shows the Gmail client (http://gmail.com), which also includes a simple,
web-based IM client.
40718c02.indd 24
11/30/09 8:26:01 PM
Learning from Others
❘ 25
Figure 2-2
With the advent of Twitter, the rise of microblogging is at hand, even in the corporate environment.
Services like Socialcast, Yammer, and Presently all offer private microblogging services to companies
to improve the companies’ internal communications. Because low-latency communication is quite
desirable, it is no surprise that many of these companies turn to XMPP as a solution. Figure 2-3
shows the Presently application (http://presentlyapp.com) allowing users to keep in touch with
their co-workers. Presently is using the Strophe library to handle XMPP communication, just like
the applications in this book. They also use XMPP to power their backend infrastructure.
XMPP is great at enabling communication and collaboration, supporting features like group chat
and file sharing. Drop.io (http://drop.io) has turned XMPP’s multi-user chat rooms into rich,
collaborative spaces capable of sharing audio, video, chat, and images. Figure 2-4 shows an example
of one of these collaborative spaces in chat mode. The Strophe library also powers the Drop.io
application.
40718c02.indd 25
11/30/09 8:26:02 PM
26
❘
Chapter 2 Designing XMPP Applications
Figure 2-3
Figure 2-4
40718c02.indd 26
11/30/09 8:26:02 PM
XMPP versus HTTP
❘ 27
Strophe was actually born from the desire to create a web-based, multi-player game system on top
of XMPP. Finding no suitable implementations of XMPP over HTTP, my team set about creating one
on top of which to build our application. Today, Chesspark enables players from all around the world
to play chess with each other in real time, whether the games are slow and thoughtful or at lightning
speed. Without XMPP and Strophe, the work would have been immensely more challenging.
Figure 2-5 shows Chesspark (http://chesspark.com) in action.
Figure 2-5
XMPP versus HTTP
Every project benefits when the right tools are chosen to complete it. Therefore, it is important to
know when XMPP best meets the needs of your application. You probably have some idea that
XMPP might better suit your needs or are interested in exploring the protocol’s possibilities. This
section attempts to point out where XMPP is most useful in comparison to the Web’s native protocol, HTTP.
40718c02.indd 27
11/30/09 8:26:02 PM
28
❘
Chapter 2 Designing XMPP Applications
Advantages of XMPP
XMPP has the following advantages over HTTP, each of which are explored in detail:
➤➤
Enables pushing data, not just pulling
➤➤
Firewall friendly
➤➤
Strong authentication and security
➤➤
Provides many out-of-the-box tools for solving a wide range of problems
Pushing Data
HTTP clients can only request data from a server. Unless the server is responding to a client request,
it cannot send data to the client. XMPP connections, on the other hand, are bidirectional. Either party
can send data to the other at any time, as long as the connection is open.
This ability to push data greatly expands the possibilities for web applications and protocol design.
Instead of inefficient polling for updates, applications can instead receive notifications when new
information is available. Not only does this result in many fewer requests, it also makes the latency
between the time new information is available and the time the client is aware of this information
nearly zero.
Pleasing Firewalls
Some web applications support the use of HTTP callbacks, where the web server makes requests to
another HTTP server in order to send data. This would be a handy feature to push data if it weren’t
for firewalls, network address translation (NAT), and other realities of the Internet. In practice it is
very hard to enable arbitrary connections to clients from the outside world.
XMPP connections are firewall and NAT friendly because the client initiates the connection on
which server-to-client communication takes place. Once a connection is established, the server can
push all the data it needs to the client, just as it can in the response to an HTTP request.
Improving Security
XMPP is built on top of TLS and SASL technologies, which provide robust encryption and security
for XMPP connections. Though HTTP uses SSL, the HTTP authentication mechanisms did not see
much implementation or use by developers. Instead, the Web is full of sites that have implemented
their own authentication schemes, often badly.
A Bigger Toolbox
HTTP is limited to simple request-response semantics and provides support for only a handful of
operations — GET, PUT, POST, DELETE, and so on. XMPP includes three different low-level tools,
<presence>, <message>, and <iq> stanzas, and almost 300 extensions that compose these tools
into sophisticated protocols.
40718c02.indd 28
11/30/09 8:26:02 PM
XMPP versus HTTP
❘ 29
It’s certainly possible to build many of the same constructs on top of HTTP, but protocol design is
non-trivial. The extensions and protocols of XMPP are robust and widely reviewed; comparable HTTP
extensions tend to be incompatible with each other, brittle, or primitive.
Many XMPP tools rely on and take advantage of the ability to push data. Any HTTP solution to
similar problems would need to re-invent much of XMPP.
Disadvantages of XMPP
Every protocol is a bag of both features and problems. In many cases XMPP is not the best tool for
the job or suffers from some limitation. XMPP’s drawbacks include:
➤➤
Stateful protocol
➤➤
Community and deployments are not as broad as HTTP
➤➤
More overhead than HTTP for simple chores
➤➤
Specialized implementations still needed
Statefulness
HTTP is a stateless protocol; XMPP is stateful. Stateless protocols are easier to scale because each
server does not need to know the entire state in order to serve a request. This drawback of XMPP
is less onerous in practice because most non-trivial web applications make extensive use of cookies,
backend databases, and many other forms of stored state.
Many of the same tools used to scale HTTP-based applications can also be used to scale XMPP-based
ones, although the number and diversity of such tools is more limited, due to XMPP’s younger age and
lesser popularity.
Smaller Ecosystem
HTTP is nearly twice as old as XMPP, and as the foundation of the Web, has become extremely
popular and well understood. HTTP’s ecosystem is bigger than XMPP’s in almost every respect as a
result of this. There are more HTTP libraries, more HTTP servers, and more engineers who understand HTTP than there are for nearly every other protocol in existence, including XMPP.
That said, the same situation exists for the C and Java programming languages compared to Python,
Ruby, Perl, Objective-C, and others. These less popular languages are no less capable of doing great
things, and often are a better solution to many tasks. Many companies find using the most powerful
tool gives them a competitive advantage over those companies using only the most popular tools.
Sometimes when developing XMPP applications you will come across a piece that is not implemented
well or in a different way than you require. It is generally very easy to build solutions to these problems, because the protocols and interactions are already defined and documented. It is also the case
that custom implementations of XMPP extensions, should they be required for your project, need not
implement the entire specification, only the parts they depend on.
40718c02.indd 29
11/30/09 8:26:02 PM
30
❘
Chapter 2 Designing XMPP Applications
More Overhead
XMPP is not optimized for short-lived sessions or simple requests. These are both areas where HTTP
is a clear winner. It takes some resources to set up, maintain, and destroy XMPP sessions. It is perfectly capable of serving static documents, but unless this is in a larger context where XMPP is used,
this use is outside of XMPP’s sweet spot.
For longer connections or more sophisticated interactions, the XMPP overhead is negligible compared
to an HTTP solution. Any HTTP solution would also need to support state, push notifications, and
the other features that make XMPP so interesting. HTTP-based solutions for similar problems are
starting to appear, but the XMPP ones tend to be more mature and more optimized.
Specialized Implementations
It used to be that the Apache web server was all anyone needed to build web applications. These days,
companies are building their own specialized systems to process web requests in order to eke out
performance improvements and lower response times.
XMPP is just entering its golden age of applications and development, and companies haven’t had as
much time to spend building specialized XMPP servers and libraries for specific needs. Most XMPP
servers are designed around traditional IM use cases, although many can be stripped down and put
to other uses.
Most of the time your application will not be so demanding as to need specialized implementations
to power it. Over time, the community of application developers pushing XMPP to its limits will
follow the HTTP community’s example and develop specialized tools focused on performance and
massive scale.
Bridging XMPP and the Web
Even though several browsers are experimenting with features that use XMPP, none of the major
browsers currently provides built-in support for the XMPP protocol. However, by using some clever
programming and a little server-side help, you can tunnel XMPP sessions over HTTP connections
efficiently and effectively.
The technology that enables this efficient tunneling is called HTTP long polling. Coupled with a
simple HTTP-based management protocol and an XMPP connection manager, it is possible to bring
XMPP, and all its charms, into HTTP-speaking applications.
Long Polling
Early web pages that wanted to provide access to live, changing data used page refreshes at set intervals. This blunt method works reasonably well when the data is constantly changing; for example,
many news sites use timed refreshes for live blogging major events.
Microsoft eventually released an API within Internet Explorer called XMLHttpRequest, which
allowed JavaScript code in web pages to make requests and process the data returned without
reloading the page. This API eventually found its way into all major browsers, and programmers
40718c02.indd 30
11/30/09 8:26:02 PM
Bridging XMPP and the Web
❘ 31
began to pick up and make use of this handy tool. This technique was eventually given the name
AJAX, for Asynchronous JavaScript and XML.
With AJAX, it is possible to update data without refreshing the entire page. This increase in efficiency
paid dividends, and nearly everything became more dynamic and responsive.
Even with AJAX, data was still being requested, or polled, at timed intervals. If you’ve ever worked
under an overbearing boss asking “is the software done yet?,” you have experienced polling. Though
servers cannot get annoyed or angry, they can be crippled if too many clients poll too fast; you get
less done if someone is constantly distracting you. However, to get quick updates, the polling interval
needs to be quite small; the lowest latency possible is the length of the polling interval.
Another issue with polling is that most poll requests do not receive new data. In order to see changes
within a reasonable time frame of when they occur, the polling interval must be quite short, but the
actual data may not change very often. Just as with your (hopefully fictional) overbearing employer,
the server’s answer to “is the software done yet?” is usually “not yet.”
Some clever folks discovered a neat trick to solve this problem. Instead of answering the request
immediately, they can hang on to it for some period of time if no new data is ready.
For example, if there is new data ready on the server, the server answers immediately. If there is not
new data, the server keeps the connection open, holding any reply. Once new data arrives, it finally
responds to the request. If no new data arrives after some period of time, the server can send back
an empty reply, so as not to hold too many open connections at once. Once a request is returned, the
client immediately sends a new one, and the whole process starts over.
Because each polling request is potentially open for a long period of time, this technique is called
long polling. It has many advantages over normal polling.
The client receives new data the moment it becomes available, because it always has at least one connection open and waiting for an update from the server. By setting the length of the poll to something
high, the total number of requests the server has to handle remains reasonable, even though the
latency of the updates is minimized. Users see instant changes in data, and server operators don’t go
broke trying to scale out their systems; everybody wins.
The only real change is that instead of the client waiting to resend the request, the server waits until
it has something to say before it responds.
Multiple libraries and protocols have been designed to take advantage of long polling, but XMPP’s
is one of the oldest implementations. In XMPP, this bridge is called BOSH, for Bidirectional streams
Over Synchronous HTTP. You may also have heard of Comet or reverse HTTP, which are protocols
built on the same technique.
One drawback is that the server needs to be a little smarter in order to deal with these long polling
requests, and that is where a connection manager comes in.
Managing the Connection
XMPP connections live for arbitrarily long periods of time, but HTTP requests are quite short lived.
A connection manager maintains an XMPP connection for a third party and provides access to the
connection via the HTTP long polling technique.
40718c02.indd 31
11/30/09 8:26:02 PM
32
❘
Chapter 2 Designing XMPP Applications
The browser and the connection manager communicate over HTTP using a simple protocol called
BOSH. Essentially, BOSH helps an HTTP client establish a new XMPP session, then transports
stanzas back and forth over HTTP wrapped in a special <body> element. It also provides some
security features to make sure that XMPP sessions can’t be easily hijacked. The connection manager
communicates with an XMPP server as if it were a normal client.
In this way, an HTTP application can control a real XMPP session. Because of the efficiency and
low latency afforded by the long polling technique, the end result performs quite well, rivaling
native connections.
It may seem like a lot of effort to get XMPP into a browser, but not only does this work well in
practice, it turns out this technique even has some advantages over direct XMPP connections:
➤➤
Interactions with the connection manager are request by request, which allows the client
to move from network to network. The managed connection stays available even if the end
user’s IP address changes several times.
➤➤
Because one failing request doesn’t terminate the managed connection, these managed sessions
are extremely robust and tolerant of temporary network failure.
➤➤
Because connection managers cache and resend data for a request, you don’t have to worry
about losing data when your connection is interrupted.
➤➤
HTTP is extremely firewall friendly, and because most connection managers run on standard HTTP ports, managed connections still work even in limited network environments
that don’t allow anything but HTTP.
These advantages make managed connections a perfect fit for some scenarios, even when direct
XMPP communication is possible.
Making JavaScript Speak XMPP
With HTTP long polling, you have the technology for low-latency data updates from a server.
Combining this with a connection manager gives you a way to send and receive XMPP data over a
series of HTTP requests. The last piece of the puzzle is making this easy to do from JavaScript, the
Web’s native programming language.
The Strophe library was created to make programming XMPP applications in JavaScript as easy as
in any other language, hiding all the gory details of the managed connection. As far as Strophe’s
users are concerned, it appears as if they are working with a native XMPP connection just as they
would in any other environment.
Long polling applications have some special requirements compared to normal AJAX applications.
Most AJAX libraries do very little error handling because the number of AJAX requests that fail is
a small percentage. Unfortunately for XMPP applications, any failed request can result in a huge
increase in latency and a tarnished user experience. For this reason, Strophe handles as many errors
as it can gracefully and uses early timeouts to detect problems before they would otherwise be
discovered.
40718c02.indd 32
11/30/09 8:26:02 PM
Making XMPP Applications
❘ 33
These features make Strophe quite reliable and high-performance, even in the face of unavoidable,
occasional errors. Strophe’s users have frequently reported their applications can live for days without being disconnected.
Making XMPP Applications
The XMPP protocol is a good choice for a variety of application domains, and you’ve seen some
technical details on how XMPP can be used from the Web. Now it’s time to learn a few details
about making XMPP applications before you embark on your first application in the next chapter.
The Browser Platform
The web browser is probably the most deployed and most used application platform that has
ever existed. Web browsers exist on every kind of computer and even many mobile phones, and
more importantly, the users of these devices tend to be very familiar with the browser and web
applications.
As more and more sophistication has been demanded of web applications, new technologies and
abstractions have been created to evolve the platform. XMPP brings yet another new set of technologies and abstractions, but with it comes enormous potential for real-time, interactive, and
collaborative applications. The rise of the social Web has given rise to social applications, and if
developers want to take more steps toward connecting the human race, technologies like XMPP
will help them do it.
For XMPP developers, targeting the web browser as a platform makes enormous sense. Web applications are cross-platform, easily deployable, and come with a large user base already familiar with
them. More than that, web technologies make heavy use of HTML, and it is often the case that
tools for manipulating HTML work very well on XML, and therefore, on XMPP.
One such tool, familiar to many web developers, is the jQuery library. jQuery makes many mundane manipulations of HTML and CSS easy and fun. This power is also almost equally applicable
to XML data, because it shares a very similar structure. This book’s applications use jQuery to
process and manipulate both the user interface, a combination of HTML and CSS, and the incoming XMPP data.
Web technologies have their warts, but from a practical standpoint, both web developers and XMPP
developers could scarcely ask for a better platform on which to create new and wonderful things.
Basic Infrastructure
Just as web applications often need a web server and an application server or framework, XMPP
applications require some basic infrastructure. An XMPP connection requires an XMPP server and,
often, an account on that server. An XMPP application also needs to communicate with a connection
manager, because browsers don’t yet speak XMPP natively. Finally, any services the application uses
will need to be provided by the XMPP server.
40718c02.indd 33
11/30/09 8:26:02 PM
34
❘
Chapter 2 Designing XMPP Applications
The XMPP server requirement is not a very difficult one. It is quite easy to download, install, and run
an XMPP server on nearly any platform, and there are several to choose from. You can also make use
of public XMPP servers that a user may already have an account on, although this depends on the
amount of data your application uses; many public XMPP servers are optimized for IM traffic and
will limit high-throughput clients.
Many users already have XMPP accounts, thanks to the efforts of Google, LiveJournal, forwardthinking ISPs, and other large organizations. If you run your own server and require users to
register there, it is generally easy to programmatically create XMPP accounts from a normal web
application back end.
All the major XMPP servers come with built-in support for HTTP-managed connections, or BOSH
support. It is usually a matter of altering a configuration file slightly to turn this on, if it is not
enabled by default. If you want to allow users to connect to arbitrary XMPP servers, you will need
a standalone connection manager. Please see Appendix B for more information on using and configuring connection managers.
Each XMPP server supports a core set of functionality as well as a number of XMPP extensions.
Generally the extensions are documented at the XMPP server’s web site. Most servers support the
mature and popular extensions such as multi-user chat and publish-subscribe. If your application
makes use of XMPP extensions, be sure to check that your server supports these extensions.
Many XMPP applications can be realized without any special web application servers or other infrastructure. The applications in this book are all self-contained and designed to be run on publicly
available XMPP servers. A connection manager is also provided for your development purposes, so
you need not set one up while you work through the applications in the book.
Protocol Design
Unless you are creating a new and better version of an existing XMPP service, like multi-user chat
or the traditional IM functions, you will probably be doing some protocol design to realize your
vision. XMPP provides a lot of tools to build on, and often the simple composition of these tools is
enough to satisfy the needs of most applications. The following guidelines have influenced the applications in this book and may help you in your own protocol designs.
Compose Existing Protocols
If your application can be implemented with the composition of existing protocol extensions, it is
often best to do so. With almost 300 such published extensions, there is usually a good starting
point available already.
Even if the particular extensions used do not have implementations, it is far easier to implement a
protocol than to design one from scratch. The extension’s authors have already been thinking about
the problem domain with enough gusto to drive them to document a solution. Furthermore, XMPP
extensions are a community effort, and your feedback will help improve the extension for everyone.
For a concrete example, consider the game developed in Chapter 11. One possible solution is to create a new protocol for all game interaction. Instead, the application layers game semantics on top of
40718c02.indd 34
11/30/09 8:26:02 PM
Making XMPP Applications
❘ 35
multi-user chat rooms. This involves a small amount of protocol design to handle the game-specific
content, but reuses a large amount of work from a well-tested, existing extension.
Using protocol composition saves work, and it makes new protocols much easier to understand by
others. To understand your new protocol, they need only understand how the pieces fit together and
possibly a few small, new things.
Keep It Simple
Keeping it simple is excellent advice in nearly every domain, and it applies equally to XMPP protocol design. If you do have to create something completely new, try to do it as simply as possible.
Not only will your protocol be easier to understand, the lack of complexity will result in fewer
bugs and less development time. Usually a complex protocol is a sign that a simpler path has been
overlooked.
Many XMPP extensions are themselves extended later to address new use cases. It is not necessary,
nor is it desirable, to pack every feature that may be needed into the protocols at the beginning. In
fact, many of the more complex extensions end up getting split into a core part and several related
extensions once they get large.
Avoid Extending Presence
The <presence> stanza can often be the largest factor in a server’s traffic. Most <presence> stanza
extensions are not applicable to the general case. Instead of extending <presence> stanzas directly,
it is a best practice to make use of the Personal Eventing Protocol, or PEP, defined in XEP-0163,
which allows users to subscribe to the extra data they are interested in.
The PEP extension, along with Entity Capabilities (XEP-0114) and Service Discovery (XEP-0015),
make providing extended presence-type information efficient and opt-in.
Other stanzas do not require similar optimizations, because they are not normally broadcast to
many people at once.
Participate in the Community
The XMPP community contains numerous individuals with protocol design experience, and they
are generally quite friendly. You may also want to document and submit your new protocol as an
XMPP extension if you think it would be generally useful. Even if your extension is not intended to
be useful beyond your own applications, it can be very helpful to get the community’s feedback on
your designs.
Protocol design discussions normally take place on the standards list, which you can subscribe to by
visiting the discussions page at the XSF web site, http://xmpp.org/about/discuss.shtml. Feel
free to ask questions, share your protocol ideas, and contribute to the discussion and feedback of
other protocols. The community always welcomes new members.
Should you want to submit your protocol as an official extension, you will want to document it
in the XEP format using the template and guidelines provided at the extension submission page,
http://xmpp.org/extensions/submit.shtml. New extensions will be considered by the XSF
40718c02.indd 35
11/30/09 8:26:02 PM
36
❘
Chapter 2 Designing XMPP Applications
Council for acceptance. The requirements for acceptance are simply that the extension be generally
useful and not already covered by existing work.
You can also join the XSF as a member; the XSF is an open organization, run by its membership.
Elections are held every quarter, and the XSF is always looking for new members, whether they are
developers or just enthusiasts. See the membership page, http://xmpp.org/xsf/members/, for
more information.
Summary
In this chapter, you learned why XMPP is often the best tool for the job and how it is different from
HTTP. You also discovered how XMPP can be made to work in the HTTP-only world of web browsers
and how XMPP applications are built.
Along the way, the following topics were covered:
➤➤
Inspiring examples of the XMPP applications of others
➤➤
The pros and cons of XMPP versus HTTP
➤➤
HTTP long polling
➤➤
Managed XMPP connections (BOSH)
➤➤
The Strophe library
➤➤
Required infrastructure for XMPP applications
➤➤
How to design XMPP protocols
In the next chapter, you finally begin your XMPP development career by creating your first
application.
40718c02.indd 36
11/30/09 8:26:03 PM
Part II
The Applications
⊲⊲ Chapter 3: Saying Hello: The First Application
⊲⊲ Chapter 4: Exploring the XMPP Protocol: A Debugging Console
⊲⊲ Chapter 5: Microblogging in Real-Time: An Identica Client
⊲⊲ Chapter 6: Talking with Friends: One-on-One Chat
⊲⊲ Chapter 7: Exploring Services: Service Discovery and Browsing
⊲⊲ Chapter 8: Group Chatting: A Multi-User Chat Client
⊲⊲ Chapter 9: Publishing and Subscribing: A Shared Sketch Pad
Introduction
⊲⊲ Chapter 10: Writing with Friends: A Collaborative Text Editor
⊲⊲ Chapter 11: Playing Games: Head-to-Head Tic-Tac-Toe
40718c03.indd 37
12/1/09 11:12:13 AM
40718c03.indd 38
12/1/09 11:12:13 AM
3
Saying Hello:
The First Application
What’s in This Chapter?
➤➤
Creating and organizing an XMPP project
➤➤
Making connections to XMPP servers
➤➤
Building and manipulating XMPP stanzas
➤➤
Sending data to the server
➤➤
Handling XMPP events
XMPP started as an open, federated protocol for instant messaging, but has become a powerful protocol for building many kinds of applications. The bulk of this book walks you through
building various interesting applications as you explore the XMPP protocol and its numerous
possibilities. These applications are all built with JavaScript, HTML, and CSS, and, though
simple, show off how easy it is to make powerful programs with XMPP.
The first application you write is the XMPP equivalent of the famous “Hello, World” example.
It sends a message to your XMPP server and displays the response. It sounds simple, and it is,
but there is a lot to cover with setting up the user interface, getting the required libraries, and
learning about the Strophe library.
By the end of this chapter, you’ll be ready to start building much more interesting applications. By
the end of the book, you’ll have built some compelling projects that would have been difficult
without XMPP.
This chapter may be one of the toughest in the book simply because it is filled with lots of
things that will be brand new.
The applications in this book assume some knowledge of the jQuery library. If you are not yet
familiar with jQuery, there is a brief tutorial in Appendix A.
40718c03.indd 39
12/1/09 11:12:14 AM
40
❘
Chapter 3 Saying Hello: The First Application
Application Preview
Before you start on each application, there will be a few preview
screenshots of what the final result will look like.
Figure 3-1 and Figure 3-2 show a glimpse into the future of
your XMPP programming career. These screenshots let you see
what the final application will look like, and they also provide a
reference point that you can compare your own work against.
The login dialog box shown in Figure 3-1 opens when the
application first starts and accepts the user’s XMPP address
and password. Once the application has sent a message to the
server, the server’s response is displayed similarly to Figure 3-2.
Figure 3-1
Figure 3-2
The user interfaces are kept deliberately simple to let you concentrate on the XMPP protocol and the
JavaScript code.
Hello Design
Every application is composed of small pieces that fit together in a particular way. These pieces may
be user interface elements, XMPP protocol handlers, or implementations of a certain process. In each
chapter, you first learn about the various pieces involved in the chapter’s application and how they fit
together to form a cohesive whole.
The first application is called Hello, and you’ve already seen the two main visible pieces in Figure 3-1
and Figure 3-2: the login dialog box and the server response screen. There are a few pieces you can’t
see as well: the XMPP connection handling, XMPP stanza generation, and the event handling.
When a user first opens the application, they are presented with the login dialog box in order to enter
their XMPP username and password. When the user then clicks Connect, Hello must initiate a connection to the XMPP server and authenticate the user.
40718c03.indd 40
12/1/09 11:12:14 AM
Preparing the Way
❘ 41
Once connected, Hello’s task is to send a simple stanza to the user’s server and wait for the server’s
reply. The Strophe library provides the ability to attach handlers to a connection in order to respond
to specific stanzas. You will see that these handlers make dealing with incoming requests and
responses very easy.
Finally, Hello displays a more human-readable version of the server’s reply and disconnects.
Hello is not an ambitious application, but as you see throughout the book, the same XMPP tools used
here are repeated in every application.
Preparing the Way
Before you can get started writing code, you must first collect a few JavaScript libraries that you will
use to build the applications. You need the following pieces:
➤➤
jQuery: The jQuery library makes dealing with HTML and CSS a breeze, and it is also
extremely handy for manipulating XML, and therefore, XMPP stanzas.
➤➤
jQuery UI: The jQuery UI library provides some common user interface building blocks that
you will need, including dialog boxes and tabs.
➤➤
Strophe: The Strophe library makes writing XMPP client applications extremely simple and is
available in multiple programming languages. You’ll be using the JavaScript version of course!
➤➤
flXHR: Strophe can make use of flXHR, a Flash replacement for the standard XMLHttpRequest
API, to make dealing with JavaScript’s same origin policy easier. Normally, a JavaScript application cannot talk to external servers, but with the help of Flash and flXHR, Strophe can overcome
this restriction.
Additionally, if you do not already have an XMPP account on a public server, you need to create one.
Same Origin Policy
JavaScript code runs in a sandboxed environment for security reasons. Though
web applications can load JavaScript code from anywhere, all the code must
restrict its communication to the server that hosts the web application. This
restriction is called the same origin policy.
In recent times, it has become common to find workarounds to this policy so
that more interesting applications can be built. Most web application libraries, including jQuery, already provide some methods for making cross-domain
requests. Unfortunately, the normal workarounds for HTTP GET operations do
not work for XMPP, which must use HTTP POST instead.
This book uses the flXHR library to enable cross-domain requests, but other
solutions are possible. The most common alternative is to use reverse HTTP
proxies to make the BOSH connection manager appear local to the application’s
home server. This alternative is discussed in Appendix B.
40718c03.indd 41
12/1/09 11:12:14 AM
42
❘
Chapter 3 Saying Hello: The First Application
jQuery and jQuery UI
The jQuery and jQuery UI libraries are available from http://jquery.com and http://ui.jquery
.com respectively. The version used in the book’s examples is 1.3.2 for jQuery and 1.7.2 for jQuery
UI. Later versions of these libraries should also work.
The jQuery libraries, like many JavaScript libraries, come in normal or minified versions. Either will
work, but during development, it is recommended that you use the normal version, because minified
JavaScript can hinder debugging.
Google has made many JavaScript libraries, including jQuery and jQuery UI, available via its AJAX
Library API. This means that you don’t even have to download the libraries if you are developing from
an Internet-connected computer; you can just link directly to the ones on Google’s super fast servers.
The sample code in this book uses the Google-hosted versions. To include jQuery, jQuery UI, and
the UI theme CSS in your HTML, put the following lines in the <head> element:
<link rel=’stylesheet’ href=’http://ajax.googleapis.com/ajax/libs/jqueryui/1.7.2/th
emes/cupertino/jquery-ui.css’>
<script src=’http://ajax.googleapis.com/ajax/libs/jquery/1.3.2/jquery.js’></script>
<script src=’http://ajax.googleapis.com/ajax/libs/jqueryui/1.7.2/jquery-ui.js’>
</script>
If you want to use the minified versions of the libraries, you need only to change the js extension to
min.js.
If you have downloaded the libraries yourself and want to use local copies, the following lines
should work assuming that jQuery and jQuery UI are installed in the scripts subdirectory of
your application and the jQuery UI themes are installed under styles/themes:
<link rel=’stylesheet’ href=’styles/themes/cupertino/jquery-ui-1.7.2.custom.css’>
<script src=’scripts/jquery-1.3.2.js’></script>
<script src=’scripts/jquery-ui-1.7.2.custom.js’></script>
jQuery UI comes with dozens of themes, and any of these themes can be used with the book’s applications. The example code and the screenshots both use the cupertino theme. You can browse all
the available themes at the jQuery UI web site and substitute your preferred one wherever you see
cupertino.
Strophe
You can find the Strophe library at http://code.stanziq.com/strophe. You’ll want to make
sure to download the latest version for JavaScript. Be sure not to accidentally download libstrophe,
which is a C library, unless of course you want to write some XMPP code in C.
Throughout the book, it is assumed that the strophe.js file, as well as any Strophe plug-in files,
are placed under the scripts directory. They can then be included in the HTML file with the following line:
<script src=’scripts/strophe.js’></script>
40718c03.indd 42
12/1/09 11:12:14 AM
Starting Your First Application
❘ 43
flXHR
The flXHR library is located at http://flxhr.flensed.com. This library provides cross-domain
request support for Strophe and is enabled via a special Strophe plug-in. You will need at least
version 1.0.4 of flXHR, but a later version should work just fine.
Once you’ve downloaded flXHR and uncompressed it, you can place the contents of the
flensed-1.0/deploy directory into the scripts directory inside your application’s directory.
Enabling flXHR in your application is as easy as loading two additional JavaScript files:
<script src=’scripts/flXHR.js’></script>
<script src=’scripts/strophe.flxhr.js’></script>
The first script, flXHR.js, loads the flXHR library. The second script is a special Strophe plug-in
that enables Strophe to use flXHR for cross-domain requests.
XMPP Accounts
If you don’t already have an XMPP account, you can create one at one of the many public XMPP
servers. There is a long list of these public XMPP services at http://xmpp.org/services/. The
jabber.org server is always a popular choice, and you can create an account there by visiting http://
register.jabber.org.
Please note that if you have an existing XMPP account, most XMPP accounts are normally provided
for typical instant messaging use. Each server may have different sets of features enabled, so you
will need to make sure your server supports the features needed for the application you are building.
The jabber.org server supports all the functionality needed in this book, for example.
You should now have all the libraries you need to start building XMPP applications as well as an
XMPP account to use with these applications. It’s time to start building something!
Starting Your First Application
All the applications in this book consist of an HTML file, a CSS file, and one or more JavaScript
files in addition to the required libraries discussed in the previous section. The HTML and CSS files
make up the user interface of the application and include the dialog boxes used, the various controls
the user interacts with, and the styling information for making those elements attractive. The main
focus of your attention will be on the JavaScript files, which contain all the application’s code.
User Interface
Each chapter begins with the basic HTML and CSS layouts for the application. During a chapter, new
things may be added to these files, but for the most part, the initial HTML and CSS are also the final
versions.
40718c03.indd 43
12/1/09 11:12:15 AM
44
❘
Chapter 3 Saying Hello: The First Application
For this first application, a more detailed explanation is provided for the HTML and CSS used, but
if you are already well versed in Web technologies, feel free to skim the code and skip to the next
section.
The HTML for the Hello application is shown in Listing 3-1.
In the <head> section, aside from the necessary libraries, it loads the hello.css and hello.js files,
which are the CSS styling and JavaScript code for the application.
Toward the end of the <body> section you will see the login dialog box. jQuery UI dialog boxes are created from normal <div> elements by calling jQuery UI’s dialog() function on the specific <div> element that you want to become a dialog box. Because the dialog box will be created, shown, and hidden
by JavaScript code, its <div> element is given the hidden class so that it appears only when needed.
The empty <div> with the id attribute of log is used to show the server’s response as well as status
updates as the application is running. This enables you to follow along with what is happening very
easily and see exactly what the code you are writing is doing.
Listing 3-1: hello.html
<!DOCTYPE HTML PUBLIC “-//W3C//DTD HTML 4.01//EN”
“http://www.w3.org/TR/html4/strict.dtd”>
<html>
<head>
<title>Hello - Chapter 3</title>
<link rel=’stylesheet’href=’http://ajax.googleapis.com/ajax/libs/j
queryui/1.7.2/themes/cupertino/jquery-ui.css’>
<script src=’http://ajax.googleapis.com/ajax/libs/jquery/1.3.2/jque
ry.js’></script>
<script src=’http://ajax.googleapis.com/ajax/libs/jqueryui/1.7.2/jq
uery-ui.js’></script>
<script src=’scripts/strophe.js’></script>
<script src=’scripts/flXHR.js’></script>
<script src=’scripts/strophe.flxhr.js’></script>
<link rel=’stylesheet’ href=’hello.css’>
<script src=’hello.js’></script>
</head>
<body>
<h1>Hello</h1>
<div id=’log’>
</div>
<!-- login dialog -->
<div id=’login_dialog’ class=’hidden’>
<label>JID:</label><input type=’text’ id=’jid’>
<label>Password:</label><input type=’password’ id=’password’>
</div>
</body>
</html>
40718c03.indd 44
12/1/09 11:12:15 AM
Starting Your First Application
❘ 45
The CSS styles for Hello are shown in Listing 3-2. This file contains a few styles to make the application prettier.
Listing 3-2: hello.css
body {
font-family: Helvetica;
}
h1 {
text-align: center;
}
.hidden {
display: none;
}
#log {
padding: 10px;
}
With the HTML and CSS files covered, you can get started on the code.
Application Code
The JavaScript code in this book is structured into three basic sections. First, there is the application’s namespace object, where all of the application’s state and functions are defined. Following the
namespace object is the document ready handler, which initializes the application once the browser is
ready. Finally come the custom event handlers, which handle internal events that are not triggered by
elements or user interactions.
Namespacing
The namespace object is used to avoid the use of global variables as much as possible. One can never
trust that every third-party library will keep to itself, but you can ensure a minimum of problems by
putting your own application state and global variables inside a single object, the namespace object.
Instead of defining your variables and functions like this:
var some_global = 0;
var another_global = true;
function my_adder(x, y) {
return x + y;
}
you can put the same code into a global MyNamespace object:
var MyNamespace = {
some_global: 0,
40718c03.indd 45
12/1/09 11:12:15 AM
46
❘
Chapter 3 Saying Hello: The First Application
another_global: true,
my_adder: function (x, y) {
return x + y;
}
};
The syntax used is slightly different, because each symbol becomes a property of the MyNamespace
object, which is defined as an object literal using the {} syntax. Now if another library also defines
some_global, your code will not be affected.
You can access the attributes of the namespace object just like any other object’s attributes. Writing
MyNamespace.some_global would access the some_global attribute, and calling MyNamespace
.my_adder(1, 2) would return 3.
The only caveat to namespace objects is that you must take care that the last attribute does not have
a trailing comma. If you forget this little detail, the code will not load correctly in Internet Explorer.
The following code will fail:
var MyNamespace = {
some_global: 0,
};
The comma after the 0 will signal to the interpreter that another attribute definition will follow,
but none exists. These extra commas are often allowed in other languages, and most browsers will
ignore them in JavaScript as well, but Internet Explorer is quite picky about this.
Document Ready Handler
The document ready event is fired as soon as the document object model (DOM) is available for use
by JavaScript code. This event fires before the entire page’s content is loaded, unlike the document
load event, which fires once all the CSS, scripts, and images are fetched and ready. It is generally
best to put initialization code here, because the DOM will be available, and the ready event is fired
early enough that the user won’t have to wait long for initialization to start.
The jQuery library makes it extremely easy to write functions that will be executed when the document ready event is fired. You create a document ready event handler function using the jQuery’s
ready() method. The following code alerts the user as soon as the document ready event fires:
$(document).ready(function () {
alert(“document ready”);
});
Notice that the initialization function doesn’t have a name, and the function is passed directly into
the ready() function. Functions like this are called anonymous functions, and they are quite common
when using callback-based libraries like jQuery and Strophe.
The applications in this book will often have some initialization code in the document ready handler
to do things like create dialog boxes and set up interaction event handlers. When the text says to add
something to the document ready handler, you can simply place the relevant code at the end of this
initialization function.
40718c03.indd 46
12/1/09 11:12:15 AM
Making Connections
❘ 47
Custom Event Handlers
The jQuery library makes it easy to create and use your own custom events. These custom events are
often used to make code easier to read and to reduce coupling between components. For example,
instead of placing all the code for connecting to an XMPP server inside the function that handles
the user’s click on the Connect button, you can have the click event handler trigger a custom event
called connect and place the connection code in the connect event handler.
Using custom events makes it easy to extend the code later without having to change the flow in
multiple locations. If more things needed to happen in response to the connect event just described,
you can simply add another handler for that event containing the new logic; there is no need to add
more complexity to the login dialog box’s code.
To fire custom events, you call:
$(document).trigger(‘event_name’, event_data);
The event’s name can be anything you want, although it is wise not to use the same names as normal DOM events like click and keypress. The event_data parameter can be set to anything you’d
like to pass to the event handler, or if you don’t need to pass anything extra, you can omit it entirely.
You create a handler for these events using bind():
$(document).bind(‘event_name’, function (e, data) {
var event_data = data;
});
This sets up the function provided as a handler for the event_name event. The first parameter passed
is the event object, similar to the one that gets passed for normal DOM events. The second parameter
is the same event_data passed into trigger().
You see shortly how namespace objects, the document ready handler, and custom event handlers
interact as you develop the initial code for Hello.
Making Connections
Before Hello can send any data to the server, it must first establish a connection. You will need to
gather the XMPP credentials from the user and then use Strophe to connect to the XMPP server.
Once a connection is established, Strophe uses the credentials provided to authenticate and create a
session, allowing data to be sent and received over XMPP.
The Connection Life Cycle
XMPP connections are created, destroyed, and go through a number of phases during their lifetimes,
as discussed in Chapter 1. It is important to understand these phases, because the phase transitions
are generally where important application logic will be found. For example, if your application needs
to be connected to do anything useful, it will be waiting for the transition to the connected phase.
40718c03.indd 47
12/1/09 11:12:16 AM
48
❘
Chapter 3 Saying Hello: The First Application
When you ask Strophe to connect to a server, you also provide it a callback function, which Strophe
invokes every time the connection phase changes. This allows your application to handle events like
the connection starting, authentication failing, or disconnection.
The full list of these phase changes or statuses is shown in Table 3-1. The status names correspond
to constants defined in the Strophe.Status object. For example, the CONNECTED status is Strophe
.Status.CONNECTED.
Table 3-1: Strophe Connection Statuses
Status
Description
CONNECTING
Strophe has started its attempt to make a connection to the XMPP server.
AUTHENTICATING
The connection has been established, and Strophe is now attempting to
authenticate and create a session.
CONNECTED
A session has been established, and user data may now flow freely.
DISCONNECTING
Termination of the connection has started.
DISCONNECTED
The connection is fully terminated.
CONNFAIL
Strophe encountered a problem trying to establish the connection.
AUTHFAIL
An error occurred during the authentication process.
A normal XMPP connection will progress through the first five phases, and your application will be
concerned mostly with CONNECTED and DISCONNECTED. Errors in the connection can be handled by
watching for the CONNFAIL and AUTHFAIL statuses. The -ING statuses are not often used, except to
provide visible updates in the UI so that users know what is happening while they wait.
Creating a Connection
XMPP connections are managed through the Strophe.Connection object. In Chapter 2 you learned
that a BOSH connection manager provides the bridge between the worlds of HTTP and XMPP.
BOSH connection managers are exposed to HTTP clients as URLs, and the Strophe.Connection
object you create needs to know about one of these URLs.
Many XMPP servers come with support for BOSH built in, and they typically expose the service
at http://example.com:5280/http-bind or http://example.com:5280/xmpp-httpbind. Some
BOSH connection managers can handle communications for arbitrary XMPP servers, but generally
the built-in connection managers can talk only to the server they run on.
For developing the applications in this book, you are free to use the BOSH connection manager at
http://bosh.metajack.im:5280/xmpp-httpbind. This BOSH connection manager is able to speak
to any public XMPP server. This server is provided specifically for readers of this book to use during
development to avoid everyone having to set up their own BOSH service.
40718c03.indd 48
12/1/09 11:12:16 AM
Making Connections
❘ 49
You can create a new Strophe.Connection object just as you would any other JavaScript object, by
using the new keyword:
var conn = new Strophe.Connection(“http://bosh.metajack.im:5280/xmpp-httpbind”);
Once you have a connection object, you can call connect() and disconnect() to start and end
communication with the server:
// starting a connection to example.com
conn.connect(“user@example.com”, “mypassword”, my_callback);
// disconnecting
conn.disconnect();
The first two parameters to connect() are the JID and password to use to authenticate the session,
and the last parameter is the callback function discussed earlier. The callback function will be called
with a single parameter that is set to one of the statuses described in the previous section. A simple
callback function that disconnects once the connection reaches the CONNECTED phase is shown here:
function my_callback(status) {
if (status === Strophe.Status.CONNECTED) {
conn.disconnect();
}
}
Every time the connection changes its status, this callback function is executed. The my_callback()
function simply ignores any status but the CONNECTED status, and disconnects once the connection
has reached that status.
There’s not much work involved to start and stop connections. You can use this new knowledge to
implement the login dialog box for Hello.
Connecting Hello
To establish a connection, you must first gather the user’s credentials. The login dialog box exists for
this purpose, but it is initially hidden and needs to be created and shown. You can use jQuery UI’s
dialog() function to show and hide this dialog box and use custom events to start the connection
using Strophe.
The dialog() function is called on the elements that you want to convert into dialog boxes and
takes a list of properties defining how the dialog boxes should behave. Most of the properties used
won’t be fully explained here, but their functions are fairly obvious from their names. All the properties are fully explained in the jQuery UI documentation at http://ui.jquery.com/.
Create the hello.js file and add the following code to it:
$(document).ready(function () {
$(‘#login_dialog’).dialog({
autoOpen: true,
draggable: false,
modal: true,
title: ‘Connect to XMPP’,
40718c03.indd 49
12/1/09 11:12:16 AM
50
❘
Chapter 3 Saying Hello: The First Application
buttons: {
“Connect”: function () {
$(document).trigger(‘connect’, {
jid: $(‘#jid’).val(),
password: $(‘#password’).val()
});
$(‘#password’).val(‘’);
$(this).dialog(‘close’);
}
}
});
});
code snippet hello.js
The most important property is buttons, which defines the dialog box’s buttons and the actions
to take when those buttons are clicked. A single button is defined here called Connect. When the
Connect button is clicked, a custom event called connect is triggered, and the JID and password
are passed along to the event’s handlers. Once the event has triggered, the password field is cleared
and the dialog box is closed. When the function defined for the Connect button is executed, the
this object will be set to the dialog box’s main element, #login_dialog. You can wrap this with
jQuery to easily access the dialog box’s other methods, like close, as is done in the preceding code.
Next, you will need to create a handler for the connect event that creates a new Strophe.
Connection object and calls the connect() method. You will also need to provide a callback that
can respond to changes in the connection status.
Add the following custom event handlers to the document ready function you wrote earlier:
$(document).bind(‘connect’, function (ev, data) {
var conn = new Strophe.Connection(
“http://bosh.metajack.im:5280/xmpp-httpbind”);
conn.connect(data.jid, data.password, function (status) {
if (status === Strophe.Status.CONNECTED) {
$(document).trigger(‘connected’);
} else if (status === Strophe.Status.DISCONNECTED) {
$(document).trigger(‘disconnected’);
}
});
});
$(document).bind(‘connected’, function () {
// nothing here yet
});
$(document).bind(‘disconnected’, function () {
// nothing here yet
});
code snippet hello.js
40718c03.indd 50
12/1/09 11:12:16 AM
Making Connections
❘ 51
The handler for the connect event creates a new connection object and calls connect() with a
callback function that merely triggers new custom events. The connected event is fired whenever
Strophe notifies the callback function of the CONNECTED status, and the disconnected event is fired
for the DISCONNECTED status.
The next two event handlers are bound to these new custom events but don’t yet do anything.
This connection event design is a pattern used throughout this book’s applications. The custom
events have made it trivial to separate out the various parts of the connection process, and you can
modify any of the handlers without affecting the others.
There is one last set of additions to make before you move on to the next section of Hello. The logging
area is used for notifying the user of what is happening as the application runs, so you should create a
function to write messages to this area and log whenever the connected and disconnected events are
triggered.
First, create a namespace object for Hello and add a connection property and the log() function.
The connection property will store the active connection object so that it can be accessed later. The
log() function simply updates the logging area with a message. The following code can go before
the document ready handler at the top of the file:
var Hello = {
connection: null,
log: function (msg) {
$(‘#log’).append(“<p>” + msg + “</p>”);
}
};
code snippet hello.js
The connection property is initialized to null, but you’ll need to assign the created connection
object to it and set it back to null when the connection is terminated. You should also add the logging message to the connected event handler. The modified event handlers are shown here, with
their modified lines highlighted:
$(document).bind(‘connect’, function (ev, data) {
var conn = new Strophe.Connection(
“http://bosh.metajack.im:5280/xmpp-httpbind”);
conn.connect(data.jid, data.password, function (status) {
if (status === Strophe.Status.CONNECTED) {
$(document).trigger(‘connected’);
} else if (status === Strophe.Status.DISCONNECTED) {
$(document).trigger(‘disconnected’);
}
});
Hello.connection = conn;
});
$(document).bind(‘connected’, function () {
// inform the user
Hello.log(“Connection established.”);
40718c03.indd 51
12/1/09 11:12:16 AM
52
❘
Chapter 3 Saying Hello: The First Application
});
$(document).bind(‘disconnected’, function () {
Hello.log(“Connection terminated.”);
// remove dead connection object
Hello.connection = null;
});
code snippet hello.js
Hello doesn’t do too much yet, but it should be ready for its first test run. If you need to verify that
all the code is in the right spot, the full hello.js file built so far is shown in Listing 3-3.
Listing 3-3: hello.js (initial version)
var Hello = {
connection: null,
log: function (msg) {
$(‘#log’).append(“<p>” + msg + “</p>”);
}
};
$(document).ready(function () {
$(‘#login_dialog’).dialog({
autoOpen: true,
draggable: false,
modal: true,
title: ‘Connect to XMPP’,
buttons: {
“Connect”: function () {
$(document).trigger(‘connect’, {
jid: $(‘#jid’).val(),
password: $(‘#password’).val()
});
$(‘#password’).val(‘’);
$(this).dialog(‘close’);
}
}
});
});
$(document).bind(‘connect’, function (ev, data) {
var conn = new Strophe.Connection(
“http://bosh.metajack.im:5280/xmpp-httpbind”);
conn.connect(data.jid, data.password, function (status) {
if (status === Strophe.Status.CONNECTED) {
$(document).trigger(‘connected’);
} else if (status === Strophe.Status.DISCONNECTED) {
40718c03.indd 52
12/1/09 11:12:17 AM
Creating Stanzas
❘ 53
$(document).trigger(‘disconnected’);
}
});
Hello.connection = conn;
});
$(document).bind(‘connected’, function () {
// inform the user
Hello.log(“Connection established.”);
});
$(document).bind(‘disconnected’, function () {
Hello.log(“Connection terminated.”);
// remove dead connection object
Hello.connection = null;
});
Running the Application
Because Hello is a web application consisting only of HTML, CSS, and JavaScript it is fairly easy
to run and test. Unfortunately, although the flXHR library allows you to do cross-domain requests
with no server setup, it doesn’t allow you to run applications from file:// URLs that make requests
to http:// URLs. This means you will need to use a web server to serve Hello over HTTP, and point
your browser to the http:// URL.
You don’t need anything fancy; any web server will work, and any cheap hosting service should work
fine as well. Simple-to-install web servers exist for every platform imaginable, and some operating
systems have them built in. You can also use the Tape program to serve the files; Tape is described in
Appendix B.
Once you have a web server running or have uploaded your code to your favorite web host, you can
point your browser to the URL for hello.html on that server and try to log in. You should see a log
message that says “Connection established.”
If something goes wrong, check your web browser’s error console to make sure the code is not
throwing an error you aren’t seeing. Also, make sure you have all the dependencies installed and in
the correct locations.
Creating Stanzas
Building XMPP stanzas is one of the most important parts of writing an XMPP application. Even
if you can use plug-ins to handle most of your protocol work with XMPP, you will probably have
to create some of your own stanzas too. Strophe comes with some powerful stanza-building tools to
make this as painless as possible.
40718c03.indd 53
12/1/09 11:12:17 AM
54
❘
Chapter 3 Saying Hello: The First Application
XMPP stanzas are just partial XML documents. You can certainly use the browser’s own DOM
manipulation functions to build stanzas, but the DOM API can be quite tedious, and varies slightly
from browser to browser. Strophe abstracts these APIs, in much the same way jQuery abstracts you
from the same APIs, so that you can focus on creating the stanzas you need without worrying about
all the details.
Strophe Builders
Constructing XMPP stanzas is the job of Strophe.Builder objects. These objects were inspired by
jQuery and make building stanzas extremely fast and easy. Strophe then goes above and beyond by
providing several shortcut functions to accomplish common construction operations.
A builder is created with two parameters: an element name and a set of attributes. The first line of
the following code creates the stanza <presence/> and the second line creates the stanza <presence
to=’example.com’/>:
var pres1 = new Strophe.Builder(“presence”);
var pres2 = new Strophe.Builder(“presence”, {to: “example.com”});
Because building stanzas is such a common operation and typing “new Strophe.Builder” is rather
long, Strophe provides four global aliases for stanza creation: $build(), $msg(), $pres(), and $iq().
The code for these functions just creates Strophe.Builder objects exactly like the examples shown.
The function $build() takes the same two arguments as the constructor for Strophe.Builder. The
other three functions create <message/>, <presence/>, and <iq/> stanzas, respectively, and take an
optional argument of the desired attributes.
You can shorten the preceding code using either $build() or $pres(), although the latter is most
often used:
var
var
var
var
pres1
pres2
pres3
pres4
=
=
=
=
$build(“presence”);
$build(“presence”, {to: “example.com”});
$pres();
$pres({to: “example.com”});
Building more complex stanzas is accomplished via chaining function calls. Just like jQuery, Strophe’s
building shortcut methods return the builder object when they are called. Most of the methods on
the builder object, which you see shortly, also return the builder object. This means that you can
keep calling methods in a chain, just like in jQuery. Don’t worry if this sounds confusing; you will
see plenty of examples.
All the builder object’s methods have shortened names to save typing. The chainable methods that
return the builder object are c(), cnode(), t(), attrs(), and up(). There are also two methods
that do not return the builder object, toString() and tree().
The toString() method serializes the stanza to text. This can be very handy for debugging purposes. For example, $pres().toString() returns the string “<presence/>”. The method tree()
does a similar job, but returns the DOM element at the top of the stanza’s element tree. This isn’t
normally used, but if you need access to the DOM elements created inside a builder object, it is
there.
You add a new child element to the stanza with c() and cnode(). The former takes the same parameters as $build() and appends a new child element to current element. The latter method does the
40718c03.indd 54
12/1/09 11:12:17 AM
Creating Stanzas
❘ 55
same job, but takes a single DOM element as input. Most of the time c() will be more than sufficient,
but occasionally cnode() is useful for copying or reusing already built pieces of stanzas.
Because these methods return the builder object, they can be easily chained:
var stanza = $build(“foo”).c(“bar”).c(“baz”);
Calling stanza.toString() would result in:
<foo><bar><baz/></bar></foo>
Each time you add a child, the current element in the builder changes to the new child. If you want
to create multiple children on the same element, you must walk back up the tree one level after calling c(). You can do this with the up() method.
The up() method can be added to the previous example to build a slightly different stanza:
var stanza = $build(“foo”).c(“bar”).up().c(“baz”);
The XML produced by this would be:
<foo><bar/><baz/></foo>
Text children are added with the t() method. Unlike the similar c() method, t() does not change
the current element.
A typical XMPP message can be created with $msg() and the c() and t() methods as in the following example:
var message = $msg({to: “darcy@pemberley.lit”, type: “chat”})
.c(“body”).t(“How do you do?”);
The XML produced by this builder is:
<message to=’darcy@pemberley.lit’
type=’chat’>
<body>How do you do?</body>
</message>
The last method of the builder object is attrs(), which takes an attribute set and uses it to augment
the current element’s attribute set. This is useful when partial stanzas are built by other pieces of
code and you need to add some final attributes before sending it across the connection. It’s not used
often, but it can be quite handy for abstracting stanza building functionality.
The following code shows several builders that are a little more elaborate as well as the stanzas they
produce:
var iq = $iq({to: “pemberley.lit”, type: “get”, id: “disco1”})
.c(“query”, {xmlns: “http://jabber.org/protocol/disco#info”});
// produces:
//
// <iq to=’pemberley.lit’
//
type=’get’
40718c03.indd 55
12/1/09 11:12:17 AM
56
❘
Chapter 3 Saying Hello: The First Application
//
id=’disco1’>
// <query xmlns=’http://jabber.org/protocol/disco#info’/>
// </iq>
var presence = $pres().c(“show”).t(“away”).up()
.c(“status”).t(“Off to Meryton”);
// produces
//
// <presence>
//
<show>away</show>
//
<status>Off to Meryton</status>
// </presence>
Saying Hello
The Hello application needs to send a stanza to the server to say “hello,” and you can do this by using
the Strophe builder functions. The “hello” stanza will be an IQ-get stanza containing a ping request.
As soon as the connection is ready to accept data, the connection’s callback function is called with a
status of CONNECTED. This triggers the connected event and calls your attached handler. This is the
perfect place to send the ping request to the server.
The modified event handler is shown here:
$(document).bind(‘connected’, function () {
// inform the user
Hello.log(“Connection established.”);
var domain = Strophe.getDomainFromJid(Hello.connection.jid);
Hello.send_ping(domain);
});
code snippet hello.js
You need to add the send_ping() function to the Hello namespace object as well:
send_ping: function (to) {
var ping = $iq({
to: to,
type: “get”,
id: “ping1”}).c(“ping”, {xmlns: “urn:xmpp:ping”});
Hello.connection.send(ping);
}
code snippet hello.js
Some new things are used here that you haven’t seen before. The send() method of the connection object sends a stanza to the server. The jid attribute of the connection object contains the full
JID associated with the connection. The Strophe object contains several methods to make dealing with JIDs easier: getUserFromJid(), getDomainFromJid(), getResourceFromJid(), and
getBareJidFromJid().
40718c03.indd 56
12/1/09 11:12:17 AM
Handling Events
❘ 57
The JID helper functions return various portions of the JID. The following code shows how these
functions are used and what they return:
Strophe.getUserFromJid(“darcy@pemberley.lit/library”); // “darcy”
Strophe.getDomainFromJid(“darcy@pemberley.lit/library”); // “pemberley.lit”
Strophe.getResourceFromJid(“darcy@pemberley.lit/library”); // “library”
Strophe.getBareJidFromJid(“darcy@pemberley.lit/library”); // “darcy@pemberley.lit”
Hello now sends a ping to the user’s server, but it does not yet do anything with the server’s
response. The last piece of the puzzle is handling incoming stanzas.
Handling Events
Most XMPP applications are event driven. Some events are triggered by user interactions like clicking the mouse or pressing a key, and others are triggered by incoming stanzas. For example, when a
message is received the application handles it by displaying it to the user. Handling incoming stanzas
is probably the most important part of any XMPP application, and Strophe makes doing so quite
simple.
Adding and Removing Handlers
New stanza handlers can be added with addHandler() and removed with deleteHandler(). The
following code shows the basics of using these functions:
var ref = conn.addHandler(my_handler_function, null, “message”);
// once the handler is no longer needed:
connection.deleteHandler(ref);
The addHandler() function returns a handler reference. This reference is only used for passing to
deleteHandler() to identify the specific handler to remove.
The deleteHandler() function is not often used since handler functions have a way of removing
themselves when they are no longer needed. In some cases, the knowledge of when to remove a handler is not available within the handler, and deleteHandler() does the job in these situations.
Stanza Matching
The addHandler() function takes one or more parameters. The first parameter is the function that is
invoked when a matching stanza is received. The rest of the parameters are matching criteria. The full
list of these parameters is shown in this abbreviated function definition from the Strophe source code:
addHandler: function (handler, ns, name, type, id, from) {
// implementation omitted
}
If any of the criteria are null or undefined, any stanza will match. Otherwise, stanzas will match only
if they satisfy the criteria by string equality in a particular part of the stanza. The last four criteria —
name, type, id, and from — specify filters on the stanza’s element name and the type, id, and from
attributes. These four criteria are checked only on the top-level element, not on any of the element’s
40718c03.indd 57
12/1/09 11:12:17 AM
58
❘
Chapter 3 Saying Hello: The First Application
descendants. The first criterion, ns, is slightly different, and it is checked for the top-level element as
well as its immediate children. You see why shortly.
The name criterion will almost always be null, to match any stanza, or one of message, presence,
or iq. The addHandler() example set up a handler that would be called for any <message> stanza
received.
The type, id, and from criteria match the main attributes of <message>, <presence> and <iq>
stanzas. You can use type to differentiate between regular chat messages and group chat messages
or to separate out IQ-result stanzas from IQ-error stanzas. The id criterion is often used to handle
replies to specific requests, like the IQ-result associated with a particular IQ-get request. Matching
on the from attribute limits the handler to dealing with messages that come from a specific JID. You
should use from with care, because you may not always know which resource another user or service
will use to communicate with you. A bare JID supplied as a from criterion will not match any full
JID; the match must be exact.
Matching on the ns (for namespace) criterion is mostly done with IQ stanzas. IQ stanzas generally contain a single child element that is namespaced according to the type of function it serves.
For example, the ping stanza you sent earlier was an IQ-get stanza with a <ping/> child under the
urn:xmpp:ping namespace. Setting up a handler to catch all incoming ping requests could be done
with the following code:
conn.addHandler(my_ping_handler, “urn:xmpp:ping”, “iq”);
The function my_ping_handler() would be called anytime the connection received an IQ stanza
with a child under the urn:xmpp:ping namespace. It would get all of these stanzas, regardless of
their type, id, or from attributes, because those criteria were left unspecified.
Stanza Handler Functions
Whenever a matching stanza is found for a handler, the handler function is invoked and passed the
stanza as its argument. Unless the function returns true or some expression that evaluates to true,
the handler function will be removed once it finishes.
The following example stanza handler is called a one-shot handler, because it returns false. After
this handler is finished with the first stanza, it will be deleted and will not be called again unless it is
explicitly re-added by another call to addHandler().
function my_ping_handler(iq) {
// do something interesting
return false;
}
If the function doesn’t use the return statement at all, it returns undefined, which results in the
same outcome as returning false. If you find that your handlers stop working, be sure to check
their return value.
The next example shows a handler that returns true and is therefore able to process as many stanzas as are received. The handle_incoming_ping() function responds with a pong to some incoming ping request.
40718c03.indd 58
12/1/09 11:12:18 AM
Handling Events
❘ 59
function handle_incoming_ping(iq) {
// conn is assumed to be a global pointing to a valid
// Strophe.Connection object
var pong = $iq({to: $(iq).attr(‘from’), type: “result”, id: $(iq).attr(‘id’)});
conn.send(pong);
return true;
}
Handling Responses in Hello
The last piece required for Hello is to handle the server’s reply to the ping request. You can use your
new knowledge of stanza handlers to implement this. As with most pings, it is interesting and fun to
measure how long it takes to receive a response, so you can add some timing code to Hello as well.
Typically, handlers should be added for responses before you send the initial requests. This helps
to avoid race conditions when the server generates a response so fast that the handler isn’t added in
time to catch it.
Modify the connected event handler to match the one shown here:
$(document).bind(‘connected’, function () {
// inform the user
Hello.log(“Connection established.”);
Hello.connection.addHandler(Hello.handle_pong, null, “iq”, null, “ping1”);
var domain = Strophe.getDomainFromJid(Hello.connection.jid);
Hello.send_ping(domain);
});
code snippet hello.js
The send_ping() function also needs the following changes:
send_ping: function (to) {
var ping = $iq({
to: to,
type: “get”,
id: “ping1”}).c(“ping”, {xmlns: “urn:xmpp:ping”});
Hello.log(“Sending ping to “ + to + “.”);
Hello.start_time = (new Date()).getTime();
Hello.connection.send(ping);
}
code snippet hello.js
The handler function is added before the code sends the stanza, and the time the request was sent is
kept in the start_time property of the Hello namespace object. This new version also adds another
message to the log so the user sees what is happening.
40718c03.indd 59
12/1/09 11:12:18 AM
60
❘
Chapter 3 Saying Hello: The First Application
You’ll also need to add the new property and the handle_pong() function to the Hello namespace
object. These additions are shown in the following code:
start_time: null,
handle_pong: function (iq) {
var elapsed = (new Date()).getTime() - Hello.start_time;
Hello.log(“Received pong from server in “ + elapsed + “ms”);
Hello.connection.disconnect();
return false;
}
code snippet hello.js
With these final additions, Hello should be fully functional. Point your browser to hello.html
and give it a whirl! How fast is your server’s response? The final version of hello.js appears in
Listing 3-4.
Listing 3-4: hello.js (final)
var Hello = {
connection: null,
start_time: null,
log: function (msg) {
$(‘#log’).append(“<p>” + msg + “</p>”);
},
send_ping: function (to) {
var ping = $iq({
to: to,
type: “get”,
id: “ping1”}).c(“ping”, {xmlns: “urn:xmpp:ping”});
Hello.log(“Sending ping to “ + to + “.”);
Hello.start_time = (new Date()).getTime();
Hello.connection.send(ping);
},
handle_pong: function (iq) {
var elapsed = (new Date()).getTime() - Hello.start_time;
Hello.log(“Received pong from server in “ + elapsed + “ms.”);
Hello.connection.disconnect();
return false;
}
};
$(document).ready(function () {
$(‘#login_dialog’).dialog({
40718c03.indd 60
12/1/09 11:12:18 AM
Handling Events
❘ 61
autoOpen: true,
draggable: false,
modal: true,
title: ‘Connect to XMPP’,
buttons: {
“Connect”: function () {
$(document).trigger(‘connect’, {
jid: $(‘#jid’).val(),
password: $(‘#password’).val()
});
$(‘#password’).val(‘’);
$(this).dialog(‘close’);
}
}
});
});
$(document).bind(‘connect’, function (ev, data) {
var conn = new Strophe.Connection(
“http://bosh.metajack.im:5280/xmpp-httpbind”);
conn.connect(data.jid, data.password, function (status) {
if (status === Strophe.Status.CONNECTED) {
$(document).trigger(‘connected’);
} else if (status === Strophe.Status.DISCONNECTED) {
$(document).trigger(‘disconnected’);
}
});
Hello.connection = conn;
});
$(document).bind(‘connected’, function () {
// inform the user
Hello.log(“Connection established.”);
Hello.connection.addHandler(Hello.handle_pong,
null, “iq”, null, “ping1”);
var domain = Strophe.getDomainFromJid(Hello.connection.jid);
Hello.send_ping(domain);
});
$(document).bind(‘disconnected’, function () {
Hello.log(“Connection terminated.”);
// remove dead connection object
Hello.connection = null;
});
40718c03.indd 61
12/1/09 11:12:18 AM
62
❘
Chapter 3 Saying Hello: The First Application
More Hellos
The best thing about simple applications is that they are the easiest to improve. Try adding the following things to Hello:
➤➤
A single measurement is often not representative; modify Hello to do several pings and measure
the average response time.
➤➤
If you used a serial approach to the previous task, try a parallel one; if you already created a
parallel version, try making it run serially.
Summary
Congratulations, you’ve now written your first Strophe application and quite possibly your first
XMPP application. As you’ve seen, using XMPP with Strophe and jQuery is pretty simple. You’ve
learned:
➤➤
How to get everything required for a Strophe-based XMPP application.
➤➤
How to test and run XMPP applications.
➤➤
How to make and terminate connections.
➤➤
How to send data to the server.
➤➤
How to handle incoming stanzas.
➤➤
How to use custom events in jQuery.
With the basics under your belt, you can move on to making your first useful XMPP application in
the next chapter.
40718c03.indd 62
12/1/09 11:12:18 AM
4
Exploring the XMPP Protocol:
A Debugging Console
What’s in This Chapter?
➤➤
Hooking into Strophe’s logging facilities
➤➤
Parsing XML
➤➤
Manipulating your presence
➤➤
Querying for software versions
➤➤
Dealing with XMPP errors
Developers have always enjoyed crafting and refining their tools. In your journey through XMPP
applications, you will need a tool to aid exploration and to inspect protocol traffic. Few web
developers could live without the view source command or the ability to easily craft URLs to
test functionality of remote sites. In the world of XMPP stanzas, such a tool would allow you to
inspect protocol traffic and easily create stanzas to send. You’ll build a protocol debugging console
named Peek over the course of this chapter, and, afterwards, you will use it to investigate a few
XMPP services and typical protocol situations.
Peek will be useful throughout this book. Whenever you encounter an example stanza, you
can load Peek, type in the stanza, and watch what happens in response. In this way, you can
play with various XMPP features even before you start building applications.
Many of the parts required to build Peek have already been introduced: establishing connections, sending stanzas, and setting up basic handlers for incoming traffic. However, Peek will
need some new features of Strophe, and once Peek is built, you’ll use it to explore a few new
XMPP concepts.
40718c04.indd 63
11/30/09 8:32:14 PM
64
❘
Chapter 4 Exploring the XMPP Protocol: A Debugging Console
Application Preview
The finished application — shown in Figure 4-1 — is reminiscent of color terminals and code editors
with fancy highlighting.
Figure 4-1
The top area with the black background is where all the stanzas appear that were sent to or received
from the server. The input area below accepts either XML input or Strophe’s stanza building
commands.
Peek Design
The debugging console is one of the simplest things you can build with XMPP. Peek needs to be
able to send traffic and display traffic, but it doesn’t need any traffic processing logic beyond those
humble requirements. Making the user interface look nice constitutes the bulk of the work.
Every connection in Strophe has some special functions for hooking into the protocol data that is
being sent and received. These functions come in two forms: xmlInput() and xmlOuptut() for
structured traffic and rawInput() and rawOutput() for the actual character data. Normally these
functions do nothing, but Peek will override them to get a view of the data flowing in and out of the
connection.
When a connection is first established, Strophe sends and receives several stanzas behind the scenes
to handle authentication and session setup. The CONNECTED status is achieved only when a session
40718c04.indd 64
11/30/09 8:32:15 PM
Building the Console
❘ 65
has been successfully started. You’ll first handle traffic display so that you can see these setup stanzas as they happen.
The XMPP streams carry data in XML, but that XML is not formatted for display. In fact, most
XMPP servers, clients, and libraries will send XML that is stripped of unnecessary whitespace.
Stanzas viewed on the wire will look mostly like one giant string of text. Following is an example
stanza with pleasant formatting, followed by the same stanza as it would typically appear:
<message to=’darcy@pemberley.lit/meryton’
from=’bingley@netherfield.lit/meryton’
type=’chat’>
<body>Come, Darcy, I must have you dance. I hate to see you standing about by
yourself in this stupid manner. You had much better dance.</body>
</message>
<message to=’darcy@pemberley.lit/meryton’ from=’bingley@netherfield.lit/meryton’
type=’chat’><body>Come, Darcy, I must have you dance. I hate to see you standing
about by yourself in this stupid manner. You had much better dance.</body></mess
age>
For short stanzas this difference is not great, but for longer stanzas and within large groups of stanzas, the latter is almost unreadable.
You will be using xmlInput() and xmlOutput() to get structured traffic, and then wrapping this in
HTML and CSS to display the traffic using syntax highlighting and extra whitespace. We won’t be
covering this display translation code in much detail because it is orthogonal to your objective, but
the code is easy to understand and modify if you’re curious.
With your console set up and receiving protocol traffic, your attentions will turn to handling
user input. You start by allowing the user to input XML stanzas by hand. Because Strophe only
accepts actual XML data for sending across the connection, you must parse this input text into
XML and then send it over the connection. You’ll use the web browser’s native XML parsing abilities to accomplish this.
Typing out XML is fairly tedious, so you’ll add the ability for users to use Strophe’s own stanza
building commands like $msg(), $pres(), and $iq(). Peek will use JavaScript’s eval() to execute
this code.
If it sounds simple, it is. However, Peek will be extremely useful in experimenting with and debugging your applications and the servers with which you interact.
Building the Console
Peek will use the same application structure as the Hello application from Chapter 3. You will first
need to create the user interface by building peek.html and peek.css, and then you’ll create the
application logic in JavaScript. The final source code is included at the end of the section in case you
get stuck.
40718c04.indd 65
11/30/09 8:32:15 PM
66
❘
Chapter 4 Exploring the XMPP Protocol: A Debugging Console
User Interface
Peek’s user interface is extremely simple. It consists of an area to display the protocol traffic, a text
area input for the user to create outgoing stanzas, and a few buttons. A login dialog box is included
as well, but it is initially hidden just like in Chapter 3. These elements appear in the initial version of
the HTML code shown in Listing 4-1.
Listing 4-1: peek.html
<!DOCTYPE HTML PUBLIC “-//W3C//DTD HTML 4.01//EN”
“http://www.w3.org/TR/html4/strict.dtd”>
<html>
<head>
<meta http-equiv=”Content-type” content=”text/html;charset=UTF-8” />
<title>Peek - Chapter 4</title>
<link rel=’stylesheet’ href=’http://ajax.googleapis.com/ajax/libs/j
queryui/1.7.2/themes/cupertino/jquery-ui.css’>
<script src=’http://ajax.googleapis.com/ajax/libs/jquery/1.3.2/jque
ry.js’></script>
<script src=’http://ajax.googleapis.com/ajax/libs/jqueryui/1.7.2/jq
uery-ui.js’></script>
<script src=’scripts/strophe.js’></script>
<script src=’scripts/flXHR.js’></script>
<script src=’scripts/strophe.flxhr.js’></script>
<link rel=’stylesheet’ type=’text/css’ href=’peek.css’>
<script type=’text/javascript’ src=’peek.js’></script>
</head>
<body>
<h1>Peek</h1>
<div id=’console’></div>
<textarea id=’input’ class=’disabled’
disabled=’disabled’></textarea>
<div id=’buttonbar’>
<input id=’send_button’ type=’submit’ value=’Send Data’
disabled=’disabled’ class=’button’>
<input id=’disconnect_button’ type=’submit’ value=’Disconnect’
disabled=’disabled’ class=’button’>
</div>
<!-- login dialog -->
<div id=’login_dialog’ class=’hidden’>
<label>JID:</label><input type=’text’ id=’jid’>
<label>Password:</label><input type=’password’ id=’password’>
</div>
</body>
</html>
40718c04.indd 66
11/30/09 8:32:15 PM
Building the Console
❘ 67
The initial CSS code appears in Listing 4-2. The only style that is not immediately obvious is
.incoming, which you will use to distinguish incoming traffic from outgoing in the console.
Listing 4-2: peek.css
body {
font-family: Helvetica;
}
h1 {
text-align: center;
}
#console {
padding: 10px;
height: 300px;
border: solid 1px #aaa;
background-color: #000;
color: #eee;
font-family: monospace;
overflow: auto;
}
#input {
width: 100%;
height: 100px;
font-family: monospace;
}
.incoming {
background-color: #111;
}
textarea.disabled {
background-color: #bbb;
}
#buttonbar {
margin: 10px;
}
#disconnect_button {
float: left;
width: 100px;
}
#send_button {
float: right;
width: 100px;
}
You add a few new styles to peek.css later in this section.
40718c04.indd 67
11/30/09 8:32:15 PM
68
❘
Chapter 4 Exploring the XMPP Protocol: A Debugging Console
Displaying Traffic
Now that you’ve built a simple user interface, it is time to wire up the login dialog box and hook
into Strophe’s logging functions to make stanzas appear in the console.
First, you’ll need to create the login dialog box and have it open when the page loads. This can be
done in response to the document ready event just like you did in Chapter 3. Place the following code
into a file called peek.js:
$(document).ready(function () {
$(‘#login_dialog’).dialog({
autoOpen: true,
draggable: false,
modal: true,
title: ‘Connect to XMPP’,
buttons: {
“Connect”: function () {
$(document).trigger(‘connect’, {
jid: $(‘#jid’).val(),
password: $(‘#password’).val()
});
$(‘#password’).val(‘’);
$(this).dialog(‘close’);
}
}
});
});
code snippet peek.js
jQuery UI’s dialog() function converts your <div> into a modal dialog box that opens automatically.
A Connect button is added that will fire the connect event and then close the dialog.
Add the following handler after the document ready handler:
$(document).bind(‘connect’, function (ev, data) {
var conn = new Strophe.Connection(
‘http://bosh.metajack.im:5280/xmpp-httpbind’);
conn.xmlInput = function (body) {
Peek.show_traffic(body, ‘incoming’);
};
conn.xmlOutput = function (body) {
Peek.show_traffic(body, ‘outgoing’);
};
conn.connect(data.jid, data.password, function (status) {
if (status === Strophe.Status.CONNECTED) {
$(document).trigger(‘connected’);
} else if (status === Strophe.Status.DISCONNECTED) {
$(document).trigger(‘disconnected’);
}
40718c04.indd 68
11/30/09 8:32:15 PM
Building the Console
❘ 69
});
Peek.connection = conn;
});
code snippet peek.js
Much of this code you’ve seen before in Chapter 3. The highlighted lines are new, and they overwrite the blank, do-nothing default logging functions of the connection object with your own versions. Instead of pointing to two functions that would be almost identical, inline functions are used
that will call show_traffic() with the correct parameters.
Add the following implementation of the Peek object, including the show_traffic() and
xml2html() function, after the document ready handler:
var Peek = {
connection: null,
show_traffic: function (body, type) {
if (body.childNodes.length > 0) {
var console = $(‘#console’).get(0);
var at_bottom = console.scrollTop >= console.scrollHeight console.clientHeight;;
$.each(body.childNodes, function () {
$(‘#console’).append(“<div class=’” + type + “‘>” +
Peek.xml2html(Strophe.serialize(this)) +
“</div>”);
});
if (at_bottom) {
console.scrollTop = console.scrollHeight;
}
}
},
xml2html: function (s) {
return s.replace(/&/g, “&”)
.replace(/</g, “<”)
.replace(/>/g, “>”);
}
};
code snippet peek.js
The Peek object serves as a namespace container for all application code and state. This is good programming practice, and isolates your code from other applications. Currently, the only application
state the application has is the connection variable.
Web browsers do not speak XMPP natively (at least not yet) so XMPP connections must be tunneled
through HTTP requests. A side effect of this tunneling is that stanzas are delivered in a <body>
40718c04.indd 69
11/30/09 8:32:15 PM
70
❘
Chapter 4 Exploring the XMPP Protocol: A Debugging Console
wrapper, which contains some metadata about the request. The details of this tunneling, called BOSH,
are the subject of XEP-0124 and XEP-0206 and were touched on in Chapter 2. The show_traffic()
function ignores this <body> wrapper and deals with its children, which are the stanzas themselves.
Each stanza is converted from XML to text (this is referred to as serialization) using a new Strophe
function, Strophe.serialize(). The XML string produced by Strophe’s serialize() function
must first be escaped before insertion into the HTML document, or the XML elements will be
interpreted as HTML ones. The escaping is done by the xml2html() function, which replaces the
special characters with their escaped versions. Then the text is appended to the console’s content as
a <div>. Incoming stanzas are given a CSS class of incoming, and outgoing stanzas receive the class
outgoing. These are typical uses of jQuery.
The console should scroll to the bottom when new data comes in, so the scrollTop attribute of the
element is set equal to its scrollHeight. However, it would be frustrating if it moved to the bottom
while you were scrolled up to read something at the top. The code checks to see if the console is currently all the way at the bottom before changing the scroll position. If the user is looking at something old, the window will not jump to the bottom when something new comes in. When the user
returns to the bottom, the auto-scrolling behavior will kick in again.
Finally, you should add some logic to make the Disconnect button functional. Once Peek is connected, you’ll want to enable the Disconnect button, and when Peek disconnects, you’ll want to disable the button. You can do this by binding the connected and disconnected events, which your
connection callback fires when those states are reported by Strophe. Add the following handlers at
the end of peek.js:
$(document).bind(‘connected’, function () {
$(‘#disconnect_button’).removeAttr(‘disabled’);
});
$(document).bind(‘disconnected’, function () {
$(‘#disconnect_button’).attr(‘disabled’, ‘disabled’);
});
code snippet peek.js
To make the button do something, you must handle its click event. Add the following code to the
document ready event handler:
$(‘#disconnect_button’).click(function () {
Peek.connection.disconnect();
});
code snippet peek.js
If you load the application in a web browser and log in to your favorite XMPP server, you’ll see the
stanzas that are sent during authentication appear in the console. The only problem is that they are
shown as long strings without any formatting. It’s time for you to make them prettier and easier
to read.
40718c04.indd 70
11/30/09 8:32:16 PM
Building the Console
❘ 71
Making XML Pretty
Looking at long strings of text gets old pretty fast, so you’ll want to reformat the XML to produce
a more pleasing and readable display. A typical way to do this is via indentation. Each child element
should appear indented under its parent, with its children similarly indented. Attributes can also
be indented so that they line up with all the other attributes, each on its own line. Finally, you can
assign different colors to all the different pieces: punctuation, tag names, attributes, attribute values,
and content.
First, you’ll want to add some appropriate CSS styles for the transformation to use. Add the following styles to peek.css:
.xml_punc { color: #888; }
.xml_tag { color: #e77; }
.xml_aname { color: #55d; }
.xml_avalue { color: #77f; }
.xml_text { color: #aaa }
.xml_level0 { padding-left: 0; }
.xml_level1 { padding-left: 1em;
.xml_level2 { padding-left: 2em;
.xml_level3 { padding-left: 3em;
.xml_level4 { padding-left: 4em;
.xml_level5 { padding-left: 5em;
.xml_level6 { padding-left: 6em;
.xml_level7 { padding-left: 7em;
.xml_level8 { padding-left: 8em;
.xml_level9 { padding-left: 9em;
}
}
}
}
}
}
}
}
}
code snippet peek.css
Each level of children will be indented 1 em, up to nine levels of children. The other styles are
explained in Table 4-1.
Table 4-1: XML Styles
40718c04.indd 71
CSS Class
Used For
.xml_punc
Tag punctuation such as <, >, /, =
.xml_tag
Element tag names
.xml_aname
Attribute names
.xml_avalue
Attribute values
.xml_text
Text children of an element
11/30/09 8:32:16 PM
72
❘
Chapter 4 Exploring the XMPP Protocol: A Debugging Console
Next, you’ll need to modify show_traffic() to use something besides Strophe.serialize() to
generate the representation. In the following code, Peek.pretty_xml() has replaced the old serialization code on the highlighted line:
show_traffic: function (body, type) {
if (body.childNodes.length > 0) {
var console = $(‘#console’).get(0);
var at_bottom = console.scrollTop >= console.scrollHeight console.clientHeight;;
$.each(body.childNodes, function () {
$(‘#console’).append(“<div class=’” + type + “‘>” +
Peek.pretty_xml(this) +
“</div>”);
});
}
}
code snippet peek.js
Finally, you’ll need to implement pretty_xml(). The implementation in Listing 4-3 is recursive. First
it styles the opening tag and its attributes; then the function calls itself for each child tag; and finally,
it styles the closing tag. There are a few extra cases to handle the text children and empty tags as well.
Each line of the output is in its own <div> element, and the text children are in their own, potentially
multiline <div>.
You might wonder why the code puts all the strings, part by part, into an array instead of concatenating them all together with +. Using an array to hold parts of a larger string and then joining it
all together at once is a common optimization pattern in JavaScript. Because JavaScript strings are
immutable, a new string must be created when two strings are joined. Waiting until all the small
strings are created to do the final concatenation saves a lot of intermediate string creation work by
the interpreter. Similar string concatenation optimization patterns exist for other programming languages with immutable strings like Python and Java.
Listing 4-3: The pretty_xml() function in peek.js
pretty_xml: function (xml, level) {
var i, j;
var result = [];
if (!level) {
level = 0;
}
result.push(“<div class=’xml_level” + level + “‘>”);
result.push(“<span class=’xml_punc’><</span>”);
result.push(“<span class=’xml_tag’>”);
result.push(xml.tagName);
result.push(“</span>”);
// attributes
var attrs = xml.attributes;
40718c04.indd 72
11/30/09 8:32:16 PM
Building the Console
❘ 73
var attr_lead = []
for (i = 0; i < xml.tagName.length + 1; i++) {
attr_lead.push(“ ”);
}
attr_lead = attr_lead.join(“”);
for (i = 0; i < attrs.length; i++) {
result.push(“ <span class=’xml_aname’>”);
result.push(attrs[i].nodeName);
result.push(“</span><span class=’xml_punc’>=’</span>”);
result.push(“<span class=’xml_avalue’>”);
result.push(attrs[i].nodeValue);
result.push(“</span><span class=’xml_punc’>’</span>”);
if (i !== attrs.length - 1) {
result.push(“</div><div class=’xml_level” + level + “‘>”);
result.push(attr_lead);
}
}
if (xml.childNodes.length === 0) {
result.push(“<span class=’xml_punc’>/></span></div>”);
} else {
result.push(“<span class=’xml_punc’>></span></div>”);
// children
$.each(xml.childNodes, function () {
if (this.nodeType === 1) {
result.push(Peek.pretty_xml(this, level + 1));
} else if (this.nodeType === 3) {
result.push(“<div class=’xml_text xml_level” +
(level + 1) + “‘>”);
result.push(this.nodeValue);
result.push(“</div>”);
}
});
result.push(“<div class=’xml xml_level” + level + “‘>”);
result.push(“<span class=’xml_punc’></</span>”);
result.push(“<span class=’xml_tag’>”);
result.push(xml.tagName);
result.push(“</span>”);
result.push(“<span class=’xml_punc’>></span></div>”);
}
return result.join(“”);
}
If you load the Peek application again with these changes, you’ll see pretty XML output just like in
Figure 4-1 at the beginning of the chapter.
40718c04.indd 73
11/30/09 8:32:16 PM
74
❘
Chapter 4 Exploring the XMPP Protocol: A Debugging Console
Dealing with XML Input
The console now shows beautiful, colorized XML stanzas, but unfortunately, once the initial
authentication and session setup is complete, there are no more stanzas to render. It’s time to add
user input to Peek so that you can interact with the console.
First, you’ll need to enable the input field and the Send button once the connection is ready to accept
stanzas. You already did this for the Disconnect button in the connected and disconnected event
handlers. Because both buttons have the button class, you can handle both buttons at the same
time. For the text area, you’ll also need to remove the disabled class, which was used to alter the
background color. The new handlers are shown here with the changed lines highlighted:
$(document).bind(‘connected’, function () {
$(‘.button’).removeAttr(‘disabled’);
$(‘#input’).removeClass(‘disabled’).removeAttr(‘disabled’);
});
$(document).bind(‘disconnected’, function () {
$(‘.button’).attr(‘disabled’, ‘disabled’);
$(‘#input’).addClass(‘disabled’).attr(‘disabled’, ‘disabled’);
});
code snippet peek.js
The user can now type in XML in the text area whenever an established connection exists. You just
need to do something when the user clicks Send.
Strophe’s send() function only accepts valid XML DOM objects or Strophe.Builder objects. This
makes it difficult to send invalid XML over the XMPP connection. Sending invalid XML would
cause the server to terminate the connection immediately. Users can only input text, however, so
you must first create a function that parses text into XML. Fortunately, web browsers all come with
built-in XML parsers. Add the following text_to_xml() function to the Peek object:
text_to_xml: function (text) {
var doc = null;
if (window[‘DOMParser’]) {
var parser = new DOMParser();
doc = parser.parseFromString(text, ‘text/xml’);
} else if (window[‘ActiveXObject’]) {
var doc = new ActiveXObject(“MSXML2.DOMDocument”);
doc.async = false;
doc.loadXML(text);
} else {
throw {
type: ‘PeekError’,
message: ‘No DOMParser object found.’
};
}
var elem = doc.documentElement;
if ($(elem).filter(‘parsererror’).length > 0) {
40718c04.indd 74
11/30/09 8:32:16 PM
Building the Console
❘ 75
return null;
}
return elem;
}
code snippet peek.js
The text_to_xml() function creates an XML parser and parses the string. Internet Explorer 6 does
not have the DOMParser class, so you must use an ActiveX object instead. Firefox, Safari, and Opera,
however, all implement DOMParser. The ActiveX object differs slightly from the DOMParser API, but
for Peek’s needs, the changes required are very minor.
Some DOMParser objects will produce XML documents for invalid input, and these error documents
will have a top-level <parsererror> element. You must check for this so that you don’t accidentally
send these error documents as XMPP stanzas.
All that is left is to wire up the Send button to the text_to_xml() function and send the result. You
can add the following code to the document ready event handler to achieve this:
$(‘#send_button’).click(function () {
var xml = Peek.text_to_xml($(‘#input’).val());
if (xml) {
Peek.connection.send(xml);
$(‘#input’).val(‘’);
}
});
code snippet peek.js
Notice that you don’t need to add the XML to the console. Strophe automatically passes the stanza
to the xmlInput() and rawInput() logging functions, and these already take care of adding pretty
XML data to the console.
There is one last thing to do — handle input errors. Currently if the user types something invalid,
like <<presence/>, clicking Send does nothing. It would be nice to give the user some feedback.
jQuery makes it extremely easy to do this. The modified Send button click event handler animates
the background fading to red when an input error is detected:
$(‘#send_button’).click(function () {
var xml = Peek.text_to_xml($(‘#input’).val());
if (xml) {
Peek.connection.send(xml);
$(‘#input’).val(‘’);
} else {
$(‘#input’).animate({backgroundColor: “#faa”}, 200);
}
});
code snippet peek.js
40718c04.indd 75
11/30/09 8:32:16 PM
76
❘
Chapter 4 Exploring the XMPP Protocol: A Debugging Console
Now you must also reset the background color once the user starts to correct his mistake. You can use a
keypress event handler to do this. The following code should be added to the document ready handler:
$(‘#input’).keypress(function () {
$(this).css({backgroundColor: ‘#fff’});
});
code snippet peek.js
Peek is now a working XMPP debugger!
Making Input Easier
Typing out all the XML by hand can be a little tiresome. Strophe compensates for this by having
the easy-to-use Builder object and its helper functions, $msg(), $pres(), and $iq(). It’s easy to
extend Peek to allow users to input code as well as XML, making their life much easier if they know
a little JavaScript.
First, you must detect if the input is code or XML. The easiest way to do this is to look at the first
character. If it is <, then it looks a lot like XML; if it is $ it looks a lot like one of the three Builder
object helper functions. If the user’s input looks like code, you can use JavaScript’s eval() function
to execute it. You can replace the Send button click event handler with this new logic:
$(‘#send_button’).click(function () {
var input = $(‘#input’).val();
var error = false;
if (input.length > 0) {
if (input[0] === ‘<’) {
var xml = Peek.text_to_xml(input);
if (xml) {
Peek.connection.send(xml);
$(‘#input’).val(‘’);
} else {
error = true;
}
} else if (input[0] === ‘$’) {
try {
var builder = eval(input);
Peek.connection.send(builder);
$(‘#input’).val(‘’);
} catch (e) {
error = true;
}
} else {
error = true;
}
}
if (error) {
$(‘#input’).animate({backgroundColor: “#faa”});
}
});
code snippet peek.js
40718c04.indd 76
11/30/09 8:32:16 PM
Building the Console
❘ 77
For the case where the first character is <, the logic is exactly the same. When the first character is
$, however, Peek evaluates the input as code, and if there are no errors, attempts to send this as a
stanza. If the code throws an exception (for example, if the code contains a syntax error or does not
produce a Builder object), an error is flagged.
Peek is now ready to help you explore the depths of XMPP. The completed peek.js file appears in
Listing 4-4.
Listing 4-4: peek.js (final)
var Peek = {
connection: null,
show_traffic: function (body, type) {
if (body.childNodes.length > 0) {
var console = $(‘#console’).get(0);
var at_bottom = console.scrollTop >= console.scrollHeight console.clientHeight;;
$.each(body.childNodes, function () {
$(‘#console’).append(“<div class=’” + type + “‘>” +
Peek.pretty_xml(this) +
“</div>”);
});
if (at_bottom) {
console.scrollTop = console.scrollHeight;
}
}
},
pretty_xml: function (xml, level) {
var i, j;
var result = [];
if (!level) {
level = 0;
}
result.push(“<div class=’xml_level” + level + “‘>”);
result.push(“<span class=’xml_punc’><</span>”);
result.push(“<span class=’xml_tag’>”);
result.push(xml.tagName);
result.push(“</span>”);
// attributes
var attrs = xml.attributes;
var attr_lead = []
for (i = 0; i < xml.tagName.length + 1; i++) {
attr_lead.push(“ ”);
}
attr_lead = attr_lead.join(“”);
for (i = 0; i < attrs.length; i++) {
40718c04.indd 77
continues
11/30/09 8:32:16 PM
78
❘
Chapter 4 Exploring the XMPP Protocol: A Debugging Console
Listing 4-4 (continued)
result.push(“ <span class=’xml_aname’>”);
result.push(attrs[i].nodeName);
result.push(“</span><span class=’xml_punc’>=’</span>”);
result.push(“<span class=’xml_avalue’>”);
result.push(attrs[i].nodeValue);
result.push(“</span><span class=’xml_punc’>’</span>”);
if (i !== attrs.length - 1) {
result.push(“</div><div class=’xml_level” + level + “‘>”);
result.push(attr_lead);
}
}
if (xml.childNodes.length === 0) {
result.push(“<span class=’xml_punc’>/></span></div>”);
} else {
result.push(“<span class=’xml_punc’>></span></div>”);
// children
$.each(xml.childNodes, function () {
if (this.nodeType === 1) {
result.push(Peek.pretty_xml(this, level + 1));
} else if (this.nodeType === 3) {
result.push(“<div class=’xml_text xml_level” +
(level + 1) + “‘>”);
result.push(this.nodeValue);
result.push(“</div>”);
}
});
result.push(“<div class=’xml xml_level” + level + “‘>”);
result.push(“<span class=’xml_punc’></</span>”);
result.push(“<span class=’xml_tag’>”);
result.push(xml.tagName);
result.push(“</span>”);
result.push(“<span class=’xml_punc’>></span></div>”);
}
return result.join(“”);
},
text_to_xml: function (text) {
var doc = null;
if (window[‘DOMParser’]) {
var parser = new DOMParser();
doc = parser.parseFromString(text, ‘text/xml’);
} else if (window[‘ActiveXObject’]) {
var doc = new ActiveXObject(“MSXML2.DOMDocument”);
doc.async = false;
doc.loadXML(text);
} else {
throw {
40718c04.indd 78
11/30/09 8:32:16 PM
Building the Console
❘ 79
type: ‘PeekError’,
message: ‘No DOMParser object found.’
};
}
var elem = doc.documentElement;
if ($(elem).filter(‘parsererror’).length > 0) {
return null;
}
return elem;
}
};
$(document).ready(function () {
$(‘#login_dialog’).dialog({
autoOpen: true,
draggable: false,
modal: true,
title: ‘Connect to XMPP’,
buttons: {
“Connect”: function () {
$(document).trigger(‘connect’, {
jid: $(‘#jid’).val(),
password: $(‘#password’).val()
});
$(‘#password’).val(‘’);
$(this).dialog(‘close’);
}
}
});
$(‘#disconnect_button’).click(function () {
Peek.connection.disconnect();
});
$(‘#send_button’).click(function () {
var input = $(‘#input’).val();
var error = false;
if (input.length > 0) {
if (input[0] === ‘<’) {
var xml = Peek.text_to_xml(input);
if (xml) {
Peek.connection.send(xml);
$(‘#input’).val(‘’);
} else {
error = true;
}
} else if (input[0] === ‘$’) {
try {
var builder = eval(input);
Peek.connection.send(builder);
$(‘#input’).val(‘’);
} catch (e) {
continues
40718c04.indd 79
11/30/09 8:32:17 PM
80
❘
Chapter 4 Exploring the XMPP Protocol: A Debugging Console
Listing 4-4 (continued)
console.log(e);
error = true;
}
} else {
error = true;
}
}
if (error) {
$(‘#input’).animate({backgroundColor: “#faa”});
}
});
$(‘#input’).keypress(function () {
$(this).css({backgroundColor: ‘#fff’});
});
});
$(document).bind(‘connect’, function (ev, data) {
var conn = new Strophe.Connection(
“http://bosh.metajack.im:5280/xmpp-httpbind”);
conn.xmlInput = function (body) {
Peek.show_traffic(body, ‘incoming’);
};
conn.xmlOutput = function (body) {
Peek.show_traffic(body, ‘outgoing’);
};
conn.connect(data.jid, data.password, function (status) {
if (status === Strophe.Status.CONNECTED) {
$(document).trigger(‘connected’);
} else if (status === Strophe.Status.DISCONNECTED) {
$(document).trigger(‘disconnected’);
}
});
Peek.connection = conn;
});
$(document).bind(‘connected’, function () {
$(‘.button’).removeAttr(‘disabled’);
$(‘#input’).removeClass(‘disabled’).removeAttr(‘disabled’);
});
$(document).bind(‘disconnected’, function () {
$(‘.button’).attr(‘disabled’, ‘disabled’);
$(‘#input’).addClass(‘disabled’).attr(‘disabled’, ‘disabled’);
});
40718c04.indd 80
11/30/09 8:32:17 PM
Exploring XMPP
❘ 81
Exploring XMPP
Peek is quite useful at helping you investigate how something works or why something is not doing
what you expect. You can cut and paste the stanza building code from your application and see
exactly what the server’s response is. If you are unfamiliar with a particular protocol extension, you
can type in the examples to see how the server responds to various inputs.
This book is filled with examples that you can try out in Peek. Be sure to adjust the server names
and JIDs appropriately; the examples in this book use imaginary server domains and JIDs of fictional characters. You see what happens if you try to use these made-up examples in the section
“Dealing with Errors.”
Controlling Presence
As you learned in Chapter 1, presence information and presence control are some of the basic features
of XMPP. Presence is also one of the simplest parts of the protocol.
Open up the Peek application, log in to your favorite XMPP server, type the following line, and
click Send:
<presence/>
This first <presence> element sent on an XMPP connection is called initial presence. Normally the
server will broadcast your presence to all the connected resources for your JID and all users subscribed to your presence notifications. The initial presence will also cause the server to send presence
probes to all the users in your roster with whom you have a presence subscription. The initial presence enables the reception of incoming presence stanzas from your contacts.
If your roster is empty, you’ll only see a slightly modified version of your stanza reflected back at
you in response. If your roster has other people in it, you’ll likely receive presence notifications from
them almost immediately. As long as the server considers you online, you will continue to receive
presence updates from your contacts as their presence status changes.
Because you didn’t specify any attributes on the <presence> element, it signals to the server that
you are online. Try typing the following input into Peek to set your presence status to away:
$pres().c(‘show’).t(“away”).up().c(‘status’).t(“reading”);
Probing Versions
Most XMPP clients, and even servers, support the Software Version extension (XEP-0092). This
simple extension asks an entity to report its software and version number. Servers and XMPP services often use this protocol extension for gathering statistics, and you can use Peek to experiment
with requesting software versions.
40718c04.indd 81
11/30/09 8:32:17 PM
82
❘
Chapter 4 Exploring the XMPP Protocol: A Debugging Console
To request the software version of your server, send an IQ-get stanza with a <query> element using
the jabber:iq:version namespace. You can input either of the following into Peek to ask the
Jabber.org server what software it runs:
$iq({type: “get”, id: “version1”, to: “jabber.org”})
.c(“query”, {xmlns: “jabber:iq:version”})
or
<iq type=’get’ id=’version1’ to=’jabber.org’><query xmlns=’jabber:iq:version’/></iq>
The server will respond with something similar to the following stanza. Because the Jabber.org
server software may have been upgraded by the time you read this book, the response you receive
may be different.
<iq xmlns=’jabber:client’
from=’jabber.org’
to=’darcy@pemberley.lit/library’
id=’version1’
type=’result’>
<query xmlns=’jabber:iq:version’>
<name>ejabberd</name>
<version>2.1.0-alpha</version>
<os>unix/linux 2.6.18</os>
</query>
</iq>
Try probing some of your contacts or other servers to see what software they use.
Dealing with Errors
Handling errors is an important part of any application. The XMPP protocol has a uniform error
reporting mechanism used by the core protocol and nearly every extension. IQ-error stanzas were
talked about in Chapter 1, but you can use Peek to investigate these and other error situations in
more detail.
IQ Stanza Errors
IQ-get and IQ-set stanzas that you send should always receive a reply of IQ-result or IQ-error. You
should try building some bad stanzas to see how different entities respond.
The Google Talk service at gmail.com does not support the Software Version extension discussed
earlier. Send gmail.com a request for its software version:
$iq({type: “get”, id: “version2”, to: “gmail.com”})
.c(“query”, {xmlns: “jabber:iq:version”})
The server should respond immediately with an error:
<iq from=’gmail.com’
to=’darcy@pemberley.lit/library’
id=’version1’
type=’error’>
40718c04.indd 82
11/30/09 8:32:17 PM
Exploring XMPP
❘ 83
<query xmlns=’jabber:iq:version’/>
<error code=’503’ type=’cancel’>
<service-unavailable xmlns=’urn:ietf:params:xml:ns:xmpp-stanzas’/>
</error>
</iq>
This IQ-error stanza contains the contents of your original request as the first child. Many error stanzas
you’ll receive will include the original request’s contents, although in some cases, this may be omitted if
the stanza is quite large or contains sensitive information. The <error> element is required, and it should
contain a <text> element and exactly one other child with the urn:ietf:params:xml:ns:xmpp-stanzas
namespace. The preceding error stanza did not contain a <text> child–it’s optional–but you see an
example of this in the next section. The latter type of child’s name tells you the kind of error that
happened. In this case it was service-unavailable. This is exactly the error that was expected,
because gmail.com does not support this extension.
Notice, also, that the <error> element’s type attribute is cancel. This means that you should not
try to continue this operation. Some errors will have type attributes of modify, which means that
your application should try again with the input corrected. Other error types are also possible and
include continue, auth, and wait. You can send the following stanza to a non-existent room on a
multi-user chat service to induce an error:
<iq type=’get’ to=’bad-room-123@conference.jabber.org’ id=’info1’>
<query xmlns=’http://jabber.org/protocol/disco#info’/>
</iq>
You should receive a response similar to the following one. Note that the server has supplied a
human-readable <text> element as well as the normal error condition element.
<iq to=’darcy@pemberley.lit/library’
from=’bad-room-123@conference.jabber.org’
id=’info1’
type=’error’>
<query xmlns=’http://jabber.org/protocol/disco#info’/>
<error code=’404’
type=’cancel’>
<item-not-found xmlns=’urn:ietf:params:xml:ns:xmpp-stanzas’/>
<text xmlns=’urn:ietf:params:xml:ns:xmpp-stanzas’>
Conference room does not exist
</text>
</error>
</iq>
The <error> element may also contain an application-specific error condition, which will have
a namespace specific to the service. You can find more information on the <error> element and
IQ-error stanzas in RFC 3920 section 9.3.
Message Stanza Errors
<message> stanzas can also result in errors, and these are structured very similarly to IQ-error stanzas. Just like IQ-error stanzas, <message> stanza errors will have a type attribute of error, usually
contain the original message, and also contain the same <error> elements.
40718c04.indd 83
11/30/09 8:32:17 PM
84
❘
Chapter 4 Exploring the XMPP Protocol: A Debugging Console
One of the most common message errors is failed delivery to a user. For example, try sending a message to a made-up user on a made-up server:
$msg({to: elizabeth@longbourn.lit’, type: ‘chat’}).c(‘body’)
.t(‘What think you of books?’)
Because the domain longbourn.lit does not exist, the server will respond with a message error like
the following:
<message to=’darcy@pemberley.lit’
from=’elizabeth@longbourn.lit’
type=’error’>
<body>What think you of books?</body>
<error code=’404’
type=’cancel’>
<remote-server-not-found xmlns=’urn:ietf:params:xml:ns:xmpp-stanzas’/>
</error>
</message>
These kinds of delivery errors are quite common; users often mistype addresses or have contacts
that have changed servers.
Presence Stanza Errors
Like message errors, <presence> stanza errors generally occur when remote servers are unreachable
either because they don’t exist or some network link is offline. They occasionally crop up in other
places as well. Just like IQ-error and message errors, presence errors have a type attribute of error
and contain the <error> element.
Often you will see these as a result of server presence probes. Your XMPP server sends a probe
to all your contacts when you send initial presence, and if any of those contacts’ servers cannot be
reached, this generates a presence error that gets delivered to you. An example of this type of error
is included here:
<presence to=darcy@pemberley.lit/library’
from=’elizabeth@longbourn.lit’
type=’error’>
<error code=’404’
type=’cancel’>
<remote-server-not-found xmlns=’urn:ietf:params:xml:ns:xmpp-stanzas’/>
</error>
</presence>
For some reason, the longbourn.lit server was not reachable by the pemberley.lit server where
Darcy’s XMPP account is, and a presence error is returned as a result of the presence probe.
Each type of stanza has a matching error stanza, and they all work the same way. The errors that
your application must pay attention to are dependent on the application and the significance of the
failure. For instance, clients usually ignore these presence errors because the state of the contact
40718c04.indd 84
11/30/09 8:32:17 PM
Summary
❘ 85
is the same from the user’s perspective whether the contact is on an unreachable server or offline.
However, presence errors received when trying to join a multi-user chat room (see Chapter 8) indicate
real problems that the user should be notified about.
Better Debugging
Peek is already extremely useful, but it could be even better. Try adding some extra features:
➤➤
Make stanzas in the console foldable — clicking on an element hides and shows children.
➤➤
Often users will want to run the same commands again; add support for command history.
Summary
In this chapter, you built an application to inspect protocol traffic and aid in exploration and debugging of XMPP applications and services. Along the way you:
➤➤
Hooked into Strophe’s structured logging facilities
➤➤
Parsed XML input from the user
➤➤
Rendered XML as nicely formatted HTML
➤➤
Evaluated user input as JavaScript code
Once Peek was built, it was used to explore some common pieces of the XMPP protocol:
➤➤
Manipulating your own presence information
➤➤
Retrieving software version information from other entities
➤➤
Dealing with various common stanza errors
Throughout the rest of the book, you should find Peek useful in diagnosing problems and exploring
the XMPP protocol.
In the next chapter, you build a simple messaging client for use with the Identi.ca microblogging
service.
40718c04.indd 85
11/30/09 8:32:17 PM
40718c04.indd 86
11/30/09 8:32:17 PM
5
Microblogging in Real Time:
An Identica Client
What’s in This Chapter?
➤➤
Using XMPP <message> stanzas
➤➤
Using the Identica XMPP API
➤➤
Improving messages with XHTML-IM
➤➤
Dealing with stored offline messages
Millions of users communicate with friends and the world on Twitter, Identica, Jaiku, and other
microblogging services. These services ask users to answer a simple question: “What are you
doing?” The resulting stream of users’ updates is very similar to a dynamic, global chat room,
where each user defines the room they see by the people they are interested in.
Like chat systems, microblogging systems typically have low latencies, facilitating real-time
communication among participants. Unfortunately, this low-latency channel is hampered by
traditional, high-latency user interfaces. Many power users of microblogging services interact
with these systems using third-party clients that make the experience faster.
One such service, Identica, has full support for XMPP clients. In this chapter, you build a realtime microblogging client for the Identica system. You will start to see how XMPP-powered
web applications result in a more dynamic, low-latency, real-time experience.
In the previous two chapters, you learned the basics of the Strophe library and built a simple
application to facilitate experimentation and debugging. The fun stuff starts in this chapter, in
which you make useful software using XMPP that would be challenging to create using other
methods.
40718c05.indd 87
11/30/09 8:34:41 PM
88
❘
Chapter 5 Microblogging in Real Time: An Identica Client
Application Preview
Updates on the Identica service are called dents. The application you build in this chapter is called
Arthur — a reference to Arthur Dent, the protagonist of The Hitchhiker’s Guide to the Galaxy.
Figure 5-1 shows Arthur in action.
Figure 5-1
The input area appears at the top of the application. Users type and send their dents here. Below the
input area, incoming messages are displayed in reverse chronological order. These messages often
contain clickable links, because they are delivered in XHTML format.
Arthur Design
Identica’s XMPP API uses XMPP <message> stanzas for interacting with the system. The user’s dents
are sent as messages to update@identi.ca, and the same address sends incoming updates from followed users as they occur. This is exactly how normal one-to-one communication works in XMPP.
Although this API is a little clumsy for user actions aside from new dents, it does have the advantage
that any XMPP client can use it without modification. XMPP clients all support one-to-one chats
and are therefore capable of basic Identica integration.
Arthur mimics this basic one-to-one chat integration in a web application. Arthur’s requirements
are much simpler than a full chat client because it needs only to support chatting with a single
entity. Because the other end is a computer program, not a human, Arthur doesn’t need to support
things like typing notification or presence updates. On the other hand, because of the application’s
narrower focus, the resulting user experience should be a bit nicer because it is designed specifically
for microblogging.
Arthur will need to handle incoming messages from the Identica system and display them appropriately. These messages also come with XHTML markup that can be used to improve their display
significantly. New dents from the user will need to be sent off to Identica as well. Finally, Arthur
must deal with messages that were sent while the user was offline.
40718c05.indd 88
11/30/09 8:34:41 PM
Microblogging with Identica
❘ 89
Microblogging with Identica
Identica is one among many microblogging services, but it has some important properties that make
it one of the best to work with, not the least of which is its XMPP support. Though Twitter is the
most well known of these services, its early experiments with XMPP support were abandoned when
its priorities shifted mainly toward keeping the site available. Twitter is also a walled garden, which
is to say that it does not interoperate with other microblogging services.
Identica is the most well known system built on the StatusNet microblogging framework. StatusNet
is an open source, federated microblogging platform that anyone can run. In fact, StatusNet is more
than just open source; it is a Free Network Service (see http://autonomo.us/2008/07/franklinstreet-statement/) — a service built on free software but with the added emphasis of giving users
control over their data.
Unlike Twitter and other walled garden microblogging services, StatusNet systems form a network
of microblogs that are capable of communicating with each other. This federation is very similar to
the XMPP network discussed in Chapter 1 or the network of Internet e‑mail servers. Any StatusNet
site can receive and send updates to other microblogging sites using the Open Microblogging
Protocol (OMB).
Open Microblogging Protocol or OMB
The OMB protocol was created by Evan Prodromou to address the need for an
open, federated world of microblogging. Evan also leads the StatusNet project,
which is the most well known software that implements OMB.
The current version of OMB is 0.1 and you can find it at:
http://openmicroblogging.org/protocol/0.1/
OMB is currently only defined over HTTP transports, but many in the OMB
community are hoping to see an XMPP transport added in the next version. If you
are interested in participating or reading more about OMB, you can join the mailing list or follow the OMB blog at the following URLs:
http://lists.openmicroblogging.org/mailman/listinfo/omb
http://openmicroblogging.org/
The philosophy of OMB and the StatusNet project match well with the philosophy of the Internet
in general. That many StatusNet sites, including Identica, have great support for XMPP is just an
added bonus. The XMPP support also makes it easy for you to build real-time applications on top
of StatusNet servers.
40718c05.indd 89
11/30/09 8:34:41 PM
90
❘
Chapter 5 Microblogging in Real Time: An Identica Client
Creating Your Account
If you don’t already have an Identica account, or an account on another XMPP-enabled StatusNet
service, you should create one now, because you will need it to test Arthur. Just visit Identica at
http://identi.ca (or your favorite XMPP-enabled StatusNet system) and sign up for an account.
My account is http://identi.ca/metajack if you are looking for someone to follow with your
new account.
Once you have your own account, you’ll need to set it up for XMPP notifications.
Turning on XMPP
To configure your Identica account for XMPP support, follow these steps:
1.
2.
3.
4.
On any Identica page, click the Connect link in the navigation bar at the top right of the page.
5.
6.
Click Save.
Select the IM tab.
In the IM Address field, type your Jabber ID and click Add.
Make sure the Send Me Notices through Jabber/Gtalk option is enabled. You might also
want to enable Send Me Replies through Jabber/GTalk from People I’m Not Subscribed To.
Identica will send a confirmation message to your XMPP account. Click the confirmation
link it provides to complete the setup.
Now your XMPP account should receive messages whenever someone you follow posts an update.
You can test that this is working by sending an update to 8ball. 8ball is an Identica bot that generates random yes or no responses to questions, just like the well known Magic 8-ball toys. Send 8ball
a message such as “@8ball Is it working?” Remember, if you didn’t enable replies from people you
aren’t subscribed to, you’ll need to subscribe to 8ball first by visiting http://identi.ca/8ball and
clicking Subscribe.
If all is well, 8ball’s random response will appear in your chat client, and you’re ready to start building Arthur.
Building Arthur
Identica has already started delivering notifications to your XMPP account. These are probably
appearing in your favorite chat client looking much like regular private chat messages from your
normal contacts. Your first goal is to write enough code that Arthur can connect to your XMPP
account, receive updates from Identica, and display them. With that accomplished, you can spend
some effort making the incoming messages prettier by using the XHTML-IM extension. Finally,
you will need to enable the users to send their updates to Identica.
40718c05.indd 90
11/30/09 8:34:41 PM
Building Arthur
❘ 91
Getting Started
The HTML and CSS needed follow the same pattern as the previous two chapters. The HTML is
shown in Listing 5-1 and the CSS is shown in Listing 5-2.
Listing 5-1: arthur.html
<!DOCTYPE HTML PUBLIC “-//W3C//DTD HTML 4.01//EN”
“http://www.w3.org/TR/html4/strict.dtd”>
<html>
<head>
<meta http-equiv=”Content-type” content=”text/html;charset=UTF-8”>
<title>Arthur - Chapter 5</title>
<link rel=’stylesheet’ href=’http://ajax.googleapis.com/ajax/libs/j
queryui/1.7.2/themes/cupertino/jquery-ui.css’>
<script src=’http://ajax.googleapis.com/ajax/libs/jquery/1.3.2/jque
ry.js’></script>
<script src=’http://ajax.googleapis.com/ajax/libs/jqueryui/1.7.2/jq
uery-ui.js’></script>
<script src=’scripts/strophe.js’></script>
<script src=’scripts/flXHR.js’></script>
<script src=’scripts/strophe.flxhr.js’></script>
<link rel=’stylesheet’ type=’text/css’ href=’arthur.css’>
<script type=’text/javascript’ src=’arthur.js’></script>
</head>
<body>
<h1>Arthur</h1>
<textarea id=’input’ rows=’3’></textarea>
<div id=’counter’><span class=’count’>140</span> chars left</div>
<div id=’stream’>
</div>
<!-- login dialog -->
<div id=’login_dialog’ class=’hidden’>
<label>JID:</label><input type=’text’ id=’jid’>
<label>Password:</label><input type=’password’ id=’password’>
</div>
</body>
</html>
Listing 5-2: arthur.css
body {
font-family: Helvetica;
}
h1 {
text-align: center;
40718c05.indd 91
continues
11/30/09 8:34:42 PM
92
❘
Chapter 5 Microblogging in Real Time: An Identica Client
Listing 5-2 (continued)
}
#input {
width: 75%;
font-size: 16pt;
}
#counter {
width: 20%;
float: right;
padding: 25px;
font-size: 14pt;
color: #bbb;
}
.hidden {
display: none;
}
The UI consists of a text area for input along with a character counter. Like Twitter, Identica limits
updates to 140 characters. You’ll want to let users know how many characters they have left so they
don’t try and send too many. Below the input area is a <div>, which will be filled with incoming
updates. The hidden login dialog box is placed at the end.
Just as in the previous chapters, you’ll need to enable the login dialog box and set up the connection
flow events. Add the following code to a new file called arthur.js:
var Arthur = {
connection: null
};
$(document).ready(function () {
$(‘#login_dialog’).dialog({
autoOpen: true,
draggable: false,
modal: true,
title: ‘Connect to XMPP’,
buttons: {
“Connect”: function () {
$(document).trigger(‘connect’, {
jid: $(‘#jid’).val(),
password: $(‘#password’).val()
});
$(‘#password’).val(‘’);
$(this).dialog(‘close’);
}
}
});
40718c05.indd 92
11/30/09 8:34:42 PM
Building Arthur
❘ 93
});
$(document).bind(‘connect’, function (ev, data) {
var conn = new Strophe.Connection(
‘http://bosh.metajack.im:5280/xmpp-httpbind’);
conn.connect(data.jid, data.password, function (status) {
if (status === Strophe.Status.CONNECTED) {
$(document).trigger(‘connected’);
} else if (status === Strophe.Status.DISCONNECTED) {
$(document).trigger(‘disconnected’);
}
});
Arthur.connection = conn;
});
$(document).bind(‘connected’, function () {
// nothing here yet
});
$(document).bind(‘disconnected’, function () {
// nothing here yet
});
code snippet arthur.js
Users of Arthur should now be able to log in to their XMPP accounts.
Receiving Messages
In Chapter 1 you learned that <message> stanzas are delivered to one or more resources based on
each resource’s availability and priority. Before Arthur will receive any messages from the server, it
must first send an initial <presence> stanza to mark itself as available. Once available, the resource
will begin to receive messages sent to the user’s bare JID, assuming it has the highest priority or happens to be the only connected resource, or to the full JID of Arthur’s connection.
Arthur is only interested in <message> stanzas, so you will want to set up a handler for them so that
they get delivered to the appropriate function for display. Be careful to set up your handler before
sending the initial presence, otherwise you may create a race condition where messages might go by
unnoticed between the time presence is sent and the handler is set up.
The following new lines in the connected event handler set up the message handler, send the initial
presence, and direct incoming messages to the handle_message() function, which will be implemented shortly:
$(document).bind(‘connected’, function () {
Arthur.connection.addHandler(Arthur.handle_message,
null, “message”, “chat”);
Arthur.connection.send($pres());
});
code snippet arthur.js
40718c05.indd 93
11/30/09 8:34:42 PM
94
❘
Chapter 5 Microblogging in Real Time: An Identica Client
The handler is set up to look for <message> stanzas with a type attribute of chat. As you learned
in Chapter 1, the chat type is used for normal, private messages in the XMPP protocol.
Now you must implement the handle_message() function. This function needs to extract the body
of the message and insert it at the top of the <div> used to display the updates. jQuery makes this
all too easy. Take care to check that the sender of the message is who you think they are, otherwise
you might show the wrong messages!
handle_message: function (message) {
if ($(message).attr(‘from’).match(/^update@identi.ca/)) {
var body = $(message).children(‘body’).text();
$(‘#stream’).prepend(“<div>” + body + “</div>”);
}
return true;
}
code snippet arthur.js
The code uses children() to find only the <body> element that is an immediate child of the <message> stanza. As you see shortly, Identica messages have an extra <body> element, and the code
needs to be more specific in this case to find the correct one.
Arthur should now be receiving updates and displaying them.
XHTML-IM
It didn’t take long for the XMPP community to get bored with plain text messages. XHTML-IM
(XEP-0071) was created to reuse XHTML’s existing formatting and inline CSS styling to make messages more structured as well as more visually pleasing. Many XMPP clients support sending and
receiving XHTML-IM messages, and XMPP services like Identica often use XHTML-IM to add
structure to message contents.
XHTML-IM is a stripped-down version of XHTML designed to be appropriate to the use case of
small chat messages. Embedded objects, scripts, style sheets, and content transformations are all
removed, leaving a basic set of markup and inline styles. Following is an example <message> stanza
using XHTML-IM. Notice that both a normal <body> element and an XHTML-IM namespaced
<html> element are provided, allowing for graceful fallback if XHTML-IM is unsupported.
<message from=’bingley@netherfield.lit’
to=’jane@longbourn.lit’
type=’chat’>
<body>I hope my dear friends will join me at Netherfield for a ball
this Tuesday.</body>
<html xmlns=’http://jabber.org/protocol/xhtml-im’>
<p style=’font-weight: bold’>I hope my dear friends will join me at Netherfield
for a ball this Tuesday.</p>
</html>
</message>
40718c05.indd 94
11/30/09 8:34:42 PM
Building Arthur
❘ 95
XMPP Extension Proposals or XEPs
XMPP is defined in the IETF RFCs (Request for Comments documents) 3920 and
3921. These documents cover the basic semantics of XMPP streams, the workings
of XMPP federation, and the details on the main stanza types. Anything that is not
considered a core part of XMPP but is accepted as a generally useful addition is
documented in an XMPP Extension Proposal, or XEP.
Anyone can propose a new XEP by submitting it to the XMPP Standards Foundation
(XSF). The XSF Council reviews all new proposed XEPs and votes on whether to
accept them into the standardization process. Once accepted, XEPs are assigned
numbers and a status of experimental. Over time, as people refine and implement the
XEP, it may move to a status of draft and perhaps eventually to final. XEPs in draft
or final status are considered well reviewed and ready for wide implementation and
deployment. In some cases, XEPs become deprecated or historical when they are
superseded or fall out of general use.
Some XEPs are very tiny, like Software Version (XEP-0092), and a few are quite
large, like Publish-Subscribe (XEP-0060, which you see in detail in Chapter 9).
Over the first decade of XMPP’s existence nearly 300 XEPs were accepted, and
they cover a wide range of functionality from remote commands to publishing song
information. Each April 1st, the XSF even publishes a humorous XEP (my favorite
of these is XEP-0239).
Several important XEPs are covered throughout this book, and you can find the
full list of XEPs and their specifications at:
http://xmpp.org/extensions/
Adding XHTML-IM to Arthur
If you were to use Peek, the debugging console from the previous chapter, and inspect the incoming
messages from Identica, you would see that the service appends an XHTML-IM payload to each
update message. These structured payloads will turn usernames, hashtags, groups, and reply references into clickable links. If users see an update in Arthur referencing someone they’ve never heard
of, they can easily click to find out more information.
Because Arthur is a web application, it is extremely easy to render the XHTML-IM message. You
can use jQuery’s contents() method to get all the XHTML children and then insert these into the
appropriate place. Since the application uses HTML DOM and the XMPP connection uses XML
DOM, you must use importNode() to transfer the elements between documents. Unfortunately, IE
40718c05.indd 95
11/30/09 8:34:42 PM
96
❘
Chapter 5 Microblogging in Real Time: An Identica Client
doesn’t support importNode(), so for this browser you must use the xml property to get the raw
text. These changes are highlighted here in the modified handle_message():
handle_message: function (message) {
if ($(message).attr(‘from’).match(/^update@identi.ca/)) {
var body = $(message).find(‘html > body’).contents();
var div = $(“<div></div>”);
body.each(function () {
if (document.importNode) {
$(document.importNode(this, true)).appendTo(div);
} else {
// IE workaround
div.append(this.xml);
}
});
div.prependTo(“#stream”);
}
return true;
}
code snippet arthur.js
Please note Arthur does not santize the XHTML it receives. It is possible that someone could inject
<script> elements and other unwanted things into the message body. If this were a real application,
you would want to make sure this possibility is accounted for.
Arthur should now be displaying nicely formatted HTML messages instead of plain text. All that is
left is to enable the users to send their own updates back to Identica.
Sending Messages
Sending messages to Identica is done via normal XMPP messages, as you might expect. You don’t
need to worry about sending XHTML-IM content or dealing with links in the message because the
Identica system will translate your input and link all of the appropriate items before delivering it to
your subscribers. Before you send the message, you should hook up the character counter so that
Arthur can give loquacious users some warning before Identica rejects their long messages.
Counting characters is trivial in JavaScript, because the String object supports the length property
just like arrays. The only challenge is when to measure the length of the text and then update the
counter.
Whenever someone types in an input field or text box, the browser triggers the keydown, keypress, and
keyup events in that order. The trouble is that the keypress event, which is the most obvious choice for
where to put the count logic, is triggered before the value of the input field is modified. When the first
keypress event is triggered, the value of the field will still be blank. Fortunately, the field is modified
before the keyup event is called, so you can place the appropriate logic there to update the counter.
40718c05.indd 96
11/30/09 8:34:42 PM
Offline Messages
❘ 97
You can add the following keyup event handler to the document ready function, right after the login
dialog box initialization code:
$(‘#input’).keyup(function () {
var left = 140 - $(this).val().length;
$(‘#counter .count’).text(‘’ + left);
});
code snippet arthur.js
Now Arthur will update the input count while the user is typing.
Once the users are satisfied with their updates, they can hit Enter to submit them. To send these
events to Identica, you need only to wrap them in normal <message> stanzas to update@identi.ca.
This time, you will want to use the keypress event so that the Enter key is not part of the messages.
Add the following code to the document ready handler:
$(‘#input’).keypress(function (ev) {
if (ev.which === 13) {
ev.preventDefault();
var text = $(this).val();
$(this).val(‘’);
var msg = $msg({to: ‘update@identi.ca’, type: ‘chat’})
.c(‘body’).t(text);
Arthur.connection.send(msg);
}
});
code snippet arthur.js
The event object passed into the handler contains a which attribute that holds the pressed key’s
ASCII code, and the code for the Enter key is 13. The handler uses preventDefault() to stop the
default handler from processing the Enter key, which would add it to the field’s value. The handler
then sends a <message> stanza to update@identi.ca.
You don’t have to worry about displaying the update to the user. Identica will notify the users of
their own updates as well, so a hyperlinked version of the update will appear in the stream all by
itself.
Arthur is now a fully functional microblogging client!
Offline Messages
Before you ship Arthur to your users, there is still one last feature to add — support for offline
messages.
Since the early days of XMPP (back then it was still called Jabber), servers have stored messages sent
to offline users for later delivery. This feature, though simple, is still not implemented on some proprietary networks! Oddly, this feature wasn’t specified in an XEP for three years after XMPP was
40718c05.indd 97
11/30/09 8:34:42 PM
98
❘
Chapter 5 Microblogging in Real Time: An Identica Client
created. Delayed delivery was finally written down in XEP-0091, which was later replaced by the
current Delayed Delivery (XEP-0203).
The sender of a message doesn’t need to do anything special to support offline messages. If a message is received for an offline user, a typical server will queue that message for when the user next
comes online. Little is required from the recipient as well. When the recipients of offline messages
next send initial presence, the server will deliver all pending offline messages to them. If no special
attention is paid to these messages, they will appear to have been sent just then, but on closer inspection, they contain extra metadata inserted by the server about when they were originally sent.
Take a look at the following example traffic. First, Jane sends her initial presence, informing the
server that she is now available. Next, the server delivers several messages to her; all but the final
message were sent before she came online.
JANE: <presence/>
SERVER: <message from=’elizabeth@longbourn.lit/bedroom’
to=’jane@longbourn.lit/bedroom’
type=’chat’>
<body>Miss Bingley sees that her brother is in love with you, and
wants himto marry Miss Darcy.</body>
<delay xmlns=’urn:xmpp:delay’
from=’longbourn.lit’
stamp=’1809-09-22T12:44:13Z’>Offline storage</delay>
</message>
<message from=’elizabeth@longbourn.lit/bedroom’
to=’jane@longbourn.lit/bedroom’
type=’chat’>
<body>She follows him to town in the hope of keeping him there, and tries
to persuade you that he does not care about you.</body>
<delay xmlns=’urn:xmpp:delay’
from=’longbourn.lit’
stamp=’1809-09-22T12:44:24Z’>Offline storage</delay>
</message>
<message from=’elizabeth@longbourn.lit/bedroom’
to=’jane@longbourn.lit/bedroom’
type=’chat’>
<body>No one who has ever seen you together, can doubt his
affection.</body>
</message>
Notice the extra <delay> element in the messages that were received while Jane was offline. These
extra elements are a delayed delivery marker and indicate that the messages have been delivered
some period of time after they were originally received. The stamp attribute indicates the time when
Jane’s server originally received the message.
You can indicate which messages in the stream happened while the user was offline by giving them a
special color in the user interface. You do this by assigning an extra CSS class in handle_message()
when a <message> stanza is processed containing a <delay> element.
40718c05.indd 98
11/30/09 8:34:42 PM
Offline Messages
❘ 99
First, add the following CSS class to arthur.css:
.delayed {
color: #a99;
}
code snippet arthur.css
Next, the following highlighted lines show the changes that need to be made to handle_message():
handle_message: function (message) {
if ($(message).attr(‘from’).match(/^update@identi.ca/)) {
var delayed = $(message).find(‘delay’).length > 0;
var body = $(message).find(‘html > body’).contents();
var div = $(“<div></div>”);
if (delayed) {
div.addClass(‘delayed’);
}
body.each(function () {
if (document.importNode) {
$(document.importNode(this, true)).appendTo(div);
} else {
// IE workaround
div.append(this.xml);
}
});
div.prependTo(‘#stream’);
}
return true;
}
code snippet arthur.js
Arthur will show the delayed messages in a pink color so that the users will know what they missed
while they were offline.
With that final feature, Arthur is ready for some real users. The final JavaScript code appears in
Listing 5-3.
Listing 5-3: arthur.js
var Arthur = {
connection: null,
handle_message: function (message) {
if ($(message).attr(‘from’).match(/^update@identi.ca/)) {
40718c05.indd 99
continues
11/30/09 8:34:43 PM
100
❘
Chapter 5 Microblogging in Real Time: An Identica Client
Listing 5-3 (continued)
var delayed = $(message).find(‘delay’).length > 0;
var body = $(message).find(‘html > body’).contents();
var div = $(“<div></div>”);
if (delayed) {
div.addClass(‘delayed’);
}
body.each(function () {
if (document.importNode) {
$(document.importNode(this, true)).appendTo(div);
} else {
// IE workaround
div.append(this.xml);
}
});
div.prependTo(‘#stream’);
}
return true;
}
};
$(document).ready(function () {
$(‘#login_dialog’).dialog({
autoOpen: true,
draggable: false,
modal: true,
title: ‘Connect to XMPP’,
buttons: {
“Connect”: function () {
$(document).trigger(‘connect’, {
jid: $(‘#jid’).val(),
password: $(‘#password’).val()
});
$(‘#password’).val(‘’);
$(this).dialog(‘close’);
}
}
});
$(‘#input’).keyup(function () {
var left = 140 - $(this).val().length;
$(‘#counter .count’).text(‘’ + left);
});
$(‘#input’).keypress(function (ev) {
if (ev.which === 13) {
40718c05.indd 100
11/30/09 8:34:43 PM
Creating a Better Microblogger
❘ 101
ev.preventDefault();
var text = $(this).val();
$(this).val(‘’);
var msg = $msg({to: ‘update@identi.ca’, type: ‘chat’})
.c(‘body’).t(text);
Arthur.connection.send(msg);
}
});
});
$(document).bind(‘connect’, function (ev, data) {
var conn = new Strophe.Connection(
‘http://bosh.metajack.im:5280/xmpp-httpbind’);
conn.connect(data.jid, data.password, function (status) {
if (status === Strophe.Status.CONNECTED) {
$(document).trigger(‘connected’);
} else if (status === Strophe.Status.DISCONNECTED) {
$(document).trigger(‘disconnected’);
}
});
Arthur.connection = conn;
});
$(document).bind(‘connected’, function () {
Arthur.connection.addHandler(Arthur.handle_message,
null, “message”, “chat”);
Arthur.connection.send($pres());
});
$(document).bind(‘disconnected’, function () {
// nothing here yet
});
Creating a Better Microblogger
Identica’s XMPP API also supports many other functions — direct messages, favoriting, subscribing
to and unsubscribing from users, and viewing profile information. You can send the message “help”
to get a complete list of available commands.
Try adding the following to Arthur:
40718c05.indd 101
➤➤
Show the current list of the user’s subscriptions.
➤➤
Translate user’s names into their real names by using information from their profile.
➤➤
Add a button next to each dent to allow users to mark it as a favorite.
11/30/09 8:34:43 PM
102
❘
Chapter 5 Microblogging in Real Time: An Identica Client
Summary
In this chapter, you moved beyond the basic setup of Strophe applications and beyond simply looking
at and crafting traffic in a debugger. You created a real-time microblogging client called Arthur, which
made keeping up with friends on Identica very easy.
In creating Arthur, you:
➤➤
Learned about Identica, StatusNet, and the Open Microblogging standard.
➤➤
Used the Identica XMPP API to interact with the microblogging service.
➤➤
Created a <message> stanza handler to process incoming dents.
➤➤
Added XHTML-IM support to the application.
➤➤
Discovered offline messages and how to detect and deal with them.
Arthur is a very simple example of handling private, one-to-one chats with XMPP. In the next chapter
you extend these ideas to a general chat client focused on private messaging with multiple people. You
create an even more complex application for group chat in Chapter 8.
40718c05.indd 102
11/30/09 8:34:43 PM
6
Talking with Friends:
One‑on‑One Chat
What’s in This Chapter?
➤➤
Presence subscriptions
➤➤
Managing rosters and contacts
➤➤
Message routing
➤➤
Best practices for one-on-one communication
➤➤
Chat state notifications
For many years, XMPP was used primarily for its original purpose of instant messaging. The
other uses of the protocol, many of which you will see in upcoming chapters, were just the
experiments of a few creative hackers. Today, the instant messaging pieces aren’t as fashionable
as publish-subscribe, group chat, and collaborative applications, but the IM foundations of
XMPP remain extremely important.
Instant messaging systems are first class social networks. Each member has a social graph,
their roster, and can communicate and participate with others. These social tools are baked
into XMPP at a low level, and they make building social applications quite easy. Unlike many
popular social networks, the XMPP network is also federated, connecting many disparate
communities together.
Social and community aspects of applications are becoming increasingly important, and
therefore it is imperative that you gain an understanding of XMPP’s basic social tools. The
chat application in this chapter, called Gab, may not be on the cutting edge of software, but
its parts can be used to add important social features onto nearly any kind of application.
Indeed, many users will expect to see these features as they have grown accustomed to them
in other tools.
40718c06.indd 103
11/30/09 8:39:22 PM
104
❘
Chapter 6 Talking with Friends: One‑on‑One Chat
Instant messaging is the oldest use of XMPP, and in this chapter, you build your own basic messaging application for chatting and keeping tabs on friends. Each feature will seem familiar if
you’ve ever used instant messaging applications before and forms a solid basis for developing social
software.
Application Preview
The interface for this chapter’s application is quite a bit more complex than the ones you’ve built in
previous chapters. Figure 6-1 shows what the finished application will look like.
Figure 6-1
The chat area is located on the left side. Each chat appears in a separate tab in the interface, allowing the user to keep track of many conversations at once. The roster appears on the right side and
shows the name and status for each of the user’s contacts. Just above these areas are buttons for
common functions.
This interface has a lot going on — multiple tabs, multiple controls, and multiple new pieces of the
XMPP protocol.
Gab Design
Instant messaging in XMPP relies heavily on the use of the <message> and <presence> stanzas. A
<message> stanza is sent whenever a user communicates with another. You saw a basic example of
these stanzas in action in the previous chapter; the Identica API is just a computer program mimicking a user. <presence> stanzas are sent whenever contacts come online, change status to away, or
go offline.
40718c06.indd 104
11/30/09 8:39:22 PM
Gab Design
❘ 105
These two stanzas go hand in hand. The <presence> stanza communicates a user’s availability for
chat. If a user is offline or away, it may not be the best time to attempt a conversation. An online user,
however, is probably happy to talk. Once a user has decided to communicate, <message> stanzas do
the work of moving pieces of the conversation between its participants.
Presence
XMPP’s designers were quite sensitive to privacy issues, so presence information is controlled
through subscriptions. In order for Elizabeth to receive presence updates from Wickham, she must
first subscribe to those updates. Furthermore, Wickham must approve her subscription request.
Presence subscriptions are asymmetric. If Elizabeth has a subscription to Wickham’s presence, it
does not necessarily mean that Wickham is subscribed to Elizabeth’s. In most cases, a user will send
a subscription request to someone, and automatically approve the subscription request coming from
that same person.
You see presence subscriptions in detail when you build Gab’s roster area functionality.
Messages
As you saw in the previous chapter, messages are usually quite simple. They do have some special
delivery semantics that you, as an XMPP programmer, must take into account. These semantics center
on addressing and whether a message is addressed to a contact’s bare JID (elizabeth@longbourn.lit) or
to a full JID (elizabeth@longbourn.lit/library).
Messages can also contain more than just the message’s text. They can carry formatting information
(as in the previous chapter’s use of XHTML-IM), metadata, or application-specific payloads. As you
see a little bit later, activity notifications sometimes appear in messages containing no message text
at all!
Gab has two major centers of functionality, the chat area and the roster area, as well as a button bar
for common functions. Each area deals with one type of stanza. The chat area handles the <message>
stanzas and the roster area handles <presence>.
Chat Area
Gab must support chats with multiple contacts simultaneously. A tab for each chat creates separation
between all the conversations as well as making it easy for users to navigate to the one they want.
Each incoming message is stamped with the address of the person who sent it. Each tab handles the
incoming messages from a particular sender. An input area for outgoing messages appears at the
bottom of every tab.
New chat tabs are created when a new message is received from a contact who does not already have
an open tab. Tabs can also be created by pressing the New Chat With button in the action bar above
the chat area or by clicking a contact’s name in the roster area.
Each chat will need to display messages, status changes, and activity notifications for the associated user.
40718c06.indd 105
11/30/09 8:39:22 PM
106
❘
Chapter 6 Talking with Friends: One‑on‑One Chat
Roster Area
The roster area displays all the user’s contacts as well as their current presence status. This list should
be sorted so that the available contacts appear at the top of the list, followed by the ones who are
away. Offline contacts appear at the very bottom of the list.
Incoming presence information should update the roster area so that the user is always aware of the
latest status for each contact.
Clicking the New Contact button in the action bar adds new contacts to the roster and requests a
presence subscription. You must also handle the case when the new contact requests a subscription
to the user’s own presence so that the user can decide whether to approve or deny the subscription.
With the basic design laid out, it’s time to start working on Gab.
Making the Interface
The HTML for Gab’s interface appears in Listing 6-1. It contains the action bar, followed by the chatarea <div> and the roster-area <div>. Below these are several dialog boxes that Gab needs — the
login dialog box you’ve seen in previous chapters, the contact dialog box for adding new contacts
to the roster, the chat dialog box for starting new chats, and the approval dialog box for handling
incoming presence subscription requests.
Listing 6-1: gab.html
<!DOCTYPE HTML PUBLIC “-//W3C//DTD HTML 4.01//EN”
“http://www.w3.org/TR/html4/strict.dtd”>
<html>
<head>
<meta http-equiv=”Content-type” content=”text/html;charset=UTF-8”>
<title>Gab - Chapter 6</title>
<link rel=’stylesheet’ href=’http://ajax.googleapis.com/ajax/libs/jqueryu
i/1.7.2/themes/cupertino/jquery-ui.css’>
<script src=’http://ajax.googleapis.com/ajax/libs/jquery/1.3.2/jquery.js’>
</script>
<script src=’http://ajax.googleapis.com/ajax/libs/jqueryui/1.7.2/jquery-u
i.js’></script>
<script src=’scripts/strophe.js’></script>
<script src=’scripts/flXHR.js’></script>
<script src=’scripts/strophe.flxhr.js’></script>
<link rel=’stylesheet’ type=’text/css’ href=’gab.css’>
<script type=’text/javascript’ src=’gab.js’></script>
</head>
<body>
40718c06.indd 106
11/30/09 8:39:22 PM
Making the Interface
❘ 107
<h1>Gab</h1>
<div id=’toolbar’>
<span class=’button’ id=’new-contact’>add contact..</span> ||
<span class=’button’ id=’new-chat’>chat with..</span> ||
<span class=’button’ id=’disconnect’>disconnect</span>
</div>
<div id=’chat-area’>
<ul></ul>
</div>
<div id=’roster-area’>
<ul></ul>
</div>
<!-- login dialog -->
<div id=’login_dialog’ class=’hidden’>
<label>JID:</label><input type=’text’ id=’jid’>
<label>Password:</label><input type=’password’ id=’password’>
</div>
<!-- contact dialog -->
<div id=’contact_dialog’ class=’hidden’>
<label>JID:</label><input type=’text’ id=’contact-jid’>
<label>Name:</label><input type=’text’ id=’contact-name’>
</div>
<!-- chat dialog -->
<div id=’chat_dialog’ class=’hidden’>
<label>JID:</label><input type=’text’ id=’chat-jid’>
</div>
<!-- approval dialog -->
<div id=’approve_dialog’ class=’hidden’>
<p><span id=’approve-jid’></span> has requested a subscription
to your presence. Approve or deny?</p>
</div>
</body>
</html>
The chat area contains a single <ul> element, which will become the tab bar. Each visible tab will
correspond to an <li> child of this element containing the tab’s name. The contents of each tab will
be inserted as a <div> after the <ul> element. The jQuery UI tabs() function will do the hard work
of converting this simple HTML structure into a fully functioning set of chat tabs.
The roster area starts off with an empty list as well. This list will be filled dynamically with roster
contacts once Gab has fetched this information from the server.
Listing 6-2 contains the CSS for Gab. The styling is very simple, but goes a long way to making
Gab’s interface visually appealing.
40718c06.indd 107
11/30/09 8:39:22 PM
108
❘
Chapter 6 Talking with Friends: One‑on‑One Chat
Listing 6-2: gab.css
body {
font-family: Helvetica;
}
h1 {
text-align: center;
}
.hidden {
display: none
}
.button {
padding: 10px;
background-color: #ddd;
border: solid 1px #666;
font-weight: bold;
}
.button:hover {
background-color: #ddf;
}
#toolbar {
text-align: center;
margin-bottom: 15px;
}
#chat-area {
float: left;
width: 600px;
height: 300px;
}
.chat-messages {
height: 180px;
border-bottom: solid 2px #ddd;
overflow: auto;
}
#chat-area input {
margin-top: 10px;
width: 95%;
}
#roster-area {
float: right;
border-left: solid 2px #ddd;
padding: 10px;
width: 250px;
height: 300px;
40718c06.indd 108
11/30/09 8:39:22 PM
Building the Roster
❘ 109
}
.chat-name {
color: #c33;
}
.chat-message .me {
color: #33c;
}
.chat-event {
font-style: italic;
font-size: 75%;
}
.roster-contact {
padding: 3px;
}
.roster-contact:hover {
background-color: #aaa;
color: white;
}
.roster-name {
font-size: 150%;
}
.online {
color: #3c3;
}
.away {
color: #c33;
}
.offline {
color: #ccc;
}
This interface’s layout and styling are relatively simple, but it doesn’t take much to have a big impact
with powerful tools like HTML and CSS.
Now that the interface is created, you should start hooking up the code for the roster area.
Building the Roster
XMPP chat clients generally perform the following actions when they start:
1.
2.
3.
40718c06.indd 109
Connect and authenticate to the server.
Request the roster.
Send initial presence.
11/30/09 8:39:23 PM
110
❘
Chapter 6 Talking with Friends: One‑on‑One Chat
The last step causes the server to send presence probes to contacts for whom the user has a presence
subscription. These probes will result in a <presence> stanza being sent back to the user for each
contact that is online.
Gab will need to replicate this sequence of actions and handle the resulting roster data and presence
updates. First, you will hook up the login dialog box, just as you did in previous chapters, as well as
build the basic connection event handling. Create a file called gab.js and insert the following code,
which should be familiar from the previous chapters:
var Gab = {
connection: null
};
$(document).ready(function () {
$(‘#login_dialog’).dialog({
autoOpen: true,
draggable: false,
modal: true,
title: ‘Connect to XMPP’,
buttons: {
“Connect”: function () {
$(document).trigger(‘connect’, {
jid: $(‘#jid’).val(),
password: $(‘#password’).val()
});
$(‘#password’).val(‘’);
$(this).dialog(‘close’);
}
}
});
});
$(document).bind(‘connect’, function (ev, data) {
var conn = new Strophe.Connection(
‘http://bosh.metajack.im:5280/xmpp-httpbind’);
conn.connect(data.jid, data.password, function (status) {
if (status === Strophe.Status.CONNECTED) {
$(document).trigger(‘connected’);
} else if (status === Strophe.Status.DISCONNECTED) {
$(document).trigger(‘disconnected’);
}
});
Gab.connection = conn;
});
$(document).bind(‘connected’, function () {
// nothing here yet
});
$(document).bind(‘disconnected’, function () {
// nothing here yet
});
code snippet gab.js
40718c06.indd 110
11/30/09 8:39:23 PM
Building the Roster
❘ 111
Once the user clicks the Connect button, the code starts connecting to the XMPP server.
Successful connections fire the connected event, and any disconnection (or connection failure)
fires disconnected.
Now you can request the roster in the connected event handler.
Requesting Rosters
Rosters are manipulated with IQ-get and IQ-set stanzas that contain a <query> element under the
jabber:iq:roster namespace. Rosters can be retrieved and contacts modified and deleted using
these simple stanzas. You see addition of new contacts soon, but for now, you can focus just on
retrieval.
The following stanza requests Elizabeth’s roster from her server:
<iq from=’elizabeth@longbourn.lit/library’
type=’get’
id=’roster1’>
<query xmlns=’jabber:iq:roster’/>
</iq>
Her server will reply with something similar to the following:
<iq to=’elizabeth@longbourn.lit/library’
type=’result’
id=’roster1’>
<query xmlns=’jabber:iq:roster’>
<item jid=’darcy@pemberley.lit’ name=’Mr. Darcy’ subscription=’both’/>
<item jid=’jane@longbourn.lit’ name=’Jane’ subscription=’both’/>
</query>
</iq>
This roster contains two contacts. The jid attribute is the address of the contact, and the name
attribute is a user-assignable nickname for the contact. The subscription attribute is set based
on the presence subscription status of the contact. It can have the value both if there is a subscription in each direction, to if Elizabeth has a subscription but the other party does not, and from if
Elizabeth is not subscribed to the contact’s presence but the other user has a subscription to her
presence. Generally, the user will only want to see contacts in the roster for which the subscription
value is both or to.
Add the following JavaScript code to the connected event handler to retrieve the roster:
$(document).bind(‘connected’, function () {
var iq = $iq({type: ‘get’}).c(‘query’, {xmlns: ‘jabber:iq:roster’});
Gab.connection.sendIQ(iq, Gab.on_roster);
});
code snippet gab.js
40718c06.indd 111
11/30/09 8:39:23 PM
112
❘
Chapter 6 Talking with Friends: One‑on‑One Chat
Next, add the implementation of on_roster() to the Gab object:
on_roster: function (iq) {
$(iq).find(‘item’).each(function () {
var jid = $(this).attr(‘jid’);
var name = $(this).attr(‘name’) || jid;
// transform jid into an id
var jid_id = Gab.jid_to_id(jid);
var contact = $(“<li id=’” + jid_id + “‘>” +
“<div class=’roster-contact offline’>” +
“<div class=’roster-name’>” +
name +
“</div><div class=’roster-jid’>” +
jid +
“</div></div></li>”);
Gab.insert_contact(contact);
});
}
code snippet gab.js
You’ve probably noticed that there is a new Strophe library function in the preceding event
handler — sendIQ(). This function handles most of the common ways to deal with IQ stanzas, and
it is described more fully in the next section.
The on_roster() function traverses the roster items, each one in its own <item> element, and calls
insert_contact() with the appropriate HTML. To find the contact later, it is necessary to give its
element an id attribute. The code uses a slightly transformed version of the contact’s bare JID as the
id. The jid_to_id() function is shown here and should be added to the Gab object:
jid_to_id: function (jid) {
return Strophe.getBareJidFromJid(jid)
.replace(“@”, “-”)
.replace(“.”, “-”);
}
code snippet gab.js
The insert_contact() function is used to keep the contact list sorted correctly. The more available
a contact, the higher in the roster they will appear. If two contacts have the same availability then
they are sorted by their JID. The following implementations of insert_contact() and its helper
function presence_value() should be added to the Gab object:
presence_value: function (elem) {
if (elem.hasClass(‘online’)) {
return 2;
} else if (elem.hasClass(‘away’)) {
return 1;
40718c06.indd 112
11/30/09 8:39:23 PM
Building the Roster
❘ 113
}
return 0;
},
insert_contact: function (elem) {
var jid = elem.find(‘.roster-jid’).text();
var pres = Gab.presence_value(elem.find(‘.roster-contact’));
var contacts = $(‘#roster-area li’);
if (contacts.length > 0) {
var inserted = false;
contacts.each(function () {
var cmp_pres = Gab.presence_value(
$(this).find(‘.roster-contact’));
var cmp_jid = $(this).find(‘.roster-jid’).text();
if (pres > cmp_pres) {
$(this).before(elem);
inserted = true;
return false;
} else {
if (jid < cmp_jid) {
$(this).before(elem);
inserted = true;
return false;
}
}
});
if (!inserted) {
$(‘#roster-area ul’).append(elem);
}
} else {
$(‘#roster-area ul’).append(elem);
}
}
code snippet gab.js
If you give Gab a spin in its current form, you should be able to log in to a server and see your roster
displayed and sorted.
Handling IQs
<iq> stanzas are special in XMPP in that they are the only stanzas required to have a response.
Every IQ-get or IQ-set stanza must receive a corresponding IQ-result or IQ-error stanza, just as any
GET or POST request must receive a response in the HTTP protocol. All <iq> stanzas must also
contain an id attribute that is unique enough to identify them within a session. The reason for this
is that the same id attribute will be used to tag the response so that the code knows to which IQ-get
or IQ-set stanza a particular IQ-result or IQ-error stanza corresponds.
40718c06.indd 113
11/30/09 8:39:23 PM
114
❘
Chapter 6 Talking with Friends: One‑on‑One Chat
Each time you send an IQ-get or IQ-set stanza, you usually want to handle the success and error
responses. This means that you must set up a stanza handler for each IQ-get or IQ-set you send.
Also, you’ll need to take care that your id attributes are unique so that incoming responses are not
ambiguous.
The sendIQ() function wraps all these requirements and the associated behavior in an easy-to-use
interface. Instead of creating a unique id value, setting up success and error handlers, and then
sending out the <iq> stanza, sendIQ() accepts an <iq> stanza, ensures it has a unique id, automatically sets up handlers with the success and error callbacks you provide, and ensures the handlers
are properly cleaned up after your callbacks are executed.
Calls to sendIQ() look like this:
Connection.sendIQ(iq_stanza, success_callback, error_callback);
The success and error callbacks are both optional. The success callback fires if an IQ-result is received,
and the error callback fires on an IQ-error. Both callbacks are passed a single parameter — the
response stanza.
In addition, sendIQ() accepts a timeout value as an optional fourth parameter. If a response to the
IQ-get or IQ-set stanza is not received within the timeout period, the error callback is automatically
triggered. This timeout can be very useful for making your code robust in the presence of network
or service errors that cause responses to be delayed or unsent.
sendIQ() makes dealing with IQ stanzas extremely easy, and you see a lot more of it in later
chapters.
Updating Presence Status
After the roster is retrieved, the code should send initial presence to kick off the presence probes and
presence updates from the user’s contacts. In order not to miss any updates, you should always set
up the appropriate handler before you send a stanza that will trigger events of interest. Modify the
on_roster() handler by adding the following highlighted code:
on_roster: function (iq) {
$(iq).find(‘item’).each(function () {
var jid = $(this).attr(‘jid’);
var name = $(this).attr(‘name’) || jid;
var jid_id = Gab.jid_to_id(jid);
var contact = $(“<li id=’” + jid_id + “‘>” +
“<div class=’roster-contact offline’>” +
“<div class=’roster-name’>” +
name +
“</div><div class=’roster-jid’>” +
jid +
“</div></div></li>”);
Gab.insert_contact(contact);
40718c06.indd 114
11/30/09 8:39:23 PM
Building the Roster
❘ 115
});
// set up presence handler and send initial presence
Gab.connection.addHandler(Gab.on_presence, null, “presence”);
Gab.connection.send($pres());
}
code snippet gab.js
Next, implement the on_presence() function to update the list of contacts accordingly. The following code should be added to the Gab object:
on_presence: function (presence) {
var ptype = $(presence).attr(‘type’);
var from = $(presence).attr(‘from’);
if (ptype !== ‘error’) {
var contact = $(‘#roster-area li#’ + Gab.jid_to_id(from))
.removeClass(“online”)
.removeClass(“away”)
.removeClass(“offline”);
if (ptype === ‘unavailable’) {
contact.addClass(“offline”);
} else {
var show = $(presence).find(“show”).text();
if (show === “” || show === “chat”) {
contact.addClass(“online”);
} else {
contact.addClass(“away”);
}
}
var li = contact.parent();
li.remove();
Gab.insert_contact(li);
}
return true;
}
code snippet gab.js
The presence stanza handler simply updates the CSS class of the contact in the list, which causes the
browser to update the screen, and then removes the contact and reinserts it to keep the list correctly
ordered. The on_presence() handler uses the same jid_to_id() transformation as on_roster() to
find the correct element to modify.
Test out Gab by using it to log in to your favorite account. You should see your roster load and be
able to watch the colors change as your contacts come online, change status, and go offline.
40718c06.indd 115
11/30/09 8:39:23 PM
116
❘
Chapter 6 Talking with Friends: One‑on‑One Chat
Adding New Contacts
Gab already works well for seeing your current contacts, but you must also add functionality so that
users can create new ones. New contacts are created in two ways: users can click Add Contact and
enter in the contact’s information, or they can receive and accept a presence subscription from someone new.
First, you should set up the new contact dialog box and bind the click event on the appropriate
button to open the dialog box. Add the following code to the document ready function:
$(‘#contact_dialog’).dialog({
autoOpen: false,
draggable: false,
modal: true,
title: ‘Add a Contact’,
buttons: {
“Add”: function () {
$(document).trigger(‘contact_added’, {
jid: $(‘#contact-jid’).val(),
name: $(‘#contact-name’).val()
});
$(‘#contact-jid’).val(‘’);
$(‘#contact-name’).val(‘’);
$(this).dialog(‘close’);
}
}
});
$(‘#new-contact’).click(function (ev) {
$(‘#contact_dialog’).dialog(‘open’);
});
code snippet gab.js
The dialog box will fire the contact_added event when the user clicks the Add button. You’ll need
to handle this event to send the appropriate XML to the server to actually add the contact to the
user’s roster. The following handler should be added after the other document event bindings at the
end of gab.js:
$(document).bind(‘contact_added’, function (ev, data) {
var iq = $iq({type: “set”}).c(“query”, {xmlns: “jabber:iq:roster”})
.c(“item”, data);
Gab.connection.sendIQ(iq);
var subscribe = $pres({to: data.jid, “type”: “subscribe”});
Gab.connection.send(subscribe);
});
code snippet gab.js
40718c06.indd 116
11/30/09 8:39:23 PM
Building the Roster
❘ 117
The contact_added event handler creates a roster add IQ-set stanza and sends it to the server. Then
it sends a presence stanza of type subscribe to the new contact to request a subscription to the contact’s presence updates. Notice that there is no code to update the UI with the new roster state. Instead
of handling this here, you will create another handler, which will be notified when the user’s roster
state changes.
Responding to Roster Changes
Users may connect to their XMPP server multiple times, with each connection being assigned its
own resource (see Chapter 1 for more details on client resources). Any of these resources could make
changes to the roster. To keep every resource synchronized with respect to the roster, an XMPP
server will broadcast roster state changes to all connected resources.
Each connected resource will get notified of roster additions, deletions, and modifications, even the
ones the resource itself performed. Some actions, like requesting a presence subscription, may cause
the roster to change as a side effect. These changes will also be broadcast in the same manner.
Imagine that Jane has just used Gab’s new contact dialog box to add Bingley to her roster. Just like
the code you saw earlier, Jane’s client would send an IQ-set like the one shown here:
<iq from=’jane@longbourn.lit/sitting_room’
type=’set’
id=’add1’>
<query xmlns=’jabber:iq:roster’>
<item jid=’bingley@netherfield.lit’ name=’Mr. Bingley’/>
</query>
</iq>
Her server will respond with the IQ-result acknowledging her request:
<iq to=’jane@longbourn.lit/sitting_room’ type=’result’ id=’add1’/>
Her server will also broadcast out the roster state change in a very similar IQ-set stanza:
<iq to=’jane@longbourn.lit/sitting_room’
type=’set’
id=’changed1’>
<query xmlns=’jabber:iq:roster’>
<item jid=’bingley@netherfield.lit’ name=’Mr. Bingley’ subscription=’none’/>
</query>
</iq>
The server’s reply may contain attributes that were unspecified in the original IQ-set from Jane, as
with the subscription attribute in the preceding code. Note that, just as with any other IQ stanza,
Jane must respond with an IQ-result or IQ-error stanza:
<iq type=’result’ id=’changed1’/>
If Jane had been connected from multiple resources, each of those connections would have received
the same roster addition notification.
40718c06.indd 117
11/30/09 8:39:23 PM
118
❘
Chapter 6 Talking with Friends: One‑on‑One Chat
Because the server broadcasts state changes to all resources, many XMPP clients will wait for this
notification before updating the UI. This also has the advantage that the roster will not display an
inconsistent state; if the roster was updated immediately before the response was received, the UI
might reflect the addition when the server has actually rejected the operation.
You can now add support for these roster state changes to Gab, which will not only show the modified roster to the user after they add a new contact, but also show any modifications, as they happen, from the user’s other resources. The following highlighted lines show the changes that you
must make to the connected event handler:
$(document).bind(‘connected’, function () {
var iq = $iq({type: ‘get’}).c(‘query’, {xmlns: ‘jabber:iq:roster’});
Gab.connection.sendIQ(iq, Gab.on_roster);
Gab.connection.addHandler(Gab.on_roster_changed,
“jabber:iq:roster”, “iq”, “set”);
});
code snippet gab.js
The on_roster_changed() function defined in the following code will also need to be added to the
Gab object:
on_roster_changed: function (iq) {
$(iq).find(‘item’).each(function () {
var sub = $(this).attr(‘subscription’);
var jid = $(this).attr(‘jid’);
var name = $(this).attr(‘name’) || jid;
var jid_id = Gab.jid_to_id(jid);
if (sub === ‘remove’) {
// contact is being removed
$(‘#’ + jid_id).remove();
} else {
// contact is being added or modified
var contact_html = “<li id=’” + jid_id + “‘>” +
“<div class=’” +
($(‘#’ + jid_id).attr(‘class’) || “roster-contact offline”) +
“‘>” +
“<div class=’roster-name’>” +
name +
“</div><div class=’roster-jid’>” +
jid +
“</div></div></li>”;
if ($(‘#’ + jid_id).length > 0) {
$(‘#’ + jid_id).replaceWith(contact_html);
} else {
Gab.insert_contact(contact_html);
}
}
40718c06.indd 118
11/30/09 8:39:24 PM
Building the Roster
❘ 119
});
return true;
}
code snippet gab.js
This handler is triggered anytime an IQ-set is received for a roster update. If the subscription attribute of the <item> child is remove, the corresponding roster item is deleted. Otherwise a new roster
item is added or an old one replaced. You can find more information on roster manipulations in
Chapter 14.
Gab will now keep the roster’s state in sync with other clients, show presence updates from contacts,
and let users add new contacts.
Dealing with Subscription Requests
Roster additions may also happen as a result of new presence subscription requests being accepted
by the user. Recall that in an earlier example you saw Jane add Bingley as a contact. After adding
him to the roster, she would send a presence subscription request. Gab takes these same steps in the
contact_added event handler you saw earlier.
Jane’s subscription request to Bingley would appear as shown here:
<presence from=’jane@longbourn.lit/sitting_room’
to=’bingley@netherfield.lit’
type=’subscribe’/>
Bingley can approve or deny her request by replying with a presence stanza containing a type attribute of subscribed or unsubscribed, respectively. His response, approving Jane’s subscription, is
shown here:
<presence from=’bingley@netherfield.lit/parlor’
to=’jane@longbourn.lit/sitting_room’
type=’subscribed’/>
If Bingley wanted to deny Jane’s subscription request, this stanza would have had a type of
unsubscribed.
If Bingley had not already had Jane as a contact in his roster, the server would immediately add Jane
and send him a roster update including the subscription state.
<iq to=’bingley@netherfield.lit/parlour’
type=’set’
id=’newcontact1’>
<query xmlns=’jabber:iq:roster’>
<item jid=’elizabeth@longbourn.lit’
subscription=’from’/>
</query>
</iq>
40718c06.indd 119
11/30/09 8:39:24 PM
120
❘
Chapter 6 Talking with Friends: One‑on‑One Chat
The subscription attribute has a value of from because Bingley does not yet have a subscription
to Jane’s presence. Normally, he would now request a subscription to her presence, and if Jane
approves the request, the final subscription state would be both.
The roster update handler you created earlier will also work for change notifications triggered by
approving a subscription request, but you must still handle the request itself. The following code
should be added to the document ready handler to enable the approval dialog box:
$(‘#approve_dialog’).dialog({
autoOpen: false,
draggable: false,
modal: true,
title: ‘Subscription Request’,
buttons: {
“Deny”: function () {
Gab.connection.send($pres({
to: Gab.pending_subscriber,
“type”: “unsubscribed”}));
Gab.pending_subscriber = null;
$(this).dialog(‘close’);
},
“Approve”: function () {
Gab.connection.send($pres({
to: Gab.pending_subscriber,
“type”: “subscribed”}));
Gab.pending_subscriber = null;
$(this).dialog(‘close’);
}
}
});
code snippet gab.js
The Approve and Deny buttons send a response <presence> stanza with a type attribute set to
either subscribed or unsubscribed, respectively. If the request is approved, the server generates a
roster modification; if the request is denied, the sender is notified of the rejection, and the roster will
not be changed.
Next, you must modify the presence handler you wrote earlier to handle incoming subscription
requests. The following highlighted lines show the needed modifications to the Gab object:
pending_subscriber: null,
on_presence: function (presence) {
var ptype = $(presence).attr(‘type’);
var from = $(presence).attr(‘from’);
if (ptype === ‘subscribe’) {
// populate pending_subscriber, the approve-jid span, and
// open the dialog
Gab.pending_subscriber = from;
40718c06.indd 120
11/30/09 8:39:24 PM
Building the Roster
❘ 121
$(‘#approve-jid’).text(Strophe.getBareJidFromJid(from));
$(‘#approve_dialog’).dialog(‘open’);
} else if (ptype !== ‘error’) {
var contact = $(‘#roster-area li#’ + Gab.jid_to_id(from))
.removeClass(“online”)
.removeClass(“away”)
.removeClass(“offline”);
if (ptype === ‘unavailable’) {
contact.addClass(“offline”);
} else {
var show = $(presence).find(“show”).text();
if (show === “” || show === “chat”) {
contact.addClass(“online”);
} else {
contact.addClass(“away”);
}
}
var li = contact.parent();
li.remove();
Gab.insert_contact(li);
}
return true;
}
code snippet gab.js
Note that the pending_subscriber attribute has been added to the Gab object. This is used by
the new subscribe request handling code. When the on_presence() handler receives a subscribe
request, it just populates this attribute and prepares and opens the dialog box. The user’s action in
the dialog box determines which kind of response is generated.
Gab will now handle the incoming subscription requests, but generally when a request is approved the
user will want to send a complementary subscribe request so that the final subscription is bi-directional.
Modify the Approve button’s action to match the highlighted lines in the following code:
“Approve”: function () {
Gab.connection.send($pres({
to: Gab.pending_subscriber,
“type”: “subscribed”}));
Gab.connection.send($pres({
to: Gab.pending_subscriber,
“type”: “subscribe”}));
Gab.pending_subscriber = null;
}
code snippet gab.js
40718c06.indd 121
11/30/09 8:39:24 PM
122
❘
Chapter 6 Talking with Friends: One‑on‑One Chat
Now, whenever the user approves a subscription request, Gab will send a subscription request back.
Gab’s roster area is finished for the time being, and it’s time to do some work on the chat area.
Building the Chats
Chatting is the heart of Gab, and all the action takes place in the chat area. You’ll be using jQuery
UI’s tab controls to make displaying and switching between multiple chats very easy. Each of the
chat tabs will represent a conversation with a particular contact, and each tab will also have an
input area for sending messages. A new chat tab will appear whenever a new message from a user
without an existing tab is received. Clicking a contact in the roster will either select an existing chat
tab or create a new one if one doesn’t already exist.
Before you begin on the code, you should review the basics of the jQuery UI tab control if you
haven’t seen it before.
Working with Tabs
jQuery UI’s tab control is quite powerful. It provides familiar tabbing functionality that you have
probably seen before in a variety of desktop and web applications. It imposes some specific constraints on element ids and structure, and it also has a lot of options.
The tabbed area contains a bar, which holds all of the labeled tabs. This bar appears as a <ul> element in the HTML. The Gab application’s HTML already contains this element as you can see at
the beginning of the chapter in Listing 6-1. Each tab will have an <li> child that contains its name
as a hyperlink with a special href attribute.
Following is an example of the HTML that is needed for a tabbed area containing two tabs:
<div id=’tab-example’>
<ul>
<li><a href=’#tab-example-1’>First Tab</a></li>
<li><a href=’#tab-example-2’>Second Tab</a></li>
</ul>
<div id=’tab-example-1’>
<p>This is the first tab.
</div>
Neat!</p>
<div id=’tab-example-2’>
<p>And here is the second tab.</p>
</div>
</div>
Each tab has an <li> entry in the <ul> element as well as a corresponding <div> containing the
tab’s content. The href attribute and the <div> element’s id attribute must be the same except for
the leading # in the href attribute.
The tab area can be initialized with a call to tabs(). For example, to turn the preceding HTML
into a tab control, run:
$(‘#tab-example’).tabs();
40718c06.indd 122
11/30/09 8:39:24 PM
Building the Chats
❘ 123
New tabs are added with the add subcommand of tabs(). You can add a new tab to the preceding
ones with:
$(‘#tab-example’).tabs(‘add’, ‘#tab-example-3’, ‘Third Tab’);
$(‘#tab-example-3’).html(“<p>Finally, a third tab!</p>”);
You can also programmatically change the selected tab with the select subcommand. Switch to the
second tab with:
$(‘#tab-example’).tabs(‘select’, ‘#tab-example-2’);
Tabs support a number of other subcommands as well as various options that control their behavior.
Please refer to jQuery UI’s documentation if you’d like to explore the additional functionality.
You will put your new tabbing knowledge to use in the next section when you create some chat
windows.
Creating New Chats
The easiest place to start creating chats is by letting users click contacts in the roster to create or
select chat windows. Before you can implement these actions though, you must first initialize the
chat area. Add the following code to the document ready handler:
$(‘#chat-area’).tabs().find(‘.ui-tabs-nav’).sortable({axis: ‘x’});
code snippet gab.js
The code initializes the chat area as a tabbed control and then makes the tabs sortable in the tab bar
using jQuery UI’s sortable() function. This allows the user to reorder the tabs after they are created so that they appear exactly where the user prefers.
Now that you have a real tab area, you’ll need to respond to click events on the roster contacts. Up
to now, you’ve always used bind() or click() to set up event handlers, but now you’ll have to use
live(). Like bind(), live() attaches a handler function to an event, but it will also do this for any
elements that are created after live() is called. Because roster contacts are being added dynamically, you must use live() to ensure that any future roster contacts will still get the right event
handlers.
Place the following click event handler into Gab’s document ready handler:
$(‘.roster-contact’).live(‘click’, function () {
var jid = $(this).find(“.roster-jid”).text();
var name = $(this).find(“.roster-name”).text();
var jid_id = Gab.jid_to_id(jid);
if ($(‘#chat-’ + jid_id).length > 0) {
$(‘#chat-area’).tabs(‘select’, ‘#chat-’ + jid_id);
} else {
$(‘#chat-area’).tabs(‘add’, ‘#chat-’ + jid_id, name);
$(‘#chat-’ + jid_id).append(
“<div class=’chat-messages’></div>” +
“<input type=’text’ class=’chat-input’>”);
40718c06.indd 123
11/30/09 8:39:24 PM
124
❘
Chapter 6 Talking with Friends: One‑on‑One Chat
$(‘#chat-’ + jid_id).data(‘jid’, jid);
}
$(‘#chat-’ + jid_id + ‘ input’).focus();
});
code snippet gab.js
This click handler first finds the JID and name of the contact. It determines if a chat tab already
exists for this contact, and if so, selects it. Otherwise, it creates a new chat tab for the contact and
initializes its content. Finally, the text input box is focused so that the user can start typing immediately. Notice that the jQuery data() function is used to stash the JID of the contact with the <div>
element. This JID will be needed by other code later.
These newly created chat tabs aren’t very interesting yet. You need to enable the user to send messages and update the content when new messages are received.
Sending Messages
You should send the user’s message whenever they hit the Enter key inside the input box. Once
again, you can use jQuery’s live event handlers to do this:
$(‘.roster-input’).live(‘keypress’, function (ev) {
if (ev.which === 13) {
ev.preventDefault();
var body = $(this).val();
var jid = $(this).parent().data(‘jid’);
Gab.connection.send($msg({
to: jid,
“type”: “chat”
}).c(‘body’).t(body));
$(this).parent().find(‘.chat-messages’).append(
“<div class=’chat-message’><” +
“<span class=’chat-name me’>” +
Strophe.getNodeFromJid(Gab.connection.jid) +
“</span>><span class=’chat-text’>” +
body +
“</span></div>”);
Gab.scroll_chat(Gab.jid_to_id(jid));
$(this).val(‘’);
}
});
code snippet gab.js
40718c06.indd 124
11/30/09 8:39:24 PM
Building the Chats
❘ 125
First, the default action of adding the Enter key to the data is prevented. The text of the message and
the stashed JID are retrieved, and they are both used to construct the message that is sent. The text is
also echoed to the display, and the input box is cleared to make it ready for the user to enter new text.
Now, you must handle incoming messages so that their content can be placed in the appropriate tab.
The following highlighted lines show the required modifications to the connected event handler to
set up a new <message> stanza handler:
$(document).bind(‘connected’, function () {
var iq = $iq({type: ‘get’}).c(‘query’, {xmlns: ‘jabber:iq:roster’});
Gab.connection.sendIQ(iq, Gab.on_roster);
Gab.connection.addHandler(Gab.on_roster_changed,
“jabber:iq:roster”, “iq”, “set”);
Gab.connection.addHandler(Gab.on_message,
null, “message”, “chat”);
});
code snippet gab.js
Next, you must implement on_message() and its helper function scroll_chat() in the Gab object:
on_message: function (message) {
var jid = Strophe.getBareJidFromJid($(message).attr(‘from’));
var jid_id = Gab.jid_to_id(jid);
if ($(‘#chat-’ + jid_id).length === 0) {
$(‘#chat-area’).tabs(‘add’, ‘#chat-’ + jid_id, jid);
$(‘#chat-’ + jid_id).append(
“<div class=’chat-messages’></div>” +
“<input type=’text’ class=’chat-input’>”);
$(‘#chat-’ + jid_id).data(‘jid’, jid);
}
$(‘#chat-area’).tabs(‘select’, ‘#chat-’ + jid_id);
$(‘#chat-’ + jid_id + ‘ input’).focus();
var body = $(message).find(“html > body”);
if (body.length === 0) {
body = $(message).find(‘body’);
if (body.length > 0) {
body = body.text()
} else {
body = null;
}
} else {
40718c06.indd 125
11/30/09 8:39:24 PM
126
❘
Chapter 6 Talking with Friends: One‑on‑One Chat
body = body.contents();
var span = $(“<span></span>”);
body.each(function () {
if (document.importNode) {
$(document.importNode(this, true)).appendTo(span);
} else {
// IE workaround
span.append(this.xml);
}
});
body = span;
}
if (body) {
// add the new message
$(‘#chat-’ + jid_id + ‘ .chat-messages’).append(
“<div class=’chat-message’>” +
“<<span class=’chat-name’>” +
Strophe.getNodeFromJid(jid) +
“</span>><span class=’chat-text’>” +
“</span></div>”);
$(‘#chat-’ + jid_id + ‘ .chat-message:last .chat-text’)
.append(body);
Gab.scroll_chat(jid_id);
}
return true;
},
scroll_chat: function (jid_id) {
var div = $(‘#chat-’ + jid_id + ‘ .chat-messages’).get(0);
div.scrollTop = div.scrollHeight;
}
code snippet gab.js
The on_message() handler is slightly involved. First, it detects whether an existing chat tab is
available for this contact, and if not, creates one. Then it selects the tab and focuses the input box.
Once the tab has been properly displayed, it then extracts the body of the message (looking for
XHTML-IM payloads like you saw in Chapter 5), creates a new <div> element for the message,
and then appends the body. Finally, it returns true so that it will continue to be called for future
messages.
Gab is now a simple, but capable, instant messaging client. Take a few minutes to play around with
it and make sure it works as expected.
40718c06.indd 126
11/30/09 8:39:24 PM
Best Practices for Instant Messaging
❘ 127
Best Practices for Instant Messaging
Gab is currently a little too simple, and it doesn’t conform to the standard best practices for communication. For example, outgoing messages are always sent to the bare JID of the user, even if a
full address is known for them. Messages need to be addressed with care because their delivery is
affected by a server’s routing rules.
Understanding Message Routing
XMPP <message> stanzas sent to connected clients are routed specially by XMPP servers. Particularly,
the server will do different things depending on whether the to attribute is a bare JID or a full JID.
Messages addressed to a user’s bare JID are delivered to the connected resource with the highest
priority. If multiple resources are tied for the highest priority, the server may choose to deliver the
message to all of them or choose the best one. How a server chooses the best resource for delivery is
server dependent. Most servers deliver messages to all tied resources, but you may encounter servers
that attempt to guess by estimating the most recently active resource.
Messages addressed to full JIDs are delivered only to that specific resource, or if that resource is
offline, potentially to offline storage until the user next comes online.
Because sending a message to a bare JID may result in multiple deliveries, it is best to address messages to the full JID as soon as you receive the full address of the other party.
For example, if you haven’t recently been communicating with a user, you should address a message
to their bare JID. Once they respond, you will know which resource they are using to talk to you,
and you can then use that destination to address future messages to them.
Users may go online and offline or away and back during a chat. Because they may want to receive
messages at a different location after these events, it is best to forget the full addresses of users
whenever their presence status changes. Once you have their first reply, you can again start addressing messages to the potentially new, full address.
Now that you have a better understanding of message routing, you can update Gab to do the right
thing when sending messages.
Addressing Messages Better
Changing Gab to address messages to full JIDs is very easy. The address to send messages to is
already stored in the chat tab’s <div> element, so all that is needed is to replace the bare JID stored
there with the user’s full JID. Of course, you only want to do this once you know the full address in
on_message(). Modify the following highlighted lines in your on_message() handler:
on_message: function (message) {
var full_jid = $(message).attr(‘from’);
var jid = Strophe.getBareJidFromJid(full_jid);
var jid_id = Gab.jid_to_id(jid);
if ($(‘#chat-’ + jid_id).length === 0) {
$(‘#chat-area’).tabs(‘add’, ‘#chat-’ + jid_id, jid);
40718c06.indd 127
11/30/09 8:39:24 PM
128
❘
Chapter 6 Talking with Friends: One‑on‑One Chat
$(‘#chat-’ + jid_id).append(
“<div class=’chat-messages’></div>” +
“<input type=’text’ class=’chat-input’>”);
}
$(‘#chat-’ + jid_id).data(‘jid’, full_jid);
$(‘#chat-area’).tabs(‘select’, ‘#chat-’ + jid_id);
$(‘#chat-’ + jid_id + ‘ input’).focus();
var body = $(message).find(“html > body”);
if (body.length === 0) {
body = $(message).find(‘body’);
if (body.length > 0) {
body = body.text()
} else {
body = null;
}
} else {
body = body.contents();
var span = $(“<span></span>”);
body.each(function () {
if (document.importNode) {
$(document.importNode(this, true)).appendTo(span);
} else {
// IE workaround
span.append(this.xml);
}
});
body = span;
}
if (body) {
// add the new message
$(‘#chat-’ + jid_id + ‘ .chat-messages’).append(
“<div class=’chat-message’>” +
“<<span class=’chat-name’>” +
Strophe.getNodeFromJid(jid) +
“</span>><span class=’chat-text’>” +
“</span></div>”);
$(‘#chat-’ + jid_id + ‘ .chat-message:last .chat-text’)
.append(body);
Gab.scroll_chat(jid_id);
}
return true;
}
code snippet gab.js
40718c06.indd 128
11/30/09 8:39:25 PM
Best Practices for Instant Messaging
❘ 129
Whenever a message is received from a user, the JID data stashed in the <div> element for that user
is updated to the full address. Now all that remains is to switch back to the bare JID whenever a
user’s presence changes. Make the following highlighted changes to your on_presence() handler:
on_presence: function (presence) {
var ptype = $(presence).attr(‘type’);
var from = $(presence).attr(‘from’);
if (ptype === ‘subscribe’) {
// populate pending_subscriber, the approve-jid span, and
// open the dialog
Gab.pending_subscriber = from;
$(‘#approve-jid’).text(Strophe.getBareJidFromJid(from));
$(‘#approve_dialog’).dialog(‘open’);
} else if (ptype !== ‘error’) {
var contact = $(‘#roster-area li#’ + Gab.jid_to_id(from))
.removeClass(“online”)
.removeClass(“away”)
.removeClass(“offline”);
if (ptype === ‘unavailable’) {
contact.addClass(“offline”);
} else {
var show = $(presence).find(“show”).text();
if (show === “” || show === “chat”) {
contact.addClass(“online”);
} else {
contact.addClass(“away”);
}
}
var li = contact.parent();
li.remove();
Gab.insert_contact(li);
}
// reset addressing for user since their presence changed
var jid_id = Gab.jid_to_id(from);
$(‘#chat-’ + jid_id).data(‘jid’, Strophe.getBareJidFromJid(fom));
return true;
},
code snippet gab.js
Gab should now switch between full and bare addressing as the user’s presence changes and it learns
about their connected resources.
40718c06.indd 129
11/30/09 8:39:25 PM
130
❘
Chapter 6 Talking with Friends: One‑on‑One Chat
Adding Activity Notifications
Many clients support sending and receiving activity notifications. These notifications inform the
opposite party when someone is typing, paying attention to the chat, or has left or closed the chat.
These events are all defined in Chat State Notifications (XEP-0085). To make Gab more user
friendly, you will add support for displaying and sending typing notifications.
Understanding Chat States
Following are the five defined chat states:
➤➤
Active: The user is paying attention to the chat.
➤➤
Inactive: The user is not paying attention to the chat.
➤➤
Composing: The user is typing a message for the chat.
➤➤
Paused: The user was typing, but has briefly stopped.
➤➤
Gone: The user has closed or left the chat.
Each state can transition to one or more of the other states. For example, a user in the composing
state may move to paused or to active, and a user in the gone state can only move to active. You can
find the full list of state transitions in XEP-0085.
Some clients may not support activity notifications. Gab assumes that all clients will understand
these, which is not optimal, but shouldn’t cause any problems because elements that are not understood will be ignored. In a real-world application, you would want to detect support for this feature
and disable sending the notifications to the other party if their client couldn’t process them. The
specification details several ways in which this detection can be done.
Notifications are communicated in <message> stanzas. Some states are communicated alongside the
message body, but some are sent in their own messages that do not contain bodies. The following
example stanzas show a user entering the composing state, and then sending the completed message
along with the transition to the active state:
<message from=’darcy@pemberley.lit/rosings’
to=’elizabeth@longbourn.lit/hunsford’
type=’chat’>
<composing xmlns=’http://jabber.org/protocol/chatstates’/>
</message>
<message from=’darcy@pemberley.lit/rosings’
to=’elizabeth@longbourn.lit/hunsford’
type=’chat’>
<body>In vain have I struggled. It will not do. My feelings will not be repressed.
You must allow me to tell you how ardently I admire and love you.</body>
<active xmlns=’http://jabber.org/protocol/chatstates’/>
</message>
Darcy’s client first sends a notification to Elizabeth that he has begun typing. Several seconds later, a
normal message is received with the beginnings of his proposal along with a second notification that
40718c06.indd 130
11/30/09 8:39:25 PM
Adding Activity Notifications
❘ 131
he is paying attention to this chat. Elizabeth’s client can use these notifications to modify her display
appropriately.
Sending Notifications
Gab supports only the active and composing states. When the user starts typing, the composing
state is communicated to the intended recipient. Upon completion of the message, the active state is
sent. This is exactly the series of events shown in the previous example.
First, you should modify the keypress event handler of the chat tab input boxes to send the composing notification. It will also need to append the active state notification once the message is sent.
The modified handler is shown here:
$(‘.chat-input’).live(‘keypress’, function (ev) {
var jid = $(this).parent().data(‘jid’);
if (ev.which === 13) {
ev.preventDefault();
var body = $(this).val();
var message = $msg({to: jid,
“type”: “chat”})
.c(‘body’).t(body).up()
.c(‘active’, {xmlns: “http://jabber.org/protocol/chatstates”});
Gab.connection.send(message);
$(this).parent().find(‘.chat-messages’).append(
“<div class=’chat-message’><” +
“<span class=’chat-name me’>” +
Strophe.getNodeFromJid(Gab.connection.jid) +
“</span>><span class=’chat-text’>” +
body +
“</span></div>”);
Gab.scroll_chat(Gab.jid_to_id(jid));
$(this).val(‘’);
$(this).parent().data(‘composing’, false);
} else {
var composing = $(this).parent().data(‘composing’);
if (!composing) {
var notify = $msg({to: jid, “type”: “chat”})
.c(‘composing’, {xmlns: “http://jabber.org/protocol/chatstates”});
Gab.connection.send(notify);
$(this).parent().data(‘composing’, true);
}
}
});
code snippet gab.js
40718c06.indd 131
11/30/09 8:39:25 PM
132
❘
Chapter 6 Talking with Friends: One‑on‑One Chat
The user’s chat partner will now get typing notifications as the user starts typing. If you run Gab
and start a conversation with yourself in another client, you can see this in action.
Receiving Notifications
You’ll also want to add support to Gab for incoming typing notifications. You can do this by watching for the composing notification in incoming messages. Add the following highlighted code to the
on_message() handler:
on_message: function (message) {
var full_jid = $(message).attr(‘from’);
var jid = Strophe.getBareJidFromJid(full_jid);
var jid_id = Gab.jid_to_id(jid);
if ($(‘#chat-’ + jid_id).length === 0) {
$(‘#chat-area’).tabs(‘add’, ‘#chat-’ + jid_id, jid);
$(‘#chat-’ + jid_id).append(
“<div class=’chat-messages’></div>” +
“<input type=’text’ class=’chat-input’>”);
}
$(‘#chat-’ + jid_id).data(‘jid’, full_jid);
$(‘#chat-area’).tabs(‘select’, ‘#chat-’ + jid_id);
$(‘#chat-’ + jid_id + ‘ input’).focus();
var composing = $(message).find(‘composing’);
if (composing.length > 0) {
$(‘#chat-’ + jid_id + ‘ .chat-messages’).append(
“<div class=’chat-event’>” +
Strophe.getNodeFromJid(jid) +
“ is typing..</div>”);
Gab.scroll_chat(jid_id);
}
if (body.length === 0) {
body = $(message).find(‘body’);
if (body.length > 0) {
body = body.text()
} else {
body = null;
}
} else {
body = body.contents();
var span = $(“<span></span>”);
body.each(function () {
if (document.importNode) {
$(document.importNode(this, true)).appendTo(span);
} else {
// IE workaround
span.append(this.xml);
}
40718c06.indd 132
11/30/09 8:39:25 PM
Final Touches
❘ 133
});
body = span;
}
if (body) {
// remove notifications since user is now active
$(‘#chat-’ + jid_id + ‘ .chat-event’).remove();
// add the new message
$(‘#chat-’ + jid_id + ‘ .chat-messages’).append(
“<div class=’chat-message’>” +
“<<span class=’chat-name’>” +
Strophe.getNodeFromJid(jid) +
“</span>><span class=’chat-text’>” +
“</span></div>”);
$(‘#chat-’ + jid_id + ‘ .chat-message:last .chat-text’)
.append(body);
Gab.scroll_chat(jid_id);
}
return true;
}
code snippet gab.js
Every time the other party starts typing, Gab will now show a small message informing the user of
this activity. When the other party finally sends their message, the typing notification will disappear.
Final Touches
You still have two small pieces left, the two other buttons in the toolbar.
The Disconnect button is quite simple. Add the following click event handler to the document ready
function:
$(‘#disconnect’).click(function () {
Gab.connection.disconnect();
});
code snippet gab.js
You must also reset the UI in the disconnected event handler. Make the highlighted changes to the
handler:
$(document).bind(‘disconnected’, function () {
Gab.connection = null;
Gab.pending_subscriber = null;
$(‘#roster-area ul’).empty();
40718c06.indd 133
11/30/09 8:39:25 PM
134
❘
Chapter 6 Talking with Friends: One‑on‑One Chat
$(‘#chat-area ul’).empty();
$(‘#chat-area div’).remove();
$(‘#login_dialog’).dialog(‘open’);
});
code snippet gab.js
To implement the New Chat dialog box, you must first initialize the dialog box, and then bind the
button click to the dialog(‘open’) call. Add the following code to the document ready function to
do this:
$(‘#chat_dialog’).dialog({
autoOpen: false,
draggable: false,
modal: true,
title: ‘Start a Chat’,
buttons: {
“Start”: function () {
var jid = $(‘#chat-jid’).val();
var jid_id = Gab.jid_to_id(jid);
$(‘#chat-area’).tabs(‘add’, ‘#chat-’ + jid_id, jid);
$(‘#chat-’ + jid_id).append(
“<div class=’chat-messages’></div>” +
“<input type=’text’ class=’chat-input’>”);
$(‘#chat-’ + jid_id).data(‘jid’, jid);
$(‘#chat-area’).tabs(‘select’, ‘#chat-’ + jid_id);
$(‘#chat-’ + jid_id + ‘ input’).focus();
$(‘#chat-jid’).val(‘’);
$(this).dialog(‘close’);
}
}
});
$(‘#new-chat’).click(function () {
$(‘#chat_dialog’).dialog(‘open’);
});
code snippet gab.js
With these last additions, the application is complete. Gab has become more than just a simple chat
client with its support for notifications, sortable tabs, multiple chats, and the roster. The final version
of the code appears in Listing 6-3.
40718c06.indd 134
11/30/09 8:39:26 PM
Final Touches
❘ 135
Listing 6-3: gab.js
var Gab = {
connection: null,
jid_to_id: function (jid) {
return Strophe.getBareJidFromJid(jid)
.replace(“@”, “-”)
.replace(“.”, “-”);
},
on_roster: function (iq) {
$(iq).find(‘item’).each(function () {
var jid = $(this).attr(‘jid’);
var name = $(this).attr(‘name’) || jid;
// transform jid into an id
var jid_id = Gab.jid_to_id(jid);
var contact = $(“<li id=’” + jid_id + “‘>” +
“<div class=’roster-contact offline’>” +
“<div class=’roster-name’>” +
name +
“</div><div class=’roster-jid’>” +
jid +
“</div></div></li>”);
Gab.insert_contact(contact);
});
// set up presence handler and send initial presence
Gab.connection.addHandler(Gab.on_presence, null, “presence”);
Gab.connection.send($pres());
},
pending_subscriber: null,
on_presence: function (presence) {
var ptype = $(presence).attr(‘type’);
var from = $(presence).attr(‘from’);
var jid_id = Gab.jid_to_id(from);
if (ptype === ‘subscribe’) {
// populate pending_subscriber, the approve-jid span, and
// open the dialog
Gab.pending_subscriber = from;
$(‘#approve-jid’).text(Strophe.getBareJidFromJid(from));
$(‘#approve_dialog’).dialog(‘open’);
} else if (ptype !== ‘error’) {
var contact = $(‘#roster-area li#’ + jid_id + ‘ .roster-contact’)
.removeClass(“online”)
.removeClass(“away”)
.removeClass(“offline”);
if (ptype === ‘unavailable’) {
contact.addClass(“offline”);
40718c06.indd 135
continues
11/30/09 8:39:26 PM
136
❘
Chapter 6 Talking with Friends: One‑on‑One Chat
Listing 6-3 (continued)
} else {
var show = $(presence).find(“show”).text();
if (show === “” || show === “chat”) {
contact.addClass(“online”);
} else {
contact.addClass(“away”);
}
}
var li = contact.parent();
li.remove();
Gab.insert_contact(li);
}
// reset addressing for user since their presence changed
var jid_id = Gab.jid_to_id(from);
$(‘#chat-’ + jid_id).data(‘jid’, Strophe.getBareJidFromJid(from));
return true;
},
on_roster_changed: function (iq) {
$(iq).find(‘item’).each(function () {
var sub = $(this).attr(‘subscription’);
var jid = $(this).attr(‘jid’);
var name = $(this).attr(‘name’) || jid;
var jid_id = Gab.jid_to_id(jid);
if (sub === ‘remove’) {
// contact is being removed
$(‘#’ + jid_id).remove();
} else {
// contact is being added or modified
var contact_html = “<li id=’” + jid_id + “‘>” +
“<div class=’” +
($(‘#’ + jid_id).attr(‘class’) || “roster-contact offline”) +
“‘>” +
“<div class=’roster-name’>” +
name +
“</div><div class=’roster-jid’>” +
jid +
“</div></div></li>”;
if ($(‘#’ + jid_id).length > 0) {
$(‘#’ + jid_id).replaceWith(contact_html);
} else {
Gab.insert_contact(contact_html);
}
}
});
return true;
40718c06.indd 136
11/30/09 8:39:26 PM
Final Touches
❘ 137
},
on_message: function (message) {
var full_jid = $(message).attr(‘from’);
var jid = Strophe.getBareJidFromJid(full_jid);
var jid_id = Gab.jid_to_id(jid);
if ($(‘#chat-’ + jid_id).length === 0) {
$(‘#chat-area’).tabs(‘add’, ‘#chat-’ + jid_id, jid);
$(‘#chat-’ + jid_id).append(
“<div class=’chat-messages’></div>” +
“<input type=’text’ class=’chat-input’>”);
}
$(‘#chat-’ + jid_id).data(‘jid’, full_jid);
$(‘#chat-area’).tabs(‘select’, ‘#chat-’ + jid_id);
$(‘#chat-’ + jid_id + ‘ input’).focus();
var composing = $(message).find(‘composing’);
if (composing.length > 0) {
$(‘#chat-’ + jid_id + ‘ .chat-messages’).append(
“<div class=’chat-event’>” +
Strophe.getNodeFromJid(jid) +
“ is typing..</div>”);
Gab.scroll_chat(jid_id);
}
var body = $(message).find(“html > body”);
if (body.length === 0) {
body = $(message).find(‘body’);
if (body.length > 0) {
body = body.text()
} else {
body = null;
}
} else {
body = body.contents();
var span = $(“<span></span>”);
body.each(function () {
if (document.importNode) {
$(document.importNode(this, true)).appendTo(span);
} else {
// IE workaround
span.append(this.xml);
}
});
body = span;
}
if (body) {
// remove notifications since user is now active
40718c06.indd 137
continues
11/30/09 8:39:26 PM
138
❘
Chapter 6 Talking with Friends: One‑on‑One Chat
Listing 6-3 (continued)
$(‘#chat-’ + jid_id + ‘ .chat-event’).remove();
// add the new message
$(‘#chat-’ + jid_id + ‘ .chat-messages’).append(
“<div class=’chat-message’>” +
“<<span class=’chat-name’>” +
Strophe.getNodeFromJid(jid) +
“</span>><span class=’chat-text’>” +
“</span></div>”);
$(‘#chat-’ + jid_id + ‘ .chat-message:last .chat-text’)
.append(body);
Gab.scroll_chat(jid_id);
}
return true;
},
scroll_chat: function (jid_id) {
var div = $(‘#chat-’ + jid_id + ‘ .chat-messages’).get(0);
div.scrollTop = div.scrollHeight;
},
presence_value: function (elem) {
if (elem.hasClass(‘online’)) {
return 2;
} else if (elem.hasClass(‘away’)) {
return 1;
}
return 0;
},
insert_contact: function (elem) {
var jid = elem.find(‘.roster-jid’).text();
var pres = Gab.presence_value(elem.find(‘.roster-contact’));
var contacts = $(‘#roster-area li’);
if (contacts.length > 0) {
var inserted = false;
contacts.each(function () {
var cmp_pres = Gab.presence_value(
$(this).find(‘.roster-contact’));
var cmp_jid = $(this).find(‘.roster-jid’).text();
if (pres > cmp_pres) {
$(this).before(elem);
inserted = true;
return false;
40718c06.indd 138
11/30/09 8:39:26 PM
Final Touches
❘ 139
} else {
if (jid < cmp_jid) {
$(this).before(elem);
inserted = true;
return false;
}
}
});
if (!inserted) {
$(‘#roster-area ul’).append(elem);
}
} else {
$(‘#roster-area ul’).append(elem);
}
}
};
$(document).ready(function () {
$(‘#login_dialog’).dialog({
autoOpen: true,
draggable: false,
modal: true,
title: ‘Connect to XMPP’,
buttons: {
“Connect”: function () {
$(document).trigger(‘connect’, {
jid: $(‘#jid’).val(),
password: $(‘#password’).val()
});
$(‘#password’).val(‘’);
$(this).dialog(‘close’);
}
}
});
$(‘#contact_dialog’).dialog({
autoOpen: false,
draggable: false,
modal: true,
title: ‘Add a Contact’,
buttons: {
“Add”: function () {
$(document).trigger(‘contact_added’, {
jid: $(‘#contact-jid’).val(),
name: $(‘#contact-name’).val()
});
$(‘#contact-jid’).val(‘’);
$(‘#contact-name’).val(‘’);
$(this).dialog(‘close’);
}
40718c06.indd 139
continues
11/30/09 8:39:26 PM
140
❘
Chapter 6 Talking with Friends: One‑on‑One Chat
Listing 6-3 (continued)
}
});
$(‘#new-contact’).click(function (ev) {
$(‘#contact_dialog’).dialog(‘open’);
});
$(‘#approve_dialog’).dialog({
autoOpen: false,
draggable: false,
modal: true,
title: ‘Subscription Request’,
buttons: {
“Deny”: function () {
Gab.connection.send($pres({
to: Gab.pending_subscriber,
“type”: “unsubscribed”}));
Gab.pending_subscriber = null;
$(this).dialog(‘close’);
},
“Approve”: function () {
Gab.connection.send($pres({
to: Gab.pending_subscriber,
“type”: “subscribed”}));
Gab.connection.send($pres({
to: Gab.pending_subscriber,
“type”: “subscribe”}));
Gab.pending_subscriber = null;
$(this).dialog(‘close’);
}
}
});
$(‘#chat-area’).tabs().find(‘.ui-tabs-nav’).sortable({axis: ‘x’});
$(‘.roster-contact’).live(‘click’, function () {
var jid = $(this).find(“.roster-jid”).text();
var name = $(this).find(“.roster-name”).text();
var jid_id = Gab.jid_to_id(jid);
if ($(‘#chat-’ + jid_id).length === 0) {
$(‘#chat-area’).tabs(‘add’, ‘#chat-’ + jid_id, name);
$(‘#chat-’ + jid_id).append(
“<div class=’chat-messages’></div>” +
“<input type=’text’ class=’chat-input’>”);
$(‘#chat-’ + jid_id).data(‘jid’, jid);
40718c06.indd 140
11/30/09 8:39:26 PM
Final Touches
❘ 141
}
$(‘#chat-area’).tabs(‘select’, ‘#chat-’ + jid_id);
$(‘#chat-’ + jid_id + ‘ input’).focus();
});
$(‘.chat-input’).live(‘keypress’, function (ev) {
var jid = $(this).parent().data(‘jid’);
if (ev.which === 13) {
ev.preventDefault();
var body = $(this).val();
var message = $msg({to: jid,
“type”: “chat”})
.c(‘body’).t(body).up()
.c(‘active’, {xmlns: “http://jabber.org/protocol/chatstates”});
Gab.connection.send(message);
$(this).parent().find(‘.chat-messages’).append(
“<div class=’chat-message’><” +
“<span class=’chat-name me’>” +
Strophe.getNodeFromJid(Gab.connection.jid) +
“</span>><span class=’chat-text’>” +
body +
“</span></div>”);
Gab.scroll_chat(Gab.jid_to_id(jid));
$(this).val(‘’);
$(this).parent().data(‘composing’, false);
} else {
var composing = $(this).parent().data(‘composing’);
if (!composing) {
var notify = $msg({to: jid, “type”: “chat”})
.c(‘composing’, {xmlns: “http://jabber.org/protocol/chatstates”});
Gab.connection.send(notify);
$(this).parent().data(‘composing’, true);
}
}
});
$(‘#disconnect’).click(function () {
Gab.connection.disconnect();
Gab.connection = null;
});
$(‘#chat_dialog’).dialog({
autoOpen: false,
draggable: false,
modal: true,
title: ‘Start a Chat’,
buttons: {
“Start”: function () {
40718c06.indd 141
continues
11/30/09 8:39:26 PM
142
❘
Chapter 6 Talking with Friends: One‑on‑One Chat
Listing 6-3 (continued)
var jid = $(‘#chat-jid’).val();
var jid_id = Gab.jid_to_id(jid);
$(‘#chat-area’).tabs(‘add’, ‘#chat-’ + jid_id, jid);
$(‘#chat-’ + jid_id).append(
“<div class=’chat-messages’></div>” +
“<input type=’text’ class=’chat-input’>”);
$(‘#chat-’ + jid_id).data(‘jid’, jid);
$(‘#chat-area’).tabs(‘select’, ‘#chat-’ + jid_id);
$(‘#chat-’ + jid_id + ‘ input’).focus();
$(‘#chat-jid’).val(‘’);
$(this).dialog(‘close’);
}
}
});
$(‘#new-chat’).click(function () {
$(‘#chat_dialog’).dialog(‘open’);
});
});
$(document).bind(‘connect’, function (ev, data) {
var conn = new Strophe.Connection(
‘http://bosh.metajack.im:5280/xmpp-httpbind’);
conn.connect(data.jid, data.password, function (status) {
if (status === Strophe.Status.CONNECTED) {
$(document).trigger(‘connected’);
} else if (status === Strophe.Status.DISCONNECTED) {
$(document).trigger(‘disconnected’);
}
});
Gab.connection = conn;
});
$(document).bind(‘connected’, function () {
var iq = $iq({type: ‘get’}).c(‘query’, {xmlns: ‘jabber:iq:roster’});
Gab.connection.sendIQ(iq, Gab.on_roster);
Gab.connection.addHandler(Gab.on_roster_changed,
“jabber:iq:roster”, “iq”, “set”);
Gab.connection.addHandler(Gab.on_message,
null, “message”, “chat”);
});
$(document).bind(‘disconnected’, function () {
40718c06.indd 142
11/30/09 8:39:26 PM
Summary
❘ 143
Gab.connection = null;
Gab.pending_subscriber = null;
$(‘#roster-area ul’).empty();
$(‘#chat-area ul’).empty();
$(‘#chat-area div’).remove();
$(‘#login_dialog’).dialog(‘open’);
});
$(document).bind(‘contact_added’, function (ev, data) {
var iq = $iq({type: “set”}).c(“query”, {xmlns: “jabber:iq:roster”})
.c(“item”, data);
Gab.connection.sendIQ(iq);
var subscribe = $pres({to: data.jid, “type”: “subscribe”});
Gab.connection.send(subscribe);
});
Gabbing More
Most chat clients you are probably familiar with have many more features than Gab. You could add
some of these to Gab to make it more competitive.
Try adding some of these simple features:
➤➤
Add support for the other chat notification states like paused and gone.
➤➤
Allow the user to use text based markup like Markdown or Textile to send rich XHTML-IM
messages.
➤➤
Using the Personal Eventing Protocol (XEP-0163), show the music that a user’s contacts are
listening to in the chat area; several other chat clients send such notifications.
Summary
Instant messaging is the original XMPP application domain. By creating Gab, you’ve made a capable
IM client that can manage a roster and multiple chat sessions. Gab was quite a bit more complex than
the previous chapters’ applications, but by sticking with it you learned:
40718c06.indd 143
➤➤
How to get and process a roster
➤➤
How to deal with roster changes
➤➤
How to add and edit contacts
➤➤
How to send and respond to presence subscription requests
11/30/09 8:39:26 PM
144
❘
Chapter 6 Talking with Friends: One‑on‑One Chat
➤➤
How XMPP servers route messages
➤➤
About jQuery UI’s tab control
➤➤
How to send and interpret activity notifications for chats
The next chapter teaches you how to explore services and their features with XMPP service discovery.
40718c06.indd 144
11/30/09 8:39:26 PM
7
Exploring Services:
Service Discovery and Browsing
What’s in This Chapter?
➤➤
The basics of service discovery
➤➤
Interpreting service discovery results
➤➤
Service discovery trees
➤➤
How other XMPP extensions use service discovery
The federated world of XMPP servers and services is a big place, and it’s growing every day.
Early on, XMPP developers realized that they needed some way to find information about these
servers and which services they supported. The XMPP service discovery system was created to
fill this need.
Service discovery requests can be sent to nearly every XMPP-addressable entity on the network.
Applications can find out which entities are servers, publish-subscribe systems, and multi-user
chat services. Service information often includes the list of supported features so that application
code never has to guess what functionality is supported.
Most of the extension protocols to XMPP make use of service discovery, usually to communicate feature support. Some also rely on it for service browsing. Multi-user chat services, for
example, can be queried for what rooms exist, what settings are applied to a given room, and
even which users are present.
Service discovery is a simple but important piece of many XMPP protocols, and your own
applications will often need to use it in a variety of tasks. In the course of this chapter, you
build a service browser called Dig, which allows users to explore various XMPP services.
40718c07.indd 145
11/30/09 8:43:01 PM
146
❘
Chapter 7 Exploring Services: Service Discovery and Browsing
Application Preview
The Dig application is similar to other directory browsing interfaces you may be familiar with, such
as Windows Explorer or Mac OS X’s Finder. Figure 7-1 shows what the final application will look like.
Figure 7-1
On the left is the service tree for a given entity. The panel on the right displays information about
the selected item in the tree. The user can input the entity for which to query services at the top of the
application.
The tree shown in Figure 7-1 is just part of the service tree for jabber.org’s multi-user chat server at
conference.jabber.org.
Dig Design
Dig must make two kinds of service discovery queries to an entity — disco#info and disco#items. The
hash character in their names is taken from their underlying namespace. A disco#info query returns
basic identity information and supported features for an entity. Disco#items queries enumerate an
entity’s children.
40718c07.indd 146
11/30/09 8:43:02 PM
Finding Information
❘ 147
Once users input an entity they want to view, both types of queries are run, and the results begin
to form a tree in the left pane. Clicking leaves of the tree results in further service discovery queries
and further expands the tree. Results from disco#info queries appear in the right information
pane, and disco#items query results are used to expand the tree.
The application’s UI is quite simple, but the amount of information the user can learn about XMPP
servers and services is immense.
Finding Information
Service discovery, defined in XEP-0030 and often called disco, consists of a hierarchy of information relating to an entity or service and a pair of queries, disco#info and disco#items, to request
information and traverse the tree, respectively.
Disco#info Queries
Most XMPP entities you will interact with will respond to disco#info queries. Generally, these queries are concerned with two kinds of information: identity and features. Identity information contains
the entity’s name and purpose, and some services may have multiple identities. Feature information
is useful to discover which particular features a service supports. For example, a publish-subscribe
service may report that it supports all the required and some of the optional features defined in the
Publish-Subscribe specification (XEP-0060) and that it also supports several other extensions.
Disco#info queries are extremely simple. They consist of an IQ-get stanza using the http://
jabber.org/protocols/disco#info namespace:
<iq to=’pemberley.lit’
from=’elizabeth@longbourn.lit/lambton’
type=’get’
id=’info1’>
<query xmlns=’http://jabber.org/protocol/disco#info’/>
</iq>
In this example query, Elizabeth is probing the pemberley.lit server for information. This server will
respond with a list of identities and features:
<iq to=’elizabeth@longbourn.lit/lambton’
from=’pemberley.lit’
type=’result’
id=’info1’>
<query xmlns=’http://jabber.org/protocol/disco#info’>
<identity name=’Pemberley XMPP Server’
category=’server’
type=’im’/>
<feature var=’http://jabber.org/protocol/disco#info’/>
<feature var=’jabber:client’/>
<feature var=’jabber:iq:roster’/>
40718c07.indd 147
11/30/09 8:43:02 PM
148
❘
Chapter 7 Exploring Services: Service Discovery and Browsing
<feature var=’jabber:iq:version’/>
<feature var=’msgoffline’/>
</query>
</iq>
The pemberley.lit server reports its name and that it is an instant messaging service. It also enumerates the features that the server supports, including disco#info support, standard XMPP client
support, support for roster commands, support for version queries, and support for the storage of
messages for offline users.
XMPP servers vary in their responses to disco#info queries, but the responses appear in the same
form. Typically, XMPP servers will support a wide range of features, and the list of identities and
features will both be much longer than those of the fictional pemberley.lit. Disco#info responses
are required to contain at least one identity and at least the disco#info feature.
Each <identity> element contains an optional name attribute as well as the required category and
type attributes. A list of standard category and type values is maintained by the XMPP registrar
and you can find it at http://xmpp.org/registrar/disco-categories.html. Entities that provide
multiple services at a single address return multiple <identity> elements, usually one per service.
The <feature> elements list the basic features the entity provides. The required var attribute contains the feature’s identifier. These often correspond to namespaces used in various XMPP protocol
extensions, and the XMPP registrar maintains the list of registered features at http://xmpp.org/
registrar/disco-features.html. In the previous example, all but the msgoffline feature used
the relevant namespaces as identifiers.
Applications can use this information to test what kind of services particular entities provide, or to
determine whether a particular service supports some specific feature. For example, not all conference servers support server-side logging of group chats. Those that do can advertise such support in
a <feature> element.
Disco#items Queries
Service discovery information is organized in the form of a tree. The disco#items query requests
the list of children for an entity. Some of these children will be other entities and some will be internal nodes. By continuing to do disco#items queries on each child, the entire service tree can be
expanded.
Requesting disco#items on an XMPP server returns the various server-side components that make
up the server, each as a separately addressable entity. For example, a publish-subscribe service would
return the list of top-level nodes, each of which may also have child nodes. Multi-user chat servers
answer disco#items queries by returning the list of chat rooms.
Disco#items queries are almost exactly the same as disco#info queries:
<iq to=’pemberley.lit’
from=’elizabeth@longbourn.lit/lambton’
type=’get’
id=’items1’>
<query xmlns=’http://jabber.org/protocol/disco#items’/>
</iq>
40718c07.indd 148
11/30/09 8:43:02 PM
Creating Dig
❘ 149
As you can see, only the last portion of the namespace has changed. The response from pemberley.lit
appears here:
<iq to=’elizabeth@longbourn.lit/lambton’
from=’pemberley.lit’
type=’result’
id=’items1’>
<query xmlns=’http://jabber.org/protocol/disco#items’>
<item jid=’pubsub.pemberley.lit’
name=’The Pemberley Pubsub System’/>
<item jid=’chat.pemberley.lit’
name=’The Pemberley Multi-User Chat System’/>
<item jid=’pemberley.lit’
node=’statistics’
name=’Pemberley Server Statistics’/>
</query>
</iq>
Each child item of the entity is represented by an <item> element in the response. The preceding
example shows three children, two of which are server components, and one of which is an internal
node. All of these items will respond to disco#info and disco#items queries as well.
Disco Nodes
Internal parts of the service tree are exposed as nodes. The disco#items query you saw in the last
section contained a statistics node as one of the pemberley.lit children. Disco nodes are addressable by including a node attribute in the <query> element of the request:
<iq to=’pemberley.lit’
from=’elizabeth@longbourn.lit/lambton’
type=’get’
id=’info2’>
<query xmlns=’http://jabber.org/protocol/disco#info’
node=’statistics’/>
</iq>
The statistics node will respond with one or more <identity> elements and one or more
<feature> elements, just like any other entity. A disco#items query to the statistics node may
also reveal more child nodes.
Aside from the various error cases and other small details, these simple pieces are all there is to
service discovery. You have all the knowledge you need to start building Dig.
Creating Dig
As with previous applications, you start building Dig by first creating its user interface. The
screenshot in Figure 7-1 shows the three main pieces: the service input control, the tree pane, and
the information pane. The HTML for Dig appears in Listing 7-1, and the CSS styles appear in
Listing 7-2.
40718c07.indd 149
11/30/09 8:43:02 PM
150
❘
Chapter 7 Exploring Services: Service Discovery and Browsing
Listing 7-1: dig.html
<!DOCTYPE HTML PUBLIC “-//W3C//DTD HTML 4.01//EN”
“http://www.w3.org/TR/html4/strict.dtd”>
<html>
<head>
<meta http-equiv=”Content-type” content=”text/html;charset=UTF-8”>
<title>Dig - Chapter 7</title>
<link rel=’stylesheet’ href=’http://ajax.googleapis.com/ajax/libs/jqueryu
i/1.7.2/themes/cupertino/jquery-ui.css’>
<script src=’http://ajax.googleapis.com/ajax/libs/jquery/1.3.2/jquery.js’>
</script>
<script src=’http://ajax.googleapis.com/ajax/libs/jqueryui/1.7.2/jquery-u
i.js’></script>
<script src=’scripts/strophe.js’></script>
<script src=’scripts/flXHR.js’></script>
<script src=’scripts/strophe.flxhr.js’></script>
<link rel=’stylesheet’ type=’text/css’ href=’dig.css’>
<script type=’text/javascript’ src=’dig.js’></script>
</head>
<body>
<h1>Dig</h1>
<div id=’input-bar’>
<input id=’service’ type=’text’>
<input id=’dig’ type=’button’ value=’Dig!’ disabled=’disabled’>
</div>
<div class=’clear’></div>
<div class=’left’>
<ul id=’tree’>
</ul>
</div>
<div class=’right’>
<h2 id=’selected-name’></h2>
<div id=’disco-info’>
<h3>Identities:</h3>
<ul id=’identity-list’>
</ul>
<h3>Features:</h3>
<ul id=’feature-list’>
</ul>
</div>
</div>
<!-- login dialog -->
<div id=’login_dialog’ class=’hidden’>
40718c07.indd 150
11/30/09 8:43:02 PM
Creating Dig
❘ 151
<label>JID:</label><input type=’text’ id=’jid’>
<label>Password:</label><input type=’password’ id=’password’>
</div>
</body>
</html>
Listing 7-2: dig.css
body {
font-family: Helvetica;
}
h1 {
text-align: center;
}
.hidden {
display: none
}
.left {
padding: 10px;
width: 400px;
float: left;
}
.right {
padding: 10px;
border-left: solid 1px black;
width: 500px;
float: right;
background-color: #eee;
}
.clear {
clear: both;
}
.item {
padding: 4px;
}
.selected {
background-color: #ff6;
font-weight: bold;
}
#input-bar {
padding: 10px;
text-align: center;
40718c07.indd 151
continues
11/30/09 8:43:02 PM
152
❘
Chapter 7 Exploring Services: Service Discovery and Browsing
Listing 7-2 (continued)
border-bottom: solid 2px black;
}
input {
font-size: 150%;
}
#tree ul {
line-height: 175%;
margin-left: 0;
padding-left: 10px;
}
The input control contains a text entry box and a button; the tree pane contains an empty unordered
list; and the information pane contains a section for the identities and one for the features. The styles
just make the default rendering of these various elements a little more visually pleasing. Selected
entities in the tree are highlighted in yellow and bold, and various UI elements have a little extra
whitespace or larger fonts.
Listing 7-3 contains the skeleton of the JavaScript code for Dig. You’ve seen all these elements before
in previous chapters, so they won’t be explained here.
Listing 7-3: dig.js (initial skeleton)
var Dig = {
connection: null,
};
$(document).ready(function () {
$(‘#login_dialog’).dialog({
autoOpen: true,
draggable: false,
modal: true,
title: ‘Connect to XMPP’,
buttons: {
“Connect”: function () {
$(document).trigger(‘connect’, {
jid: $(‘#jid’).val(),
password: $(‘#password’).val()
});
$(‘#password’).val(‘’);
$(this).dialog(‘close’);
}
}
});
});
$(document).bind(‘connect’, function (ev, data) {
40718c07.indd 152
11/30/09 8:43:02 PM
Creating Dig
❘ 153
var conn = new Strophe.Connection(
‘http://bosh.metajack.im:5280/xmpp-httpbind’);
conn.connect(data.jid, data.password, function (status) {
if (status === Strophe.Status.CONNECTED) {
$(document).trigger(‘connected’);
} else if (status === Strophe.Status.DISCONNECTED) {
$(document).trigger(‘disconnected’);
}
});
Dig.connection = conn;
});
$(document).bind(‘connected’, function () {
// nothing here yet
});
With these basics in place, you can start on the real meat of the application.
Initial Disco Queries
Once the user has input a JID into the text entry box and clicked Dig!, the code must send the initial
disco#info and disco#items queries to the designated service.
First, bind the click event for the Dig! button and send the two disco queries. The following code
should be placed in the document ready handler:
$(‘#dig’).click(function () {
var service = $(‘#service’).val();
$(‘#service’).val(‘’);
// set up disco info pane
$(‘#selected-name’).text(service);
$(‘#identity-list’).empty();
$(‘#feature-list’).empty();
// clear tree pane
$(‘#tree’).empty();
$(‘#tree’).append(“<li><span class=’item selected’>” +
service +
“</span></li>”);
Dig.connection.sendIQ(
$iq({to: service, type: “get”})
.c(“query”, {xmlns:
“http://jabber.org/protocol/disco#info”}),
function (iq) {
Dig.on_info(iq, $(‘.selected’)[0]);
});
Dig.connection.sendIQ(
$iq({to: service, type: “get”})
40718c07.indd 153
11/30/09 8:43:03 PM
154
❘
Chapter 7 Exploring Services: Service Discovery and Browsing
.c(“query”, {xmlns:
“http://jabber.org/protocol/disco#items”}),
function (iq) {
Dig.on_items(iq, $(‘.selected’)[0]);
});
});
code snippet dig.js
This code first gets the name of the service and clears the text entry box. Then the code clears the
information pane and creates the initial disco tree. Finally, it sends disco#info and disco#items
queries to the service.
Notice that the currently selected element is also passed to both on_info() and on_items(). This
extra information is passed so that the handlers know which branch of the tree the result is for.
Without this information, a user might see the results for one branch appear under another if the
user clicks on a different branch before a response to a query is received.
The on_info() and on_items() functions must now be implemented. The following code adds the
first of these functions to the Dig object:
on_info: function (iq, elem) {
// do nothing if the response is not for the selected branch
if ($(‘.selected’).length > 0 &&
elem !== $(‘.selected’)[0]) {
return;
}
$(‘#feature-list’).empty();
$(iq).find(“feature”).each(function () {
$(‘#feature-list’).append(“<li>” +
$(this).attr(‘var’) +
“</li>”);
});
$(‘#identity-list’).empty();
$(iq).find(“identity”).each(function () {
$(‘#identity-list’).append(“<li><dl><dt>Name</dt><dd>” +
($(this).attr(‘name’) || “none”) +
“</dd><dt>Type</dt><dd>” +
($(this).attr(‘type’) || “none”) +
“</dd><dt>Category</dt><dd>” +
($(this).attr(‘category’) || “none”) +
“</dd></dl></li>”);
});
}
code snippet dig.js
40718c07.indd 154
11/30/09 8:43:03 PM
Creating Dig
❘ 155
The on_info() function simply takes each feature and each identity and formats them into
list elements. The little-used definition list (<dl> element) aids the formatting of each identity’s
properties.
The on_items() function is also quite simple:
on_items: function (iq, elem) {
var items = $(iq).find(“item”);
if (items.length > 0) {
$(elem).parent().append(“<ul></ul>”);
var list = $(elem).parent().find(“ul”);
$(iq).find(“item”).each(function () {
var node = $(this).attr(‘node’);
list.append(“<li><span class=’item’>” +
$(this).attr(“jid”) +
(node ? “:” + node : “”) +
“</span></li>”);
});
}
}
code snippet dig.js
If any <item> elements are returned, new items are added to the selected branch of the tree in the tree
pane. Notice that if the items point to disco nodes as opposed to JIDs, they are written as jid:node.
This isn’t the best way to display the information perhaps, but it will assist you later when you must
handle click events for items in the tree.
Finally, you need to enable the Dig! button in the connected event handler. Make the highlighted
changes to this event handler:
$(document).bind(‘connected’, function () {
$(‘#dig’).removeAttr(‘disabled’);
});
code snippet dig.js
Running Dig in this state should allow you to see the top-level children and the basic information
about an entity. Next you need to add the ability to browse and expand the tree.
Browsing the Disco Tree
So far, Dig is not much use beyond obtaining a high-level view of a service. You need to extend it
to allow users to click various branches of the tree to change what information is displayed in the
information pane and expand the tree under the current branch.
40718c07.indd 155
11/30/09 8:43:03 PM
156
❘
Chapter 7 Exploring Services: Service Discovery and Browsing
Because the on_items() and on_info() functions are so general, the only thing you must add is a
handler for click events in the tree pane. Add the code handler to the document ready handler:
$(‘#tree .item’).live(‘click’, function () {
if ($(this).hasClass(“selected”)) {
return;
}
$(“.selected”).removeClass(“selected”);
$(this).addClass(“selected”);
var serv_node = $(this).text();
var service, node;
var idx = serv_node.indexOf(“:”);
if (idx < 0) {
service = serv_node;
node = null;
} else {
service = serv_node.slice(0, idx);
node = serv_node.slice(idx + 1);
}
var query_attrs;
if (node) {
query_attrs = { node: node };
} else {
query_attrs = {};
}
var elem = this;
query_attrs[“xmlns”] = “http://jabber.org/protocol/disco#info”;
Dig.connection.sendIQ(
$iq({to: service, type: “get”})
.c(“query”, query_attrs),
function (iq) {
Dig.on_info(iq, elem);
});
if ($(“.selected”).parent().find(“ul”).length === 0) {
query_attrs[“xmlns”] = “http://jabber.org/protocol/disco#items”;
Dig.connection.sendIQ(
$iq({to: service, type: “get”})
.c(“query”, query_attrs),
function (iq) {
Dig.on_items(iq, elem);
});
}
});
code snippet dig.js
40718c07.indd 156
11/30/09 8:43:03 PM
Creating Dig
❘ 157
jQuery’s live() function is used to bind an event handler to matching elements. Unlike using click()
or bind() to do this, live() enables the binding even on elements that are added dynamically after
the binding is created. You have used live() before in Chapter 6.
The code first checks to see if the selected branch was clicked, and if so, returns. There is no need to
redo the queries in this case. If the branch that received the click is not selected, the old selection is
removed, and the clicked branch becomes selected.
The next block of code parses the text in the selected <span> element to determine the service and
node for this branch’s tree item. Both of these pieces of information are needed to address the disco
queries.
Finally, a disco#info query is sent to the correct service and node, and if no disco#items query
was previously done for this part of the tree, a disco#items query is also sent. Because on_items()
creates a sublist for the relevant tree branch, it is sufficient to check for a child <ul> element to determine if on_items() has already been executed. Both of the disco queries use the same on_items()
and on_info() handlers you created previously.
Dig is complete and can now be used to explore the vast number of public XMPP services. The final
source code is shown in Listing 7-4. In the next section, you use Dig to browse a few well-known
services.
Listing 7-4: dig.js (final)
var Dig = {
connection: null,
on_items: function (iq, elem) {
var items = $(iq).find(“item”);
if (items.length > 0) {
$(elem).parent().append(“<ul></ul>”);
var list = $(elem).parent().find(“ul”);
$(iq).find(“item”).each(function () {
var node = $(this).attr(‘node’);
list.append(“<li><span class=’item’>” +
$(this).attr(“jid”) +
(node ? “:” + node : “”) +
“</span></li>”);
});
}
},
on_info: function (iq, elem) {
// do nothing if the response is not for the selected branch
if ($(‘.selected’).length > 0 &&
elem !== $(‘.selected’)[0]) {
return;
}
$(‘#feature-list’).empty();
40718c07.indd 157
continues
11/30/09 8:43:03 PM
158
❘
Chapter 7 Exploring Services: Service Discovery and Browsing
Listing 7-4 (continued)
$(iq).find(“feature”).each(function () {
$(‘#feature-list’).append(“<li>” +
$(this).attr(‘var’) +
“</li>”);
});
$(‘#identity-list’).empty();
$(iq).find(“identity”).each(function () {
$(‘#identity-list’).append(“<li><dl><dt>Name</dt><dd>” +
($(this).attr(‘name’) || “none”) +
“</dd><dt>Type</dt><dd>” +
($(this).attr(‘type’) || “none”) +
“</dd><dt>Category</dt><dd>” +
($(this).attr(‘category’) || “none”) +
“</dd></dl></li>”);
});
}
};
$(document).ready(function () {
$(‘#login_dialog’).dialog({
autoOpen: true,
draggable: false,
modal: true,
title: ‘Connect to XMPP’,
buttons: {
“Connect”: function () {
$(document).trigger(‘connect’, {
jid: $(‘#jid’).val(),
password: $(‘#password’).val()
});
$(‘#password’).val(‘’);
$(this).dialog(‘close’);
}
}
});
$(‘#dig’).click(function () {
var service = $(‘#service’).val();
$(‘#service’).val(‘’);
// set up disco info pane
$(‘#selected-name’).text(service);
$(‘#identity-list’).empty();
$(‘#feature-list’).empty();
// clear tree pane
$(‘#tree’).empty();
$(‘#tree’).append(“<li><span class=’item selected’>” +
40718c07.indd 158
11/30/09 8:43:03 PM
Creating Dig
❘ 159
service +
“</span></li>”);
Dig.connection.sendIQ(
$iq({to: service, type: “get”})
.c(“query”, {xmlns:
“http://jabber.org/protocol/disco#info”}),
function (iq) {
Dig.on_info(iq, $(‘.selected’)[0]);
});
Dig.connection.sendIQ(
$iq({to: service, type: “get”})
.c(“query”, {xmlns:
“http://jabber.org/protocol/disco#items”}),
function (iq) {
Dig.on_items(iq, $(‘.selected’)[0]);
});
});
$(‘#tree .item’).live(‘click’, function () {
if ($(this).hasClass(“selected”)) {
return;
}
$(“.selected”).removeClass(“selected”);
$(this).addClass(“selected”);
var serv_node = $(this).text();
var service, node;
var idx = serv_node.indexOf(“:”);
if (idx < 0) {
service = serv_node;
node = null;
} else {
service = serv_node.slice(0, idx);
node = serv_node.slice(idx + 1);
}
var query_attrs;
if (node) {
query_attrs = { node: node };
} else {
query_attrs = {};
}
var elem = this;
query_attrs[“xmlns”] = “http://jabber.org/protocol/disco#info”;
Dig.connection.sendIQ(
$iq({to: service, type: “get”})
.c(“query”, query_attrs),
function (iq) {
40718c07.indd 159
continues
11/30/09 8:43:03 PM
160
❘
Chapter 7 Exploring Services: Service Discovery and Browsing
Listing 7-4 (continued)
Dig.on_info(iq, elem);
});
if ($(“.selected”).parent().find(“ul”).length === 0) {
query_attrs[“xmlns”] = “http://jabber.org/protocol/disco#items”;
Dig.connection.sendIQ(
$iq({to: service, type: “get”})
.c(“query”, query_attrs),
function (iq) {
Dig.on_items(iq, elem);
});
}
});
});
$(document).bind(‘connect’, function (ev, data) {
var conn = new Strophe.Connection(
‘http://bosh.metajack.im:5280/xmpp-httpbind’);
conn.connect(data.jid, data.password, function (status) {
if (status === Strophe.Status.CONNECTED) {
$(document).trigger(‘connected’);
} else if (status === Strophe.Status.DISCONNECTED) {
$(document).trigger(‘disconnected’);
}
});
Dig.connection = conn;
});
$(document).bind(‘connected’, function () {
$(‘#dig’).removeAttr(‘disabled’);
});
Digging into Services
Service discovery can provide a variety of useful functionality. Your applications might use or implement service discovery to:
➤➤
Determine support for a specific software feature.
➤➤
Use disco#items results to generate lists of resources such as public multi-user chat rooms.
➤➤
Crawl the disco tree to look for specific services like proprietary IM network gateways or
proxy services.
➤➤
Communicate metadata about your application to other entities making service discovery
requests.
40718c07.indd 160
11/30/09 8:43:03 PM
Digging into Services
❘ 161
Over the next sections, you will use Dig to accomplish similar tasks. You will try to find whether
the jabber.org server offers a proxy service, if the server supports registration, and what public chat
rooms you can join at its multi-user chat service.
Finding a Proxy Server
XMPP clients often support peer-to-peer file transfers between contacts. Due to network restrictions,
however, many peers are behind NATs (network address translators) or corporate firewalls. In these
cases, it is necessary for both sides to use a third-party proxy service to complete the transfer.
It may happen that neither party knows of a proxy service to use, but with service discovery browsing, their client software can determine whether the users’ servers provide one. Normally, this check
would be done transparently to the end user, but here you use Dig to find an answer manually.
Open the Dig application in your web browser, type jabber.org into the text entry box, and click
Dig! You should see a result similar to the screenshot in Figure 7-2, although your result may be different if the jabber.org service has changed or upgraded any of its services.
Figure 7-2
40718c07.indd 161
11/30/09 8:43:04 PM
162
❘
Chapter 7 Exploring Services: Service Discovery and Browsing
You should see the promising proxy.eu.jabber.org item. Click it to obtain more information, and you
should see something similar to Figure 7-3 in the information pane.
An XMPP Bytestreams (see XEP-0065 for more information) proxy is exactly what is needed to
complete a peer-to-peer file transfer.
Normally, your application will search for a particular item by its type, category, or features, not by
its name. In this instance, human intuition short-circuited the search by inferring possible features
from the name of the service.
Note that the proxy.eu.jabber.org item does not have any children, so the tree is not expanded
underneath it.
Discovering Features
Some servers support account creation over XMPP. If your application depends on this feature, it is
wise to check whether the feature is supported by the XMPP server using service discovery.
If you have the Dig application open from the previous example, simply click the root item of the
tree, jabber.org. Otherwise, open the Dig application and browse to the disco tree for jabber.org.
You should see a list of features similar to those listed in Figure 7-4.
Figure 7-3
Figure 7-4
As you can see, the jabber:iq:register feature appears in the list, so you can be assured that the
server supports registration.
Looking for a Chat
Service discovery is also used to enumerate lists of publicly available resources, be they publishsubscribe nodes, multi-user chat rooms, or a list of shared files. You’ve seen from the previous two
examples that the jabber.org server hosts a conference.jabber.org service. You can browse this service to get a list of the public rooms.
Use Dig to browse to the disco tree of jabber.org and click the conference.jabber.org item. You
should see a long list of chat rooms like those in Figure 7-5.
40718c07.indd 162
11/30/09 8:43:04 PM
Summary
❘ 163
If you click any of the rooms, you will see more information about it in the right pane. You may notice that
after you click a specific room, the tree expands beneath
it. These subitems are the participants of the chat; the
resource part of each JID is the participant’s nickname.
Now that you’ve built Dig and seen service discovery
in action, you’ll be ready to make use of it in your own
applications.
Discovering More
Dig is already quite useful for browsing disco trees, but
you might try adding a few new features to make it even
better:
Figure 7-5
➤➤
Add the ability to group the items by category or type
instead of only by their names.
➤➤
llow the user to filter the tree for specific features
A
they are interested in.
Summary
This chapter covered a simple, but important, XMPP extension called service discovery, often referred
to as disco. Using service discovery, your application can browse available resources, determine
support for specific features, and find metadata about various services. Your application can also
implement service discovery to enable other entities to gather information on your application’s
resources.
You created a simple service discovery browser called Dig, which allowed you to explore several
areas of jabber.org’s services tree. Along the way you learned:
➤➤
How to make disco#info and disco#items queries
➤➤
How to interpret results and use the items to build a disco tree
➤➤
How to use disco to determine feature support
➤➤
How to enumerate public chat rooms and other public resources
➤➤
How to find specific services needed by your application
The next chapter is all about one of the services you explored here, multi-user chat.
40718c07.indd 163
11/30/09 8:43:04 PM
40718c07.indd 164
11/30/09 8:43:04 PM
8
Group Chatting:
A Multi‑User Chat Client
What’s in This Chapter?
➤➤
Joining group chat rooms
➤➤
Creating and configuring rooms
➤➤
Exchanging presence and messages in group chat
➤➤
Multi-user chat roles and permissions
➤➤
Moderating rooms
XMPP’s multi-user chat extension was originally inspired by the Internet Relay Chat (IRC)
protocol. Some clever XMPP protocol designers wanted to improve upon IRC in several ways,
while at the same time bringing group chat natively to XMPP.
XMPP’s multi-user chat (MUC) has one enormous advantage over its predecessors — structured payloads. IRC and other chat protocols typically transmit plain text back and forth with
very little structure. Because of XMPP’s extensibility, MUC messages can carry arbitrarily
complex payloads even within regular chat messages.
MUC is also a form of message broadcast. A single message sent to a room gets rebroadcast
out to all the participants automatically. This makes it similar to Publish-Subscribe, which you
see in the next chapter. Unlike Publish-Subscribe, MUC provides a lot of advanced management
features typical of group chat services, such as room moderation, and each participant is often
allowed to broadcast messages to the room as well.
40718c08.indd 165
11/30/09 8:56:57 PM
166
❘
Chapter 8 Group Chatting: A Multi‑User Chat Client
The combination of structured messaging, automatic broadcast, and group publishing opens the
doors to many alternative uses of MUC. It has been used as the basis for rich, collaborative spaces
(for example, Drop.io, which was shown in Chapter 2), and in Chapter 11, you build a multi-user
Tic-Tac-Toe game on top of MUC.
Multi-user chat is a big protocol, and a full-featured client can become quite sophisticated. In this
chapter, you build a simple group chat client called Groupie, which uses the most important pieces
of the MUC protocol.
Application Preview
Figure 8-1 shows a screenshot from the finished Groupie application. Just as in previous chapters, the
application’s interface is as simple as possible.
Figure 8-1
At the top of the screen are the chat and participant areas. The chat area contains all the messages
people send to the room as well as private messages sent to and from the user. The participant area
contains the list of current room occupants with whom the user is conversing. Beneath the chat area is
a text box for the user to type and send messages.
40718c08.indd 166
11/30/09 8:56:57 PM
Public Speaking
❘ 167
Groupie Design
Although Groupie’s UI design appears simplistic, there is some sophistication necessary to make a
usable group chat client. Groupie will need to support features like room creation and configuration,
topic changes, private messaging between participants, and basic moderation.
When the application starts, the user is presented with an expanded version of the login dialog box
you have seen in earlier chapters. This new login dialog box contains new fields for the multi-user
chat room the user wants to join as well as the nickname the user wants to use within the room. If
the room already exists, the user will join the other participants in the room, and if the room doesn’t
already exist, the room will be created.
Once in the room, messages from other participants appear in the chat area, and the user can type
their own messages in the text entry box. The list of participants to the right of the chat area changes
as people join and leave the room. Private messages can be sent to other participants using special
commands in the text box, and private messages that get sent to the user show up in the normal chat
area but rendered differently.
Two other special commands will be implemented — user actions and topic changes. User actions
allow users to describe their own actions, similar to someone talking about himself or herself in the
third person. Topic changes allow the user to modify the room’s topic if they have adequate permissions within the room.
Group chat rooms have roles and affiliations, which control permissions and access to the room on a
short- or long-term basis. Manipulating roles is necessary for silencing or removing users in a room
when they get out of hand and changing a participant’s affiliation can make them a fellow administrator or ban them permanently. Groupie supports these operations via special text commands. You
see more on these topics later in Understanding Roles and Affiliations.
It may seem like a lot to implement, but these features just scratch the surface of possible functionality
for multi-user chat rooms. Before you start coding, you should become familiar with the stanzas
that make up the multi-user chat protocol.
Public Speaking
Group chat allows multiple people to gather in the same place to discuss a topic. These virtual meeting
places are called rooms, and unlike in the real world, users can be in more than one group chat room
at the same time. Rooms can have access controls, moderators, administrators, and even automatic
logging and archival of the group’s communications. Before you can start work on your application,
you must first learn how group chat operations are accomplished at the protocol level.
Group Chat Services
Group chat is provided as a service, usually alongside a regular XMPP server. The group chat
service has its own domain; for example, the jabber.org server runs a group chat service at
conference.jabber.org.
40718c08.indd 167
11/30/09 8:56:57 PM
168
❘
Chapter 8 Group Chatting: A Multi‑User Chat Client
Each room on the group chat service gets its own address, which looks just like a user’s JID. The
XMPP developer’s chat room on the conference.jabber.org service is at jdev@conference.jabber.org,
and general XMPP-related chat takes place in jabber@conference.jabber.org.
Many XMPP servers run group chat services, and thousands of chat rooms are spread across these
services. As you saw in Chapter 7, service discovery can be used to find and locate group chat services
as well as the public rooms hosted on them.
Entering and Leaving a Room
Before you can do much with a group chat room, you must first enter the room. This is also often
referred to as joining the room. When you are done participating, you leave the room. Because this
mirrors the concept of a user coming and going on and offline, the multi-user chat designers decided
to model this part of the protocol with <presence> stanzas.
Users can join a group chat room simply by sending available presence to the room, along with a note
that they understand the multi-user chat protocol. Sending presence directly to a JID instead of to the
user’s server is called directed presence. Similarly, to leave, unavailable presence is sent to the room.
Directed Presence
Sending presence stanzas directly to a JID instead of to the user’s server is called
sending directed presence. Directed presence is quite useful in XMPP protocols
and extensions because it has some special properties.
Directed presence can be sent to users or services without requiring that presence
subscriptions be set up. This is useful for giving another user or an external service temporary access to presence information.
Another property of directed presence is that the server keeps track of who has
received direct presence notifications. The server uses this information to ensure
that the recipients are notified when the sender goes offline, even if the sender
forgets to send unavailable presence before logging off.
There is one limitation to be aware of when using directed presence — only
unavailable presence is sent automatically. Presence changes from available
to away or away to available are not automatically broadcast on the sender’s
behalf.
Because group chat services need to keep track of participants’ presence, direct
presence fulfills a crucial role. The server rarely loses track of a participant’s
presence, even if that person forgets to send unavailable presence.
Every participant in a group chat room gets their own address as well. Each participant picks a nickname for the room, and their JID within the room is the room’s JID with a resource added containing
their nickname. For example, Darcy’s nickname in the Meryton ball chat room is darcy, so his group
chat JID is ball@chat.meryton.lit/darcy.
40718c08.indd 168
11/30/09 8:56:58 PM
Public Speaking
❘ 169
If Bingley and Jane want to join the group chat room for the Meryton ball, they will both need to
send directed presence to their desired identity in the room ball@chat.meryton.lit. Their stanzas
are shown here:
<presence to=’ball@chat.meryton.lit/bingley’
from=’bingley@netherfield.lit/meryton’>
<x xmlns=’http://jabber.org/protocol/muc’/>
</presence>
<presence to=’ball@chat.meryton.lit/jane’
from=’jane@longbourn.lit/meryton’>
<x xmlns=’http://jabber.org/protocol/muc’/>
</presence>
Once they have joined the room, the group chat service will broadcast all the other participants’
presence statuses to them. After all the other participants’ presence stanzas are sent, the server concludes the presence broadcast by sending the arriving participant’s presence to everyone, including
the new arrival. Thus, when a new participant sees their own presence broadcast back to them, they
know they have fully joined the room.
This is what Jane’s client will receive upon joining the room:
<presence to=’jane@longbourn.lit/meryton’
from=’ball@chat.meryton.lit/elizabeth’>
<x xmlns=’http://jabber.org/protocol/muc’>
<item affiliation=’member’ role=’participant’/>
</x>
</presence>
..
<presence to=’jane@longbourn.lit/meryton’
from=’ball@chat.meryton.lit/bingley’>
<x xmlns=’http://jabber.org/protocol/muc’>
<item affiliation=’member’ role=’participant’/>
</x>
</presence>
<presence to=’jane@longbourn.lit/meryton’
from=’ball@chat.meryton.lit/jane’>
<x xmlns=’http://jabber.org/protocol/muc’>
<item affiliation=’member’ role=’participant’/>
<status code=’110’/>
</x>
</presence>
The room sends the affiliations and roles of each participant along with their presence. Jane’s own
presence broadcast also includes a status code of 110, which signals that this presence refers to the
user herself. Just as with presence updates from Jane’s roster, Jane will also receive presence updates
from the room as people leave and new people join.
40718c08.indd 169
11/30/09 8:56:58 PM
170
❘
Chapter 8 Group Chatting: A Multi‑User Chat Client
It can happen that someone already in the room has a user’s desired nickname. When this happens,
the group chat service will respond to the directed presence with a presence error signaling a nickname
conflict.
Lydia tries to join the room with her sisters, but someone else has already used her desired
nickname:
<presence to=’ball@chat.meryton.lit/lydia’
from=’lydia@longbourn.lit/meryton’>
<x xmlns=’http://jabber.org/protocol/muc’/>
</presence>
The server responds with a nickname conflict error:
<presence to=’lydia@longbourn.lit/meryton’
from=’ball@chat.meryton.lit’
type=’error’>
<x xmlns=’http://jabber.org/protocol/muc’/>
<error type=’cancel’>
<conflict xmlns=’urn:ietf:params:xml:ns:xmpp-stanzas’/>
</error>
</presence>
Lydia will have to choose a new nickname and attempt to join the room again.
Leaving a room is accomplished by sending unavailable presence to your room JID. Darcy has tired
of the conversation in the room and has decided to leave. He sends the following stanza:
<presence to=’ball@chat.meryton.lit/darcy’
from=’darcy@pemberley.lit/meryton’
type=’unavailable’/>
The server will broadcast this out to the other occupants. For example, Jane’s client will receive the
following stanza marking Darcy’s exit:
<presence to=’jane@longbourn.lit/meryton’
from=’ball@chat.meryton.lit/darcy’
type=’unavailable’>
<x xmlns=’http://jabber.org/protocol/muc’>
<item affiliation=’member’ role=’none’/>
</x>
</presence>
Darcy will also receive the broadcast from the room. Note that it also contains the status code 110
because it refers to his own presence.
<presence to=’darcy@pemberley.lit/meryton’
from=’ball@chat.meryton.lit/darcy’
type=’unavailable’>
<x xmlns=’http://jabber.org/protocol/muc’>
<item affiliation=’member’ role=’none’/>
<status code=’110’/>
</x>
</presence>
40718c08.indd 170
11/30/09 8:56:58 PM
Public Speaking
❘ 171
Aside from more error cases defined in the specification, that is all there is to joining and leaving
group chat rooms.
Sending and Receiving Messages
Once in a room, users can communicate with each other by sending and receiving messages. This works
very similarly to private chat messages, which you’ve seen in previous chapters.
Messages are sent to the room with a special type — groupchat. Messages directed to the bare room
JID, ball@chat.meryton.lit, for example, are broadcast out to all occupants. Messages sent to the
full JID of an occupant in the room are private and relayed by the room to the real JID of the user.
In the following example, Mr. Bingley addresses Mr. Darcy in the room. First Bingley sends his message to the room:
<message to=’ball@chat.meryton.lit’
from=’bingley@netherfield.lit/meryton’
type=’groupchat’>
<body>Come, Darcy, I must have you dance. I hate to see you standing
about by yourself in this stupid manner. You had much better
dance.</body>
</message>
His message will be broadcast out to all occupants, including Mr. Darcy. Darcy’s client will receive:
<message to=’darcy@pemberley.lit/meryton’
from=’ball@chat.meryton.lit/bingley’
type=’groupchat’>
<body> Come, Darcy, I must have you dance. I hate to see you standing
about by yourself in this stupid manner. You had much better
dance.</body>
</message>
In most group chat rooms, messages will appear just like these, perhaps with XHTML-IM payloads
for nicer formatting. Group chat messages can be extended just like anything else in XMPP, and by
using extensions, the messages can carry arbitrary structured information. You see this in action in
Chapter 11 when you build a game service using group chat.
Anonymity
XMPP multi-user chat rooms have configurable levels of anonymity, unlike many other group chat
systems. Three levels are currently defined in the specification: non-anonymous, semi-anonymous,
and fully anonymous.
In non-anonymous rooms, each occupant can see the real JID of the other occupants; the room will
broadcast an extra jid attribute in the occupant’s presence updates.
In semi-anonymous rooms, only owners and admins can see the real JIDs of occupants. Semianonymous and non-anonymous rooms are the most common types, and most group chat services
will be configured to use one of these as the default for newly created rooms.
40718c08.indd 171
11/30/09 8:56:58 PM
172
❘
Chapter 8 Group Chatting: A Multi‑User Chat Client
Fully anonymous rooms are quite rare, and only server administrators have access to the real JIDs of
participants of these rooms. Not even the room’s owner can access the real JIDs.
Normal private messages cannot be sent to participants in semi-anonymous or anonymous rooms,
as the sender does not have access to the participant’s actual JID. This is why private messages in
group chat are sent to the participant’s room JID.
Creating Rooms
Thousands of rooms in the federated XMPP network are already available for you to participate in,
but sometimes you will find that the room you are looking for does not yet exist. Creating rooms is
easy, and it is accomplished in much the same manner as joining a room.
Actually, rooms can be created just by joining a non-existent room. Assuming the service allows the
user to create new rooms, sending directed presence to the desired room JID of the new room will
cause the room to be created and the user to be set as the room’s owner. Here, Bingley creates a new
room for the Netherfield party:
<presence to=’chatter@chat.netherfield.lit/bingley’
from=’bingley@netherfield.lit/drawing_room’>
<x xmlns=’http://jabber.org/protocol/muc’/>
</presence>
The chat.netherfield.lit service responds with the presence broadcast for the room’s new and only
occupant:
<presence to=’bingley@netherfield.lit/drawing_room’
from=’chatter@chat.netherfield.lit/bingley’>
<x xmlns=’http://jabber.org/protocol/muc’>
<item affiliation=’owner’ role=’moderator’/>
<status code=’110’/>
<status code=’201’/>
</x>
</presence>
Notice that Bingley has the owner affiliation and the moderator role. These attributes give Bingley
special powers within the room, and you see more about these later. The 110 status code is sent, just
as it was before, and a new status code of 201 is sent. This new status code signals that a new room
has been created.
Once the room is created, the owner will usually configure it to behave as desired. Group chat
rooms support a wide range of configuration options, including:
➤➤
Room persistence, or whether the room will continue to exist after all participants have left
➤➤
Room description
➤➤
Whether the room’s messages should be logged
➤➤
Whether participants are allowed to change the room’s topic
➤➤
The maximum number of occupants
➤➤
Access controls like membership lists
40718c08.indd 172
11/30/09 8:56:58 PM
Public Speaking
❘ 173
Room configuration is done with Data Forms (XEP-0004), which you learn about in the next chapter.
Groupie’s needs are modest so the default room configuration will be sufficient.
Understanding Roles and Affiliations
You’ve already seen that every user in a group chat room has a role and an affiliation assigned.
Occupants will usually have a role of participant and an affiliation of member, but as you saw with
room creation, the room’s creator has a role of moderator and an affiliation of owner. It’s time to learn
a little more about roles and affiliations because they are important for one of the most essential pieces
of chat rooms, community management.
Roles and affiliations enable or restrict functionality, but they apply on different time scales.
An affiliation is a long-term property that persists across visits to the room, but roles apply only to
the current visit. For example, when the room’s owner joins the room, their role is moderator, and
when they leave, their role becomes none, but even after leaving, their affiliation remains as owner.
Roles and affiliations are mostly hierarchical, and each level has all the properties of the previous one
as well a few new ones. Table 8-1 lists the defined roles and their normal meanings, and Table 8-2
lists the possible affiliations.
Table 8-1: Group Chat Roles
Role
Privileges
None
No permissions — not in the room
Visitor
Can observe conversation, but can’t talk
Participant
Can fully participate in public conversation
Moderator
Can remove users from the room, or promote participants to visitors
Table 8-2: Group Chat Affiliations
Affiliation
Privileges
Outcast
Banned from the room
None
Can join the room
Member
Can join even if room is members-only, and can retrieve the member list
Admin
Can ban members or unaffiliated users; can add and remove the member affiliation
or the moderator role
Owner
Can add and remove admins and owners; can configure or destroy the room
Using the information in Table 8-1 and Table 8-2, you can begin to see how community management is accomplished. Kicking out a rowdy participant is done by setting their role within the room
40718c08.indd 173
11/30/09 8:56:58 PM
174
❘
Chapter 8 Group Chatting: A Multi‑User Chat Client
to none. If they return and continue to cause problems, you can set their affiliation with the room to
outcast, and they will no longer be allowed to join. The room’s owner can recruit new room administrators by setting their affiliations to admin, which will change their role to moderator whenever
they join the room.
Manipulating roles and affiliations is done via IQ-set and IQ-get stanzas. Modifying the role or
affiliation of a participant usually causes new presence information to be broadcast to the room for
the affected user.
Wickham has eloped with Lydia, abandoning his post in the militia. Colonel Forster is forced to ban
Wickham from the militia’s chat room. The colonel sends an IQ-set to change Wickham’s affiliation:
<iq to=’militia@chat.emdashshire.lit’
from=’forster@militia.lit/headquarters’
type=’set’
id=’ban1’>
<query xmlns=’http://jabber.org/protocol/muc#admin’>
<item jid=’wickham@emdashshire.lit’
affiliation=’outcast’/>
<reason>AWOL</reason>
</query>
</iq>
The chat.emdashshire.lit service will respond with an IQ-result indicating success because Colonel
Forster is the owner of the room. If Wickham is not currently in the room, the room does not need to
broadcast anything to the rest of the occupants; however, if Wickham is in the room when he is banned,
he will be forcibly removed, and all the room occupants will be notified of his presence change.
Wickham will receive the following stanza when he is removed from the room after his banishment:
<presence to=’wickham@emdashshire.lit/london’
from=’militia@chat.emdashshire.lit’
type=’unavailable’>
<x xmlns=’http://jabber.org/protocol/muc#user’>
<item affiliation=’outcast’ role=’none’>
<actor jid=’forster@militia.lit’/>
<reason>AWOL</reason>
</item>
<status code=’301’/>
</x>
</presence>
The <actor> element lets Wickham know who made the affiliation change, and the status code of
301 signals that he has been banned.
The other militia members receive a similar presence stanza.
Role changes are done in the same manner as affiliations. If Lady Catherine wants to grant speaking
privileges to Elizabeth within her room, she will send an IQ-set with the desired role change:
<iq to=’chatter@chat.rosings.lit’
from=’lady_catherine@rosings.lit/parlor’
type=’set’
id=’voice1’>
40718c08.indd 174
11/30/09 8:56:58 PM
Building the Interface
❘ 175
<x xmlns=’http://jabber.org/protocol/muc#admin’>
<item nick=’elizabeth’ role=’participant’/>
</x>
</iq>
Elizabeth’s role changes from visitor to participant, and the room will send the presence change
to all occupants. Note that the nick attribute is used to specify Elizabeth by her nickname; because
roles apply to a single room visit, changing roles is done by nicknames instead of JIDs.
As you have seen, the multi-user chat protocol has quite a bit of depth. Many more use cases, configuration options, and error flows are enumerated in the extension’s specification, but the topics
covered in this section are enough for you to build Groupie.
Building the Interface
Groupie’s interface is simple, as you saw in Figure 8-1. It consists of a slightly extended login dialog
box, a chat area, a participant area, and the chat input box. The HTML required to build this interface is shown in Listing 8-1, and the CSS for styling it is shown in Listing 8-2.
Listing 8-1: groupie.html
<!DOCTYPE HTML PUBLIC “-//W3C//DTD HTML 4.01//EN”
“http://www.w3.org/TR/html4/strict.dtd”>
<html>
<head>
<meta http-equiv=”Content-type” content=”text/html;charset=UTF-8”>
<title>Groupie - Chapter 8</title>
<link rel=’stylesheet’ href=’http://ajax.googleapis.com/ajax/libs/jqueryui
/1.7.2/themes/cupertino/jquery-ui.css’>
<script src=’http://ajax.googleapis.com/ajax/libs/jquery/1.3.2/jquery.js’>
</script>
<script src=’http://ajax.googleapis.com/ajax/libs/jqueryui/1.7.2/jquery-ui
.js’></script>
<script src=’scripts/strophe.js’></script>
<script src=’scripts/flXHR.js’></script>
<script src=’scripts/strophe.flxhr.js’></script>
<link rel=’stylesheet’ type=’text/css’ href=’groupie.css’>
<script type=’text/javascript’ src=’groupie.js’></script>
</head>
<body>
<h1>Groupie</h1>
<div id=’toolbar’>
<input id=’leave’ type=’button’ value=’Leave Room’
disabled=’disabled’>
</div>
<div>
<div>
40718c08.indd 175
continues
11/30/09 8:56:59 PM
176
❘
Chapter 8 Group Chatting: A Multi‑User Chat Client
Listing 8-1 (continued)
<span id=’room-name’></span>
<span id=’room-topic’></span>
</div>
<div id=’chat’>
</div>
<textarea id=’input’></textarea>
</div>
<div id=’participants’>
<ul id=’participant-list’>
</ul>
</div>
<!-- login dialog -->
<div id=’login_dialog’ class=’hidden’>
<label>JID:</label><input type=’text’ id=’jid’>
<label>Password:</label><input type=’password’ id=’password’>
<label>Chat Room:</label><input type=’text’ id=’room’>
<label>Nickname:</label><input type=’text’ id=’nickname’>
</div>
</body>
</html>
Listing 8-2: groupie.css
body {
font-family: Helvetica;
}
h1 {
text-align: center;
}
.hidden {
display: none
}
#toolbar {
text-align: center;
padding: 5px;
margin-bottom: 15px;
}
#room-name {
font-size: 150%;
font-weight: bold;
40718c08.indd 176
11/30/09 8:56:59 PM
Building the Interface
❘ 177
}
#room-topic {
font-style: italic;
}
#chat-area {
float: left;
width: 500px;
}
#chat {
overflow: auto;
height: 400px;
border: solid 1px #ccc;
}
#participants {
float: left;
width: 200px;
height: 500px;
overflow: auto;
}
#input {
width: 95%;
font-size: 120%;
}
.notice {
font-style: italic;
font-weight: bold;
color: #3d3;
}
.error {
color: #d33;
}
.message {
color: #aaa;
}
.nick {
color: #66f;
}
.self {
color: #f66;
}
.body {
color: #000;
40718c08.indd 177
continues
11/30/09 8:56:59 PM
178
❘
Chapter 8 Group Chatting: A Multi‑User Chat Client
Listing 8-2 (continued)
}
.delayed {
opacity: 0.5;
}
.private {
background-color: #fdd;
}
.action {
color: #333;
}
You’ll want the login dialog box to be presented as soon as the application is opened, just as in previous chapters. The JavaScript skeleton in Listing 8-3 has been slightly modified to work with the
new fields in the login dialog box, but is otherwise the same as you’ve seen previously.
Listing 8-3: groupie.js (skeleton)
var Groupie = {
connection: null,
room: null,
nickname: null
};
$(document).ready(function () {
$(‘#login_dialog’).dialog({
autoOpen: true,
draggable: false,
modal: true,
title: ‘Join a Room’,
buttons: {
“Join”: function () {
Groupie.room = $(‘#room’).val();
Groupie.nickname = $(‘#nickname’).val();
$(document).trigger(‘connect’, {
jid: $(‘#jid’).val(),
password: $(‘#password’).val()
});
$(‘#password’).val(‘’);
$(this).dialog(‘close’);
}
}
});
40718c08.indd 178
11/30/09 8:56:59 PM
Joining the Room
❘ 179
});
$(document).bind(‘connect’, function (ev, data) {
Groupie.connection = new Strophe.Connection(
‘http://bosh.metajack.im:5280/xmpp-httpbind’);
Groupie.connection.connect(
data.jid, data.password,
function (status) {
if (status === Strophe.Status.CONNECTED) {
$(document).trigger(‘connected’);
} else if (status === Strophe.Status.DISCONNECTED) {
$(document).trigger(‘disconnected’);
}
});
});
$(document).bind(‘connected’, function () {
// nothing here yet
});
$(document).bind(‘disconnected’, function () {
// nothing here yet
});
Now that the boilerplate is done, you can start adding support for joining the group chat room.
Joining the Room
As you saw in the section Public Speaking, joining group chat rooms is a simple matter of sending
directed presence to your desired room JID. However, the room will immediately send you a presence
broadcast for all of the other participants when you join, so you will have to handle those too. You’ll
also need to add support for leaving the room, in case your users care to join a different room.
First, you should add a namespace constant to the Groupie object, so that you don’t have to keep
typing the multi-user chat namespace, http://jabber.org/protocol/muc, over and over. Also,
a flag is needed for whether the user has joined a room or not. Finally, a dictionary for the room’s
occupants is needed as well. Add the following attributes to the Groupie object:
NS_MUC: “http://jabber.org/protocol/muc”,
joined: null,
participants: null
code snippet groupie.js
Next, modify the connected event handler to send initial presence to the server to go online and
directed presence to the user’s desired room JID to join the room:
$(document).bind(‘connected’, function () {
Groupie.connection.send($pres().c(‘priority’).t(‘-1’));
Gropuie.connection.send(
$pres({
40718c08.indd 179
11/30/09 8:56:59 PM
180
❘
Chapter 8 Group Chatting: A Multi‑User Chat Client
to: Groupie.room + “/” + Groupie.nickname
}).c(‘x’, {xmlns: Groupie.NS_MUC}));
});
code snippet groupie.js
The directed presence stanza looks just like the ones you saw as examples before, but the initial
presence has something new, a priority child.
Presence priorities give information to the user’s server about which connected resources are more
important for message delivery. Messages will be routed to the resources with the highest positive
presence priority, and in the case of a tie, the message will be delivered to one or all of the resources
with tied priorities.
The presence priority in Groupie is negative, which has a special meaning. Any resource with negative priority will never receive messages addressed to the bare JID. This is very useful for XMPP
applications that do not intend to use private messages, because the negative priority will ensure that
the application is not delivered messages it won’t process. It also ensures that the user does not lose
private messages that are sent to resources that are not capable of private chat.
Because Groupie doesn’t handle private messages, aside from the special group chat private messages
you see later, it sets the presence priority to –1 to avoid accidentally stealing private messages from
users.
Now that Groupie starts the process to join a group chat room, you should add support for handling
the broadcast of the other participants’ presence as well as the broadcast of your own presence, which
indicates the room join is complete.
Add the following highlighted lines to the connected event handler to set up the incoming presence
handler:
$(document).bind(‘connected’, function () {
Groupie.joined = false;
Groupie.participants = {};
Groupie.connection.send($pres().c(‘priority’).t(‘-1’));
Groupie.connection.addHandler(Groupie.on_presence,
null, “presence”);
Gropuie.connection.send(
$pres({
to: Groupie.room + “/” + Groupie.nickname
}).c(‘x’, {xmlns: Groupie.NS_MUC}));
});
code snippet groupie.js
Now you must implement on_presence(). This handler needs to do two things at this stage. First,
it must populate the participant area with the current occupants of the room. Second, it will trigger
40718c08.indd 180
11/30/09 8:56:59 PM
Joining the Room
❘ 181
the room_joined event when the user’s own presence shows up. The modified Groupie object is
shown here:
var Groupie = {
connection: null,
room: null,
nickname: null,
NS_MUC: “http://jabber.org/protocol/muc”,
joined: null,
participants: null,
on_presence: function (presence) {
var from = $(presence).attr(‘from’);
var room = Strophe.getBareJidFromJid(from);
// make sure this presence is for the right room
if (room === Groupie.room) {
var nick = Strophe.getResourceFromJid(from);
if ($(presence).attr(‘type’) === ‘error’ &&
!Groupie.joined) {
// error joining room; reset app
Groupie.connection.disconnect();
} else if (!Groupie.participants[nick] &&
$(presence).attr(‘type’) !== ‘unavailable’) {
// add to participant list
Groupie.participants[nick] = true;
$(‘#participant-list’).append(‘<li>’ + nick + ‘</li>’);
}
if ($(presence).attr(‘type’) !== ‘error’ &&
!Groupie.joined) {
// check for status 110 to see if it’s our own presence
if ($(presence).find(“status[code=’110’]”).length > 0) {
// check if server changed our nick
if ($(presence).find(“status[code=’210’]”).length > 0) {
Groupie.nickname = Strophe.getResourceFromJid(from);
}
// room join complete
$(document).trigger(“room_joined”);
}
}
}
return true;
}
};
code snippet groupie.js
40718c08.indd 181
11/30/09 8:56:59 PM
182
❘
Chapter 8 Group Chatting: A Multi‑User Chat Client
The code keeps track of whether or not the room is joined in order to know when to fire the
room_joined event. It should only fire room_joined the first time it receives the user’s own presence as indicated by a status code of 110. If a presence error occurs, this usually signals a nickname
conflict. Groupie simply resets the application in this case. Note that the group chat service may
change the user’s requested nickname; this change is signaled by the 210 status code, so in that case,
the nickname property is updated to reflect the change.
You can add a handler for the room_joined event to let the user know their action was successful
and enable the Leave Room button. Add the following handler to the end of groupie.js:
$(document).bind(‘room_joined’, function () {
Groupie.joined = true;
$(‘#leave’).removeAttr(‘disabled’);
$(‘#room-name’).text(Groupie.room);
$(‘#chat’).append(“<div class=’notice’>*** Room joined.</div>”)
});
code snippet groupie.js
All that’s left is to enable the user to leave the room by wiring up the Leave Room button. Add the
following code to the document ready handler:
$(‘#leave’).click(function () {
Groupie.connection.send(
$pres({to: Groupie.room + “/” + Groupie.nickname,
type: “unavailable”}));
Groupie.connection.disconnect();
});
code snippet groupie.js
The preceding code sends directed presence of type unavailable to the room to exit nicely and then
terminates the XMPP connection. You should make sure that the login dialog box reappears by
modifying the disconnected event handler:
$(document).bind(‘disconnected’, function () {
Groupie.connection = null;
$(‘#participant-list’).empty();
$(‘#room-name’).empty();
$(‘#room-topic’).empty();
$(‘#chat’).empty();
$(‘#login_dialog’).dialog(‘open’);
});
code snippet groupie.js
If you run Groupie now, you should see it join the requested room and add the list of all occupants
to the participant area. Once your own presence is received, you should see “*** Room joined”
printed in the chat area.
40718c08.indd 182
11/30/09 8:56:59 PM
Dealing with Presence and Messages
❘ 183
Dealing with Presence and Messages
Once in a group chat room, the user needs to be able to send and receive messages, and their participant
list should remain updated as people join and leave the room. Private messages sent to the user should
be displayed specially, and the user should also be able to send private messages to other participants.
You can add all these features to Groupie very easily.
Handling Room Messages
To display messages from people in the room, you must first add a handler for incoming <message>
stanzas and then display them. You can add the appropriate handler in the connected event handler,
right after the addHandler() for <presence> stanzas:
Groupie.connection.addHandler(Groupie.on_public_message,
null, “message”, “groupchat”);
code snippet groupie.js
Note that each message to the room will have the type attribute set to groupchat. This differentiates public messages from private ones. Later you add a handler for private messages, which have a
type attribute equal to chat or normal.
Now you must implement on_public_message(), which should display incoming messages
addressed to the room. Add this code to the Groupie object:
on_public_message: function (message) {
var from = $(message).attr(‘from’);
var room = Strophe.getBareJidFromJid(from);
var nick = Strophe.getResourceFromJid(from);
// make sure message is from the right place
if (room === Groupie.room) {
// is message from a user or the room itself?
var notice = !nick;
// messages from ourself will be styled differently
var nick_class = “nick”;
if (nick === Groupie.nickname) {
nick_class += “ self”;
}
var body = $(message).children(‘body’).text();
if (!notice) {
Groupie.add_message(“<div class=’message’>” +
“<<span class=’” + nick_class + “‘>” +
nick + “</span>> <span class=’body’>” +
body + “</span></div>”);
} else {
Groupie.add_message(“<div class=’notice’>*** “ + body +
“</div>”);
}
40718c08.indd 183
11/30/09 8:56:59 PM
184
❘
Chapter 8 Group Chatting: A Multi‑User Chat Client
}
return true;
}
code snippet groupie.js
This function is less complicated than it may appear. First, the function distinguishes messages sent
by the room’s occupants from messages sent by the room itself and prints the message appropriately. It
also uses CSS styles to differentiate messages the user sends from the messages of the other occupants.
Finally, just as in previous applications, the function ensures that the content window is scrolled to the
bottom when adding new lines by using the add_message() function. The add_message() helper is
shown here, and should be added to the Groupie object:
add_message: function (msg) {
// detect if we are scrolled all the way down
var chat = $(‘#chat’).get(0);
var at_bottom = chat.scrollTop >= chat.scrollHeight chat.clientHeight;
$(‘#chat’).append(msg);
// if we were at the bottom, keep us at the bottom
if (at_bottom) {
chat.scrollTop = chat.scrollHeight;
}
}
code snippet groupie.js
Next on the list is wiring up the input text box so that the user can send messages to the room. You
do this by adding a keypress event handler and watching for the key code that corresponds to the
Enter key. Add the following code to the document ready handler:
$(‘#input’).keypress(function (ev) {
if (ev.which === 13) {
ev.preventDefault();
var body = $(this).val();
Groupie.connection.send(
$msg({
to: Groupie.room,
type: “groupchat”}).c(‘body’).t(body));
$(this).val(‘’);
}
});
code snippet groupie.js
40718c08.indd 184
11/30/09 8:57:00 PM
Dealing with Presence and Messages
❘ 185
With this latest feature, Groupie is moderately useful. Users can join group chat rooms and participate in the conversation. Unfortunately, the participant list does not track the actual state of the
room yet, but you will fix that next.
Tracking Presence Changes
The on_presence() handler you wrote earlier does a great job of updating the participant list whenever a new person joins the room, but it isn’t kept up-to-date as people leave. You’ll need to add logic
to on_presence() to remove people when they leave the room.
The modified on_presence() appears in the following code with the new and modified lines highlighted. Note that events have been added for people joining and leaving the room. You will make
use of these shortly.
on_presence: function (presence) {
var from = $(presence).attr(‘from’);
var room = Strophe.getBareJidFromJid(from);
// make sure this presence is for the right room
if (room === Groupie.room) {
var nick = Strophe.getResourceFromJid(from);
if ($(presence).attr(‘type’) === ‘error’ &&
!Groupie.joined) {
// error joining room; reset app
Groupie.connection.disconnect();
} else if (!Groupie.participants[nick] &&
$(presence).attr(‘type’) !== ‘unavailable’) {
// add to participant list
Groupie.participants[nick] = true;
$(‘#participant-list’).append(‘<li>’ + nick + ‘</li>’);
if (Groupie.joined) {
$(document).trigger(‘user_joined’, nick);
}
} else if (Groupie.participants[nick] &&
$(presence).attr(‘type’) === ‘unavailable’) {
// remove from participants list
$(‘#participant-list li’).each(function () {
if (nick === $(this).text()) {
$(this).remove();
return false;
}
});
$(document).trigger(‘user_left’, nick);
}
if ($(presence).attr(‘type’) !== ‘error’ &&
!Groupie.joined) {
// check for status 110 to see if it’s our own presence
if ($(presence).find(“status[code=’110’]”).length > 0) {
40718c08.indd 185
11/30/09 8:57:00 PM
186
❘
Chapter 8 Group Chatting: A Multi‑User Chat Client
// check if server changed our nick
if ($(presence).find(“status[code=’210’]”).length > 0) {
Groupie.nickname = Strophe.getResourceFromJid(from);
}
// room join complete
$(document).trigger(“room_joined”);
}
}
}
return true;
}
code snippet groupie.js
You can print helpful messages to the user whenever people join and leave by writing handlers for
these two new events. The following event handlers add notice messages to the chat area on these
events; add them to the end of groupie.js:
$(document).bind(‘user_joined’, function (ev, nick) {
Groupie.add_message(“<div class=’notice’>*** “ + nick +
“ joined.</div>”);
});
$(document).bind(‘user_left’, function (ev, nick) {
Groupie.add_message(“<div class=’notice’>*** “ + nick +
“ left.</div>”);
});
code snippet groupie.js
Now Groupie keeps track of who is in the room as well as when people join and leave.
Chat History
You might have noticed that often, as soon as you join a group chat room, a lot of messages appear
immediately. These represent the recent chat history, and XMPP multi-user chat rooms send a configurable amount of this history to new occupants so that they have some context for the ensuing
discussions. If you’ve ever used IRC, you may be familiar with how confusing it is to join a room in
the middle of an active conversation.
It would be nice if Groupie presented this chat history differently. You can modify the on_public_
message() handler to add a special CSS class to these messages. The room tags historical chat messages with <delay> elements just like the stored private messages you saw in Chapter 5. It may be
that group chat servers you encounter use the legacy version of delay indication defined in XEP-0091
instead of the current version in XEP-0203. To detect the old-style delay indicators, just check for an <x>
40718c08.indd 186
11/30/09 8:57:00 PM
Dealing with Presence and Messages
❘ 187
element under the jabber:x:delay namespace. The following modified version of on_public_
message() adds the delayed class to messages that contain delay indicators of either type:
on_public_message: function (message) {
var from = $(message).attr(‘from’);
var room = Strophe.getBareJidFromJid(from);
var nick = Strophe.getResourceFromJid(from);
// make sure message is from the right place
if (room === Groupie.room) {
// is message from a user or the room itself?
var notice = !nick;
// messages from ourself will be styled differently
var nick_class = “nick”;
if (nick === Groupie.nickname) {
nick_class += “ self”;
}
var body = $(message).children(‘body’).text();
var delayed = $(message).children(“delay”).length > 0 ||
$(message).children(“x[xmlns=’jabber:x:delay’]”).length > 0;
if (!notice) {
var delay_css = delayed ? “ delayed”: “”;
Groupie.add_message(“<div class=’message” + delay_css + “‘>” +
“<<span class=’” + nick_class + “‘>” +
nick + “</span>> <span class=’body’>” +
body + “</span></div>”);
} else {
Groupie.add_message(“<div class=’notice’>*** “ + body +
“</div>”);
}
}
return true;
}
code snippet groupie.js
With chat history taken care of, you can now move on to the last messaging-related feature — private
room messages.
Keeping It Private
When sending messages for all to see, Groupie addressed the message to the room itself, and the room
rebroadcast it to all occupants. You can also address messages to specific occupants, and these
40718c08.indd 187
11/30/09 8:57:00 PM
188
❘
Chapter 8 Group Chatting: A Multi‑User Chat Client
messages are sent privately and not shared with the rest of the room. To complete Groupie, you’ll
want to add support for sending and receiving private messages within the room.
To send a private room message, you need only address the message directly to the occupant’s room
JID, making sure to set the type attribute to chat instead of groupchat. As discussed in the Anonymity
section, the participant’s room JID is used since the room may be configured as anonymous or semianonymous.
Without a different type attribute, the recipient would have no way to distinguish a public message
from a private one. To receive private messages, you must watch for incoming messages from room
occupants with a type attribute of chat.
First, add a new <message> stanza handler for private messages next to the others in the connected
event handler:
Groupie.connection.addHandler(Groupie.on_private_message,
null, “message”, “chat”);
code snippet groupie.js
Next, add the on_private_message() function to the Groupie object:
on_private_message: function (message) {
var from = $(message).attr(‘from’);
var room = Strophe.getBareJidFromJid(from);
var nick = Strophe.getResourceFromJid(from);
// make sure this message is from the correct room
if (room === Groupie.room) {
var body = $(message).children(‘body’).text();
Groupie.add_message(“<div class=’message private’>” +
“@@ <<span class=’nick’>” +
nick + “</span>> <span class=’body’>” +
body + “</span> @@</div>”);
}
return true;
}
code snippet groupie.js
Groupie ensures the message is from a participant of the room before displaying it to the user.
Finally, you need to modify the input text box’s keypress event handler to detect private messages
and send them. Private messages are sent with the /msg command, which the user types into the text
box. If you’ve used IRC clients before, this should look pretty familiar. The new handler code must
parse out this special command, check it for errors or bad arguments, and then execute the intended
action.
40718c08.indd 188
11/30/09 8:57:00 PM
Dealing with Presence and Messages
❘ 189
The modified keypress handler follows, with the changed lines highlighted:
$(‘#input’).keypress(function (ev) {
if (ev.which === 13) {
ev.preventDefault();
var body = $(this).val();
var match = body.match(/^\/(.*?)(?: (.*))?$/);
var args = null;
if (match) {
if (match[1] === “msg”) {
args = match[2].match(/^(.*?) (.*)$/);
if (Groupie.participants[args[1]]) {
Groupie.connection.send(
$msg({
to: Groupie.room + “/” + args[1],
type: “chat”}).c(‘body’).t(body));
Groupie.add_message(
“<div class=’message private’>” +
“@@ <<span class=’nick self’>” +
Groupie.nickname +
“</span>> <span class=’body’>” +
args[2] + “</span> @@</div>”);
} else {
Groupie.add_message(
“<div class=’notice error’>” +
“Error: User not in room.” +
“</div>”);
}
} else {
Groupie.add_message(
“<div class=’notice error’>” +
“Error: Command not recognized.” +
“</div>”);
}
} else {
Groupie.connection.send(
$msg({
to: Groupie.room,
type: “groupchat”}).c(‘body’).t(body));
}
$(this).val(‘’);
}
});
code snippet groupie.js
The preceding code abstracts the command parsing logic because you add more special commands
in the next section. For the /msg command, Groupie sends the private message to the occupant specified
by the user. If the addressed occupant is not in the room or an invalid command was given, an error
is shown.
40718c08.indd 189
11/30/09 8:57:00 PM
190
❘
Chapter 8 Group Chatting: A Multi‑User Chat Client
Private messages are now shown in between “@@” markers and with a light red background. Adding
support for one command wasn’t too hard, but additional commands can be implemented extremely
easily. As the final feature in this section, you should add an action command.
Describing Actions
Many chat systems support action descriptions where users describe themselves or what they are
doing. Because talking about yourself in the third person is often strange, commands were added to
these chat systems to make this more natural. Typically these commands were written /action or
/me, and users would type something like this:
/me writes another XMPP application
You can easily add support for these to Groupie. All you need to do is to add a new clause to the
command logic inside the keypress event handler and display messages starting with /me in a
special way.
The following code shows the modifications needed to the command interpretation clauses:
if (match[1] === “msg”) {
args = match[2].match(/^(.*?) (.*)$/);
if (Groupie.participants[args[1]]) {
Groupie.connection.send(
$msg({
to: Groupie.room + “/” + args[1],
type: “chat”}).c(‘body’).t(body));
Groupie.add_message(
“<div class=’message private’>” +
“@@ <<span class=’nick self’>” +
Groupie.nickname +
“</span>> <span class=’body’>” +
args[2] + “</span> @@</div>”);
} else {
Groupie.add_message(
“<div class=’notice error’>” +
“Error: User not in room.” +
“</div>”);
}
} else if (match[1] === “me” || match[1] === “action”) {
Groupie.connection.send(
$msg({
to: Groupie.room,
type: “groupchat”}).c(‘body’)
.t(‘/me ‘ + match[2]));
} else {
Groupie.add_message(
“<div class=’notice error’>” +
“Error: Command not recognized.” +
“</div>”);
}
code snippet groupie.js
40718c08.indd 190
11/30/09 8:57:00 PM
Managing the Room
❘ 191
Lastly, modify the relevant parts of on_public_message() to match the parts in the modified version here:
if (!notice) {
var delay_css = delayed ? “ delayed”: “”;
var action = body.match(/\/me (.*)$/);
if (!action) {
Groupie.add_message(
“<div class=’message” + delay_css + “‘>” +
“<<span class=’” + nick_class + “‘>” +
nick + “</span>> <span class=’body’>” +
body + “</span></div>”);
} else {
Groupie.add_message(
“<div class=’message action “ + delay_css + “‘>” +
“* “ + nick + “ “ + action[1] + “</div>”);
}
} else {
Groupie.add_message(“<div class=’notice’>*** “ + body +
“</div>”);
}
code snippet groupie.js
Groupie is nearly done, and it’s already quite a usable group chat client. However, if you are a room
moderator, you will need some extra functionality for managing the occupants.
Managing the Room
The last features you will add to Groupie are all about room management. These are the tools users
need to run their own successful group chat rooms, including manipulating the room’s topic, kicking
and banning users, and managing the room’s administrators.
Changing Topics
Every room has a topic, which is typically shown at the top of the room. Depending on the room’s
configuration, users may be able to change the topic message, or this action may be restricted to
administrators. Groupie will need to display the current topic and allow authorized users to change it.
Topic changes are sent out as bodiless messages that contain a <subject> element, and the content
of the <subject> element becomes the new room topic. You can watch for these messages in the on_
public_message() handler. The following code should be inserted right before the line containing
“if (!notice) {”:
// look for room topic change
var subject = $(message).children(‘subject’).text();
if (subject) {
$(‘#room-topic’).text(subject);
}
code snippet groupie.js
40718c08.indd 191
11/30/09 8:57:00 PM
192
❘
Chapter 8 Group Chatting: A Multi‑User Chat Client
You can allow users to change the topic by adding a /topic command to the keypress event handler.
The modified command logic appears here with the new lines highlighted:
} else if (match[1] === “me” || match[1] === “action”) {
Groupie.connection.send(
$msg({
to: Groupie.room,
type: “groupchat”}).c(‘body’)
.t(‘/me ‘ + match[2]));
} else if (match[1] === “topic”) {
Groupie.connection.send(
$msg({to: Groupie.room,
type: “groupchat”}).c(‘subject’)
.text(match[2]));
} else {
Groupie.add_message(
“<div class=’notice error’>” +
“Error: Command not recognized.” +
“</div>”);
}
code snippet groupie.js
Groupie’s users can now see and change room topics, assuming that the room’s configuration allows
them to do so.
Dealing with Troublemakers
It is a sad fact that nearly every gathering place on the Internet is prey to those who would disturb
peaceful conversations. Luckily, the multi-user chat protocol has quite a few tools for dealing with
these troublemakers, and you add two of these to Groupie: kicking out and banning.
Kicking out users from the room simply removes them from the room temporarily and functions as
a stern warning. As you saw in the section Public Speaking, kicking out users is accomplished by
sending an IQ-set for an occupant that changes the occupant’s role to none. In order for a user to
kick out an occupant, the user must have the role of moderator.
Add the /kick command by adding the following clause to the command logic:
} else if (match[1] === “topic”) {
Groupie.connection.send(
$msg({to: Groupie.room,
type: “groupchat”}).c(‘subject’)
.text(match[2]));
} else if (match[1] === “kick”) {
Groupie.connection.sendIQ(
$iq({to: Groupie.room,
type: “set”})
.c(‘query’, {xmlns: Groupie.NS_MUC + “#admin”})
.c(‘item’, {nick: match[2],
role: “none”}));
} else {
Groupie.add_message(
40718c08.indd 192
11/30/09 8:57:01 PM
Managing the Room
❘ 193
“<div class=’notice error’>” +
“Error: Command not recognized.” +
“</div>”);
}
code snippet groupie.js
You can test this feature by creating a new room so that you are the room’s owner and then joining the
room with another XMPP account. Once the second account is joined, you can type /kick nickname
on the first account to remove the second one from the room.
Banning a user is nearly the same, except that you must modify the user’s affiliation instead of their
role. A banned user has an affiliation of outcast, and won’t be able to join the room again until the
ban is lifted.
Add the following clause to the command logic to add support for /ban:
} else if (match[1] === “kick”) {
Groupie.connection.sendIQ(
$iq({to: Groupie.room,
type: “set”})
.c(‘query’, {xmlns: Groupie.NS_MUC + “#admin”})
.c(‘item’, {nick: match[2],
role: “none”}));
} else if (match[1] === “ban”) {
Groupie.connection.sendIQ(
$iq({to: Groupie.room,
type: “set”})
.c(‘query’, {xmlns: Groupie.NS_MUC + “#admin”})
.c(‘item’, {jid: Groupie.participants[match[2]],
affiliation: “outcast”}));
} else {
Groupie.add_message(
“<div class=’notice error’>” +
“Error: Command not recognized.” +
“</div>”);
}
code snippet groupie.js
Users must be banned using their bare JIDs, not their room nicknames. It is also possible to ban an
entire domain, but usually moderators try to restrict the ban to avoid inadvertently punishing the
innocent. The preceding code uses the participants dictionary to get the JID for an occupant’s
nickname. Previously, Groupie only stored the value true in this dictionary; you will have to add
the following highlighted lines to the on_presence() handler to store the JID if that information is
available:
} else if (!Groupie.participants[nick] &&
$(presence).attr(‘type’) !== ‘unavailable’) {
// add to participant list
var user_jid = $(presence).find(‘item’).attr(‘jid’);
Groupie.participants[nick] = user_jid || true;
40718c08.indd 193
11/30/09 8:57:01 PM
194
❘
Chapter 8 Group Chatting: A Multi‑User Chat Client
$(‘#participant-list’).append(‘<li>’ + nick + ‘</li>’);
if (Groupie.joined) {
$(document).trigger(‘user_joined’, nick);
}
} else if (Groupie.participants[nick] &&
code snippet groupie.js
Groupie can now help room administrators and owners keep the peace as long as one of them is around.
Because administrators have to sleep sometime, it is often helpful to recruit new administrators to
help out.
Recruiting Help
The final feature you will add to Groupie is granting and revoking administrator privileges. This is
done via the /op and /deop commands, named after their IRC counterparts.
Adding or removing administrators is done very similarly to banning users; you need only change
someone’s affiliation with the room. Add the following highlighted clauses to implement the new
commands:
} else if (match[1] === “ban”) {
Groupie.connection.sendIQ(
$iq({to: Groupie.room,
type: “set”})
.c(‘query’, {xmlns: Groupie.NS_MUC + “#admin”})
.c(‘item’, {jid: Groupie.participants[match[2]],
affiliation: “outcast”}));
} else if (match[1] === “op”) {
Groupie.connection.sendIQ(
$iq({to: Groupie.room,
type: “set”})
.c(‘query’, {xmlns: Groupie.NS_MUC + “#admin”})
.c(‘item’, {jid: Groupie.participants[match[2]],
affiliation: “admin”}));
} else if (match[1] === “deop”) {
Groupie.connection.sendIQ(
$iq({to: Groupie.room,
type: “set”})
.c(‘query’, {xmlns: Groupie.NS_MUC + “#admin”})
.c(‘item’, {jid: Groupie.participants[match[2]],
affiliation: “none”}));
} else {
Groupie.add_message(
“<div class=’notice error’>” +
“Error: Command not recognized.” +
“</div>”);
}
code snippet groupie.js
40718c08.indd 194
11/30/09 8:57:01 PM
Managing the Room
❘ 195
Groupie is finally complete, and can be used by normal participants and moderators alike. The final
JavaScript code appears in Listing 8-4.
Listing 8-4: groupie.js (final)
var Groupie = {
connection: null,
room: null,
nickname: null,
NS_MUC: “http://jabber.org/protocol/muc”,
joined: null,
participants: null,
on_presence: function (presence) {
var from = $(presence).attr(‘from’);
var room = Strophe.getBareJidFromJid(from);
// make sure this presence is for the right room
if (room === Groupie.room) {
var nick = Strophe.getResourceFromJid(from);
if ($(presence).attr(‘type’) === ‘error’ &&
!Groupie.joined) {
// error joining room; reset app
Groupie.connection.disconnect();
} else if (!Groupie.participants[nick] &&
$(presence).attr(‘type’) !== ‘unavailable’) {
// add to participant list
var user_jid = $(presence).find(‘item’).attr(‘jid’);
Groupie.participants[nick] = user_jid || true;
$(‘#participant-list’).append(‘<li>’ + nick + ‘</li>’);
if (Groupie.joined) {
$(document).trigger(‘user_joined’, nick);
}
} else if (Groupie.participants[nick] &&
$(presence).attr(‘type’) === ‘unavailable’) {
// remove from participants list
$(‘#participant-list li’).each(function () {
if (nick === $(this).text()) {
$(this).remove();
return false;
}
});
$(document).trigger(‘user_left’, nick);
}
if ($(presence).attr(‘type’) !== ‘error’ &&
!Groupie.joined) {
// check for status 110 to see if it’s our own presence
40718c08.indd 195
continues
11/30/09 8:57:01 PM
196
❘
Chapter 8 Group Chatting: A Multi‑User Chat Client
Listing 8-4 (continued)
if ($(presence).find(“status[code=’110’]”).length > 0) {
// check if server changed our nick
if ($(presence).find(“status[code=’210’]”).length > 0) {
Groupie.nickname = Strophe.getResourceFromJid(from);
}
// room join complete
$(document).trigger(“room_joined”);
}
}
}
return true;
},
on_public_message: function (message) {
var from = $(message).attr(‘from’);
var room = Strophe.getBareJidFromJid(from);
var nick = Strophe.getResourceFromJid(from);
// make sure message is from the right place
if (room === Groupie.room) {
// is message from a user or the room itself?
var notice = !nick;
// messages from ourself will be styled differently
var nick_class = “nick”;
if (nick === Groupie.nickname) {
nick_class += “ self”;
}
var body = $(message).children(‘body’).text();
var delayed = $(message).children(“delay”).length > 0 ||
$(message).children(“x[xmlns=’jabber:x:delay’]”).length > 0;
// look for room topic change
var subject = $(message).children(‘subject’).text();
if (subject) {
$(‘#room-topic’).text(subject);
}
if (!notice) {
var delay_css = delayed ? “ delayed”: “”;
var action = body.match(/\/me (.*)$/);
if (!action) {
Groupie.add_message(
“<div class=’message” + delay_css + “‘>” +
“<<span class=’” + nick_class + “‘>” +
40718c08.indd 196
11/30/09 8:57:01 PM
Managing the Room
❘ 197
nick + “</span>> <span class=’body’>” +
body + “</span></div>”);
} else {
Groupie.add_message(
“<div class=’message action “ + delay_css + “‘>” +
“* “ + nick + “ “ + action[1] + “</div>”);
}
} else {
Groupie.add_message(“<div class=’notice’>*** “ + body +
“</div>”);
}
}
return true;
},
add_message: function (msg) {
// detect if we are scrolled all the way down
var chat = $(‘#chat’).get(0);
var at_bottom = chat.scrollTop >= chat.scrollHeight chat.clientHeight;
$(‘#chat’).append(msg);
// if we were at the bottom, keep us at the bottom
if (at_bottom) {
chat.scrollTop = chat.scrollHeight;
}
},
on_private_message: function (message) {
var from = $(message).attr(‘from’);
var room = Strophe.getBareJidFromJid(from);
var nick = Strophe.getResourceFromJid(from);
// make sure this message is from the correct room
if (room === Groupie.room) {
var body = $(message).children(‘body’).text();
Groupie.add_message(“<div class=’message private’>” +
“@@ <<span class=’nick’>” +
nick + “</span>> <span class=’body’>” +
body + “</span> @@</div>”);
}
return true;
}
};
$(document).ready(function () {
$(‘#login_dialog’).dialog({
autoOpen: true,
draggable: false,
40718c08.indd 197
continues
11/30/09 8:57:01 PM
198
❘
Chapter 8 Group Chatting: A Multi‑User Chat Client
Listing 8-4 (continued)
modal: true,
title: ‘Join a Room’,
buttons: {
“Join”: function () {
Groupie.room = $(‘#room’).val();
Groupie.nickname = $(‘#nickname’).val();
$(document).trigger(‘connect’, {
jid: $(‘#jid’).val(),
password: $(‘#password’).val()
});
$(‘#password’).val(‘’);
$(this).dialog(‘close’);
}
}
});
$(‘#leave’).click(function () {
$(‘#leave’).attr(‘disabled’, ‘disabled’);
Groupie.connection.send(
$pres({to: Groupie.room + “/” + Groupie.nickname,
type: “unavailable”}));
Groupie.connection.disconnect();
});
$(‘#input’).keypress(function (ev) {
if (ev.which === 13) {
ev.preventDefault();
var body = $(this).val();
var match = body.match(/^\/(.*?)(?: (.*))?$/);
var args = null;
if (match) {
if (match[1] === “msg”) {
args = match[2].match(/^(.*?) (.*)$/);
if (Groupie.participants[args[1]]) {
Groupie.connection.send(
$msg({
to: Groupie.room + “/” + args[1],
type: “chat”}).c(‘body’).t(body));
Groupie.add_message(
“<div class=’message private’>” +
“@@ <<span class=’nick self’>” +
Groupie.nickname +
“</span>> <span class=’body’>” +
args[2] + “</span> @@</div>”);
} else {
Groupie.add_message(
“<div class=’notice error’>” +
40718c08.indd 198
11/30/09 8:57:01 PM
Managing the Room
❘ 199
“Error: User not in room.” +
“</div>”);
}
} else if (match[1] === “me” || match[1] === “action”) {
Groupie.connection.send(
$msg({
to: Groupie.room,
type: “groupchat”}).c(‘body’)
.t(‘/me ‘ + match[2]));
} else if (match[1] === “topic”) {
Groupie.connection.send(
$msg({to: Groupie.room,
type: “groupchat”}).c(‘subject’)
.text(match[2]));
} else if (match[1] === “kick”) {
Groupie.connection.sendIQ(
$iq({to: Groupie.room,
type: “set”})
.c(‘query’, {xmlns: Groupie.NS_MUC + “#admin”})
.c(‘item’, {nick: match[2],
role: “none”}));
} else if (match[1] === “ban”) {
Groupie.connection.sendIQ(
$iq({to: Groupie.room,
type: “set”})
.c(‘query’, {xmlns: Groupie.NS_MUC + “#admin”})
.c(‘item’, {jid: Groupie.participants[match[2]],
affiliation: “outcast”}));
} else if (match[1] === “op”) {
Groupie.connection.sendIQ(
$iq({to: Groupie.room,
type: “set”})
.c(‘query’, {xmlns: Groupie.NS_MUC + “#admin”})
.c(‘item’, {jid: Groupie.participants[match[2]],
affiliation: “admin”}));
} else if (match[1] === “deop”) {
Groupie.connection.sendIQ(
$iq({to: Groupie.room,
type: “set”})
.c(‘query’, {xmlns: Groupie.NS_MUC + “#admin”})
.c(‘item’, {jid: Groupie.participants[match[2]],
affiliation: “none”}));
} else {
Groupie.add_message(
“<div class=’notice error’>” +
“Error: Command not recognized.” +
“</div>”);
}
} else {
Groupie.connection.send(
$msg({
to: Groupie.room,
type: “groupchat”}).c(‘body’).t(body));
40718c08.indd 199
continues
11/30/09 8:57:01 PM
200
❘
Chapter 8 Group Chatting: A Multi‑User Chat Client
Listing 8-4 (continued)
}
$(this).val(‘’);
}
});
});
$(document).bind(‘connect’, function (ev, data) {
Groupie.connection = new Strophe.Connection(
‘http://bosh.metajack.im:5280/xmpp-httpbind’);
Groupie.connection.connect(
data.jid, data.password,
function (status) {
if (status === Strophe.Status.CONNECTED) {
$(document).trigger(‘connected’);
} else if (status === Strophe.Status.DISCONNECTED) {
$(document).trigger(‘disconnected’);
}
});
});
$(document).bind(‘connected’, function () {
Groupie.joined = false;
Groupie.participants = {};
Groupie.connection.send($pres().c(‘priority’).t(‘-1’));
Groupie.connection.addHandler(Groupie.on_presence,
null, “presence”);
Groupie.connection.addHandler(Groupie.on_public_message,
null, “message”, “groupchat”);
Groupie.connection.addHandler(Groupie.on_private_message,
null, “message”, “chat”);
Groupie.connection.send(
$pres({
to: Groupie.room + “/” + Groupie.nickname
}).c(‘x’, {xmlns: Groupie.NS_MUC}));
});
$(document).bind(‘disconnected’, function () {
Groupie.connection = null;
$(‘#room-name’).empty();
$(‘#room-topic’).empty();
$(‘#participant-list’).empty();
$(‘#chat’).empty();
40718c08.indd 200
11/30/09 8:57:01 PM
Summary
❘ 201
$(‘#login_dialog’).dialog(‘open’);
});
$(document).bind(‘room_joined’, function () {
Groupie.joined = true;
$(‘#leave’).removeAttr(‘disabled’);
$(‘#room-name’).text(Groupie.room);
Groupie.add_message(“<div class=’notice’>*** Room joined.</div>”)
});
$(document).bind(‘user_joined’, function (ev, nick) {
Groupie.add_message(“<div class=’notice’>*** “ + nick +
“ joined.</div>”);
});
$(document).bind(‘user_left’, function (ev, nick) {
Groupie.add_message(“<div class=’notice’>*** “ + nick +
“ left.</div>”);
});
Improving Groupie
Groupie is a simple group chat client, but it is full of potential. Try adding some more features to make
your users even happier:
➤➤
Add support for chatting in multiple rooms at the same time.
➤➤
Let room owners configure some basic settings for newly created rooms.
➤➤
Combine a version of Chapter 7’s browser with Groupie to allow users to find new chat rooms
and join them easily.
Summary
XMPP’s multi-user chat protocol allows a group of people to create a shared space for communication. Typically, it is used for text communication between human users, but it can also be used for
many other purposes. Some people have used group chat to enable bots to exchange data. Others
have used it to create rich collaborative environments or to provide the basis for game systems,
which you do in Chapter 11.
40718c08.indd 201
11/30/09 8:57:01 PM
202
❘
Chapter 8 Group Chatting: A Multi‑User Chat Client
In this chapter, you created a simple group chat client that implemented an important cross-section
of MUC’s feature set. By the end you learned:
➤➤
How to join, leave, and create group chat rooms
➤➤
How to participate in conversations
➤➤
How to send and receive private messages within a room
➤➤
How to manage the room’s topic
➤➤
How roles and affiliations work and the different privileges they enable
➤➤
How to deal with and ban troublemakers
➤➤
How to create new room administrators
➤➤
How to deal with chat history
In the next chapter, you discover a similar protocol called Publish-Subscribe, which is used primarily for notification and one-to-many broadcast systems.
40718c08.indd 202
11/30/09 8:57:01 PM
9
Publishing and Subscribing:
A Shared Sketch Pad Introduction
What’s in This Chapter?
➤➤
How publish-subscribe systems work
➤➤
Using Data Forms
➤➤
Creating and configuring pubsub nodes
➤➤
Subscribing and unsubscribing from pubsub nodes
➤➤
Publishing and receiving events
➤➤
Using HTML5’s <canvas> element
Chatting online is a great way for teams to communicate, but it is often ineffective at communicating visual ideas. In a face-to-face setting, the speaker can step up to a whiteboard and
begin sketching out their ideas. In this chapter, you develop an application called SketchCast,
which allows a presenter to broadcast a whiteboard session to a virtually unlimited number of
participants. You develop SketchCast using one of XMPP’s most powerful extensions, publishsubscribe, or pubsub as it is commonly called.
SketchCast is an example of a very simple vector drawing program. Similar programs can be
found in almost every introductory book on graphics or GUI programming. SketchCast stretches
this functionality to a shared environment, giving the entire audience a view of what the presenter
is drawing.
A lot of functionality is required to bring this application to life beyond just the simple graphics. To enable others to see what someone is drawing, you must capture the drawing actions,
transform them into a format suitable for transmission, send these actions across a network, and
re-create them on the audience’s computers. In addition, presenters will need some mechanism for
40718c09.indd 203
12/1/09 11:09:04 AM
204
❘
Chapter 9 Publishing and Subscribing: A Shared Sketch Pad Introduction
setting up this whole system, keeping track of participants, and ensuring everyone is getting the
same data.
XMPP and pubsub make this complex set of actions easy to achieve. It handles the heavy lifting,
leaving you free to concentrate on only a few key pieces.
This chapter presents many of the core ideas of the XMPP pubsub system as well as an introduction
to working with XMPP’s Data Forms, which is used in many XMPP extensions.
SketchCast Preview
Before you get started, Figure 9-1 shows a peek at what the final application will look like.
Figure 9-1
SketchCast has a simple user interface consisting of a toolbar of various drawing tools and a large
sketching area. The presenter can pick from a number of colors or line widths and can also erase the
board. These controls will be disabled for the audience.
40718c09.indd 204
12/1/09 11:09:04 AM
SketchCast Design
❘ 205
SketchCast Design
SketchCast has a lot of functionality, but as you will see, it is actually one of the simplest XMPP
pubsub applications possible. This is a testament to the immense power and flexibility of the pubsub
system. It’s time to dive in and see what pubsub has to offer.
Everything Is Pubsub
Publish-subscribe systems are everywhere — newspapers, blogs, television, and even e‑mail lists. Almost
everything you need to know about how pubsub works is right there in its name. There is a channel
of communication, subscribers who are interested in data sent on that channel, and publishers who
can send data across the channel.
Imagine that you start a new magazine, XMPP Aficionado. The magazine becomes quite popular,
and it attracts thousands of subscribers who give you their money and their addresses. Whenever a
new issue is ready, you publish it and mail it out to every subscriber’s address.
Publishing a magazine is hard work; think about all the time you must spend collecting money and
addresses, printing each issue, and driving the truck full of magazines to the post office. Wouldn’t it
be great if you could just worry about writing the next issue and sending that out to a company that
would handle the rest of the work? Oh, look! There is Pubsub, Inc. right there in the yellow pages.
XMPP pubsub takes all the manual labor out of building publish-subscribe systems, just as Pubsub,
Inc. promises to make publishing your magazine easier. Computing machines made calculation
so easy that sophisticated applications, like spreadsheets and web browsers, were built on top of
them. In the same way, XMPP pubsub enables new types of applications to be built on top of its
foundations.
Now that you know what pubsub systems are, you can learn to use them to power the SketchCast
application.
Presenter’s Flow
The first thing the SketchCast application must do for a would-be presenter is to create a channel for
them to publish sketches. In XMPP pubsub these channels are called nodes.
Pubsub applications vary in their needs, so the system offers a configuration facility to allow for maximum flexibility. SketchCast will need to make some tweaks to the default configuration of its pubsub
nodes. Many different XMPP extensions have similar configuration systems so it makes sense to have
a standardized way to manipulate these systems. XMPP’s Data Forms provides this mechanism, and
SketchCast will need to use this to request and submit a configuration form.
Once a node is created and configured, the application needs to publish the user’s drawing actions to
the node. Once these events are published, pubsub takes over and makes sure that they get delivered
to the interested audience members.
40718c09.indd 205
12/1/09 11:09:05 AM
206
❘
Chapter 9 Publishing and Subscribing: A Shared Sketch Pad Introduction
While the presenter is sketching, they’ll want to know how many people are watching. SketchCast
will need to retrieve the subscriber list from the pubsub node so that it can present this data to them.
Once the sketching session is done, it’s good to clean up after it by deleting the pubsub node.
Audience’s Flow
Once a presenter has created a node and is ready to begin, they’ll communicate the existence of the
node to potential audience members. You don’t need to worry about how this happens; perhaps it is
sent inside a company-wide e‑mail to all employees.
Each audience member will type in the node to SketchCast, and the application will subscribe to the
pubsub node for the sketch. From then on the pubsub system will make sure that any new data that
is published will be sent to them.
Some audience members will probably be busy playing Minesweeper and will not notice the presenter’s
e‑mail until after they have already begun drawing. These users will need to catch up to the rest of the
group, so SketchCast will need to use pubsub to fetch the drawing actions they have missed.
Each drawing action will need to be rendered in the sketching area, just like it appeared on the presenter’s screen. SketchCast will translate the drawing events into graphics on the screen to re-create
the sketch.
Finally, once the sketch is over or the audience members’ attentions are spent, they will want to stop
watching the presentation. The application will have to unsubscribe from the pubsub node to ensure
that it doesn’t keep getting events that the user isn’t interested in.
Keep this design for SketchCast in mind as you learn about the Data Forms and Publish-Subscribe
extensions. Once you learn these new XMPP protocols, you start to build SketchCast.
Filling Out Forms
Every application’s data is different. A spreadsheet organizes data in one format, whereas a recipe
tracker organizes it completely differently. Even different versions of the same application may have
different needs. Instead of creating new formats for each application, it’s often better to create a
flexible format that can be used by a wide range of applications. Data Forms is the most widely used
such format in the XMPP toolbox.
You’ll need to use forms to configure your pubsub nodes for SketchCast.
What Is The Data Forms Extension?
Data Forms takes a bit of inspiration from forms in HTML. It allows applications to define a form
with fields of various types — text fields, list fields, and address fields to name a few. It also provides
a lightweight workflow on top of these forms enabling applications to request, provide, submit, and
cancel forms.
40718c09.indd 206
12/1/09 11:09:05 AM
Filling Out Forms
❘ 207
Forms are used in several places in the Pubsub protocol, including configuring pubsub nodes
and dealing with subscription options. Many XMPP protocols depend on forms for similar functionality. Multi-User Chat (XEP-0045) uses forms for room configuration among other things;
Ad-Hoc Commands (XEP-0050) uses forms for command input and output; and Service Discovery
Extensions (XEP-0128) relies on forms as a way to easily add extensibility to a another protocol.
An example form is shown here. This form has a type attribute whose value is form, which means
that the system expects it to be filled it out. You might receive such a form as a result of requesting
one from some XMPP service. Don’t worry if you don’t understand the purpose of some of the attributes yet; you will see these in more detail in the next section.
<x xmlns=’jabber:x:data’ type=’form’>
<title>A Simple Form</title>
<instructions>Fill out this simple form!</instructions>
<field type=’text-single’
label=”What’s your favorite color?”
var=’favorite_color’>
<required/>
</field>
</x>
Forms of this type often come with labels, and for certain fields, a list of options will also be included.
When forms are filled out and returned, usually only the response data is sent, and the metadata for
the fields is omitted.
A completed version of the preceding form might look like this:
<x xmlns=’jabber:x:data’ type=’submit’>
<field type=’text-single’
var=’favorite_color’>
<value>orange</value>
</field>
</x>
Forms are easily extensible. If someone later decides that this form should ask about your favorite
food, the question can be added to the form without changing the protocol at all. A well-designed
user interface could just add the new field to a dialog box and send the user’s response back to the
server.
Form Elements, Fields, and Types
You saw that forms consist of some metadata and some fields in the examples in the previous section.
These elements are all contained inside of a form element, which looks like <x xmlns=’jabber:x:data’
type=’form’/>. The <x> element is an historical artifact; if protocol designers were building Data
Forms today, this would probably have been the more descriptive <form>.
Inside the <x> element are a few bits of metadata, like the <instructions> element you saw in the
preceding section, and the form’s fields.
40718c09.indd 207
12/1/09 11:09:05 AM
208
❘
Chapter 9 Publishing and Subscribing: A Shared Sketch Pad Introduction
The <x> Element’s type Attribute
The type attribute in a form has four possible values: form, submit, cancel, and result. These
relate to the form’s place in a particular workflow.
A value of form means that the form is blank and needs filling out. If you were attempting to open
a new bank account, and the bank clerk handed you a clipboard with a form on it, that form would
have a type attribute with the value of form.
The submit value is used when you return a completed form. Once you’ve filled out that new
account form at the bank, you hand it back to the teller, and that form now has a type of submit.
If you change your mind about completing a form, you can send back an empty form with the cancel
type. As you’re sitting in the bank filling out the new account form, you might notice that the bank
across the street has a big sign advertising its lower fees. You would stop filling out the form, hand it
back to the clerk, and walk across the street to the other bank. The poor clerk is now holding a form
with a type of cancel.
Finally, there is the result type. This type is used when the form represents a generic data set, or the
result of submitting a form generated some response data. After completing a new account form at
the cheaper bank, the clerk creates the account and hands you a document containing your account
details. This document is a form with a type of result.
Form Metadata
In addition to fields, forms may have a title and a set of instructions. These are intended for human
consumption in the case that the form is presented directly in the user interface. You saw these elements used in the previous section with the example favorite color form.
Form Fields
The heart of every form is the collection of fields waiting to be filled out or communicating result
data. Unlike HTML forms, XMPP’s Data Forms has a fairly rich set of data types that can be specified. Form fields can even be flagged as required or optional and contain other metadata to assist
with display to users.
Every field can have some metadata associated with it. You’ve already seen the label attribute in the
first example. Fields may also contain the <required> element, which means that any submission of the
form must include a value for that field. And just like the <instructions> element in the form itself,
each field can have a <desc> element containing a human-readable description of the field’s purpose.
Every field must have a var attribute, which uniquely identifies the field. This can be any identifier
you like, but most XMPP extensions use standardized form fields as defined in Field Standardization
for Data Forms (XEP-0068). There is more about this in the next section.
Each field has a type attribute that describes the type of data for the field. The following types are
defined:
➤➤
text-single: A single line of text, similar to <input type=’text’> in HTML
➤➤
text-private: A single line of text that is obscured during entry, similar to <input
type=’password’> in HTML
40718c09.indd 208
12/1/09 11:09:05 AM
Filling Out Forms
➤➤
➤➤
❘ 209
text-multi: Multiple lines of text, similar to <textarea> in HTML
list-single: A single value from a predefined list of options, similar to <select>
in HTML
➤➤
list-multi: Multiple values from a predefined list of options, similar to <select
multiple=’multiple’> in HTML
➤➤
jid-single: A single JID
➤➤
jid-multi: Multiple JIDs
➤➤
boolean: Either true or false
➤➤
hidden: A field hidden from the user and whose value is normally returned unmodified
➤➤
fixed: A human-readable description, used for section headers in the form
The options for list-single and list-multi fields are specified by including <option> elements
as children of the field. Each <option> element can have a label attribute, and the value of
the option is specified in a <value> child. Take a look at an example list-single field with
three options:
<field type=’list-single’ var=’animals’
label=’Pick an animal’>
<option label=’Fox’>
<value>fox</value>
</option>
<option label=’Hare’>
<value>hare</value>
</option>
<option label=’Tortoise’>
<value>tortoise</value>
</option>
</field>
Fields may also specify a default value by including a <value> element as an immediate child. If the
field can have multiple values, as with list-multi, jid-multi, and text-multi fields, multiple
<value> children can be present. The same <value> elements store the filled out fields’ values when
forms are returned. The following is an example of a submitted form field that was used to inquire
about XMPP server administrators:
<field type=’jid-multi’ var=’admins’>
<value>alice@example.com</value>
<value>bob@example.com</value>
</field>
Forms allow a rich, structured set of data to be manipulated or returned. In Figure 9-2 you can see a
screenshot of an XMPP client rendering a form related to multi-user chat room configuration. This
form allows a user to make configuration changes easily. Even if the server supports some new feature
that wasn’t defined in the multi-user chat specification, the user can still customize it due to the flexible nature of forms.
40718c09.indd 209
12/1/09 11:09:06 AM
210
❘
Chapter 9 Publishing and Subscribing: A Shared Sketch Pad Introduction
Figure 9-2
Standardized Form Fields
Flexibility is a wonderful attribute to have, but having forms be so malleable does have a downside.
How do you get everyone to agree what the fields should be for common forms? It didn’t take long for
the XMPP community to address this problem with Field Standardization for Data Forms (XEP-0068).
Each standardized form has a form type, which is encoded in a special field. The XMPP registrar
manages a list of standard types used in XMPP extensions, but custom protocol developers are not
required to register their form types. Because you’ll be using standardized pubsub-related forms in
the SketchCast application, you should see an example of such a form. The following is a node configuration form that has been submitted to change the title of a pubsub node:
<x xmlns=’jabber:x:data’ type=’submit’>
<field var=’FORM_TYPE’ type=’hidden’>
<value>http://jabber.org/protocol/pubsub#node_config</value>
</field>
<field var=’pubsub#title’>
<value>Best Node Ever</value>
</field>
</x>
The standardized form type is included as a special hidden field with a var attribute equal to
FORM_TYPE. The value of this field is the form type’s identifier. The pubsub extension defines several
different types of forms, and consulting the pubsub specification in XEP-0060, you can see that
http://jabber.org/protocol/pubsub#node_config is the identifier for the node configuration form.
40718c09.indd 210
12/1/09 11:09:06 AM
Working with Pubsub Nodes
❘ 211
Fields within a standardized form will have var attributes that are defined in the specification for
the form. The node configuration form for pubsub is specified in section 16.4.2 of XEP-0060, and
an excerpt that includes the pubsub#title field is shown here:
<form_type>
<name>http://jabber.org/protocol/pubsub#node_config</name>
<!-- parts omitted -->
<field var=’pubsub#title’
type=’text-single’
label=’A friendly name for the node’/>
<!-- parts omitted -->
</form_type>
The content of the <name> element is what will appear in the FORM_TYPE field, and the <field>
element specifies what kind of field it will be.
The SketchCast application will use standardized forms to configure the pubsub node, and custom
forms to transmit drawing information from the publisher to the subscribers. If the SketchCast protocol was published in a XEP of its own, it might define and register a standard form type for the
drawing information.
Working with Pubsub Nodes
Pubsub nodes are the communication hubs of the publish-subscribe system. Users and applications
can subscribe to a node that they are interested in, and when data is published there, the node will
immediately broadcast that data to all subscribers.
These nodes are provided by pubsub services. Nearly every XMPP server has a built-in pubsub service for its users. For example, the well-known jabber.org XMPP server has a public pubsub service
located at pubsub.jabber.org. All you need to know to start using pubsub is the location of a pubsub
service. You can create an interesting pubsub node, and to subscribe, a user needs to know the service’s address and the node’s name.
Pubsub nodes support a wide range of actions and configurations. The SketchCast application will
make use of many of the basic actions: creating nodes, configuring nodes, publishing to nodes, deleting nodes, subscribing to nodes, and receiving events from nodes. It may seem like a lot of work, but
you see shortly that pubsub nodes are pretty simple.
Creating Nodes
SketchCast’s users can’t accomplish much unless there is a pubsub node to publish and subscribe to.
The presenting user will need to create a node so that all the viewers can subscribe to it.
A pubsub node is created by sending an IQ-set stanza to the pubsub service:
<iq to=’pubsub.pemberley.lit’
from=’darcy@pemberley.lit/library’
type=’set’
id=’create1’>
40718c09.indd 211
12/1/09 11:09:06 AM
212
❘
Chapter 9 Publishing and Subscribing: A Shared Sketch Pad Introduction
<pubsub xmlns=’http://jabber.org/protocol/pubsub’>
<create node=’latest_books’/>
</pubsub>
</iq>
Most actions on pubsub nodes will look very similar to this one. You’ve seen several stanzas like
this one in other chapters already; the difference here is the <pubsub> element.
Other than Service Discovery queries (see Chapter 7), pubsub-related actions all contain a <pubsub>
element qualified by one of the pubsub namespaces. Here, http://jabber.org/protocol/pubsub is
used, which is the main pubsub namespace, but some actions, such as node configuration, require related
namespaces like http://jabber.org/protocol/pubsub#owner. It’s easy when reading these examples
to skip over the namespace used and to assume that they are all the same. If you encounter errors with
pubsub stanzas, please double-check that you are using the correct namespace for your actions.
Inside the <pubsub> element is the action requested, <create>. The node to create is specified in the
node attribute. If there isn’t already a node with this name, and if you are allowed to create nodes
on this service, the server will acknowledge that your request was successful:
<iq from=’pubsub.pemberley.lit’
to=’darcy@pemberley.lit/library’
type=’result’
id=’create1’/>
If the node already existed, or if you didn’t have authorization to create it, the server would have
returned an IQ-error with a <conflict> or <forbidden> condition.
Now your pubsub node is created and ready to receive events.
It’s possible to let the server choose the name when you create a node. Sometimes it doesn’t matter what
the node is called, and if the user doesn’t have to pick a name, the application becomes easier to use.
You’ll be using these instant nodes in SketchCast, and the following example shows how to create one:
<iq from=’darcy@pemberley.lit/library’
to=’pubsub.pemberley.lit’
type=’set’
id=’instant1’>
<pubsub xmlns=’http://jabber.org/protocol/pubsub’>
<create/>
</pubsub>
</iq>
Creating instant nodes is even easier than named ones. One question remains, though; what node
did the server create? Thankfully, when you create an instant node, the server includes the node’s
name with its response.
<iq from=’pubsub.pemberley.lit’
to=’darcy@pemberley.lit/library’
type=’result’
id=’instant1’>
<pubsub xmlns=’http://jabber.org/protocol/pubsub’>
<create node=’1390361429’/>
</pubsub>
</iq>
40718c09.indd 212
12/1/09 11:09:06 AM
Working with Pubsub Nodes
❘ 213
The server’s response looks just like your original creation request for a named node. It has generated a random number for the node name because it was instructed that you didn’t care what the node
was called. Pubsub services may name instant nodes differently; one might name each node with a
random string of characters, and another might use a numeric counter.
Configuring Nodes
Newly created pubsub nodes have a default configuration that is useful for many purposes. Normally
the default configuration is for a publicly accessible node that persists a few of the most recently
published items and allows only the node’s creator (also called the owner) to publish to it. The exact
configuration that is used depends on the service and its configuration.
Applications with special requirements may need to configure pubsub nodes appropriately to ensure
that those requirements are met. SketchCast, for example, should persist quite a few recent drawing
actions or new subscribers may be confused by a partial sketch. The pubsub node’s configuration
also includes things like the title of the node, the access controls, and whether event notifications
should include the original data.
Pubsub node configuration is done by submitting a form inside a <configure> action. Node configuration must be done by the owner of the node, so the <pubsub> element’s namespace is slightly
different than the previous example. First, request a configuration form to see what options are
available:
<iq from=’darcy@pemberley.lit/library’
to=’pubsub.pemberley.lit’
type=’get’
id=’configure1’>
<pubsub xmlns=’http://jabber.org/protocol/pubsub#owner’>
<configure node=’latest_books’/>
</pubsub>
</iq>
The server returns a blank configuration form. Many of the form fields are omitted in the following
form so you can concentrate on the structure of the protocol instead of its fine details. Also, XMPP
servers vary in their support of the pubsub feature set, so don’t be surprised if a server doesn’t return
some of these fields.
<iq from=’pubsub.pemberley.lit’
to=’darcy@pemberley.lit/library’
type=’result’
id=’configure1’>
<pubsub xmlns=’http://jabber.org/protocol/pubsub#owner’>
<configure node=’latest_books’>
<x xmlns=’jabber:x:data’ type=’form’>
<field var=’FORM_TYPE’ type=’hidden’>
<value>http://jabber.org/protocol/pubsub#node_config</value>
</field>
<field var=’pubsub#title’ type=’text-single’
label=’A friendly name for the node’/>
<field var=’pubsub#persist_items’ type=’boolean’
label=’Persist items to storage’>
<value>true</value>
40718c09.indd 213
12/1/09 11:09:06 AM
214
❘
Chapter 9 Publishing and Subscribing: A Shared Sketch Pad Introduction
</field>
<field var=’pubsub#max_items’ type=’text-single’
label=’Max # of items to persist’>
<value>10</value>
</field>
<!-- more fields -->
</x>
</configure>
</pubsub>
</iq>
This configuration form is just like the ones you saw in the section Filling Out Forms. The first field
in the form is the form type identifier and after that are the normal fields. The three fields shown in
the form are settings that control the title of the node, whether it persists previously published items,
and if so, how many items it will persist.
Because you want to change the node’s settings, you must submit a completed form back to the server
containing your desired configuration. The form submission stanza appears almost identical to the preceding example, but the field labels and types have been removed, the field values filled in, and the
form’s type attribute changed to submit. Only the three settings from the example have changed
here, but you could also change a single setting or all possible settings at the same time:
<iq from=’darcy@pemberley.lit/library’
to=’pubsub.pemberley.lit’
type=’set’
id=’configure2’>
<pubsub xmlns=’http://jabber.org/protocol/pubsub#owner’>
<configure node=’latest_books’>
<x xmlns=’jabber:x:data’ type=’submit’>
<field var=’FORM_TYPE’>
<value>http://jabber.org/protocol/pubsub#node_config</value>
</field>
<field var=’pubsub#title’>
<value>Books I’ve Read Lately</value>
</field>
<field var=’pubsub#persist_items’>
<value>true</value>
</field>
<field var=’pubsub#max_items’>
<value>100</value>
</field>
</x>
</configure>
</pubsub>
</iq>
The server should respond to your submission with a successful reply:
<iq from=’pubsub.pemberley.lit’
to=’darcy@pemberley.lit/library’
type=’result’
id=’configure2’/>
40718c09.indd 214
12/1/09 11:09:06 AM
Working with Pubsub Nodes
❘ 215
Now Mr. Darcy has a pubsub node with a nice title to entice subscribers and the ability to persist
the data about the most recent 100 books he has read.
Pubsub Events
Pubsub nodes and their configuration are necessary and useful, but they don’t do much by themselves. The real value of pubsub nodes is in the events that are published to them and broadcast to
subscribers.
Anything can be included in a pubsub event. The pubsub service doesn’t know or care what is inside
the event; it simply broadcasts this data to a node’s subscribers. The content of a pubsub event is called
its payload. Generally, subscribers will know what payloads are published at a given node and how to
interpret them. Some common event payloads include blog posts in the Atom syndication format or
information about songs currently playing in User Tune format (XEP-0118).
When publishing, the event is wrapped in a <publish> action within the <pubsub> element, and when
receiving events, the same event is carried in a <message> stanza. In both cases the event payload is
the same. Following is an example of an event with a User Tune payload:
<tune xmlns=’http://jabber.org/protocol/tune’>
<artist>Elizabeth Bennet</artist>
<title>A Piano Song for Lady Catherine</title>
</tune>
Forms are flexible enough to represent many kinds of payloads, and Mr. Darcy has chosen to use a
form to encode the latest books that he has read. Whenever he finishes reading a book, he publishes
an event to his pubsub node using the following form-based payload:
<x xmlns=’jabber:x:data’ type=’result’>
<field var=’title’>
<value>A History of Pemberley</value>
</field>
<field var=’author’>
<value>Sir Lewis de Bourgh</value>
</field>
</x>
The previous examples both included event payloads, but nodes can also be configured to send only
event notifications. In this case, the payload can be retrieved by querying the pubsub node. You see
how to publish and receive events as well as how to retrieve payloads in the next sections.
Publishing to a Node
Mr. Darcy, having just finished his latest book, must now publish a new event to his pubsub node.
You saw Mr. Darcy’s event payloads in the previous section; here is how they are published:
<iq from=’darcy@pemberley.lit/library’
to=’pubsub.pemberley.lit’
type=’set’
id=’publish1’>
<pubsub xmlns=’http://jabber.org/protocol/pubsub’>
40718c09.indd 215
12/1/09 11:09:06 AM
216
❘
Chapter 9 Publishing and Subscribing: A Shared Sketch Pad Introduction
<publish node=’latest_books’>
<item>
<x xmlns=’jabber:x:data’ type=’result’>
<field var=’title’>
<value>A History of Pemberley</value>
</field>
<field var=’author’>
<value>Sir Lewis de Bourgh</value>
</field>
</x>
</item>
</publish>
</pubsub>
</iq>
In this example, the event payload is wrapped in an <item> element and then placed inside the
<publish> action. If Mr. Darcy had just finished two books, he would just append the second one
in its own <item> element.
The server will accept the publish request and return a successful response:
<iq from=’pubsub.pemberly.lit’
to=’darcy@pemberley.lit/library’
type=’result’
id=’publish1’>
<pubsub pubsub xmlns=’http://jabber.org/protocol/pubsub’>
<publish node=’latest_books’>
<item id=’821b576dfabfc6b358b6ec4139b87f5c’/>
</publish>
</pubsub>
</iq>
Notice that the server’s response also includes an <item> element. Because Mr. Darcy’s <item> element did not contain an id attribute, the server created one for him since every item must have an
identifier. These identifiers are used for notifications, item retrieval, and retraction.
Mr. Darcy could also have specified an id attribute in his original publish stanza, and the server
would have used that id instead. This is very similar to the earlier examples of normal and instant
node creation.
Subscribing and Unsubscribing
Elizabeth and Georgiana are both avid readers and quite curious about what books Mr. Darcy has
had his nose in lately. Each of the ladies can subscribe to Mr. Darcy’s pubsub node by sending an
IQ-set with the <subscribe> action:
<iq from=’elizabeth@longbourn.lit/outside’
to=’pubsub.pemberley.lit’
type=’set’
id=’subscribe1’>
<pubsub pubsub xmlns=’http://jabber.org/protocol/pubsub’>
40718c09.indd 216
12/1/09 11:09:07 AM
Working with Pubsub Nodes
❘ 217
<subscribe node=’latest_books’
jid=’elizabeth@longbourn.lit/outside’/>
</pubsub>
</iq>
Elizabeth has specified both the node she wants to subscribe to as well as the address to which events
should be delivered. As long as she stays a subscriber, she’ll be immediately notified whenever Mr. Darcy
finishes a book and publishes a corresponding event.
The server sends a successful response to Elizabeth’s request:
<iq from=’pubsub.pemberley.lit’
to=’elizabeth@longbourn.lit/outside’
type=’result’
id=’subscribe1’>
<pubsub pubsub xmlns=’http://jabber.org/protocol/pubsub’>
<subscribe node=’latest_books’
jid=’elizabeth@longbourn.lit/outside’
subscription=’subscribed’/>
</pubsub>
</iq>
The subscription attribute informs Elizabeth about the status of her subscription, and in this
example, it informs her she is fully subscribed. Pubsub nodes can be configured with a variety of
access models, some of which require the node’s owner to approve subscription requests manually.
If Mr. Darcy’s node were configured this way, the subscription attribute would have a value of
pending.
If for some reason Mr. Darcy had configured his node to allow only a specific set of people to
subscribe (called a whitelist access model), Elizabeth’s request might have been returned with a
not-allowed error:
<iq from=’pubsub.pemberley.lit’
to=’elizabeth@longbourn.lit/outside’
type=’error’
id=’subscribe1’>
<pubsub pubsub xmlns=’http://jabber.org/protocol/pubsub’>
<subscribe node=’latest_books’
jid=’elizabeth@longbourn.lit/outside’/>
</pubsub>
<error type=’cancel’>
<not-allowed xmlns=’urn:ietf:params:xml:ns:xmpp-stanzas’/>
<closed-node xmlns=’http://jabber.org/protocol/pubsub#errors’/>
</error>
</iq>
Now that Elizabeth has subscribed, she’ll receive event broadcasts when Mr. Darcy finishes
a book. Event broadcasts are sent in <message> stanzas containing an <event> child with the
http://jabber.org/protocol/pubsub#event namespace. The <event> element will contain
one or more <item> elements wrapped in an <items> element; the payloads are contained within
the <item> elements, if included. In this example, a lone item appears, and the item’s id attribute
40718c09.indd 217
12/1/09 11:09:07 AM
218
❘
Chapter 9 Publishing and Subscribing: A Shared Sketch Pad Introduction
matches the one the server returned earlier to Mr. Darcy. The payload is also identical to the one
Mr. Darcy published.
<message from=’pubsub.pemberley.lit’
to=’elizabeth@longbourn.lit/outside’>
<event xmlns=’http://jabber.org/protocol/pubsub#event’>
<items node=’latest_books’>
<item id=’821b576dfabfc6b358b6ec4139b87f5c’>
<x xmlns=’jabber:x:data’ type=’result’>
<field var=’title’>
<value>A History of Pemberley</value>
</field>
<field var=’author’>
<value>Sir Lewis de Bourgh</value>
</field>
</x>
</item>
</items>
</event>
</message>
Unlike Elizabeth, Georgiana sees Darcy all the time, and this frequent contact has the benefit of
keeping her informed about Darcy’s reading habits without having a pubsub subscription. After a
few days of being subscribed to Darcy’s pubsub node, she’s decided the information published there
is not useful to her. She can unsubscribe by sending an IQ-set with the <unsubscribe> action:
<iq from=’georgiana@pemberley.lit/piano’
to=’pubsub.pemberley.lit’
type=’set’
id=’unsubscribe1’>
<pubsub pubsub xmlns=’http://jabber.org/protocol/pubsub’>
<unsubscribe node=’latest_books’
jid=’georgiana@pemberley.lit/piano’/>
</pubsub>
</iq>
The server responds with a successful result:
<iq from=’pubsub.pemberley.lit’
to=’georgiana@pemberley.lit/piano’
type=’result’
id=’unsubscribe1’/>
Any future book updates from Mr. Darcy will no longer be sent to Georgiana.
Retrieving Subscriptions
Mr. Darcy is of an inquisitive mind, and though he loathes admitting it, he often wants to see how
popular his book updates have become. When he publishes a new update, he gets no indication of
how many people have received his event. Luckily, Mr. Darcy can easily query the list of subscribers
to his pubsub node:
<iq from=’darcy@pemberley.lit/library’
to=’pubsub.pemberley.lit’
40718c09.indd 218
12/1/09 11:09:07 AM
Working with Pubsub Nodes
❘ 219
type=’get’
id=’subscribers1’>
<pubsub xmlns=’http://jabber.org/protocol/pubsub#owner’>
<subscriptions node=’latest_books’/>
</pubsub>
</iq>
You can see that Mr. Darcy has used the http://jabber.org/protocol/pubsub#owner namespace
because retrieving the subscriber list is an action restricted to the node’s owner. Inside the normal
<pubsub> element he’s placed a <subscriptions> action referencing his pubsub node. The server
returns an unfortunately short subscriber list:
<iq from=’pubsub.pemberley.lit’
to=’darcy@pemberley.lit/library’
type=’result’
id=’subscribers1’>
<pubsub xmlns=’http://jabber.org/protocol/pubsub#owner’>
<subscriptions node=’latest_books’>
<subscription jid=’elizabeth@longbourn.lit/outside’
subscription=’subscribed’/>
<subscription jid=’bingley@netherfield.lit/house’
subscription=’subscribed’/>
</subscriptions>
</pubsub>
</iq>
Only his dear friend Charles and that willful girl Elizabeth care to know what books he’s been
reading.
Retrieving Items
Elizabeth just subscribed to Mr. Darcy’s latest_books node, and she has missed his event broadcasts
from earlier in the week. She must investigate his past reading material if she wishes to learn more
about him.
Remember that Mr. Darcy configured his node to persist items. Anyone can query his node for the
most recently published items. Here, Elizabeth requests the last five items by sending an IQ-get
stanza to the node with the <items> action:
<iq from=’elizabeth@longbourn.lit/outside’
to=’pubsub.pemberley.lit’
type=’get’
id=’items1’>
<pubsub xmlns=’http://jabber.org/protocol/pubsub’>
<items node=’latest_books’ max_items=’3’/>
</pubsub>
</iq>
The <items> element contains a node attribute just like the other actions you’ve seen previously.
Elizabeth has also set the max_items attribute to 3 because she is only interested in the recent
history. If she had omitted max_items, the server would interpret it as a request to send all the historical data it has been configured to keep. If she had set max_items to 500, which is much larger
than the configured maximum for the node, the server would have sent as many as were available.
40718c09.indd 219
12/1/09 11:09:07 AM
220
❘
Chapter 9 Publishing and Subscribing: A Shared Sketch Pad Introduction
The server responds with the requested items along with their payloads:
<iq from=’pubsub.pemberley.lit’
to=’elizabeth@longbourn.lit/outside’
type=’result’
id=’items1’>
<pubsub xmlns=’http://jabber.org/protocol/pubsub’>
<items node=’latest_books’>
<item id=’4f900045977f0ccd372c4a670bcba27f’>
<x xmlns=’jabber:x:data’ type=’result’>
<field var=’title’>
<value>Of Acquaintances and Persuasion</value>
</field>
<field var=’author’>
<value>Daleforth Carnham</value>
</field>
</x>
</item>
<item id=’16ddab0d5b3572388446c552d1bdf793’>
<x xmlns=’jabber:x:data’ type=’result’>
<field var=’title’>
<value>Managing Temperment</value>
</field>
<field var=’author’>
<value>Sarah Pratt</value>
</field>
</x>
</item>
<item id=’e4139c9d583558c172a28f68ec036c6c’>
<x xmlns=’jabber:x:data’ type=’result’>
<field var=’title’>
<value>The Haunting at Hertfordshire</value>
</field>
<field var=’author’>
<value>Sir William Lucas</value>
</field>
</x>
</item>
</items>
</pubsub>
</iq>
The node could have been configured to send only notifications, in which case the payloads would be
missing. Had Mr. Darcy’s node been configured this way, the server’s response would have appeared
like this:
<iq from=’pubsub.pemberley.lit’
to=’elizabeth@longbourn.lit/outside’
type=’result’
id=’items1’>
<pubsub xmlns=’http://jabber.org/protocol/pubsub’>
<items node=’latest_books’>
<item id=’4f900045977f0ccd372c4a670bcba27f’/>
<item id=’16ddab0d5b3572388446c552d1bdf793’/>
40718c09.indd 220
12/1/09 11:09:07 AM
Working with Pubsub Nodes
❘ 221
<item id=’e4139c9d583558c172a28f68ec036c6c’/>
</items>
</pubsub>
</iq>
A separate request must be sent to the server to retrieve the items with their payloads. Elizabeth would
send an IQ-get with an <items> action as before, but the <items> element would contain the list of
items she is interested in. An example is shown here:
<iq from=’elizabeth@longbourn.lit/outside’
to=’pubsub.pemberley.lit’
type=’get’
id=’items2’>
<pubsub xmlns=’http://jabber.org/protocol/pubsub’>
<items node=’latest_books’>
<item id=’4f900045977f0ccd372c4a670bcba27f’/>
<item id=’16ddab0d5b3572388446c552d1bdf793’/>
<item id=’e4139c9d583558c172a28f68ec036c6c’/>
</items>
</pubsub>
</iq>
The server will then respond with the payloads just as in the original example.
If a node is configured to send only notifications, subscribers will receive <message> containing a
list of items that are new. A similar retrieval process is necessary to get the event payloads for these
items.
Subscription Management
You saw that when subscribing to a pubsub node, you must include the JID at which you want to
receive event notifications. This JID can be either the bare JID (as with elizabeth@longbourn.lit) or
a full JID (as with darcy@pemberley.lit/library). Because delivery of events is done with <message>
stanzas, the delivery semantics are different depending on whether a subscription is for the bare or
full JID. Whether an application should use the bare or full JID depends on the situation.
Normally, each subscription will last as long as the pubsub node exists or until the user unsubscribes. A pubsub node can also have a different subscription life cycle; the specification contains
several examples of expiring subscriptions (see section 12.18 of XEP-0060 for an example). For
instance, anonymously connected users’ subscriptions will be removed when their session terminates,
even if they never unsubscribe explicitly. Some clever developers are even working on presence-based
subscriptions that can be canceled as soon as the subscriber goes offline.
Considering the number of available pubsub services and nodes, Elizabeth might forget just what
she is subscribed to and where events are supposed to be sent. If Elizabeth remembers the pubsub
services that she might have subscriptions on, she can ask them for a list of her subscriptions:
<iq from=’elizabeth@longbourn.lit/outside’
to=’pubsub.pemberley.lit’
type=’get’
40718c09.indd 221
12/1/09 11:09:07 AM
222
❘
Chapter 9 Publishing and Subscribing: A Shared Sketch Pad Introduction
id=’mysubs1’>
<pubsub xmlns=’http://jabber.org/protocol/pubsub’>
<subscriptions/>
</pubsub>
</iq>
Elizabeth asks the service at pubsub.pemberley.lit to list her subscriptions across all nodes on the
service. She could also specify a node attribute on the <subscriptions> action to limit her query to
a specific node. Here, the server informs her that in addition to her subscription to Mr. Darcy’s latest
books, she also has a forgotten subscription to Georgiana’s public diary:
<iq from=’pubsub.pemberley.lit’
to=’elizabeth@longbourn.lit/outside’
type=’result’
id=’mysubs1’>
<pubsub xmlns=’http://jabber.org/protocol/pubsub’>
<subscriptions>
<subscription node=’latest_books’
jid=’elizabeth@longbourn.lit/outside’
subscription=’subscribed’/>
<subscription node=’public_diary’
jid=’elizabeth@longbourn.lit’
subscription=’subscribed’/>
</subscriptions>
</pubsub>
</iq>
You’ve now seen many of the major use cases in pubsub, and this is enough knowledge about the
protocol to create this chapter’s application.
Broadcasting Sketches Using Pubsub
It’s time to put theory into practice. You’ve spent the bulk of this chapter getting familiar with Data
Forms and Publish-Subscribe, and this new knowledge will make it easy to build the SketchCast
application.
The presenting user must create a pubsub node, turn drawing events into form-based payloads,
publish the events to the node, and delete the node once finished. Users in the audience need to subscribe to the presenter’s pubsub node, retrieve the past drawing events, translate events into drawing
commands, handle new event notifications, and eventually unsubscribe from the node. All the while
the application should be user friendly, handle common errors, and enable users to communicate
visually.
Building the Interface
The SketchCast user interface needs only a few major pieces. First you need someplace to draw.
You’ll also need some buttons to change the color being used, to change the thickness of the lines, to
40718c09.indd 222
12/1/09 11:09:08 AM
Broadcasting Sketches Using Pubsub
❘ 223
erase the drawing, and to disconnect. You also need a small status bar to report what’s going on to
the user. Finally, you need a login dialog box and an error dialog box.
The HTML for the application, shown in Listing 9-1, contains all of these interface elements.
Listing 9-1: sketchcast.html
<!DOCTYPE HTML PUBLIC “-//W3C//DTD HTML 4.01//EN”
“http://www.w3.org/TR/html4/strict.dtd”>
<html>
<head>
<meta http-equiv=”Content-type” content=”text/html;charset=UTF-8” />
<title>SketchCast - Chapter 9</title>
<link rel=’stylesheet’ href=’http://ajax.googleapis.com/ajax/libs/jqueryui/1.
7.2/themes/cupertino/jquery-ui.css’>
<script src=’http://ajax.googleapis.com/ajax/libs/jquery/1.3.2/jquery.js’>
</script>
<script src=’http://ajax.googleapis.com/ajax/libs/jqueryui/1.7.2/jquery-u
i.js’></script>
<script src=’scripts/strophe.js’></script>
<script src=’scripts/flXHR.js’></script>
<script src=’scripts/strophe.flxhr.js’></script>
<link rel=’stylesheet’ type=’text/css’ href=’sketchcast.css’>
<script type=’text/javascript’ src=’sketchcast.js’></script>
</head>
<body>
<h1>SketchCast</h1>
<!-- status bar -->
<div id=’status’></div>
<!-- drawing tool buttons. The ids are the button values -->
<div class=’button disabled color’ id=’color-000’></div>
<div class=’button disabled color’ id=’color-f00’></div>
<div class=’button disabled color’ id=’color-0f0’></div>
<div class=’button disabled color’ id=’color-00f’></div>
<div class=’button disabled linew’ id=’color-2’><div></div></div>
<div class=’button disabled linew’ id=’color-4’><div></div></div>
<input id=’erase’ type=’button’ value=’erase sketch’
disabled>
<input id=’disconnect’ type=’button’ value=’disconnect’
disabled>
<div class=’clear’></div>
<!-- drawing area -->
<canvas id=’sketch’ class=’disabled’ width=’600’
height=’500’></canvas>
<!-- login dialog -->
<div id=’login_dialog’ class=’hidden’>
40718c09.indd 223
continues
12/1/09 11:09:19 AM
224
❘
Chapter 9 Publishing and Subscribing: A Shared Sketch Pad Introduction
Listing 9-1 (continued)
<label>JID:</label><input type=’text’ id=’jid’>
<label>Password:</label><input type=’password’ id=’password’>
<label>Pubsub service:</label><input type=’text’ id=’service’>
<label>Pubsub node:</label><input type=’text’ id=’node’>
</div>
<!-- empty error dialog -->
<div id=’error_dialog’ class=’hidden’>
<p></p>
</div>
</body>
</html>
The CSS for this application is shown in Listing 9-2.
Listing 9-2: sketchcast.css
.clear {
clear: both;
}
.button {
border: solid 1px black;
width: 25px;
height: 25px;
float: left;
}
div.disabled {
-moz-opacity: 0.25;
opacity: 0.25;
}
.hidden {
display: none;
}
#sketch {
border: solid 1px black;
}
#color-000 {
background-color: #000;
}
#color-f00 {
background-color: #f00;
}
#color-0f0 {
background-color: #0f0;
40718c09.indd 224
12/1/09 11:09:19 AM
Broadcasting Sketches Using Pubsub
❘ 225
}
#color-00f {
background-color: #00f;
}
#width-2 div {
background-color: #000;
height: 5px;
margin-top: 10px;
}
#width-4 div {
background-color: #000;
height: 10px;
margin-top: 7px;
}
#erase {
margin-left: 5px;
}
The two dialog boxes start off hidden and the status bar starts empty. All other controls are shown
but disabled. When the presenter starts publishing a sketch, the toolbar and drawing area will be
enabled. Viewers’ toolbars will remain disabled, but the drawing area will be become enabled once
they are subscribed to a sketch.
Sketching with Canvas
Before you worry about the XMPP parts of the application, you should wire up the drawing area
and the drawing tools so that you can make some test sketches.
Sketching is done with a virtual pen, similar to the ones found in many consumer graphics applications. The end of the pen is the mouse pointer, and it will leave ink on the drawing area while the
mouse button is pressed. The toolbar buttons are used to change the color of the ink, the thickness
of the lines produced, and to erase the entire sketch.
First, you must keep track of whether the pen is up or down and connect these to the mouseup and
mousedown events. Next, whenever the mouse moves, you should check if the pen is down and, if so,
draw a line from its old position to the current position. Create a file called sketchcast.js and add
the following code to it:
var SketchCast = {
pen_down: false,
old_pos: null
};
$(document).ready(function () {
$(‘#sketch’).mousedown(function () {
SketchCast.pen_down = true;
});
$(‘#sketch’).mouseup(function () {
40718c09.indd 225
12/1/09 11:09:19 AM
226
❘
Chapter 9 Publishing and Subscribing: A Shared Sketch Pad Introduction
SketchCast.pen_down = false;
});
$(‘#sketch’).mousemove(function (ev) {
// get the position of the drawing area, our offset
var offset = $(this).offset();
// calculate our position within the drawing area
var pos = {x: ev.pageX - offset.left,
y: ev.pageY - offset.top};
if (SketchCast.pen_down) {
if (!SketchCast.old_pos) {
SketchCast.old_pos = pos;
return;
}
// render the line segment
var ctx = $(‘#sketch’).get(0).getContext(‘2d’);
ctx.beginPath();
ctx.moveTo(SketchCast.old_pos.x, SketchCast.old_pos.y);
ctx.lineTo(pos.x, pos.y);
ctx.stroke();
SketchCast.old_pos = pos;
} else {
SketchCast.old_pos = null;
}
});
});
code snippet sketchcast.js
Once your application has loaded, it binds the mousedown, mouseup, and mousemove events. The
mousedown and mouseup events simply change the pen state; all the real work is in mousemove.
In order to draw anything, you’ll need to know exactly where you are inside the drawing area. This
is slightly tricky because the coordinate system for the <canvas> element begins at its upper-left corner but the mouse coordinates from the mousemove event are relative to the top left of the browser’s
viewport. jQuery helps resolve this difference with its offset() function, which will give you the
coordinates of an element relative to the viewport. If you subtract these from the mousemove event
coordinates, the result is a set of coordinates relative to the top left of the drawing area.
The HTML5 <canvas> element is capable of some amazing things, but this application’s needs are
quite modest. All the drawing logic needed for SketchCast is explained shortly, but if you are interested in what else canvas elements can do, there is a great tutorial on the Opera developer’s site at
http://dev.opera.com/articles/view/html-5-canvas-the-basics/.
All canvas operations require a drawing context, which contains drawing information like the current color and line width. If you’ve ever done graphics programming before, it’s very likely you’ve
seen drawing contexts like these. Because SketchCast is only capable of two-dimensional drawing,
you create a 2d context using the getContext() function from the canvas API as shown here:
var ctx = $(‘#sketch’).get(0).getContext(‘2d’);
40718c09.indd 226
12/1/09 11:09:19 AM
Broadcasting Sketches Using Pubsub
❘ 227
Call beginPath()on the context to start defining a path. Paths can be quite complex, but you’ll only
be using simple line segments in SketchCast. moveTo() is used to go to the last known position of the
mouse without marking the canvas and lineTo() is used to add a line segment from the previous
position to the current location. The path is now completed, so you can make it appear on the canvas
by calling stroke(). That’s all there is to it!
Load SketchCast into a web browser and try a few sketches.
It’s pretty fun to play around with, but before long it gets boring drawing thin, black lines. You can
make sketches more interesting by enabling the buttons on the toolbar so that the pen’s color and
width are changeable. Bind the click event on each of the toolbar buttons and implement them as
shown here. Make the highlighted modifications to sketchcast.js:
var SketchCast = {
pen_down: false,
old_pos: null,
color: ‘000’,
line_width: 4
};
$(document).ready(function () {
$(‘#sketch’).mousedown(function () {
SketchCast.pen_down = true;
});
$(‘#sketch’).mouseup(function () {
SketchCast.pen_down = false;
});
$(‘#sketch’).mousemove(function (ev) {
// get the position of the drawing area, our offset
var offset = $(this).offset();
// calculate our position within the drawing area
var pos = {x: ev.pageX - offset.left,
y: ev.pageY - offset.top};
if (SketchCast.pen_down) {
if (!SketchCast.old_pos) {
SketchCast.old_pos = pos;
return;
}
// render the line segment
var ctx = $(‘#sketch’).get(0).getContext(‘2d’);
ctx.strokeStyle = ‘#’ + SketchCast.color;
ctx.lineWidth = SketchCast.line_width;
ctx.beginPath();
ctx.moveTo(SketchCast.old_pos.x, SketchCast.old_pos.y);
ctx.lineTo(pos.x, pos.y);
ctx.stroke();
SketchCast.old_pos = pos;
} else {
40718c09.indd 227
12/1/09 11:09:20 AM
228
❘
Chapter 9 Publishing and Subscribing: A Shared Sketch Pad Introduction
SketchCast.old_pos = null;
}
});
$(‘.color’).click(function (ev) {
SketchCast.color = $(this).attr(‘id’).split(‘-’)[1];
});
$(‘.linew’).click(function (ev) {
SketchCast.line_width = $(this).attr(‘id’).split(‘-’)[1];
});
$(‘#erase’).click(function () {
var ctx = $(‘#sketch’).get(0).getContext(‘2d’);
ctx.fillStyle = ‘#fff’;
ctx.strokeStyle = ‘#fff’;
ctx.fillRect(0, 0, 600, 500);
});
});
code snippet sketchcast.js
Two new state variables have been added — color and line_width — and the code has been modified
to use these values while drawing. The erase button implementation is straightforward; it draws a white
rectangle over the whole canvas. The toolbar buttons, however, warrant a little more explanation.
All the color buttons work almost identically except for the actual color value they set. Instead of
writing several different handlers, one for each button, you can use the button’s id attribute to store
the color the button will set. All the color buttons have the CSS class color, and whenever one of
them is pressed, you can grab the color value out of its id attribute to set the drawing color. The
same trick also works for the line width buttons. This saves a lot of typing!
Reload the SketchCast page in your web browser and exercise your new creative options!
Logging In and Making Nodes
The next step in bringing SketchCast to life is to start building in pubsub support so that users can
share drawings with others. First, you’ll want to enable the login dialog box and ensure that it pops
up when the application starts. Then you’ll connect to the XMPP server and either create and configure a pubsub node if the user is presenting or subscribe to an existing one if he is just watching.
The login dialog box has the normal fields for the username and password, but it also contains two
fields for the pubsub service and the pubsub node. If a presenter wants to create a new sketch, they
will leave the pubsub node blank, and if a viewer wants to watch a sketch, they simply enter the
sketch’s node. Put the following code at the top of your document ready handler:
$(‘#login_dialog’).dialog({
autoOpen: true,
draggable: false,
modal: true,
title: ‘Connect to a SketchCast’,
40718c09.indd 228
12/1/09 11:09:20 AM
Broadcasting Sketches Using Pubsub
❘ 229
buttons: {
“Connect”: function () {
$(document).trigger(‘connect’, {
jid: $(‘#jid’).val(),
password: $(‘#password’).val(),
service: $(‘#service’).val(),
node: $(‘#node’).val()
});
$(‘#password’).val(‘’);
$(this).dialog(‘close’);
}
}
});
code snippet sketchcast.js
As with the other applications, SketchCast will need to keep track of the connection; it must also
store the pubsub service and node. SketchCast also needs some namespace constants for pubsub and
forms. Add the following attributes to the SketchCast object:
connection: null,
service: null,
node: null,
NS_DATA_FORMS: “jabber:x:data”,
NS_PUBSUB: “http://jabber.org/protocol/pubsub”,
NS_PUBSUB_OWNER: “http://jabber.org/protocol/pubsub#owner”,
NS_PUBSUB_ERRORS: “http://jabber.org/protocol/pubsub#errors”,
NS_PUBSUB_NODE_CONFIG: “http://jabber.org/protocol/pubsub#node_config”
code snippet sketchcast.js
You also need to hook up the error dialog box. For simplicity, all errors are treated as fatal and
terminate the connection when they occur. You don’t want to confuse users, so when they close the
error dialog box, you must re-open the login dialog box so that they can start over. Later, you’ll add
a function to report errors that opens this dialog box. Add this code to the document ready handler:
$(‘#error_dialog’).dialog({
autoOpen: false,
draggable: false,
modal: true,
title: ‘Whoops! Something Bad Happened!’,
buttons: {
“Ok”: function () {
$(this).dialog(‘close’);
$(‘#login_dialog’).dialog(‘open’);
}
}
});
code snippet sketchcast.js
40718c09.indd 229
12/1/09 11:09:20 AM
230
❘
Chapter 9 Publishing and Subscribing: A Shared Sketch Pad Introduction
Now add the familiar connection logic event handlers at the end of sketchcast.js:
$(document).bind(‘connect’, function (ev, data) {
$(‘#status’).html(‘Connecting..’);
var conn = new Strophe.Connection(
‘http://bosh.metajack.im:5280/xmpp-httpbind’);
conn.connect(data.jid, data.password, function (status) {
if (status === Strophe.Status.CONNECTED) {
$(document).trigger(‘connected’);
} else if (status === Strophe.Status.DISCONNECTED) {
$(document).trigger(‘disconnected’);
}
});
SketchCast.connection = conn;
SketchCast.service = data.service;
SketchCast.node = data.node;
});
$(document).bind(‘connected’, function () {
// nothing here yet
});
code snippet sketchcast.js
Once SketchCast is connected, it must send initial presence and set up or subscribe to a pubsub
node. Modify the connected event handler to accomplish this:
$(document).bind(‘connected’, function () {
$(‘#status’).html(“Connected.”);
// send negative presence since we’re not a chat client
SketchCast.connection.send($pres().c(‘priority’).t(‘-1’));
if (SketchCast.node.length > 0) {
// a node was specified, so we attempt to subscribe to it
// first, set up a callback for the events
SketchCast.connection.addHandler(
SketchCast.on_event,
null, “message”, null, null, SketchCast.service);
// now subscribe
var subiq = $iq({to: SketchCast.service,
type: “set”})
.c(‘pubsub’, {xmlns: SketchCast.NS_PUBSUB})
.c(‘subscribe’, {node: SketchCast.node,
jid: SketchCast.connection.jid});
SketchCast.connection.sendIQ(subiq,
SketchCast.subscribed,
40718c09.indd 230
12/1/09 11:09:25 AM
Broadcasting Sketches Using Pubsub
❘ 231
SketchCast.subscribe_error);
} else {
// a node was not specified, so we start a new sketchcast
var createiq = $iq({to: SketchCast.service,
type: “set”})
.c(‘pubsub’, {xmlns: SketchCast.NS_PUBSUB})
.c(‘create’);
SketchCast.connection.sendIQ(createiq,
SketchCast.created,
SketchCast.create_error);
}
});
code snippet sketchcast.js
A negative presence priority is used because SketchCast is not capable of dealing with normal chat
messages. You used this before in Chapter 8 to avoid accidentally stealing private messages from the
user’s other connected resources.
If the user has supplied a node, the application prepares a pubsub event handler, builds a subscription stanza — just like the ones from the “Working with Pubsub Nodes” section — and sends the
request to the server. If they receive a successful reply, the subscribed() function is called; otherwise, an error has occurred and subscribe_error() is invoked. A <message> handler is added so
that when a pubsub event is received, on_event() can process it.
If a node is not supplied, SketchCast builds and sends a similar IQ-set stanza to create a node.
Once the node is created, the code calls created(), or, on any IQ-error response, create_error()
is called.
The initial implementation of SketchCast.on_event() does nothing. You’ll be adding more to it
later. Add this placeholder to the SketchCast object:
on_event: function (msg) {
// blank for now
}
code snippet sketchcast.js
Now add the subscription handlers to the SketchCast object:
subscribed: function (iq) {
$(document).trigger(“reception_started”);
},
subscribe_error: function (iq) {
SketchCast.show_error(“Subscription failed with “ +
SketchCast.make_error_from_iq(iq));
}
code snippet sketchcast.js
40718c09.indd 231
12/1/09 11:09:25 AM
232
❘
Chapter 9 Publishing and Subscribing: A Shared Sketch Pad Introduction
Once successfully subscribed, the code fires a custom reception_started event. If the subscription
fails, an error is shown. You’ll need to implement the two error helper functions, show_error() and
make_error_from_iq(), by adding the following to the SketchCast object:
make_error_from_iq: function (iq) {
var error = $(iq)
.find(‘*[xmlns=”‘ + Strophe.NS.STANZAS + ‘“]’)
.get(0).tagName;
var pubsub_error = $(iq)
.find(‘*[xmlns=”‘ + SketchCast.NS_PUBSUB_ERRORS + ‘“]’);
if (pubsub_error.length > 0) {
error = error + “/” + pubsub_error.get(0).tagName;
}
return error;
},
show_error: function (msg) {
SketchCast.connection.disconnect();
SketchCast.connection = null;
SketchCast.service = null;
SketchCast.node = null;
$(‘#error_dialog p’).text(msg);
$(‘#error_dialog’).dialog(‘open’);
}
code snippet sketchcast.js
The make_error_from_iq() function looks at the <error> element of the IQ-error stanza and pulls
out the generic error type and, if present, the application-specific error type. It combines these into
a simple string for presentation to the user. show_error() disconnects, resets the XMPP state, and
pops up the error dialog box with the supplied message. These error messages aren’t the most userfriendly, but they are simple to generate and get the job done. In a real-world application, more care
should be taken to present more helpful errors.
Subscriptions are taken care of, so you can move on to node creation for the presenter. Following
are the node creation callback implementations, which should be added to the SketchCast object:
created: function (iq) {
// find pubsub node
var node = $(iq).find(“create”).attr(‘node’);
SketchCast.node = node;
// configure the node
var configiq = $iq({to: SketchCast.service,
type: “set”})
.c(‘pubsub’, {xmlns: SketchCast.NS_PUBSUB_OWNER})
.c(‘configure’, {node: node})
.c(‘x’, {xmlns: SketchCast.NS_DATA_FORMS,
type: “submit”})
.c(‘field’, {“var”: “FORM_TYPE”})
.c(‘value’).t(SketchCast.NS_PUBSUB_NODE_CONFIG)
40718c09.indd 232
12/1/09 11:09:25 AM
Broadcasting Sketches Using Pubsub
❘ 233
.up().up()
.c(‘field’, {“var”: “pubsub#deliver_payloads”})
.c(‘value’).t(“1”)
.up().up()
.c(‘field’, {“var”: “pubsub#send_last_published_item”})
.c(‘value’).t(“never”)
.up().up()
.c(‘field’, {“var”: “pubsub#persist_items”})
.c(‘value’).t(“true”)
.up().up()
.c(‘field’, {“var”: “pubsub#max_items”})
.c(‘value’),t(“20”);
SketchCast.connection.sendIQ(configiq,
SketchCast.configured,
SketchCast.configure_error);
},
create_error: function (iq) {
SketchCast.show_error(“SketchCast creation failed with “ +
SketchCast.make_error_from_iq(iq));
}
code snippet sketchcast.js
The pubsub node creation stanza requests an instant node; the first thing the created() callback
must do is store the name of the node created.
After the presenter begins sketching, any viewers that arrive will see new drawing events, but they
won’t get any of the events from before they subscribed. To remedy this situation, the viewers
must retrieve the most recent items from the pubsub node to give the drawing events some context.
Because you usually have no idea what the configuration defaults might be on any given pubsub service, the code must configure the pubsub node to store a reasonable amount of past events.
The created() callback that follows builds a configuration form for the pubsub node and submits it. Notice that you do not need to ask for a form from the server; you already know what
values need changing. The callback sends the configuration form and assigns configured() and
configure_error() to handle the success and error cases, respectively.
create_error() just displays an error message to the user.
Both callbacks are shown here:
configured: function (iq) {
$(document).trigger(“broadcast_started”);
},
configure_error: function (iq) {
SketchCast.show_error(“SketchCast configuration failed with “ +
SketchCast.make_error_from_iq(iq));
}
code snippet sketchcast.js
40718c09.indd 233
12/1/09 11:09:26 AM
234
❘
Chapter 9 Publishing and Subscribing: A Shared Sketch Pad Introduction
When the server acknowledges that your node is successfully configured, SketchCast triggers the
custom event broadcast_started. If something bad happens during configuration, the error dialog
box is opened.
A placeholder handler for the broadcast_started event is shown here and should be added at the
end of sketchcast.js; it updates the status area and enables the drawing controls:
$(document).bind(‘broadcast_started’, function () {
$(‘#status’).html(‘Broadcasting at service: <i>’ +
SketchCast.service + ‘</i> node: <i>’ +
SketchCast.node + “</i>”);
$(‘.button’).removeClass(‘disabled’);
$(‘#sketch’).removeClass(‘disabled’);
$(‘#erase’).removeAttr(‘disabled’);
});
code snippet sketchcast.js
Publishing and Receiving Sketch Events
The next tasks to implement are generating the sketch events from the presenter’s drawing actions,
publishing those events to the node, receiving the events on the subscriber side, and translating event
payloads back into drawing actions. Once you’ve written these pieces, the rest of the application is
just polish.
Sketch Events
A form is a convenient way to store sketch events, but first you must decide what data needs to
be encoded to re-create a drawing action. Look again at the lines that control drawing inside the
mousemove handler you wrote earlier:
// render the line segment
var ctx = $(‘#sketch’).get(0).getContext(‘2d’);
ctx.strokeStyle = ‘#’ + SketchCast.color;
ctx.lineWidth = SketchCast.line_width;
ctx.beginPath();
ctx.moveTo(SketchCast.old_pos.x, SketchCast.old_pos.y);
ctx.lineTo(pos.x, pos.y);
ctx.stroke();
code snippet sketchcast.js
Only a few pieces of data are needed to draw the line segment — the color, line width, and the old
and new coordinates of the mouse pointer.
To build a pubsub event payload, you can encode these four pieces of data into a form like this:
<x xmlns=’jabber:x:data’ type=’result’>
<field var=’color’>
<value>f00</value>
</field>
<field var=’line_width’>
40718c09.indd 234
12/1/09 11:09:26 AM
Broadcasting Sketches Using Pubsub
❘ 235
<value>6</value>
</field>
<field var=’from_pos’>
<value>50,123</value>
</field>
<field var=’to_pos’>
<value>72,89</value>
</field>
</x>
Publishing Sketch Events
The drawing code must be modified to publish events to the node in the format outlined previously.
Also, only the presenter should be able to draw and only when the sketching area is enabled. Modify
the mousemove event handler to match the one shown here:
$(‘#sketch’).mousemove(function (ev) {
// get the position of the drawing area, our offset
var offset = $(this).offset();
// calculate our position within the drawing area
var pos = {x: ev.pageX - offset.left,
y: ev.pageY - offset.top};
if (SketchCast.pen_down) {
if (!SketchCast.old_pos) {
SketchCast.old_pos = pos;
return;
}
if (!$(‘#sketch’).hasClass(‘disabled’) &&
(Math.abs(pos.x - SketchCast.old_pos.x) > 2 ||
Math.abs(pos.y - SketchCast.old_pos.y) > 2)) {
// render the line segment
var ctx = $(‘#sketch’).get(0).getContext(‘2d’);
ctx.strokeStyle = ‘#’ + SketchCast.color;
ctx.lineWidth = SketchCast.line_width;
ctx.beginPath();
ctx.moveTo(SketchCast.old_pos.x, SketchCast.old_pos.y);
ctx.lineTo(pos.x, pos.y);
ctx.stroke();
SketchCast.publish_action({
color: SketchCast.color,
line_width: SketchCast.line_width,
from: SketchCast.old_pos,
to: pos
});
SketchCast.old_pos = pos;
}
} else {
SketchCast.old_pos = null;
}
});
code snippet sketchcast.js
40718c09.indd 235
12/1/09 11:09:26 AM
236
❘
Chapter 9 Publishing and Subscribing: A Shared Sketch Pad Introduction
Note that any line segment must be at least two pixels high or two pixels wide before it will be
drawn in this new version of the code. This is needed to prevent excessive amounts of drawing
events from being published. In some browsers, the mousemove event will be sent many times within
the same pixel.
Next, implement publish_action() by adding the following code to the SketchCast object:
publish_action: function (action) {
SketchCast.connection.sendIQ(
$iq({to: SketchCast.service,
type: “set”})
.c(‘pubsub’, {xmlns: SketchCast.NS_PUBSUB})
.c(‘publish’, {node: SketchCast.node})
.c(‘item’)
.c(‘x’, {xmlns: SketchCast.NS_DATA_FORMS,
type: “result”})
.c(‘field’, {“var”: “color”})
.c(‘value’).t(action.color)
.up().up()
.c(‘field’, {“var”: “line_width”})
.c(‘value’).t(‘’ + action.line_width)
.up().up()
.c(‘field’, {“var”: “from_pos”})
.c(‘value’).t(‘’ + action.from.x + ‘,’ + action.from.y)
.up().up()
.c(‘field’, {“var”: “to_pos”})
.c(‘value’).t(‘’ + action.to.x + ‘,’ + action.to.y));
}
code snippet sketchcast.js
This function may look complex, but it’s just building the form you saw previously and sending it to
the server wrapped in a pubsub IQ-set stanza containing a <publish> action. Once this data is published to the node, the pubsub service will broadcast it out to all subscribers.
Receiving Sketch Events
You already created a blank on_event() handler that is executed whenever new events come in.
You must now fill in the missing pieces to extract the data from the event and turn it into a line segment on the canvas.
You will build an action object like the one you used for publish_action() in the previous section,
and then send that to the render_action() function. The new on_event() code is shown here:
on_event: function (msg) {
if ($(msg).find(‘x’).length === 0) {
// this message wasn’t for us!
return true;
}
var color = $(msg).find(‘field[var=”color”] value’).text();
var line_width = $(msg).find(‘field[var=”line_width”] value’).text();
40718c09.indd 236
12/1/09 11:09:26 AM
Broadcasting Sketches Using Pubsub
❘ 237
var from_pos = $(msg).find(‘field[var=”from_pos”] value’).text()
.split(‘,’);
var to_pos =1 $(msg).find(‘field[var=”to_pos”] value’).text()
.split(‘,’);
var action = {
color: color,
line_width: line_width,
from: {x: parseFloat(from_pos[0]),
y: parseFloat(from_pos[1])},
to: {x: parseFloat(to_pos[0]),
y: parseFloat(to_pos[1])}
};
SketchCast.render_action(action);
return true;
}
code snippet sketchcast.js
Now implement render_action() and add it to the SketchCast object:
render_action: function (action) {
// render the line segment
var ctx = $(‘#sketch’).get(0).getContext(‘2d’);
ctx.strokeStyle = ‘#’ + action.color;
ctx.lineWidth = action.line_width;
ctx.beginPath();
ctx.moveTo(action.from.x, action.from.y);
ctx.lineTo(action.to.x, action.to.y);
ctx.stroke();
}
code snippet sketchcast.js
Don’t be surprised if this code looks familiar; it’s just a slightly modified version of the drawing code
from the mousemove event handler. It’s bad practice to be copying slightly modified code around, so
replace the old drawing code with another call to render_action(). This puts all the drawing logic
in one place where it is easier to find and modify and won’t get out of sync. You can replace the old
drawing code by modifying the mousemove event handler:
$(‘#sketch’).mousemove(function (ev) {
// get the position of the drawing area, our offset
var offset = $(this).offset();
// calculate our position within the drawing area
var pos = {x: ev.pageX - offset.left,
y: ev.pageY - offset.top};
if (SketchCast.pen_down) {
if (!SketchCast.old_pos) {
40718c09.indd 237
12/1/09 11:09:27 AM
238
❘
Chapter 9 Publishing and Subscribing: A Shared Sketch Pad Introduction
SketchCast.old_pos = pos;
return;
}
if (!$(‘#sketch’).hasClass(‘disabled’) &&
(Math.abs(pos.x - SketchCast.old_pos.x) > 2 ||
Math.abs(pos.y - SketchCast.old_pos.y) > 2)) {
SketchCast.render_action({
color: SketchCast.color,
line_width: SketchCast.line_width,
from: {x: SketchCast.old_pos.x,
y: SketchCast.old_pos.y},
to: {x: pos.x,
y: pos.y}});
SketchCast.publish_action({
color: SketchCast.color,
line_width: SketchCast.line_width,
from: SketchCast.old_pos,
to: pos
});
SketchCast.old_pos = pos;
}
} else {
SketchCast.old_pos = null;
}
});
code snippet sketchcast.js
You now have a working version of SketchCast!
Joining Late and Catching Up
When late joining users arrive, they need to request the drawing events that they have missed from
the pubsub service. As shown previously, this is easily done with an IQ-get stanza containing an
<items> command. Add the following highlighted code to the reception_started event handler:
$(document).bind(‘reception_started’, function () {
$(‘#status’).html(‘Receiving SketchCast.’);
// get missed events
SketchCast.connection.sendIQ(
$iq({to: SketchCast.service, type: “get”})
.c(‘pubsub’, {xmlns: SketchCast.NS_PUBSUB})
.c(‘items’, {node: SketchCast.node}),
SketchCast.on_old_items);
});
code snippet sketchcast.js
40718c09.indd 238
12/1/09 11:09:27 AM
Broadcasting Sketches Using Pubsub
❘ 239
Now, add the implementation of on_old_items() to the SketchCast object:
on_old_items: function (iq) {
$(iq).find(‘item’).each(function () {
SketchCast.on_event(this);
});
}
code snippet sketchcast.js
Because the on_event() handler only looks for a form containing drawing actions, you can just
send each <item> child to it. As far as on_event() knows, the action was received just like any
other event.
When a straggler joins an in-progress sketching session, they will receive past drawing actions,
and they will have some context for the new parts of the sketch they will see. In this case, they will
receive up to twenty previous actions because the node configuration was set to persist up to twenty
items. Note that some XMPP servers place limits on how many items can be persisted, so if you
need a lot of persistence, you may have to specially configure the server to support your application.
Gracefully Ending the Session
To finish off SketchCast, you should make sure the presenter and the viewers can gracefully quit. In
order to clean up after itself, the application must delete the pubsub node if the user is a presenter
and unsubscribe if they are a viewer. In both cases, you should also disconnect and reset the application to its starting state.
Start with the publisher case by implementing the Disconnect button in the toolbar. The best place
to add the handler for the button is when you get the broadcast_started event; when this event is
received you know the user is a publisher and that they have just created a pubsub node. The modified event handler is shown here:
$(document).bind(‘broadcast_started’, function (ev, data) {
$(‘#status’).html(‘Broadcasting at service: <i>’ +
SketchCast.service + ‘</i> node: <i>’ +
data.node + “</i>”);
$(‘.button’).removeClass(‘disabled’);
$(‘#sketch’).removeClass(‘disabled’);
$(‘#erase’).removeAttr(‘disabled’);
$(‘#disconnect’).removeAttr(‘disabled’);
$(‘#disconnect’).click(function () {
$(‘.button’).addClass(‘disabled’);
$(‘#sketch’).addClass(‘disabled’);
$(‘#erase’).attr(‘disabled’, ‘disabled’);
$(‘#disconnect’).attr(‘disabled’, ‘disabled’);
SketchCast.connection.sendIQ(
$iq({to: SketchCast.service,
type: “set”})
.c(‘pubsub’, {xmlns: SketchCast.NS_PUBSUB_OWNER})
40718c09.indd 239
12/1/09 11:09:27 AM
240
❘
Chapter 9 Publishing and Subscribing: A Shared Sketch Pad Introduction
.c(‘delete’, {node: SketchCast.node}));
SketchCast.disconnect();
});
});
code snippet sketchcast.js
The code binds the click event for the Disconnect button in order to delete the pubsub node using
the <delete> pubsub action and then disconnect. You must now write the disconnect() function
and add it to the SketchCast object:
disconnect: function () {
$(‘#erase’).click();
SketchCast.connection.disconnect();
SketchCast.connection = null;
SketchCast.service = null;
SketchCast.node = null;
$(‘#login_dialog’).dialog(‘open’);
}
code snippet sketchcast.js
After disconnecting the XMPP stream, the code resets the application state, clears the drawing area,
and opens the login dialog box. SketchCast is then ready for another round.
The viewer’s disconnection sequence is slightly more complicated. You must unsubscribe from the
pubsub node and disconnect, which is very similar to the publisher’s actions, but there is a possibility
that the publisher of the sketch has disconnected before all the subscribers. In this case, the pubsub
service will notify the user of the node’s deletion, and you must extend on_event() to deal with this
new kind of event.
First, enable the disconnect button once you receive the reception_started event, just like you did
for the publisher’s side. The modified event handler is shown here:
$(document).bind(‘reception_started’, function (ev, data) {
$(‘#status’).html(‘Receiving SketchCast.’);
$(‘#disconnect’).removeAttr(‘disabled’);
$(‘#disconnect’).click(function () {
$(‘#disconnect’).attr(‘disabled’, ‘disabled’);
SketchCast.connection.sendIQ(
$iq({to: SketchCast.service,
type: “set”})
.c(‘pubsub’, {xmlns: SketchCast.NS_PUBSUB_OWNER})
.c(‘unsubscribe’, {node: SketchCast.node
jid: SketchCast.connection.jid}));
SketchCast.disconnect();
40718c09.indd 240
12/1/09 11:09:27 AM
Broadcasting Sketches Using Pubsub
❘ 241
});
// get missed events
SketchCast.connection.sendIQ(
$iq({to: SketchCast.service, type: “get”})
.c(‘pubsub’, {xmlns: SketchCast.NS_PUBSUB})
.c(‘items’, {node: SketchCast.node}),
SketchCast.on_old_items);
});
code snippet sketchcast.js
Next, you must modify the pubsub event handler, on_event(). Simply show an error if the pubsub
node gets deleted while the user is still subscribed. Replace the old handler with the following:
on_event: function (msg) {
if ($(msg).find(‘x’).length > 0) {
var color = $(msg).find(‘field[var=”color”] value’).text();
var line_width = $(msg).find(‘field[var=”line_width”] value’).text();
var from_pos = $(msg).find(‘field[var=”from_pos”] value’).text()
.split(‘,’);
var to_pos =1 $(msg).find(‘field[var=”to_pos”] value’).text()
.split(‘,’);
var action = {
color: color,
line_width: line_width,
from: {x: parseFloat(from_pos[0]),
y: parseFloat(from_pos[1])},
to: {x: parseFloat(to_pos[0]),
y: parseFloat(to_pos[1])}
};
SketchCast.render_action(action);
} else if ($(msg).find(‘delete[node=”‘ + SketchCast.node + ‘“]’)
.length > 0) {
SketchCast.show_error(“SketchCast ended by presenter.”);
}
return true;
}
code snippet sketchcast.js
This new version first looks for a sketch drawing event, and if it doesn’t find one, it looks for a node
delete notification.
Your job is done, and it’s time to alert the marketing department! The complete JavaScript file is
shown in Listing 9-3.
40718c09.indd 241
12/1/09 11:09:27 AM
242
❘
Chapter 9 Publishing and Subscribing: A Shared Sketch Pad Introduction
Listing 9-3: sketchcast.js
var SketchCast = {
// drawing state
pen_down: false,
old_pos: null,
color: ‘000’,
line_width: 4,
// xmpp state
connection: null,
service: null,
node: null,
// namespace constants
NS_DATA_FORMS: “jabber:x:data”,
NS_PUBSUB: “http://jabber.org/protocol/pubsub”,
NS_PUBSUB_OWNER: “http://jabber.org/protocol/pubsub#owner”,
NS_PUBSUB_ERRORS: “http://jabber.org/protocol/pubsub#errors”,
NS_PUBSUB_NODE_CONFIG: “http://jabber.org/protocol/pubsub#node_config”,
on_event: function (msg) {
if ($(msg).find(‘x’).length > 0) {
var color = $(msg).find(‘field[var=”color”] value’).text();
var line_width = $(msg)
.find(‘field[var=”line_width”] value’).text();
var from_pos = $(msg).find(‘field[var=”from_pos”] value’).text()
.split(‘,’);
var to_pos = $(msg).find(‘field[var=”to_pos”] value’).text()
.split(‘,’);
var action = {
color: color,
line_width: line_width,
from: {x: parseFloat(from_pos[0]),
y: parseFloat(from_pos[1])},
to: {x: parseFloat(to_pos[0]),
y: parseFloat(to_pos[1])}
};
SketchCast.render_action(action);
} else if ($(msg).find(‘delete[node=”‘ + SketchCast.node + ‘“]’)
.length > 0) {
SketchCast.show_error(“SketchCast ended by presenter.”);
}
return true;
},
on_old_items: function (iq) {
$(iq).find(‘item’).each(function () {
SketchCast.on_event(this);
});
40718c09.indd 242
12/1/09 11:09:27 AM
Broadcasting Sketches Using Pubsub
❘ 243
},
// subscription callbacks
subscribed: function (iq) {
$(document).trigger(“reception_started”);
},
subscribe_error: function (iq) {
SketchCast.show_error(“Subscription failed with “ +
SketchCast.make_error_from_iq(iq));
},
// error handling helpers
make_error_from_iq: function (iq) {
var error = $(iq)
.find(‘*[xmlns=”‘ + Strophe.NS.STANZAS + ‘“]’)
.get(0).tagName;
var pubsub_error = $(iq)
.find(‘*[xmlns=”‘ + SketchCast.NS_PUBSUB_ERRORS + ‘“]’);
if (pubsub_error.length > 0) {
error = error + “/” + pubsub_error.get(0).tagName;
}
return error;
},
show_error: function (msg) {
SketchCast.connection.disconnect();
SketchCast.connection = null;
SketchCast.service = null;
SketchCast.node = null;
$(‘#error_dialog p’).text(msg);
$(‘#error_dialog’).dialog(‘open’);
},
// node creation callbacks
created: function (iq) {
// find pubsub node
var node = $(iq).find(“create”).attr(‘node’);
SketchCast.node = node;
// configure the node
var configiq = $iq({to: SketchCast.service,
type: “set”})
.c(‘pubsub’, {xmlns: SketchCast.NS_PUBSUB_OWNER})
.c(‘configure’, {node: node})
.c(‘x’, {xmlns: SketchCast.NS_DATA_FORMS,
type: “submit”})
.c(‘field’, {“var”: “FORM_TYPE”})
.c(‘value’).t(SketchCast.NS_PUBSUB_NODE_CONFIG)
.up().up()
.c(‘field’, {“var”: “pubsub#deliver_payloads”})
.c(‘value’).t(“1”)
40718c09.indd 243
continues
12/1/09 11:09:28 AM
244
❘
Chapter 9 Publishing and Subscribing: A Shared Sketch Pad Introduction
Listing 9-3 (continued)
.up().up()
.c(‘field’, {“var”: “pubsub#send_last_published_item”})
.c(‘value’).t(“never”)
.up().up()
.c(‘field’, {“var”: “pubsub#persist_items”})
.c(‘value’).t(“true”)
.up().up()
.c(‘field’, {“var”: “pubsub#max_items”})
.c(‘value’).t(“20”);
SketchCast.connection.sendIQ(configiq,
SketchCast.configured,
SketchCast.configure_error);
},
create_error: function (iq) {
SketchCast.show_error(“SketchCast creation failed with “ +
SketchCast.make_error_from_iq(iq));
},
configured: function (iq) {
$(document).trigger(“broadcast_started”);
},
configure_error: function (iq) {
SketchCast.show_error(“SketchCast configuration failed with “ +
SketchCast.make_error_from_iq(iq));
},
publish_action: function (action) {
SketchCast.connection.sendIQ(
$iq({to: SketchCast.service, type: “set”})
.c(‘pubsub’, {xmlns: SketchCast.NS_PUBSUB})
.c(‘publish’, {node: SketchCast.node})
.c(‘item’)
.c(‘x’, {xmlns: SketchCast.NS_DATA_FORMS,
type: “result”})
.c(‘field’, {“var”: “color”})
.c(‘value’).t(action.color)
.up().up()
.c(‘field’, {“var”: “line_width”})
.c(‘value’).t(‘’ + action.line_width)
.up().up()
.c(‘field’, {“var”: “from_pos”})
.c(‘value’).t(‘’ + action.from.x + ‘,’ + action.from.y)
.up().up()
.c(‘field’, {“var”: “to_pos”})
.c(‘value’).t(‘’ + action.to.x + ‘,’ + action.to.y));
},
render_action: function (action) {
// render the line segment
40718c09.indd 244
12/1/09 11:09:28 AM
Broadcasting Sketches Using Pubsub
❘ 245
var ctx = $(‘#sketch’).get(0).getContext(‘2d’);
ctx.strokeStyle = ‘#’ + action.color;
ctx.lineWidth = action.line_width;
ctx.beginPath();
ctx.moveTo(action.from.x, action.from.y);
ctx.lineTo(action.to.x, action.to.y);
ctx.stroke();
},
disconnect: function () {
$(‘#erase’).click();
SketchCast.connection.disconnect();
SketchCast.connection = null;
SketchCast.service = null;
SketchCast.node = null;
$(‘#login_dialog’).dialog(‘open’);
}
};
$(document).ready(function () {
$(‘#login_dialog’).dialog({
autoOpen: true,
draggable: false,
modal: true,
title: ‘Connect to a SketchCast’,
buttons: {
“Connect”: function () {
$(document).trigger(‘connect’, {
jid: $(‘#jid’).val(),
password: $(‘#password’).val(),
service: $(‘#service’).val(),
node: $(‘#node’).val()
});
$(‘#password’).val(‘’);
$(this).dialog(‘close’);
}
}
});
$(‘#error_dialog’).dialog({
autoOpen: false,
draggable: false,
modal: true,
title: ‘Whoops! Something Bad Happened!’,
buttons: {
“Ok”: function () {
$(this).dialog(‘close’);
$(‘#login_dialog’).dialog(‘open’);
}
}
});
$(‘#sketch’).mousedown(function () {
40718c09.indd 245
continues
12/1/09 11:09:28 AM
246
❘
Chapter 9 Publishing and Subscribing: A Shared Sketch Pad Introduction
Listing 9-3 (continued)
SketchCast.pen_down = true;
});
$(‘#sketch’).mouseup(function () {
SketchCast.pen_down = false;
});
$(‘#sketch’).mousemove(function (ev) {
// get the position of the drawing area, our offset
var offset = $(this).offset();
// calculate our position within the drawing area
var pos = {x: ev.pageX - offset.left,
y: ev.pageY - offset.top};
if (SketchCast.pen_down) {
if (!SketchCast.old_pos) {
SketchCast.old_pos = pos;
return;
}
if (!$(‘#sketch’).hasClass(‘disabled’) &&
(Math.abs(pos.x - SketchCast.old_pos.x) > 2 ||
Math.abs(pos.y - SketchCast.old_pos.y) > 2)) {
SketchCast.render_action({
color: SketchCast.color,
line_width: SketchCast.line_width,
from: {x: SketchCast.old_pos.x,
y: SketchCast.old_pos.y},
to: {x: pos.x,
y: pos.y}});
SketchCast.publish_action({
color: SketchCast.color,
line_width: SketchCast.line_width,
from: SketchCast.old_pos,
to: pos
});
SketchCast.old_pos = pos;
}
} else {
SketchCast.old_pos = null;
}
});
$(‘.color’).click(function (ev) {
SketchCast.color = $(this).attr(‘id’).split(‘-’)[1];
});
$(‘.linew’).click(function (ev) {
40718c09.indd 246
12/1/09 11:09:28 AM
Broadcasting Sketches Using Pubsub
❘ 247
SketchCast.line_width = $(this).attr(‘id’).split(‘-’)[1];
});
$(‘#erase’).click(function () {
var ctx = $(‘#sketch’).get(0).getContext(‘2d’);
ctx.fillStyle = ‘#fff’;
ctx.strokeStyle = ‘#fff’;
ctx.fillRect(0, 0, 600, 500);
});
});
$(document).bind(‘connect’, function (ev, data) {
$(‘#status’).html(‘Connecting..’);
var conn = new Strophe.Connection(
‘http://bosh.metajack.im:5280/xmpp-httpbind’);
conn.connect(data.jid, data.password, function (status) {
if (status === Strophe.Status.CONNECTED) {
$(document).trigger(‘connected’);
} else if (status === Strophe.Status.DISCONNECTED) {
$(document).trigger(‘disconnected’);
}
});
SketchCast.connection = conn;
SketchCast.service = data.service;
SketchCast.node = data.node;
});
$(document).bind(‘connected’, function () {
$(‘#status’).html(“Connected.”);
// send negative presence send we’re not a chat client
SketchCast.connection.send($pres().c(‘priority’).t(‘-1’));
if (SketchCast.node.length > 0) {
// a node was specified, so we attempt to subscribe to it
// first, set up a callback for the events
SketchCast.connection.addHandler(
SketchCast.on_event,
null, “message”, null, null, SketchCast.service);
// now subscribe
var subiq = $iq({to: SketchCast.service,
type: “set”})
.c(‘pubsub’, {xmlns: SketchCast.NS_PUBSUB})
.c(‘subscribe’, {node: SketchCast.node,
jid: SketchCast.connection.jid});
SketchCast.connection.sendIQ(subiq,
SketchCast.subscribed,
SketchCast.subscribe_error);
} else {
// a node was not specified, so we start a new sketchcast
40718c09.indd 247
continues
12/1/09 11:09:28 AM
248
❘
Chapter 9 Publishing and Subscribing: A Shared Sketch Pad Introduction
Listing 9-3 (continued)
var createiq = $iq({to: SketchCast.service,
type: “set”})
.c(‘pubsub’, {xmlns: SketchCast.NS_PUBSUB})
.c(‘create’);
SketchCast.connection.sendIQ(createiq,
SketchCast.created,
SketchCast.create_error);
}
});
$(document).bind(‘broadcast_started’, function () {
$(‘#status’).html(‘Broadcasting at service: <i>’ +
SketchCast.service + ‘</i> node: <i>’ +
SketchCast.node + “</i>”);
$(‘.button’).removeClass(‘disabled’);
$(‘#sketch’).removeClass(‘disabled’);
$(‘#erase’).removeAttr(‘disabled’);
$(‘#disconnect’).removeAttr(‘disabled’);
$(‘#disconnect’).click(function () {
$(‘.button’).addClass(‘disabled’);
$(‘#sketch’).addClass(‘disabled’);
$(‘#erase’).attr(‘disabled’, ‘disabled’);
$(‘#disconnect’).attr(‘disabled’, ‘disabled’);
SketchCast.connection.sendIQ(
$iq({to: SketchCast.service,
type: “set”})
.c(‘pubsub’, {xmlns: SketchCast.NS_PUBSUB_OWNER})
.c(‘delete’, {node: SketchCast.node}));
SketchCast.disconnect();
});
});
$(document).bind(‘reception_started’, function () {
$(‘#status’).html(‘Receiving SketchCast.’);
$(‘#disconnect’).removeAttr(‘disabled’);
$(‘#disconnect’).click(function () {
$(‘#disconnect’).attr(‘disabled’, ‘disabled’);
SketchCast.connection.sendIQ(
$iq({to: SketchCast.service,
type: “set”})
.c(‘pubsub’, {xmlns: SketchCast.NS_PUBSUB_OWNER})
.c(‘unsubscribe’, {node: SketchCast.node,
jid: SketchCast.connection.jid}));
SketchCast.disconnect();
40718c09.indd 248
12/1/09 11:09:28 AM
Summary
❘ 249
});
// get missed events
SketchCast.connection.sendIQ(
$iq({to: SketchCast.service, type: “get”})
.c(‘pubsub’, {xmlns: SketchCast.NS_PUBSUB})
.c(‘items’, {node: SketchCast.node}),
SketchCast.on_old_items);
});
A Better SketchPad
Software can always be improved. Perhaps you’d like to try adding some new features to SketchCast?
The marketing department says that the top three user requests are:
➤➤
Show drawing events that happened before viewers subscribed.
➤➤
Enable writing on the board using fonts.
➤➤
Browse for available SketchCasts instead of typing in their names.
Summary
XMPP pubsub is an extremely powerful tool. Even in its simplest forms, it makes creating applications
like SketchCast quite easy. In this chapter, you used XMPP pubsub to develop a sketch presentation
application and learned about:
➤➤
The basics of pubsub
➤➤
Creating and using forms
➤➤
Subscribing, unsubscribing, and retrieving items from pubsub nodes
➤➤
Creating, configuring, and deleting pubsub nodes
➤➤
Publishing and dealing with pubsub events
➤➤
HTML5’s <canvas> element
In the next chapter, you see a truly collaborative application, which allows two users to edit a
shared document, and you learn how to extend XMPP stanzas with your own elements.
40718c09.indd 249
12/1/09 11:09:28 AM
40718c09.indd 250
12/1/09 11:09:28 AM
10
Writing with Friends:
A Collaborative Text Editor
What’s in This Chapter?
➤➤
Learning the Operational Transformation algorithm
➤➤
Using service discovery to probe features
➤➤
Extending XMPP stanzas
People used to mail manuscripts back and forth to collaborate. Over the years, as technology
improved, this turned into file sharing via disks and then sharing over e‑mail. Technology
has now reached a point where multiple people, even in large groups, can simultaneously edit
the same document over the network, and the familiarity of the Web has made it both easy
and common. Given your previous experience with XMPP applications, it should be no sur‑
prise to you that XMPP provides an ideal medium for collaborative document editing.
One of the latest examples of such applications is Google Wave, a rich, media-filled, col‑
laborative space for groups of people to work on shared documents. When Google needed
a protocol to facilitate such a platform, it turned to XMPP. On top of XMPP, Google has
built a fantastic platform for collaborative editing based on the principles of operational
transformation. It has also chosen to do its protocol design work on the Wave protocol in
the open at http://www.waveprotocol.org.
In this chapter, you will build a collaborative text editor based on the same principles as Google
Wave — operational transformation. Although the application is designed for collaboration
between a pair of users, the underlying algorithms can be scaled to arbitrary numbers of col‑
laborators. You see through this and other applications how simple it is to build sophisticated
software on top of XMPP’s core technology.
40718c10.indd 251
11/30/09 9:08:26 PM
252
❘
Chapter 10 Writing with Friends: A Collaborative Text Editor
Application Preview
The final version of the NetPad application is shown in Figure 10-1. It has a simple UI, but is never‑
theless quite powerful.
Figure 10-1
A large editing area takes up most of the screen. A status area and a disconnect button appear at the
top, and the chat area appears at the bottom. Not only can the two collaborators work on the same
text, but they can also chat with each other about their ideas.
NetPad Design
Like any text editor, NetPad’s primary focus is to edit text. It is easy to accept local edits to the text,
but NetPad must also support editing operations coming from a remote user. Most of the work of
building NetPad is supporting these remote operations. The chat area is a slimmed-down version of
the functionality from Chapter 6’s Gab application, and by now you should be comfortable with the
private messaging pieces that are needed.
To allow users to collaborate on the same text, NetPad uses the theory of operational transformation.
Local editing actions are expressed as operations on the text and sent to the remote party. Remote
operations are received and transformed into slightly modified versions; after these modified versions
are applied, both parties end up with a consistent view of the text.
NetPad must establish an editing session between a pair of users, send local operations to the other
party, and process incoming remote operations. These operations will be encoded into XML as an
40718c10.indd 252
11/30/09 9:08:26 PM
Operational Transformation
❘ 253
extension to the XMPP protocol. The application uses <presence> stanzas for establishing sessions
and <message> stanzas for communicating editing operations.
Of course, not every user will be capable of collaborating on a NetPad document, so NetPad must
first determine whether the potential collaborator’s client has support for this editing functionality.
This can be done with Service Discovery, which you saw in Chapter 7.
NetPad’s design is rather simple, but operational transformation and XMPP protocol extensions are
both worthy of a thorough investigation. Once these concepts are explained, you will be ready to
design the NetPad protocol and build NetPad.
Operational Transformation
Ellis and Gibbs first presented the concept behind operational transformation in their paper
“Concurrency Control in Groupware Systems.” This paper is an excellent example of an academic
article that is extremely readable, turning a complex topic into a simple description. The algorithm
that NetPad uses is based directly on the work of these fine researchers.
Collaborative editing is a form of real-time groupware. These types of applications have many inter‑
esting and important properties. First, they are highly interactive, real-time, distributed network
applications. These properties are true of most of the applications in this book. Groupware applica‑
tions are ad-hoc and volatile in nature; there is no telling what actions users will take or what order
they take them in, and the users may come and go freely. Finally, these types of applications are quite
focused; each user of the system is interacting with the same data and often making conflicting
changes.
The main challenge of groupware applications is consistency. The view that one user has of a docu‑
ment should be as close as possible to the other users’ views of the same information. When editing
operations have stopped, the resulting documents should all be identical. It does users no good to
work collaboratively if at the end of their session each has a different result.
Concurrency problems are not unique to groupware applications, but the real-time and distributed
properties of these systems make most common solutions to the concurrency impractical. For example,
database management systems have often supported various forms of concurrency control, but they
accomplish this by disallowing conflicting operations altogether. Other systems allow only one edi‑
tor at a time, and this ability passes from user to user. The low latency and interactivity required by
groupware necessitates a different approach.
Basic Principles
The operational transformation algorithm is concerned with a group of users, the operations these
users can perform, and the order in which each user executes these operations.
The set of operations that NetPad needs is quite simple — i nserting a character and deleting a
character. The insertion operation takes two arguments — the character to insert and the position
at which to place it. This operation is written as insert(pos, char). The deletion operation needs
only the position at which to delete a character and is written as delete(pos).
40718c10.indd 253
11/30/09 9:08:26 PM
254
❘
Chapter 10 Writing with Friends: A Collaborative Text Editor
Each user’s editing actions will generate a sequence of these two operations. It is important that the
sequence of operations be executed in the proper order. For example, consider the four operations
insert(0, ‘c’), insert(0, ‘b’), insert(0, ‘a’), and delete(0). Permuting the order of these
operations would result in a different string. In the order listed, these operations result in the string
bc. If the middle two operations are switched, the resulting string becomes ac.
Each user’s operations are ordered, and other users must execute them in the same order. In addi‑
tion, the total set of operations has an order as well, although unlike local operations, this ordering
is not always complete. It is possible for two users to generate different operations simultaneously on
the same string. These operations are overlapping and cannot be ordered in relation to each other.
Figure 10-2 and Figure 10-3 illustrate these two cases. In both figures each user, u1 and u 2 , gener‑
ates an operation, o1 and o2 , respectively. In Figure 10-2, o1 is executed by u 2 before they generate o2 .
However, in Figure 10-3, u1 and u 2 perform simultaneous operations that overlap.
Operation 1
Operation 1
Time
Time
Operation 2
Operation 2
User A
User B
User A
User B
A dapted from Figure 2 of “C oncurrency C ontrol in
A dapted from Figure 2 of “C oncurrency C ontrol in
Groupware Systems” by E llis and G ibbs , ACM Sigmod
Groupware Systems” by E llis and G ibbs , ACM Sigmod
R ecord, ACM 18(2), 1989.
Figure 10-2
R ecord, ACM 18(2), 1989.
Figure 10-3
The case where operations overlap is the real crux of the collaborative editing problem. The nonoverlapping cases can easily be handled by keeping track of the order of operations, and enforcing
execution in the correct order. Overlapping operations, however, have no ordering. How are these to
be executed?
Overlapping operations must be transformed into new operations that can be ordered, and this is
where the name “operational transformation” comes from. Because u1 knows the state on which o2
operated, they can transform o2 into an operation that accounts for the local operation o1. Similarly,
u 2 can transform o1 to account for the changes made by o2 .
Imagine that both u1 and u 2 have the string ace in their editors. Each user simultaneously does an
insert operation; o1, performed by u1, is insert(1, ‘b’), and o2, performed by u2, is insert(2, ‘d’).
First, watch what happens when these operations are not transformed. The first user executes o1 and
then receives and executes o2; the resulting string is abdce. The second user executes o2 and then o1
and ends up with the string abcde. Each user now has an inconsistent view of the data, and only one
of them has the correct version.
40718c10.indd 254
11/30/09 9:08:26 PM
Operational Transformation
❘ 255
Now, observe the result when each user transforms the operations they receive. The first user exe‑
cutes o1 and then receives o2 . Because the user has added a character to the string, he or she applies
a transformation turning o2 into o2´ adding one to the position of the insert operation; insert(2, ‘d’)
becomes insert(3, ‘d’). The o1 operation that u2 receives needs no transformation because the posi‑
tion it references has not been changed by o2; o1´ is the same as o1. Applying o1, o2´ or o2 , o1´ results in
the same result — the string abcde.
Similar transformations are possible between any pair of operations.
Details of the Algorithm
As you’ve learned, operational transformation solves a complex problem in a relatively simple
and straightforward manner. However, you have a few important details to consider before the
algorithm can be implemented in NetPad. The structure of operation requests must be defined.
Executing groups of operations will need some care, and the algorithm has the concept of priorities
to address this. Also, it is necessary for each user to maintain a queue of outstanding operations, to
know the state for which a given operation applies, and to track the history of operations that have
already been performed.
State
Each user must keep a state vector with one element for each user participating in the session. There
will be two participants in every NetPad session, and the state vectors for both users will have two
elements. The elements of the state vector are simple counters that start at zero. For every operation
executed, the operation initiator’s element of the state vector is incremented by one. For example, if
the first position in the state vector represents the local user and the second position represents the
remote user, a state vector of <10, 23> means that 10 locally generated operations and 23 remotely
generated operations were executed on the local document.
Each user’s place in the state vector must be the same for all state vectors. This can be achieved eas‑
ily by lexicographically ordering the users by their JIDs.
Operation Requests
When any user executes a local operation, they will broadcast a corresponding operation request
to the other users. Operation requests can be represented as a four-element vector in the form
<j, s, o, p>. The first element, j, is the initiator’s position in the state vector. The next element, s, is
the state vector of the jth user at the time the operation was generated. The element o is the opera‑
tion requested, and p is the operation’s priority.
Each request carries not only the operation and its parameters but also the state vector at the time
the operation was first executed and its priority. This extra information will allow the other par‑
ticipants to determine when they can execute the request. For example, one user may generate an
operation that comes after a second user’s; a third user, who has received the second user’s operation
first, must wait for the first user’s operation before they can execute either. Without knowledge of
the operation’s corresponding state, it would not be possible to order execution properly.
40718c10.indd 255
11/30/09 9:08:26 PM
256
❘
Chapter 10 Writing with Friends: A Collaborative Text Editor
Request Queue and Execution Log
Each user must keep a queue for incoming requests. All requests, both local and remote, will be
appended to the queue, and a user must traverse the queue to execute operations that are ready.
An operation is ready for execution if the current state vector for the user is less than or equal to
the queued request’s state vector.
State vectors are compared in a special way, described in the Implementation section. If the state
vectors are equal, the operation was performed on the same state, and can be executed without any
transformation. If the request’s state vector is less than the current local state vector, some overlap‑
ping operations have already been executed and the request’s operation must be transformed before
execution.
After any request’s operation is executed, the request is appended to the user’s execution log. This
log is used to transform overlapping operations — operations executed simultaneously by different
users — by taking into account operations that have already been executed. The execution log will
be traversed in reverse chronological order to look for operations that affect a given request.
Priorities
Every request has a priority, which is calculated at the operation’s origin at the time of its execution.
These priorities must take into account previous operations’ priorities at the same location, so they
are composed of two parts. The first part is the priority of the most recent request in the execution
log whose operation had an original position equal to the current operation’s position. The second
part is the user’s position in the state vector. If no request in the execution log applies, the priority
consists of just the user’s position in the state vector.
This may sound complex, but it is necessary for the algorithm to function perfectly. Using a simpler
scheme for priorities doesn’t work in all cases, so this scheme is needed. The outline of a proof for
the correctness of this approach is provided in the paper; the paper also shows why a simpler scheme
cannot work.
Implementation
The implementation of operational transformation is taken directly from the aforementioned
paper. The details are explained here along with the source code, but if you need more details or
are just curious, please read the original paper.
Initial Code
You start by setting up the OpTrans object and its basic properties and initialization function. Place
the following code into a new file called optrans.js:
var OpTrans = {
log: null, // the request log
queue: null, // the request queue
state: null, // our state vector
jid: null, // our jid
jid_map: null, // maps jids to positions in state vectors
buffer: null, // the text buffer being affected by operations
40718c10.indd 256
11/30/09 9:08:26 PM
Operational Transformation
❘ 257
update_func: null, // callback function
init: function (jids, buffer, update_func) {
this.log = [];
this.queue = [];
this.state = [];
this.jid_map = {};
this.buffer = buffer.split(‘’);
this.jid = jids[0];
this.update_func = update_func;
$.each(jids.sort(), function (i) {
OpTrans.jid_map[this] = i;
OpTrans.state.push(0);
});
}
};
code snippet optrans.js
The init() function’s parameters are a list of JIDs of the participants, the initial buffer contents,
and a callback function. The first item in the list of JIDs must be the JID of the local user. The ini‑
tial buffer will normally be an empty string, but it may be a partial document if the hosting user
has done some editing before the other user has connected. The callback function will be invoked
every time an operation is executed, and it will be passed the new buffer as well as a flag indicating
whether the update came from the local user or a remote one.
The init() function sets the various properties to their default values. The execution log and request
queue start empty. The list of JIDs passed into the function is used to create the jid_map property,
which maps each JID to a corresponding index in a state vector. Each state vector is the same length
as the list of JIDs, and the initial state vector starts with each value set to zero. The jid property
stores the local user’s JID.
Each user in the session will initialize their own OpTrans object when the session begins. Except for
the jid property, which will be different for each user, all participants start with the same initial state.
Comparison Functions
A state vector will need to be compared against other state vectors in order to determine operation
precedence. Similarly, priority values will also need to be compared to each other. Because both of
these objects are not simple numbers or strings, you will write special comparison functions for them.
Add the following code for the compare_state() and compare_priority() functions to the
ObTrans object:
compare_state: function (s1, s2) {
var i, smaller = false;
for (i = 0; i < s1.length; i++) {
if (s1[i] > s2[i]) {
return 1;
} else if (s1[i] < s2[i]) {
smaller = true;
40718c10.indd 257
11/30/09 9:08:27 PM
258
❘
Chapter 10 Writing with Friends: A Collaborative Text Editor
}
}
if (smaller) {
return -1;
}
return 0;
},
compare_priority: function (p1, p2) {
if (p1.length > p2.length) {
return -1;
} else if (p1.length < p2.length) {
return 1;
} else {
var i;
for (i = 0; i < p1.length; i++) {
if (p1[i] > p2[i]) {
return -1;
} else if (p1[i] < p2[i]) {
return 1;
}
}
}
return 0;
}
code snippet optrans.js
State vectors are compared element by element. A state vector si is equal to another state vector sj if
all its elements are equal. If all elements of si are less than or equal to sj but at least one element in si
is less than its corresponding element in sj, si is less than sj. Otherwise, si is considered greater than sj.
Priorities are also compared element-wise. Whereas state vectors are always of equal length, priori‑
ties can be arbitrarily long. Two priorities are equal if they have the same length and each element
is the same. Otherwise, either one priority is a sub list of the other, or they differ at some specific
element. In the former case, the longer priority is the greater one. In the latter case, the result of the
first differing elements’ comparison is the result of the priorities’ comparison.
Handling Requests
The first step in operational transformation is to handle the request. A request may be a result of
a local user operation, or it may be received over the network from a remote user. For local opera‑
tions, a priority must be calculated and a request constructed; remote operations are wrapped in
a request before they are sent. In both cases, the request must be added to the requests queue, and
then the execution stage is begun.
40718c10.indd 258
11/30/09 9:08:27 PM
Operational Transformation
❘ 259
Add the following do_local() and do_remote() functions to the ObTrans object:
do_local: function (op, pos, chr) {
// calculate p
var l, maxp = [];
for (l = 0; l < this.log.length; l++) {
if (this.log[l][4] === pos) {
if (this.compare_priority(maxp, this.log[l][3]) == 1) {
maxp = this.log[l][3];
}
}
}
var p = maxp.concat(this.jid_map[this.jid]);
// append request to queue
var req = [this.jid_map[this.jid],
this.state.concat(),
[op, pos, chr],
p];
this.queue.push(req);
this.execute();
return req;
},
do_remote: function (jid, state, op, pos, chr, pri) {
// append request
var req = [this.jid_map[jid], state, [op, pos, chr], pri];
this.queue.push(req);
this.execute();
}
code snippet optrans.js
For do_local() only the operation’s details are passed in, but for do_remote() you must pass in all
the necessary components of the request, which are used to create a request object.
The do_local() function is more involved than do_remote() due to the priority calculation. The
do_local() function must also return the constructed request back to the caller in order for the request to
be broadcast to the remote users. The priority calculation was described previously in the “Priorities”
section.
NetPad calls init() once the editing session has started, and from then on it calls do_local()
when the local user performs editing operations and do_remote() when requests are received from
the remote user. After each request is executed, the callback function will be invoked to notify
NetPad about the new text changes. All the other functions of the OpTrans object are for use
internally.
40718c10.indd 259
11/30/09 9:08:27 PM
260
❘
Chapter 10 Writing with Friends: A Collaborative Text Editor
Execution
The execute() function contains most of the core logic of the operational transformation algorithm.
It finds requests that are ready to be executed on the request queue, potentially transforms these
based on past operations in the execution log, and then applies the operation to the buffer. The fol‑
lowing execute() function should be added to the OpTrans object:
execute: function () {
var r, cmp, new_queue = [];
for (r = 0; r < this.queue.length; r++) {
var remstate = this.queue[r][1];
var cmp = this.compare_state(remstate, this.state);
if (cmp < 1) {
var op = this.queue[r][2];
var orig_pos = op[1];
if (cmp < 0) {
var l = -1;
while (l = this.find_prev(remstate, l) >= 0) {
var k = this.log[l][0];
if (remstate[k] <= this.log[l][1][k]) {
op = this.transform_op(op,
this.log[l][2],
this.queue[r][3],
this.log[l][3]);
}
}
}
var remote = this.queue[r][0] !== this.jid_map[this.jid];
this.perform_op.apply(this, [remote].concat(op, orig_pos));
this.log.push(this.queue[r].concat(orig_pos));
this.state[this.queue[r][0]] += 1;
} else {
new_queue.push(this.queue[r]);
}
}
this.queue = new_queue;
}
code snippet optrans.js
The execute() function traverses the request queue in the order the requests were added, looking
for requests that are ready for execution. Each request whose state vector is less than or equal to the
local user’s current state vector can be executed. If the request’s state vector is strictly less than the
local user’s state vector, the request must be transformed before it can be executed; the local buffer
has been modified by operations that weren’t executed at the request’s origin. If the two state vectors
are equal, the request can be executed immediately.
To transform a request, the execution log is searched for requests whose state vectors are less than
or equal to the current request. The find_next() function returns the index of the next such request
40718c10.indd 260
11/30/09 9:08:27 PM
Operational Transformation
❘ 261
from the execution log or -1 if no such request is found. Additionally, only some of these requests from
the log will affect the transformation; the logged request’s and the current request’s state vectors are
compared at the element corresponding to the logged request’s origin, and if the element in the logged
request’s state vector is greater than or equal to the element of the current request’s state vector, that
request must be transformed against. Each such request found in the execution log will trigger a trans‑
formation done by transform_op(); it is possible that several transformations will take place.
Add the following find_prev() function to the OpTrans object:
find_prev: function (state, last_idx) {
if (last_idx < 0) {
last_idx = this.log.length;
}
var k;
for (k = last_idx; k >= 0; k--) {
if (this.compare_state(this.log[k][1], state) < 1) {
break;
}
}
return k;
}
code snippet optrans.js
Once the potentially transformed operation is ready for execution, perform_op() does the buffer
manipulation, and then the request is added to the execution log. Note that the original position of
the operation is also stored in the execution log because this is needed for the priority calculation
shown previously in do_local().
The following perform_op() function should be added to the OpTrans object:
perform_op: function (remote, op, pos, chr) {
if (op === ‘insert’) {
this.buffer.splice(pos, 0, [chr]);
} else if (op === ‘delete’) {
this.buffer.splice(pos, 1);
}
this.update_func(this.buffer.join(‘’), remote);
}
code snippet optrans.js
The final operations are very easy to perform. The splice() method of JavaScript’s Array class makes
it easy to insert or delete a character at any position. Once the operation is done, the callback func‑
tion is notified with the new buffer. Note that inside the OpTrans object the buffer is stored as an
array, but perform_op() passes it as a string to the callback function.
40718c10.indd 261
11/30/09 9:08:27 PM
262
❘
Chapter 10 Writing with Friends: A Collaborative Text Editor
Transformation
The only piece of the algorithm left is to perform the transformation of operations. The transform_
op() function takes both an operation to transform and also an operation to transform against. The
first operation will always be the current operation, and the operation to transform against will come
from the execution log. Once it has finished the transformation, it returns the new, transformed
operation.
The transform_op() function that follows should be added to the OpTrans object:
transform_op: function (op1, op2, pri1, pri2) {
var idx1 = op1[1];
var idx2 = op2[1];
if (op1[0] === ‘insert’ && op2[0] === ‘insert’) {
if (idx1 < idx2) {
return op1;
} else if (idx1 > idx2) {
return [op1[0], idx1 + 1, op1[2]];
} else {
if (op1[2] === op2[2]) {
return null;
} else {
var cmp = this.compare_priority(pri1, pri2);
if (cmp === -1) {
return [op1[0], idx1 + 1, op1[2]];
} else {
return op1;
}
}
}
} else if (op1[0] === ‘delete’ && op2[0] === ‘delete’) {
if (idx1 < idx2) {
return op1;
} else if (idx1 > idx2) {
return [op1[0], idx1 - 1, op1[2]];
} else {
return null;
}
} else if (op1[0] === ‘insert’ && op2[0] === ‘delete’) {
if (idx1 < idx2) {
return op1;
} else {
return [op1[0], idx1 - 1, op1[2]];
}
} else if (op2[0] === ‘delete’ && op2[0] === ‘insert’) {
if (idx1 < idx2) {
return op1;
} else {
return [op1[0], idx1 + 1, op1[2]];
}
}
}
code snippet is part of optrans.js
40718c10.indd 262
11/30/09 9:08:27 PM
Operational Transformation
❘ 263
There are four possible combinations of operations — insert() transformed against an insert()
or a delete() and delete() transformed against an insert() or delete(). In each case the trans‑
formed operation may shift position forward or backward, be discarded, or remain unchanged.
Consider the case where a delete() is transformed by a previous delete() operation. If the index
where the current delete() will occur is less than the old delete(), no change is necessary. If the
index is the same, then the delete has already happened and the operation is superfluous. Otherwise,
the index must be decremented by one so account for the missing character. The other operation
transformations are similar.
The one slightly tricky case is when both operations are insert()s. In this case, if two insert()
operations occur at the same index, the algorithm must use the priorities of the operations to deter‑
mine the final transformation. If this priority comparison were not done, it would be possible for
users to perform the operations in different orders, resulting in different buffers.
The final optrans.js file appears in Listing 10-1. Although NetPad uses this to enable collaborative
editing between two users, the operational transformation algorithm — and this particular implemen‑
tation of it — is not limited to two users; arbitrary numbers of participants can work simultaneously
on the same buffer just as easily.
Listing 10-1: optrans.js
var OpTrans = {
log: null, // the request log
queue: null, // the request queue
state: null, // our state vector
jid: null, // our jid
jid_map: null, // maps jids to positions in state vectors
buffer: null, // the text buffer being affected by operations
update_func: null, // callback function
init: function (jids, buffer, update_func) {
this.log = [];
this.queue = [];
this.state = [];
this.jid_map = {};
this.buffer = buffer.split(‘’);
this.jid = jids[0];
this.update_func = update_func;
$.each(jids.sort(), function (i) {
OpTrans.jid_map[this] = i;
OpTrans.state.push(0);
});
},
getState: function (jid) {
},
do_local: function (op, pos, chr) {
// calculate p
40718c10.indd 263
continues
11/30/09 9:08:27 PM
264
❘
Chapter 10 Writing with Friends: A Collaborative Text Editor
Listing 10-1 (continued)
var l, maxp = [];
for (l = 0; l < this.log.length; l++) {
if (this.log[l][4] === pos) {
if (this.compare_priority(maxp, this.log[l][3]) == 1) {
maxp = this.log[l][3];
}
}
}
var p = maxp.concat(this.jid_map[this.jid]);
// append request to queue
var req = [this.jid_map[this.jid],
this.state.concat(),
[op, pos, chr],
p];
this.queue.push(req);
this.execute();
return req;
},
do_remote: function (jid, state, op, pos, chr, pri) {
// append request
var req = [this.jid_map[jid], state, [op, pos, chr], pri];
this.queue.push(req);
this.execute();
},
compare_state: function (s1, s2) {
var i, smaller = false;
for (i = 0; i < s1.length; i++) {
if (s1[i] > s2[i]) {
return 1;
} else if (s1[i] < s2[i]) {
smaller = true;
}
}
if (smaller) {
return -1;
}
return 0;
},
compare_priority: function (p1, p2) {
if (p1.length > p2.length) {
return -1;
} else if (p1.length < p2.length) {
40718c10.indd 264
11/30/09 9:08:27 PM
Operational Transformation
❘ 265
return 1;
} else {
var i;
for (i = 0; i < p1.length; i++) {
if (p1[i] > p2[i]) {
return -1;
} else if (p1[i] < p2[i]) {
return 1;
}
}
}
return 0;
},
execute: function () {
var r, cmp, new_queue = [];
for (r = 0; r < this.queue.length; r++) {
var remstate = this.queue[r][1];
var cmp = this.compare_state(remstate, this.state);
if (cmp < 1) {
var op = this.queue[r][2];
var orig_pos = op[1];
if (cmp < 0) {
var l = -1;
while (l = this.find_prev(remstate, l) >= 0) {
var k = this.log[l][0];
if (remstate[k] <= this.log[l][1][k]) {
op = this.transform_op(op,
this.log[l][2],
this.queue[r][3],
this.log[l][3]);
}
}
}
var remote = this.queue[r][0] !== this.jid_map[this.jid];
this.perform_op.apply(this, [remote].concat(op, orig_pos));
this.log.push(this.queue[r].concat(orig_pos));
this.state[this.queue[r][0]] += 1;
} else {
new_queue.push(this.queue[r]);
}
}
this.queue = new_queue;
},
perform_op: function (remote, op, pos, chr) {
if (op === ‘insert’) {
this.buffer.splice(pos, 0, [chr]);
} else if (op === ‘delete’) {
this.buffer.splice(pos, 1);
40718c10.indd 265
continues
11/30/09 9:08:27 PM
266
❘
Chapter 10 Writing with Friends: A Collaborative Text Editor
Listing 10-1 (continued)
}
this.update_func(this.buffer.join(‘’), remote);
},
find_prev: function (state, last_idx) {
if (last_idx < 0) {
last_idx = this.log.length;
}
var k;
for (k = last_idx; k >= 0; k--) {
if (this.compare_state(this.log[k][1], state) < 1) {
break;
}
}
return k;
},
transform_op: function (op1, op2, pri1, pri2) {
var idx1 = op1[1];
var idx2 = op2[1];
if (op1[0] === ‘insert’ && op2[0] === ‘insert’) {
if (idx1 < idx2) {
return op1;
} else if (idx1 > idx2) {
return [op1[0], idx1 + 1, op1[2]];
} else {
if (op1[2] === op2[2]) {
return null;
} else {
var cmp = this.compare_priority(pri1, pri2);
if (cmp === -1) {
return [op1[0], idx1 + 1, op1[2]];
} else {
return op1;
}
}
}
} else if (op1[0] === ‘delete’ && op2[0] === ‘delete’) {
if (idx1 < idx2) {
return op1;
} else if (idx1 > idx2) {
return [op1[0], idx1 - 1, op1[2]];
} else {
return null;
}
40718c10.indd 266
11/30/09 9:08:28 PM
Extending the XMPP Protocol
} else if (op1[0] === ‘insert’
if (idx1 < idx2) {
return op1;
} else {
return [op1[0], idx1 }
} else if (op2[0] === ‘delete’
if (idx1 < idx2) {
return op1;
} else {
return [op1[0], idx1 +
}
}
❘ 267
&& op2[0] === ‘delete’) {
1, op1[2]];
&& op2[0] === ‘insert’) {
1, op1[2]];
}
};
Extending the XMPP Protocol
In previous applications you have seen much of the core XMPP protocol and several important exten‑
sions, but you’ve not yet created your own extensions. Creating protocol extensions is an important
part of XMPP development, and sometimes you’ll even need to create extensions of another extension.
XML documents are easily extensible through the use of namespaces. Every attribute or element
is attached to some namespace, and new elements and attributes can be added under different
namespaces. XMPP systems are designed to ignore XML under namespaces they don’t recognize,
but they will forward these payloads along to their final destinations. This combination of features
makes XMPP easy to extend, and the community around developing extensions has used these fea‑
tures to create nearly 300 protocol extensions.
Ignoring the Unknown
XMPP extensions work because XMPP systems do not require knowledge of every bit of XML
passing through. New things can be added without breaking existing XMPP software, and anything
unknown will not only be ignored, but it will also be preserved until it is finally delivered to its
destination.
This principle of ignoring the unknown is adhered to by every piece of the XMPP stack. For example,
servers do not know anything about typing notifications, but these can still be sent from one client
to another. Clients, likewise, may not understand some features of other clients; this does not cause
them to break, and the strange features are simply ignored.
It is hard to know how developers or even end users will use a protocol. Therefore, it is best to remain
as flexible as possible, leaving room for future growth and change. If XMPP did not ignore unknown
protocol elements, it is likely that it would still be limited to the few uses for which it was originally
designed.
40718c10.indd 267
11/30/09 9:08:28 PM
268
❘
Chapter 10 Writing with Friends: A Collaborative Text Editor
XML Namespaces
Many people are familiar with XML, but few seem to have much experience with XML namespaces.
Namespaces are important for defining XMPP extensions because they allow the addition of elements
and attributes that will be interpreted in a new context.
An XML namespace is simply a URI, or uniform resource identifier. It is important to note that
although a URI may sometimes look like a URL, it does not necessarily reference an actual location
on the Web.
In XMPP, the URIs take several forms. Originally URIs of the form jabber:foo or jabber:x:foo
were used. Eventually the community adopted more URL-like URIs such as http://jabber.org/
protocol/muc. Today, XMPP URIs look like urn:xmpp:jingle:1. These differences are due to the
community’s increasing knowledge of and sophistication with URIs.
Official XMPP extensions register their URIs with the XMPP registrar as part of the standardization
process. Application-specific namespaces that are not intended for standardization typically use
URL-style URIs such as http://metajack.im/ns/netpad. If you intend to submit your protocol
extension to the XSF, you can contact the XMPP registrar to obtain a temporary namespace to use
until your extension reaches draft status and is assigned a permanent namespace.
XML elements can have a default namespace, and this namespace is inherited by child elements
that have no namespace declaration of their own. For instance, XMPP client streams use a default
namespace of jabber:client; a <message> element in the stream does not need to declare itself
part of the jabber:client namespace because it will inherit this property from the default namespace.
This inheritance is quite handy because it saves having to declare the namespace of every element;
most of the time, elements will all be in a common, inherited namespace.
Extended Elements
Extended elements are just new child elements that live under a different namespace. You’ve seen
several examples of these including XHTML-IM’s <html> child and inside every IQ-get and IQ-set
stanza in the book.
There’s no restriction on where you can place extended elements, except that you cannot normally
place an extended element at the XMPP stanza level. XMPP extensions routinely add extended ele‑
ments even to other XMPP extensions’ elements.
Extended elements for a particular protocol extension can generally appear only in a few specific
places. It makes little sense, for example, to place a jabber:iq:roster element anywhere but as the
first child of an <iq> stanza. Some extensions do have more generic properties; Data Forms in par‑
ticular can go nearly anywhere.
Extended elements can appear two ways. Either they can declare a new default namespace by including
the xmlns attribute in the element, or they can use namespace prefixes.
Changing the Default Namespace
Changing the default namespace is the most common method used with extended elements, and all
the examples in this book have used this method. Any element can declare the default namespace
40718c10.indd 268
11/30/09 9:08:28 PM
Extending the XMPP Protocol
❘ 269
by setting the value of the xmlns attribute to the namespace desired. The following example shows
a <message> stanza with an extended <event> child under a new default namespace. Some children
under the <event> element are also under the new namespace because they have no namespace specifi‑
cally declared, and the <x> element declares another default namespace for the form and its children.
<message to=’elizabeth@longbourn.lit/bedroom’
from=’pubsub.pemberley.lit’>
<event xmlns=’http://jabber.org/protocol/pubsub#event’>
<items node=’latest_books’>
<item id=’821b576dfabfc6b358b6ec4139b87f5c’>
<x xmlns=’jabber:x:data’ type=’result’>
<field var=’title’>
<value>A History of Pemberley</value>
</field>
<field var=’author’>
<value>Sir Lewis de Bourgh</value>
</field>
</x>
</item>
</items>
</event>
</message>
Namespace Prefixes
Instead of changing the default namespace, XML elements may define namespace prefixes. You’ve
seen these briefly in Chapter 1; the <stream:stream> element that opens an XMPP stream is a pre‑
fixed element.
Prefixes must be defined before or at the time of their use, and descendants of an element that defines
a prefix will also inherit the prefix’s definition. The prefix is defined by including an xmlns:foo attri‑
bute, where foo is the prefix you want you use. The value of this attribute is the namespace to which
the prefix is bound. Prefixes appear before element names and are separated from the name by a colon.
The following example shows the same <message> stanza as before, but uses prefixes instead of
changing the default namespace:
<message to=’elizabeth@longbourn.lit/bedroom’
from=’pubsub.pemberley.lit’>
<pubsub:event xmlns:pubsub=’http://jabber.org/protocol/pubsub#event’>
<pybsub:items node=’latest_books’>
<pubsub:item id=’821b576dfabfc6b358b6ec4139b87f5c’>
<form:x xmlns:form=’jabber:x:data’ type=’result’>
<form:field var=’title’>
<form:value>A History of Pemberley</form:value>
</form:field>
<form:field var=’author’>
<form:value>Sir Lewis de Bourgh</form:value>
</form:field>
</form:x>
</pubsub:item>
</pubsub:items>
</pubsub:event>
</message>
40718c10.indd 269
11/30/09 9:08:28 PM
270
❘
Chapter 10 Writing with Friends: A Collaborative Text Editor
In this case, prefixes are more verbose than changing the default namespace. However, if the children
of the <pubsub:event> element were replaced with elements under the jabber:client namespace,
the use of prefixes would be an improvement. This is why the <stream:stream> element of an
XMPP stream is prefixed; most of the elements it contains belong to a different namespace.
Note that changing the default namespace and using prefixes can be done in the same element; in
fact, this is exactly what the <stream:stream> element does:
<stream:stream xmlns=’jabber:client’
xmlns:stream=’http://etherx.jabber.org/streams’
version=’1.0’
from=’pemberley.lit’
id=’893ca401f5ff2ec29499984e9b7e8afc’
xml:lang=’en’>
Extended Attributes
Extended attributes can also be created, but these are rarely used in protocol extensions. Attributes
are treated somewhat differently in XML than elements; an attribute with no prefix does not belong
to the default namespace, but to the element in which it appears. What interpretation an element
gives to such an attribute is application defined. For this reason, it is suggested that only prefixed
attributes be used for extending XMPP.
Prefixed attributes work very similarly to prefixed elements, and the prefix must be defined in the
same manner as with prefixed elements. The following example uses a prefixed attribute on a mes‑
sage’s <body> element to add an explicit emotion to the text:
<message to=’darcy@pemberley.lit’
from=’elizabaeth@longbourn.lit/ballroom’
type=’chat’>
<body emote:emotion=’annoyed’ xmlns:emote=’http;//metajack.im/ns/emote-0’>
I cannot talk of books in a ball-room; my head is always full of
something else.
</body>
</message>
You could easily have made the emotion attribute an element instead, perhaps so the emoticon could
pertain to the entire stanza, not just the <body> element. Indeed, elements are the preferred way to
extend XMPP. Few protocol extensions use attributes, but the capability exists if you ever need it.
For an example of them in real-world use, see SOAP over XMPP in XEP-0072.
One prefix is always defined — xml — and this prefix is often used to add attributes to various
XMPP elements. In addition, any prefix beginning with “xml” (or “XML”, “xMl”, and so on) is
reserved. Most often you will see the xml:lang attribute used to designate which language is used
for a piece of text. It can also be used to provide alternate translations. For example, you could send
a message with two <body> elements, each with a different xml:lang value. Unlike other prefixes,
the xml prefix does not need to be defined; it is always implicitly defined in XML, as is the xmlns
attribute.
40718c10.indd 270
11/30/09 9:08:28 PM
Designing the Protocol
❘ 271
Contributing Extensions
If you develop an interesting extension that you think might be useful to the community at large,
you should consider submitting it to the XSF and participating in the standardization process. The
XSF welcomes new and interesting ideas from both within and outside the XMPP community.
Submitting a proposal is very easy. A document template for XEPs is provided at http://xmpp.org/
extensions/submit.shtml, which you can modify to describe your extension. The entire process
of standardization is described in XEP-0001, XMPP Extension Protocols, and a set of guidelines to
help you is provided by Guidelines for Authors of XMPP Extension Proposals in XEP-0143.
Once submitted, you send your proposal to the XMPP extensions editor, and the proposal will be
placed in the XEP inbox. The XSF elects a group of members every year to form the XMPP Council,
and this council votes on whether to accept new proposals or modify existing ones.
The XMPP Council and the XMPP extensions editor are very friendly, and they will be more than
happy to help you with your proposal by providing feedback and answering any questions you may have.
Another way to participate is to join one of the many discussion lists run by the XSF. You can find these
lists at http://xmpp.org/about/discuss.shtml. The standards@xmpp.org list is where most proto‑
col discussions happen. List members propose new ideas, point out errors or missing functionality in
existing protocols, and ask and answer protocol-related questions. Lists also exist for a variety of spe‑
cialized topics, and there is even a list for real-time web services, ws-xmpp@xmpp.org.
You can also apply for XSF membership. The XSF holds membership elections every quarter, and
the XSF membership elects the XSF Council, the board of directors, and new members; they also
vote on changes to the organization’s structure and rules.
For the past several years, the XSF has had two summits every year — one in the U.S. and one in
Europe. These summits are open to everyone, and many of the most prolific community members
often attend as well as developers from a variety of companies. You can find more information at
http://xmpp.org/summit/.
Designing the Protocol
The NetPad protocol is a combination of other XMPP protocols plus a new set of elements specific
to the application. These new elements will belong to a special namespace, http://metajack.im/
ns/netpad. First, support for the NetPad protocol is discoverable using standard Service Discovery
queries. Then, users establish sessions by include new elements within directed presence stanzas.
Finally, commands to start and stop the session along with the editing operations themselves travel
inside normal <message> stanzas.
The actual application specific bits are sparing, and they are layered within fairly standard pieces
of existing XMPP protocols. This type of protocol construction is typical and demonstrates why so
many developers are able to build amazing things with such little effort.
40718c10.indd 271
11/30/09 9:08:28 PM
272
❘
Chapter 10 Writing with Friends: A Collaborative Text Editor
Testing for Support
A client can signal support for the NetPad protocol by responding appropriately to service discovery
requests. The client must watch for disco#info queries and return a <feature> element containing a
var attribute of http://metajack.im/ns/netpad.
Here is an example response from a client claiming to support the NetPad protocol:
<iq to=’darcy@pemberley.lit/library’
from=’bingley@netherfield.lit/drawing_room’
type=’result’
id=’netpad1’>
<query xmlns=’http://jabber.org/protocol/disco#info’>
<identity category=’client’
type=’pc’
name=’NetPad’/>
<feature var=’http://jabber.org/protocol/disco#info’/>
<feature var=’http://metajack.im/ns/netpad’/>
</query>
</iq>
Once the application knows that the remote party supports the NetPad protocol, it can start to interact
with them using the protocol.
Requesting and Controlling Sessions
Once an editing session is established, the hosting user will want to be notified if the other party
leaves. Directed presence is well suited to provide a base protocol for this situation. The remote user
can send directed presence along with a new NetPad protocol element requesting an editing session.
This new element is called <collaborate>, and here is an example of a request for an editing
session:
<presence to=’bingley@netherfield.lit/drawing_room’
from=’darcy@pemberley.lit/library’>
<collaborate xmlns=’http://metajack.im/ns/netpad’/>
</presence>
Bingley receives not only the request for collaboration, but he will also receive notification if Darcy
goes offline, implicitly ending any session.
It’s possible that Bingley is already in a session with another user, so an appropriate error must be
returned in this case. XMPP stanza errors may contain application specific error conditions, so you
can create the <already-collaborating> condition for this situation. Here’s an example error
response from Bingley:
<presence to=’darcy@pemberley.lit/library’
from=’bingley@netherfield.lit/drawing_room’
type=’error’>
<collaborate xmlns=’http://metajack.im/ns/netpad’/>
<error type=’wait’>
<recipient-unavailable xmlns=’urn:ietf:params:xml:ns:xmpp-stanzas’/>
40718c10.indd 272
11/30/09 9:08:28 PM
Designing the Protocol
❘ 273
<already-collaborating xmlns=’http://metajack.im/ns/netpad’/>
</error>
</presence>
This error’s general condition is <recipient-unavailable>, which is the most appropriate choice
for the situation. The type of the error is wait, signaling that retrying in the future may prove suc‑
cessful. The original contents of the failed request are also included.
Alternatively, if the session request is successful, Bingley should send an acknowledgement to Darcy.
Also, Bingley may have already started working on his document; Darcy must be sent the current
text so that Bingley’s future editing commands will make sense.
You can use a <message> stanza to respond to the session request and include the contents of the
document along with it. A new element is needed to signal that this <message> stanza is part of the
NetPad protocol and to hold the document’s contents. Since this is the official start of the editing
session, it seems reasonable to call this element <start>. The following example shows Bingley’s
response to Darcy’s session request:
<message to=’darcy@pemberley.lit/library’
from=’bingley@netherfield.lit/drawing_room’
type=’chat’>
<start xmlns=’http://metajack.im/ns/netpad’>
Dearest Jane
</start>
</message>
Darcy receives the <start> acknowledgement along with what appears to be the beginnings of a let‑
ter to Jane. If Bingley had not yet written anything, the <start> element would be empty.
Darcy can terminate the editing session at anytime by sending unavailable presence or going offline,
but Bingley also needs the ability to stop the session. You can add a <stop> element to a <message>
stanza to accomplish this, and this is shown in the following example:
<message to=’darcy@pemberley.lit/library’
from=’bingley@netherfield.lit/drawing_room’
type=’chat’>
<stop xmlns=’http://metajack.im/ns/netpad’/>
</message>
Now both parties can terminate a session.
Editing Operations
Once a session is underway, the parties need to send editing operations to each other. These can
easily be carried by new elements inside <message> stanzas. The new element is called <op>, and it
must carry the name of the operation and its parameters. Also, operation requests must include the
state vector and the operation’s priorty.
Because the name, position, and character attributes of an operation are single values, they are
placed in the attributes of an <op> element. The state vector and priority value are lists of numbers,
so each of these is encoded as a container of child elements holding the individual cell values. State
40718c10.indd 273
11/30/09 9:08:28 PM
274
❘
Chapter 10 Writing with Friends: A Collaborative Text Editor
vectors are encoded in <state> elements, priorities in <priority> elements. Each cell value appears
in a <cell> element. This is very similar to the encoding process that Chapter 9’s SketchPad appli‑
cation used, except that instead of using a form, a custom protocol is employed.
The following stanzas show operations in action:
<message to=’bingley@netherfield.lit/drawing_room’
from=’darcy@pemberley.lit/library’
type=’chat’>
<op name=’insert’ pos=’12’ char=’,’ xmlns=’http://metajack.im/ns/netpad’>
<state>
<cell>0</cell>
<cell>0</cell>
</state>
<priority>
<cell>1</cell>
</priority>
</op>
</message>
<message to=’darcy@pemberley.lit/library’
from=’bingley@netherfield.lit/drawing_room’
type=’chat’>
<op name=’delete’ pos=’4’ xmlns=’http://metajack.im/ns/netpad’>
<state>
<cell>0</cell>
<cell>1</cell>
</state>
<priority>
<cell>0</cell>
</priority>
</op>
</message>
Darcy has added a comma, and Bingley has started to delete the “est” from “Dearest”.
These are all the pieces necessary for the NetPad protocol. By layering the protocol on top of existing
primitives, the new elements remain simple but accomplish much. You see shortly that this protocol is
not just easy to understand; it is also easy to implement.
Building the Editor
With the fundamentals of operational transformation and XMPP protocol extensions in hand, you
can start building the NetPad collaborative editor. You build the editor in three stages. First, you
must determine feature support and set up the editing session between the users. Next, you add chat
capabilities between the two users. Finally, you enable both users to collaborate on a single docu‑
ment in the editing window.
The Initial Skeleton
Before you start writing code, NetPad needs a user interface, some styling, and the initial skeleton
of the code. These are all similar to the other applications you’ve seen in previous chapters.
40718c10.indd 274
11/30/09 9:08:28 PM
Building the Editor
❘ 275
The basic layout of the application appears in Listing 10-2. Aside from the familiar header and
login dialog box, the application consists of a status area, a Disconnect button, an editing area,
and a chat area.
Listing 10-2: netpad.html
<!DOCTYPE HTML PUBLIC “-//W3C//DTD HTML 4.01//EN”
“http://www.w3.org/TR/html4/strict.dtd”>
<html>
<head>
<title>NetPad - Chapter 10</title>
<link rel=’stylesheet’ href=’http://ajax.googleapis.com/ajax/libs/jqueryu
i/1.7.2/themes/cupertino/jquery-ui.css’>
<script src=’http://ajax.googleapis.com/ajax/libs/jquery/1.3.2/jquery.js’>
</script>
<script src=’http://ajax.googleapis.com/ajax/libs/jqueryui/1.7.2/jquery-u
i.js’></script>
<script src=’scripts/strophe.js’></script>
<script src=’flxhr/flXHR.js’></script>
<script src=’scripts/strophe.flxhr.js’></script>
<link rel=’stylesheet’ href=’netpad.css’>
<script src=’optrans.js’></script>
<script src=’netpad.js’></script>
</head>
<body>
<h1>NetPad</h1>
<div id=’status’ class=’no-collab’>
Not collaborating.
</div>
<input id=’disconnect’ type=’button’ value=’disconnect’
disabled=’disabled’>
<div class=’clear’></div>
<textarea id=’pad’ disabled=’disabled’></textarea>
<div id=’chat-area’>
<div id=’chat’></div>
<input id=’input’ type=’text’ disabled=’disabled’>
</div>
<!-- login dialog -->
<div id=’login_dialog’ class=’hidden’>
<label>JID:</label><input type=’text’ id=’jid’>
<label>Password:</label><input type=’password’ id=’password’>
<label>Collaborator:</label><input type=’collaborator’ id=’collaborator’>
</div>
</body>
</html>
40718c10.indd 275
11/30/09 9:08:29 PM
276
❘
Chapter 10 Writing with Friends: A Collaborative Text Editor
The login dialog box contains a field called Collaborator. If this field is left blank, NetPad will start
a session with no collaborator, and it will allow another user to join the editing session. If a collabo‑
rator is given, it will attempt to join an editing session with the given user.
The optrans.js file is included, because it will be needed later when the operational transformation
library you created is used to power the editing features.
Listing 10-3 contains the CSS for the NetPad application and does nothing out of the ordinary.
Listing 10-3: netpad.css
body {
font-family: Helvetica;
}
h1 {
text-align: center;
}
.hidden {
display: none;
}
.clear {
clear: both;
}
#pad {
width: 500px;
height: 300px;
}
#disconnect {
margin: 5px 5px 5px 50px;
}
#status {
padding: 5px 15px 5px 15px;
float: left;
}
.no-collab {
background-color: #fcc;
}
.try-collab {
background-color: #ccf;
}
.collab {
background-color: #cfc;
}
40718c10.indd 276
11/30/09 9:08:29 PM
Building the Editor
❘ 277
The initial JavaScript skeleton appears in Listing 10-4. By now this initial connection code should be
quite familiar. The only difference from previous chapters’ applications is the extra collaborator field.
Listing 10-4: netpad.js (skeleton)
var NetPad = {
connection: null,
collaborator: null
};
$(document).ready(function () {
$(‘#login_dialog’).dialog({
autoOpen: true,
draggable: false,
modal: true,
title: ‘Connect to XMPP’,
buttons: {
“Connect”: function () {
$(document).trigger(‘connect’, {
jid: $(‘#jid’).val(),
password: $(‘#password’).val(),
collaborator: $(‘#collaborator’).val()
});
$(‘#password’).val(‘’);
$(this).dialog(‘close’);
}
}
});
$(document).bind(‘connect’, function (ev, data) {
var conn = new Strophe.Connection(
“http://bosh.metajack.im:5280/xmpp-httpbind”);
conn.connect(data.jid, data.password, function (status) {
if (status === Strophe.Status.CONNECTED) {
$(document).trigger(‘connected’);
} else if (status === Strophe.Status.DISCONNECTED) {
$(document).trigger(‘disconnected’);
}
});
NetPad.connection = conn;
NetPad.collaborator = data.collaborator || null;
});
$(document).bind(‘connected’, function () {
// nothing here yet
});
$(document).bind(‘disconnected’, function () {
// nothing here yet
});
40718c10.indd 277
11/30/09 9:08:29 PM
278
❘
Chapter 10 Writing with Friends: A Collaborative Text Editor
Starting Editing Sessions
Once a user clicks the Connect button, either they will wait for someone to start an editing session
with them, or they will attempt to start an editing session with a remote user. Because not every user
will be running NetPad, or a NetPad-compatible editor, you must first test for support for collabora‑
tive editing. If support is available, you then initiate an editing session.
The NetPad protocol you developed earlier in this chapter includes some basic session establishment
support. It’s important to know when a collaborator comes and goes, and so the session establish‑
ment is done with directed presence, just like joining and leaving multi-user chat rooms.
Determining Feature Support
Feature support is signaled by responding with the NetPad namespace when replying to a disco#info
query. You’ll need to add a namespace constant to the NetPad application to keep track of this
namespace.
In addition to this, you also need to know whether the application is running as the master editor.
Though the master editor has no special power among the collaborators, the master editor serves as
the contact point for the session. If the user starts NetPad with no collaborator given, the applica‑
tion becomes a master editor and waits for collaborators.
Add the following attributes to your NetPad object:
NS_NETPAD: ‘http://metajack.im/ns/netpad’,
master: null
code snippet netpad.js
When a collaborator is specified, NetPad must send a service discovery request to the collaborator to
determine if their client supports the NetPad protocol. When running as the master editor, NetPad
must listen for these requests and respond with the correct feature to confirm it supports the proto‑
col. You can modify the connected event handler to add this functionality:
$(document).bind(‘connected’, function () {
if (NetPad.collaborator) {
NetPad.master = false;
$(‘#status’)
.text(‘Checking feature support for ‘ + NetPad.collaborator + ‘.’)
.attr(‘class’, ‘try-collab’);
// check for feature support
NetPad.connection.sendIQ(
$iq({to: NetPad.collaborator, type: ‘get’})
.c(‘query’, {xmlns: Strophe.NS.DISCO_INFO}),
function (iq) {
var f = $(iq).find(
‘feature[var=”‘ + NetPad.NS_NETPAD + ‘“]’);
if (f.length > 0) {
$(‘#status’)
40718c10.indd 278
11/30/09 9:08:29 PM
Building the Editor
❘ 279
.text(‘Establishing session with ‘ +
NetPad.collaborator + ‘.’)
.attr(‘class’, ‘try-collab’);
// request editing session
} else {
$(‘#status’)
.text(‘Collaboration not supported with ‘ +
NetPad.collaborator + ‘.’)
.attr(‘class’, ‘no-collab’);
NetPad.connection.disconnect();
}
});
} else {
NetPad.master = true;
// handle incoming discovery requests
NetPad.connection.addHandler(NetPad.on_disco_info,
Strophe.NS.DISCO_INFO, “iq”, “get”);
}
});
code snippet netpad.js
The connected event handler checks if the collaborator has been specified, and if not, it sets the
master attribute to false. It updates the status area to inform the user of what is happening, and
then it sends the service discovery request to the collaborator.
Once the collaborator has answered the service discovery request, NetPad checks whether the
response contains the desired feature. If the feature is supported, the status area is updated, and an
editing session is requested. If the feature is unsupported, the status area displays an appropriate
message and the connection is terminated.
If the collaborator is specified, master is set to true, and a handler for service discovery requests is
added. You need to implement this handler, on_disco_info(). The following code should be added
to the NetPad object:
on_disco_info: function (iq) {
NetPad.connection.sendIQ(
$iq({to: $(iq).attr(‘from’),
id: $(iq).attr(‘id’),
type: “result”})
.c(‘query’, {xmlns: Strophe.NS.DISCO_INFO})
.c(‘identity’, {category: ‘client’,
type: ‘pc’}).up()
.c(‘feature’, {‘var’: NetPad.NS_NETPAD}));
return true;
}
code snippet netpad.js
40718c10.indd 279
11/30/09 9:08:29 PM
280
❘
Chapter 10 Writing with Friends: A Collaborative Text Editor
The handler sends an IQ-result with the appropriate <identity> and <feature> elements. NetPad
identifies itself as a chat client with NetPad protocol support. Note that the response’s id attribute
must match the original request’s id attribute.
If you run NetPad now, you should be able to see the feature negotiation in action. Try collaborating
both with another NetPad user and also a regular XMPP user, and watch the different behavior.
Unfortunately, there is no way to disconnect yet, so you should wire up the Disconnect button.
First, modify the disconnected event handler to reset the application:
$(document).bind(‘disconnected’, function () {
NetPad.connection = null;
NetPad.collaborator = null;
$(‘#login_dialog’).dialog(‘open’);
});
code snippet netpad.js
Next, enable the Disconnect button once the connection has been established. Add the following
line as the first line of the connected event handler:
$(‘#disconnect’).removeAttr(‘disabled’);
code snippet netpad.js
Finally, add the click event handler for the button. The following code should be added to the
document ready handler:
$(‘#disconnect’).click(function () {
$(‘#disconnect’).attr(‘disabled’, ‘disabled’);
NetPad.connection.disconnect();
});
code snippet netpad.js
Now the application will behave as the user expects.
Establishing NetPad Sessions
Once NetPad has determined a collaborator supports the protocol, it can request an editing ses‑
sion. In the NetPad protocol you designed, this is done with directed presence containing a special
<collaborate> element.
After the directed presence is sent to request an editing session, the master editor responds with a special
message containing the <start> element to begin the session or with an <already-collaborating>
error. The master editor can also send a session stop message using the <stop> element when it termi‑
nates the session. If the other user terminates their connection, the master editor needs to stop the
collaboration; it handles this by watching for the unavailable presence.
40718c10.indd 280
11/30/09 9:08:29 PM
Building the Editor
❘ 281
First, you’ll modify the connected event handler to add a handler for the session request. At the
same time, the master editor can start manipulating text, so the edit area will need to be enabled.
The highlighted code that follows are the new additions to the connected event handler:
} else {
NetPad.master = true;
$(‘#pad’).removeAttr(‘disabled’);
// handle incoming discovery and collaboration requests
NetPad.connection.addHandler(NetPad.on_disco_info,
Strophe.NS.DISCO_INFO, “iq”, “get”);
NetPad.connection.addHandler(NetPad.on_collaborate,
NetPad.NS_NETPAD, “presence”);
}
code snippet netpad.js
Now add the following on_collaborate() function to the NetPad object:
on_collaborate: function (presence) {
var from = $(presence).attr(‘from’);
if (NetPad.collaborator) {
// we already have a collaborator
NetPad.connection.send(
$pres({to: from, type: ‘error’})
.c(‘error’, {type: ‘wait’})
.c(‘recipient-unavailable’, {xmlns: Strophe.NS.STANZAS})
.up()
.c(‘already-collaborating’, {xmlns: NetPad.NS_NETPAD}));
} else {
NetPad.collaborator = from;
NetPad.start_collaboration(true);
}
return true;
}
code snippet netpad.js
The on_collaborate() handler checks that there is not already a session in progress. If an existing
session is found, it returns an appropriate error <presence> stanza, like the one shown in the pro‑
tocol design examples. Otherwise, the collaborator is set and start_collaboration() is called to
begin the session.
The start_collaboration() function follows, and, as discussed earlier, it sends the session start
message to the collaborator to inform them the request was successful:
start_collaboration: function () {
$(‘#status’)
.text(‘Collaborating with ‘ + NetPad.collaborator + ‘.’)
40718c10.indd 281
11/30/09 9:08:29 PM
282
❘
Chapter 10 Writing with Friends: A Collaborative Text Editor
.attr(‘class’, ‘collab’);
if (NetPad.master) {
// set up and send initial collaboration state
NetPad.connection.send(
$msg({to: NetPad.collaborator, type: ‘chat’})
.c(‘start’, {xmlns: NetPad.NS_NETPAD}));
} else {
$(‘#pad’).removeAttr(‘disabled’);
}
}
code snippet netpad.js
The status text is updated to reflect the new editing session. The master editor sends a <message>
stanza with a <start> child under the NetPad namespace to acknowledge that a session has begun.
Because both parties will call this function, it is necessary to send the message only for the master
editor. When the other participant calls this function, it will just enable their editing area.
The collaborating user will need to handle this message in order to begin the session as well. Modify
the connected event handler by adding the following highlighted line:
$(document).bind(‘connected’, function () {
$(‘#disconnect’).removeAttr(‘disabled’);
NetPad.connection.addHandler(NetPad.on_message, null, “message”);
if (NetPad.collaborator) {
NetPad.master = false;
code snippet netpad.js
You’ll also need to add the following on_message() function to the NetPad object:
on_message: function (message) {
var from = $(message).attr(‘from’);
if (NetPad.collaborator === from) {
var collab = $(message)
.find(‘*[xmlns=”‘ + NetPad.NS_NETPAD + ‘“]’);
if (collab.length > 0) {
if (NetPad.master) {
// handle state changes
} else {
var command = collab[0].tagName;
if (command === “start”) {
NetPad.start_collaboration();
} else if (command === “stop”) {
NetPad.stop_collaboration();
} else {
// handle state changes
}
}
40718c10.indd 282
11/30/09 9:08:29 PM
Building the Editor
❘ 283
}
}
return true;
}
code snippet netpad.js
The on_message() handler watches for elements under the NetPad namespace. Three possible
elements may arrive — the <start> element, signaling the beginning of the session, the <stop>
element, signaling the termination of the session by the master editor, and the actual editing opera‑
tions, which you implement later.
When the master editor’s client disconnects, it first notifies the other participant that the session is
ended by sending the stop message. Make the highlighted modifications to the Disconnect button’s
click handler:
$(‘#disconnect’).click(function () {
if (NetPad.collaborator) {
NetPad.stop_collaboration(true);
}
$(‘#disconnect’).attr(‘disabled’, ‘disabled’);
NetPad.connection.disconnect();
});
code snippet netpad.js
The argument to stop_collaboration() controls whether a stop message is sent to the collabora‑
tor. The master editor must send this when the end of the session is initiated, but the rest of the time
no notification is needed.
Add the following stop_collaboration() function to the NetPad object:
stop_collaboration: function (notify) {
$(‘#status’)
.text(‘Not collaborating.’)
.attr(‘class’, ‘no-collab’);
if (notify) {
NetPad.connection.send(
$msg({to: NetPad.collaborator, type: ‘chat’})
.c(‘stop’, {xmlns: NetPad.NS_NETPAD}));
}
}
code snippet netpad.js
This function simply updates the status area, and if notify is set, sends the stop message to the
collaborator.
40718c10.indd 283
11/30/09 9:08:30 PM
284
❘
Chapter 10 Writing with Friends: A Collaborative Text Editor
The master editor can now end a session, but it doesn’t yet detect when the other participant dis‑
connects. Because the other participant sent directed presence, the master editor can watch for
unavailable <presence> stanzas. You can add a handler for these stanzas by making the following
modifications to the connected event handler:
} else {
NetPad.master = true;
$(‘#pad’).removeAttr(‘disabled’);
// handle incoming discovery and collaboration requests
NetPad.connection.addHandler(NetPad.on_disco_info,
Strophe.NS.DISCO_INFO, “iq”, “get”);
NetPad.connection.addHandler(NetPad.on_collaborate,
NetPad.NS_NETPAD, “presence”);
NetPad.connection.addHandler(NetPad.on_unavailable,
null, “presence”, “unavailable”);
}
code snippet netpad.js
Now add the following on_unavailable() handler to the NetPad object:
on_unavailable: function (presence) {
var from = $(presence).attr(‘from’);
if (from === NetPad.collaborator) {
NetPad.stop_collaboration();
}
return true;
}
code snippet netpad.js
This handler just calls stop_collaboration() when the other participant leaves. Because the other
participant is disconnected, there is no reason to send a notification that the session is over.
If you test NetPad at this point, you should see the collaborative editing session start and end as one
or the other party joins and disconnects. Now that sessions can be started and stopped, you just
need to send and process editing commands to have a functional editor. Before that though, there is
another handy feature you should add.
Chatting About Work
An important part of every collaborative process is communication. Two people working together
on a document will have much to discuss, and it is up to you to give NetPad’s users the ability to
chat with each other.
40718c10.indd 284
11/30/09 9:08:30 PM
Building the Editor
❘ 285
You’ve already built several types of chat functionality, and NetPad’s chat is actually simpler than
your previous private chat client, Gab, from Chapter 6. You see shortly how easy it is to add an
important feature by leveraging the stock tools of XMPP.
The input box starts disabled, so you need to enable it when the session is started and disable it once
the session is over. The following highlighted modifications must be made to start_collaboration() and stop_collaboration():
start_collaboration: function () {
$(‘#status’)
.text(‘Collaborating with ‘ + NetPad.collaborator + ‘.’)
.attr(‘class’, ‘collab’);
$(‘#input’).removeAttr(‘disabled’);
if (NetPad.master) {
// set up and send initial collaboration state
NetPad.connection.send(
$msg({to: NetPad.collaborator, type: ‘chat’})
.c(‘start’, {xmlns: NetPad.NS_NETPAD}));
} else {
$(‘#pad’).removeAttr(‘disabled’);
}
},
stop_collaboration: function (notify) {
$(‘#status’)
.text(‘Not collaborating.’)
.attr(‘class’, ‘no-collab’);
$(‘#input’).attr(‘disabled’, ‘disabled’);
if (notify) {
NetPad.connection.send(
$msg({to: NetPad.collaborator, type: ‘chat’})
.c(‘stop’, {xmlns: NetPad.NS_NETPAD}));
}
}
code snippet netpad.js
Next, you wire up the input box to send messages when the user presses the Enter key. Add the fol‑
lowing keypress event handler to the document ready handler:
$(‘#input’).keypress(function (ev) {
if (ev.which === 13) {
ev.preventDefault();
var body = $(this).val();
$(‘#chat’).append(“<div class=’message’>” +
“<<span class=’nick self’>” +
Strophe.getBareJidFromJid(
NetPad.connection.jid) +
40718c10.indd 285
11/30/09 9:08:30 PM
286
❘
Chapter 10 Writing with Friends: A Collaborative Text Editor
“</span>> “ +
“<span class=’message’>” +
body +
“</span>” +
“</div>”);
NetPad.scroll_chat();
NetPad.connection.send(
$msg({to: NetPad.collaborator, type: ‘chat’})
.c(‘body’).t(body));
$(this).val(‘’);
}
});
code snippet netpad.js
The function formats the chat text and adds it to the chat area, and then it sends a <message> stanza
to the collaborator. Once the message is sent, the function clears the input box, preparing it for the
next message.
The chat area must be scrolled once content is added so that the new messages appear correctly. Add
the following scroll_chat() function to the NetPad object to do this:
scroll_chat: function () {
var chat = $(‘#chat’).get(0);
chat.scrollTop = chat.scrollHeight;
}
code snippet netpad.js
Finally, NetPad must watch for incoming messages and display them. Modify the on_message()
function to match the one shown here:
on_message: function (message) {
var from = $(message).attr(‘from’);
if (NetPad.collaborator === from) {
var collab = $(message)
.find(‘*[xmlns=”‘ + NetPad.NS_NETPAD + ‘“]’);
if (collab.length > 0) {
if (NetPad.master) {
// handle state changes
} else {
var command = collab[0].tagName;
if (command === “start”) {
NetPad.start_collaboration();
} else if (command === “stop”) {
NetPad.stop_collaboration();
} else {
// handle state changes
}
40718c10.indd 286
11/30/09 9:08:30 PM
Building the Editor
❘ 287
}
} else {
// add regular message to the chat
var body = $(message).find(‘body’).text();
$(‘#chat’).append(“<div class=’message’>” +
“<<span class=’nick’>” +
Strophe.getBareJidFromJid(from) +
“</span>> “ +
“<span class=’message’>” +
body +
“</span>” +
“</div>”);
NetPad.scroll_chat();
}
}
return true;
}
code snippet netpad.js
With just those few changes, NetPad now supports chat between the collaborators.
Making Edits
You have only one task left — to add the primary feature of collaborative editing. Much of the work
has already been done by creating the OpTrans object, but there is still a little bit of glue needed to
stick everything together.
To finish everything off, you’ll need to initialize the OpTrans object, generate and broadcast local
operations, receive and process remote operations, and keep the editing area updated with the latest
changes.
Initializing OpTrans
OpTrans’s init() method needs to be invoked by all participants at the start of a session. You can
do this easily by modifying the start_collaboration() function:
start_collaboration: function () {
$(‘#status’)
.text(‘Collaborating with ‘ + NetPad.collaborator + ‘.’)
.attr(‘class’, ‘collab’);
$(‘#input’).removeAttr(‘disabled’);
var buffer = $(‘#pad’).val();
OpTrans.init([NetPad.connection.jid, NetPad.collaborator],
buffer,
NetPad.update_pad);
if (NetPad.master) {
// set up and send initial collaboration state
40718c10.indd 287
11/30/09 9:08:30 PM
288
❘
Chapter 10 Writing with Friends: A Collaborative Text Editor
var msg = $msg({to: NetPad.collaborator, type: ‘chat’})
.c(‘start’, {xmlns: NetPad.NS_NETPAD});
if (buffer) {
msg.t(buffer);
}
NetPad.connection.send(msg);
} else {
$(‘#pad’).removeAttr(‘disabled’);
}
}
code snippet netpad.js
The initial contents of the editing area and the relevant JIDs are passed into init(). The start mes‑
sage is also modified to include any text that the master editor created before the session began.
The on_message() handler, which processes the start message, must also be modified to deal with
this initial data. Make the highlighted modifications to on_message():
if (command === “start”) {
$(‘#pad’).val(collab.text());
NetPad.start_collaboration();
} else if (command === “stop”) {
NetPad.stop_collaboration();
} else {
code snippet netpad.js
The start_collaboration() function also passes the update_pad() function to OpTrans.init(),
which will be called whenever buffer modifications occur due to editing operations. Add the follow‑
ing implementation of update_pad() to the NetPad object:
update_pad: function (buffer, remote) {
var old_pos = $(‘#pad’)[0].selectionStart;
var old_buffer = $(‘#pad’).val();
$(‘#pad’).val(buffer);
if (buffer.length > old_buffer.length && !remote) {
old_pos += 1;
}
$(‘#pad’)[0].selectionStart = old_pos;
$(‘#pad’)[0].selectionEnd = old_pos;
}
code snippet netpad.js
Most of the code in update_pad() handles saving and restoring the cursor position so that it stays
in the same place during an update. Otherwise, the cursor would jump to the end of the buffer after
40718c10.indd 288
11/30/09 9:08:30 PM
Building the Editor
❘ 289
every edit. Unfortunately, IE 6 does not support the selectionStart and selectionEnd properties,
so this code will not work there. It should work fine in later versions of IE and in other browsers.
Local and Remote Operations
The next step is to generate and broadcast local editing events. While the user is in the editing area,
certain key presses will cause the contents of the buffer to change. These keys include normal alpha‑
numeric keys, the Delete and Backspace keys, as well as the shortcuts for copy and paste. It is a lot
of work to handle the full range of possibilities, so for the sake of simplicity, NetPad will be limited
to the most basic operations and will disallow the others.
The following keypress event handler processes local editing events. After it determines which
event is intended, it calls the send_op() function to update the OpTrans object and broadcast the
operation to the other user. Add this code to the document ready handler:
$(‘#pad’).keypress(function (ev) {
if (NetPad.collaborator) {
var idx = this.selectionStart;
var handled = true;
if (ev.which === 8) {
this.selectionStart = idx - 1;
this.selectionEnd = idx - 1;
NetPad.send_op(‘delete’, idx - 1);
} else if (ev.which === 46) {
NetPad.send_op(‘delete’, idx);
} else if ((ev.which >= 32 && ev.which <= 127) ||
ev.which >= 256) {
NetPad.send_op(‘insert’, idx, String.fromCharCode(ev.which));
}
ev.preventDefault();
}
});
code snippet netpad.js
The key codes 8 and 46 are for the Backspace and Delete keys, respectively. The range of key codes
in the last case handle the normal printable ASCII character set as well as the printable non-ASCII
characters. The handler passes the send_op() function the operation, the index at which the opera‑
tion occurred, and, for an insert operation, the character that was inserted. Any characters not
explicitly handled here will be ignored because the default behaviors are switched off with the call
to preventDefault().
The send_op() function takes a local operation, encodes it into the NetPad protocol XML format
you designed previously, and sends it to the collaborator. Its counterpart, process_op(), handles
decoding the NetPad protocol stanza and passing the operation request to OpTrans’s do_remote()
function. Add the following two functions to the NetPad object:
send_op: function (op, pos, chr) {
var req = OpTrans.do_local(op, pos, chr);
var op_attrs = {xmlns: NetPad.NS_NETPAD,
name: op,
40718c10.indd 289
11/30/09 9:08:30 PM
290
❘
Chapter 10 Writing with Friends: A Collaborative Text Editor
pos: pos};
if (chr) {
op_attrs[‘char’] = chr;
}
var msg = $msg({to: NetPad.collaborator, type: ‘chat’})
.c(‘op’, op_attrs)
.c(‘state’);
var i;
for (i = 0; i < req[1].length; i++) {
msg.c(‘cell’).t(‘’ + req[1][i]).up();
}
msg.up().c(‘priority’);
for (i = 0; i < req[3].length; i++) {
msg.c(‘cell’).t(‘’ + req[3][i]).up();
}
NetPad.connection.send(msg);
},
process_op: function (op) {
var name = op.attr(‘name’);
var pos = parseInt(op.attr(‘pos’), 10);
var chr = op.attr(‘char’);
var pri = [];
var state = [];
op.find(‘state > cell’).each(function () {
state.push(parseInt($(this).text(), 10));
});
op.find(‘priority > cell’).each(function () {
priority.push(parseInt($(this).text(), 10));
});
OpTrans.do_remote(NetPad.collaborator,
state,
name, pos, chr,
pri);
}
code snippet netpad.js
The last step is to call process_op() whenever remote operations are received. Because they arrive
in <message> stanzas, you can modify the on_message() handler by adding the following high‑
lighted lines:
if (collab.length > 0) {
if (NetPad.master) {
NetPad.process_op(collab);
} else {
40718c10.indd 290
11/30/09 9:08:31 PM
Building the Editor
❘ 291
var command = collab[0].tagName;
if (command === “start”) {
$(‘#pad’).val(collab.text());
NetPad.start_collaboration();
} else if (command === “stop”) {
NetPad.stop_collaboration();
} else {
console.log(“got remote op”);
NetPad.process_op(collab);
}
}
} else {
code snippet netpad.js
NetPad can now send and receive editing operations, process them with the OpTrans object, and
update the buffer contents to reflect both local and remote changes. Give it a try with a friend or
by running multiple copies of the application yourself. At the end of every editing session, you will
notice that both users have the same resulting text.
The final version of netpad.js appears in Listing 10-5.
Listing 10-5: netpad.js (final)
var NetPad = {
connection: null,
collaborator: null,
NS_NETPAD: ‘http://metajack.im/ns/netpad’,
master: null,
on_disco_info: function (iq) {
NetPad.connection.sendIQ(
$iq({to: $(iq).attr(‘from’),
id: $(iq).attr(‘id’),
type: “result”})
.c(‘query’, {xmlns: Strophe.NS.DISCO_INFO})
.c(‘identity’, {category: ‘client’,
type: ‘pc’}).up()
.c(‘feature’, {‘var’: NetPad.NS_NETPAD}));
return true;
},
on_collaborate: function (presence) {
var from = $(presence).attr(‘from’);
if (NetPad.collaborator) {
// we already have a collaborator
NetPad.connection.send(
$pres({to: from, type: ‘error’})
.c(‘error’, {type: ‘wait’})
.c(‘recipient-unavailable’, {xmlns: Strophe.NS.STANZAS})
40718c10.indd 291
continues
11/30/09 9:08:31 PM
292
❘
Chapter 10 Writing with Friends: A Collaborative Text Editor
Listing 10-5 (continued)
.up()
.c(‘already-collaborating’, {xmlns: NetPad.NS_NETPAD}));
} else {
NetPad.collaborator = from;
NetPad.start_collaboration(true);
}
return true;
},
start_collaboration: function () {
$(‘#status’)
.text(‘Collaborating with ‘ + NetPad.collaborator + ‘.’)
.attr(‘class’, ‘collab’);
$(‘#input’).removeAttr(‘disabled’);
var buffer = $(‘#pad’).val();
OpTrans.init([NetPad.connection.jid, NetPad.collaborator],
buffer,
NetPad.update_pad);
if (NetPad.master) {
// set up and send initial collaboration state
var msg = $msg({to: NetPad.collaborator, type: ‘chat’})
.c(‘start’, {xmlns: NetPad.NS_NETPAD});
if (buffer) {
msg.t(buffer);
}
NetPad.connection.send(msg);
} else {
$(‘#pad’).removeAttr(‘disabled’);
}
},
on_message: function (message) {
var from = $(message).attr(‘from’);
if (NetPad.collaborator === from) {
var collab = $(message)
.find(‘*[xmlns=”‘ + NetPad.NS_NETPAD + ‘“]’);
if (collab.length > 0) {
if (NetPad.master) {
NetPad.process_op(collab);
} else {
var command = collab[0].tagName;
if (command === “start”) {
$(‘#pad’).val(collab.text());
NetPad.start_collaboration();
} else if (command === “stop”) {
40718c10.indd 292
11/30/09 9:08:31 PM
Building the Editor
❘ 293
NetPad.stop_collaboration();
} else {
NetPad.process_op(collab);
}
}
} else {
// add regular message to the chat
var body = $(message).find(‘body’).text();
$(‘#chat’).append(“<div class=’message’>” +
“<<span class=’nick’>” +
Strophe.getBareJidFromJid(from) +
“</span>> “ +
“<span class=’message’>” +
body +
“</span>” +
“</div>”);
NetPad.scroll_chat();
}
}
return true;
},
stop_collaboration: function (notify) {
$(‘#status’)
.text(‘Not collaborating.’)
.attr(‘class’, ‘no-collab’);
$(‘#input’).attr(‘disabled’, ‘disabled’);
if (notify) {
NetPad.connection.send(
$msg({to: NetPad.collaborator, type: ‘chat’})
.c(‘stop’, {xmlns: NetPad.NS_NETPAD}));
}
},
on_unavailable: function (presence) {
var from = $(presence).attr(‘from’);
if (from === NetPad.collaborator) {
NetPad.stop_collaboration();
}
return true;
},
scroll_chat: function () {
var chat = $(‘#chat’).get(0);
chat.scrollTop = chat.scrollHeight;
},
update_pad: function (buffer, remote) {
var old_pos = $(‘#pad’)[0].selectionStart;
40718c10.indd 293
continues
11/30/09 9:08:31 PM
294
❘
Chapter 10 Writing with Friends: A Collaborative Text Editor
Listing 10-5 (continued)
var old_buffer = $(‘#pad’).val();
$(‘#pad’).val(buffer);
if (buffer.length > old_buffer.length && !remote) {
old_pos += 1;
}
$(‘#pad’)[0].selectionStart = old_pos;
$(‘#pad’)[0].selectionEnd = old_pos;
},
send_op: function (op, pos, chr) {
var req = OpTrans.do_local(op, pos, chr);
var op_attrs = {xmlns: NetPad.NS_NETPAD,
name: op,
pos: posK};
if (chr) {
op_attrs[‘char’] = chr;
}
var msg = $msg({to: NetPad.collaborator, type: ‘chat’})
.c(‘op’, op_attrs)
.c(‘state’);
var i;
for (i = 0; i < req[1].length; i++) {
msg.c(‘cell’).t(‘’ + req[1][i]).up();
}
msg.up().c(‘priority’);
for (i = 0; i < req[3].length; i++) {
msg.c(‘cell’).t(‘’ + req[3][i]).up();
}
NetPad.connection.send(msg);
},
process_op: function (op) {
var name = op.attr(‘name’);
var pos = parseInt(op.attr(‘pos’), 10);
var chr = op.attr(‘char’);
var pri = [];
var state = [];
op.find(‘state > cell’).each(function () {
state.push(parseInt($(this).text(), 10));
});
op.find(‘priority > cell’).each(function () {
priority.push(parseInt($(this).text(), 10));
40718c10.indd 294
11/30/09 9:08:31 PM
Building the Editor
❘ 295
});
OpTrans.do_remote(NetPad.collaborator,
state,
name, pos, chr,
pri);
}
};
$(document).ready(function () {
$(‘#login_dialog’).dialog({
autoOpen: true,
draggable: false,
modal: true,
title: ‘Connect to XMPP’,
buttons: {
“Connect”: function () {
$(document).trigger(‘connect’, {
jid: $(‘#jid’).val(),
password: $(‘#password’).val(),
collaborator: $(‘#collaborator’).val()
});
$(‘#password’).val(‘’);
$(this).dialog(‘close’);
}
}
});
$(‘#disconnect’).click(function () {
if (NetPad.collaborator) {
NetPad.stop_collaboration(true);
}
$(‘#disconnect’).attr(‘disabled’, ‘disabled’);
NetPad.connection.disconnect();
});
$(‘#input’).keypress(function (ev) {
if (ev.which === 13) {
ev.preventDefault();
var body = $(this).val();
$(‘#chat’).append(“<div class=’message’>” +
“<<span class=’nick self’>” +
Strophe.getBareJidFromJid(
NetPad.connection.jid) +
“</span>> “ +
“<span class=’message’>” +
body +
“</span>” +
40718c10.indd 295
continues
11/30/09 9:08:31 PM
296
❘
Chapter 10 Writing with Friends: A Collaborative Text Editor
Listing 10-5 (continued)
“</div>”);
NetPad.connection.send(
$msg({to: NetPad.collaborator, type: ‘chat’})
.c(‘body’).t(body));
$(this).val(‘’);
}
});
$(‘#pad’).keypress(function (ev) {
if (NetPad.collaborator) {
var idx = this.selectionStart;
var handled = true;
if (ev.which === 8) {
this.selectionStart = idx - 1;
this.selectionEnd = idx - 1;
NetPad.send_op(‘delete’, idx - 1);
} else if (ev.which === 46) {
NetPad.send_op(‘delete’, idx);
} else if ((ev.which >= 32 && ev.which <= 127) ||
ev.which >= 256) {
NetPad.send_op(‘insert’, idx, String.fromCharCode(ev.which));
}
ev.preventDefault();
}
});
});
$(document).bind(‘connect’, function (ev, data) {
var conn = new Strophe.Connection(
“http://bosh.metajack.im:5280/xmpp-httpbind”);
conn.connect(data.jid, data.password, function (status) {
if (status === Strophe.Status.CONNECTED) {
$(document).trigger(‘connected’);
} else if (status === Strophe.Status.DISCONNECTED) {
$(document).trigger(‘disconnected’);
}
});
NetPad.connection = conn;
NetPad.collaborator = data.collaborator || null;
});
$(document).bind(‘connected’, function () {
$(‘#disconnect’).removeAttr(‘disabled’);
NetPad.connection.addHandler(NetPad.on_message, null, “message”);
if (NetPad.collaborator) {
40718c10.indd 296
11/30/09 9:08:31 PM
Building the Editor
❘ 297
NetPad.master = false;
$(‘#status’)
.text(‘Checking feature support for ‘ + NetPad.collaborator + ‘.’)
.attr(‘class’, ‘try-collab’);
// check for feature support
NetPad.connection.sendIQ(
$iq({to: NetPad.collaborator, type: ‘get’})
.c(‘query’, {xmlns: Strophe.NS.DISCO_INFO}),
function (iq) {
var f = $(iq).find(
‘feature[var=”‘ + NetPad.NS_NETPAD + ‘“]’);
if (f.length > 0) {
$(‘#status’)
.text(‘Establishing session with ‘ +
NetPad.collaborator + ‘.’)
.attr(‘class’, ‘try-collab’);
NetPad.connection.send(
$pres({to: NetPad.collaborator})
.c(‘collaborate’, {xmlns: NetPad.NS_NETPAD}));
} else {
$(‘#status’)
.text(‘Collaboration not supported with ‘ +
NetPad.collaborator + ‘.’)
.attr(‘class’, ‘no-collab’);
NetPad.connection.disconnect();
}
});
} else {
NetPad.master = true;
$(‘#pad’).removeAttr(‘disabled’);
// handle incoming discovery and collaboration requests
NetPad.connection.addHandler(NetPad.on_disco_info,
Strophe.NS.DISCO_INFO, “iq”, “get”);
NetPad.connection.addHandler(NetPad.on_collaborate,
NetPad.NS_NETPAD, “presence”);
NetPad.connection.addHandler(NetPad.on_unavailable,
null, “presence”);
}
});
$(document).bind(‘disconnected’, function () {
NetPad.connection = null;
$(‘#login_dialog’).dialog(‘open’);
});
40718c10.indd 297
11/30/09 9:08:31 PM
298
❘
Chapter 10 Writing with Friends: A Collaborative Text Editor
Expanding NetPad
NetPad is quite functional, but it is lacking a lot of nice features. You should try making NetPad a
more competitive product by adding some of these features:
➤➤
The collaborating user does not receive notifications when the master editor disconnects
without sending the session stop message. Modify the protocol to include this case, and
implement it.
➤➤
Allow more than two collaborators. You could even use a multi-user chat room to broadcast
the editing operations.
➤➤
Fix the edit area so that it handles more advanced functions like arrow key movement and
copy and paste.
➤➤
Add a shared whiteboard, perhaps based on Chapter 9’s SketchPad, to the application so that
collaborators can draw pictures. Each user could draw with a different color.
Summary
In this chapter you built a sophisticated application that allowed two users to collaboratively edit
the same document in real time. Applications such as NetPad are becoming more common, and the
XMPP protocol makes them fun and easy to build.
Hopefully you learned a lot in this chapter, including:
➤➤
The principles behind operational transformation
➤➤
The various ways XMPP stanzas can be extended to make custom protocols
➤➤
Using directed presence to do your own session management
➤➤
The ease of adding chat and other social features to existing applications
In the next chapter, you build the biggest application yet — a multi-user, real-time gaming system
for Tic-Tac-Toe players.
40718c10.indd 298
11/30/09 9:08:31 PM
11
Playing Games: Head to Head
Tic-Tac-Toe
What’s in This Chapter?
➤➤
Writing an XMPP bot
➤➤
Creating sophisticated protocols
➤➤
Collaborative spaces on top of multi-user chat
Almost everyone enjoys playing games, and if the successes of the massively multi-player
online role-playing games (MMORPGs) like World of Warcraft are any indication, people
enjoy playing games with others. Many games depend on low-latency interaction between
players, and others need features for players to find each other and communicate. XMPP
offers a lot of built-in functionality perfect for games, and more complex features are just a
few extended stanzas away.
XMPP excels at sending small bits of structured information back and forth, which games
can use to pass around changes to the game’s world or state. This is really not such a different
problem from other forms of collaboration; the only real difference is in the purpose of the
data. Just replace the buffer full of text in Chapter 10’s NetPad with a dungeon full of monsters. To XMPP, it’s all just bits of XML.
As long as players are not playing alone, communication is an important part of game play.
As you’ve discovered throughout this book, XMPP has a wide variety of tools for communication of all kinds, and most of these tools are built-in and ready for use without much work
required. Remember just how easy it was to add chat to the NetPad application? The same can
40718c11.indd 299
11/30/09 9:14:58 PM
300
❘
Chapter 11 Playing Games: Head to Head Tic-Tac-Toe
be done in games. Add some game-related information alongside players’ presence, and what was
once a chat roster is now a guild of fellow adventurers.
You will put XMPP to this pleasurable use in this chapter, developing a Tic-Tac-Toe game that users
all over the world can play.
Application Preview
Toetem has a lot of different pieces for the UI. Figure 11-1 shows the initial screen, which displays
the current list of games and the list of waiting players.
Figure 11-1
Several buttons line the top of the interface. You’ve seen the Disconnect button before, but the other
one is new. The Wait button adds the user to the list of players waiting to play a game.
Underneath the button bar is the list of waiting players. These are players who are ready to play a
Tic-Tac-Toe game. Next to each player is a Play button the user can click to start a game with that
player, or if that player is also the user, a Stop Waiting button appears.
At the bottom is the list of active games. Anytime a new game starts, it shows up in this list, and
when the game finishes, the game is removed. Next to each game is a Watch button, allowing the
user to join the game as an observer to watch the action.
The game board and chat are shown in Figure 11-2. Players interact with the board by clicking on it
during their turn. The button at the top allows them to resign. The chat area allows all the players
and observers to talk to each other.
This is the biggest application you build in this book, but you see soon that it is composed of parts
you have already worked with.
40718c11.indd 300
11/30/09 9:14:58 PM
Toetem Design
❘ 301
Figure 11-2
Toetem Design
Toetem consists of two major pieces: the referee and the game client.
The referee is an XMPP bot that enforces game rules and keeps track of the active games and waiting players. Users interact with the referee only indirectly through the actions they take in the game
client. Only one referee is needed for all the players in the system, but without a referee, there would
be no way to prevent cheating and abuse by malicious players.
The game client is the application that each player uses to access the system and play games. Actions
that the user takes are sent to the referee and then broadcast out to the other players and observers.
Because the referee is a bot, it does not need a user interface. It simply maintains a connection and
listens for commands from users, checks their legality, and then broadcasts them out to other users
or updates its internal state.
The referee understands a number of commands, and these are covered in detail in the following
“Designing the Game Protocol” section. The protocol you create is a healthy mix of all three
stanza types — <iq>, <presence>, and <message> — and makes use of existing extensions like
multi-user chat.
Games are organized around multi-user chat rooms. Each game has an associated room, and all
players and observers join this room to play or watch the game. This chat room provides the communication area for all the game’s participants, and it also is used to broadcast the players’ moves to
everyone. Multi-user chat rooms already provide most of the functionality needed, so they make a
great building block for the Toetem protocol.
40718c11.indd 301
11/30/09 9:14:58 PM
302
❘
Chapter 11 Playing Games: Head to Head Tic-Tac-Toe
Bots and Components
Toetem uses a bot for the referee, but bots have some potential pitfalls. Because
bots are normal users on the server, they come complete with rosters and all the
normal message routing that clients have. Usually this extra functionality is not
necessary and can get in the way as your bot scales in size.
In a more robust system, the referee would be replaced with a component that
performed the same function. The component would have more control over its
resources and routing, and it wouldn’t run into size limitations as quickly.
For more information on components and scaling please see the “Components”
section in Chapter 1 and the “Spreading Out Components” section in Chapter 13.
Users wishing to play games will need to know the JID of the referee when they connect. Once connected, they will be able to view the list of current games and the list of waiting players. They can
choose to start a game with one of the waiting players, to wait for someone to play, or to watch one
of the active games being played by others.
If they start a game or join a game as an observer they will be switched to the game view. In the
game view, the user will see the Tic-Tac-Toe board as well as the game’s chat. Whenever a player
moves, the board will update in real time for all the players and observers. An observer can leave the
game at any time, but players must wait until the game has concluded before they can leave.
Most of the work will be defining and implementing the Toetem protocol and creating the game
board control. The protocol you design in this chapter is not limited to Tic-Tac-Toe games; in fact, it
is a simplification of the same protocol that Chesspark uses for its chess games. Changing the game
board and the particular kinds of moves and state is all that you need to turn it into any other kind
of game. Tic-Tac-Toe was chosen because it has extremely simple rules, allowing you to concentrate
on the protocol and interactions between users instead of complex game logic.
Designing the Game Protocol
You designed a simple protocol in the previous chapter, and in this chapter, you design a much more
complex protocol for managing and running a game system. Each piece of the protocol is built out
of the protocol blocks that you’ve seen in previous chapters, but the combination of these simple
pieces results in a sophisticated system.
The Toetem protocol comprises four main areas. First, you need some way to keep track of players in the system, and just as in the previous chapter, you use directed presence for this task. Next,
you need to manage the list of players who are waiting for a game. You also need to manage the
active games and their corresponding chat rooms. Finally, you must deal with the player interactions
within each game.
40718c11.indd 302
11/30/09 9:14:58 PM
Designing the Game Protocol
❘ 303
Keeping Track of Users
Keeping track of users is quite important. For starters, the other players will want to know who is
available to play and who is already playing. Even more importantly, the referee must gracefully
handle the situation where players leave unexpectedly.
If a player leaves who is not playing or in the waiting list, it is not a concern. However, if a player
in a game or a player in the waiting list leaves, the consequences will be felt by other users. It will
be frustrating for users if they click a waiting player’s Play button and that player is no longer there.
Even worse is the exit of a player during a game.
The first case is easily handled by removing the player from the list of waiting players. In the second
case, a decision must be made on how to handle the situation. In Toetem, the simplest solution is
used, which is to forfeit the player who leaves the game. This solution is not optimal, but it prevents
the most common form of abuse — cheating by leaving the game in a losing position.
The Toetem protocol uses directed presence to keep track of players. To interact with the referee, the
user must first send it directed presence. From then on, the referee will know when the user becomes
unavailable, and the referee can take the appropriate action. This is the same technique used by
NetPad in Chapter 10 and by multi-user chat rooms.
The following example <presence> stanza shows Darcy registering himself with the referee. Note
that the namespace used for the Toetem protocol is http://metajack.im/ns/toetem.
<presence to=’referee@pemberley.lit/toetem’
from=’darcy@pemberley.lit/library’>
<register xmlns=’http://metajack.im/ns/toetem’/>
</presence>
When a player leaves, the referee will receive a stanza similar to the following:
<presence to=’referee@pemberley.lit/toetem’
from=’darcy@pemberley.lit/library’
type=’unavailable’/>
Once a player registers with the referee, the current list of waiting players and active games will
be sent in a pair of <message> stanzas. Darcy receives the following <message> stanzas after
registering:
<message to=‘darcy@pemberley.lit/library’
from=’referee@pemberley.lit/toetem’>
<waiting xmlns=’http://metajack.im/ns/toetem’>
<player jid=’elizabeth@longbourn.lit/sitting_room’/>
</waiting>
</message>
<message to=‘darcy@pemberley.lit/library’
from=’referee@pemberley.lit/toetem’>
<games xmlns=’http://metajack.im/ns/toetem’>
40718c11.indd 303
11/30/09 9:14:58 PM
304
❘
Chapter 11 Playing Games: Head to Head Tic-Tac-Toe
<game x-player=’jane@longbourn.lit/outside’
o-player=’bingley@netherfield.lit/drawing_room’
room=’toetem-1045@games.pemberley.lit’/>
</games>
</message>
The <waiting> element contains a <player> element for each waiting player along with the player’s
JID. Similarly, the <games> element contains a <game> for each active game along with its players
and its room.
Managing Players
Players need to signal that they are waiting to start a game and also when they stop waiting. These
tasks are easily done with the help of <iq> stanzas. The players also need to handle changes to the
list of currently waiting players, which the referee sends in <message> stanzas.
If users want to add themselves to the waiting list, they send the <waiting> command in an IQ-set
stanza. To remove themselves from the list, they send a <stop-waiting> command in an IQ-set
stanza. Elizabeth adds and removes herself from the list in the following stanzas:
<iq to=’referee@pemberley.lit/toetem’
from=’elizabeth@longbourn.lit/sitting_room’
type=’set’
id=’waiting2’>
<waiting xmlns=’http://metajack.im/ns/toetem’/>
</iq>
<iq to=’elizabeth@longbourn.lit/sitting_room’
from=’referee@pemberley.lit/toetem’
type=’result’
id=’waiting2’/>
<iq to=’referee@pemberley.lit/toetem’
from=’elizabeth@longbourn.lit/sitting_room’
type=’set’
id=’waiting3’>
<stop-waiting xmlns=’http://metajack.im/ns/toetem’/>
</iq>
<iq to=’elizabeth@longbourn.lit/sitting_room’
from=’referee@pemberley.lit/toetem’
type=’result’
id=’waiting3’/>
These stanzas are all fairly simple commands with empty responses, but it is enough to fulfill
Toetem’s requirements.
It’s possible that someone could send a <waiting> command while they are already waiting, or a
<stop-waiting> command when they are not yet waiting. The Toetem protocol needs to handle
these cases as well. In the first case, there is no reason to throw an error; the referee can simply pretend it has added the user to the list and return a successful response. In the other case, the referee
40718c11.indd 304
11/30/09 9:14:58 PM
Designing the Game Protocol
❘ 305
must return an appropriate error. The following example shows the bad-request condition sent in
response to a strange <stop-waiting> command from Jane:
<iq to=’jane@longbourn.lit/outside’
from=’referee@pemberley.lit/toetem’
type=’error’
id=’stop1’>
<stop-waiting xmlns=’http://metajack.im/ns/toetem’/>
<error type=’cancel’>
<bad-request xmlns=’urn:ietf:params:xml:ns:xmpp-stanzas’/>
</error>
</iq>
Every time the waiting list changes, the referee will broadcast out the update to every registered
player. Each player will receive <message> stanzas like the following:
<message to=‘darcy@pemberley.lit/library’
from=’referee@pemberley.lit/toetem’>
<waiting xmlns=’http://metajack.im/ns/toetem’>
<player jid=’jane@longbourn.lit/outside’/>
</waiting>
</message>
<message to=‘darcy@pemberley.lit/library’
from=’referee@pemberley.lit/toetem’>
<not-waiting xmlns=’http://metajack.im/ns/toetem’>
<player jid=’jane@longbourn.lit/outside’/>
</not-waiting>
</message>
The first stanza is exactly like the one players receive when first registering, except that updates
contain only a single <player> element. Updates about players leaving the waiting list are nearly the
same, except with a <not-waiting> element instead of <waiting>.
Users will always see an accurate waiting list of players because they start with the current list and
receive updates as it changes. There is no need for each user to poll the waiting list; updates are
delivered and processed in real time.
These simple interactions, in addition to the unavailable presence notifications described previously,
are all that is needed for the referee to manage the waiting list of players.
Managing Games
Managing games is a little more complex. From the user’s perspective, the same three kinds of actions
are needed as for the waiting player’s list — handle updates to the list of active games, start a game,
and resign a game. However, the referee must create or destroy a multi-user chat room as the result
of a game beginning or ending, and this makes its job a little more involved.
Once a game starts, the game’s players receive a message from the referee with the name of the
game’s room. These players must then join the room for the game to begin. After a game is concluded, the players can leave at their leisure; they may want to continue chatting with each other
after the match.
40718c11.indd 305
11/30/09 9:14:58 PM
306
❘
Chapter 11 Playing Games: Head to Head Tic-Tac-Toe
Handling updates to the list of active games is done exactly like updates to the waiting list. A message is broadcast to all registered players when games begin or end. Here are the stanzas Darcy sees
as Jane and Elizabeth start and finish their game:
<message to=‘darcy@pemberley.lit/library’
from=’referee@pemberley.lit/toetem’>
<games xmlns=’http://metajack.im/ns/toetem’>
<game x-player=’jane@longbourn.lit/outside’
o-player=’elizabeth@longbourn.lit/sitting_room’
room=’toetem-123@games.pemberley.lit’/>
</games>
</message>
<message to=‘darcy@pemberley.lit/library’
from=’referee@pemberley.lit/toetem’>
<game-over xmlns=’http://metajack.im/ns/toetem’>
<game x-player=’jane@longbourn.lit/outside’
o-player=’elizabeth@longbourn.lit/sitting_room’
room=’toetem-123@games.pemberley.lit’/>
</game-over>
</message>
Like the waiting list, game notifications are delivered immediately so that each player always has the
most current information without having to continuously ask for it.
If Elizabeth wants to watch a game, she can simply join the game’s room. The referee will then start
broadcasting game moves to her as described in the next section.
To start her own game, Elizabeth must send the <start> command to the referee along with the
player she wishes to start a game with. A successful request and its response are shown in the following example:
<iq to=’referee@pemberley.lit/toetem’
from=’elizabeth@longbourn.lit/sitting_room’
type=’set’
id=’start1’>
<start xmlns=’http://metajack.im/ns/toetem’
with=’jane@longbourn.lit/outside’/>
</iq>
<iq to=’elizabeth@longbourn.lit/sitting_room’
from=’referee@pemberley.lit/toetem’
type=’result’
id=’start1’/>
The referee then creates the game room and invites the players. These invitations are sent by the
room on behalf of the referee and can be seen in the following example. The format of these invitations is defined in section 7.5.2 of XEP-0045, Mediated Invitation.
<message to=’elizabeth@longbourn.lit/sitting_room’
from=’toetem-456@games.pemberley.lit’>
<x xmlns=’http://jabber.org/protocol/muc#user’>
40718c11.indd 306
11/30/09 9:14:58 PM
Designing the Game Protocol
❘ 307
<invite from=’referee@pemberley.lit/toetem’/>
</x>
</message>
<message to=’jane@longbourn.lit/outside’
from=’toetem-456@games.pemberley.lit’>
<x xmlns=’http://jabber.org/protocol/muc#user’>
<invite from=’referee@pemberley.lit/toetem’/>
</x>
</message>
Once the invitations are received, both players must join the room. The protocol interactions from
there are covered in the next section.
A few possible error cases exist for game starts. If a player tries to start a game with a user who is
not currently on the waiting list, the server returns an item not found error stanza like the following:
<iq to=’jane@longbourn.lit/outside’
from=’referee@pemberley.lit/toetem’
type=’error’
id=’start2’>
<start xmlns=’http://metajack.im/ns/toetem’
with=’elizabeth@longbourn.lit/library’/>
<error type=’modify’>
<item-not-found xmlns=’urn:ietf:params:xml:ns:xmpp-stanzas’/>
</error>
</iq>
Also, it is possible that the requested player has already started a game with someone else and is currently busy playing. In this case, the referee returns a not allowed error such as the following:
<iq to=’jane@longbourn.lit/outside’
from=’referee@pemberley.lit/toetem’
type=’error’
id=’start3’>
<start xmlns=’http://metajack.im/ns/toetem’
with=’darcy@pemberley.lit/library’/>
<error type=’cancel’>
<not-allowed xmlns=’urn:ietf:params:xml:ns:xmpp-stanzas’/>
</error>
</iq>
While in a game, a player may wish to resign instead of await their obvious fate. Resigning is done
by sending the <resign> command in an IQ-set to the referee. Beaten by her clever sister, Jane
resigns in the following example:
<iq to=’referee@pemberley.lit/toetem’
from=’jane@longbourn.lit/outside’
type=’set’
id=’resign1’>
<resign xmlns=’http://metajack.im/ns/toetem’/>
40718c11.indd 307
11/30/09 9:14:58 PM
308
❘
Chapter 11 Playing Games: Head to Head Tic-Tac-Toe
</iq>
<iq to=’jane@longbourn.lit/outside’
from=’referee@pemberley.lit/toetem’
type=’result’
id=’resign1’/>
A user who tries to resign while not in a game will receive the same bad request error you saw in a
previous example.
All that is left to finish the Toetem protocol is the interaction between players once they are in the
game room.
Playing and Watching the Game
When a game start request is received, the referee creates a room for the game, joins the room, and
then invites each of the players. Once both players have joined the room, the game is started. The
referee manages the game state, receives moves from the players, and broadcasts the game’s moves
and state as needed.
The first task for the referee is to notify everyone in the room when the game has started and when
it has finished. It is easy to do this by sending a message to the room containing some Toetem protocol elements alongside the regular message contents. The following example stanzas show these
<game-started> and <game-ended> elements:
<message to=’elizabeth@longbourn.lit/sitting_room’
from=’toetem-789@games.pemberley.lit/referee’
type=’groupchat’>
<body>The match has started.</body>
<game-started xmlns=’http://metajack.im/ns/toetem’
x-player=’elizabeth@longbourn.lit/sitting_room’
o-player=’jane@longbourn.lit/outside’/>
</message>
<message to=’elizabeth@longbourn.lit/sitting_room’
from=’toetem-789@games.pemberley.lit/referee’
type=’groupchat’>
<body>elizabeth has won the match.</body>
<game-ended xmlns=’http://metajack.im/ns/toetem’
winner=’elizabeth@longbourn.lit/sitting_room’/>
</message>
Once a game has begun, the player with the X pieces can make the first move. Each player makes a
move by sending an IQ-set stanza with a <move> command to the referee. The players send moves to
the referee instead of broadcasting them directly to the room so that the referee can check that each
move is legal. If the move is accepted, the referee forwards it to everyone in the room. If a move is
illegal, the referee returns an IQ-error stanza and will not relay the message to the room.
The following example shows Elizabeth making her first move:
<iq to=’referee@pemberley.lit/toetem’
from=’elizabeth@longbourn.lit/sitting_room’
40718c11.indd 308
11/30/09 9:14:58 PM
Designing the Game Protocol
❘ 309
type=’set’
id=’move1’>
<move xmlns=’http://metajack.im/ns/toetem’
col=’b’ row=’2’/>
</iq>
The referee determines that this move is legal and responds to Elizabeth with an IQ-result stanza.
Then, the referee forwards the move on to the other player and the observers in the room:
<iq to=’elizabeth@longbourn.lit/sitting_room’
from=’referee@pemberley.lit/toetem’
type=’result’
id=’move1’/>
<message to=’toetem-789@games.pemberley.lit’
from=’referee@pemberley.lit/toetem’
type=’groupchat’>
<body>elizabeth has marked an x at b2.</body>
<move xmlns=’http://metajack.im/ns/toetem’
col=’b’ row=’2’/>
</message>
The rest of the game continues in the same way until its conclusion.
Elizabeth may attempt to move out of turn or send an illegal move. The referee must return a proper
error in both of these cases. In the former case, the correct error is unexpected request, and in the
latter case, not acceptable. The unexpected request can also be used if a player sends a move before
the game has officially started and the not allowed error will suffice for the case where the game has
already ended. These errors are nearly identical to the error stanzas you’ve already seen; only the
error condition element is changed.
Note that it is important that all participants in the game room check the sender of the game state
messages. Only game state changes broadcast by the referee are legal. A rogue player could impersonate the referee if the participants were not paying attention to the origin of the messages.
These simple bits of protocol handle most of the interaction within a game. One problem remains,
however; if a new observer joins in the middle of a game, they won’t know the current state of the
game. The referee must send the current game state to anyone who joins the room. Once the user
has joined and received the state, the user can watch for game state broadcasts just like the other
participants.
The game state consists of the phase of the game, the players and their pieces, the current board
position, and the result if one is known. The phase of the game may be waiting, playing, or finished.
If the state is waiting, only the players and pieces are needed to communicate the rest of the state.
During the playing state, the players, pieces, and board position are needed. In the finished state, all
the information is necessary.
The referee can send this information in a <game> element inside a direct room message to the user
who has joined. The <game> element can use a phase attribute for the game’s phase. The x-player
and o-player attributes you saw earlier can be reused to communicate the players and their pieces
if needed. Finally, the board position can be stored in the pos attribute encoded as a string.
40718c11.indd 309
11/30/09 9:14:59 PM
310
❘
Chapter 11 Playing Games: Head to Head Tic-Tac-Toe
A Tic-Tac-Toe board consists of nine squares, which can be filled with either an X or an O. You can
turn this information into a nine-character string in which each character is a Space, an X, or an O.
The characters fill the board’s squares starting from the top left and moving right and continuing
the same way with the other two rows.
For example, the string for the position shown in Figure 11-3 would be “o
xxox
“.
Figure 11-3
The following example shows a game state stanza broadcast to Bingley who has joined the game after
it has finished. A participant joining during other game phases would see something very similar, just
with less information.
<message to=’toetem-789@games.pemberley.lit/bingley’
from=’referee@pemberley.lit/toetem’
type=’chat’>
<game-state xmlns=’http://metajack.im/ns/toetem’
phase=’finished’
x-player=’elizabeth@longbourn.lit/sitting_room’
o-player=’jane@lonbourn.lit/outside’
pos=’oxoxxooxx’
winner=’elizabeth@longbourn.lit/sitting_room’/>
</message>
If the game was aborted or tied, the winner attribute will not be present. An observer arriving after
the game is over can distinguish between these states by noting whether the pos attribute is completely full of moves. If all moves are exhausted, the game was tied; otherwise, it was aborted.
Now any participant who joins will know what the current state is and can follow along with any
new moves.
The Toetem protocol is completed. The protocol consists of lots of individual pieces, but each piece
is simple. The end result, however, is a flexible gaming platform for connoisseurs of Tic-Tac-Toe.
40718c11.indd 310
11/30/09 9:14:59 PM
Getting Started on Toetem
❘ 311
Getting Started on Toetem
Unlike the other applications in this book, Toetem consists of two large pieces of code — the referee
and the game client. Each of these pieces requires its own HTML, CSS, and JavaScript files. In order
to play a game, three users are needed — t wo players running the game client and one referee — and
a multi-user chat service is needed to host each game’s room.
Before you implement the Toetem protocol, you need to get the skeletons of the application set up.
The HTML and CSS for the referee are shown in Listing 11-1 and Listing 11-2, and Listing 11-3
has the initial skeleton JavaScript file. Note that there is very little UI for the referee; it contains just
enough UI to enable whoever runs the referee to see what is happening.
Listing 11-1: referee.html
<!DOCTYPE HTML PUBLIC “-//W3C//DTD HTML 4.01//EN”
“http://www.w3.org/TR/html4/strict.dtd”>
<html>
<head>
<title>Toetem Referee - Chapter 3</title>
<link rel=’stylesheet’ href=’http://ajax.googleapis.com/ajax/libs/jqueryu
i/1.7.2/themes/cupertino/jquery-ui.css’>
<script src=’http://ajax.googleapis.com/ajax/libs/jquery/1.3.2/jquery.js’>
</script>
<script src=’http://ajax.googleapis.com/ajax/libs/jqueryui/1.7.2/jquery-u
i.js’></script>
<script src=’scripts/strophe.js’></script>
<script src=’flxhr/flXHR.js’></script>
<script src=’scripts/strophe.flxhr.js’></script>
<link rel=’stylesheet’ href=referee.css’>
<script src=’referee.js’></script>
<script src=’board.js’></script>
</head>
<body>
<h1>Toetem Referee</h1>
<div id=’log’>
</div>
<!-- login dialog -->
<div id=’login_dialog’ class=’hidden’>
<label>JID:</label><input type=’text’ id=’jid’>
<label>Password:</label><input type=’password’ id=’password’>
</div>
</body>
</html>
40718c11.indd 311
11/30/09 9:14:59 PM
312
❘
Chapter 11 Playing Games: Head to Head Tic-Tac-Toe
Listing 11-2: referee.css
body {
font-family: Helvetica;
}
h1 {
text-align: center;
}
.hidden {
display: none;
}
#log {
padding: 10px;
}
Listing 11-3: referee.js (skeleton)
var Referee = {
connection: null
};
$(document).ready(function () {
$(‘#login_dialog’).dialog({
autoOpen: true,
draggable: false,
modal: true,
title: ‘Connect to XMPP’,
buttons: {
“Connect”: function () {
$(document).trigger(‘connect’, {
jid: $(‘#jid’).val(),
password: $(‘#password’).val()
});
$(‘#password’).val(‘’);
$(this).dialog(‘close’);
}
}
});
});
$(document).bind(‘connect’, function (ev, data) {
var conn = new Strophe.Connection(
“http://bosh.metajack.im:5280/xmpp-httpbind”);
conn.connect(data.jid, data.password, function (status) {
if (status === Strophe.Status.CONNECTED) {
$(document).trigger(‘connected’);
} else if (status === Strophe.Status.DISCONNECTED) {
$(document).trigger(‘disconnected’);
40718c11.indd 312
11/30/09 9:15:00 PM
Getting Started on Toetem
❘ 313
}
});
Referee.connection = conn;
});
$(document).bind(‘connected’, function () {
// nothing here yet
});
The HTML, CSS, and skeleton JavaScript for the game client are in Listing 11-4, Listing 11-5, and
Listing 11-6. The login dialog box takes an extra Referee input to tell the client the location of the
service’s referee. The UI has two main sections — one for when users are not playing or observing
a game and one for when they are participating in a game. Both are fairly simple. The participant
UI has a game board and a chat area, and the non-participant UI contains the list of waiting players and the list of active games. These two layouts were shown at the beginning of the chapter in
Figure 11-1 and Figure 11-2.
Listing 11-4: toetem.html
<!DOCTYPE HTML PUBLIC “-//W3C//DTD HTML 4.01//EN”
“http://www.w3.org/TR/html4/strict.dtd”>
<html>
<head>
<title>Toetem - Chapter 11</title>
<link rel=’stylesheet’ href=’http://ajax.googleapis.com/ajax/libs/jqueryu
i/1.7.2/themes/cupertino/jquery-ui.css’>
<script src=’http://ajax.googleapis.com/ajax/libs/jquery/1.3.2/jquery.js’>
</script>
<script src=’http://ajax.googleapis.com/ajax/libs/jqueryui/1.7.2/jquery-u
i.js’></script>
<script src=’scripts/strophe.js’></script>
<script src=’flxhr/flXHR.js’></script>
<script src=’scripts/strophe.flxhr.js’></script>
<link rel=’stylesheet’ href=’toetem.css’>
<script src=’toetem.js’></script>
</head>
<body>
<h1>Toetem</h1>
<div id=’browser’>
<div class=’buttons’>
<input id=’disconnect’ class=’button’ type=’button’ value=’disconnect’>
<input id=’wait’ class=’button’ type=’button’ value=’wait’>
</div>
<h2>Players Available</h2>
<table id=’waiting’>
<thead>
<tr>
40718c11.indd 313
continues
11/30/09 9:15:00 PM
314
❘
Chapter 11 Playing Games: Head to Head Tic-Tac-Toe
Listing 11-4 (continued)
<th>Player</th>
<th></th>
</tr>
</thead>
<tbody>
</tbody>
</table>
<h2>Games In Progress</h2>
<table id=’games’>
<thead>
<tr>
<th>X</th>
<th>O</th>
<th>Room</th>
<th></th>
</tr>
</thead>
<tbody>
</tbody>
</table>
</div>
<div id=’game’ class=’hidden’>
<div class=’buttons’>
<input id=’resign’ class=’button’ type=’button’
value=’resign’ disabled=’disabled’>
<input id=’leave’ class=’button’ type=’button’
value=’leave’ disabled=’disabled’>
</div>
<div id=’board-area’>
<canvas id=’board’ width=’300’ height=’300’>
</canvas>
<div id=’board-status’></div>
</div>
<div id=’chat’>
<div id=’messages’>
</div>
<input type=’text’ id=’input’>
</div>
</div>
<!-- login dialog -->
<div id=’login_dialog’ class=’hidden’>
<label>JID:</label><input type=’text’ id=’jid’>
<label>Password:</label><input type=’password’ id=’password’>
<label>Toetem Referee</label><input type=’text’ id=’referee’>
</div>
</body>
</html>
40718c11.indd 314
11/30/09 9:15:00 PM
Getting Started on Toetem
❘ 315
Listing 11-5: toetem.css
body {
font-family: Helvetica;
}
h1 {
text-align: center;
}
.hidden {
display: none;
}
.buttons {
text-align: center;
}
input.button {
margin: 10px;
}
#board {
width: 300px;
height: 300px;
background-color: #000;
}
#board-area {
float: left;
}
#chat {
padding-left: 25px;
float: left;
}
#messages {
padding: 5px 10px;
width: 400px;
height: 300px;
background-color: #ddd;
}
#messages .system {
text-align: right;
font-style: italic;
font-weight: bold;
color: #999;
}
#input {
40718c11.indd 315
continues
11/30/09 9:15:00 PM
316
❘
Chapter 11 Playing Games: Head to Head Tic-Tac-Toe
Listing 11-5 (continued)
width: 400px;
}
.nick {
color: #00c;
}
.me {
color: #c00;
}
Listing 11-6: toetem.js (skeleton)
var Toetem = {
connection: null,
referee: null
};
$(document).ready(function () {
$(‘#login_dialog’).dialog({
autoOpen: true,
draggable: false,
modal: true,
title: ‘Connect to XMPP’,
buttons: {
“Connect”: function () {
$(document).trigger(‘connect’, {
jid: $(‘#jid’).val(),
password: $(‘#password’).val(),
referee: $(‘#referee’).val()
});
$(‘#password’).val(‘’);
$(this).dialog(‘close’);
}
}
});
});
$(document).bind(‘connect’, function (ev, data) {
var conn = new Strophe.Connection(
“http://bosh.metajack.im:5280/xmpp-httpbind”);
conn.connect(data.jid, data.password, function (status) {
if (status === Strophe.Status.CONNECTED) {
$(document).trigger(‘connected’);
} else if (status === Strophe.Status.DISCONNECTED) {
$(document).trigger(‘disconnected’);
}
40718c11.indd 316
11/30/09 9:15:00 PM
Implementing Sessions and the Waiting List
❘ 317
});
Toetem.connection = conn;
Toetem.referee = data.referee;
});
$(document).bind(‘connected’, function () {
// nothing here yet
});
$(document).bind(‘disconnected’, function () {
// nothing here yet
});
With the initial bits of drudgery out of the way, you can start implementing the first bits of the
protocol.
Implementing Sessions and the Waiting List
The place to start on Toetem is with session tracking and the waiting player’s list. Session tracking
is needed before players can interact with the referee, and the waiting list is the easiest piece of the
protocol in Toetem. Because you build both the service and the client in this chapter, you implement
both sides in parallel.
The referee must keep track of players’ presence and maintain a list of players who are waiting for
games. The referee will add and remove players from the list at their request. This list must be sent
to all players whenever they register, and changes to the list must be broadcast to players as they
happen.
The user must send directed presence to the referee to establish a gaming session and gain access to
the game functionality. Once the referee is tracking the player’s presence, the player can query the
list or add or remove themselves from the list by clicking various buttons in the UI.
Referee Version One
First, the referee will need structures to track player presence and to store the waiting list. Also, it
is handy to create a Toetem protocol namespace constant to save typing. Add the following to the
Referee object:
waiting: [],
presence: {},
NS_TOETEM: “http://metajack.im/ns/toetem”
code snippet referee.js
The waiting list will be stored in an array and the players’ presence in a dictionary keyed on their JID.
40718c11.indd 317
11/30/09 9:15:00 PM
318
❘
Chapter 11 Playing Games: Head to Head Tic-Tac-Toe
To track presence and answer players’ queries, the referee will need handlers for <presence> and
<iq> stanzas. You can make the following modifications to the connected event handler to set up
these handlers:
$(document).bind(‘connected’, function () {
var conn = Referee.connection;
$(‘#log’).prepend(“<p>Connected as “ + conn.jid + “</p>”);
conn.addHandler(Referee.on_presence, null, “presence”);
conn.addHandler(Referee.on_iq, null, “iq”);
conn.send($pres());
});
code snippet referee.js
Both of these handlers will need to be implemented.
Add the following on_presence() function to the Referee object:
on_presence: function (pres) {
var from = $(pres).attr(‘from’);
var bare_from = Strophe.getBareJidFromJid(from);
var type = $(pres).attr(‘type’);
var bare_jid = Strophe.getBareJidFromJid(Referee.connection.jid);
// only look for direct presence from other users
if ((!type || type === “unavailable”) && from !== bare_jid) {
if (type === “unavailable”) {
delete Referee.presence[bare_from];
// remove from lists
Referee.remove_waiting(from);
$(‘#log’).prepend(“<p>Unregistered “ + bare_from + “.</p>”);
} else if ($(pres).find(‘register’).length > 0) {
Referee.presence[bare_from] = from;
$(‘#log’).prepend(“<p>Registered “ + bare_from + “.</p>”);
Referee.send_waiting(from);
}
}
return true;
}
code snippet referee.js
The on_presence() function ignores any <presence> stanza from the referee itself or its other
resources. For available <presence> stanzas containing <register>, it will add the sender to the
tracked player list and send the list of waiting players. For unavailable <presence> stanzas, the
referee will remove the sender from the tracked player list and remove them from the waiting list in
40718c11.indd 318
11/30/09 9:15:00 PM
Implementing Sessions and the Waiting List
❘ 319
case they forget to remove themselves. In each case the referee makes sure to keep the user informed
with nice log messages.
Note that the waiting list and the presence tracking use bare JIDs. This limits users to interacting
with the Toetem system with a single connected resource. It is possible to extend the referee to support multiple gaming sessions for a single user, but this can make the interactions more complicated.
The simple solution has been chosen here.
The remove_waiting() function does exactly what its name implies and also broadcasts any waiting list changes to all the registered players. If the requested JID is not in the list, the function does
nothing. The implementation that follows should be added to the Referee object:
remove_waiting: function (jid) {
var bare_jid = Strophe.getBareJidFromJid(jid);
var i;
for (i = 0; i < Referee.waiting.length; i++) {
var wjid = Strophe.getBareJidFromJid(Referee.waiting[i]);
if (wjid === bare_jid) {
break;
}
}
if (i < Referee.waiting.length) {
Referee.waiting.splice(i, 1);
Referee.broadcast(function (msg) {
return msg.c(‘not-waiting’, {xmlns: Referee.NS_TOETEM})
.c(‘player’, {jid: jid});
});
}
$(‘#log’).prepend(“<p>Removed “ + bare_jid + “ from “ +
“waiting list</p>”);
}
code snippet referee.js
The code simply scans through the entire list until it finds a matching JID, and when a match is
found, deletes that entry from the array and notifies all the players using broadcast(). The broadcast() function takes a function that adds on to a <message> stanza that will be sent to every registered player; in this way, broadcast() makes it easy to send notifications. Add the broadcast()
function to the Referee object:
broadcast: function (func) {
$.each(Referee.presence, function () {
var msg = func($msg({to: this}));
Referee.connection.send(msg);
});
}
code snippet referee.js
40718c11.indd 319
11/30/09 9:15:00 PM
320
❘
Chapter 11 Playing Games: Head to Head Tic-Tac-Toe
The referee will also need to send errors to clients that make illegal or unexpected requests. Create
the following function, send_error(), and add it to the Referee object:
send_error: function (iq, etype, ename, app_error) {
var error = $iq({to: $(iq).attr(‘from’),
id: $(iq).attr(‘id’),
type: ‘error’})
.cnode(iq.cloneNode(true)).up()
.c(‘error’, {type: etype})
.c(ename, {xmlns: Strophe.NS.STANZAS}).up();
if (app_error) {
error.c(app_error, {xmlns: Referee.NS_TOETEM});
}
Referee.connection.send(error);
}
code snippet referee.js
This function is quite handy because the referee will have to deal with a lot of error cases.
Because the referee will often need to check to see if a player is on the waiting list, the is_waiting()
function is also helpful to have. Add the following code to the Referee object to implement this:
is_waiting: function (jid) {
var bare_jid = Strophe.getBareJidFromJid(jid);
var i;
for (i = 0; i < Referee.waiting.length; i++) {
var wjid = Strophe.getBareJidFromJid(Referee.waiting[i]);
if (wjid === bare_jid) {
return true;
}
}
return false;
}
code snippet referee.js
Just like the remove_waiting() function, is_waiting() looks for a player’s JID by traversing the
list.
Now you can implement the on_iq() function, which handles many of the interactions with players. In this version, only the waiting and stop-waiting commands are implemented. Add the following code to the Referee object:
on_iq: function (iq) {
var id = $(iq).attr(‘id’);
var from = $(iq).attr(‘from’);
40718c11.indd 320
11/30/09 9:15:00 PM
Implementing Sessions and the Waiting List
❘ 321
var type = $(iq).attr(‘type’);
// make sure we know the user’s presence first
if (!Referee.presence[Strophe.getBareJidFromJid(from)]) {
Referee.send_error(iq, ‘auth’, ‘forbidden’);
} else {
var child = $(iq).find(‘*[xmlns=”‘ + Referee.NS_TOETEM +
‘“]:first’);
if (child.length > 0) {
if (type === ‘get’) {
Referee.send_error(iq, ‘cancel’, ‘bad-request’);
return true;
} else if (type !== ‘set’) {
// ignore IQ-error and IQ-result
return true;
}
switch (child[0].tagName) {
case ‘waiting’:
Referee.on_waiting(id, from, child);
break;
case ‘stop-waiting’:
Referee.on_stop_waiting(id, from, child);
break;
default:
Referee.send_error(iq, ‘cancel’, ‘bad-request’);
}
} else {
Referee.send_error(iq, ‘cancel’, ‘feature-not-implemented’);
}
}
return true;
}
code snippet referee.js
This function first checks whether the referee is tracking the user making the request; the appropriate error is sent if this is not the case. If the request is from a tracked client, the function looks for
a Toetem command in an IQ-set stanza and, if not found, responds with an error. For the waiting
command, on_iq() delegates the behavior to on_waiting(); the stop-waiting command is delegated to on_stop_waiting().
The last two functions on_waiting() and on_stop_waiting(), are implemented in the following code:
on_waiting: function (id, from, elem) {
// if they were already waiting, remove them so their resource
// can be updated
if (Referee.is_waiting(from)) {
40718c11.indd 321
11/30/09 9:15:01 PM
322
❘
Chapter 11 Playing Games: Head to Head Tic-Tac-Toe
Referee.remove_waiting(from);
}
Referee.waiting.push(from);
Referee.connection.send($iq({to: from, id: id, type: ‘result’}));
Referee.broadcast(function (msg) {
return msg.c(‘waiting’, {xmlns: Referee.NS_TOETEM})
.c(‘player’, {jid: from});
});
$(‘#log’).prepend(“<p>Added “ +
Strophe.getBareJidFromJid(from) + “ to “ +
“waiting list.</p>”);
},
on_stop_waiting: function (id, from, elem) {
if (Referee.is_waiting(from)) {
Referee.remove_waiting(from);
}
Referee.connection.send($iq({to: from, id: id, type: ‘result’}));
}
code snippet referee.js
The on_waiting() function adds users to the waiting list, taking care to remove them if they are
already waiting. It also broadcasts the change to the waiting list to all players. Finally, the on_stop_
waiting() function removes the user from the waiting list.
Notice that these functions always return successful responses. There is no need to send an error to
the user if the action can simply be ignored. If for some reason the user’s client is out of sync, returning success will generally correct the problem. The referee tries to be liberal in what it accepts, but
strict in what it sends, just like any good Internet service or client application should.
The first version of the referee is now ready to be put to work, but first you must implement the initial Toetem client.
Toetem Client Version One
Just as with the referee, the Toetem client needs a protocol constant; the protocol’s namespace will
be used in nearly every stanza sent. Add the following NS_TOETEM attribute to the Toetem object:
NS_TOETEM: “http://metajack.im/ns/toetem”
code snippet toetem.js
When the client connects, it must send directed presence to the referee to start a gaming session.
Once registered with the referee, it must then handle the incoming list of waiting players. After
40718c11.indd 322
11/30/09 9:15:01 PM
Implementing Sessions and the Waiting List
❘ 323
disconnecting, it must clear the list, reset the application state, and re-open the login dialog box.
Add the following highlighted code to the connected and disconnected event handlers:
$(document).bind(‘connected’, function () {
$(‘#disconnect’).removeAttr(‘disabled’);
$(‘#wait’).removeAttr(‘disabled’);
Toetem.connection.addHandler(Toetem.on_message, null, “message”);
// tell the referee we’re online
Toetem.connection.send(
$pres({to: Toetem.referee})
.c(‘register’, {xmlns: Toetem.NS_TOETEM}));
});
$(document).bind(‘disconnected’, function () {
Toetem.referee = null;
Toetem.connection = null;
$(‘#waiting tbody’).empty();
$(‘#games tbody’).empty();
$(‘#login_dialog’).dialog(‘open’);
});
code snippet toetem.js
The on_message() handler listens for the initial waiting list as well as the change notifications. Its
implementation follows and should be added to the Toetem object:
on_message: function (message) {
var from = $(message).attr(‘from’);
if ($(message).find(‘waiting’).length > 0) {
$(message).find(‘waiting > player’).each(function () {
$(‘#waiting tbody’).append(
“<tr><td class=’jid’>” +
$(this).attr(‘jid’) +
“</td><td>” +
($(this).attr(‘jid’) === Toetem.connection.jid ?
“<input type=’button’ class=’stop_button’ “ +
“value=’stop waiting’>”:
“<input type=’button’ class=’start_button’ “ +
“value=’start game’>”) +
“</td></tr>”);
});
} else if ($(message).find(‘not-waiting’).length > 0) {
$(message).find(‘not-waiting > player’).each(function () {
var jid = $(this).attr(‘jid’);
$(‘#waiting td.jid’).each(function () {
if ($(this).text() === jid) {
$(this).parent().remove();
40718c11.indd 323
11/30/09 9:15:01 PM
324
❘
Chapter 11 Playing Games: Head to Head Tic-Tac-Toe
return false;
}
});
});
}
return true;
}
code snippet toetem.js
Whenever a <waiting> or <not-waiting> message comes in, the waiting list will be updated. Note
that an action button is displayed next to the JID of the waiting player. If the player in the list is
actually the user, this button will remove the user from the waiting list. Otherwise, the button will
start a game with the player. You can add the following event handler to the document ready handler
in order to implement the Stop Waiting button:
$(‘input.stop_button’).live(‘click’, function () {
Toetem.connection.sendIQ(
$iq({to: Toetem.referee, type: “set”})
.c(‘stop-waiting’, {xmlns: Toetem.NS_TOETEM}));
});
code snippet toetem.js
You should also implement the handlers for the Disconnect and Wait buttons on this screen. Add
the following code to the document ready handler:
$(‘#disconnect’).click(function () {
Toetem.connection.disconnect();
});
$(‘#wait’).click(function () {
Toetem.connection.sendIQ(
$iq({to: Toetem.referee, type: “set”})
.c(“waiting”, {xmlns: Toetem.NS_TOETEM}));
});
code snippet toetem.js
The Wait button sends the appropriate IQ-set stanza with the <waiting> command to the referee.
There is no need to update the waiting list on the screen because the referee will broadcast out the
change, triggering the on_message() handler and causing the new information to appear.
This completes the first version of the referee and the game client. If you launch an instance of the
referee and point several game clients at it, you should be able to monitor and manipulate the waiting
player list.
40718c11.indd 324
11/30/09 9:15:01 PM
Implementing Game Management
❘ 325
Implementing Game Management
The next step on the path to a complete game system is to implement the game management features
as well as game chat.
For the referee this includes the ability to create new games between players, make chat rooms for
these games, and invite the players to the rooms to interact. The referee must also handle the list
of active games as well as keep this new list, the waiting player list, and the players up-to-date as
games begin and end.
The game page of the Toetem client will need to be activated and its various widgets enabled. The
Start Game button you saw in the previous section must also be implemented. Finally, the client will
need to be able to send and receive regular chat messages in the room.
Referee Version Two
The enhanced referee must now keep track of active games and it will interact with a multi-user chat
server to create game rooms. Add the following new attributes to the Referee object, which add a
games dictionary and protocol namespace constants for MUC:
games: {},
NS_MUC: “http://jabber.org/protocol/muc”,
NS_MUC_USER: “http://jabber.org/protocol/muc#user”,
NS_MUC_OWNER: “http://jabber.org/protocol/muc#owner”,
MUC_SERVICE: ‘games.pemberley.lit’
code snippet referee.js
Note that you must change the MUC_SERVICE value to an appropriate multi-user chat service;
the value used here is only a placeholder. Your favorite XMPP server probably runs a service at
conference.domain.com.
The referee’s on_iq() handler, created earlier, will need to respond to two new commands — start
and resign. These new commands will start a new game and end a game. Add the following new
cases to the switch statement in your on_iq() handler:
case ‘start’:
Referee.on_game_start(iq, id, from, child);
break;
case ‘resign’:
Referee.on_resign(iq, id, from);
break;
code snippet referee.js
Next, you implement on_game_start() and on_resign().
40718c11.indd 325
11/30/09 9:15:01 PM
326
❘
Chapter 11 Playing Games: Head to Head Tic-Tac-Toe
The following implementation of on_game_start() is simple, but only because it relies on other
functions to do its dirty work. The function first checks that the players involved are not already
playing, removes them from the waiting list, and creates the game room. Add the following code
to the Referee object:
on_game_start: function (iq, id, from, elem) {
var with_jid = $(elem).attr(‘with’);
var with_bare = Strophe.getBareJidFromJid(with_jid);
// check that the players are available
if (!Referee.is_waiting(with_jid)) {
Referee.send_error(iq, ‘modify’, ‘item-not-found’);
return;
}
if (Referee.is_playing(with_jid) ||
Referee.is_playing(from)) {
Referee.send_error(iq, ‘cancel’, ‘not-allowed’);
return;
}
Referee.connection.send($iq({to: from, id: id, type: ‘result’}));
// remove players from waiting list
Referee.remove_waiting(from);
Referee.remove_waiting(with_jid);
// create game room and invite players
Referee.create_game(from, with_jid);
}
code snippet referee.js
Two new functions are referenced in the preceding code — is_playing() and create_game().
Similar to the is_waiting() function, is_playing() checks if a user is already in a game. Add its
implementation to the Referee object:
is_playing: function (jid) {
var bare = Strophe.getBareJidFromJid(jid);
var found = false;
$.each(Referee.games, function () {
if (Strophe.getBareJidFromJid(this.x_player) === jid ||
Strophe.getBareJidFromJid(this.o_player) === jid) {
found = true;
return false;
}
});
return found;
}
code snippet referee.js
40718c11.indd 326
11/30/09 9:15:01 PM
Implementing Game Management
❘ 327
The create_game() function is more involved. Because the referee is not integrated with the multiuser chat service, it’s possible that any room the referee attempts to create already exists. To deal
with this possibility, the referee chooses a random room name and attempts to create the room. If
the room already exists, the referee leaves the room and starts over. Once a new room has been
created, the referee initializes the game and invites the players to the room.
Add the following code for create_game() to the Referee object:
create_game: function (player1, player2) {
// generate a random room name, and make sure it
// doesn’t already exist to our knowledge
var room;
do {
room = “” + Math.floor(Math.random() * 1000000);
} while (Referee.games[room]);
var room_jid = room + “@” + Referee.MUC_SERVICE + “/Referee”;
Referee.connection.addHandler(function (presence) {
var game;
if ($(presence).find(‘status[code=”201”]’).length > 0) {
// room was freshly created
game = Referee.new_game();
game.room = room;
// create initial game state with randomized sides
if (Math.random() < 0.5) {
game.x_player = player1;
game.o_player = player2;
Referee.games[room] = game;
} else {
game.x_player = player2;
game.o_player = player1;
Referee.games[room] = game;
}
// invite players to start the game
Referee.invite_players(game);
// notify everyone about the game
Referee.broadcast(function (msg) {
return msg.c(‘games’, {xmlns: Referee.NS_TOETEM})
.c(‘game’, {‘x-player’: game.x_player,
‘o-player’: game.o_player,
‘room’: Referee.game_room(room)});
});
$(‘#log’).prepend(“<p>Created game room “ + room + “.</p>”);
} else {
// room was already in use, we need to start over
Referee.connection.send(
$pres({to: room_jid, type: ‘unavailable’}));
Referee.create_game(player1, player2);
40718c11.indd 327
11/30/09 9:15:01 PM
328
❘
Chapter 11 Playing Games: Head to Head Tic-Tac-Toe
}
return false;
}, null, “presence”, null, null, room_jid);
Referee.connection.send(
$pres({to: room_jid})
.c(“x”, {xmlns: Referee.NS_MUC}));
}
code snippet referee.js
The initial game state is created by the call to new_game(). Once the game object exists, the referee
randomly assigns each player to a side — either the Xs or the Os — invites the players to the game,
and broadcasts the game’s existence to all registered players.
The <presence> handler defined in this function checks for the special 201 status from the room.
This status, previously discussed in Chapter 8, is sent whenever the room has been freshly created.
The handler is only needed to check this first <presence> stanza, so it returns false and is deleted
after it finishes.
Take a look at the code for new_game(). You’ve already seen the room, x_player, and o_player
attributes, but there are several more.
new_game: function () {
return {
room: null,
waiting: 2,
status: ‘starting’,
x_player: null,
o_player: null,
winner: null
};
}
code snippet referee.js
Most of these attributes are self-explanatory. The waiting attribute starts at two because the referee
is waiting for two players to join the room before the game starts. Each time a player joins the room,
this value is decremented. When waiting reaches zero, the game is officially started. The status
attribute describes what is happening with the game. It may contain the values starting, playing,
finished, and aborted. These values are explained in detail as you implement more of the referee.
Finally, the winner attribute stores the JID of the winning player when the game is finished.
With the game’s room and object created, both players must be invited to the room. Add the following code to the Referee object, which sends the invitations:
invite_players: function (game) {
// send room invites
$.each([game.x_player, game.o_player], function () {
Referee.connection.send(
40718c11.indd 328
11/30/09 9:15:02 PM
Implementing Game Management
❘ 329
$msg({to: game.room + “@” + Referee.MUC_SERVICE})
.c(‘x’, {xmlns: Referee.NS_MUC_USER})
.c(‘invite’, {to: this}));
});
}
code snippet referee.js
The referee will get <presence> stanzas from each player as they join the game’s room. You need to
modify the referee’s on_presence() handler to look for these and start the game once both players
have joined. Also, if a player leaves before the game is over, you must forfeit that player and end the
game. Therefore, the on_presence() handler must watch for both available and unavailable presence from the players in the room.
Modify your referee’s on_presence() handler to match the following implementation. The changed
lines are highlighted:
on_presence: function (pres) {
var from = $(pres).attr(‘from’);
var bare_from = Strophe.getBareJidFromJid(from);
var type = $(pres).attr(‘type’);
var bare_jid = Strophe.getBareJidFromJid(Referee.connection.jid);
var domain = Strophe.getDomainFromJid(from);
if (domain === Referee.MUC_SERVICE) {
// handle room presence
var room = Strophe.getNodeFromJid(from);
var player = Strophe.getResourceFromJid(from);
var game = Referee.games[room];
// make sure it’s a game and player we care about
if (game &&
(game.status === ‘starting’ || game.status === ‘playing’) &&
(player === game.x_player || player === game.o_player)) {
if (game.status === ‘starting’) {
if (type !== ‘unavailable’) {
// waiting for one less player; if both are
// now present, the game is started
game.waiting -= 1;
$(‘#log’).prepend(“<p>Player “ + bare_from +
“ arrived to game “ + game.room +
“.</p>”);
if (game.waiting === 0) {
Referee.start_game(game);
}
} else {
// one of the players left before the game even
// started, so abort the game
Referee.end_game(game, ‘aborted’);
}
40718c11.indd 329
11/30/09 9:15:02 PM
330
❘
Chapter 11 Playing Games: Head to Head Tic-Tac-Toe
} else {
// during play, forfeit a player if they leave the room
if (type === ‘unavailable’) {
if (player === game.x_player) {
game.winner = game.o_player;
} else {
game.winner = game.x_player;
}
Referee.end_game(game, ‘finished’);
}
}
}
} else if ((!type || type === “unavailable”) &&
bare_from !== bare_jid) {
// handle directed presence from players
if (type === “unavailable”) {
delete Referee.presence[bare_from];
// remove from lists
Referee.remove_waiting(bare_from);
$(‘#log’).prepend(“<p>Unregistered “ + bare_from + “.</p>”);
} else {
Referee.presence[bare_from] = from;
$(‘#log’).prepend(“<p>Registered “ + bare_from + “.</p>”);
Referee.send_waiting(from);
Referee.send_games(from);
}
}
return true;
}
code snippet referee.js
The new if clause watches for <presence> stanzas that originate from the domain of the multi-user
chat service. The room and sender are extracted from the JID and the game object is looked up. If
the game exists, is active, and this stanza is from one of the players, then the stanza warrants closer
inspection.
While in the starting state, the referee is waiting for players to join the game. Once both players
have joined, it calls start_game(), and the state becomes playing. If one player joins and then
leaves before the other player arrives, the game is aborted with a call to end_game().
In the playing state, the referee is watching for the premature exit of one of the players, at which
point that player will be forfeited.
Before you implement start_game() and end_game(), you must implement send_games() to
send out the initial game list just like the current waiting list is sent when player’s register. Add the
40718c11.indd 330
11/30/09 9:15:02 PM
Implementing Game Management
❘ 331
send_games() function and the following helper functions to the Referee object. The helpers are
for constructing the JID of the game room and sending messages to the room.
send_games: function (jid) {
var msg = $msg({to: jid})
.c(‘games’, {xmlns: Referee.NS_TOETEM});
$.each(Referee.games, function (room) {
msg.c(‘game’, {‘x-player’: this.x_player,
‘o-player’: this.o_player,
‘room’: Referee.game_room(room)}).up();
});
Referee.connection.send(msg);
},
game_room: function (game) {
return game.room + “@” + Referee.MUC_SERVICE;
},
muc_msg: function (game) {
return $msg({to: Referee.game_room(game.room), type: “groupchat”});
}
code snippet referee.js
send_game() builds the list of currently active games and sends that to the player. The game_room()
function takes the base room name and constructs the appropriate JID for the game’s room. This is
used by muc_msg(), which returns a partially built stanza for communication with the room’s occupants. Because the referee will be sending a number of different messages to the game’s room, this
function is useful in reducing the programming work required.
The start_game() function broadcasts the <game-started> message to the room and sets the
game’s status to playing. Add its implementation to the Referee object:
start_game: function (game) {
game.status = ‘playing’;
Referee.connection.send(
Referee.muc_msg(game)
.c(‘body’).t(‘The match has started.’).up()
.c(‘game-started’, {xmlns: Referee.NS_TOETEM,
‘x-player’: game.x_player,
‘o-player’: game.o_player}));
$(‘#log’).prepend(“<p>Started game “ + game.room + “.</p>”);
}
code snippet referee.js
40718c11.indd 331
11/30/09 9:15:02 PM
332
❘
Chapter 11 Playing Games: Head to Head Tic-Tac-Toe
The referee includes both the <game-started> element and a normal <body> element. This provides
a human-readable message in the room as well as the machine-friendly trigger for the client code.
The end_game() function is a bit longer because it needs to send a similar message to the room,
clean up the game, and leave the room. Add the following code for end_game() to the Referee
object:
end_game: function (game, status) {
game.status = status;
// let room know the result of the game
var attrs = {xmlns: Referee.NS_TOETEM};
if (game.winner) {
attrs.winner = game.winner;
}
var msg = “”;
if (game.winner) {
msg += Strophe.getBareJidFromJid(game.winner) +
“ has won the match.”;
} else if (status === ‘finished’) {
msg += “The match was tied.”;
} else {
msg += “The match was aborted.”;
}
Referee.connection.send(
Referee.muc_msg(game)
.c(‘body’).t(msg).up()
.c(‘game-ended’, attrs));
// delete the game
delete Referee.games[game.room];
// leave the room
Referee.connection.send(
$pres({to: game.room + “@” + Referee.MUC_SERVICE + “/Referee”,
type: “unavailable”}));
// notify all the players
Referee.broadcast(function (msg) {
return msg.c(‘game-over’, {xmlns: Referee.NS_TOETEM})
.c(‘game’, {‘x-player’: game.x_player,
‘o-player’: game.o_player,
‘room’: Referee.game_room(game.room)});
});
$(‘#log’).prepend(“<p>Finished game “ + game.room + “.</p>”);
}
code snippet referee.js
40718c11.indd 332
11/30/09 9:15:02 PM
Implementing Game Management
❘ 333
The winner of the game, if there is one, is also included in the <game-ended> element sent to
the room.
Note that even though the referee has left and the game is concluded, the players may continue to
chat in the room for as long as they want.
The last task for this version of the referee is to implement on_resign() to handle a player resigning
the game. Remember that on_resign() was one of the three new functions added in the on_iq()
handler earlier in this section.
The referee must first find the game the user wants to resign; this is done by the helper function
find_game(). Add the following code for find_game() and on_resign() to the Referee object:
find_game: function (player) {
var game = null;
$.each(Referee.games, function (r, g) {
if (g.x_player === player || g.o_player === player) {
game = g;
return false;
}
});
return game;
},
on_resign: function (iq, id, from) {
var game = Referee.find_game(from);
if (!game || game.status === ‘finished’ ||
game.status === ‘aborted’ ||
game.status === ‘starting’ ) {
Referee.send_error(iq, ‘cancel’, ‘bad-request’);
} else {
if (from === game.x_player) {
game.winner = game.o_player;
} else {
game.winner = game.x_player;
}
Referee.end_game(game, ‘finished’);
Referee.connection.send($iq({to: from, id: id, type: ‘result’}));
$(‘#log’).prepend(“<p>” + Strophe.getBareJidFromJid(from) +
“ resigned game “ + game.room + “.</p>”);
}
}
code snippet referee.js
The on_resign() function makes sure the game exists and is in the playing state; otherwise, it
sends an error. The other player is set as the game’s winner, and then the previously implemented
40718c11.indd 333
11/30/09 9:15:02 PM
334
❘
Chapter 11 Playing Games: Head to Head Tic-Tac-Toe
end_game() function is called to conclude the game. Note that the player’s IQ-set stanza to resign
requires a corresponding IQ-result reply, and this is sent at the end of the function.
The referee now supports game management. The only thing still lacking is the game logic and
in-game events.
Toetem Client Version Two
Because the referee supports creating games, you can implement the Start Game button in the list of
waiting players as well as the active games list. Starting the game results in the referee inviting the
player to a new game room, and the client will need to listen for these invitations and join the room.
The client must then shift into the game mode, and you will make the game page’s buttons and chat
area do their jobs.
The client will need to keep track of the game it is currently involved in. Add the game attribute to
the Toetem object:
game: null
code snippet toetem.js
The main path to starting a game is through the Start Game button. When clicked, the button’s
handler sends a <start> command to the referee. Add the following handler to the client’s document ready function:
$(‘input.start_button’).live(‘click’, function () {
Toetem.connection.sendIQ(
$iq({to: Toetem.referee, type: “set”})
.c(‘start’, {xmlns: Toetem.NS_TOETEM,
“with”: $(this).parent().prev().text()}));
});
code snippet toetem.js
Notice that the name of the player is gleaned from the previous <td> element of the waiting player’s
table in the HTML.
Eventually the referee will send an invitation to the game’s room to the player. Because this invitation is sent as a <message> stanza, you’ll modify the on_message() handler to deal with it. At the
same time, you can add support for the active game notifications that the referee broadcasts. Make
the highlighted modifications to on_message():
on_message: function (message) {
var from = $(message).attr(‘from’);
if ($(message).find(‘waiting’).length > 0) {
$(message).find(‘waiting > player’).each(function () {
$(‘#waiting tbody’).append(
“<tr><td class=’jid’>” +
40718c11.indd 334
11/30/09 9:15:02 PM
Implementing Game Management
❘ 335
$(this).attr(‘jid’) +
“</td><td>” +
($(this).attr(‘jid’) === Toetem.connection.jid ?
“<input type=’button’ class=’stop_button’ “ +
“value=’stop waiting’>”:
“<input type=’button’ class=’start_button’ “ +
“value=’start game’>”) +
“</td></tr>”);
});
} else if ($(message).find(‘not-waiting’).length > 0) {
$(message).find(‘not-waiting > player’).each(function () {
var jid = $(this).attr(‘jid’);
$(‘#waiting td.jid’).each(function () {
if ($(this).text() === jid) {
$(this).parent().remove();
return false;
}
});
});
} else if ($(message).find(‘games’).length > 0) {
$(message).find(‘games > game’).each(function () {
if ($(this).attr(‘x-player’) !== Toetem.connection.jid &&
$(this).attr(‘o-player’) !== Toetem.connection.jid) {
$(‘#games tbody’).append(
“<tr><td>” +
$(this).attr(‘x-player’) +
“</td><td>” +
$(this).attr(‘o-player’) +
“</td><td class=’jid’>” +
$(this).attr(‘room’) +
“</td><td>” +
“<input type=’button’ class=’watch_button’ “ +
“value=’watch game’>” +
“</td></tr>”);
}
});
} else if ($(message).find(‘game-over’).length > 0) {
$(message).find(‘game-over > game’).each(function () {
var jid = $(this).attr(‘room’);
$(‘#games td.jid’).each(function () {
if ($(this).text() === jid) {
$(this).parent().remove();
return false;
}
});
});
} else if ($(message)
.find(‘x > invite’).attr(‘from’) === Toetem.referee) {
Toetem.game = from;
$(‘#messages’).empty();
$(‘#messages’).append(“<div class=’system’>” +
40718c11.indd 335
11/30/09 9:15:02 PM
336
❘
Chapter 11 Playing Games: Head to Head Tic-Tac-Toe
“Joined game #” +
Strophe.getNodeFromJid(from) +
“</div>”);
Toetem.scroll_chat();
$(‘#wait’).removeAttr(‘disabled’);
$(‘#browser’).hide();
$(‘#game’).show();
var nick = Toetem.connection.jid;
Toetem.connection.send(
$pres({to: Toetem.game + ‘/’ + nick})
.c(‘x’, {xmlns: Toetem.NS_MUC}));
}
return true;
}
code snippet toetem.js
When game notifications are received, the on-screen active games list is updated appropriately. When
a game invitation is received, on_message() sets the game attribute to the room’s JID, switches the
client to the game screen, and joins the room. Before switching to the game screen, the message area
is cleared and a brief message is added to let the user know what’s happening. The browser screen is
hidden, the game screen is shown, and because the user is no longer waiting for a game, the Wait
button is re-enabled.
Players join the room with their nickname set to their own JID. This is not the most user-friendly,
but it makes the code easier and shorter. In a real game system, you might handle nicknames more
elegantly.
Eventually, both players should join the room and the referee will send the <game-started> element.
The on_message() handler needs to watch for these elements in messages sent to the room. Add this
final else clause to the main if statement in on_message():
} else {
var body = $(message).children(‘body’).text();
if (body) {
var who = Strophe.getResourceFromJid(from);
var nick_style = ‘nick’;
if (who === Toetem.connection.jid) {
nick_style += ‘ me’;
}
$(‘#messages’).append(
“<div><<span class=’” + nick_style + “‘>” +
Strophe.getBareJidFromJid(who) +
“</span>> “ +
body + “</div>”);
Toetem.scroll_chat();
40718c11.indd 336
11/30/09 9:15:02 PM
Implementing Game Management
❘ 337
}
if ($(message).find(‘delay’).length > 0) {
// skip command processing of old messages
return true;
}
var cmdNode = $(message)
.find(‘*[xmlns=”‘ + Toetem.NS_TOETEM + ‘“]’);
var cmd = null;
if (cmdNode.length > 0) {
cmd = cmdNode.get(0).tagName;
}
if (cmd === ‘game-started’) {
$(‘#resign’).removeAttr(‘disabled’);
} else if (cmd === ‘game-ended’) {
$(‘#resign’).attr(‘disabled’, ‘disabled’);
$(‘#leave’).removeAttr(‘disabled’);
}
}
code snippet toetem.js
The new code first adds the contents of any <body> element to the chat area. If any commands are
received from the referee, it takes the appropriate actions, but it ignores any delayed commands
from the chat history. For the game-started command, it simply enables the Resign button; for the
game-ended command, the Resign button is disabled and the Leave button is enabled.
This code also displays any messages sent by the other occupants of the game room. Of course, the
user will want to communicate as well and be able to use the new buttons. Add the following event
handlers to the client’s document ready function:
$(‘#input’).keypress(function (ev) {
if (ev.which === 13) {
ev.preventDefault();
var input = $(this).val();
$(this).val(‘’);
Toetem.connection.send(
$msg({to: Toetem.game, type: ‘groupchat’})
.c(‘body’).t(input));
}
});
$(‘#resign’).click(function () {
Toetem.connection.sendIQ(
$iq({to: Toetem.referee, type: ‘set’})
.c(‘resign’, {xmlns: Toetem.NS_TOETEM}));
});
$(‘#leave’).click(function () {
Toetem.connection.send(
40718c11.indd 337
11/30/09 9:15:03 PM
338
❘
Chapter 11 Playing Games: Head to Head Tic-Tac-Toe
$pres({to: Toetem.game + ‘/’ + Toetem.connection.jid,
type: ‘unavailable’}));
$(‘#game’).hide();
$(‘#browser’).show();
});
code snippet toetem.js
The keypress handler is nearly identical to similar handlers you’ve created in previous chapters to
allow the user to input and send text. Clicking the Resign button simply sends the <resign> command to the referee, which will cause a <game-ended> command to be sent to the room. The Leave
button exits the room and puts the client back on the browser screen.
The final function needed is the scroll_chat() function, which you’ve also seen before. Add this
function to the Toetem object:
scroll_chat: function () {
var div = $(‘#messages’).get(0);
div.scrollTop = div.scrollHeight;
}
code snippet toetem.js
The second version of the Toetem client is complete. Try running the new referee along with several
clients and create, resign, and leave games. You may even chat with yourself if you are so inclined.
Implementing the Game Logic
The last step on the path to Tic-Tac-Toe madness is to implement the game rules, player moves,
display the Tic-Tac-Toe board, and allow observers to watch games.
First, the referee will need to manage the board for each Tic-Tac-Toe game, and you will create a
small library that tracks the previous moves on the board and makes sure new moves are legal. This
library will also determine when the game is over, either by one player winning or by all possible
moves having been made without anyone achieving three Xs or Os in a row.
Once the board’s logic is finished, you extend the referee to use it as well as react to the incoming
moves from players.
The referee must also send intermediate game state to any observer that joins the room.
Finally, you’ll add a graphical display of the Tic-Tac-Toe board to the client and allow players to
make their moves by clicking directly on the board. Observers will be able to join games in progress
and watch the action.
The Tic-Tac-Toe Library
The Tic-Tac-Toe library abstracts all the game-specific logic into a single place. The referee will create a board for each game and send moves to the board. After a move, it can find out whether the
40718c11.indd 338
11/30/09 9:15:03 PM
Implementing the Game Logic
❘ 339
game is over in order to take the appropriate action. In this section, you create a Board class with
this functionality.
First, create a file called board.js and add the Board constructor function to it:
Referee.Board = function () {
this.board = [[‘ ‘, ‘ ‘, ‘ ‘], [‘ ‘, ‘ ‘, ‘ ‘], [‘ ‘, ‘ ‘, ‘ ‘]];
};
code snippet board.js
Notice that the Board object is defined under the Referee object. The referee can create new boards
with new Referee.Board().
The board’s internal state consists of a single attribute, board. This attribute is just a three-by-three
matrix of characters, which will have the value ‘x’, ‘o’, or ‘ ‘.
Moves are sent to the referee as a column and a row. The column is a letter, either a, b, or c, and the
row is a number from 1 to 3. The Board class will need to convert these values to internal coordinates it can use to index the board matrix. Create the following helper function, moveToCoords().
Add this code right after the constructor function:
Referee.Board.prototype = {
moveToCoords: function (col, row) {
var map = {‘a’: 0, ‘b’: 1, ‘c’: 2, ‘1’: 0, ‘2’: 1, ‘3’: 2};
var coords = {row: null, col: null};
coords.col = map[col];
coords.row = map[row];
return coords;
}
};
code snippet board.js
Methods of JavaScript classes can be defined by setting the class’s prototype object to an object
containing the desired methods. When a Board object is created, the new object will inherit these
methods from the prototype. You augment this prototype with more methods throughout the rest of
this section.
The moveToCoords() function takes the column and row and creates a simple object with col and
row properties set to the converted values. The map variable defines a simple mapping from usersupplied coordinates to numerical indexes; this makes the conversion extremely simple.
Another handy helper function that is needed is toString(), which will convert the state of the
board into a short string. Add the following code to the prototype:
toString: function () {
var r, s = ‘’;
for (r = 0; r < 3; r++) {
40718c11.indd 339
11/30/09 9:15:03 PM
340
❘
Chapter 11 Playing Games: Head to Head Tic-Tac-Toe
s += this.board[r].join(‘’);
}
return s;
}
code snippet board.js
To determine if moves are legal or if the game is over, the Board class must know whose turn it is.
Add the following currentSide() function to the prototype. This function counts the Xs and Os to
determine which side can make the next move:
currentSide: function () {
var r, c;
var x = 0, o = 0;
for (r = 0; r < 3; r++) {
for (c = 0; c < 3; c++) {
if (this.board[r][c] === ‘x’) {
x += 1;
} else if (this.board[r][c] === ‘o’) {
o += 1;
}
}
}
if (x === o) {
return ‘x’;
}
return ‘o’;
}
code snippet board.js
Given a move consisting of an X or an O and target coordinates, you can easily determine whether
the move is legal. An X move can be made only when it is the X side’s turn to move, and the same
applies for O moves. Also, no move can be made to a square that already contains a move. These
rules are codified in the following implementation of validMove(), which should be added to the
prototype:
validMove: function (side, col, row) {
var curSide = this.currentSide();
if (side !== curSide) {
return false;
}
var coords = this.moveToCoords(col, row);
if (this.board[coords.row][coords.col] !== ‘ ‘) {
return false;
40718c11.indd 340
11/30/09 9:15:03 PM
Implementing the Game Logic
❘ 341
}
return true;
}
code snippet board.js
The move() function calls validMove() to make sure a move is actually allowed. If the move is
legal, the board matrix can be updated to reflect the new move. Add move() to the prototype:
move: function (side, col, row) {
if (this.validMove(side, col, row)) {
var coords = this.moveToCoords(col, row);
this.board[coords.row][coords.col] = side;
} else {
throw {
name: “BoardError”,
message: “Move invalid”
};
}
}
code snippet board.js
If the move is not legal, an exception is raised, which the referee will catch in order to send an error
to the offending client.
Once a move is made, the referee must determine whether the game has finished. Create a function
called gameOver() to handle this task, and add it to the prototype:
gameOver: function () {
var r, c;
// check for row wins
for (r = 0; r < 3; r++) {
if (this.board[r][0] === ‘x’ &&
this.board[r][1] === ‘x’ &&
this.board[r][2] === ‘x’) {
return ‘x’;
} else if (this.board[r][0] === ‘o’ &&
this.board[r][1] === ‘o’ &&
this.board[r][2] === ‘o’) {
return ‘o’;
}
}
// check for column wins
for (c = 0; c < 3; c++) {
if (this.board[0][c] === ‘x’ &&
this.board[1][c] === ‘x’ &&
this.board[2][c] === ‘x’) {
40718c11.indd 341
11/30/09 9:15:03 PM
342
❘
Chapter 11 Playing Games: Head to Head Tic-Tac-Toe
return ‘x’;
} else if (this.board[0][c] === ‘o’ &&
this.board[1][c] === ‘o’ &&
this.board[2][c] === ‘o’) {
return ‘o’;
}
}
// check for diagonal wins
if (this.board[0][0] === ‘x’ &&
this.board[1][1] === ‘x’ &&
this.board[2][2] === ‘x’) {
return ‘x’;
} else if (this.board[0][0] ===
this.board[1][1] ===
this.board[2][2] ===
return ‘o’;
} else if (this.board[0][2] ===
this.board[1][1] ===
this.board[2][0] ===
return ‘x’;
} else if (this.board[0][2] ===
this.board[1][1] ===
this.board[2][0] ===
return ‘o’;
}
‘o’ &&
‘o’ &&
‘o’) {
‘x’ &&
‘x’ &&
‘x’) {
‘o’ &&
‘o’ &&
‘o’) {
// check for a tie
var tie = true;
for (r = 0; r < 3; r++) {
if (this.board[r].indexOf(‘ ‘) >= 0) {
tie = false;
break;
}
}
if (tie) {
return “=”;
}
return false;
}
code snippet board.js
This function is long but quite simple. It simply checks for all the winning Tic-Tac-Toe patterns
within the board matrix. If no such pattern is detected, it then checks to see if all squares contain a
move, in which case the game is a tie. It will return ‘x’, ‘o’, or ‘=’ if the game is over and false
otherwise.
This is all the logic needed for the simple game of Tic-Tac-Toe. The complete code for board.js
appears in Listing 11-8 at the end of the chapter.
40718c11.indd 342
11/30/09 9:15:03 PM
Implementing the Game Logic
❘ 343
Referee Version Three
With the help the new Board class, it won’t take long to make the referee fully functional. Most of
the work is adding the new <move> command.
First, modify the new_game() function to initialize a Board object for the game:
new_game: function () {
return {
room: null,
board: new Referee.Board(),
waiting: 2,
status: ‘starting’,
x_player: null,
o_player: null,
winner: null
};
}
code snippet referee.js
Next, add the new switch statement clause for the <move> command to the referee’s on_iq()
handler:
case ‘move’:
Referee.on_move(iq, id, from, child);
break;
code snippet referee.js
Just like the other commands, this command delegates its implementation to another function, on_
move(). Add the following function to the Referee object:
on_move: function (iq, id, from, elem) {
var game = Referee.find_game(from);
var row = elem.attr(‘row’);
var col = elem.attr(‘col’);
if (!game) {
Referee.send_error(iq, ‘cancel’, ‘not-allowed’);
} else if (!row || !col) {
Referee.send_error(iq, ‘modify’, ‘bad-request’);
} else if (!game || game.status !== ‘playing’ ||
(game.board.currentSide() === ‘x’ &&
from === game.o_player) ||
(game.board.currentSide() === ‘o’ &&
from === game.x_player)) {
Referee.send_error(iq, ‘wait’, ‘unexpected-request’);
} else {
var side = null;
if (from === game.x_player) {
side = ‘x’;
} else {
40718c11.indd 343
11/30/09 9:15:03 PM
344
❘
Chapter 11 Playing Games: Head to Head Tic-Tac-Toe
side = ‘o’;
}
try {
game.board.move(side, col, row);
Referee.connection.send(
$iq({to: from, id: id, type: ‘result’}));
Referee.connection.send(
Referee.muc_msg(game)
.c(‘body’).t(
Strophe.getBareJidFromJid(from) +
‘ has placed an ‘ + side + ‘ at ‘ +
col + row).up()
.c(‘move’, {xmlns: Referee.NS_TOETEM,
col: col,
row: row}));
$(‘#log’).prepend(“<p>” + Strophe.getBareJidFromJid(from) +
“ moved in game “ + game.room + “.</p>”);
// check for end of game
var winner = game.board.gameOver();
if (winner) {
if (winner === ‘x’) {
game.winner = game.x_player;
} else if (winner === ‘o’) {
game.winner = game.o_player;
}
Referee.end_game(game, ‘finished’);
}
} catch (e) {
Referee.send_error(iq, ‘cancel’, ‘not-acceptable’);
}
}
}
code snippet referee.js
The function does a few checks to ensure that a game exists for the player that sent the move and
that the game is in the correct state with the player allowed to move. If these conditions are satisfied, the board’s move() function is called to make the move and the gameOver() function used to
determine if the game is over and whether there is a winner. If an error is encountered, the appropriate response is sent back to the player. If all is well, the referee will broadcast out the move to
the entire room.
Finally, the referee must send intermediate game state to any observers who join the room. These
observers may enter the room after several moves have been made, so they will need the current
40718c11.indd 344
11/30/09 9:15:03 PM
Implementing the Game Logic
❘ 345
board moves and other game state. The referee is notified when observers join via their presence to
the room, so you must modify the on_presence() handler to send game state. Add the following if
else clause to the end of the if statement beginning “if (game && (game.status === ‘starting’”
in on_presence():
} else if (game && type !== ‘unavailable’) {
// handle observers joining
var msg = $msg({to: from, type: ‘chat’});
if (game.status === ‘starting’) {
msg.c(‘body’).t(‘Waiting for players..’).up()
.c(‘game-state’, {xmlns: Referee.NS_TOETEM,
‘phase’: game.status,
‘x-player’: game.x_player,
‘o-player’: game.o_player});
} else if (game.status === ‘playing’) {
msg.c(‘body’).t(‘Game in progress.’).up()
.c(‘game-state’, {xmlns: Referee.NS_TOETEM,
‘phase’: game.status,
‘x-player’: game.x_player,
‘o-player’: game.o_player,
‘pos’: game.board.toString()});
} else {
msg.c(‘body’).t(‘Game over.’).up()
.c(‘game-state’, {xmlns: Referee.NS_TOETEM,
‘phase’: ‘finished’,
‘x-player’: game.x_player,
‘o-player’: game.o_player,
‘pos’: game.board.toString()});
if (game.winner) {
msg.attr({winner: game.winner});
}
}
Referee.connection.send(msg);
$(‘#log’).prepend(“<p>Sent state to observer “ + bare_from +
“ in game “ + game.room + “.</p>”);
}
code snippet referee.js
That’s it! The referee is now ready to officiate Tic-Tac-Toe games.
Toetem Client Version Three
The final Toetem client needs a pretty Tic-Tac-Toe board to show the game in progress as well as
allow the player to make moves. Toetem will also need to watch for <move> commands sent to the
room by the referee in order to keep the board up to date, and if the user is observing the game,
react to game state messages when the user joins.
40718c11.indd 345
11/30/09 9:15:04 PM
346
❘
Chapter 11 Playing Games: Head to Head Tic-Tac-Toe
The graphical board will be drawn with the HTML5 <canvas> API, which was also used for the
sketching area in Chapter 9’s SketchPad application. Like SketchPad, the final Toetem client will not
work in Internet Explorer due to its lack of support for the <canvas> element.
A Tic-Tac-Toe board is comprised of nine squares separated by four straight lines that cross each
other. Add the following draw_board() function to the Toetem object to draw the board:
draw_board: function () {
var ctx = $(‘#board’)[0].getContext(‘2d’);
// clear board
ctx.fillStyle = ‘#000’;
ctx.beginPath();
ctx.fillRect(0, 0, 300, 300);
// draw grid lines
ctx.strokeStyle = ‘#999’;
ctx.lineWidth = 4;
ctx.beginPath();
ctx.moveTo(100, 10);
ctx.lineTo(100, 290);
ctx.moveTo(200, 10);
ctx.lineTo(200, 290);
ctx.moveTo(10, 100);
ctx.lineTo(290, 100);
ctx.moveTo(10, 200);
ctx.lineTo(290, 200);
ctx.stroke();
}
code snippet toetem.js
First, the entire area is filled with black. Four lines are then drawn in gray to create the nine squares.
The <canvas> API calls are fairly self-explanatory, and you can find more details about them in
Chapter 9.
When a player moves, an X or an O must be placed at the appropriate location. You draw an X with two
diagonal lines and an O as a circle. Add the following draw_piece() function to the Toetem object:
draw_piece: function (piece, x, y) {
var ctx = $(‘#board’)[0].getContext(‘2d’);
ctx.strokeStyle = ‘#fff’;
var center_x = (x * 100) + 50;
var center_y = (y * 100) + 50;
ctx.beginPath();
if (piece === ‘x’) {
40718c11.indd 346
11/30/09 9:15:04 PM
Implementing the Game Logic
❘ 347
ctx.moveTo(center_x - 15, center_y - 15);
ctx.lineTo(center_x + 15, center_y + 15);
ctx.moveTo(center_x + 15, center_y - 15);
ctx.lineTo(center_x - 15, center_y + 15);
} else {
ctx.arc(center_x, center_y, 15, 0, 2 * Math.PI, true);
}
ctx.stroke();
}
code snippet toetem.js
The position is calculated for the center of the appropriate square, and then the correct shape is
drawn relative to that position.
The fancy graphics are now out of the way, but they still need to be integrated into the game client.
To draw the initial board and set the watching attribute correctly, add the following highlighted
line to the on_message() handler, just after the game area is shown:
Toetem.game = from;
Toetem.watching = false;
$(‘#messages’).empty();
$(‘#messages’).append(“<div class=’system’>” +
“Joined game #” +
Strophe.getNodeFromJid(from) +
“</div>”);
Toetem.scroll_chat();
$(‘#wait’).removeAttr(‘disabled’);
$(‘#browser’).hide();
$(‘#game’).show();
Toetem.draw_board();
$(‘#board-status’).html(‘Waiting for other player..’);
code snippet toetem.js
The Watch Game button also needs similar code to switch to the game view and draw the board as
well as code to join the game’s room. Add the following code to the document event handler:
$(‘input.watch_button’).live(‘click’, function () {
// join the game room
Toetem.game = $(this).parent().prev().text();
Toetem.watching = true;
$(‘#browser’).hide();
$(‘#game’).show();
40718c11.indd 347
11/30/09 9:15:04 PM
348
❘
Chapter 11 Playing Games: Head to Head Tic-Tac-Toe
Toetem.draw_board();
$(‘#board-status’).html(‘’);
Toetem.connection.send(
$pres({to: Toetem.game + ‘/’ + Toetem.connection.jid}));
});
code snippet toetem.js
To make new moves, the player clicks an empty square on the board. This action causes the appropriate <move> command to be sent to the referee. There’s no point in letting players move out of
turn, so moving should only be allowed during a player’s own turn.
To keep track of whose turn it is, what pieces the players are using, and whether the user is watching
or playing, add the following new attributes to the Toetem object:
x_player: null,
o_player: null,
turn: null,
my_side: null,
watching: false
code snippet toetem.js
These new attributes will be initialized when the game starts or is joined and maintained as the
players make moves.
Add the following handler to the document ready handler to enable the player to make moves:
$(‘#board’).click(function (ev) {
if (Toetem.turn && Toetem.turn === Toetem.my_side) {
var pos = $(this).position();
var x = Math.floor((ev.pageX - pos.left) / 100);
var y = Math.floor((ev.pageY - pos.top) / 100);
Toetem.connection.sendIQ(
$iq({to: Toetem.referee, type: ‘set’})
.c(‘move’, {xmlns: Toetem.NS_TOETEM,
col: [‘a’, ‘b’, ‘c’][x],
row: y + 1}));
}
});
code snippet toetem.js
If it’s the player’s turn, the coordinates of the mouse click are used to calculate the square on the
board the player clicked. Because the event’s pageX and pageY coordinates are provided relative to
the page — not the element — they must be transformed by subtracting the position of the board’s
top-left corner. Because each square is 100 pixels on a side, the code divides the final coordinates by
100 to obtain integers from 0 to 2, indicating one of the three possible squares in each dimension.
40718c11.indd 348
11/30/09 9:15:04 PM
Implementing the Game Logic
❘ 349
Once the square is known, the <move> command is sent to the referee. Notice that the on-screen
board is not updated yet; it will be updated once the referee broadcasts out the verified move to the
game room.
The game start, game state, and move processing logic are all that remain before Toetem is able to
play real Tic-Tac-Toe games. The referee broadcasts game starts and moves to the room, but sends
game state to oservers directly; all of these notifications arrive to the on_message() handler. Make
the highlighted modifications to the command processing logic inside on_message():
var cmdNode = $(message)
.find(‘*[xmlns=”‘ + Toetem.NS_TOETEM + ‘“]’);
var cmd = null;
var row, col;
if (cmdNode.length > 0) {
cmd = cmdNode.get(0).tagName;
}
if (cmd === ‘game-started’) {
var me = Toetem.connection.jid;
Toetem.x_player = cmdNode.attr(‘x-player’);
Toetem.o_player = cmdNode.attr(‘o-player’);
Toetem.turn = ‘x’;
if (Toetem.x_player === me) {
Toetem.my_side = ‘x’;
$(‘#board-status’).html(‘Your move..’);
} else if (Toetem.o_player === me) {
Toetem.my_side = ‘o’;
$(‘#board-status’).html(“Opponent’s move..”);
}
if (!Toetem.watching) {
$(‘#resign’).removeAttr(‘disabled’);
} else {
$(‘#leave’).removeAttr(‘disabled’);
}
} else if (cmd === ‘game-ended’) {
$(‘#resign’).attr(‘disabled’, ‘disabled’);
$(‘#leave’).removeAttr(‘disabled’);
var winner = cmdNode.attr(‘winner’);
if (winner === Toetem.connection.jid) {
$(‘#board-status’).html(‘You won!’);
} else if (winner && !Toetem.watching) {
$(‘#board-status’).html(‘You lost!’);
} else if (!Toetem.watching) {
$(‘#board-status’).html(‘You tied!’);
}
} else if (cmd === ‘move’) {
var map = {‘a’: 0, ‘b’: 1, ‘c’: 2, ‘1’: 0, ‘2’: 1, ‘3’: 2};
col = cmdNode.attr(‘col’);
row = cmdNode.attr(‘row’);
Toetem.draw_piece(Toetem.turn, map[col], map[row]);
if (Toetem.turn === ‘x’) {
40718c11.indd 349
11/30/09 9:15:04 PM
350
❘
Chapter 11 Playing Games: Head to Head Tic-Tac-Toe
Toetem.turn = ‘o’;
} else {
Toetem.turn = ‘x’;
}
if (!Toetem.watching) {
Toetem.my_turn = Toetem.turn === Toetem.my_side;
if (Toetem.my_turn) {
$(‘#board-status’).html(“Your move..”);
} else {
$(‘#board-status’).html(“Opponent’s move..”);
}
}
} else if (cmd === ‘game-state’) {
Toetem.x_player = cmdNode.attr(‘x-player’);
Toetem.o_player = cmdNode.attr(‘o-player’);
var pos = cmdNode.attr(‘pos’);
var blanks = 0;
if (pos) {
var idx = 0;
for (row = 0; row < 3; row++) {
for (col = 0; col < 3; col++) {
if (pos[idx] !== ‘ ‘) {
Toetem.draw_piece(pos[idx], col, row);
} else {
blanks += 1;
}
idx += 1;
}
}
}
if (blanks % 2 === 0) {
Toetem.turn = ‘o’;
} else {
Toetem.turn = ‘x’;
}
}
code snippet toetem.js
The game-started command now sets up the x_player, o_player, turn and my_side attributes
and updates the board’s status area appropriately.
When <move> commands are received, they are transformed to board coordinates and used to draw
the piece on the board. Then the turn attribute is flipped, and the board’s status area is updated.
The game-ended command updates the states of the Buttons for the player and prints a message
about the winner to the board’s status area.
40718c11.indd 350
11/30/09 9:15:04 PM
Implementing the Game Logic
❘ 351
Finally, the game-state command causes the previous moves to be drawn and the game’s attributes
to be set up.
The Toetem client is finished. Fire up a referee and invite several of your friends to play Tic-Tac-Toe
online with you. Tell the world about your new game service and watch the games of other players.
The final code for the referee, the Board class, and the client are shown in Listing 11-7, Listing 11-8,
and Listing 11-9, respectively.
Listing 11-7: referee.js (final)
var Referee = {
connection: null,
games: {},
waiting: [],
presence: {},
NS_TOETEM: “http://metajack.im/ns/toetem”,
NS_MUC: “http://jabber.org/protocol/muc”,
NS_MUC_USER: “http://jabber.org/protocol/muc#user”,
NS_MUC_OWNER: “http://jabber.org/protocol/muc#owner”,
MUC_SERVICE: ‘chat.cactus.local’,
is_waiting: function (jid) {
var bare_jid = Strophe.getBareJidFromJid(jid);
var i;
for (i = 0; i < Referee.waiting.length; i++) {
var wjid = Strophe.getBareJidFromJid(Referee.waiting[i]);
if (wjid === bare_jid) {
return true;
}
}
return false;
},
is_playing: function (jid) {
var bare = Strophe.getBareJidFromJid(jid);
var found = false;
$.each(Referee.games, function () {
if (Strophe.getBareJidFromJid(this.x_player) === jid ||
Strophe.getBareJidFromJid(this.o_player) === jid) {
found = true;
return false;
}
});
return found;
40718c11.indd 351
continues
11/30/09 9:15:04 PM
352
❘
Chapter 11 Playing Games: Head to Head Tic-Tac-Toe
Listing 11-7 (continued)
},
remove_waiting: function (jid) {
var bare_jid = Strophe.getBareJidFromJid(jid);
var i;
for (i = 0; i < Referee.waiting.length; i++) {
var wjid = Strophe.getBareJidFromJid(Referee.waiting[i]);
if (wjid === bare_jid) {
break;
}
}
if (i < Referee.waiting.length) {
Referee.waiting.splice(i, 1);
Referee.broadcast(function (msg) {
return msg.c(‘not-waiting’, {xmlns: Referee.NS_TOETEM})
.c(‘player’, {jid: jid});
});
$(‘#log’).prepend(“<p>Removed “ + bare_jid + “ from “ +
“waiting list</p>”);
}
},
send_error: function (iq, etype, ename, app_error) {
var error = $iq({to: $(iq).attr(‘from’),
id: $(iq).attr(‘id’),
type: ‘error’})
.cnode(iq.cloneNode(true)).up()
.c(‘error’, {type: etype})
.c(ename, {xmlns: Strophe.NS.STANZAS}).up();
if (app_error) {
error.c(app_error, {xmlns: Referee.NS_TOETEM});
}
Referee.connection.send(error);
},
on_presence: function (pres) {
var from = $(pres).attr(‘from’);
var bare_from = Strophe.getBareJidFromJid(from);
var type = $(pres).attr(‘type’);
var bare_jid = Strophe.getBareJidFromJid(Referee.connection.jid);
var domain = Strophe.getDomainFromJid(from);
if (domain === Referee.MUC_SERVICE) {
// handle room presence
var room = Strophe.getNodeFromJid(from);
var player = Strophe.getResourceFromJid(from);
40718c11.indd 352
11/30/09 9:15:04 PM
Implementing the Game Logic
❘ 353
var game = Referee.games[room];
// make sure it’s a game and player we care about
if (game &&
(game.status === ‘starting’ || game.status === ‘playing’) &&
(player === game.x_player || player === game.o_player)) {
if (game.status === ‘starting’) {
if (type !== ‘unavailable’) {
// waiting for one less player; if both are
// now present, the game is started
game.waiting -= 1;
$(‘#log’).prepend(“<p>Player “ + bare_from +
“ arrived to game “ + game.room +
“.</p>”);
if (game.waiting === 0) {
Referee.start_game(game);
}
} else {
// one of the players left before the game even
// started, so abort the game
Referee.end_game(game, ‘aborted’);
}
} else {
// during play, forfeit a player if they leave the room
if (type === ‘unavailable’) {
if (player === game.x_player) {
game.winner = game.o_player;
} else {
game.winner = game.x_player;
}
Referee.end_game(game, ‘finished’);
}
}
} else if (game && type !== ‘unavailable’) {
// handle observers joining
var msg = $msg({to: from, type: ‘chat’});
if (game.status === ‘starting’) {
msg.c(‘body’).t(‘Waiting for players..’).up()
.c(‘game-state’, {xmlns: Referee.NS_TOETEM,
‘phase’: game.status,
‘x-player’: game.x_player,
‘o-player’: game.o_player});
} else if (game.status === ‘playing’) {
msg.c(‘body’).t(‘Game in progress.’).up()
.c(‘game-state’, {xmlns: Referee.NS_TOETEM,
‘phase’: game.status,
‘x-player’: game.x_player,
‘o-player’: game.o_player,
‘pos’: game.board.toString()});
} else {
msg.c(‘body’).t(‘Game over.’).up()
40718c11.indd 353
continues
11/30/09 9:15:04 PM
354
❘
Chapter 11 Playing Games: Head to Head Tic-Tac-Toe
Listing 11-7 (continued)
.c(‘game-state’, {xmlns: Referee.NS_TOETEM,
‘phase’: ‘finished’,
‘x-player’: game.x_player,
‘o-player’: game.o_player,
‘pos’: game.board.toString()});
if (game.winner) {
msg.attr({winner: game.winner});
}
}
Referee.connection.send(msg);
$(‘#log’).prepend(“<p>Sent state to observer “ + bare_from +
“ in game “ + game.room + “.</p>”);
}
} else if ((!type || type === “unavailable”) &&
bare_from !== bare_jid) {
// handle directed presence from players
if (type === “unavailable”) {
delete Referee.presence[bare_from];
// remove from lists
Referee.remove_waiting(bare_from);
$(‘#log’).prepend(“<p>Unregistered “ + bare_from + “.</p>”);
} else {
Referee.presence[bare_from] = from;
$(‘#log’).prepend(“<p>Registered “ + bare_from + “.</p>”);
Referee.send_waiting(from);
Referee.send_games(from);
}
}
return true;
},
broadcast: function (func) {
$.each(Referee.presence, function () {
var msg = func($msg({to: this}));
Referee.connection.send(msg);
});
},
send_waiting: function (jid) {
var msg = $msg({to: jid})
.c(‘waiting’, {xmlns: Referee.NS_TOETEM});
$.each(Referee.waiting, function () {
msg.c(‘player’, {jid: this}).up();
40718c11.indd 354
11/30/09 9:15:05 PM
Implementing the Game Logic
❘ 355
});
Referee.connection.send(msg);
},
on_iq: function (iq) {
var id = $(iq).attr(‘id’);
var from = $(iq).attr(‘from’);
var type = $(iq).attr(‘type’);
// make sure we know the user’s presence first
if (!Referee.presence[Strophe.getBareJidFromJid(from)]) {
Referee.send_error(iq, ‘auth’, ‘forbidden’);
} else {
var child = $(iq).find(‘*[xmlns=”‘ + Referee.NS_TOETEM +
‘“]:first’);
if (child.length > 0) {
if (type === ‘get’) {
Referee.send_error(iq, ‘cancel’, ‘bad-request’);
return true;
} else if (type !== ‘set’) {
// ignore IQ-error and IQ-result
return true;
}
switch (child[0].tagName) {
case ‘waiting’:
Referee.on_waiting(id, from, child);
break;
case ‘stop-waiting’:
Referee.on_stop_waiting(id, from, child);
break;
case ‘start’:
Referee.on_game_start(iq, id, from, child);
break;
case ‘resign’:
Referee.on_resign(iq, id, from);
break;
case ‘move’:
Referee.on_move(iq, id, from, child);
break;
default:
Referee.send_error(iq, ‘cancel’, ‘bad-request’);
}
} else {
Referee.send_error(iq, ‘cancel’, ‘feature-not-implemented’);
}
}
return true;
40718c11.indd 355
continues
11/30/09 9:15:05 PM
356
❘
Chapter 11 Playing Games: Head to Head Tic-Tac-Toe
Listing 11-7 (continued)
},
on_waiting: function (id, from, elem) {
// if they were already waiting, remove them so their resource
// can be updated
if (Referee.is_waiting(from)) {
Referee.remove_waiting(from);
}
Referee.waiting.push(from);
Referee.connection.send($iq({to: from, id: id, type: ‘result’}));
Referee.broadcast(function (msg) {
return msg.c(‘waiting’, {xmlns: Referee.NS_TOETEM})
.c(‘player’, {jid: from});
});
$(‘#log’).prepend(“<p>Added “ +
Strophe.getBareJidFromJid(from) + “ to “ +
“waiting list.</p>”);
},
on_stop_waiting: function (id, from, elem) {
if (Referee.is_waiting(from)) {
Referee.remove_waiting(from);
}
Referee.connection.send($iq({to: from, id: id, type: ‘result’}));
},
send_games: function (jid) {
var msg = $msg({to: jid})
.c(‘games’, {xmlns: Referee.NS_TOETEM});
$.each(Referee.games, function (room) {
msg.c(‘game’, {‘x-player’: this.x_player,
‘o-player’: this.o_player,
‘room’: Referee.game_room(room)}).up();
});
Referee.connection.send(msg);
},
new_game: function () {
return {
room: null,
board: new Referee.Board(),
waiting: 2,
status: ‘starting’,
x_player: null,
o_player: null,
40718c11.indd 356
11/30/09 9:15:05 PM
Implementing the Game Logic
❘ 357
winner: null
};
},
on_game_start: function (iq, id, from, elem) {
var with_jid = elem.attr(‘with’);
var with_bare = Strophe.getBareJidFromJid(with_jid);
// check that the players are available
if (!Referee.is_waiting(with_jid)) {
Referee.send_error(iq, ‘modify’, ‘item-not-found’);
return;
}
if (Referee.is_playing(with_jid) ||
Referee.is_playing(from)) {
Referee.send_error(iq, ‘cancel’, ‘not-allowed’);
return;
}
Referee.connection.send($iq({to: from, id: id, type: ‘result’}));
// remove players from waiting list
Referee.remove_waiting(from);
Referee.remove_waiting(with_jid);
// create game room and invite players
Referee.create_game(from, with_jid);
},
create_game: function (player1, player2) {
// generate a random room name, and make sure it
// doesn’t already exist to our knowledge
var room;
do {
room = “” + Math.floor(Math.random() * 1000000);
} while (Referee.games[room]);
var room_jid = room + “@” + Referee.MUC_SERVICE + “/Referee”;
Referee.connection.addHandler(function (presence) {
var game;
if ($(presence).find(‘status[code=”201”]’).length > 0) {
// room was freshly created
game = Referee.new_game();
game.room = room;
// create initial game state with randomized sides
if (Math.random() < 0.5) {
game.x_player = player1;
game.o_player = player2;
Referee.games[room] = game;
} else {
game.x_player = player2;
40718c11.indd 357
continues
11/30/09 9:15:05 PM
358
❘
Chapter 11 Playing Games: Head to Head Tic-Tac-Toe
Listing 11-7 (continued)
game.o_player = player1;
Referee.games[room] = game;
}
// invite players to start the game
Referee.invite_players(game);
// notify everyone about the game
Referee.broadcast(function (msg) {
return msg.c(‘games’, {xmlns: Referee.NS_TOETEM})
.c(‘game’, {‘x-player’: game.x_player,
‘o-player’: game.o_player,
‘room’: Referee.game_room(room)});
});
$(‘#log’).prepend(“<p>Created game room “ + room + “.</p>”);
} else {
// room was already in use, we need to start over
Referee.connection.send(
$pres({to: room_jid, type: ‘unavailable’}));
Referee.create_game(player1, player2);
}
return false;
}, null, “presence”, null, null, room_jid);
Referee.connection.send(
$pres({to: room_jid})
.c(“x”, {xmlns: Referee.NS_MUC}));
},
invite_players: function (game) {
// send room invites
$.each([game.x_player, game.o_player], function () {
Referee.connection.send(
$msg({to: game.room + “@” + Referee.MUC_SERVICE})
.c(‘x’, {xmlns: Referee.NS_MUC_USER})
.c(‘invite’, {to: this}));
});
},
game_room: function (room) {
return room + “@” + Referee.MUC_SERVICE;
},
muc_msg: function (game) {
return $msg({to: Referee.game_room(game.room), type: “groupchat”});
},
start_game: function (game) {
game.status = ‘playing’;
Referee.connection.send(
40718c11.indd 358
11/30/09 9:15:05 PM
Implementing the Game Logic
❘ 359
Referee.muc_msg(game)
.c(‘body’).t(‘The match has started.’).up()
.c(‘game-started’, {xmlns: Referee.NS_TOETEM,
‘x-player’: game.x_player,
‘o-player’: game.o_player}));
$(‘#log’).prepend(“<p>Started game “ + game.room + “.</p>”);
},
end_game: function (game, status) {
game.status = status;
// let room know the result of the game
var attrs = {xmlns: Referee.NS_TOETEM};
if (game.winner) {
attrs.winner = game.winner;
}
var msg = “”;
if (game.winner) {
msg += Strophe.getBareJidFromJid(game.winner) +
“ has won the match.”
} else if (status === ‘finished’) {
msg += “The match was tied.”;
} else {
msg += “The match was aborted.”;
}
Referee.connection.send(
Referee.muc_msg(game)
.c(‘body’).t(msg).up()
.c(‘game-ended’, attrs));
// delete the game
delete Referee.games[game.room];
// leave the room
Referee.connection.send(
$pres({to: game.room + “@” + Referee.MUC_SERVICE + “/Referee”,
type: “unavailable”}));
// notify all the players
Referee.broadcast(function (msg) {
return msg.c(‘game-over’, {xmlns: Referee.NS_TOETEM})
.c(‘game’, {‘x-player’: game.x_player,
‘o-player’: game.o_player,
‘room’: Referee.game_room(game.room)});
});
$(‘#log’).prepend(“<p>Finished game “ + game.room + “.</p>”);
},
find_game: function (player) {
var game = null;
40718c11.indd 359
continues
11/30/09 9:15:05 PM
360
❘
Chapter 11 Playing Games: Head to Head Tic-Tac-Toe
Listing 11-7 (continued)
$.each(Referee.games, function (r, g) {
if (g.x_player === player || g.o_player === player) {
game = g;
return false;
}
});
return game;
},
on_resign: function (iq, id, from) {
var game = Referee.find_game(from);
if (!game || game.status === ‘finished’ ||
game.status === ‘aborted’ ||
game.status === ‘starting’ ) {
Referee.send_error(iq, ‘cancel’, ‘bad-request’);
} else {
if (from === game.x_player) {
game.winner = game.o_player;
} else {
game.winner = game.x_player;
}
Referee.end_game(game, ‘finished’);
Referee.connection.send($iq({to: from, id: id, type: ‘result’}));
$(‘#log’).prepend(“<p>” + Strophe.getBareJidFromJid(from) +
“ resigned game “ + game.room + “.</p>”);
}
},
on_move: function (iq, id, from, elem) {
var game = Referee.find_game(from);
var row = elem.attr(‘row’);
var col = elem.attr(‘col’);
if (!game) {
Referee.send_error(iq, ‘cancel’, ‘not-allowed’);
} else if (!row || !col) {
Referee.send_error(iq, ‘modify’, ‘bad-request’);
} else if (!game || game.status !== ‘playing’ ||
(game.board.currentSide() === ‘x’ &&
from === game.o_player) ||
(game.board.currentSide() === ‘o’ &&
from === game.x_player)) {
Referee.send_error(iq, ‘wait’, ‘unexpected-request’);
} else {
var side = null;
if (from === game.x_player) {
side = ‘x’;
} else {
40718c11.indd 360
11/30/09 9:15:05 PM
Implementing the Game Logic
❘ 361
side = ‘o’;
}
try {
game.board.move(side, col, row);
Referee.connection.send(
$iq({to: from, id: id, type: ‘result’}));
Referee.connection.send(
Referee.muc_msg(game)
.c(‘body’).t(
Strophe.getBareJidFromJid(from) +
‘ has placed an ‘ + side + ‘ at ‘ +
col + row).up()
.c(‘move’, {xmlns: Referee.NS_TOETEM,
col: col,
row: row}));
$(‘#log’).prepend(“<p>” + Strophe.getBareJidFromJid(from) +
“ moved in game “ + game.room + “.</p>”);
// check for end of game
var winner = game.board.gameOver();
if (winner) {
if (winner === ‘x’) {
game.winner = game.x_player;
} else if (winner === ‘o’) {
game.winner = game.o_player;
}
Referee.end_game(game, ‘finished’);
}
} catch (e) {
Referee.send_error(iq, ‘cancel’, ‘not-acceptable’);
}
}
}
};
$(document).ready(function () {
$(‘#login_dialog’).dialog({
autoOpen: true,
draggable: false,
modal: true,
title: ‘Connect to XMPP’,
buttons: {
“Connect”: function () {
$(document).trigger(‘connect’, {
jid: $(‘#jid’).val(),
password: $(‘#password’).val()
});
$(‘#password’).val(‘’);
40718c11.indd 361
continues
11/30/09 9:15:05 PM
362
❘
Chapter 11 Playing Games: Head to Head Tic-Tac-Toe
Listing 11-7 (continued)
$(this).dialog(‘close’);
}
}
});
});
$(document).bind(‘connect’, function (ev, data) {
var conn = new Strophe.Connection(
“http://bosh.metajack.im:5280/xmpp-httpbind”);
conn.connect(data.jid, data.password, function (status) {
if (status === Strophe.Status.CONNECTED) {
$(document).trigger(‘connected’);
} else if (status === Strophe.Status.DISCONNECTED) {
$(document).trigger(‘disconnected’);
}
});
Referee.connection = conn;
});
$(document).bind(‘connected’, function () {
var conn = Referee.connection;
$(‘#log’).prepend(“<p>Connected as “ + conn.jid + “</p>”);
conn.addHandler(Referee.on_presence, null, “presence”);
conn.addHandler(Referee.on_iq, null, “iq”);
conn.send($pres());
});
$(document).bind(‘disconnected’, function () {
// nothing here yet
});
Listing 11-8: board.js
Referee.Board = function () {
this.board = [[‘ ‘, ‘ ‘, ‘ ‘], [‘ ‘, ‘ ‘, ‘ ‘], [‘ ‘, ‘ ‘, ‘ ‘]];
};
Referee.Board.prototype = {
validMove: function (side, col, row) {
var curSide = this.currentSide();
if (side !== curSide) {
return false;
}
var coords = this.moveToCoords(col, row);
if (this.board[coords.row][coords.col] !== ‘ ‘) {
40718c11.indd 362
11/30/09 9:15:05 PM
Implementing the Game Logic
❘ 363
return false;
}
return true;
},
move: function (side, col, row) {
if (this.validMove(side, col, row)) {
var coords = this.moveToCoords(col, row);
this.board[coords.row][coords.col] = side;
} else {
throw {
name: “BoardError”,
message: “Move invalid”
};
}
},
moveToCoords: function (col, row) {
var map = {‘a’: 0, ‘b’: 1, ‘c’: 2, ‘1’: 0, ‘2’: 1, ‘3’: 2};
var coords = {row: null, col: null};
coords.col = map[col];
coords.row = map[row];
return coords;
},
currentSide: function () {
var r, c;
var x = 0, o = 0;
for (r = 0; r < 3; r++) {
for (c = 0; c < 3; c++) {
if (this.board[r][c] === ‘x’) {
x += 1;
} else if (this.board[r][c] === ‘o’) {
o += 1;
}
}
}
if (x === o) {
return ‘x’;
}
return ‘o’;
},
gameOver: function () {
var r, c;
// check for row wins
for (r = 0; r < 3; r++) {
if (this.board[r][0] === ‘x’ &&
this.board[r][1] === ‘x’ &&
40718c11.indd 363
continues
11/30/09 9:15:05 PM
364
❘
Chapter 11 Playing Games: Head to Head Tic-Tac-Toe
Listing 11-8 (continued)
this.board[r][2] === ‘x’) {
return ‘x’;
} else if (this.board[r][0] === ‘o’ &&
this.board[r][1] === ‘o’ &&
this.board[r][2] === ‘o’) {
return ‘o’;
}
}
// check for column wins
for (c = 0; c < 3; c++) {
if (this.board[0][c] === ‘x’ &&
this.board[1][c] === ‘x’ &&
this.board[2][c] === ‘x’) {
return ‘x’;
} else if (this.board[0][c] === ‘o’ &&
this.board[1][c] === ‘o’ &&
this.board[2][c] === ‘o’) {
return ‘o’;
}
}
// check for diagonal wins
if (this.board[0][0] === ‘x’ &&
this.board[1][1] === ‘x’ &&
this.board[2][2] === ‘x’) {
return ‘x’;
} else if (this.board[0][0] ===
this.board[1][1] ===
this.board[2][2] ===
return ‘o’;
} else if (this.board[0][2] ===
this.board[1][1] ===
this.board[2][0] ===
return ‘x’;
} else if (this.board[0][2] ===
this.board[1][1] ===
this.board[2][0] ===
return ‘o’;
}
‘o’ &&
‘o’ &&
‘o’) {
‘x’ &&
‘x’ &&
‘x’) {
‘o’ &&
‘o’ &&
‘o’) {
// check for a tie
var tie = true;
for (r = 0; r < 3; r++) {
if (this.board[r].indexOf(‘ ‘) >= 0) {
tie = false;
break;
}
}
if (tie) {
return “=”;
40718c11.indd 364
11/30/09 9:15:05 PM
Implementing the Game Logic
❘ 365
}
return false;
},
toString: function () {
var r, s = ‘’;
for (r = 0; r < 3; r++) {
s += this.board[r].join(‘’);
}
return s;
}
};
Listing 11-9: toetem.js (final)
var Toetem = {
connection: null,
referee: null,
NS_TOETEM: “http://metajack.im/ns/toetem”,
game: null,
x_player: null,
o_player: null,
turn: null,
my_side: null,
watching: false,
on_message: function (message) {
var from = $(message).attr(‘from’);
if ($(message).find(‘waiting’).length > 0) {
$(message).find(‘waiting > player’).each(function () {
$(‘#waiting tbody’).append(
“<tr><td class=’jid’>” +
$(this).attr(‘jid’) +
“</td><td>” +
($(this).attr(‘jid’) === Toetem.connection.jid ?
“<input type=’button’ class=’stop_button’ “ +
“value=’stop waiting’>”:
“<input type=’button’ class=’start_button’ “ +
“value=’start game’>”) +
“</td></tr>”);
});
} else if ($(message).find(‘not-waiting’).length > 0) {
$(message).find(‘not-waiting > player’).each(function () {
var jid = $(this).attr(‘jid’);
$(‘#waiting td.jid’).each(function () {
if ($(this).text() === jid) {
$(this).parent().remove();
return false;
}
40718c11.indd 365
continues
11/30/09 9:15:05 PM
366
❘
Chapter 11 Playing Games: Head to Head Tic-Tac-Toe
Listing 11-9 (continued)
});
});
} else if ($(message).find(‘games’).length > 0) {
$(message).find(‘games > game’).each(function () {
if ($(this).attr(‘x-player’) !== Toetem.connection.jid &&
$(this).attr(‘o-player’) !== Toetem.connection.jid) {
$(‘#games tbody’).append(
“<tr><td>” +
$(this).attr(‘x-player’) +
“</td><td>” +
$(this).attr(‘o-player’) +
“</td><td class=’jid’>” +
$(this).attr(‘room’) +
“</td><td>” +
“<input type=’button’ class=’watch_button’ “ +
“value=’watch game’>” +
“</td></tr>”);
}
});
} else if ($(message).find(‘game-over’).length > 0) {
$(message).find(‘game-over > game’).each(function () {
var jid = $(this).attr(‘room’);
$(‘#games td.jid’).each(function () {
if ($(this).text() === jid) {
$(this).parent().remove();
return false;
}
});
});
} else if ($(message)
.find(‘x > invite’).attr(‘from’) === Toetem.referee) {
Toetem.game = from;
Toetem.watching = false;
$(‘#messages’).empty();
$(‘#messages’).append(“<div class=’system’>” +
“Joined game #” +
Strophe.getNodeFromJid(from) +
“</div>”);
Toetem.scroll_chat();
$(‘#wait’).removeAttr(‘disabled’);
$(‘#browser’).hide();
$(‘#game’).show();
Toetem.draw_board();
$(‘#board-status’).html(‘Waiting for other player..’);
var nick = Toetem.connection.jid;
Toetem.connection.send(
$pres({to: Toetem.game + ‘/’ + nick})
.c(‘x’, {xmlns: Toetem.NS_MUC}));
40718c11.indd 366
11/30/09 9:15:06 PM
Implementing the Game Logic
❘ 367
} else {
var body = $(message).children(‘body’).text();
if (body) {
var who = Strophe.getResourceFromJid(from);
var nick_style = ‘nick’;
if (who === Toetem.connection.jid) {
nick_style += ‘ me’;
}
$(‘#messages’).append(
“<div><<span class=’” + nick_style + “‘>” +
Strophe.getBareJidFromJid(who) +
“</span>> “ +
body + “</div>”);
Toetem.scroll_chat();
}
if ($(message).find(‘delay’).length > 0) {
// skip command processing of old messages
return true;
}
var cmdNode = $(message)
.find(‘*[xmlns=”‘ + Toetem.NS_TOETEM + ‘“]’);
var cmd = null;
var row, col;
if (cmdNode.length > 0) {
cmd = cmdNode.get(0).tagName;
}
if (cmd === ‘game-started’) {
var me = Toetem.connection.jid;
Toetem.x_player = cmdNode.attr(‘x-player’);
Toetem.o_player = cmdNode.attr(‘o-player’);
Toetem.turn = ‘x’;
if (Toetem.x_player === me) {
Toetem.my_side = ‘x’;
$(‘#board-status’).html(‘Your move..’);
} else if (Toetem.o_player === me) {
Toetem.my_side = ‘o’;
$(‘#board-status’).html(“Opponent’s move..”);
}
if (!Toetem.watching) {
$(‘#resign’).removeAttr(‘disabled’);
} else {
$(‘#leave’).removeAttr(‘disabled’);
}
} else if (cmd === ‘game-ended’) {
$(‘#resign’).attr(‘disabled’, ‘disabled’);
$(‘#leave’).removeAttr(‘disabled’);
var winner = cmdNode.attr(‘winner’);
if (winner === Toetem.connection.jid) {
40718c11.indd 367
continues
11/30/09 9:15:06 PM
368
❘
Chapter 11 Playing Games: Head to Head Tic-Tac-Toe
Listing 11-9 (continued)
$(‘#board-status’).html(‘You won!’);
} else if (winner && !Toetem.watching) {
$(‘#board-status’).html(‘You lost!’);
} else if (!Toetem.watching) {
$(‘#board-status’).html(‘You tied!’);
}
} else if (cmd === ‘move’) {
var map = {‘a’: 0, ‘b’: 1, ‘c’: 2, ‘1’: 0, ‘2’: 1, ‘3’: 2};
var col = cmdNode.attr(‘col’);
var row = cmdNode.attr(‘row’);
Toetem.draw_piece(Toetem.turn, map[col], map[row]);
if (Toetem.turn === ‘x’) {
Toetem.turn = ‘o’;
} else {
Toetem.turn = ‘x’;
}
if (!Toetem.watching) {
Toetem.my_turn = Toetem.turn === Toetem.my_side;
if (Toetem.my_turn) {
$(‘#board-status’).html(“Your move..”);
} else {
$(‘#board-status’).html(“Opponent’s move..”);
}
}
} else if (cmd === ‘game-state’) {
var pos = cmdNode.attr(‘pos’);
if (pos) {
var idx = 0;
for (row = 0; row < 3; row++) {
for (col = 0; col < 3; col++) {
if (pos[idx] !== ‘ ‘) {
Toetem.draw_piece(pos[idx], col, row);
}
idx += 1;
}
}
}
}
}
return true;
},
scroll_chat: function () {
var div = $(‘#messages’).get(0);
div.scrollTop = div.scrollHeight;
40718c11.indd 368
11/30/09 9:15:06 PM
Implementing the Game Logic
❘ 369
},
draw_board: function () {
var ctx = $(‘#board’)[0].getContext(‘2d’);
// clear board
ctx.fillStyle = ‘#000’;
ctx.beginPath();
ctx.fillRect(0, 0, 300, 300);
// draw grid lines
ctx.strokeStyle = ‘#999’;
ctx.lineWidth = 4;
ctx.beginPath();
ctx.moveTo(100, 10);
ctx.lineTo(100, 290);
ctx.moveTo(200, 10);
ctx.lineTo(200, 290);
ctx.moveTo(10, 100);
ctx.lineTo(290, 100);
ctx.moveTo(10, 200);
ctx.lineTo(290, 200);
ctx.stroke();
},
draw_piece: function (piece, x, y) {
var ctx = $(‘#board’)[0].getContext(‘2d’);
ctx.strokeStyle = ‘#fff’;
var center_x = (x * 100) + 50;
var center_y = (y * 100) + 50;
ctx.beginPath();
if (piece === ‘x’) {
ctx.moveTo(center_x - 15, center_y - 15);
ctx.lineTo(center_x + 15, center_y + 15);
ctx.moveTo(center_x + 15, center_y - 15);
ctx.lineTo(center_x - 15, center_y + 15);
} else {
ctx.arc(center_x, center_y, 15, 0, 2 * Math.PI, true);
}
ctx.stroke();
}
};
$(document).ready(function () {
$(‘#login_dialog’).dialog({
40718c11.indd 369
continues
11/30/09 9:15:06 PM
370
❘
Chapter 11 Playing Games: Head to Head Tic-Tac-Toe
Listing 11-9 (continued)
autoOpen: true,
draggable: false,
modal: true,
title: ‘Connect to XMPP’,
buttons: {
“Connect”: function () {
$(document).trigger(‘connect’, {
jid: $(‘#jid’).val(),
password: $(‘#password’).val(),
referee: $(‘#referee’).val()
});
$(‘#password’).val(‘’);
$(this).dialog(‘close’);
}
}
});
$(‘#disconnect’).click(function () {
$(this).attr(‘disabled’, ‘disabled’);
Toetem.connection.disconnect();
});
$(‘#wait’).click(function () {
$(this).attr(‘disabled’, ‘disabled’);
Toetem.connection.sendIQ(
$iq({to: Toetem.referee, type: “set”})
.c(“waiting”, {xmlns: Toetem.NS_TOETEM}));
});
$(‘input.stop_button’).live(‘click’, function () {
Toetem.connection.sendIQ(
$iq({to: Toetem.referee, type: “set”})
.c(‘stop-waiting’, {xmlns: Toetem.NS_TOETEM}),
function () {
$(‘#wait’).removeAttr(‘disabled’);
});
});
$(‘input.start_button’).live(‘click’, function () {
Toetem.connection.sendIQ(
$iq({to: Toetem.referee, type: “set”})
.c(‘start’, {xmlns: Toetem.NS_TOETEM,
“with”: $(this).parent().prev().text()}));
});
$(‘input.watch_button’).live(‘click’, function () {
// join the game room
Toetem.game = $(this).parent().prev().text();
Toetem.watching = true;
40718c11.indd 370
11/30/09 9:15:06 PM
Implementing the Game Logic
❘ 371
$(‘#browser’).hide();
$(‘#game’).show();
Toetem.draw_board();
$(‘#board-status’).html(‘’);
Toetem.connection.send(
$pres({to: Toetem.game + ‘/’ + Toetem.connection.jid}));
});
$(‘#input’).keypress(function (ev) {
if (ev.which === 13) {
ev.preventDefault();
var input = $(this).val();
$(this).val(‘’);
Toetem.connection.send(
$msg({to: Toetem.game, type: ‘groupchat’})
.c(‘body’).t(input));
}
});
$(‘#resign’).click(function () {
Toetem.connection.sendIQ(
$iq({to: Toetem.referee, type: ‘set’})
.c(‘resign’, {xmlns: Toetem.NS_TOETEM}));
});
$(‘#leave’).click(function () {
Toetem.connection.send(
$pres({to: Toetem.game + ‘/’ + Toetem.connection.jid,
type: ‘unavailable’}));
$(‘#game’).hide();
$(‘#browser’).show();
});
$(‘#board’).click(function (ev) {
if (Toetem.turn && Toetem.turn === Toetem.my_side) {
var pos = $(this).position();
var x = Math.floor((ev.pageX - pos.left) / 100);
var y = Math.floor((ev.pageY - pos.top) / 100);
Toetem.connection.sendIQ(
$iq({to: Toetem.referee, type: ‘set’})
.c(‘move’, {xmlns: Toetem.NS_TOETEM,
col: [‘a’, ‘b’, ‘c’][x],
row: y + 1}));
}
});
});
$(document).bind(‘connect’, function (ev, data) {
var conn = new Strophe.Connection(
40718c11.indd 371
continues
11/30/09 9:15:06 PM
372
❘
Chapter 11 Playing Games: Head to Head Tic-Tac-Toe
Listing 11-9 (continued)
“http://bosh.metajack.im:5280/xmpp-httpbind”);
conn.connect(data.jid, data.password, function (status) {
if (status === Strophe.Status.CONNECTED) {
$(document).trigger(‘connected’);
} else if (status === Strophe.Status.DISCONNECTED) {
$(document).trigger(‘disconnected’);
}
});
Toetem.connection = conn;
Toetem.referee = data.referee;
});
$(document).bind(‘connected’, function () {
$(‘#disconnect’).removeAttr(‘disabled’);
$(‘#wait’).removeAttr(‘disabled’);
Toetem.connection.addHandler(Toetem.on_message, null, “message”);
// tell the referee we’re online
Toetem.connection.send(
$pres({to: Toetem.referee})
.c(‘register’, {xmlns: Toetem.NS_TOETEM}));
});
$(document).bind(‘disconnected’, function () {
Toetem.referee = null;
Toetem.connection = null;
$(‘#waiting tbody’).empty();
$(‘#games tbody’).empty();
$(‘#login_dialog’).dialog(‘open’);
});
Making the Game More Fun
Toetem is a simple example of an XMPP-powered gaming system. Try creating an even better and
more fun version. You might:
➤➤
Add support for another game like Texas Hold’em or chess.
➤➤
Add the ability for the system to handle more than one type of game.
➤➤
Allow players to watch multiple games simultaneously.
➤➤
Allow players to play multiple games simultaneously. Chess masters can easily beat dozens
of lesser players at the same time!
40718c11.indd 372
11/30/09 9:15:06 PM
Summary
❘ 373
Summary
In this final application, you created a real-time, multi-user game system for Tic-Tac-Toe. Players
from all over the world can use their XMPP accounts to connect to the system, find other players,
and have fun playing with each other. Unlike previous applications, Toetem required you to implement both the service logic and the client logic. You also had to design an appropriate protocol
leveraging multi-user chat to tie it all together.
Along the way you:
➤➤
Created an XMPP bot
➤➤
Managed external resources on behalf of users
➤➤
Designed a game protocol built on top of multi-user chat and simple interactions
➤➤
Implemented a complex application using the tools you’ve learned in previous chapters
A game system like Toetem can be created without the aid of the XMPP protocol, but by now you
should be convinced that doing so would be a lot more painful and a lot less fun. Interactive applications like Toetem are easy to design and easy to build when you have the power of XMPP at your
fingertips.
The third and final part of this book covers several advanced topics including XMPP session attachment, deploying XMPP applications, and writing Strophe plug-ins.
40718c11.indd 373
11/30/09 9:15:06 PM
40718c11.indd 374
11/30/09 9:15:06 PM
Part III
Advanced Topics
⊲⊲ Chapter 12: Getting Attached: Bootstrapping BOSH
⊲⊲ Chapter 13: Deploying XMPP Applications
⊲⊲ Chapter 14: Writing Strophe Plug-ins
40718c12.indd 375
11/30/09 9:17:57 PM
40718c12.indd 376
11/30/09 9:17:57 PM
12
Getting Attached:
Bootstrapping BOSH
What’s in This Chapter?
➤➤
How BOSH keeps track of sessions
➤➤
Using Strophe to attach to sessions
➤➤
Improving performance with attachment
➤➤
Using attachment for persistence
➤➤
Increasing security with attachment
One of the more advanced uses of Strophe is session attachment. Instead of initiating a fresh
XMPP connection when the application starts, a connection is provided that is already set up
along with a little extra information that Strophe can use to attach to it. The connection may
have been set up by server-side logic or by a previous page in the application.
Session attachment can solve a variety of problems relating to security, session persistence, and
performance. Most of the time you probably won’t need session attachment, but when your
application does need it, it really comes in handy.
Although session attachment can provide faster application startup times or enhanced security,
it comes with the cost of doing more work to prepare and manage the connection.
Knowing when to use session attachment is as important as knowing how to use it. In this
chapter you are introduced to the common use cases and mechanics of attaching to alreadyestablished sessions.
Unlike the other chapters in this book, it is impossible to demonstrate session attachment with
pure JavaScript code. This chapter contains some additional server-side code to handle session
creation that will not be fully covered in the text.
40718c12.indd 377
11/30/09 9:17:57 PM
378
❘
Chapter 12 Getting Attached: Bootstrapping BOSH
Session Attachment
Session attachment is one of those features whose purpose is limited but indispensable. At its core,
it is extremely simple; instead of starting a new connection and authenticating with the server, you
simply attach to a connection that has already been set up. However, exactly how this works and
what kinds of things it is useful for are not quite as obvious.
The Mechanics of Sessions
XMPP is a TCP-based protocol, just like HTTP, and communication happens over an established,
mostly reliable socket between two endpoints. As you may remember from Chapter 2, the BOSH
extension to XMPP provides a bridge between this bidirectional, stateful protocol and HTTP, which
is unidirectional and stateless. To understand how session attachment works, it’s necessary to peek
under the covers a little bit to see how BOSH achieves the translation.
Because a web browser cannot directly connect to an XMPP server, a BOSH connection manager
responds to requests from a browser using HTTP and uses them to manage an XMPP connection on
behalf of the user. Aside from the socket needed for XMPP communication, each managed connection
has two other pieces of data associated with it: the SID and the RID.
SID stands for Session Identifier. This uniquely identifies the managed XMPP connection, and it is
often a long, opaque alphanumeric string. Even though it is enough to identify the session, it is not
very useful on its own.
The Request Identifier (RID) identifies a particular HTTP request associated with a BOSH-managed
connection. Before a connection is established, the client sends a random RID to the connection manager
along with its first request. Each subsequent request increments the RID by one.
The SID and the RID together provide enough information to interact with the underlying XMPP
connection. Because the RID is generated randomly from a very large range of numbers, it is virtually impossible to guess the RID if you do not know one of the previous ones. Also, the connection
manager will reject RIDs that fall outside of a narrow window around the current request. In this
way, the BOSH-managed connection is tolerant of small errors like out of order delivery but robust
to attacks like hijacking the connection.
Because these two identifiers are enough to both address and make use of a managed XMPP session,
if an application knows the SID and the RID, it can take over or attach to the underlying session.
All it must do is send a request to the BOSH connection manager using the unchanged SID and the
RID incremented by one.
Note that it is very difficult to share a session in this manner, because the two applications (or two
instances of the same application) will need to know the current RID at all times. If this were an
easy problem to solve, you wouldn’t need XMPP to shuttle data around in the first place!
Of course, attaching to a session does not give the application access to the previous history of what
happened on the connection before attachment. For this reason, it is often used very early during the
session’s life or at other well defined, known points.
40718c12.indd 378
11/30/09 9:17:57 PM
Session Attachment
❘ 379
If your code knows the SID and the RID of the session you want to attach to, you can use Strophe’s
attach() function to take over the session. Instead of a username and password, you pass the SID
and the RID, but like connect(), it still takes a connection status callback function. The attach()
function also takes the JID used in the session, but this isn’t strictly necessary. If you didn’t know
the JID used for the underlying session, you could discover it once you were attached.
The attach() function is demonstrated in the following code, but it should look very familiar after
seeing connect() in previous chapters:
var connection = new Strophe.Connection(BOSH_URL);
connection.attach(jid, sid, rid, callback);
Using session attachment with Strophe is pretty easy; the tricky part is getting the SID and RID to
Strophe in the first place and establishing the connection outside of the application.
Typically the SID and RID are transmitted as the result of an AJAX call to set up a session or embedded
within the HTML served from the backend web application. The underlying connection is usually
established by backend code doing the initial HTTP requests that the JavaScript code would normally
be doing.
Even with the knowledge of how attachment works, you might still be wondering why you would
need such a feature. After all, every application you built in this book was possible without it.
Use Cases
Session attachment is typically employed to solve issues of security, performance, and persistence.
New use cases for technology appear every day, so this small list is by no means exhaustive, but
these uses have emerged as the main motivations for session attachment in the few years the technique has been around.
Increased or Easier Security
BOSH sessions can be encrypted, and often the underlying XMPP sessions are encrypted as well.
Because XMPP makes use of SASL, the authentication mechanisms tend to be quite strong. How then
can session attachment improve on this situation?
In web applications, authentication starts with the user typing in a username and password. The
server assigns and returns a session identifier, and from then on all the HTTP requests sent and
received contain this identifier, which verifies the identity of the client without asking for credentials
repeatedly. This use case is still desirable in XMPP-enabled web applications.
This same use case for cached credentials is similar to token-based authentication. Just imagine that
the SID and the RID are tokens, and you can see why session attachment is useful here.
If the XMPP-enabled piece of your application is a part of a larger web site, it is much more convenient if the users do not have to both log in to the web site and also to the XMPP application. In
this situation, it is best if the web site can serve the pages for the XMPP application with credentials
already embedded. To avoid leaking the user’s password by placing it in the web page (and therefore
40718c12.indd 379
11/30/09 9:17:57 PM
380
❘
Chapter 12 Getting Attached: Bootstrapping BOSH
also in the browser’s cache, and so on), the session and request identifiers can be embedded instead,
and used to attach to a running session that has already been pre-authenticated by the server. In a
worst-case scenario, only a single session becomes compromised.
Pushing Performance
Another common use case is to increase the performance of application startup. Typically it takes
half a dozen requests and responses to initiate and set up an XMPP connection over BOSH. Preestablishing the connection on the server side eliminates precious round-trip cycles when startup
latency is important, and if well done, can mean essentially instant-on connections.
Fewer requests at startup puts a smaller load on the HTTP infrastructure of your web application,
especially when large numbers of clients are reconnecting after an outage or failure. Imagine the
traffic spike if ten thousand clients suddenly connected and each had to make six or seven requests
to get set up!
Session creation performance is also drastically increased if the XMPP session is established to a
server local to the backend web infrastructure. Instead of each round trip being across the Internet,
they could all be across a local network. Assuming an average ping time on the open Internet of
100ms, the six setup requests would take more than half a second. With a typical local network
ping time of 10ms, start up latency is suddenly an order of magnitude faster. Even better, the session
creation could happen completely internal to the XMPP server itself, involving no round trips or
extra requests at all.
Persisting Connections
Session attachment can also be used to persist a connection across multiple pages. This use case is much
trickier though because nothing prevents a user from opening the same web page in a second window
or tab, so care must be taken that there is only one page using the underlying session at a time.
One way to achieve session persistence might be to store the SID and RID in a cookie, and reattach
to the session once the next page has loaded. In this way, the XMPP session would follow the user
from page to page, becoming detached and reattached multiple times.
Now that you are familiar with the main use cases for session attachment as well as the basics of
how it works, it is time to see an example of it in action.
Automatic Logins with Session Attachment
Most of the work of session attachment is outside the JavaScript application code. This chapter
departs from the JavaScript-only examples in the rest of the book by also implementing a backend
web application built in Python on top of the Django framework. The same work could be done by
a Ruby on Rails application or one written in Java, but Python code is quite readable even for those
unfamiliar with it and that makes for a nice example.
40718c12.indd 380
11/30/09 9:17:57 PM
Automatic Logins with Session Attachment
❘ 381
First, you must install a few dependencies for the example. You need:
➤➤
Django version 1.1 or later, http://www.djangoproject.com
➤➤
Twisted Python version 8.2.0 or later, http://twistedmatrix.com
➤➤
Punjab version 0.13 or later, http://code.stanziq.com/pubjab
Note that although Punjab is a fully functional BOSH connection manager, it is used in this
example only for its ready-made BOSH library routines. It is not necessary to run a Punjab server,
only to install the code so that it can be found by the session establishment code inside the Django
application.
Please refer to the instructions provided with these packages for installation instructions for your
particular platform. You can also find some basic instructions for Punjab in Appendix B. Once you
have the software installed, you can create the project.
Creating the Django Project
You create a Django project called attach by using Django’s included django-admin.py command.
Find a suitable directory for your project, and run:
django-admin.py startproject attach
This should create a directory called attach filled with a project skeleton. The contents of this
directory should include files named settings.py, __init__.py, urls.py, and manage.py.
Next, you must create a Django application inside this project called attacher. You can do this
with the manage.py command. From inside the attach directory, run:
python manage.py startapp attacher
Like startproject, this creates a directory called attacher that contains skeleton files for the
application.
Next, you must set up urls.py to map URLs in the application to specific views in the code. The
urls.py file shown in Listing 12-1 creates a mapping from the root URL to the attacher application’s index view.
Listing 12-1: urls.py
from django.conf.urls.defaults import *
urlpatterns = patterns(‘’,
(r’^$’, ‘attach.attacher.views.index’),
(r’^static/(?P<path>.*)$’, ‘django.views.static.serve’,
{‘document_root’:
‘/path/to/attach/media/’}),
)
40718c12.indd 381
11/30/09 9:17:58 PM
382
❘
Chapter 12 Getting Attached: Bootstrapping BOSH
Be sure to replace /path/to/attach/media/ with the real, absolute path to the attach directory
with /media/ appended. This is where the static resources for the application are stored, and you
will create this directory shortly.
The index view is defined in attacher/views.py, which appears in Listing 12-2.
Listing 12-2: views.py
from django.http import HttpResponse
from django.template import Context, loader
from attach.settings import BOSH_SERVICE, JABBERID, PASSWORD
from attach.boshclient import BOSHClient
def index(request):
bc = BOSHClient(JABBERID, PASSWORD, BOSH_SERVICE)
bc.startSessionAndAuth()
t = loader.get_template(“attacher/index.html”)
c = Context({
‘jid’: bc.jabberid.full(),
‘sid’: bc.sid,
‘rid’: bc.rid,
})
return HttpResponse(t.render(c))
This view creates an XMPP session via the BOSHClient object using credentials and configuration
defined in the project settings file. Once created, it renders a response page from the index.html
template. The jid, sid, and rid properties provided in the Context object will be substituted inside
the template. When the browser receives the rendered page, it will have access to the real JID, SID,
and RID for the established connection.
The file boshclient.py handles session establishment, and you will need to download it from the
book’s web site and copy it into your project directory. It is not shown here because its source code
is too long to list in the text.
To create the HTML template, create a directory under the attach project directory called templates.
Create the attacher directory under the templates directory, and place the HTML code from
Listing 12-3 into an index.html file there.
Listing 12-3: index.html
<!DOCTYPE HTML PUBLIC “-//W3C//DTD HTML 4.01//EN”
“http://www.w3.org/TR/html4/strict.dtd”>
<html>
<head>
<title>Strophe Attach Example</title>
40718c12.indd 382
11/30/09 9:17:58 PM
Automatic Logins with Session Attachment
❘ 383
<script src=’http://ajax.googleapis.com/ajax/libs/jquery/1.3.2/jquery.js’>
</script>
<script src=’scripts/strophe.js’></script>
<script src=’scripts/flXHR.js’></script>
<script src=’scripts/strophe.flxhr.js’></script>
<script type=’text/javascript’>
<!-var Attacher = {
JID: ‘{{ jid }}’,
SID: ‘{{ sid }}’,
RID: ‘{{ rid }}’
};
// -->
</script>
<link rel=’stylesheet’ type=’text/css’ href=’attacher.css’>
<script type=’text/javascript’ src=’attacher.js’></script>
</head>
<body>
<h1>Strophe Attach Example</h1>
<p>This example shows how to attach to an existing BOSH session with
Strophe.</p>
<h2>Log</h2>
<div id=’log’>
</div>
</body>
</html>
The Attacher object’s properties will be substituted during template rendering to be the actual JID,
SID, and RID values for the established session. The JavaScript code will then be able to access these
in order to call Strophe’s attach() function.
You must edit the settings.py file in the project directory to provide the configuration information
for your preferred XMPP server and BOSH server. Add the following lines to the end of settings.py,
but be sure to use real domain names and values:
BOSH_SERVICE = ‘http://pemberley.lit/xmpp-httpbind’
JABBERID = ‘darcy@pemberley.lit/bosh’
PASSWORD = ‘lizzy’
The CSS and HTML files in Listing 12-4 and Listing 12-5 should be placed in a directory called
media inside the attach project directory. You’ll need to set the MEDIA_ROOT setting to the absolute
path to this directory along with the trailing slash character. For example, on Windows systems,
this might be:
MEDIA_ROOT = ‘c:\\projects\\attach\\media\\’
On Mac OS X or GNU/Linux systems, this might be:
MEDIA_ROOT = ‘/projects/attach/media/’
40718c12.indd 383
11/30/09 9:17:58 PM
384
❘
Chapter 12 Getting Attached: Bootstrapping BOSH
Listing 12-4: attacher.css
body {
font-family: Helvetica;
}
h1, h2 {
text-align: center;
}
#log {
background-color: #ccc;
}
Listing 12-5: attacher.js
$(document).ready(function () {
Attacher.connection = new Strophe.Connection(
“http://bosh.metajack.im:5280/xmpp-httpbind”);
Attacher.connection.attach(
Attacher.JID, Attacher.SID, Attacher.RID, null);
$(‘#log’).append(“<div>Session attached!</div>”);
Attacher.connection.sendIQ(
$iq({to: Strophe.getDomainFromJid(Attacher.JID),
type: “get”})
.c(‘query’, {xmlns:
‘http://jabber.org/protocol/disco#info’}),
function () {
$(‘#log’).append(“<div>Response received “ +
“from server!</div>”);
});
});
The application is now complete, and you can use Django’s built-in web server to test it out. Start
the server with:
python manage.py runserver
This starts a web server at http://127.0.0.1:8000/, which you can connect to with your web
browser. If everything is set up correctly, you should see log messages appear on the web page stating
that it has connected to the session and communicated with the server.
As you can see, session attachment is a lot more complicated to set up, but from the JavaScript application’s point of view, is extremely easy. If you don’t have a current need for pre-established sessions
and session attachment, just remember that it is available to use when such a need arises.
40718c12.indd 384
11/30/09 9:17:58 PM
Summary
❘ 385
Summary
Session attachment is an advanced use of Strophe and XMPP to attach to a pre-established session
from JavaScript. Attaching to sessions created out of band allows XMPP applications to increase
security in the face of convenience demanded by users, improve startup performance, and to persist
a session across multiple page loads.
In this chapter, you:
➤➤
Discovered why session attachment is useful
➤➤
Learned how attached sessions work
➤➤
Learned how to make Strophe attach to an existing session
➤➤
Built a small automatic login example using Django for the backend
In the next chapter, you will discover some considerations, best practices, and guidelines for deploying and scaling XMPP applications.
40718c12.indd 385
11/30/09 9:17:58 PM
40718c12.indd 386
11/30/09 9:17:58 PM
13
Deploying XMPP Applications
What’s in This Chapter?
➤➤
Load balancing connection managers
➤➤
Clustering XMPP servers
➤➤
Distributing components
➤➤
Reducing latency and serialization
➤➤
Optimizing client side operations
Developing an application with XMPP is only the beginning. Once you have put the finishing
touches on your latest creation, you’ll likely want to share it with the world at large. Because the
world is a big place, full of lots of potential users, you’ll want to ensure that your application is
deployed in such a way that it will scale and run as efficiently as possible.
You can scale your application in quite a few ways, both horizontally, spreading it across
multiple machines, and vertically, optimizing the application and running it on better hardware. For example, many XMPP servers have a clustered operation mode, enabling more than
one server to provide services under a single domain.
If your application has only modest amounts of users or traffic, feel free to skip this chapter.
After all, you can always come back when your application becomes wildly popular.
Growing Horizontally
Applications will often exceed the limit of resources available on a single machine. For some
applications, this limit may be memory, and for others, the limit will be processor speed. Though
adding more resources to the machine is an easy fix, there is a finite limit on how much can be
added. Often it is better to scale horizontally by distributing the application over more than one
physical machine.
40718c13.indd 387
11/30/09 9:21:46 PM
388
❘
Chapter 13 Deploying XMPP Applications
XMPP applications can make use of a number of techniques to do this. What technique is appropriate
depends on which resource is in contention and the nature of the specific application. Your application
can grow horizontally in the following ways:
➤➤
Running multiple connection managers on different machines and load balancing between them
➤➤
Clustering XMPP servers to spread connections over multiple machines
➤➤
Running a single server component on several machines
➤➤
Using internal federation to spread the application over a network of XMPP servers
➤➤
Speaking the server-to-server protocol directly
Clever programmers will no doubt discover additional ways, but these constitute the current
practices.
Multiple Connection Managers
The BOSH connection manager is an HTTP service, and like most HTTP services, is fairly easy to
scale across multiple machines. If your application has many thousands of simultaneously connected
users, you will probably need to spread their connections across several connection managers.
Running multiple connection managers is easy with standalone managers, but requires server support
for clustering when using built-in managers. Once all the connection managers are running, you will
want to load balance their use and provide a common end point for accessing them.
Great open source and commercial applications as well as specialized hardware are available that
can load balance and aggregate HTTP services. Most large web sites already employ these tools for
their normal web applications. Two open source tools built for these purposes are used as examples
in this chapter: nginx and Haproxy.
Before you dive into the details, there is one more thing to note about load balancing BOSH connection managers; connection managers keep a small amount of state — the XMPP connection and its
identifiers. When a user sends an HTTP request for the first time, the load balancer must pick a
server to respond. For all later requests, the load balancer must continue to choose the same server
or the connection may be interrupted. Fortunately, most load balancers are capable of tracking server
assignments via special HTTP cookies because web applications with session support often need
similar functionality.
Each product’s configuration and setup procedures are unique, but many of the concepts described
in the following examples are applicable to all of them.
nginx
nginx is a lightweight web server built for high performance and stability. Its great support for
reverse HTTP proxies and load balancing make it a good fit for XMPP-based web applications. This
section describes a basic load balancing setup for the standalone connection manager Punjab. See
40718c13.indd 388
11/30/09 9:21:47 PM
Growing Horizontally
❘ 389
Appendix B for more information on Punjab, standalone connection managers, and using nginx as a
simple proxy.
You can find nginx at its web site, http://nginx.net.
First, you need to configure and set up Punjab on multiple machines, or run several instances
on the same machine on different IPs or ports. For purposes of this example, it is assumed that
Punjab is running on port 5280 on the following machines, and that the path to the service is
/xmpp-httpbind:
➤➤
bosh-1.pemberley.lit
➤➤
bosh-2.pemberley.lit
➤➤
bosh-3.pemberley.lit
nginx will be configured to reverse proxy and load balance these three Punjab servers under the
local path at /xmpp-httpbind.
Under the http section, you need to add an upstream configuration section, like the one here, to
define the set of Punjab servers:
upstream punjab {
ip_hash;
server bosh-1.pemberley.lit:5280;
server bosh-2.pemberley.lit:5280;
server bosh-3.pemberley.lit:5280;
}
The ip_hash directive tells nginx to use a hash of the user’s IP address to pick a server, guaranteeing
that each request from that IP will be sent to the same server. Users will never accidentally get sent
to a Punjab instance that does not have the user’s state. You might notice that this is not quite true
load balancing, but in many situations this hash-based approach is similarly effective.
Under the server section, you need to add a location configuration section to set up the reverse
proxy. Instead of using the hostname of the proxied server, you instead use the previously set up
upstream configuration named punjab:
location /xmpp-httpbind {
proxy_pass http://punjab;
}
Now nginx will proxy an incoming request to /xmpp-httpbind to one of the three configured
Punjab servers based on the hash of the user’s IP address. Please note that adding or removing servers
changes the hash function; users will likely experience a temporary disconnection if you reconfigure
the server in this way.
That’s all there is to it! Of course, nginx has many configuration options not covered here that can
expand upon this basic example. Please see the nginx documentation at http://wiki.nginx.org
for more information on nginx’s configuration.
40718c13.indd 389
11/30/09 9:21:47 PM
390
❘
Chapter 13 Deploying XMPP Applications
Haproxy
Haproxy is a high-performance, highly available load balancer for TCP and HTTP services. It is
capable of supporting complex load balancing configurations, but here it is used in a basic configuration useful for BOSH connection managers.
You can find Haproxy at its web site, http://haproxy.1wt.eu/.
Just as with the nginx example, this example assumes the same three Punjab servers are available, all
listening on port 5280, with the BOSH service accessible at the path /xmpp-httpbind. The servers
are named bosh-1.pemberley.lit, bosh-2.pemberley.lit, and bosh-3.pemberley.lit.
First, in the haproxy.cfg file, you need to define a new backend listing the set of Punjab servers
similar to the following:
backend punjab
mode http
balance leastconn
cookie BOSHSRV insert indirect nocache
server bosh-1 bosh-1.pemberley.lit:5280 cookie bosh-1
server bosh-2 bosh-2.pemberley.lit:5280 cookie bosh-2
server bosh-3 bosh-3.pemberley.lit:5280 cookie bosh-3
This section defines an HTTP backend called punjab with three servers. The balancing strategy,
leastconn, is to choose the server with the least number of current connections. A cookie is used to
make sure that each client continues to be served by the same Punjab server across multiple HTTP
requests.
To use the new backend, you need to add some configuration to your relevant frontend configuration section. The following lines demonstrate such a configuration:
frontend www
# normal config would be here
option httpclose
acl bosh path_beg /xmpp-httpbind
use_backend punjab if bosh
The httpclose option is necessary because Haproxy does not support keep-alive mode; if it is omitted, Haproxy only processes the initial request, and this can cause some unexpected behavior. The
httpclose option works around this by disabling keep-alive mode.
The other two lines tell Haproxy to use the punjab backend whenever the path begins with
/xmpp-httpbind.
When Haproxy sees an /xmpp-httpbind path, it forwards the request to one of the three servers
configured for the punjab backend. It inserts an HTTP cookie named BOSHSRV set to the identifier of the server, or if this cookie already exists, uses it to route the request to the correct server.
Because Haproxy uses cookies to identify the servers instead of an IP hash, the configuration can be
changed at will without affecting users.
More complex setups can be easily created with Haproxy. For example, each Punjab server can be
limited to serving a specific number of connections, have custom timeouts set, and be continuously
monitored for availability.
40718c13.indd 390
11/30/09 9:21:47 PM
Growing Horizontally
❘ 391
Please refer to the documentation for information on the specific configurations shown here or for
information on more advanced uses. You can find the documentation at http://haproxy.1wt.eu/
download/1.3/doc/configuration.txt.
Clustering XMPP Servers
Several XMPP servers support clustering. In a clustered configuration, several instances of the XMPP
server provide services for a single XMPP domain. For example, the pemberley.lit server could resolve
to a group of 10 clustered servers, but no matter which server was selected by a user, it would appear
as pemberley.lit.
Each XMPP server has its own configuration requirements for clustering. In this section, you see an
example of how to cluster an ejabberd server on two separate machines. You can obtain and learn
more about ejabberd at http://www.ejabberd.im.
First, you need to install ejabberd on two separate machines. For this example, it is assumed that
these machines are named xmpp-1.pemberley.lit and xmpp-2.pemberley.lit, and that both machines
provide an XMPP service for the pemberley.lit domain. Please refer to the ejabberd documentation
for basic installation instructions.
You must edit the ejabberd.cfg configuration file to configure both machines.
First, you must change the server’s hostname to the correct domain; in this case it will be pemberley.lit.
This should be the same on both xmpp-1.pemberley.lit and xmpp-2.pemberley.lit. Find the line similar
to the following one, and change the domain to pemberley.lit:
{hosts, [“pemberley.lit”]}.
Next, you can make any other normal configuration changes, just as you normally would for a
single server.
Now you can start the XMPP server on xmpp-1.pemberley.lit. Just run:
ejabberdctl start
You can check to see if the server started up correctly by running:
ejabberdctl status
After a few seconds, it should inform you that the node is started.
Once ejabberd is running, it creates an Erlang cookie file. You need to make sure that the Erlang
cookie files on both machines match. ejabberd’s Erlang cookie file is named .erlang.cookie and
can be found along with ejabberd’s other data files. On UNIX-like systems, including Mac OS X and
GNU/Linux, it can usually be found in the /var/lib/ejabberd directory. Simply copy the cookie
file from xmpp-1.pemberley.lit to the same location on xmpp-2.pemberley.lit.
Before you start up this second node, you must first initialize the cluster’s database on this node. This
step can be a little finicky depending on how you have named your ejabberd nodes. By default, ejabberd
uses short names, but it can also use the fully qualified domain names if so configured. The command
is slightly different for each case, and the one shown here is for the default setup.
40718c13.indd 391
11/30/09 9:21:47 PM
392
❘
Chapter 13 Deploying XMPP Applications
To initialize the second node’s database, run the following command:
erl -sname ejabberd@xmpp-2 -mnesia dir ‘“/var/lib/ejabberd”‘ \
-mnesia extra_db_nodes “[‘ejabberd@xmpp-1’]” -s mnesia
Be sure to use the correct quotes because they are very important, and the command won’t work
without the proper quoting. The backslash just continues the command on the next line; if you enter
the entire command on one line, you can omit this character. You may also have to edit the node
names and the path to the database if these are different on your system. Finally, if you are using
fully qualified names, you’ll want to change -sname to -name.
The previous command will leave you inside an Erlang command shell. You can verify that both
nodes are connected to the database by typing the following command and pressing Enter:
mnesia:info().
You should see a line starting with “running db nodes” that includes your two ejabberd nodes.
If all has gone well, you can now copy the schema table to the new node. Type in the following
command and press Enter:
mnesia:change_table_copy_type(schema, node(), disc_copies).
You can now exit the Erlang shell by typing:
q().
Your second ejabberd node is ready to be started. Start it the same way as the first node, with:
ejabberdctl start
If you want to run more than two nodes, you can repeat the instructions for the second node for all
the additional nodes. Some people run ejabberd clusters spanning dozens of machines!
Note that if you are running the internal BOSH connection manager for ejabberd, you can use the
same steps as in the previous section to load balance among them. If you want to load balance native
XMPP connections, you can rely on DNS to round-robin requests by listing all available XMPP nodes
in appropriate SRV records. You can even use Haproxy or another TCP load balancer solution to
load balance the XMPP connections from a single endpoint.
Spreading Out Components
You learned a little about components in Chapter 1 when the different kinds of XMPP entities were
described. All of the XMPP code in this book accesses the server as a client, but often XMPP services
are written as server components. Several XMPP servers, including ejabberd, support load balancing
components, offering yet another way to scale your applications.
The basic idea behind load balancing of components is that multiple components connect to the
server with the same identity. For example, if the service is provided by library.pemberley.lit, each
machine would run the component and connect as library.pemberley.lit.
40718c13.indd 392
11/30/09 9:21:47 PM
Growing Horizontally
❘ 393
In ejabberd’s case, this load balancing is done by sending requests to each machine in a round-robin
fashion. In a clustered setup, ejabberd first tries locally connected machines, followed by the remote
ones. This load balancing strategy is not suited to all applications, but it is helpful in several cases.
Currently, other strategies are not supported but should be easy to add by aspiring Erlang hackers.
You will need to consult your server’s documentation to see if it supports load balancing of components and to see what strategies it employs. If your service can be written to take advantage of this,
it will be able to scale very well.
Federating Internally
There is often no reason that every user or every component of an XMPP service must be located on
the same server or domain. In these cases, you can forgo server clustering and turn to internal federation to achieve scale. Internally federated servers are just internal servers that talk to each other via
the server-to-server protocol, just as public XMPP servers talk to each other.
Internal federation can even be combined with clustering. For example, a global XMPP service may
have clusters in the U.S. and in Europe, each of which communicates with the other via regular
server federation.
One advantage of federation over clustering is that there are no shared databases between the servers, so the achievable scale is far higher. There is practically no limit to how many XMPP servers (or
e‑mail, HTTP, or DNS servers) can exist and communicate with each other.
Often natural application boundaries exist at which to place the federation boundaries. Some services might use geography as a guide, and others might use IP hashes. If the service is the same at
any location, any number of techniques can be used to place users at the fastest or most appropriate
server.
Becoming a Server
There is no reason that XMPP servers must be the only things that speak the server-to-server protocol. Probably the most efficient way to scale an application is to bypass the server altogether and
have your service speak the server-to-server protocol directly.
The server-to-server protocol is slightly more complicated than the client-to-server version, due to its
reliance on TLS certificates or dialback authentication. Once the XMPP streams are set up, though,
the same kinds of stanzas are sent back and forth.
If your XMPP service has little need for user accounts, rosters, or other traditional IM server features, you might be better off without a server. For example, an XMPP pubsub service might be
unrelated to any particular server full of users, and such a pubsub service could be made directly
addressable as a server.
There aren’t yet a lot of libraries that make server-to-server protocol programming easier, but the
situation is rapidly changing as more and more non–IM-related XMPP services spring up. This may
soon become the way most XMPP services are exposed, in much the same way as web services have
become their own HTTP servers as well.
40718c13.indd 393
11/30/09 9:21:47 PM
394
❘
Chapter 13 Deploying XMPP Applications
Growing Vertically
Horizontal scalability is sometimes tough to achieve. Not only must you deal with your application’s
normal concerns, you must also keep in mind how the various machines involved will distribute
the work and handle internal communication. If you don’t plan ahead for such scalability, it can be
difficult to retrofit your application. On the other hand, it is just a question of money to buy faster
machines and a question of time and effort to optimize the application’s code.
All applications can be profiled and timed to find slow operations. XMPP applications in particular
have a few common places where performance problems appear, and this section focuses on those.
The main areas to watch out for are communication latency, XML serialization, and HTML DOM
operations.
Reducing Latency
All network applications must deal in some way with latency. The speed of an operation can be
lightning fast, but if the time it takes to send the request to the server and receive the response is
high, the user will still experience an irritating delay. Often, reducing latency provides enormous
benefits to perceived application speed, so you should always aspire to make your application’s
latency as minimal as possible.
Latency can come from many places, but only a few are directly under your control as an application developer. The two biggest sources of latency in XMPP applications are initialization and setup
of connections (and other resources) and overly large stanzas. Each of these can be handled in a
number of ways depending on your application’s particular needs.
Streamlining Connections and Setup
When XMPP applications start, they need to connect to a server. This process takes some time and
involves a few rounds of requests and responses to complete. Once connected, applications often
need to perform a set of initialization operations such as fetching the roster and joining chat rooms.
When native XMPP connections are used, these processes are not as much of a problem, but over
HTTP, the story is much different.
Any number of stanzas can be sent in one HTTP request to a connection manager, and the same is
true for stanzas in responses. The nature of initialization stanzas is such that they must usually be
sent and received sequentially, with the next stanza depending on the results of the previous one. If
you assume 100 milliseconds of latency per request and response, a handful of initialization stanzas
don’t take long to add up to noticeable delays and annoyed users.
The first step to combating these problems is to parallelize as much as possible. If you can start several sequences simultaneously, fewer HTTP round trips will be needed to complete the initialization.
If you have three initialization tasks that can be run in parallel, the number of round trips needed to
complete all of them is equal to the number it takes to complete just the longest one. For example, if
a group chat application joins rooms on startup, it should join every room at once, instead of serially.
The end result will be much faster launch times for the application.
40718c13.indd 394
11/30/09 9:21:47 PM
Growing Vertically
❘ 395
By default, Strophe automatically sends new stanzas as soon as you call the send() function. If your
application is going to be sending a lot of stanzas in a short amount of time, this behavior is undesirable
because it could result in using more HTTP round trips than is necessary. You could batch up stanzas
in your code to send all at once, but this is hard to do if your initialization code is spread over several modules.
Strophe provides two functions that will help you optimize these areas of your application: pause()
and resume(). After pause() is called for a connection, Strophe stops sending any data to the server
until resume() is called. Optimizing the transmission of a large number of stanzas is as easy as pausing, doing all the individual calls to send(), and then resuming. The end result will be one large
request to the server instead of many small ones.
You’ve already seen another helpful tool to reduce connection latency, the attached sessions described
in Chapter 12. Because all of the initial set up of the connection happens over a native XMPP connection — often from a machine on the same network as the XMPP server — only one HTTP round
trip is needed to start the connection. In addition to making the connection and authentication process
faster, you can also put common initialization code in the server-side attachment service to make those
operations faster as well. This can easily reduce multiple seconds of latency down to a mere instant.
Session attachment can’t help once your application is already running, but the other techniques
are equally applicable during other phases of your application’s session. For example, a gaming client might need to make several requests to a central service as well as join a room and query initial
state. The pause() and resume() functions combined with parallelization can make this happen as
quickly as possible.
Of course, all these latency cost-saving measures can be combined in various ways. Choose the
ones that are the most effective and appropriate for your particular application. Both Amazon and
Google have done extensive research on the benefits of reducing latencies in page requests and found
them to significantly impact their bottom lines. Your users will definitely appreciate your application’s responsiveness.
Dealing with Large Stanzas
The XMPP protocol is built for exchanging small bits of information, and it is therefore no surprise
that large stanzas can cause some problems. For the most part, it is easy to avoid large stanzas, but
even when they can’t be avoided, several tools can help mitigate their effect.
To understand why large stanzas can be a problem, remember that each XMPP session consists of
two XMPP streams. Only one stanza at a time can be sent over a stream, and each stanza takes
some time to transmit from the source to the destination. Any further stanzas that need to be sent
must wait until the ones before them have been transmitted.
Normally, the stanzas are small, so each stanza must wait only a very short amount of time before
it is actually transmitted. When a large stanza is sent, the transmission time can be quite large, and
during this time, no other stanzas can be sent in the same direction.
40718c13.indd 395
11/30/09 9:21:47 PM
396
❘
Chapter 13 Deploying XMPP Applications
Imagine playing a fast chess game over XMPP, and, in the middle of the game, right before you
move, a giant avatar from one of your contacts is sent. Your move is sent to the server immediately,
and your opponent instantly responds, but your client must now wait until the avatar is completely
transmitted before you will see your opponent’s move. Meanwhile, your move clock is ticking away
precious seconds!
Two main methods exist for handling large stanzas: splitting them up into smaller stanzas and dealing with them out of band.
XMPP provides a number of ways to split a large amount of data over multiple, smaller stanzas.
One such way is In-Band Bytestreams (XEP-0047), which break up a large payload into smaller
chunks and send them in a series of <iq> or <message> stanzas. Once all the stanzas for the payload
are received, the original data can be combined and processed. Unlike sending data in a large blob,
chunking it over several stanzas allows for breaks where other stanzas can be sent as well, improving overall latency. In-Band Bytestreams work well for things like images and binary data.
Some XMPP stanzas consist of a long list of items or results. For example, a service discovery
request to a busy pubsub system may return thousands of available nodes, resulting in a large,
cumbersome stanza. For these types of stanzas, it is often better to return the set of results in
pages. Results Set Management (XEP-0059) can be used to do this for arbitrary things, and Roster
Versioning (XEP-0237) provides a similar solution specifically for rosters. These solutions aren’t
always built into every extension, but you can certainly add them to your own. Over time, I expect
the XMPP community will apply a solution similar to these two across all extensions that may generate large stanzas.
Though XMPP may not be the best protocol for transferring large blocks of information, plenty of
other protocols exist that handle this job with ease. Your application is free to use these other protocols to transfer large blobs of data out of band (OOB), outside of the XMPP connection.
The most common OOB technique for web-based XMPP applications is to use normal HTTP
requests. For example, instead of transferring avatars or images over XMPP, the URLs of the data
can be transmitted over XMPP and the actual data fetched via HTTP. The XMPP connection will
retain the necessary low latencies, and the large pieces of data can be sent over a near-optimal transport. As an added bonus, the browser caches many requests, so multiple requests for the same data
can be answered without wasting bandwidth on duplicate data.
The Jingle extensions (XEP-0166, XEP-0234, XEP-0247, and others) provide a very flexible framework for negotiating, establishing, and communicating over OOB connections. This technology was
originally developed by Google for use in voice and video chat but has since been standardized and
extended by the XMPP community to handle a wide variety of use cases.
If sufficient intermediary services exist, Jingle is capable of negotiating and facilitating connections
even through NATs and firewalls. Jingle is also capable of negotiating in-band channels for those
cases where no OOB channel is available. Although Jingle came from a need for multimedia transport negotiation and management, it is quickly becoming one of XMPP’s most important tools,
and extensions already exist for using Jingle for arbitrary file transfers and secure end-to-end
communications.
40718c13.indd 396
11/30/09 9:21:47 PM
Growing Vertically
❘ 397
Minimizing XML Serialization
Applications work with stanzas in a convenient data structure, and when ready for transmission,
these data structures are serialized to XML bytes and sent over the network. Busy applications will
be serializing a lot of XML data, and though it is not usually an expensive operation, it can become
a critical factor in performance.
Aside from optimizing the XML serialization routines yourself, the only way to improve performance
is to reduce the amount of serialization that is done. Applications can be structured to minimize
serialization, but you must first know where it happens.
Every XMPP connection involves a minimum of two serialization steps. One entity must serialize
XML to send to another, and the recipient must serialize any response it sends back.
For two clients on different servers, there are up to six serialization steps. First Darcy must serialize
his stanzas to send them to the pemberley.lit server. His server may need to parse and serialize them
to send them to the longbourn.lit server. The longbourn.lit server may need to serialize the stanza
for transmission to Elizabeth’s client. Finally, Elizabeth’s response will take the reverse route. If both
clients are using HTTP connection managers, there may even be more serialization occurring!
Some heavily optimized XMPP servers can route many stanzas without fully parsing them, thus
avoiding re-serialization, and connection managers may use similar tricks to avoid unnecessary
serialization as well. If serialization becomes a bottleneck for your application, you might consider
using one of these existing, optimized implementations.
In some cases, your own application may be able to avoid serialization. For example, just like an
optimized server, if you have access to the raw XML bytes and you only need to send a copy of a
stanza, you can transmit the same raw bytes. Unfortunately, most interesting applications are not
often resending copied stanzas.
There is, however, one instance where serialization can be more of an issue — components. XMPP
server components communicate over an XMPP stream just like clients do, and because they are
often both the endpoint and origin of communication, they cannot simply route pre-serialized stanzas around. Components are doomed to a life full of parsing and serialization.
The only way to eliminate this kind of serialization is to transmit the internal data structure representation of a stanza between the entities, but because the entities are often written in different
programming languages by different people or teams, this is not usually a practical solution.
Server plug-ins do not have these kinds of serialization issues because they share data representations — and often the same memory or process — and have no need for serialization. Also, because
they are part of the server itself, communication is usually done with function calls instead of TCP
socket connections.
If you have a component that is bottlenecked on XML serialization, converting it to a server plug-in
may be the most viable option.
In all cases, understanding where serialization is happening and at which points it is not strictly
required is the first step to figuring out how to optimize this part of your application. Once you
know where the extra serialization steps are, it is fairly straightforward to apply one of the preceding
techniques to minimize it.
40718c13.indd 397
11/30/09 9:21:47 PM
398
❘
Chapter 13 Deploying XMPP Applications
Optimizing DOM Operations
Dynamic web applications must do a lot of DOM operations. The application’s user interface changes
as new data or new user interactions are processed. Operations that manipulate the DOM are often
among the most expensive.
You can use a few techniques to reduce or optimize your access and manipulation of the browser’s
DOM: batching operations, cloning, and limiting scope.
Batching Operations
If you’ve ever written any graphics code you might be familiar with double buffering. Instead of
painting directly on the screen, a double-buffered graphics application paints on an off-screen buffer
area. Once the painting is complete, the buffer is swapped with the on-screen buffer. This results in
flicker-free frame changes.
Batching DOM operations is much the same as double buffering. Instead of manipulating the DOM
one element at a time, you build up an updated part of a DOM tree off-screen, and then insert the
entire part at once. Performance is gained because the browser does not have to render anything to
the screen until your final structure is complete.
Another technique, also used extensively in computer graphics, is to update the user interface at regular intervals. Humans cannot perceive very small slices of time; any operation that completes fast
enough is perceived as instantaneous. You can save up several intermediate updates over a small slice
of time and then render them all at once at the end. The user will not be able to tell the difference, but
the computer must do far fewer screen updates, which are expensive.
The following example may be helpful in illustrating both of these techniques. The on-screen roster in
Chapter 6’s Gab application is composed of a list of items, each of which is itself composed of several
elements. When contacts are added or removed from the roster, the whole item is manipulated at
once, as opposed to piece by piece, in order to manipulate the DOM efficiently. However, it is possible for many roster updates to happen nearly simultaneously. It would be much more efficient if Gab
would accumulate roster changes in a batch and process them every 1/10th of a second. The user
will not notice any significant decrease in responsiveness, but the browser will have to update the UI
10 times in a second at most, even if hundreds of changes per second are coming in.
Cloning Instead of Creating
Browsers can clone an already existing element much faster than they can create a similar element
from scratch. By cloning and then changing template elements, you can optimize the insertion of
new UI objects. You can also use cloning to facilitate batching up operations.
If your application needs to insert many similar kinds of elements that differ only in a few places,
you can gain some efficiency by using template elements. You can include a template element in the
HTML code or create one when your application starts. When you need to insert a similar element,
you clone the template, make the necessary changes, and then insert the cloned element. jQuery provides the clone() function, which makes this operation easy.
40718c13.indd 398
11/30/09 9:21:47 PM
Summary
❘ 399
You can also use cloning in conjunction with batching updates. First, clone the section of the UI that will
be receiving the changes. Next, do all of your updates to this cloned element. When you’re finished, you
can replace the original element with the cloned one, exposing all your DOM manipulations at once.
Limiting the Scope of Operations
Many DOM operations are done on sets of elements, and before the operations can be done, the set
of elements must be enumerated. By carefully choosing your selectors when using jQuery or similar
libraries, you can limit the scope of the target element search. This can make a big difference; the
code will only need to traverse a small set of elements to find the ones you want instead of traversing
the entire document.
The easiest way to limit the scope is to use an element identifier as the first part of your selector. For
example, if you want to manipulate all elements of class roster-item and these elements all happen
to be descendants of an element with the roster id, you can use the selector #roster .roster-item
instead of the less efficient .roster-item. The browser will only need to search through all descendants of the roster element instead of all elements in the entire document. For large documents, this
can result in tremendous speed increases.
Summary
The world may feel small, but it is filled with millions of potential users. You must take into account
considerations of scale when your application needs to serve a large audience. Similarly, if your application is very resource intensive, you will often need to deploy it with special attention to optimization
and scalability.
In this chapter, you learned about how to solve these kinds of deployment issues using techniques like:
➤➤
Scaling applications both horizontally and vertically
➤➤
Distributing HTTP connection managers
➤➤
Clustering XMPP servers
➤➤
Load balancing server components
➤➤
Internally federating servers
➤➤
Speaking the server-to-server protocol
➤➤
Minimizing latency in initialization
➤➤
Dealing with large stanzas
➤➤
Reducing XML serialization
➤➤
Optimizing DOM manipulations in browsers
In the next and final chapter, you will discover how the Strophe library is easily extendable by developers to add new functionality.
40718c13.indd 399
11/30/09 9:21:48 PM
40718c13.indd 400
11/30/09 9:21:48 PM
14
Writing Strophe Plug-ins
What’s in This Chapter?
➤➤
Using Strophe plug-ins
➤➤
Creating plug-ins
➤➤
Adding namespaces to Strophe
➤➤
Building a simple roster plug-in
The applications in this book were all written using Strophe’s primitive functions to build and
send XMPP stanzas. Developing the code this way provided valuable visibility into how the
various extensions of XMPP work. In real applications, however, it is nice to develop some
abstractions to reduce some of the grunt work. Strophe allows users to build and load plug-ins
that extend its functionality so that such abstractions can be built by developers and used by
applications.
As an example, recall that in Chapter 9 you built SketchCast, which broadcast drawing events
to a pubsub node for subscribers to watch. The application’s code created subscription stanzas, node creation stanzas, and configuration stanzas to accomplish its tasks. Imagine if there
was a pubsub plug-in for Strophe that encapsulated this logic for you. Code using this plug-in
might appear as follows:
SketchCast.connection.pubsub.create(
SketchCast.node, SketchCast.created, SketchCast.create_error);
SketchCast.connection.pubsub.configure(
SketchCast.node, {“max_items”: 20},
SketchCast.configured, SketchCast.configure_error);
40718c14.indd 401
11/30/09 9:29:29 PM
402
❘
Chapter 14 Writing Strophe Plug-ins
This version of the code is no less correct, but much shorter and more clear. The details of how to
build the various stanzas required for the operations are hidden behind the plug-in’s interface, leaving you to think about your own application’s logic rather than protocol details.
Several Strophe plug-ins are already available on the Strophe web site, and more are created by its users
all the time. Before you start your next XMPP project, you might want to take a look at the available plugins to see if there is one that meets your application’s needs. You should also feel free to contribute plug-ins
to the community as well!
Plug-ins are a great way to create running code faster, by leveraging the work of others. They also
enable you to modularize your own code, by separating application logic from the underlying protocol
semantics. In this chapter, you see exactly how to use existing plug-ins and create ones of your own.
Using Plug-ins
Using Strophe plug-ins is as easy as loading the plug-in code and then accessing the new functionality through a Strophe.Connection instance. Each plug-in automatically installs itself into the
Strophe library when loaded and then becomes available as an attribute of the connection whenever
a new connection is created.
Loading Plug-ins
Strophe plug-ins must be loaded after the Strophe library. The following HTML code loads the
Strophe pubsub plug-in, included with the Strophe library, after the main Strophe code:
<script src=’strophe.js’></script>
<script src=’strophe.pubsub.js’></script>
By convention, plug-ins are named strophe.plugin-name.js. The plug-in injects itself into the
Strophe library automatically once loaded (you see how this is done in the “Creating Plug-ins” section). If you are familiar with jQuery plug-ins, this should look very similar.
Accessing Plug-in Functionality
Once plug-ins are loaded, they become available to all Strophe.Connection object instances. If
you load a plug-in from the file strophe.myplugin.js, the plug-in’s interface will be accessible via
the myplugin attribute on the connection object. If you load the Strophe pubsub as in the previous
example, you would access it like this:
var connection = new Strophe.Connection(BOSH_URL);
connection.connect(. . .);
. . .
connection.pubsub.subscribe(“pubsub.pemberly.lit”, “latest_books”,
function (iq) { . . . },
function (iq) { . . . });
Other pubsub plug-in functionality would be accessed the same way.
40718c14.indd 402
11/30/09 9:29:29 PM
Building Plug-ins
❘ 403
In addition to providing new functions, plug-ins can also add new namespaces to Strophe. These
namespaces are accessible alongside the built-in ones found in the Strophe.NS object. For example,
the Strophe pubsub plug-in adds many pubsub-related namespaces to Strophe, a few of which are:
➤➤
Strophe.NS.PUBSUB, which expands to http://jabber.org/protocol/pubsub
➤➤
Strophe.NS.PUBSUB_OWNER, which expands to http://jabber.org/protocol/
pubsub#owner
➤➤
Strophe.NS.PUBSUB_EVENT, which expands to http://jabber.org/protocol/
pubsub#event
These namespaces make it very convenient to build pubsub stanzas yourself if for some reason the
plug-in doesn’t provide the functionality you want directly. They will also save you some typing and
some searching through the specifications.
Each plug-in provides different functions, but these functions are always accessible in the same
way. If you want to learn more about a particular plug-in and the operations it provides, please see
its documentation. Even if the plug-in is sparsely documented or not documented at all, the tools
you have learned throughout this book should make it easy to understand all but the most complicated plug-ins. After all, most plug-ins are just convenience wrappers around common protocol
operations.
Now that you know how to load and use plug-ins, you should read on to learn how to build
your own!
Building Plug-ins
Plug-ins are created by making a prototype object that defines the plug-in’s functionality and registering that prototype with the Strophe library. When a new Strophe connection is created, it creates
a plug-in object from the plug-in prototype and calls the object’s init() function to initialize the
plug-in. After initialization, the plug-in is ready to be used by your application code.
The init() function also serves another purpose. Most plug-ins will need to send data over the
XMPP connection and set up stanza handlers, and for these tasks, the plug-in needs access to a
Strophe.Connection object. Strophe will pass the connection object as the first parameter to
init(), and the plug-in can then save this reference for later use.
Another function common to most plug-ins is statusChanged(). Strophe calls each plug-in’s
statusChanged() function whenever the connection status changes. This is exactly the same as the
connection callback you’ve seen in many of the previous chapters. This allows the plug-in to react
to events like CONNECTED and DISCONNECTED. This function is optional, because some plug-ins only
need to respond to direct invocation.
The example plug-in in Listing 14-1 is one of the smallest Strophe plug-ins you can make. Aside
from the init() function discussed earlier, it also provides online() and offline() functions that
change your presence.
40718c14.indd 403
11/30/09 9:29:29 PM
404
❘
Chapter 14 Writing Strophe Plug-ins
Listing 14-1: strophe.simple.js
Strophe.addConnectionPlugin(‘simple’, {
init: function (connection) {
this.connection = connection;
},
online: function () {
this.connection.send($pres());
},
offline: function () {
this.connection.send($pres({type: “unavailable”}));
}
});
Registering new Strophe plug-ins is accomplished via the addConnectionPlugin() function. This
function takes the name of the plug-in and the plug-in prototype as arguments. These plug-ins are
called connection plug-ins because they augment the Strophe.Connection object. In the future,
Strophe may support other plug-in types that augment other parts of the library.
Finally, Strophe plug-ins can augment the namespaces available in the Strophe.NS object by using
.addNamespace(). The following code adds service discovery namespaces to Strophe. The simple
example plug-in has no new namespaces, but more complex plug-ins will often need to add to the
namespaces for the convenience of the plug-in’s users.
Strophe.addNamespace(‘DISCO_INFO’, ‘http://jabber.org/protocol/disco#info’);
Strophe.addNamespace(‘DISCO_ITEMS’, ‘http://jabber.org/protocol/disco#items’);
Users of the preceding example plug-in can write connection.simple.online() to send available
presence and connection.simple.offline() to send unavailable presence instead of building the
stanzas by hand. In this particular case, this doesn’t save much effort, but as you soon see, more
sophisticated plug-ins can make your XMPP programming tasks far simpler.
Creating a Roster Plug-in
To really get a feel for what plug-ins can do, you will have to build one that has some non-trivial
functionality. In this section, you develop a roster management plug-in, which abstracts away common roster operations and makes roster data available in a JavaScript-friendly data structure.
Managing the roster involves a few basic operations. First, you’ll need to query the roster and store
it. Then you’ll need ways to add, edit, and delete roster items. Because other connection resources
might also be making roster changes, you’ll need to listen for those and update the roster accordingly.
Finally, you will want to keep the status of your roster fresh as presence information comes in from
your contacts.
40718c14.indd 404
11/30/09 9:29:30 PM
Creating a Roster Plug-in
❘ 405
Storing Contacts
Before starting on roster mutation operations, you should begin with how to store the roster’s state
in the plug-in. This will be the main interaction point between various pieces of the code.
Imagine that you’ve created an application that shows a user’s roster in the user interface. To do this,
your code could query the roster and add handlers for roster updates. When another piece of your
application needs the roster data, you can either query for the roster again, which is inefficient, or
have one part of the UI communicate with the other, which tightly couples the functionality. Instead
of doing either of those things, it is better to put knowledge of the roster state in one place where the
various parts of your application can interact with it.
Following is a sample roster expressed as a JavaScript literal; this same structure will be the basis of
the roster state in your plug-in.
contacts = {
“darcy@pemberley.lit”: {
name: “Darcy”,
resources: {
“library”:, {
show: “away”,
status: “reading”
}
},
subscription: “both”,
ask: “”,
groups: [“Family”]
},
“bingley@netherfield.lit”: {
name: “Charles”,
resources: {},
subscription: “both”,
ask: “”,
groups: [“Friends”]
}
};
The sample roster contains two contacts, Darcy and Bingley, who are online and offline, respectively.
The resources attribute tells you which resources of the contacts are currently online along with
their appropriate metadata; because Darcy has at least one resource, he is considered online, and
because Bingley has none, he is considered offline.
The name, subscription, and ask properties of the contact and the show and status properties of
the resource are named for the protocol attributes they represent. These attributes were covered in
detail back in Chapter 6. The show and status attributes come from contacts’ <presence> stanzas,
and name, subscription, and ask are part of the user’s roster state for a given contact.
We’ve simplified things slightly, however, with respect to the show and status attributes. When a
contact’s presence has no <show> element, they are considered online and available, so the show attribute is set to “available.” Similarly, if the contact’s presence has no <status> element, the status
attribute is set to the empty string.
40718c14.indd 405
11/30/09 9:29:30 PM
406
❘
Chapter 14 Writing Strophe Plug-ins
Finally, the groups attribute specifies which roster groups a contact belongs in.
It would be quite tedious for users of your plug-in to have to write code to enumerate the resources
property to determine if a contact was online. You can make these programmers’ lives easier by providing a utility method that computes this property based on the resources attribute’s value:
online: function () {
var result = false;
for (var k in this.resources) {
result = true;
break;
}
return result;
}
code snippet strophe.roster.js
Now you have enough pieces to make a first outline of the plug-in code. The following version isn’t
very useful yet, but you will be extending it over the next sections. Add the following code to a new
file called strophe.roster.js:
// Contact object
function Contact() {
this.name = “”;
this.resources = {};
this.subscription = “none”;
this.ask = “”;
this.groups = [];
}
Contact.prototype = {
// compute whether user is online from their
// list of resources
online: function () {
var result = false;
for (var k in this.resources) {
result = true;
break;
}
return result;
}
};
Strophe.addConnectionPlugin(‘roster’, {
init: function (connection) {
this.connection = connection;
this.contacts = {};
Strophe.addNamespace(‘ROSTER’, ‘jabber:iq:roster’);
}
});
code snippet strophe.roster.js
40718c14.indd 406
11/30/09 9:29:30 PM
Creating a Roster Plug-in
❘ 407
Getting and Maintaining the Roster
You saw how to retrieve and deal with the roster in Chapter 6, and now you will put those skills to
use again to populate the roster state in the plug-in. First, you must get an initial copy of the roster
from the server once the connection is established. After that, each contact’s information will need
to be updated as their presence changes. The plug-in must also trigger an event so that the user’s
code gets notified when new roster changes have been made.
In Chapter 6, you learned how to retrieve rosters from the server. The plug-in must do this every
time the connection is established. After all, while a user is disconnected in one client, another client
could have made changes. Also, when the plug-in is notified about disconnection, it needs to put the
roster representation into an appropriate state.
The following code implements the statusChanged() function to handle these tasks for the
CONNECTED and DISCONNECTED statuses. It also notifies any handlers for the roster_changed event
that the roster has been updated. You should insert this into the plug-in’s prototype after init().
statusChanged: function (status) {
if (status === Strophe.Status.CONNECTED) {
this.contacts = {};
// build and send initial roster query
var roster_iq = $iq({type: “get”})
.c(‘query’, {xmlns: Strophe.NS.ROSTER});
var that = this;
this.connection.sendIQ(roster_iq, function (iq) {
$(iq).find(“item”).each(function () {
// build a new contact and add it to the roster
var contact = new Contact();
contact.name = $(this).attr(‘name’) || “”;
contact.subscription = $(this).attr(‘subscription’) ||
“none”;
contact.ask = $(this).attr(‘ask’) || “”;
$(this).find(“group”).each(function () {
contact.groups.push(this.text());
});
that.contacts[$(this).attr(‘jid’)] = contact;
});
// let user code know something happened
$(document).trigger(‘roster_changed’, that);
});
} else if (status === Strophe.Status.DISCONNECTED) {
// set all users offline
for (var contact in this.contacts) {
this.contacts[contact].resources = {};
}
// notify user code
$(document).trigger(‘roster_changed’, this);
}
}
code snippet strophe.roster.js
40718c14.indd 407
11/30/09 9:29:30 PM
408
❘
Chapter 14 Writing Strophe Plug-ins
The plug-in will now keep track of the basic roster information, but it doesn’t keep this information
up to date as the roster changes or as contacts change their presence. You can solve the first issue by
setting up stanza event handlers for IQ-set stanzas that contain roster updates from the server. The
second issue can be solved by adding presence stanza handlers.
In Chapter 6, you discovered how to modify rosters by adding, updating, and deleting contacts. The
server also notifies other connected resources about roster changes so that every client’s state remains
consistent. For example, if Darcy removes Wickham from his roster while connected on the resource
library, his other resource, drawing_room, will be notified of the change. First, Darcy deletes
Wickham from his roster:
<iq from=’darcy@pemberley.lit/library’
type=’set’
id=’delete1’>
<query xmlns=’jabber:iq:roster’>
<item jid=’wickham@militia.lit’ subscription=’remove’/>
</query>
</iq>
The server deletes Wickham and notifies all of Darcy’s connected resources about the roster change.
Darcy’s drawing_room resource will receive:
<iq to=’darcy@pemberley.lit/drawing_room’
type=’set’
id=’deleted1’>
<query xmlns=’jabber:iq:roster’>
<item jid=’wickham@militia.lit’ subscription=’remove’/>
</query>
</iq>
Darcy’s library resource will also receive the same update, even though it requested the change.
The server will always notify all resources of roster state changes.
<iq to=’darcy@pemberley.lit/library’
type=’set’
id=’deleted1’>
<query xmlns=’jabber:iq:roster’>
<item jid=’wickham@militia.lit’ subscription=’remove’/>
</query>
</iq>
Both clients must acknowledge the IQ-set stanza with an IQ-result. At this point, each client will
have the same view of the roster state.
You can extend statusChanged() to set up handlers for roster changes and add a new function to
the plug-in prototype to handle these changes. A modified version of statusChanged() is shown
in the following code, with the new lines highlighted, followed by the new rosterChanged() function. Because the server will always send a single change at a time, rosterChanged() only needs to
handle one <item/> child.
40718c14.indd 408
11/30/09 9:29:30 PM
Creating a Roster Plug-in
❘ 409
statusChanged: function (status) {
if (status === Strophe.Status.CONNECTED) {
this.contacts = {};
this.connection.addHandler(this.rosterChanged.bind(this),
Strophe.NS.ROSTER, “iq”, “set”);
// build and send initial roster query
var roster_iq = $iq({type: “get”})
.c(‘query’, {xmlns: Strophe.NS.ROSTER});
var that = this;
this.connection.sendIQ(roster_iq, function (iq) {
$(iq).find(“item”).each(function () {
// build a new contact and add it to the roster
var contact = new Contact();
contact.name = $(this).attr(‘name’) || “”;
contact.subscription = $(this).attr(‘subscription’) ||
“none”;
contact.ask = $(this).attr(‘ask’) || “”;
$(this).find(“group”).each(function () {
contact.groups.push(this.text());
});
that.contacts[$(this).attr(‘jid’)] = contact;
});
// let user code know something happened
$(document).trigger(‘roster_changed’, that);
});
} else if (status === Strophe.Status.DISCONNECTED) {
// set all users offline
for (var contact in this.contacts) {
this.contacts[contact].resources = {};
}
// notify user code
$(document).trigger(‘roster_changed’, this);
}
},
rosterChanged: function (iq) {
var item = $(iq).find(‘item’);
var jid = item.attr(‘jid’);
var subscription = item.attr(‘subscription’) || “”;
if (subscription === “remove”) {
// removing contact from roster
delete this.contacts[jid];
} else if (subscription === “none”) {
// adding contact to roster
var contact = new Contact();
contact.name = item.attr(‘name’) || “”;
40718c14.indd 409
11/30/09 9:29:30 PM
410
❘
Chapter 14 Writing Strophe Plug-ins
item.find(“group”).each(function () {
contact.groups.push(this.text());
});
this.contacts[jid] = contact;
} else {
// modifying contact on roster
var contact = this.contacts[jid];
contact.name = item.attr(‘name’) || contact.name;
contact.subscription = subscription || contact.subscription;
contact.ask = item.attr(‘ask’) || contact.ask;
contact.groups = [];
item.find(“group”).each(function () {
contact.groups.push($(this).text());
});
}
// acknowledge receipt
this.connection.send($iq({type: “result”, id: $(iq).attr(‘id’)}));
// notify user code of roster changes
$(document).trigger(“roster_changed”, this);
return true;
}
code snippet strophe.roster.js
With the roster updates handled, you can now move on to handling presence updates. You’ll need to
add a presence stanza handler to statusChanged() as well as a new function in the plug-in’s prototype, presenceChanged(). The presenceChanged() function just needs to add, modify, or delete
the appropriate resource in the resources attribute for a contact based on the presence stanza
information.
Add the following line just after the addHandler() line from the preceding version of
statusChanged():
this.connection.addHandler(this.presenceChanged.bind(this),
null, “presence”);
code snippet strophe.roster.js
Now add the implementation of presenceChanged() to the prototype:
presenceChanged: function (presence) {
var from = $(presence).attr(“from”);
var jid = Strophe.getBareJidFromJid(from);
var resource = Strophe.getResourceFromJid(from);
var ptype = $(presence).attr(“type”) || “available”;
if (!this.contacts[jid] || ptype === “error”) {
// ignore presence updates from things not on the roster
// as well as error presence
40718c14.indd 410
11/30/09 9:29:30 PM
Creating a Roster Plug-in
❘ 411
return true;
}
if (ptype === “unavailable”) {
// remove resource, contact went offline
delete this.contacts[jid].resources[resource];
} else {
// contact came online or changed status
this.contacts[jid].resources[resource] = {
show: $(presence).find(“show”).text() || “online”,
status: $(presence).find(“status”).text()
};
}
// notify user code of roster changes
$(document).trigger(“roster_changed”, this);
}
code snippet strophe.roster.js
The plug-in will now maintain roster state over the lifetime of the connection. Plug-in users can
access this information at any time with connection.roster.contacts. All that remains is to
assist the developer with making roster changes.
Manipulating the Roster
In the previous section you handled notifications for the three roster manipulations: add, modify,
and delete a contact. Here you implement the other side of this functionality by allowing the plugin’s users to change the roster with simple calls to addContact(), deleteContact(), and modifyContact(). There are also two other times when the roster changes; contacts are added whenever
a presence subscription is requested, and contacts are usually deleted whenever a user unsubscribes
from a contact’s presence. You’ll make subscribing and unsubscribing just as easy as the other roster
modifications with subscribe() and unsubscribe().
The direct roster manipulation helpers are very simple. Because the plug-in already handles the
change notifications, there is no need for your code to modify the contacts attribute at all. Once
the server has processed the roster modification, it generates a change notification, and that notification will trigger the handlers you wrote that already do the appropriate modifications of the contacts attribute. You only need to send the appropriate IQ-sets to the server to initiate the chain of
events. On top of that, roster item modification is exactly the same as addition, so you can reuse the
same code!
All three functions are implemented in the following code. The code is very similar to the code you
wrote in Chapter 6 to accomplish the same operations.
addContact: function (jid, name, groups) {
var iq = $iq({type: “set”})
.c(“query”, {xmlns: Strophe.NS.ROSTER})
.c(“item”, {name: name || “”, jid: jid});
if (groups && groups.length > 0) {
40718c14.indd 411
11/30/09 9:29:31 PM
412
❘
Chapter 14 Writing Strophe Plug-ins
$.each(groups, function () {
iq.c(“group”).t(this).up();
});
}
this.connection.sendIQ(iq);
},
deleteContact: function (jid) {
var iq = $iq({type: “set”})
.c(“query”, {xmlns: Strophe.NS.ROSTER})
.c(“item”, {jid: jid, subscription: “remove”});
this.connection.sendIQ(iq);
},
modifyContact: function (jid, name, groups) {
this.addContact(jid, name, groups);
}
code snippet strophe.roster.js
Recall that subscribing and unsubscribing to someone’s presence is a two-step process. For subscriptions, the client first adds a new contact, and then sends a presence subscription request. For unsubscribe requests, the client first sends the correct presence stanza, and then deletes the contact from
the roster. The following code makes use of the roster manipulation functions you just wrote, and
should be added to the plug-in prototype:
subscribe: function (jid, name, groups) {
this.addContact(jid, name, groups);
var presence = $pres({to: jid, “type”: “subscribe”});
this.connection.send(presence);
},
unsubscribe: function (jid) {
var presence = $pres({to: jid, “type”: “unsubscribe”});
this.connection.send(presence);
this.deleteContact(jid);
}
code snippet strophe.roster.js
Your shiny, new roster plug-in is now complete. It’s time to see what it can do!
Taking the Plug-in for a Spin
Strophe plug-ins are intended to make developers’ lives easier than dealing with the messy details
directly. Even the simple plug-in you developed in the previous section is surprisingly useful. To
40718c14.indd 412
11/30/09 9:29:31 PM
Taking the Plug-in for a Spin
❘ 413
demonstrate this, you build a small mini-application that shows your current roster state and
updates even as other resources are manipulating your contacts.
The HTML code and CSS styles for the RosterWatch application are shown in Listing 14-2 and
Listing 14-3. There is nothing here that you haven’t seen before. The main thing to notice in the
HTML file is that the plug-in file strophe.roster.js is loaded as well as the Strophe library.
Listing 14-2: rosterwatch.html
<!DOCTYPE HTML PUBLIC “-//W3C//DTD HTML 4.01//EN”
“http://www.w3.org/TR/html4/strict.dtd”>
<html>
<head>
<meta http-equiv=”Content-type” content=”text/html;charset=UTF-8”>
<title>RosterWatch - Chapter 14</title>
<link rel=’stylesheet’ href=’http://ajax.googleapis.com/ajax/libs/jqueryu
i/1.7.2/themes/cupertino/jquery-ui.css’>
<script src=’http://ajax.googleapis.com/ajax/libs/jquery/1.3.2/jquery.js’>
</script>
<script src=’http://ajax.googleapis.com/ajax/libs/jqueryui/1.7.2/jquery-u
i.js’></script>
<script src=’scripts/strophe.js’></script>
<script src=’scripts/flXHR.js’></script>
<script src=’scripts/strophe.flxhr.js’></script>
<script src=’strophe.roster.js’></script>
<link rel=’stylesheet’ type=’text/css’ href=’rosterwatch.css’>
<script src=’rosterwatch.js’></script>
</head>
<body>
<h1>RosterWatch</h1>
<div class=’toolbar’>
<input id=’disconnect’ type=’button’ value=’disconnect’
disabled=’disabled’>
</div>
<div id=’roster’>
</div>
<!-- login dialog -->
<div id=’login_dialog’ class=’hidden’>
<label>JID:</label><input type=’text’ id=’jid’>
<label>Password:</label><input type=’password’ id=’password’>
</div>
</body>
</html>
40718c14.indd 413
11/30/09 9:29:31 PM
414
❘
Chapter 14 Writing Strophe Plug-ins
Listing 14-3: rosterwatch.css
body {
font-family: Helvetica;
}
h1 {
text-align: center;
}
.toolbar {
text-align: center;
}
#roster {
width: 500px;
margin: auto;
border: solid 1px black;
}
.hidden {
display: none;
}
.contact {
padding: 10px;
}
.name {
font-size: 150%;
font-weight: bold;
}
.jid {
font-size: 80%;
font-style: italic;
}
.online {
background-color: #7f7;
}
.away {
background-color: #f77;
}
.offline {
background-color: #777;
}
The actual JavaScript code for this application is quite simple and appears in Listing 14-4. Because
all of the heavy lifting dealing with roster updates is handled by the plug-in, the code deals very little
with XMPP except to make the connection and send initial presence. The roster_changed event
handler just enumerates the roster contacts and writes out HTML, just like any modern, dynamic
web application.
40718c14.indd 414
11/30/09 9:29:31 PM
Taking the Plug-in for a Spin
❘ 415
Listing 14-4: rosterwatch.js
RosterWatch = {
connection: null
};
$(document).ready(function () {
$(‘#login_dialog’).dialog({
autoOpen: true,
draggable: false,
model: true,
title: ‘Connect to XMPP’,
buttons: {
“Connect”: function () {
$(document).trigger(‘connect’, {
jid: $(‘#jid’).val(),
password: $(‘#password’).val()
});
$(‘#password’).val(‘’);
$(this).dialog(‘close’);
}
}
});
$(‘#disconnect’).click(function () {
$(‘#disconnect’).attr(‘disabled’, ‘disabled’);
RosterWatch.connection.disconnect();
});
});
$(document).bind(‘connect’, function (ev, data) {
var conn = new Strophe.Connection(
‘http://bosh.metajack.im:5280/xmpp-httpbind’);
conn.connect(data.jid, data.password, function (status) {
if (status === Strophe.Status.CONNECTED) {
$(document).trigger(‘connected’);
} else if (status === Strophe.Status.DISCONNECTED) {
$(document).trigger(‘disconnected’);
}
});
RosterWatch.connection = conn;
});
$(document).bind(‘connected’, function () {
$(‘#disconnect’).removeAttr(‘disabled’);
RosterWatch.connection.send($pres());
});
$(document).bind(‘disconnected’, function () {
40718c14.indd 415
continues
11/30/09 9:29:31 PM
416
❘
Chapter 14 Writing Strophe Plug-ins
Listing 14-4 (continued)
RosterWatch.connection = null;
$(‘#roster’).empty();
$(‘#login_dialog’).dialog(‘open’);
});
$(document).bind(‘roster_changed’, function (ev, roster) {
$(‘#roster’).empty();
var empty = true;
$.each(roster.contacts, function (jid) {
empty = false;
var status = “offline”;
if (this.online()) {
var away = true;
for (var k in this.resources) {
if (this.resources[k].show === “online”) {
away = false;
}
}
status = away ? “away”: “online”;
}
var html = [];
html.push(“<div class=’contact “ + status + “‘>”);
html.push(“<div class=’name’>”);
html.push(this.name || jid);
html.push(“</div>”);
html.push(“<div class=’jid’>”);
html.push(jid);
html.push(“</div>”);
html.push(“</div>”);
$(‘#roster’).append(html.join(‘’));
});
if (empty) {
$(‘#roster’).append(“<i>No contacts:(</i>”);
}
});
40718c14.indd 416
11/30/09 9:29:31 PM
Summary
❘ 417
The roster plug-in you created does an excellent job abstracting away the details of roster management, which is exactly what was intended.
Improving the Roster Plug-in
The roster plug-in you created is pretty simple, although it is still quite useful. Here are some ideas
for improvements you can try:
➤➤
Send more detailed update information in the roster_changed event so that the user’s code
doesn’t have to refresh the entire roster every time.
➤➤
Extend the plug-in to trigger more events for things like incoming presence subscriptions and
contacts going on and offline.
➤➤
Add support for Personal Eventing Protocol (XEP-0163) and Entity Capabilities (XEP-0115)
to get extended information, such as what music contacts are listening to.
Summary
Plug-ins make developers’ lives easier by abstracting away protocol details and letting developers
reuse and build easily upon the work of others. The Strophe library provides a simple, yet highly
effective plug-in system that allows its users to add advanced functionality. In this chapter you:
➤➤
Learned how to load and use Strophe plug-ins
➤➤
Discovered how to create your own plug-ins
➤➤
Created a roster management plug-in that made dealing with rosters, roster updates, and
presence changes really easy
➤➤
Saw how easy application logic becomes when plug-ins are available to do the heavily lifting
It’s been a long journey, but I hope an interesting and enjoyable one. You built nine applications,
including several really sophisticated ones, and learned how to scale XMPP applications. You should
now be well versed in the XMPP protocol and the Strophe library as well, and perhaps you’ve learned
a few new JavaScript or jQuery tricks, too. Hopefully your head is now filled with wonderful ideas
for great XMPP-powered applications. Good luck and happy hacking!
40718c14.indd 417
11/30/09 9:29:31 PM
40718c14.indd 418
11/30/09 9:29:31 PM
A
Getting Started with jQuery
For years JavaScript programmers have been dealing with the myriad idiosyncrasies of the DOM
(Document Object Model) API. Many people created helper functions that abstracted particular operations so that they worked across all browsers, and a few of the best abstractions became
polished enough to become generally useful for a wide range of applications. The jQuery library
is a lightweight, cross-browser JavaScript library that replaces the ugly parts of the DOM API
with a clever CSS selector-based API that makes quick work of most tasks.
jQuery is excellent for slicing and dicing HTML, but it also works very well on XML documents.
Because XMPP stanzas are just XML document fragments, jQuery makes manipulating XMPP
much easier than using the raw DOM APIs.
Strophe itself was partially inspired by the function chaining, use of callbacks, and plug-in
architecture in jQuery, and so the two libraries fit together quite naturally.
If you haven’t used or seen jQuery before, this appendix teaches you the basics and gives you
the background you need to use jQuery effectively for your own XMPP applications. The
jQuery library also provides many other useful functions for web programming, like AJAX
requests and animations, but these are not covered here because they are not used in the book.
Finding jQuery
You can find the jQuery library on the Web at http://jquery.com. jQuery’s web site also
contains tutorials, reference documentation, examples, and a long list of third-party plug-ins
that extend jQuery in interesting ways.
You can download the library to use in your own applications, or, as shown in Chapter 3, you
can use the hosted version provided by Google as part of its AJAX Libraries API. The applications in this book use the Google-hosted version.
40718bapp01.indd 419
11/30/09 9:33:32 PM
420
❘
Appendix A Getting Started with jQuery
You can load jQuery by including a <script> element in your page like the one shown here:
<script src=’http://ajax.googleapis.com/ajax/libs/jquery/1.3.2/jquery.js’>
</script>
In a production application, you may want to use the minified version of the library, which reduces
to the size of the library to make your application’s page load faster. The minified version is usually
named jquery.min.js instead of jquery.js.
Once jQuery is loaded in your application, you access its functionality via the $() function. This
funny looking function has a short name to save typing because it usually becomes one of the most
used functions in an application.
jQuery versus DOM
Before you jump into the details of jQuery, take a look at the following example comparing DOM
and jQuery. This example should give you a feeling for what jQuery code looks like and how it is
different from using the DOM API directly.
The following code has a simple task. It finds all the <p> elements in the current page and changes
their background color to a light red. First the DOM API version:
var p_elems = document.getElementsByTagName(‘p’);
for (var i = 0; i < p_elems.length; i++) {
p_elems[i].style.backgroundColor = ‘#faa’;
}
Now the same action using jQuery:
$(‘p’).css({backgroundColor: ‘#faa’});
The jQuery code is not only much shorter, but it is also much clearer. It selects a set of elements
using CSS selector syntax and applies a new background color to all the matching elements.
The DOM code in the previous example works in all browsers, but jQuery really shines when the
code uses some DOM functionality that is not consistent across all browsers. For the inconsistent
DOM API functions, the jQuery code is just as short, but equivalent code without jQuery is generally filled with extra if statements for compability checks.
Using jQuery
jQuery’s design is simple, but powerful: find a set of elements and perform an operation on the
resulting set.
Finding Elements
As you saw in the previous section, jQuery’s $() function accepts an extended version of CSS selector
syntax instead of using the DOM’s getElementById() or getElementsByTagName(). This makes
40718bapp01.indd 420
11/30/09 9:33:32 PM
Using jQuery
❘ 421
finding elements quick and easy. Once an initial selection has been made, jQuery contains helper
functions to augment the selection if needed.
jQuery’s $() function also accepts DOM elements instead of CSS selectors. The given DOM elements become the jQuery selection.
Selectors
Just like CSS, jQuery supports the following basic selectors:
➤➤
anelement: Selects elements with the name anelement
➤➤
.aclass: Selects elements that have the class aclass
➤➤
#anid: Selects the element with the unique ID anid
These selectors can be combined as in the selectors p.error and input#textbox to make more specific selectors. Multiple selectors can be separated by commas, and the resulting combined selector
will find any element that matches any one of these selectors.
Selectors can also be made to find elements in a specific hierarchy by separating several selectors
with spaces. For example, the selector #chat p finds any <p> element within the element identified
by chat. More specific relationships can be specified with >, +, and -. The selector div > p finds
only the <p> elements that are direct descendants of a <div> element. Using h1 + p only finds <p>
elements that come immediately after an <h1> sibling, and similarly, h1 - p selects <p> elements
that come immediately before an <h1> sibling.
Selectors can also be filtered. Adding :first or :last selects only the first or last of the elements
that match the rest of the selector. The filters :visible and :hidden are similar, but restrict the
selection to those elements that the user can or can’t see on screen.
Finally, jQuery provides several filters for attributes. The main variants are [anattr], which matches
when the elements have an anattr attribute, and [anattr=’somevalue’], which matches when the
elements have the anattr attribute and its value equals ‘somevalue’.
See if you can determine what elements would match the following selectors:
➤➤
p:first
➤➤
ul > li .name
➤➤
input[type=’text’], input[type=’password’]
Augmenting Selections
Once a selection is made, jQuery contains plenty of methods to refine it to just the elements you need.
The most common of these are discussed here.
filter() picks out a subselection of elements from a given selection. If you have large selection of
elements that needs a common manipulation performed, but a smaller subset that needs a second
manipulation, you can use filter() after the first operation to narrow the selection and then perform the second manipulation.
40718bapp01.indd 421
11/30/09 9:33:32 PM
422
❘
Appendix A Getting Started with jQuery
children() filters the list for all immediate children of the matched elements. This is often used to
match the first-level children of XMPP stanzas. For example, to get the <error> element out of a
stanza, you could use $(stanza).children(‘error’).
find() looks for matching elements among the current selection’s descendants. Because XMPP stanzas
will generally start off with only the top-level element selected, find() is often used to select the inter-
esting child elements from there.
not() removes the matching elements from the selection. This function is very useful for removing
one or two stragglers from an otherwise perfect selection.
Acting on Elements
The operations that jQuery supports on selected elements include changing CSS properties, getting
and setting the contents of each element or its attributes, and binding event handlers. jQuery also
supports several functional programming-inspired methods like each() and map(), which allow easy
iteration and function application over the entire selection. You are introduced to all these shortly.
Making Chains
Function call chaining also contributes to jQuery’s accessibility and power. Chaining allows multiple operations to be performed on the same selection easily.
Most of jQuery’s methods return the jQuery object itself along with its corresponding selection.
This means that method calls on the object can be chained one after another.
The following code shows an example of a typical object’s methods being called:
var obj = new SomeObject();
obj.foo();
obj.bar(2);
obj.baz(‘XMPP’);
If each of SomeObject’s methods returned the object’s instance, these methods could be chained. A
chained invocation is shown here:
var obj = new SomeObject();
obj.foo().bar(2).baz(‘XMPP’);
This may look a little peculiar if this is the first time you’ve seen such a construction. It turns out to
be quite useful in practice with libraries that are designed for it, like jQuery. Strophe uses chaining
to make building stanzas easier, as you can see in Chapter 3.
The following jQuery examples are understandable and quite readable even if you’ve never seen the
library before:
$(‘p.error’).css({backgroundColor: ‘#f00’, fontHeight: ‘14pt’}).show();
$(‘#lists ul’).append(‘<li>New item</li>’).append(‘<li>Another new item</li>’);
40718bapp01.indd 422
11/30/09 9:33:32 PM
Manipulating Elements
❘ 423
Manipulating Elements
Much of the work you will do with jQuery in this book relates to extracting data out of elements,
adding new elements, or modifying existing elements. This section goes over the most common
manipulations that jQuery supports and that are used throughout the book’s applications.
Data Extraction
When dealing with XMPP stanzas, jQuery is used mainly to extract the interesting information out
of the XML, much like a programmatic version of XPath.
attr() is used to get and set an element’s attributes. To get an attribute, pass the attribute’s name, and
to set an attribute, pass both a name and the desired value. If the current jQuery selection contains
more than one element, only the first element is affected when called as attr(name); all elements
are affected when called as attr(name, value). See the following examples for the typical usage of
attr():
$(stanza).find(‘item’).attr(‘jid’); // get the first item’s jid attribute
// set the form’s input elements to buttons
$(‘#someform input’).attr(‘type’, ‘button’);
text() and html() get or set the text or HTML contents of the element. Because Strophe’s builders
are used to construct most stanzas, this book most often uses these methods to retrieve values rather
than set them.
var body = $(stanza).find(‘body’).text(); // get the message body contents
$(‘#chat_input’).text(‘Type your message here..’); // set the text box prompt
Styling Elements
Most dynamic web applications accomplish many UI tasks by manipulating the styles of various elements. Elements can be shown or hidden, change colors and size, or have their CSS classes
manipulated programmatically. The following jQuery methods provide this behavior.
show() and hide() are somewhat obvious from their names. They change the visibility of all the
selected elements. This is often used to make dialog boxes pop into view or to replace one tab’s contents with another’s.
css() can retrieve a specific CSS style from an element or change one or more of its style properties.
The following code shows some typical uses of this method:
var c = $(‘#tab1’).css(‘color’); // get the tab’s font color
$(‘.username’).css(‘background-color’, ‘#fff’); // set a single css style
$(‘.errorMsg’).css({fontSize: ‘150%’, color: ‘red’}); // change multiple styles at
once
Notice that the style’s name can be written as fontSize or ‘font-size’. jQuery helpfully allows
you to save typing the quotes and the dash.
40718bapp01.indd 423
11/30/09 9:33:32 PM
424
❘
Appendix A Getting Started with jQuery
addClass() and removeClass() change the CSS classes that are in effect for the selected elements.
These provide a fast way to change lots of CSS styles at once, without having to specify them all
individually.
Adding and Removing Elements
Showing and hiding elements works well for a lot of things, but sometimes you will have to add or
remove elements completely from the DOM. For example, in Chapter 6’s chat application, when roster items are received from the server, new items are added to the contact list.
You can add content with append() and prepend(), or with the previously mentioned html() function. Each of these functions just takes a string containing the new HTML to append, prepend, or
replace.
remove() deletes the selected elements from the DOM completely. empty() removes all the child
elements for each element in the selection, and it is often used to clear lists or whole <div>s.
Iterating over Selections
Applications will often need to perform some function over all the elements in a selection. In most
popular languages, this is often done with the aid of a for or while loop, but jQuery allows you to
do this easily by borrowing patterns from functional programming languages.
The jQuery object supports the length attribute, just like normal JavaScript arrays, and each element
in the selection can be accessed with normal bracket notation for arrays. Using these properties, the
following code follows the traditional iteration pattern to add contacts to a list:
var i;
var items = $(stanza).find(‘item’);
for (i = 0; i < items.length; i++) {
$(‘#contact_list’).append(‘<li>’ + $(items[i]).attr(‘jid’) + ‘</li>’);
}
This code finds all the <item> elements in an XMPP stanza and then extracts the jid attribute from
each and uses this to add new elements to a contact list. Note that items[i] is wrapped by $()
because it is a normal DOM element, not a jQuery selection; after calling $() on the element, it will
be a normal jQuery selection of just the one element.
The same actions can be accomplished by using jQuery’s each() method on the initial selection:
$(stanza).find(‘item’).each(function () {
$(‘#contact_list’).append(‘<li>’ + $(this).attr(‘jid’) + ‘</li>’);
});
each() takes a function as its argument, and that function performs the desired action for each
item. Each time the function is called, the this variable references the current item of the iteration.
Once again, because the item is a normal DOM element, to use the attr() method, it must first be
wrapped by the $() function.
Notice that lots of unneeded things have been eliminated, such as the variable i, to leave a very
readable bit of code.
40718bapp01.indd 424
11/30/09 9:33:32 PM
Dealing with Events
❘ 425
each() can also be used on normal JavaScript arrays by using the global version of the method,
accessed as a property of the global $ object:
var list = [1, 2, 3, 4, 5];
$.each(list, function () {
$(‘body’).append(‘called for item ‘ + this);
});
Dealing with Events
Aside from dealing with DOM elements themselves, web applications must also handle and trigger
events on the document and specific elements. The event models across two browsers can behave
quite differently, but jQuery provides a consistent interface for events that makes using them simple.
Aside from the normal user interaction events like clicking a button or a page finishing loading, jQuery
also provides support for custom events. Custom events can be used for all sorts of interesting things.
You can have a piece of UI in your application trigger a contact_added event or turn a series of simple
events into a composite event that has meaning in your particular application.
Custom events also provide an easy way to decouple your application’s code. Instead of having one
piece of code call another directly, it can instead fire an event that the other piece of code can listen
for. If more pieces of the application need to be involved in the same bit of logic, they can simply
listen and respond to the same event, instead of having to change the rest of the code to call the new
function.
Custom events are handled exactly like normal DOM events; the only differences are that the event
names are different and jQuery doesn’t provide conveniently named helper functions for custom
events.
Basic Event Methods
The basic event handling methods are bind() and trigger(). bind() is used to listen for events,
and trigger() notifies listeners that an event has happened.
bind() accepts two parameters: an event name and a function that is executed when the event is
triggered.
The following example code adds an event handler for the click event on a button:
$(‘#go_button’).bind(‘click’, function () {
// do something here
});
Your code can trigger both custom events and normal DOM events with trigger(). The first argument to trigger() is the event’s name, and the optional second argument is extra data that you can
pass to the event’s handlers.
$(‘#go_button’).trigger(‘click’); // click the button programmatically
// trigger a custom event with some event specific data
$(document).trigger(‘contact_added’, {jid: ‘darcy@pemberley.lit’});
40718bapp01.indd 425
11/30/09 9:33:32 PM
426
❘
Appendix A Getting Started with jQuery
The handlers for normal events get passed a single argument, the event object. The on_click()
handler here demonstrates this:
function on_click(ev) {
// handler code
}
If trigger() is passed some data as its second parameter, this data will be passed along to the
handler in the second parameter:
function on_new_contact(ev, data) {
// add the new contact
}
Convenience Event Methods
To save typing and aid readability, jQuery supplies several convenience methods for working with
common DOM events.
Most DOM events have a corresponding method in jQuery with the same name as the event. For
example, the click() method triggers the click event. When these methods are invoked without
arguments, the corresponding event is triggered, but when passed a function as the argument, they
bind a new handler for the event. The example from the previous section for a button’s click event
handler can be rewritten as:
$(‘#go_button’).click(function () {
// do something here
});
The methods provided by jQuery include keypress(), keyup(), keydown(), mouseup(),
mousedown(), mousemove(), click(), load(), and ready().
The Document Ready Event
The document ready event is somewhat special. This event fires as soon as the DOM is available to
be accessed and manipulated by JavaScript code. Most initialization and startup code for web applications is generally put in a handler for the document ready event.
To bind a handler to the document ready event, you can use either:
$(document).bind(‘ready’, function () {
// init code here
});
or:
$(document).ready(function () {
// init code here
});
40718bapp01.indd 426
11/30/09 9:33:33 PM
Further Reading
❘ 427
Because this construction is so common, jQuery also provides an even simpler shortcut. Just pass
the handler directly to the $() function:
$(function () {
// init code here
});
Many jQuery programmers seem to use the shortest construction, but this book uses ready() to
make the code as easy to understand as possible. You will see other DOM events handled with their
specially named methods as well, and custom events are managed with bind() and trigger().
Further Reading
All jQuery methods are fully explained in the excellent reference documentation, which you can find
at http://docs.jquery.com. The documentation wiki also contains pointers to numerous tutorials; you can find a list of these at http://docs.jquery.com/Tutorials.
jQuery also has a large community of programmers extending the library through plug-ins, much
like the Strophe plug-ins discussed in Chapter 14. The jQuery UI plug-in used in this book is the
most well known of these, and it provides rich user interface components for use in web applications.
jQuery UI features used in this book are explained in the chapters where they appear. You can find
more information on jQuery UI at http://ui.jquery.com, and the full list of jQuery plug-ins lives
at http://plugins.jquery.com.
40718bapp01.indd 427
11/30/09 9:33:33 PM
40718bapp01.indd 428
11/30/09 9:33:33 PM
B
Setting Up a BOSH
Connection Manager
Web browsers do not yet speak XMPP. In order to use XMPP in web applications, a middleman
is needed that turns the stateless HTTP requests into stateful and long-lived XMPP connections.
The details surrounding this process are called Bi-directional streams Over Synchronous HTTP
(BOSH), and a server that provides this service is called a connection manager.
This chapter gives you the information you need to choose and install a BOSH connection
manager for your XMPP applications. The applications in this book have all used a public
BOSH connection manager provided by the author for testing purposes. If you plan to make
your application widely available, you will probably want to set up your own.
Due to JavaScript’s same origin policy (see the Same Origin Policy section of Chapter 3), direct
communication with a connection manager is typically treated as a security violation. To circumvent this policy, the applications in this book have used a Flash library called flXHR to allow
cross-domain requests. Alternatively, you can use a reverse proxy to make the connection
manager appear to be part of your own web server.
The last section of this appendix shows you how to configure a reverse-proxied connection
manager for the cases where using Flash is not possible or not desirable.
Choosing a Connection Manager
Connection managers come in two main flavors: built-in to an XMPP server or standalone
managers. Each type has its own advantages and disadvantages and, accordingly, may be more
or less appropriate for your particular application.
40718bapp02.indd 429
11/30/09 9:37:15 PM
430
❘
Appendix B Setting Up a BOSH Connection Manager
Standalone Managers
The original connection managers were all standalone, because the XMPP server teams had not yet
had time to integrate BOSH services into their systems. A standalone connection manager runs as a
separate service or daemon, possibly on a machine far from any XMPP server.
Standalone managers can typically connect to any XMPP server reachable on the Internet. When a
request comes in for an XMPP connection, the connection manager initiates a normal XMPP client
connection to the desired server on behalf of the requesting party. This makes a standalone manager
a great choice when the application’s users already have XMPP accounts across a variety of different
XMPP servers.
Because a standalone manager must maintain XMPP connections on behalf of users, there is some
extra overhead to each connection. In addition to the normal TCP connection to the XMPP server,
there will be two or more HTTP connections as well. This means that for every user of the connection manager at least three TCP sockets will be needed.
The benefit of this overhead is that standalone BOSH connection managers are often more easily
scalable than the built-in ones. This is a result of the decoupling of the BOSH service from the rest
of the XMPP server. Scaling a standalone connection manager is often achieved with the normal
methods for scaling other HTTP services, but scaling a built-in manager relies on the scalability of
the underlying XMPP server.
Built-In Managers
Most XMPP servers now come with built-in support for BOSH. These built-in connection managers
are easy to set up; they generally require only a small change to the server’s configuration to enable
them. This means they are often a programmer’s first stop when looking for a connection manager
for their applications.
Unlike their standalone counterparts, built-in managers cannot establish XMPP connections to
external servers, only the server they are running on. This makes them ideal for applications where
all users have accounts on the server where the connection manager is located or where all users are
connecting anonymously.
Built-in managers have low overhead because they are coupled to the XMPP server. There is no need
for a TCP connection to the XMPP server, because the connection manager is running as a part of
the server already. A built-in manager can convert the HTTP requests directly into internally routed
packets without going through an extra network layer.
Another bit of efficiency gained by built-in managers is decreased serialization costs. Normally applications will store XML data in a specialized data structure that makes the data easy to manipulate
and retrieve. When writing the XML to a socket for transmission to the server, this data structure
must be serialized into actual XML. In high-performance situations, this serialization cost can be
substantial. Standalone connection managers must often re-serialize the data they receive for transmission to the external XMPP server, but built-in managers can avoid this extra step.
40718bapp02.indd 430
11/30/09 9:37:15 PM
Punjab: A Standalone Manager
❘ 431
Finally, built-in managers are well tested with their corresponding servers because they are developed as a unit. Standalone connection managers are generally tested against a wide variety of
servers, but it is hard to beat the stability afforded by direct integration by the same team of programmers that write the XMPP server.
Connection Manager Trade-offs
Each connection manager has its own strengths and weaknesses.
Support for External Servers
Standalone connection managers can connect to any XMPP server reachable over the Internet, but
built-in connection managers can only connect to the server that hosts them.
Setup and Configuration Complexity
Built-in servers are easy to set up because they require only a few configuration file changes to an
existing XMPP server. Standalone servers, however, must be installed and configured on their own,
making them slightly more complicated.
Scalability
Built-in servers can be much more efficient by saving extra serialization costs, but depend on the
underlying server for their scalability. Standalone servers can usually be scaled similarly to any other
web service, though they have slightly higher serialization cost.
No solution is perfect for all applications. The correct choice can only be made by careful consideration of the needs of your own applications.
Punjab: A Standalone Manager
If your application demands a standalone connection manager that can make connections to any
XMPP server, Punjab can deliver. Punjab is a Python daemon written with the Twisted Python networking library. It is well tested and delivers high performance.
Getting Punjab
You can obtain Punjab from its web site at http://code.stanziq.com/punjab. It requires Python 2.5
or later, and Twisted Python 2.5 or later, although Twisted Python 8.1 or later is recommended.
Python is available from the Python web site at http://www.python.org. If you are running a
Linux distribution or use Mac OS X, a suitable version of Python is probably already installed.
You can find Twisted Python at http://www.twistedmatrix.com. Linux users will probably find
a version of Twisted Python in their distribution’s package list, and Mac OS X users already get a
copy preinstalled with the operating system.
40718bapp02.indd 431
11/30/09 9:37:15 PM
432
❘
Appendix B Setting Up a BOSH Connection Manager
Installation and Setup
Punjab can be installed in the familiar Python fashion by using setup.py. First, extract the compressed files in the distribution to a directory of your choice. Next, run the following command to
install Punjab:
python setup.py install
Once installed, you can configure Punjab by creating a .tac file for it. A .tac file contains the
application’s configuration, and Twisted Python’s twistd command uses this file when it launches
Punjab.
The Punjab package comes with a default punjab.tac file, which configures Punjab to run on port
5280 with a BOSH URL of /xmpp-httpbind. This default configuration is usually good enough but
feel free to change these settings if your application needs something different. The values you will
want to change should be clear when you view the file.
Starting and Testing Punjab
Punjab is started by the twistd command. To start Punjab as a background process, or daemon,
run the following command:
twistd -y punjab.tac
If you’d rather run Punjab in the foreground you can add the parameter -n to the command as
shown here:
twistd -ny punjab.tac
Whichever way you choose, Punjab should start up normally and respond on port 5280 (or the port
you chose in the configuration). If you are running Punjab on your local machine, you can visit
http://localhost:5280/xmpp-httpbind to see if Punjab is working. If it is running on another
host, use the host’s normal domain name instead of localhost.
If Punjab is working correctly, you should see some variant of the following message when you visit
the configured URL:
XEP-0124 - BOSH
Note that unless you are using the flXHR library with Strophe for cross-domain access, you will
need to proxy Punjab into your web application’s directory tree to comply with JavaScript’s same
origin policy.
ejabberd and mod_http_bind: A Built-in Manager
ejabberd is one of the most popular XMPP servers out there, and it should be no surprise that it
comes with a BOSH connection manager to enable XMPP access over HTTP connections. If you are
already running ejabberd as your XMPP server, it is very easy to enable BOSH support.
40718bapp02.indd 432
11/30/09 9:37:15 PM
ejabberd and mod_http_bind: A Built-in Manager
❘ 433
Obtaining mod_http_bind
ejabberd has included mod_http_bind along with its distribution files for some time, but if you happen to use a version that predates this practice, you can obtain mod_http_bind separately from the
ejabberd modules page at http://www.ejabberd.im/ejabberd-modules.
If you need to get a copy of ejabberd itself or upgrade your older version, you can always find the
latest code at http://www.ejabberd.im.
Configuring mod_http_bind
Modules in ejabberd are enabled in the ejabberd.cfg file. These files are actually full of actual
Erlang syntax data structures, so they don’t resemble most configuration files you might be used to.
They are still easy to modify if you know what to watch out for.
The default ejabberd.cfg file has some web server options already enabled, so you only need to
modify those slightly to add connection manager support.
Search through the ejabberd.cfg file until you find a section that looks similar to the following:
{listen,
[
{5222, ejabberd_c2s, [
This section of the configuration file handles the ports on which ejabberd will listen for connections.
A few lines down, you should see a bit of configuration for port 5280:
{5280, ejabberd_http, [
http_poll,
web_admin
]}
You will need to modify this section slightly to add support for http_bind instead of http_poll.
Change the section so that it appears as shown here:
{5280, ejabberd_http, [
web_admin,
{request_handlers, [{[“xmpp-httpbind”],
mod_http_bind}}
]}
If your configuration file did not already have a section for port 5280, you can easily add the preceding one to the file. Just make sure to put a comma after the last section of the listen block, and then
add the new section. For example, see the following highlighted lines where a web section has been
added to a listen block that did not previously contain one:
{listen,
[
%% some sections omitted
{5269, ejabberd_s2s_in, [
40718bapp02.indd 433
11/30/09 9:37:15 PM
434
❘
Appendix B Setting Up a BOSH Connection Manager
{shaper, s2s_shaper},
{max_stanza_size, 131072}
]},
{5280, ejabberd_http, [
web_admin,
{request_handlers, [{[“xmpp-httpbind”],
mod_http_bind}}
]}
]}.
Notice that a comma was added to the section for port 5269, and then a section for port 5280 was
added including the new mod_http_bind section.
In addition to modifying the listen section, you must also add mod_http_bind to the modules section. Look for the modules section, which starts like this:
{modules
[
{mod_adhoc, []},
At the end of this section, just insert a line for mod_http_bind, making sure to put a comma at the
end of the line preceding the new one:
{mod_disco, []},
{mod_roster, []},
{mod_http_bind, []}
]}.
Once again, a comma was added to the line with mod_roster, and then the new line was added.
Restarting and Testing ejabberd
Once the configuration file is updated with mod_http_bind support, you can restart the ejabberd
server by running:
ejabberdctl stop
ejabberdctl start
ejabberd should start normally, and you should be able to visit http://server.example.com:5280/
xmpp-httpbind and see a message about BOSH support. Replace server.example.com with the correct
hostname of your XMPP server.
You will also need to proxy this URL under the directory tree that serves your application unless
you are using Strophe’s flXHR plug-in for cross-domain request support.
40718bapp02.indd 434
11/30/09 9:37:15 PM
Proxies and Security Policy
❘ 435
Proxies and Security Policy
JavaScript code is subject to numerous restrictions when run inside a web browser. Among these is
the same origin policy, which restricts JavaScript to making HTTP connections to the same server
from which the application is loaded. If the index.html file for your application is served from
example.com on port 80, the JavaScript code can only make requests to that same domain and port.
AJAX libraries like jQuery often have partial workarounds for this restriction, but these only help
you if the requests you need to make are GETs and the remote server can return data in the special
JSON-P format. Unfortunately, BOSH requests are done with HTTP POST, and because the data
sent and received is XML, these workarounds won’t help.
One solution to this problem is to use Flash’s cross-domain abilities to make the HTTP connections,
and this approach is used for the applications in this book via Strophe’s flXHR plug-in. Another
solution is to use a reverse proxy to make a URL local to the application’s server proxy a remote
BOSH service. To the JavaScript code, the requests are being made to the same server, but on the
backend, the data is actually being sent by the web server to a remote service and then the responses
are forwarded back to the requestor.
Cross-Domain Requests with Flash
Just like JavaScript, Flash has a strict security policy, but unlike JavaScript, it allows cross-domain
requests to be sent to domains that permit such requests. Flash checks for this permission by reading
a special configuration file at the target domain, crossdomain.xml.
The crossdomain.xml must reside in the root directory of the web site to which your application
needs to make a cross-domain request. For example, if your application is hosted at http://
pemberley.lit and it needs to access the connection manager at http://longbourn.lit:5280/
xmpp-httpbind, then Flash will search the file http://longbourn.lit:5280/crossdomain.xml
for permission to make the needed cross-domain requests. If a crossdomain.xml file is found and
contains the appropriate configuration, the requests will be allowed.
To enable a BOSH connection manager to serve arbitrary Flash-based clients, it will need to serve
up a permissive crossdomain.xml such as the one shown in Listing B-1. Note that this file allows
cross-domain requests from any domain. If this liberal policy is not right for your application, you
can use a more restrictive configuration. See http://www.adobe.com/devnet/articles/
crossdomain_policy_file_spec.html to learn more about how to craft custom crossdomain
.xml files.
Listing B-1: crossdomain.xml
<!DOCTYPE cross-domain-policy SYSTEM
“http://www.macromedia.com/xml/dtds/cross-domain-policy.dtd”>
<cross-domain-policy>
<!-Cross domain policy file for allow everything. If you need more
40718bapp02.indd 435
continues
11/30/09 9:37:16 PM
436
❘
Appendix B Setting Up a BOSH Connection Manager
information on these, please see:
http://www.adobe.com/devnet/articles/crossdomain_policy_file_spec.html
-->
<site-control permitted-cross-domain-policies=”all”/>
<allow-access-from domain=”*” />
<allow-http-request-headers-from domain=”*” headers=”*” />
Serving crossdomain.xml with Punjab
Punjab’s default punjab.tac configuration file includes support for serving static content. By default
it makes the html subdirectory of the directory in which it runs accessible from HTTP.
To serve crossdomain.xml, just place the file in the html directory. You can verify that it is working
by visiting http://bosh.example.com:5280/crossdomain.xml if your Punjab server is running at
bosh.example.com on port 5280.
Serving crossdomain.xml with ejabberd
The ejabberd server also includes support for serving static content with its mod_http_fileserver
module. You can enable this module and then add the appropriate request handler in ejabberd’s configuration file.
First, add the following line within the modules section:
{mod_http_fileserver, [{docroot, “/path/to/html”}
{content_types, [{“.xml”, “text/xml”}]}]}
The docroot option provides a path where ejabberd will look for static files to serve. The content_
types option just adds the appropriate text/xml content type to the list of known types. This is
needed because ejabberd doesn’t include this particular mapping by default.
Now that the module will be loaded, you must add a new request handler to tell ejabberd how and
where to serve static files. Modify the ejabberd_http section inside the listen section of the configuration file to look like this:
{5280, ejabberd_http, [
web_admin,
{request_handlers, [{[“xmpp-httpbind”],
mod_http_bind},
{[], mod_http_fileserver}]}
]}
The bolded line shows the new request handler, which serves the configured document root at the
root of ejabberd’s web service.
All that’s left is for you to put the crossdomain.xml file in the document root. Once the file is in the
right spot, you can check that everything is working by visiting http://example.com:5280/crossdomain.xml, replacing example.com with the name of your server.
40718bapp02.indd 436
11/30/09 9:37:16 PM
Proxies and Security Policy
❘ 437
Proxying BOSH
Proxies require the cooperation of a web server and some extra configuration. To make this book’s
material as simple as possible, the Flash plug-in was used, but sometimes the proxied solution is
preferable. For example, the iPhone’s web browser does not support Flash, so XMPP applications
written for that platform will need to use proxied BOSH connection managers.
The examples in the next sections assume you already have a working BOSH connection manager
set up. If you want to experiment with proxying BOSH services without having to set up a BOSH
connection manager, you can use the BOSH service at http://bosh.metajack.im:5280/xmpphttpbind for testing.
Configuring Apache to Proxy BOSH
The Apache HTTP server has long been one of the most popular choices for serving web pages and
applications, and it has comprehensive proxy support via its mod_proxy module. If you use Apache
for your web application, you can add a proxy for a BOSH connection manager.
You’ll need to ensure the mod_proxy module is built or otherwise available, although it is often
compiled and included by default.
First, you must allow access to the remote BOSH server. You can put the following <Proxy> section
most anywhere, although it is often placed within the <VirtualHost> section or in the main httpd.
conf configuration file.
<Proxy http://bosh.metajack.im:5280/xmpp-httpbind>
Order allow,deny
Allow from all
</Proxy>
The BOSH URL used here is http://bosh.metajack.im:5280/xmpp-httpbind, which can be used
for testing, but you should substitute your own BOSH service URL.
Once the BOSH URL is allowed in proxy configurations, you can add the relevant ProxyPass and
ProxyPassReverse lines:
ProxyPass /xmpp-httpbind http://bosh.metajack.im:5280/xmpp-httpbind
ProxyPassReverse /xmpp-httpbind http://bosh.metajack.im:5280/xmpp-httpbind
These two lines proxy the /xmpp-httpbind URL on the local server to the remote BOSH service URL.
Once Apache has been configured, you can restart the Apache server however you normally do so.
You can check that the new configuration is working by visiting the /xmpp-httpbind URL on your
Apache server; you should see some mention there of XEP-0124 or BOSH.
Configuring nginx to Proxy BOSH
nginx (pronounced “engine x”) is a small and fast web server created by Igor Sysoev, and it is used
by many of the busiest Internet startups due to its amazing performance. nginx also has great support for proxying resources, and this makes it an excellent choice for serving XMPP-enabled web
applications.
40718bapp02.indd 437
11/30/09 9:37:16 PM
438
❘
Appendix B Setting Up a BOSH Connection Manager
Proxies are very easy to set up in nginx. You need only add a location block within the relevant
server block. The following example adds the location /xmpp-httpbind, which proxies the BOSH
service at http://bosh.metajack.im:5280/xmpp-httpbind:
server {
listen 80;
# more configuration..
location /xmpp-httpbind {
proxy_pass http://bosh.metajack.im:5280;
}
# more configuration..
}
Once the configuration is changed and the server restarted, you can test that the proxy setup is
working by visiting the /xmpp-httpbind resource on your nginx server.
Using Tape for Local Development
If you’re developing more than one XMPP application or if you are testing various versions of the
same application, it can be a little tedious to keep changing web server configurations to proxy the
correct BOSH service. To make this kind of development easy, the Tape program was created. Tape
is a really simple instant web server.
Tape is generally run in a directory and serves up the files in that directory and its subdirectories
over the Web. In addition to serving static files, it can also proxy arbitrary URLs under the local
directory tree. This can be used to proxy BOSH services for use in your XMPP applications without
having to set up and configure a traditional web server.
To get the most recent copy of Tape, you can visit http://github.com/metajack/tape. Like
Punjab, described earlier in this appendix, Tape depends on the Twisted Python framework. It needs
no special installation; just put the Tape file in /usr/local/bin on OS X or Linux and somewhere
in your system path on Windows.
Change to the directory where your application is stored and launch Tape:
cd awesome_project
tape
By default, Tape serves files at http://localhost:8273 (8273 spells out T-A-P-E on a phone number pad). You can easily tell Tape to proxy a BOSH service with the -P option on the command line:
tape -P /xmpp-httpbind=http://bosh.metajack.im:5280/xmpp-httpbind
If port 8273 is not to your liking, you can also change the port with the -p option:
tape -p 8000 -P /xmpp-httpbind=http://bosh.metajack.im:5280/xmpp-httpbind
To stop running Tape, simply press Ctrl+C or kill the process.
40718bapp02.indd 438
11/30/09 9:37:16 PM
More BOSH Connection Managers
❘ 439
Tape also supports a simple configuration file that you can put in your XMPP application’s directory.
This file is named .taperc. The following .taperc example emulates the previous example using the
-p and -P options:
[server]
port = 8000
[proxies]
/xmpp-httpbind = http://bosh.metajack.im:5280/xmpp-httpbind
Tape makes it easy to fire up an instant web server that proxies the correct URL. With a .taperc file
in each XMPP application’s directory, you can simply switch to the new project and type tape, and
your application will be immediately available with the correct configuration.
Tape is also useful for serving the Flash-assisted version of Strophe because Flash’s security policy
requires that you compile the Flash code either for file:// URL access or http:// URL access.
In order to use a Flash object with http:// URLs, the Flash object will need to be served from an
http:// URL. If you don’t already have a web server set up and ready to go, Tape makes a fine
substitute during development.
More BOSH Connection Managers
More BOSH connection managers are available than the ones highlighted in this appendix. The following is a list of the other popular options and where you can find more information about them:
➤➤
Openfire, an XMPP server written in Java with BOSH support, http://www.igniterealtime
.org/projects/openfire/index.jsp
➤➤
Tigase, another XMPP server written in Java with BOSH support, http://www.tigase.org/
➤➤
Prosody, a lightweight, easy-to-use XMPP server written in Lua, http://prosody.im/
➤➤
JabberHTTPBind, a Java servlet–based standalone connection manager, http://blog.jwchat
.org/jhb/
➤➤
40718bapp02.indd 439
rhb, a standalone connection manager in Ruby, http://rubyforge.org/projects/rhb/
11/30/09 9:37:16 PM
40718bapp02.indd 440
11/30/09 9:37:16 PM
Index
Symbols
$, 77
$(), 420–421, 424
<, 77
@@, 190
2D, 226
A
aborted, 328
accounts
Identica, 90
XMPP, 43
.aclass, 421
/action, 190
action descriptions, MUC, 190–191
ActiveX, 75
<actor>, 174
add, 123
Add Contact, 116–117
addClass(), 424
addConnectionPlugin(), 404
addContact(), 411
addHandler(), 57, 58, 183, 410
add_message(), 184
.addNamespace(), 404
addressing, XMPP, 8–9
Ad-Hoc Commands, 206
Adium, 24
admin, 173–174
affiliations, chat rooms, 173–175
AJAX. See Asynchronous JavaScript and XML
<already-collaborating>, 272, 280
[anattr], 421
[anattr=’somevalue’], 421
anelement, 421
#anid, 421
anonymity, 171–172
AOL Instant Messenger, 5
Apache, BOSH, 437
append(), 424
applications. See also specific applications
authentication, 379
design, 23–36
performance, 379
XMPP, 387–399
Approve button, 120
Array, splice(), 261
Arthur
contents(), 95
<div>, 92–93
Identica, 89–90
JIDs, 93
<message>, 93–94
offline messages, 97–101
<presence>, 93
UI, 92
arthur.css, 91–92
arthur.html, 91
arthur.js, 99–101
ask, 405
Asynchronous JavaScript and XML (AJAX), 31
Google, 42
long polling, 32
RID, 379
SID, 379
attach, 381, 382
attach(), 379, 383
attacher, 381
attacher.css, 384
attacher.js, 384
attr(), 423, 424
attributes, 270
attrs(), 55
auth, 17, 83
AUTHENTICATING, 48
authentication, 4
applications, 379
components, 7
Hello, 40
SASL, 379
Strophe, 64
TLS, 20
441
40718bindex.indd 441
11/30/09 9:41:29 PM
AUTHFAIL – child
AUTHFAIL, 48
automatic logins, session attachment, 380–384
available, 11
away, 12
B
backend, 390
Backspace, 289
bad-request, 305
<bad-request>, 17
/ban, 193
bare JIDs, 8
batching, 398
beginPath(), 227
Bi-directional streams Over Synchronous HTTP
(BOSH), 41, 70
Apache, 437
connection managers, 48, 388, 429–439
encryption, 380
HTTP, 32, 378, 388
HTTP POST, 435
load balancing, 388
nginx, 437–438
performance, 379
proxies, 437–439
security, 379–380
session attachment, 377–385
Tape, 438–439
bind(), 123, 425
<bind>, 20
Board, 339, 343
board.js, 339, 362–365
<body>, 44, 270, 332
BOSH, 32
<message>, 15
show_traffic(), 70
stanzas, 69–70
XHTML-IM, 94
boolean, 209
BOSH. See Bi-directional streams Over
Synchronous HTTP
BOSHClient, 382
BOSHSRV, 390
both, 111, 120
bots, 7, 300–301
broadcast(), 319
broadcast_started, 234, 239
browsers, 30, 33, 69
$build(), 54
built-in connection managers, 430–431
buttons, 50
Bytestreams, 162
C
c(), 54–55
callbacks
connect, 51
connect(), 379
CONNECTED, 49
created(), 233
HTTP, 28
cancel, 17, 83, 208
<canvas>, 346
SketchCast, 225–228
category, 148
chaining functions, 54, 422
chat, 5, 103–144. See also Gab; Multi-User Chat
Dig, 162–163
keypress, 285–286
<message>, 104–105, 286
NetPad, 284–287
on_message(), 286–287
<presence>, 104–105
start_collaboration(), 285
stop_collaboration(), 285
type, 56
chat, 12, 14, 94, 183
type, 94, 183, 188
chat area
Gab, 122–126
<message>, 105
MUC, 166
<ul>, 107
chat history, 186–187
chat rooms
affiliations, 173–175
anonymity, 171–172
connected, 179
creating, 172–173
entering and leaving, 168–171
joining, 179–182
<message>, 183–185
MUC, 167–171
nicknames, 168
on_presence(), 180–181
roles, 173–175
sending and receiving messages, 171
topics, 191–192
troublemakers, 192–194
Chat State Notifications, 130–133
Chesspark, 27
child
disco#items, 148–149
<iq>, 268
<item>, 239
stanzas, 54–55
442
40718bindex.indd 442
11/30/09 9:41:29 PM
children – Deny button
<start>, 282
<stream:stream>, 9
XML, 71
children(), 422
click, 47, 116, 426
Disconnect button, 240, 280, 283
SketchCast, 227
click(), 123
clients, 7
Toetem, 322–324, 334–338, 345–351
clone(), 398
clones, 398–399
<closed-node/>, 18
closing elements, 4
cluster servers, 388, 391–392
internal federation, 393
cnode(), 54–55
col, 339
<collaborate>, 272, 280
color, 228
compare_priority(), 257–258
compare_state(), 257–258
components, 7–8
bots, 301
load balancing, 392–393
<configure>, 213
configured(), 233
configure_error(), 233
<conflict>, 17, 212
connect, 50, 51
Connect button, 278
connect()
callbacks, 379
connect, 51
JIDs, 48
password, 49
CONNECTED, 48, 64–65, 403, 407
callbacks, 49
connected, 56
connected, 70
chat room, 179
CONNECTED, 56
handle_message(), 93
master, 279
<message>, 125, 188
NetPad, 278–279, 281
<presence>, 284
pubsub nodes, 230
roster, 111
Toetem, 323
CONNECTING, 48
connection, JIDs, 56
connection
log(), 51
null, 51
connection managers
BOSH, 48, 429–439
built-in, 430–431
Hello, 47–53
multiple, 388–391
persisting, 380
standalone, 430
Strophe, 48, 64
TCP, 430
XML, 430
XMPP, 18, 31–32
connection.simple.offline(), 404
CONNFAIL, 48
contact_added, 116–117
contact_added(), subscribe, 117
contents(), 95
continue, 17, 83
cookies, 380
Erlang, 391
Haproxy, 390
<create>, 212
created(), 231, 233
create_error(), 231
create_game(), 326–328
credentials, 379
cross-domain requests, Flash, 435–436
crossdomain.xml, 435–436
CSS, 70
jQuery, 33, 41, 423–424
on_public_message(), 186
css(), 423
currentSide(), 340
custom event handlers, 47
D
Data Forms, 173, 206–207
pubsub, 205
debugging console. See Peek
<delay>
handle_message(), 98
<message>, 98
on_public_message(), 186–187
Delayed Delivery, 98
DELETE, 28
delete(), 263
delete(pos), 253
Delete key, 289
deleteContact(), 411
deleteHandler(), 57
Dent, Arthur, 88
dents, 88
<message>, 88
Deny button, 120
443
40718bindex.indd 443
11/30/09 9:41:30 PM
/deop – eXtensible Messagingand Presence Protocol
/deop, 194
<desc>, 208
draw_board(), 346
draw_piece(), 346–347
dialback, 20
Drop.io, 25
dialog()
<div>, 44, 68
jQuery UI, 49, 68
dialog(‘open’), 134
Dig, 146–163
chat, 162–163
dig.css, 151–152
dig.html, 150–151
dig.js, 157–160
directed presence, 13, 168
disco pubsub nodes, 149
disco#info, 146–148
<feature>, 272
IQ-get, 147
NetPad, 278
disco#items, 146–147, 148–149
child, 148–149
MUC, 148
disconnect(), 240
Disconnect button, 133–134
click, 240, 280, 283
event handlers, 324
NetPad, 280
reception_started, 240
DISCONNECTED, 48, 403, 407
disconnected, 70
Toetem, 323
unavailable, 182
DISCONNECTING, 48
<div>, 72
Arthur, 92–93
dialog(), 44, 68
id, 44, 122
JIDs, 126, 129
jQuery UI, 44
log, 44
on_message(), 126
Django, 380–384
<dl>, 155
dnd, 12
DNS, 8
document object model (DOM), 46, 398–399
jQuery, 419, 420
send(), 74
tree(), 54
document ready event, 46
do_local(), 259
DOM. See document object model
DOMParser, 75
do_remote(), 259, 289–290
E
each(), 424, 425
ejabberd, 431–434
crossdomain.xml, 436
ejabberd.cfg, 391, 432
else, 336–337
emoticons, 270
empty(), 424
encryption, 4, 20, 380
end_game(), 330, 332
Entity Capabilities, 35
Erlang cookie, 391
error, 14, 15
<error>, 17–18, 83–85
make_error_from_iq(), 232
<presence>, 84–85
type, 83
eval(), 65, 76
<event>, 217, 269
event(s), 215
forms, 234
pubsub, 215, 234–238
event handlers, 324
Hello, 57–62
jQuery, 47
event_data, 47
execute(), 260
Explorer, 146
eXtensible Messagingand Presence Protocol
(XMPP), 3–21
accounts, 43
addressing, 8–9
application design, 23–36
applications, 387–399
attributes, 270
browsers, 33
clients, 7
components, 7–8
connection managers, 18, 31–32
disconnection, 20
HTTP, 27–30
Identica, 90
JavaScript, 32–33
network, 6–8
plug-ins, 8
protocols, 34–36
security, 4
servers, 6, 33–34
444
40718bindex.indd 444
11/30/09 9:41:30 PM
Extension Protocols – Groupie
stanzas, 9–18
streams, 19
TCP, 378
URIs, 268
XML, 4, 65
Extension Protocols, 271
type, 208
<x>, 207, 208
FORM_TYPE
<name>, 211
var, 210
Free Network Service, 89
from
F
Facebook, 3
false, event handlers, 58
<feature>
disco#info, 272
IQ-result, 280
statistics, 149
var, 148
<feature-not-implemented/>, 17
<field>, 211
Field Standardization for Data Forms, 208, 210–211
fields
forms, 208–210
<required>, 208
<value>, 208
file://, flXHR, 53
filter(), jQuery, 421
find(), jQuery, 422
Finder, 146
find_game(), 333
find_next(), 260
finished, game status, 328
firewalls, 28, 161
HTTP, 32
fixed, 209
Flash
cross-domain requests, 435–436
flXHR, 41
flXHR, 41, 43, 435
ejabberd, 434
file://, 53
flXHR.js, 43
for, 424
<forbidden/>, 17
<forbidden>, 212
form, 208
forms, 234
Ad-Hoc Commands, 206
<desc>, 208
fields, 208–210
<instructions>, 207, 208
metadata, 207, 208
MUC, 206, 208–209
pubsub, 206–211
Service Discovery, 206
standardized, 210–211
stanzas, 10, 57–58
subscription, 120
full JIDs, 8
G
Gab, 103–144
Add Contact, 116–117
chat area, 122–126
Chat State Notifications, 130–133
notifications, 130–133
roster area, 109–122
UI, 105–109
gab.css, 108–109
<game>, 304, 309
game-ended, 336–337
<game-ended>, 308, 333, 338
gameOver(), 341–342
game_room(), 331
games, 299–373. See also Toetem
<message>, 303
MUC, 300
<resign>, 307–308
<start>, 306
status, 328
winner, 310
<games>, 304
game-started, 336–337
<game-started>, 308, 331, 332
game_started, 350
game-state, 351
GET, 15, 28, 41
get, 15
getContext(), 226
getElementById(), 420
getElementByTagName(), 420
Gmail, 24, 82
Google, 42
Google Apps for Domains, 24
Google Talk, 24, 82
Google Wave, 24, 251
groupchat, 14, 171
Groupie, 166–202
joining rooms, 179–182
keypress, 184
privacy, 187–190
UI, 175–179
445
40718bindex.indd 445
11/30/09 9:41:30 PM
groupie.css – <iq>
groupie.css, 176–178
groupie.html, 175–176
groupie.js, 195–201
groups, 406
groupware, 253
H
handle_incoming_pin(), 58
handle_message(), 93, 96, 98
<delay>, 98
handle_pong(), 60
Haproxy, 390–391
haproxy.cfg, 390
<head>, 44
headline, 15
Hello, 39–62
authentication, 40
connection managers, 47–53
event handlers, 57–62
HTTP, 53
IQ-get, 56
login, 40
stanzas, 53–57
UI, 43–45
hello.css, 44
hello.js, 60–61
hidden, 209
hide(), 423
The Hitchhiker’s Guide to the Galaxy, 88
horizontal scaling, 387–393
href, 122
HTML
jQuery, 33, 41, 419
players, 334
roster_changed, 414
<ul>, 122
html(), 423, 424
<html>, XHTML-IM, 94, 268
HTTP, 15
BOSH, 32, 378, 388
browsers, 69
callbacks, 28
firewalls, 32
GET, 28, 41
Hello, 53
JavaScript, 435
long polling, 30–31
POST, 41
round trips, 394
SSL, 28
stanzas, 394
TCP, 390
XMPP, 27–30
http, 389
http://, 53
HTTP POST, 15, 28, 41, 435
httpclose, 390
httpd.conf, 437
I
ICQ, 5
id, 113, 122
color, 228
<div>, 44, 122
<item>, 217–218
stanzas, 10–11, 57–58
Identica, 88–90
<identity>, 148
IQ-result, 280
statistics, 149
IE. See Internet Explorer
IETF, 5–6
if, 330, 336–337
if else, 345
importNode(), 95–96
In-Band Bytestreams, 396
incoming, 70
.incoming, 67
indentation, XML, 71–73
index.html, 382–383, 435
init()
JIDs, 257
OpTrans, 286–287
start_collaboration(), 286–287
Strophe, 403
insert(), 263
insert(pos, char), 253
insert_contact(), 112
instant messaging (IM). See chat
instant pubsub nodes, 212–213
<instructions>, 207, 208
internal federation, 388, 393
<internal-server-error/>, 17
Internet Explorer (IE)
<canvas>, 346
DOMParser, 75
importNode(), 95–96
selectionEnd, 289
selectionStart, 289
XMLHttpRequest, 30
Internet Relay Chat (IRC), 165
ip_hash, 389
$iq(), 54, 65, 76
<iq>, 9–10
child, 268
error, 15
get, 15
id, 113
In-Band Bytestreams, 396
players, 304
446
40718bindex.indd 446
11/30/09 9:41:30 PM
IQ-error – jQuery UI
referee, 318
result, 15
sendIQ(), 114
set, 15
stanzas, 15–17
IQ-error, 15, 82
referee, 308
IQ-get, 15, 82, 111
disco#info, 147
Hello, 56
<items>, 238
<ping/>, 56
IQ-result, 15, 82, 280
referee, 309
IQ-set, 15, 82, 304
<move>, 308
<publish>, 236
pubsub nodes, 211–212
<query>, 111
troublemakers, 192
Wait button, 324
IRC. See Internet Relay Chat
is_playing(), 326
is_waiting(), 320
<item/>, 408, 424
<item>, 155
child, 239
<event>, 217
id, 217–218
insert_contact(), 112
on_event(), 239
<publish>, 216
remove, 119
<item-not-found/>, 17
<items>, 219, 238
J
Jabber, 5
Jabber Extension Proposals (JEPs), 5
jabber identifiers (JIDs), 8–9
Arthur, 93
connect(), 49
connection, 56
<div>, 126, 129
init(), 257
<message>, 126–129
presence, 319
referee, 302
session attachment, 379
troublemakers, 193–194
waiting list, 319
Jabber Software Foundation (JSF), 5
jabber:client, 268
JabberHTTPBind, 439
jabber:iq:register, 162
jabber:iq:roster, 111
jabber:x:delay, 186–187
Java, 380
JavaScript
each(), 425
eval(), 76
Google, 42
HTTP, 435
prototype, 339
same origin policy, 41, 429
session attachment, 384
String, 96
Strophe, 32
XMPP, 32–33
JEPs. See Jabber Extension Proposals
jid, 257, 424
jid_map, 257
jid-multi, 209
jid:node, 155
JIDs. See jabber identifiers
jid-single, 209
jid_to_id(), 112
on_presence(), 115
Jingle, 396
jQuery, 33, 41, 419–427
$(), 420–421
attr(), 423
chaining functions, 422
children(), 422
clone(), 398
CSS, 423–424
css(), 423
DOM, 419, 420
event handlers, 47
filter(), 421
find(), 422
Google, 42
hide(), 423
HTML, 419
html(), 423
live(), 157
not(), 422
<script>, 420
selectors, 421
show(), 423
text(), 423
UI, 41
jQuery UI, 42
dialog(), 49, 68
<div>, 44
Google, 42
sortable(), 123
tabs, 122
tabs(), 107
themes, 42
447
40718bindex.indd 447
11/30/09 9:41:30 PM
JSF – <move>
JSF. See Jabber Software Foundation
JSON-P, 435
K
keydown, 96
keypress, 47, 96
chat, 285–286
Groupie, 184
/me, 190
<message>, 97
NetPad, 285–286
notifications, 131
privacy, 188–189
send_op(), 289
/topic, 192
keyup, 96–97
/kick, 192–193
L
latency, 394–396
leastconn, 390
length, 424
String, 96
<li>, 107, 122
library, 408
lineTo(), 227
line_width, 228
list-multi, 209
list-single, 209
live(), 123, 157
load balancing, 388, 392–393
local part, JIDs, 8
location, 389
log, 44
log(), 51
login
automatic, 380–384
Hello, 40
Peek, 68
pubsub nodes, 228–234
security, 379
long polling, 30–32
M
make_error_from(), 232
make_error_from_iq(), 232
map, 339
Markdown, 143
massively multi-player online role-playing games
(MMORPGs), 299
master, 279
max_items, 219
/me, 190
/media/, 382
MEDIA_ROOT, 383
Mediated Invitation, 306
member, 173
<message>, 9–10
addHandler(), 58
Arthur, 93–94
<body>, 15
broadcast(), 319
chat, 104–105, 286
chat, 94
chat area, 105
chat rooms, 183–185
connected, 125, 188
content, 15
<delay>, 98
dents, 88
<error>, 83–84
<event>, 217
events, 215
games, 303
handle_message(), 98
In-Band Bytestreams, 396
jabber:client, 268
JIDs, 126–129
keypress, 97
namespaces, 269
NetPad, 253, 273, 286
notifications, 221
on-message(), 334–336
<op>, 273–274
players, 303, 305
process_op(), 290–291
stanzas, 13–15
<stop>, 273
<thread>, 15
type, 13–14, 94
XHTML-IM, 94
metadata, forms, 207, 208
microblogging. See Arthur
Miller, Jeremie, 5
MMORPGs. See massively multi-player online roleplaying games
moderator, 172, 173–174
troublemakers and, 192
mod_http_bind, 431–434
modify, 17, 83
modifyContact(), 411
mousedown, 225, 226
mousemove, 226, 235–236
<render_action>, 237–238
mouseup, 225, 226
move(), 341
<move>
IQ-set, 308
448
40718bindex.indd 448
11/30/09 9:41:30 PM
moveTo – on_move
players, 308
referee, 349
switch, 343
moveTo(), 227
moveToCoords(), 339
$msg(), 54, 65, 76
/msg, 188–189
MSN Messenger, 5
MUC. See Multi-User Chat
muc_msg(), 331
Multi-User Chat (MUC), 165–202. See also chat rooms;
Groupie
action descriptions, 190–191
anonymity, 171–172
chat area, 166
chat rooms, 167–171
disco#items, 148
forms, 206, 208–209
games, 300
referee, 325–334
type, 56
my_callback(), 49
MyNamespace, 45–46
my_ping_handler(), 56
myplugin, 402
my_side, 350
MySpace, 3
N
name, 57, 58, 148, 405
-name, 392
<name>, 211
namespaces, 45–46, 268–270
<error>, 83
Peek, 69
<pubsub>, 212
Strophe, 403, 404
NAT. See network address translation
NetPad
chat, 284–287
connected, 278–279, 281
disco#info, 278
Disconnect button, 280
keypress, 285–286
<message>, 253, 273, 286
on_collaborate(), 281
on_disco_info(), 279
on_message(), 282–283, 286–287
<presence>, 253
protocols, 271–274
Service Discovery, 271, 278
UI, 274
update_pad(), 288
netpad.css, 276
netpad.html, 274
netpad.js, 277, 291–298
network, XMPP, 6–8
network address translation (NAT), 28, 161
Jingle, 396
New Chat, 134
new Referee.Board(), 339
new_game(), 328, 343
nginx, 388–389, 437–438
nicknames, 168, 170, 175, 336
node, 149, 212, 222
normal, 14, 183
not(), 422
not-allowed, 217
notifications
Gab, 130–133
keypress, 131
<message>, 221
on_message(), 132–133, 349
pubsub nodes, 221
notify, 283
<not-waiting>, 324
ns, 58
NS_TOETEM, 322
null, 51, 58
O
offline(), 403–404
offline messages, 97–101, 148
offset(), 226
OMB. See Open Microblogging Protocol
on_click(), 426
on_collaborate(), 281
on_disco_info(), 279
on_event(), 231, 239
on_game_start(), 325–326
on_info(), 154–157
on_iq(), 320–321, 325, 343
on_items(), 154–157
online(), 403–404
on_message(), 126–127, 334–337, 349–350
chat, 286–287
<div>, 126
NetPad, 282–283, 286–287
notifications, 132–133, 349
referee, 324, 349
scroll_chat(), 125
<start>, 283
<stop>, 283
Toetem, 323–324
watching, 347
on_move(), 343–344
449
40718bindex.indd 449
11/30/09 9:41:30 PM
on_old_items – Prosody
on_old_items(), 239
<on_presence>, 185
on_presence(), 115, 129, 180–181, 318, 329
on_public_message(), 183–184, 186–187, 191
on_resign(), 325–326, 333
on_roster(), 112, 114–115
on_roster_changed(), 118
on_stop_waiting(), 321–322
on_waiting(), 321–322
/op, 194
<op>, 273–274
Open Microblogging Protocol (OMB), 89
Openfire, 439
opening elements, 4
operational transformation, 251–298
o_player, 350
OpTrans, 286–287, 289–290
optrans.js, 263–267
outcast, 173–174, 193
outgoing, 70
overhead, 29
owner, 172, 173–174
P
parallelization, 394
<parsererror>, 75
parsers, XML, 74–75
participant, 173, 175
password, 49, 379
pause(), 395
Peek, 63–85
login, 68
namespaces, 69
<presence>, 81
Software Version, 81–82
traffic, 68–70
UI, 66–67
peek.css, 65, 67, 71
peek.html, 65, 66
peek.js, 72–73, 77–80
Peek.pretty_xml(), 72–73
peer-to-peer file transfer, 161
pending, 217
pending_subscriber, 121
PEP, 35
performance, 379
perform_op(), 261
Personal Eventing Protocol, 143
phase, 309
<ping/>, 56
<player>, 304
players
broadcast(), 319
HTML, 334
<iq>, 304
<message>, 303, 305
<move>, 308
nicknames, 336
on_iq(), 320–321
on_resign(), 333
remove_waiting(), 319
send_game(), 331
Toetem, 303–305
players, 334
playing, 328, 330, 331
plug-ins
rosters, 404–412
Strophe, 43, 401–417
XMPP, 8
polling, 30–31
prepend(), 424
$pres(), 54, 65, 76
presence
JIDs, 319
priority, 180
subscription, 105
<presence>, 9–10, 11–13
addHandler(), 183
Arthur, 93
available, 11
chat, 104–105
connected, 284
directed, 13
<error>, 84–85
extending, 12, 35
if, 330
NetPad, 253
new_game(), 328
normal, 11–12
on_collaborate(), 281
on_presence(), 318
Peek, 81
referee, 303, 318, 329
<register>, 318
roster area, 106
subscribed, 120
substitutions, 12–13
type, 120
unsubscribed, 120
presenceChanged(), 410–411
presence_value(), 112
Presently, 25
pretty_xml(), 72
preventDefault(), 97, 289
priority, 180
<priority>, 12, 273–274
privacy, 105, 187–190
process_op(), 290–291
Prosody, 439
450
40718bindex.indd 450
11/30/09 9:41:31 PM
protocols – <register>
protocols
NetPad, 271–274
Toetem, 302–310
XMPP, 34–36
prototype, 339
proxies, 161–162
BOSH, 437–439
security, 435–439
ProxyPass, 437
ProxyPassReverse, 437
<publish>
events, 215
IQ-set, 236
<item>, 216
<pubsub>, 215
pubsub nodes, 215–216
publish_action(), 236
Publish-Subscribe (pubsub), 147, 203–249. See also
SketchCast
Data Forms, 205
events, 215, 234–238
forms, 206–211
pubsub nodes, 205, 211–222
UI, 222–225
XEPs, 95
pubsub. See Publish-Subscribe
<pubsub>
<create>, 212
namespaces, 212
<publish>, 215
<subscriptions>, 219
pubsub nodes
<configure>, 213
configuring, 213–215
<conflict>, 212
connected, 230
created(), 231
create_error(), 231
<forbidden>, 212
instant, 212–213
IQ-set, 211–212
<items>, 219
login, 228–234
notifications, 221
on_event(), 231
<publish>, 215–216
pubsub, 205, 211–222
reception_started, 232
<subscribe>, 216–218
subscribed(), 231
subscribe_error(), 231
subscription, 217
<unsubscribe>, 218
pubsub#title, 211
Punjab, 381
crossdomain.xml, 436
standalone connection managers, 431–432
pushing data, 28
PUT, HTTP, 28
Python, 380–384, 431
Q
<query>
IQ-get, 82, 111
IQ-set, 111
node, 149
R
rawInput(), 64
Strophe, 75
rawOutput(), 64
ready(), 46
reception_started, 238
Disconnect button, 240
pubsub nodes, 232
<recipient-unavailable/>, 17, 273
referee
Board, 339, 343
<body>, 332
broadcast(), 319
create_game(), 327–328
end_game(), 332
<game-started>, 332
<iq>, 318
IQ-error, 308
IQ-result, 309
is_waiting(), 320
JIDs, 302
<move>, 349
MUC, 325–334
on_iq(), 320–321, 325
on_message(), 324, 349
on_move(), 343–344
on_presence(), 318, 329
playing, 330
<presence>, 303, 318, 329
send_error(), 320
send_games(), 330–331
Toetem, 300, 301, 325–334
waiting, 328
waiting list, 317–322
referee.css, 312
referee.html, 311
referee.js, 312–313, 351–362
<register>, 318
451
40718bindex.indd 451
11/30/09 9:41:31 PM
<remote-server-not-found/> – sketchcast.js
<remote-server-not-found/>, 17
<remote-server-timeout/>, 17
remove, 119
remove(), 424
removeClass(), 424
remove_waiting(), 319, 320
<render_action>, 237–238
render_action(), 236–237
Request for Comments (RFCs), 5, 83, 95
<required>, 208
<resign>, 307–308, 338
Resign button, 336–337
<resign>, 338
resource part, JIDs, 8
resources, 405
result, 15, 208
Results Set Management, 396
resume(), 395
return, 58
RFCs. See Request for Comments
rhb, 439
RID, 378–380
roles, chat rooms, 173–175
room_joined, 181
room_joined(), 182
roster(s)
bots, 301
connected, 111
disco#info, 148
Gab, 109–122
IQ-get, 111
plug-ins, 404–412
<presence>, 106
Roster Versioning, 396
rosterChanged(), 408
roster_changed, 407, 414
roster-item, 399
rosterwatch.css, 414
rosterwatch.html, 413
rosterwatch.js, 415–416
round trips, HTTP, 394
row, 339
Ruby on Rails, 380
S
same origin policy, 41, 429
SASL. See Simple Authentication and Security Layers
<script>, 96, 420
scripts, 42
scroll_chat(), 125
scrollHeight, 70
scrollTop, 70
security, 28
BOSH, 32, 379–380
login, 379
proxies, 435–439
same origin policy, 429
XMPP, 4
selectionEnd, 289
selectionStart, 289
selectors, jQuery, 421
send(), 56, 74, 395
send_error(), 320
send_game(), 331
send_games(), 330–331
sendIQ(), 112, 114
send_op(), 289
send_ping(), 56, 59
serialization, XML, 397
serialize(), 70
server, 389
servers, 6, 33–34
server-to-server protocol, 388, 393
Service Discovery, 35, 145–163. See also Dig
forms, 206
NetPad, 271, 278
service records (SRV), 18
service_unavailable, 83
<service_unavailble/>, 17
<session>, 20
session(s)
performance, 379
Toetem, 317–324
session attachment, BOSH, 377–385
Session Identifier (SID), 378
AJAX, 379
cookies, 380
Strophe, 379
set, 15
short names, 391
show, 405
show(), 423
<show>, 12
show_error(), 232
show_traffic(), 69, 70, 72
SID. See Session Identifier
Simple Authentication and Security Layers,
authentication, 379
Simple Authentication and Security Layers (SASL), 4,
20, 28
SketchCast, 203–249
<canvas>, 225–228
click, 227
sketchcast.css, 224–225
sketchcast.html, 223–224
sketchcast.js, 225–226, 227–228
452
40718bindex.indd 452
11/30/09 9:41:31 PM
-sname – subscription
-sname, 392
Socialcast, 25
Software Version, 81–82
disco#info, 148
XEPs, 95
some_global, 46
sortable(), jQuery UI, 123
spam, 4
<span>, 157
splice(), 261
SRV. See service records
SSL, 28
standalone connection managers, 430
Punjab, 431–432
standards list, 35
stanzas, 4
from, 10
to, 10
<body>, 69–70
child, 54–55
<error>, 17–18
Hello, 53–57
HTTP, 394
id, 10–11
<iq>, 15–17
large size, 395–396
matching, 57–58
<message>, 13–15
streams, 9
Strophe.Builder, 54–56
type, 10
XMPP, 9–18
<start>, 273, 280, 334
child, 282
games, 306
on_message(), 283
Start Game button, 334
start_collaboration(), 281–282
chat, 285
init(), 286–287
update_pad(), 288
start-game(), <game-started>, 331
start_game(), 330
starting
game status, 328
start_game(), 330
startproject, 381
start_time(), 59
<state>, 273–274
state vector, 273–274
operational transformation, 255
<priority>, 273–274
statefulness, 29
statistics, 149
status, 405
games, 328
<status>, 12
statusChanged(), 407–410
addHandler(), 410
Strophe, 403
StatusNet, 89
<stop>, 280
<message>, 273
on_message(), 283
stop_collaboration()
chat, 285
notify, 283
stop-waiting
on_iq(), 320–321
on_stop_waiting(), 321
<stop-waiting>, 304, 305
<stream:features>, 19
streams, 9, 19
<stream:stream>, 9, 19, 270
String, 96
stroke(), 227
Strophe, 25–27, 42, 403–404
attach(), 379, 383
authentication, 64
connection managers, 48, 64
Flash, 41
flXHR, 41
handlers, 40
JavaScript, 32
pause(), 395
plug-ins, 43, 401–417
rawInput(), 75
resume(), 395
RID, 379
send(), 395
SID, 379
xmlInput(), 75
Strophe.Builder, 54–56, 74, 76
strophe.js, 42
Strophe.serialize(), 70, 72
<subject>, 191
submit, 208
subscribe, 13, 117
subscribe(), 411
<subscribe>, 216–218
subscribed, 119, 120
subscribed(), 231
subscribe_error(), 231
subscription, 405
from, 120
to, 111
both, 111, 120
pending, 217
presence, 105
pubsub nodes, 217
453
40718bindex.indd 453
11/30/09 9:41:31 PM
<subscriptions> – username
<subscriptions>, 219, 222
switch, 325, 343
T
t(), 55
tabs
jQuery UI, 122
<li>, 107
tabs(), 122–123
jQuery UI, 107
Tape, BOSH, 438–439
TCP, 378, 390, 430
<td>, 334
templates, XEPs, 271
templates, 382
text(), 423
<text>, 83
text editor. See NetPad
Textile, 143
text-multi, 209
text-private, 208
text-single, 208
text_to_xml(), 74–75
themes, jQuery UI, 42
<thread>, 15
threads, 15
Tic-Tac-Toe. See Toetem
Tigase, 439
TLS. See Transport Layer Security
to
stanzas, 10
subscription, 111
Toetem
bots, 300, 301
<canvas>, 346
clients, 322–324, 334–338, 345–351
connected, 323
disconnected, 323
logic, 338–372
management, 325–334
on_message(), 323–324
players, 303–305
protocols, 302–310
referee, 300, 301, 325–334
sessions, 317–324
waiting list, 317–324
toetem.css, 315–316
toetem.html, 313–314
toetem.js, 365–372
/topic, 192
topics, chat rooms, 191–192
toString(), 54, 339–340
traffic, Peek, 68–70
transform_op(), 261, 262–263
Transport Layer Security (TLS), 4, 20, 28
tree(), 54
trigger(), 47, 425–426
troublemakers, chat rooms, 192–194
true, 58
Twisted Python, 431
Twitter, 3, 25
type
available, 11
cancel, 208
chat, 56
chat, 94, 183, 188
<error>, 17, 83
form, 208
forms, 208
<identity>, 148
<message>, 13–14, 94
MUC, 56
<presence>, 120
result, 208
stanzas, 10, 57–58
submit, 208
subscribe, 13
U
UI. See user interface
<ul>, 107, 122
unavailable, 182
undefined, 58
unsubscribe(), 411
<unsubscribe>, 218
unsubscribed, 119
<presence>, 120
up(), 55
update_pad(), 288
upstream, 389
URIs, 268
urls.py, 381
urn:ietf:params:xml:ns:xmpp-stanzas, 83
user interface (UI). See also jQuery UI
Arthur, 92
Gab, 105–109
Groupie, 175–179
Hello, 43–45
jQuery, 42
NetPad, 274
Peek, 66–67
pubsub, 222–225
User Tune, 215
username, 379
454
40718bindex.indd 454
11/30/09 9:41:31 PM
validMove – Yammer
V
validMove(), 340–341
<value>, 208
var, 148, 210
vertical scaling, 394–399
views.py, 382
virtual pen, 225
<VirtualHost>, 437
visitor, 173, 175
W
wait, 17, 83, 273
Wait button, 300, 324
waiting, 320–321, 328
<waiting>
IQ-set, 304
<player>, 304
Wait button, 324
waiting list, 324
waiting list, Toetem, 317–324
Watch Game button, 347–348
watching, 347
while, 424
winner, 310
X
<x>, 186–187, 207, 208
xa, 12
XEPs. See XMPP Extension Proposals
XHTML-IM, 94–96
<html>, 268
<message>, 94
XML
child, 71
connection managers, 430
indentation, 71–73
jQuery, 41
namespaces, 268
parsers, 74–75
serialization, 397
XMPP, 4, 65
xml, 96, 270
xml2html(), 69
.xml_aname, 71
.xml_avalue, 71
XMLHttpRequest, 30
xmlInput(), 64, 75
xml:lang, 270
xmlns, 269, 270
xmlOutput(), 64
.xml_punc, 71
.xml_tag, 71
.xml_text, 71
XMPP. See eXtensible Messagingand Presence Protocol
XMPP Council, 271
XMPP Extension Proposals (XEPs), 6, 35
pubsub, 95
Software Version, 95
templates, 271
XSF, 95
XMPP Standards Foundation (XSF), 4, 6, 35–36
XEPs, 95
/xmpp-httpbind, 389, 390, 437
x_player, game_star, 350
XSF. See XMPP Standards Foundation
XSF Council, 271
Y
Yahoo Pager, 5
Yammer, 25
455
40718bindex.indd 455
11/30/09 9:41:31 PM
Programmer to Programmer
TM
Take your library
wherever you go.
Now you can access complete Wrox books online, wherever
you happen to be! Every diagram, description, screen capture,
and code sample is available with your subscription to the
Wrox Reference Library. For answers when and where you need
them, go to wrox.books24x7.com and subscribe today!
Find books on
• ASP.NET
• C#/C++
• Database
• Java
• Mac
• Microsoft Office
• .NET
• Open Source
• PHP/MySQL
• SQL Server
• Visual Basic
• Web
• XML
www.wrox.com
49099_wrox_bob_k_as.indd 1
40718badvert.indd 456
11/10/09 9:12:15 AM
12/2/09 9:17:54 AM
Related Wrox Books
Beginning JavaScript, 4th Edition
Programmer to Programmer™
Get more out of
wrox.com
Interact
Join the Community
Take an active role online by participating in our
P2P forums @ p2p.wrox.com
Sign up for our free monthly newsletter at
newsletter.wrox.com
Wrox Online Library
Browse
Hundreds of our books are available online
through Books24x7.com
Ready for more Wrox? We have books and
e-books available on .NET, SQL Server, Java,
XML, Visual Basic, C#/ C++, and much more!
Wrox Blox
Download short informational pieces and code
to keep you up to date and out of trouble!
Contact Us.
We always like to get feedback from our readers. Have a book idea?
Need community support? Let us know by e-mailing wrox-partnerwithus@wrox.com
ISBN: 978-0-470-52593-7
Serving as a great introduction to JavaScript, this book offers all you need to start using JavaScript on your web pages right away. It’s
fully updated and covers utilizing JavaScript with the latest versions of the Internet Explorer, Firefox, and Safari browsers and walks you
through the basics of JavaScript: what it is, how it works, and what you can do with it.
Beginning JavaScript and CSS Development with jQuery
ISBN: 978-0-470-22779-4
With this unique, project-oriented book, author Richard York teaches even the most novice of JavaScript users how to quickly get started
utilizing the JavaScript jQuery Library to decrease the amount of code that needs to be written and tested. A four-color code syntax
highlighting system provides a visual reinforcement and allows you to see the nuts and bolts that comprise each line and section of code.
With this helpful guide and hands-on exercises, you’ll be able to put jQuery to work for you and avoid having to write code from scratch.
Beginning XML, 4th Edition
ISBN: 978-0-470-11487-2
The perfect resource for beginning XML programmers, this guidebook clearly shows you what XML is, how to use it, and what technologies surround it. The authors build on the strengths of previous editions while covering the latest changes in the XML landscape such as
XQuery, RSS and Atom, and Ajax. The most recent specifications are presented along with best practices to follow when developing XML
solutions. You’ll delve into the state of the art for XML and databases, discover how to query XML information, retrieve data, and create
new XML documents. In addition, you’ll learn how to publish information on the web, design dynamic interactive graphics, and make
interactive forms.
Professional JavaScript for Web Developers, 2nd Edition
ISBN: 978-0-470-22780-0
This book covers JavaScript from its very beginning to the present-day incarnations that include support for the DOM and Ajax. It also
shows you how to extend this powerful language to meet specific needs and create seamless client-server communication without intermediaries such as Java or hidden frames. You’ll explore the components that make up a JavaScript implementation, with specific focus on
standards such as ECMAScript and DOM. You’ll also learn how to utilize regular expressions and build dynamic user interfaces. This valuable insight will help you apply JavaScript solutions to the business problems faced by Web developers everywhere.
Professional XML
ISBN: 978-0-471-77777-9
From document type definitions and XQuery to Web services and form development, this book takes you through all of the XML capabilities that companies want to implement today. It not only covers the basics of XML and the XML specification, but also shows you the
XML-based applications that are driving the tech industry forward, such as blogging and alerts.
B
a
P
a
B
a
Moffitt
Create real-time, highly interactive apps
quickly with the powerful XMPP protocol
•
Learn about XMPP’s instant messaging features, such as rosters,
presence and subscriptions, and private chats
Covers XMPP stanzas, stanza errors, and client protocol syntax
and semantics
•
Discusses service discovery, data forms, and publish-subscribe
•
Addresses XMPP programming-related topics such as application
design, event handling, and combining existing protocols
•
Details the best ways to deploy XMPP-based applications
•
Explains how to use Strophe’s plugin system and how to create
your own plugins
Jack Moffitt is CTO of Collecta, where he leads a team that produces several
XMPP-related projects including Strophe (a family of libraries for XMPP
communication), Palaver (a group chat server), Punjab (an HTTP to XMPP
gateway service), and Speeqe (a simple web-based group chat client). He also
served several terms on the Board of Directors and Council of the XMPP
Standards Foundation.
Wrox Professional guides are planned and written by working programmers
to meet the real-world needs of programmers, developers, and IT professionals.
Focused and relevant, they address the issues technology professionals face
every day. They provide examples, practical solutions, and expert education
in new technologies, all designed to help programmers do a better job.
Programming / General
$49.99 USA
$59.99 CAN
wrox.com
Programmer
Forums
Join our Programmer to
Programmer forums to ask
and answer programming
questions about this book,
join discussions on the
hottest topics in the industry,
and connect with fellow
programmers from around
the world.
Code Downloads
Take advantage of free code
samples from this book, as
well as code samples from
hundreds of other books, all
ready to use.
XMPP
•
Wrox Programmer to Programmer™
Professional
XMPP is a robust protocol used for a wide range of applications,
including instant messaging, multi-user chat, voice and video
conferencing, collaborative spaces, real-time gaming, data
synchronization, and search. This book teaches you how to harness
the power of XMPP in your own apps and presents you with all the
tools you need to build the next generation of apps using XMPP
or add new features to your current apps. Featuring the JavaScript
language throughout and making use of the jQuery library, the book
contains several XMPP apps of increasing complexity that serve as
ideal learning tools.
Join the discussion @ p2p.wrox.com
Read More
Find articles, ebooks, sample
chapters and tables of contents
for hundreds of books, and
more reference resources on
programming topics that matter
to you.
Programming
with
JavaScript ®
and jQuery
Professional
XMPP
Programming with JavaScript and jQuery
®
Jack Moffitt