/


Теги: knitting needlework creativity

Текст
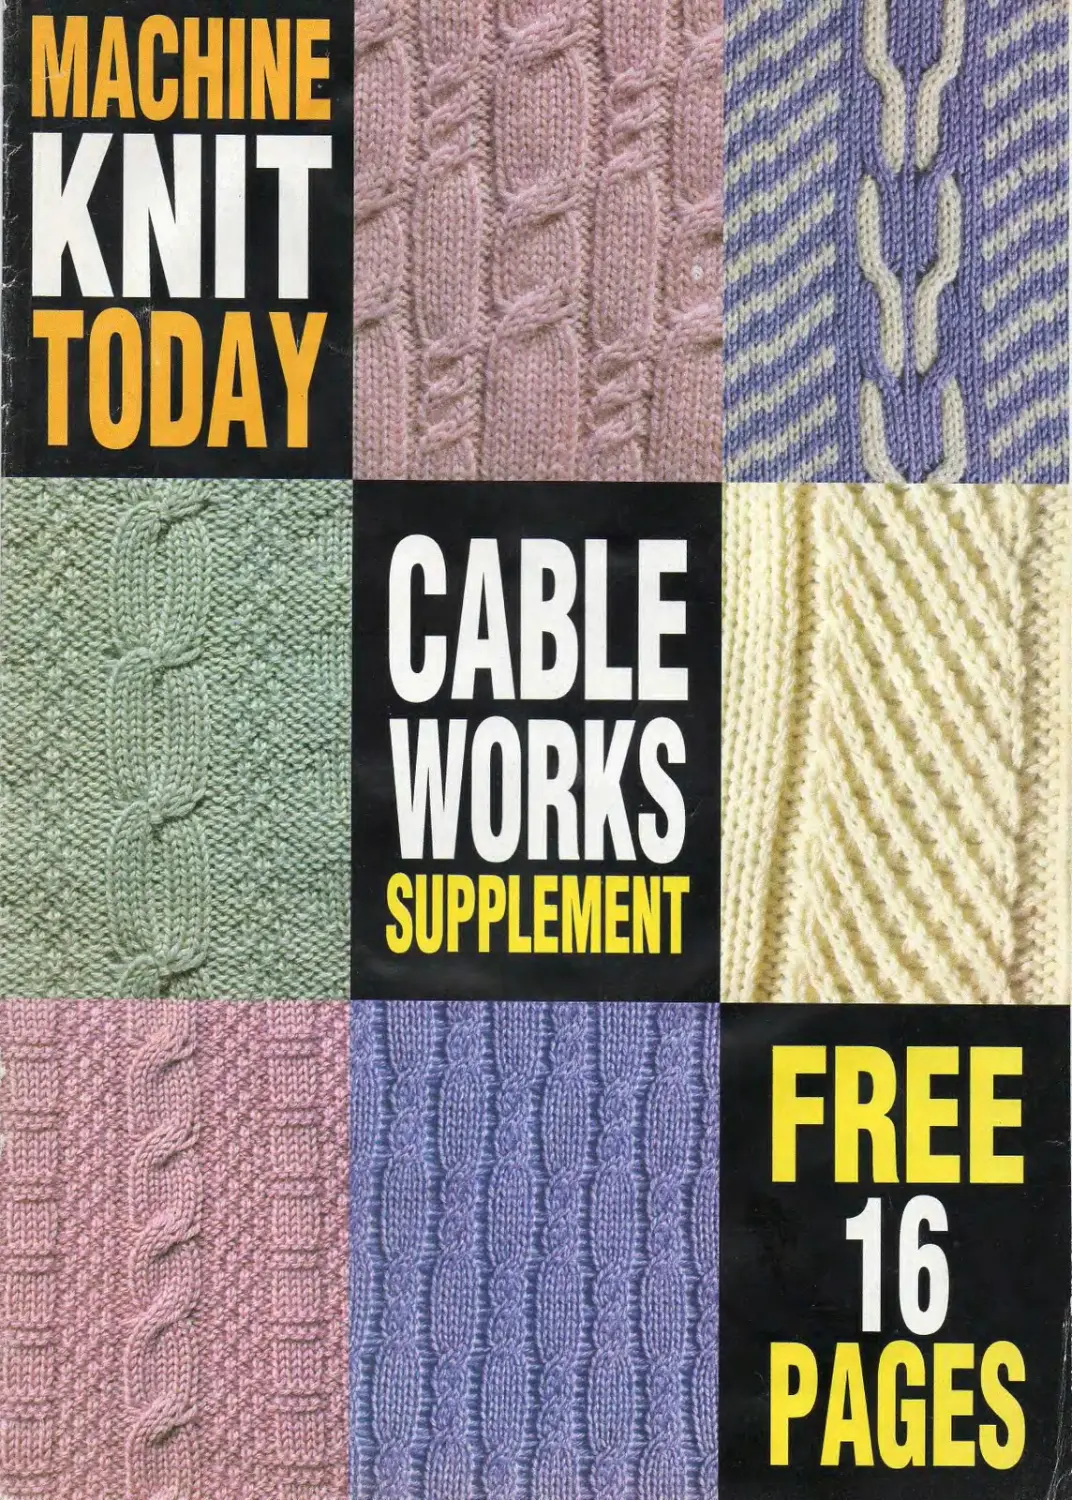
Cable and twist patterns form an important part of our
knitting heritage. In the past they were very closely associated
with Aran garments and fisherman's gansey designs, but
times have changed and this coming season they are to
be seen everywhere!
I his design in cashmere was shown al die Design m Knitwear' show by N«Peai II epitomises lhe combination of
luxury yarn, easy styling and the all-important cable
BASIC CABLE KNOW-HOW
Cable and twist designs are easily
worked on any make, model or gauge
of knitting machine. One of the sim-
plest cables to start with is over a group
of four stitches. Although on a small
crossover it is possible to work straight
on to a stocking stitch background, it
is common to transfer a stitch at each
side of the cable group on to their adja-
cent needle The empty needles are then
pushed into non-working position and
left there throughout. The straight
thread at each side of the group pro-
vides a little extra elasticity when
crossing the stitches and also acts as
a ‘frame’ in the way in which a purl
stitch would. This is they way our
basic cable has been worked. We’ve
illustrated the procedure opposite.
1.	Use a double-eyed transfer tool to
take off two stitches. Turn the tool at
right angles to the work as show.
These first two stitches transferred
will be the ones to be crossed behind
in pattern or diagram instructions.
Turning the tool at right angles like this
is usefill in that the stitches remain
securely on the tool and placed across
the fabric, serve as an ‘extra hand’
keeping the knitting back against the
sinker plates.
2.	Use a second double-eyed tool and
transfer the last two stitches of the set
of four, on to the first set of vacated
needles.
3.	Now complete the cable by trans-
ferring the remaining stitches on to the
recently vacated needles.
4.	The cross-over cable process is
complete.
A cable panel is formed by knitting a
few rows and then repeating the cross-
over again, often, but not necessarily
throughout (see Swatch 1).
READING CABLE DESIGNS
Cable designs can carry written instruc-
tions, but these are usually' accompanied
by a diagram. Diagram 1 shows two
ways in which our simple four stitch cable
panel might be represented in print
Note: The method used to represent
the cable patterns differs between pat-
terns, as some instructions are easier
to read for certain specific designs
than others. A full table of diagram
abbreviations is given on page 6.
Simple this cross-over might bp, but
used in combination with other sim-
ilar transfers, interesting and com-
plex designs can be readily built up
as illustrated in Swatches 2,3 and 4.
DIAGRAM-!
ABCD
lll.llll.il
 Cross A and В behind C and D, K6 rows".
Repeal from" to* throughout.
THE SIX STITCH PANEL
WITH RIB
For column trims and all-over cabling,
one of the most common cross-overs
you will find will be over a six stitch
group. The actual crossing of stitches
is worked as given for a four stitch
group, but using a triple-pronged tool
of course (Picture 5).
However, a purl stitch each side of the
cable looks a lot more professional
than a ladder. Although the ladder
could be hooked up to form a column
of purl stitches, you’ll find the stitches
formed are rather tight and not really
satisfactory. A neater method is to
’allow stitches on either side of cable
to knit up to the cross-over point.
Drop these adjacent stitches, but leave
the empty needles in work. Cross the
stitches as required*. Repeat from *
to * throughout (see Picture 6). When
the cable patterning or piece is com-
pleted, and whilst work is still on the
machine, use the latch tool to hook up
the resultant ladders to form a purl
stitch (Picture 7). You could form the
purl stitches with the work off your
machine and in your lap, but it is
quicker and easier to latch up the
stitches whilst the work is under ten-
sion —which it is whilst still on the
machine and with some sort of cast
on comb on it. Swatch 5 shows a
double column of cables with
latched up stitches framing each
cable set
It is not necessary only to work in
columns. Small cable columns can
be positioned as desired on a garment
to emphasise a specific area, to break
up a plain background etc. Swatch 6
shows an isolated cable section. Note
that the 'framing' stitches have been
latched up to die top of the cable, then
put on to the needle, so knitting con-
tinues plain thereafter.
COMPOSITE DESIGNS
Once the basic cross-over procedure
and purl framing options are under-
stood, there are a phenomenal number
of stitch designs that can be formed,
all from these same basic principles.
The three shown in Swatches 7,8 and
9 all appear extremely complex, but
are actually quite simple to do.
MAKING A WRONG MOVE!
There’s nothing worse than complet-
ing a complex cable panel/pattem.
only to find on removing the piece
from the machine that just one cross-
over has been worked in the wrong
direction! In the words of The Hitch-
hikers Guide to the Galaxy—“DON'T
PANIC" Don’t throw away the piece
or frustratedly start unravelling it — the
error can usually be invisibly repaired!
Check out Swatch 10 — doesn't your
eye just go straight to the mistake!
Check for the cross-over row care-
fully, then cut the thread and unravel
it from the incorrectly crossed stitches
at the top — see Swatch 11.
Now that the incorrectly crossed
I imic-shaped diamond Intarsia with cahle detailing m 2 ply pure cashmere Shown at the 'Design in Knitwear'
show from the Autumnfflirter 9M4 Ballartyne Cashmere Collection
stitches are free, tuck them through to
the wrong side, then graft — or even
simply sew — them together. Con-
trast was used to do this on Swatch
12, but for a garment piece, you would
obviously use the main colour.
Although it looks a little bit untidy from
the wrong side, it is secure and would
be much less noticeable after steam-
ing and in a matching colour.
Swatch 13 shows the corrected cross-
over from the right side. As you can
see, using main yam, the repair would
become invisible.
INVOLVING THE DOUBLE BED
If you use a double bed machine or
have a ribber, then this is the obvious
means of producing a purl ‘frame’ to
a cable design. However, if you just
set up for the rib and try crossing over
more than a four stitch group, you
might find it too tight to knit properly,
even with needles pulled forward to
assist the knitting. In extreme cases,
you may even break the yam over the
tightest part — the cable cross-over.
There are ways of increasing the stitch
size in this area—the precise method
depends on your pitch setting:
1. When the ribber is set at full pitch
— as for 1 x 1 rib (‘P’ on Japanese
machines, handle up forPassap/Pfeff),
then you’ll need to change pitch one
row before crossing over to add in
extra yam length. Diagram 2 shows an
example of a needle arrangement
which could be used on this setting.
Knit straight in full pitch to one row
before the cross-over is required.
Change to half pitch. Push needles
marked * on the diagram (on the ribber
bed—i.e. the non-cabling bed) to WP
and knit the row. Drop the loops
formed by the marked needles and
return them to NWP. Now work the
cross-over—you’ll find this is more
easily done now that the extra yam
from the ribber loops has been taken
up into the cable stitches. Knit the in-
between crossing rows as before and
repeat the change of pitch etc. prior
to each cross-over. Swatch 14 illustrates
the finished knitting from this needle
and pattern arrangement
2. A slightly quicker method is to use
the half pitch setting (if viable for the
design) throughout Diagram 3 shows
a very similar arrangement to that of
Diagram 2, but amended for half pitch.
You can miss out the step for a change
of pitch here, but you still need to
push marked needles from NWP to WP
on the row prior to cross-over, drop-
ping the loops and returning the
marked needles back to NWP before
the actual crossing is done. Swatch 15
illustrates the finished result. Apart
from the difference in cabling inter-
val, the appearance of the swatches is
very similar and I doubt if anyone
could tell, simply from the fabric,
which purl stitches were worked on
full and which on half pitch setting.
LARGE CABLES
Apart from having access to a chunky
machine, there are quite a few ways
to make a cable design appear quite
large, without crossing more than one
or two stitches at a time. The follow-
ing stitch designs illustrate simple
means to achieve this end.
A consecutive series of 2 x 2 crossings,
progressively moved across a central
panel gives, the effect of a giant cable
(Swatch 16). This method was seen on
several garments from the top fashion
houses for the autumn and winter and
was a special favourite used as a one
or two panel decoration on men’s wear.
Swatch 17 shows another ‘illusion’
which for clarity and maximum exag-
geration has been worked on a chunky
machine. In this instance all the cross-
ings are worked by sets of single stitches!
Worked on a finer gauge and in finer
у am, it can also look extremely delicate.
The number of stitches involved in the
complete panels of Swatches 16 and
17 can be varied as desired, but add
or subtract in units of two — they
require an even number of stitches.
ADDING A BIT EXTRA!
Sometimes, nothing but ‘the real thing’
will do — that is a large group of
stitches (well more than three anyway)
crossed over a similar sized set. For
the extra elasticity required, you need
larger stitches in the cable area. Use
a separate piece of main yam (we've
illustrated using contrast so you can
see clearly) andknitthecable stitches
by hand, making quite large stitches.
A multiple-ended tool (preferably a pair
of them) is useful for the actual cross-
ing (Picture 8).
The stitches are transferred and crossed
exactly as the method given at the
beginning (for a four stitch group). As
this large crossing was worked on the
single bed, you can see that the dropped
stitch method is being used for a purl
‘frame’. Having made the larger stitches
and crossed the desired number of
stitches — the example shown was
worked over a ten stitch group cross-
ing five stitches behind five—knit the
in-between rows and work the cable
panel as desired.
It might look a little messy on the
machine (Picture 9) but don’t worry
about the ends at this stage. Latch up
purl stitches before completing the
piece and remove from the machine
— see Swatch 18.
Even when the main yam has been
used to knit stitches back it is quite
likely that the ‘loose’ stitches will
show clearly. Gently pull the ends of
the manually knitted row until the
stitch size comes close to the rest of
the knitting, without distorting it.
Swatch 19 shows the finished result
when the matching colour is used.
Once you have the tension even, finish
off the ends of the added-in yam by
weaving neatly into the back of the work.
If you are using the ribber, you can
either add in extra yarn as for the
single bed version, or push more
needles opposite the cable group to
WP (as we did earlier). We give a few

ideas for ‘giant’ cables in Swatch 20.
Although only three stitches are crossed
over three, they have a long way to
travel as the the ribber stitches in the
centre (opposite to a needle out of
work on the main bed) remain in situ
throughout This is another bold cable
idea seen on fashion knitwear for the
coming season.
Swatch 21 shows another exaggeration
in size provided by the use of the
chunky machine. Pick the right yams
and you can have cables 10cm wide!
Pushing up all the ‘opposing’ ribber
needles ensured that the actual cross-
ing was quite easy even though the dis-
tance travelled seemed a lot!
The design in Swatch 22 was formed
by changing which needles were
cabled. Note that depending on which
set of cross-overs are being worked,
the marked needle on the ribber
changes. This is to ensure that the
additional yam is added in at the posi-
tion it is required. A further variation
of this stitch is possible, try reversing
the directions — i.e. those formerly
crossed behind to be crossed in front.
Half pitch ('H' or handle down). Arrange Ns as shown. K5 rows. ’ Push
RB Ns marked * to WP and К the row. Drop loops from marked Ns.
Cross A, В and C behind D, E and F. K11 rows Repeat from" to'
throughout.
Work cables over the group shown. Use a separate piece of MC to knit
cable sts loosely. Cross them and check they align in WP before starting
garter carriage.
I USING THE GARTER CARRIAGE |
The garter carriage has terrific poten-
tial for adding appropriate texture on
either side of a cable. When you are
using the garter carriage, needles
cannot be put in holding position,
they must remain in working posi-
tion throughout, or they will inhibit,
even perhaps, damage, the garter car-
riage if the butts are further forward
than working position. In order that
a cable knits cleanly and has suffi-
cient elasticity to cross without strain,
exactly the same method as given for
large cross-over cables on the single
bed is used—i.e. that of manually knit-
ting cable stitches by hand to produce
larger stitches. You’ll find that cables
will cross without strain and knit
neatly and correctly on the garter car-
riage. Some interesting effects and
patterns are obtainable with the garter
carriage, well worth the little extra
time they might take to make.
Mixed column stitches (Swatch 23) can
be very effective in garter stitch and
there is ample opportunity to add
small different designs into the
columns. Electronic owners can really
‘go to town’ designing a range of dif-
ferent small columns.
With care you can even add some tex-
tural patterning into the cable itself
(Swatch 24). In this design single
columns of moss stitch have been
incorporated into the stitches which
are crossed.
As extra yarn is being used anyway
to assist in the cable crossing, there is
ample opportunity to make the cables
more interesting (Swatch 25). Here a
centre stitch is not involved in the
crossing and gives the effect of sepa-
rate ribs being cabled.
If you prefer, when working straight-
forward cables over four or six stitches,
you can cross stitches first, pulling
needles out to holding position and
All marked*
Half pitch ('H' or handle down). Arrange Ns as shown. K5 rows.' Push
RB Ns marked * to WP and К the row. Drop loops from marked Ns.
Cross A. B.C and D behind E, F.G and H. K15 rows Repeat from * to'
throughout.
SWATCH 24
Work cables over the group shown. Use a separate piece of MC to knit
cable sts loosely. Cross them and check they align in WP before starting
garter carriage.
SWATCH 25
12aBcPcBA21
<°> I П H . . . JJHTHTl Ш . . . . IJJJJ
'" ' 11111' 'хжтскж’ ’Hill""
12aBa59Ba2i
(Ы I I 11 I.... I 11 1111 11 111 .... 11111
''Uli Io*......sie&l Illi”"
Half pitch (W or handle down). Arrange Ns as shown. K5 rows.* Push
Ns marked * in (a) to WP and К the row. Drop loops from marked Ns.
Cross A and В behind C and 0. K5 rows. Push Ns marked * in (b) to
WP and К the row. Drop loops from marked Ns. Cross 1 and 2 behind A
and В. K5 rows *. Repeat from * to * throughout
Work cable crossing over the group shown, note that centre stitch
remains in situ throughout. Use MC and К the 3 sts to L and R of‘centre
loosely. Cross 3 sts at L behind 3 sts at R. ensure Ns remain in WP before
re-starting garter carriage. Sample shows cables made every 15 rows.
then manually knit them back to
working position using a separate
piece of main yam, evening up the ten-
sion with the rest of the knitting. Once
you are confident that the cabled
needles are aligned with the rest, the
garter carriage can continue knitting.
KEEPING TRACK
Coping with a column trim is usually
quite easy to do. Tiy and make the cable
crossing positions at intervals you'll
easily remember. For instance, on
column cables, the cross-overs can be
worked at five or ten row intervals. So,
every time your RC ends in 5 or 0
you’ll know that the cable needs to be
crossed. Some of the composite designs
require crossing on alternate rows, so
will need your attention every time the
carriage is at the right (or left, if that
is where you worked the first cross-
over). If the design doesn’t allow such
regularity, then do a bit of pre-plan-
ning first. Check the diagram and
instructions to find the pattern repeat
and then make yourself a table of RC
numbers alongside the 'steps’ up to the
end of the garment piece — see Dia-
gram 4 for an example. Once your
actions have been planned and plot-
ted in this manner, you’ll find it easy
to follow where you are, even if you
are unexpectedly interrupted.
SWATCH 27
USING THE PATTERNING
SYSTEM AS A GUIDE
Arrange Ns as shown above, hall pitch. To make N arrangement easier,
without any work on the machine, set carr to select Ns. note the position
from them as transfers to be made.
 == Punched hole for first sts to be transferred
X = Position of the rest of the stitches to be crossed
If you have a machine which selects
needles into the forward position
(Brother and Toyota systems spring to
mind), then you can design a punch-
card, mylar sheet or program to select
needles for crossing. If you work out
the card in such a manner that you only
select the needles to be taken on to the
transfer tool first, you’ll find this greatly
speeds up the work, especially when
you've become accustomed to the
design. How you use the selected
needles may depend on whether you’re
working a solely single bed or double
bed design. On the single bed, the
selected needles may act as the signal
to actually cross the stitches. If work-
ing on the double bed, you may choose
to select the needles the row before
crossing over, to remind you to put
additional ribber needles into work,
to give the additional crossing ease
required. The following designs can
be used in either fashion.
Swatch 26. This would be an awk-
ward repeat to remember, as no two
consecutive cable panels are crossed
on the same row. You may choose to
select all the needles forward for the
cable, to remind yourself of the ‘set’
involved—it’s your choice.
The design in Swatch 27 isquitesimple
to do, but as it alternates two sets of cross-
overs at two row intervals with a four
row ‘gap’ it is exactly the sort of sequence
you could lose track of if the phone goes
right in the middle!
There is a combination both of cable
width and varying intervals for cross-
ing in the design in Swatch 28. The two
SWATCH 28
 - 'Punched' hole selecting Ms for transfer
X = Stitches not selected but required in cable
- RB Ns to be put into work the row before crossing
• = Optional extra punching, as a reminder to push marked RB Ns to WP
Arrange Ns as shown on half pitch
10
over two cables don’t need any addi-
tional help in the form of extra yam for
them to cross cleanly, but the larger three
by three cables do. To keep the inter-
vals correct and so you don't forget to
push ribber needles into work to add
in extra yam, card can been designed
to select the three stitches on two con-
secutive rows (first to add in ribber
needles, second to work the cross-
overs). The 2x2 sections are crossed
on the row where needles are selected.
CABLES PLUS
There are so many extras you can add
into a cable pattern, ranging from lace
work to heavy textures. Some of the
effects would need to be added in
manually, but can add some inter-
esting effects to the cable itself.
In Swatch 29 an eyelet has been added
in at the edge of the cable. This is
formed by crossing one set of stitches
‘short’ and is quick and easy to do.
There are many possible variations
on this design. A very obvious one is
to reverse the crossings, so the centres
of two adjacent columns both have a
lace hole, forming a lacy vertical panel.
Working the cross-over over an odd
number of needles (although the centre
one is not actually involved, it just
remains in situ) enables a neat eyelet pat-
tern to be added centrally (Swatch 30).
In Swatch 31 more eyelets have been
added at the centre of a six stitch group.
It looks more complex than it really is,
only four of the stitches used in the cable
are involved in forming the eyelets.
Swatch 32 is an extended version of
the previous design. The actual cross-
over shows clearly, but the edge of
the cable is rather lost. However, it still
forms an attractive and unusual design.
USING THE LACE CARRIAGE
If you have a machine with automatic
patterning, you’ll find that patterns
can be designed with allowance for the
cable built-in. Think about what the
machine will be doing and the require-
ments of the knitting and design to see
if there is a way of working at least part
of the design automatically. I remem-
ber a designer producing a beautiful
lace and cable cardigan. All the lace
work had been done manually, even
though she owned a punchcard
machine and a lace transfer carriage.
When I asked her why she had done
so much manually, she replied it was
due to the feet that you cannot use the
lace carriage when needles are pulled
forward to holding position (which
she had done each time she crossed
the cables). The answer to this is to work
the lace transfer first then cross the
cables! For lace transfer carriages which
do not allow the use of holding posi-
tion, use the method as given for work-
ing cables when using the garter car-
riage, which will enable stitches to sit
back in working position with the
required degree of ease after crossing.
The following designs give some
ideas (manual charts are given — as
appropriate—for lace for those machines
SWATCH 30
Mated centre stitch remains in situ throughout and is not involved in
cable at all. Rib stitches either side may be worked on ribber or by re-
forming regularly dropped stitches manually.
without a transfer carriage). Check the
pattern diagrams for lace carriage move-
ments in relation to cross-overs.
The design in Swatch 33 uses six
stitch group cables, alternating ones
edge directly on to the lace pattern.
Using pure wool there was sufficient
‘strength and give’ not to use a dropped
stitch. However, on other types of
yams this, or the addition of extra
yarn (as for garter carriage and larger
cable designs) might be required. Alter-
natively, life is easier if the three by
three cross-overs are replaced by two
by two columns. Try it and see.
In Swatch 34 again we worked with-
out a dropped edge stitch. The centre
needle remained in situ throughout and
did give a little extra ease in the cross-
ing. Make sure that this centre stitch
as well as the crossed ones is pulled
forward to holding position for the
next row. Two simple but different
small lace designs have been incor-
porated in the surrounding fabric —
a similar design idea to that men-
tioned for the garter carriage.
On Brother machines, use of the fine lace
setting, even with very simple designs,
results in a delightful light textural effect
between the cables (Swatch 35).
I CABLE TEXTURE AND COLOUR I
In the same way as you can add a
cable to a column lace design, you
can work out similar ‘marriages' for
other techniques. On the single bed
one of the most versatile combina-
tions is with Fair Isle.
The design in Swatch 36 alternates a Fair
bleborder withaborderof cables. The rib
stitches can be formed on the ribber or
carefolly re-formed manually in the cable
area alone. This is another pattern styleseen
in the current fashion scene and it can
haveadramatic effect (see March Machine
клйТа/ryfortwogamifflt designs incor-
porating this idea).
Working a Fair Isle design in columns,
with plain spaces between leaves room
for the cables to become part of an inte-
grated fabric (Swatch 37). Hooking up
re-formed stitches to make the framing
ribs is a bit more fiddly as you need to
ensure that floats from the Fair Isle do
not get caught up. Latch as fer as you can
until the floats impede your movement
Use a transfer tool to hold the stitch
whilst you disengage the latch tool,
which you can then re-insert into the stitch
once it has‘cleared’the floats. This is more
complicated to explain than to do!
In Swatch 38 there is real integration,
with the Fair Isle being designed to
directly incorporate the movement of
cabled stitches.
Cast on and work rib wit. Remove weights but leave axnb in situ.
Fair Isle Borden
FISHERMAN'S RIBS
AND CABLES
One built-in function on any double bed
machine is that of half and full Fish-
erman’s rib. You need to take a little
care with the needle arrangements you
use for the patterning to keep the cables
running neatly and the continuity of
pattern between them as illustrated in
the following examples.
12
SWATCH 36
Feeder 1	Feeder 2	Rows
Aran	Purbeck	3
Aran	Pistachio	9
Aran	Purbeck	3
K2 rows st st in Aran
Arrange Ns as shown in diagram. Weight comb. MT-1/MT-2,
K2 rows. Cable first group, and continue to work from diagram,
ending with 2 plain rows. Transfer RB sts back to MB, both sts
on to empty N. In st st and Aran K2 rows. Repeat Fair Isle and
cable sequence as desired.
e, but drop and re-form one stitch
at each side of cable manually. Note 2 plain
rows before and after cable carry the rib stitch. 2
rows each side of Fair isle, all Ns knit in st st.
Thread a piece of WY through dropped stitch
when it is first dropped in the cable sequence,
so you can control how far it runs back.

ihe example in Swatch 39 is only suit-
able for working complete columns, as
the needle arrangement lias been amended
on each side. If you reverted back for
half Fisherman's rib again, the needle
arrangement would not work as set!
In Swatch 40, as the cables have been
crossed using an odd number of stitches
—even though thecentreone remains
in situ throughout—the overall needle
arrangement is not disturbed. Using
this style of cable, motifs and odd
cable cross-overs can be worked any-
where within the fabric, being started
and stopped as desired.
Swatch 41 is not for a novice, but the
bold effect of crossing the 'actual'
stitches of a full Fisherman's rib is
great fun. Worked on a 1 x 1 needle
arrangement—no disturbance of the
ordinary setting, once again the cable
can be started and stopped as desired.
Use matching yam to knit the stitches
involved in tire crossing very loosely
before they are crossed. On standard
gauge Japanese machines, alternating
prongs of two 7 x 1 tools can be used
to speed up the cabling.
SWATCH 40
ППТПТПТПТГ
’
Cables worked over 5 sts. but the centre one is left in situ throughout,
only 2 x 2 are crossed. MB set to K. RB tuck (in one direction). Cables
stop and start as desired as N arrangement readily reverts back to the
1 x 1 required for the English rib.
К in English rib until first cable required. Transfer sts as in (1). ’ K2. cross
rabies. K6-8. cross cables. K2. return to 1 x 1 arrangement K20 rows".
Transfer sts as in (2) and work from • to". Transfer sts as in (3) and work
from' to'. Repeat as desired for a panel, or use as scattered motifs.
Basic Bird's-eye pattern:
Use bird's-eye double
length for Swatch 44 and
on normal rotation tor
Swatch 45.
THE POTENTIAL OF
FULL NEEDLE RIBS
Flat ribs form a wonderful backcloth
for cables and for designs with transfer
movements. Cables can be crossed either
on main bed or ribber bed needles.
There is a case to be made for either
selection. Ifyou cross stitches on the ribber
bed, you can drop it and see where you
are in a sequence. However, you may
find it more comfortable and natural to
cross stitches on the main (back) bed and
be willing to forfeit the ability to see the
design as you work.
With a ribber which has a plating
facility, even the simplest cable
columns can have great impact, as
illustrated by the designs taken from
Learn to Machine Knit with the Ribber
Book 6.
The fabric of Swatch 42 illustrates
open and closed cable cross-overs.
Such designs are normally worked
from a chart, but a card could be
designed to select needles if desired.
Four small ribs were involved in the
effective panel pattern in Swatch 43,
which actually covers quite a few
stitches, to give an ultimate illusion
of a wide and dramatic design.
SWATCH 41
s'-д, t>->3
N arrangement 2
ABCDEr
Work in full fisherman's rib. Cross A В and C behind 0. E and F—
liter knitting these sts loosely with matching yam. K20-30 rows between
cross-overs.
SWATCH 42
ADDING AUTOMATIC
PATTERNING
One particularly useful combination
for additional texture is tuck pat-
terning. Depending on the needle
arrangement, cross-over designs can
either appear plain on a textured back-
ground, or take up some of the attrac-
tive distortions. Simple bird's-eye
background fabrics have been selected
to show two possible variations. In
these designs, which used tuck pat-
terning on the main bed, machines
which don't select needles are at an
advantage, as selected needles don’t
have to be moved out of the way when
cabling. For machines which do select,
14
1 square = 1 st and 1 row. RB sts only are shown, all corresponding MB
Ns in WP. Hall pitch.
The central pattern repeat is exactly as shown in the diagram. The panels
ol rabies at each side have been crossed — in opposite directions,
every 10 rows. An interesting straight needle arrangement at each side
sets off ihe panel and-makes the whole garment interesting with the
minimum ol work!
take note of the selection before cross-
ing the cable. Move any selected
needles which would interfere with
the crossing process out of the way,
cross the stitches and then manually
return them to their original position.
In Swatch 44 the cable columns are
formed on the ribber bed and are oppo-
site empty needles on the main bed,
so that they don’t incorporate any of
the stitch pattern. Don’t forget, if you
have a machine which selects end
needles forward for easy Fair Isle knit-
ting, such selection should be can-
celled for this type of design. If it is
not, then each time the carriage reaches
a needle out of work it will take that
to be the end of the work and needles
adjacent to ‘spaces’ will be selected on
every row.
In the design in Swatch 45 , a full
needle arrangement for the rib columns
means that the ribber stitches will
incorporate some of the tuck pattern.
This is not a problem and, indeed,
can lead to some fascinating textural
patterns. The combination of single and
double bed patterning is interesting and
even simple designs can be very effec-
tive.
This is fer from being the end of poten-
tial for cable designs. For interesting
designs, look through the many hand-
knitting books devoted to Aran and
Semsey knits. As you make other
rics, consider whether a cable could
be incorporated and, using many of
the guidelines given, how it could be
done. As clues to further experimen-
tation, cables can be incorporated into
Jacquard fabrics; used in welts and
edgings and form distinctive classical
lines on raglan decreases. Once you
start exploring the fascinating world
of cables, you’ll almost wonder why
other forms of patterning were devised!
Yams used in the cables were 4 ply
wools from T. Forsell & Son in the
qualities and shades given in the Stitch
Library.
Note that the fashion designs illus-
trated are all copyright. Should you
require details of stockists in order to
buy any of the fashion items illus-
trated, please contact the relevant
Fashion House for stockist details:
Ballantyne: 4-6 Savile Row, London
W1X1AF.
East River Knitwear: Stockists include
Principles, Debenhams, Miss Self-
ridge, Top Shop, Dorothy Perkins,
Hennes and Asda and various items
from their range are available via mail
order catalogues such as Freemans,
GUS, Grattan, Littlewoods and Empire.
N*Peol: 17 Savile Row, London W1X
1AE.
Designs taken from team to Knit with the Ribber Book 6 illustrate the dramatic effect of plated cables
SUPPLEMENT