/


Автор: Riley J.
Теги: music musical instruments musical compositions musical art survival guide drummer guide alfred publisher
Год: 2015


Текст
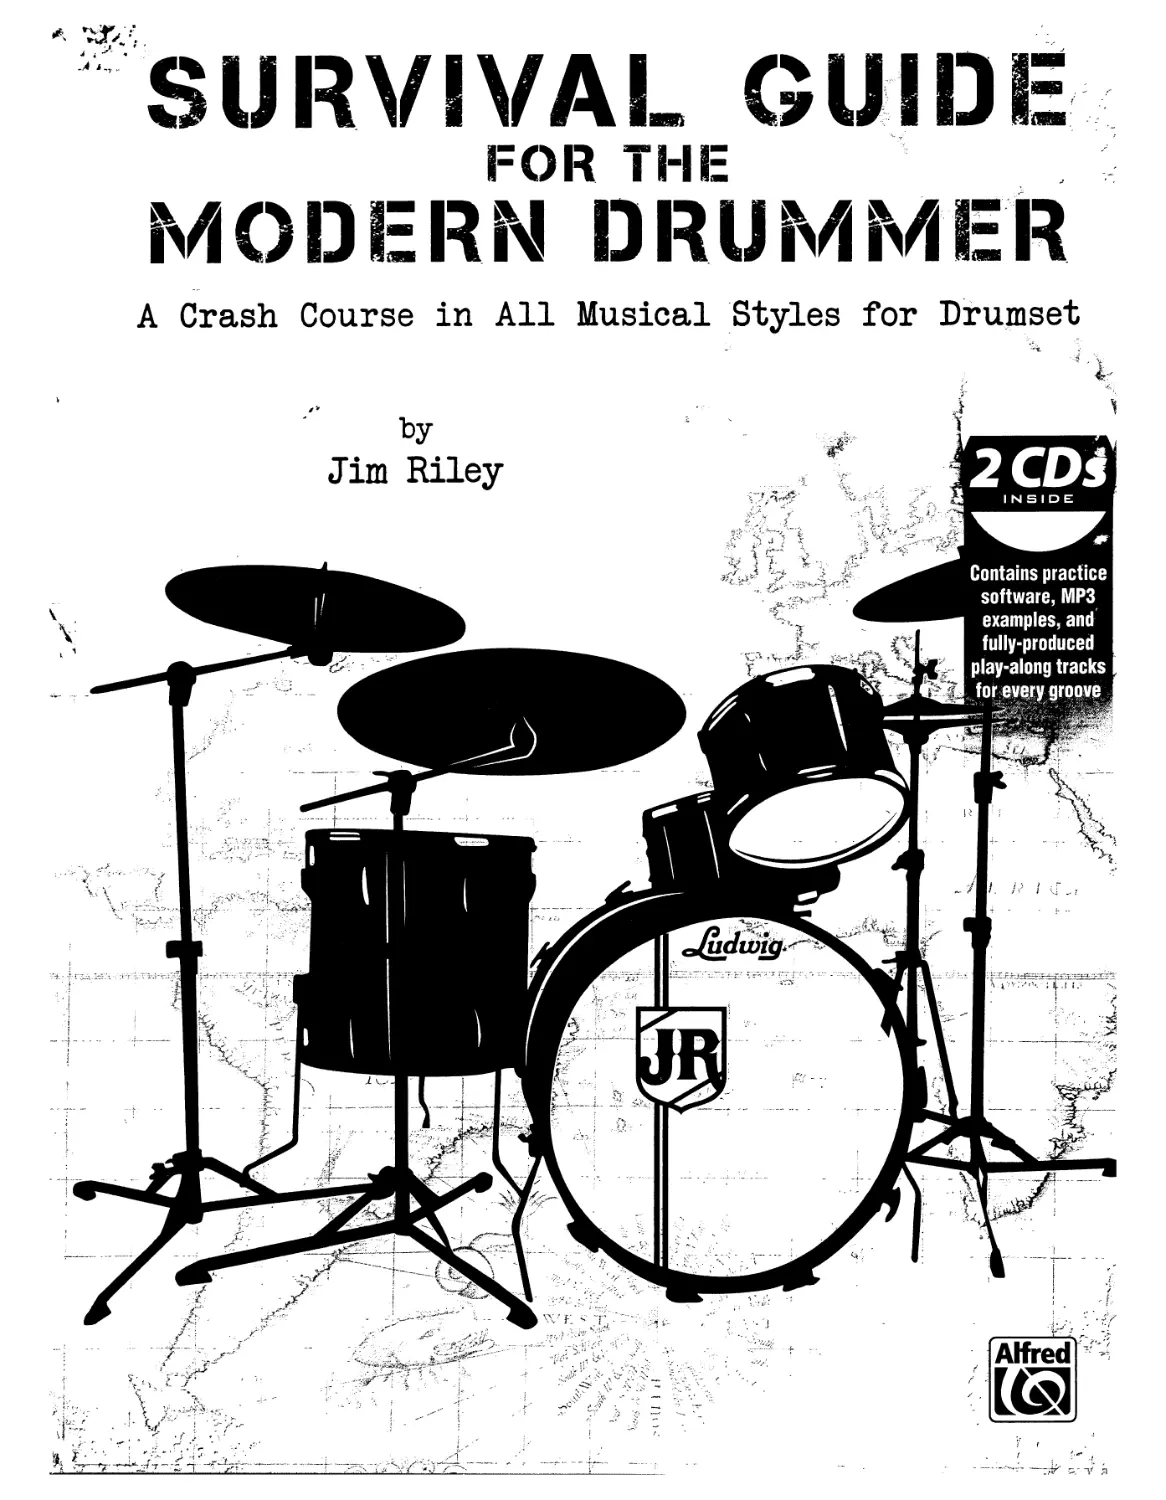
                    SURVIVAL GUIDE
FOR THE
MODERN DRUMMER
A Crash Course in All Musical Styles for Druniset
III
SURVIVAL GUIDI
FOR THE
MODERN DRUMMER
A Crash Course in All Musical Styles for Drumset
by
Jim Riley
Alfred
L(sl
0
Exclusively distributed by
Alfred Music
P.O. Box 10003
Van Nuys, CA 91410-0003
alfred.com
© 2015 Jim Riley Music
All rights reserved. Printed in USA.
No part of this book shall be reproduced, arranged, adapted, recorded, publicly performed, stored in a retrieval system,
or transmitted by any means without written permission from the publisher. In order to comply with copyright laws, please apply for
such written permission and/or license by Contacting the publisher at alfred.com/permissions.
ISBN-10: 0-692-28408-7
ISBN-13: 978-0-692-28408-7
2
TABLE OF CONTENTS
Introduction..........................................................3
About the Music/Discs.................................................3
About the Notation....................................................4
Chapter 1:	Pop Drumming...............................................5
Track Listing.....................................................16
Chapter 2:	Blues.....................................................17
Track Listing.....................................................22
Chapters: Swing......................................................23
Track Listing.....................................................32
Chapter 4:	Country...................................................33
Track Listing.....................................................41
Chapter 5:	Early Rock and Motown.....................................42
Track Listing.....................................................45
Chapter 6:	Dance and Electronic......................................46
Track Listing.....................................................49
Chapter 7:	Funk and Fusion...........................................50
Track Listing.....................................................58
Chapter 8:	Odd-Time Signatures.......................................59
Track Listing.....................................................63
Chapter 9:	Metal and Double Bass.....................................64
Track Listing.....................................................69
Chapter 10:	Grooves from Around the World...........................70
Track Listing.....................................................76
Acknowledgments......................................................79
About the Author.....................................................80
3
INTRODUCTION
I have spent my entire career as a working drummer. For this, I feel like the luckiest guy in the world. As a musician for hire,
you are always waiting for the phone to ring forthat next gig. The question is, are you ready for that next call? If you get
called for a jazz gig, are you ready? What about a heavy metal cover band? If you get called to do a recording session playing
country, can you cover it? The last thing you want to say when called to work as a musician is "I'm not comfortable playing
that kind of music."The fact is, in order to be a successful working drummer you must be ready to play all styles. I can honestly
say that I have been hired to play, at one time or another, virtually every style imaginable. I have also played in virtually every
type of situation as well, from club gigs to stadiums, from community theaters to major motion pictures, from high school
football games to video games. With the many different styles of music that exist in the world, it is not likely you will become
a master of all styles in your lifetime. And while we all have certain specialties, in order to survive we must have what I call a
deep "bag of tricks."This is what the Survival Guide is all about, as it is much more than just a styles-book. My goal in writing
this text is to give you the tools to be able to cover any gig situation you will likely encounter as a working drummer traveling
the jungle we call the music business.
This book, in fact, is my own survival guide as it contains the grooves I've personally played throughout my years as a
professional drummer. I have written this text for players of every level, from beginners to pros, to help prepare you for a
career in the real world. There is no filler in this book. If I don't use the groove, it's not in the book, period. This book is not an
encyclopedia containing endless variations. For each style covered in the book, you can find other books on the market with
similar subject matter, so I hope this book inspires you to explore these styles even further.
Even though I've tried my best to throw these grooves into logical categories, the fact of the matter is that all of these
grooves have the potential to cross over to many genres. The important thing to remember is to learn and use them where
they fit into your own personal musical situation.
None of the grooves were deliberately written to be challenging, although some are. They were written to be practical, so
if you finish this book and say,"That wasn't so hard,"then I've done my job. I find no glory in creating a book so difficult that
nobody can play the grooves. I consider myself a regular, non-superhero drummer and am confident that if you put the time
in on this book, you will be able to play every groove in here.
ABOUT THE MUSIC/DISCS
One thing I hope sets this book apart from the others is the music. I went to great lengths to hire not just one generic band
to play everything, but several specialized bands to help you feel as though you are playing in the most authentic musical
environment possible.
Included with this book are two discs. Disc 1 contains 124 play-along tracks. Disc 2 contains a drumset performance of each
of the 318 examples in the book. Also included is Alfred's Tempo Change Software*, which lets you slow down or speed up
any of the audio files on either disc. All audio files are in MP3 format, which has allowed me to include a high volume of audio
on just two discs. These MP3 files can be played with the included tempo change software, uploaded easily to your MP3
player, or transferred to your computer. My suggestion is to transfer the audio files from the discs to your computer, and then
place the discs back in their protective sleeve for future use.
Every example has a corresponding play-along track. Many of the examples have more than one corresponding track
with different tempos and/or feels. A detailed explanation of each track can be found at the end of each chapter. The
tracks are intended to be intuitive and easily navigated without charts. If you desire charts to the tracks, please visit
survivalguidecharts.com for a free download.
At the end of some chapters, you will find bonus tracks. These play-along tracks correspond to grooves that may have been
covered in the previous chapter, but are important enough in that genre to warrant repetition. Throughout the book, you will
also find this icon: It denotes that the example is one of my favorite go-to grooves.
To watch video performances of some of the tracks in this book, please visit survivalguidevideos.com, which will take you to
my YouTube page. I also encourage you to record and post your own performance videos.
This application requires Quicktime (7.6.7 or higher), and Java (7.6.7 or higher) to be installed on your computer.
4
ABOUT THE NOTATION
I have chosen a particular style of notation in which all stems are facing up. This goes against the more traditional notation
practice in which the bass drum stems face down, but I feel it gives the player a better sense of the composite rhythm rather
than having to look at one set of rhythms for the hands and another for the feet.
Snare Drum	Snare Drum Rimshot	Side Stick	Snare Drum Ghost Note	Stick Shot	Snare Drum Buzz	Snare Rim	High Tom	Floor Tom	Floor Tom Shell or Rim	Bass Drum
	1		J	J	J	О J		+
IS
Bass Drum	Ride	Ride	Crash Cymbals	Hi-Hat	Hi-Hat	Hi-Hat	Hi-Hat	Hi-Hat	Hi-Hat
Ghost Note	Cymbal	Bell		(w/stick)	Open	Half Open	Closed	(w/foot)	Splash (w/foot)
In addition, here are some techniques we will need to use, and how they will be notated.
Rimshot: Play the head and rim of the snare drum simultaneously with a single stick. If you are not a fan of playing rimshots,
simply read this as your top dynamic level.
Side stick (left hand only): Play the rim of the drum with the tip of the stick anchored on the head.
Ghost notes: These are notes that will be played at a very low dynamic level. Make sure to play these quiet notes using only a
slight wrist movement.
Stick shot: With the tip of the left stick anchored in the center of the head, use the right stick to hit the shaft of the left stick,
creating a unique accent.
Buzz: The drum is struck but the stick is forced back into the head instead of being allowed to rebound. The result will
produce a "buzz" sound.
DO /OU WANT TO BE RIGHT, OR DO УОЦ WANT TO WORK?
This book is my effort to give every drummer the tools they need to carve out a living as a drumset player. This will sometimes
mean that the versions of certain grooves I present may not line up perfectly with the historical interpretations. Instead, I am
providing adaptations that are more comfortable to play and better suited for the music of the modern world.
5
------- CHAPTER 1 -=
POP DRUMMING
Traditionally this section would be titled "Rock," but the way musical styles have blended over the years, that moniker just
doesn't cover it. The following examples are some of the primary grooves used in recordings of all popular music, including
rock, pop, R&B, country, blues, hip-hop, metal, and many other forms of music from around the world.The key to playing
pop music is to play strong, and for the song. In other words, you have to develop the discipline to play only what the song
requires—great grooves and fills.
I like to think about the following pop grooves in terms of layers. The first layer (examples 1-20) is the skeleton groove, but
these grooves can be used just as written and are very effective. As we go on in this chapter, I'd like to revisit these grooves
and add layers on top in order to give you more variety. Advanced players, please don't make the mistake of skipping over
this section! Trust me; these grooves are where the money is!
BASIC POP GROOVES
Here are some of my go-to pop grooves. You can play every example on this page with the following tracks. £ и Tracks 1-4
6
SXNCOPATEDPOP GROOVES
.. —- '	—
Pop grooves 11 -20 add some sixteenth-note syncopation to our '•ecertoire. Remember tnat these notes should fall "in the
cracks" between your right-hand eighth notes.
Tracks
Track 6
7
ADDING GHOST NOTES
Now let's add that second layer: ghost notes. Usually played on the snare drum, these notes are played at a low volume (thus
the term "ghost note") and add to the feel of the groove. Many of the ghost notes I use fall on the"e"and "a" of the beat,
meaning they will fall rhythmically in between the hi-hat notes. These are sometimes referred to as the offbeats. I use four
basic types of ghost notes: single taps, drags, "middle 2," and what I refer to as a "back-beat stutter."
Single Taps
Drags
Middle 2
Back-beat Stutter
In addition, I can create a similar effect by playing the right-handed ghost notes on the hi-hat. I use two basic patterns to
create this effect:	and "2-e-&."We will explore these further in Chapter 7 (Funk and Fusion). Many grooves contain
a combination of these elements which helps give a groove texture and dimension. You can also use rimshots on the back
beats to bring them out while making sure to play your ghost notes in the center of the drum where the articulation is best.
Here are the first 20 grooves, now with ghost notes added.
Tracks 1-4
Tracks 1-4
Tracks 1-4
8
Tracks 1-4
Tracks 1-4
Tracks
Track 7
6
Track8
9
Grooves 1-40 can also be played in a swung sixteenth environment. Here is example 33 as it would be interpreted in swung
sixteenth time.
( 41,
Track 4
TWO-BAR PATTERNS
When a one-bar phrase seems a bit static for a given song, you can combine two one-bar patterns to create a new two-bar
pattern. Try the following combinations.
Tracks 1-4
Tracks 1-4
Tracks 1-4
10
Tracks 1-4
(19+20J
Track 9
Pop drumming is all about parts. You can come up with almost limitless variations simply by changing the voicing of your
right hand. Each voicing will create a different energy for the section in which it is played.Try playing grooves 1-40 with the
following right-hand voicings: Closed Hi-Hat, Open Hi-Hat, Crash Cymbal, Ride Cymbal, and Floor Tom. Play each variation for
four bars, then move on to the next. Here is what it would look like using groove 22 as the starting point.
open hi-hat
ride cymbal
crash
floor tom
II j J	J1*'1/'1 j.. J J'
j J a J
1

This will give us the variations we need to create parts for the different sections of the song.
11
ANATOM/ OF A SONG
One of the key elements to becoming a more musical drummer is being able to understand how songs are constructed.
There are identifiable parts in every song, and so if you realize what they are and how they function within the song's form,
then you can create parts for each section that will support the song's structure. Here are the parts of a song (in typical order),
and my take on what each of these sections should mean to you as a drummer.
Intro: The introduction section of the song. It's usually short, and sometimes resembles the chorus.
Verse: This is the part of the song where the story is told.
Channel (or pre-chorus): This is an optional section of the verse which is unique in form and chord structure to the verse that
leads to the chorus.
Chorus: This is the part of the song that contains the hook and is repeated throughout.
Turnaround: This is similar to the intro in form and feel, and connects the chorus back to the verse.
Bridge: A unique section of the song, as it may contain a twist in the story. Most songs will only have one bridge.
Solo: An instrumental break in the song containing no vocals.
Breakdown chorus: An optional but often-used variation in the song form that uses the chords of the chorus at a much
lower volume then ramps up to full volume for the second half of the chorus.
Tag: Another optional writing tool, the tag is usually only about two or four bars in length, and takes the last line of the last
chorus and repeats it sometimes with a twist.
Outro: Similar in structure to the intro, it is the last section of the song.
PART FORMULATION
Playing with purpose is the key to formulating parts. Each drum part you create must service the section in which it is being
played. For instance, during the verse of a song, the timekeeper's main job is to lay down a solid foundation while leaving
room for the story to be told. I may choose to voice my right hand on the closed hi-hat and play fewer fills than in other
sections of the song. If the verse is more dramatic and melancholy, I will typically incorporate the floor tom using my right
hand. During the chorus, the drum part should reflect the song's increase in intensity; I may go to an open hi-hat and play fills
every four measures. The bridge is a wild card—to propel intensity, try riding on the crash cymbal. If the energy of the song
takes a less intense turn, you can try voicing the right hand on the floor tom. Your drum parts should dearly define the song
structure, while your fills lead them to the next section.
PROGRESSION
This is a concept I like to employ when playing a song in order to make it feel like it's building throughout the composition.
Under most circumstances, choosing a singular voicing for a given section type (verse, chorus, etc.) is the best idea. However,
sometimes you'll find that when using a certain specialty right-hand voicing on verse 1, such as floor tom or the rim of the
rack tom, the song may be better served by switching to a more aggressive voicing, like closed hi hat, on the second verse.
I will frequently apply the concept of progression to the fills that I choose within a song, playing the simpler fills towards the
beginning and saving the more complicated fills for the end. This helps ramp up the energy of the song from beginning
to end.
12
ADDING CRASHES
Another common tool I use to help build intensity is to incorporate additional cymbal crashes. While too many crashes on
beat 1 can break up the flow of a section, crashes on beat 2 can actually ramp up the intensity of a given section. Here is
an example:
FILLS
Your fills should groove as hard as your grooves do.They also need to serve a purpose. Fills are there to outline phrases,
introduce sections, and set up musical figures. In pop music, it is not necessary to reinvent the wheel each time you play a
fill. A great session guitar player once told me,"If you play a great fill, no one will realize it was the same fill."With the spirit of
that in mind, here are four of my go-to fills of various lengths. The reason these fills work so well is because the righthand
never stops playing eighth notes. It moves seamlessly from playing time, to playing the fill, and back to playing time without
interruption.This really helps maintain the groove throughout the fill.
RLR R RL
R L L L L L RLRL
R R R R R
fp~=f
I generally use shorter fills to hook phrases within a section together, while the longer fills are more effective to usher in new
sections. These fills will work for both straight and swing time.
This next fill is one I use exclusively in swing time, but it is a killer fill when you need a big moment.
Track 4
13
I have another subset of fills I like to call "incidental fills."They are great when you want to mark the beginning of a new
phrase, but feel a traditional fill would be overkill.
This first one is nothing more than an open and closed hi-hat, but it can be the perfect choice in the right situation.
The next fill adds a tom hit to the previous fill.
Incidental fills are perfect for connecting phrases within a verse.
Once you understand these concepts, you can then come up with a roadmap to follow. This will ensure that your grooves
and fills are functioning properly within the framework of the song.
FOUR-ON-THE-FLOOR
This first pattern is simple, but effective.
Track 10
Here is a groove I use at lower volumes and is a perfect loop imitator. It features a"buzz"on the first back beat.
The next pattern continues to employ the four-on-the-floor bass drum pattern, but adds hand-to-hand sixteenth notes. Pay
attention to the hi-hat accents as they provide the flavor on this one.
Track 10
RLRLRLRLRLRLRLRL
14
HAND-TO-HAND SIXTEENTHS
Pay close attention to the sticking on this one.
t 54 J
RLRLRLRLRLRLRLRL
RIGHT-HAND SIXTEENTH PATTERN
At slower tempos this pattern, featuring right-handed sixteenth notes, is perfect and an important groove to have under your
hands. If you would like create more sixteenth variations, go back and play grooves 1-20 and replace the eighth-note hi-hat
pattern with this right-hand sixteenth pattern.
And here it is outfitted with ghost notes.
I2 BALLAD
This is a really important feel to have in your bag of tricks as it shows up in many popular genres of music. Pay close attention
to the placement of the ghost notes.
15
CHANGE OF PACE
Sometimes a song needs a break from the constant time-keeping of the right hand. This is where the following groove comes
in handy, mostly in introductions and breakdowns of a song. Make sure to play these flams fat, not flat!

r L
r L
Track 3
TOM GROOVES
Another type of groove that is great for changing up the energy of a song is what I refer to as a tom groove. There are two I
lean on heavily.The first is relatively simple and keeps the right hand voiced on the floor tom.
This next tom groove really flows around the kit.
RLR r L LRLRLR rL LRL
Tracks
16
CHAPTER 1	TRACK LISI
1.	Slow moody rock
Time signature: |
Tempo: J = 75
Form: Intro, verse, chorus, turn, verse, chorus, bridge,
breakdown chorus, chorus.
Notes: Listen for the stop before the first verse. Try
example 59 on the verse.
2.	Medium pop rock
Time signature: |
Tempo: J = 95
Form: Intro, verse, chorus, turn, verse, chorus, bridge,
guitar solo, breakdown chorus, outro.
Notes: Make sure your right-hand voicings reflect the
mellow character of the song. Try a closed hi-hat on
the guitar solo.
3.	Driving pop rock
Time signature: |
Tempo: J = 148
Form: Intro, verse, chorus, turn, verse, chorus, guitar
solo, breakdown turnaround, chorus, guitar solo.
Notes: Use example 58 for the intro and breakdown
turnaround.
4.	Swung sixteenths pop
Time signature: |
Tempo: J = 100
Form: Intro, verse, chorus, turn, verse, chorus, bridge,
breakdown chorus, outro.
Notes: Make sure any ghost notes you play line up with
the swung-sixteenth matrix of time.
5.	'90s power pop
Time signature: |
Tempo: J = 128
Form: Intro, verse, chorus, verse, chorus, bridge,
breakdown chorus, double chorus.
Notes: Try voicing the right hand on the crash for
the intro and chorus. Use example 58 on the
breakdown.
6.	70s laid-back pop
Time signature: |
Tempo: J = 105
Form: Intro, verse, chorus, turn, key solo over verse/
chorus, turn, verse, chorus.
Notes: Try to keep that bass drum pattern tight with
the bass player.
7.	Moody pop
Time signature: |
Tempo: J = 100
Form: Intro, verse, chorus, turn, half verse, chorus,
bridge, breakdown chorus, chorus.
Notes: Listen for the stop before the first verse, use
example 60 on the bridge, and listen for the figure
at the end of the bridge.
8.	Syncopated pop rock
Time signature: |
Temoo:.= 105
Form: Intro, verse, chorus, turn, verse, chorus, bridge,
guitar solo, breakdown, 2x chorus, outro.
Notes: Listen to the figure at the end of the breakdown
chorus.
9.	Blues rock
Time signature: |
Tempo: J= 102
Form type: 12-barform
For/7?:4-bar intro, head, intro, head, guitar solo, 8-bar
bridge, breakdown, 2x sax solo, outro.
Notes: Listen for the figure at the end of the intro
as well as the ones on either side of the bridge.
Alternate examples 19 and 20 or 39 and 40 to create
the two-bar pattern.
10.	Four-on-the-floor pop
Time signature: |
Tempo: J = 124
Form: Intro, verse, chorus, verse, double chorus, bridge,
breakdown chorus, double chorus.
Notes: Listen for the extra bar of silence after the
breakdown chorus.
11.	Sixteenth-note pop ballad
Time signature: |
Tempo: , = 80
Form: Intro, verse, chorus, verse, chorus, guitar solo,
bridge, breakdown chorus, chorus.
Notes: Listen for the stop before the first verse and
before and after the first chorus.
12.	*8 pop ballad
Time signature:
Tempo:	160
Form: Intro, .verse, chorus, turn, verse, chorus, bridge,
guitar solo, breakdown chorus, outro.
Notes: Try playing side stick on the first verse. Listen for
the stop before the turn.
17
CHAPTER 2
Blues is very simply the father of rock 'n' roll. Without the blues, rock 'n' roll as we know it would not exist. While many beats
used in this genre are covered in our pop section, here are some that I feel are more indigenous to this genre.
The shuffle is the staple groove of the blues drumming. Here is a traditional four-on-the-floor blues shuffle. Notice that the
left hand mimics exactly what the right hand is doing on the ride.This is called a "double shuffle."
Tracks 13-15
I always find that taking out the snare hits on beats 1 and 3 make it feel better for me.
This variation has similar characteristics to the previous example, but the drag breaks up the static pattern.This is my
personal favorite.
Tracks 13-15
At fast tempos you can choose to play a two-beat bass drum pattern even though the bass player is walking.This can
sometimes clean up the groove if it feels too muddy.
18
Here are two common shuffle patterns that lean on the bass drum.
Here is a very useful blues shuffle featuring a bass drum accent on the "ah"of 2 and 4.
This Texas shuffle uses the left foot to play the hi-hat on the "ah" of each beat.
(.70,,
It can also be performed with quarter notes on the ride.
12-BAR BLUES FORM
The most common blues form is what is referred to as the "12-bar blues." In order to explain this, I need to make sure you
understand scale degrees. If we were to play a major scale in the key of C (no sharps, no flats), then C would be 1, D would
be 2, E would be 3, F would be 4, and G would be 5. With blues, the music is centered around three chords (1,4, and 5).These
scale degree numbers can be assigned to any key, so learning music by the numbers can be really practical.
The 12-bar blues form is as follows. Keep in mind that each number in this case represents a chord to be played for one measure.
14	11
4	4	11
5	4	11
It is very common to use the last line as a four-bar intro to the song, so listen up for that.
Blues will often use the same chord changes for a verse, chorus, and solo section of a song, so it's up to the drummer to
make the sections feel unique. In order to achieve this variety, you can apply many of the same formulas covered in the
other genre sections.
19
FILLS
This is m\ go-:o shuffle fill.
You can create .ariations of this fill by simply moving your right hand around the kit. Remember to keep the sticking the
same all the '.'. ay around the kit.
On the snare.
On the floor tom.
The use of a one-bar fill is fairly common in a blues shuffle. Here are a few that I regularly employ. This first fill uses a
left-handed flam between the snare and floor tom on the "ah" of each beat.
Tracks 13-15
R IrL R IrLRLrLR LrL
Another favorite fill of mine is this paradiddle figure.
RLRRL RLRRL RLRRL RLRRL
Here is a fill that uses a five-stroke roll.
R LLRR L RRLL R L L
20
One of the most common feels in blues is the groove. is similar to playing in %, but with three subdivisions per beat. Here
is a basic ^-blues groove.
Here is a groove with a more active bass drum part.
This next variation features a busier ride cymbal part.
blues can also be swung as well.
3	3
Here are some simple, but effective fills in
r L R R
Track 17
r L RLRL
G
21
This next fill uses a six-stroke roll and is my favorite fill.
> 3	3
Tracks 17,1
RLLRRL
Here is a longer fill using similar sticking.
Tracks 17,
RLLRLLRRLRLLRLLRRL
BONUS TRACK
I'm going to close this chapter with a bonus play-along.This is a straight eighth feel with a syncopated bass drum pattern.
C 86,
Track 20
22
CHAPTER 2	TRACK LIST
13.	Slow blues shuffle
Time signature: |
Tempo: J= 100
Form type: 12-bar blues
Form: Head, 2x piano solo, 2x sax solo, head.
Notes: Listen for the stop at the top of the sax solo.
14.	Medium blues shuffle
Time signature: |
Tempo: J= 117
Form type: 12-bar blues
Form: Intro, head, 2x solo, 2x organ solo, head, 2 turns.
Notes: Listen for the triplet figure the second time
through the guitar solo.
15.	Fast blues shuffle
Time signature: |
Tempo: J= 148
Form type: 12-bar blues
Form: 2x head, 2x solo, trade fours, head.
Notes: Listen for the stop time at the beginning as well
as the triplet figure leading into the drum breaks.
16.	Push blues shuffle
Time signature: |
Tempo: J= 134
Form type: 12-bar blues
Form: 4-bar intro, 2x head, 2x sax solo, 3x guitar solo,
2x head, turn.
Notes: Experiment with the right-hand voicing to
create distinction for each section.
17.	*8 blues
Time signature:
Tempo: J. = 84
Form type: 12-bar blues
Form: 4-bar intro, head, 2x organ solo, guitar solo,
head, turn, outro.
Notes: Experiment with the right-hand voicing to
create distinction for each section.
18.	Up-tempo blues pop
Time signature:
Tempo: 9. = 106
Form type: Modified 12-bar blues
Form: 4-bar intro, 2x head, bridge, solo, 2x guitar solo,
breakdown, 2x head, turn.
Notes: Relax and listen for the stop at the end of the
bridge.
19.	Swung-sixteenth1^ blues
Time signature:
Tempo: }= 169
Form type: 12-bar blues
Form: Head, organ solo, guitar solo, head.
Notes: Listen for stops at the top of the guitar solo.
20.	Up-tempo blues rock
Time signature: |
Tempo: J = 161
Form type: 12-bar blues
Form: 2x head, 2x guitar solo, 2x organ solo, 2x guitar
solo, 2x head.
Notes: Listen for the stops.
23
-- CHAPTER 3 -
SWING
Playing swing time is an art form. Unlike with the straight eighth feel, the placement of the notes in swing time is a matter of
interpretation. I will be notating these grooves using triplets, but the truth is that the actual distance between these notes
can be played either tighter or looser depending on the musical situation.
The earliest swing music was dance music. It required a steady, solid beat. To play swing time, you must first master this
simple pattern.
Notice the hi-hat played with the foot on beats 2 and 4. This is an essential element of playing swing time. Although it is not
written, you should play the ride pattern with an accent on 2 and 4, and let the other notes trail off in volume. Beats 1 and
3, played on the ride, will now produce the softest notes.This, of course, is completely opposite from rock and pop styles in
which 1 and 3 are the strong beats. You should spend a great deal of time getting comfortable with this pattern, as it is the
foundation on which the following patterns are built.
The following is what is referred to as a "two-beat" swing pattern. It gets its name from the two bass drum hits per measure.
This pattern can also be played with the hi-hat instead. Make sure you open the hi-hat in time to create an open note on the
"ah" of 2.
24
The next pattern uses a four-on-the-floor bass drum pattern. But when playing this pattern in the context of big-band swing,
the bass drum should be played softly. This is commonly referred to as"feathering"the bass drum.
This pattern can also be voiced on the hi-hat.
Figuring out when to play a four-on-the-floor pattern (as opposed to a two-beat) usually depends on what the bass player is
playing. If the bass player is playing what is referred to as a walking bass line (consisting of four quarter notes inf time), you
may want to consider playing four-on-the-floor softly. If the bassist is playing a two-beat feel, you should follow suit.
This next groove will add crashes to example 90. As in the pop section, adding crashes to a groove can add power, as well
as emphasis to the back beat. This can be very effective when there's a need to take the energy level of the track up a level.
However, it should be used very sparingly.
The next several grooves make use of the side stick. Make sure you are creating a quality side-stick sound.
This is a two-beat with the side stick on beat 4.
з
3
Track 25
Here is the same pattern voiced on the hi-hat.
25
The previous two grooves can also be played using a four-on-the-floor bass drum pattern.
3	3
In the swing era, many big bands used a conga player, and so drummers started picking up on the patterns the conga player
would play. With the use of a tom, here are two swing patterns that mimic a conga player's accompaniment.
Here is the same concept spread out over two bars.
AABA FORM
One notable difference between pop music and jazz is the form. Jazz forms are built much differently than pop forms. Rather
than using terms like "verse" and "chorus,"jazz forms are mostly labeled using letters.
Jazz forms may or may not contain an introduction, but that is usually where the similarities to pop end. After the optional
intro, the next section is called the "A" section. It contains the prevailing melody of the piece called "the head." This section can
vary in length, but is usually repeated. After the repeat, the song will shift gears by going to a new melody and chords. This
section is called the "B" section. The A section usually then returns (hence the AABA form). A jazz song using this form may
utilize one feel on the A section and another on the В section, so understanding the form and when these changes occur is
key to being an accomplished jazz player.
BE-BOP JAZZ COMPING
As swing music evolved, it became more complex by moving away from dance music to an art form purely for the listener's
pleasure. The once prominent back beat on the snare was replaced with what we refer to as comping figures. Comping is
short for complementary.The idea is that when another instrumentalist is featured, you as the drummer play complementary
figures to help support them (like a musical dialogue). Comping figures should be played relatively quiet in most cases. In
order to have a musical dialogue, a drummer must develop his or her musical vocabulary.
While the possible combinations are close to infinite, here are some of the more common comping figures to help get you
started. As you play these figures, make sure the ride cymbal and hi-hat pattern stays the same. The first group of comping
patterns on the snare drum uses simple eighth-note patterns.
26
Tracks 21-24
The next two examples make use of the middle note of the triplet, creating an offset quarter-note triplet rhythm. It sounds
complicated, but it is actually not very hard to play.	Tracks 21-24
27
The next section adds the bass drum using simple eighth-note patterns. o Tracks 21-24
3	3	3
Next, let's add successive eighth-note triplets into the mix.
28
Once you get comfortable with these types of rhythms, you can go back and add some different timbres. Q) Tracks 21-24
Here is an extended comping example using some of our new voicings. о Tracks 21-24
FILLS	• •
Here are some fills you can use when playing swing, Tracks21-24
R R
L
3	3	3	3
R L R L
RLLRLLRL L
29
FOUR-BAR BREAKS
What does the term "trading fours" mean? It refers to a situation in which the drummer (typically after everyone else in the
band has taken a solo) will alternate four-bar phrases with one or more members of the band. When trading fours, a soloist
accompanied by the rhythm section will usually solo over four bars, and then the entire band will rest for four bars while
the drummer plays his four-bar solo break. After the drummer's solo break, the soloist will resume with rhythm section
accompaniment. It is important to note that these solos follow the form of the song, so it's imperative that the drummer be
familiar with the form and melody of the tune.
Being able to trade fours with other musicians is important when playing in the bebop style. While this is clearly not a book
about playing solos, I would be remiss if I did not share a few four-bar breaks to use in this situation.The first break is relatively
simple; remember, it doesn't have to be complicated in order to be cool.The example uses a rudiment called a single-stroke
four. It also uses a stick shot which is defined at the beginning of the book.
This next break features a rudiment called a six-stroke roll. Make sure to keep the notes spaced evenly while playing those
triplet combinations.
The last break features some very useful combinations. Pay close attention to the stickings.
RLRLL RLRLL RLRLL RLRLL RLLRLRLL RLL RLRLL RLRLRL
30
HOW TO INTERPRET BIG BAND CHARTS
When playing big band music, the skill of reading music is a necessity. Many times bands will sight-read charts right on the
bandstand. For the drummer, it's less about sight-reading and more about sight-interpretation. The reason being is most big
band charts are written by piano, brass, or woodwind players, and not drummers! The key to success lies in your ability to
decipher these charts and create a musical drum part the very first time you see them.
There are basically two types of musical figures you will encounter: section figures and ensemble figures. Section figures,
written just above the staff, are musical lines played by one or two sections of the band. You can hear this figure at the 1:12
mark of track 27
The most important thing to remember with section figures is that the drummer should continue to play uninterrupted
time, and the figure should be played on the snare drum with little or no "set up." Here's how the previous figure could
be interpreted.
Ensemble figures, on the other hand, are usually written on the middle line of the staff when the rhythms expressed are
being played by the entire band. When encountering an ensemble figure, the rhythm section should stop marking time and
play the figure. Here is a short example you can hear at the :17 mark of track 27.
It is the drummer's job to set up the band for ensemble figures. As the drummer, this means we must look ahead in the chart
and oftentimes telegraph to the band where in the measure the ensemble figure will fall. This is one of my favorite set-up fills.
Here is the ensemble figure interpreted using our set-up fill.
Track 27
31
When setting up and playing musical figures you need to be aware of the duration of the notes being played. If the band
plays a long note, you want to play a long note as well. Long notes can be played on the cymbals since they produce the
longest decay. Conversely, if the band is playing a short note, you'll want to be able to match that on the kit. This can be
accomplished by using the snare drum, bass drum or a quickly closed hi-hat. You can create a short note on a crash cymbal
by striking it with your right hand and immediately choking it with your left.
TOM GROOVE
No portfolio of swing grooves would be complete without this tom groove. Make sure your accents speak louder than the
inner beats.
SWINGING IN ODD TIMES
Not all swing is in | time. Some of it is written using odd-time signatures, the most popular of which is | (or waltz) time. Here
is the two-bar pattern I find works best. Pay close attention to the hi-hat pattern.
I wouldn't be talking about this next groove if it weren't for the classic jazz hit "Take Five,"which is written in | time. In this
particular example, the phrasing will be played as one group of 3, followed by one group of 2. Again, be aware of the
hi-hat part.
As I said earlier, jazz drumming is an art form. This will help get you started, but as with any genre, I encourage you to study
further if you want to be great.
32
CHAPTER 3	TRACK LISI
21.	Slow be-bop jazz
Time signature: |
Tempo: J = 99
Form type: 12-bar blues
Form: Head, guitar solo, piano solo, bass solo, 2x
trading fours, head, turn.
Notes:Tvy using example 131 for your 4-bar breaks.
22.	Medium be-bop jazz
Time signature: |
Tempo: J = 150
Form type: 12-bar blues
Form: 2x head, 2x piano solo, 2x guitar solo, bass solo,
trade fours, head.
Notes:Tvy using example 131 for your 4-bar breaks.
23.	Medium fast be-bop jazz
Time signature: |
Tempo: J = 180
Form type: AABA
Form: Head, piano solo, violin solo, guitar solo, trade
fours, head.
Notes: Try using example 132 for your 4-bar breaks.
24.	Fast be-bop jazz
Time signature: |
Tempo: J = 220
Form type: AABA
Form: Head, piano solo, guitar solo, 4-bar breaks, head.
Notes: Listen for the stop at the end of the head. Try
using example 133 for your 4-bar breaks.
25.	Two-beat swing
Time signature: |
Tempo: J = 147
Form type: AA
Form: Head, piano solo, guitar solo, head, turn.
Notes: Try starting with example 94 for the head and
use examples 88 and 89 for the solos.
26.	Four-on-the-floor swing
Time signature: |
Tempo: J = 126
Form type: AABA
Form: Head, harmonica solo (AA), piano solo (BA),
trade fours (AAB), head (A only), turn around.
Notes: Try using example 95 on the A sections and
example 98 on the В sections.
27.	Jazz sextet (with syncopated ensemble figures)
Time signature: |
Tempo: J = 97
Form type: AABA
Form: Head, piano solo, sax solo, trade fours, head,
turn.
Notes: For the A sections of the head, play
example 135. For the В sections in the solo, use
example 134. Listen for the ensemble figures in the
trading fours section.
28.	1940s swing with drum solos
Time signature: |
Tempo: J = 220
Form type: AABC
Form: Drum intro, head (AABC), fiddle solo (AA, BC),
head (AABC).
Notes: Use example 136 for the intro, B, and C sections.
Use example 95 for the A sections.
29.	Medium jazz waltz
Time signature: |
Tempo: J= 144
Form type: AABA
Form: Head, guitar solo, piano solo, bass solo (AA),
head (BA), turn.
Notes:Tcy riding on different cymbals to define the
sections.
30.	Up-tempo jazz waltz
Time signature: |
Tempo: 180
Form type: 24 bars
Form: Intro, head, guitar, piano solo, bass solo, trade
eights, head, turn.
Notes: Try to use rhythmic elements from the 14-bar
breaks to create the breaks in this track.
31.	| medium jazz
Time signature: %
Tempo: J= 154
Form type: AAB
Form: Head, piano solo, sax solo, head, turn.
33
CHAPTER 4
COUNTRX
The sound of country music has changed radically over its history due to the fact that it often borrows from other genres.
From swing to blues, to rock, to pop, and even metal, country music is less about a particular sound and more about the idea
that the lyric and story of a song matters. Most educators tend to dismiss the genre and yet the popularity of country music
is still very high. The fact of the matter is if you can't play country, you are going to miss out on some gigs. While there is
significant overlap between many country grooves and the grooves covered in Chapters 1 -3, here are some grooves that are
definitive in the country music genre.
COUNTRX SHUFFLE
The shuffle is probably the groove most identified with traditional country music.
Here is a two-beat country shuffle.
As with the swing grooves in the last chapter, you can play a shuffle with either a two-beat feel, or four-on-the-floor
depending on what the bass part is doing.
This version, very common at slow and medium tempos, features a more syncopated bass drum part that would typically be
matched with the bass guitar line. It can be used on its own, or in alternation with example 139.
34
Now that we have these grooves working, we can move our hands around the kit and create a bunch of extremely useful
variations.Try playing examples 139-141 with the following voicings.
Right hand on the ride, left hand on the snare.
Right hand playing on the snare rim and the left hand playing in the center of the snare.
Right hand playing snare (towards the edge) and the left hand playing in the center of the snare.
Right hand playing hi-hat and the left hand playing side stick.
Right hand playing ride cymbal and the left hand playing side stick.
Right hand playing rim and the left hand playing side stick.
35
COUNTRy SONG FORM
This gives us an extremely large arsenal of variations to use throughout a song. We use these variations to create the proper
foundation on which to build a song. A traditional country shuffle could be voiced like this:
Intro: ride and snare
Verse: hi-hat and side stick
Chorus: hi-hat and snare
Turnaround: ride and snare
Verse 2: hi-hat and side stick
Chorus 2: hi-hat and snare
Bridge: both hands on snare
Solo: ride and snare
Chorus: hi-hat and snare
Outro: ride and snare
FILLS	.....~	—
Here are my go-to shuffle fills. Pay close attention to the stickings.
R R L
L L
R L R L
L R R L L
36
TRAIN BEATS
The train beat is a signature of country music. It has its origins in bluegrass music, which is ironic because bluegrass music
rarely contains any drumming. The driving rhythm played between the bass guitar and mandolin clearly outlines what we as
drummers should play.
The train beat is a great groove to utilize different types of implements. Wire brushes are nice, but train beats are really cool
when played with dowel-rod implements. The resulting texture is great and it's a good way to control the volume as well. The
train beat is most commonly played as written—with straight eighth notes—but may also be swung.
Here is the train beat in its simplest form.
Here is a very useful variation..
Tracks 36-38
RLRLRLRL
And here is one of my favorite fills for this feel.
RLRLRLRL RLRLRLRL
Playing three bars of the train beat and one bar of fill will create a nice four-bar phrase. But sometimes I find it's more suitable
to create a four-bar pattern to suit each individual song. Here are two examples.
RLRLRLRL RLRLRLRL RLRLRLRL RLRLRLRL
RLRLRLRL RLRLRLRL RLRLRLRL RLRLRLRL
37
You can apply rudimental stickings to the pattern in order to change the feel. The first variation is the double-stroke roll; this
requires you to be able to play a tap stroke following an accent.This will take some practice, but this variation is great for
medium to fast tempos.
Tracks 37-38
RRLLRRLL
Paradiddle: this one feels great, but pay close attention to the sticking as it starts with an RL (with LL stickings on all repeats).
Tracks 37-38
RLRLRRLR LLRLRRLR
L L
Flam tap: well, close anyway. This is a variation that feels great at medium to fast tempos. It is actually one flam short of being
a flam tap.
R RrL L R RrL L
Adding drags to a train beat gives the groove a nice texture.
I like to add a triplet to a straight train beat. It brings a certain desirable "slop" to the groove.
Tracks 36-37
At slower tempos, this variation works great. It is accomplished using the right hand to play the eighth-note time, and the left
hand on the back beats. The secret for me is to make that back beat on 2 and 4 a left-handed flam.
R RrL R R RrL R
38
Here is a great variation using the hi-hat splash on beat 3. It gives the groove a simultaneous half-time/double-time feel. It
was inspired by some 70s recordings using two drummers.
Another way to offer some diversity at slow tempos is to add this ride-cymbal variation. Both hands are playing eighth notes
but pay close attention to the accents, as they are in opposition with one another. When you work the beat up, it's a very
cool effect.
Here is a written example of how I might interpret a train beat in swing time.
R LR LR L R LRRLR LR LR LR LR LR LR LRRLR LR LR L
FOUR-ON-THE-FLOOR COUNTR7
This is a groove that came into prominence in the 70s. It is part country and part disco, having inherited the signature upbeat
accents on the hi-hat.
This version contains some additional accents.
Track 40
This is what I call a breakdown variation. It is great for sections of a song at a lower volume.
39
MODERN BRUSH PATTERN
Here is a groove that fits perfectly with more progressive country ballads.
RLRRLLRLRLRRLLRLL
Track 41
FLAT TIRE SHUFFLE
The flat tire shuffle is a four-on-the-floor shuffle with the snare played on the "ah" of each beat. I think it feels best using the
swing pattern in the right hand rather than the full shuffle.
Track 33
COWBOX CHA-CHA
This groove was influenced by the Latin music south of the American border.
COUNTRY WALTZ
The waltz is present in many genres, and country music is no exception. Here are two of the most commonly used variations.
And here's the halftime waltz (shuffle).
40
BONUS TRACKS
Modern rock country: Country music has a long history of borrowing sounds from other genres. This track takes the heavy
guitar tone from modern rock and is typical of the new millennium sound in Nashville.
Track 44
Western swing: a parallel genre to the big band swing era, this feel is a must in the country world.
Track 45
41
CHAPTER 4	TRACK LISI
32.	Two-beat slow country shuffle
Time signature: |
Tempo: J= 100
Form: Intro, verse, chorus, turn, verse, chorus, fiddle
solo, steel solo, chorus, turn.
Notes: Try using the voicings outlined on the "country
song form" page.
33.	Four-on-the-floor country shuffle
Time signature: |
Tempo: J = 128
Form: Intro, verse, chorus, turn, verse, chorus, bridge,
chorus, turn.
Notes: Listen for the stops before each chorus.
34.	Up-tempo four-on-the-floor country shuffle
Time signature: |
Tempo: J = 142
Form: Intro, verse, chorus, turn, verse, chorus, fiddle/
steel solo, chorus, turn.
Notes: Listen for the stops at the beginning and end of
the chorus. Listen for the figure in the last chorus.
35.	Country shuffle
(using two-beat and four-on-the-floor feels)
Time signature: |
Tempo: J= 118
Form: Intro, verse, chorus, verse, chorus, gиitar/fiddle
solo, chorus, outro.
Notes: Listen for the stops before the verse. Be aware
of the switch from two beat to four-on-the-floor.
36.	Slow train beat
Time signature: |
Tempo: J = 160
Form: Intro, verse, chorus, guitar solo, verse, chorus,
fiddle solo, guitar solo, turn.
Notes: Listen for the stop at the end of the chorus and
the figure at the end of the song.
37.	Medium bluegrass train beat
Time signature: |
Tempo: J = 240
Form type: A AB В
Form: Head, mandolin solo, banjo solo, fiddle solo,
acoustic solo, head.
Notes: Try using different patterns to help define
the sections.
38.	Up-tempo train beat
Time signature: |
Tempo: J = 310
Form: Intro, chorus, half turn, verse, chorus, bridge,
steel/piano solo, half turn, chorus, outro.
Notes: Listen for the stop before the steel solo.
39.	Up-tempo swung train beat
Time signature: |
Tempo: J = 240
Form: Intro, verse, chorus, guitar solo, verse, chorus,
steel solo, bridge, breakdown chorus, turn.
Notes: Listen for stops before the verse and solos.
Listen for the figure on the breakdown chorus.
40.	Four-on-the-floor modern country
Time signature: |
Tempo: J = 116
Form: Intro, verse, chorus, verse, guitar, solo, chorus,
breakdown verse, outro.
Notes: Try using example 168 for the breakdown
section. Listen for the figure before the outro.
41.	Modern country brush ballad
Time signature: |
Tempo: J = 86
Form: Intro, verse, chorus, turn, verse, chorus, bridge,
breakdown chorus, outro.
Notes: Listen for the stop before the first chorus, and
try laying out for the first 4 bars of the breakdown.
42.	Cowboy cha-cha
Time signature: |
Tempo: J= 116
Form: Intro, verse chorus, turn, verse, chorus, bridge,
breakdown chorus, turn.
Notes: Listen for stops before the verse and the chorus.
Listen for the figure at the end of the song.
43.	Country waltz
Time signature: |
Tempo: J= 100
Form: Intro, verse, chorus, turn, verse, chorus, steel
solo, chorus, turn.
Notes: To help define the form, try using side stick on
the verse and snare and ride on the chorus.
44.	Modern rock country
Time signature: |
Tempo: J = 90
Form: Intro, verse, chorus, turn, verse, chorus, bridge,
chorus breakdown, 3x guitar solo.
Notes: Try modifying the verse pattern to closer fit the
bass line. Listen for the stop before the first chorus.
Listen for the figure at the end of the breakdown
and at the end of the song.
45.	Western swing
Time signature: |
Tempo: j = 250
Form: Intro, verse, chorus, guitar/piano solo, verse,
chorus, fiddle/steel solo, outro.
Notes: Try playing a side stick on the verse. Listen for
the break before the solo and figures throughout.
42
------- CHAPTER 5 -
EARL? ROCK
and MOTOWN
EARI-У ROCK
We begin this section by taking a look at a few historically significant grooves that are extremely important to have under
your hands.
The first groove we will look at is in the time signature of Borrowed from the blues, it was sped up and became a staple of
what would become early rock.
Track 46
Emerging from the American south, rockabilly was one of the earliest forms of rock 'n' roll: a hybrid of country and blues. At
theforefront of this new sound was the emergence of the electric guitar. This early rock beat is nothing more than a swing
beat played on a closed hi-hat.
Track 47
* *
The shuffle was also a primary groove of early rock drummers. In this particular shuffle, the right hand is riding on the snare
drum. The key to playing this groove correctly is to make sure you are playing the back beat as a flam.
R RrL RR R r L L
43
Remember the double shuffle from the blues chapter?This next example borrows that concept playing the same part with
both hands.
Track 49
This next version is the simpler, cleaner version we begin to identify as a true rock beat.
Track 49
The previous groove can also be sped up and used as a beat for early- and mid-'60s popular surf music in conjunction with
the following iconic tom groove.
Speaking of tom grooves, this Latin-inspired pattern is one you must know. The interpretation of the sixteenth notes is
somewhere between straight and swung, so listen to the track before playing. Make sure you don't play the bass drum too
loudly, as this groove is all about the toms.
.182
Track 51
This next pattern is called a rock 'n'roll shuffle, and it works great with open or closed hi-hat.
Here is a tom pattern that works very well as a companion to the rock 'n' roll shuffle.
Track 52
44
MOTOWN GROOVES
These next two grooves use a steady beat in the hands, while providing variation on the bass drum. Each one can be used
throughout a song, but will also work great for a section part.
Here is a more syncopated variation.
Track 53
This double-time groove from the 1960s has a very syncopated bass drum part. The sixteenth notes have a slightly swung
interpretation, similar to that of example 182.
Track 54
Here is another classic '60s groove that's missing the back beat on beat 2.
Here is a super funky groove from the 1960s.
О +
45
CHAPTER 5	TRACK LIST
46.	^medium blues rock
Time signature:
Tempo: J. = 85
Form type: AABA
Form: Head, sax solo (AA), head (BA).
Notes: Listen for the stop at the end of the В section.
47.	Rockabilly swing
Time signature: |
Tempo: J = 195
Form type: 12-bar blues
Form: 2x head, 4x guitar solo, bass solo, 2x trade fours,
guitar solo, 2x head.
Notes: Try to use examples 131-133 as your drum breaks.
48.	Rockabilly shuffle
Time signature: |
Tempo: J = 174
Form type: 12-bar blues
Form: 4-bar intro, 2x head, 3x guitar solo, bass solo,
3x guitar solo, 2x head.
Notes: Try breaking the bass solo down to just snare
rim. Listen for the figure at the end of the song.
49.	'50s rock
Time signature: |
Tempo: J= 158
Form type: 12-bar blues
Form: 4-bar intro, 2x head, 2x sax solo, 2x guitar solo,
bass solo, 2x head.
Notes: Listen for the stop and figure at the end of
the song.
50.	'60s surf rock
Time signature: |
Tempo: J= 161
Form type: 12-bar blues
Form: Head, drum solo, sax solo, drum solo, 2x guitar
solo, drum solo, head.
Notes: Use example 181 for the drum solo. Try voicing
it on different toms to create interest.
51.	BoDiddley
Time signature: |
Tempo: J= 101
Form type: Modified AABB
Form: 4-bar intro, head, 4-bar turn, organ solo, bass
breakdown (A), head (A).
Notes:Try modifying example 182 in the В section to
voice the RH on the ride and still catch the accents.
52.	Rock shuffle
Time signature: |
Tempo: J= 132
Form:4-bar intro, verse, chorus, turn, verse, chorus,
bridge.
Notes: Try using example 184 for the intro, verse and
bridge and example 183 for the chorus.
53.	Four-on-the-snare Motown
Time signature: |
Tempo: J= 120
Form: Verse, channel, chorus, verse, channel, 2x chorus,
bridge, 2x chorus, 2x verse.
Notes: Try using example 3 on the chorus to change
it up.
54.	Double-time Motown
Time signature: |
Tempo: J = 95
Form: Intro, breakdown, verse, channel, chorus,
breakdown, verse, chorus, breakdown, mod chorus,
turn.
Notes: Breakdowns are 2 bars long. Try playing only
hi-hat on beats 2 and 4 in those sections.
55.	Motown ballad
Time signature: |
Tempo: J = 115
Form: Intro, 2x verse, chorus, verse, chorus, verse, turn.
Notes: Try using example 186 for the chorus to help
define the sections.
56.	'60s R&B
Time signature: |
Tempo: J = 119
Form type: AABA
Form: Head, guitar solo (AAAABA), Sax solo (AAAABA),
breakdown, head.
Notes: Listen for the figures at the end of A as well as in
the В sections. Listen for the ending fermata.
46
----- CHAPTER 6 -
DANCE AND
ELECTRONIC
If this section feels short, remember that many of the beats I would use in these genres are covered in the pop section. There
are, however, several grooves and techniques that are more appropriate under this dance and electronic heading.
When talking about modern dance music, there is no denying that disco was a major influence.The disco beat is
characterized by its relentless four-on-the-floor bass drum, juxtaposed with an upbeat hi-hat pattern.
This is a four-on-the-floor groove that uses the sixteenth-note triplet as the foundation.
Go-go music emerged from the streets of Washington D.C., and while it was inspired by the relentless dance beat of disco,
kept the beat funkier.
This go-go groove features an upbeat hi-hat pattern similar to the one used in the disco example.
47
Here is a very cool go-go variation that borrows the cowbell rhythm from the more traditional go-go groove.
Track 61
t
1st time only
EMULATING DRUM MACHINES
The 1980s brought on the popularity of the drum machine. This was supposed to be the beginning of the end for drummers,
but of course the news of our demise was greatly overestimated. Instead, programmed drum patterns inspired hip-hop
drummers to play patterns that were never intended to be played on a drumset. On this next groove, the left hand comes
over to the hi-hat in order to pick up the extra notes.
Here is a sixteenth-note pattern that mimics elements of programming using thirty-second notes.
Using this RRL figure on the hi-hat creates the interest on this next groove.
R R L R R L R
This groove, featuring the same RRL sticking, shifts the first back beat back a sixteenth note-triplet to create a pretty funky
groove. Make sure you play the upbeat accents on the hi-hat.

Track 64
R R L R
48
This groove uses a very unusual ghost note before the back beat, which can be challenging to execute at first.
6
Track 65
Breakbeat is an electronic dance music made popular in London, and features dance music at a frenetic pace. Acoustic
drummers immediately began imitating what they heard.
Another popular dance style from London is Dubstep. It is a half-time feel mimicking extremely busy programming. Wait for
the drop ...
R RLRRLLR RLRRLLR RLRRL R RLRRLL
R L RLRRL RLRRLLRLLRLLRLRLLRLLRL
49
CHAPTER b TRACK LIST
57.	Disco
Time signature: |
Tempo: J = 116
Form type: AAB
Form: Head, sax solo, breakdown (A), head (AB).
Notes: Listen for the figure at the top, at the end of the
A sections and at the end of the В sections.
58.	Four-on-the-floor swung-sixteenth feel
Time signature: |
Tempo: J = 98
Form type: AAB
Form: Head, guitar solo, keys solo, turn.
Notes: Use RH voicings to help define the form as well
as the sections.
59.	Go-go beat 1
Time signature: |
Tempo: j= 101
Form type: AABA
Form: Head, key solo, guitar solo, bass solo (AA only),
head.
Notes: Don't feel the need to overplay. Listen for the
figure at then end of the form.
60.	Go-go beat 2
Time signature: |
Tempo: J =101
Form type: AABA
Form: Head, key solo, guitar solo, bass solo (AA only),
head.
Notes: Make sure to bring out the upbeat accents.
Listen for the figure at the end of the form.
61.	Go-go beat 3
Time signature: |
Tempo: J = 104
Form type: AB
Form: Head, keys solo, guitar solo, breakdown (A only),
head.
Notes: Listen for the stop at the end of the form.
62.	Medium straight-sixteenth hip-hop
Time signature: |
Tempo: J = 99
Form: Intro, verse, chorus, turn, verse, chorus,
breakdown, verse, outro.
Notes: Try voicing the RH on the ride for the chorus,
and listen for the stop at the end of that section.
63.	R&B ballad
Time signature: |
Tempo: J = 75
Form: Verse, chorus, verse, chorus, breakdown, verse,
chorus.
Notes: Try using example 55 as your chorus pattern.
Listen for the stop at the end of the chorus.
64.	Up-tempo swung-sixteenth hip-hop 1
Time signature: |
Tempo: J = 99
Form: 4-bar intro, head (AABAC), solo (AAAABAC),
4-barturn, head (AABAC).
Notes: Try voicing the same pattern on the ride in the
RH and on the hi-hat in LH during the solo.
65.	Up-tempo swung-sixteenth hip-hop 2
Time signature: |
Tempo: J = 100
Form: 4-bar intro, head (AAB), guitar solo (AAAAB),
organ solo (AAAAB), breakdown, head (AAB).
Notes: The В section is heavily syncopated. Challenge
yourself to hit all the accents within a groove.
66.	Breakbeat
Time signature: |
Tempo: J= 160
Form: Head (AA), keys/sax (B), head (AA), sax solo (B),
4 bars of drums, 16 bars of keys, head (AA),
keys/sax (B), head (AA)
Notes: I should be locked up for this one! Listen for the
figure at the end of the song.
67.	Dubstep
Time signature: |
Tempo: J = 70
Form: Verse, chorus, verse, chorus, bridge, verse, verse.
Notes: Try voicing example 23 on the crash cymbal
during the chorus.
50
--------- CHAPTER 7 ---
FUNK AND FUSION
FUNK
Although many funk grooves are pretty simple and straight forward, the ones in this chapter require a greater understanding
of syncopation, as well as limb independence.
PUSH GROOVES
These first two grooves are what I like to call "push grooves."They are two-bar phrases that have a "push" at the end of the first
bar.This first groove uses a push on the"&"of4 in the first measure.

Track 68
This groove employs a more syncopated sixteenth push on the"&"of4 in the first measure. Also, take note of the hi-hat
pattern.The flourish of hi-hat notes fills in the space.
Track 69
SNARE S/NCOPATION
This groove moves the first back beat back a sixteenth to the "a" of beat 1.
Here is the same concept, pushing the second back beat to the "a" of 3.
51
This groove employs an accent on the "e"of 3.

Track 72
BASS DRUM SXNCOPATION
In the following examples we are going to work on some grooves featuring syncopated bass drum patterns. This first groove
sounds great and will help you begin to focus on the bass drum notes in between the hi-hat notes.
This groove gets us playing a syncopated bass drum pattern featuring groups of two sixteenths in succession. It feels great
once you get it going.
This groove is a nice change up. Try playing example 208 for three bars and then plugging in this pattern on the fourth bar of
the phrase.
Track 73
This groove uses the open hi-hat to further accent the syncopated bass drum pattern.

Track 73
SIXTEENTH-NOTE TRIPLET SXNCOPATION
Once you get comfortable playing those kick drum doubles in a sixteenth-note pattern, you can work on employing them in
a sixteenth-triplet pattern like this:
52
This pattern is a workout for sure, but I have called upon it many times. Rather than play this next pattern over and over, try
playing example 211 three times along with this next pattern in the fourth bar of the phrase. (Unless you are a glutton for
punishment, then be my guest!)
Another groove that uses sixteenth-note triplets is the half-time shuffle. It is the funkiest of all shuffles, and a must-have in
your bag of tricks!
LINEAR GROOVES
Linear drumming is the concept of only one limb playing at a time. In other words, there are never two voices playing
together, which creates some great syncopated rhythms. Here are some of my favorites.
Track 77
LR LRRLRLL LRRL
LR LLRL RL LLRL
53
This example has a half-time feel using sixteenth-note triplets.
219
Tracks 52, 75
This half-time linear groove employs a rudimental concept called an inverted roll. Don't let the thirty-second notes scare you.
This one is fun!
LLRRLL RLLRRLL LLRRLL RLLRRLL
LLRRLL RLLRRLL LLRRLL RLLRRLL
Track 63
54
RUDIMENIALGROOVES
The following grooves use a little-used rudiment variation called an "inverted paradiddle.’The sticking of an inverted
paradiddle is: R L L R L R R L
RLLRLRRLRLLRLRRL
RLLRLRRLRLLRLRRL
RLLRLRRLRLLRLRRL
Keeping with the rudimental concept, this is a great groove using a paradiddle-diddle.
55
FUSION
Fusion, by definition, is the blending of two or more styles. In this case, it's the aggressive approach of rock and funk,
combined with the improvisational spirit and four-way limb coordination of jazz. Generally speaking, the drumming style
is busier and more involved, but, in the absence of vocals, it sounds appropriate. Remember, the options for variation are
endless.The following examples are meant to inspire the possibilities.
Because there are so many new concepts in this section, I will provide at least two versions of every groove: a simplified clean
version, and a busier more intricate version.
RIGHT-HAND OSTINATOS
One concept we can borrow from jazz is the use of ostinato. Ostinato is a repeating rhythmical pattern we will play with a
single limb, much like the ride-cymbal pattern in jazz.
The first example features this consistent right-hand ostinato on the hi-hat ("1 -&-a") using the open sound to bring out our
accented note.
Here is a pattern that features the same right-hand rhythm, only with the accent on the upbeat.
The next right-hand ostinato is the "l-e-&" pattern with the accent on the upbeat.
56
The last pattern of the group shifts the accent back on the beat.
As a reminder, these patterns can also be played on the ride cymbal using the bell to express the accent.
HI-HAT OSTINATOS
The first hi-hat ostinato we are going to play is this straight eighth pattern. While the right hand plays on the ride, the left
hand plays the inner beats on the hi-hat.
Track 84
R L R L
The next concept I want to introduce is a hi-hat splash. The "splash" sound is produced by striking the lower footboard with
your heel. After playing the splash sound with your heel, you can play a closed sound by pressing the top of the footboard
down with your toes. This "heel-toe" motion will produce an open-closed groove on the hi-hat. What follows are some
grooves using the heel-toe splashing technique.
Track 84
You can also reverse the order by playing the toe first, then the heel to create an accent on the"&''s.
Track 81

57
Using the right hand to play accents that oppose those of the hi-hat will create an extremely busy, yet groovy sound.
BONUS TRACKS
This first bonus track is an up-tempo fusion groove I think is quite fun to play. Pay close attention to the left hand, which
migrates between the hi-hat and snare. Also, take note of the linear accent pattern between measures 3 and 4.
The final groove of this chapter presents us with a challenge:Try to employ the ostinato concepts we've learned in this
chapter modifying the bass drum pattern to fit the track. Here's an example of taking the right hand ostinato from groove
230 and using it over our new bass drum pattern
58
CHAPTER 7 TRACK LIST
68.	Eighth-note push
Time signature: |
Tempo: J= 113
Form type: Modified 12-bar blues
Form: Head, piano, solo 8 bars plus 12-bar form, guitar
solo, head, turn.
Notes: Listen for the stop at the door of the form, and
listen for the ritard. at the end of the song.
69.	Sixteenth push
Time signature: |
Tempo: J= 101
Form type: AAB
Form: 8-bar intro, head, key solo (AAAAB), solo (AAAAB),
breakdown, head (AA only).
Notes: Listen for the figure at the end of the В sections.
70.	Snare syncopation funk 1
Time signature: |
Tempo: j = 92
Form type: AABA
Form: 4-bar intro, head, fiddle solo, guitar solo,
breakdown, head.
Notes: Feel free to break from your given pattern
during the В section.
71.	Snare syncopation funk 2
Time signature: |
Tempo: J= 108
Form type: One-chord jam
Form: Head, key solo, breakdown, head, 8-bar outro.
Notes: Listen for the figure after the guitar skank section.
72.	Snare syncopation funk 3
Time signature: |
Tempo: J = 92
Form type: AABA
Form: 4-bar intro, head, fiddle solo, guitar solo,
breakdown, head.
Notes: Feel free to break from your given pattern
during the В section.
73.	Bass drum syncopation funky rock
Time signature: |
Tempo: J= 115
Form type: 16-bar blues
Form: Intro, 2x head, bridge, guitar solo, bridge.
Notes: Listen for the stop before the bridge. Try to
catch the rhythms on the bridge.
74.	Sixteenth-triplet funk
Time signature: f
Tempo: J = 87
Form type: AABA
Form: Head, guitar solo (AAAABA), key solo (AAAABA),
head (AAB only).
Notes: Try to change up the pattern on the В section,
and listen for the stop at the end of the section.
75.	Half-time shuffle
Time signature: |
Tempo: J = 84
Form type: AABC
Form: Intro, head, sax solo, breakdown (AA), Head (BC).
Notes: Try moving the RH voicing to define the sections.
76-79. Linear funk ostinato
Time signature: |
Tempo:„ = 97
Form type: AABA
Form: 4-bar intro, head, sax solo, guitar solo,
breakdown, head.
Notes: Feel free to break from your given pattern
during the В section.
80-86. Fusion ostinato
Time signature: f
Tempo: J = 92
Form type: AABA
Form: 4-bar intro, head, fiddle solo, guitar solo,
breakdown, head.
Notes: Feel free to break from your given pattern
during the В section.
87. Fast fusion bonus track
Time signature: |
Tempo: J= 130
Form type: 12-bar blues
Form: 2x head, 2x key solo, 2x guitar solo, bass solo,
head, turn.
Notes: Listen for the breaks at the end of the form.
Break it down for the bass solo.
88. Ostinato challenge
Time signature: |
Tempo: j = 80
Form: Intro, head (AB), turn, guitar (solo AAB), turn,
head (AB), outro.
Notes: Try applying the RH patterns from examples
230-235. Notice that bass drum pattern changes for
the В section.
59
ODD-TIME
SIGNATURES
So far we've seen a few odd-time signature grooves, but in this section we will take a closer look at how to play and get
comfortable playing odd-time signatures. As funny as it sounds, the first step to playing odd-time signatures is to simply
countthem out loud. Similar to the last chapter, several iterations will be provided for many of these grooves.
% GROOVES
The first beat we will cover is in | time.This should be a good one to start with as this time signature is frequently used in pop
genres.This is a simple, but funky | groove.
| GROOVES
This next groove is a funk-inspired | groove. It is subdivided as 2 beats + 3 beats.
Q49j)
Track 90
60
S GROOVE
This is a rock groove broken up into 4 beats + 3 beats.
| GROOVES
Moving on to the eighth-note subdivision, here are some | grooves subdivided as 3+2.
Track 92
I GROOVES
The | time signature is primarily subdivided as 4+3.
Track 93
Track 93

Track 93
61
Here is а | groove, perfect for slower tempos, featuring a sixteenth-note pattern.
EVENLy-GROUPED RIGHT-HAND ACCENTS
One way we can make these grooves seem more accessible is to overlay a right-hand pattern you would normally hear on
a | groove.
This next one is a | groove played with a constant "1-&"accent pattern laid over the top of it. This accent pattern, being even
in nature, takes two bars to cycle through the groove, and gives it a great feel.
Here is the same concept applied to a | groove.
62
And here it is with the "1-&-a" pattern laid over the top.
16 is basically three groups of four sixteenths and one group of three sixteenths. It feels very much like | with one sixteenth
cut out of the last bar.
Track 96
63
CHAPTER 8 TRACK LIST
Time signature: f
Tempo: J = 97
Form type: AB
Form: Head, guitar solo (AAB), key solo (AAB),
breakdown (AA), head.
Notes: Listen for the figure at the end of the В section.
The song ends on that figure.
90.	f funk
Time signature: %
Tempo: J= 113
Form type: 12-bars blues
Form: Head, guitar solo, key solo, 4-bar turn, head, turn.
Notes: Try to use the right-hand voicings to help define
the sections.
91.	4 rock
Time signature: \
Tempo: J = 102
Form type: AB
Form: AB, AB, AB
Notes: Listen for the figure at the end of the В section.
This song is wide open for musical exploration.
Try starting with space, then go to the groove the
second time, and then try soloing over the third
A section.
92.	f
Time signature:#
Tempo:	180
Form type: AB
Form: Head, piano solo, fiddle solo, head
Notes: Try using example 254 on the A section and
example 253 on the В section.
Time signature: §
Tempo: } = 216
Form type: AB
Form: Head, keys solo, trade fours, head.
Notes: Listen for the reoccurring figure in the В section.
The song ends on that figure.
94.	f pop
Time signature:#
Tempo: J = 90
Form type: AB
Form: 4-bar intro, head, piano solo (A), sax solo (B), head.
Notes: Try using example 261 for the intro and the
head, voicing the left hand with a side stick.
95.	| pop
Time signature: |
Tempo: J = 87
Form type: AAB
Form: Head, sax solo, 8-bar drum solo, head, turn.
Notes: Try using the RH voicing to define the sections.
Listen for the break at the end of the В section.
96.	JI
Time signature:
Tempo: j = 93
Form type: AAB
Form: Head, guitar solo, head.
Notes: Listen for the figure at the end of the В section.
The song ends with that same figure.
64
METAL and
DOUBLE BASS
Metal is a genre that has historically been marginalized in educational circles, but contains grooves that every aspiring
drummer needs to cover. One of the most recognizable and unique facets of metal drumming is the use of double bass
drums. Here are some grooves I think you need to have in your bag of tricks.
STEAD/ SIXTEENTH PATTERNS
The first groove is your basic double bass rock pattern. This will come in handy more than you can imagine.
This is the same bass drum pattern with a double-time feel in the hands.
Track 98
Since the bass drum pattern is so solid, you can get away with quite a bit of syncopation on the ride pattern.
Track 73
Track 73
65
Here is a variation on my tom groove (example 38 from Chapter 1) using double bass drum sixteenths.
RLR LLRLRLR LLRL
R	R
SXNOCPATED DOUBLE BASS BRUM PATTERNS
Here is a groove with a syncopated bass drum pattern. Notice the sticking, or "footing," if you will.
Track 99
R L R L
R L
L R L
This groove makes use of the sixteenth-note triplet.
з
Track 100
Here is an important groove to master featuring a flurry of six sixteenth-note triplets.
Track 100
DOUBLE BASS SHUFFLE
This next groove is called a double bass shuffle.
Track 101
Here is the same shuffle using a swing pattern on the ride.
(278 J
Track 101
66
This version features a funkier pattern on the ride.
Here is the same bass drum groove with a half-time feel in the hands.
Track 101
This is a half-time shuffle pattern using the toms.
Here is a pattern that features alternating triplets on the bass drum.
Track 102
67
This variation features a more traditional shuffle pattern in the hands, while maintaining the sixteenth triplets in the bass drum.
( 286,
(285,
Track 102
Track 102
You can also play a double paradiddle with the hands and sixteenth-note triplets on the kick to create a half-time feel.
287,
Track 102
CREATING ODD-TIME DOUBLE BASS PATTERNS
Taking pieces of the grooves you've already learned, you can actually create odd-time grooves. Here is a groove, taking the
first part ofour|groove (ex. 268) and the second part of ourjfgroove (ex. 283).
We can create | by combining the beginning of our}| groove (ex. 283) with the end of our double-time groove (ex. 270).
(290j)
Track 104
Track 104
68
SINGLE BASS METAL GROOVES
Not all metal grooves employ double bass. Here is a nice double-time metal groove using a single bass drum.
Blast beats are, as the name would suggest, short spurts (or"blasts") of extremely fast time-keeping. Here are two of the most
popular versions. Since you would likely collapse if you tried to play this for three minutes, the track is set up to play eight bars
of regular | time followed by four bars of blast beats. Good luck.
Track 106
69
CHAPTER <) TRACK LIST
97.	Sixteenth double bass
Time signature: |
Tempo: J = 114
Form: Intro, 2x head (AABA), 2x C section (4 bars
half-time, 4 bars full), D section, intro, head figure.
Notes: Listen for the stops at the end of the last A
section on each head. Try laying out 4 bars at the
top of the D section and mimicking the guitar riff
on your toms.
98.	Sixteenth double-time double bass
Time signature: |
Tempo: J = 118
Form type: AAB
Form: 2x head, guitar solo (16 bars), breakdown (4
bars), head, outro (AA).
Notes: Listen for the figure at the end of the sections
and the stops at the end of the В section. Try laying
out for the breakdown.
99.	Sixteenth syncopated double bass
Time signature: |
Tempo: J = 108
Form: 2x head (AAB), C section, D section, head (AA).
Notes: Listen for the stop at the end of the second
В section. Try laying out for the first 4 bars of
section C. Try using example 273 for section C.
100.	Sixteenth-triplet double bass
Time signature: |
Tempo: J = 103
Form: AB, AB, C section (10 bars), AB
Notes: Use example 275 for sections A and C. Use
example 276 in section B.
101.	Double-bass shuffle
Time signature: |
Tempo: J = 115
Form: Head (AABAC), head (AABA), guitar solo 16 bars,
breakdown, head (AABAC), AA, turn.
Notes: Listen for the stop at the end of section C
and the guitar solo. Listen for the figures in the
breakdown.
102.	double bass
Time signature:
Tempo: J. = 140
Form: Intro, head, head, 4-bar drum solo, breakdown,
guitar solo, 4-bar intro, head, turn, 4-bar outro.
Notes: Try using example 287 on the breakdown.
103.	s double bass
Time signature: g
Tempo: = 232
Form: 8-bar Intro, head (AB), 8-bar turn, solo, 16-barC
section, 8-bar drum solo, head, turn, outro.
Notes: Listen for the stops at the end of the В section.
Lay out the first 4 bars of C, and try to emulate the
guitar rhythm.
104.	| double bass
Time signature: $
Tempo: = 220
Form: Intro, head (ABA), guitar solo (AB), breakdown,
head (A only), turn.
Notes: Try using example 255 on the breakdown.
105.	Thrash groove
Time signature: |
Tempo: J = 147
Form type: AB
Form: Head, solo, breakdown (AA), head, outro.
Notes: Listen for breaks in the middle and the end
of the В section. Try using example 182 for the
breakdown.
106.	Blast beats
Time signature: |
Tempo: J = 91
Form type: AAB
Form: AAB, AAB, AAAA
Notes: Try using example 1 or 16 for the A sections and
examples 293 and 294 for the В sections.
70
------ CHAPTER 10 -
GROOVES FROM
AROUND the
WORLD
While there is quite literally a whole world of music out there, here are some grooves from around the world I feel you cannot
live without. I've included many traditional interpretations, but have deliberately tried to focus on practical adaptations that
not only fulfill the traditional role of percussion, but go a step further to make sure they feel great on the drumset.These
grooves will work extremely well in the real world ... I promise.
SAMBA ORIGIN: BRAZIL
The samba musical movement and dance originated in Brazil and is commonly seen as the "soundtrack"of Brazilian Carnival.
Here is my interpretation of a traditional street samba as I try to incorporate the many elements of the Brazilian drum
ensemble. I'm using the floor tom to represent the surdo.
Track 107
RRLL
This is a great example of what I was talking about earlier regarding practical applications. Ethnomusicologists may quickly
dismiss this interpretation, but everyone else will dig it. It is a great real-world version.
Track 107
This is more of a jazz combo interpretation of the samba.
(297 ,
Track 108
71
BOSSA NOVA ORIGIN: BRAZIL
The bossa nova evolved from samba and reached the height of its popularity in the 1960s. It is very much a part of modern
jazz music, and is a must-know groove. The most prominent feature of the bossa nova is the use of the clave rhythm which
will be played with a side stick on the snare drum.
298J
Track 109
TANGO ORIGIN: ARGENTINA
While its origin stretches back to at least the 1800s, the tango is very much alive in modern ballroom dancing. It is a
passionate dance and should be approached as such on the drumset.
MAMBO ORIGIN: CUBA
The mambo was created in the 1930s in Cuba, and by the 1950s had become an international dance craze.The groove I'm
showing you is an amalgamation of the percussion parts with the bass drum mirroring what the bass player would play. The
rack tom is used to imitate the original conga part.
Track 111
1 st time only
This variation features the cascara bell pattern on the right hand and the 2:3 clave on the left hand.
Track 111
CHA-CHA-CHA ORIGIN: CUBA
The cha-cha-cha was created as dance music and was inspired by an earlier Cuban style called danzon. While slightly altered
from the purest form to be more suitable for the drumset, this adaption still holds all of the original characteristics of the
original rhythms.
Track 112
72
CUBAN BOLERO ORIGIN: CUBA
The Cuban bolero is a | adaption of the original Spanish bolero (in |), and has become synonymous with rumba as a
ballroom style of dance. The sticking indicated makes it much easier to play either variation.
R RRLR L R R L L
Track 113
R RRLR L R R L L
Track 113
SONGO ORIGIN. CUBA
This is one of the most natural Latin drumset grooves we will cover, and for good reason. While mos: of the Latin grooves
we're learning here are adaptations of what a section of percussionists would play, the songo's creation can be credited back
to one drummer, Jose Luis"Changuito"Quintana. It features a tumbao bass drum pattern.
Track 114
MOZAMBIQUE ORIGIN: CUBA/NEW YORK CITY
Although the mozambique came from Cuba in the early '60s, it was New York musicians re-invention that spawned this
now-famous adaptation of the groove. This pattern centers around the right hand playing the bell part while the left hand
fills in the gaps. You can play this part on the bell of the ride cymbal, but it's better suited on cowbell.
73
SOCA ORIGIN: TRINIDAD AND TOBAGO
Soca evolved from calypso music and is short for soul calypso. Its most identifiable trait is the four-on-the-floor bass drum
pattern.This pattern is commonly used to accompany steel drum bands.
BEGUINE ORIGIN: ST LUCIA/MARTINIQUE
Although a popular ballroom dance, the beguine is often used in Broadway musicals of the 20th century.
Track 117
SKA ORIGIN: JAMAICA
Ska, upon its creation in the 1950s, was the first original genre of music to come out of Jamaica. It was a dance craze and
featured a prominent upbeat played by the guitar. Our ska beat will use the hi-hat to imitate the upbeat of the guitar.
Track 118
REGGAE ORIGIN: JAMAICA
Reggae is the more lasting genre of music that came out of the development of ska and rocksteady music of 1960s Jamaica.
More specifically, reggae refers to music with a heavy accent on beats 2 and 4 which, on this groove, are played on the
bass drum.
RR L L
74
FOUR-ON-THE-FLOOR REGOsOWjamaka
As reggae developed as a genre, this four-on-the-floor feel was integrated into the sound.The displaced quarter-note triplets
on the hi-hat are a signature sound for this feel.
RL
Merengue has been called the official dance of the Dominica'* -echoic, but the style is popular —any Latin American countries.
R LR RLR L RLRL
Track 121
Second line music is a tradition in New Orleans. As such, the muse be heard in the context ma —arnhing brass band
with the "second liners"following behind. The music has evok es m cecome part of New Orleans rC* jazz vocabulary.This is a
sticking that, to my ear, sounds nasty... and that's a good thing.
RRLR LR LR LR LR RL LR L
© Track 122
CAJUN WALTZ (B||jBISIANA
Ata slower tempo, the subdivisions gain more weight in this Cajun '.-.altz-The hi-hat is used to mimic the sound ofthe tee-fer,
or triangle.
Track 123
75
NANINGO ORIGIN: NIGERIA
The naningo is an African rhythm in the time signature of Here is a traditional drumset interpretation.
C316 J
Ж

Here is a more modernized variation I frequently use.
Track 124
This one is similar but uses a double paradiddle as its sticking.
Track 124
76
CHAPTER 10 TRACK LIST
107.	Brazilian samba
Time signature: |
Tempo: J = 122
Form: 8-bar intro, head (AAB), piano solo, trumpet solo,
C section, 8-bar drum break, head (AAB), turn.
Notes: Try using example 295 on the intro and the
drum break, and use example 296 for the rest.
108.	Medium jazz samba
Time signature: |
Tempo: J = 91
Form type: AABA
Form: Intro, head, piano solo, sax solo, head.
Notes: Listen for the figure and stop at the end of the
form; the song ends on that figure.
109.	Bossa nova
Time signature: |
Tempo: J= 129
Form: Head, sax solo, piano solo, head, turn.
Notes: Try using different voicings on both hands to
create distinction between the sections.
110.	Tango
Time signature: |
Tempo: J = 121
Form type: AABA
Form: Intro, head, guitar solo (AA), piano solo (BA),
fiddle solo (AAB), head (A).
Notes: Listen for the stop at the end of the В section as
well as the figure at the end of the last A section.
111.	Mambo
Time signature: |
Tempo: J = 93
Form type: AABA
Form: Head, piano solo, flugelhorn solo, head.
Notes: Listen for the figure at the end on the last A. It's
different in the solos than in the head.
112.	Cha-cha-cha
Time signature: |
Tempo: J= 119
Form type: 16-bar blues
Form: Intro figure, head, 2x trumpet solo, 2x piano
solo, head.
Notes: The song starts with the figure that appears at
the end of the "orm, and it ends with the same figure.
113.	Cuban bolero
Time signature: |
Tempo: J = 114
Form type: 16-bar form
Form: Head, piano solo, bass solo, head, turn.
Notes: Try using examole 303 for the head and the
piano solo, and example 304 for the bass solo.
114.	Songo
Time signature: f
Tempo: J= 100
Form type: AABA
Form: Intro figure, heao, sax solo, trumpet solo, 8-bar
drum solo, head.
Notes: The song starts with the figure that appears
at the end of the form, and it ends with the same
figure.
115.	Mozambique
Time signature: f
Tempo: J = 119
Form type: 12-bar blues
Form: Intro, head, 2x piano solo, 2x guitar, solo, bass
solo, head, turn.
Notes: Listen for the figure at the end of the solos. The
song ends with that figure.
116.	Soca
Time signature: |
Tempo: J= 114
Form type: ABA
Form: Intro, head, steel pan solo, C section, head,
outro.
Notes: Listen to the figures in the A and В sections.
Listen to the C section, and try to match those
rhythms.
77
117.	Beguine
Time signature: |
Tempo: J = 138
Form type: AABA
Form: Intro, head, piano, sax solo (AAB), head (A), turn.
Notes: Use the right-hand voicing to define the
sections. Listen for the ritard. at the end of the song.
118.	Ska
Time signature: |
Tempo: J= 157
Form type: AABA
Form: Head, trombone solo, breakdown, head (AA
only).
Notes: Listen for the stop before the trombone solo, as
well as the stop at the end of the song.
119.	Reggae
Time signature: f
Tempo: J = 83
Form: Intro, verse, chorus, verse, chorus, breakdown
chorus, chorus, turn.
Notes: Listen for the whole note stops at the end of
the song.
120.	Four-on-the-floor reggae
Time signature: f
Tempo: J= 126
Form: Intro, ABC, guitar solo (ABC), breakdown, A.
Notes: Fill in the stops in the C section, and listen for
the triplet figure at the end of the song.
121.	Merengue
Time signature: |
Tempo: J= 130
Form: Intro, head (AABA), sax solo, C section, head
(AABA), C section, head (AABA).
Notes: Listen to the figures in the last 3 bars of the
10-bar C section, as well as the figure at the end of
the song.
122.	Second line
Time signature: |
Tempo: J = 90
Form type: 12-bar blues
Form: Intro, head, harmonica solo, piano solo,
breakdown, head, turn.
Notes: For a change, try to bring the RH to the ride
while maintaining the accent pattern on the LH.
123.	Cajun waltz
Time signature: |
Tempo: J= 125
Form type: AABA
Form: Head, accordion solo, head.
Notes: Listen for the additional fermata at the end of
the song.
124.	Naningo
Time signature:
Tempo: J. = 138
Form: Intro, head, guitar solo, head, guitar solo,
drum solo, intro, head, turn.
Notes: Listen for the stop at the end of the A section.
Listen for the evolving band hits on the drum solo.
78
CREDITS
Musicians	Percussion/Vocals	Producer
Bass	Jim Riley	Jim Riley
Jay DeMarcus Randy Smith	Lalo Davila
CJ Wilder	Saxophone	Lead Mix Engineer
Tim Marks	Mark Douthit	Marc Meeker
Matt Wigton Jerry Navarro Elio Giordano	Trumpet Steve Patrick	Additional Engineers Stevens Stokes
Yankton Mingua Andy Wood	Steve Herman	Taylor Nyquist
Travis Toy Jim Riley	Trombone Barry Green	Interns
Chris Nix		Graylin Stewart
Tyler Enslow	Violin	Patterson Ford
Marc Meeker	Billy Contreras John Jeansonne	Braden Griffith
Guitar Pat Bergeson	Andy Leftwich	Cover Art
Andy Reiss Jonathan Trebing James Mitchell	Harmonica Pat Bergeson	Matt Koprowski
J. D. Simo	Yankton Mingua	Photography
Darin Favorite		Rick Malkin
Trey Hill Andy Wood	Steel Guitar Travis Toy
Yankton Mingua
Chris Nix	Mandolin
Ronald Crutcher	Andy Wood
Marc Meeker	Banjo
Keyboards Joe Davidian	Russell Carson
Steve Kummer	Cajun Accordion
Steve King John Deaderick	John Jeansonne
Michael Whittaker	Steel Drums
Tim Akers	Chris Patterson
Kevin Adams	Scot Corey
Brad Neher	Colton Gibbs
Tyson Rogers Yankton Mingua	Programming
Mike Webb	Michael Whittaker
Colton Gibbs	Jim Riley
79
ACKNOWLEDGMENTS
This book project took five years to complete. In that time my family grew by two amazing children. The music took over two
years to record and, honestly, was more of an undertaking than I could've ever understood. If I'd known how much work it
would be, I may not have ever started this project... but I'm so glad I did.
There are so many people that I need to thank.
First I want to thank my beautiful wife, Jaime, and my three children, Kendall, Avery, and Nathan. This project took family time
away, and I just want you to know that I appreciate your patience and, most of all, support. Without that, this project would
have never been completed. You guys are the embodiment of all my dreams, and I love you with all my heart.
To my parents, Kathy and "Chet,"and my sister, Tricia. You all taught me to follow my dreams, and your belief in me is the
biggest reason I am where I am in life. Thank you.
To the musicians who played on this project: I called each of you for your particular talents, and you delivered in the biggest
way. I am so grateful to have had the opportunity to make music with you and hope to make more in the future.
To myteachers—Lennie Clayton, MarkThomas, Arthur Press, Ed Soph, and"Doc"Schietroma—thankyou for mentoring me. I
may not have always seemed like the model student, but I promise you I was listening. You had a huge impact on my life and
inspired me to follow in your footsteps.
To my students:Thank you for inspiring me to write this book. This is but the beginning of a lifetime of musical opportunities
that lay ahead . I wrote this book as a musical guide for you.
To my fellow North Texas students: I learned so much by being around you. Many of you are like family to me, and I'm so
glad to still have you in my life after all these years. I would like to give a special shout to Lalo Davila and Jim White for your
valuable assistance on this project.
To my sponsors—Ludwig, Sabian, Remo, LP, Gibraltar, Vater, Shure, and Direct Sound—thank you for believing in me. Your
partnership in my career is so appreciated.
To my long-time employers and friends Rascal Flatts. As a kid growing up in Massachusetts, I dreamed of a career in music.
With you I have been able to realize those dreams and so much more. It is an honor to share the stage with you.
Thanks to Chris Bates, who engraved the first draft of the book. Your work helped me visualize where this project was going.
I would like to thank the person who was pretty much my partner on this project for the last two years, Mr. Marc Meeker, my
audio engineer. Most of this project was recorded in my basement, and I feel like I spent more time with Marc in the last two
years than I did with my own family. Marc, thank you for the years of hard work you put into this project. I dreamed of putting
together the most inspiring collection of music for drummers to learn with, and you helped make that a reality. Your talents
as an engineer are clearly on display, and without you this project would've never gotten finished.
Finally I want to thank you for buying this book. Yes, you. Whenever I felt overwhelmed with the workload of this book, I
thought about all the drummers whose lives it could change, and that kept me going. Thank you for letting me be part of
your musical life.
If you have any questions, feedback, or possible corrections to the text, you can reach me atjimrileymusic.com.
—Jim Riley
80
ABOUT THE AUTHOR
Jim Riley is the drummer and musical director for the multi-platinum group Rascal Flatts. Since moving to Nashville in 1997,
he has played on over 1,000 sold-out shows for millions of fans. His television credits include the Grammy awards, The Tonight
Show, Late Show with David Letterman, the American Music Awards, The Voice, American idol, Dancing with the Stars, The Today
Show, and Oprah. His recording credits include Rascal Flatts'multi-platinum discs Me and My Gang and Rewind, EA Sports'
Madden NFL 11, and Brian McKnight's album Ten. Jim's movie credits include Hannah Montana: The Movie, Heaven Is for Real,
and Rascal Flatts' All Access and Uncovered.
Jim attended the University of North Texas where he received his degree in Music Education. In addition to being one of
Nashville's elite touring drummers, Jim has become internationally recognized as a clinician and educator. In May 2014 Jim
was featured on the cover of Modern Drummer magazine. His teaching studio, Drum Dojo, opened in 2007, and is a place
where Jim teaches the great drummers of tomorrow.
Jim is a published composer, a frequent educational columnist for Modern Drummer magazine, and is a member of the
magazine's pro and educational panel. His first book, Song Charting Made Easy, was released in 2010.
Jim is sponsored by Ludwig Drums, Sabian Cymbals, Remo Drumheads, Gibraltar, Latin Percussion, Roland, Vater, and Shure.
saNisas]
SuRvjVAt Guide for the Modern Drummer
Is Your Passport to a World of Music
r"

If you are a drummer looking to expand your knowledge of musical
styles, Survival Guide for the Modern Drummer is the book for you.
From pop to country, metal to jazz, and Latin to Motown, Jim has
crammed his considerable stage and studio experience into this
amazing resource. The book includes 124 play-along tracks which
were meticulously recorded with just the right musicians for each
recording creating an authentic and inspiring library. An audio
performance of each of the 318 grooves is also included, making
learning these grooves even easier. From beginner to advanced, this
book truly has something for everyone. If you dream of taking your
drumming to the next level, let Survival Guide for the Modern Drummer
be your guide through the jungle we call the music business.

Survival Guide for the Modern
Id
3
3
PASSPORT
PASSEPORT
PASAPORTE
Type of Book / Type de livre /Tipo de libro
DRUMSET PLAY-ALONG
Author/ Auteur /Autor
JIM RILEY
Occupation / Occupation I Ocupacion
DRUMMER, EDUCATOR
98-0692284087 Book & CD US $24.99
Survival Guide
FOR THE
Modern Drummer

V
dusively distribtffed'-i
-  -	'I
ISBN-10: 0-692-28408-7
ISBN-13: 978-0-692-28408-7
be .


' Alfred
alfred.com
9
8
8