/


Теги: weapons military affairs machine gun
Год: 1972


Текст
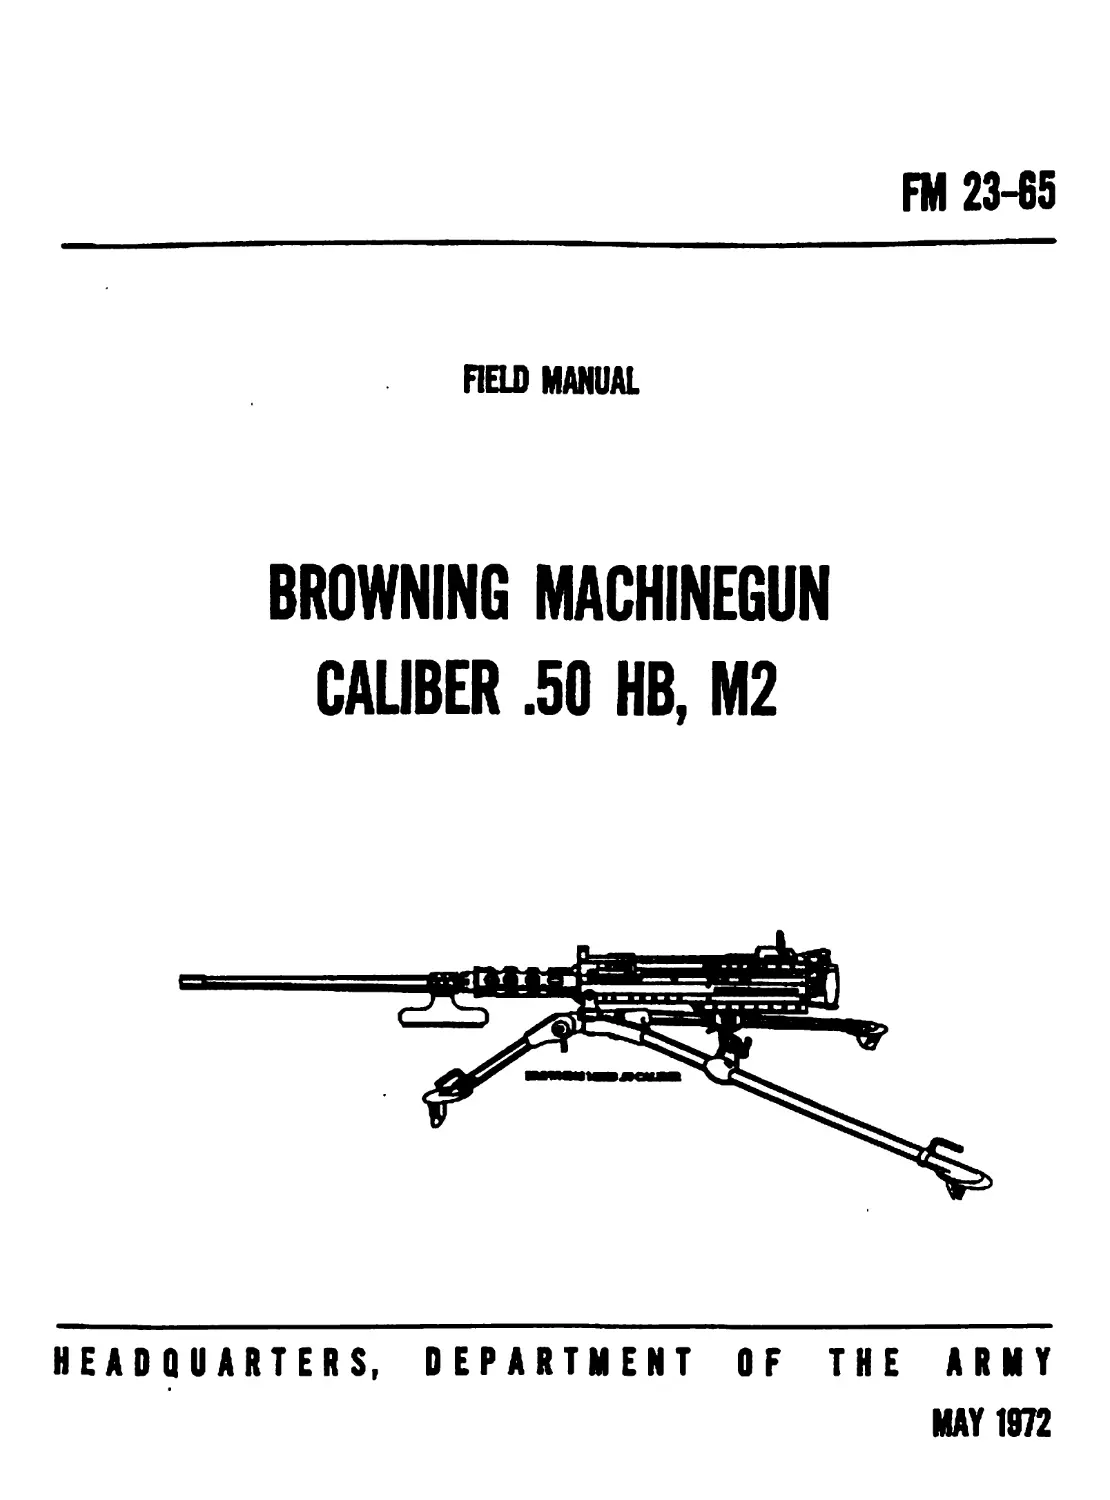
                    FM 23-65
REID MANUAL
BROWNING MACHINEGUN
CALIBER .50 НВ, М2
HEADQUARTERS, DEPARTMENT OF THE ARMY
MAY 1072
•PM 28-45
Field Manual
No. 23-66
HEADQUARTERS
DEPARTMENT OF THE ARMY
Washington, D. Cm 19 May 1979
BROWNING MACHINEGUN CALIBER .50 НВ, М2
PART ONE. MECHANICAL TRAINING AND CREW TRAINING
Ската 1.	INTRODUCTION
Section L	General 		1, 2	1
II.	Doacrlption		8-5	1-8
Сжата 2.	DISASSEMBLY AND ASSEMBLY
Section L	Introduction 				8	4
П.	General Dl*a*e*mbly		7	4
Ш.	General АемтЫу	_			8	18
IV.	Detailed DleacMmbly and АмеепЫу		8, 18	14—57
V.	Headepaco and Tinting		11, 12	77—79
CSAPfag 8.	OPERATION AND FUNCTIONING
Section L	Operation 		18-17	81, 82
n	Functioning 				18-88	88—88
Ската A	MOUNTS
Section L	Ground Mount*				——		27—W	85, 88
П.	Vehicular Mount*	...			80—88	97—88
СИАРПЖ 5.	MALFUNCTIONS, STOPPAGES. IMMEDIATE AOTION, MAINTENANCE,
	INSPECTION, AND DESTRUCTION
Section I.	Malfunction* and Stoppage* 						84, 85	100
IL	Immediate Action 	—		58-88	101
m.	Maintenance (Care and Cleaning) 		88—48	108
IV.	Inspection 				44	104
V.	Destruction 		45, 48	104
Сжата A	CREW TRAINING
flection I.	Crew Drill		47—58	108—111
IL	Hand Carry		58-58	114, 115
PART
TWO. TECHNIQUE OP FIRE AND EMPLOYMENT
Сжата 7. TECHNIQUE OP FIRE DURING PERIODS OF GOOD VISIBILITY
Section L Introduction ----------------—-----------------------------------------------------55, 57	118
Л	Chamtarictie of Rhe____________________________________________________________W—81	118—1»
HL	Claacei of Fire------------------------------------------------------------------88—85	1»
IV.	Range Determination ____________________________________________________________05—71	128—IM
V.	Pin Control end Fire Commando _________________________________________________72—78	127—180
VI.	Principle* of Application of Fire----------------------------------------------- 77—80	180—188
VII,	Application of Piro (Target Engagement/Dlroct Lay)______________________________ 81—88	184—188
Vm.	Overhead Fire------------------------------------------------------------------87-M	187, 188
IX	Defilade Petition 80-88	188—141
СВАИВ 8. TECHNIQUE OP FIRE DURING PERIODS OF UNITED VISIBILITY
Section L Introduction ---------------------------------------------------—----—-------------87, 88	142
П. Technique* of Engaging Target!--------------------------------------------—------80—101	148
Ш. Technique* of Delhraring Preplanned Plroe----------------------_—~----------------108—105 148, 144
IV. Rang* Card*______________________________________________________________________185, 107	147
• 1Ы» ivawai еарем*4м M 13 *1. 8 fcnihir ItM. ImMIm al Aeano*.
AOO MMA
1
Свата» 9. MARKSMANSHIP TRAINING
flection L Genera) 	—		10S—HO	151
IL Preparatory Exercise»				111—121	161—150
IIL Rango Firing	.				122—124	160
IV. Conduct of Range Firing			125—182	161—168
V. Conduct of Exercieee			188—145	168-175
Скатав 10. COURSES OF FIRE: FIELD TARGET FIRING
Section I. Introduction 		.—140, 147	177
П. Day Dofonoivo Field Firing			148—160	177—170-
HL Predetermined Firing Coureee			151—164	100—152
Ската» 11. ANTIAIRCRAFT GUNNERY
Section I. Engagement and Employment				165—157	184, 185
IL Target Conreoe			151, 159	185
Ш, Requirements for a Hit						100—162	187
IV. Lt»** 			168, 164	188, 180
V. Target Engagement			165, 166	100
VL Tracer Observation			167—170	101—105
Скатав 12. ADVICE TO INSTRUCTORS
Section I. General 			171—176	IN
II. Mechanical Training			176-180	106—108
HL Mounte					 								...					181, 182	190
IV. Organisational Maintenance ...							.			188	800
V. Mounting and Placing the Gun in Action		...184, 186	200
VL Markamanahip 		...186—180	200—802
VII. Technique of Fire, General, Direct Lay, Predetermined Firoa, and Poaition DeAlado	190-197	202—IN
VIII. Familiarisation Firing			.	—		IM	206
IX. Antiaircraft Gunnery Training	——		__ 100—201	805—807
AmndixA. REFERENCES	—				2M
B. POSITION OF PARTS FOR LEFT-HAND FEED			200
C. BEFORE, DURING, AND AFTER OPERATION CHECKLIST			210
D. INSPECTION CHECKLIST			211
E. AMMUNITION		__ *—******	212
F. TELESCOPIC SIGHTS			215
G. CREW-SERVED WEAPON NIGHT VISION BIGHT			216
H. AERIAL TARGET ENGAGEMENT	 INDEX 			217 219
N
ado ши
PART ONE
MECHANICAL TRAINING AND CREW TRAINING
CHAPTER 1
INTRODUCTION
Section I.
1* Purpose «nd Scope
a.	This manual is a guide for training on the
Browning machinegun» caliber .60 HB, М2, It pro,
vides a sound and detailed basis for the conduct of
training, to include mechanical and crew training,
techniques of Are, employment, and layout and
operation of machinegun ranges and courses of
Are. Information in thia manual io presented in a
logical sequence from the basic to the more com-
plex phases of instruction. AU instruction can be
given either on the range or In the vicinity (con-
current training stations).
b.	The material contained herein to applicable
without modification to nuclear and conventional
warfare.
c.	Users of thia manual are encouraged to sub-
mit recommended changes or comments to im-
prove the manual. Comments should be keyed to
the specific page, paragraph* and line of the text
in which the change to recommended» Reasons will
be provided for each comment to insure under-
standing and eamptoto evaluation. Comments
GENERAL
should be prepared using DA Form 2028 (Recom-
mended Changes to Publications) and forwarded
direct to the Commandant, US Army Infantry
Schoch Fort Benning, Georgia 31906.
2. Roles of the Machinegun
a.	The machinegun supports the infantryman in
both ths attack and defense. It provides the rifle-
man with the heavy volume of does, accurate, and
continuous fire necessary to accomplish his mis-
sion in the attack. The long range, eloco defensive,
and final protective fires delivered by this gun
form an integral part of the units defensive fires.
b.	The caliber .50 machinegun is also used to:
(1)	Provide protection for motor movements,
vehicle parks, and train bivouacs.
(2)	Defend against low-flying hostile air-
craft.
(8)	Destroy Hghtly armored vehicles.
(<) Reconnaissance by fire on suspected
enemy positions.
Section II. DESCRIPTION
3.	Principles of Operation
The Browning machinegun, caliber .50 НВ, М2,
is a belt-fed, reedi-operated, air-cootod, crew-op-
erated machinegun. The gun is capable of single,
shot, as well as automatic fire (fig 1).
a.	Belt Feed. By repositioning some of the com-
ponent parts, the gun to capable of alternate feed
(ammunition can be fed into the weapon from the
right or the left side of the receiver); however,
the infantry uses only loft side feed. A dtointe-
grating metallic link belt to used in feeding.
b,	Весов OpsroNoit. The force for recoil opera-
tion is furnished by expanding powder gases
which are controlled by various springs, cams,
and levers.
a. Air СооМлд. Maximum surface of the barrel
and receiver are exposed to permit air cooling.
Perforations in the barrel support allow air to
circulate around the breach end of the barrel and
help in cooling the parts. The heavy barrel Is used
to retard early overheating.
iMieu
1
BARREL SUPPORT
Figure 1. Browning machinegun, cal .50 HB,
Mt on tripod mount, MS.
Figure t. Loaf type rear eight.
2
AGO HILA
4. Sight»
The gun has a leaf-type rear sight, graduated in
both yards and mils for ranges from 100 to 2,600
yards, and from 0 to 62 mils. A windage knob
permits deflection changes of 5 mils right or left
of center (fig 2). The front sight is a semi-fixed
blade type with cover (fig 3).
5. GonoralData
Weight of receiver group______________60 lb.
Weight of barrel______________________24 lb. (approx.)
Weight of tripod mount M8
(w/traversing and elevating mech-
anism and pintle w/bolt) ____________44 lb.
Total weight of gun, complete, on
tripod mount, M8___________________128 lb. (approx.)
Maximum range (М2 ball) ..6,800 meters (approx.)
Maximum effective range______1380 meters
Rates of fire:
Sustained ___________________40 rd. or leas per min.
Rapid _______________________40 rd. or more per min.
Cyclic rate of fire__________450-650 rd. permin.
Muxzle velocity (М2 ball)____8,050 ft per see (2,080 mph)
Length of gun, overall_______65 in. (approx.)
Length of barrel-------------45 in.
Figaro 3. Front tight, oovor, and bladt.
AGO Ш1А
3
CHAPTER 2
DISASSEMBLY AND ASSEMBLY
Section I. INTRODUCTION
6.	General
a.	Types о/ Disassembly and Auembty. The two
classifications of (НшмтЫу end ueembly ere:
(1)	General dwaaembfy and auembly. Re*
moving end replacing major groups and assem-
blies of the gun.
f2) Detailed diMseembiy and auembty. Re-
moving and replacing all component parts of each
major group and assembly.
b.	Changing Part». When time is critical and a
major group or assembly Is available, a broken
part can be replaced by substituting a complete
group or assembly containing the part. When a
major group or assembly within the receiver is
replaced, headspace and timing must be set
Section II. GENERAL DISASSEMBLY
7.	Procedure
Genera] disassembly consists of removing the
major groups and assemblies for inspection or
cleaning.
a.	Clearing the Gun. Before disassembly can be
conducted, the gun must be cleared as prescribed
in paragraph 15.
b.	Barrel group. Turn the cover latch and raise
the cover group (fig 4). Grasp the retracting slide
handle with the right hand, palm up, and pull the
recoiling parts to the rear until the lug on the
barrel locking spring alines with the %-inch hole
In the right sideplate of the receiver (just below
the feedway exit). The barrel can be turned only
when the lug la alined with the 46-inch hole. Place
the smallest loop of a caliber .60 link, or suitable
spacer, between the trunnion block and the barrel
extension (fig 5 and в). This holds the barrel lock-
ing spring lug alined with the %-lnch hole In the
right Bideplate. Unscrew the barrel from the re-
ceiver (fig 7). Be careful not to damage the
threads or barrel locking notches when setting the
barrel down. Pull back slightly on the retracting
slide handle and remove the link or spacer from
the receiver.
e.	Bookplate Group. Inewre that the bolt latch
release is in ike up position, free of the bolt latch
release lock. If it is not, push down on the bolt
latch release and turn the buffer tube sleeve to the
right to free it (fig 8). The bolt must be forward
4
before the backplate is removed. If the bolt is to
the rear, push down on the bolt latch release al-
lowing the bolt to go forward.
Caution, Care must be taken to prevent the bolt
from slamming forward with the barrel removed.
Use the retracting slide handle to ease the bolt
forward after the bolt latch is released. The back*
plate latch lock and latch are below the buffer
tube. Pull out on the lock and up on the latch;
remove the backplate by lifting it straight up (fig
9).
d. Driving Spring Rod Aeeembly. The inner and
outer driving springs and driving spring rod are
located inside the receiver next to the right side-
plate (fig 10). Push in on the head of the driving
spring rod and push to the left to remove the
driving spring rod retaining pin from its seat in
the right sideplate. Pull the driving spring assem-
bly to the rear and out of the receiver.
Caution, Never attempt to cock the gon while
the backplate is off and the driving spring assem-
bly is bi place. If the backplate is off and the
driving spring assembly is compressed, the retain-
ing pin on the driving spring red can slip from its
seat In the Bideplate and could cause serious inju-
ries to anyone behind the gun.
e. Bolt Stud, Grasp the retracting slide handle
and give it a quick jerk, freeing the bolt from the
barrel extension. Aline the shoulder on the bolt
stud with the clearance hole in the bolt slot on the
rght sideplate, and remove the bolt stud (fig 11).
AOO
Fiffw* 4. Railing tb eo»«r.
AGO B4B1A
5
Figure 8. Alining the lug on the barrel locking spring with
the %-inch hole in the right ride plate.
6
AGO MtlA
Figure t. The enwlleet loop of the cal .SO link it ueed in alining the barrel
locking epring lug with the %-inch hole tn the right oidoplate.
AGO MtlA
7
Figure 7. Removing the barrel.
8
AGO 1491Л
Figure 8. Bolt latch release free of the bolt latch release lock.
AGO >491A
9
Figure 9. Removing the backplate.
10
AGO M»U
Figure ю. Driving spring rod assembly.
AGO HtiA
11
Figure 11. Removing the bolt etud.
12
AGO MI1A
Fifwrt If. Frermj tM Ml,
13
AGO Ш1А
Figuro IS. Rtmoving tho bolt from tho roooivor.
14
AGO 1481A
Figure Ц. Removing barrel buffer group and barrel extenricn group.
AGO MI1A
15
BARREL BUFFER BODY GROUP
Figure IS. Separating tAe grvupe.
BAAFEL HL'FFfR BODY GROUP
Figure IS. Separating ike barrel buffer aeeembfy from tke barrel buffer body group.
16
AGO »O1A

Fig** 17. Major graiKfa.
Figwe 18. Removing the barrel buffer аееетЫд.
Figure 19. Replacing the barrel buffer aeeembly.
Note. If the bolt ia accidentally moved all the way to
the rear, the bolt latch will enrage in the bolt latch
notchea in the top of the bolt. If thia occurs, raise tho bolt
latch (left of the trigger lever) and push the bolt forward
to aline the bolt stud with clearance hole (fig 12).
f.	Bolt Group, After freeing the bolt, slide it to
the rear and out of receiver (fig 13). Place the
bolt down on its right side (with the extractor
arm up), so that the extractor will not fall from
the bolt.
g.	Barrel Buffer Group and Barrel Extension
Group. Insert the drift of a combination tool, or
other pointed instrument, through the hole in the
lower rear corner of the right sideplate. Push in
on the barrel buffer body lock. At the same time,
place one hand in the receiver and push the barrel
extension group and barrel buffer group to the
rear (fig 14). Remove the barrel buffer group and
barrel extension group from the receiver. Sepa-
rate the two groups by pushing forward on the
tips of the accelerator (fig 15).
h.	Barrel Buffer Assembly. Pull the barrel
buffer assembly from the rear of the barrel buffer
body group. The barrel buffer assembly will not
be disassembled (fig 16). This completes general
disassembly (fig 17).
AGO НМЛ
Section III. GENERAL ASSEMBLY
8.	Procedure
To assemble the gun, replace the groups and as-
semblies (in reverse order of removal in disas-
sembly).
a.	Barrel Buffer Assembly and Barrel Buffer
Body Group. Replace the barrel buffer assembly
in the barrel buffer body group, with the key on
the spring guide to the right. This key must fit in
its slot in the right side of the barrel buffer body.
Turn the barrel buffer tube until the screwdriver
slot (in the rear of the tube) is vertical, the arrow
pointing to the right. The stud on the tube lock
will now engage the serrations in the barrel buffer
tube, to keep the tube from turning. Push the
barrel buffer assembly fully forward (fig 18 and
19).
b.	Barrel Buffer Group and Barrel Extension
Group. To join the two groups together, hold the
barrel buffer group in the right hand, with the
index finger supporting the accelerator. Join the
notch on the shank of the barrel extension group
with the cross-groove in the piston rod of the
barrel buffer assembly. At the same time, aline
the breech lock depressors with their guideways
in the sides of the barrel extension, insuring that
the tips of the accelerator are against the rear end
of the barrel extension (claws against the shank)
(fig 20). Push the groups together. As the acceler-
ator rotates to the rear, press down on its tips to
insure positive locking of groups. Place the groups
in the receiver, and push them forward until the
barrel buffer body spring lock snaps into position.
When the parts are properly locked in place, the
barrel buffer tube should protrude about 1Ц-
inches from the rear of the barrel buffer body
group.
c.	Bolt. Place the bolt in the receiver, with the
top of the cocking lever forward and the extractor
down (fig 21). Push the bolt forward into the
receiver. As the front end of the bolt approaches
the tips of the accelerator, look in the sideplate of
the receiver, press down on the rear end of the
bolt to insure the front end of the bolt clears the
Figure SO. Joining the barrel extension group and barrel buffer group.
AGO M«1A
19
Figure il. Replacing the bolt.
АСЮ 8491A
20
Figure П. Bolt clearing tKe accelerator Upe.
лао
22
ЛОО MILA
Figwt Ц. Replacing the backplate group.
AGO M*1A
23
accelerator tips (fig 22), Raise the rear of the bolt
and continue to push the bolt forward until the
bolt latch engages the notches in the top of the
receiver.
Noto. The barrel extension, barrel buffer, and bolt
froup» may be assembled and returned to the reerivax
together (flg 23).
d.	Bolt Stud. Aline the stud hole in the bolt with
the clearance hole and replace the bolt stud, insur-
ing that the shoulder of the stud is inside the
sideplate.
e.	Driving Spring Group. Press up on the bolt
latch and puah the bolt all the way forward by
pushing on the bolt stud only. Place the end of the
driving spring rod in its hole in the rear of the
bolt, and push forward on the driving spring
group and the barrel buffer tube. Press in and to
the right on the head of the driving spring rod
and place the retaining pin in its seat in the right
sideplate.
Noto. At this time, the barrel buffer tube should be
completely inside the receiver. If not, the barrel buffer
body spring is not properly seated.
f.	Backplate Group. Hold the backplate with the
latch down and the trigger up; place the backplate
guides in their guideways. Hold out on the latch*
lock and tap the backplate into position until the
latch snaps into place (fig 24). Release the latch
lock, and pull up on the backplate group to insure
it is firmly seated.
p. Barrel. Pull the retracting slide handle to the
rear until the lug on the barrel locking spring is
visible through the %-inch hole in the right side-
plate. Place the smallest loop of a caliber .50 link,
or suitable spacer, between the trunnion block and
the barrel extension. Screw the barrel all the way
into the barrel extension; then unscrew the barrel
two notches. Remove the link and close the cover.
This completes general assembly.
Section fV. DETAILED DISASSEMBLY AND ASSEMBLY
9.	General
To replace damaged or broken parts within major
groups or assemblies, a knowledge of detailed dis-
assembly and assembly is required. Detailed dis-
assembly and assembly involves the bolt, barrel
buffer, barrel extension, cover, receiver, and back-
plate groups.
a. Bolt Group (fig 2S).
(1)	ОйоштЫр-
(a)	Extractor. Rotate the extractor up-
ward, and remove it from the bolt, freeing the
bolt switch. The ejector and ejector spring are not
disassembled from the extractor (fig 26).
(b)	Bolt switch and bolt switch stud. Lift
out the bolt switch and pull out the bolt switch
stud (fig 27). On some models, the bolt switch
stud may bo staked, so that it cannot be removed,
(c) Cocking lever pin and cocking lever.
Rotate the top of the cocking lover toward the
rear of the bolt and remove the cocking lever pin.
Lift out the cocking lever. NOTE: The rounded
nose of the cocking lever is down and to the roar
of the bolt (fig 2d).
(d)	Sear stop and pin.
Noto. Safer* removing the *a*r stop and pla, («а мем
model*, the seeahrstor «top and lock) prow down on the
top of tha war to rolaaoc the firing pin.
Use the thin end of the cocking lever to pry the
sear atop (accelerator stop lock) out of its groove
in the bolt, and into the center recess (fig 29 and
80)	. Turn the bolt over and drift the soar stop pin
free from engagement with the firing pin spring
(shake out the accelerator stop lock) (fig 31 and
82). Turn the bolt over and lift the sear stop and
pin from the bolt (drift out the accelerator atop)
(fig 88 and 84). If the pin does not oome out
freely, place the thin end of the cocking lever
under the sear stop, against the pin, and pry it
out of the bolt.
(e)	Sear eUde, Press down on the sear and
withdraw the sear slide. Withdraw the square end
first (fig 85).
(f)	Soar and eear spring. To prevent loss
of the sear spring, insert the thin end of the
cocking lever between the coils of the sear spring.
Lift out the sear and remove the sear spring.
Leave the spring on the cocking lever (fig 86).
(p)	Firing pin extension assembly and
firing pin. Raise the front end of the bolt and
allow the firing pin extension assembly and firing
pin to fall into your hand (fig 87). Separate the
firing pin from its extension. This completes de-
tailed disassembly of the bolt (fig 88 and 39).
(2) Assembly
(a) Firing pin and extension assembly. En-
gage the rear end of the firing pin in Its seating
groove in the front end of the firing pin extension
assembly. Insert the firing pin and extension as-
sembly in the bolt, striker first, sear notch down
(fig 40). Push the extension assembly into the
bolt, and tilt the front end down until the striker
24
AOO MllA
Figure 25. Bolt group, exploded view.
▲GO UIU
25
Jf-ffr.TQfi	_extractor arm
Figure 28. Removing the extractor.
AGO S«»1A
26
Fiffurt t7. Removing the bolt twitch and bolt twitch ttud.
protrudes through its aperture in the face of the
bolt.
(5)	Sear spring and sear. With the sear
spring still wedged on the cocking lever, replace
the spring, and insert the sear in its slot-—stud
up, and notch to the front. Make sure the sear
spring is properly seated in its recess in the bolt,
and the bottom of the sear (fig 36).
(c)	Sear slide. Press down on the sear and
replace the sear slide in its guideways. The slide
may be inserted from either side, unless the gun is
to be fired by the sideplate trigger. In that case,
the square end must be to the left (fig 35).
(d)	Sear pin and stop. Replace the sear
stop and pin (accelerator stop and lock). Press
down on the head of the pin (base of the accelera-
tor stop) to force it in place (fig 41); swing the
sear stop into its groove in the bolt.
(e)	Cocking lever and pin. Replace the
cocking lever, the rounded nose down and to the
rear; the top of the cocking lever to the rear.
Replace the cocking lever pin from the left side of
the bolt To test for correct assembly, cock the
firing pin by rotating the top of the cocking lever
toward the front of the bolt; then rotate it to the
rear and depress the sear. This should release the
firing pin.
(/) Bolt switch stud and bolt switch. Re-
place the bolt switch stud with the small end up.
Place the bolt switch over the bolt switch stud, so
that the groove marked *‘L” is continuous from
the left-hand feed (fig 42). (The wider portion of
the bolt switch will be to the front.)
(p) Extractor. With the extractor arm ver-
tical, replace the extractor stud in the extractor
pivot hole of the bolt. Rotate the extractor for-
ward ; insure that the collar is engaged in its slot
in the bolt (fig 43).
b.	Barrel Buffer Body Group (Fig 44).
(1)	Disassembly.
(a)	Barrel buffer tube lock assembly. Turn
the barrel buffer body group upside down. Pry up
on the barrel buffer tube lock latch, to disengage
the latch before moving the lock body to the rear.
Pry up the latch end of the assembly, so that the
lug will clear the barrel buffer body. At the same
time, press down on the front of the lock body to
keep it from springing out Turn the accelerator
back to push the barrel buffer tube lock assembly
out of its slot (fig 45 and 46).
(b)	Barrel buffer body spring lock. In most
cases, the barrel buffer body spring lock is staked
and will not be removed.
(c)	Accelerator pin and accelerator. Drift
the accelerator pin out and remove the accelera-
tor. This completes detailed disassembly of the
barrel buffer body group.
(2)	Assembly.
(a)	Accelerator and accelerator pin. Re-
place the accelerator with the tips up and the
claws to the rear. Replace the accelerator pin so
that the ends are flush with the sides of the barrel
buffer body group.
(b)	Barrel buffer tube lock assembly. Turn
the barrel buffer body upside down. Hold the as-
sembly against the barrel buffer body, lug down.
With the thumb of one hand, press the forward
winged part into the circular opening in the slot.
With the other hand, raise the rear of the assem-
bly enough to lift the lug over the buffer body.
Push the assembly forward until the rear winged
part (barrel buffer tube lock latch) snaps into the
circular opening in the slot (fig 47). This com-
pletes assembly of the barrel buffer body group.
c.	Barrel Extension Group.
(1)	Disassembly (fig 48 and 4$).
(a) Breech lockpin and breech lock. Drift
the lockpin out and remove the breech lock from
the bottom of the barrel extension group. The top
of the breech lock may have a wide, single-beveled
edge, or a double-beveled edge. In earlier models,
the top may be fiat (fig 50); the newer models
aoo МИЛ
27
Figaro 18. Removing the cocking lover and cocking lever pin.
▲GO >4»1A
CENTER RECESS
SEAR STOP
▲00 MMA
29
'П№,*>. А..
(Ал
и,с»’>Ьт
*в0 ’«U
30
SEAR STOP PIN
Figure Si. Drifting the eear etop pin free from
engagement with the firing pin opting.
AGO MMA
31
АОО «491д
*°° »«u
33
^'•34. />,
n°Vin»>k.acc,.

PRESS SEAR DOWN
Figure 85. Removing and replacing the eear elide.
AGO 1491A
35
Figure 36. Removing and replacing the eear and eear spring.
36
AGO 8491A
Figure 37. Removing the firing pin exteneion ate em big and firing pin.
AGO M»1A
37
NOTE: BOLT SWITCH STUD (STAKED)
Figure 38. Bolt disassembled (sear stop and pin).
AGO S4»1A
38
Fi,ur. St>. Bolt di.o.»Mod (aocoloralor .top and look).
AGO 14ИЛ
Figure 40. Replacing the firing pin and extension aeeembly.
▲00 М91Л
Figure 41. Replacing the etar etop and pin.
AGO 84»1A
41
Figure 42. Replacing the bolt twitch, and stud.
AGO S491A
42
SLOT IN THE BOLT
Figure 13. Extractor replaced in the bolt.
43
AGO M»1A
BARREL BUFFER TUBE LOCK ASSEMBLY
BARREL BUFFER GUIDE
Figure 44. Barrel buffer body group, exploded view.
AGO 8491A
44
BARREL BUFFER TUBE LOCK ASSEMBLY
Figure iS. Disengaging the latch.
AGO 3491A
45
AGO ««I*
46
REAR WINGED PART
(BARREL BUFFER TUBE LOCK LATCH)
Figure 47. Replacing the barrel buffer tube lock aeeembly.
AGO S4»1A
47
may have a large slot (fig 51). Guns currently
manufactured have the breech lock with the slot
on top, for use with the accelerator stop and lock.
When the accelerator stop and lock replaces the
sear stop and pin, the breech lock with slot will be
used.
(b) Barrel locking spring. The barrel lock-
ing spring should already be staked to the barrel
extension; it should not be removed. This com-
pletes detailed disassembly of the barrel extension
group.
(2) Assembly of breech lock and breech lock-
pin. Replace the breech lock from the bottom of
the barrel extension. Make sure that the wide,
single-beveled edge (double-beveled edge) is up
and to the front. In any case, the breech lock will
be correctly positioned in its slot when the beveled
edge is up and to the front, and the hole for the
breech lockpin is toward the bottom of the barrel
extension. Replace the breech lockpin so that the
ends of the pin are flush with the sides of the
barrel extension. This completes assembly of the
barrel extension group.
d. Cover Group.
(1)	Disassembly (fig 52).
(a)	Cover pin. With the cover closed, re-
move the cotter pin and drift the cover pin out of
the receiver. Unlatch the cover and rotate it up
and forward to remove the cover from the trun-
nion block (fig 53). Place the cover group (top
down) on a flat, sturdy surface, with the latch end
to the front and the hinged end toward you.
(t>) Belt feed lever and lockpin. Remove
the belt feed lever pin (cotter pin). Push the belt
feed lever to the right, until the toe end of the belt
feed lever (engaging the slide) is in line with the
slot in the cover. Lift the belt feed lever off its
pivot stud. Insure the shoulder headless pin and
spring do not fly out (fig 54).
(c)	Shoulder headless pin and spring. Re-
move these from their seat in the side of the belt
feed lever (fig 55).
(d)	Belt feed slide. Remove the belt feed
slide from either side (fig 56).
1.	Drift the belt feed pawl pin out, main-
taining pressure on the belt feed pawl to prevent
the spring from flying out (fig 57).
BREECH LOCK PIN
BREECH LOCK
Figure 4S. Barrel extension group with old type breech look.
48
AGO »«1A

Figure SO. Breech lock (old type) to be need with the eoar etop and pin.
50
AGO M»1A
Figure 51. Brooch lock (now typo) to be uaed with tho accolorator atop and lock.
AGO S491A
51
Figure 52. Cover group.
52
AGO S481A
Figure 53. Removing the cover group.
AGO 14HA
53
Figure 64. Removing the belt feed lever.
54
AGO »O1A
HELICOH COMPRESSION
SEAR
Figure 55. Removing the a boulder headleee pin and epring.
AGO 8491A
55
Figure 56. Belt feed elide.
56
AGO M»1A
Figure 57. Drifting out the belt feed pawl pin. (Use any available punch
or caliber .30 combination as shown above.)
AGO 8491A
57
Figure 58. Removing the belt feed pawl and arm.
58
AGO 84»1A
Figure 59. Dieengaging the belt feed pawl arm /ram tAa belt feed pawL
AGO 8*»1A
59
Figure 60. Removing the cover latch rpring.
60
AGO M«1A
Figure 61. Removing the cover extractor epring.
AGO M»1A
61
Figure 9t. Replacing the cover latch eprtng.
2. Slowly release pressure, and remove
the belt feed pawl and arm (fig 58).
J. Disengage the belt feed pawl arm
from the belt feed pawl (fig 59).
Jt. Remove the belt feed pawl spring.
(e) Cover latch spring. Pry the hooked end
of the spring out of its groove in the cover, and
shift it to the left until it rests on the cover ex-
tractor spring. Press down on the cover latch
spring, and slide it away from the cover latch.
Make sure that it rides on top of the cover extrac-
tor spring. When the enlarged hole in the spring
meshes with the cover latch spring stud, remove
the spring from its stud (fig 60).
(/) Cover extractor spring. Press down on
the cover extractor spring and pry the end of the
spring out of its recess in the cover extractor cam
(fig 61). This spring, if not handled carefully, can
cause injury. Disengage the opposite end of the
spring from the cover extractor spring stud. This
completes detailed disassembly of the cover
spring.
(2) Assembly.
(a)	Cover extractor spring. Place the cover
in the same position as for detailed disassembly.
Hook the slotted end of the spring under the cover
extractor stud with the projection pointing in the
Figure 63. Parte of the belt feed elide, dieplayed for
final aeeembly and return to the cover (left-hand feed).
direction of its recess. Exercising caution, press
down, and seat the projection of the spring in its
recess in the cover extractor cam.
(b)	Cover latch spring. Place the cover
latch spring inside the cover with the enlarged
hole meshing with the cover latch spring stud, the
hooked end down (resting on the cover extractor
spring). Press down on the cover latch spring,
and slide it toward the latch. Pry up on the latch
end of the spring, so that it rides up over the
projecting wing of the cover latch. Snap the
hooked end of the spring into its groove in the
cover (fig 62).
(c)	Belt feed slide. To reassemble the belt
feed slide:
1.	Replace the belt feed pawl arm on the
belt feed pawl.
Note. There are two pin» on each aide of the belt feed
pawl. The larger is the belt feed pawl arm pin; the smaller
is the belt feed pawl arm locating pin (fig Б9).
For a left-hand feed, the belt feed paw] arm must
be placed over the pins so that the belt feed pawl
62
AGO MSI A
Figure 61. Projecting oval of the belt feed pawl, epring properly eeated
in relation to the belt feed pawl arm (left-hand feed).
arm is toward the latch end of the cover, when the
assembled slide is returned to the cover (fig 63).
2.	Place the small end of the belt feed
pawl spring over the belt feed pawl spring stud
(inside the belt feed slide). Place the assembled
pawl and arm over the spring so that the large
end of the spring is seated in the recess in the
pawl, with the projecting oval (loop) of the
spring away from the belt feed pawl arm (fig 64).
3.	Aline the pinholes in the pawl, arm,
and slide; replace the belt feed pawl pin (fig 65).
Make sure that the pin is flush with the sides of
the slide.
4.	Replace the belt feed slide in its guide-
ways, with the belt feed pawl to the left, arm
toward the latch (fig 66).
(d)	Shoulder headless pin and spring. Re-
place these in their seats in the side of the belt
feed lever. For left-hand feed, the spring and pin
are seated in the hole nearest the belt feed lever
lug (fig 52).
(e)	Belt feed lever and lock pin. Place the
belt feed lever over the pivot stud, lug up and to
the left (fig 67). With a thumb at either end of
the lever, press down and turn the lever until the
shoulder headless pin is against the inside of the
cover. Pivot the lever until it is alined with the
slots of the cover and slide. Press the lever down
as far as it will go (fig 68). Move the lug end all
the way to the right (fig 69). Maintain a down-
ward pressure, and snap the lug end all the way
to the left so that the shoulder headless pin is
properly positioned in the cover (fig 70). Replace
the lock pin (cotter pin) in the pivot stud. Make
sure that the toe end of the lever moves laterally
in its slot without binding.
(/) Cover pin. To replace the cover group
on the receiver, place the latch end of the cover in
position, with the latch engaging the top plate.
With the heel of your hand, tap the hinged end
downward into position (fig 71). Aline the pin
holes and replace the cover pin. Insert the cotter
pin in the cover pin and spread the ends. This
completes assembly of the cover group.
e.	Receiver Group.
(1)	Disassembly (fig 72).
(a)	Belt holding pawl, spring (s), and pin.
Press down on the spring belt holding pawl and
withdraw the belt holding pawl pin to the rear.
Remove the belt holding pawl and springs, being
careful not to lose the springs. The split belt hold-
АОО >4I1A
63
Figure 65. Replacing the belt f—d pawl arm pm.
64
AGO *4*1A
Figure 66. Replacing the belt feed elide in it« guideways (left-hand feed).
AGO 3441A
65
Figure 67. Placing the belt feed lever over it* pivot etud.
66
AGO M»IA
Figure 68. Alining the belt feed lever with the elote m
the cover and elides.
ing pawl assembly includes a left-hand and right-
hand belt holding pawl, connected by a belt hold-
ing pawl sleeve; two belt holding pawl springs are
used (fig 73). Guns of earlier manufacture use a
single belt holding pawl, adapted for either one or
two springs (fig 72).
(b)	Cartridge stop assembly, front car-
tridge stop, and belt holding pawl pin. Withdraw
the belt holding pawl pin from the right side of
the receiver. Remove the cartridge stop assembly
(or rear cartridge stop and link stripper—on guns
of earlier manufacture), and front cartridge stop,
from the right side of the receiver (fig 74).
(c)	Trigger lever pin assembly and trigger
lever. Release the hinged lock from the left side-
plate; turn the pin clockwise, and withdraw the
pin to the left. Remove the trigger lever from
inside the receiver. Guns of earlier manufacture
may have a trigger lever pin assembly without the
hinged lock. In this case, lift the lock of tha-pin
out of the small hole in the left sideplate and
rotate the lock end downward 90° until it is just
forward of a vertical position. Withdraw the pin
to the left (fig 75, 76, and 77). This completes
disassembly of the receiver group.
(2)	Assembly.
(a)	Trigger lever and trigger lever pin as-
sembly. Replace the trigger lever in the receiver,
with the long end forward and the bowed surface
upward, between the top plate bracket and the
bolt latch bracket (fig 78 and 79). The trigger
lever should project about y8-inch beyond the tim-
ing adjustment nut. Aline the hole in the trigger
lever with the holes in the receiver. Position the
trigger lever pin assembly so that the key on the
pin will pass through the keyway in the left side-
plate. Push the trigger lever pin assembly all the
way in and turn the pin 90° to the left, or coun-
terclockwise. Turn the lock flat against the side of
the receiver. (With the lock without the hinge,
turn the lock counterclockwise until the lock fits
in the small hole in the sideplate.)
(b)	Cartridge stop assembly, front car-
tridge stop, and belt holding pawl pin. Install the
cartridge stop assembly (or rear cartridge stop
and link stripper) and front cartridge stop, on the
right side of the receiver. Replace the belt holding
pawl pin.
(c)	Belt holding pawl, spring(s) and pin.
Place the belt holding pawl in position on the left
side of the receiver, first seating the springs. De-
press the pawl and insert the belt holding pawl
pin. This completes assembly of the receiver
group.
f.	Backplate Assembly. The backplate assembly
is not disassembled by using units.
10.	Positioning of Ports for Left-Hand feed
(Арр B)
AGO M»1A
67
Figure 69. Moving th» belt food lover lug all th» way io th» right.
68
AGO >OIA
Figure 70. Snapping the Mt feed lever lug all the way to the left,
to eeat the ehoulder headleee pin.
PLUNGER
AGO Ш1А
69
Figure 71. Replacing the cover.
70
AGO 8491A
Figure 71. Receiver group, with old typo bolt food pawl.
AGO MtlA
71
Figure 79. Belt holding pawl aeeembly (new type).
CARTRIDGE STOP ASSEMBLY
Figure 74. Cartridge etop aeeemblg, front cartridge etop, and belt holding pawl pin.
72
AGO SO1A
Figure 75. Removing the trigger lever pin алеотЫд (old type).
AGO 84»1A
73
Figure 76. Removing the trigger lever pin aeeemblg (new tgp»).
AGO S4»1A
74
TRIGGER LEVER
(PRESENT DESTGN)
Figure 77. Trigger lever (present design), and trigger lever pin assemblies.
AGO 84»1A
75
TIMING ADJUSTMENT NUT
Figure 78. Trigger lever replaced (rear view).
76
AGO 3491A
Figure 79. Trigger lever replaced (Irani view).
Section V. HEADSPACE AND TIMING
11.	Headspace Adjustment
a.	Introduction. Headspace is the distance be-
tween the face of the bolt and the base of car-
tridge case, fully seated in the chamber. Head-
space adjustment is correct when the following
conditions are met:
(1)	The recoiling groups are fully forward.
(2)	There is no independent rearward move-
ment between the bolt, barrel, and barrel exten-
sion.
b.	Importance of Correct Headspace. Improper
headspace adjustment can cause improper func-
tioning of the gun and, frequently, damage to
parts and/or injury to personnel.
e.	When to Check Headspace. Headspace is
checked and set prior to firing. Other instances
include:
(1)	When the gun is assembled.
(2)	When the barrel or any major group or
assembly within the receiver is replaced.
(8)	When there is doubt that correct head-
space is set.
d.	Gages. The headspace and timing gage con-
sists of a headspace gage and two timing gages
(fig 80). These gages provide an accurate means
of checking the adjustment of headspace and tim-
ing.
Note. Th» headspace and timing gage should be kept
with th» gun at all time».
HEADSPACE GAGE
"Fl MT GAG»	NO FIRE" GAGE
Figure 80. Headepace and tinting gage.
AGO Ш1А
77
e.	Headspace Adjustment With the Gage. With
the gage, you can accurately determine the dis-
tance between the face of the bolt and the cham-
ber end of the barrel by the following procedures:
(1)	Raise the cover. Retract the recoiling
parts as described in paragraph 7a, and screw the
barrel all the way into the barrel extension, then
unscrew the barrel two notches.
(2)	Cock the gun; pull the retracting slide
handle all the way to the rear, then return it to its
most forward position. Press the bolt latch release
and allow the bolt to go forward.
Note. Be careful not to depress the trigger, since this
will cause the firing pin to be released.
If the firing pin is forward, the gage cannot be
inserted in the T-slot far enough to give an accu-
rate determination.
Caution. The firing pin should never be re-
leased with the gage in the T-slot as this could
damage the firing pin and gage.
(3)	Pull the retracting slide handle back
until the barrel extension is about one-sixteenth
of an inch from the trunnion block. This will in-
sure that the locking surfaces of the breech lock
and the bolt are in proper contact. This prevents
the driving spring group and weight of the parts
from giving a false determination (fig 81).
(4)	First, insert the GO end of the headspace
gage in the T-slot, between the face of the bolt
and the rear end of the barrel. If the GO end of
the gage enters freely down to the center ring of
the gage, then attempt to insert the NO GO end of
the gage. If the GO end enters, and the NO GO
end does not enter, correct headspace is set
(5)	If the GO end of the gage does not enter
freely, headspace is too tight. When this condition
exists the barrel must be unscrewed one click
(notch) at a time (checking with the gage after
each click), until the GO end of the gage enters
freely. To complete the adjustment, attempt to
Figure 81. Inserting the headepaoe gage.
7«
AGO M»1A
insert the NO GO end of the gage; if it does not
enter correct headspace is set. Remember» to un-
screw the barrel, or to screw the barrel into the
barrel extension, the lug on the barrel locking
spring must be alined with the %-inch hole in the
right side plate (para 7b.).
(6)	If the NO GO end of the gage enters the
T-slot, headspace is too loose. The barrel must be
screwed into the barrel extension (one click at a
time) checking with the gage after each click,
until the GO end enters and the NO GO end does
not.
(7)	Remove the gage.
12.	Timing
a.	General. Timing is the adjustment of the
weapon so that firing takes place when the recoil-
ing parts are between .020 and .116 inches out of
battery to prevent contact between the front end
of the barrel extension and the trunnion block.
Timing is correctly set when the following condi-
tions are met:
(1)	The recoiling parts are locked together.
(2)	Firing takes place just before the psrrts
are in battery (fully forward).
(3)	When the gun fires on the FIRE gage,
and does not fire on the NO FIRE gage. Timing
must be checked and/or set each time headspace
is set, or whenever timing is questionable.
b.	Checking and/or Setting Timing.
(1)	Insure that the gun has correct head-
space adjustment.
(2)	Cock the gun; pull the retracting slide
handle all the way to the rear and return it to its
most forward position. Press the bolt latch release
and allow the bolt to go forward.
Note. Do not depress the trigger.
Figure 82. Inserting the timing gage.
AGO 84»1A
79
Figure 83. Rotating the timing adjustment nut to the left.
(3)	Raise the extractor and pull the retract-
ing slide handle back until the front end of the
barrel extension is about one-fourth of an inch
from the trunnion block.
(4)	Insert the NO FIRE timing gage between
the barrel extension and the trunnion block, plac-
ing the beveled edge of the gage on the barrel
notches (fig 82).
(6)	Let the barrel extension close slowly on
the gage.
(6)	Depress the trigger firmly, attempting to
release the firing pin. The firing pin should not
release. If the firing pin does release, the gun is
timed to fire too early.
(7)	To correct for this, pull the retracting
slide handle to the rear, allow the bolt to go for-
ward. Insert the fire gage, remove the backplate
and screw the timing adjustment nut to the left
until it rests on the trigger lever (fig 88). Press
“up” firmly on the trigger lever attempting to fire.
Rotate the timing adjustment nut to the right one
(1) notch at a time, each time pressing up firmly
on the trigger lever, attempting to fire the
weapon.
(8)	When the firing pin is released, turn the
timing adjustment nut two (2) additional notches
to the "right” and replace the backplate.
Caution. Do not attempt to cock the gun with
the backplate off.
(9)	Recock the weapon and allow the bolt to
go forward. Insert the "NO FIRE” gage between
the trunnion block and the barrel extension and
attempt to fire the weapon by depressing the trig-
ger. The weapon should not fire. If the weapon
does fire, a mechanical defect exists and the gun-
ner should notify his organizational maintenance
personnel.
(10)	Replace the "NO FIRE” gage with the
"FIRE” gage and attempt to fire. The weapon
should fire.
(11)	When all of the above procedures have
been completed, the weapon is correctly timed.
80
AGO S491A
CHAPTER 3
OPERATION AND FUNCTIONING
Section I. OPERATION
13.	General
Operation includes loading or unloading the gun,
clearing the gun, or allowing the bolt to go for-
ward.
14.	Half-Loading and Loading the Gun
a.	To half-load the gun, the gunner insures the
bolt Is forward and the cover is closed. The assist-
ant gunner inserts the double loop end of the am-
munition belt in the feedway until the first round
is engaged by the belt holding pawl. The gunner
grasps the retracting slide handle with the right
hand, palm up, and vigorously jerks the bolt to
the rear and releases the retracting slide handle.
If the bolt latch release lock is engaging the bolt
latch release, the bolt and retracting slide handle
will move forward under pressure of the driving
spring group, half-loading the gun. However, if
the bolt latch release is up and free of the bolt
latch release lock, the bolt latch will hold the bolt
and retracting side handle to the rear. The re-
tracting slide handle must be returned to its most
forward position prior to releasing the bolt. To
complete half-loading, press the bolt latch release,
allowing the bolt to go forward.
b.	To fully load the gun, the procedure is the
same as in half-loading, except it requires the
gunner to pull and release the bolt twice.
15.	Unloading and Clearing the Gun
a.	To unload the gun, the gunner unlocks the
bolt latch release (if applicable) and raises the
cover. The assistant gunner lifts the ammunition
belt from the feedway. The gunner pulls the bolt
to the rear and examines the chamber and T-slot
to insure they hold no rounds. In darkness, the
gunner must feel the chamber and T-slot.
b.	To clear the gun additional precautions are
taken. After the steps above have been accom-
plished, a wooden block, extending above and
below the receiver approximately one inch, is in-
serted in the receiver between the bolt and the
rear of the barrel. A cleaning rod is then inserted
in the muzzle end of the barrel, pushed through
the bore until it can be seen in the receiver, and
immediately removed (fig 84).
c.	During any temporary cessation of fire,
where it is not necessary to unload or clear the
gun, the bolt should be latched to the rear to pre-
vent accidental firing.
16.	Precautions During Operation
a.	Insure that the cover (once raised) remains
in the raised position, with the barrel remaining
in the gun, before allowing the bolt to go forward.
дедов 14. CUarinf tM gvn.
AGO M»1A
SI
b.	If the cover is lowered when the bolt is to the
rear, the belt feed lever lug will not fit into its
proper groove in the bolt. Thus, parts may be
damaged as the bolt goes forward. In the cover
assembly, the belt feed lever lug is held to the left
by the action of the shoulder headless pin and
spring, just above the pivot.
c.	If the bolt is allowed to go forward with the
barrel out of the gun, parts may be damaged when
the bolt slams forward. The added weight and
cushioning effect of the barrel act as a buffer and
protect the parts from damage.
d.	To allow the bolt to go forward with the
barrel out of the gun, pull the retracting slide
handle all the way to the rear, engaging the bolt
stud in the notch in the rear of the retracting
slide. Maintain a steady pressure to the rear on
the retracting slide handle; press the bolt latch
release and allow the bolt to ride slowly forwar
17.	Singh Shot Operation
a.	To fire the gun single shot, the bolt Ifttch
release must be in the up position. The latch en-
gages the notches on top of the bolt when the bolt
is to the rear after each round is fired.
b.	When the bolt latch release is depressed the
latch assembly is raised, allowing the bolt to be
driven forward into battery. The gun may then be
fired by pressing the trigger.
c.	When the bolt latch release Is locked down by
the bolt latch release lock on the buffer tube
sleeve, the gun functions as an automatic weapon. .
Section II. FUNCTIONING
18.	General
a.	The cycle of operation is broken down Into
eight basic steps. More than one step may occur at
the same time. The steps are listed below in the
order explained:
(1)	Feeding. Feeding is the action of placing
a cartridge in the receiver, approximately in back
of the barrel, ready for chambering.
(2)	Chambering. The round is placed in the
chamber.
(8)	Locking. The bolt is locked to the barrel
and barrel extension.
(4)	Firing. The releasing of the firing pin,
igniting the primer of the cartridge.
(5)	Unlocking. The bolt unlocks from the
barrel and barrel extension.
(6)	Extracting. The empty cartridge case is
pulled from the chamber.
(7)	Ejecting. The empty cartridge case is
ejected from the receiver.
(8)	Cocking. The firing pin is withdrawn into
the cocked position.
b.	With the Browning machinegun, caliber .60
НВ, М2, the recoiling groups must be manually
operated to place the first round in the chamber.
The cycle of operation begins with the first round
positioned over the belt holding pawl. The recoil-
ing groups are in their forward position.
19.	Feeding
a.	Left-Hand Feed.
(1)	When the bolt is fnlly forward, the belt
feed slide is in the cover; the ammunition belt is
held in the feedway by the belt holding pawl (fig
86 and 86).
(2)	As the bolt moves to the rear, the cam
grooves guide the belt feed lever, pivoting the
lever and moving the slide out the side of the
cover (fig 87). The belt is held stationary by the
belt holding pawl, while the belt feed pawl pivot'
compressing its spring, and rides up over the link
holding the first round (fig 88).
(3)	When the bolt is all the way to the rear,
the belt feed slide moves out far enough to allow
the belt feed pawl spring to force the pawl down
behind the first round (fig 89).
(4)	As the bolt moves forward, the belt feed
lever moves the slide back into the receiver. The
Fignr» Ci. F—ding—ЫС folly forward. bolt f—d »Hd»
in Uo cover and ммясяШ bolt held in th» f—dway
by Ue bolt holding pawl freer view).
•2
▲GO MtlA
Figure 86. Feeding—bolt fully forward, belt feed elide in the cover and
ammunition belt held in the feedway by the belt holding pawl (top view).
Figure 87. Feeding—belt feed elide moving out of the tide of the cover.
belt is pulled in by the belt feed pawl. The next
round rides over the belt holding pawl, compress-
ing its spring and forcing the pawl down until the
round has passed over the pawl (fig 90).
(Б) When the bolt is fully forward, the slide
is back in the cover; the first round is engaged by
the extractor.
(6)	If for any reason a round is not ex-
tracted from the belt, the belt feed pawl arm will
ride up over the round, holding up the belt feed
pawl to prevent double-feeding.
b.	Withdrawing a Round From the Belt.
(1)	The extractor grips the first round in the
feedway and, as the recoiling parts move to the
ear, withdraws it from the ammunition belt. Ini-
tially, the grip of the extractor is held secure by
the downward pressure of the cover extractor
spring (fig 91).
(2)	As the bolt continues its movement to the
rear, the cover extractor cam forces the extractor
down, causing the cartridge to enter the T-slot in
the bolt (fig 92).
(3)	As the bolt moves to the rear and the
extractor is forced down, the extractor lug, riding
along the top of the extractor switch, forces the
rear end of the extractor switch downward. Near
the end of the rearward movement, the extractor
lug overrides the end of the switch and the switch
snaps back up into position.
20.	Chambering
As the bolt moves forward, the round is held by
the T-slot and the extractor assembly. The extrac-
tor stop pin (on the left side of the bolt) permits
the extractor assembly to go down only far
enough to aline the round with the chamber (fig
AGO >4»1A
83
BELT FEED SLIDE
Figure 88. Feeding—be It feed pawl riding over the
firet round.
Figure 90. Feeding—belt feed elide moving tiuto tie
cover, with the belt feed pawl ftefa'nd the firet round.
Figure 89. Feeding—belt feed pawl behind the jfrit round.
S3). As the bolt continues forward, the round is
chambered. As this action takes place, the extrac-
tor lug rides up the extractor cam, compressing
the cover extractor spring, and through the pres-
sure of the spring, snaps into the groove in the
next cartridge base.
21.	Locking
a.	Initially, the bolt is forced forward in count-
er-recoil by the energy stored in the driving spring
assembly and the compressed buffer disks. At the
start of counter-recoil, the barrel buffer body tube
lock keeps the accelerator tips from bouncing up
too soon and catching in the breech lock recess in
the holt After the bolt travels forward about Б
inches, the lower rear projection of the bolt
strikes the tips of the accelerator, turning the
accelerator forward. This unlocks the barrel ex-
tension from the barrel buffer body group and
releases the barrel buffer spring. The barrel
buffer spring expands, forcing the piston rod for-
ward.
b.	Since the cross groove in the piston rod en-
gages the notch on the barrel extension shank, the
barrel extension and barrel are also forced for-
ward by the action of the barrel buffer spring.
Some of the forward motion of the bolt is trans-
mitted to the barrel extension through the acceler-
ator. As the accelerator rotates forward, the front
of the accelerator speeds up the barrel extension;
at the same time, the accelerator tips slow down
the bolt.
c.	Locking begins 1% inches before the recoil-
ing groups (bolt, barrel extension, and barrel) are
fully forward. The breech lock in the barrel ex-
tension rides up the breech lock cam in the bottom
of the receiver into the breech lock recess in the
bottom of the bolt, locking the recoiling groups
together. The recoiling groups are completely
locked together three-fourths of an inch before
the groups are fully forward (fig 94).
22.	Bring
a.	As the trigger is pressed down, it pivots on
84
AGO Ш1А
COVER EXTRACTOR SPRING
Figure 91. Feeding—withdrawing the firet round from the feedway.
Figure 9t. Feeding—cartridge entering the T-elot in the bolt.
the trigger pin, so that the trigger cam on the
inside of the backplate engages, and raises, the
rear end of the trigger lever, which, in turn, piv-
ots on the trigger lever pin assembly, causing the
front end of the trigger lever to press down on the
top of the sear stud. The sear is forced down until
the hooked notch of the firing pin extension is
disengaged from the sear notch. The firing pin
and firing pin extension are driven forward by
the firing pin spring; the striker of the firing pin
hits the primer of the cartridge, firing the round
(fig 95 and 96).
b.	For automatic firing, the bolt latch release
must be locked, or held depressed, so that the bolt
latch will not engage the notches in top of the
bolt, holding the bolt to the rear, as in single-shot
firing. The trigger is pressed and held down. Each
time the bolt travels forward in counter-recoil,
the trigger lever depresses the sear releasing the
firing pin extension assembly and the firing pin,
automatically firing the next round when the for-
ward movement of the recoiling groups is nearly
completed. The gun should fire about one-six-
teenth of an inch before the recoiling groups are
AGO >4»1A
85
EXTRACTOR SWITCH
Figure 93. Chambering—new round alined with the chamber.
Figure 91. Locking-recoiling group» locked together.
fully forward. At the instant of firing, the parts
are in battery, i.e., the proper position for firing.
Only the first round should be fired with the parts
fully forward. The gun fires automatically as long
as the trigger and bolt latch are held down, and
ammunition is fed into the gun.
23.	Unlocking
a.	At the instant of firing, the bolt is locked to
the barrel extension and against the rear end of
the barrel by the breech lock, which is on top of
the breech lock cam and in the breech lock recess
in the bottom of the bolt (fig 94).
f>. When the cartridge explodes, the bullet trav-
els out of the barrel; the force of recoil drives the
recoiling groups rearward. During the first three-
fourths of an inch, the recoiling groups are locked
together. As this movement takes place, the
breech lock is moved off the breech lock cam stop,
allowing the breech lock depressors (acting on the
breech lock pin) to force the breech lock down,
out of its recess from the bottom of the bolt (fig
97). At the end of the first three-fourths of an
inch of recoil, the bolt is unlocked, free to move to
the rear, independent of the barrel and barrel ex-
tension (fig 98).
c.	As the recoiling groups move to the rear, the
barrel extension causes the tips of the accelerator
to rotate rearward. The accelerator tips strike the
lower rear projection of the bolt, accelerating the
movement of the bolt to the rear (fig 99).
d.	The barrel and barrel extension continue to
travel to the rear an additional three-eighths of
an inch, or an approximate total distance of 1Ц
inches, until they are stopped by the barrel buffer
assembly (fig 100).
e.	During the recoil of 1Ц inches, the barrel
buffer spring is compressed by the barrel exten-
sion shank, since the notch on the shank is en-
gaged in the cross groove in the piston rod head.
AGO M»1A
86
FIRING PIN SPRING
Figure 95. Firing—ready to fire.
Figure 96. Firing—round ignited.
87
AGO M»1A
Figure 97. Unlocking—breech lock being forced out of it»
receee in the bolt.
The spring is locked in the compressed position by
the claws of the accelerator, which engage the
shoulders of the barrel extension shank (fig 101).
/. After its initial travel of three-fourths of an
inch, the bolt travels an additional 6% inches to
the rear, after it is unlocked from the barrel and
barrel extension, for a total of 7Ц inches. During
this movement, the driving springe are com-
pressed. The rearward movement of the bolt is
stopped as the bolt strikes the buffer plate. Part
of the recoil energy of the bolt is stored by the
driving spring rod assembly, and part is absorbed
by the buffer disks in the backplate (fig 102).
24.	Extracting
a.	The empty case, held by the T-slot, has been
expanded by the force of the explosion; therefore,
it fits snugly in the chamber. If the case is with-
drawn from the chamber too rapidly, it may be
tom. To prevent this, and to insure slow initial
extraction of the case, the top forward edge of the
breech lock and the forward edge of the lock
recess in the bolt are beveled. As the breech lock
is unlocked, the initial movement of the bolt away
from the barrel and barrel extension is gradual
(fig 97).
b.	The slope of the locking faces facilitates lock-
ing and unlocking and prevents sticking. The le-
verage of the accelerator tips on the bolt speeds
extraction, after it is started, by kicking the bolt
to the rear to extract the empty case from the
chamber (fig 98).
25.	Ejacting
As the bolt starts its forward movement (count-
er-recoil) the extractor lug rides below the extrac-
tor switch, forcing the extractor assembly farther
down, until the round is in the center of the T-
slot. The round, still gripped by the extractor,
ejects the empty case from the T-slot. The last
empty case of an ammunition belt is pushed out
by the ejector.
26.	Cocking
a.	When the recoiling groups are fully forward,
the top of the cocking lever rests on the rear half
of the V-slot in the top plate bracket (fig 108). As
the bolt moves to the rear, the top of the cocking
lever is forced forward. The lower end pivots to
the rear on the cocking lever pin. The rounded
nose of the cocking lever, which fits through the
slot in the firing pin extension, forces the exten-
sion to the rear, compressing the firing pin spring
against the sear stop pin (accelerator stop).
b.	As the firing pin extension is pressed to the
rear, the hooked notch of the extension rides over
the sear notch, forcing the sear down. The sear
spring forces the sear back up after the hooked
notch of the firing pin extension has entered the
sear notch. The pressure of the sear and firing pin
springs holds the two notches locked together.
There is a slight overtravel of the firing pin exten-
sion in its movement to the rear, to insure proper
engagement with sear (fig 104). As the bolt starts
forward, the overtravel is taken up and completed
when the cocking lever enters the V-slot of the top
plate bracket, and is cammed towards the rear;
pressure on the cocking lever is relieved as the
bolt starts forward (fig 105).
M
▲GO MllA
Figure 98. Unlocking—bolt unlocked from the breech lock.
AGO 5491A
89
accelerator
Figure 99. Unlocking—accelerator tipe accelerating the movement
of the bolt to the rear.
Figure 100. Unlocking—barrel and barrel extension etopped by the barrel buffer aoeembly.
90
AGO »4»1A
BARREL EXTENSION SHANK
Figure 101. Unlocking—barrel buffer spring compressed and locked.
FFER. PLAT? •
Figure 102. Unlocking—recoil movement completed.
AGO 3491A
91
TOP PLATE BRACKET
BOLT
Figuro 10Л. Cooking—roooiling group forward, gun not oookod.
92
AGO >4»1A
COCKING LEVER
FIRING PIN EXTENSION
Figure 101. Cocking—hooked notch of the firing pin
extension engaged by the eear notch.
AGO J491A
93
SEAR STOP PIN
FIRING PIN EXTENSION
Ffeur* 10f. Cooking—recoiling group forward, gun oockod.
94
AGO MtlA
CHAPTER 4
MOUNTS
27.	General
a.	The two principal ground mounts used with
the caliber .50 machinegun are the tripod mount,
MS, and the antiaircraft mount» M63. The tripod
mount, MS, is a ground mount designed for use
against ground targets. The antiaircraft mount,
M6S, is a ground mount principally designed for
use against aerial targets. Its use against ground
targets is limited because the mount tends to be
unstable when the gun is tired at low angles.
b.	The three principal vehicular mounts used
with the caliber .50 machinegun are the truck
mount, M36; the pedestal truck mount, M31C and
M24A2: and the commander's cupola, Ml 13 ar-
mored personnel carrier.
Section I. GROUND MOUNTS
20.	Tripod Mount, М3
a.	General. The M8 mount is the standard
ground mount of the caliber .50 machinegun (fig
106). It Is a folding tripod with three telescopic,
tubular legs, connected at the tripod head. Each
leg ends in a metal shoe, which can be stamped
into the ground for greater stability. The two
trail lego are joined together by the traversing
bar. The traversing bar serves as a support for
the traversing and elevating mechanism, which in
turn supports the rear of the gun. The tripod head
furnishes a front support for the mounted gun
which is further supported by the short front leg.
When the tripoid Is emplaced on flat terrain, with
all extensions closed, the adjustable front leg
should form an angle of about 60 degrees with the
ground. This places the gun on a low mount, about
12 inches above the ground. To raise the tripod
farther off the ground, extend the telescopic front
and trail legs (enough to keep the tripod level and
maintain the stability of the mount).
(1)	Front leg. To adjust the front leg, turn
the front leg clamp screw handle counterclockwise
to loosen the front leg clamp screwnut. Adjust the
leg to the desired angle, and tighten the front leg
damp.
(2)	Leg extensions. To extend any of the tri-
pod legs, unscrew the leg clamping handle; press
down on the indexing lever, and extend the leg to
the desired length. Aline the stud on the indexing
lever with one of the holes in the tripod leg exten-
sion. Release pressure on the indexing lever, al-
lowing the stud to fit the desired hole. Tighten the
leg damping handle.
b.	Traversing and Elevating Mechanism.
(1)	The traversing mechanism.
(a)	Consists of a traversing bar, slide, and
screw assembly. The traversing bar, graduated in
5-mil increments, fits between the trail legs of the
tripod. The traversing slide and screw assembly
are damped in place on the traversing bar by the
traversing slide lock lever. When the traversing
slide is locked to the traversing bar, the travers-
ing handwheel should be centered. The traversing
slide is properly mounted when the lock lever is to
the rear and the traversing handwheel is posi-
tioned to the left.
(b)	To make changes in direction, loosen
the traversing slide lock lever and move the slide
along the traversing bar. This permits traverse of
400 mils left or right of the zero index in the
center of the traversing bar. Readings on the
traversing bar are taken from the left side of the
traversing slide. For changes of 50 mils or less in
deflection, turn the traversing handwheel of the
screw assembly. This allows a traverse of 50 mils
left or right of center. One click in the traversing
handwheel signifies 1 mil change in direction.
(2)	The elevating mechanism (fig 107).
(a)	Consists of an upper and lower elevat-
ing screw, and is connected to the gun by insert-
ing the quick release pin assembly through the
holes in the upper elevating screw yoke and the
rear mounting lugs of the receiver. A scale, gradu-
ated in mils, is fitted to the upper screw to indi-
cate elevation. This scale is marked to show 250
mils in depression and 100 mils in elevation from
the zero setting.
95
AGO *411A
Figure 106. Tripod mount, М3.
(b)	The elevating handwheel is graduated
in 1-mil increments up to 50 mils, and is fastened
to the elevating screw by a screw lock. This syn-
chronizes the handwheel graduations with those
on the upper elevating screw. A spring actuated
index device produces a clicking sound when the
handwheel is turned. Each click equals 1 mil
change in elevation. The handwheel is turned
clockwise to depress the barrel and counterclock-
wise to elevate.
c.	Pintle. The gun is connected to the tripod
mount, М3, by a pintle. This pintle is semiperma-
nently attached to the machinegun by a pintle bolt
through the front mounting hole in the receiver.
The tapered stem of the pintle seats in the tripod
head, and is held secure by a pintle lock and
spring. To release the pintle, raise the pintle lock,
releasing the cam.
d.	General data. The weight of the pintle and
traversing and elevating mechanism are consid-
ered as part of the total weight of the tripod
mount, MS (44 lbs).
29.	Antiaircraft mount, M63
Reference TM 9-1005-218-10.
96
AGO 84»1A
Fiffw 107, SUvatinff mtetantom.
Section II. VEHICULAR MOUNTS
30.	Truck Mount, M36 (Fig 108 and 100)
a.	This mount constate of a cradle with a roller
carriage on a circular track. The cradle can be
rotated in the pintle sleeve of the carriage and can
be adjusted for elevation. The carriage is guided
on the track by rollers. The track is secured to the
vehicle by supports.
b.	To move the gun in elevation on the МЗв
mount, remove the cradle locking pin and place it
in the carriage handle; grasp the spade gripe and
elevate or depress as desired. The gun ta also
moved in traverse by pressure on the spade grips.
To move the gun on the track, raise the brake
handle lever until it is retained by the brake de-
87
AGO I4»XA
Figure 108. Browning machinegun, caliber .50 HB, MS, on truck mount M89.
98
AGO I491A
Figure 109. Browning machinegun, caliber .50 HB, Mt, on truck mount M55»
tent plungers. The cradle may then be moved on
the track by applying pressure on the carriage
handle.
31.	Pedestal Trude Mount, М31C
Reference TM 9-2016.
32.	Pedestal Trude Mount, M24A2
Reference TM 9-2016.
33.	Commander's Cupola—Ml 13 Armored
Personnel Carrier
A caliber .50, М2, machinegun and mount are in-
stalled in the gun support on the commander's
cupola. The machinegun can be traversed 360 de-
grees, elevated 53 degrees, and depressed 21 de-
grees maximum.
AGO S4»1A
99
CHAPTER 5
MALFUNCTIONS, STOPPAGES, IMMEDIATE ACTION, MAINTENANCE,
INSPECTION, AND DESTRUCTION
Section I. MALFUNCTIONS AND STOPPAGES
34» Gonoral
A stoppage is any interruption in the cycle of
operation caused by the faulty action of the gun
or ammunition. The first thing to do when a stop,
page occurs is to apply immediate action. Immedi-
ate action is the prompt action taken by the firer
to reduce a stoppage (para 86).
35. Types of Stoppages
a. General, Stoppages are classified as follows:
(1) Failure to feed; A stoppage that prevents
the round from being properly positioned in the
receiver group.
(2)	Failure to chamber: A stpppage that pre-
vents the chambering of the round completely.
(8)	Failure to lock: A stoppage that prevents
the breech lock from correctly entering its recess
in tbs bolt
(4)	Failure to £re; A stoppage that prevents
the ignition of the round.
(5)	Failure to unlock: A stoppage that pre-
vents the breech lock from moving out of its
recess In the bolt.
(6)	Failure to extract: A stoppage that pre-
vents the extraction of the expended cartridge
from the chamber.
(7)	Failure to eject: A stoppage that pre-
vents the ejection of the expended cartridge from
the receiver.
(8)	Failure to cock: A stoppage that pre-
vents the firing pin extension from being engaged
with the sear.
b.	Common Stoppage», The most common stop-
pages with caliber .50 НВ, М2 machineguns are:
(1)	Failure to feed.
(2)	Failure to chamber.
(8)	Failure to fire.
c.	Caueee of Stoppage», The chart below lists
the usual, and other causes of the various stop-
pages.
Nrtvra of «ммие*	Urael мема	Other eaueae
Failure to fwd..................		Defective ammunition belt			Improperly loaded belt. Short round. Thick or thin rim, bulged round, set back primer. Broken parts. Battered breech lock. Barrel breech lock cam. Faulty breech lock cam adjustment. Worn or faulty breech lock cam, or ad- juatment. Defective cartridge caw. Burred T-ilot. Broken cocking lever.
Failure to chamber....................	Defective feed mechanism. Defective extractor.
	Broken part or obstruction In T-alot or chamber. Separated (ruptured) ease. Incorrect headspace.....
Fbflura to lode........................
to	Defective parts in firins mechanism. De- fectlve ammunition. Incorrect timing. Broken parte in receiver.................
FaOure to unlock...			.
Failure to extract................		, Dirty chamber.........	..........
Failure to eject.		Defective ejector
Failure to cock.	...	-	.......	. Broken eear.
	Worn eear notch. Weak eear spring. Worn hooked notch on firing pin exten- sion.
100
▲00 MMA
d.	Malfunctions. A malfunction is any failure of
the gun to function satisfactorily.
(1)	Failure to function freely. Sluggish oper-
ation is usually due to human failure to eliminate
excessive friction caused by dirt, lack of proper
lubrication, burred parts, tight headspace adjust-
ment, or incorrect timing.
(2)	Uncontrolled automatic fire. Uncontrolled
automatic Are is continued Are when the trigger
or trigger control mechanism is released. If the
cause is present before the gun is fired, the gun
will start to fire when the recoiling groups move
into battery the second time. If the defect occurs
during firing, the gun will continue firing when
the trigger control mechanism is released.
(a)	Uncontrolled automatic fire (runaway
gun) may be caused by the following:
1. Bent trigger lever, forward end of the
trigger lever sprung downward.
f. Burred beveled contacting surfaces-of
the trigger lever and sear.
3.	Jammed or broken sideplate trigger.
(b)	To remedy uncontrolled automatic fire:
1.	Keep the gun laid on target.
2.	Twist the belt, causing the gun to jam.
Note. This may damage the feeding mechanism.
Caution. DO NOT UNLATCH THE COVER1
8.	Replace broken, worn, or burred
parts. Check the sideplate trigger and trigger con-
trol mechanism, when applicable.
Section II. IMMEDIATE ACTION
36.	General
a.	Immediate action is performed by the gun-
ner; however, every crew member must be
trained to apply immediate action. The procedures
outlined below will assist in reducing most stop-
pages without analyzing their cause in detail.
b.	If gun fails to fire:
(1)	Wait 5 seconds; a hangfire may be caus-
ing the misfire. In the next 5 seconds, pull the bolt
to the rear (check for ejection and feeding of
belt), release it, relay on the target and attempt to
fire.
Note. When ths holt latch engages the holt and holds
it to the roar, the gunner must return the retracting
Udo handle to its forward position.
If the boltlatch release and trigger are depressed
at the same time, the bolt goes forward and the
weapon should fire automatically.
(2)	If the gun again fails to fire, wait 5 sec-
onds, pull the bolt to the rear (engage with bolt
latch if applicable) and return the retracting slide
handle to its forward position. Open the cover and
remove the belted ammunition. Inspect the gun to
determine the cause of stoppage as outlined in
paragraph 86c.
37.	Safely Precautions After Misfire
A hangfire or cookoff can cause injury to person-
nel or damage to the weapon. To avoid these, the
gunner must take the following precautions:
a.	Always keep the round locked in the chamber
the first 5 seconds after a misfire occurs. This
prevents an explosion outside of the gun in event
of a hangfire.
b.	If the barrel is hot, the round must be ex-
tracted within the next Б seconds to prevent a
cookoff. When more than 150 rounds have been
fired in a 2-minute period, the barrel Is hot
enough to produce a cookoff.
c.	If the barrel is hot and the round cannot be
extracted within the 10 seconds, it must remain
locked in the chamber for at least 5 minutes, to
guard against a cookoff.
d.	The gun cover will remain closed during the
waiting periods prescribed in a, bt and c above.
38.	Reduction of Stoppages
When immediate action does not correct the mal-
function, the quickest way to resume firing is to
replace the defective part
a.	Removal of a Cartridge From the Т-Slot If
the cartridge does not fall out hold the bolt to the
rear, and with the extractor raised, use a screw-
driver to push the cartridge out the bottom of the
receiver.
b.	Removal of a Ruptured Cartridge. A rup-
tured (separated) cartridge case may be removed
with a cleaning rod or ruptured cartridge extrac-
tor.
(1) To remove a ruptured cartridge with the
ruptured cartridge extractor (cal .50
41-E-557-50, (7160041) raise the cover, and
pull the bolt to the rear. Place the ruptured car-
tridge extractor in the T-slot of the bolt, In the
same manner as that of a cartridge, so that it is
held in line with the bore by the ejector of the
extractor assembly of the gun. With the ruptured
cartridge extractor alined with the bore and held
firmly in the T-slot, let the bolt go forward into
battery. This forces the extractor through the
ruptured case, and the shoulders will spring out in
front of the case. Pull the bolt to the rear and
▲GO «•!▲
101
SHOULDERS
Figure 110. Caliber .50 ruptured cartridge case extractor.
Figure 111. Ruptured cartridge case extractor alined with the chamber.
remove the ruptured case and extractor (fig 110	(2) Always check headspace and timing after
and 111),	a ruptured cartridge occurs, and set if necessary.
102
▲GO »4»1A
Section III. MAINTENANCE (CARE AND CLEANING)
39.	General
a.	Gun Maintenance. The importance of a thor-
ough knowledge of care» cleaning, and mainte-
nance of the machinegun cannot be overempha-
sized. Care, cleaning, and maintenance determine
whether or not the gun will function properly
when needed. The bore and chamber must be
properly maintained to preserve accuracy. Be-
cause of the close fit of working surfaces and the
high speed at which the gun operates, the receiver
and moving parts must be kept clean, correctly
lubricated, and free from burrs, rust, dirt, or
grease to insure proper, efficient functioning.
b.	Mount Maintenance. The care, cleaning, lu-
brication, and adjustment of the mounts used
with the gun are no less important. The function-
ing of the gun and mount together determine
overall effectiveness. AH accessories and equip-
ment used with the gun and mount, including am-
munition, must be properly maintained.
c.	Maintenance System. To insure proper care
of the machinegun, it is necessary to have a sys-
tem of maintenance or a standard operating pro-
cedure (SOP) for the frequency of cleaning. Each
gun should be cleaned as soon after firing as pos-
sible and each time it is exposed to field condi-
tions. Under combat conditions, the gun should be
cleaned and oiled daily. Under extreme climatic
and combat conditions it may be necessary to
clean and lubricate more frequently. Under ideal
conditions, where the gun Is not used, and is
stored in a clean, dry place, it may only be neces-
sary to inspect, clean, and lubricate every 6 days.
The gun should be disassembled, cleaned, and
oiled in a clean, dry location, where it is least
exposed to moisture, dirt, etc. Maintenance and
preparation for storage over a longer period of
time is covered In ordnance regulations (Ord
8SNL A-l). If possible, keep the gun covered
with a gun cover, canvas, tarpaulin, or poncho,
when not in use.
d.	Cleaning Materials.
(1)	Rifle bore cleaner is used to clean the bore
of the machinegun barrel after flring. Immedi-
ately after using bore cleaner, dry the bore and
any parts of the gun exposed to the bore cleaner;
then apply a thin coat of special preservative lu-
bricating oil.
(2)	When bore cleaner is not available, water
can be used. Hot or cold wat» can be used; how-
ever, warm, or hot, soapy water is recommended.
After using soap and water, dry the barrel and
apply a thin coat of special preservative lubricat-
ing oil.
e.	Lubricating.
(1)	Special preservative lubricating oil (PL-
SPECIAL). A thin oil used for lubricating at nor-
mal and low temperatures and for providing tem-
porary protection against rust, The entire gun can
be lubricated with this oil.
(2)	Lubricating oil (LSA). Should be used to
lubricate all friction-producing parts of the gun
as well as exterior parts exposed to the elements.
LSA will not burn off during firing or wash off
during rain.
(8)	Cold climates (consistently below 0 de-
grees F). Lubricate the gun with weapon lubricat-
ing oil (LAW) and keep It covered as much as
possible. For further information, see TM 9-207
and FM 31-70.
(4)	Hot, humid climates. Inspect the gun
more frequently for signs of rust. Keep the gun
free of moisture and lightly oiled with lubricating
oil (LSA).
40.	Care and Cleaning Before, During, and
After Firing
a.	Before firing (when the situation permits),
take the following steps to insure efficient func-
tioning of the machinegun:
(1)	Disassemble the gun into its major
groups or assemblies.
(2)	Clean the bore and chamber, but do not
oil them.
(8)	Clean all metal parts thoroughly and
apply a light coat of oil to all metal parts which
do not come In contact with the ammunition. (See
app C for a checklist of before, during, and after
firing care and cleaning.)
b.	To insure complete removal of powder resi-
due and primer fouling from the bore of the
machinegun barrel, the bore should be cleaned
once each day, for at least three consecutive days
after firing. The bore sweats out this fouling or
residue, and cleaning must be repeated until there
is no further evidence of sweating.
41.	Cara and Cleaning Under Unusual
Climatic Conditions
Extreme cold, hot, dry, and tropical climates
affect the gun and its functioning. Care should be
taken under these climatic conditions to insure
that the gun is cleaned daily with the prescribed
ЛОО MMA
103
lubricant! and protected from the elements by
some sort of cover if possible. Further Informa-
tion on care and cleaning of the gun under unu-
sual climatic conditions can be found in TM
3-1005-213-10.
42.	Care and Cleaning Under CBR Conditions
a.	If contamination is anticipated, apply oil to
all outer surfaces of the machinegun (DO NOT
OIL AMMUNITION). Keep the gun covered as
much as possible.
b.	If the gun is contaminated, decontaminate
by following the procedures outlined in FM 21-40
end TM 3-220, then clean and lubricate.
43.	Care and Cleaning of Mounts and
Accessories
a.	General. The mounts and accessories, such as
the ammunition chest and spare parts, should also
be kept clean and lubricated. Painted surfaces
should be spot painted when necessary. Moving
surfaces should be inspected and oiled with the
prescribed lubricant
b.	Tripod Mount, MS. All external surfaces of
the mount should be kept clean and lightly oiled.
Be particularly careful that the pintle bushing is
clean and lightly oiled, and that the pintle lock
release cam is well-lubricated and free from grit
The sleeve lock indexing levers and telescopic legs
should be clean and lubricated enough for ease in
use. The mount should be cleaned and oiled with-
the same regularity as the gun. Cleaning of the
mount can be accomplished in the same manner as
the gun.
c.	Antiaircraft Mount, MSS. Lubrication on the
M6B mount should be light. A drop of oil on the
joints of the flring grips, trigger control linkage,
elides of the trigger control mechanism, sideplate
trigger, sideplate trigger cam, and pintle pivot
bolts should be sufficient. Although the pintle does
not revolve in the elevator, it should be lightly
oiled to prevent rust. When in use, the traversing
bearing should be sparingly lubricated monthly.
Use automotive and artillery grease (GAA), in-
jected by a lubricating gun through the lubricat-
ing fittings in the base. The bearing should be
thoroughly lubricated at all times, but excessive
lubrication should be avoided, since excess grease
will work out onto the mount
Section IV.
44.	Preparation
When Inspected, the machinegun should be com-
pletely assembled, mounted, and have headspace
and timing properly set. Inspecting personnel
should look for dirt, cracks, burrs, and rust, and
INSPECTION
operate the gun manually to insure it is function-
ing properly. Appendix D Is an inspection check-
list to be used as a guide for crew members or
inspecting personnel to insure that the gun and
equipment are properly maintained.
Section V. DESTRUCTION
49.	General
The decision to destroy the gun to prevent its
capture and use by the enemy is a command deci-
sion, and will be ordered and carried out only on
authority delegated by the major unit commander.
a.	Destroy the machinegun and mount only
when they are subject to capture or abandonment.
Destruction must be as complete as circumstances
permit
b.	Lacking time for complete destruction, de-
stroy the parts essential to operation of the gun,
beginning with those parts most difficult for the
enemy to duplicate.
c.	Destroy the same parts of each gun to pre-
vent the reconstruction of a complete gun from
several damaged guns.
46. Methods of Destruction
g. Gun. Field strip the gun. Use the barrel as a
sledge. Raise the cover and smash the cover for-
ward and down, toward the barrel support Smash
the backplate group. Remove the firing pin from
the bolt; place the striker in the hole In the face
of the bolt and bend it until broken, Remove the
barrel buffer tube lock assembly from the barrel
buffer body group and bend and deform it. Smash
and bend the breech lock depressors. Place the
barrel extension In the rear of the receiver, with
the barrel extension shank protruding; knock
off the shank by striking it with the barrel
from the side. Deform and crack the receiver by
striking it with the barrel at the sideplate comers
nearest the feedway. Smash the extractor.
104
▲00 Ш1А
&. Tripod Mount MS. Leave the pintle on the
tripod by removing the pintle bolt from the gun.
Use the barrel as a sledge. Strike the sides of the
pintle and deform it Fold the trail legs and turn
the mount over. Stand on the folded trail legs and
knock off the pintle latch (pintle lock release
cam). Smash the elevating mechanism with the
barrel. If possible, smash the rear legs to prevent
unfolding.
e. Antifttrore/t Mount» M6S. Remove the side-
plate trigger control mechanism from its con-
tainer, or the gun, and deform it by using the
barrel Lock the cradle and yoke assembly In the
horizontal position, and beat the trigger frame
assembly and cradle until they an bent down
along the elevator assembly. Strike the elevator
from the side, with the barrel, until it is bent so
that the elevator will not rotate in the base.
d.	Spars Parts. Destroy the bolt, barrel exten-
sion, firing pins, and barrel buffer groups as pro-
scribed in 46a above. Break or deform all other
parts.
e.	Ammunition. When time permits and mate-
rial Is available, ammunition can be destroyg-by
burning. Unpack all ammunition from boxes or
cartons, stack the ammunition in a heap and,
using flammable material available, ignite and
take cover immediately.
f.	Burning. To destroy the gun by burning,
place a thermite grenade in the receiver on the
bolt (with the cover resting on the grenade) and
fire the grenade. (This method may require the
use of more than one grenade.) Remove the back-
plate group, place a thermite grenade in the rear
of the receiver and fire the grenade.
g.	DiopoodL Bury in suitable holes or dump
parts into streams, mud, snow, sumps, latrines, or
scatter the parts over a wide area.
AGO M»U
IM
CHAPTER 6
CREW TRAINING
Section I. CREW DRILL
47.	Donora I
a.	The purpose of crow drill Is to develop preci-
sion, speed, skill, end teamwork in the techniques
of examination of equipment, placing the gun into
and taking it out of action. In crew drill, precision
must be stressed Once that is attained, speed,
skill, and teamwork will be developed.
b.	Duties are rotated during crew drill to allow
each member of the gun crew to become familiar
with the duties of the other members.
c.	Precision is attained only through adherence
to prescribed procedure. Precision is the first con-
sideration. Speed, skill, and teamwork will develop
with practice.
d.	During crew drill, all oral or visual signals
are repeated. When the Are command Is com-
pleted, the gunner will give the assistant gunner
an UP. The assistant gunner win extend his hand
and arm into the air in the direction of the leader
(to indicate READY) and announce, UP.
s.	With the M8 mount, the crew must consist of
at least four men, Including the leader.
41. Craw Equipment
In addition to individual arms and equipment,
crew members carry the following equipment for
the tripod-mounted machinegun:
Bqwri or (hew Loader
No. 1. Aaaistant Gmmot
No. 1. Gumer
No. 8. Amraaitton bearer
Bfaooulari, compass, oao box
of axmumition.
Tripod.
Baealvtr, traversing end
efovating methanlsm at-
tached, and headspace oad
tfnrfag sago.
BsrreL band cover, and box
of ammvnitiosL
49.	Form for Craw Drill
a.	Positions With Equipment. The crew leader
commands, FORM FOR CREW DRILL. The crew
forms in column, facing the crew leader, with five
paces between men, in the following order: assist-
ant gunner, gunner, and ammunition bearer: the
assistant gunner is five paces from the crew
leader. When the crew members reach their
correct positions, they assume the prone position
with equipment arranged as follows (fig 112):
(1)	No. 1: tripod to his left, trail legs to the
rear, front leg uppermost.
(2)	No. 2: receiver across his front, back-
plate to the right, retracting slide handle upper-
most
(8)	No. 8: barrel to his right muzzle to the
rear, and ammunition box to his left front with
latch to the right (latch to the front for the new
box).
(4)	Other members, if present: ammunition
boxes in front, one foot apart, latches to the right
(front).
(6)	Crew leader places the ammunition box
to his right, as he faces the crew, latch to the
right (front).
b.	Rotation of Duties.
(1)	Duties are rotated to insure that each
member learns and is capable of performing the
duties of the other members.
(2)	The command to rotate all personnel is,
FALL OUT LEADER. At this command each
member of the crew rises, moves forward, and
assumes a new duty. The crew leader becomes the
ammunition bearer. The assistant gunner moves
forward and becomes the crew leader. The gunner
moves forward and becomes the assistant gunner.
The ammunition bearer moves forward and be-
comes the gunner. If the leader is not changed, the
command, FALL OUT ASSISTANT GUNNER, is
given. At this command, the crew members rise,
the gunner becomes the assistant gunner, the am-
munitin bearer becomes the gunner, and the as-
sistant gunner becomes the ammunition bearer.
When the crew members have assumed their new
positions, they call out their new duties in order,
ASSISTANT GUNNER, GUNNER, AMMUNI-
TION BEARER.
▲00 SO1A
Figure us. Crew formed in column, five pace» apart.
50.	Inspection of Equipment Before Firing
When the crew is formed with equipment, the
comand is, INSPECT EQUIPMENT BEFORE
FIRING. At this command, the crew proceeds as
follows:
a.	The assistant gunner inspects the tripod М3
mount to insure that:
(1)	The indexing levers and clamps ou the
front and trail legs function properly, and the legs
are in the short (low) position.
(2)	Front leg and trail legs are closely
folded; front leg clamp is handtight.
(3)	Sleeve lock latch and pintle lock release
cam are in working order; pintle lock release cam
is down.
(4)	Pintle bushing is free from dirt and
burrs.
b.	The gunner inspects the receiver group to
insure that:
(1)	Barrel support and breech bearing are
free of dirt.
(2)	Gun pintle is free of dirt.
(3)	Feed mechanism and bolt switch are
properly assembled to feed from left (raises cover
for proper inspection).
(4)	Striker projects through the aperture in
face of bolt (closes the cover).
(5)	Rear sight is set at 1000 yards (900 me-
ters) windage zero.
Figure US. Screwing the barrel into the barrel extension.
AGO MIA
107
(6)	Traversing and elevating mechanism is
securely attached to the receiver.
(7)	Traversing handwheel is centered.
(8)	Elevating screws are equally exposed
(about 2 inches), above and below elevating hand-
wheel.
(9)	Backplate is latched and locked in place.
(10)	Bolt latch release is locked in the down
position by the bolt latch release lock.
c.	The ammunition bearer inspects the barrel
and ammunition box to insure that:
(1)	Barrel is clear.
(2)	Barrel carrier assembly is securely at-
tached to barrel.
(3)	Barrel bearing is free of dirt.
(4)	Metallic links are clean (open ammuni-
tion box).
(5)	Belt is properly loaded and placed in box,
the double looped end up.
(6)	Dummy ammunition will be used during
crew drill and NO LIVE ammunition is present.
(7)	The box is closed and latched.
d.	When the ammunition bearer completes his
inspection, he moves to the gunner’s position, with
the barrel in his right hand and ammunition box
in his left hand. With the aid of the gunner, the
ammunition bearer screws the barrel into the bar-
rel extension. The headspace and timing adjust-
ment is now made as prescribed in paragraphs 11
and 12 (fig 113). The ammunition bearer remains
on the left and on line with the gunner.
e.	The crew leader examines his ammunition as
described in c above.
f.	At the completion of the inspection, a report
is rendered as follows:
(1)	The ammunition bearer reports: AMMU-
NITION CORRECT (or any deficiencies).
(2)	The gunner reports: GUN AND AMMU-
NITION CORRECT (or any deficiencies).
(3)	The assistant gunner reports: ALL
CORRECT (or any deficiencies) (fig 114).
Figure 1Ц. Crew ready to place the gun into action.
108
AGO S4P1A
51.	Placing the Gun Into Action
To place the gun into action, the crew leader com-
mands and signals, GUN TO BE MOUNTED
HERE (pointing to the position where the gun is
to be mounted), FRONT (pointing in the direc-
tion of fire), ACTION (vigorously pumping his
fist in the direction of the designated gun posi-
tion).
a.	At the command or signal ACTION the as-
sistant gunner grasps the left trail leg near the
center with his left hand. Springing to his feet
and grasping the tripod head with his right hand,
he lifts the tripod across the front of his body
with the front leg up, and carries the tripod to the
desired location (fig 115). Upon arrival at the
position, he places the trail leg shoes on the
ground with the front leg pointing upward.
Steadying the tripod with his left hand on the
front leg, loosens the front leg clamp with his
right hand (fig 116), positions the front leg with
his left hand, tightens the front leg clamp with his
right hand. With his right hand on the tripod
head, he slides his left hand down on the left trail
leg and with a snapping motion, pulls the left leg
(to the left), engaging the sleeve latch. He then
alines the tripod for direction, drops the mount to
the ground, stamps the right and left trail shoes
with his right or left foot, and assumes the prone
position behind the mount.
b.	The gunner and ammunition bearer move to-
gether. When the tripod is nearly mounted, the
gunner and ammunition bearer spring to their
feet. The gunner places both hands on the spade
grips, the ammunition bearer grasp the ammuni-
tion box in his left hand and the gun carrying
handle with his right hand; both men lift the gun
from the ground and move rapidly to the gun
position. At the gun position, the ammunition
bearer places the ammunition box on line and in
front of the leader's ammunition box. The gunner,
assisted by the ammunition bearer, inserts the
pintle into the pintle bushing. The ammunition
bearer stamps the front shoe into the ground with
his left foot (fig 117), releases the carrying han-
dle, lowers his right hand and lifts the gun pintle
lock release cam. When the gun pintle is fully
seated, he presses down the pintle lock release
cam with his right hand; then turns to his left
and returns to his original position.
c.	The assistant gunner holds the left spade grip
with his left hand, and with his right hand, low-
ers the traversing and elevating mechanism to the
traversing bar, insuring that the traversing hand-
wheel is to the left and the lock lever is to the
rear. He then assumes a semi prone position to the
left of the gun with his feet to the rear, and his
head on line with the feedway. He unlatches and
Fignro 119. AeritUnt gtmxrr—fNoJ) opening tKo tripod.
Fignro Ив. Emplaoing tho monnt.
MO USU
109
Figure 117. Mounting the gun.
raises the cover of the ammunition box, removes
the ammunition belt, and inserts the double
looped end into the feedway and taps the cover
with his right hand to insure it is closed.
d.	With his right hand, palm-up, the gunner
grasps the retracting slide handle, vigorously
jerks it to the rear and releases it. The gun is
half-loaded (fig 118). He then assumes the correct
gunner’s position by taking a prone position di-
rectly behind the gun, legs spread and heels down.
His right hand lightly grasps the right spade grip
with the thumb in position to depress the trigger.
His left hand is on the elevating handwheel (palm
down) with his thumb near the traversing slide
lock lever. He rests on his left elbow, head as close
as possible to the rear sight (fig 119). He then
gives the assistant gunner an UP. The assistant
gunner announces UP and extends his hand and
arm into the air in the direction of the leader.
110
ЛОО I491A

52. Taking the Gun Out of Action
To take the gun out of action, the command is
OUT OF ACTION.
a.	The gunner raises the cover with his left
hand, the assistant gunner lifts the ammunition
out of the feedway, replaces the ammunition in
the box, closes and latches the box. The gunner
closes the cover, pulls the retracting slide handle
to the rear with right hand (palm up) releases it,
presses the trigger with his right thumb, and loos-
ens the traversing slide lock lever with his left
hand. He rises to his feet, grasping both spade
grips. At this time the ammunition bearer will
arrive at the gun position. With his left hand, the
ammunition bearer grasps the ammunition box
and places his right foot on the front leg shoe.
With his righthand, he reaches down and lifts up
the pintle lock release cam and grasps the carry-
ing handle (fig 120).
ago mma
111
4
Figure 119, Crew rtady for action.
b.	The gunner and ammunition bearer lift the
gun from the tripod, turn right and carry the gun
back to their original position. They set the gun
down, muzzle to the left, retracting slide handle
up. The gunner pulls the retracting slide handle to
the rear, alines the lug on the barrel locking
spring with the %-inch hole in the right side of
the receiver. The ammunition bearer unscrews the
barrel from the receiver, picks up the ammunition
box and barrel, moves five paces to the rear,
places the barrel to his right, muzzle to the rear,
ammunition box to his left, and assumes the prone
position.
c.	The gunner rotates the bolt latch release lock
to the right and releases the bolt latch. He checks
his sights to insure they are properly set.
d.	The assistant gunner assumes a kneeling po-
sition behind the tripod and releases the sleeve
112
▲GO
Figure HO. Crew taking the gun out of action.
Figure It I. Folding the trail lege.
lock latch with his right hand, rises to his feet,
grasps the front leg with his left hand, and ro-
tates the tripod to a vertical position on the trail
legs. With his right hand, he loosens the front
leg clamp, folds down the front leg, then tightens
the clamp. With his right hand on the tripod head,
he rotates the tripod on the right trail leg and
releases the sleeve latch, folds the left trail leg
against the right, with his left hand (fig 121).
Holding the tripod head with his right hand, trail
legs with his left, he lifts the tripod across the
front of his body, with the front leg up. He turns
to the right and returns to his original position.
At this time, the crew leader picks up his ammu-
nition box and faces the crew. The assistant gun-
ner places the tripod on the ground, assumes a
prone position to the right of the tripod, and an-
nounces UP.
AGO I401A
11Э
Section II. HAND CARRY
Figure Itt. Drugging the gun into poeition.
53.	Duties of Crew
To hand-carry gun and equipment, the command
is SECURE EQUIPMENT, FOLLOW ME. At
this command—
a.	The crew leader carries his ammunition box
in his right hand.
b.	The assistant gunner carries the tripod over
either shoulder.
c.	The gunner carries the receiver on either
shoulder, spade grips to the front.
d.	The ammunition bearer carries his ammuni-
tion box in his left hand, and the barrel in his
right hand, muzzle to the rear; or on his left
shoulder with the muzzle to the front.
54.	Carrying the Tripod-Mounted Gun
When the gun is mounted on the tripod, it can be
114
AGO I481A
Figure ItS. Two-man carry.
moved for short distances by dragging, or by a
two- or three-man carry. (In the two- or three-
man carry, men should move in step to make car-
rying easier.)
a.	Dragging. The gun is dragged when limited
cover or the situation requires the gun to be
moved in this manner. The gunner and assistant
gunner drag the mounted gun to the desired posi-
tion (fig 122).
b.	Two-Man Carry. With the gunner on the
right and assistant gunner on the left, each grasps
the front leg with his forward hand, and a trail
leg with the other hand, just above the traversing
bar (fig 128).
c.	Three-Man Carry.
(1)	When the barrel is hot. The gunner is
behind the tripod with a trail leg in each hand.
The assistant gunner is on the left and the ammu-
nition bearer on the right, each grasps the carry-
ing handle. In addition, the assistant gunner car-
ries the ammunition in his left hand (fig 124).
(2)	When the barrel is cool. The ammunition
bearer and the assistant gunner each grasp the
front leg (fig 125).
Nott. Carrying the gun by the barrel may cause damage
to the barrel support and the barrel extension.
55.	Carrying the Gun to Other Mounts
With the mount prepared to receive the gun, the
cradle of the mount is placed in a horizontal posi-
tion To move the gun to the mount, the gunner
carries the right spade grip with his left hand,
and a box of ammunition in his right. The assist-
ant gunner grasps the carrying handle with his
left hand, and a box of ammunition in his right
AGO 1401A
115
Figure 12 k. Three-man carry (hot barrel).
hand. Upon arrival at the mount, the gunner and
assistant gunner place their ammunit; ,n boxes
near the mount. The gunner removes the rear
mounting (gun-locking) pin with his right hand.
The assistant gunner removes the front mounting
(gun-locking) pin with his right hand. The gun is
placed on the mount. The gunner alines the holes
in the rear mounting lugs of the receiver with the
rear mounting bracket and inserts the rear mount-
ing pin. The assistant gunner alines the front
mounting hole in the front of the receiver with the
front mounting bracket and inserts the front
mounting pin. (For use of the sideplate trigger
with the M63 mount, see TM 9-1005-213-10.)
116
AGO >«91A
Figure 125. Three-man carry (cold barrel).
AGO M91A
117
PART TWO
TECHNIQUE OF FIRE AND EMPLOYMENT
CHAPTER 7
TECHNIQUE OF FIRE DURING PERIODS OF GOOD VISIBILITY
Section I.	INTRODUCTION
56.	General
a.	Technique of fire is the method of delivering
and controlling effective fire. Each member of the
machinegun crew must be trained in the standard
methods of applying fire, either as a crew member
or an individual, and must perform his assigned
task automatically and effectively.
b.	The simplest and most effective technique of
delivering fire with the machinegun, mounted on
its ground or vehicular mounts, is to aline the
sights of the gun on the target and properly apply
fire. This technique of fire is called direct laying.
c.	At times, techniques of fire other than direct
laying are more appropriate and effective. When
delivering overhead fire and fire from position def-
ilade, the gunner must use the appropriate tech-
niques described in paragraphs 87 through 96.
d.	Before the machinegun can be employed to
the best advantage using any firing technique, cer-
tain fundamentals must be understood and ap-
plied. These include:
(1)	Characteristics of fire.
(2)	Classes of fire.
(3)	Range determination.
(4)	Fire control and fire commands.
(5)	Target designation.
(6)	Methods of engaging targets.
(7)	Overhead fire.
(8)	Predetermined fire.
(9)	Methods of laying the gun.
(10)	Final protective fires.
(11)	Range cards.
(12)	Firing from position defilade.
e.	This chapter discusses the above subjects,
which apply to all phases of techniques of fire.
57.	Marksmanship Training
Training in machinegun marksmanship (chap 9)
is a prerequisite to training in the technique of
fire.
Section II.	CHARACTERISTICS OF RRE
58.	General
The gunner's knowledge of his machinegun is not
complete until he learns something of the action
and effect of the projectiles when fired. This sec-
tion discusses various characteristics of machine-
gun fire, including trajectory, cone of fire, and the
beaten zone.
59.	Trajectory
a.	The trajectory is the curved path of the pro-
jectile in its flight through the air, from the muz-
zle of the weapon to its area of impact. The major
factors which influence the trajectory are: the ve-
locity of the round, gravity, rotation of the round,
and resistance of the air.
b.	The farther the round travels, the greater the
curve of the trajectory. The highest point of the
trajectory is called the maximum ordinate. This is
a point approximately two-thirds of the distance
from the gun to the target. The maximum ordi-
nate increases as the range increases (fig 126).
60.	Cone of Fire
When the weapon is fired automatically in bursts,
all the rounds do not follow the same path. This is
due to the vibrations of the gun and mount, varia-
nt
AGO 1491A
JStfurf jff. Масймик опКялй» el *•¥ r«VM
▲OOMtU
>4fwr»If7. Coiwe/jK.
lit
tions in ammunition, and atmospheric conditions
which cause the rounds to follow a slightly differ-
ent trajectory. Thia group of trajectories formed
by a single burst is called the cone of fire (fig
127).
61.	Beaten Zone
The beaten zone is an elliptical pattern formed by
the cone of fire as it strikes the ground.
a.	fjfccf of Range. As the range to the target
increases, the beaten zone becomes shorter and
wider.
b.	Effect of Terrain. The length of the beaten
zone for any given range will vary according to
the slope of the ground. On rising ground, the
beaten zone becomes shorter, but remains the
same width. On ground that slopes away from the
gun, the beaten zone becomes longer, but remains
the same width.
Section 111.	CLASSES OF FIRE
62.	General
Machinegun Are is classified with respect to:
a.	The ground.
b.	The target.
e.	The gun.
63.	Class of Fire With Respect te the Ground
(Fig 128)
a.	Plunging Fire. Fire in which the angle of fall
of the rounds, with reference to the slope of the
ground, is such that the danger space is practi-
cally confined to the beaten zone, and the length of
the beaten zone is materially shortened. Plunging
fire is obtained when firing from high ground into
low ground, when firing from low ground into
high ground, and when firing at long ranges.
b.	Grating Fire. Fire in which the center of the
cone of fire does not rise more than one meter
above the ground. When firing over level or uni-
formly sloping terrain, the maximum extent of
grazing fire obtainable is approximately 1000 me-
ters.
64.	Classes of Fira With Respect to the Target
(Fig 129)
a.	Frontal. The long axis of the beaten zone is
at a right angle to the long axis of the target
b.	Flanking. Delivered against the flank of a
target.
o.	Oblique. The long axis of the beaten sone is
at an angle, but not a right angle, to the long axis
of the target
d.	Enfilade. The long axis of the beaten sone
coincides or nearly coincides with the long axis of
the target. This class of fire is either frontal or
flanking and is the most desirable class of fire
with respect to the target, because it makes maxi-
mum use of the beaten zone.
65.	Classes of Fro With Respect to the Gun
(Fig 130)
a.	Fixed Fire. Fire delivered on a point target
Little or no manipulation is required. After the
initial burst, the gunners will follow any change
or movement of the target without command.
b.	Traversing Fire. Fire distributed against a
wide target requiring successive changes in the
direction of the gun. When engaging a wide target
requiring traversing fire, the gunner should select
successive aiming pointe throughout the target
area. These aiming points should be dose enough
together to insure adequate target coverage, but
not so dose as to be wasteful of ammunition by
concentrating a heavy volume of fire in a small
area.
c.	Searching Fire. Fire delivered against a deep
target or a target that has depth, requiring
changes in elevation of the gun. The amount of
elevation change depends upon the range and
slope of the ground.
d.	Traversing and Searching Fire. Fire deliv-
ered both in width and depth by changes in direc-
tion and elevation. It is employed against a target
whose long axis is oblique to the direction of the
fire.
e.	Swinging Traverse. Employed against targets
which require major changes in direction but lit-
tle or no change in elevation. Targets may be
dense, of considerable width, in relatively close
formations moving slowly toward or away from
the gun, or vehicles or mounted troops moving
across the front. The traversing slide lock lever is
loosened enough to permit the gunner to swing the
gun laterally.
f.	Free Gun. Fire delivered against moving tar-
gets which must be rapidly engaged with rapid
changes in both direction and elevation. Examples
are: aerial targets, vehicles, mounted troops, or
120
AGO MMA
Iff, Cla»M9 of firo with rotpooi to th* pxmndL
infantry in relatively close formations moving
rapidly toward or away from the gun position. To
fire free gun on the M8 tripod mount, the gunner
disengages the traversing slide lock lever from the
traversing bar and pushes the traversing and ele-
vating mechanism up, out of the way.
p. Rate of Fire. When firing swinging traverse
and free gun, the weapon is normally fired at the
cyclic rate of fire which is in excess of 450 rounds
per minute, consuming a large quantity of ammu-
nition. Also, there is no beaten zone as such, as
each round seeks it own area of impact.
AGO MMA
121
Affw* IM. Clout of Яг* «rit* r—put to 1Л* tarfrt.
m
▲00 M*1A
FIXED TRAVERSE
SEARCH TRAVERSE
& SEARCH
QQQ9QPP
FREE GUN
SWINGING
TRAVERSE
Fipvri 110. Олни of flro with roopoct to tho n*
Section IV.	RANGE DETERMINATION
66.	Oonoral
Range determination Is the process of deter-
mining the distance between the gunner's position
and his target. The gunner's ability to engage a
target depends on his ability to accurately deter-
mine the range to the target. Under combat condi-
tions, ranges are seldom known in advance; there-
fore, the effectiveness of fire depends largely upon
the accuracy of range determination.
67.	Maximum Usable Rango
The maximum usable range is the range at which
the target is visible to the gun crew or leader.
This range varies with the terrain and visibility,
but normally will not exceed the maximum effec-
tive range of the weapon. The caliber .60 НВ, М2,
machinegun has a maximum effective range of
I860 meters.
68.	Methods of Range Determination
There are many methods for determining range.
Some of these are estimating by eye, firing the
gun, measuring range from a map or aerial photo-
graph, stepping off the distance, or securing the
information from other units. Ranges are deter-
mined to the nearest 100 meters for machinegun
firing. In combat, the most commonly used meth-
ods are estimating by eye and firing the gun. s
69.	Estimating by Eye
This is the method most often used in the field.
There are two methods of estimating by eye; the
100-meter unit of measure method , and the ap-
pearance of objects method. ......... ~'
a.	100-Metor Unit of MeaouriMethod. To use
this method, the gunner must be able to visualize
a 100-meter distance on the ground. With this
distance in mind, he can mentally determine bow
many of these 100-meter units there are between
his position and the target In training, his esti-
mates should be checked by pacing off the distance
(the average soldier takes about 130 steps per 100
meters). Constant practice in applying the 100-
123
Лоо mu
Fiesrf J/J. Applying tho lOO-^msior unit of moaouromont mothod
for rangn up to SOO motor*.
meter unit of measure is essential This method is
used for ranges up to 600 meters (fig 181).
(1)	For ranges from 600 to 1,000 meters, the
soldier selects a point halfway to the target, deter-
mines the range to the midpoint by applying the
100-meter unit of measure, then doubles the esti-
mate (fig 182). This method of determining range
is not accurate beyond 1,000 meters.
(2)	Certain types of terrain will affect the
appearance of 100-meter units of measure. On ter-
rain that slopes upward toward the target, 100
meters appears longer than on level terrain; on
ground that slopes downward toward the target,
100 meters appears shorter than on level terrain.
b.	Ths Appearance-of-Objects Method. Many
times it is impossible to observe all of the terrain
to the target When this occurs, it is impractical
to apply the 100-meter unit of measure, and
ranges must be determined by the appearance-of-
objects method. To use this method, the soldier
must learn through practice how familiar objects
look at various known ranges. For example, he
studies the appearance of a man standing 100 me-
ters away. He fixes the appearance of the man
firmly in mind—-his size and the details of his
uniform and equipment Next, he studies the man
in a kneeling position, then in a prone position.
This procedure is followed at various known
ranges out to 500 meters. By comparing the ap-
pearance of the man in these positions at known
ranges, he can establish a series of mental images
which will help him to determine range on unfa-
miliar terrain out to 500 meters.
124
AGO 14»] A
Figure Iff. Applying «Ле 100-meter wfttt о/ measure method
for rongoo grooter than SOO motor*.
(1)	Training should be conducted to familiar-
ize the soldier with the appearance of other famil-
iar objects, such as weapons and vehicles, at var-
ious ranges.
(2)	Factors which affect the appearance of
objects must be considered, and an understanding
of these factors will help to make estimates more
accurate.
Table 1. roeion AffooAng Rango КоКплЛоп by Буе
	Л09МЯ BMm (над* to weSiramaitoM) wba—	Jtoosan more dtou*t (гмп to мгмМмММ) *Ьш—
Tenet vtolbliity	_ Terrain, or position of the observer	 Light and atmosphere			Most of the target to visible and offers a dear outline. Looking acrossa depression, most of which to hidden from view. Looking from low ground toward high ground. Looking down a straight, open road or along a railroad trade. Looking over uniform surfaces like water, enow, desert, or grain fields. In bright light or the run to shining from behind the observer. The target to In sharp contrast with the background, or to dhonetted by rea- son of etoe, shape, or color, seen In the dear atmoephern of high altitudes.	Only a small part of the target is seen or target to small in relation to its жиг- roundings. Looking across a depression, all of which to visible. Looking downward from high ground. Vision to narrowly confined м in streets, draws, or forest trails. In poor light such as dawn, and dusk, in rain, snow, fog, or when the sun to in the observer’s eyes. The target blends Into tbs background or terrain.
ano msu.
125
70.	Other Methodi of Determining Range
a.	To determine range by firing the gun, the
gunner opens fire on the target at the estimated
range, and moves the center of the beaten zone
into the center base of the target by means of the
traversing and elevating handwheels. He resets
the sight so the new line of aim is at the center
base of the target and notes the sight setting on
the rear sight. This sight setting may apply only
to this gun.
b.	When the ground in the vicinity of the target
does not permit observation of the strike of the
rounds, or when surprise fire on the target is de-
sired, fire is adjusted on a point which offers ob-
servation and is known to be at the same range as
the target The gunner then lays his gun on the
target when ordered.
c.	When moving into positions occupied by
other units, range cards prepared by those units
can furnish valuable range information on tar-
gets, suspected targets, and various terrain fea-
tures.
d.	When the tactical situation and time permit
range may be determined by pacing off the dis-
tance.
71.	Lateral Distance Measurement
In addition to the ability to determine range accu-
rately, the gunner needs a quick method of meas-
uring lateral distance right or left from a refer-
ence point to a target.
a.	When the gun is mounted on the MS tripod,
width can be measured by aiming on a point and
manipulating the traversing handwheel, counting
the clicks from one point of alm to another point
of aim. Each click equals one meter at 1,000 me-
ters, or half a meter at 600 meters. This method is
accurate but time-consuming.
b.	The finger measurement method is not a
method of range determination but only a method
Figure 191. ТЫ jfnper	method.
126
AGO MILA
of measuring the lateral distance (in fingers) be-
tween two points. To measure the distance in fin-
gers between a reference point and a target, ex-
tend the arm with the palm outward, the fingers
cupped, and the elbow locked, Close one eye, raise
the index finger, and eight along its edge, placing
the edge of the finger along the flank of the target
or reference point. Note the space remaining be-
tween the two points, and then All this space by
raising fingers until the space is covered. The
measurement from the reference point to the tar-
get is then stated as being one or more fingers,
depending on how many fingers are raised to
cover this distance (fig 188).
Section V.	Flit CONTROL AND FIH COMMANDS
72, Fire Control
a.	General. Fire control of machineguns in-
cludes all operations connected with the prepara-
tion and actual application of effective fire on a
target It implies the ability of the leader to open
fire at the instant he desires, adjust the fire of the
gun(s) on the target, regulate the rate of fire,
shift from one target to another, and cease firing.
Thia ability to exercise proper fire control de-
pends primarily on the discipline and the proper
training of the crew. Failure to exercise fire con-
trol results in danger to friendly troops, loss of
surprise effect, premature disclosure of positions,
application of fire on unimportant targets, loss of
time in adjusting fire, and waste of ammunition.
b.	Methods of Fire Control There are several
methods of controlling machinegun fire. The noise
of battle will limit the use of some of these meth-
ods; therefore, the leader must select the method
or combination of methods which will best accom-
plish his purpose.
(1)	Oral. This is an effective method of con-
trol; but at times the leader will be too far away
from the gun crew(s) or the noise of battle will
make it impossible for the gun crow(s) to hear
him.
(2)	Armond-hand signals. This is an effec-
tive method when the gun crew(s) can see the
leader. All crew members must understand the
standard arm-and-hand signals used to control
machinegun fire.
(8) Prearranged signals. These are either
visual or sound signals, such as pyrotechnics or
blasts on a whistle. These signals should be in-
cluded in appropriate SOP's and must be clearly
understood by all crew members.
(4) Personal contact, In many situations, the
leader must move to Individual crew members to
issue orders. This method of control is used more
than any other by small unit leaders. The leader
must use maximum cover and concealment to keep
from disclosing the gun crew’s position.
(Ф) Standing operating procedures. Standing
operating procedures are actions the gun crews
perform automatically, without command. SOP's,
such as those described in (8) above, are devel-
oped during the training of the gun crows, and
their application eliminates many commands and
simplifies the loader's job of fire control
c.	Chain of Fire Control. The chain of fire con-
trol begins with a fire unit leader. Although there
is no fixed unit organisation for the caliber .50
machinegun, this type of unit can be selected from
available personnel The fire unit leader is respon-
sible for both the technical and tactical employ-
ment of the gun (s) and the training of the crew.
Ho is responsible for passing on to the crew mem-
bers all instructions and orders from his next
higher leader (commander) regarding the situa-
tion and mission. He assigns sectors of fire and
flring positions, designates targets to be engaged,
adjusts fire, and insures effective coverage of the
targets.
d.	Rotas of Fire,
(1)	Rapid: over 40 rounds per minute.
(2)	Slow: 40 rounds or less per minute.
(3)	Single-shot: one round.
(4)	When engaging targets at ranges greater
than 1,100 meters, the gunner should use single
shot tracer ammunition. Firing the gun one round
at a time allows the gunner to deliver welLaimed
fire on the target.
s.	Adjustment of Fire.
(1)	Machinegun fire is adjusted by observing
the strike of the rounds, observing the flight of
tracers, frequently relaying the gun, or by a com-
bination of these (para 118).
(2)	Adjustment by observation of fire Is the
most important element of fire control if it is
bold, aggressive, rapid, and continuous throughout
the action. The gunner is trained to observe and
adjust his gun’s fire without command. He is
trained to anticipate the action of the enemy after
the initial buret, and is prepared to shift his Are
to cover any change in formation or movement of
his target If the gunner fails to accomplish this,
the fire unit leader must promptly correct him by
announcing or signalling subsequent fire сот-
лао Ы*1Л
127
ma nds. Thia responsibility to adjust Are continues
through the chain of commands. When subsequent
fire commands are given, the gunner makes the
required corrections and continues to engage the
target without any further command to fire.
(8)	If the gun is fired on the tripod mount,
subsequent commands are given to make changes
in direction, elevation, and the rate of fire. These
changes are given orally as, SHIFT RIGHT,
SHIFT LEFT, ADD, or DROP. (For arm-and-
hand signals see FM 21-60.) When making these
announced changes, mils may be used to indicate
the amount of desired shift; for example, SHIFT
RIGHT 6, or SHIFT LEFT 7. When making
changes in elevation, mils are not used, as it h
normally difficult to determine just how high or
low the center of the beaten zone is striking the
ground in relation to the target.
73, Яге Commands
Fire commands are technical instructions issued
by a leader to enable the unit or crew to accom-
plish a desired fire mission. Fire commands have
been standardized for infantry direct fire weap-
ons, and follow the same sequence. There are two
types of fire commands: initial fire commands are
issued to engage a target; and subsequent fire
commands are issued to adjust fire, change the
rate of fire; interrupt fire, shift fire to a new
target, or to terminate the alert. A correct fire
command is one that is as brief as clarity permits
and includes all the elements necessary for the
accomplishment of the fire mission. It is given in
the proper sequence, transmitted clearly, and at a
rate that permits receipt and application of in-
structions without confusion.
a. Elements of the Initial Fire Command. There
are six essential dements of the initial fire com-
mand for the machinegun that are given or im-
plied by using one or more of the methods of
control. During training, the gun crew repeats
each element of the fire command as it b given.
Thb is done to avoid confusion and to train the
crew to think and act in the proper sequence. The
six elements of the initial fire command as they
apply to the machinegun are, alert, direction, de-
scription, range, method of /Ire, and the command
to open fire.
(1)	Alert. Thb element brings the cnew(s) to
a state of readiness to receive further instruc-
tions. Once alerted, the gunner insures the gun is
loaded; the assistant gunner continuously chocks
with the leader for orders or Instructions and
passes them on to the gunner. The oral alert b
announced as, FIRE MISSION. At this command,
Ш
the gunner is alerted that a target has been de-
tected and fire may be delivered upon it. Since
there is no fixed unit organization for the caliber
.60 machinegun, it b possible that the leader may
have more than one gun under his command. In
this situation, the leader must number the gun
crews. If the leader desires to alert the gun сгеод
but only fire one gun, he will announce, FIRE
MISSION, then designate the number of the gun
to fire, NUMBER 2 (or 1). If he wants to alert
only one gun crew he will announce NUMBER 1
(or 2), FIRE MISSION.
(2)	Direction. Thb element indicates the gen-
eral direction to the target and may be given in
one or a combination of the following ways:
(a)	Orally. The leader gives the direction
to the target in relation to the position of the
gun(s). For example, FRONT, RIGHT FRONT,
LEFT FRONT.
(b)	Pointing. The leader can designate a
small or obscure target by pointing with his arm
and hand or aiming the machinegun(s). When
pointing with his arm and hand, a man standing
behind him should be able to look over his shoul-
der and sight along his arm and Index finger to
locate the target. When a gun has been aimed at a
target, a soldier looking through the sights should
be able to see the target.
(o) Use of tracer ammunition. Tracer am-
munition la a quick and sure method of designat-
ing a target which Is not clearly visible. When
using this method, the leader should first give the
general direction to direct the gun crew’s atten-
tion to the desired area. To minimize the lose of
surprise when using tracer ammunition, the
leader does not fire until he has given all the ele-
ments of the fire command except the command to
fire. When using this method of designating a tar-
get, the leader may use his individual weapon or
fire one or more bursts from the machinegun. The
firing of the tracer (s) then becomes the last ele-
ment of the fire command and b the signal to
open fire. For example:
FIRE MISSION
FRONT
BUNKER
WATCH MY TRACER(S)
BURST (OR SINGLE ROUND)
The leader fires hb individual weapon or a ma-
chinegun at the enemy bunker then hb gun
crew(s) open fire.
(d) Reference pointe. Another method of
designating obscure targets b by using easily rec-
ognizable reference points. Prominent terrain
features and manmade objects make good refer-
ence points, AH leaders and members of the
AGO M»1A
crew (в) must be familiar with the terrain fea-
tures and the terminology used to describe them.
When using a reference point, the word "refer-
ence” precedes its description and the word "tar-
get" precedes the target description. This is done
to avoid confusion. The general direction to the
reference point should be given.
1. Example of the use of the reference
points:
FIRE MISSION, NUMBER 2
FRONT
REFERENCE: LONE PINE TREE
TARGET: TRUCK
«. Sometimes a target must be desig-
nated by using successive reference points. For
example:
NUMBER 1, FIRE MISSION
RIGHT FRONT
REFERENCE: RED-ROOFED
HOUSE, LEFT TO HAYSTACK,
LEFT TO BARN
TARGET: MACHINEGUN
J. Finger measurements (para 71b) can
be used to direct the gun crew's attention to the
right or left of reference points. For example:
FIRE MISSION
LEFT FRONT
REFERENCE: CROSSROAD
RIGHT FOUR FINGERS
TARGET: LINE OF TROOPS
4. When the guns are mounted on tri-
pods, lateral distance from reference points can
be accurately announced. When gunners are firing
the tripod-mounted gun, lateral distance Is as-
sumed to be in mils unless otherwise indicated, so
the word “mils" is not necessary. For example:
FIRE MISSION
FRONT
REFERENCE: KNOCKED-OUT
TANK
LEFT FOUR ZERO
TARGET: COLUMN OF TROOPS
(e) Description. The target description is
used to create a picture of the target in the minds
of the gun crew. The gun crew (в) must know the
type of target they are to engage to properly
apply their fire. The leader should describe it
briefly, but accurately. For example;
Dismounted enemy personnel ________TROOPS
Automatic weapons ______________MACHINEGUN
Armored vehicles _____________________TANK
Artillery or antitank weapon ___ANTITANK
Airplanes or helicopters _________AIRCRAFT
If the target is obvious, no description is neces-
sary. Finger measurements or mil measurements
can be used to designate th’d width of a linear
target when the flanks cannot be pinpointed.
(Л Range. The range to the target is given
so the gun crew(s) know how far to look for the
target and immediately know what range setting
to place on the rear sight. Range la determined
and announced in meters. Since the meter ie the
standard unit of range measurement, the word
"meters" is not announced. With machineguns,
the range is determined and announced in even
hundreds and thousands. For example: THREE
HUNDRED, ONE THOUSAND, ONE ONE
HUNDRED. This element may be omitted when
the gunners can obviously determine the range;
however, it is desirable in some situations to an-
nounce the range.
(g) Method of fire. This element includes
manipulation and rate of fire.
1. Manipulation is used to prescribe the
class of fire with respect to the gun (para 65). It
is announced as FIXED, TRAVERSE, SEARCH,
TRAVERSE AND SEARCH, SWINGING TRA-
VERSE, or FREE GUN.
f. Rate is used to control the rate of fire.
There are three rates of fire which may be an-
nounced for the gun: alow, rapid, or single-shot
(para72d).
(A) Command to open /Ire. If surprise fire
is not desired the command FIRE is given with-
out pause. It is often important that machinegun
fire be withheld for maximum effect of surprise
fire. To insure this, the leader may preface the
command to commence firing with the words AT
MY COMMAND or AT MY SIGNAL. When the
gunner (в) are ready to engage the target, they
report UP to the assistant gunner(s) who signal
READY to the leader. For example:
FIRE MISSION
FRONT
TROOPS
AT MY COMMAND (Pause until crew
members are ready and fire is de-
sired.)
FIRE (or appropriate arm-and-band sig-
nal)
74.	Abbreviated, Informal R re Commands
Fire commands need not be the complete formal
command to be effective. In combat, the leader’s
fire command will seldom Include all elements of
the formal fire command. He will use only those
elements necessary to rapidly place effective fire
on a target without confusion. However, during
training he should initially use all elements of the
formal fire command to instill in the crew mem-
лао M»1A
129
bere the habit of thinking and reacting in the
proper manner when a target is to be engaged.
After the crew members have been thoroughly
trained in formal Are commands, they should be
taught to react to the abbreviated or informal Are
command, using the various methods of control as
discussed in paragraph 72. There are three ele-
ments that must be given in the abbreviated or
informal Are command: the alert, range, and the
command to commence firing. Other elements of
the formal Are command may be used, depending
upon the tactical situation and time.
75.	Doubtful Elements end Corrections
a.	Doubtful Elements. When the gunner is in
doubt about any element of the Are command, he
repeats the element of the Are command in ques-
tion and states THE COMMAND WAS. At this
time the leader announces THE COMMAND
WAS. and repeats the element in question, and
continues with the Are command.
b.	Corrections.
(1)	Initial fire commands. When the leader
makes a mistake in the initial Are command, he
corrects it by announcing CORRECTION, and
then gives the corrected element(s). For example:
FIRE MISSION
FRONT
TROOPS
FIVE HUNDRED
CORRECTION
SIX HUNDRED
TRAVERSE
AT MY COMMAND
(2)	Subsequent fire commands. When the
leader makes an error in the subsequent Are com-
mand, he may correct it by announcing CORREC-
TION, and then repeating the entire subsequqpt
Are command. For example:
LEFT FIVE, DROP ONE
CORRECTION
LEFT FIVE, DROP ONE ZERO
76.	Subsequent Fire Commands
If the gunner fails to adjust his Are on the target,
the leader must promptly correct him by announc-
ing or signaling the desired changes. When
changes are givqn, the gunner makes the required
corrections and continues to engage the target
without further command. When Aring under the
control of a leader, the assistant gunner checks
with the leader for instructions which he passes
on to the gunner (para 72a).
a.	Changes in the rate of Are are given orally
and by arm-and-hand signals.
b.	To interrupt Aring, the leader announces
CEASE FIRE or gives a signa) to cease Are. The
gun crew(s) remain on the alert and Aring can be
resumed on the same target by announcing FIRE.
c.	To terminate the alert, the leader announces
CEASE FIRE, END OF MISSION.
Section VI. PRINCIPLES OF APPLICATION OF FIRE
77.	Direct Laying
Direct laying is pointing the gun for direction and
elevation so that the sights are alined directly on
the target. An intelligent application of the prin-
ciples of direct laying involves a knowledge ci the
factors contained in this chapter.
78.	Target Designation
Target designation follows a logical prescribed se-
quence. The three elements used to designate tar-
gets are direction, description, and range. These
elements may be transmitted orally, by using
arm-and-hand signals, by pointing, or by a combi-
nation of these methode. Targets may also be des-
ignated by laying or Aring the gun.
79.	Fire Distribution, Concentration, and Ratos
of Fire
a.	General. To be effective, machinegun Are
must be distributed over the entire target area.
Improper distribution of Are results in gaps
which allow the enemy to escape or use weapons
against friendly positions without effective oppo-
sition. The method of applying Are to a target is
generally the same for either a single gun or a
pair of guns.
b.	Engaging Ground Targets. There are Ave
main factors that govern employment against
ground targets.
(1)	Greater accuracy when Ared single-shot.
(2)	Long beaten zone.
(8)	Low rate of sustained Are.
(4)	Any number of guns may be operating
together at any given time, as opposed to Axed
organization.
(5)	Best used at long ranges or against tar-
gets where penetration of cover is a consideration.
c.	Distribution and Concentration of Fires.
(1)	Fire is delivered in width, depth, or in a
180
ЛОО МИЛ
combi nation of the two. To distribute Are prop-
erly, the gunners must know where to aim, how to
adjust their fire, and the direction to manipulate
the gun.
(a)	Point of initial lay and adjustment.
The gunner must aim, Are, and adjust on a certain
point of the target. It is extremely important that
Are be adjusted boldly, rapidly, and continuously.
Binoculars may be used by the leader to facilitate
Are adjustment. The gunner insures, throughout
his Arlng, that tlflFQfiter of the beaten zone is
maintained at the center base of the target for
maximum effect from each burst of Are. When
this is done, projectiles in the upper half of the
cone of Are will pass through the target if it has
height, and the projectiles in the lower half of the
beaten zone may ricochet into the target (Ag 134).
(b)	Direction of manipulation of the gun
after adjusting fire onto the point of initial aim.
The gunner must move his beaten zone in a cer-
Ptgwre Its. LAeear target.
лао мил
131
tain direction over the target. The direction de-
pends on the type of target and whether the tar-
get is engaged with a pair of guns or a single gufl.
When engaging targets other than point targets
with a pair of guns, the targets are divided so
that Are is evenly distributed through the target
area.
(2)	Fire delivered on point targets or a spe-
cific area of other target configurations is called
concentrated fire.
d.	Rates of Fire.
(1)	There are three rates of fire with the
machinegun; slow, rapid, and single-shot. These
rates are established primarily as a guide for
training. In training, the rate of fire should be
announced to facilitate learning and to provide
the gunners with a basis for judging the number
of rounds being expended.
(a) Slow fire is any number of rounds less
than 40 rounds per minute in bursts of six to nine
rounds at 10 to 16 second intervals. It is directed
by announcing SLOW.
(0) Kaput fire is any number oz rounds
greater than 40 rounds per minute fired in bursts
of six to nine rounds at 5 to 10 second intervals.
It is directed by announcing RAPID.
(c) Singleshot. The caliber .60 machine-
gun, as compared with other automatic weapons,
has the capability of firing one round at a time. It
is directed by announcing SINGLE-SHOT. This
rate of fire can be delivered very effectively
against targets at great ranges since it allows the
gunner to place well-aimed shots into the target.
Single-shot rounds can be fired every 2 or 3 sec-
onds ; however, the rate of fire is dictated by the
nature of the target and the range.
(d) The cyclic rate of fire represents the
maximum amount of ammunition which can be
expended by a gun In 1 minute. The cyclic rate of
fire for the caliber .50 machinegun is in excess of
450 rounds per minute. The gun fires at this rate
of fire when the trigger is held down and ammuni-
tion is continuously fed into the gun for any given
period of time.
Figure Ite. Linear terget with deptk.
AGO 14В1Л
132
(2)	The rates of Are below should be followed
for maximum effect:
(a)	Ground targets are Initially engaged
using the rapid or higher rate in order to gain Are
superiority. Once Are superiority has been gained,
the rate of Are is reduced to a point that is suffi-
cient to maintain fire superiority. This reduction
in rate of fire is necessary to keep the barrel from
overheating and to conserve ammunition.
(b)	Aerial targets (chap 11) are engaged
using the cyclic rate.
80.	Types of Targets
Targets presented to the machinegunners during
combat will in most cases consist of enemy sol-
diers in various formations which require distri-
bution and concentration of fire. These targets
have width and depth, and the application of
machinegun fire is designed to thoroughly cover
the area in which the enemy is known or sus-
pected to be. These targets may be easily distin-
guishable or may be indistinct and difficult to
locate.
a.	Paint targets are targets which require the
use of a single aiming point. Enemy bunkqja,
weapons emplacements, vehicles, small groups of
soldiers, and aerial targets such as helicopters or
descending paratroopers are examples of point
targets.
b.	Linear targets have sufficient width to re-
quire traversing fire and no more depth than can
be effectively covered by the beaten zone (fig 13Б).
c.	Linear targets with depth are targets which
have sufficient width to require traversing fire,
and depth which cannot be covered by the beaten
zone. A combined change in direction and eleva-
tion (traversing and searching fire) is required to
maintain effective Are on these targets (fig 186).
d.	Deep targets have depth but very little width
and can be effectively covered by searching fire
(fig 187).
Figure 187. Deep target.
AGO
1U
e.	Area target» as discussed in this manual have
considerable width and depth and require exten-
sive traversing and searching fire. This ty*pe tar-
get exists when the enemy is in a certain area but
his exact location is not known. A hilltop is a
typical area target.
Seetien VII. AFFUCATION OF HRE
(TARGET ENGAG8M5NT/DIRECT LAY)
81.	Gon era I
a.	When machinegun fire is under direct control
of a leader, he designates the midpoint and Ranks
or ends of a target unless they are obvious to the
gun crew(s).
b.	When a target other than a point target is
engaged by two gunners, it is always divided.
Each gunner applies hb fire to that portion of the
target corresponding to his position with relation
to the other gun. Normally, each gunner engages
one-half of the target; however, gunners must be
prepared to engage th* entire target if necessary.
Gunners continue to fire on the target until it is
neutralised or until another signal is received
from the leader.
c.	The gunner's positions should be numbered so
each gunner will know which portion of a target
he should engage. (This pertains also to the vehic-
ular-mounted weapons.) It should be emphasized
that the positions are numbered, not the guns or
gunners.
d.	To insure that gunners react quickly and
properly when they detect a target or when a
target is designated by the leader, standard meth-
ods of applying fire to the various type targets are
taught. These methods are the same for ground
and vehicular-mounted guns.
82.	Point Target
A point target is engaged with fixed fire. If the
target moves after the initial burst, the gun
crew(s) keeps fire on the target by following its
movement with the gun(s).
83.	Linear Targets
Linear targets are engaged with traversing fire.
a.	Two Gun»,
(1)	Normal division. The target is divided at
the midpoint; the right gun (No. I) engages the
right half of the target, and the gun on the left
(No. 2) engages the left half of the target The
point of initial lay and adjustment for both guns
is at the midpoint of the target After adjusting
on the midpoint the right gun(No. 1) traverses
the right half of the target to include one aiming
point beyond the last visible target flank and re-
turns to the midpoint.
(2)	Special division. If one portion of the
target presents a greater threat than another, the
target can ba divided so Are is concentrated on
that portion presenting the greatest threat. The
special division of the target is accomplished by a
subsequent fire command after firing begins. The
gunners initially lay at the midpoint, regardless
of the special division to be made, thus precluding
confusion.
b.	One Gun. A Single gunner must engage the
entire width of a linear target. The point of the
initial lay and adjustment Is on the midpoint, or
that portion of the target presenting the greatest
threat. The gunner traverses to either flank and
then coven the remainder of the target.
84.	Deep Targets
Deep targets are engaged with searching fire.
When range is announced, it Is given to the mid-
point of the target.
a.	Two Gun». The point of initial lay of both
guns is on the midpoint, which Is abo the point of
division. Since enfilade fire (para 64d) b deliv-
ered, it is not necessary to adjust on the midpoint
of the target because the long axis of the beaten
sone will compensate for missing the midpoint.
However, should the gunner’s beaten sone be out
of the lateral confines of the target it will be nec-
essary to adjust fires into the target area. After
the initial bursts, the right gun (No. 1) searches
to the near end of the target, the left gun (No. 2)
searches to the far end of the target. Both gun-
ners then reverse their direction of search and
return to the midpoint (fig 138).
b.	One Gun. A single gunner initially lays and
fires at the midpoint of a deep target, unless an-
other portion of the target presents a greater
threat. The gunner immediately searches to the
near end then covers the entire target.
85.	Unear Targets with Depth
Linear targets with depth are engaged with trav-
ersing and searching fire. When range b an-
nounced, the range to the midpoint b given.
a.	Two Guns. The method of divbion, the point
of initial lay and adjustment, and the extent of
134
AOO W1A
s
I
SINGLE
FUfitH Ш. ХммоиМ «/ dMp tarf«te.
Ю MIU
13S
PMR
SINGLE
Fiffvn lit. Лндотме о/ Нмог tarpit? with daptk.
manipulation for both guns are the same as pre-
scribed for linear targets. The gunners, however,
apply enough search between each burst to insure
the center of the beaten zone is maintained at the
center base of the target.
b.	One Gun. A single gunner initially lays and
adjusts on the midpoint of a linear target with
depth, unless some other portion of the target
presents a greater threat. The gunner traverses
and searches to the near flank, then covers the
entire target area (flg 139).
86.	Area Targets
The leader designates an area target by indicating
to the gun crew(s) the width and depth of the
target. Area targets are engaged with traversing
and searching Are.
a.	Two Gwu.
(1)	The target is divided at the center of
mass; the right gun (Ko. 1) fires on the right half
and the left gun (No. 2) fires on the left half. The
point of initial lay and adjustment for both guns
Is on the center of mass.
(2)	After adjusting on the center of mass,
Are is distributed by determining the size of the
beaten sones and applying direction and elevation
changes that саше the most effective coverage of
the target area. Both guns traverse and search
their respective halves to the flanks, then return
to the midpoint
b.	One Gwt. A single gunner engages an area
target by laying and adjusting on the center of
mass, traversing and searching to either flank,
then, reversing the direction, traversing and
searching to the other flank (flg 140).
184
SOO I4IU
PAIR
SINGLE
GREATER THAN 90 NILS VIM
Figwt T46. ffNfсдоым ©/ огм tarpate (об/аеМ*).
Section VIII. OVIKHEAD RM
•7, General
a.	Fire delivered over the heads of friendly
troops is overhead Are. During training» it la used
only when troop safety has been proven. The ter-
rain and visibility dictate when overhead fire can
bo delivered safely.
b.	Overhead fire is used only when the following
conditions have been met:
(1)	The safety limit has been determined and
has teen identified on the ground.
(2)	The gun mount is firmly seated.
(3)	Friendly troops have been notified, if at
all possible, that fire is to bo delivered over them.
(4)	The rate of fire does not exceed 40
rounds per minute.
(5)	The gun barrel is not badly worn. This
condition is indicated by excessive muscle blast.
•8. Determining the Safety limit
a.	Minimum Clearance. When delivering over-
head fire, the center of the cone of fire must clear
the feet of friendly troops by a prescribed dis-
tance. This distance is known as minimum clear-
ance.
b.	Safety Angle. The amount of elevation
change required on the gun to give minimum
clearance is known as the safety angle. The safety
angle is the difference between the angle of eleva-
tion to hit the troops and the angle of elevation
for troop safety.
о. Corresponding Range. When the safety angle
is placed on the gun, the point where the center of
the beaten sone would strike the ground deter-
mines the shortest range at which fire can be de-
livered over the heads of friendly troops. When
the ground is level or uniformly sloping between
the gun and the target, the corresponding range
for the safety angle used Is obtained by convert-
ing the troop safety angle from mils into meters.
The corresponding ranges are in firing table FT
,60 AA-T-2 or FT .5O-H-2, for types of ammuni-
tion indicated.
AOO МПА
117
d. Uneven Terrain. Level or uniformly eloping
ground is seldom found in the field. This limits the
use of firing tables and corresponding ranges in
determining the limit of troop safety. In lieu of
firing tables, a rule of thumb has been devised to
give the gunner a simple method of checking for
troop safety.
(1)	The gunner's rule can be applied when
the friendly troops are at least 350 meters in
front of the gun position, and the range to the
target is 850 meters or less.
(a)	Lay the gun on the target with the
correct sight setting to hit the target.
(b)	Without disturbing the lay of the gun,
set the rear sight at a range of 1600 meters.
(c)	Look through the sights and notice
where the new line of aim strikes the ground.
This is the limit of troop safety. When the feet of
the friendly troops reach this point, fire must be
lifted or shifted.
(2)	When the range to the target is greater
than 850 meters, overhead fire should be delivered
only in an emergency and then only out to a range
in which either the tracers of the strike of the
bullets can be seen by the gunner.
89.	Precautions for the Overhead Fire
The following safety precautions mutt be ob-
served in delivering overhead fire.
a.	Firmly emplace the tripod mount,
b.	Use depression stops to prevent the muzzle of
the gun from accidentally being lowered below Xfae
safety limit
c.	Do not deliver overhead fire through trees.
d.	Inform commanders of friendly troops when
fire is to be delivered over their heads.
e.	Insure that all members of the gun crew(s)
are aware of the safety limit
/. Do not deliver overhead fire if the range from
the gun to the target is less than 850 meters or
exceeds 850 meters.
g.	Do not use a barrel which has excessive muz-
zle blast or is otherwise determined to be badly
worn.
h.	During training exercises;
(1)	Do not lay machineguns so their fire will
cross at any point over the heads of friendly
troops.
(2} Consult AR 385-68 and local safety regu-
lations concerning overhead fire.
Section IX. DEFILADE POSITION
90.	General
In order to achieve maximum effectiveness, the
machinegun must be employed using the technique
of direct lay; however, at times it may be desira-
ble to employ guns from defilade positions. A
machinegun is in defilade when the gun and its
crew are hidden from enemy ground observation
by a land mass such as the crest of a hill. The
position may be on the reverse side of the crest or
the forward slope of the next higher ground (fig
141).
a.	Advantage*
(1)	The gun and crew have cover and con-
cealment from direct fire weapons.
(2)	The crew has some freedom of movement
in the vicinity of the gun position.
(8)	Control and supply are facilitated.
(4)	The characteristic smoke and flash of the
gun are partially concealed from observation.
b.	Disadvantage*
(1)	Rapidly moving ground targets are not
easily engaged because adjustment of fire must be
made through an observer.
(2)	Targets dose to the mask usually cannot
be engaged.
(8)	It is difficult to secure grazing fire for a
final protective line.
c.	Defilade. A gun is in defilade when the gun
and its crew are completely behind the terrain
which masks them from the enemy (usually on
the reverse slope of a hill). The gun must fire up
and over the hill. Fire must be observed and ad-
justed by a crew member who can observe the
target from a position on a flank or to the rear of
the gun (on higher ground). A defilade position
allows little opportunity to engage new targets.
d.	Partial Defilade. A machinegun is in partial
defilade when a mask (usually the crest of a hill)
provides the gun and gunner with some protection
from enemy direct fire, but the gunner is able to
engage the target using direct laying techniques.
The gun is far enough up the slope so that the
gunner can see the target through the sights but
the lower portion of his body and lower portion of
the gun are protected by the mask. Partial defi-
lade positions are desirable when a fire mission
cannot be accomplished from a defilade position.
91.	Selection, Preparation, and Occupation of
Rrlng Positions
a.	The fire unit leader selects the location of the
gun position.
138
▲GO M»1A
▼xm
Fipurt 111. Minimum вк4 maximum pomtwn de/Uad*,
partial dafUadt, and direct lap aroaa.
i
b.	To select a position in partial defilade, the
fire unit leader moves up the reverse side of the
slope until he has the target in view above the
mask when sighting at the height of the gunner's
eyes.
c.	To select a position in maximum defilade, the
fire unit leader estimates the lowest point below
the mask at which his gun can still engage the
target without danger of hitting the mask.
d.	While the fire unit leader is selecting the
position» the gun crew examines equipment and
mounts the gun under cover.
s. Upon signal or command from the fire unit
leader, the gun is carried or dragged Into the se-
lected firing position.
92.	Engaging Targets
The essential elements in engagement of a target
from defilade are direction, elevation, mask clear-
ance, and adjustment of fire. These elements are
discussed in paragraphs 93 through 96. More than
one gun may be employed using the techniques
outlined in this section.
JXfwv /4** Afining pofal matAod.
140
▲00
93.	Laying the Gun for Direction
a.	Direction Alinement Method. An observer
pieces himself on the gun-Urget line, end in а
position from which he can see the gun and the
target. He alines the gun, approximately, by hav-
ing the gunner shift the mount. The gunner then
loosens the traversing slide lock lever and, di-
rected by the observer, moves the gun right or left
until it is alined on the target; then damps it In
that position.
b.	Ute of an Aiming Point A prominent land-
mark, visible to the gunner through his sights, is
selected as an aiming point. An aiming point on
the gun-target line, and at an equal or greater
range than the target is desirable. However, an
aiming point on the mask may he used.
(1)	If the aiming point Is on the gun-target
line, the gun Is laid on the aiming point and is
thereby alined for direction.
(2)	If the aiming point is not on the gun-tar-
get line, the deflection is measured by means of
binoculars or compass. This measured deflection
is laid-off with the gun.
94.	Aiming Point Method of Laying the Gun
for f levaHon
An aiming point visible from the gun position is
jelected (preferably a point at a greater range
than the target, and at a higher elevation than the
target) and the range to the target Is determined.
The leader, using binoculars, measures the verti-
cal angle in mils from the ahning point to the base
of the target. He then lays the gun on the aiming
point with the sight setting to hit the target (flg
142), and directs the gunner to manipulate the
gun through the number of mils measured. For
example, in figure 142 the range to the target is
1,800 meters. The angle read with the binoculars
from the aiming point down to the base of the
target is 12 mils. The sight is set at 1,300 meters,
the gun laid on the aiming point, and muzzle de-
pressed 12 mils (fig 142). If the aiming point Is
off the gun-target Une, deflection in mils may be
taken with the rear eight windage screw knob,*IT
not over 8 mils; otherwise, the deflection must
be taken up on the traversing handwheel.
95.	Establishing Mask Clearance
After the gun has been laid, determine whether or
not the entire cone of fire will clear the mask.
a.	Vinal Method. When the range to the mask
is not more than 4Б0 meters, mask clearance ex-
lets when the axis of the bore is elevated 7 mils or
more above the gunmask line. Mask clearance can
be checked, after the gun has been laid on the
target, by depressing the muzzle of the gun 2 mils
and sighting along the bottom of ths receiver and
the barrel support If this line of sight clears the
mask, mask clearance exists. Elevate 2 mils before
firing.
b.	Ute of Firing Tablet. Determine the range to
the mask and obtain the corresponding angle of
elevation for mask clearance from firing tables
FT .60 AA-T-2 and FT .Б0-Н-2. The range cor-
responding to the angle of elevation is set on the
gun sight. If the line of aim through the sight
dears the mask, mask clearance exists.
96.	Adjustment of Fire
Under field conditions, even the most practical
methods of laying the gun on the target quickly do
not always result in the initial burst being on the
target. For this reason, rapid adjustment of fire
on the target is essential. Adjustment of fire must
be bold, rapid, and continuous. Creeping fire
should be avoided.
AGO MMA
141
CHAPTER 8
TECHNIQUE OF FIRE DURING PERIODS OF LIMITED VISIBILITY
Section 1. INTRODUCTION
97.	General
The machinegun is provided with & stable tripod
mount, MS, and traversing and elevating mecha-
nism. By manipulating the traversing and elevat-
ing mechanism, gun crew (a) can record target
data during hours of good visibility, and engage
the same targets under conditions of poor visibil-
ity. This chapter provides guidance in machine-
gun firing techniques, and terms used during peri-
ods of limited visibility. Periods of limited visibil-
ity include darkness, smoke, fog, rain, or snow.
a.	Gunners, as well as other members of the
crew, encounter difficulties while defending dur-
ing periods of limited visibility. These difficulties
preclude the use of many of the daylight tech-
niques of engaging targets.
(1)	During periods of limited visibility, the
machinegunner's sector of responsibility cannot
be observed in depth as during periods of good
visibility. Most targets are difficult or impossible
to detect.
(2)	Visibility may be so limited that the
leader cannot control the Ares of his guns by se-
lecting and directing fire on targets as he would
during periods of good visibility. Oral commands
are not dependable, arm-and-hand signals may not
be seen, and personal contact with the gunner is
difficult.
(8)	At night, machinegunners have a tend-
ency to fire indiscriminately at noises and sus-
pected enemy locations other than preplanned tar-
getareas.
b.	To overcome the difficulties encountered dur-
ing periods of limited visibility, special techniques
must be developed for engaging targets and deliv-
ering preplanned fires by the use of range cards.
98.	Terms
a.	Sector of Fire. An area (to be covered by
fire) assigned to an Individual or unit Machine-
guns are normally assigned two sectors of fire, a
primary and a secondary sector.
142
b.	Final Protective Line. A predetermined line
along which grazing fire is placed to stop an
enemy assault. This line Is fixed as to direction
and elevation; however, a few mils of search are
employed during firing to compensate for irregu-
larities in the terrain. The final protective line can
be delivered regardless of conditions of visibility.
The final protective line Is always the inner limit
of the primary sector which, ideally, is assigned
close to the forward edge of the battle area. When
terrain permits, final protective lines are assigned
to machineguns along the forward edge of the bat-
tle area as a part of the final protective fires of
the defending unit.
c.	Principal Direction of Fire. A priority direc-
tion of fire which marks a specific area assigns
to a weapon. This area may extend from the gun
position to the maximum effective range of the
weapon and is, therefore, not fixed for elevation.
Visible targets appearing in the principal direc-
tion of fire take priority over targets which may
appear elsewhere in the sector. A principal direc-
tion of fire may be assigned to cover an area
which provides good fields of fire, a likely avenue
of foot approach, or mutually supports an adja-
cent unit.
(1)	Principal direction of fire, day. A prior-
ity direction of fire which maria the center of a
specific principal area assigned to a weapon, to be
covered during periods of good visibility.
(2)	Principal direction of fire, night. A prior-
ity direction of fire which marks the center of a
specific principal area assigned to a weapon, to be
covered during periods of limited visibility.
d.	Sector of Grace. A wedge-shaped area
formed by assigned sector limits, which affords
grazing fire (1 meter high, maximum) from the
muzzle of the weapon to the first major break in
the terrain. The sector of graze is fired usinr
swinging traverse in the primary sector of fire. 1
can be fired in the secondary sector in conjunc-
tion with field expedients, by freeing the travers-
al MIU
Ing and elevating mechanism and using the mount
as a pivot. A sector of graze can be delivered
regardless of the condition of visibility.
e.	Area of Graze. An area, other than the sector
of graze, within a sector of Are which is covered
by grazing fire. Grazing fire need not be continu-
ous from the muzzle of the weapon to the area
over which grazing fire is desired.
Section II. TECHNIQUES OF ENGAGING TARGETS
99.	General
A gunner's ability to detect and identify targets
during periods of limited visibility will vary, de-
pending upon the amount of natural and artificial
illumination and the types and numbers of sen-
sors utilized. Complete definition of these targets
as to exact size and flanks will be questionable in
many cases.
100.	Ига Control
During periods of limited visibility, the leader
cannot direct the fires of his guns as effectively as
with good visibility. Consequently, initiative is re-
quired of the gunners. When targets within their
sectors become visible to gunners, they must en-
gage such targets without command and continue
to fire until the targets have been neutralized.
Gun crews engage targets only when they can
identify them, unless ordered to do otherwise. For
example, If one gunner detects a target and en-
gages it, the other gunners will observe the area
in which fire is being placed. They will add their
fire only if they can identify the target or are
ordered to place fire in the area.
101.	Target Engagement
a.	All-tracer ammunition enables a gunner to
more effectively engage visible targets during pe-
riods of limited visibility and should be used when
possible. Gunners must be trained to fire low ini-
tially and adjust up when engaging targets during
periods of limited visibility. This aids in overcom-
ing the tendency to fire high during these condi-
tions.
b.	In engaging linear, linear with depth, and
deep targets, no attempt is made to divide the
targets (when two or more guns are engaging the
same targets) as is done during periods of good
visibility. During periods of limited visibility, the
center and flanks of these targets will not be
dearly defined; therefore, each gunner observes
his tracers and covers what he believes to be the
entire target
(1)	Linear targets. The gunner lays on what
he considers to be the center of mass of the target.
With the tripod mounted gun, he uses traversing
fire and maintains his beaten zone on the base of
the target.
(2)	Linear targets with depth. The gunner
lays on what he considers to be the center of mass
of the target, traverses and searches it first, cov-
ering the side which is closest to his position, then
covers the entire target.
(8)	Deep targets. The gunner lays on what
he considers to be the center of mass of the target
then searches it The direction of search is to
what is considered the near end, then up to what
is considered the far end.
c.	The types of point targets machinegunners
will be concerned with during period of limited
visibility, particularly at night, are enemy auto-
matic weapons and assaulting enemy personnel.
(1)	ffnemy automatic' weapons. Point tar-
gets such as automatic weapons may be identified
during conditions of limited visibility by their
muzzle flashes. To effectively engage these targets,
fire should be delivered in a heavy volume and
adjusted by observing the tracer stream.
(2)	Assaulting enemy personnel During the
final stage of an enemy assault, machineguns nor-
mally fire on a final protective line (FPL). They
may be assigned a principal direction of fins
(PDF). Both are considered as final protective
fires (FPF) and should be planned for and coordi-
nated as such. If individual enemy soldien are
observed in the proximity of the gun position,
they must be neutralized by members other than
the machinegunner (by the other crew members
or by security forces of the supported unit). FPF
are fired according to the order or SOP, and the
machinegunner is not allowed to cease firing
them except in accordance with those orders or
SOP.
Section III. TECHNIQUES OF DELIVERING PREPLANNH) FIRES
102. General	preplanned fires during periods of limited vislbil-
In addition to engaging appropriate visible tar-	Jty. These fires are used to cover target areas of
gets, the machinegunner must be able to deliver	tactical significance such as routes, avenues of ap-
AOO MUA
143
proach, anticipated enemy supporting weapons
positions, probable enemy assault positions, and
to establish sectors of graze and final protective
lines.
103.	Grazing Fire
For maximum effect in all preplanned target
areas, grazing fire should be obtained when possi-
ble.
a.	Obtaining Maximum Extant of Grazing Fira
Over Level or Uniformly Sloping Terrain. The
machinegunner sets the rear sights at 1000 yards,
selects a point on the ground which he determines
to be at a range of approximately 100 meters, lays,
fires, and adjusts on thia point If the gunner
cannot obtain 1000 meters of grazing fire because
of a major break in the ground at a range of less
than 1000 meters, he places the range to the break
on his sight and lays, fires, and adjusts at that
point,
b.	Determining ths Extent of Grazing Fire on
the Final Protective Lins. The extent of grazing
fire on the final protective line is determined using
the techniques described in a above. Any interme-
diate breaks in the terrain along this line, which
cannot be covered by grazing fire from a gun
firing along the line, is considered deadspace.
c.	Determining the Extent of Grazing Fire in
the Sector of Grose. The ranges to the extent of
grazing fire in a sector of graze are determined by
observation of the terrain and by observing the
tracer stream from behind or from a flank of the
gunpoeition. Normally» the extent of grazing fire
within this area will be much less than on a final
protective line and will form an irregular pattern.
d.	Determining ths Amount of Grazing Fire m
on Area of Graze. The same procedures used in a
above are used in determining the extent of graz-
ing fire in an area of graze. The ranges to areas of
grazing fire are determined by observing the flight
of tracer ammunition from behind or from the
flank of the gun position. The gunner determines
the lateral extent of areas of graze by selecting
and engaging successive aiming points in the area
believed to afford grazing Are, using the same
range setting as when determining the range to
the extent of grazing Are.
104.	Fire Control
Predetermined targets are engaged on order from
the fire unit leader or by SOP.
a.	Final Protective Fires. The signal used in
calling for final protective fires is normally pre-
scribed In the company operation order. The au-
thority to call for these fires may be delegated to
the platoon leader of a forward rifle platoon.
Final protective fires are ceased on order.
(1} Signals. Arm-and-hand signals, voice
commands, or pyrotechnic devices may be used in
calling for these fires.
(2)	Rates of fire. When firing final protective
fires, the rapid rate of fire is used unless it is
obvious that a different rate is necessary to
accomplish the mission.
b.	Engaging Other Preselected Target Areas.
When engaging other preselected target areas, the
rapid rate of fire is used until commanded to cease
fire.
105.	Methods of Laying the Gun
The technique of laying the gun to engage prese-
lected target areas during periods of limited visi-
bility is effective only if the data is correct. Such
data is determined from the lay of the gun on
targets. If possible, the lay is verified by firing
and adjusting on targets. There are two methods
of determining data necessary to engage selected
targets during periods of limited visibility; read-
ings taken from the traversing bar and traversing
and elevating mechanism, and by the use of field
expedients.
a. Traversing Bar and Traversing and Elevat-
ing Mechanism Method. Direction and elevation
readings constitute the data necessary to engage
preselected target areas during periods of limited
visibility. These readings are measured by and
recorded from the traversing bar and traversing
and elevating mechanism. All measurements are
recorded in mils.
(1)	PrsKminarv steps before direction and
elevation readings are obtained.
(a)	To position the traversing mechanism,
turn the traversing handwheel toward your body
as far as it will go, then turn it away two com-
plete revolutions. Check the traversing handwheel
scale to insure the same reading is lined up with
the index line before and after the two revolu-
tions. The traversing mechanism can be positioned
at night by turning the traversing handwheel to-
ward your body as far as it will go, and then
turning it away 50 clicks (two revolutions).
(b)	To lay the gun for direction when a
final protective line has been assigned, lock the
traversing slide on either the extreme left or right
side of the traversing bar, depending upon which
side of the sector the final protective line has been
assigned. Pick up the rear legs of the tripod and
shift the tripod until the muzzle of the gun points
144
ДОО M«1A
along the final protective line. И a final protective
tine has not been assigned, the gun will he laid for
direction on the center of the primary sector. In
this case, lock the left edge of the traversing slide
on the “0” graduation on the traversing bar. The
left edge of the traversing bar slide is always used
aa the Index. Pick up the rear legs of the tripod
and shift the tripod until the muzzle of the gun is
laid on the center of sector.
(c)	Once the gun is laid for direction, em-
place the tripod shoes firmly by digging the tripod
shoes in or by placing sandbags on the tripod legs.
This is done to insure greater stability and pre-
vent accidental movement of the tripod.
(2)	Direction readings. Direction readings
are obtained and recorded to all targets within the
primary sector of fire with the exception of the
final protective line. The final protective line does
not require a direction reading since the travers-
ing slide is positioned to the extreme right or
left of the traversing bar. To obtain direction
readings to targets other than final protective
line:
(a)	Loosen the traversing slide lock lever
and slide the traversing bar slide along the trav-
ersing bar until the gun is laid on the center of
a point target and on either flank of a linear
target
(b)	Lock the traversing slide to the trav-
ersing bar and read the direction reading from
the scale on the traversing bar (fig 148). If the
left edge of the traversing slide does not fall
exactly on a 5-m!l graduation (tickmark), use
the nearest 5-mil graduation as the direction
reading.
(e) A direction reading to a target is de-
termined by the direction of the barrel. When the
barrel of the gun moves to the right, a right di-
rection reading will be recorded. This number
will be indicated on the traversing bar and read
from the left side of the traversing slide lock. If
the barrel moves to the left, there will be a left
reading, and the traversing slide lock will be on
the right side of zero.
(d) After taking a direction reading of a
linear target, the width of the target Is measured
in mils by traversing across the target using the
traversing handwheel. The traversing mechanism
must be repositioned before moving to another
target
(8) Elevation readings.
(a)	After obtaining the direction rending
to a target, an elevation reading is obtained be-
fore moving to another target To obtain ths read-
ing, the gun is laid on the base of the target
(b)	The elevation reading is obtained from
two scales. The first portion (or major reading) is
taken from the engraved scale on the upper eleva-
tion screw plate. The second portion (or minor
reading) is taken from the engraved scale on the
top of the elevating handwheel, using the indica-
tor as the index (fig 148), The two portions of the
elevation reading are separated by a slash 77)
when they are recorded (for example 60/8).
(c)	The engraved scale on the upper elevat-
ing screw plate is graduated in 50-mil Increments
from MINUS 250 mils to PLUS 100 mils. There is
an Index line below each number and a plus or
minus sign above each number, with the exception
of the “0". The zero reading has no sign. In ob-
taining the elevation reading, the gunner should
lower his head until his eyes are level with the top
of the elevating handwheel. The first portion of
the reading is the number with the plus or minus
sign indicated above the first visible Index line
(fig 143).
(d)	The scale on the elevating handwheel
Is graduated In 1-mil increments for a total of 50
mils. Locate the graduation on line with the indi-
cator (fig 143).
(e)	An elevation reading is valid on only
one mechanism. If data is placed on another
mechanism using the same amount and gun, the
data could be inaccurate. The number of threads
exposed on the lower elevation screw (fig 143)
must remain the same both when obtaining and
using data. If the number of threads is increased
or decreased after the data is recorded, accurate
fire cannot be placed on the target. For example,
when a gun io freed to engage a secondary sector,
should the base of the traversing and elevating
mechanism rotate, the data is correct only If the
gunner insures that the same number of exposed
threads is replaced on the mechanism.
(Л To replace an elevation reading of
—50/3 on the traversing and elevation mecha-
nism, manipulate the elevating handwheel until
the horizontal line below —50 Is visible at eye
level, with the handwheel Indicator on 8.
(4) Verifying elevation reading. To insure a
correct elevation reading to a target, the gunner
should fire end adjust on this target.
(5) Dry-fire method. Data may be obtained to
targets without firing and adjusting as mentioned
in the preceding paragraph. This Is accomplished
using the dry-fire method of laying the gun. In
using this method, the range to the target Is
placed on the rear sight and the gun is laid on the
center base of the target. The direction and eleva-
tion readings are then taken. Range determina-
tion is critical because any discrepancy will cause
an error in the elevation when the target is en-
gaged. The dry-fire method of obtaining data is
used only when firing is not feasible.
aao пил
145
TRAVERUNG
КAMDWMEEL	UPPER I LI VAT IMG ICR I* YOKE
Figure nt. Traverting bar and trsversfap and slevsMig msototfem.
b. Field Expedient Methods. The field expedient
method serves to supplement employment of the
machinegun in engaging preselected target areas.
This method is not as effective as the traversing
bar and traversing and elevating mechanism
method and requires additional material. Field
expedients are a primary means of engaging pre-
selected target areas in a secondary sector during
periods of limited visibility.
(1)	Stake method.
(a) Lay the gun on the limit of the sector
and drive a stake into the ground next to the
barrel This method can be used to establish direc-
tion for one or both limits of the sector.
(b> If one limit of the sector is a final
protective line, anothe stake should be driven into
the ground beside the sector stake, in such a man-
ner that it touches the bottom of the barrel when
the gun is laid on the final protective line. This
establishes both direction and elevation.
Nota. This expedient may be employed as а primsry
means in ths primary sector until such time as conditions
of visibility permit recording data from the traversing bar
and traversing and elevating mechanism.
(c) To engage targets in the secondary
sector of fire using this technique, the gunner re-
leases the traversing and elevating mechanism,
using the pintle as a pivot.
146
МО МИЛ
(2)	The horizontal log or board method.
(a)	This technique is used to mark sector
limits and provide a sector of graze. The horizon-
tal log or board technique is effective in all condi-
tions of visibility. This technique can be used
effectively if the sector of fire is no wider than
800 mils.
(b)	Place a log or board beneath the barrel
of the gun. The log or board should be positioned
in such a way that the barrel, when resting on the
log, will be at the proper elevation to obtain a
sector of graze. The limits are marked when ap-
propriate. (Sector of fire less than 800 mils wide.)
Sactian IV.
106.	General
a,	A range card is a record of firing data neces-
sary to engage preselected target areas within the
sectors of fire during periods of limited visibility.
The range card may also be used as a reference to
engage targets during periods of good visibility,
and to aid the leaders in preparing the supporting
fire plans.
b.	Data for areas within the primary sector are
of first concern. The tripod mounted gun is em-
ployed to cover the primary sector of fire. Prese-
lected targets in the secondary sector are engaged
during periods of limited visibility by the use of
field expedients (para 105b).
c.	A range card contains two parts; a sketch of
the sectors of fire containing drawings of targets^
and a data section which lists data necessary to
engage these targets during periods of limited vis-
ibility. The sketch section is not drawn to scale,
but the data referring to the areas is accurate.
107.	Preparation of a Rango Card
Range cards are prepared in duplicate; one copy
stays at the gun position, the other copy is sent to
the next higher headquarters. Complete range
cards are prepared for primary gun positions, and
partially completed range cards are prepared for
alternate and supplementary gun positions. The
gunner, assisted by other crew members and the
leader, is responsible for the preparation of the
range card. Range cards are prepared immedi-
ately upon arrival in a position regardless of the
anticipated length of stay. The range cards will be
constantly revised during occupation of a posi-
tion. Military symbols are used in preparing
range card (fig 144). The following are steps in
preparing a range card. They need not be accom-
plished in the order outlined:
a.	Position the traversing mechanism (para
105a).
(c) Dry-fire method. Data to targets may
be obtained without firing and adjusting- This is
accomplished using the dry’fire method of laying
the gun. In using this method, the range to the
target is determined by eye; this range is placed
on the rear sight and the gun is laid on the ceiftEr
base of the target. The direction and elevation
readings are then taken. Range determination is
critical because any discrepancy will cause an
error In the elevation when the target is engaged.
The dry-fire method of obtaining data is used only
when firing is not possible or when the situation
is such that firing would disclose the position,
RANGE CARDS
b.	Position the weapon with the muzzle oriented
on the final protective line. If a final protective
line is not assigned, the muzzle should be oriented
on the center of sector. Emplace the tripod as
explained in paragraph 105a(l) (b).
c.	Sketch in the basic symbol for the machine-
gun in the lower center portion of the card, ori-
ented in the direction of the final protective line
or center of sector, as appropriate (fig 148).
d.	If a final protective line is assigned, draw in
the final protective line using the procedure out-
lined In к below.
e.	Draw in the limits of the primary sector
which does not contain a final protective line on
the sketch. No data is recorded in the data section
for the limits of sector unless a target is located
along this line (fig 146).
f.	Draw in the limit of the secondary sector
which doss not border the primary sector on the
range card sketch.
g.	Draw in and label friendly positions which
are located forward of the forward edge of the
battle area (FEBA) and in the vicinity of ma-
chinegun's sector of fire (fig 145).
h.	Draw a magnetic north arrow from the base
of the machinegun symbol pointing in the direc-
tion of magnetic north on the sketch.
t.	Orient the gun position with a prominent ter-
rain feature recognizable on a map by obtaining
the magnetic azimuth from the terrain feature to
the gun position. Determine the distance in me-
ters between these two pointe (fig 145). Place
arrow barbe along this line to indicate the direc-
tion in which the magnetic azimuth was taken. If
a prominent terrain feature is not available, the
gun position may be oriented by using an 8-digit
grid coordinate.
As marginal data, record the gun number,
unit designation, and date in one comer of the
sketch. No higher unit designation than company
AGO MM1
147
SYMBOLS
FPL ALONG THE RIGHT LIMIT OP
SECTOR.
4. SECONDARY SECTOR OF PlRE.
S. SECONDARY ANO PRIMARY SECTOR
OP FIRE WITH AN PPL ALONG
THE RIGHT LIMIT OF SECTOR.
Fiptro /44. MiKtarv oymbolo sppKartto to tko oMor JO maeMwpun.
is recorded on the sketch for security reasons (fig
145).
k. Obtain data to target areas.
(1) When a final protective line is assigned,
determine the maximum extent of grazing fire on
this line, then draw a solid line in extension to the
basic symbol for the machinegun. This line ends
in an arrowhead. Sketch a shaded blade on the
inside of the final protective line to represent the
extent of grazing fire. If the final protective line
has deadspace, breaks are left in the shaded blade
14g
AGO MtlA
DATA SECTION
NO.	DIRECTION	ELEVATION	RANGE	DESCRIPTION	REMARKS
1		*50/15	520	FPL	1605
2	R 20	0/43	700	PDFD
3	L 305	0/10	200	PDFN	R 30
4	Я 250	♦50/15	500	HOUSE	R 25
5	R WO	♦50/3	360	AG	R 50
6	L 210	0/20	600	RJ


RANGE CARD WITH A FINAL
PROTECTIVE LINE.
Пдшъ Rons* Mrd wftfc M* Дна! ргойеЫм №*t.
where it occurs. Record the ranges to the near and
far edges of the deadspace and to the maximum
extent of graze along the Anal protective line.
Deadspace must be accurately recorded and sent
to higher headquarters so that it may be covered
by the fires of other weapons. Record the eleva-
tion reading and other pertinent data under ap-
propriate columns in the data section (fig 145).
(2) Select the principal direction of day fire
and principal direction of night fire and mark the
center of these areas on the sketch with a number,
as discussed in (6) below. Obtain direction read-
ings to this marked area and enter in appropriate
columns of the data section.
(8) If a sector of graze is obtained, deter-
mine the elevation setting which gives the maxi-
mum extent of grazing fire between the muzzle of
the weapon and the first major break in the ter-
дао MMA
149
data section
NO.	DIRECTION	ELEVATION	RANCE	DESCRIPTION	REMARKS
1	UM	0/43	700	PDFD
2	L 305	0/14	210	PDFN	R 30
3	R 250	450/15	540	HOUSE	R 25
4	A 210	0/24	600	RJ
5	R 100	>50/3	360	AC	R 50


149, Ran?* ourd without a finul proto&ioo №w.
rain within the primary sector limits. Record this
elevation in the data section. The sector
of grace is referred to in the data section as “SG.”
(4) After laying the gun on other tar-
get areae In the primary sector, obtain direction
and elevation readings for these arena and record
in the data section (fig 145).
(5) An area of grass is treated м a target
area, and is referred to in the data section as
"AG"
(5) Target areas in th« primary sector are
marked on the range card sketch section by num-
IM
ben inclosed in circles. These numbers are as-
signed in the order of target priority.
(7) When field expedients are used to engage
targets, replicas of the field expedients are
sketched above the drawing of the targets and the
word "stake" with its number, is written in the
data section (fig 146).
(8) Preselected targets in the secondary
sector are sketched in on the range card. Ranges
to these targets are not recorded below the
sketches. Data to those targets is recorded in the
data section (fig 146).
AOO »4IU
CHAPTER 9
MARKSMANSHIP TRAINING
Section I.
108.	Method of Instruction
a.	It is essential that assistant instructors and
demonstration personnel be thoroughly trained
and rehearsed in their duties before group in-
struction commences.
b.	Each exercise is first explained and demon-
strated, Each man is then given practical work in
the exercise, supervised by assistant instructors.
Finally, the men are given an examination in
order to determine their progress and proficiency.
c.	The coach-and-pupil method is used wherever
practicable. Under this method, men are grouped
in pain and take turns as coach and pupil.
d.	A crew is the largest unit in which individual
instruction can be closely supervised. If a suffi-
cient number of machineguns are available, it is
preferable to assign an assistant instructor and
four men to one gun.
e.	Training prescribed herein, including courses
to be fired, should be conducted on the M60 ma-
chinegun prior to training with the caliber -50.
The machinegunners should be capable of firing
both weapons. This method permits the caliber .60
gunners to receive the maximum machinegun
training without excessive expenditure of caliber
.50 ammunition.
109.	Phases of Training
a.	Marksmanship training is divided into two
major phases—
(1)	Preparatory marksmanship training.
GENERAL
(2)	Range firing.
b.	These phases are further broken down into
progressive steps, and should be taught in the
order outlined herein.
c.	The following must be observed during
marksmanship training:
(1)	Each student will be proficient in me-
chanical training and crew drill before he receives
instruction in machinegun marksmanship.
(2)	No man will be allowed to fire on the
range until he has received thorough training in
preparatory marksmanship, regardless of pre-
vious qualifications.
110.	Fundamentals of Marksmanship
To become accurate and proficient in machinegun
marksmanship the soldier must be thoroughly
trained in the following fundamentals:
a.	Accurate delivery of initial round (burst) of
fire on either stationary or moving targets.
b.	Mechanical skill in manipulating the gun and
rapid shifting of fire to new targets.
e.	Adjustment of fire by the foUowing methods:
(1)	Observation of strike.
(2)	Observation of flight of tracer.
(8)	Frequent relaying of the gun during
firing.
d. Speed in combining these fundamentals when
delivering fire.
Saction II.
111.	General
a.	The purpose of the preparatory exercises in
marksmanship training Is to teach the essentials
of marksmanship. A thorough, carefully super-
vised course in the preparatory exercises con-
serves time and ammunition during range prac-
tice.
PRVARATORY ЕХЖСЗШ
b.	The preparatory exercises consist of the fol-
lowing eight steps:
(1)	Positions for firing and introductory ma-
nipulation with both the tripod and vehicular
mounted machinegun.
(2)	Sighting and aiming exercises.
(8)	Sight setting and laying exercises.
AGO S4B1A
151
(4)	Manipulation exercises.
(5)	Fire adjustment.
(6)	Range determination.
(7)	Tracking and leading exercises.
(8)	Examination before range firing.
c.	The first five steps are listed in the order of
instruction. They must be taught in that order. As
the sixth step is not based on the material covered
in any of the other steps, it may be taught any
time before the examination. The seventh step
will be conducted after 10-meter firing, but before
firing on moving targets.
d.	Every man who is to fire on the range, in-
cluding those who have previously qualified, will
receive complete instructions in the preparatory
exercises. The instructor insures that each man is
tested thoroughly and graded in the exercises be-
fore he is allowed to fire. Men with an unsatisfac-
tory rating will be given additional instruction
until a satisfactory rating is obtained.
112.	Equipment for Training
The following equipment per four men is desira-
ble for the preparatory exercises:
a.	One sighting bar.
b.	One machinegun and mount complete (tripod
and vehicular mounts).
c.	One i^-inch aiming paster per gun.
d.	One vehicle silhouette aiming target per gun.
e.	One target frame per gun, covered with blank
paper and equipped with braces for mounting.
f.	One 10-meter machinegun target per gun.
g.	Material for blackening sights.
113.	Position! for Firing
a.	The caliber .50 machinegun can be fired from
the prone or sitting position with the gun
mounted on the tripod in low position, or from a
sitting position with the gun mounted on the tri-
pod in high position. The prone position is used
for tables 2 and 3 qualification firing. However,
the gunner should be thoroughly trained in both
positions. The standing position with vehicular
mount is used for table 4.
b.	In the prone position, the gunner is between
the trail legs with his body extending directly to
the rear of the gun (fig 147).
(1)	The inside of his feet are as flat as possi-
ble on the ground, legs well-spread, toes turned
outward.
(2)	His left elbow rests on the ground, the
left hand placed on the elevating handwheel with
the palm down.
(3)	The gunner lightly grasps the right spade
grip with his right hand, thumb in position to
press the trigger.
(4)	The position of the body varies according
to the physique of the individual so that the eye is
in the proper position to aline the sights.
c.	In the sitting positon, the gunner sits be-
tween the trail legs, directly in rear of the gun.
He may sit with his legs extended under the tri-
pod or with his legs crossed, depending upon his
physique (fig 148, 149).
(1)	The gunner places his elbows on the in-
side of his thighs to obtain maximum support.
(2)	He grasps the elevating handwheel with
his left hand, palm down.
(3)	He lightly grasps the right spade grip
with his right hand, thumb in position to press
the trigger.
d.	With the Ml 18 turret mount, the gunner
places both hands on the spade grips, locks his
Fiffuro Ц7. Prone petition.
152
AGO 849LA
Figure Ц8. Sitting petition, lege extended.
elbows into the sides of his body with his body
forward and chest against his hands, thumbs in
position to press the trigger. Brace the body and
arms firmly and aim low on the target, as the
muzzle has a tendency to rise during firing.
114.	Introductory Manipulation
To give the gunner practice in manipulation, the
following procedure is used: the coach stands
about 10 paces in front of the gun, and uses hand
signals to indicate the direction in which the gun-
ner is to move the muzzle. The gunner manipu-
lates the handwheels, observed by the coach who
makes necessary corrections. When the gunner
reacts quickly, and can manipulate the gun as in-
dicated, he is ready to continue his instruction
(fig 160).
115.	Sighting and Aiming Exercises
a.	First Sighting and Aiming Exercise (Sight-
ing Bar).
(1)	The purpose of the first sighting and
aiming exercise is to teach the correct sight aline-
ment and sight picture.
(2)	When the top center of the front sight
blade is in the center of the peep sight, the sights
are correctly alined.
(3)	A correct sight picture is one in which
the sights are correctly aligned, with the top of the
front sight blade just touching the bottom center
of the target (fig 151).
(4)	All men will be required to demonstrate
proficiency in obtaining the correct sight aline-
ment and a correct sight picture with a sighting
bar (fig 152).
b.	Second Sighting and Aiming Exercise (With
Gun).
(1)	The purpose of the second sighting and
aiming exercise is to apply the preceding lesson to
sight alinement of the machinegun sights on a
target
(2)	A machinegun target is placed 10 meters
from the pintle (fig 153).
(3)	The instructor uses a demonstration
crew of two assistants who are placed at the gun.
One acts as the coach, and the other as the pupil
during the demonstrations.
(4)	The exercise is first explained and then
demonstrated. The coach shows the gunner the
correct sight picture. The coach then moves the
gun off the target, and requires the gunner to
move the gun back on the correct sight picture
using the handwheels. (See para 129 for positions
and duties of the coach.)
(5)	The coach checks and critiques the aline-
ment made by the gunner.
(6)	Practical work is then conducted using
the method demonstrated.
AGO 3491A
153
Figure Ц9. Sitting potition, Uge folded.
Figure 150. Introducing manipulation.
116.	Sight Setting and Laying Exercises
a.	Sight Setting Exercise. The purpose of this
exercise is to teach the method of setting the rear
sight, and to develop accuracy and speed in its
use.
(1)	The exercise is first explained and dem-
onstrated.
(2)	The sight slide is set at the desired range
by turning the elevating screw knob. The hairline
through the peep sight is used as an index in
setting the sight at the desired graduation.
(3)	To demonstrate the exercise, the instruc-
tor has one demonstrator take the pupil's position
at the gun and another the coach’s position. The
exercise is demonstrated as follows:
154
AGO
о
Ftpur* 151. Correct tight picture.
(a)	The instructor announces the range,
(For example: EIGHT HUNDRED.)
(b)	The pupil repeats the range, sets the
sight at the announced range, then assumes the
correct gunner's position and reports UP.
(c)	The coach checks the setting of the
slide and points out errors.
(4)	All men go to their groups, work in pairs,
go through the exercise until each man has
become proficient in accurate and rapid sight set-
ting.
b.	Sight Setting and Laying. The purpose of the
sight setting and laying exercise is to develop
accuracy and speed in laying the gun on an aim-
ing point, and to give additional practice in sight
setting.
(1)	The instructor explains that the exercise
starts with the sight leaf down and the slide at
1,000 yards, that ranges less than 1,000 or greater
than 1,800 will not be announced.
(2)	To demonstrate the exercise, the instruc-
tor has one demonstrator take the pupil's position
at the gun and another the coach's position. The
exercise is demonstrated as follows:
(a)	The instructor announces an aiming
point and range. (For example: 1. PASTER
NUMBER FIVE, 2. ONE TWO HUNDRED.)
After giving the first element, the instructor
pauses long enough to permit the pupil to repeat
it and then gives the second element.
(b)	The pupil repeats both elements, raises
the sight leaf, and sets the sights. Upon complet-
ing the sight setting, he manipulates the gun by
turning the traversing and elevating handwheels
until the sights are accurately alined on the desig-
nated aiming point. He then assumes the correct
gunner’s position, and announces UP.
(3)	The coach checks the sight setting and
lay at the completion of the exercise.
(4)	All men go to their groups, and instruc-
tion is continued.
117.	Manipulation Exercises
Manipulation is the process of shifting the
direction of the gun from one definite point to
another definite point. After the soldier under-
stands the principles of sighting and aiming, and
can assume a satisfactory firing position, he is
given instruction in manipulating the gun to ob-
tain an accurate initial lay; then, to shift the
direction of the gun to successive points with pro-
ficiency.
a.	Second Manipulation Exercise. The instructor
insures that the following instructions are under-
stood and followed:
(1)	A machinegun target is placed out 10
meters from the pintle for this manipulation exer-
cise (figure 153).
(2)	Manipulation of the gun for great shifts
in direction is obtained by releasing the travers-
ing slide lock lever, and moving the slide to the
right (left). Small changes in direction are made
by turning the traversing handwheel with the left
hand. One click on the traversing or elevating
handwheel moves the strike 1 mil, or 1 centimeter
on the target.
(3)	Manipulate for elevation by rotating the
elevating handwheel with the left hand.
(4)	Traversing and searching the target is
accomplished by laying on the initial aiming pas-
ter (number 5 or 6) and then shifting to each of
the other numbered pasters in order (5 through
10 or its reverse). All major shifts in traverse are
done by loosening the traversing slide lock lever.
When shifting from pasters number 7 to 8 or 8 to
7, use the traversing handwheel.
(5)	Upon receiving the command, the pupil
repeats the instructions, sets the sight, lays the
gun on the designated paster, assumes the correct
gunner's position, and reports UP.
(6)	At the command FIRE, the pupil repeats
the command, simulates firing two single shots,
then shifts to the next paster and simulates firing
until the exercise is completed. The pupil aims at
each paster.
AGO S4I1A
155
TARGET
TOP VIEW
SIDE VIEW
PEEPSIGHT
SIGHTING TARGET
FRONT SIGHT
FOLDED *'L'* SHAPE
Fifur# Itt. Sighting bar.
IM
AGO M»1A
<2Z
A . В--------C D
QQQQ QQQQ QQQQ Q Q Q Q
1 t 3	4	12	3	4	1	2	3	4	1	2	3	4
Bado яимЫшртт яюгкгтммМ?
(7)	While the pupil it performing these oper-
ations, the coach:
(a)	Checks the eight иШад end initial lay.
(b)	Checks the pupil's position.
(c)	Sees that the pupil simulates firing a
shot(s) before manipulating the gun.
(d)	Checks for proper manipulation.
(e> At the completion of the exercise,
checks the lay and critiques the exercise.
b.	Th9 Awnowwtent of InrtrvcitoM. (Ezcwn-
?*•):
(1)	PASTER NUMBER FIVE (SIX) TO
FASTER NUMBER SIX (FIVE).
(8)	ONE THOUSAND.
(8)	TRAVERSE ANQ SEARCH. At the com-
mand FIRE, the instruction proceeds as described
in 0(4), (8), (8) above.
IIS. Observation and Adfustmwit of Fire
The purpose of observation and adjustment
practice is to teach the adjustment of fire by ob-
serving the strike of the bullets, the flight of tra-
ЛОО HtlA
сея, or by frequent relaying on the target using
the sights.
a.	ObeervatiOH.
(1)	When firing on the 10 motor range, the
strike of the bullets is visible on the target.
(2)	When firing at greater distances, the
strike of the bullets on the ground may cause dust
to rise which is visible to the gunner; however,
Z during wet weather, the strike can not always be
seen.. In this event, the tracers will allow the gun-
ner ar crow leader to note the strike of the burst
in relation to the target
b.	Ad/ttf trnent
(1)	Using the mi) relation, 1 click of the trav-
ersing handwheel or elevating handwheel moves
the strike of the bullet Ц-inch on the target at a
range pf 10 meters.
(2)	When firing on the 10-meter range, ad-
just, moving the shot group a required number of
centimeters vertically or horizontally until the
center of ths group is on the aiming paster.
Should the gunner’s initial burst strike the target
2 centimeters to the left and 3 centimeters below
137
the aiming paster, he adjusts his fire by travers-
ing right 4 clicks, and elevating 6 clicks before
firing again.
(3)	When firing on field targets, adjustment
is made by moving the burst into the target. One
click (mil) on the traversing handwheel will move
the strike 4 meter at 600 meters, or 1 meter at
1,000 meters; however, the distance 1 click (mil)
in the elevating handwheel will move the strike
depends on the range to the target and the slope
of the ground. The gunner determines the number
of mils necessary to move the center of the strike
into the target and he manipulates the gun the
required number of mils. This does not require the
use of sights. For example, should the gunner fire
on a target at 300 meters and observe the strike
10 meters to the right of the target and ehort
about 50 meter», he would traverse the gun to the
left 20 clicks (mils) and adds one or more clicks
(mils) depending on the slope of the ground.
(4)	The gunner may use the “adjusted aim-
ing point” method to adjust the fire. In this
method the gunner must use his sights. He selects
an aiming point which will place the next burst on
the target. For example, should the gunner fire on
a target at 500 meters and estimate that the
strike Is 20 meters short and 10 meters to the
right of the target, he would rapidly select an
aiming point approximately 20 meters beyond the
target and 10 meters to the left of the target, lay
on that aiming point and fire.
119.	Range Determination and Windago
Corrections
Range determination is the process of determin-
ing distance between two points. There are two
methods of estimating range by eye—mental unit
of measure (yardstick), and the appearance of ob-
jects. The soldier needs training and practice in
both methods over varied terrain and under var-
ied conditions of light and weather. A definite sys-
tem of range determination, frequently practiced.
Is the only way to make estimation by eye relia-
ble. For information and exercises recommended
for training in range estimation by eye, see para-
graphs 68 and 68.
120.	Tracking and Leading Exercises
a.	General.
(1)	The gunner normally completes a course
of instruction in firing a machinegun at stationary
targets before instruction is given in firing at
moving targets.
(2)	Battlefield targets may be either moving
or stationary. The technique of engaging a mov-
ing target differs from that of engaging a station-
ary target. The gun must be aimed ahead of the
target a sufficient distance to cause the bullet and
target to arrive simultaneously at the same point
This distance is measured in target lengths. One
target length as seen by the gunner is one lead.
Leads are measured from the center of mass (fig^
154). The lead necessary depends upon range,
speed, and direction of movement of the target
To hit the target the gunner aims at a point
ahead of the target equal to the estimated number
of leads, maintains this lead by tracking the tar-
get (manipulating the gun at the same angular
speed as that of the target), and then fires. Fire is
adjusted by observation of strike and/or tracer.
b.	Tracking. Tracking consists of maintaining
correct alinement of the sights (with or without a
lead) on a moving target by moving the gun at
the same angular speed as that of the target
(1)	The gunner is required to alm at a pre-
scribed point (center of mass) on the target and
maintain that aim during uniform movement of
the target. As instruction progresses, speeds used
should differ from successive runs of the target
Speeds, at which 10-meter targets should be run
to represent speeds at various ranges, are shown
in the following table.
Гагр** Sptode, 10-Mator Moving Targot
TaiBtt ipMd* in nph	Tcreet bpmSi Itt tub* pw моема ооттмратв* to—
	MOM	MOM	MOM
7 И		s	4	2
16		12	8	4
80		24	16	9

(2)	The target handler must have practice in
moving the target silhouette across the blank tar-
get at the varying speeds.
o. Leads.
(1) Lead table. Mathematical computation or
use of voluminous lead tables to obtain exact leads
to be used on a moving target are impractical in
combat. The simple lead table shown below gives
amount of lead necessary to hit a target moving
at right angles (0 degrees) to direction to hit at
speed and ranges indicated.
IpoMt in milaa Mr bear	Вам* M
	MOM	MOM	*00 M
16		И tartot laapth	1 UTfOt teofth	2 target hoftho.
(2) Correction changee. The gunner must
make corrections as conditions change. If the tar-
IM
лао m*ia
Figure 1U- Sight picture with one target length had.
get speed is 714 miles per hour, the amount of
lead is half that shown in the table; at 30 miles
per hour, double that shown. The angle at which
the target is moving also alters the amount of
lead taken (if the angle between line of fire and
line of travel of the target is less than 45 degrees,
use one-half the lead shown in the table). For a
target moving directly toward the gun, the line of
aim is placed on the center or the lower edge of
the target, depending on range and slope of the
ground. The lower edge is used for longer ranges
and for broken ground. For a target moving di-
rectly away from the gun, the line of aim is placed
similarly on the center or upper edge of the tar-
get. Too much lead is better than too little because
the target runs into the fire, also the observation
of a strike is easier. Intelligent use of the lead
table includes immediate application of fire with
estimated lead followed by necessary corrections
based upon observation of strike and/or tracer.
(3)	Lead exercise (10 meter).
(a)	The gunner is required to take a posi-
tion at the gun. swing through the target silhou-
ette, and aim at a point ahead of the target equal
to the prescribed lead from the center of mass.
(b)	The gunner then directs the target
handler to move the marking silhouette until the
center of the target is at the point of aim. He then
repeats this procedure three times fur each target
lead announced (flg 155).
(c)	The target handler places his marking
silhouette on the blank target, traces around it,
and holds it in place for the pupil to aim using the
Figure 155. Aiming target used in tracking and
hading exercieee.
prescribed leads. Following the pupil’s instruc-
tions, he moves the marking silhouette until the
pupil commands HOLD. He then places a pencil
dot at this point, and returns the silhouette to the
original position. This procedure is followed until
the pupil has completed three tries for each target
lead announced. The three pencil dots for each
target should be inclosed in a circle 1 centimeter
in diameter.
(d)	The exercise should be conducted for
varying right and left leads.
d. Tracking and Leading.
(1) Combine tracking and leading exercises
at 10 meters. After the gunner has gained profi-
ciency in tracking the target, he is required to
repeat the tracking exercises while using a desig-
nated lead to simulate firing when his sights are
properly alined.
(2) As a further exercise in tracking and
leading, the gunner may be required to track and
lead moving targets at greater ranges. A vehicle
can be run at right angles to the line of aim at
ranges between 600 and 1,000 yards, and at vary-
ing speeds, averaging 15 miles per hour.
121.	Preliminary Gunner*! Test
a.	Preliminary gunner’s tests should be held pe-
riodically. Training units should prescribe meth-
AGO MtlA
159
ods and procedure*, and issue orders announcing
satisfactory completion of the preliminary gun-
ner's test, including the scores attained.
b.	Preliminary gunner's test, if given, should be
given prior to range firing.
c.	The recommended preliminary gunner's teat
has a possible score of 100 point*. A score of 80
should be required for satisfactory completion of
the test.
Itomova the groups from the receiver -......—	5
DtaMaobfo sad aiaambla the boh--------------- 8
Dfnasemble and aasmbli the oil buffer body group 5
Aaaeuible the medtfaegan--------------------- 8
Damoastxate and акрШп the aattfog of aorreet 10
headspace
Demonstrate and explain setting the correct timing 10
Demonstrate application of the Ant phase of im- 8
mediate nation
Explain ом. phase of functioning (as directed by 5
the axaminfeg otteor)
Explain why ths machinegun will not fire auto- 8
matkaHy with the cover unlatched
Inspect a loaded belt and make any corrections 5
nammary to prepare it for firing (Belt to have at
least one of each of the following: Short round,
beat round, loose bullet, broken link and round
not poshed fully Into the link)
Explain and demonstrate checks to be made before 5
firing.
Explain the full cure and denning ef the gun after 18
firing
Explain how gun is targeted at 10 motors-------10
Demonstrate and explain care, adjustment, and In- 10
bricatioa of the Mi mount
TOTAL______________________WO
Section 111.
122.	General
Range firing is conducted upon completion of
preparatory marksmanship training. Range firing
consists of the following:
a.	Rang* Firing. Range firing begins with in-
struction firing. Each student complete* instruc-
tion firing before firing for record. Once record
firing is begun, the table is completed before addi-
tional instructional firing is undertaken.
b.	Instruction Firing, This is practice firing on a
marksmanship range with the help of an instruc-
tor. The coach and pupil method may be used.
c.	Record Firing. A record is kept and used as
the basis for a soldier's classification in marks-
manship.
d.	FamSiorwitwn Firing. This I* firing to
acquaint a soldier with a weapon. For familiarisa-
tion training prior to firing, see paragraph 198.
123.	Purpose
a.	The purpose of range firing is to teach the
soldier to apply the fundamentals of marksman-
ship as preecribed in paragraph 110. The method
of instruction is prescribed in paragraph 108.
b.	Instruction firing teaches the accurate deliv-
ery of fire, mechanical skill in manipulating the
gun to engage various type* of targets, and obser-
vation and adjustment of fire within the time pre-
scribed.
RANGE FIRING
c.	Record firing is a test of the gunner's profi-
ciency in all phases of instruction in machinegun
marksmanship and furnishes the means for classi-
fication according to the proficiency attained.
124.	Course to be Fired
a.	General.
(1)	The following course is prescribed for
personnel required to fire the machinegun for
qualification.
(2)	The amount of instruction firing is not
limited to that prescribed in the following table*.
The minimum number of instruction firing* rec-
ommended is four. Such additional practice as
time and ammunition allowance permit may be
given. The gunner will be proficient on the IO-
meter range before he is permitted to fire on the
transition range. The gunner can learn all basic
elements of marksmanship by firing on the IO-
meter range with the exception of range determi-
nation, and leading and tracking.
(8)	Before range firing, the instructor wiD
insure that all minimum qualifying scores con-
form to the latest published directives.
b.	ToMss. Instruction firing consists of firing
tables 2,8» and 4 (4 firings of each recommended).
Record firing consists of firing tables 2, 8, and 4
once.
140
AQO НМЛ
f. 10 Mdtr
(natam)	Ttoa (ateonto	Total ГОД di	Taryat	Тура *f Sm
10	No Limit.				в	10 Meter Tlrf»t Paster 1, 2, 8, or 4_.	Targeting faintieehot flrtf -
				ftoupe of three).
10	No Limit				2	10 Meter.							Sighting ehote*
10	90		78	Target Patter 6, 6, 7, and 8.	Trtvme end Search.
*ТЬа fun laving ton tmtod, **eh MOtorfv* ПИЬ* I* aUowarf two abota to toltrtti tito toumcy «f th* tMtHbf. Г*«И m ai&tiit atola.
ToUf <S. ТгОМШоН Rwt
Itatf* (matan)	Tbnt	Total roeada	Tattot	Typ* tf (Ira
400 to 1,000 400 to 1,000	No Limit		 180		6 80	Double E-etlhouette_._		 Double E-dlhouette (8) (400 to 1,000)	TtTfetia* (dngleahot). Free gun (two 6-roupd burwta per turret).
TaWi ITT, Mvriiig Towl
Кавса	Tim* (мов<1Ю	Total reunda	Target	Typo of bo
Minimum 600. Maxi- mum 1,000	Variable. Not leas 80 eeconda	26	Rectangle 6' x 8' or 8 x 12		Speed variable 10 to 80 mph averaging 16 mph. Direction of turret variable, but etin- dardtaed during record Bring. Engage target with tingle ehota, Are automatic buroti when adjusted.
Section FV. CONDUCT OF RANGE FIRING
125.	Officer In Charge of firing
a.	The officer In charge of firing 1» responsible
for the conduct of range firing. Thia officer is de-
tailed by the brigade, battalion, or equivalent com-
mander of the troop* being trained.
b.	Hla principal duties are as follows:
(1)	To arrange, coordinate, and supervise the
assignment of firing points.
(2)	To insure the application of safety pre-
cautions by all units firing.
(8}	To make decisions upon interpretation of
the rules governing record firing.
126.	Range Officer
Operation of the range is thd responsibility of the
range officer. He should be appointed well in ad-
vance of range firing. The principal duties of the
range officer are:
a.	To make timely estimates of material and
labor in order to place the range in proper condi-
tion for firing.
b.	To supervise and direct repairs of installa-
tions.
c.	To regulate the distribution of ranges and
targets.
d.	To maintain a supply of material* required.
e.	To instruct and supervise range guards.
f.	To assist the officer in charge of firing in
enforcing safety regulations.
127.	Uniform and Equipment
a.	The uniform and individual equipment worn
during range firing are prescribed by the com-
manders of the units to be trained.
b.	A sufficient number of guns should be availa-
ble for one gun per four men.
c.	Sufficient cleaning rods, waste» spare parts,
ruptured cartridge extractors, wrenches, cleaning
material*, and other required equipment should be
available on the range.
141
AGO MIU
128.	Control Commands
a.	General. In order to control the firing, and to
insure that all men fire the same exercises, a set
of control commands is established for the con-
duct of firing. The complete command is divided
into two parts; the first part permits the gunner
to lay on the exercise, and allows the coach time
to make inspections and corrections as required.
The second part tells how and when to fire.
b,	Explanation of Control Commands for 10-
Meter Range.
(1)	Space six (one two, four zero)» denotes
the number of belted rounds to be used for the
exercise.
(2)	Half-load. (Load). The belt is half-loaded
as directed.
(8)	Patter number one (two, five, eight).
This is the command used to indicate the initial
aiming point (paster) used in the exercise to be
fired.
(4)	One four hundred. This is the command
used to indicate the range that is set on the rear
sight in preparation for, or to actually fire, the
exercise. In the absence of an announced range
the exercise is fired with the sight setting at
which the gun was targeted.
(5)	One of the following commands will be
given at this time:
(a)	Fixed. This command indicates that
the target is a fixed target requiring no change in
direction or elevation.
(b)	Traverse. Thia command indicates that
the gunner is required to make changes in direc-
tion (right or left).
(c)	Search. This command indicates that
the gunner is required to make changes in eleva-
tion only.
(d)	Traverse and search. This command
indicates that the gunner is required to make
changes in both direction and elevation.
(S)	Single-shot (four rounds). This com-
mand is to indicate to the gunner that he must fire
the exercise slngle-ehot. In the execution of this
command, the gunner reaches forward, palm up,
and places his hand below, but not touching» the
retracting slide handle.
(7)	Fire. This Is the command for the gunner
to load his weapon, relay on the paster and fire
the exercise.
(8)	Cease firing. At this command or signal,
the gunner must stop firing.
(9)	Clear and check. This command is always
given, to insure that all guns are free of ammuni-
tion.
142
c. Example of a Control Command.
(1)	For fixed fire, the instructor
commands:!. SPACE SIX, HALF-
LOAD, 2. PASTER NUMBER ONE
(TWO), 3. ONE THOUSAND, 4.
FIXED. The second part is: 5. SINGLE
SHOT, 6. FIRE.
(2)	For exercises other than fixed fire, the
instructor commands: 1. SPACE ONE
TWO (FOUR ZERO), HALF-LOAD, 2.
PASTER NUMBER FIVE (ONE
ZERO), 8. ONE THOUSAND, 4. TRA-
VERSE AND SEARCH. The second
part is: 1. FOUR-ROUND BURSTS, 2.
FIRE.
129.	Duties of the Coach
a.	General. During preparatory exercises and
instruction firing, the coach is allowed to be at the
gun. The success of the instruction during both
the preparatory exercises and the instruction
firing depends to a great extent upon the thor-
oughness with which the coach performs his du-
ties.
b.	Coaches. When enough experienced personnel
are available, well-trained and well-rehearsed per-
sonnel are assigned as coaches. Otherwise, the
gunners take turns coaching.
c.	Duties of the Coach. The duties of the coach
are to:
(1)	Require the gunner to inspect his gun
and equipment.
(2)	Assist the gunner in targeting the gun.
(8) Require the gunner to explain the exer-
cise which he is about to perform.
(4) Check the sight setting and eight picture
(lay) for accuracy, and then lay the gun off in
direction not less than 6, nor more than 10 mils.
(6)	Observe the gunner's position, grip, and
manipulation during firing.
(6)	Require the gunner to adjust his fire by
observation.
(7)	Point out errors and explain their effect
on the exercise.
(8)	Constantly watch the adjustment and
condition of the gun.
d. Position of the Coach.
(1)	The coach takes a position to the left of
the gun. He may move in order to accomplish his
duties as outlined in c above.
(2)	When firing the caliber .60 machinegun
from the M8 mount, the coach should be lying on
his side, feet to the rear, where he can watch the
▲00 М91Ж
gunner, and also observe control flags placed at
the right limit of each unit on the flring line.
130.	To Emplace the Gun
a.	To insure maximum accuracy during flring,
the mount must be adjusted so that the traversing
bar is level.
b.	Before emplacing the mount, make certain
that the sleeve lock latch engages the sliding
sleeve. After placing the gun on the mount, stamp
al) shoes firmly into the ground.
131.	Targeting the gun
a.	Targeting is the process used to determine
and apply corrections for mechanical errors be-
tween the barrel and sights so that the line of aim
and strike of bullet will intersect at the target.
b.	Method of targeting at 10 meters.
{1) Set the sights at 1,000 and windage at
zero.
(2)	Lay on a paster.
(3)	Fire three rounds in single shots; use the
same sight picture for each shot.
(4)	Locate, by inspection, the center of
impact of the shots.
(5)	If the center of impact is on the palter,
the gun Is targeted.
(6)	If the center of impact is not on the
paster, insure that the gun is laid on the original
paster. Without moving the gun, move the rear
sight first for deflection, then for elevation, until
the line of aim is on the center of Impact.
(7)	Confirm the adjustment by again aiming
at a paster and firing three rounds, single-shot.
<8> If the center of impact still is not on the
paster, repeat the above procedure (6) until the
center of Impact coincides with the point of aim.
(9	) Record the sight settings.
132.	10-Meter Machinegun Targets
The 10-meter target will be used to fire table 2 for
Instruction and record firing. The scoring spaces
measure 4 centimeters by 5 centimeters.
Section V. CONDUCT OF EXERCISES
133.	General
a.	All firing is initiated by control commands of
the type in paragraph 128. The gunner (pupil)
repeats al) commands.
b.	The use of a T-base or other device for
steadying the mount is prohibited.
o.	The sight leaf is raised for all firing. Both
sights of the machinegun may be blackened.
d.	Before firing, the gunner examinee all the
equipment and insures that it is in order and
ready for firing (para 50).
e.	The coach performs the duties outlined in
paragraph 129.
134.	Instruction Firing, Table 2
a.	Purpose. The purpose of instruction firing in
table 2 is to develop skill in the delivery of initial
fire on a series of targets that vary in direction
and elevation.
b.	Demonttration of Firing.
(1)	To demonstrate each of the exercises, the
instructor uses a demonstration crew of two men.
One man (the gunner) takes his position at the
gun, the other man to the left of the gun as coach.
The equipment required is one machinegun (prop-
erly mounted and targeted), ammunition for the
exercise, and two 10-meter machinegun targets.
One of the targets is set up 10 meters from the
gun (measured from the pintle). The other target
is placed near the instructor to be used in expla-
nation of table 2.
(2)	The procedure in demonstrating each of
the exercises is as follows:
(a)	The instructor explains the exercise
the gunner is about to fire, Including sighting
shots (para 124 and 131).
(b)	The instructor gives the first part of
the control command.
(c)	The gunner repeats the command,
half-loads, lays on the designated paster, assumes
the correct gunner’s position, and reports UP.
(d)	The coach checks the lay of the gun,
and the gunner’s position. He then lays the gun off
in direction not less than 5 or more than 10 mils.
(e)	The instructor then gives the remain-
der of the control command.
(/) The gunner repeats the command, and
after the command to fire, fully loads, relays the
gun, assumes the correct gunner’s position and
fires the exercise.
(p)	Prior to firing, the coach requires the
gunner to relay, and to assume the correct posi-
tion. During the firing, he notes any errors In
position and grip, or manipulation, and, If necas-
sary, stops the gunner from firing, to correct er-
rors.
(Л.) After the exercise is fired, the coach
checks the lay of the gun, points out any errors
made by the gunner and explains their effect on
the target.
(i)	The coach and gunner then examine the
target. The Instructor explains the effect of an
Improperly mounted gun or incorrect lay (target
analysis).
c.	Explanation of Exercise. The instructor ex-
plains that the scoring spaces represent point tar-
gets, and that this exercise requires accurate de-
livery of initial fire. Table 2 is fired by engaging
scoring spaces 6-6 and 7-8, or 8-7 and 6-6 In that
order. The gunner has 6 rounds to engage each
scoring space with a 4-6 round burst, total of 78
rounds. The shots should strike in the scoring
space. Pasters 1, 2, 8, and 4 are used for targeting
and sighting shots,
d,	Dry Run. If time is available, the gunner
should be required to “dry run” the exercise a
number of times prior to firing. The control com-
mand is preceded by the word SIMULATE,
135.	Record Firing for Table 2
a.	General
(1)	Record firing consists of the firing pre-
scribed in paragraph 124. The rules for instruc-
tion firing apply to record firing as well, except
where stated otherwise. Any departure from the
rules governing record firing will disqualify a
gunner. This includes firing single shot when
bursts are required.
(2)	After completing Instruction firing, each
gunner fires the table in one period as prescribed
in paragraph 124. After the gunner has completed
firing table 2, the targets are changed and another
gunner then fires table 2. Once begun, record
firing of any table is carried to completion before
any other firing Is permitted. Ordinarily, a gunner
is required to fire for record on the day following
that on which he fired any part of his instruction
firing. When necessary, the officer in charge of
firing may authorize the firing of both inetruction
and record on the same day. The two types of
firing are conducted simultaneously only on
ranges where each type of firing is conducted on a
different part of the range.
b.	Equipment. The machinegun and mount as
Issued will be used in all firing, The use of addi-
tional clamps or appliances of any kind on the gun
or mount is prohibited. Cloth patches or similar
soft material may be used for the elimination of
164
excessive looseness, such as between the pintle
and the pintle bushing, and between the upper
elevating screw yoke and rear mounting lugs.
Only authorized ammunition will be used. It will
be examined carefully and defective cartridges
and/or links eliminated.
c.	Coach. Coaching the gunner Is not authorized
at any time during record firing. The officer in
charge of firing may employ the coaches to assist
in control of firing, for transmitting the cease fire
signal from the officer in charge of firing to the
gunner, and to lay the gun off In direction, not
less than 6, nor more than 10 mils.
(1)	The coach will not touch the gunner dur-
ing the conduct of the exercise, except to transmit
the cease firing signal.
(2)	The coach will not speak to the gunner
other than to give control commands.
d.	Gunner. In record firing, the gunner takes his
position at the gun to fire the prescribed exercises
with the prescribed amount of ammunition.
(1)	During this firing, he performs required
operations, such as setting the sight, laying the
gun, manipulating, and firing within the pre-
scribed time limit
(2)	After the gunner has taken his place at
the gun for an exercise, all rounds fired by him
will count as part of that exercise. The total
amount of ammunition used in any exercise, in-
cluding rounds fired accidentally, will not exceed
the amount authorized for that exercise. Ammuni-
tion remaining from one exercise, due to expira-
tion of the time allowance, is lost to the gunner.
However, it may be used for targeting purposes.
e.	Stoppages.
(1)	When a stoppage occurs during record
firing, the gunner will raise his hand, call TIME,
and without touching the gun, await further in-
structions from the officer In charge of firing
(para 86 and 86). The assistant notes the time
that the gunner signals, and determines the re-
maining time for the exercise by deducting the
elapsed time from the allotted time.
(2)	The assistant determines where the gun
is laid and counts the ammunition remaining for
the particular exercise. He lays the gun off the
exercise and presses the trigger, making sure that
the bolt is forward, to determine if there is a
stoppage. If a stoppage exists, he directs the gun-
ner to reduce it
(8)	He then reports the nature of the stop-
page to the officer in charge of firing, who gives
instructions as to whether or not the gunner will
be permitted to complete the exercise. If the cause
AGO M81A
SCORECARD MG, CAL.50, НВ, М2 (For ив» of this fonn,	FM 23-45; th» prop»n«nt o|*ncy it U. S. Continental Army Commend.)
NAME:	I S3 AH:	GRADE:
ORGANIZATION;				PLACE:	1 DATE; TABLE 1 (IOMETER)	I
NUMBER OF ROUNDS	BONUS			HITS		PENALTIES		SCORE MAX. T04
80*
«INCLUDES TWO SIGHTING SNOTS. DISREGARD IN SCORING
DATE:	SCORER:
	CERTIFIED CORRECT;
	FIRER:
DATE:	TABLE II (TRANSITION)
NUMBER OF ROUNDS			6	NO TIME LIMIT			TARGETING
			60	3 MINUTES			TRANSITION FIRING
TARGETS ENGAGED (TOTAL)
NUMBER OF HITS
NUMBER OF POINTS								SCORE MAX: 50
TARGETS :			RANGES		HIT			MISS
1			400
2			500
3			600
4			800
5			1000
TOTAL: 10 POINTS PER TARGET X 5 TARGETS 50 POINTS TOTAL								I-
			TOTAL TABLES 1, IL
			CLASSIFICATION:
			TABLE HI (MOVING TARGETS)
NUMBER OF ROUNDS		TOTAL HITS						SCORE MAX: 125
25
DATE:		SCORER:
		CERTIFIED CORRECTi						TOTAL SCORE MAX: 270
		FIRER:
		TOTAL TABLES 1, II, 111: CLASSIFICATION:
DA FORM 3U7MU 1 Jim 72
Fifur» 168. CiUbir Л0 mooAtvM^im MorvMrd,
▲ad MI1A
165
Arwv lit—Conthwid
at the stoppage ww the fault of the gunner, the
exercise is not completed and the score stands. If
it is not the fault of the gunner, he is permitted to
complete the exercise. To complete the exercise,
the gunner fully loads and lays on that point of
the exercise where the stoppage occurred. At the
command FIRE, given by the assistant» the gun-
ner fires the ammunition that remained for the
particular exercise, In the time remaining to com-
plete the exercise. In no case will any exercise be
completely refired. Should a breakage occur, the
gun is retargeted or replaced before firing to com-
plete the exercise. If, as a result of pulling the
bolt to the rear when a stoppage occurs, any un-
fired or damaged rounds are ejected from the gun,
the gunner is allowed to fire the equivalent of
these rounds as soon as the exercise is completed.
At the command FIRE, given by the assistant, the
gunner is allowed one second for each ejected
round.
166
/. Penalty.
(1)	A penalty of 6 points is deducted from
the ecore of any flrer who fails to cease firing at
the command or signal. An additional 2 points are
deducted for each round fired after the command
CEASE FIRE is given. The assistant will exact
the penalty.
(2)	A gunner who fires on the wrong target
receives credit only for hits on his own target. He
does not refire the exercise. The man whose target
was erroneously fired on refires the exercise.
(8)	Five points are deducted from the score
for each shot-hole in excess of the prescribed
number of rounds. No deductions are made for
the targeting or sighting shots. No deductions are
made if the firing is under the circumstances de-
scribed In (2) above.
g.	Scoring.
(1)	DA Form 8867-R (Score Card, MG, CAL
.50, HB, М2) is kept for each man firing. The date
of the firing and all other entries are recorded in
ink or indelible pencil. No erasures are made on
scorecards. Alterations may be made only by the
unit commander or the officer acting ae scorer,
and each alteration is authenticated fay the initiate
of the officer who made it. In record firing, the
target is scored by an assistant. An officer authen-
ticates the entry on the scorecard (fig 156). DA
Form 8867-R will be reproduced locally on
8х10Ц inch paper.
(2)	Two points bonus are scored for each
scoring space hit The maximum bonus for table 2
is 26 points. One point is scored for each hit in
the prescribed scoring space up to a maximum of
six hits per scoring space. Strikes touching the
boundary line of a scoring space are hits. Maxi-
mum score for table 2 is 104 points.
h.	Acstetant Iiuiructors. Officers or noncommis-
sioned officers who supervise record firing are de-
tailed as assistants to the officer in charge of
firing. Personnel performing this duty should be
from units other than the one firing. A maximum
of two guns can he supervised by one assistant
Instructor. He performs the following duties:
(1)	Lays the gun off In direction not leas
than 5 and not more than 10 mite, as prescribed
for the exercise, unless a coach is at the gun.
(2)	Sees that the gunner does not alter the
lay of the gun until after the command (signal)
FIRE is given.
(8) Sees that the gun Is not fully loaded until
after the command (signal) FIRE.
(4) Watches for stoppages, and performs the
duties prescribed in e above.
600 M*16
SCORECARD MG. CAL.SO, MB, М2 (Fer w»« el this ferm, >h FM 23—65; th# proponent oyency is U. S. Continentci Army Commend.)
cwu^s 1 ”*N 5V3-xo -z*or						GRADE:
ORGANIZATION:^/			PLACE:/СГДГЛ'А'/^	DATE: If	А Т/ TABLE 1 (IOMETER)	z/
NUMBER OF ROUNDS	BONUS		HITS		PENALTIES		SCORE MAX. 104
W			72.
•INCLUDES TWO SIGHTING SHOTS. DISREGARD IN SCORING
DATE: /У 7*4 7/	SCORER:	№	Z. STfiKFaRD
	CERTIFIED CORRECT: £***&&?. s
	FIRES:	V. 4J<V0LUX_
DATE:	/9	7/	TABLE II (TRANSITION)
NUMBER OF ROUNDS:		6	NO TIME LIMIT			TARGETING
		60	3 MINUTES			TRANSITION FIRING
TARGETS ENGAGED(TOTAL)							J
NUMBER OF HITS							f
NUMBER OF POINTS							SCORE MAX: 50
TARGETS :		RANGES		HIT			MISS
1		400		y/*"
2		500
3		600		y/'
4		800					0
5		1000
TOTAL: BAiuvf							*o
X___5JARGETS
50 POINTS TOTAL
	TOTAL TABLES 1, II.
	CLASSIFICATION:
	TABLE III (MOVING TARGETS)
NUMBER OF ROUNDS	TOTAL HITS	SCORE MAX: 125
25	X0
DATE:	SCORER:	2 . Slbnf»*/
33^7/	CERTIFIED CORRECT:	7* Qha^dUt-.	TOTAL SCORE MAX: 279
	firer: ChoucUo V'. U>OA4JLU-
	TOTAL TABLES 1, II, 111: CLASSIFICATION: / №
0Л FORM ЖМЦ 1 Jm 71
FiffVH IM—ConUniud
AQQ 1ИХА
167
(6)	Makes the deduction described in / above
for firing after the command CEASE FIRE is
given,
(6)	Counts the total number of holes in the
target and deducts, if necessary, points as pre-
scribed in g above.
(7)	Counts and records the score as pre-
scribed in g above.
136. Instruction firing for Table 3
Table 8 is the connecting link between basic
marksmanship and the engagement of field tar-
gets. It is designed to provide transition or pro-
gressive instruction as it is an introduction to en-
gagement of field targets at unknown locations
and ranges. The targets vary In type and there-
fore require engagement by varying types of fire.
The purpose of instruction firing is to teach the
gunner to locate the target, estimate the range»
engage the target» and to adjust his fire if neces-
sary.
a.	Demonstration of Firing.
(1)	The instructor uses a demonstration
crew of three men. The acting safety NCO, takes
a position on the right of the gun facing to the
rear. The gunner is in prone position» five paces in
rear of the gun. The ammunition bearer is five
paces in rear of the gunner» with one ammunition
case containing the prescribed number of rounds
to fire the course. The equipment for the demon-
stration consists of one mounted machinegun» am-
munition for the course, and two double E-silhou-
ette targets. The targets are placed so that the
instructor can point to them.
(2)	The instructor explains that the five tar-
gets are located in a lane that is not more than
100 meters wide at the extreme range, and not
less than 10 meters wide at the firing line. The
nearest target is located approximately 400 me-
ters from the firing line, and the far target is
1,000 meters. Intermediate targets are placed ir-
regularly In width and depth (fig 167). The tar-
gets may be the disappearing type or may be used
with the bases flush with the ground on stakes.
AU targets consist of double E-type silhouettes
mounted abreast, without interval (fig 158). Ri-
cochets hitting the targets are hits.
b.	Field Targeting.
(1)	Six rounds are used for targeting the gun
on table 8. Any target in the lane may be used;
however, it Is recommended that a target at ap-
proximately 000 meters be used. The range to the
target used must be known, because a fenown
range Is required for accurate targeting.
(2)	The gunner will;
(a)	Set the sights at 600 (or range to the
target), windage zero.
(b)	Lay on the target.
(o) Fire one round.
(d)	Observe the strike.
(e)	If the strike is on the target, check
sight setting and sight picture, and fire the con-
firming round (s).
(f)	If the strike is not on the target, the
gunner estimates the number of meters he is off,
then places the changes in elevation and windage
on his rear sight.
(p) Lay on the target by using the travers-
ing and elevating mechanisms, and confirm.
(A) If the strike Is not on the target, the
gunner repeats steps (f) and (g).
e. Explanation of the Couree.
(1)	Time begins at the command, ACTION,
given by the instructor in charge of firing. At this
time, the acting safety NCO gives the hand signal
for ACTION, and the crew goes into action in the
following manner: upon the command and signal,
the gunner springs to his feet and runs to the gun
where he takes the prone gunner's position; the
assistant gunner arrives as the gunner takes his
position, and places the ammunition case close to
and on line with the feedway, and assumes a posi-
tion on hia left side, facing the gun, head even
with the feedway. He then assists the gunner in
loading the gun. After the gun Is loaded, the gun-
ner estimates the range to the target, sets hia
sights, lays on the target, fires, and observes the
strike. If the target is not hit, the gunner may
change the elevation and windage on the sights or
select a new aiming point to place the next burst
on the target.
(2)	Two 6-round bursts (automatic fire) mag
be fired at each of the targets until a kill has been
registered.
(8)	The gunner engages the three near tar-
gets (400—600 meters) before engaging the far
targets (800—1*000 meters). The officer in charge
of firing prescribes the order to fire the targets in
each group.
(4)	The ammunition container carried by the
assistant gunner contains 60 rounds of ammuni-
tion. Tracers may be used to observe fire, but not
to exceed the ratio of one tracer to four ball car-
tridges.
(5)	The acting safety NCO assists the gunner
in locating targets, but at no time does he an-
nounce the range or adjustment for any firing. He
also has these additional duties:
16g
aoo Mita
g
4 BOO METERS
I
£
Fiffwr* Iff- Лапу о layout, tranoition ranyo.
100 METERS

Figure 189. Transition range target, double E-tgpe
ailhouettee.
(a)	Check the gunner's position before
firing.
(b)	Insure that the gunner fires within the
safety limits of the range.
(c)	Insure that the gunner fires the course
in the prescribed manner.
d. Dry Run. If time is available, the gunner
should be required to dry run the exercise prior to
the firing of the course prescribed above.
137.	Record Firing for Tabla 3
a.	General.
(1)	The rules for instruction firing apply to
record firing except where otherwise stated. Any
departure from the rules governing record firing
disqualifies the gunner.
(2)	After completing instruction firing, each
gunner, when firing table 3, fires the exercise in a
single time period. Ordinarily, a gunner is re-
quired to fire the exercise on a day subsequent to**
that on which he fired any part of his instruction
firing. However, if necessary, the officer in charge
of firing may authorize the firing of both instruc-
tion and record firing the same day.
b.	Equipment. The machinegun as issued is
used in all firing. Ammunition will be examined
carefully and defective cartridges and or links
eliminated.
c.	Gunner.
(1)	In record firing, the gunner must per-
form operations required, such as estimating the
range, setting the sights, laying the gun, firing
and adjusting the fire, within the prescribed time
limits.
(2)	After the gunner has taken his place at
the gun, all rounds fired by him count as part of
the course. The total amount of ammunition used
on the course, including rounds fired accidentally,
will not exceed the amount authorized for the
course. Ammunition left over at the expiration of
the time is lost
d.	Acting Safety NCO. After the command
ACTION, the acting safety NCO assists the gun-
ner only in locating the target and in no way
assists or disturbs the gunner during the conduct
of the exercise.
e.	Stoppages.
(1)	When a stoppage occurs during record
firing, the gunner holds up his hand, calls TIME,
and awaits further instructions from the assist-
ant to the officer in charge of firing. The assistant
notes the time of stoppage and determines the
amount of time remaining. He determines
whether an actual stoppage exists; if it does, he
directs the gunner to reduce it.
(2)	The assistant instructor then reports the
nature of the stoppage to the officer In charge of
firing, who gives instructions as to whether or not
the gunner is permitted to complete the course. If
the cause of the stoppage was the fault of the
gunner, the course is not completed, and the score
stands. If it was not the fault of the gunner, he Is
permitted to complete the course by fully loading
and laying on the target at which he was firing
when the stoppage occurred.
f.	Penalties.
(1)	If the gunner does not cease firing at the
170
AGO M»1A
command, 10 points are deducted from his total
score,
(2)	Five points are deducted from the total
score for each of the first three targets not en-
gaged by two bursts.
(3)	Five points are deducted from the total
score for each round in excess of 4 rounds fired at
each of the last two targets,
(4} If the gunner fails to engage a target, 10
points are deducted for each from his total score.
g.	Scoring. Ten points are scored for 8-5 target
hits (400-1,000 meters). Seven points are scored
for 1-2 target hits. Total possible score is ten
points. Four points are awarded for completion of
exercise.
h.	Assistant Instructors. Assistant instructors
and noncommissioned officers to supervise record
firing are detailed as assistants to the officer in
charge of firing. Personnel performing this duty
should be from units other than the one firing. A
maximum of two guns can be supervised by one
assistant instructor.
i.	Range Detail. A sufficient number of men to
operate the range will be detailed to assist the
officer in charge of firing.
138.	Inspection Firing for Tabb 4
a. This section outlines the methods of conduct-
ing preparatory training, Instruction firing, and
record firing at moving ground targets at ranges
from 300 to 1,000 meters.
d. Moving target range facilities vary widely at
different installations. For this reason, the provi-
sions of this section furnish a guide for correct
training procedure.
e. Men are not permitted to fire for record at
moving targets unless they are qualified in tables
2 and 8 as 1st class gunners.
d. In addition to the preparatory exercises pre-
scribed in paragraph 121. the following additional
exercises will be conducted before firing at long
range moving targets.
(1) First exercise: Use a light and easily ma-
neuverable vehicle to represent the target. The
target should move parallel to the firing point at a
range of 300 to 400 meters, at an initial speed of
five miles an hour. Require estimates of range,
speed, and point of aim. As proficiency is gained,
increase the range to 800 to 900 meters and the
speeds up to 2Б or 80 miles per hour.
(2) Second exercise; This exercise is con-
ducted similarly to the first exercise. Direction of
movement is changed. The vehicle (target) is
moved toward the firing point on diagonal
courses, varying in direction and speed. Require
estimates of range, speed, and point of aim.
(8)	Third exercise: This exercise reqi^res
actual manipulation of the gun to track the target
moving on courses as prescribed in (1) and (2).
(4)	Fourth exercise; This exercise requires
range estimation, sight setting, estimation of lead,
leading the target with the gun, simulating fire,
and continuation of aiming with a predetermined
lead while simulating single-shot fire. It should be
conducted using the target on which the guns will
fire, running the course on which it will operate
during actual firing.
(5)	Gunner. During the leading and tracking
exercises, the traversing slide lock lever is re-
leased and the traversing slide is moved along the
traversing bar. The gunner applies a steady and
firm pressure to the elevating handwheel with the
left hand, changes in elevation are made by rotat-
ing the handwheel. For smoother tracking, a
steady lateral pressure is applied to the right
spade grip with the right hand. The gunner must
shift his body in order to stay directly behind the
gun.
139, Demonstration of Firing
To demonstrate the firing, the Instructor uses a
demonstration crew of three men. One man, a
trained safety NCO (assistant instructor), takes a
kneeling position to the right rear of the gun. The
gunner (No. 1) is in the correct gunner's position
behind the gun (prone). The assistant gunner
(No. 2) is to the left of the gun. The equipment
required for demonstration is a caliber .SO ma-
chinegun (mounted), ammunition for the course,
and one target of the type to be fired upon. This
target is placed so that the class can see it and
the instructor can point to it.
a.	Procedure in Demonstrating the Firing.
(1)	The instructor explains that prior to
mounting the gun, the examination of equipment
was accomplished by the crew as outlined in para-
graph 48. The instructor then explains the course
that the gunner will fire.
(2)	The instructor explains how the target
will move across the front, and gives the range
(600 to 1,000 meters depending on range layout)
that the speed of the target will vary, that the
gunner estimates the leads necessary to place fire
on the target, and that the gunner is not aided in
his fire adjustment
b.	Explanation of Course.
(1)	The control command is given by the of-
aso ЫИЛ
171
fleer (instructor) in charge of flring. Time begins
at the command FIRE. Л typical control com-
mand is MOVING TARGET, LEFT FRONT
(RIGHT FRONT), SIX HUNDRED, AT MY
COMMAND. The command to Are is given at the
same time the target commences its movement
across the course.
(2)	At the command MOVING TARGET, the
gunner and assistant gunner load the gun in the
prescribed manner. At the command LEFT
FRONT (RIGHT FRONT), the gunner releases
the traversing slide lock lever and swings the gun
through free traverse to the left (right) front,
and seta the sight at 800. At the command FIRE,
the gunner lays on the target, takes the necessary
lead and commences firing.
(8)	A maximum of five shots may be fired
single-shot for adjustment. For the first round,
the gunner looks through the lights. After the
first round is fired, the gunner makes the neces-
sary adjustments by observing the flight of the
tracer and/or the strike of the bullet. The remain-
ing ammunition is fired in a burst. If there is a
stoppage, the gunner relays on the target using
the light, then takes the necessary lead before
firing is resumed.
(4) The ammunition container contains 28
rounds of ammunition. Tracers are used, but not
to exceed the ratio of one tracer to four ball car-
tridges.
(6)	The safety NCO (assistant instructor)
notes any error in position, grip, sight setting,
manipulation, and/or adjustment. If necessary, he
stops the firing to correct errors. After the exer-
cise has been flred, he explains how the errors
made by the gunner affected the firing. The safety
NCO keeps a close watch on the fire delivered
along the flanks of the range, and prevents the
gunner from firing outside the safety limits.
(6)	The gunner should be required to dry run
the exercise prior to the firing prescribed above.
140.	Targeting the Gun
Prior to firing the course, the gun will be targeted
at the mid-range over which the target moves.
The same procedure is followed as in field target-
ing, paragraph 181.
141.	Record Firing for Tabb 4
•.General.
(1)	Record firing consists of the firing pre-
scribed in paragraph 1880. The rules for instruc-
tion firing apply to record firing, except when oth-
erwise stated. Any departure from the rules gov-
erning record firing disqualifies the gunner.
(2)	All men firing table 4 must first be quali-
fied as First Class Gunner in tables 2 and 8.
(3)	After completing instruction firing, each
gunner will fire the exercise in table 4 in a singl>
time period. Ordinarily, a gunner is required to
fire for record on a day subsequent to that which
he fired any part of his instruction firing. How-
ever, when necessary the officer in charge of firing
may authorize the firing of both instruction and
record on the same day.
(4)	As far as practicable, the gunner fires for
record with the target moving on a different
course than for instruction firing.
b.	Equipment. The machinegun and ammuni-
tion as issued is used in all firing. Ammunition
will be examined carefully and defective car-
tridges and/or links eliminated.
c.	Gunner.
(1)	In record firing, the gunner must per-
form the operations required; such as setting the
sights, determining the leads, laying the gun,
firing, and adjusting the fire within the prescribed
time limit.
(2)	All rounds fired by the gunner will count
as part of the course. The total amount of ammu-
nition used on the course, including rounds flred
accidentally, will not exceed the amount author-
ized for the course. Ammunition left over at the
expiration of the time is lost to the gunner.
d.	Stoppages. When a steppage occurs during
record firing, the gunner holds up his hand and
calls TIME, and awaits further instructions from
the officer in charge of firing. The assistant deter-
mines whether an actual stoppage exists; if it
does, he directs the gunner to reduce it.
(1)	The assistant then reports the nature of
the stoppage to the officer in charge of firing, who
gives instructions as to whether or not the gunner
is permitted to refire the course.
(2)	If the cause of the stoppage was, without
doubt, the fault of the gunner, the course is not
refired, and the score stands.
(8) If it was not the fault of the gunner, he
is permitted to refire the course.
*. Penalty. It ths gunner does not cease firing at
the command, 6 points for each round flred are
deducted from his total score.
/. Searing. Five points are scored for each hit
on the target. The total possible score is 128
points.
g.	Aenetant Instructor*. Officers and noncom-
missioned officers to supervise record firing in
strict accordance with the rules governing this
172
ЛОО МИЛ
firing are detailed ал aseistants to the officer in
charge of firing. Personnel performing this duty
should be from units other than the one firing.
Each gun will have one safety NCO.
h.	Range Detail. A sufficient number of men to
operate the range are detailed to assist the officer
in charge of firing.
142.	Safety Precautions
a.	General. General safety precautions for firing
caliber .50 machinegun ammunition are contained
in AK 885-68.
b.	Additional Safety Precautione.
(1)	No firing is done except under the direct
supervision of an officer.
(2)	No firing is done until correct headspace
and timing have been cheeked by the safety NCO.
(8)	No firing wih be done until a cleaning
rod and dry patch have been run through the bore
from the muscle and immediately removed.
(4)	No gun is loaded or half loaded until a
command to do so has been given.
(5)	After machineguns are fired, each gun is
cleared and checked prior to being removed from
the firing line.
(6)	No one is allowed in front of the gun for
any purpose unless authorized by the officer in
charge of firing.
(7)	During moving target firing, conspicuous
markers are placed to indicate the right and left
safety limits of the range. The safety NCO for
each gun makes certain his gun does not fire out-
side these limits.
(8)	Firing at moving targets is not permitted
on any range until the safety angles have been
checked.
(9)	Personnel of the towing vehicle operate
at sufficient distance from line of fire in order to
be protected not only from direct hits but also
from ricochets.
(10}	Vehicles operating in the range area in
front of the firing line win be equipped with red
flags.
(11)	Target personnel do not leave desig-
nated safety areas until the command to do so has
been given,
PIT WITH STATIONARY
MOTOR AND DRUM
TH К TARGET MAY BE TOWED, USING A
STATIONARY MOTOR. DRUM AND ENDLESS ROPE
RUN THROUGH A PULLEY. OR BY A VEHICLE
IN REAR OF THE FIRING LINE ATTACHED TO A
ROPE RUN THROUGH PULLEYS AT THE FOUR
CORNERS.
FIRING LINE
Figure Ite. Moving target range layout, iMU target omtm.
AGO МПА
171
FIRING LINE
ИЧдиге ISO. Moving target range layout, variable target eoww.
(12)	A safety officer is designated. At least
one safety officer is designated for each four guns
firing, and one safety noncommissioned officer is
detailed to assist him at each, gun position.
c.	Duties of the Safety Officer and Hie Assist-
ants Are to Insure—
(1)	Guns are never pointed In such a direc-
tion that the target detail ia endangered.
(2)	Guns do not fire outside the prescribed
safety limits.
(8)	Firing ceases immediately upon the com-
mand CEASE FIRING.
(4)	Guns are cleared, covers opened, bolts to
the rear, and the gun crews standing clear of the
guns at the end of each run, before the target
detail moves onto the range.
(5)	That all target personnel have returned
to the designated safety area before guns are
loaded.
143.	Moving Target Ranges
a.	A level or gently rising piece of ground
should bo selected for the moving target range.
It should be at least 900 meters in depth and of
sufficient width to permit convenient operation of
the moving target Pits conveniently placed for
the scoring and target details, with telephone
communication with the firing line, and targets
that are rapidly mounted and dismounted from
the sled or carriage facilitate scoring and chang-
ing targets. The pits must be constructed so that
they are impervious to the type of ammunition
used.
b.	Targets may be towed across the course by
truck or by motor and drum located in a pit at the
end of the run. See figure 159 for one type of
range layout. With this type of range, the target
course cannot vary. Therefore, one end of the run
should be at a higher elevation than the other so
that the gunner must continually adjust for eleva-
tion.
e.	Figure 160 Illustrates one type of range lay-
out that provides changes in direction of the tar-
get in addition to range changes. Changes in
direction of the target are accomplished by setting
pulleys at desired locations. A large knot or
wooden ball fastened to the towline about 15 feet
in front of the sled or car will disengage the line
from the pulley, thereby changing direction of the
target The towline should be of Ц-inch wire
cable or %-inch rope. For an example of the
towed types of target see figure 161.
d.	Target speeds should approximate speeds
that might be expected of combat vehicles on com-
174
AGO MB1A
CLOTH
TARGET FRAME
Fipwrv 191. ThnA t&rf9t far тл&йяц terpft ли^1.
parable tarrain. Better regulation of speeds is ob-
tained if the towing vehicle can operate on a road
and is not required to change direction.
e.	Target courses must be smooth and free from
rocks that will fray the towing rope, and from
stumps, roots, etc., which may damage or upset
the target
144.	QuaRfcattons
a.	To qualify with the caliber .50 machinegun, a
gunner must fire a minimum score of 55 points on
table 2 and 7 points on table 3. The total mini-
mum score is 62 points.
Batltt	4мм
Expert —__________—.—16Б
1st Clan_____—--------120
Id CUm 88
UaqusliM__________2, Ism than ББ
Table 8,1ms than 7
b.	The total qualification score is determined by
adding the scores made on tables 2,8, and 4.
o. The gunner must score 85 points on table 2
and 3, qualifying as a 1st* Class Gunner, before
firing table 4 for record. He must score 80 points
on table 4 to qualify as Expert If the gunner does
not score 80 points on table 4, his qualification
remains 1st Class Gunner.
145.	Other Mounts
The courses prescribed in the preceding para-
graph may be fired using other standard mounts.
a.	Position (for Mounts Other Than ths М3).
The gunner takes a position that will permit him
to brace himself without constraint and at the
same time control his gun effectively. The posi-
tions vary for men of different physiques and
according to the mount used. The hands are
placed to facilitate manipulating and firing. A
free gun should be held securely without rigidity.
“Riding*’ the gun in an effort to hold it on the
target causes excessive dispersion and Ineffective
fire. The head is placed in the position best suited
to aline the sights and to observe the target
Standard equipment issued for the support of the
gunner may be used. The use of pads or other
improvised supports for the gunner or the mounts
AGO
173
is prohibited during record firing. Position exer-
cises, using a target or other aiming point, will be
conducted to Insure that each man can take a suit-
able position at the gun and aim without delay.
b.	Engagement of Rapidly Moving Ground Tar-
gtte. When firing on rapidly moving ground tar-
gets, the gunner assumes a position that will per-
mit him to observe the target and manipulate
freely through large angles.
o. Manipulation.
(1) When manipulating to engage a rapidly
moving target, the mopnt should be adjusted to
permit free movement of the gun.
(2) When manipulating to engage a station-
ary target, tiie gunner should be required to ma-
nipulate slowly over the target; accuracy is
chocked by an assistant instructor (coach). As he
gains proficiency in manipulating, the time should
bo reduced until the gunner can accurately manip-
ulate over the target without firing, and within
approximately three-fourths of the authorised
timelimit.
170
aao чма
CHAPTER 10
COURSES OF FIRE: FIELD TARGET FIRING
Section I. INTRODUCTION
146.	General
After firing on the basic and transition ranges,
gunners need practice in applying *11 of the fun-
damentals they have learned, and the experience
of engaging targets that depict enemy formations
the gunner would be likely to engage on a battle-
field during periods of good or limited visibility.
Field target firing courses will provide this expe-
rience. This training is conducted on day defen-
sive and predetermined fire ranges.
147.	Organisation
a.	Paragraphs 148 through 154 on organization
for training suggest methods for conducting field
firing exercises for a 200- to 250-man unit Com-
manders may modify the outlined procedures to
fit the facilities, the time available, and the num-
ber of gunners to receive training. Training pre-
scribed is conducted during unit training at the
discretion of the unit commander, and includes
Instruction for personnel assigned to machinegun
crews only.
b.	Maximum use is made of available training
time by conducting field target firing exercises
and training in related subjects concurrently. On
the day defensive field firing range the unit is
assembled, receives instruction, and Is organized
Into groups which rotate through concurrent
training ranges or stations until completion of
training. Following this, the entire unit is assem-
bled and organized for a continuation of the train-
ing on the predetermined fire range.
Section П. DAY DEFENSIVE REID FIRING
148.	Training Focllltioe
a. General Characterietice. Figure 162 shows a
schematic diagram and the dimensions of a day-
light defensive field firing range.
(1)	A tower or elevated platform from which
the officer-in-charge (QIC) can observe each lane
Is desirable.
(2)	Seating facilities must be available to
seat the entire unit for instruction.
(8)	The range is set up with lanes 10 to 20
meters wide at the firing line and 100 to 200 me-
ters wide at the end of the lane. The lanes should
be at least 1100 meters deep so targets can be
placed at the maximum effective range of the
guns.
(4)	Terrain should be irregular so gunners
have the opportunity to fire into various types of
ground.
(6) Each lane should have seating facilities
for the gunners not firing, and the rear area of
the range should include facilities for concurrent
training (fig 162).
b. Targete. "E” type silhouettes are arranged to
represent the enemy in linear, deep, and linear
with depth formations. This is accomplished by
placing 10 to 12 silhouettes five to 10 meters apart
for each type of target Earth bunkers may be
constructed and salvage vehicles may be placed
downgrade to depict enemy point targets. One of
each of the various types of targets should be
constructed in each lane.
149.	Organization for Training
a.	The unit is assembled in one bleacher and
presented instruction covering—
(1)	The location of machineguns in infantry
units and the duties of the weapons squad leader
and members of the machinegun crew.
(2)	Direct laying to include a review of char-
acteristics of fire, classes of fire with respect to
the ground, target and gun, and methods of fire
control (chap 7).
(8)	A review and demonstration of the en-
gagement of distinct and indistinct linear, deep,
▲OO S4SU
177
199.	fe/tiwfot ДО jtHnj f*W«
ЛОО M»1A
171
and linear targets with depth, with guns in pairs
and single guns (chap 7).
b.	At the end of the instruction, the unit is
organized into three equal groups. Two of the
groups move to concurrent training stations as
discussed in paragraph 148b and receive instruc-
tion on the preparation and use of a range card
and assault firing
r The third group remains at the firing line and
is organized into equal groups. The number of
groups will depend on the number of firing lanes
available. Ideally five lanes are used. A lane NC’O
is placed in charge of each group.
d.	Upon arriving at the lane the gunners are
given a brief orientation by the lane NCO con-
cerning the targets to be engaged, safety limits
for tiring, and the method of rotation for firing.
The lane NCO assigns each man a number to fa-
cilitate control. On each lane there is a critique
chart (tig 163), and two machineguns. These gurtS
are 1 ripod mounted.
150.	Conduct of Firing
The gunners target, their weapons and engage tar-
gets using the technique of direct lay. During the
engagement of targets, some of the individuals
will be called upon to act as squad leaders apply-
ing the various methods of fire control. Each gun-
ner fires 130 rounds as prescribed in figure 164.
Gunners should engage targets firing as a single
gunner before engaging targets firing as one of a
Figure Lane NCO’t critxqut chart.
AGO 3491A
179
Хшп	Time	Teal peri*4lv			Tjrje Af«
800—700 meters	 800—1100 meter».... 800—1100 meter».... Total		. No limit	 No limit	 No		as s з	*’E type eilhouette	 Linear, deep, or linear with depth. Vehicle-type Uriel		4-1... 4-1...	TSrgeUnf (three 8-round bursts) 8- to О-round bursta-slnrls pin 8- to Bound burtta-pim employed in pair».
Figure Ш. Tails о/ ammtnHtios /or day th/oneive field firing.
pair. To Insure that firing is conducted in a safe
and orderly manner» it will be conducted accord-
ing to the safety instructions in paragraph 148. A
recommended method of conducting firing is as
follows:
a.	The lane NCO designates two gunner» and
two assistant gunners. The crews move to the
guns and load a 20-round belt.
b.	The lane NCO instructs the gunners to pre-
pare to target their weapons. When the gunners
indicate they are ready to target» the lane NCO
announces UP to the OIC.
e. When all lanes are ready to fire, the OIC
announces GIVE ME AN UP WHEN YOU
HAVE TARGETED AND ARE READY TO EN-
GAGE THE FIRST TARGET. YOU ARE
CLEAR TO FIRE.
cL When the gunners have zeroed their weap-
ons, the lane NCO directs them to load a 60-ropnd
belt of ammunition. He also selects another indi-
vidual to act as squad leader,
e. The squad leader takes a position to the rear
of the two gun crews. He leeuee a fire command
requiring one of the crews to engage either a lin-
ear, deep» or linear target with depth. The fire
command is issued only up to the command to fire.
The lane NCO then eignab the OIC that his lane
is ready to firs by announcing UP.
f. When all lanes are ready to fire, the OIC
announces GIVE ME AN UP WHEN YOU ARE
READY TO ENGAGE YOUR NEXT TARGET.
YOU ARE CLEAR TO FIRE.
p. The squad leader announces FIRE, observes
the firs, and issues subsequent fire commands if
they are needed to place effective fire on the tar-
get.
k. When the gun crew has fired 60 rounds, the
lane NCO conducts a critique. Special attention
should be given to initial fire commands» accuracy
of the initial bants, direction and extent of ma-
nipulation, rate of fire, and the squad leader’s con-
trol of fire. At the end of the critique, the squad
leader issues a second fire command, and the
second crew engages a target as described in в, f,
and p above.
Л When the second gunner has fired 60 rounds,
the lane NCO conducts a critique and instructs
each gunner to load a 60-round belt
/. The squad leader issues a third fire command
requiring both gunners to engage a vehicle-type
target The gunners fire aa a pair.
A. After they haveengaged the target and have
been critiqued, the gunners and squad leader re-
turn to their seats.
t The procedure in a through/above is repeated
until all gunners have find. The assistant gunners
an always the next men to act as gunners.
Sectton HI.	TOtIHG COU1SI
151.	General
After firing on the day defensive range which
included concurrent training in preparation of
range cards, the unit b moved to the predeter-
mined fire field firing range. The instruction pro*
sented on this range b eondnetod in two phases,
one during good visibility and the other during
limited visibility.
1*0
A The daylight phase consists of a review on
the preparation fod use of range cards, which
was covered eandferentiy during previous train-
ing. Following thia review they receive practical
work fn the preparation of a range card by ob-
taining data to assigned targets.
b. The night phase is presented after darkness
on the same day that the daylight phase h con-
ДОО ll»U
BLEACHFflO
□<— TOWER
Itywrt Ш> PwbtermAMd jfrv Д*и гчоф».
ЛОО ммл
181
ducted. In the night phase the fundamental re-
viewed during the daylight phase are applied. The
gunners reapply the data they obtained to their
assigned targets» then engage those targets.
152,	Training Facilitias
a.	General Characteristics. Figure 16Б shows а
schematic diagram and the dimensions of a prede-
termined fire field firing range.
(1)	A tower or elevated platform from which
the OIC can observe firing is desirable.
(2)	Seating facilities must be available to
seat the entire unit for a conference and demon-
stration
(8)	The range should be constructed on a
flat» open piece of terrain which allows one man
to control the firing of all weapons.
(4)	A firing line consisting of 50 points is
desirable» allowing at least 4 meters per point
b.	Target Area. In figure 165, everything In
front of the firing line out to the range limits is
considered target area.
(1)	The target area should be at least 700
meters deep and 440 meters wide at the 500 meter
range. It should contain at least three targets
which will permit engagement from either flank
of the firing line and cuase gunners to record data
to the left and right of the zero graduation on the
traversing bar. The center target should be a lin-
ear target that requires about 20 mils of traverse
(approximately 10 meters wide).
(2)	Hard objects such as salvage vehicles or
dirt-filled gasoline drums may be positioned to
represent targets. Earth mounds may also repre-
sent targets. The construction of targets in this
manner assists the gunner In determining the
effectiveness of his fire by enabling him to see his
tracers or hear his projectiles hit the target.
(8)	The lateral firing limits of the target
area must be marked with safety fan poles. Red
lights must be attached for night firing.
c.	Allowable Difference. In Heu of a range de-
signed specifically for predetermined fire instruc-
tion» the day defensive range may be used if the
terrain between the firing line and targets at 500
meters is such that final protective lines and sec-
tors of graze can be obtained.
153.	Organization far Training
a.	The entire unit Is seated in the bleachers and
presented a review and demonstration on the
preparation and use of a range card in predeter-
mined fire and an orientation on the range proce-
dures
b.	Upon completion of the instruction, the unit
is organized into five equal groups. Ideally» a
group NCO and a minimum of three assistant
instructors are assigned to each group to assist
and supervise.
c.	The group NCO organizes his group into gun-
ners and assistant gunners, and a crew is assigned
to each gun.
154.	Conduct of Firing
Each gun crew fires 200 rounds as indicated by
figure 166. Safety procedures as outlined in para-
graph 142 must be followed. The firing is con-
ducted in two separate exercises as follows:
a.	Dag Firing.
(1)	Each crew is issued 80 rounds of ammu-
nition (four 20-round belts) and instructed by the
group NCO to load a 20-round belt for targeting.
(2)	When all the gunners of a group Indicate
that they are ready to target their weapons» the
group NCO announces UP to the OIC.
(3)	When all groups are ready to fire, ths
OIC announces GIVE ME A CLEAR AND
CHECK WHEN YOU HAVE OBTAINED DATA
TO ALL TARGETS. YOU ARE CLEAR TO
FIRE.
(4)	When the gunners have targeted, the
group NCO instructs them to obtain data to the
final protective lines by firing 20 rounds.
(5)	After data to the final protective line has
been obtained and recorded, the assistant gunner
becomes the gunner and obtains data to a point
and a linear target by firing 20 rounds at each
target.
(6)	The group NCO then instructs the crews
to obtain data to a point target by using the dry
fire method.
(7)	After all data to targets have been ob-
tained and recorded, the group NCO clears and
checks the weapons of his group and announces
GROUP_________ CLEARED AND CHECKED, to
the OIC.
b.	Night Firing. Each crew is Issued 120 rounds
of ammuition (two 20- and two 40-round belts).
They then reapply data obtained during the day
and engage their targets. If at any time during
firing it becomes obvious that a large error In
data has been made by the gunner» he should be
stopped and directed to check his data and gun
settings. A recommended method of conducting
firing is as follows:
(1)	The group NCO instructs each gunner to
load a 20-round belt and apply the data that was
obtained by dry firing on a point target.
(2)	When all the gunners under the control
of a group NCO indicate that they are ready to
fire» the group NCO announces UP to the OIC.
112
Лоо mu
Time	Total ramde pnt»O- виои	Тагам	Tyburn»	TypoSro
a. Dajf Firing No Limit 		...	20		Point		4-1		Targatini—three 6- to 9-ronnd burnt». Obtain direction and elevation readings to tael protective Uno. Obtain direction and elevation readings to point target. Obtain direction and elevation readion to engage linear tar- gat. Obtain direction and elevation readings by uae of the “dry Are*' method. Prodatennined data	 Predetermined data	 Predetermined data	 Predetermined data
No Limit .		20		Final protective lino.. Point		4-1
No Limit..		20
No Limit		20		Linear
No Limit	 b. NitfAi tfrfog No Limit		20		Point		 Point (dry fro)			Tracer.	..		..........
No Lindt		40		Linear	...		Tracer........
No Limit.				20.		Point.	-	_	Tracer. ......................
No Limit		40. 			Final protective line..	Tracer

100 per Individual (200 rounds per 2-man crew)
Total.
РЧриге 194. PvtdrttriHhui frt*9 (range aerdej.
(8) When al) group* are ready to fire, the
OIC announces GIVE ME A CLEAR AND
CHECK WHEN YOU HAVE ENGAGED ALL
TARGETS» YOU ARE CLEAR TO FIRE
(4) The group NCO instructs one gun crew
at a time to engage the point target
(6) When all point target* have been en-
gaged, the group NCO instructs gunner» to load a
40-round belt and inetructa the gun crew one at a
time to engage the linear target.
(6) After the gunners engage the linear tar-
get, they become the assistant gunner, and the
assistant gunners become the gunners.
(7)Tbe gunner» apply data and engage the
second point target with 20 rounds and the final-
protective line with 40 rounds using the same pro-
cedure outlined in (4) and (5) above.
(8) The group NCO and assistant conduct a
critique as each crew fires its exercise. The cri-
tique should cover the following: the Importance
of maintaining the correct position and grip while
laying on and engaging targets, accuracy in ob-
taining and recording data, accuracy in reapply-
ing data, and adjustment of fire.
(8) After all targets have been engaged and
all crews have been critiqued, the group NCO
dean and cheeks the weapons of his group and
announces .GROUP _________ CLEARED AND
CHECKED, .to the OIC.
ago маха
CHAPTER 11
ANTIAIRCRAFT GUNNERY
Section I. ENGAGEMENT AND EMPLOYMENT
155.	General
a.	Individual caliber .50 machineguns can pro-
vide units with a self-defense capability against
hostile low-flying, low-performance aircraft These
guns are employed in the air defense (AD) role
as part of the unit's local defense. The machine-
guns are not components of an integrated and
coordinated AD system. Normally, the following
rules for engagement apply:
(1)	Attack aircraft identified as hostile.
(2)	Attack aircraft committing a hostile act.
b.	Unless otherwise directed, hostile aircraft
within range of the gun (approximately 800 mo-
tors maximum effective range) should be engaged.
Surveillance, reconnaissance, and liaison aircraft;
troop carriers; helicopters; and drones are typi-
cal targets.
156.	Employment
a.	Employment of machineguns used for AD is
- - — - SKOOMOASY ilCTOR Of ЯМ
IM
□J0~1
YlMlCLI MOUNT» И TH WIAFVN
197, March oofamn with fcwr caMbar M яимМшртжо (addad).
▲eo
guided by the following defense design factors:
(1)	The mission of AD machinegun defense
la to impose maximum attrition upon the attack-
ng enemy.
(2)	Machinegun defenses are designed to
combat lowflying, low-performance aircraft
(3)	Defense design should produce an equally
balanced defense that is effective in all directions,
unless a forced route of approach exists. Defense
design should weight those routes of approach
which are likely to be used.
(4)	Machineguns should be sited so that the
maximum number of targets can be engaged, con-
tinuous fire can be delivered, and the most likely
routes of approach are covered.
b.	Machineguns used to defend march columns
should be interspersed in the convoy, with empha-
sis on the lead and rear elements (fig 167).
e.	Target selection and engagement control de-
pend upon visual menas. The sites selected for the
guns must provide maximum observation and
unobstructed sectors of fire. Units tarnished cali-
ber .50 machineguns in sufficient numbers should
site them within mutual support distances of 50
to 860 meters. Each gun is assigned a primary
and secondary sector of fire. Weapon crews main-
tain constant vigilance in their primary sectors of
fire, regardless of the sector in which the guns are
actually engaged. For detailed coverage of air-
craft recognition and identification, see Fm 44-3IL
157.	Allocation
a.	The Browning machinegun, caliber .50 HB,
М2 is provided to forward area units on a Table
of Allowance basis. Issue is determined by tactical
considerations, extent of air parity, and the type
of unit (artillery, armor, engineer, infantry) con-
cerned.
b.	Applicable mounts for the machinegun in-
clude:
(1)	Antiaircraft mount, MBS
(2)	Truck mount, M86
(8)	Pedestal truck mount, MS1C.
(4)	Pedestal truck mount M24A2.
(5)	Cupola mount (MZfi) modified.
c.	The M68 mount is portable and can be em-
ployed either on the ground or bolted to a vehicle
platform. Unless modified, the other mounts listed
are suitable for vehicular use only. The M28
mount was designed for the personnel carrier,
M114. In a modified version it is appropriate for
use on the personnel carrier Ml 18.
Section II. TARGET COURSB
158.	Definitions (Rg 168)
a.	The line along the course which the target is
flying is the course Ияе.
b.	The point along the course of any target at
which the target is nearest the gun position is the
Midpoint
o.	That part of the course In which the target is
flying toward midpoint is the approaching teg.
d.	That part of the course in which the target
ia flying away from midpoint is the rsosdixp йр.
e.	The angle formed by the gun, present posi-
tion of the target, and any future position Is the
angle of approach. The angle of approach at mid-
point la always 1,600 mils.
159.	Target Course Names
Aircraft may fly any of the following types of
courses (figure 169).
a.	Level. In a level course, the target is flying at
a constant altitude.
b.	Diving. In a diving course, the target is
flying with altitude decreasing.
о.	Climbing. In a climbing course, the target is
flying with altitude increasing.
d.	Incoming. An incoming course Is one in
which the target will fly directly over the gun.
e.	Outgoing. An outgoing course is one In which
the target is flying away from the gun.
/. frosstap. A crossing course is any course not
incoming or outgoing.
g. Dknottg at tite Gwt. This type of course is
one in which the target is flying toward the pintle
center of the gun.
AGO M*XA
IM
MIDPOINT
Figwro 188. Diagram thawing midpoint, approaching Ugt and recoding leg-
1NCOMING LEVEL COURSE
186
AGO M»U
Section III. REQUIREMENTS FOR A HIT
160.	General
a.	To engage enemy aircraft effectively, the
machinegunner must accurately estimate the fu-
ture position of the target and point his gun in
such a manner that the flred rounds and the air-
craft will arrive at the estimated point at the
same time.
b.	The problem can he compared to that of a
machinegun flring up a hill. Laying the gun in
elevation is accomplished by tracking the target.
In figure 170, despite the fact that the vehicle is
moving along the side of a hill, the machinegunner
concerns himself with only a 1-lead angle mea-
sured along the slope of the hill. If the vehicle js
replaced by an aircraft, and the hill is replaced
by air space (fig 171), it is apparent that the
gunner's problem in figure 171 is identical to that
in figure 170. (There is a faster speed in the case
of the aircraft.) To hit the target, the gunner
must fulfill two requirements: line and lead.
161.	line Requirement for a Hit
The line requirement demands that the gunner
cause the round to intersect the target course
line. The vertical mass of the target affords the
gunner a small angular (elevation) tolerance in
fulfilling the line requirement The site of this
angle varies directly with the diameter of the
fuselage and inversely with the range to the
target.
162.	Load Requirement for a Hit
The lead requirement demands that the gunner
cause the round to intersect the target Angular
tolerance in fulfilling the lead requirement is pro-
vided by the horizontal mass of the target The
magnitude of this angle varies directly with the
length of the target fuselage and the sine of the
angle of approach. It varies inversely with the
range to the target.
Figvre 170. Lead angle, moving greand target.
AGO MtU
117
AIRCRAFT
JtyuriW. £м4<и'ей,мгй11агрИ»
Section
163.	General
a.	The gunner has no sighting devices for set-
ting initial leads on the machinegun, eel .50, HB,
М2, or on mount M68, The discussion In this sec-
tion presents the magnitude of leads in antiair-
craft firing.
IV. LEAD
b.	Prior to opening fire, the gunner estimates
the amount his gun will lead the target This esti-
mate is based upon an understanding of the mag
nitude of the lead required under varying condi-
tions of target speed, target range, and angle of,
approach. For example, a target, traveling 600
IM
miles per hour, fllee a crossing course that causes
ft to pass at a midpoint range of 460 meters from
the gun position. To hit the aircraft at this mid-
point, the gunner aims and fires his weapon at a
point on the target course line 165 meters ahead
of the target (The time of flight for a caliber .50
round for a range of 460 meters is 0.6 second. A
speed of 600 miles per hour is approximately 275
meters per second. During the time of flight of the
projectile, the target will have traveled 0.6 x 275
or 165 meters.) Using the mil relation rule, with a
range of 460 meters and 165 meters as the dis-
tance traveled by the aircraft, the lead required to
hit the target at midpoint is 860 mils.
c.	Lead for specific midpoint ranges may be cal-
culated on the basis of target speed. For a mid-
point range of 460 meters, the midpoint lead re-
quired is 60 mils or 27 meters for each 100 miles
per hour of target speed. The length of the target
is a convenient unit of measure in establishing
initial leads. The estimated lead is divided by the
length of the target to determine the number of
apparent target lengths which the gunner will
lead the target Midpoint leads expressed in me-
ters, mils, and apparent target lengths for se-
lected targets, target speeds, and midpoint ranges
are contained in figure 172.
164.	Iffect of Angle of Approach on Lead
a.	As the angle of approach increases up to
midpoint, the amount of lead necessary also in-
creases. When the target passes midpoint and con-
tinues on the receding leg, the amount of lead
decreases, while the angle of approach continues
to increase. The amount of lead necessary at mid-
MIDPOINT LEADS (BASED UPON FT 0.50-H-l)
AIRCR AFT (TYPE)	AVERAGE LENGTH AIRCRAFT (METERS)	SPEED (MPH)	MIDPOINT RANGE (METERS)	MIDPO INT LEAD
				METERS	MILS	APPARENT TARGET LENGTHS'
FIGHTER	7	400	020	378	414	4 14
FIGHTER	7	400	440	165	340	18
FIGHTER	7	400	020	2S2	274	2 7.4
FIGHTER	7	400	440	109	240	12
FIGHTER	7	200	020	124	138	13.8
FIGHTER	7	200	440	S4	120	4
TRAMSPORT	21	200	020	124	138	4
TRANSPORT	21	200	440	54	120	2.4
LIAISON	7	too	0 20	42	40	7. 7
LIAISON	7	100	440	27	40	3.3
DROP ALL FR ACTI	DNS INESTIM	ATI NG LEAD IN TARGET LENGTHS
Причт. Midpoint Ша
▲SO MUA
1W
ANGLE OF APPROACH IN MILS	LEAD
0 -100 (APPROACHING LEG )	0
100-500 (APPROACHING LEG)	1/2
500*800 (APPROACHING LEG)	3/4
800*i GOO (APPROACHING LEG)	FULL
1600- 2400 (RECEDING LEG)	3/4
FifWlTt. Хммии «/food «мммгу/м* voHmm cmylee «/оругмак.
point is called “full lead.” Figure 172 is baaed on
targets at or near midpoint
b.	Figure 178 gives the fraction of full lead
necessary for various angles of approach.
c.	To simplify the lead problem, the following
rules may be used as a guide in determining ini-
tial leads:
(1)	Crossing courses.
(a) Open Are with a %-full estimated lead,
when the target is on the approaching or receding
leg.
(b> Open fire with a full estimated lead,
when the target is at midpoint
(2)	Directly at the gun course*. Open fire
with no lead.
(8)	AU courses. Observe tracers and make
corrections accordingly.
Section V. TARGET ENGAGEMENT
165.	Sequence of Events
The following are the gunner’s actions to bring
the target under fire:
a.	Estimates the necessary lead.
6.	Elevates his weapon until the aids of the
bore is alined with the target-course line, and ap-
plies the estimated lead.
c,	Opens fire, and observes only the tracers in
the vicinity of the target (para 167—170).
d.	Elevates or depresses the gun until line shots
are obtained.
e.	Corrects his lead until hits are obtained,
using tracer observation.
166.	Techniques
a.	The machinegunner fires continuously
throughout the engagement Since the large
amount of smoke created by continuous fire tends
to restrict visibility, the gunner keeps his head
and eyes high above the gun to observe the tra-
cers. When there is doubt as to the tracers posi-
tions, he Increases his lead. It is important that
the gunner initially opens fire with an adequate
lead and, once established, his tracking is not re-
versed. If his initial lead is too great, the tracking
rate is slowed and he allows the target to catch up
with his tracers.
b.	The dispersion cone Is excessive when the
gun Is fired as a free weapon. To offset this, the
gunner seises the grips firmly with both hands
and braces the gun with his body. When firing
from the M68 mount, the gunner stands erect and
makes .changes in elevation by moving his hands
and arms up and down. For a change in azimuth
he shifts his feet and moves around the mount.
The gun is fired with the left hand by depressing
either one of the upper and lower firing grips on
the left aide of the frame. The upper firing grip is
used for fire at medium and high angles of eleva-
tion. The lower firing grip Is used for fire at low
angles of elevation.
T90
AGO MI1A
Section VI. TRACE* OBSERVATION
167.	General
To make adjustments during firing» the gunner
must know the location of the round with respect
to the target. Tracer ammunition provides this
information. However, the gunner must be
trained to sense tracers correctly to produce a hit.
Where target courses and target speeds can be
fixed, valid lead data is obtained from a tracer
observer located down-course from the gun (FM
44-2). Under normal conditions, valid sensings
are obtained only if the tracer observer is sta-
tioned as dose to the gun as possible
168.	Principles
a.	Suparimpoaition. In observing tracers, the
machinegunner utilizes the principle of superim-
position. By alining the tracer with the target, the
gunner compares the range from his eye to the
target and from his eye to the tracer. In figure
174, it can be seen that regardless of the range to
the target, he can compare the range to the tracer,
and the range to the target as long as the two are
superimposed. Lead can be judged on the basis of
these comparisons. Because of the common tend-
ency of gunners to attempt to judge lead when
tracers are not alined with the target, the first
basic principle of tracer observation must be
stressed. Fulfill the hne requirement be/ore at-
tempting to judge lead.
b.	Localized Virion, In figure 175, the tracer is
shown as a single spot in the sky, moving directly
away from the gunner’s eye. In actual practice,
the tracer does not appear as a fixed spot, but
rather as a curved path (fig 175). Thia apparent
curvature of the tracer path ia called the Wurion
a. not alined cannot
COMPARE RANGES.
В ALINED ON NEAR
SIDE, TRACER RANGE
IS LESSER.
Agwv 174-
C. ALINED ON FAR
SIDE, TRACER Range
is GREATER.
AflO UB1A
181
FOCUSED HERE
1 Tt.	vtotou
о/ curvature Once a round if fired, it move» in a
straight line directly away from the gun. Gravity
causes the trajectory to curve down toward the
earth; but under no conditions, other than wind
or drift, does the round move to the left or right
The illusion of curvature occurs because the gun-
ner is concentrating upon a moving reference
point the target As the tracer moves along its
path, the distance between the target and the
tracer is reduced to the point that the eye relates
the two separate motions. The illusion of curva-
ture then takes place. The point of maximum ap-
parent curvature is referred to as the tracer
hump. Here, the tracer path appears to curve
sharply into a direction opposite from that in
which the target is moving. The gunner must
focus his attention on the immediate vicinity of
the target, just as if he were looking through a
telescope with a restricted field of view (fig 176).
Tke gunner's (observer's) vision must be localised
to tke immediate vicinity of the target.
o. Kead Nose-to-Taii. In certain types of target
192
▲GO MtlA
В. LOW
0. ASTERN
Figure 177. Lint and Itnd fa/armaKM, boot* tn traatr MMhga
courses, particularly incoming and outgoing, the
tracer may intersect the gunner's line of vision to
the target in two places. Here, the gunner first
sees the tracer passing the target In a tall-to-noee
direction. Lead information, based upon a sensing
of a tracer that appears to pass the target in this
direction, is invalid. The target actually crosses
the tracer path only once, entering the path nose
first, and leaving tail last Because of the Illusion
of curvature, the gunner sees this passage when
the tracer appears to float by the target in a
nose-to-tall direction. Bead when the tracer рамм
the target noee-to-tail.
169.	Line Information
a.	Level and Nonlovol Craning Court".
(1)	High. When the tracer is above the tar-
get course Uno (A, fig 177).
(2)	Low. When the tracer is below the target
course line (B, flg 177).
(8)	Lint. When the tracer intersects a line
from the gunner's eyes, through the target to in-
finity. Thia line might be described as the gun-
ner's line of vision through the target to infinity
(C and D, fig 177), In referring to a tracer that is
▲go миа
m
LEFT	RIGHT
Жл»* 1T9. О/-Мы treeer	ймояйял «гиНУ
st Me ym, and vary ttaaf d/Мяв еомгм»
IM
AGO UHA
Ffcwr* 179. А Mt.
«lined with the target, the term “line" la omitted,
and only the lead sensing is mentioned. (The
tracer must be alined with the target before a lead
sensing can be made.)
b.	Other Соитье*. For incoming, outgoing,“di-
rectly at the gun, and very steep diving courses,
off-line sensings change from high or low to left
and right (fig 178).
170.	Lead Information
a.	Ahead. If the tracer Intersects the gunner’s
line of vision beyond the target; l.e., if a portion
of the tracer’s path is hidden by the target ttip
round is ahead, the lead is too great (C, fig 177).
b.	Astern. If the tracer passu between the gun-
ner's eye and the target, the sensing is astern or
too little lead (A, fig 177).
c.	Hit. If the tracer path terminates in the tar-
get itself, the sensing is lead correct, a hit (fig
179).
aeo mma
195
CHAPTER 12
ADVICE TO INSTRUCTORS
Section I.
171.	PurpOM
Thia chapter will assist instructors in effectively
training men assigned to a caliber .50 machinegun
crew to become a proficient machinegun team. Ap-
proximately 186 hours of instruction are neces-
sary prior to training the crew as a unit.
172.	Preparation
To present effective instruction in the time allot-
ted, the instructor must be thoroughly prepared
and rehearsed. Assistant instructors and demon-
strators must also be thoroughly trained and re-
hearsed to conduct demonstrations that clearly il-
lustrate the instruction. Support instruction with
the training aids essential to presentation of the
subject. Use public address sets if the group is
larger than platoon size.
173.	Organisation
Divide the men into groups of appropriate sise,
considering the phase of Instruction and the facil-
ities available. If sufficient assistant instructors
GENERAL
are available, assign one to each group; otherwise,
position the assistant instructors so they can
cloeely supervise the groups.
174.	Prarantatlon
Explain and demonstrate each portion of the in-
struction. Follow thia by practical work, cloeely
supervised by the instructors. Emphasize practi-
cal work throughout machinegun training, in
order to develop skill and teamwork. Score and
critique all machinegun firings during training.
175» Examination
Insure that students make satisfactory progress
throughout each period of instruction. Those men
who do not progress satisfactorily must receive
additional Instruction under close supervision.
Give a formal or setniformal participation-type
examination following each phase of instruction
to measure effectiveness of Instruction.
Note, For Techniques of Fire and Training Techniques,
«ее ТС 28-15.
Section II.	MECHANICAL TRAINING
176» Disassembly and Assembly
a.	Aids to Instruction.
(1)	During this phase of training, the gun is
mounted on the M8 mount, or installed on a table,
so that students may better observe removal and
replacement of parts.
(2)	Nomenclature charts, or “mats,” are a
material aid in explaining mechanical training,
and help the students to learn nomenclature of the
parts,
b.	Organization, Assign one assistant instructor
per group (gun) if possible; otherwise, place as-
sistant Instructors where they can supervise as-
signed groups.
c.	Presentation.
(1)	Present a brief historical background of
196
the gun. Stress the combat role it has played, and
the mission it is assigned. Emphasize the purpose,
scope, and importance of the instruction to be pre-
sented.
(2)	Give a brief description of the operation,
general data, and exterior nomenclature of the
gun.
(3)	Assistant instructors should disassemble
and assemble the gun as the instructor explains
the procedure.
(4)	After the students become skilled in dis-
assembly and assembly, demonstrate thia phase
of Instruction with an assistant blindfolded. This
often encourages men to practice during their free
time, and develops their Individual skill and initi-
ative. Stress that this ia not dona againat time,
because of the danger of damaging parts of the
gun.
▲00 M»IA
177.	Headspace and Timing
a.	Aids to Instruction.
(1)	During instruction in headspace and tim-
ing adjustment, use a caliber .50 machinegun and
a headspace and timing gage for demonstration
and practical work.
(2)	A large wooden operating model of a
headspace and timing gage should be obtained for
use in demonstration.
(8)	Filmstrips and training films covering
headspace and timing adjustment give clearer un-
derstanding of the subject
b.	Organisation. Organize the class as explained
in paragraph 176b.
e. Presentation»
(1)	Stress the importance of correct head-
space and timing adjustment with the gages. Ex-
plain and demonstrate the proper method of ad-
justing headspace and timing. Discuss the effects
of tight and loose headspace, and early and late
timing.
(2)	Every member of the crew must know
how to correctly adjust headspace and timing.
This is the most important single phaM of caliber
.50 machinegun training. If the gun is to fire, the
headspace and timing must be correct.
(8)	Talk the demonstrators through head-
space adjustment and timing, with students ob-
serving the demonstrators at each gun position.
(4)	Each student will adjust headspace and
timing.
(5)	Explain the field expedient methods of
adjusting headspace and timing as the last phase
of instruction. Make sure students understand
that the gun will not be fired under training con-
ditions with field expedient adjustments.
178.	Operation
a.	Aide to Instruction. Each instructional group
requires a caliber .50 machinegun mounted on an
M8 mount, a belt of approximately five dummy
rounds, a clearing block, and caliber .50 cleaning
rod.
b.	Organisation. Organize the class as described
in paragraph 176b.
0.	Presentation.
(1)	Explain and demonstrate the proper
method of half-loading, loading, unloading, and
clearing the gun. Stress the safety factors in-
volved.
(2)	Point out how the belt feed lever stud can
be broken if the bolt is released (in the rearward
position) with cover lowered.The stud will not fit
into Its proper groove.
(3)	Explain the damage that results from
allowing the bolt to slam forward with the barrel
out of the gun.
(4)	Demonstrate the proper method of let-
ting the bolt go forward, when the barrel is out of
the gun.
(5)	Explain the role of the bolt latch, bolt
latch release, and bolt latch release lock in single-
shot, semiautomatic operation. Demonstrate sin-
gle-shot operation. Graphic training aids (GTA)
charts will be beneficial in platoon-size groups.
179.	Functioning
a.	Aids to Instruction.
(1)	Graphic training aids are useful if the
class is approximately platoon size; otherwise,
they may be made available for study and discus-
sion during breaks.
(2)	Use one gun per group, as in previous
mechanical training instruction.
b.	Organisation» Organize the class as described
in paragraph 176b.
0. Presentation.
(1) Divide functioning into eight phases, as
described in paragraph 18a.
(2) Explain and demonstrate each phase of
functioning. Assistant instructors should dupli-
cate each demonstration on the guns within each
group. With these "setups'1 at the guns, each sol-
dier can see functioning of the various groups and
their component parts. Setups, which may be used
for each phase of functioning, are described
below, as applicable.
(a)	Feeding. Insert a 5-round belt in the
feedway. Demonstrate the action of the belt feed
pawl and belt holding pawl In bringing the new
round against the cartridge stops. Have the dem-
onstrators raise the cover to illustrate how the
new round is engaged by the extractor, and to
explain the operation of the bolt and cover groups
in feeding.
(b)	Chambering. Have a dummy round
placed In the T-slot of the bolt, engaged by the
extractor. Instruct the demonstrator to depress
the bolt latch release, and lot the bolt ride slowly
forward, pointing out to the student how the ejec-
tor is cammed out into the grooved surface in the
left side of the barrel extension.
(c)	Locking. Demonstrate this phase with
the barrel extension, barrel buffer, and bolt
AGO М11Л
197
groups inside and outside the gun. Make certain
that the students are shown the location of the
breech lock cam and understand its function.
(d)	Firing. Have the demonstrators cock
the gun, allow the bolt to go forward, and remove
the backplate, to demonstrate this phase of func-
tioning. Explain each action that takes place from
trigger down to the firing pin, removing the driv-
ing spring group and bolt in the final phases of
explanation.
(e)	Unlocking, Instruct the demonstrators
to remove the backplate, bolt, barrel extension,
and barrel buffer groups from the receiver. Fi-
nally, remove the barrel buffer assembly from the
barrel buffer body group. Again, explain the func-
tion of the breech lock cam in the bottom of the
receiver.
(f)	Extracting. Point out this phase of
functioning with groups outside of the receiver,
explaining the job of each part Afterwards, as-
semble the gun and complete explanation. Use
dummy rounds.
(p) Ejecting. Demonstrators should have
the gun fully assembled with a dummy round in
the T-slot, and another against the cartridge stop
in the feedway.
(A) Cocking. Remove the bolt group from
the receiver for the initial demonstration; com-
plete instruction with the gun fully assembled.
(3) Throughout the instruction, explain the
similarity and difference between the functioning
of the caliber .50 and the M60 machineguns.
(4) Functioning is taught by visualising how
the parts work, rather than by memorizing the
text Test retention of the instruction by asking
questions concerning combined phases of func-
tioning. Example: "The first cartridge in the belt
is positioned against the cartridge stops, and the
bolt is forward. Explain the functioning of the
parts involved in chambering this round?*
1 BO. Malfunctions (Stoppage! and Immediate
Action)
a.	Aids to Instruction.
(1)	Clearly define the term "stoppage” in in-
troduction to this portion of the instruction.
(2)	Emphasize the need for correct care and
cleaning procedures.
b.	Organization. Organize the class as described
in paragraph 176b.
c.	Presentation.
(1)	The following chart can be used as a
guide in presenting instruction in stoppages and
immediate action:
8topp«vM
Те prwMte for iaatrocdM
1, Misfire due to defective primer............................
2. Short round................................................
2. Bulged round...............................................
4. Belt Improperly loaded.....................................
5. Battered or thick rimmed cartridge.........................
S. Failure to remove a round from the chamber.................
7.	Separated ease which b removed from the chamber by the
new round when the bolt to pulled to the roar.
8.	Separate сам, which stays In the chamber when the bolt to
pulled to the roar. (Do not set up loose headspace.)
0. Short or broken firing pin or extension....................
10.	Weak or broken firing pin spring........................
11.	Faulty engagement of the hooked notch of the firing pin
extension and the seer notch.
12.	Broken ar weak seer spring..............................
18.	Belt feed lover pivot out, worn, or broken..............
14.	Bent, or worn, belt food lever..........................
16. Bolt food pawl spring out, or weak.
16. Bolt food pawl pin out or partially out.. ............-	- - -
17. Cover extractor spring out or weak........................
IS. Belt feed lever bent up (stud jumps out of cam groove)....
19.	Damaged extractor.......................................
20.	Bolt holding pawl out, or springe weak..................
21.	Broken extractor or ejector.............................
191
1. Place a dummy cartridge io the belt.
2. Place a short round in the bolt.
8. Insert a bulged round in ths belt.
4. Pull a cartridge partially out of the belt.
8. Place a battered or chick rimmed cartridge in the belt.
6.	Place a dummy cartridge with the rim filed off, tn the chamber.
7.	Drive the front portion of a cartridge securely on a dummy
cartridge. Pull the bolt to the rear and place the cartridge
properly on the face of the bolt. Ease the bolt forward.
8.	Insert the front end of a case in the chamber, and load.
9.	Assemble the bolt with a defective firing pin, or extension,
or place fire or more successive dummy cartridges In the belt
for instruction in immediate action.
10.	Same as 9.
11.	Same as 9.
12.	Same as 9.
18. Assemble the cover with a defective part.
14.	Same as 18.
15.	Remove the bolt feed pawl spring.
16.	Remove the belt feed pawl pin.
17.	Remove cover extractor spring.
18.	Assemble with a defective part.
19.	Same as 18.
20.	Remove the belt holding pawl or springs.
21.	Assemble the bolt with a detective part.
AGO UIU
Itopp&sta
To рт«нг« tor iMtnictioa
22.	Broken or dam&fod T-elot, causing micaMnesnant and buck- 22. Do not prepare,
lint o< tha cartridge aa the bolt move forward, or a failure to
extract.
23.	Weak ejector spring, caualng miaalinement and buckling of 23. АметЫе with a defective part.
the cartridge aa the bolt goee forward.
24. Broken barrel extenalon or barrel buffer group.............24.	Same aa 23.
25. Defective trigger mechanism, (runaway gun).................25.	Do not prepare.
(2)	Stress precision in detecting the cause
and reducing stoppages. As the soldiers progress,
concentrate on speed in applying immediate
action and other methods of reducing a stoppage.
Train the crew to function as a team.
(8)	Stress safety precautions in connection
with a hangfire or cookoff.
(4)	When covering removal of ruptured car-
tridges, stress the cause: loose headspace, timing;
and the prevention: correct headspace and timing.
Section III. MOUNTS
181.	Ground Mounts:
a.Aids to Instruction.
(1)	Provide a gun, mounted on* MS or M68
mount (dependent upon the mount to be covered
by instruction) for each group.
(2)	Set up an additional pair of guns on their
respective mounts (M8 and M88), for demonstra-
tion purposes.
(8)	When M68 mounts for each group are
not available^ at least one mount should be ob-
tained for demonstration purposes.
(4)	When both the М3 and M68 mounts are
set up for demonstration purposes, only one
mount should be exposed to the students view at
any one time.
(5)	Use applicable GTA’s or filmstrips.
b. Organisation.
(1)	For instruction on the M8 mount, organ-
ize groups as outlined in paragraph 178.
(2)	If enough M68 mounts are available to
provide one per group, organize the class for in-
struction as outlined in paragraph 178b.
(8)	If sufficient mounts are not available to
conduct instruction on the M68 mount, use the
mounts for demonstration purposes only, dividing
the class so that each man can get the best
possible view of the demonstration.
e. Presentation.
(1)	Introduce the M8 and M68 mounts as
the two principal ground mounts used with the
caliber .50 machinegun.
(2)	Explain the role of the M8 mount against
ground targets.
(8)	Explain the role of M63 mount against
aerial targets.
(4)	Present the following information and
demonstrate; first the M8 and then the M63
mounts.
(a)	General nomenclature and data.
(b)	Functioning of the mount.
(c)	Use, or operation, of the mount.
182.	Vehicular Mounts
a.	Aids to Instruction.
(1)	This instruction will be more effective if
the mounts are demonstrated on a firing range.
(2)	If a firing range is not available, give
general data on the mounts and place the mounts
adjacent to the class area for inspection during
breaks.
(3)	If mounts are not available, and the class
is small, refer to available GTA’s.
b.	Organisation. Due to the nature of the sub-
ject, instruction in vehicular mounts is presented
by conference and discussion, and demonstration
and practical work, when mounts are available.
The class should be organized into one large group
initially, and divided into smaller groups for prac-
tical work.
o. Presentation.
(1)	Where possible, introduce each type
mount, followed by demonstration firing before
proceeding to the next mount
(2)	Following the initial conference, divide
the class into small groups for practical work
firing, changing stations after each group has
completed familiarization firing with each mount.
AGO MMA
199
Sactian IV. ORGANIZATIONAL MAINTENANCE
18Э.	Car* and Cleaning
a.	Aids to Instruction.
(1)	Use one cleaning rod and one dummy
round per weapon, plus bore cleaner» lubricating
oil, patches and waste (rags).
(2)	Assemble a display of all available clean-
ing materials, lubricants, and rust preventives, as
listed in paragraph 39. Display according to cate-
gory, and label each item.
(3)	Use available filmstrips, or similar in-
structional aids.
(4)	Refer to the Inspection checklist, appen-
dix C.
b.	Organization. Organize the class as outlined
in paragraph 173.
c.	Presentation.
(1)	Emphasize meticulous cleaning, lubrica-
tion, inspection, and preventive maintenance to
insure performance.
(2)	Use the care and cleaning period to fur-
ther the soldier’s knowledge of nomenclature, and
skill in assembly and disassembly.
(8)	Emphasize Inspection, care, and preven-
tive maintenance under combat conditions, which
is the final test of the weapon maintenance pro-
gram.
(4)	Conduct semiformal practical work in-
struction before, during, and after firing.
(6)	Emphasize care of the mount, as well as
the gun, throughout care and maintenance in-
struction.
(6)	Point out the differences in care and
cleaning in cold climates, tropical climates, hot-
dry climates, and care and cleaning following a
CBR attack.
(7)	Emphasize the importance of frequent
inspection, as a means of insuring proper mainte-
nance of the gun and mount
Section V. MOUNTING AND PLACING THE
GUN IN ACTION
184.	Crew Drill (М3 Mount)
a.	Aids to Instruction.
(1)	The demonstration crew must be well-
trained and demonstration equipment complete.
Use basic TOE equipment and distinctive helmet
liners (identifying each crew member according
to his duties), and normal individual equipment.
(2)	Issue equipment for each group partici-
pating in practical work.
b.	Organization.
(1)	Present initial instruction and demon-
stration to one group.
(2)	For practical work, divide the class into
crews of four men per gun.
(8)	To facilitate control and supervision,
aUne equipment with engineer tape or wire, with
the students in files behind their equipment
e. Presentation.
(1) Emphasize the fact that crew drill is the
first step in developing teamwork in the machine-
gun crew, and that precision is required of every
member for the crew to function smoothly.
(2) During initial practical work periods,
stress precision; talk each man through his par-
ticular duties as a crew member. Require the stu-
dents to perform each operation when directed
and precisely as directed.
(8) As precision is attained, introduce and
develop speed.
(4) In advanced training, use speed drill to
create interest and stimulate competition. This
also furthers teamwork and tests individual crew
performance. A well-trained crew should be able
to place the gun in action, or take it out of action,
in 26 seconds, with all points correct
IBS. Crew Drill (Other Mounts)
Due to the nature of mounts other than the MS
mount crew drill with these mounts is limited to
instructing two men to properly mount the gun
(the mount already emplaced, as with the M68
mount), or take the gun out of action.
Section VI. MARKSMANSHIP
186. Preparatory Exorcfoos
a.	Aids to Instruction. Demonstration crew with
gun and mount, a sighting bar, graphic illustra-
tion of correct sight picture, sighting target
(panel with holder), stopwatch, control flags,
cleaning rods, clearing blocks, and patches.
200
AGO SM1A
b.	Organization.
(1)	Preferably two soldiers per group.
(2)	Centralized area (preferably with bleach-
ers) for conference and demonstrations. Any rela-
tively level area that will permit the guns to he
placed 10 meters from the targets.
c.	Presentation.
(1)	The instructor should convince the indi-
vidual soldier that in order to fire the marksman-
ship course satisfactorily, the fundamentals of
marksmanship must be learned and practiced dur-
ing the preparatory phase of marksmanship
training.
(2)	Explain that a marksman is made during
preparatory training and not on the firing line.
(3)	Through proper supervision by coaches,
assistants, and the instructor, insure that correct
practices are followed (good habits initiated, and
bad ones eliminated), during the preparatory
phase of marksmanship.
(4)	The gunner's test is given prior to firing
on the 10 meter range (para 128).
187, SOCMnch Firing
a.	Aids to Instruction.
(1)	Demonstration crew with gun and
mount, a 10 meter machinegun target, control
flags and/or whistles, stopwatches, patches, clean-
ing rods, clearing blocks, and Ц-inch aiming pas-
ters. Sound equipment la desirable during firing.
(2)	Each firing point (group): See equip-
ment listed In paragraph 112.
b.	Organization. The minimum required number
of soldiers remain on the firing line, with the re-
mainder receiving concurrent instruction on the
dry line or in rear areas.
c.	Presentation.
(1)	Conference, demonstration, and practical
work for the correct procedures in emplacing the
gun on the firing line will be conducted. Emphasis
is placed on three-point contact (tripod leg shoes),
correct shimming (when necessary), and prepara-
tion of the gun for firing, to include safety checks.
(2)	The interval between the two portions of
the control command should be sufficient to per-
mit the execution of the command, and for the
coach to perform his duties properly. Coaches are
required to perform their duties quickly and pre-
cisely. These duties should be reduced to writing,
given to each coach, and their execution super-
vised.
(3)	During instruction firing, the coach,
through corrections, places ths gunner in the
proper position before he permits him to com-
mence firing. This correction should be done from
the standing position.
(4)	The soldier should become proficient in
the execution of the exercise within the pre-
scribed time limit. After the introduction, finhg
(dry or instruction) is done against time; how-
ever, the soldier is permitted to complete the exer-
cise except for the last instruction or record
firing.
(5)	The soldier should know and understand
the principles of targeting the machinegun prior
to firing.
(6)	After each firing, assistants analyze each
target and point out errors made and their causes.
This assists the gunner in correcting errors.
188.	Transition Firing
a.	Aids to Instruction.
(1)	Demonstration crew with gun and
mount, double E-type silhouette targets, mounted
on one target frame, cleaning rods, clearing
blocks, patches; sound equipment is desirable dur-
ing firing.
(2)	Two guns with mounts, telephones, tar-
gets, cleaning rod, oil, patches, waste, clearing
blocks are required for each lane.
b.	Organisation. Preferably, two crews per lane
(one gun dry fires while the other fires). Person-
nel not required as crew members or In the opera-
tion of the range should receive concurrent train-
ing in rear areas. One assistant instructor per
lane is desirable.
c.	Presentation.
(1)	Prior to the conference and demonstra-
tion of firing table 3 (marksmanship course)* the
instructor briefly reviews range determination,
techniques of long range fire adjustment, and ex-
plains the characteristics of machinegun fire, and
its effect on field targets.
(2)	When firing, the alternate aiming point
method of adjustment is explained and demon-
strated. Gunners should be required to use this
method.
(8)	The guns are targeted at a known dis-
tance on the transition range (preferably at 600
yards). The soldiers receiving the instruction
should do the targeting.
(4)	The acting safety NCO for each gun crew
requires the gunner to be in the correct position
before permitting him to fire.
(6)	The acting safety NCO may assist the
gunner in locating the targets, but is not permit-
AOO Ш1Л
201
tea to Aid in range determination or fire adjust-
ment
(6)	At the completion of each exercise, the
members of the firing crew rotate.
(7)	Appropriate subjects to be included in
rear area training are —
(a)	Mechanical training.
(b)	Any other machinegun subjects in
which additional training is needed.
189.	Moving Target Firing
a.	Aide to Instruction.
(1)	Demonstration crew with gun and
mount. One appropriate target, cleaning rods,
clearing blocks, patches, waste, vehicle (prefera-
bly ^4-ton truck), blank target with holder, and a
marking silhouette.
(2)	Two guns per firing point, cleaning rod,
clearing blocks, oil, and patches.
b.	Organisation.
(1)	Preferably two crews per firing point
(one gun dry fires while the other fires). Person-
nel not required as crew members or in the opera-
tion of the range, receive concurrent training in
rear areas.
(2)	One assistant instructor per lane as the
safety NCO.
c.	Presentation.
(1)	Prior to the conference and demonstra-
tion of firing table 4, the instructor conducts the
preparatory exercises as prescribed in paragraph
138 (tracking and leading). He should also review
and discuss range determination, the techniques
of long range fire adjustment, and characteristics
of machinegun fire.
(2)	The gun should be targeted at a known
distance on the range, preferably at the midrange
of the target run.
(8)	The acting safety NCO requires the gun-
ner to be in the correct gunner’s position before
permitting him to fire.
(4)	At the completion of each firing, the
members of the crew are rotated.
(5)	Appropriate subjects to be included In
rear area training are—
(a)	Mechanical training to include head-
space and timing adjustments.
(b)	Care and cleaning.
(e) Any other machinegun subject in
which additional training Is needed.
Section VII. TECHNIQUE OF FIRE, GENERAL,
DIRECT LAY, PREDETERMINED RRE, AND
POSITION DEFILADE
190.	PURPOSE
The objective of this training is to teach the sol-
dier teamwork and give him confidence in his abil-
ity to quickly deliver a large volume of accurate
machinegun fire against targets. Technique of fire
training also gives him further training in the
basic fundamentals of gunnery.
191.	Organisation
a.	The instructional area should have seating
facilities for the entire group during conferences
and demonstrations.
b.	After the conference and demonstration, the
group Is divided into smaller groups for practical
work, each under the control of an assistant in-
structor. (These smaller groups should be less
than platoon rise.)
c.	The officer in charge of instruction controls
all firing.
d.	If space permits, all men are employed on the
firing line.
e.	Keep requirements for the various exercises
simple and progressive.
f.	Coordinate demonstrations and exercises
with the instruction. Demonstration crews should
have distinctive helmet liners to indicate their po-
sition within the crew.
g.	If possible, select terrain suitable for the sub-
ject ; otherwise, apply the subject to the terrain.
h.	Improvise targets from salvage material, and
make them durable. Dirt mounds, drums filled
with dirt, do not require frequent replacement
192.	Introduction
a.	Aids to Instruction.
(1)	A blackboard, appropriate charts, guns
with mounts, ammunition, and appropriate equip-
ment.
(2)	Equip each practical work area with
guns and mounts, ammunition, clearing blocks,
cleaning rod, gun cover, and other necessary
equipment
b.	Presentation. If possible, control firing with
a sound system. Flags, arm-and-hand signals, or
whistlee, may be used as alternate means of con-
AOO MU
202
trol in an emergency, or to supplement the sound
system.
(1)	Explain and demonstrate the characteris-
tics of fire, classes of fire, target designation, fire
control, and review range determination and
windage adjustments.
(2)	Explain the proper sequence and use of
fire commands.
(3)	Conduct practical exercises (in practical
work areas) in applying fire commands.
193.	Distribution of Fire
a.	Aids to Instruction. Same as paragraph 192a.
b.	Area. Field target range or landscape target
range.
c.	Presentation.
(1)	Explain and demonstrate the engagement
of various types of targets (wide, deep, oblique,
etc.) using direct laying. Demonstrate methods by
using a punchboard (fig 130), if available, and by
firing.
(2)	In the first demonstration of each type of
target, show step-by-step the initial lay, direction
of manipulation, and extent of manipulation of
the gun (or each gun when employed in pairs).
Fire the remaining demonstrations of each type
of target in the normal manner.
(3)	Follow the conference and demonstration
of each type target with practical work. The as-
sistant instructor in charge of the smaller group
breaks the group down into gun crews, and desig-
nates crew leaders and crews to fire the guns sin-
gly, or in pairs. The crew leader then gives the
fire command, which is placed on a blackboard. It
is corrected, and the gun crew(s) take appropri-
ate action to prepare to engage the designated
target. The crew(s) engages the target, and the
group critiques their firing and performance.
After the critique, other crews are designated.
Follow the same procedure throughout practical
work, engaging as many targets as time permits.
194,	Overhead Rre
a.	Aids to Instruction. Same as paragraph 192a.
b.	Area. Field target range.
0. Presentation.
(1) Explain and demonstrate the advantages,
limitations, and application of overhead fire, to
include safety angles and the gunner’s rule. Use
tracer ammunition throughout this instruction so
that the trajectories are seen by the soldiers.
(Emphasise that tracer ammunition is not used in
the actual delivery of overhead fire.)
AGO MMA
(2) During practical work, each assistant in-
structor points out the location of friendly troops
(indicated by flags, silhouette targets, etc.); desig-
nates the target, obtains the range by group esti-
mation, and requires the group to determine, by
using the gunner’s rule with the guns, whether or
not overhead fire can be delivered safely. The
correct fire command is given, and the target is
engaged. Thus, the group can see whether or not
the fire clears friendly troope. The assistant in-
structor and the group critique the firing and the
performance of the crews.
195.	Predetermined Rra
a.	Aids to Instruction. Same as paragraph 192a.
b.	Area. Field target range, or landscape target
range.
c.	Presentation.
(1)	Explain and demonstrate methods of lay-
ing the gun and firing, using the traversing bar
and elevating mechanism, auxiliary aiming points,
aiming stake, and various field expedients.
(2)	Explain and demonstrate the employ-
ment of the caliber .59 machinegun, firing final
protective fires. Explain how the terrain controls
the extent of grazing fire obtainable along the
final protective line.
(3)	Explain the purpose and use of a range
card. Draw a range card on the blackboard as
data is obtained by the demonstration crew. Re-
quire each soldier to record the same information
on his individual range card.
(4)	The groups report to their practical work
areas along the firing line and are divided into
gun crews (three or four men per gun). They
prepare a group range card for each gun, includ-
ing data for a final protective line and targets.
Use as many of the methods as possible to engage
targets and fire the final protective line. This data
should be confirmed by firing through target cloth
screens placed in front of the gun position, so that
the gunner cannot see the target through his
sights. If possible, these same targets should be
engaged at night to show the soldier the technique
of applying data in the dark.
194.	Position Defilade
a.	Aids to Instruction. Same as paragraph 192a.
b.	Area. Use a field target range affording a
defiladed firing line. If possible, the mask should
be at least 100 yards in front of the gun positions
to avoid danger from possible ricochets.
c.	Presentation.
(1)	Explain and demonstrate the types of de-
20®
Fiffvro ItO. Ttohniqvo of Дп fptcwoAbMrdJ»
204
A00 MtlA
filade positions, the four essentials of positions
defilade, and the aiming point method of laying
the gun for direction and elevation.
(2)	Assemble the groups in their practical
work areas, and have them place the guns in posi-
tion defilade on a reverse slope (also on a forward
slope) and engage targets by—
(a)	Applying the four euentiale in the en-
gagement of targets from position defilade.
(6)	Laying the gun for direction and eleva-
tion by use of the aiming point method.
(S)	When time permits or concurrent train-
ing is used, a review of the following subjects is
recommended, using aand tables, charts, dia-
grams, and terrain:
(a)	Firing positions.
(b)	Laying the gun for direction and eleva-
tion.
(c)	Checking for mask clearance.
(d)	Adjustment of fire.
197. Advanced Training
As the soldier gains proficiency in the basic prin-
ciples of techniques of fire, and aa training for
noncommissioned officers (NCO’s), the following
guide may be applied to various phases of instruc-
tion:
a.	The NCO may be placed in charge of a crew,
or crews, during practical work periods, and in-
spect weapons. He may also be used to critique
firing and give fire commands.
b.	In applying the gunner’s rule, binoculars may
be used to determine whether or not it is safe to
fire. The student must understand, however, that
before firing, calculations must be checked by
using the gun.
c.	Noncommissioned officers and experienced
soldiers may select gun positions and determine
data to be placed on the guns, when firing from
position defilade.
Section VIII. FAMILIARIZATION FIRING
198. Genoral
liarization with the Browning machinegun, cali-
ber .50, НВ, М2, on ground mount, or mounted on
vehicles:
a. The following course may be fired for fami-
	Rouad»	Taryvta	Тур» of fir*
400-1000..-	60		6 typ« double E fllhoutta target* par run			Targettnr—6 rdf afarlaahot. Burst» of 0—10 rotmdf.
b. When fired for familiarization, the course
outlined in a above is operated as follows:
(1)	Each man receives 12 hours of prelimi-
nary marksmanship instruction.
(2)	Each man receives 4 hours of familiari-
zation firing.
(8)	The ammunition allowance of 56 rounds
per individual contains at least 1 round of tracer
ammunition to every 4 rounds of ball ammunition.
(4)	Before the course is fired, each man is
allowed 6 rounds for targeting. The entire group
at each gun observes the targeting fire.
(5)	No time limit is set for firing the allotted
ammunition.
(6)	All guns are stationary.
(7)	All targets are stationary.
(8)	The 5 targets, which may be placed In the
lanes of a transition range, are mounted at ranges
varying from 400 to 1,000 meters. Red flags may
be used to identify the targets.
Section IX. ANTIAIRCRAFT GUNNERY TRAINING
199. Preliminary Training
a. Scope. Gunners must complete the following
preliminary training before firing at moving aer-
ial targets:
(1)	Aircraft recognition.
(2)	Range estimation.
(S) Speed estimation.
(4) Position exercise.
(5) Tracer observation.
<6> Demonstration firing.
(7) Tracking exercises.
b.	Aircraft Recognition. Refer to FM 44-80.
c.	Range Estimation. The purpose of range esti-
mation is to teach the gunner when to open fire.
The only basis for aerial range estimation is the
appearance of the airplane. Trainees observe the
206
AGO НМЛ
ft AN (J 1 (METERS)	DETAILS SUN BY UNAIDED EYE
KO	TME SYMBOLS AND NUMGEftS. LETTERS ON THE AIRCRAFT CAN SEEN FLAINLY.
300	TME SMALL FROJ ACTIONS FftON THE FUSELAGE. SUCH AS GUNS ANO AERIALS
700	TME RUDDER AND COCKFIT
100C	TME GENERAL OUTLINE OF TME AIRCRAFT (OPENING RANGE)
OVER 1000	THE GENERAL IKAFE GRADUALLY DISAPPEARS AND BECOMES ONLY AN ELONGATED SFEC » IN AIR
Figw* Ml* Detail wgh by tAe wtafcbd «и ** vireraft at varfow rnpi.
plane aa it flies courses at known ranges until
they become familiar with the plane's appearance
at various ranges. The 1,000 meter range is
stressed because this is the range where the gun-
ner ia taught to open Are. If an airplane is not
available, figure 181 may be used as an aid for
training.
d.	Speed Eatimation. When possible, an air-
plane ia used for training men to estimate speeds
of aerial targets. Trainees observe the aircraft aa
it flies various courses at known speeds until they
become capable of estimating speeds with reason-
able accuracy, The usual speeds of attack for var-
ious types of aircraft are covered in aircraft rec-
ognition training and repeated as concurrent in-
struction in this phase.
a. Position Exercise.
(1) This exercise teaches the gunner to as-
sume the antiaircraft flring position quickly and
accurately. The instructor sees that each man as-
sumes a stable position. Speed in assuming the
position is obtained by practice. The position of
each gunner is tested by his moving a free gun
through a wide traverse at high elevation without
reference to any target
(2) The ability to fire a machinegun effec-
tively is directly dependent on hand-eye-foot coor-
dination. Practice alone will develop these skills.
To engage targets quickly and track them
smoothly and accurately, a machinegunner must
develop a feel for his weapon. He should track
moving aerial targets frequently.
/. Tracer Observation,
(1)	This instruction teaches the gunner the
principles of tracer observation (para 167-170)
and develops the ability to properly interpret the
relationship of target and tracer, under varying
conditions of line and lead.
(2)	Graphic representations similar to those
in figures 177, 178, and 179, and chalkboard
sketches are effective aids in teaching the funda-
mentals of tracer observation. Advanced instruc-
tion in tracer observation is conducted concur-
rently with all phases of antiaircraft firing.
(8)	Further information on this subject ia
contained in FM 44-2.
ff. Demonstration Firing.
(1)	This firing familiarizes the gunner with
the appearance of the tracer path with its appar-
ent curve, and demonstrates the methods of ad-
justing the tracer path onto the target
(2)	The demonstration consists of the follow-
ing:
(a)	Without reference to a target traverse
a free gun while firing. Call attention to the need
for keeping the head high above the gun so that
the tracer path can be observed through the
smoke.
(b)	Fire at aerial targets that are flying
incoming and crossing courses. Demonstrate how
lead is applied, and how a moving reference point
in the sky (the target) introduces an apparent
curvature in the tracer path.
(c)	Stress the principles of tracer observa-
tion.
(d)	Test the trainee's ability to мпм tra-
cers correctly.
h. Tracking Exercise. The tracking exercise
teaches control of the free gun, and tests the gun-
ner's ability to estimate and apply initial leads.
Gunners track and simulate continuous fire on
aerial targets flying various types of courses. The
radio-controlled airplane is the most suitable tar-
get for this type of exercise.
200. Firing Exorcises
a.	General. Firing at high-speed aerial targets
2M
▲00 wu
is the Anal phase of antiaircraft machinegun
training. It consists of flring the caliber .60 mach-
inegun from ground and/or vehicular mounts at
targets towed by aircraft or at radio-controlled
airplane targets. The purpose of the flring exer-
cise is to—
(1)	Teach control of the free gun while
tracking an aerial target and flring continuously.
(2)	Develop and test the gunner’s ability to
estimate initial leads, and make appropriate
corrections in line and lead baaed on tracer obser-
vation.
b.	Eusntiab for Firing. Prior to a flring exer-
cise, the instructor explains the importance of
keeping the proper position with a flrm grip on
the gun while flring, and the necessity of firing
continuous Are. The techniques of estimating lead
and the principles of tracer observation are re-
viewed. During a firing exercise, the instructor or
his assistants carefully check each man before
and during flring to insure that instructions are
followed and malpractices are corrected on the
spot
ft. Faulty Training Methods. Antiaircraft firing
without the use of tracers is obviously wasteful
and useless training. Errors cannot be seen and
corrected, and, although a few hits may be ob-
tained, the gunner never knows at what time and
with what lead, these hits were obtained.
201 • Targets
a.	Towed Targets. These targets are very relia-
ble; however, safety factors limit the types of
courses which can bo flown by the towing air-
craft. Two types of targets are available; the flag
(or banner), and the sleeve target Both types of
targets are provided in a variety of colors; red,
white, and black for use under varying conditions
of cloud and sky. These targets may be towed at
speeds in excess of 200 miles per hour, the only
limiting factor being the disintegration ratio of
the target.
b.	Radio-Controlled Airplane Targets. These
targets are 147 inches long, 81 inches high, and
have a wing span of 188 inches. They are remote-
controlled by radio and are the most realistic and
maneuverable type of target available. (See TC
28-16 for additional information.)
AGotma
207
APPENDIX A
REFERENCES
AR 810-25
AR 810-50
AR 3504
AR 385-68
FM 5-15
FM 7-10
FM 7-20
FM 21-5
FM 21-6
FM 21-30
FM 21-40
FM 21-60
FM 31-70
FM 44-1
FM 44-2
FM 44-80
TM 8-220
TM 9-207
TM 9-247
TM 9-1005-213-10
TM 9-1005-218-25
TM 9-1800-206
TM 9-2300-224-10
TM 10-1101
TA 28-100-1
TC 23-13
TC 28-15
DA Pam 310-4
DA Pam 810-7
SC 4933-95-C.-E04
SM Ord 1, 8, 9,
SNL A-55
Dictionary of United States Army Terms.
Authorized Abbreviations and Brevity Codes.
Qualification and Familiarization with Weapons and Weapon Systems.
Regulations to Firing Ammunition for Training, Target Practice, and
Combat
Field Fortifications.
The Rifle Company, Platoons and Squads.
The Infantry Battalions
Military Training Management
Techniques of Military Instruction.
Military Symbols.
Chemical, Biological, Radiological and Nuclear Defense.
Visual Signals.
Basic Cold Weather Manual.
US Army Air Defense Artillery Employment.
Air Defense Artillery Employment Automatic Weapons. M42/M55.
Visual Aircraft Recognition.
Chemical, Biological, and Radiological (CBR) Decontamination.
Operation and Maintenance of Army Materiel in Extreme Cold Weather.
(0* to—60°F.) To 86-1U0.
Materials used for Cleaning, Preserving, Abrading, and Cementing Ord-
nance Materiel.
Operators Manual: Machinegun, Caliber .50, Browning, М2.
Organizational, DS, GS, and Depot Maintenance Manual Including Repair
Parts and Special Tool Lists, Machinegun Cal .50.
Care, Handling, Preservation, and Destruction of Ammunition.
Operator's Manual: Carrier, Personnel, Full-Tracked, Armored Ml 18.
Petroleum-Handling Equipment and Operations.
Ammunition, Rockets, and Missiles for Basic and Advanced Individual
Training. (By MOS)
Crew-Served Weapon Night Vision Sight
Engagement of Aerial Targets with Small Arms.
Military Publications: Index of Technical Manuals, Technical Bulletins,
Supply Manuals, Supply Bulletins and Lubrication Orders.
Military Publications: US Army Equipment Index of Modification Work
Orders.
Tool Set Direct and General Support Maintenance, Basic Small Arms.
Mount Machinegun, AA Cal .50(6580080) and (8867286).
208
▲OO M»LA
APPENDIX В
POSITION OF PARTS FOR LEFT-HAND FEED
hrt	EWttoa
Bolt food fever» вЬомИег boadfen pin, and eprfng.........
Brit food elide..........................................
Brit food Rwlita.l.......................................
Cover fetch shaft Irw....................................
Cartridge stops Mak stripper.............................
Rfenetfag sHdo with handle...................... ........
Mt hridtog pawL.............................-............
Mt switch................................................
Upper (rear) brio, Lug of feed lever ia on loft ride of cover.
Feed pawl is on Left rido of cover.
Am toward lateM end of eowr, printing right.
Lrit ride of cover.
Right-hand rear cartridge stop ыоеаЫу and front mrtridgo
stop on right rido of feodway.
Right ridopfete.
UR ride df foodwey.
Com groove to Itoe with on holt.
лао мил
ВО*
APPENDIX С
BEFORE, DURING, AND AFTER OPERATION CHECKLIST
F»rt		fite «* —впму «mattoa	Altar
BON«...................	Мака гага it is dear and clean..		Clean and oil Lightly. Inspect, dean, and ofl lightly.
Moving parte		OU lightly and test for worn or broken parte. They should function without excessive friction.	Lubricate working parte. Ob- bsfvs the functioning of the gun to anticipate failures.
Headspace timing		Chock adjustment by gage and correct tf пЕсвтвту.	Watch for bulged cases to pro* ▼sot a ruptured (separated) сам. If separated сам occur»» remove it, readjust head- space and timing.	Check adjustment.
Rear eight and «indan knob.	Bee that the Bight ia dean and fuMtione properly. Bet eight at 1,000, windage aero.	Keep properly sot.	(Teen and oil; set at 1 ,И0, windage aero.
Spare parte and tool»		Clean and oil враге parte and tools. Cheek kite for com- pletCDCsa. Examine newly drawn parte.	Keep available		Clean and oil. Chock and ro- place damaged or missing parte.
Ammunition		Have an adequate supply; dean, correctly loaded, and in good condition Not oiled.	Keep correctly alined with tha foodway» chock resupply. Pro- tect from sun, moisture, and dirt. Watch for link atop- РЧ»	Clean, etote carefully, and replenish supply.
AGO MBlA
APPENDIX D
INSPECTION CHECKLIST
UlA
Gam.
o. Barrel..	.. Inspect the bort and chamber tor rust. Soe that they art clean and Hghtly oiled.
ft. Moving parte		.. See that they are etean and lightly oiled. Operate the retracting iHde handle and bolt latch rales as several times, to see that the porta function without excessive friction.
c. Headspace and timing		.. Check with the gages to insure that headspace and timing are correct.
d. Rear eight and windage knob.	.. Insure that tho sight is in good condition, dean, tree of grease or dirt, and Hghtly oiled. Elevation should be sot at 1,000, windage zero, and the sight should be down.
2. МоаЫ. ..		.. floe that it la clean, lightly oiled, lubricated, and that all clamps are securely tightened. It should function properly and bo complete.
1.	Inspect to see that they are clean and Hghtly oiled. Soo that spare parte kite are complete and tn good condition. RoplaeonMcit parte should bo requisitioned and newly drawn parts eaambod.
4» АеитшШеа					.. See that ammunition Is properly stored, and that boxes and ammunittan ate in good eon- dltion and not Oiled.
AGO HSIA
211
APPENDIX E
AMMUNITION
I.	General
This appendix describee the Ammunition used in
caliber .50 machineguns. You should be able to
recognize the types of ammunition available, and
know how to care for that ammunition.
a.	The caliber .50 cartridge consists of a car-
tridge case, primer, propelling charge, and the
bullet. See TM 9-1300-200.
b.	The term bullet refers only to the small-arms
projectile. The term "ball" was originally used to
describe the ball-shaped bullet of early small-arms
ammunition. The term "ball ammmunition” now
refers to a cartridge having a bullet that has a
metallic jacket» filled only with lead.
2» Classification
Based on use, the principal classifications of the
several types of ammunition used with the machi-
negun are as follows:
a.	Ball. For use in marksmanship training,
against personnel, and light material targets.
b.	Tracer. To aid in observing fire. Secondary
purposes are for incendiary effect and for signall-
ing.
c.	Armor-Piercing. For use against armored
aircraft and lightly armored vehicles, concrete
shelters, and other bullet-resisting targets.
d.	Incendiary. For incendiary effect, especially
against aircraft
e.	Armor^Piercing-Incendiary. For combined
armor-piercing and incendiary effect.
/. Armor-Piercing Jncendiary-Tracer. For com-
bined armor-piercing and incendiary effect with
the additional tracer feature.
g.	Blank. For simulated fire (contains no bul-
let).
h.	High-Preuure Test. For use only in proof
firing of weapons and barrels.
i.	Dummy. For training (completely inert).
3» Lot Numbar
When ammunition is manufactured, it is given an
ammunition lot number, which is marked on all
packing containers. It is also on the identification
card inclosed in each packing box. The lot number
is required for purposes of record, such as grad-
ing and use, and reports on the condition, func-
tioning, and accidents in which the ammunition
might be involved. It is impractical to mark the
ammunition lot number on each individual car-
tridge. Every effort should be made to maintain
the ammunition lot number, or the repacked lot
number, with its original packing. Cartridges that
have been removed from their original packing,
and for which the ammunition lot number has
been lost, are automatically placed in grade 3 (un-
serviceable and not to be issued or used).
4.	Identification
a.	Marking. The contents of original boxes or
containers may be readily identified by markings
on the box. They indicate, by stencil, the number
of rounds in the box or container, the caliber, the
code symbol, and the lot number.
b.	Code Symbol. The code symbols for machine-
gun ammunition indicate the grade as well as con-
tents and type of inner packing. To provide
proper identification, the abbreviated markings
are stenciled in yellow on each metal ammunition
container, together with the repacked lot number.
c.	Ammunition Marking. Colors painted on the
tips of the bullet aid in identification of the var-
ious types of ammunition. The following colors
are used:
IW* «/ МННЙ*	ww
Bal]----------------------None
Tracer--------------------Bad, maroon, or orange tip
Armor-piercing------------Blade tip
Incandiary________________Bine tip, light blue	ring with
blue tip.
Armor-piercing-inoondlaTy — Aluminum colored tip, or
aluminum ring with blue
tip.
Armor- pi ardng-ineendiaTy-
tracar--------------------Aluminum ring with red tip.
Blank---------------------No bullet
Dummy------------------__None, holee in cartridge ease.
Blgh-preeenrMaet----------None, tinned cartridge cans.
212
AGO >U1A
d.	Ammunition Grades,
(1)	The grades for caliber .50 ammunition
are aa follows:
AC—Aircraft and antiaircraft machine-
guns.
MG—Ground machineguns,
8—Unserviceable, not to be issued or used.
(2)	More than one grade may be authorized
for ammunition, as an example, AC or MG ammu-
nition may be used for both aircraft and antiair-
craft machineguns, and ground machineguns.
(3)	Ammunition that cannot be identified is
considered as grade 3, but is not classified unser-
viceable until every effort has been made to estab-
lish its identity. Ammunition placed in grade 3
(due to loss of lot number) and identified as hav-
ing been in serviceable lots issued to a specific
organization, may be reissued after visual inspec-
tion for local training purposes (graded “/en-
training purposes only") in ground machineguns.
It will not be used for overhead fire,
5.	Care, Handling, and Preservation
a.	Exercise care to prevent ammunition boxes
from becoming broken or damaged. Repair all
broken ammunition boxes immediately. Transfer
all original markings to the new parts of the box.
b.	Ammunition boxes should not be opened until
the ammunition ia to be used. Ammunition re-
moved from the airtight container, particularly in
damp climates, is likely to corrode.
c.	Protect ammunition from mud, sand, and
water. If the ammunition gets wet or dirty, wipe
it off at once with a clean, dry cloth. Wipe off
light corrosion as soon as it is discovered. Turn in
heavily corroded cartridges.
d.	Do not expose ammunition to the direct rays
of the sun. If the powder is hot, excessive pres-
sure may be developed when the weapon is fired;
s.	Do not oil or grease ammunition. Dust and
other abrasives that collect on greasy ammunition
are injurious to the operating parts of the gun.
Moreover, oiled cartridges produce excessive
chamber pressure.
f.	Do not fire dented cartridges, cartridges with
loose bullets, or otherwise defective rounds.
6.	Storage
a,	Small-arms ammunition is not an explosive
hazard, but under poor storage conditions, it may
become a fire hazard.
b.	Store ammunition of all classes away from
radiators, hot water pipes, and other sources of
heat
c.	Whenever possible, store ammunition under
cover. If it is necessary to leave ammunition in
the open, keep it at least 6 inches off the ground,
and covered with a double thickness of tarpaulin.
Place the tarpaulin so that it gives maximum pro-
tection, and allows free circulation of air. Dig
suitable trenches to prevent water from flowing
under the ammunition pile.
7.	Ballistic Data
The approximate maximum range, and average
muzzle velocity of some of the different types of
caliber .50 ammunition authorized for use in the
machinegun are as follows:
Cartridge	Ммйяспя , man (matan)	Meter traoe	Awin noria vriodly (feat per aeaoad)
Bull, М2				7,400		2,980
AnnoT-pierdng, М2				7,400		2,980
Armoi^pierring-iiicendUiy, MB				6,470				8,050
AnnoT-pitrdng-iocendlary-tracer, M20.__		6,470	♦*800—1760	8,050
Incendiary, Ml				0,060		8,090
Tracer, Ml (with gilding metal jacket)			5,675	1800	2,860
Tracer, Ml (with dad ateal jacket)				5,460	1800	8,080
Tracer. Ml?				6,460	2460	8,080
High гтидге teat, Ml				C)	—	C>
*Thh rand U ЛЫоИ enty for la ргоеМНаг of caliber . W laachtaqpiaa at iba plant of шашиЕмОп». The cartrldn dmlopa a eb amber prwort of 40,000
to ОДОО pouadj рагадига la oootraat to tha avara<t ehambar preaacra of M.000 panda par Kpuuro fcwM davalopad In moat of tbe МШИЬ ОООШЮйу uea* In
tbelMd.
‘Thia traaat ia dim at >mr raajm, bat inirmaaa to bright aa it inarm farthm from the gm.
AGO U1LA
213
8.	Miscellaneous Ammunition Data
a.	The cartridge, ball, caliber .60, М2 is about
6Ц inches long and its bullet is about 2^ inches
long. The cartridge weighs 1,818 grains; its case
weighs 860 grains, the powder charge weighs 286
grains, the primer 19.06 grains, and the bullet
709.5 grains.
6.	The following chart lists the maximum pene-
tration in inchex for armor-piercing cartridge,
caliber .50, М2, fired from the 45-inch barrel
(muzzle velocity 2935 feet per second):
Material	htekteau
	MM	•MM	1ЛММ
Armor plate (homofeneoua)		1.0	0.7	0.8
Armor plate (tue-hardened)		0.9	0.8	0.2
Sand (100 lb dry wt/cu ft)			14	12	16
Gay (100 lb dry wt/cu ft)	,	28	27	21
c.	The following chart lists the maximum pene-
tration in inches for ball cartridge, caliber .50,
М2, fired from the 45-inch barrel (muzzle velocity
2,985 feet per second):
Material	iMtteaat:
	MOM	MOM	1.Ю0М
Sand (100 lb dry wt/cu ft)..			14	12	6
Gay (100 lb dry wt/cu ft)		28	28	21
Concrete				2	1	1
9. Precautions in Kring Service Ammunition
The general precautions concerning the firing
and handling of ammunition in the field, as pre-
scribed in TM 9-1300-206 are observed. Precau-
tions that apply particularly to small-arms ammu-
nition are—
a. Do not fire small-arms ammunition (other
than blank ammunition) until it has been posi-
tively identified by ammunition lot number and
grade. Do not fire small-arms ammunition, graded
and marked “For Training Use Only,” over the
heads of troops.
5. Do not use armor-piercing cartridges in dem-
onstrations where tanks are used as demonstra-
tion targets.
c. Before firing, make sure that the bore of the
weapon is free from foreign matter, such as clean-
ing patches, mud, sand, snow, etc.
214
AGO
APPENDIX F
TELESCOPIC SIGHTS
At the present time, there is no definite telescopic sight designed for ex-
clusive use with the Browning machinegun, caliber .60 HB, М2. However,
the telescopic sight M86C can be adopted for use with this caliber .60
machinegun by adjusting the sight reticle. Any direct fire sight that can
be adapted to fit in the dovetailed slot on top of the receiver, and can be
adjusted for range, is suitable for use with this caliber .60 machinegun.
A telescopic sight is primarily used when the machinegun is employed as
a sniper weapon on tie MS mount. For this purpose, the sight presents a
clearer, closer picture of the target area. When the sight is properly ad-
justed, single-shot sniper fire can be very accurate at ranges up to 1,600
meters. With different optical equipment, accurate fire can be achieved at
greater ranges.
AGO Ш1А
216
APPENDIX G
CREW-SERVED WEAPON NIGHT VISION SIGHT
1. General
Training circular 28-18 provides guidance for the conduct of training with
the Crew-Served Weapon Night Vie Ion Sight.
2. Scope
TC 28-13 contains a complete description of the Crew-Served Weapon
Night Vision Sight, mechanical training to include assembly, diaasaeinbly,
operation, installation, functioning, and maintenance; marksmaship train-
ing to Include boresighting, aiming, positions, and zeroing; and other In-
formation pertinent to its employment and the conduct of training. The
material is applicable, without modification, to nuclear and nonnuclear
warfare.
21*
МО МПЛ
APPENDIX H
AERIAL TARGET ENGAGEMENT
1,	Lino and lead
In engaging aerial targets, there are two require-
ments that must be considered: "Line” and
“Lead.” “Lead” is the compensation made for the
speed of the aircraft and the projectile that will
allow the two to intersect at a given point The
required lead for a given aircraft is always calcu-
lated as a certain number of lengths of that air-
craft A high performance aircraft will require a
greater lead factor because of its high speed than
a low performance, slower, aircraft “Line” ia the
requirement that the projectiles must intersect
the target course line of the aircraft If the pro-
jectiles do not pass through this target course
line, the aircraft cannot be engaged. Super-eleva-
tion is the compensation that must be made for
the pull of gravity on the projectile. Since the
caliber .50 machinegun projectile is basically flat
out to a distance of BOO meters, the gunner need
not worry about super-elevation, for, by tracer
observation, he can observe the rounds crossing
the target course line and make the required ad-
justments.
2.	Fly Through Technique
As an aerial target moves along its target course
line, the required lead to engage the target
changes due to the changing range and angle be-
tween the aircraft and the gun position. The lead
required increases from the Initial sighting (flg
182, point A) until midpoint (flg 182, point C).
The required lead is at its maximum at midpoint
As the aircraft moves beyond the midpoint on the
target course line, the required lead begins to de-
crease, again due to changing ranges, etc. There-
fore, by leading an aerial target by less than the
maximum required lead, there will be two points
along the target course line where the constant
lead will be the correct lead and “fly through” will
be achieved. “Fly through” is further explained
below.
a.	If the gunner is able to track an aircraft and
MIDPOINT
C
D
E
TARGET COURSE LINE.
.50
GUN POSITION
J4ptr« ifrkl torsst
AGO МИА
217
lead the aircraft with a constant number of leads,
there will be two pointe along the target сошли
H»e where he will attain hits. As long as the gun-
ner understands this principle, he can bring effec-
tive fire on an aircraft
b.	(Refer to fig 182,) Let us assume that ths
gunner brings continuous fire on the aerial target
from Point A through Point E. Point A is the
point at which the gunner sights and begins to
engage the aerial target. Between Point A and B,
the rounds will cross the line of flight in front of
the aircraft At Point B, “fly through” will be
achieved. Between Points В and D, the rounds
will cross the target course line behind the air-
craft At midpoint, the required lead begins to
decrease until, at Point D, “fly through” is
achieved for the second time. Between Points D
and E, the rounds will again cross the target
course line ahead of the aircraft
e. There are many different types of hostile air-
craft (FM 44-80), so, to simplify the matter for
the gunner, all aircraft are classified into two
types: “high performance” and **low perform-
ance.” Any aircraft which has an estimated speed
of greater than 150 knots will be classified as
“high performance.” Any aircraft which has an
estimated speed of Uss than 150 knots will be
classified as “low performance.”
d. It has been found that for low performance
aircraft, the gunner should apply a lead factor of
8 and a lead factor of 7 for high performance
aircraft. He should be taught to estimate leads by
projecting images of the fuselage in front of the
aircraft In instructing the “fly through” method
of aerial target engagement, the student would
not be instructed to bring continuous Are from
Points A through E, but would be instructed to
bring fire at Points A through В and again before
Point D through the second “fly through.” As the
gunner becomes proficient in tills “fly through”
method, he will learn to adjust his load and bring
longer and more accurate fire on the target,
218
aoo мша
INDEX
Puwaph Там
Adjustment of Fir*------------.------- 78	128
Adjustment of Headspace------------11	77
Advioo to Instructors:
Antitank Gunnery__________—_______. SOO SOO
Crew Drill__________________________185	SOO
Maintenance IM	SOO
Marksmanship___________________—. 107 SOI
Mechanical Training-------—.------177	107
Presentation _______________________  175	ISO
Rotation of Duties-----------------  50	107
Technique of Fire--------------------101	SOS
Transition Firing--------------------ISO	SOS
Aiming Exerdeeo_______________—-------110	IM
Ammunition_________________________-___Арф Я Sil
Antiaircraft Gunnery:
Employment —.-------------.-------157	185
Leede________________________________IM	100
Target Cburwoo----------------------150	105
Target Engagamont-------------------106	ISO
Target Obeerration__________________108	191
Application of Fire:
Direct Lay 78	ISO
Fire Distribution____________________ 80	1S8
Target Designation________—________79	180
Arm and Hand Signal!______—________78	188
Assembly - —__________________________ 8	19
Beaten Zone______________... --------- OS	180
Bafore*Oper*tion Checklist____________AppC	810
Carrying the Gun______________________ 54	114
Causes of Stoppagea___________________— 85	100
Chambering ________________________.... SO	88
Charaeterietiei of Fire_______-_______59	118
Checklist, Inspections----------------AppD 811
Опеке of Fire____________—---------—— 68	180
Cleaning------------------------------   48	104
Cleaning Material!---------------------- 80	106
Clearing the Gun-----------------------  15	61
Cocking_________________________________ 88	88
Command!, Fire 44	104
Cone of Fire 61	ISO
Crew Drill:
Carrying the Gun-------------------- 54	114
Duties of Crew______________________ 49	106
Equipment ________________________— 48	100
Placing Gun into Action--------------51	109
Taking Gun out of Action------------ 58	111
Data» General____________...__-_________ 5	8
Dey Defensive Field Firing--------------149	177
Defilade Poeftfoni---------------------- 91	188
Demembration of Firing------------------140	ITS
rieetruction-----------------------------46	100
Irect Laying 78	ISO
Jioassembly and Aaaembly:
General Assembly--------------------- 8	19
General ХИмамтЫу--------------------- 7	4
Drill, Crew-----------------------------  M	100
УммтаЬ Ttei
Engagement of Targets:
Area Target!___________________________ 87	187
Deep Targsta-------------------     85	IM
Linear Target!M	184
Linear Targets with Depth ..._____  86	180
Point Targets 88	IM
Ejecting_______________________________ 85	88
Engaging Targets______________..__... 100	148
Extracting __________________________ 84	88
Familiarisation Firing________________ 199	305
Feeding______________________________ 19	88
Field Target Firing__________________147	177
Fire Adjustment______________________— 78	138
Fire Distribution_________—______...... 80	188
Fire Commands:
Abbreviated Commands____________________75	180
General 74	189
Subsequent Commands_______________  77	180
Fire Control .....____________.._____ 78	138
Firing Courses_________________________185	161
Firing Positions_______________________114	158
Firing the One S3	M
Fixed Fire_____________________________ 06	133
Functioning___________________....  18	88
Forming for Crew Drill 50	107
General Data____________________________ 8	1
Gracing Fhe_____________________________ M	ISO
Hand Carry_____________________________ 54	114
Headspace Adjustment--------------------11	77
Half Loading 14	81
Immediate Action______________________  36	101
Inspections__________________________   44	104
Inspection Checklist-----------------AppD	211
Lateral Distance Measurement___________ 78	137
Laying fbr Direction___________________ 94	141
Leads, Antiaircraft_____________________IM	109
Leading ExerdoM________________________181	159
Left-Hand Food-----------------------AppB	209
Limited Visibility:
Principles of	Engagement--------------- 98	148
Target Engagement__________________108	148
Loading-------------------------------     14	81
Looking--------------------------------- SI	M
Lubricating_____________________________ 39	108
Maintenance--------_-----------------89	108
Malfunctions and Stoppages______________ M	100
Marksmanship Training:
Manipulation Exercises ----------------118	157
Methods of Instruction.............109	161
Positions for Firing_______________114	168
Preparatory Fires________________  112	168
Sighting and Aiming----------------116	154
Tracking and Tending_______________131	159
Mask Clearance-------------------------  90	141
AGO Ш1А
819
На»
Method* "of Destruction —— ------------— 47 IM
MUftrw---------------------------------17 Ml
Mmnti:
Ground......................  —--------M И
Vehicular M	47
Night Firing M	141
Observation and Adjustment of Tire-----UP	111
Operation of Gun------------------------  1*	И
Operation CheckHei---------------------AppC lit
Overhead Tira--------------------------— M 1W
Placing Gun into Action----—-----------M 111
Plunging Tire----------------------------- M	1*°
Petition for Tiring----—---------------114 Ш
Precaution* during Operation-----------— 11	H
Predetermined Tiring Conroe--------------111	Ш
Preparation for Inspection--------—— 44	104
Preparation of Range Garde —-----------IM	111
Preparatory ExertisM —------------------- Hi	Ш
Preplannod Pires:
Fin Control-------------------------------IM	144
Grating Tin--------------------------104	144
Laying the Gun------------------------IM	147
Rango Card*------,-----------------------117	147
Rango TMng________________________________IM	IM
Rang* Determination:
lateral XHctanea Meaeunaeent_________ 71	117
Methods _____________________________  M	Ш
Rate* of Tin_____________________________71	IN
Reference* —___________________________AppA IM
»WMN0b Паа
Raia* of th* Machinegun--------—_______1	1
Raptured Cartridge* ———-------------------M	141
Safety Precautions-------------—------ 17	141
Sighting and Aiming Kxardsss_____________US	1S4
Bight*------------------------------------4	1
Sight Sotting Exercfeee-----------------117	Ш
Single Shot Operation___—-------------— 17 4S
Stoppage*------------------:---—— M IM
Subsequent Fin Commands 77	IM
Taking Gun out of Action______________M	114
Target engagement. Antiaircraft —-----IM	IM
Target Type*------------------------------U	114
Technique* of Fin:
Good Visibility--------------------------47	111
United VltibUHy_______________________И	141
Telescopic Bight*______———_AppF US
Timing---------—---------------1—ИГ '	' 71
Tracer Observation--------------------IM 111
Training Equipment---------—----------111	111
Trajectory ____________—--------------— M 111
Tripod Mount,»----------------------------M	N
Truck Mount, MM___________________________M	17
Two Guns Firing M	114
Type* of Stoppages - ____________________ M	IM
Unloading and	Clearing--------------- IB	11
Unlocking M	M
Weights__________________________________•	•
Zone, Beaten--------------------------M IM
By Order of Ш Secretary of the Array:
Official:
VERMS U BOWERS,
Ma/or General, U*itad Stain Army,
The A<Mor4 GeueruL
W. C. WESTMORELAND,
GoMrei, Unitad Stain Amv,
Chtaf of Staff.
Diitribation:
To be distributed in soeovdance with DA Form 11-11 requirement» for Browning Machine Gun,
Caliber .50, MB, MR.
• u. a oomwiMvr >пгтш corms: lew nwu/wm
АЛО МПЛ