/


Автор: Ito K.
Теги: needlework sewing crafts toys soft toys tuttle publishing crafting patterns
Год: 2018


Текст
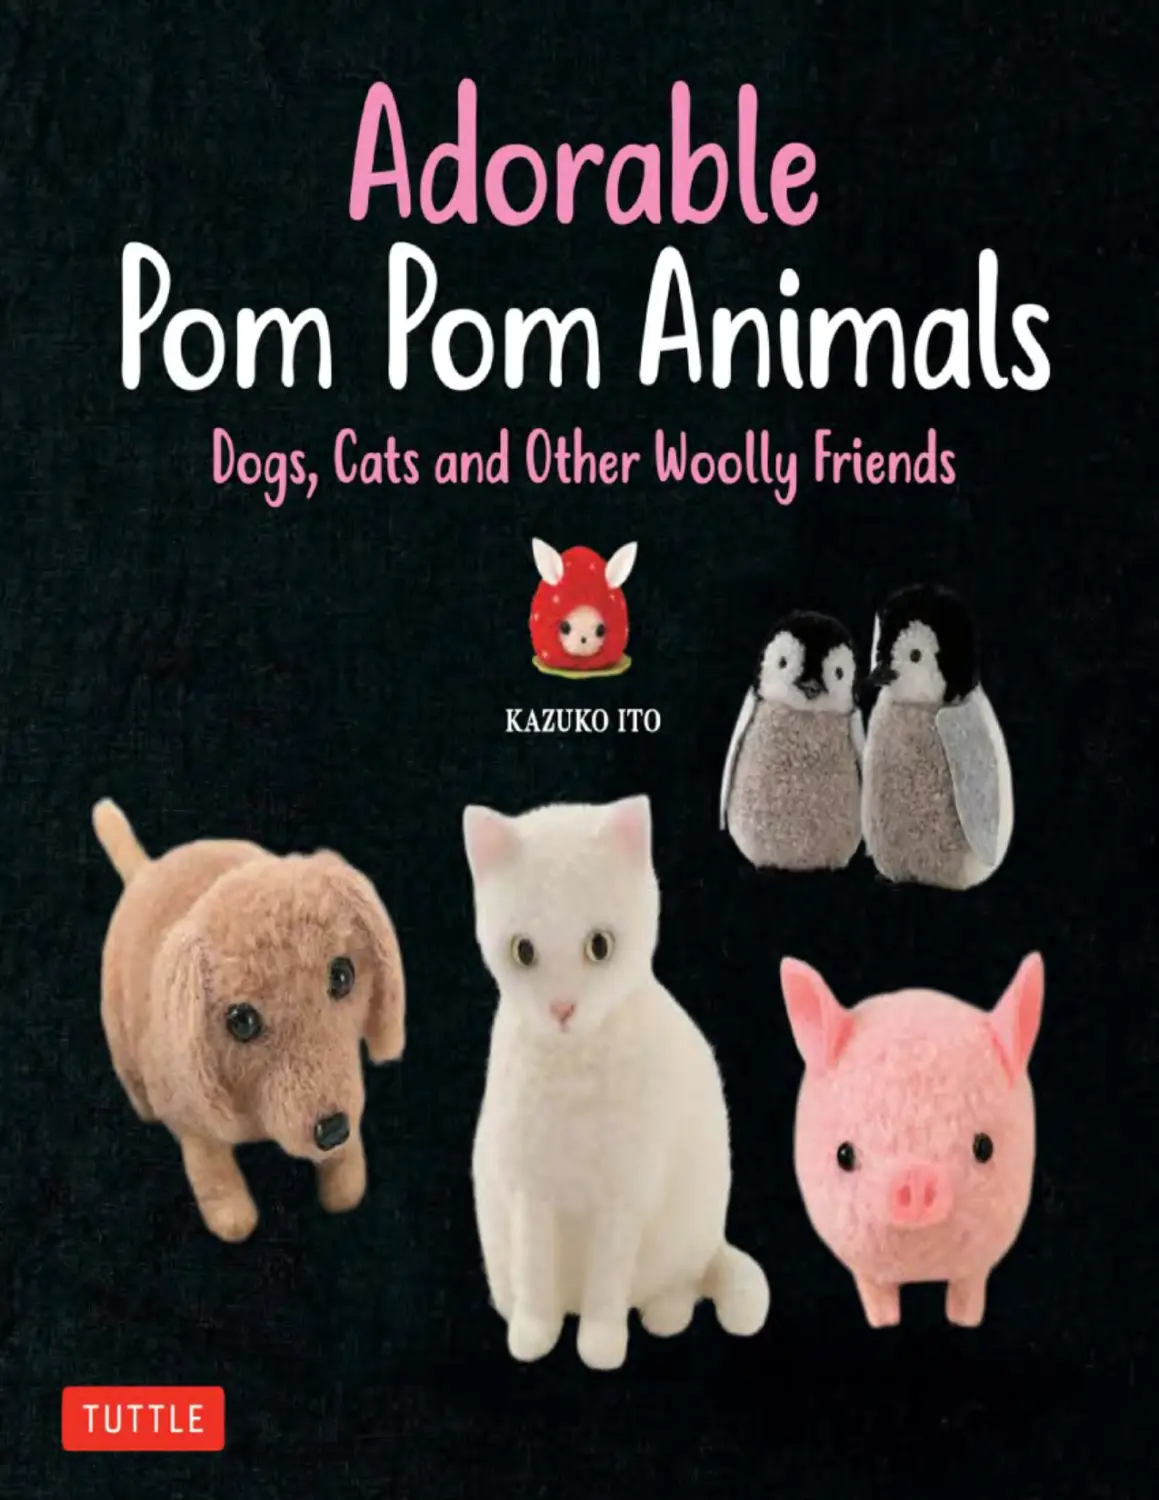
Contents
Introduction
Rabbit
Sheep
Poodle
Miniature Schnauzer
Calico Cat
Brown Tiger Cat
Bear
Lion
Monkey
Elephant
Cat
Dachshund
Penguin
Seal
Tropical Fish
Puffer Fish
Parakeet
Frog
Pig
Strawberry Bunny
Hamster
Chick
Hamburger Set
Onigiri Rice Ball Set
Round Cake
Cupcakes
Ice Cream Cones
Apple Pencil Topper
Seasonal Pom Poms
Tools
Pom Pom Sizing
Yarns
Other Materials
Eyes • Noses Parts
Pom Pom Basics 1
Let’s Make a Chick Hair Tie
Pom Pom Basics 2
Rabbit
Pom Pom Techniques 1
Basic Tips
Trimming Methods
Pom Pom Techniques 2
How to Make a Mini Pom Pom
Forming Shapes with Glue
Pom Pom Techniques 3
Attachment Methods
Pom Pom Techniques 4
How to Use a Felting Needle
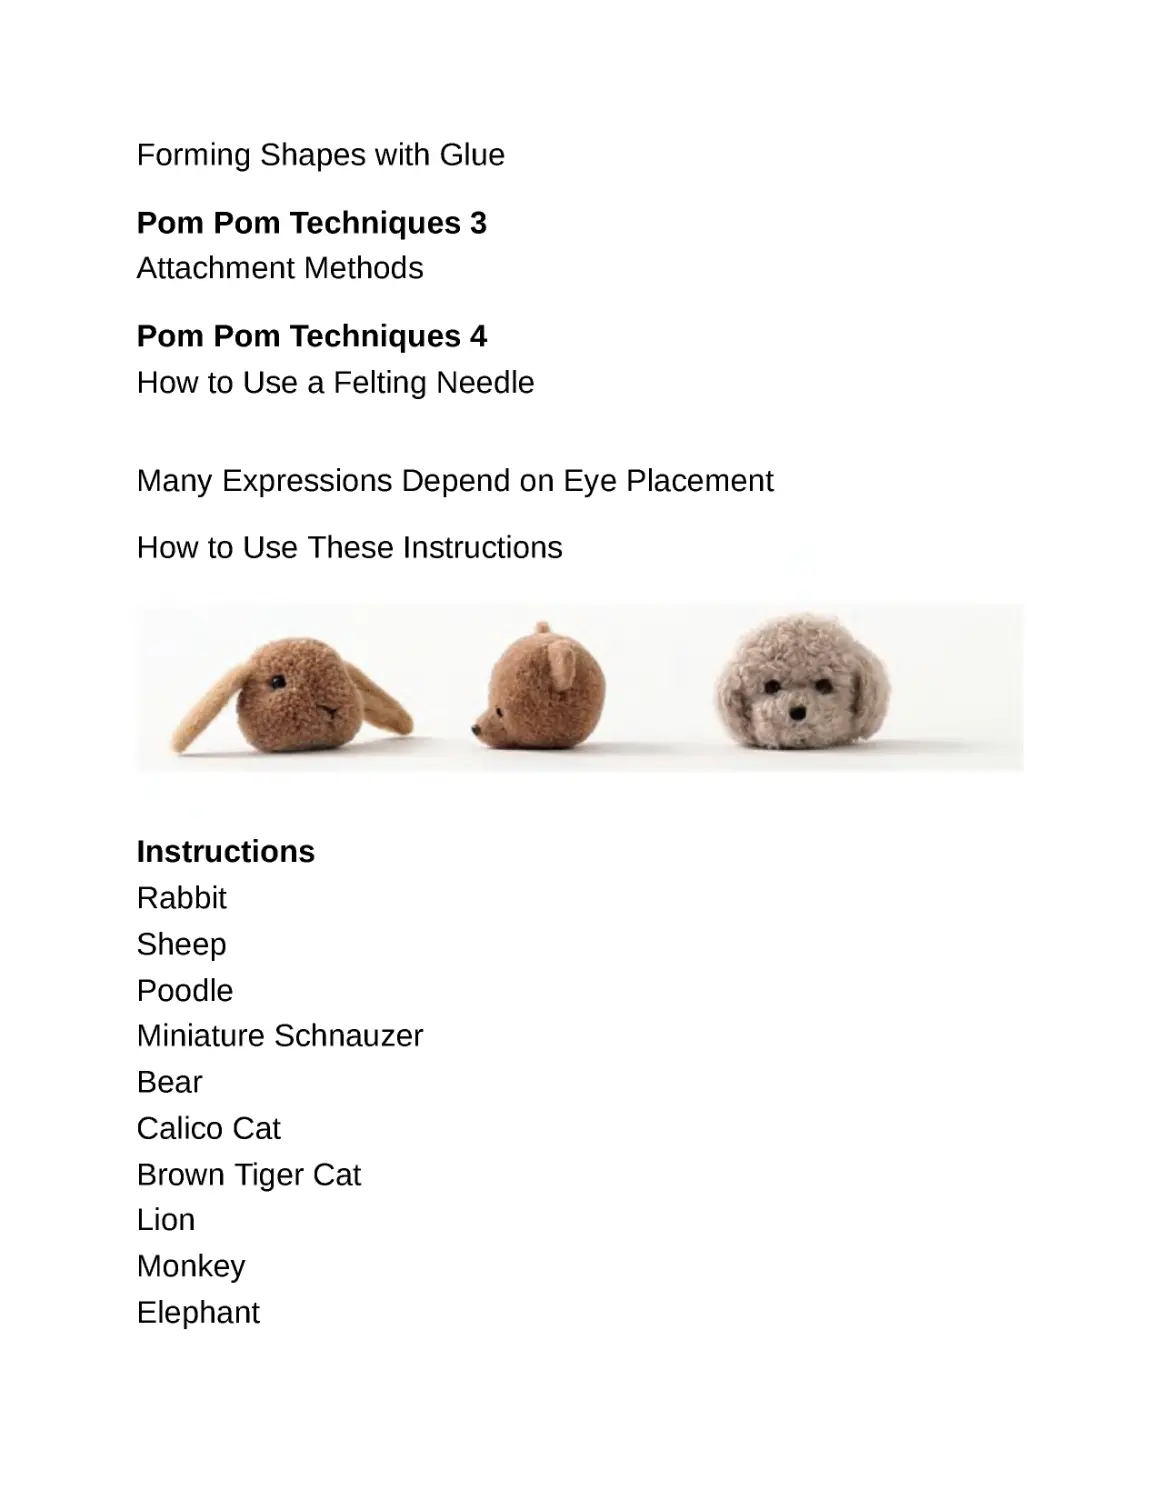
Many Expressions Depend on Eye Placement
How to Use These Instructions
Instructions
Rabbit
Sheep
Poodle
Miniature Schnauzer
Bear
Calico Cat
Brown Tiger Cat
Lion
Monkey
Elephant
Cat
Dachshund
Penguin
Seal
Tropical Fish
Puffer Fish
Parakeet
Frog
Pig
Strawberry Bunny
Hamster
Chick
Hamburger
Broccoli
Apple
Cherry
Two types of Onigini
Sausage
Fried Shrimp
Boiled Egg
Round Cake
Cupcake
Ice Cream
Apple Pencil Topper
New Year’s Rice Cakes (Kagami Mochi)
Two Types of Flowers
Heart
Snow Rabbit
Halloween Pumpkin
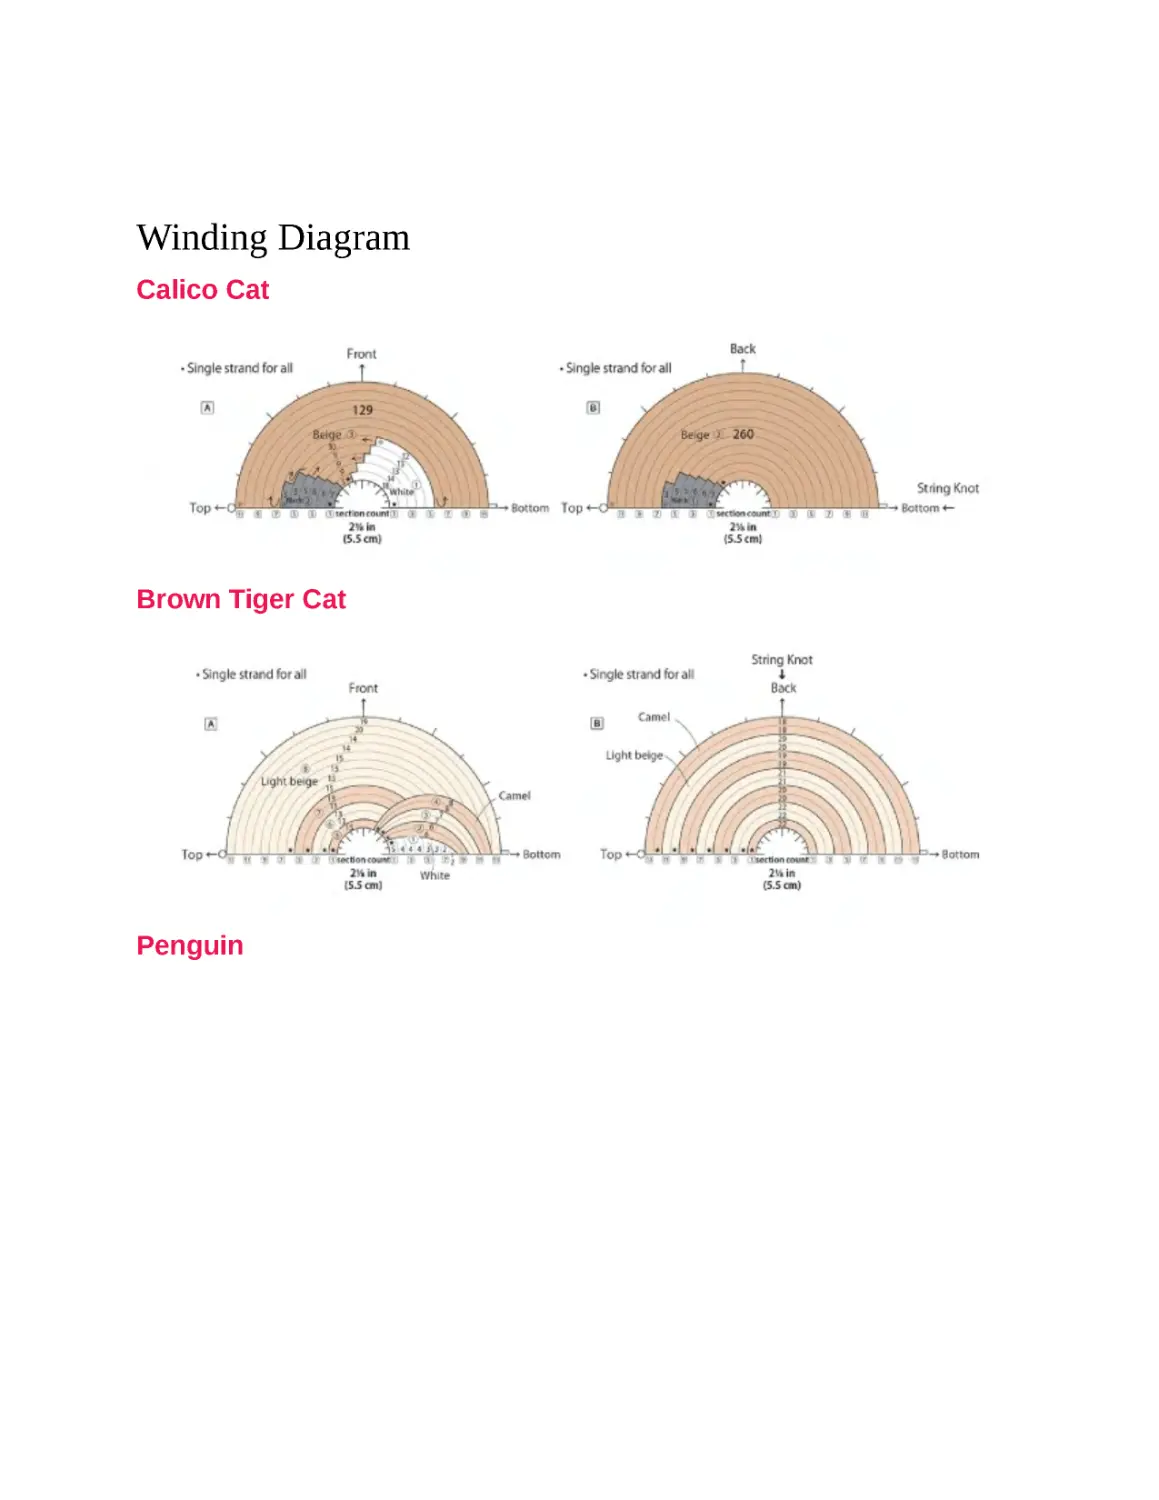
Winding Diagram
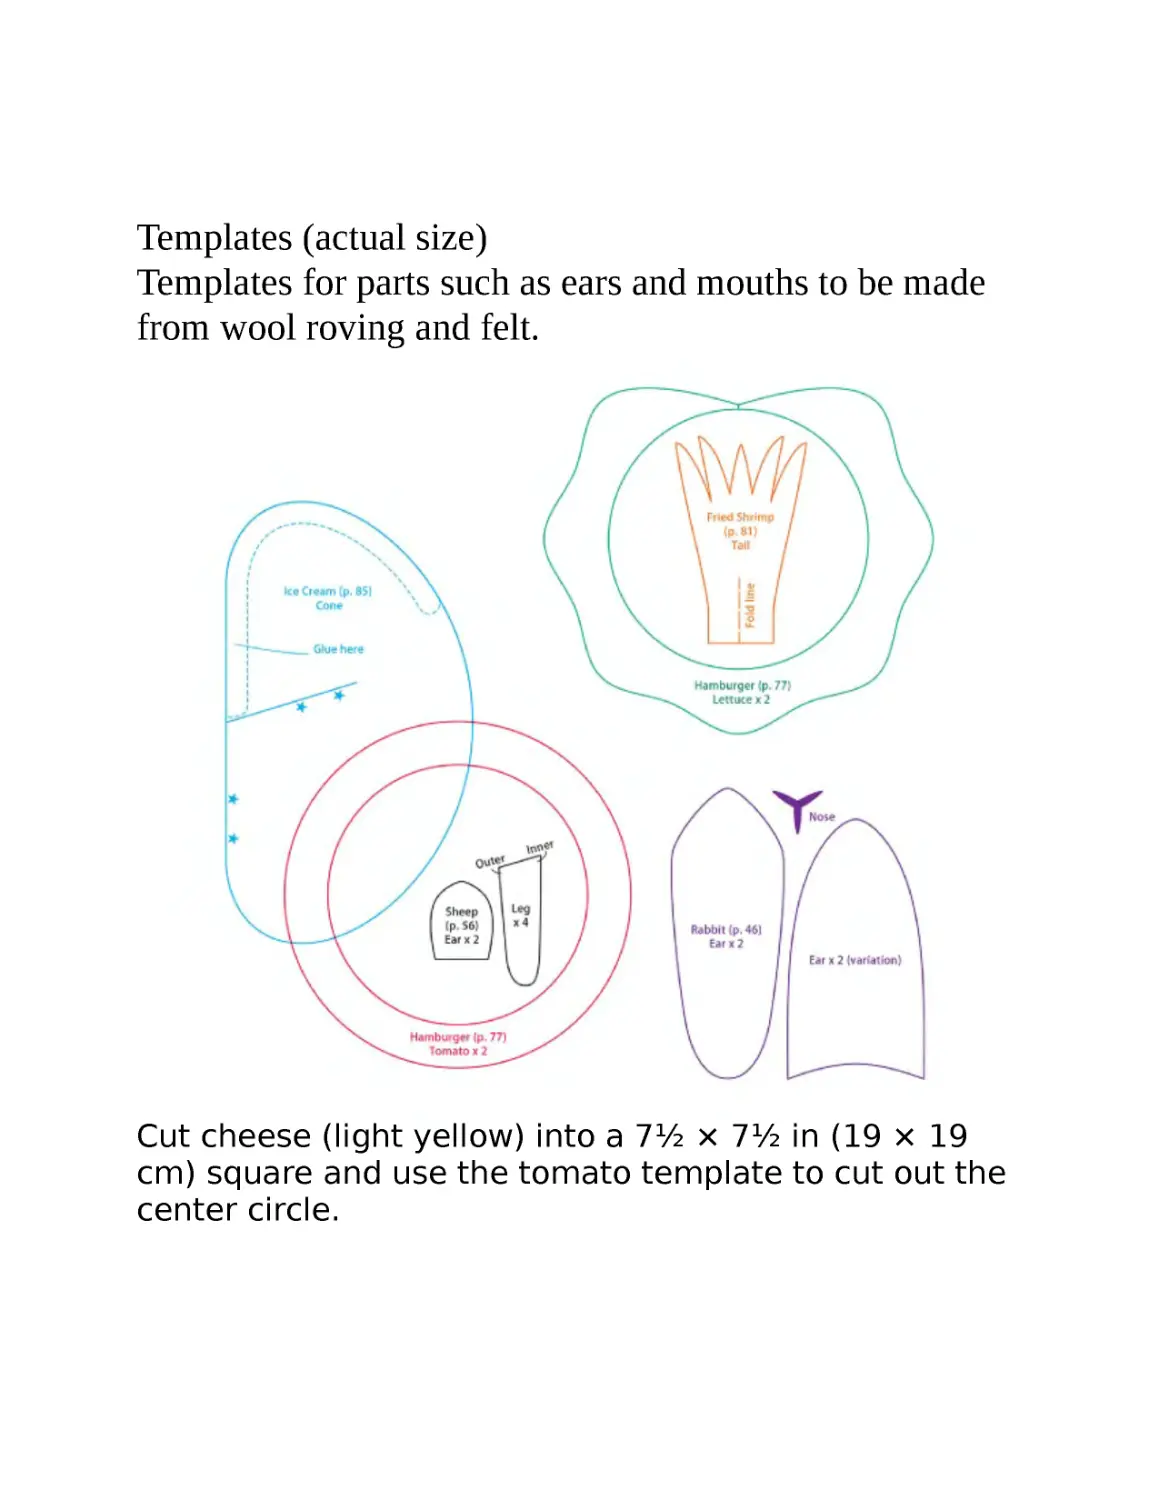
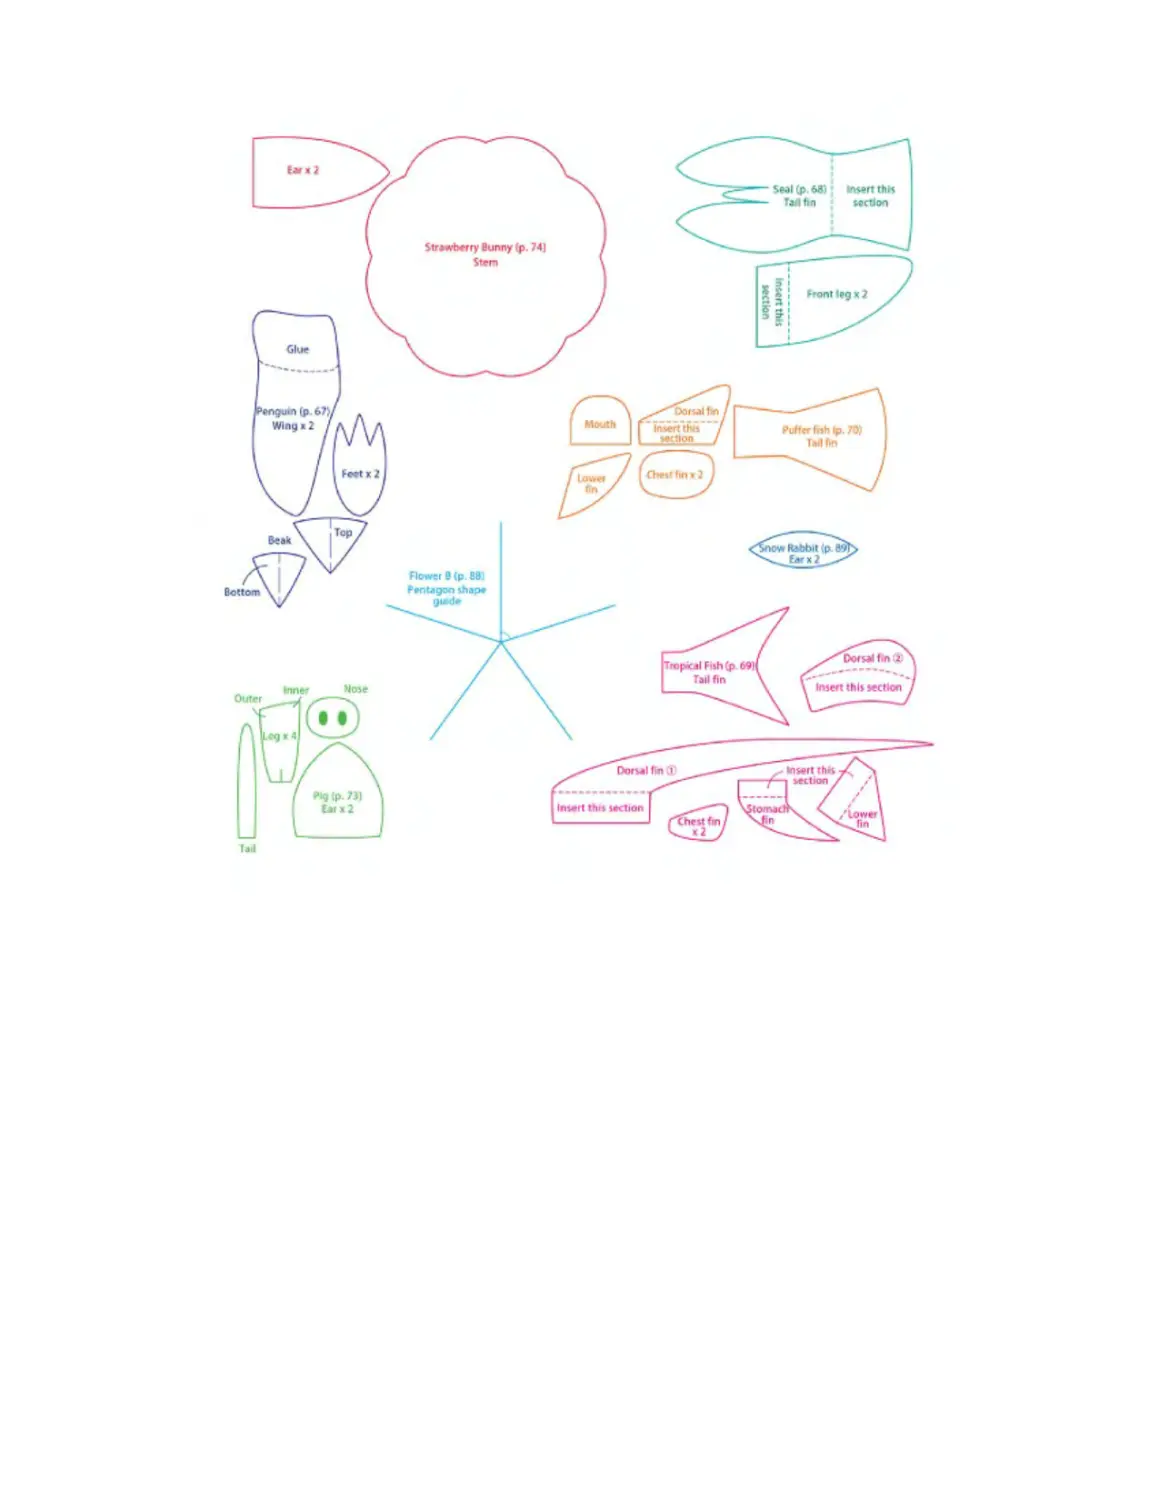
Templates (actual size)
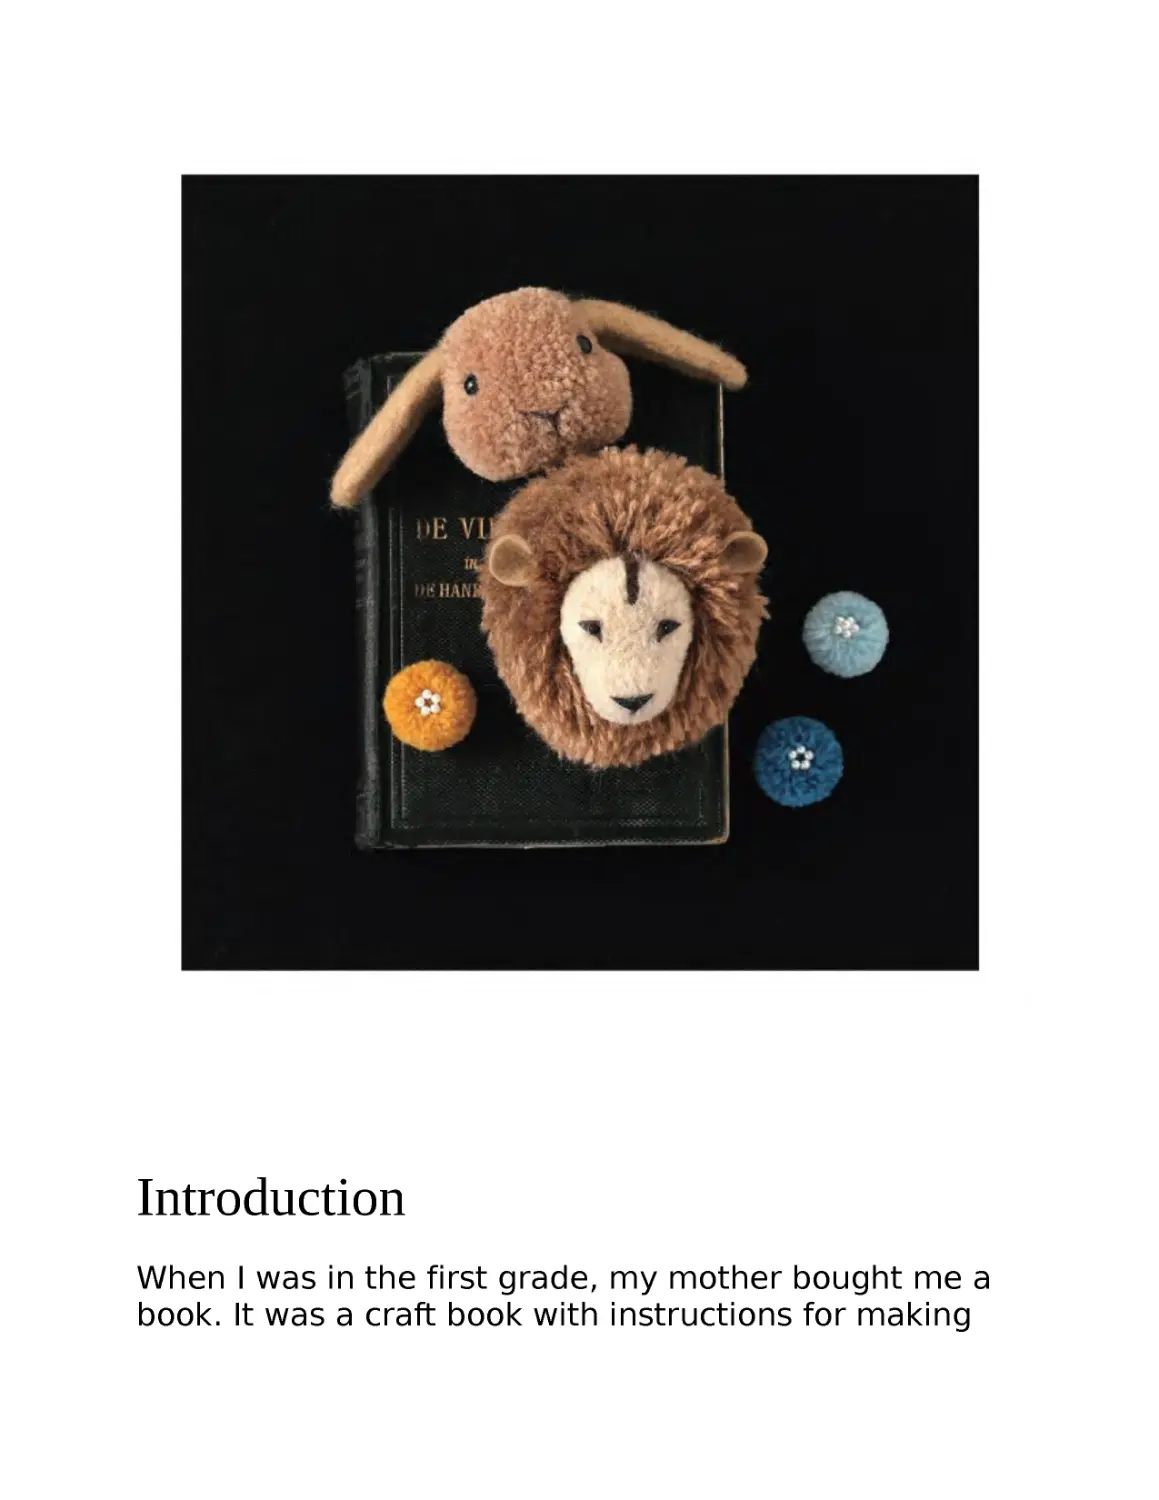
Introduction
When I was in the first grade, my mother bought me a
book. It was a craft book with instructions for making
little animals. That book made my heart sing, and I
made many animals. Even now, I can still vividly
remember that joyful feeling.
Time has passed, and I am still making handmade
goods with that same joy. Sometimes I experience the
challenges that come with creating something new, but
the feeling that comes with surmounting the issues and
watching the projects take form is unbeatable.
In this book, I introduce pom pom projects suitable for
all levels: from absolute beginners to more advanced
crafters. While making these projects, I hope that you
too will feel the kind of joy I discovered as a first-grader
and beyond. Welcome to the wonderful world of pom
poms!
Kazuko Ito
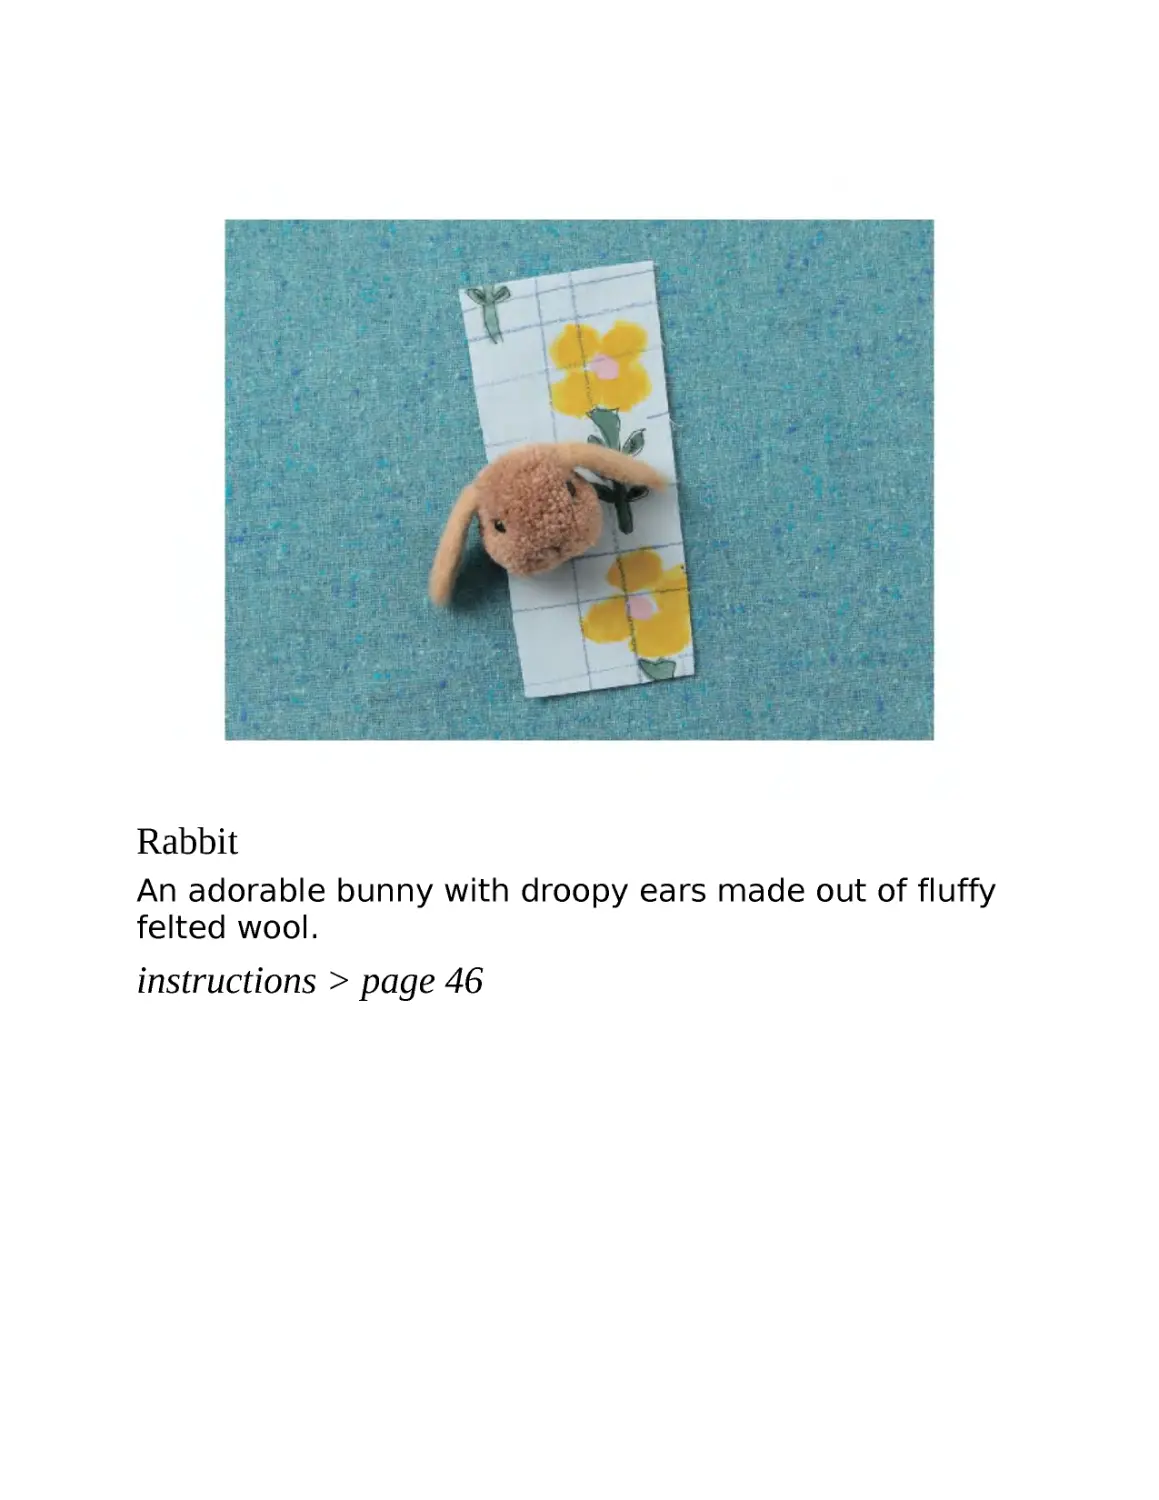
Rabbit
An adorable bunny with droopy ears made out of fluffy
felted wool.
instructions > page 46
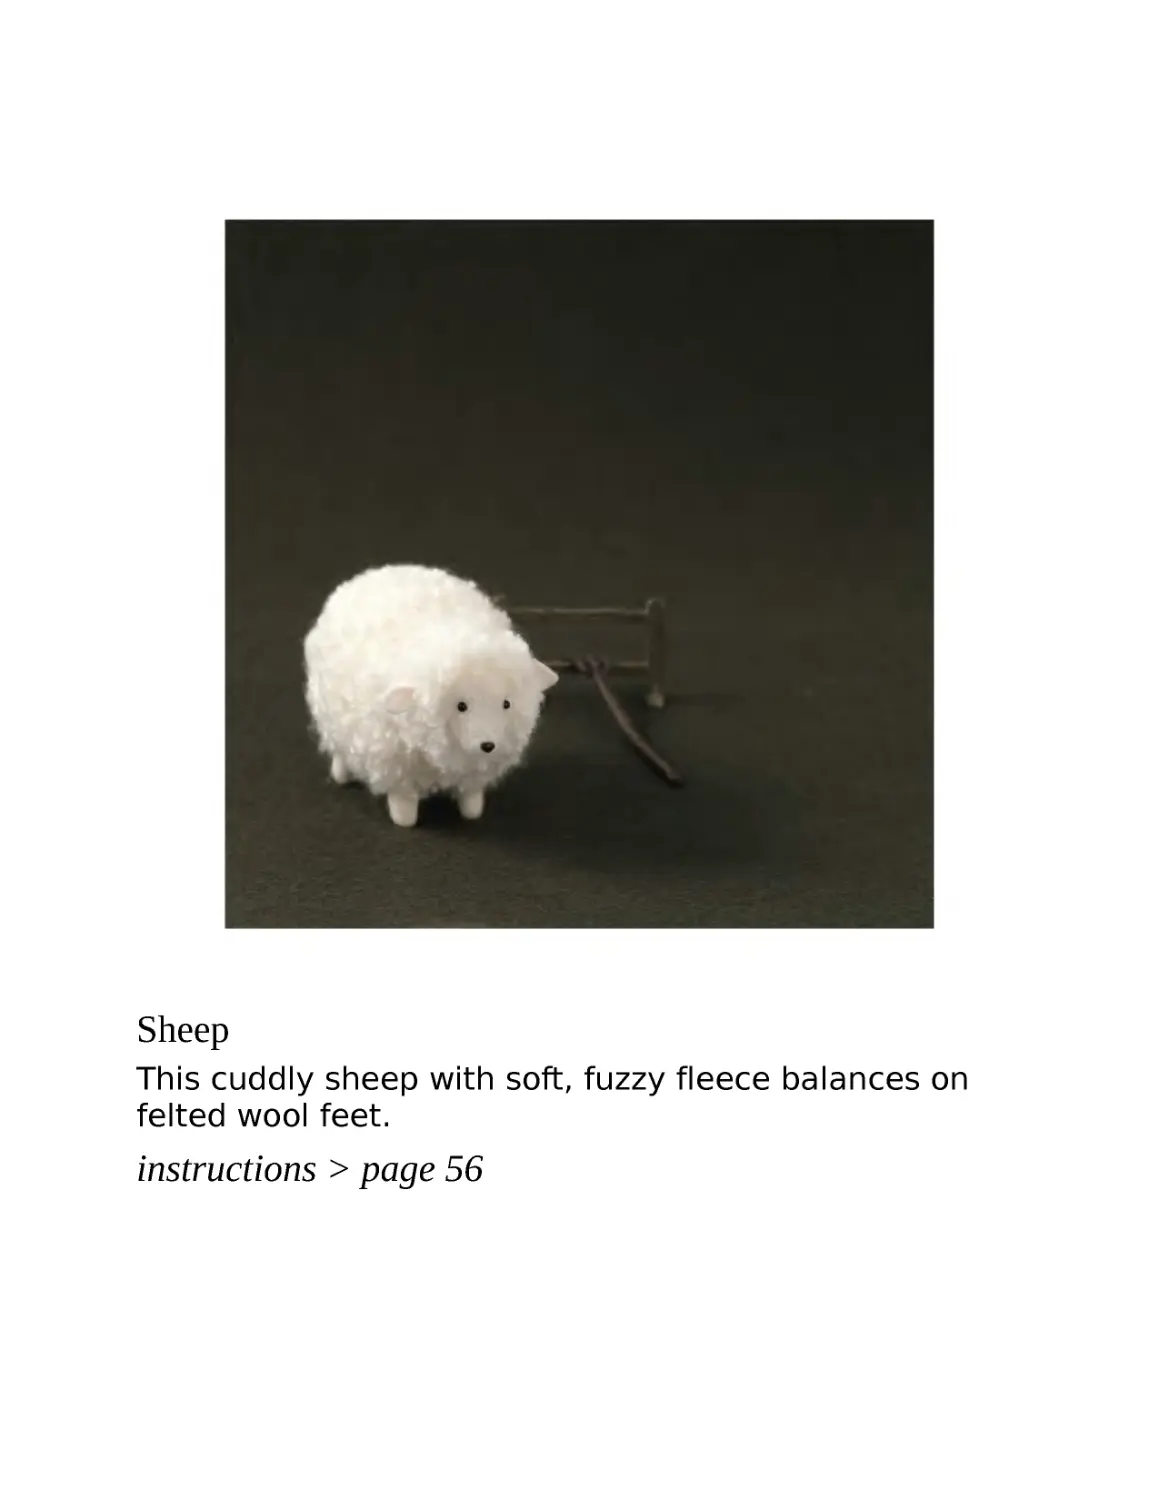
Sheep
This cuddly sheep with soft, fuzzy fleece balances on
felted wool feet.
instructions > page 56
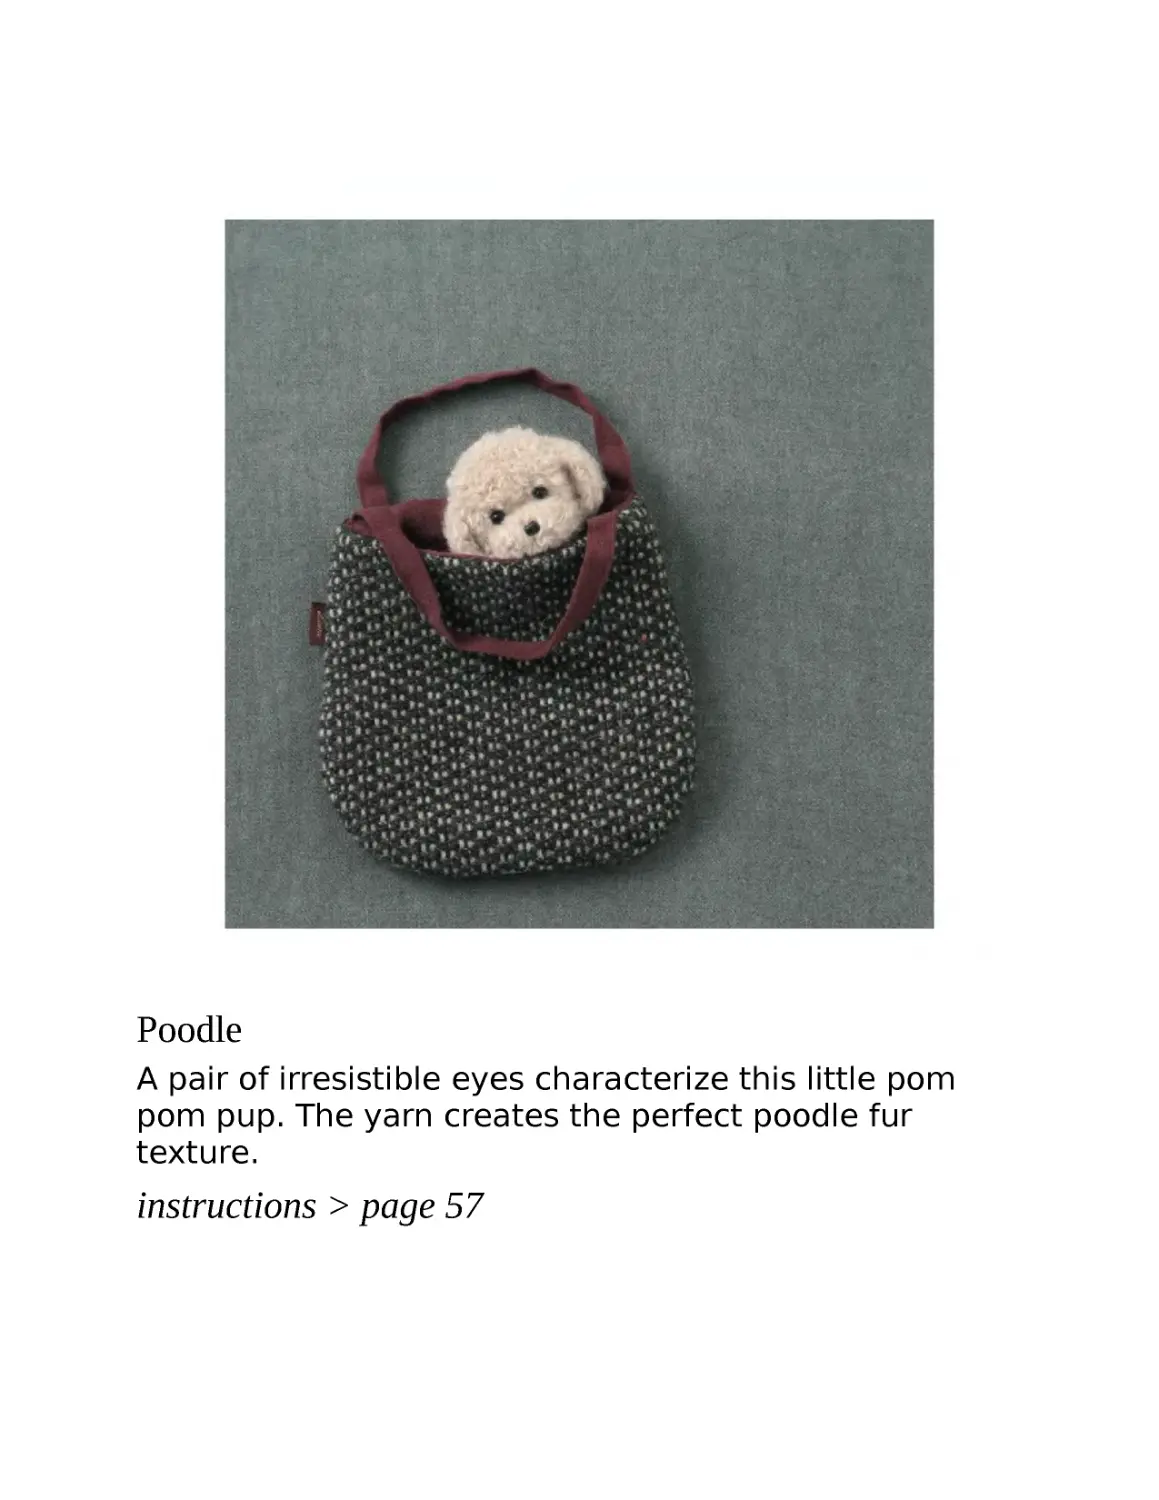
Poodle
A pair of irresistible eyes characterize this little pom
pom pup. The yarn creates the perfect poodle fur
texture.
instructions > page 57
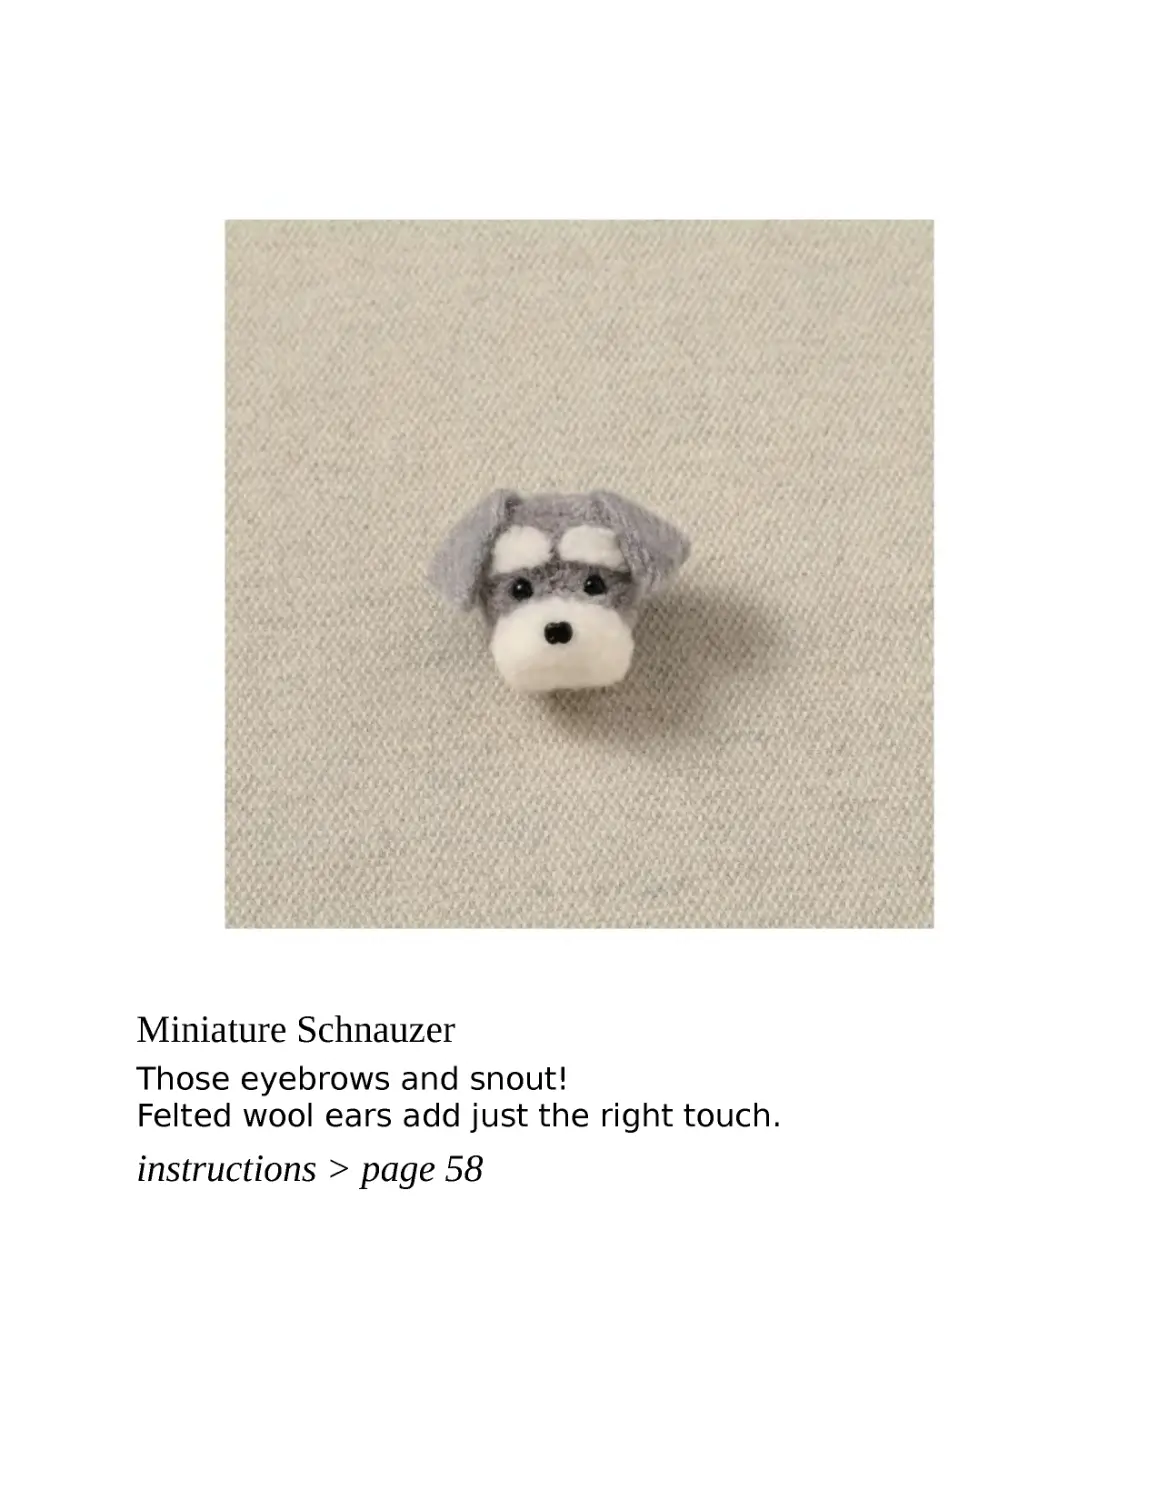
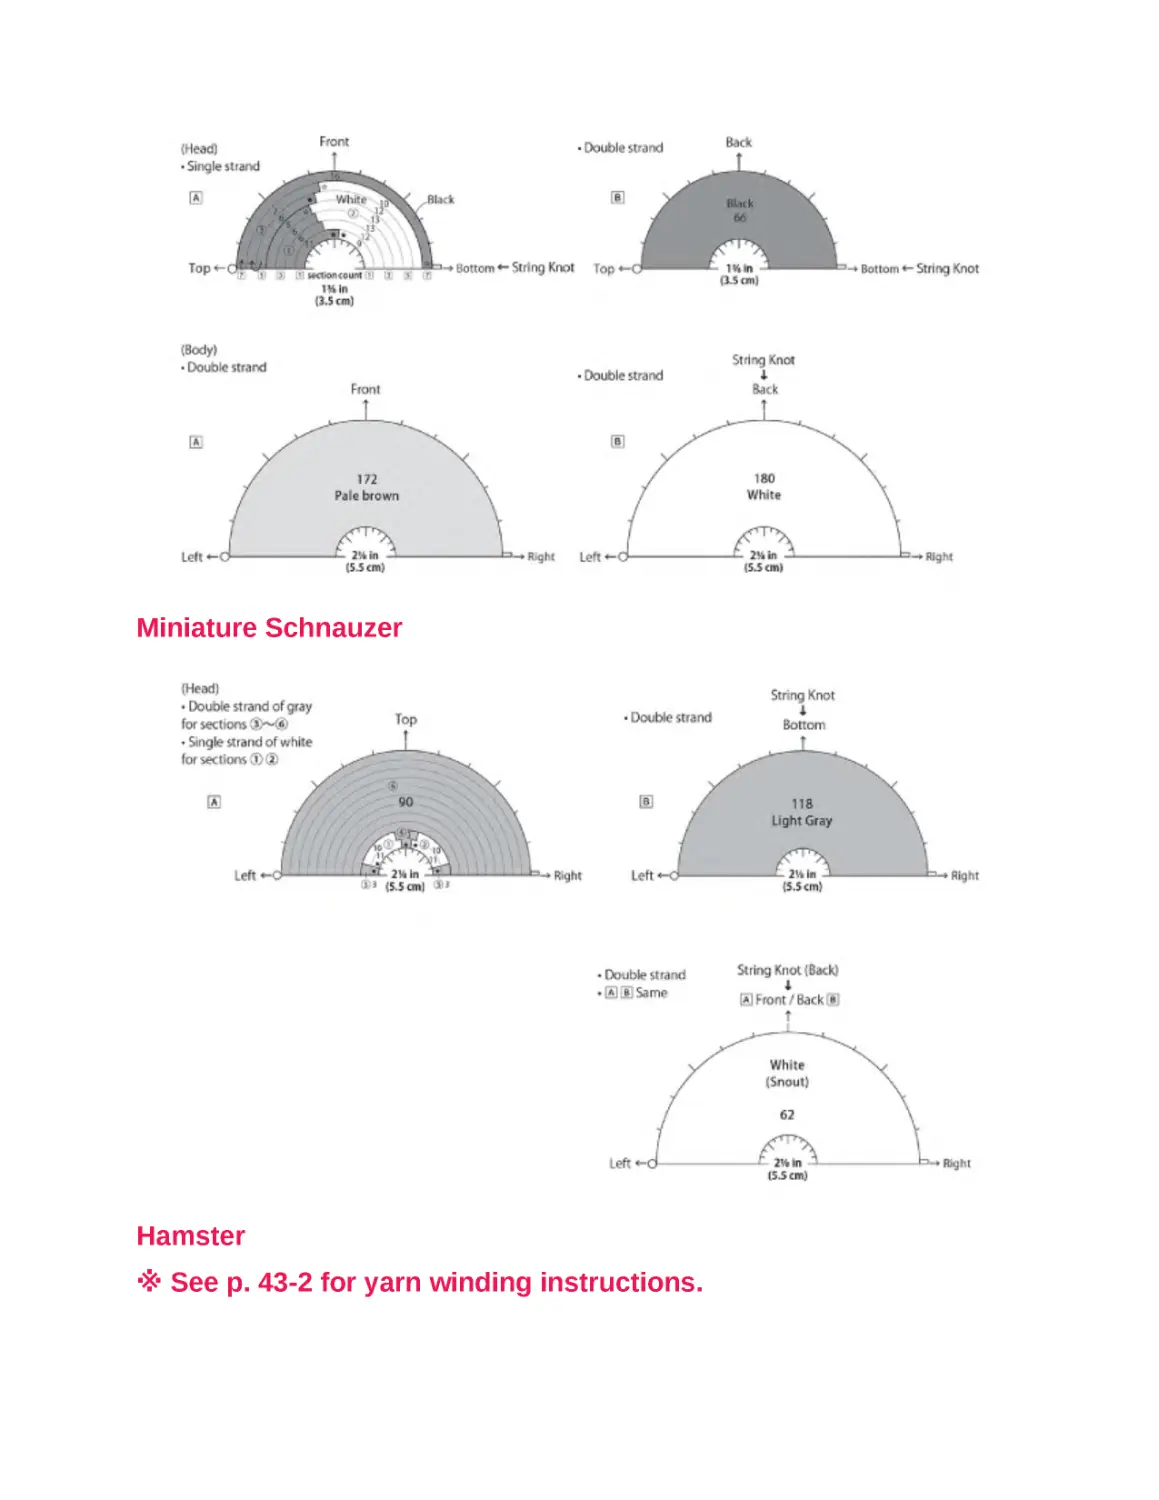
Miniature Schnauzer
Those eyebrows and snout!
Felted wool ears add just the right touch.
instructions > page 58
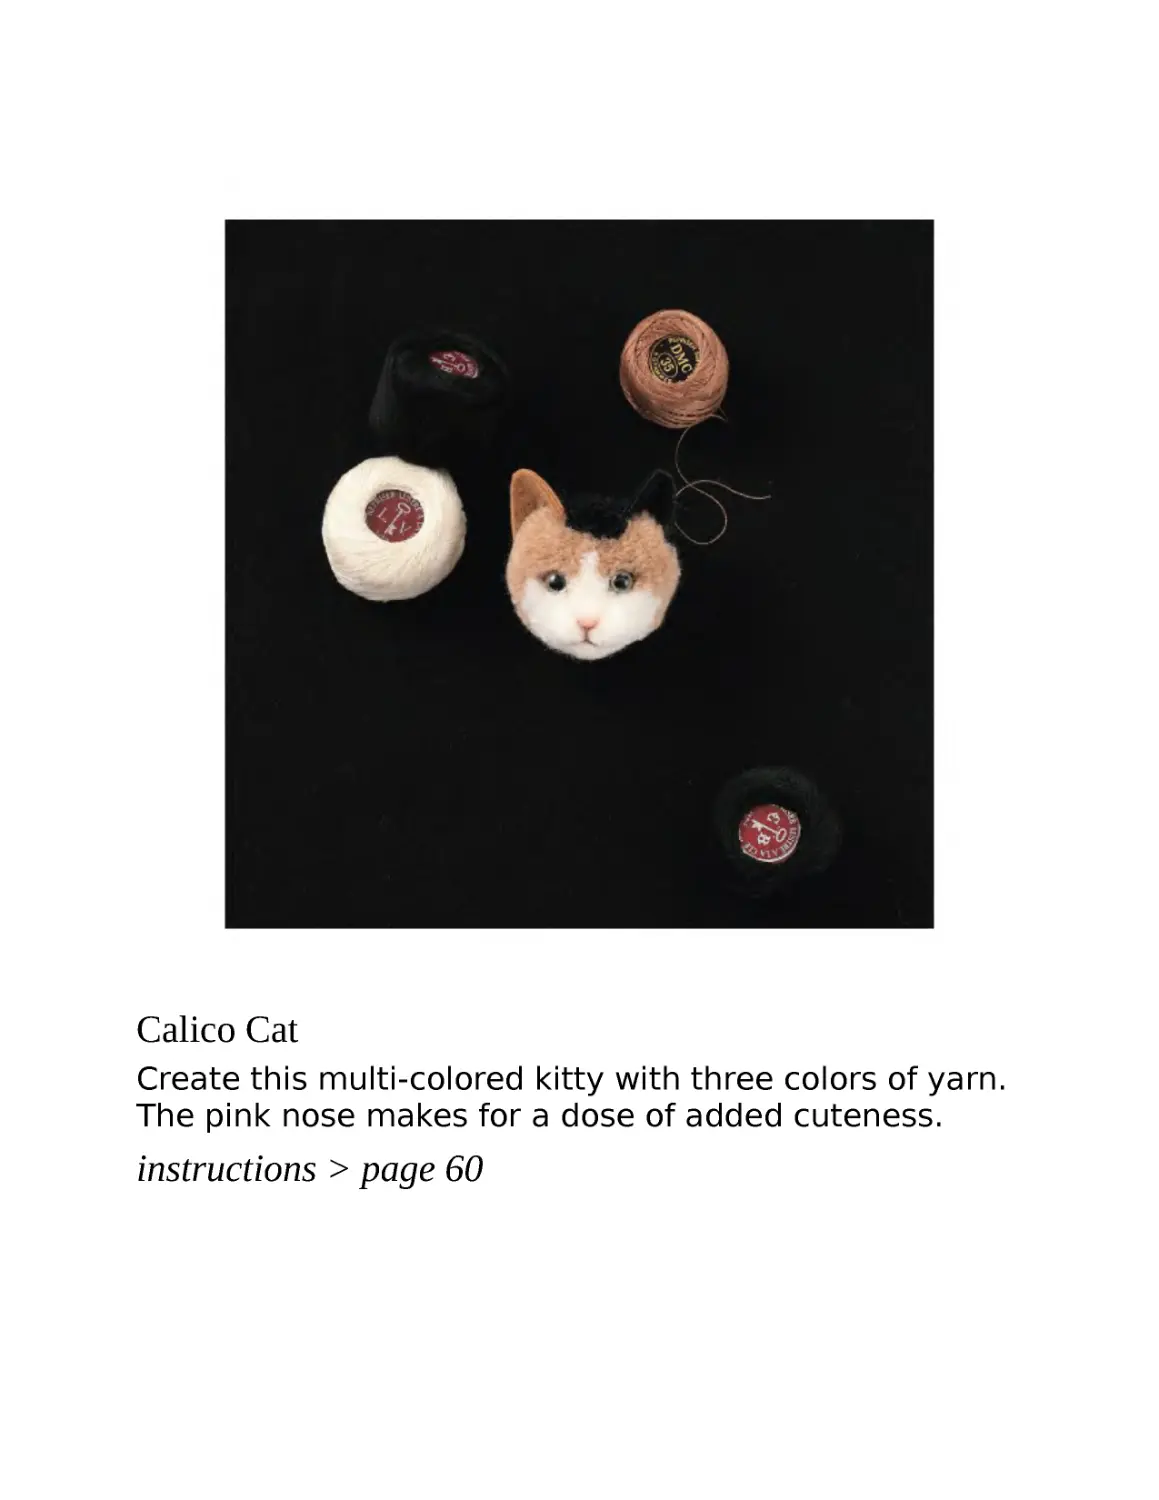
Calico Cat
Create this multi-colored kitty with three colors of yarn.
The pink nose makes for a dose of added cuteness.
instructions > page 60
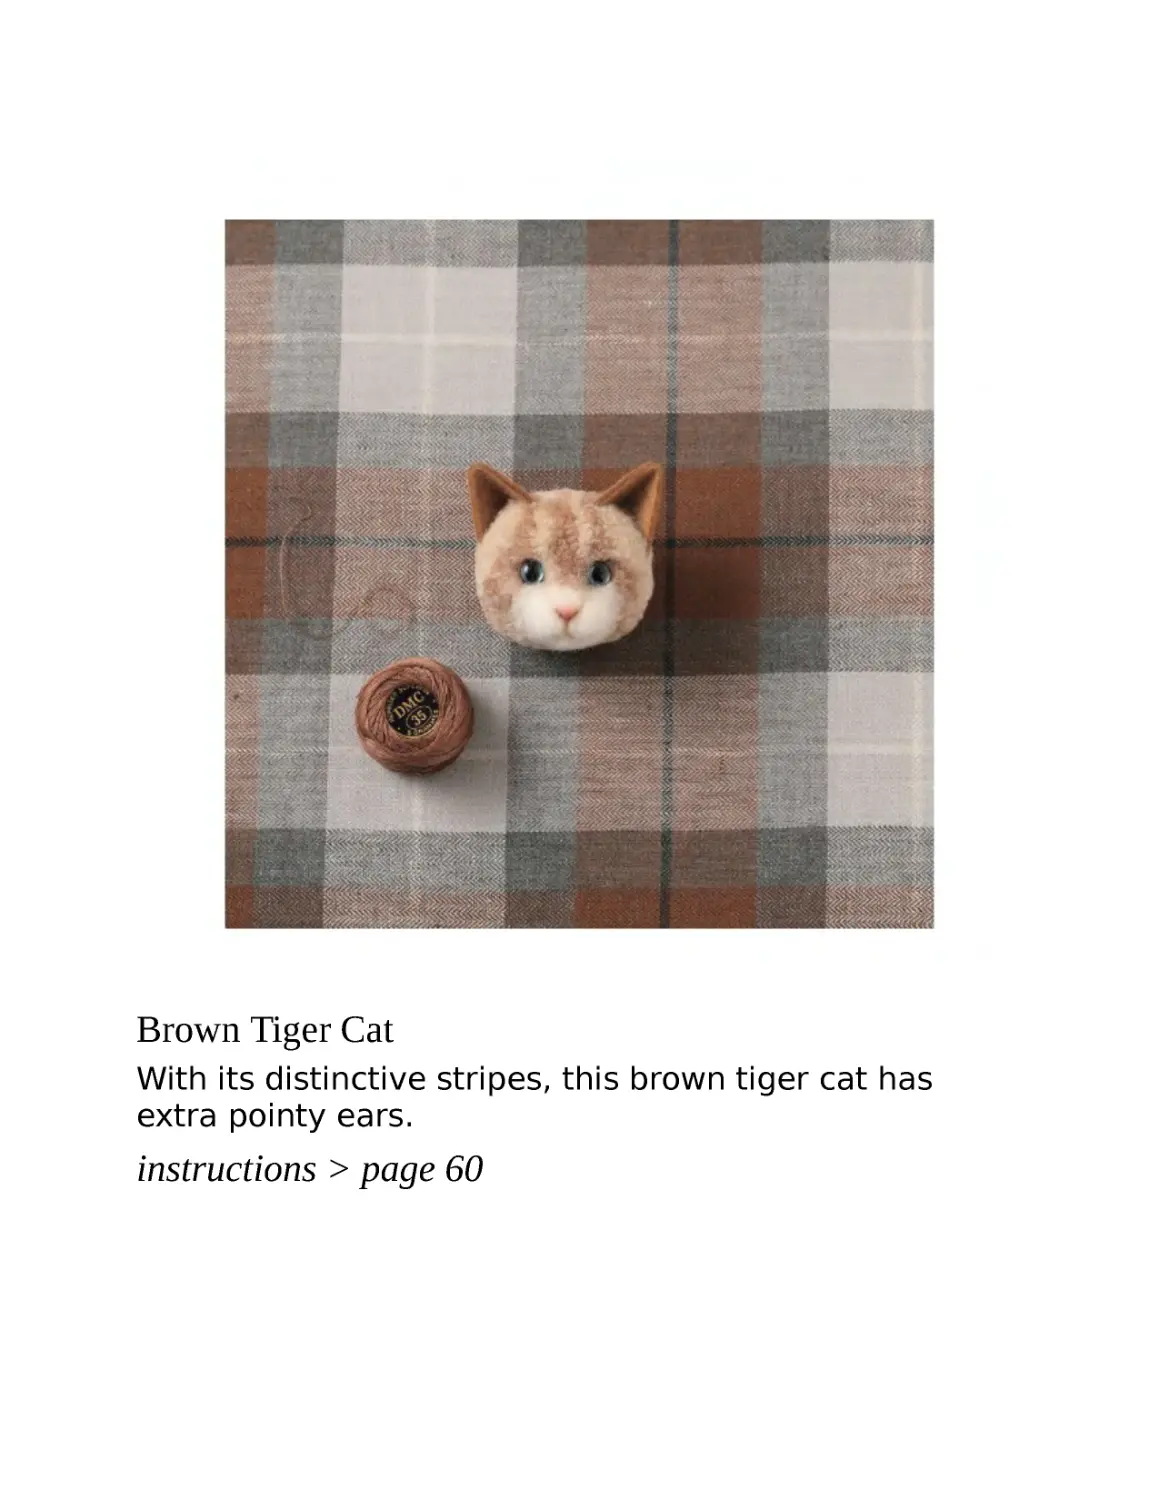
Brown Tiger Cat
With its distinctive stripes, this brown tiger cat has
extra pointy ears.
instructions > page 60
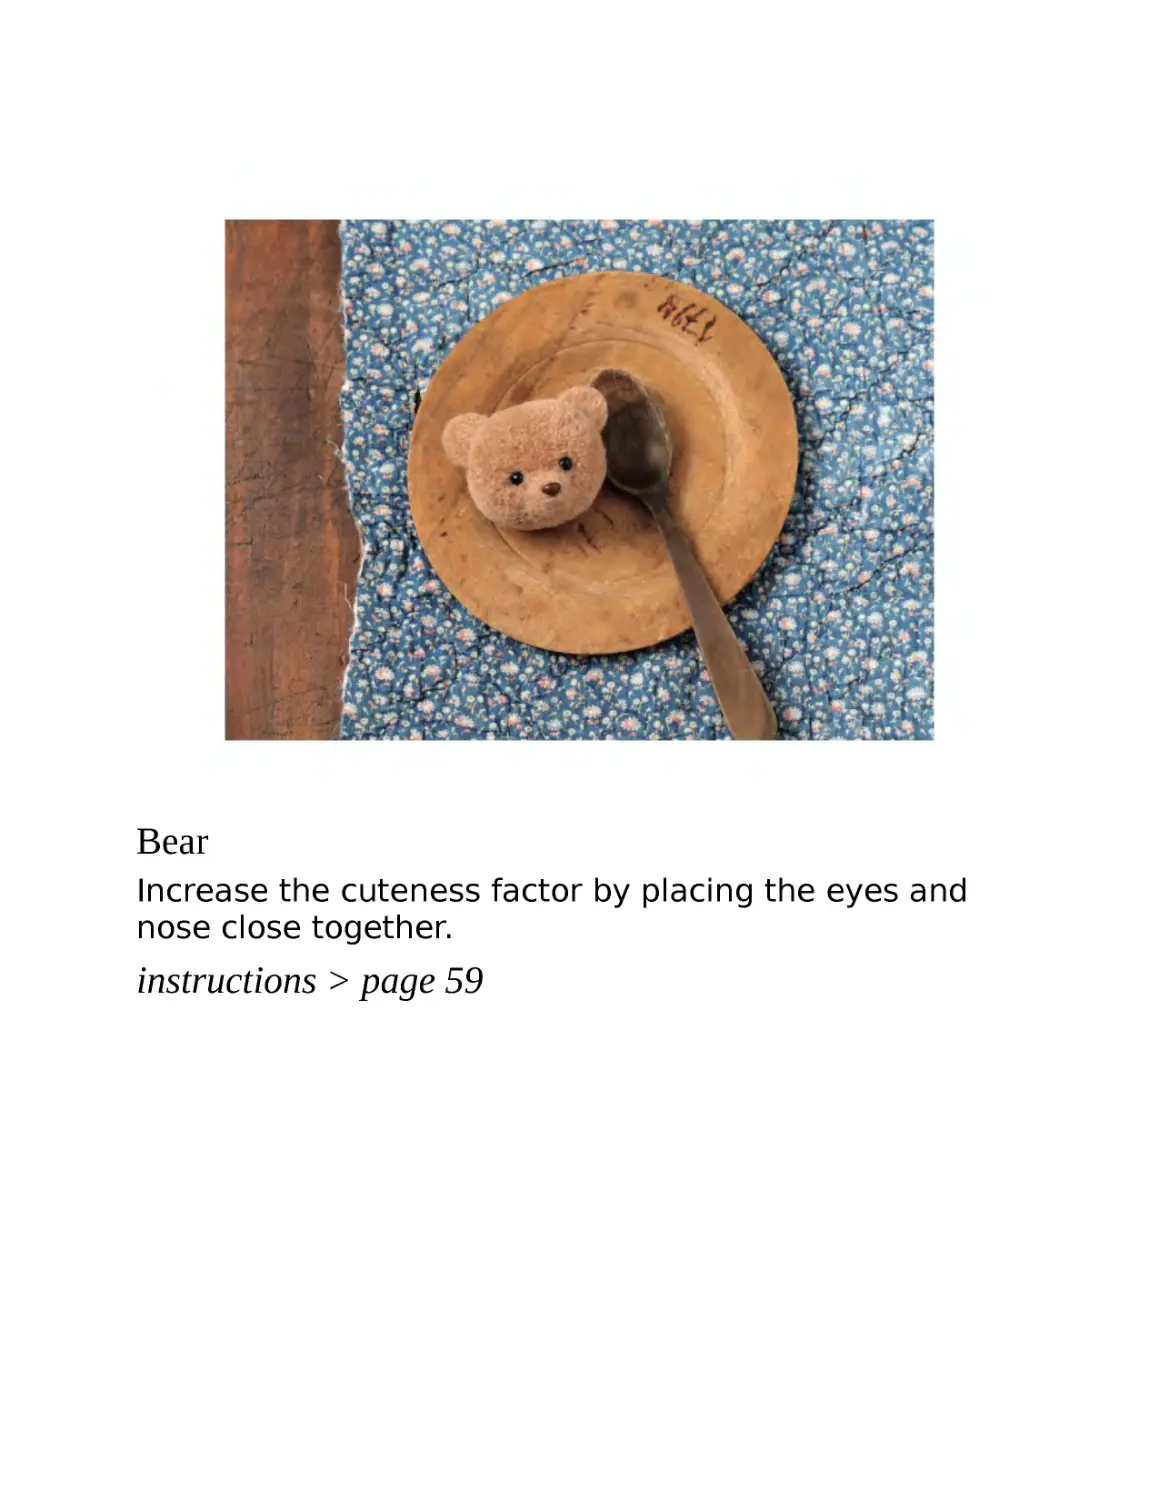
Bear
Increase the cuteness factor by placing the eyes and
nose close together.
instructions > page 59
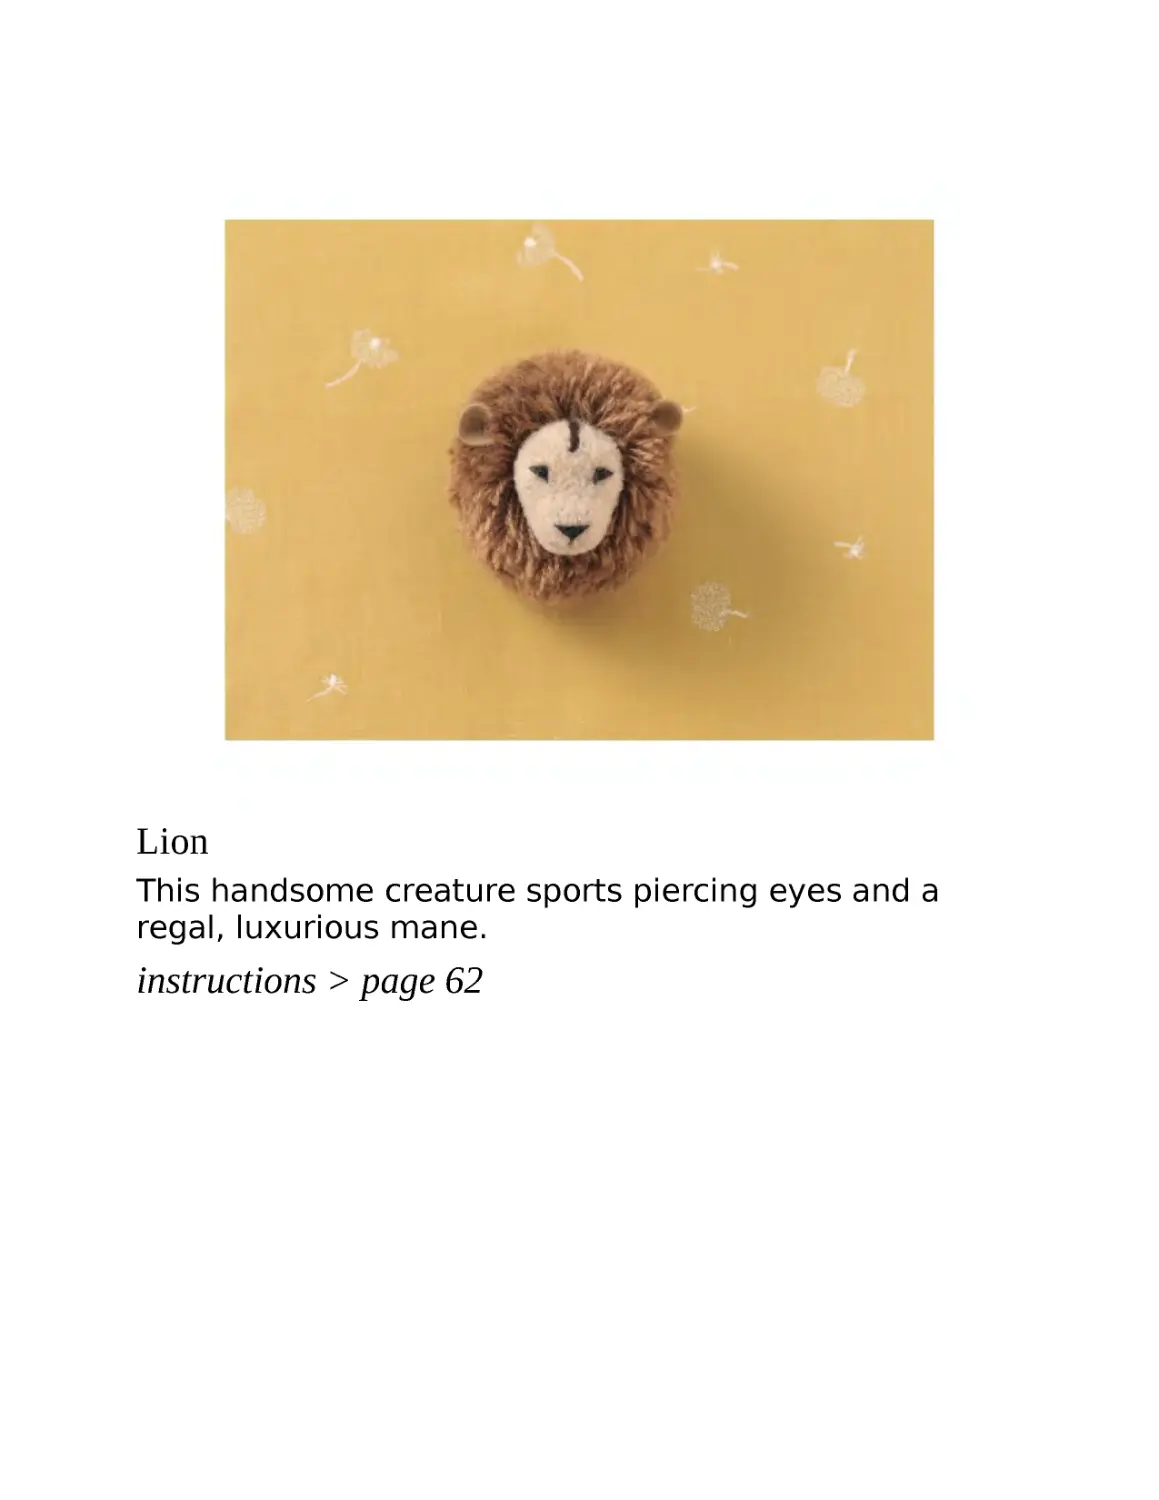
Lion
This handsome creature sports piercing eyes and a
regal, luxurious mane.
instructions > page 62
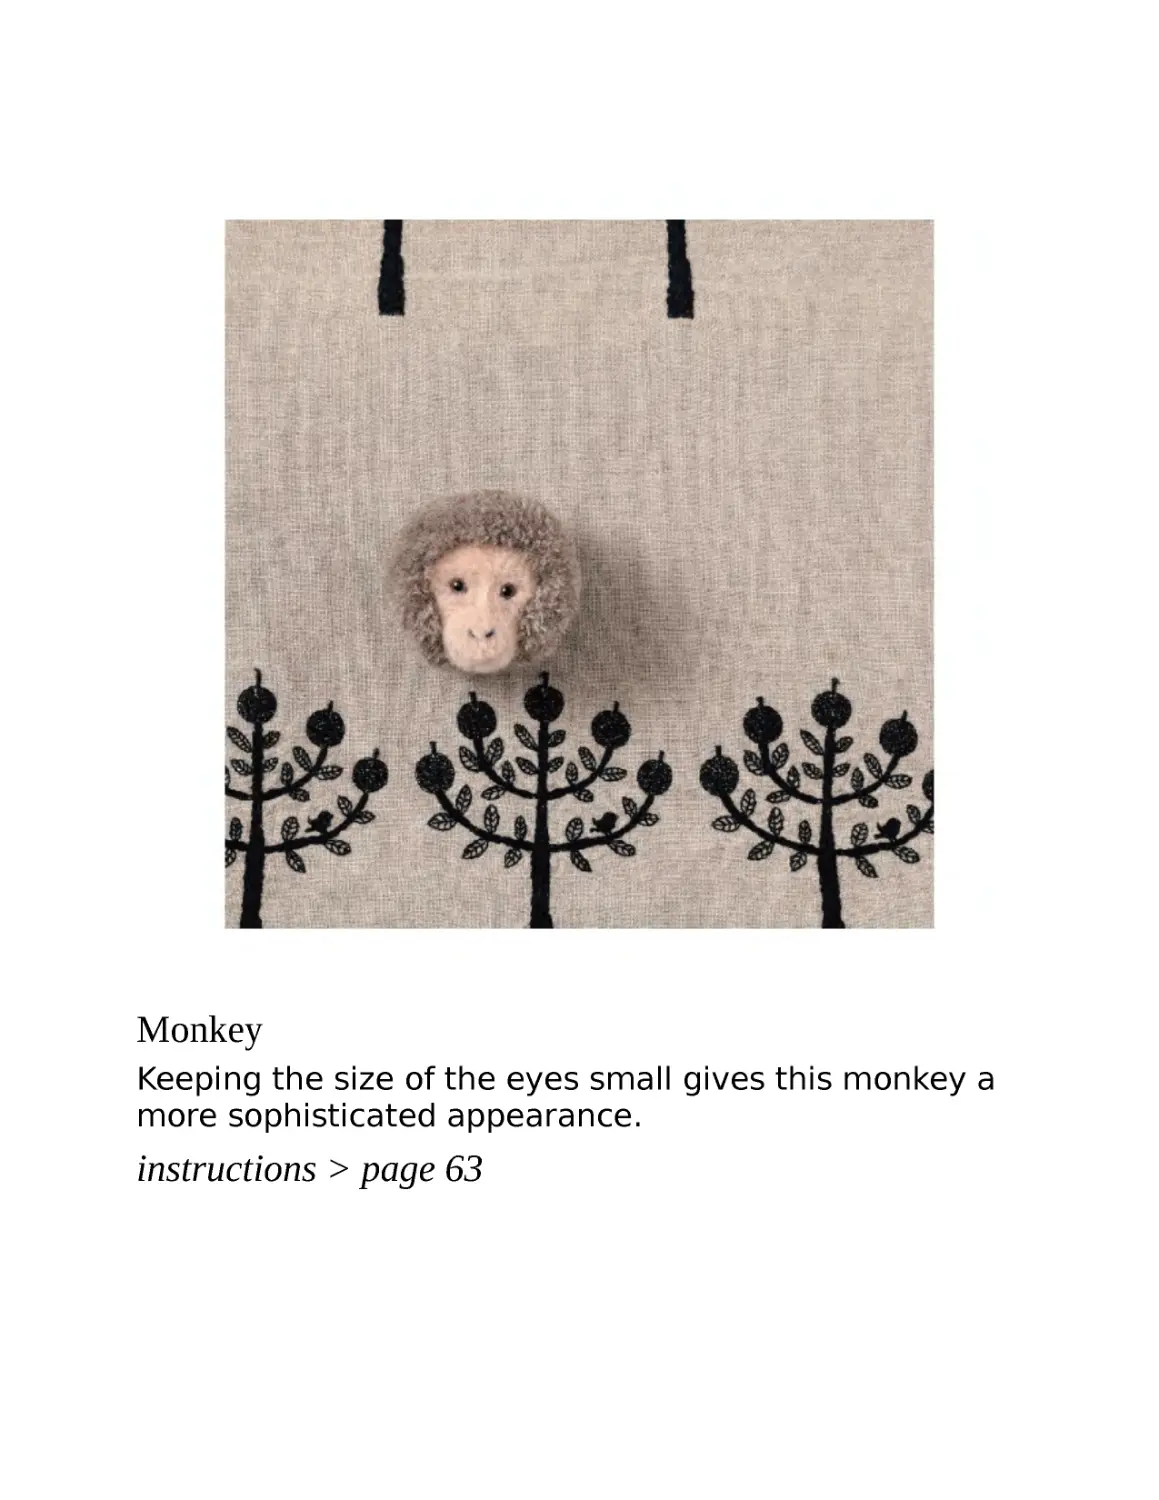
Monkey
Keeping the size of the eyes small gives this monkey a
more sophisticated appearance.
instructions > page 63
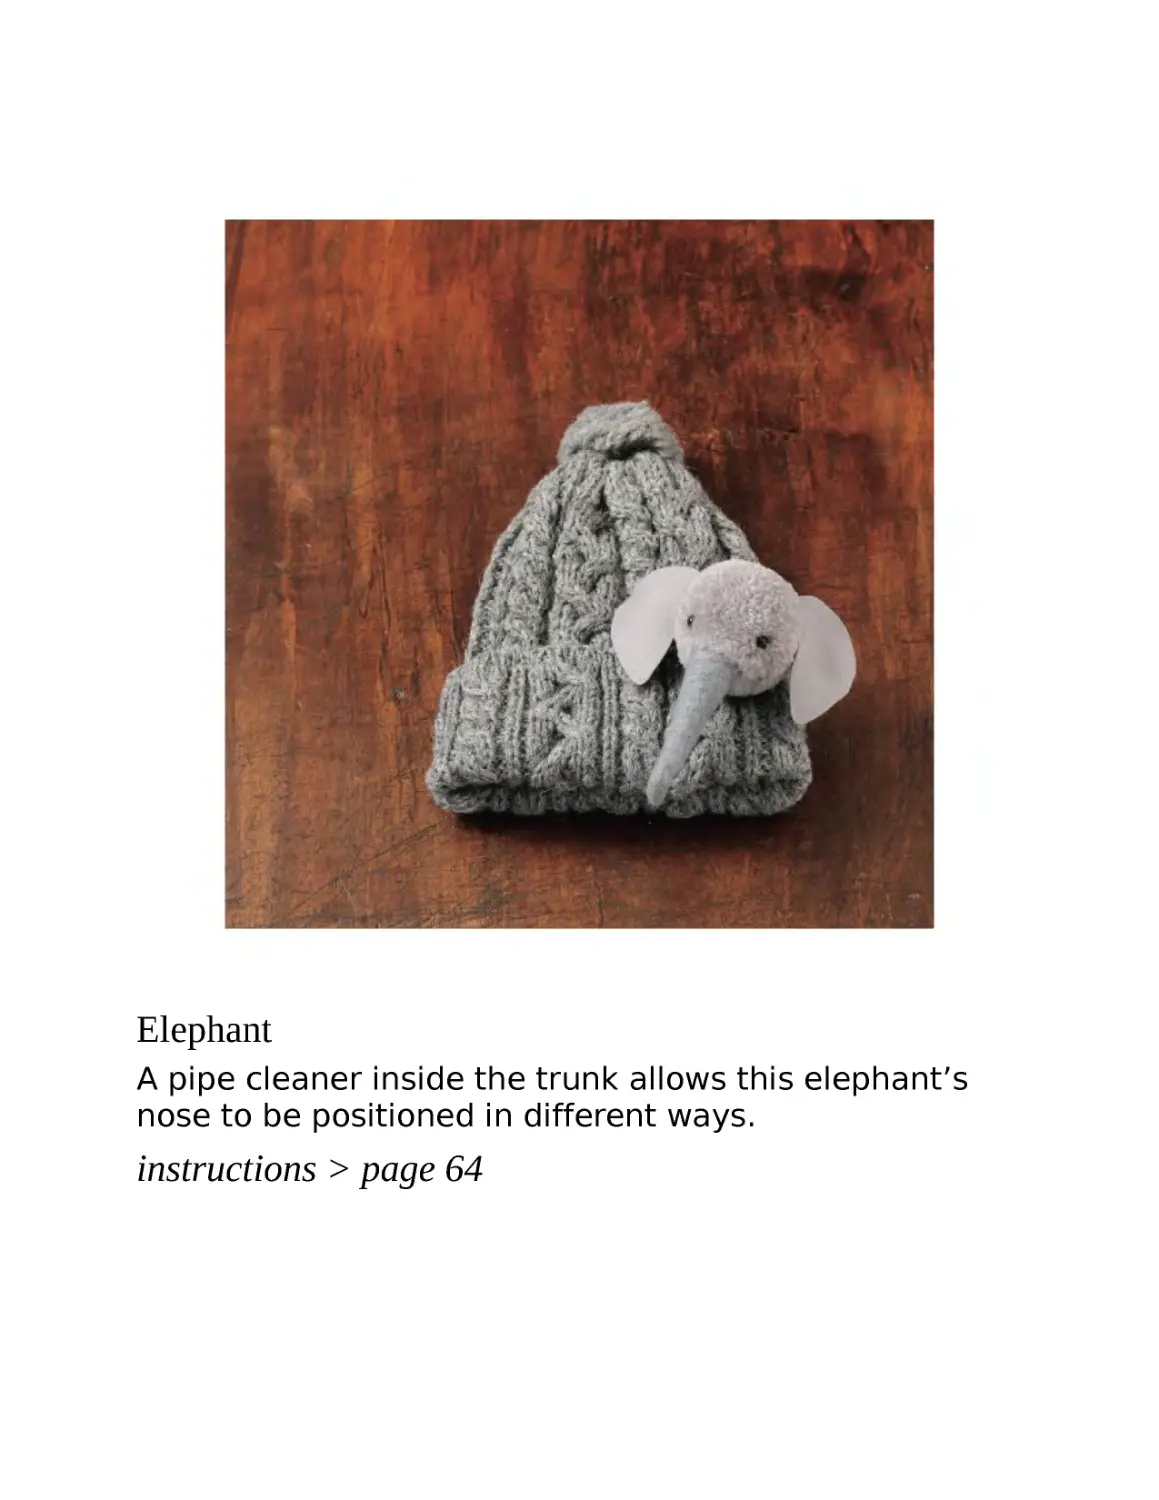
Elephant
A pipe cleaner inside the trunk allows this elephant’s
nose to be positioned in different ways.
instructions > page 64
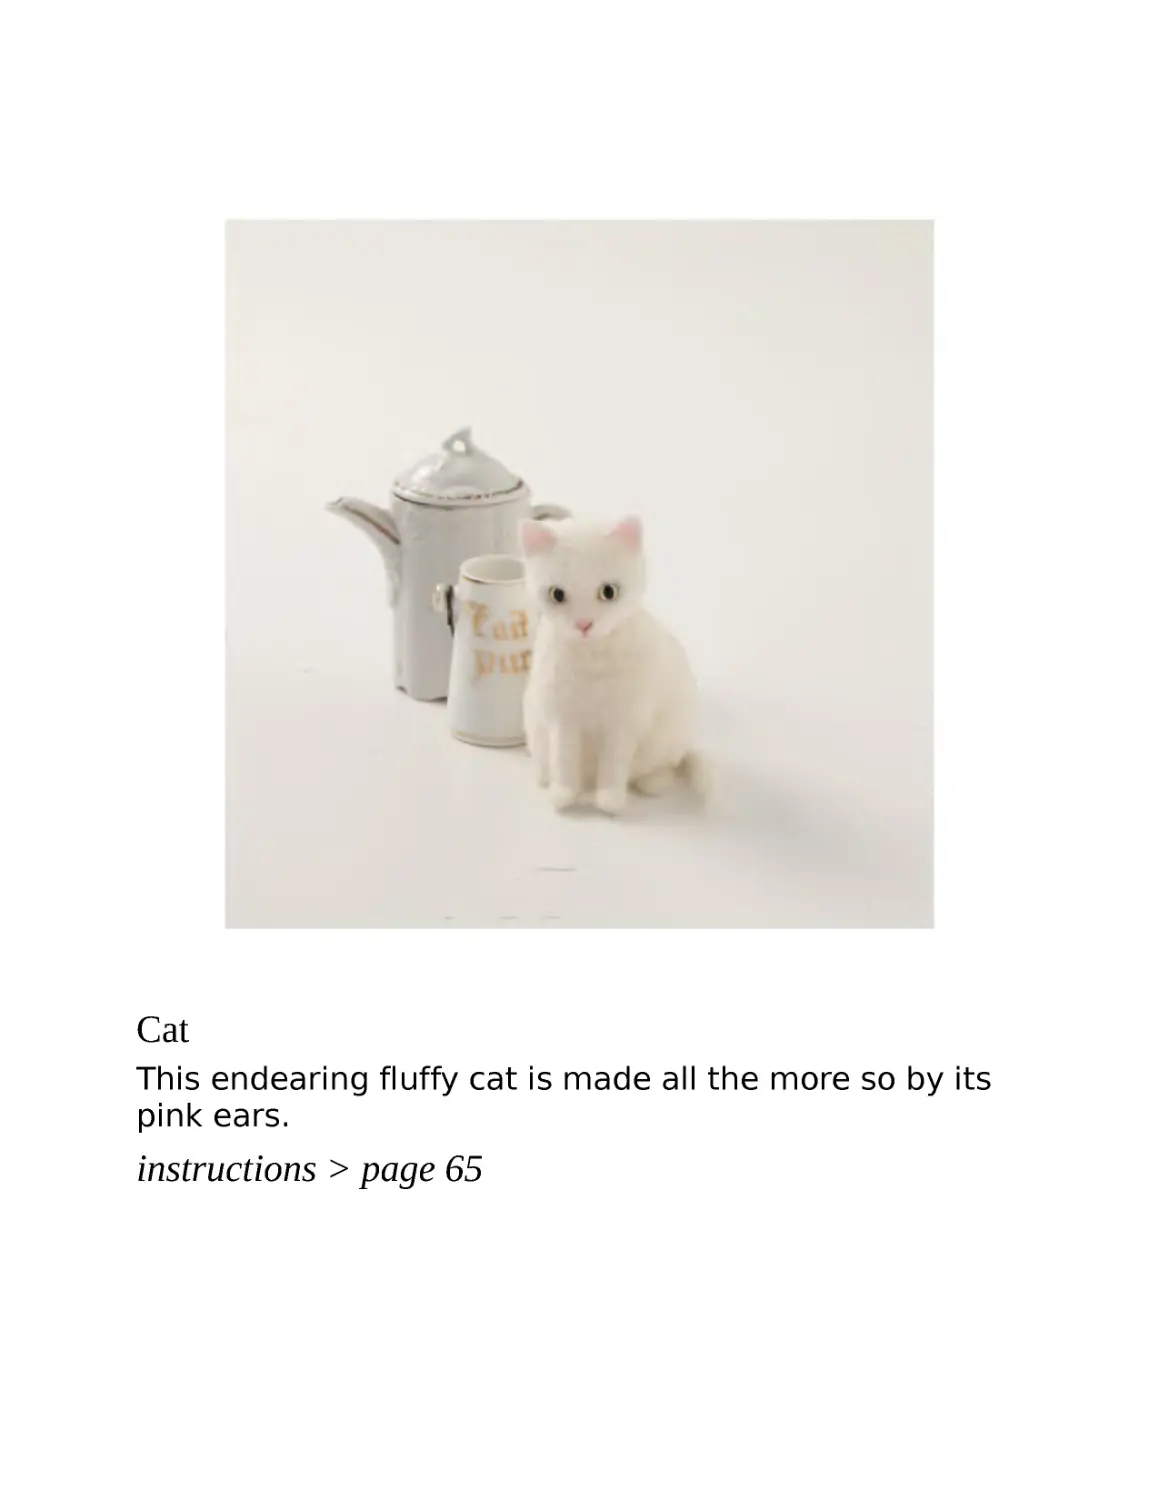
Cat
This endearing fluffy cat is made all the more so by its
pink ears.
instructions > page 65
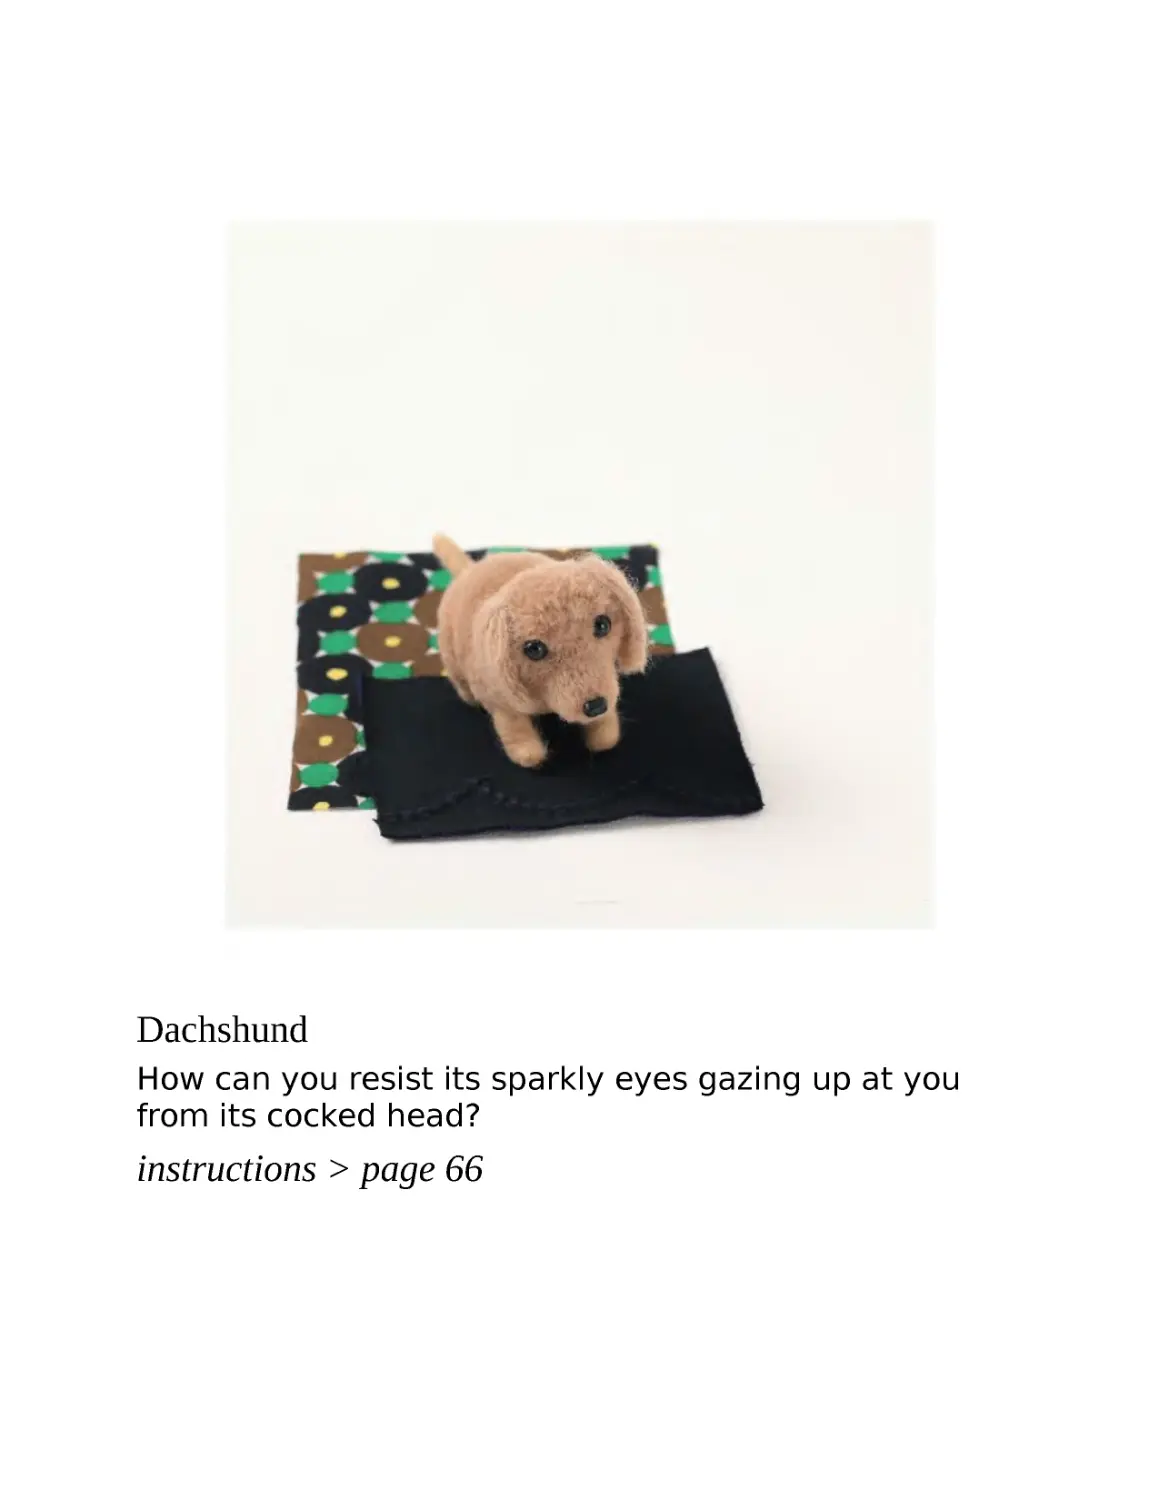
Dachshund
How can you resist its sparkly eyes gazing up at you
from its cocked head?
instructions > page 66
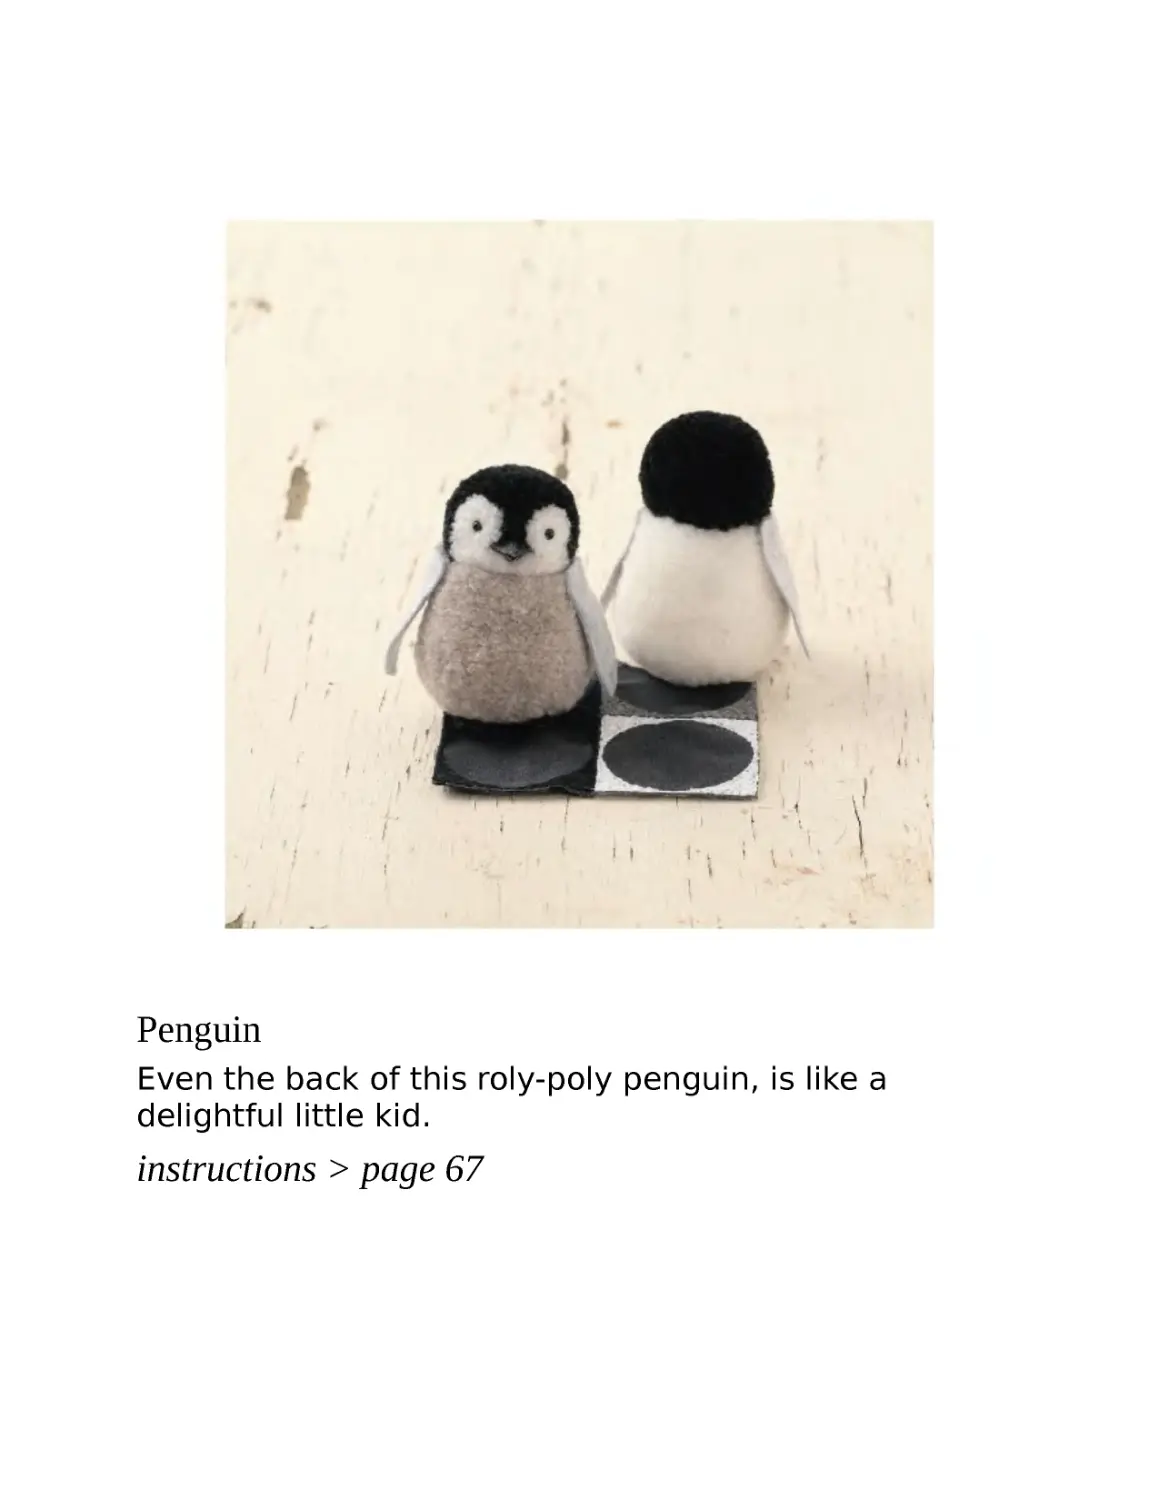
Penguin
Even the back of this roly-poly penguin, is like a
delightful little kid.
instructions > page 67
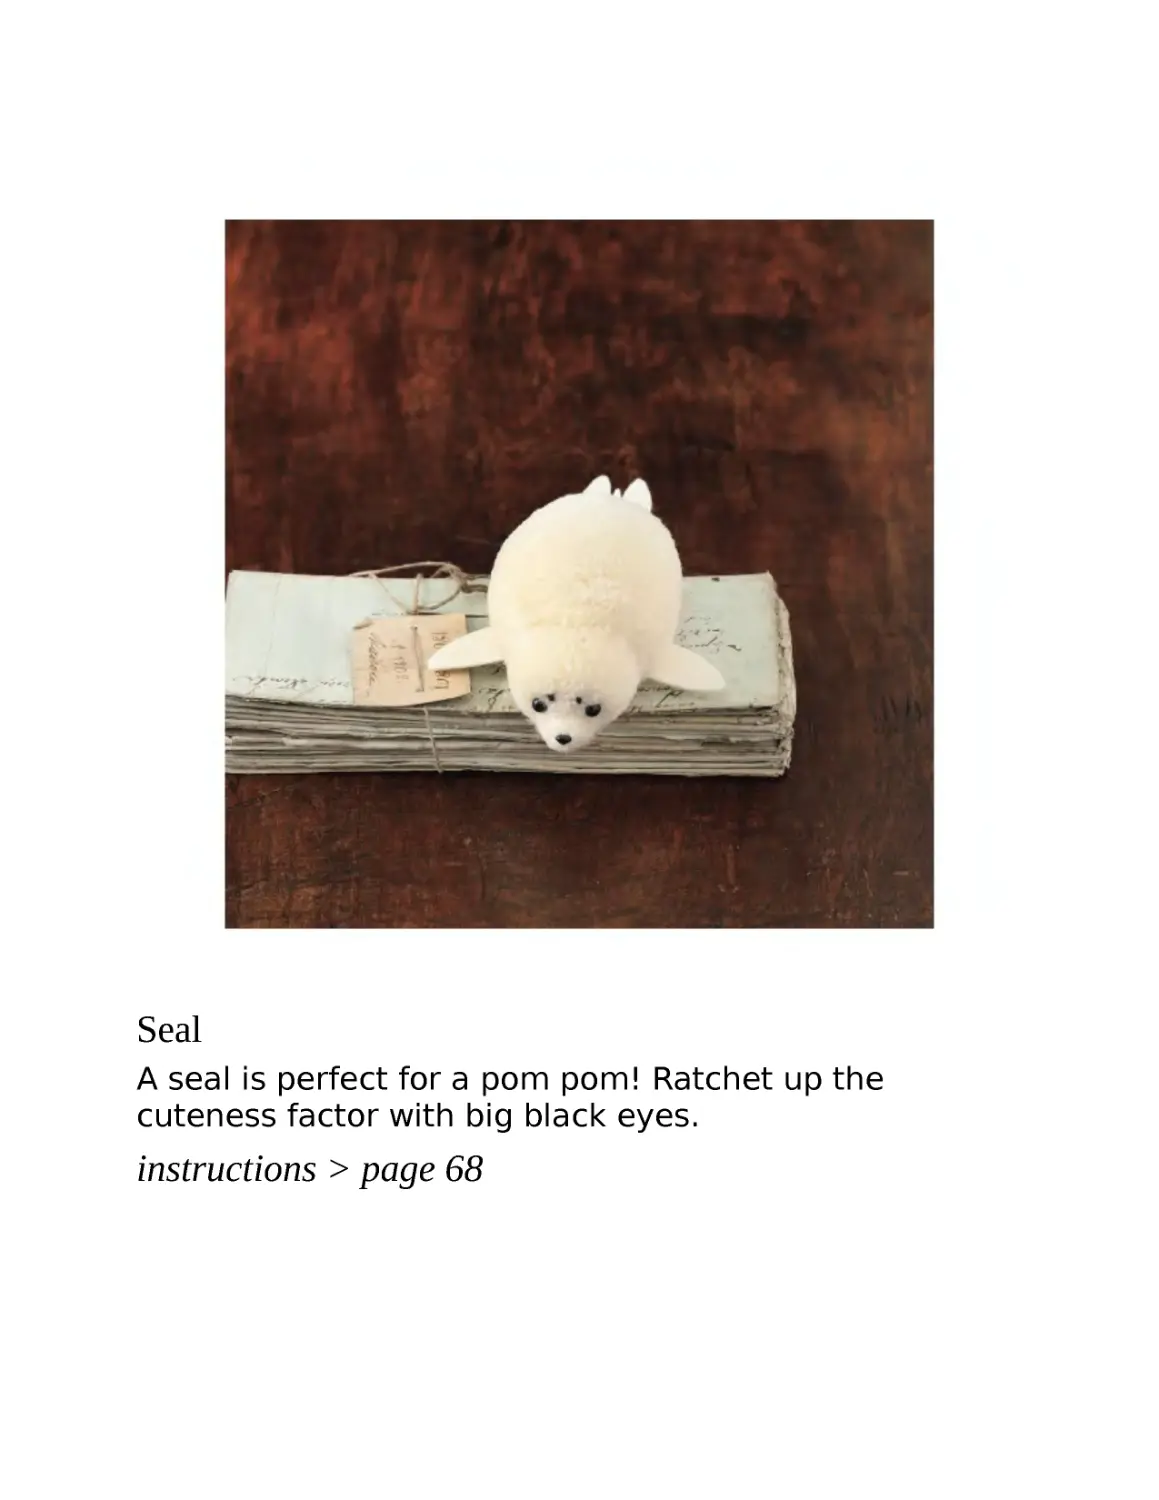
Seal
A seal is perfect for a pom pom! Ratchet up the
cuteness factor with big black eyes.
instructions > page 68
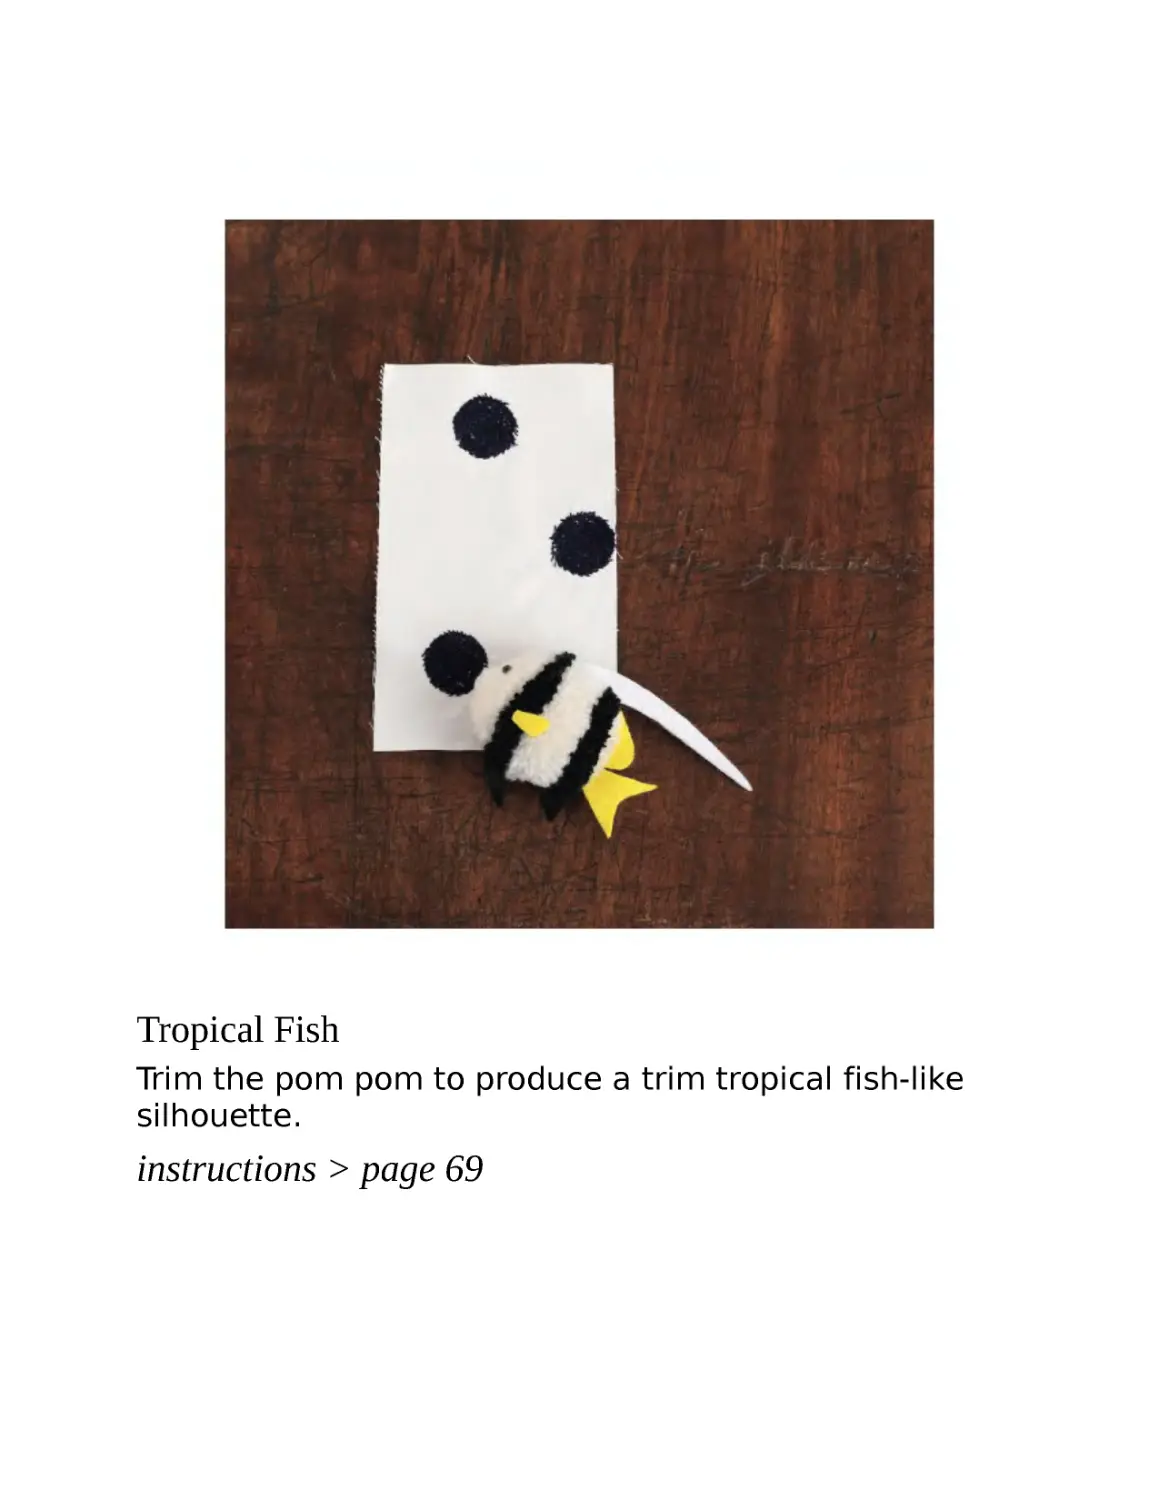
Tropical Fish
Trim the pom pom to produce a trim tropical fish-like
silhouette.
instructions > page 69
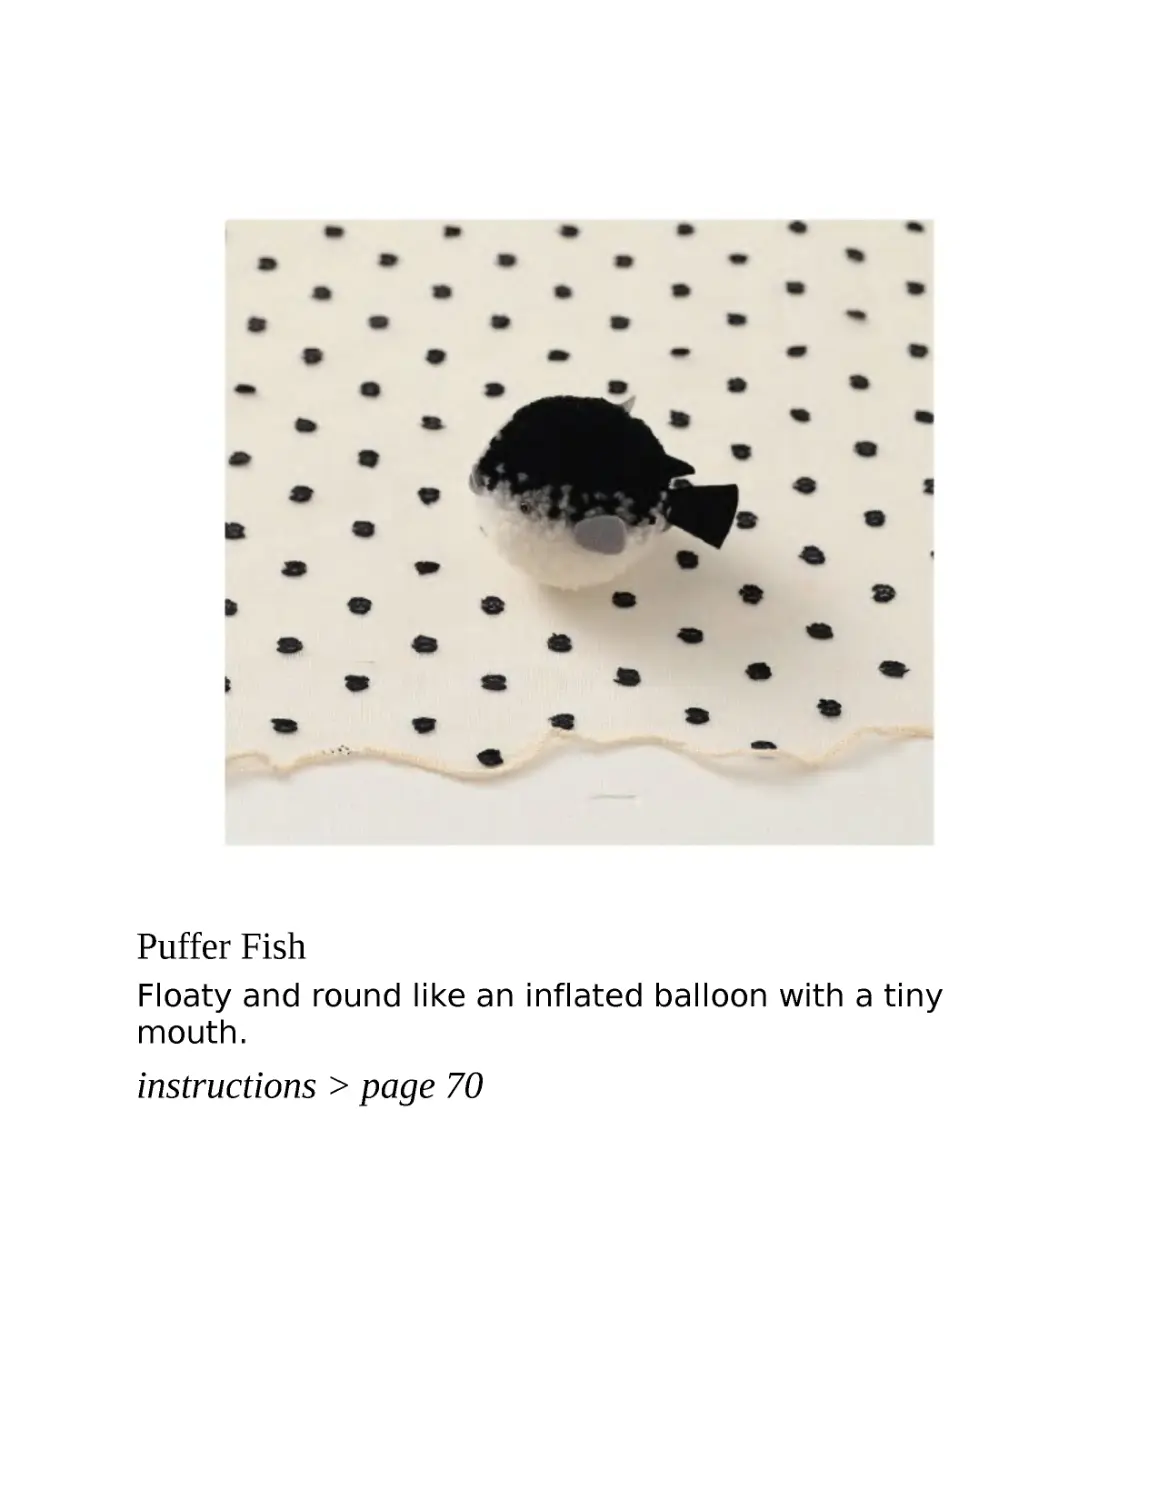
Puffer Fish
Floaty and round like an inflated balloon with a tiny
mouth.
instructions > page 70
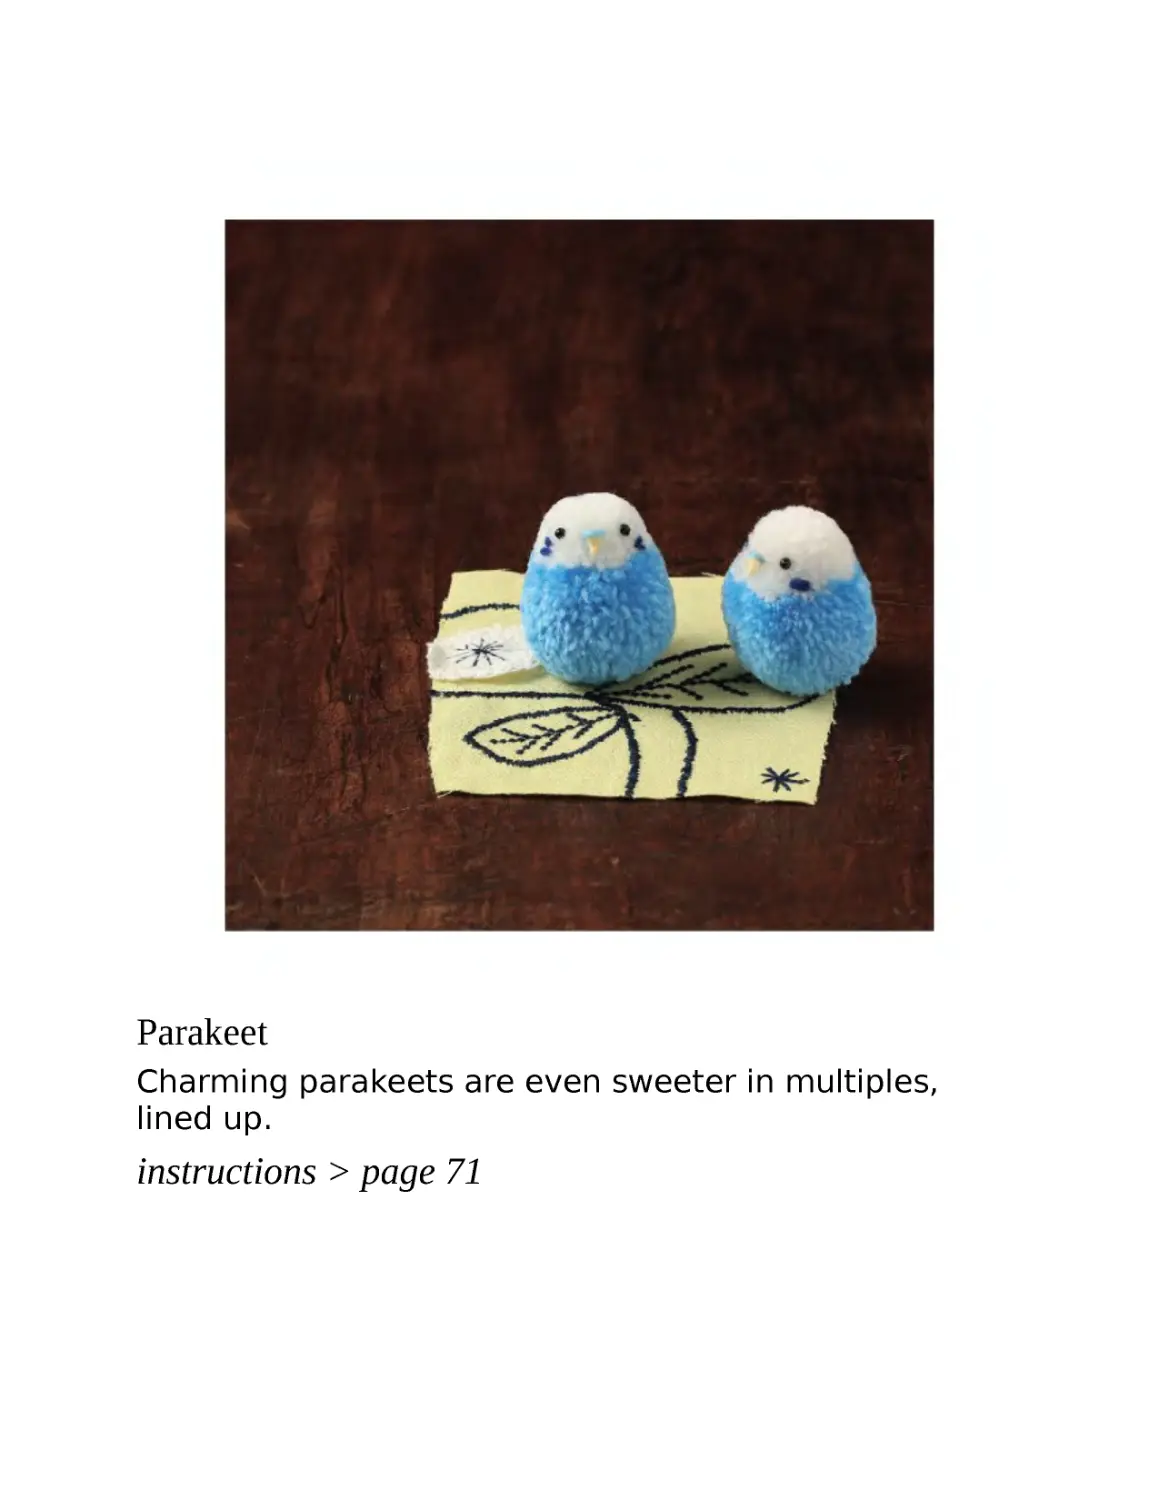
Parakeet
Charming parakeets are even sweeter in multiples,
lined up.
instructions > page 71
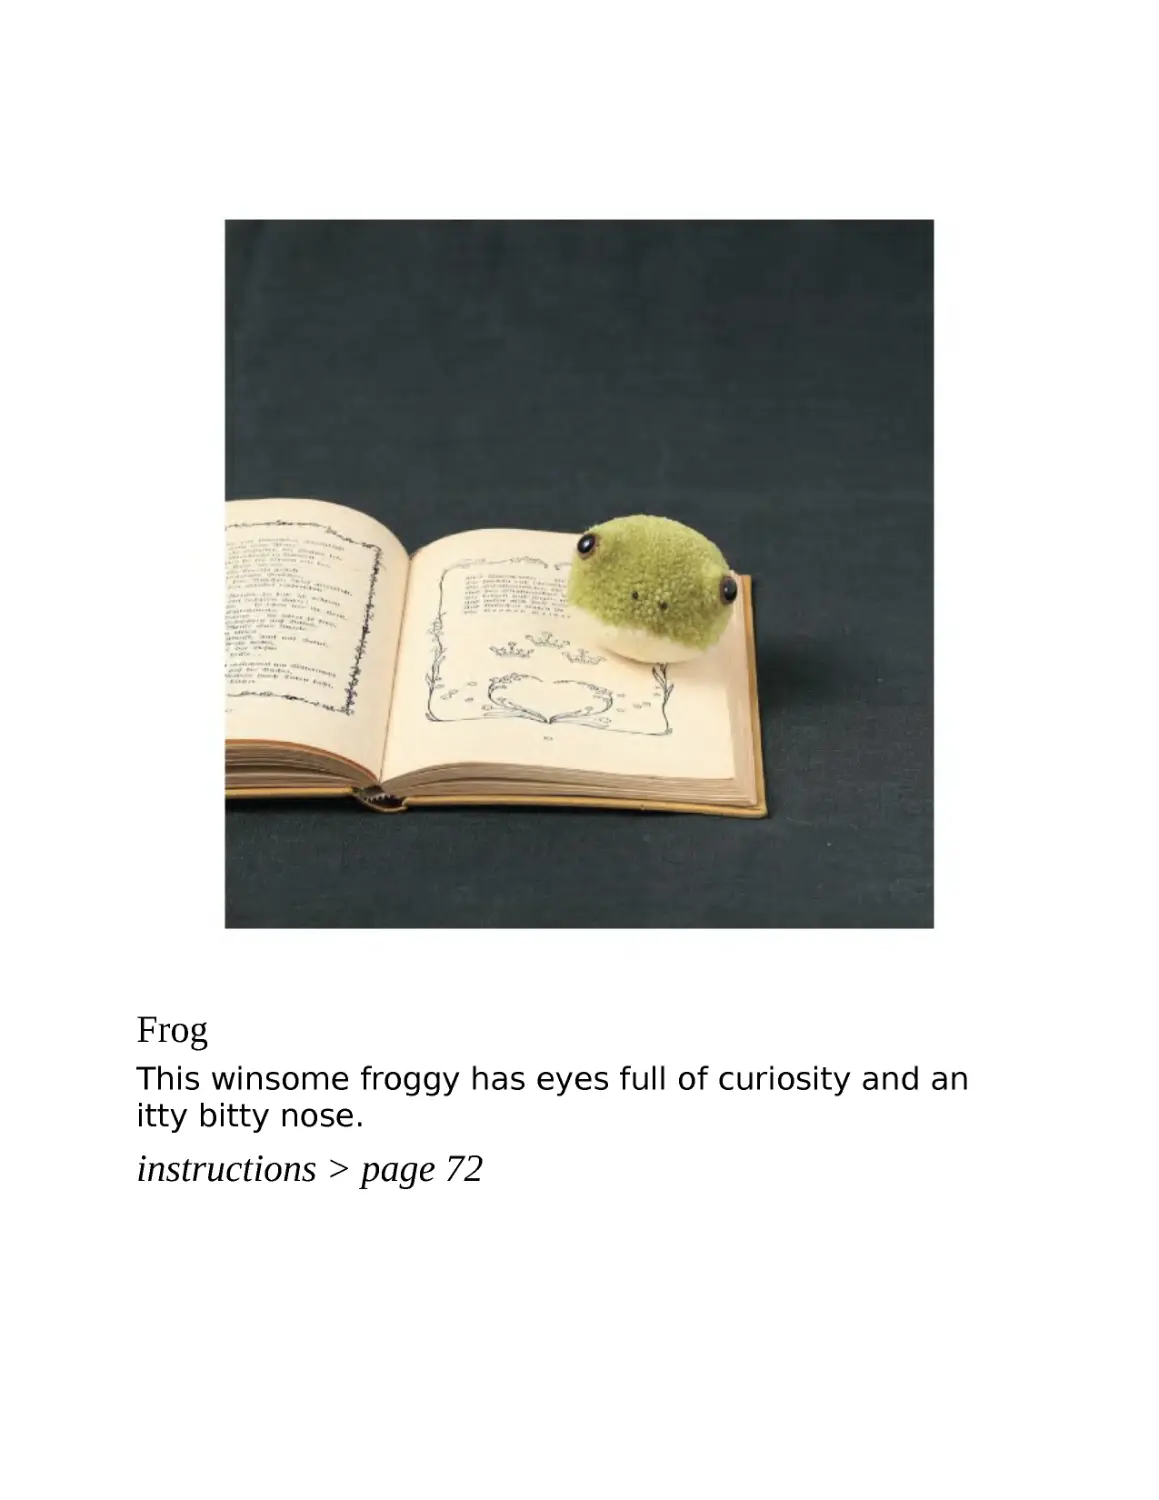
Frog
This winsome froggy has eyes full of curiosity and an
itty bitty nose.
instructions > page 72
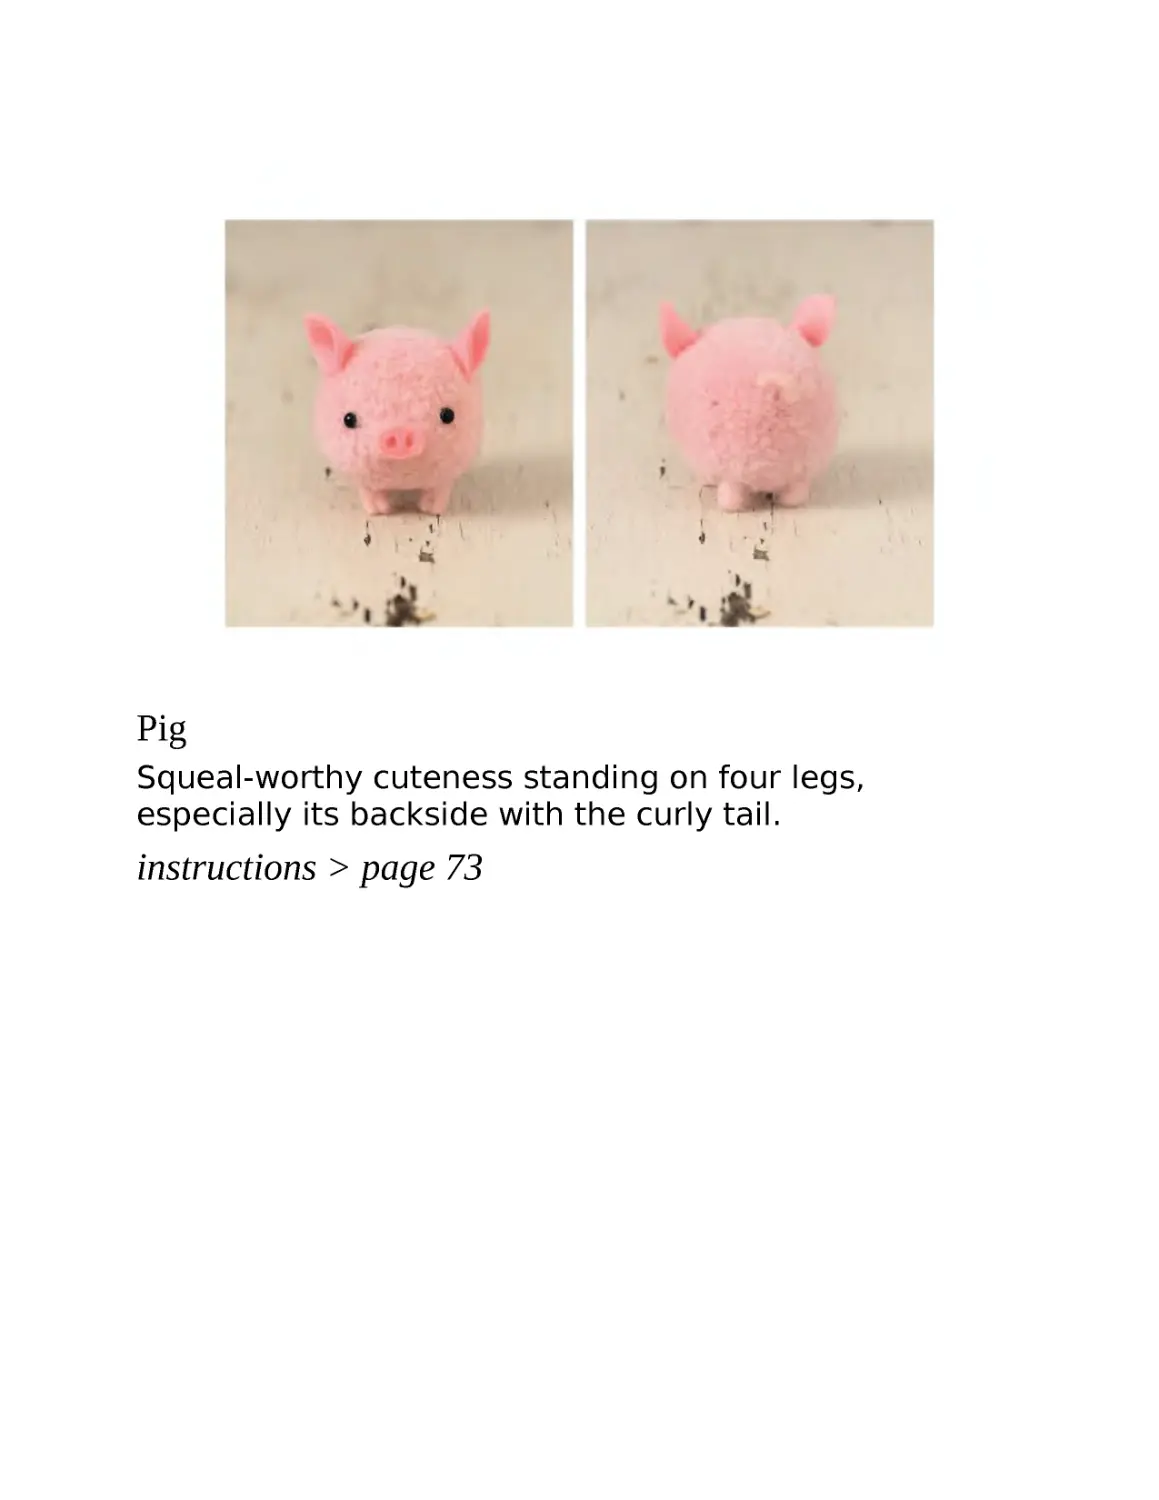
Pig
Squeal-worthy cuteness standing on four legs,
especially its backside with the curly tail.
instructions > page 73
Strawberry Bunny
It’s hard to get cuter than this: a pointy-eared rabbit
tuft wearing a strawberry hat.
instructions > page 74
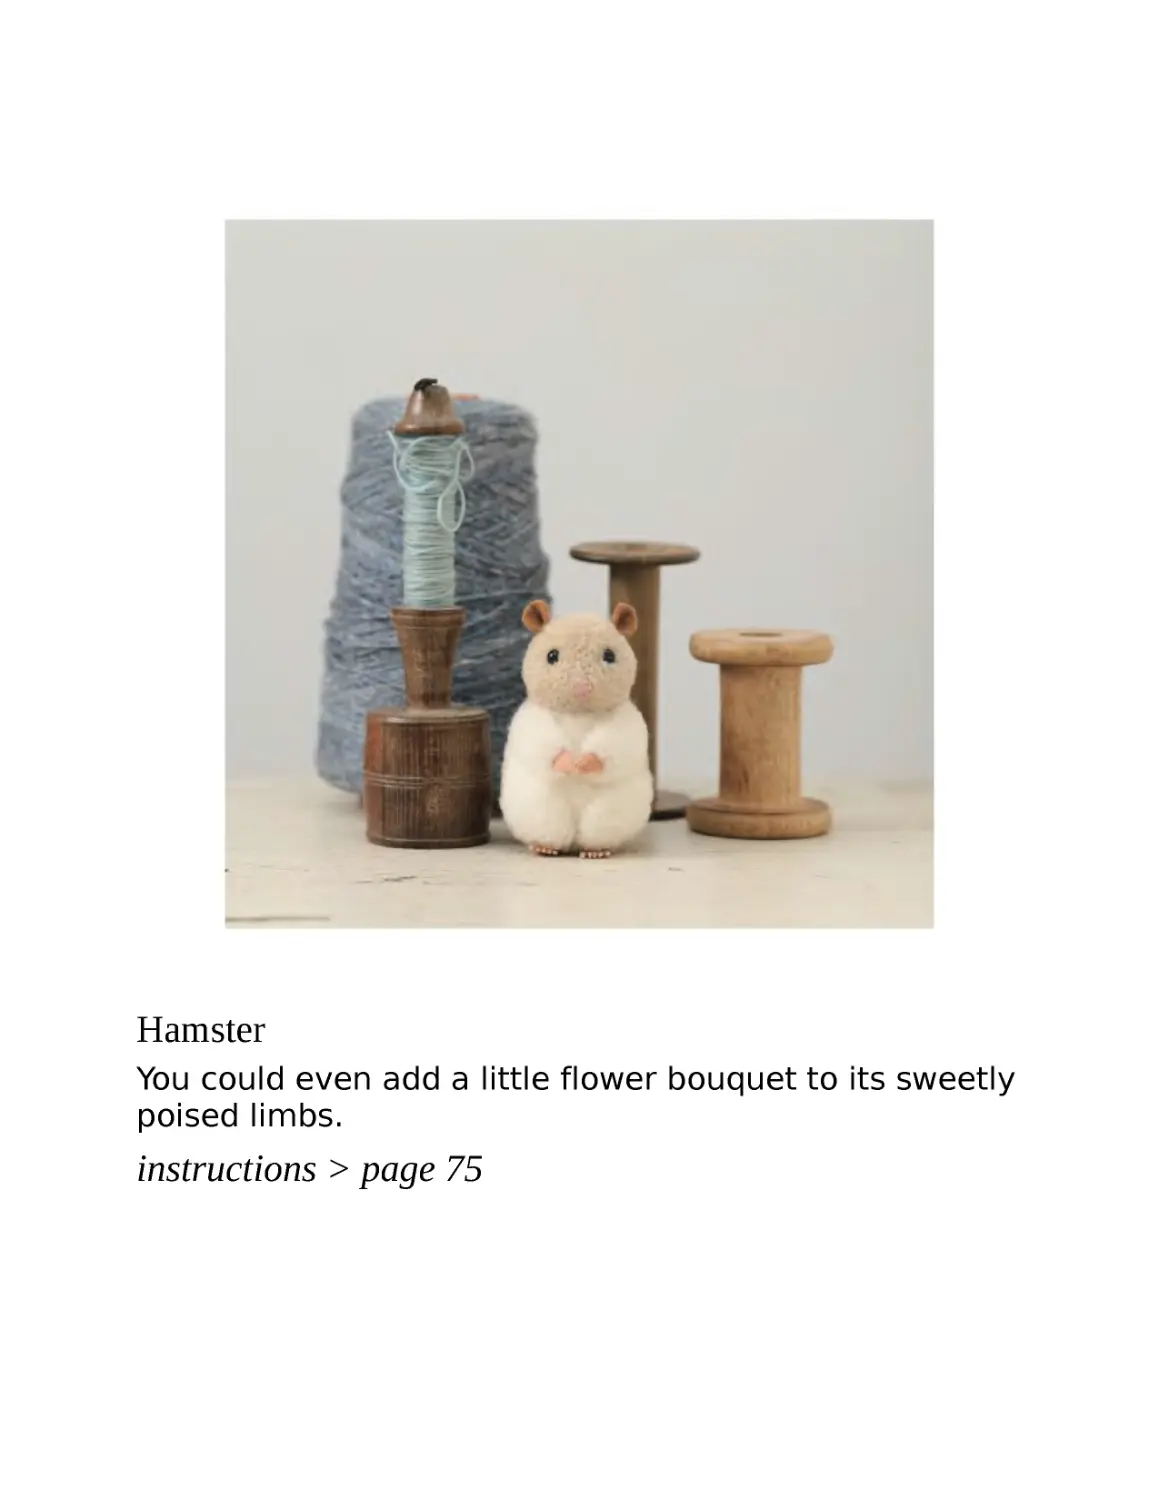
Hamster
You could even add a little flower bouquet to its sweetly
poised limbs.
instructions > page 75
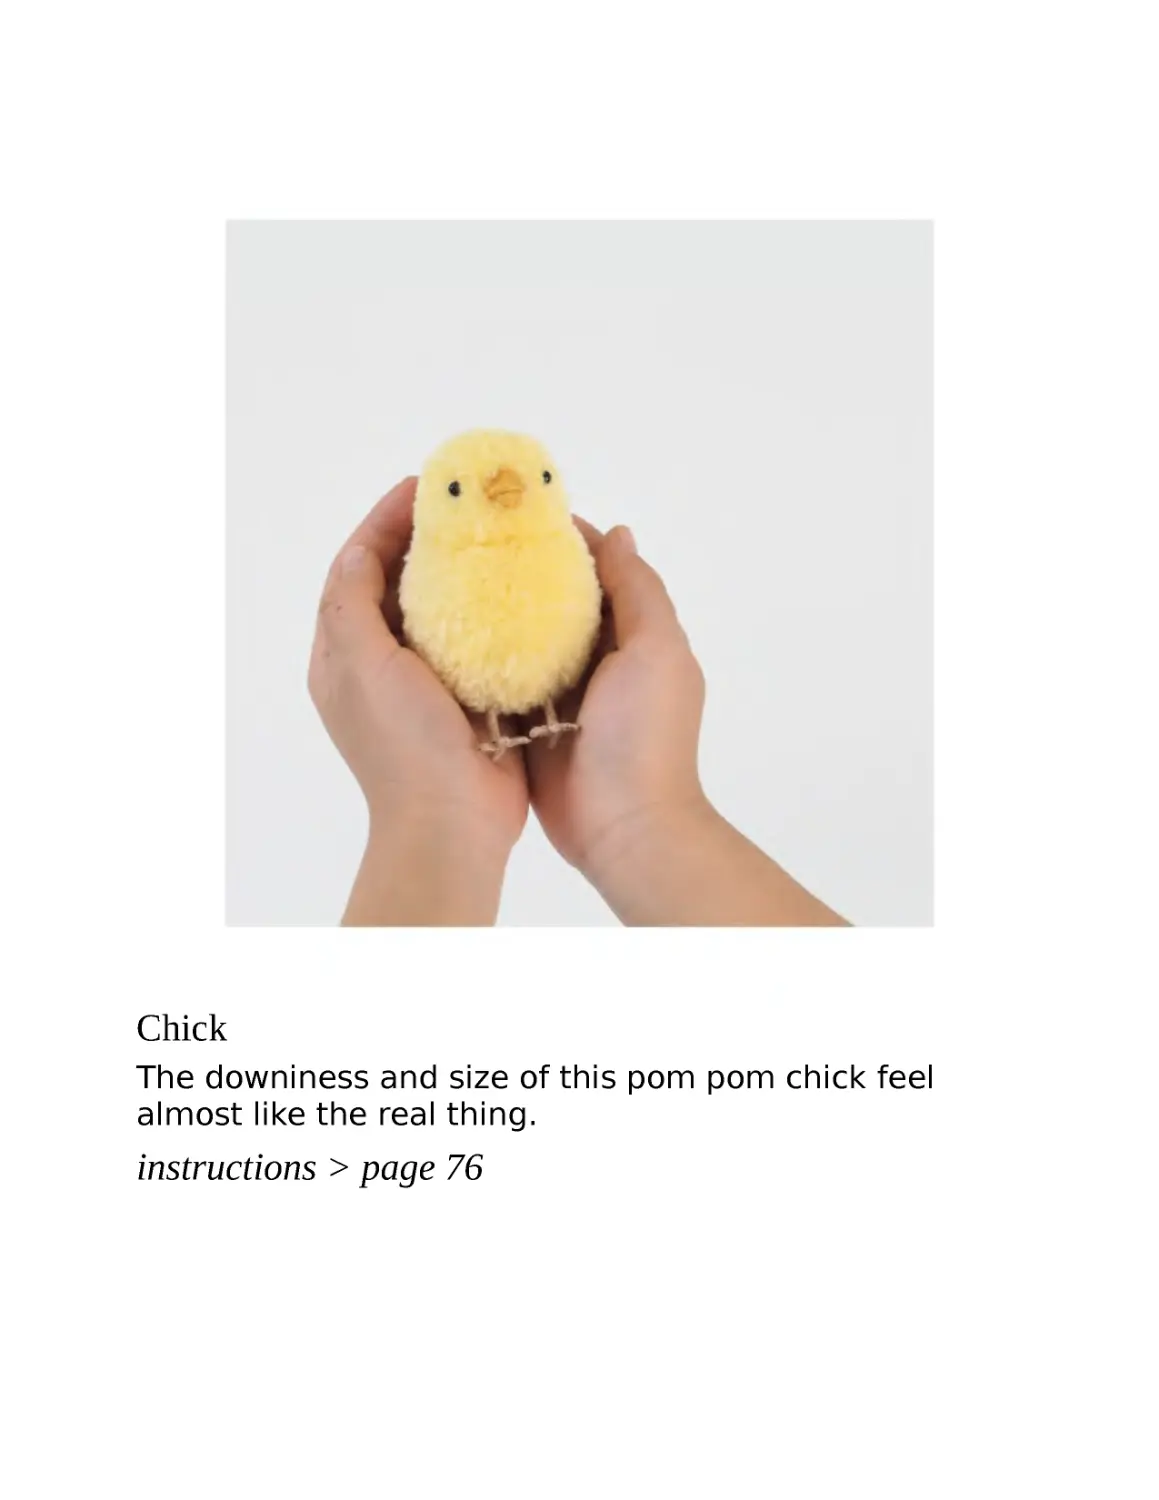
Chick
The downiness and size of this pom pom chick feel
almost like the real thing.
instructions > page 76
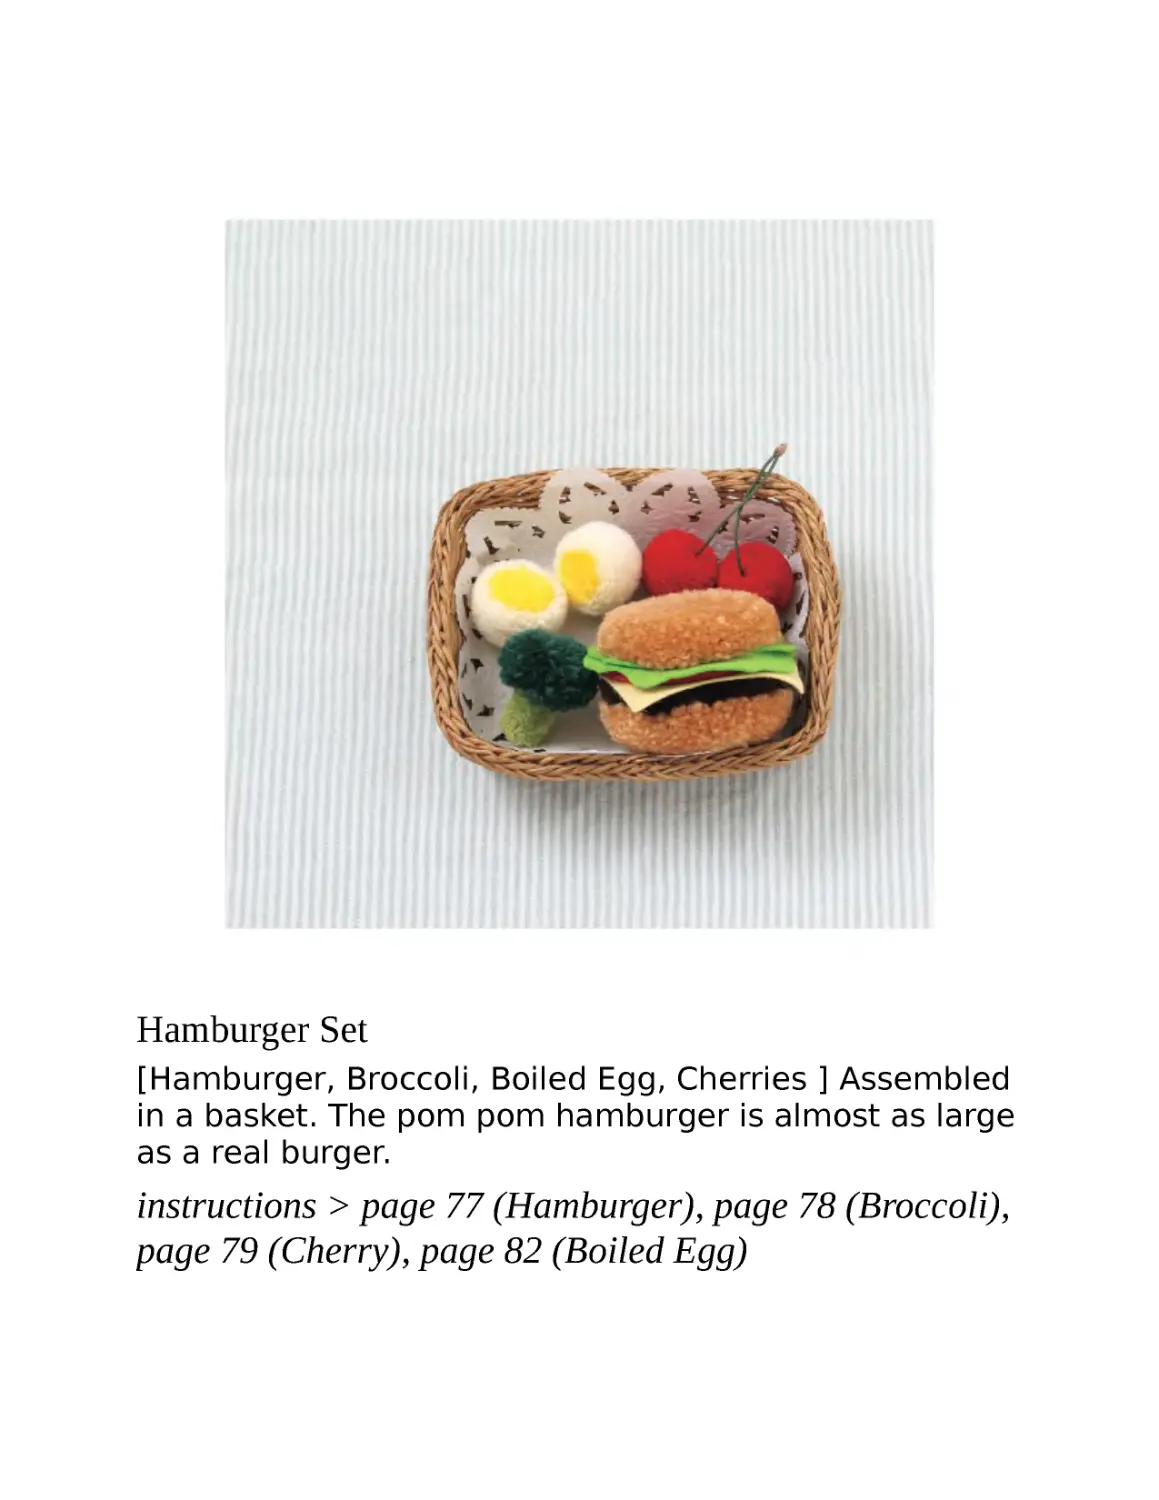
Hamburger Set
[Hamburger, Broccoli, Boiled Egg, Cherries ] Assembled
in a basket. The pom pom hamburger is almost as large
as a real burger.
instructions > page 77 (Hamburger), page 78 (Broccoli),
page 79 (Cherry), page 82 (Boiled Egg)
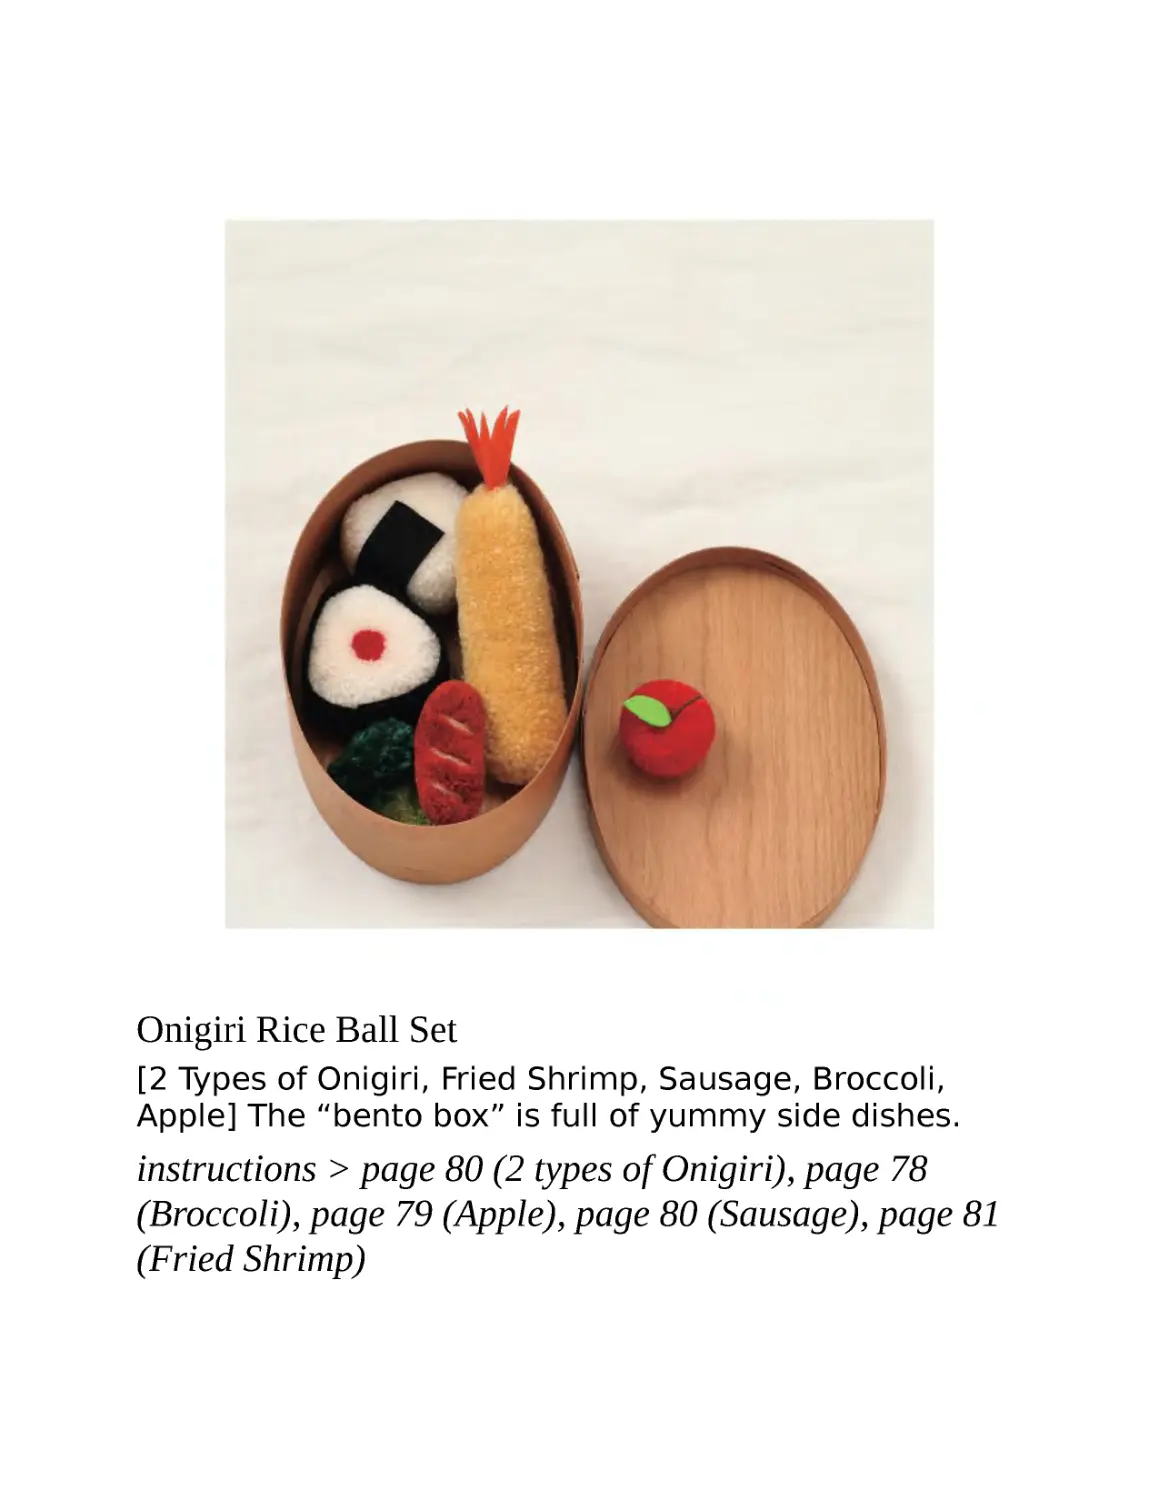
Onigiri Rice Ball Set
[2 Types of Onigiri, Fried Shrimp, Sausage, Broccoli,
Apple] The “bento box” is full of yummy side dishes.
instructions > page 80 (2 types of Onigiri), page 78
(Broccoli), page 79 (Apple), page 80 (Sausage), page 81
(Fried Shrimp)
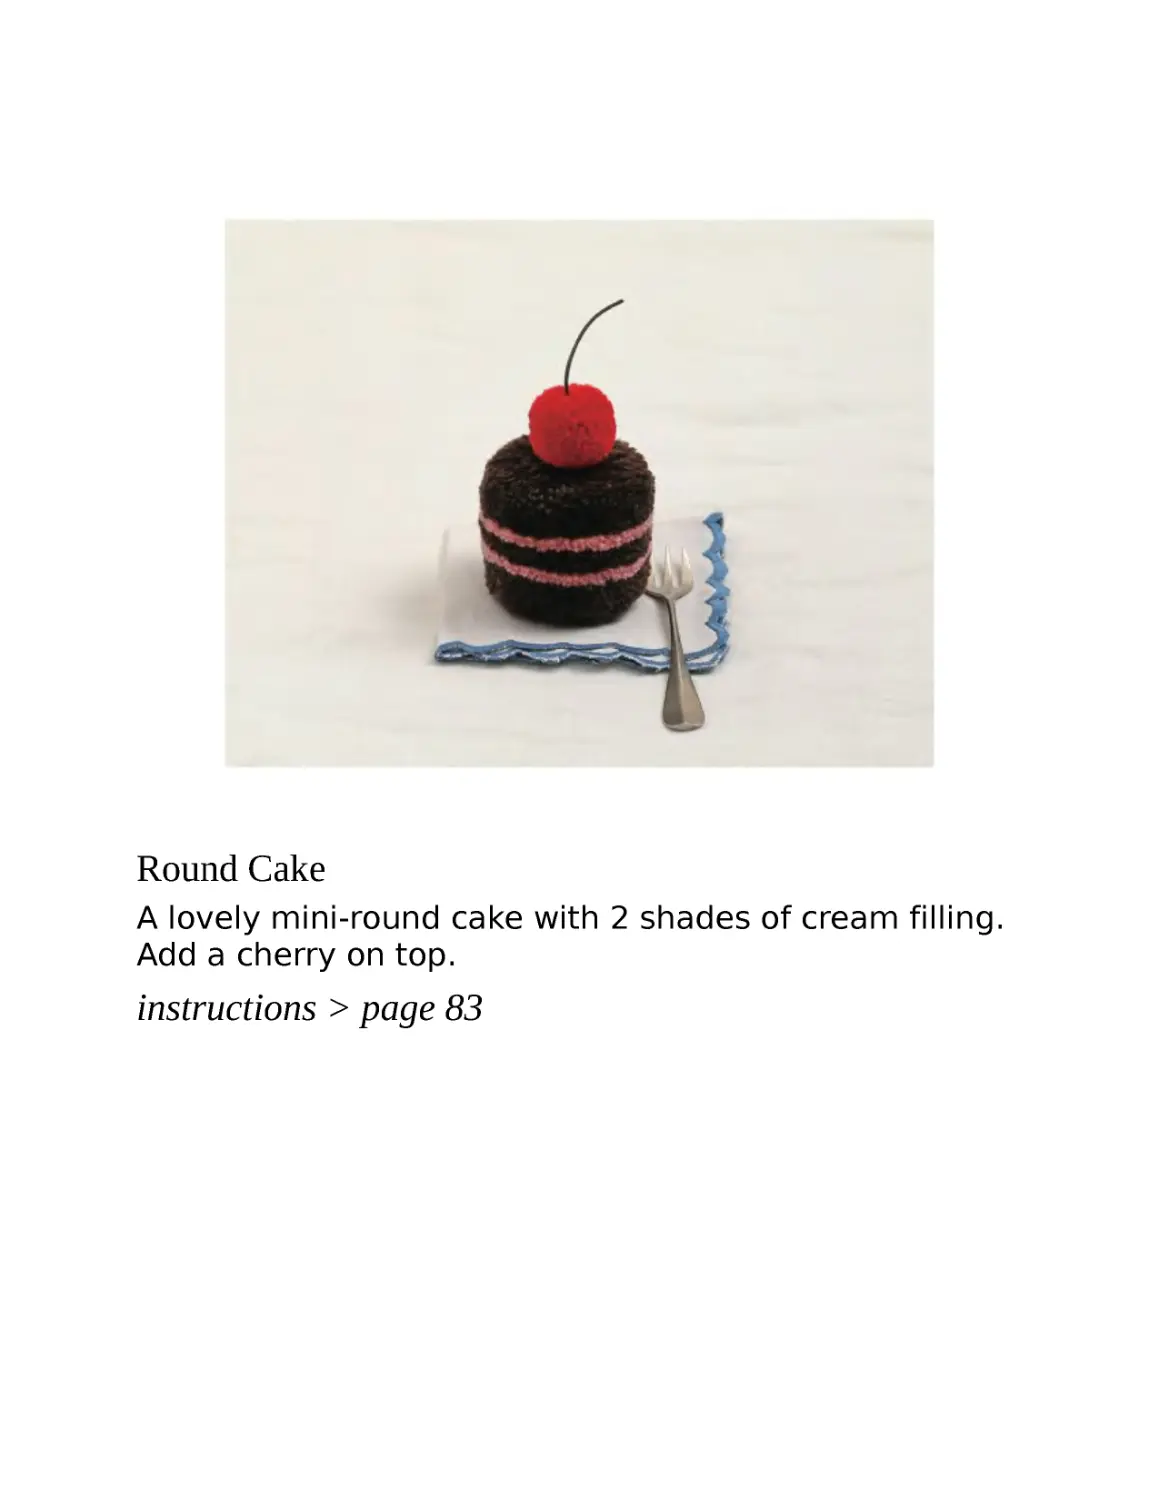
Round Cake
A lovely mini-round cake with 2 shades of cream filling.
Add a cherry on top.
instructions > page 83
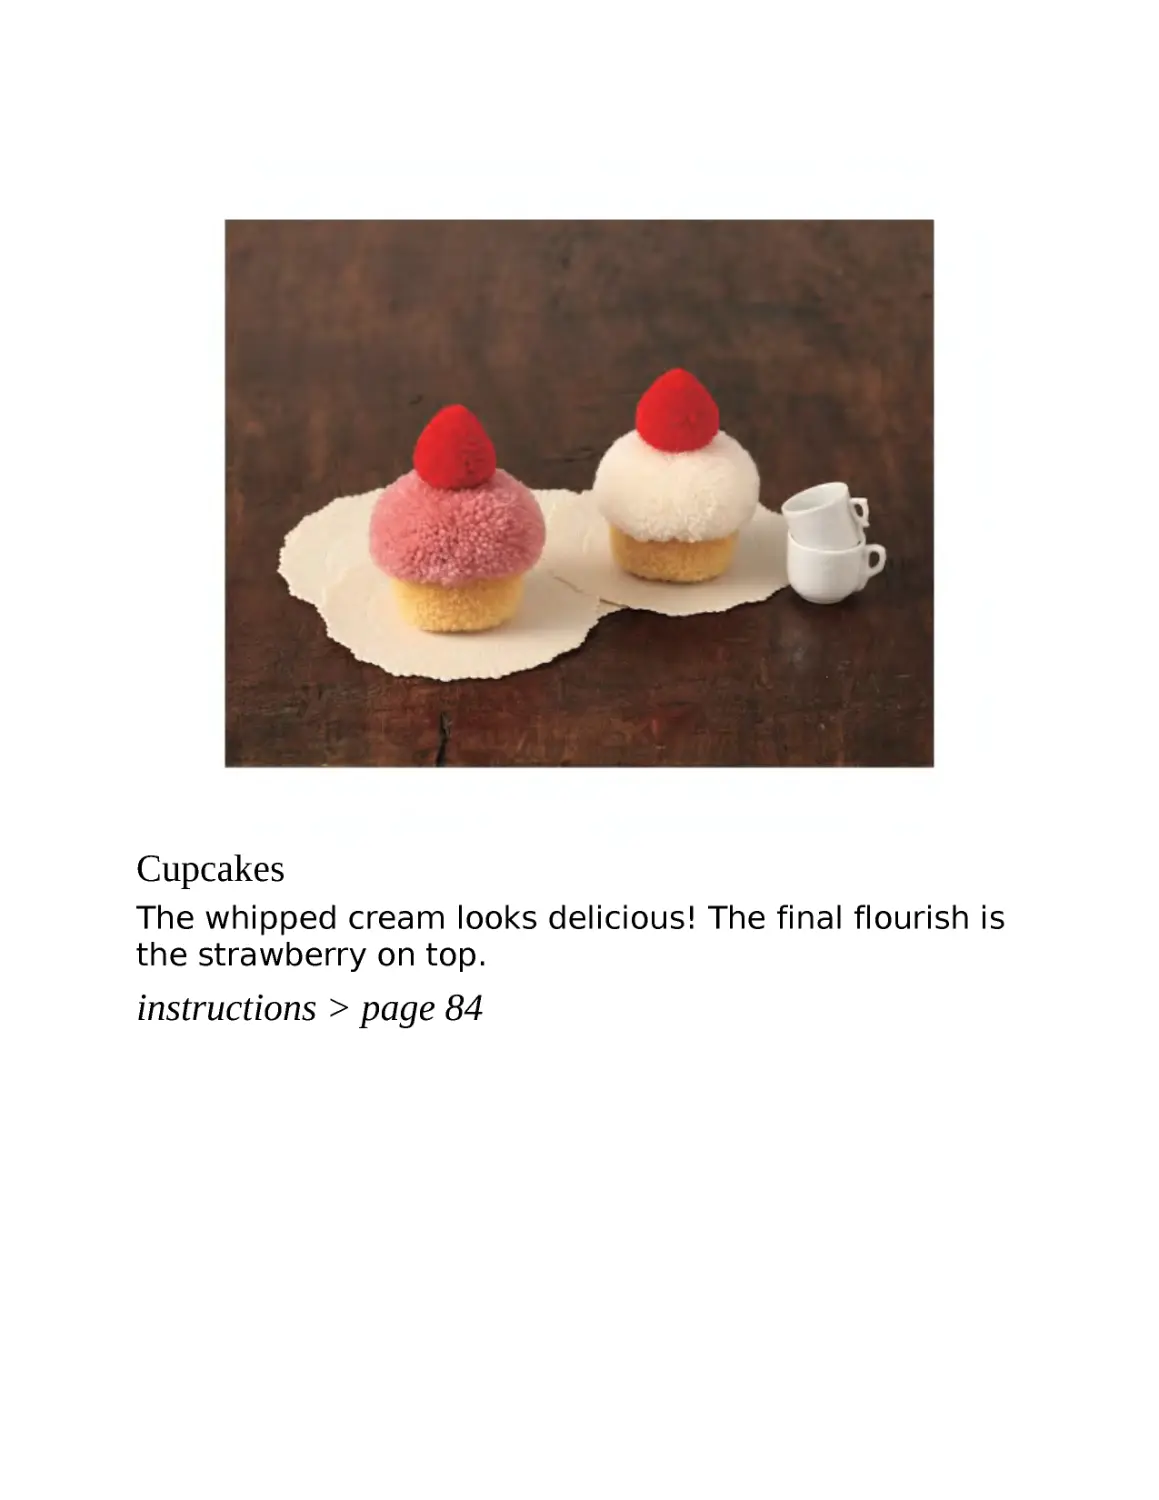
Cupcakes
The whipped cream looks delicious! The final flourish is
the strawberry on top.
instructions > page 84
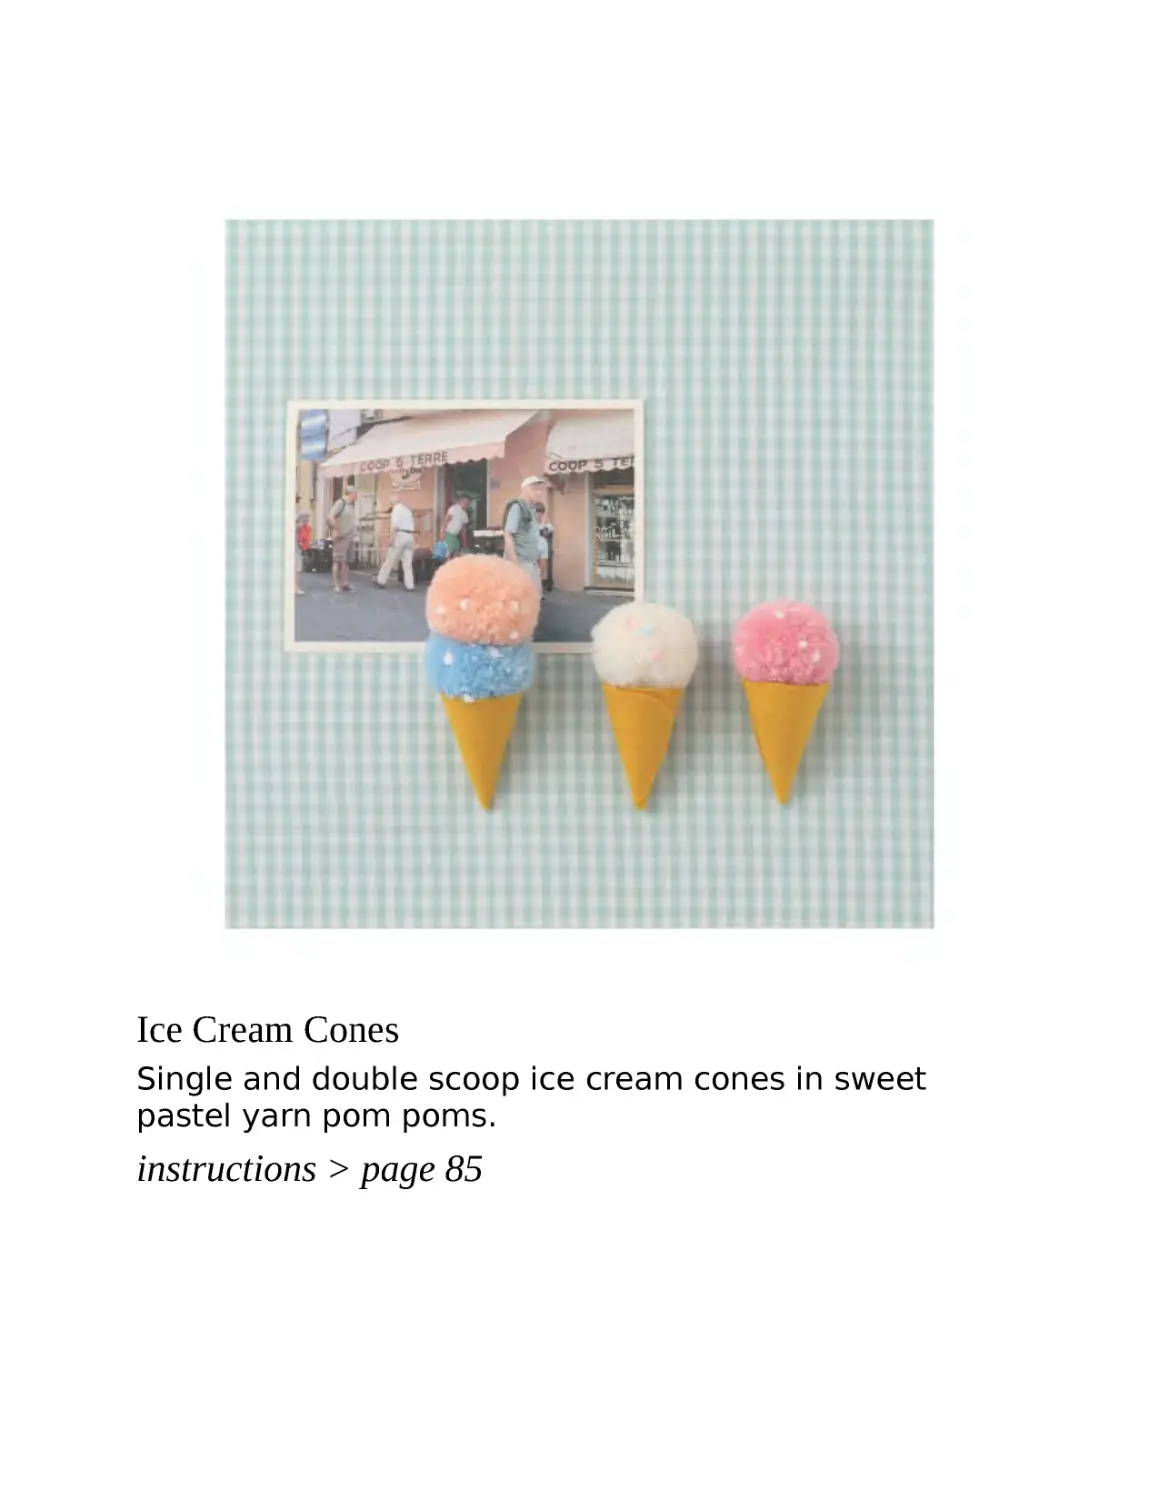
Ice Cream Cones
Single and double scoop ice cream cones in sweet
pastel yarn pom poms.
instructions > page 85
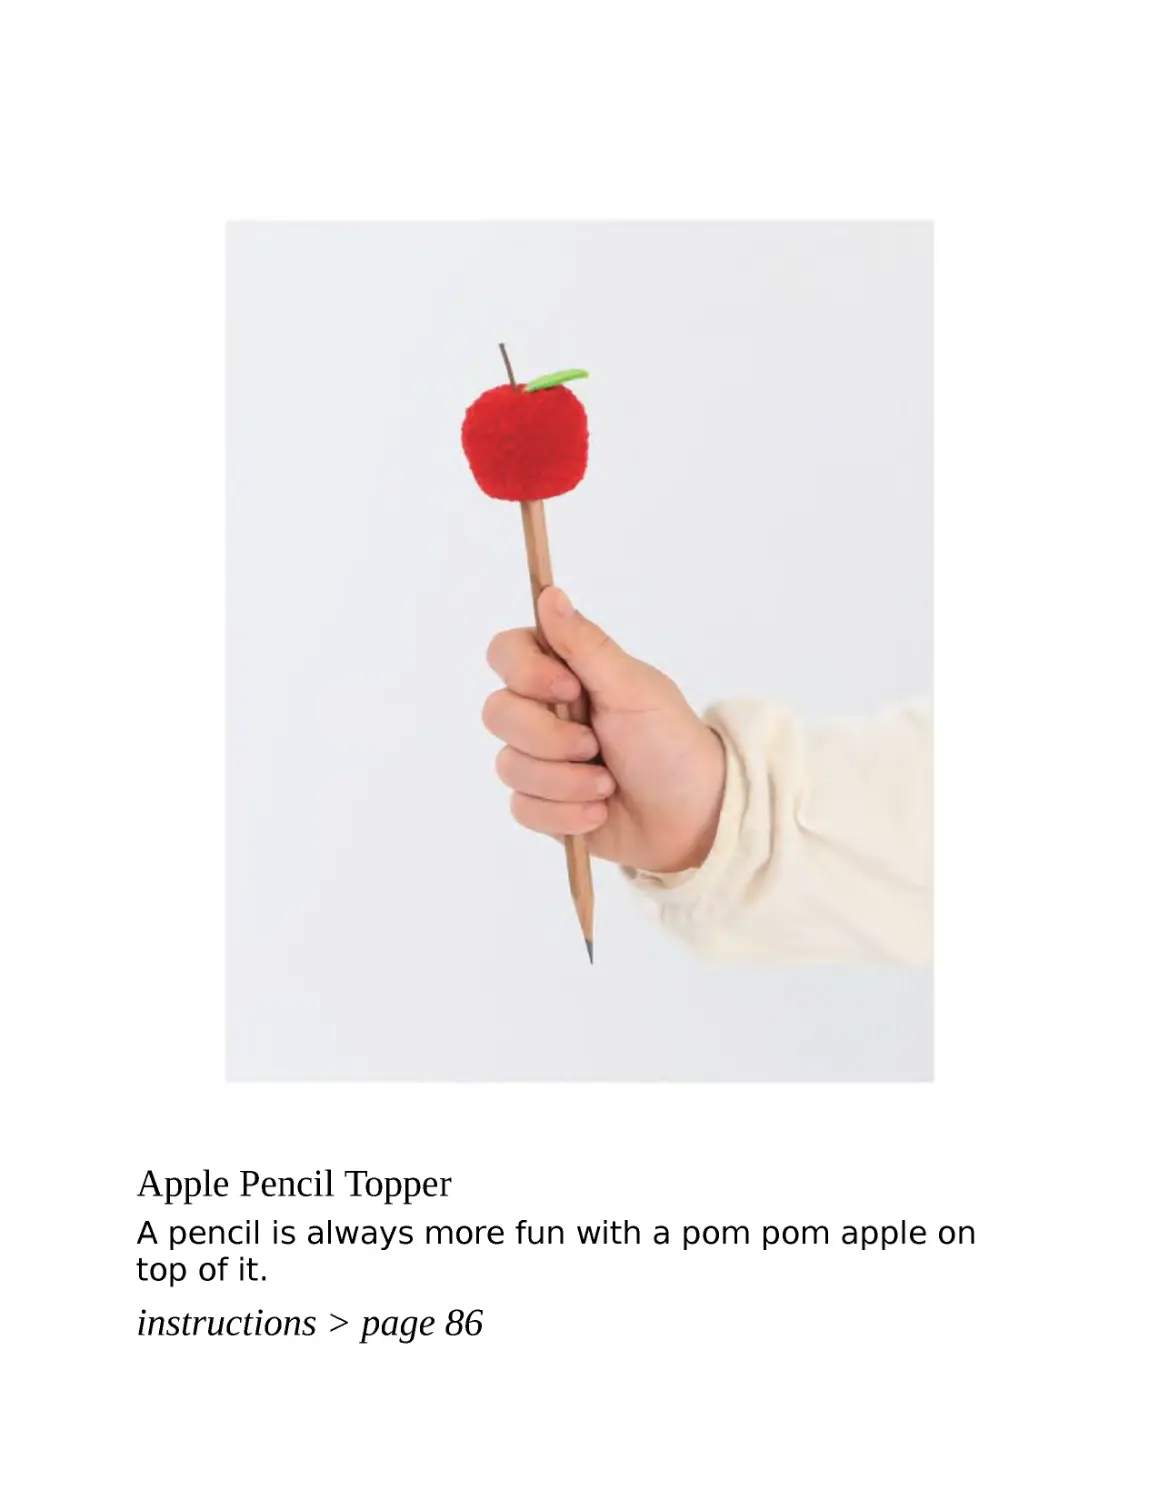
Apple Pencil Topper
A pencil is always more fun with a pom pom apple on
top of it.
instructions > page 86
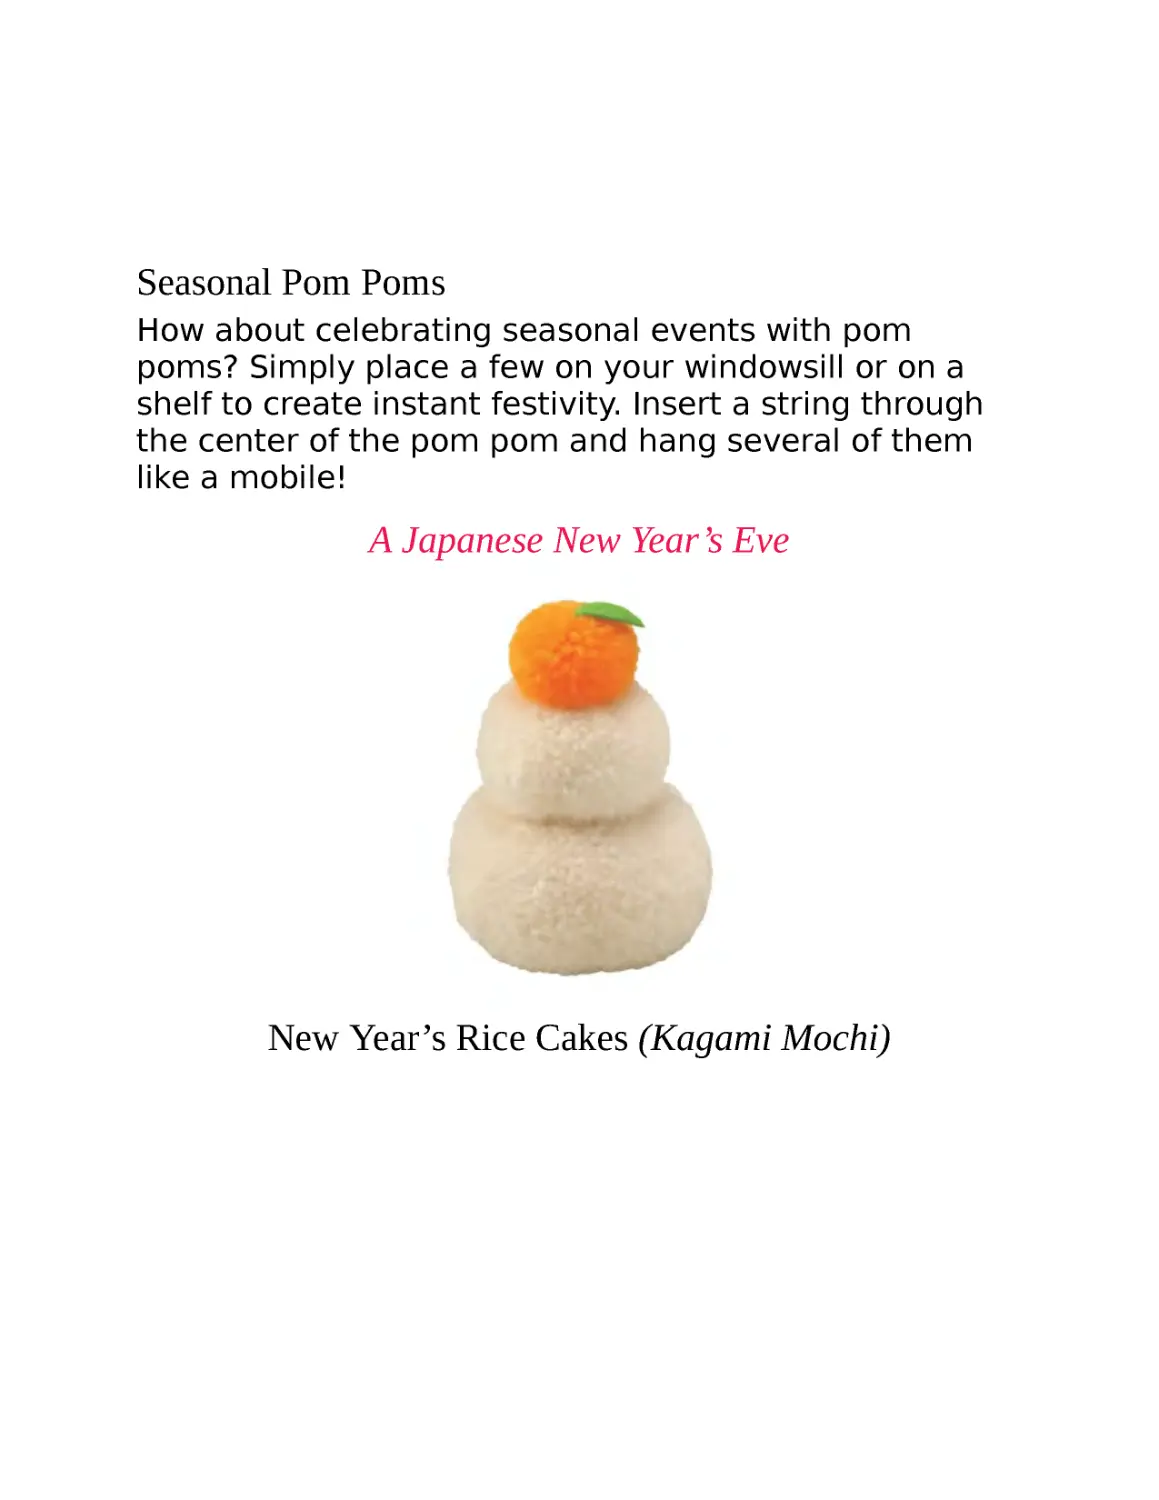
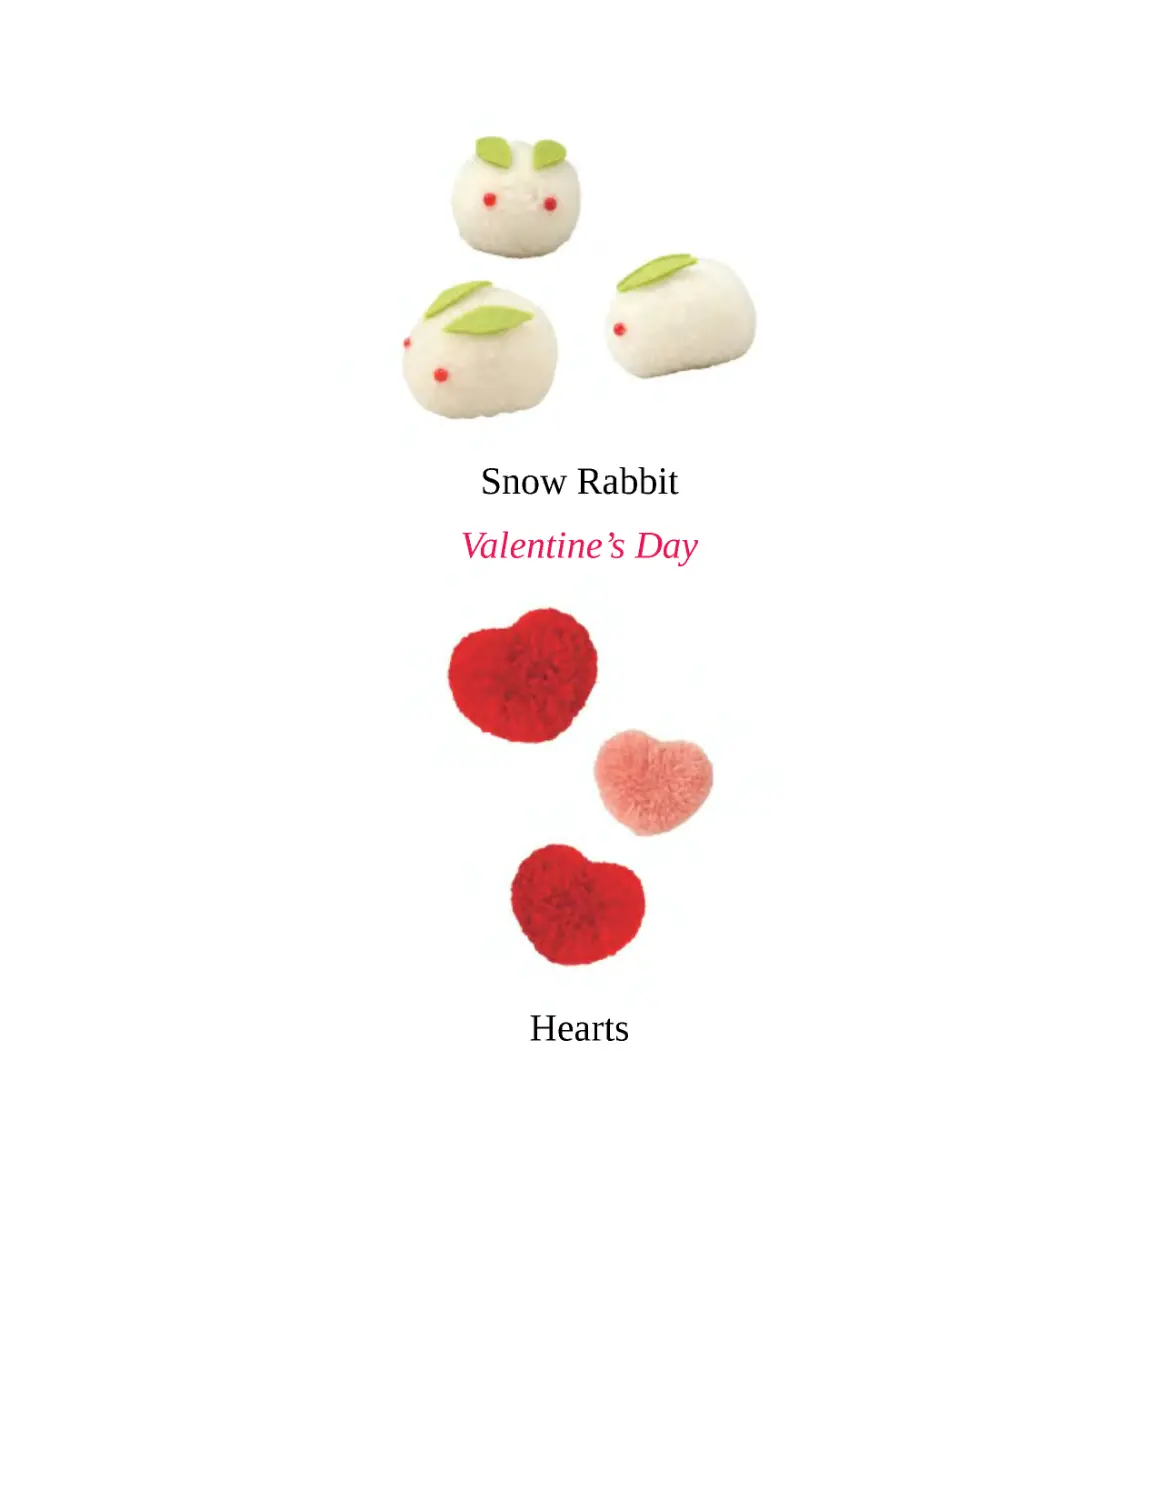
Seasonal Pom Poms
How about celebrating seasonal events with pom
poms? Simply place a few on your windowsill or on a
shelf to create instant festivity. Insert a string through
the center of the pom pom and hang several of them
like a mobile!
A Japanese New Year’s Eve
New Year’s Rice Cakes (Kagami Mochi)
Snow Rabbit
Valentine’s Day
Hearts
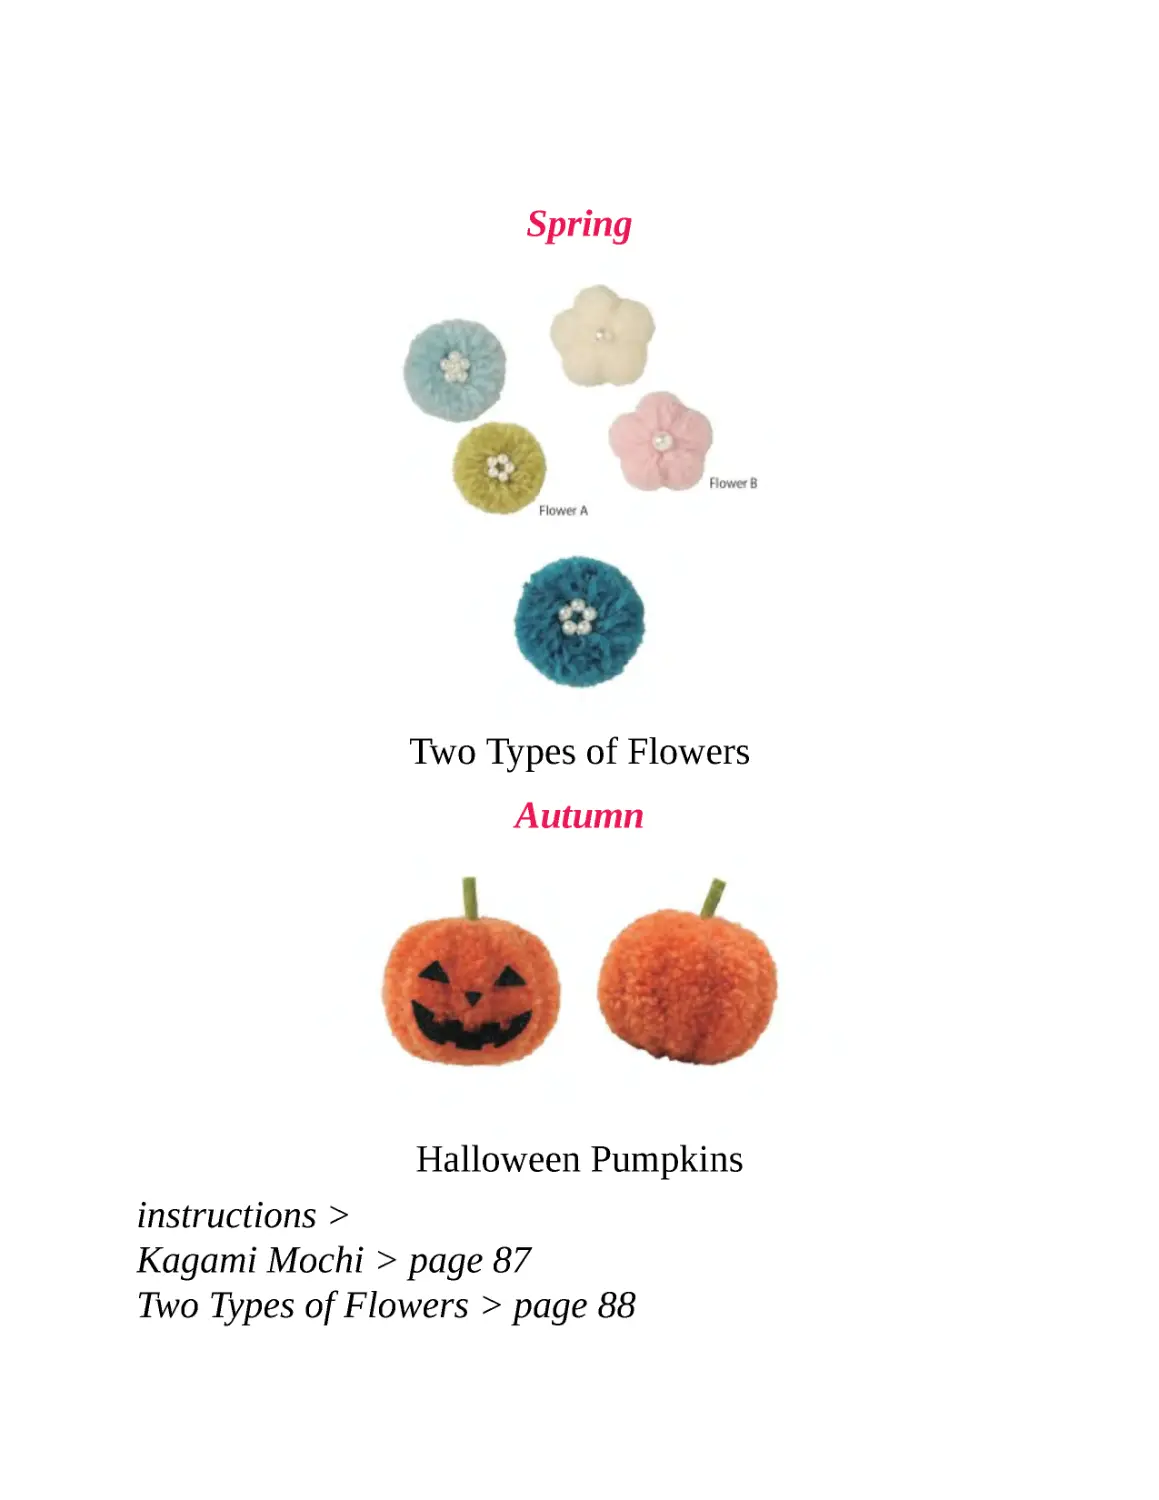
Spring
Two Types of Flowers
Autumn
Halloween Pumpkins
instructions >
Kagami Mochi > page 87
Two Types of Flowers > page 88
Snow Rabbit > page 89
Heart > page 89
Halloween Pumpkin > page 90
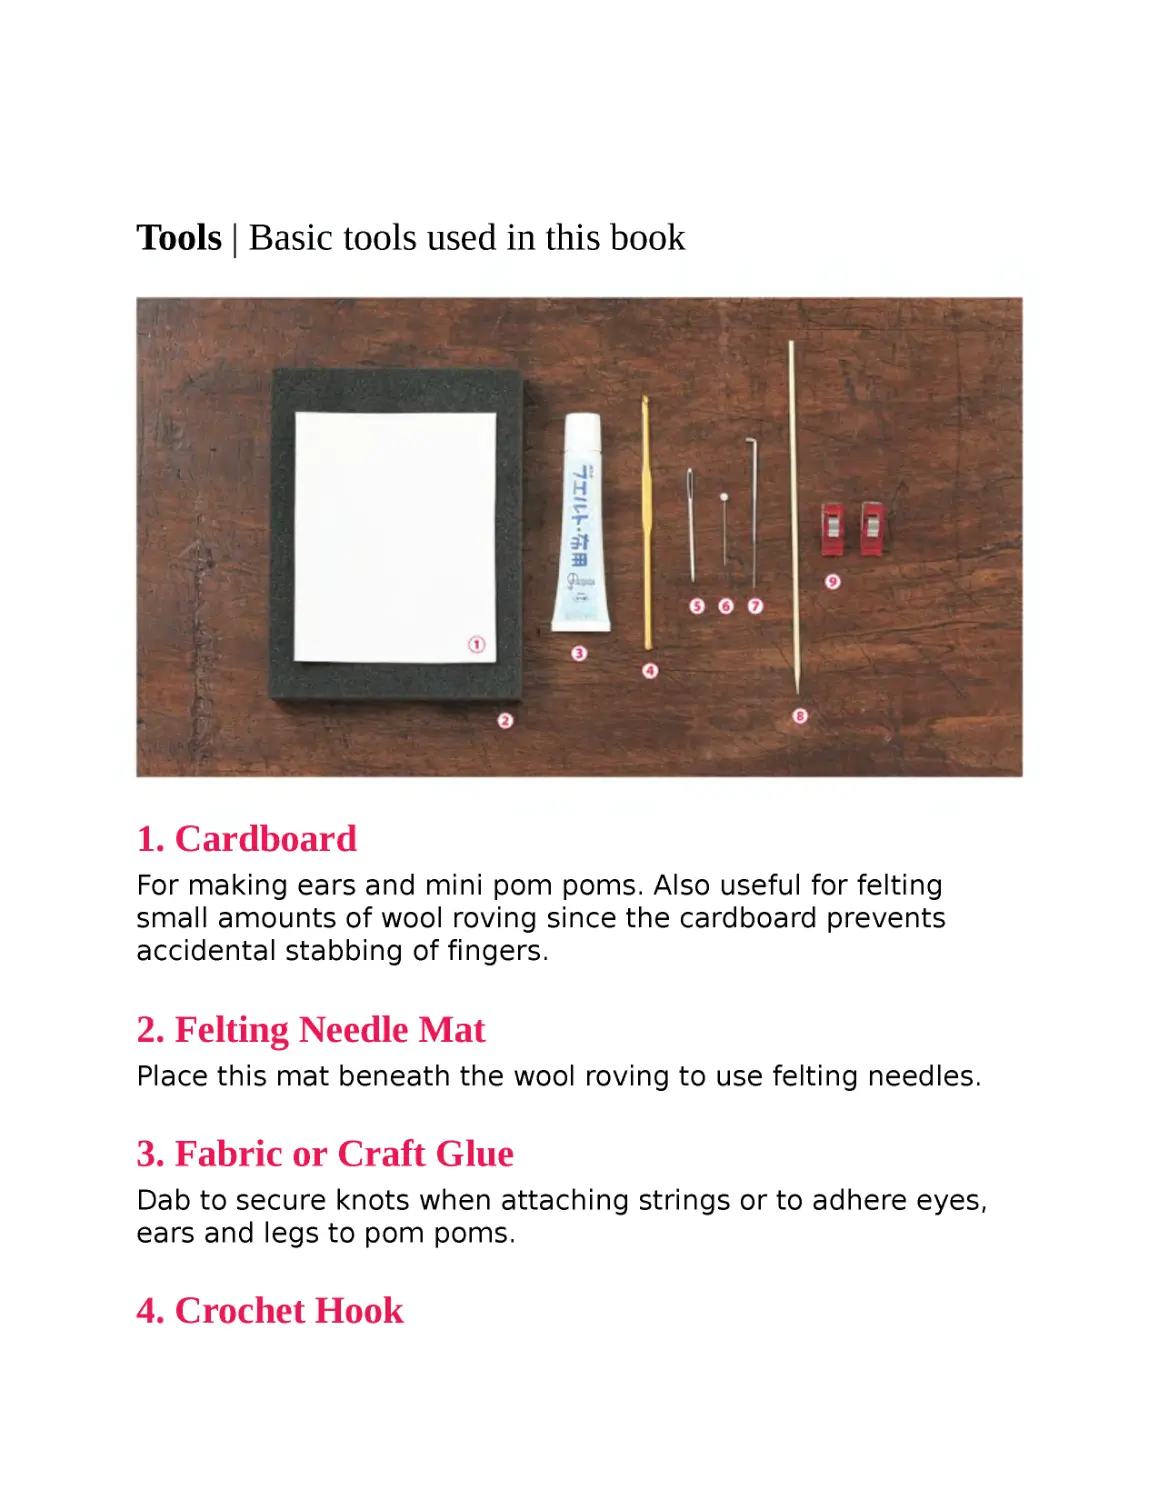
Tools | Basic tools used in this book
1. Cardboard
For making ears and mini pom poms. Also useful for felting
small amounts of wool roving since the cardboard prevents
accidental stabbing of fingers.
2. Felting Needle Mat
Place this mat beneath the wool roving to use felting needles.
3. Fabric or Craft Glue
Dab to secure knots when attaching strings or to adhere eyes,
ears and legs to pom poms.
4. Crochet Hook
Use to connect pom poms together. With larger pom poms, a
yarn darning needle may not be long enough so a crochet hook
is handy to have.
5. Yarn Darning Needle
For connecting ears to the head and such. Select a needle with
an eye that will accommodate the thickest string or yarn you
will be using.
6. Pins
To indicate eyes and nose positions or to mark the crown of the
head when trimming the pom pom.
7. Felting Needle
For felting wool roving. Also used to attach ears, nose and legs
to pom poms (we will refer to it as simply “needle” in this book).
8. Bamboo Stick
Helpful for adding small drops of glue to beads and string knots.
9. Clips
Secure various sections with clips while felt pieces are drying
once glue has been applied to form shapes. Clothespins work as
well. Small sizes are recommended.
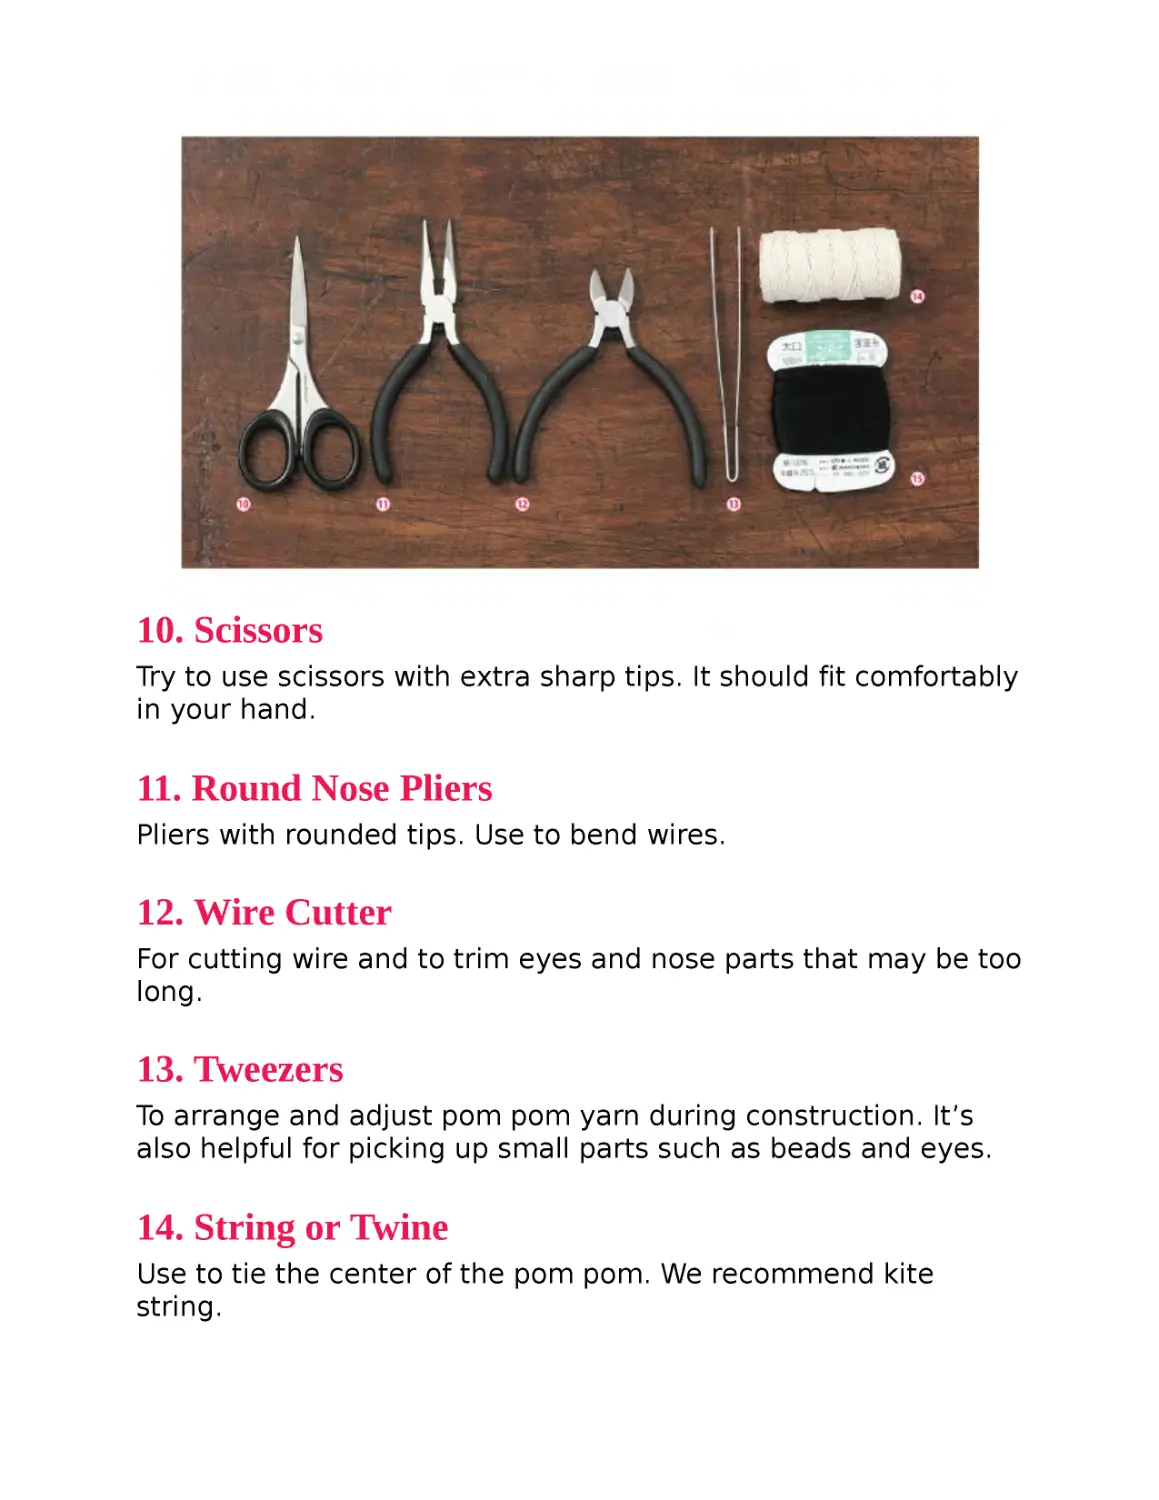
10. Scissors
Try to use scissors with extra sharp tips. It should fit comfortably
in your hand.
11. Round Nose Pliers
Pliers with rounded tips. Use to bend wires.
12. Wire Cutter
For cutting wire and to trim eyes and nose parts that may be too
long.
13. Tweezers
To arrange and adjust pom pom yarn during construction. It’s
also helpful for picking up small parts such as beads and eyes.
14. String or Twine
Use to tie the center of the pom pom. We recommend kite
string.
15. Heavy Duty Sewing Thread
For tying the center of mini-pom poms or to create the mouth
for some of the animals.
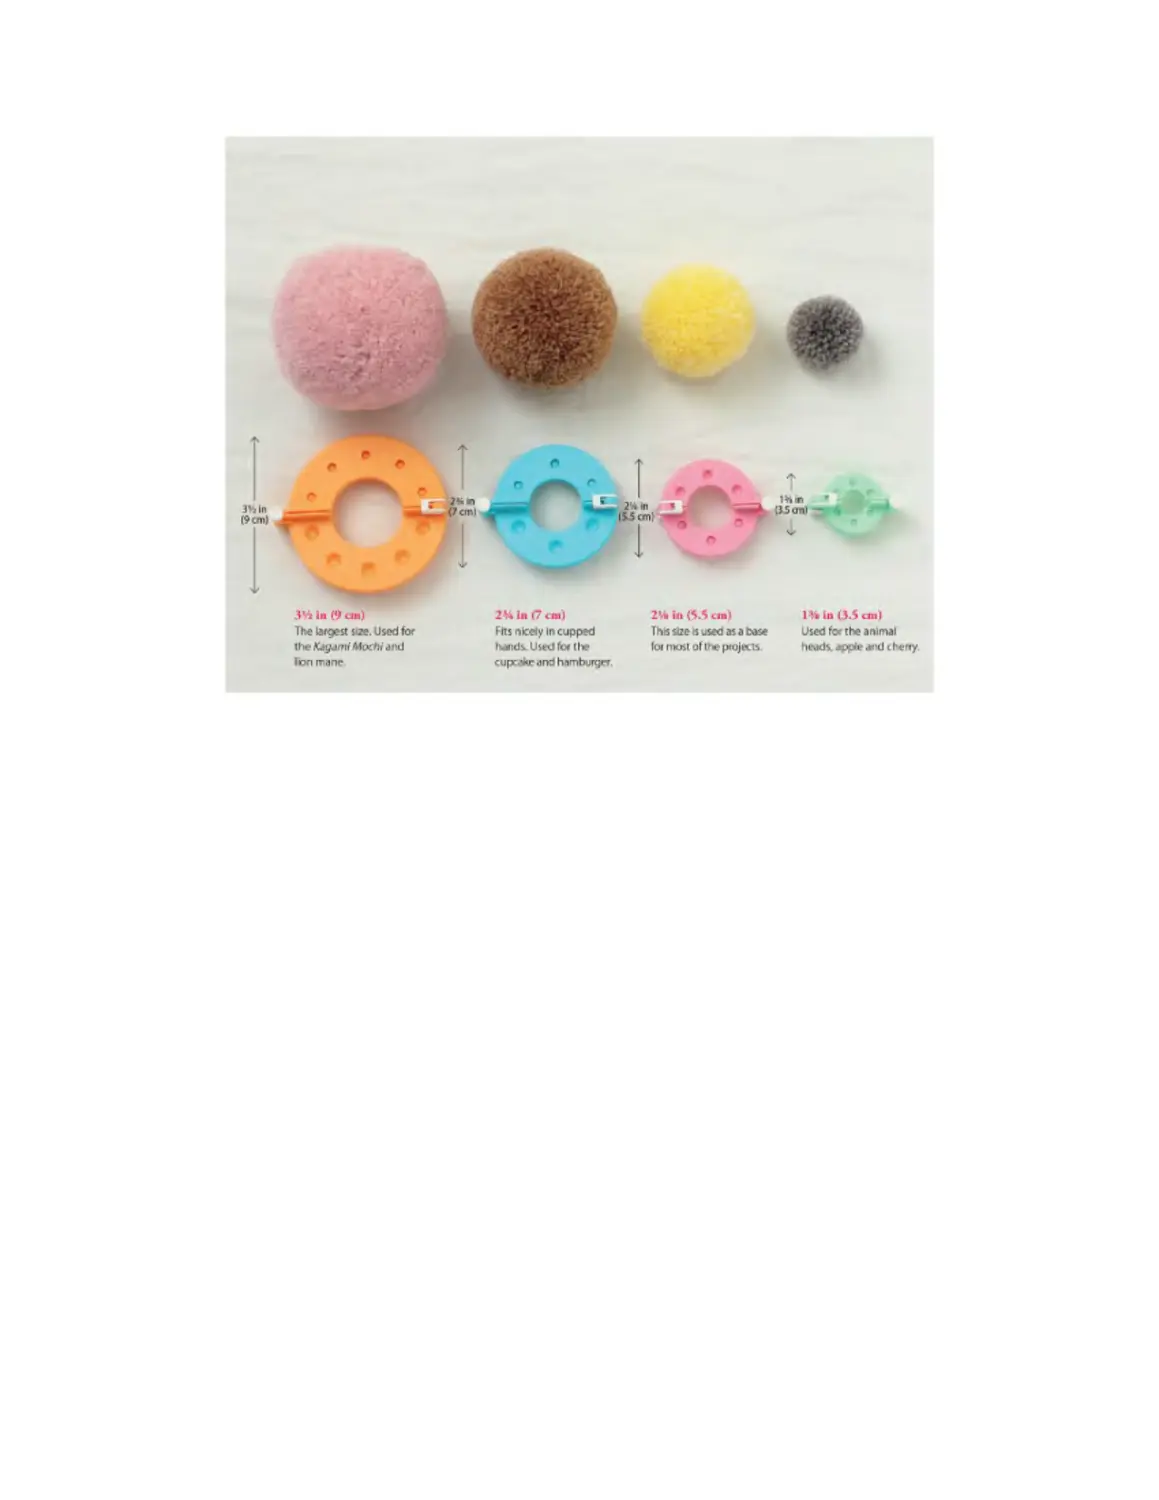
Pom Pom Sizing
Below are the different sizes of pom pom makers and
the corresponding pom poms for reference. Pom pom
density will vary depending on the thickness of the yarn
and the number of times the yarn is wound; some will
be thick and solid, while others may be fluffier and soft.
※The two arms are combined and the yarn is wound on each half.
Instructions will indicate which side to wind first with A. B will be wound
next.
※The pom pom maker used for the projects in these books was
Hamanaka Kuru Kuru Pom Pom Maker, a Japanese brand. Many
different brands are available, such as Clover, Lion and others. Sizes,
design and instructions for use vary from brand to brand, so it’s a good
idea to visit craft shops for a good look, and check out YouTube videos to
see how they’re used. Buying a set is a good idea too, so that the
different sizes will be in proportion with one another.
Tips
Other than the 1⅜ in (3.5 cm) pom pom maker size, winding
the yarn tightly will result in an elliptical shape instead of a
circle. This shape can be used in a variety of ways such as
the animal body.
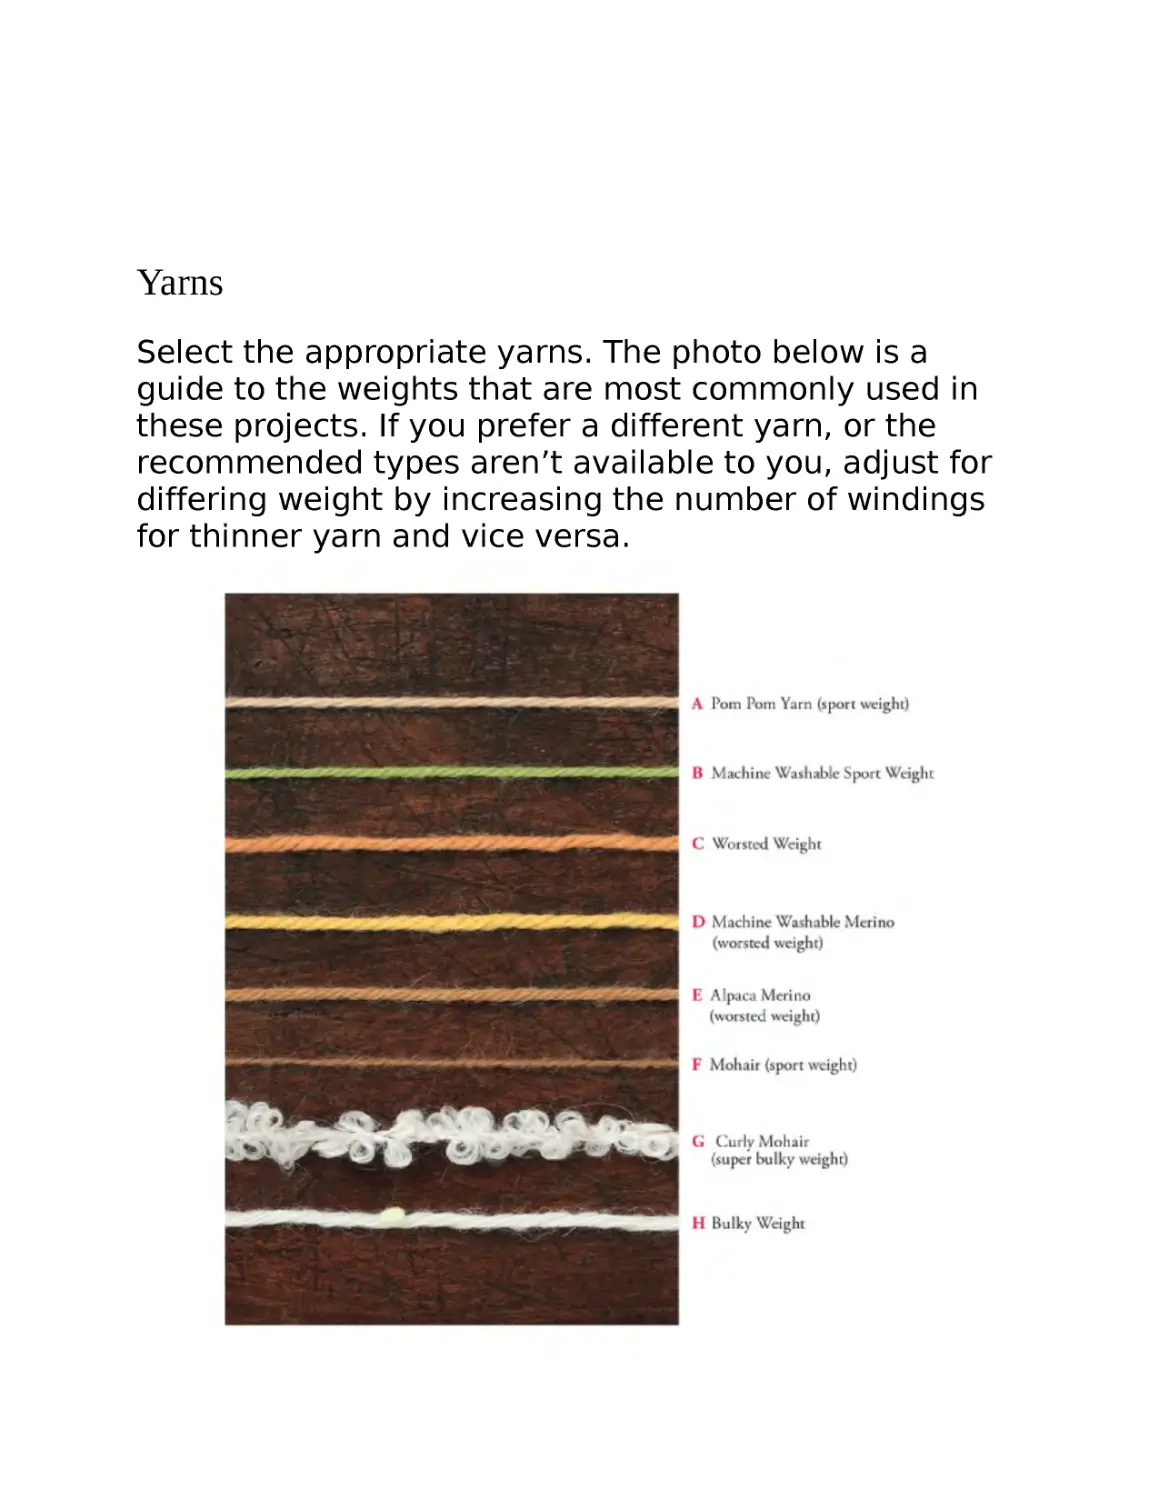
Yarns
Select the appropriate yarns. The photo below is a
guide to the weights that are most commonly used in
these projects. If you prefer a different yarn, or the
recommended types aren’t available to you, adjust for
differing weight by increasing the number of windings
for thinner yarn and vice versa.
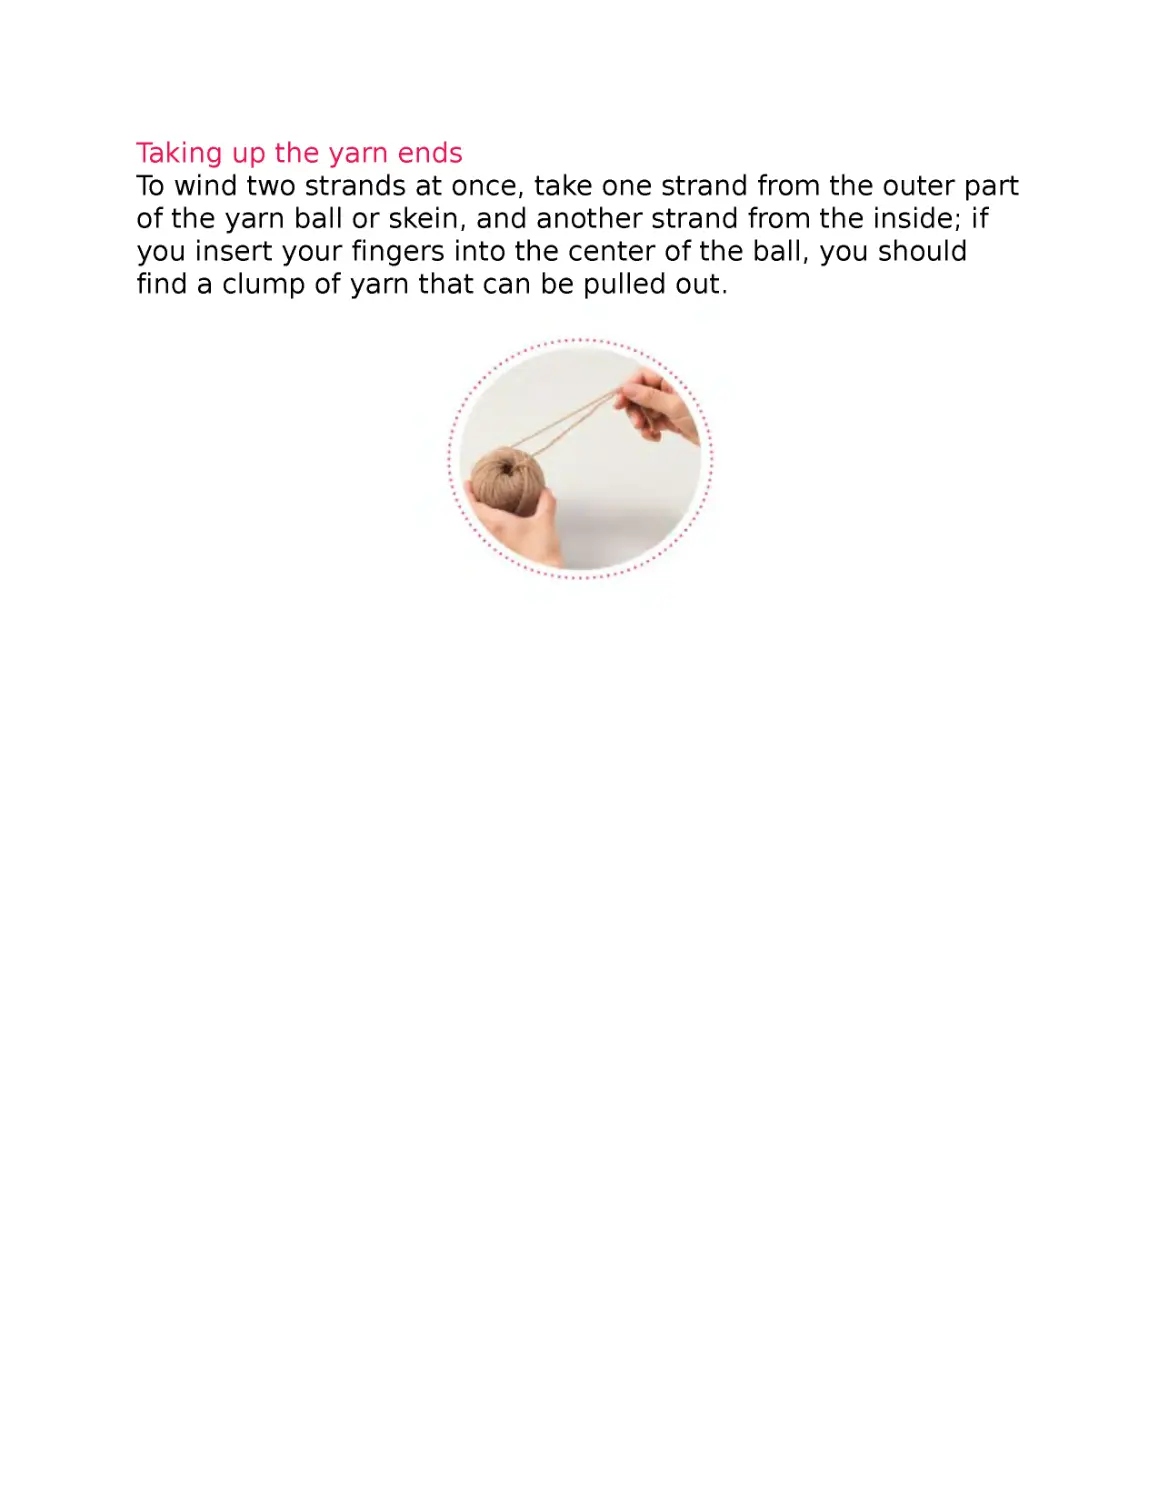
Taking up the yarn ends
To wind two strands at once, take one strand from the outer part
of the yarn ball or skein, and another strand from the inside; if
you insert your fingers into the center of the ball, you should
find a clump of yarn that can be pulled out.
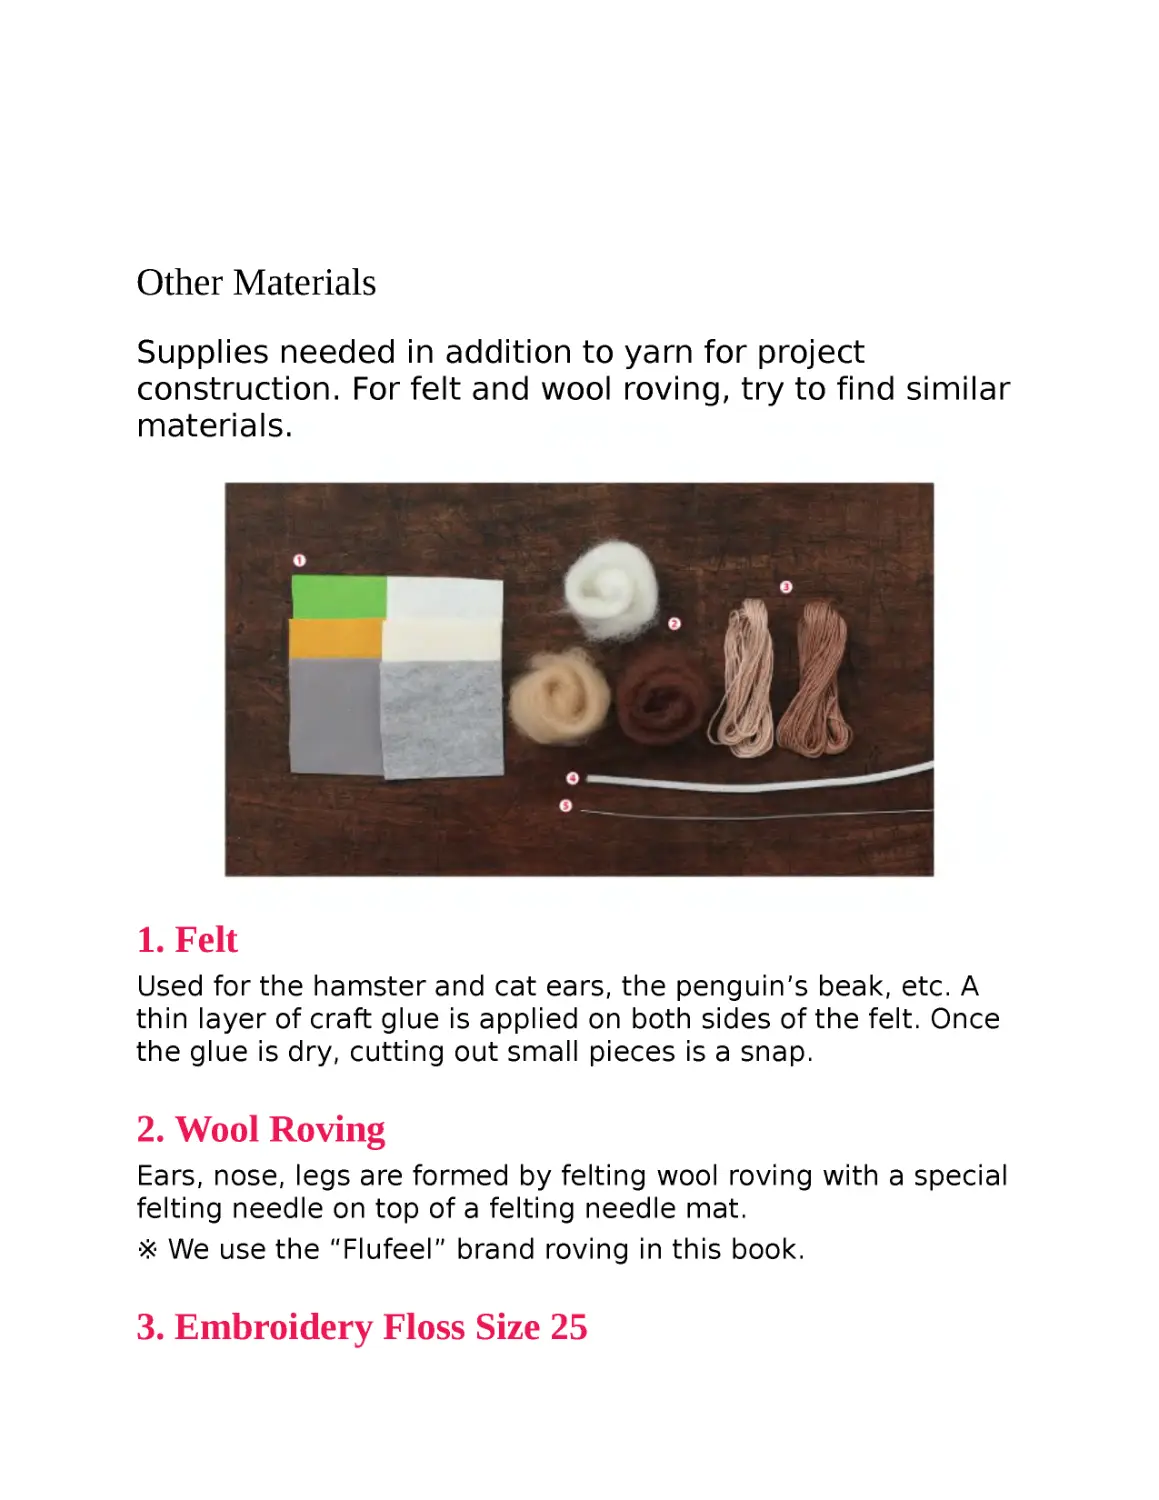
Other Materials
Supplies needed in addition to yarn for project
construction. For felt and wool roving, try to find similar
materials.
1. Felt
Used for the hamster and cat ears, the penguin’s beak, etc. A
thin layer of craft glue is applied on both sides of the felt. Once
the glue is dry, cutting out small pieces is a snap.
2. Wool Roving
Ears, nose, legs are formed by felting wool roving with a special
felting needle on top of a felting needle mat.
※ We use the “Flufeel” brand roving in this book.
3. Embroidery Floss Size 25
Create the chick’s legs by wrapping the embroidery floss around
a piece of wire.
4. Pipe Cleaner
By wrapping wool roving around the pipe cleaner and using a
needle to felt it, the elephant’s nose and cat’s tail can be
shaped.
5. Wire
For the chick’s leg and fried shrimp.
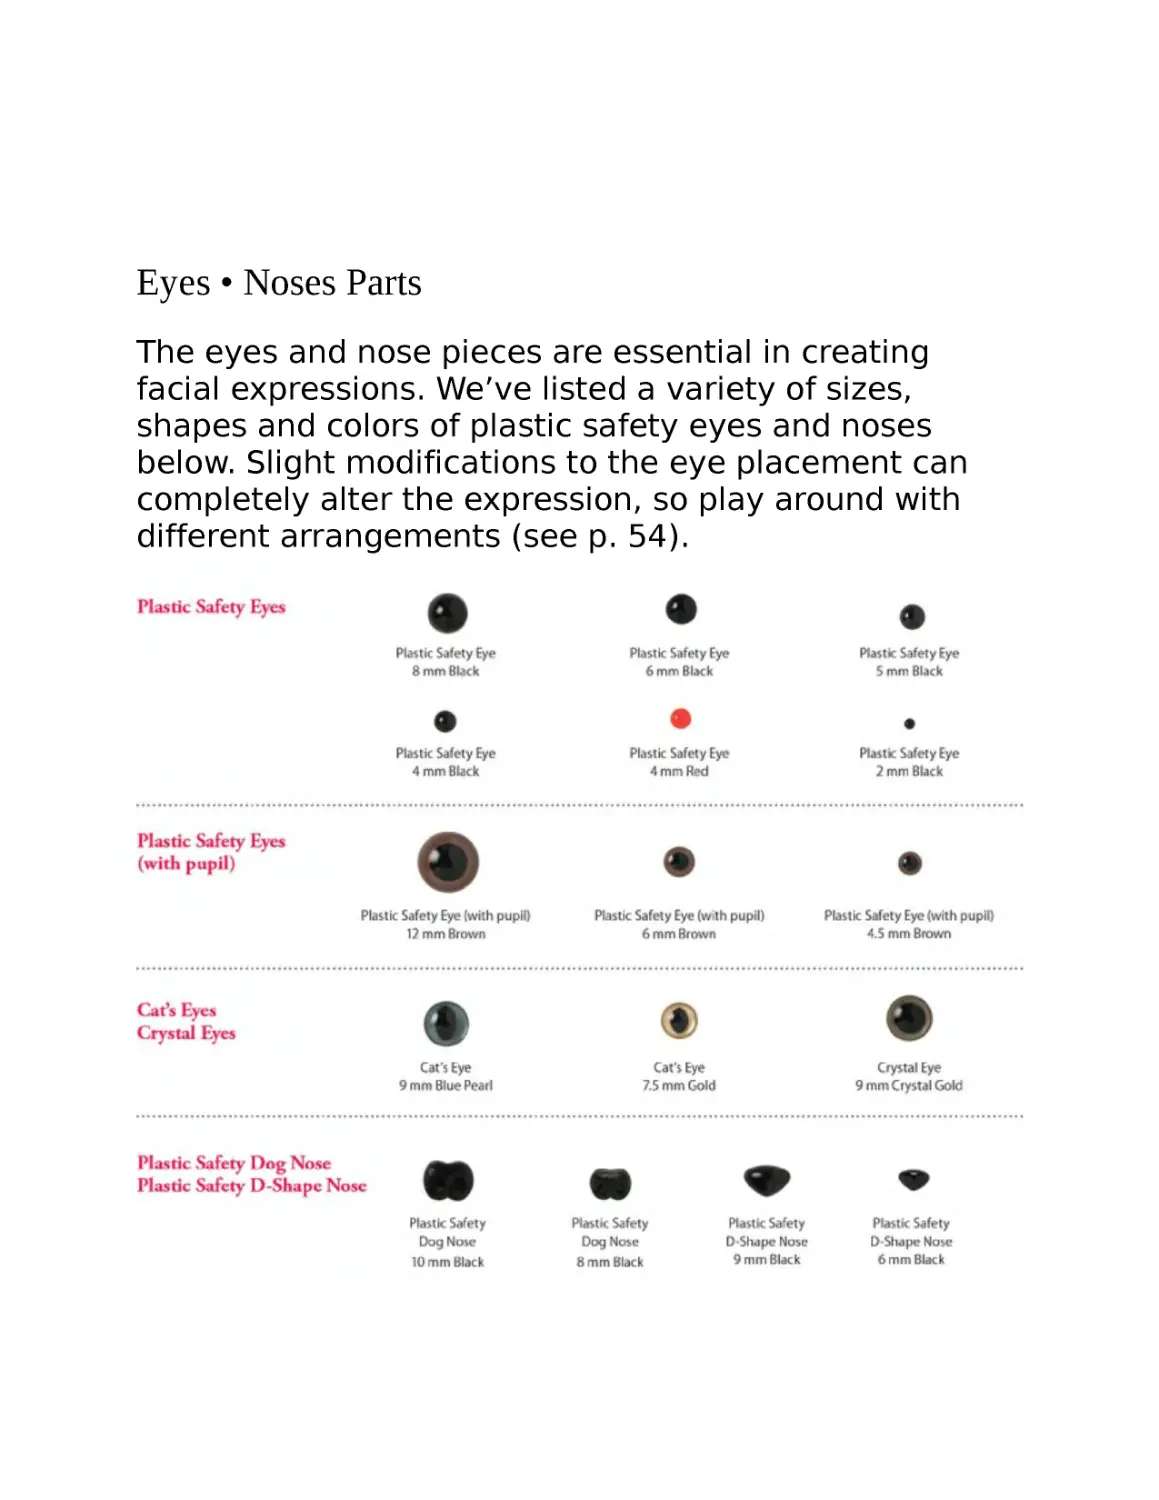
Eyes • Noses Parts
The eyes and nose pieces are essential in creating
facial expressions. We’ve listed a variety of sizes,
shapes and colors of plastic safety eyes and noses
below. Slight modifications to the eye placement can
completely alter the expression, so play around with
different arrangements (see p. 54).
Pom Pom Basics 1
Let’s Make a Chick Hair Tie
(Template on page 45)
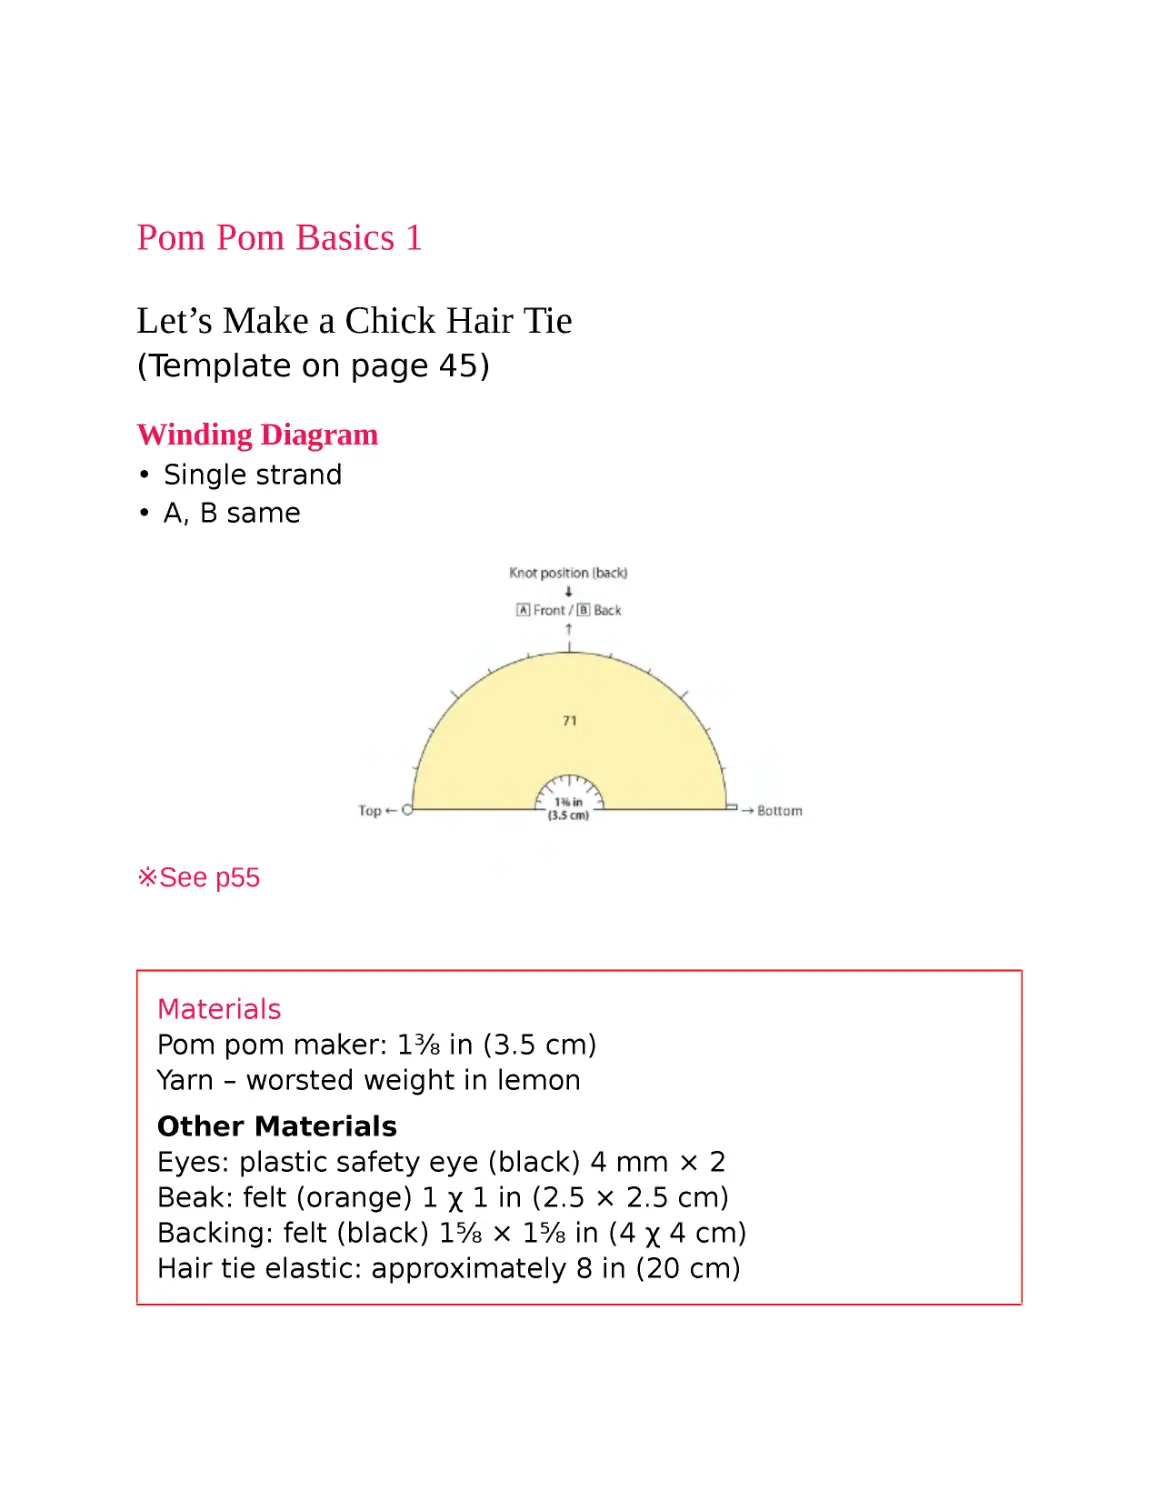
Winding Diagram
• Single strand
• A, B same
※See p55
Materials
Pom pom maker: 1⅜ in (3.5 cm)
Yarn – worsted weight in lemon
Other Materials
Eyes: plastic safety eye (black) 4 mm × 2
Beak: felt (orange) 1 χ 1 in (2.5 × 2.5 cm)
Backing: felt (black) 1⅝ × 1⅝ in (4 χ 4 cm)
Hair tie elastic: approximately 8 in (20 cm)
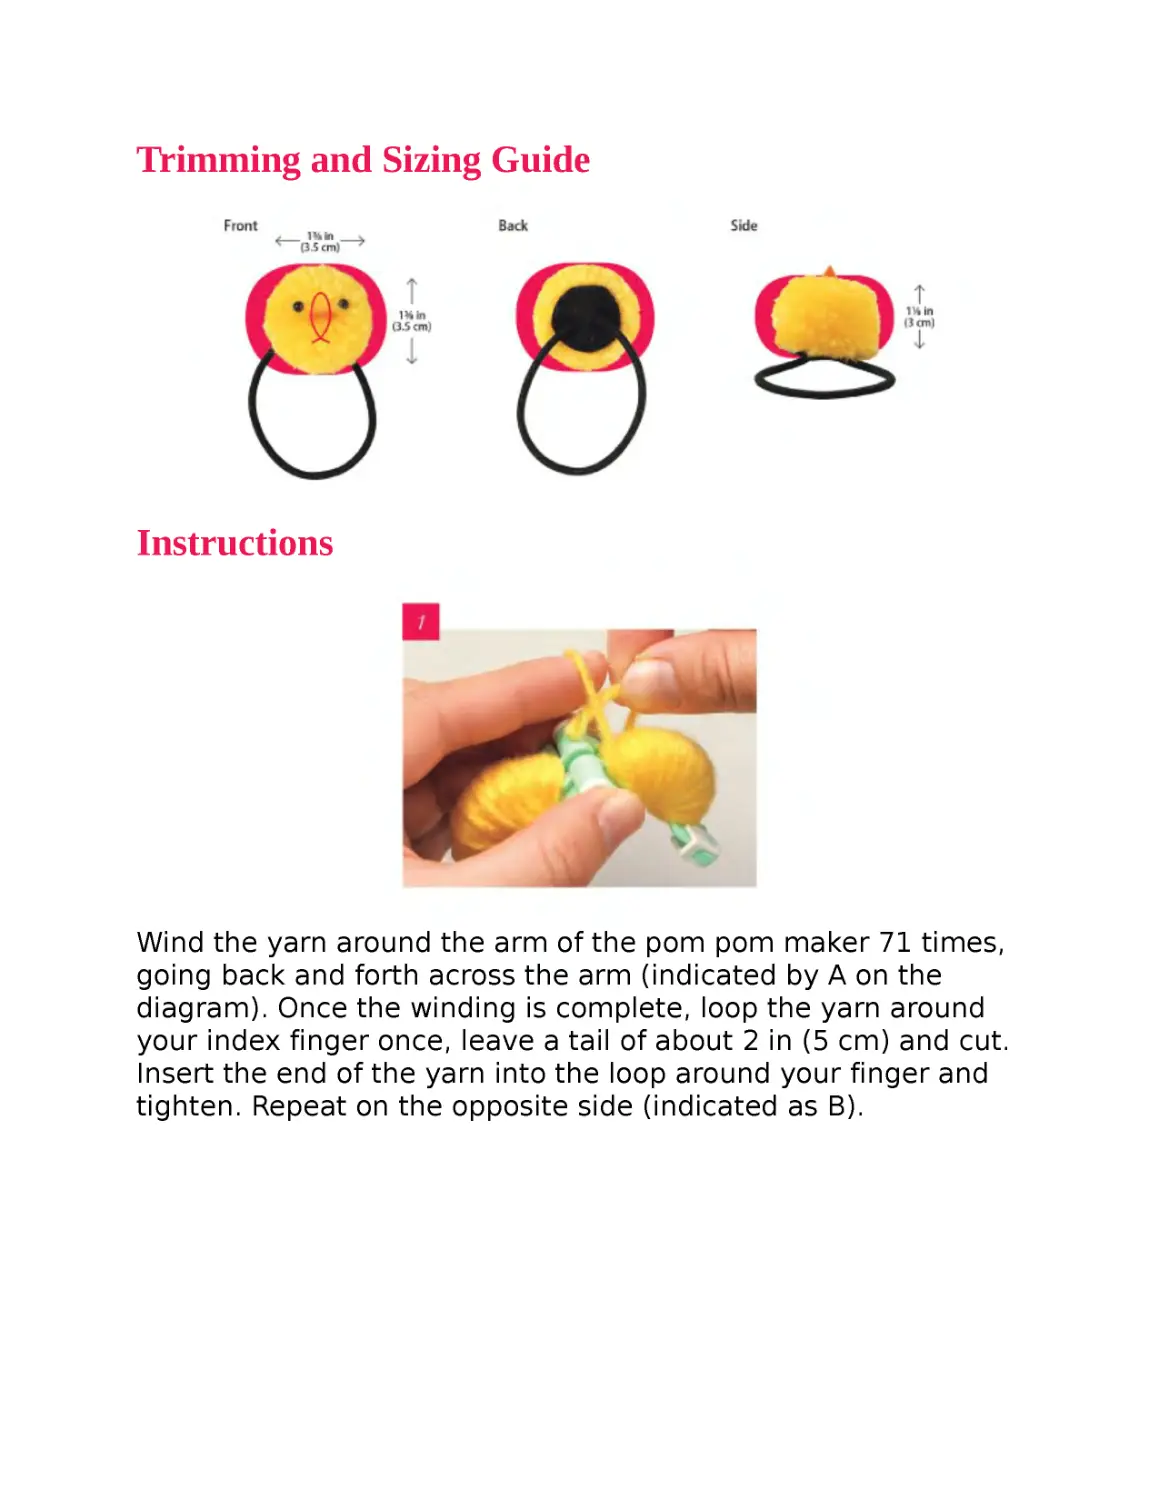
Trimming and Sizing Guide
Instructions
Wind the yarn around the arm of the pom pom maker 71 times,
going back and forth across the arm (indicated by A on the
diagram). Once the winding is complete, loop the yarn around
your index finger once, leave a tail of about 2 in (5 cm) and cut.
Insert the end of the yarn into the loop around your finger and
tighten. Repeat on the opposite side (indicated as B).
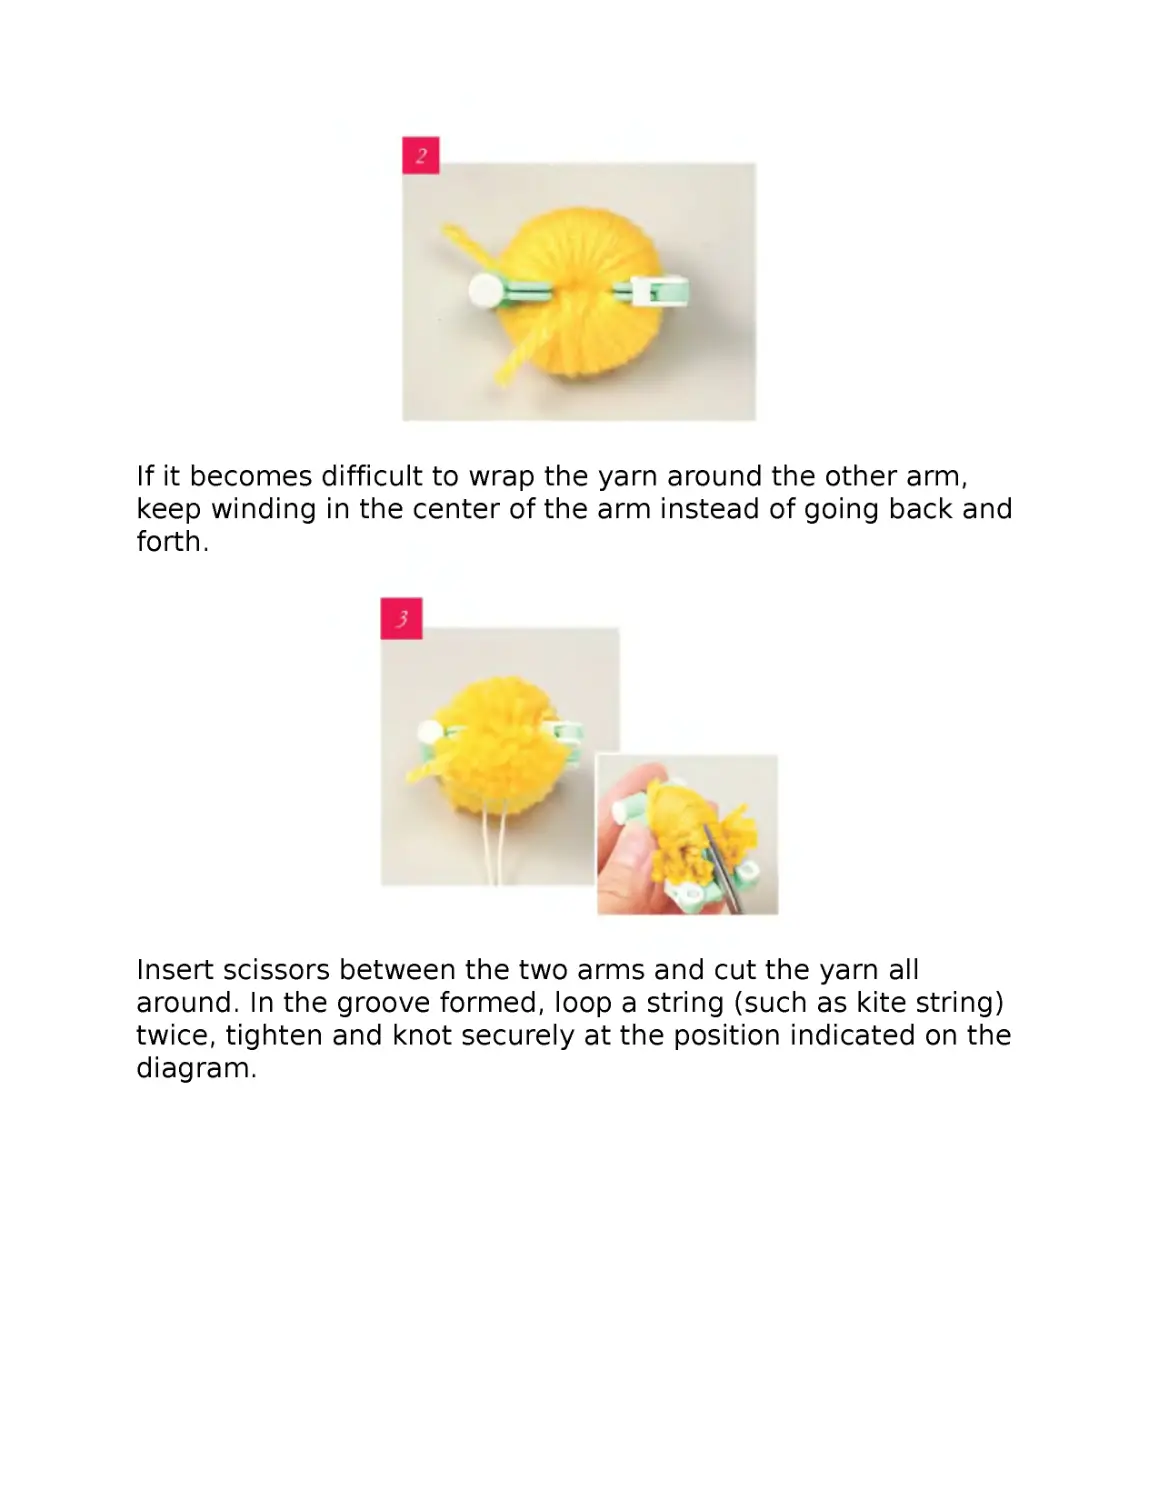
If it becomes difficult to wrap the yarn around the other arm,
keep winding in the center of the arm instead of going back and
forth.
Insert scissors between the two arms and cut the yarn all
around. In the groove formed, loop a string (such as kite string)
twice, tighten and knot securely at the position indicated on the
diagram.
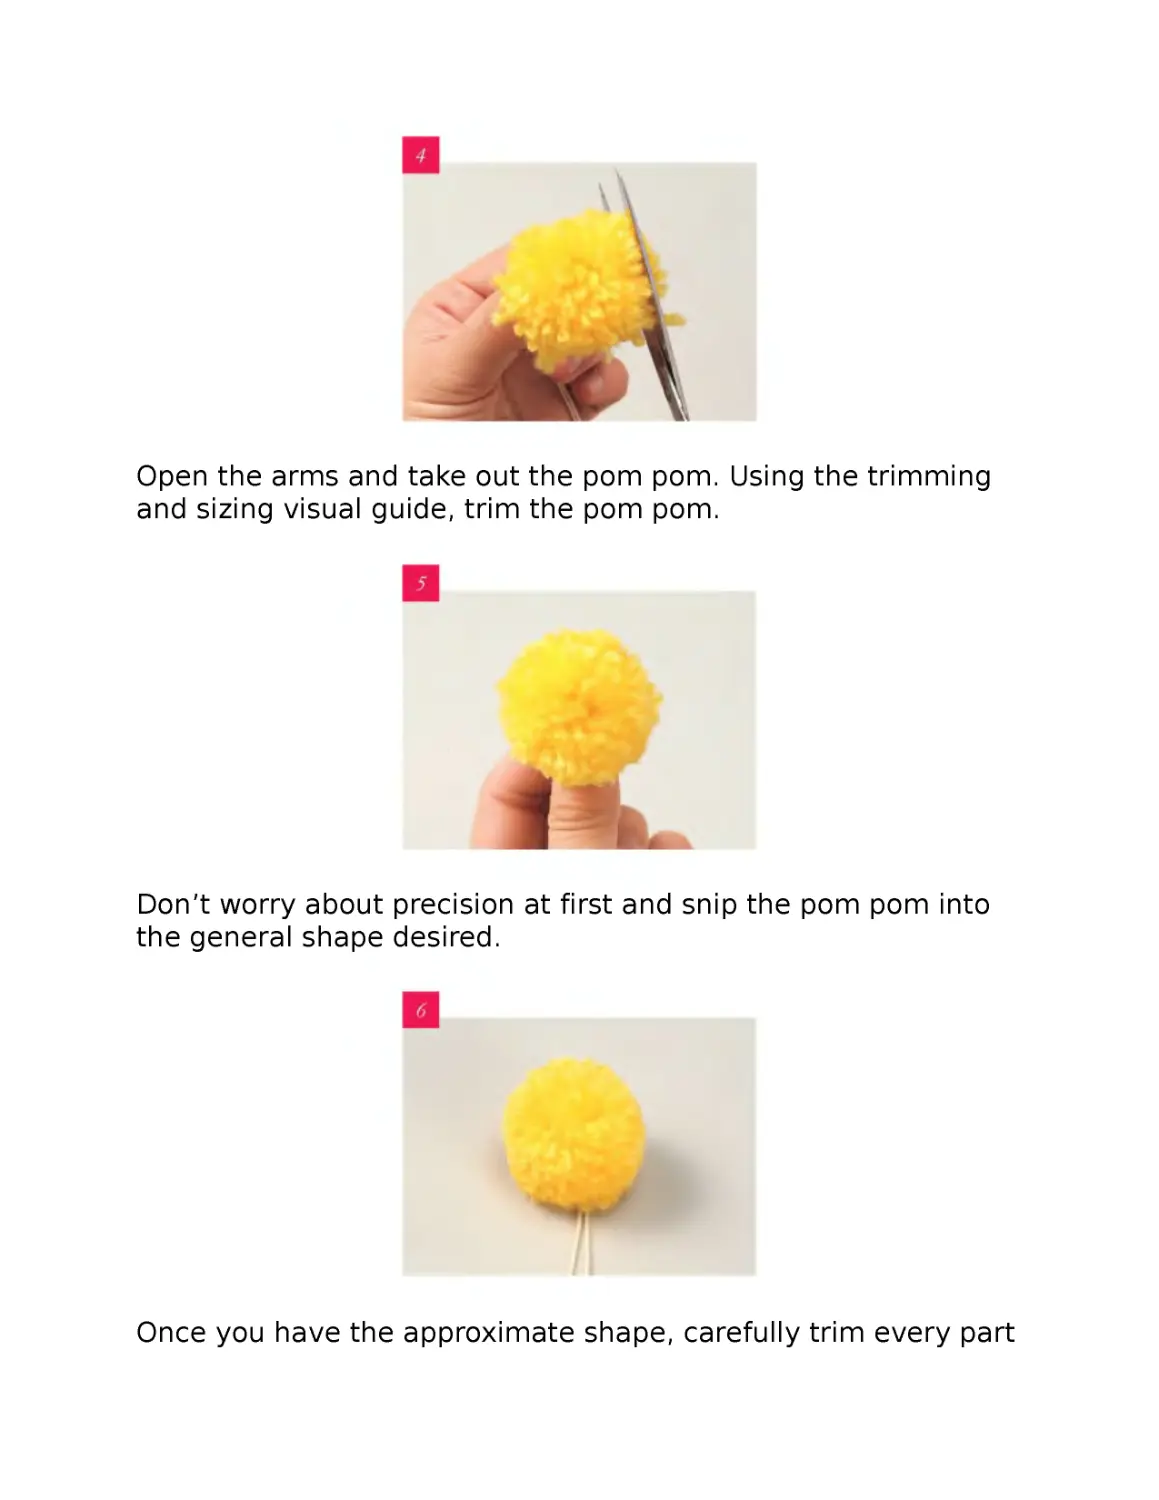
Open the arms and take out the pom pom. Using the trimming
and sizing visual guide, trim the pom pom.
Don’t worry about precision at first and snip the pom pom into
the general shape desired.
Once you have the approximate shape, carefully trim every part
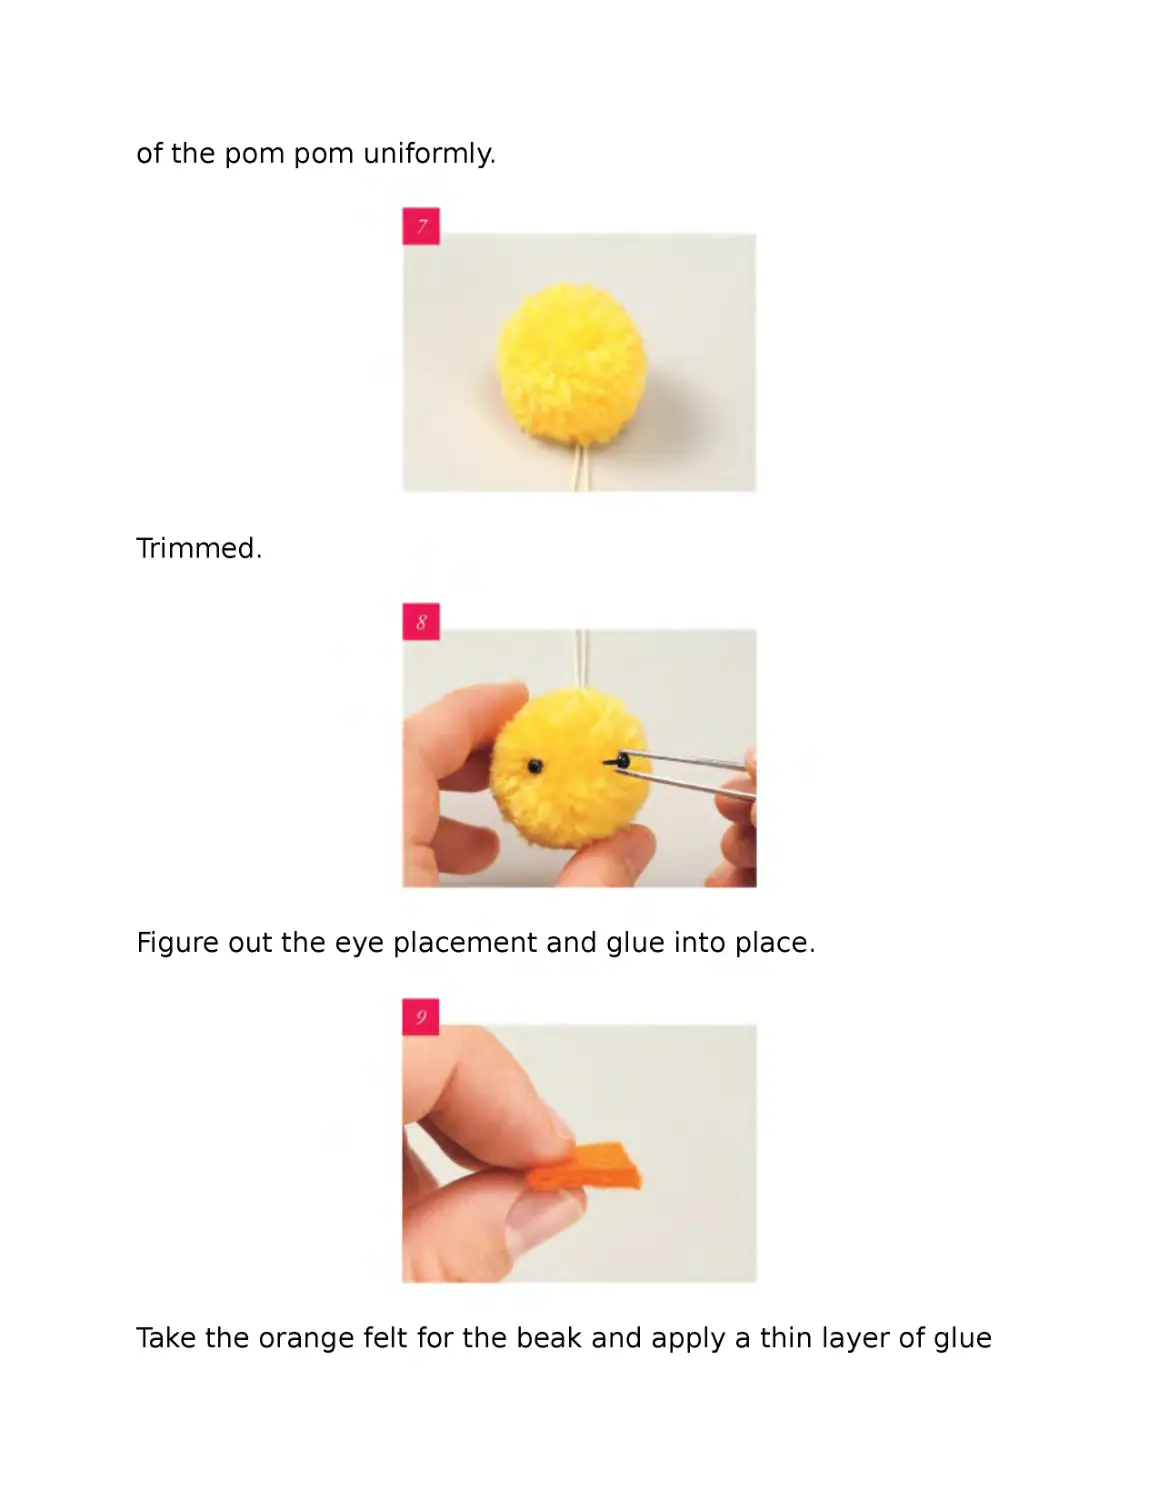
of the pom pom uniformly.
Trimmed.
Figure out the eye placement and glue into place.
Take the orange felt for the beak and apply a thin layer of glue
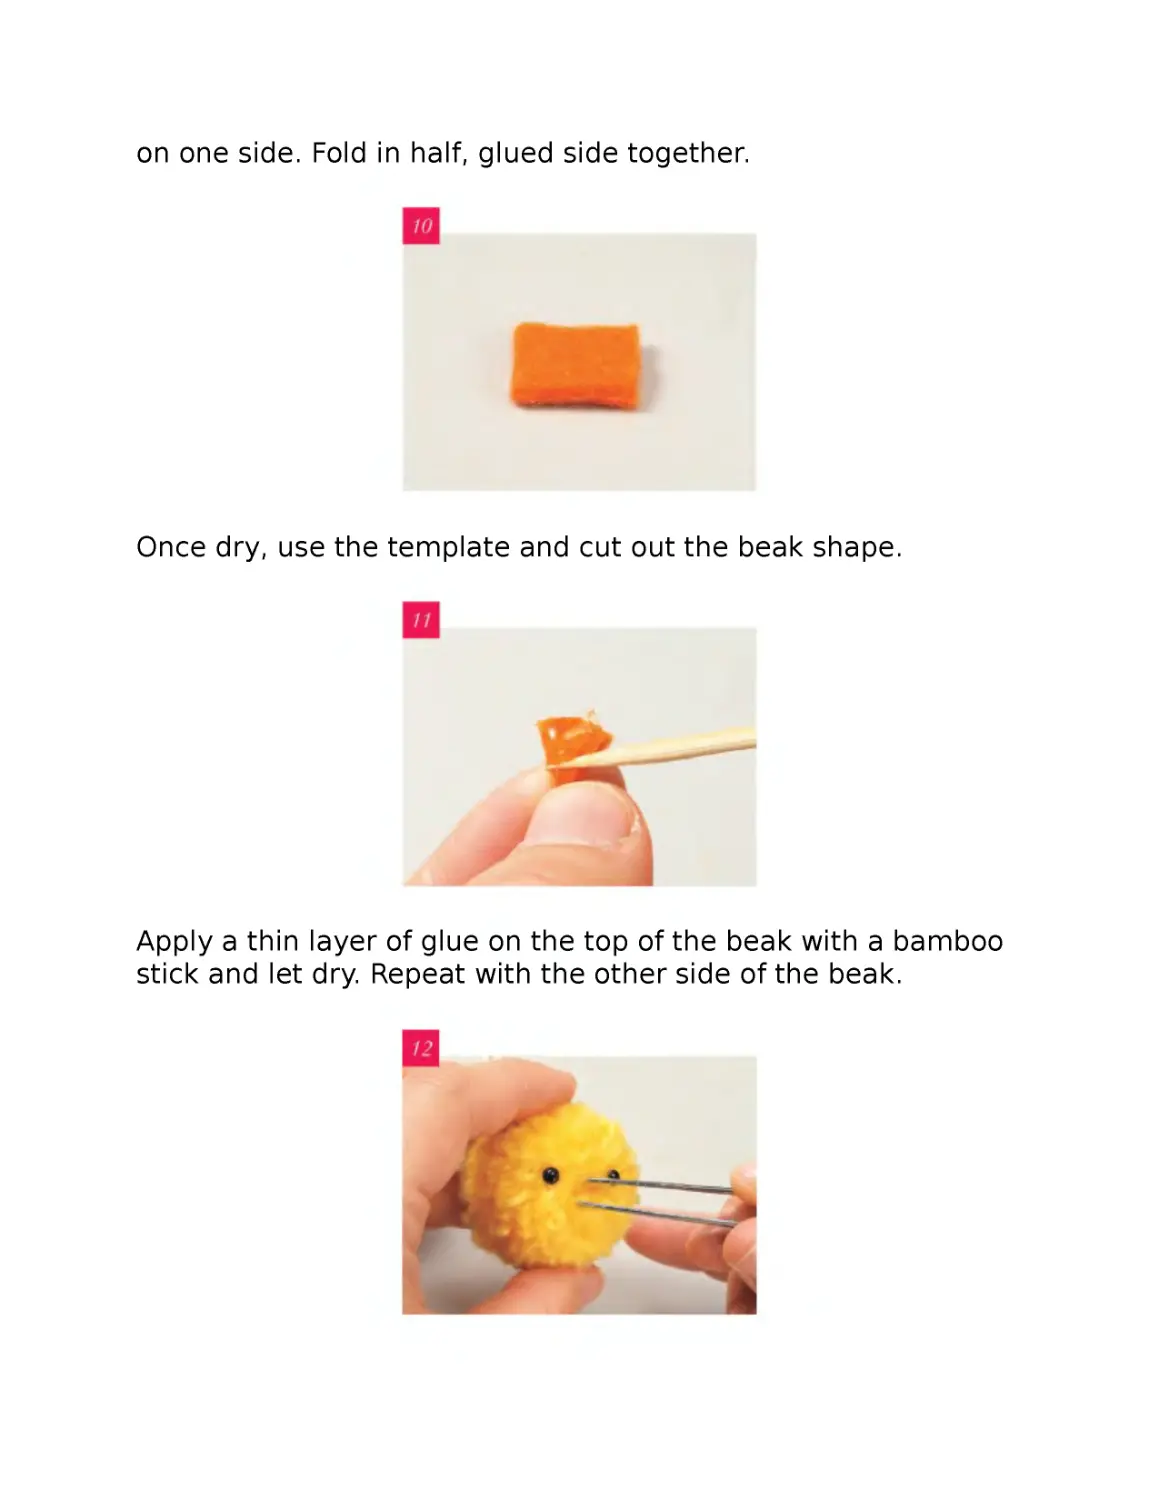
on one side. Fold in half, glued side together.
Once dry, use the template and cut out the beak shape.
Apply a thin layer of glue on the top of the beak with a bamboo
stick and let dry. Repeat with the other side of the beak.
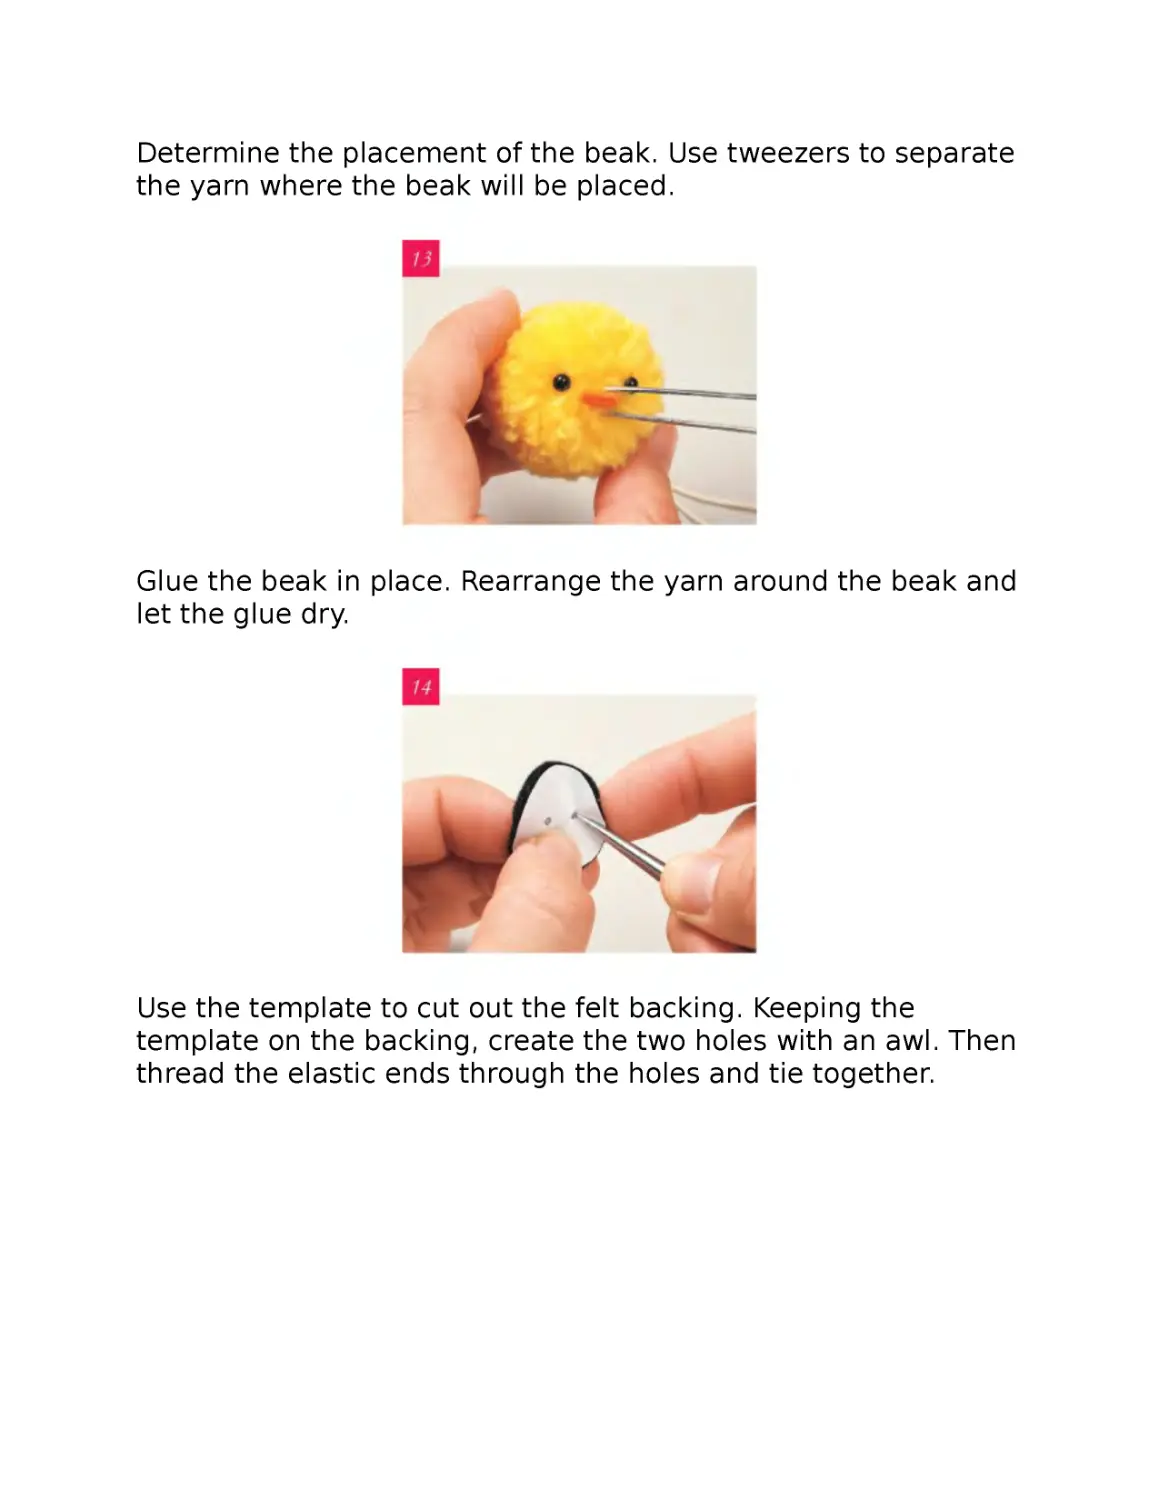
Determine the placement of the beak. Use tweezers to separate
the yarn where the beak will be placed.
Glue the beak in place. Rearrange the yarn around the beak and
let the glue dry.
Use the template to cut out the felt backing. Keeping the
template on the backing, create the two holes with an awl. Then
thread the elastic ends through the holes and tie together.
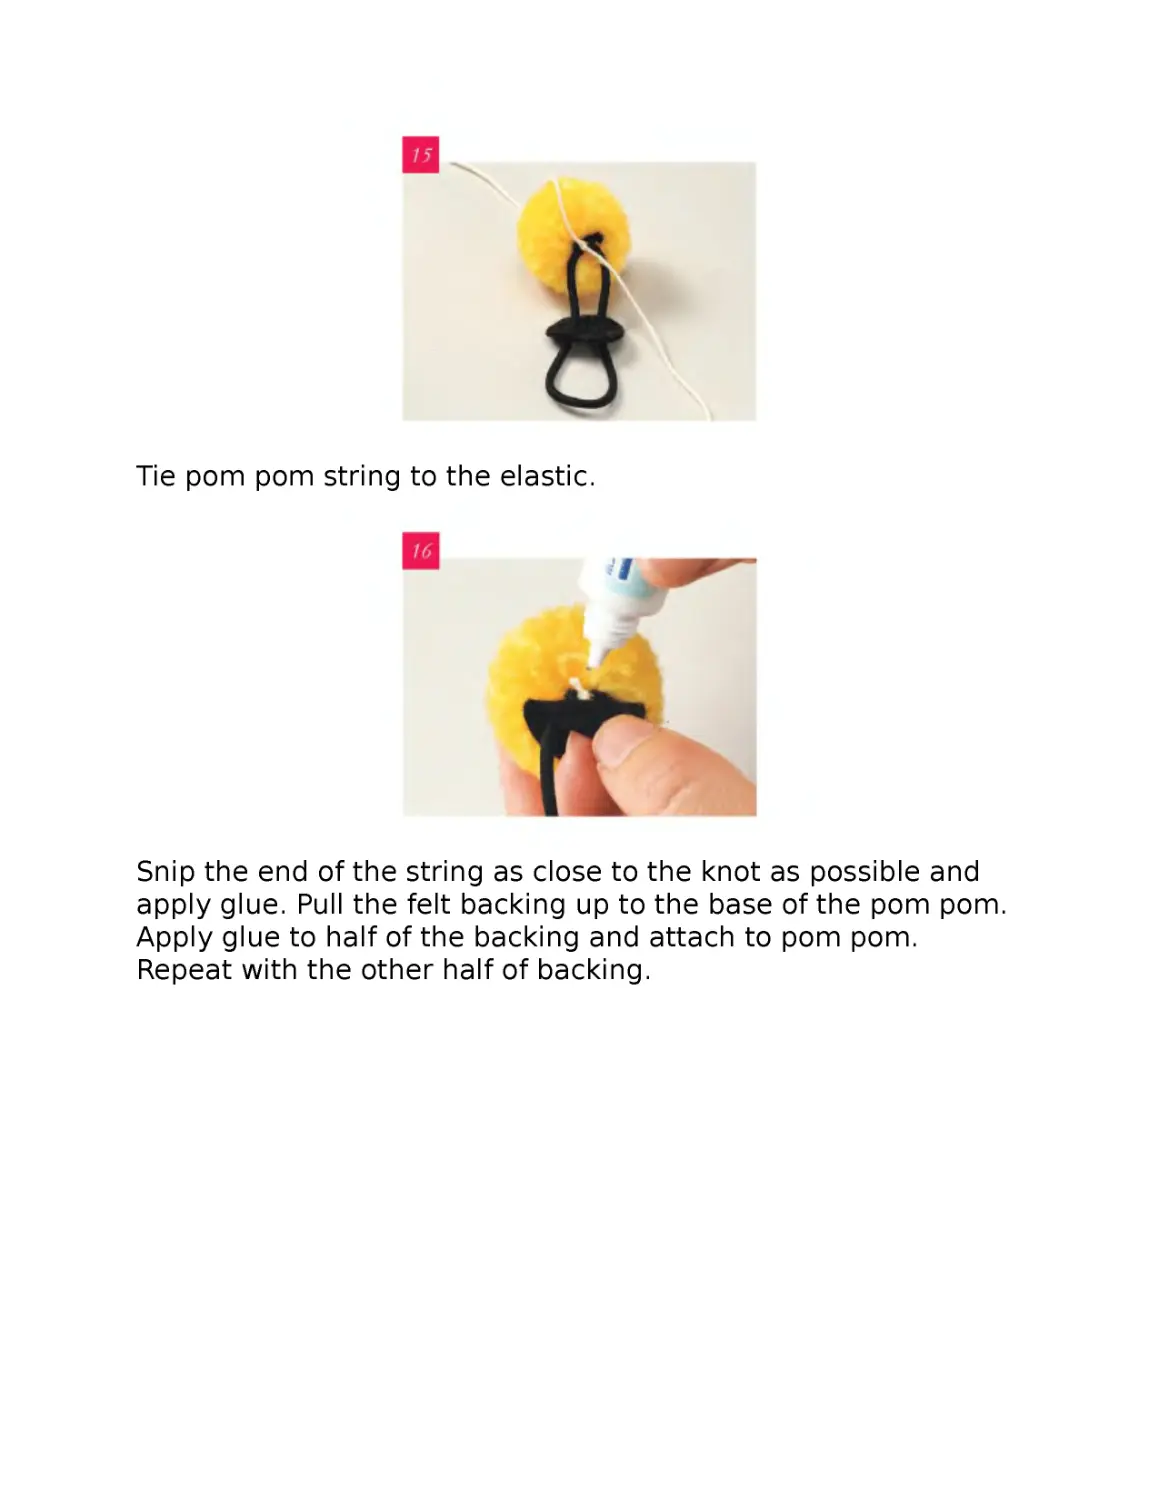
Tie pom pom string to the elastic.
Snip the end of the string as close to the knot as possible and
apply glue. Pull the felt backing up to the base of the pom pom.
Apply glue to half of the backing and attach to pom pom.
Repeat with the other half of backing.
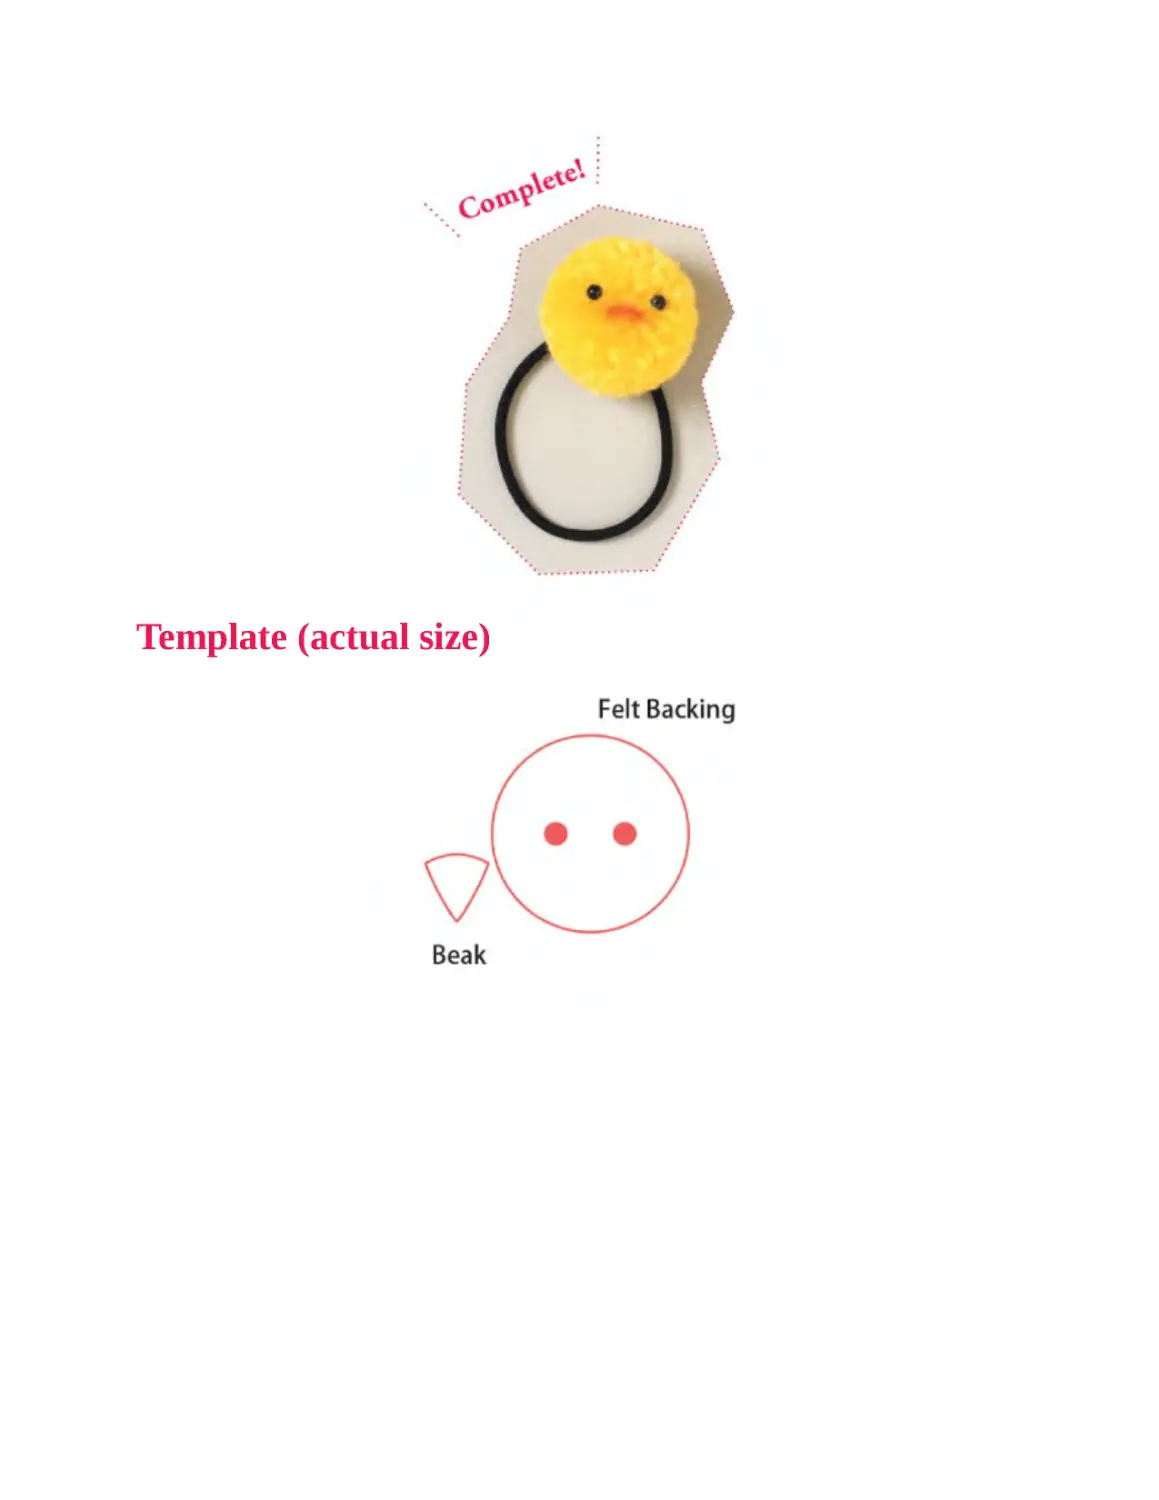
Template (actual size)
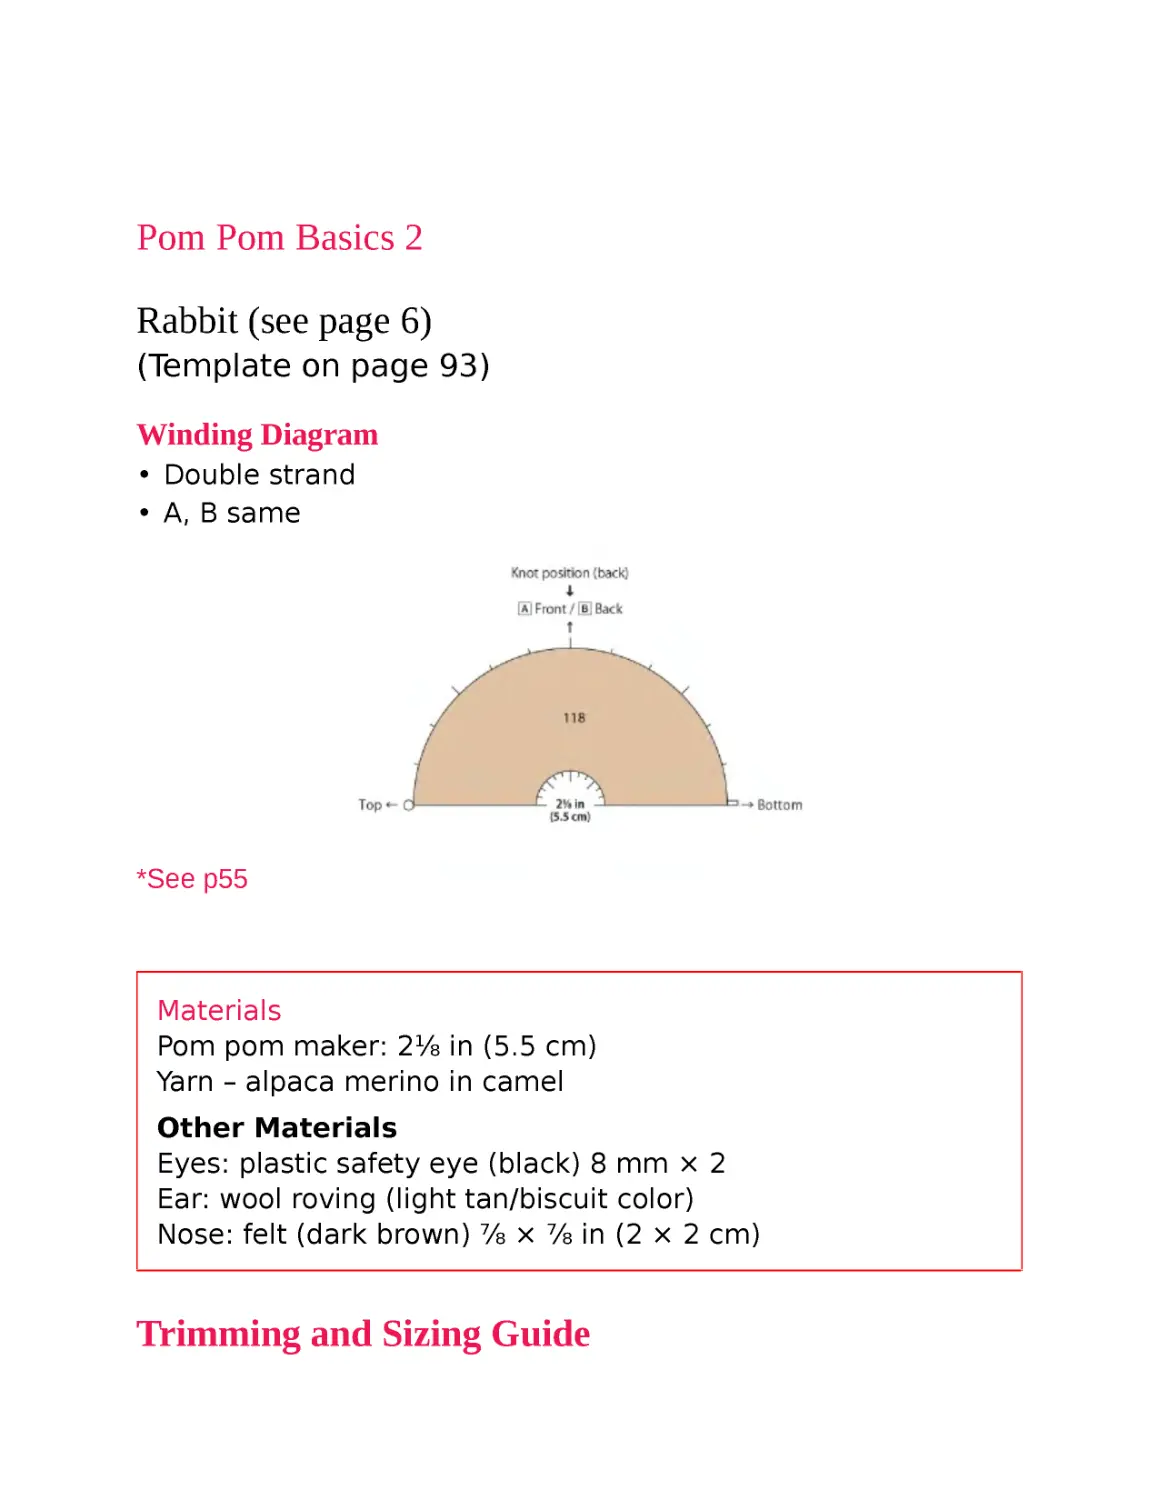
Pom Pom Basics 2
Rabbit (see page 6)
(Template on page 93)
Winding Diagram
• Double strand
• A, B same
*See p55
Materials
Pom pom maker: 2⅛ in (5.5 cm)
Yarn – alpaca merino in camel
Other Materials
Eyes: plastic safety eye (black) 8 mm × 2
Ear: wool roving (light tan/biscuit color)
Nose: felt (dark brown) ⅞ × ⅞ in (2 × 2 cm)
Trimming and Sizing Guide
Instructions
Follow the winding diagram and wrap the yarn 118 times to
make a 2⅛ in (5.5 cm) pom pom. For how to make a pom pom,
refer to the Chick Hair Tie steps 1–4 (p.43).
Shape into a triangular shape with loose, rough cuts.
Roughly-formed shape.
Determine eye placement and separate yarn with tweezers to
insert the eye pieces. Do not glue yet.
If the eye or nose fastener is too long, cut down to desired
length with pliers.
Insert eyes as deeply as possible. If you have to adjust the eye
position, fix the yarn with tweezers before re-inserting.
Flatten and slightly hollow out the section from above the eye to
the top of the head (dotted line in photo) and round out the
shape from below the eye.
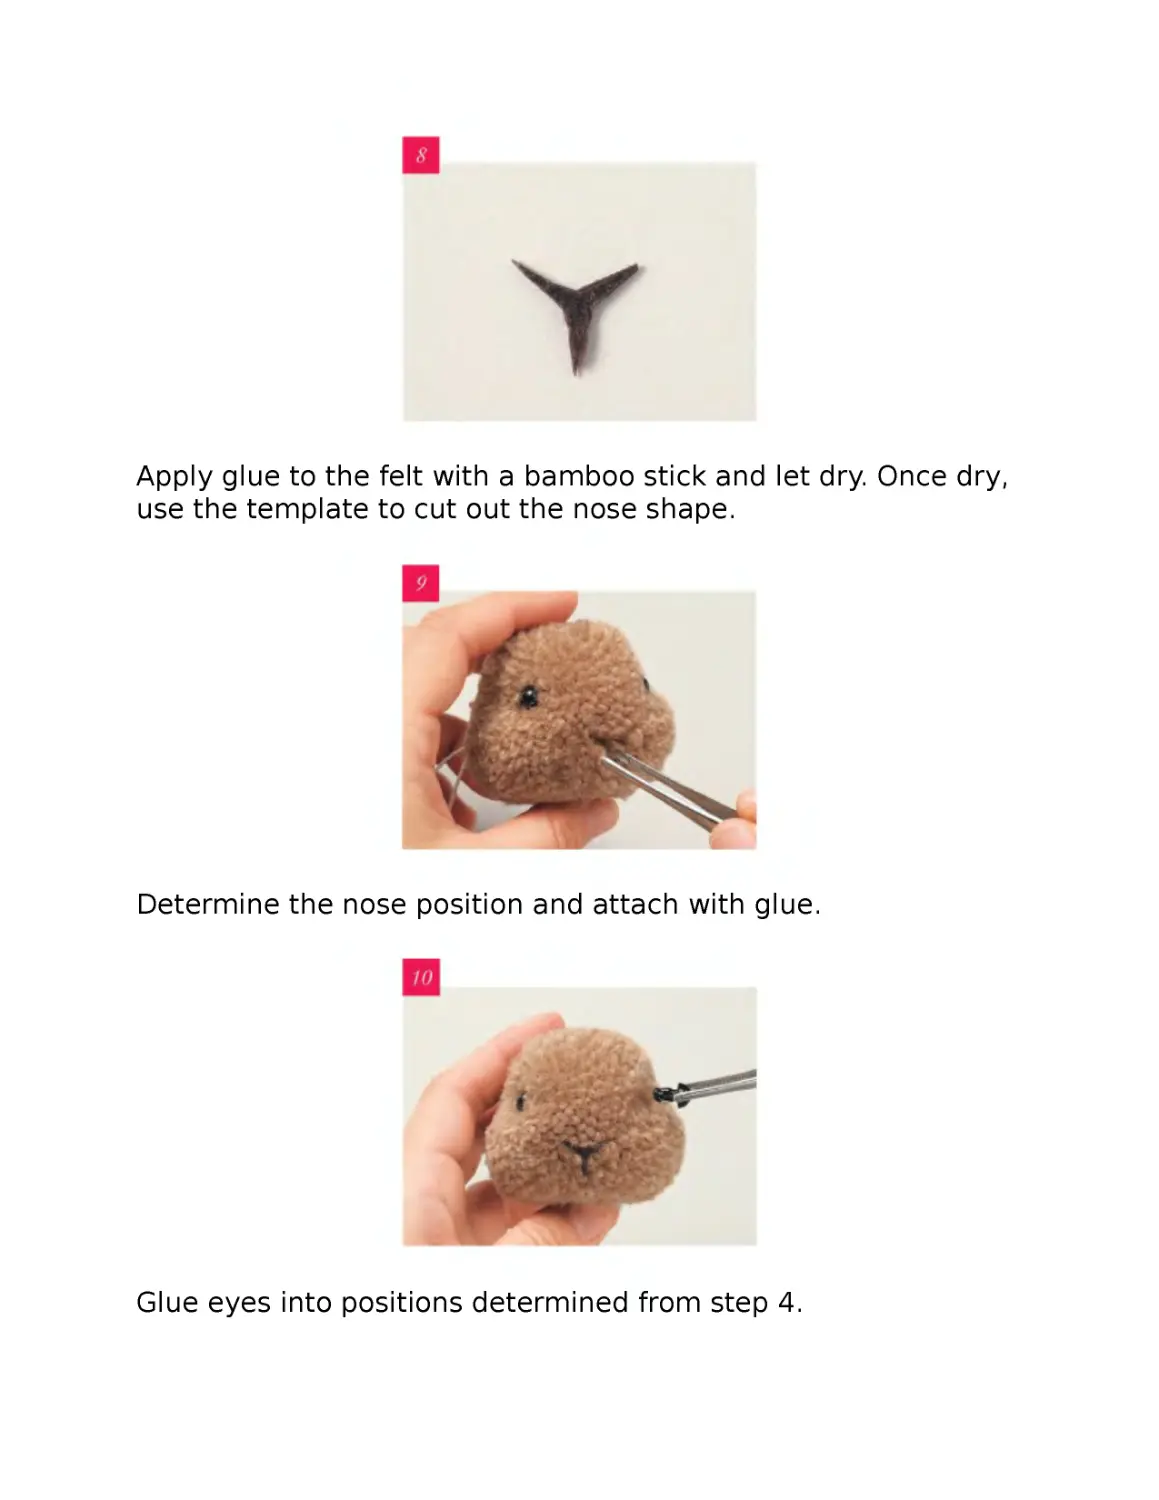
Apply glue to the felt with a bamboo stick and let dry. Once dry,
use the template to cut out the nose shape.
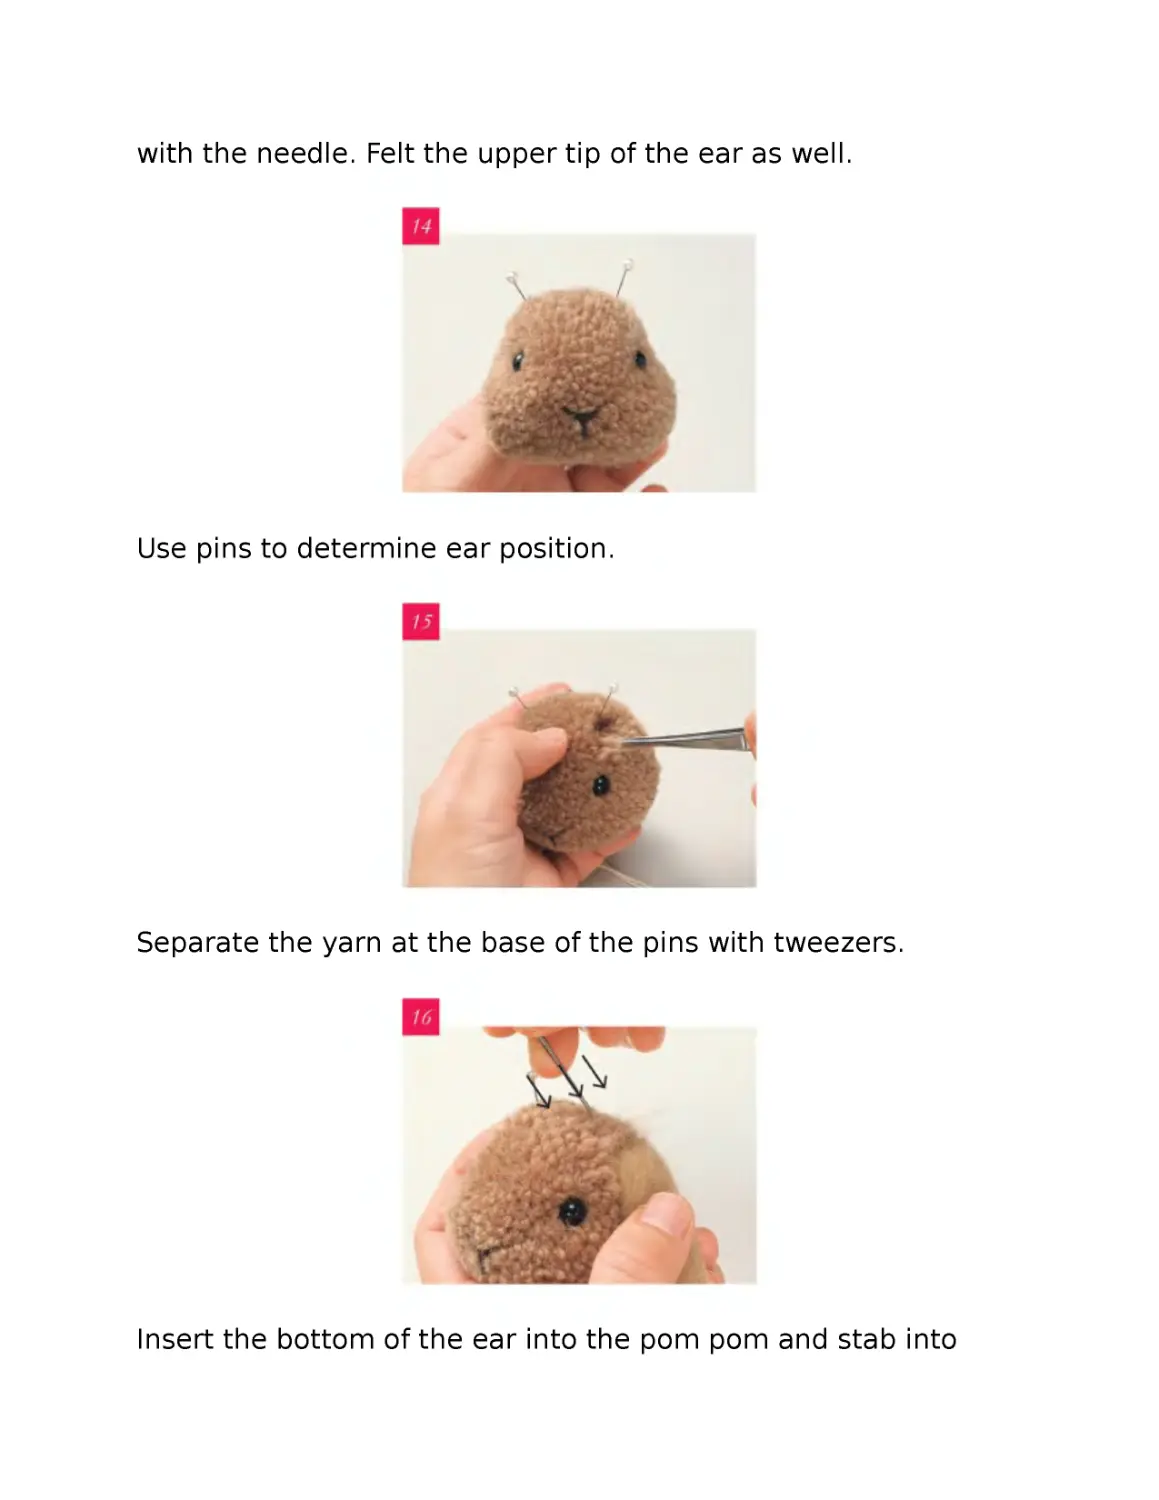
Determine the nose position and attach with glue.
Glue eyes into positions determined from step 4.
Felt the wool roving into ears using the template.
Once the ears are felted into the desired shape, place between
cardboard pieces and felt the sides as well. This helps you form
the shape easily while avoiding injury.
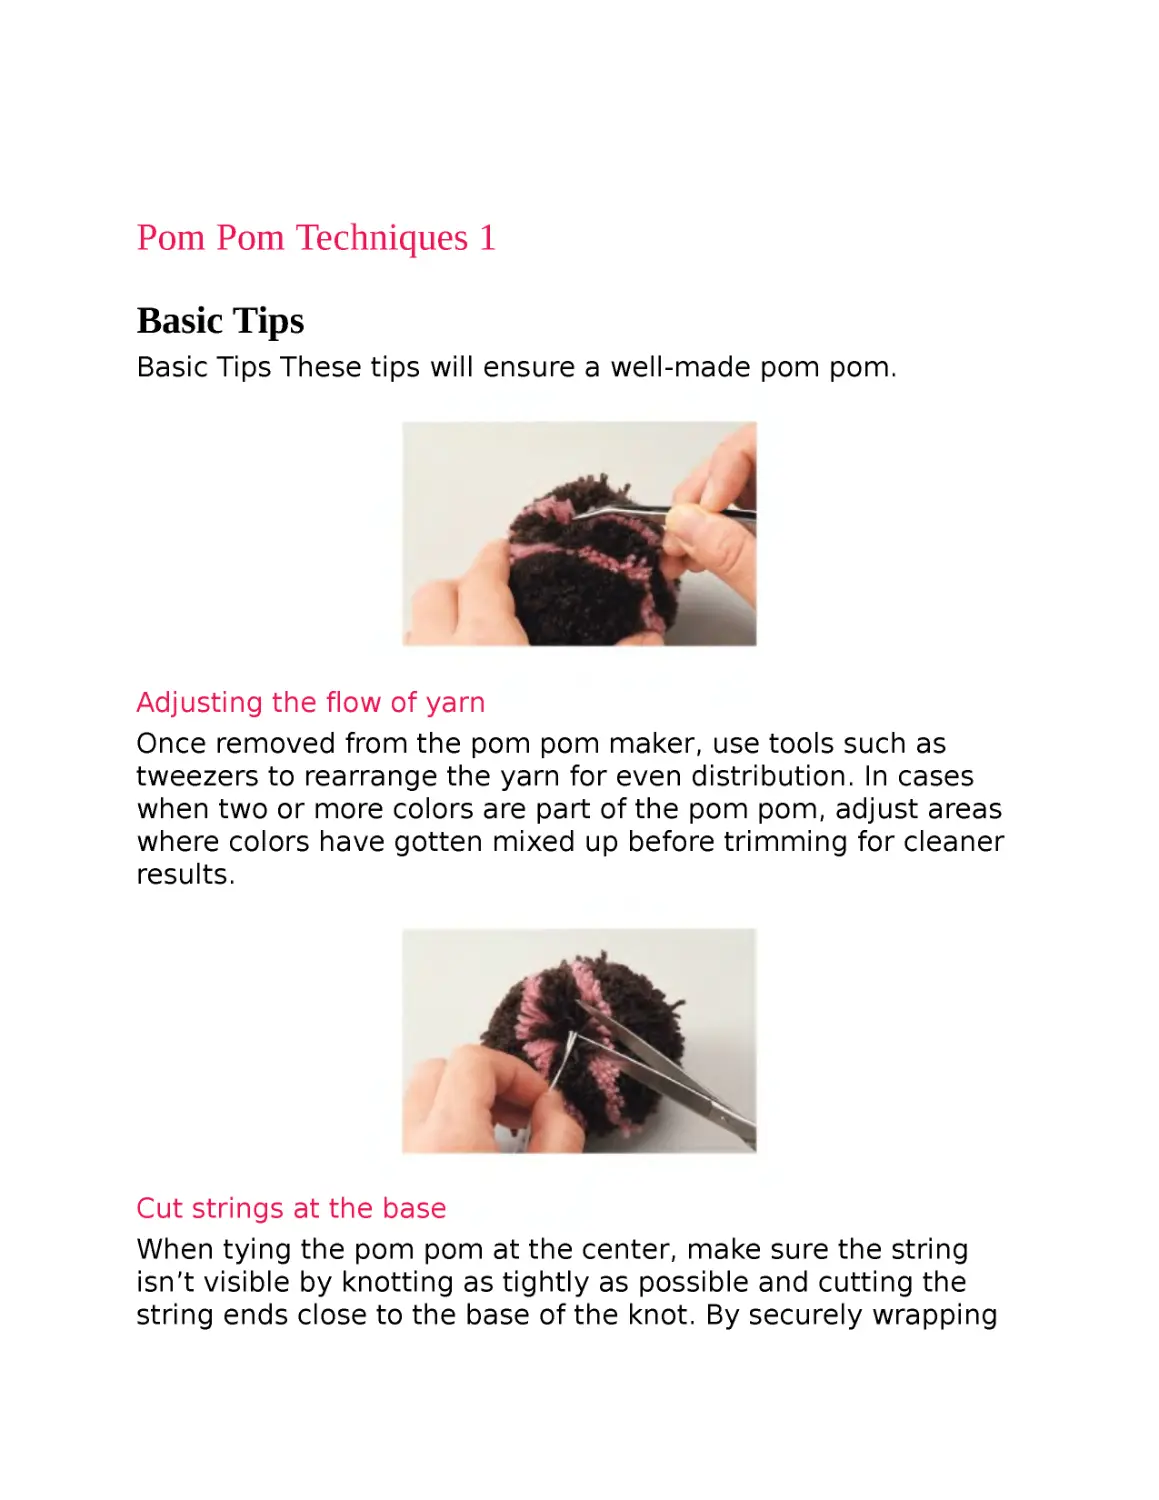
Pinch with your thumb to curve the bottom of the ear and felt
with the needle. Felt the upper tip of the ear as well.
Use pins to determine ear position.
Separate the yarn at the base of the pins with tweezers.
Insert the bottom of the ear into the pom pom and stab into
place with the felting needle. Rearrange the yarn around the ear
to blend it in.
Lightly felt the area above the eye with the needle to give it
some pointy texture.
Variation
※ Template on page 93
Follow same steps up to gluing the eyes. Use felt instead of wool
roving to achieve the upright, pointy-eared look.
Pom Pom Techniques 1
Basic Tips
Basic Tips These tips will ensure a well-made pom pom.
Adjusting the flow of yarn
Once removed from the pom pom maker, use tools such as
tweezers to rearrange the yarn for even distribution. In cases
when two or more colors are part of the pom pom, adjust areas
where colors have gotten mixed up before trimming for cleaner
results.
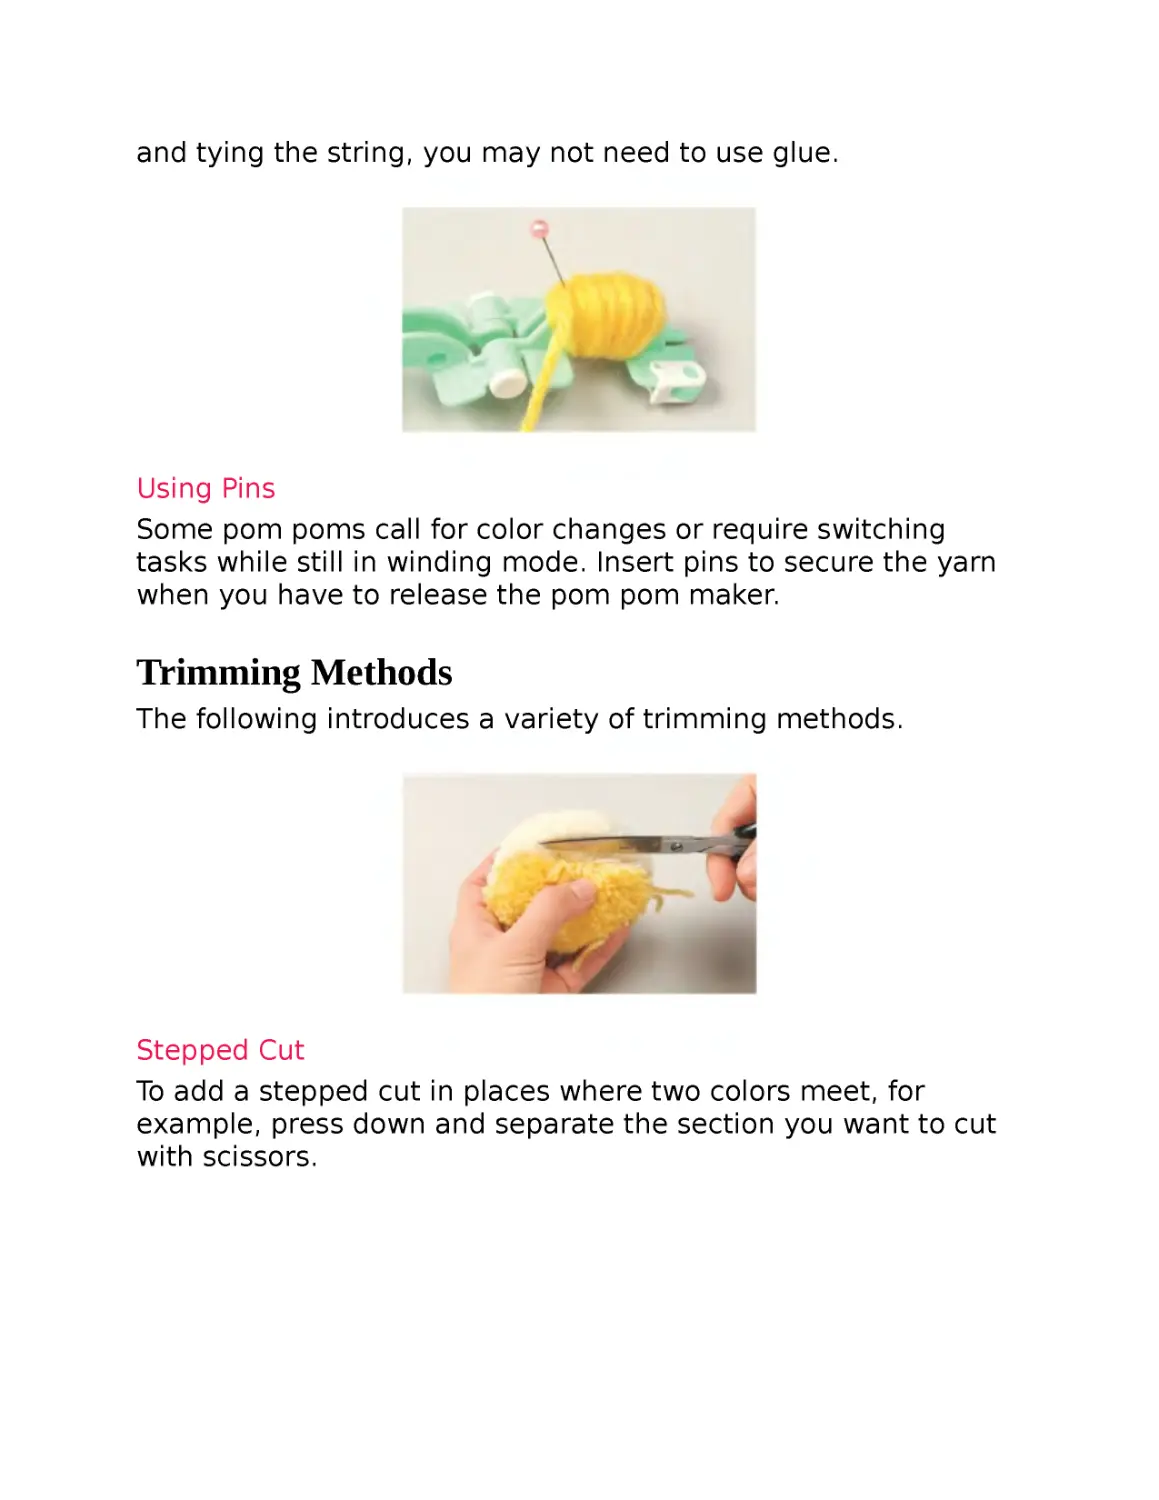
Cut strings at the base
When tying the pom pom at the center, make sure the string
isn’t visible by knotting as tightly as possible and cutting the
string ends close to the base of the knot. By securely wrapping
and tying the string, you may not need to use glue.
Using Pins
Some pom poms call for color changes or require switching
tasks while still in winding mode. Insert pins to secure the yarn
when you have to release the pom pom maker.
Trimming Methods
The following introduces a variety of trimming methods.
Stepped Cut
To add a stepped cut in places where two colors meet, for
example, press down and separate the section you want to cut
with scissors.
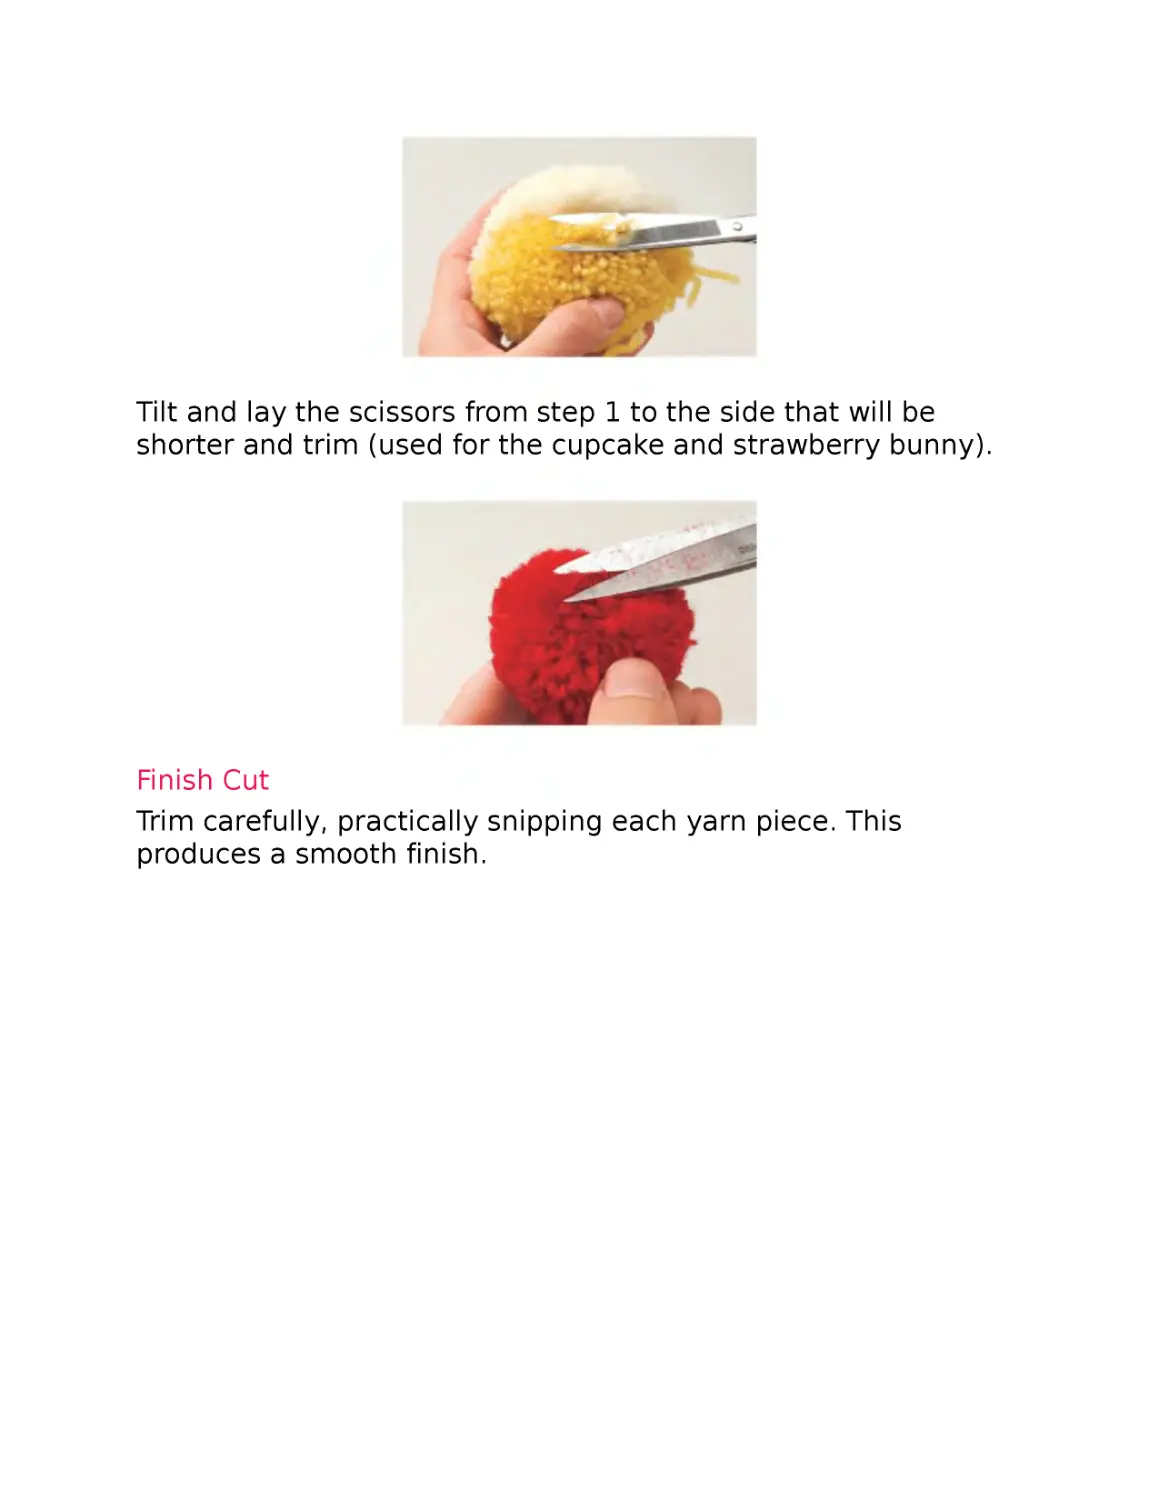
Tilt and lay the scissors from step 1 to the side that will be
shorter and trim (used for the cupcake and strawberry bunny).
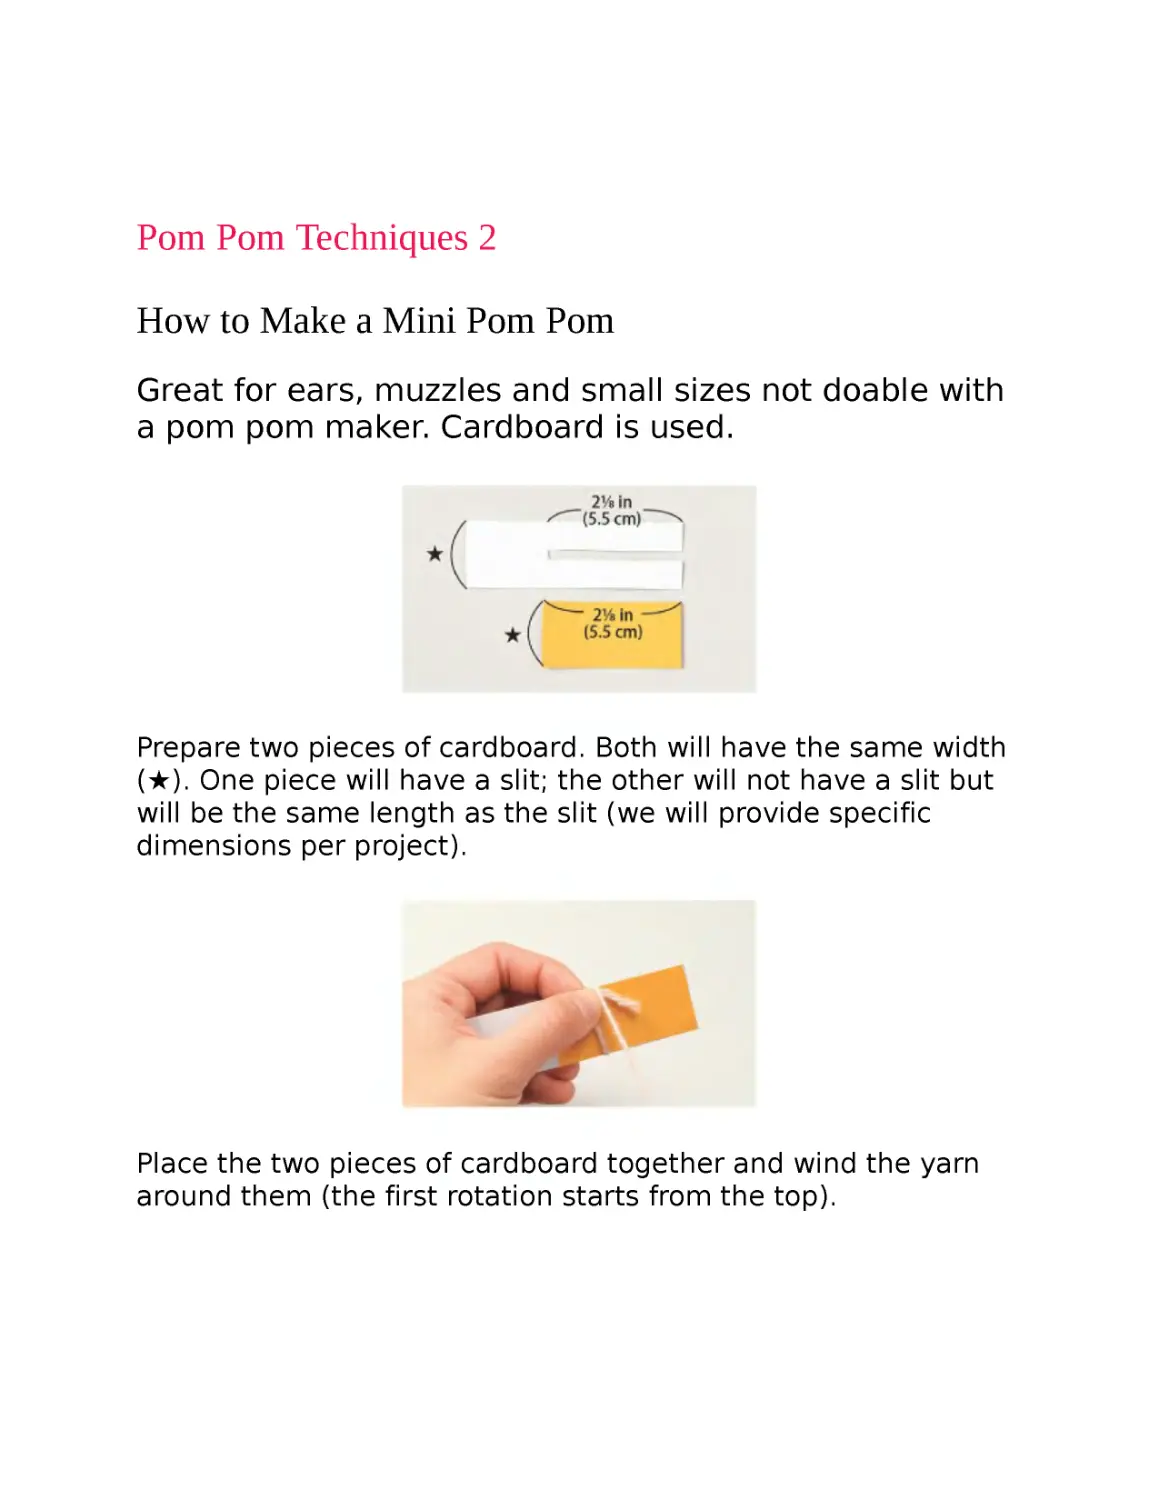
Finish Cut
Trim carefully, practically snipping each yarn piece. This
produces a smooth finish.
Pom Pom Techniques 2
How to Make a Mini Pom Pom
Great for ears, muzzles and small sizes not doable with
a pom pom maker. Cardboard is used.
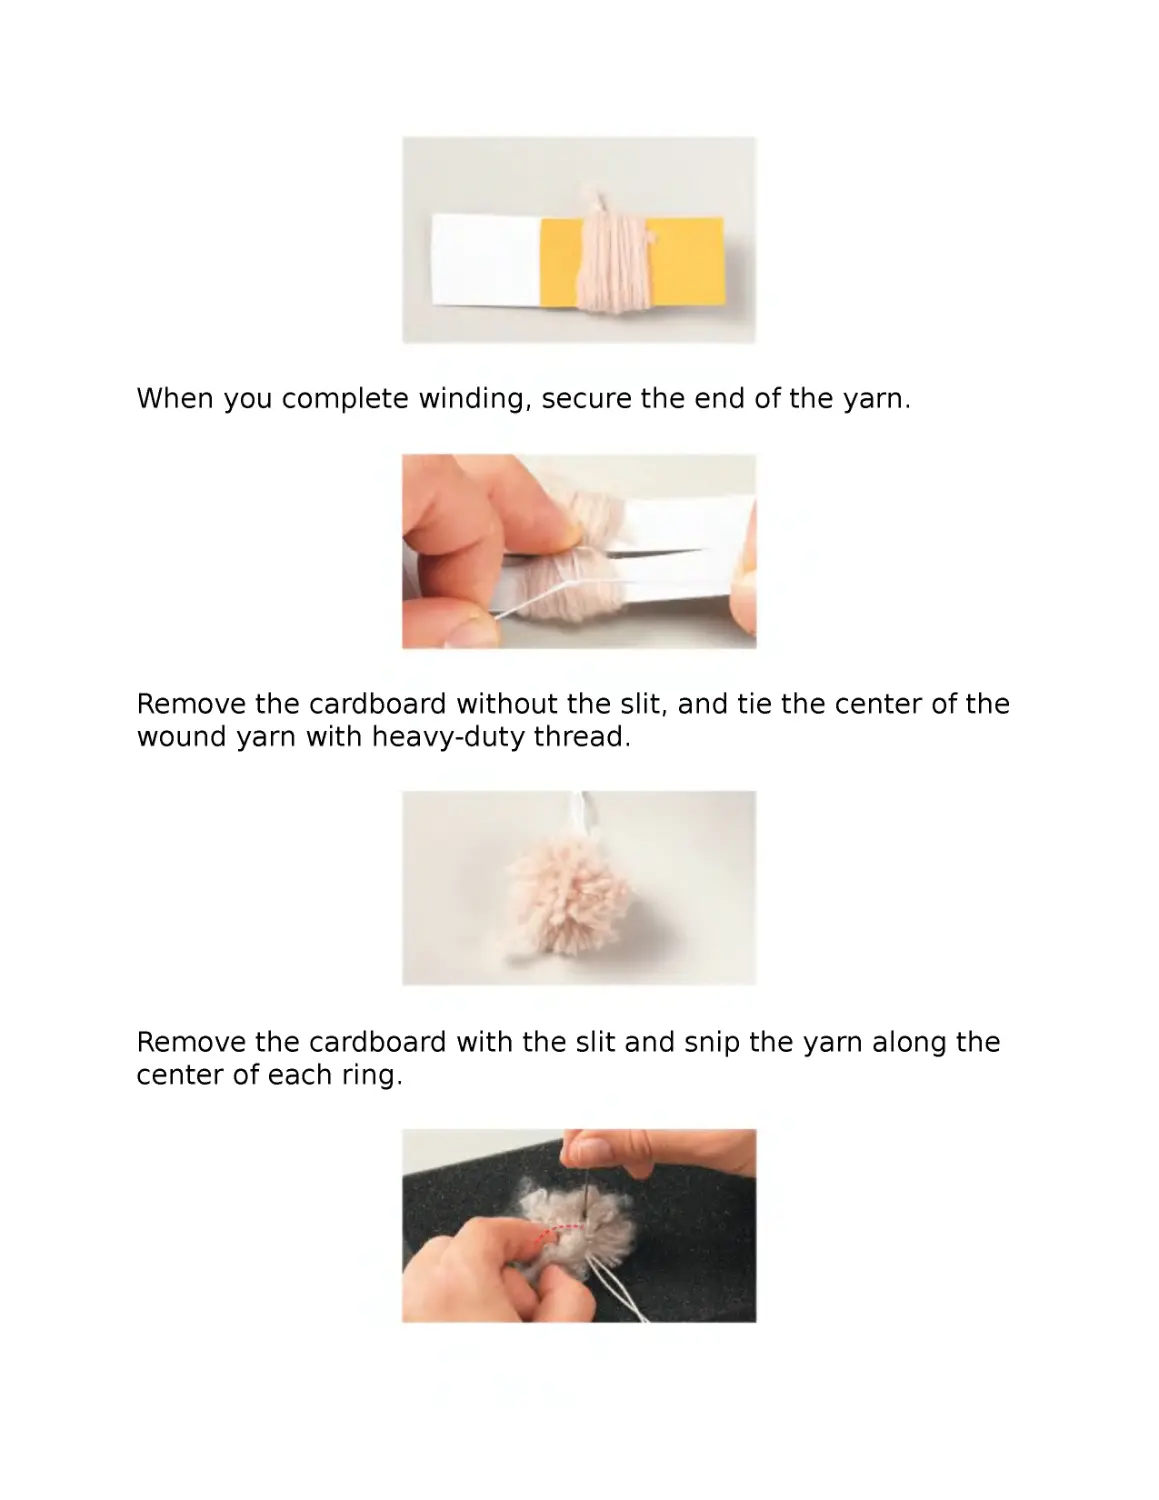
Prepare two pieces of cardboard. Both will have the same width
(★). One piece will have a slit; the other will not have a slit but
will be the same length as the slit (we will provide specific
dimensions per project).
Place the two pieces of cardboard together and wind the yarn
around them (the first rotation starts from the top).
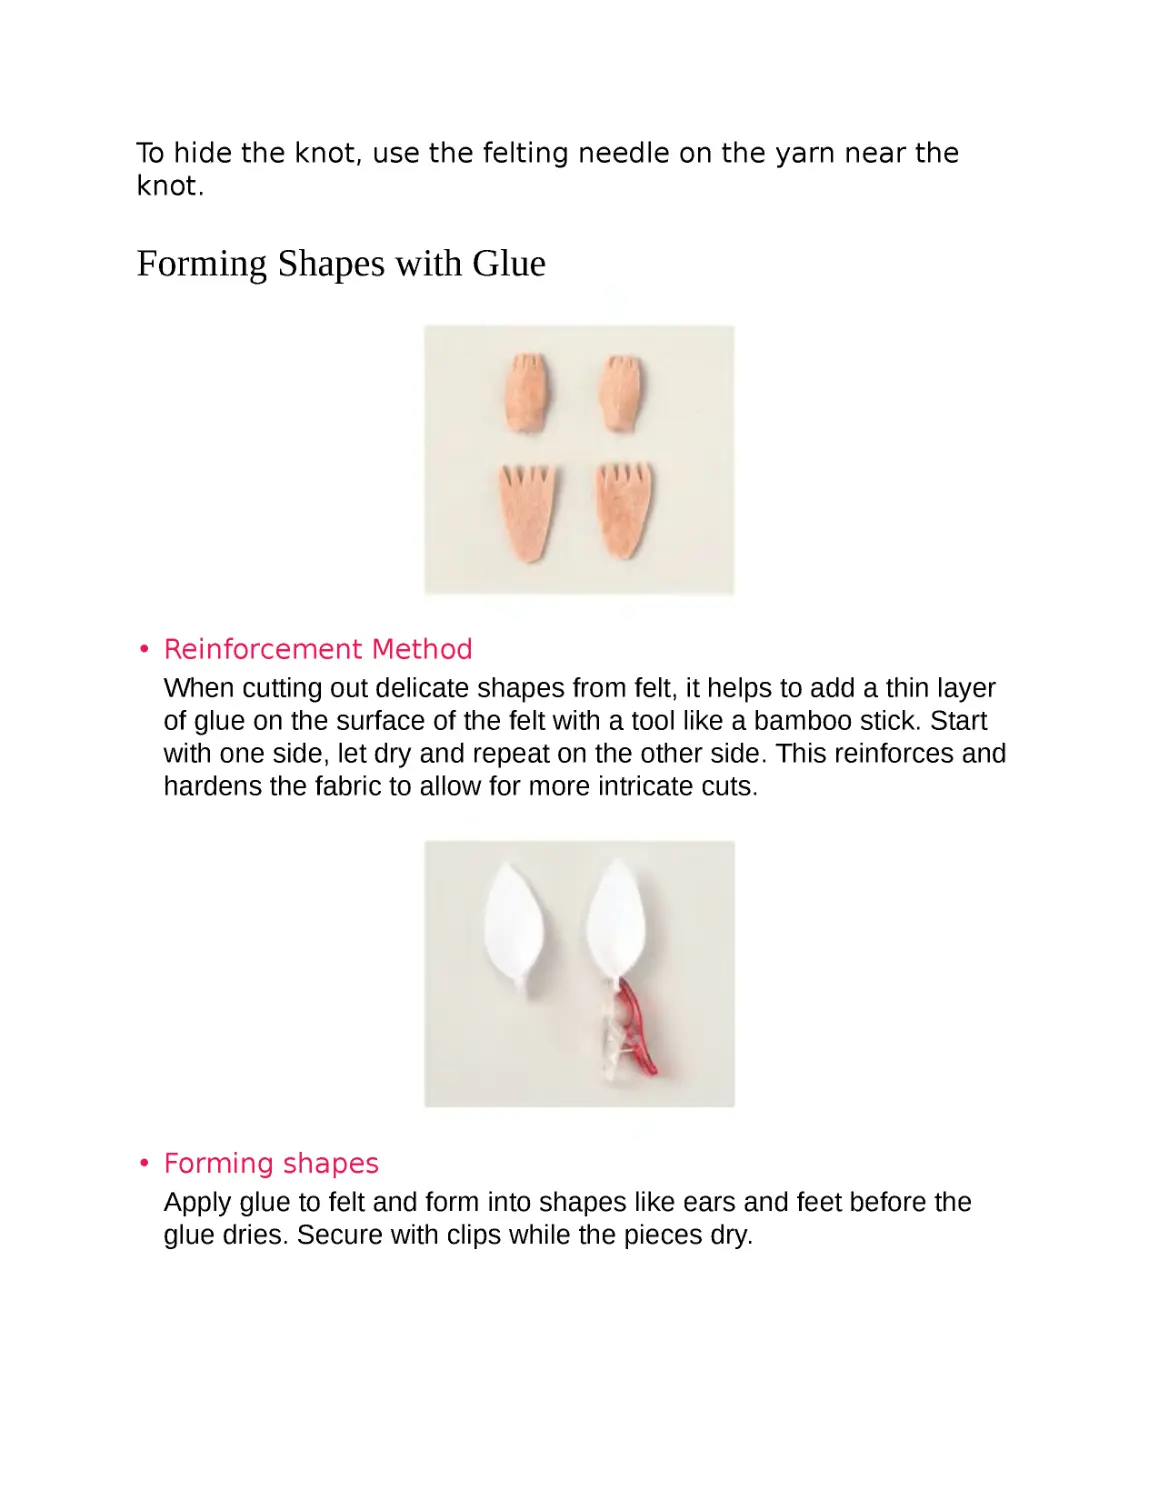
When you complete winding, secure the end of the yarn.
Remove the cardboard without the slit, and tie the center of the
wound yarn with heavy-duty thread.
Remove the cardboard with the slit and snip the yarn along the
center of each ring.
To hide the knot, use the felting needle on the yarn near the
knot.
Forming Shapes with Glue
• Reinforcement Method
When cutting out delicate shapes from felt, it helps to add a thin layer
of glue on the surface of the felt with a tool like a bamboo stick. Start
with one side, let dry and repeat on the other side. This reinforces and
hardens the fabric to allow for more intricate cuts.
• Forming shapes
Apply glue to felt and form into shapes like ears and feet before the
glue dries. Secure with clips while the pieces dry.
Pom Pom Techniques 3
Attachment Methods
To attach ears, snout/muzzle, and heads to bodies.
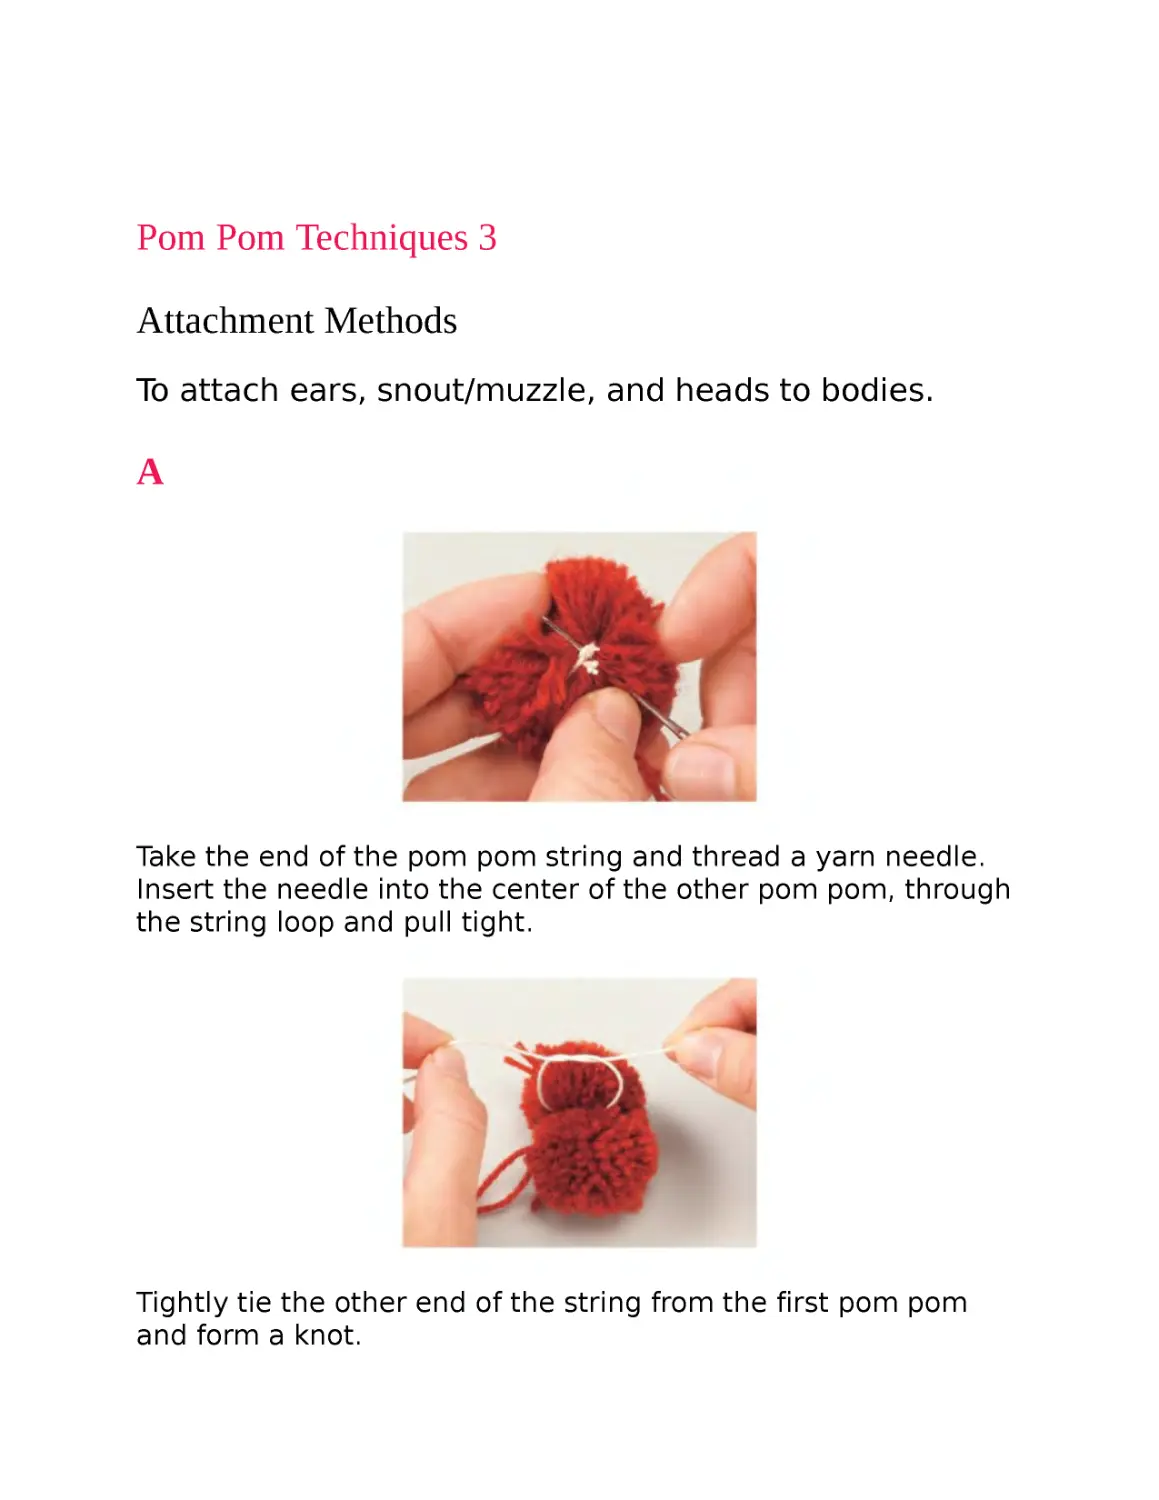
A
Take the end of the pom pom string and thread a yarn needle.
Insert the needle into the center of the other pom pom, through
the string loop and pull tight.
Tightly tie the other end of the string from the first pom pom
and form a knot.
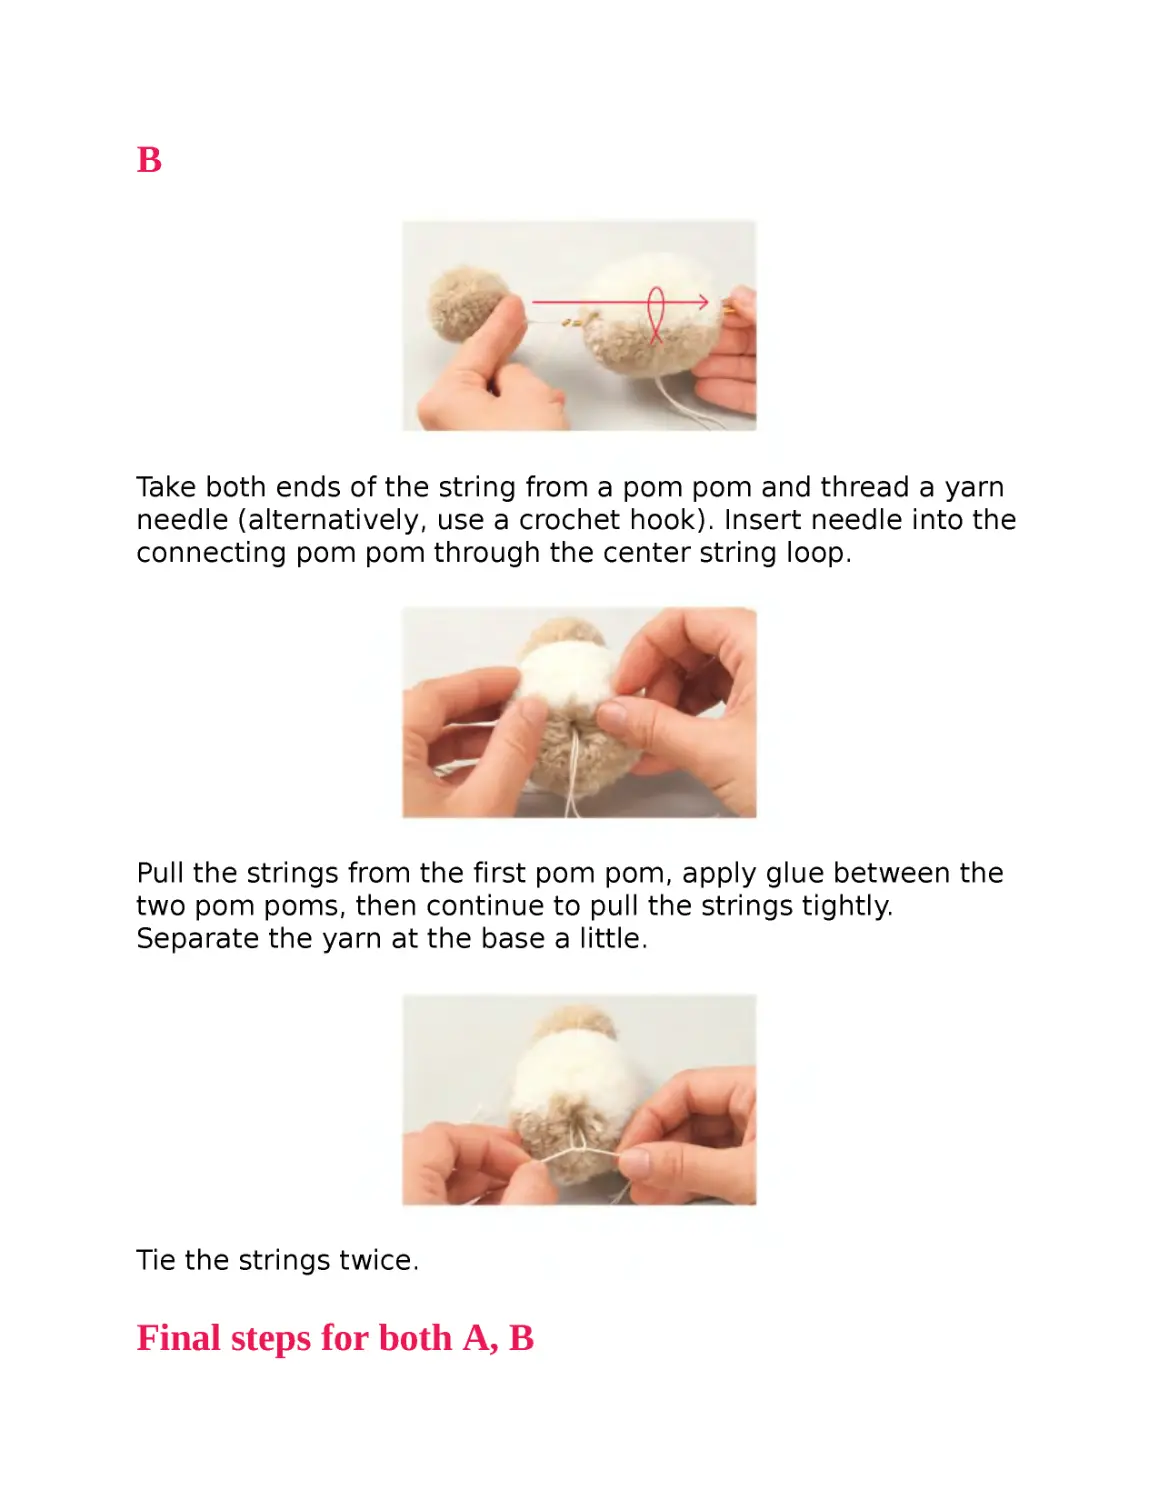
B
Take both ends of the string from a pom pom and thread a yarn
needle (alternatively, use a crochet hook). Insert needle into the
connecting pom pom through the center string loop.
Pull the strings from the first pom pom, apply glue between the
two pom poms, then continue to pull the strings tightly.
Separate the yarn at the base a little.
Tie the strings twice.
Final steps for both A, B
Once tied, clip the strings as close to the knot as possible and
lightly apply glue.
Hide the knot by rearranging the yarn.
Connecting position for snout/muzzle
Attach the snout/muzzle around the lower 1/3 of the face.
Pom Pom Techniques 4
How to Use a Felting Needle
The texture created with a felting needle on yarn and
wool roving is handy for a variety of techniques.
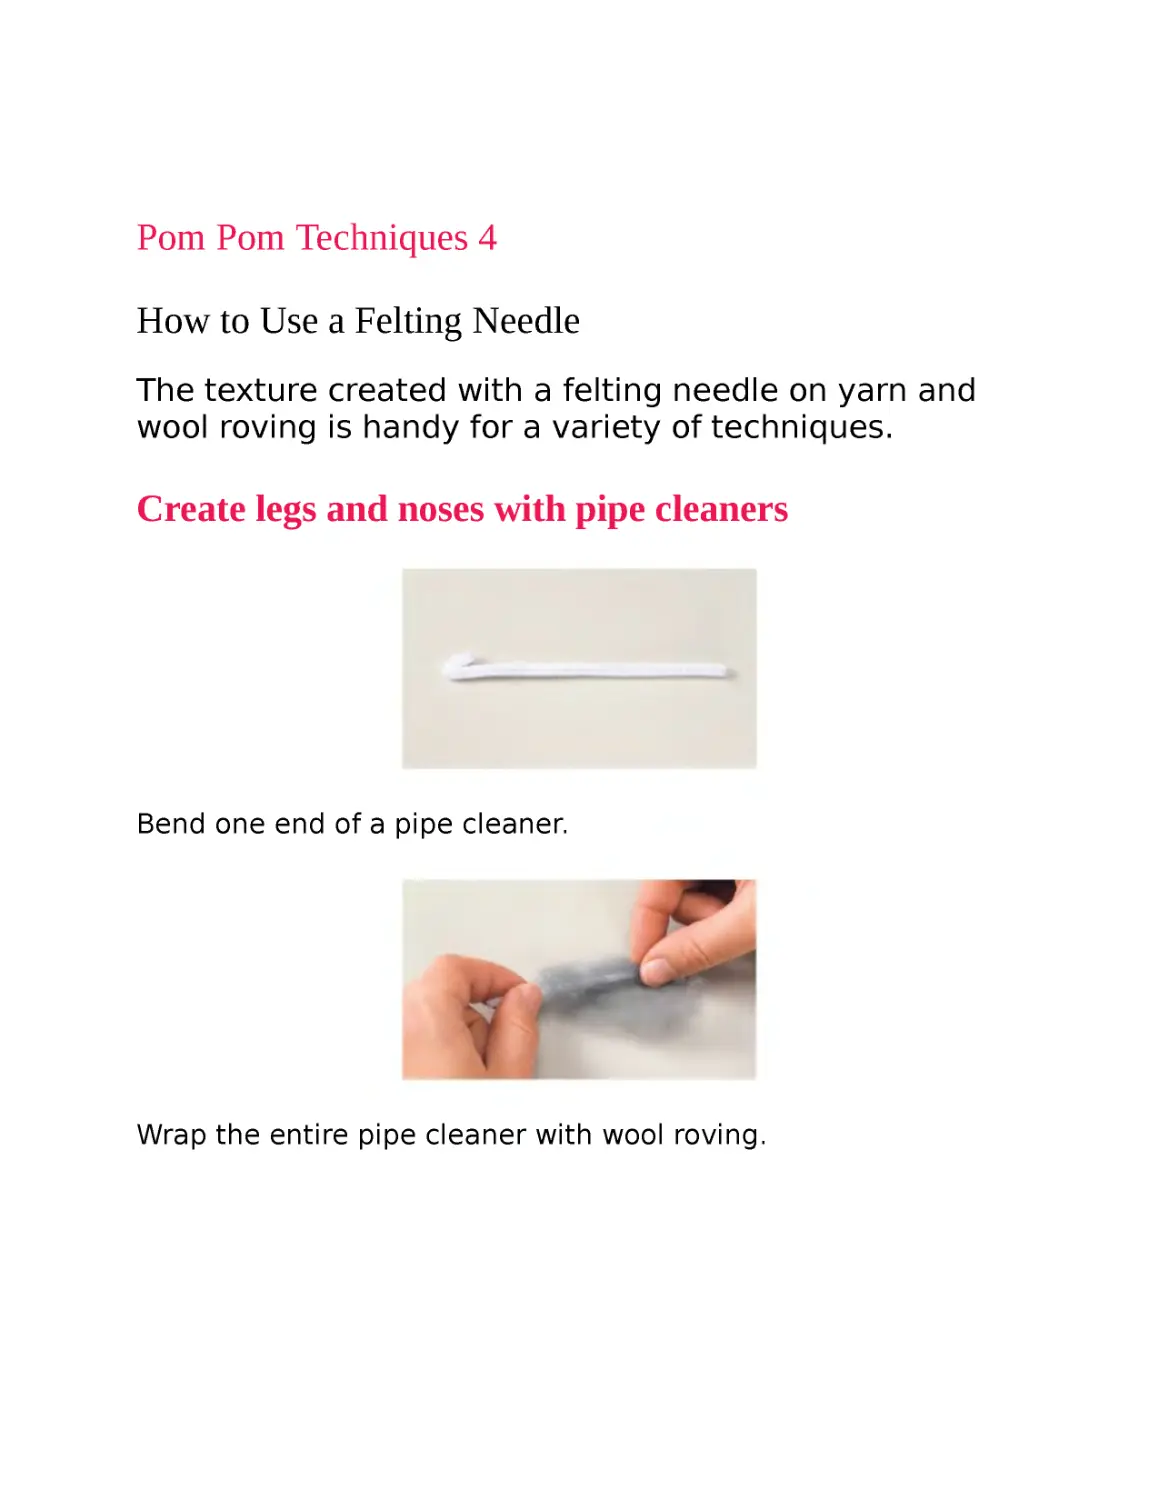
Create legs and noses with pipe cleaners
Bend one end of a pipe cleaner.
Wrap the entire pipe cleaner with wool roving.
Place on top of a felting mat (or a sponge if you don’t have a
mat), and stab with the needle. Repeat steps 2 and 3 to make
sure the pipe cleaner doesn’t poke out from the tips.
Using the needle on Pom Poms, forming shapes,
hardening
To create indentations or for a hardened finish, use the needle
to lightly stab the area. Trim the surface to even it out.
Felted snout/muzzle
Lightly felt towards the center of the snout/muzzle. Trim the
surface to even it out.
Place between cardboard and felt
Place thin or small parts between two pieces of cardboard and
stab with the needle to avoid unwanted finger stabbings. When
felting thin shapes, try bending the edge of the cardboard a
little to make felting a little easier.
Point
• To felt yarn→use short, light stabs and check often to make
sure you haven’t felted too much. Felting is irreversible.
• To felt wool roving→firm stabbing is OK. If you think you’ve
overdone the felting, simply add more roving or trim off the
surface.
Felted noses and legs
1 Separate the yarn, insert the felted piece and using the felting needle,
stab the base of the piece into the pom pom.
2 Arrange and lightly stab the surrounding yarn around the felted piece
and blend in.
Many Expressions Depend on Eye
Placement
The position of the eyes can make all the difference in
the world when it comes to expression. Set them wider
apart or closer together to see how varied the looks can
be. Use pins to temporarily mark the eye placement
and find your favorite expressions!
Little eyes
Big eyes
Same placement, different sizes
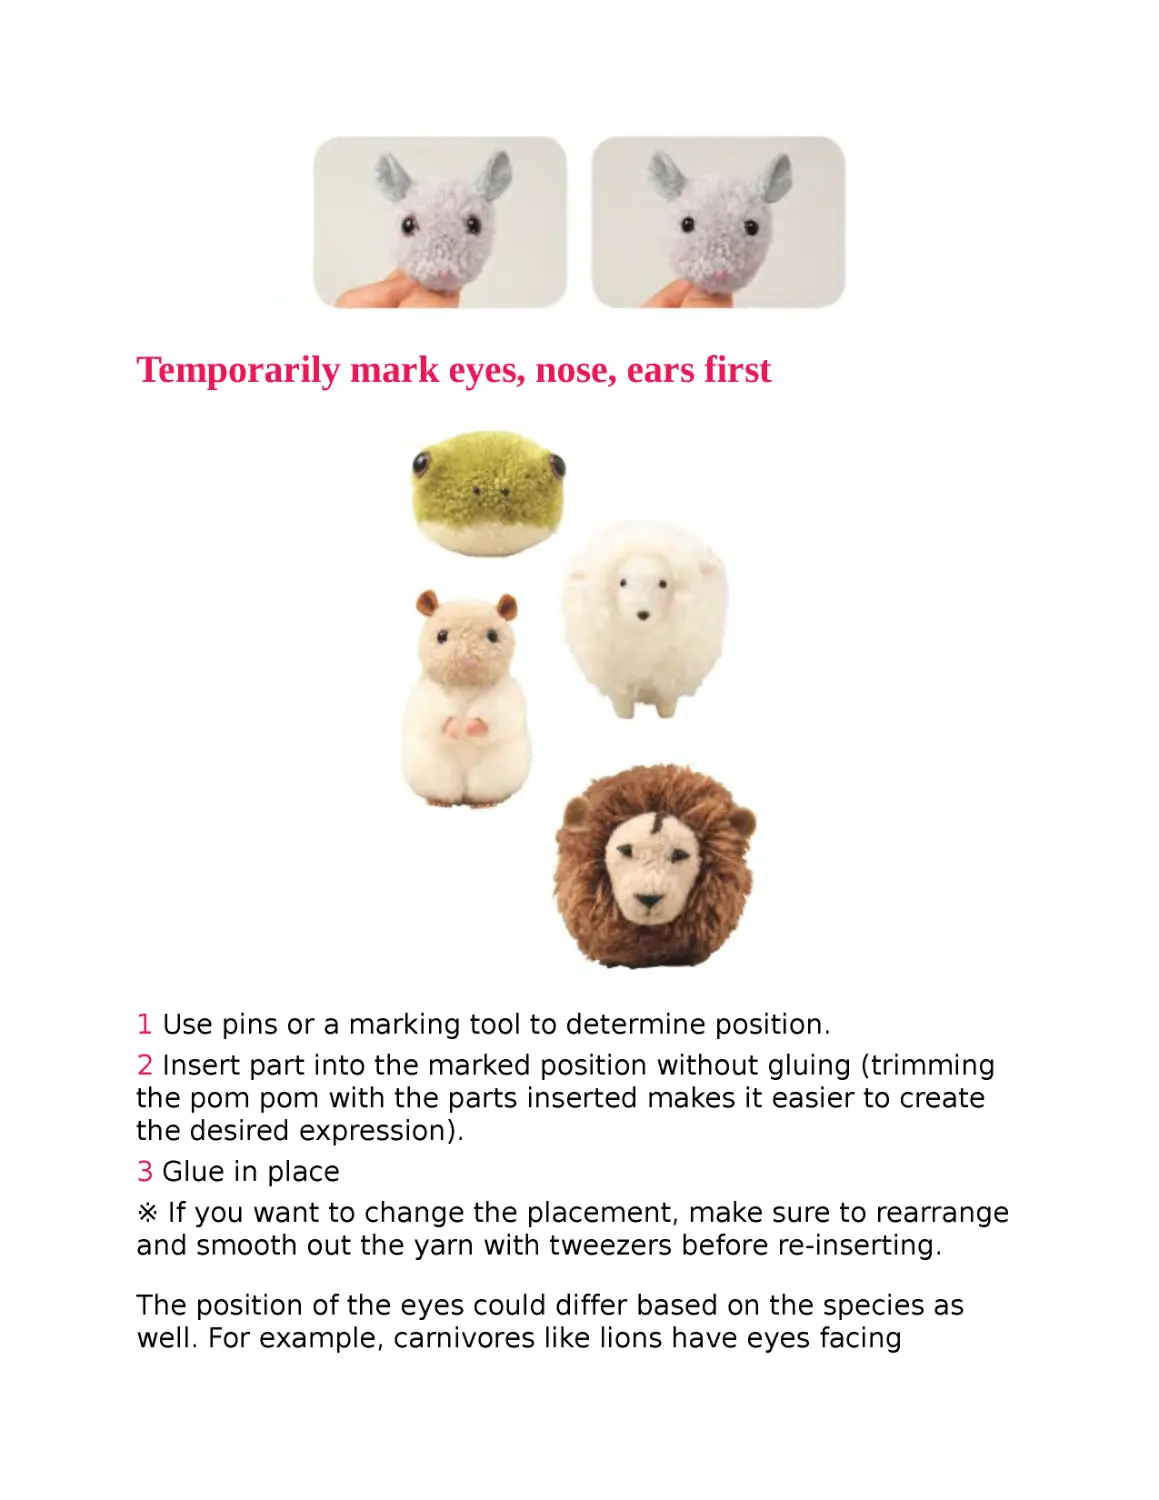
Temporarily mark eyes, nose, ears first
1 Use pins or a marking tool to determine position.
2 Insert part into the marked position without gluing (trimming
the pom pom with the parts inserted makes it easier to create
the desired expression).
3 Glue in place
※ If you want to change the placement, make sure to rearrange
and smooth out the yarn with tweezers before re-inserting.
The position of the eyes could differ based on the species as
well. For example, carnivores like lions have eyes facing
frontward, while rabbits/rodents and other herbivores tend to
have eyes on the sides.
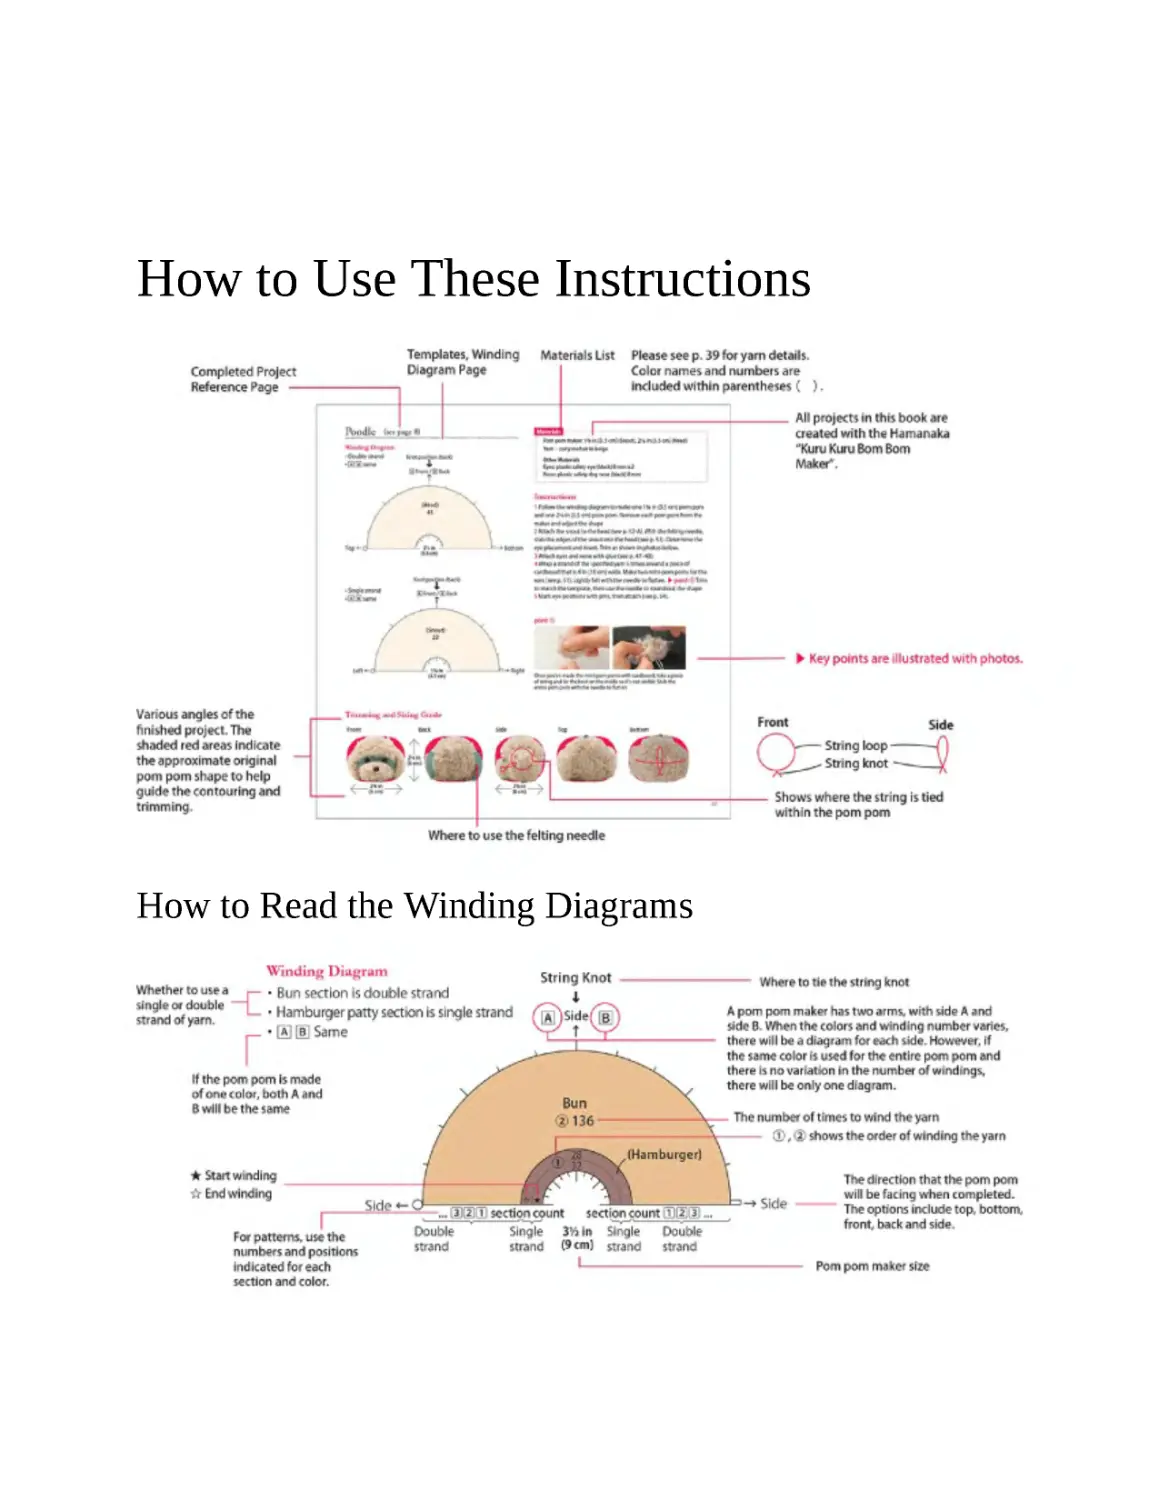
How to Use These Instructions
How to Read the Winding Diagrams
Sheep (see page 7)
(Template on page 93)
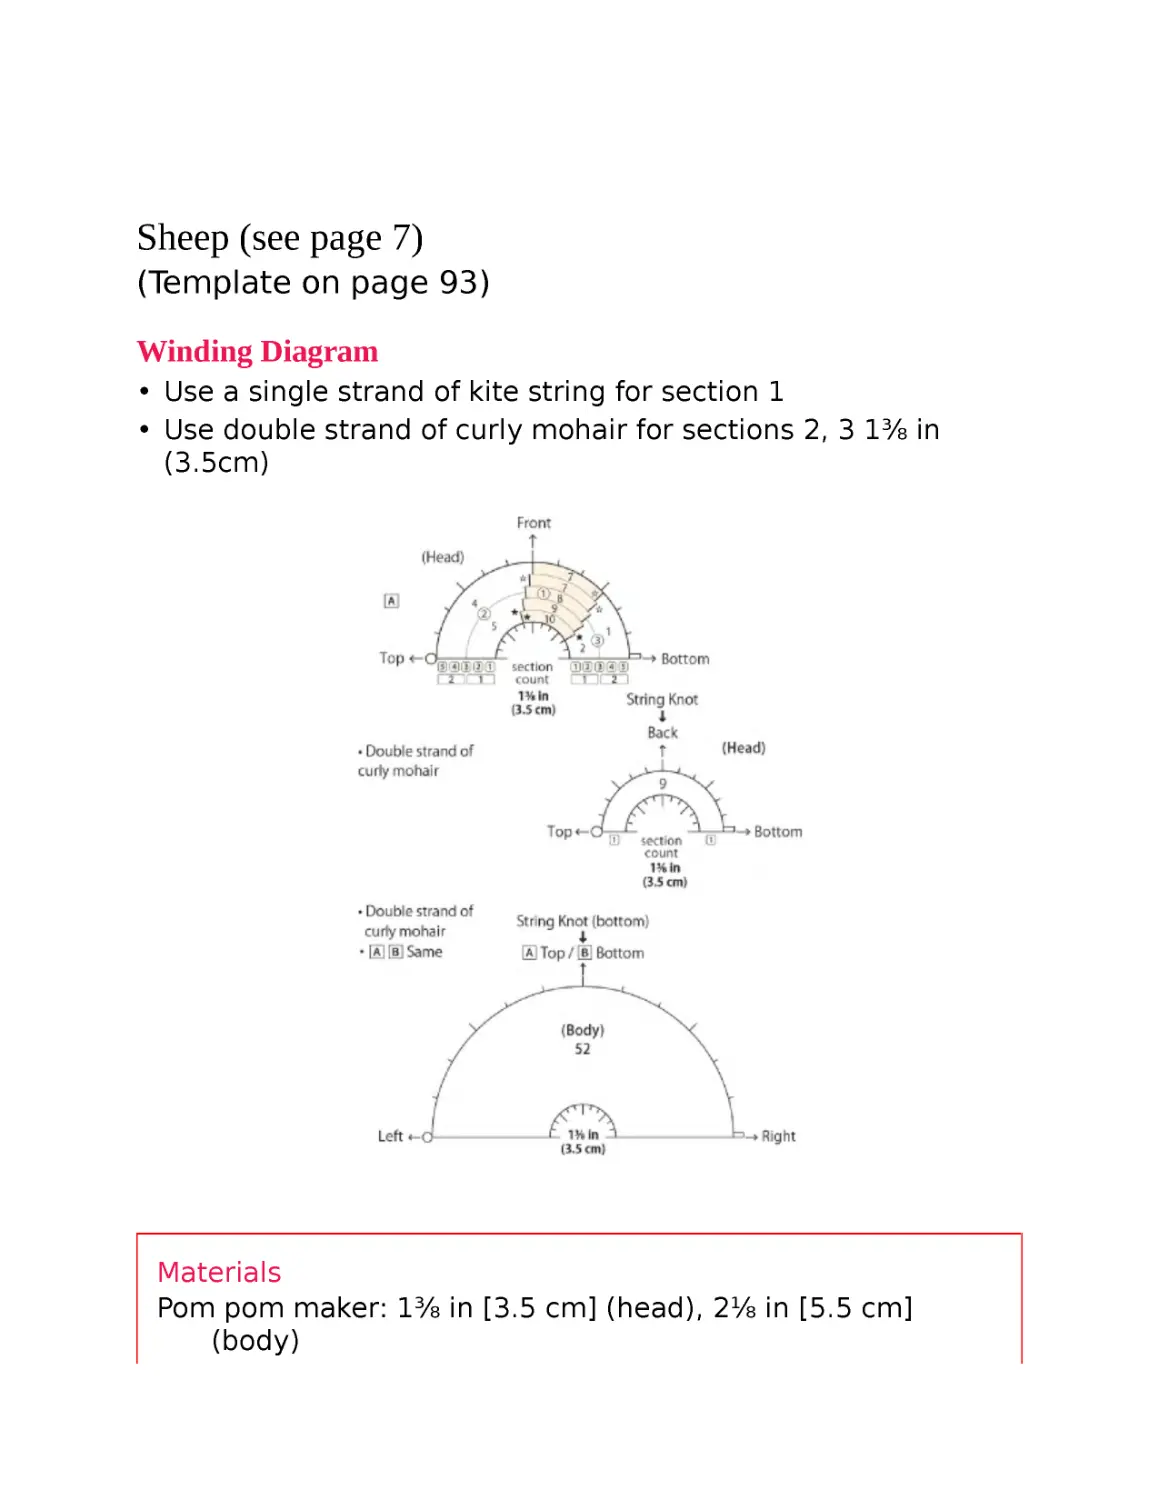
Winding Diagram
• Use a single strand of kite string for section 1
• Use double strand of curly mohair for sections 2, 3 1⅜ in
(3.5cm)
Materials
Pom pom maker: 1⅜ in [3.5 cm] (head), 2⅛ in [5.5 cm]
(body)
Yarn – Head, Body: curly mohair in white Face: pom pom yarn
in white
Other Materials
Eyes: plastic safety eye (black) 3 mm × 2
Nose: plastic safety nose (brown) 4 mm
Ears: felt (white) 2 × 1⅝ in (5 × 4 cm)
※ Optional: add a touch of pink to the inside of the ears with
a colored pencil
Instructions
1 Follow the winding diagram and make one 1⅜ in (3.5 cm) pom
pom for the head and another 2⅛ in (5.5 cm) pom pom for the
body. Remove from the pom pom makers and adjust the shape a
little.
2 Attach the head to the body (see p. 52-A).
3 Lightly felt the body with a felting needle. Trim any loose yarn.
4 Shape the face using the stepped cut (see p. 50).
5 Determine the positions for the eyes and nose and attach with
glue (see p. 47–48).
6 Take a small ball of wool roving, place between two pieces of
cardboard and using the template, felt into legs. Create 4 legs.
► point 1 For the ears, use the template to cut them out of felt,
then add a dab of glue at the bottom section of the ears, clip
and let dry (see p. 74 – point 3). Use pins to mark ear positions
(see p. 49) and attach the ears with glue.
7 Glue the legs from step 6 to the body. ► point 2
point 1
By placing them between cardboard, felting small pieces is
made easier.
point 2
Position the legs so that the sheep can stand upright. Attach
legs with glue.
Trimming and Sizing Guide
Poddle (see page 8)
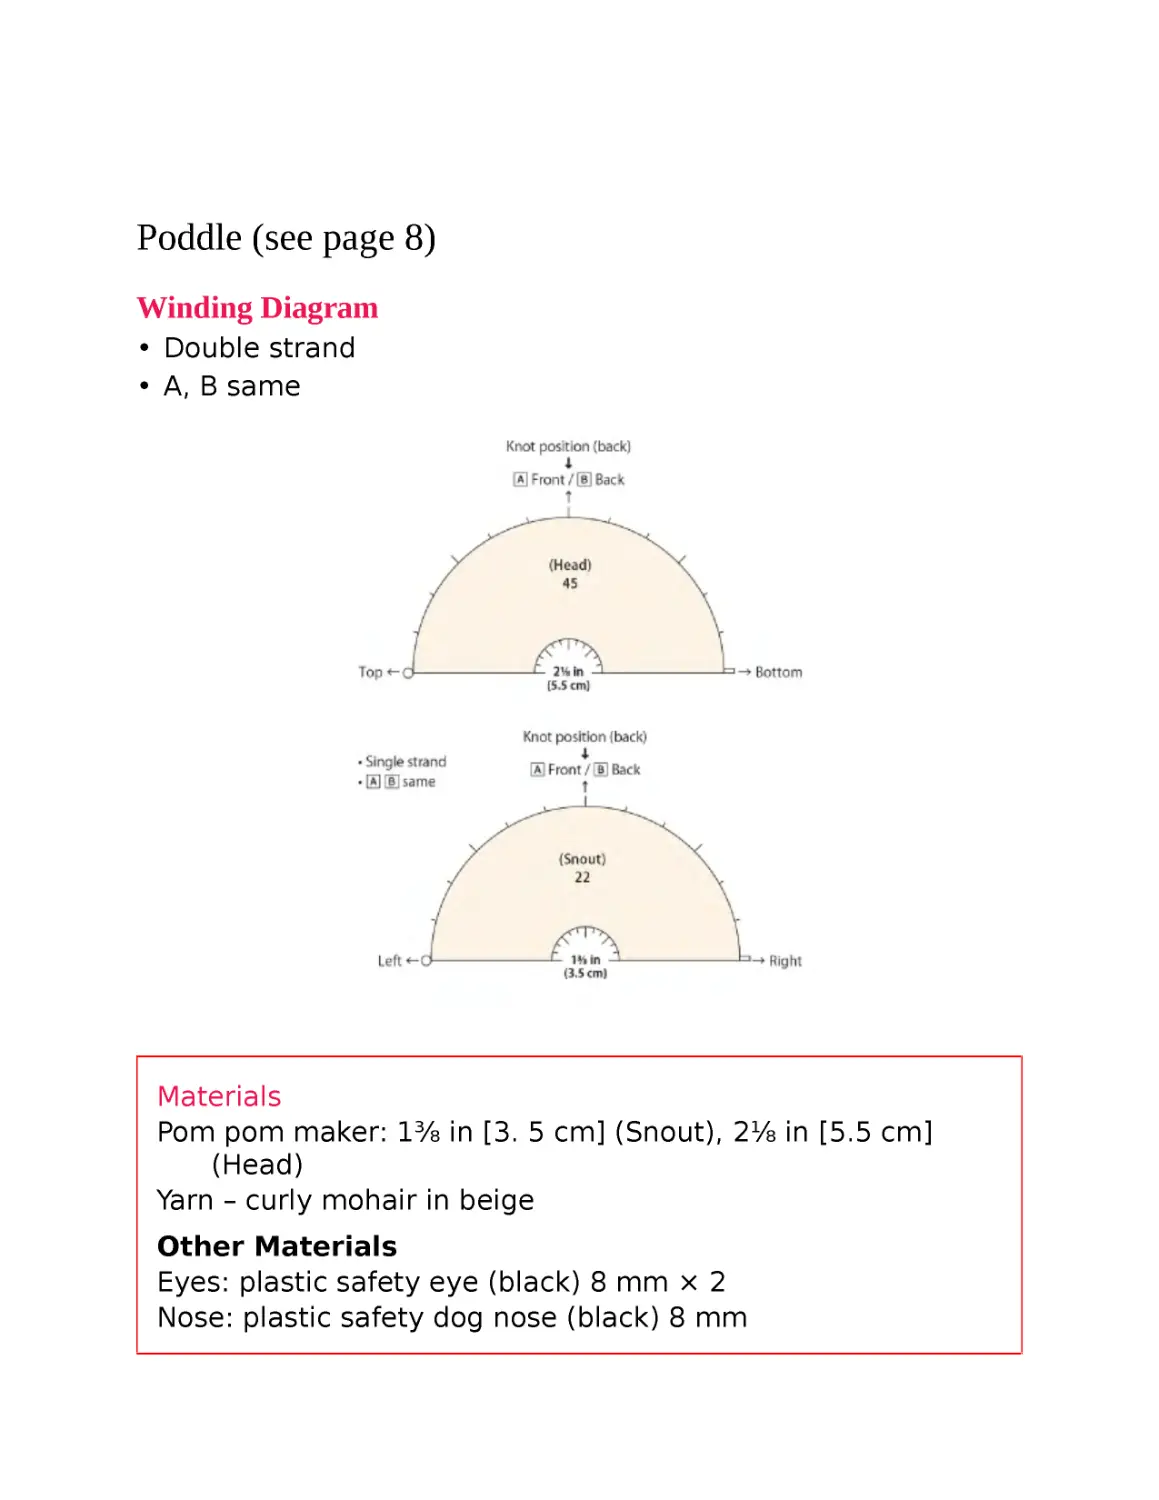
Winding Diagram
• Double strand
• A, B same
Materials
Pom pom maker: 1⅜ in [3. 5 cm] (Snout), 2⅛ in [5.5 cm]
(Head)
Yarn – curly mohair in beige
Other Materials
Eyes: plastic safety eye (black) 8 mm × 2
Nose: plastic safety dog nose (black) 8 mm
Instructions
1 Follow the winding diagram to make one 1⅜ in (3.5 cm) pom
pom and one 2⅛ in (5.5 cm) pom pom. Remove each pom pom
from the maker and adjust the shape
2 Attach the snout to the head (see p. 52-A). With the felting
needle, stab the edges of the snout into the head (see p. 53).
Determine the eye placement and insert. Trim as shown in
photos below.
3 Attach eyes and nose with glue (see p. 47–48).
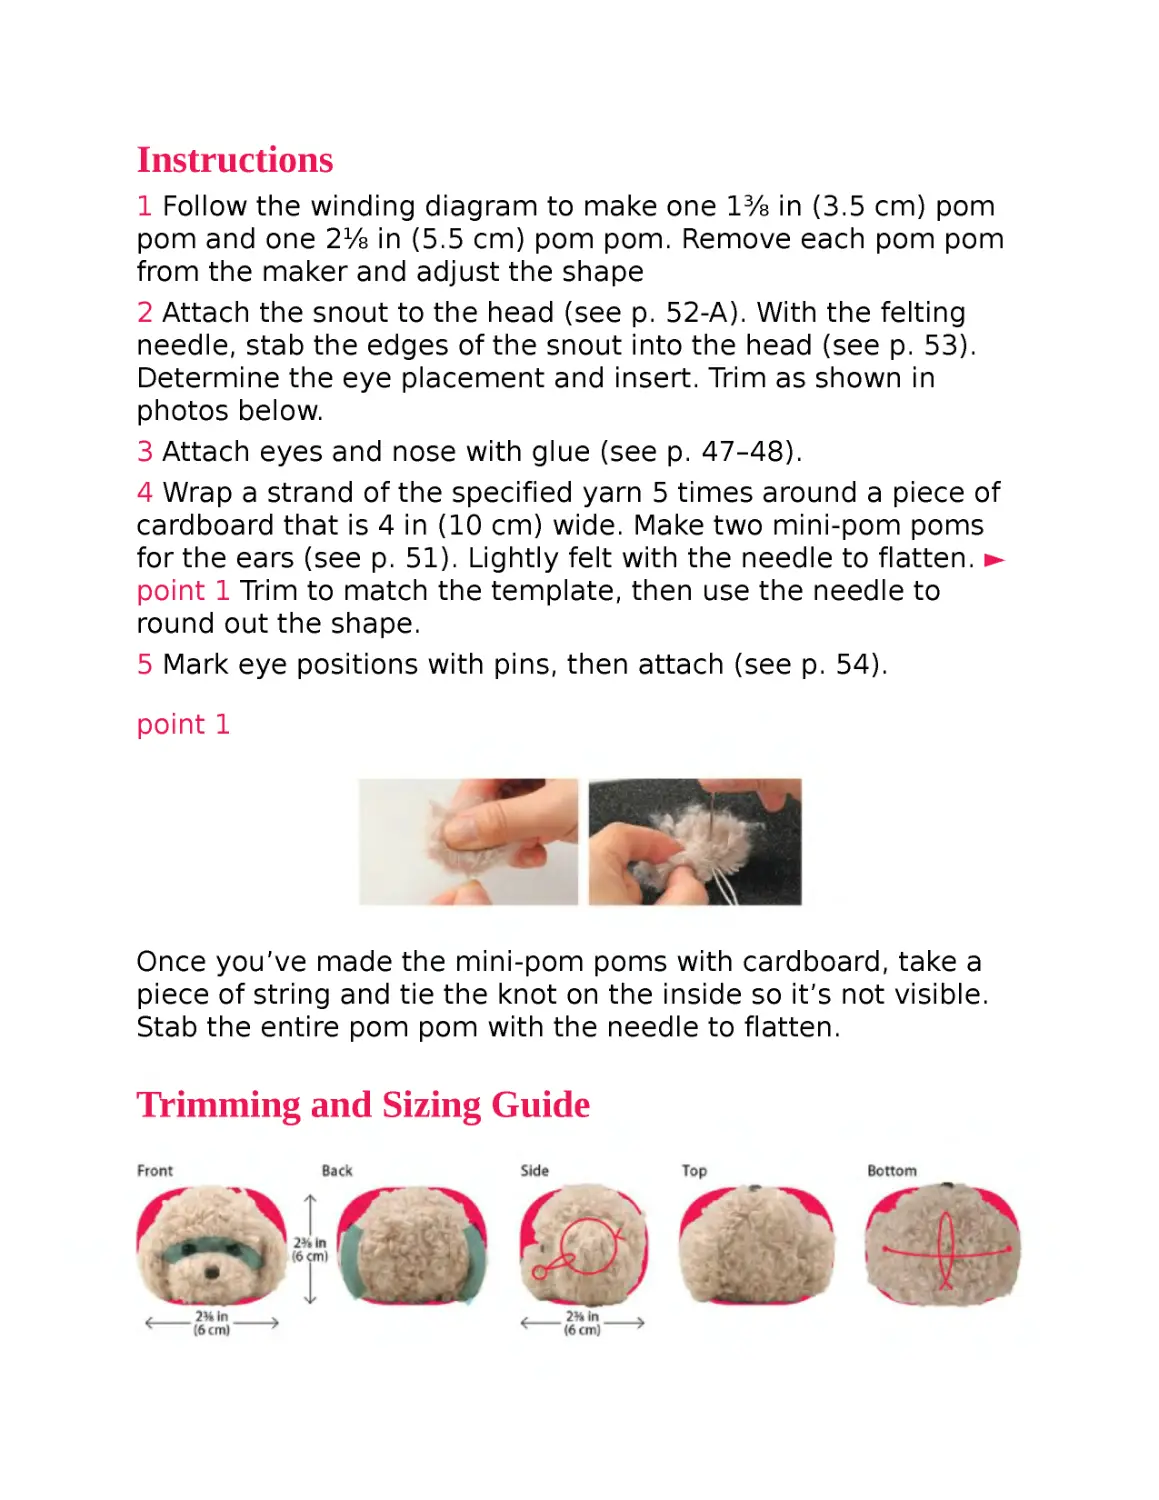
4 Wrap a strand of the specified yarn 5 times around a piece of
cardboard that is 4 in (10 cm) wide. Make two mini-pom poms
for the ears (see p. 51). Lightly felt with the needle to flatten. ►
point 1 Trim to match the template, then use the needle to
round out the shape.
5 Mark eye positions with pins, then attach (see p. 54).
point 1
Once you’ve made the mini-pom poms with cardboard, take a
piece of string and tie the knot on the inside so it’s not visible.
Stab the entire pom pom with the needle to flatten.
Trimming and Sizing Guide
Miniature Schnauzer (see page 9)
(Template on page 94
Winding Diagram on page 92)
Materials
Pom pom maker: 2⅛ in [5.5 cm] (Snout, head)
Yarn – Ears and head: machine washable merino in light gray
Snout: pom pom yarn in white
Other Materials
Eyes: plastic safety eye (black) 8 mm × 2
Nose: plastic safety dog nose (black) 10 mm
Ears: wool roving in gray – small amount
Instructions
1 Follow the winding diagram to make two 2⅛ in (5.5 cm) pom
poms. Remove from pom pom maker and adjust shape.
2 Attach snout to head (see p. 52-A). Stab the edges of the
snout into the head with the felting needle (see p. 53).
3 Use the stepped cut method to create the eyebrows (see p.
50). Trim as shown in the photos below.
4 Wrap a strand of the specified yarn 20 times around a piece of
cardboard that is 3⅛ in (8 cm) wide. Make two mini-pom poms
for the ears. Layer thin pieces of wool roving and lightly felt with
the needle. Wrap in a separate piece of cardboard and felt some
more. ► point 1
5 Use the template and cut out the ears. Fold each ear along
line indicated on template. Felt the folded section, stabbing
from above. Temporarily mark ear positions with pins. Thread
the loose ends of the ear pom pom string into a yarn needle and
attach to the head using the marking pins as a guide.
6 Determine the eyes and nose placements and attach with
glue (see p. 47–48).
point 1
Clip two strands of heavy duty thread across the top of a piece
of cardboard. Wrap the specified yarn (for the ears in this case)
around the cardboard. When done, tie the threads tightly at the
top.
Adjust the yarn, layer a thin piece of wool roving on top and
flatten by felting with the needle (the felted portion will be the
underside of the ear).
Place ear between another piece of cardboard and felt some
more.
Trimming and Sizing Guide
Bear (see page 12)
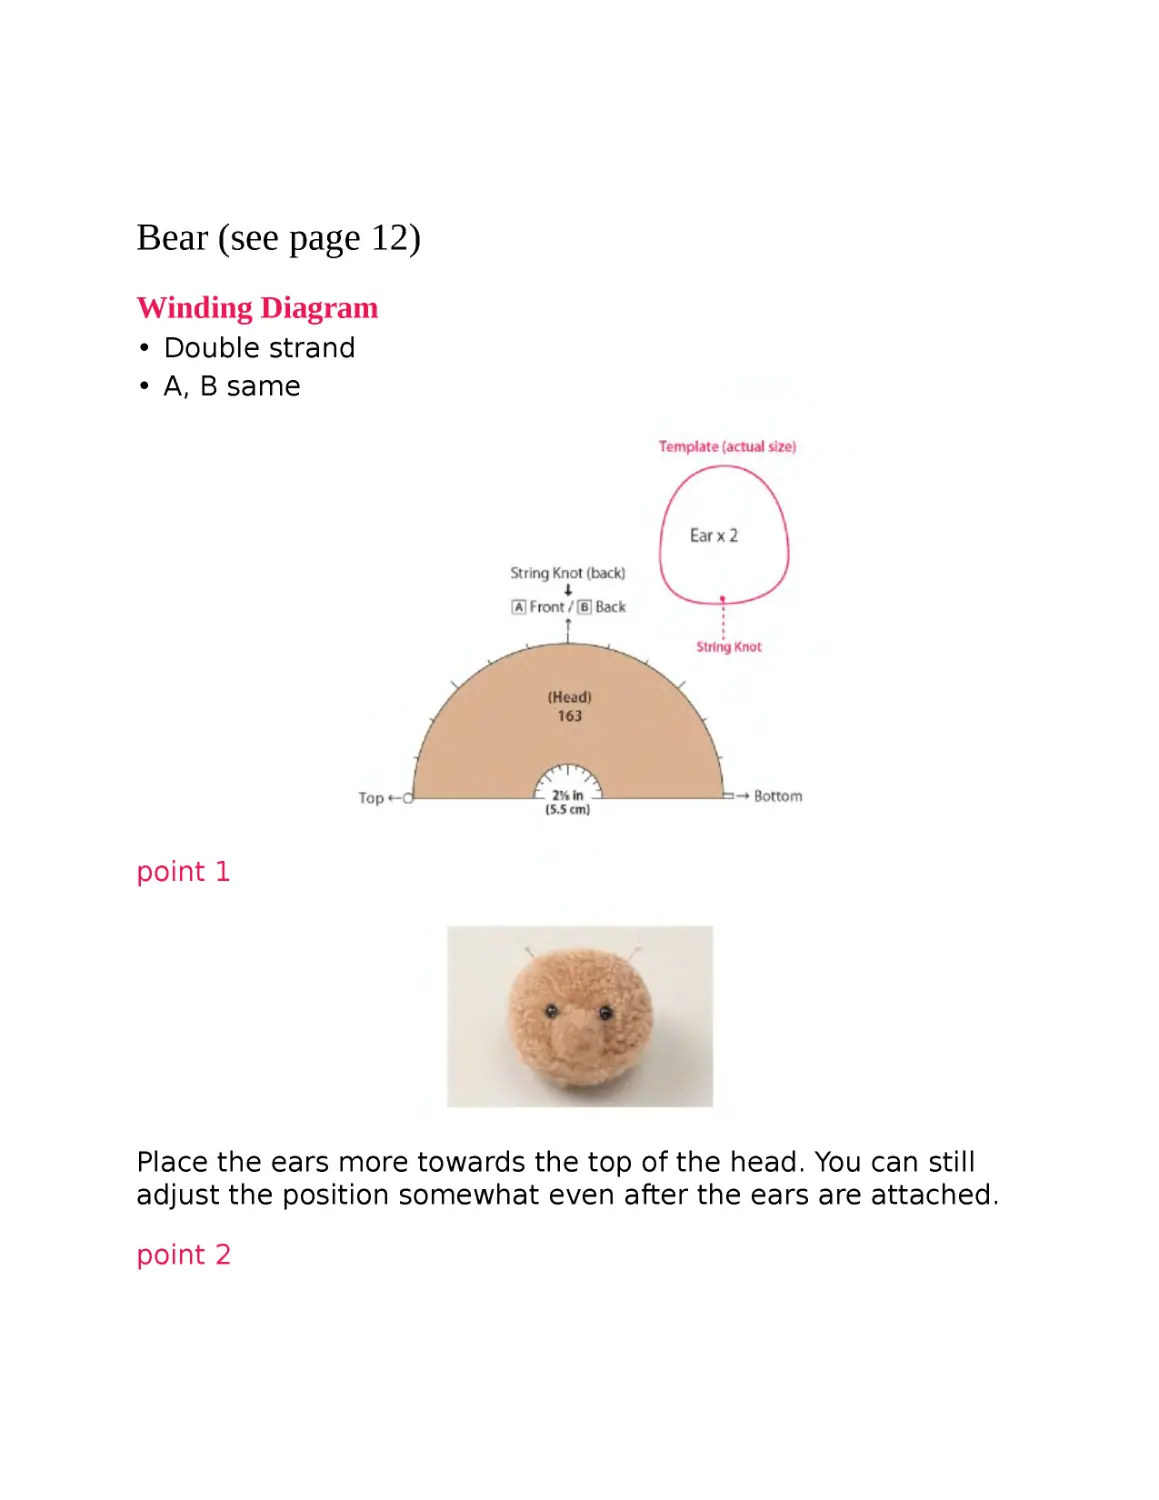
Winding Diagram
• Double strand
• A, B same
point 1
Place the ears more towards the top of the head. You can still
adjust the position somewhat even after the ears are attached.
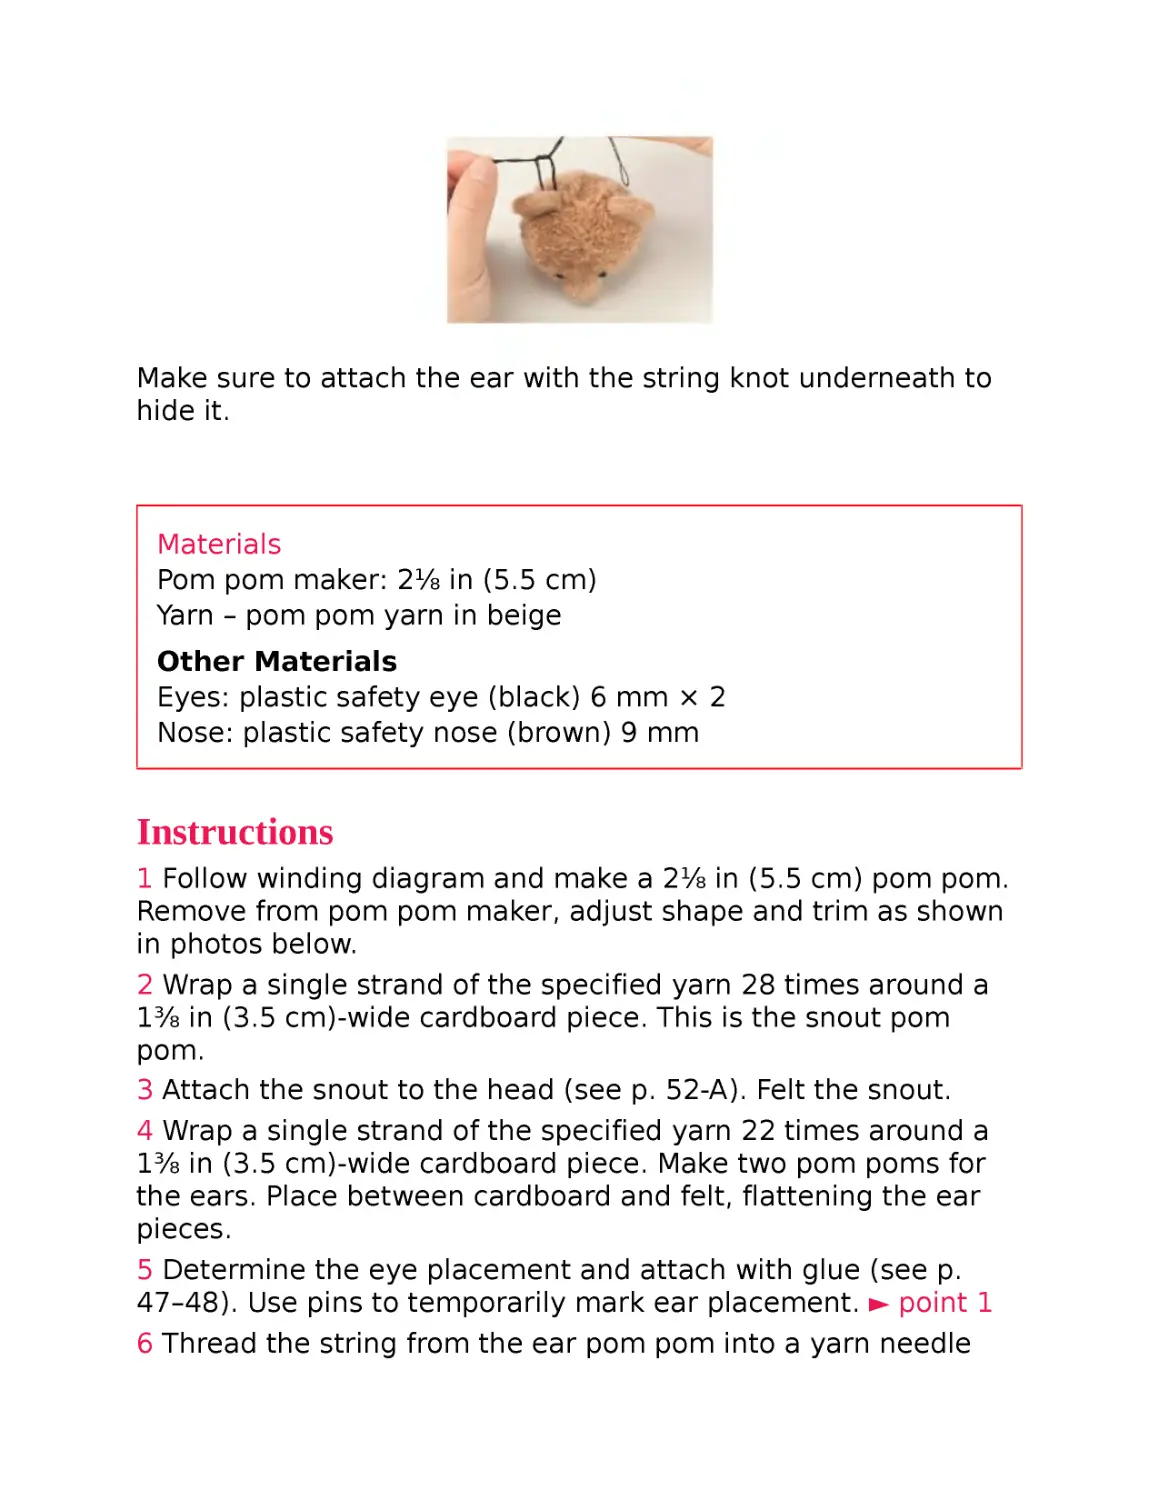
point 2
Make sure to attach the ear with the string knot underneath to
hide it.
Materials
Pom pom maker: 2⅛ in (5.5 cm)
Yarn – pom pom yarn in beige
Other Materials
Eyes: plastic safety eye (black) 6 mm × 2
Nose: plastic safety nose (brown) 9 mm
Instructions
1 Follow winding diagram and make a 2⅛ in (5.5 cm) pom pom.
Remove from pom pom maker, adjust shape and trim as shown
in photos below.
2 Wrap a single strand of the specified yarn 28 times around a
1⅜ in (3.5 cm)-wide cardboard piece. This is the snout pom
pom.
3 Attach the snout to the head (see p. 52-A). Felt the snout.
4 Wrap a single strand of the specified yarn 22 times around a
1⅜ in (3.5 cm)-wide cardboard piece. Make two pom poms for
the ears. Place between cardboard and felt, flattening the ear
pieces.
5 Determine the eye placement and attach with glue (see p.
47–48). Use pins to temporarily mark ear placement. ► point 1
6 Thread the string from the ear pom pom into a yarn needle
and attach to the head (see p. 72 point 1). ► point 2
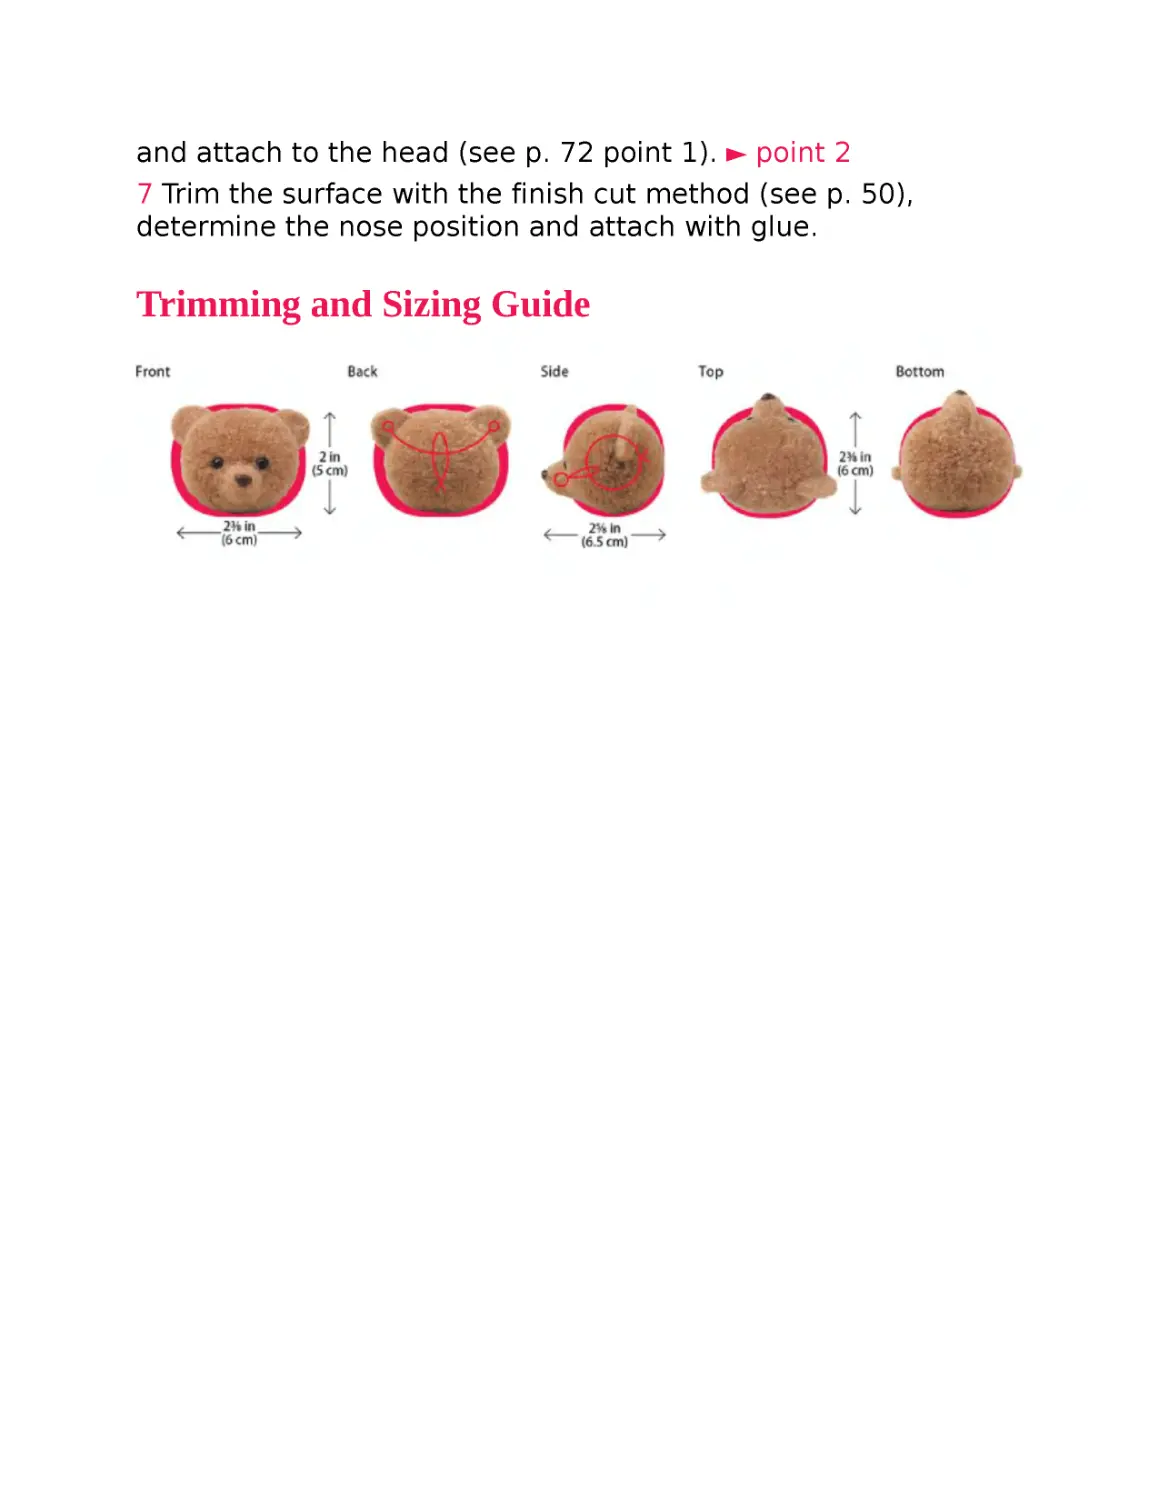
7 Trim the surface with the finish cut method (see p. 50),
determine the nose position and attach with glue.
Trimming and Sizing Guide
Calico Cat (see page 10)
(Template on page 94 Winding Diagram on page 90)
Materials
Pom pom maker 2⅛ in (5.5 cm)
Yarn – pom pom yarn in white, beige and black
Other Materials
Eyes: crystal eyes in gold in 9 mm × 2
Ears: felt (black) 7 × 4⅜ in (18 × 11 cm), (camel) 3⅛ × 4⅜
in (8 × 11 cm)
Nose, mouth: wool roving (a: light pink, b: apricot/peach c:
brown) – a small amount each
Trimming and Sizing Guide
Brown Tiger Cat (see page 11)
(Template on page 94 Winding Diagram on page 91)
Materials
Pom pom maker 2⅛ in (5.5 cm)
Yarn – pom pom yarn in light beige and white alpaca merino
in camel
Other Materials
Eyes: cat’s eyes in blue 9 mm × 2
Ears: felt (camel) 6¼ × 8⅝ in (16 × 22 cm)
Nose, mouth: wool roving (a: light pink, b: apricot/peach c:
brown d: biscuit) – a small amount each
Trimming and Sizing Guide
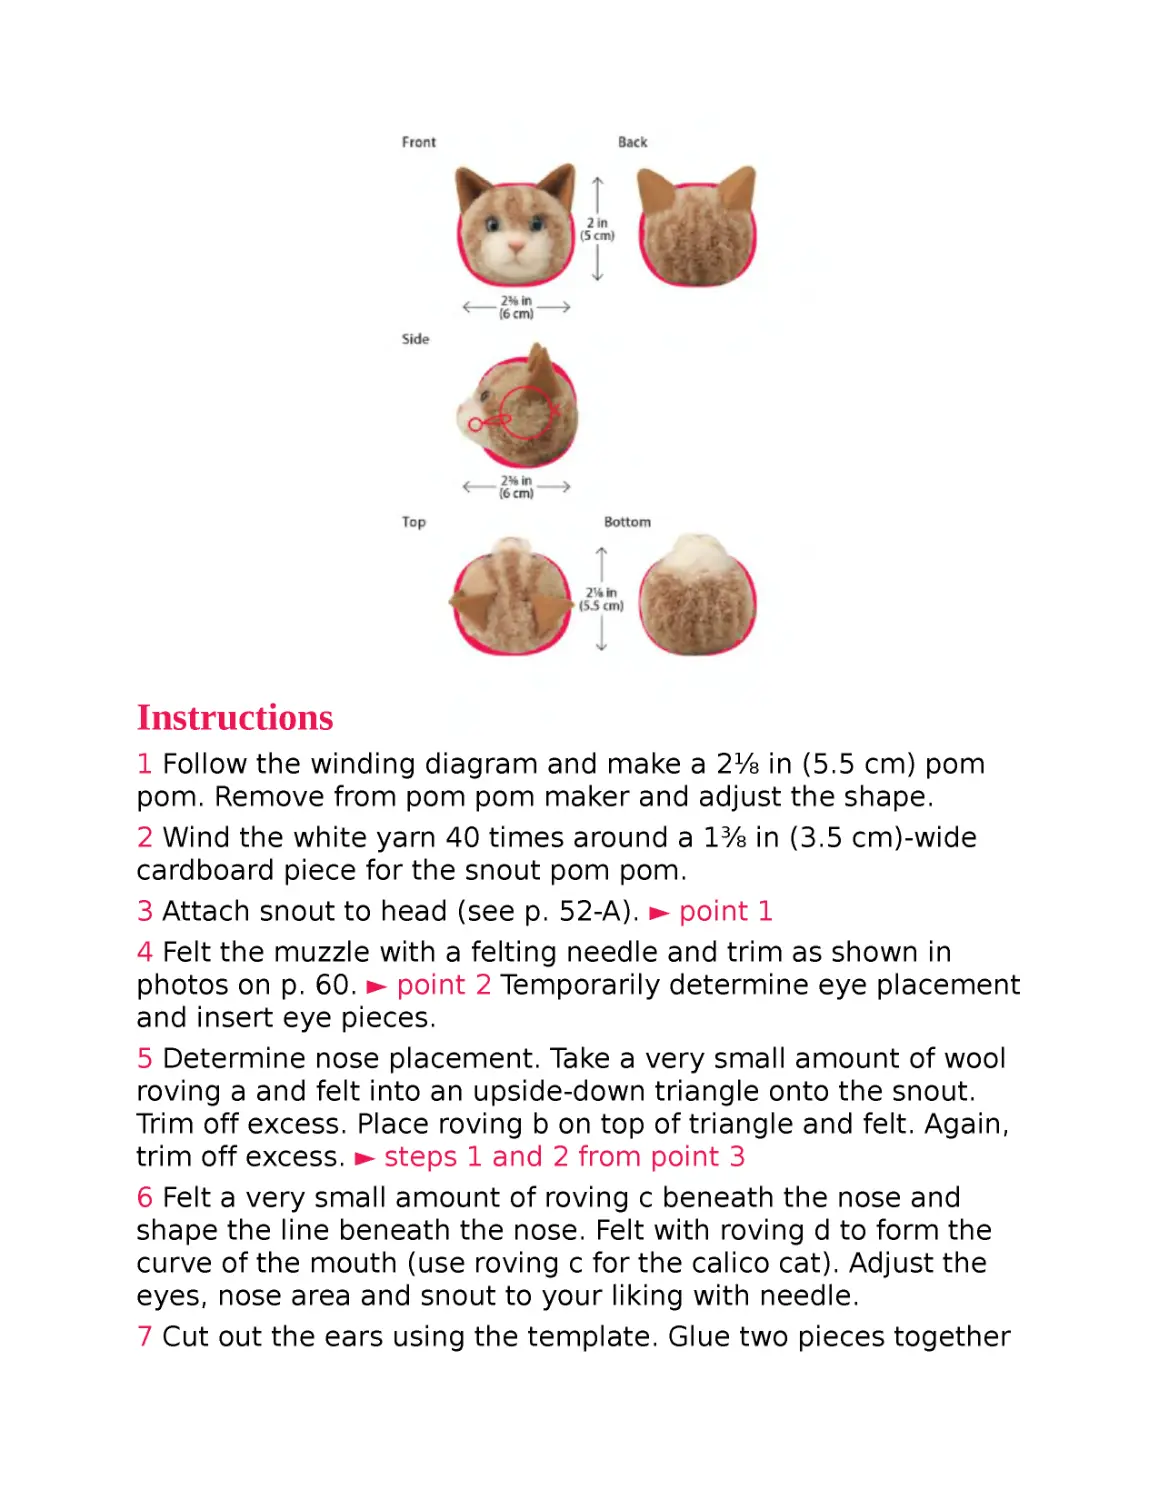
Instructions
1 Follow the winding diagram and make a 2⅛ in (5.5 cm) pom
pom. Remove from pom pom maker and adjust the shape.
2 Wind the white yarn 40 times around a 1⅜ in (3.5 cm)-wide
cardboard piece for the snout pom pom.
3 Attach snout to head (see p. 52-A). ► point 1
4 Felt the muzzle with a felting needle and trim as shown in
photos on p. 60. ► point 2 Temporarily determine eye placement
and insert eye pieces.
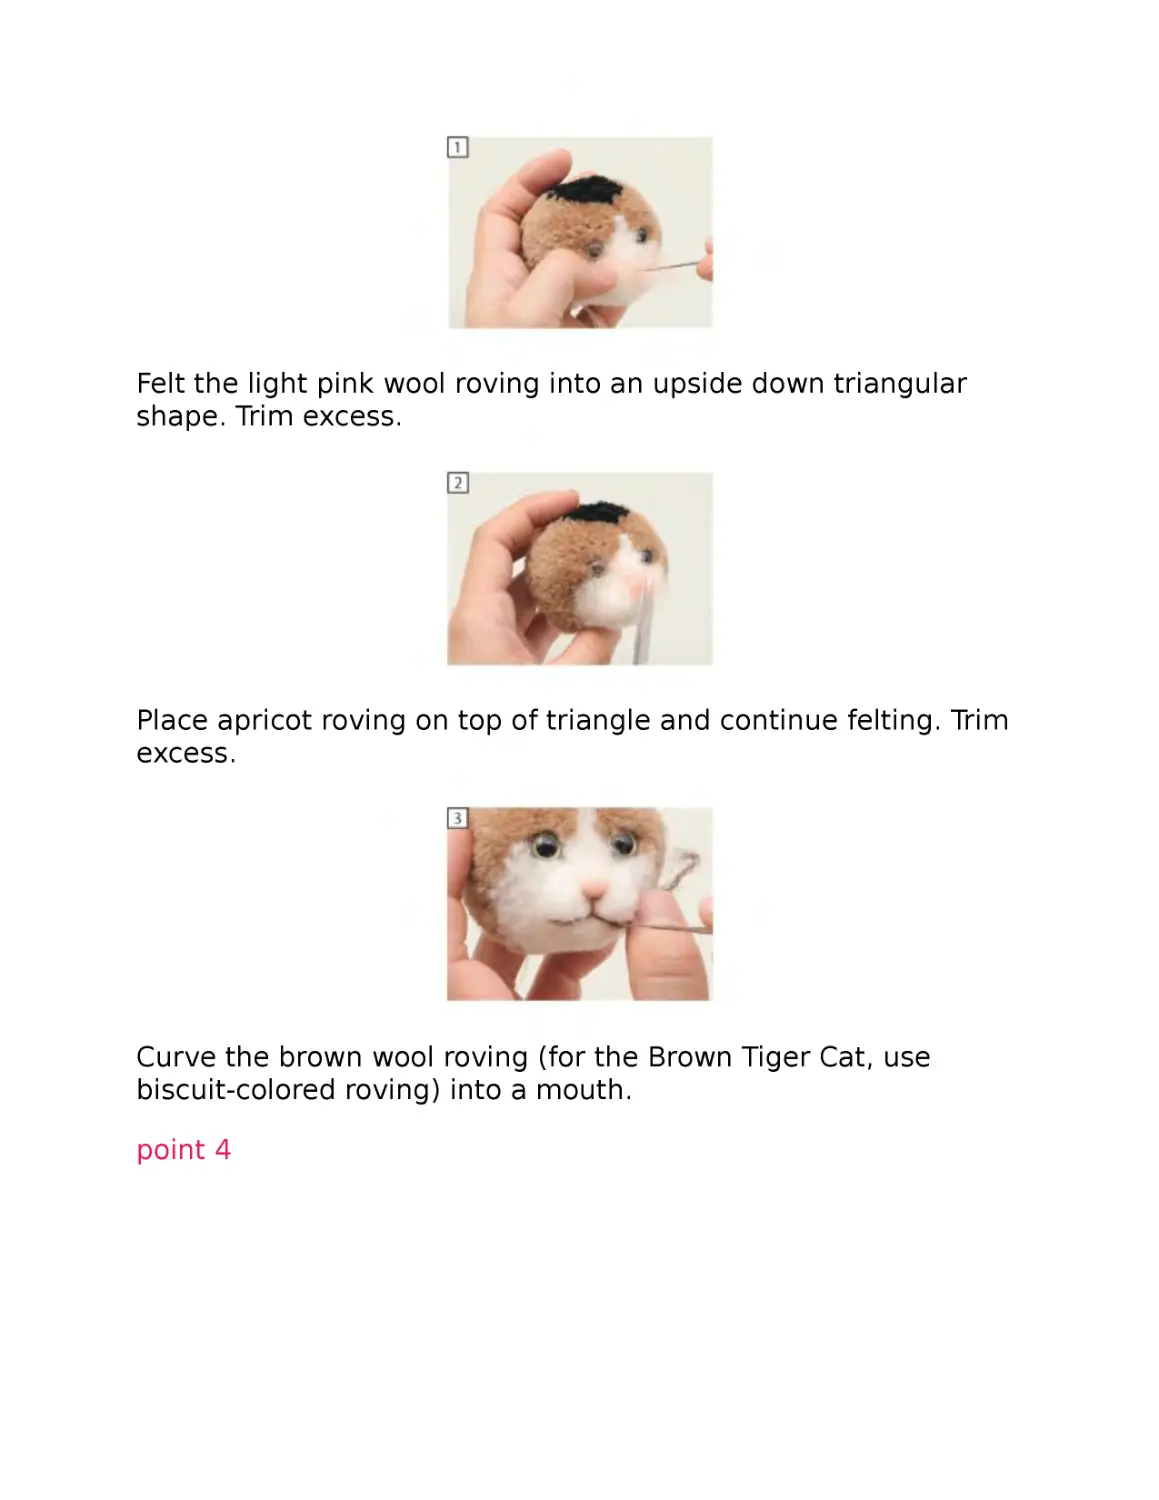
5 Determine nose placement. Take a very small amount of wool
roving a and felt into an upside-down triangle onto the snout.
Trim off excess. Place roving b on top of triangle and felt. Again,
trim off excess. ► steps 1 and 2 from point 3
6 Felt a very small amount of roving c beneath the nose and
shape the line beneath the nose. Felt with roving d to form the
curve of the mouth (use roving c for the calico cat). Adjust the
eyes, nose area and snout to your liking with needle.
7 Cut out the ears using the template. Glue two pieces together
for each ear, bend and let dry.
8 Determine ear placement, separate the yarn of that section
(see p. 49) and attach with glue. Glue the eyes in at this point
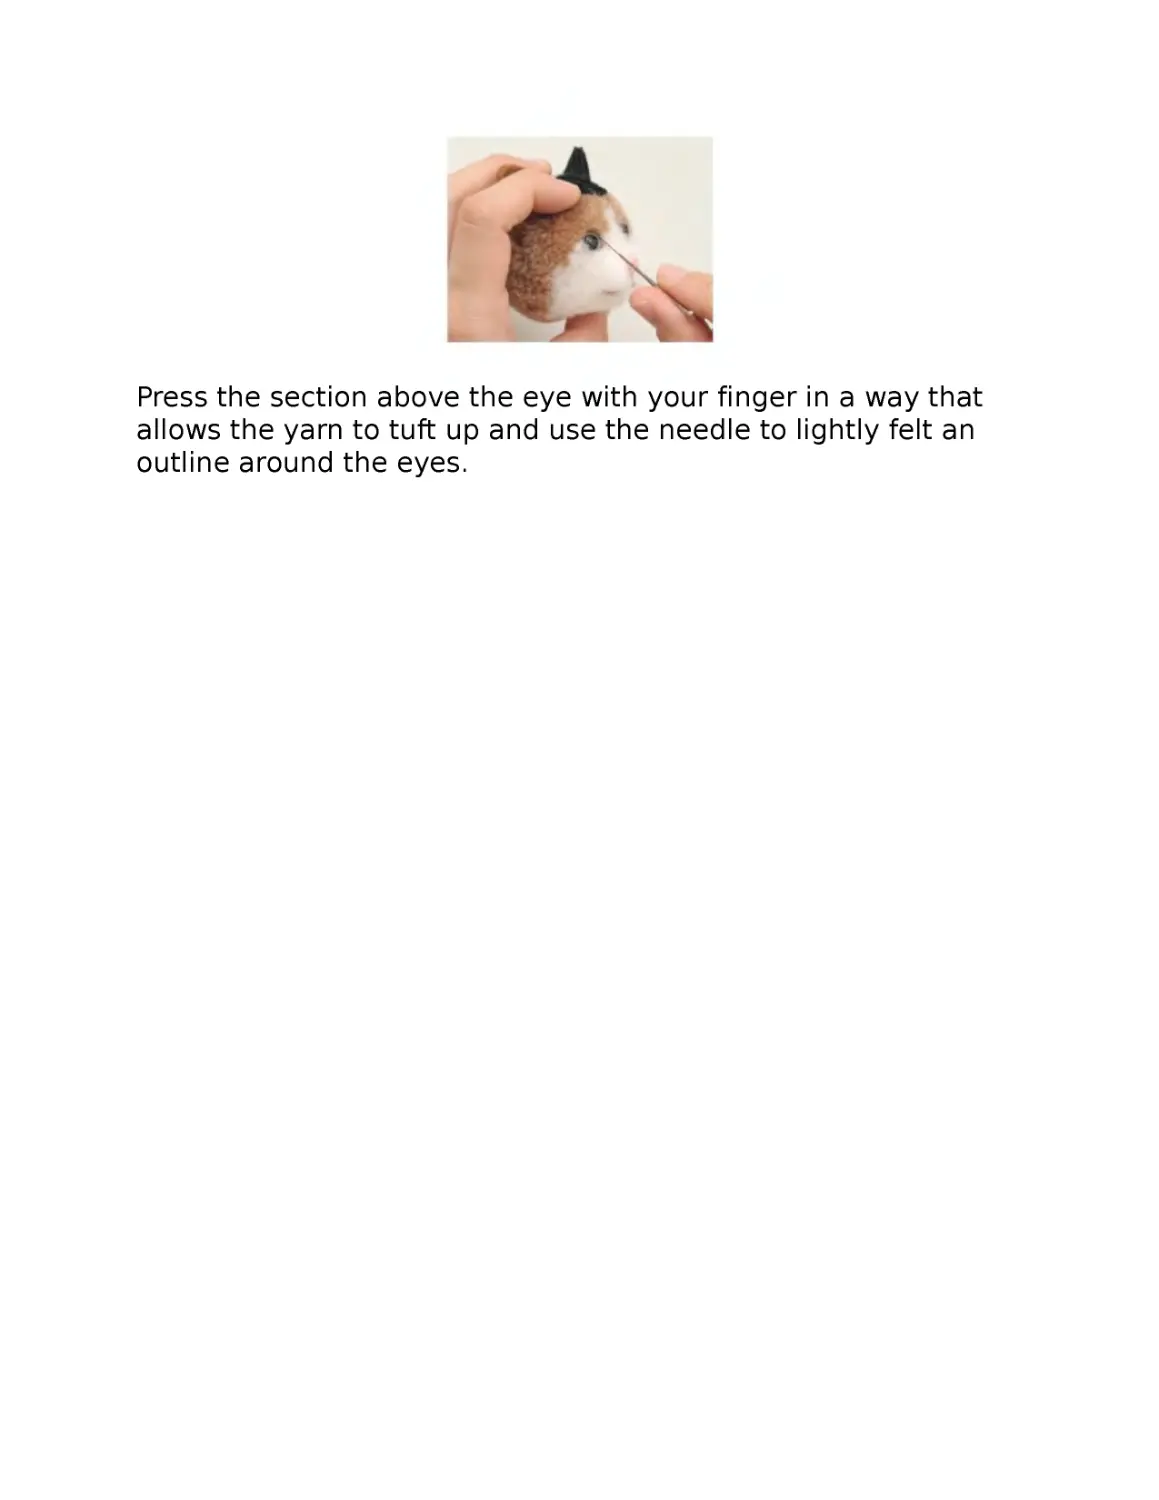
as well. Using the felting needle, lightly stab an outline above
the eyes, creating “eyelids” (for the calico cat, felt roving c
above and at the corner of the eyes). ► point 4 Lightly felt
beneath the nose as well.
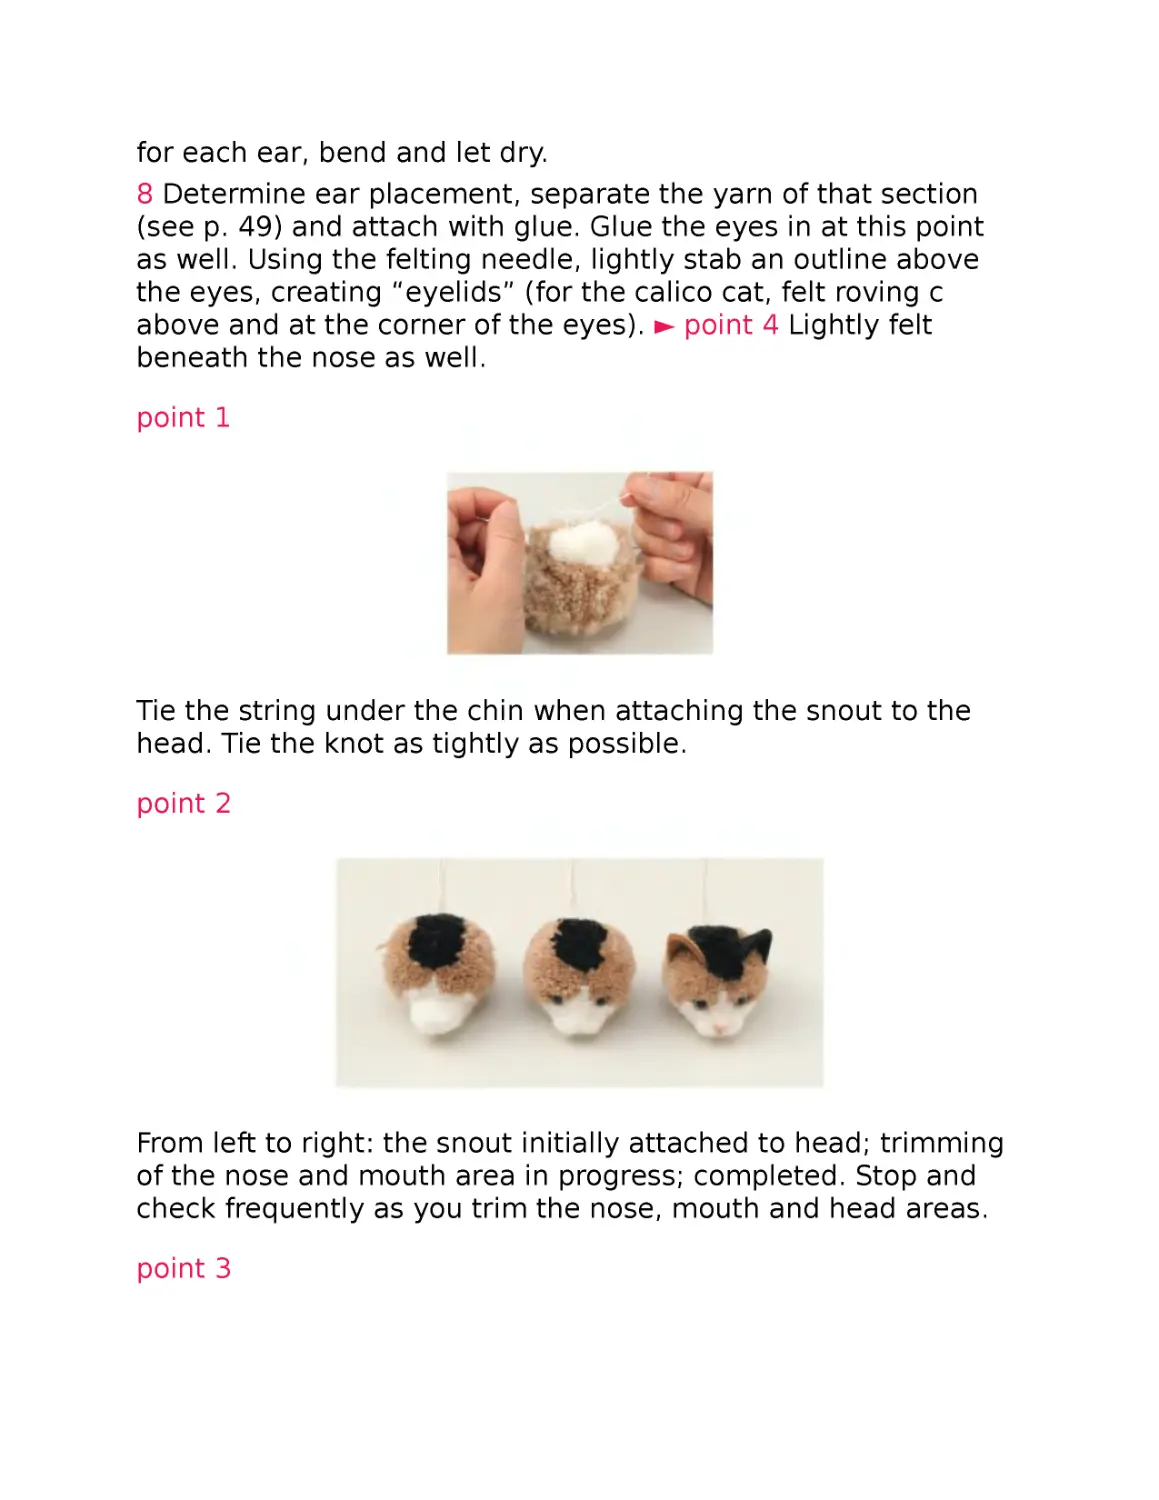
point 1
Tie the string under the chin when attaching the snout to the
head. Tie the knot as tightly as possible.
point 2
From left to right: the snout initially attached to head; trimming
of the nose and mouth area in progress; completed. Stop and
check frequently as you trim the nose, mouth and head areas.
point 3
Felt the light pink wool roving into an upside down triangular
shape. Trim excess.
Place apricot roving on top of triangle and continue felting. Trim
excess.
Curve the brown wool roving (for the Brown Tiger Cat, use
biscuit-colored roving) into a mouth.
point 4
Press the section above the eye with your finger in a way that
allows the yarn to tuft up and use the needle to lightly felt an
outline around the eyes.
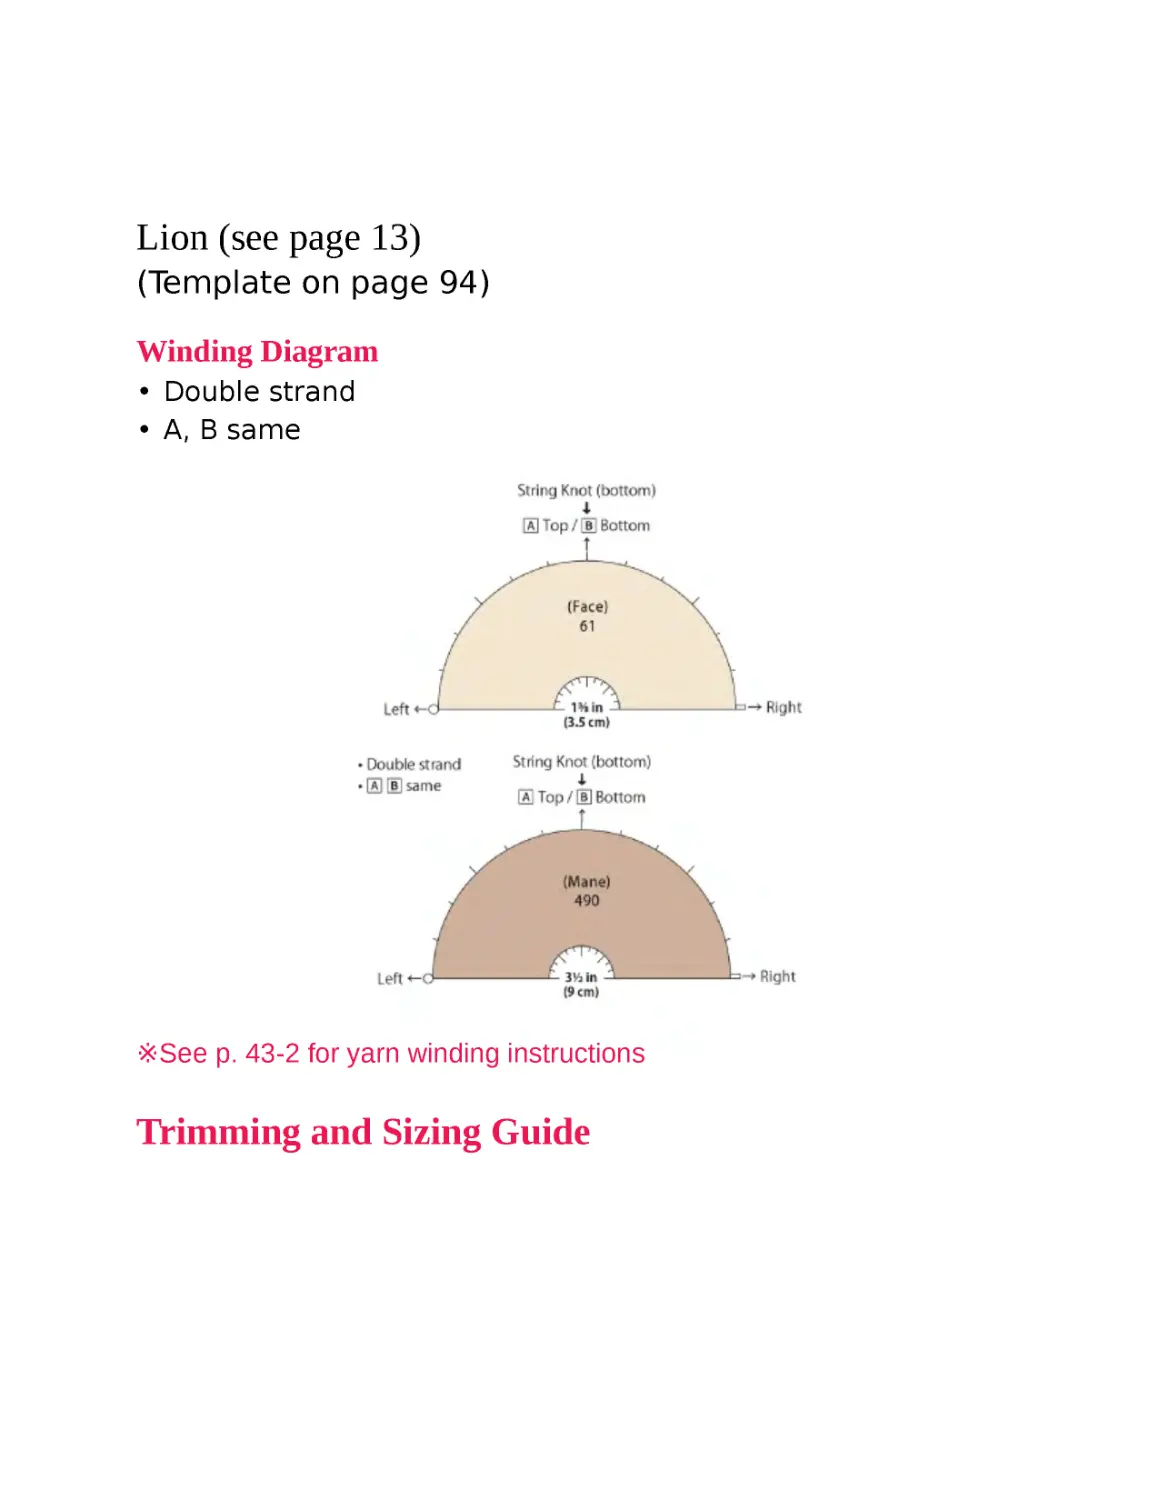
Lion (see page 13)
(Template on page 94)
Winding Diagram
• Double strand
• A, B same
※See p. 43-2 for yarn winding instructions
Trimming and Sizing Guide
Materials
Pom pom maker 1⅜ in (3.5 cm) (face), 3½ in (9 cm) (mane)
Yarn — Face: pom pom yarn in light beige
Mane: mohair in brown →2 balls/skeins
Detail between eyes: pom pom yarn in brown, 1 in (2.5
cm) × 8 strands
Other Materials
Eyes: plastic safety eye (black) 3 mm × 2; felt (dark brown)
⅜ × 1 in (1 × 2.5 cm)
Nose: felt (black) ⅜ × ⅞ in (1 × 2 cm)
Ears: felt (tan) 2⅜ × 2¾ in (6 × 7 cm)
Mouth: heavy duty thread (black) 12⅝ in (32 cm)
Instructions
1 Follow winding diagram and make one 1⅜ in (3.5 cm) pom
pom and one 3½ in (9 cm) pom pom. Remove from pom pom
maker and adjust shape.
2 With the blue line shown in the lower left photos as a guide,
use a felting needle to shape the face. Trim (see p. 53-1).
3 Add the detail between the eyes. ► point 1 Apply glue on both
sides of the black felt. Once dry, cut out eyes and nose using
the templates. Apply another dab of glue to the base of each
ear, clip each ear to pinch the bottom and let dry (see p. 74point 3).
4 Trim the top of the head to align with the angle of the mane
and attach mane to face (see p. 52-B).
5 Punch a hole in the felt pieces for the eyes with an awl or
similar tool. Insert and glue in the plastic safety eye in each felt
piece. Determine the eye and nose placement and attach with
glue (see p. 48).
6 Create the mouth with the heavy duty thread. Clip the thread
ends close to the knot and apply a dab of glue. ► point 2
Determine the ear placement and attach the dried pieces from
step 3 with glue (see p. 49).
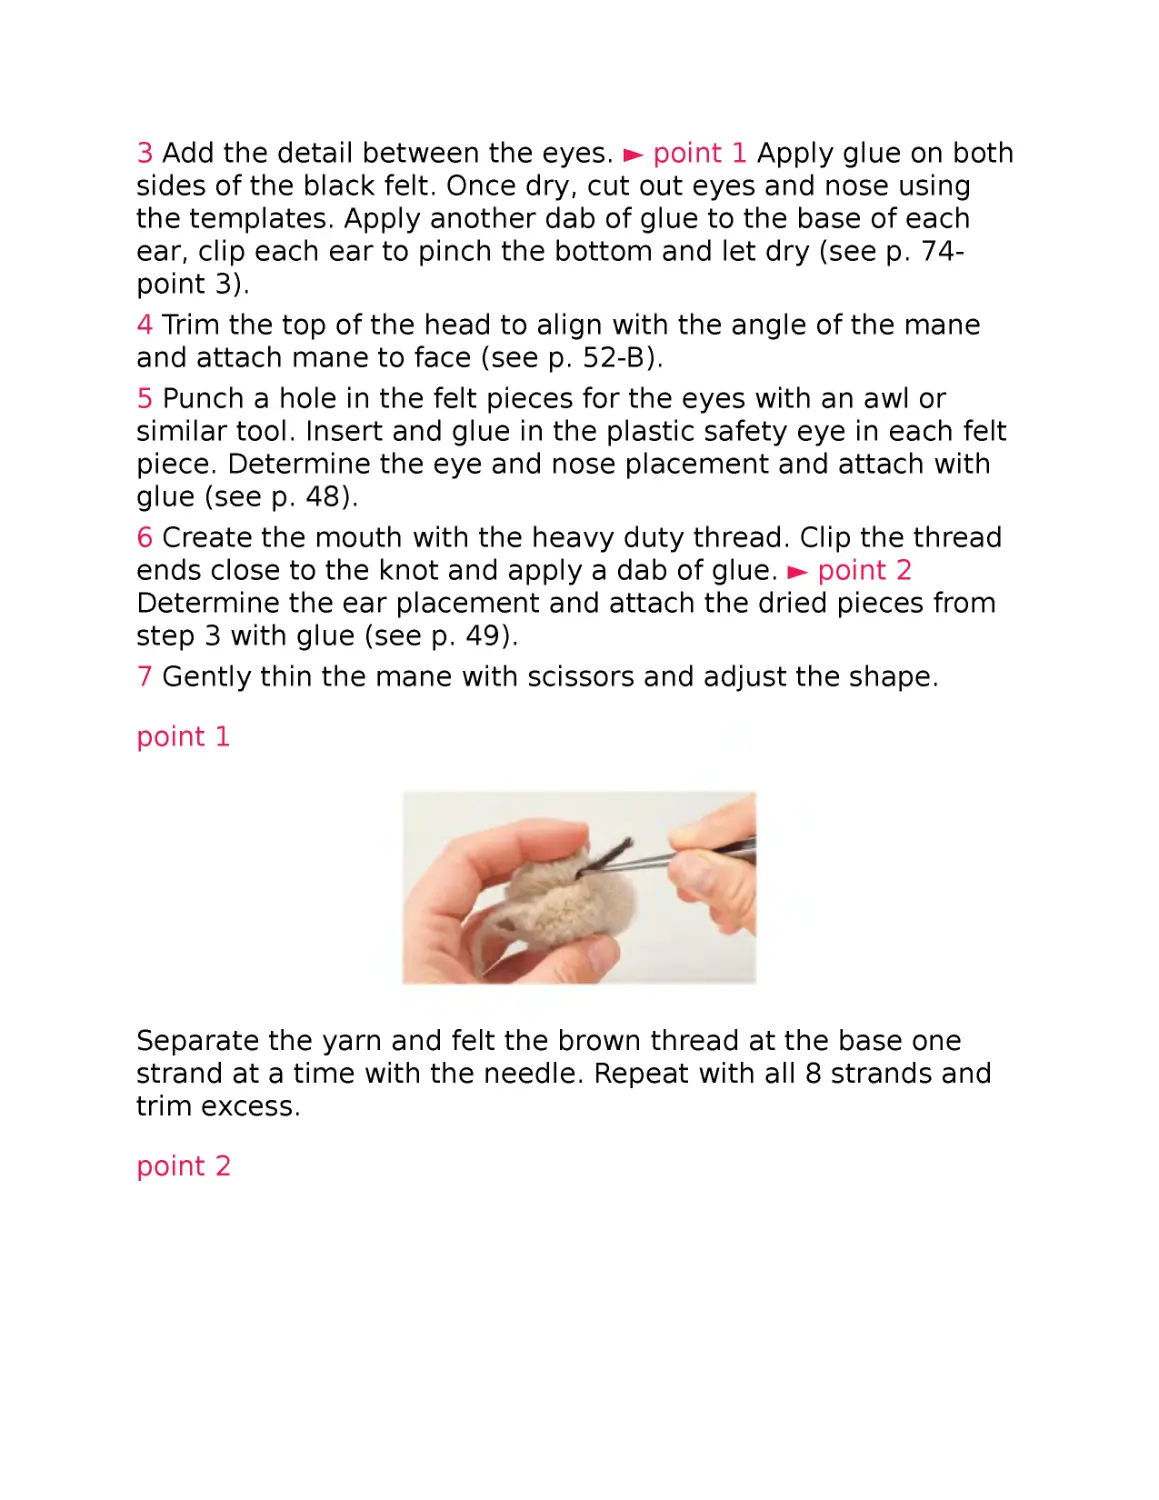
7 Gently thin the mane with scissors and adjust the shape.
point 1
Separate the yarn and felt the brown thread at the base one
strand at a time with the needle. Repeat with all 8 strands and
trim excess.
point 2
Loop the thread once and repeat. Then create a line from the
mouth to the nose with a felting needle.
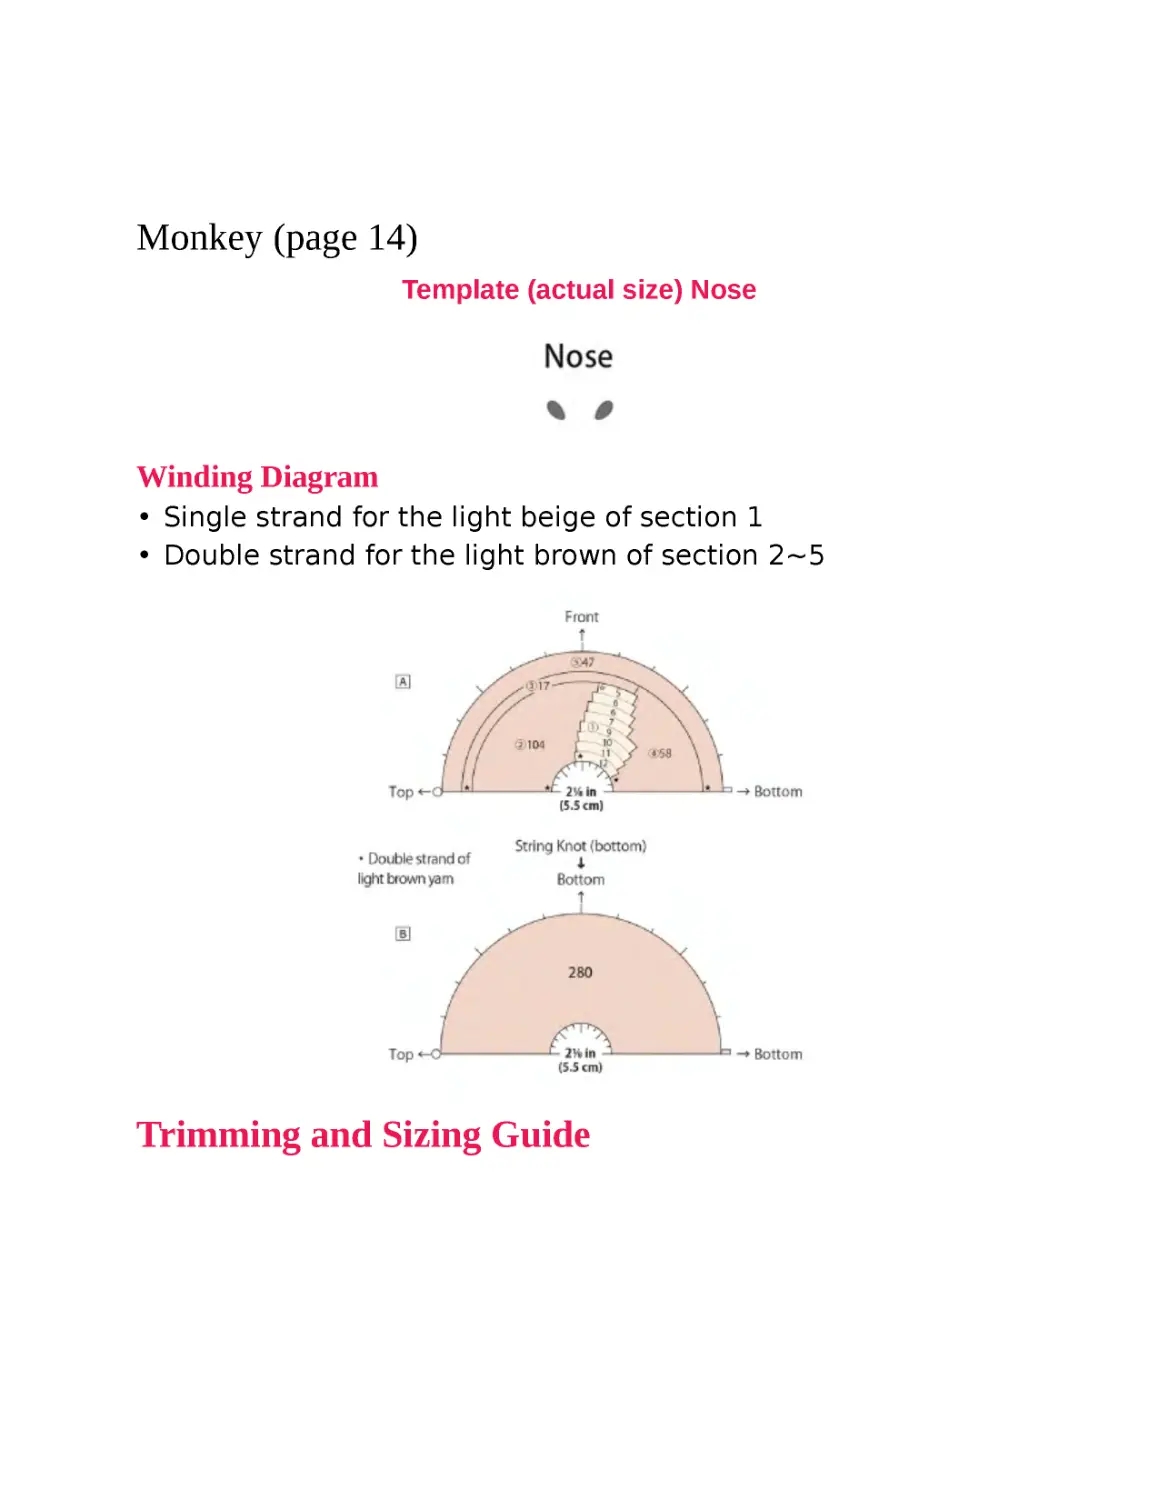
Monkey (page 14)
Template (actual size) Nose
Winding Diagram
• Single strand for the light beige of section 1
• Double strand for the light brown of section 2~5
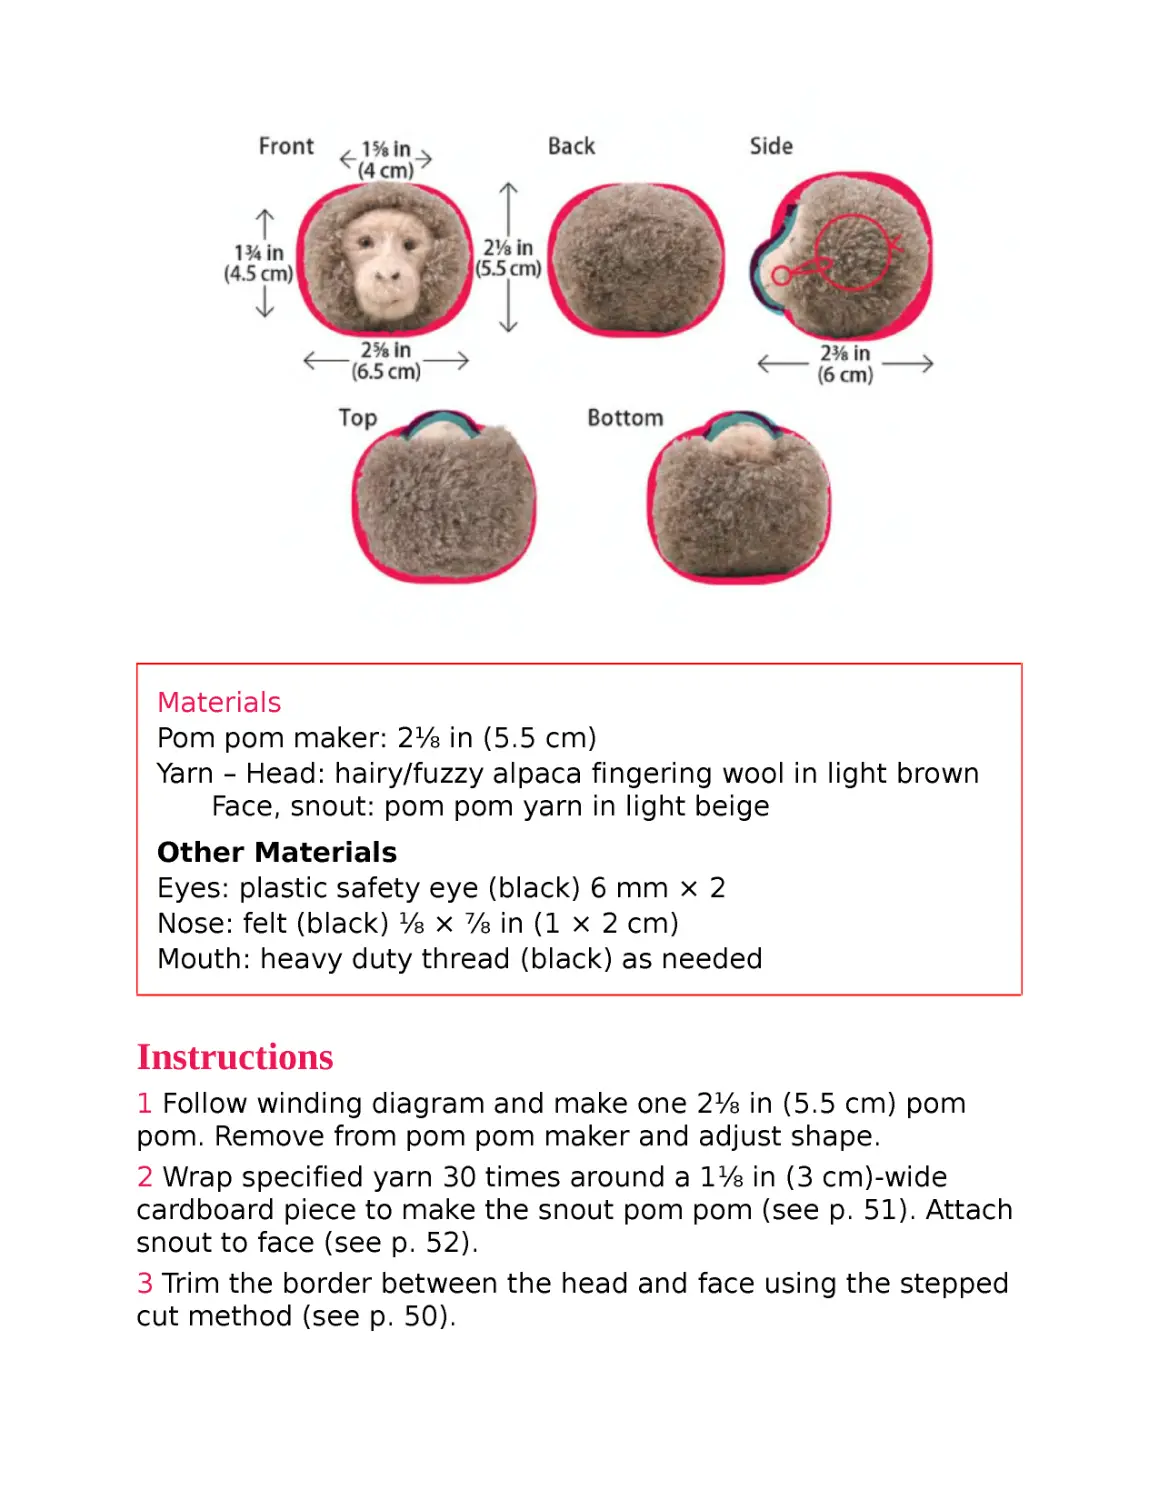
Trimming and Sizing Guide
Materials
Pom pom maker: 2⅛ in (5.5 cm)
Yarn – Head: hairy/fuzzy alpaca fingering wool in light brown
Face, snout: pom pom yarn in light beige
Other Materials
Eyes: plastic safety eye (black) 6 mm × 2
Nose: felt (black) ⅛ × ⅞ in (1 × 2 cm)
Mouth: heavy duty thread (black) as needed
Instructions
1 Follow winding diagram and make one 2⅛ in (5.5 cm) pom
pom. Remove from pom pom maker and adjust shape.
2 Wrap specified yarn 30 times around a 1⅛ in (3 cm)-wide
cardboard piece to make the snout pom pom (see p. 51). Attach
snout to face (see p. 52).
3 Trim the border between the head and face using the stepped
cut method (see p. 50).
4 Use a felting needle on the snout to shape it as shown in the
photos below (see p. 53).
5 Determine the eye placement and temporarily insert the
plastic eye pieces (see p. 47). Shape the face by trimming and
using the felting needle. Felt to outline the eyes and form the
line under the nose. ► point 1 See point 2 section for the Lion to
create the mouth (p. 62).
6 Attach the eyes with glue. Also attach the glue-reinforced
nose (see p. 51).
point 1
Insert eyes and trim the surrounding area a little.
※ Tuft up the corners of the eyes a little.
Pinch some yarn with tweezers to create the line under the
nose, then felt with a needle.
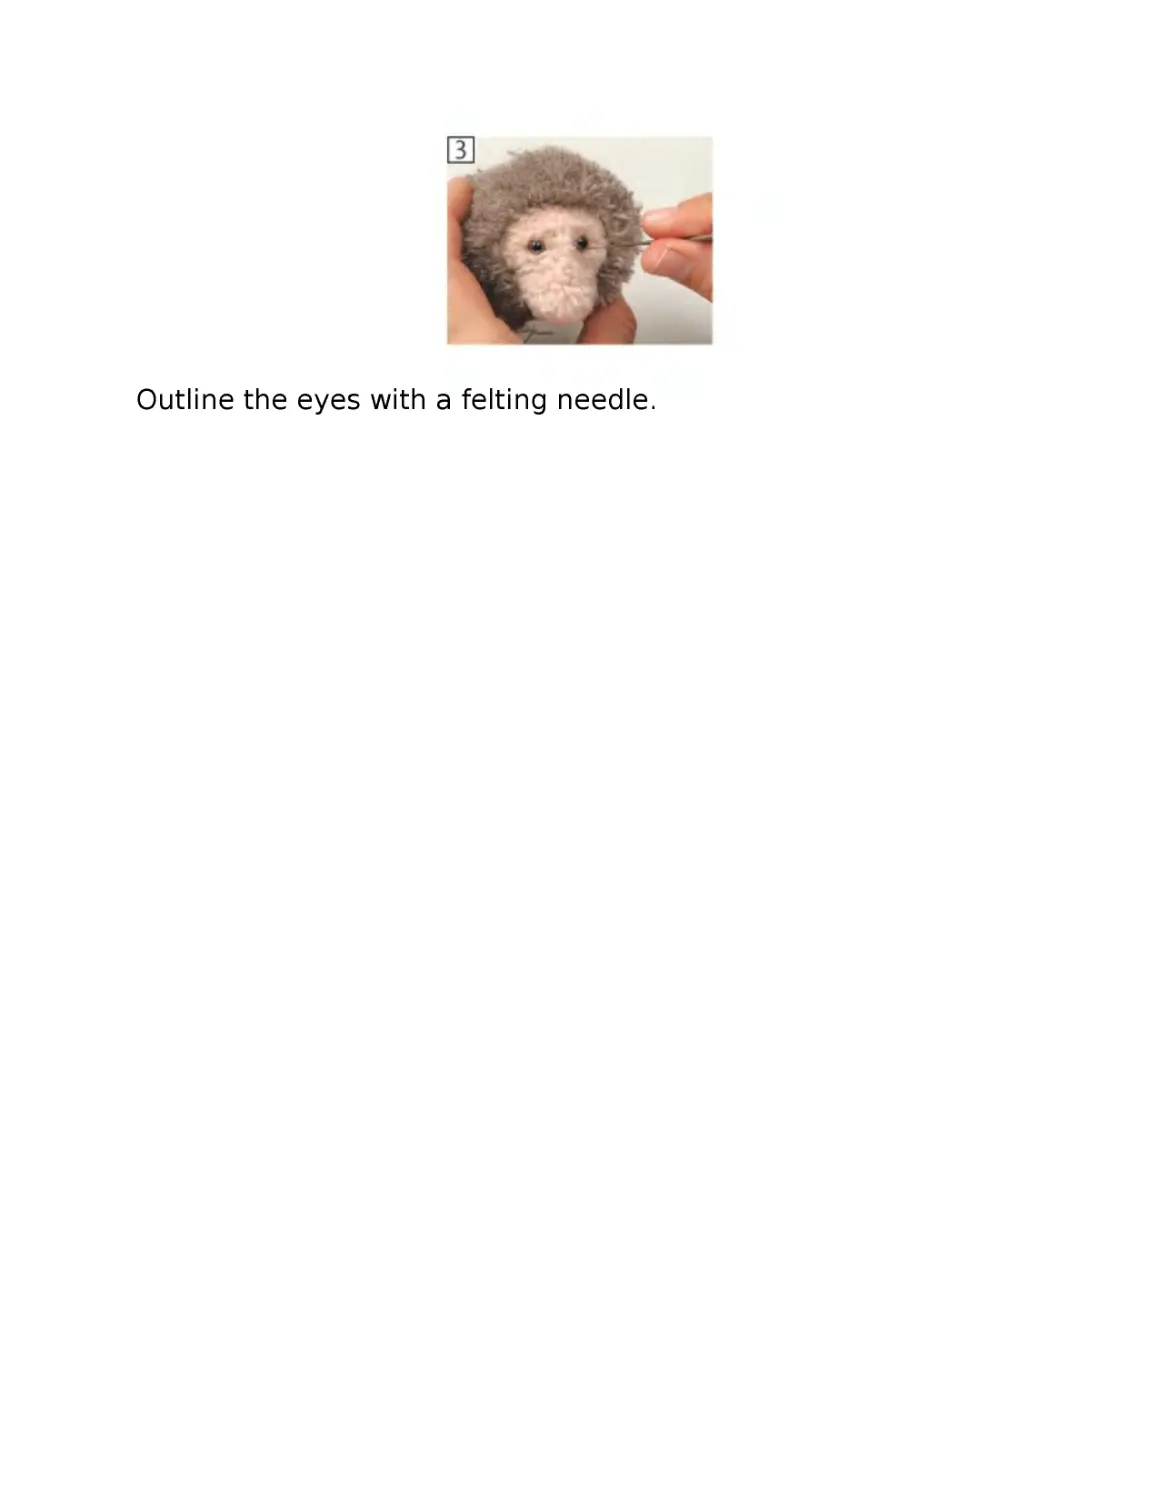
Outline the eyes with a felting needle.
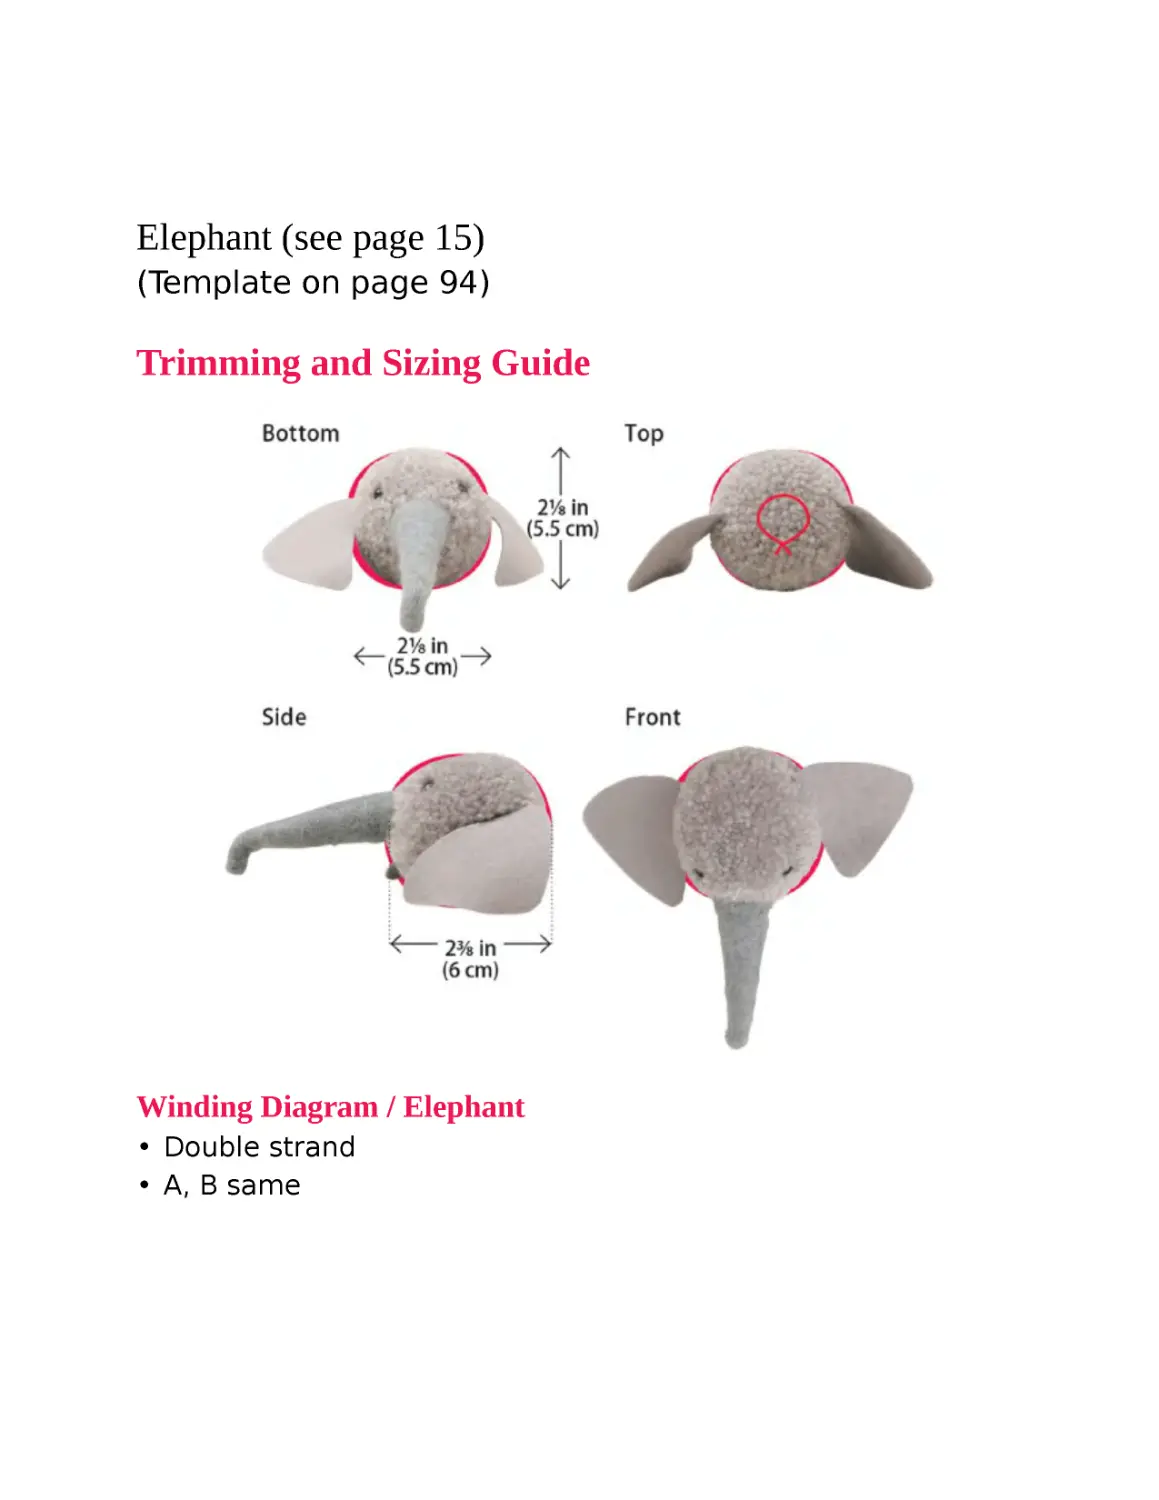
Elephant (see page 15)
(Template on page 94)
Trimming and Sizing Guide
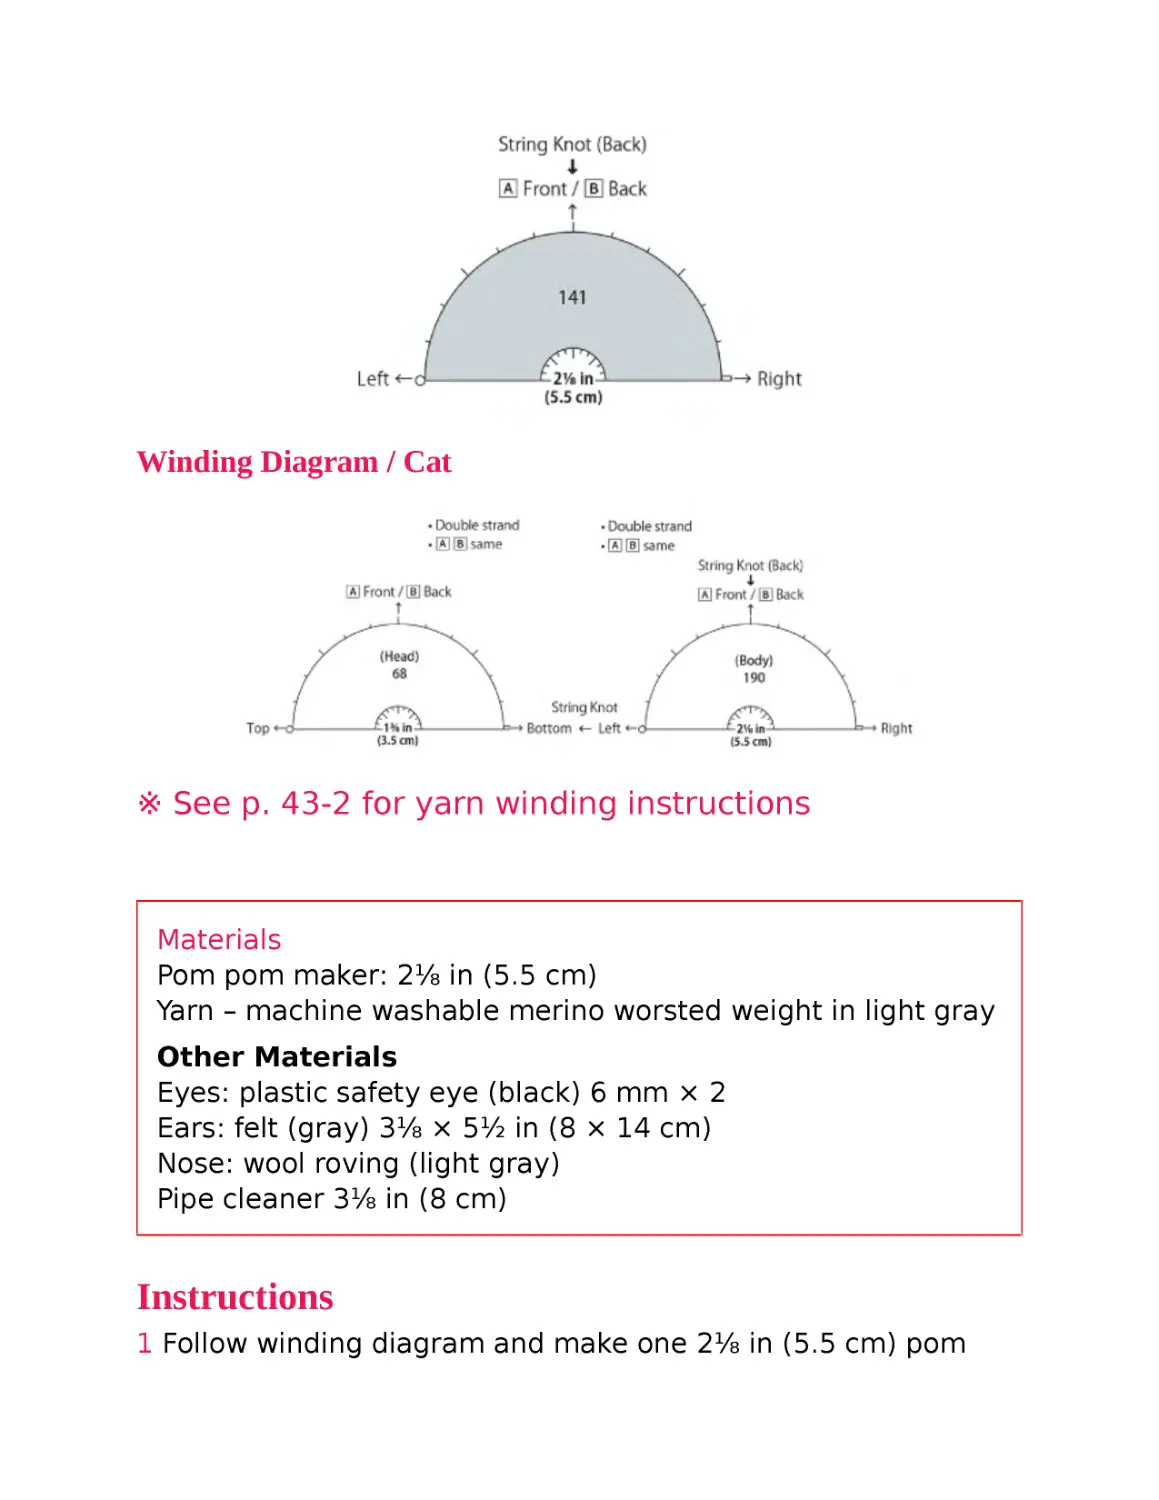
Winding Diagram / Elephant
• Double strand
• A, B same
Winding Diagram / Cat
※ See p. 43-2 for yarn winding instructions
Materials
Pom pom maker: 2⅛ in (5.5 cm)
Yarn – machine washable merino worsted weight in light gray
Other Materials
Eyes: plastic safety eye (black) 6 mm × 2
Ears: felt (gray) 3⅛ × 5½ in (8 × 14 cm)
Nose: wool roving (light gray)
Pipe cleaner 3⅛ in (8 cm)
Instructions
1 Follow winding diagram and make one 2⅛ in (5.5 cm) pom
pom. Remove from pom pom maker and adjust shape. Trim as
shown in left photo.
2 Wrap pipe cleaner with wool roving and using the template,
felt with the needle to make the nose (see p. 53). Cut out the
ears using the template.
3 Attach nose to head with the felting needle. ► point 1
4 Determine the eye placement and attach with glue (see p.
47–48)
5 Mark ear placement with pins (see p. 49), then attach ears
with glue.
point 1
Determine nose position and separate out the yarn at the base.
point 2
Felt the nose into place with the felting needle. Rearrange the
surrounding yarn and blend in with the needle.
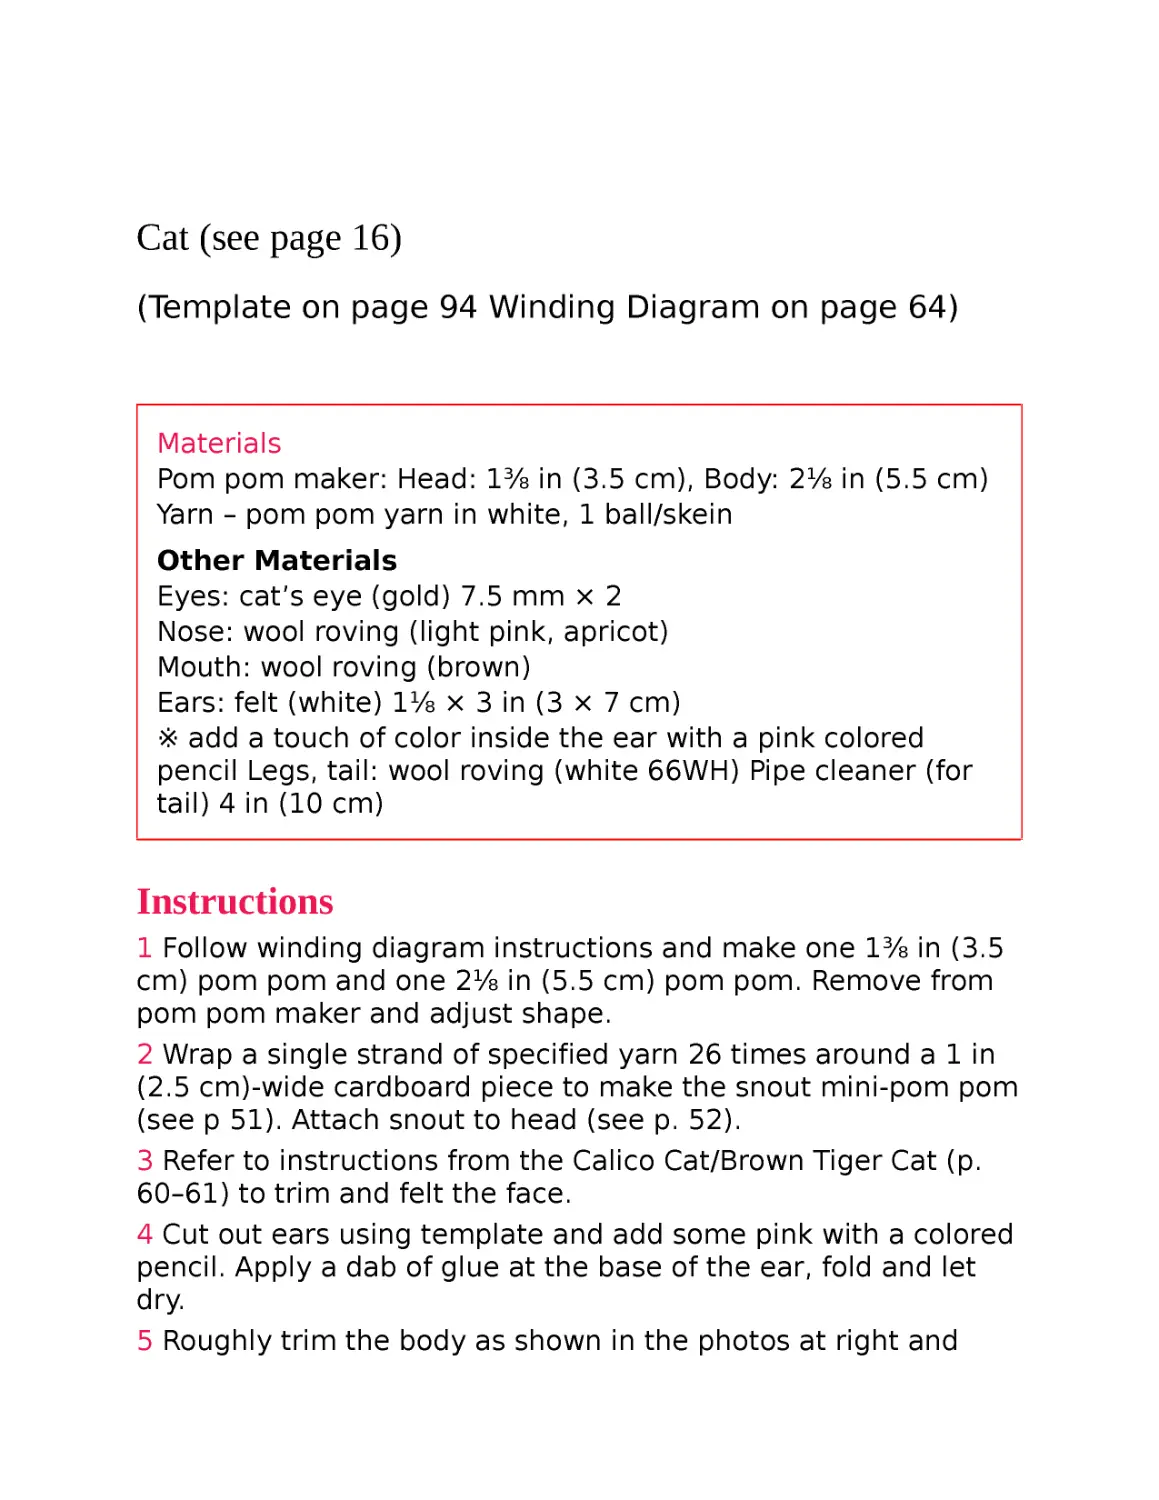
Cat (see page 16)
(Template on page 94 Winding Diagram on page 64)
Materials
Pom pom maker: Head: 1⅜ in (3.5 cm), Body: 2⅛ in (5.5 cm)
Yarn – pom pom yarn in white, 1 ball/skein
Other Materials
Eyes: cat’s eye (gold) 7.5 mm × 2
Nose: wool roving (light pink, apricot)
Mouth: wool roving (brown)
Ears: felt (white) 1⅛ × 3 in (3 × 7 cm)
※ add a touch of color inside the ear with a pink colored
pencil Legs, tail: wool roving (white 66WH) Pipe cleaner (for
tail) 4 in (10 cm)
Instructions
1 Follow winding diagram instructions and make one 1⅜ in (3.5
cm) pom pom and one 2⅛ in (5.5 cm) pom pom. Remove from
pom pom maker and adjust shape.
2 Wrap a single strand of specified yarn 26 times around a 1 in
(2.5 cm)-wide cardboard piece to make the snout mini-pom pom
(see p 51). Attach snout to head (see p. 52).
3 Refer to instructions from the Calico Cat/Brown Tiger Cat (p.
60–61) to trim and felt the face.
4 Cut out ears using template and add some pink with a colored
pencil. Apply a dab of glue at the base of the ear, fold and let
dry.
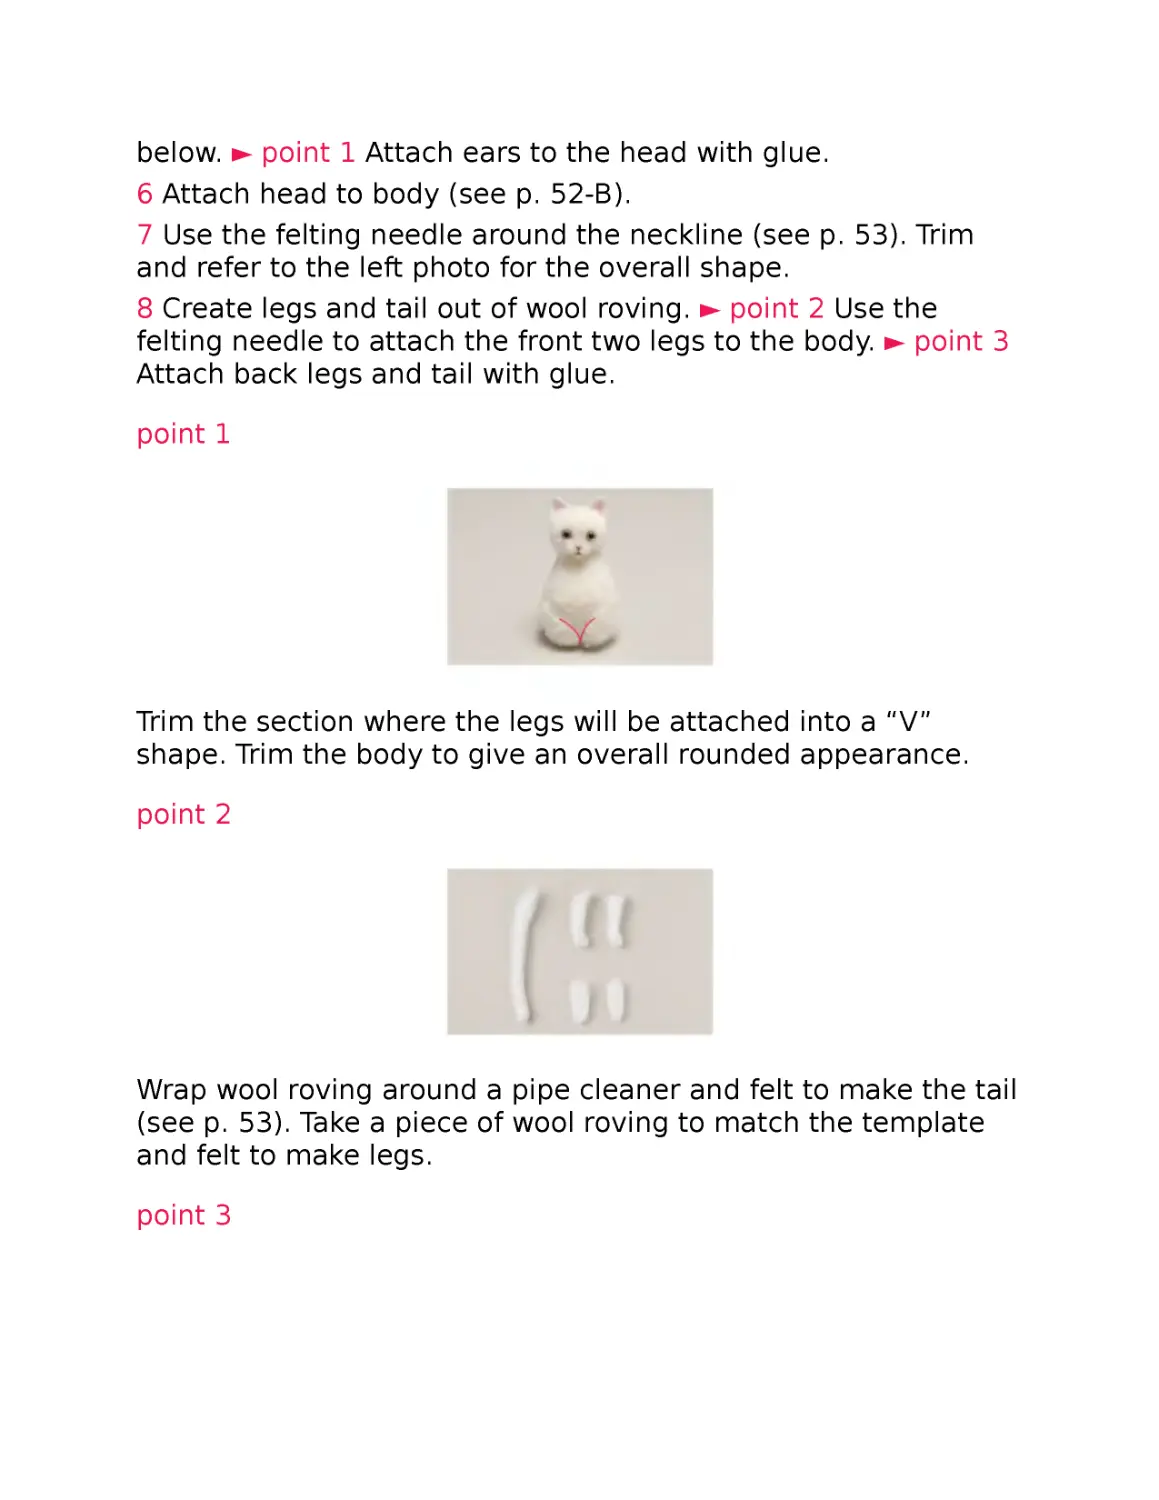
5 Roughly trim the body as shown in the photos at right and
below. ► point 1 Attach ears to the head with glue.
6 Attach head to body (see p. 52-B).
7 Use the felting needle around the neckline (see p. 53). Trim
and refer to the left photo for the overall shape.
8 Create legs and tail out of wool roving. ► point 2 Use the
felting needle to attach the front two legs to the body. ► point 3
Attach back legs and tail with glue.
point 1
Trim the section where the legs will be attached into a “V”
shape. Trim the body to give an overall rounded appearance.
point 2
Wrap wool roving around a pipe cleaner and felt to make the tail
(see p. 53). Take a piece of wool roving to match the template
and felt to make legs.
point 3
Shape the front legs to fit at a nice angle around the chest area
and attach with the felting needle. Separate the yarn and use
the needle to stab the base of the legs into the body from
below.
Trimming and Sizing Guide
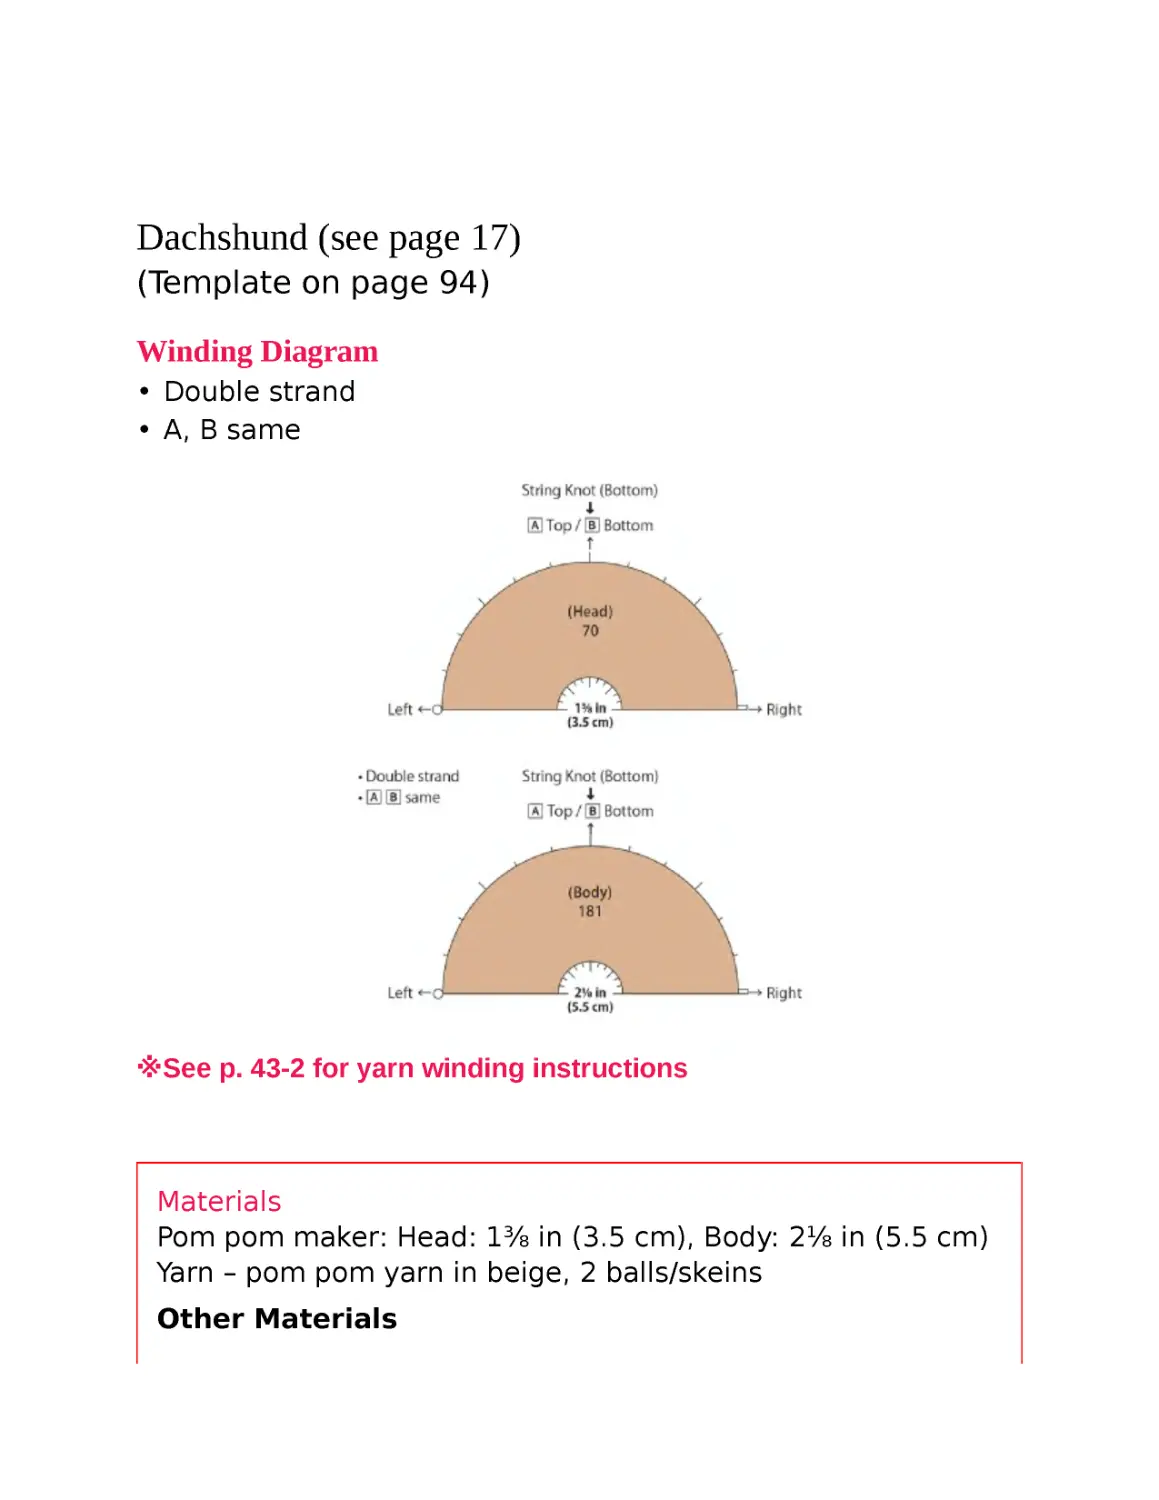
Dachshund (see page 17)
(Template on page 94)
Winding Diagram
• Double strand
• A, B same
※See p. 43-2 for yarn winding instructions
Materials
Pom pom maker: Head: 1⅜ in (3.5 cm), Body: 2⅛ in (5.5 cm)
Yarn – pom pom yarn in beige, 2 balls/skeins
Other Materials
Eyes: plastic safety eye (black) 8 mm × 2
Nose: plastic safety dog nose (black) 8 mm
Legs, tail: wool roving (light tan/biscuit)
Instructions
1 Follow winding diagram and make one 1⅜ in (3.5 cm) pom
pom and one 2⅛ in (5.5 cm) pom pom. Remove from pom pom
maker and adjust shape. Wrap a single strand of specified yarn
5 times around a 4 in (10 cm)-wide piece of cardboard. Tie the
top off with heavy duty thread and felt with a needle (see p. 51).
Cut using template. ► point 1
2 Felt as shown in photo, and trim to form snout. ► point 2
Determine eye placement and temporarily insert eye pieces.
Trim and felt the head. Mark ear placement with pins and attach
ears to head with yarn needle and thread from ear pom poms
(see p. 72-point 1). Add a dab of glue at the inner base of the
ears to secure.
3 Attach eyes and nose with glue. Roughly trim the body as
shown in photo below. Attach head to body (see p. 52-B). Trim
and felt as shown in photo to shape body.
4 Use the template to felt the wool roving into the legs and tail.
5 Attach front legs to body with the felting needle (see p. 53).
Attach back legs and tail with glue.
point 1
Arrange the knot underneath and evenly felt the entire ear.
point 2
Firmly felt the nose area, then trim with scissors.
Trimming and Sizing Guide
Penguin (see page 18)
(Template on page 95 Winding Diagram on page 91)
Materials
Pom pom maker: Head: 1⅜ in (3.5 cm), Body: 2⅛ in (5.5 cm)
Yarn – pom pom yarn in black. white and pale brown
Other Materials
Eyes: plastic safety eye (black) 4 mm × 2
Wing: felt (gray) 2⅜ × 2¾ in (6 × 7 cm)
Beak, feet: felt (black) 2⅜ × 2¾ in (6 × 7 cm)
Instructions
1 Follow winding diagram and make one 1⅜ (3.5 cm) pom pom
and one 2⅛ in (5.5 cm). Remove from pom pom maker and
adjust shape.
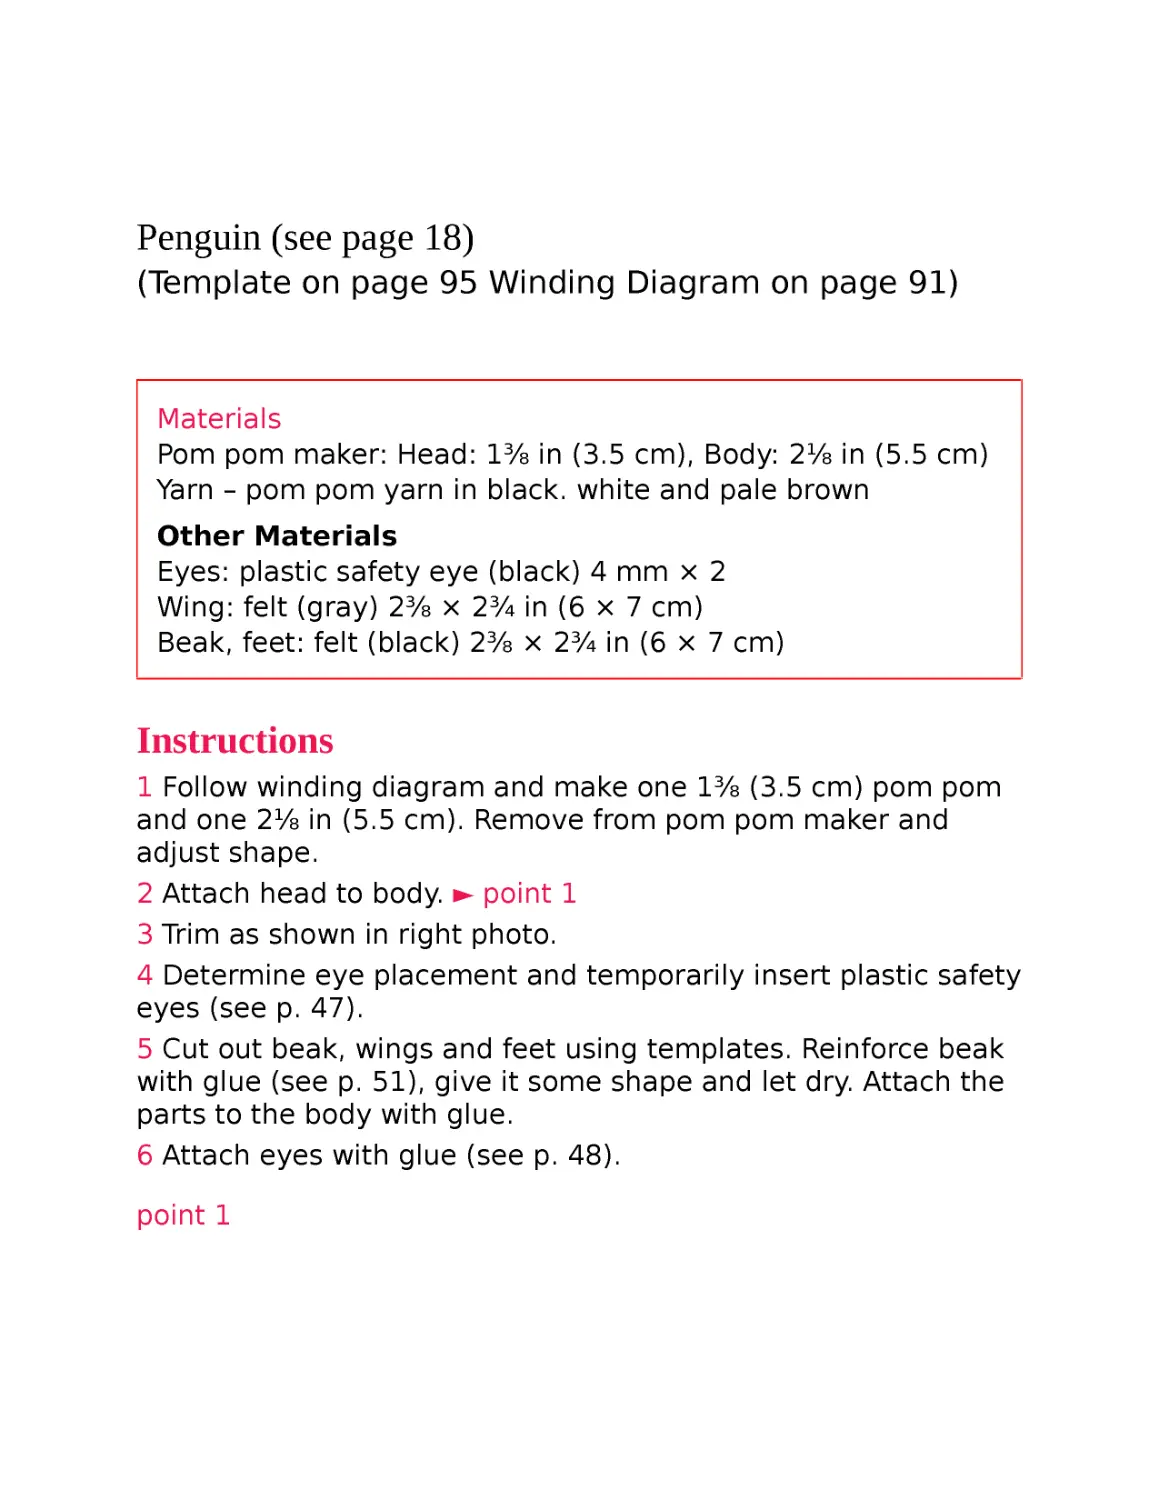
2 Attach head to body. ► point 1
3 Trim as shown in right photo.
4 Determine eye placement and temporarily insert plastic safety
eyes (see p. 47).
5 Cut out beak, wings and feet using templates. Reinforce beak
with glue (see p. 51), give it some shape and let dry. Attach the
parts to the body with glue.
6 Attach eyes with glue (see p. 48).
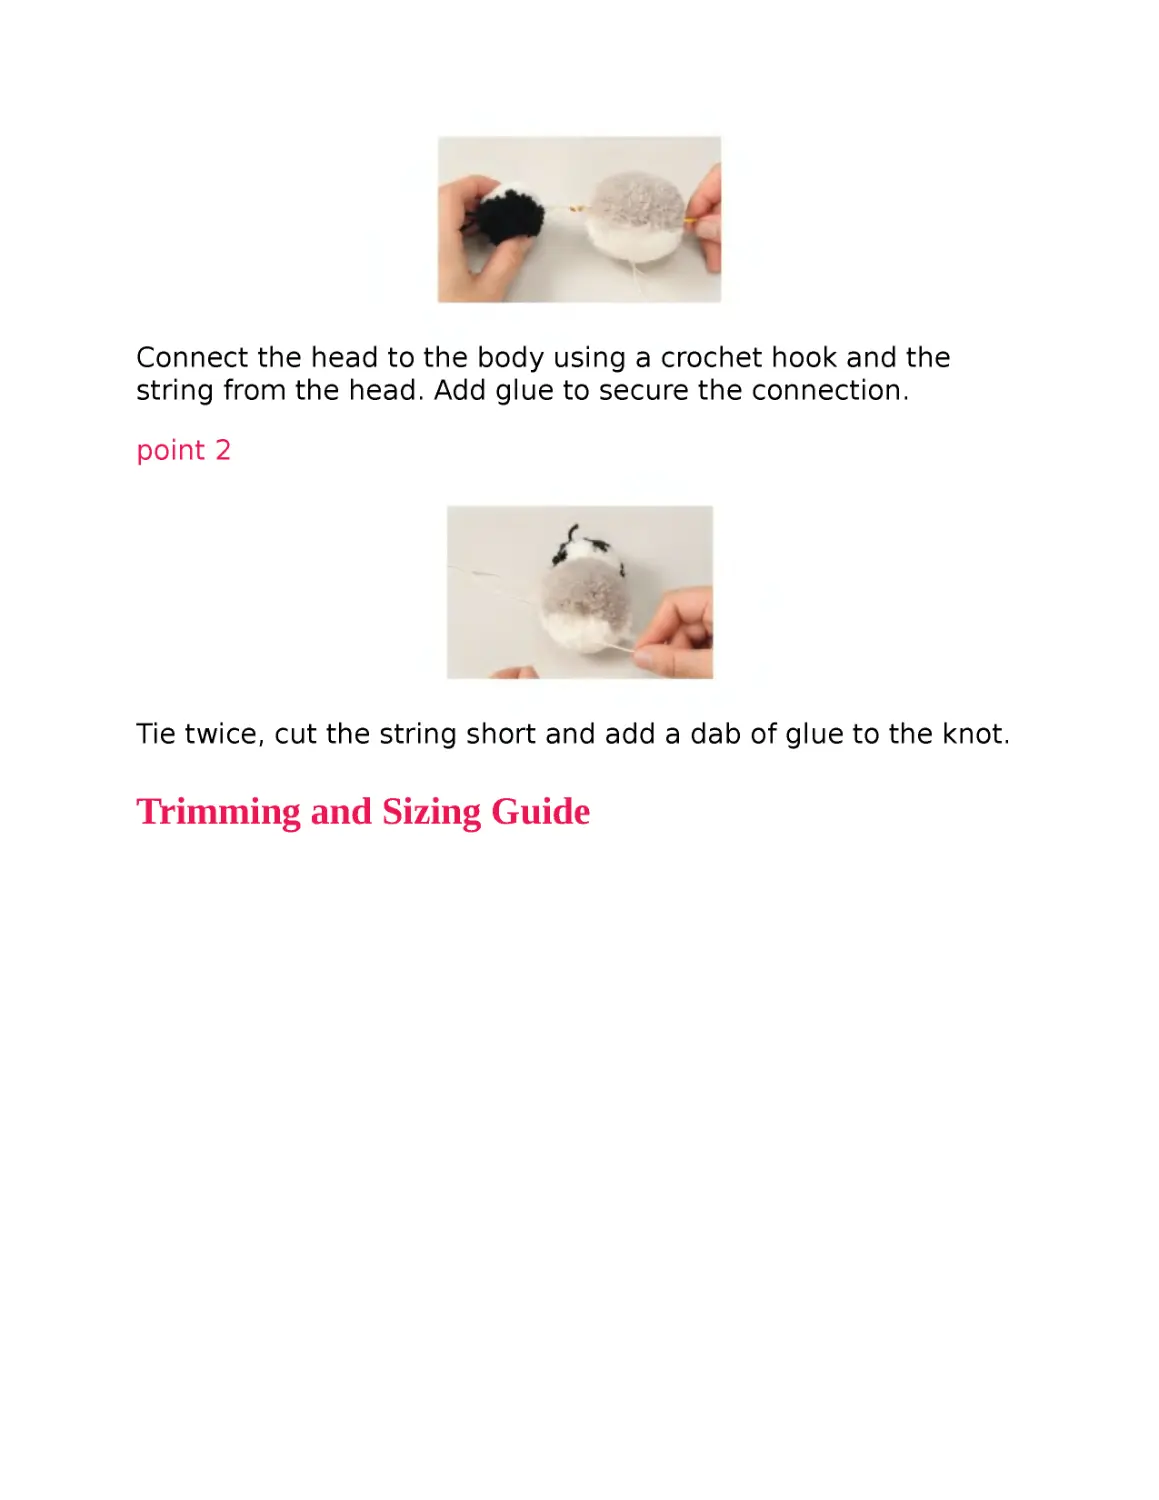
point 1
Connect the head to the body using a crochet hook and the
string from the head. Add glue to secure the connection.
point 2
Tie twice, cut the string short and add a dab of glue to the knot.
Trimming and Sizing Guide
Seal (see page 19)
(Template on page 95)
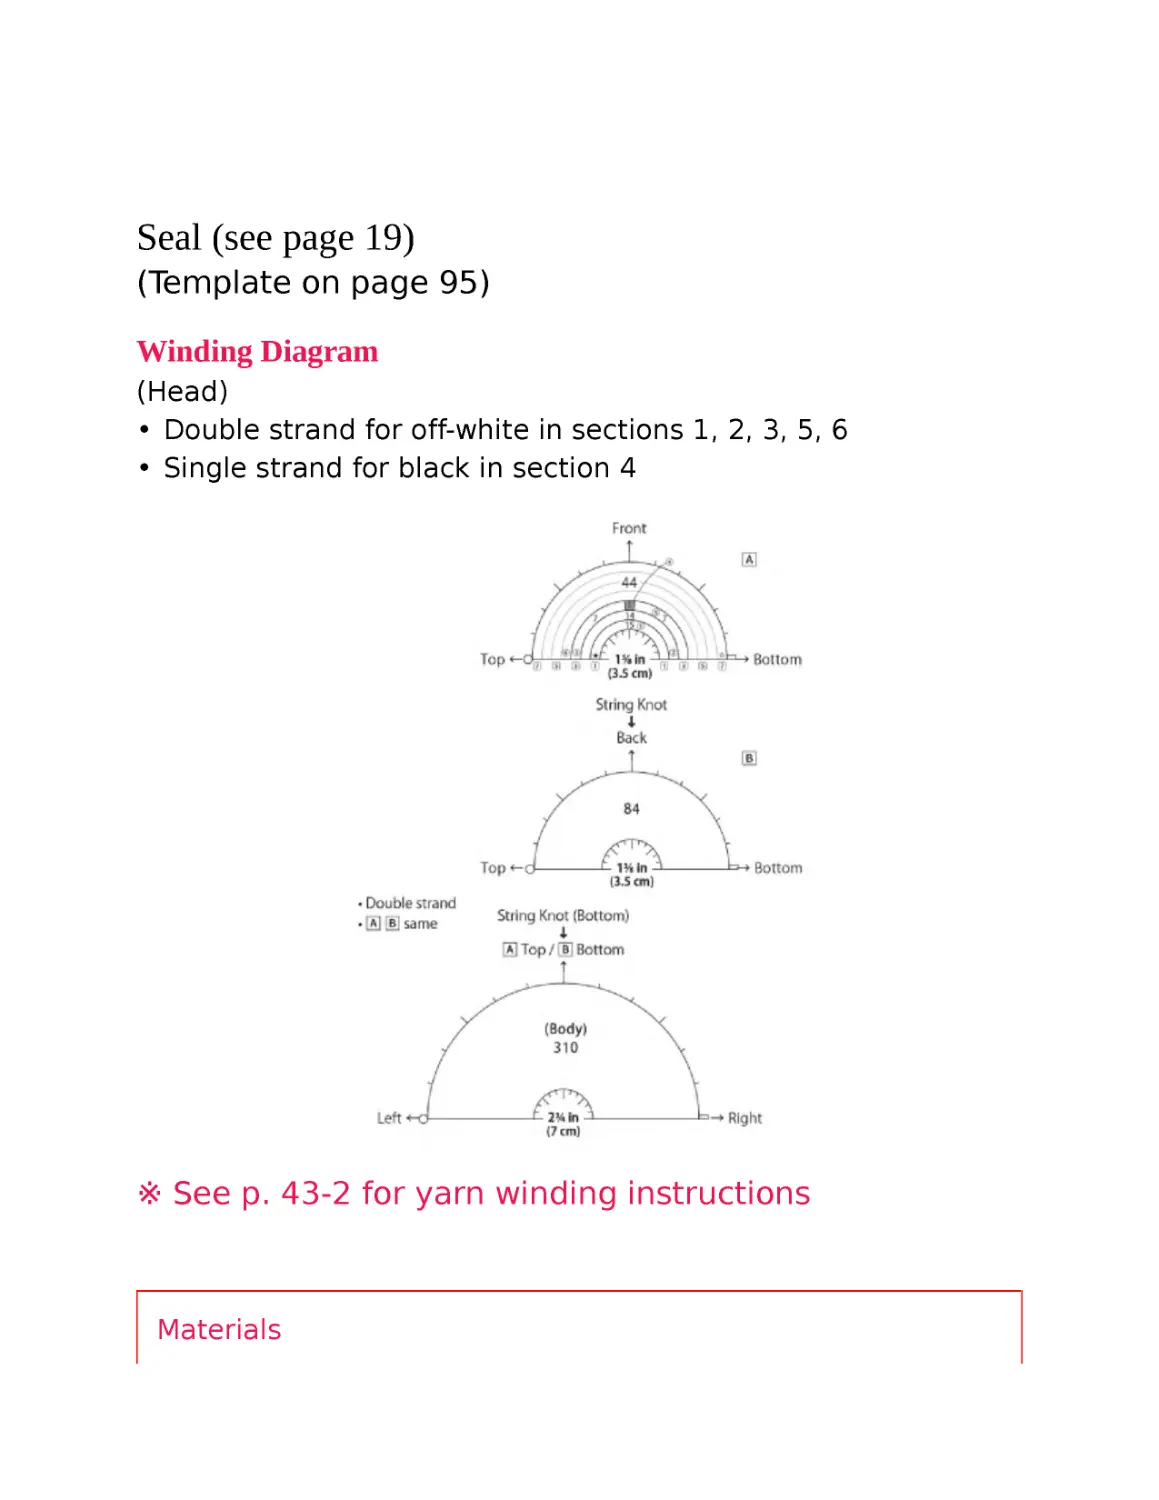
Winding Diagram
(Head)
• Double strand for off-white in sections 1, 2, 3, 5, 6
• Single strand for black in section 4
※ See p. 43-2 for yarn winding instructions
Materials
Pom pom maker: Head: 1⅜ in (3.5 cm), Body: 2¾ in (7 cm)
Yarn – machine washable sport weight in off-weight 2
balls/skeins machine washable sport weight in black
Other Materials
Eyes: plastic safety eye (black) 6 mm × 2
Nose: plastic safety nose (black) 6 mm
Front legs, tail fin: felt (off-white) 2¾ × 3½ in (7 × 9 cm)
Instructions
1 Follow winding diagram and make one 1⅜ in (3.5 cm) and one
2¾ in (7 cm) pom pom. Wrap a single strand of the specified
yarn 34 times around a 1 in (2.5 cm)-wide cardboard piece and
make a mini-pom pom for the snout (see p. 51).
2 Attach snout to head (see p. 52-A). Felt the muzzle (see p. 53).
Trim as shown in photos below. Attach eyes and nose with glue
(see p. 47–48).
3 Attach head to body. ► point 1 Roughly trim the body. Felt the
back and tail fin areas and trim as shown in photos below.
4 Cut out front legs and tail fin using templates and attach with
glue.
point 1
Keep the tail string from the head pom pom after connecting the
snout. Use this string to then attach the head to the body. Once
they are connected, cut the string from the body pom pom.
Trimming and Sizing Guide
Tropical Fish (see page 20)
(Template on page 95)
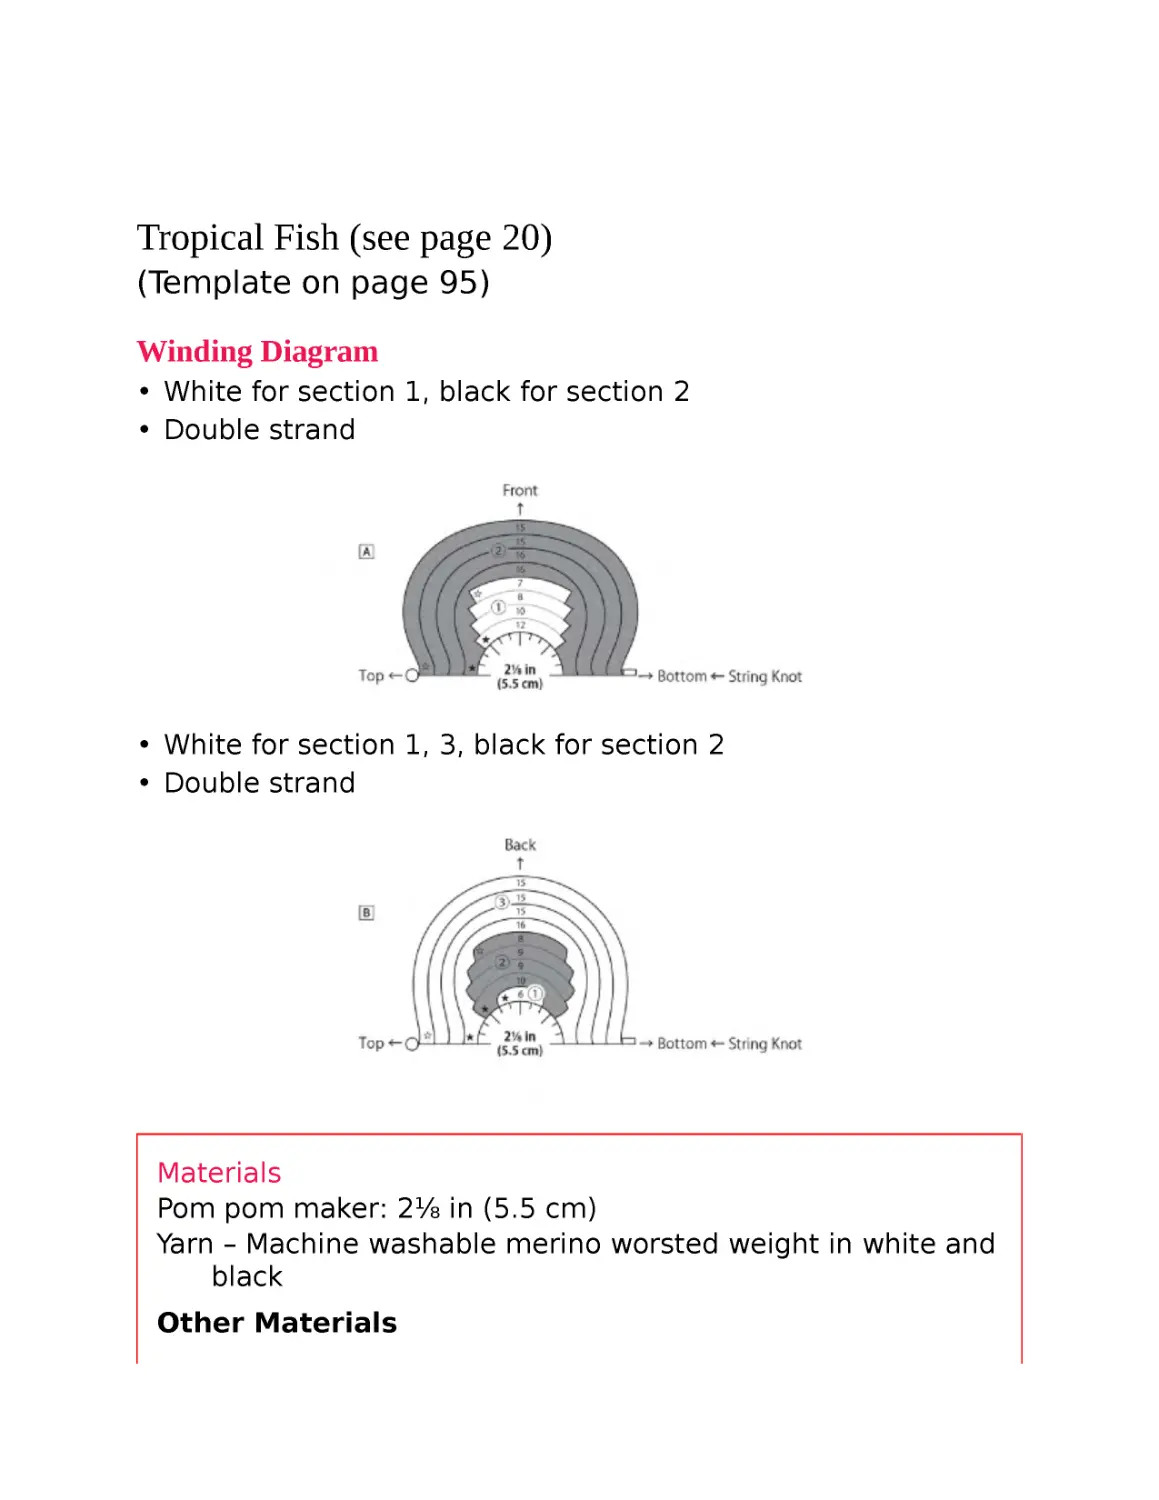
Winding Diagram
• White for section 1, black for section 2
• Double strand
• White for section 1, 3, black for section 2
• Double strand
Materials
Pom pom maker: 2⅛ in (5.5 cm)
Yarn – Machine washable merino worsted weight in white and
black
Other Materials
Eyes: plastic eye (brown) 4.5 mm × 2
Dorsal fin 1: felt (white) 2¾ × 4⅜ in (7 × 11 cm)
Chest fin, dorsal fin 2, tail fin: felt (yellow) 1⅝ × 3⅛ in (4 × 8
cm)
Stomach fin, lower fin: felt (black) 1⅛ × 2¾ in (3 × 7 cm)
Instructions
1 Follow winding diagram and make a 2⅛ in (5.5 cm) pom pom.
► point 1 Remove from pom pom maker and adjust shape (see
p. 50).
2 While keeping an eye on the direction of the string, trim as
shown in the photos below.
3 For dorsal fin 1, glue two pieces of felt together and use
template to cut out shape. Cut out other fins as well.
4 Using the photo below as a guide, attach the fins with glue.
5 Attach eyes with glue (see p. 44).
point 1
Pay attention to the winding diagram to create the pretty
pattern.
Trimming and Sizing Guide
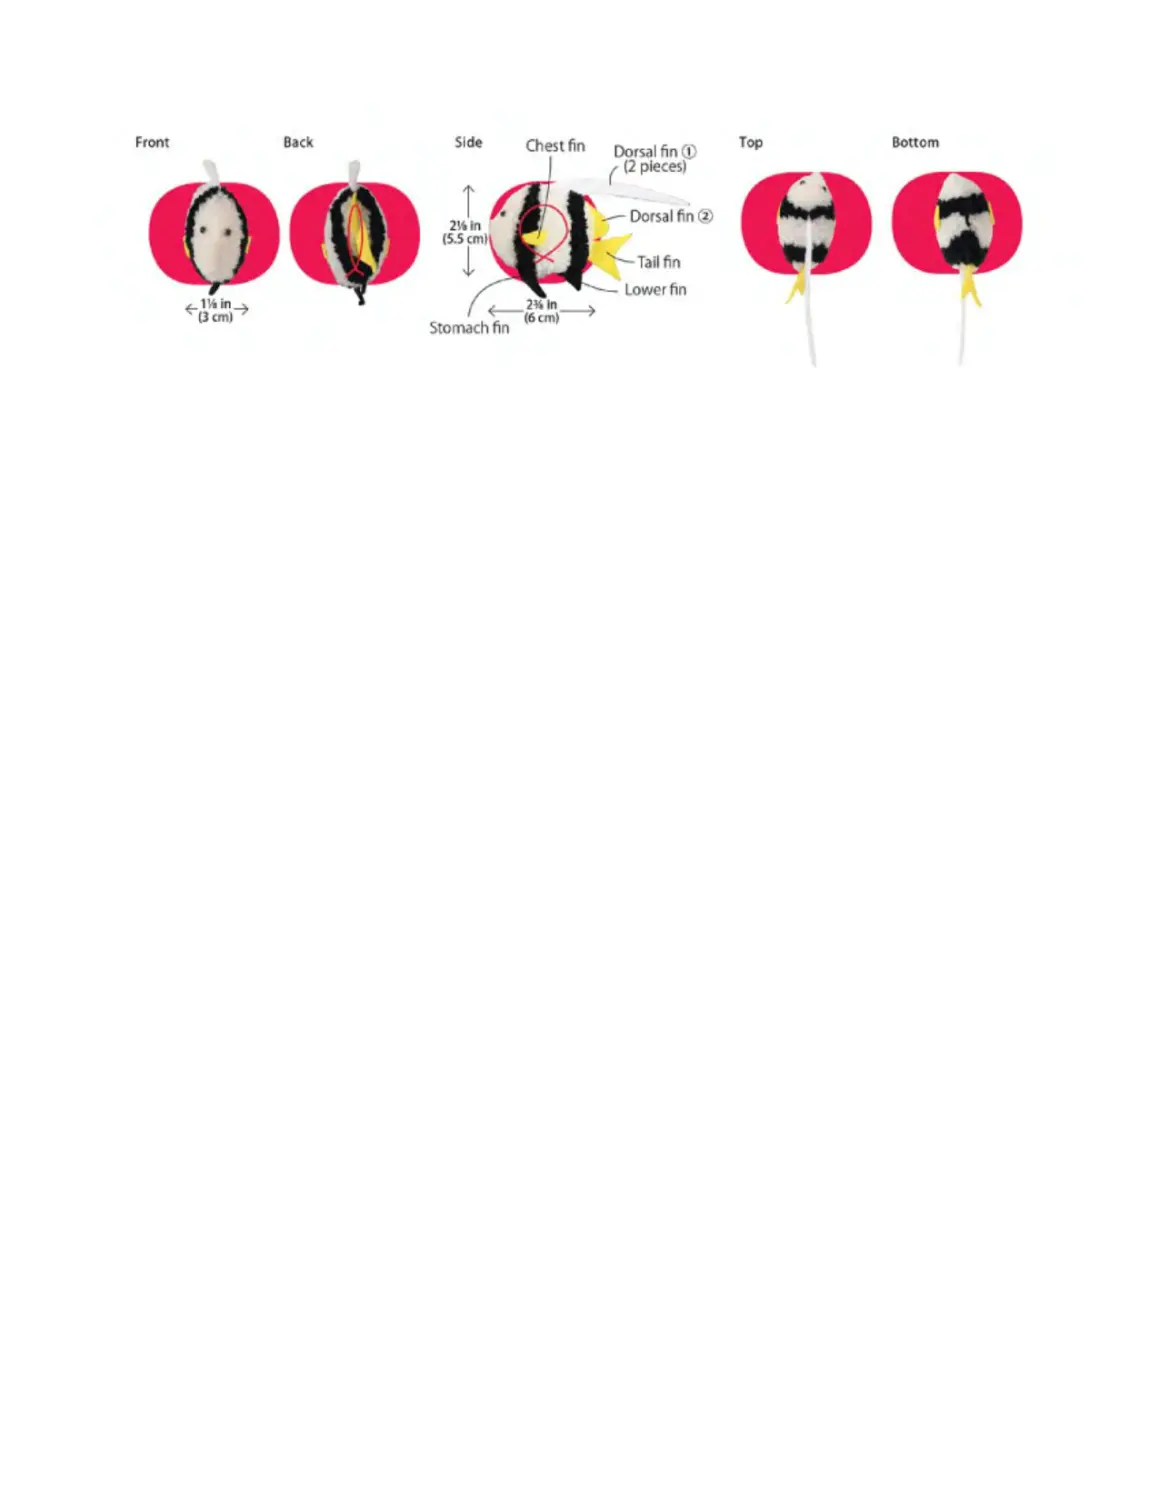
Puffer Fish (see page 21)
(Template on page 95)
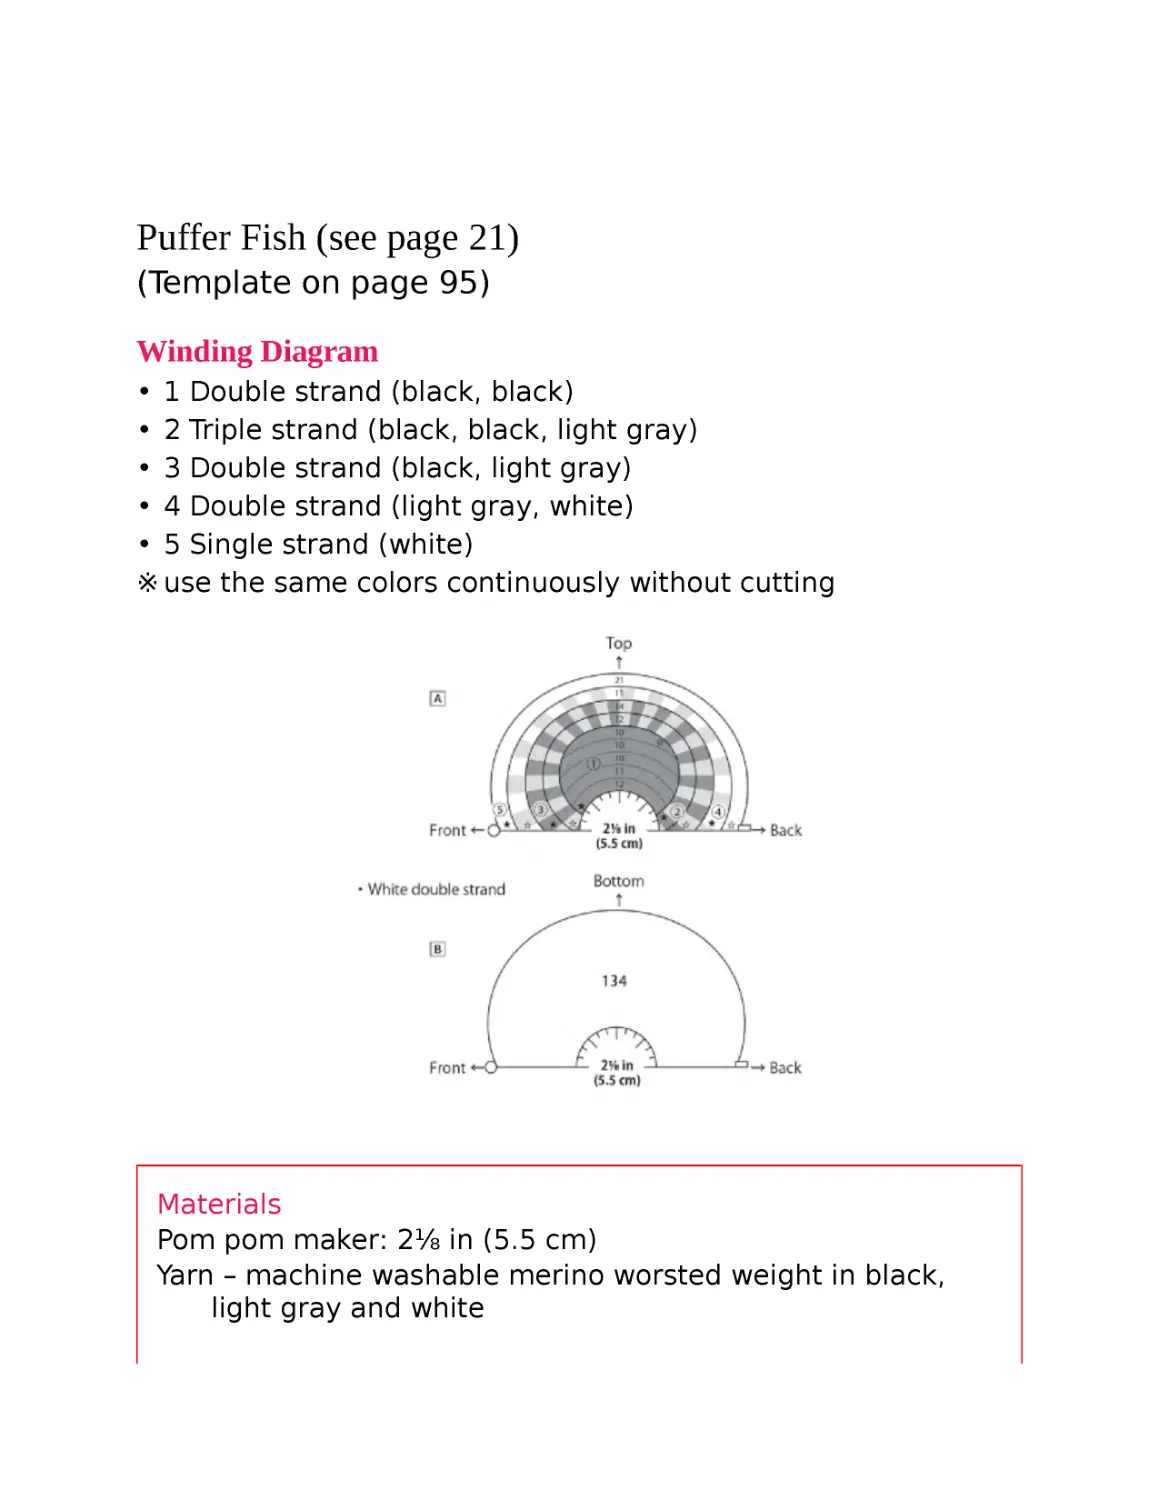
Winding Diagram
• 1 Double strand (black, black)
• 2 Triple strand (black, black, light gray)
• 3 Double strand (black, light gray)
• 4 Double strand (light gray, white)
• 5 Single strand (white)
※ use the same colors continuously without cutting
Materials
Pom pom maker: 2⅛ in (5.5 cm)
Yarn – machine washable merino worsted weight in black,
light gray and white
Other Materials
Eyes: plastic eye (brown) 4.5 mm × 2
Dorsal fin, tail fin: felt (black) 1⅝ × 3⅛ in (4 × 8 cm)
Chest fin, lower fin, mouth: felt (gray) 1⅝ × 3⅛ in (4 × 8 cm)
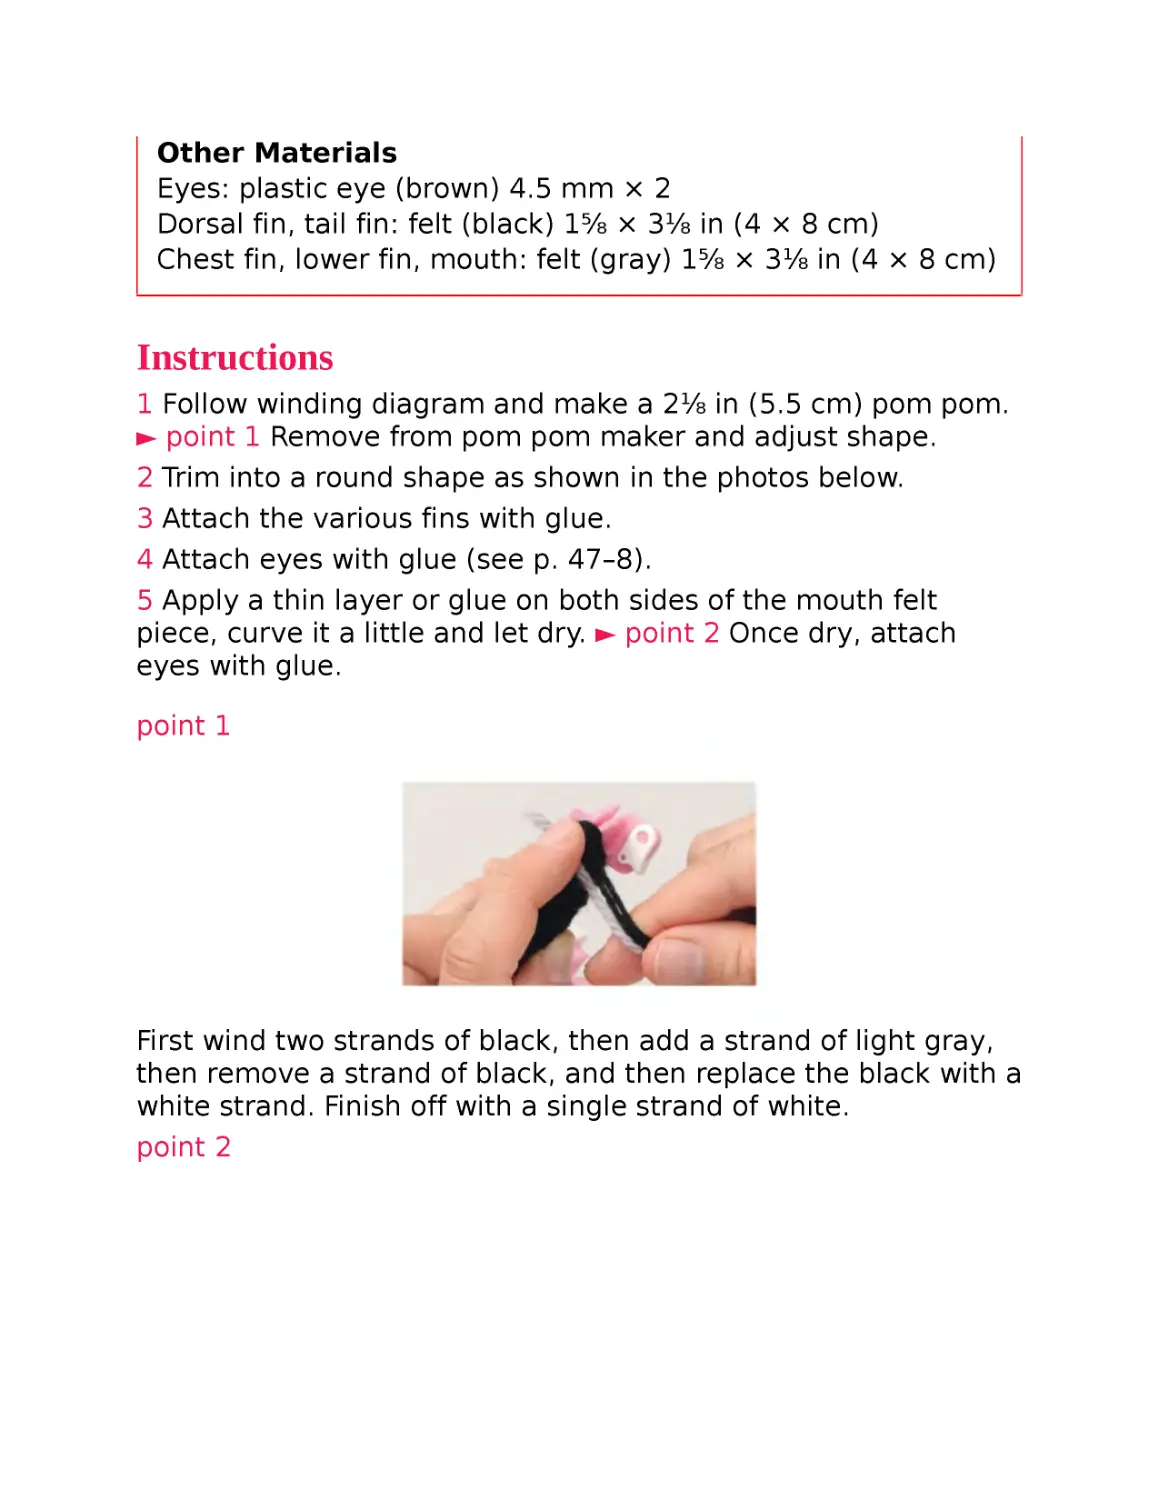
Instructions
1 Follow winding diagram and make a 2⅛ in (5.5 cm) pom pom.
► point 1 Remove from pom pom maker and adjust shape.
2 Trim into a round shape as shown in the photos below.
3 Attach the various fins with glue.
4 Attach eyes with glue (see p. 47–8).
5 Apply a thin layer or glue on both sides of the mouth felt
piece, curve it a little and let dry. ► point 2 Once dry, attach
eyes with glue.
point 1
First wind two strands of black, then add a strand of light gray,
then remove a strand of black, and then replace the black with a
white strand. Finish off with a single strand of white.
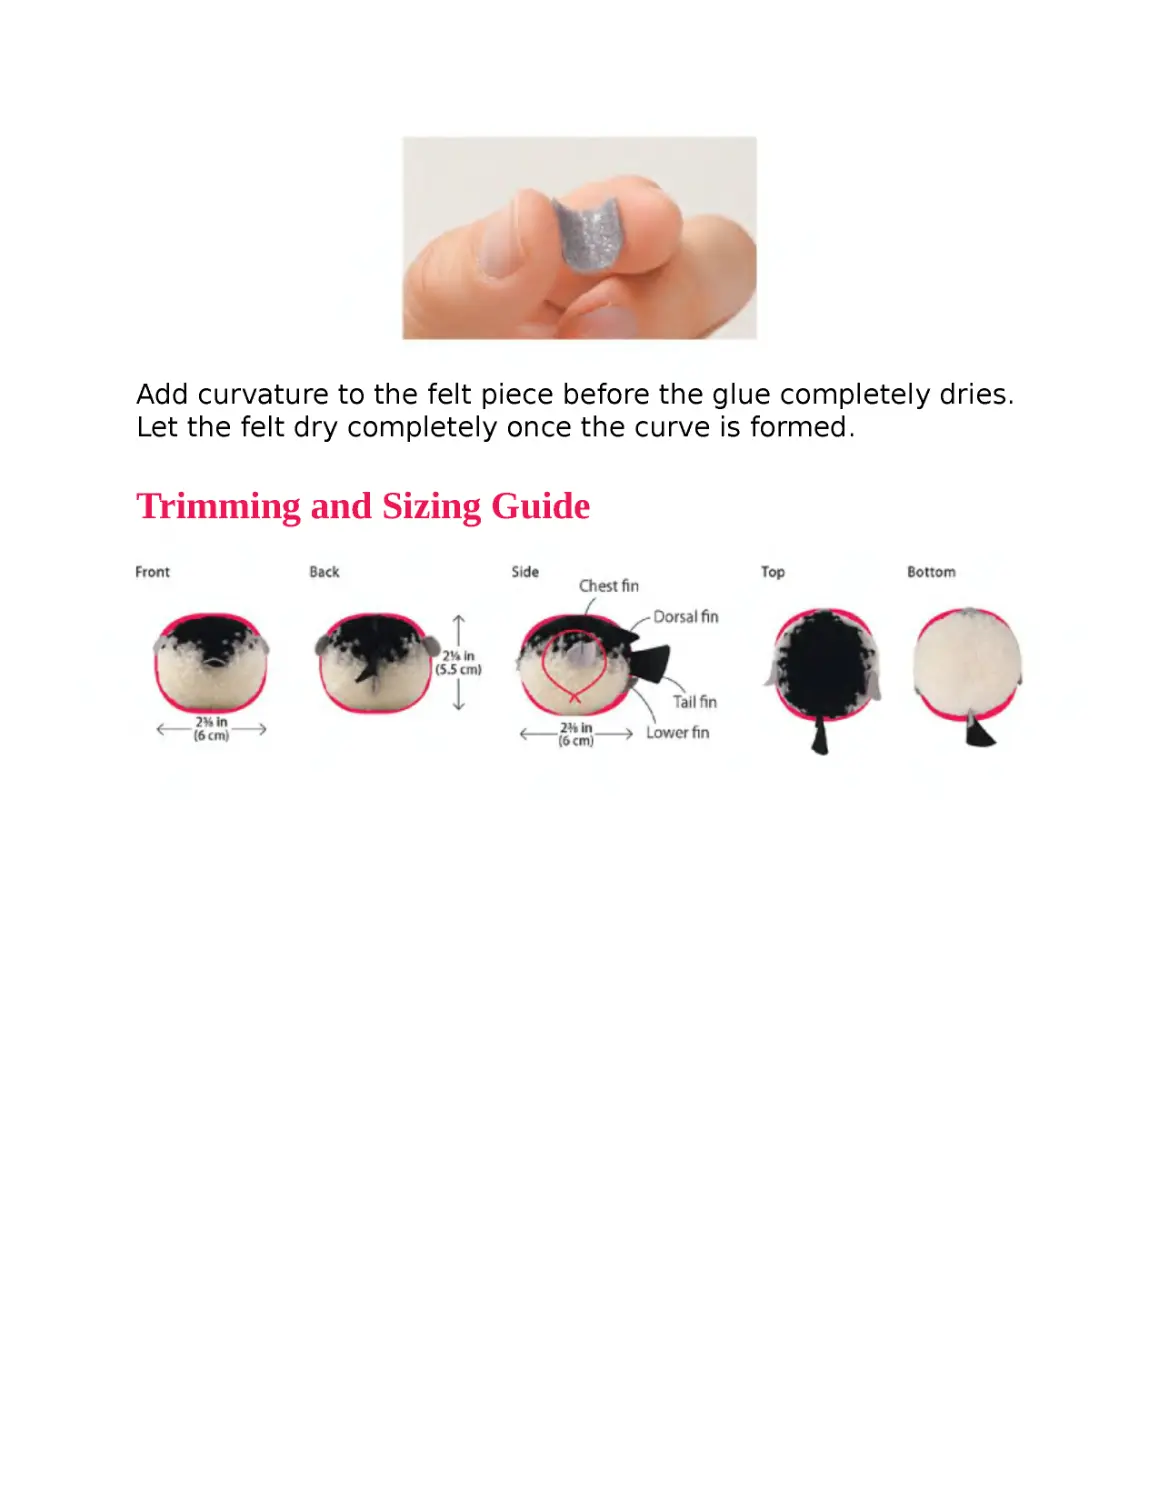
point 2
Add curvature to the felt piece before the glue completely dries.
Let the felt dry completely once the curve is formed.
Trimming and Sizing Guide
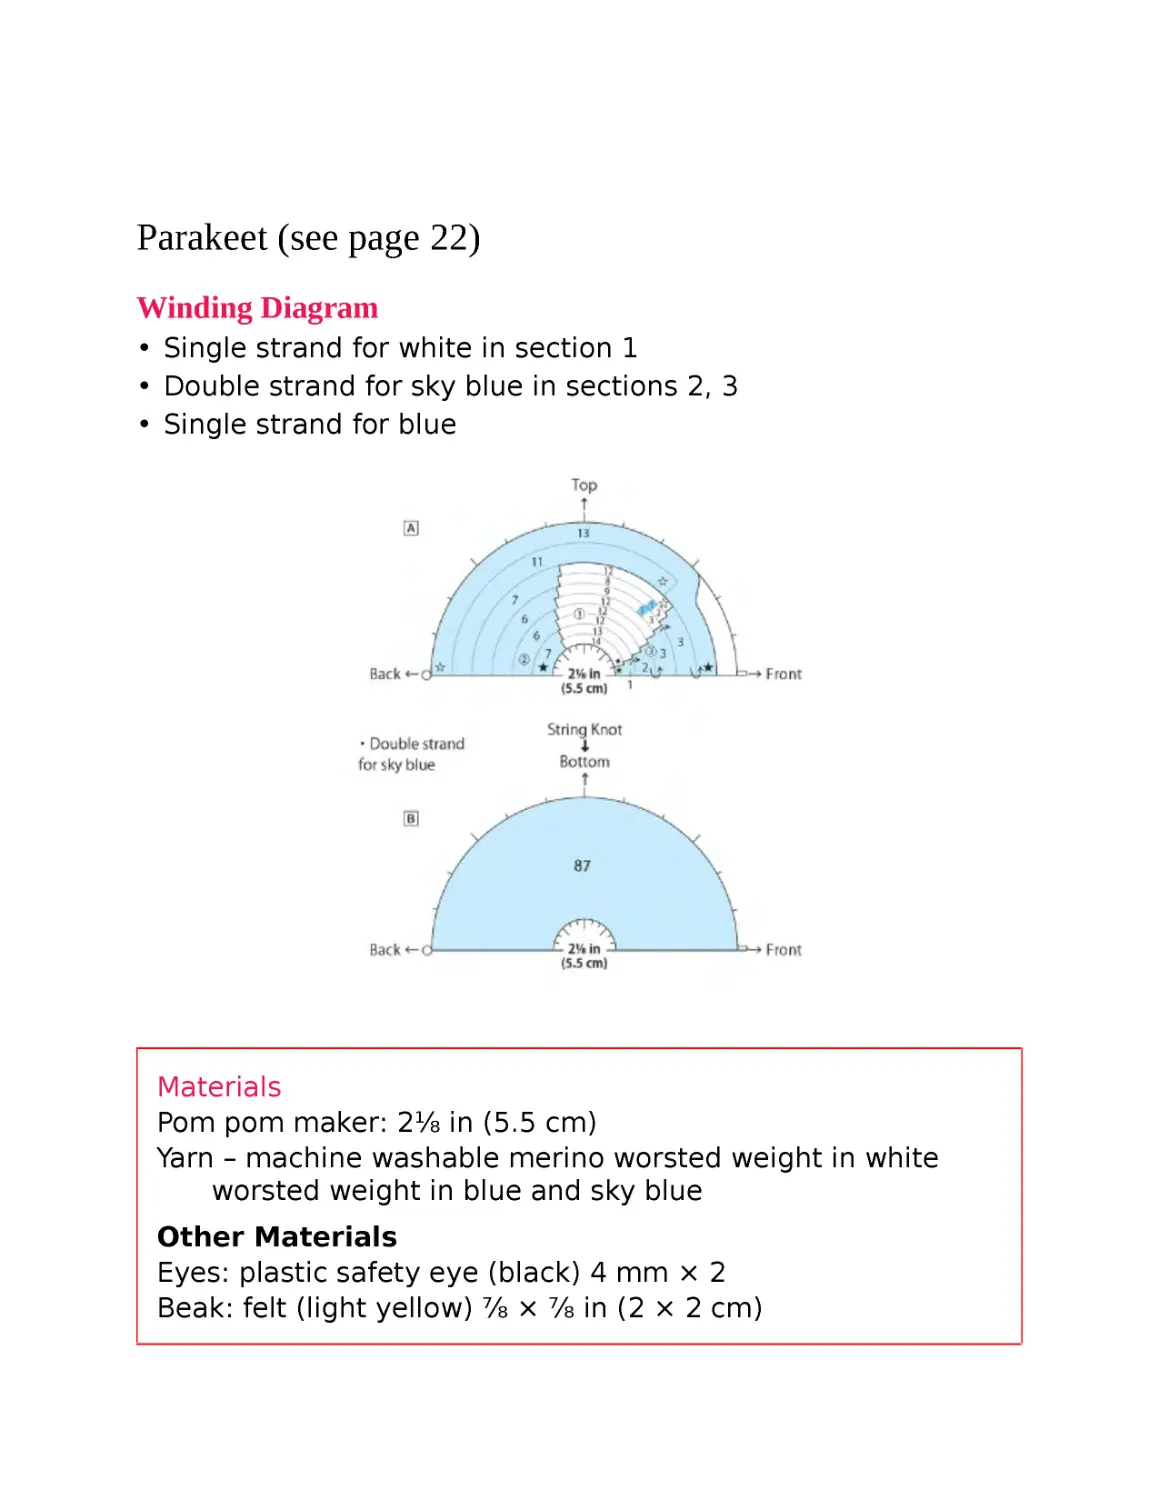
Parakeet (see page 22)
Winding Diagram
• Single strand for white in section 1
• Double strand for sky blue in sections 2, 3
• Single strand for blue
Materials
Pom pom maker: 2⅛ in (5.5 cm)
Yarn – machine washable merino worsted weight in white
worsted weight in blue and sky blue
Other Materials
Eyes: plastic safety eye (black) 4 mm × 2
Beak: felt (light yellow) ⅞ × ⅞ in (2 × 2 cm)
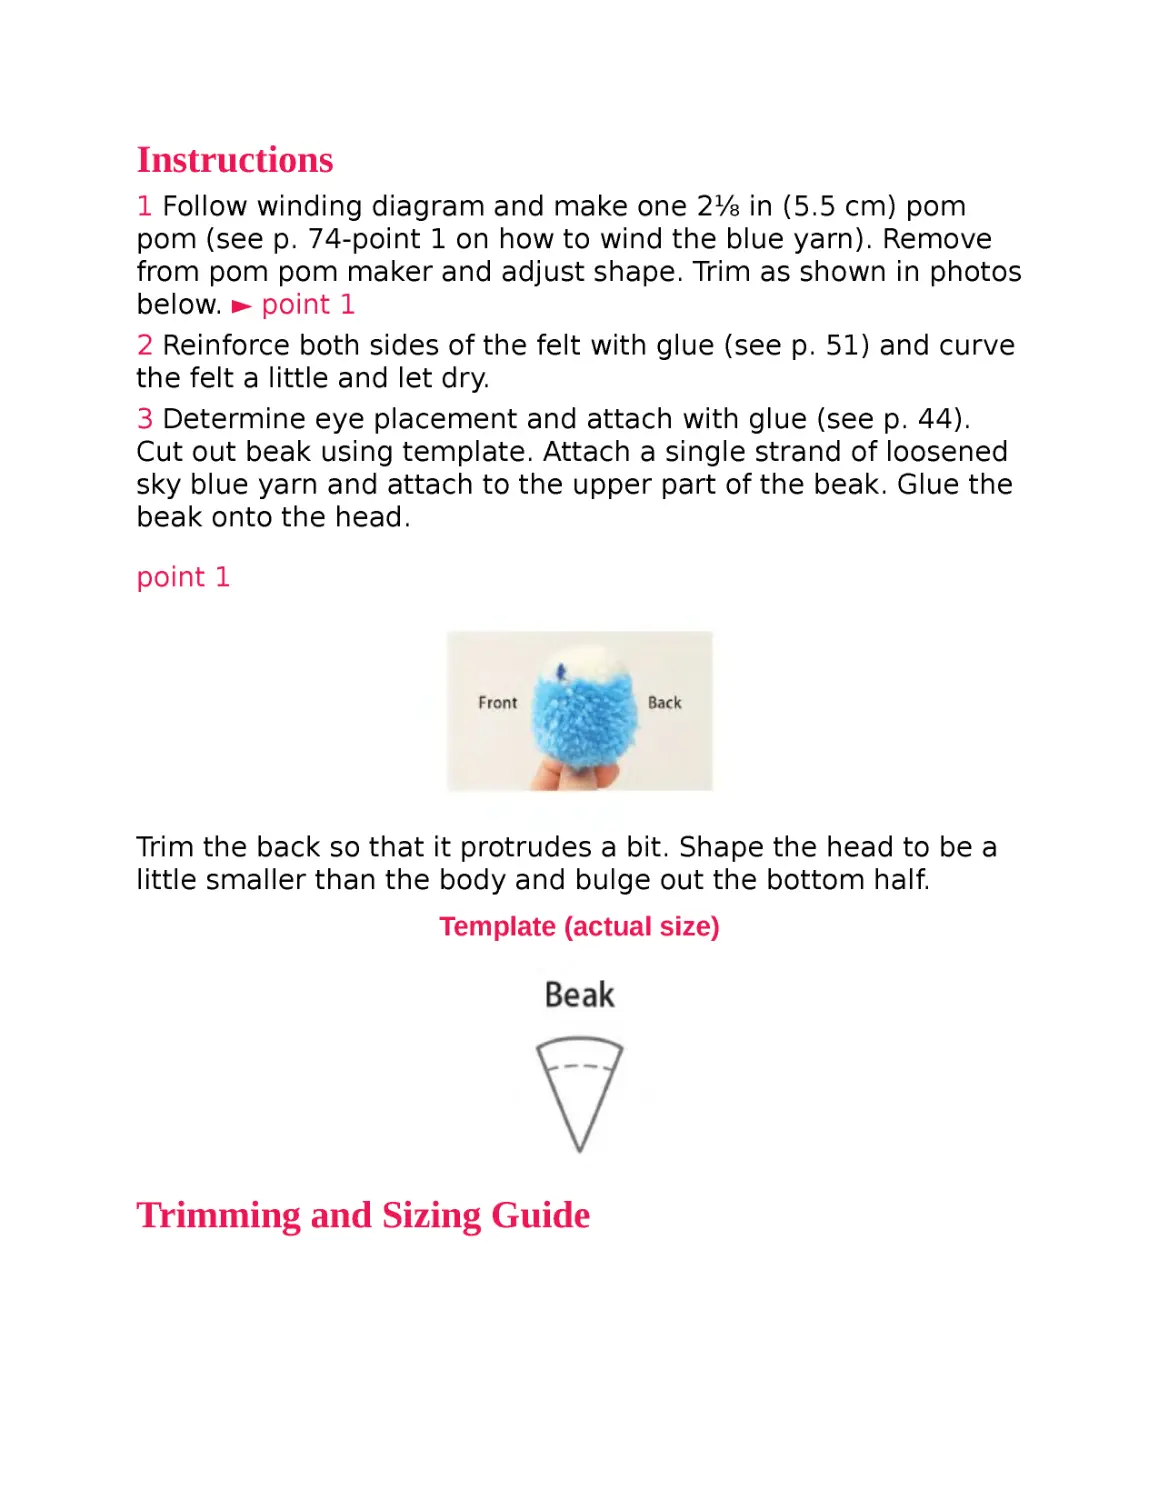
Instructions
1 Follow winding diagram and make one 2⅛ in (5.5 cm) pom
pom (see p. 74-point 1 on how to wind the blue yarn). Remove
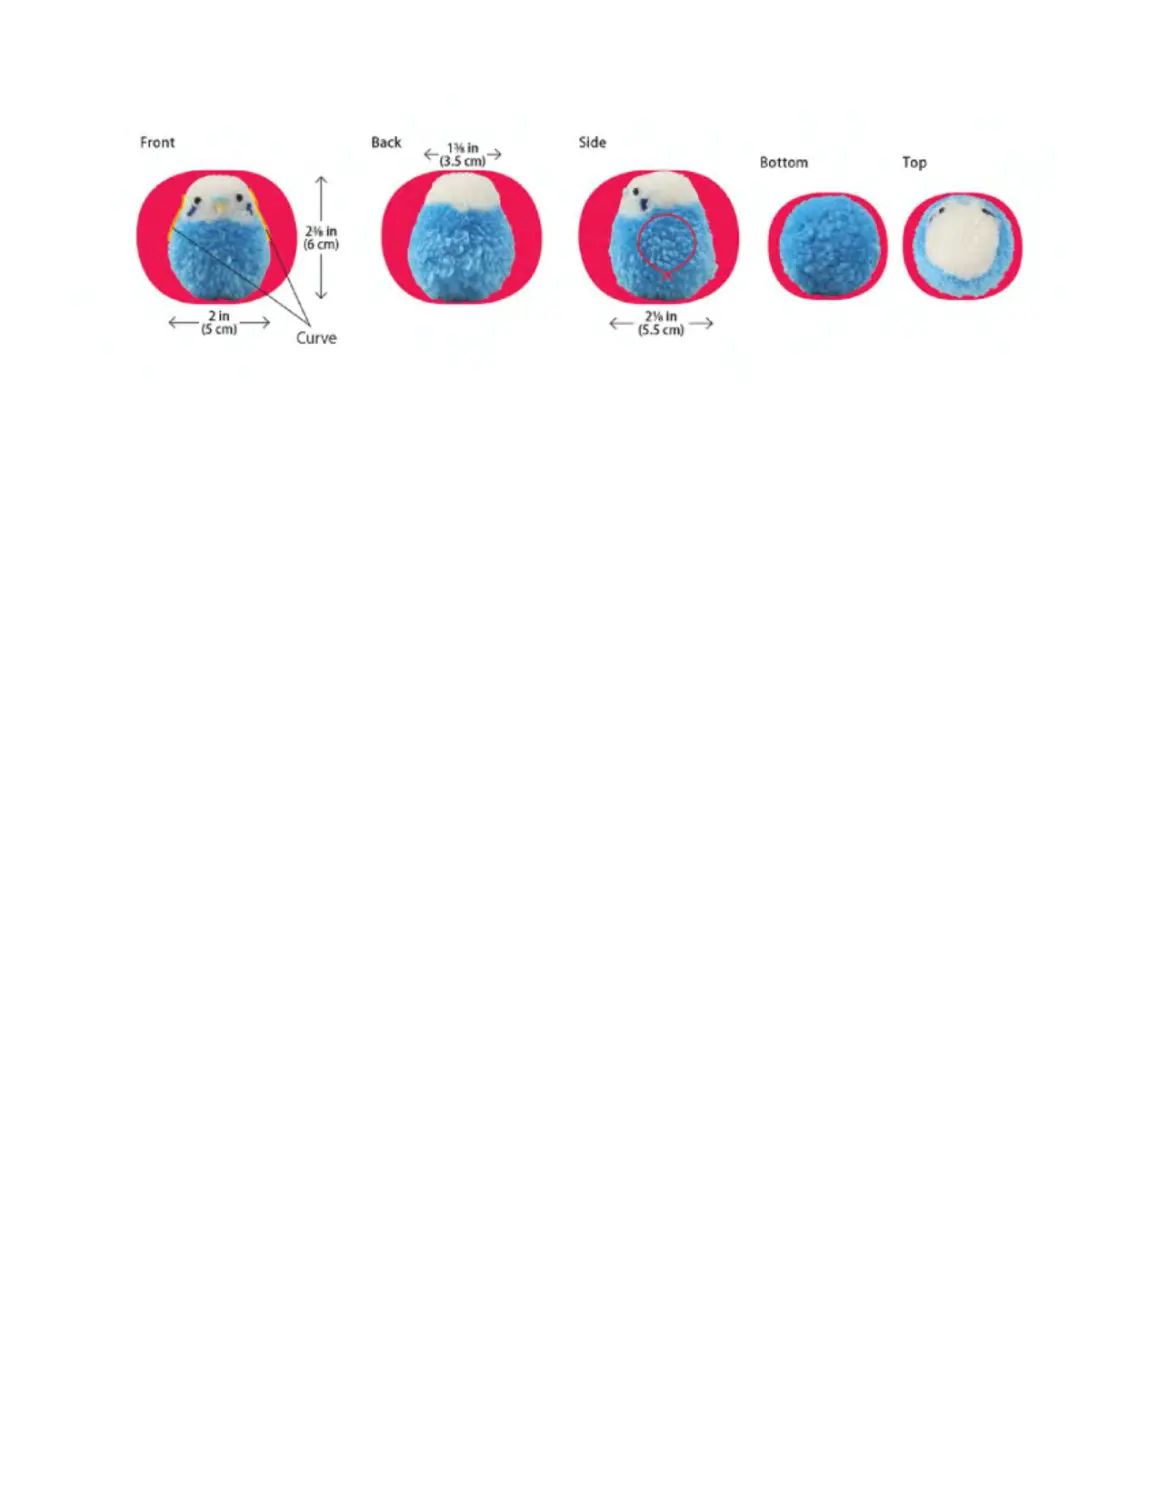
from pom pom maker and adjust shape. Trim as shown in photos
below. ► point 1
2 Reinforce both sides of the felt with glue (see p. 51) and curve
the felt a little and let dry.
3 Determine eye placement and attach with glue (see p. 44).
Cut out beak using template. Attach a single strand of loosened
sky blue yarn and attach to the upper part of the beak. Glue the
beak onto the head.
point 1
Trim the back so that it protrudes a bit. Shape the head to be a
little smaller than the body and bulge out the bottom half.
Template (actual size)
Trimming and Sizing Guide
Frog (see page 23)
Winding Diagram
• Double strand for yellow-green
Materials
Pom pom maker: 2⅛ in (5.5 cm)
Yarn – worsted weight in yellow-green and off-white
Other Materials
Eyes: plastic eye (brown) 12 mm × 2
Nose: plastic safety nose 2 mm × 2
Instructions
1 Follow winding diagram and make a 2⅛ in (5.5 cm) pom pom.
2 Remove from pom pom maker, adjust shape and trim as
shown in photos below.
3 Wrap a single strand of the specified yarn 25 times around a 1
in (2.5 cm)-wide cardboard piece and make 2 mini-pom poms
for the eyes (see p. 51).
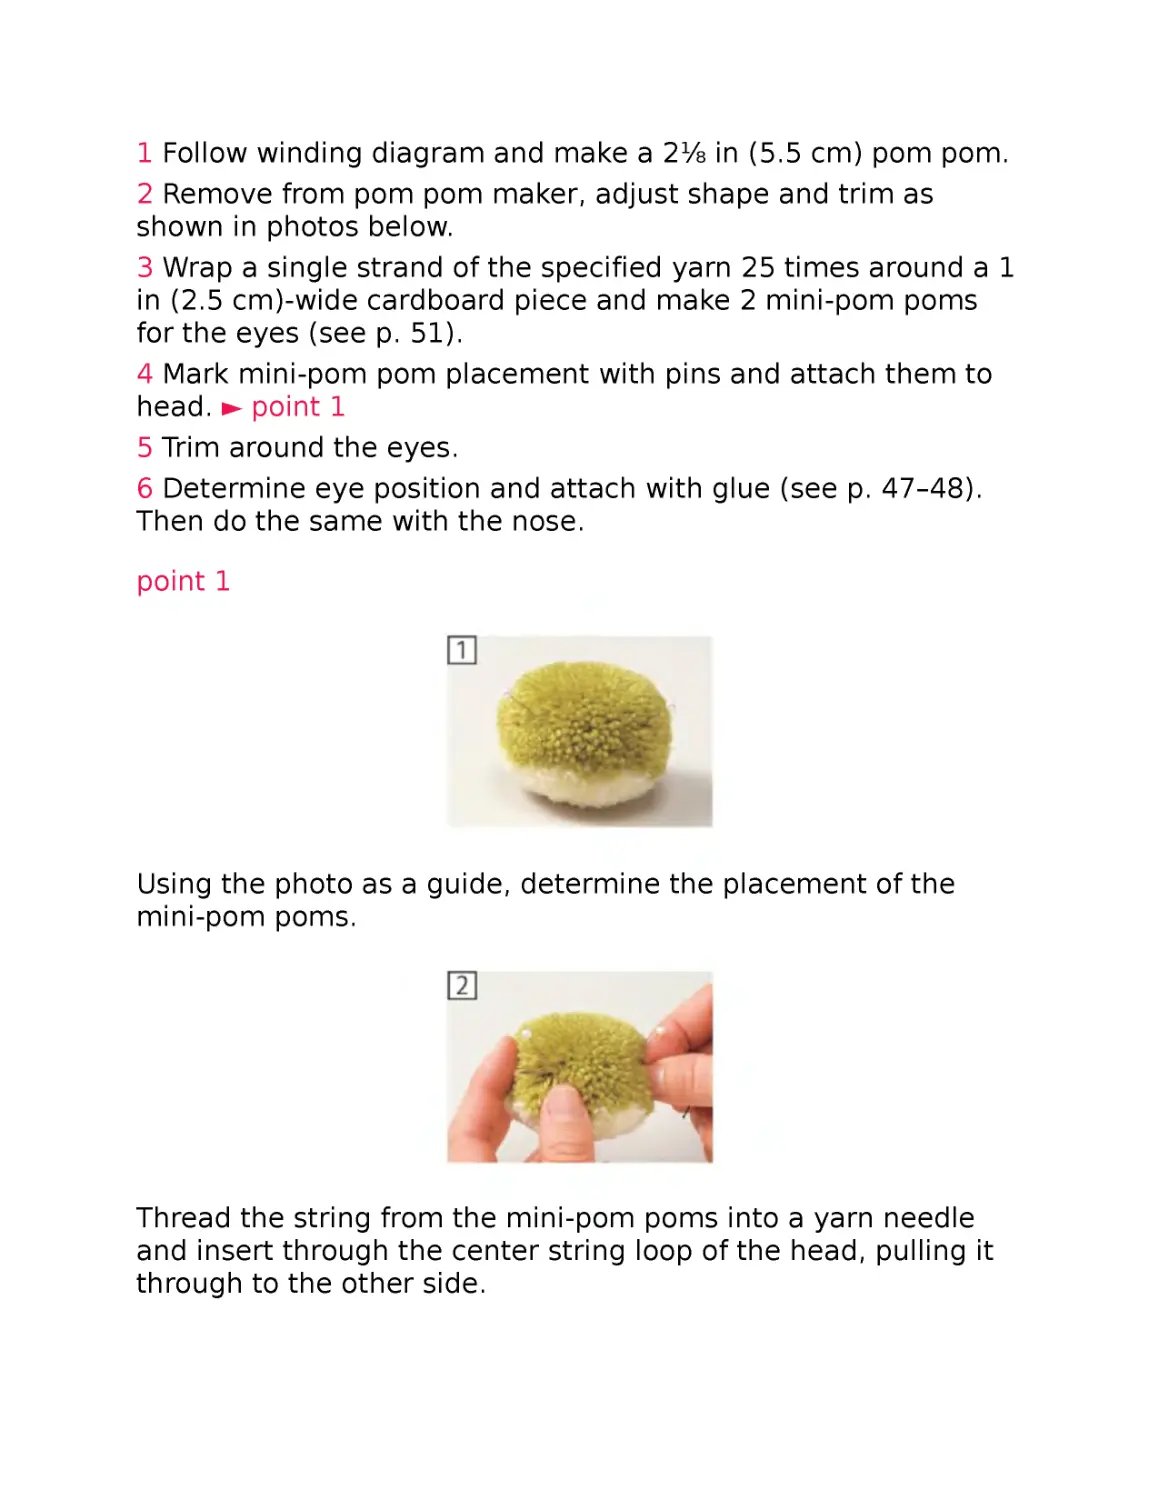
4 Mark mini-pom pom placement with pins and attach them to
head. ► point 1
5 Trim around the eyes.
6 Determine eye position and attach with glue (see p. 47–48).
Then do the same with the nose.
point 1
Using the photo as a guide, determine the placement of the
mini-pom poms.
Thread the string from the mini-pom poms into a yarn needle
and insert through the center string loop of the head, pulling it
through to the other side.
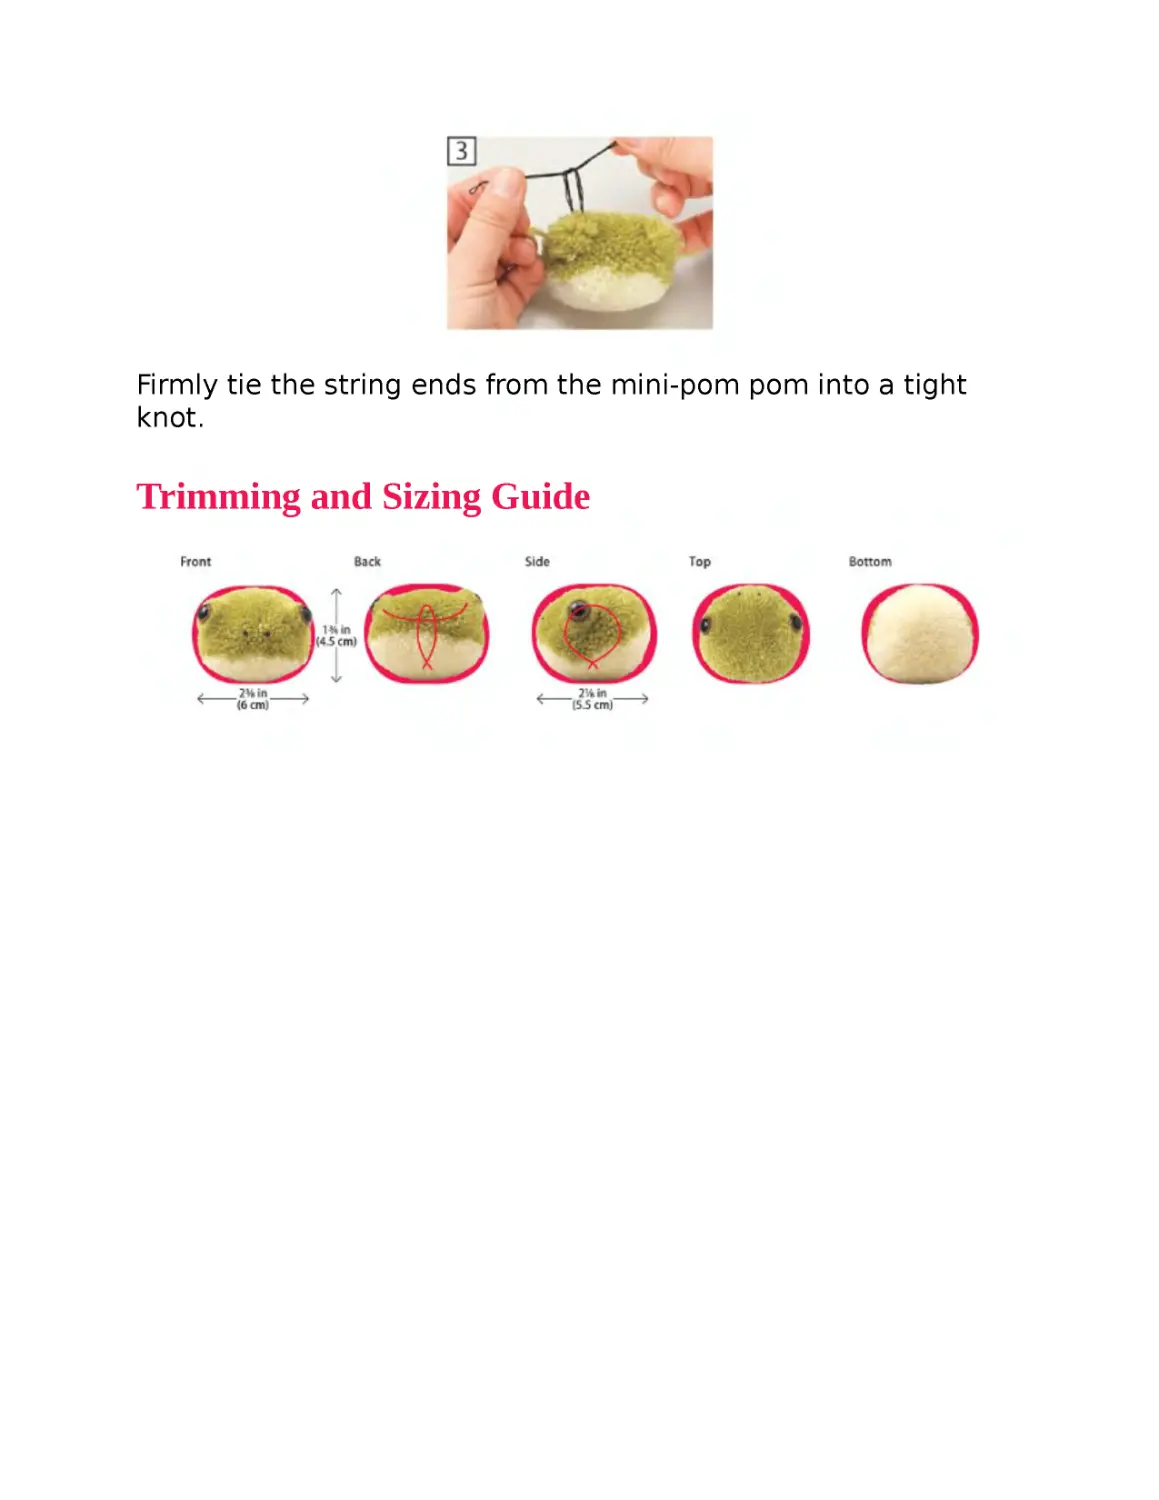
Firmly tie the string ends from the mini-pom pom into a tight
knot.
Trimming and Sizing Guide
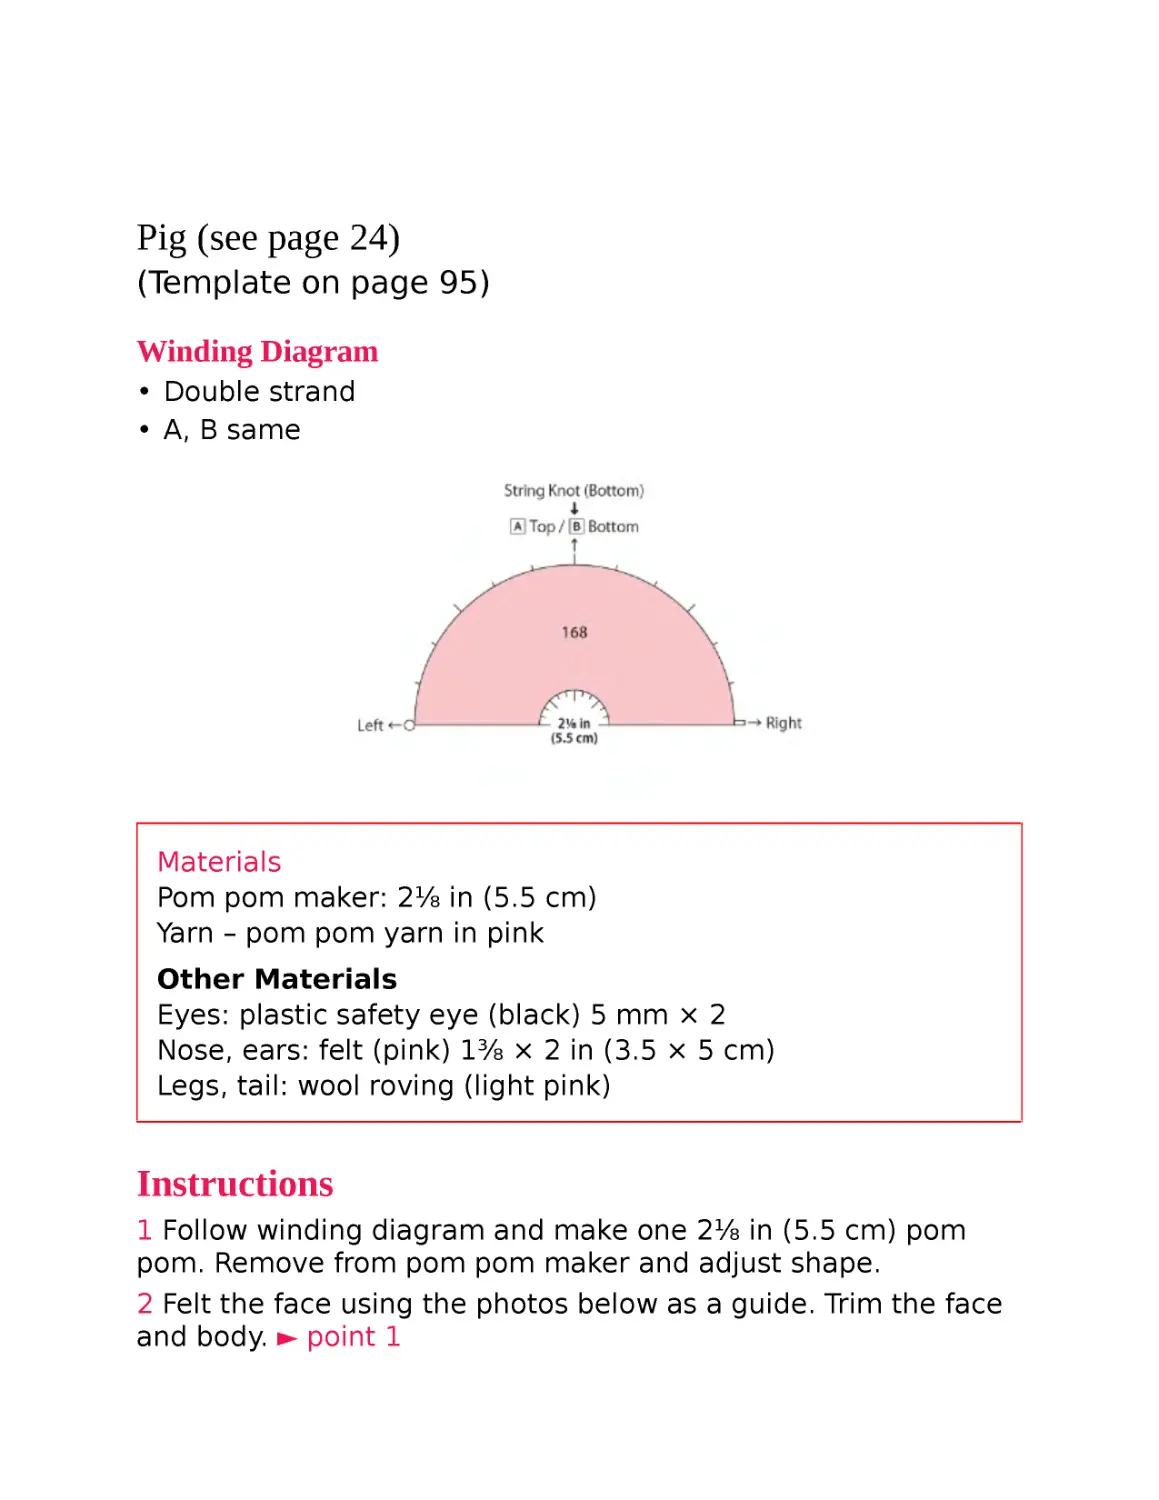
Pig (see page 24)
(Template on page 95)
Winding Diagram
• Double strand
• A, B same
Materials
Pom pom maker: 2⅛ in (5.5 cm)
Yarn – pom pom yarn in pink
Other Materials
Eyes: plastic safety eye (black) 5 mm × 2
Nose, ears: felt (pink) 1⅜ × 2 in (3.5 × 5 cm)
Legs, tail: wool roving (light pink)
Instructions
1 Follow winding diagram and make one 2⅛ in (5.5 cm) pom
pom. Remove from pom pom maker and adjust shape.
2 Felt the face using the photos below as a guide. Trim the face
and body. ► point 1
3 Cut out nose using the template, create holes and attach with
glue.
4 Determine eye placement and attach with glue (see p. 47–48).
5 Cut out ears using template. Add a dab of glue to the base of
each ear, clip and let dry (see p. 74-point 3). Attach with glue
(see p. 49).
6 Shape wool roving using template and make the legs and tail.
Attach to the body with the felting needle.
point 1
Make one side the snout end and firmly felt using the needle.
Trim the tip of the nose to flatten it to make it easier to attach
the felt nose piece.
Trimming and Sizing Guide
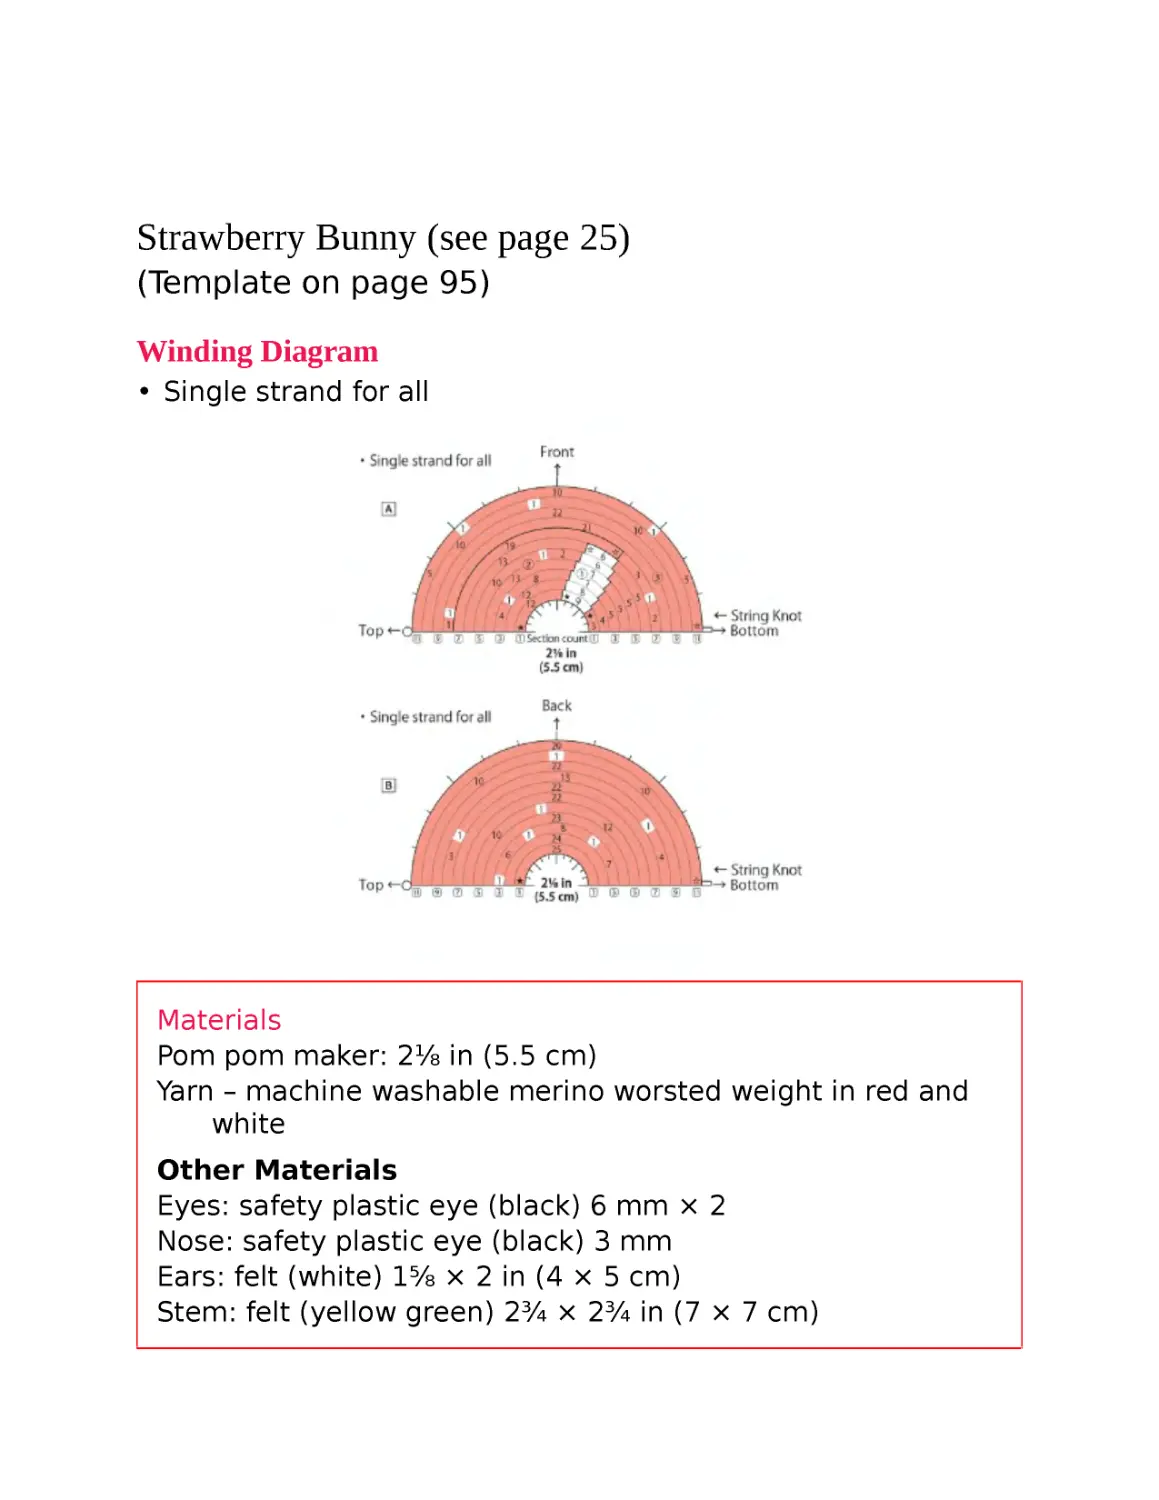
Strawberry Bunny (see page 25)
(Template on page 95)
Winding Diagram
• Single strand for all
Materials
Pom pom maker: 2⅛ in (5.5 cm)
Yarn – machine washable merino worsted weight in red and
white
Other Materials
Eyes: safety plastic eye (black) 6 mm × 2
Nose: safety plastic eye (black) 3 mm
Ears: felt (white) 1⅝ × 2 in (4 × 5 cm)
Stem: felt (yellow green) 2¾ × 2¾ in (7 × 7 cm)
Instructions
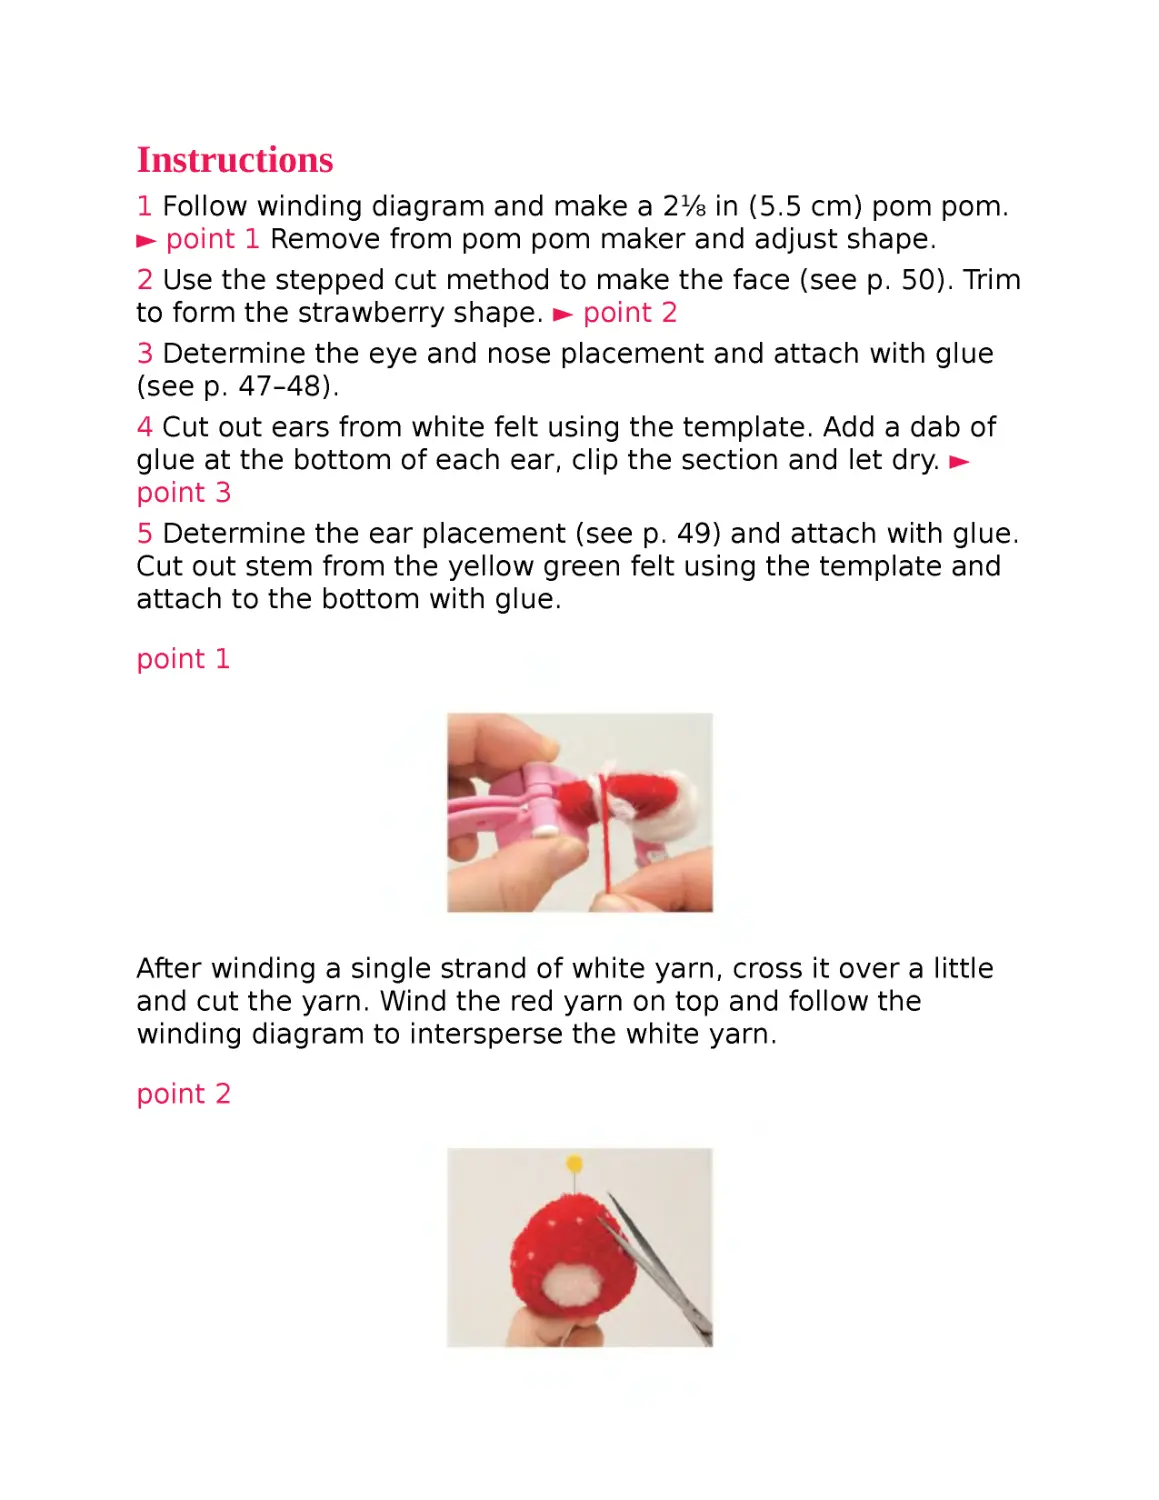
1 Follow winding diagram and make a 2⅛ in (5.5 cm) pom pom.
► point 1 Remove from pom pom maker and adjust shape.
2 Use the stepped cut method to make the face (see p. 50). Trim
to form the strawberry shape. ► point 2
3 Determine the eye and nose placement and attach with glue
(see p. 47–48).
4 Cut out ears from white felt using the template. Add a dab of
glue at the bottom of each ear, clip the section and let dry. ►
point 3
5 Determine the ear placement (see p. 49) and attach with glue.
Cut out stem from the yellow green felt using the template and
attach to the bottom with glue.
point 1
After winding a single strand of white yarn, cross it over a little
and cut the yarn. Wind the red yarn on top and follow the
winding diagram to intersperse the white yarn.
point 2
Mark the tip of the strawberry with a pin. Maintain that area as
the highest point and roughly trim the rest of the pom pom into
an approximate shape of a strawberry. Once the general shape
is formed, use the finish cut method (see p. 50).
point 3
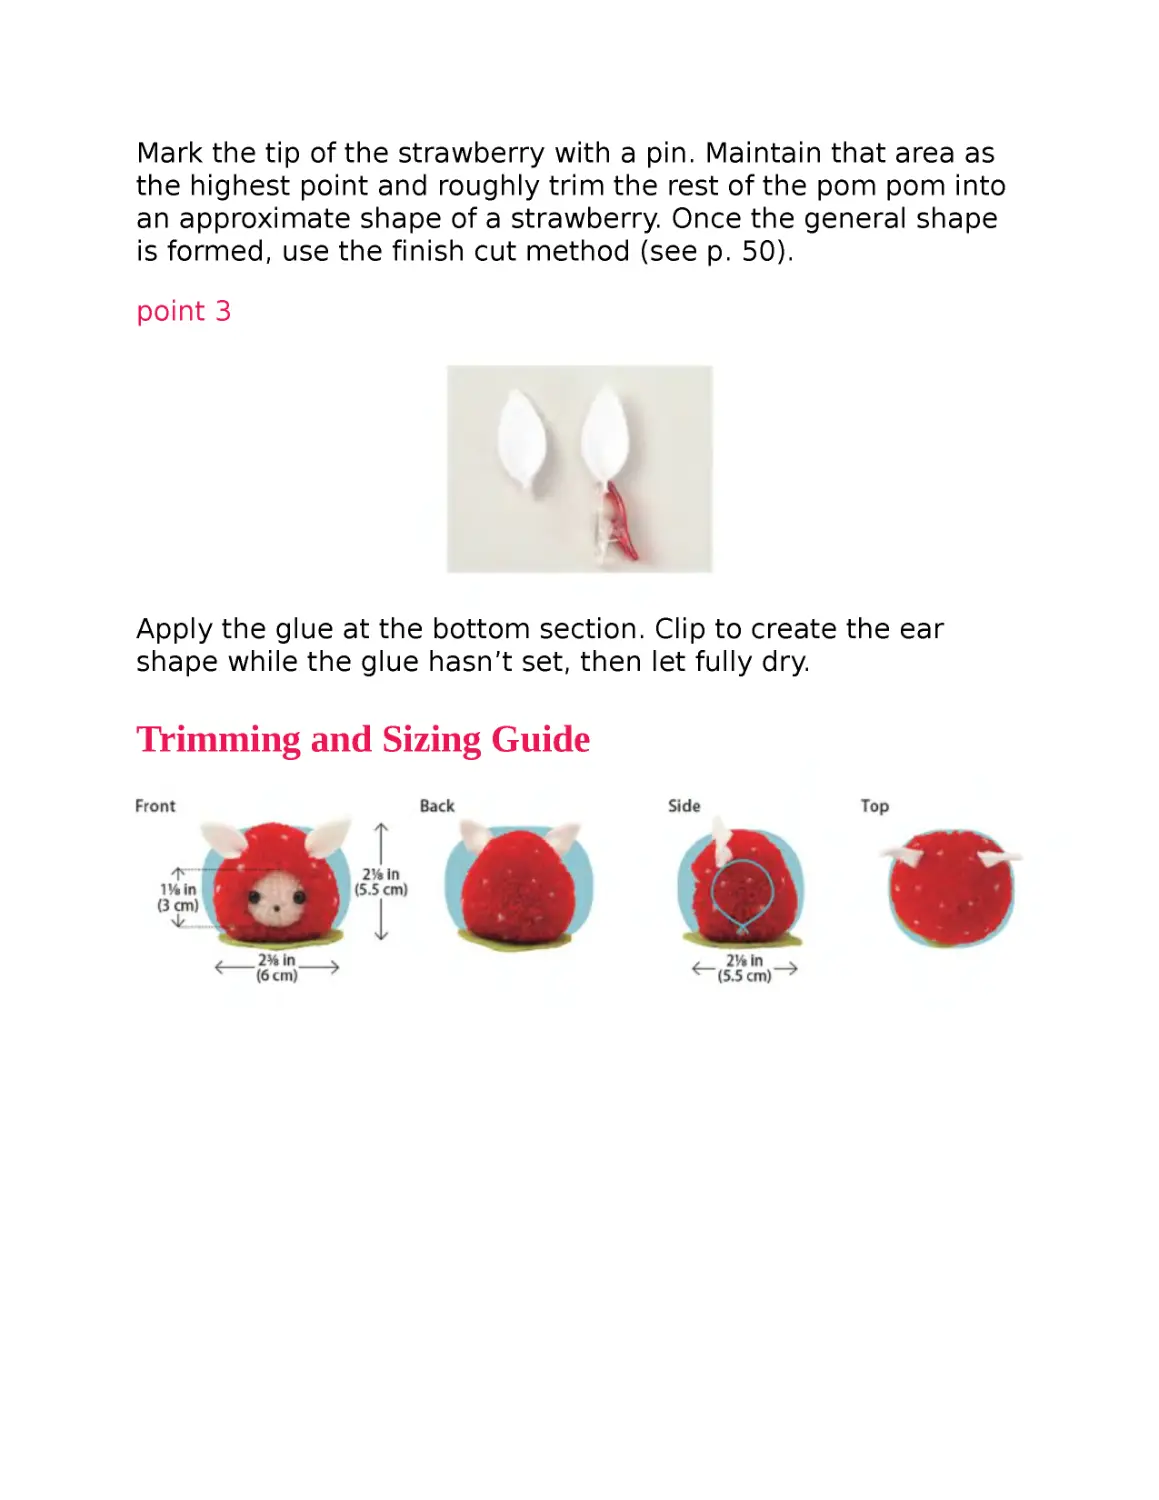
Apply the glue at the bottom section. Clip to create the ear
shape while the glue hasn’t set, then let fully dry.
Trimming and Sizing Guide
Hamster (see page 26)
(Winding Diagram on page 92)
Materials
Pom pom maker: Head: 1⅜ in (3.5 cm), Body: 2⅛ in (5.5 cm)
Yarn – pom pom yarn in light beige and white
Other Materials
Eyes: plastic safety eye (black) 6 mm × 2
Nose: Beads (pink) ⅛ in (4 mm)
Ears: felt (beige) 1⅛ × 2⅜ in (3 × 6 cm)
Paws: felt (brown beige) 2⅜ × 1⅝ in (6 × 4 cm)
Instructions
1 Follow the winding diagram and make one 1⅜ in (3.5 cm) pom
pom and one 2⅛ in (5.5 cm) pom pom. Remove from pom pom
maker and adjust shape.
2 Trim the head as shown in photo on right. Roughly trim the
body.
3 Attach the head to the body (see p. 52-B).
4 Trim the body as shown in photos on right. ► point 1
5 Determine the eyes and nose placement and attach with glue
(see p. 47–48).
6 Cut out the ears using the template. Add a dab of glue at the
bottom portion for each ear. Clip and let dry (see p. 74-point 3).
7 Apply a thin layer of glue on both sides of the paws with a
bamboo stick and let dry. ► point 2
8 Cut the fingertips once the glue has dried. ► point 3
9 Determine the paw and ear placement (see p. 49) and attach
with glue.
Trimming and Sizing Guide
point 1
To make the arms and legs extend out, trim as shown in the
photos.
point 2
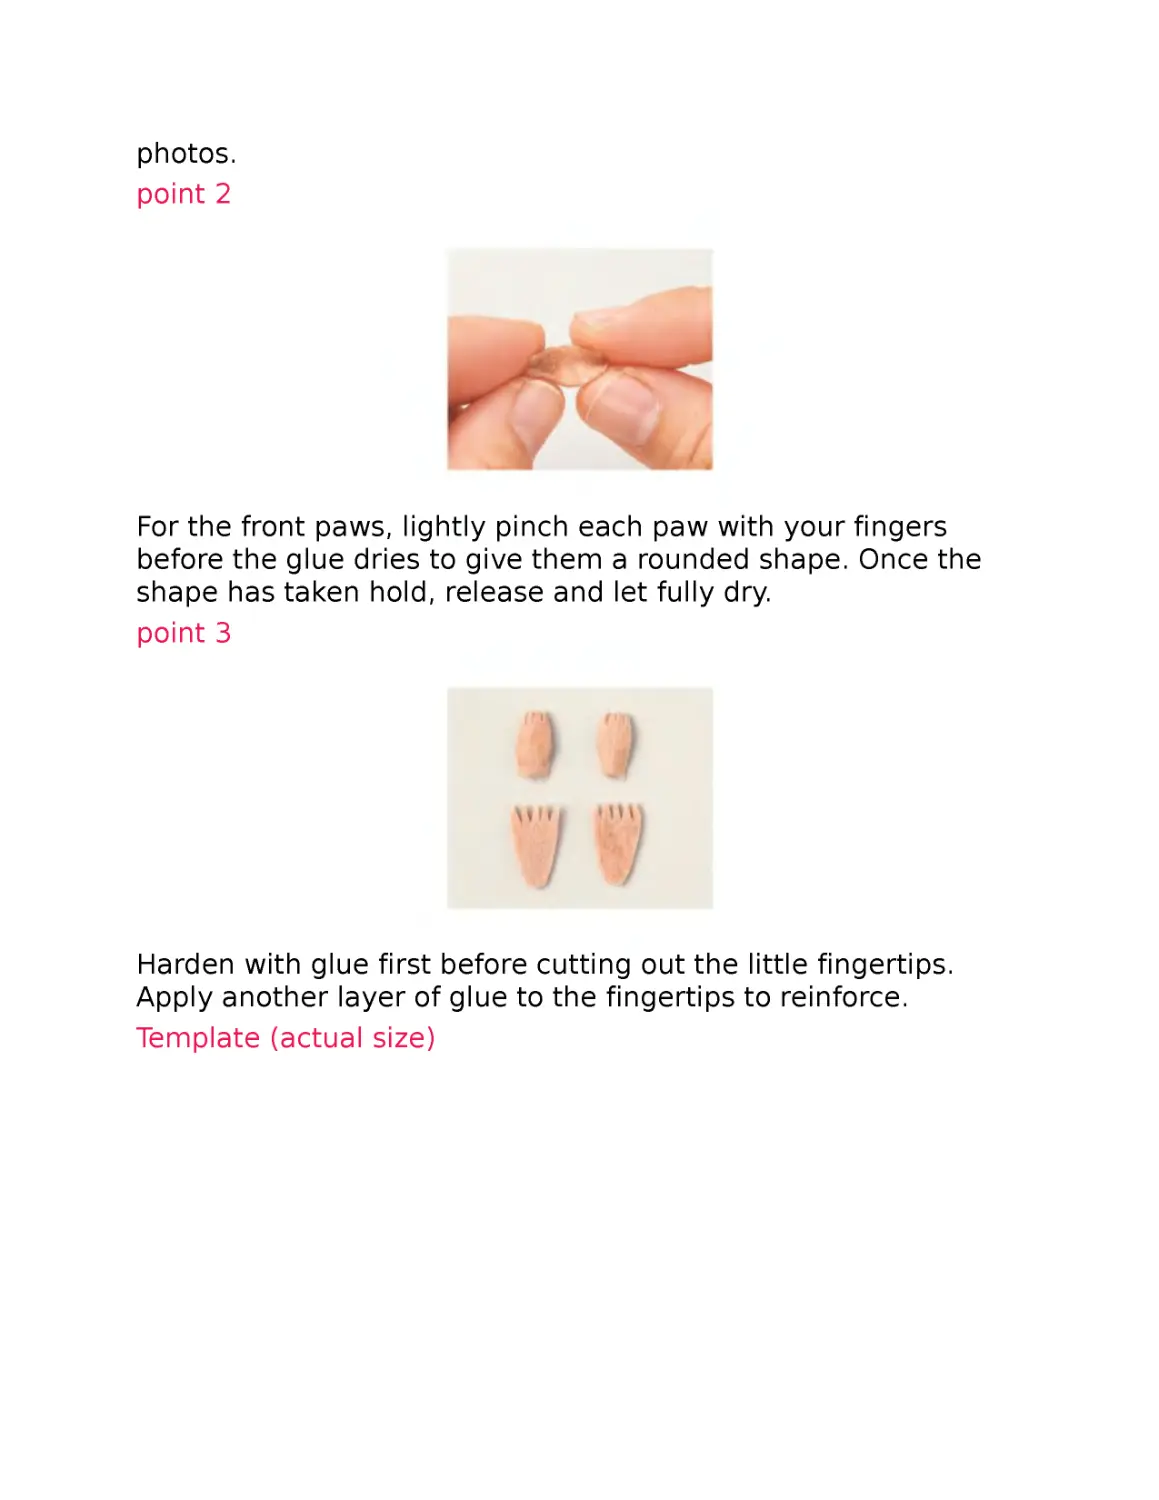
For the front paws, lightly pinch each paw with your fingers
before the glue dries to give them a rounded shape. Once the
shape has taken hold, release and let fully dry.
point 3
Harden with glue first before cutting out the little fingertips.
Apply another layer of glue to the fingertips to reinforce.
Template (actual size)
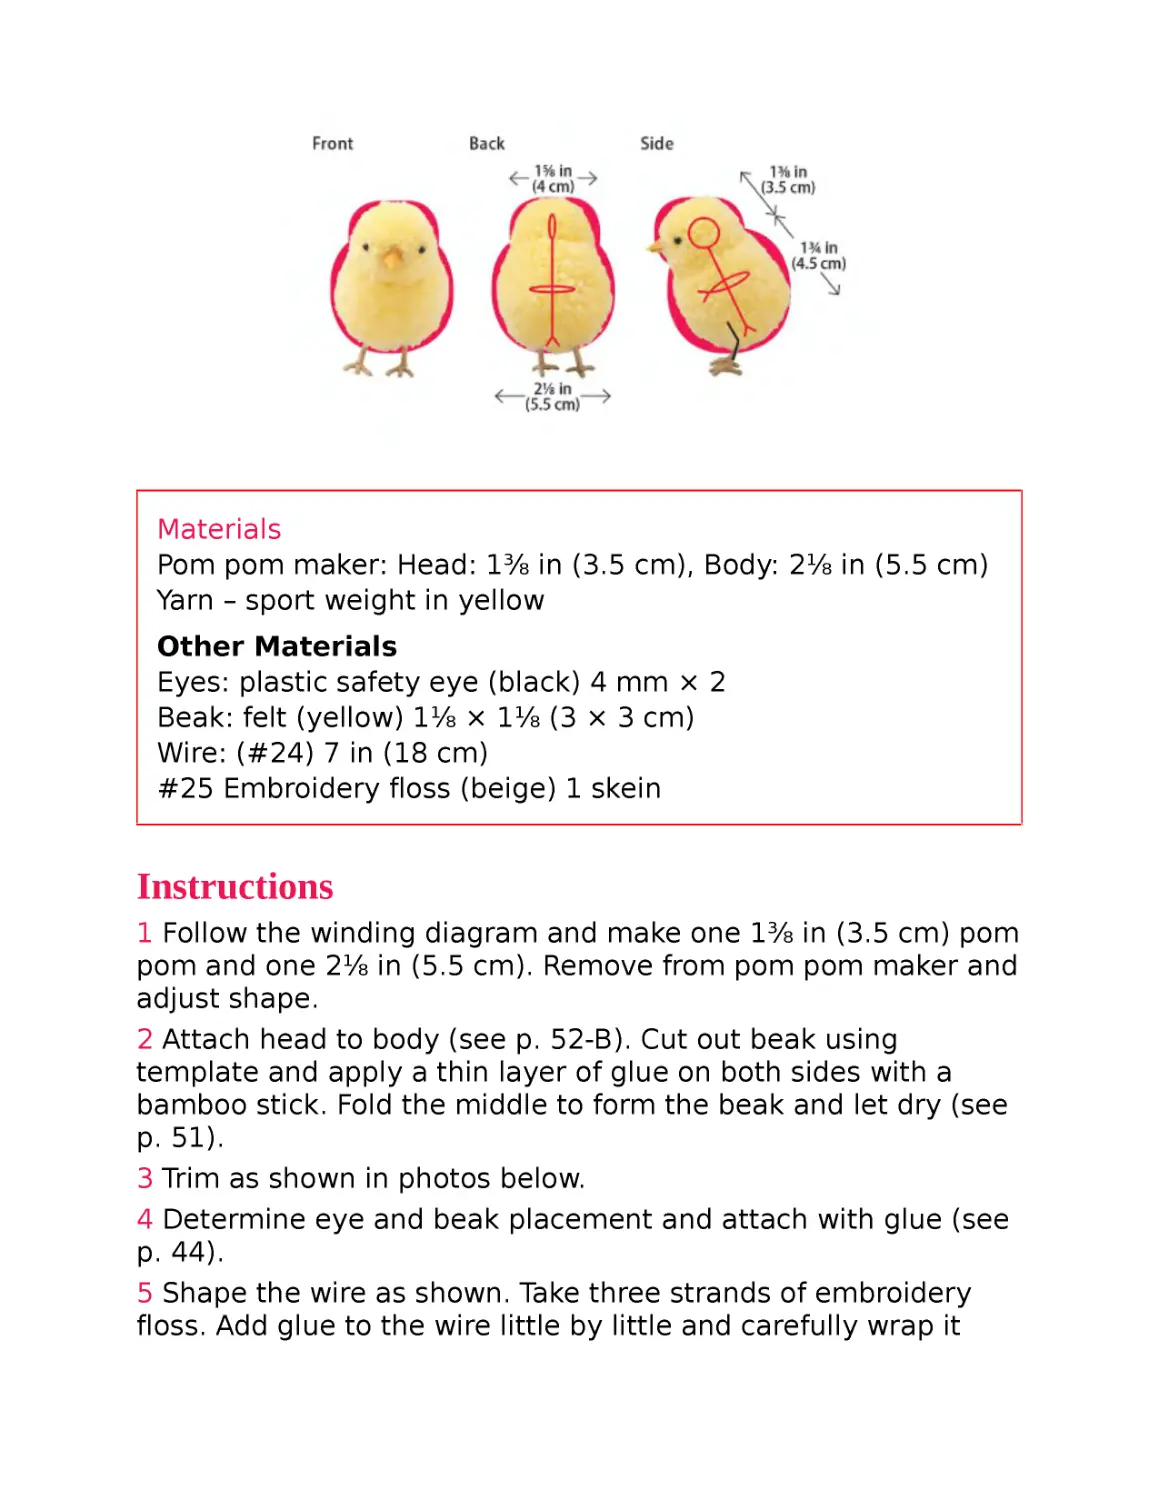
Chick (see page 27)
(Template on page 94)
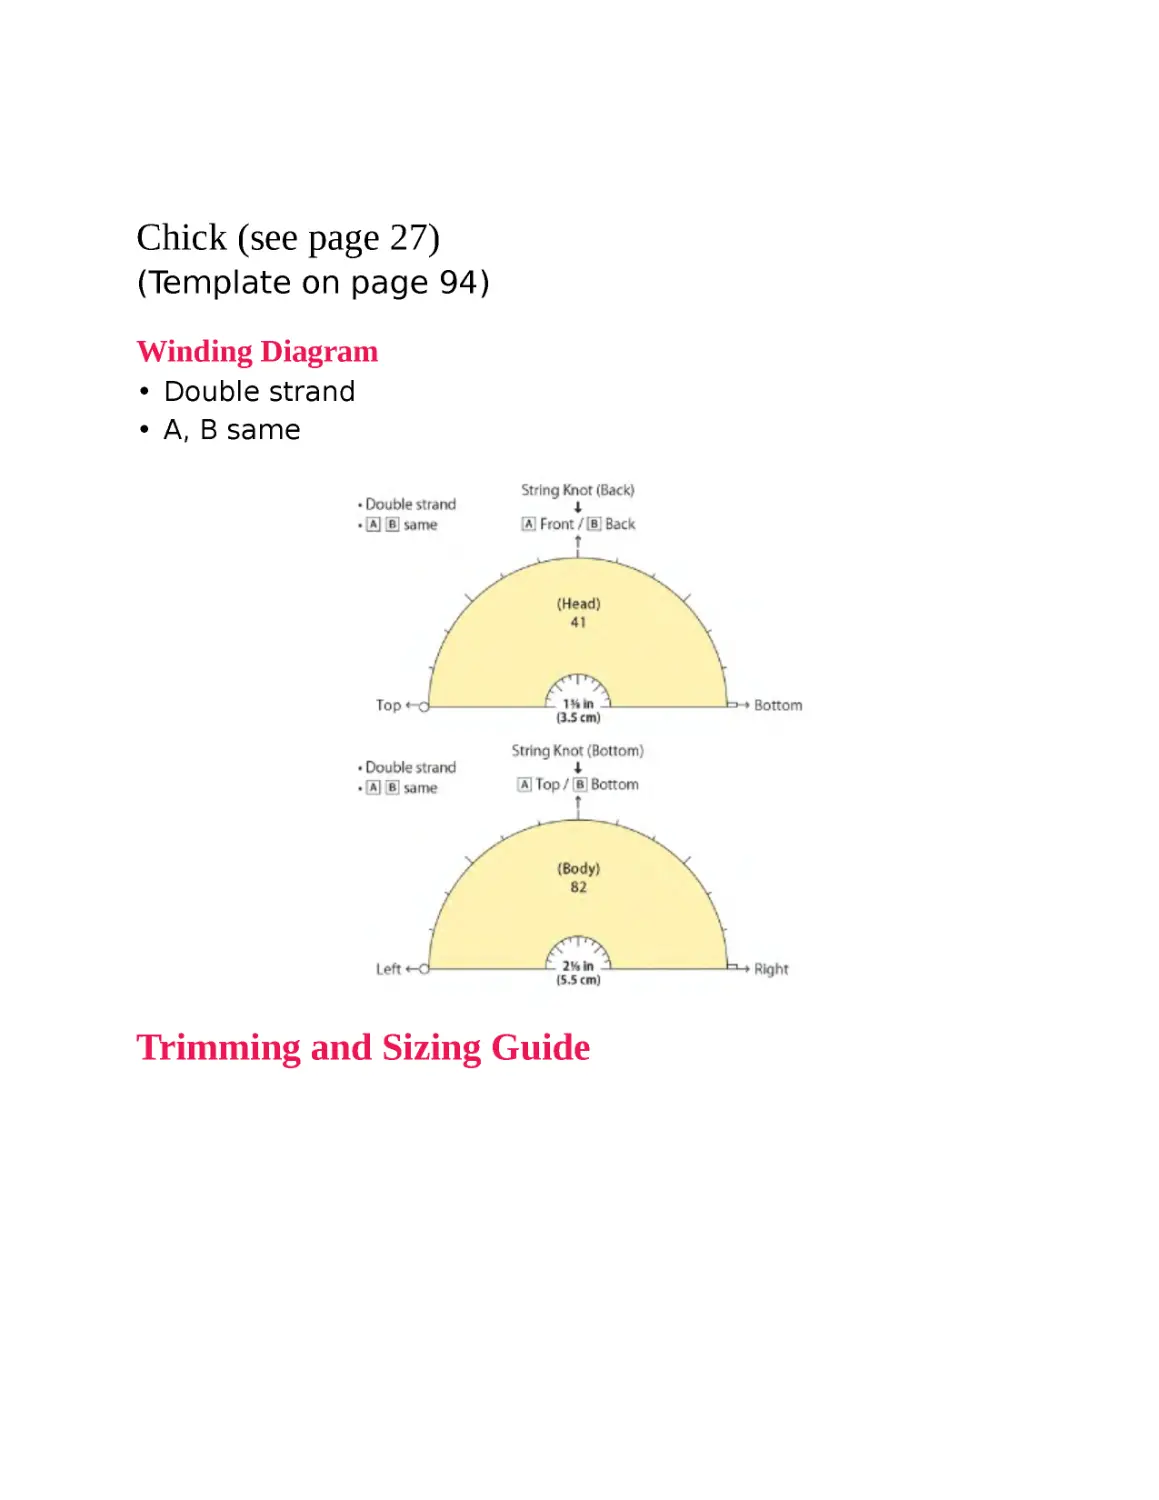
Winding Diagram
• Double strand
• A, B same
Trimming and Sizing Guide
Materials
Pom pom maker: Head: 1⅜ in (3.5 cm), Body: 2⅛ in (5.5 cm)
Yarn – sport weight in yellow
Other Materials
Eyes: plastic safety eye (black) 4 mm × 2
Beak: felt (yellow) 1⅛ × 1⅛ (3 × 3 cm)
Wire: (#24) 7 in (18 cm)
#25 Embroidery floss (beige) 1 skein
Instructions
1 Follow the winding diagram and make one 1⅜ in (3.5 cm) pom
pom and one 2⅛ in (5.5 cm). Remove from pom pom maker and
adjust shape.
2 Attach head to body (see p. 52-B). Cut out beak using
template and apply a thin layer of glue on both sides with a
bamboo stick. Fold the middle to form the beak and let dry (see
p. 51).
3 Trim as shown in photos below.
4 Determine eye and beak placement and attach with glue (see
p. 44).
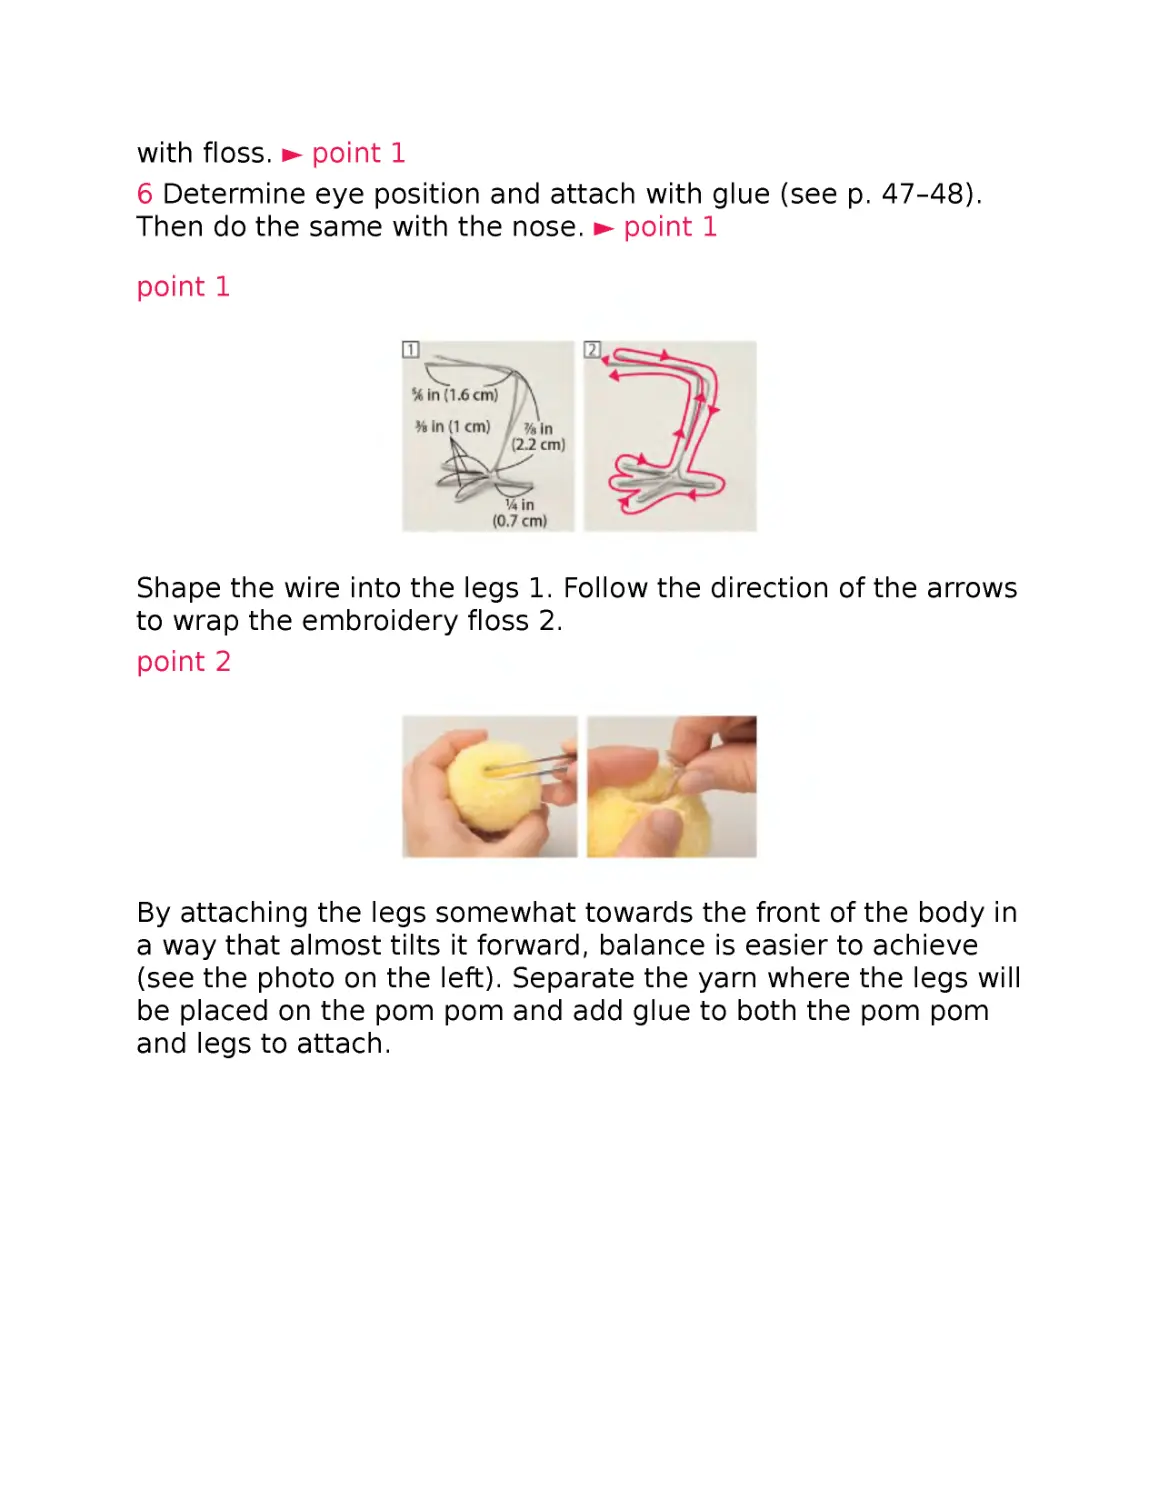
5 Shape the wire as shown. Take three strands of embroidery
floss. Add glue to the wire little by little and carefully wrap it
with floss. ► point 1
6 Determine eye position and attach with glue (see p. 47–48).
Then do the same with the nose. ► point 1
point 1
Shape the wire into the legs 1. Follow the direction of the arrows
to wrap the embroidery floss 2.
point 2
By attaching the legs somewhat towards the front of the body in
a way that almost tilts it forward, balance is easier to achieve
(see the photo on the left). Separate the yarn where the legs will
be placed on the pom pom and add glue to both the pom pom
and legs to attach.
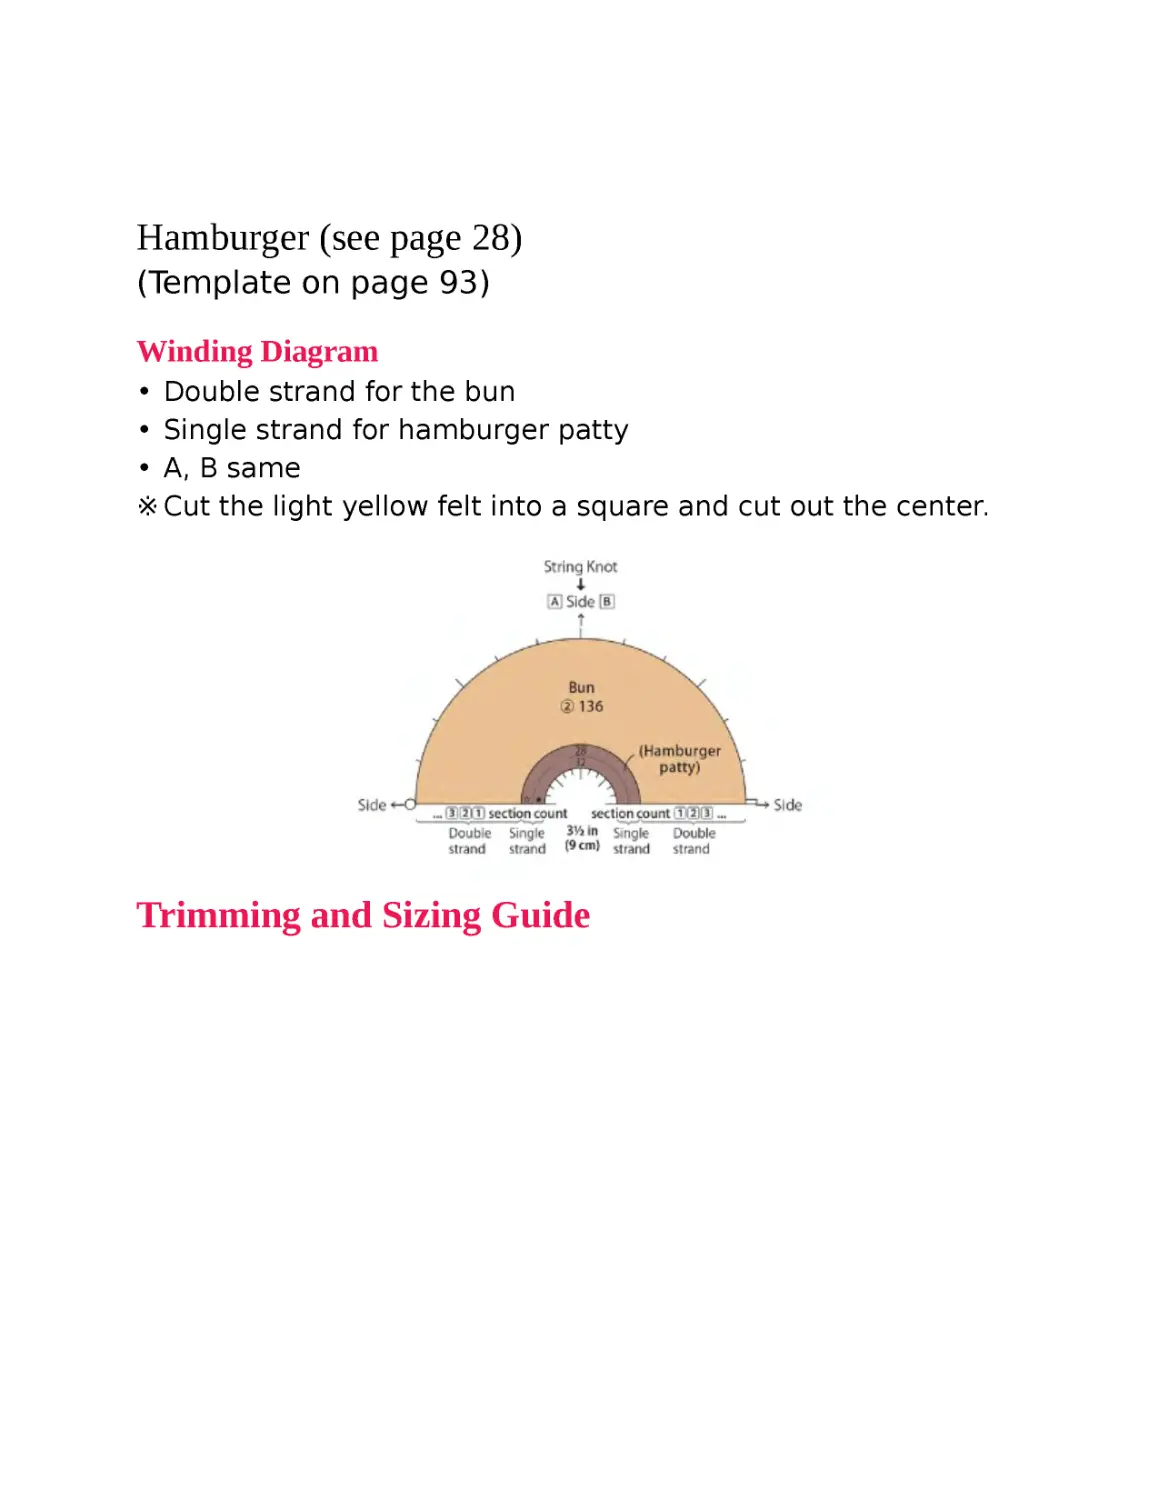
Hamburger (see page 28)
(Template on page 93)
Winding Diagram
• Double strand for the bun
• Single strand for hamburger patty
• A, B same
※ Cut the light yellow felt into a square and cut out the center.
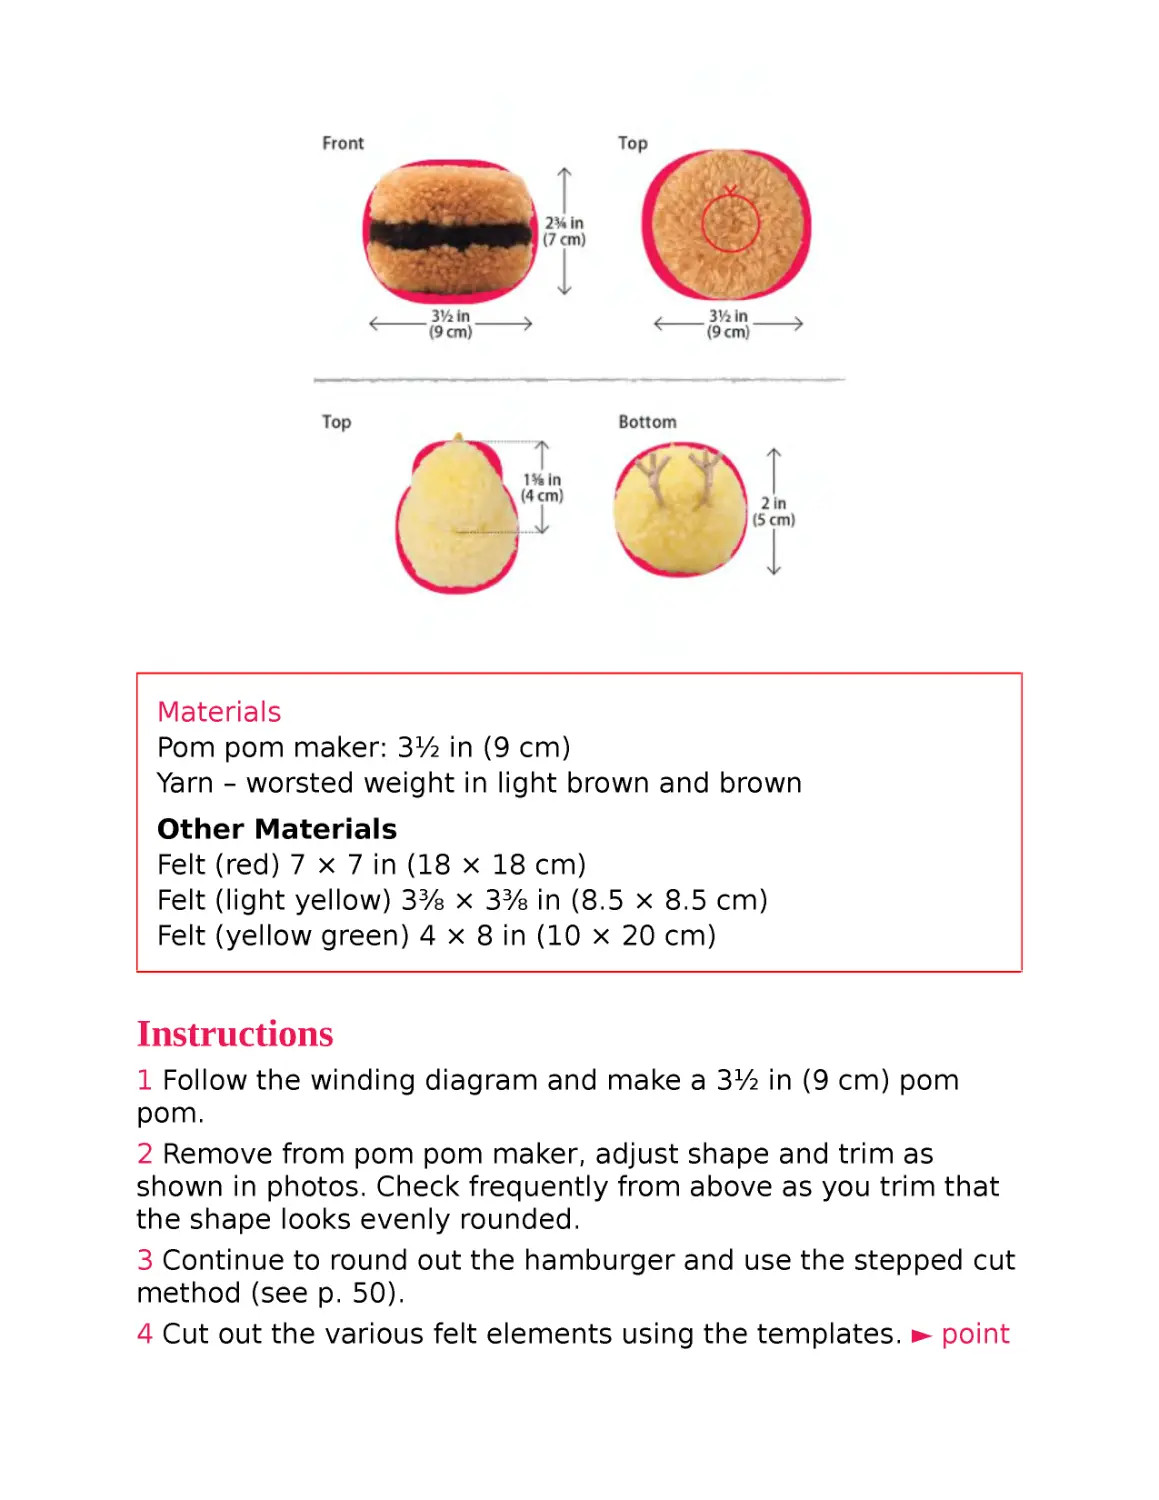
Trimming and Sizing Guide
Materials
Pom pom maker: 3½ in (9 cm)
Yarn – worsted weight in light brown and brown
Other Materials
Felt (red) 7 × 7 in (18 × 18 cm)
Felt (light yellow) 3⅜ × 3⅜ in (8.5 × 8.5 cm)
Felt (yellow green) 4 × 8 in (10 × 20 cm)
Instructions
1 Follow the winding diagram and make a 3½ in (9 cm) pom
pom.
2 Remove from pom pom maker, adjust shape and trim as
shown in photos. Check frequently from above as you trim that
the shape looks evenly rounded.
3 Continue to round out the hamburger and use the stepped cut
method (see p. 50).
4 Cut out the various felt elements using the templates. ► point
1 Glue three layers of the red felt before cutting. ► point 2
5 Insert the light yellow, red and yellow green felt pieces from
step 4 (in that order) between the patty and bun. Attach the felt
edges with glue. ► point 3
point 1
Use the templates to cut out the felt pieces. Because these will
be inserted into the pom pom, cut a slit on one side of each
piece to make the placement easier.
point 2
Apply glue on the entire surface, layer three pieces and let dry.
Once dry, use the template to cut out shape.
point 3
Spread the space between the burger and bun with a tool such
as tweezers and insert the felt toppings. Secure the slit section
of each felt layer into the pom pom with glue and make sure
that they are positioned in the pom pom to hide the slits.
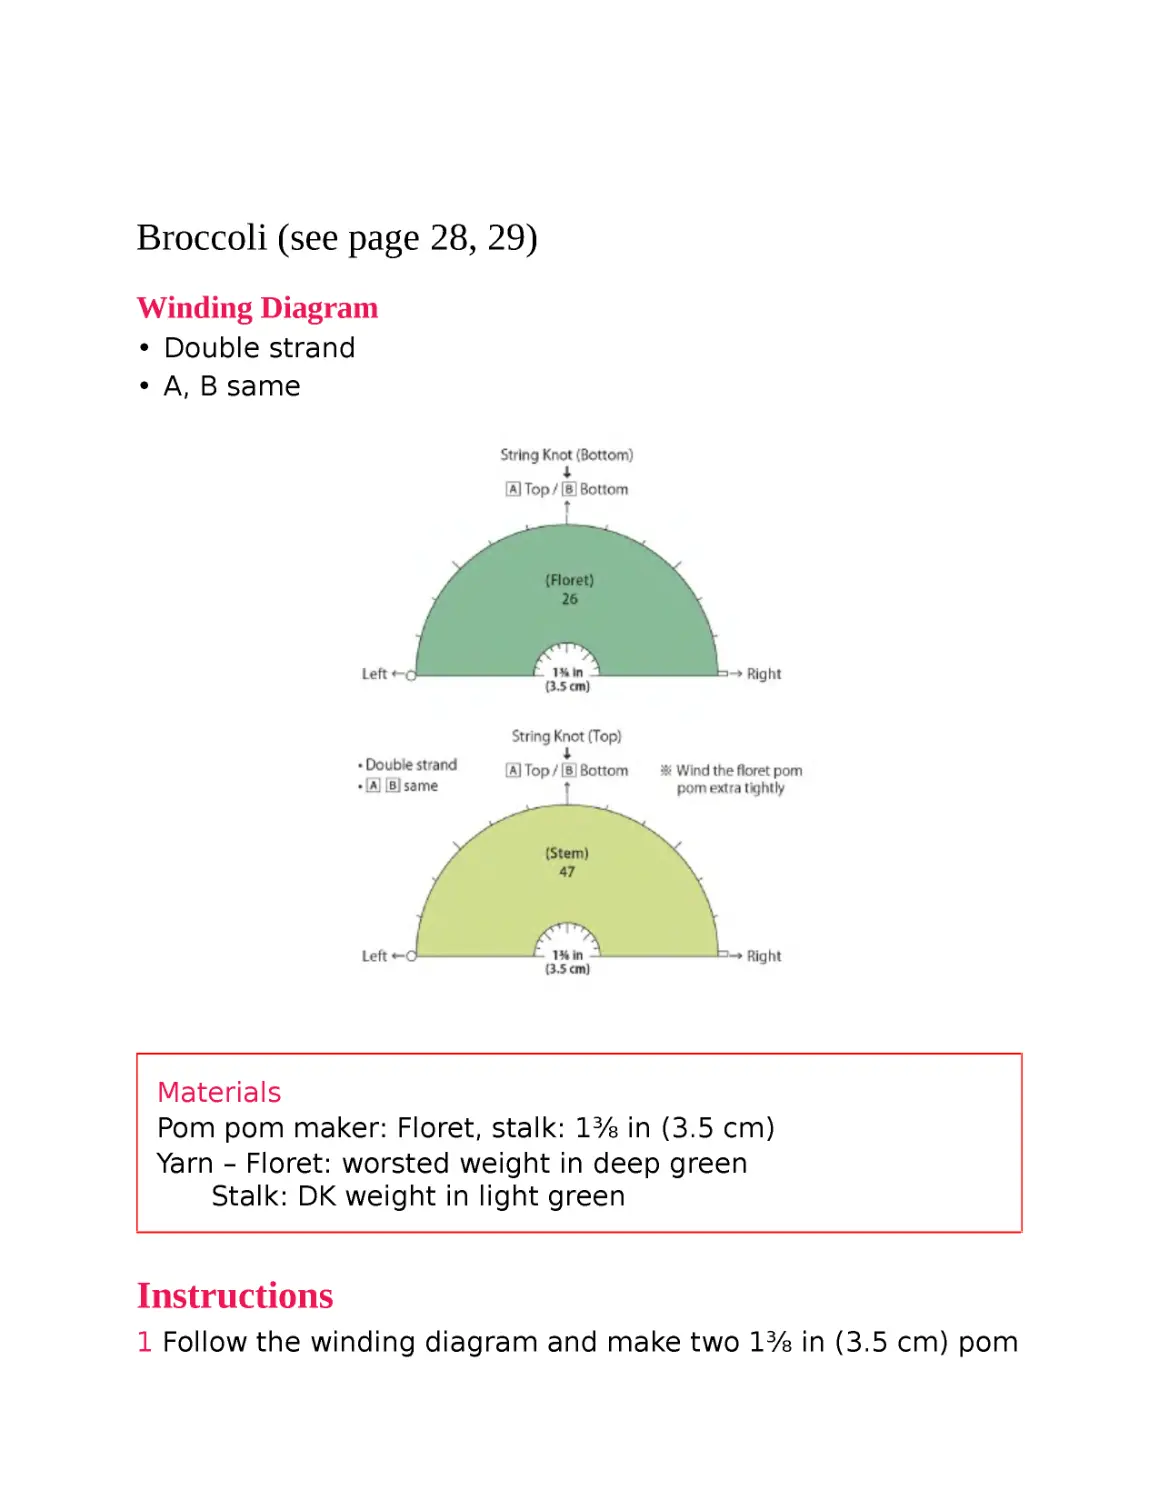
Broccoli (see page 28, 29)
Winding Diagram
• Double strand
• A, B same
Materials
Pom pom maker: Floret, stalk: 1⅜ in (3.5 cm)
Yarn – Floret: worsted weight in deep green
Stalk: DK weight in light green
Instructions
1 Follow the winding diagram and make two 1⅜ in (3.5 cm) pom
poms. Remove from pom pom maker and adjust shape.
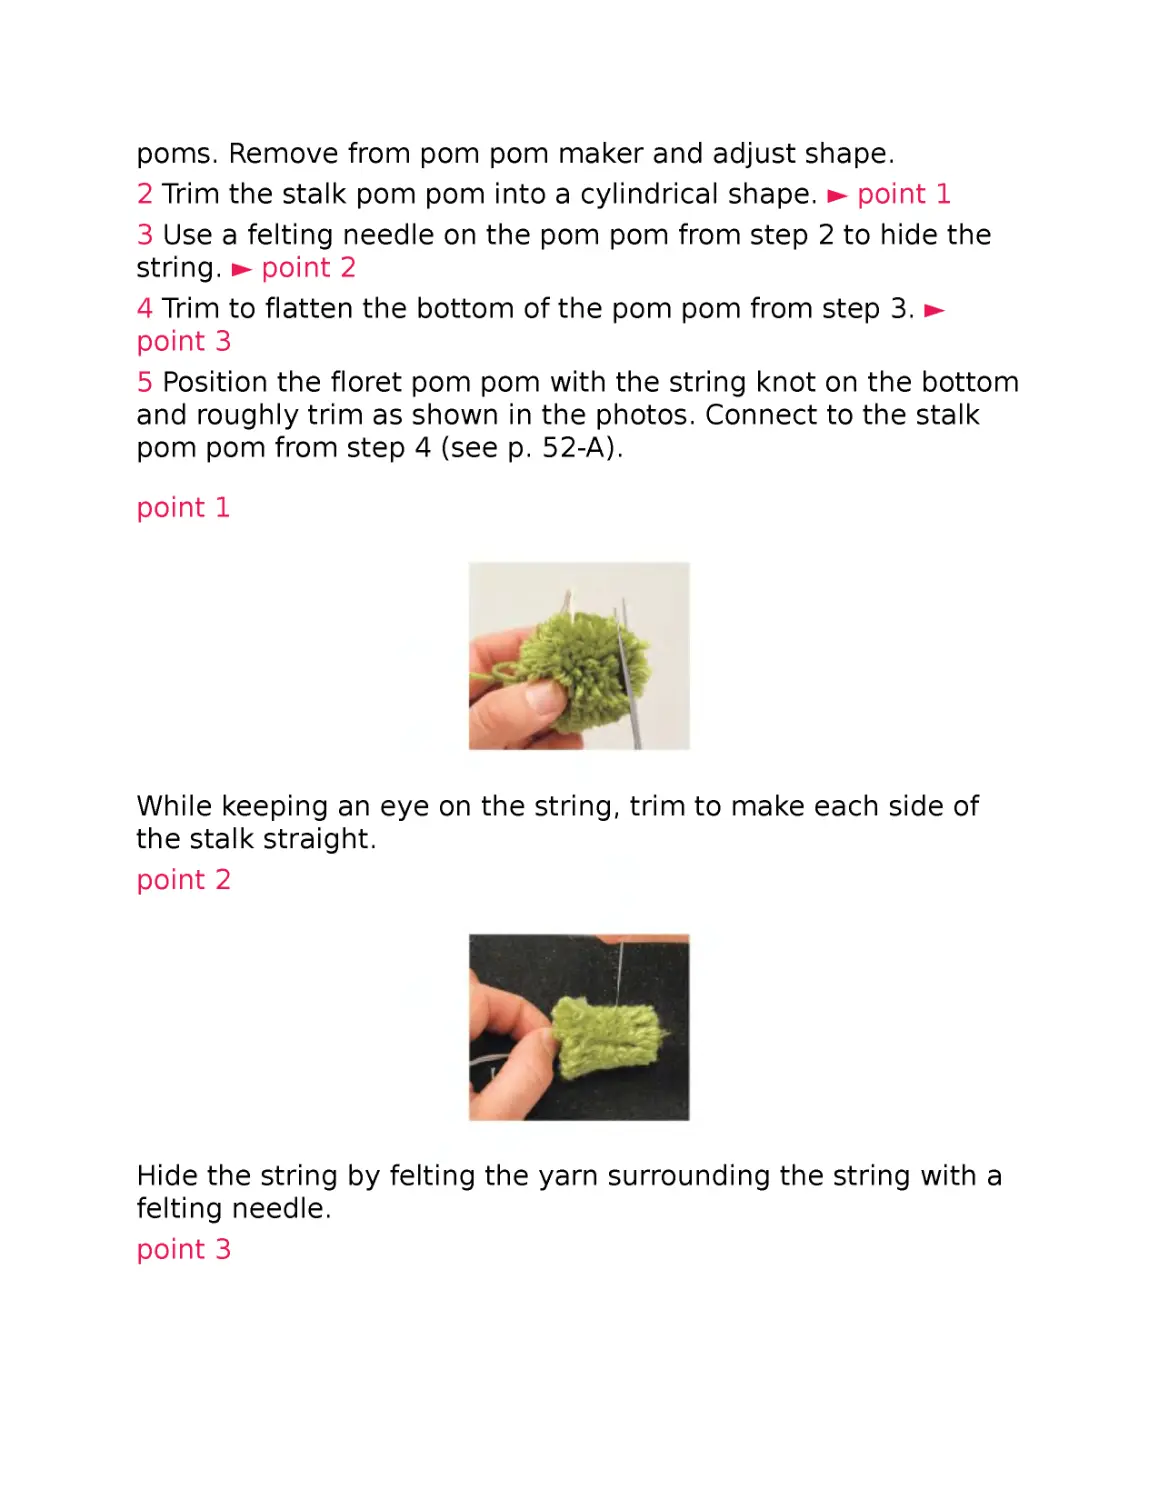
2 Trim the stalk pom pom into a cylindrical shape. ► point 1
3 Use a felting needle on the pom pom from step 2 to hide the
string. ► point 2
4 Trim to flatten the bottom of the pom pom from step 3. ►
point 3
5 Position the floret pom pom with the string knot on the bottom
and roughly trim as shown in the photos. Connect to the stalk
pom pom from step 4 (see p. 52-A).
point 1
While keeping an eye on the string, trim to make each side of
the stalk straight.
point 2
Hide the string by felting the yarn surrounding the string with a
felting needle.
point 3
No need to trim the top since it will be connected to the floret.
Trimming and Sizing Guide
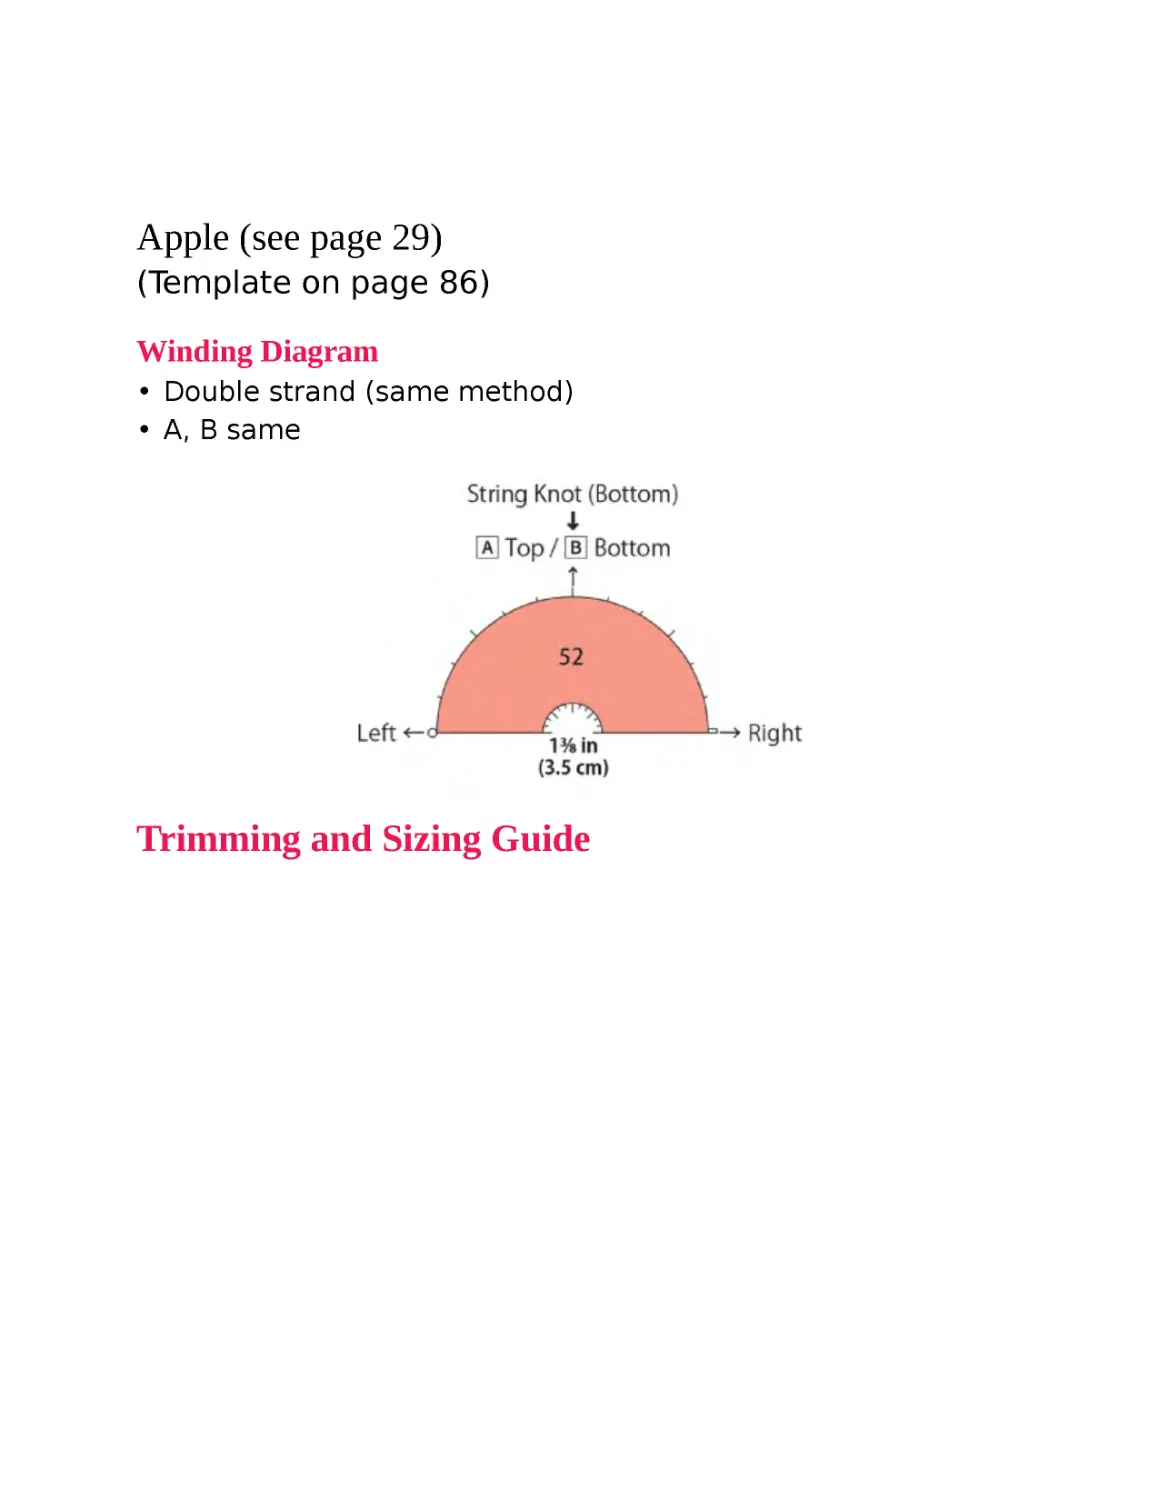
Apple (see page 29)
(Template on page 86)
Winding Diagram
• Double strand (same method)
• A, B same
Trimming and Sizing Guide
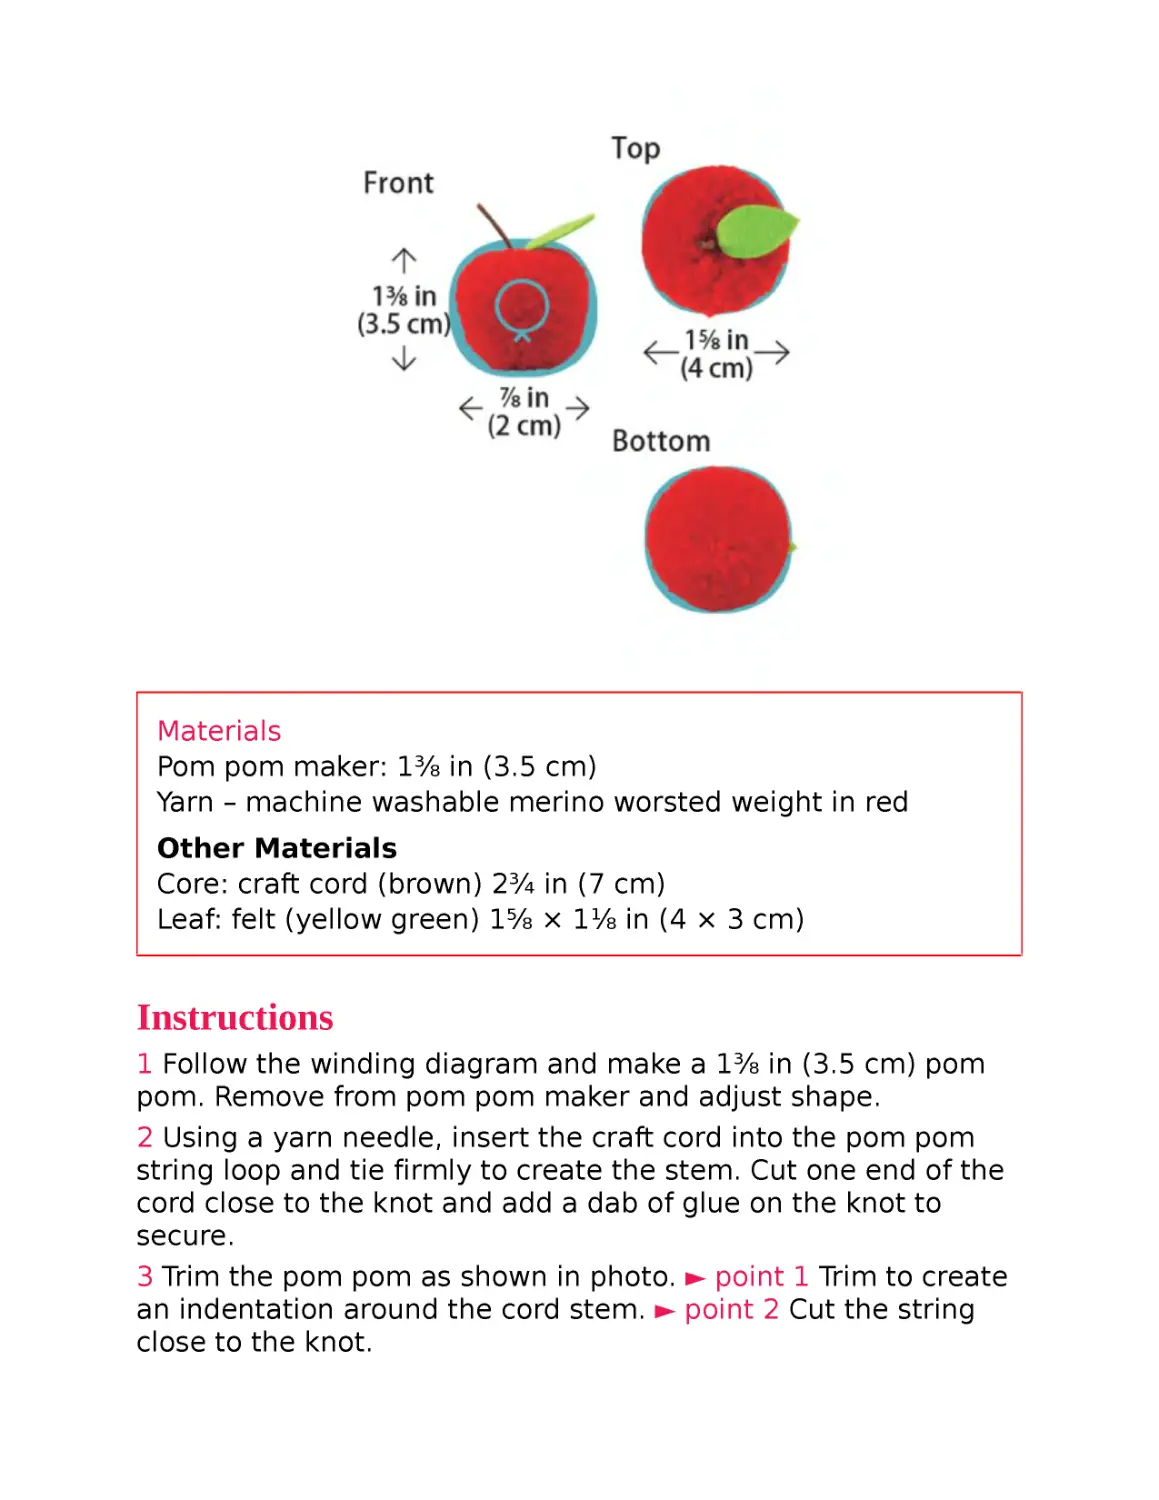
Materials
Pom pom maker: 1⅜ in (3.5 cm)
Yarn – machine washable merino worsted weight in red
Other Materials
Core: craft cord (brown) 2¾ in (7 cm)
Leaf: felt (yellow green) 1⅝ × 1⅛ in (4 × 3 cm)
Instructions
1 Follow the winding diagram and make a 1⅜ in (3.5 cm) pom
pom. Remove from pom pom maker and adjust shape.
2 Using a yarn needle, insert the craft cord into the pom pom
string loop and tie firmly to create the stem. Cut one end of the
cord close to the knot and add a dab of glue on the knot to
secure.
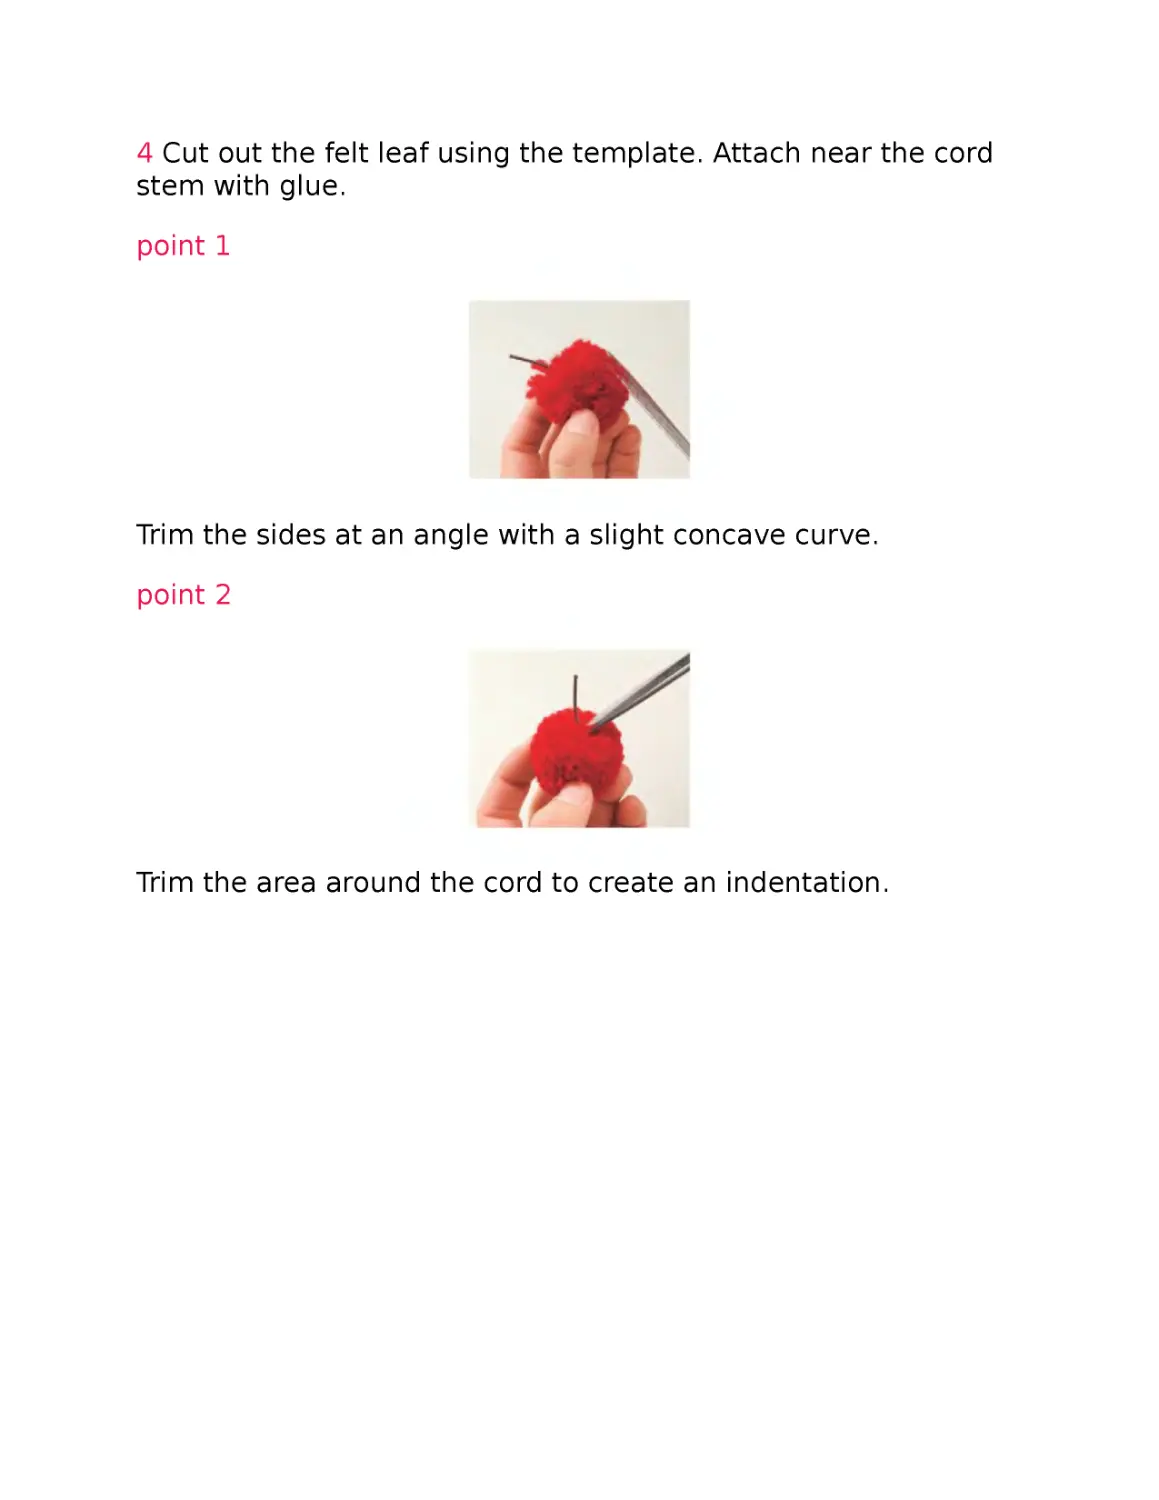
3 Trim the pom pom as shown in photo. ► point 1 Trim to create
an indentation around the cord stem. ► point 2 Cut the string
close to the knot.
4 Cut out the felt leaf using the template. Attach near the cord
stem with glue.
point 1
Trim the sides at an angle with a slight concave curve.
point 2
Trim the area around the cord to create an indentation.
Cherry (see page 28)
Winding Diagram
• Double strand (same method)
• A, B same
Trimming and Sizing Guide
Materials
Pom pom maker: 1⅜ in (3.5 cm)
Yarn – machine washable merino worsted weight in red
Other Materials
Craft cord (dark green) 8 in (20 cm)
#25 Embroidery floss (beige) 4 in (10 cm)
Instructions
1 Follow the winding diagram and make a 1⅜ in (3.5 cm) pom
pom. Remove from pom pom maker and adjust shape.
2 Follow step 2 of the apple to attach cord to pom pom string.
Cut one end of cord.
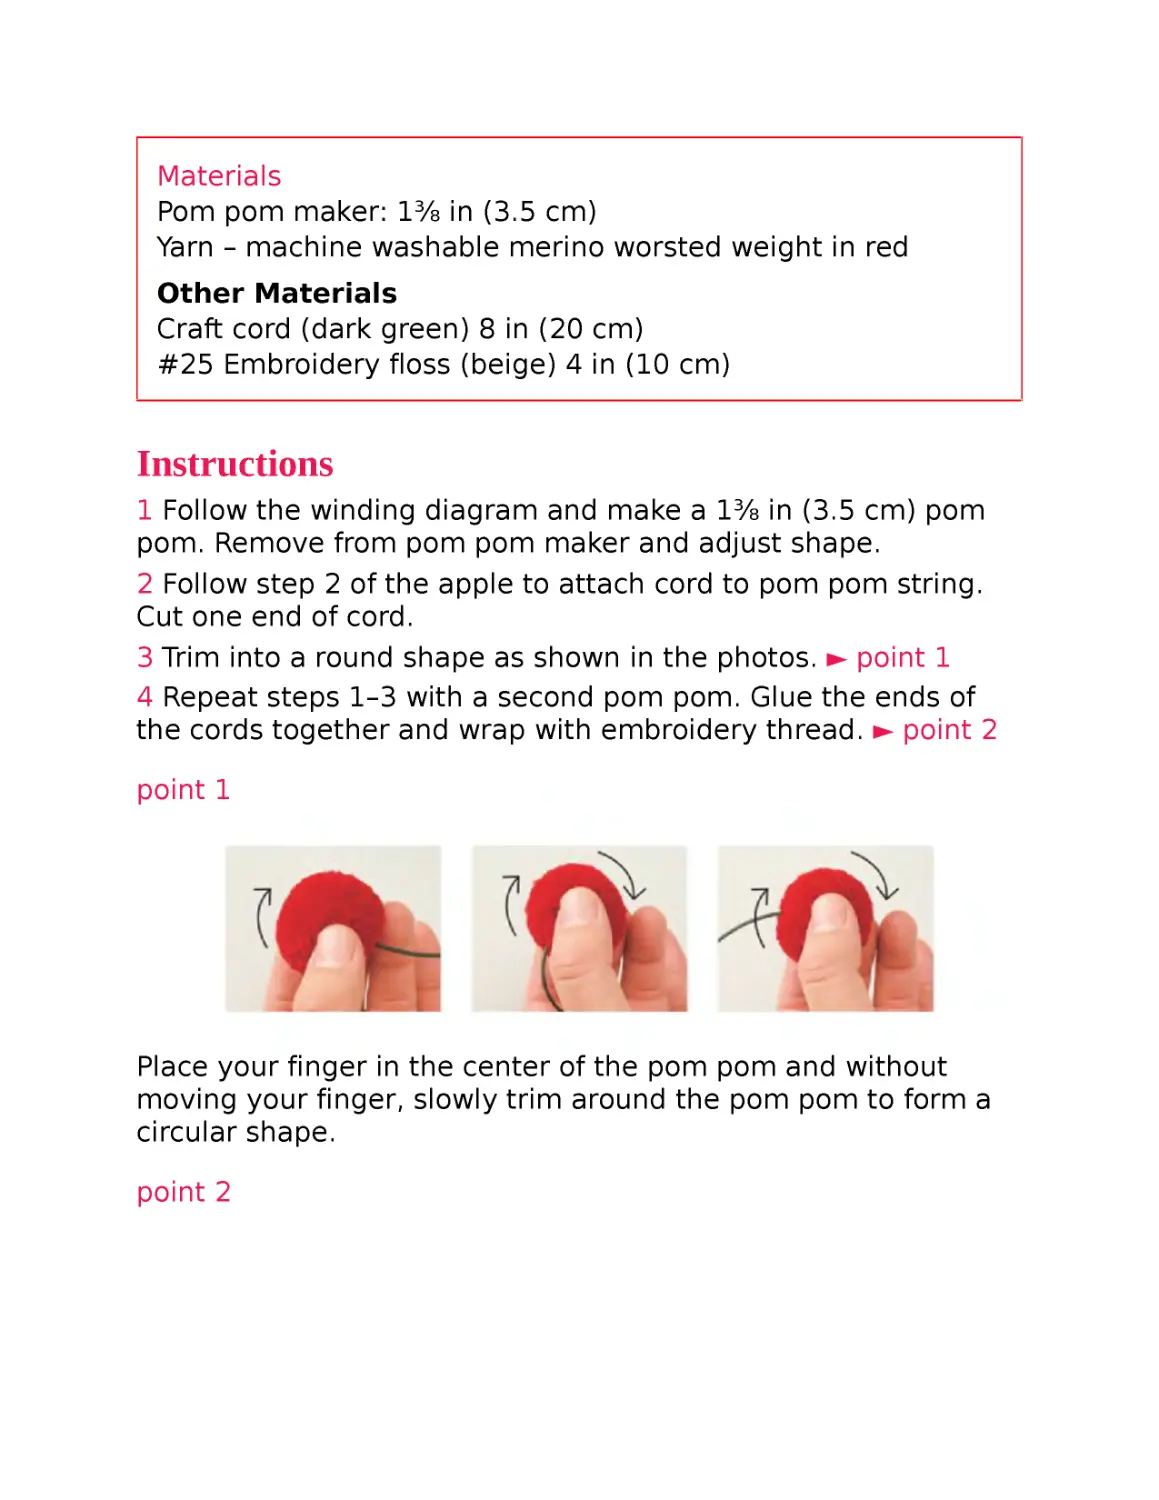
3 Trim into a round shape as shown in the photos. ► point 1
4 Repeat steps 1–3 with a second pom pom. Glue the ends of
the cords together and wrap with embroidery thread. ► point 2
point 1
Place your finger in the center of the pom pom and without
moving your finger, slowly trim around the pom pom to form a
circular shape.
point 2
When attaching the cord ends, add a little glue and then wrap
with embroidery floss. Add a dab of glue to secure the floss
when you’ve finished wrapping.
Rice Ball (Onigiri) 2 types umeboshi (pickled plum) •
seaweed (see page 29)
Materials
Pom pom maker: 2⅛ in (5.5 cm)
Yarn – Seaweed onigiri / washable sport weight in off-white
Umeboshi [Pickled plum] onigiri / rice: machine washable
sport weight in off-white
Umeboshi [Pickled plum]: machine washable merino
worsted weight in red
Other Materials
Seaweed: felt (black) 3½ × 1 in (8.9 × 2.5 cm)
Umeboshi [pickled plum]: felt (black) 8⅜ × 1⅜ in (21.2 × 3.5
cm)
Instructions (same method)
1 Follow the winding diagram and make a 2⅛ in (5.5 cm) pom
pom.
2 Remove from pom pom maker, adjust shape and cut string as
close to the knot as possible. Trim to create a triangle with
rounded corners.
3 Trim to flatten the front and back as shown in the photos
below.
4 Cut the felt using dimensions provided. Attach to the pom
pom with glue.
Trimming and Sizing Guide
Winding Diagram
Seaweed
• Double strand
• A, B same
Sausage (see page 29)
Materials
Pom pom maker: 1⅜ in (3.5 cm)
Yarn – machine washable sport weight in reddish brown
Cut marks Sausage: pom pom yarn in pale warm brown
Instructions (same method)
1 Follow the winding diagram (see p. 81) and make two 1⅜ in
(3.5 cm) pom poms.
2 Remove from pom pom maker and adjust shape.
3 Connect the pom poms (see p. 52). Cut the string close to the
knot.
4 Use a felting needle to blend where the two pom poms
connect. ► point 1 Trim as shown in the photos on page 81. ►
point 1
5 Place the pale warm brown yarn strand at an angle in the
middle of the pom pom from step 4. Use the felting needle to
felt the yarn into the pom pom to create a “cut mark”. Once
felted, cut the yarn. Repeat with three other cut marks. ► point
2
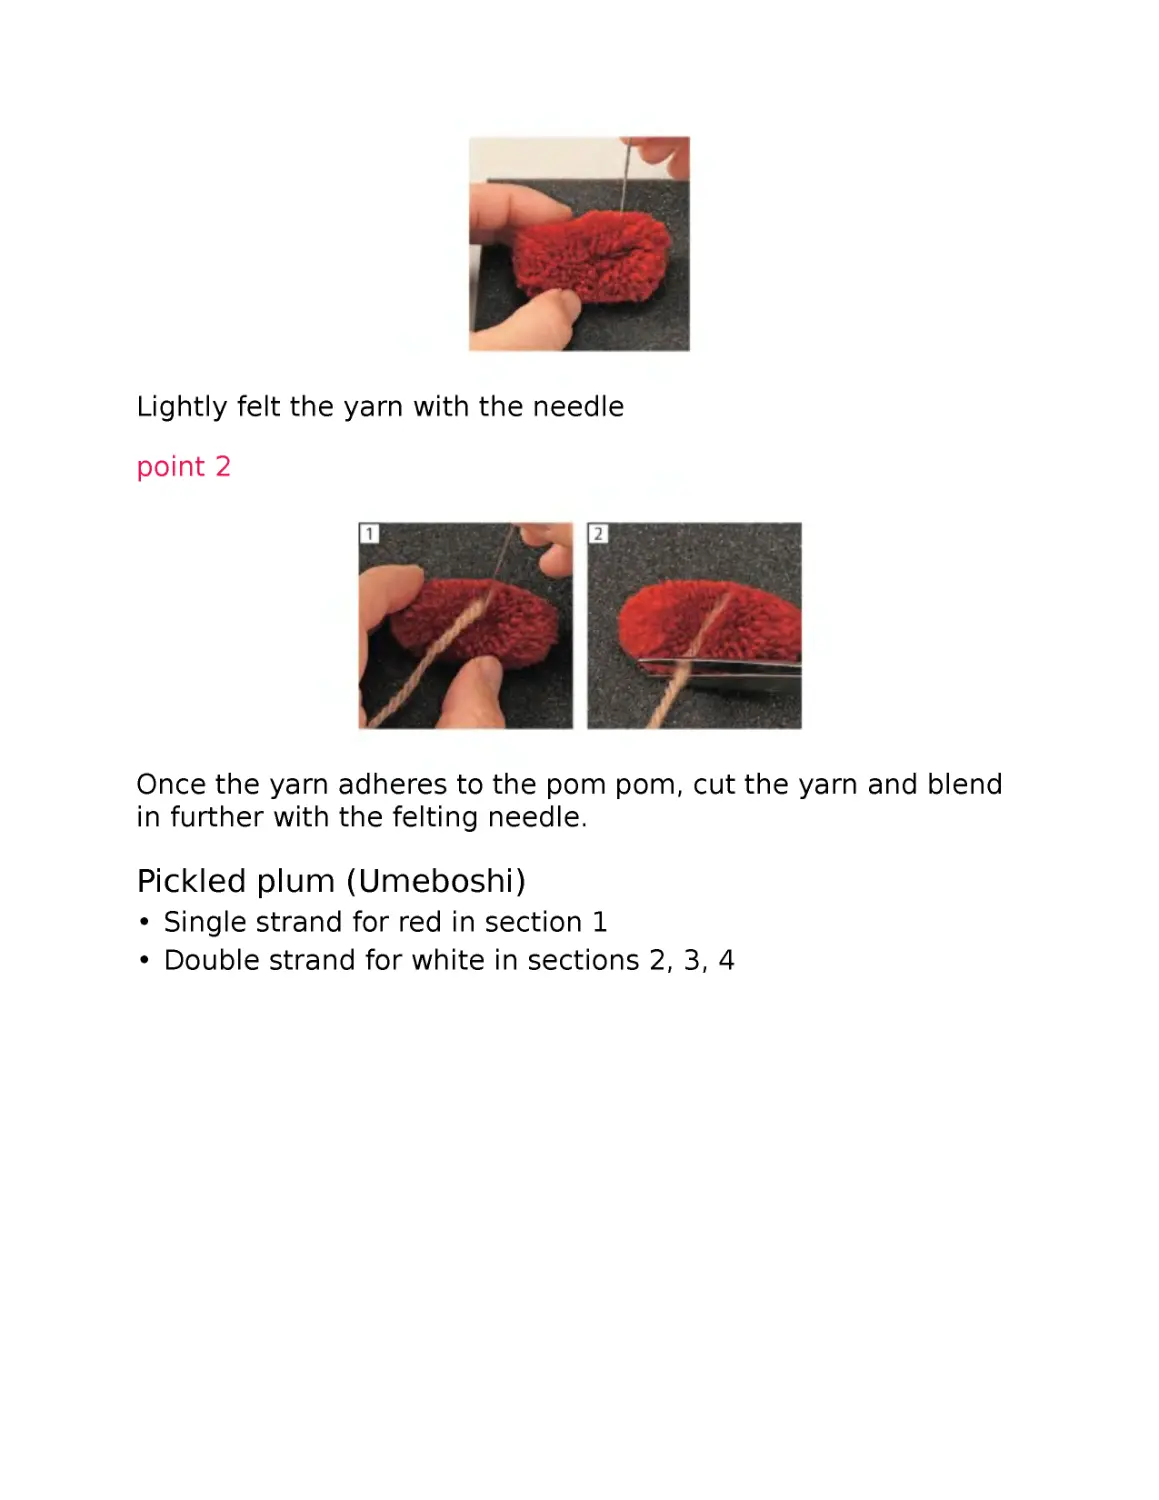
point 1
Lightly felt the yarn with the needle
point 2
Once the yarn adheres to the pom pom, cut the yarn and blend
in further with the felting needle.
Pickled plum (Umeboshi)
• Single strand for red in section 1
• Double strand for white in sections 2, 3, 4
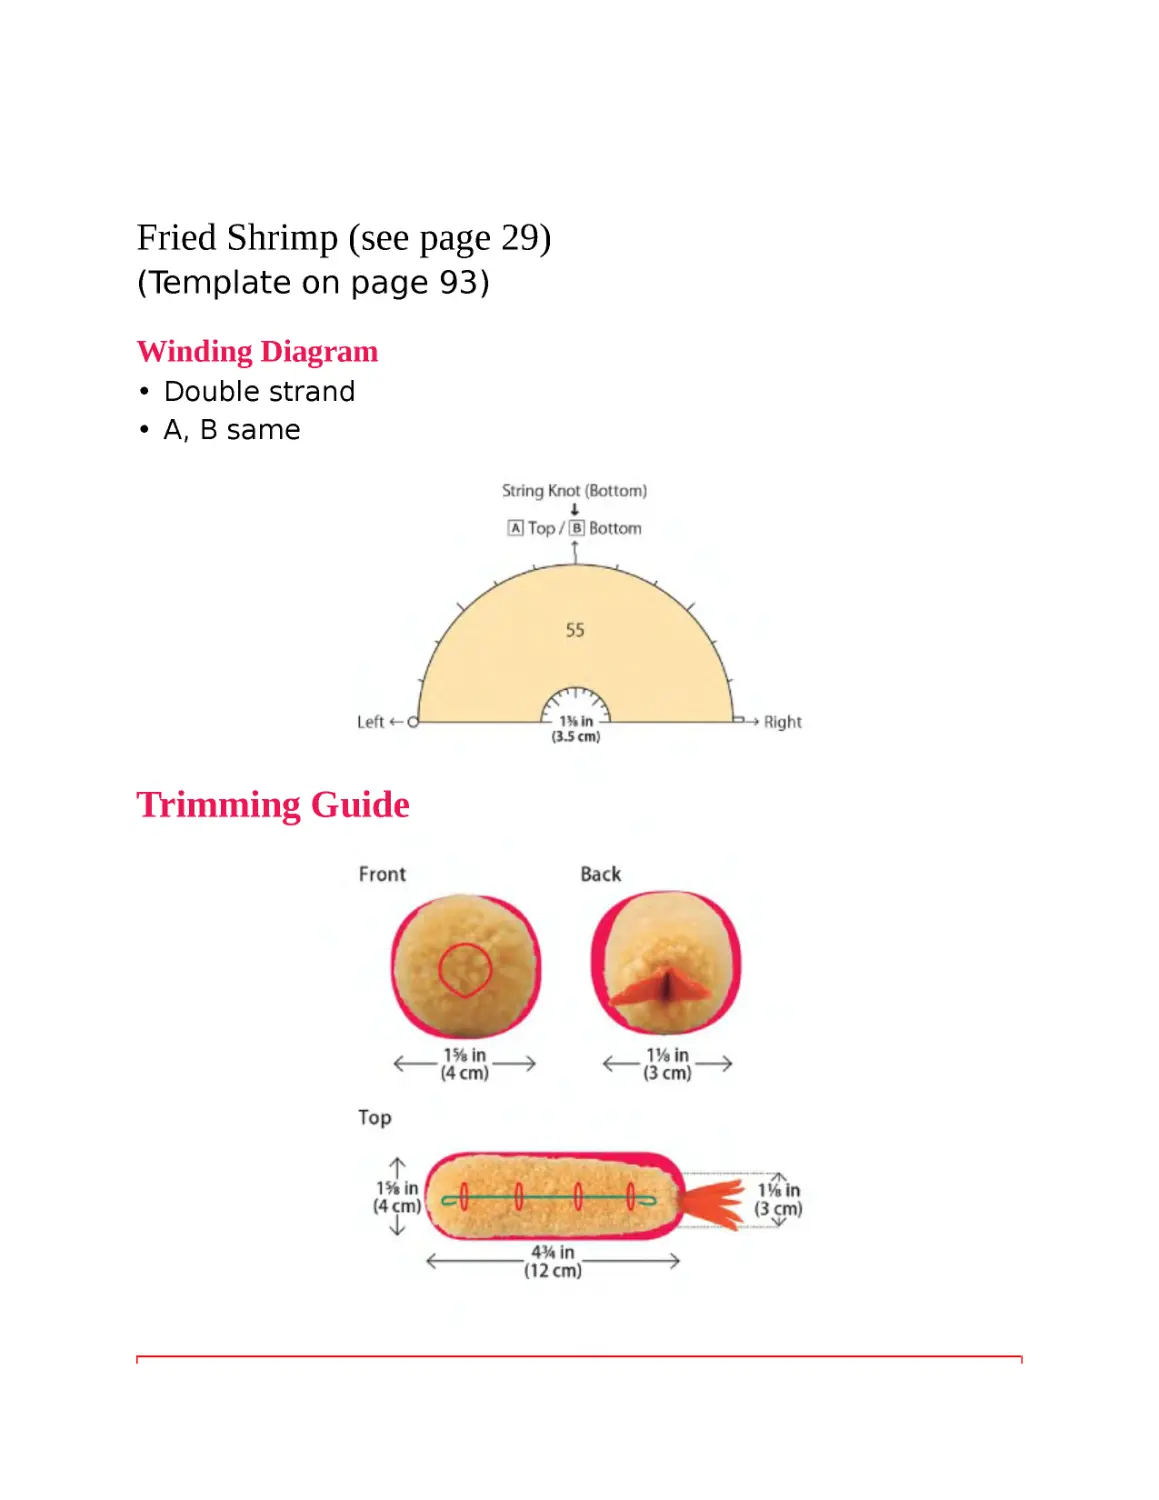
Fried Shrimp (see page 29)
(Template on page 93)
Winding Diagram
• Double strand
• A, B same
Trimming Guide
Materials
Pom pom maker 1⅜ in (3.5 cm)
Yarn – machine washable merino worsted weight in yellow
Other Materials
Wire (#20) Approximately 8 in (20 cm)
Tail: felt (red) 2⅜ × 1⅝ in (6 × 4 cm)
Instructions
1 Follow the winding diagram and make four 1⅜ in (3.5cm) pom
poms. Remove from pom pom maker and adjust shape. Connect
with the wire. ► point 1
2 Trim and round out the shape as shown in the photos below.
3 Spread out the yarn on the thinner end. Reinforce the felt
piece by applying a thin layer of glue on both sides (see p. 51).
Once dry, cut out using the template and attach to the pom
pom with glue.
point 1
Bend one end of the wire to form a hook
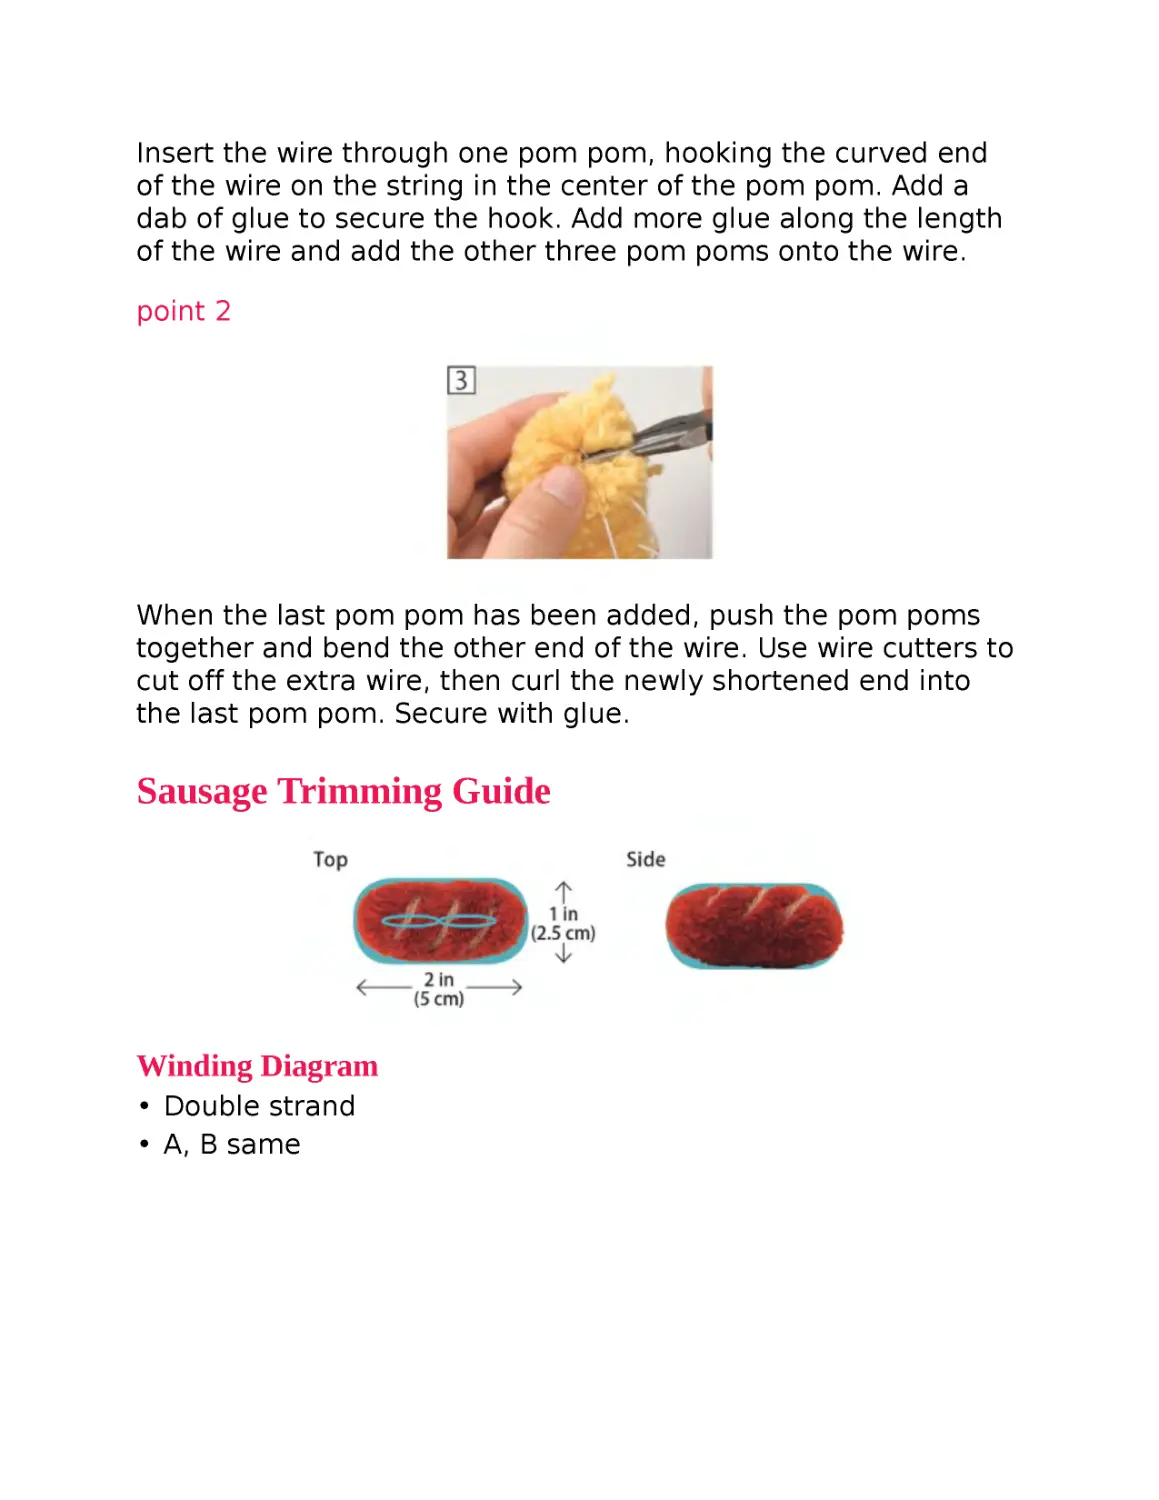
Insert the wire through one pom pom, hooking the curved end
of the wire on the string in the center of the pom pom. Add a
dab of glue to secure the hook. Add more glue along the length
of the wire and add the other three pom poms onto the wire.
point 2
When the last pom pom has been added, push the pom poms
together and bend the other end of the wire. Use wire cutters to
cut off the extra wire, then curl the newly shortened end into
the last pom pom. Secure with glue.
Sausage Trimming Guide
Winding Diagram
• Double strand
• A, B same
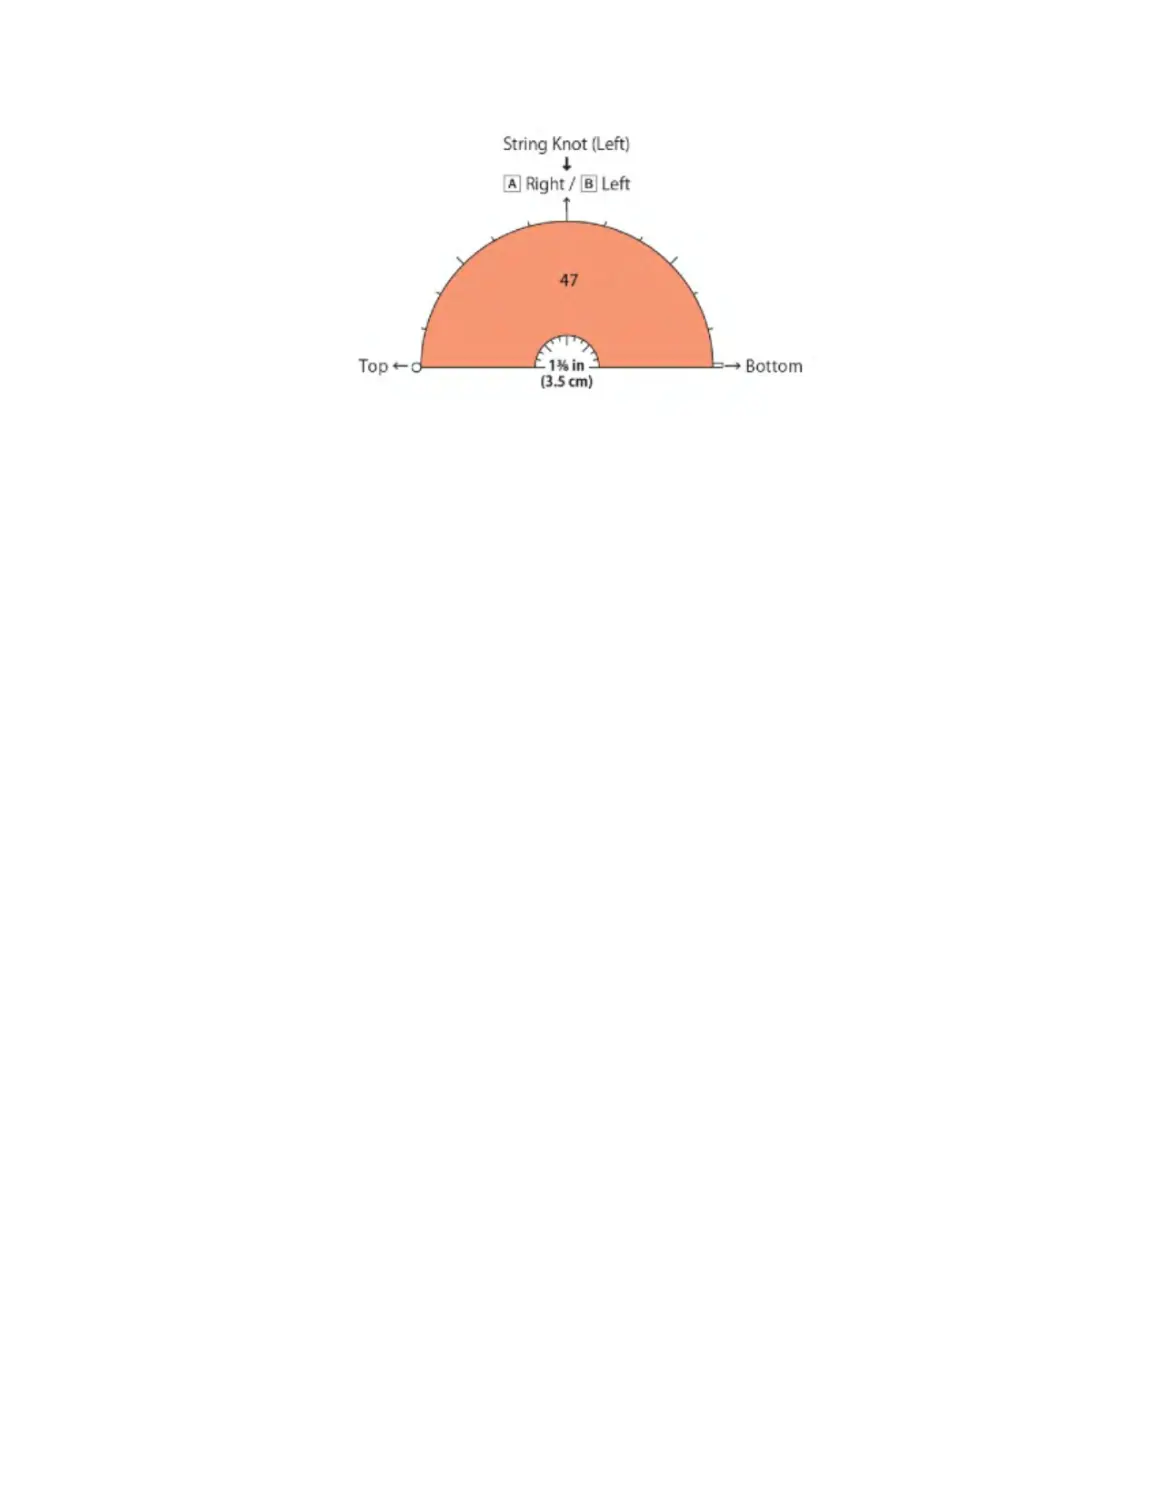
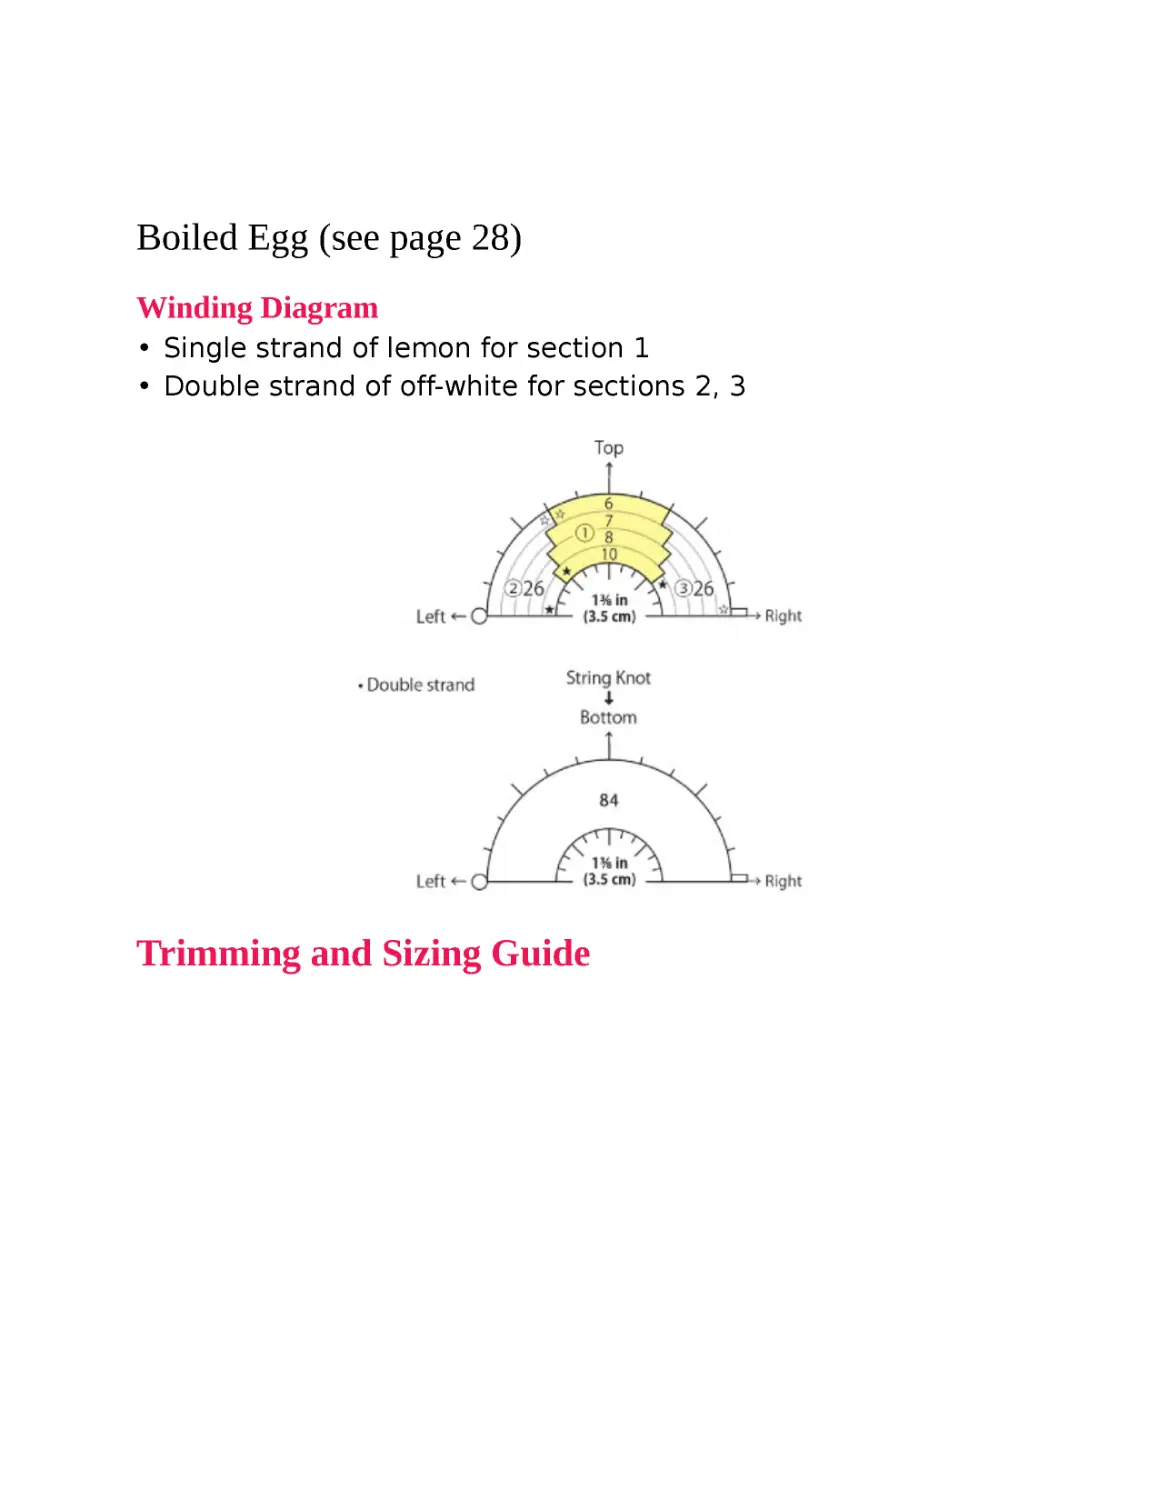
Boiled Egg (see page 28)
Winding Diagram
• Single strand of lemon for section 1
• Double strand of off-white for sections 2, 3
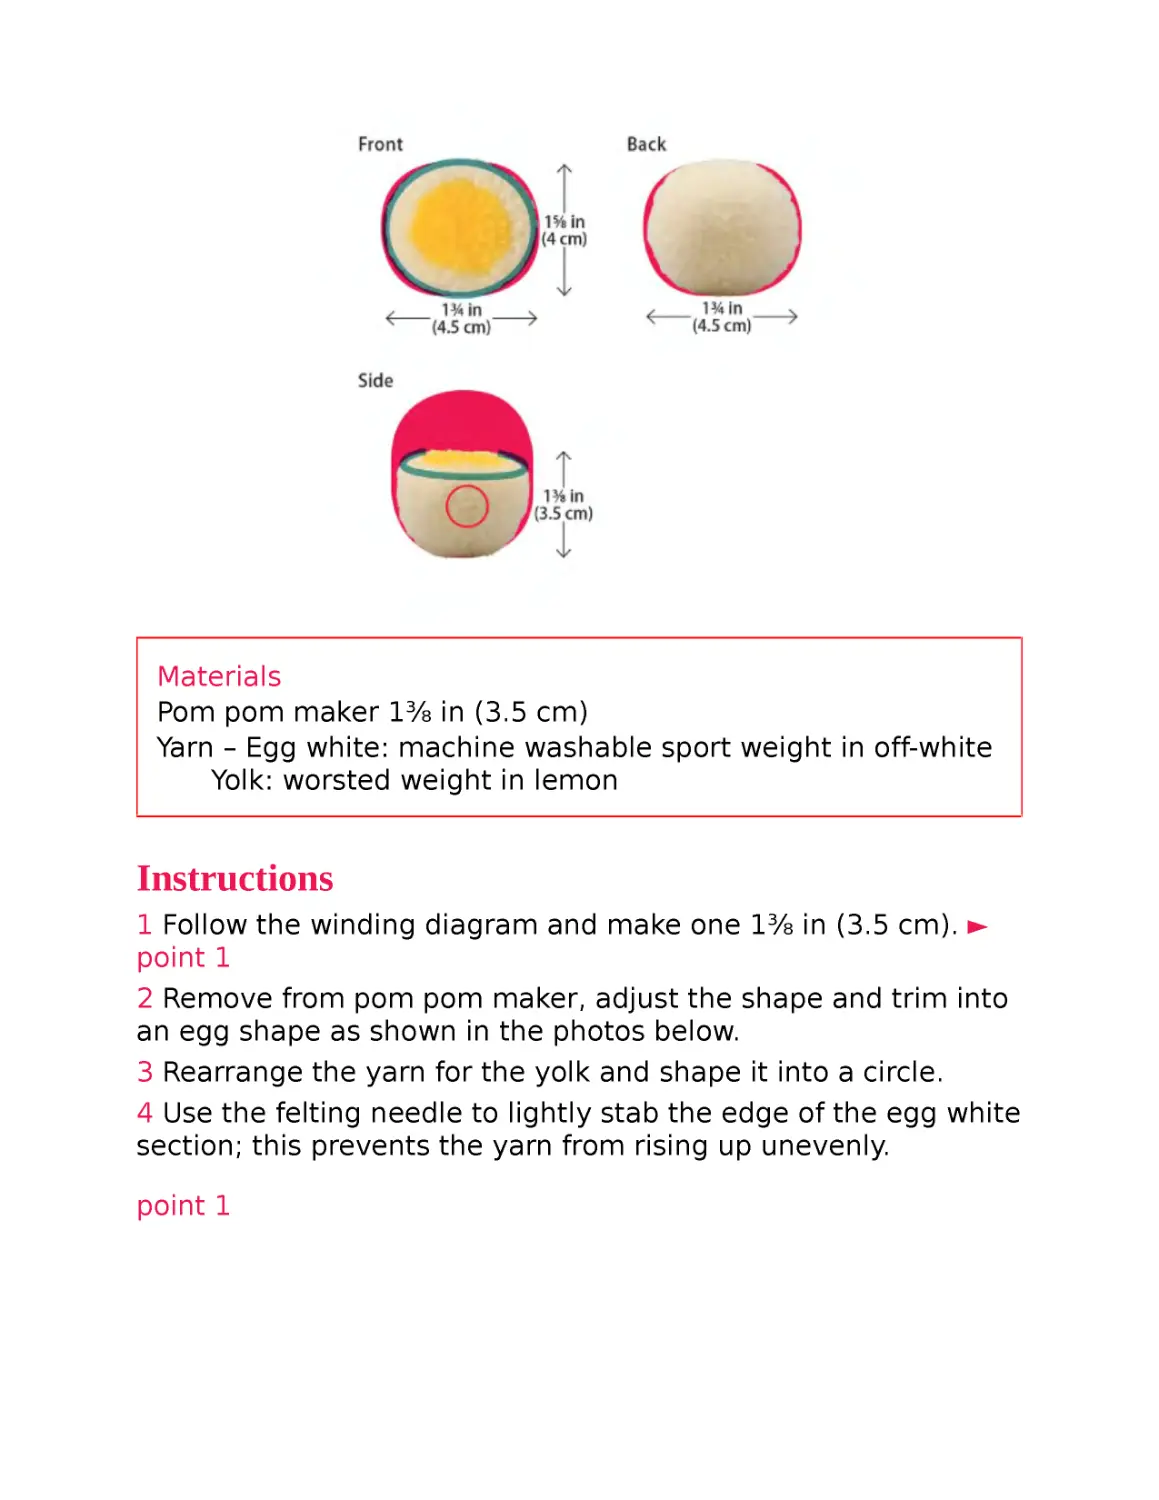
Trimming and Sizing Guide
Materials
Pom pom maker 1⅜ in (3.5 cm)
Yarn – Egg white: machine washable sport weight in off-white
Yolk: worsted weight in lemon
Instructions
1 Follow the winding diagram and make one 1⅜ in (3.5 cm). ►
point 1
2 Remove from pom pom maker, adjust the shape and trim into
an egg shape as shown in the photos below.
3 Rearrange the yarn for the yolk and shape it into a circle.
4 Use the felting needle to lightly stab the edge of the egg white
section; this prevents the yarn from rising up unevenly.
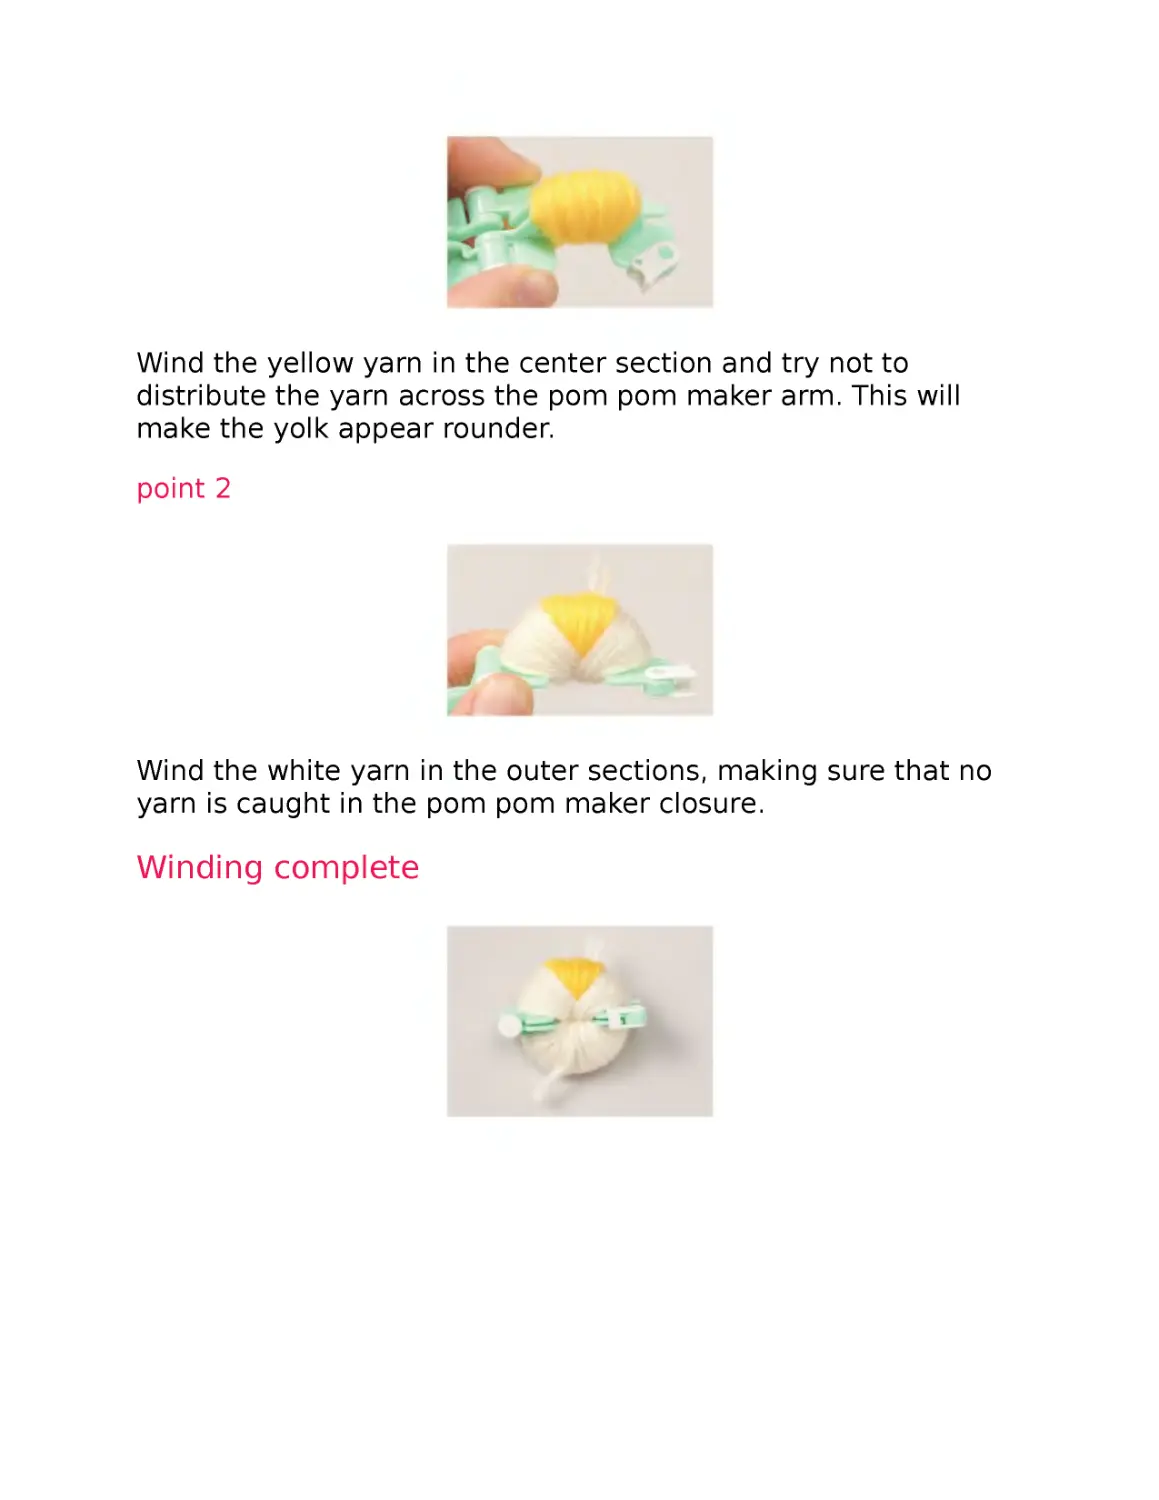
point 1
Wind the yellow yarn in the center section and try not to
distribute the yarn across the pom pom maker arm. This will
make the yolk appear rounder.
point 2
Wind the white yarn in the outer sections, making sure that no
yarn is caught in the pom pom maker closure.
Winding complete
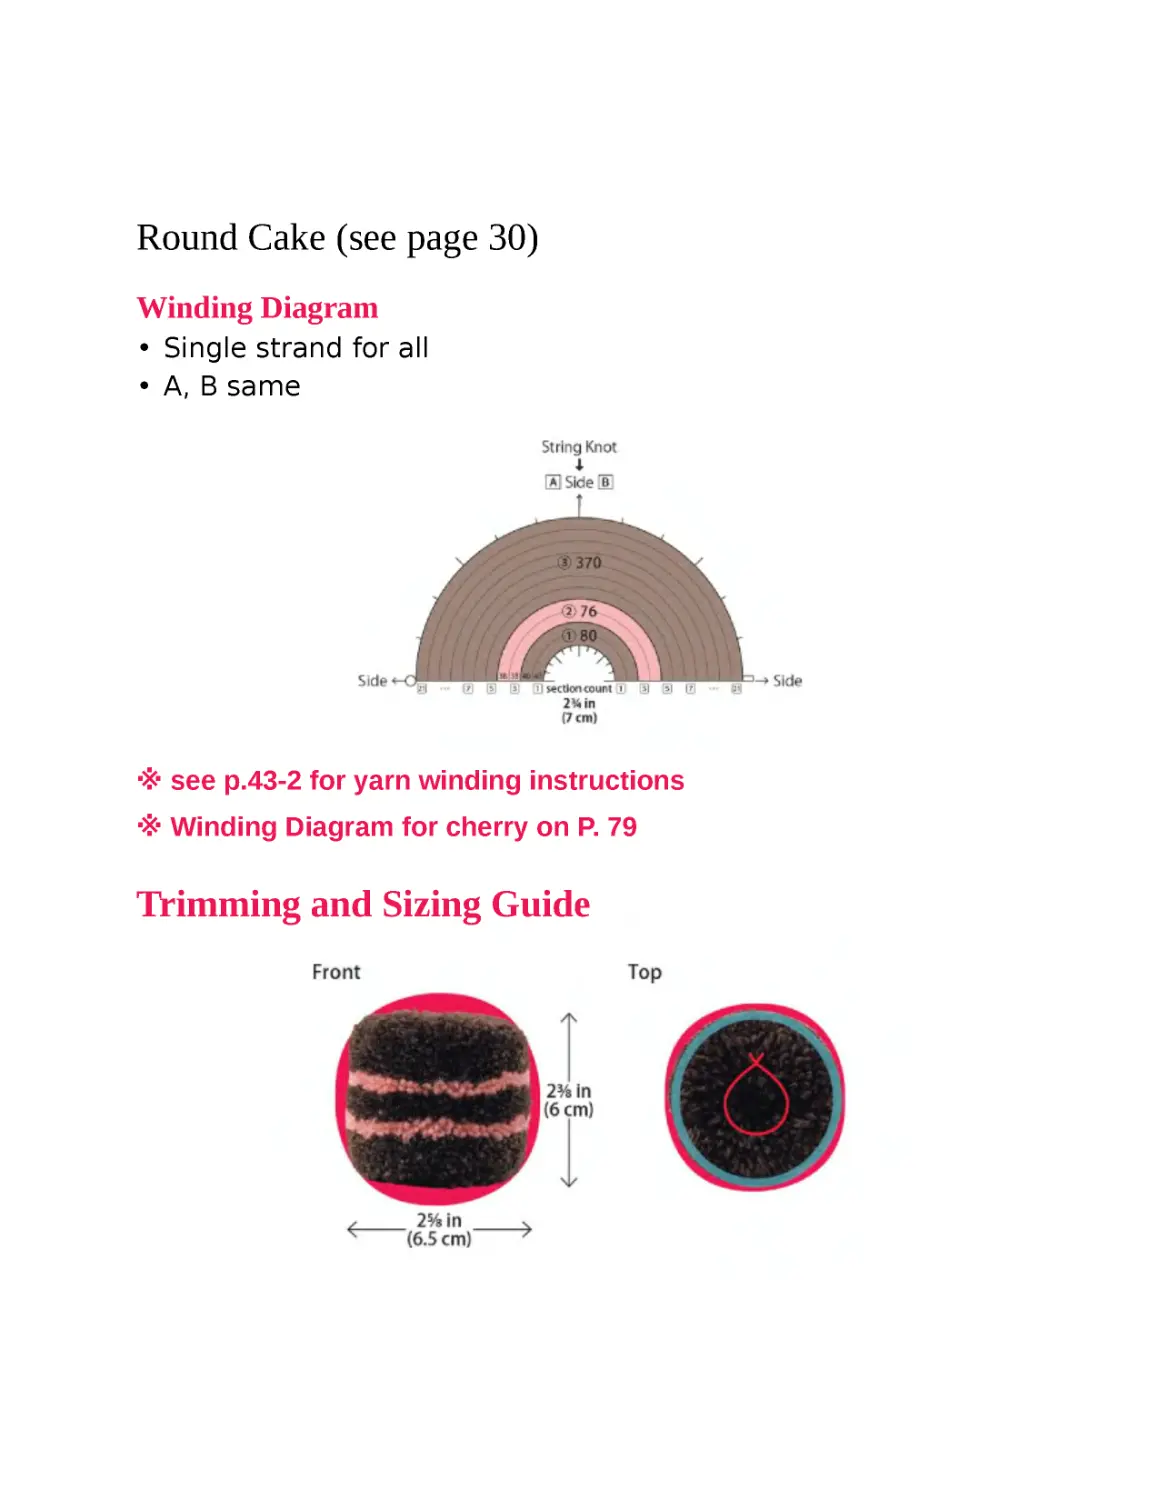
Round Cake (see page 30)
Winding Diagram
• Single strand for all
• A, B same
※ see p.43-2 for yarn winding instructions
※ Winding Diagram for cherry on P. 79
Trimming and Sizing Guide
Materials
Pom pom maker: Cherry: 1⅜ in (3.5 cm), Cake: 2¾ in (7 cm)
Yarn – Cake layers: machine washable sport weight in dark
brown Frosting: machine washable sport weight in pink
Cherry: machine washable merino worsted weight in red
Other Materials
Cherry stem: craft cord (deep green) 4 in (10 cm)
Instructions
Instructions
1 Follow the winding diagram and make one 2¾ in (7 cm) pom
pom.
2 Remove from pom pom maker, adjust the yarn with tweezers,
then cut the string near the knot.
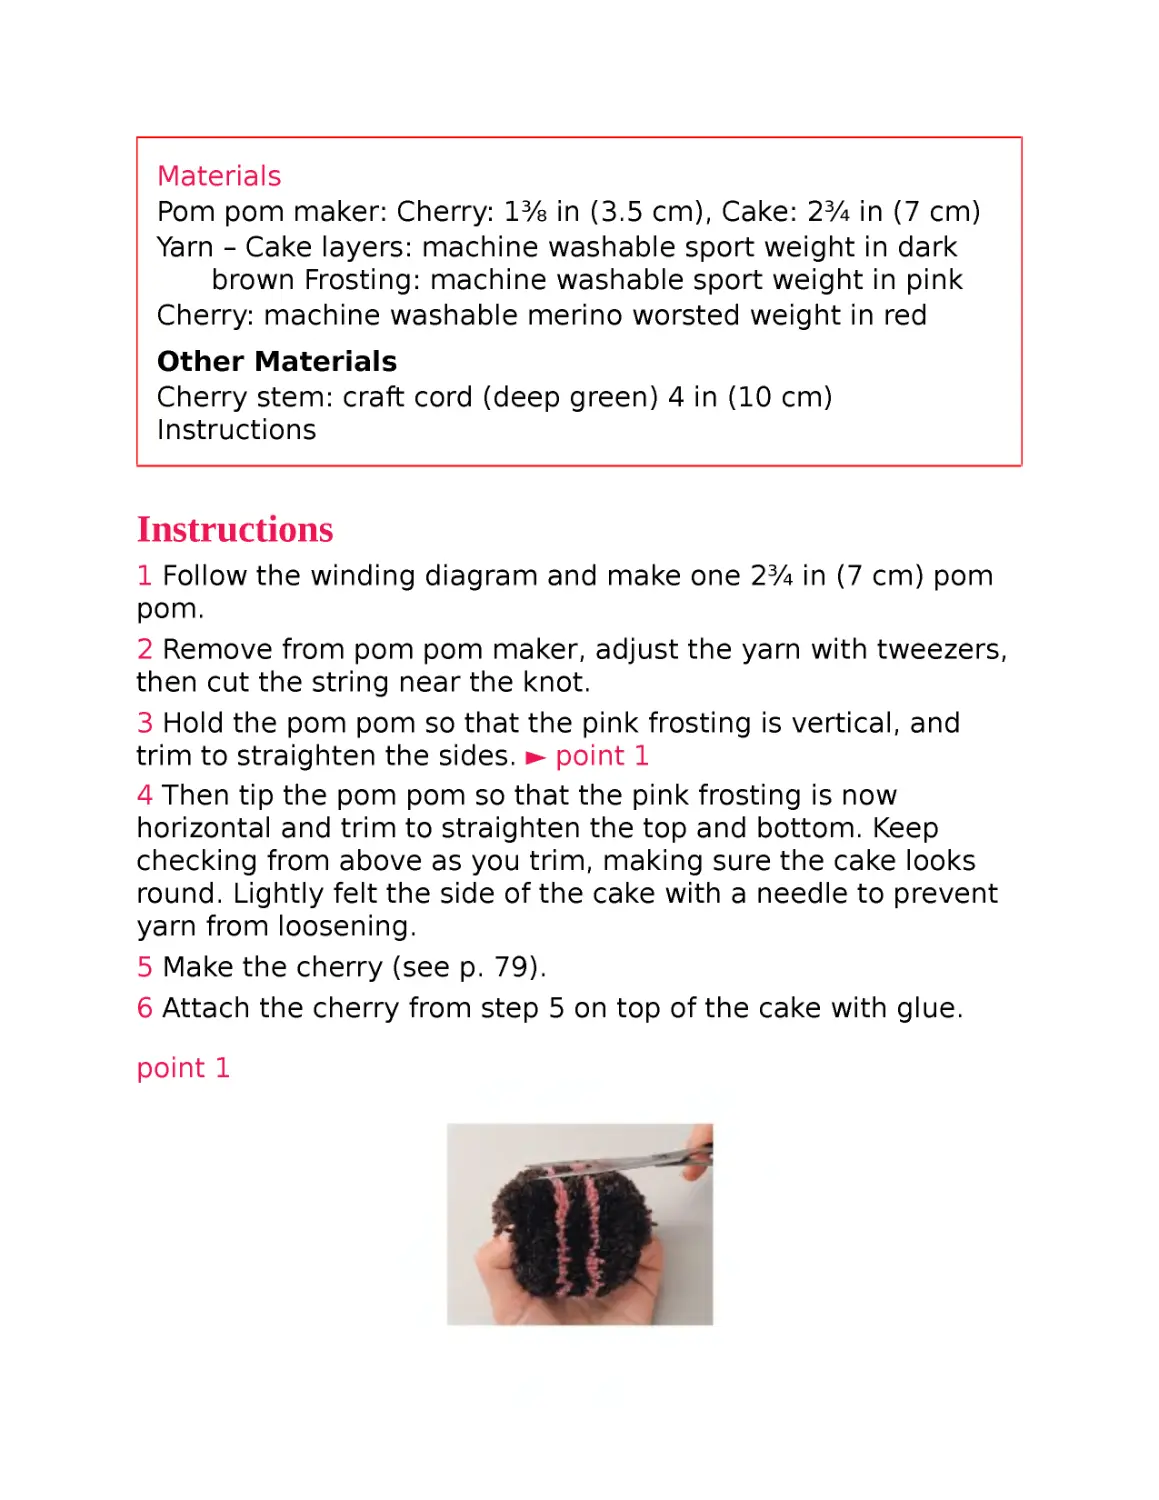
3 Hold the pom pom so that the pink frosting is vertical, and
trim to straighten the sides. ► point 1
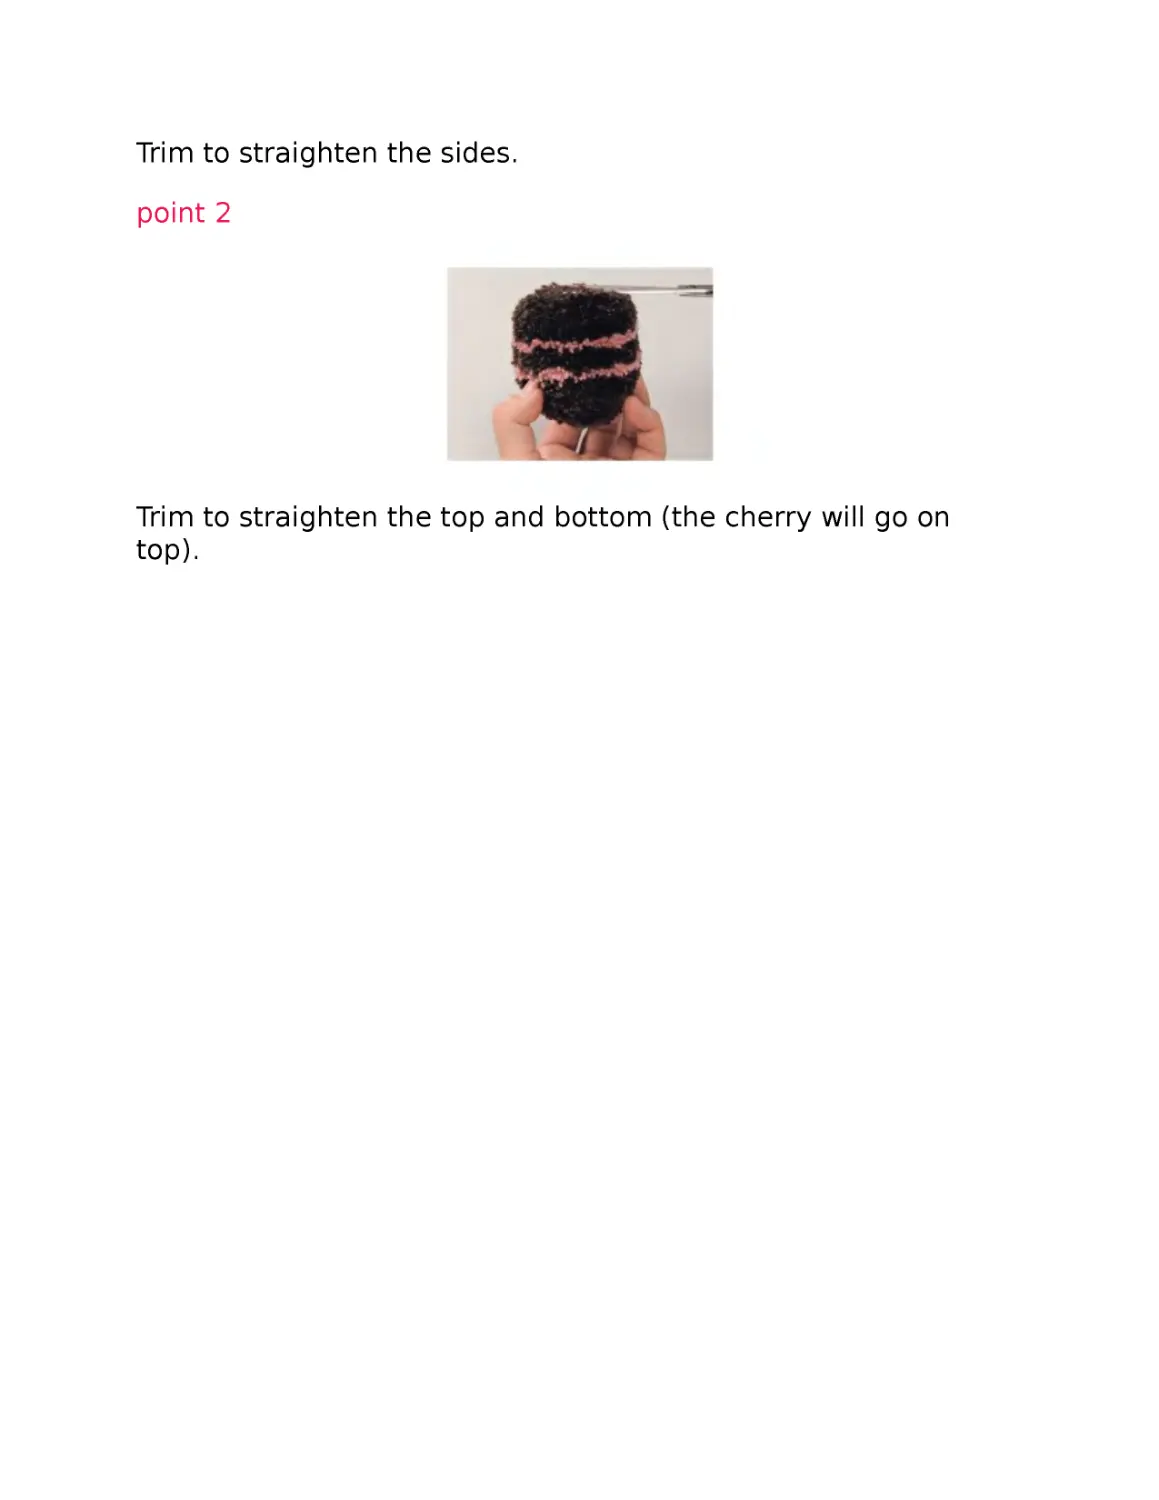
4 Then tip the pom pom so that the pink frosting is now
horizontal and trim to straighten the top and bottom. Keep
checking from above as you trim, making sure the cake looks
round. Lightly felt the side of the cake with a needle to prevent
yarn from loosening.
5 Make the cherry (see p. 79).
6 Attach the cherry from step 5 on top of the cake with glue.
point 1
Trim to straighten the sides.
point 2
Trim to straighten the top and bottom (the cherry will go on
top).
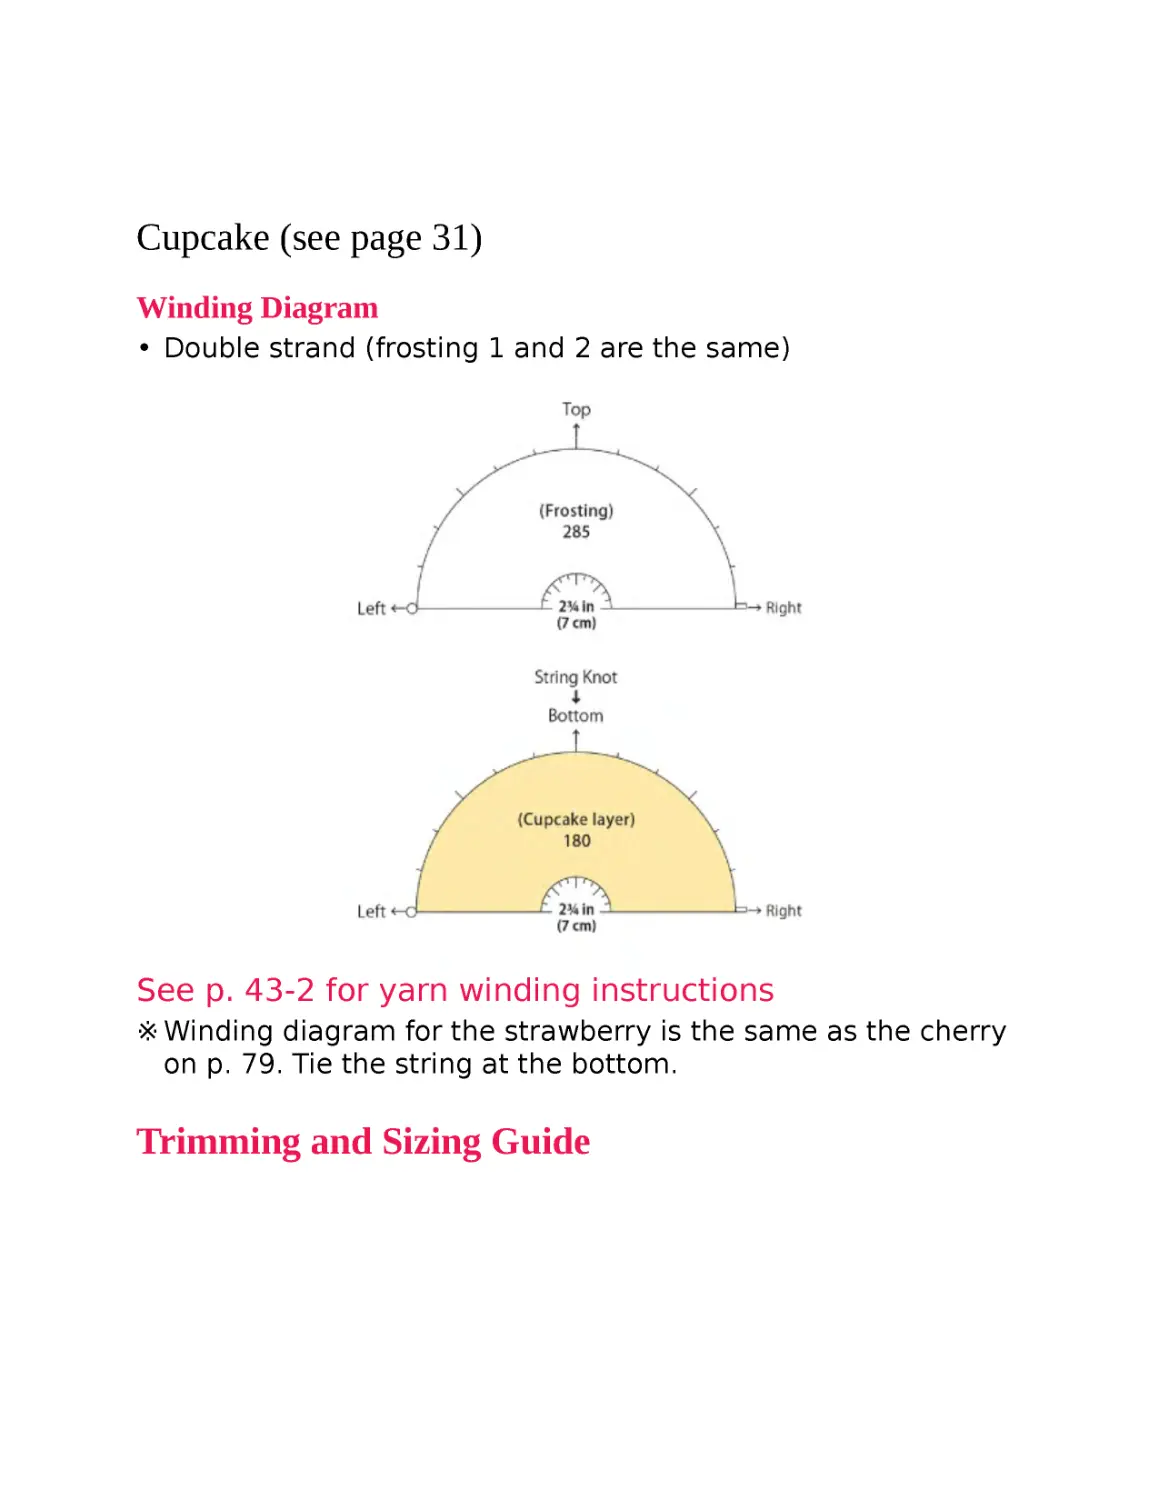
Cupcake (see page 31)
Winding Diagram
• Double strand (frosting 1 and 2 are the same)
See p. 43-2 for yarn winding instructions
※ Winding diagram for the strawberry is the same as the cherry
on p. 79. Tie the string at the bottom.
Trimming and Sizing Guide
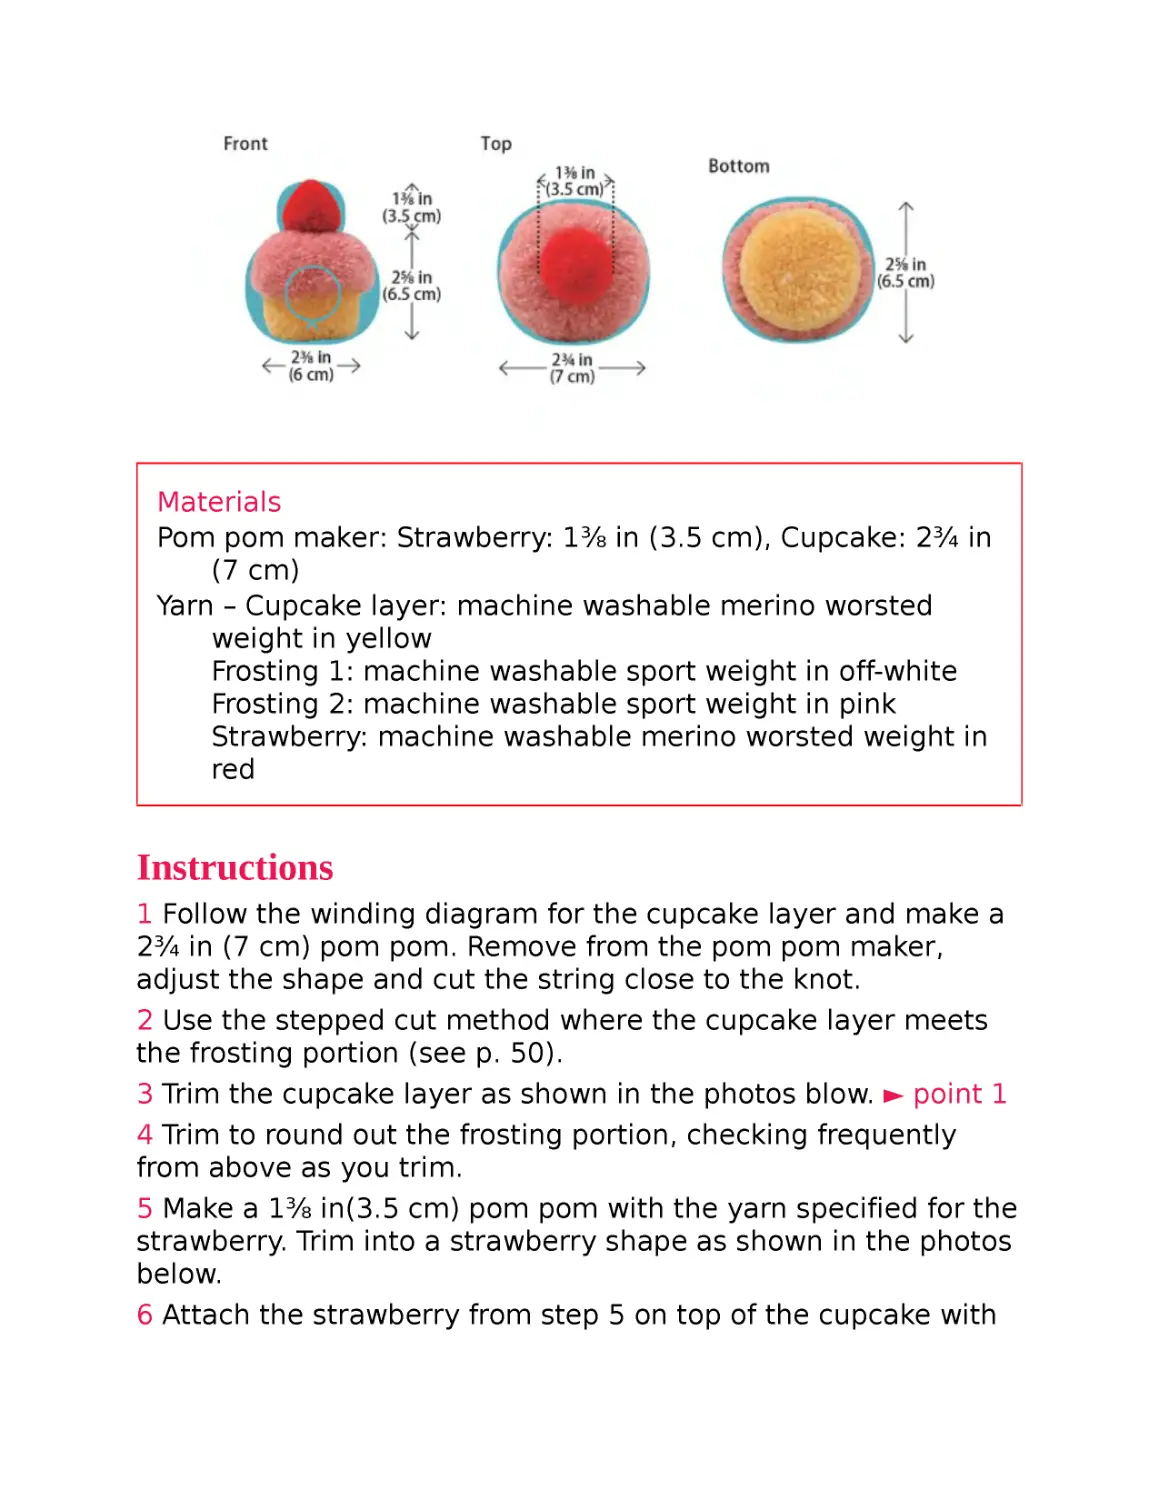
Materials
Pom pom maker: Strawberry: 1⅜ in (3.5 cm), Cupcake: 2¾ in
(7 cm)
Yarn – Cupcake layer: machine washable merino worsted
weight in yellow
Frosting 1: machine washable sport weight in off-white
Frosting 2: machine washable sport weight in pink
Strawberry: machine washable merino worsted weight in
red
Instructions
1 Follow the winding diagram for the cupcake layer and make a
2¾ in (7 cm) pom pom. Remove from the pom pom maker,
adjust the shape and cut the string close to the knot.
2 Use the stepped cut method where the cupcake layer meets
the frosting portion (see p. 50).
3 Trim the cupcake layer as shown in the photos blow. ► point 1
4 Trim to round out the frosting portion, checking frequently
from above as you trim.
5 Make a 1⅜ in(3.5 cm) pom pom with the yarn specified for the
strawberry. Trim into a strawberry shape as shown in the photos
below.
6 Attach the strawberry from step 5 on top of the cupcake with
glue.
point 1
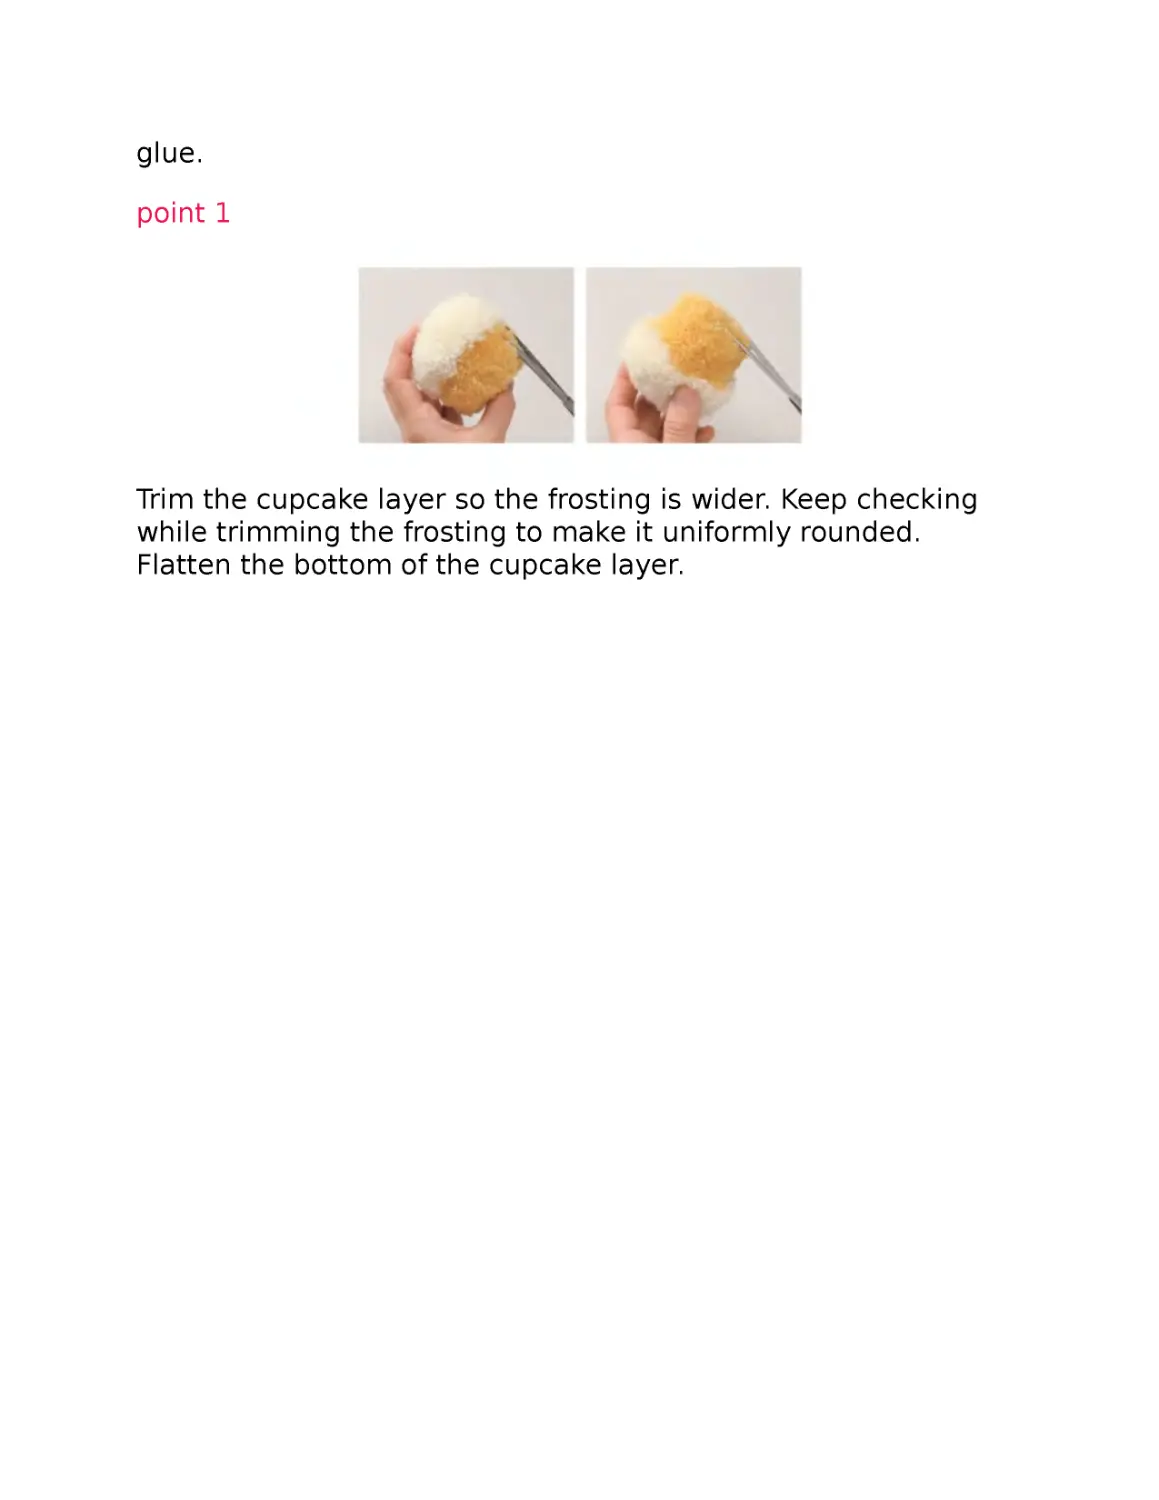
Trim the cupcake layer so the frosting is wider. Keep checking
while trimming the frosting to make it uniformly rounded.
Flatten the bottom of the cupcake layer.
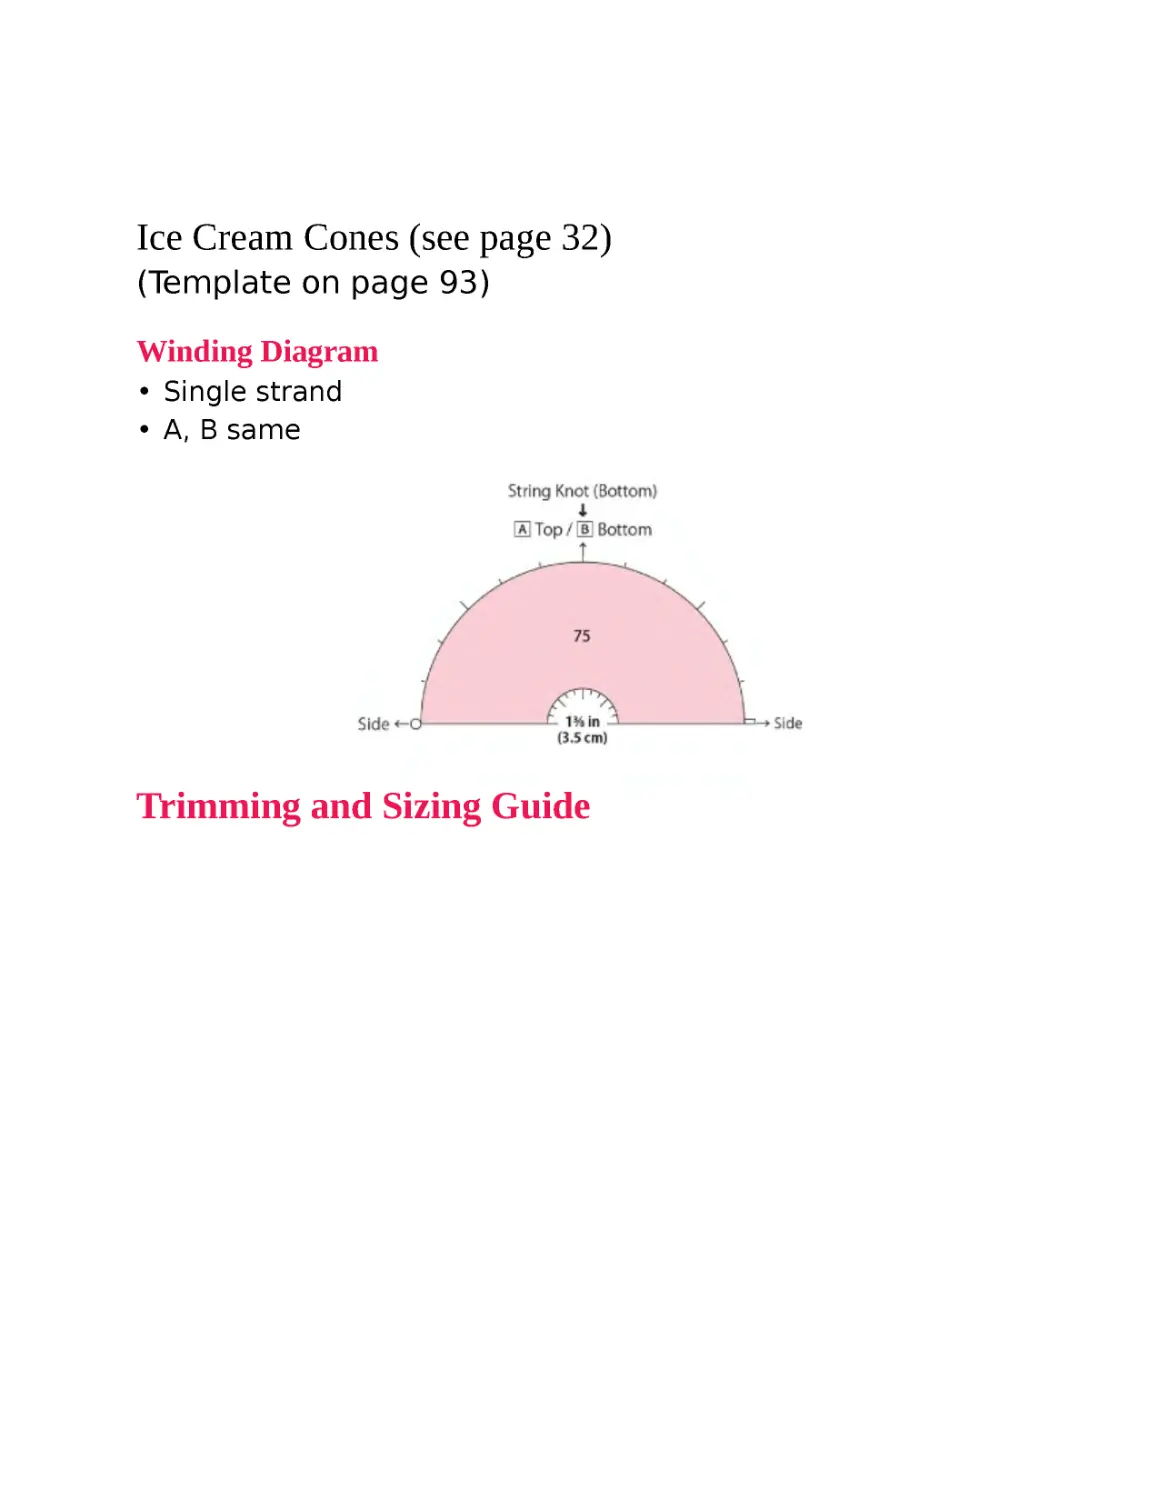
Ice Cream Cones (see page 32)
(Template on page 93)
Winding Diagram
• Single strand
• A, B same
Trimming and Sizing Guide
Materials
Pom pom maker: 1⅜ in (3.5 cm)
Yarn – Single scoop: DK weight in pink and white
Double scoop: DK weight in pale orange and pale blue
Other Materials
Cone: felt (ocher) 2¾ × 4⅜ in (7 × 11 cm), cotton batting as
needed
Instructions (same for both)
1 Follow the winding diagram and make 1⅜ in (3.5cm) pom
pom. For a single scoop, make one pom pom; for a double
scoop, make two pom poms.
2 Remove from pom pom maker, adjust the shape and trim to
an evenly round shape. Cut the string close to the knot (for the
double scoop, don’t cut the string).
3 For the double scoop, connect the two pom poms (see p. 52A).
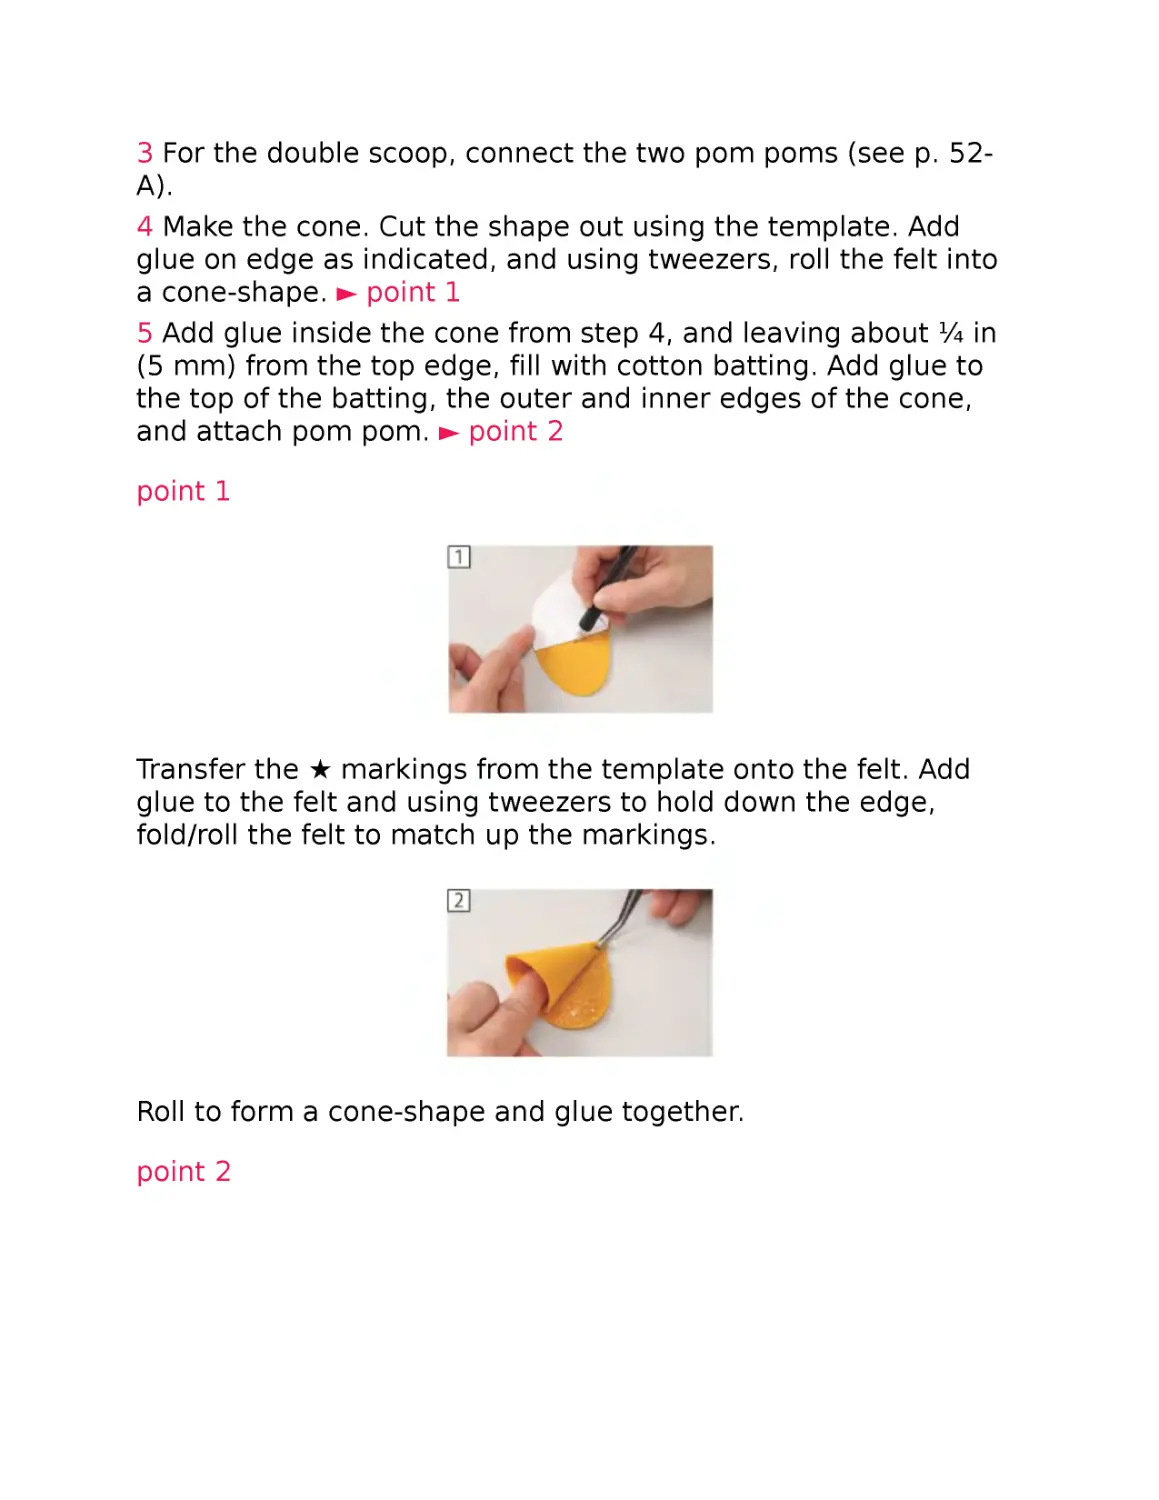
4 Make the cone. Cut the shape out using the template. Add
glue on edge as indicated, and using tweezers, roll the felt into
a cone-shape. ► point 1
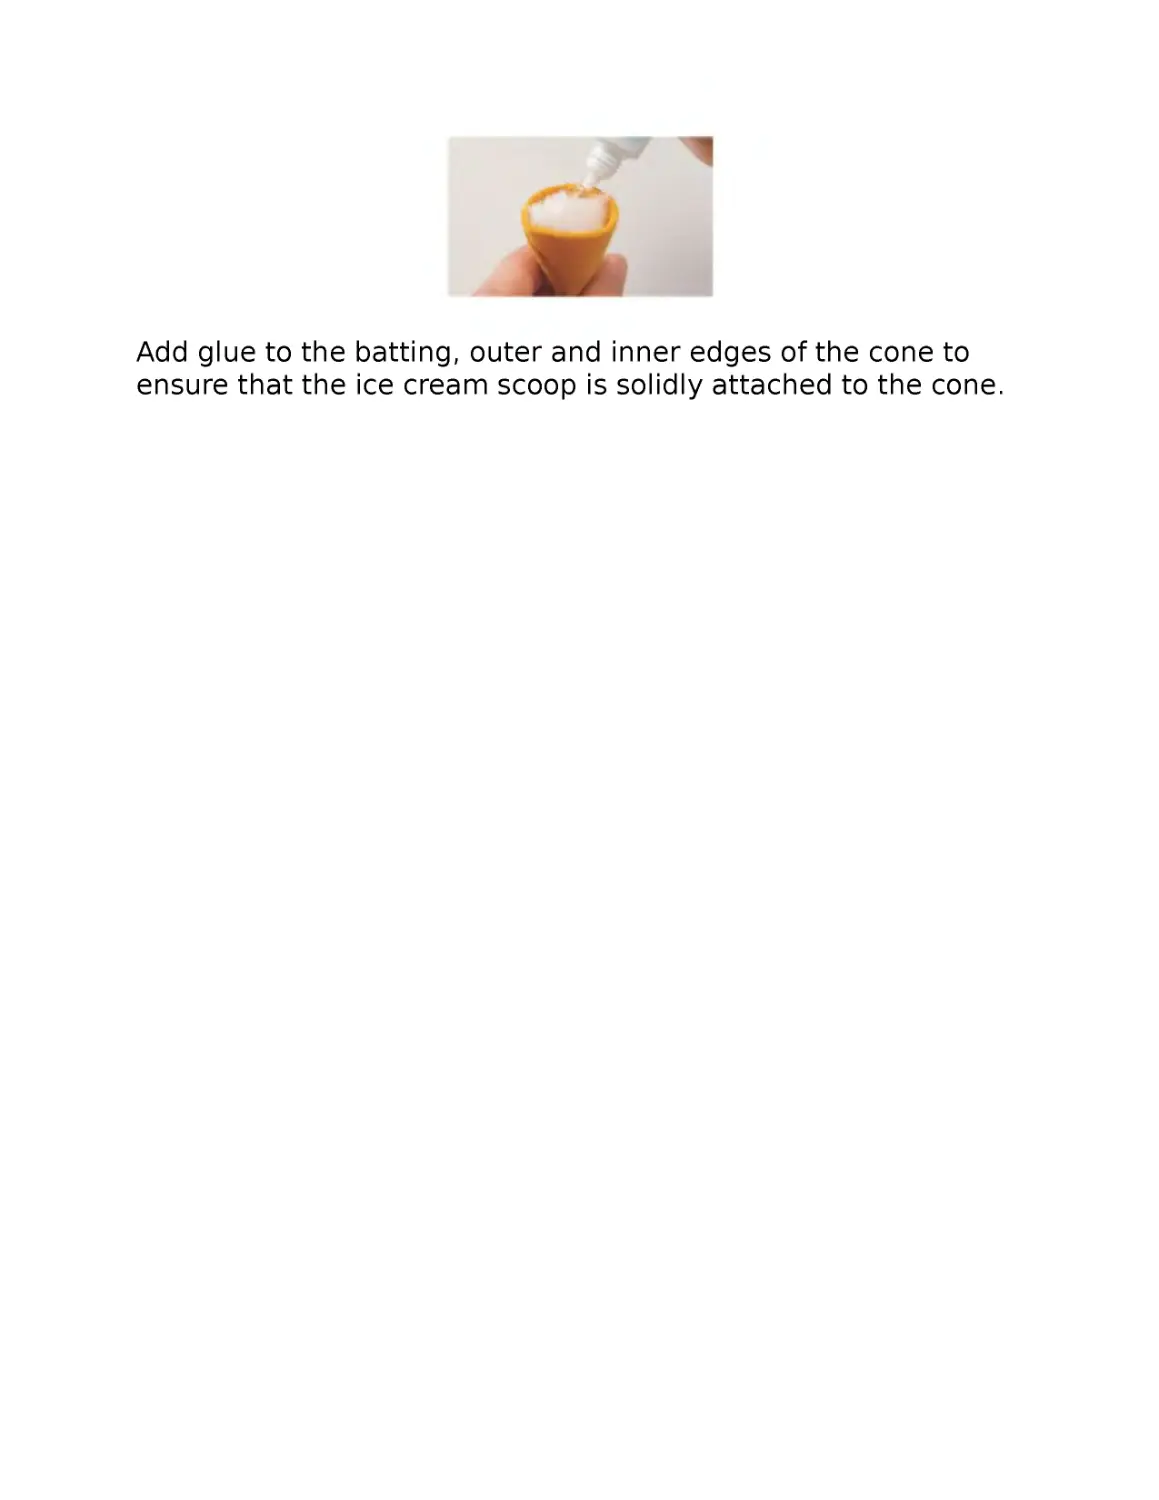
5 Add glue inside the cone from step 4, and leaving about ¼ in
(5 mm) from the top edge, fill with cotton batting. Add glue to
the top of the batting, the outer and inner edges of the cone,
and attach pom pom. ► point 2
point 1
Transfer the ★ markings from the template onto the felt. Add
glue to the felt and using tweezers to hold down the edge,
fold/roll the felt to match up the markings.
Roll to form a cone-shape and glue together.
point 2
Add glue to the batting, outer and inner edges of the cone to
ensure that the ice cream scoop is solidly attached to the cone.
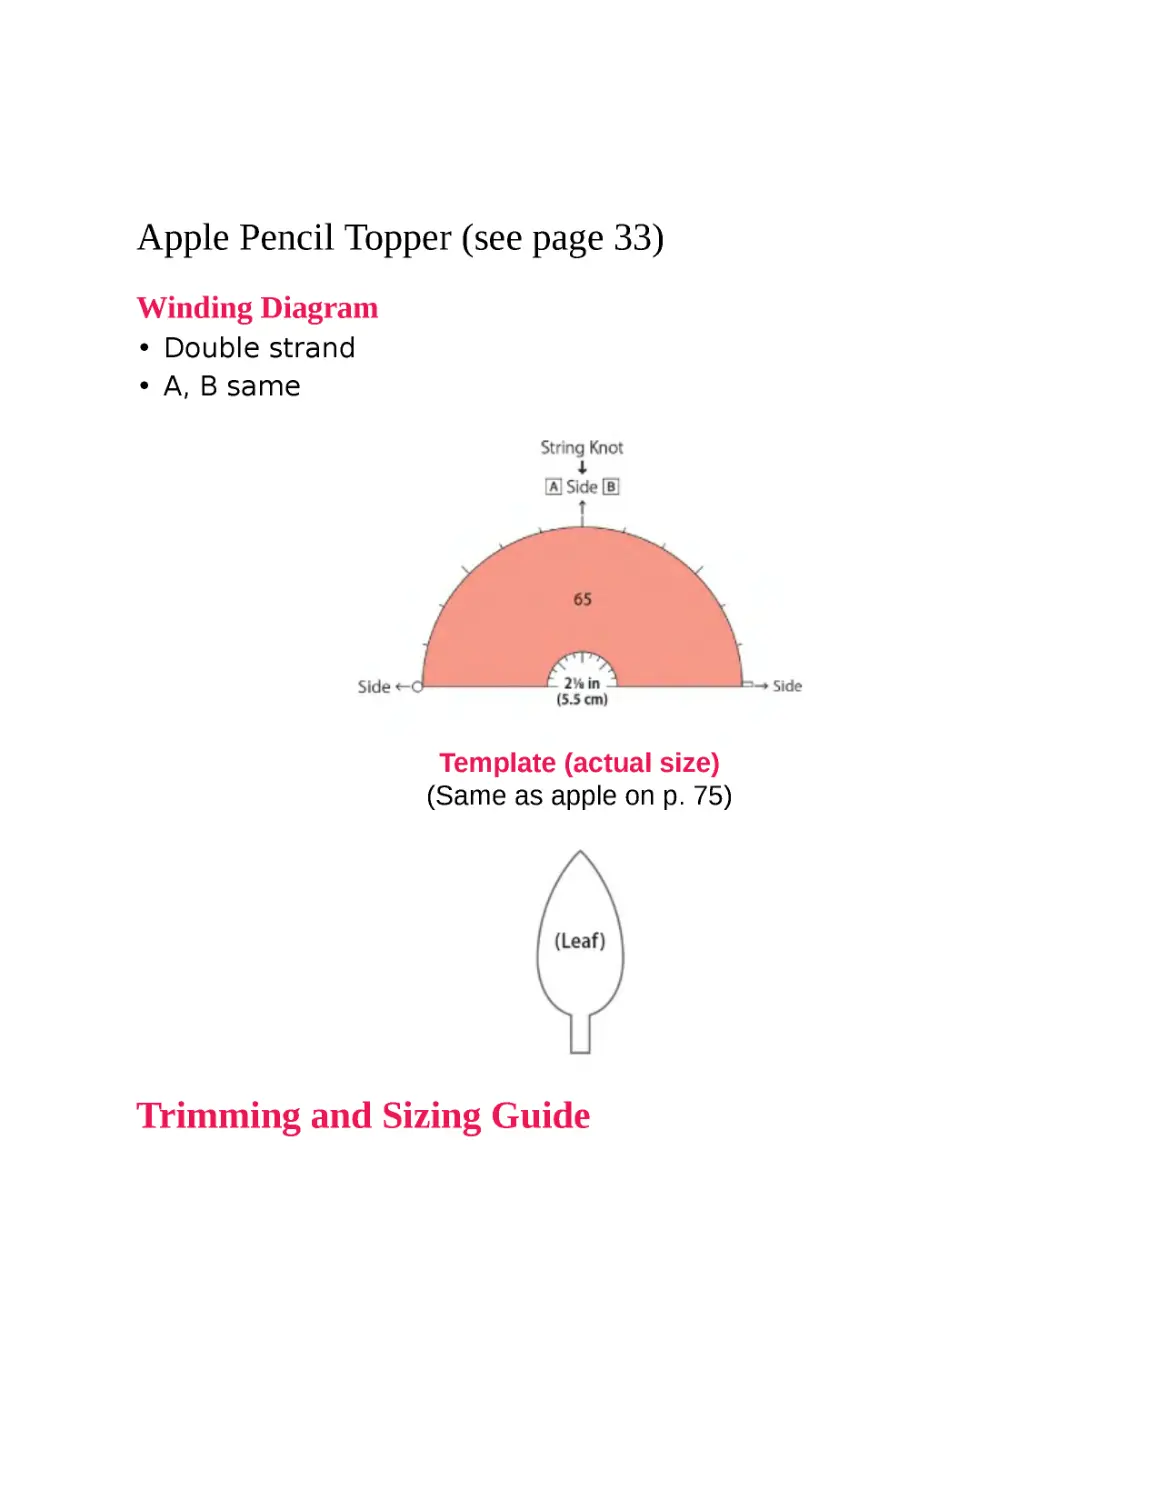
Apple Pencil Topper (see page 33)
Winding Diagram
• Double strand
• A, B same
Template (actual size)
(Same as apple on p. 75)
Trimming and Sizing Guide
Materials
Pom pom maker: 2⅛ in (5.5 cm)
Yarn – machine washable merino worsted weight in red
Other Materials
Leaf: felt (yellow green) 1⅝ × 1 in (4 × 2.5 cm)
Stem: Decorative cord (brown) 2 in (5 cm) Pencil
Instructions
1 Follow the winding diagram and make a 2⅛ in (5.5 cm) pom
pom. Place the pencil in the center of the pom pom maker and
tie the pom pom onto the pencil. ► point 1
2 Remove from the pom pom maker and adjust the shape.
Insert the cord into the center and attach to the pencil with
glue. ► point 2 Spread out the yarn at the base of the apple.
Add glue and attach the surrounding yarn to the pencil. Trim as
shown in the photos below and cut the cord to your liking.
3 Cut out felt using template and attach to the base of the cord
with glue.
point 1
Tie the string around the pencil as well. When removing from
the pom pom arm, make sure the pencil doesn’t fall out.
point 2
Insert the cord and attach to the eraser with glue.
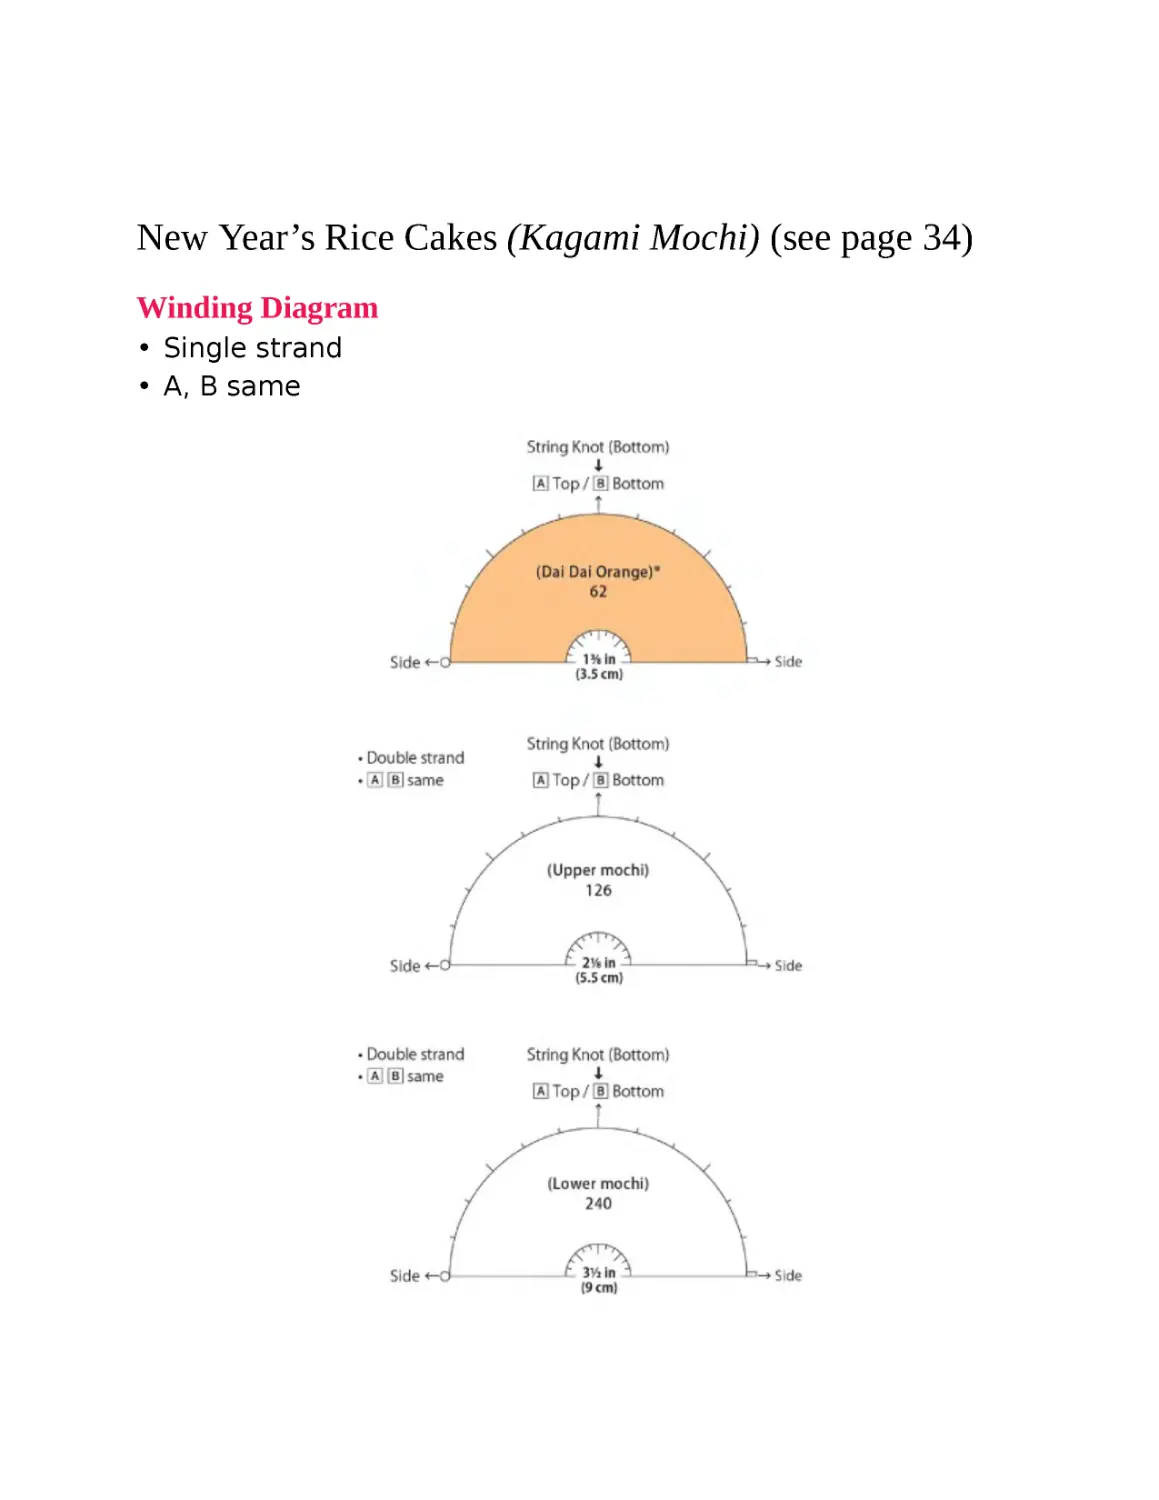
New Year’s Rice Cakes (Kagami Mochi) (see page 34)
Winding Diagram
• Single strand
• A, B same
* Japanese bitter orange
※ See p. 43-2 for yarn winding instructions.
Materials
Pom pom maker: Dai Dai Orange: 1⅜ in (3.5 cm)
Mochi: 2⅛ in (5.5 cm), 3½ in (9 cm)
Yarn – Dai Dai Orange: worsted weight in orange
Mochi: machine washable worsted weight in white
Other Materials
Leaf: felt (yellow green) ⅞ × 1⅝ in (2 × 4 cm) Instructions
(same for both)
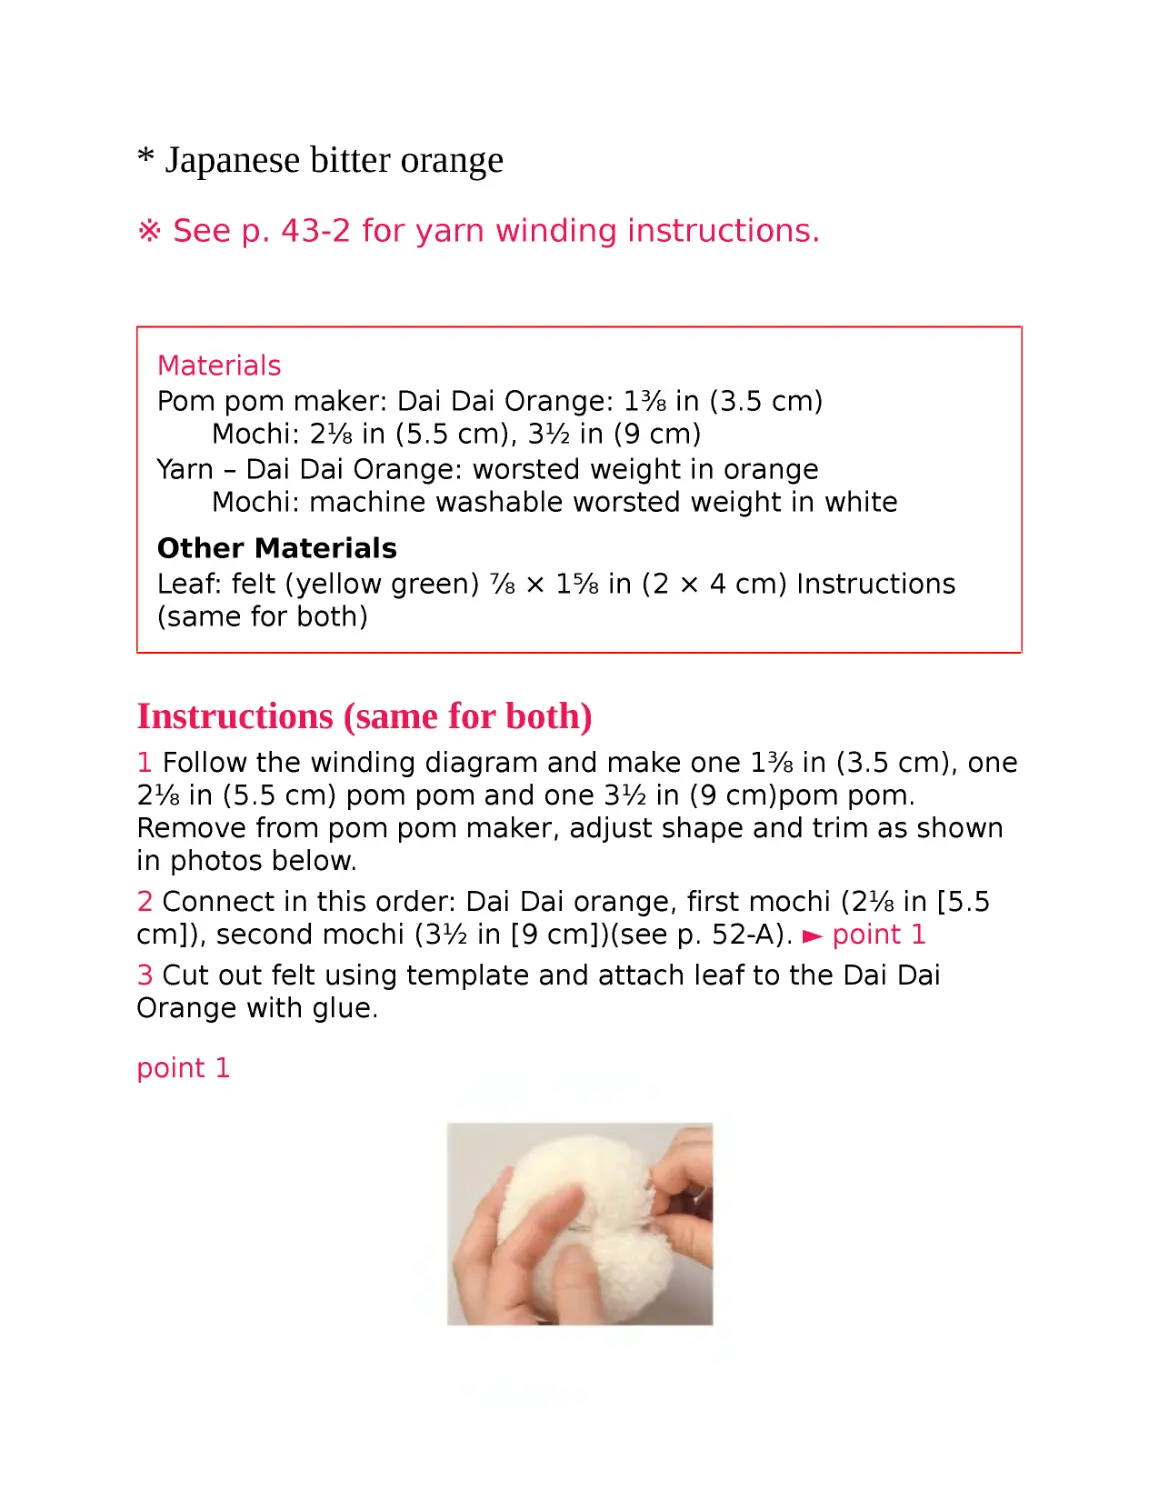
Instructions (same for both)
1 Follow the winding diagram and make one 1⅜ in (3.5 cm), one
2⅛ in (5.5 cm) pom pom and one 3½ in (9 cm)pom pom.
Remove from pom pom maker, adjust shape and trim as shown
in photos below.
2 Connect in this order: Dai Dai orange, first mochi (2⅛ in [5.5
cm]), second mochi (3½ in [9 cm])(see p. 52-A). ► point 1
3 Cut out felt using template and attach leaf to the Dai Dai
Orange with glue.
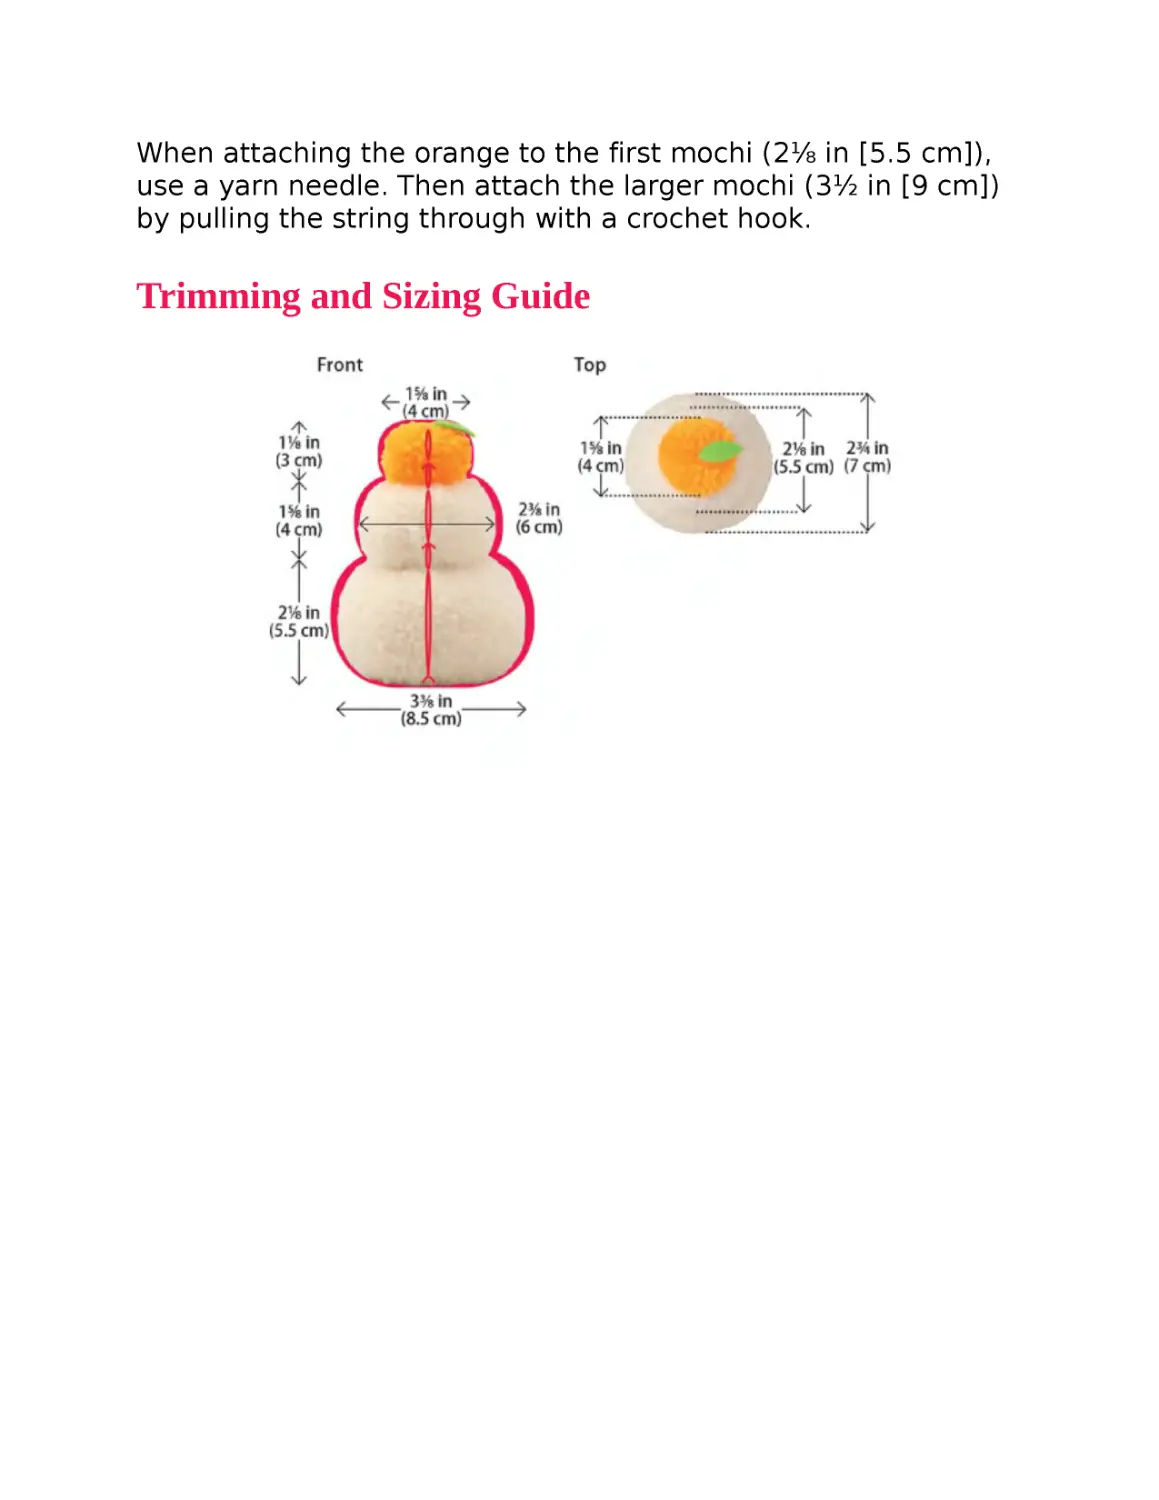
point 1
When attaching the orange to the first mochi (2⅛ in [5.5 cm]),
use a yarn needle. Then attach the larger mochi (3½ in [9 cm])
by pulling the string through with a crochet hook.
Trimming and Sizing Guide
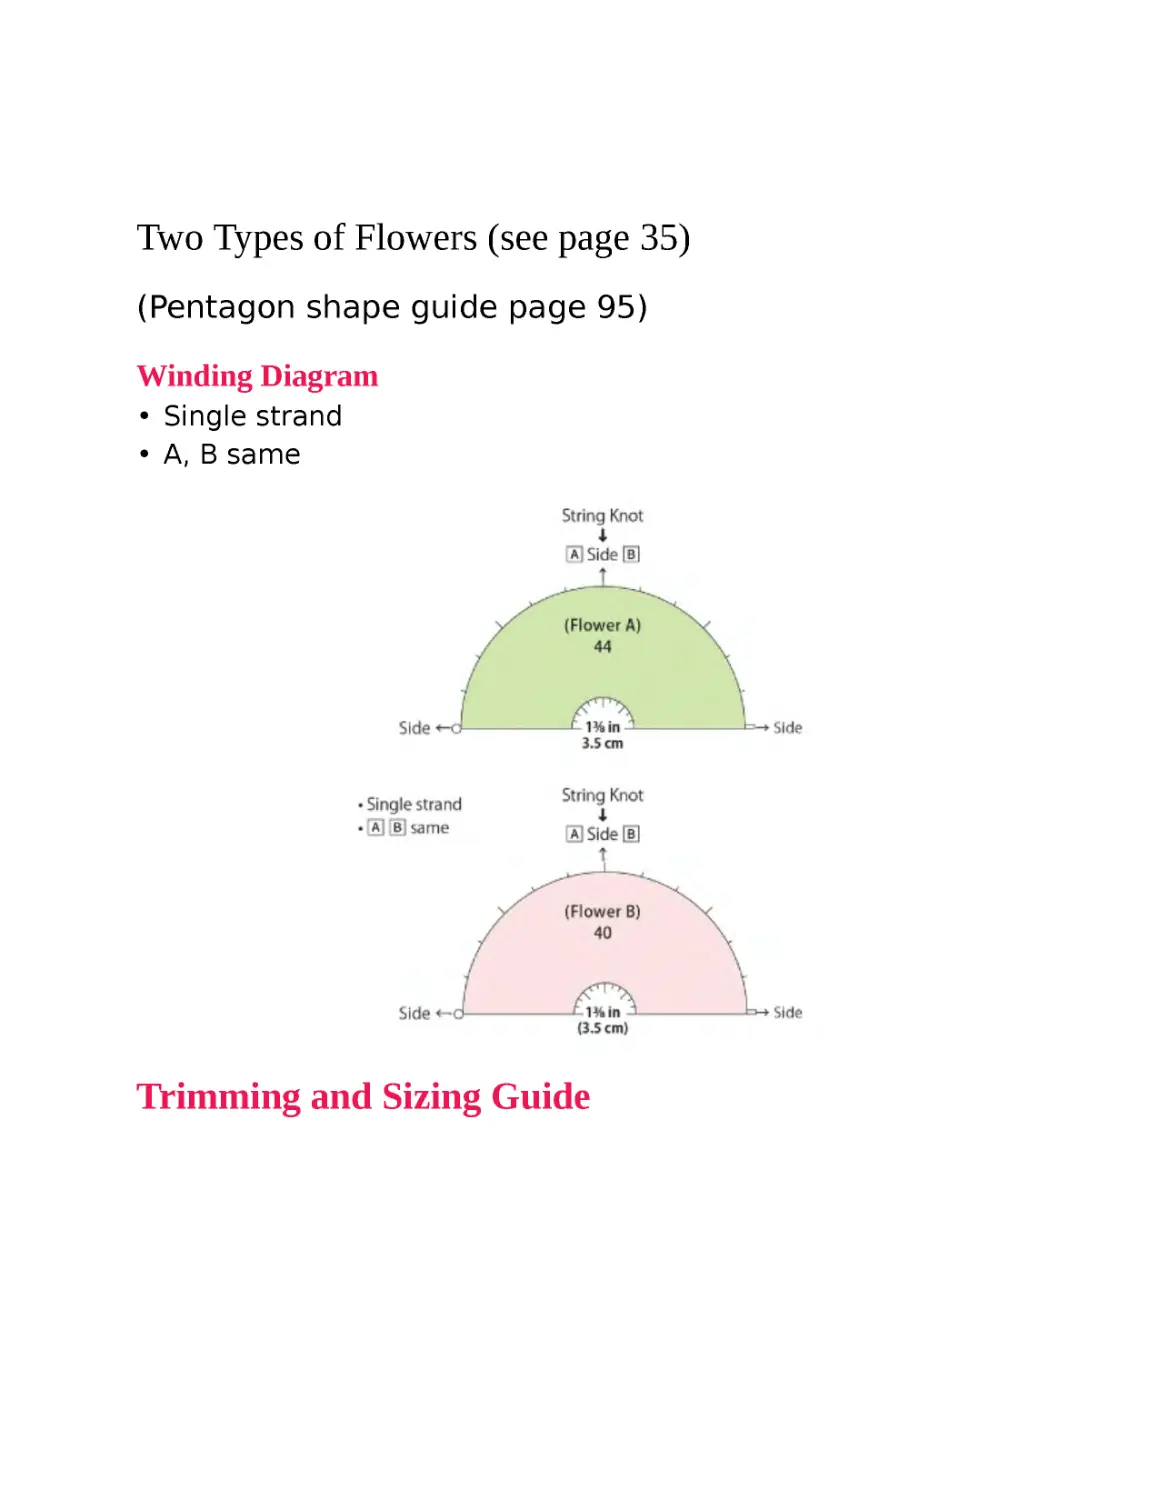
Two Types of Flowers (see page 35)
(Pentagon shape guide page 95)
Winding Diagram
• Single strand
• A, B same
Trimming and Sizing Guide
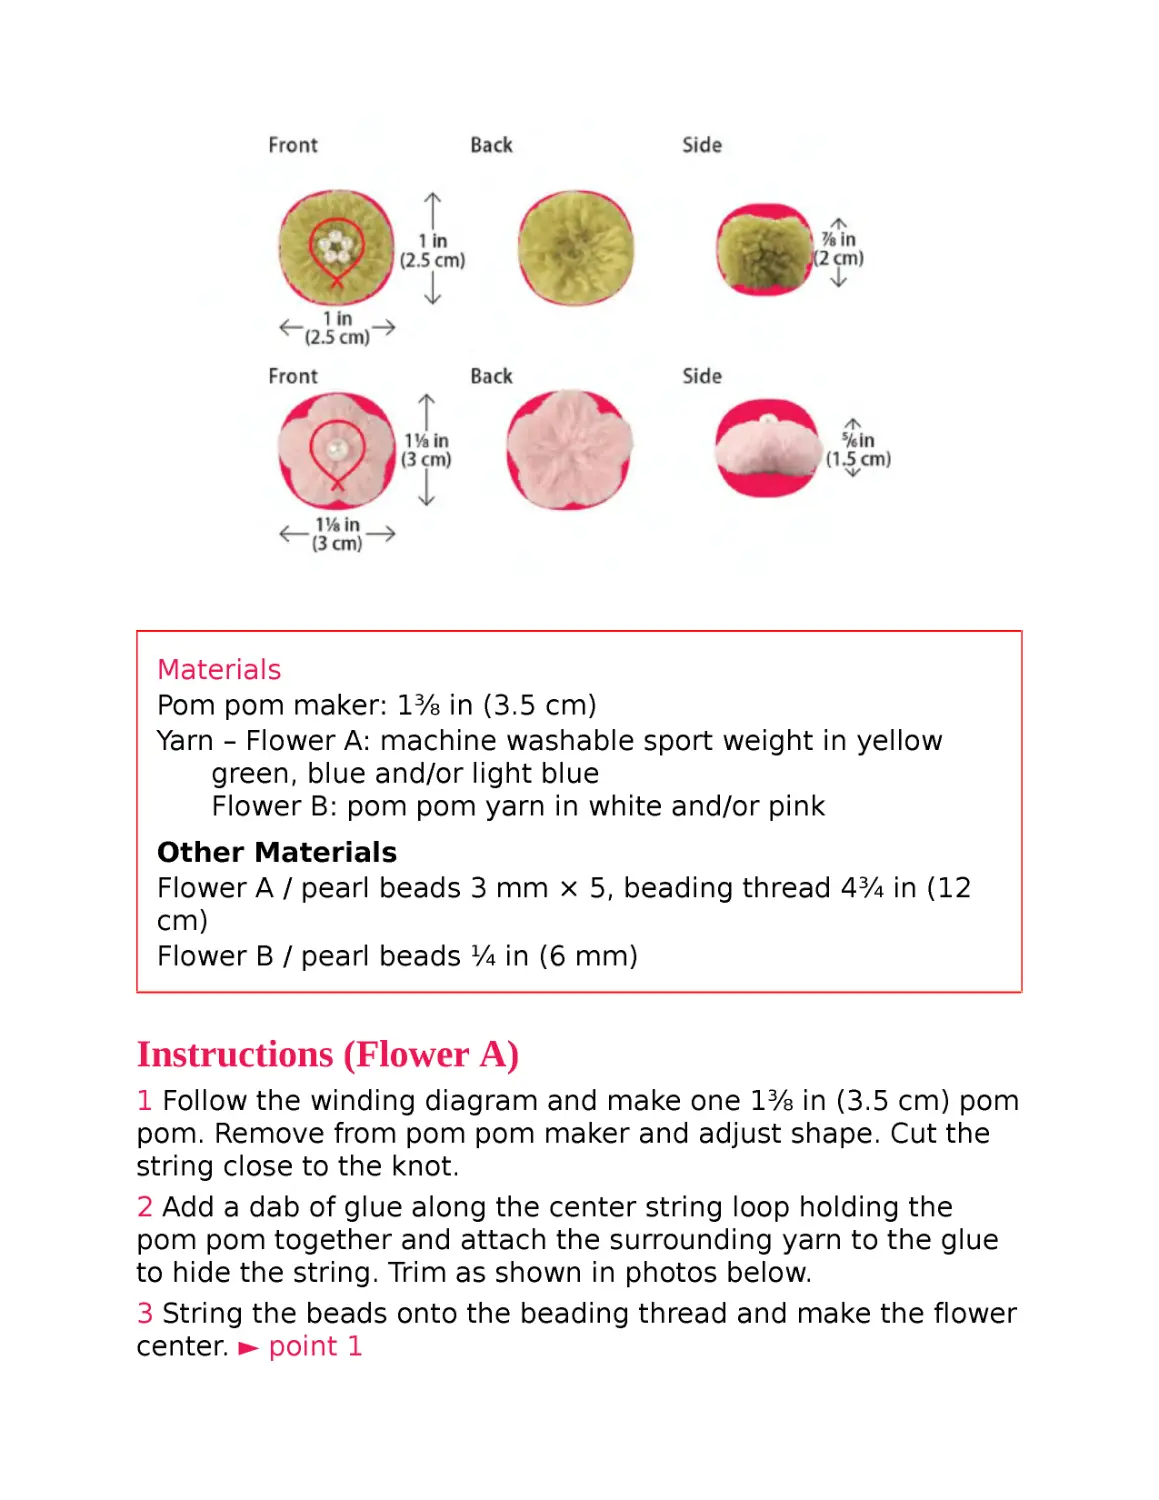
Materials
Pom pom maker: 1⅜ in (3.5 cm)
Yarn – Flower A: machine washable sport weight in yellow
green, blue and/or light blue
Flower B: pom pom yarn in white and/or pink
Other Materials
Flower A / pearl beads 3 mm × 5, beading thread 4¾ in (12
cm)
Flower B / pearl beads ¼ in (6 mm)
Instructions (Flower A)
1 Follow the winding diagram and make one 1⅜ in (3.5 cm) pom
pom. Remove from pom pom maker and adjust shape. Cut the
string close to the knot.
2 Add a dab of glue along the center string loop holding the
pom pom together and attach the surrounding yarn to the glue
to hide the string. Trim as shown in photos below.
3 String the beads onto the beading thread and make the flower
center. ► point 1
4 Glue the beads from step 3 in the middle of the flower (if you
prefer, feel free to glue on additional beads).
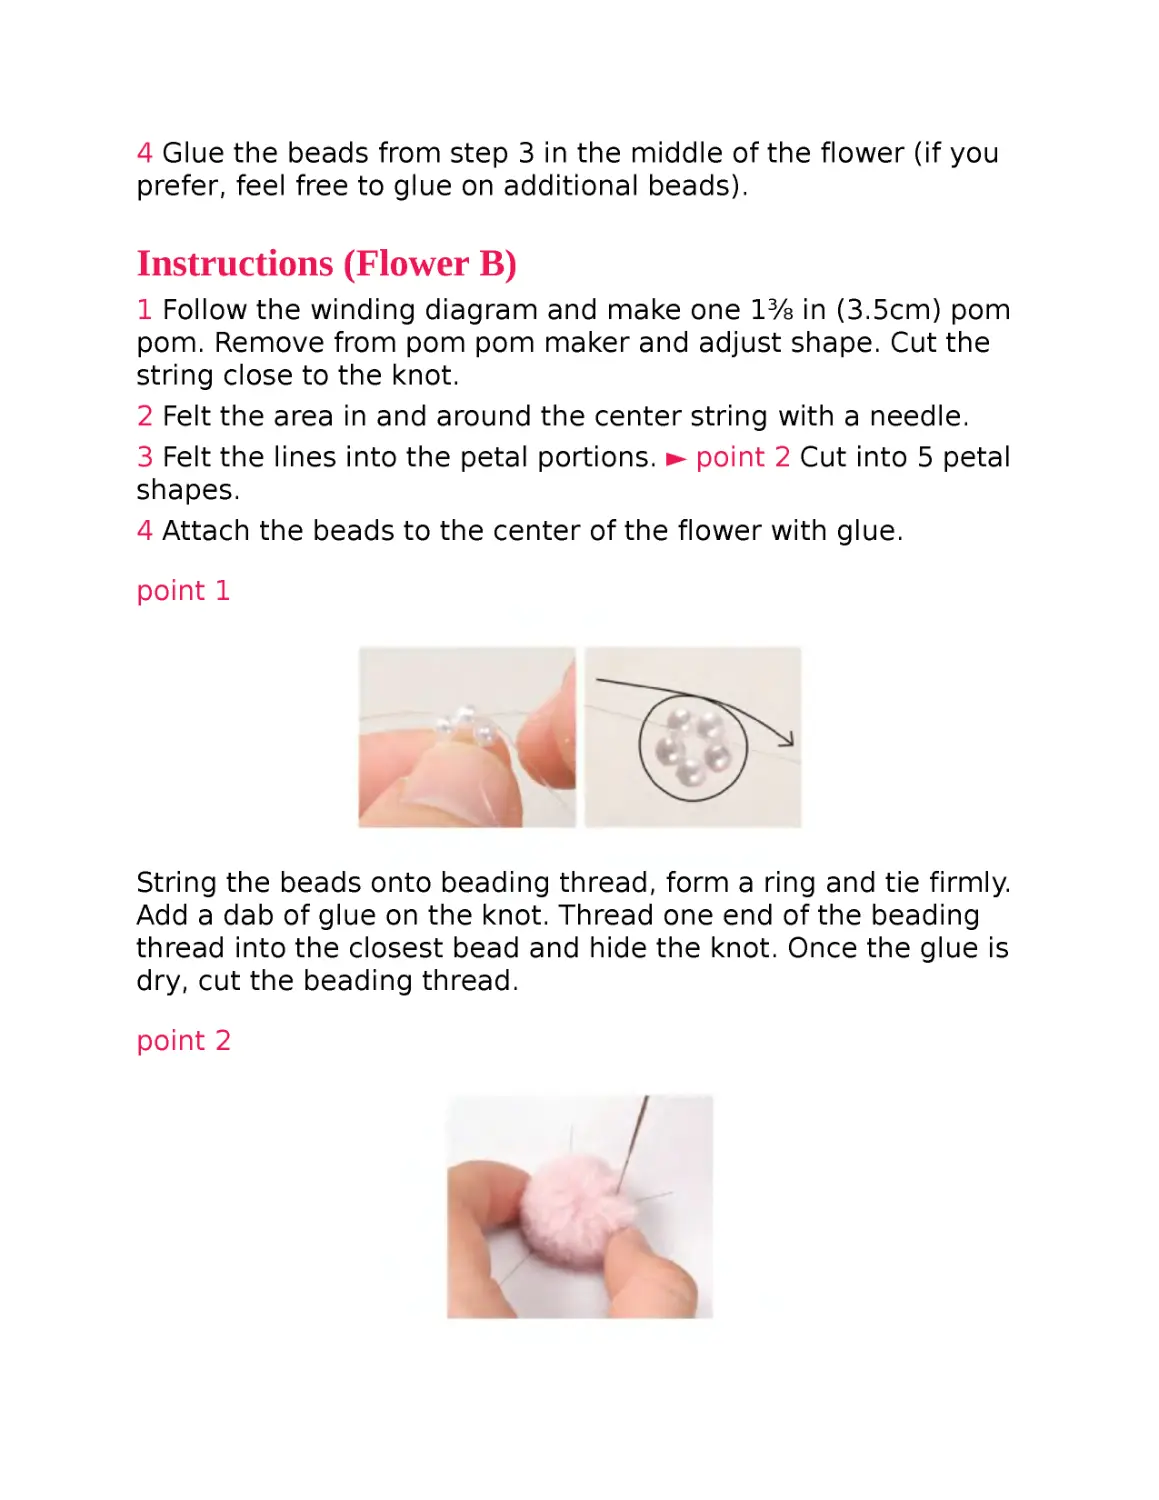
Instructions (Flower B)
1 Follow the winding diagram and make one 1⅜ in (3.5cm) pom
pom. Remove from pom pom maker and adjust shape. Cut the
string close to the knot.
2 Felt the area in and around the center string with a needle.
3 Felt the lines into the petal portions. ► point 2 Cut into 5 petal
shapes.
4 Attach the beads to the center of the flower with glue.
point 1
String the beads onto beading thread, form a ring and tie firmly.
Add a dab of glue on the knot. Thread one end of the beading
thread into the closest bead and hide the knot. Once the glue is
dry, cut the beading thread.
point 2
Use the pentagon shaped guide (see p. 95) to felt the lines into
the flower petals.
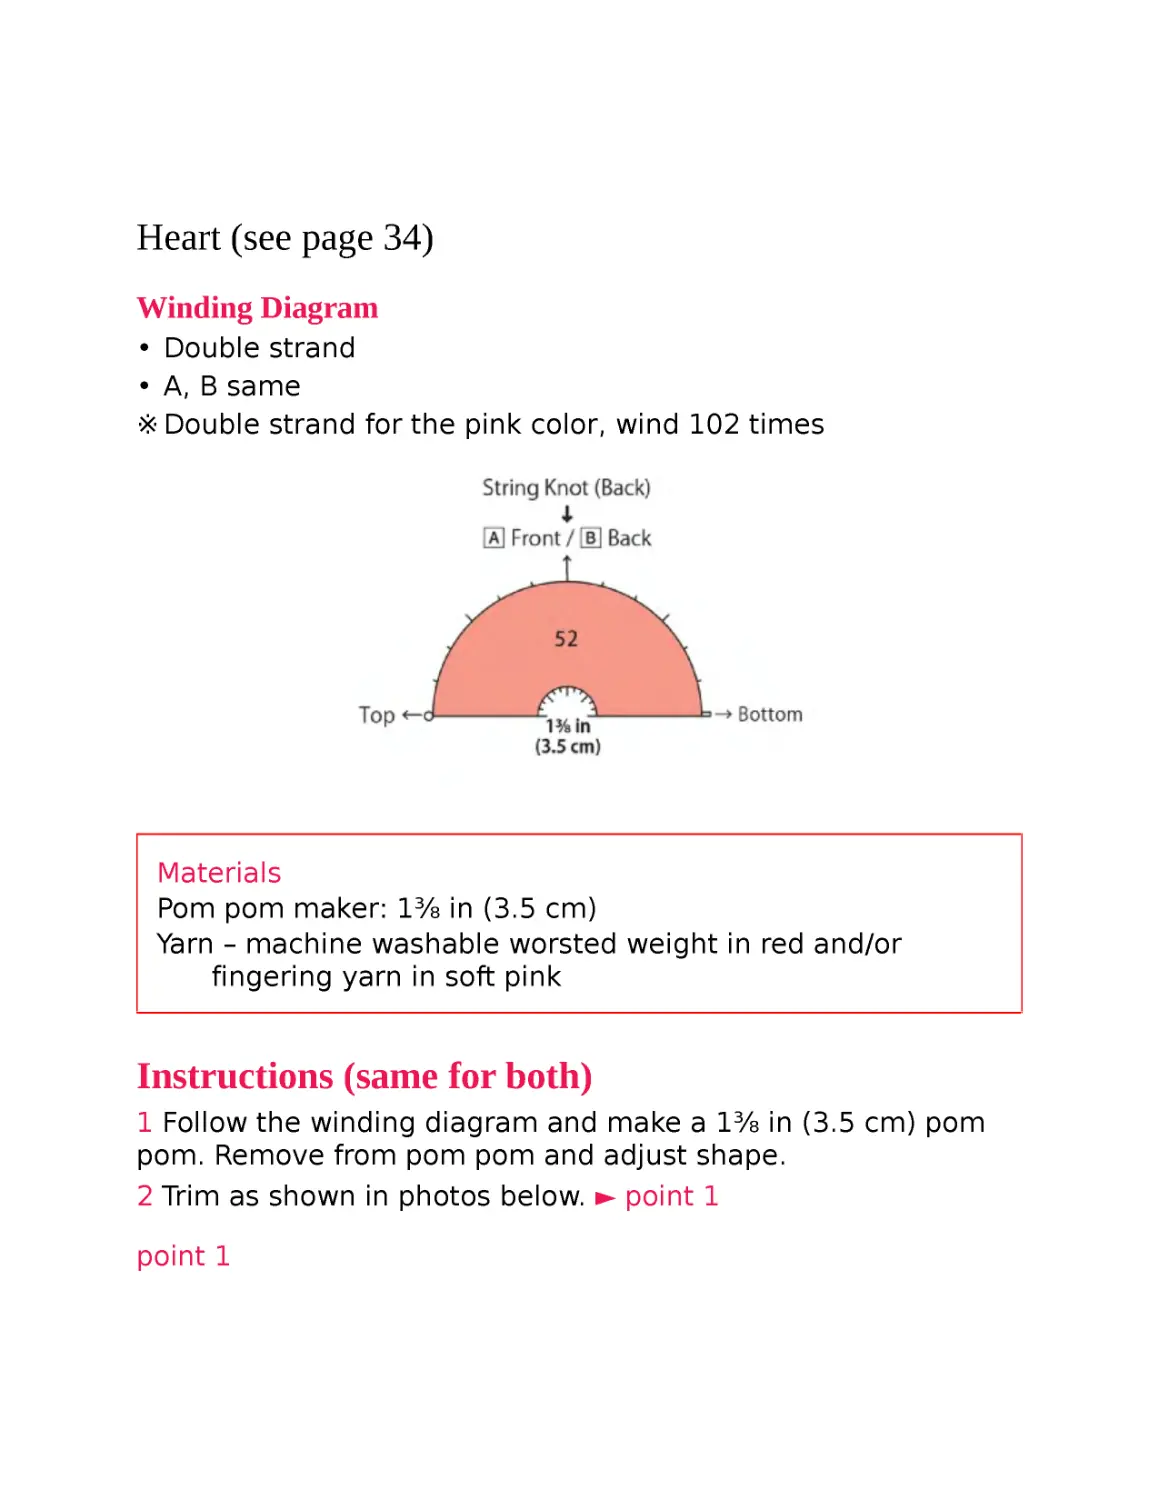
Heart (see page 34)
Winding Diagram
• Double strand
• A, B same
※ Double strand for the pink color, wind 102 times
Materials
Pom pom maker: 1⅜ in (3.5 cm)
Yarn – machine washable worsted weight in red and/or
fingering yarn in soft pink
Instructions (same for both)
1 Follow the winding diagram and make a 1⅜ in (3.5 cm) pom
pom. Remove from pom pom and adjust shape.
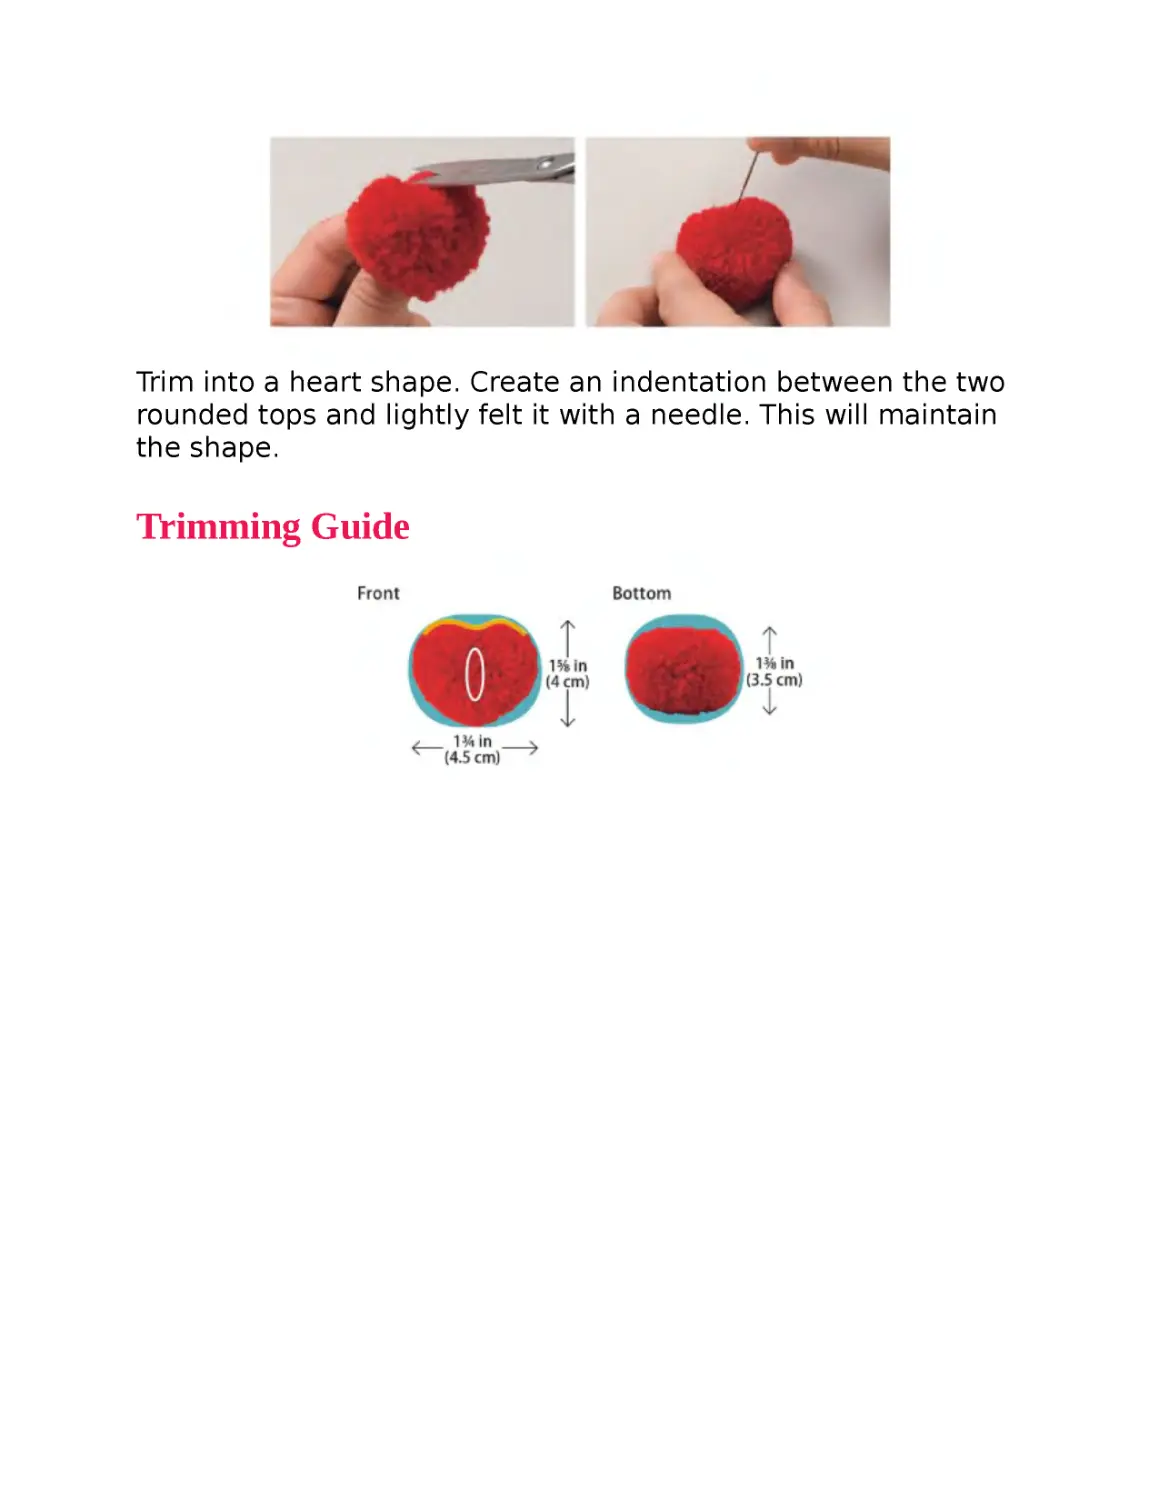
2 Trim as shown in photos below. ► point 1
point 1
Trim into a heart shape. Create an indentation between the two
rounded tops and lightly felt it with a needle. This will maintain
the shape.
Trimming Guide
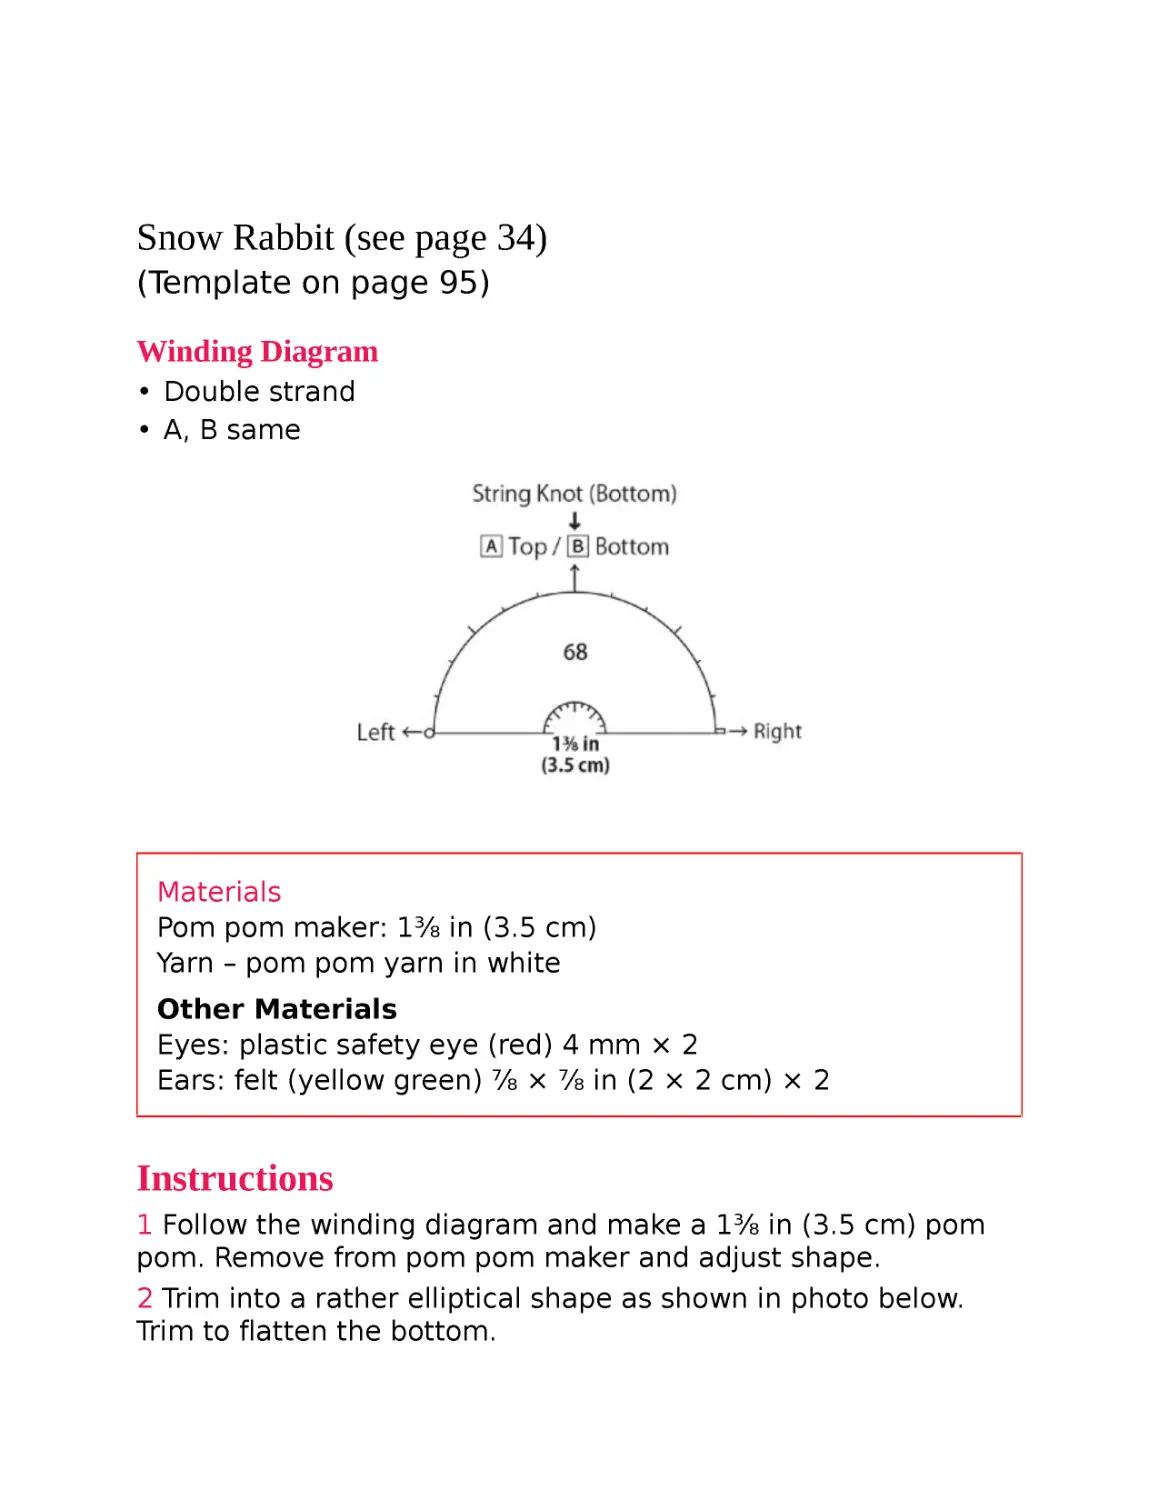
Snow Rabbit (see page 34)
(Template on page 95)
Winding Diagram
• Double strand
• A, B same
Materials
Pom pom maker: 1⅜ in (3.5 cm)
Yarn – pom pom yarn in white
Other Materials
Eyes: plastic safety eye (red) 4 mm × 2
Ears: felt (yellow green) ⅞ × ⅞ in (2 × 2 cm) × 2
Instructions
1 Follow the winding diagram and make a 1⅜ in (3.5 cm) pom
pom. Remove from pom pom maker and adjust shape.
2 Trim into a rather elliptical shape as shown in photo below.
Trim to flatten the bottom.
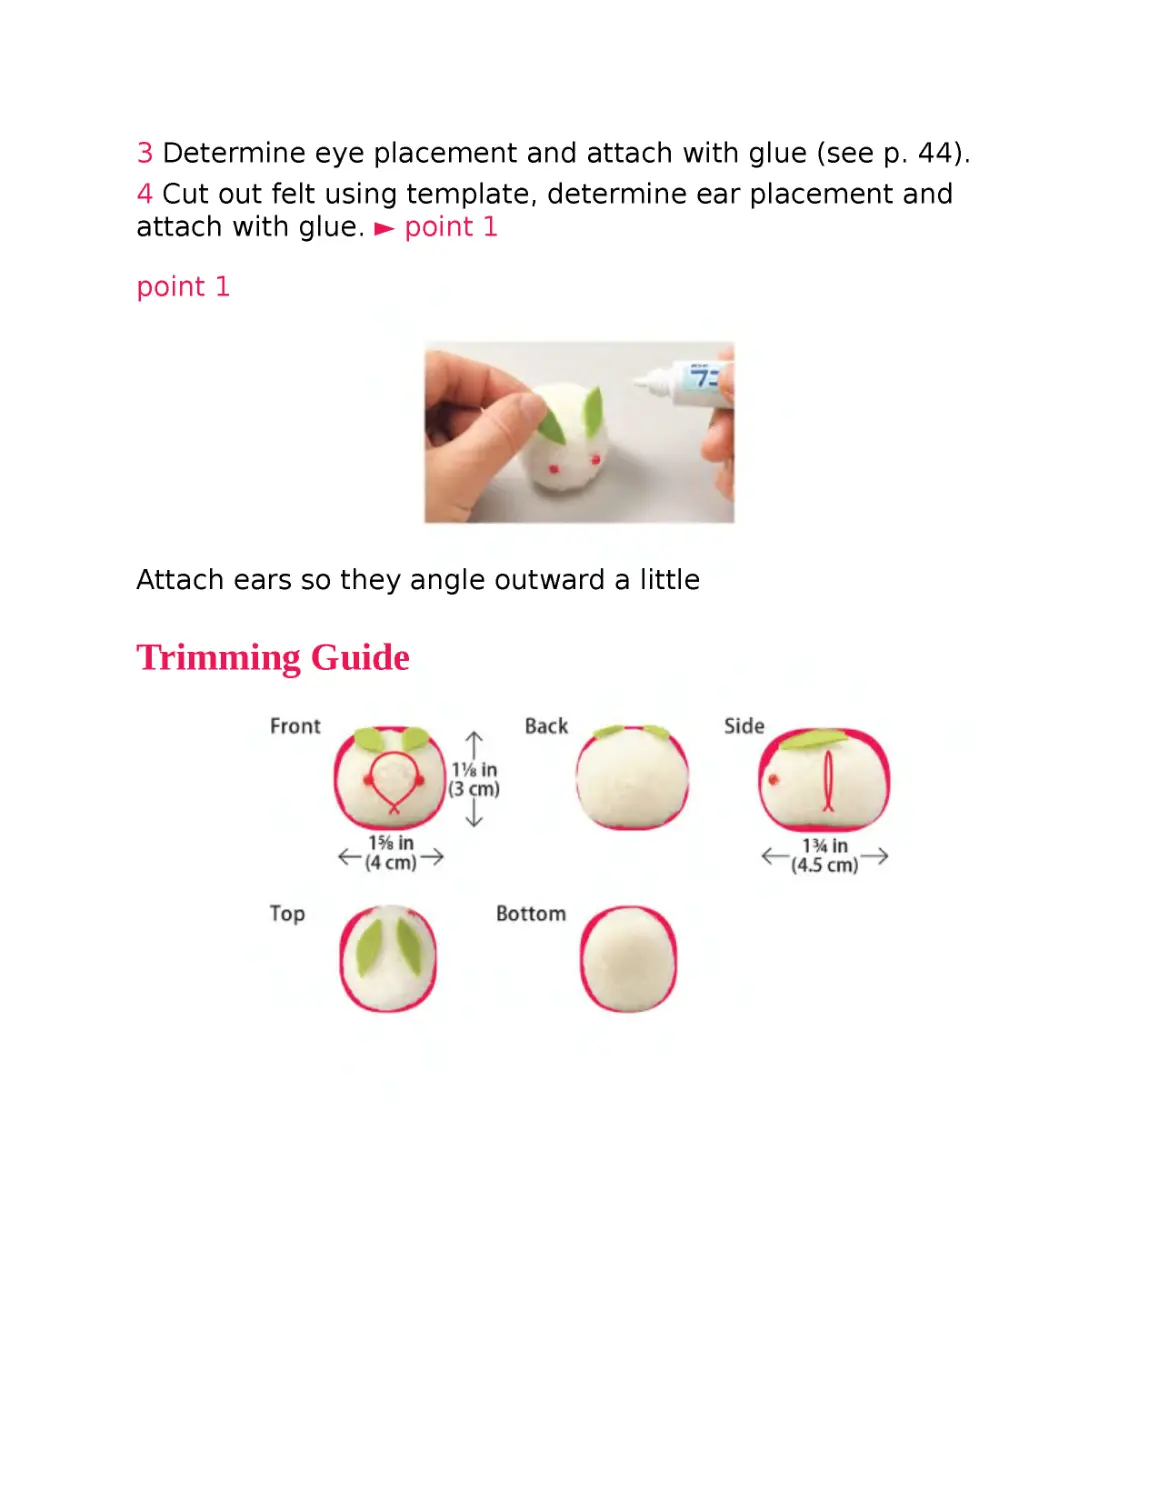
3 Determine eye placement and attach with glue (see p. 44).
4 Cut out felt using template, determine ear placement and
attach with glue. ► point 1
point 1
Attach ears so they angle outward a little
Trimming Guide
Halloween Pumpkin (see page 35)
Winding Diagram
• Double strand
• A, B same
Trimming and Sizing Guide
Template (actual size)
Materials
Pom pom maker: 2⅛ in (5.5 cm)
Yarn – machine washable merino worsted weight in orange
Other Materials
Stem: felt (deep green) 1¾ × 1¾ in (4.5 × 4.5 cm)
Eyes, nose, mouth: felt (black) 2⅜ × 1⅝ in (6 × 4 cm)
Instructions
1 Follow winding diagram and make a 2⅛ in (5.5 cm) pom pom.
Remove from pom pom maker and adjust shape.
2 Trim as shown in photos on left. ► point 1
3 Cut out felt using templates. Attach eyes, nose and mouth
with glue.
4 For the stem, cut three ⅜ × 1⅛ in (1 × 3 cm) pieces of green
felt and glue all three layers together. Once the glue is dry, cut
into a horn-shape and roll into a cylinder. Attach to the top of
the pumpkin with glue.
point 1
Mark the stem placement with a pin. Hold the pom pom so the
center string is horizontal and trim the yarn along the string to
create a ridge. Rotate the string 36 degrees (or 1/10th of the
pom pom) and trim another ridge. Repeat this five times to
create the ribs on the pumpkin shell.
Winding Diagram
Calico Cat
Brown Tiger Cat
Penguin
Miniature Schnauzer
Hamster
※ See p. 43-2 for yarn winding instructions.
Templates (actual size)
Templates for parts such as ears and mouths to be made
from wool roving and felt.
Cut cheese (light yellow) into a 7½ × 7½ in (19 × 19
cm) square and use the tomato template to cut out the
center circle.
Published by Tuttle Publishing, an imprint of Periplus Editions (HK) Ltd
www.tuttlepublishing.com
ISBN: 978-4-8053-1485-2; ISBN: 978-1-4629-1988-8 (ebook)
Pom Pom de Tsukuru Dobutsu to Motif by Kazuko Ito
© Kazuko Ito 2017
English translation rights arranged with NIHONBUNGEISHA Co., Ltd.,
through Japan UNI Agency, Inc., Tokyo
English Translation ©2017 Periplus Editions (HK) Ltd
Translated from Japanese by Sanae Ishida
All rights reserved. No part of this publication may be reproduced or
utilized in any form or by any means, electronic or mechanical, including
photocopying, recording, or by any information storage and retrieval
system, without prior written permission from the publisher.
Original Japanese edition
Photography: Norihito Amano (NIHONBUNGEISHA)
Styling: Akiko Suzuki
Model: Yumi Ito, Hiroki Ito
Design: Motoko Kitsukawa
Design Production: WADE
Editing: OMEGASHA
Supplies: FUJIKYU
Distributed by
North America, Latin America & Europe
Tuttle Publishing
364 Innovation Drive
North Clarendon, VT 05759-9436 U.S.A.
Tel: 1 (802) 773-8930; Fax: 1 (802) 773-6993
info@tuttlepublishing.com
www.tuttlepublishing.com
Japan
Tuttle Publishing
Yaekari Building, 3rd Floor
5-4-12 Osaki Shinagawa-ku, Tokyo 141-0032
Tel: (81) 3 5437-0171; Fax: (81) 3 5437-0755
sales@tuttle.co.jp
www.tuttle.co.jp
Asia Pacific
Berkeley Books Pte. Ltd.
61 Tai Seng Avenue, #02-12
Singapore 534167
Tel: (65) 6280-1330; Fax: (65) 6280-6290
inquiries@periplus.com.sg
www.periplus.com
20 19 18
10 9 8 7 6 5 4 3 2 1
Printed in China
1804RR
TUTTLE PUBLISHING® is a registered trademark of Tuttle Publishing, a
division of Periplus Editions (HK) Ltd.
About Tuttle:
“Books to Span the East and West”
Our core mission at Tuttle Publishing is to create books which
bring people together one page at a time. Tuttle was founded in
1832 in the small New England town of Rutland, Vermont (USA).
Our fundamental values remain as strong today as they were then
—to publish best-in-class books informing the English-speaking
world about the countries and peoples of Asia. The world has
become a smaller place today and Asia’s economic, cultural and
political influence has expanded, yet the need for meaningful
dialogue and information about this diverse region has never been
greater. Since 1948, Tuttle has been a leader in publishing books
on the cultures, arts, cuisines, languages and literatures of Asia.
Our authors and photographers have won numerous awards and
Tuttle has published thousands of books on subjects ranging from
martial arts to paper crafts. We welcome you to explore the wealth
of information available on Asia at www.tuttlepublishing.com.