


Текст
'I
harina Buss
Big Book of Knitting
*<
V <•
\
Katharina Buss
Big Book
of
Knitting
) ®
Sterling Publishing Co., Inc.
New York
Thanks to the Schachenmayr Company for their helpful support of this book, and for working the clothes and knitting
patterns. The designs are by Elisabeth Kopff (1) and Barbara Schreyer (4).
Drawings: Sigrid Witzig, Hamburg
Cover design: Dirk Lieb
Translation: Ellen Riemschnieder—in loving memory of Jim
Library of Congress Cataloging-iivPublication Data
Buss, Katharina.
[Urania-Ravensburger. English]
Big book of knitting / by Katharina Buss,
p. cm.
ISBN 08069-6203-8
1. Knitting. I. Title.
TT820.B97 1999
746.437—Jc21
20 19 18 17 16 15 14 13 12
99-20386
CIP
Inches
%
!/4
%
Vi
%
%
1
l!/4
Wl
Wa
1
1Vi
3
3Vi
4
4l/2
r-
D
6
7
8
9
Metric
cm
0.3
0.6
1.0
1.3
1.6
1.9
2.5
3.2
3.8
4.4
5.1
6.4
7.6
8.9
10.2
11.4
12.7
15.2
17.8
20.3
22.9
Equivalents
Inches
10
11
12
13
14
15
16
17
18
19
20
21
22
23
24
25
26
27
28
29
30
cm
25.4
27.9
30.5
33.0
35.6
38.1
40.6
43.2
45.7
48.3
50.8
53.3
55.9
58.4
61.0
63.5
66.0
68.6
71.1
73.7
76.2
First paperback edition published in 2001 by
Sterling Publishing Co., Inc.
387 Park Avenue South, New York, N.Y. 10016
Originally published in Germany by Urania-Ravensburger under the title Das grofie Ravemburger Sirickbiich
© 1996 by Urania-Ravensburger in the Dornier Medienholding GmbH Berlin, Germany.
English translation © 1999 by Sterling Publishing Co., Inc.
Distributed in Canada by Sterling Publishing
ch Canadian Manda Group, 165 Dufferin Street,
Toronto, Ontario, Canada K46K 3H6
Distributed in Great Britain bv Chrysalis Books Group PLC,
The Chrysalis Building, Bramley Road, London W10 6SR England
Distributed in Australia by Capricorn Link (Australia) Pty Ltd.
PO. Box 704, Windsor, NSW 2756 Australia
Printed and Bound in China
All rights reserved
Sterling ISBN 0-8069-6203-8 Trade
0-8069-6317-4 Paper
For information about custom editions, special sales, premium and corporate purchases, please contact Sterling
Special Sales Department at 800-805-5489 or specialsales(a sterlingpub.com
Contents
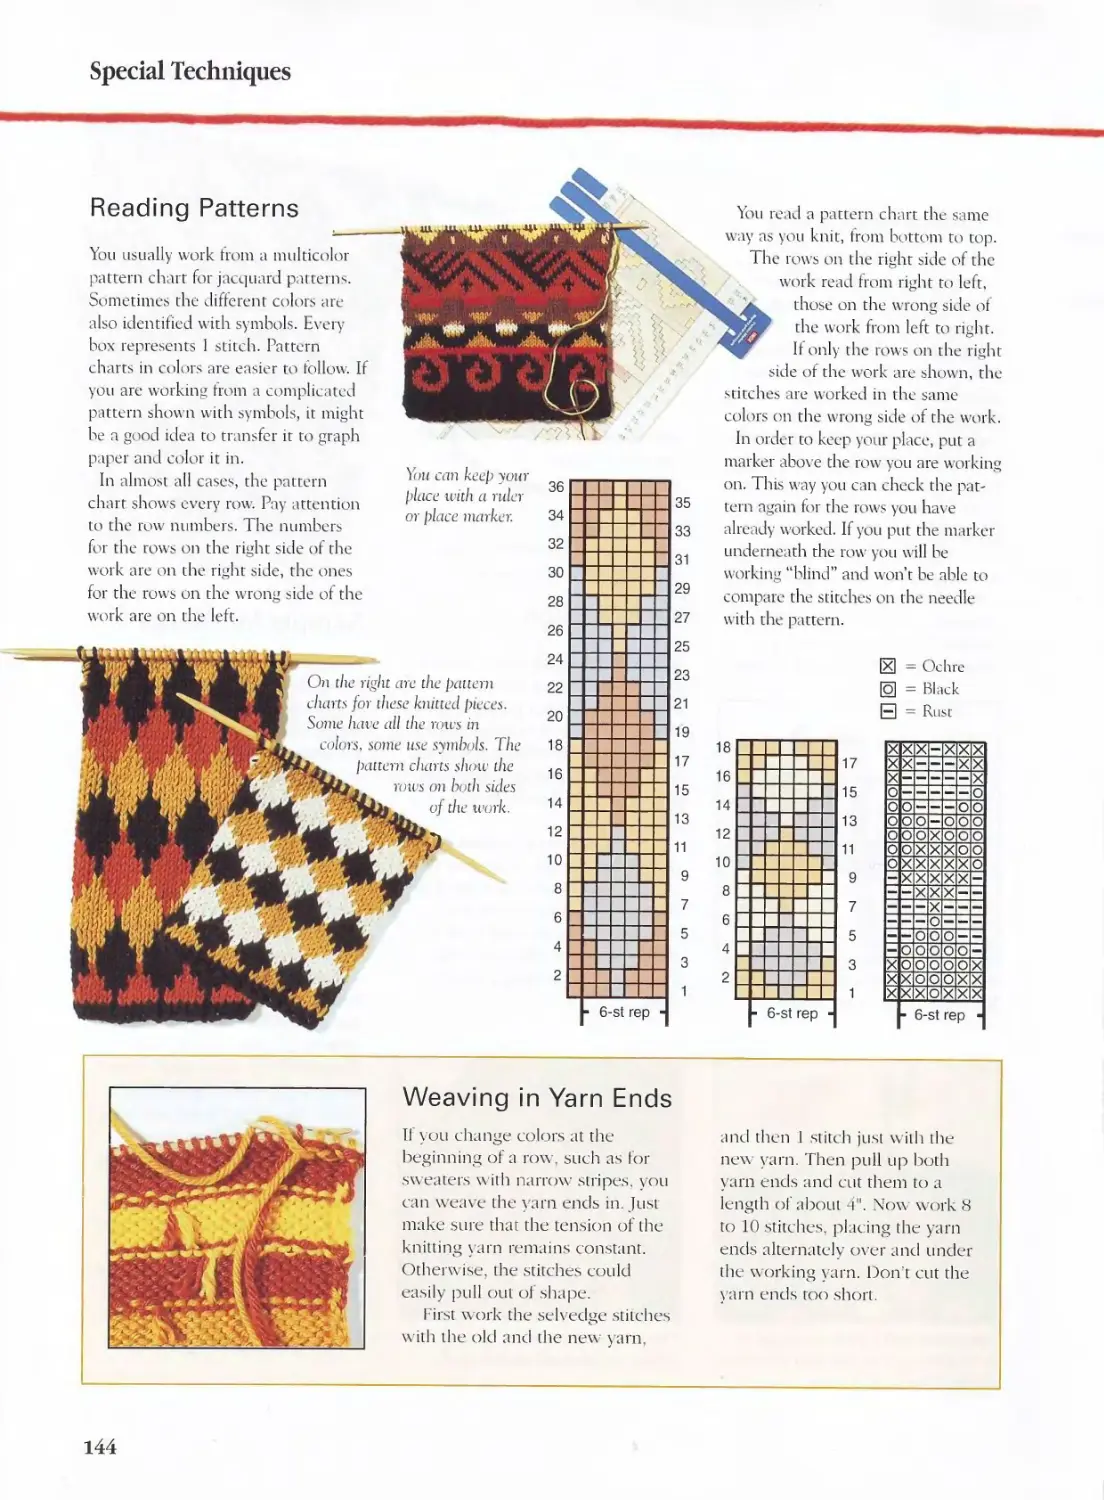
Introduction
Materials
Needles and Tools
Yarns
Caring for Your Finished Knit
Basic Techniques
Casting On
Casting On in Kitchener Rib
Selvedges
Knit and Purl
Basic Patterns and Color Changes
Decreasing
Increasing
Binding Off
Binding Off in Kitchener Rib
Gauge
Perfect Details
Bands, Hems, Ribbing
Knit-on Facings
Knit-in Facings
Sewn-on Facings
Crocheted Edges
Necklines: Round and Square
V-necks
Polo Collars
Shawl Collars
Pockets
Buttonholes
Zippers
Finishing
Invisible Seams to Join Selvedges
Invisible Seams with Grafting Stitch
Sewing In Sleeves
Starting and Finishing Yarn Ends
Blocking your Work
8
10
12
15
16
18
22
26
28
30
32
36
42
46
50
52
54
60
66
70
73
76
80
84
88
92
100
106
110
112
114
117
120
121
Special Techniques
Shaker Knitting
Cable Patterns
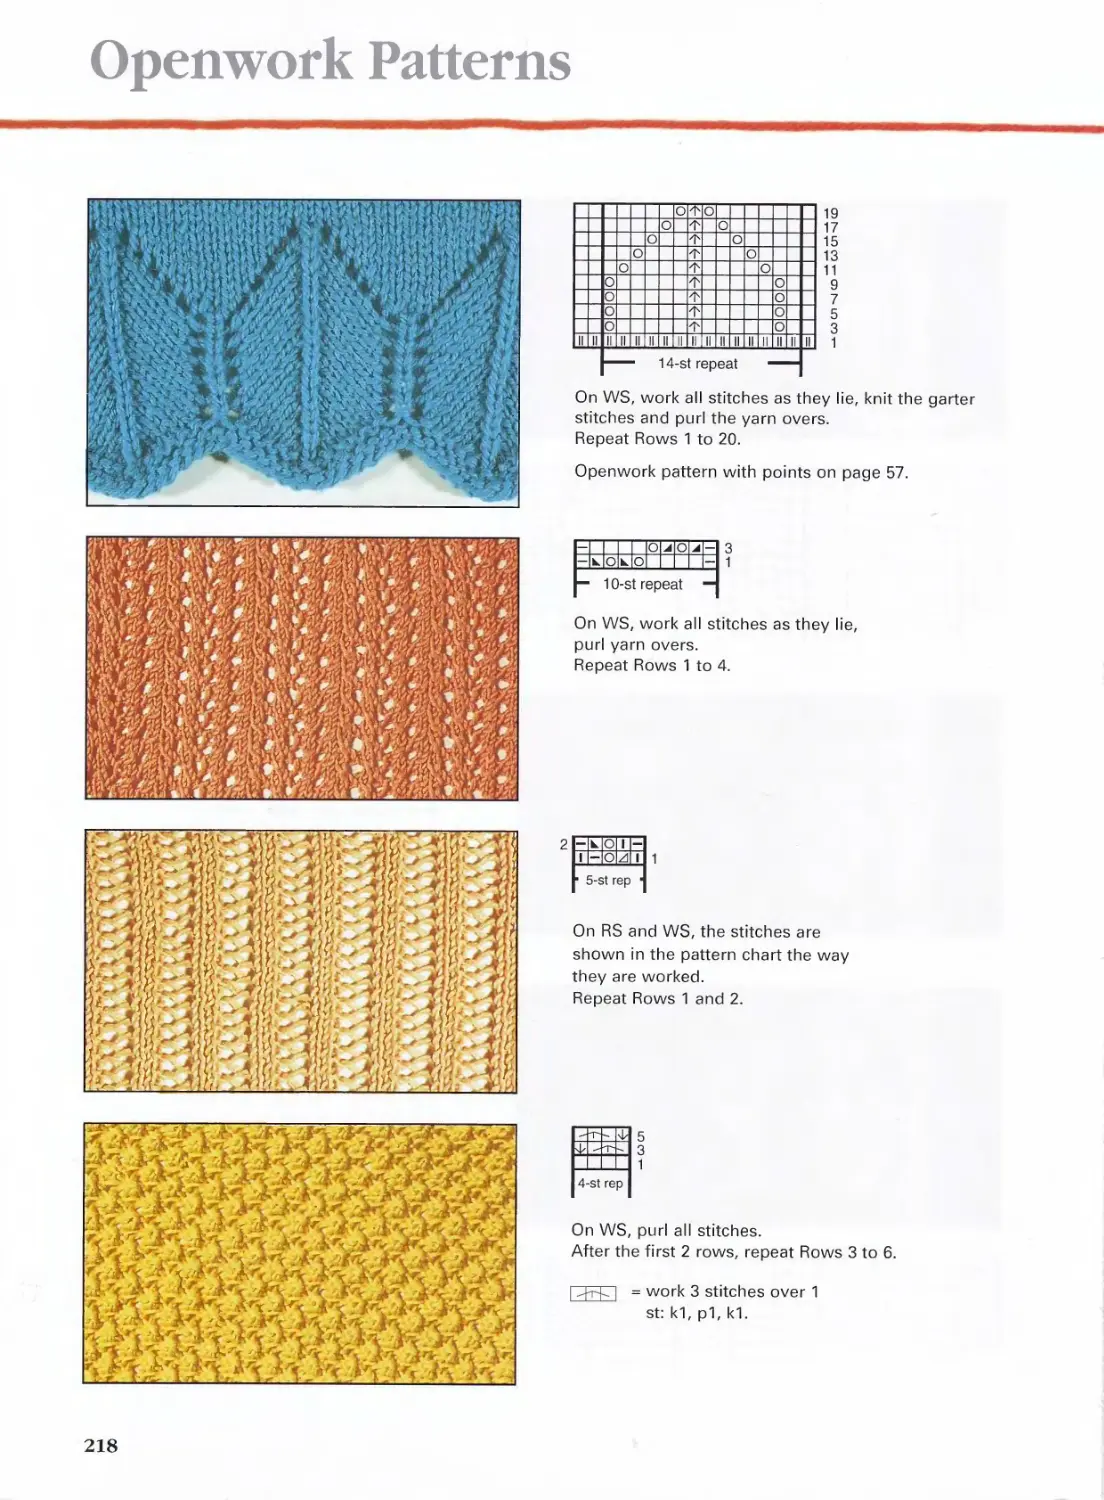
Openwork Patterns
Twisted Stitch Patterns
Slipped Stitch Patterns
Jacquard Patterns
Intarsia Patterns
Shortened Rows for Slanted Patterns
Embossing
Entrelac Patterns
Reversible Patterns
Decorative Details
Crocheted and Knitted Bobbles
Duplicate Stitch and Embroidery
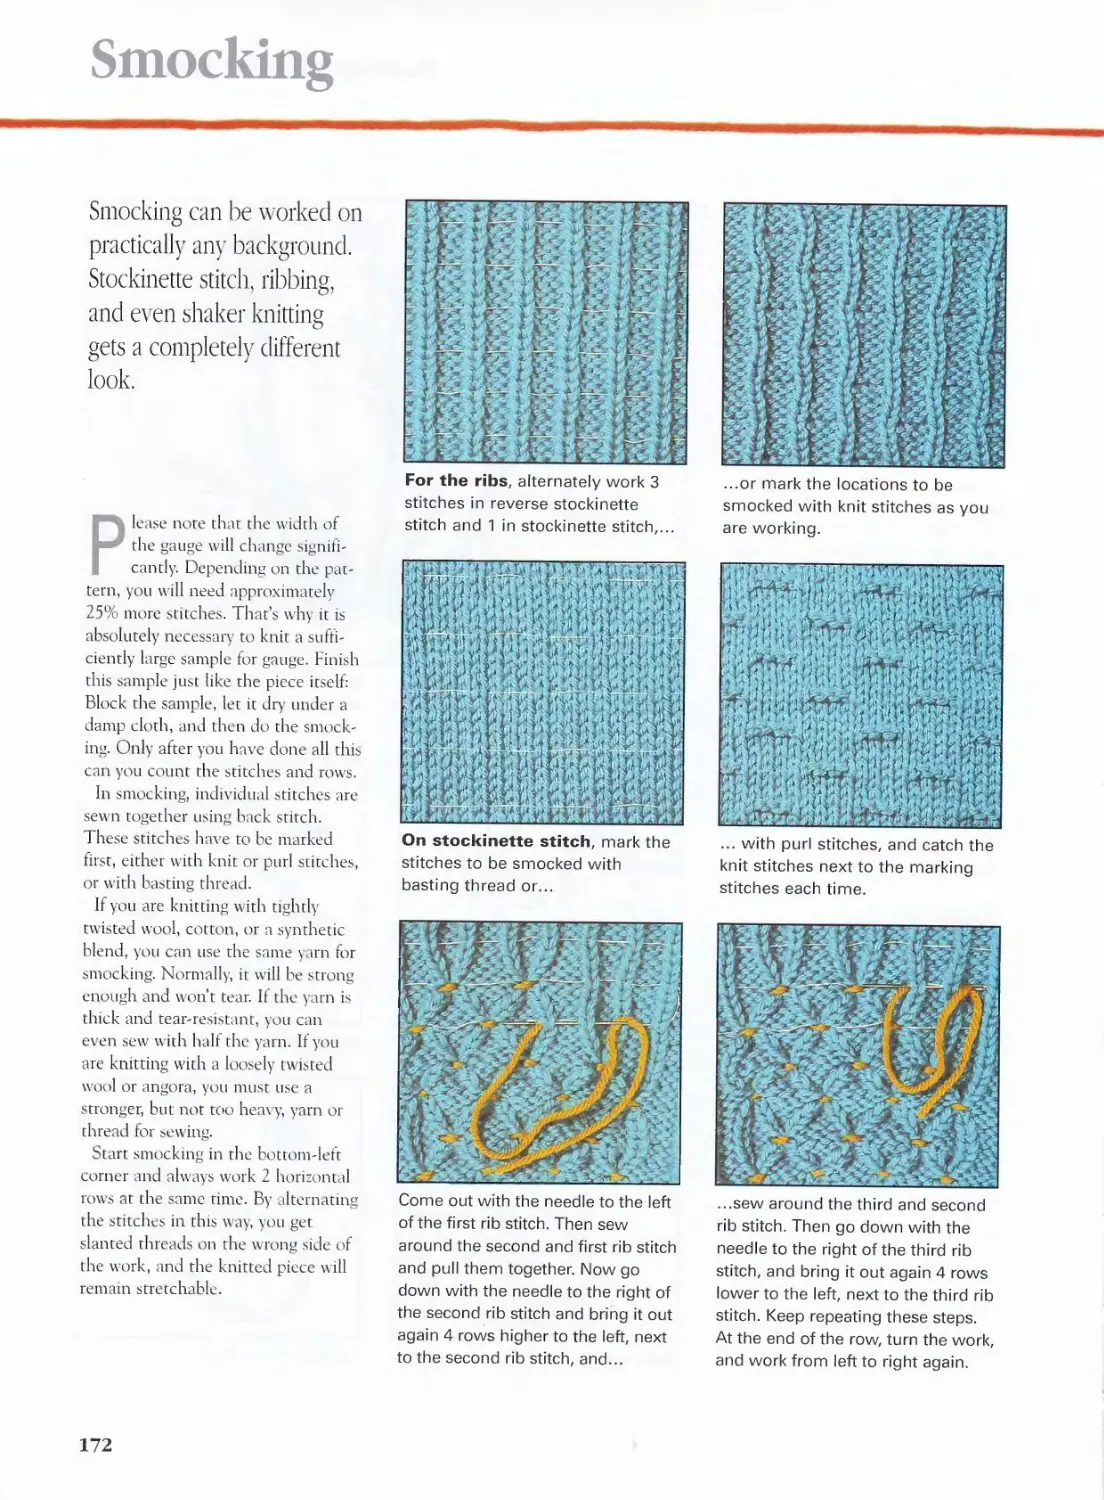
Smocking
Pom-poms, Tassels, Fringes
Practical Tips
Measurements and Patterns
Converting Patterns
Lengthening and Shortening Pieces
Tips for Ribbings
Dropped Stitches
Pattern Charts
122
124
132
136
138
140
142
146
148
153
156
160
164
166
168
172
174
176
178
182
184
186
L88
190
\
Sleeves Increases in Openwork
Patterns
Basic Patterns
Sweaters
Socks
Gloves and Mittens
Stitch Patterns
Shaker Knitting
Cables
Openwork Patterns
Twisted Stitches
Leaf Patterns
Aran Isle Patterns
Slipped Stitches
Textured Patterns
Jacquard Patterns
Symbols and Abbreviations
Index
192
194
196
204
208
210
212
214
218
222
226
228
230
232
234
237
238
- >
Introduction
.t «
\\ A- I
A \
4 0
u
■x
I N
1
:\
S\''
it
' *)
J; I *
""'If / ',''
• *
v
//
'$
>• •
*
• •»•
• > •
V
» i
» • i
i
4
■J"
A
tf ¥
\.\
I *
v ' ^^« 1*W
w>V * ' v > * \ s \ > <
< >•
«
/ .
' »•■ f;v> -1
•l •
\
t
*■'.'
\r
\<
J
N
1U
>
t
*
\
\
Would you like to learn how to
knit? You certainly can with this
book! Do you already know how
to knit? Then this book is also the right
one for you. It is not just a detailed,
accurate, and richly illustrated book of the
fundamentals, it is also a comprehensive
reference work for every imaginable
problem that can come up in knitting.
Knitting is one of the oldest and most
popular needlecraft arts. People were
knitting as far back as the Middle Ages,
although at that time knitting was
primarily considered "busy work" for
upper-class women and girls. But it was
also practiced for economic reasons.
Economics played a role even later, whenever
times got tough.
In today's fast-paced world, however,
knitting has taken on a whole new
function. Knitting is creative, fashionable,
and fun. And last but not least: Knitting
soothes the nerves!
Because of the enormous and constantly
changing selection of yarns, there are
almost no limits on your imagination.
High-quality standard yarns are available
in many different colors, which are
constantly updated. Beginners can use
fashionable specialty yarns that hide
slight irregularities. For advanced
knitters, there are countless patterns at
all levels of difficulty.
The chapter on "Basic Techniques"
explains all the fundamental steps in
detail—from the various methods for
casting on, to selvedge stitches, to
binding off with knitting or tapestry needles.
Then there are the "Perfect Details"—
bands and facings that look good from
both sides. Neatly knitted neck bands for
round and V-neck necklines. Polo collars
and shawl collars that fit perfectly.
Straight, slanted, or added pockets,
buttonholes, and zippers.
There is also a detailed chapter on
finishing, because how you put the parts
together is what makes a piece perfect.
After all, what good are neatly knitted
parts if the seams are crooked! With the
amount of time and attention you spent
on knitting, careful sewing is the nice
finishing touch.
"Special Techniques" relate to different
knitting patterns, with hints and tricks for
the best results. For example, double
increases and decreases look better than
single ones in shaker knitting. And even
shortened, slanted rows are a breeze with
our instructions.
Seahorses and roses are only two
examples of how you can beautifully
embellish a sweater. The chapter on
"Decorative Details" includes not only
many embroidery stitches but also
bobbles, pom-poms, fringes, and tassels.
"Practical Hints" tell you how to
calculate the number of stitches needed
for a sweater, and how to convert patterns
for different sizes and different yarns. You
will find hints for designing your own
sweaters, for knitting according to a
pattern chart, for fixing dropped stitches,
for shortening and lengthening finished
pieces.
So that you can start right away and try
out your knitting skills, detailed
instructions are given for all the designs
shown in the book as well as for knitting
gloves, mittens, and socks. There is also a
whole palette of beautiful patterns.
A final note: Some knitters have to
"warm up" first. Many people knit
relatively loosely for the first two or three
rows until they get to their usual tension.
So keep a small practice piece on hand—
the type of yarn and needle size are
unimportant. Whenever you haven't knit
in a while, first knit a few rows on this
practice piece before you start working on
your actual project.
v 1 x"Ml>V*
»
\ l»
h*
V
!
k
X.
<* V
\
\
\
\\ -\. \\~ W > v
From knitting needles to
stitch holders, from angora
to viscose—here you'll
learn eveiything you need
to know about yarns,
needles, and other useful
knitting tools as well as
important hints for taking
good care of your finished
pieces.
Needles and Tools
You can't do anything
without knitting needles. But
there are also many other
useful tools that make
knitting easier and more fun.
Knitting Needles
Straight knitting needles (that have
the same thickness over their entire
length) and interchangeable needles
(that come in a bet of varying sizes
with interchangeable tips that are
attached to the same needle shaft) are
available in sizes from 0 to 15 in
lengths of 10" and 14"; straight
knitting needles are also available in a
length of 16". They are made from
aluminum, plastic, bamboo, or wood.
Circular Needles
Circular knitting needles, either
nickel-plated or made of aluminum,
are available in lengths of 11" to 60".
and sizes from 0 to 15. Bamboo
needles are available in a length of 29"
and sizes 3 to 15.
Circular knitting needles can also be
used in regular knitting. They are
easier to handle than regular needles,
especially when knitting large pieces.
Also, they can be used to knit patterns
in which two rows on the right side or
the wrong side have to be knit one
right after the other—for example, in
2-color shaker knitting. You simply
push the stitches to the end where the
yarn you need is located. Neck bands
are knit using short circular needles.
Bamboo and
wooden needles
Flex Needles
Flex needles consist of a thicker tip
and a thin, round plastic strip with a
length of about 20". These needles
are also easier to use when knitting
large pieces, such as a sweater with
dolman sleeves. They are available in
sizes 0 to 15.
BambooAVooden Needles -
Bamboo knitting needles are
especially light. They have .
the additional advantage that " .
persons with allergies can use
them, because they are
guaranteed to be free of nickel.
Bamboo knitting needles are
available in double-pointed sets in sizes
from 0 to 11 and as straight knitting
needles in sizes from 0 to 15. Wooden
knitting needles, such as birch and
walnut, are available in sizes 4 to 13.
Cable Needles, Needle Sets,
Needle Sizer
Cable needles are available
straight or angled. The ang
ones prevent stitches from
accidentally slipping off
the needle while you are
making cables.
Needle sets or sock
knitting needles consist
ot four or five double-
pointed needles. The stitches
divided among three or four
needles, and you knit with the fourth
or fifth needle. They are available in
lengths of 4" to 12". The short needles
work particularly well for knitting
baby booties or gloves. Needle sets are
available in sizes from 0 to 15.
Needle sizers make it easier to
check the size of knitting needles
such as double-pointed needles.
Gauges come in different varieties.
Stitch Gauge
This practical aid can be used to
count stitches for knitting a gauge
sample, to read off the required
number of stitcher, and to check the size
of knitting needles.
Knitting needles
>jv
v.
\
Circular
needles
Flex needles
o
# • As?/
Cable needles, needle sets
needle sizer
—tfi *J> mm m*-j «T£ -i_^ "^ I*-
-?» s *• e <■ %° ^ .. ■ >>
* ■*
\
\
X
M/
Stitch gauge
10
Needles and Tools
^
V
^
Stitch markers, row counters,
needle guards
I-J*, I* I
Knitting
thimbles,
bobbins
* ■%
\
.**
Ui-
■ill
4
V
, I
,-.l
>
x
ii
N r-
^ -r.
X
/ Line
>'
.*
^
^
Blocking pnis,
tapestr)' needles, stitch holders
•&
Stitch Markers, Row Counters,
Needle Guards
Stitch markers are available in
different colors and sizes. They make
it easier to count stitches and rows,
and they can be used for marking
pattern sections, such as an armhole.
Row counters can be slipped onto
the knitting needle. For knitting in
the round, there are also row
counters with open loops.
Needle guards are not intended to
protect the needles but rather to
keep the stitches from slipping off
the needles when you are not
knitting.
Yarn Guides, Bobbins
For knitting jacquard patterns, 2-
eyed yarn guides are available for 2-
color knitting; others with 4 notches
are available for multicolor knitting.
Bobbins are available in 2 sizes.
They are very helpful when knitting
small areas in a different color and
for intarsia knitting.
Line Marker
Using a line marker will always
keep you on the correct row
•6
when you're working off a
pattern chart.
Blocking Pins, Tapestry Needles,
Stitch Holders
For blocking knitted pieces, blocking
pins arc longer and easier to handle
than normal sewing pins.
Tapestry needles or blunt needles
should be used for sewing
together knitted pieces, securing
yarn ends, or for embroidery.
Stitch holders are extra-long safety
pins. They can be used to hold
stitches that will be worked later,
such as those for pocket bands, or if
shoulder seam stitches are going to
be knit together later.
Yarn Boxes
Yarn boxes are very useful in keeping
your yarn under control—and not
just if you have a cat.
\
V
Ytini boxes
v
i ■
ow
k. -t
.vs^*-"
*&■■
*'«fti
X.
Mohair brush,
wool comb
Knitting dolly
All of the products shown on pages 10
and 11 are manufactured by Inox and
are available in craft stoies.
Mohair Brush, Wool Comb
Mohair brushes can be used to fluff
up mohair sweaters.
Wool combs remove pilled wool
and fuzz.
Knitting Dolly
Knitting dollies are used to "knit"
thin tubes of knitted material. For
people who are impatient, there are
also ''knitting mills" (not shown).
11
Yarns
/
\
Of course, the most
important thing besides
knitting needles is yarn. So
well start with a brief
description of the most
common kinds of yarn.
Alpaca
Alpaca wool (not to be confused
with Alpakka hatting) comes from
alpacas, which are part of the llama
family and live in South America.
Alpaca wool is fine, soft, and slightly
curly. You can get about I kg (about
2 lbs) of wool from an alpaca every 2
years.
Angora
The fur of Angora rabbits is fine and
lightweight, but also relatively
delicate. Angora has a very high
moisture absorption capacity; it can
absorb twice as much moisture as
virgin wool and four times as much
as cotton without feeling wet. An-
gora rabbits can be shorn every 3
months and each shearing yields
about 250 g (about Vi lb) of wool.
Ribbon Yarn
Ribbon yarns are made primarily
from cotton or viscose. They are
available in knit or woven form
and in different widths.
Cotton
Cotton—white gold—is the oldest
known fiber in the world. It grows in
tropical and subtropical climates, is a
pure, natural product, and does not
cause any allergies. It is breathable
and can absorb a lot of moisture. It
feels cool and comfortable even in
hot weather.
Something new on the market is
naturally colored cotton, which is
grown primarily in the U.S. The
earth-tone colors range from light
yellow to brown, from khaki to
olive.
Mercerized cotton is treated with
concentrated, warm soda lye to make
it shrink-proof, shiny, and stronger.
Cotton can be gas-treated to singe
off the projecting fiber hairs to make
the yarn even smoother.
Boucle Yarn
Boucle yarn is made from specialty
yarns with irregular loops, twisted
together with a "support thread"
that is generally thinner. The denser
the loops, the bulkier the knitted
piece.
Angora
,-r :>\
v-^-.vV..0n.
4n
Cotton
12
-,\v ■-.-•:■ *>*\ - i *<&-.*
ftV*£w.-•'•■
Ribbon
yarns
\\
1 *si
4/ ■■
'.« i'
&r
Boucle yarns are generally made
from wool or wool mixed with other
yarn. For light summer, boucle yarns,
cotton and linen can also be twisted
together.
Cable Yarn
For cable yarns, two or more
spinning threads arc twisted together.
Then several twisted threads are
twisted together again. Cable yarns
are very durable, but usually they are
not as soft as normal yarns.
/>
^
\ •;.
*r<
VV
\
Boucle yarns
&-.
■£
M
\
'X
^
aft
"^..
Yarns
Chenille Yarn
Chenille yarns can be made from
cotton or synthetics. They have a
plush-like and soft surface.
Therefore, they are not well suited for
textured patterns.
Wick Yarns
Wick yarns are open, soft yarns that
are twisted together only loosely
during spinning. Wick yarns with
thick nubs have a real country look.
Nubby Yarns
Nubby yarns are specialty yarns with
irregular, wick-like sections.
Frequently, the nubs are emphasized bv
being a different color.
Fluffy Yarns
Fluffy yarns are high-volume yarn&
that look like mohair or angora, but
are made from synthetic fibers.
Shorn Yarns
Shorn yarns contain a fine looped
thread. The specialty yarn is added
more quickly during spinning so that
the exce^ yarn forms small loops.
Shiny or Specialty Yarns
The list of shiny yarns is endless. The
natural exception is shiny silk,
because most shiny yarns are
produced from chemical fibers.
Specialty yarns* are generally used for
dressy pieces or for pieces made from
mixed yarns with individual "glittery"
areas.
Camel Hair
Camel hair has a slightly natural
shine. Pure camel hair cannot be
dyed. In order to obtain fashionable
colors, camel hair always has to be
mixed with other libers. Generally,
high-quality virgin wool is used tor
this purpose, since it is very similar to
camel hair.
Cashmere
Cashmere goats are not shorn; their
hair is combed out when they lose
their coats in the spring. A cashmere
goat only gives about 100 grams (less
than Va lb) of wool a year. That's why
cashmere is very expensive. Clothing
made of cashmere is very light and
soft. It also provides greater warmth
than any other type of yarn.
Lamb's Wool
Lamb's wool is obtained from the
first shearing of a young sheep. It is
particularly soft and warm.
Linen
Linen is a fiber obtained trom flax
plants. It feels cool, is slightly shiny,
relatively stiff, but not very pliant.
Linen yarn is best suited for summer
clothing, since it provides little
warmth and rapidly evaporates
moisture. For hand knitting, linen is
usually mixed with other yarns.
Metallic Polyester
These yarns are also called lame
yarns or lurex yarns. A very thin
metal layer is applied to a polyester
filament. Individual filaments are
also twisted together with non-shiny
yarns for a more quiet effect.
^o
\
Chenille
\,
>/ ;
f
\-»-
Chenille
specialty
yams
'i kr
\ ■»» \
»\\
."IS
Wick
yams
Multicolor
wick yams
-*».
^
s,
i\
'H
% Metallic polyester
yarn
13
Yarns
V J ' '
~»i
*">,
« V
x^
7
^^
X
-V
%^
i
\
Tweed and
nubby yarns
j <
Pure wool
Melange Yarn
The French word "melange" means
mixture. For melange yarns, fibers of
different colors are mixed before
spinning.
Mohair/Kid Mohair
Angora goats have a long, white,
curly coat. The wool obtained from
young goats is called kid mohair.
Since mohair dyes easily, it is
available in every fashion color.
Mouline Yarn
Mouline, also a French word, means
"twisting." For mouline yarn, two or
more different colors or different
types of filaments arc twisted
together. If the yarn is made from
different kinds of material and then
dyed, each material takes on the dye
in a different wav.
*
Shetland Wool
The wool of Shetland sheep is very
robust, and it is generally used to
spin country tweed yarns.
Silk
Silk keeps you cool when it's hot and
warm when it's cold. It is also very
comfortable. But it is not easy to
knit. Silk has to be knit very tightly,
because finished pieces stretch the
first time they are washed. Don't
check the gauge until after you have
washed your sample piece.
Tweed Yarns
Tweed yarns are nubby
specialty yarns with the nubs
dyed a different color.
Viscose
To obtain viscose, chemically pure
cellulose (from wood and other
plants) is treated with soda lye and
carbon disulfide. Viscose is easy to
knit; the finished pieces drape like
cloth. The yarn can be matte or
shiny. Viscose is often used as a
shiny specialty yarn in mixed
yarns.
N.
* A
N
\
\
-~ i
.V
1
Mouline and
melange yarns
Moh
air
.1
*\
-*C ' V.
— A.
Specialty yams ^ t;V&^:\
^
\
s r
14
Caring for Your Finished Knit
Here's some information
about how to wash and
store knits so that you will
enjoy the clothes you
create for as long as
possible.
ay attention to the cleaning
information on the yarn label.
For example, if the label
shows a washtub and a hand, the
pieces have to be washed by hand.
If there is a number in the washtub,
von can wash the items at this
temperature. A line under a wash-
tub means that you should use the
gentle cycle.
Yarns are often advertised as being
"easy-care." But that does not
necessarily mean you can wash
them in a washing machine. It only
means that they are easy to wash
and will dry quickly.
Here's a tip: Write the most
important care information onto a
laundry tag with a laundry pen, and
sew the tag into the back of the
nee
kline.
Storage
Knitted clothing should always be
stored lying down. Putting them on
a hanger would stretch them out of
shape under their own weight.
Also, wool clothing should never
lie in the sun, and it definitely
should not be dried in the sun.
Until now, it has not been possible
to dye wool so that it does not fade.
Washing and Drying
Knitted pieces should never be
soaked, because that quickly causes
felting. It is best to wash knitted
articles in cold water with
detergent for delicate items, and make
sure not to rub or brush them.
Also, don't wring them dry—just
squeeze out the excess water. Then
put the pieces between terrycloth
towels, roll them up, and squeeze
them dry.
If machine washing is permitted,
use the gentle cycle and a slow
speed for spinning.
To dry the pieces, spread them
out and pull them into the correct
shape. For example, cotton
sweaters sometimes shrink slightly
and can be stretched again while
wet; on the other hand, viscose
stretches, so those pieces have to
be pushed together slightly. If an
article is made from different
colors, put cloths between the
front and the back and into the
sleeves to check whether the
colors are still bleeding.
Use only a small amount of fabric
softener (and not just to protect
the environment). Don't ever use
fabric softener for "superwash"
yarns, unless you want to use your
sweater as a dust rag when it's dry!
Most yarns will not survive being
put in the dryer.
More Tips for Basic
Yarns
Angora is especially delicate. Wash
angora sweaters in cold water, with
a mild shampoo, and rinse well
many times. Then carefully squeeze
the water out, roll the piece in
towels, and allow it to air dry on a
towel.
Pure cotton can generally be
washed in a washing machine, at
140°F/60°C (see label). Use only a
detergent for delicates, without a
fabric brightener. Since cotton
absorbs a lot of water and therefore
gets very heavy, you should put the
piece into a mesh laundry bag so
that it can't stretch very much
during washing and spinning.
Pure silk is not resilient and will
stretch, particularly during the first-
wash. That is why you have to wash
your sample before checking the
gauge. Wash silk articles by
themselves and move them as little
as possible. Rinse with a lot of cold
water. Squeeze water out carefully
and allow the article to dry flat.
Viscose is similar to silk in that it
tends to stretch a lot. Viscose is
also not allowed to be pulled and
must dry flat on a towel.
Cleaning Symbols
Normal wash
cycle
Gentle wash cycle
\Vj H
and wash
®
®
©
Do not wash
Do not use
chlorine bleach
Use cool iron
Do not iron
Standard dry
cleaning
Dry cleaning for
delicate textiles
Do not dry clean
Dry on gentle
cycle (max. 1409F)
Do not put in
dryer
15
V
%
1
\
t
»
t
\
• 1
Eveiy knitted piece
starts with casting on
and ends with
binding off. Both of
these are basic
techniques, along
with increasing and
decreasing, knit and
ourl, selvedges, and,
ast but not least,
checking the gauge.
All of them are
explained in detail
with many
photographs and drawings.
Casting On
Every knitted piece starts
with a cast-on row. It
should not only be even
but it must also be
stretchable and durable,
so that the edges, not to
mention the whole piece,
don't lose their shape later.
Casting On with One
Needle
The best-known method of casting
on uses 1 needle. This Italian cast-on
method gives you a strong, stretch-
able edge that can be used with any
knitting pattern.
In order to achieve the best
possible appearance, you must work
very evenly. Don't cast on too tightly
in order that the first row is easy to
knit off. But you shouldn't cast on
too loosely either; otherwise, the
edge stretches out too easily. If your
stitches are too tight, you can also
cast on holding two needles together,
and pull the second needle out
before you start to knit the first row.
Before you start, measure out
enough yarn for the bottom part of
your piece for casting on. For every
stitch you cast on, you need about
34" of medium-weight yarn, slightly
less for thinner yarn. Add another 8"
to the length you have calculated. It
doesn't hurt to leave the yarn a little
long as you can always use it later to
sew the parts together.
You don't need a slip knot or any
other knot to start casting on with
this method.
Make sure that the first row after
casting on is a wrong-side row,
because the loops that form on the
back look like purl loops.
IWind the yarn end around the
left pinkie finger, bring it to the
back between your forefinger and
middle finger, and forward over the
forefinger. Then wrap it around
your thumb from front to back.
Hold both ends of the yarn
tightly and insert the knitting
needle from your right hand up
into the loop around your thumb.
3 Bring the needle behind the
yarn that comes from your
forefinger...
4 ...and draw this piece through
the thumb loop. Let the yarn
slip off your thumb.
5 Pick up the bottom piece of
yarn with your thumb again,
from the back to the front. Pull the
stitch tightly and lift your thumb
up again.
18
Casting On
The first stitch is now on the
needle in your right hand.
Now insert the needle into the
loop around your thumb...
...and pull the yarn through
again. Tighten the loop.
Repeat each of these steps for
a new stitch.
Making Doubly Sure
This method of casting on produces
an especially durable edge if you iu>c
double yarn for the bottom part. This
is particularly important for
children's sweaters as well as for socks or
hats, .since the cast-on edge is often
stretched a lot. Place the yarn
around your left hind as previously
above. The end piece of yarn has to
be about twice as long.
1 Place the end of the bottom
piece of yarn around your
thumb too and start casting on as
described on page 18.
After you have tightened the
first stitch, put the short end
piece aside and keep working with
the two loops of yarn on your
thumb.
Casting On Wide
Pieces of Sweaters
It's difficult to estimate the
correct length of the bottom piece
of yarn. Use a skein each for
the top part and the bottom
part, and knot the ends loosely
together. This way you can
cast on as mam stitches as you
like. Cut off the bottom piece of
varn at the end of the casting-
on row, and continue with the
top piece.
3 If you run out of yarn on the
bottom, you can easily make it
longer by putting an additional
piece of yarn into the loop.
19
Basic Techniques
Open Cast On
If you want to add a ribbing or band
later, use the open cast-on method.
This is also a way to avoid a thick seam
for pieces that are knitted crosswise.
Using yarn of a different color but
approximately the same thickness,
crochet a row of chain stitches. Pick Lip
a stitch from the back, crosswise part ot
each crochet stitch. Make sure to pick
up the stitches neatly, so that the chain
stitcher can be undone easily later on.
After the piece i> finished, pick up
the first row of stitches on a thinner
needle and undo the row of chain
stitches.
Now knit the first row as if it is on
the right side of the work, or purl as if
it is on the wrong side of the work,
using the thinner ribbing needle. If
you don't work this additional row,
the stitches knit with the heavier
needles can be clearly seen (see
photo to the right).
Even if you knit the ribbing in the
same color as the rest o( the piece,
you should work this additional row.
v
• » «
i
•
_±1
*
\
} »
ilk
" 4". "
t
■o
Simple Cast On
A simple cast on is not good for
casting on a large number of stitches.
The loops are difficult to knit from
the needle, and the row of stitches
does not stretch well.
A simple cast on is used for short
pieces, such as the top edge of
buttonholes. To start a row of bimple
cast on, you need a slip knot.
ITo make a slip knot, form a
loop with the end of the yarn.
Put the end of the yarn under the
loop and catch it with the needle.
2 Pull both ends of the yarn
while pushing the knot
towards the needle.
To cast on, place the yarn
around your thumb and...
...pick the front of the yarn up
with the needle from below.
Pull the loop tight with your
thumb.
20
Casting On
Knitted Cast On
Used a knitted cast on whenever
several stitches have to he added at a
side edge, such as for sweaters
knitted crosswise when you need
many stitches for the side edges at
the end of a sleeve.
For a knitted cast on at the
beginning of your work, vou need a slip
knot. For a knitted cast on of stitches
at the side of a started piece, always
cast on at the beginning of a row.
This method of casting on is not
good for ribbing, because it is too
loose.
^ V v
* W
V:
, ...V " •
IDraw a loop out from the first
stitch of the row (or out from
the slip knot if you are starting a
piece) and pull it a little longer
than normal.
>
Now insert the left needle
through the loop from the
front and below.
3 Put the loop onto the left
needle and pull the stitch
tightly.
Don't take the right needle
out. Use it to draw out
another loop, which you'll lift onto
the left needle again, etc.
This results in a loose edge
that is easy to knit off and
easy to sew together later.
From the Middle
It's a matter of luck if you
happen to find the yarn end in the
center of a skein in \ our first try.
In most cases, you will pull otit
loo much yarn. But only if you
pull the yarn out of a skein from
the middle will the yarn always
sta\ in the same place and not
roll around as you knit. This is
especially important when you
are knitting with sexeral skeins.
The little tangle of yarn at the
beginning is easy to untangle
dnd will soon be tisecl up.
v
€
^r
**Z
V
III
v<
\TT
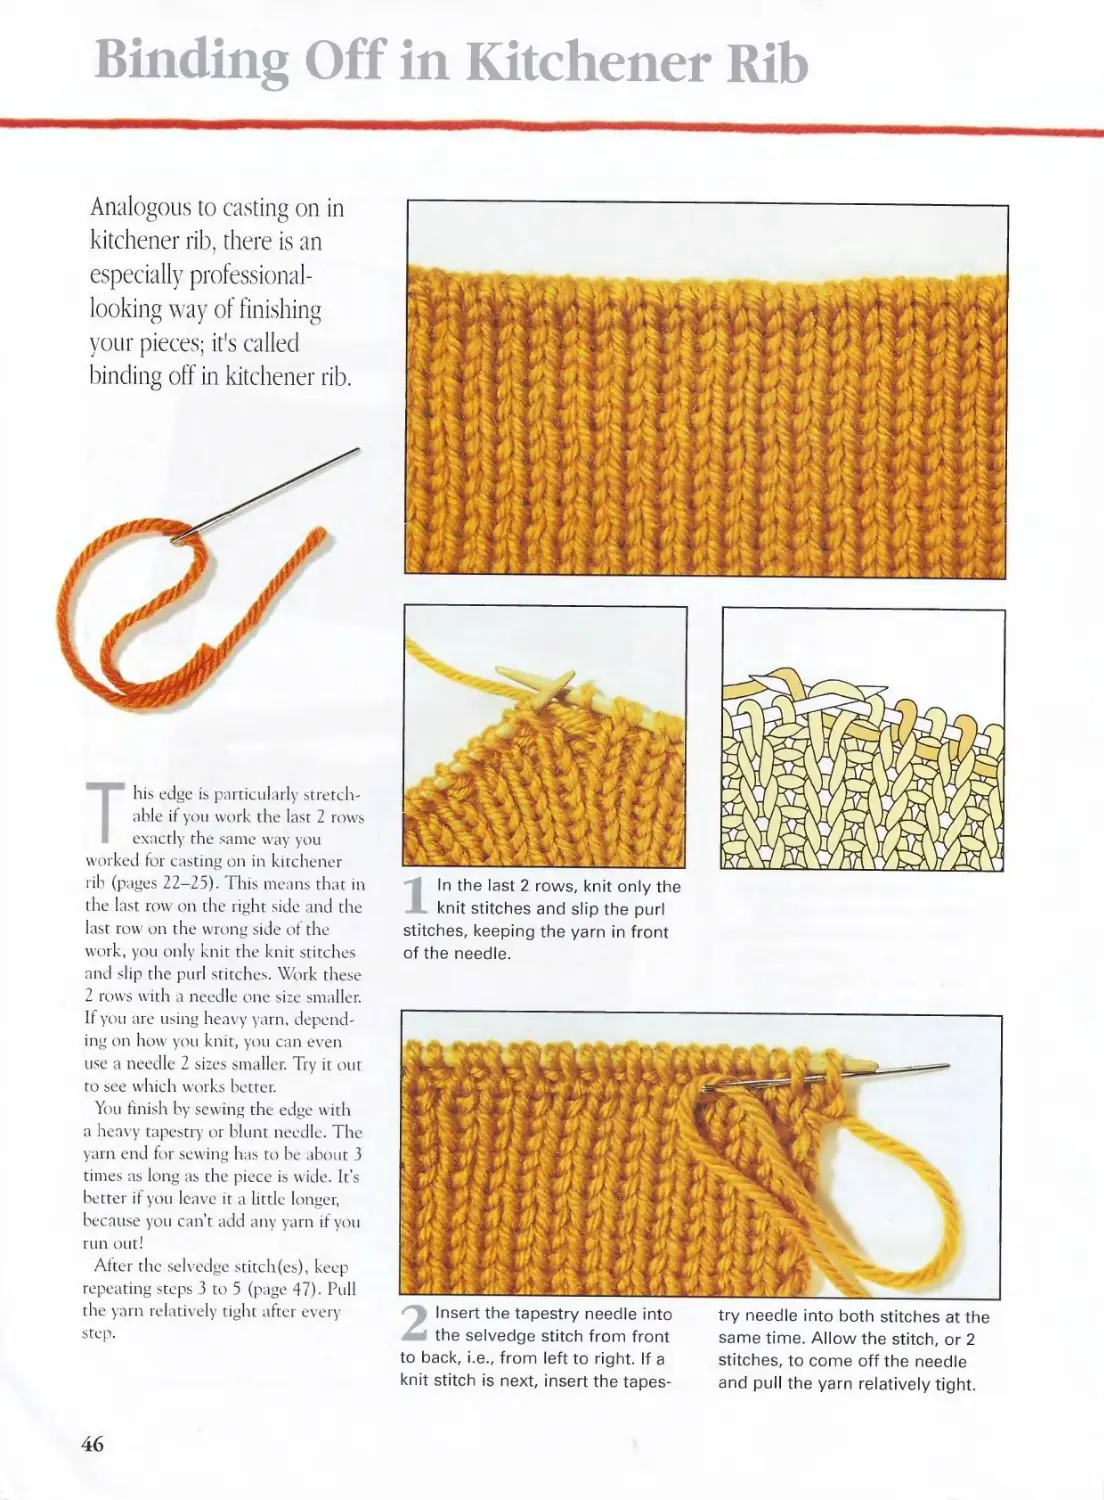
Casting On in Kitchener Rib
So that your hand-knit items
look as professional as
possible, you should try
casting on in kitchener rib.
This is also an 'Italian
method" of casting on.
To start, you can cast on with 1
needle or crochet a row of
chain stitches, using a yarn of a
different color in each instance, or
you can start with the yarn you are
going to use and cast on the number
of stitches you need right away.
These two ways will be described in
detail on the following pages.
Kitchener rib always starts with 4
rows that are knit on needles 1 or 2
sizes smaller than the rest of the
ribbing. In these rows, only the knit
stitches are knit; the purl stitches are
slipped. These four rows are knit
exactly the same way as a double -
face work (starting on page 160). If
>ou put the knit and purl stitches on
two separate needles, there will only
be knit stitches on both sides.
Casting On in
Kitchener Rib with a
Different-colored Yarn
There are two possibilities: Crochet a
row of chain stitches or cast on with
1 needle, as explained above. Choose
a yarn of a different color that is
equal in thickness to the yarn you
intend to use and as smooth as
possible. That allows you to undo the
chain stitches or cast-on stitches
easily after the piece is finished.
<g-
ICast on Vi the number of
stitches needed + 1 with a different-
colored yarn and largest size needle,
and knot ends together (bottom). Or
crochet a loose row of appropriate
number of chain stitches (top).
Number of Stitches
Feu- both ways, you need to crochet
or cast on half the number of stitches
needed plus 1 stitch. Or you can
calculate the number of stitches this
way:
Except for the selvedge stitches,
every stitch is doubled: 24 X 2 =
48 stitches plus two selvedge
stitches. So for 80 britches you need
41 starting stitches; for 90 stitches
you need 46.
Needle Size
If you intend to knit the basic
pattern of your piece using size 6
-BT
Then knit, or pick up from the
back, the crosswise part of the
crochet stitch as follows, using the
smallest size needles (for example,
size 2). After the selvedge stitch,
alternately knit 1 stitch...
...from the next stitch or chain
stitch then bring the yarn over to
end with a selvedge stitch.
3 In the next row, knit the loops
formed by bringing the yarn
over, and...
4 ...pick up the purl stitches
purlwise, keeping the yarn in
the front of your work.
22
Casting On in Kitchener Rib
needles, you should also use size 6
needles for casting on the first row.
Then knit the first 4 or 5 rows with
the main yarn, using size 2 needles,
and the rest of the ribbing with size 4
needles.
After finishing steps 1-4, you must
always knit the knit stitches and slip
the purl stitches purlwisc in the next
3 rows, keeping the yarn in the front
of your work.
After these 4 rows, keep alternating
knit and purl with the needles used
for the ribbing (for example, size 4).
■A«
■A
'it
' •»- t
* A *
I I
it
«*
When you are done, cut the
different-colored yarn at intervals
of 3 or 4 stitches...
...and pull out the pieces, or undo
the chain stitches.
Cross-over for
2x2 Rib
If you want to alternate 2 knit, 2 purl
stitches for your ribbing, start the
same way as for the 1 X 1 ribbing.
After the first 4 rows, in which you
only knit the knit stitches and slip
the purl stitches purlwise,
cross 2 stitches out of every
4 so that 2 knit stitches and
2 purl stitches lie next to each other.
Always choose a number of stitches
that can be divided by 4, plus 2
selvedge stitches. This means that
the pattern will be complete even
after the seams are closed.
After the selvedge stitch, knit the
next stitch, as before. Then always
alternately cross 2 stitches, as
described to the right, and knit 2
stitches as they appear.
You can also cross the stitches using
a cable needle. To do this, place
every 2nd purl stitch onto a cable
needle behind the work, first knit the
knit stitch from the left needle, then
purl the purl stitch from the cable
needle.
S I
.1
* f
V
-% V x, • V •
1
s
*\"\
l*
\
i •- •
4
1 First knit the stitch after the
next, i.e., knit stitch, passing in
front of the purl stitch. Leave both
stitches on the left needle for now.
.-> *
fit
i
J"
Casting on in
kitchener rib
looks good
whether you alternately
knit 1, purl 1, or knit 2, purl 2.
Now bring the yarn to the
front and purl the purl stitch
that is in front of it. Then slip both
stitches off the left needle. Knit the
next two stitches "normally."
23
Basic Techniques
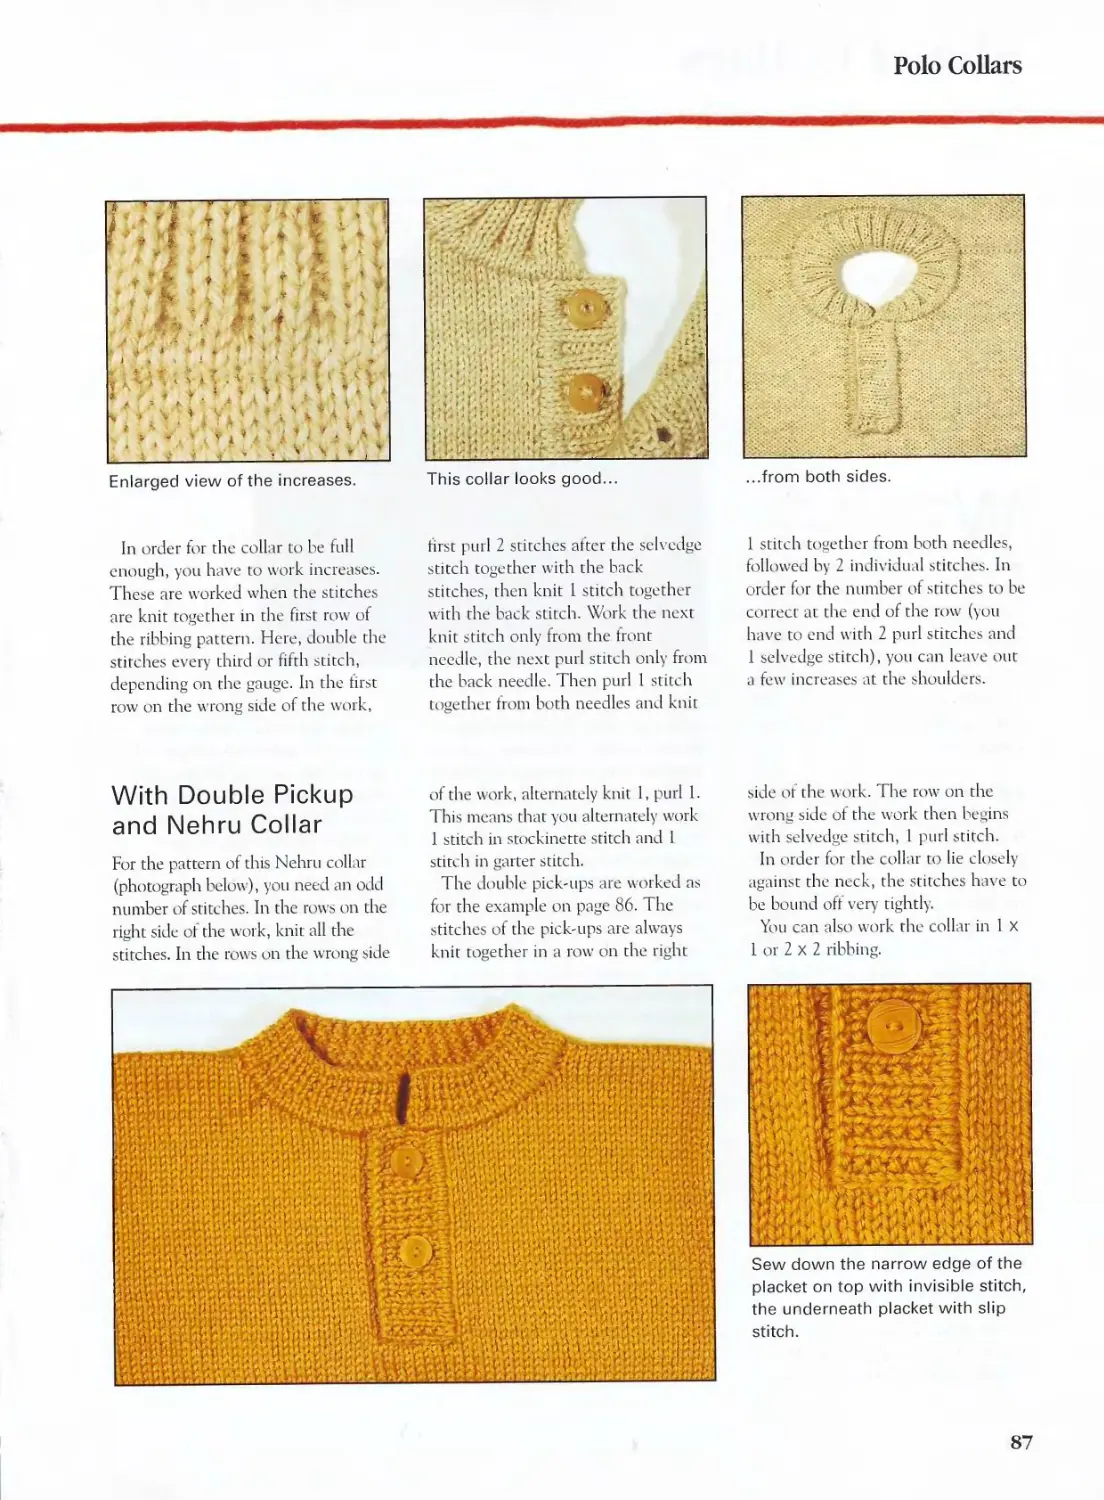
Casting On Kitchener
Rib with Main Yarn
Place the yarn around your left hand
as usual and then over your thumb.
The end of the yarn will hang over
the thumb and has to be about three
times as long as the intended width
oi the piece—as is the case for all
other types of casting on.
Hold the end of the yarn tightly
between your middle finger and your
ring finger. Work the casting on and
the next 4 rows using needles one
size smaller than the needles you will
use for the ribbing.
1 Bring the tip of the needle
from the left to the right under
the yarn, and turn it
counterclockwise to the left...
...so that a loop is formed on
the needle. Hold this loop,
which will be the selvedge stitch,
tight with your right thumb.
3 Bring the needle under the part
of yarn that is on your thumb,
take hold of the yarn with your
forefinger, coming from above and
going down, and draw it under the
yarn on your thumb and to the front
The yarn on your thumb is
now behind the first (knit)
stitch, that is, behind the needle.
Bring the needle from back to
front, under the yarn on your
forefinger. Take the yarn on your
thumb, coming from above and
going down, and draw it under the
yarn on your forefinger to the back.
The forefinger yarn is in front
of the (purl) stitch—in front of
the needle. It is on the needle the
"wrong" way and will be knit
twisted in the first row on the right side.
Keep repeating steps 3-5 and
end the row with a "knit"
stitch, that is, with steps 3 and 4.
Now turn the work and knit the
first stitch as a selvedge stitch.
24
Casting On in Kitchener Rib
% The next stitch is a knit stitch
• and is twisted on the needle.
Insert the needle into the back part
of the stitch, from right to left, and
knit this stitch twisted.
Place the yarn in the front of
your work and slip the next
stitch purlwise.
To make the individual steps
easier to understand, the yarn
on your thumb and forefinger is
shown in different colors in the
drawings and in the knit
example.
\
Once you have cast on the required
number of stitches in steps 1-7, turn
your work. From then on, you must
keep repeating steps 8 and 9; this
means that you must knit the knit
stitches twisted, since they are on the
needle the "wrung" way, slip the purl
stitches purlwise, and carry the yarn
along at the front of your work.
In the next 3 rows, keep on
knitting the knit stitches and slipping the
purl stitches purlwise using the
smaller-size needles.
After these 4 rows, continue
working in the ribbing pattern, using
needles that are one size larger—as
described for casting on with yarn of a
different color.
The finished ribbing looks the same
from both sides. After they are no
longer on the needle, the loops
formed by the yarn on your thumb
(which are yellow in the drawings)
form the knit stitches on one side,
while the loops formed by the yarn
on your forefinger (which are orange
in the drawings) form the knit
stitches on the other side.
"»
■\'\
: S
\
V
V
* »
25
Selvedges
Perfect edges are an
important part in knitting.
They make it easier to sew
the knit pieces together, and
those edges that are not
hidden away in a seam are
supposed to look decorative.
•0
\
For all knitted pieces that will be
sewn together later, I
recommend selvedge stitches that are
knit twice, that is, in eve 17 row,
rather than selvedge stitches that are
knit once. This makes the stitches
next to the selvedge stitches more
uniform. Also, the pieces can be
sewn together more attractively,
because when selvedge stitches are
knit only once, little holes often form
at the seams.
Seam Selvedge
For seam selvedge in stockinette
stitch, all the stitches are knit in the
stockinette pattern—i.e., all of them
are knit on the right side of the
work, purled on the wrong side of
the work; vice versa for reverse
stockinette stitch.
This firm selvedge is good for any
pieces that are going to be sewn
together later. So that the seam stays
flat, half stitches can be sewn
together in the case of thick or bulky yarns.
Also, this is the best seK edge if you
intend to knit on bands.
Garter Stitch Selvedge
In a garter stitch selvedge, the
selvedge stitches are slipped knitwise at
the beginning of each row, and knit
at the end of each row. Or vice
versa: the selvedge stitches are knit
at the beginning of each row and
slipped knitwise at the end of each
row. However, this way of knitting
has been shown to have some
drawbacks. In every 2 rows, there is an
offset in the knit piece, which
reaches several stitches into the
piece and remains visible even after
the seams are sewn.
For this reason, a knitted or purled
garter stitch selvedge is better. Here,
the selvedge stitches are knit or
purled at the beginning and end of
each row.
>
<>
V
« J
>
•
y
• 7 y
1 X
1
V
- -i
r r x
v
J
h.
Seam selvedgt
Knitted garter stitch selvedge
Purled garter stitch selvedge
26
\
I
Selvedges
\
> >
y-
v
Conventional chain stitch selvedge
V
Decorative chain stitch selvedge
Selvedges in shaker knitting
A knitted garter stitch selvedge is
good for any pieces worked in garter
stitch, since the rows tend to
contract more than in a stockinette
stitch. It is also good for mohair yarn
with very long fibers, because the
knots can be sewn together like the
parts of a zipper to allow the scam to
lie flat (see seams, page 113).
With a purled garter stitch sel-
\edge, the stitches can be pulled
even tighter. For this reason, this
selvedge is particularly good for shaker
knitting.
Chain Stitch Selvedge
Chain stitch selvedges can be knit in
two different ways: the conventional
chain stitch selvedge and the
decorative chain stitch selvedge.
For a conventional chain stitch
selvedge, bring the yarn to the front at
the beginning of every row on the
right side of the work, and slip the
selvedge stitch purlwise; bring the
yarn to the front again in front of the
last stitch and slip the last stitch
purlwise. In every row on the wrong
side, knit the first stitch twisted,
inserting the needle into the back part
of the stitch, and knit the last stitch.
For a decorative chain stitch
selvedge, in every row on the right side
of the work, knit the tirst stitch
twisted, inserting the needle into the
back part of the stitch, and knit the
last stitch; in every row on the wrong
side, slip the first and last stitch
purlwise, keeping the yarn in the front of
your work.
Selvedges in Shaker
Knitting
This selvedge is especially attractive
tor edges in shaker knitting that will
not disappear into a seam later. It is
worked over three stitches, in each
instance, at the beginning and end of
a row. You should knit these three
stitches as tightly as possible so that
this selvedge doesn't stretch out later.
On right side of work: Knit the
selvedge stitch, slip the next stitch
purlwise, placing the yarn in the
front of your work, then knit 1
stitch. Now continue working in the
shaker knitting pattern, beginning
and ending with a purl stitch. Over
the last 3 stitches, knit 1 stitch, slip 1
stitch purlwise, and, keeping the yarn
in the front of your work, knit the
selvedge stitch.
On wrong side of work: Slip the
selvedge stitch purlwise, placing the
yarn in the front of your work, knit 1
stitch, slip 1 stitch purlwise, placing
the yarn in the front of your work.
Then continue working in the shaker
knitting pattern, beginning and
ending with a knit stitch. At the end,
slip 1 stitch purlwise, placing the
yarn in the front of your work, knit 1
stitch, and slip the selvedge stitch
purlwise, placing the yarn in the
front of your work.
TIP
In every row, knit the
fi rst 4-5
stitches tightly, this will make
the edges next to the
vedges more uniform
also page 29).
sel-
(see
27
Knit and Purl
fc ,>
^
~* *
I
Knit and purl are
the basis of all knitting. No
matter whether it's a textured
pattern or an openwork
pattern, a cable pattern or
shaker knitting, these 2 basic
stitches are alwavs used.
ieces knit in stockinette stitch
have a flat, smooth surface.
Pieces in reverse stockinette
stitch have a grainy texture. Pieces
knit in garter stitch have a rough
surface.
For beginners, textured patterns
composed of knit and purl stitches
are best. The combination
possibilities are almost infinite. If the knit
and purl stitches are arranged
vertically—i.e., in rib patterns—the
knit stitches are more prominent. In
horizontal stripes, purl stitches form
a clearly marked crosswise rib.
Some examples of simple knit-purl
patterns are shown on page 30.
to
1- »/ Z l \ -A L V V\ ■
^nUnl -tpxIKji- i^t^'t^
?* .y • [TO I F» 1 v . v ▼» 4. rv* • f ' / 'j ./ I ^ > i
4N
11
:1
■4 V>
•o
K v
*>.»'
:\V
*0
v*.
\\
w
rK?
3^
>^
v^<s av^; :. >v~^
r • Vi:.
.V
W'ttS-V
V4 ' ^
^v
Stockinette:
K?i/f every rrnt" o?i
t/ie right side of
the work, purl
every row on the
wrong skle.
Garter stitch:
Knit every row,
both on the right
side and on the
wrong side of the
work.
Reverse
stockinette: Purl
every row on the
right side of the
work, knit every
row on the wrong
side.
28
Knit Stitch
Knit and Purl
1 Insert the right needle into the
first stitch of the left needle,
going from front to back.
Pass the yarn under and up
the front of the right needle.
Draw it through the stitch with the
right needle.
Drop the stitch from the left
needle. The stitch on the right
needle is a knit stitch.
Purl Stitch
1 Place the yarn in the front of
your work. Insert the right
needle into the first stitch on the
left needle, going from back to
front.
Pass the yarn over, down the
back, and under the right
needle. Draw it through the stitch to
the back.
Drop the stitch from the left
needle. The stitch on the right
needle is a purl stitch.
Attractive Edges
When knitting pieces in
stockinette stitch, some stitches at the
Mdes, directly next to the sel-
vectee stitches, look verv tight,
and those in the row above
them look \erv loose. This
problem is generally even more
pronounced on the left side.
The cause for this lies in the
previous row! When inserting
the needle into the stitch, the
yarn of the previous row is
generally pulled up a little too
much, and then the next stitch
is made. This way, a little bit of
extra yarn is pushed along to
the next stitch, almost invisibly,
at every stitch. This is not so
obvious within the row but at
the end of the row—
ed with a little bit of practice:
In every row. you have to
pull the first 3—-i stitches after
the selvedge stitch tightly, and
knit the last 3—i stitches more
loosely.
v v» * «■*.
the excess yarn spreads
out over the last few
stitches before the
selvedge stitch.
These unattractive
edges can be prevent-
•\}
■...« 'I 'sR'l .
iV*» w.,-.}■> „
i
t
1 ■*
.-x . A
v>
A. k']U < ^ ^ ■
■■■■■■ r* l:X ?^ • ^ ^
i
, 4. . -, • f ■ -\\ ... \'t *i ^ v,«
■ . . ■■,>.;«. '-v %^- •• •
-*Vi
^1
^ Y< 'r{-'v
v'
* - ■ ■ *.
29
Basic Patterns and Color Changes
You can knit lovely textured
patterns using simple knit
and purl stitches. Here are
some examples.
Small Seed Stitch
Alternately knit 1 stitch, purl 1
stitch. In the next row, knit over the
purl stitch and purl over the knit
stitch. Use even number of stitches.
Large Seed Stitch
Just as in small seed stitch,
alternately knit 1 stitch, purl 1 stitch,
but work two rows of the same
stitches betore switching stitches.
Use even number of stitches.
Box Stitch
For this pattern, you need an even
number of stitches. Alternately knit
two stitches, purl two stitches, and
switch the stitches after two rows.
Ribbed Stitch
For this pattern, alternately knit two
stitches, purl two stitches. So that
the pattern matches at the yearns,
start with 1 knit stitch on the right
side of the work, 1 purl stitch on the
wrong side.
Crosswise Rib
After 5 rows of stockinette stitch,
knit a row on the wrong side o\ the
work. This row will form the
crosswise rib on the right side.
\
-r
ft - -
w H
f * v »
X
K
.*
Small seed
stitch
*i
v. j..'-1 i v.
M
r--
^
4
Large seed
stitch
I
,.. .: * .-
\
1
i.
/r=:
>v
<i
%v*
- ^- " i.
J?
tn,v
itT
wi \"
- ' ('<"> t* &'
.*'*
m
.sV
- V
•V
*
■*
V,
v, *
Box stitch
~t.
\ : *5* x *
»i - • ■■■--. -.
' ■ '. » -
■- • -V
\i
I, x.
& -■"*'
•£
I
Ribbed stitch
x: ■•■*■
>•
*■'-■% \
■\
>\ V
Crosswise
rib
30
Basic Patterns and Color Changes
Color Changes in
Reverse Stockinette
Stitch and Patterned
Stripes
"Lines" form when knit and purl
stitches come on top of each other in
horizontal stripes with textured
patterns. In order to have a clear
color differentiation on the right side
of the work with these patterns, the
stitches in the first row of a new
color have to he knit on the right
side and purled on the wrong side.
This makes the two-color line show
on the wrong side of the work.
* * « j
<*r- _
,«■»•'
i <
These 4 rows in aqua and white are
in reverse stockinette stitch. The line
is made in the first row of the new
color each time the color changes.
» • «
F,r
v,
« i J A . 1 • A
After the first 4 rows, knit 1 row on
the right side of the work and then
work 3 rows in reverse stockinette
stitch in every color. The colors
will not mix together.
- 1
~. — v
> i *
&
5. -1%
TIP
Work color patterns with an
uneven number of rows, like
the box stitch pattern
without a "line" (see column 3.
row 2 photo on this page),
on a circular knitting needle.
This way, you can always
push the stitches to the end
of the needle where the
yarn for the new color is
located. \ou won't have to
sew in all those ends after
e\ en color change.
*>*
-\
#■
--' v
Here the pattern is alternately 2
knit, 2 purl, and after every other
row—i.e., in every row on the right
side of the work, the stitches are
switched. A new color starts every
6 rows. In all seed or box stitch
patterns, purl stitches in the new
color will show up as a line.
**. .
v.
1 . » \
' I '
1 \ \ \
* » >
V
■\ •
_ • I «
■ :'^- ;
.v*
■r *
■=- v*
Here the box pattern is knit over 7
rows. The first row of each new
color is worked as an additional
row. It is knit on the right side of
the work and purled on the wrong
side. This additional row is hardly
noticeable in the pattern. Only the
stripe is a little wider.
At the bottom, the
stitches between the
cables are done in
reverse stockinette stitch.
At the top, these
stitches are worked as knit
stitches in the first row
on the right side each
time there is a color
change. This allows
better color definition.
31
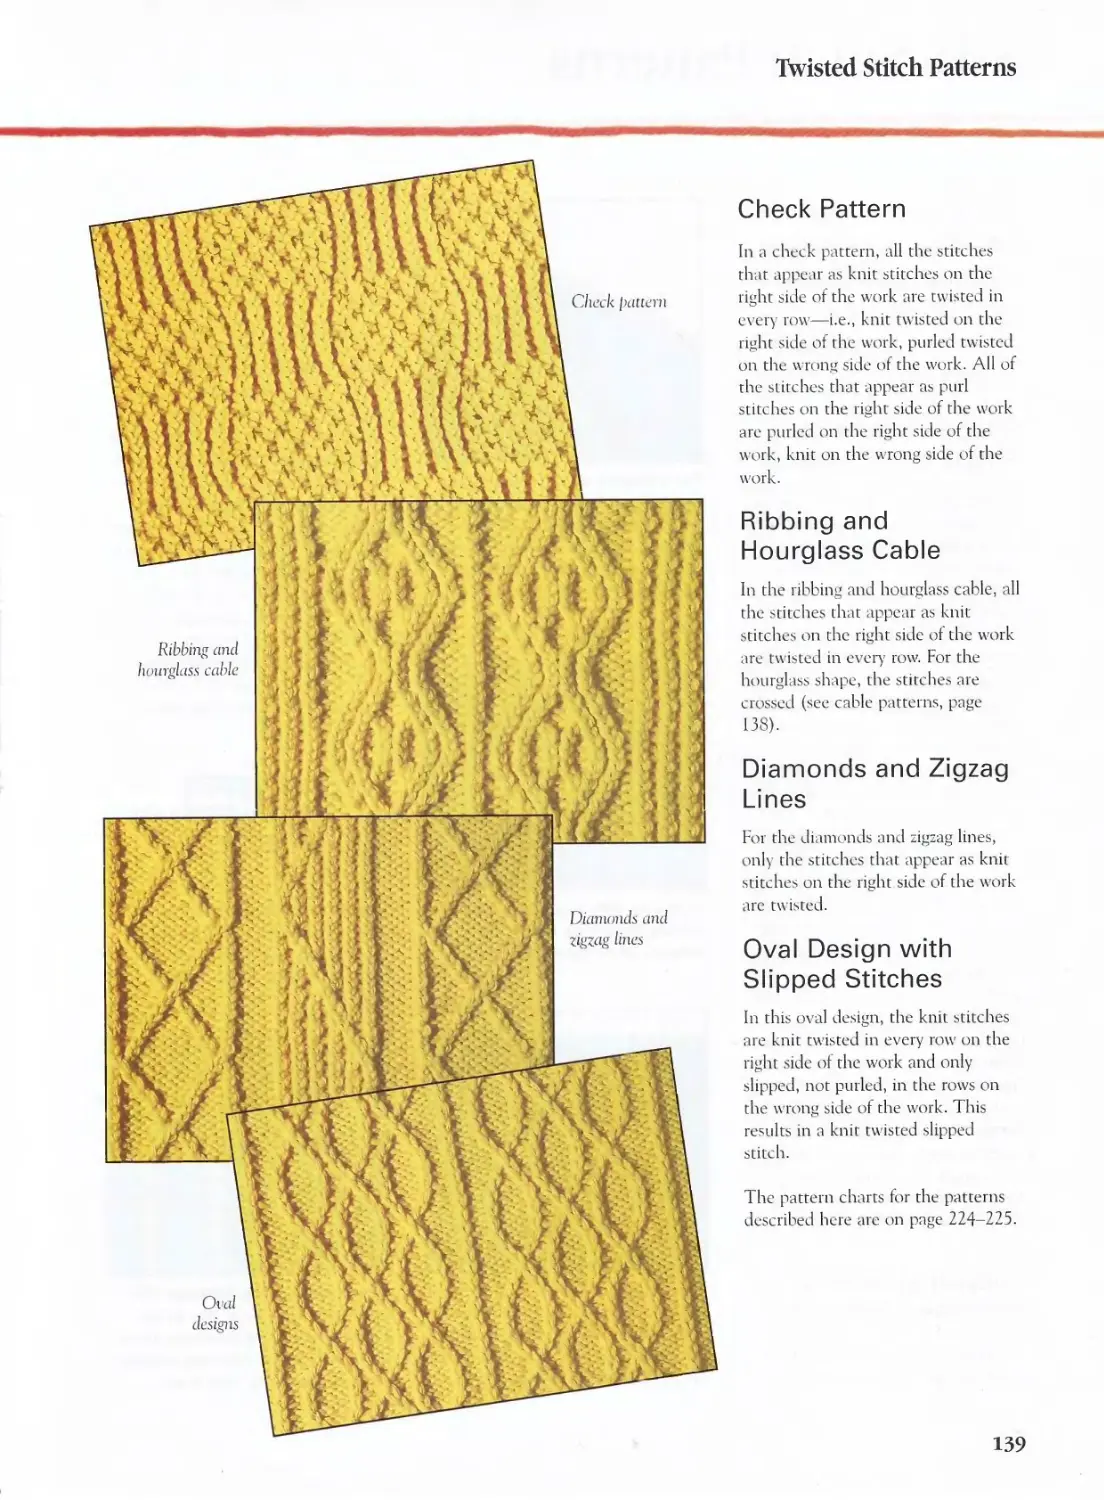
Decreasing
v $^4'''-~
$&$AW,<>< Decreases
'•'*"■' "■""'"'•" should always
.. r"-f-'
■> .«$"|iiH Hi"'
;# o ts
^llll ■ III"! >
III t
II I
U) ,U
be worked in
such a wav
,, that they
4) match the
4 knitted
/^;^ • piece as
perfectly as
possible. This also applies
to decreases at the edges
and within a piece.
hen working rounded or
slanted shapes at the side
edges—such as armholes,
V-necks, or raglan
patterns—individual stitches have to he decreased at
the edges. These decreases should
always match the design o( the piece
and the knitted pattern.
If only I stitch has to be decreased
at the armhole or the neckline, you
can simply knit or purl the selvedge
stitch together with the stitch next
to it as needed. However, for raglan
sleeves or V-necks, it looks better if
you shift the decrease 1 or 2 stitches
in from the edge and knit the second
and third, or third and fourth
stitches together. In the examples shown,
the third and fourth stitches were
knit together or worked together, as
appropriate.
Decreases within a piece are
worked the same way as at the edges.
If you want to decrease symmetrically
on both sides, you must knit or work
two stitches together two times. You
need such double decreases for V-
neck edgings, picot, or openwork
patterns.
M*' *
-A
.ni
rt i.'
M1:k
?'
,k~v\ *>
> \ -K
v A *y
*
T»"
*<t
■ ■ **l
; •
■i- •;
.>■ •" i '* %
i
Decreases slanted
to the left: Kim I
stitch after the
selvedge stitch, then
work a single
decrease; slip the
next stitch knit-
•wise, knit J stitch,
and pass the
slipped stitch over
it.
Decreases slanted
to the right: Knit
to within 4 stitches
from the end of the
row, knit the next
2 stitches together,
knit I stitch, then
work the selvedge
stitch.
On the right side,
a single decrease
to the left is
worked with the
last stitch of the
stockinette rib and
the next stitch. On
the left side, the
first stitch of the
rib is knit together
with the stitdi in
front of it.
\%
32
Decreasing
Knit Decrease
For a 1-stitch decrease slanting to the
right within a knitted piece, knit 2
stitches together.
1 Insert the needle into the front
of the two knit stitches from
left to right.
Draw the yarn through to the
front knitwise, and drop both
stitches from the needle.
Slip Decrease
Work a single decrease slanting to
the left by passing 1 stitch over the
other.
1
Slip the first stitch knitwise
onto the right needle.
Knit the next stitch and pass
the slipped stitch over it.
Twist Decrease
You can also work decreases slanted
to the left by knitting the stitches
twisted. This will cause the stitch on
top to twist.
l
Insert the right needle into the
back part of the 2 knit stitches,
from the right to the left.
2 Draw the yarn through to the
front knitwise, and drop both
stitches from the needle.
33
Basic Techniques
Purl Decrease
In reverse stockinette stitch, you can
work all the decreases by purling 2
stitches together. However, if the
decrease is supposed to be symmetrical
on the stockinette side, purl 2
stitches together for a decrease slanted to
the right.
1 Insert the right needle into the
front of the next 2 stitches,
from right to left.
2 Draw the yarn through both
stitches purlwise, and drop
these stitches from the needle.
Purl Slip Decrease
Woi k a single decrease slanted to the
left on the stockinette side by passing
1 stitch over the other.
1 Carefully drop the first and
second stitch off the left needle.
Pick up the second stitch with the
right needle and pick up the first
stitch again with the left needle.
2 Now purl the first stitch (the
stitch on the left needle) and
then pass the second stitch over
the first stitch at the back of the
work.
Purl Twist Decrease
For a decrease that will be slanted to
the left on the stockinette side, you
can also purl 2 stitches together
twisted. This causes the stitch on the
right to twibt, just as when knitting 2
stitches together twisted.
1 Insert the right needle into the
back of both stitches at the
back of the work, from left to right.
Draw the yarn through the
stitches purlwise, and drop
both stitches from the left needle
34
Decreasing
Double Decrease
Slanting to the Left or
to the Right
If you want to decrease 2 stitches,
you can knit 3 stitches together for a
decrease slanted to the right. For a
decrease slanted to the left, you can
knit 3 stitches together twisted, or
you can work as described on the
right.
For a double decrease slanted
to the right, slip the first stitch
knitwise, knit the next 2 stitches
together,...
...then pass the slipped stitch
over the 2 knitted-together
stitches.
Double Decrease with
Center Stitch on Top
This decrease, also called a decrease
with 2 stitches passed over, is
frequently used for lacy openwork pat-
terns. It is also the most attractive
decrease for the center of V-neck
neck bands that are knitted on
(starting on page 80). Working a
double decrease with the center
stitch on top is described on the
risht.
ISlip the stitch in front of the
center stitch, together with the
center stitch, knitwise.
2
Knit the next stitch and pass
the slipped stitches over it.
r* ^
I i I
n
>
f
£4
tl
For decreases in the wrong side
rows, slip 1 stitch. On the right side,
knit this stitch together with the
stitch in front of it. On the left side,
work a decrease slanted to the right.
V
**•
-A
■it >
**■
H
r \
Av
it
.f,
1*
i
■ x .l
* t * * s
On both sides of the edge, purl
together 2 stitches. For the band tip,
knit together 2 stitches on the right
side of the center, and a decrease to
the right is worked on the left side.
W
\
r
■$..
\ i
i
*\.
i i
ti
-v
For this band, 3 stitches are purled
together 3 times. The last decrease
is worked with the knit stitches
slanted to the left (see above).
35
Increasing
&
"^
vM-
For slanted edges of sleeves
and sides, wider parts after
ribbing, and many different
textured patterns, stitches
have to be added in
different ways. All the
various kinds of increase are
explained in detail on the
following pages.
Increases for Slanted
Edges
These increases are generally knit
into the horizontal part of the yarn
between 2 stitches by twisting the
strand so that no holes will form.
It is best not to work the
increases directly sv -,
next to the
selvedge
stitches, but rather 2-3
stitches in from the edge.
When the pieces are sewn
together later, using an
invisible seam, the crosswise
parts of the yarn can be sewn
together precisely. I recommend
an increase next to the second
stitch, particularly in openwork
patterns, since the horizontal threads
pull out of shape even more when
the yarn is wound around the needle
36
(see also sleeve increases in
openwork patterns, page 192).
Increasing Several
Stitches
If several stitches have to be
increased at the sides, such as for the
body of a sweater knit crosswise, you
can add the stitches at the beginning
of a row by knitting them on or by a
simple cast on (see casting on, page
20-21). However, it is better to knit
them on. If you use a simple cast on,
the edge will not be as stretchable,
and these stitches are also more
difficult to knit off.
Increases After
Ribbing
Stitches also can be increased after
ribbing. At the waist, a few increases
are generally sufficient, but after
tight wrist ribbing, the number of
stitches to be added is generally
greater. These increases should be
distributed evenly over the entire
width of the piece so that you don't
get ugly "bulges." And the increases
should be worked twisted so that no
holes appear.
If a simple pattern is used after the
ribbing, such as stockinette stitch,
the increases can be worked in the
first row of the pattern. However, if
the body of the piece is being worked
in a complicated cable, openwork, or
jacquard pattern, it is easier to work
the increases in the last row of the
ribbing. This gives you the right
number of stitches right from the
first row of the pattern.
Some patterns require double
increases after the ribbing—for
example, if you arc goimj to continue to
work in a ribbed pattern or in shaker
knitting. Such increases are the most
attractive if you work a twisted purl
increase before and after the purl
stitch, and knit the purl stitch.
Double Increases
Within a Piece
In some patterns, double increases
have to be worked within the knitted
piece, i.e., a stitch is increased on
both sides of one or several center
stitches. If you work these increases
the same way on both sides of this
center stitch, the increases will both
be slanted to the left and look
asymmetrical.
*t
.->
\
^S."-.Mil ?'.:? f ■ .pV1 vi'\' -X-V^V
Y
^
Whenever you have to
increase several stitches at the
sides, such as for items that are
knit crosswise, knit the stitches on
(see casting on, page 21).
Increasing
To make your knitting appear
symmetrical when working with
increases with yarn over, work the
yarn over ahead of the center stitch
''the wrong way." Place the yarn over
the right needle from the back to the
front; but after the center stitch,
place the yarn over the normal way.
In the next row on the wrong side of
the work, purl the normal yarn over
ahead of the center stitch twisted,
and just purl the "wrong" yarn over
after the center stitch.
For increases from the horizontal
threads between stitches, pick up the
horizontal thread ahead of the center
stitch from back to front and knit it;
after the center stitch, pick up the
horizontal thread from front to back
and knit it twisted.
These symmetrical increases are
important for emphasized slanted
edges that are knit from the top to
the bottom. Here, the pattern is
uniformly widened on both sides of
the center stitches, and the increases
recede into the background.
In the knitted examples on the
following pages, the increases are
worked on both sides; however,
they can be worked either only on
one side or on both sides.
Patterns with
Decreases and
Increases
Here are two more examples of
patterns in which double decreases and
increases form the basis of the
pattern. The increases are worked with
yarn over; the double decreases are
worked with the center stitch on top.
:-*,iV/.f" V*-! il* '^Hv
For t/iz's sltnu, a
)Ymi-oi'er increase is
worked on both sides
of the large seed
stitch pattern on
every other row, on
the right side of the
work, and purled oy\
the wrong side.
* I \ n' *■ * I
For this increase on
the side, knit I
twisted stitch from
the horizontal
thread on every
fourth row.
1
*A> v
\
r
^>
V
' T
1-
V
*M-
}-
V
- *
V
H
t.
* •»*
■i*
.7- ' ;
Sx
^ »
i
1
i
1
t
\ \ v
4
x V'
•
<
1
-
\
-*
w.
4
V
1 >
•
•
1
V
i
1
1
N T »
» t '•
4
«
In these two
patterns, the
chevron shape is
created with
decreases and
increases.
i r
v
V
o
37
Basic Techniques
Knit Increase Without Twisting
1 Using the left needle, pick up
the horizontal thread between
2 stitches from front to back, and..
2 ...knit it. The new knit stitch is
on the right needle. This
increase creates a visible little hole.
1 v $ ' '■",.■
« t . 7 r
■ * • i
. M •' ■ ■ '.. . * .
On both sides of the center stitch,
1 stitch is increased from the
horizontal thread, without twisting; 2
little holes can be seen here.
Twisted Knit Increase
K- '\
Using the left needle, pick up
the horizontal thread between
2 stitches from front to back, and...
...knit it twisted by inserting
the needle into the back part
of the loop.
I- ■•:■. V
i
1 "» t
* •
.■?■'
X
. • . >
. > ,;>
. s >
v • V*V%-
h .
■
i
f
i
1
- i
t .
On both sides of the center stitch,
1 twisted stitch is increased from
the horizontal thread; there are no
holes in the knitting.
Symmetrical Increases from Horizontal Thread
IFor symmetrical increases,
pick up the horizontal thread
ahead of the center stitch from
back to front...
...and knit it. Work the
horizontal thread after the
center stitch with a twisted knit
increase (see above).
f
« •
k * ^
' i
%
\ J
>.
v
* *
*
The increases are symmetrical if
the horizontal thread ahead of and
after the center stitch are worked
as described on the left.
38
Increasing
Purl Increase Without Twisting
1 Using the left needle, pick up
the horizontal thread between
2 stitches from front to back, and..
...purl it. The new purl stitch is
on the right needle. This
increase creates a visible little hole.
Twisted Purl Increase
1 Using the left needle, pick up
the horizontal thread between
2 stitches from front to back and
purl it twisted...
...by inserting the needle into
the back part of the loop from
left to right. This prevents holes in
the knitting. On the stockinette stitch
side, this increase slants to the left.
Increases in
Ribbing
In 1 x 1 ribbing, you should
always work double
increases. To do this, increase
1 stitch with a twisted purl
out of the horizontal thread
after a knit stitch, then knit
the next stitch (which was a
purl stitch), then increase
another stitch with a twisted
purl out of the next
horizontal thread. In this way, the
ribbing is maintained even
after the increases.
-1
* V
V
1
•V)-.
Symmetrical Twisted Purl Increase
IThis increase is important for
a symmetrical appearance in
stockinette stitch. Using the left
needle, pick up the horizontal
thread between 2 stitches from the
back to the front, and...
2 ...purl it by inserting the
needle into the front part of
the stitch from right to left. The
loop will twist by itself. On the
stockinette stitch side of the work
this increase is slanted to the right
>
39
Basic Techniques
Increase with Simple Knit Yarn Over
1 Place the yarn over the right
needle from front to back, and
continue knitting normally.
In the next row, on the wrong
side of the work, purl the yarn
over the loop.
I. \iA V "'U * v &• i ■ P
KASk \ • • ■ '■-•<
■*yl '11-. '■ V-"
Increase both sides of center stitch 1
stitch with a yarn over. Purl stitch the
new loops on the purl row of the
wrong side. This makes 2 large holes.
Increase with Twisted Knit Yarn Over
1 Place the yarn over the right
needle from front to back, and
continue knitting normally. In the
next row,...
...purl the loop twisted by
inserting the needle into the
back part of the loop from left to
right. On the stockinette stitch
side, this increase slants to the left.
v , 7 '
»\V ■ - » ;
*» *
i,
On both sides of the center stitch,
increase 1 stitch using a yarn over,
and purl it with a twist in the next
row. This makes the holes smaller.
Symmetrical Increases with Yarn Over
IFor symmetrical increases on
both sides of the center stitch,
place the yarn over "the wrong
way" ahead of the center stitch, and
"normally" after the center stitch.
2 In the next row, purl the
"normal" yarn over twisted. Purl the
"wrong way" yarn over as shown.
On the right side of the work, this
increase is slanted to the right.
For symmetrical increases, work
the yarn overs differently before
and after the center stitch.
40
Increasing
ncrease from Previous Row Stitch
1
Using the right needle, pick up
the horizontal loop of the stitch
in the previous row and knit it.
2
Then knit the stitch itself.
Increase in Previous Row Stitch
For increasing in the stitch of the
previous row, don't pick up the
horizontal loop, but instead insert
the needle directly into the stitch in
the previous row and knit it.
f
*\ s'
i
/
% *
r
f •
t
t
i «
*
Over the same stitch, knit 1 stitch
in the stitch of the previous row,
knit 1 stitch, and knit 1 stitch in the
stitch of the previous row. Don't
drop the stitch from the left needle
until all 3 stitches have been made.
Increasing from the previous row
stitch is good for the slanted edges
of sleeves. Work this increase 2-3
stitches in from the side edges
(see drawing on the left).
ft".
\
1 : V k.v ,;
. 11
I »
j ii_
In the same stitch, knit 1 stitch, knit
1 stitch in the previous row, and
knit 1 stitch. Don't drop the stitch
from the left needle until all 3
stitches have been made.
- 1 . 4 »% H,
. > * I • * I J.
.* » v \ \^ *i
, ..V, » m j- \ v'<>.
»«<<**%
< -.»
I
- f
/ *' *
* • *■' i > *
' ' ' I • ) 4 f
f r ' > • . * I
t*„< *'." y* r ./ .{/j' < For this decorative corner, the in-
creases are worked with yarn
overs. The center stitch is
slipped in the knit rows
" ' % ' * * <# «' « i - rf ' ' r < .,♦ j
and purled in the
purl rows.
' - 1
' r _
. k .» . »
'''J. ' ' • r
' I
I* ' *
f <
« r
f
t -
4 >
l
1 * •
v \
< i
' • -
* ' • i t .
1 ■« ■ •' t r f.
• t
41
i hiding Off
s.
-.%*
V
You have to bind
off stitches at the end of
knitted pieces, at armholes
and necklines, and also for
buttonholes. You can
choose from among 3
different ways: binding off
by passing stitches over
each other, binding off by
knitting stitches together, or
finishing with crochet.
Binding Off by
Passing Stitches
over Each Other
with the pattern—tor example,
alternately 1 knit, 1 purl.
Work as close to the tip of the
needle as possible and make sure that
when you are passing the stitch you
are binding off over the next one and
you don't pull it out too far.
In the binding-off row, keep an eye
on the pattern, because this row will
still show a little once the pieces are
sewn together.
Binding Off by Knitting
Stitches Together
When you bind off by knitting
stitches together, you get a firm edge
that doesn't stretch much, because
the binding-off stitch is only as large
as a normal stitch, since it is picked
back up onto the left needle. In nor-
mal binding off, on the other hand,
the stitch is usually pulled out a little
when it is passed over.
Knitting the stitches together is
therefore good for patterns in which
the stitches tend to pull together,
such as cable patterns as well as for
jacket or pocket bands that are not
supposed to stretch. Also, it is very
good for shoulder seams, since it will
keep the seams from stretching out.
V*v
A-
Y:\
\v-\
i
V
1
Finishing with a
Crochet Hook
Some knitters prefer to finish with a
crochet hook. The size of the hook
influences how loose the edge will
be.
For a normal, relatn ely stretchy
edge, use a crochet hook that is the
same size as the knitting needles. For
an especially strong edge, such as for
front bands, use a smaller crochet
hook. For a looser edge, such as for
neck bands that will be turned in
and sewn down later, use a bigger
hook.
Insert the crochet hook into the
stitch the same way you would knit
the stitch following the pattern: for
stockinette stitch from front to back;
for purl stitch from back to front.
No matter how you bind off, there
will always be 1 stitch left over at the
end of the row. Draw the end of the
yarn through this stitch and pull it
very tight. Then you can sew the
yarn end into the selvedge stitches or
use it to sew rhe pieces together.
■ k
\
\ ■»
The stitches in the binding-off row
are adapted to the pattern. For
textured patterns, con tin tie according to
the pattern, bind knit stitches oft
knitwise, purl stitches purlwise.
The binding-off row of ribbing can
be worked entirely with knit stitches;
this will make the edge turn slightly
forward (see knit-on bands, page 62).
But an edge bound off entirely in
knit stitches is less stretchable than
an edge bound off in accordance
42
A *
Binding Off
Binding off by
[Kissing stitches
over each other
in stockinette
stitch: For pat-
terns with knit
stitches, knit the
stitches and then
bind them off by
passing one over
the other.
Binding off Iry
passing stitches
over each other
in reverse
stockinette stitch: For
patterns with purl
studies, purl the
stitches and then
bind them off by
passing one over
the other.
v
For patterns with a stockinette
stitch background, knit the
selvedge stitch and the next stitch,
then pass the selvedge stitch over
the second knit stitch. Keep
knitting 1 stitch at a time and
passing the previous stitch over it
until all the stitches are bound off.
For patterns with reverse stockinette
stitch background, work selvedge
stitch and purl next stitch, then pass
selvedge stitch over second purl
stitch. Keep purling 1 stitch at a time
and passing previous stitch over it
until all stitches are bound off.
Binding off by
knitting stitches
together: This
results in a firm,
non-stretchable
edge, which is
especially good for
patterns that "pull
together," such as
cable patterns, or
for bands and
buttonholes.
Knit the first 2 stitches on the left
needle together, twisted, and put
the finished stitch back onto the
left needle Keep knitting 2 stitches
together until all the stitches are
bound off.
43
Basic Techniques
Finishing with a
crochet hook also
produces a neat
edge. The size of
the crochet hook
detennines the
stretchability
of the edge.
When binding off
cable pattern
stitches, knit 2
stitches together,
more than once if
necessaiy, so that
the pieces dont
become too wide.
^
When you finish with a crochet hook,
draw a loop through selvedge stitch.
Pick up 1 stitch at a time from
knitting needle, add it to stitch on
crochet hook, and crochet both stitches
together like a chain stitch, i.e., pull
working yarn through with the hook.
Binding Off in Cable
Patterns
When you bind off large cables, the
edge usually gets very wavy if you
knit and bind off all the stitches.
This could easily cause problems
when you sew shoulder seams
together or sew sleeves in.
You can eliminate this excess width
by knitting the center stitches of the
cables together before you bind them
off. If the cables are very wide, you
can knit 2 stitches together 2 or 3
times.
Shaker knitting
stretches out easily
at points that are
subject to greater
stress, such as the
shoulders. That is
why it is especially
important to bind
off firmly.
rt
Binding Off in Shaker
Knitting
In shaker knitting, the stitches are
bound off the way they lie. Yarn
overs are knit together with their
related knit stitch, purl stitches are
purled.
You will get a stronger edge if you
knit the last row before binding off,
not in the shaker pattern, but rather
alternating knit and purl without
yarn overs. Then you can bind off by
knitting the stitches together.
44
Binding Off
If your binding off edge
has become too loose
or irregular, don't
despair! You can pull
the stitches up so that
they come out perfect.
\
4
any knitters have
problems with binding off
uniformly and precisely
to measure. When binding off
sleeve stitches, that isn't so
important, since the binding-off
row disappears into the seam
later. But for cardigan and
pocket bands, or for shoulder
seams, which are not supposed
to stretch too much, firm edges
when binding off arc very
important.
Always start at the beginning of
the row so that you can sew the
excess yarn away when you are
done. If you work in the other
direction, you will end up with a
loop.
If you bind off in a row on the
right side of the work, turn the
piece and work from left to right.
One stitch at a time, pull tip first
the back part of the stitch (the
*v
V
■\
.r\
\ »x
!■ > v
\ \< * 'I
Y... ^ 1
.« *
T
» *
' V-
.\l
- *"
V s!
; *
* v
part that is facing the front oi the
work), then the front part of the
stitch. Do this for every single
stitch.
If you bind off in a row on the
wrong side of the work, you can
pull the stitches up on the right
side of the work. Here again, first
pull up the back part of the stitch,
then the front part of the stitch,
of every single stitch.
\ : * O* . V'
1 ,
\V >
v\.
-V\
'1
Viv
V
«
ss
* **v»
-»;'■'■'v
Even a band knit loosely with
many stitches will fit perfectly
after the stitches are pulled up.
The binding-off stitches will be
precise and uniform at the top
edge, and in the right size.
45
Binding Off in Kitchener Rib
Analogous to casting on in
kitchener rib, there is an
especially professional-
looking \va) of finishing
your pieces; it's called
binding off in kitchener rib.
\ y y
•*
f /
•
\
I
ti
K
his edge is particularly stretch-
ahle if you work the last 2 rows
exactly the .same way you
worked for casting on in kitchener
rih (pages 22-25). This means that in
the last row on the right side and the
last row on the wrong side of the
work, you only knit the knit stitches
and &lip the purl stitches. Work these
2 rows with a needle one size smaller.
If you are using heavy yarn,
depending on how you knit, you can even
use a needle 2 sizes smaller. Try it out
to see which works better.
You finish by sewing the edge with
a heavy tapestry or blunt needle. The
yarn end for sewing has to he about 3
times as long as the piece is wide. It's
better if you lea\e it a little longer,
because you can't add any yarn if you
run out!
After the selvedge stitch(es), keep
repeating steps 3 to 5 (page 47). Pull
the yarn relatively tight after every
step.
^
V
fc
'i
Iln the last 2 rows, knit only the
knit stitches and slip the purl
stitches, keeping the yarn in front
of the needle.
\*
V •
v.
Insert the tapestry needle into
the selvedge stitch from front
to back, i.e., from left to right. If a
knit stitch is next, insert the
tapestry needle into both stitches at the
same time. Allow the stitch, or 2
stitches, to come off the needle
and pull the yarn relatively tight
46
Binding Off in Kitchener Rib
Now insert the tapestry needle
into the purl stitch from left to
right—i.e., from back to front—and
pull the yarn tight. Leave the stitch
on the needle for now.
Insert the tapestry needle from
right to left through the last knit
stitch (not on the needle) and at the
same time through the next knit
stitch (on the needle). Pull yarn tight.
5 Then insert tapestry needle
through the purl stitch again,
from right to left, and pull yarn
tight. Then let the 2 stitches—1 purl
and 1 knit—drop off the needle.
47
Basic Techniques
Binding Off in
Kitchener Rib for
2x2 Ribbing
Since binding off in kitchener rib is
actually only possible with 1 X 1
ribbing, the ribbing has to be prepared
properly.
In the third-to-last row, which is a
row on the wrong side of the work,
you "exchange" 2 stitches. If you
start the ribbing in a row on the right
side of the work, purl 1 stitch, knit 2
stitches, purl 2 stitches, etc. If you
start the ribbing in a row on the
wrong side of the work, start by
purling 1 stitch.
Now, in a row on the wrong side of
the work, knit the selvedge stitch
and purl 1 stitch. Exchange the next
2 stitches as follows: First knit the
knit stitch, which is not the next
stitch but the one after it, and leave
it on the needle. Then place the yarn
at the front of the work, purl the purl
stitch, and let both stitches drop
from the needle.
Alternately, keep on working knit
1, purl 1, exchange 2.
If you tend to knit rather tightly,
pull the knit stitch slightly to the
front with the right needle, because
this will make it easier to insert the
needle from left to right as you finish
an exchange. You can also use a
cable needle to exchange the
stitches, just as for crossing stitches.
But in most cases this takes even
longer and involves even more effort.
Now work 2 more rows the same
way as in 1 X 1 ribbing, and then
start working with the tapestry
needle.
v.
*
i
■ »
t
y
r
«
/
\
*r
s
•
■
*
i
1
"k_. H
t
1 t
1 "* •
,1=
• ■
c*
r . \
1
V
a
§
1 ■ *
%
1 ••
*
•t
*
*
In a row on the
wrong side of the
work, knit I stitch
and [nirl I stitch
after the selvedge
stitch. Cross the
next 2 stitches:
First knit the knit
stitch, which
comes after the
next stitch. Then
place the yam at
the front of the
work,...
...purl the purl
stitch, which is in
front of it, and let
both stitches drop
from the left
needle. Keep
repeating these
steps over 4
stitches. After you
are done, you will
end up with
alternating knit
and purl stitches
on the right needle.
Finish by working
2 rows with
slipped purl
stitches and using
a tapestry needle
to finish as in
I X I ribbing.
48
Binding Off in Kitchener Rib
Binding Off in
Kitchener Rib When
Knitting in the Round
Tight-fitting neckline ribbing is
usually worked with short circular knit-
ting needles. This is the most
attractive way to work necklines, because
it avoids a seam.
Here again, the last 2 rounds have
to be worked with slipped stitches.
To do this, in the first round, knit all
the knit stitches and slip the purl
stitches with the yarn at the front of
the work. In the next round, work all
the purl stitches and slip all the knit
stitches with the yarn at the back of
the work.
After these 2 rounds, start with the
tapestry needle and in a purl stitch:
Insert the tapestry needle into the
purl stitch from left to right and pull
the varn tisht. Leave this stitch on
the knitting needle for now. Then
insert the tapestry needle through
the last knit stitch on the right
needle, and at the same time through
the next knit stitch on the left
needle, from right to left, and pull the
yarn tight. The stitch on the right
needle stays on the needle. Now
insert the tapestry needle into the
purl stitch again, from right to left,
and allow the first 2 stitches to drop
from the left needle.
Continue working as for open
ribbing until the end of the round.
After the last purl stitch has been
bound off, pull the yarn end in to the
inside and sew it in on the back.
After having put
the tapestiy needle
through the purl
stitch and pulled the
yam tight, put the
tapestry needle
through the last knit
stitch on the right
needle and the first
knit stitch on the
left needle and pull
the yam tight. Then
put the tapestry
needle through the
purl stitch again. At
the end of the
round, sew the yam
end in on the inside.
TIP
Always make sure that your
yarn end is long enough for
binding off in kitchener rib.
You need about 3 times the
width of the piece. You can't
add more yarn if you run out
before you finish.
Two neck bands finished with binding off
in kitchener rib. Here's how you can save
a neckline that has come out too wide:
Under the first neck band, knit an a
second, slightly longer neck band in the
same color or a contrast color (see also
necklines, pages 76ff.).
49
Gauge
»»,
Before you
start knitting
an article of
clothing,
you should
always knit a
sample to check your gauge!
This is absolutely necessary,
because everyone knits
differently, and you might
need more or fewer stitches
and rows for the same
width. Even though it takes
a little time, it will save you
time in the long run—not to
mention money and trouble.
Use the same yarn as the one
you intend to use for your
sweater or cardigan. Pay
attention to the information on the
label.
You should always work a sample
that is at least 5" X 5" square.
Selvedge britches and casting-on and
binding-off rows generally don't give
reliable measurements. Before you
measure your sample, dampen it
slightly, block it, and let it dry—in
other words, treat it just like your
finished piece will be treated.
Now place the sample piece on a
smooth surface; you might have to
pin it down.
Using a stitch gauge (available in
needlework stores), you can easily
count the stitches and rows. But you
can use a simple tape measure, too;
putting pins in at the appropriate
locations will help.
If the number of stitches and rows
matches the information on the label
or in the instructions, you can go
ahead and start knitting.
A \-J * Ml kN ' " Mir ft ^ . &- - IMR
:;'1 •• iHV^^n v •" fV^ "41 i$
;] iTfc' Fjr Pilii|ii i nipt iii|iiniiii|iiiiiin|inl|iTii|iii'!|ii'iifiilrti ip
rj^f't fM po ^ in co r— co en
51 -I I 'I I ■ W GERMANY
•J li ll • 'W LiUli Jinlii 11 nJilH. I ilnuliuiliiu HJlJIi Ji Jl IIIJlJlH
~m-
-0
/ ■.j 3 '"'I
^ t ij "
t .
ti| iTTKi |if1i
ID l|l
l| 1*111
t |llll|lfll|llll
IX)| CO
n ctBMJtirr
Jl'Hl llljll'i
flll|MM]1ft (I II Il1[fll I III Mil II l| II IHI|lllt
p^ os m a ^ ^
lllll li'JlllLlllli ll|ll lllll I'lljllll llljllll
,,,-,. -I, ,♦.,-,.
K
mpii
CO
Iiiiliiii
Hlllllll
lllllllll
Cable patterns
lend to pull
together in
comparison with
stockinette stitch.
That is why you
must ivork a
separate sample
piece for each
pattern and check
the gauge.
Pieces worked in
shaker knitting
tend to stretch
when worn: Single
shaker knitting
tends to stretch
length u nse, Donblc
shaker knitting
tends to stretch
sideways. Stretch
your sample piece
correctly before
counting the
stitches and rows.
If you counted more stitcher and
rows, you knit too tightly. Then use a
larger-size needle. If you counted
fewer stitches and rows, you knit too
loosely. You should use a smaller-size
needle.
Pattern Samples to
Check Gauge
For the gauge oi pieces in stockinette
stitch or reverse stockinette stitch,
the ratio of stitches to rows is about
2:3. The same holds true for textured
patterns and for intarsia worked in
stockinette stitch.
For jacquard patterns, the number
of stitches is generally the same as for
stockinette stitch, but you need
fewer rows in comparison. For uniform
jacquard patterns, the ratio is
actually only 1:1—i.e., you need an equal
number of stitches and rows for a 4"
square. Some patterns have to be
stretched slightly to measure them—
for example, you should stretch
50
Gauge
For jacquard
patterns, the
number of stitches
over the width is
the same as for
stockinette stitch,
but you need
fewer rows for the
same length.
Different
hinds of
stitch and
row counters
are available
in needlework
stores.
.^H^V^Ik \
TT
v ' *1 V
7
«.»
«.•
'< -.1 \
ill
"B
»fc
i,? *. /At-K-.- ^ 3 =
•h
\*a
** ■:•'
s —
J> —
z —
-< *■»
V.T
• Mi*, v.-
fi.\
, ^neHa**"
UI#MWM
/*■
A
«*". i»
A *i «*
%>*
&>
no* w
I
e y, % »SS?-.afisa^sise-"
l« sSRB *S-
*
• •
• •
ribbing out sideways
slightly before measuring.
Pieces worked in shaker
knitting also stretch out
as you wear them. You
should stretch samples
worked in single shaker
knitting the long way slightly, while
samples worked in double shaker
knitting should be stretched sideways
slightly, before you count the number
of stitches and rows.
For cable patterns, you need more
stitches than for stockinette stitch. If
you arc combining cables and
stockinette stitch, you must knit a sample
piece for both patterns. This also
holds true for all other kinds of
pattern that tend to "pull together."
You can calculate the required
number of stitches for the desired
width of your piece using the table
below. The selvedge stitches always
have to be added. For a gauge of 22
TIP
Even if your sample piece
has the correct gauge, check
your work again once your
piece is about 12" long.
Many knitters work differently
when they have a lot of
stitches on the needles, as
compared with working a
small sample piece.
stitches per 4" and a desired width of
22", you will need 66 + 55 + 2
selvedge stitches = 123 stitches in
total.
Number of Stitches per 4 Inches
'/."
Vi"
%"
1"
2"
3"
4"
5"
6"
7"
8"
9"
10"
11"
12"
10
1
2
2
3
5
8
10
13
15
18
20
23
25
28
30
11
1
2
2
3
6
9
11
14
17
20
22
25
28
31
33
12
1
2
3
3
6
9
12
15
18
21
24
27
30
33
36
13
1
2
3
4
7
10
13
17
20
23
26
30
33
36
39
14
1
2
3
4
7
11
14
18
21
25
28
32
35
39
42
15
1
2
3
4
8
11
15
19
23
26
30
34
38
41
45
16
1
2
3
4
8
12
16
20
24
28
32
36
40
44
48
17
1
2
3
4
9
13
17
21
26
30
34
38
43
47
51
18
1
2
4
5
9
14
18
23
27
32
36
41
45
50
54
19
1
3
4
5
10
15
19
24
29
33
38
43
48
52
57
20
1
3
4
5
10
15
20
25
30
35
40
45
50
55
60
21
1
3
4
5
11
16
21
26
32
37
42
47
53
58
63
22
1
3
4
6
11
17
22
28
33
39
44
50
55
61
66
23
2
3
4
6
12
17
23
29
35
40
46
52
58
63
69
24
2
3
5
6
12
18
24
30
36
42
48
54
60
66
72
25
2
3
5
6
13
19
25
31
38
44
50
56
63
69
75
26
2
3
5
7
13
20
26
33
39
46
52
59
65
72
78
27
2
3
5
7
14
20
27
34
41
47
54
61
68
74
81
28
2
4
5
7
14
21
28
35
42
49
56
63
70
77
84
29
2
4
5
7
15
22
29
36
44
51
58
65
73
80
87
30
2
4
6
8
15
23
30
38
45
53
60
68
75
83
90
31
2
4
6
8
16
23
31
39
47
54
62
70
78
85
93
32
2
4
6
8
16
24
32
40
48
56
64
72
80
88
96
51
^
•
.«■ -.
4
» >
x'
i •
I V
V
•
• A
V
i
The details are what's important! Whether it's a
simple ribbing or a double facing, neckline or
collar, pocket or buttonhole—perfectly
worked details decide the
quality of your finished
piece.
•- \
• \
* >
»
V
i
»
1
\
1
f
.
V
* »
' ^ • 1 > t ' L- . V
1
i
»
* • I 4
1
I
I
V
I •
1 . «,
I 1
t
<
\
%
» V 1. *
•> ■> ;
^ l. -t
Bands, Hems, Ribbing
Attractive ribbing and bands
on a sweater can
catch the
eye. ' \
The more decorative
the outside edges, the
prettier the piece. No '
matter which method
of casting on
you prefer, you
should match the bands to
the main pattern as well as
possible.
Bands are the edges at the
beginning of a knitted piece, whether
they are wristbands on the
sleeves or waistbands on the back
and front. They can range from
traditional ribbing—1 or 2 stitches
alternately knit and purled, either worked
normally or twisted—to double hems
to bands that are patterns in
themselves with cable patterns or
openwork patterns. Everything is possible.
A rolled edge worked in stockinette
stitch is very simple to make but also
very decorative.
Make sure that after the casting-on
row (except when you are using open
casting on), you always work a row-
on the wrong side of the work first,
because the casting-on row itselt
forms a purl-like line that often does
not match the pattern.
a v
■*
i
A
.\
■ >
*
),.
Ribbing should be stretchable and
slightly gather the piece. That is why
it is generally worked with a needle
one or two sizes smaller than the rest
of the piece. Thib holds true even for
bands that are worked double.
So that the seams match too
If you are working a 2 X 2 ribbing,
the number of stitches should be
divisible by 4, plus 2 selvedge stitches—
for example, 50 or 98 stitches. No
matter whether you start with 1 or 2
knit stitches or purl stitches, the
pattern is maintained even after the
parts are sewn together.
For 2x2 ribbing, cast on a number
of stitches that is divisible by 4,
plus 2 selvedge stitches. After the
parts are sewn together, the
pattern will also match at the seams—
»•, i
I
Always start the
ribbing with a row
on the wrong side o)
the work so that the
purl stitches of the
casting-on row are on
the inside of your
sweater.
In the first row on the wrong side of
the work, purl I stitch; the row will
then also end with a purl stitch and
the selvedge stitch. After the pieces
are sewn together with an invisible
stitch (sec pages 112ff.), 2 knit
stitches will be right next to one
another. Or start the first row on the
wrong side of the work with 2 purl
stitches; then you will automatically
end with 2 knit stitches. Here again,
the pattern is complete after the
pieces are sewn together.
>;' \\\ r
T
f
i
\
\S «■
4 ¥
\
regardless of whether you begin
with 1 or 2 stitches knit or purl
after the selvedge stitch.
54
Bands, Hems, Ribbing
• 1 '-V
1 • ■ >
..,'-■ ■■■■;. .\tf -V
ik- ^ ■ * -it i -I * . .~
v: - ' * * . .vrjb »■# . * - „
J.I'
1 ■• <s
r ' t *• { ~* i .>■■:>■ . ' . v. -\. , "■*• v v . - ■""
:j- ">v-;v-.?L v.- •#■ •<".'.*-/A ' .'-" vV'-r:i--:
■ ^■..\- v-"»v* ^-K^ j-^ \.\ a'-:*.j* :.^ ^^"'. *;v '.;
Vi7ir/i tu'/stccl
St/tc/lC5
■^
*:
..^
s i
,*
Wlt/l SL'L'J
stitch in the ribbing \ . .-- .;*. ,.. .. -h- l S'
^ t - - . \
Seed stitch edge
all
aroum
I
>.
I
V S * ^
.v.- -
n
.5 V
Gancr
With Twisted Stitches
In the rows on the right side of the
work, alternately knit 1 twisted stitch
and purl 1 stitch. In the rows on the
wrong side of the work, alternately
knit 1 stitch and purl 1 twisted
stitch.
With Seed Stitch in
the Ribbing
After casting on, begin with a row on
the wrong side of the work,
alternately knit 1, purl 1. In the row on
the right side of the work, knit all
the stitches. Keep repeating these 2
rows.
This ribbing is less stretchable. It is
good for boxy sweaters with a
straight cut and tor straight facings,
such as for polo necklines or side
slits.
Rolled Edge
For this edge, work about %" to 114"
in reverse stockinette stitch, then
work in stockinette stitch. Work the
rows in reverse stockinette stitch
with a needle one size smaller so that
the edge does not become too loose.
Seed Stitch Edge All
Around
Small bced stitch is gooJ for bands
and fucintis. But it dues not stretch.
Alternately knit 1, purl 1, and offset
the work in the rows on the wrong
side of the work.
Garter Stitch
Edges worked in garter stitch do not
roll tip. Knit all the rows.
55
Perfect Details
Kitchener Rib Cast On
and Stripes
If the ribbing includes a few stripes in
a contrasting color, a sweater worked
in only one color other than the
additional color in the ribbing has a much
fresher look. Casting on in kitchener
rib is described starting on page 22.
Mini-ribbing and
Jacquard Border
If you want to work a jacquard border
into the band, because of the yarn
carried on the back of the work, you
either have to work a double hem
(page 58) or start with a very narrow
ribbing (in the photo, it was started
by casting on in kitchener rib).
A border worked in stockinette
stitch is not stretchable. It is
therefore good for waist-length sweaters or
long sweaters with a side slit. Work
with needles one size smaller than
the basic pattern requires to the end
of the border.
Two-color Ribbing
Here the 2-color rows arc worked
using the jacquard technique
(starting on page 142). The selvedge
stitches always have to be worked
with both yarns.
After the casting-on row, in the
next row, on the wrong side of the
work, alternately knit 1, purl 1, then
continue in 2 colors: In the rows on
the right side of the work, work the
knit stitches with the first color, the
purl stitches with the second color,
and vice versa in the rows on the
wrong side of the work. Make &ure
that the yarn not being used is
carried at the back or the work in the
rows on the right side of the work,
and at the front of the work in the
rows on the wrong side of the work.
At the end, continue ribbing in just
the first color for another 2 rows,
then continue in the desired pattern.
ft,
i
Kitchener
rib cast on
and stripes
>
<\ t
V~
\- :
i
*
>
V- -
•I *..
k
v ^;
*
. *■■*
i •>
•- V-'
t i
Mini-ribbing
and
jacquard
border
i *
\
-4
■n
1'
# * ' *\
. %
.U"
*i \
vS
\ "
» 1
i'
1 x
"s
I T * l V » - V ,. 1
Two-color ribbing
X
1
1 «
U
1
» «^i >
H
> H
• T,
t
fr
•^.\-
^ ^
; * 7 .. i
> : ' i ^ ; I : * . ¥ • *, *.
\ ■ f*t f . V - '. ■- ^ \ * ' c • .> ,
. - . • . x * 4 - • * > ^ «* ^
*'i .
\
'• n\.
■ S :
V
i^ v
•An ^
I",, j**' •'-- •*$ .-'■
\?>
** t ..
Tiro- color
ribbing
, • ■ ' v I • l3 ■- n \ - "v. * ^ • <<?**>
1, ^
V .
:'-■;> .• --v
t s
»7
f'
v. -V ■ "*
56
Bands, Hems, Ribbing
>.
f-
t *>
A^-
* >
•■■v.-:
\
•
* *-
s ' ;
V
•%,
-■ * .y
\ •:
.1
-v
■*s
<" 1 *!.
r
^
*.
/
\\vzt/i targe
cables
>*•
"I:
, - «^ ■' -' ' ■■•■■ -^
«■"•<
t
/ •
a*. '
• if-
%*- Aft "** j
4V y--.
^
V... «*\
\>
V
V-'.
€ :
■ ».*
I J*. i"« -
With small
cables
S
"A;. .
::V.v-y.
."X.
T
', .•«,- *
•"i*.-**"
■>
X
l$*"i
*»*?*■
n^:?
.T/.
r.
'^^v'
, f
%
r- '
r^
^
u
-V
^» »•
V -%
A'
:/
Ope?iu'or/<
pattern with
points
^
\'-» %iA>
OpL'iui'orfc
pattern
with garter
stitch
■ '£
* &&
r*. -
' -i
With Large Cables
If you w ant to work a sweater with
ribbing and cables, this band is a nice
"finish." The wide cables (worked
over 8 stitches) are worked over the
entire sweater; the narrow cables
(worked over 4 stitches) turn into
stockinette stitch ribs tee cable
patterns, pages 132ff.).
With Small Cables
On the left, 2 stitches are crossed to
the left every other row, and on the
right every 4th row. Cables pull the
stitches together a lot. If you
continue in stockinette stitch after the
ribbing, don't increase any more
stitches; if the sweater is supposed to
be boxy, you have to decrease a tew
stitches (see cable patterns, pages
132ft).
Openwork Pattern
with Points
Bands of openwork are also very
attractive on sweaters worked in
stockinette stitch. The increases and
decreases usually result in a wavy edge,
which does not roll up or only rolls
up slightly (pattern chart on pages
218ff.).
Openwork Pattern
with Garter Stitch
This pattern is also good for bands,
since it does not roll up because of
the garter stitch. The length of the
pattern can be varied; it is always
offset by half a pattern repeat
(pattern chart on page 219).
57
Perfect Details
Double Hems Knitted
Together
Cast the stitches onto two needles
(or on a needle two sizes larger),
then work 6 or 8 rows in stockinette
stitch using the ribbing needles,
starting with a row of purl
stitches nn the wrong side of the
work. After the 8 rows, work a
row of knit stitches on the wrong
side of the work, and then
another 6 or 8 rows in stockinette
stitch. Then pick up the stitches of
the casting-on row on a thin needle,
and knit I stitch from the main
needle and I stitch from the cable
needle together.
If you need an odd number of rows
for the desired length of the hem,
work 7 or L) rows of stockinette
stitch, for example, then I row of
purl stitches on the right side of the
work, and then another 7 or 9 rows
of stockinette stitch. Again, the
stitches are knit together with the
casting-on stitches in a row on the
rieht side of the work.
^X
t.
Pick the stitches of
the casting-on edge up onto a
thin needle.
■\
Now always knit
I stitch from the knitting
needle and I stitch of the
casting-on row...
*fc, -
;<A A „
...together and keep
working this way to
the end.
If the hem gets a little
too loose, you can pull
a wide elastic through it.
i
*-k
■ 3
V
X
•*•■ 'V, *<v(
-~- Pi, i.^-
?'
.";%r!.^,v;\
s;
Picot Edge
For this decorative edge, instead of
working the turning line with purl
stitches, work a row with yarn overs
on the right side ot the work. For
this, you need an even number of
stitches and must work this row as
follows: selvedge stitch, "knit 2
stitches together, work 1 yarn over,
keep repeating from*, selvedge stitch.
Afterwards, purl L row on the wrong
side of the work and then work the
same number of rows as before the
row of openwork. Then knit the
stitches together with the picked-up
stitches of the casting-on edge.
J. -
■. * Y N
•
>
1 *
*•
'1* *
<&**£. '
> Y >
.'il \i *
S
c
' I-"
i
-"* » ■.
1
'*.
^T
■ ■• ' i
. *<• \
11 j»
■v
»
■ V
^ ♦
/S li^'>*
.
>
)■
k.
"f&
For a row of openwork, alternately
knit 2 stitches together and work 1
yarn over. Pick up the stitches of
the casting-on row as for the
double hem, and...
•mil MmnV^mm If
•a v ' IT- hr '. T * ? 'i^ri b.*r I i
...knit them together with the
stitches on the working needle. Or
continue knitting and turn the hem
after the piece is finished, and sew
it down at the appropriate point.
58
Bands, Hems, Ribbing
^
I * v'a. %X
Turn the hem over at the row of
purl stitches, and carefully pin it
down over its entire width. When
you sew it down, catch every
other stitch.
ty
I
M
h v
^
A
%,» ■
\
\
. I
i
■i 7
W
j.
•*■
s t-
t- '
ro
*•
Increase 1 stitch every other row at
the corners until you reach the
desired hem length and facing
width.
v '■';■
N
J
a,
H- H
«
X.
s
*. ■
I \
{■■'
:»f'i
I > t
I
^ i-
l?,*>
h
Then turn the facing in to the
inside and sew it down.
The finished hem from the right
side of the work. Don't pull the
yarn too tight when you are
sewing the hem down, otherwise the
hem tends to turn to the outside.
'"V
■' ■■"-*.
■I
1
1*
>
X'
s
■ K
*i
> - I) *
b
y ■
■,-■ " : ,-»!
t
. i, ■
■:-=l '
i - . .«
' . .t
-
V
V "
. » !
<
First sew the double hem down as
described above.
<i
^
1 j ■
■ »■ ■ • 7 V ■» \ ■ ?;
^ - • y ,v
,v. . <-«
'1
*
\-'.
J ■■ ■
■ ■ i3,
i .. r> • - 'fix.
^
On the right side of the work, you
see a neat, flat corner.
Double Hems Sewn
Together
Instead ot knitting the hem together,
you can also simply continue knitting
after the row of purl stitch, which
creates the turning line (or after the
openwork row), and at the end, turn
the hem to the inside at this edge
and sew it down. To do thi^ pin the
stitches very carefully one on top of
the other, because even a single
stitch that is in the wrong place will
make the hem look crooked. Then
sew the stitches loosely to the
backstitch parts of the corresponding row.
Hem and Facing with
Mitered Corner
If you want to work a piece with a
double hem and knit-on facings, you
should use a mitered corner so that
you don't have a thick bunch ui
material at the bottom edge.
Depending on the gauge, cast on
4-6 stitches less than you need.
Then increase 1 stitch every other
row at the outside edge. At the
desired length for the hem, work the
row of purl stitches and then
continue in the pattern. Use the stitch that
was increased in the purl row as the
outside edge for the front facing, and
slip it every other row—don't knit it.
Then increase as many stitches as
before for the hem, every other row.
59
Knit-on Facings
)
3
>
t
y. ,.■
i«
V
/.
v
%
i
\
V
. (
t *
. * '.V /.j;
»*•>*->.
-•> /-ii
\ '
)
m
L
»-■ ■ m if
*">**"
I ■
t
^
•V
V
1
1 I
*~ '-»
t / 4 ' /«
. J
.v
I
1
.1
4 ;
i
■ •
■ *
■ * \
: •
j:'pi-' <?'
'•1
«-•
mT"
!l
•V
f •••
?
» *
* i
•*
t
: -*-
X
V
4 :Vv
j
>v:.
i
r
•t
■» :l " */
■»-.
'*"
v'.v •
• !•
4>\.\
1 »?
:r> U U *•*. • "
♦J
i..
If you knit facings on
afterwards, it is very
important to pick
up the correct ^
number of stitches and to
bind off correctly. The
finished facing is not
supposed to pull together or
to be unattractively stretched
out. Pav attention to the
following tips and your
facing will be perfect!
V;*'
.0. »
Single Facings
Follow this basic rule for the number
of stitches to be picked up: Always
work 3 stitchet. over 4 rows. This is
almost always the case for racings in
stockinette stitch or reverse
stockinette stitch. For ribbing
patterns that are worked as 1 X 1 or
2x2 ribbing, or for cable patterns,
you have to try out the correct ratio
of stitches to be picked up over the
rows by using your sample as a gauge.
If the facing is not supposed to
tighten too much, more stitches are
required—for example, 4 stitches
V a
i.
!
I .
• ■
I
»!■
\. •
>.>■■
.. .
11'*'"
f, t, • ^ . . - - — I
I», f -^ •>
■1,1 - - * ~r- • I
:< ♦. v- - J
l,i« .... 7.
-***f* Ic'-V.".
IS
.,
• f
'A
"il
■
i
ill*
f.r <k-
r,- '» "
---■■ - U Lv-'
-—- v \ t- > ■ -
, hr';.
(; l«-
:: y if
- caWw iV.
On cardigan facings, make sure thai the
ribbing is arranged to be symmetrical.
60
Knit-on Facings
over 5 rows or 5 stitches over 6 rows.
If you knit very tightly, or with
needles two sizes smaller, or if you
want to work a small cable pattern,
you may have to pick up a stitch out
ot every row.
When vou have few stitches and
rows on your gauge sample—tor
example, if you are knitting with size
IOV2 or 11 needles and only need
approximately 16 rows for 4" in
length—little holes might form when
you pick up the stitches if you skip
rows. In this case, the best thing to do
is to pick up a stitch from every row
and knit 2 stitches together in the first
row on the wrong side of the work at
regular intervals. Again, you should try
this out using your sample for gauge.
For picking up the facing stitches, it
is important to have the correct
selvedge stitches; they should always
be worked either in stockinette stitch
or in reverse stockinette stitch in
every row. Only then is it possible to
pick the stitches up evenly. In order
for the facing not to fold towards the
outside later, the entire selvedge
stitch also has to be picked up.
If the selvedge stitches are not knit
well, or are knit too loosely, you can
strengthen the edge with crocheted
slip stitches. When crocheting, pay
attention to how many slip stitches
to work over the rows ^o that you
can pick up a facing stitch out of
every slip stitch later. You can also
work the slip stitches several stitches
in from the edge and then sew the
edge down on the inside.
Binding off correctly is ah>o
important (see pages 42tf). Normally, a
facing bound off as the stitches lie
will be very stretchable. Therefore,
you should always bind off firmly.
Always work as close as possible to
the tip of the needle, and make sure
that when you pass the binding-off
stitches over, you don't pull these
stitches and make them long.
You get the tightest edge if you bind
off the stitches by knitting them
together.
' *
* *
*>
*!
^
\V
Normally, pick up
3 stitches over 4
rows for
stockinette stitch or
reverse stockinette.
The sets of 3 can
he clearly seen.
For facings with
patterns, including
ribbing, use the
sample for gauge
to trv out how
many stitches you
need to pick up.
You can reinforce
an edge that was
worked too looseh
or not done well
with a row of slip
stitches crocheted
on (page 73).
Then pick up the
facing stitches
from both parts of
the slip stitches.
Use a thinner
knitting needle or
use a crochet hook
to pull the knitting
yam through and
put the loop on the
knitting needle.
61
Perfect Details
Y
•■(
!
• V
-. . ^ -<
* *-
tt
" '*• V
1 «o
%■ V
*■
t
A
>
t ^
fe
.
■ •w-^S .
*- <
*
. -,/ ^t 4**--*
-* " -
*%ft<KfO
*w*
A."
-<t -4-
-*-S*
1
"j
1
I
•
i? '•
*"■ -
5*
+
--+*
.
•"" *
A facing in 1 x 1 ribbing is very
stretchable if it is bound off as the
stitches lie.
v x v
Y
t
"• •b
■ t- >-
:■ >
v*->>
<
-* v v
}**'*«
*• "#•«>« r
I " V • '
\ . V •
v ■
-«. /» -»■
^-v l >**-
^.V *■*.»'.
V
' *- ■ *
-*• <■
w V • V>
v-w v-^ * vv v Vvv
■
•*" - «
V- * fr •
* -*
. 1 f '
V
L
I
\
1
■t t-:*
vw ■- .
*-*- - kv^
„ ** •<
V*K>-V -
"s. Vj^ V-V v.:h
- -* .4
The facing is less stretchable if you
bind it off entirely with knit
stitches.
^ • * J
*i
The same facing bound off in
kitchener rib (see pages 46ff.).
<" l
^ '", : * ,-"
* *. >^ V w * " V > %
w C
>
r *
».
/^
1
.
n*
:• ^ ■•■>
1 • ••. \; .
t .r
T * ' J ^
-sr
*" "' *
" ^
X v
V-
-< -. » X
>-• -v * :V -*•
For this facing, alternately work 1
stitch in stockinette stitch and 1 stitch
in seed stitch: On the right side rows,
knit all the rows. On the wrong side
rows, alternately knit 1, purl 1. You
can bind the facing off with knit
stitches on the right side, or as they
lie in a wrong side row (as shown).
. * \ •*• *.
v
- «
> .v^- W VV X v V - ^ V^» v V V
' -VV V V =» V"V^ " - -'V-^h -j *
^-->..
For a rolled edge, add about 1o" in
reverse stockinette stitch. This will
make the edge roll towards the
outside.
*■ .*
*-
^.
^.
\^
\ ,*i. v- V-
>
N. -
f %
1 »«.. •^«
* 1 ^ ,
-. -**
;. \
h *
*
■ *
4
^L
<*-»*
% ->
^ ^.
, •--*■
•Wv-
**^
•^
^■;^v>'
v
V-
^■•+-4-
For a facing with mini-cables, pick
up 1 stitch from every row. There
is a reverse stockinette stitch
between every cable. Bind the
stitches off very tightly, crossing
the cables even in the binding-off
row.
/ -*v
V
>s*~
Tv v\ V % - ^ ^f% ,32*^
—t -it. ..
•^-«t *}.
This facing of 2 x 2 ribbing is
bound off as the stitches lie, 2 knit
stitches, 2 purl stitches.
62
IK
» t
For pieces knit on the diagonal, a
facing is easier to work and also
more attractive if you crochet a
slip stitch through every row along
the edge.
•
-A
*%
V
4
X < .
i 1 i
».
•
i_.
t
iV
JL„>
* ••
«*-
**-•-*■
r •*
V-
-* V
i '* ^ *■ 1 -v
'^VjVi',
•»
A1 V^ V> > •*.
For this garter-stitch facing, the
stitches are bound off in a row on
the wrong side of the work as knit
stitches.
f \
^-».v
1 > \ V.
■ - v --
V\ -v >
wW-_
r. \
*. ^ J)- V - -?- v
vv *-- ,\;vjVa^\;v v
^W-V>-w*\ ^V^ VW
"\ •* - -^ « « t, > ■* -v ^ * -^
Binding off stitches that are too
loose or irregular can be quickly
and easily corrected (see page 45).
* » \
< t
>
^
■t
V " ■■•
T
f
I
" -w '
V
r *
Then work a stitch out of every slip
stitch, catching both parts of the
stitch. For this facing, the stitches
were picked up from the front,...
\ \
Worked around the corner: If
facings are supposed to be worked
all around, stitches have to be
increased at all the corners. These
increases turn out best with yarn
overs purled twisted. At every
corner, knit an additional knit stitch
out of the corner edge stitches. On
both sides of this stitch, the
increases are made alternately with
Knit-on Facings
■\ *
i.
V V
', V
*- V
* .
*V
t.j*,- ,«
•-** »
...and for this facing, they were
picked up from the back. Here the
slip-stitch edge makes a nice
transition.
a twisted knit stitch and a twisted
purl stitch. In order to get a nice
angle, 2 rows with increases and 1
row without increases have to be
worked alternately. For knit
increases, make sure that the
appearance is symmetrical (see
symmetrical increases with yarn over,
page 40). Bind the stitches off after
the desired length is reached.
63
Perfect Details
Double Facings
Fundamentally, double facings, such
as at the front edges of a cardigan,
give a piece more hold. They also
look good from both sides and don't
tend to fold over to the inside or
outside.
Pick up the facing stitches as knit
stitches, as for single facings. Now-
work in ribbing pattern or in
stockinette stitch to the desired length,
then work a row of purl stitches on
the right side of the work and
continue in the pattern. In order to
be able to sew the facing down onto
the edge at which the stitches were
picked up, you need 1 row more for
the back half of the facing.
When using the ribbing pattern,
the facing is a little flatter if you
work the pattern offset by 1 stitch in
the second half.
~*t-
V
I % \ I. \ X
*
V
jj-^ -*- «• J>* *►.
.v.
Five rows stockinette stitch, 1 purl
row, and 6 rows stockinette stitch
were worked for this facing.
~ir
►»
»• »> -■
» »■ *- *■ r* K
f^lfc * * • * . >» •« r • * .
► - .►"»»• *
* « « p % * * . •• H b «
w H * . * r
• I* *•►. * . ^ » #- y
> ►
H^
H IK
"A
A 4
1 *
r
*
A
t '
', i
X 4
Turn the facing in to the inside and
pin it down carefully so that the
stitches are exactly on top of one
another. As you are sewing,
always catch 1 stitch of the knitting
and V2 a selvedge stitch.
"• v< ■* <^- ^ «• ■«" •*
******
» >
The finished facing looks good
from both sides.
{(
,r
* *
^
■
!
Y.! (-f ••
r r
I. ^
* * v \ ^ i
1
«*--M^ -♦ ->•-
w-V ^«-
^-k >.
* P- ^.--; «- <■ * •• v * •
- - - -• *. , -- •
1 < * ■ .1 ■
When you work a double facing in
ribbing pattern, shift the pattern
over 1 stitch for the second half...
1.
V 5^
tv
%
-* .*•
"^ it ^. **- U -"* > *»- ' -s^
-v -« ■"—«■
T1
V
>
• ■ ^
* ->
...and sew it down the same way
as for the facing in stockinette
stitch.
64
Knit-on Facings
A Special Tip for
Armhole Facings on
Sleeveless Sweaters
and Vests
So that armhole facings don't
stick out at the shoulder,
knit 2 stitches together 4
times, in total, in the binding-off
row before and after the shoulder.
In 2 X 2 ribbing, purl 2 purl
stitches together. In I X 1 ribbing,
knit a purl stitch together with
the next knit stitch.
The second way of making
armhole lacings slightly slanted is
double decreases at the shoulder.
For this, make sure there is a knit
stitch at the shoulder seam. In the
next-to-last and last row on the
right side oi the work, slip this
stitch knitwise with the stitch
ahead oi it, knit the next stitch,
and pass the slipped stitches over
(see also decreasing, page 35).
Bind the stitches off as they lie in
the last row on the right side of
the work or the next row on the
wrong side of the work.
Top photo: On the orange facing, all
oj the stitches were hound off
nonnally; the facing comes away
straight from the shoulder.
On the yellow and light yellow
facings, 2 stitches were knit together 4
times; this makes the facing fit better.
Bottom photo: 2 double decreases at
the shoulder assure a good fit for an
aimhole facing.
A binding-off edge
that is too loose...
...can be corrected afterwards:
Pull the stitches of the binding-off
row up, one by one, using the tip
of the knitting needle (see also
page 45). After they have been
pulled up, the binding-off stitches
lie precisely along the top edge in
the correct size.
65
Knit-in Facings
On
cardigans
and vests, the front
facings can be knit as you
are working the piece itself.
Double facings look
particularly neat. They give the
piece a professional touch
and also make it fit better.
Double Facing in
Stockinette Stitch
When you make a double facing in
stockinette stitch, the half of the
facing that is turned to the inside
needs to be 1 stitch wider. In the
example bhown, the facing is 5
stitches wide on the outside, 6
stitches wide on the inside, with the
selvedge stitch. In between, a slipped
stitch ensures a good turning edge.
For sewing the facing together, it is
also important that you work a row
of reverse stockinette stitch between
the cardigan piece itself and the
facing. This purl stitch can hardly be
seen from the outside in stockinette
stitch or textured patterns, and
disappears into almost all other
patterns too.
The slipped stitch is only worked
every other row. It is either slipped as
if to purl in the rows on the right
side of the work (carry the yarn
along at the back of the work) and
fvV
\
1 J
y
r
f
,-r
\
i * i
V
I
\0¥>t
•if
»•
Facing worked in
stockinette stitch,
with raised slip
stitch, before being
sewn down
\
\
VWien you sew the
facing down on
the wrong side,
sew part of the
second stitch and
the stitch next to
the facing together.
1m ss
\
\ * <
4
< >
M
N> ' • * '
'I
'0
^ *
The finished
facing seen on
the wrong side
s \
I TJ-V7
■ ^
<v:
. . *.
:s
^s
> \
4 scr
\
\
S '
*. \
A
V 1
''»
(,
i
A
1 .
V
i.
V
V
V
?>
M-
T/ie finished
facing seen on
the right side
A X
y
\
\
"* yNSV
1 i
> *
s *• "■
« \
i J
'v
i
T
u
:•;>
•>
\ \ \ 1
f i'
66
Knit-in Facings
1 a
V S *^ v •• T * it I
* JL A * ,' U'-tTV Vt
1 *vS
\
■ •- v -J.
*' ir 3- . *
A ■ « ' ..
M ■ *
\r & « -
• * » T * ■ »
V. \ V
It
9 ** *,
<; ^
=.V V ^ * , S S.V. K
* it— , ^j —_-
1
W/ie?i *vom sen1 the
facing down on
the wrong side,
sew the first part
of the first facing
stitch and the last
part of the
selvedge stitch
together.
Facing worked in
reverse stockinette
stitch, with turning
edge worked in
stockinette stitch,
before being sewn
down
■A
«v , *
• 1
Hi
«i
^
i <
4
>> 'i
■I
* >
s
Jk *
* 0 T
. <
'.r?:»
Jfc J"
'^ JL - ^
v i i.
1 ).
.*
>■?
K
At. * -
^
sxs , *+», v
a *
• T
, t « * T *
, ^ I - » *
3 >'
iJ.
T/ie finished
facing seen on
the right side
1 &^ rr
V
,:v^
•1 r
*\
^V^vV
K
■ f
■ ? \; • •v
i
t
<'
^•, :<
^. ■»
^ A ' *
Y T
The finished
facing seen on
ii
,*
the
n;ron
£ sz Je
Y
»
> &
i
;<
1
; V A
ikl-
\ r .
5 ^ .A.
**,
4( . ** ^ *■
purled in the rows on the wrong side
of the work, or it is knit in the rows
on the right side of the work and
slipped as if to purl in the rows on
the wrong side of the work (carry the
yarn along at the front of the work).
When you sew the facing down on
the wrong side, sew the outer part of
the stitch you worked as reverse
stockinette, which appears as a knit
stitch, together with the left half of
the first stitch next to the selvedge
stitch. Sew from side to side,
alternately from left to right and
from right to left. Work the sewing
stitches in every row and don't pull
the yarn too tight so that the knitted
piece is still stretchable and the
individual stitches are not pulled
together. On the wrong side, the
seam is almost invisible. On the right
side, it can t be seen at all.
Double Facing in
Reverse Stockinette
Stitch
For a double facing in reverse
stockinette stitch, you work the same
number of stitches in reverse
stockinette stitch to the right and the left of
the turning edge. Here, you work 1
stitch in stockinette stitch as the
turning edge. The seam edge—in
other words, the selvedge stitch
worked in every row—is important
here for sewing the facing down later.
It is purled in the rows on the right
side of the work, knit in the rows on
the wrong side of the work, and
pulled tight.
When you sew the facing down,
sew from side to side, as for a double
facing in stockinette stitch. But now,
on the wrong side, sew the left part
of the first facing stitch together with
the outside part of the selvedge
stitch. This creates a new "knit"
stitch on the inside, while the seam
cannot be seen on the right side.
67
Perfect Details
Single Facings Knit
with the Piece
For these facings, you almost
always work in ribbing—knit and
purl I or 2 stitches alternately.
Here the selvedge stitch is even
more important than for double
facings. It should match the knitted
piece as closely as possible and also
prevent the parts rrom stretching in
length. If you work a seam
selvedge, work the selvedge stitches in
every row (knit on the right side of
the work, purl on the wrong side of
the work) and pull the stitches
tight. You will get a good edge. A
purled garter stitch selvedge is also
good, since it can be worked tighter
and more evenly than a knit garter
stitch selvedge (see also selvedge
stitches, pages 26ff).
For a perfect edge, here's a trick
when working 2x2 ribbing: Work 4
stitches in stockinette stitch at the
outer edge instead of 2 (including
the selvedge stitch). The outer
stitches roll up by themselves and
generally hold this shape.
After frequent wearing and
washing, ho\\e\er, the edge can stretch
out. It is easy to fix this by sewing it:
On the wrong side ot the work, sew
the outer part of the selvedge stitch
to the first part of the knit rib. Work
the stitches in every row and from
side to side, alternately from right to
left and left to right (see also double
facing, page 66).
For I X I ribbing, you achieve the
same effect if you work the selvedge
stitch and the first stitch of the
facing in stockinette stitch on the
outer edge. The selvedge stitch then
rolls in halfway and does not need to
be attached even after you wear and
wash the piece many times.
Another problem is if facings that
are worked with the piece stretch in
length later. This can be from overly
loose selvedge stitches, or the
individual stitches can become larger,
particularly if you worked knit 1, purl 1
\
hi4 <v \ n i
4
rSS
S T
i *
^VT- »f- it *.?
r
ft-*
«♦•
The facing worked
over 10 stitches
ends with 4
stitches in
stockinette stitch,
including the selvedge
stitch. This facing
rolls in by itself.
r
v VT' *fi <f« v: * *
W f r v y v A
is
If the facing
stretches out, the
outer part oj the
selvedge stitch can
he sewn together
with the first part
of the knit rib.
On the right side,
the seam can l be
seen at all.
4, *.
-»-%.*
«
>
■A
*.
* *-
" * - a"1 " i> S
. t
- J * - \ »
■4. 4 ••
i * * ^' 'i
s * y.
\ s * \ - j
V I
* * *
-A *
■> » *
■. t »
4. A -*• -
^ .A -
<* - _ <"» A. ■«.
>/
i jw ' ■ . ;;;
;s
«. &
* A
* • >V
>4 '
s
* i
alternately. And if you have buttons
on the piece, the buttonholes on one
side and the weight of the buttons on
the other side will stretch the piece
even more. Normally, smaller needles
are used for ribbing and facings,
specifically for this reason.
You can prevent the facings from
stretching in length by working
shortened rows. To do this, you can
use the buttonhole and button
locations as reference points. In
textured patterns, you can also select
a specific row in the pattern to
work the buttonhole and,
therefore, the shortened row as shown
on the next page for the diamond
pattern (see also shortened rows,
pages 148ff.).
Always work the facing with an odd
number of stitches, such as 9 stitches
used for the piece on the next page.
For the left front, start in the first
row on the wrong side of the work
with the selvedge stitch and 1 purl
stitch. For the right front, work to
within 9 stitches from the end of the
row, then start the facing with 1 knit
stitch and end with the next-to-last
stitch and the schedge stitch as purl
stitches.
The small buttonhole in the
example at the right is worked over 1
stitch. On the left front, work to
within 5 stitches from the end of the
row, then work 1 yarn over and knit
the next 2 stitches together. For the
right front, work a single decrease
68
Knit-in Facings
For the shortened
rows, work up
to the facing
and turn with a
yam over.
> { i I ' > . • . * -. k.—; » • * l »
I *'4 . *s
W»* I - ~
-hi
- \
- I* M
' ' ' u"
above the fourth and fifth stitch: Slip
the fourth stitch, knit the fifth stitch,
and pass the slipped stitch over, then
work the yarn over. Knit the yarn
over on the wrong side of the work.
This way, the buttonhole will always
lie between 2 knit stitches. It can
hardly be seen bin is nevertheless
good for small to medium-size
buttons (see also the section on
buttonholes, pages lOOff).
Buttonholes are worked in the
facing on the right front for women's
cardigans and on the left front for
men's cardigans.
k. »
K V
t
1
A
r* *
■! ^
i-;
.v.
vr
f '
f '
" T * - * «-
i.
4
4
'.J',
tl-
r
\ »
«. V
T
*
±L.
K'
In the next row on
the right side of
the work, purl the
yarn over together
with the first stitch
of the facing.
* 4
V
1 -
s
* ^ •
%
fc
t
%.
* »
•
i »
1 w r.
v V *.
>>\
V.
In t/ie ?icxf 7"on», o?i
t/ie ii'roJig iic/e of
the work, knit the
yam over. The
buttonhole will be
between 2 knit
stitches.
For the buttonhole,
in die facing on the
left side, work to
within 5 stitches
from the end of the
row, then work a
yam over and knit
2 stitches together.
69
Sewn-on Facings
Facings sewn on with open
stitches are also very
attractive. Whether single or
double, these facings will
almost never flip over,
unless you cast on too few
or too many stitches.
N t
*.
&
7
r
^ - -*
•r
». Jt *
*-\» ,
. - >- '*, w -v.'V '- f
-v ^_- ^ v - ,
<*' -e ■-*
c* -^
Work ribbing to the desired length,
then work 2 more rows in a
contrast color.
V- ^w
Then undo the additional rows, 1
stitch at a time, and sew the facing
on, using back stitch.
To make sure that the open
stitches don't come undone
before you sew the racings on,
work 2 or 3 additional rows with a
contrast yarn on the facing. Always
use wool or a rough yarn for the
additional rows. If you use cotton or
a similar smooth yarn, the stitches
will come undone too easily.
Single Facings
For a single facing that is sewn on,
cast on the appropriate number of
stitches and work to the desired
length in the main color, then
another 2 rows in ribbing or
stockinette stitch with a contrast color.
For open casting on, the number o(
stitches is based on the number of
rows in the piece. Here again, the
following general rule applies: You
need 3 stitches for 4 rows (see also
knit-on facings, pages 60ff)- This
means: If you worked 120 rows, you
need about 90 stitches for the
facing. Divide the number of rows
by 4 and multiply by 3. A few
stitches more generally doesn't hurt,
but you should never cast on fewer
stitches. If you knit the facings very
tightly, you can also choose a
* t
\ i
,*
v <-
To make this clear, the seam was
worked with a contrast color.
different ratio, such as 5 stitches for
6 rows.
Double Facings
Double facings that are &cwn on are
first knit on. To do this, pick up the
stitches on the wrong side of the
work and then work a turning edge
after the desired length (1 row of
purl stitches on the right side of the
work or 1 row of knit stitches on the
wrong side of the work, or an
openwork row for picots, page 58).
The second half is worked I row
4
f
n
*':
\
v.
' ' ' ■ 1
■*-.
* wv*»-
V ■-*
& ■
"* «wy»
IK *
-
-
V
^
4.
- *
. -*"
^^_"~^J
».
►■V-V
V
■ V
- *•»
>-9 -V
-V-w-^
v- ■*-
v..
— —Wr
VtV. V V-
' -* _
V—V -
V "
*-*-•>*
,
t * -
- . -5.
■V
-■- - .
*»
<
■* ^
Sewn-on facings look perfect on
the finished piece.
longer so that the facing can be sewn
down on the outside over the picked-
up edge. Then come the rows in the
contrast color.
70
Sewn-on Facings
Sewing with Back
Stitch
A back stitch is worked from right to
left, between the selvedge stitch and
the lirst stitch, using the original
yarn and a blunt tapestry needle or
yarn needle. As you sew, undo the
additional rows 1 stitch at a time.
First insert the tapestry needle
through the stitch of the casting-on
row and the first stitch of the facing,
from bottom to top. As you sew,
undo the additional rows 1 stitch at a
time. Then go back through the
stitch of the casting-on row from top
to bottom, and through the knitted
piece one horizontal thread farther to
the left and through the second
facing stitch, from bottom to top.
Then continue working as described
for the drawing at the bottom right.
However, since you have
approximately 25% fewer stitches available
on
the fc
ha
Eicins: as vou nave rows on
the knitted piece, you need to work
around 3 horizontal threads ot the
knitted piece instead of 2 horizontal
threads, approximately after every 3
stitches. Keep precisely to the ratio
you calculated previously, otherwise
you can end up with too few or even
too many stitches. Or pin the facing
down carefully along the entire
length of the knitted piece, and don't
take the pins out too soon.
r •>
v\
.v
' V
1 v
* %
■i. *
O V
V v*
V
* ■*. . -, *
It
A M. '
IFor a double sewn-on facing,
pick up the facing stitches on
the wrong side of the work, going
through the entire selvedge stitch.
4
*.
*%■
* v-" • j~
V-
3r
•- -4
» ^.< V^ -j^. +-<, . .
Bring the needle out and pin
the facing on so that the
corresponding stitches are right on
top of one another. Now undo the
additional rows 1 stitch at a time,
and sew the facing on 1 stitch at a
time using a back stitch.
j-.«V;»A'Jc1.h*'
-r
<>ii J
■v. ,riu,;0>>
.' x
1 *
v«
^ .5, ''.X-
For this facing, you work 6
rows in stockinette stitch, 1
row of knit stitches on the wrong
side of the work, 7 rows in
stockinette stitch, and 2 additional rows in
a different color.
i ■■' t'lu * ^ *»'■■ -*'"
•*. *x
:w
This is what the facing looks
like on the right side of the
work.
For back stitch, put the needle
through a facing stitch and knitted
piece from top to bottom, then
through the knitted piece 2 horizontal
threads over and facing stitch 2
stitches over, from bottom to top.
Then go through the stitch 1 over to
the right and knitted piece, from top
to bottom, and back through the
knitted piece and facing stitch 2 stitches
over, etc. As you do this, undo the
extra rows 1 stitch at a time.
71
Perfect Details
For neckbands, you can also sew on
facings with open stitches. Thib has
several advantages: First, the casting-
on edge is generally more stretchablc
than a binding-orf edge. Second, you
can distribute the stitches evenly
around the neckline.
£
W i
i.-.'i
-#:
J.-v
-C^C/-
.* v
&.''
Pin the facing down around the
neckline and then sew it on as
described on the previous pages.
./miHku
• --■
f,« '• -/ U.M-V
\>
o
'• i
I.
.» » f
J:
4
J *■ 'J- «,
•^ »^
This way, a neckline edge that
didn't come out very neatly can be
covered up.
Facings Worked
the Long Way
You can also work vertical cardigan
facings separately and then sew them
on, using invisible stitch. This has
the advantage that you can work the
facings, just like ribbing, on smaller
needles, to prevent them from
stretching in length. Also, you can
check the exact location for the
buttonholes on the finished tronts.
Even as you are working the fronts,
make sure that you start the front
edges the same on both sides—tor
example, with selvedge stitch, 2
stitches in stockinette stitch. Then
you can match the facing to the
pattern. In the example shown here,
you end or start the facing with 2
stitches in reverse stockinette stitch,
plus 1 selvedge stitch, starting in a row
on the wrong side of the work. It looks
even better if you work the facing
along with the waistband, to the end
of the waistband, put the facing
stitches on a stitch holder, and first
knit the front. At the outside edge of
the front and the inside edge ot the
facing, you then have to cast on an
additional selvedge stitch in each
instance so that the pattern is complete
again after the facing is sewn on.
For a facing worked the long way,
you should work the same number of
--*-
1
"V
•V.
* *
*.•;> v
"?£' 'fc -• V^>iV:
\
^(s^-*^ v ■■ : "to ' 'VJ ,#
^
r-
.-*,Av -*\* '."'"
,y
As? ;* ' V*--.
\il fa
■»
t
Add a facing
that was knit
lengthwise by
sewing it to the
front, using
invisible stitch.
rows as for the front. When you sew
the facing on, row to row, the facing
has to be stretched a little, but it will
never get longer than the other
parts. Even for slanted edges, you
generally don't have to work any
additional rows.
Work both facings to a length that
lets them reach the center of the
back neckline. However, don't bind
the stitches off. First sew both facings
on as tar hs the shoulder. Then you
can check the remaining length and
add or undo a few rows, if necessary.
Then join the facing stitches in a
grafting stitch (see starting on pages
114fff
72
Crocheted Edges
Even though crocheting is
not the subject of this book,
here are some useful tips for
finishing edges by
crocheting.
If you want to Jo without facings
entirely, or if your edges* didn't
turn out that nice, crocheting is a
solution. You can "save" quite a few
bad edges this way.
For plain and boat necklines, knit-
on neckbands don't always look that
good. In this case, reverse crochet or
picots make a nice finish. If die
binding-off stitches came out
unevenly, first straighten out the
edge with a row of single crochet.
Working Slip Stitches
around the Edge
For all straight edges, such as for side
slits or slits in polo sweaters, a neat
edge is especially important. I Iere, 2
rows of crocheted slip stitches work
miracles: The edge turns in neatly to
the inside.
The slip stitches can be worked
between the selvedge stitch and the
first stitch, or farther into the piece.
Crochet them on the right side ol
the work, alw ays from right to left.
Leave a long enough yarn end at the
beginning of the first row o( slip
stitches, which you will use to
crochet the second row. The first
row is crocheted through the knitted
piece, the second row only through
the top part of the first row of slip
stitches.
$>
- < •*■
-* -*■
The slip stitches are each worked
over 1 knitted row. When the
second row of slip stitches is added,
the edge turns neatly to the inside.
If you crochet the slip stitches in
the same yarn, the double row can
hardly be seen.
•
-
t- .- ■-"
-V
4- - -*
-
■*- . -*•
j *
*r ~
•
~-
.
--»» ~*
^.
10*
K.
- - ^ -.--""
1 ^~
■v
~v
-
-
^
^m
^-t-
^r-
< •
'
Here the slip stitches are crocheted
over 2 knitted rows, i.e., there are
always 2 horizontal threads of the
knitting between the slip stitches.
Crocheting slip stitches: Place the
yarn underneath the work. Insert
the crochet hook between 2
stitches, from top to bottom, and
pull the yarn through to the top. At
1 or 2 rows farther along, go
through from top to bottom again,
pulling another loop through, and
pull it through the loop on the
needle.
73
Perfect Details
Making an Edge with
Reverse Crochet
Reverse crochet is the "classic" stitch
for crocheted necklines, because this
stitch makes the edge hold together
well. Reverse crochet is single
crochet worked from left to right, in
contrast to every other technique in
crocheting.
Reverse crochet can be worked
directly onto the edge. However, in
most instances, it looks better if you
work 1 or 2 rows of single crochet
first.
When reverse crochet is worked on
the right side of the work, the
stitches wrap around the binding-off
edge like little ropes (top photo). If
the> are worked on the wrong side of
the work, they form a decorative
edge that is somewhat reminiscent of
cross stitch (bottom photo). If the
crocheted edge of reverse crochet
worked on the wrong side of the
work is not supposed to be very high,
you can do without the first row of
single crochet. Work 1 row of single
crochet on. the wrong side of the
work, and then work the row of
reverse crochet, without turning.
Reverse crochet stitches are single
crochet stitches worked from left to
right. Bring the yarn through the first
stitch from back to front, and bring
the working stitch through the loop.
*One stitch over to the right insert
the hook and bring a loop through.
Put the yarn around the needle and
pull it through both loops. Keep
repeating from *, going into 1 stitch
farther to the right each time.
. *:<-
^ r _. * N
?
o**
.. T
» -*
* v
For reverse crochet worked on the
right side of the work, work a row
of single crochet first. Don't turn
the work. Work a row of reverse
crochet going into each stitch of
the previous row, from left to right.
Working single crochet: Insert
crochet hook between the selvedge
stitch and first stitch, from top to
bottom, and pull yarn through to the
top. Bring the second loop through
to the top 1 or 2 rows farther to the
left, put yarn around the hook again,
and bring it through both loops.
•*x *
V
■t »_
*■ >
T »
* >
^O* -:>.
r
1
T
For reverse crochet worked on the
wrong side of the work, first
crochet a row of single crochet on
the right side of the work, then
turn the work with a chain stitch
and work another row of single
crochet. Then work a row of
reverse crochet without turning.
74
Crocheted Edges
Crochet Edge with
Picots
Small picots make a nice edge that
you can work on the bottom edgej, of
sleeves and sweaters.
Picots are crocheted from right to
left. For a picot, you work a single
crochet into the knitted piece, then
make 3 chain stitches and 1 single
crochet into the first chain stitch,
and then 1 single crochet into the
knitted piece again. For every single
crochet that is worked into the
knitted piece, skip approximately 2
rows or 1 stitch, depending on the
gauge.
*\ <
■** v
H.I
s
V.
>v *> *v --
■ T
.an
Picots look equally good on lengthwise or crosswise edges.
Picots with Double
Crochet
For the picots of this crocheted edge,
a double crochet is worked into the
first chain stitch, instead ot a single
crochet. Since this makes the picot
longer, skip approximately 3 row b of
the knitted piece each time.
Double crochet: Bring the yarn
around the crochet hook from back
to front. Bring it through the first
single crochet of the picot, put the
yarn around the hook again, and pull
it through the 2 loops on the hook.
*v
-*>
* *
4 -9
*4
* —■ »
-*" *<r
^. s.
j.
4.
~\.
4
*
-* <
_*J
Here the picots were worked with double crochet.
IFor a picot, work 1 single
crochet into knitted piece. Make 3
chain stitches, work 1 single crochet
into the first of the 3 chain stitches,...
\ \\ ~\x
...then work 1 single crochet
into knitted piece again. For
every 1 crochet worked in knitted
piece, skip 1 stitch or 2 rows
Picots with double crochet
(instructions above) are slightly longer
and also slightly higher than picots
with single crochets
75
Necklines: Round and Square
Round necklines are
probably the ones most
frequently used in knitting.
You have to work careful!)
here, because the neckline
and the neckband are the
first thing people notice
about a sweater.
In normal patterns, the neckline
width is about one-third of the
entire back width. The front
neckline is usually 2" to 3" deep, the
back neckline is 3/i" to l1/ deep.
The wider the neckline, the flatter it
should be. A boat neck, which is
bound off straight across and not
rounded, requires the widest
opening.
Start the decreases over the center
stitches. To do this, bind off about
one-third of the neckline width over
the center stitches, or put these
stitches onto a stitch holder for
knitting the neckband on later. Work the
remaining decreases in such a way
that the edge becomes rounded. For
example, if the neckline is 32 stitches
wide, first bind off the center 12
stitches on the front part. Then bind
off 3 stitches once, 2 stitches twice,
and 1 stitch three limes, every other
row, on both sides ol the center
stitches. For the back part, in this
case you can bind off the center 20
stitches, or put them on a stitch
holder, and then bind off 4 stitches
once and 2 stitches once, every other
row, on both sides oi the center
stitches.
Since the decreases are not worked
in every row, steps will form. In order
to flatten these out, a single decrease
is worked first, for the first decrease
of 3 stitches to the left of the center;
then the other 2 stitches are bound
off. If only 1 stitch is going to be
decreased, work only the single
decrease. To the right ot the center,
If all the neckline stitches are
bound off normally every other
row, steps with corners are
formed, as can be seen clearly in
this photo.
*• * 4; '■ «
A » , ' . . » *■ «
^" *■ ■„ N k * * *
.♦;♦:'.:*».'
K
• **• •]* *i»
tvt»i« v v
To the left of the center, work a
single decrease over the first 2
stitches of the decrease, and purl 2
stitches together to the right of the
center. This gives you a neat
rounded edge.
With the end of the yarn that is
used to continue the right side,
even out the step first. To do this,
pull the yarn through the first
binding-off stitch and then sew it
in on the wrong side of the work.
After the shoulder stitches are sewn
or knit together, knit the neckband
on with a short circular needle.
Always start picking up the
neckband stitches at a shoulder seam. At
the short straight parts just before
the rounded part, pick up 4 stitches
over 5 rows, between the selvedge
stitch and the first stitch. Starting
from the larger decreases (2 stitches
and more), pick up 1 stitch out of
every stitch. As you pick the stitches
up, make sure that you pick up die
neckband stitches, not from the
bound-off stitches, but rather from
the whole stitches underneath them.
Otherwise the stitches will be off
relative to one another, which is not
attractive (sec detail photos and
drawing).
the first 2 stitches are purled
together for every decrease, and the
other stitches are bound off
normally. To decrease only I stitch,
purl 2 stitches together.
76
Necklines: Round and Square
t
) T *
t
■■*. ■ i / * ;■*. *
Correct: Pick the neckband
stitches up out of the
whole stitches below the
binding-off stitches, ...
♦ 1 \
>
*
...J ^ ■ '> > i / f ■*
M"
■ I. v*
M
♦ *
... because this is the
only way you can have a
neat transition to the
neckband.
* i. i
Incorrect: If the stitches
are picked up out of the
binding-off row, ...
f * / *
V
1. » .1
•1
...they look half a stitch
off relative to the pattern
of the piece itself.
A drawing of the neckline
decreases with "steps." The big steps
over 3 stitches at the right edge of
the neckline are clearly visible. The
stitches shown in a different color
show where the neckband stitches
should be picked up. Steps of 2
rows are evened out by picking the
neckband stitches up, not out of
the stitches in the top row, but
rather the stitches 1 row farther
down, in the case of the stitches
before and after the steps.
Single and Double
Neck Band
A "normal" neckband, with the
stitches bound off as they lie, is about
Wax to 2" high.
If vour neckline came out too wide,
you can save it by making it a double
neckband. First work the outer
neckband. Then pick up the stitches
for the second neckband on the
inside, and work it to be !/i" to %"
higher than the first one. On the
double neckband shown here, the
stitches were bound off in kitchener
rib (pages 46-49).
Double neckband
•' *. * ■
• «
Single neckband
77
Perfect Details
Turned In and
Sewn Down
Work a neckband in ribbing to twice
the length you want the final
neckband to be, then turn it in to the
inside halfway and sew it down
loosely. A sewn-down neckband is
especially good for children's sweaters
on which the relatively small
neckline has to be \ cry stretchable. It
also looks good on heavier sweaters.
Double Neckband
Done in Stockinette
Stitch
A neckband worked in stockinette
stitch blends right in with the sweater.
Here, a row of purl stitches was worked
as the turning edge; depending on the
pattern, you can also use a picot edge.
In order for the neckline to lie flat
against the neck rather than standing
up, decreases and increases are worked
at the shoulder. Every other row before
the turning edge, work a double
decrease on both sides of the shoulder
stitch (page 35). After the turning edge,
increase I stitch knit twisted out of the
horizontal threads on both sides of the
shoulder stitch for every other row.
Rolled-edge Neckband
A rolled-edge neckband, which looks
very casual, is easy to knit. If you
want a wider neckline, you can start
with stockinette stitch right after you
pick up the neckband stitches. The
neckline gets a little tighter if you
work %" in ribbing first, and then
work in stockinette stitch for about
llA". Bind the stitches off loosely.
Turtleneck Collar
For a turtleneck collar that fits
snugly, pick up the stitches as for a
single neckband, then work in
ribbing for about 8". Bind the stitches
off loosely.
j)
?•■.•!.
\ • ■»
■« i
♦ «
l«
,'- •
* t
■» ■%
•1 * •
m
* ■ •
i >
r ->
■*
»i» . *
\ -
r i
\ • .
b.
- 'Vv *
i *
f/tl
' r
< ..i u
s s *
Turned An
and sewn-down
neckband
»•
Double
neckband done in
stockinette stitch
:t.
*. * -1.» , > •, r* *■ ' i- . *■ .
•i i .' •? ' • ' ,• ' » i . * " *■ *-- - » - -■ ^ r V ■ •
•:*■-:••••* I '.; .»'.••: ■ :•:• • *. *.» r ...»*.».•«. ».•:
« • »
• i 4 I >
• 4 t • 1 «
:!•: ':;•• •
,o.«
»• * »<
i. > %»i
i-«:
••>::>.•;
Ti/rt/eneck colla
r
Rolled-edge
neckband
v,
v>
'^
^'A!ff!^;V
If you want the collar to be a little
looser, you have to work 10-15
double increases when the collar is
about 1 l/4M to V long (page 39). Or
continue working the collar in single
shaker knitting (page 131).
Open Crew Neck
Start picking up the neckband
stitches about 1%" to the right of the
center of the front. After picking up
the last stitch, cast on the necessary
number of stitches for an additional
31/2U for the underneath part of the
collar. Then work back and forth
with shortened rows (page 144).
After the second row, work 1 stitch
less at the end of each row twice,
then 2 stitches less, until the
neckband reaches the desired length.
Then work one more row all the way
to the edge, bind off all the stitches,
and sew the underneath part on.
78
Necklines: Round and Square
For the open crewneck collar
shown on the right, knit all stitches
in the rows on the right side of the
work and alternately knit 1, purl I
on the wrong side of the work.
Open Collar
For this collar, start picking up the
neckband stitches %" to 1V4" to the
right of the center of the front. At
the end of the row, cast on the
additional number of stitches for an
additional l3A" to 2Vi\ Then work in rib-
bing pattern for 4" to 43/4M, bind the
stitches off as they lie, and sew the
underneath part on.
*
1
*
t
9
n
Open collar
9
*
Open crew neck
' * ' " 1 _.-.
* » . . .■
.•.
•:• . .
• . ■ •■•""•.
•- •.• » ••• . , . .<
Hjl'. •'. . .* «... •
-•■.;■-■• ^ \ '
*
«
•
* % •
•
Square Neckline
Preparing for a square neckline is
very easy. Here the neckline stitches
are put on a stitch holder. Then work
straight up both shoulders from
there. Bind the shoulder stitches off
and sew the seams, or work the
seams in grafting stitch.
For the neckband, pick up the
stitches with a short circular
needle, starting at one shoulder.
Pick up about 4 stitches out of 5
rows at the side edges (see facings,
pages 60ff.). At the corners, an
additional stitch has to be worked each
time. In the first round, make sure
that these corner stitches are knit.
This means that an odd number of
stitches have to be worked between
the corner stitches along the
straight neckline edge.
Now work in the neckband pattern.
In every other round, slip the corner
stitch knitwise together with the
stitch ahead of it, knit the next
stitch, and pass the slipped stitches
over. If the yarn is very thin, the
decreases can ak>o be worked every
h
:*/
^
s
v 4
-'" \
7 --
*
XV
» t i- «:
" -r*
-^
t*r*".
round. Always work the first round
without decreases.
Bind the stitches off normally when
the neckband has reached the
desired length; work the decreases in
the binding-off round too. Or work
another 2 rounds to bind off in
kitchener rib (see page 46) and then
bind off that way, as was done here.
V'
a. t
The added knit
corner stitch can be
clearly seen.
* v- \
•;♦*.■•..• f
79
V-necks
Whether you want to show
a little more decollete, or
wear an elegant blouse or a
casual T-shirt underneath,
V-necks offer every
possibility.
For all V-necks, the number of
stitches is already important
right after the ribbing. If you
want to work a single center stitch
that comes up the front, you need an
odd number of stitches, while you
need an even number of stitches for
2 center stitches. It is also important
to lay the pattern out correctly.
Make sure that your basic pattern—
whether it is a textured pattern
cable pattern, or openwork
pattern—is interrupted as little as
possible at the start of the V-neck.
You bhould fundamentally work
selvedge stitches in every row,
otherwise it won't be possible to pick the
neckband stitches up neatly.
For the slanted edges, even
decreases are important. For a
neckline that is a little rounder towards
the bottom part ot the V, you can
decrease every other row 4 to 6
times, then every fourth row. II you
want to decrease every third row,
every other decrease is worked in a
row on the wrons[ side of the work.
This means that on the right side of
the neckline, you purl 2 stitches
together, and on the left side of the
neckline you work a single decrease
in purl stitch (see decreasing, pages
32ff.).
The decreases of the neckline
stitches at the tip of the V are
worked every other round or row, for
very wide necklines. For narrow
necklines, they should be worked in
every round. Il decreasing in every
round is too much, while decreasing
every other round is not enough,
The finished
neckband with die
center stitch on top
alternately work 2 rounds with and I
round without decreasing. The
binding-off round is always worked
with decreases.
Neckband with
Center Stitch on Top
For thi:> neckband, you need an odd
number of stitches for the front. Put
the center stitch on a safety pin and
continue Deparately over the 2 sides
of the front.
For the slanted edge, on the right
side work to within 3 or 4 stitches
from the end ot the row, then knit 2
stitches together; on the left side,
work a single decrease over the sec-
r— ^*7T
\„
4 • "V-
4
' I 'A £.' *.
' I
:.£<;
*
*
^
.*.. *•■-■■ ■*
IPut the center stitch on a
safety pin. Catch a stitch on
either side of the center stitch with
the safety pin so that the pin does
not stretch out the stitch.
ond and third, or third and fourth,
stitches.
When you pick up the neckband
stitches, pick up I stitch on both
sides of the center stitch, from the
stitches next to it, and simply slip the
center stitch onto the needle. Now
work 1 round in the neckband
pattern without decreases. Make sure
that the center stitch is knit, not
purled. Then work a double decrease
over the 3 stitches at the tip of the V,
every round or every other round
(drawing on page 81). Work the
decreases in the binding-off round
too.
v»
"Y
.. \.
*-
:-.«t *• •
2 Pick up 1 stitch on both sides
of the center stitch, out of the
stitches next to it, but just slip the
center stitch onto the needle.
80
V-necks
Decreases Offset
to the Outside with
Slipped Stitches
Slipped stitches are normally slipped
in the rows on the right side of the
work, purled in the rows on the
wrong side of the work. However, if
you want to work the decreases over
the clipped stitches in such a pattern,
you must slip these stitches ab if to
purl in the rows on the wrong side of
the work, and knit them in the rows
on the right side of the work. The
appearance o( the slipped stitches
remains unchanged.
Between the slipped stitches, always
work 1 or 3 stitches in reverse
stockinette stitch. In the center of
the front, there are ^ slipped stitches.
For the neckband, put the center one
of these slipped stitches on a safety
pin. Here the slant is worked every
other row. On the right side of the
V-neck, knit the single slipped stitch
together with the stitch in front of it;
just slip it in the row on the wrong
side of the work. On the left side of
: V . «**
■. - ? ^. ■?
I .
* $%
^ I
I.
* 1 •.' J
V
> » ■'
> - .>
" \" i' a i
>**\
.-11
*-•!;
!» tf.
^y" v"
<T-
the V-neck, work a single decrease:
Slip the slipped stitch as if to knit,
knit the next stitch, and pass the
slipped stitch over the knit stitch.
For a double decrease with the center
stitch on top, slip 2 stitches knitwise,
knit the next stitch, and pass the
slipped stitches over.
■» »i i
•n
* «i, v ■ • of,' > ■ '
Here, the
neckband was
worked with a
double decrease,
as described below.
Neckband with 2 Knit
Stitches Running Up
the Center
The pattern of die sweater with this
neckband is worked as follows: *4
stitches in stockinette stitch, 1 stitch
reverse stockinette, I stitch knit garter
stitch, 1 stitch stockinette, 1 stitch knit
garter stitch, 1 stitch reverse stockiiv
ette, repeat from*. In the center of the
front, there are 4 stockinette stitches.
For the neckline, put the center 2
stitches on a safety pin. Move the
decreases 6 stitches in from the
edge—i.e., purl the outer stitches, in
reverse stockinette, of the pattern
ribs next to the edge together with
the stitch before or after them,
depending on the side you are on.
Here the decreases were worked
every other row 5 times, then every
fourth row. This makes the V a little
rounder towards the tip.
For the neckband, pick up the
stitches with a circular needle
beginning at a shoulder; pick up the
2 center stitches along with the rest.
For this neckband, the number ot
stitches must be divisible bv 4.
Arrange the pattern in such a way
that the 2 center bitches are knit
stitches; work 2 purl stitches and 2
knit stitches alternately on both sides
of them. Now, in every round, knit
the first of the 2 center stitches
together with the stitch in front of it,
then work a single decrease over the
next 2 stitches. Work these decreases
in the binding-off row too.
-**-
>■»• ■»■
^
v*\*
1
.ty*y ,
■* *
i .
-v
A
i
S"
\ 4
A.
.r*>^
»- •
%■
Matching the
pattern: the
textured ribs on
both sides oj the
neckband
81
Perfect Details
Overlapping V-neck
Band
For this shape of V-neck, bind the
center 6 to 8 stitches off after the
piece has reached the desired length.
Here, a single decrease was worked
over the second and third stitches,
every fourth row. On the right side,
the last 2 stitches before the selvedge
stitch are knit together for the
slanted edge.
For the neckband, first cast on a
new selvedge stitch and then begin
picking up the neckband stitches on
the left-slanted side. Cast on an
additional selvedge stitch at the end
of the row too. Make sure that at the
end of the neckband, which will be
on top, there is a line of knit stitches
next to the selvedge stitches. As is
the case for cardigans, the right
neckband is on top ot the left neck-
band for women's sweaters, while the
left is on top of the right for men's
sweaters.
m »■' "i i
*'. * v
A
1
1 ^
v
X
5
?«■
When you pick up the neckband
stitches, cast on additional
selvedge stitches at the beginning
and end of the row.
The finished neckline.
t
»*
**■■.
V
-*-.
k
Sew the narrow edge of the top
part of the neckband on using
invisible stitch and the edge of the part
that is underneath with slip stitches.
>v"
*——TTTT
V i 0
. • i >
1 * t ».1
.) t a, «
I -w. • » * » 1
mwmmki.m
The same neckline with 1x1
ribbing.
Neckband Sewn on
Top of Itself
For this neckline, the decreases are
moved 2 stitches into the knitted
piece. To do this, on the right side
knit to within 3 stitches from the
center of the front, knit the next 2
stitches together, and knit the last
stitch; cast on a new selvedge stitch
next to that. Then finish the right
side of the front first.
For the slanted edge, every fourth
row always work to within 4 stitches
from the end of the row, then knit 2
stitches together. On the left side of
the front, cast on a new selvedge
stitch, then work a single decrease
over the next 2 britches. After the
first row, work a single decrease over
the third and fourth stitches for
e\ ery fourth row.
The neckband is worked without a
point in rows on the right and wrong
side of the work. First cast on a new
selvedge stitch and then start picking
up the neckband stitches on the left
side of the V point, and at the end
cast on another selvedge stitch.
Make sure that 2 stitches next to
the selvedge stitch are worked in
stockinette stitch, at least at that end
of the facing that will be on top.
-3-
4 *
.yi t
;*«v
■1+
t^
V
^
,^''
«S^*
V,
The side edges of the top part of
the facing are sewn on using
invisible stitch; the part underneath is
sewn on with slip stitches.
82
V-necks
."£»
I
, it •
v"'-;, * r '34
V
f$*
*■*>
yyv/vvJ
rt
■"n^ -"v a* *"-;
»>
>***
-«' ■•
-\
• \
h
r
Mi
Ami
" ' JM *..C4
< /#. 'J 41m
- : _ i i »Vir :
J
a
I'
stitches for the neckband, and work
7 stitches in large seed stitch over
these stitches. Then join these
stitches to the piece and complete
the work in reverse. Sew the
underneath part of the neckband to
the inside with slip stitches.
You can also continue this
neckband for the back neckline. To do
this, cast on an additional selvedge
stitch on the inside edge, before or
after the seed stitch pattern stitches,
depending on which side you are
A
i
-V
u
+ ....
3*
,x
£
ill'
V .
I
4
*-\
■Of*
Si?*
\v
A
'1 -l#.Vf
working, at shoulder seam level, and
work over these 9 stitches to the
center of the back neckline. Sew the
neckband stitches together using
grafting stitch, and sew the neckband
onto the back neckline.
\) i
: *
i S
t!
t
r
*
r
1
v P
I > i: j
r
1
V l
V
1 t t
'7 I
v.r * -
1 v > \
i
»
\ ♦
'« V
r
1
I
I
i ^
1
i!
v
' .t
i i»
Knit-on Neckband
Using Seed Stitch
Seed stitch, whether large or small, is
great as a finishing touch, since the
edges do not roll up. For this sweater,
8 stitches are alternately worked in
stockinette stitch and large seed
stitch. The seed stitch pattern is
arranged in the center of the front.
Here, first work the slanted edge of
the neckline over the left side. To do
this, work to the end of the seed
stitch pattern stitches in a row on the
wrong side of the work, turn, and
work the first stitch as a selvedge
stitch (seam selvedge worked in
stockinette stitch). Now work the last
seed stitch pattern stitch together
with the next stitch, matching the
pattern, every fourth row. It looks
best if the last seed stitch pattern
stitch is a purl stitch; then you can
purl the 2 stitches together. If the last
stitch in the large seed stitch pattern
has to be worked as a knit stitch, it is
better to work another 2 rows before
starting with the decreases.
Work the right side of the front in
reverse. To do thib, cast on 8 new
Without a Neckband
This neckline was worked without
any neckband. To do this, it is
important to work the selvedge stitches
very evenly and tightly. Here, the
selvedge stitches are purled in every
row and pulled tight.
For this neckline, the center stitch
has to be a purl stitch, so the number
of stitches must be divisible by 4 plus
1 stitch plus 2 selvedge stitches. After
the selvedge stitch, start with 1 purl
stitch in the rows on the right side or
the work, and with 1 knit stitch in the
rows on the wrong side of the work.
Double the center stitch in the last
row on the wrong side of the work
be tore you divide the front into the
two halves. Then continue working
over the right half and work the first
of these 2 stitches as a selvedge stitch.
The double decreases (see shaker
knitting, page 130) are worked every
sixteenth row here, 5 stitches in from
the neckline edges in each instance.
83
Polo Collars
Polo sweaters, named after
the game, are a tradition in
hand knitting. Here are
some examples for beautiful
collars.
or polo sweaters, the front
placket can be knit later or with
the piece. In most cases, it is
knit on later. The collar stitches are
then picked up from half the placket
parts and the neckline. You will find
some tips about how to pick up the
placket stitches starting on page 60.
And there is a detailed explanation
about how to pick up the stitches for
the collar in the section on round
necklines (starting on page 76). For
women's cardigans and polo sweaters,
the right placket, with the
buttonholes, is on top; for men's
sweaters, the left placket is on top.
* i
t i
» i
_» . '
\ I
.*.'»'
<'.'>:
4 I
.1 * •
«v
. I '-
... - *
' «
IJ ■
1 • • 4
.>
• .ii
•
<•♦
• * •
\ »
i • » »
\
»i
r ., -
• • t • 4 '
4 4
» 1
• I
J'.
\
* .
t
f
• »
. * *
• • a • <
• •
• I *
' • • 1 i ' . "
' » • , .'. , • • 4 , » .
'.'
.'.
I » •,
•*•
• t
• »
" 1 *. ■
* ».
\ .
' < 1
. • » » , —
' - f
• 11'
. *
".J.
«.
• '»
Knit-on Plackets
For the slit of the collar shown above,
bind off the center stitches on the
front over a width of about 114".
Depending on the yarn thickness, this will
come to approximately 6 to 10 stitches;
in the case of the placket shown above,
6 stitches were bound off.
The placket and collar are worked
with needles one size smaller than
* " 3 ■
\
'N
j
tT
v
' , i . '
t
i. I
» >
i
'.» * *«
V
For the necessary collar width, the
increases have to be worked at
regular intervals.
the rest of the sweater. Pick up the
stitches from the edges of the slit and
cast on an additional selvedge stitch
at the bottom edge. When working 1
X 1 ribbing, make sure that you have
an odd number of stitches and work
a line of stockinette stitch next to
both of the selvedge stitches.
For the collar, pick up an odd
number of stitches from half the plackets
and the neckline, arranging a purl
stitch next to the selvedge stitches in
the first row, on the wrong side of
the work. After 4 rows, work a
double increase (page 39) every sixth
stitch (= purl stitches) at the back
neckline to create the necessary
fullness. Work the collar to a length
of about 4 to 4%". Don't bind the
collar stitches off too tightly.
Sew the bottom edge of the top
part of the placket on, using invisible
stitch, alternately catching 2
horizontal threads of the placket and
a whole or a half stitch of the
sweater.
84
Polo Collars
Knit-in Plackets
For the polo collar shown on the
right, the placket is knit with the rest
of the sweater. The top placket is
worked over the knit stitches of the
front, the bottom placket is worked
out of the wrong side of the work.
First mark the center 6 stitches of
the front. If the left placket is
supposed to be on top of the right
placket, work to just before these 6
stitches. Now alternately work 1
stitch purl twisted out of the
horizontal thread, and knit 1 stitch 5 times,
working the last stitch as a chain
selvedge stitch or as a seam selvedge
stitch in stockinette stitch. At the
beginning of the row, especially after
the selvedge stitch, the stitches have
to be worked very tightly.
If the right placket is supposed to
be on top of the left on^j work up to
these 6 stitches. The first of these
stitches is the new selvedge stitch.
Now alternately knit 1 stitch and
increase 1 stitch purl twisted out of
the horizontal thread, then continue
in the basic pattern. Work the
buttonholes (see pages lOOff.) in the top
placket.
Work the 11 placket stitches for the
underneath placket out of the wrong
side oi the front placket stitches.
Work the ribbing pattern in reverse.
Start with selvedge stitch, 1 knit
stitch.
At the top edge of the neckline, put
the 11 placket stitches on a stitch
holder and then work the rounded
part of the neckline. Then sew the
shoulder seams.
Now, for the collar, first bind off
the first 5 stitches of both placket
parts without knitting them, then
work the remaining placket stitches
and pick up the other stitches ior the
collar from the neckline. Make sure
that a purl stitch is worked next to
the selvedge stitch so that a knit
stitch will be on the outside edge
when the collar is turned. After 4
rows, work double increases (page
* >
i
\<
• , t
I »
1
J
By increasing at the front edges,
the collar reaches farther down.
i ' J '<
V
1 i '
For the front placket, work the purl
stitches twisted out of the horizontal
threads. At the top edge, put placket
edges on a stitch holder, then work
the rounded part of the neckline.
39) every sixth stitch (= purl
stitches) at the back neckline to
create the necessary fullness. Work
the collar to a length of about 4 to
4%" in total.
In order for the collar to close well
at the front, as in the example
shown, stitches are increased every
third row, 4 stitches in from the edge,
Here, this comes to a total of 6
■A «
»<i
x \>
r fc
'%
1
"l*^ * klv s
Work the stitches for the
underneath placket out of the stitches of
the front placket, on the wrong
side of the work.
stitches. These increases can also be
worked every second or fourth row.
Keep to the pattern and alternately
increase 1 stitch knit twisted and 1
stitch purl twisted from the
horizontal thread.
85
Perfect Details
With Double Pickup
A double pickup at the neckline is
also good for polo sweaters and
cardigans, since it holds its shape and
looks good from both sides.
Work the double pickup with flex
or circular knitting needles. Since
normal knitting needles are stiff, it
would be difficult to pick up the
stitches for the second pickup with
them.
For 2x2 ribbing, the number of
stitches picked up, including the
selvedge stitches, must be divisible by 4-
The stitches are worked in such a
way that on the outside of the work
2 stitches in stockinette stitch always
lie next to the selvedge stitches. Of
course you can also work the collar
with 1 X 1 ribbing, but then the
number of stitches must be odd and
1 stitch in stockinette stitch has to
be worked next to the sehedge
stitches.
Pick up the stitches from the slit
edges as for a single facing. To do
this, use a knitting needle 3 sizes
larger than the needles being used
for the placket. Then work 3 rows in
stockinette stitch with the placket
needles, casting on an additional
selvedge stitch in the first row at the
bottom edge.
\:<
<
j • * %« * * " * • I r ' * * • 1 • « «
""•'* «Ia^ .*'\ ' ■-- • .* J* * V -»"V ' ** '*'*>! i't> '. i'«i.»
v'.:t s\ ••:•*' - - - -:•.:' , ■ .-"*>.* •*,*• ' • v.Y•.'ori' •' :'•
»•■*•'.:•» t,;;f' ::-■»". ' - .-! * i i> -i» .«, :•.-*,v •!*.••./,
x :l i •»•;-,::•• ^r • •■;- t ■■••j ',vxx r«, x**-' x* ■#*♦»*. x
■ %' ' j i :» • • i •» *. •»■»-.-.
,».•. ■ »
«"l
■. • ■.♦
• > ',
». i
>•■■■
• • i
.»
• t.t.i.'.'
• •. *
■ . « •
• •»» •' •
»
•••»• ?■?.•.
ii it* * 'i*-* * * • •
■V.;
• ' . • .* • . .' ' • • .» •!• .». V. " ' *
On the inside, pick up the stitches
from the horizontal threads of the
stitches picked up as knit stitches
previously (= 1 stitch less). Since
these stitches were picked up with a
larger needle before, the horizontal
threads are easy to knit with the
placket needle. Here again, work 3
rows in stockinette stitch.
Now continue in the ribbing
pattern. In the next row on the right
side of the work, always work 1 stitch
from the front needle together with 1
stitch from the back needle: If they
are knit stitches, insert the needle
first into the front stitch; if they are
purl stitches, insert the needle first
into the back stitch (see photos of
the method below). So that the
number of stitches is evened out,
work I stitch of the front pickup by
itself in the center uf the work.
Pick up stitches with a larger needle
also from the neckline and half of the
plackets. When picking up the stitches
from the plackets, catch the entire
selvedge stitch each time. This way
both sides of the pickup are covered
here too. Work the 2 sides of the
double pickup as described above.
*
-
*«
■»
^»
■fc.
«*
«•» «
ft -*
1
*
1
*
.«
K
,
<q»
S
t
>
1
"»
* J
1
1 For the double pickup, pick up
the stitches from the outside
with a larger needle, and pick up
the stitches on the inside from the
horizontal threads of the outside
pickup, using the placket needle.
Knit or purl the stitches of the
pickups together, as
appropriate.
s
t ■ .
1 V *N
For the increases, always work
the second stitch of a rib only
from the front needle, the first purl
stitch only from the back needle.
86
Polo Collars
■
J
i
^
*
-r-
1 *
m
*•*
*^r
3
1
*
1 * ^
t 1
f
\
t
•
*
t
i
V
ft
i
Enlarged view of the increases.
*■» -^
.';.
► i
«iv
b*. b'WWi ;
« * * 1: V
, *
This collar looks good...
"r
J*-. .•
• * * *,
v. >
.:: .£-- . ;:iLS Or- ->\ :;t.: / • .'.--•. ^:::::::*: :*:>:
»> » ■;":-.-. -.a\\,%: 11: f, .• :* ' -'V ■•■•■-.-'*•■- -■*>•
. V >rV--I"«-V ^- ' . * - .-->".»: w..«..v *. V.«.
...from both sides.
In order for the collar to be full
enough, you have to work increases.
These are worked when the stitches
are knit together in the first row of
the ribbing pattern. Here, double the
stitches every third or fifth stitch,
depending on the gauge. In the tirst
row on the wrong side of the work,
first purl 2 stitches atter the selvedge
stitch together with the back
stitches, then knit I stitch together
with the back stitch. Work the next
knit stitch only from the front
needle, the next purl stitch only from
the back needle. Then purl 1 stitch
together from both needles and knit
1 stitch together from both needles,
followed by 2 individual stitches. In
order for the number of stitches to be
correct at the end of the row (you
have to end with 2 purl stitches and
1 selvedge stitch), you can leave out
a few increases at the shoulders.
With Double Pickup
and Nehru Collar
For the pattern of this Nehru collar
(photograph below), you need an odd
number of stitches. In the rows on the
right side of the work, knit all the
stitches. In the rows on the wrong side
of the work, alternately knit 1, purl 1.
This means that you alternately work
1 stitch in stockinette stitch and 1
stitch in garter stitch.
The double pick-ups are worked as
for the example on page 86. The
stitches of the pick-ups are always
knit together in a row on the right
,. i k » , • •
) I
t
V
T
> ' -ti ^' Vt ;»;i {t*{,w t .i
side of the work. The row on the
wrong side of the work then begins
with selvedge stitch, I purl stitch.
In order for the collar to lie closely
against the neck, the stitches have to
be bound oft very tightly.
You can also work the collar in 1 X
1 or 2 X 2 ribbing.
♦
\ i
M
v
i-
>>
■*> -*-
S.
v • ■»
4 *
n
"V
.*
I'
Sew down the narrow edge of the
placket on top with invisible stitch,
the underneath placket with slip
stitch.
87
Shawl Collars
There are 2 ways of making
attractive shawl collars:
knitting them on later or
working them right with the
piece.
The necessary
collar fullness is
obtained by
increasing at the
back neckline.
hether a shawl collar is
worked on a cardigan or a
pullover, it always looks
best when it lies close against the
neck. For this reason, the neckline
should not be too large. A total
width of 6V4" to 7" is enough. On a
pullover, the neckline should begin
at chest height, in other words about
10" below the shoulders. On a
cardigan, the slanted edge can start e\en
lower down.
Increases on shawl collars
In order for a shawl collar not to pull
up, like a turtleneck, stitches always
have to be increased at the back
neckline to get the necessary
fullness. For a collar knit on in 1 X 1
ribbing, work double increases. To do
this, increase 1 stitch purl twisted
out of the horizontal thread after a
knit stitch, knit the next purl stitch,
and then increase 1 stitch purl
twisted out of the next horizontal
thread again. The pattern repeat of
the ribbing pattern continues
without interruption.
When a shawl collar is worked with
the piece itself, shortened rows have
to be worked instead of increases at
the back of the collar.
Shawl Collar Knit
onto a Pullover
On the pullover shown above, the
center 14 stitches are bound off
straight across for the inset piece.
After that, make the slanted edges
for the neckline by knitting 2 stitches
together, next to the selvedge stitch,
on the right side of the sweater, and
working a single decrease over these
stitches on the left side. For the back
neckline, bind off the center 20
stitches, then 3 stitches once and 2
stitches once, on both sides of the
center, every other row.
After you sew the shoulder seams,
pick up an odd number of stitches
from the back neckline with a
circular needle or flex needles, starting
and ending at a shoulder. Turn the
work, slip the first stitch knitwise,
and then work in ribbing pattern. At
the end of the row, pick up several
stitches from the slanted edge of the
front. Always pick up the stitches on
the front to the next decrease made
on the slanted edge. Here, the
decreases were made every sixth row so
that at the end of each row, you
should pick up an additional 6
stitches. Turn the work, slip the first
stitch, then work in ribbing pattern.
Continue working the same way,
picking up 6 stitches at the end of
each row until you have reached the
bottom end of the neckline edge.
Cast on an additional selvedge stitch
here so that you can sew the collar
on later. Also make sure that there is
a knit stitch on the right side of the
work next to the selvedge stitch.
At the same time, when the collar
is about 3/4M long at the back
neckline, work double increases evenly
distributed over the back neckline.
This is the only way the collar can be
turned over loosely to the outside
later! Work the increases about 2-3
stitches after the shoulder, before
and after a purl stitch, then work 5
stitches and make another double
increase. Keep repeating these
increases up to the other shoulder.
The frequency of increases is the
same for almost all thicknesses of
yarn.
Once all the stitches have been
picked up, continue working until
the selvedge is as long as the bottom
neckline edge is wide, then bind the
stitches off. Sew the top part of the
shawl collar onto the bottom edge of
the neckline with invisible stitch.
Since the ribbing pattern requires
more rows for the same length, as
88
Shawl Collars
compared with stockinette stitch,
always sew around 2 crosswise
threads of the ribbing and alternately
a whole stitch twice, and a half stitch
once on the sweater, or alternately a
whole stitch and a half stitch,
depending on the gauge. Sew the
underneath part of the collar on with
slip stitches.
Shawl Collar Knit
onto a Cardigan
For the slanted edge of this cardigan
(bottom photo), the decreases were
worked every fifth row, over the third
and fourth stitch in uach instance. On
the right side ol the cardigan, knit the 2
stitches together in a row on the right
side of the work, purl them together in
a row on the wrong side of the work.
On the left side of the neckline, work a
single decrease in a row on the right
side of the work; work a single purl
decrease in a row on the wrong side of
the work (page 34). If the gauge calls
for decreases every fourth or sixth row,
they are worked only in the rows on
the right side ot the work.
For the collar, first pick up the
stitches from the back neckline, as
described for the pullover sweater,
then start picking up from the
slanted edges at the end of every row
(here, you pick up 5 stitches each
time). At the same time, when the
collar is about %" long at the back
neckline, work the increases for the
necessary fullness of the collar.
At the end of the slanted edge on the
front, along the straight edge, pick up 3
stitches over 4 rows, or, depending on
the gauge and how you knit, 4 stitches
over 5 rows (see knit-on facings, pages
60fh), and work over all the stitches
until you reach the desired facing length.
On the left side of the pullover
sweater, pull the stitches through
with a crochet hook and lift them
onto the knitting needle.
From the side: The front edge forms
a straight line. The collar stitches
should not be bound off too tightly.
In order for the collar to turn well,
the stitches have to be bound off
loosely.
* *. ^
<
•4bi-H$.
i
-V. - ^
4 *
!**'
0. -A
I
%
t-
*:
At the back neckline, work several
double increases for the necessary
collar fullness.
The finished shawl
collar fits perfectly.
89
Perfect Details
Shawl Collar Knit
with a Cardigan
For this collar, the front facing is
worked along with the body of the
cardigan, starting from the
waistband. To do this, work 11 stitches in
1 X 1 ribbing, starting with a chain
selvedge stitch and 1 knit stitch.
Start widening the ribbing for the
shawl collar 10" to 12" below the
shoulder. To do this, work the facing
stitches, knit the next stitch, and
increase 1 stitch purl twisted from
the horizontal thread next to that
stitch = 13 stitches in the ribbing
pattern. Continue to work these
increases every sixth row, widening the
ribbing by 2 stitches each time, until
the collar is about 31 stitches wide.
Then continue without increasing up
to the shoulder.
After the shoulder stitches have
been bound off or put on a stitch
holder, continue knitting just the
collar stitches, adding 1 selvedge
stitch at the shoulder edge in the
first row. This edge will be sewn into
the back neckline later.
In order for the shawl collar to
have the necessary fullness,
shortened rows must be worked over
about three-quarters of the stitches
(24 stitches in this instance) 5 to 6
times on every side, after 4 rows each
The finished
cardigan with a
shawl collar.
time. These shortened rows can be
worked with varn overs or with
stitches passed over (pages 144-147).
The shawl collar shown here, and
the slanted shoulders, were worked
with stitches passed over.
Work the collar to the center of the
back neckline, then put the stitches
on a stitch holder. Work the other
half of the front in reverse.
At the end, put the knit and purl
stitches of the two halves of the
collar onto 2 needles for each half,
and sew the seam using grafting
stitch (page 116). Then sew the side
edge of the collar to the back
neckline.
»**
*K
\\
l- '
*f*g
A?-*
° for V
- .vr* ■ " " "
s
**
IFor the slanted edge, work 2
more stitches in ribbing after
every sixth row, increasing the
second stitch from the horizontal thread.
-"■v-
2 For the necessary collar
fullness, work shortened rows
every fourth row. Slanted shoulders
assure a better fit of the cardigan.
i
■f
■*•*-
~.": --*'
■•»»l *'
\ "J"
■i s; V
3
The seam in the back is sewn in
grafting stitch (see page 116).
90
Shawl Collars
Shawl Collar Knit
with a Pullover
The sweater ahown on the right was
worked with a very wide shawl collar;
the center 12 stitches were doubled.
If you want to, and depending on the
gauge, you can also start the collar
over 6 or 8 stitches, or over 14 or
more.
First mark the center 12 stitches of
the front. If the left end of the
collar is supposed to lie on top of
the ri^ht end, work to just before
these 12 stitches. Now alternately
work 1 stitch purl twisted out of the
horizontal thread and knit 1 stitch
11 times. Work the last stitch as a
seam selvedge stitch or a chain
selvedge stitch = 23 stitches in rib-
bing. Then continue working over
these stitches.
If the right end of the collar is
supposed to lie on top ot the left end,
you also work to just before these 12
stitches. The first of these stitches is
the new selvedge stitch. Then
alternately knit 1 stitch and increase 1
stitch purl twisted out of the
horizontal thread. Then continue in the
basic pattern.
Now widen the ribbing pattern by 2
stitches every sixth row, as tor the
cardigan: Knit the stitch next to the
selvedge stitches and then increase 1
Zly*^.
v\
. /
;SS5S=£S£S?
t"Vv*
<--v y-.
^V.
l.iO
,<.
■^:
><* ■ y
•y.r ,
t«>
■ .J..:s'
;•*
/"*. tv
••> 1
* t
r 1
> r
»*
The co/kir
fcccc/use 0/ the
shortened rows.
stitch purl twisted from the
horizontal thread next to it. These increases
to widen the ribbing were worked 8
times for the sweater shown here =
18 additional stitches—i.e., 41 collar
stitches in total.
Now continue over these 41
stitches, and the knit stitch next to
them, to the center of the back
neckline, casting on an additional
selvedge stitch (for sewing the collar
on) = 43 stitches. For sufficient
fullness, starting from the shoulder,
work shortened rows over the outer
30 stitches every fourth row, 6 times.
For the second half of the collar,
pick up 23 stitches from the inside
edge of the top part of the collar, and
finish the piece in reverse.
Put the knit and purl stitches of the
collar parts onto a needle each, and
sew the seam using grafting stitch
(page 116). Then sew the collar onto
the back neckline.
IFor the collar, work 2 more
stitches in ribbing after every sixth
row, increasing the second stitch purl
twisted from the horizontal thread.
J
l'f\*.YAM< :u\L
\y
1 <
i >
■, • •■< \ 1
J ■■' >.'■■. /
>< '-I'M I
» -.
*..»
j
2 For the inside of the collar, pick
up stitches from the front part
of the collar on the wrong side, or
cast them on and sew collar on later.
*-F- ._
i~. ^
***•* ■+*-*. .^*
>^>
* ■+* u^ ^U.
^'
U
3 The seam in the back is sewn
in grafting stitch from both
sides.
91
Pockets
A cardigan usually has
pockets. The bigger the
pockets, the more
comfortable the cardigan.
Pockets can be
inconspicuously worked into the piece,
or thev can be used as a
decorative element. Whether
the pockets are
worked horizontally,
vertically, or diagonally,
there is a perfect
solution for every
cardigan.
Neat facings are especially
important for pockets. They
can he worked with the
pocket or knitted on later with the
side edges being sewn on.
When you knit the pocket facing
along with the rest of the sweater,
you work with the same size needle
as for the other parts. For this reason,
you must be sure to bind the stitches
off tightly.
If you knit the facing on later, you
can work with a needle one or two
sizes smaller. This makes the facing
tighter, but you should still make sure
to bind off tightly, because a loose
edge always looks unattractive.
Ribbing, seed stitch, or even garter
stitch prevents the facing from
rolling up. The edge ot a double
facing is particularly attractive. Here,
the outside part is worked in ribbing
or seed stitch, the inside part in
stockinette stitch on slightly smaller
needles. That prevents this facing
from riding up.
When you are working patterns
that tighten, such as cable patterns,
make sure that you decrease a few
stitches at the start of the facing, in
accordance with the gauge, so that
the pocket facing does not become
too wide.
Pocket facings should always be
worked symmetrically. Always start
and end with I or 2 knit stitches
next to the selvedge stitches. In the
case of 1 X I ribbing, this means you
need an odd number of stitches, and
in the ca>e ot 2 X 2 ribbing, you
need a number divisible by 4
(including selvedge stitches). Pay
attention to this when you pick up
the stitches. One stitch more or less
is hardly noticeable, but an
asymmetrical facing is ver^
noticeable.
Another way is to work
entirely without a facing.
Here you need a turning
edge, such as a row of purl
stitches or decorative
picots. The inside pockets
should not ride up, if
possible. If you are
working a simple textured
; ' pattern, they can be
worked with this pattern,
but if you are working wide cables,
for example, this would cause the
cardigan to bulge here. For this
reason, the inside pockets are
generally worked in stockinette stitch or
reverse stockinette stitch. But always
work the last \lA" to 2" in the basic
pattern so that the plain part
of the inside pocket does not
show. Also pay attention to
the number ot stitches: For
patterns that tighten, like
cable patterns, you need
fewer stitches for the inside
pockets. Before you
continue working in the basic
pattern, you must adjust
the number of stitches,
which means you need to
increase (work increases
purl twisted from the
horizontal thread). For
patterns that stretch, such as
shaker knitting patterns, the inside
pocket is worked with more stitches.
Before you continue in the basic
pattern, you need to decrease
stitches. To do this, knit 2 stitches
together as needed, uniformly
divided over the pocket stitches.
Always cast on 2 additional
selvedge stitches for the seam. These
stitches are bound off before the
inside pocket is inserted into the
piece.
On the following pages, you will see
all the possibilities in detail.
92
Pockets
Horizontal Pocket
with Facing Knit On
Work about 8 to 10 rows in ribbing
or in seed stitch, over the desired
width, when the piece has reached
the length where the pocket is
supposed to go. In ribbing, make sure
that the facing is symmetrical—tor
example, it starts and ends with a
knit stitch. If the pattern requireb an
even number oi stitches, you can
decrease a stitch within the pocket
facing. Then bind the facing stitches
off. For a tighter edge, you can also
pass the stitches over without
knitting them (mjc page 102) or bind
them off by knitting them together.
For the inside pocket, cast on the
required number of stitches plus 2
selvedge stitches, and work either in
the basic pattern or in stockinette
stitch or reverse stockinette stitch.
Then work the last llA" to 2" in the
basic pattern. Before inserting the
inside pocket into the body of the
piece, bind oft the 2 selvedge
stitches. Then continue working over
all the stitches.
IBind off tightly the stitches of
the pocket facing. Insert stitches
of the inside pocket here later.
i
^■ty \ ■ ■ ji
I
j;
3 Pin the inside pocket down on
the wrong side of the work
and sew down first the bottom
edge, then the side edges.
Work the inside pocket in
stockinette stitch, then work the last
11/4" to 2" in the basic pattern.
, \*
■t*>
f
1 { M
■ 1
\
\
^ i ,
«
\
1. /
The finished pocket with a
tight binding-off edge.
If the pattern does
not allow a wide
pocket opening...
...you can simply widen the
pocket itself by several stitches
below the facing. Just cast on
about 5 or 6 stitches on both
sides. Then work the pocket until
it reaches the facing, and bind
the additional stitches off
straight across. Or you can work
a slanted edge on the
top part of the pocket
for which you knit 2
stitches together every
second row on both
sides. Then insert the
stitches into the piece.
93
Perfect Details
Pocket Worked
In Later
Pockets worked in afterwards have a
great advantage: They can be worked
precisely to your measurements—
farther up if your arms are short,
farther down if they are long. You
can also determine the precise width.
For patterned cardigans, you should
pay attention that you don't
interrupt the pattern at an inappropriate
point. For example, undoing a row
with crossed stitches would make
your work unnecessarily difficult.
,■!•:.
) :•
0%'
V T t
!.' V
r
*»
YS
> ,i; '. '^
i ■■*
■v
IMark the position and the
width of the pocket. Include the
length of the pocket facing in your
calculation. Then cut a stitch in the
middle of the marked section.
1*1
i. *o:>
1 1.1'
1 IV
*.■»
#*■> -re.-""* >&:■ #
tit. » , ' < • * * *J
Now undo this row on both
sides until you reach the end
of the marker. The yarn ends will
be sewn in on the wrong side of
the work.
I
A fast solution:
a rolled edge
Instead of making a pocket
facing in ribbing, you can also
knit on a rolled edge that is
about VA" long. If the edge is
worked in stockinette stitch, it
will roll to the outside (top
photo). If it is worked in
reverse stockinette stitch, it
will roll to the inside (bottom
photo).
»-j'1 • tit >' •!• ? •>> 'i ,'i
':.■.*' ' A
.<
1 >
VM4 i,
j.-
. )
With a thin knitting needle,
pick up the top and bottom
stitches. Also pick up on the top
edge the "half" stitches on both
sides. You will have 1 stitch more
on the top needle.
I •:•
ft
*
•
a
>
'.
i
I'.
" I.
to
*
* \
I
f')
fi '
-
1
111
>.
s'- ».
1 » •
\_
.s
< ■ •
* • *
i t
«
i i;...
^
■(!-,!■
1
J
r '
H
n ••:->>*
N*S
;t (.<^'
i
I
L
i'
»s«,
s
«
t
\
tm ff
/
.}
j)
5 At the desired length, work inside
facing in stockinette stitch on
needles 1 size smaller and 1 row less
than the facing worked in ribbing. In
the first stockinette stitch row, bind the
selvedge stitches off on both sides.
-V
I
IJ1* ..ft*'Vrf'
4 Now knit the facing on over the
stitches on the bottom needle.
In the first row, cast on a selvedge
stitch on both sides. Make sure that
the number of stitches is uneven,
and work a knit stitch next to the
selvedge stitches on both sides.
6 Now work the inside pocket in
stockinette stitch over the
stitches on the top needle.
94
Pockets
V
4
\ »
A.
> *
*' n *;
Sew inside facing down. Then
sew the narrow edges on, using
invisible stitch. Alternately catch 2
horizontal threads of the front and...
i—*-
i
•J
\s
%
*»•
• ...of the pocket facing. The
• seam runs between the
selvedge stitch and the first knit
stitch of the facing.
The pocket does not ride up
even with a double facing, and
it looks perfect.
Pocket Knit On in
Cable Pattern
For this pocket, the stitches for the
facing arc put on a stitch holder at
the desired length, and the stitches
of the inside pocket are inserted into
the work. The pocket facing is
worked last.
For cable patterns that tighten,
stitches have to he decreased—i.e.,
knit together—for the pocket facing.
For narrow cables, 1 decrease is
generally enough; for wide cables,
you generally need to decrease 2 to 3
stitches per cable.
In the example on the right, the
narrow cables continue in the facing,
while 2 stitches ire purlud together
twice over the wide cables. This
means that the purl ribs next to the
cables don't have to be offset.
For the double facing, cast on a
selvedge stitch on both sides in the
first row. When the facing has
reached the desired length, continue
in stockinette stitch on needles one
size smaller, binding off the selvedge
stitches in the first row of stockinette
stitch and knitting 2 stitches
together once over each of the
narrow7 cables.
•I'i
>!: ■
ft;
ii
i.
r
U
*
i -o
■\»
?, v.
* ,
* • •
.tf;u\
r . l
. •■ •. •
f ■ •
■ W :
K
« I,
1
•
4
•
•
•'":'•.
v . :■
4 v •!*'
• * ■
■ V'1
i
w
>
u
r
SJJ.
;;»■■
!T«"
li!
«.v:
• ;»•■
. u
■ s p.
•• "r »;• :• . *l -* • .. \ ;♦,'
IPut the stitches for the pocket
facing on a stitch holder or a
piece of heavy yarn in accordance
with the pattern.
i
f
!
,1
li
. * ••• » • »
• i .•
' i.
' /' T
o
tl " J- // f
■r
V
h
3 Match the outside facing to the
pattern as closely as possible.
Work the inside facing in
stockinette stitch on smaller needles.
,•.1 > i i
i V.4 f ' • I i 4i
'•V
i I-.
> ■ !•
2 Work the inside part of the
pocket and insert the stitches
into the work in place of the
stitches on the stitch holder.
Continue working over all the stitches.
i'i: -'v ■•'■
,Ut
<■
i',-
r
' ^ . - .
■,«-'iv.
* I4
II' v-' :f V'^-'^V "••V"
i'i " v} A #■■•'' •■•»'t'. .(■,, •
it1 ' ' . .••'■• \ •'•'.-.) • ;, . )V
• 11
(!'
[
'I
" ... >•
;,V,
' i v.' *
m
kt' '.'if ,." T - >•'• . • - V
• »!
V
H1
The pocket facing matches the
pattern of the cardigan even
better when it includes small
cables.
95
Perfect Details
Pocket Worked
Diagonally
Diagonal pockets are the right touch
for some cardigans. For example,
long cardigans worked in plain
stockinette stitch need something extra.
Here, diagonal pockets will make the
hipline look slimmer.
Work the waistband and the tront
to the bottom edge of the pocket.
Now put the outer third of the
stitches on a stitch holder and first
work the front, with the slanted edge
for the pocket. To do this, decrease 1
stitch every second row: On the left
front, work a single decrease (slip I
stitch, then knit 1 stitch, and pass
the slipped stitch over). On the right
front, knit 2 stitches together. You
can work these decreases over the
selvedge stitch and the first stitch, or,
as shown, over the second and third
stitches. When you decrease over the
second and third stitches, you don't
need a facing; the selvedge stitch will
turn in by itself.
For the inside pocket, cast on the
stitches or pick them up from the
horizontal threads of the purl stitches
of the first row above the ribbing, on
the wrong side of the work. The
pocket has to be at least as wide as
the number of stitches decreased for
the slant. However, it is better to
make the inside pocket 10 to 15
stitches wider (depending on the
gauge). When the pocket has
reached the desired length, bind off
the additional stitches of the inside
pocket, or knit them together with
the outside stitches. Then continue
working oxer the entire front.
For the pocket facing, pick up
stitches from every row of the edge
(odd number of stitches!), and in the
first row, cast on a selvedge stitch on
both sides. Sew the side ed^es of the
pocket facing on, using invisible
stitch.
? -
i
It
at
\ v
^ ,**<»
* £
3r. +
, »
IFor the inside pocket, pick up
the stitches from the first row
of the basic pattern, or cast them
on.
.V K-V-*
3 At the desired pocket length,
knit the additional stitches of
the inside pocket together with
those on the outside.
»**'
:>
«
1 Hv ■ ■ ■
Y
■\
*• *
"«**
' vj
%
t".
5 For the facing, pick up stitches
from every row of the side
edge. Work to the desired facing
length and bind off tightly.
„**
>
^
\
• i
■ - J*? \' * '
< i
T
X
.i
5. Z*
i
$i
\< ¥
vf- '
2 Work to the bottom edge of
the pocket, then join the
stitches with those of the third to
the side.
■a.
■ Tift.* ..I*' ■' : fc< :■!* f- ^-j,' •
¥
4
The pocket edge looks good
even without a facing.
6
The finished pocket on the
right side of the cardigan.
96
Pockets
Perpendicular Pocket
with Inside Pocket
Knit On
For this pocket, put about one-third
of the stitches at the side edge on a
stitch holder, either right after the
ribbing or at the desired point. Then
continue working over the other
stitches until the pocket has reached
the desired length. Then continue
working over the side one-third,
casting on as many stitches as
necessary for the inside pocket, and work
to the same length as the other part.
Now continue working over all the
stitches, knitting or purling the
stitches additionally cast on for the
inside pocket together with the
stitches of the outside pocket, as
appropriate. The additional stitches
can also be bound off and sewn on
later.
From the lengthwise edge of the
outside pocket, pick up stitches and
work about \VA" in ribbing pattern.
Work a stockinette stitch on either
side of the selvedge stitch.
To finish, sew the inside pocket and
the narrow edges of the facings
down.
Tip
If the pocket is worked not
directly above the ribbing, but
higher up, the inside pocket
can be made larger towards
the bottom, as in the diagonal
pocket. To do this, cast the
stitches for the inside pocket
on separately, work about 2"
to 311" in the pattern, and then
join these stitches with the
stitches of the side part.
>v
\
The inside pocket is
worked in the basic
pattern, or it can
also he worked in
stockinette stitch.
■Ik iUWt IP'f %$ ;• 7<<
Bind off the
stitches of the
inside pocket,
or knit them
together with
the stitches of the
outside pocket.
\ T
.T¥
V"6^ -*~*v --*-:*
■* — —
-i -
S'
>;-
.&
~>
V
To finisht knit on
the pocket facing.
«•*
11
v. -• - ,V -■ .
j. **- ^ - w --7. ' ** .
' -/if J -" '■ V .V > ■ ■** I rt, A\ \\ , li:?i
-^*w>/■■■#*■■.■ % Vm -'W
*:$ if?
mm f ••*«-' ■■■$ lifr
it# ,: V' ,?i ill- v;
* + ^ •■ r ■■■! ■ 1 ■ \ ' •> . -^ ":.f- .{jf- H-
- ^ .II-.'.
>-■ I
3f
I
97
Perfect Details
Sewn-on Pockets
Sewn-on pockets offer a variety of
decorative possibilities. On the right
is an example with stripes. The
knitted piece was worked with
horizontal stripes and the pocket
with vertical stripes. Here you can
also work with diagonal stripes, with
openwork or textured patterns, or
with embroidery. In addition, you
can sew the pockets on wherever you
want, such as a large one at the hip,
a small one on the chest, etc.
Since the edges of stockinette stitch
roll up, you always need a lacing for
the pocket opening. To make this
facing on a piece knit crosswise, pick
up 3 stitches over 4 rows along a side
edge (see also facings starting on
page 60).
Of course you can also work the
entire pocket in seed stitch. Then
you don't need a facing.
Pin the pocket onto the knitted
piece precisely where you want it to
go. Pinning the pocket down is \ery
important for pocketb knit crosswise
or diagonally, since stitches and rows
don't have the same length. When
you sew the pocket on using invisible
stitch, you must work very carefully
to make sure that everything lies flat
and you don't create any bulges.
l
Pin the pocket, worked
crosswise, onto the knitted piece.
i . * * » » » « « ! • ;
■ ■lit • i » » - »
t ! ' - '
'• ' ■ *** ■.* .. ■a:^
V M • j • - - ■ * * * * *
y.-i v^.>W - vs. - *
''" *' 'Ail ■*' - "'*>■■ -S^*%' ■:»-■'
. v -
f 4 I
m *>.
*
«£V
yv
^
3
...and 1 to 2 horizontal threads
of the knitted piece.
.4 til
1
• :»'
11 •'" '^
;V i ;
'. >*
1 ^'--,
"^
1 ■*
■*■.,— -•
* ^>^ "^ - f- » - * > "
^ - — ■<
■ -V - vJV." - »-
2
Always catch one stitch of the
pocket...
<**;'! v<
1
»n
*- iM
i \
^3,
+
'-j^-
'-v'
V
.>
^
>
1- J
^^
» >.
- -r<^^
For the facing, alternately
catch 2 horizontal threads of
the knitted piece and of the facing.
• . «y ,vr?-•■'».' fM <t '.vtW * *H$WL #
■» * t
Y-
\
•.*
' ' *
. * * ■ r •*»
i •
t
. f » t *
v <
- <
"I"*'
4 • » •
■»-B'
^
»
.'-1
*- >
. ■ ,»
98
Pockets
Ribbing Pocket
If you have a very long waistband
worked in ribbing, you can make
inconspicuous pockets. Work the
ribbing to the desired length and then
bind off the stitches for the pocket
very tightly. Instead of knitting the
stitches as you bind them ott, you
can simply pass them over (see
horizontal buttonholes, page 102). This
will make the binding off edge even
tighter.
Ribbing pockets arc even more
inconspicuous if you bind the stitches
off in kitchener rib (starting on page
45).
Pick up the stitches for the inside
pocket from the casting-on edge, on
the wrong side of the work. On the
purl stitches, pick them up from the
crosswise thread. On the knit
stitches, pick them up from one part
of the stitch each time.
Then work to the length of the
ribbing, insert the stitches into the
work, and continue in stockinette
stitch or the basic pattern. The side
edges of the inside pocket are sewn
on later.
>.
&
IPick up the stitches for the
inside pocket on the wrong side
from the casting-on row...
The finished pocket with the edge
bound off "normally"...
...and work in ribbing pattern.
Turn the ribbing up and
continue working over all the stitches.
. i.
\
\
...and with the edge bound off in
kitchener rib.
Double Knit-in Pocket
While double knit-in pockets ride up a
little more, they don't have the
problem of sewing the inside pocket on.
Work the front to the desired
length at the top edge of the pocket.
Then put the stitches on both sides
of the pocket on stitch holders and
first work a row of knit stitches, on
the right side ot the work, over the
pocket stitches. In the next row', on
the wrong side of the work, make a
picot edge by alternately purling 2
stitches together and working a yarn
over. In the next row, on the right
side of the work, knit all the stitches
and yarn overs.
Then continue in stockinette stitch
until the piece reaches twice the
pocket length, but work the last PA"
i<
l
Work the inside pocket to
twice the pocket length.
to 2" in the basic pattern again (pay
attention to the number of stitches).
Now put the two halves ot the
pocket together, right side on right
side, and continue working the front
On this pocket picots make a
nice turning edge.
over all the stitches. To finish, sew
the side seams oi the pocket and
attach the outside stitches to the top
pocket edges with a few sewing
stitches.
99
Buttonholes
Whether they are round,
horizontal, or vertical,
whether they are knit in,
crocheted on, or sewn on—
here's a suitable buttonhole
for anything you want to
knit.
purl stitch (i.e., after a knit stitch)
and then knit the purl stitch
together with the next knit stitch. In the
next row, work the yarn over in
keeping with the pattern, knitting it
not twisted.
On facings in 2 X 2 ribbing, a
round buttonhole is always worked
over the purl stitches. In a row on
the right side of the work, work a
single decrease over the second knit
stitch and the first purl stitch (slip
the knit stitch knitwise, knit the purl
stitch, and pass the slipped stitch
over). Now make 2 yarn overs and
knit the next 2 stitches (the second
purl stitch and the first knit stitch of
the next rib) together. In the next
row on the wrong side of the work,
knit the first yarn over and knit the
second yarn over twisted.
If this buttonhole is too large, you
can also work just 1 single decrease,
and in the next row on the wrong
side of the work knit 1 stitch and
knit 1 stitch twisted over it.
Before you make buttonholes,
you should know how large the
buttons are as well as how
many buttonholes you need to make.
If possible, knit a facing on and
determine the number and size of the
buttons on the facing. When you
knit the facing with the piece, you
need to know the location of the
buttonholes right from the start.
To determine the size of the
buttonhole^ put the button on the
facing, stretch the knitting sightly,
and count out the stitches. It is
better to make buttonholes a little
smaller rather than too large, since
knitting stretches over time anyway,
and the buttons would come open
easily.
Round Buttonholes
On facings in 1 X 1 ribbing, work a
small buttonhole like an openwork
pattern with a yarn over. It can
hardly be seen in the finished facing,
since it lies between 2 knit stitches.
This buttonhole is usually the right
size for shoulder facings on children's
sweaters or for button plackets on
polo sweaters.
On facings knit up and down, there
should he a purl stitch in the middle
so that you can work the buttonhole
over it. Work a yarn over before this
^
N-
1
-
i.; .
"'V
■\
V
#"v
> K
—
V
>^
1
V .
,
f
V
V
»«
•^
-
i
•
s -
*"--r -»
-
M-':
k
\
*
^*S •
>
.
-
* .
\
*
1
*.
>i
■+■
V -
K
In a row on the right side of the
work, work a yarn over after a knit
stitch, and knit the next 2 stitches
together.
*-v. ^ ; < i "»- t*" -
^
n%
.s .»*
!^.
-K
-*&
^
» ii
On facings worked in 2 x 2 ribbing,
work a single decrease and 1 or 2
yarn overs, then knit 2 stitches
together.
^
^ •■—
;
V
V
•\
<M
ljv<
\
/^ -
>
N
<^x
v
8:
_«
*>*
V'"-- H
'V
*§
^
* - ^
/
>;-
S8
V\.
>'
P
~ i
^
~4- r
4>
AN
■ -3 "\
t\
h,
""N^
—
The buttonhole with 1 yarn over
(top) is slightly smaller than the
buttonhole with 2 yarn overs
(bottom). Both lie neatly in the purl
rib of the facing.
100
Buttonholes
Vertical Buttonholes
On a 1 X 1 ribbing, the buttonhole
is worked over a purl stitch. In order
to maintain the knit stitches on both
sides of it, this stitch has to be
doubled in the last row on the wrong
side of the work before the button -
hole. To do this, knit 1 stitch and
knit 1 stitch twisted out of the stitch
above which the buttonhole is going
to lie.
In the following rows, work Vi or
the facing with the first purl stitch as
a selvedge stitch, and put the stitches
on a stitch holder when the
buttonhole has reached the desired length.
Work the selvedge stitches in every
row and pull them especially tight.
Now work the second half of the
facing, using the second stitch as a
selvedge stitch.
When this side has reached the
desired length, work over the entire
width again, and in the first row knit
or purl the 2 "selvedge stitches"
together, as applicable.
On a 2 X 2 ribbing, the work for
the buttonhole is divided up between
2 purl stitcher. One purl stitch, in
each instance, forms the selvedge
stitch on each side here.
«*N
S- '
i
;>-
■ -.N
-^s
• 3*
■ .1 x*
IFor a vertical buttonhole in 1 x
1 ribbing, double 1 knit stitch
in a row on the wrong side of the
work, and work the first purl stitch
of the row on the right side of the
work as the selvedge stitch.
The purl stitches of 2 x 2 ribbing
form the selvedge stitches of the
buttonhole edges.
... A;
r. M
Work the second half of the
facing to the desired length with the
second stitch forming the selvedge
stitch. Continue working on all the
stitches, knitting or purling them
together in the first row, as applicable.
1
^
*' **
-.. ., : ^ .-^ ,.- l-"
r * ■ .
-Tk
_- >*
• "-'
<»
J " . ' ■ * ■
-"" - ^ "■'"'■ -
c «
" -^
^.
^
-'■"»-
On garter stitch facings, vertical
buttonholes are hardly noticeable
if the selvedge stitches are worked
as a garter stitch selvedge. Knit
them in every row and pull tight.
Knitted Buttons
If you can't find matching
buttons, you can knit them with
the same yarn in a contrast
color. Cast on 6 to LU stitches,
depending on the yarn
thickness, with a
different-colored
~\^%. ^ yarn.
Work 4 to 6
-5* x
-X
Xr
-- >
^
%
■t
■\\\
* .0
v
\-
K^Mi^i t^—
rows in
stockinette stitch
with the actual varn.
Cut the varn to about
i" lony and draw it
through the stitches with a
tapestry needle. Undo the yarn in
the different color and draw the
yarn end through those stitches
too. Now tighten the yarn ends
slightly and fill the button
with a small scrap of wool.
Sew the narrow ed^es
closed with 2 stitches,
then pull the yarn ends
tidit and knot them. Pull the
yarn ends through the knitted
piece and sew them in.
K
■4
. .v^-\•.'(V-^!,(•:, ■,
^
u
101
Perfect Details
Horizontal
Buttonholes
You can work horizontal buttonholes
several different ways. The usual way
is to bind the stitches off in a row on
the ri«ht side of the work and cast
them back on in the next row on the
wrong side of the work. The
disadvantage of this is that the buttonhole
usually gets very wide, because of the
stitches being passed over.
On a facing in 1 X 1 ribbing, work
this buttonhole over an odd number
of stitches, starting and ending with
a knit stitch.
On a facing in 2 X 2 ribbing, the
buttonhole should be worked over an
even number of stitches. If it is 2
stitches wide, it is worked over 2 knit
stitches; if it is 4 stitches wide, it is
worked over 1 purl stitch, 2 knit
stitches, and 1 purl stitch.
This means that the last binding-off
stitch is always passed over a purl
stitch, and the buttonhole fits
perfectly into the ribbing pattern.
However, if the buttonhole is
supposed to be 2 stitches wide, you
should try to work a round
buttonhole over 2 purl stitches, since
this type of buttonhole is even less
conspicuous.
x
" > /' v ' ^
4>
i
XJ ■ &
/
.1
«. "I*
■ r
ivv
\
IFor a "normal" buttonhole in 1
x 1 ribbing, bind off tightly 3
(or 5) stitches in a row on the right
side of the work,...
•>.
i ^
.A &
S, '
A .
■=»'.
^ /?
.'i
- \ v
...and cast them on again very
tightly in the next row on the
wrong side of the work.
■;■■''!■■■- ' NX
1 v. ' • • -..:- • . • ■ -
s l < ■ •- "^ ' > •.*■■<
) ■ ' v
y 7* *■ i a -• ■ ■»
V. 1
V
■» " N . -. !. *
1 x'
1 v., -^'-
*
-
1
.v,
v^:
;A ^ '
V
: / ^ %
\: -v>» •
■*
^
'" ! '
>
I
i
\
u
The finished buttonhole worked
over 3 stitches.
The finished buttonhole worked
over 2 stitches (top) and over 4
stitches (bottom) in 2 x 2 ribbing.
A horizontal buttonhole comes out
tighter...
...if you don't knit the stitches before
binding them off, but rather simply
pass them over: Put 2 stitches from
the left needle onto the right needle,
slipping the purl stitches purlwisc
and the knit stitches knitwisc. Now
pass the first stitch over the second
stitch. Then slip 1 stitch onto the
right needle again, etc., until the
buttonhole is 1 stitch less wide than
you want it. Put the last stitch back
onto the left needle.
A. -~
1 In 1 x 1 ribbing, for a
buttonhole over 5 stitches,
first bind off 4 stitches without
knitting them. Just pass the
stitches over. Put the last stitch
back onto the left needle.
} ■
A.
%
*
r ,
s
■■<■ k
■P.
i
<
-A.
-*
^
■ x
r -
» i
•■
*
"i
■'•'*■
•
i
* V
*■ v^
■v it
• . *.
1
-^ -' "
T-
V
*V
" ' .» - \
v v H-
■V.
K. . ■* - Ik
A - l —
V S" v
, ^Tv Is
f
r
V
^k-
^
- _0
- \
,_,
■ m
A:
i ■
•~&
-v;
4 ■^.
2 Now cast on 5 new stitches as
tightly as possible. Then knit
the last buttonhole stitch together
with the next knit stitch.
102
Buttonholes
Cast on as many new stitches on
the right needle as the entire
buttonhole is wide. Pull these stitches as
tight as possible. Then knit or purl
the last buttonhole btitch together
with the next stitch the same way as
the second stitch on the left needle
lies. In the example shown on page
102, bottom photo 2, the stitches are
knit together.
You should always work these
buttonholes over an odd number of
stitches in 1 X 1 ribbing, and start
and end over a purl stitch. There will
be a knit stitch on both sides* of the
buttonhole to give the ribbing a neat
appearance.
In 2 X 2 ribbing, the buttonhole has
to be worked over an even number of
stitches. If it is only supposed to be 2
britches wide and worked over 2 purl
stitches, a round buttonhole will look
more attractive. If the buttonhole is 4
stitches wide, work it over 1 purl
stitch, 2 knit stitches, and 1 purl
stitch. If it is 6 stitches wide, work it
over 2 purl stitches, 2 knit stitches,
and 2 purl stitches.
«.\* 1-'
■ ■ • t. i
^v
\ *- i
.va- ■ *-*f- -^r ,j..^ >.<•
■'A
4 *•
r
> i
- - . '■*■ i v
In 2 x 2 ribbing, the buttonhole
over 4 stitches begins with a purl
stitch (top). A buttonhole over 6
stitches begins with 2 purl stitches
(bottom).
Working with
Contrast Yarn
Another way for getting really tight
buttonholes is working an additional
row in a contrast yarn. The button-
hole stitches are crocheted together
later.
Without Contrast
Yarn
...is another way you can
work this buttonhole. To do
this, cut a stitch in the middle
of the buttonhole, carefully
pull the yarn out on both
sides, and put the stitches on
thin cable needles. Crochet
the buttonhole and sew in the
yarn ends. The buttonhole
will spread apart a little more
than one worked with
contrast yarn.
*■» '•
J£^
■ -%
\
\
V- <
v' ( •'
:: A
\
*•-.*.
L* > V-"
Mc '•-:J,. ^: - -
>
.A.
> \
V
, r , ■ -
S * - ■ ^*
"»
•v :v v
>■ << '■■>' -a
IWork with a different-colored
yarn over the desired number of
stitches. There are 5 here. Then slip
the stitches back onto the left needle
and work them once again with the
original yarn. This means that you
are knitting the buttonholes twice!
. V
■ t
■^ i
^
/|;''^
\
«:vi^ss* ^%
Crochet the open stitches of the
bottom part, then top part, in
1 direction without using extra yarn.
Draw the last stitch of the bottom
part through the first stitch of the
top part. Draw the last loop through
to the wrong side and sew it in.
V 5 l-.v -S
vv ■; t
* \
-.dta ^. ;
■? *,
/K" ^^ 4. -1 '.V " .
.^■- v
*
Pull the contrast yarn out and
pick up the bottom 5 and top 6
stitches with cable needles (catch
the half stitches of the stitches
next to the ends on both sides).
. r i:- « v
i » ■ ^ • ■
' I •"* '' ■
f . V
■. * v
-■"-%?■■
*
s\
■#
v" '. 4S? ^v ^:- \ ' *> -A"^ ' \VJ
£
!.')
-,\
^ **•■
• \
Crocheting the stitches gives
you a tight, durable
buttonhole.
103
Perfect Details
Crocheted Button
Loops
Crocheted button loops are quick
and easy. They can be used on polo
sweater plackets and shoulder facings.
On polo sweaters, work the slit in
the center ot the middle. In the row
in which the sides are divided,
increase 1 selvedge stitch for the
button loop edge, and 2 to 3 stitches for
the underneath part. Since the loops
are crocheted between the selvedge
stitch and the first stitch, you should
work a seam selvedge in stockinette
stitch (page 26).
In order to be able to distribute the
loops evenly, first count the rows of
the slit edge. For example: If you
want to distribute 3 loops over 30
stitches and assume 5 rows per loop,
this leaves 2 rows for the top edge, 5
rows between loops, and 3 rows for
the bottom edge. Viewed from the
bottom edge, this is 3 rows without a
loop; then, 2 times: 5 rows with a
loop, 5 without, then another 5 with,
and 2 without.
Now work I row of slip stitches
between the selvedge stitch and the
first stitch, using a crochet hook
approximately the same size as the
knitting needles used (or a little
snviller; see drawing on page 105).
Above that, work another row, from
right to left again, with slip stitches
and chain stitches. Leave a long
enough yarn end at the beginning of
the first row. This \v<\) you can use it
to work the second row and don't
have to sew the end in.
The slip stitches of the second row
are now crocheted only in the top
part of the first row of slip stitches.
The number of slip stitches and
chain stitches is determined by the
arrangement and the size of the
buttons.
"7
.>
\£$
X"~>-
-- <
J9f
-■■>r -*ris.
-» ^ -* "•
"*>_;
?>■
tr^
•c
*<£-4g
.„^„_^£.- —
1 Insert the crochet hook
between the selvedge stitch
and the first stitch, and crochet a
row of slip stitches from right to
left. Then start from right to left
again, and work alternately 4 slip
stitches and 5 chain stitches.
To reinforce the button loops,
you can crochet around them
with half a piece of yarn and single
crochets; just work slip stitches
over the slip stitches.
\ -y
V
■s \
!- ' ~
\ * '
1 \
- '•t
•' - ^ .<-
-.. V
-« »■
IV
v
W
t
The finished facing worked in
the same color. If necessary,
reinforce the edge of the
underneath part with a row of single
crochets.
t *
•.
^
t:
V
ft
i
\
Ni
*
..; { •
104
Buttonholes
Sewn Button Loops
Preparing the knitted piece tor sewn
button loops is the same as for
crocheted button loops. Here again,
where the knitted piece divides for
the slit, increase 1 selvedge stitch for
the part on top, and 2 to 3 stitches
for the part underneath. The loop
placement is calculated the same way
as for the crocheted loops.
If the selvedge stitches are very
neat, you can sew the loops on be
tween the selvedge stitches and the
first stitch. If the selvedge stitches
came out a little uneven, first en)-
chet a row of slip stitches between
the selvedge stitch and the first
stitch, and then sew the loops on.
These loops are always made with
half the yarn.
Tip
If you don't have matching
thread to sew the buttons,
then use the knitting yarn! For
most types of yarn, this isn't a
problem. Depending on the
yarn thickness, you have to
divide the yarn in halves or
into thirds.
■*-**>%
*s
""*"".» "
**-£.
" ~3<
*—• "*"
_—***•-
—4 __-—
-•^
m •*%--^»
^
>H
-~ - .- •
~~ -" -
"? -.—
—- • ■.
>*r*
*"£- *
-*•*-
-*■
r-**. _
~ *»r ,,.
-*
— -25-
*«-
— -.
.
-
-
_.<
-r-
._
-£~ -*.-
_^r- •
—^
- Tf^
-< -
.^
W ^
" —
•<r
"~>
•■»
J
►""*-""
•
-
\lL~-
~
j -
1 Start at the bottom edge of the
slit, and sew a double loop
between selvedge stitch and first stitch,
or into the middle of the row of slip
stitches, whichever is applicable.
.<
^ * \ I . ■
"-Y-
^'
.1
.^TArvW VA^-T-WV •%^Uk» Y
VT "^' I V W» -1'tA r- if I K ■'
* l -si ? * • Wl#¥\l' l- V^t ,
»*> ^S*V ft *!' ■■ % v-iFlT '
' - ,' : li p- - . \V '-j*-* M . ■ 'w ■ \ i.\ J y *. 1r at *^v 'J. 'k >
i- \ j- ■ • • * ■•»■ ■ ■' vf4> r w- -..\ ■ , i> ■*;f ;^ tn |m ,i
,# !^W
*^%^tJk:-\
»* %
*/
^t- *
' - r
2 Sew around the loops with
buttonhole stitch. At the end,
insert needle into the stitch and
come out again a few rows farther
along. Then sew the next loop.
The finished facing worked in the
same color. If needed, work a row
of single crochets along the edge
of the underneath part.
Crocheting slip stitches: Put yarn un
der the work. Insert crochet hook
between 2 stitches, from top to bottom,
and bring the yarn through to the top.
Insert hook from top to bottom again,
1 or 2 rows farther along, bring
another loop through, and draw it
through the loop on the needle.
>
U
"^**5T**
Since the yarn is thick and the
selvedge stitches are uniform, you
can do without the row of slip
stitches.
105
lppers
Sewing in zippers is a very
special topic in knitting. To
keep the knitted piece and
the edge next to the zipper
from becoming wavy, you
have to work very
accurately. The zippered closure
should look good from both
sides.
'A-
* • * < .-V* -f ■ -v^ ' V * • >
)
*""Nv r.:;r w *
, . >' f Jr. hi •
For the inside facing, pick up 1
stitch from each of the loops of the
front facing stitches, and work the
facing like the outside facing.
)t -.
V x
* 1 x
v7«-
-* .-•-.
«->.
<* V
■~ :
a
f- r
i »
A, '*
r>
■ —». * v
r*'
« '^ ''
> /'' V^f
*■' -^-->
3-'v
>",^
,^
„>
x3^
<>'^ *
The zipper neatly sewn in, as seen
from the wrong side.
Zipper with Double
Facing
On the cardigan shown to the right,
the zipper was sewn in between a
double facing.
After you have worked the neck
band, pick up 3 stitches over 4 rows
from the edges. Use a knitting needle
that is 2 to 3 sizes larger than the
needles used tor the neck band.
Don't let the size of the stitches
bother you. Half of" this will be pulled
to the inside for picking up the
stitches for the inside facing.
Now work 3 rows of stockinette
stitch (= 1 row of purl stitches on
the wrong side, 1 row of knit stitches
on the right side, 1 row of purl
stitches on the wrong side) with the
facing needles. Then bind off the
stitches in a row on the right side of
the work with purl stitches.
If you are using heavy yarn, 2 rows
of stockinette stitch may be enough.
But if you are using very thin yarn,
you might have to work 4 rows of
stockinette stitch. The facing must
be approximately as wide as the
fabric edge of the zipper.
On the inside, pick up 1 stitch from
the loops of every stitch previously
picked up on the right side, and work
the facing the same way as on the
&
if .. . *
■ -t
<j
4
' }*
V
•J"
The zipper neatly sewn in as seen
from the right side.
(
t
x
* » 4
106
Zippers
outside. The inside facing will be 1
stitch narrower than the outside
facing.
Pin the zipper to the edges of the
facings so that the zipper teeth are
exposed, and sew it down between
the purl stitch and the binding-off
stitch with strong sewing thread in a
matching color. Then sew the inside
(acing down.
to
r
,4
i ""
The same zipper with a binding-off
edge worked with knit stitches.
Here the seam is sewn through the
middle of the binding-off stitches.
The same zipper with the edge
bound off with knit stitches, as
seen from the wrong side.
Sewn-in Zipper in
Cable or Ribbing
Pattern
-QL
In the example shown, 2 stitches in
reverse stockinette are worked
between each of the cables. The
zipper is sewn into this rib of reverse
stockinette. You can work zipper
closures in any vertical ribbing
pattern this way.
At the point where the 2 halves of
the piece divide, cast on 2 additional
stitches on both sides, between the
purl stitches, for the underneath
parts. The zipper is then sewn on
using invisible stitch, between the
la^t stitch ot the cable and the purl
stitch. To do this, alternately catch a
crosswise thread and sew a short
stitch through the fabric of the
zipper. On the wrong side ol the
work, sew the zipper tapes to the
underneath part of the knitting.
~)
K
* -
V
\1*
'A ^
\
*.\
■\ *
In order to be able to sew the
zipper in well , cast on 2 additional
stitches for the underneath part on
both sides (right photo inset). The
zipper fits perfectly between 2
cables.
ji
+ -
• t.
v. ■»
107
Perfect Details
Straightening Out
Zipper Edges with
Slip Stitches
This technique is good for the front
closures of polo sweaters and turtle-
neck sweaters as well as for zippered
hack closures, such as in children's
sweaters.
For the slit, just bind off the 2
center stitches. Then continue the 2
sides separately, working evenly over
the same number of stitches.
Before you sew in the zipper, first
straighten out the edges with slip
stitches (see drawing on page 73). To
do this, put the yarn under the work.
Insert the hook between the 2
bound-off stitches at the bottom of
the slit, and bring the yarn through
to the top. Leave enough yarn to
work the row of slip stitches on the
other side.
Now crochet the slip stitches on 1
side first. Insert the crochet hook
into the middle of the first binding-ofl
stitch, from top to bottom. Bring the
yarn through to the top and pull it
through the loop on the hook. Keep
working the following slip stitches
through the selvedge stitches, 1 or 2
rows higher. Work slip stitches over
the second edge the same way.
Then work a second row of slip
stitches over the first. To do this,
start again at the bottom of the slit,
as described above, and now work
the slip stitches through the half of
the previous slip stitches that (aces
the slit.
For the inside facing, cast on 10
stitches and work in stockinette
stitch for about %". Then bind off
the 2 center stitches and continue
the 2 halves separately. Pin the
fachm on and sew it down.
\.
1 First crochet a row of slip
stitches onto the selvedge
stitch.
Above that, crochet a second
row of slip stitches through
the part of the first slip stitches
that faces the slit.
/ •*
Sew in the zipper with sewing
thread, going through the outer
row of slip stitches.
Pin the inside facing down on the
wrong side of the work and sew it
down with slip stitches
108
Zippers
Zipper in a Turtleneck
Sweater
This turtleneck sweater is worked in
single shaker knitting with the rough
side on the outside. The collar,
worked in 1 X 1 ribbing, is sewn
down on the inside. The front zipper
reaches to the Lop edge of the turned
collar. Since the neck can be worn
open, the zipper should be covered
by a facing on the inside.
At the division into the 2 sides,
work the center purl stitch as a
selvedge stitch on 1 side. For the other
side, cast on a new selvedge stitch.
Sew the zipper in so that it ends
about 'A" below half of the collar.
Turn the collar to the inside and
loosely sew it on with slip stitches.
For the inside racing, cast on 9
stitches and work in stockinette
stitch for about 3/i". Then bind off
the center stitch and finish the 2
halves separately. Pin the racing on
and sew it down.
\
On this turtleneck
sweater, the zipper
reaches up into the
collar.
Sew the inside
facing onto the
wrong side of the
work.
u
<g
Shortening a Zipper
If you can't find a zipper of the
correct length, buy one that is
a little longer and shorten it to
the desired length. Sew a new
stop at the appropriate
location, using a double buttonhole
thread. Then cut off the rest of
the zipper below it.
-
4. «
."#^s
*****
1&" ■
*■""
V_^
109
»
«
A nice-fitting sweater comes
from how you sew the
individual pieces together.
Here are the best tricks for
perfect seams.
t
Invisible Seams to Join Selvedges
The best way to sew side
and sleeve seams is with
invisible stitches.
on can use this stitch to sew
pieces worked in stockinette
stitch, reverse stockinette, or
even shaker knitting—almost
invisibly together. Of course, you
must first have perfect edges (see
also selvedge stitches, pages 26-27).
Before you sew the pieces together,
block them and let them dry under
damp cloths (see page 121).
To sew the seams, you need a
tapestry or wool needle. If possible,
you should sew the pieces together
with the same yarn you used for
knitting. That works well for all
smooth or only slightly fuzzy yarns.
When using long mohair yarn or
specialty yarns with nubs or fringes,
it is better to use a smooth yarn that
matches in color. But do not use
sewing thread, because it does not
stretch enough.
Put the knitted pieces onto a
sufficiently large work area with the
right side of the work on top. Always
start at the bottom edge and work
from right to left.
Stockinette Stitch
Pieces
First sew the selvedge stitches of the
casting-oil rows together. To do this,
insert the needle next to the
selvedge stitches, going from bottom
to top of one piece to the other.
Then catch the first horizontal
thread between the selvedge stitch
and the knitted piece of the top
piece. On the bottom piece, now
catch the first and the second
horizontal threads, then the second
and third horizontal threads on the
■* v .
x -v
-\ -
■%*£
^ "v-
^
•
*> -"
-x
* -v.
v^
"V.
:vC .
*-
^-
s
a.
■*.
'-^»''
.
* 1. .
"••"■.*
"
1.
r<
1
■»"
<--
X
.
h-
K*
■»
*4
*
s. „»*.*
•>-
. - w.;«v^
~>
V ,
• *» »
^ ^f*^V
_ )
•*r
*
^- -:
. -
~ *T
7—
*^_
Vs ,
<#-.
,
-
^
, •
. ^
•^
"- • -V-
v
¥
*■
- •.<-
>
-*l
*. *■
. -• 1
*
*' "*.
\->
'*- >•
"- —
V
■%
>
V
*
■c
)
-^ •
*s _
IOn pieces worked in
stockinette stitch, begin
sewing with 1 horizontal thread,.
^-V^'-V *
V
>
*N
\ i
.. *%*■
v "-
». \
«. • v
* \r
*
<~
*.
^
;
N
...then catch 2 horizontal
threads of the top and bottom
pieces each time.
V
■ -A1
Because of the offset, even
stripes and textured patterns
match up perfectly.
t
II ' ■ '• ' ]
r
'*
- >
V.
Ty^-"" N.% '^ ,"
r ' t
t
, )
■ -.^
>:
V. - V
v '.\, ' I- ' * « V." V
''.• [*/'$ < '^'' !^%- ' "
IOn pieces worked in reverse
stockinette, only catch 1 stitch
of the bottom piece...
■»'»
i \
> i *
if
, V '-V' •
Vil
< ■
■.*■,■ . v ■
' } r.'. ',
t
«5r-
v\
'v«
I' (
yy \
) .i
i \
,.V l
It, v-, •
r ,' ■>
\ •
v:,.>v. ?
•i
and 1 stitch of the top piece.
>--
^
"*: -
*r
r^'
- "St
- - v -X. ■ ■ \ ' - - -w -
After tightly pulling the yarn,
the seam can hardly be seen.
112
Invisible Seams to Join Selvedges
first piece, etc. You always catch 2
horizontal threads with the needle,
olfset relative to one another. Don't
pull the yarn too tight so that the
seams remain btretchahle.
Becatise of the offset oi the stitches,
even patterns such as stripes or
textured patterns match up perfectly.
Reverse Stockinette
Pieces
A seam worked in invisible stitch is
almost impossible to see in reverse
stockinette too. Here, however, from
the beginning you only catch 1
horizontal thread per side. The yarn
has to be pulled a little tighter. It
forms a back~and~forth line in the
knitting.
Shaker Knitting Pieces
For a seam using invisible stitch, you
have to work a purl stitch on the
right side of the work, next to the
selvedge stitch (odd number of
stitches). It is also important that
your selvedge is worked very tightly.
This scam is slightly thicker, but
almost invisible.
Alter you have sewn the casting-on
rows together, always catch the
center of the purl stitches next to the
selvedge stitches (it is made up of 2
threads), going from side to side. The
2 half stitches from each side
produce a whole stitch.
Garter Stitch
Selvedges
If the pattern allows, such as in the
case of faux shaker knitting, garter
stitch selvedges are the best edges for
an especially attractive seam. Since
the little knots always form at the
beginning of a row, they lit into each
other like the teeth of a zipper when
they are sewn together. The finished
stitch then looks like an additional
purl stitch.
VW-. -A.
A
" \
s- * .y
^
» i • v
.***
Vi
k.
IFor shaker knitting, alternately
catch the middle of the purl
stitch next to the selvedge stitch...
■V -.x-.. v
> vw.
v-
1
■\ >
e
2
*> ■«"-"v
-V-
v
"N
N
'>\,
...on the top and bottom
pieces.
N*
^
%>*.
"■■*': v-- .s->
4 •■ :*; *■
->
-1
5 "^ -.':
*
1 *
H
\«
■v
This seam is a little thicker,
but it is still almost invisible.
«
4
1
"*
•
s
*
>
-
*
t
*
»
\
-# „
t
V
1 Alternately insert the needle
through a knotted selvedge
stitch on the top...
...and bottom pieces. Don't
pull the yarn too tight.
i "If *
- «
3 The seam is very flat and
looks like an additional purl
stitch.
113
Invisible Seams with Grafting Stitch
The great advantage to
sewing seams using grafting
stitch is that no visible seam
is formed. This looks better,
particularly when using
heavier yarn or when
sewing a top shoulder/sleeve
seam of a sweater worked
in 2 parts, such as a sweater
with dolman sleeves.
To sew grafting stitches, you
need a tapestry or blunt wool
needle. The yarn for sewing
has to be about three times as long as
the width oi the pieces when lying
flat. If you use the end of the yarn
you knit with, this is one less yarn
end to sew in. It is better to leave the
yarn a little longer rather than too
short, because you can't add more
yarn if you run out.
You can sew the stitches right as
they come off the needle. You need a
little practice to do this, because
sometimes they.slip off the needle
too quickly, especially if you knit
loosely.
Or you can work another 2 rows in
stockinette stitch in a different-
colored yarn on both pieces. These
additional rows will be undone little
by little as you sew the pieces
together. Use wool or a wool blend
for these additional rows, because
cotton comes undone too easily.
Whtrn you sew parts together using
grafting stitch, you create a new row.
Therefore, you should work the
knitted piece 1 row shorter. For
example, if you are working stripes of
4 rows each, work 2 rows on one
side; the finished row and the
stitches on the knitting needle will
be visible. On the other side, knit
just 1 row; here the stitches on the
needle will form the row of grafting
stitches.
■ A
• * > \ ? Y ...
V
A *
i -j *
ITo sew off of knitting needles,
insert tapestry needle in the
selvedge stitches of bottom and top
pieces, from bottom to top. Then insert
needle into bottom piece from top...
i > ♦ i
> i <*ttti I V
v *
* •• v y i v *
^ * \
s
2
1
s
X
X
-i
2 Now insert the tapestry needle
into the previous stitch,
alternately in the top and the bottom
pieces, and out through the next
stitch on the needle.
H * < * f
t
it
- r
'$ >t,
V
•V
* vt
* v
\ .
The stitches on the needle and
the seam itself form a row in
the knitting. For a pattern repeat...
...to bottom, and come out of the
next stitch from bottom to top.
Then allow the second stitch to
slip off the needle.
Don't pull the yarn too tight. With
every working step, you catch 2
half stitches.
...of 4 rows, you need 1 row on
one needle and 2 on the other.
114
Invisible Seams with Grafting Stitch
T ? *
v
W :
,-«*?':
N^>
**>-»>"% w*^ r\*V %"-
:«V
V**&3-^R *******
;£1 '>,{ M *Kl ify «\k
L
IFor sewing with open stitches,
first work 2 rows in stockinette
stitch in a different-colored yarn.
Place the parts next to each other
and pull the knitting needles out.
\
rX
v ,»
. Wilis'
• v:. ■
1
v.. <*»
N
v^ ■
K'
.V' '
** \
Work as when sewing from the
knitting needles, alternately
joining 2 stitches of the bottom and top
pieces after the selvedge stitches.
Undo the additional rows as you work.
*'
*
■j*X,
J
k
3 The result is the same as
when sewing from the knitting
needles. The finished seam is
invisible.
Put the pieces next to one another
in the way they are going to be
joined, with the right side ot the
work on top. The working yarn is
attached to the bottom piece. The
way you work in stockinette stitch is
explained in detail on these pages.
For pieces worked in reverse
stockinette, the stitches are similarly
sewn together. You only have to
insert the needle from bottom to top
instead of from top to bottom, and
bring it out the opposite way.
This means that you insert the
needle into the selvedge stitch from
top to bottom. Then insert the
needle in the other selvedge stitch from
bottom to top, and out of the next
stitch from top to bottom, etc. If the
piece was worked entirely in reverse
stockinette, you can also turn the
work and sew it together using
grafting stitch for stockinette stitch.
When you have a patterned design,
such as textured or ribbing patterns,
it is not as practical to use grafting
stitch to join the pieces, because the
stitches move over by half a stitch
each time. In this case, it looks better
if you knit the stitches together or
sew them together after they arc
bound o(i
Sewing Bind-off
Stitches Together
On some patterns, such as
openwork patterns, it is difficult to
sew open stitches together using
"rafting stitches. In this case, it is
easier to bind off the stitches
and then sew them together with
grafting stitches. A slightly raised
area will form on the inside with
this seam, hut it can hardlv be
seen on the outside.
Similar to sew ing open stitches
together to sew the bind-off
stitches together with grafting
stitches, you need a tapestrs or
wool needle, and a working yarn
that is about three times as long as
the width of the piece.
Put both pieces clown, right
side of the work on top, next to
one another. Start with the
selvedge stitches just as you do
for open stitches. Then again,
catch 2 stitches from the bottom
and top pieces. Don't pull the
working yarn too tightly,
otherwise the seam will be hard
and rigid, and the line on the
inside will become thicker.
115
Finishing
Sewing Together
Pieces Worked
Crosswise
For some patterns, you have to knit
sweaters crosswise, such as if you
want to work lengthwise stripes and
don't want to work with a lot of
different skeins of yarn.
It's true that you can start the
sweater at the sleeve and work it in 1
piece over the shoulders. But if you
use thick, country-type yarn, the
sweater gets very heavy; and if you
use soft yarn, it can easily stretch out
of shape.
Here, ^ou can work all the parts
separately and then sew the sleeves
onto the casting-on or hinding-off
edge of the front and back in open
stitches. In order to finish at the
same length on both sides, start in
the middle of the sleeve—i.e., at the
shoulder. Leave half the working
yarn hanging on the right side of the
work, and first sew 1 side to the
corner of the sleeve. Then begin at
the same point in the middle again,
and sew the other side.
At the end, sew the side edges of
the front and the back together
using grafting stitch, and sew the
sleeve seam using invisible stitch
(pages 112-113).
VT
Mr'* -1
IWhen you sew sleeves onto
pieces knit crosswise, put half
the sleeve stitches on 1 needle, the
other half on another.
*Vt H
ai
4i #" • i*#Mh
\
2 Start working the grafting
stitch in the center of the
sleeve, i.e., at the shoulder, and
first work towards the left edge of
the sleeve.
*■*> Y • *
iwiiiiii
\ -
#
v i
0f.\4fci-
WOW''*'"' i$$t
Then turn the piece and finish
the other side. At the casting-
on edge, catch the whole stitch. At
the open edge, catch 2 half stitches
each time.
Sewing Ribbing
Together
Cardigan or \est facings that
wore knit with die piece, or
wide shawl collars, are
generally worked in simple
ribbing: knit 1. purl 1. For the
section from the shoulder to the
center of the back neckline,
\ou work only these facing
stitches, then they are joined in
the center of the back.
Since the stitches of a seam
sewn with "rafting stitch shift
over half a stitch, you can't sew
this seam invisibly nor can the
stitches be knit together. Since
ribbed stitches also contract a
lot, try this technique:
First put all the knit stitches on
1 needle dnd the purl stitches on
another so that only the knit
stitches are on the needle on both
sides. Then put the pieces next to
one another and first se\\r the knit
stitches from the 2 needles on top
together with "rafting stitch. Then
turn the work and sew the
> *
■5* \
t >
*
M
i v
i
)<
\r- ::i
\\
■iv
stitches from the needles on the
bottom together in the same
wav.
.1 I
\ '•
» - * ,
1.
{ '
116
Sewing In Sleeves
You have to set the sleeves
in with special care. This
seam should always be
sewn before you sew the
side and sleeve seams.
Straight and Slightly
Rounded Sleeves
p*t
r
t r
\»
"l
•u
>n
>■' - ) ,■ • • • ■ ^
k -\ * *i ^ 4 • T
..n
::*v "^
■SL
\% ' *
.**'■
x 1
V
h "
-;H
, " 4'
.r:'*A-UV-XV'*-'.- -.-4 V"*' %?*'
% ^ • ;
I i
Sewing sleeves on using invisible
stitch: Always alternately catch 1
whole stitch of the sleeve, and 1 or
• / ■
2 horizontal threads of the front or
back.
These sleeves should always he sewn
in from the outside, using invisible
stitch or hack stitch. This is the only
way to keep the seams straight with
the stitches.
Lay the pieces, opened out, onto a
counter or tabletop. Pin the sleeves
exactly into place so that nothing
can pull out of shape while you are
sewing. Start pinning at the shoulder,
in the center of the sleeve, and at
the corners of the sleeves. Then pin
the rest of the top sleeve edge at
intervals of 2".
While you are sewing, pay attention
to the gauge. For parts worked in
stockinette stitch, you have to go
around 1 horizontal thread instead of
2 every 3 stitches when sewing
invisible stitch, and around 3 instead of 2
horizontal threads when sewing back
stitch. If you have pinned the parts
together carefully, it should be easy
to check the seam.
If you have bound off the sleeve
stitches, you can now work in
invisible stitch. Always go alternately
around 1 sleeve stitch and 1 or 2
horizontal threads of the front or
back.
The seam will be even Hatter if you
sew the open sleeve stitches on using
back stitch. To do this, first bind the
-"if
i l \
N. * *
When sewing a sleeve on in back
stitch, undo the binding-off row 1
stitch at a time.
stitches otf loosely, so that they wont
come undone when you block the
piece. Now pin the sleeve to the
front and back, as described, and
undo the binding-orf row, little by
little, as you sew the seam. Work the
seam from right to left as follows:
First draw the yarn through the
front or back, from bottom to top,
next to the selvedge stitch, then
through the first sleeve stitch. Now
insert the needle directly to the right,
from top to bottom, and come out
again from bottom to top, 2
horizontal threads farther along,
.X . > '
y
^~
. s
** . l«K
N V
' \
'!*.-• i
: i- u
- • •. T-
^ r '
t *
' : r.
•*
It l
'i
1 \
■»■■.: V
v ; •,
4
The back stitches form a seam that
looks similar to a row of purl
stitches.
catching the second sleeve stitch.
Then go back down through the first
sleeve stitch and the front or back,
and 2 horizontal threads farther
along through the front or back, and
out through the third sleeve stitch.
Go back down through the second
sleeve stitch and back out again 2
horizontal threads farther along, and
through the fourth sleeve stitch, etc.
(see also sewing on facings, pages
70-72).
117
Finishing
Full and Puffy Sleeves
When you join in very full sleeves,
you can work either from the outside
or inside. With full sleeve seams, it is
easier to sew them before you sew
the side seams and sleeve seams.
On the Wrong Side of the Work
The more popular method of joining
uses back stitch on the wrong side of
the work. Pin the pieces together,
right side to right side. Put the pins
in place close together so that the
pieces can't slip out of place.
Distribute the additional width at the top
of full, rounded sleeves over the
shoulder region.
Put the parts down so that the
front and back are at the top and the
sleeve i* at the bottom. To make sure
that the seam is in line with the
stitches, always insert the needle
directly next to the selvedge stitch ot
the top or bottom.
On the Right Side of the Work
When you work this way, it is easier
to make sure you are staying in line
with the stitches than when you sew-
on the wrong side. First pin the
pieces together, wrong side to wrong
side, distributing the additional width
over the shoulder region. Then sew
the seam using invisible stitch, as
described on the previous pages.
Work from 1 pin to the next and
don't remove the pins too quickly. At
the shoulder, depending on the
fullness, catch 2 or more stitches at
the same time, then a horizontal
thread ot the front or back
K.
-J
mmm
•r^f^r ■'
y^
* f* Dte-gZmt:.
"~-?:^-----«-
'AY v
•I', '" J , .1 '■ '' Ji M- .- I '■:■■■ ,: 'ill, . I*
••/r.
•.Si
''■J lilif
iiim ■■
!•!'
nil
iM
# WM\ i:
{: F
•::i:i.fs^iiit,!i
i
!" Jin1
$ ..fr'.^
i ,!iVI:
,!''". :'!■'
I.;.:|-:..V
ill t
«!:,:
■I: ill
?:
II'
W,w 4-
mm.1-'
h,.,ii,„, <yi,Kjk
i' ■>
Put the body of the sweater and
the sleeve next to one another.
Spread them out and mark the
Either pin the pieces together,
right side to right side, and then
sew the seam using back stitch,
or...
■*
-
•
-% *
. 1
,x \A ^>> **:
* V * * ' , r\
* - * «* J
"* < 1 *U,>1'
— *
.
*
* «, ■»
— _
>
' ',» H
*>
»
»
i
• i
«
I
4'
■
■
m
>> -
-*■
_
* *
N
•
* '
t.; '
'
*
i
1
» «
•
K
4
At the gathered parts, always put
several stitches onto the sewing
needle at the same time, and join
them with 1 horizontal thread from
the front or back.
center of the sleeve. Pin the sleeve
in place and then sew the 2 pieces
together using invisible stitch.
...pin the pieces together, wrong
side to wrong side, and sew the
seam using invisible stitch.
*.
S I
4
A
• f'ffilfr
. TtfJ'll
.: - «i tj il
I 3
' ' ' \
I!
*.•*l* * • • ■
J::':*:"
. ,' t »,' ' . • * * ■ i i ',ii' .•,• -.'j'
i ■ ■ hi i ■
Both seams look perfect when
seen from the outside.
118
Sewing In Sleeves
NM )
*
. '
.
• * •
i
m
•
'V
■< :
■ *
V
*+
« »
\"i '■
>•
t • .
i
•
*
•
-
.*. ?
•
■
•
4 ■-
-
* *
•
! •
V
4
1
V
^^v^
^o& ■
>r*
—<
The best way to do it: Put the pieces,
right side up, onto a large counter or
table. Pin the outside edges of the
sleeve in place, and then pin the
center of the sleeve to the shoulder
seam. Now sew the sleeve on, using
invisible stitch with the original yarn,
it possible. Don't take the pins out
too quickly so that the seam won't
pull out of shape.
The instructions for the cardigan
with cable patterns are on page 200;
those for the pullover sweater with
jacquard and textured patterns are
on pages 198-199.
^ ^— -< -W -3
A contrast yarn makes it easier to
count rows and increases. In every
row where you work an increase, put
the yarn to the back ahead ot the
center stitch (or the stitch next to
it), and alter you work the center
stitch, put it to the front again. This
makes it easy to check the number ot
increases and the number of rows
between increases.
Leave the yarn in the knitted piece
until you have finished the sleeve.
Since it also marks the center of the
sleeve, the sleeve can be pinned to
the shoulder seam at this point.
TIP
Here is a simple trick for
rounding the top of the sleeve
evenly without having any
"steps": After the first big
decreases, in all the following
rows knit the first 2 stitches
together twisted on the right
side of the work and purl them
together on the wrong side of
the work. Bind off the
following stitches normally. If only 1
stitch is supposed to be bound
off, just knit the stitches
together appropriately.
119
Starting and Finishing Yarn Ends
When your yarn comes to
an end, making a knot is a
taboo in knitting.
Starting a New Skein
If possible, don't btart a new skein
within the knitted piece. Even if
the remaining piece of yarn looks
pretty long, it often won't be long
enough for the whole row. Leave it
hanging at the side; you can use it
later for sewing the parts together.
If the yarn end bothers you as you
are knitting, cut it off to about 4"
long.
In order for the stitches not to
become loose easily when you start a
new skein, work the selvedge stitch
at the end of the row with the old
yarn and the new yarn. Turn the
piece and work the selvedge stitch
and several stitches with the new
yarn. Then pull on both yarns so that
the stitches will not get any looser
again.
Sewing In Yarn Ends
Since knitted pieces are more
stretchable in width than in length,
yarn endb are always sewn
individually and vertically into the selvedge
stitches. If they were sewn in
horizontally, the ends could easily
come through to the front.
It doesn't matter whether you sew
the yarn endb in before or after you
sew the pieces together. When you
are working with thin yarn, it is
better to sew the yarn ends in after
you have sewn the pieces together.
Since the selvedge stitches and
frequently also the stitches next to
them become thicker when you sew
the yarn ends in, it might not be
possible to distinguish the
individual stitches clearly any more.
That makes it more difficult to sew
the pieces together. Also, you can
use the yarn ends for sewing.
I w
*
) I
■i -
I
Iln order that the first stitches
with the new yarn don't come
loose, work the last selvedge stitch
with both yarns and turn the piece.
n.
>
* «^ * • " = ■
v H '* <s^
•* - vx
V
*
Ilf you must sew yarn ends in
within a knitted piece, put the
needle through the stitch next to
the yarn end so that the stitch is
completed.
When you are using heavy yarn
with small lengths of yarn on a skein,
it could easily happen that a akein
ends in the middle of a piece.
Whatever you dt), don't make a knot! Not
only are knots unattractive, they can
unravel while the piece is being worn
or washed, and then the piece is
almost impossible to save.
Cut the yarn ends to about 4" long
and sew them in as described on
middle photos 1 and 2 above.
* ♦
■" r
**v*
V. t^
'* V TV • * .< J- h * . t
i
*' \ x + •— • it *V:
Work the selvedge stitch and
several stitches of the row
with the new yarn, and then pull
the yarn ends tight.
\*
,7
I ;
^^.S/ I'll.' *').■■ ^
tt-i
* . Si*
1^^ ..-£< ifh
Then sew the yarn end in
vertically. Never catch whole
stitches, just parts of them, and
don't pull the yarn too tight.
Wit
mm -
V-
4
*. T
V* %
* >
You can sew in yarn ends at the
edges before or after you sew the
pieces together. Always sew them
individually and vertically into the
selvedge stitches or seam.
120
Blocking Your Work
\
Before you sew the pieces
together, you should blocl
them. This makes the edges
lie flat and the overall look
of the stitches becomes
more even.
Before you block your work, you
should sew in any yarn ends
that are within the piece. Yarn
ends at the sides can be sewn in the
seams after you sew the pieces
together.
All of the pieces are pinned to a
smooth suriace, according to the
measurements of the pattern. You
can use a large ironing table, a piece
of carpet, a Styrofoam sheet covered
with a kitchen towel, or a blocking
and steaming pad with foam
(available in needlework stores). You can
use normal pins to pin the pieces in
place, but somewhat longer blocking
pins are more practical.
Put the pins through the selvedge
stitches as flat as possible and not too
far apart. Check your measurements
frequently as you pin, so that the
front, back, and sleeves are the same
size later. Don't stretch the ribbing.
Now put damp cloths on top of the
piece, press down lightly with your
hands, and allow everything to dry
for several hours or overnight.
Remove the cloths. Before removing
the needles, allow the parts to rest
for about an hour more.
Do not put weights, such as books
or other heavy items, on the pieces.
This would flatten the patterns, and
even pieces worked in stockinette
stitch would lose their texture.
Steam Ironing
Before you steam iron your knitted
pieces, carefully check the label. If
s*.
::■$'*»
■ v
- t.
• ■
Lr I" -
•' v ' ■;■■■ \ \V- V^.'
\ • \
Block all the pieces
according to the
measurements of
the pattern, and
allow them to dry
under damp
cloths.
This blocking
and steaming pad
is available in
most needlework
stores.
there is a picture of a crossed-out
iron, you can't iron or steam iron this
yarn. You can carefully apply steam
only to pure wool and cotton. Any
other yarn mixtures—which means
most yarns—doiVt take steam very
well; the pieces become limp.
For applying steam, place a damp
cloth on the knitted piece. Put the
iron down just briefly and lift it to
move it to the next spot. In other
words, don't move it back and forth
as in normal ironing. This would
cause the stitches to pull out of
shape. It is better to use a steam iron
that you don't put down on the
piece, but rather move above the
piece, not touching it.
V *
, '*
\ J
\
V
* I
x«
"V
• •
V.
N I >
\
\ •'
V
1
t v
V
^ •
Shaker Knitting
row on the wrong side of the work,
you knit a stitch next to the selvedge
stitch.
Bind off shaker knitting as the
stitches lie—i.e., in double and single
shaker knitting, you alternately bind
Shaker
knitting patterns have a lot
of "depth/' And once you
get the hang of it, they're
very easy to knit.
arn labels always have
recommended needle sizes, Mich as
size 3 to 6. Since shaker
knitting stretches a lor—double shaker
knitting in width, single shaker
knitting in length—you should knit these
patterns relatively tightly and,
therefore, you shouldn't use the biggest
needle size indicated. If you tend to
knit loosely, size 3 will be big
enough; if you tend to knit tightly,
use size 4-
For the same reason, the sample for
gauge (pages 50-51) has to be
stretched slightly before you measure
it so that your sweater doesn't turn
out too big. Don't worry if the
knitted pieces look small. They won't
have the correct size until after they
are blocked or washed.
In shaker knitting, the selvedge
stitches have to be knit very tightly.
A purled garter stitch selvedge is
best. Purl the selvedge stitches in
every row and pull them tightly.
Very nice examples of this are the V-
necks on page 83. A purled garter
stitch selvedge is so even that no
additional facing is required. For
edges that won't disappear in a
seam, such as ^carves or the front
edges of a cardigan, a selvedge
worked in shaker knitting looks the
most attractive (sec selvedge
stitches, pages 26-27).
Also make sure that there is always
a purl stitch next to the selvedge
stitches un the right side of the work.
You will need this purl stitch to make
an invisible seam later. This means
that in double and single shaker
knitting, you must cast on an odd
number of stitches, and already make
sure in the ribbing that in the first
Instead of using yarn over,
louble and single shaker
knitting can be worked by inserting
the needle in the stitch of the
previous row. To many knitters, this
seems a simpler way of doing it, but
the knitting becomes much looser
because an entire stitch is opened up.
In most instances, the finished piece
looks as if it was knit unevenly—and
it doesn't go any faster either! Also,
when you use some yarns, such as
nubby or boucle yarn, the stitches
don't necessarily unravel by
themselves.
TIP
For shaker knitting, as
compared with stockinette stitch,
you need about 30%-50%
more yarn. Make sure you
choose 'light" yarn that isn't
twisted too tightly. Wool and
wool blends are lighter than
cotton yarns. Even a sweater
knit in stockinette stitch
comes out fairly heavy when
it is made of cotton. The
heavier the sweater, the
more it will "grow" later!
124
Shaker Knitting
Double Shaker Knitting
For knitting with yarn over:
Odd number of stitches.
Row 1 (WS): selv st, *kl, slip 1
purlwisc with yo *, kl, selv st.
Row 2 (RS): selv st, * slip 1 purlwisc
with yo, k next st tog with yo *, slip
1 purlwisc with yo, selv st.
Row 3: selv st, * k st tog with >o,
slip 1 purlwise with yo *, k st tog
with yo, selv st.
Repeat Rows 2 and 3.
For knitting by inserting the needle
in the stitch of the row below:
Row 1 (WS): Between the selv st, k
all the st.
Row 2 (RS): selv st, * kl, knit next
stitch in the row below (the st above
it will come undone) *, kl, selv st.
Row 3: selv st, * knit next stitch in
the row below, k 1 *, knit next stitch
in the row below, selv st.
Repeat Rows 2 and 3.
Two-color Double
Shaker Knitting
This pattern has to be worked on
circular knitting needles in open
Two-color double
shaker knitting: The
pattern described is
seen on the right
side of the work...
\
V
r
it.
<v>
ft.-
»
t •
*■
1
1
V
l»
1
*
r
!
1
•
\
',4
\
*,
\
^»
i
o
^
*.
4
*
«
i
•
1
1
f
•
-
r
\
1
s
1
1
%
L
\
•
Pieces worked in
double shaker
knitting look the
same from both
sides.
rows, since 2 rows on the right side
of the work and 2 rows on the wrong
side o( the work always have to be
worked consecutively. After working
the first row on the right side of the
work, push the needles from the left
tip of the needle back to the right
tip, and work the second row on the
right side of the work. Then work
the first row on the wrong side or the
work, etc.
In order lor the selvedge stitches to
be ti^ht in this pattern, they are
always purled in the odd rows and
V I
,1
K
i -
j \
*
v'
•\* i
:%
- \
\ V
...and with the
opposite colors on
the wrong side.
knit in the even rows. In the
example shown below, all the white
selvedge stitches are purled, all the
ochre selvedge stitches arc knit.
In this pattern, the ochre side is the
right side or the work. You need an
odd number of stitches.
Row 1 (RS) in white: selv st, * p 1,
slip 1 purlwise with yo *, pi, selv st.
Now push the stitches to the right
tip of the needle.
Row 2 (RS) in ochre: selv st, * slip
1 purlwise with yo, k next st tog with
yo *f slip 1 purlwise with yo, selv st.
Turn the work.
Row 3 (WS) in white: selv st, * k st
tog with yo, slip 1 purlwise with yo *,
k st tog with yo, selv st. Push the
stitches to the right tip ot the needle.
Row 4 (RS) in ochre: selv st, * slip
1 purlwise with yo, p next st tog with
yo ::\ slip 1 purlwise with yo, selv st.
Turn the work.
Row 5 (RS) in white: selv st, * p st
tog with yo, slip 1 purlwisc with yo *,
p st tog with yo, selv st. Push the
stitches to the right tip of the needle.
Repeat Rows 2 to 5.
125
Special Techniques
Single Shaker Knitting
As the name says, single shaker
knitting is worked with the yarn over on
only one side. This pattern looks
smooth on one side, almost exactly
like double shaker knitting. On the
other side, the pattern looks "rough";
that is the side that is worked with
the yarn over. You must decide right
from the start which side is going to
be the right side of your work.
Again, make sure that you work a
purl stitch next to the selvedge
stitches. The number of stitches has
to be odd.
If you follow the instructions given
below, the smooth, single shaker
knitting side is the right side oi the
work.
Row 1 (WS):sclvst, * kl, slip 1
purlwise with yo *, kl, selv st.
Row 2 (RS): selv st, * pi, k next st
tog with yo ::\ pi, selv st.
Repeat Rows 1 and 2.
For a "rough" look on the right side
of the work:
Row 1 (WS)rselvst, * slip 1
purlwise with yo, kl *, slip 1 purlwise
with yo, selv st.
Row 2 (RS): selv st, * k next st tog
with yo, pi *, k next st tog with yo,
selv st.
Repeat Rows 1 and 2.
Of course you can also work this
pattern by inserting the needle in the
stitch of the previous row. In this
case, you knit all the stitches on the
rough side of the work and
alternately purl 1 stitch and knit 1
stitch in the stitch of the previous
row.
i
t -
f
^\
{ v
■»
' <
*t
I •
V
%
A
...on the other,
the stitches look
•is
1 / "
rough
Shaker knitting with yam over:
If you slip a stitch with a yarn over,
the yarn will be at the front of the
work, at first. You then insert the
right needle into the next stitch as if
to purl, slip it, and bring the yarn to
the back of the work. If you are
working in double shaker knitting,
you knit the next knit stitch together
with the yarn over of the previous
row. If you are working in single
shaker knitting, you knit the stitch.
) ,
*
Single shaker
knitting: On one
side, you have the
smooth shaker
knitting stitches,...
4
i..
a
-
1
v»
\i-
I
-•» -?-
.st-
r
r"
;\
v.
i
I
V
*-
*
f
4
K
i*
■t
*'&
>'
4
Ws
Needle inserted in stitch of row
below:
Instead of bringing the yarn over
the purl stitch, you can also simply
knit a stitch. In the next row, you
then have to insert the needle into
the stitch of the row below. The
stitch, which looks like a purl stitch
on this side, will come undone.
126
Shaker Knitting
Single Shaker Knitting
Worked Twisted
Shaker knitting stitches worked
twisted have a completely different
look. To work this, yon need an even
number of stitches.
Row 1 (WS): selv st, * slip 1
purlwise with yo, kl *, selv st.
Row 2 (RS): selv st, * pi, k next st
tog with yo twisted (insert needle
into the back part of the stitch and
the back loop or the yarn o\ er, and
k), pi *, k next st tog with yo
twisted, selv st.
Repeat Rows 1 and 2.
*
;>>
; v
v>
•**
' ^
v
1 x
Shaker knitting
stitches worked
twisted look
completely
different.
Double-ribbed Shaker
Knitting
This pattern, in which the yarn over
is always knit together with 2
stitches, is also very striking. The
drawing below shows how the yarn
overs and stitches are worked.
The number of stitches must be
divisible by 4 + 2 + 2 selvedge
stitches.
Row 1 (WS): selv st, * k2, slip 2
purlwise with yo *, k2, selv st.
Row 2 (RS): selv st, * slip 2 purlwise
with yo, k next st tog with the yo,
leaving the yo on the left needle anil
putting only the st on the right
needle, then k the second st tog with the
yo *, slip 2 purlwise with yo, selv st.
Row 3: selv st, * k the first st tog
with the yo, leaving the yo on the
left needle and putting only the st on
the right needle, then k the second st
tog with the yo, slip 2 purlwise with
yo ::", k next st tog with the yo,
leaving the yo on the left needle and
putting only the st on the right
needle, then k the second st tog with
the yo, selv st.
Repeat Rows 2 and 3.
*
t
1
i
J
1'
1
,*
-
1 »
r
?
\
I
)
1
In double-ribbed
shaker knitting, the
yarn overs are
worked over 2
stitches.
Double-ribbed shaker knitting: In
double-ribbed shaker knitting, slip
2'stitches purlwise with a yarn
over, then knit 2 stitches, each
individually, together with the yarn
over of the previous row.
127
Special Techniques
Triple-ribbed Shaker
Knitting
Here, 3 knit shaker stitches and 1
purl shaker stitch are worked
alternately. The first and third knit
shaker stitches in the rows on the
right side of the work are knit
together with the yarn over. For the
second knit stitch, the yarn over is
worked in the rows on the right side
of the work, and the stitch is purled
together with the yarn over on the
wrong side of the work. You can
expand this to 5, 7, or more knit
stitches so that the ribs on the wrong
side of the work are farther apart.
For triple-ribbed shaker knitting,
the number ot stitches has to be
divisible by 4 + 1 + 2 selvedge stitches.
Row 1 (WS)rselvst, * kl, slip 1
purl wise with yo, kl, slip 1 purlwise
with yo *, kl, selv st.
Row 2 (RS): selv st, * slip 1 purlwise
with yo, k next st tog with the yo *,
slip 1 purlwise with yo, selv st.
Row 3: selv st, * k next st tog with
yo, slip 1 purlwise with yo, k next st
tog with yo *, k next st tog with the
yo, sclv st.
Repeat Rows 2 and 3.
Faux Shaker Knitting
This pattern is actually a textured
pattern, not a real shaker knitting
pattern, since it is not worked with
yarn overs or with the needle
inserted in a stitch of the previous row. It
is good for country-look sweaters and
cardigans as well as scarves, since it
looks the same on both sides like
shaker knitting.
The number of stitches is divisible
by 4 + 3 + 2 selvedge stitches.
Row 1 (RS): selv st, * k3, pi *, k3,
selv st.
Row 2 (WS):selvst, kl,Pl,*k3,
pi *, kl, selv st.
Repeat Rows 1 and 2.
v.
...on the other
side a completely
new textured
pattern with
ribs oj shakei
kniitiiw stitches
Triple-ribbed
shaker knitting:
On one side with
3 shaker knitting
stitches next to one
another,...
p
*
4
► .e
Faux shaker
knitting: Actually,
a simple textured
pattern
128
Shaker Knitting
Brioche Stitch
Brioche stitch is worked almost
entirely with knit stitches. The
pattern is shifted over every 2 rows, so
you always repeat 4 rows. The yarn
o\ crs are worked in the rows on the
wrong side of the work, and knit
together with the corresponding
stitch in the next row on the wrong
side of the work.
This pattern is worked with an
even number of stitches.
Row 1 (\VS): selv st, :::slip 1
purlwisc with yo, kl*, selv st.
Row 2 (RS): selv st, :::k2, slip the yo
of the previous row purlwise*, selv st.
Row 3: selv st, * kl tog with the yo,
slip the next st purl wise with the yo
*, selv st.
Row 4: selv st, * kl, slip the yo of
the previous row purl wise, kl ::\ selv
st.
Row 5: selv st, * slip 1 purlwisc with
yo, k next st tog with yo *, selv st.
Repeat Rows 2 to 5.
Two-color brioche stitch is worked
the same way as single-color brioche
stitch, hut always alternately knit 2
rows in the same color. Start the new
color in a row on the wrong side ot
the work.
or 2 colors.
\
\ «
V
V »
N
1
%
ki
\
* *
^,
<•
>
*
\
t *
)
\
«
\
■a
, J
\
\
Brioche stitch is
particularly
attractive for large
sweaters and
cardigans either in
I color...
v ■
Why not try 3
or more colors?
it
\ *
Brioche stitch: In the first row on
the wrong side of the work, slip
every second stitch with a yarn
over, purlwise. In the rows on the
right side of the work, you knit the
stitch that is sort of hiding under
the yarn over, and slip the yarn
over purlwise. Then knit the next
stitch.
In all the following rows on the
wrong side of the work, you knit
the stitch together with the yarn
over, and slip the stitches in
between with a yarn over, purlwise.
129
Special Techniques
Decreases in Shaker
Knitting
Whether they're for a V-neck or rag-
Ian sleeves, decreases in shaker
knitting are always worked on the right
side of the work.
In shaker knitting, don't work
decreases right next to the selvedge
stitch, since it will make the edges
uneven. Decreases moved over 3 or
5 stitches towards the inside of the
piece come out much more even.
The decreases are especially
attractive if they are worked as double
decreases. This holds true for both
niglan edges and V-necks.
For V-necks with a facing knit on
later, put the knit center stitch on a
stitch holder. In order for you to
have a knit stitch in the middle, the
number of stitches must be divisible
by 4+3 stitches + 2 selvedge
stitches. You must be able to count
an odd number of knit stitches on
the right side of the work.
For V-necks without a facing (see
also V-necks, page 83), the number
of stitches must be divisible by 4+1
stitch + 2 selvedge stitches. The
number of knit stitches must be an
even number. Work the center purl
stitch as a selvedge stitch on one
side. For the other side, pick up an
additional selvedge stitch.
If you work single decreases, you
will have a knit stitch next to the
decreased shaker knitting stitch after
every other decrease. Until the next
decrease, don't work this stitch in
the shaker knitting pattern. Instead,
purl it in the rows on the wrong side
of the work or slip it purlwise in the
rows on the right side of the work
with the yarn at the back of the
work.
A finished V-neck
with the center
stitch on a stitch
holder and the
facing knit on.
T
n
v<
«*M
r* .
*:
t^
t
*
—i
1
«*
fc •
•»
'
■
-\
*
/
1
t '
;
^
For a double decrease to the left,
work 2 more stitches in the pattern
after the selvedge stitch, slip the
next knit stitch knitwise together
with the yarn over, then knit 2
stitches (= 3 loops) together...
V
>
A
\ V
For a double decrease to the right,
work to within 6 stitches from the
end of the row. Knit the next 3
stitches together. Including the
yarn overs, this comes to 5 loops.
« I
^Vi
' «4
...and pass the slipped stitch over
together with the yarn over. Then
continue in the shaker knitting
pattern.
Then work the last 3 stitches in the
shaker knitting pattern.
130
Shaker Knitting
r ♦.
f L
4
, I
r'-".t
f v
■
4
t
f
t »
I
7
\* <
y
*%**
\i
V
\ *
i
i
/
\ *
1 t'\
V
» »
•;
• n.
i
1
1 y
s ■
»..
1 ■
*
Vjv & jl
- s
Increases
Just like decreases, increases in
shaker knitting should he worked as
double increases. Here again, it looks
nicer if they aren't worked right next
to the selvedge stitches. For this
slanted edge of a sleeve, the
increases are worked after 3 stitches.
Work 3 stitches at the right edge,
then purl 1 stitch twisted and knit 1
stitch twisted from the horizontal
thread (the yarn over of the previous
row).
At the left edge, work to within 3
stitches from the end of the row,
then knit 1 stitch twisted and purl 1
stitch twisted from the horizontal
thread.
After the seam has been sewn with
invisible stitch, 2 ribs of shaker
knitting will run up the sleeve next
to one another.
In order for the pattern after the
ribbing not to look mismatched, you
should always work double increases
here as well.
After a knit stitch, increase a purl
stitch twisted, knit the next stitch,
which was previously a purl stitch,
then increase another purl stitch
twisted from the next horizontal
thread. This allows the ribs to
continue in the same pattern.
Working in the Round
I don't recommend working an
entire sweater in shaker knitting in
the round, if only because it will get
too large and heavy. But if you
want to knit a really luxurious tur-
tleneck and don't want to have a
seam, single shaker ribbing is a
good solution.
You should work the first %" to 1 lA"
in simple ribbing (alternating knit 1,
purl 1) to keep the neckline from
getting too wide.
If you want to wear the single
shaker knitting pattern with the smooth
side on the outside, turn the work—
that is, work in rounds on the wrong
side of the work—as follows:
Round 1: Slip the k st with yo, p the
p st.
Round 2: k the st tog with the yo, p
the p st. Repeat Rounds 1 and 2.
If you don't turn the work, the
rough side will he on the outside
once the turtleneck collar has been
turned over.
You can also work double shaker
knitting in rounds. To do that, every
other round, slip the purl stitches
with a yarn over and knit the knit
stitches together with the yarn over.
In the other rounds, slip the knit
stitches with a yarn over and purl
the purl stitches together with the
yarn over.
131
Ca le Patterns
1 ^.*
V «
■^ *-« w*v
v
%A .v-
s
vs
'■>
a»v
V
ff>
* t
^ n
• \
V
•*\
This
simple
technique of
crossing
stitches is the basis for
textured patterns with a lot
of depth. The cables formed
this way can be worked in
individually or distributed
over the sweater or cardigan
in different combinations,
such as in Aran Isle knitting.
A
able patterns look bc^t if they
are worked with smooth yarn
or wool. Note that designs
with cable patterns require more
yarn, since cables contract in
width.
You also have to take that into
account when you bind off. To
keep from having too much width
at the shoulders and sleeves, knit 2
stitches together several times as
you bind off, or bind off by knitting
stitches together (see also pages
43-44).
If you v\ant to make a sweater with
different kinds of cable, you have to
make a sample gauge tor each of
these cables using the original yarn.
If you are a little short of the desired
sweater width, you can add small or
large seed stitch (see page 30) or
narrow cables.
Some of the stitches that form the
cable are placed on a cable needle
in front of or behind the work. You
then work the indicated number of
stitches before continuing with the
stitches from the cable needle.
The examples on page 133 show
you how to work the cable stitches.
Each cable is made up of 6 stitches.
These stitches are knit on the right
side oi the work, purled on the
wrong side of the work—in other
words, worked in stockinette stitch.
The cables stand out even more if
you work a few stitches of reverse
stockinette stitch on both sides of
them. The number of rows between
cable crossings can be varied
however you want; the cables shown
on pa^e 133 were crossed every sixth
row.
Simple cables (top): crossed
just to the right, alternately to the
right and the left, or just to the left.
Plait cables (bottom) are a
combination of stitches crossed to
the right and left.
Horseshoe or
chain cables (top) are made up of
2 cables next to one another and
worked in reverse. Fancy cables
(bottom) are a combination of
different cable widths and lengths.
132
Cable Patterns
Left Cross Cables
^/
7
ISlip the first 3 stitches of the
cable onto a cable needle and
place them in front of the work.
Knit the next...
...3 stitches on the left needle.
Knit the 3 stitches from the
cable needle.
Then work another 5 rows
without crossing the cable
Right Cross Cables
ISlip the first 3 stitches of the
cable onto a cable needle and
place them behind the work. Knit
the next...
...3 stitches on the left needle.
Knit the 3 stitches from the
cable needle.
Then work another 5 rows
without crossing the cable
Cable needles are available in
different sizes in angled shape
or straight. You can also use a
short double-pointed needle as
well. The angled needles have
the advantage that the
stitches won't slip off the
needle as easily.
133
Special Techniques
Making Cables
Without a Cable Needle
Crossing stitches with a cable needle
takes a lot of time, especially when
you are working an interwoven pat-
tern. Since the little "cables" in these
patterns are generally worked over
only 2 or 4 stitches, with a little
practice you can work without a
cable needle.
In comparison to stockinette stitch
or even normal cables, interwoven
patterns tighten a lot, so you should
knit them a little looser. Use ar least
the largest needle size indicated. If
you have a little "play" in the yarn, it
is also easier to cross the stitches.
You can work the interwoven
pattern explained in the photos on the
right as perpendicular strips or all the
way around. However, entire
sweaters in the interwoven pattern are
relatively stiff and heavy, so this
pattern is not good for all sweaters. A
country-look cardigan, on the other
hand, will be especially warm. You
need an even number of stitches for
this interwoven pattern.
Left Cross Mini-cables
For mini-cables crossed to the left,
there's a trick you can use to make
crossing the stitches easier. The
difficult stitch in the row on the right
side of the work is always the second
stitch of the cable, which is the first
stitch on the wrong side of the work.
So if you purl this stitch "the wrong
way" in the previous row on the
wrong side ot the work, it will be on
the needle twisted in the next row
on the right side of the work—in
other words, the front part of the
stitch will be behind the needle. You
can then knit the stitch "twisted."
Insert the needle into the back part
of the stitch and get a normal knit
stitch.
Iln the right side rows, insert
the needle into the front of the
second stitch, going behind the first
stitch, and pull the yarn through.
In the wrong side rows, purl 1
stitch at both edges, and in
between work as follows every 2
stitches. Insert the needle into the
second stitch, going in front of the
first stitch, and purl it.
Iln the previous row on the
wrong side, pull the loop for
the purl stitch through from the
top to the bottom. This puts the
stitch on the needle "twisted/7 In
the row on the right side, knit the
second stitch of the cable twisted:
Insert the needle from right to left,
behind the first stitch into the back
loop of the second stitch, and pull
the yarn through.
Then knit the first stitch and
let both stitches drop from the
left needle.
Then purl the first stitch and
let both stitches drop from the
left needle.
^
2 Then insert the needle into the
front of the first stitch, from
right to left, and knit the stitch.
Then allow both stitches to drop
from the left needle. The twisted
stitch of the previous row will now
lie "correctly" under the crossing.
134
Cable Patterns
Left Cross Wider Cables without a Cable Needle
V
T
IFor stitches crossed to the left,
skip the appropriate number of
stitches (in this case, 2 stitches) and
insert the right needle into the next
2 stitches behind the left needle.
Allow the 4 stitches to slip
from the left needle, and then
quickly catch the first 2 stitches
with the left needle.
Slip the 2 cable stitches on the
right needle back onto the left
needle, and knit all 4 stitches.
Right Cross Wider Cables Without a Cable Needle
I
IFor stitches crossed to the right,
skip the appropriate number of
stitches (in this case, 2 stitches) and
insert the right needle into the next
2 stitches in front of the left needle.
Allow the 4 stitches to slip
from the left needle and then
quickly catch the first 2 stitches
with the left needle.
Slip the 2 cable stitches on the
right needle back onto the left
needle, and knit all 4 stitches.
Interwoven cables (left)
look like basket lattice.
Staghorn cables (right) are
very attractive as a single
pattern element of a
sweater. The pattern
charts for these cables
and for the patterns on
page 132 are on pages
216-217.
135
Openwork Patterns
Openwork patterns, also
called filigree patterns, are
the laciest patterns you can
make.
Smooth cotton
yarns are
especially good for
patterns like this
arrowhead lace.
There are no limits on the
patterns you can come up with.
The larger the pattern designs,
the lighter and airier the piece will
look.
The holes are made with simple
yarn overs, which can be arranged
horizontally, vertically, or diagonally.
The working yarn is placed over the
needle from front to back. In most
patterns, these yarn overs are purled
in the row on the wrong side of the
work. Every yarn over forms a new
stitch, so the number of stitches has
to be corrected with corresponding
decreases.
Openwork patterns arc frequently
worked over the entire piece.
However, they can also be very effective
as a single separate design, horizontal
borders, or vertically arranged
pattern strips. Leaf and diamond
patterns are especially attractive. Lace
patterns with a lot of openwork,
which are practically an art in
themselves, are always fashionable.
Make sure that the openwork
patterns start 1 to 2 stitches in from
the edges, so that you don't have any
problems when you sew the pieces
together.
By the way, the most inconspicuous
buttonholes are worked like a mini-
openwork pattern (see buttonholes,
starting on page 100).
X
*\;
s a
i ♦
> 4
t
»i » i
. * ****«» Mi U
Yam over before a decrease: Put
the yarn over the needle from front
to back, slip 1 stitch, knit the next
stitch, and pass the slipped stitch
over.
t>
< <
Yarn over before 2 stitches knitted
together: Put the yarn over the
needle from front to back, then knit
the next 2 stitches together
Yarn over after a decrease: Slip 1
stitch, knit the following stitch, and
pass the slipped stitch over, then
put the yarn over the needle from
front to back and continue knitting
normally.
Yarn over after 2 stitches knitted
together: Knit two stitches
together, then put the yarn over
the needle from front to back.
136
Openwork Patterns
s
»«
i -
■ *
• >
/ \
M
1 I
**#
t
* <
» \ f
s
t I
' t. -,' >
r r
N
s i
■;: v
Left double decrease with 2 yarn
overs: Put the yarn over the
needle, then slip 1 stitch
knitwise,...
S!\
<
4s
\
±±
' * " i s '
Double decrease with center stitch
on top and 2 yarn overs: Put the
yarn over the needle, then slip 2
stitches knitwise,...
> ,
f
it < \ »
v; •..
*^
. ♦
4 f i • * i
1 > i i
Right double decrease with 2 yarn
overs: Put the yarn over the
needle, knit 3 stitches together,...
...knit the next 2 stitches together
and pass the slipped stitch over,
then put the yarn over the needle
again.
...knit the next stitch, and pass the
slipped stitches over together.
Then put the yarn over the needle
again.
1 M*i *
I v
' V
4
4 I
V'". «K
1 V l
. * * •
I-1- f
1 *
I
then put the yarn over the needle
again.
For vertical strips of
openwork, the
arrangement of the yam overs
before and ajter stitches
knit together is
important. The pattern
charts for all these
patterns are on pages
219 and 221.
137
Twisted Stitch Patterns
Patterns with twisted stitches
have a lot of texture. In
ribbed patterns, the knit ribs
are even more prominent.
The stitch in the previous
row7 is always the one that is
twisted.
For ribbing, knit all the knit stitches
twisted on the right side of the
work and purl all the purl stitches
normally.
On the wrong side of the work,
knit all the knit stitches normally
and purl all the purl stitches
twisted.
For a twisted knit stitch, insert the
needle into the back of the stitch
on the left needle, from right to
left, and knit it.
For a twisted purl stitch, insert the
needle into the back of the stitch
on the left needle from behind the
work, from left to right, and purl it.
Ribbing with twisted stitches
also looks very nice. Only
work every other stitch
twisted, namely the stitch that
appears as a knit stitch on the front of
the work. The stitch in between is
purled normally in the rows on the
right side of the work and knit
normally in the rows on the wrong side of
the work. Knitting both stitches
twisted is not good for ribbing; the
ribbing loses its elasticity.
Check patterns, ribbing cables, and
slipped stitches have even more
texture when they are worked with
twisted stitches. Some examples are
shown on page 139.
To knit 2 stitches together twisted,
insert the needle into the back of
the next 2 stitches at the same
time, from right to left, and knit
them together.
To purl 2 stitches together twisted,
insert the needle into the back of
the next 2 stitches at the same
time, from behind the work, from
left to right, and purl them together.
138
Twisted Stitch Patterns
Check pattern
Ribbing and
hourglass cable
\
.*.»
V
1
•• •
1
T i
\ ~, *. '-
-i 1 »
1
t
S "
s -
• 1
* »
<
1
1
1
1 I
V
' * *
Oval
desigiis
s1
i
1 * x
I 1
*-
\
r*
V
V
V X
i • >
'v l .'.".
t >
* 1
1 1 \
I « *
* " * V
> t *
\ 1 .
1
■
i
■
f
i
"i S
■» " * »
* • A A.
Diamonds and
zigzag lines
»
-> I
\ i
X
iN. *
T 1
s -,
A J
»
•I1
V.
"> "J^
1 V^
>
. • ,.
■
\
\
\
^
\
\
' * v
'- \
\ *
V
- .■ > i
V
. 1
\
> i
^1
\
Check Pattern
In a check pattern, all the stitches
that appear as knit stitches on the
rmht side of the work are twisted in
o
every row—i.e., knit twisted on the
right side of the work, purled twisted
on the wrong side of the work. All of
the stitches that appear as purl
stitches on the right side of the work
are purled on the right side of the
work, knit on the wrong side of the
work.
Ribbing and
Hourglass Cable
In the ribbing and hourglass cable, all
the stitches that appear as knit
stitches on the right side of the work
are twisted in every row. For the
hourglass shape, the stitches are
crossed (see cable patterns, page
138).
Diamonds and Zigzag
Lines
For the diamonds and zigzag lines,
only the stitches that appear as knit
stitches on the right side of the work
are twisted.
Oval Design with
Slipped Stitches
In this oval design, the knit stitches
are knit twisted in every row on the
right side of the work and only
slipped, not purled, in the rows on
the wrong side of the work. This
results in a knit twisted slipped
stitch.
The pattern charts for the patterns
described here arc on page 224-225.
139
Slii Stitch Patterns
Whether they are worked in
the same or different colors,
you can create impressive
patterns with slipped
stitches. And they're really
simple to do!
Slipped Stitches in
Single-color Patterns
Slipped stitches give reverse
stockinette stitch and even stockinette
stitch a lot of texture. They are
particularly attractive when worked in
smooth yarn, since the stitches on
top stand out more.
The stitches are generally slipped in
a row on the right side of the work,
and purled on the wrong side. To slip
them, insert the right needle into the
stitch from right to left and slip it oK
In other words, the stitches are
slipped purlwisc; the yarn is at the
hack of the work. Purl the stitch on
the wrong side of the work.
The stitches can also he slipped in
the rows on the wrung side ot the
work and knit on the right side of
the work; the effect is the same. In
this case, you also insert the needle
into the stitch as if to purl; the yarn
is at the front of the work. Knit the
stitches in the rows on the right side
of the work.
You can also achieve an attractive
effect if you cross slipped stitches
(see cables, pages 132-135). The
background can be worked in
stockinette or reverse stockinette stitch.
In the example shown at the right,
you can see that crossed slipped
stitches really stand out well against
a stockinette stitch background.
Slipped Stitches in
Multicolor Patterns
Although vou only work with I yarn
at a time, these patterns often look
> ■ \
v..
1 ^ .
For a slipped stitch on the right
side of the work, insert the right
needle into the stitch as if to purl
and slip it off. Then work the next
stitch, bringing the yarn along
loosely at the back of the work.
In this pattern, 1 or 3 stitches are
worked in reverse stockinette stitch
between the slipped stitches.
> 1
1 ffV
A.
*!*&&
Crossed slip stitches: The interior of
the diamonds is alternately worked
in stockinette stitch and reverse
stockinette stitch. The pattern chart
for this pattern is on page 230.
as if they were done using intarsia or
jacquard technique.
In the pattern with vertical slip
stitches (figure below), the yarn
color is changed after every row—
i.e., 2 rows on the right side of the
work and 2 rows on the wrong side
of the work are worked one after the
other. To do this, you have to work
on a circular knitting needle. After
the first knit row on the right side ot
the work in white, push the stitches
back and knit the second row on the
right side of the work in turquoise.
Then turn the work and purl the first
row on the wrong side of the work in
white; push the stitches back and
purl the second row on the wrong
side of the work in turquoise. For this
reason, the slipped stitches
sometimes have to be worked in a
row on the right side of the work,
sometimes in a row on the wrong
side of the work.
4(WS)
3(WS]
V
V
V
V
6-st
V
V
rep
-
2(RS]
1(RSi
Every row is shown in the pattern
chart. Read the 2 RS rows from
right to left, the WS rows from left
to right. Repeat these 4 rows.
"sr
> ■
> &f
i '■
, 1
*
t i
I *U
1 1
> • \
g •
V
u
\
' V
4
i
>
' it-,
S
v
<: .
Perpendicular Slip Stitches: This
pattern (chart above) has to be
worked on a circular needle, since
2 RS rows and 2 WS rows must be
knit consecutively each time.
140
Slip Stitch Patterns
I
■ *
*v
* »
1 »
tf
4 ' ' .O
A
\ V
I
•i'
»\
i *.V,
*■■■ ■ SN _. ..)• ?K- '.*•'«. ■
H
r \
h ' N.
^ * •
T
i
Slip the individual slip-stitches of
this pattern over 2 rows each.
Individual slip-stitches (left)
loosen up a pattern with wide
turquoise stripes. Two rows of white
alternate with 4 rows of turquoise.
The slip stitches are worked every
sixth btitch, shifted from 1 row of
white to the next, and over 2 rows.
Three slip stitches (below), which
are always worked over 2 rows in
different colors and shifted over,
interrupt the horizontal stripes. This
pattern, too, is worked with only 1
color yarn at a time. For the vertical
breaks, 3 stitches are always slipped
when the stripes in the second color
are being worked.
The diamond pattern looks like a
jacquard pattern. Alternately work 2
rows of turquoise, 2 rows of white.
The slipped stitches are shifted over,
which is shown on the pattern chart.
V
V
V
V
V
V
V
V
V
V
V
V
V
V
V
V
V
V
V
V
V
V
V
V
V
V
V
V
V
V
V
V
V
V
V
V
V
V
V
V
V
V
V
V
V
V
V
V
V
V
V
V
V
V
V
V
V
V
V
V
V
V
V
V
V
V
V
V
V
V
V
V
V
V
V
V
V
V
V
V
V
16-st repeat
V
V
V
V
V
V
V
V
V
V
V
V
V
V
V
V
V
V
V
V
V
V
V
V
V
V
V
39
37
35
33
31
29
27
25
23
21
19
17
15
13
11
9
7
5
3
1
The pattern chart for the diamond
pattern shows only the RS rows.
Purl the stitches on the wrong side
and slip the slipped stitches again.
Repeat these 40 rows.
J
« • • *
t < ■ i i
i *
i
\.
1 VMW..--V tti.i>.-;
V." ' •"
<
n^ \\
.■ , i ] . .....
Hi/ * i •! ■ » \ . t 1 ■
. • • » ■ \ . . ■ , ■ • • ■
• • • • i i i , •
•
•i \
'.•• • 1.::..-.Vty>'-.' ,..S Vt'
. hi\\^ » i -v -i* w , . .
Three slip-stitches are slipped
twice over the stitches in the other
color. After 10 rows, the pattern is
shifted over by 6 stitches.
v * -*
"V
The yarn carried behind the work
can be seen behind the 3 slip
stitches.
V
V
V
V
V
V
1
V
V
2-
V
V
St
V
V
re
pe
at
V
V
V
V
V
V
19
17
15
13
11
9
7
5
3
1
The pattern chart for 3 slip stitches
shows only the RS rows. Purl the
stitches on the wrong side and slip
the slipped stitches again Repeat
these 20 rows.
141
J cqu r« P tterns
Patterns with at least 2
colors in a row are called
jacquard patterns. They are
also called Fair Isle patterns.
Jacquard patterns are almost
always worked in stockinette
stitch: On the right side of the
work, knit the stitches; both yarn
colors are at the back ot the work.
On the wrong side of the work, purl
the stitches; both yarn colors are at
the front of the work. If you work
jacquard patterns in the round, knit
all the stitches and keep the yarn at
the back of the work. The selvedge
stitches are always worked with both
yarn colors.
• "i •
\\
J\
*N
You'll find a sweater
•with this jacquard border
on page 198.
When you work small checks like
these, use the jacquard technique.
If you make larger checks, interlock
the different colors (see intarsia).
A view of the mini-checks from the
back
IOn the right side, hold both
yarn colors behind the work and
alternately knit with the front yarn...
and the back one.
U^A^JUlT
3 On the wrong side, hold both
colors in front of the work and
alternately purl with the front yarn.
4
and the back one.
142
Jacquard Patterns
Holding the Yarn
You can get special yarn guides for 2-
color or multicolor knitlina. You
i
hook or thread the yarn into the
eyes.
Another way is keeping both yarn
colors on your left hand at the same
time. First put 1 color yarn around
the pinkie linger of your left hand
and then around your forefinger from
back to front. Put the other color
yarn around your pinkie finger the
same \va\, but then put it around
your forefinger from front to back.
The 2 colors cross in front of your
forefinger.
Now alternately work with the
front and the back yarn as the
pattern requires. In the case of
irregular patterns, if you are knitting
Holding both yarn colors on your
left hand at the same time.
v
\
7
-^
' /
n
V t '
The guide with 2 eyes (left) is for 2-
color knitting. The one with 4 notches
(right) is for up to 4 colors.
The
diamonds are
staggered in such a way thai
tl\e greatest distance the yarn
has to he carried on the back
is over 7 stitches.
» i
with more of 1 color,
}ou have to tighten
the yarn on
your pinkie
finger from time to
time so that the stitches you knit
with it don't become too loose.
Yarn Tension
The yarn that is not used is carried
along at the back of the work. It
should not be pulled too tight, since
this would make the knitted piece
tighten, but it should also not be too
loose. This is particularly important
over several stitches in the same
color.
Here is a little trick for maintaining
proper yarn tension: Every time you
change colors, work only 1 stitch in
the new color. Then spread the
stitches on the right needle out to
the correct width and correct the
length of the yarn being carried
alone.
t» *
The yarn not in use is carried
evenly at the back of the work
*f
Ml
Ji
/
4
J
*'
Sample for Gauge
In jacquard patterns, the stitches are
longer than in single-color pattern^,
so you need fewer rows for the same
length. The density of the pattern
determines how big the difference is
as compared with single-color
knitting. If you work 2 colors in every
row, and it the patterns are very
small, the stitch length can actually
be the same as the stitch width. For
example, a 4" square can have 22
stitches and 24 rows.
If you want to make a sweater in
which different patterns, such as
single-color textured patterns and
jacquard patterns, are to be worked
next to one another to produce the
same length, you have to work
shortened rows on the single-color
side to make up for the difference
(pages 146-150). Or you can make 2
different pieces and sew them
together later, using invisible stitch
(don't forget to include the
additional selvedge stitches). When
you change patterns over the length,
all that matters is the stitch width,
and that is the same for stockinette
stitch, textured patterns, and
jacquard patterns.
143
Special Techniques
Reading Patterns
"V
You usually work from a multicolor
pattern chart for jacquard patterns.
Sometimes the different colors are
also identified with symbols. Every
box represents 1 stitch. Pattern
charts in colors are easier to follow. If
you are working from a complicated
pattern shown with symbols, it might
be a good idea to transfer it to graph
paper and color it in.
In almost all cases, the pattern
chart shows every row. Pay attention
to the row numbers. The numbers
for the rows on the right side of the
work are on the right side, the ones
for the rows on the wrong side of the
work are on the left.
IU
ut
•UV
\T'
You can keep your
place with a ruler
or place marker.
"p
1
W'-'t wM
■'ft
4.1
ft
*r I
:#•
•■li til
>.
On the right are the pattern
charts for these knitted pieces.
Some have all the rows in
colors, some use symbols. The
pattern charts show the
rows on both sides
of the work.
j. >
/'/
*. y
i •
/,
■&
I
*
•.'i <
'~}\ \
36
34
32
30
28
26
24
22
20
18
16
14
12
10
8
6
4
2
■>
V>
.*>
*»
*r
N
6-
■st
re
>P
-
35
33
31
29
27
25
23
21
19
17
15
13
11
9
7
5
3
1
*S!
You read a pattern chart the same
way as you knit, from bottom to top.
The rows on the right side of the
work read from right to left,
' those on the wrong side of
/ the work from left to right.
If only the rows on the right
side ot the work are shown, the
stitches are worked in the same
colors on the wrong side of the work.
In order to keep your place, put a
marker above the row you are working
on. This way you can check the
pattern again for the rows you have
already worked. If you put the marker
underneath the row you will be
working "blind" and won't be able to
compare the stitches on the needle
with the pattern.
X] = Ochre
IS] = Black
H = Rust
18
16
14
12
10
8
6
4
2
6-
■st
re
>P
-
17
15
13
11
9
X
X
X
o
o
o
o
o
o
—
—
—
—
—
—
X
X
X
X
X
o
o
o
o
X
X
—
—
—
—
o
o
X
X
X
—
—
o
o
X
X
X
X
—
—
o
o
o
o
X
6-
-
—
—
—
X
X
X
X
X
X
o
o
o
o
o
o
St
X
—
—
o
o
X
X
X
X
—
—
o
o
o
o
X
re
X
X
o
o
o
o
X
X
—
—
—
—
o
o
X
X
p
X
X
X
o
o
o
o
o
o
—
—
—
—
—
—
X
X
X
-
- -1
t * •
-
J. <. -
1
>
4 •' '
Weaving in Yarn Ends
If you change colors at the
beginning of a row, such as for
sweaters with narrow stripes yon
can weave the varn ends in. Just
make sure that the tension of the
knitting varn remains constant.
Otherwise the stitches could
easily pull out of shape.
First work the selvedge stitches
with the old and the new varn,
and then 1 stitch just with the
new yarn. Then pull up both
yarn ends and cut them to a
length of about i". Now work <S
to 10 stitches, placing the yarn
ends alternately over and under
the working varn. Don't cut the
varn ends too short.
144
Jacquard Patterns
Weaving In Yarn
Carried Across the
Back of the Work
If you are working large jacquard
patterns, where the individual parts
of the design arc more than 7 stitches
apart, you should occasionally weave
in the yarn you are not using, or even
weave it in continuously.
If you use the weaving technique—
in other words, ii you weave in the
yarn not being used continuously—
the appearance of the stitches can
easily become irregular on the front
of the work and the colors of the
yarn being carried on the back can
show through on the front. For this
reason, the yarn being woven in
always has to be pulled tip rather
tight. Also, the knitting usually
becomes tighter than normal in
jacquard patterns because of the yarn
being woven in.
For a better overview, the drawings
show the yarn woven in at only 1
point (photo at bottom). Make sure
that as you are knitting, you always
have the same yarn color at the front
of your forefinger, otherwise you
won't be able to reproduce the steps
shown in the drawings. Here the
yellow yarn is at the front, the rust-
colored yarn at the back.
IOn the right side rows,
alternately knit the front yarn
normally. Then insert right needle into
the stitch, bring the tip of the needle
over both yarns to the back, catch
the front yarn from top to bottom,
and bring it forward and through the
stitch, passing over the back yarn.
3 On the wrong side rows,
alternately work the front yarn
normally. Then catch it going over
the back yarn.
Alternately knit the back yarn
normally, then catch the yarn
going under the front yarn.
Alternately work the back yarn
normally. Then insert the right
needle into the stitch, bring the tip
of the needle over the front yarn
from the front, catch the back yarn
from top to bottom, and bring it
forward and through the stitch,
passing over the front yarn.
r* -
A •
A.
Long pieces of yarn carried at the
back of the work are woven in at 1
or more points.
m1
VM
* y
M
If you use the weaving technique
for every stitch, the piece gets very
stiff. If the yarn is heavy, the
woven yarn can show through on
the right side of the work.
A view of continuous weaving from
the back. Here, alternately work 1
stitch "normally," using the
jacquard technique (page 142), and 1
stitch using the weaving technique.
145
In rsia Patterns
Whether you are working a
complicated ^sweater with a
picture design, or diagonal
areas of color, patterns in
which areas of color are
worked with several skeins
of yarn are called intarsia
patterns.
For intarsia work, the yarn must
be crossed within the knitted
piece at every color change (see
photos and drawings). Crossing the
yarn prevents holes from forming in
the knitted piece.
In order not to get your yarn all
tangled if you are working with a lot
of different colors, put the skeins o(
yarn next to one another in the order
in which they arc going to be
worked. The yarns will cross in the
first row. Now turn the piece to the
front, turning the tip of the needle
towards your body and to the right.
When you work the row on the
wrong side of the work, the yarns will
uncross. At the end of this row, turn
the work to the back—in other
words, turn the tip of the needle
away from your body and to the
right. Now the yarns will cioss again.
For all the subsequent rows, always
turn the work alternately towards
your body and away from your body.
The skeins only have to be resorted if
new yarn, such as a new color, is
added or a color is eliminated. It is
best that when you stop knitting, you
always interrupt your work after a
row on the wrong side of the work,
so that when you start working again
you can put the skeins next to one
another in the proper order.
IOn the right side rows, put the
"old" color yarn over the
"new" color yarn at the back of the
work and continue working with
the "new" color.
On the back of the work, a 2-color
"chain" forms where the yarns
cross.
7
• »
If areas of color are shifted over by
several stitches prepare to cross
the yarns ahead of time: Cross the
"new" yarn 1 stitch before or after
the stitch to be knit in this color...
2 On the wrong side rows, put the
"new" color yarn over the "old"
color yarn at the front of the work
and continue with
the "new" color.
If areas of color are shifted over by
only 1 stitch, cross the yarns the
same way as for straight areas of
color. Small photo: A view from the
back. The yarn ends are sewn in on
the area of color that they match.
V «.
...so that the yarn will come from
the "correct" side and the first new
stitch will not be pulled in the
wrong direction.
146
Intarsia Patterns
For Attractive Color
Changes
Just as at the beginning of each row,
when you change colors the first few
stitches in a new color have to be
worked tight (see also page 29). In
spite of this, the stitches of the 2
areas of color will generally have 2 to
3 very loose stitches in 1 row, and 2
to 3 very tight small stitches in the
rows above and below that row.
You can correct this uneven
appearance of the stitches, although
it requires some time and effort: Use
Pull the stitches in the top row up
in the direction of the color change
in the sequence indicated, and
then distribute the excess yarn
over the small stitches on the
previous row.
If you are working a lot of
small areas of different colors,
yarn bobbins are very helpful.
a knitting needle to pull each parr
of the large stitches, individually
and one after the other, from the
outside to the inside—i.e., towards
the color change. At the point
where the yarns cross, put the
knitting needle into the small stitch
underneath, and pull the excess
yarn through to the bottom. Hold
the stitches you have just corrected
in place with your thumb. Now
distribute the excess yarn over the
first 2 stitches.
Ribbing with Areas
of Color
If the areas of color already start at
the ribbing, the stitches have to be
cast on appropriately. Since the first
row in the ribbing pattern is
supposed to be a row on the wrong side
ot the work, the stitches have to be
cast on exactly as the areas of color
are supposed to appear later. In this
example, you start with the red
yarn.
If the second piece is worked in
reverse—that is, if the red area is on
You can make them out of
cardboard, but they are also
available in needlework stores.
the left—start casting on with the
natural-color yarn.
Sewing in the
Yarn Ends
In order for the starting stitches of
every area of color to have the
correct shape, the yarn ends must
first be sewn in the direction in
which you normally would have
continued knitting with this yarn:
If the area of color started in a row
on the right side of the work, or
ended in a row on the wrong side of
the work, the yarn ends on the back
are first pulled through the
horizontal thread of the next stitch to the
left, or through the perpendicular
yarn crossing, and then sewn into the
same area of color to the right.
If an area of color started in a row
on the wrong side of the work, or
ended in a row on the right side of
the work, the yarn ends on the back
are first pulled through the yarn
carried on the back of the work to
the right, and then sewn into the
same area of color to the left.
The stitches before (top) and after
(bottom) the correction.
\
If the areas of color already start at
the ribbing, cast the stitches on in
the same color sequence as that in
which they are worked.
Here, the area of color started in a
right side row and ended in a wrong
side row. First pull all the yarn ends
through the yarn of the other color
to the left, and then sew them in.
147
Shortened Rows for Slanted P tterns
Hardly anyone who knits
likes to work shortened
rows. But it's not really
difficult once you get the
hang of it.
Shortened Rows at the Right Edge of a Facing
-r-r
orking shortened rows
means working fewer rows
over some stitches. These
rows are needed if you want to make
a shawl collar or a dart, or if you are
combining patterns that require a
different number ot rows for the
same length, such as garter stitch
and stockinette stitch.
Shortened Rows
with Yarn Over
There are 2 ways ot preventing a
hole from forming when you work
shortened rows. The first is shown on
these pages using the example of a
garter-stitch facing that is knit on.
Here, you turn with a yarn over, and
in the next row knit the yarn over
together with the first of the stitches
that was not worked before.
If you knit a facing on in ribbing
pattern, you should add shortened
rows from time to time, because
when you knit 1, purl 1 alternately,
the knit and purl stitches pull into
each other slightly, which makes the
stitches larger, and the facing will
stretch out more easily. Also, facings
are normally worked with smaller-
size needles, and that is not possible
when they are worked together with
the main piece. In this case, however,
in contrast to what is shown here,
you don't work more rows over the
stitches of the facing, but rather over
the other stitches (see knit-in
facings, pages 66-67).
Iln a row on the right side of
the work knit to the end of the
facing. Turn the work and make a
tight yarn over ahead of the first
stitch.
Y
\
3... knit the facing stitches up
to the yarn over. Then knit the
yarn over together with the first
stitch of the pattern.
IFor darts on the left side, the
shortened rows are worked
within the piece. Turn with a yarn
over, as described,...
2 Then knit back along the row.
In the next row on the right
side of the work, ...
After the next row, the
shortened row can hardly be
seen. Here, the shortened rows are
worked every 6 rows.
2 ...and when you knit back
along the row knit the stitch
after the yarn over together with
the yarn over.
148
Shortened Rows for Slanted Patterns
Shortened Rows at the Left Edge of a Facing
V
IWork a row on the wrong side
of the work to the end of the
facing. Turn, make a tight yarn
over ahead of the first stitch, and
work back along the row of facing.
Y
In the next row on the wrong
side of the work, knit the
facing stitches up to the yarn over.
Slip the yarn over onto the right
needle knitwise.
3
Also slip the next purl stitch
onto the right needle.
Insert the left needle, from
right to left, into the stitch and
the yarn over at the same time...
5 ...and put both loops back
onto the left needle. Now the
yarn over is ahead of the stitch—
i.e., on the back of the work.
6
Now the yarn over and the
stitch can be purled together.
After the next row, the
shortened row can hardly be seen
even on the right side of the work.
l
For darts on the right side,
turn the work with a yarn
over,...
...and when you knit back
along the row first reverse the
yarn over and the next stitch, as
described above, then purl them
together.
149
Special Techniques
Shortened Rows with
Stitches Passed Over
A completely different way of
working shortened rows is passing stitches
over. Here again, you turn at the
point where the shortened row is
supposed to end.
But now you don t work with a yarn
over, but rather place the working
yarn at the front of the work. Then
insert the needle into the stitch from
right to left, and slip the stitch onto
the right needle without knitting it.
Now pull the working yarn from
front to back over the right needle
and continue knitting normally. Two
parts of the stitch of the previous row
will now be on the needle. Oi course
these 2 parts of the stitch count as
only 1 stitch, as they are worked
together in the next row. On the
right side of the work, you will only
see 1 stitch here; in all other rows,
there are 2 stitches in height.
Shortened Rows on the Left Side
y
•y. v.-
o* , - Y v ■ , * , i
IWork the wrong side row to the
desired length, then turn the
work. Put the yarn to the front of the
work. Insert the needle into the first
stitch from right to left and...
On the next wrong side row,
work to the stitch that was passed
over (at this turning stitch, there are
2 threads on the needle), insert...
You can see the shortened
rows very clearly in the
different colors. There is
always only I stitch in white
or purple at the left end of
these rows.
The single-color sample was worked
the exact same way as the multicolor one.
No transition is evident between the
shortened rows and the ''normal" ones.
\
A
^ A'
...slip the stitch onto the right
needle. Put the yarn over the right
needle from front to back, and
don't pull it too tight. Knit back
along the row.
...the needle from right to left into
both threads—i.e., parts of the
stitch—and purl them together.
3 On the right side of the work,
only 1 stitch can be seen at
the end of the shortened rows.
150
Shortened Rows for Slanted Patterns
Shortened Rows on the Right Side
Turn the work at the desired
point. Put the yarn to the front of
the work. Insert needle into the first
stitch from right to left and slip it
onto the right needle. Put the yarn over
the right needle from front to back,...
In the next right side row, work
to the stitch that was passed
over. At this turning stitch, there are
2 threads on the needle. Now...
...and don't pull it too tight. You can
see the 2 parts of the stitch of the
previous row. Put the yarn to the
front, ahead of the slipped stitch,
and work back along the row.
...insert the needle from left to
right into both threads and knit
them together.
When, you make a
cardigan with a shawl
collar (see also page 90),
the collar has to be
worked with shortened
rows in order to have the
necessary width. Slanted
shoulders worked with
shortened rows assure
a better fit.
i i
4
T V
On the right side of the work,
only 1 stitch can be seen at
the end of the shortened rows.
A contrast yarn ...
... makes it easier to count rows.
Since the shortened rows are
almost in\ isihle, this little aid
will help you to consistently
work the shortened rows after
the same number of rows.
Simplv put a piece of yarn in
a contrast color around a stitch
in the knitting in every row in
which vou are working the
shortened rows. This wav, vou
only have to count the rows
from 1 marker to another.
151
Special Techniques
Pattern Variations with
Shortened Rows
Knitting such patterns and still
keeping them "straight" is not magic.
You simply have to make sure that
you work the shortened rows to the
same point from both sides. The
single stitch at the end of the
shortened row is a perfect reference point.
To make sure you don't work 1 row
shorter than the other, work the
passed-over stitch precisely on top of
this single stitch. That is what was
done in all 4 of these pattern
variations, although it does not look that
way at first glance. For every stripe, I
worked more or less 6 stitches. The 3
rows in purple are slanted because of
the shortened rows.
You should not work this type of
pattern over too many rows, because
the rows worked over all the stitches
would stretch too much. But 5 times
2 rows, as in these examples, is no
problem.
t « f i » * i
> >
• » i
1 « ^
\ ,
\
\
\ ■
\
V
i 4 V\ ^ UK"* -.'■ '
fc<"
/>• •/
'v.-.i.S-.,. \y^MX:,^lii^'":
The right side and the left side start with short shortened rows.
> v
;■' v
. »
» , ' *
1 i i \ i
• , ' '
f f t f » I ' '
4v1 \ ;
1 i « » «
*
> »
^ >
i i
f i
\ » » • * / * » »
« «
<
< ' '
• i « ' • • « « > > * J • , , ,
The right side starts with long shortened rows, the left side with short
shortened rows.
t
* N
J
. v
,1
','.'.'.
','' '
, i<
, *
t i
v*;
•^
\ * v
K • * V
L;- ' . » l
V
<
(
:. • ^
V »
<
< \
« \
, » »
>\
1 A
^ (V
The right side starts with short shortened rows, the left side with long
shortened rows.
t
-■:,J-\
* \ •
*v
■.'< '
,'.•-'
i
^
I
s . ' i1^ - ■
\ ' i
\
\ — V
* I ' i . ' » > >
< « '
/ i
1 ' * >
1 *
v •*'«
>l
^!-
■I t • v
; ;1 ::v^"'
1<
The right side and the left side start with long shortened rows.
152
Special Techniques
Pattern Variations with
Shortened Rows
Knitting such patterns and still
keeping them "straight" is not magic.
You simply have to make sure that
you work the shortened rows to the
same point from both sides. The
single stitch at the end of the
shortened row is a perfect reference point.
To make sure you don't work 1 row
shorter than the other, work the
passed-over stitch precisely on top of
this single stitch. That is what was
done in all 4 of these pattern
variations, although it does not look that
way at first glance. For every stripe, I
worked more or less 6 stitches. The 3
rows in purple are slanted because of
the shortened rows.
You should not work this type of
pattern over too many rows, because
the rows worked over all the stitches
would stretch too much. But 5 times
2 rows, as in these examples, is no
problem.
t « f i » * i
> >
• » i
« •»
\ ,
I
\
\ ■
\
V
fc<"
/>• •/
The right side and the left side start with short shortened rows.
> v
;■' v
. »
» , ' *
1 i i \ i
• , ' '
f f t f » I ' '
4v1 \ ;
1 i « » «
*
> »
^ >
i i
f i
\ » » • * / * » »
« «
<
< ' '
• i « ' • • « « > > * J • , , ,
The right side starts with long shortened rows, the left side with short
shortened rows.
t
* N
J
. v
,1
','.'.'.
','' '
, i<
, *
t i
v*;
•^
\ * v
L;- ' . » l
V
<
(
:. • ^
V »
<
< \
« \
, » »
>\
1 A
^ (V
The right side starts with short shortened rows, the left side with long
shortened rows.
t
-■:,J-\
* \ •
*v
■.'< '
,'.•-'
i
^
I
s . ' i1^ - ■
\ ' i
\
\ — V
* I ' i . ' » > >
< « '
/ i
1 ' * >
1 *
v •*'«
>l
^!-
•I fc
; ;1 ::v^"'
1<
The right side and the left side start with long shortened rows.
152
Embossing
In addition to bobbles,
sections of embossing are a
nice way of creating
interesting effects.
Embossing can be worked over a
few stitches or over an entire
row. Yoti can create a very
attractive design of different lengths
distributed at irregular intervals over
an entire sweater. And you can use
all kinds of colorful bits of yarn.
If the sections or embossed knitting
are close together, the yarn for the
embossed knitting can be carried
along at the back of the work, jusc as
in intarsia work. If the sections of
embossed knitting are farther apart,
you should work with individual
pieces ot yarn or small skeins.
1 Leave the yarn of the main
color hanging on the back, and
use the embossing yarn ...
2... to work the desired width
and length—in this case, 6
rows of stockinette stitch.
* —
If sewing in the
yarn ends of the
embossing yarn
is too much
trouble ...
... try a tailor's knot. Make
an overhand knot with the 2
yarn ends held
together. Then
push the knot
towards the
knitted piece with
a needle, pulling
the ends tight.
You should check
the knots from
time to time to
make sure that they
haven't come
undone.
3 Use a thin cable needle to pick
up the stitches of the last row
below the embossing. Make sure
you have the same number of
stitches.
\
Turn the work and put the
needles one behind the other.
Then knit 1 stitch from the front
needle and from the cable needle
together each time. Insert the
needle into the front stitch knitwise and
into the back stitch knitwise twisted.
Finally, work the row to the
end.
153
Special Techniques
Narrow or Wide
Embossing can be worked over only a
few stitches or over the entire width
of the piece.
Embossing in
Stockinette Stitch
This embossing was worked in stock-
inette stitch over 4, 6, and 8 rows.
Two examples of each are shown.
Embossing with different stripes is
even livelier.
Embossing in Reverse
Stockinette Stitch
Embossing worked in reverse
stockinette stitch looks like little rolls of
knitting. The first row of the
embossing, worked in reverse stockinette
stitch on the right side of the work,
always has to be knitted rather than
purled. Otherwise, the horizontal
threads of the last row of the
background color will show.
Embossing with Picots
Whether you work it in 1 or 2 colors,
embossing with picots is very striking.
For the examples of narrow
embossing over 6 rows, the third row is an
openwork row. For the examples or
wide embossing over 10 rows, it is the
fifth row. For this row of openwork,
vou need an odd number oi stitches.
After the selvedge stitch, first knit 1
stitch, then alternately make a yarn
over and knit 2 stitches together. In
the next row, on the wrong side of
the work, purl all stitches and yarn
overs. For the 2-color embossing,
work 5 rows in the first color (i.e.,
including the openwork row) and 5
rows in the second color. On the
right side of the work, the picot edge
will still show in the first color.
^ ♦
154
£
h . XN
<t
N.
Nar
wid
row or
e
> * i
,,.'•"• *
* *•
. v 1
-• »
*fc
•^ •- i
"* \
,"< ' >
&<
*~ &
^ »*
*;*\ £
V. »
> ^' *•
iv» , s '*
i ■ * . - -
'..•'•
Embossing in
stockinette
stitch
• 4
i »
i '
, i
»!■
>4
, t
\
^ ■>
V
- •>*
Embossing in
reverse
stockinette
stitch
Embossing
A
1 »
Embossing with
[ricots
,1
<W
*
V "S»
^ \ .■ • < *
,1
.K.tM
n
^\:\^
*i
I
'c V
A N
.' ^ *i
V f
•» •
r
> 1
e.
•v ■ *\
s -TO
^fc*r * ^ ;*
^
NX ■
J
> «
. #
Shifted
embossing
N >
N-"'
S*
« % i
• s <
_ « \
- 1 . , v
* ' * 1S
% * *
, ■« 1 '
. * » \
N >
M t *
■ . • * >
* .
i »
Waved ribbing
Shifted Embossing
Shifted embossing patterns are
particularly attractive. I Iowever, you
should only work patterns like this
over the entire width of the sweater.
Alternately work 6 rows in the main
color and 4 rows in the piping color.
In the first row of the main color,
alternately work 6 stitches as em-
bossing and 6 stitches not as
embossing. When you w ork the next stripe,
do the opposite.
If you start and end a row with 3
embossed stitches or 3 normal
stitches, as needed, the pattern will
also match at the side seams after
you have sewn the pieces together.
Waved Ribbing
Waved ribbing patterns are very
striking, but require quite some
effort. To work this way, first slip the
horizontal thread of the first previous
row (= on the wrong side of the
work, the second horizontal thread
below the stitch you want to work)
in fronr of the knit stitch and knit
both together. Then, in order, do
that for the horizontal threads of the
second, third, fourth, fifth, fourth,
third, second, and first previous row.
Then knit a normal knit stitch.
In the next row, Row 8, work the
pattern shifted over: Where you
worked the normal knit stitch, slip
the horizontal thread of the fifth
previous row (= on the wrong side of
the work, the sixth horizontal thread
below the stitch you want to work)
and work a simple knit stitch where
you previously inserted the needle
the farthest down. For this pattern,
the number of stitches has to be
divisible by 10+1 stitch + 2
selvedge stitches.
155
Entrelac P tterns
.^ *^
**-
- i .
^S
» » »
# •
» -« ^^
>.
'C»
V? ,
< • '
- *■.
The traditional Entrelac
pattern may look
complicated at first
glance but once you
get the hang of it, its
easv to knit.
If you want to work a sweater in
Entrelac pattern, you should
choose either a V-neck, boat
neck, or square neck. You can't make
individual decreases for a rounded
neckline. Also, the slee\ es have to
be knit from the top down. A
decrease of half a pattern piece every
other row of the pattern ib the
simplest answer for the slanted edges
of the sleeves.
The various schematic drawings
show you how the triangles and
squares can be divided up. Always
work a sufficiently large sample for
gauge. It should be at least 3 squares
wide and high. Then you can
calculate the size of the sweater. As in the
examples shown, draw the entire
sweater (or at least the front or back)
and 1 sleeve on graph paper.
In this pattern, there are no limits
on how you vary the colors. You can
use 2, 3, or more colors. Or you can
work each rectangle or triangle in a
different color. It might be
worthwhile checking your scrap basket.
The size of the pattern pieces can
also vary. On pages 158-159, the
pattern is explained step by step,
using the example of pattern pieces
worked over 10 stitches. The pattern
pieces can be made smaller or larger,
following the same principle.
Sweater
In this 3-color sweater, the pattern
pieces arc worked over 10 stitches.
The layout of the triangles and
squares is shown in the full diagram
and photo. Four triangles were left
out for the front neckline. The
wristband and waistband ribbing and
the neckband were knit on later.
156
Entr elac Patterns
-Si
This child's sweater can be worked
in any size. The diagram shows the
different areas of color of the
sweater.
;?/
>vT-
* • ^
%■"- ^
N&
;.^-n
v^
*■* .-
- « * •
V • *• //* \Li.
^
*■*.
>
V
■v..
Block the finished pieces of the
child's sweater only slightly so that
it doesn't get too flat. Sew all the
seams from the outside using
invisible stitch.
This example shows a rounded,
straight neckline. If the colors are
laid out vertically, the front and the
back should be worked crosswise—
i.e., from side seam to side seam.
Otherwise, the yarn ends have to
be sewn in for every color change.
The sleeves are worked from top to
bottom, as in the other examples.
Two ways of making V-neck
sweaters: For a very wide
neckline, continue the V all
the way to the shoulder.
For a slightly narrower
neckline, knit another
small triangle at the top
edge of the neckline on
both sides.
157
Special Techniques
Instructions for Entrelac pattern:
The individual areas of color are
worked in stockinette stitch over 10
stitches, and the selvedge stitches are
also worked in every row. The
stitches for the individual pattern
pieces arc always picked up from the
outer part of the selvedge stitches of
every second row.
Row 1 is worked from right to left.
Then alternately repeat Row 2 from
left to right, and Row 3 from right to
left.
Finish the work with triangles. It you
end the work after a second row, the
last row of triangles will he worked
from right to left; sec Row 4. If the
desired length requires you to finish
the work after a third row, the last row
is worked from left to right, and an
additional small triangle has to he
worked at the beginning and end of
the row; see Row 5. The pattern can
be worked on normal knitting needles,
but circular needles are better.
«.«
* *
" •- v
s
* X
* *
- r
»• -»
\
« » "
V
> *
i *
I V
i %•
-» *
Row 1 with triangles
For the first triangle, cast on 2 st, p
1 row# k 1 row, p 1 row. In Row 4
(RS), and then in every second
row, at the left edge, before the
selv st, always inc 1 st k twisted
from the horizontal thread, until
there are 10 st on the needle. Now
don't turn the work. Stop working
on the first triangle and cast on 2
st for the second triangle by
knitting them on. Then continue
working as described. Work all the
other triangles the same way.
Row 2, first edge triangle
The second row of pattern pieces
starts in a row on the wrong side
of the work with a triangle: p the
last 2 st of the last triangle, turn ( =
t) - k1, increase 1 st (k twisted out
of the horizontal thread), selv st, t -
p2, p the third stitch tog with the
next st of the triangle (= p tog), t -
k2, inc 1, selv st, t - p3, p the fourth
stitch tog with a st of the triangle,
etc., until all the triangle stitches
have been used. By working the
increases, you have 10 stitches on
the needle again.
Row 2, square
Now don't turn, rather work 10 st
out of the side edge of the next
triangle, going through the selv st
from back to front and bringing the
st through to the back. Or turn the
work and pull the st through to the
front with a crochet hook and put
them onto the knitting needle. * t -
k10, t - p9, p the last st tog with the
1st st of the triangle, rep from *
until all st of the triangle have
been used. Work all the other
rectangles the same way.
158
Entrelac Patterns
Row 2, last edge triangle
At the end of the row, work
another triangle: p10 st out of the
side edge of the last triangle, t -
klO, t - p8, p2 tog,1 - k9, t - p7, p2
tog, etc. Pull the working yarn
through the last st and cut it off.
\
*
m *
*
m •
* '
i
•
» • • ■ *
r. V </-
*
. V
...»
Row 3, squares
Here, you work squares over the
entire row: Knit 10 st out of the
side edge of the triangle, t - * p10,
t - k9, single dec (= slip the last st
knitwise, k the first st of the square
of the second row and pass the
slipped st over), t - rep from * until
all the stitches of the square are
used. Then don't turn and k
another 10 st out of the side edge
of the next part. Work the
following squares the same way and, at
the end, cut the yarn off.
\
>
>
■ 'a *
* ■
"»
"-- J."-"
•r - .«
V
•» -
- V
■ *- _
Row 4, end triangles from
right to left
Work the last st of the previous
triangle with the new yarn, then
pick up 10 st knitwise out of the
side edge (= 11 st), t - p9, p2 tog, t
- k9, 1 single dec, t - p8, p2 tog, t -
k8, 1 single dec, t. Continue
according to the same principle
until only 1 st is left on the needle.
Then pick up another 10 st out of
the side edge. Work all the
following triangles the same way.
\
■J. .
^- a . ,
„ .. a. - \ -. » »
X i » » » a *, -
* - *»■ 1 • "» a •
Row 5, end row from left to
right, first small triangle
For the first small triangle, p the
first 2 st of the last square you
worked, t - k1, inc 1, selv st, t - p2,
p the third st tog with the first st of
the square (= p2 tog), t - k2, inc 1,
selv st, t - p3, p2 tog, t - k3, inc 1,
selv st, t - p4, p2 tog, t - k4, inc 1,
selv st, t - p5, p2 tog, t - k6, t - p2
tog, p3, p2 tog, t - k5, t - p2 tog, p2,
p2 tog, t - k4, t - p2 tog, p1, p2 tog,
t - k3, t - p2 tog T, then pass the
first st over the second = 1 st left.
- *. \
- ■- A.
- * -
.1
v-
' • 1 a. *
Row 5, triangle
Pick up 10 st purlwise out of the
side edge of the square, t - k11, t -
p2 tog, p8, p1 st of the triangle tog
with the first st of the previous
square (= p2 tog), t - k10, t = p2
tog, p7, p2 tog, t - k9, t - p2 tog, p6,
p2 tog, t. Continue working
according to the same principle. P
the last 2 st of the end triangle tog,
put the st back onto the left
needle, and then p tog with the
last st of the square.
-\*"**
v.-
l -."St T *>**.. •
Row 5, last small triangle
P 10 st out of the side edge of the
last square, t - k11, t - p2 tog, p7,
p2 tog, t - k9, t - p2 tog, p5, p2 tog,
t - k7, t. Continue working
according to the same principle. At
the end, p2 tog, put the st back
onto the left needle, and p the last
2 st tog. Cut off the yarn and pull
the end through.
159
Reversible Patterns
Reversible patterns, also
called double-face or double
knitting, look good on both
sides. They are good for
scarves, warm blankets, and
heaw cardisans. With this
j C
type of knitting, you have
stockinette stitch on both
sides. The color pattern on
the "wrong" side of the
work is the reverse of the
front.
?
S lit"
\ *
»•'* \
V V
i <
.s ^
1 .-».
*»
• » V
A
- «*4
\ *
■ \
,«.*
V i
1
♦ v
1 I «
\*
»' t"
v . * v
\:
«. »
/ * i I » ^
■ t
Opened up: If the knit and purl
stitches are placed on separate
needles, you can hardly see any
transition in casting on with
kitchener rib.
Casting On with
Kitchener Rib
The nicest way of casting on for
reversible patterns is kitchener rib.
The back is the opposite of the front
from the very first row.
Knot the 2 yarns together and cast
on the required number of stitches
with a needle that is 1 or 2 sizes
smaller (see also pages 24 and 25).
Hold the yarn in your left hand.
Hold the short end pieces with your
right hand, bring the needle under
the front yarn for the first stitch, and
pull the back yarn to the front from
top to bottom. Then continue as
described above. You need twice as
many stitches for the desired width,
since the "knit" and "purl" casting-
on stitches are each needed for 1
side.
In the next row, work according to
the jacquard technique, alternately
knittuni* 1 stitch with the first color
and purling 1 stitch with the second
color, keeping to the color ot the
casting-on stitches.
*-.
IFor open casting on, undo the
row of chain stitches and put
the stitches onto a cable needle.
Alternately knit the stitches from
the front needle with the first
color and purl the stitches from the
back needle with the second color.
V»-
3
A "facing" of the same length
appears on both sides.
160
Reversible Patterns
Open Cast On
If you want to have the same color
facing on both sides at the bottom
edge, an open cast on (page 20) is
the best and easiest solution. If this
facing is supposed to hold the knitted
piece in a little, like ribbing, the first
few rows until the facing is joined
together can be worked with thinner
needles.
Crochet a loose row of chain
stitches in a contrast yarn in the
length as the number of stitches
required for I side. Now pick up the
stitches from the horizontal parts of
the chain stitches, on the back, and
work in stockinette stitch to a length
of twice the facing length, ending
with a purl row.
Undo the chain stitches and catch
the open stitches with a thinner
cable needle. Make sure that you
have the same number of stitches.
Fold the piece together wrong side
on wrong side. Now continue
according to the jacquard
technique, with 2 colors of yarn, and
alternately knit 1 stitch from the
front needle in the first color and
purl 1 stitch from the back needle in
the second color.
Double Cast On
The simplest way of casting on is
with both yarns, but this is less
attractive. The only time this method
is good is if you are working a double
scarf, for example, and the edge will
be hidden between fringes later.
In the first row, for every double cast-
on stitch, always knit 1 stitch in the
first color and purl 1 stitch in the
second color.
Chain stitch selvedges are worked
on both sides. To do this, knit both
selvedge stitches at the beginning of
every row together, but slip them at
the end of every row.
In the binding-off row, the stitches
of the front and back are knitted
together.
Selvedge Stitches
No matter if you are knitting a
double scarf or a reversible jacket in
which the pieces have to be joined
seamlessly and attractively, you
should always work seam selvedge
stitches—i.e., selvedge stitches
worked in stockinette stitch. To do
this, knit the selvedge stitch for the
front—in other words, the first stitch
on the needle—and purl the
selvedge stitch for the back—i.e., the
second stitch. Then knit the next-to -
last stitch—i.e., the selvedge stitch
for the front—and purl the last
stitch. Work the selvedge stitches
this way in every row.
Important: Make sure when you
turn the work that the yarn in the
color of the first stitch on the needle
is at the front—i.e., that it does not
cross the yarn for the second stitch.
Only in this way will you get the
open edge (see photo 1, below) with
which you can later sew both sides
using invisible stitch (photo 2,
below).
You cannot avoid crossing the yarns
at those places where the main color
changes, or in the case of small
patterns that reach all the way to the
edge (such as the zigzag pattern in
the bottom part of the knitted
piece). For very attractive edges, you
should try to lay the patterns out so
that they begin and end
approximately 2 to 3 stitches after and
before the selvedge stitch. In our
sample, they are the diamond pattern
and checkered pattern.
t ^
> .
V
\
A double cast on and cast off, and
chain selvedge stitches, are not as
attractive.
L *
I * 4
* »
i 4
1 *
I
.V ,4V ••• ' n
> s*
» V
Ilf the knitted piece is turned at
every new row so that the yarn
of the first selvedge stitch is on the
outside the edges can be opened
up to the first pattern stitches.
4 '*
t
fc
* h
. \ I 4 < I » *
» t
»
i
1
I
; I
Then you can either sew both
sides of the knitted piece
together (such as for a scarf) or you
can sew the pieces of a cardigan
together using invisible stitch.
161
Special Techniques
Using Jacquard
Technique
Reversible patterns are usually worked
with the jacquard technique—i.e.,
you work with two colors of yarn at
the same time. You can use a yarn
holder or hold both, yarns over your
left forefinger as explained for
jacquard patterns (starting on page 142).
In reversible pattern, there is no
yarn carried on the back of the work
within the knitted piece, since you
alternately work 1 stitch in each
color. If you don't work any patterns,
but rather work 2 sides, each in I
color, the piece can be opened up if
it is put onto 2 needles (sec photos
on pages 22-25 for casting on in
kitchener rib). If you work patterns,
the stitches cross within the piece
every time the color changes (see
photo 1, page 161).
At first glance, the stitches on the
needle, which arc very close to one
another, seem rather confusing. But if
you think about the stitches in pairs,
this way of working is easier to
understand. A knit stitch on the
front and the next purl stitch on the
back belong together. Before the first
Drawing 1
8
6
4
2
8
7
6
5
4
3
2
1
Drawing 2
Drawings 1
and 2 show a
square and a
small diamond
with the stitches
for 1 side. The
numbers on the
right side stand
for a row on the
right side of the
work, those on
the left side
stand for a row
on the wrong
side of the work.
Drawings 3 and 4 show the same
color sequence for a reversible
pattern. The darker vertical lines
separate the pairs of stitches. The
short horizontal lines show the purl
8
6
4
2
stitch of a pair—i.e., the stitch on
the front—put both yarns behind the
work, then knit this stitch in the
appropriate color. Then put both
yarns at the front of the work and
purl the second stitch in the
appropriate color.
In order to make the purl stitch
easier to work, hold the yarn not
being used with your left thumb. Or
work the stitch "the wrong way,"
pulling the yarn through the stitch
from top to bottom. Then the stitch
in the next row must be knit twisted,
since it is on the needle "the wrong
way" (see also page 134, bottom).
Working a pattern is also simple if
you think of the stitches as being in
pairs. When you make a color
change of 1 stitch, first knit the knit
stitch in the second color, then purl
the purl stitch in the first color. The
next knit stitch is knit in the first
color again, the next purl stitch is
purled in the second color. The
examples in the drawings show how
the stitches are worked for plain
knitting and reversible knitting.
Drawing 3
8
7
6
5
4
3
2
1
-------- 7
-------- 5
-------- 3
Z«-.----i----_=._ 1
Drawing 4
7
5
3
1
stitches of the individual rows. Read
the stitches—i.e., colors of the rows
on the right side of the work from
right to left, those on the wrong
side of the work from left to right.
>
\
■ ' v > '. • •■'
■.'■.•>■"■■
1 Before a knit stitch, put both
yarns at the back of the work
and knit the stitch in the
appropriate color.
r
«*•
i ►
V
V, } .
u
2 Before a purl stitch, put both
yarns at the front of the work
and purl the stitch in the second
color.
Using One Yarn
at a Time
If you don't like working with 2
colors of yarn at the same time, you
have the option of working each row
in only 1 color at a time—i.e.,
working each row twice. However,
this is harder and takes longer.
To do this, use a circular knitting
needle so that you can push the
stitches to the end of the needle,
where the yarn in the color you need
is located.
Now work 1 row7 on the right side
o\ the work, for example, with the
blue yarn. If you are not working a 2-
color pattern, knit all the knit
162
Reversible Patterns
stitches and slip all the purl stitches
purlwise. Before yon slip the purl
stitches, the yarn has to he placed at
the front of the work every time. At
the end of the row, push the stitches
hack to the other end of the needle
and now work all the purl stitches
with the yellow yarn. Now slip the
knit stitches—i.e., the blue
stitches—as if to knit them. The
yarn has to be put at the back of the
work each time.
If you are working a pattern,
however, you have to pay even more
attention. In this case, you are
working not only knit stitches but
also purl stitches. Sometimes you are
working the stitches on the right side
of the work, and sometimes those on
the wrong side of the work. At every
change from the right to the wrong
side, 1 knit stitch and 1 purl stitch,
or vice versa, have to be worked in
the same color or slipped purlwise.
rt
: :•*>
u .
\ .
- . 4|i .
v i
* \ * ' *
v> -' ^
* * *v
# v. -t V
J4t t*
1 Before a knit stitch, put both
yarns behind the work and knit
the stitch in the appropriate color.
Casting Off
Before casting off normally or in
kitchener rib, put all the knit stitches
and purl stitches of the knitted piece
separately on 2 knitting needles.
It you started a scarf using casting
on in kitchener rib, you can now join
the stitches from both needles using
grafting stitch.
If you started with an open cast on,
after you separate the knit and purl
stitches you should work as many
rows in stockinette stitch, over the
stitches of 1 side, as you worked for
the facing. Only afterwards join them
with the stitches from the second
needle, using grafting stitch.
■,1 '"if
■
* *
■A h
1 •
-.V'.' -
■. »
Border
For a reversible blanket the
edges are also finished with a
double facing. To do this, pick
up 3 stitches every 4 rows from
the selvedge stitches, and work
about 10 rows in stockinette
stitch. Then sew the open
stitches onto the other side
using grafting stitch (see pages
114-117).
" ' '}
\
*' '
1 . '-.f
a
i * ♦
s *,
4 k > ' . v » ■♦ . S
f
♦ >
If you started a scarf using
casting on in kitchener rib,
join the stitches of both sides
using grafting stitch.
If the knitted piece is part of a
cardigan, such as the back, put the
shoulder stitches onto a stitch holder
for now. Then work the front and
sew the shoulder stitches of both
sides together using grafting stitch.
Make sure that the stitches on the
needles and the seam itself produce
an additional row in each instance.
For necklines and armholes, the
stitches on each side are bound off
separately. For neckline facings, you
can then pick up the stitches of I
side "normally," work twice the
length of the desired facing, and sew
the stitches to the inside using
grafting stitch.
For sleeves, the 2 sides arc also
bound off separately. Then each
sleeve must be sewn on twice using
grafting stitch, once from the inside
and once from the outside. The last
thing you do is sew the side and
sleeve seams using invisible stitch,
also twice, once from the outside and
once from the inside.
163
Knitted pieces are made
one of a kind with lovely
embroidery, attractive
smocking, or bobble
embellishments.
Crocheted and Knitted Bobbles
Whether the)7 are worked in
lots of colors or tone on
tone, you can achieve a
unique effect w ith crocheted
or knitted bobbles on
stockinette stitch or even on
individual patterns.
Crocheted Bobbles
You can crochet bobbles
separately and knot them in,
or you can crochet
them onto the ^
stitches where
you want >
them as you
j>' >.r
•T
Y
I
M'J J
are knitting. The
advantage of
crocheting them
separately ib that you
can knot the bobbles into the piece
later at wherever you want them. On
the child's blue sweater, for example,
^ lots of
colorful bobbles
made from
' _ scraps of
yarn are
irregularly
distributed over
the entire
sweater. For small
bobbles, 2 to 3 double crochets are
enough. For large bobbles, you can
crochet 4 to 6 double crochets. Of
course the thickness of the yarn you
are using is important too. In the
examples shown below, each bobble
is made from 4 double crochets.
&>
1 Chain 3 and work 4 double
crochets into the first of these
chains, leaving the last loop of the
double crochet on the hook each
time.
*^
Then draw the yarn through
all the loops on the hook,
chain 1, and pull the yarn through
this stitch.
■X
*'
) V t
V
Pull the end of yarn at the
beginning and at the end of the
bobble through the piece separately,
and knot them together well on the
back of the work, or sew them in.
Instead of the first double crochet,
work 3 chain stitches. Place the yarn
around the hook from back to front,
bring it through the chain stitch, and
pull it through the stitch and yarn over.
\
J- \
Ilf you crochet bobbles directly
into the piece, bring the
bobble yarn through the desired
stitch and continue to work as for
a bobble crocheted separately.
\
w
At the end, go through all the
loops on the hook with the
yarn of the background color, and
put this stitch on the right needle.
Then knit to the next bobble.
166
Crochet and Knitted Bobbles
k
1 •
1
IFrom the horizontal thread
between 2 stitches, work 5
stitches, alternately k1, k1 twisted.
Turn the work.
<*..
A >r
3 In the next row on the right
side of the work, k3 tog, k2 tog
and pass the first bobble stitch
over the second bobble stitch.
i
\<
f
Work another 3 rows
stockinette stitch, reverse
stockinette stitch, or garter stitch
over the 5 stitches.
4 In the next row on the wrong
side of the work, purl the
bobble stitch together with the
stitch ahead of it.
Knit-in Bobbles
Bobbles can be knit different ways.
Small bobbles are knit over 3
stitches, large bobbles over 5 to 7
stitches. The number of rows also
depends on how big you want the
bobbles to be. Of course the size of
the bobble is also determined by the
thickness and the consistency of the
yarn.
Bobbles are knit either over the
horizontal thread between 2 stitches,
or out of a stitch. The way you work
is the same either way.
For bobble increases from a
horizontal thread, or out of a stitch,
alternately knit 1 stitch and knit 1
stitch twisted (alternately inserting
the needle into the front and back
part of the stitch). Leave the stitch
on the left needle until the desired
number of stitches is reached.
Instead of knit twisted stitches, you can
also work purl stitches. Or you can
work a yarn over between the knit
stitches.
The steps and photos show the
increase from the horizontal thread
with the stitches worked twisted.
^:r^
^ v
V ,. ; \\- ft,
•
t
•v. * , ■
'.IV.*
! ■*■*
1
The instructions foi
this sweater are on
page 201.
V
5 These bobbles can be worked
in garter stitch (top), reverse
stockinette stitch (bottom left), or
stockinette stitch (bottom right).
167
Duplicate Stitch and Embroidery
\
:j\\\ v* ;-
>&
I
Embroidery makes plain
sweaters unique. Duplicate
stitch, outline stitch, and
satin stitch are all explained
on the following pages.
Duplicate Stitch
Small designs, such as the stylized
cat, or designs with many colors,
such as the rose, should always be
emhroidered in duplicate stitch. It is
almost impossible to knit such
designs in neatly. Larger designs,
such as seahorses, can also be worked
in duplicate stitch. Here again, the
advantage is the neat appearance.
You can also put the design exactly
where you want it.
Work the embroidery with a
tapestry or yarn needle. You can use
the original yarn, or you can use an
embroidery yarn that matches in
thickness.
'M
The
instructions
for this child's
sweater are on
page 203.
•!■:*«
/ / J:
1 Bring needle out below and in
the center of the stitch that is to
be covered in duplicate stitch, then
bring it around the stitch above it. In
the first row, work from right to left.
If a second row of embroidery is to
be worked above that, work this row
from left to right.
3 For a diagonal shift, put needle
in where it came out and bring it
out again 1 row higher and 1 stitch
over to the left or right, as needed.
i
V
• A
•. -i :
,"
i ■ 1 • i .
» ',
• « .«
. r
,!
t»
■ -it-..;"
1
M 1 ♦ • i
These pretty flowers can be
embroidered as a small
embellishment at the side of a
sweater just above the ribbing.
Then put the needle back into
the place where it came out,
and bring it out again in the center
of the stitch next to that. After the
last duplicate stitch, bring the yarn
to the back through the place where
it came out, and sew the ends in.
When working vertical
duplicate stitches, put needle in
where it came out and bring it out
again 1 horizontal thread higher.
168
Duplicate Stitch and Embroidery
niiiiiiiirii
1 J
^^
w^k
1
1
1
1
^^
hH
■^-
1
I
•4 '
V
*. tkt ■ 'Sib f ■*%*. i.
If n *' %
,'.#" <
•t , *>
.v. *
Vr.
..«■"
Design chart: Each box on the
chart represents 1 stitch.
A »
to V j*i'i l vS-r
If ¥S^<-; *!"• • I
Small designs, like this stylized cat
face, should be worked in
duplicate stitch. Such designs can
even turn a purchased sweater
into a one-of-a-kind item.
For Vertical or
Diagonal Lines
It is easier and faster to work slip
stitches with a crochet hook than to
embroider duplicate
stitches. Hold the
yarn under the
work. Insert the
crochet hook
between 2 stitches,
from front to back,
and bring the yarn to
the front. Then insert
the hook from front to back again, 1
or 2 rows higher. Bring another loop
through and draw it through the loop
on the hook.
AN.
\
Tip
At the start of your embroidery,
leave the yarn end on the front
so that it won't get tangled on
the back as you work. When you
start a new thread, sew it in first.
Then bring it to the front and
start embroidering. Of course
you should always sew the ends
of the yarn in as soon as you
have finished with them.
You can embroider the cat face
according to this pattern chart.
169
Decorative Details
, Embroidery
on Organza
+■ i
r V It is rather difficult
. ■ v ■"• : * . to work this em-
~ * ^ broidery directly
*■ v ; onto a knitted
background,
since the stitches are generally
too large and too loose. Small designs
should therefore be drawn on
organza (a very thin fabric made of
silk). Larger ones can also be drawn
on somewhat coarser waste canvas.
Baste this pattern securely onto the
knitted piece using running basting
stitch or prick stitch. In the
particular case of larger designs, prick stitch
is better, because organza and even
waste canvas can easily pull out of
shape when you are using running
basting stitch.
On organza, you should always
embroider with a sharp embroidery
needle. On waste canvas, you can
also work with a tapestry needle.
When using waste canvas, the
stitches have to be pulled a little
tighter so that the embroidery is snug
against the background even after
the waste canvas is removed.
Outline Stitch
Individual lines are worked in. outline
stitch, such as those nexr to the
seahorses on page 168. These lines
are frequently used to separate
different areas of color. Not only does
outline stitch accentuate the area, it
also hides any irregularities in the
appearance of the stitches.
To work outline stitch, bring the
needle out at the desired location.
Insert it to the right, and bring it out
again halfway between the beginning
and end of the stitch, always working
abo\ e the yarn of the previous stitch.
Work outline stitch from left to
right. Turn the knitted piece as
necessary.
TT7T7T7
I I J **^j,«n».
•A . . • •» . i
\-
A.
y
IDraw the design onto organza
or waste canvas, and baste it to
the knitted piece with prick stitch.
* f
i i <l
^'p..:
•:: I 4 i
A k' K
» ^ i
V
: \
i A -^ ^
*t ■ "* - * ■ ' ' '
: i * '. i l
The larger areas are divided into 2
fields. French knots fill the center.
» ■>
1 -t
Outline stitches emphasize color
areas and make them look neater.
j '''wis1-- Mt^i^ v if ***
sfc
-1? A
\
1 v« -
• ■ r ■ ' -
iff $ J:*«
-7. \ --
t ;*
V :
» ; «
.*>
After the embroidery is done,
pull the threads of the organza
or waste canvas out individually.
Full-size pattern for the flower.
Even a delicate butterfly can
be embroidered on knitted
pieces by using organza.
Outline stitch
170
Duplicate Stitch and Embroidery
Lazy Daisy, French
Knot and Multiple
French Knot Stitch
For a lazy daisy, bring the needle out
at the desired location, then go back
down in the same place. Come back
out where you want the petal to end.
Place the loop around the needle. Go
back down in the same place or
slightly above it, and come back up
in the center of the flower for the
next petal.
For a french knot, bring the needle
out at the desired location, and wrap
the yarn around the needle twice.
Hold the loops tight with your
thumb and pull the needle through.
Then go back down just below the
place you came out.
For a multiple french knot, bring
die needle out at the desired
location, wrap the yarn around the
needle several times, hold the loops
tight with your thumb, and pull the
needle through. Then go back down
right next to the place you came out.
The size of the knot is determined by
the number of loops.
Satin Stitch
You can fill an area with satin stitch.
Work parallel stitches right next to
one another. The stitches can lie
horizontally or diagonally. They can
also be directed in slightly, as for the
flower petals above. To achieve this,
leave a slightly larger gap between
the stitches on the outside edge than
between those on the inside edge of
the area.
"*
j
i
/
^
.i *
•
v. •
^
{■
J)
«
1
«
'* *
•X
'« I
»
. V
t ■
, • t,
» \
t
t
■£
■ lM
» » i
k > ■
\
• •
AVlr ' ■
'}
I I
» «
I «
' • I « I I
' • til I
■ t
■
I i
• s
I- 1 M»
A colorful meadow of outline and
satin stitches, lazy daisies, and
french knots. Such delicate designs
can only be worked over organza.
Lazy daisy stitch
French knot
Satin stitch
Multiple french knot
171
Smocking
Smocking can be worked on
practically any background.
Stockinette stitch, ribbing,
and even shaker knitting
gets a completely different
look.
lease note that the width of
the gauge will change
significantly. Depending on the
pattern, you will need approximately
25% more stitches. That's why it is
absolutely necessary to knit a
sufficiently large sample for gauge. Finish
this sample just like the piece itself:
Block the sample, let it dry under a
damp cloth, and then do the
smocking. Only after you have done all tills
can you count the stitches and rows.
In smocking, individual stitches are
sewn together using hack stitch.
These stitches have to be marked
first, either with knit or purl stitches,
or with basting thread.
If you are knitting with tightly
twisted wool, cotton, or a synthetic
blend, you can use the same yarn for
smocking. Normally, it will be strong
enough and won't tear. If the yarn is
thick and tear-resistant, you can
even sew with half the yarn. If you
are knitting with a loosely twisted
wool or angora, you must use a
stronger, but not too heavy, yarn or
thread for sewing.
Start smocking in the bottom-lett
corner and always work 2 horizontal
rows at the same time. By alternating
the stitches in this way, you get
slanted threads on the wrong side of
the work, and the knitted piece will
remain stretcliable.
* -*:-
-■t
i.
1 -.-
A
i. '*■-..*
•j&} >. '
JL
%'
\
■S9 ■
Hi.
I 1
r
'<&
*
*-
£
■x
- -"U
V:
MvH. *
i-1
For the ribs, alternately work 3
stitches in reverse stockinette
stitch and 1 in stockinette stitch,.
...or mark the locations to be
smocked with knit stitches as you
are working.
On stockinette stitch, mark the
stitches to be smocked with
basting thread or...
... with purl stitches, and catch the
knit stitches next to the marking
stitches each time.
J s
■J
f
v
*.
-» -'
\
V
1
k
?■»*
1 ■ '
-1
•
■ r*~?"
V
-at"
*.
■s " -
5s..
i
»
»
lv
^l-*"
V-
->-.-
•"
h
... T
3 ■* *1
« - f ■ -
** ^
*
%
-4'
r -=
<
at
i ,
-,-^r
-\-
-!*"
.-i:
*;-
i
ii ■
•^
*s - ^
» . a ■* *x >i ■*%■».
Come out with the needle to the left
of the first rib stitch. Then sew
around the second and first rib stitch
and pull them together. Now go
down with the needle to the right of
the second rib stitch and bring it out
again 4 rows higher to the left, next
to the second rib stitch, and...
...sew around the third and second
rib stitch. Then go down with the
needle to the right of the third rib
stitch, and bring it out again 4 rows
lower to the left, next to the third rib
stitch. Keep repeating these steps.
At the end of the row, turn the work,
and work from left to right again.
172
Smocking
1
*
1
I ■»
■53
>
'—
A
o
-»■
-ae.
-^
.«
- ^.-
I
t -*
*
_v N
<r>
The finished smocking piece has a
pronounced texture.
>•' # V \ • ' . ^
Y > v..v * ciy
Smocking on a stockinette stitch
background
-
* "
r ■ x
k
-*
%
%
*
1
>
. J «*- -A
\ - - -» v
-— -^ -j* •*• t *
~t . * - -H *
h
*, . .* ?^ * - '
■ * " "V * ■ V i'
A.
n • v .■* -:
Sewing small beads on top of the
smocking stitches makes the piece
particularly attractive.
V
t:
^1
K-.
^
i*
- . V
% ,
\-
\
J*
J ):
In 2 x 2 ribbing, catch only the
outer knit stitch with the needle
each time.
\
v^r^,-'^n»'«.-u'.u^?.,.s'*mw:,»''i1«MMi,v-i«^V;!iUrtI\ni^
4 A,
/.A
» \
A t
:,r>
1
I).
* ' A. * • f
'.)
7 • '
^ J
* *
V I
*v
!',4;M<*^
• * >
.\;^;.
iri
I V
t »
.■t';.«lr.«-i'
4
'^
•r
^ My.''4
> »
•>/l
>4->
1 *. ' ^
i
t^/l^1
'•I'
Smocking Stretched-
out Sweaters
If a sweater worked in ribbins
or shaker knitting has yoltcn
stretched out and too wide
because it was worn and
washed frequently, you can get
it back into shape with
smocking. Depending on the desired
width of the sweater, you can
smock the whole sweater, just
the middle or the sides, or even
just individual vertical strips.
In shaker knitting, larger
intervals between the
smocking stitches are more attractive.
Mere again, the width of the
knitted piece will be reduced
bv about 25° o.
V
u
r,
X
(*
, i *
■{ A
V, '- »'
1 r /«
'•*
I
V
T
x
X
■I
\i !
r
*i.
*
r
■»
r - ».
v*
You can even smock crosswise
ribs: For this pattern, you
alternately work 4 rows of stockinette
stitch in turquoise as well as 1 row
of knit stitches on the right side of
the work and 3 rows of reverse
stockinette stitch in dark blue.
Smock the knitted piece after you
have blocked it: At intervals of
16-20 stitches, sew 2 dark blue ribs
together and shift the smocking on
the ribs above the first two.
173
Pom-poms, Tassels, Fringes
A pom-pom or tassel looks
great on a child's knitted
hat, as do fringes on a scarf.
,V * -
>
V
ISew yarn around 2 cardboard
rings until the inside hole is
filled with yarn.
tight, and knot it securely. This piece
of yarn has to be very strong so that
it does not tear. For example, if you
are using angora or loosely twisted
yarn for your pom-pom, it is better to
use a piece oi' synthetic yarn, or even
a piece of buttonhole thread in a
matching color rather than the yarn
of the pom-pom itself.
Remove the cardboard circles and
trim the pom-pom into a perfectly
round shape.
• 4
*\
Pom-poms
A large pom-pom, or 2 or 3 small
ones, gives a finishing touch to a
child's knitted hat. Many little
pompoms at the bottom edge of pullovers
without ribbing are also a lot of fun.
You can make snakes and other
animals out of pom-poms. And a gift
package wrapped with wool and
decorated with a lot o( colorful
pompoms is very original. There are no
limits on your imagination!
Cut 2 rinss of the same size from
sturdy cardboard. The outside
diameter of these rings corresponds
to about half the diameter of the
finished pom-pom. (You can also buy
plastic pom-pom makers in
needlework stores.) The inside diameter has
to be about V> to Vi of the outside
diameter. For example, if the outside
diameter is 2Vi\ the inside diameter
of the circle should be about
%"-l W. The bigger the inside
diameter, the firmer the pom-pom.
Now place the 2 rings on top of
each other. Thread a heavy yarn
needle with several long pieces of
yarn, and sew around the cardboard
rings until the hole in the middle is
filled with yarn.
Then cut the yarn along the
outside edge. Pull the cardboard
circles apart slightly, wind double
yarn around the bundle of yarn very
•4
2 Cut the yarn
around the edge,
and put a knot between the
cardboard circles with a strong
piece of yarn or thread.
Trim the pom-pom into shape
with a sharp pair of scissors.
7
,('
t
>
* v»
You can use any type of yarn for
pom-poms. Even scraps of yarn
can be used for a bright and
colorful pom-pom.
Tassels
Tassels are even simpler to make
than pom-poms. A fat tassel can
even replace a pom-pom on a knitted
hat. Instead of fringes, you can make
many little tassels on a scarf. Tissels
are also a traditional and attractive
touch on pillows, tablecloths, and
table runners.
For tassels, you need scraps of yarn
and a rectangular piece of cardboard
that is as long as the desired tassel
length.
Place a double piece of yarn along
the top edge of the cardboard and
loosely wind the yarn around both
the piece of yarn and the cardboard.
Then knot the top threads tight
together, and cut the bunch of yarn
at the bottom edge. Wrap yarn tight
around the bunch of yarn about lA"
below the top edge, pull the ends
through the wrapped part, and cut
them off. Finally, trim the bottom
edge of the tassel so that it is straight.
174
Pom-poms, Tassels, Fringes
/
c
c
tn
IWrap yarn around a
rectangular cardboard, and tie the
bunch of yarn at the top. Cut it
open at the bottom.
, /
i \
*
V ..„
v\\
>,
\ >
2 Wrap the bunch of yarn tightly
with some more yarn, and
trim the ends to a uniform length.
!.- /
■■•■'>■• >■<■
^■',,^i• *!
Whether they're solid or mixed
colors, they're always
decorative. 55
* *
\
»>
V V
\s *
V
S:
y
-*
1 • V x
~Js
< \
} 1 1 ^ v
v.
Fringes
Hand-knit scarves somehow look
incomplete without fringes.
Individual fringes can also look very
attractive on \ ests and cardigan*..
The pieces of yarn have to be twice
as long plus approximately %" as the
desired length of the fringe. For short
fringes, wind the yarn around a
rectangular piece of cardboard cut to
the right size. For longer fringes, you
can even wrap the yarn around a
book of the correct size. Then cut
the bunch ol yarn at the bottom
edge.
Now put 2 to 3 pieces of yarn
together and fold them in half. Insert a
crochet hook through a stitch of the
scarf from bottom to top, and pull
the pieces of yarn through so that a
loop is formed on the bottom. Draw
the ends of the yarn through this
loop and pull them tight. Leave a
space of 1 to 3 stitches between
every fringe.
For a fringed edge with multiple
knots, the pieces of yarn have to be
about IVi longer than the desired
fringe length. Knot the fringes in
with a crochet hook, as described
above. Then, for the first row of
knots, take only half of the bunch of
yarn at the beginning
and end. In between,
always knot half of 2
bunches of yarn together
at a distance of about Vi
from the edge. Bring the
knot to the desired
location the same way as
for the tailor's knot (page
153). Work the second row of
knots the same way. At the
beginning and end, knot the first
half bunch of yarn together with half
of the next one.
>s
y
1 . . V ■*
x »■; ■
■V
■l i
■\»
1
Pull the bunches of yarn down
and through with a crochet hook.
» iV
•l»
i -'•
1 ,\
.1 w
•s •>
\
•\S
Bring the ends of the yarn
through the loop and pull
them tight. Finally, trim the fringes
so they are the same
length.
A fringed edge with
multiple knots on a
scarf is very attractive
/
175
In this chapter, you will find
different pattern shapes, a
way to convert patterns for
different sizes and yarns, as
well as information about
making pieces shorter or
longer, how to fix dropped
stitches, and much more.
t
Measurements and Patterns
If you want to design your
own sweater, you first have
to decide on the correct
pattern. Here are some
hints and basic
shapes.
To determine the correct size,
the best thing is to measure a
sweater that fits well and to
transfer the measurements to the
pattern. For the patterns on the
following pages, only half of the front
and hack is included in the drawing.
Sweater Width
In general, the following applies for
traditional sweaters: Vi body
measurement + 3Va" = Vi sweater
width. For a relaxed tit, you have
to allow a little more. Measure at
the widest part of the chest. For
very long sweaters, the hip
measurement also has to be taken into
consideration.
For sweaters that come only to the
waist, measure the waist. If the
sweater is supposed to be relatively
snug, add about IV2" for the front
and for the back, starting from the
ribbing.
Sweater Length
The length is measured trom the
neck/shoulder point over the chest to
the desired length. Note that
depending on the type of yarn and the
way you knit, long sweaters usually
stretch somewhat in length. For
example, you should work a sweater
Ribbing width
Total width
—H
in single shaker knitting a little
shorter than you want it to be,
because this patterns tends to stretch
in length more than double shaker
knitting or textured patterns.
For sweaters that come only to the
waist, measure the length from the
neck/shoulder point to the waist, and
add the ribbing length.
Necklines
For necklines, calculate •/} of the
back width measured on the body
plus approximately l1/^" to IV2"—in
other words, about l/i of the sweater
width tor normal sweaters. For V-
necks, a little less is enough, since
the length of the neckline also
influences the width in this case.
To prevent sweaters and cardigans
from slipping to the back, you
should make a small neckline on
the back part too, except when you
are making a completely straight
boat neck. It should be at least 3A"
deep. If you arc adding a rather
long neckband, it can also be 1V4"
to 11/2" deep.
Armholes
If you don't like dropped shoulders,
you should always work an armhole.
The looser the fit of the sweater, the
deeper the armhole can be. Arm-
holes can be straight, slanted, or
rounded.
Slanted Shoulders
Slanted shoulders make every
sweater fit better, because nobody
has straight shoulders. And the wider
the sweater, the more important it is
to have slanted shoulders especially
if you haven11 put in any armholes.
For short shoulder pieces, it is
enough to work regular decreases
over 3/i" to 114". Wide, long shoulder
seams can be decreased over as much
as 3".
178
Measurements and Patterns
,"*
Sleeve Width
For a relatively snug wristband, add
about ilA" to the measured wrist
circumference. For the sleeve to
drape well, an inch should be added
after the wristband ribbing. The
sleeve width at the top end is
determined by the size of the armhole.
Sleeve Length
First measure from the top vertebra at
the neck in the center of the back,
over the shoulder, over the arm
(which should be bent slightly), to the
wrist. Now deduct Vi the width of the
This sweater is a knitted
version oj Pattern 6.
Instructions start on page
198.
front or back from this measurement,
and you have the sleeve length. If you
plan to make an armhole, the arm-
hole depth has to be added again.
Here's an example: The back/sleeve
measurement is 30", Vi the width of
the front or back is 12". This means
that the sleeve has to be 18" long. If
you make the armholes with a depth
of 2", the sleeve has to be 20" long.
About the Patterns
Pattern 1: If a sweater is supposed to
fit snugly at the waist or hips, slanted
side edges are worked in addition to
the increases after the ribbing. This
also applies to very large chest
measurements.
Pattern 2: Slanted shoulders and
armholes assure a good fit, particular
ly for oversize sweaters.
Pattern 3: Ii a sweater is very long,
you can wait to just before the waist
to start working the slanted edge.
Pattern 4: A traditional vest has
slanted shoulders and very deep
armholes. Work a few decreases in
the armhole facings at the shoulder
scam (sec also page 65) so that the
facings lie flat. Sleeveless sweaters
are worked the same way.
! /
r
/
Pattern 3
Pattern 1
Pattern 2
Pattern 4
179
Practical Tips
Pattern 5: If you don't like dropped
shoulders, bind stitches off over a
width of IVi" to 3", straight across,
when the front or back is long
enough to start the armhole. Then
the sleeve has to be lengthened by
the armhole depth.
Pattern 6: This sleeve shape
provides a better fit. Here the
stitches for the armhole are bound
off in several steps. Match the top of
the sleeve to this slanted edge.
Pattern 7: A slightly rounded
armhole with a matching, slightly
rounded shape at the top of the
sleeve produces the best fit.
Pattern 8: For a traditional, rounded
top of the sleeve, the stitches are
bound off in a rounded shape, but
the stitches over the last 23A" or so
arc bound off straight across. The
length of the rounded part varies, but
it should he at least 2" less than the
armhole length on the front and
back. The excess width is evenly
distributed over the shoulder area
when the sleeve is sewn in.
Pattern 9: For a puffy sleeve, a
normal armhole is worked on the
front and back. On the sleeve, about
V\ of the stitches, in total, are
decreased on both sides, then the
other stitches are bound off straight
across. When the sleeve is sewn in,
the straight bound-off part at the top
of the sleeve is gathered and the rest
of the sleeve is sewn in normally.
Pattern 10: Shoulder yokes can be
worked with or without a rounded
shape at the top of the sleeve. The
yoke width must be deducted from
the front and back, hal! from each.
The neckline is reduced by this
length. At the back, no neckline is
necessary. Slanted shoulders can also
be used with this pattern.
1 L
/
H
i k
i
i
i
1 r
\V/
Pattern 5
Pattern 6
1
1
'/
1
1
1
1
1
1
f
L
"T
^)
Pattern 7
Pattern 8
Pattern 9
Pattern 10
180
Measurements and Patterns
Pattern 11
Pattern 12
Pattern 13
Pattern 14
Pattern 16
Pattern 11: If you are working a very
wide shoulder yoke and the hack
neckline is not supposed to be as
deep as half the yoke width, the yoke
has to be extended over the hack to
the center of the back.
Pattern 12: In this raglan pattern,
the back is bound off straight across
at the neckline and the front
neckline is rounded slightly. The
sleeves end in a rounded part that is
deeper towards the front. This means
that the second sleeve has to be
worked as a reverse of the first.
Before starting the slanted edge at
the top of the sleeve, bind off a few
stitches straight across on both sides
so that there isn't "too much
material" at the armpit.
Pattern 13: This pattern assures a
very good fit. For about Vi the length
of the slanted raglan edge, decrease
the stitches every other row, then
every fourth row. The second sleeve
has to be worked as a reverse of the
first (see also the sweater, page 202).
Pattern 14: For a dolman sleeve,
increase evenly from the waistband
ribbing to the wristband ribbing. You
can work this sweater in one piece
over the shoulder. Or you can put the
stitches at the shoulder/arm line on
stitch holders and sew the 2 parts
together later, using grafting stitch
(starting on page 114). Pieces with
such a large number of stitches
should always be worked on a long
circular needle.
Pattern 15: For a kimono pattern,
the increases for the slanted edges at
the sides and the sleeves are worked
in a rounded shape.
Pattern 16: For a kimono pattern
with a flattened shoulder/sleeve line,
the simplest solution is to bind the
stitches ofi and sew them together
later using grafting stitch (page 114).
Pattern 15
181
Converting P tterns
You've found a great
sweater in a magazine, but
the instructions aren't given
in your size. Or you would
like to use yarn that works
up to a different gauge.
Don't worry, the changes
are easy to figure out!
The most important thing for
converting patterns to a
different size or yarn is the
gauge. In the following examples, 22
stitches and 30 rows are 4" X 4".
This means that .4 square inches
contains 2.2 stitches and 3 rows;
these are the numbers you use for
your calculations. So you have to
multiply the inch measurements for
the width by 2.2, those for the length
bv3.
If you come- up with numbers that
are not whole numbers, round off.
For example, if your calculation
gives you 127.6 stitches, that would
be 128 stitches; if you come up with
114-4, you can choose cither 114 or
115. The 2 selvedge stitches are
always added to these numbers; this
means that for these parts, you need
130 and 116 or 117 stitches,
respectively.
In instructions, patterns are usually
shown in only half their width, so
that the indicated width has to be
doubled. To make the calculations
easier to understand, we have bhown
the patterns in their entire width.
Front and Back
For a size 4 pattern, the calculation is
as follows: 54 X 2.2 = 118.8. This
means that you need 119 stitches
plus 2 ;>clvedge stitches =121
stitches for the necessary width. (For
size 8: 58x2.2 = 127.6 + 2
selvedge stitches = 130 stitches.)
If you now calculate the ribbing the
same way, 105.6—i.e., 108 stitches
including selvedge stitches—would
be enough. However, since ribbing
patterns tighten, you should use a
tew more stitches, such as 112
stitches, and add the additional 9
stitches you need cither in the last
row of ribbing or the first row of the
basic pattern, evenly distributed over
the row, and twisted. (For size 8: 52
X 2.2 = 114-4 + another 6 stitches
= 120 stitches.)
When the piece is 24%" long, work
the neckline. In traditional patterns,
the neckline width is approximately
!/3 of the sweater width, deducting
the selvedge stitches. For size 4, the
calculation would be: 18 X 2.2 =
39.6—i.e., 37 stitches for the
neckline. (For size 8: 20 x 2.2 = 44—
i.e., 42 stitches.) This leaves 18 X
2.2 = 39.6 + 2 selvedge stitches =
42 stitches for the shoulders. (For
size 8: 19x2.2 = 41.8 + 2
selvedge stitches = 44 stitches.)
For the back neckline, you need
3/j"—i.e., 6 rows. This means that
after binding off the center stitches,
you can decrease twice. With this
gauge, 4 stitches once and 2 stitches
once are the best option. Therefore,
bind oiT the center 25 stitches (size
8: 30 stitches) first.
For the front neckline, you have
21/2n—i.e., 18 rows. Here the last 4
rows are supposed to be worked on
the same number of stitches—i.e.,
you can decrease 7 times = 14 rows.
For an attractive rounded edge, the
decreases should become smaller as
you go: For size 4, first bind the
center 15 stitches off straight across,
then, every other row, 3 stitches
once, 2 stitches twice, and 1 stitch
4x. (For size 8: the center 16
stitches, then, every other row, 4
stitches once, 3 stitches once, 2
stitches once, and 1 stitch 4x.)
Patterns for Size 10
18
18
18
CD
CO
42 st
^=f
42 st
Neckline: 37 st
Back: center 25 st,
then 4 st 1xand 2 st 1x
Front: center 15 st, then
3 st 1 x, 2 st 2x, and 1 st 4x
00
C\J
CD
W
C\J
o
+ 9 st= 121 st
112 st
CD
CO
00
I3I
48
!3I
52
116 st
28 st increase:
2x every sixth row, then
26x every fourth row
116 rows for increases
+ 12st = 60st
48 st
18
I4I 13 I
Sleeves
For the sleeves, you do the same
calculations: The width after the
wristband ribbing is 26 X 2.2 = 57.2
+ 2 selvedge stitches = 60 stitches
tor size 4.
For the ribbing, 7" = 39.6 stitches
4- 2 sehedge stitches, but 42 stitches
in the ribbing pattern might be too
tight. Add a tew stitches—6 stitches
in this case. Increase the missing 12
stitches at the end of the ribbing
evenly distributed over the row.
Now first calculate the top sleeve
width: 52x2.2 = 114.4 + 2
selvedge stitches =116 stitches.
182
Converting Patterns
Patterns for Size 14
19
20
19
CM
co
CD
v_
CM
44 st
t
Neckline: 42 st
-J
44 st
Back: center 25 st, then
4 st 1xand 2 st 1x
Front: center 15 st, then
3 st 1 x, 2 st 2x, and 1 st 4x
CO
oo
o
+ 10st = 130 st
120st
co
c\j
CO
co
52
13
This means 56 stitches in total—i.e.,
28 stitches per side—have to he
increased.
These increases must be evenly
divided over all the rows: 40 X 3 =
120 rows in total. Now divide 120 by
28 = 4.29. This means that you have
to increase approximately every
fourth row: 28 X 4 = 112. Since the
distance from the last increase to
binding off is supposed to be
approximately the same as that
between increases, it is too large
here. Divide the extra 4 rows over
the beginning of the sleeve. This
means that you can increase 1 stitch
on both sides every sixth row twice,
and every fourth row 26 times. Or
you can divide the first few increases
even more evenly: Increase 1 stitch
alternately every fourth and sixth
row 4 times, then 1 stitch every
fourth row 24 times =116 rows.
In general, increases are spaced
farther apart at the bottom end of
the sleeve and closer together to-
wards the top of the sleeve. As an
example: You want to make the
sleeve only 14V£" long but still
increase 28 stitches. This means: 108
rows divided by 28 = 3.86. There-
fore, some increases have to be
worked every fourth row, some every
third row—i.e., alternately exery
second and fourth roxv.
The answer is: Increase 1 stitch
every fourth row 20 times = 80 rows,
then alternately every second and
fourth roxv 8 times = 24 rows—i.e.,
104 rows in total.
Here's a little trick: If you multiply
18 X 4 in the example above, you
get 112 rows. You have 108 rows—
i.e., 104 rows to the last increase.
The difference between 1 12 and 104
is 8. Therefore, you x\ork 8 increases
with a smaller distance between
them.
Another example: You want to
divide the 28 increases up over 94
rows: 94 -^ 28 = 3.35. Here you
multiply 28 X 3 = 84 rows. The
number of rows available for iiv
creases is 90 = 6 rows difference.
Therefore, you must increa>e at a
greater distance 6 times = 6 X every
fourth row and 22 X every third
row—i.e., alternately every second
and fourth roxv = 90 rows.
Working in Different
Patterns
First of all, you have to knit a sample
piece of each pattern for gauge. Then
count the number of stitches and
rows. Here's an example: You want
to knit a sweater that has 3 cables on
the front and back, and a centei
cable on the sleeve. Samples of
stockinette stitch give you 16 stitches
lor a 4" X 4" square, or 4 stitches per
inch. The cable, which is made up of
26 stitches, is 4.8" wide. The sweater
you want to make is 24" wide, the
sleeve is 11.2" wide after the
wristband ribbing, and 23.2" wide ar the
top.
The calculation for the front and
back: 24" - 14.4" for the 3 cables =
9.6". 9.6 x 4 = 38.4 stitches 4- 2
selvedge stitches = 40 stitches. This
means that you need a total of 40 +
78 stitches for the cables = 118
stitches. The 40 stitches in
stockinette stitch are divided up between
the cables—for example, 8 stitches
between each of the cables and 12
stitches at each side.
The calculation for the sleeves is as
follows: After the wristband ribbing:
11.2" - 4.8" cable = 6.4" x 4 - 25.6
pitches. Add the 2 selvedge stitches
and the 26 stitches for the cable =
54 stitches. At the end of the sleeve:
23.2"-4.8"- 18.4" x4 = 73.6.
Add 2 selvedge stitches and 26
stitches for the cable = 102 stitches.
You must increase 24 stitches on
both sides. With a sleeve length of
18", you have 99—i.e., 100 rows to
work with, 100 + 24 = 4.17; 4 X 24
= 96. Therefore, you must increase 1
stitch every fourth roxv 24 times.
Following this principle, you can
perform these calculations for any
pattern.
This pattern chart is on page 215.
183
Lengthening and Shortening Pieces
•■a
is
I ■
#
Your
sweater
came
out too
short, or a
cardigan or vest has
"grown" longer, or the
ribbing has stretched out
of shape or been damaged.
A ll
In all these cases, you have to take
the piece apart at a certain point
and make the changes as
seamlessly as possible. This is not a big
problem if the basic pattern is simple.
Just follow the steps shown here.
Making a sweater or cardigan long'
er is harder than making it shorter.
You still have to have enough of the
original yarn in the correct dye lot,
or be able to buy it. Also, worn
pieces arc often slightly washed out
or discolored, so you might not even
be able to use the original yarn. For
children's sweaters, this ij> not always
very important; you can use an
entirely different color and just work in
a few stripes. However, you should
always use the same type of yarn,
because the gauge must be the same,
and the washing instructions should
be the same.
When you shorten a piece, you
don't have these problems. You jusr
have to work carefully!
For Sleeves
If you want to shorten a sleeve, you
must put up with a wider sleeve
width above the ribbing. If you are
making a sleeve longer, you normally
can't follow the increase repeats of
the slanted edge unless the sleeve
was relatively wide above the wrLst-
band.
Lengthening sleeves of children's
sweaters is usually not a worthwhile
thing to do. For one thing, they are
generally subject to a lot o( wear.
Also, the shape changes so much
that the work involved in changing
them is not much less than that for
knitting a whole new sweater. You
might be able to save some sweaters
by taking the sleeves out entirely,
adding facings to the armholes, and
making a sleeveless sweater out of
them.
If you want to save the ribbing, cut
the selvedge stitch about 3 rows
above the ribbing. Then you can
catch the stitches by undoing the
last few rows. Undoing the rows is
only necessary if there is no yarn end
for sewing when you have cut the
selvedge stitch. If you are making a
new ribbing, you can cut the
selvedge stitch 1 row above the ribbing.
In most cases, wristband ribbing has
to be knit on again, since the
number or stitches changes both
when lengthening or shortening the
sleeve.
Undoing the Knitted
Piece
Actually, only I row of knitting is
"undone." After the yarn is pulled
out, the open stitches of the top and
bottom pieces can be put onto a
knitting needle in a straight row.
Use a thinner needle to do this so
that you don't pull or drop any
stitches.
To lengthen a piece, you can then
add as many rows as needed with the
appropriate-size knitting needle, and
join the pieces again, using grafting
stitch. If you work the added knitting
onto the top piece, the knitting will
shift over half a stitch. Within the
piece, this cannot be seen. However,
3h
Once the pieces have
been sewn back
together using grafting
stitch, you cant see
where the seam is.
184
Lengthening and Shortening Pieces
k V :YM
' ' J
lit * t > *
• f • , t , .
\' 1 ■ '
1 First open the seams as far as
needed. To lengthen a piece,
pull the selvedge stitch out a
little—2 to 3 rows above the
ribbing. To shorten a piece, pull it out
at the point you wish to shorten
the piece to and cut it open.
Pull on one end of the cut
yarn and carefully gather the
piece to the end of the row. At the
end of the row, watch to see which
stitch is being pulled. Put a knitting
needle into this stitch and pull the
gathering yarn out a little (to sew it
in later). Then cut the yarn.
Now pull the yarn out all the
way. This way, 1 row of
knitting is neatly undone. The open
stitches of the top and bottom
pieces will be in front of you in a
straight row. (If the yarn is very
fine or tears easily, you will have
to undo the yarn 1 stitch at a time.)
you have to be a little careful at the
edges: When you sew the beams, pay
attention to the line of stitches. At
one edge, the seam now has to go
along the selvedge stitch. At the
other side, it has to go within the
first stitch atter the selvedge stitch.
You should work a seam selvedge
edge, because this is the only way
you will be able to sew the seam
within the selvedge stitch.
To shorten a piece, undo the
bottom piece only up to the next-to-
last row above the ribbing. That
makes it easier to sew the ribbing
back on using grafting stitch.
Put the open stitches onto a
thinner knitting needle. As you
pick the stitches up, make sure that
they are on the needle correctly. If
there is not a long enough yarn
end at the sides to be sewn away,
you can undo a row as you pick up
the stitches and put the stitches
onto the needle one at a time.
Now you can continue knitting
on either the top or bottom
piece. If you work on the top piece
the knitting will shift over half a
stitch. You have to pay attention to
that when you sew the seams
again (see text on left). After the
piece has been lengthened, you
can join the pieces again, using a
grafting stitch.
185
Ti • s for Ribbings
Ribbing holds knitted
pieces in shape. Unless you
want a box-shaped sweater,
elastic thread or pieces of
elastic will help to give
stretched-out ribbing its
shape back. If the ribbing
is damaged, you then have
to redo it.
Knitted items made of wool or
wool blends are relatively
resilient. The ribbing can be
pressed into shape after washing and
usually does not stretch out of shape.
However, cotton and some synthetic
fibers are different. Ribbing made of
these yarns tends to stretch out of
shape easily, so you should always
work this ribbing with needles 2 sizes
smaller than for the rest of the
sweater.
You can get very thin elastic thread
(see top photo) that you can knit
■•V
\
'7
^
almost invisibly into the ribbing. But
if this thread wears out, the ends will
stick out all over, and the pieces are
hard to pull out and remove.
Sewing in or
Crocheting on
Elastic Thread
The best and most durable solution
is if you pull a somewhat heavier
elastic thread through with a tapestry
needle after the ribbing is finished.
Pull the elastic thread through on
the wrong side of the work, through
pai t of a knit stitch in each
instance, and knot the threads
very tightly in the selvedge
stitches. If you pull the
thread through an entire
knit stitch, part of the thread
might still show on the right side
of the work. Depending on the width
of the ribbing, you should put in 4 to
6 rows this way and spaced evenly
over the ribbing.
Even more durable is the method
of crocheting the elastic thread on
with slip stitches. Although 2 to 3
rows are generally enough, you need
a lot more material. In addition, you
have to sew the ends in very
securely, because if the knot comes out, so
does the whole row. That's why it's
important that you crochet each
row individually and sew it in
individually.
On the wrong side of the work, at
regular intervals, pull elastic thread
through Vi of all the knit stitches
with a tapestry needle, and sew or
knot them into the selvedge
stitches.
X J. '
3" .
r TT
* 1
<r
+ * *
J -ar
1 ;
♦
r d*„
&
".^ °,
<c
-X
i. i • .. va^ \ir \* •
-A. t\
Or crochet slip stitches through Vi
of all the knit stitches with the
elastic thread, at regular intervals,
and sew them securely at the
edges.
4\.»
"T "a t
31 'ii
'■\LiL
3 tf
■\i w\
?
For 2x2 ribbing, always put the
tapestry needle through the first
and last loops of the knit stitches
when you sew or crochet the
elastic thread in.
186
Tips for Ribbings
Elastic Waistband
For heavy sweaters, skirts, or
children's pants, wide elastic can be sewn
on or inserted into a double
waistband.
For a Single Waistband
Cut the elastic to the required length
plus 3/i" for the scam. Now put the
beginning and end of the elastic on
top of each other and sew them to-
qethur with a few stitches.
Pin the elastic onto the waistband.
Using overcast stitches, sew it on
with a tapestry needle and the
original yarn or a yarn that matches
in color and is not too thin. Work
from left to right, but keep inserting
the needle into the knitted piece
from right to left. Alternately put
the needle through a knit rib at the
top edge, above the elastic, and
through the 2 loops of the knit rib
just before the basic pattern at the
bottom edge, below the elastic,
skipping 1 rib each time. Don't pull the
yarn too tight.
For a Double Waistband
Double waistbands can be knit
together or can be sewn down later
(sec also hems, pages 58-59).
No matter which way you work,
you can leave a few stiiches open,
insert the elastic, pull it through,
sew it together, and then sew the
rest of the waistband beam. Or you
can knit together or sew the entire
waistband seam, and pull the elastic
through the narrow opening in the
side seam.
Knitting on New
Ribbing
Worn-out or damaged ribbing can
also be replaced as follows: Open the
seams partway. Now pull a marking
thread through Vi of all the knit
stitches of the second row of the
For a single waistband, the elastic
is sewn on with overcast stitch.
1
'•' ' v. il
\
\
'1 ■
r
.u
i
^
•i:
-V
,"^
i
' *
.-' /
.* A
■ & \> .-. a V.' • ■-.- x y ■
IPull a marking thread through
the second row of the basic
pattern. Then pick up the stitches
in the first row of the basic pattern
on a thin knitting needle.
*, i
V
i -i-.,:>
. ^ 1
i
■* i
V ■"■
i 3
Uft
» •{
>
\. i
\
k ■ l ' ■ • •: \ • >
r \ i
( \
I. '
Cut the purl stitches of the
ribbing open carefully, below
the knitting needle, take the
ribbing off the sweater, and remove
the small pieces of yarn.
For a double waistband, cut the
elastic to the required length plus
about %" and pull it through.
basic pattern. This marker makes
your work much easier, because it
prevents you from slipping into
another row. Then pick up the
stitches in the first row of the basic
pattern on a thin knitting needle.
Now you can cut all the purl
stitches of the ribbing, take off the
ribbing, and pull the ends of the yarn
out. Now work 1 row of knit stitches
on the right bide of the work, or 1
row of purl stitches on the wrong
side of the work, using the required
needle size. In this row, make sure
that the stitcher are not on the
needle twisted.
Then work in the ribbing pattern
again. In the first row, work the
previous increases as decreases (k2 or
p2 tog evenly distributed). Work the
ribbing to the desired length and
bind off loosely.
187
Dropped Stitches
Whether your cat or child
played with your knitting,
or whether you weren't
paying attention, dropped
stitches are a nuisance, but
you can easily fix them with
a crochet hook.
For Stockinette Stitch
It is quite easy to fix a mistake here.
For knit stitches, put the crochet
hook through from the front—i.e.,
from below—and pull the horizontal
thread above it through. Repeat.
For Textured Patterns
For reverse stockinette stitch, the
easiest thing to do is to turn the
work and crochet the knit britches.
For textured patterns, you have to
work differently: knit and purl
stitches as required by the pattern.
For purl stitches, insert the crochet
hook from behind—i.e., from above—
and pull the horizontal thread through.
Then take the crochet hook out again.
v £" .*-
V >,
." J V
For knit stitches, pull the horizontal
thread directly above the stitch on
the crochet hook through that stitch.
\-
:.\
iU.
. * ^tH *
V*
I-
». \'
h* \* v;
'i
For purl stitches, insert the hook
into the stitch from behind—i.e.,
from the top—behind the
horizontal thread above it, and pull the
horizontal thread through.
For every purl stitch (and also
for every first knit stitch), the
crochet hook has to be taken out
and put into the stitch again.
For garter stitch, you insert the
crochet hook into the stitch
alternately from the front and
back.
For Single Shaker
Knitting
Here there is a smooth side and a
rough side. Either a dropped stitch
on the smooth side (the shaker knit
stitch side) or a rough stitch on the
other side has to he rescued.
If a stitch was dropped in single
shaker knitting, you must first undo
the individual threads, as explained
for double shaker knitting. In
contrast to the double shaker
knitting, single shaker knitting
always has alternately a short thread
and a lonti thread on both sides.
V,
r
V -
W>
<«
V
\
V \
v. <
3 '
V
' . V
For a smooth stitch in single shaker
knitting, insert the crochet hook into
the stitch, put the hook under the
short thread above that stitch, catch
the long thread, and pull it through.
* v N.
r,
v t \
V
N
On the rough side, catch the stitch
with the crochet hook. If there is
still a short thread above that stitch,
pull it through first. Then put the
hook under the next short thread,...
H
} I' * ■
...crochet the long thread, and
then also crochet the short thread.
Repeat these steps.
188
Dropped Stitches
For Double Shaker
Knitting
It's a little more complicated to fix
dropped stitches in double shaker
knitting with a crochet hook.
However, the repairing idea can be seen
with the example of two-color
double shaker knitting:
First stretch the piece sideways and
untangle the threads as much as
possible. Crochet with the very long
pieces of yarn (the green ones, in this
instance). The threads between them
(the white ones, in this instance) are
the "yarn overs." First pull the
particularly loose green threads up and
then work as described in the photos.
Keep repeating this process and put
the last stitch back onto the left
needle together with the last short
thread—i.e., the yarn over.
For single-color double shaker
knitting, the idea is the same. Here the
long threads can only be easily
distinguished from the short ones if
they are pulled through to the top.
Undoing Your Work
If you've made a really big mistake
over many stitches, the only solution
is to undo your work. Undo the
knitted piece to the row before the
mistake. To pick up the stitches, use
a needle that is about 1 size smaller
than the one you used for knitting.
This makes it easy to pick up the
stitches, even if you knit tightly.
Before you undo a stitch, always
put the needle into the stitch
underneath it from back to front. Pull the
yarn out carefully. Continue working
this way, 1 stitch at a time. Hold the
yarn in your left hand and keep
winding it around your forefinger as
you undo the stitches. At the end of
each row, turn your work and
continue working with the appropriate
needles.
In the case of shaker knitting,
picking the stitches up is slightly
more difficult. In order for the
t
sV
.1
.->-.
* ~ tt
V.
X
^ ^
1
Double shaker knitting: Put the
crochet hook through the last (green)
stitch. Bring the needle under the 2
short (white) threads above it. Catch
the long (green) thread and pull it
through the stitch on the hook under
the 2 short threads. The lower one of
the 2 short threads is the "yarn over"
of the stitch you just crocheted. Now
put the crochet hook under the top
one of the 2 threads and the next
short thread, catch the next long
thread, etc.
stitches not to be pulled too tightly,
it is very important to use a thin
knitting needle. Put the needle
through the purl stitches and the
yarn over from back to front. Then
carefully undo the yarn and catch
^r
■\
. t iv ■ * v
i • »
• i iq
*
V, >
*, * »,
When undoing knitted pieces, pick
up 1 stitch at a time from back to
front.
In single-color double shaker
knitting, the long threads have to
lie on top. Catch the next long
thread with the crochet hook,
under 2 short threads, and pull it
through the stitch under the short
threads.
the next knit stitch. It the knit stitch
continues to drop, catch the
horizontal thread of the knit stitch
underneath it. Then undo another
row. At the stitch in question, simply
transfer it to the right needle.
N*
*^
^;
"V
»v
<
1
When ur doing shaker knitting,
catch th* yarn over along with the
purl stitc les, and carefully pick the
knit stitel es up onto the needle.
189
Pattern Charts
Pattern charts have the great
advantage that yon can
easily imagine what a
pattern will look like.
ritten instructions for
individual stitches are often
complicated and more
difficult to understand because of the
long text. Here is some information
about the width and the length of a
pattern, then about how to read a
pattern chart.
Pattern Width
The width of the pattern repeat is
given under each pattern chart, for
the textured pattern shown, it is 10
stitches. These 10 stitches are con-
stantly repeated. The last stitch of
the pattern is only worked at the end
of the piece to complete the pattern.
To calculate the number of stitches
needed, the number of stitches must
be divisible by 10 + 1 stitch + 2
selvedge stitches—for example, 43
stitches.
On some patterns, several stitches
are shown on both sides of the
pattern repeat to complete the pattern.
In this case, you start with the first
stitches of the chart after the
selvedge stitch, then repeat the pattern
repeat as indicated. At the end, work
the last stitches on the chart and the
selvedge stitch.
Pattern Length
Many charts show only the rows on
the right side of the work. That is
practically always the case if the
stitches are simply purled in the rows
on the wrong side of the work. Or it
is usually also the case if all the
stitches are worked as they lie—i.e.,
the purl stitches are purled, the knit
stitches are knit.
This can be clearly seen using the
example of a simple textured
pattern. Chart 1 shows the pattern in
the rows on the right side of the
work; the row numbers are given
only on the right side of the chart.
Chart 2, on the other hand, is more
confusing, although it shows the
same pattern. Here the rows on the
right and wrong side of the work
are shown the way they are worked;
the numbers for the rows on the
right side of the work are on the
right, the number for the rows on
the wrong side of the work are on
the left.
Chart 3 shows another possible
way of representing the stitches.
Here the stitches are shown in the
rows on the right and wrong side of
the work the way they appear on the
right side. The chart explanation
would then have to say: Open box =
knit stitch on right side of work, purl
stitch on wrong side of work. Box
with horizontal line = purl stitch on
right side of work, knit stitch on
wrong side of work.
Reading a Pattern
Chart
On all pattern charts, the rows on
the right side of the work read from
right to left, the rows on the wrong
side of the work from left to right,
always in the knitting direction. The
selvedge stitches are not shown,
unless otherwise indicated.
For a textured pattern, the text for
the first 3 rows would read:
Row 1: selv st, :;: k2, p7, kl, * kl,
selv st.
Row 2 and all subsequent rows on
WS: work the st as they lie. (Or:
Row 2: selv st, pi, * pi, k7, p2, rep
from *, selv st.)
Row 3: selv st, * k3, p5, k2, rep from
*, kl, selv st.
Textured pattern
—
—
—
—
—
—
—
—
—
—
—
—
—
—
—
—
—
10-st repeat
—
—
—
—
—
—
—
-
16
14
1?
10
8
6
4
?
—
—
—
—
—
—
—
—
—
—
—
—
—
—
—
—
—
—
—
1
—
—
—
—
0-
—
—
—
—
■st
—
—
—
—
—
—
re
—
—
—
—
>p<
—
—
—
—
—
—
—
—
sa
—
—
—
—
—
t
—
—
—
—
—
—
—
—
—
—
—
—
—
—
-
15
13
11
9
7
5
3
1
15
13
11
9
7
5
3
1
Chart 1:
Only the
rows on the
right side of
the work
are shown.
Chart 2:
The same
pattern with
the rows on
the right
and wrong
side shown
as they are
worked.
16
14
12
10
8
6
4
2
—
—
—
—
—
—
—
—
—
—
—
—
—
—
—
—
—
—
—
—
—
—
—
10
—
—
—
—
—
—
—
—
-s
—
—
—
—
tr
—
—
—
ep
—
—
—
—
—
—
—
—
ei
—
—
—
—
—
it
—
—
—
—
—
—
—
—
—
—
—
—
—
—
—
—
15
13
11
9
7
5
3
1
Chart 3:
The stitches
on the right
and wrong
sides are
shown as
they appear
on the right
side of the
work.
The pattern repeats between the
asterisks. This means in the first row,
for example, that after the first 3
stitches, you alternately p7 and k3
(the last stitch before the asterisk
and the first 2 stitches after the
asterisk).
Reading patterns in words might
seem easier to some knitters than
reading pattern charts. Rut the
complicated length of the text
190
Pattern Charts
becomes clear when you read the
instructions for the little openwork
pattern according to Chart 4:
Row 1: selv st, * p2, k5, k2 tog, yo,
pi, rep from *, pi, selv st.
Row 2 and all WS row: work the st
as they lie.
Row 3: selv st, * p2, k4, k2 tog, kl,
yo, pi, rep from *, pi, selv st.
Row 5: selv st, * p2, k3, k2 tog, k2,
yo, pi, rep from *, pi, selv st.
Row 7: selv st, * p2, k2, k2 tog, k3,
yo, pi, rep from *, pi, selv st.
Row 9: selv st, * p2, yo, single dec
(slip 1 st knitwise, kl, psso), k5, pi,
rep from *, pi, selv st.
R 11: selv st, * p 2, yo, k 1, single
dec, k 4, p 1, rep from *, p 1, selv st.
Row 13: selv st, * p2, yo, k2, single
dec, k3, p 1, rep from *, pi, selv st.
Row 15: i>elv st, * p2, yo, k3, single
dec, k2, pi, rep from *, pi, selv st.
Repeat Rows 1 to 16.
—
—
—
—
—
—
—
—
—
—
—
—
—
—
—
—
o
o
o
o
A
t
A
k
A
k
A
k
O
O
O
O
10-st repeat
—
—
—
—
—
—
—
—
—
—
—
—
—
—
—
—
-
15
13
11
9
7
5
3
1
Chart 4:
Pattern chart
for openwork
pattern
Intarsia Pattern Chart
On pattern charts for intarsia work,
the rows on the right side of the
work also read from right to left,
while the rows on the wrong side of
the work read from left to right.
Large areas of color are often
worked in reverse on the back as
compared with the front, so that
the same areas of color come
together at the side seams and
shoulders. For this purpose, you
read the first row and all other odd
rows as rows on the wrong side of
the work even though you are
knitting these rows. And you read
Intarsia is
sometimes worked
in reverse,...
or the same
way as the
chart.
L'.-l
V
' 1
*,.
01
\a.
\, VMM .* ' i 4' •' • il i .1 .<
X
**
lY!!W!l ! Mil'.;1., l\\V<
_L_
-
the rows on the wrong side of the
work from right to left.
In the example shown, on the front
you work 26 stitches in yellow, 9
stitches in red, and 5 stitches in
yellow. That is the sequence in which
you cast the stitches on, too.
If you are not working any ribbing,
you cast the stitches on the same
way, but start with a purl row on
the wrong side of the work, and
read the first row of the chart from
left to right, the second from right
to left, etc.
If you arc working the back in
reverse, cast on 5 stitches in yellow,
9 stitches in red, and 26 stitches in
yellow. Then, after the ribbing, read
the first row of the chart from left
to right, the second from right to
left, etc.
Chart 5: For intarsia
patterns, every row
is shown on the
chart. Each box
represents 1 stitch.
TIP
Sometimes the stitches on
pattern charts look as if they
don't fit on top of each other
This could be because of
increases, decreases, and yarn
overs. Just put a ruler under
the row you are working on
so that the previous row
doesn't confuse you. On
pattern charts for intarsia
work, put the ruler on top of
the row you are working on
so you can compare the color
sequence more easily.
191
Sleeve Increases in Openwork P tterns
In
complicated
openwork
patterns,
increasing with yarn overs
can sometimes create not-
so-easy-to-solve problems.
Here are some tips to make
it easier.
Adding an Extra
Stockinette Stitch at
the Edges
You will get especially neat-looking
sleeve seams if you work an extra
stitch in stockinette stitch next to
the selvedge stitches, and work the
pattern and increases next to that
stitch. That is how this sleeve was
calculated and is shown in the
drawing. It is always easier to sew a
seam between a selvedge stitch and a
knit stitch than between a selvedge
stitch and a pattern with confusing
increases. In the pattern, the
horizontal threads are difficult to see,
and it is almost impossible to make
an invisible seam. The additional
stitch at the sleeve seam does not
affect the pattern and practically
disappears into it.
Adjusting the Pattern
to the Slanted Edge of
the Sleeve
When working the slanted edge of a
sleeve, a pattern might call for a yarn
over after the selvedge stitch—i.e.,
after the selvedge stitch and the
additional knit stitch—but there are
no stitches available to knit together,
which is also called for. This happens
in Rows 31 and 45 of the example
shown. At the^e points, the number
of stitches is increased with the yarn
over, and vou do without the knitting
together.
Vice versa, it can happen that after
the selvedge stitch, 2 stitches have to
be knit together. However, a yarn
over right next to the seam doesn't
look nice (as in Rows 55 or 77 of the
chart). Instead of the decrease,
simply work 2 knit stitches and 1
twisted increase. The rule of thumb
for slanted ed<zes of sleeves is that
orkinq openwork patterns
on straight pieces is easy for
most knitters. The
problems start with increases in the
sleeve.
Here is the simplest solution: Draw
the slanted edges of the sleeves on
graph paper. For symmetrical patterns
like the diamond pattern shown
here, it is very helpful if you draw at
least the right side of the sleeve.
Then the pattern repeat is repeated
as often as necessary, and the pattern
is widened in reverse on the left side.
t<
/jVAJfc I
■ >fc
«%
. V
V
In an openwork
pattern, it is easier
to sew the sleeve
seams using
invisible stitch if
an additional
stockinette stitch is
worked on both
sides next to the
selvedge stitch.
192
Sleeve Increases in Openwork Patterns
•
•
•
•
+
•
•
+
•
•
o
i
+
•
•
o
A
o
+
•
•
o
A
o
A
+
•
•
o
A
o
A
1
X
•
•
4
o
A
o
k
+
•
•
O
0
A
o
o
+
•
•
o
->
o
->
+
•
•
o
A
0
k
o
A
o
k
o
1
1
X
•
•
77
n = kst
4-
o
k
o
A
o
4-
o
k
+
•
•
1 1
o
k
0
k
o
A
o
o
k
o
k
+
•
•
[o] -yo
o
k
o
k
0
A
o
A
o
k
0
k
+
•
•
0 =k2tog
o
k
0
o
A
o
A
o
k
o
o
1
+
•
•
0 = slip 1 st
o
k
o
-»
o
A
o
k
o
->
1
o
+
•
•
knitwise. k1.
and pass slipped
o
o
o
o
A
f\
o
o
o
o
A
+
•
•
•
stitch over
o
^
A
o
->
o
-»
A
o
->
+
•
•
SI = k3 tog 45
o
A
o
k
o
A
o
k
o
A
o
k
o
A
o
k
+
•
•
•
GB = slip 1 st knitwise, k2,
o
A
0
<-
o
k
0
^
o
<r
o
k
o
1
+
•
•
and pass slipped
stitch over
o
A
o
o
k
o
k
o
A
o
o
k
o
k
o
A
o
1
X
•
•
•
|T| = 1 k st instead of pattern 31
o
A
o
A
o
k
o
k
o
A
o
A
o
k
o
k
o
A
o
A
o
k
+
•
•
U = 1 k twisted inc
o
A
o
4
o
k
o
o
A
s-\
o
A
o
k
o
0
A
o
A
o
k
+
•
•
•
[X] = 1 k st (the yarn over is
3
o
4
o
k
o
->
o
^J
o
k
o
^
o
A
o
k
1
X
•
•
worked here instead of
the inc)
0
0
A
0
o
A
0
0
A
o
0
.4
0
0
A
0
0
0
0
+
•
•
•
o
^
o
->
o
-*
o
->
o
->
o
^
o
->
+
•
•
o
A
o
k
o
A
o
k
0
A
o
k
o
A
0
k.
0
^
o
k
o
A
o
k
o
A
o
k
+
•
•
•
4-
o
k
o
A
o
4-
o
o
A
o
<r
o
k
o
^
o
<r
o
r
+
•
•
o
k
0
k
o
A
o
0
k
t7
k
o
A
o
0
k
o
k
o
A
o
o
k
u
k
o
+
0
k
o
k
o
A
o
A
o
k
o
k
o
A
o
A
o
k
o
k
o
A
o
A
o
k
o
k
0
A
o
1
0
k
o
o
A
o
A
o
k
o
o
A
o
A
o
k
o
o
A
o
A
o
k
o
o
A
o
^
o
k
o
->
o
^
o
o
->
o
4
o
k
o
->
o
A
o
k-
0
->
0
A
o
o
o
o
A
^v
o
o
o
A
o
o
o
o
A
u
0
o
o
^1
0
->
J
o
-»
0
-»
^
o
->
o
->
4
o
-»
o
->
J
o
->
0
4
0
k
0
A
0
k
n
A
0
k
0
A
0
k
0
J
0
k
0
A
0
k
t*
4
0
k
0
A
0
k
o
A
o
<-
o
k
o
A
o
<r
o
k
o
A
o
<-
o
k
o
■*
o
4-
o
k
o
A
o
0
k
0
k
o
A
o
o
k
0
k
o
A
o
o
k
o
k
o
A
o
o
k
o
k
o
A
o
A
o
k
o
k
o
A
o
A
o
k
o
k
o
A
o
A
o
k
o
k
o
A
o
A
o
k
o
1
u
A
o
A
o
k
o
o
A
n
A
o
k
o
o
A
o
A
o
k
o
o
A
t*
^
o
1
+
4
o
^
o
k
o
->
o
o
k
o
-*
0
A
o
k
o
-*
o
■3*
+
•
•
0
0
Jl
o
o
\A
o
0
^
o
o
A
o
o
4
o
o
A
o
o
A
+
m
•
•
z
O a
-»c
k
c
o ^
-»c
■
c
O A
^c
k
c
O A
-K
k
c
O A
-K
k
c
O A
-»c
k
c
o ^
->c
4
+
«
«
•
•
•
T
o
k
o
A
o
4-
o
o
) A
i
)
.o
4-
o
k
o
^
o
X
•
»
»
>
o
k
o
k
to
A
o
o
k
o
k
IO
A
0
o
k
o
k
o
A
+
•
•
•
o
k
0
k
o
A
o
A
o
k
o
k
o
A
o
A
o
k
o
k
o
A
+
•
•
O
k
O
o
A
o
A
o
k
o
o
A
o
A
o
k
o
X
•
•
•
te
k
\6
->
o
A
o
k.
o
->
o
A
o
1
+
•
•
o
o
o
o
A
o
o
o
o
A
+
•
•
•
o
-»
A
o
->
0
o
A
O
k
o
A
O
k
o
^
->o
^
o
->
+
•
•
k
o
A
o
k
+
•
•
•
o
A
o
4-
o
k
o
A
o
4-
o
1
+
•
•
o
A
o
o
k
o
k
o
A
o
o
1
+
•
•
o
A
o
A
o
k
o
k
o
A
o
A
+
•
•
o
A
o
A
o
k
o
o
A
o
A
+
•
•
T
o
A
O
k
o
-»
o
+
•
•
o
o
^
0
o
A
o
1
X
•
•
O
-»
o
->
+
•
o
A
o
k
o
^
o
+
•
•
V
o
k
o
A
+
•
•
o
k
o
k
1
X
•
•
o
k
0
k
+
•
•
o
k
o
+
•
•
o
+
•
•
+
•
•
+
•
•
•
•
•
•
77
55
45
31
Jt is prnendfa imnerrssm-v to
draw the entire sleeve, since the
pattern repeats in the center of
the sleeve, lust draw the outside
pans of the sleeve.
i\»
always, at difficult points, it is better
to increase a few more stitches in
stockinette stitch and start working
the pattern afterwards. In the case of
very small openwork patterns, you
can even wait until you have enough
increases in stockinette stitch to start
an entire new pattern repeat. That
always looks better than messy sleeve
edges.
The complete instruction for the
sweater shown here is on page 199.
m
193
1 k
t
* ■
• i
- l ' , a4*..-* - i •
■ m • • ■* • ^ •
» *
aV
»
•
* v'
•
• ^»
vV " *
S • VK
A 1» * »
■ \ « W
* A *« » . • *
'* ^ * * • « /' Mi* • •
* » » * . . r *
s I •"
i *
*
M I
*, *
A\
•
i
* , t « t . * • * \ * i
M ..-. . • -m> ."* A .' •■ ti M^. .'
;♦• . 1V • • «\ *•■"" ■ -x Ali
■aA . v
A SH\>. >
- -v' * * ■•\.;:.r,,-:>'v-/',v-vV:vv .iv-'A'^-A<.
. - •►.».)'.•,' ♦ • '. /M»V' V ■ *•* A -.
>• A • . //
-.v^.^v-AA-A -
**»
'•!f''
M > l* ^ T ^ v
• * 4
1 »>
,••.«'. 1 • . V- -. *^'A. . v ' •
. ' A^V"M ' , ^ ^ '"v'V^>' * ■ S
- " .'-." A V*-' \-m\ ' • . . v rW-.
' . 1 . » • * M * . • .'.•». • ^ * * ' * .
:.-.}?' •"■:•• Av.^-^-v,-:. a./v, ■ l -
* *!t »' . 4* ^» »•.'#.■• * ^ *
* " »^*.M*/Twi- •
\f
1 r* * ,'M
0 *A,^ ?
1
» ' ill''.' .>* *
_ •
N "* » "A ' ^ * ^
•-.V •
, ».
b
* y
-A'»
»,
■\A
c .
»>>
/«^
#*
^ « •
i
This section includes the
instructions for all the
designs in this book. It
also has socks and
gloves, which are
explained in detail with
tables for all sizes.
4
Sweaters
Here are the instructions
for all the designs in this
book—from intarsia work
to embroidered children's
sweaters.
< * * *
V
it.
U'
.'1 ■
'■ I
'A \ »
•*-*... .'- ..*■'•
'■'.' , «r; ...:*!
.' ■? -
."5
' v "i • " 'A
n* •"*
<
A.'
.\f
■ -■• *■ .
, -1, •
i
. 1' * ' ■
'.\\\V...~
,1,1. -l»l' ■
•.\\\i.,-,nv..,.V
* Vl1', ,'\-
/J'
: i''
I'.'.
;l<
*4
• r: •. •. • * v ■_....
*rS
»<-.
'■■'■:lJ.i.V
■ 1<i
•|1 "
.1
4$'t-
i-
he paper patterns show only
half the width. Only for the
raglan sweater worked in shaker
knitting is the entire left sleeve
shown.
The instructions ask for a normal
cast on with 1 needle. However, you
can cast on in kitchener rib (starting
on page 22).
The number of stitches indicated
always includes selvedge stitches.
According to the instructions,
stitches at the shoulder seams are
always bound off. However, shoulder
seams in grafting stitch or knit seams
generally look better. To finish the
seams this way, put the stitches
temporarily on a stitch holder and
finish the shoulders after you are done
with the second piece.
The symbols and abbreviations
used in the instructions are
explained on page 237.
Sweater with Intarsia
Pattern
Size: 8/10
Yarn: virgin wool yarn approx. 125 m
(1371/2 yds)/50 g (\¥4 oz); 450 g
(15% oz) of black, 50 g (l3/4 oz) each
of turquoise, red, green, yellow,
orange, pistachio, and plum
Basic pattern: Stockinette stitch on
size 6 needles.
Gauge: 21 st and 29 rows = 4" X 4"
Ribbing: Alternately kl, pi on size 3
needles.
Back: Cast on 128 st with black and
work ribbing for 1 Vi starting on WS.
Continue in stockinette stitch with
black. When the piece is 261/21' long,
bind off the center 26 st, then 4 st
lx and 3 st lx, every other row, on
both sides, for the neckline.
When the piece is 27V4" long, bind
off the shoulder stitches.
Front: Cast on 5 st with plum, 30 st
with orange, 17 st with yellow, 17 st
with plum, and 59 st with black (128
st). Work in ribbing for \Vi\ keeping
the color pattern the same.
Continue in stockinette stitch,
following the pattern chart. Every
row is shown; 1 box corresponds to 1
stitch.
1 10
C\i >
-^
C\l
CD
J
20
36 I 28
•^r
27
I3I
I 10 I4I
196
Sweaters
■£-*■
i ■ ■ i ■
m
m
B
ZJTE
,JP^
a
•=p=
d:
3E
I I
i
T ' 1 1 I
tf.
J-L-
= 3=
n ; rr
ZTZJ
i
I
=t
X-,
X:
H
s
i
ZT,
£
?t£
rrr
^
TT
Iffi
3=r
E?
T}
3
j±
j—
33
W
m
IM
ffe
+-r
When the piece is 24%" long, bind
off the center 16 st, then 4 st lx, 3
st lx, 2 st lx, and 1 st Jx, every
other row, on both sides, for the
neckline.
When the piece is 27lA" long, bind
off the shoulder stitches.
Sleeves: Cast on 50 st with black
and work ribbing for Wi". In the last
row, increase 12 st evenly distributed
over the row (62 st).
Continue in stockinette stitch with
black, and increase 1 st every fourth
ro\v29x (120 st).
When the piece is ISVi' long, bind
off all stitches.
Finishing: Correct the color changes
on the front, if necessary (see page
147).
Sew the shoulder seams, sew the
sleeves on, then sew the side seams
and sleeve seams.
For the neckband, cast on 116 st
with black on a short size 3 circular
needle, and work in round ribbing for
1 Va\ then k 2 rounds. Sew stitches or
the neckband to the neckline using
back stitch, undoing the 2 knit
rounds as you sew it on (see pages
70-72).
197
Basic Patterns
*
Jacquard and
Textured Pattern
Sweater
Size: 8/10
Yarn: Cotton yarn approx. 85 m
(93V2 yds)/50 g (1% oz); 600 g (21
oz.) of rust, 150 g (5Vi oz) of black,
50 g (1-% oz) each of red, curry,
natural, brown, and yellow
Basic pattern I: Work the jacquard
pattern in stockinette stitch on size 6
needles. The pattern chart shows
every row. Read RS rows from right
to left, WS rows from left to right.
Work all selvedge stitches with both
color yarns.
Gauge I: 22 st and 27 rows = 4" X 4"
Basic pattern II: Work the textured
pattern on size 6 needles. Only the
RS rows are shown; on WS rows,
work all stitches as they lie.
Gauge II: 22 st and 30 rows = 4" X
4"
Ribbing: Alternately kl, pi on size 3
needles.
Back: Cast on 124 st with black and
work ribbing for \x/i starting on WS.
In the last WS row, inc 1 1 st evenly
distributed over row (135 st).
Now work the 56 rows in basic
pattern I as follows: selv st, pattern
repeat 5x, st I to 13 of pattern
repeat, selv st.
Then work in basic pattern II as
follows: selv st, pattern repeat 1 lx,
last st of chart, selv st.
When the piece is YiVi long, bind
off 1 st every other row on both sides
12x for the armholes (111 st).
When the piece is 28" long, bind off
the center 29 st, then 3 st lx and 2
st lx, every other row, on both
sides, for the neckline.
When the piece is 28%" long, bind
off the shoulder stitches.
Front: Work like the back, but when
the piece is 25,/2M long, bind off the
center 15 st, then 3 st lx, 2 st 2x,
and 1 st 5x, every other row, on
both sides, for the neckline.
Sleeves: Cast on 46 st with black
and work ribbing for 3/4". Purl the last
row on WS, inc 9 st evenly
distributed over the row (55 st).
Now work Rows 1 to 31 of basic
pattern I, then continue in basic
pattern II. Center the patterns on
the middle of the sleeve. In the
jacquard pattern, stitch 13 is the
center st. For the slanted edges of
the sleeve, on both sides, inc 1 st
every fourth row 15x, then inc 1 st
alternately every second and every
fourth row another 20x (125 st).
When the piece is 18" long, bind off
3 st every other row 4x, and 2 st
every other row 3x. Then bind off
the remaining stitches in a straight
line.
Finishing: Sew the shoulder seams,
sew on the sleeves, and then sew the
side seams and sleeve seams. For the
neckband, cast on 124 st with rust
16
CD
O
CNJ
CO
CO
o
27
I3I
I 10 I2I
198
Sweaters
on a short size 3 circular needle, and
work round in ribbing for 1 Va\ then
k 2 rounds. Sew the st of the
neckband to the neckline using back
stitch, undoing the 2 knit rounds as
you sew it on.
Textured pattern
—
—
—
—
—
—
—
—
—
—
—
—
—
—
—
—
—
12
—
—
—
—
—
-s
—
—
—
—
—
tr
—
—
—
—
—
ep
—
—
ec
—
—
—
it
—
—
—
—
—
—
—
—
—
—
—
—
Jacquard pattern
31
29
27
25
23
21
19
17
15
13
11
9
7
5
3
1
56
54
52
50
48
46
44
42
40
38
36
34
32
30
28
26
24
22
20
18
16
14
12
10
8
6
4
2
13
24-st repeat
55
53
51
49
47
45
43
41
39
37
35
33
31
29
27
25
23
21
19
17
15
13
11
9
7
5
3
1
,¥Z-i&
~7 ,U
Openwork Pattern
Sweater
Size: 8/10
Yarn: Approx. 550 g
[\9lAoz) smooth,
mercerized cotton
yarn approx. 115
m (126l*yds)/50g
(P/4 0Z)
Basic pattern: Work the openwork
pattern on size 5 needles. Only the
RS rows are shown; on WS rows,
purl all st and yo.
Gauge: 20 st and 30 rows = 4" X 4"
Ribbing: Alternately kl, pi on size 3
needles.
10
£i
in
19
tn
05
C\J
CM
CO
27
J 52 _
I2I
Back: Cast on 110 st and work-
ribbing for llA" starting on WS. In
last row on WS, inc 8 sr evenly
distributed over row (118 st).
Then work in basic pattern as follows:
selv st, first st of chart, pattern repeat
of 16 st 7x, last st uf chart, selv st.
When the piece is 243/4" long, bind
off the center 28 st, then 3 st lx and
2 st lx, every other row, on both
sides, for the neckline.
When the piece is 25 Vi" long, bind
off the shoulder stitches.
Front: Work like the back, but when
the piece is 24-%" long, bind off the
center 16 st, then 3 st lx, 2 st 2x,
and 1 st 4x, every other row, on
both sides, tor the neckline.
Sleeves (see increasing in opeiv
work patterns, page 181): Cast on
52 st and work in ribbing for I lA". In
the last row on WS, inc 9 st evenly
distributed over the row (61 st).
Then work in basic pattern as
follows: selv st, st 12 to 16 of the
pattern repeat, pattern repeat of 16 st
3x, st 1 to 6 of pattern repeat,
selv st.
For the slanted edges of the sleeve,
on both sides, inc 1 st alternately
every fourth and sixth row 12x,
then inc 1 st every fourth row 16x
(117 st).
When the piece is 18" long, bind off
all st straight across = 4 pattern
repeats (128 rows).
Finishing: Sew the shoulder seams,
sew on the sleeves, then sew the side
seams and sleeve seams.
For the neckband, pick up 116 st on
a short size 3 circular needle, and
work in round ribbing for 1 lA". Bind
off normally or in kitchener rib.
o
A
o
k
o
A
o
k.
o
A
o
k.
O
A
o
<-
o
k.
o
A
o
o
k.
o
I
o
A
o
A
o
k.
o
k.
16
o
A
o
A
o
k.
o
->
o
A
o
k.
o
o
o
A
o
o
A
o
->
o
->
o
A
o
k.
o
A
o
k,
<r
O
k
o
A
o
o
t
o
k
o
A
o
o
k.
o
k.
o
A
o
A
12 6
16-st repeat
o
k.
o
o
A
o
A
o
k.
o
^
o
A
o
o
o
o
A
o
^
A
o
-*
1
A
o
A
O
31
29
27
25
23
21
19
17
15
13
11
9
7
5
3
1
199
Basic Patterns
y 'W
4
V
r
..r
r J,l ^ fe. i \. I- ". ** -At
i-
4-
' i
^55* S3&
:lif
-« f
\ — ■ ».
Cardigan with Cables
Size: 12/14
Yarn: 1200 g (42 oz) Shetland wool
yarn approx. 166 m (18216 yds)/50 g
(13/4 oz)
Basic pattern: Work the cable
pattern according to the chart on
size 8 needles. The chart shows half
of the back, which is the same as the
left front, not including selvedge
stitches. In addition, 1 row of ribbing
and above it the increases in the last
row of the ribbing, on the wrong side
of the work, are shown in yellow.
For the narrow cables, repeat Rows 1
to 6. For the wide cables, repeat
Rows 1 to 32 (the pattern repeat of
the basic patterns is shown in
yellow).
Gauge: The 44 st with the wide
cables (pocket width) are 7" wide. In
the ribbing/cable pattern, 20 st and
25 rows = 4" x 4"
Ribbing: Alternately k2, p2 on size 6
needles.
Back: Cast on 122 st and work in
ribbing for 1 Vi" (the first row of the
pattern chart). The row on \VS starts
with selv st, pi. In last row on WS
(second row in yellow), inc 44 st purl
twisted as shown (166 st).
Now continue working in the basic
pattern with cables. Here, too,
reverse the pattern from the center of
the back part, but continue crossing
the narrow cables to the left.
When the piece is 18" long, bind off
3 st 2x, 2 st 2x, 1 st 5x, every
other row, then 1 st lx after 4 rows,
on both sides, for the armholes =
134 st.
When the piece is 283/i" long, bind
off the center 24 st, then 5 st lx and
3 st lx, every other row, on both
sides, for the neckline.
Put the stitches for the shoulders on
a holder and bind them off later by
knitting them together with the
stitches of the front parts. Work
firmly.
Right front: Cast on 60 st, working
in ribbing for \Vi\ begin the first row
on WS with selv st, kl (front edge).
In the last row on WS, inc 21 st as
shown (81 st).
When the piece is 9Vi" long, 17 st in
from the side edge, put the next 44 st
on a holder for the pocket opening
(see also pattern chart). Cast on 34
st for the inside pocket and work in
stockinette stitch for 6", then
continue in pattern for 2", increasing 10 st
(44 st).
When the piece is 8" long, join the
stitch into the work and continue
working the entire tront. (The
pocket is shown in detail on page 95.)
When the piece is \7Vi" long, start
binding off 1 st every fourth row on
the right edge for the neckline by
purling the last 2 st before the i>elv st
together.
At die same time, when the piece is
18" long, work the armhole at the left
edge the same way as for the back.
Knit the shoulder stitches together
with the shoulder stitches of the
back part, RS on RS, and bind off
firmly.
Work the left front in reverse, read
the inc from left to right. The narrow
cables are still crossed the same way.
Sleeves: Cast on 54 st and work in
ribbing for 1 Vi". Begin the first row
on WS with selv st, kl; the
beginning of the sleeve (without selv
st) is shown on the pattern chart. In
the last row on WS, inc 18 st as
shown (72 st).
For the slanted edges of the sleeves,
inc 1 st alternately every second and
fourth row on both sides 31x (134
st). Above the increases, first pi,
then alternately k4 and p2.
Alternately work the 4 knit st as a rib and
as a cable.
Pocket width = 44 st
1
1
1
1
1
1
1
1
1
1
1
+
1
■ 1
1
1
—\
1
1
—>
1
1
1
1
1
1
1
1
1
I
1
1
>
1
1
\
1
1
\
1
1
*_
1
1
1
1
1
1
1
1
1
1
1
1
1
1
1
+
—
—
—
—
—
—
—
—
—
—
—
—
—
—
—
—
—
—
—
—
—
—
—
—
—
—
—
—
—
—
—
—
—
—
—
—
1
1
1
1
1
1
1
1
1
1
1
1
1
1
1
1
4-
i
i
i
i
i
i
i
i
I
i
i
i
i
i
i
i
i
i
i
i
i
I
I
i
1
i
1
I
I
I
i
I
i
i
i
i
i
i
i
i
i
i
I
i
I
i
i
I
i
i
i
i
+
—
—
—
—
—
—
—
—
—
—
—
—
—
—
—
—
—
—
—
—
—
—
—
—
—
—
—
—
—
—
—
—
—
—
—
—
i
i
i
i
I
i
i
I
i
i
i
4-
i
...,
i
i
—>
i
i
I
i
—i
I
i
i
i
i
i
i
*
i
i
u_
i
i
i
I
i
*
I
i
V
1
1
1
1
1
1
1
1
1
1
1
1
1
1
1
4-
—
—
—
—
—
—
—
—
—
—
—
—
—
—
—
—
—
—
—
—
—
—
—
—
—
—
—
—
—
—
—
—
—
—
—
—
i
i
i
i
I
i
i
i
i
I
I
i
i
i
i
i
+
i
i
i
i
i
i
i
i
i
i
i
i
i
I
i
i
i
I
i
i
i
i
i
i
i
i
I
i
I
i
i
I
i
i
i
i
i
i
i
i
i
i
I
i
I
i
i
i
i
I
i
i
+
—
—
—
—
—
—
—
—
—
—
—
—
—
—
—
—
—
—
—
—
—
—
—
—
—
—
—
—
—
—
—
—
—
—
—
—
i
4-
i
—v
—*
■'
■v
1
t
^
k_
1
4-
—
—
—
—
—
—
—
—
—
—
—
—
—
—
—
—
—
—
—
—
—
—
—
—
—
—
—
—
—
—
—
—
—
—
—
—
i
i
i
i
I
i
i
I
i
i
i
I
i
i
i
i
i
i
I
i
i
I
I
I
i
i
i
i
■<
i
i
i
N
1
1
1
/
1
1
1
1
1
1
1
—
—
.
1
1
1
*_
1
1
1
'
1
1
1
,...
1
1
1
—
—
1
1
1
1
1
1
1
1
1
I
1
1
4-
i
i
i
i
i
i
i
i
i
i
i
i
i
i
i
i
i
i
i
i
i
i
i
i
i
i
i
i
i
i
i
i
i
i
i
i
i
i
i
i
4-
i
I
I
_<
i
i
i
i
i
i
I
i
i
—
—
^
i
I
i
i
i
i
i
i
i
i
i
V
1
1
1
—
—
1
1
1
1
1
1
1
1
1
1
1
1
1
1
1
1
1
1
1
1
1
1
1
1
1
1
1
1
—
—
—
—
—
—
—
—
—
—
—
—
—
—
—
—
—
—
—
—
—
—
—
—
—
—
—
—
—
—
—
—
—
—
—
1
1
1
1
1
1
1
1
1
1
1
+
1
—>
1
1
*
1
1
--»
1
1
"*
1
1
1
1
1
1
1
k
1
1
V
1
1
>
1
1
\
1
1
\
1
1
1
1
1
1
1
1
1
1
1
1
1
1
1
4-
—
—
—
—
—
—
—
—
—
—
—
—
—
—
—
—
—
—
—
—
—
—
—
—
—
—
—
—
—
—
—
—
—
—
—
—
i
i
i
i
i
i
i
i
i
i
i
i
i
i
i
i
i
i
i
i
i
i
i
i
i
i
i
i
■<
i
i
i
*
i
i
i
-
i
i
i
i
i
i
—
—
s...
i
i
i
V
1
1
1
'—
1
1
1
'—
1
1
1
—
—
1
1
1
1
1
1
1
1
1
1
1
1
4-
4-
_,
i
i
1
_y
1
1
1
■*
1
1
1
"~*
1
1
i
—
>"
1
1
1
1
1
1
1
i.
1
1
1
k_
1
1
1
—
—
1
1
1
1
1
1
1
1
1
1
1
1
1
1
1
1
1
1
1
1
1
1
1
1
1
1
1
1
—
—
—
—
—
—
—
—
—
—
—
—
—
—
—
—
—
—
—
—
—
—
—
—
—
—
—
—
—
—
—
—
—
—
—
—
1
1
1
1
1
1
1
1
1
1
1
4-
i
—i
i
i
->
i
i
*
i
i
■<
i
i
i
i
i
i
i
i
i
t_
i
i
i
i
»
i
i
>
i
i
i
i
i
i
i
i
i
i
i
i
i
i
i
4-
—
—
—
—
—
—
—
—
—
—
—
—
—
—
—
—
—
—
—
—
—
—
—
—
—
—
—
—
—
—
—
—
—
—
—
—
i
i
i
i
i
i
i
i
I
i
i
i
i
i
i
i
4-
i
i
I
I
I
I
I
i
[
i
I
I
i
i
i
i
i
i
i
i
I
i
I
i
I
i
I
i
I
I
i
i
i
i
i
i
i
i
i
I
1
i
I
i
I
i
I
i
i
i
i
i
+
—
—
—
—
—
—
—
—
—
—
—
—
—
—
—
—
—
—
—
—
—
—
—
—
—
—
—
—
—
—
—
—
—
—
—
—
i
I
1
i
I
1
i
i
i
i
i
+
i
—i
I
I
—i
i
i
—>
I
i
■
i
i
i
I
i
i
i
*
I
i
>
i
i
V .
1
1
\
1
1
I
1
1
1
1
1
1
1
1
1
1
1
1
1
1
1
4-
—
—
—
—
—
—
—
—
—
—
—
—
—
—
—
—
—
—
—
—
—
—
—
—
—
—
—
—
—
—
—
—
—
—
—
—
i
i
i
i
i
i
i
i
i
i
i
i
i
i
i
i
i
i
i
i
i
i
i
i
i
i
I
i
i
i
i
i
i
i
+
29
27
25
23
21
19
17
15
13
11
9
7
5
End of sleeve
End of front
Center of back
EB = On WS, inc 1 st purl twisted from the horizontal thread
Beginning of sleeve I
Beginning of front and back
200
Sweaters
When the piece is 17" long, bind off
on both sides every other row 4 st
lx, 3 st lx, 2 st 3x, 3 st lx, 4 st
lx, and 5 st lx. Then bind off the
remaining st straight across. When
binding off over a narrow cable, k2
tog lx. When binding off over a
wide cable, k2 tog 3x.
Finishing: Work a double facing
above the pocket stitch as follows:
First cast on new selv st with needle
size 6, * work the next 4 st in cable
pattern, 14 st in ribbing, starting with
2 purl st, over the wide cable, p2 tog
2x, rep from *, then after the last 4
st in cable pattern, cast on another
selv st (42 st).
When the piece is 1 lA" long, work
another IV\" in stockinette stitch
with size 4 needle. In the first row,
k2 tog lx above each of the narrow
cables.
Turn the stockinette stitch part of
the facing in and sew it down. Sew
the narrow sides on, using invisible
stitch.
Sew the sleeves on, then sew the side
seams and sleeve seams.
Pick up 356 st from the front edges
and the neckline edges, and work
1V4" in ribbing. The first row on RS
starts with selv st, 2 knit st (see also
photo on page 60). On the right
front, evenly distributed along the
straight edge, work in 5 round
buttonholes over 2 purl st, in each
instance (page 100). Sew buttons on.
ll 8
CO vf
CO
CO
—
"3"
I
/
/
/
I
19
18
31
I 7 I
o
CO
—
V.
en
CO
o
in
20
o
CO
"•fr
13
12
31
I
1-
Child's Sweater with
Bobbles
Size: 4
Yarn: 200 g (7 oz) light mohair yarn
approx. 150 m (165 yds)/50 g (l3/4
oz) and small amounts of cotton yarn
in different colors for the bobbles
Basic pattern: Stockinette stitch on
size 6 needles
Gauge: 22 st and 30 rows = 4" X 4"
Ribbing: Alternately kl, pi on size 3
needles.
Back: Cast on 80 st and work in
ribbing for 1 Va\ starting with a WS row.
In the last row on WS, inc 6 st
evenly distributed (86 st). Continue
in stockinette stitch.
When the piece is 141/2M long, bind
off the center 20 st straight across,
then 3 st lx and 2 st lx, every
other row, on both sides, for the
neckline.
When the piece is 15 lA" long, bind
off the shoulder stitches.
Front: Work the same way as the
back, but for the neckline, when the
piece is 123/i" long, bind off the center
10 st, then 3 st lx, 2 st 2x, and 1 st
3x, every other row, on both sides.
Sleeves: Cast on 36 st and work in
ribbing for 1V4". In the last row on
o ^
-'V
V -i
«
J •
WS, increase 6 st evenly distributed
over the row (42 st).
Continue in stockinette stitch and
increase on both sides 1 st every
fourth row 1 7x (76 st).
When the piece i^ 10 %" long, bind
off all stitches.
Finishing: Crochet approximately 80
bobbles and knot them evenly
distributed onto the front and sleeves
(see page 166).
Sew the shoulder seams, sew on the
sleeves, then sew the side seams and
sleeve seams.
For the neckband, pick up
approximately SO st from the neckline with a
short size 3 circular knitting needle,
and work in ribbing for 2". Bind
stitches off very loosely, turn the
neckband in, and sew it on.
I 7 I 12
"C?
CO
CO
r- I 17 |
CO
J CO | | CO
17 I2I I 7 12 8 \
201
Basic Patterns
^3S^gSfeSfe^S&iT^.
Raglan Sweater in
Shaker Knitting
Size: 8/10
Yarn: Approx. 800 g (28 oz) tweed-
colored virgin wool/alpaca yarn
approx. 110 m (121 yds)/50 g (l3/4
o=)
Basic pattern: Single shaker knitting
worked on size 5 needles
Row 1 (WS): Selv st, * kl st, slip 1
st purlwise with yo *, kl, selv st
Row 2 (RS): Selv st, pi, * k the st
tog with the yo, pi *, selv st
Repeat Rows 1 and 2.
Gauge: 16 st and 34 rows = 4" X 4"
Ribbing: Alternately kl, pi on size 3
needles
Back: Cast on 99 st and work in
ribbing for 1 lA". Start the first row on
WS with selv st, kl.
Continue in single shaker knitting.
When the piece is 14%" long, start
decreasing for the raglan sleeve
edges, on both sides, 2 st lx, then 2
st every eighth row 8x, and 2 st
every fourth row llx. Work these
dec 4 st in from the edge in each
case: At the right edge, slip the fifth
st = k st with the yo purlwise, k the
next 2 st tog with the yo, and pass
the slipped st over with the yo. On
the left side, 7 st before the end of
the row, k the next 3 st with the yo
( = 5 loops) tog.
When the piece is 28" long, 4 rows
after the last dec, bind off the
remaining 19 st.
Front: Work like the back, but when
the piece is 25l/i" long
(with the seventh dec in
the fourth row; before
these dec, there are still
39 st on the needle), bind
off the center 19 st, then
2 st 2x and 1 st lx,
every other row, on both
sides, for the neckline.
Left sleeve: Cast on 38 st
and work in ribbing for
VA". Start the first row on
WS with selv st, kl.
Continue in single shaker
knitting, and in the first row, inc 1 st
purl twisted after the selv st, then 2
st 5x evenly distributed (49 st). For
the double inc, work 1 st purl twisted
from the horizontal thread after a
knit st, k the next st, then inc 1 st
purl twisted from the horizontal
thread.
For the slanted edges of the sleeve,
on both sides inc 1 st every sixth row
12x, then inc 1 st alternately every
fourth and sixth row 8x (89 st). If
you work double increases, 2 st have
to be inc every twelfth row 6x, then
2 st every tenth row 4x (see also
page 131).
When the piece is 15 W long, dec 2
st lx for the raglan seam, then 2 st
every fourth row 12x, as described
for the back. Continue decreasing as
follows: On the right bide, dec 2 st
ever} eighth row 7x. On the left
side, dec 2 st every eighth row 5x,
after another 8 rows, 4 st every other
row 2x, and 2 st lx. Then bind off
the remaining 3 st.
Work the right sleeve in reverse.
Finishing: Sew the raglan seams,
then sew the side seams and sleeve
seams (see sewing seams, page 113).
For the neckband, pick up 70 st on a
short size 3 circular needle, and work
in round in ribbing for 2Vi". Bind the
stitches off loosely. Turn the
neckband in and sew it on.
131 12 I
202
Sweaters
> VtfV
i *•
.\«»'
I < <
•I I
■:Ji,.l
' I'I I i'jN •" .*• .f. ,<4 < . '
•• •*• !• ■ •* ••
< • ('• i'i t;<;
». i
!;J
4\-
*v.
a' \ ■ »'#^ "AW-.*--" ■'■■"
.'V'.it • WWW V'.'i-"' Ml M".^''!
'• v n iJi'v .•".• \.»> \ jVVk • •••i'*' • ■'■
■r::.:-:..J'';
V\1L
-■A , ' * '* ;
^
Child's Sweater with
Seahorses
Size: 2
Yarn: 200 g (7 oz) natural-color
virgin wool yarn approx. 125 m (13 7 V^
yds)/50 g (l-y4 oz), and small
amounts of light green and green for
embroidery
Basic pattern: Stockinette stitch on
size 6 needles
Gauge: 22 st and 30 rows = 4" X 4"
Ribbing: Alternately kl, pi on size 3
needles
Back: Cast on 68 st and work in
ribbing for IV<\". In the last row on WS,
inc 4 st evenly distributed (72 st).
Continue in stockinette stitch.
When the piece is 12%" long, bind
off the center 20 st straight across,
then 3 st lx and 2 st Ix, every
other row, on both sides, for the
neckline.
When the piece is UVi" long, bind
off the shoulder stitches at the left
shoulder, continue in ribbing for
another %" at the right shoulder,
then bind off the stitches.
Front: Work the same way as the back.
But for the neckline, when the piece is
1 Wi long, bind off the center 14 st,
then 4 st
lx, 2 st
' lx, and 1 st
2x, every
other row, on
both sides. Also,
when the piece is
12%" long, work %" of
ribbing on the right side
for the left shoulder,
making a buttonhole 1 Vi" and
2-%" in from the side edge. To make the
buttonholes, in a row on RS, yo in front
of a purl st, and k the next 2 st tog.
When the piece is 1316" long, bind
off the shoulder stitches at the right
shoulder.
Sleeves: Cast on 36 st and work in
ribbing for \V\". In the last row on
WS, increase 6 st evenly distributed
over the row (42 st).
17 19
ip^
CM
L
CM.
C\J
CO
15
CO
CO
I
CO '
"I
I-'
I 7
T^
12
/
/
/
6
/
r\i
I3I
I
14 I2I
Continue in stockinette stitch and
increase on both sides 1 st every
sixth row 2x, then 1 st every fourth
row 1 lx (68 st).
When the piece is 10%" long, bind
off all the stitches.
Finishing: Embroider the seahorses
on the front in duplicate stitch and
the lines in outline stitch. The center
of the front is indicated on the chart,
every box = 1 st.
Sew the right shoulder seam. On the
left shoulder attach the front facing
over the back facing. Then sew the
sleeves on and sew the side seams
and sleeve seams.
For the neckband, pick up
approximately 90 st from the neckline and
work in ribbing for -%". After V2" make
the third buttonhole 4 st in from the
front edec. Sew the buttons on.
<i
1
s
1'
^^
F
I
Center of front
203
Socks
Now well making the
rounds, because socks are
knit with a set of needles in
the round. Once you have
the hang of it, it's really very
simple. And since you need
at most 50 g (Pa oz) of yarn
per sock, you'll be done in
no time.
You should always use a yarn
that is machine washable and
very durable, such as Regia 4-
fadig made of 75% virgin wool and
25% polyamide, which we have iibed
here. This yarn is about 210 m (231
yds) per 50 g (1% oz) and is done on
size 2 double pointed needles
If you prefer cotton, try Schoeller
Esslinger's Fortissima Cotton, which
is 75% cotton. This yarn is also
reinforced with 25% nylon. It is
approximately 209 m (230 ydb) per 50 g (1%
oz), and is worked with the same size
needles.
Reinforcing the heel and the toe ib
a good idea, because the^e parts are
particularly subject to wear.
Reinforcement yarns are available in
many different colors.
Socks should be knit as tightly as
possible with an even gauge.
Normally, size 2 needles are the right size,
but if you knit very loosely, size 0
might be better. That is why you
should definitely knit a sample for
gauge.
Double pointed needles usually
come in a set of 5 needles.
Divide the stitches evenly
onto 4 needles. Change
rounds at the center in the
back: The heel is worked
over the first and fourth needle**. The
arch—the top of the foot—is worked
over the second and third needles.
Ribbing
Cuff
This sock was knit
with Regia 4-fadig.
You can find the
number of
stitches and
rows for
different sizes
in the table.
Toe
Gusset
Length from gusset pickup to toe
Heel
Turn
Size calculation
Total length of foot in inches
Stitches to cast on
Stitches for heel width
Rows for heel length
Stitches for turn
Stitches picked up on both sides
Length of foot from gusset
pickup to toe
5.8
44
22
20
7/8/7
11
2.6
6.2
48
24
22
8/8/8
12
2.8
6.8
48
24
22
8/8/8
12
3.4
7.2
52
26
24
8/10/8
13
3.6
7.8
52
26
24
8/10/8
13
4.2
8.4
56
28
26
9/10/9
14
4.6
8.8
56
28
26
9/10/9
14
5
9.4
60
30
28
10/10/10
15
5.4
10
60
30
28
10/10/10
15
6
10.6
64
32
30
10/12/10
16
6.2
11
64
32
30
10/12/10
16
6.6
11.4
68
34
32
11/12/11
17
6.8
12
72
36
34
12/12/12
18
7.2
204
Socks
The cast-on stitches are divided up
among the 4 needles of the set.
The round starts in the center, at
the back, between the first and
fourth needle.
Great for knee-high socks: A
rubber band can be inserted into
the band worked in stockinette
stitch.
The kitchener rib method of
casting on is also very good for
socks (see also page 207).
Ribbing
Work the ribbing either in I X I or 2
X 2 ribbing. Cast the stitches on
with 2 needles so that the edge is
stretchable and wide enough.
Casting on in kitchener rib (see
page 207) gives you a more stretch-
able edge. First cast on all the
stitches on 1 needle and then divide
the stitches up among the needles in
the first row, closing them into a
round in the second row. It might be
easier to cast on with yarn in a
different color: In the first row,
alternately knit 1 stitch out ot the
crochet chain, then work 1 yarn o\ er.
At the same time, divide the stitches
up onto the 4 needles.
For knee-high socks, I also
recommend a double band with picot edge
(pages 58-59) into which you can
put an elastic later. To make this
band, work about 8 to 1C rounds in
stockinette stitch on size 0 needles,
then an openwork round (alternately
knit 2 stitches together, yarn over),
then another 8 to 10 rounds in
stockinette stitch (in the first round,
knit all stitches and yarn overs). In
the next round, knit 1 stitch from
the needle together with 1 stitch of
the casting on, on the fourth needle;
leave the last 3 stitches open. Or you
can turn the band in later and sew it
on. Then continue with size 2
needles.
Cuff
If the cuff ib going to be worked in
stockinette stitch, you can continue
working with the same number of
stitches as for the ribbing. If you are
going to work in a pattern, any
change in the gauge has to be taken
into consideration. For cables,
stitches have to be added, and fewer
stitches might be enough for
openwork patterns.
The width of the pattern repeat is
also important. If, for example, you
have selected a pattern repeat of 6
stitches, and have cast on 60
stitches, the pattern repeat is worked
10 times. If you have 64 stitches, you
must increase 2 stitches for the cuff,
then decrease 2 stitches before you
start the heel.
TIP
In order not to have any
loose stitches at the
transition from 1 needle to
another, the first 2 stitches on
every needle have to be knit
especially tight (see also Tip
for more attractive edges,
page 29). Place the needles
so that the end of the used
needle lies on top of the
next one, and work
underneath the previous
needle with the new needle
Hold the needle on which
you are working between
your thumb and forefinger
in such a way that the
needle in front lies in
between.
205
Basic Patterns
For a reinforced heel, every other
stitch on the right side of the work
is slipped rather than worked.
T i
I*
Heel and turn are worked with the
first and fourth needles on the
right and wrong side of the work.
\
For the gusset pick stitches up
from the heel edges, then continue
working in rounds.
Hee
The heel and turn are worked with
the first and fourth needles. Tempo-
rarily put aside the stitches on the
second and third needle. The heel
and turn will wear better if you add a
reinforcement yarn.
The heel is worked in stockinette
stitch. If you wish, you can work the
first and last 2 or 3 stitches in garter
stitch. You can also work the turn
and heel on only 2 needles.
The heel length proportion is
always 2 rows less than the number
of stitches. For example, if you have
30 stitches, you will have 28 rows.
An additionally reinforced heel is
worked with slipped stitches. On the
right side of the work, alternately
knit 1 stitch and slip 1 stitch
purl wise. On the wrong side of" the
work, purl all the stitches.
Turn
For the turn, the heel stitches are
divided evenly onto 3 needles. For
example, if you have 30 stitches, put
10 stitches on each needle. You can
also leave all the stitches on 1
needle, but you won't work the outer
stitches. If the number of stitches is
not divisible by 3, put the extra
stitches tni the center needle.
Continue working back and forth:
CD
In the first row, slip the last stitch on
the second needle knitwise, knit the
first stitch on the third needle, and
pass the slipped stitch over. Turn the
work. In the second row (WS), slip
the first stitch purlwtse, purl the
following stitches, then purl the last
stitch on the second needle together
with the tirst stitch on the third
needle. Turn the work. In the third
row, slip the first stitch purlwisc,
work a single decrease over the last
stitch on the needle and the first
stitch of the third needle. Keep
repeating Rows 2 and 3 until all the
stitches on the first and third needles
have been used up. Put the
remaining stitches (here there are
10) onto 2 needles, at 5 stitches each
on the fourth and tirst needles.
Gusset
Knit the stitches on the fourth and
first needles, then pick up 1 stitch
every other row on the heel edge (in
the example, 28 rows were worked,
so 14 stitches will be picked up). To
prevent a hole from forming between
the heel and the cuff, increase 1
stitch knit twisted out of the
horizontal thread in the corner between the
edge of the heel and the cuff (15
stitches in total). Then work the
stitches on the second and third
needles. For the fourth needle, first
increase 1 stitch in the corner, knit
twisted, then pick up 1 stitch every
other row along the heel edge. Then
work the remaining 5 stitches. There
are now more stitches on the first
and fourth needles (20, in this case),
which will be reduced again as the
gusset decreases are made.
Now work 1 round using all the
stitches. The stitches on the first and
fourth needles should always be
worked in stockinette stitch, while
the stitches on the second and third
needles can be worked in a pattern.
In the next row, knit the second
and third to last stitches on the first
needle together for the decreases,
then knit the last stitch. On the
fourth needle, knit the first stitch,
slip the second stitch knitwise, knit
the third stitch, and pass the slipped
stitch over. Then work 2 rounds
without decreasing. Repeat these 3
rows until the original number of
stitches (here it is 15) on the first
and fourth needles has been reached
again. Work the desired length of the
foot.
206
Socks
Toe
For a banded toe, the decreases are
worked at the end of the first and
third needles and at the beginning of
the second and fourth needles:
On the first and third needles, work
to within 3 stitches from the end,
then knit 2 stitches together and knit
the last stitch. On the second and
fourth needles, knit 1 stitch, slip the
next stitch knitwise, knit the third
stitch, and pass the slipped stitch
over the third stitch.
In order to make the rounded part
as attractive as possible, evenly
reduce the number of rows: Work the
decreases, as described, lx in the
fourth round, then 2x in every third
round, 3x in every second round
and then in every round. Pull the last
8 stitches together with the working
yarn or place the stitches from the
top onto the bottom stitches and sew
them together using grafting stitch.
For children's socks, it is usually
enough if between decreases, 2
rounds using all the stitches are
worked lx and 1 round 2x to 4x.
Then decrease in every round.
>>..
A banded toe is the most attractive
finish.
Even nicer when you
cast on in kitchener
rib
fust as with neckbands, ribbing
for gloves, mittens, or socks can
••
be started b} casting on in
kitchener rib (page 22). You can
either start with a chain of
crochet stitches in a contrasting
yarn, or you can start with the
yarn you are going to use.
Using the actual yarn, you
cast on the required number of
stitches on 1 needle. Here, don't
1 s* ^ „
\ *.x
1 «
\ ^v
1 v"
use a smaller needle size;
otherwise, the ribbing edge becomes
too tight. In the first row, the
stitches are then divided up
amon" the i needles. Alternately
knit 1 stitch and slip the next
stitch purl wise. Each time you
have worked one-fourth of the
stitches, start a new needle.
Now work in rounds. In the
first round, all the knit stitches
are slipped purlwise, all the purl
stitches are purled. In the second
round, the knit stitches are knit
and the purl stitches are slipped.
\ \ <jC<*
i \ *t
it *
Then repeat the first round once
more. Now continue in the
ribbing pattern.
If you start with a row of
crocheted chain stitches in a
different color, you already
divide the stitches up among the
i needles in the first row:
Alternately knit 1 stitch out of
the horizontal back part of a
chain stitch, and work 1 yarn
over. Then continue with the
actual yarn.
V'\>. \
< * \
4 1
* 1
' "* " 1
207
Gloves and Mittens
You need a little dexterity
for knitting gloves, because
even the few stitches for the
fingers have to be worked
in rounds.
• * Y » _ • 1
' * *<?*.■-,: i .
*• -*w *.
_*.
/v.
4 -m ^ <
* .
"•*■
• . -■ , ■* . *■
t
:.■<"* -
**
— *v>
.^v
'«■*
Just like socks, gloves should be
knit relatively tightly. These
gloves were worked in pure
virgin wool of approximately 125 m
(1371/2 yds)/50 g (PA oz), on size 4
double pointed needles. The gauge is
26 stitches and 38 rows for a 4"
square.
For the right glove, work the palm
with the first and second needles, the
back of the hand with the third and
fourth needles. Reverse this for the
left glove. Since all the fingers are
worked symmetrically, only the
position of the thumb has to be
changed. Everything else is worked
the same way.
5/6/7/8 4/5/6/7
5/6/7/8 6/7/8/9
Pinkie
finger
1
3
-1-
Ring
finger
1
3
Middle
finger
T
3
-1-
Forefinger
5/6/7/8 4/5/6/7
5/6/7/8 6/7/8/9
The gloves are described in size 7.
All information for sizes 6,7, 8,
and 9 (for yarns with a gauge of 26
stitches and 38 rows = 4") is
contained in the table.
Glove size
Hand circumference in inches
Stitches to cast on
Stitches for thumb gusset
Stitches for thumb fourchette
Length of pinkie finger
Length of ring finger
Length of middle finger
Length of forefinger
Length of thumb
6
6.8
40
13
7
2
2.4
2.6
2.4
2
7
7.6
48
13
7
2.4
2.8
3
2.8
2.2
8
8.8
56
15
9
2.8
3.2
3.4
3.2
2.4
9
9.6
64
17
9
3.2
3.6
3.8
3.6
2.6
Ribbed Cuff
Cabt on 48 st with size 3 needles (see
also casting on in kitchener rib, page
207) and divide the stitches evenly
among the 4 needles of the set (12 st
per needle). Work the cuff to the
desired length. However, it should be
at least iVi long. If you tend to knit
ribbing very tightly, or if you want to
turn the cuff over, you can also cast
on a few stitches more and knit 2
stitches together several times in the
first row of stockinette stitch.
Then continue in stockinette stitch
cm size 4 needles.
Thumb Gusset
After 2 rounds, start with the
increase^ for the thumb gusset. On
the first needle, knit 2 stitches.
Before and after the third stitch, inc
1 stitch knit twisted out of the
horizontal thread. Then work 3
rounds without increasing. In the
fourth round, inc 1 stitch on both
sides of the increased stitch. Repeat
these increases every fourth
round 4 more times (13
stitches for the thumb
gusset). After the last round
of increasing, work another 3
round, then put the 13
thumb stitches onto a stitch
holder.
For the left glove, work to
within 3 stitches before the
end of the fourth needle for
the thumb gusset, then work
the increases before and after the
third to last stitch.
Thumb Fourchette
Above the thumb stitch on the stitch
holder, cast on a fourchette of 7
stitches. End the round and work
another round over all the stitches.
In the next round, work decreases
over the 7-st fourchette as follows:
Slip the first fourchette stitch
knitwise, knit the second fourchette
stitch, and pass the slipped stitch
over. Knit the next 3 stitches and
knit the last 2 stitches together. In
the next round, repeat the decreases.
Then work 1 round without
decreases and in the next round, slip
the first of the last 3 fourchette
stitches knitwise, knit the next 2
stitches together, and pass the slipped
stitch over. Now you have the
original 12 st on the first needle
again.
Continue evenly up to the little
finger.
v * « • »
^\
*1 '- t
'»*«
•'.V ■•.
}
* <
208
Gloves and Mittens
'i,,*:.;;t!«i».
Pinkie Finger
When the glove is long enough for
the pinkie finger, work to within 6
stitches from the end oi the second
needle. Now work the last 6 stitches
on the second needle and the first 6
stitcher on the third needle on extra
needle with a new piece of yarn. Cast
on 3 stitches as the fourchette from
the hack of the glove to the palm.
Divide these 15 stitches among 3
needles, 5 stitches on each, and work
in the round in stockinette stitch.
When the finger is about 2" long, try
the glove on. Starting about V21 before
the fingertip, knit the last 2 stitches on
each needle together. Work these
decreases until only 6 stitches are left
in total. Cut off the yarn and draw the
6 stitches together with the varn.
Now, using the previous yarn, work
3 stitches out of the fourchette, then
work about 3 rounds over all the
stitches to the ring finger.
Ring Finger
Work to within 5 stitches from the
end of the second needle. With a new
piece of yarn, work the last 5 stitches
on the second needle, the 3 stitcher
of the fourchette, and the first 5
stitches on the third needle on extra
needle with a new piece of yarn. Cast
on 3 stitches as the next fourchette.
Divide these 16 stitches among 3
needles, (5/5/6 stitches), and work in
round in stockinette stitch for about
2Vi". Slip the last stitch from the
second and third needles onto the
first and fourth needles, respectively.
Work the tip as for the pinkie
finger. Since there is 1 stitch less on 2
needles, don't knit any stitches
together on the^e needles in the first
dec round. Draw the last 6 stitches
together with the working yarn.
Middle Finger
Put the first 7 stitches from the first
needle and the last 7 stitches from
the fourth needle on a stitch holder
for the forefinger.
Knit the 6 stitches on the back of
the glove, knit 3 stitches from the
fourchette of the ring finger, knit the
next 6 stitche.s on the palm, and cast
on 3 stitches tor the next fourchette.
Divide these IS stitches among 3
needles and end the middle finger
like the pinkie finger.
Forefinger
Knit 3 stitches from the fourchette,
then knit the remaining 14 stitches.
Divide die>e 17 stitches among 3
needles (5/6/6 stitches), and finish
the forefinger like the other fingers.
Thumb
In addition to the 13 thumb stitches
from the stitch holder, knit another 7
btitches from the fourchette. To
prevent a hole from forming, knit the
first and last stitches twisted from the
horizontal thread next to the thumb
stitch. Divide these 20 stitches
among 3 needles (6/7/7 stitches).
Knit in round over all the stitches.
When the thumb is 2" long, work the
tip as for the other fingers.
1
*
* >
>
1
1
•
j
»
J
» - •
» - • 4
• •'. »-
.*
.*«.
■wo
•w
v.
o-v»
' * . * . •
*■ . . - *
*
. • 1
v\
Mittens
Mittens are started just
like gloves. After the / ' s^
thumb fourchette, continue
working over the 48 stitches
to the end of the pinkie finger. Then
start the decreases tor the banded tip.
For the banded tip, knit 1 stitch an
thu first needle, slip the second stitch
knitwise, knit the third stitch, and
pass the second stitch over it. Work to
within 3 stitches before the end of the
second needle, then knit 2 stitches
together and knit the last stitch. Work
the decrease on the third needle as on
the first needle, and on the fourth
needle as on the second needle.
Repeat these decreases every other
round until only half the stitches arc
left on the needle, then work the
decreases in every round until only 8
stitches in total are left.
Place the remaining stitches of the
right band flat onto those of the left
band and sew them together using
grafting stitch.
-. S;
X
v "
V
\
TIP
Since the last 6 stitches of
the fingertips are drawn
together using the working
yarn, the stitches should not
be too large. For this reason,
work the last round of
decreases with a needle one
size smaller than that used
for the other rounds.
209
\
< TV
«
i
' X
.>
A
M
.V
.f
1 « y,
X
L
-%*
.^ .
\
»*
> -^
1 *
t
r
*\
\
^
~*v
.\
A
V
I .
• \.
}-
*-.
•s. *■-
This chapter contains the
pattern charts for all the
patterns in this book as
well as a great many
other beautiful patterns.
Shaker Knitting
T-r—i —
1 '» ;
■i t '
> i '
• •>
»
t «
a
)
- >
ij'
v
s
,v
V ».
•I .
> 1
i
I *
r
■I
» s I
• t ' '
\ '
• *
*
t
• »
« *
» *
• • »
t ,
v.
\
»
• 1 ■> t !♦
t i
a '
r
► i
1 •
1 i *
1 I ,»' '
» »
% * »
I 1
Y
— v
; •• ■
•
* v *
* * i
«
* * »
• • \
»
v
«
i f
■■'"J- *
\i
■< V ' . • • « ; f
* I it a■ > * »
•0 •
4
* I
. J
V* f
\
1 S
V
v
J * i
' I . *,
• t
1 i
• •
■ i
AL±.
—
—
—
—
—
—
—
—
—
—
—
—
—
—
—
—
—
—
—
—
A
A
A
A
A
A
A
A
A
A
A
A
A
A
A
A
A
A
A
A
—
—
—
—
—
—
—
—
—
—
—
—
—
—
—
—
—
—
—
—
A
A
A
A
A
A
A
A
A
A
A
A
A
A
A
A
A
A
A
A
—
—
—
—
—
—
—
—
—
—
—
—
—
—
—
—
—
—
—
—
A
A
A
A
A
A
A
A
A
A
A
A
A
A
A
A
A
A
A
A
—
—
—
—
—
—
—
—
—
—
—
—
—
—
—
—
—
—
—
—
A
A
A
A
A
A
A
A
A
A
A
A
A
A
A
A
A
A
A
A
—
—
—
—
—
—
—
—
—
—
—
—
—
—
—
—
—
—
—
—
->
—s
—
—
—
—
—
—
—
—
—
—
—
—
—
y
\
A
A
A
A
A
A
A
A
A
A
A
A
A
A
A
—
—
—
—
—
—
—
—
—
—
—
—
—
—
—
A
A
A
A
A
A
A
A
A
A
A
A
A
A
A
—
—
—
—
—
—
—
—
—
—
—
—
—
—
—
—
—
—
—
—
A
A
A
A
A
A
A
A
A
A
A
A
A
A
A
—
—
—
—
—
—
—
—
—
—
—
—
—
—
A
A
A
A
A
A
A
A
A
A
A
A
A
A
A
—
—
—
—
—
—
—
—
—
—
—
—
—
_j
—i
—
i—
>
—
—
—
—
—
—
—
—
—
—
—
—
—
—
—
—
—
—
—
—
26-st repeat
A
A
A
A
A
A
A
A
A
A
A
A
A
A
A
A
A
A
A
A
—
—
—
—
—
—
—
—
—
—
—
—
—
—
—
—
—
—
—
—
A
A
A
A
A
A
A
A
A
A
A
A
A
A
A
A
A
A
A
A
—
—
—
—
—
—
—
—
—
—
—
—
—
—
—
—
—
—
—
—
A
A
A
A
A
A
A
A
A
A
A
A
A
A
A
A
A
A
A
A
—
—
—
—
—
—
—
—
—
—
—
—
—
—
—
—
—
—
—
—
A
A
A
A
A
A
A
A
A
A
A
A
A
A
A
A
A
A
A
A
—
—
—
—
—
—
—
—
—
—
—
—
—
—
—
—
—
—
—
—
39
37
35
33
31
29
27
25
23
21
19
17
15
13
11
9
7
5
3
1
On WS, work all stitches as they lie.
Repeat Rows 1 to 40.
212
Shaker Knitting
vf V A^irM/-
v
—
—
—
—
—
—
—
—
—
—
—
—
—
—
—
—
—
—
—
—
V
V
V
V
V
V
V
V
V
V
V
V
V
V
V
V
V
V
V
V
1
A
—
—
—
—
—
—
—
—
—
—
—
—
—
—
—
—
—
—
—
V
A
V
V
V
V
V
V
V
V
V
V
V
V
V
V
V
V
V
+
1
—
V
A
—
—
—
—
—
—
—
—
—
—
—
—
—
—
—
X
V
V
—
V
A
V
V
V
V
V
V
V
V
V
V
V
V
V
+
V
—
1
—
V
—
V
A
—
—
—
—
—
—
—
—
—
—
—
X
V
—
V
V
—
V
—
V
A
V
V
V
V
V
V
V
V
V
+
V
—
V
—
1
X
V
—
V
—
V
A
—
—
—
—
—
—
—
X
V
—
V
—
V
V
+
V
—
V
—
V
A
V
V
V
V
V
+
V
—
V
—
V
A
1
—
—
X
V
—
V
—
V
A
—
—
—
X
V
—
V
—
V
A
—
V
V
V
+
V
—
V
—
V
A
V
+
V
—
V
—
V
A
V
V
1
—
—
—
—
X
V
—
V
—
V
X
V
—
V
—
V
A
—
—
—
V
V
V
V
V
+
V
—
V
—
V
—
V
—
V
A
V
V
V
V
1
—
—
—
—
—
—
X
V
—
V
—
V
—
V
A
—
—
—
—
—
V
V
V
V
V
V
V
+
V
—
V
—
V
A
V
V
V
V
V
V
1
—
—
—
—
—
—
—
—
X
V
—
V
A
—
—
—
—
—
—
—
V
V
V
V
V
V
V
V
V
+
V
A
V
V
V
V
V
V
V
V
1
—
—
—
—
—
—
—
—
—
—
A
—
—
—
—
—
—
—
—
—
V
V
V
V
V
V
V
V
V
V
V
V
V
V
V
V
V
V
V
V
1
i o-si ic|jt;cii
—
—
—
—
—
—
—
—
—
—
—
—
—
—
—
41
39
37
35
33
31
29
27
25
23
21
19
17
15
13
11
9
7
5
3
1
On WS, work all stitches as they lie.
After Rows 1 and 2, repeat Rows 3 to 42.
—
—
—
—
—
—
—
—
—
—
V
V
V
V
V
V
V
V
V
V
1
—
A
—
—
—
—
—
—
—
—
V
—
A
V
V
V
V
V
V
V
1
—
V
—
A
—
—
—
—
—
—
V
—
V
—
A
V
V
V
V
V
1
—
V
—
V
—
A
—
—
—
—
V
—
V
—
V
—
A
V
V
V
1
—
V
—
V
—
V
—
A
—
—
V
—
V
—
V
—
V
—
A
—
—
+
X
+
X
+
X
+
X
—
V
V
V
V
V
V
V
V
V
V
1
—
+
X
+
X
+
X
+
X
—
V
—
V
—
V
—
V
—
A
—
—
V
—
V
—
V
—
A
—
—
V
—
V
—
V
—
A
V
V
V
1
20-st repeat
—
V
—
V
—
A
—
—
—
—
V
—
V
—
A
V
V
V
V
V
1
—
V
—
A
—
—
—
—
—
—
V
—
A
V
V
V
V
V
V
V
1
—
A
—
—
—
—
—
—
—
—
V
V
V
V
V
V
V
V
V
V
1
—
—
—
—
—
—
—
—
—
—
On WS, work all stitches as they lie.
After Rows 1 and 2, repeat Rows 3 to 22.
—
—
—
—
—
—
—
—
—
—
—
—
—
—
—
—
V
V
V
V
V
V
V
V
V
V
V
V
V
V
V
V
1
X
+
X
+
X
+
X
—
—
—
—
—
—
—
—
—
V
—
V
—
V
—
A
—
A
V
V
V
V
V
V
V
1
—
V
—
V
—
A
—
—
—
A
—
—
—
—
—
—
V
—
V
—
A
V
V
V
V
—
A
V
V
V
V
V
1
—
V
—
A
—
—
—
—
—
V
—
A
—
—
—
—
V
—
A
V
V
V
V
V
V
—
V
—
A
V
V
V
1
—
A
—
—
—
—
—
—
—
V
—
V
—
A
—
—
A
V
V
V
V
V
V
V
V
—
V
—
V
—
A
—
—
—
—
—
—
—
—
—
X
+
X
+
X
+
X
—
V
V
V
V
V
V
V
V
V
V
V
V
V
V
V
V
1
—
—
—
—
—
—
—
—
X
+
X
+
X
+
X
—
A
V
V
V
V
V
V
V
V
—
V
—
V
—
A
—
—
A
—
—
—
—
—
—
—
V
—
V
—
A
—
—
V
—
A
V
V
V
V
V
V
—
V
—
A
V
V
V
1
—
V
—
A
—
—
—
—
—
V
—
A
—
—
—
—
V
—
V
—
A
V
V
V
V
—
A
V
V
V
V
V
1
—
V
—
V
—
A
—
—
—
A
—
—
—
—
—
—
V
—
V
•—
V
—
A
—
A
V
V
V
V
V
V
V
1
X
+
X
+
X
+
X
—
—
—
—
—
—
—
—
—
V
V
V
V
V
V
V
V
V
V
V
V
V
V
V
V
1
£u-si repeal
—
—
—
—
—
—
—
—
—
—
—
—
—
—
—
—
On WS, work all stitches as they lie.
After Rows 1 and 2, repeat Rows 3 to 34.
21
19
17
15
13
11
9
7
5
3
1
33
31
29
27
25
23
21
19
17
15
13
11
9
7
5
3
1
213
Cables
15
13
11
9
7
5
3
1
On WS, work all stitches as they lie.
Repeat Rows 1 to 16.
- -v
V
v
16-st repeat
*■
—
—
—
—
—
—
—
—
/
/
/
—
—
—
—
—
—
—
'—
'
f
—
—
—
—
—
/
N
'
V
~—
—
—
—
—
—
—
—\
^
^-v
—
—
s
\
i
—
—
—
—
—
—
/
1
/
—
'
1—
'—
—s
/
8-st repeat
1,.
'
—
—
—
—
—
—
—*
V
*
—
—
—
—
—
—
\
V
\
—
—
—
—
—
—
—
—
—
—
—
—
—
23
21
19
17
15
13
11
9
7
5
3
1
On WS, work all stitches as they lie.
Repeat Rows 1 to 24.
—
—
—
—
—
—
—
—
—
—
—
—
—
—
—
—
—
^~"
—
—
—
~~1
—v
N
—s
—
—
—
'
■
V
—
V
—
./
—
—
—
—
*
—
f
"™~
\
>
—>
——
">
>
—
'
—
~
~
I—
—
_, j
—
—
V
~~
\
N
—
t
—
—
—
s
V .
—
—
—
—
/
J
'
—
—
—
^~
t
1
1—
N
~~1
\
\
\
'
—
\
V
>
/
■
>
20-st pattern
^_
r
—
c~~
d
■N
—
/
^-~
^
—
—
—
—
'
—
—
—v
~
~~'/
""/
l
l
t
—
—
27
25
23
21
19
17
15
13
11
9
7
5
3
1
On WS, work all stitches as they lie.
After first 2 rows, repeat Rows 3 to 28.
= put 2 st on 1 cable needle in back, 2 st on
second cable needle in back, k2, purl the 2
purl st on the second cable needle and
knit the 2 st on the first cable needle.
= put 2 st on 1 cable needle in front, 2 st on
second cable needle in front, k2, purl the
2 purl st on the second cable needle and
knit the 2 st on the first cable needle.
i
\
214
Cables
—
—
—
—
—
—
—
—
—
—
—
—
—
—
—
—
—
—
—
—
—
—
—
—
—
—
—
—
—
—
—
—
—
—
—
—
—
—
—
—
—
—
s
N
^ .
\
■^j
t
^_
'
v
—
—
—
—
22J
* '
V
—
—
*~
—
—
—
—
—
^
^
—
—
—
—
V
^
—
—
—
—
—
—
—
—
—
.=
—>
k
—
—
—
—
—
—
k.
—
—
—
—
—
—
—
ZZJ
r-
\
—
—
/
—
zz
-\
—
—
—
—
/
—
—
34-st repeat
—
—
■ ■
~N
f—
—
—
—
—
—
—
JZ
■\
—
—
—
—
—
—
—
—
—
v
v
—
—
—
—
—
\
1,
—
—
—
—
—
—
—
—
—
—
—
—
—
—
—
—
—
—
—
—
—
—
—
—
—
—
—
—
—
—
—
—
—
—
—
—
—
—
—
—
—
—
On WS, work all stitches as they lie.
Repeat Rows 1 to 28.
27
25
23
21
19
17
15
13
11
9
7
5
3
1
—
—
—
—
—
—
—
—
—
—
—
—
—v
V
-
/
—s
V
J
21-st repeat
r-
—
—
—
—
—
—
—
—
—
—
—
—
7
5
3
1
On WS, work all stitches as they lie.
Repeat Rows 1 to 8.
24
22
20
18
16
14
12
10
8
6
4
2
—
—
—
—
—
—
—
—
—
~
—
—
—
—
—
—
—
—
—
—
—
—
—
—
—
—
—
—
—
—
—
—
—
—
—
—
—
—
—
—
—
—
—
—
—
—
—
—
—
—
—
—
—
—
—
—
—
—
—
—
"
—
—
—
—
—
—
—
—
—
—
—
—
—
—
—
—
—
—
—
—
—
—
—
—
—
—
—
—
—
>
—
—
—
—
—>
—
—
—
—
—
—
—
/
—
—
—
—
—
^
—
—
—
—
—
—
—
—
—
—
—
—
—
—
—
—
—
—
—
—
—
—
—
—
—
—
—
—
—
—
—
—
—
—
—
—
—
—
—
—
—
—
—
—
—
—
—
—
—
—
—
—
—
—
v
—
—
—
—
—
J
—
—
—
—
—
—
—
k
—
—
—
—
—
r_"
—
—
—
—
—
—
—
—
—
—
—
—
—
—
—
—
—
—
—
—
—
—
—
—
—
—
15-st pattern
—
—
—
—
—
—
—
—
^1
—
^
—
—
—
—
—
—
—
—
—
—
—
—
—
—
—
—
—
—
—
—
—
—
—
—
—
—
—
—
—
—
—
—
—
—
—
—
—
—
—
—
—
—
—
—
—
—
—
—
—
23
21
19
17
15
13
11
9
7
5
In this pattern,
the stitches on
RSand WS
rows are
shown the
way they
appear on the
right side of
the work.
Repeat Rows 1
to 24.
C-. — _
i 4 i
— \
= put 3 st on cable needle behind work, p1, k1,
p1, then knit the stitches on cable needle.
= put 3 st on cable needle in front of work, k1, p1,
k1, then knit the stitches on cable needle.
215
Stitch Patterns
—
—
—
—
—
—
—
—
—
—
—
—
'
/
^
V
— 8-st cable —
—
—
—
—
—
—
—
—
—
—
—
—
>
—s
•6-s
s
s
it(
/
/
:a
<
i—
blc
5 •
—
—
—
—
—
—
—
—
—
—
—
—
-v
V
1
'
— 8-st cable —
—
—
—
—
—
—
—
—
—
—
—
—
7
5
3
1
On WS, work all stitches as they lie.
Repeat Rows 1 to 8.
Pattern on page 132.
—
—
—
—
—
—
—
—
—
s
V
V
V.
N.
V
\
-/
1
t
<
1
>
lU-oi i/duic
_ J
'
1
1
i
t—
- ■>
V
V
\
—\
>>_
~ ID'iJl OdUlfc!
—
—
—
—
—
—
—
—
—
5 On WS, work all stitches as they lie.
1 Repeat Rows 1 to 6.
Pattern on page 135.
—
—
—
—
—
—
—
—
—
—
—
—
—
—
—
—
—
—v
—v
\
V
1
4
'
'
— 8-st cable —
—
-
/
r
'
—v
—N
\
\
— 8-st cable —
—
—
—
—
—
—
—
—
—
—
—
—
—
—
—
—
—
—
j
—s
'—
V
N
/
s
'
— 8-st cable —
—
—
—
—
—
—
—
—
—
—
—
—
—
—
—
—
11
9
7
5
3
1
On WS, work all stitches as they lie.
Repeat Rows 1 to 12.
Pattern on page 132.
216
Cables
—
—
—
—
—
—
—
—
—
—
—
—
—
—
—
—
—
—
—
—
—
—
—
—
—
—
—
—
—
—
8
-s
/
/
tc
'
'■
at
)le
-
—
—
—
—
—
—
—
—
—
—
—
—
—
—
—
—
—
—
—
—
—
—
—
—
—
—
—
—
—
—
■e
*
—\
*
^
^->
<
3-s
^_
^_
\_
;tc
_,
_,
_,
:a
>—
/—
>—
r
r
>
blc
i ■
—
—
—
—
—
—
—
—
—
—
—
—
—
—
—
—
—
—
—
—
—
—
—
—
—
—
—
—
—
—
-
s
■ N
/
/
I
\
\
'
f
3-S
;t<
:a
/
/
>
—v
blc
/—
>
s
^
3
-
—
—
—
—
—
—
—
—
—
—
—
—
—
—
—
—
—
—
—
—
—
—
—
—
—
—
—
—
—
—
9
7
5
3
1
9
7
5
3
1
On WS, work all stitches as they lie.
Repeat Rows 1 to 20.
Pattern on page 132.
—
—
—
—
—
—
—
—
V
\...
/
>
N
\
..>
■6-st repeat ■
Smallest pattern width
= 15 st
'
—
—
—
—
—
—
—
—
7
5
3
1
On WS, work all stitches as they lie.
Repeat Rows 1 to 8.
Pattern on page 135.
—
—
—
—
—
—
—
—
—
—
—
—
—
—
—
—
—
—
- I
6-s
f
. i
itc
'
f
:at
)le
—
—
—
—
—
—
—
—
—
—
—
—
—
—
—
—
—
—
—
—
—
—
—
—
- 1
5-s
^
/
;tc
\
i—
:at
)le
—
—
—
—
—
—
—
—
—
—
—
—
—
—
—
—
—
—
—
—
—
—
—
—
-
B-s
V
N
;tc
\
s
:at
)le
—
—
—
—
—
—
—
—
—
—
—
—
—
—
—
—
—
—
11
9
7
5
3
1
On WS, work all stitches as they lie
Repeat Rows 1 to 12.
Pattern on page 132.
217
Openwork Patterns
II
II
0
o
o
o
II
o
II
o
II
o
II
o
II
o
ll
*
<r
<r
<r
*
^
*
^
<r
ii
o
ii
o
ii
o
ii
14-st repeat
o
ii
o
II
o
o
o
o
II
II
II
19
17
15
13
11
9
7
5
3
1
On WS, work all stitches as they lie, knit the garter
stitches and purl the yarn overs.
Repeat Rows 1 to 20.
Openwork pattern with points on page 57.
M
'k t
*
*
/*
'i
.«''■'■
I'
ft
V.
■■■'.'*
U
it 4
.' I'1
■; i
.-»
&
#
—
kOkO
o^o^
10-st repeat
—
—
—
3
1
On WS, work all stitches as they lie,
purl yarn overs.
Repeat Rows 1 to 4.
2 -
—
1
■
L
—
5-s
O
O
Jtr
1
A
ep
—
1
■
On RS and WS, the stitches are
shown in the pattern chart the way
they are worked.
Repeat Rows 1 and 2.
.
r
, c
■r
If -»"
*
•r- '
^
i
* *
c •
•
«**■
,
*
\
■V
<r~
.
*
•
>
#
#
•
*
X
<r
r
r
■r
i
*■•
•^
X
5*
*
s
,
.J
^*.
^
1
—7—
4
^
*
»
I
-r
,*
«
*-
-
^
n
\/
4/
4-st rep
5
3
1
On WS, purl all stitches.
After the first 2 rows, repeat Rows 3 to 6.
= work 3 stitches over 1
st: k1, pi, l<1.
218
Openwork Patterns
K
w * --if -•■ .-
j- ■** *
■V
V
w \ -v.
V k-.>
■*\
A
A
A
A
A
A
O
11
II
II
II
II
O
o
II
II
II
II
o
II
o
II
II
II
o
II
II
o
II
II
o
II
II
II
o
II
o
II
II
II
II
o
o
II
II
II
II
II
^
^
t
*
^
o
o
II
II
II
II
Is II
o
II
o
II
II
II
II
o
II
II
o
II
II
II
o
II
II
II
o
II
II
o
II
II
II
II
o
II
o
II
II
II
II
II
o
14-st
T
<r
<r
<r
<r
<r
o
II
II
II
ll
II
o
O
ll
II
ll
II
o
II
o
II
II
II
o
II
II
repeat
o
II
II
o
II
II
II
o
II
o
II
II
II
II
o
o
II
II
II
II
II
1
^
^
^
o
o
II
II
II
^ II
^ II
o
II
o
II
II
II
II
o
II
II
o
II
II
II
o
II
II
II
o
II
II
o
II
II
II
II
o
II
o
II
II
II
II
II
o
A
A
A
A
A
A
23
21
19
17
15
13
11
9
7
5
3
1
On WS, work all stitches as they lie, knit the garter
stitches, and purl the yarn overs.
Repeat Rows 1 to 24.
Openwork pattern with garter stitch on page 57.
T"
i
ft ■.
> 'll.. -TV
ikP"
jk*
-#*"
AAAO
0
0
0
0
17-st repeat
OAAA
3
1
On WS, purl all stitches and yarn overs.
Repeat Rows 1 to 4.
0
0
A
8
O
A
-St
<r
Xi
O
k.
3P
0
k.
ea
0
t
—
5
3
1
On WS, purl all stitches and yarn overs.
Repeat Rows 1 to 6.
Arrowhead lace pattern on page 136.
>• *
t
•*
+)
t •
i
^ • \
4 a S
■• /
h '
.<,
1
V
\
•a
l\ v
, I v
1
>
\ «
n l
5 j i
*
. A • ' "
0
7
A
r-S
tr
L.
ep
0
)
-
3
1
On WS, purl all stitches and yarn overs.
Repeat Rows 1 to 4.
Vertical openwork stripes on page 137.
219
Stitch Patterns
• V
*
v\ ~*
•* I
. S 1
s
»
"^
■
1
1
1
* *
•
*
i
■
V
& •
i-
X
«i.V
w ~.->^*^.
'U&58S&A
o
o
o
o
o
o
o
o
o
o
o
o
o
o
*
^
*
^
*
^
^
^
^
*
^
^
^
^
o
o
o
o
o
o
o
o
o
o
o
o
o
o
■
■
m
■
■
■
■
■
■
■
II
II
II
■
■
■
■
■
■
■
■
■
II
II
II
II
II
II
II
II
II
->
-►
-►
II
II
II
x
m
■
■
■
■
■
■
■
■
ii
ii
ii
ii
■
■
■
■
■
■
■
■
■
■
ii
ii
ii
iO
o
IO
o
H
\o
IO
o
o
o
o
o
o
o
*
^
^
^
^
^
^
^
^
^
^
^
*
^
o
o
o
o
o
o
o
o
o
o
o
o
o
o
■
■
■
II
II
II
■
■
■
■
■
■
■
■
■
II
II
II
II
■
■
■
■
■
■
■
■
II
II
II
II
II
-»
-►
-►
II
II
II
■
II
II
II
II
II
■
■
II
II
II
II
■
■
■
■
■
■
■
■
■
■
II
II
II
■
■
■
■
■
■
■
O
O
O
O
O
O
O
O
O
O
O
O
O
O
+
^
^
^
+
^
^
^
*
^
+
*
+
^
o
o
o
o
o
o
o
o
o
o
o
o
o
o
■
■
■
■
■
■
■
■
■
■
II
II
II
■
■
■
■
■
■
■
■
■
II
II
II
II
^
-►
-►
II
II
II
2.
o-si repeal
m
■
■
■
■
■
■
■
■
II
II
II
II
■
■
■
■
■
■
■
■
■
■
II
II
II
o
o
o
o
o
o
o
o
o
o
o
o
o
o
^
^
^
-r
+
*
*
*
*
*
^
^
^
T*
o
o
o
o
o
o
o
o
o
o
o
o
o
o
29
27
25
23
21
19
17
15
13
11
9
7
5
3
1
On WS, work all stitches as they lie, purl the yarn overs and
knit the garter stitches.
After the first 2 rows, repeat Rows 3 to 30.
work 7 stitches in 1 st: alternately k1, yo,
end with k1. On WS, knit all stitches.
7
H = k3tog, on WS k1.
—
—
—
—
—
—
—
—
—
—
—
—
—
k.
—
—
—
—
—
—
—
k.
—
—
—
k.
—
—
—
—
—
—
—
k.
—
—
k.
—
—
—
—
—
—
k.
o
—
k.
—
—
—
—
o
—
k.
o
—
k.
—
—
—
—
o
—
k.
o
—
k.
—
—
—
o
—
k.
o
—
k.
—
o
—
—
o
—
—
—
—
o
—
—
o
—
o
o
—
—
—
—
—
—
—
—
—
—
o
o
—
—
—
o
—
—
o
—
o
—
—
o
—
—
o
—
A
o
—
A
—
—
o
—
A
o
—
A
—
—
23-st repeat
o
—
A
o
—
A
—
—
—
—
A
o
—
A
—
—
—
—
—
A
—
—
A
—
—
—
—
—
A
—
—
—
A
—
—
—
—
—
—
—
—
—
A
—
—
—
—
—
—
—
—
—
—
—
—
—
—
—
—
—
—
21
19
17
15
13
11
9
7
5
3
1
On WS, work all stitches as they lie, purl the yarn overs.
Repeat Rows 1 to 22.
—
—
—
—
—
A
—
—
—
—
—
—
—
—
—
—
—
O
A
—
—
—
—
—
—
—
—
—
O
/
/
O
A
—
—
—
—
—
—
—
O
A
r
'—
o
A
—
—
—
—
—
O
A
O
—
—
—
—
o
A
—
—
—
—
—
—
—
—
—
—
—
—
—
->
—
—
—
O
—
—
—
—
o
k.
1
*
o
A
—
—
—
—
—
o
k.
\
\
o
A
—
—
—
—
—
—
—
o
k.
o
A
—
—
—
—
—
—
—
—
—
o
—
—
—
—
A
—
—
—
—
—
—
—
A
—
—
—
—
—
—
—
—
—
—
O
O
A
—
—
—
—
—
—
—
—
o
A
>
. /
O
A
—
—
—
—
—
—
O
A
i—
f
O
A
—
—
—
—
O
A
O
—
—
—
—
->
—
—
—
—
—
—
—
—
—
—
—
—
—
—
—
—
o
k.
o
—
—
—
—
—
o
k.
V
N
O
A
—
—
—
—
—
—
O
k.
\
\
o
A
—
—
—
—
—
—
—
—
O
o
A
—
—
—
—
—
—
A
—
—
—
—
—
—
—
A
—
—
—
20-st repeat
O
A
—
—
—
—
—
—
—
—
—
O
i
t
o
A
—
—
—
—
—
—
—
O
A
i
i
o
A
—
—
—
—
—
O
A
O
—
—
—
—
o
A
—
—
—
—
—
—
—
—
—
—
—
—
—
->
—
—
—
O
—
—
—
—
o
k.
—v
■N
o
A
—
—
—
—
—
O
k.
*
i
o
A
—
—
—
—
—
—
—
O
k.
o
A
—
—
—
—
—
—
—
—
—
O
—
—
—
—
—
A
—
—
—
—
—
—
—
—
—
—
—
35
33
31
29
27
25
23
21
19
17
15
13
11
9
7
5
3
1
On WS, work all stitches as they lie, purl the yarn overs.
Repeat Rows 1 to 36.
220
Openwork Patterns
1* &. fr
n
W MRi. ft" '^fc. ' ' A
\
w
■7
i >
f1 V-
A. P •*- M'
K
iV
>i'
»»
A
^
A
A
A
A
A
A
A
A
A
A
A
O
O
o
o
o
o
o
o
o
o
o
o
o
o
o
o
o
o
o
o
o
o
o
o
^
^
/N
^
^
^
*
^
^
T*
^
o
^o
o
o
o
o
o
o
o
o
o
o
o
o
o
o
O
O
O
O
O
o
o
o
^
*
^
*
^
^
^
^
*
^
^
^
o
o
o
o
o
o
o
o
o
o
o
o
o
o
o
o
o
o
o
o
o
o
o
o
t
-t
-T
t
/|s
-r
^
*
-r
\
Is
Is
io-t>i lepecu
o
o
o
o
o
o
o
o
o
o
o
o
o
o
o
o
o
o
o
o
o
o
o
o
k.
k.
k.
k.
k
k.
k.
k.
k.
k.
k.
k.
On WS, purl all stitches and yarn overs.
Repeat Rows 1 to 24.
23
21
19
17
15
13
11
9
7
5
3
1
» »
—
—
„c
k.
)-S
o
o
tr
A
ep
—
—
) ■
3
1
On WS, purl all stitches
and yarn overs.
Repeat Rows 1 to 4.
Openwork stripe on page
137.
i
.* 'V-.V\l >,\ ->y .y
, »s i \ a .,i .n s
8
6
4
2
—
—-
1
—
1
1
—
_—
—
1
—
1
—
1
—
—s
1
—
™~
1
O
Y
1
—
1
—
*-—
1
—
H
1
—
1
o
y
i
—
—v
1
—
_—.
1
V
o
V
i
—
i
-st
—
1
—
—s
1
re
—
1
O
y
i
■
p
—
—v
1
—
1
1
o
y
i
—
i
i
7
5
3
1
—
—
—
—
■ c
k.
)-S
O
O
tr
A
ep
—
—
—
—
) ■
7
5
3
1
On WS, purl all stitches
and yarn overs.
Repeat Rows 1 to 4.
Openwork stripe on
page 137.
On RS and WS, the stitches are shown
in the pattern chart the way they are
worked.
Repeat Rows 1 to 8.
E
^Y
slip 1 st knitwise, knit the
next 3 st, and pass the
slipped st over.
221
Twisted Stitches
• « . 4. * • * . » A ' ft - »
.... > Wi i. ...
. * % * *: •
^ * ft * ft
* *- ' . * '» * . ,
< '* *. i r- -' *: ' ; '
\ • - -
• * . * - • • i i ■ V '
* ' * ' * i ' ', * to l' * 1 .
ft. .» * . •»*.» fc 1 * ■ ft •
• » .» * \ ■*.*.*'
• ' f T • - | '. 1 i . . * •
• . * *' * * •". •• , ■,-.•.
- « r V • - » '
.... -v" \ »_
- " . . - • * T • * V
. ' • *• 'I \ ' ■•*'*.
—
—
—
—
—
—
—
—
—
—
—
—
—
—
—
—
—
—
—
—
—
—
—
—
—
—
—
—
o
o
o
o
o
o
o
o
o
o
o
o
o
o
—
—
—
—
—
—
—
—
—
—
—
—
—
—
o
o
<?
o
o
o
o
o
o
^
o
o
o
o
—
—
d
^
—
—
—
—
—
^
<?
—
—
—
o
o
o
c:
C^
—
—
—
—
—
v—
o"
o
o
—
—
—
—
^
<?
—
—
—
—
—
~
?
—
o
o
o
o
o
<?
—
—
—
—
—
—
z>
*
—
—
—
—
^
V
—
—
—
—
—
^
—
V
o
o
o
o
o
cz
V
—
—
—
—
—
—
a
<?
—
—
—
—
—
^
o^
—
—
—
—
—
—
d
^
O
o
o
o
o
d
?
—
—
—
—
—
—
^
—
—
—
—
—
0s
—
—
—
—
—
—
—
<?
o
o
o
o
o
—
<?
—
21-st repeat
—
—
—
—
—
^
V
—
—
—
—
—
c:
—
o
o
o
o
o
o
*3
o
o
o
o
o
o
o
—
—
—
—
—
—
—
—
—
—
—
—
—
—
o
o
o
o
o
o
o
o
o
o
o
o
o
o
—
—
—
—
—
—
—
—
—
—
—
—
—
—
—
—
—
—
—
—
—
—
—
—
—
—
—
—
I
27
25
23
21
19
17
15
13
11
9
7
5
3
1
On WS, work all stitches as they lie, work the twisted
stitch twisted again.
Repeat Rows 1 to 28.
. *
• »
■ \
i •
i i i
.'.
» .
■ • •; »
*
i
s
. '
«• .■•■"•'■■
i » •„■
j
• -
i
t i
» » I I . I I i * '
i i. • »
1 •
• •
J.I ! ■*»
i * 'J
• i
F
ft
1 t
—
—
—
—
—
—
—
—
—
—
—
—
—
—
—
—
—
—
—
—
—
—
—
—
—
—
—
—
—
—
—
—
—
—
—
—
—
tw
o
o
o
o
o
o
o
o
o
o
o
o
o
o
e
iw
—
—
—
—
—
—
—
—
—
—
—
—
o
to.
o
o
o
o
o
o
o
o
o
o
e
iw
—
—
—
—
—
—
—
—
o
k.
o
o
o
o
o
o
e
iw
—
—
—
—
O
iw
—
—
O
—
o
A
—
—
—
—
o
A
—
—
—
o
o
o
e
A
o
o
o
o
—
—
—
—
o
A
—
—
—
—
—
o
o
o
o
o
e
A
o
o
o
o
o
o
17-st repeat
—
—
—
—
—
—
o
A
—
—
—
—
—
—
—
o
o
o
o
o
o
o
e
A
o
o
o
o
o
o
o
o
—
—
—
—
—
—
—
—
—
—
—
—
—
—
—
—
—
—
—
—
—
—
—
—
—
—
—
—
—
—
—
—
—
—
—
—
—
—
37
35
33
31
29
27
25
23
21
19
17
15
13
11
9
7
5
3
1
On WS, work all stitches as they lie.
Work the twisted stitches and the yarn
overs with left diagonal line with
twisted purl; knit the normal yarn over.
Repeat Rows 1 to 38.
222
Twisted Stitches
—
—
—
—
—
—
—
—
—
—
—
—
—
—
—
—
—
—
—
—
—
o
o
o
o
o
o
o>
—
—
—
—
—
—
—
•Zj
^
—
—
—
—
—
—
£-
o"
—
—
—
o
o
0s
^>
—
—
—
—
—
—
—
—
cz
0>
o
o
—
—
k
—
—
—
—
—
—
—
—
—
—
V
—
—
o
o
o
p"
—
—
—
—
—
—
—
—
IT/
o
o
o
—
—
—
^
<?
—
—
—
—
—
—
^0
—
—
—
—
—
—
—
—
<?
o
o
o
o
o"
^
—
—
—
—
—
—
—
—
—
^
—
—
—
d
—
—
—
—
—
8-st
—
—
—
—
—
o
o
o
o
o
o
o>
—
—
—
—
—
—
—
^
^
—
—
—
—
—
—
^
V
—
—
—
o
o
<?
<o
—
—
—
—
—
—
—
—
—
<?
o
o
—
—
^"
—
—
—
—
—
—
—
—
—
—
k
—
—
repeat
o
o
o
^
—
—
—
—
—
—
—
—
ZD
o
o
o
■
—
—
—
—
^
—
—
—
—
—
—
'o
—
—
—
—
—
—
1 u
o
o
o
o
o
o
<o
—
—
—
—
—
—
—
•MM
—
—
—
—
—
—
—
—
—
—
—
On WS, work all stitches as
they lie and work the twisted
stitches twisted again.
Repeat Rows 1 to 28.
31
29
27
25
23
21
19
17
15
13
11
9
7
5
3
1
V
•—
o
= put 1 st on cable needle in front
of work, knit the next st twisted,
purl the next st, knit the st from
cable needle twisted.
—
—
—
—.
—
—
—
—
o
1
o
—
1
—
o
1
o
—
1
—
o
1
o
—
1
—
o
1
o
—
1
—
o
i
o
—
1
—
o
o
o
1
—
1
1
o
1
1
—
1
21-st cable
1
o
1
I
—
1
1
o
1
1
—
1
1
o
1
1
—
1
1
s,
o
1
—
__
—
_
—
_
—
—
Row 47-60
Row 45-46
Row 17-44
Row 15-16
Row 1-14
On WS, work all stitches as they lie and
work the twisted stitches twisted again.
Work Rows 1 and 2 7x, then Rows 15 and
16. Work Rows 17 and 18 14x, then Rows
45 and 46. Now work Rows 47 and 48 7x
(60 rows). Repeat these 60 rows.
Ik s
V. >s.
= put 10 st behind the work on cable needle, work 10
st in ribbing pattern, then knit st from cable needle.
\
put 11 st behind the work on cable needle, k10, then
work st from cable needle in ribbing pattern.
223
Stitch Patterns
M
\ •
.F
'V.
> -»
rl
.1 i
N
\
1
*
fx
\*
\
V
I
^
f
1 \
I
*
1
1
1
<
',
1
1
1
1
»
*
J. J
I
4. *
X 1
J-
K *
\
A
>
7 *
4
A
t *
•
V
>
V
1
1
>
■N 1
\
V
^
i
>
>
V
>
t
\
x
\
i
A
\
>
X
\
^
t
a
^
^
\
x
—
—
—
—
—
—
—
—
O
O
o
o
o
o
o
o
—
—
—
—
—
—
—
—
o
o
o
o
o
o
o
o
—
—
—
—
—
—
—
—
o
o
o
o
o
o
o
o
—
—
—
—
—
—
—
—
o
o
o
o
o
o
o
0
—
—
—
—
—
—
—
—
^_l
o
o^
—
—
—
—
—J
'o
—
—
<?
—
—
-
'o
—/
o
<?
d
<?
—
'o
—
'o
—
cr
d^
—
O
—>
'O
d^
—
^
cz
V
—
3
—
cr
O
*o
—
CI
o
<?
—
—
o
o^
—
o
CI
o]
'o
—
—
—
^
—
o^
£-
<?
—
—J
'o
—
o
*—
o^
—
o
^
^
^0
—
—
d
<?
—
3
'o
—
—
15-st repeat
—
—
—
o
<o
—
—
—
—
—
—
—
—
—
—
—
o
o
o
o
o
o
o
o
—
—
—
—
—
—
—
—
o
o
o
o
o
o
o
o
—
—
—
—
—
—
—
—
o
o
o
o
o
o
o
o
—
—
—
—
—
—
—
—
o
o
o
o
o
o
o
o
—
—
—
—
—
—
—
—
15
13
11
9
7
5
3
1
On WS, work all stitches as they lie and work the
twisted stitches twisted again.
Repeat Rows 1 to 16
Pattern on page 139.
I »
V
\
N. \ '
■«. \
I
« ■
* ■
!■ r>
\«-
\x
\
• * \
; v
4
^*
\ -f
•J >> \
a ;
m. y
>*
i' *l •
4] *
«S \
a ■
<, '
' \
*•- '
> -\
S
i* »
; x .
—
—
—
—
—
—
—
—
1
—
—
—
—
—
—
—
—
1
6
o
o
o
o
o
o
o
V
—
—
—
—
—
—
—
—
1
—
—
—
—
—
—
—
—
1
o
o^
—
—
—
~Zj
o
o
V
—
—
^1
—
—/
<0
—
—
1
—
—
^
o^
'O"
—
—
—
T
—
—
^
£
o"
—
—
—
1
—
—
^o
—
c:
o^
—
—
1
o
'o
—
—
—
CI
o
o
V
—
ZZj
o
o
o
<?
—
—
1
3
<0
—
—
—
—
<?
—
1
S
—
—
—
—
—
c:
2
V
S
—
—
—
—
—
—
^o
V
*—
V
—
—
~^J
V
—
1
—
o
o
o
'o
—
—
1
o
0s
—
—
—
3
o
o
V
—
c:
^1
—
—
^0
—
—
1
—
—
cz
0"
^o
—
—
—
1
—
—
£
0s
—
—
—
1
23-st repeat
—
3
<0
—
—
<?
—
—
T
o
<o
—
—
—
c:
O
o
V
—
—
—
—
—
—
—
—
1
—
—
—
—
—
—
—
—
T
6
o
o
o
o
o
o
o
V
—
—
—
—
—
—
—
—
1
—
—
—
—
—
—
—
—
1
1
15
13
11
9
7
5
3
1
On WS, knit all knit stitches, slip all purl st purlwise.
After the first row (WS) on the chart, repeat Rows 1 to
16.
|o] = On RS, knit 1 twisted. On WS, slip 1 purlwise
with yarn in front of the work.
Pattern on page 139.
224
Twisted Stitches
On WS, work all stitches as they lie.
After the first 2 rows, repeat Rows 3 to 22 for
9-st pattern, Rows 3 to 34 for 21-st pattern.
= put 2 st behind work on cable needle,
k1 twisted, purl the first st from cable
needle and knit the second st twisted.
= put 1 st in front of work on cable
needle, k1 twisted, p1, then knit
the st from cable needle twisted.
put 1 st in front of work on cable
needle, k1 twisted, then knit the st
from cable needle twisted.
put 1 st behind work on cable
needle, k1 twisted, then knit the st
from cable needle twisted.
mm
SEE
Pattern on page 139.
—
—
—
—
—
—
—
—
—
—
—
o
—
o
—
o
o
o
o
o
o
—
o
—
o
—
—
—
—
—
—
o
—
o
—
0
o
o
o
o
o
—
o
—
o
—
—
—
—
—
—
o
—
o
—
o
o
o
o
o
o
—
o
—
o
—
—
—
—
—
—
o
—
o
—
o
o
o
o
o
o
—
o
—
o
—
—
—
—
—
—
o
—
o
—
o
o
o
o
o
—
—
—
—
—
—
—
—
—
—
o
o
o
o
o
—
o
—
o
—
—
—
—
—
—
o
—
o
—
o
o
o
o
o
o
—
o
—
o
—
—
—
—
—
—
o
—
o
—
o
20-st repeat
o
o
o
o
o
—
o
—
o
—
—
—
—
—
—
o
—
o
—
o
o
o
o
o
o
—
o
—
o
—
—
—
—
—
—
o
—
o
—
o
o
o
o
o
o
—
o
—
o
—
—
—
—
—
—
—
—
—
—
—
19
17
15
13
11
9
7
5
3
1
On WS, work all stitches as they lie and
work the twisted stitches twisted again
Repeat Rows 1 to 20.
Pattern on page 139.
225
A
A
A
A
A
A
A
A
O
o
o
o
o
o
o
k.
k.
k.
k.
k.
k.
o
o
A
o
o
o
o
o
o
k.
o
o
o
A
o
k,
k.
k.
k.
k.
k.
o
k.
o
o
o
o
A
A
o
A
o
o
o
o
o
o
k.
o
A
A
A
A
o
o
A
o
k.
o
k.
o
o
o
o
A
A
o
k.
o
A
A
A
A
o
o
k.
o
o
o
o
k.
k.
k.
k.
k.
k.
k.
k.
o
A
A
A
A
A
A
A
A
A
O
o
o
o
k.
o
A
o
k.
k.
k.
k.
o
k.
o
A
o
A
o
o
o
0
k.
o
k.
o
o
A
o
k.
k.
k.
k.
19-st repeat
o
k.
o
k.
o
o
o
o
o
A
o
A
o
o
o
o
o
k.
o
A
A
A
A
A
o
A
O
o
k.
o
o
o
o
o
A
o
o
A
A
A
A
A
o
o
o
o
o
0
k.
k.
k.
k.
k.
k.
k.
k.
On WS, work all stitches as they lie,
purl all yarn overs.
Repeat Rows 1 to 32.
31
29
27
25
23
21
19
17
15
13
11
9
7
5
3
1
E
—
—
—
A
—
—
A
—
—
—
—
—
—
—
—
—
—
A
O
O
o
o
—
—
—
—
—
—
—
—
—
—
—
—
—
—
—
<r
~~N
—
—
—
—
—
—
—
—
—
—
—
—
—
—
—
k.
o
o
o
o
^
—
—
—
—
—
—
—
—
—
—
—
—
—
—
—
k.
—
—
—
—
—
—
—
—
—
—
—
—
—
—
—
—
—
—
k.
—
—
—
—
—
—
—
—
—
—
—
—
—
—
—
—
—
—
—
—
—
—
—
—
—
—
c:
—
—
UUUUBUUUU
LDHB
■
■
■
■
—
—
—
—
—
—
—
■
A
■
■
■
—
—
—
—
—
■
■
■
■
■
—
—
—
■
■
■
O
O
o
o
□□□□B
■
■
■
■
■
■
■
■
■
■nnn
o
o
o
o
■
■
■
—
—
—
■
■
■
■
■
■
■
k.
■
■
■
—
—
—
—
—
■
■
■
■
—
—
—
—
—
—
—
□□□□■□□□E
—
—
—
—
—
—
—
—
—
—
—
—
—
—
—
—
—
—
—
—
—
1
3-
St
Pc
att
en
n
—
—
—
—
—
—
—
—
—
—
—
A
—
—
—
—
—
—
—
—
—
—
—
—
—
—
—
—
—
—
A
—
—
r~
—
—
—
—
—
—
—
—
—
—
—
—
—
A
O
o
o
o
IZ/
f—
—
—
—
—
—
—
—
—
—
—
—
—
—
<-
—
—
—
—
—
—
—
—
—
—
—
—
—
—
—
k.
o
o
o
o
—
—
—
—
—
—
—
45
43
41
39
37
35
33
31
—
k.
—
29
—
k.
—
27
—
—
25
23
-121
19
17
15
13
11
9
7
5
3
1
The black boxes have no meaning. They're only
intended for a better overview. On WS, work all
stitches as they lie and purl all yarn overs.
Repeat Rows 1 to 46.
Leaf Patterns
V iff. . J >#to'i, -'v.^ ♦ \\m'- * '
SV*
;r^j#-
k.
k.
k.
k.
Ik
o
o
o
o
o
o
A
A
A
A
A
o
A
O
o
o
o
o
o
o
o
o
o
o
A
o
A
A
A
A
A
o
A
A
A
A
A
A
O
A
O
O
o
o
o
o
A
o
o
o
o
o
o
A
o
o
A
o
A
A
A
A
A
A
O
O
A
O
A
O
O
o
o
o
o
A
A
k.
k.
k.
k.
k.
k.
k.
k.
k.
k.
A
A
A
A
A
A
A
A
O
k.
o
k.
o
o
o
o
o
o
o
k.
o
k.
k.
k.
k.
k
k.
o
o
k.
o
o
o
o
o
o
k.
o
o
k.
k.
k.
k.
k.
k.
o
k.
o
o
o
o
o
o
o
o
o
o
o
Ik
o
k.
k.
k.
k.
k.
o
k.
o
o
o
o
o
o
k.
k.
k.
k.
k.
o
o
o
o
o
*
*
*
*
*
o
o
o
o
o
o
A
A
A
A
A
o
A
O
o
o
o
o
o
o
o
o
o
o
A
o
A
A
A
A
A
19-st repeat
o
A
A
A
A
A
A
o
A
O
o
o
o
o
o
A
o
o
o
o
o
o
A
o
o
A
o
A
A
A
A
A
A
O
O
A
O
A
O
O
o
o
o
o
A
A
k.
k.
k.
k.
k.
k.
k.
k.
k.
k.
A
A
A
A
A
A
A
A
O
k.
o
k.
o
o
o
o
o
o
o
k.
o
k.
k.
k.
k.
Ik
Ik
o
o
k.
o
o
o
o
o
o
k.
o
o
k.
k.
k.
k.
k.
k.
o
k.
o
o
o
o
o
o
o
o
o
o
o
k.
o
k.
k.
k.
k.
k.
o
k.
o
o
o
o
o
o
k.
k.
k.
k.
k.
o
o
o
o
o
A
A
A
A
A
33
31
29
27
25
23
21
19
17
15
13
11
9
7
5
3
1
On WS, purl all stitches
and yarn overs.
After the first 32 rows,
repeat Rows 33 and 34.
v
'u
A^'V
$*£ty n,
t-1
■Vi v
V
t ,
V
\*x
s\mm^' m,% ^
k.
k.
21
21
21
21
—
—
—
—
O
O
o
o
o
o
—
—
—
—
—
—
—
—
—
—
—
—
—
—
—
—
—
—
—
_
—
—
—
—
—
—
—
—
—
—
—
—
—
—
—
—
—
—
—
—
o
o
o
o
o
o
—
—
—
—
-*
^
>u
vj/
^
4^
o
o
o
o
o
o
—
—
—
—
—
—
—
—
—
—
—
—
—
—
—
—
—
—
—
—
—
—
—
—
—
—
—
—
—
—
—
—
—
—
—
—
—
—
—
—
—
—
—
—
—
—
—
—
o
o
o
o
o
o
->
->
si/
^
nU
4,
—
—
—
—
o
o
o
o
o
o
—
—
—
—
—
—
—
—
—
—
—
—
—
—
—
—
—
—
—
—
—
18-st repeat
—
—
—
—
—
—
—
—
—
—
—
—
—
—
o
o
o
0
o
o
—
—
-»
->
vb
4,
^
+
o
o
o
o
o
o
—
—
—
—
—
—
—
—
—
—
—
—
—
—
—
—
—
—
—
—
—
—
—
—
—
—
—
—
—
—
—
—
—
—
—
—
—
—
—
—
—
o
o
o
o
o
o
A
A
A
A
A
A
On WS, work all stitches as they lie and purl all yarn overs.
Repeat Rows 1 to 24.
23
21
19
17
15
13
11
9
7
5
3
1
227
n Isle P tterns
v i
Pattern C
Pattern B
Pattern A
—
—
—
—
—
—
—
—
A
A
A
A
—
—
—
—
—
—
—
\
—
—
—
\
—
—
—
—
—
cz
V
—
—
__
\
—
^
r~
^^
—,
r
—
/—
—
—
—
—
—
—
—
—
—
A
A
A
A
—
—
—
—
Pattern C = 25 st
—
—
—
—
—v
\
—
—
—
—
—
—
—
—
A
A
A
A
A
A
A
A
—
—
—
—
—
—
—
—
/
/—
—
—
—
—
—
—
—
—
A
A
A
A
—
—
—
—
—
—
—
N
^
V
—
_^
v
—
—
^
•
—
—
^
t—
Pattern A = 25 st
—
Z>
'
d,
i
—
f
—
—
—
—
—
—
—
—
—
A
A
A
A
—
—
—
—
—
—
—
—
7
5
3
1
7
5
3
1
■ . V> * \ N >
V'A*
J *
^
.>*
Vc T
>•* -\< ».
•; AX
3 \\ JO *"
* I •■*'*-* •'
• r » *
b t r I J
L.- - <.»
* > i
r V .*
• .• .** r .a.
- -*
i f
10
8
6
4
2
—
—
—
—
—
—
—
—
—
*
—
—
—
—
—
—
*
—
"^
—
^
->
—
—
—
c:
-v
—
—
—
d
—
~"
c:
—v
—
—
—
—
^~
^_
—
—
—
—
_,
—
_,
—
—
—
—-
—
—
—
/~
ZZj
*
—
r-
—
ZZj
—
—
—/
<~
—
Pattern B = 16st
—
*
—
r-
—
—
—
—
—
—
—
—
—
*
-H*l 9
EIEE 7
Z 5
= bobble; k5 out of
the st, work 5 rows
garter stitch over
these st, then l<5
tog, twisted.
---=. 3
^v-, ^
V
\ »
.1 .*%S
^>
h
s
M
4 * 1
.i J- *
'if •> >J
V.*. i
4 • 1 »
■n>\
ffi ^
■> v
Work pattern A, pattern B, and pattern C
next to one another widthwise. Only the
rows on RS are shown for patterns A and C
On WS, work stitches as they lie.
For patterns A and C, repeat Rows 1 to 8. For
pattern B, repeat Rows 1 to 10.
\ V
—
—
—
—
—
—
—
—
—
*
—
—
—
\
—
—
cr
v
—
—
^
—N
—
—
—
—
—
—
—
—
—
^
^
—
—
—
—
—
—
—
—
—t
—
\
—
—
—t
/
cz
s
—
^
r-
—
—
"^
-\
—
—
—t
r~
\
/
—
V
—
—
:=
\
—
—
—
—
— —
V
—
—
—
—
t.
—
—
—
—
—
—
—
s
t
■\
—
—
—
—
—
^
r-
—
V
rr,
/
—
28-st pattern
—
^
""N
—
—
^
r-
—
—
—
—
\ZT
V
zz>
t
—
—
—
—
—
—
—
/
—
—
—
—
—
—
—
^
f—
—
—
—
—
—
—
—
7^
r-
—
—
—
—
—
—
—
^
f—
—
—
—
—
—
—
—
—
f -
—
—
—
—
—
—
—
—
*
—
—
—
—
—
—
—
—
—
—
—
—
—
—
—
—
—
—
—
—
—
—
—
—
—
—
—
—
—
—
—
—
I
—
—
—
—
—
—
—
—
—
—
—
—
^
"^
^
"N
-^
^_
^_
v_
—
—
—
—
—
—
—
—
—
—
—
—
—
—
—
—
—
—
—
—
—
—
—
—
\
—v
—\
'
\
<
i
^
/
v
/
—\
'—'
\
>
\
1
\
—v
\
\
i
V ,.
1
—*
./
-\
/
—s
/
V
/—
s
i—
V
f
/
/
1
22-st pattern
1
/
1
—
—
—
—
—
—
—
—
—
—
—
—
—
—
—
—
—
—
—
—
—
—
—
—
—>
~*
—s
~*
—\
^
-A
~*
"^
~*
"~^
—v
^_
y_
y_
^
^_
—
—
—
—
—
—
—
—
—
—
—
—
23
21
19
17
15
13
11
9
7
5
3
1
On WS, work
all stitches as
they lie.
Repeat Rows 1
to 24.
228
Aran Isle Patterns
—
—
—
—
—
—
—
—
—
—
—
—
—
—
—
—
—
—
—
—
—
—
—
—
k
o
k
o
I
o
k
k
o
o
Ik
o
I
o
k
k
o
o
k
o
k
o
k
k
o
o
k
o
k
o
k
o
—
—
—
—
—
—
—
—
—
—
—
—
N
—
—
—
—
—
—
—
o
58-st repeat
o
A
O
A
o
A
A
O
O
A
o
A
o
A
A
O
O
A
o
A
o
A
A
O
o
A
o
A
o
A
A
—
—
—
—
—
—
—
—
—
—
—
—
—v
—
—
—
—
—
—
—
—
—
—
—
—
7
5
3
1
J
1
J
I
t
1
/
/
/
/
/
/
/
'
1
1
1
1
1
r
'
f
t
i—
'
i—
—
—
—
—
—
—
—
—
—
—
—
—
—
—
—
—
—
—
—
—
—
—
—
—
—
—
—
—
—
—
3
—
—
—
—
—
—
—
—
r
V
—
—
—
—
t
N
—
—
—
■
■
1
—
—
"■>
—
—
—
~2j
—
J^
v
■
■
—
—
-^
—
—
—
^
—\
—
—
—
—
—
^
r~
-—
—
—
cz
^
—
—
■
■
^
—
—
—
—
>^
—s
—
—
—
^
f—
—
—
—
—
ZZ
^
■
■
■
■
"^
—\
—
—
—
—
d
"^
—
—
*~~
—
—
—
—
Zj
*~~
""
■
■
—
—
-v
—
—
—
_•
f
—
—
—
—
/
—
—
—
—
—
—
^
—\
—
—
—
—
c:
—>
—
—
—
—
=>
r-
—
—
—
—
—
—
—
—
—
c:
~^
—
—
—
^
t—
—
—
—
3,
^
—
—
—
—
—
—
—
—
—
—
—
—
^
—
~^->
f—
~^
—
zz,
^~
—
—
—
—
—
—
—
—
—
—
—
—
—
^=
—v
*~
—
^
->
*~
—
—
—
—
—
—
—
—
—
—
—
—
—
V
—
—
V
—
—
—
—
—
—
—
—
—
—
—
—
k
—
—
Zj
V. _
—
—
—
—
—
—
—
—
—
—
—
—
—
Zj
*~
\
—
^
r~
\
—
—
—
—
—
—
—
—
r
—
CZ
'
—
c=
\
J
J
I
/
—
—
t
—
—
c:
/
./
/
i
38
/
i—
>—
>
—
—
t
—
r
*
f
r
-s
V
—
—j
\
—
zz
tr
—
—
—
—
—
t
—
—
/
—
—
—
—
—
—
ep
—
—
—
—
—
—
—v
—
—
—v
—
—
—
—
—
—
ea
—
—
—
—
—
—
i
—
—
i
\ .
—
—
—
—
—
—
it
—
—
—
—
—
ZZt
\
—
—
r-
\
—
—
—
—
—
—
—
—
—
—
—
—
^
—
^
"^
f
—
ZL
~^
—
—
—
—
—
—
—
—
—
—
—
zz
*~
—
—
—
—
. /
—
—
—
^
—\
—
—
—
—
—
—
—
—
r-
—
—
—
t
—
—
£-
' v
—
—
—
—
—
f
—
—
—
—>
—s
—
—
—
—
V
—
—
■
■
^
*~
—
—
—
—
Zj
*~
—
c:
->
—
—
—
—
ci
—>
-v«
■
■
■
■
—
—
—
—
'
v
—
■
■
—
^
—
—
—
—
r—
—
—
—
—
—
^
—>
—
—
—
^
—
—
■
■
"^
—\
—
~
—
—
—
—
—
—
c=
—\
—
^
f—
^-
■
■
—
—
—
c:
"^
r—
—
—
—
—
—
—
—
—
—
—
v
r-
—
—
—
—
—
—
—
—
—
—
—
—
—
—
—
—
—
—
—
—
—
—
—
—
—
—
—
—
—
—
—
—
—
—
—
—
—
i
i
i
i
i
i
i
t
i
i
i
i
—*
>—
i—
i—
i—
'
r
t
r ■
r
'
r-
>
rl ■
49
47
45
43
41
39
37
35
33
31
29
27
25
23
21
19
17
15
13
11
9
7
5
3
1
On WS, work all stitches as they
lie and purl all yarn overs.
Repeat Rows 1 to 8.
On WS, work all stitches
as they lie.
After the first 46 rows,
repeat Rows 47 to 50.
= work 4 st from 1 st:
k1, k1 twisted, k1,
and k1 twisted.
= p4 tog.
229
Slipped Stitches
y
>)'
1i \ V
\
\
I.
i 1
11
18-st repeat
31
29
27
25
23
21
19
17
15
13
11
9
7
5
3
1
On WS purl
all stitches.
Repeat Rows
1 to 32.
\ »•.. *• ' i
i
* *
i
t »
% »
' ,i
t %
I—h^l = put 1 st on cable needle behind work, slip 1 st
purlwise (yarn will be behind work), then k st
from cable needle.
put 1 st on cable needle in front of work, k1,
then slip st from cable needle purlwise (yarn
will be behind work).
A
x ■*
v
"<\
/ r
■■' ■ ?'
' 'J1
I
.).
h
i l
• \
t
1 *
|4 *
vNl\
il
Crossed slipped stitches from page 140.
^
i,
'1 j. •
1
».
y^
^^
y-^
8-st repeat
15
13
11
9
7
5
3
1
On WS, work all stitches
as they lie.
Repeat Rows 1 to 6.
I^f^l = put 1 st on cable needle behind work, slip 1 st
purlwise (yarn will be behind work), then k st
from cable needle.
I^H—| = put 1 st on cable needle in front of work, k1,
then slip stfrom cable needle purlwise (yarn
will be behind work).
= put 1 st on cable needle behind work, slip 1 st
purlwise (yarn will be behind work), then purl
st from cable needle.
p^] = put 1 st on cable needle in front of work, p1,
then slip st from cable needle purlwise (yarn
will be behind work).
|^p| = put 1 st on cable needle behind work, slip 1 st
purlwise (yarn will be behind work), then slip
st from cable needle purlwise.
[^Zl = put 1 st on cable needle in front of work, slip
1 st purlwise, then slip st from cable needle
purlwise (yarn will be behind work).
230
Slipped Stitches
(
.^ f,
1
\
\ '
V
A -"si.
i
J K 1
I I '
v- -Mw ..ilf'-^'-i'.'V
IS. '.i -4-\ j \. W.i "(ill
i
i t |., j .-.
* 51 x*. A
' rt
t
t
♦ * -»
*
a
4
f
,f
i •
J
v<*
••J
M
t
/ -t
l»
) :
\ *
1 i
? hf-* -ill-
J
. f
<< >/ >
f f
V
* • 4
■t'i '! *
1 7
i>
>
\t '-''l*
-f
,.ii
t .
/a
(.'
■ i » J:
» ,i •
14-st repeat
27
25
23
21
19
17
15
13
11
9
7
5
3
1
On WS, purl all stitches.
Repeat Rows 1 to 28.
put 1 st on cable needle behind work, slip 1 st
purlwise (yarn will be behind work), then k st
from cable needle.
|*-kl = put 1 st on cable needle in front of work, k1,
then slip st from cable needle purlwise (yarn
will be behind work).
18-st repeat
35
33
31
29
27
25
23
21
19
17
15
13
11
9
7
5
3
1
On WS, purl all stitches.
Repeat Rows 1 to 36.
m
= put 1 st on cable needle behind
work, slip 1 st purlwise (yarn will be
behind work), then k st from cable
needle.
= put 1 st on cable needle in front of
work, k1, then slip st from cable
needle purlwise (yarn will be
behind work).
231
Textured Patterns
*> . \
1
* k i.
•\
i 4
I.
4 I
-»-
—
—
—
—
—
—
—
—
—
•
—
—
—
—
—
—
8-st
—
—
—
—
—
—
—
-—
repeat
—
—
—
—
—
—
—
—
7
5
3
1
On WS, work all stitches as they lie.
Repeat Rows 1 to 8.
—
—
—
—
—
—
—
—
—
—
—
—
—
—
—
—
—
—
—
—
—
—
—
—
—
—
—
—
18-st repeat
—
—
—
—
—
—
—
—
—
—
—
—
—
—
—
—
—
—
—
—
29
27
25
23
21
19
17
15
13
11
9
7
5
3
1
On WS, work all stitches as they lie.
Repeat Rows 1 to 30.
The same pattern from the back.
232
Textured Patterns
—
—
—
—
—
—
—
—
—
—
—
—
—
—
—
—
—
—
—
—
—
—
—
—
—
—
—
—
—
—
—
—
—
—
—
—
—
—
—
—
—
—
—
—
—
—
—
—
—
—
—
—
—
—
—
—
—
—
—
—
—
—
—
—
—
—
—
—
—
—
—
—
—
—
—
—
—
16-st repeat
—
—
—
—
—
—
—
—
—
—
—
—
—
—
—
—
—
—
—
—
—
—
—
—
—
—
—
—
—
35
33
31
29
27
25
23
21
19
17
15
13
11
9
7
5
3
1
On WS, work all stitches as they lie.
Repeat Rows 1 to 36.
—
—
—
—
—
—
—
—
—
1
—
0-
—
-St
—
—
re
—
?p<
—
—
—
—
sa
—
—
t
—
—
—
—
—
—
—
-
15
13
11
9
7
5
3
1
On WS, work all stitches as they lie.
Repeat Rows 1 to 16.
—
—
—
—
—
—
—
—
—
—
—
—
—
—
—
—
—
12
—
—
—
—
—
-s
—
—
—
—
—
tr
—
—
—
—
—
ep
—
—
ec
—
—
—
at
—
—
—
—
—
—
—
—
—
—
—
—
31
29
27
25
23
21
19
17
15
13
11
9
7
5
3
1
On WS, work all stitches as they lie.
Repeat Rows 1 to 32.
233
Jacquard Patterns
< i
. • * \'
U
• i * «
<-'*\
« X
• » . ' » * . ■
4 * V
» » V
' s ' V
«,.
% »
I
I I
A
♦ '
V
>
\
V >
I • I • »
A »,
.*,' vv »
» \ I-
» 4 '* <X
I « » I *
• ." .» *.* »
<*
■ • « I '
«
\
1 i
. \
•
■ i
.'.V
i »
v ■
■
<
' »
.V
.\>.
«-.\",
IV-
• * • i
i. « •
• ■ • ■ • *. • v
. ' . ' ' . t V
« ■ • * * *
• • » i
' » i
i * i • • »
4
. t •
I. ' » »
f , *
' ' ' ' I
<
I
' 1 • *
.M
I • • 4
• »
. * * >
' * /
(
» V
• >
«
J', •'
«
»
t »
h
• « 4 » *
• t • " • •
" 4
•l J *
t
■
4 I
/ .
»
« \
» t '
%*l
* • III
i'<\
i
i
* r
t • •y
• .» >
> i
» *
• . • •
« «
* V
\
^ 1
,V .
* . 4 . V * )
. v \ v
• ^ * J
I
•-'.\»
) . . %
I
\
.•t
s * '
/ «
» • » \ V » \ v
* • ' * t . % « • »
» » ' » «
< \
4
4
» ll .
i'f
i .
t»l» .» • 'ly i . i «"i' *)i v* \ ' * iii
i» i
, •'.,,j! ,! V v i. '..lid."., • i ' . ••■;: i'
i i, ,1- i,.ij * , * % : < • k> N • » ' •'
)
.1
t
I
"j
\ 1 T '>'/' I
■ » 4 f
. .v I
J
i \v
s •■; ^!}? !»)
. 'll
■l,rl" 'i
i V » *
i 'i:i -'i' A'
t. 'u'
I >„' ' > V
# »• »
». ^
f..ir •
1 '»
t 1
I
1 1
i
»"
'ii;',.. 'i
i y
i
i >
I -i
t f ''
1>.
J'*'
.f
\ •
i i
1 • » *\-*'.
' 'JIM '-1 ' ,'\ v-
40
38
36
34
32
30
28
26
24
22
20
18
16
14
12
10
8
6
4
2
I
40-st repeat
-
-
39
37
35
33
31
29
27
25
23
21
19
17
15
13
11
9
7
5
3
1
20
18
16
14
12
10
8
6
4
2
16-st repeat
-
19
17
15
13
11
9
7
5
3
1
Repeat Rows 1 to 40.
Repeat Rows 1 to 20.
234
Jacquard Patterns
. •
• #
.-,> • '
i i
i \
/ i
• .
16
14
12
10
8
6
4
?
12-st repea
15
13
11
9
7
5
3
1
Repeat Rows 1 to 16.
• ♦
i • i •
< «
. *
• *. •
, » »
• >
h'v'i:<i.f*-. n*?\ 'WV»' 'AMI''' I ay-
20
18
16
14
12
10
8
6
4
2
22-st repeat
19
17
15
13
11
9
7
5
3
1
.1
> V
.■ \, I: , ",
>;
i » ri
• i * *
ti * . .»
i
f S
• t l *
v *
•*.-' ' tV
*
<J l,»
V .
k
1 \ * ' ,
* * f
>
,4 » '
34
32
30
28
26
?4
22
20
18
16
14
12
10
8
6
I
4
2 i
4-stand10-st
repeat
35
33
31
29
27
25
23
21
19
17
15
13
11
5
3
1
After the first 29 rows,
repeat Rows 30 to 35.
235
Stitch Patterns
/
> t
. .y.
' J.
it
I I
K\\.
i:
k.
» #
<• >
.aJ
* Om
*.:?*-..'"i- J.Pi^U
20
18
16
14
12
10
8
6
4
2
|
13-St
|
repeat
19
17
15
13
11
9
7
5
3
1
» )
4 t
/ ►
• '. :
4 '
r
20
18
16
14
12
10
8
6
4
2
14
-s
tr(
2P
aa
19
17
15
13
11
9
7
5
3
1
The second pattern from the top
was worked as shown in this pattern
chart; in the pattern below it, the
colors were switched.
Repeat Rows 1 to 20.
'A
• /
I <
• i
I «
I
■ i
*
f I
1
1
I
'4
I r
4 •
i i
* /.'.'. '
f ,'
,-,-,v
« * »
','.
r » i
• • •
r » »
V
'/'»', V
• V
s
1 *
< \
I
»
v.'.',.
'.',♦ •
V."
»
' ' 'if *
/ <
» » <
I
24
22
20
18
16
14
12
10
8
6
4
2
—
—\
i
I
24-st repeat
i i
1
J
-T—
25
23
21
19
17
15
13
11
9
7
5
3
1
236
m i ols an« Abbreviations
r □ = RS: kl; WS: p1
RS: pi; WS: k1
RS: k1; WS: k1 (garter st)
RS: k1 twisted; WS: p1 twisted
RS: p1 twisted; WS: k1 twisted
1 yo; on WS p1
1 yo; on WS kl
k2 tog
single dec: slip 1 knitwise, k1, and pass slipped
st over
p2tog
p2 tog twisted
k3 tog
double dec: slip 2 st knitwise, k1, and pass
slipped st over
slip 1 st knitwise, k2 tog, and pass slipped st
over
p3 tog
bobble: work 5 st in 1 st (alternately k1, yo).
Work 3 to 5 rows of stockinette stitch over
these 5 st; in the next row on WS k5 tog twisted
inc 1 k st, twisted, from horiz. thread between stitches
inc 1 p st, twisted, from horiz. thread between stitches
box not defined (no stitch)
1 st worked in st of previous row: k1, but
insert needle 1 row lower
shaker knitting st: RS: slip st purlwise with 1
yo; WS: purl st tog with yo
cross 2 st to left: place 1 st in front of work
with cable needle, knit next st, then knit st on
cable needle
cross 2 st to right: place 1 st behind work with
cable needle, knit next st, then knit st on cable
needle
cross 2 st to left: place 1 st in front of work
with cable needle, purl next st, then knit st on
cable needle
cross 2 st to right: place 1 st behind work with
cable needle, knit next st, then purl st on cable
needle
cross 3 st to left: place 2 st in front of work with
cable needle, k1, then knit st on cable needle
cross 3 st to right: place 1 st behind work with
cable needle, k2, then knit st on cable needle
cross 3 st to left: place 2 st in front of work with
cable needle, p1, then knit st on cable needle
cross 3 st to right: place 1 st behind work with
cable needle, k2, then purl st on cable needle
l~ll_l
c-zn
rrtid
e-dh
i=rrn
i-rru_Li
I I H~
~VJL-
U_ -'Ml
loHd
= cross 4 st to left: place 2 st in front of
work with cable needle, k2, then knit st
on cable needle
= cross 4 st to right: place 2 st behind
work with cable needle, k2, then knit st
on cable needle
= cross 4 st to left: place 2 st in front of
work with cable needle, p2, then knit st
on cable needle
= cross 4 st to right: place 2 st behind
work with cable needle, k2, then purl st
on cable needle
= cross 4 st to left: place 3 st in front of
work with cable needle, p1, then knit st
on cable needle
= cross 4 st to right: place 1 st behind
work with cable needle, k3, then purl st
on cable needle
= cross 6 st to left: place 3 st in front of
work with cable needle, k3, then knit st
on cable needle
= cross 6 st to right: place 3 st behind
work with cable needle, k3, then knit st
on cable needle
= cross 8 st to left: place 4 st in front of
work with cable needle, k4, then knit st
on cable needle
= cross 8 st to right: place 4 st behind
work with cable needle, k4, then knit st
on cable needle
= cross 2 st to left: place 1 st in front of
work with cable needle, p1, then knit st
on cable needle twisted
= cross 2 st to right: place 1 st behind
work with cable needle, k1 twisted,
then purl st on cable needle
Abbreviations
dec = decrease, decreases
inc = increase, increases
k = knit
k tog = knit together
p = purl
p tog = purl together
psso = pass slipped stitch over
rep = repeat
RS = right side of work
selv st = selvedge stitch
single dec = slip 1 stitch knitwise, knit next stitch,
and pass slipped stitch over it
st = stitch, stitches
tog = together
WS = wrong side of work
yo = yarn over
237
Index
/i hbreviations
Accessories
Armhole facings
Dand, seed stitch
Bands
double
knit on new
tips
2-color
with mite red corner
Basic patterns
Basic techniques
Blocking
Bobbles, crocheted
Bobbles, knit
Box pattern
Brioche stitch
Buttonholes
horizontal
round
vertical
with contrast yarn
working in afterwards
Buttons, knitted
L- able patterns
with cable needles
without cable needles
Cardigan with cable pattern
Caring for your finished knit
Casting off
fixing the edge
in kitchener rib
with crochet
Casting on
double
in kitchener rib
open
with double bottom yarn
with one needle
Chain selvedge stitch
237
8
65
55
54
58
187
186
56
59
30
16-51
121
166
167
30
129
69, 100
102
100
101
103
103
101
132
133
134
100
15
42
45,63
46
42
18
19
22, 160,207
20, 161
19
18
27
Collars 78, 84, 88
Color changes for stripes in
reverse stockinette stitch 31
Contrast piping 153
pattern variations 154
Converting sizes and yarns 182
Correcting color changes
(intarsia) 147
Crew neck 78
open 78
Crochet to finish edges 61
Crochet slip stitches 61, 63, 73, 169
Crocheted facings 73
Crocheting on button loops 104
Crossing yarn at color changes 146
ilolding the yarn (2 colors) 143
Honeycomb cable 132
LJecorative details
Decreasing
double decreases
single decreases
Double-face
Double facings
Double neckbands
Double pickup
Double shaker knitting
2-color
Dropped stitches
Embroidery
duplicate ;>titch
frcnch knot
lazy daisy
on organza
outline stitch
satin stitch
tntrelac pattern
acings
Fa
crocheted
double
for arm holes
knitted on
knitted with the piece,
knitted with the piece,
sewn on
with mite red corner
Fan-shaped cables
Faux shaker knitting
Finishing
Fringes
Glo ves and mittens
Grafting
doubl
single
164-175
32
35
33
160
64
58
86
125
125
1
16
16
171
171
170
170
171
156
60
73
64
65
60
e 66
68
70
59
135
128
110-126
175
208-209
114
J ncreasing
after ribbing
in openwork patterns (sleeves)
knitting on
symmetrical
twisted
with yarn over
Instructions for sweaters
Intarsia
Invisible seam stitch
36
36
192
21
38,40
38
40
196
146
112
J acquard patterns
Ixitchener rib
casting off in
casting on in
Knit stitches
Knitted casting on
Knitted-on facings
Knitting
needles
patterns
Knitting together, twisted
Materials
Mittens
JNecklines
cast off in kitchener rib
facing, sewn on
round
square
Needle gauge
wpen casting on
Openwork patterns
1 aper patterns
basic patterns
dolman sleeve
kimono
raglan
shoulder yoke
Pass slipped stitch over
Pattern charts, following
Perfect details
Pickup, double
Picot edge
142
46
22
29
21,36
60
8
210
33,34
8-15
209
76
49
72
76
79
8
20
136
179
179, 180
181
181
181
180 181
33
190
52-109
86
58
238
Index
Picots, crocheted
Pocket, inside of, double-
Pockets
horizontal
knit in afterwards
set on
sewing on
slanted
vertical
Polo collar
Pom-poms
Practical tips
Purl stitches
lAaglan sweater in shaker
knitting
Reading patterns
Reverse single crochet
Rolled edge
Sample for gauge
Seam selvedge stitch
Seams
in pieces knit crosswise
in ribbing patterns
using grafting
using invisible stitch
Seed stitch
large
small
Selvedge stitches
chain stitch selvedge
garter stitch selvedge
scam stitch selvedge
shaker knitting selvedge
Sewing in
button loops
puffy7 sleeves
sleeves
yarn ends
Sewn-on facings
Shaker knit selvedge stitch
Shaker knitting
decreasing
double-ribbed
dropped stitches
faux
increasing
75
99
92
93
94
98
98
96
97
84
174
176-193
29
202
144
74
55
50, 143
26
116
90, 116
114
112
30
30
26
27
26
26
27
105
118
117
120, 147
70
27
124
130
127
188
128
131
in the round 131
triple-ribbed 128
Shawl collar 88
Shortened rows 90, 184
on facings 68
pattern variations 152
with stitches passed over 150
with yarn over 148
Shortening and lengthening 184
Simple casting on 20
Single decrease, pass stitch over 33
Single decreases 33
CD
Single shaker knitting 126
twisted 127
Slipped stitches 140
multicolor 140
single color 140
Smocking 172
on stretched-out sweaters 173
Socks 204-207
measurement table 204
Special techniques 122-163
Starting a new skein 120
Stitch conversion table 51
Stitch gauge 10
Stitch marker 9
Stitch of previous row, work in 41
Sweaters
in jacquard and textured
patterns 198
in openwork patterns 192, 199
in Entrelac pattern 156
with bobbles 167, 201
with seahorses 168, 203
Sweaters, socks, gloves, and
\ V
mittens
Symbols
Symmetrical increases
194-
-209
237
38,40
1 able of glove measurements
Tailor's knot
Taking measurements
Tassels
Tulip cable
Turtleneck collar
Twisted stitches
Two-color ribbing
CD
V -necks
tarings, sewn on top of
each other
without facing
W aistband, rubber band
Washing and drying
Weave pattern
208
153
178
174
132
78
138
60
80
80
81
187
13
156
Weaving in yarn at back of work 145
Weaving in yarn ends
Work in stitch oi previous row
I arns
dippers
in cable patterns
shortening
turtleneck sweaters
with double facing
with slip stitches
144
41
10
106
107
109
109
106
108
\
}\ s
f
\
A
, h
\ \
239