


Текст
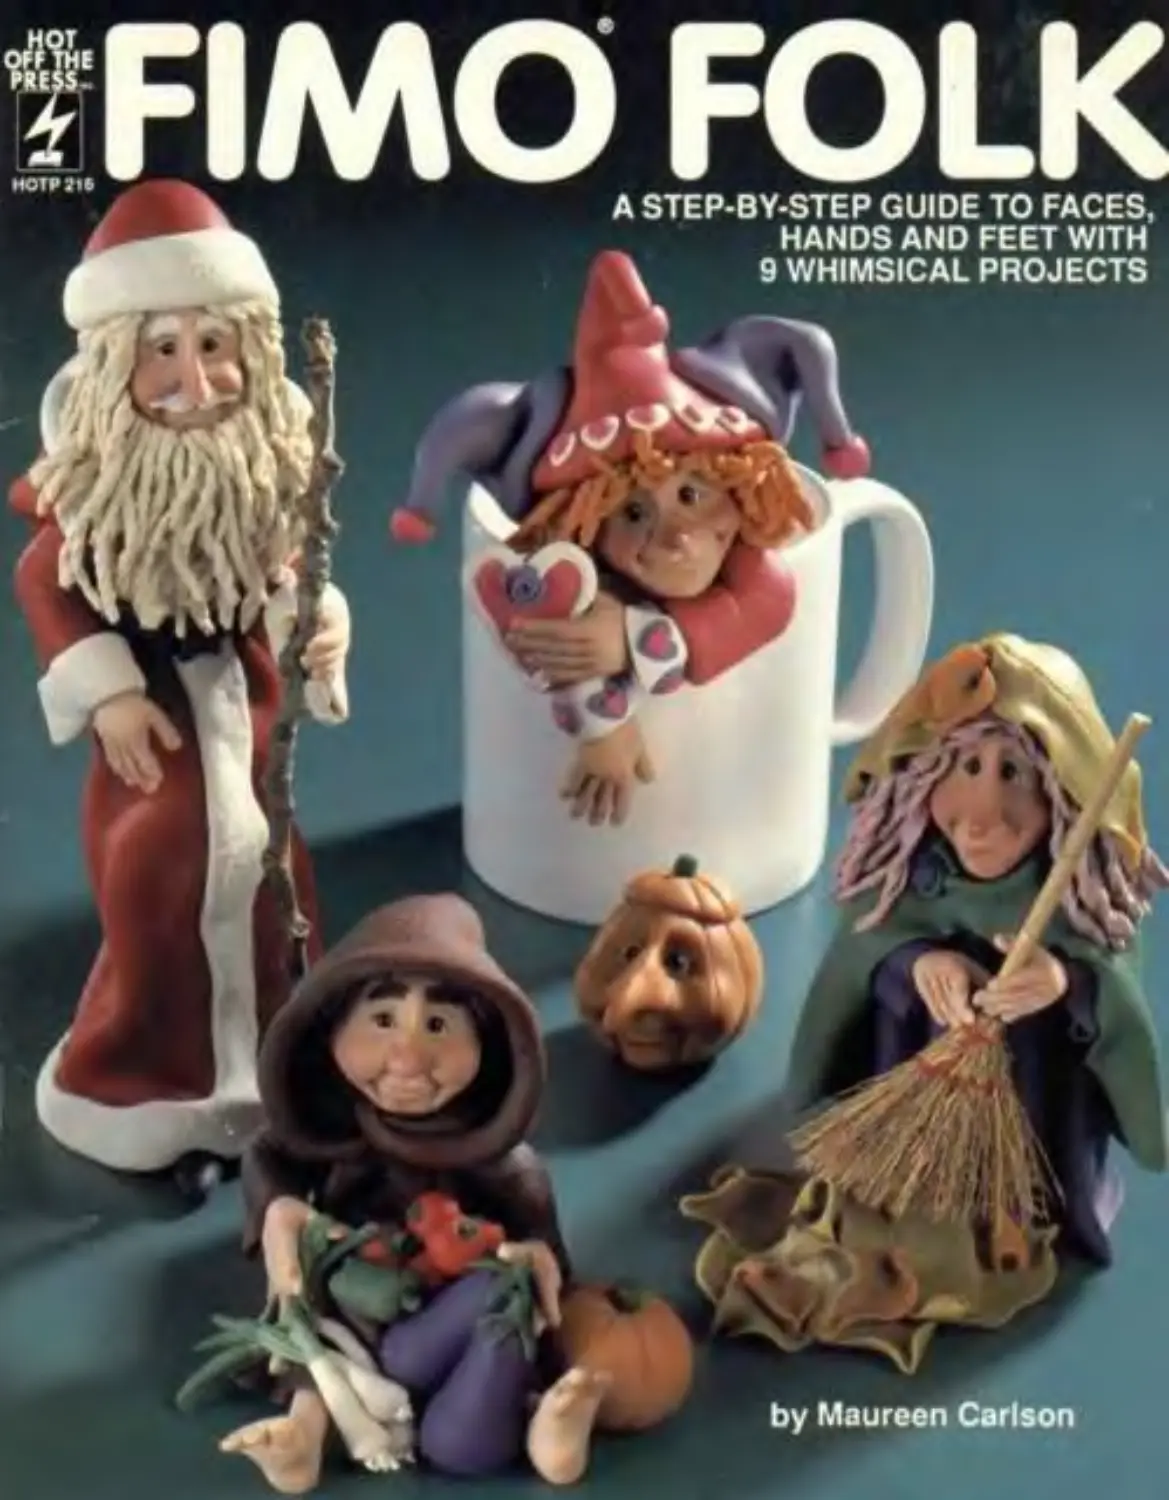
?FIMO FOLK
К A STEP-BY-STEP GUIDE TO FACES,
HANDS AND FEET WITH к 9 WHIMSICAL PROJECTS
In the past 12 years that Hot Off The Press has been publishing craft books, never has one publication so captivated our entire staff as has Fimo* Falk. Taking this book home is like having the gifted designer, Maureen Carlson, at your side. She guides you through die creative process to turn blocks of Fimo* into magical, life-like characters. This book is actually a series of Fimo* classes, each built upon the teachings of previous lessons. You’ll find that designs later in the book refer to tcchniuucs addressed in earlier projects -for instance. Mother Nature is like Heliotrope, with somewhat chubbier features. Best of all. as you create each personality every figure will be unique. Okay. Maureen, what's next*?
TIPS FOR SUCCESS WITH FIMO’
Warm it first! Warmth is the key to changing firm blocks of Fimo* into a workable puny-like substance Warm it in your bands, in a pocket, or sit on it while you're reading these instructions! To hurry it along, place small chunks in a plastic bag under a very low beat source such as a light bulb or warm water. Anything that feels hot to the touch may begin to cure Fimo* so be careful. Microwave ovens arc not recommended.
Condition it: Knead it until it is pliable and no longer crumbly. Speed up the process by adding Mix Quick, a soft, neutral mixing compound developed especially for Fimo*. Use one part of Mix Quick to four or five parts of Fimo*. if Mix Quick is unavailable, add mineral oil, vaseline, or cooking oil. Be careful alwut adding too much softener, as firmness is one of the major advantages of Fimo*. Soft clay may turn mushy as you work and rework your faces.
Work it: Professional Fimo* designers use a food processor to warm. chop, and mix the clay. Hand kneading is «ill necessary, but half the work is done. Add the Fimo* in small chunks, and don’t overload the processor. (Note: Don’t mix Fimo* in your kitchen food processor Fimo* is not on edible product.)
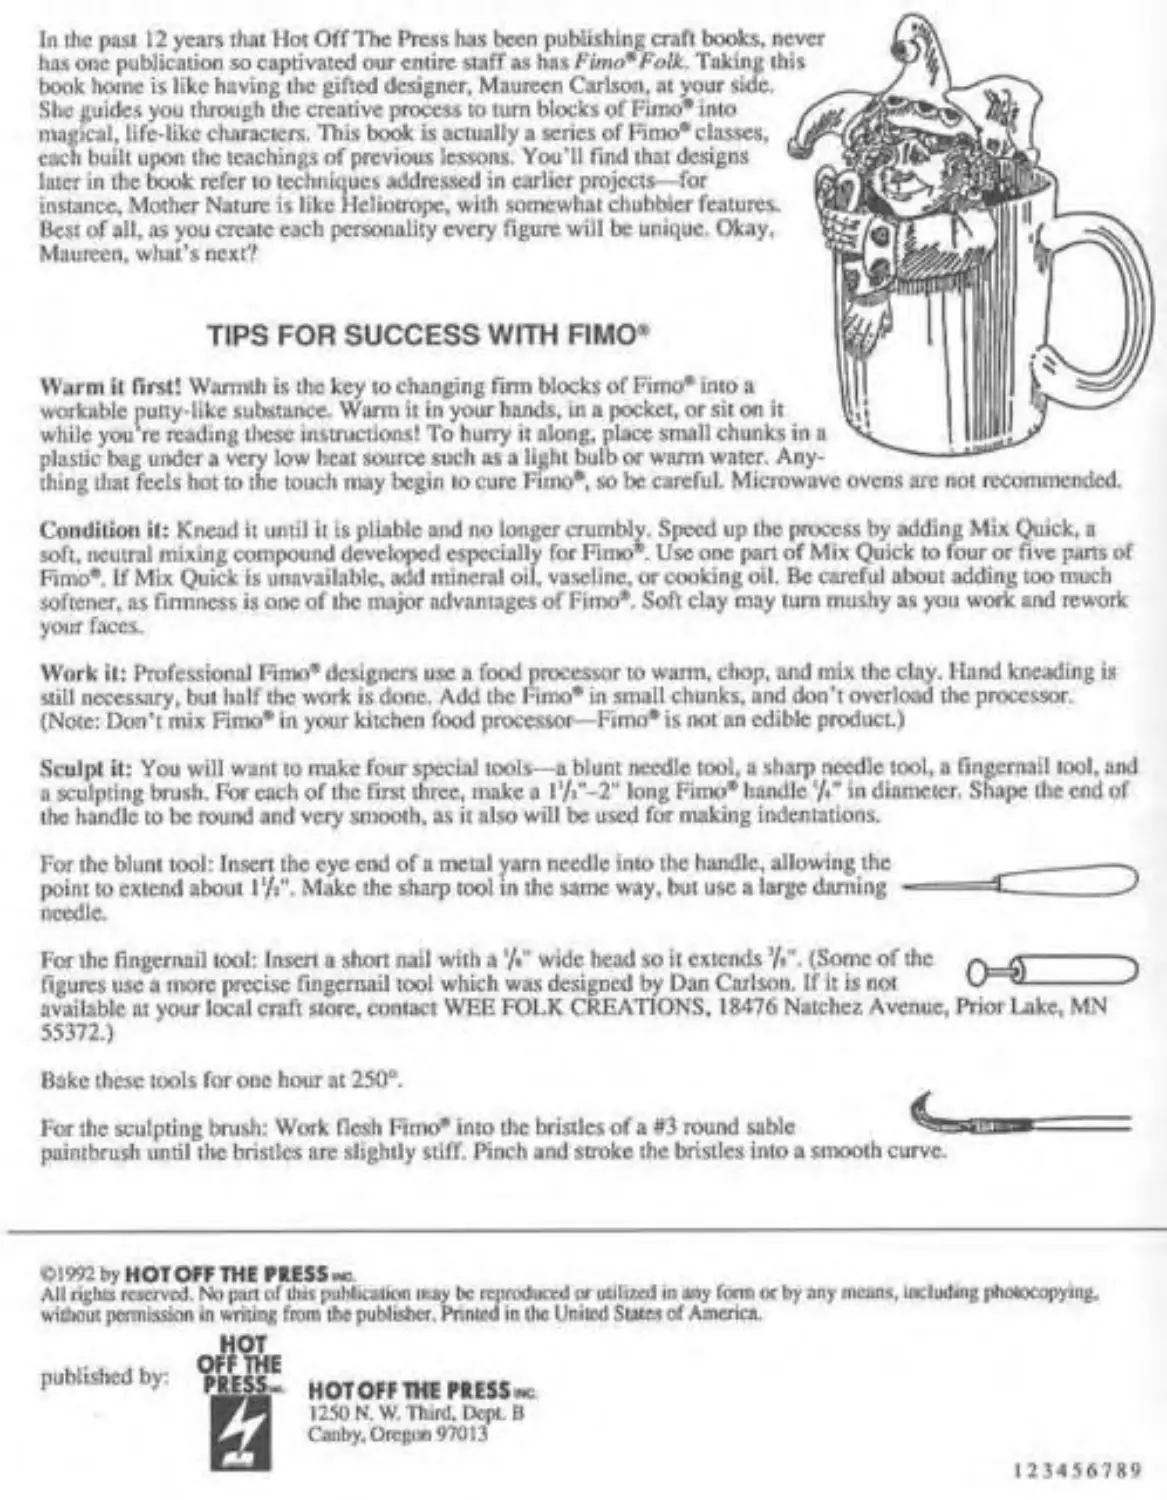
Sculpt it: You will want to make four special tools—a blunt needle tool, a sharp needle tool, a fingernail tool, and a sculpting brush. For each of the first three, make а 1‘/Г-2“ long Fimo* handle '/•’ in diameter. Shape the end of the handle to be round and very smooth. as it also will be used for making indentations.
For the blunt tod: Insert the eye end of a metal yarn needle into the handle, allowing the point to extend about I'/i". Make the sharp tool tn the same way. but use a large darning needle.
For the fingernail tool: Insert a short nail with a '/•" wide head so it extends (Some of the }
figures use a more precise fingernail tool which was designed by Dan Carlson. If it is not ---------x
available nt your local craft store, contact WEE FOLK CREATIONS. 18476 Natchez Avenue, Prior Lake, MN 55372.)
Bake these tools for one hour at ISO”.
For the sculpting brush: Work flesh Fimo* into the bristles of a #3 round sable paintbrush until the bristles are slightly stiff. Pinch and stroke the bristles into a smooth curve.
©1992 by HOT OFF THE PRESS ж
All rights reserved. No part of du$ ри14к»1К*1 iwy be reproduced or utilized in аду (олп ос by any mean», including photocopying, without permission in writing from the publisher. Pnntcd in the United States of America.
published by:
HOTOFF THE PRESS»c 1250 N. W. Third. IJcpt В Canby. Огер» 97013
123456789
Other tools aixi supplies you will need: «
paring knife or pulcKe knife: for cutting clay
rolling pin:foe flattening Fimo* For fabric-likc sheets, first flatten a pancake of wanned and conditioned limo* between your hands, then anchor one edge of this pancake to a laminated plastic work surface (such as Formica*). Roll two or three limes in one direction with a very clean rolling pin, then flip, anchor, and roll again to'/»" thick. Immediately smooth any ripped or sticky spots, or you’ll have a mess. If you hate this part, buy a pasta machine -slick! Roll the clay to setting #4. (Again, do not use the same pasta machine for Fimo* that you use for food.)
Kemper punch cutters: for cutting small precise shapes. Available in a variety of shapes and f----
sires, including hearts, flowers, circles, and leaver
paintbrushes: round sable brushes—use size MO or # I for painting eyes. #3 or #5 for blushing checks
chalk: pink, for blushing cheeks; other colors as required in the projects. Rub the chalk onto paper, then pick up the powder with з very soft round sable brush and dab it onto the wet clay.
fabric: for texturing. Collect 6“ squares of interesting textures: knits, linen, wool tweed, or stubbed silk
round wooden toothpicks: for reinforcing necks.
oven parchment: for lining baking sheets (aluminum foil will leave shiny areas on the bottoms of baked pieces).
waterless hand cleaner or baby wipes: for cleaning hands and surfaces before, during, and after working with Fimo*. This is essential the clay will pick up any little speck of din or lint on your hands or work surface.
ruler: for measuring Fimo* to ensure accurate proponions
Bake it: Bake Fimo* figures for one to two Ixxirs. depending on how many you are baking, how big they are, and whether or not people will be touching them (underbaked Fimo* will not tolerate as much handling).
Underbaked Fimo’ is fragile, like piecrust, while Fimo* baked al too high a temperature may bum. which results in irritating fumes. To guard against both of these problems, test your actual oven temperature with a separate oven thermometer, and always bake on an insulated or doubled baking sheet, or u heavy ceramic tile, to protect the Fimo* from uneven or intense heat at the oven bottom. Never bake under 212” or over 265°.
The figures in this book use prebaked eyes: Bake '/•" balls of white Fimo* for 15 minutes. Let titan cool, then set them aside until needed.
Most of these figures require less than one 2-ounce package of the main color. Depending on how thinly their robes are rolled, a friar or St. Nicholas may require more than one package.
ГЬе publlAa designer widi Io thank the follow me companies (at providing nuicnah used in tin» puMicati»: Dre'» Delights. Inc. (er Mix Ouck; American Art Clay farFuixr; Kemper Mfg. Co, for punch cutlers, and DdUvShrva, lac. farxrylac paints.
The mfarrnatioa in th»« book u presented ui good faith; however, no warranty is gisen nor are results guaranteed. Hol Off The Press. Inc disclaims any liability for untoward results. Nut for cinniwcicial reproduction The designs in this book are poacctccl by copyright; however, you may make the designs for ycer renmul uic or to sell far pin money, This me has been surpassed when the designs are made by employee» or so«l tlu-ougli commercial outku.
2
PUMPKIN PATCH FACE
I 2
Оз LI
YOU WILL NEED:
Fiino*: orange. green
Mix Quick mixing compound two prebaked ey es (see page 1) acrylic paints: black, brown, white VO and V3 round paintbrushes sculpting brush, blunt anti sharp tools (see inside the front cover and page I) aluminum foil, ruler, knife insulated or double baking sheet oven parchment
DESIGNER'S NOTE:
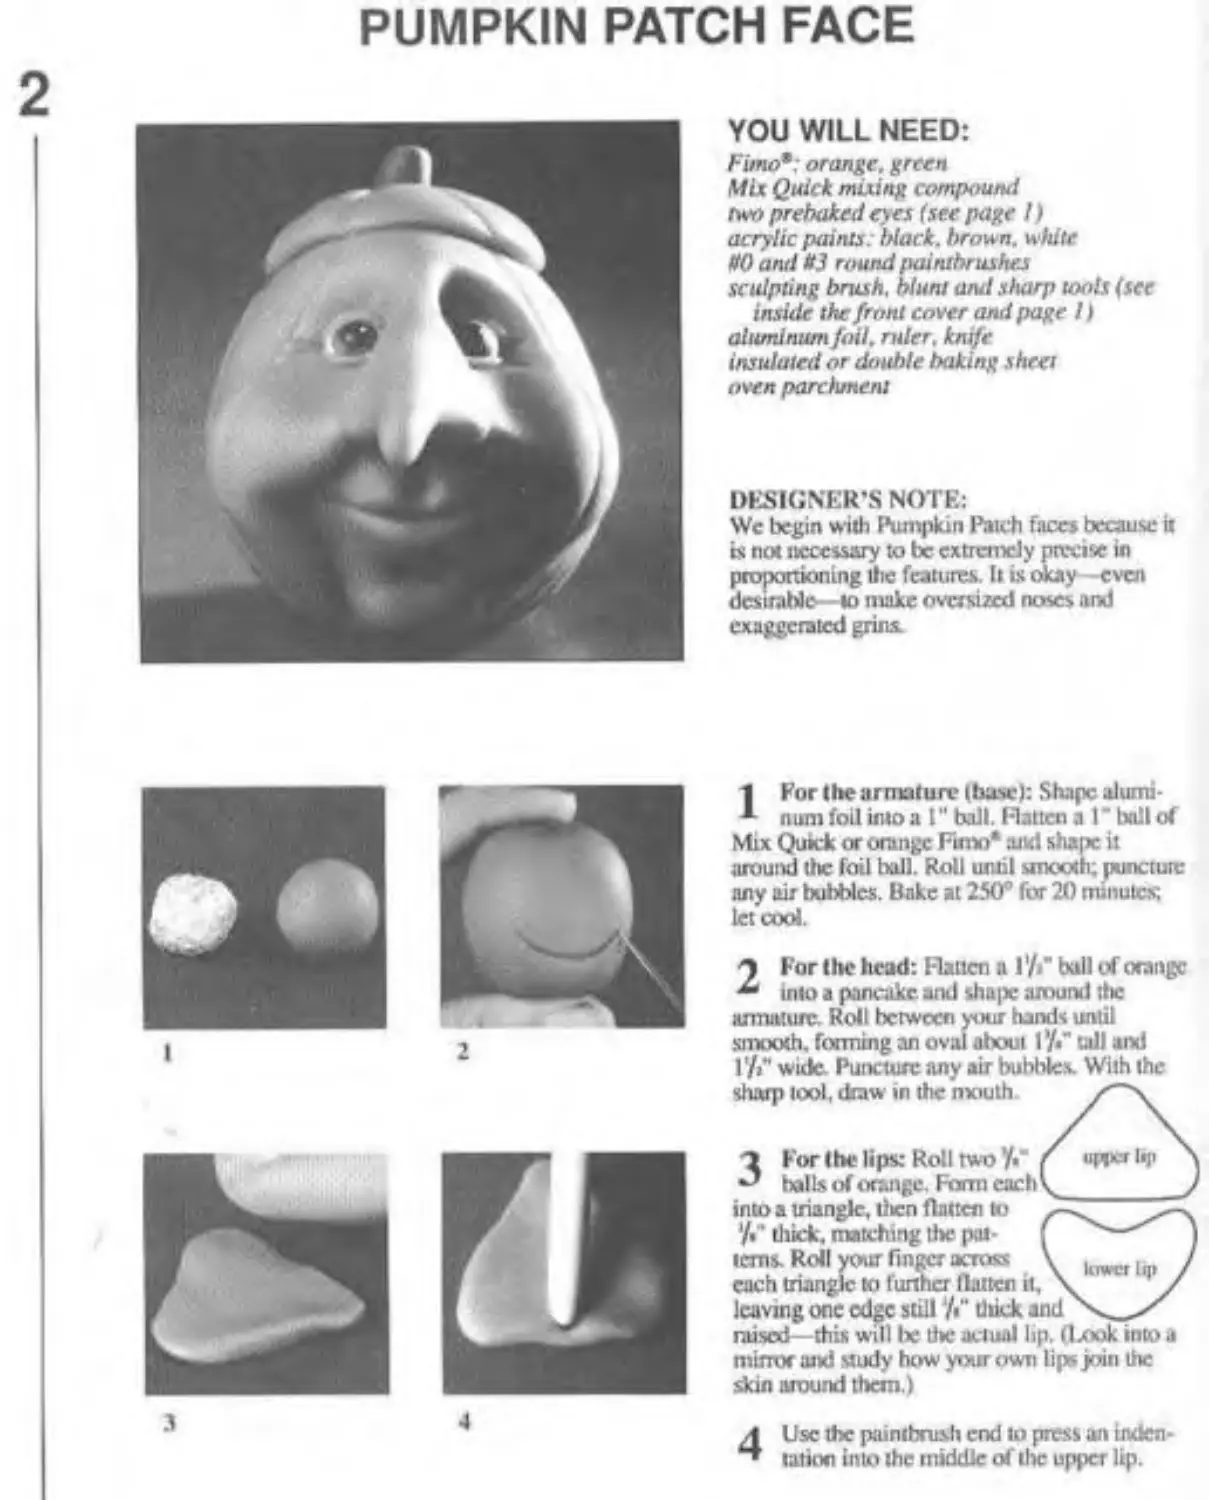
We begin with Pumpkin Patch faces because it is not necessary to be extremely precise in proportioning the features. It is okay —even desirable—to make oversized noses and exaggerated grins.
1 For the armature (base): Shape alumi-
•*- num foil into a I" ball. Ratten а Г ball of Mix Quick or orange Hmo* and shape it around the foil boll. Roll until smooth; puncture any air bubbles. Bake at 250° for 20 minutes let cool.
2 For the head: Flatten a l’/Г boll of orange into a pancake. and shape around tlx armature. Roll between your hands until smooth, forming an oval about !*/•“ tall and l'/>" wide. Puncture any air bubbles. With the sharp tool, draw in the nxiuth
3For (be lips: Roll two У«" f >4’ balls of orange. Farm cach\_______, into a triangle, llxn flatten to ,—.
'/»" thick, matching the pot- f
tems. Roll your finger across \ ktwCf ( 7
each triangle to further flatten it, \ /
leaving one edge soil '/Г tltick and raised—this will lx the actual bp. (Look into a mirror aid study how your own lips join the skin around them.)
4 Use the paintbrush end to press an indentation into the middle of tlx upper lip.
3
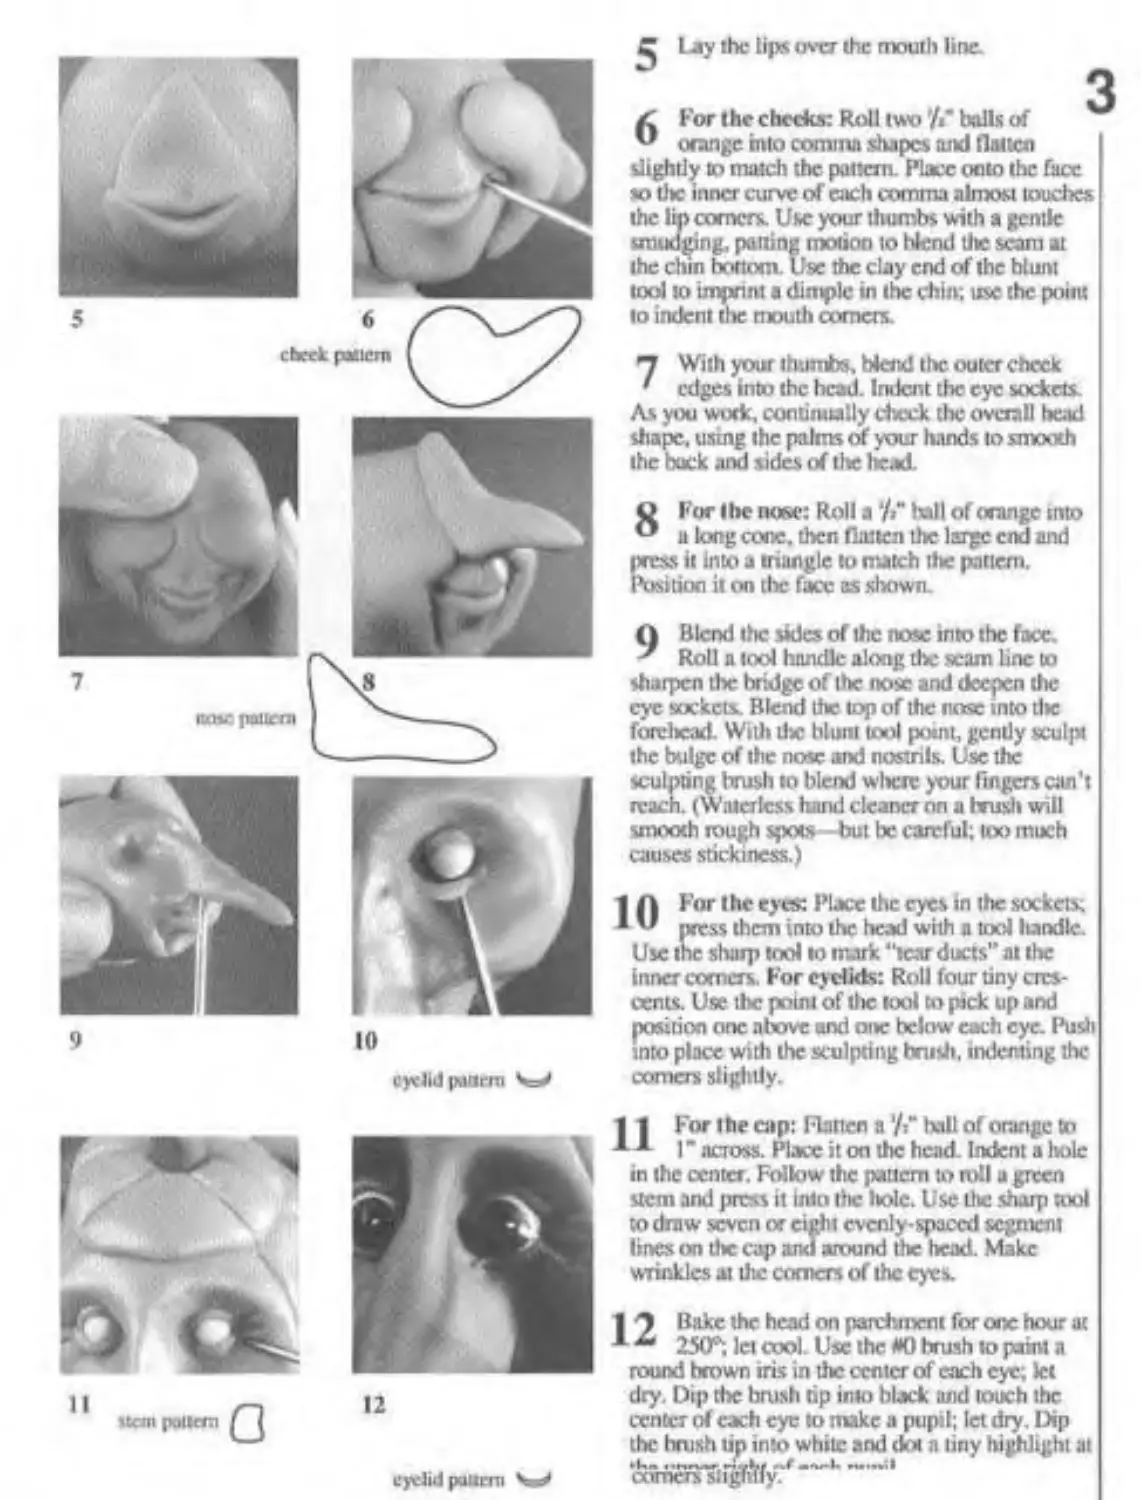
Lay the lips us-ст the mouth line.
10
eyelid 1ХШГЛ1 4=/
12
eyelid paurni 4^
A For the checks: Roll two '/Г balls of orange into comma shapes and flatten slightly to match the pattern. Place onto the face so tltc inner curve of each comma almost touches the lip comers. Use your thumbs with a gentle smudging, patting motion to blend Use seam at the chin bottom. Use the clay end of the blunt tool to imprint a dimple in the chin; use the point Io indent the mouth comers.
*7 With your thumbs, bkixl the outer check ' edges into the head. Indent the eye sockets.
Ал you work, continually check the overall head shape, using the palms of your funds to smooth the bock and sides of lite Itcad.
Q For the nose: Roll a'/»" hall of (range into ° и long cone. then flatten live large end and press it into a triangle to match the pattern. Positioci it on the face as shown.
() Blend the sides of the nose into the face. ' Roll a tool handle along the scam line to sharpen tlx: bridge of the nose and deepen die eye sockets. Blend the top of the nose into tlte foreltcad. Willi die blunt tool point, gently sculpt the bulge of the nose and nostrils. Use the sculpting brush to blend where your fingers can’t reach. (Waterless hand cleaner on a brush will smooth rough spots but be careful; too much causes stickiness.)
1 Л For l he eyes: Place the eyes in the sockets. * " press them into the head with a tool lundlc.
Use the sharp tool to mark "tear ducts" at the inner comers. For eyelids: Roll four tiny crescents. Use the point of tlie tool to pick up and position one above and one below each eye. Push into place with the sculpting brush, indenting the comers slightly.
1 | For the cap: Flatten а ’/" Kill of orange to
I" across. Place it on the head. Indent a hole in the center. Follow the pattern to roll a green stem and press it into tlte Itolc. Use tlx: sharp tool to draw seven or eight evenly-spaced segment lines on tlx: cap and around the head. Make wrinkles at the comers of the eyes.
1 Bake the head on parchment for one hour at 250^. let cool. Use the #0 brush to paint a round brown iris in the center of each eye; let dry. Dip the brush rip ink) black and touch the center of each eye to make a pupil; let dry. Dip the brush tip into while and dot a liny highlight at avrierssiigfi,f(y’.’f u 1
4
HANDS
3 4
5 6
7
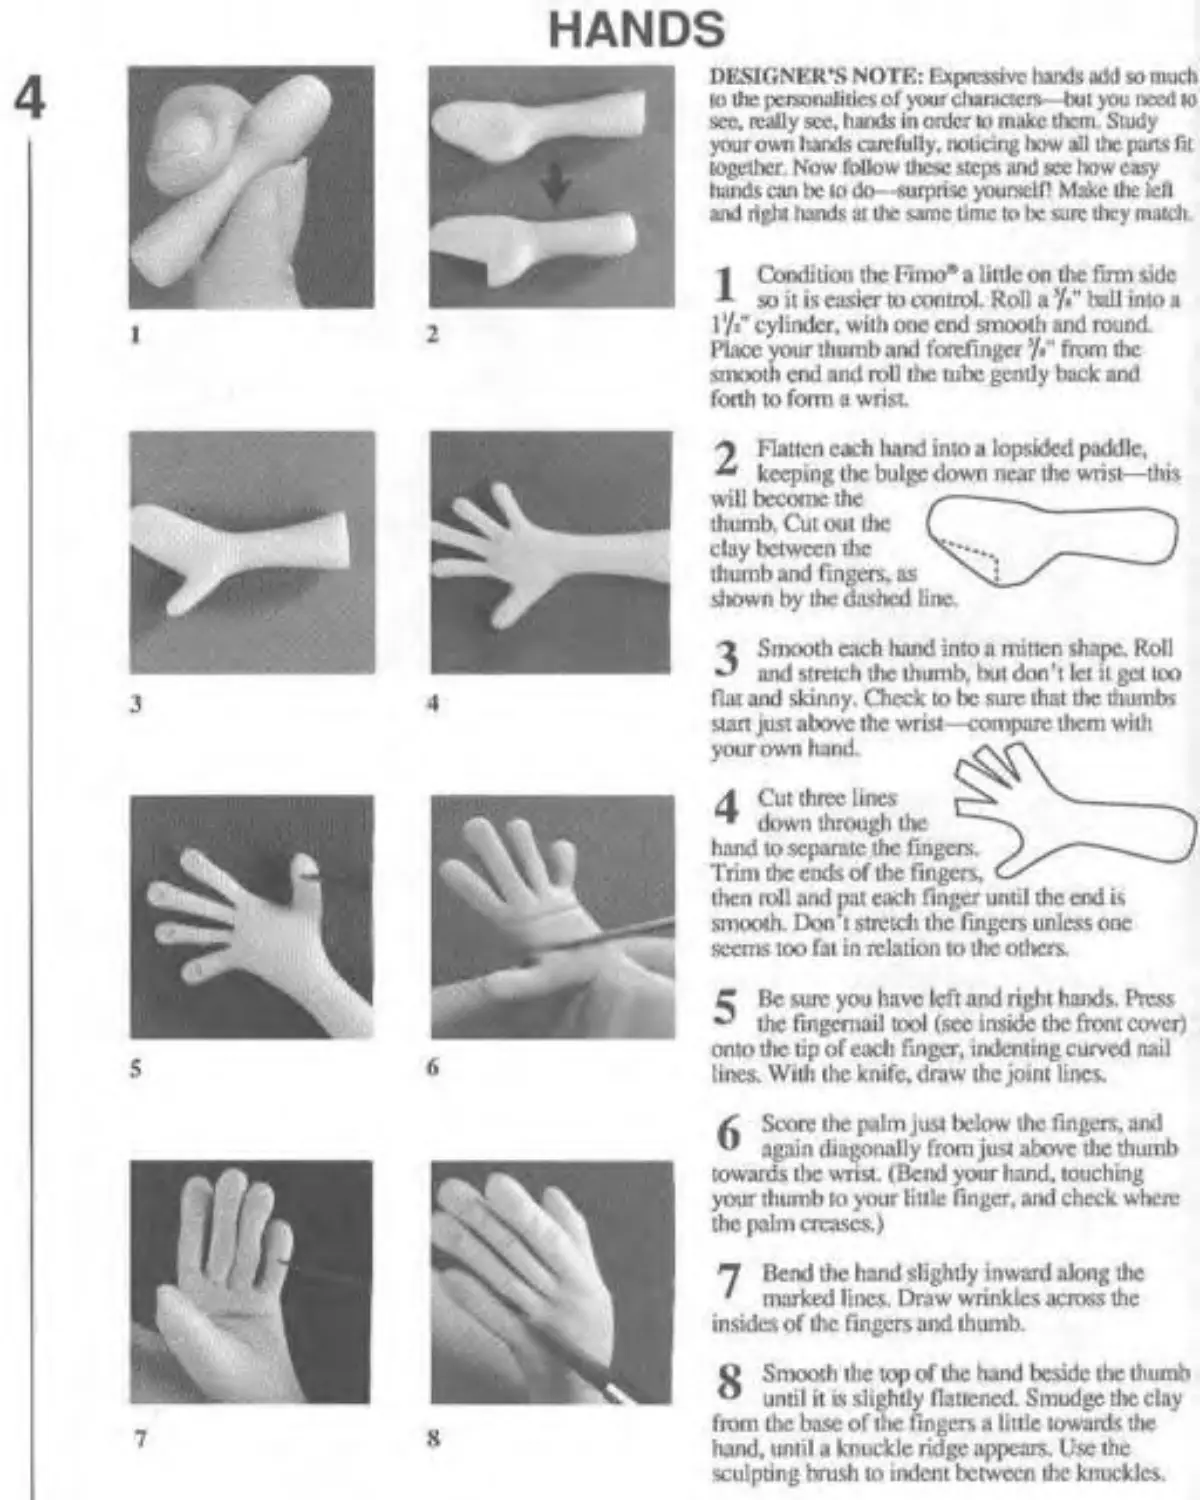
DESIGNER’S NOTE: Impressive lands add so much Ю the personalities of your cluraae» tai you need ю see. really see. hands in order k> make them Study your own lands carefully, noticing how all the pans fit together Now follow dicw steps and sec how easy hands can lie to do -surprise yourself Make die lefl and right liands at the same time to Ik sure they match
1 Condition the Fimo*a little on the firm side so it is easier to control. Roll a ’/a" lull into a l'/Г cylinder, with one end smooth and round. Place your thumb and forefinger from the smooth end and roll the tube gently back and forth to fomi a wrist.
О Flatten each lutnd into a lopsided paddle, keeping (he bulge down near the wrist—this will become the thumb. Cut out dx: clay between the thumb and fingers. dx>wn by the dashed line
3 Smooth each hand into a mitten shape. Roll and stretch the thumb, but don't let it get loo fiat and skinny. Check to be sure that the thumbs Man just above the wrist - compare them with your own hand
A Cut three lines pb. --------------------------
“ down through the
hand to separate the fingers. )-----------------...
Trim the ends of the fingers.
then roll and nat each finger until the end is smooth. Don’t stretch the fingers unless one seems too fat in relation to the otltcrs.
C Be sure you have left and right hands. Press the fingernail tool (see inside the front ewer) onto tlie tip of cadi finger, indenting curved nail lines. With the knife, draw the joint lines.
К
Z Score the palm just below the fingers, and " again diagonally from just above die thumb towards tlx: wrist. (Bend your hand, touching your thumb to your link: finger, aid check where the palm creases.)
7 Bend the hand slightly inward along the
' marked lines. Draw wrinkles across the insides of the fingers and thumb.
Q Smooth the top of the hand beside the thumb ° until it is slightly flattened. Smudge die clay from the base of the fingers a little towards die hand, until a knuckle ridge appears. Use the sculpting brush to indent between die knuckles.
5
HELIOTROPE THE GARDEN TROLL
boB
YOU WILL NEED:
Fund*: violet. leif great, flesh, golden yellou orange, champagne. caramel
Mix Quick muting compound mu prebaked eyes (see page I) acrylic paints: black, brawn, white »() and Я J round paintbrushes sculptuig brush. blunt, sharp, and fingernail took (see inside the front cover)
rolling pin or pasta machine
Ли» 4"rt~ pieces of lira-free wool fabric (for texturing)
'IS-2“ long fresh leases (for test unng)
44* long natural fiber broom ptnk chalk aluminum fad. round toothpick, knife, ruler insulated or doable baking dteet, oven parchment super glue
DESIGNER’S NOTE: Heliotrope’s face is smaller, longer and thinner than a Pumpkin Patch Face, with a pointed chin. Iler face and liands arc chapped and reddened from the work of tidying tier tiny patch of canh for winter.
| For the armature: Shape aluminum foil into a cone, 37»" tall, with a I" wide base
Insert a toothpick into tlx? top. Hatten a 1“ boll of violet Fimo* into a 7«" thick pancake. Plate tlx: foil tone in the center arid shape the Fimo* to cover '/>" up tlx: sides.
9 Roll a %" ball of Mix Quick or flesh limo* into an egg shape. Pless live small end onto the toothpick. Use your thumb to press an indentation into the face side of the egg. Wrap a 7Гх7«“хЗ" strip of the same clay around the neck and press it firmly into pLxx Bake at 250* for 30 minutes; In cool.
2 Fur the head: Roll a У." ball of flesh and press it into tile Гасс indentation. Flatten anotlxx У«“ hall into а Г/«" wide pancake; use it to cover the neck anti the back and top of tlx? haul. Use your thumbs to smooth the seams. Roll and pat the bead between your palms until it is egg-shaped, then shajx a pointed chin.
not'/.
Л For I he face: With the sharp took draw in “ the mouth. Follow pages 2-3, steps 3-9. to shape die face, but use the patterns and dimensions on this page with flesh limo*.
6
6
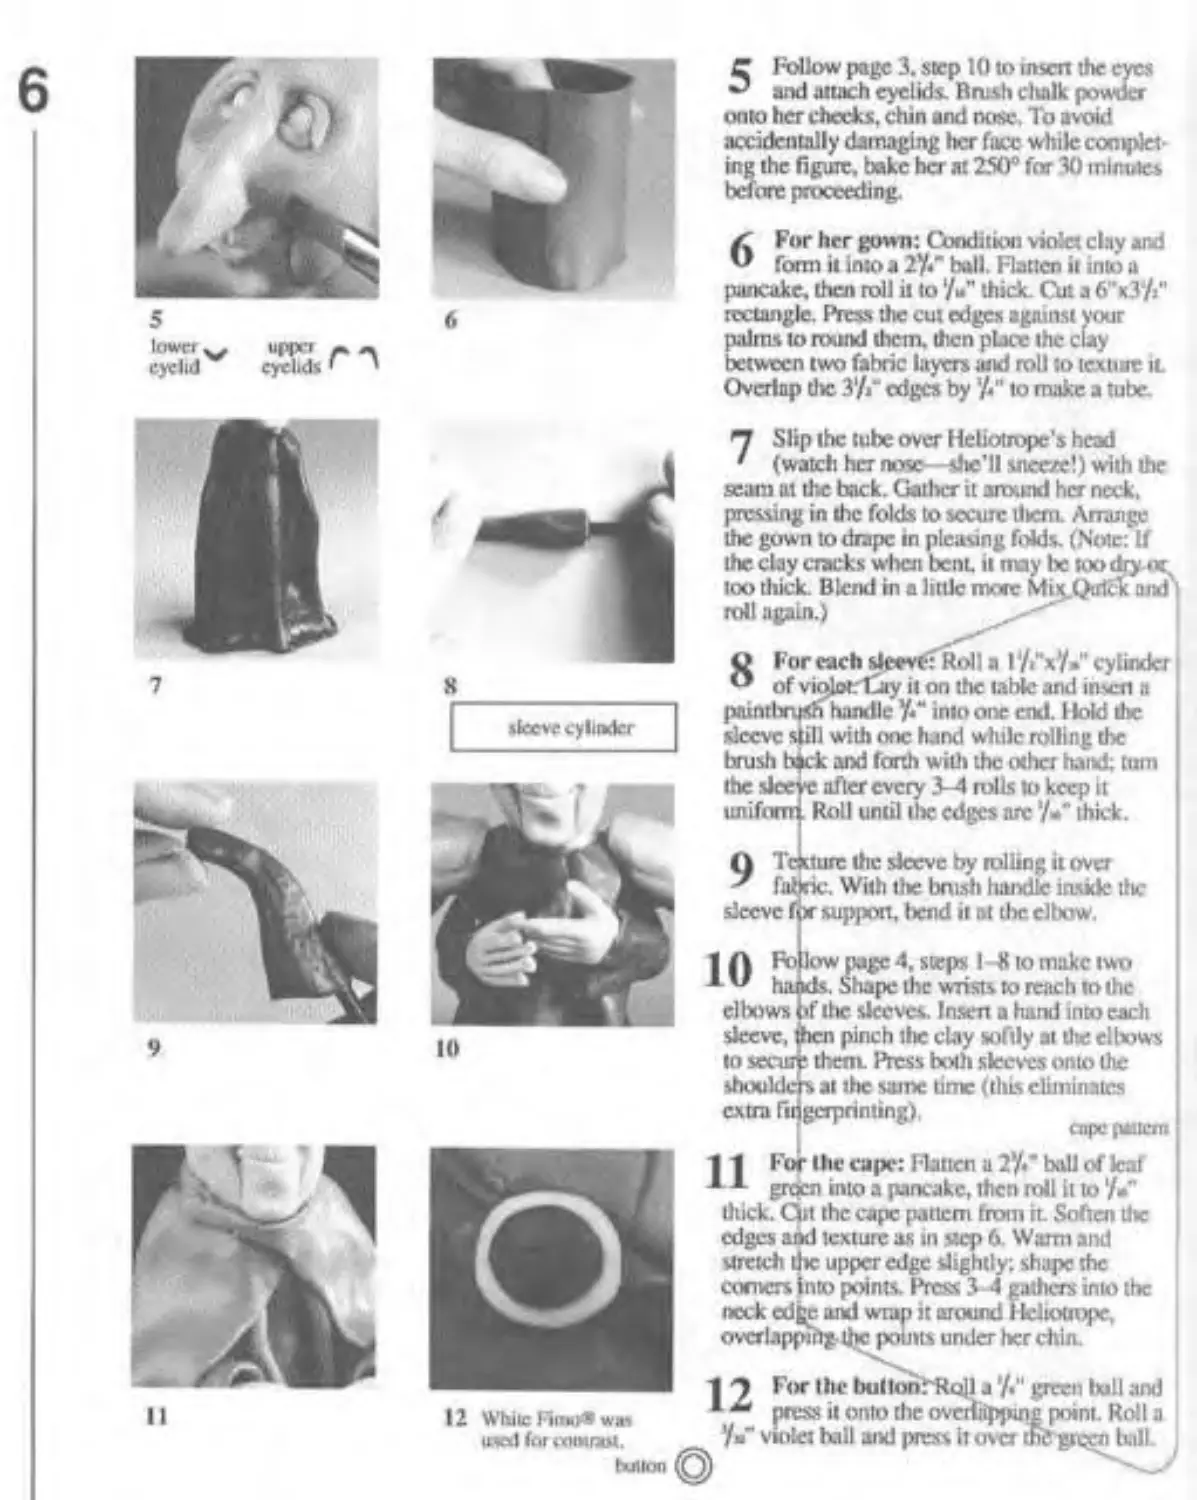
5 Follow page 3. step 10 to insert the eyes and attach eyelids. Brush cluilk powder onto her checks, chin and nose, To avoid accidentally damaging her face while comptet-Sthe figure, bake her at 250" for 30 minutes ore proceeding.
6 For her gown: Condition violet clay and form it into а 2У*" ball. Hatten it into a pancake, then roll it tothick. Cut a 6"x3‘/>" rectangle. Press the cut edges against your palms to round them, then place the clay between two fabric layers and roll to texture it Overlap die 3'/r edges by to make a tube.
jfcxve cylinder
П Slip the lube over Heliotrope's head
' (watch her nose -die'll sneeze!) with the seam at the back. Gather it anxi.nd her neck,
pressing in the folds to secure llicrn. /\rrunge the gown to drape in pleasing folds. (Note: If
the clay cracks when bent, it may Ik too dry too thick. Blend in a little more Mix.Qtrick and I roll again.)
0 For each sleevt: Roll a 1 '/»"x7 •” cylinder О of violet; iSay it on the table and insert a paintbrush handle ’/*“ into one end. 1 told the
sleeve s ill with one hand while rolling the brush bjek and forth with the other hand; turn
1(1
the slee -e after every 3-4 rolls to keep it uniform Roll until the edges are ’/*" thick.
9 Texture the sleeve by rolling it over fabric. With the brush handle inside the sleeve f(x support, (tend it nt the elbow.
| A Fo low page 4, steps I -«to make two * " hands, Shape the wrists to reach to the
elbows if the sleeves. Insert a hand into each sleeve, then pinch tire clay softly at lire elbows to secure them. Press both sleeves onto the shoulder» at the same time (this eliminates extra fiiigcrprinting).
cape piiicrii
11
1 1 For the cape: Hatten a 2*/T ball of leaf x green into a pancake, then roll it to'//’
12
thick. Qtt the cape pattern from it. Soften die edges and texture as in step 6. Warm and stretch ll»c upper edge slightly; shape the comers Into points. Press 3 4 gathers into the neck edge and wrap it around I Idiotrope, overlapping the points under her chin.
I "7 For the butlon:'Ra]l agreen lull and
While Fima» w» press it onto the overitipjwig point. Roll a
used far enmnM. v“’!« 1x1,1 alxJ l>rcss *’ «W 1x1,1
button©
Iiait
П top view
IS lop view orange leaf puilcni (vaty lhe I «ires and dupes slightly) \
19 top view
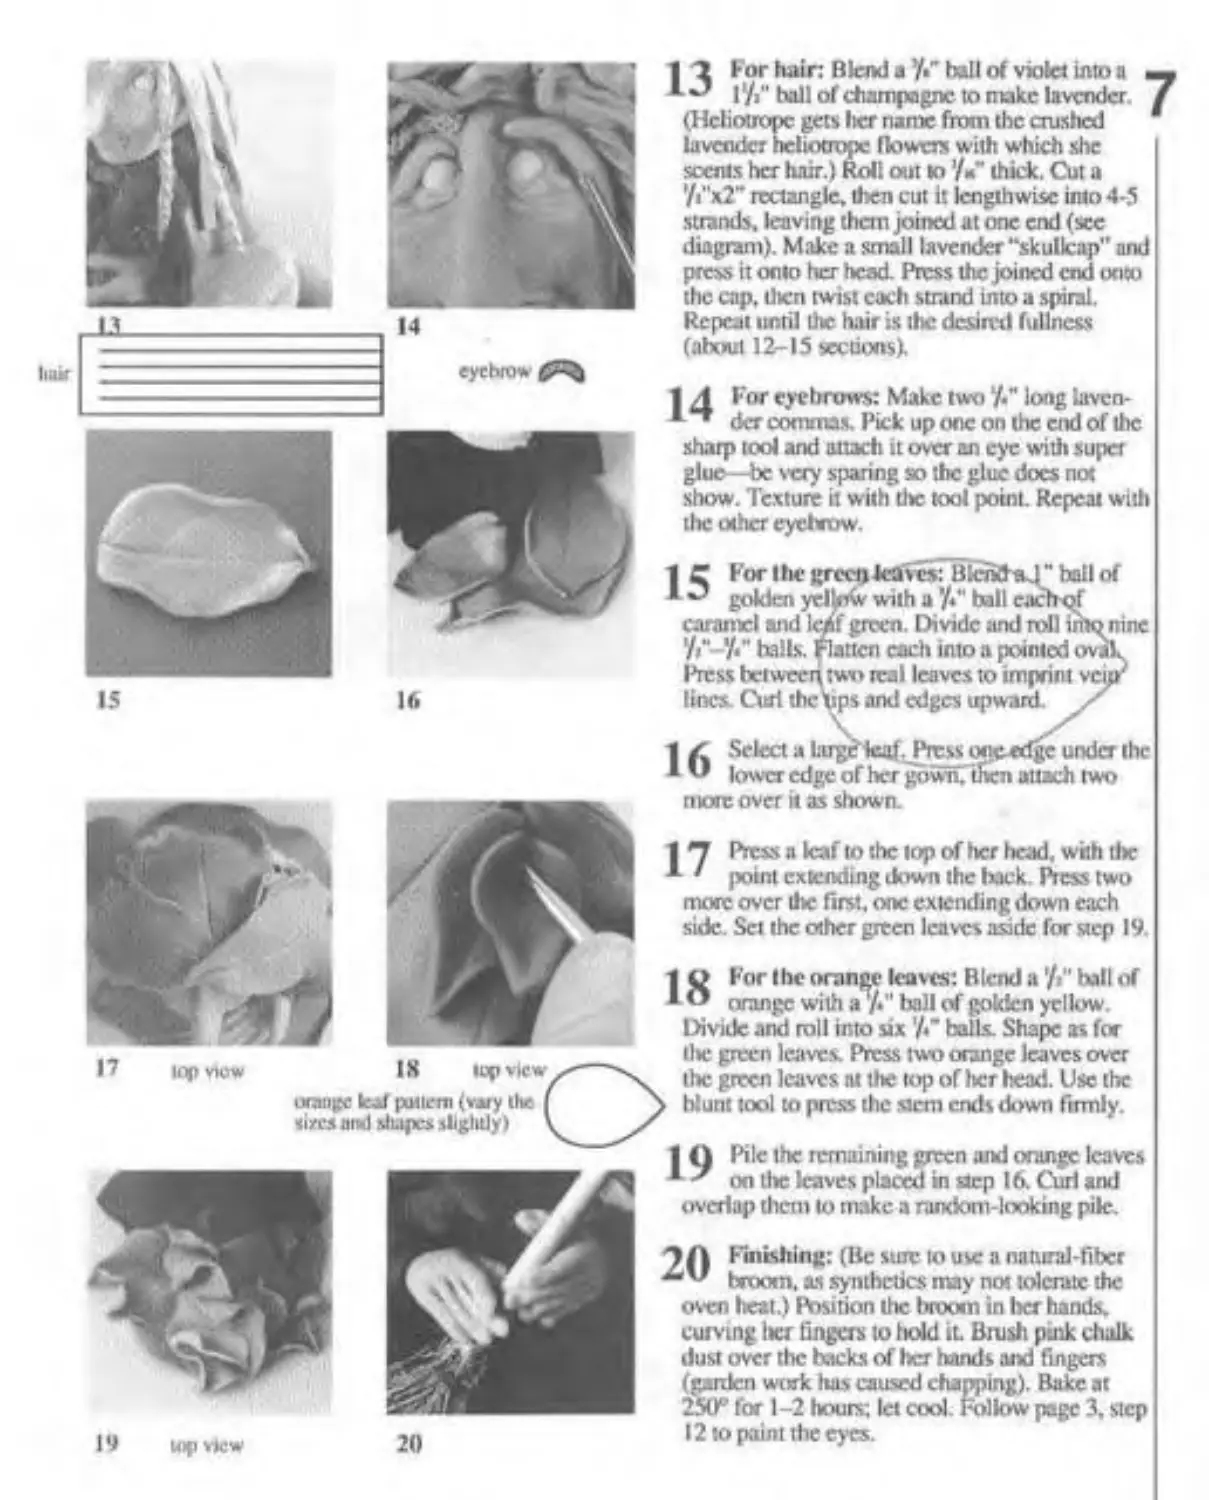
2 For hair: Blend a '/•" ball of violet into a l‘/>" hall of champagne to пике lavender.
(Heliotrope gets her name from the crushed lavender heliotrope flowers with which she scents her hair.) Roll out to ’/•»*' thick. Cut a '/i"x2“ rectangle, then cut it lengthwise into 4-5 strands, leaving them joined at one end (sec diagram). Make a small lavender “skullcap" and press it onto tier head. Press the joined end unto the cap. then twist each strand into a spiral. Repeat until the hair is the desired fullness (about 12-15 sections).
I 4 For eyebrows: Make two ’Л” long lavcn-L “ dcr commas. Pick up one on the end of die sharp tool anti attach it over an eye with super glue—be s cry sparing so the glue docs not show. Texture it with d»c tool point. Repeat with the other eyebrow.
1 C For lhe greet» leaves: BlciidsJ" hall of * golden yellow with a ’/•" bail each of caramel and Ic/tf green. Divide and roll into nine halls. Flatten each into a pointed ovik I’ress between Bro real leaves to imprint vcip' lines. Curl the ups and edges upward. z
1 z Select a Luge-leal.-Press one-edge under the * ” lower edge of her gown, then attach two
more over it as shown.
1 *7 Press л leaf to the top of her head, with die A ' point extending down the track. Press two more over the first, one extending down each side. Set the other green leaves aside for мер 19.
1 Q For t he orange leaves: Blend a'/»" hall of * О orange with a '/<" ball of golden yellow.
Divide and roll into six '/<" balls. Shape as for lhe green leaves. Press two orange leaves over the green leaves nt the top of her head. Use the > blunt tool to press the stem ends down firmly.
1 О Pile the remaining green and orange leaves on the leaves placed in step 16. Curl and overlap them to make a random-looking pile.
t Л Finishing: (Be sure to use a natural-fiber 'v broom. xs synthetics may not tolerate the oven lieat.) Position die btoom in licr hands, curving licr lingers to liold it Brush pink chalk dust over the backs of licr hands and fingers (garden work lias caused chapping). Bake at 250° for 1-2 hours; let cool. Follow page 3, step 12 to paint the eyes.
8
FEET HU EJL1
J 4
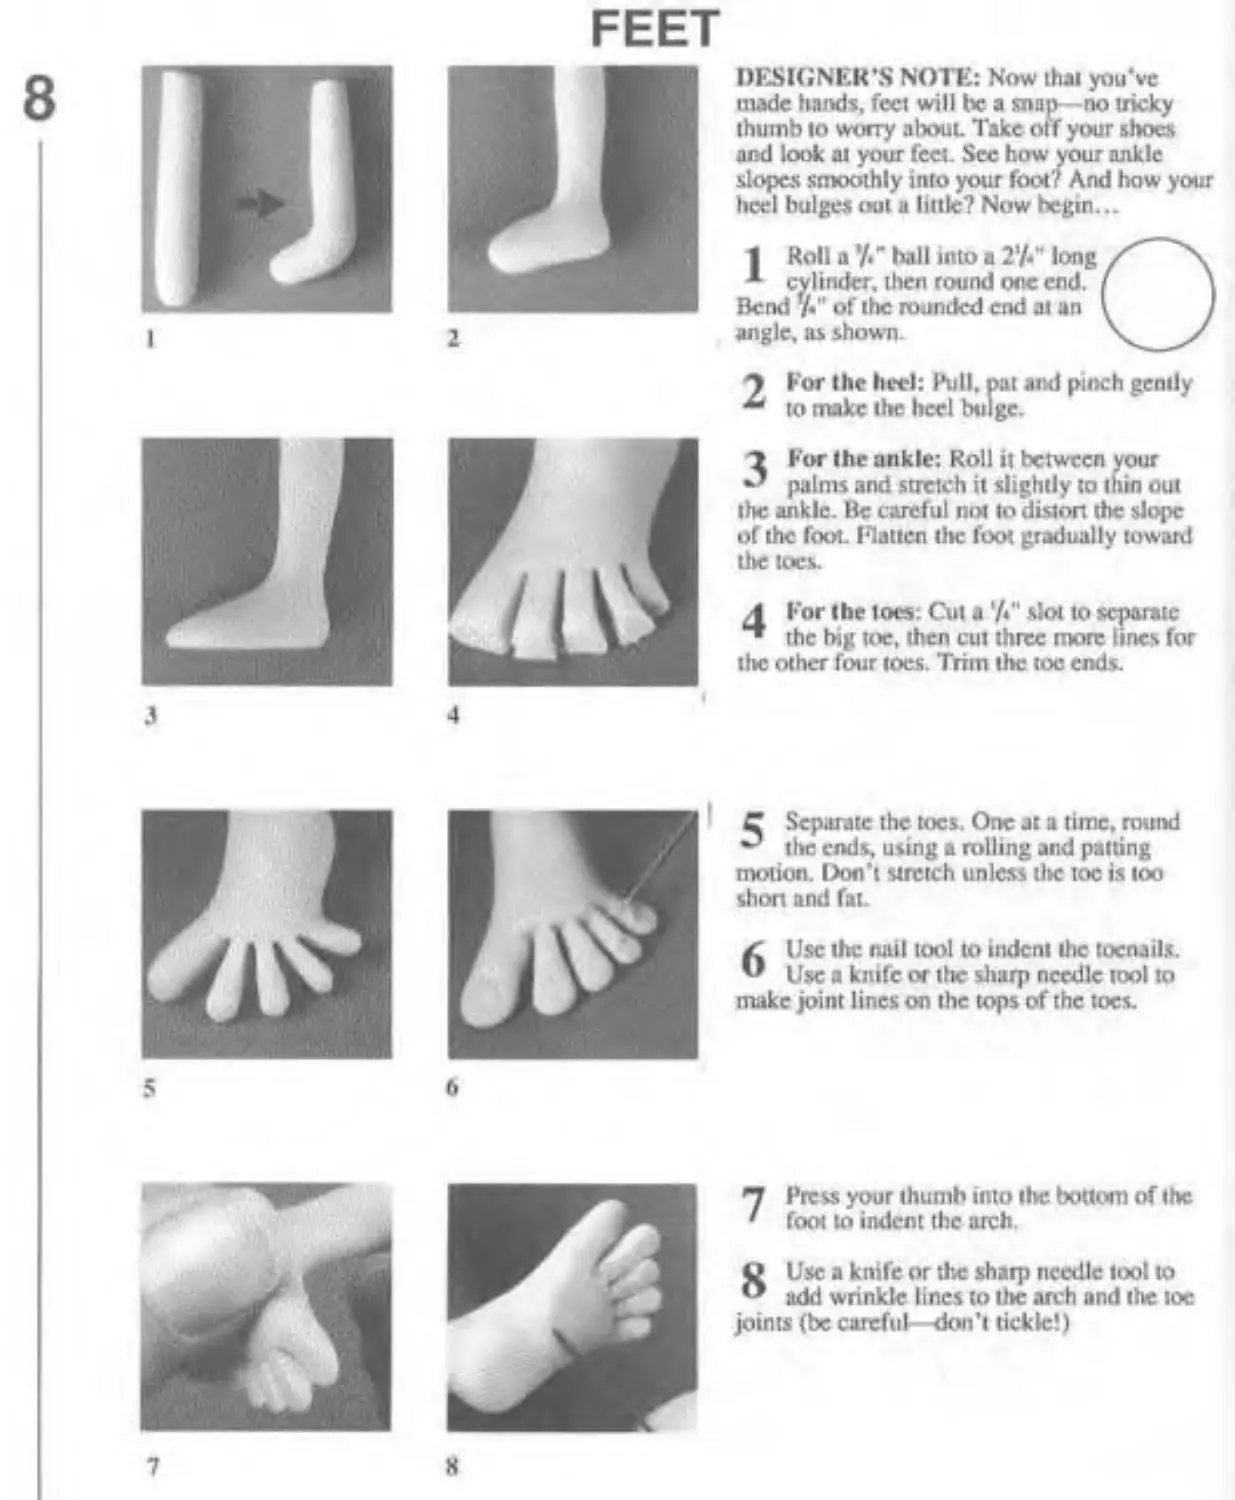
DESIGNER’S NOTF2: Now that you’ve made hands, feet will lx: a snap -no tricky thumb io worry about. Take off your shoes and look al your feet. See how your ankle slopes smoothly into your foot? And how your heel bulges out a little? Now begin...
1 Roll a */«’’ ball into a 27«" long
* cylinder, then round otic end. I \ Bend '/•" of the rounded end at an I J angle, as shown
For the heel: Pull, pat and pinch gently * to make the heel bulge.
3For the ankle: Roll it between your palms and stretch it slightly to thin out the ankle. Be careful not to distort the slope of the foot. Hatten the foot gradually toward tlie toes.
Л For the toes: Cut a '/♦" slot to separate the big toe, then cut three more lines for the other four toes. Trim the toe ends.
C Separate the toes. One at a time, round the ends, using a rolling and patting motion. Don't stretch unless tlie toe is loo short and fat.
Z Use the nail tool to indent tlie toenails. Use a knife or tlie slurp needle tool to make joint lines on the tops of the toes.
6
*7 Press your thumb into the bottom of the • foot to indent the arch.
8 Use a knife or the sharp needle tool to add wrinkle lines to the arch and the toe joints (be careful don't tickle!)
7
«
9
FRIAR JONATHAN JAMES
I 2
7* now: (•' ball
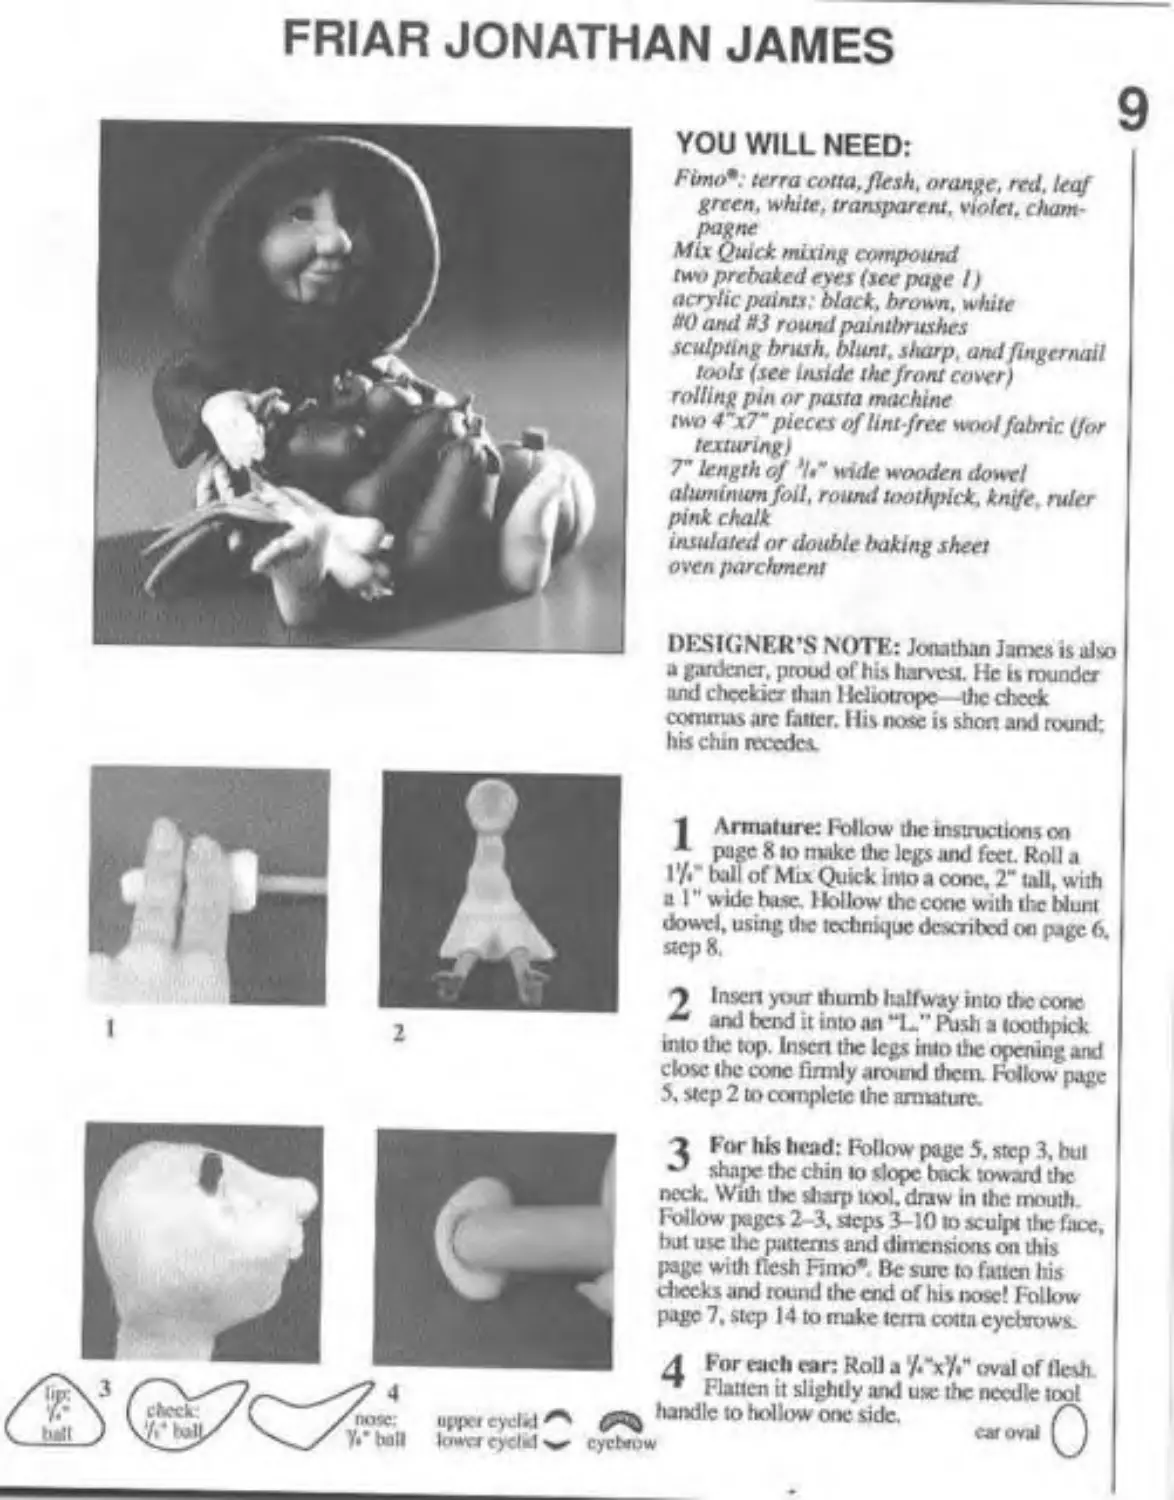
YOU WILL NEED:
Fimo*. terra cotta, flesh, orange, red. leaf green, white, transparent, violet, champagne
Mix Quick mixing compound rwv prebaked eyes (see page /) acrylic paints; black, brown, white HO and ИЗ round paintbrushes sculpting brush. blunt, sharp, and fingernail tools (see inside the front cover) rolling pin or pasta machine two 4"x7" pieces of lint-free wool fabric (for texturing)
7" length of '/•* wide wooden dowel aluminum foil, round toothpick, knife, ruler pink chalk insulated or double baking sheet oven parchment
DESIGNER'S NOTE: Jonathan Jam» is also a gardener, proud of his harvest. He is rounder and cheekier than Heliotrope- -the check conunas arc fatter. His nose is short and round: his chtn recedes.
1 Armature: Follow the instructions on * page X to make die legs and feet. Roll a l'/Г ball of Mix Quick Into a cone. 2“ tall, with a I" wide ha.se. Hollow the cone with the blunt dowel, using tlie technique dexntx-d on page 6. stq>8.
у Insert your thumb halfway into the cone ** and bend it into an “L” Push a toothpick into Die top. Insert the legs into tlie opening and clow the cone firmly around them. RMIow page 5. step 2 to complete the armature.
3For his head: Follow page 5. step 3, but shajic tire chin to slope back toward tlie neck. Witli tlie sharp tool, draw in the mouth. Follow jxigcs 2-3, steps 3-10 to sculpt the face, but use the patterns and dimensions on tliis page witli flesh Fimo*. Be sure to fatten his checks and round the end of his nose? Follow page 7. step 14 to make terra cotta eyebrows.
4 For each car: Roll a '/."x’/." oval of flesh ** Flatten it slightly and use the needle tool handle to hollow one side. , /Л
.... - , - car oval I 1
lower eyclrf -w cyctwuw \_/
10
5
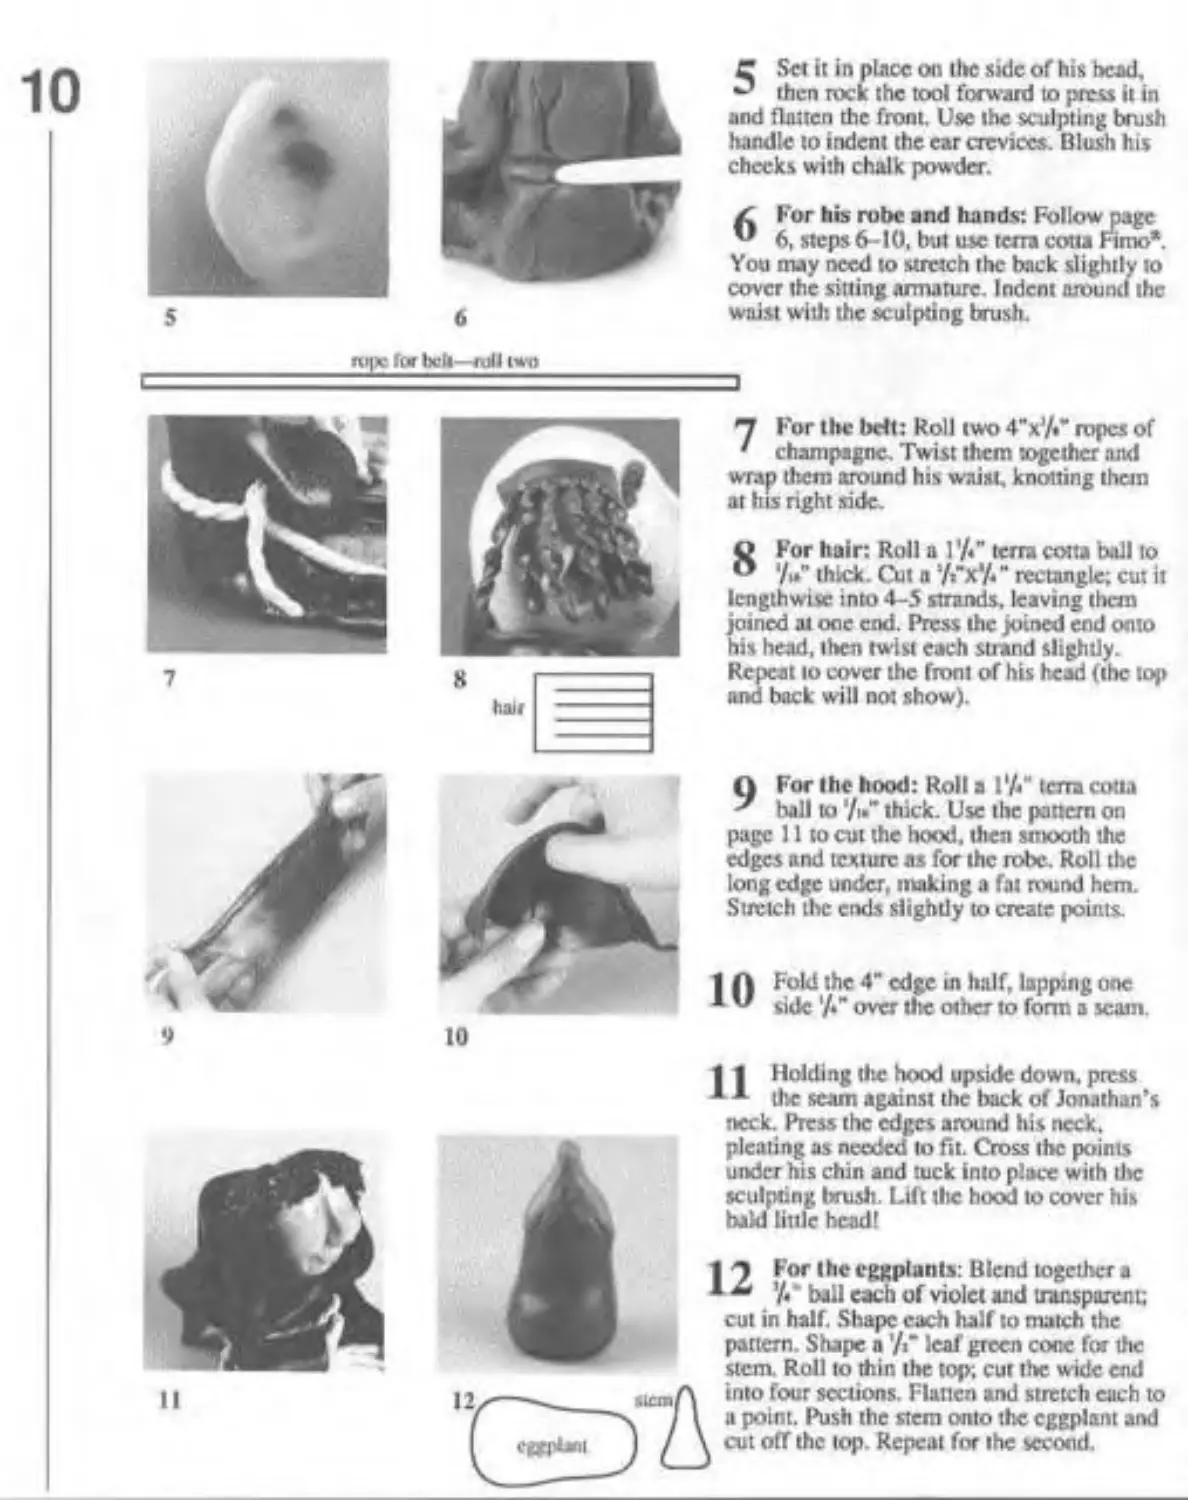
C Set it in place on the side of his bead, then rock the tool forward to press it in and flatten the front. Use lhe sculpting brush handle to indent the ear crevices. Blush his checks with chalk powder.
Z For his robe and hands: Follow page v 6, steps 6-10, but use terra cotta Fimo*. You may need to stretch the back slightly to cover the sitting armature. Indent around the waist with the sculpting brush.
rope for belt—Alli IWI>
7
*7 For the belt: Roll two 4"x’/.” ropes of ' champagne. Twist them together and wrap them around his waist, knotting than at his right side.
О For hair: Roll a 1'/«" terra cotta ball to ° '/«" thick. Cut a 7»"x'/." rectangle; cut it lengthwise into 4-5 strands, leaving them joined at one end. Press the joined end onto his head, then twist each strand slightly. Ж1 to cover the front of his head (the top tele will not show).
9 10
Q For the hood: Roll а ГЛ" terra cotta ball to '/it" thick. Use the pattern on page 11 to cut lhe hood, then smooth the edges and texture as for the robe. Roll the long edge under, making a fat round hem. Stretch the ends slightly to create points.
1 Л Fold the 4“ edge in half, lapping one * v side '/♦" over the other to form a scam.
eatrUni
| 1 Holding (lx hood upside down, press 1 A the scam against the back of Jonathan’s neck. Press the edges around his neck, pleating as needed to fit. Cross the points under his chin and tuck into place with die sculpting brush. Lift the hood to cover his bald little head!
1 9 f,°r ,hv eggplants: Blend together a
1 ** '!•' ball each of violet and transparent;
cut in half. Shape each half to match the pattern. Shape а '/Г leaf green cone for die stem. Roll to thin the top; cur the wide end into four sections. Flatten and stretch each to a point. Push the stem onto the eggplant and cut off the top. Repeat for the second.
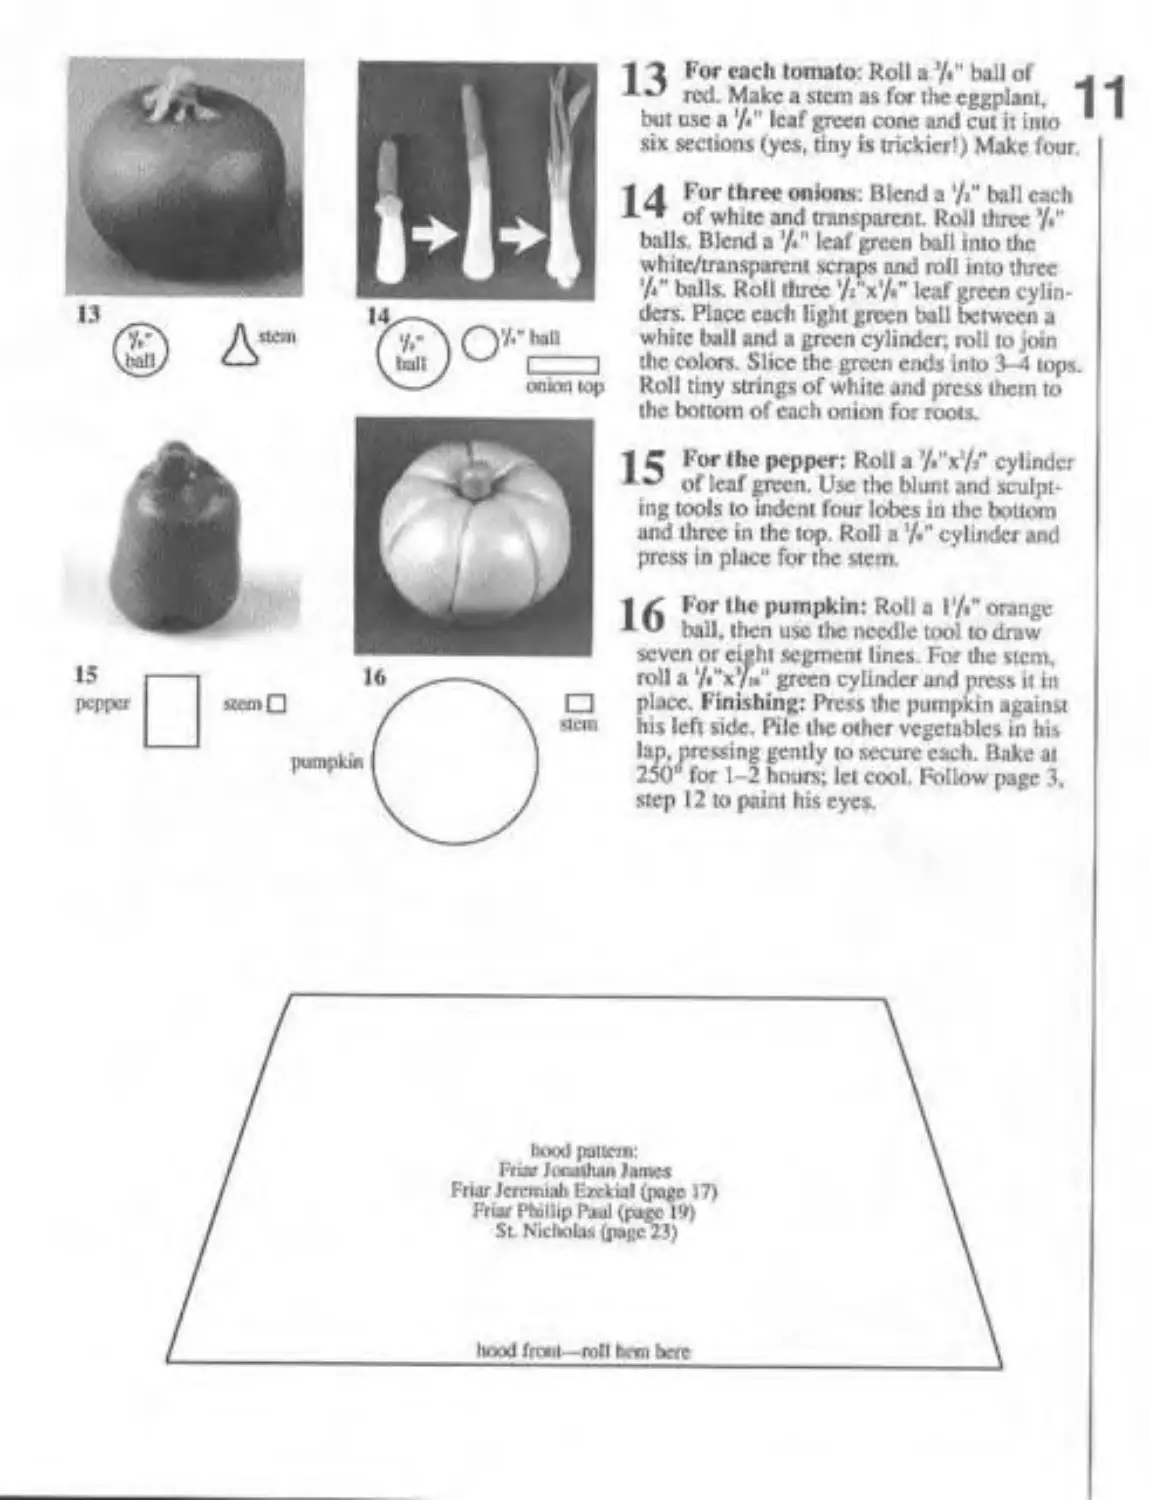
"I 2 For each tomato: Roll a ’/«" ball of
1 red. Make a stem as for the eggplant, | | but use a '/•" leaf green cone and cut it into six sections (yes, tiny is trickier!) Make four
MFor three onions: Blend а 7>“ ball cadi of white and transparent. Roll three '/•" balls. Blend a ’/«" leaf green ball into the whitc/transparent scraps and roll into three '/*“ balls. Roll three 7i"x'/." leaf green cylinders. Place each light green ball between a white tall and a green cylinder; roll to join the colors. Slice the green ends into 3-4 tops. Roll tiny strings of white and press them to the bottom of each onion for roots.
| C For the pepper: Roll a 7»"x'A" cylinder 1 of leaf green. Use the blunt and sculpting tools to indent four lobes tn the bottom and three in the top. Roll a ’/•'* cylinder and press in place for the stem
1 *or *hc pumpkin: Roll a !'/•" orange * ” tall, then use the needle tool to draw seven or eight segment lines. For die stem, roll a ‘/•"x7i»“ green cylinder and press it in place. Finishing: Press the pumpkin against his left side. Pile the other vegetables in his lap. pressing gently to secure each. Bake at 250“ for 1-2 hours; let cool. Follow page 3, step 12 to paint his eyes.
hood pulton: Friar JiMinluin James Fnar Jeremiah Exckial (page >7) Friar Phillip Paul (pijc l!»| St Nichola* (jokc23)
hood frtwt—mtl U-m c
MORE FACES
12
П4*
1 2
...simple ways to add different expressions.
1 Smiling or speaking mouth: Form the
* head into an egg shape which sits slanted on top of the neck.
П Use the paintbrush handle to hollow a
* * large mouth.
ЙП 3 4
3 Follow pages 2-3. steps 3-5 to make live lips. Place them over the hole, completely covering the edges; leave the center open.
Blend, then continue as on page 3.
,4 Singing mouth: Follow steps 1-3 above, but curve the lips more for the appearance of an open mouth. Eliminate the cheek commas—our checks arc flat when we open our mouths to sing (look in the mirror and sec).
C For a tongue: Make a flattened teardrop of pink Fimo*. Pick it up with the point of the sharp tool and position it in the mouth.
6 Fur teeth: Cover a ’/»" diameter wooden dowel with foil. Curve a ’/«Tx’/Г strip of white Fimo* over the dowel as shown. Cut in teeth lines, then bake 30 minutes at 250й. Let cool, then remove from the foil.
7 Follow steps 1 -2 above to make a head with a large mouth hole. Press the teeth over the upper edge of the hole.
8 Form the lips over the teeth, nuking a smiling or ringing mouth as desired.
Continue as on page 3.
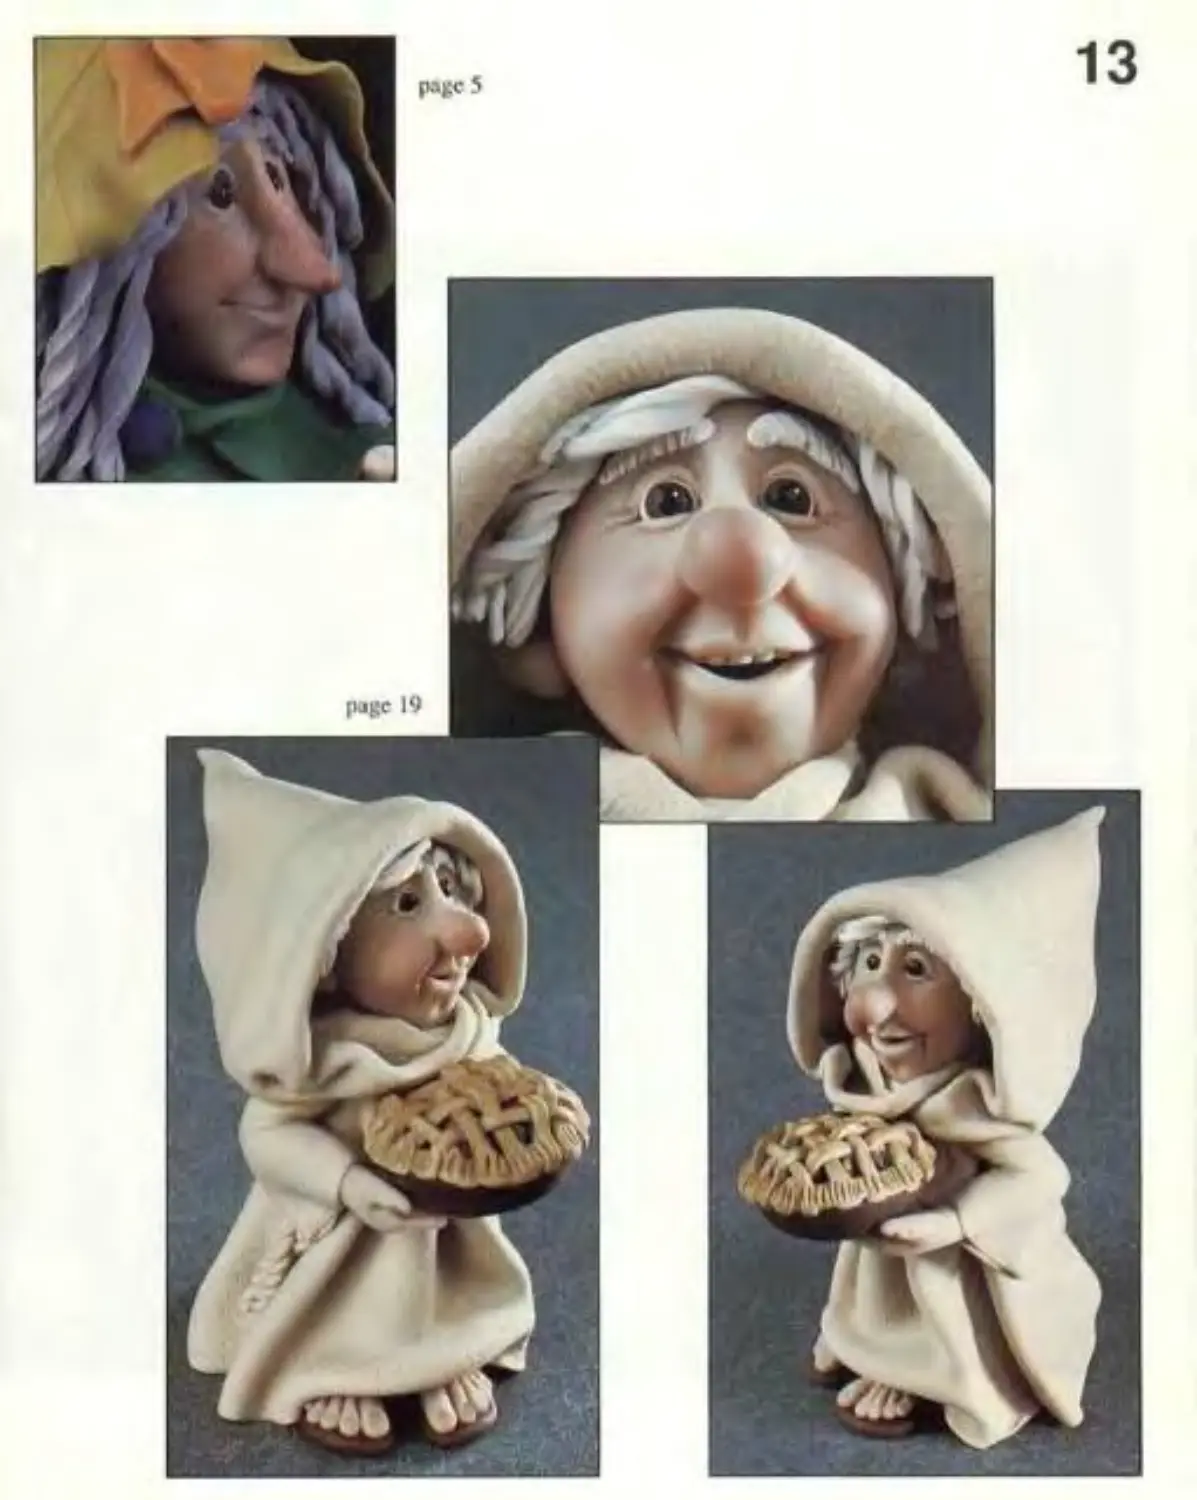
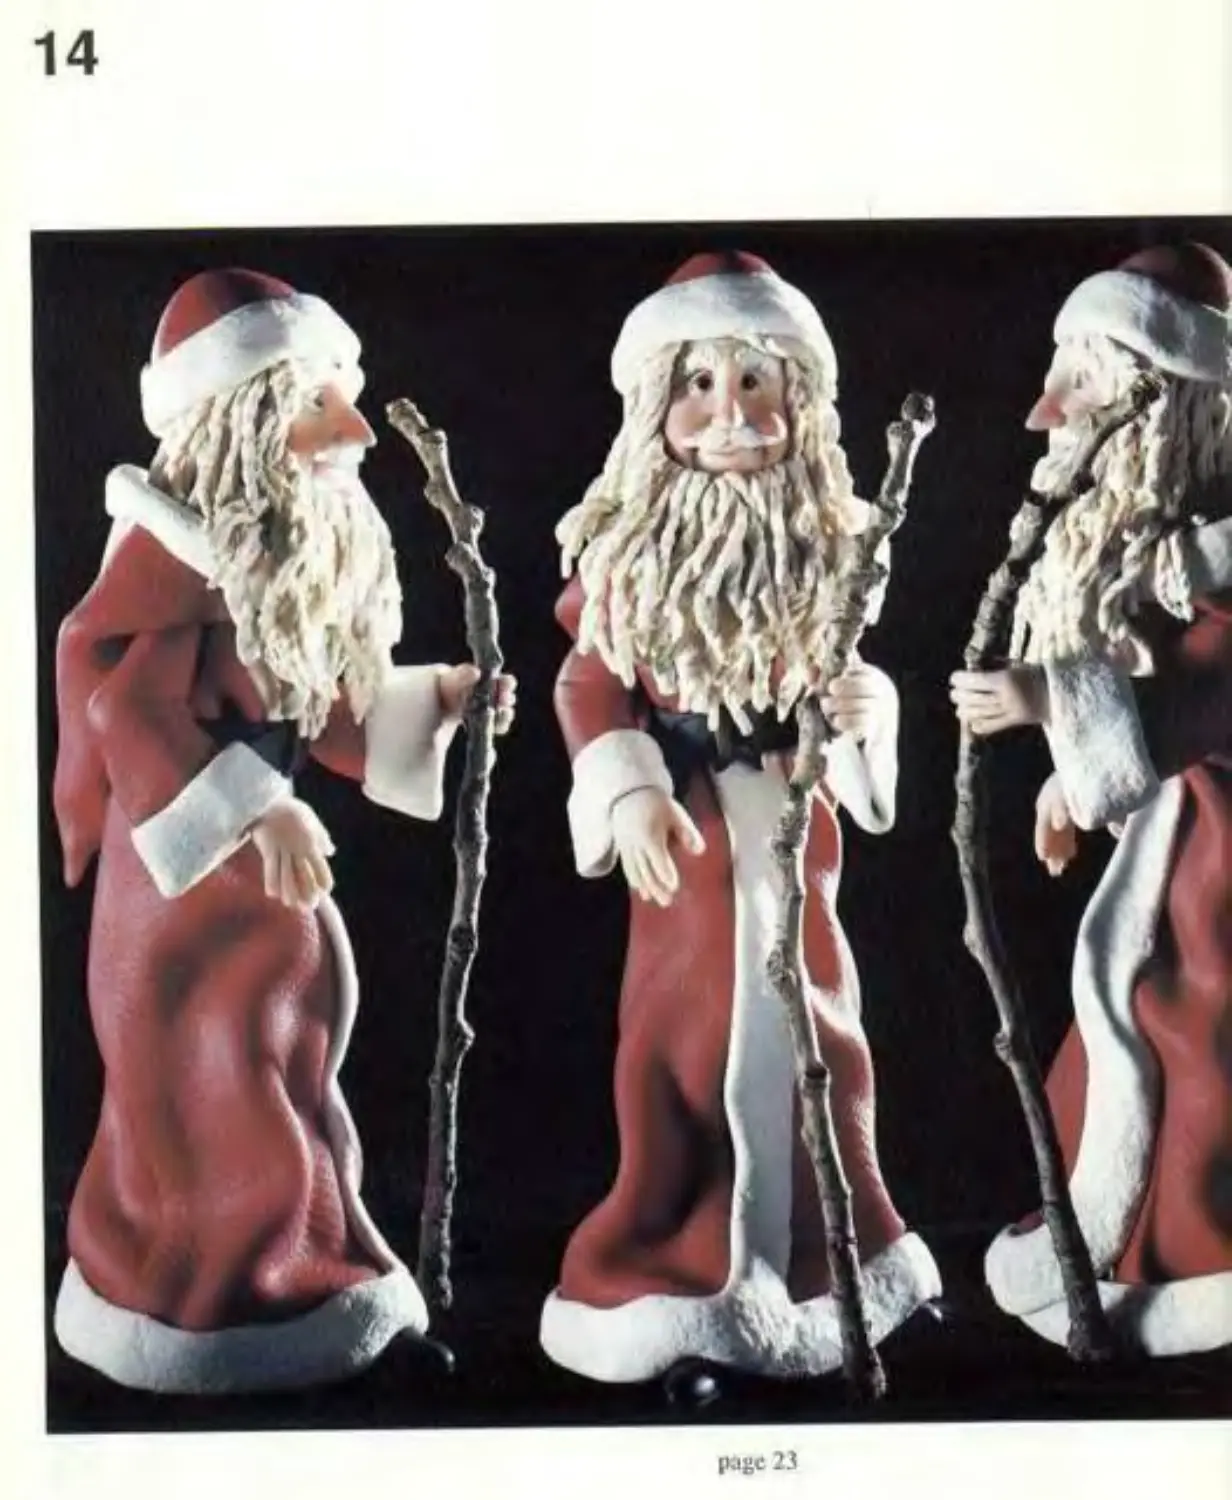
14
page 23
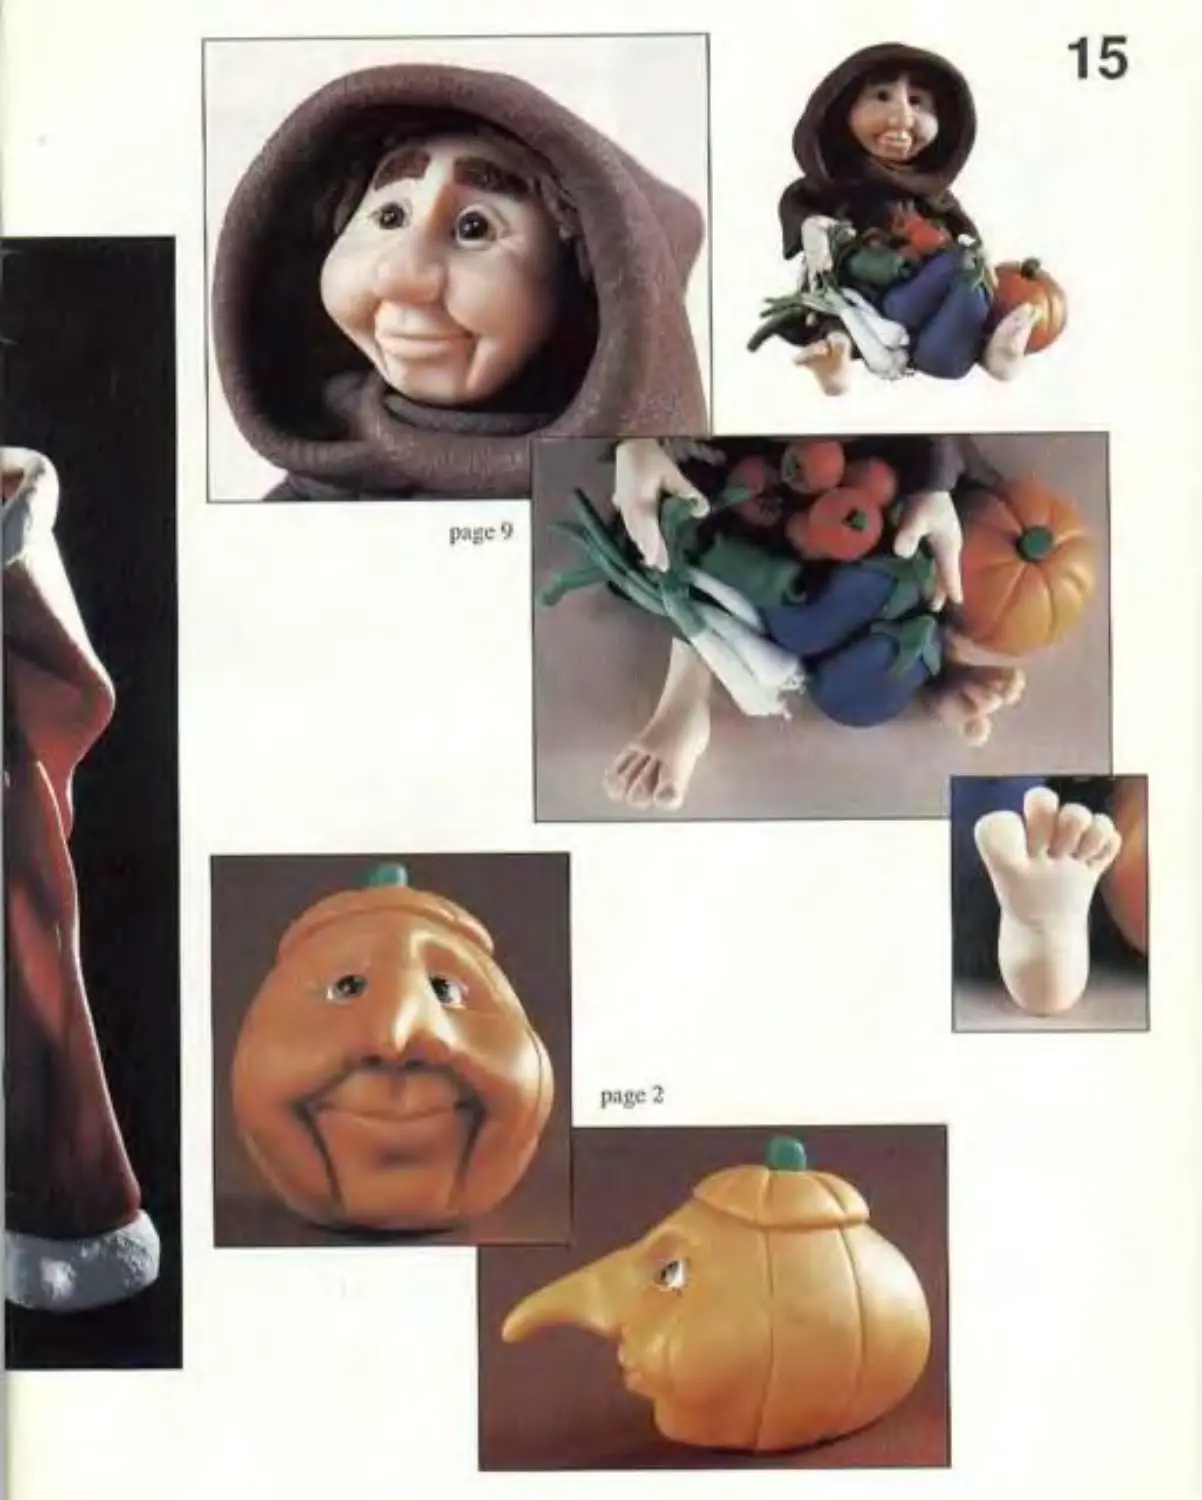
16
page 17
page 25
17
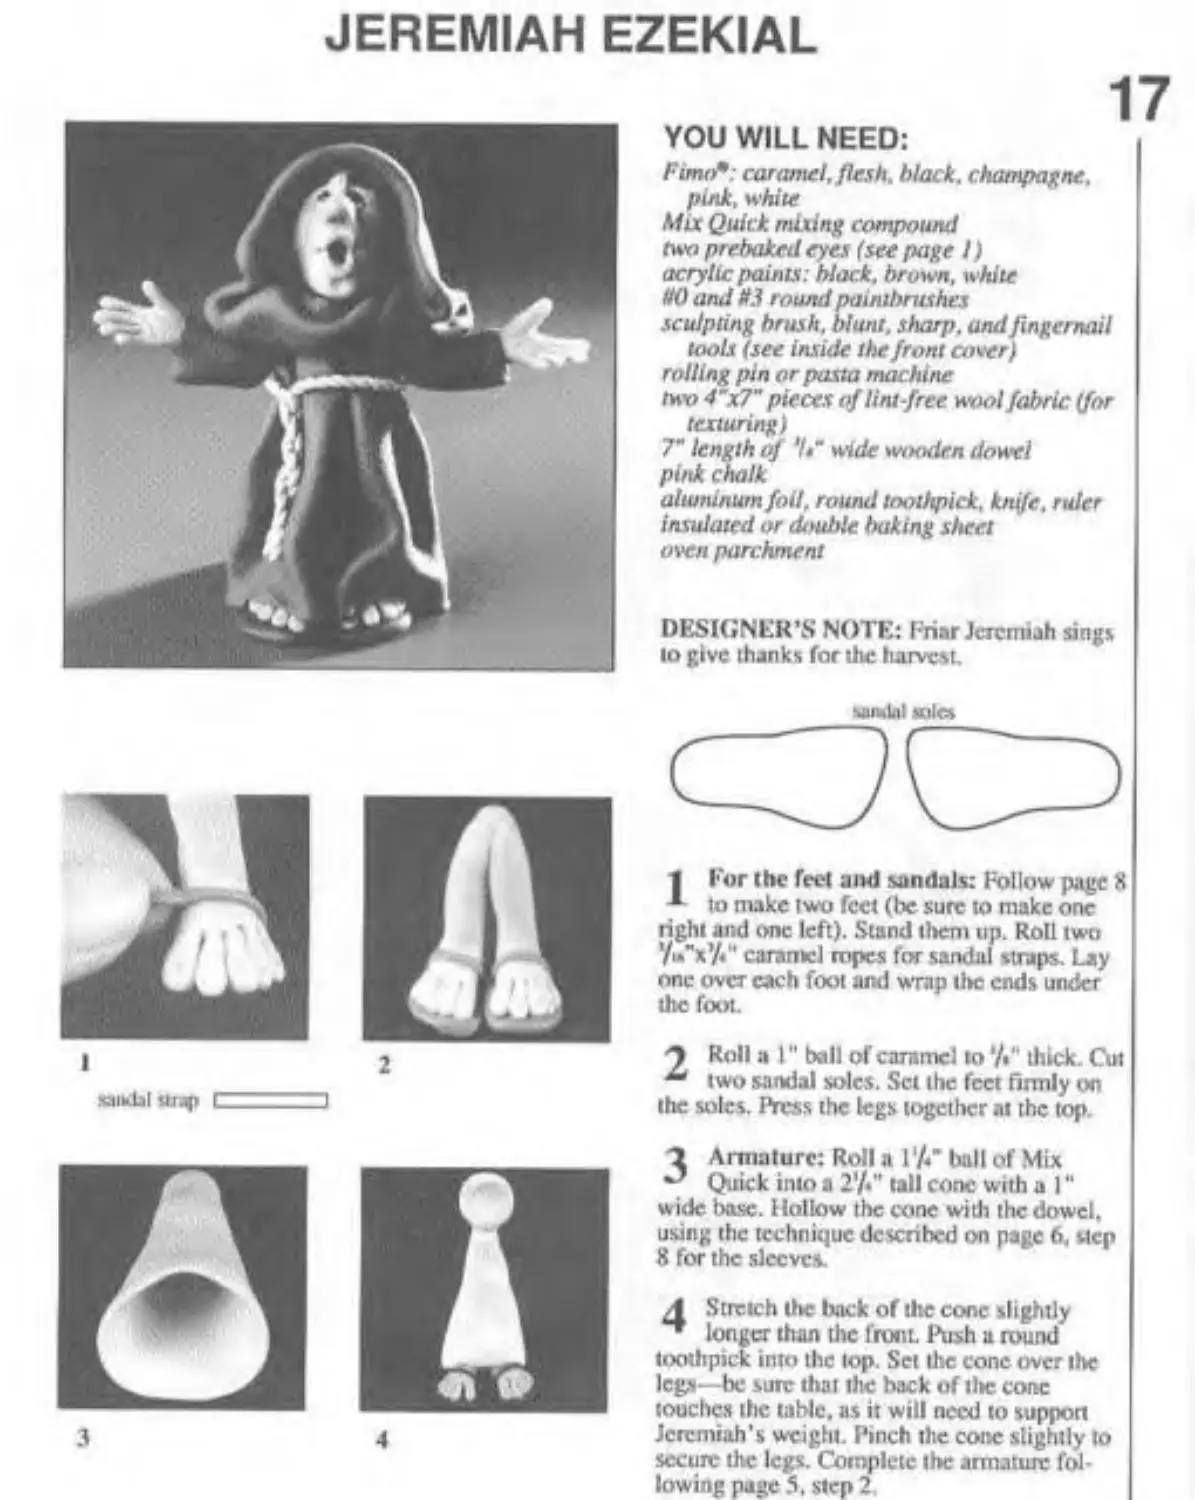
JEREMIAH EZEKIAL
YOU WILL NEED:
Fimo*: caramel, flesh, black, champagne, pink, white
Mix Quick mixing compound nm prebaked eyes (see page I) acrylic paints: black, brown, white HO and Н.З round paintbrushes sculpting brush, blunt, sharp, and fingernail tools (see inside the front cover) rolling pin or pasta machine nw> 4"x7" pieces of lint-free wool fabric (for texturing)
7" length of ‘It" wide wooden dowel pink chalk aluminum foil, round toothpick, knife, ruler insulated or double baking sheet oven parchment
DESIGNER’S NOTE: Friar Jeremiah sing* io give thanks far the harvest.
23 E]
1 2
xaikbl ibap l ~~1
3 4
Miiulal sties
| For the feet and sandals: Follow page 8 * to nuke two feet (be sure to make one right and one left). Stand them up. Roll two Уш"х’/«и caramel ropes for sandal straps. Lay one over each foot and wrap the ends under the foot.
J Roll a I" ball of caramel to •/." thick. Cut ~ two sandal soles. Set the feet firmly on the soles. Press the legs together at the top
1 Armature: Roll a \'fi" ball of Mix Quick into a 2'/*" tall cone with a 1 “ wide base. Hollow the cone widt the dowel, using the technique described on page 6. step 8 for the sleeves.
1 Stretch the back of the cone slightly ** longer than the front. Push u round tpothpick into the lop. Set the cone over the legs—be sure that the back of the cone touches the table, as it will need to support Jeremiah's weight. Pinch the cone slightly to secure the legs. Complete the armature following page 5. step 2.
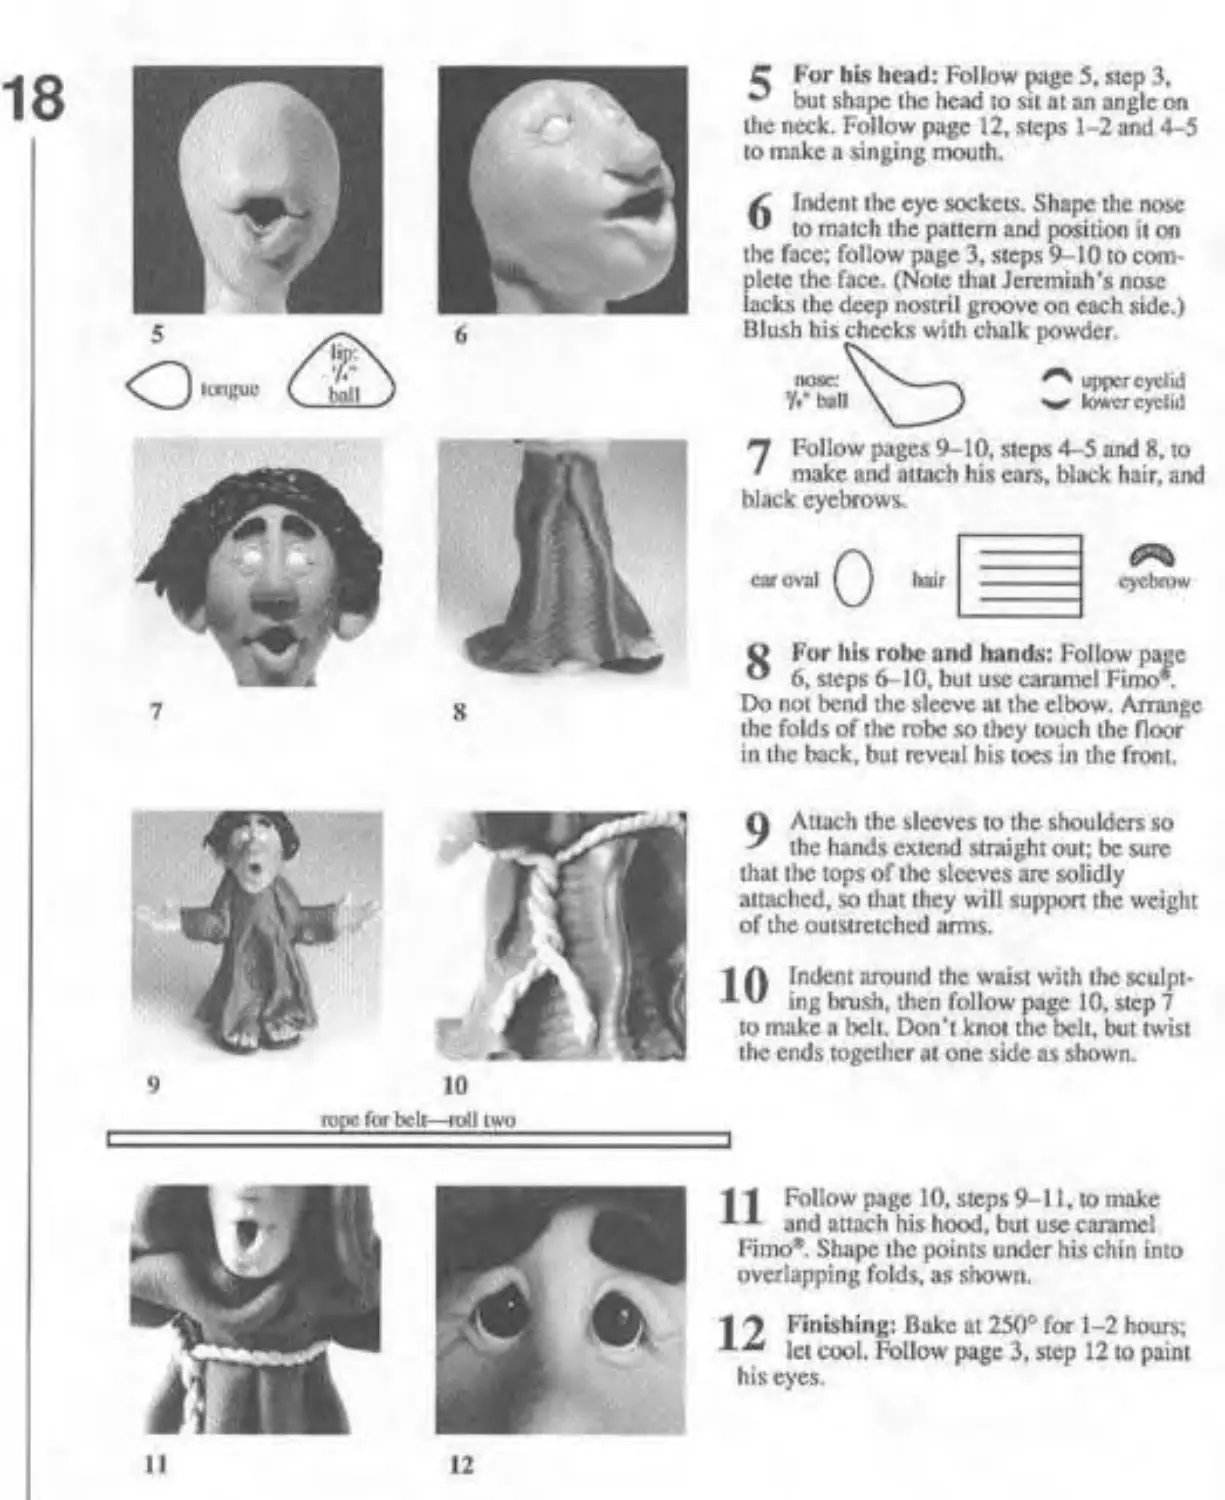
C For his head: Follow page 5. «ср 3.
but shape the head to sit at an angle on the neck. Follow page 12, steps 1-2 and 4-5 to make a singing mouth.
Indent tlx: eye sockets. Shape the nose to match the pattern and position it on the face: follow page 3, steps 9-10 to complete the face. (Note that Jeremiah’s nose lacks the deep nostril groove on each side.) Blush his checks with chalk powder.
upper eyelid w lower eyelid
nose: У.* tall
П Fol low pages 9-10. steps 4-5 and 8, to ' make and attach his cars, black hair, and black eyebrows.
fair
eyebrow
У For his robe and hands: Follow page ® 6, steps 6-10, but use caramel Fimo. Do not bend the sleeve at the elbow. Arrange the folds of tltc robe so they touch the floor in the back, but reveal his toes in the front.
9
10
Q Attach the sleeves to the shoulders so 7 the hands extend straight out; be sure that lite tops of the sleeves are solidly attached, so that they will support the weight of the outstretched arms.
1 A Indent around the waist with lhe sculpt-* " ing Iwush, then follow page 10. «ср 7
to make a belt. Don’t knot the belt, but twist the ends together at one side as shown.
tope hit belt—mil iwu
II
12
1 1 Follow page 10. steps 9-11. to make
1 -1 and attach his hood, but use caramel Fimo*. Shape the points under his chin into overlapping folds, as shown.
1 7 Finishing: Bake at 250° for 1-2 hours;
A •" let cool. Follow page 3. step 12 to paint his eyes.
19
FRIAR PHILLIP PAUL
I 2
Q ear oral
eyebrow
YOU WILL NEED:
Fimo*: caramel, flesh, champagne. white, red. orange, leaf green, bronze
Mix Quick mixing compound two prebaked eyes (see page I) acrylic paints : Ыаск. brown, while HO and №.I round paintbrushes Sculpting brush, blunt, sharp. and fingernail tools (see inside the front cover) rolling pin or pasta machine two 4"xT pieces of lint-free wool fabric (for texturing)
7“ length of '/•” wide wooden dowel wide bottle cap (to shape the pie pan) chalk: pink. brown, yellow aluminum foil, round toothpick, knife, ruler insulated or double baking sheet oven parchment
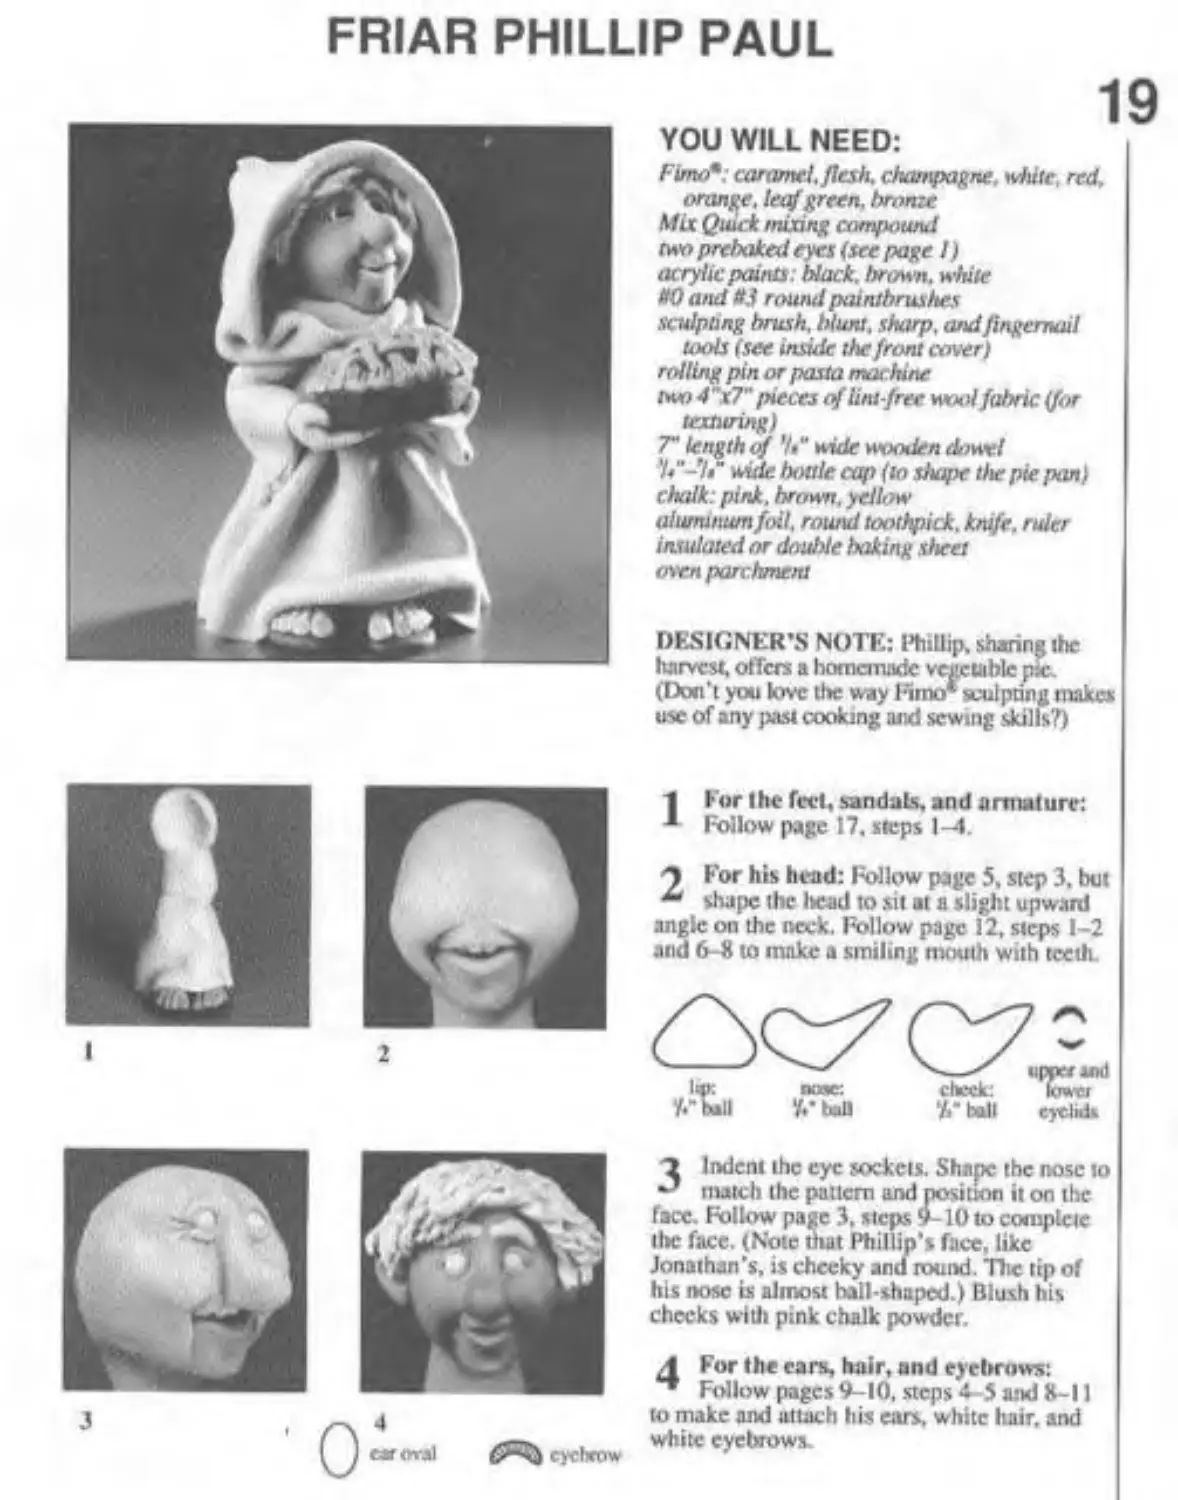
DESIGNER’S NOTE: Phillip, sharing the Iwrvcst. offers a homanadc vegetable pic. (Don't you love tlie way Fimo* sculpting make* use of any past cooking and sewing skills?)
IFor the feet, sandaLs, and armature: Follow page 17. steps 1-4.
J For his head: Follow page 5, step 3. but ** shape the Itead to sit al я slight upward angle on the neck. Follow page 12, steps 1-2 and 6-8 to make a smiling mouth with teeth.
3 Indent the eye sockets. Shape the nose to match the pattern and position it on the face. Follow page 3. steps 9-10 to complete lite face. (Note that Phillip's face, like Jonathan's, is cheeky and round. The tip of his nose is almost bail-shaped.) Blush his checks witli pink chalk powder.
4 For the cars, hair, und eyebrows:
Follow pages 9-10, steps * -5 and 8-11 to make and attach his ears, white hair, and white eyebrows.
20
5
6 Mde view
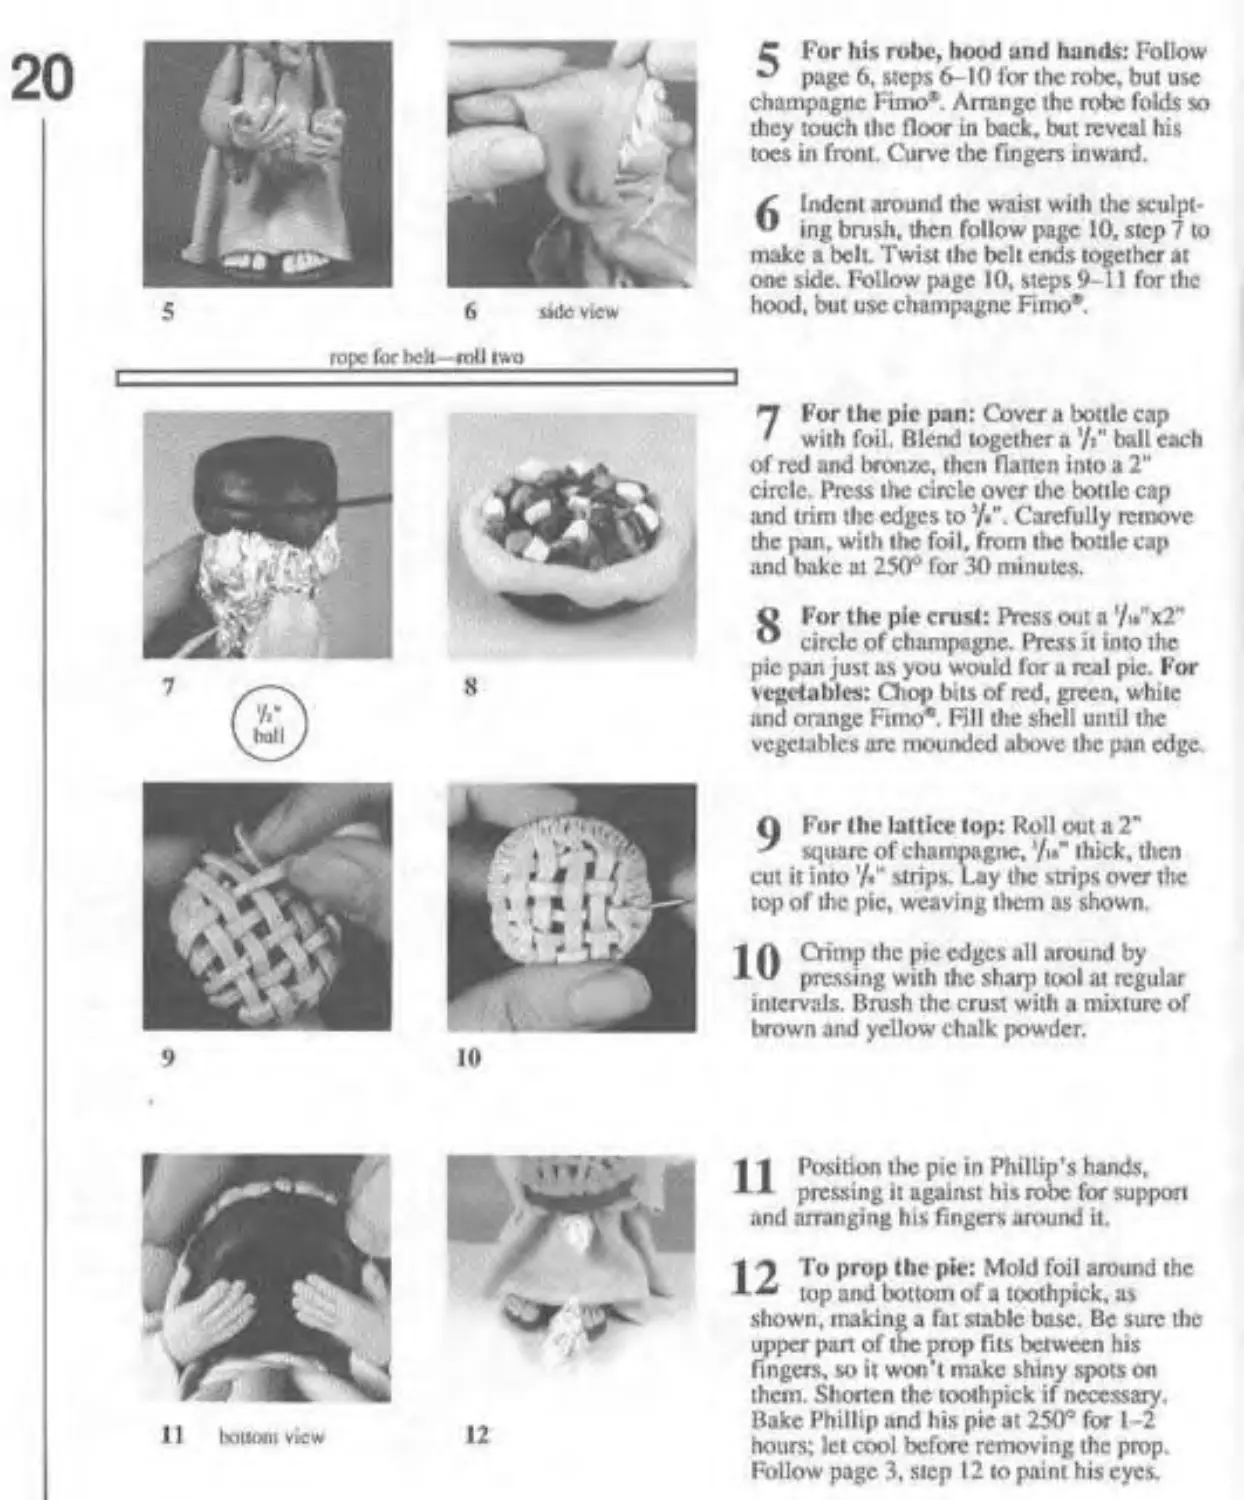
C For his rolre, hood and hands: Follow ** page 6. steps 6-10 for the robe, but use champagne Fimo’. Arrange the n>be folds so they touch the floor in back, but reveal his toes in front. Curve the fingers inward.
Indent around the waist with the sculpt* ing brush, then follow page 10, step 7 to make a belt. Twist the belt ends together at one side. Follow page 10. steps 9-11 for the hood, but use champagne Fimo*
rope for tick - «nil iwu
7
8
П For the pic pan: Cover a bottle cap ' with foil. Blend together a'/«" ball each of red and bronze. then flatten into a 2“ circle. Press the circle over the bottle cap and trim tlie edges to Carefully remove the pan. with the foil, from the boule cap and hake al 250° for 30 minutes.
V For the pie crust: Press out a 7»"x2" ° circle of champagne. Press it into the pic pan just as you would for a real pic. For vegetables: Chop bits of red. green, white and orange Fimo*. Rll the shell until the vcgciablcs are mounded above the pan edge
9
10
Q For the lattice top: Roll out a 2“ square of chamnagne. */i." thick, then cut it intostrips. Lay the strips over the top of the pie. weaving them as shown.
1 A Critnp the pic edges all around by * v pressing with the sharp tool at regular intervals. Brush the crust with a mixture of brown and yellow chalk powder.
11 tnuoni View
I 1 Position the pic in Phillip's hands.
*1 pressing it against his robe for support and arranging his fingers around it.
12
| To prop the pic: Mold foil around the * ** top and bottom of a toothpick, as
shown, making a fat stable base. Be sure the upper pan of the prop fits between his fingers, so it won't make shiny spots on them. Shorten the toothpick if necessary. Bake Phillip and his pic at 250° for I -2 hours: let cool before removing the prop. Follow page 3, step 12 to paint his eyes.
21
MOTHER NATURE
upper eyelid lower eyelid
3
YOU WILL NEED:
Fimo*: flesh, apricot. leaf green, yellow, pearl Mix Quick mixing compound Iwu preludedeyes (see page I) acrylic paints: black, brown, white ItO and 03 round paintbrushes sculpting brush, blunt, slurp, and fingernail tends (see inside the front caver) rolling pin or pasta machine punch cutters (see page ! А Ч я’flower. ’/«•" flower, ’/я" leaf
two 4 "x7“ pieces of fine cotton or silk fabric (to texture the. gown and cape); two 2“xS” pieces of lint-free wool (to tenure the scarf) pink chalk aluminum foil, round toothpicks, knife, ruler insulated baking sheet, oven parchment
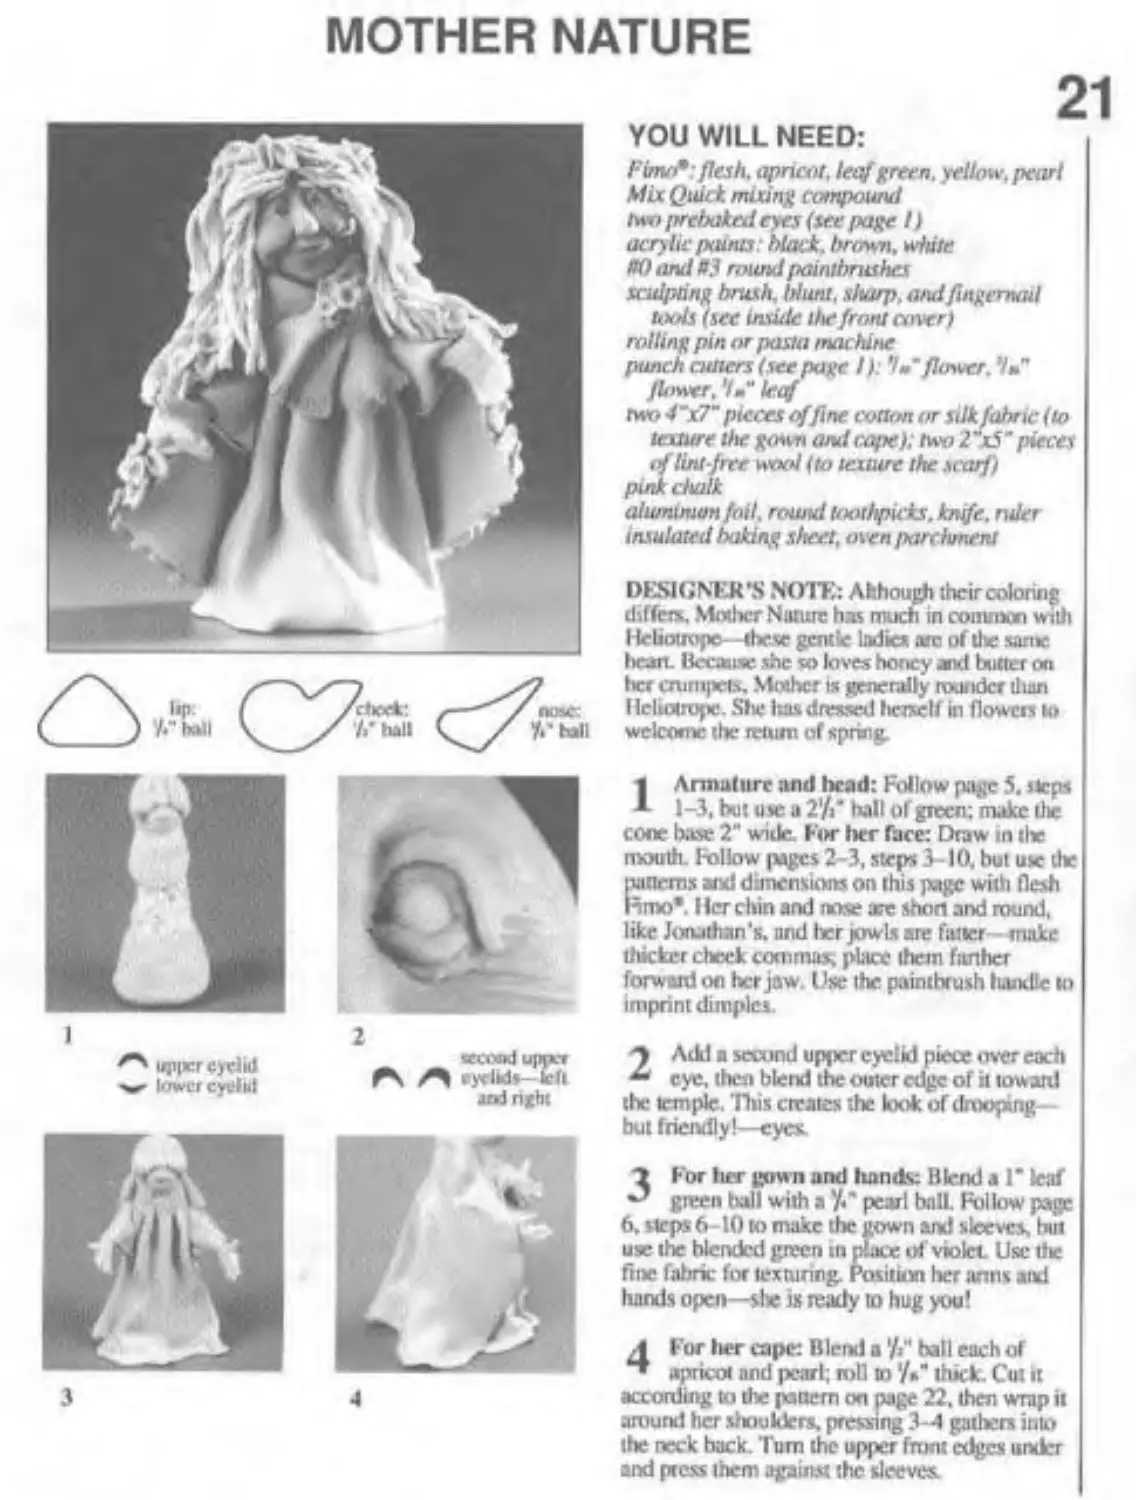
DESIGNER’S NOTE: Ahhough their coloring differs. Mother Nature hm much in common with Heliotrope—these gentle ladies arc of lire same liean. Because she so loves honey and butter on tier crumpets, Mother is generally rounder than I leliotropc. Site has dressed herself fat flowers to welcome (he return of spring.
1 Armature and bead: Follow page 5. steps 1-3, but use а 2'/Г hall of green; make die cone base 2" wide. For her face: Draw in the mouth. Irollow pages 2-3, steps 3 -10. but use die ratten» and dimensions on this page with flesh Inmo". I ler chin and nose же short and round, like Jonathan’s. and her jowls are fatter make thicker check commas; place them farther forward on her jaw. Use the painthtuxh luuxllc to imprint dimples.
2 Adil a second upper eyelid piece over each eye, then blend the outer edge of it toward the temple. This creates the look of drooping— but friendly!—eyes.
3For tier gow n and Irands: Blend а Г leaf green ball with apearl ball. Follow page 6, steps 6-10 to make the gown and sleeves, but use the blended green tn place of violet Use the fine fabric for texturing. Position tier arms and hands open—she is ready to hug you!
/1 For her cape Blend n '/>" ball each of “ apricot and pearl; roll to thick. Cm it according to the pattern on page 22. then wrap it around Iter .duuiders. pressing 3-4 gathers into the neck back. Turn the upper front edges under and ptcss them against the sleeves.
22
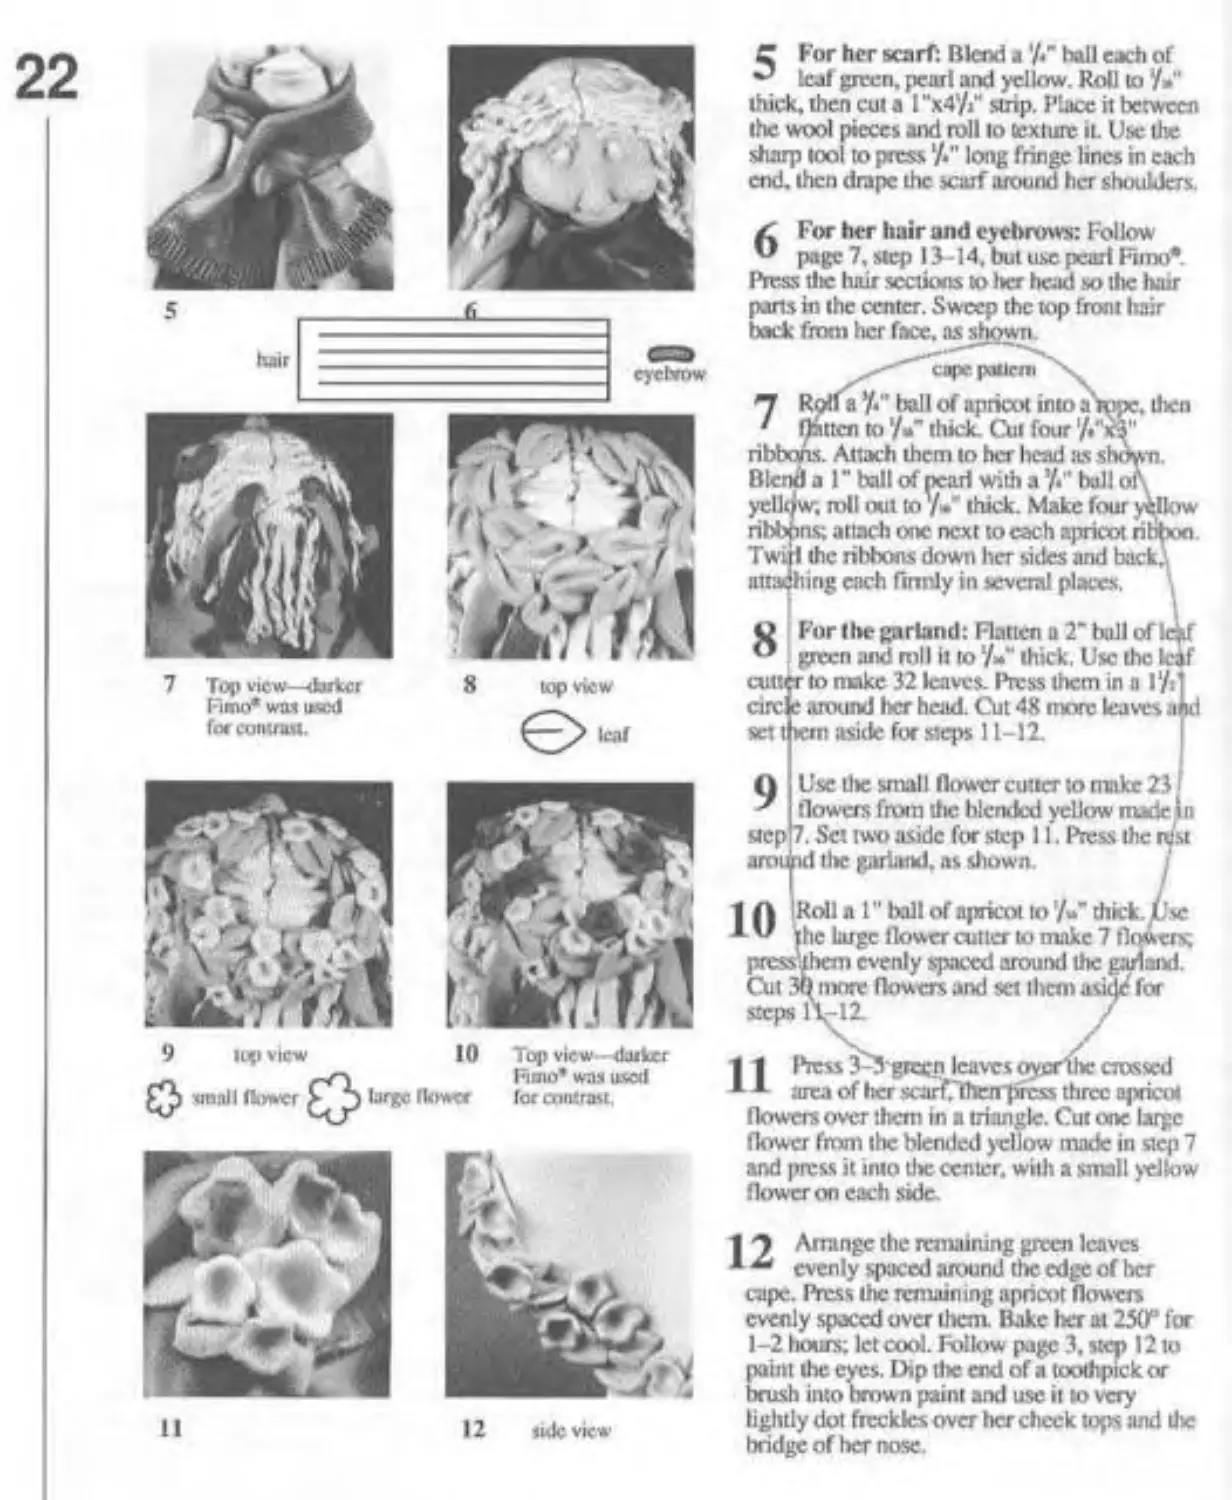
C For her scarf: Blend aboll each of leaf green, pearl and yellow. Roll to У«" thick, then cut a I “x4'/i“ snip. Place it between the wool pieces and roll lo tcxlure it Use the sharp tool to press long fringe lines in each end. then drape the scarf around her shoulders
. then
For her hair and eyebrows: Follow " page 7, step 13-14. but use pearl Fimo* Press tlie hair sections to her head so lire hair parts in the center. Sweep the top front hair back from her face, ns shown
' cape potlcm
П Rolfa У." I>al I of apricot into a ' patten to'/»" thick. Cui four ribbons. Attach them to her head as s Blend a 1 “ bail of near! with a bull yellow, roll out to'/»' thick. Make four ribbons; attach ooe next to each apricot ribbon. Twiil the ribbons down her sides and back; attaching each firmly in several places. ’
Q For the garland: Flatten u 2“ ball of 1ф ° green and roll it to '/>•“ thick. Use the leif cutter to nnke 32 leaves. Pless them in a l‘/s circle around her head. Cut 48 more leaves ahd set t tern aside foe steps 11-11
9
10
9
Use lire small flower cutter to make 23 flowers from the blended yellow made n step 7. Set two aside for step 11. Press the nfsi arot id the garland, as shown.
1 П IRoU a 1" ball of apricot to'/»" thick. Use A V jhc huge flower cutler to make 7 flowers; evenly spaced around the garland.
Cut more flowers and set them aside for steps 1\-12. /
tire garland, as diown.
lop view onnll fbwer <
I tower
Top view - <kukcr Fimo* wax used for amtrau.
12 «de view
| 1 Press 3-3grct;n leaves oyer me crossed
* * area of her scarfjhen'prcss three apricot flowers over them in a triangle. Cut one large flower from the blended yellow mode in step 7
and press it into tire center, with a small yellow flower on each side.
9 Arrange the remaining green leaves evenly spaced around the edge of her rape. Press the remaining apricot flowers evenly spaced over litem. Bake her at 250“ for 1-2 hours; let cool. Follow page 3, step 12 lo paint the eyes. Dip die end of a toothpick or brush into brown paint and use it to very lightly dot freckles over her cheek tops and the bridge of her nose.
SAINT NICHOLAS
lull
njjil leg/ioul paitnn: cut in uaili lor left fool
23
YOU WILL NEED:
FinuP: while, red. flesh, black. champagne, bronze
Mix Quick mixing compound r*w pre baked eyes {see page 1) acrylic paints; black, brown, while HO and ИЗ round paintbrushes sculpting brush, blunt, sharp, and fingernail tools {see inside the front cover) rolling pin or pasta machine гию */"x7“ pieces of tini-free wool fabric, old soft toothbrush (for texturing) 7* natural twig {walking stick) pink chalk round toothpick, aluminum insulated or double baking s oven parchment
ct*xfc: 7Г lull
I _______
eye bow
inuratdic
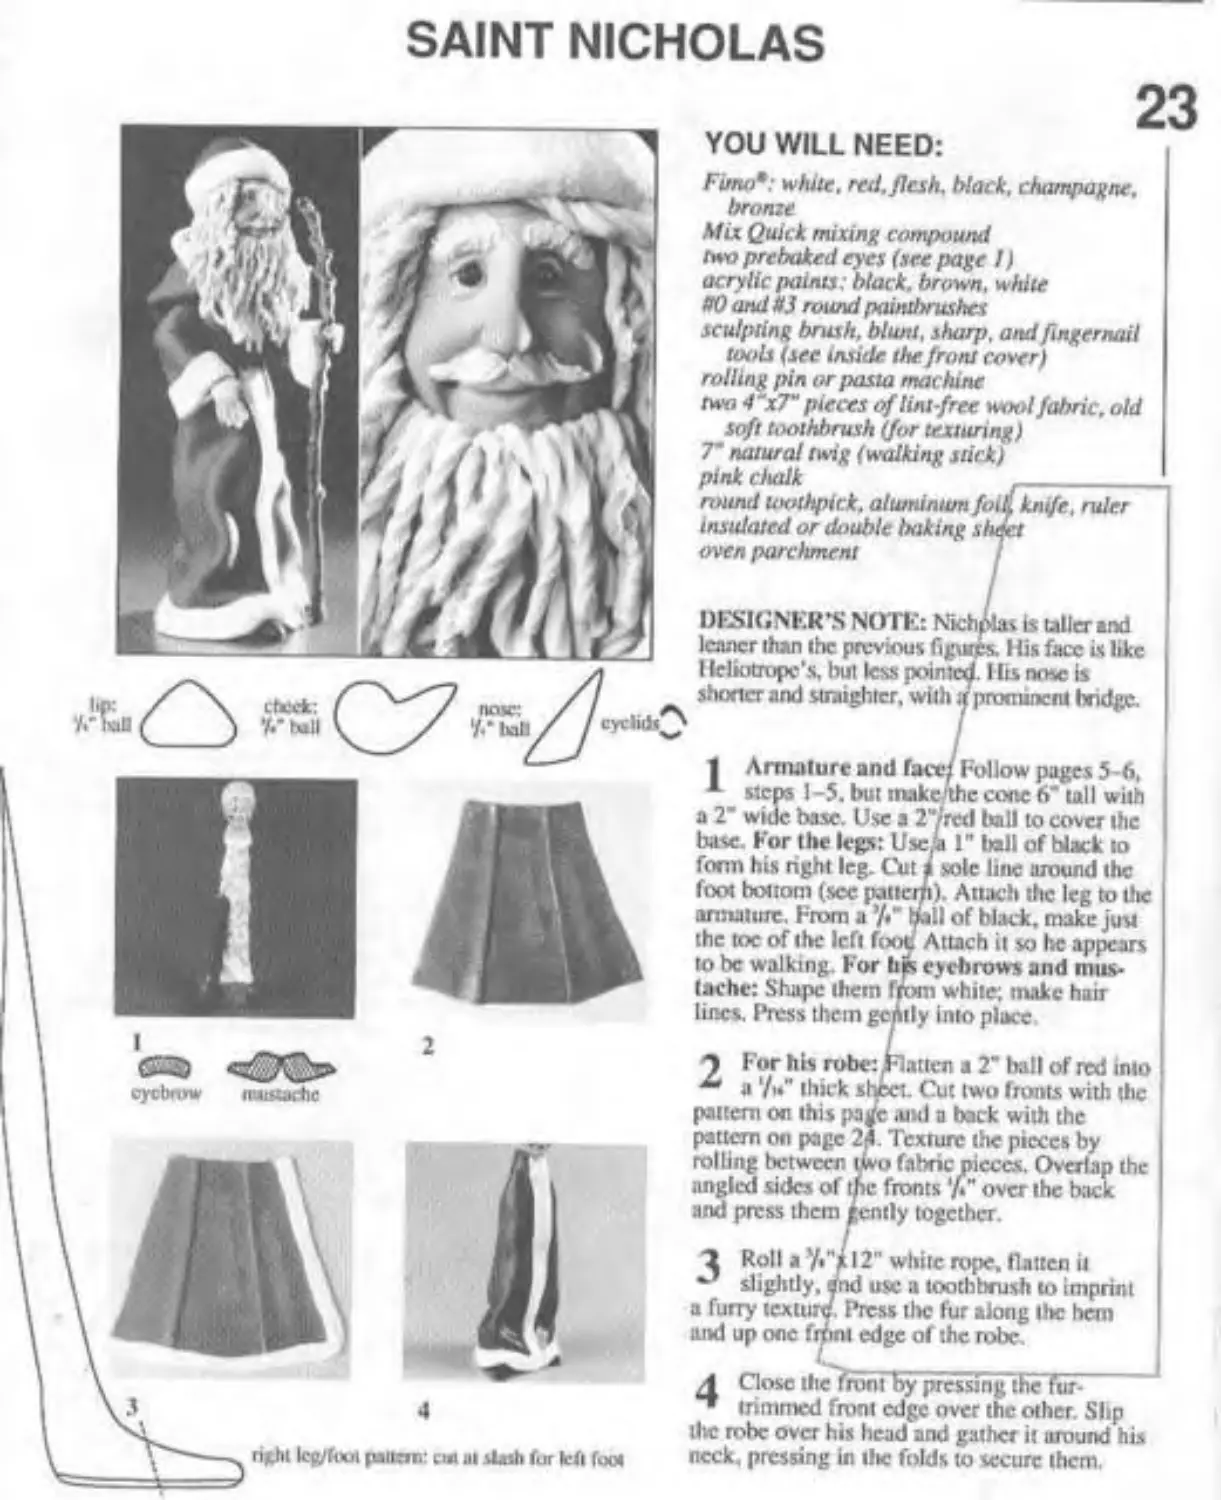
DESIGNER'S NOTE: N leaner than (he previous fi I leliotropc’s, but less poin shorter and straighter, will
knife, ruler
is taller and His face is like 1.1 Its nose is pronunent bridge.
1 Armature and face/ Follow pages 5-6, 1 steps 1-5. but make'the cone 6" tall with a 2" wide base. Use a 2”/'rcd trail to cover the base. For the legs: Use,it 1” trail of black to form his right leg. Cut i sole line around the foot bottom (see armature. From a ’/• the toe of the left f to be walking. For (ache: Shape them lines. Press them gejMIy into place.
). Attach the leg to the II of black, make just Attach it so he appears eyebrowsand mus* white; make hair
For his robe: JHatten a 2“ ball of red into a thick sheet. Cut two fronts with the patient on this pa and a back with the pattern on page 2|1. Texture the pieces by rolling between angled sides of and press them
fabric pieces. Overlap the fronts 'h" over the back tly together.
J Roll а ‘/."i 12" white rope, flatten it Slightly. n fftnfhhrich f.4 irtu
a furry tex and up one f
A Close the front by pressing the fur-
“ trimmed front edge over the other. Slip the robe over his head and gather it around his neck, pressing in t!tc folds to secure them.
use a toothbrush to imprint . Press the fur along Ute hem edge of the robe.
24
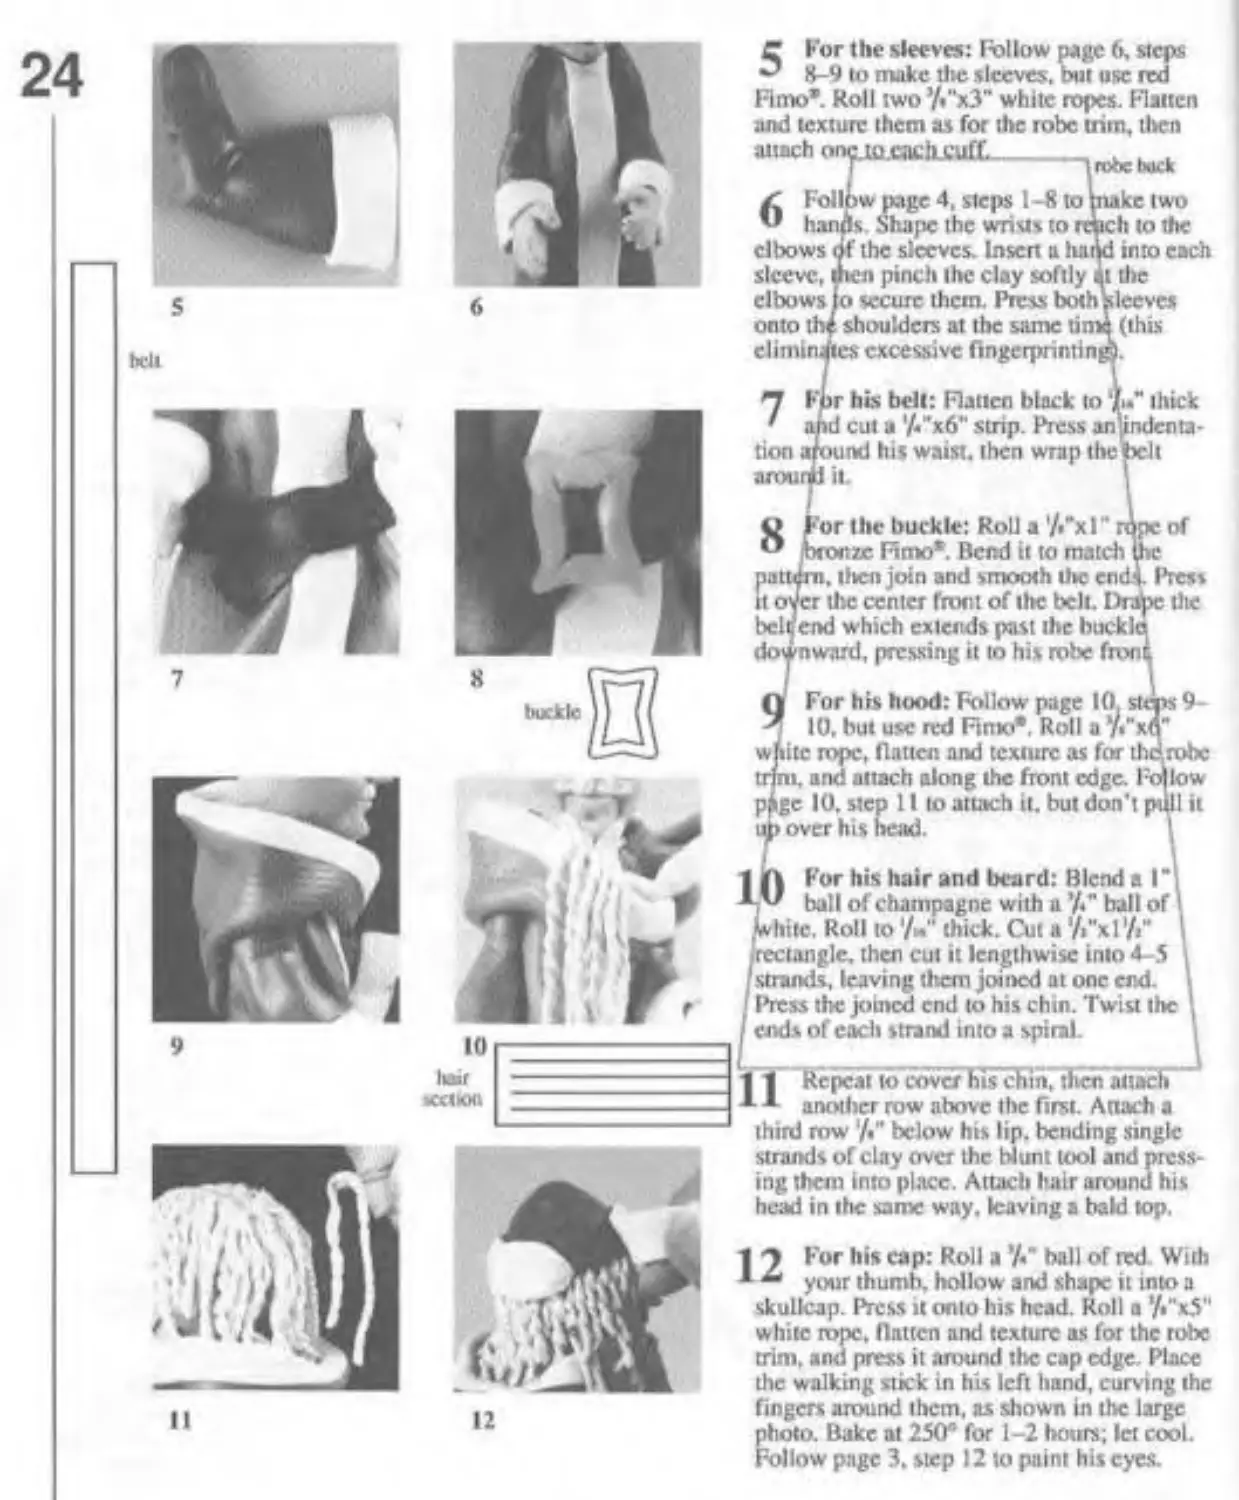
5 For the sleeves: Follow page 6. steps 8-9 to make die sleeves, but use red
Rmo*. Roll two ’/."x3" white ropes. Ratten and texture them as for the robe trim, then attach cacbAuff
tion arou
6 И
elbows sleeve, elbows onto climi
w page 4, steps I -8 to ; Shape the wrists to r the sleeves. Insen a lia pinch the clay softly о secure them. Press both shoulders at the same ti
excessive ftngetprintin
robe thick
kc two h to the into each die Iceves (this
г his bell: Ratten black to 7>." thick cut а УГхб" strip. Press anlindcnta-nd his waist, then wrap the it.
of
or the buckle: Roll a '/."xl" zc Ftmo*. Bend it to match
, tlien join and smooth die en Press r the center front of the belt. Drajse the end which extends past the buckle ward, pressing it to hi* robe front.
8
bcl
For his hood: Follow page 10.
10, but use red Rmo*. Roll a */• wfiitc rope, flatten and texture as for th i, and attach along the front edge. F pfrgc 10. step 11 to attach it. but don't ub over his head.
robe low lit
1 0 ^or ***s *,a'r an<* *x'ar^: Blend а Г * V ball of champagne with u ball of .Uhitc. Roll to '/>•" thick. Cut а УГх1'/«" rectangle. then cut it lengthwise into 4-5 'strands, leaving them joined at one end. I Press the joined end to his chin. Twist the / end* of each strand into a spiral.
1 1 Repeat to cover his chin. then"attach-* another row above the first. Attach a
third row '/•" below his lip. bending single strands of clay over the blunt tool and pressing them into place. Attach hair around his head in the same way. leaving a bald юр.
1 9 For his cap: Roll a ’/«" ball of red With ~ your thumb, hollow and shape it into a skullcap. Press it onto his head. Roll а У«"х5" white rope. Batten and texture as for the robe trim, and press it around the cap edge. Place the walking stick in his left hand, curving the fingers around them, as shown in the large photo. Bake at 250е for 1-2 hours; let cool. Follow page 3. step 12 to paint his eyes.
25
TONYA AND TIMOTHY
YOU WILL NEED:
Fimo*: terra cotta, flesh, caramel, blue, violet, black.
Mix Quick mixing compound
Fimo* metallic powder: lavender, blue
Fimo* gloss lacquer (Speziat-Lack) four prebaked eyes (see page I f J" wide black ceramic mug
4n" wide Bedford Bendable" Ribbon: 'h yard each of blue, lavender, silver
acrylic paints: black, brown, white
ttO round paintbrush
soft round brush (for applying metallic powder)
garlic press, sculpting brush, blunt, sharp, and fingernail tools (see inside the front cover)
aluminumfoil. round toothpicks, knife, rider double or insulated baking sheet aven parchment
super glue
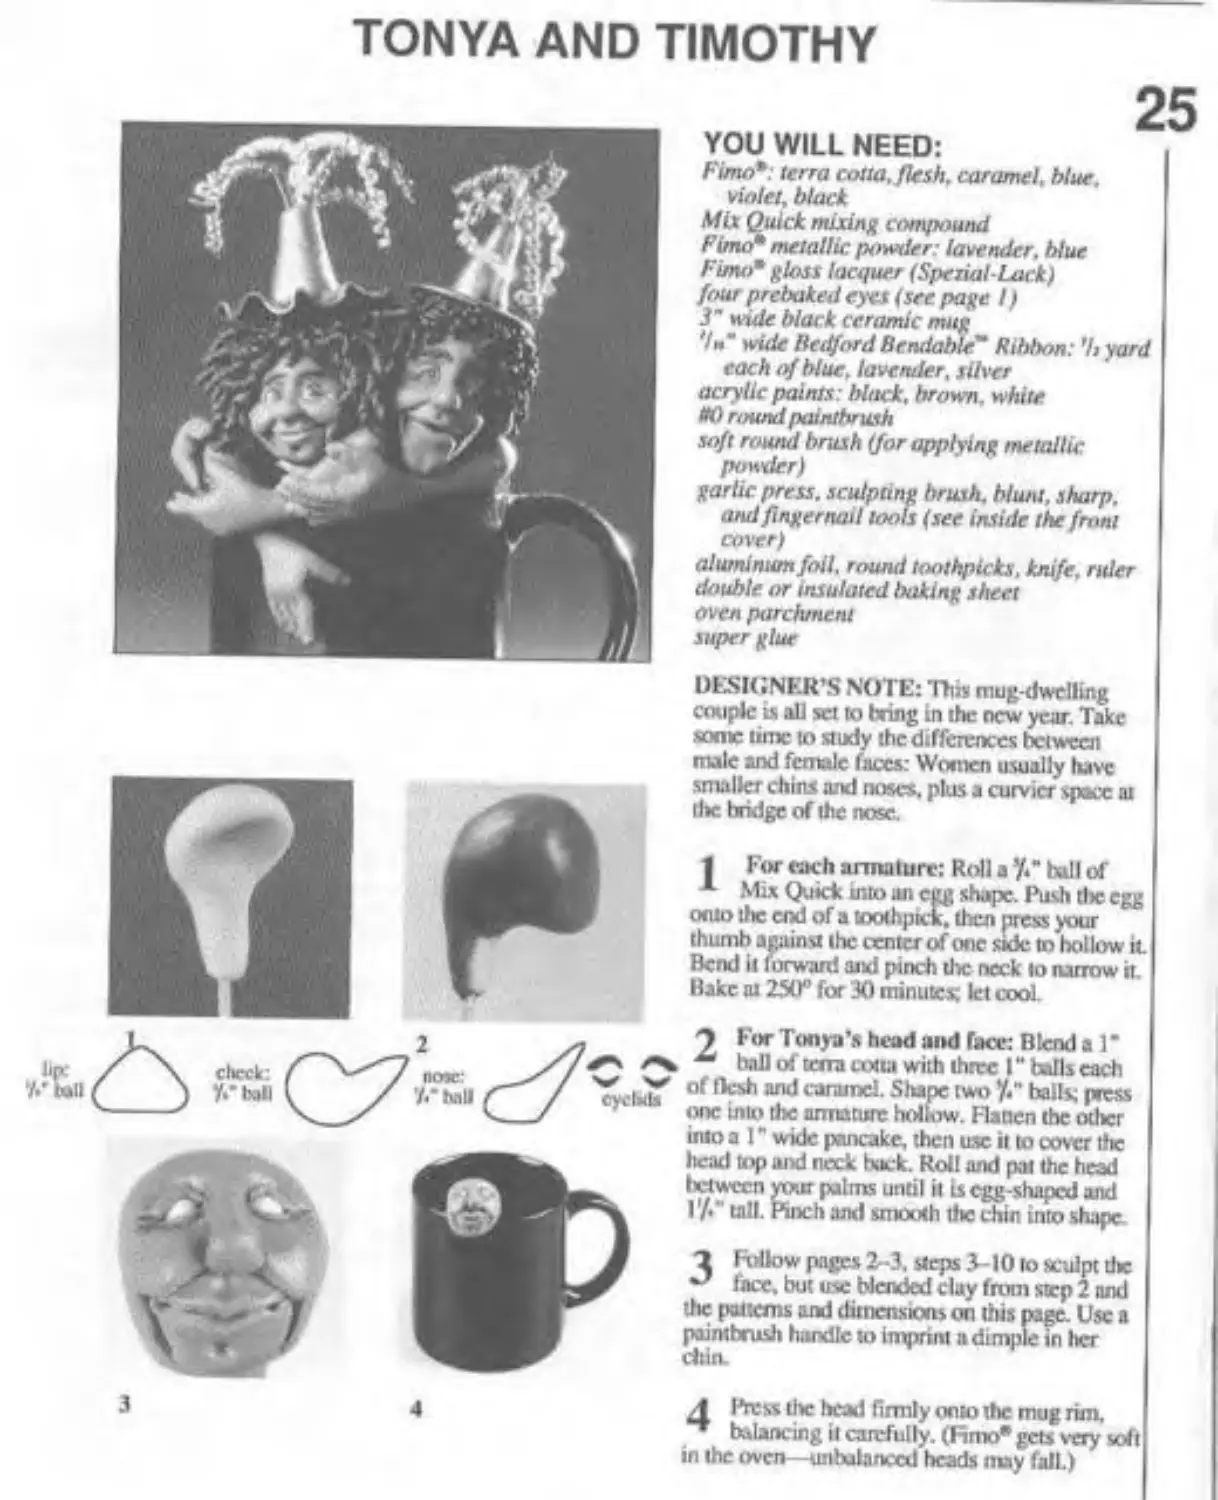
DESIGNER’S NOTE: Dm mug-dwelling couple is all sei to bring in the new year. Take some time to study the differences betweal
male and female faces: Women usually have smaller chins and noses. plus a curvier space ai lire bridge of the nose.
1 For each armature: Roll a '/•" ball of
-*• Mix Quick into iui egg shape. Push tlie egg onto :l»c end of a toothpick, then press your thumb against the center of one side to hollow it Bend it forward aixi pinch the neck lo narrow it. Bake at 250° for 30 minutes; let cool.
9 For Tonya’s head and face: Blend a 1 ’ ball of terra cotta with three I" balls each of fksh and caramel. Shape two У«" balls; press one into tlie armature hollow. Flatten the otlscr into a I" wide pancake, then use it to cover tlie haul top and neck back. Roll and pat the head lietwccn your palms until it is egg-shaped and I tall. Pinch anti smooth tlie chin into shape
"1 Follow pages 2- -3. stejw 3 -10 to sculpt die face, but use blended clay from step 2 and die patterns and dimensions on this page. Use a paintbrush handle to imprint a dimple in Iter dun.
4 Press tlsc head firmly onto the mug rim.
*"* balancing it carefully, (fimo* gets very soli in the oven—unbalanced heads may fall.)
4
26
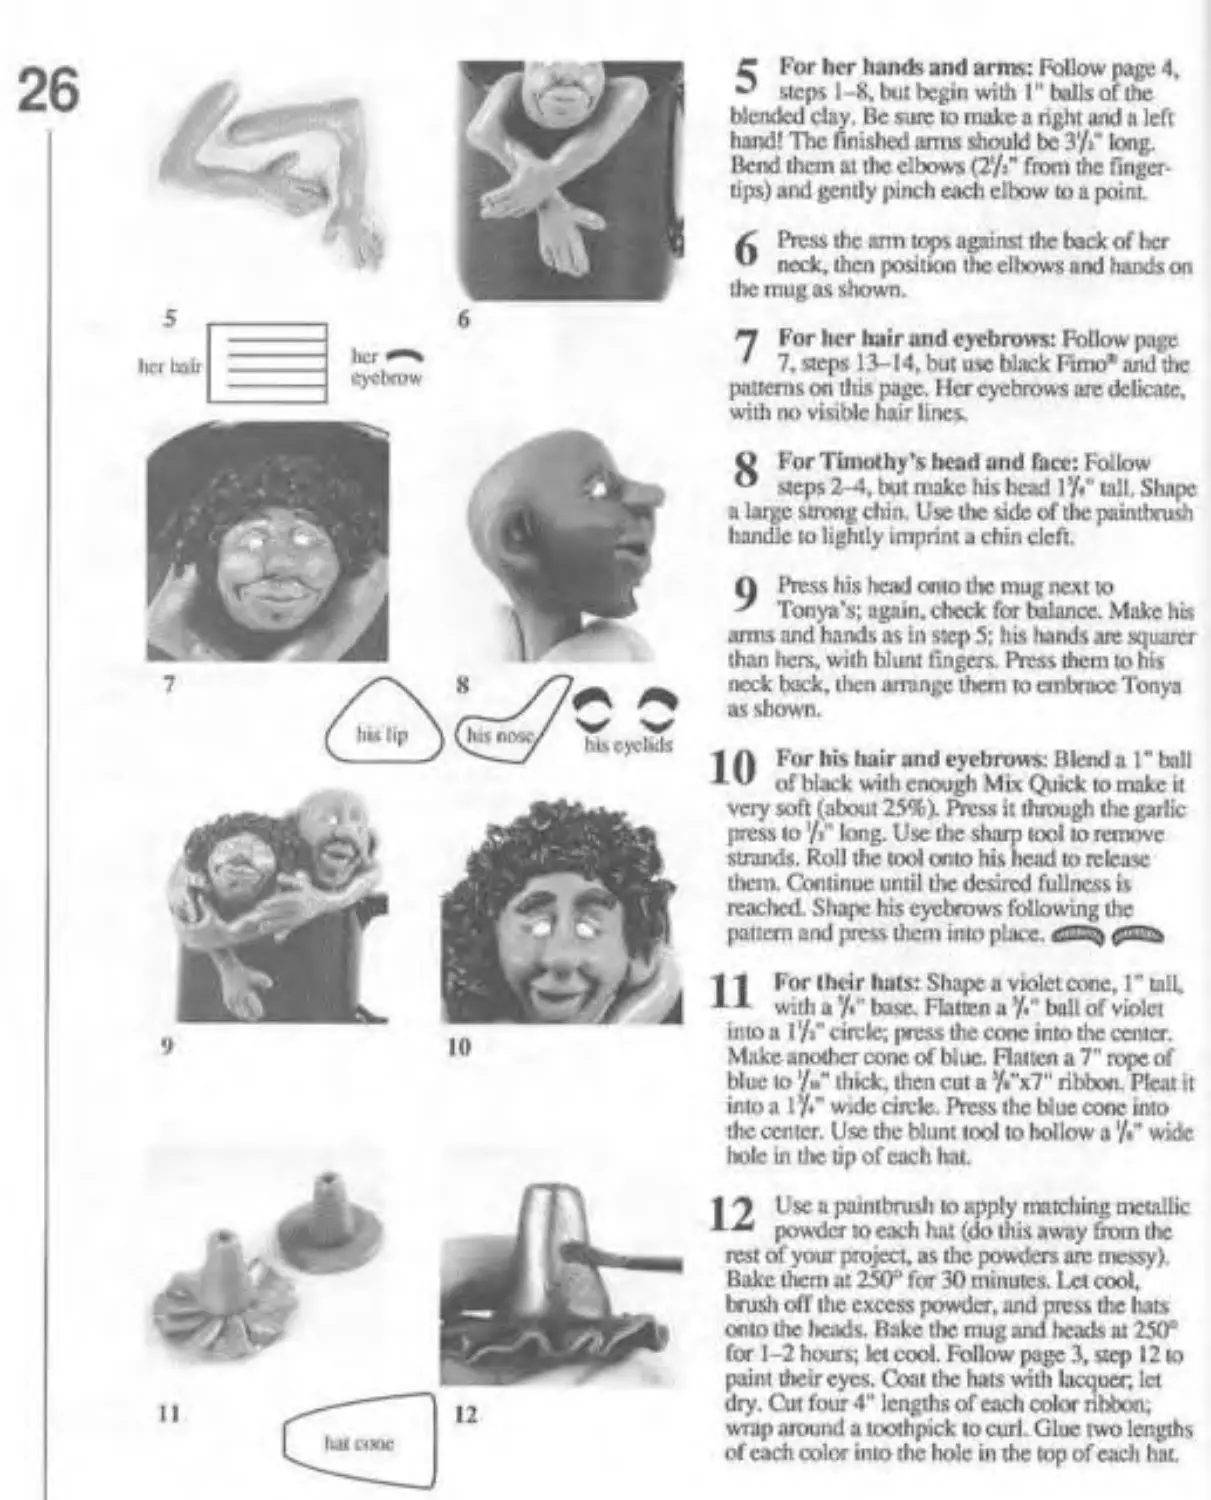
5 For her hands and arms: Follow page 4. steps I -8, but begin with 1" balls of the blended day. Be sure to make a right and n left hand! The finished arms should be 3'/»’ long. Bend than at the elbows (2'/i" from the fingertips) and gently pinch each elbow to a point.
/С Press the arm tops against the back of her u neck, then position the ellwws and hands on the mug as shown.
"7 For her hair and eyebrows: Follow page
' 7. steps 13-14, but use black Fimo* and the patterns on this page. Her eyebrows are delicate, with no visible hair lines.
8 For Timothy’s head and fare: Follow steps 2-4, but make his bead 1’/." tall. Shape a large strong chin. Use the side of the paintbrush handle to lightly imprint a chin cleft.
Q Press his head onto tl»c mug next to Tonya’s; again, check for balance. Make his arms and hands as in step 5; his hands arc squarcr than Iters, with blunt fingers. Press them to his neck back, tltcn arrange them to embrace Tonya as shown.
1 For his hair and eyebrows: Blend a I" ball * 'J of black with enough Mix Quick to make it very soft (about 25%). Press it through the garlic press to '/•“ king. Use the sharp tool to remove strands. Roll the tool onto his head to release them. Continue until the desired fullness is reached. Shape his eyebrows following the pattern and press ilium into place. cSSa
nFor their huts: Shape a violet cone, Г tall.
with a ’/•' base. Flatten а У." ball of violet into a I '/»" circle; press the cone into the center. Make another cone of blue. Flatten a 7" rope of blue to /" thick, then cut а У«”х7" ribbon. Pleat it into a iy.’ wide circle. Press the blue cone into the center. Use the blunt tool to hollow a '/•" wide Itolc in tl»e 6p of each hat.
| -T Use a paintbrush to apply matching metallic 1 ** powder to each hat (do th is away from tlx: rest of your project, as the powders arc messy). Bake them at 250“ for 30 minutes. Ixt cod. brush off the excess powder, and press the hats onto the licads. Rake the mug and beads at 250° for 1-2 hours; let cod. Follow page 3, «ср 12 to paint their eyes. C«tt the hats with lacquer, let dry. Cut four 4“ lengths of each color ribbon, wrap around a toothpick to curl. Glue two lengths of each color into the hole in the top of cadi hat.
27
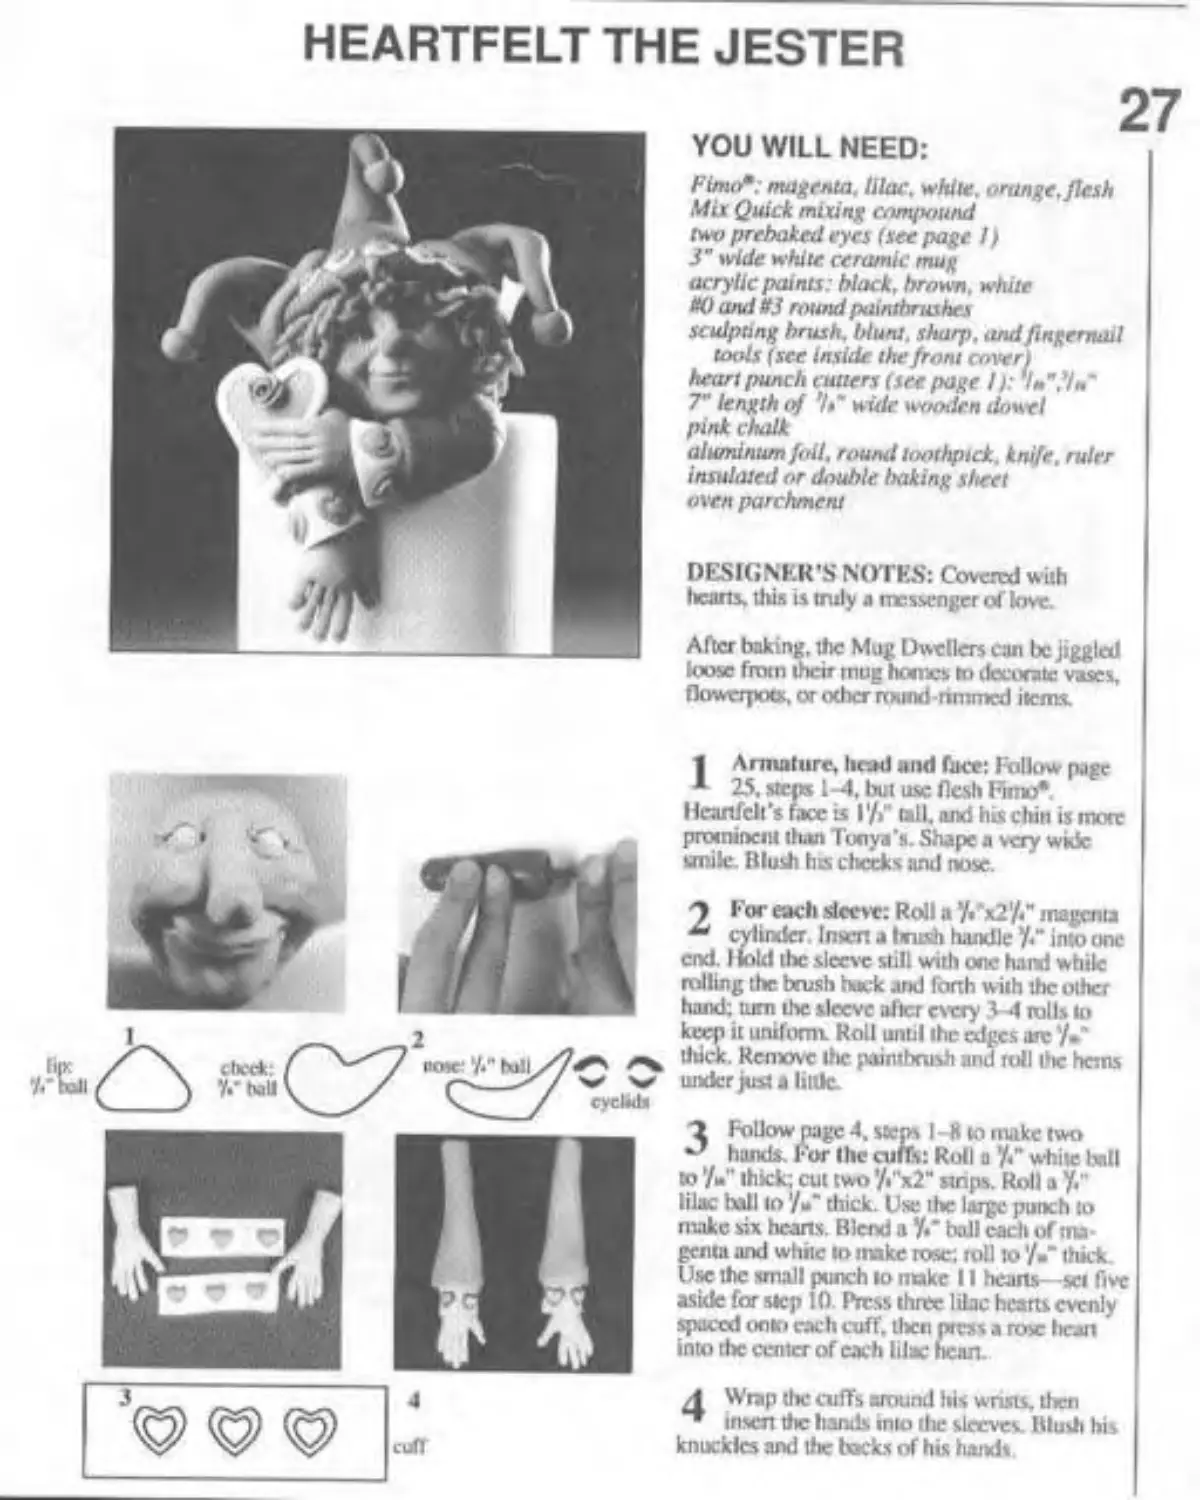
HEARTFELT THE JESTER
YOU WILL NEED:
Fimo*: magenta, lilac, while, orange, flesh Mix Quick mixing compound two prebaked eyes (see page I) 3" wide white ceramic mug acrylic paints: black, brown, white W and №3 round paintbrushes sculpting brush, blunt, shaqi. and fingernail tools (see Inside the front cover!
heart punch cutters (seepage I): 7л 7" length of '!»“ wide wooden dowel pink chalk aluminum fail. round toothpick, knife, ruler insulated or double baking sheet oven parchment
DESIGNER'S NOTES: Covered with leans. Ulis is truly л messenger of love.
After baking, Uic Mug Dwellers can be jiggled loose from their mug homes tn decorate vases, flowvqxxx, or odier rcxtnd-hrnmcd items.
1 Armature, head and face: Follow page
* 25. sttfis 1-4. but use flesh Fimo*.
Heartfelt's face is I1/»" tall, and his chin is mon: prominent than Tonya’s. Shape a very wide smile. В lush his checks and nose.
9 For each sleeve: Roll a ’/» x2'/." magenta ** cylinder. Insert a I rush handle 7." into one end. I fold the sleeve still with one hand while rolling the brush buck and forth with the olhci hand: turn tire sleeve idler every 3-4 rolls lo keep it uniform Roll until the edges arc Utick. Remove lite paintbrush and roll the hans under just a little.
3 Follow page 4, steps 1-8 to make two hands. For the cuffs: Roll a '/«" white bull to 7»" thick; cut two ’/Гх2" strips. Roll a У." lilac ball to 7-' thick. Use tl»c large punch to make six hearts. Blend a 7«* ball each of nu-gcrita and white lo make rose; toll to 7»" Ihkk. Use the small punch to make 11 hearts—set five aside for step 10 Press three lilac hearts evenly spaced onto each cuff, then press a rose Ixran into tbc center of each lilac heart.
1 Wrap the cuffs around his wrists, then insert tlie hands into the sleeves. Blush his knuckles and the locks of his handt
28
5
6
9
1(1
II
12
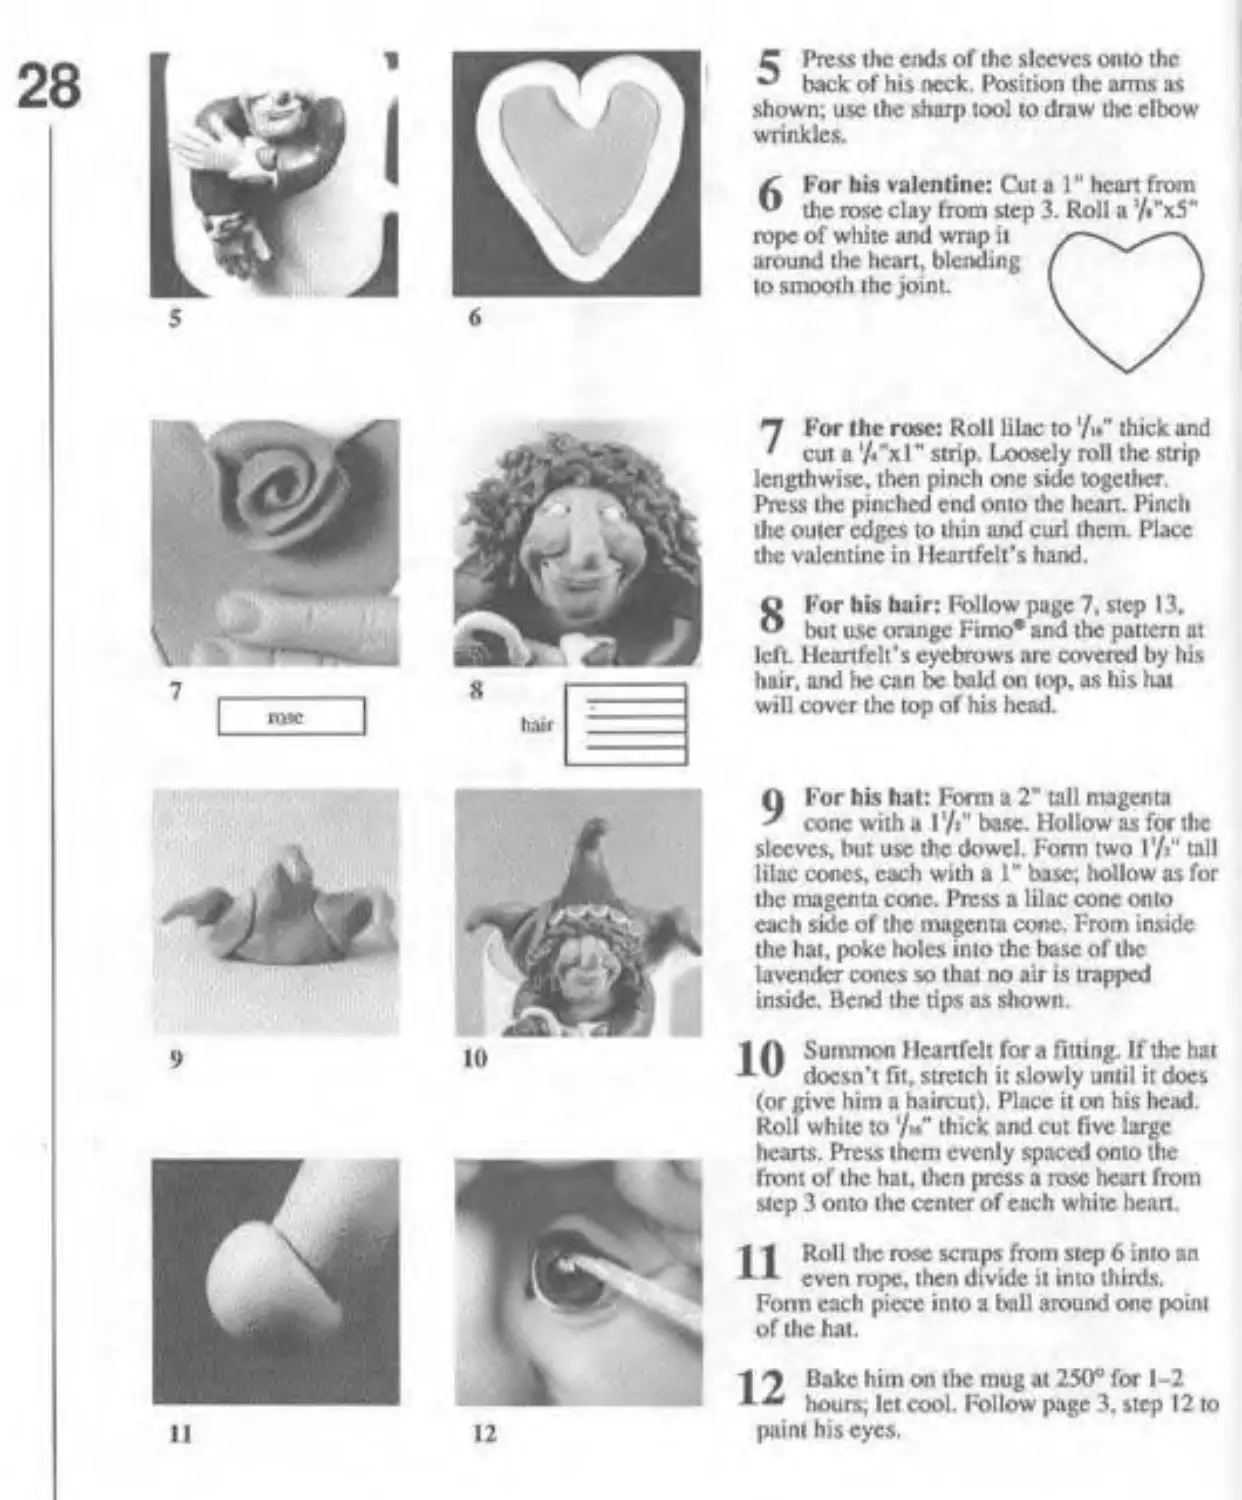
C Press the ends of the sleeves onto the back of his neck. Position the arms as shown; use the sharp tool to draw the elbow wrinkles.
Z For his valentine: Cut a 1" heart from " the rose clay from step 3. Roll a '/•"xS" rope of white and wrap it >—\/^\
around the heart, blending ( \
to smooth the joint. I )
*7 For the rose: Roll lilac to '/u" thick and ' cut a 7«"x Г strip. Loosely roll the strip lengthwise, then pinch one side togctlier. Press the pinched end onto the bean. Pinch the outer edges to thin and curl them. Place the valentine in Heartfelt's hand.
SFor his hair: Follow page 7. step 13.
but use orange Fimo* and the pattern at left. Heartfelt's eyebrows are covered by his hair, and he can be bald on top. as his hat will cover the top of his head.
9 For his hat: Form a 2" tall magenta cone with a l’/Г base. Hollow as for the sleeves, but use the dowel. Form two I’/i" tail lilac cones, each with а Г base; hollow as for the magenta cone. Press a lilac cone onto each side of the magenta cone. From inside the hat, poke holes into the base of the lavender cones so that no air is trapped inside. Bend the dps as shown.
1 (I Summon Heartfelt fora fitting. If the hat A v doesn't fit, stretch it slowly until it docs (or give him a haircut). Place it on his head. Roll white to '/и" thick and cut five large hearts. Press them evenly spaced onto the front of the hat, then press a rose heart from мер 3 onto the center of each white heart
| 1 Roll the rose scraps from step 6 into an * *• even rope, then divide it into thirds.
Form each piece into a ball around one point of the hat.
1 7 Bake him on tire mug at 250° for 1-2
1 hours, let cool, fellow page 3. step 12 to paint his eyes.
ISBN 1-56231-100-Х